Post Syndicated from xkcd.com original https://xkcd.com/2861/

Post Syndicated from xkcd.com original https://xkcd.com/2861/
Post Syndicated from João Tomé original http://blog.cloudflare.com/cyber-week-analyzing-internet-traffic-and-e-commerce-trends/

Throughout the year, special events lead to changes in Internet traffic. We observed this with Thanksgiving in the US last week, where traffic dipped, and during periods like Black Friday (November 24, 2023) and Cyber Monday (November 27, 2023), where traffic spiked.
But how significant are these Cyber Week days on the Internet? Is it a global phenomenon? Does e-commerce interest peak on Black Friday or Cyber Monday, and are attacks increasing during this time? These questions are important to retailers and stakeholders around the world. At Cloudflare, we manage substantial traffic for our customers, which gives us a unique vantage from which to analyze traffic and attack patterns across large swaths of the Internet.
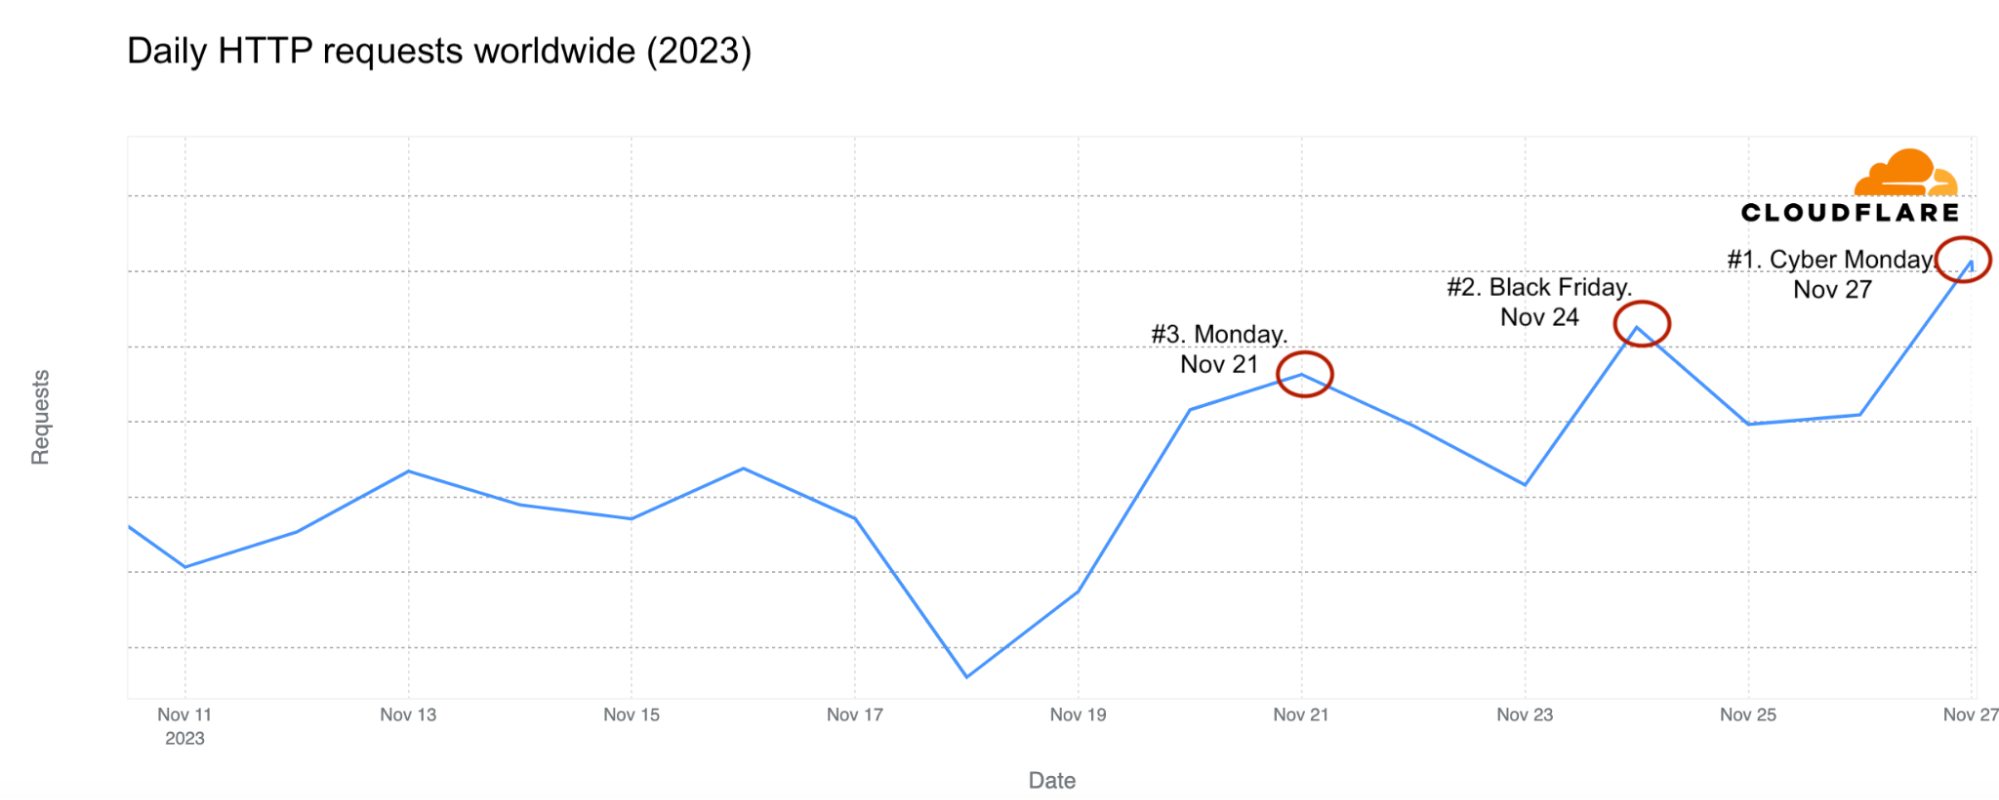
As we’ll explore next, we observed varying trends. From a global perspective, there was a clear Internet traffic winner: Cyber Monday was the highest overall traffic day of 2023 (as it was for 2022), followed by Black Friday, and then Monday, November 21 from the same week. But zooming in, this pattern didn’t hold in some countries.
For this analysis, we examined anonymized samples of HTTP requests crossing our network, as well as DNS queries. Cloudflare’s global data shows that peak request traffic occurred on Cyber Monday, and that recent weeks have generally been the year’s busiest. Here are some notable figures:
What about DNS queries?
These numbers and trends are consistent with what we observed in 2022 and previous years, where traffic peaks in late November but usually drops in December. Here’s a snapshot of global human Internet traffic this year (bot traffic shows a similar pattern).
Worldwide. Most popular Internet traffic days
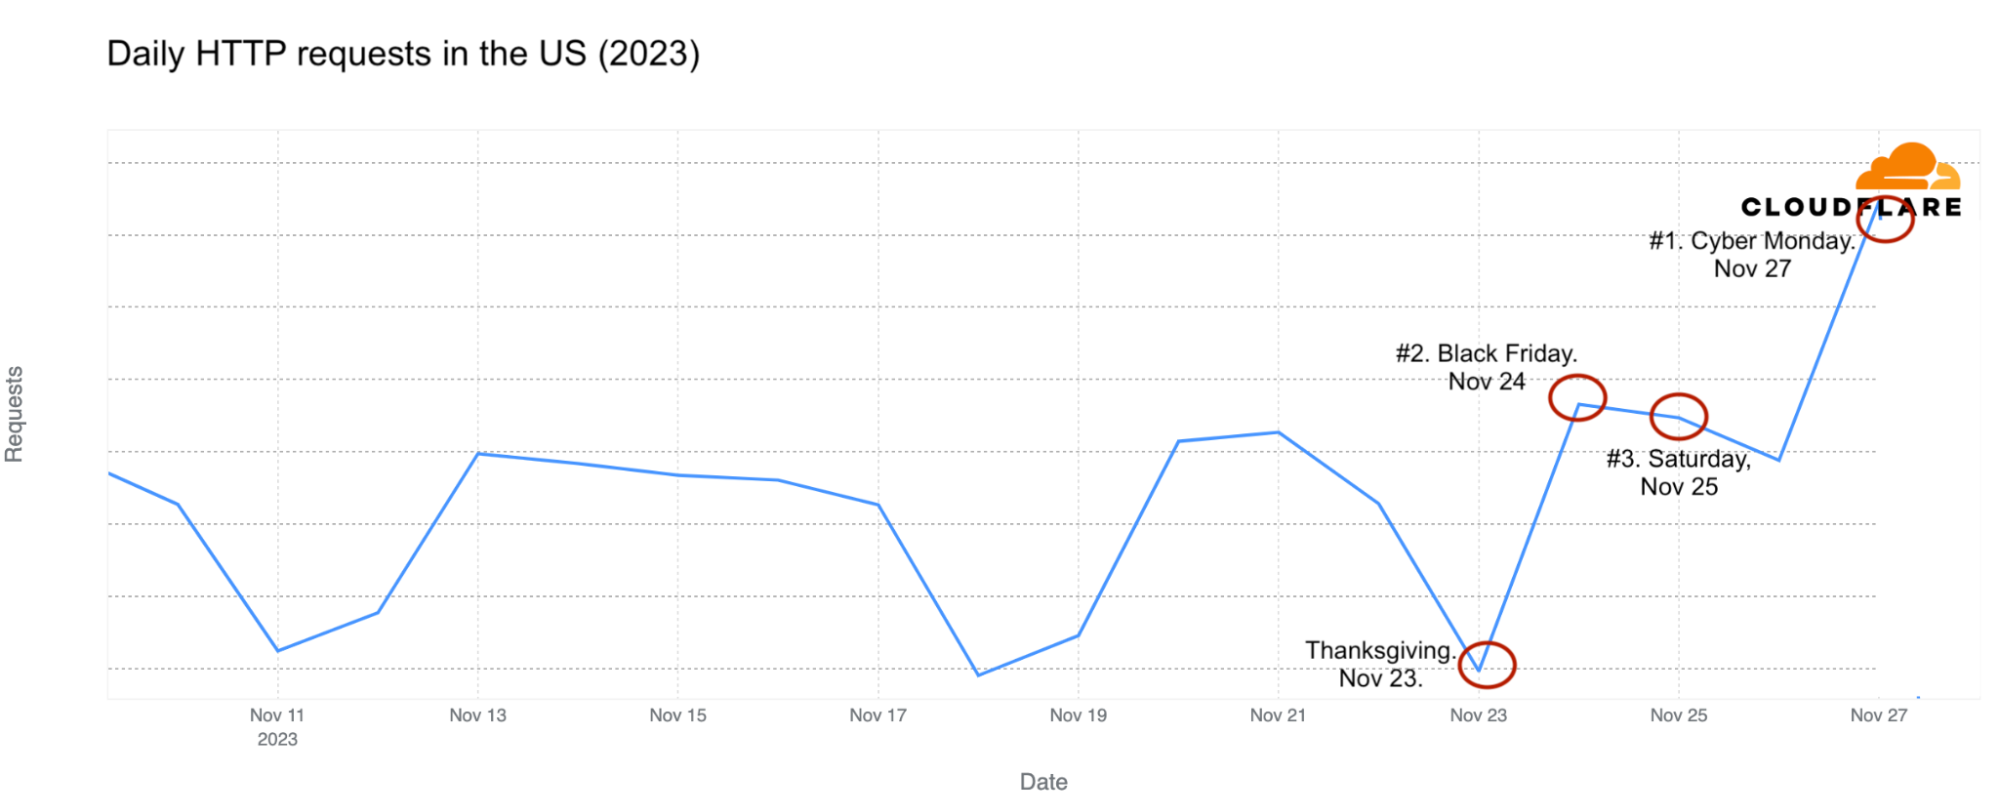
From the US perspective, the ranking is similar, with Saturday, November 25, the day after Black Friday, ranking as the third busiest day for Internet traffic.
US. Most popular Internet traffic days
Additionally, most U.S. states show a similar trend, with Cyber Monday experiencing the most traffic, followed by Black Friday. However, Alaska is a notable exception, where the days with the highest Internet traffic were November 13 and 14, coinciding with a snow emergency that closed schools and roads.
States like Colorado, Hawaii, Idaho, New Mexico, and California also had Saturday, November 25, as their second busiest day, but Cyber Monday also “won” there.
Internationally, a trend of peak Internet traffic in November is observed in most countries, as highlighted in our previous 2022 Year in Review (stay tuned for our 2023 edition in the next few weeks). This trend is likely linked to colder weather in the Northern Hemisphere, where approximately 87% of the world’s population resided in 2023, as well as holidays and shopping periods, among other factors.
Here’s a table summarizing the November days with the most traffic, where the Black Friday week plays a significant role.
Most popular Internet traffic days
Countries like India, Japan, South Korea, Thailand, and Indonesia, though they show increased traffic during October and November compared to other months, do not exhibit an obvious increase in traffic during Black Friday week.
Singles’ Day (November 11), a popular Asian shopping event, only features in the top three traffic days in Turkey. In China, October saw bigger traffic peaks than November. However, in November, both Black Friday and the following day (November 25) showed clear increases in traffic, similar to Singles’ Day. In South Africa, Singles’ Day and Black Friday were the busiest traffic days in November, even though October also had higher peaks.
We observed last week that during Thanksgiving Day, mobile use in US Internet traffic was higher than in the previous week. This trend was intensified on Black Friday, peaking at 55.3% of all traffic, surpassing the typical weekend, which usually sees a higher mobile usage percentage. However, on Cyber Monday, desktop use took the lead, with the percentage of mobile device traffic dropping to 47.6%, lower than the previous Monday.
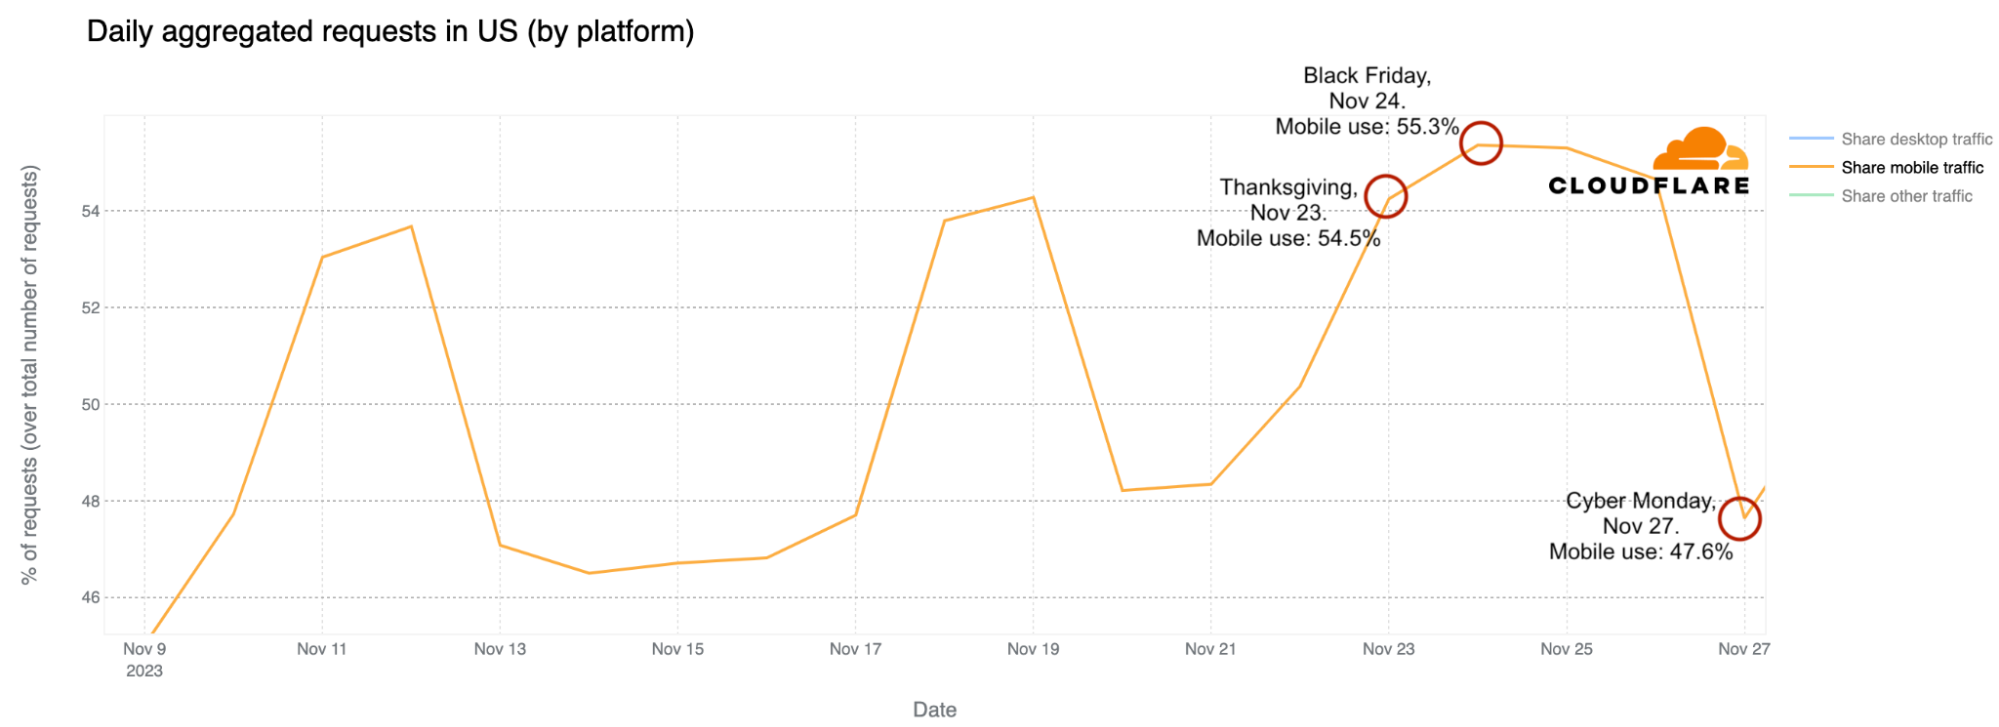
This trend seems to suggest that Black Friday shopping might involve more offline activities, with people in the US using their mobile devices more for Internet access on that day.
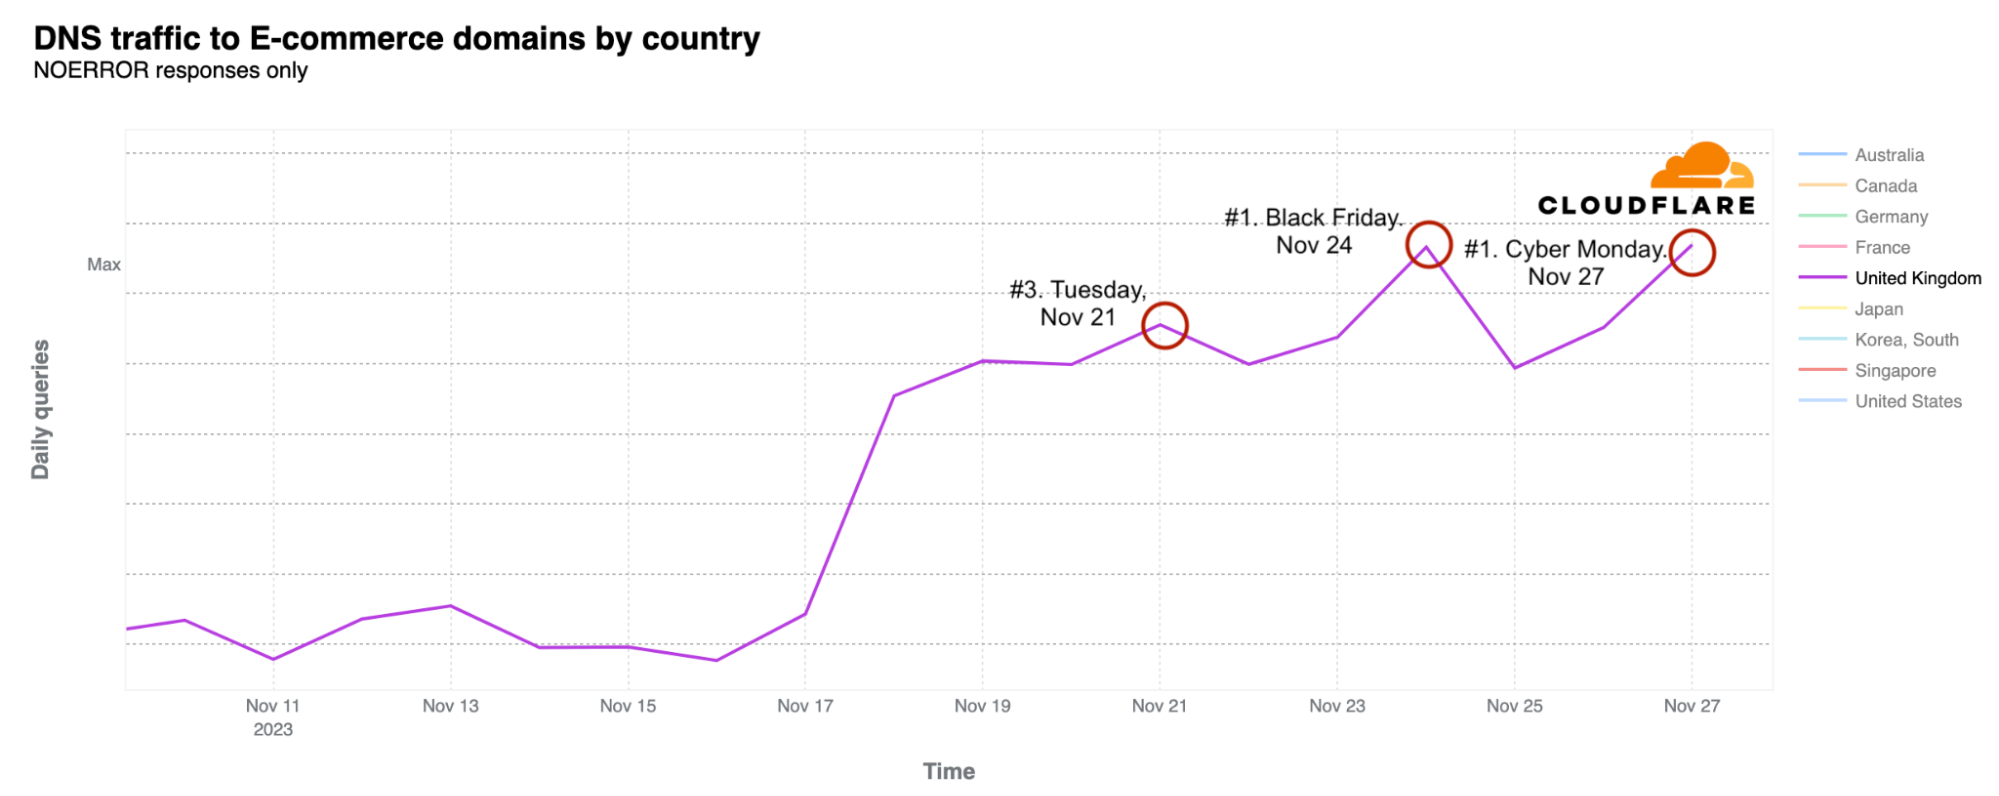
Using our 1.1.1.1 resolver, we have a more focused, category-specific view of the DNS traffic growth to e-commerce sites. There’s a general rising trend throughout November, very similar to what we observed in the Internet traffic section.
Looking more closely at the US aggregated e-commerce sites, it’s evident that Cyber Monday and Black Friday, in that order, were the days with the most DNS traffic, with Saturday, November 25, ranking third on the podium — exactly mirroring the HTTP traffic pattern discussed earlier.
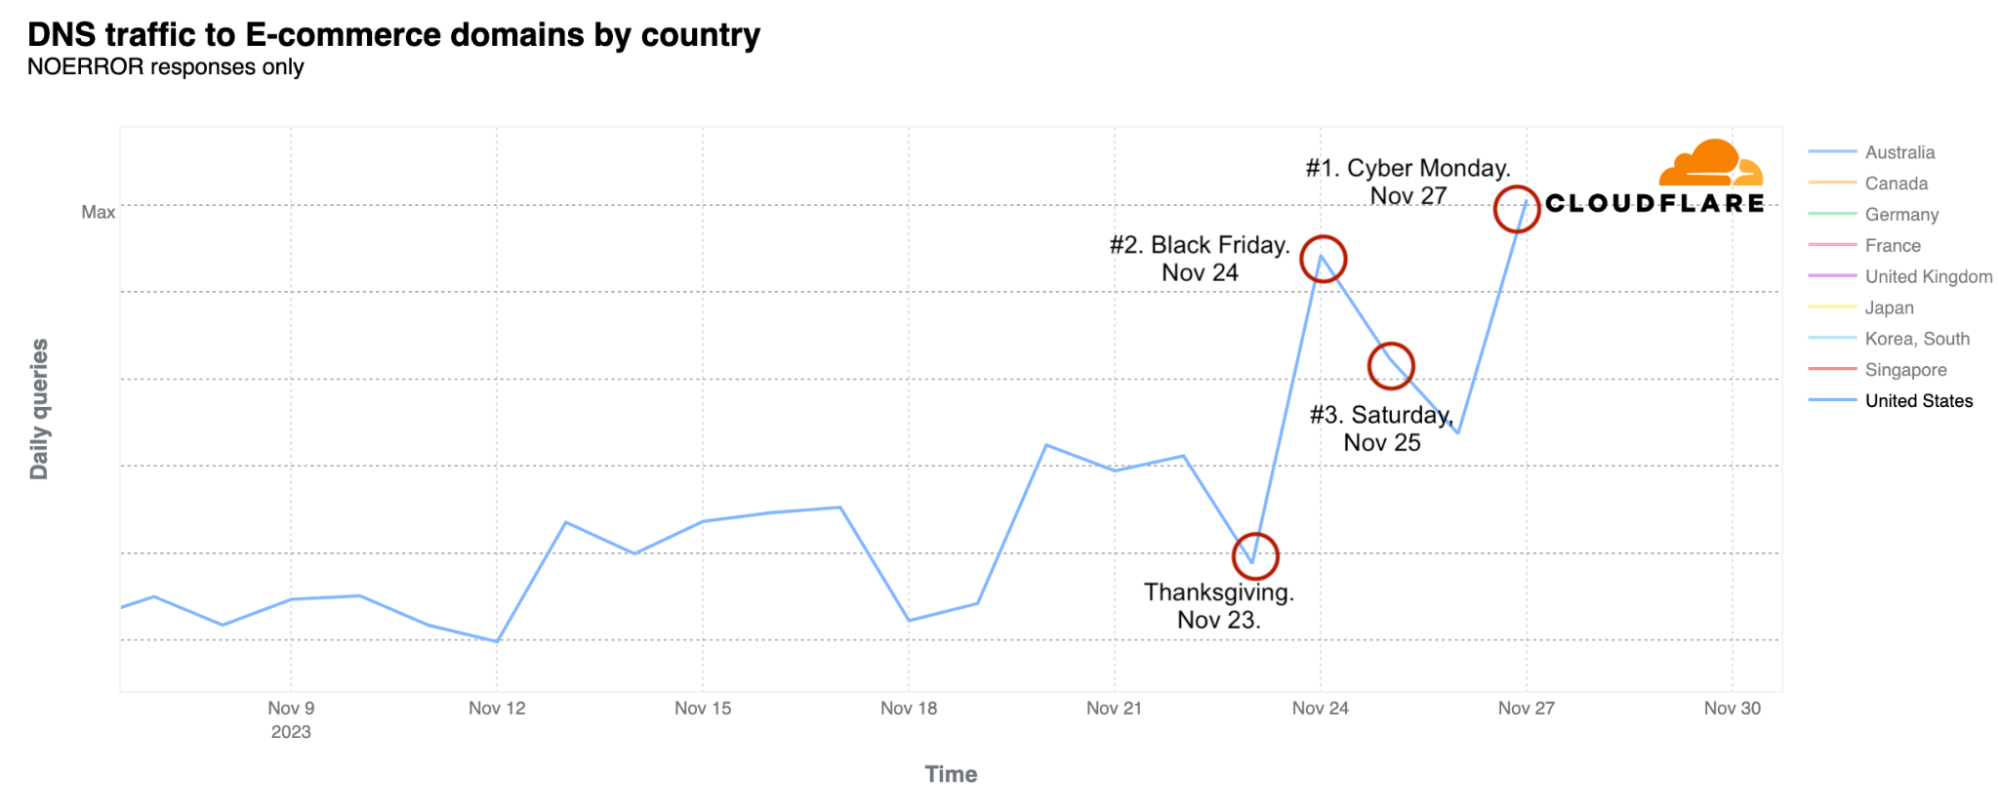
The peak hours of DNS traffic on Black Friday were around 16:00 and 17:00 UTC, which correspond to 12:00 and 13:00 EST and 09:00 and 10:00 PST. The same pattern was observed on Cyber Monday.
During Cyber Week (November 20 to 27), there was a 15% increase in DNS traffic compared with the previous week. A consistently high level of DNS traffic was maintained throughout Black Friday week, starting on Monday, November 20, with the sole exception being a noticeable drop on Thanksgiving Day — DNS traffic to e-commerce sites was 6% lower than the previous week on that day.
The UK shows a very similar trend to the US in terms of Black Friday and Cyber Monday interest. However, in 2023, Black Friday and Cyber Monday are tied for the top spot, followed by Tuesday, November 21.
In Australia, Cyber Monday ranked as the most popular day for e-commerce DNS traffic, followed by Black Friday. Canada showed a similar pattern, with Black Friday being the most trafficked day, followed by Cyber Monday.
In Germany, Black Friday indisputably led in e-commerce DNS traffic, followed by the previous Friday, November 17, and then the Black Friday weekend. Cyber Monday did not make it to the top three in Germany.
In France, Black Friday was the most popular e-commerce day, followed by Saturday, November 18.
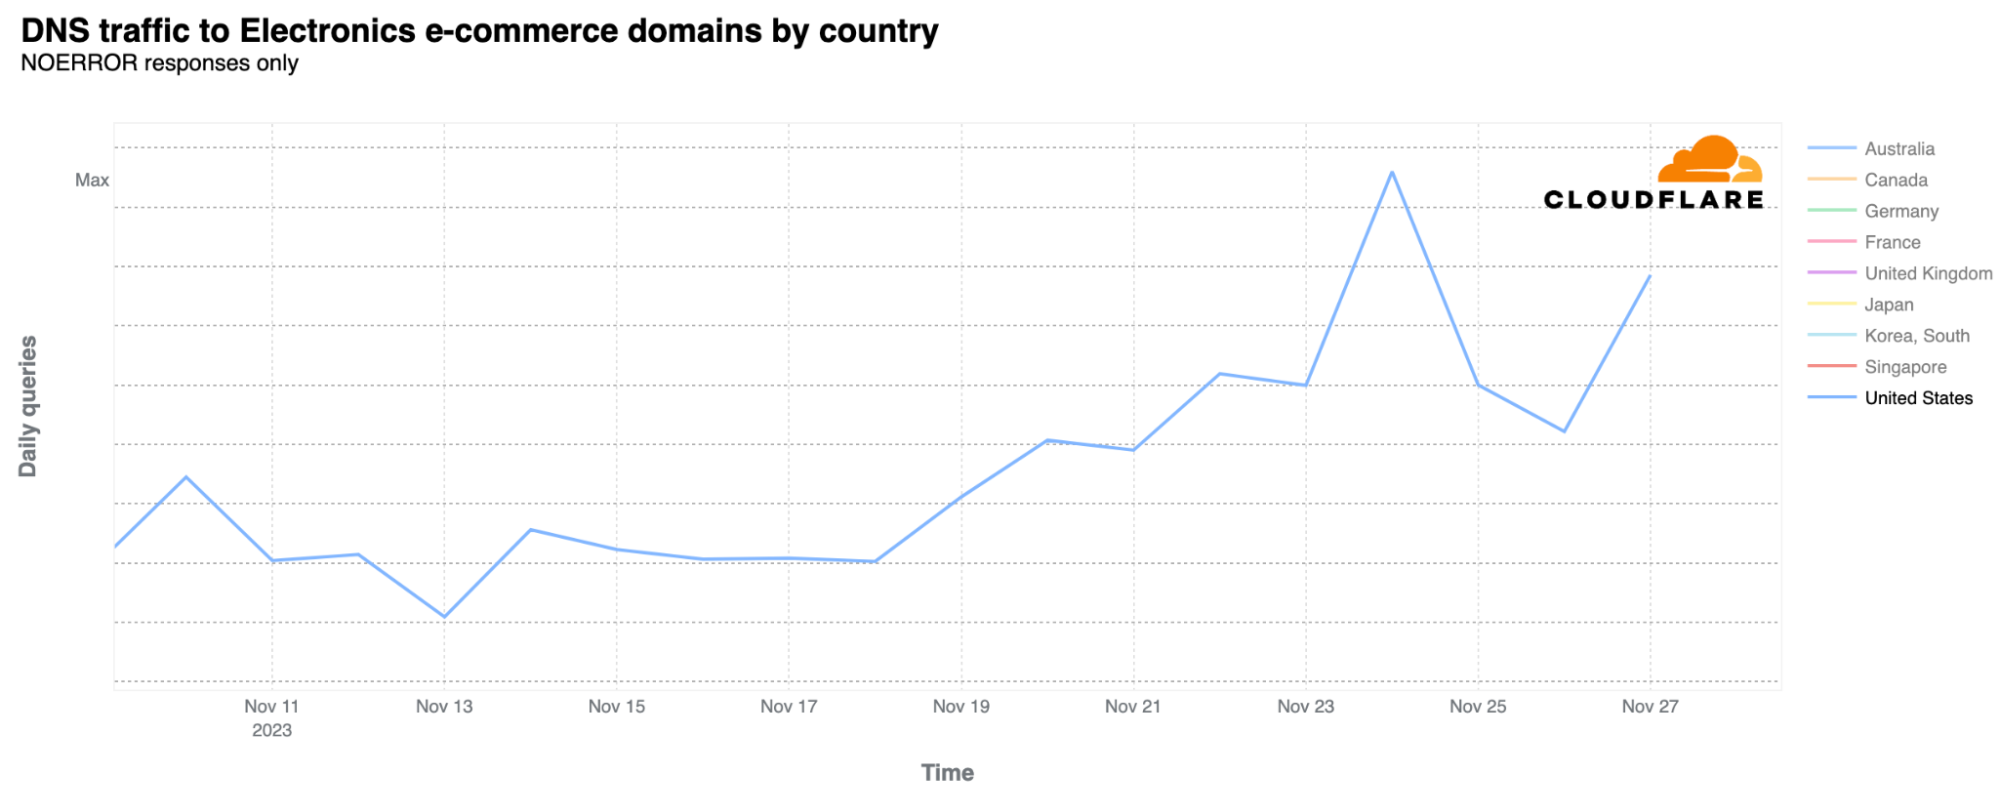
Focusing on the US only again, electronics e-commerce sites experienced more DNS traffic on Black Friday than on Cyber Monday.
This trend was mirrored in the fast fashion category, with Black Friday clearly in the lead.

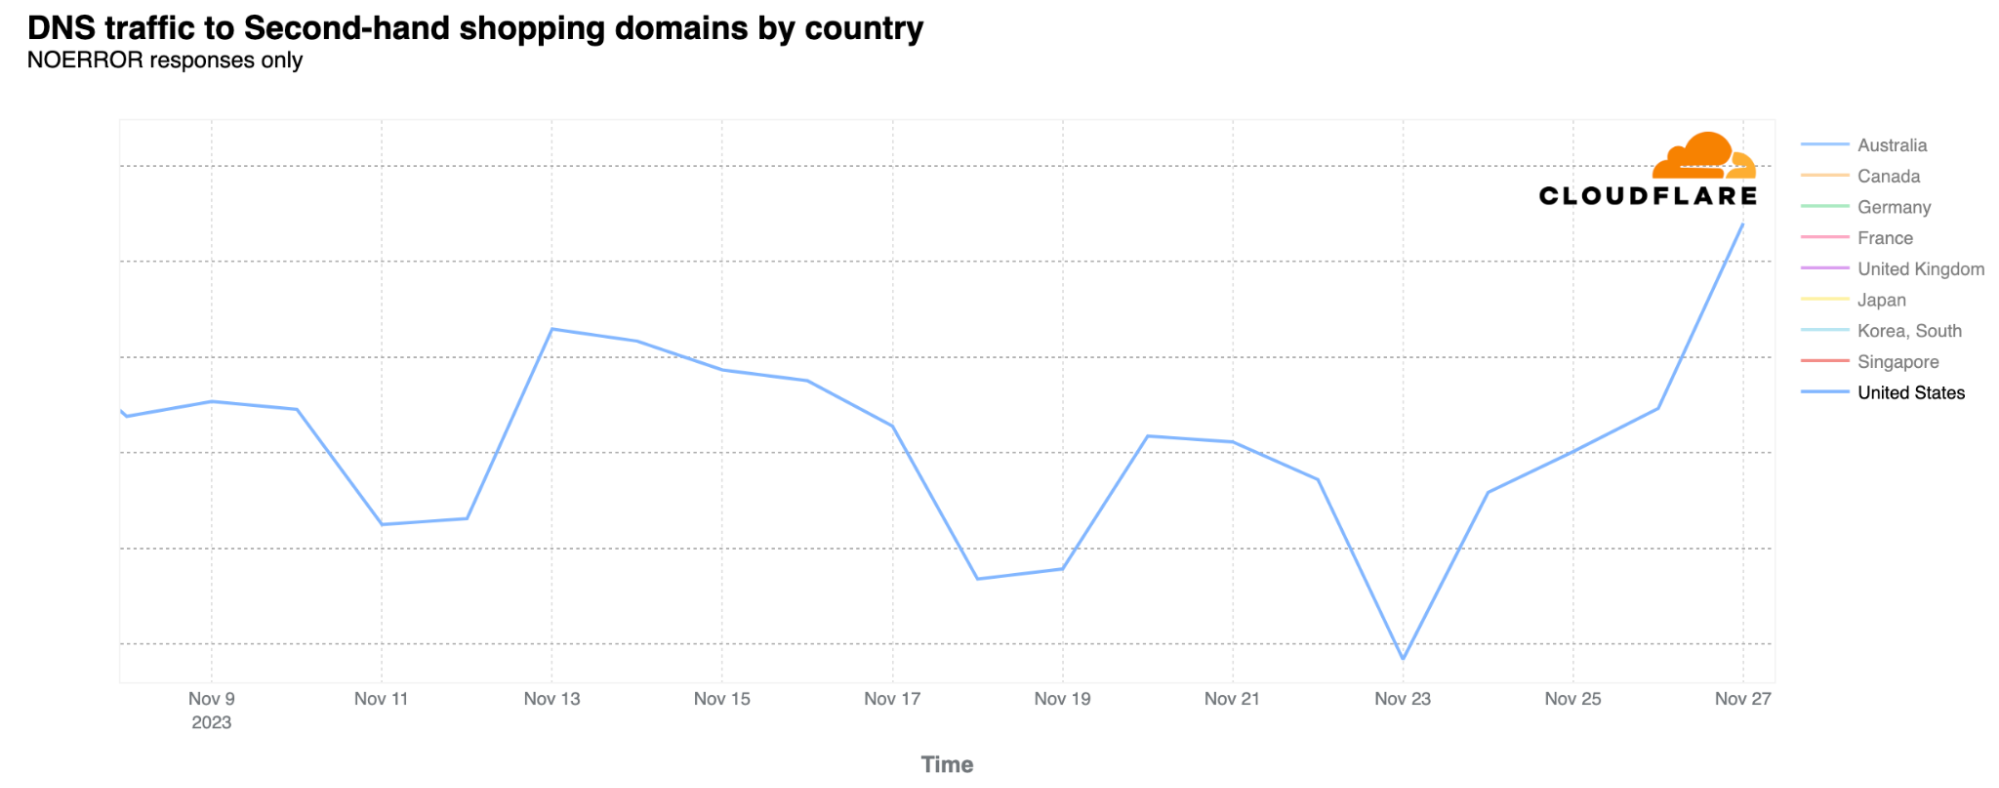
It’s perhaps unsurprising that second-hand shopping sites in the US gained more momentum and DNS traffic in the preceding week (November 12-18) leading up to Black Friday. However, these sites then reached their peak on Cyber Monday.
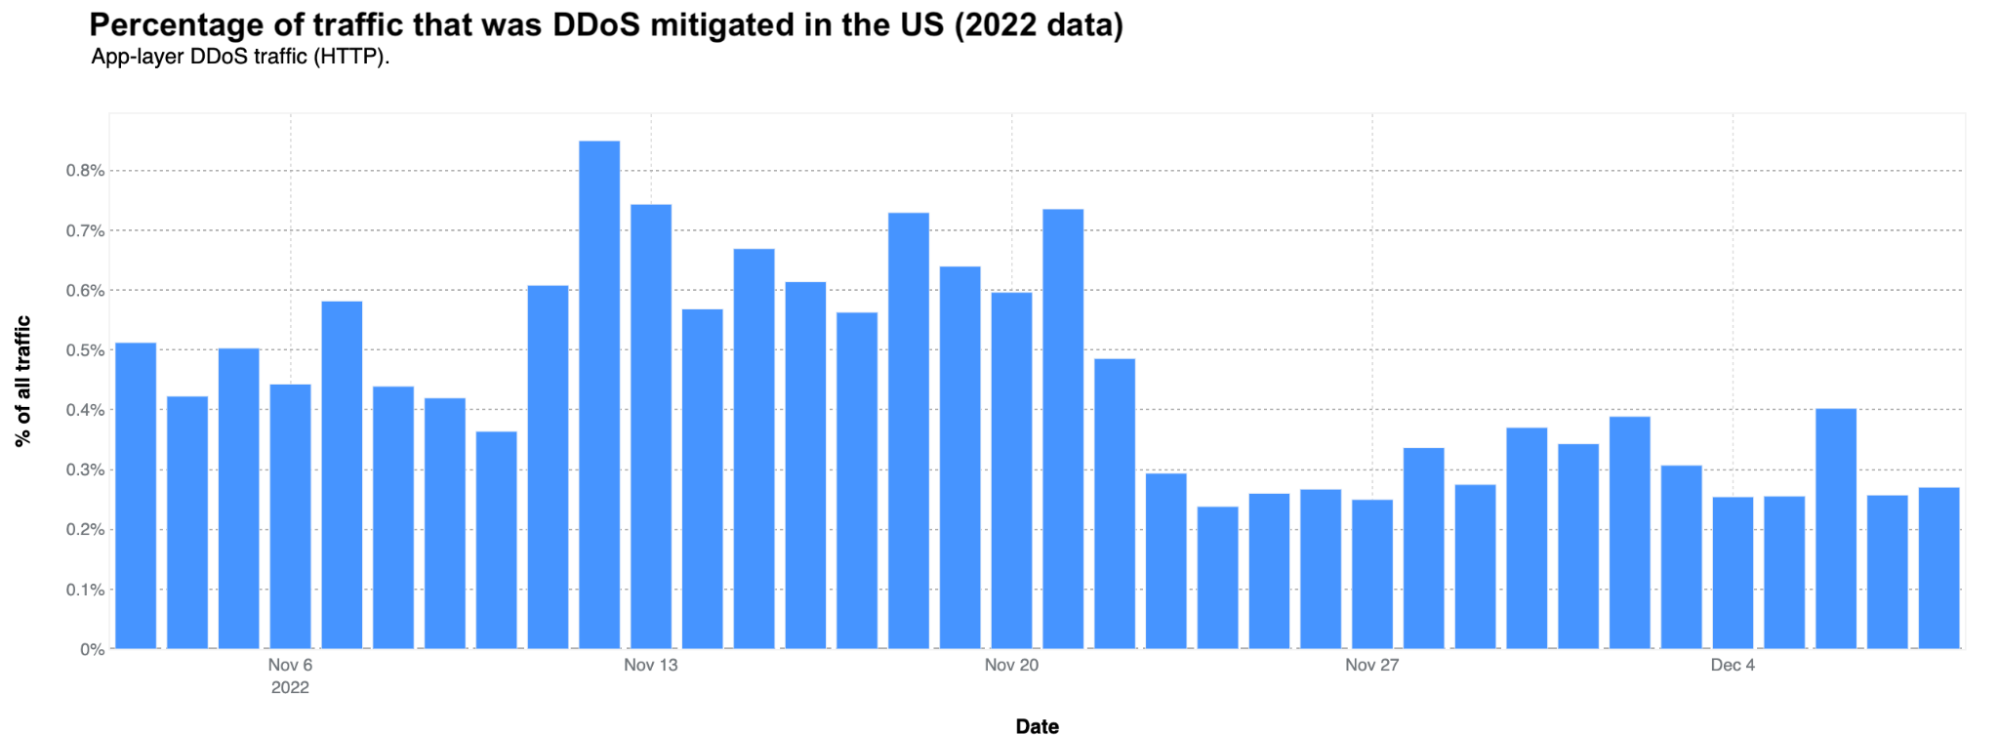
Regarding cyber threats, let’s focus on DDoS (distributed denial-of-service) attacks, a popular method for disrupting Internet properties. Data from November 2023 shows that on Thanksgiving, DDoS attacks accounted for the lowest daily fraction of traffic volume observed in the month of November across the US. There were higher percentages of DDoS attacks in late August and September, associated with the HTTP/2 Zero-Day vulnerability, which led to record-breaking attacks.
The Black Friday week was not a peak period for DDoS attacks. The highest activity occurred earlier, mainly in the week of November 6-13.
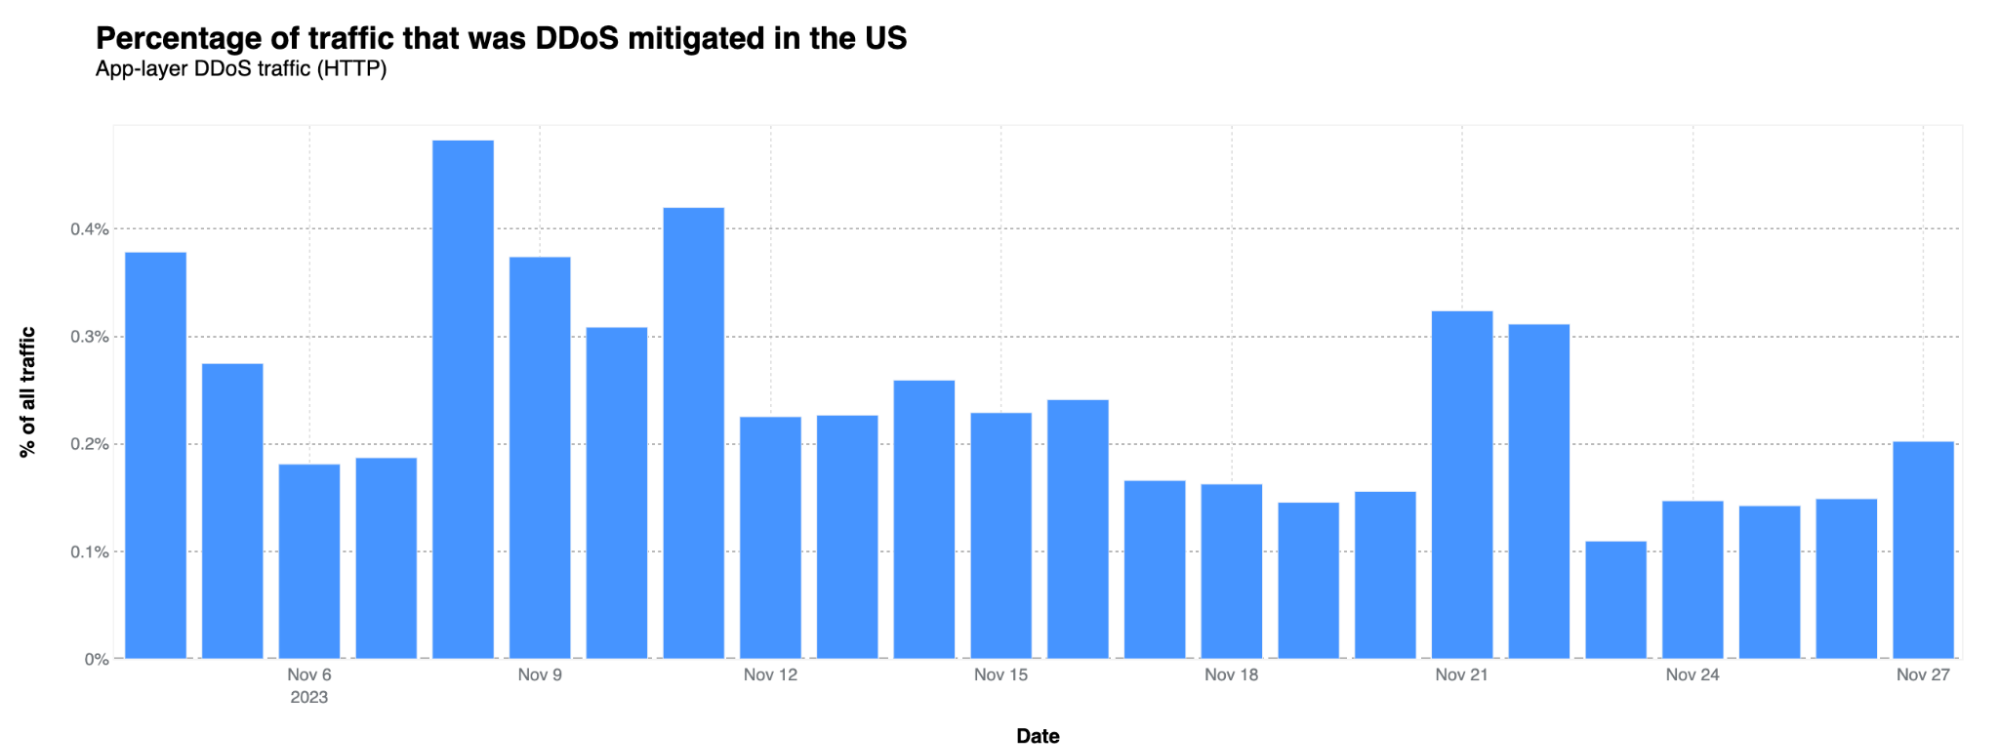
This pattern is consistent with 2022, where a higher percentage of DDoS attacks was observed before November 21.
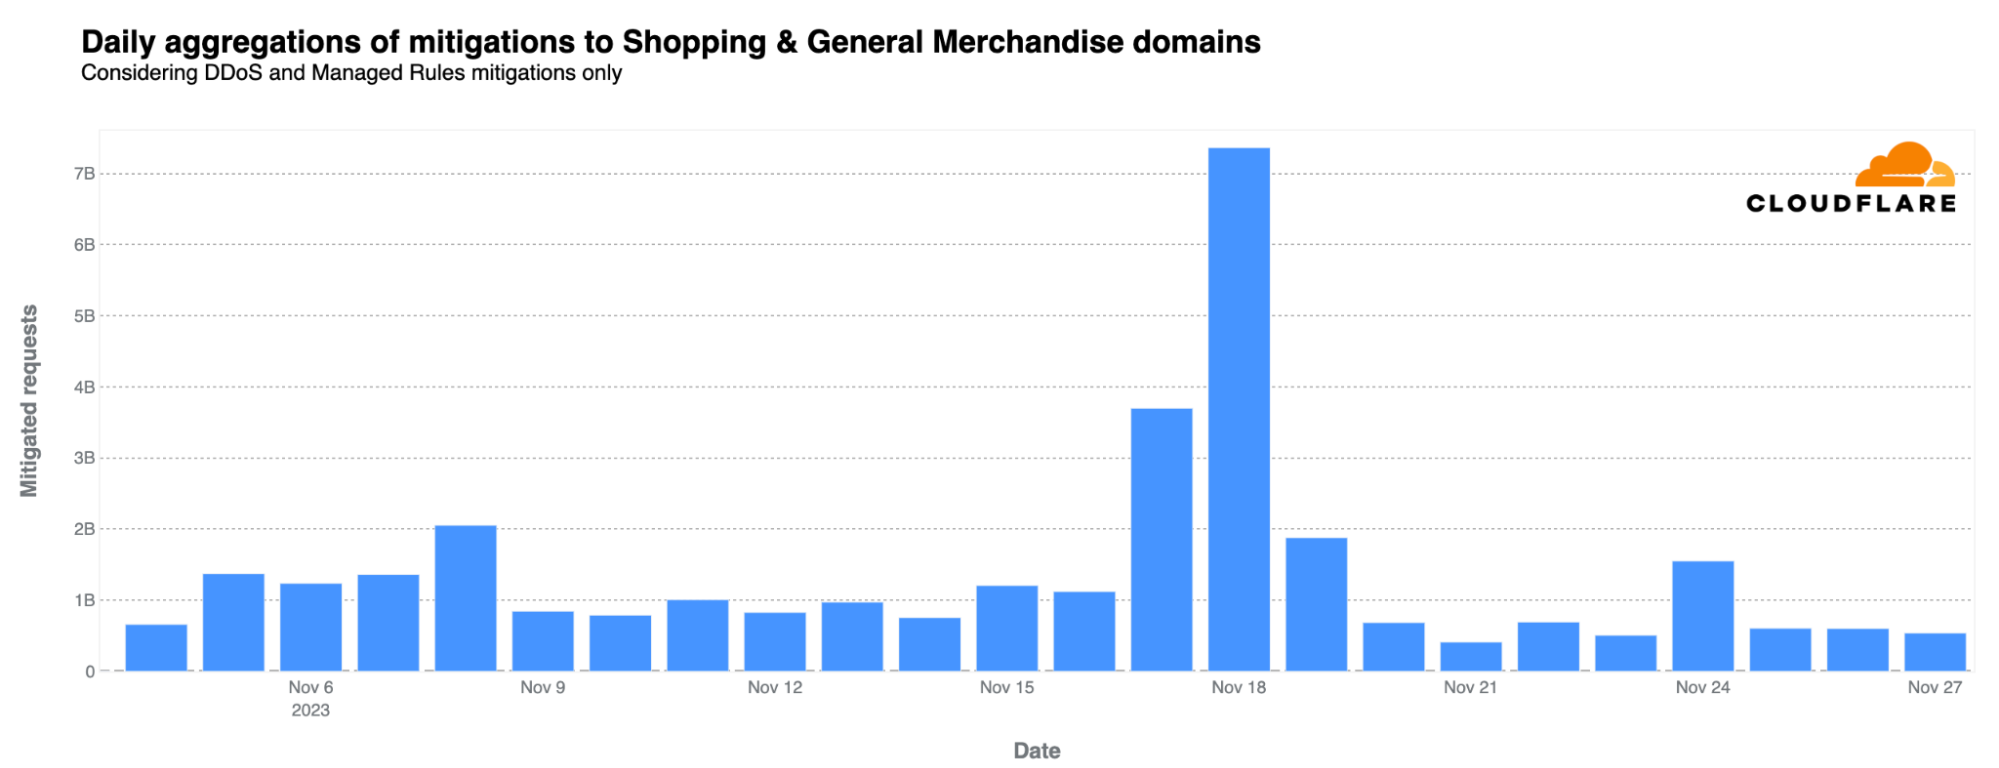
Going back to 2023, in terms of potential blocked attacks targeting the “Shopping & General Merchandise” industry, a similar pre-Black Friday week trend is evident. Here we’re including both DDoS and attacks blocked by the Managed Ruleset enforced by Cloudflare’s Web Application Firewall, and it’s a global perspective. The peak of 7.3 billion daily HTTP requests occurred during the weekend before Thanksgiving (November 18), coinciding with early Black Friday promotions.
The trends in Internet traffic during events like Black Friday and Cyber Monday highlight a complex pattern of behavior globally and regionally. Cyber Monday leads the way in Internet traffic, closely followed by Black Friday. The trends in the US and UK are similar, but other countries like Germany and France show distinct patterns. The period before Black Friday also gained traction in terms of Internet and e-commerce activity in some countries.
The shift towards mobile usage on Black Friday and desktop dominance on Cyber Monday (in the US) suggests different consumer behaviors, with e-commerce sites experiencing significant DNS traffic increase during these peak shopping periods.
In terms of cybersecurity, while attacks are constant, we observed a lower incidence of DDoS attacks during the Black Friday week in 2023, but there was a clear increase in the two weeks leading up to the most shopping-intense period.
And finally — don’t forget, you can check Cloudflare Radar to track global and country-specific Internet traffic trends.
Happy Holidays from everyone at Cloudflare!
Post Syndicated from jake original https://lwn.net/Articles/952942/
The drgn Python-based kernel
debugger was developed by Omar Sandoval for use in his job on the kernel
team at Meta. He now spends most of his time working on drgn, both in
developing new features for the tool and in using
it to debug production problems at Meta, which gives him a view of both
ends of that feedback loop. At the 2023
Linux Plumbers
Conference (LPC), he led a session on drgn in the kernel debugging
microconference, where he wanted to brainstorm on how to add some new
features to the debugger and, in particular, how to allow them to work on
production kernels.
Post Syndicated from Bruce Schneier original https://www.schneier.com/blog/archives/2023/11/digital-car-keys-are-coming.html
Soon we will be able to unlock and start our cars from our phones. Let’s hope people are thinking about security.
Post Syndicated from Cliff Robinson original https://www.servethehome.com/aws-graviton4-is-an-even-bigger-arm-server-processor-and-tranium2-for-ai-nvidia/
Today AWS made the much-anticipated announcement of Graviton4 which should be available in 2024. This is AWS’s latest Graviton processor and the fourth generation launched in the last five years. The company also announced its second-generation Tranium2 processor for AI workloads. AWS Graviton4 is an Even Bigger Arm Server Processor AWS is continuing on its […]
The post AWS Graviton4 is an Even Bigger Arm Server Processor and Tranium2 for AI appeared first on ServeTheHome.
Post Syndicated from Jyoti Aggarwal original https://aws.amazon.com/blogs/big-data/announcing-zero-etl-integrations-with-aws-databases-and-amazon-redshift/
As customers become more data driven and use data as a source of competitive advantage, they want to easily run analytics on their data to better understand their core business drivers to grow sales, reduce costs, and optimize their businesses. To run analytics on their operational data, customers often build solutions that are a combination of a database, a data warehouse, and an extract, transform, and load (ETL) pipeline. ETL is the process data engineers use to combine data from different sources.
Through customer feedback, we learned that lot of undifferentiated time and resources go towards building and managing ETL pipelines between transactional databases and data warehouses. At Amazon Web Services (AWS), our goal is to make it easier for our customers to connect to and use all of their data and to do it with the speed and agility they need. We think that by automating the undifferentiated parts, we can help our customers increase the pace of their data-driven innovation by breaking down data silos and simplifying data integration.
Customers want flexible data architectures that let them integrate data across their organization to give them a better picture of their customers, streamline operations, and help teams make better, faster decisions. But integrating data isn’t easy. Today, building these pipelines and assembling the architecture to interconnect all the data sources and optimize analytics results is complex, requires highly skilled resources, and renders data that can be erroneous or is often inconsistent.
Amazon Redshift powers data driven decisions for tens of thousands of customers every day with a fully managed, artificial intelligence (AI)-powered cloud data warehouse that delivers the best price-performance for your analytics workloads.
Zero-ETL is a set of integrations that eliminates the need to build ETL data pipelines. Zero-ETL integrations with Amazon Redshift enable customers to access their data in place using federated queries or ingest it into Amazon Redshift with a fully managed solution from across their databases. With newer features, such as support for autocopy that simplifies and automates file ingestion from Amazon Simple Storage Service (Amazon S3), Redshift Streaming Ingestion capabilities to continuously ingest any amount of streaming data directly into the warehouse, and multi-cluster data sharing architectures that minimize data movement and even provide access to third-party data, Amazon Redshift enables data integration and quick access to data without building manual pipelines.
With all the data integrated and available, Amazon Redshift empowers every data user to run analytics and build AI, machine learning (ML), and generative AI applications. Developers can run Apache Spark applications directly on the data in their warehouse from AWS analytics services, such as Amazon EMR and AWS Glue. They can enrich their datasets by joining operational data replicated through zero-ETL integrations with other sources such as sales and marketing data from SaaS applications and can even create Amazon QuickSight dashboards on top of this data to track key metrics across sales, website analytics, operations, and more—all in one place.
Customers can also use Amazon Redshift data sharing to securely share this data with multiple consumer clusters used by different teams—both within and across AWS accounts—driving a unified view of business and facilitating self-service access to application data within team clusters while maintaining governance over sensitive operational data.
Furthermore, customers can build machine learning models directly on their operational data in Amazon Redshift ML (native integration into Amazon SageMaker) without needing to build any data pipelines and use them to run billions of predictions with SQL commands. Or they can build complex transformations and aggregations on the integrated data using Amazon Redshift materialized views.
We’re excited to share four AWS database zero-ETL integrations with Amazon Redshift:
By bringing different database services closer to analytics, AWS is streamlining access to data and enabling companies to accelerate innovation, create competitive advantage, and maximize the business value extracted from their data assets.
The Amazon Aurora zero-ETL integration with Amazon Redshift unifies transactional data from Amazon Aurora with near real-time analytics in Amazon Redshift. This eliminates the burden of building and maintaining custom ETL pipelines between the two systems. Unlike traditional siloed databases that force a tradeoff between performance and analytics, the zero-ETL integration replicates data from multiple Aurora clusters into the same Amazon Redshift warehouse. This enables holistic insights across applications without impacting production workloads. The entire system can be serverless and can auto-scale to handle fluctuations in data volume without infrastructure management.
Amazon Aurora MySQL zero-ETL integration with Amazon Redshift processes over 1 million transactions per minute (an equivalent of 17.5 million insert/update/delete row operations per minute) from multiple Aurora databases and makes them available in Amazon Redshift in less than 15 seconds (p50 latency lag). Figure 1 shows how the Aurora MySQL zero-ETL integration with Amazon Redshift works at a high level.

Figure 1: High level working of Aurora MySQL zero-ETL integration with Amazon Redshift
In their own words, see how one of our customers is using Aurora MySQL zero-ETL integration with Amazon Redshift.
In the retail industry, for example, Infosys wanted to gain faster insights about their business, such as best-selling products and high-revenue stores, based on transactions in a store management system. They used Amazon Aurora MySQL zero-ETL integration with Amazon Redshift to achieve this. With this integration, Infosys replicated Aurora data to Amazon Redshift and created Amazon QuickSight dashboards for product managers and channel leaders in just a few seconds, instead of several hours. Now, as part of Infosys Cobalt and Infosys Topaz blueprints, enterprises can have near real-time analytics on transactional data, which can help them make informed decisions related to store management.
– Sunil Senan, SVP and Global Head of Data, Analytics, and AI, Infosys
To learn more, see Aurora Docs, Amazon Redshift Docs, and the AWS News Blog.
The new Amazon RDS for MySQL integration with Amazon Redshift empowers customers to easily perform analytics on their RDS for MySQL data. With a few clicks, it seamlessly replicates RDS for MySQL data into Amazon Redshift, automatically handling initial data loads, ongoing change synchronization, and schema replication. This eliminates the complexity of traditional ETL jobs. The zero-ETL integration enables workload isolation for optimal performance; RDS for MySQL focuses on high-speed transactions while Amazon Redshift handles analytical workloads. Customers can also consolidate data from multiple sources into Amazon Redshift, such as Aurora MySQL-Compatible Edition and Aurora PostgreSQL-Compatible Edition. This unified view provides holistic insights across applications in one place, delivering significant cost and operational efficiencies.
Figure 2 shows how a customer can use the AWS Management Console for Amazon RDS to get started with creating a zero-ETL integration from RDS for MySQL, Aurora MySQL-Compatible Edition, and Aurora PostgreSQL-Compatible Edition to Amazon Redshift.

Figure 2: How to create a zero-ETL integration using Amazon RDS.
This integration is currently in public preview, visit the getting started guide to learn more.
The Amazon DynamoDB zero-ETL integration with Amazon Redshift (limited preview) provides a fully managed solution for making data from DynamoDB available for analytics in Amazon Redshift. With minimal configuration, customers can replicate DynamoDB data into Amazon Redshift for analytics without consuming the DynamoDB Read Capacity Units (RCU). This zero-ETL integration unlocks powerful Amazon Redshift capabilities on DynamoDB data such as high-speed SQL queries, machine learning integrations, materialized views for fast aggregations, and secure data sharing.
This integration is currently in limited preview, use this link to request access.
Our mission is to help customers get the most value from their data, and integrated services are key to this. That’s why we’re building towards a zero-ETL future today. By automating complex ETL processes, data engineers can redirect their focus on creating value from the data. With this modern approach to data management, organizations can accelerate their use of data to streamline operations and fuel business growth.
 Jyoti Aggarwal is a Product Management lead for Amazon Redshift zero-ETL. She brings along an expertise in cloud compute and storage, data warehouse, and B2B/B2C customer experience.
Post Syndicated from Channy Yun original https://aws.amazon.com/blogs/aws/new-generative-ai-capabilities-for-amazon-datazone-to-further-simplify-data-cataloging-and-discovery-preview/
Today, we are announcing a preview of an automation feature backed by generative artificial intelligence (AI) for Amazon DataZone that will dramatically decrease the amount of time needed to provide context for organizational data. The new feature can automate the traditionally labor-intensive process of data cataloging. Powered by the large language models (LLMs) of Amazon Bedrock, it generates detailed descriptions of data assets and their schemas, and suggests analytical use cases. You can generate a comprehensive business context with a single click.
We heard from customers that data consumers such as data analysts, scientists, and engineers in organizations struggle to understand the data’s relevance with little metadata. As a result, they either spend more time interpreting the data, or they return to data producers with continued questions. So, data producers such as data owners, engineers, and analysts who own the data and make it available for consumers need to manually enter detailed context for higher-priority data to make data shareable and discoverable. This is time-consuming and the number one problem customers have when trying to collate their data in a system for self-service by consumers.
When we launched the general availability of Amazon DataZone in October 2023, we introduced the first feature that brings generative AI capabilities to automate the generation of the table name and column names of a business catalog asset. In the data portal of Amazon DataZone, the green brain icon indicates automatically generated metadata suggestions. You could accept, edit, or reject each suggestion recommended by Amazon DataZone.
What’s new with today’s preview announcement?
Now, in addition to column and table names, you can automatically generate more detailed descriptions of the table and schema, as well as suggested uses.
In the Business Metadata tab in the data portal, when you choose Generate summary, new content will be generated to explain the table and its metadata.

You can also accept, edit, and reject this recommendation.

When you choose the Schema tab, you can also see new Description recommendations as well as the Name. You can review generated metadata and choose to accept, edit, or reject the recommendation.

This new feature will enhance data discoverability and reduce on back-and-forth communications between data consumers and producers. You will have a richer search experience based on extensive data insights in the future.
Join the preview
The new metadata generation ability is now previewed in the AWS US East (N. Virginia) and US West (Oregon) Regions. With this new generative AI capability, you can reduce time-to-insight by accelerating data cataloging and boosting data discovery. To learn more, visit the Amazon DataZone: Automate Data Discovery.
Give it a try and send feedback to AWS re:Post for Amazon DataZone or through your usual AWS Support contacts.
— Channy
Post Syndicated from Channy Yun original https://aws.amazon.com/blogs/aws/amazon-dynamodb-zero-etl-integration-with-amazon-opensearch-service-is-now-generally-available/
Today, we are announcing the general availability of Amazon DynamoDB zero-ETL integration with Amazon OpenSearch Service, which lets you perform a search on your DynamoDB data by automatically replicating and transforming it without custom code or infrastructure. This zero-ETL integration reduces the operational burden and cost involved in writing code for a data pipeline architecture, keeping the data in sync, and updating code with frequent application changes, enabling you to focus on your application.
With this zero-ETL integration, Amazon DynamoDB customers can now use the powerful search features of Amazon OpenSearch Service, such as full-text search, fuzzy search, auto-complete, and vector search for machine learning (ML) capabilities to offer new experiences that boost user engagement and improve satisfaction with their applications.
This zero-ETL integration uses Amazon OpenSearch Ingestion to synchronize the data between Amazon DynamoDB and Amazon OpenSearch Service. You choose the DynamoDB table whose data needs to be synchronized and Amazon OpenSearch Ingestion synchronizes the data to an Amazon OpenSearch managed cluster or serverless collection within seconds of it being available.
You can also specify index mapping templates to ensure that your Amazon DynamoDB fields are mapped to the correct fields in your Amazon OpenSearch Service indexes. Also, you can synchronize data from multiple DynamoDB tables into one Amazon OpenSearch Service managed cluster or serverless collection to offer holistic insights across several applications.
Getting started with this zero-ETL integration
With a few clicks, you can synchronize data from DynamoDB to OpenSearch Service. To create an integration between DynamoDB and OpenSearch Service, choose the Integrations menu in the left pane of the DynamoDB console and the DynamoDB table whose data you want to synchronize.

You must turn on point-in-time recovery (PITR) and the DynamoDB Streams feature. This feature allows you to capture item-level changes in your table and push the changes to a stream. Choose Turn on for PITR and enable DynamoDB Streams in the Exports and streams tab.
After turning on PITR and DynamoDB Stream, choose Create to set up an OpenSearch Ingestion pipeline in your account that replicates the data to an OpenSearch Service managed domain.

In the first step, enter a unique pipeline name and set up pipeline capacity and compute resources to automatically scale your pipeline based on the current ingestion workload.

Now you can configure the pre-defined pipeline configuration in YAML file format. You can browse resources to look up and paste information to build the pipeline configuration. This pipeline is a combination of a source part from DyanmoDB settings and a sink part for OpenSearch Service.
You must set multiple IAM roles (sts_role_arn) with the necessary permissions to read data from the DynamoDB table and write to an OpenSearch domain. This role is then assumed by OpenSearch Ingestion pipelines to ensure that the right security posture is always maintained when moving the data from source to destination. To learn more, see Setting up roles and users in Amazon OpenSearch Ingestion in the AWS documentation.

After entering all required values, you can validate the pipeline configuration to ensure that your configuration is valid. To learn more, see Creating Amazon OpenSearch Ingestion pipelines in the AWS documentation.
Take a few minutes to set up the OpenSearch Ingestion pipeline, and you can see your integration is completed in the DynamoDB table.

Now you can search synchronized items in the OpenSearch Dashboards.
Things to know
Here are a couple of things that you should know about this feature:
Now available
Amazon DynamoDB zero-ETL integration with Amazon OpenSearch Service is now generally available in all AWS Regions where OpenSearch Ingestion is available today.
— Channy
Post Syndicated from Veliswa Boya original https://aws.amazon.com/blogs/aws/new-generative-ai-features-in-amazon-connect-including-amazon-q-facilitate-improved-contact-center-service/
If you manage a contact center, then you know the critical role that agents play in helping your organization build customer trust and loyalty. Those of us who’ve reached out to a contact center know how important agents are with guiding through complex decisions and providing fast and accurate solutions where needed. This can take time, and if not done correctly, then it may lead to frustration.
Generative AI capabilities in Amazon Connect
Today, we’re announcing that the existing artificial intelligence (AI) features of Amazon Connect now have generative AI capabilities that are powered by large language models (LLMs) available through Amazon Bedrock to transform how contact centers provide service to customers. LLMs are pre-trained on vast amounts of data, commonly known as foundation models (FMs), and they can understand and learn, generate text, engage in interactive conversations, answer questions, summarize dialogs and documents, and provide recommendations.
Amazon Q in Connect: recommended responses and actions for faster customer support
Organizations are in a state of constant change. To maintain a high level of performance that keeps up with these organizational changes, contact centers continuously onboard, train, and coach agents. Even with training and coaching, agents must often search through different sources of information, such as product guides and organization policies, to provide exceptional service to customers. This can increase customer wait times, lowering customer satisfaction and increasing contact center costs.
Amazon Q in Connect, a generative AI-powered agent assistant that includes functionality formerly available as Amazon Connect Wisdom, understands customer intents and uses relevant sources of information to deliver accurate responses and actions for the agent to communicate and resolve unique customer needs, all in real-time. Try Amazon Q in Connect for no charge until March 1, 2024. The feature is easy to enable, and you can get started in the Amazon Connect console.

Amazon Connect Contact Lens: generative post-contact summarization for increased productivity
To improve customer interactions and make sure details are available for future reference, contact center managers rely on the notes that agents manually create after every customer interaction. These notes include details on how a customer issue was addressed, key moments of the conversation, and any pending follow-up items.
Amazon Connect Contact Lens now provides generative AI-powered post-contact summarization, and enables contact center managers to more efficiently monitor and help improve contact quality and agent performance. For example, you can use summaries to track commitments made to customers and make sure of the prompt completion of follow-up actions. Moments after a customer interaction, Contact Lens now condenses the conversation into a concise and coherent summary.

Amazon Lex in Amazon Connect: assisted slot resolution
Using Amazon Lex, you can already build chatbots, virtual agents, and interactive voice response (IVR) which lets your customers schedule an appointment without speaking to a human agent. For example, “I need to change my travel reservation for myself and my two children,” might be difficult for a traditional bot to resolve to a numeric value (how many people are on the travel reservation?).
With the new assisted slot resolution feature, Amazon Lex can now resolve slot values in user utterances with great accuracy (for example, providing an answer to the previous question by providing a correct numeric value of three). This is powered by the advanced reasoning capabilities of LLMs which improve accuracy and provide a better customer experience. Learn about all the features of Amazon Lex, including the new generative AI-powered capabilities to help you build better self-service experiences.
Amazon Connect Customer Profiles: quicker creation of unified customer profiles for personalized customer experiences
Customers expect personalized customer service experiences. To provide this, contact centers need a comprehensive understanding of customers’ preferences, purchases, and interactions. To achieve that, contact center administrators create unified customer profiles by merging customer data from a number of applications. These applications each have different types of customer data stored in varied formats across a range of data stores. Stitching together data from these various data stores needs contact center administrators to understand their data and figure out how to organize and combine it into a unified format. To accomplish this, they spend weeks compiling unified customer profiles.
Starting today, Amazon Connect Customer Profiles uses LLMs to shorten the time needed to create unified customer profiles. When contact center administrators add data sources such as Amazon Simple Storage Service (Amazon S3), Adobe Analytics, Salesforce, ServiceNow, and Zendesk, Customer Profiles analyze the data to understand what the data format and content represents and how the data relates to customers’ profiles. Then, Customer Profiles then automatically determines how to organize and combine data from different sources into complete, accurate profiles. With just a few steps, managers can review, make any necessary edits, and complete the setup of customer profiles.
In-app, web, and video capabilities in Amazon Connect
As an organization, you want to provide great, easy-to-use, and convenient customer service. Earlier in this post I talked about self-service chatbots and how they help you with this. At times customers want to move beyond the chatbot, and beyond an audio conversation with the agent.
Amazon Connect now has in-app, web, and video capabilities to help you deliver rich, personalized customer experiences (see Amazon Lex features for details). Using the fully-managed communication widget, and with a few lines of code, you can implement these capabilities on your web and mobile applications. This allows your customers to get support from a web or mobile application without ever having to leave the page. Video can be enabled by either the agent only, by the customer only, or by both agent and customer.

Amazon Connect SMS: two-way SMS capabilities
Almost everyone owns a mobile device and we love the flexibility of receiving text-based support on-the-go. Contact center leaders know this, and in the past have relied on disconnected, third-party solutions to provide two-way SMS to customers.
Amazon Connect now has two-way SMS capabilities to enable contact center leaders to provide this flexibility (see Amazon Lex features for details). This improves customer satisfaction and increases agent productivity without costly integration with third-party solutions. SMS chat can be enabled using the same configuration, Amazon Connect agent workspace, and analytics as calls and chats.
Learn more
Send feedback
– Veliswa
Post Syndicated from Donnie Prakoso original https://aws.amazon.com/blogs/aws/new-amazon-q-in-quicksight-uses-generative-ai-assistance-for-quicker-easier-data-insights-preview/
Today, I’m happy to share that Amazon Q in QuickSight is available for preview. Now you can experience the Generative BI capabilities in Amazon QuickSight announced on July 26, as well as two additional capabilities for business users.
Turning insights into impact faster with Amazon Q in QuickSight
With this announcement, business users can now generate compelling sharable stories examining their data, see executive summaries of dashboards surfacing key insights from data in seconds, and confidently answer questions of data not answered by dashboards and reports with a reimagined Q&A experience.
Before we go deeper into each capability, here’s a quick summary:
To get started, you need to enable Preview Q Generative Capabilities in Preview manager.

Once enabled, you’re ready to experience what Amazon Q in QuickSight brings for business users and business analysts building dashboards.
Stories automatically builds formatted narratives
Business users often need to share their findings of data with others to inform team decisions; this has historically involved taking data out of the business intelligence (BI) system. Stories are a new feature enabling business users to create beautifully formatted narratives that describe data, and include visuals, images, and text in document or slide format directly that can easily be shared with others within QuickSight.
Now, business users can use natural language to ask Amazon Q to build a story about their data by starting from the Amazon Q Build menu on an Amazon QuickSight dashboard. Amazon Q extracts data insights and statistics from selected visuals, then uses large language models (LLMs) to build a story in multiple parts, examining what the data may mean to the business and suggesting ideas to achieve specific goals.
For example, a sales manager can ask, “Build me a story about overall sales performance trends. Break down data by product and region. Suggest some strategies for improving sales.” Or, “Write a marketing strategy that uses regional sales trends to uncover opportunities that increase revenue.” Amazon Q will build a story exploring specific data insights, including strategies to grow sales.

Once built, business users get point-and-click tools augmented with artificial intelligence- (AI) driven rewriting capabilities to customize stories using a rich text editor to refine the message, add ideas, and highlight important details.

Stories can also be easily and securely shared with other QuickSight users by email.

Executive summaries deliver a quick snapshot of important information
Executive summaries are now available with a single click using the Amazon Q Build menu in Amazon QuickSight. Amazon QuickSight automatically determines interesting facts and statistics, then use LLMs to write about interesting trends.
This new capability saves time in examining detailed dashboards by providing an at-a-glance view of key insights described using natural language.

The executive summaries feature provides two advantages. First, it helps business users generate all the key insights without the need to browse through tens of visuals on the dashboard and understand changes from each. Secondly, it enables readers to find key insights based on information in the context of dashboards and reports with minimum effort.
New data Q&A experience
Once an interesting insight is discovered, business users frequently need to dig in to understand data more deeply than they can from existing dashboards and reports. Natural language query (NLQ) solutions designed to solve this problem frequently expect that users already know what fields may exist or how they should be combined to answer business questions. However, business users aren’t always experts in underlying data schemas, and their questions frequently come in more general terms, like “How were sales last week in NY?” Or, “What’s our top campaign?”
The new Q&A experience accessed within the dashboards and reports helps business users confidently answer questions about data. It includes AI-suggested questions and a profile of what data can be asked about and automatically generated multi-visual answers with narrative summaries explaining data context.

Furthermore, Amazon Q brings the ability to answer vague questions and offer alternatives for specific data. For example, customers can ask a vague question, such as “Top products,” and Amazon Q will provide an answer that breaks down products by sales and offers alternatives for products by customer count and products by profit. Amazon Q explains answer context in a narrative summarizing total sales, number of products, and picking out the sales for the top product.

Customers can search for specific data values and even a single word such as, for example, the product name “contactmatcher.” Amazon Q returns a complete set of data related to that product and provides a natural language breakdown explaining important insights like total units sold. Specific visuals from the answers can also be added to a pinboard for easy future access.

Watch the demo
To see these new capabilities in action, have a look at the demo.
Things to Know
Here are a few additional things that you need to know:
Join the preview
Amazon Q in QuickSight product page
Happy building!
— Donnie
Post Syndicated from Antje Barth original https://aws.amazon.com/blogs/aws/introducing-amazon-q-a-new-generative-ai-powered-assistant-preview/
Today, we are announcing Amazon Q, a new generative artificial intelligence- (AI)-powered assistant designed for work that can be tailored to your business. You can use Amazon Q to have conversations, solve problems, generate content, gain insights, and take action by connecting to your company’s information repositories, code, data, and enterprise systems. Amazon Q provides immediate, relevant information and advice to employees to streamline tasks, accelerate decision-making and problem-solving, and help spark creativity and innovation at work.
Amazon Q offers user-based plans, so you get features, pricing, and options tailored to how you use the product. Amazon Q can adapt its interactions to each individual user based on the existing identities, roles, and permissions of your business. AWS never uses customers’ content from Amazon Q to train the underlying models. In other words, your company information remains secure and private.
In this post, I’ll give you a quick tour of how you can use Amazon Q for general business use.
Amazon Q is your business expert
Let’s look at a few examples of how Amazon Q can help business users complete tasks using simple natural language prompts. As a marketing manager, you could ask Amazon Q to transform a press release into a blog post, create a summary of the press release, or create an email draft based on the provided release. Amazon Q searches through your company content, which can include internal style guides, for example, to provide a response appropriate to your company’s brand standards. Then, you could ask Amazon Q to generate tailored social media prompts to promote your story through each of your social media channels. Later, you can ask Amazon Q to analyze the results of your campaign and summarize them for leadership reviews.

In the following example, I deployed Amazon Q with access to my AWS News Blog posts from 2023 and called the assistant “AWS Blog Expert.”

Coming back to my previous example, let’s assume I’m a marketing manager and want Amazon Q to help me create social media posts for recent company blog posts.
I enter the following prompt: “Summarize the key insights from Antje’s recent AWS Weekly Roundup posts and craft a compelling social media post that not only highlights the most important points but also encourages engagement. Consider our target audience and aim for a tone that aligns with our brand identity. The social media post should be concise, informative, and enticing to encourage readers to click through and read the full articles. Please ensure the content is shareable and includes relevant hashtags for maximum visibility.”

Behind the scenes, Amazon Q searches the documents in connected data sources and creates a relevant and detailed suggestion for a social media post based on my blog posts. Amazon Q also tells me which document was used to generate the answer. In this case, it is PDF file of the blog posts in question.
As an administrator, you can define the context for responses, restrict irrelevant topics, and configure whether to respond only using trusted company information or complement responses with knowledge from the underlying model. Restricting responses to trusted company information helps mitigate hallucinations, a common phenomenon where the underlying model generates responses that sound plausible but are based on misinterpreted or nonexistent data.
Amazon Q provides fine-grained access controls that restrict responses to only using data or acting based on the employee’s level of access and provides citations and references to the original sources for fact-checking and traceability. You can choose among 40+ built-in connectors for popular data sources and enterprise systems, including Amazon S3, Google Drive, Microsoft SharePoint, Salesforce, ServiceNow, and Slack.
How to tailor Amazon Q to your business
To tailor Amazon Q to your business, navigate to Amazon Q in the console, select Applications in the left menu, and choose Create application.

This starts the following workflow.
Step 1. Create application. Provide an application name and create a new or select an existing AWS Identity and Access Management (IAM) service role that Amazon Q is allowed to assume. I call my application AWS-Blog-Expert. Then, choose Create.

Step 2. Select retriever. A retriever pulls data from the index in real time during a conversation. You can choose between two options: use the Amazon Q native retriever or use an existing Amazon Kendra retriever. The native retriever can connect to the Amazon Q supported data sources. If you already use Amazon Kendra, you can select the existing Amazon Kendra retriever to connect the associated data sources to your Amazon Q application. I select the native retriever option. Then, choose Next.

Step 3. Connect data sources. Amazon Q comes with built-in connectors for popular data sources and enterprise systems. For this demo, I choose Amazon S3 and configure the data source by pointing to my S3 bucket with the PDFs of my blog posts.

Once the data source sync is successfully complete and the retriever shows the accurate document count, you can preview the web experience and start a conversation. Note that the data source sync can take from a few minutes to a few hours, depending on the amount and size of data to index.
You can also connect plugins that manage access to enterprise systems, including ServiceNow, Jira, Salesforce, and Zendesk. Plugins enable Amazon Q to perform user-requested tasks, such as creating support tickets or analyzing sales forecasts.

Preview and deploy web experience
In the application overview, choose Preview web experience. This opens the web experience with the conversational interface to chat with the tailored Amazon Q AWS Blog Expert. In the final step, you deploy the Amazon Q web experience. You can integrate your SAML 2.0–compliant external identity provider (IdP) using IAM. Amazon Q can work with any IdP that’s compliant with SAML 2.0. Amazon Q uses service-initiated single sign-on (SSO) to authenticate users.
Join the preview
Amazon Q is available today in preview in AWS Regions US East (N. Virginia) and US West (Oregon). Visit the product page to learn how Amazon Q can become your expert in your business.
Also, check out the Amazon Q Slack Gateway GitHub repository that shows how to make Amazon Q available to users as a Slack Bot application.
Learn more
— Antje
Post Syndicated from Danilo Poccia original https://aws.amazon.com/blogs/aws/upgrade-your-java-applications-with-amazon-q-code-transformation-preview/
As our applications age, it takes more and more effort just to keep them secure and running smoothly. Developers managing the upgrades must spend time relearning the intricacies and nuances of breaking changes and performance optimizations others have already discovered in past upgrades. As a result, it’s difficult to balance the focus between new features and essential maintenance work.
Today, we are introducing in preview Amazon Q Code Transformation. This new capability simplifies upgrading and modernizing existing application code using Amazon Q, a new type of assistant powered by generative artificial intelligence (AI). Amazon Q is specifically designed for work and can be tailored to your business.
Amazon Q Code Transformation can perform Java application upgrades now, from version 8 and 11 to version 17, a Java Long-Term Support (LTS) release, and it will soon be able to transform Windows-based .NET Framework applications to cross-platform .NET.
Previously, developers could spend two to three days upgrading each application. Our internal testing shows that the transformation capability can upgrade an application in minutes compared to the days or weeks typically required for manual upgrades, freeing up time to focus on new business requirements. For example, an internal Amazon team of five people successfully upgraded one thousand production applications from Java 8 to 17 in 2 days. It took, on average, 10 minutes to upgrade applications, and the longest one took less than an hour.
Amazon Q Code Transformation automatically analyzes the existing code, generates a transformation plan, and completes the transformation tasks suggested by the plan. While doing so, it identifies and updates package dependencies and refactors deprecated and inefficient code components, switching to new language frameworks and incorporating security best practices. Once complete, you can review the transformed code, complete with build and test results, before accepting the changes.
In this way, you can keep applications updated and supported in just a few steps, gain performance benefits, and remove vulnerabilities from using unsupported versions, freeing up time to focus on new business requirements. Let’s see how this works in practice.
Upgrading a Java application from version 8 to 17
I am using IntelliJ IDEA in this walkthrough (the same is available for Visual Studio Code). To have Amazon Q Code Transformation in my IDE, I install the latest version of the AWS Toolkit for IntelliJ IDEA and sign in using the AWS IAM Identity Center credentials provided by my organization. Note that to access Amazon Q Code Transformation, the CodeWhisperer administrator needs to explicitly give access to Amazon Q features in the profile used by the organization.
I open an old project that I never had the time to update to a more recent version of Java. The project is using Apache Maven to manage the build. The project object model (POM) file (pom.xml), an XML representation of the project, is in the root directory.
First, in the project settings, I check that the project is configured to use the correct SDK version (1.8 in this case). I choose AWS Toolkit on the left pane and then the Amazon Q + CodeWhisperer tab. In the Amazon Q (Preview) section, I choose Transform.

This opens a dialog where I check that the correct Maven module is selected for the upgrade before proceeding with the transformation.

I follow the progress in the Transformation Hub window. The upgrade completes in a few minutes for my small application, while larger ones might take more than an hour to complete.
The end-to-end application upgrade consists of three steps:

After a few minutes, the transformation terminates successfully. From here, I can open the plan and a summary of the transformation. I choose View diff to see the proposed changes. In the Apply Patch dialog, I see a recap of the files that have been added, modified, or deleted.

First, I select the pom.xml file and then choose Show Difference (the icon with the left/right arrows) to have a side-by-side view of the current code in the project and the proposed changes. For example, I see that the version of one of the dependencies (Project Lombok) has been increased for compatibility with the target Java version.

In the Java file, the annotations used by the upgraded dependency have been updated. With the new version, @With has been promoted, and @Wither (which was experimental) deprecated. These changes are reflected in the import statements.

There is also a summary file that I keep in the code repo to quickly look up the changes made to complete the upgrade.
I spend some time reviewing the files. Then, I choose OK to accept all changes.
Now the patch has been successfully applied, and the proposed changes merged with the code. I commit changes to my repo and move on to focus on business-critical changes that have been waiting for the migration to be completed.
Things to know
The preview of Amazon Q Code Transformation is available today for customers on the Amazon CodeWhisperer Professional Tier in the AWS Toolkit for IntelliJ IDEA and the AWS Toolkit for Visual Studio Code. To use Amazon Q Code Transformation, the CodeWhisperer administrator needs to give access to the profile used by the organization.
There is no additional cost for using Amazon Q Code Transformation during the preview. You can upgrade Java 8 and 11 applications that are built using Apache Maven to Java version 17. The project must have the POM file (pom.xml) in the root directory. We’ll soon add the option to transform Windows-based .NET Framework applications to cross-platform .NET and help accelerate migrations to Linux.
Once a transformation job is complete, you can use a diff view to verify and accept the proposed changes. The final transformation summary provides details of the dependencies updated and code files changed by Amazon Q Code Transformation. It also provides details of any build failures encountered in the final build of the upgraded code that you can use to fix the issues and complete the upgrade.
Combining Amazon’s long-term investments in automated reasoning and static code analysis with the power of generative AI, Amazon Q Code Transformation incorporates foundation models that we found to be essential for context-specific code transformations that often require updating a long tail of Java libraries with backward-incompatible changes.
In addition to generative AI-powered code transformations built by AWS, Amazon Q Code Transformation uses parts of OpenRewrite to further accelerate Java upgrades for customers. At AWS, many of our services are built with open source components and promoting the long-term sustainability of these communities is critical to us and our customers. That is why it’s important for us to contribute back to communities like OpenRewrite, helping ensure the whole industry can continue to benefit from their innovations. AWS plans to contribute to OpenRewrite recipes and improvements developed as part of Amazon Q Code Transformation to open source.
“The ability for software to adapt at a much faster pace is one of the most fundamental advantages any business can have. That’s why we’re excited to see AWS using OpenRewrite, the open source automated code refactoring technology, as a component of their service,” said Jonathan Schneider, CEO and Co-founder of Moderne (the sponsor of OpenRewrite). “We’re happy to have AWS join the OpenRewrite community and look forward to their contributions to make it even easier to migrate frameworks, patch vulnerabilities, and update APIs.”
Upgrade your Java applications now
Amazon Q Code Transformation product page
— Danilo
Post Syndicated from Irshad Buchh original https://aws.amazon.com/blogs/aws/improve-developer-productivity-with-generative-ai-powered-amazon-q-in-amazon-codecatalyst-preview/
Today, I’m excited to introduce the preview of new generative artificial intelligence (AI) capabilities within Amazon CodeCatalyst that accelerate software delivery using Amazon Q.
Accelerate feature development – The feature development capability in Amazon Q can help you accelerate the implementation of software development tasks such as adding comments and READMEs, refining issue descriptions, generating small classes and unit tests, and updating CodeCatalyst workflows — tedious and undifferentiated tasks that take up developers’ time. Developers can go from an idea in an issue to fully tested, merge-ready, running code with only natural language inputs, in just a few clicks. AI does the heavy lifting of converting the human prompt to an actionable plan, summarizing source code repositories, generating code, unit tests, and workflows, and summarizing any changes in a pull request which is assigned back to the developer. You can also provide feedback to Amazon Q directly on the published pull request and ask it to generate a new revision. If the code change falls short of expectations, you can create a development environment directly from the pull request, make any necessary adjustments manually, publish a new revision, and proceed with the merge upon approval.
Example: make an API change in an existing application
In the navigation pane, I choose Issues and then I choose Create issue. I give the issue the title, Change the get_all_mysfits() API to return mysfits sorted by the Age attribute. I then assign this issue to Amazon Q and choose Create issue.

Amazon Q will automatically move the issue into the In progress state while it analyzes the issue title and description to formulate a potential solution approach. If there is already some discussion on the issue, it should be summarized in the description to help Q understand what needs to be done. As it works, Amazon Q will report on its progress by leaving comments on the issue at every stage. It will attempt to create a solution based on its understanding of the code already present in the repository and the approach it formulated. If Amazon Q is able to successfully generate a potential solution, it will create a branch and commit code to that branch. It will then create a pull request that will merge the changes into the default branch once approved. Once the pull request is published, Amazon Q will change the issue status to In Review so that you and your team know that the code is now ready for you to review.
Summarize a change – Pull request authors can save time by asking Amazon Q to summarize the change they are publishing for review. Today pull request authors have to write the description manually or they may choose not to write it at all. If the author does not provide a description, it makes it harder for reviewers to understand what changes are being made and why, delaying the review process and slowing down software delivery.
Pull request authors and reviewers can also save time by asking Amazon Q to summarize the comments left on the pull request. The summary is useful for the author because they can easily see common feedback themes. For the reviewers it is useful because they can quickly catch up on the conversation and feedback from themselves and other team members. The overall benefits are streamlined collaboration, accelerated review process, and faster software delivery.
Join the preview
Amazon Q is available in Amazon CodeCatalyst today for spaces in AWS Region US West (Oregon).
Learn more
— Irshad
Post Syndicated from Donnie Prakoso original https://aws.amazon.com/blogs/aws/amazon-q-brings-generative-ai-powered-assistance-to-it-pros-and-developers-preview/
Today, we are announcing the preview of Amazon Q, a new type of generative artificial intelligence (AI) powered assistant that is specifically for work and can be tailored to a customer’s business.
Amazon Q brings a set of capabilities to support developers and IT professionals. Now you can use Amazon Q to get started building applications on AWS, research best practices, resolve errors, and get assistance in coding new features for your applications. For example, Amazon Q Code Transformation can perform Java application upgrades now, from version 8 and 11 to version 17.
Amazon Q is available in multiple areas of AWS to provide quick access to answers and ideas wherever you work. Here’s a quick look at Amazon Q, including in integrated development environment (IDE):

Building applications together with Amazon Q
Application development is a journey. It involves a continuous cycle of researching, developing, deploying, optimizing, and maintaining. At each stage, there are many questions—from figuring out the right AWS services to use, to troubleshooting issues in the application code.
Trained on 17 years of AWS knowledge and best practices, Amazon Q is designed to help you at each stage of development with a new experience for building applications on AWS. With Amazon Q, you minimize the time and effort you need to gain the knowledge required to answer AWS questions, explore new AWS capabilities, learn unfamiliar technologies, and architect solutions that fuel innovation.
Let us show you some capabilities of Amazon Q.
1. Conversational Q&A capability
You can interact with the Amazon Q conversational Q&A capability to get started, learn new things, research best practices, and iterate on how to build applications on AWS without needing to shift focus away from the AWS console.
To start using this feature, you can select the Amazon Q icon on the right-hand side of the AWS Management Console.
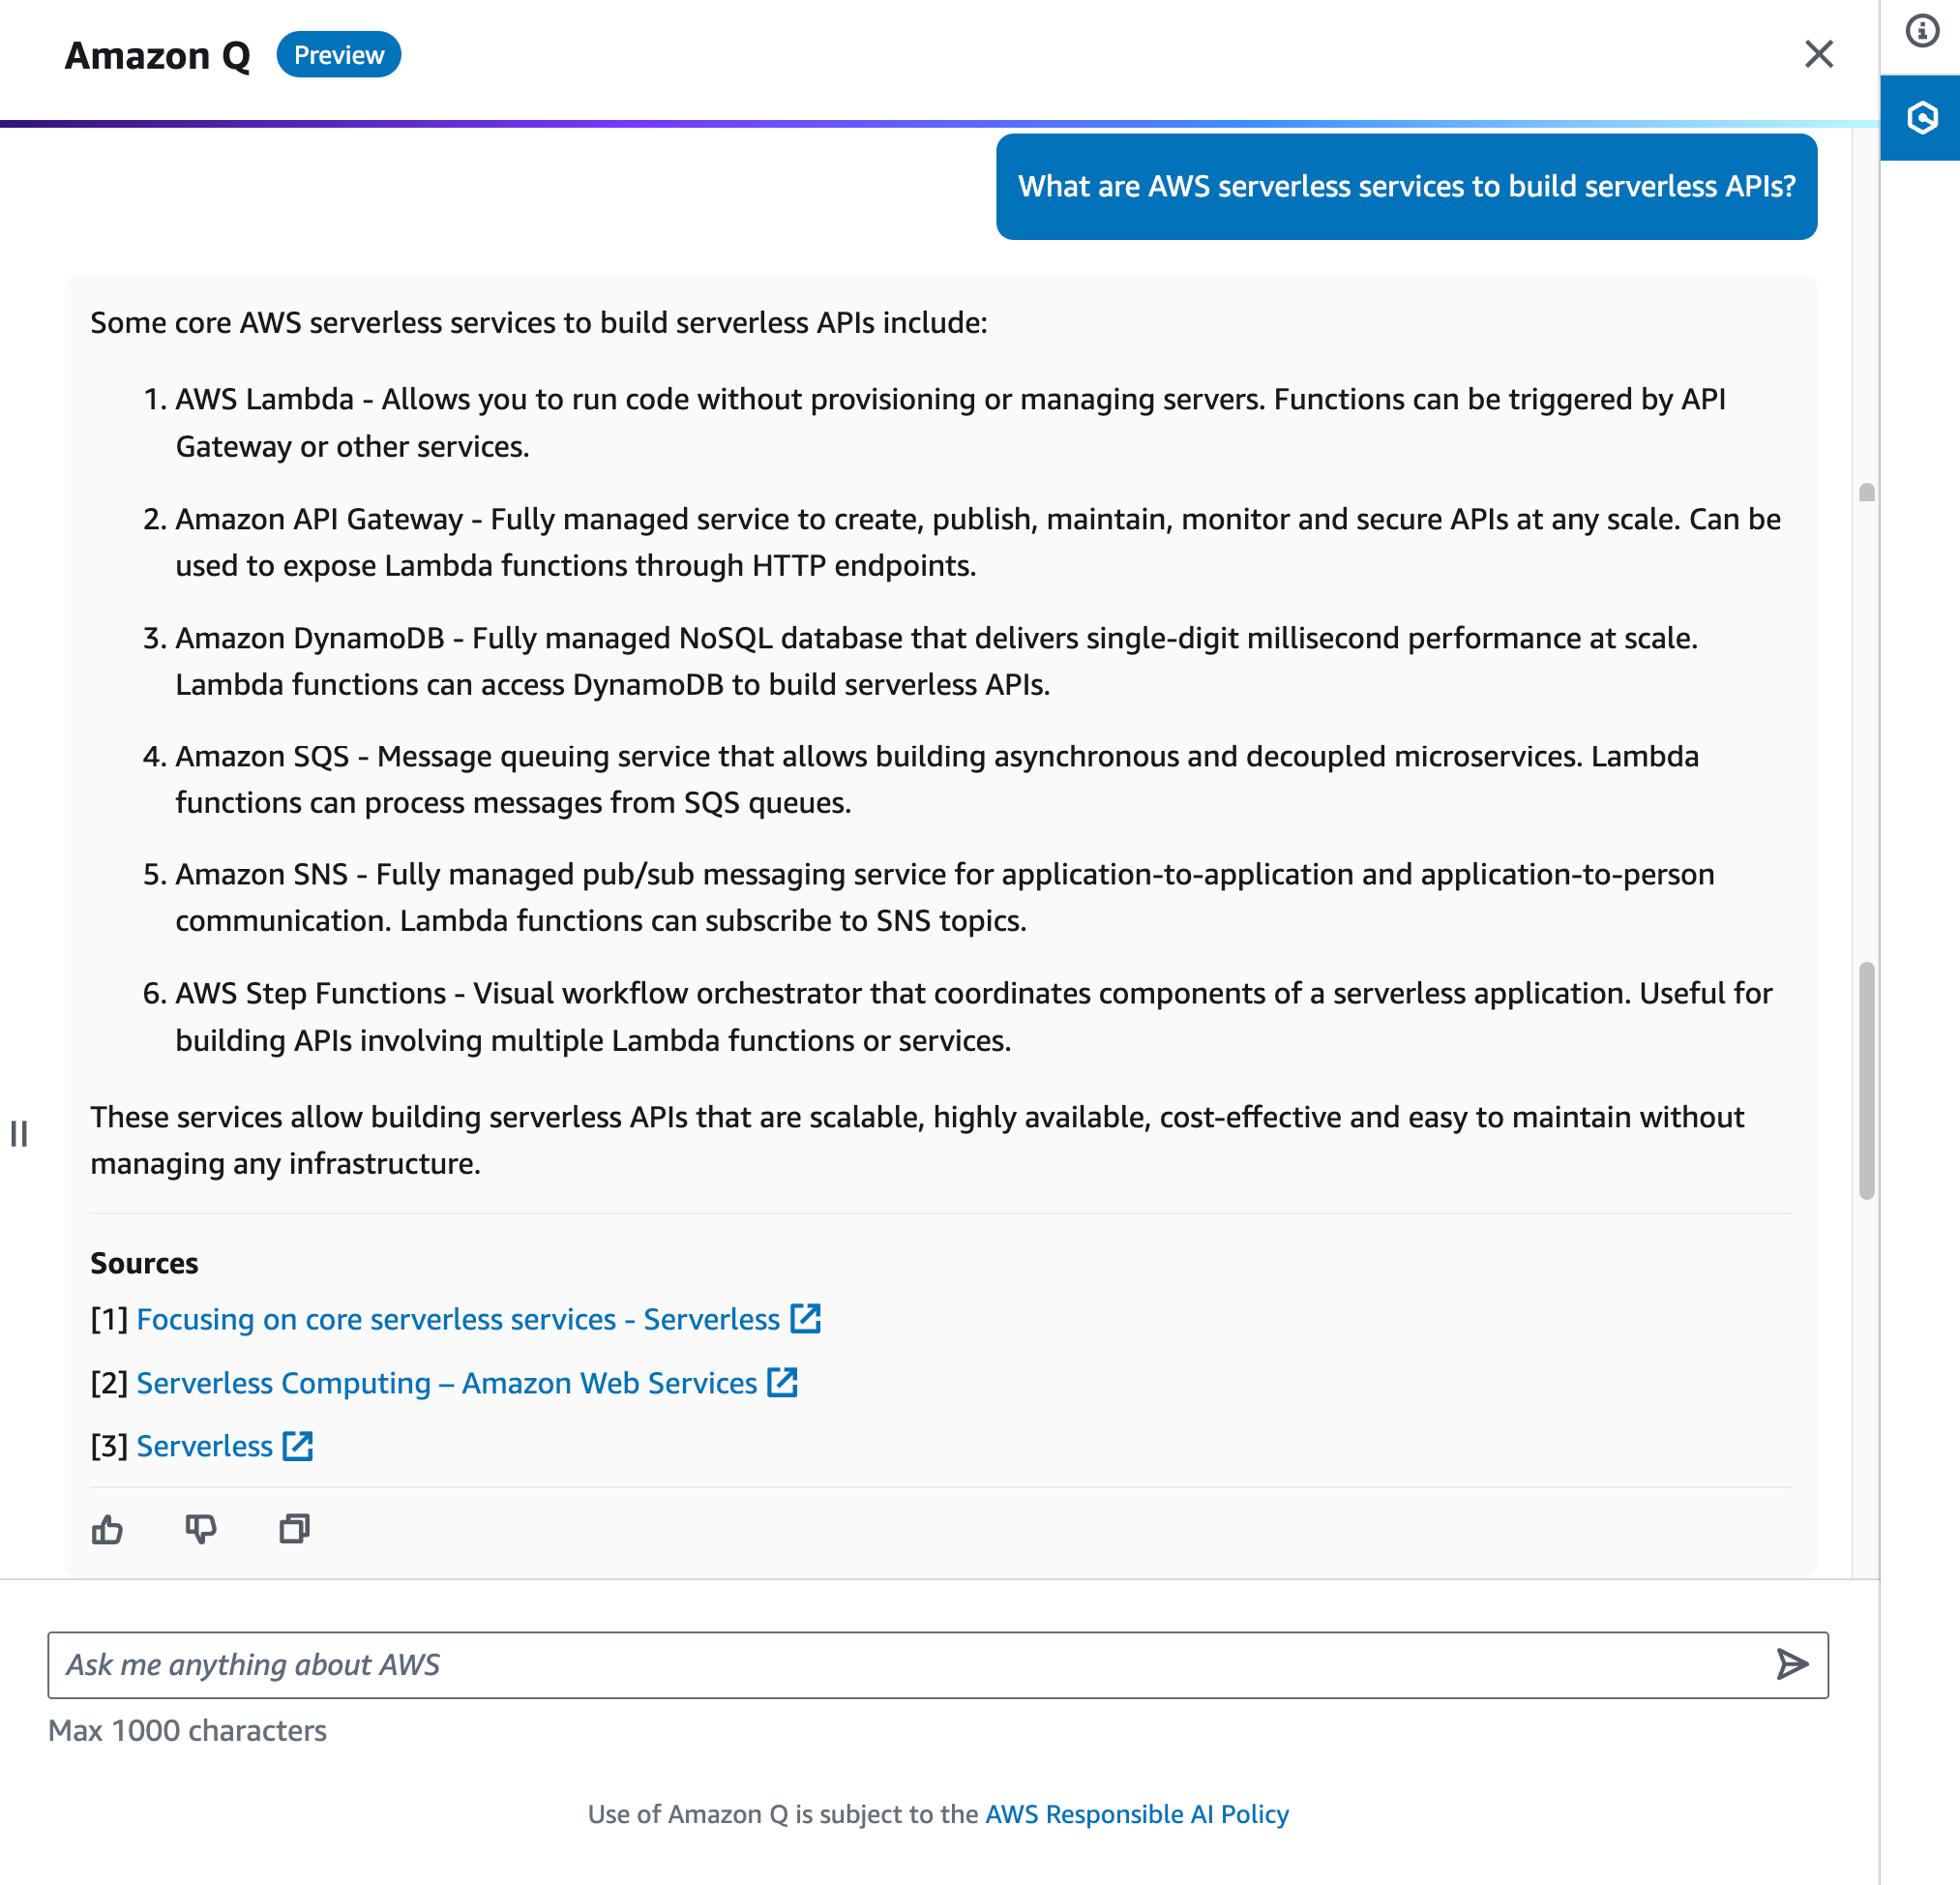
For example, you can ask, “What are AWS serverless services to build serverless APIs?” Amazon Q provides concise explanations along with references you can use to follow up on your questions and validate the guidance. You can also use Amazon Q to follow up on and iterate your questions. Amazon Q will show more deep-dive answers for you with references.
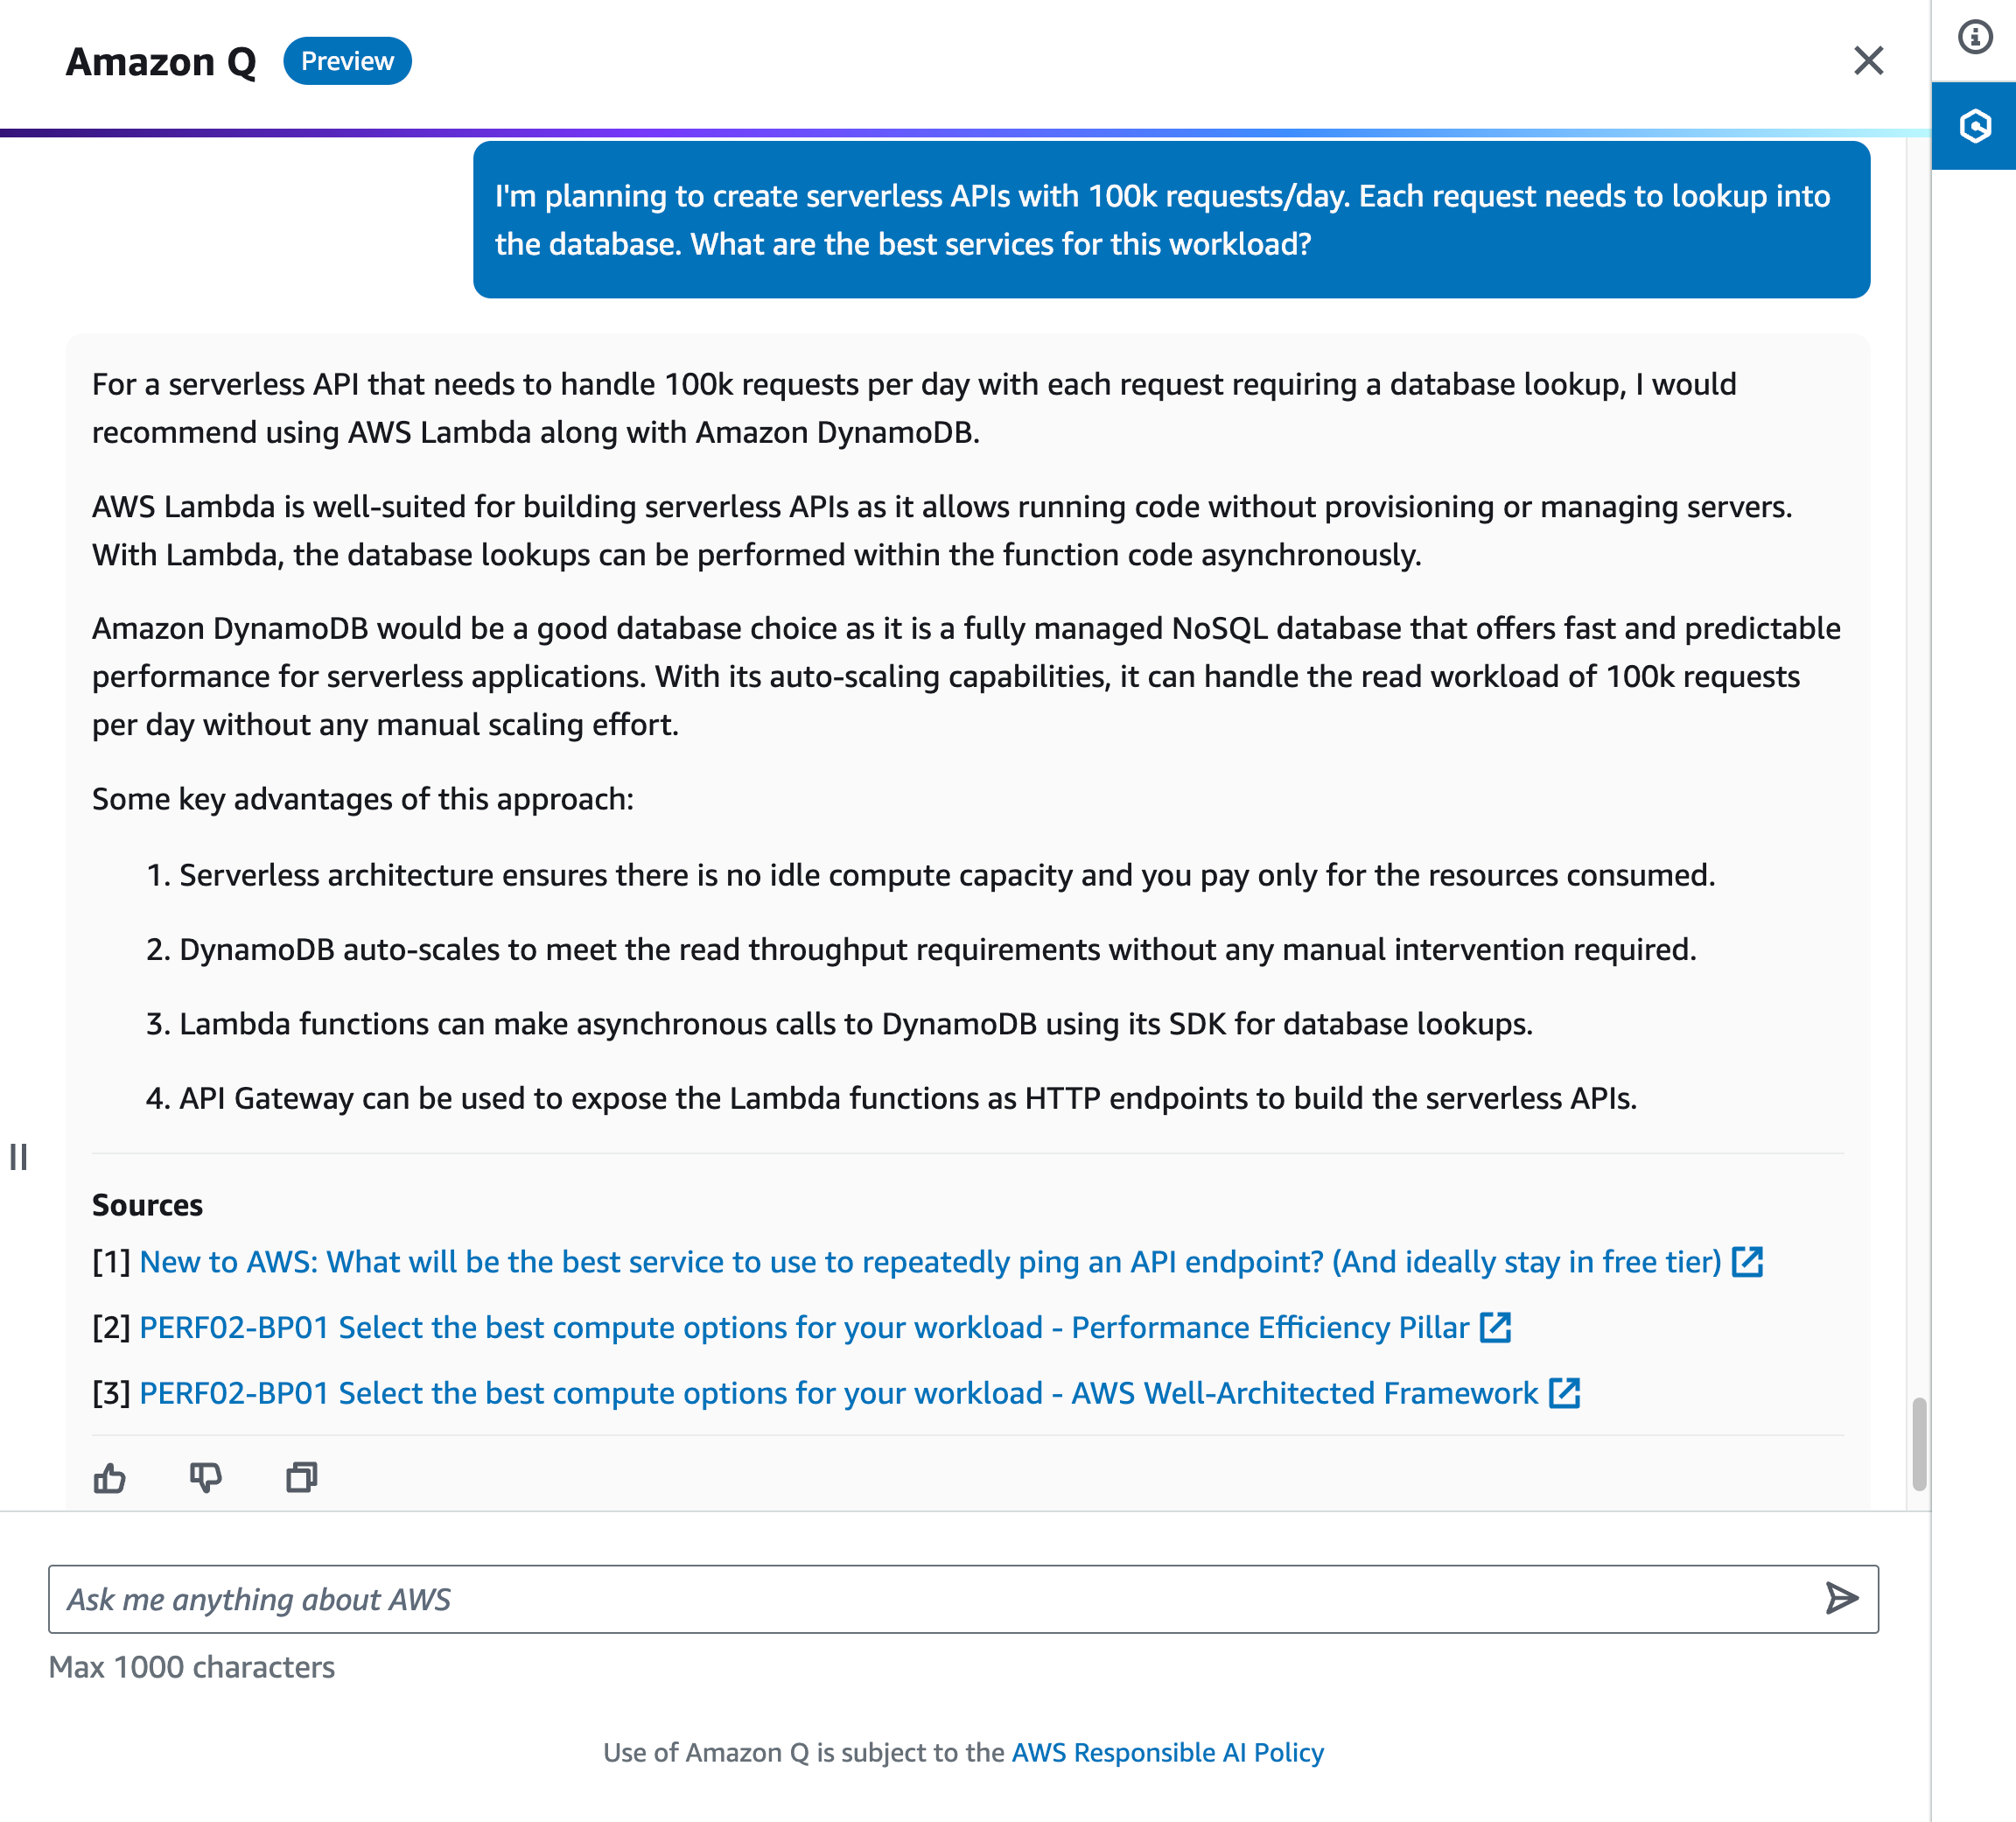
There are times when we have questions for a use case with fairly specific requirements. With Amazon Q, you can elaborate on your use cases in more detail to provide context.
For example, you can ask Amazon Q, “I’m planning to create serverless APIs with 100k requests/day. Each request needs to lookup into the database. What are the best services for this workload?” Amazon Q responds with a list of AWS services you can use and tries to limit the answer results to those that are accurately referenceable and verified with best practices.
Here is some additional information that you might want to note:
2. Optimize Amazon EC2 instance selection
Choosing the right Amazon Elastic Compute Cloud (Amazon EC2) instance type for your workload can be challenging with all the options available. Amazon Q aims to make this easier by providing personalized recommendations.
To use this feature, you can ask Amazon Q, “Which instance families should I use to deploy a Web App Server for hosting an application?” This feature is also available when you choose to launch an instance in the Amazon EC2 console. In Instance type, you can select Get advice on instance type selection. This will show a dialog to define your requirements.
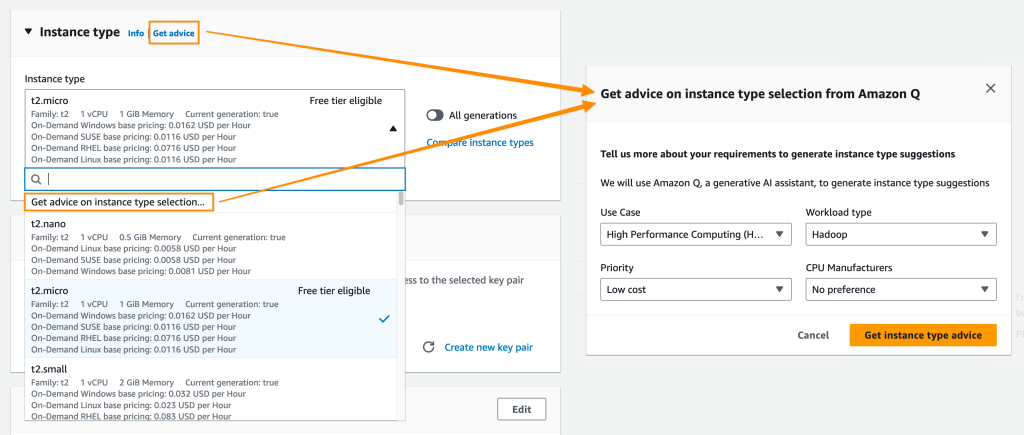
Your requirements are automatically translated into a prompt on the Amazon Q chat panel. Amazon Q returns with a list of suggestions of EC2 instances that are suitable for your use cases. This capability helps you pick the right instance type and settings so your workloads will run smoothly and more cost-efficiently.

This capability to provide EC2 instance type recommendations based on your use case is available in preview in all commercial AWS Regions.
3. Troubleshoot and solve errors directly in the console
Amazon Q can also help you to solve errors for various AWS services directly in the console. With Amazon Q proposed solutions, you can avoid slow manual log checks or research.
Let’s say that you have an AWS Lambda function that tries to interact with an Amazon DynamoDB table. But, for an unknown reason (yet), it fails to run. Now, with Amazon Q, you can troubleshoot and resolve this issue faster by selecting Troubleshoot with Amazon Q.

Amazon Q provides concise analysis of the error which helps you to understand the root cause of the problem and the proposed resolution. With this information, you can follow the steps described by Amazon Q to fix the issue.

In just a few minutes, you will have the solution to solve your issues, saving significant time without disrupting your development workflow. The Amazon Q capability to help you troubleshoot errors in the console is available in preview in the US West (Oregon) for Amazon Elastic Compute Cloud (Amazon EC2), Amazon Simple Storage Service (Amazon S3), Amazon ECS, and AWS Lambda.
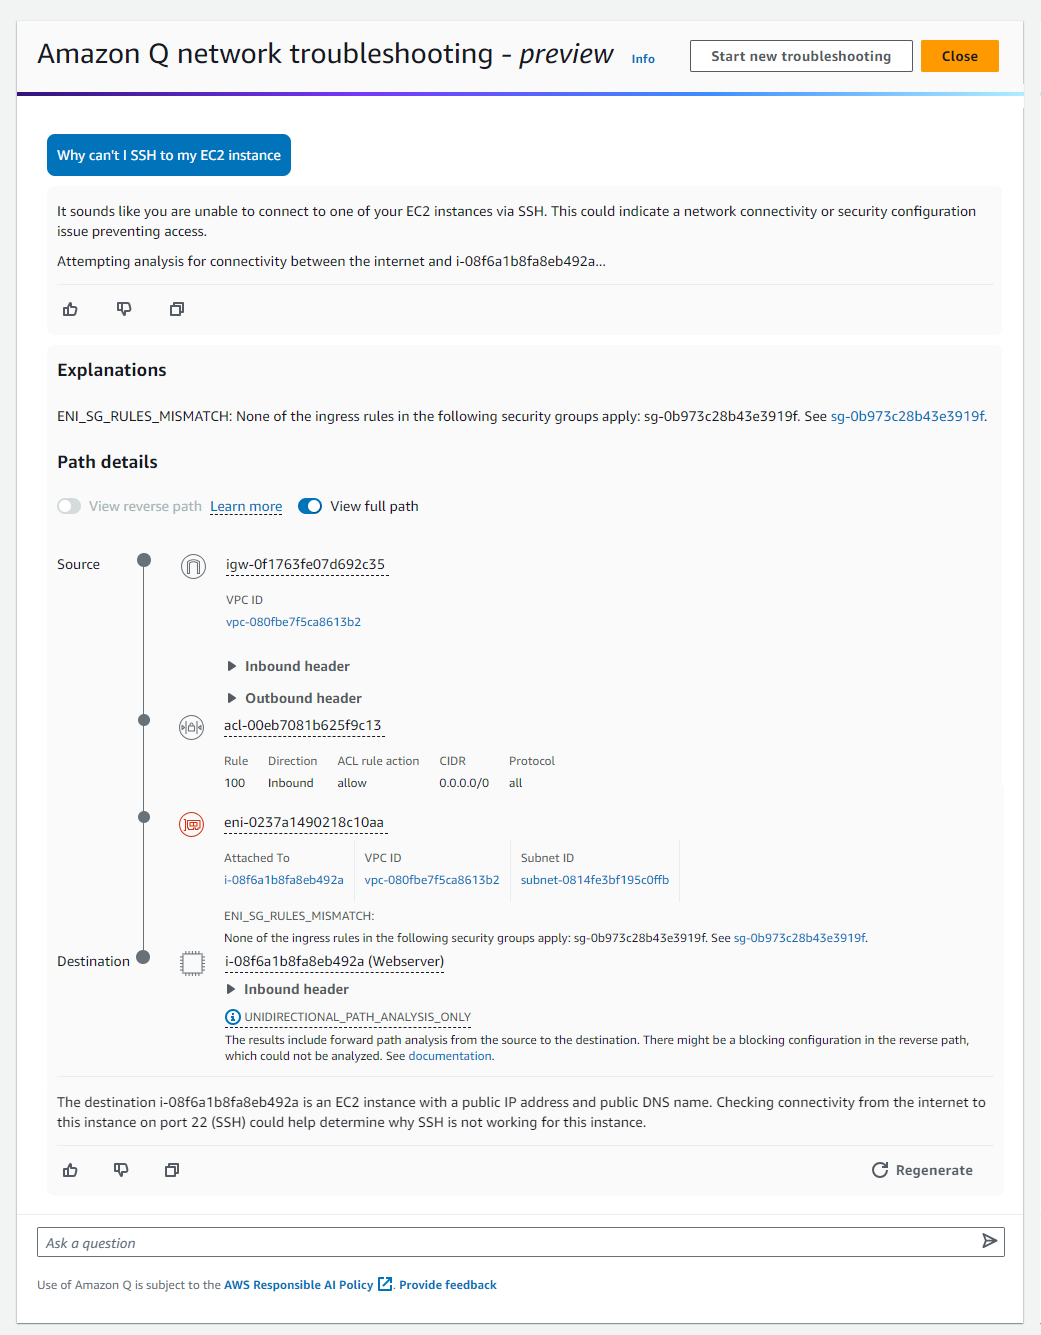
4. Network troubleshooting assistance
You can also ask Amazon Q to assist you in troubleshooting network connectivity issues caused by network misconfiguration in your current AWS account. For this capability, Amazon Q works with Amazon VPC Reachability Analyzer to check your connections and inspect your network configuration to identify potential issues.
This makes it easy to diagnose and resolve AWS networking problems, such as “Why can’t I SSH to my EC2 instance?” or “Why can’t I reach my web server from the Internet?” which you can ask Amazon Q.

Then, on the response text, you can select preview experience here, which will provide explanations to help you to troubleshoot network connectivity-related issues.
Here are a few things you need to know:
5. Integration and conversational capabilities within your IDEs
As we mentioned, Amazon Q is also available in supported IDEs. This allows you to ask questions and get help within your IDE by chatting with Amazon Q or invoking actions by typing / in the chat box.
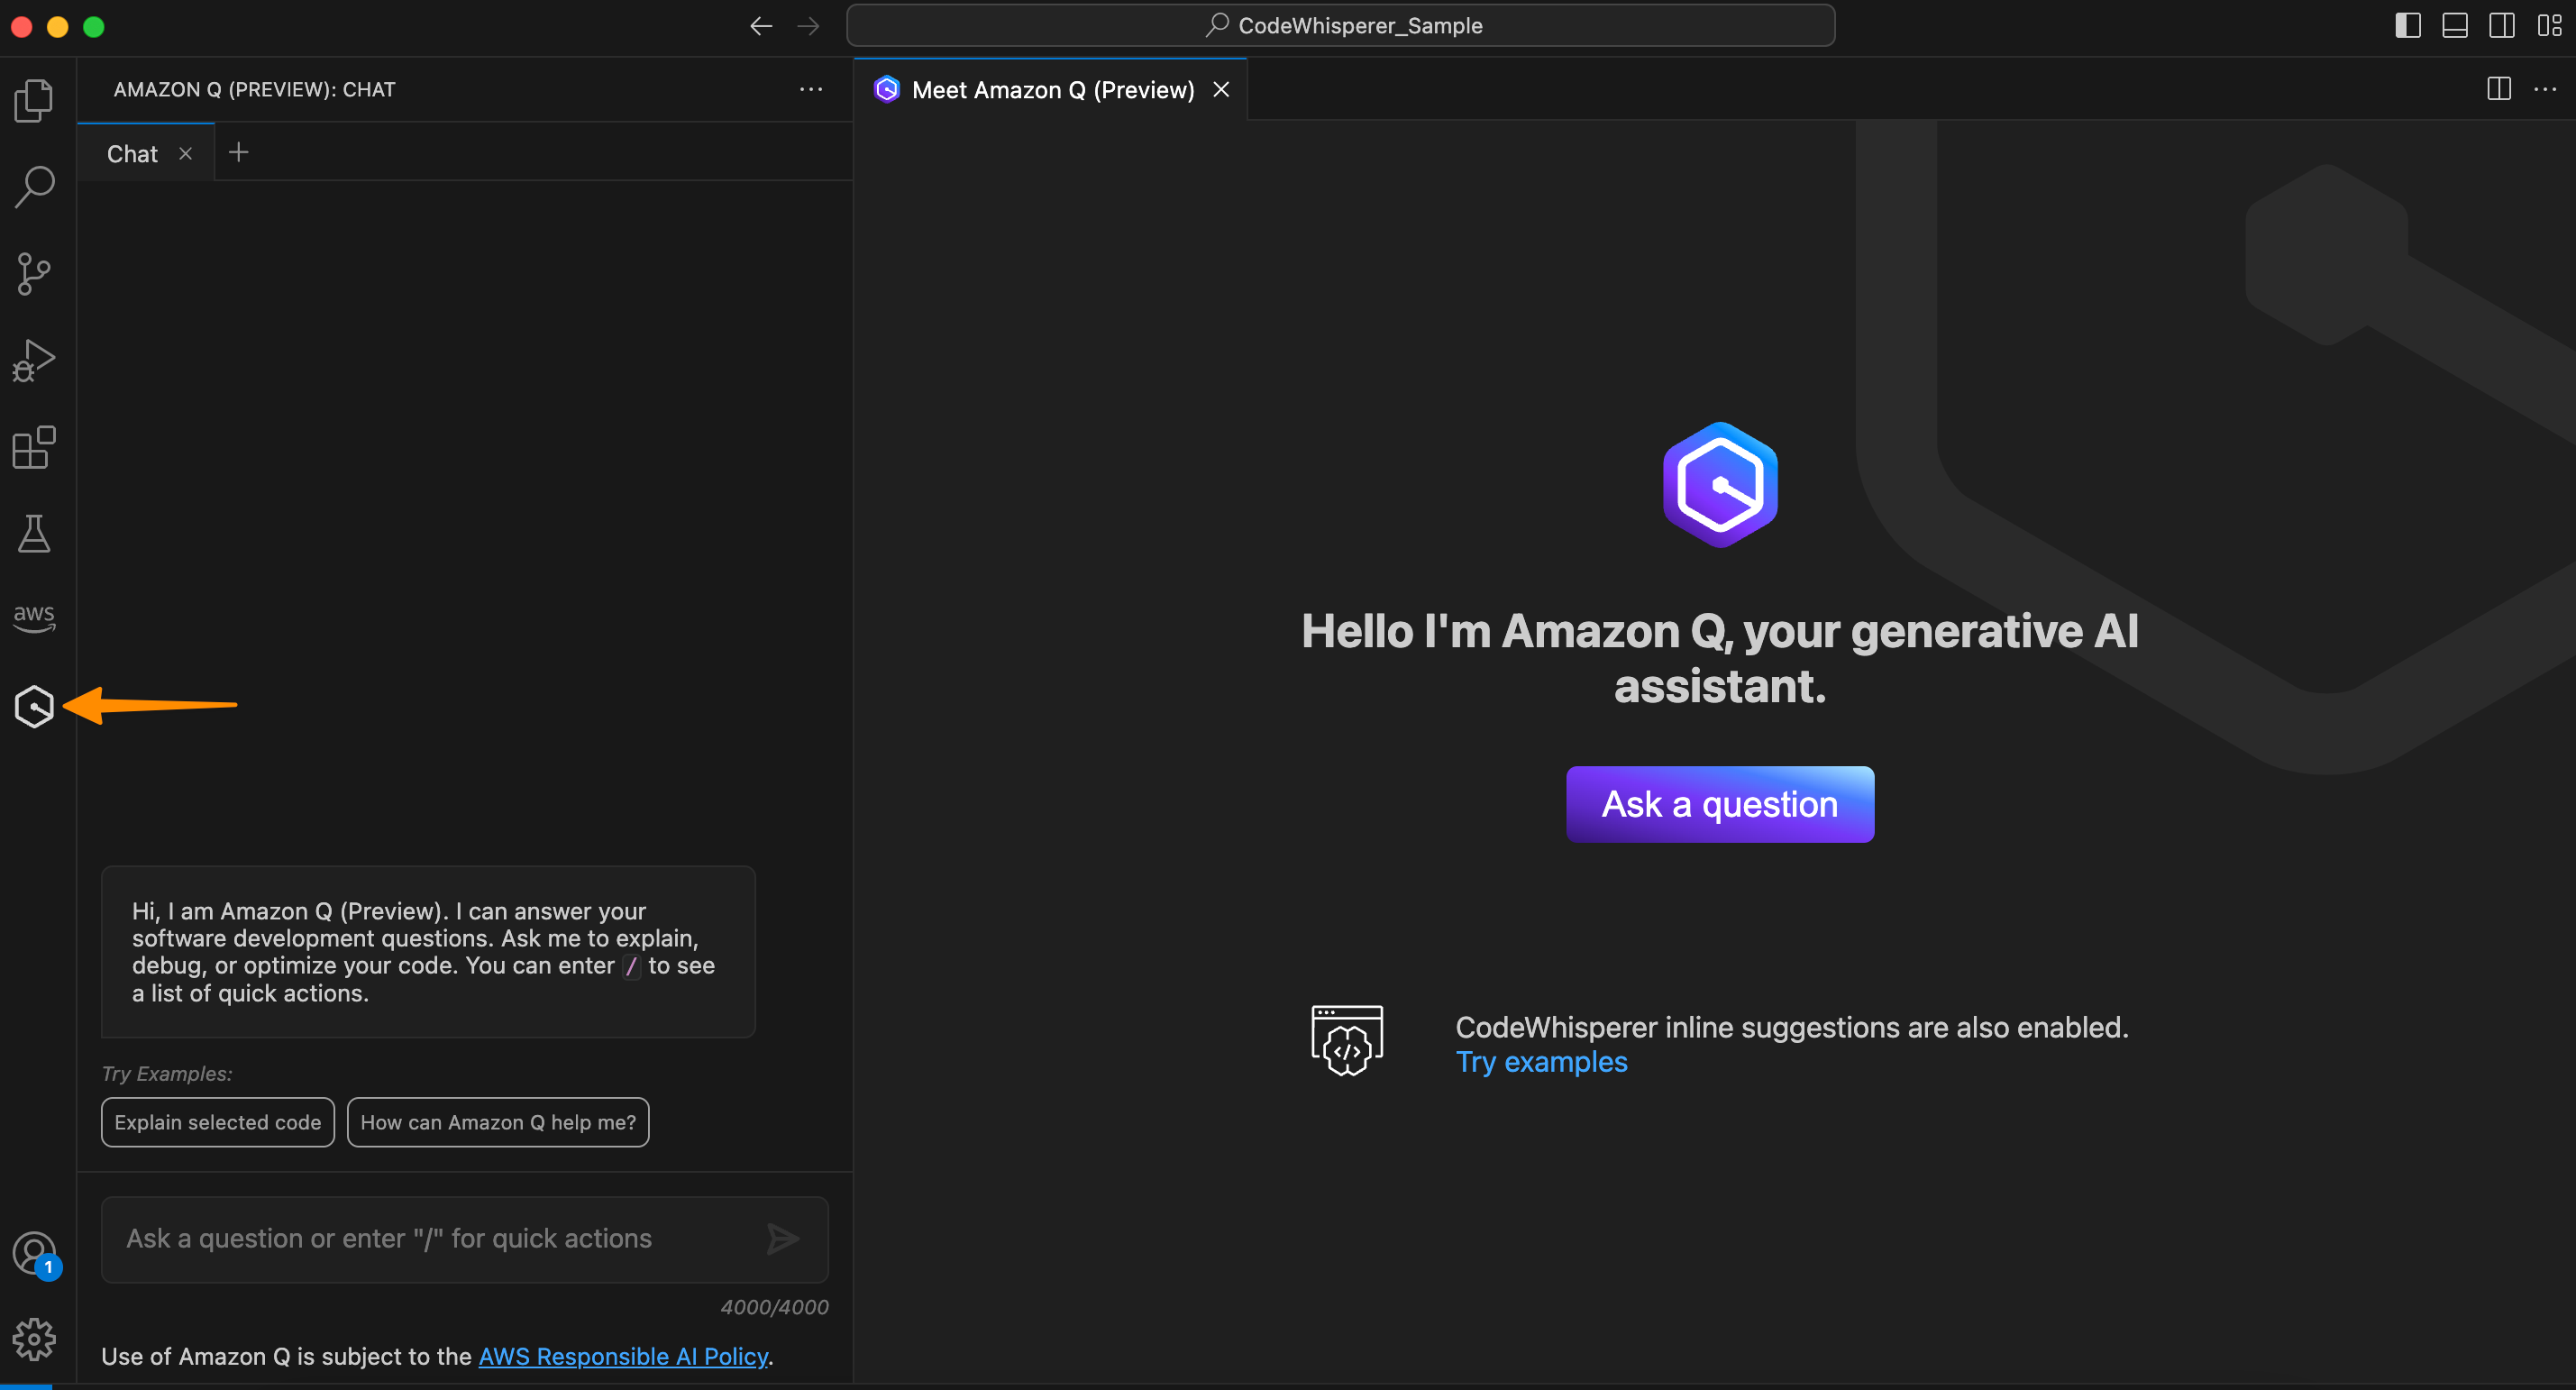
To get started, you need to install or update the latest AWS Toolkit and sign in to Amazon CodeWhisperer. Once you’re signed in to Amazon CodeWhisperer, it will automatically activate the Amazon Q conversational capability in the IDE. With Amazon Q enabled, you can now start chatting to get coding assistance.
You can ask Amazon Q to describe your source code file.

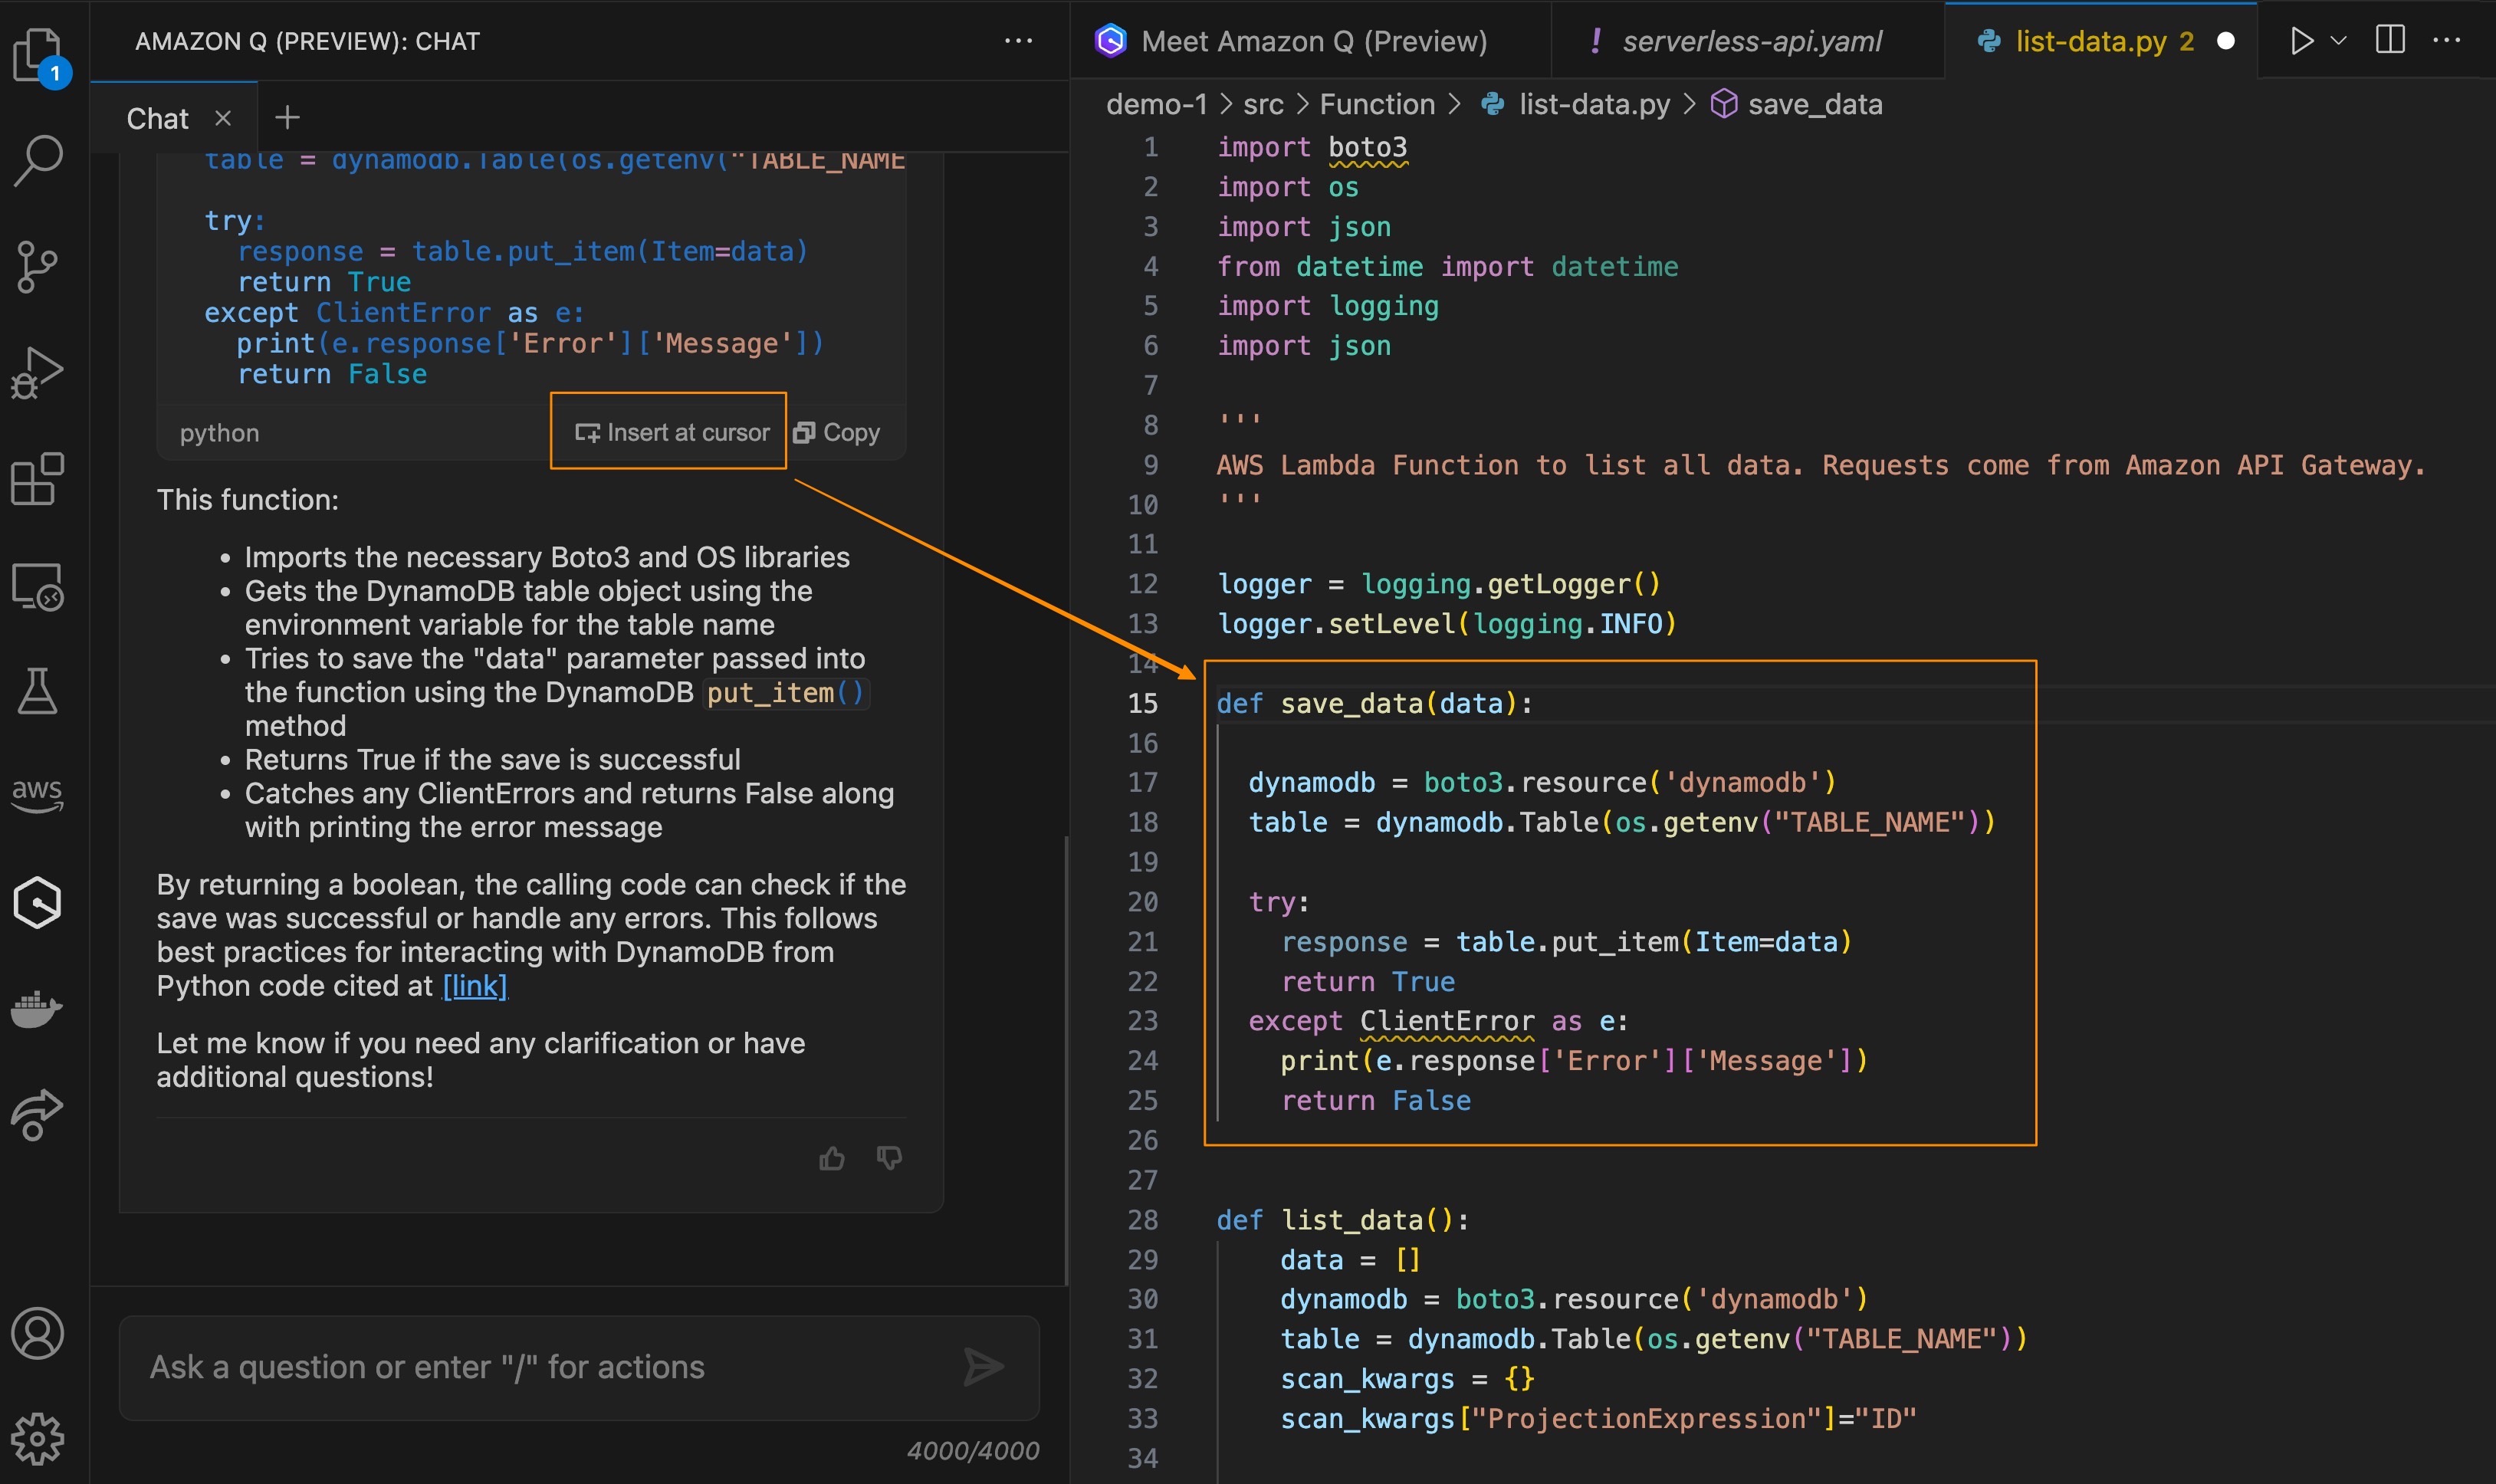
From here, you can improve your application, for example, by integrating it with Amazon DynamoDB. You can ask Amazon Q, “Generate code to save data into DynamoDB table called save_data() accepting data parameter and return boolean status if the operation successfully runs.”
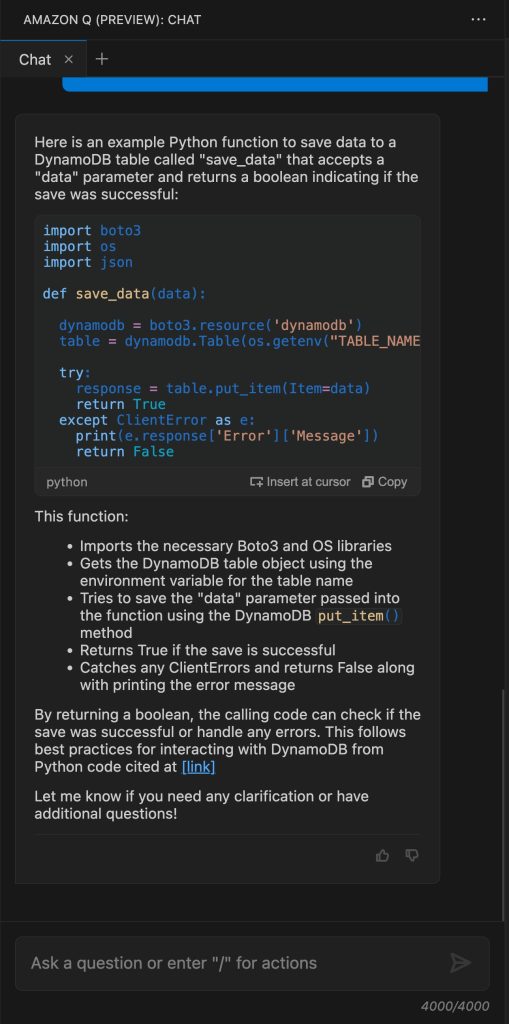
Once you’ve reviewed the generated code, you can do a manual copy and paste into the editor. You can also select Insert at cursor to place the generated code into the source code directly.
This feature makes it really easy to help you focus on building applications because you don’t have to leave your IDE to get answers and context-specific coding guidance. You can try the preview of this feature in Visual Studio Code and JetBrains IDEs.
6. Feature development capability
Another exciting feature that Amazon Q provides is guiding you interactively from idea to building new features within your IDE and Amazon CodeCatalyst. You can go from a natural language prompt to application features in minutes, with interactive step-by-step instructions and best practices, right from your IDE. With a prompt, Amazon Q will attempt to understand your application structure and break down your prompt into logical, atomic implementation steps.
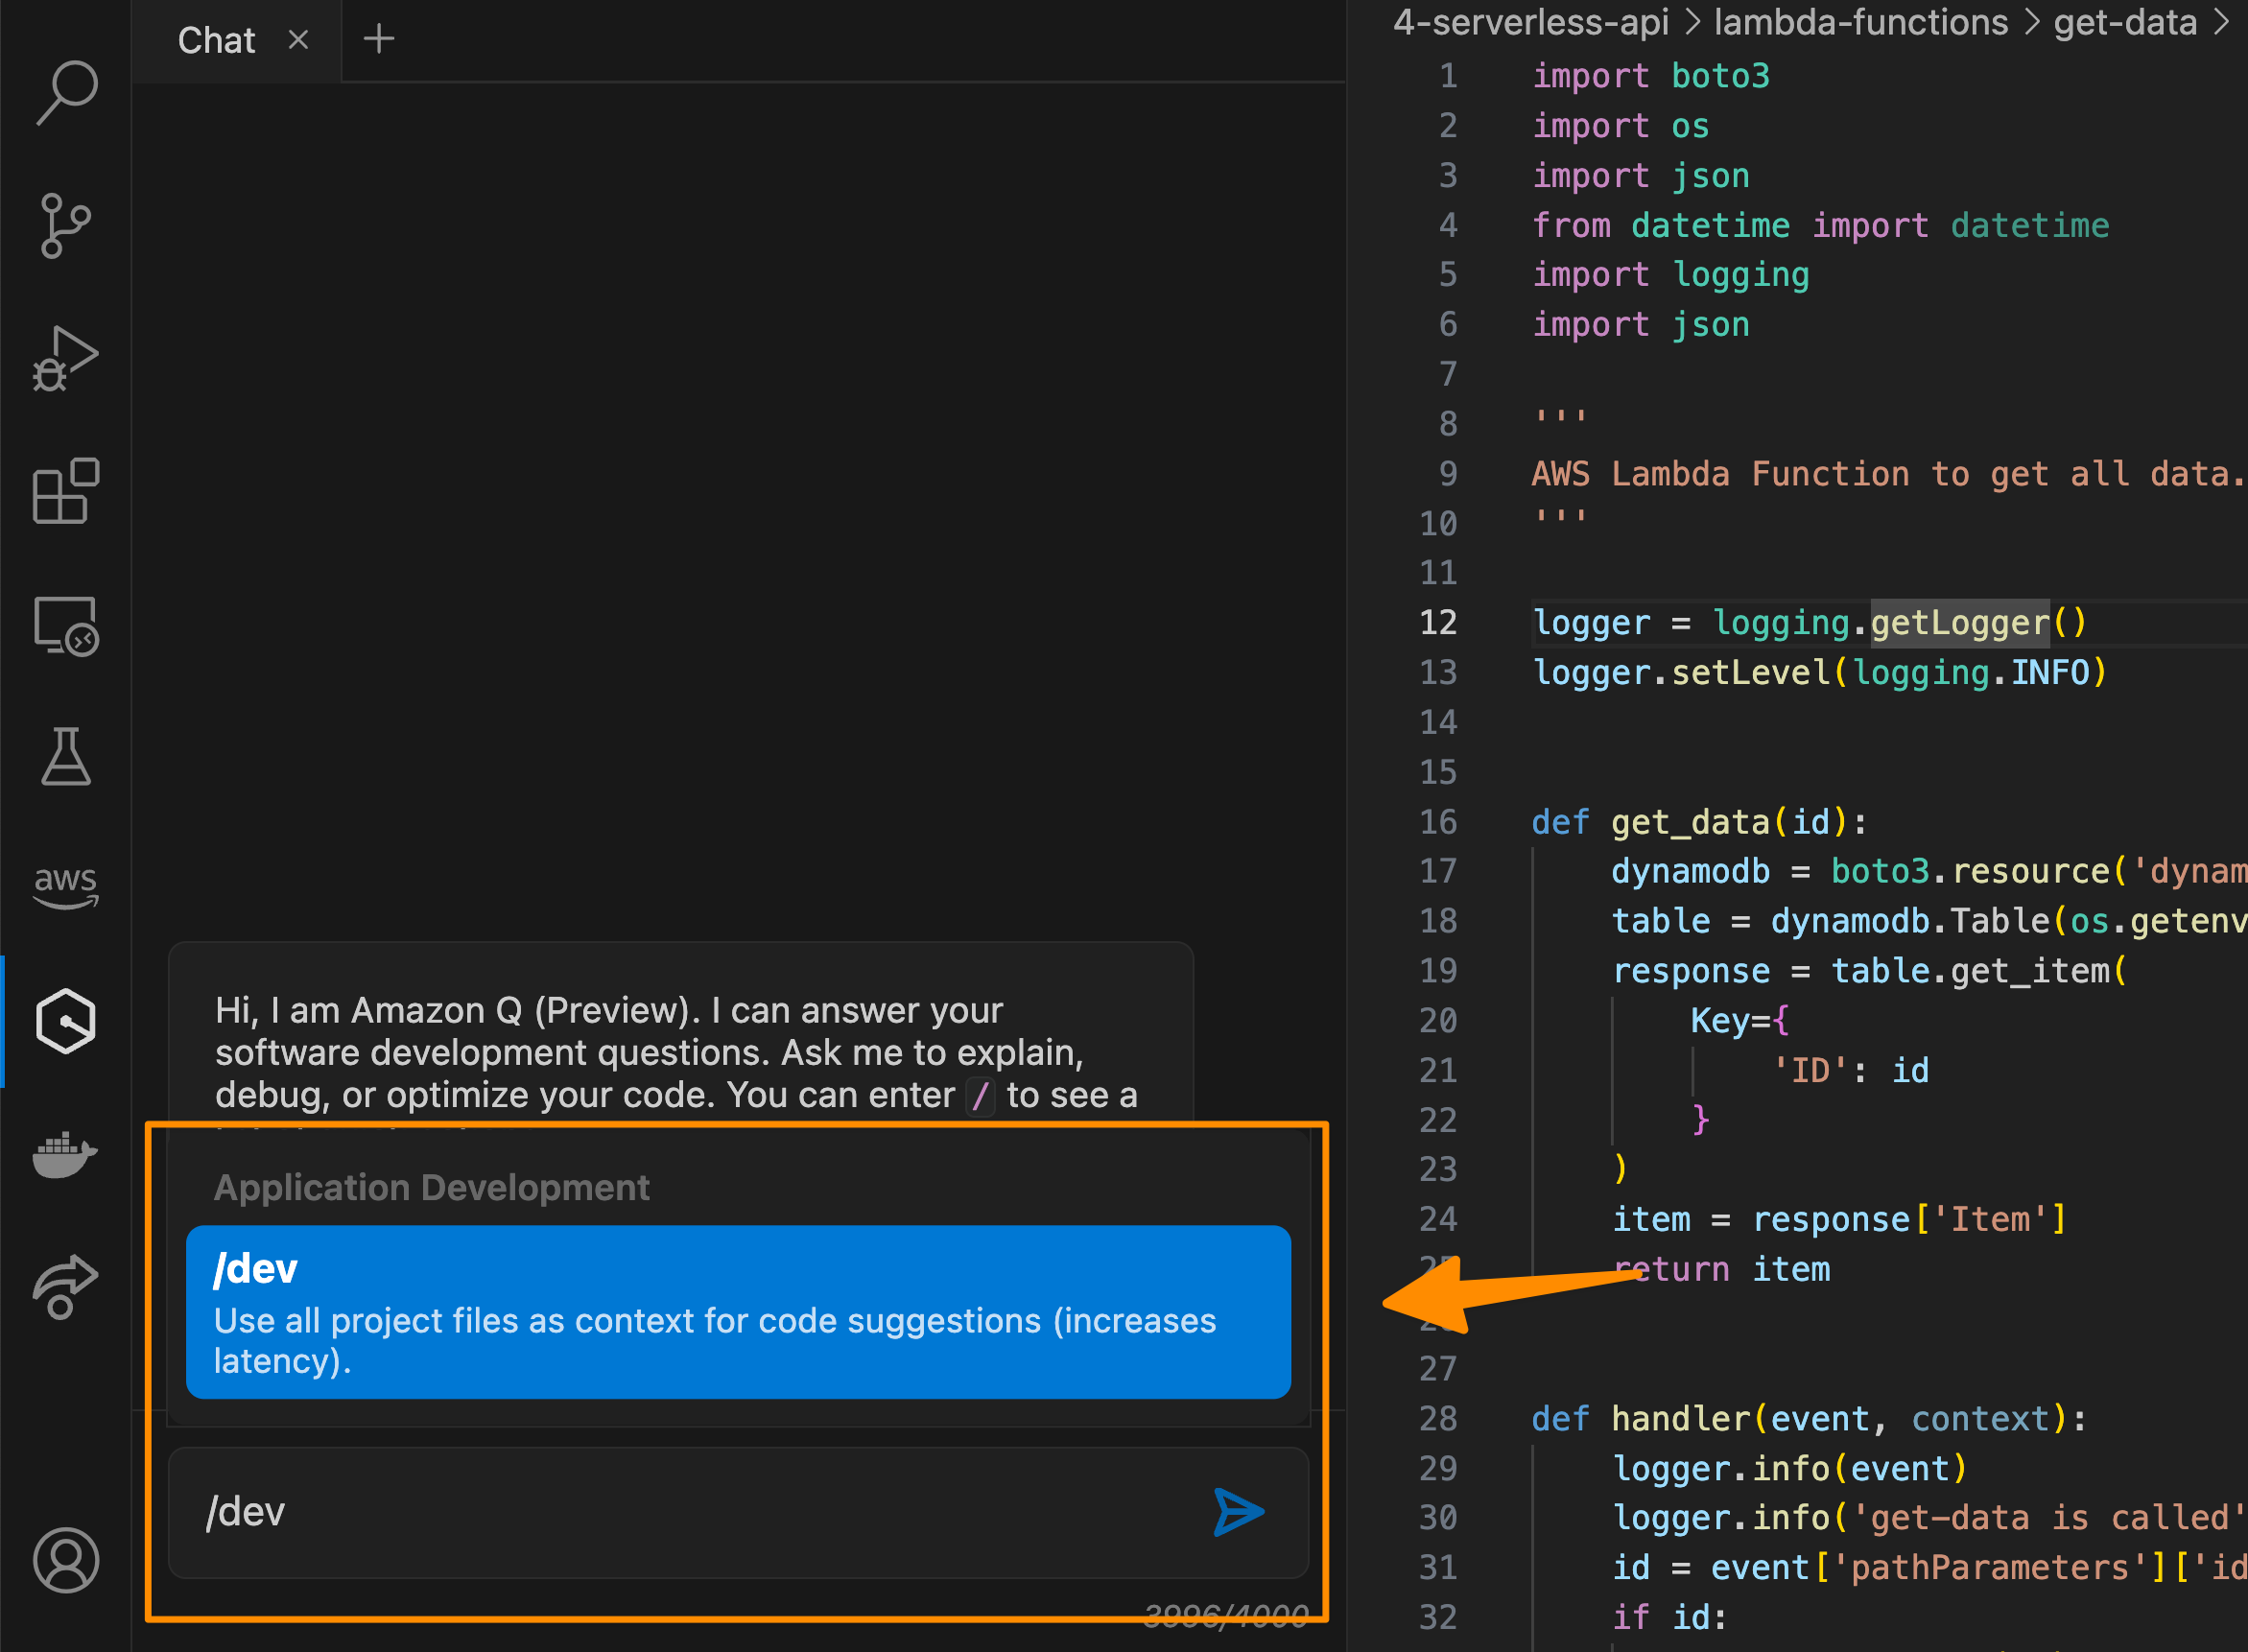
To use this capability, you can start by invoking an action command /dev in Amazon Q and describe the task you need Amazon Q to process.
Then, from here, you can review, collaborate and guide Amazon Q in the chat for specific areas that need to be implemented.
Additional capabilities to help you ship features faster with complete pull requests are available if you’re using Amazon CodeCatalyst. In Amazon CodeCatalyst, you can assign a new or an existing issue to Amazon Q, and it will process an end-to-end development workflow for you. Amazon Q will review the existing code, propose a solution approach, seek feedback from you on the approach, generate merge-ready code, and publish a pull request for review. All you need to do after is to review the proposed solutions from Amazon Q.
The following screenshots show a pull request created by Amazon Q in Amazon CodeCatalyst.
Here are a couple of things that you should know:
7. Upgrade applications with Amazon Q Code Transformation
With Amazon Q, you can now upgrade an entire application within a few hours by starting a guided code transformation. This capability, called Amazon Q Code Transformation, simplifies maintaining, migrating, and upgrading your existing applications.
To start, navigate to the CodeWhisperer section and then select Transform. Amazon Q Code Transformation automatically analyzes your existing codebase, generates a transformation plan, and completes the key transformation tasks suggested by the plan.
![]()
Some additional information about this feature:
Get started with Amazon Q today
With Amazon Q, you have an AI expert by your side to answer questions, write code faster, troubleshoot issues, optimize workloads, and even help you code new features. These capabilities simplify every phase of building applications on AWS.
Amazon Q lets you engage with AWS Support agents directly from the Q interface if additional assistance is required, eliminating any dead ends in the customer’s self-service experience. The integration with AWS Support is available in the console and will honor the entitlements of your AWS Support plan.
Learn more
Post Syndicated from Pat Patterson original https://www.backblaze.com/blog/digging-deeper-into-object-lock/

Using Object Lock for your data is a smart choice—you can protect your data from ransomware, meet compliance requirements, beef up your security policy, or preserve data for legal reasons. But, it’s not a simple on/off switch, and accidentally locking your data for 100 years is a mistake you definitely don’t want to make.
Today we’re taking a deeper dive into Object Lock and the related legal hold feature, examining the different levels of control that are available, explaining why developers might want to build Object Lock into their own applications, and showing exactly how to do that. While the code samples are aimed at our developer audience, anyone looking for a deeper understanding of Object Lock should be able to follow along.
I presented a webinar on this topic earlier this year that covers much the same ground as this blog post, so feel free to watch it instead of, or in addition to, reading this article.
For even more information on Object Lock, check out our Object Lock overview in our Technical Documentation Portal as well as these how-tos about how to enable Object Lock using the Backblaze web UI, Backblaze B2 Native API, and the Backblaze S3 Compatible API:
In the simplest explanation, Object Lock is a way to lock objects (aka files) stored in Backblaze B2 so that they are immutable—that is, they cannot be deleted or modified, for a given period of time, even by the user account that set the Object Lock rule. Backblaze B2’s implementation of Object Lock was originally known as File Lock, and you may encounter the older terminology in some documentation and articles. For consistency, I’ll use the term “object” in this blog post, but in this context it has exactly the same meaning as “file.”
Object Lock is a widely offered feature included with backup applications such as Veeam and MSP360, allowing organizations to ensure that their backups are not vulnerable to deliberate or accidental deletion or modification for some configurable retention period.
Ransomware mitigation is a common motivation for protecting data with Object Lock. Even if an attacker were to compromise an organization’s systems to the extent of accessing the application keys used to manage data in Backblaze B2, they would not be able to delete or change any locked data. Similarly, Object Lock guards against insider threats, where the attacker may try to abuse legitimate access to application credentials.
Object Lock is also used in industries that store sensitive or personal identifiable information (PII) such as banking, education, and healthcare. Because they work with such sensitive data, regulatory requirements dictate that data be retained for a given period of time, but data must also be deleted in particular circumstances.
For example, the General Data Protection Regulation (GDPR), an important component of the EU’s privacy laws and an international regulatory standard that drives best practices, may dictate that some data must be deleted when a customer closes their account. A related use case is where data must be preserved due to litigation, where the period for which data must be locked is not fixed and depends on the type of lawsuit at hand.
To handle these requirements, Backblaze B2 offers two Object Lock modes—compliance and governance—as well as the legal hold feature. Let’s take a look at the differences between them.
When objects are locked in compliance mode, not only can they not be deleted or modified while the lock is in place, but the lock also cannot be removed during the specified retention period. It is not possible to remove or override the compliance lock to delete locked data until the lock expires, whether you’re attempting to do so via the Backblaze web UI or either of the S3 Compatible or B2 Native APIs. Similarly, Backblaze Support is unable to unlock or delete data locked under compliance mode in response to a support request, which is a safeguard designed to address social engineering attacks where an attacker impersonates a legitimate user.
What if you inadvertently lock many terabytes of data for several years? Are you on the hook for thousands of dollars of storage costs? Thankfully, no—you have one escape route, which is to close your Backblaze account. Closing the account is a multi-step process that requires access to both the account login credentials and two-factor verification (if it is configured) and results in the deletion of all data in that account, locked or unlocked. This is a drastic step, so we recommend that developers create one or more “burner” Backblaze accounts for use in developing and testing applications that use Object Lock, that can be closed if necessary without disrupting production systems.
There is one lock-related operation you can perform on compliance-locked objects: extending the retention period. In fact, you can keep extending the retention period on locked data any number of times, protecting that data from deletion until you let the compliance lock expire.
In our other Object Lock option, objects can be locked in governance mode for a given retention period. But, in contrast to compliance mode, the governance lock can be removed or overridden via an API call, if you have an application key with appropriate capabilities. Governance mode handles use cases that require retention of data for some fixed period of time, with exceptions for particular circumstances.
When I’m trying to remember the difference between compliance and governance mode, I think of the phrase, “Twenty seconds to comply!”, uttered by the ED-209 armed robot in the movie “RoboCop.” It turned out that there was no way to override ED-209’s programming, with dramatic, and fatal, consequences.
While the compliance and governance retention modes lock objects for a given retention period, legal hold is more like a toggle switch: you can turn it on and off at any time, again with an application key with sufficient capabilities. As its name suggests, legal hold is ideal for situations where data must be preserved for an unpredictable period of time, such as while litigation is proceeding.
The compliance and governance modes are mutually exclusive, which is to say that only one may be in operation at any time. Objects locked in governance mode can be switched to compliance mode, but, as you might expect from the above explanation, objects locked in compliance mode cannot be switched to governance mode until the compliance lock expires.
Legal hold, on the other hand, operates independently, and can be enabled and disabled regardless of whether an object is locked in compliance or governance mode.
How does this work? Consider an object that is locked in compliance or governance mode and has legal hold enabled:
By default, Backblaze B2 Buckets have versioning enabled, so as you upload successive objects with the same name, previous versions are preserved automatically. None of the Object Lock modes prevent you from uploading a new version of a locked object; the lock is specific to the object version to which it was applied.
You can also hide a locked object so it doesn’t appear in object listings. The hidden version is retained and can be revealed using the Backblaze web UI or an API call.
As you might expect, locked object versions are not subject to deletion by lifecycle rules—any attempt to delete a locked object version via a lifecycle rule will fail.
Now that you understand the two modes of Object Lock, plus legal hold, and how they all work with object versions, let’s look at how you can take advantage of this functionality in your applications. I’ll include code samples for Backblaze B2’s S3 Compatible API written in Python, using the AWS SDK, aka Boto3, in this blog post. You can find details on working with Backblaze B2’s Native API in the documentation.
Every application key you create for Backblaze B2 has an associated set of capabilities; each capability allows access to a specific functionality in Backblaze B2. There are seven capabilities relevant to object lock and legal hold.
Two capabilities relate to bucket settings:
readBucketRetentions writeBucketRetentionsThree capabilities relate to object settings for retention:
readFileRetentions writeFileRetentions bypassGovernanceAnd, two are specific to Object Lock:
readFileLegalHolds writeFileLegalHolds The Backblaze B2 documentation contains full details of each capability and the API calls it relates to for both the S3 Compatible API and the B2 Native API.
When you create an application key via the web UI, it is assigned capabilities according to whether you allow it access to all buckets or just a single bucket, and whether you assign it read-write, read-only, or write-only access.
An application key created in the web UI with read-write access to all buckets will receive all of the above capabilities. A key with read-only access to all buckets will receive readBucketRetentions, readFileRetentions, and readFileLegalHolds. Finally, a key with write-only access to all buckets will receive bypassGovernance, writeBucketRetentions, writeFileRetentions, and writeFileLegalHolds.
In contrast, an application key created in the web UI restricted to a single bucket is not assigned any of the above permissions. When an application using such a key uploads objects to its associated bucket, they receive the default retention mode and period for the bucket, if they have been set. The application is not able to select a different retention mode or period when uploading an object, change the retention settings on an existing object, or bypass governance when deleting an object.
You may want to create application keys with more granular permissions when working with Object Lock and/or legal hold. For example, you may need an application restricted to a single bucket to be able to toggle legal hold for objects in that bucket. You can use the Backblaze B2 CLI to create an application key with this, or any other set of capabilities. This command, for example, creates a key with the default set of capabilities for read-write access to a single bucket, plus the ability to read and write the legal hold setting:
% b2 create-key --bucket my-bucket-name my-key-name listBuckets,readBuckets,listFiles,readFiles,shareFiles,writeFiles,deleteFiles,readBucketEncryption,writeBucketEncryption,readBucketReplications,writeBucketReplications,readFileLegalHolds,writeFileLegalHoldsYou must enable Object Lock on a bucket before you can lock any objects therein; you can do this when you create the bucket, or at any time later, but you cannot disable Object Lock on a bucket once it has been enabled. Here’s how you create a bucket with Object Lock enabled:
s3_client.create_bucket(
    Bucket='my-bucket-name',
    ObjectLockEnabledForBucket=True
)
Once a bucket’s settings have Object Lock enabled, you can configure a default retention mode and period for objects that are created in that bucket. Only compliance mode is configurable from the web UI, but you can set governance mode as the default via an API call, like this:
s3_client.put_object_lock_configuration(
    Bucket='my-bucket-name',
    ObjectLockConfiguration={
        'ObjectLockEnabled': 'Enabled',
        'Rule': {
            'DefaultRetention': {
                'Mode': 'GOVERNANCE',
                'Days': 7
            }
        }
    }
)
You cannot set legal hold as a default configuration for the bucket.
Regardless of whether you set a default retention mode for the bucket, you can explicitly set a retention mode and period when you upload objects, or apply the same settings to existing objects, provided you use an application key with the appropriate writeFileRetentions or writeFileLegalHolds capability.
Both the S3 PutObject operation and Backblaze B2’s b2_upload_file include optional parameters for specifying retention mode and period, and/or legal hold. For example:
s3_client.put_object(
    Body=open('/path/to/local/file', mode='rb'),
    Bucket='my-bucket-name',
    Key='my-object-name',
    ObjectLockMode='GOVERNANCE',
    ObjectLockRetainUntilDate=datetime(
        2023, 9, 7, hour=10, minute=30, second=0
    )
)
Both APIs implement additional operations to get and set retention settings and legal hold for existing objects. Here’s an example of how you apply a governance mode lock:
s3_client.put_object_retention(
    Bucket='my-bucket-name',
    Key='my-object-name',
    VersionId='some-version-id',
    Retention={
        'Mode': 'GOVERNANCE',  # Required, even if mode is not changed
        'RetainUntilDate': datetime(
            2023, 9, 5, hour=10, minute=30, second=0
        )
    }
)
The VersionId parameter is optional: the operation applies to the current object version if it is omitted.
You can also use the web UI to view, but not change, an object’s retention settings, and to toggle legal hold for an object:

As mentioned above, a key difference between the compliance and governance modes is that it is possible to override governance mode to delete an object, given an application key with the bypassGovernance capability. To do so, you must identify the specific object version, and pass a flag to indicate that you are bypassing the governance retention restriction:
# Get object details, including version id of current version
object_info = s3_client.head_object(
    Bucket='my-bucket-name',
    Key='my-object-name'
)

# Delete the most recent object version, bypassing governance
s3_client.delete_object(
    Bucket='my-bucket-name',
    Key='my-object-name',
    VersionId=object_info['VersionId'],
    BypassGovernanceRetention=True
)
There is no way to delete an object in legal hold; the legal hold must be removed before the object can be deleted.
Object Lock is a powerful feature, and with great power… you know the rest. Here are some of the questions you should ask when deciding whether to implement Object Lock in your applications:
If you already have a Backblaze B2 account, you can start working with Object Lock today; otherwise, create an account to get started.
The post Digging Deeper Into Object Lock appeared first on Backblaze Blog | Cloud Storage & Cloud Backup.
Post Syndicated from Antje Barth original https://aws.amazon.com/blogs/aws/guardrails-for-amazon-bedrock-helps-implement-safeguards-customized-to-your-use-cases-and-responsible-ai-policies-preview/
As part of your responsible artificial intelligence (AI) strategy, you can now use Guardrails for Amazon Bedrock (preview) to promote safe interactions between users and your generative AI applications by implementing safeguards customized to your use cases and responsible AI policies.
AWS is committed to developing generative AI in a responsible, people-centric way by focusing on education and science and helping developers to integrate responsible AI across the AI lifecycle. With Guardrails for Amazon Bedrock, you can consistently implement safeguards to deliver relevant and safe user experiences aligned with your company policies and principles. Guardrails help you define denied topics and content filters to remove undesirable and harmful content from interactions between users and your applications. This provides an additional level of control on top of any protections built into foundation models (FMs).
You can apply guardrails to all large language models (LLMs) in Amazon Bedrock, including fine-tuned models, and Agents for Amazon Bedrock. This drives consistency in how you deploy your preferences across applications so you can innovate safely while closely managing user experiences based on your requirements. By standardizing safety and privacy controls, Guardrails for Amazon Bedrock helps you build generative AI applications that align with your responsible AI goals.

Let me give you a quick tour of the key controls available in Guardrails for Amazon Bedrock.
Key controls
Using Guardrails for Amazon Bedrock, you can define the following set of policies to create safeguards in your applications.
Denied topics – You can define a set of topics that are undesirable in the context of your application using a short natural language description. For example, as a developer at a bank, you might want to set up an assistant for your online banking application to avoid providing investment advice.
I specify a denied topic with the name “Investment advice” and provide a natural language description, such as “Investment advice refers to inquiries, guidance, or recommendations regarding the management or allocation of funds or assets with the goal of generating returns or achieving specific financial objectives.”


Content filters – You can configure thresholds to filter harmful content across hate, insults, sexual, and violence categories. While many FMs already provide built-in protections to prevent the generation of undesirable and harmful responses, guardrails give you additional controls to filter such interactions to desired degrees based on your use cases and responsible AI policies. A higher filter strength corresponds to stricter filtering.

PII redaction (in the works) – You will be able to select a set of personally identifiable information (PII) such as name, e-mail address, and phone number, that can be redacted in FM-generated responses or block a user input if it contains PII.
Guardrails for Amazon Bedrock integrates with Amazon CloudWatch, so you can monitor and analyze user inputs and FM responses that violate policies defined in the guardrails.
Join the preview
Guardrails for Amazon Bedrock is available today in limited preview. Reach out through your usual AWS Support contacts if you’d like access to Guardrails for Amazon Bedrock.
During preview, guardrails can be applied to all large language models (LLMs) available in Amazon Bedrock, including Amazon Titan Text, Anthropic Claude, Meta Llama 2, AI21 Jurassic, and Cohere Command. You can also use guardrails with custom models as well as Agents for Amazon Bedrock.
To learn more, visit the Guardrails for Amazon Bedrock web page.
— Antje
Post Syndicated from Antje Barth original https://aws.amazon.com/blogs/aws/agents-for-amazon-bedrock-is-now-available-with-improved-control-of-orchestration-and-visibility-into-reasoning/
Back in July, we introduced Agents for Amazon Bedrock in preview. Today, Agents for Amazon Bedrock is generally available.
Agents for Amazon Bedrock helps you accelerate generative artificial intelligence (AI) application development by orchestrating multistep tasks. Agents uses the reasoning capability of foundation models (FMs) to break down user-requested tasks into multiple steps. They use the developer-provided instruction to create an orchestration plan and then carry out the plan by invoking company APIs and accessing knowledge bases using Retrieval Augmented Generation (RAG) to provide a final response to the end user. If you’re curious how this works, check out my previous posts on agents that include a primer on advanced reasoning and a primer on RAG.
Starting today, Agents for Amazon Bedrock also comes with enhanced capabilities that include improved control of the orchestration and better visibility into the chain of thought reasoning.
Behind the scenes, Agents for Amazon Bedrock automates the prompt engineering and orchestration of user-requested tasks, such as managing retail orders or processing insurance claims. An agent automatically builds the orchestration prompt and, if connected to knowledge bases, augments it with your company-specific information and invokes APIs to provide responses to the user in natural language.
As a developer, you can use the new trace capability to follow the reasoning that’s used as the plan is carried out. You can view the intermediate steps in the orchestration process and use this information to troubleshoot issues.
You can also access and modify the prompt that the agent automatically creates so you can further enhance the end-user experience. You can update this automatically created prompt (or prompt template) to help the FM enhance the orchestration and responses, giving you more control over the orchestration.
Let me show you how to view the reasoning steps and how to modify the prompt.
View reasoning steps
Traces gives you visibility into the agent’s reasoning, known as the chain of thought (CoT). You can use the CoT trace to see how the agent performs tasks step by step. The CoT prompt is based on a reasoning technique called ReAct (synergizing reasoning and acting). Check out the primer on advanced reasoning in my previous blog post to learn more about ReAct and the specific prompt structure.
To get started, navigate to the Amazon Bedrock console and select the working draft of an existing agent. Then, select the Test button and enter a sample user request. In the agent’s response, select Show trace.

The CoT trace shows the agent’s reasoning step-by-step. Open each step to see the CoT details.

The enhanced visibility helps you understand the rationale used by the agent to complete the task. As a developer, you can use this information to refine the prompts, instructions, and action descriptions to adjust the agent’s actions and responses when iteratively testing and improving the user experience.
Modify agent-created prompts
The agent automatically creates a prompt template from the provided instructions. You can update the preprocessing of user inputs, the orchestration plan, and the postprocessing of the FM response.
To get started, navigate to the Amazon Bedrock console and select the working draft of an existing agent. Then, select the Edit button next to Advanced prompts.

Here, you have access to four different types of templates. Preprocessing templates define how an agent
contextualizes and categorizes user inputs. The orchestration template equips an agent with short-term memory, a list of available actions and knowledge bases along with their descriptions, as well as few-shot examples of how to break down the problem and use these actions and knowledge in different sequences or combinations. Knowledge base response generation templates define how knowledge bases will be used and summarized in the response. Postprocessing templates define how an agent will format and present a final response to the end user. You can either keep using the template defaults or edit and override the template defaults.
Things to know
Here are a few best practices and important things to know when you’re working with Agents for Amazon Bedrock.
Agents perform best when you allow them to focus on a specific task. The clearer the objective (instructions) and the more focused the available set of actions (APIs), the easier it will be for the FM to reason and identify the right steps. If you need agents to cover various tasks, consider creating separate, individual agents.
Here are a few additional guidelines:
Availability and pricing
Agents for Amazon Bedrock are available today in AWS Regions US East (N. Virginia) and US West (Oregon). You will be charged for the inference calls (InvokeModel API) made by agents. The InvokeAgent API is not charged separately. Amazon Bedrock Pricing has all the details.
Learn more
— Antje
Post Syndicated from Antje Barth original https://aws.amazon.com/blogs/aws/customize-models-in-amazon-bedrock-with-your-own-data-using-fine-tuning-and-continued-pre-training/
Today, I’m excited to share that you can now privately and securely customize foundation models (FMs) with your own data in Amazon Bedrock to build applications that are specific to your domain, organization, and use case. With custom models, you can create unique user experiences that reflect your company’s style, voice, and services.
With fine-tuning, you can increase model accuracy by providing your own task-specific labeled training dataset and further specialize your FMs. With continued pre-training, you can train models using your own unlabeled data in a secure and managed environment with customer managed keys. Continued pre-training helps models become more domain-specific by accumulating more robust knowledge and adaptability—beyond their original training.
Let me give you a quick tour of both model customization options. You can create fine-tuning and continued pre-training jobs using the Amazon Bedrock console or APIs. In the console, navigate to Amazon Bedrock, then select Custom models.

Fine-tune Meta Llama 2, Cohere Command Light, and Amazon Titan FMs
Amazon Bedrock now supports fine-tuning for Meta Llama 2, Cohere Command Light, as well as Amazon Titan models. To create a fine-tuning job in the console, choose Customize model, then choose Create Fine-tuning job.

Here’s a quick demo using the AWS SDK for Python (Boto3). Let’s fine-tune Cohere Command Light to summarize dialogs. For demo purposes, I’m using the public dialogsum dataset, but this could be your own company-specific data.
To prepare for fine-tuning on Amazon Bedrock, I converted the dataset into JSON Lines format and uploaded it to Amazon S3. Each JSON line needs to have both a prompt and a completion field. You can specify up to 10,000 training data records, but you may already see model performance improvements with a few hundred examples.
{"completion": "Mr. Smith's getting a check-up, and Doctor Haw...", "prompt": Summarize the following conversation.\n\n#Pers..."}
{"completion": "Mrs Parker takes Ricky for his vaccines. Dr. P...", "prompt": "Summarize the following conversation.\n\n#Pers..."}
{"completion": "#Person1#'s looking for a set of keys and asks...", "prompt": "Summarize the following conversation.\n\n#Pers..."}
I redacted the prompt and completion fields for brevity.
You can list available foundation models that support fine-tuning with the following command:
import boto3
bedrock = boto3.client(service_name="bedrock")
bedrock_runtime = boto3.client(service_name="bedrock-runtime")

for model in bedrock.list_foundation_models(
    byCustomizationType="FINE_TUNING")["modelSummaries"]:
    for key, value in model.items():
        print(key, ":", value)
    print("-----\n")
Next, I create a model customization job. I specify the Cohere Command Light model ID that supports fine-tuning, set customization type to FINE_TUNING, and point to the Amazon S3 location of the training data. If needed, you can also adjust the hyperparameters for fine-tuning.
# Select the foundation model you want to customize
base_model_id = "cohere.command-light-text-v14:7:4k"

bedrock.create_model_customization_job(
    customizationType="FINE_TUNING",
    jobName=job_name,
    customModelName=model_name,
    roleArn=role,
    baseModelIdentifier=base_model_id,
    hyperParameters = {
        "epochCount": "1",
        "batchSize": "8",
        "learningRate": "0.00001",
    },
    trainingDataConfig={"s3Uri": "s3://path/to/train-summarization.jsonl"},
    outputDataConfig={"s3Uri": "s3://path/to/output"},
)

# Check for the job status
status = bedrock.get_model_customization_job(jobIdentifier=job_name)["status"]
Once the job is complete, you receive a unique model ID for your custom model. Your fine-tuned model is stored securely by Amazon Bedrock. To test and deploy your model, you need to purchase Provisioned Throughput.
Let’s see the results. I select one example from the dataset and ask the base model before fine-tuning, as well as the custom model after fine-tuning, to summarize the following dialog:
prompt = """Summarize the following conversation.\\n\\n
#Person1#: Hello. My name is John Sandals, and I've got a reservation.\\n
#Person2#: May I see some identification, sir, please?\\n
#Person1#: Sure. Here you are.\\n
#Person2#: Thank you so much. Have you got a credit card, Mr. Sandals?\\n
#Person1#: I sure do. How about American Express?\\n
#Person2#: Unfortunately, at the present time we take only MasterCard or VISA.\\n
#Person1#: No American Express? Okay, here's my VISA.\\n
#Person2#: Thank you, sir. You'll be in room 507, nonsmoking, with a queen-size bed. Do you approve, sir?\\n
#Person1#: Yeah, that'll be fine.\\n
#Person2#: That's great. This is your key, sir. If you need anything at all, anytime, just dial zero.\\n\\n
Summary: """
Use the Amazon Bedrock InvokeModel API to query the models.
body = {
    "prompt": prompt,
    "temperature": 0.5,
    "p": 0.9,
    "max_tokens": 512,
}

response = bedrock_runtime.invoke_model(
	# Use on-demand inference model ID for response before fine-tuning
    # modelId="cohere.command-light-text-v14",
	# Use ARN of your deployed custom model for response after fine-tuning
	modelId=provisioned_custom_model_arn,
    modelId=base_model_id,
    body=json.dumps(body)
)
Here’s the base model response before fine-tuning:
#Person2# helps John Sandals with his reservation. John gives his credit card information and #Person2# confirms that they take only MasterCard and VISA. John will be in room 507 and #Person2# will be his host if he needs anything.
Here’s the response after fine-tuning, shorter and more to the point:
John Sandals has a reservation and checks in at a hotel. #Person2# takes his credit card and gives him a key.
Continued pre-training for Amazon Titan Text (preview)
Continued pre-training on Amazon Bedrock is available today in public preview for Amazon Titan Text models, including Titan Text Express and Titan Text Lite. To create a continued pre-training job in the console, choose Customize model, then choose Create Continued Pre-training job.

Here’s a quick demo again using boto3. Let’s assume you work at an investment company and want to continue pre-training the model with financial and analyst reports to make it more knowledgeable about financial industry terminology. For demo purposes, I selected a collection of Amazon shareholder letters as my training data.
To prepare for continued pre-training, I converted the dataset into JSON Lines format again and uploaded it to Amazon S3. Because I’m working with unlabeled data, each JSON line only needs to have the prompt field. You can specify up to 100,000 training data records and usually see positive effects after providing at least 1 billion tokens.
{"input": "Dear shareholders: As I sit down to..."}
{"input": "Over the last several months, we to..."}
{"input": "work came from optimizing the conne..."}
{"input": "of the Amazon shopping experience f..."}
I redacted the input fields for brevity.
Then, create a model customization job with customization type CONTINUED_PRE_TRAINING that points to the data. If needed, you can also adjust the hyperparameters for continued pre-training.
# Select the foundation model you want to customize
base_model_id = "amazon.titan-text-express-v1"

bedrock.create_model_customization_job(
    customizationType="CONTINUED_PRE_TRAINING",
    jobName=job_name,
    customModelName=model_name,
    roleArn=role,
    baseModelIdentifier=base_model_id,
    hyperParameters = {
        "epochCount": "10",
        "batchSize": "8",
        "learningRate": "0.00001",
    },
    trainingDataConfig={"s3Uri": "s3://path/to/train-continued-pretraining.jsonl"},
    outputDataConfig={"s3Uri": "s3://path/to/output"},
)
Once the job is complete, you receive another unique model ID. Your customized model is securely stored again by Amazon Bedrock. As with fine-tuning, you need to purchase Provisioned Throughput to test and deploy your model.
Things to know
Here are a couple of important things to know:
Data privacy and network security – With Amazon Bedrock, you are in control of your data, and all your inputs and customizations remain private to your AWS account. Your data, such as prompts, completions, custom models, and data used for fine-tuning or continued pre-training, is not used for service improvement and is never shared with third-party model providers. Your data remains in the AWS Region where the API call is processed. All data is encrypted in transit and at rest. You can use AWS PrivateLink to create a private connection between your VPC and Amazon Bedrock.
Billing – Amazon Bedrock charges for model customization, storage, and inference. Model customization is charged per tokens processed. This is the number of tokens in the training dataset multiplied by the number of training epochs. An epoch is one full pass through the training data during customization. Model storage is charged per month, per model. Inference is charged hourly per model unit using provisioned throughput. For detailed pricing information, see Amazon Bedrock Pricing.
Custom models and provisioned throughput – Amazon Bedrock allows you to run inference on custom models by purchasing provisioned throughput. This guarantees a consistent level of throughput in exchange for a term commitment. You specify the number of model units needed to meet your application’s performance needs. For evaluating custom models initially, you can purchase provisioned throughput hourly with no long-term commitment. With no commitment, a quota of one model unit is available per provisioned throughput. You can create up to two provisioned throughputs per account.
Availability
Fine-tuning support on Meta Llama 2, Cohere Command Light, and Amazon Titan Text FMs is available today in AWS Regions US East (N. Virginia) and US West (Oregon). Continued pre-training is available today in public preview in AWS Regions US East (N. Virginia) and US West (Oregon). To learn more, visit the Amazon Bedrock Developer Experience web page and check out the User Guide.
Customize FMs with Amazon Bedrock today!
— Antje
Post Syndicated from Antje Barth original https://aws.amazon.com/blogs/aws/knowledge-bases-now-delivers-fully-managed-rag-experience-in-amazon-bedrock/
Back in September, we introduced Knowledge Bases for Amazon Bedrock in preview. Starting today, Knowledge Bases for Amazon Bedrock is generally available.
With a knowledge base, you can securely connect foundation models (FMs) in Amazon Bedrock to your company data for Retrieval Augmented Generation (RAG). Access to additional data helps the model generate more relevant, context-specific, and accurate responses without continuously retraining the FM. All information retrieved from knowledge bases comes with source attribution to improve transparency and minimize hallucinations. If you’re curious how this works, check out my previous post that includes a primer on RAG.
With today’s launch, Knowledge Bases gives you a fully managed RAG experience and the easiest way to get started with RAG in Amazon Bedrock. Knowledge Bases now manages the initial vector store setup, handles the embedding and querying, and provides source attribution and short-term memory needed for production RAG applications. If needed, you can also customize the RAG workflows to meet specific use case requirements or integrate RAG with other generative artificial intelligence (AI) tools and applications.
Fully managed RAG experience
Knowledge Bases for Amazon Bedrock manages the end-to-end RAG workflow for you. You specify the location of your data, select an embedding model to convert the data into vector embeddings, and have Amazon Bedrock create a vector store in your account to store the vector data. When you select this option (available only in the console), Amazon Bedrock creates a vector index in Amazon OpenSearch Serverless in your account, removing the need to manage anything yourself.

Vector embeddings include the numeric representations of text data within your documents. Each embedding aims to capture the semantic or contextual meaning of the data. Amazon Bedrock takes care of creating, storing, managing, and updating your embeddings in the vector store, and it ensures your data is always in sync with your vector store.
Amazon Bedrock now also supports two new APIs for RAG that handle the embedding and querying and provide the source attribution and short-term memory needed for production RAG applications.
With the new RetrieveAndGenerate API, you can directly retrieve relevant information from your knowledge bases and have Amazon Bedrock generate a response from the results by specifying a FM in your API call. Let me show you how this works.
Use the RetrieveAndGenerate API
To give it a try, navigate to the Amazon Bedrock console, create and select a knowledge base, then select Test knowledge base. For this demo, I created a knowledge base that has access to a PDF of Generative AI on AWS. I choose Select Model to specify a FM.

Then, I ask, “What is Amazon Bedrock?”

Behind the scenes, Amazon Bedrock converts the queries into embeddings, queries the knowledge base, and then augments the FM prompt with the search results as context information and returns the FM-generated response to my question. For multi-turn conversations, Knowledge Bases manages the short-term memory of the conversation to provide more contextual results.
Here’s a quick demo of how to use the APIs with the AWS SDK for Python (Boto3).
def retrieveAndGenerate(input, kbId):
    return bedrock_agent_runtime.retrieve_and_generate(
        input={
            'text': input
        },
        retrieveAndGenerateConfiguration={
            'type': 'KNOWLEDGE_BASE',
            'knowledgeBaseConfiguration': {
                'knowledgeBaseId': kbId,
                'modelArn': 'arn:aws:bedrock:us-east-1::foundation-model/anthropic.claude-instant-v1'
                }
            }
        )

response = retrieveAndGenerate("What is Amazon Bedrock?", "AES9P3MT9T")["output"]["text"]
The output of the RetrieveAndGenerate API includes the generated response, the source attribution, and the retrieved text chunks. In my demo, the API response looks like this (with some of the output redacted for brevity):


