Post Syndicated from Geographics original https://www.youtube.com/watch?v=iMnmscnr404
Upgrade Your Email Tech Stack with Amazon SESv2 API
Post Syndicated from Zip Zieper original https://aws.amazon.com/blogs/messaging-and-targeting/upgrade-your-email-tech-stack-with-amazon-sesv2-api/
Amazon Simple Email Service (SES) is a cloud-based email sending service that helps businesses and developers send marketing and transactional emails. We introduced the SESv1 API in 2011 to provide developers with basic email sending capabilities through Amazon SES using HTTPS. In 2020, we introduced the redesigned Amazon SESv2 API, with new and updated features that make it easier and more efficient for developers to send email at scale.
This post will compare Amazon SESv1 API and Amazon SESv2 API and explain the advantages of transitioning your application code to the SESv2 API. We’ll also provide examples using the AWS Command-Line Interface (AWS CLI) that show the benefits of transitioning to the SESv2 API.
Amazon SESv1 API
The SESv1 API is a relatively simple API that provides basic functionality for sending and receiving emails. For over a decade, thousands of SES customers have used the SESv1 API to send billions of emails. Our customers’ developers routinely use the SESv1 APIs to verify email addresses, create rules, send emails, and customize bounce and complaint notifications. Our customers’ needs have become more advanced as the global email ecosystem has developed and matured. Unsurprisingly, we’ve received customer feedback requesting enhancements and new functionality within SES. To better support an expanding array of use cases and stay at the forefront of innovation, we developed the SESv2 APIs.
While the SESv1 API will continue to be supported, AWS is focused on advancing functionality through the SESv2 API. As new email sending capabilities are introduced, they will only be available through SESv2 API. Migrating to the SESv2 API provides customers with access to these, and future, optimizations and enhancements. Therefore, we encourage SES customers to consider the information in this blog, review their existing codebase, and migrate to SESv2 API in a timely manner.
Amazon SESv2 API
Released in 2020, the SESv2 API and SDK enable customers to build highly scalable and customized email applications with an expanded set of lightweight and easy to use API actions. Leveraging insights from current SES customers, the SESv2 API includes several new actions related to list and subscription management, the creation and management of dedicated IP pools, and updates to unsubscribe that address recent industry requirements.
One example of new functionality in SESv2 API is programmatic support for the SES Virtual Delivery Manager. Previously only addressable via the AWS console, VDM helps customers improve sending reputation and deliverability. SESv2 API includes vdmAttributes such as VdmEnabled and DashboardAttributes as well as vdmOptions. DashboardOptions and GaurdianOptions.
To improve developer efficiency and make the SESv2 API easier to use, we merged several SESv1 APIs into single commands. For example, in the SESv1 API you must make separate calls for createConfigurationSet, setReputationMetrics, setSendingEnabled, setTrackingOptions, and setDeliveryOption. In the SESv2 API, however, developers make a single call to createConfigurationSet and they can include trackingOptions, reputationOptions, sendingOptions, deliveryOptions. This can result in more concise code (see below).

Another example of SESv2 API command consolidation is the GetIdentity action, which is a composite of SESv1 API’s GetIdentityVerificationAttributes, GetIdentityNotificationAttributes, GetCustomMailFromAttributes, GetDKIMAttributes, and GetIdentityPolicies. See SESv2 documentation for more details.
Why migrate to Amazon SESv2 API?
The SESv2 API offers an enhanced experience compared to the original SESv1 API. Compared to the SESv1 API, the SESv2 API provides a more modern interface and flexible options that make building scalable, high-volume email applications easier and more efficient. SESv2 enables rich email capabilities like template management, list subscription handling, and deliverability reporting. It provides developers with a more powerful and customizable set of tools with improved security measures to build and optimize inbox placement and reputation management. Taken as a whole, the SESv2 APIs provide an even stronger foundation for sending critical communications and campaign email messages effectively at a scale.
Migrating your applications to SESv2 API will benefit your email marketing and communication capabilities with:
- New and Enhanced Features: Amazon SESv2 API includes new actions as well as enhancements that provide better functionality and improved email management. By moving to the latest version, you’ll be able to optimize your email sending process. A few examples include:
- Increase the maximum message size (including attachments) from 10Mb (SESv1) to 40Mb (SESv2) for both sending and receiving.
- Access key actions for the SES Virtual Deliverability Manager (VDM) which provides insights into your sending and delivery data. VDM provides near-realtime advice on how to fix the issues that are negatively affecting your delivery success rate and reputation.
- Meet Google & Yahoo’s June 2024 unsubscribe requirements with the SES v2
SendEmailaction. For more information, see the “What’s New blog”
- Future-proof Your Application: Avoid potential compatibility issues and disruptions by keeping your application up-to-date with the latest version of the Amazon SESv2 API via the AWS SDK.
- Improve Usability and Developer Experience: Amazon SESv2 API is designed to be more user-friendly and consistent with other AWS services. It is a more intuitive API with better error handling, making it easier to develop, maintain, and troubleshoot your email sending applications.
Migrating to the latest SESv2 API and SDK positions customers for success in creating reliable and scalable email services for their businesses.
What does migration to the SESv2 API entail?
While SESv2 API builds on the v1 API, the v2 API actions don’t universally map exactly to the v1 API actions. Current SES customers that intend to migrate to SESv2 API will need to identify the SESv1 API actions in their code and plan to refactor for v2. When planning the migration, it is essential to consider several important considerations:
- Customers with applications that receive email using SESv1 API’s
CreateReceiptFilter,CreateReceiptRuleorCreateReceiptRuleSetactions must continue using the SESv1 API client for these actions. SESv1 and SESv2 can be used in the same application, where needed. - We recommend all customers follow the security best practice of “least privilege” with their IAM policies. As such, customers may need to review and update their policies to include the new and modified API actions introduced in SESv2 before migrating. Taking the time to properly configure permissions ensures a seamless transition while maintaining a securely optimized level of access. See documentation.
Below is an example of an IAM policy with a user with limited allow privileges related to several SESv1 Identity actions only:
{
    "Version": "2012-10-17",
    "Statement": [
        {
            "Sid": "VisualEditor0",
            "Effect": "Allow",
            "Action": [
                "ses:VerifyEmailIdentity",
                "ses:Deleteldentity",
                "ses:VerifyDomainDkim",
                "ses:ListIdentities",
                "ses:VerifyDomainIdentity"
            ],
            "Resource": "*"
        }
    ]
}
When updating to SESv2, you need to update this user’s permissions with the SESv2 actions shown below:
{
    "Version": "2012-10-17",
    "Statement": [
        {
            "Sid": "VisualEditor0",
            "Effect": "Allow",
            "Action": [
                "ses:CreateEmailIdentity",
                "ses:DeleteEmailIdentity",
                "ses:GetEmailIdentity",
                "ses:ListEmailIdentities"
            ],
            "Resource": "*"
        }
    ]
}
Examples of SESv1 vs. SESv2 APIs
Let’s look at a three examples that compare the SESv1 API with the SESv2 API.
LIST APIs
When listing identities in SESv1 list API, you need to specify type which requires multiple calls to API to list all resources:
aws ses list-identities --identity-type Domain
{
    "Identities": [
        "example.com"
    ]
}
aws ses list-identities --identity-type EmailAddress
{
    "Identities": [
        "[email protected]",
        "[email protected]",
        "[email protected]"
    ]
}
With SESv2, you can simply call a single API. Additionally, SESv2 also provides extended feedback:
aws sesv2 list-email-identities
{
    "EmailIdentities": [
        {
            "IdentityType": "DOMAIN",
            "IdentityName": "example.com",
            "SendingEnabled": false,
            "VerificationStatus": "FAILED"
        },
        {
            "IdentityType": "EMAIL_ADDRESS",
            "IdentityName": "[email protected]",
            "SendingEnabled": true,
            "VerificationStatus": "SUCCESS"
        },
        {
            "IdentityType": "EMAIL_ADDRESS",
            "IdentityName": "[email protected]",
            "SendingEnabled": false,
            "VerificationStatus": "FAILED"
        },
        {
            "IdentityType": "EMAIL_ADDRESS",
            "IdentityName": "[email protected]",
            "SendingEnabled": true,
            "VerificationStatus": "SUCCESS"
        }
    ]
}
CREATE APIs
With SESv1, creating email addresses or domains requires calling two different APIs:
aws ses verify-email-identity --email-address [email protected]
aws ses verify-domain-dkim --domain example.com
{
    "DkimTokens": [
        "mwmzhwhcebfh5kvwv7zahdatahimucqi",
        "dmlozjwrdbrjfwothoh26x6izvyts7qx",
        "le5fy6pintdkbxg6gdoetgbrdvyp664v"
    ]
}
With SESv2, we build an abstraction so you can call a single API. Additionally, SESv2 provides more detailed responses and feedback:
aws sesv2 create-email-identity --email-identity [email protected]
{
    "IdentityType": "EMAIL_ADDRESS",
    "VerifiedForSendingStatus": false
}
aws sesv2 create-email-identity --email-identity example.com
{
"IdentityType": "DOMAIN",
"VerifiedForSendingStatus": false,
"DkimAttributes": {
"SigningEnabled": true,
"Status": "NOT_STARTED",
"Tokens": [
"mwmzhwhcebfh5kvwv7zahdatahimucqi",
"dmlozjwrdbrjfwothoh26x6izvyts7qx",
"le5fy6pintdkbxg6gdoetgbrdvyp664v"
],
"SigningAttributesOrigin": "AWS_SES",
"NextSigningKeyLength": "RSA_2048_BIT",
"CurrentSigningKeyLength": "RSA_2048_BIT",
"LastKeyGenerationTimestamp": "2024-02-23T15:01:53.849000+00:00"
}
}DELETE APIs
When calling delete- with SESv1, SES returns 200 (or no response), even if the identity was previously deleted or doesn’t exist:
aws ses delete-identity --identity example.com
SESv2 provides better error handling and responses when calling the delete API:
aws sesv2 delete-email-identity --email-identity example.com

An error occurred (NotFoundException) when calling the DeleteEmailIdentity operation: Email identity example.com does not exist.
Hands-on with SESv1 API vs. SESv2 API
Below are a few examples you can use to explore the differences between SESv1 API and the SESv2 API. To complete these exercises, you’ll need:
- AWS Account (setup) with enough permission to interact with the SES service via the CLI
- Upgrade to the latest version of the AWS CLI (aws-cli/2.15.27 or greater)
- SES enabled, configured and properly sending emails
- A recipient email address with which you can check inbound messages (if you’re in the SES Sandbox, this email must be verified email identity). In the following examples, replace
[email protected]with the verified email identity. - Your preferred IDE with AWS credentials and necessary permissions (you can also use AWS CloudShell)
Open the AWS CLI (or AWS CloudShell) and:
- Create a test directory called v1-v2-test.
- Create the following (8) files in the v1-v2-test directory:
destination.json (replace [email protected] with the verified email identity):
{
    "ToAddresses": ["[email protected]"]
}
ses-v1-message.json
{
   "Subject": {
       "Data": "SESv1 API email sent using the AWS CLI",
       "Charset": "UTF-8"
   },
   "Body": {
       "Text": {
           "Data": "This is the message body from SESv1 API in text format.",
           "Charset": "UTF-8"
       },
       "Html": {
           "Data": "This message body from SESv1 API, it contains HTML formatting. For example - you can include links: <a class=\"ulink\" href=\"http://docs.aws.amazon.com/ses/latest/DeveloperGuide\" target=\"_blank\">Amazon SES Developer Guide</a>.",
           "Charset": "UTF-8"
       }
   }
}
ses-v1-raw-message.json (replace [email protected] with the verified email identity):
{
     "Data": "From: [email protected]\nTo: [email protected]\nSubject: Test email sent using the SESv1 API and the AWS CLI \nMIME-Version: 1.0\nContent-Type: text/plain\n\nThis is the message body from the SESv1 API SendRawEmail.\n\n"
}
ses-v1-template.json (replace [email protected] with the verified email identity):
{
  "Source":"SES Developer<[email protected]>",
  "Template": "my-template",
  "Destination": {
    "ToAddresses": [ "[email protected]"
    ]
  },
  "TemplateData": "{ \"name\":\"SESv1 Developer\", \"favoriteanimal\": \"alligator\" }"
}
my-template.json (replace [email protected] with the verified email identity):
{
  "Template": {
    "TemplateName": "my-template",
    "SubjectPart": "Greetings SES Developer, {{name}}!",
    "HtmlPart": "<h1>Hello {{name}},</h1><p>Your favorite animal is {{favoriteanimal}}.</p>",
    "TextPart": "Dear {{name}},\r\nYour favorite animal is {{favoriteanimal}}."
  }
}
ses-v2-simple.json (replace [email protected] with the verified email identity):
{
    "FromEmailAddress": "[email protected]",
    "Destination": {
        "ToAddresses": [
            "[email protected]"
        ]
    },
    "Content": {
        "Simple": {
            "Subject": {
                "Data": "SESv2 API email sent using the AWS CLI",
                "Charset": "utf-8"
            },
            "Body": {
                "Text": {
                    "Data": "SESv2 API email sent using the AWS CLI",
                    "Charset": "utf-8"
                }
            },
            "Headers": [
                {
                    "Name": "List-Unsubscribe",
                    "Value": "insert-list-unsubscribe-here"
                },
				{
                    "Name": "List-Unsubscribe-Post",
                    "Value": "List-Unsubscribe=One-Click"
                }
            ]
        }
    }
}
ses-v2-raw.json (replace [email protected] with the verified email identity):
{
     "FromEmailAddress": "[email protected]",
     "Destination": {
            "ToAddresses": [
                       "[email protected]"
              ]
       },
      "Content": {
             "Raw": {
                     "Data": "Subject: Test email sent using SESv2 API via the AWS CLI \nMIME-Version: 1.0\nContent-Type: text/plain\n\nThis is the message body from SendEmail Raw Content SESv2.\n\n"
              }
      }
}
ses-v2-tempate.json (replace [email protected] with the verified email identity):
{
     "FromEmailAddress": "[email protected]",
     "Destination": {
       "ToAddresses": [
         "[email protected]"
       ]
     },
     "Content": {
        "Template": {
          "TemplateName": "my-template",
          "TemplateData": "{ \"name\":\"SESv2 Developer\",\"favoriteanimal\":\"Dog\" }",
          "Headers": [
                {
                   "Name": "List-Unsubscribe",
                   "Value": "insert-list-unsubscribe-here"
                },
                {
                   "Name": "List-Unsubscribe-Post",
                   "Value": "List-Unsubscribe=One-Click"
                }
             ]
         }
     }
}
Perform the following commands using the SESv1 API:
send-email (simple):
- In the CLI, (replace
[email protected]with the verified email identity) run:
aws ses send-email --from [email protected] --destination file://destination.json --message file://ses-v1-message.json
- The response will return a valid MessageID (signaling the action was successful). An email will be received by
the verified email identity.
{
    "MessageId": "0100018dc7649400-Xx1x0000x-bcec-483a-b97c-123a4567890d-xxxxx"
}send-raw-email:
- In the CLI, run:
aws ses send-raw-email --cli-binary-format raw-in-base64-out --raw-message file://ses-v1-raw-message.json
- The response will return a valid MessageID (signaling the action was successful). An email will be received by
the verified email identity.
{
   "MessageId": "0200018dc7649400-Xx1x1234x-bcec-483a-b97c-123a4567890d-
}
send templated mail:
- In the CLI, run the following to create the template:
aws ses create-template --cli-input-json file://my-template.json
- In the CLI, run:
aws ses send-templated-email --cli-input-json file://ses-v1-template.json
- The response will return a valid MessageID (signaling the action was successful). An email will be received by
the verified email identity.
 {
    "MessageId": "0000018dc7649400-Xx1x1234x-bcec-483a-b97c-123a4567890d-xxxxx"
 }
Perform similar commands using the SESv2 API:
As mentioned above, customers who are using least privilege permissions with SESv1 API must first update their IAM policies before running the SESv2 API examples below. See documentation for more info.
As you can see from the .json files we created for SES v2 API (above), you can modify or remove sections from the .json files, based on the type of email content (simple, raw or templated) you want to send.
Please ensure you are using the latest version of the AWS CLI (aws-cli/2.15.27 or greater).
Send simple email
- In the CLI, run:
aws sesv2 send-email --cli-input-json file://ses-v2-simple.json
- The response will return a valid MessageID (signaling the action was successful). An email will be received by
the verified email identity
{
    "MessageId": "0100018dc83ba7e0-7b3149d7-3616-49c2-92b6-00e7d574f567-000000"
}
Send raw email (note – if the only reason is to set custom headers, you don’t need to send raw email)
- In the CLI, run:
aws sesv2 send-email --cli-binary-format raw-in-base64-out --cli-input-json file://ses-v2-raw.json
- The response will return a valid MessageID (signaling the action was successful). An email will be received by
the verified email identity.
{
    "MessageId": "0100018dc877bde5-fdff0df3-838e-4f51-8582-a05237daecc7-000000"
}
Send templated email
- In the CLI, run:
aws sesv2 send-email --cli-input-json file://ses-v2-tempate.json
- The response will return a valid MessageID (signaling the action was successful). An email will be received by
the verified email identity.
{
    "MessageId": "0100018dc87fe72c-f2c547a1-2325-4be4-bf78-b91d6648cd12-000000"
}
Migrating your application code to SESv2 API
As you can see from the examples above, SESv2 API shares much of its syntax and actions with the SESv1 API. As a result, most customers have found they can readily evaluate, identify and migrate their application code base in a relatively short period of time. However, it’s important to note that while the process is generally straightforward, there may be some nuances and differences to consider depending on your specific use case and programming language.
Regardless of the language, you’ll need anywhere from a few hours to a few weeks to:
- Update your code to use SESv2 Client and change API signature and request parameters
- Update permissions / policies to reflect SESv2 API requirements
- Test your migrated code to ensure that it functions correctly with the SESv2 API
- Stage, test
- Deploy
Summary
As we’ve described in this post, Amazon SES customers that migrate to the SESv2 API will benefit from updated capabilities, a more user-friendly and intuitive API, better error handling and improved deliverability controls. The SESv2 API also provide for compliance with the industry’s upcoming unsubscribe header requirements, more flexible subscription-list management, and support for larger attachments. Taken collectively, these improvements make it even easier for customers to develop, maintain, and troubleshoot their email sending applications with Amazon Simple Email Service. For these, and future reasons, we recommend SES customers migrate their existing applications to the SESv2 API immediately.
For more information regarding the SESv2 APIs, comment on this post, reach out to your AWS account team, or consult the AWS SESv2 API documentation:
- https://docs.aws.amazon.com/cli/latest/reference/ses/
- https://awscli.amazonaws.com/v2/documentation/API/latest/reference/sesv2/index.html
About the Authors

Zip
Zip is an Amazon Pinpoint and Amazon Simple Email Service Sr. Specialist Solutions Architect at AWS. Outside of work he enjoys time with his family, cooking, mountain biking and plogging.

Vinay Ujjini
Vinay is an Amazon Pinpoint and Amazon Simple Email Service Worldwide Principal Specialist Solutions Architect at AWS. He has been solving customer’s omni-channel challenges for over 15 years. He is an avid sports enthusiast and in his spare time, enjoys playing tennis and cricket.

Dmitrijs Lobanovskis
Dmitrijs is a Software Engineer for Amazon Simple Email service. When not working, he enjoys traveling, hiking and going to the gym.
A Conversation with Walter Isaacson and Jeffrey Goldberg | New Orleans Book Festival
Post Syndicated from The Atlantic original https://www.youtube.com/watch?v=kHu4afxVVK4
Improved Workers testing via Vitest and workerd
Post Syndicated from Brendan Coll original https://blog.cloudflare.com/workers-vitest-integration

Today, we’re excited to announce a new Workers Vitest integration – allowing you to write unit and integration tests via the popular testing framework, Vitest, that execute directly in our runtime, workerd!
This integration provides you with the ability to test anything related to your Worker!
For the first time, you can write unit tests that run within the same runtime that Cloudflare Workers run on in production, providing greater confidence that the behavior of your Worker in tests will be the same as when deployed to production. For integration tests, you can now write tests for Workers that are triggered by Cron Triggers in addition to traditional fetch() events. You can also more easily test complex applications that interact with KV, R2, D1, Queues, Service Bindings, and more Cloudflare products.
For all of your tests, you have access to Vitest features like snapshots, mocks, timers, and spies.
In addition to increased testing and functionality, you’ll also notice other developer experience improvements like hot-module-reloading, watch mode on by default, and per-test isolated storage. Meaning that, as you develop and edit your tests, they’ll automatically re-run, without you having to restart your test runner.
Get started testing Workers with Vitest
The easiest way to get started with testing your Workers via Vitest is to start a new Workers project via our create-cloudflare tool:
npm create cloudflare@latest hello-world -- --type=hello-world
Running this command will scaffold a new project for you with the Workers Vitest integration already set up. An example unit test and integration test are also included.
Manual install and setup instructions
If you prefer to manually install and set up the Workers Vitest integration, begin by installing @cloudflare/vitest-pool-workers from npm:
$ npm install --save-dev @cloudflare/vitest-pool-workers
@cloudflare/vitest-pool-workers has a peer dependency on a specific version of vitest. Modern versions of npm will install this automatically, but we recommend you install it explicitly too. Refer to the getting started guide for the current supported version. If you’re using TypeScript, add @cloudflare/vitest-pool-workers to your tsconfig.json’s types to get types for the cloudflare:test module:
$ npm install --save-dev @cloudflare/vitest-pool-workers
@cloudflare/vitest-pool-workers has a peer dependency on a specific version of vitest. Modern versions of npm will install this automatically, but we recommend you install it explicitly too. Refer to the getting started guide for the current supported version. If you’re using TypeScript, add @cloudflare/vitest-pool-workers to your tsconfig.json’s types to get types for the cloudflare:test module:
{
  "compilerOptions": {
    "module": "esnext",
    "moduleResolution": "bundler",
    "lib": ["esnext"],
    "types": [
      "@cloudflare/workers-types/experimental",
      "@cloudflare/vitest-pool-workers"
    ]
  }
}
Then, enable the pool in your Vitest configuration file:
// vitest.config.js
import { defineWorkersConfig } from "@cloudflare/vitest-pool-workers/config";

export default defineWorkersConfig({
  test: {
    poolOptions: {
      workers: {
        wrangler: { configPath: "./wrangler.toml" },
      },
    },
  },
});
After that, define a compatibility date after “2022-10-31” and enable the nodejs_compat compatibility flag in your wrangler.toml:
# wrangler.toml
main = "src/index.ts"
compatibility_date = "2024-01-01"
compatibility_flags = ["nodejs_compat"]
Test anything exported from a Worker
With the new Workers Vitest Integration, you can test anything exported from your Worker in both unit and integration-style tests. Within these tests, you can also test connected resources like R2, KV, and Durable Objects, as well as applications involving multiple Workers.
Writing unit tests
In a Workers context, a unit test imports and directly calls functions from your Worker then asserts on their return values. Let’s say you have a Worker that looks like this:
export function add(a, b) {
  return a + b;
}

export default {
  async fetch(request) {
    const url = new URL(request.url);
    const a = parseInt(url.searchParams.get("a"));
    const b = parseInt(url.searchParams.get("b"));
    return new Response(add(a, b));
  }
}
After you’ve setup and installed the Workers Vitest integration, you can unit test this Worker by creating a new test file called index.spec.js with the following code:
import { env, createExecutionContext, waitOnExecutionContext, } from "cloudflare:test";
import { describe, it, expect } from "vitest";
import { add }, worker from "./src";

describe("Hello World worker", () => {
  it(“adds two numbers”, async () => {
    expect(add(2,3).toBe(5);
  });
  it("sends request (unit style)", async () => {
    const request = new Request("http://example.com/?a=3&b=4");
    const ctx = createExecutionContext();
    const response = await worker.fetch(request, env, ctx);
    await waitOnExecutionContext(ctx);
    expect(await response.text()).toMatchInlineSnapshot(`"7"`);
  });
});
Using the Workers Vitest integration, you can write unit tests like these for any of your Workers.
Writing integration tests
While unit tests are great for testing individual parts of your application, integration tests assess multiple units of functionality, ensuring that workflows and features work as expected. These are usually more complex than unit tests, but provide greater confidence that your app works as expected. In the Workers context, an integration test sends HTTP requests to your Worker and asserts on the HTTP responses.
With the Workers Vitest Integration, you can run integration tests by importing SELF from the new cloudflare:test utility like this:
// test/index.spec.ts
import { SELF } from "cloudflare:test";
import { it, expect } from "vitest";
import "../src";

// an integration test using SELF
it("sends request (integration style)", async () => {
   const response = await SELF.fetch("http://example.com/?a=3&b=4");
   expect(await response.text()).toMatchInlineSnapshot(`"7"`);
});
When using SELF for integration tests, your Worker code runs in the same context as the test runner. This means you can use mocks to control your Worker.
Testing different scenarios
Whether you’re writing unit or integration tests, if your application uses Cloudflare Developer Platform products (e.g. KV, R2, D1, Queues, or Durable Objects), you can test them. To demonstrate this, we have created a set of examples to help get you started testing.
Better testing experience === better testing
Having better testing tools makes it easier to test your projects right from the start, which leads to better overall quality and experience for your end users. The Workers Vitest integration provides that better experience, not just in terms of developer experience, but in making it easier to test your entire application.
The rest of this post will focus on how we built this new testing integration, diving into the internals of how Vitest works, the problems we encountered trying to get a framework to work within our runtime, and ultimately how we solved it and the improved DX that it unlocked.
How Vitest traditionally works
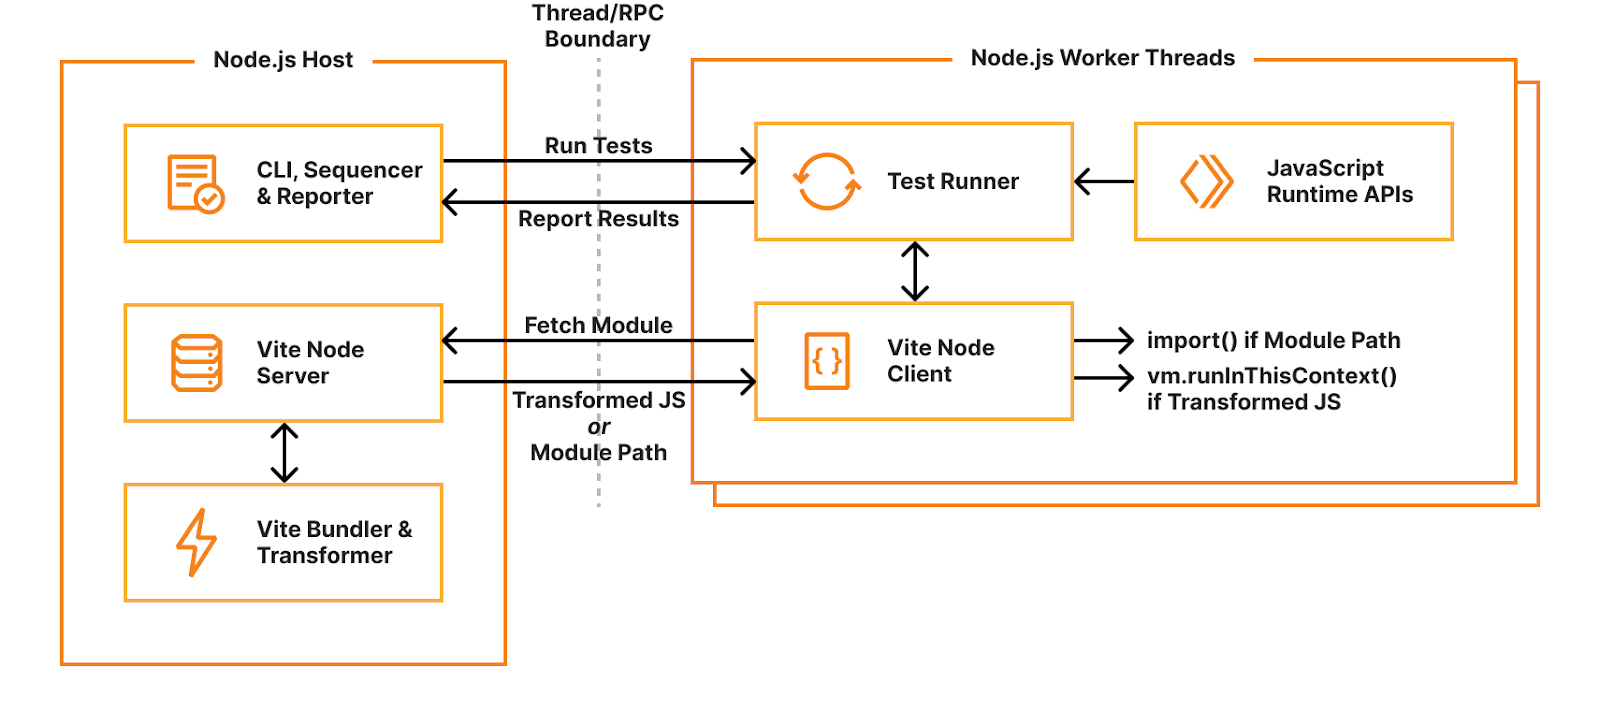
When you start Vitest’s CLI, it first collects and sequences all your test files. By default, Vitest uses a “threads” pool, which spawns Node.js worker threads for isolating and running tests in parallel. Each thread gets a test file to run, dynamically requesting and evaluating code as needed. When the test runner imports a module, it sends a request to the host’s “Vite Node Server” which will either return raw JavaScript code transformed by Vite, or an external module path. If raw code is returned, it will be executed using the node:vm runInThisContext() function. If a module path is returned, it will be imported using dynamic import(). Transforming user code with Vite allows hot-module-reloading (HMR) — when a module changes, it’s invalidated in the module cache and a new version will be returned when it’s next imported.
Miniflare is a fully-local simulator for Cloudflare’s Developer Platform. Miniflare v2 provided a custom environment for Vitest that allowed you to run your tests inside the Workers sandbox. This meant you could import and call any function using Workers runtime APIs in your tests. You weren’t restricted to integration tests that just sent and received HTTP requests. In addition, this environment provided per-test isolated storage, automatically undoing any changes made at the end of each test. In Miniflare v2, this environment was relatively simple to implement. We’d already reimplemented Workers Runtime APIs in a Node.js environment, and could inject them using Vitest’s APIs into the global scope of the test runner.
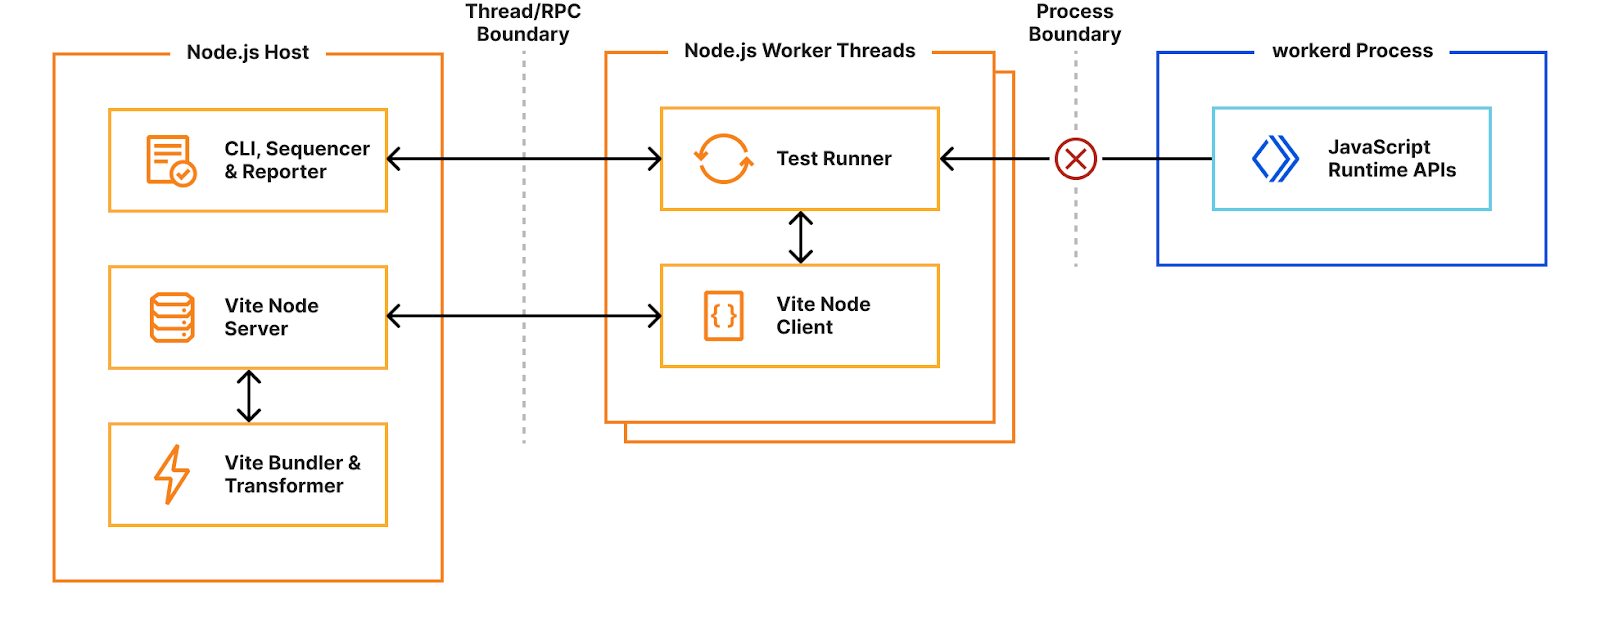
By contrast, Miniflare v3 runs your Worker code inside the same workerd runtime that Cloudflare uses in production. Running tests directly in workerd presented a challenge — workerd runs in its own process, separate from the Node.js worker thread, and it’s not possible to reference JavaScript classes across a process boundary.
Solving the problem with custom pools
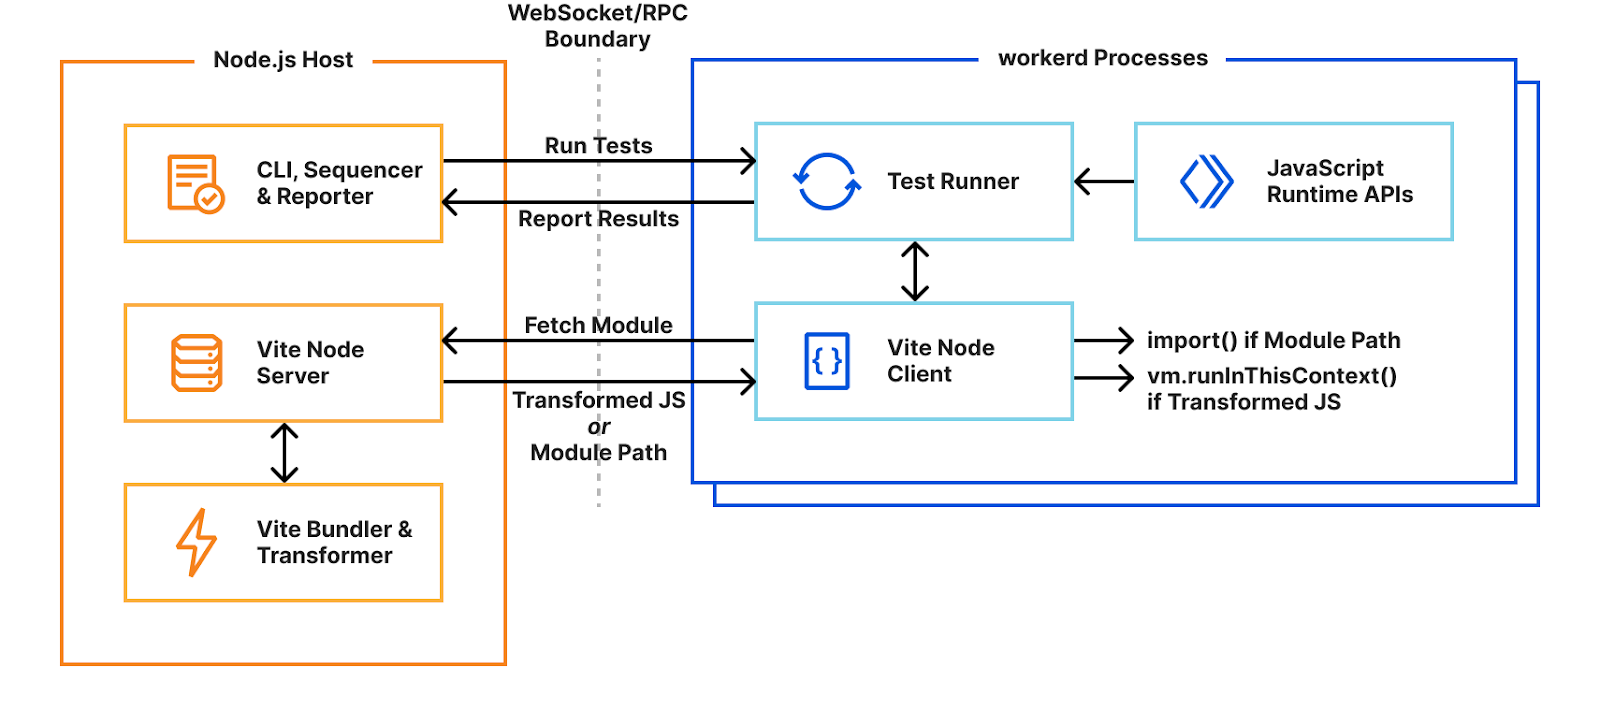
Instead, we use Vitest’s custom pools feature to run the test runner in Cloudflare Workers running locally with workerd. A pool receives test files to run and decides how to execute them. By executing the runner inside workerd, tests have direct access to Workers runtime APIs as they’re running in a Worker. WebSockets are used to send and receive serialisable RPC messages between the Node.js host and workerd process. Note we’re running the exact same test runner code originally designed for a Node-context inside a Worker here. This means our Worker needs to provide Node’s built-in modules, support for dynamic code evaluation, and loading of arbitrary modules from disk with Node-resolution behavior. The nodejs_compat compatibility flag provides support for some of Node’s built-in modules, but does not solve our other problems. For that, we had to get creative…
Dynamic code evaluation
For security reasons, the Cloudflare Workers runtime does not allow dynamic code evaluation via eval() or new Function(). It also requires all modules to be defined ahead-of-time before execution starts. The test runner doesn’t know what code to run until we start executing tests, so without lifting these restrictions, we have no way of executing the raw JavaScript code transformed by Vite nor importing arbitrary modules from disk. Fortunately, code that is only meant to run locally – like tests – has a much more relaxed security model than deployed code. To support local testing and other development-specific use-cases such as Vite’s new Runtime API, we added “unsafe-eval bindings” and “module-fallback services” to workerd.
Unsafe-eval bindings provide local-only access to the eval() function, and new Function()/new AsyncFunction()/new WebAssembly.Module() constructors. By exposing these through a binding, we retain control over which code has access to these features.
// Type signature for unsafe-eval bindings
interface UnsafeEval {
  eval(script: string, name?: string): unknown;
  newFunction(script: string, name?: string, ...args: string[]): Function;
  newAsyncFunction(script: string, name?: string, ...args: string[]): AsyncFunction;
  newWasmModule(src: BufferSource): WebAssembly.Module;
}
Using the unsafe-eval binding eval() method, we were able to implement a polyfill for the required vm.runInThisContext() function. While we could also implement loading of arbitrary modules from disk using unsafe-eval bindings, this would require us to rebuild workerd’s module resolution system in JavaScript. Instead, we allow workers to be configured with module fallback services. If enabled, imports that cannot be resolved by workerd become HTTP requests to the fallback service. These include the specifier, referrer, and whether it was an import or require. The service may respond with a module definition, or a redirect to another location if the resolved location doesn’t match the specifier. Requests originating from synchronous requires will block the main thread until the module is resolved. The Workers Vitest pool’s fallback service implements Node-like resolution with Node-style interoperability between CommonJS and ES modules.
Durable Objects as test runners
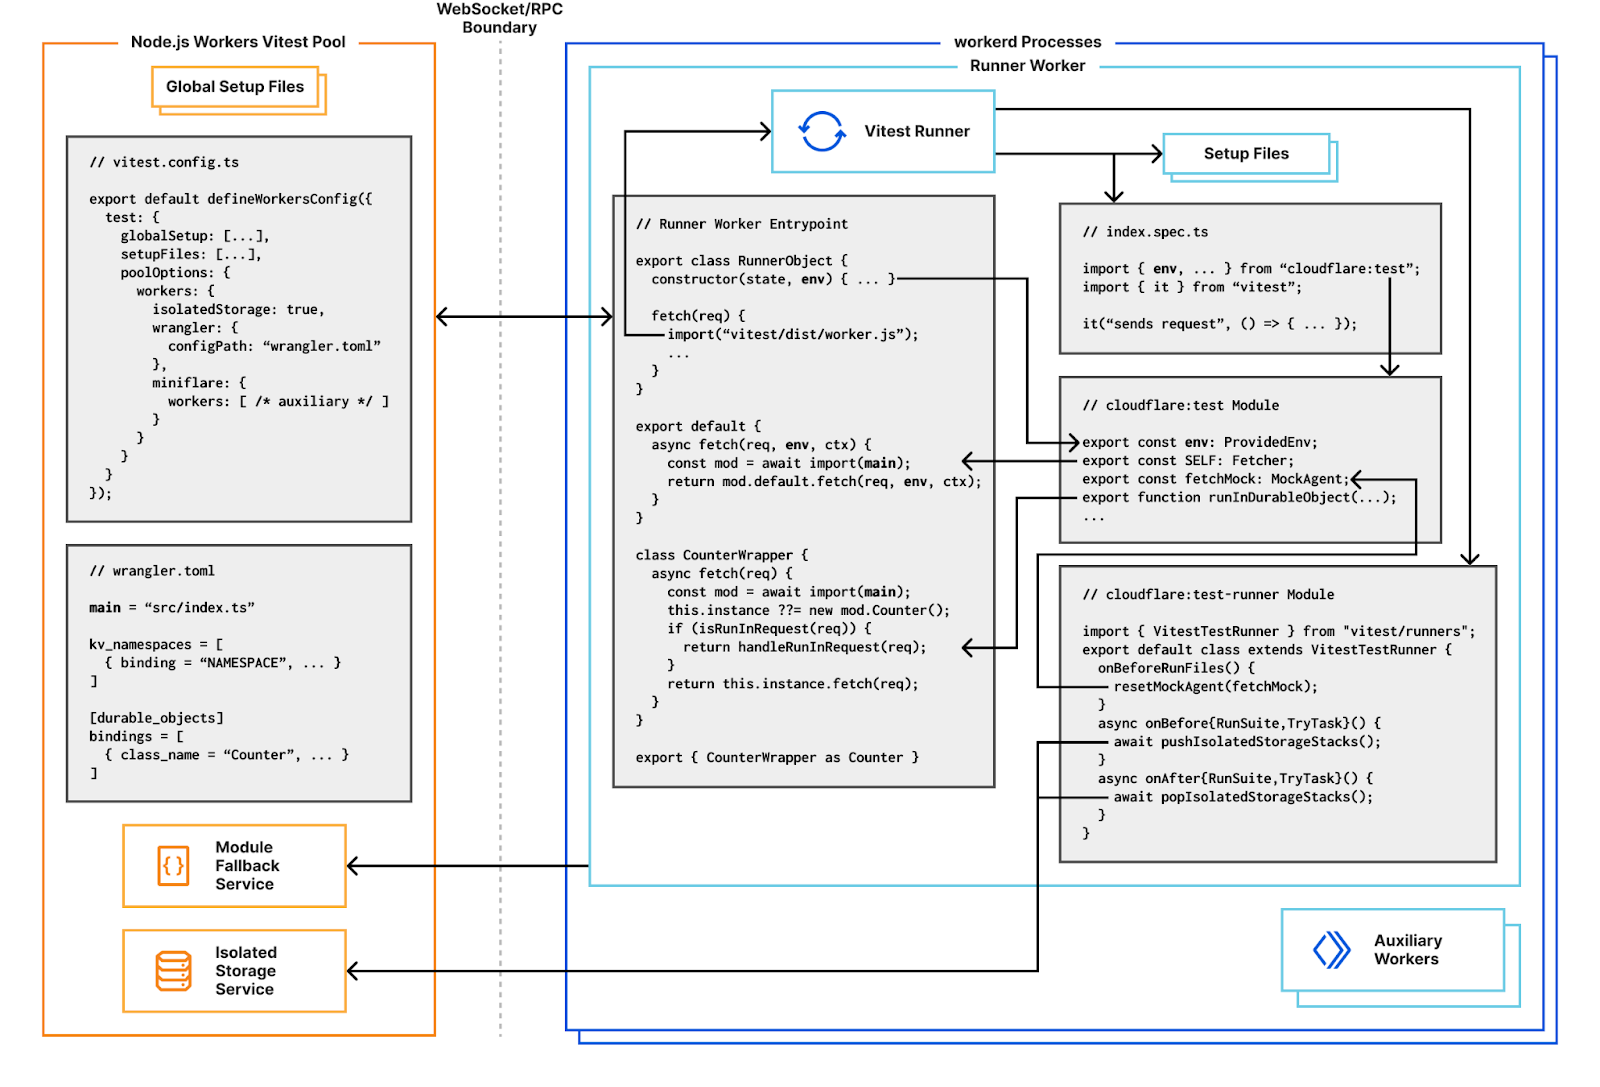
Now that we can run and import arbitrary code, the next step is to get Vitest’s thread worker running inside workerd. Every incoming request has its own request context. To improve overall performance, I/O objects such as streams, request/response bodies and WebSockets created in one request context cannot be used from another. This means if we want to use a WebSocket for RPC between the pool and our workerd processes, we need to make sure the WebSocket is only used from one request context. To coordinate this, we define a singleton Durable Object for accepting the RPC connection and running tests from. Functions using RPC such as resolving modules, reporting results and console logging will always use this singleton. We use Miniflare’s “magic proxy” system to get a reference to the singleton’s stub in Node.js, and send a WebSocket upgrade request directly to it. After adding a few more Node.js polyfills, and a basic cloudflare:test module to provide access to bindings and a function for creating ExecutionContexts, we’re able to write basic Workers unit tests! 🎉
Integration tests with hot-module-reloading
In addition to unit tests, we support integration testing with a special SELF service binding in the cloudflare:test module. This points to a special export default { fetch(...) {...} } handler which uses Vite to import your Worker’s main module.
Using Vite’s transformation pipeline here means your handler gets hot-module-reloading (HMR) for free! When code is updated, the module cache is invalidated, tests are rerun, and subsequent requests will execute with new code. The same approach of wrapping user code handlers applies to Durable Objects too, providing the same HMR benefits.
Integration tests can be written by calling SELF.fetch(), which will dispatch a fetch() event to your user code in the same global scope as your test, but under a different request context. This means global mocks apply to your Worker’s execution, as do request context lifetime restrictions. In particular, if you forget to call ctx.waitUntil(), you’ll see an appropriate error message. This wouldn’t be the case if you called your Worker’s handler directly in a unit test, as you’d be running under the runner singleton’s Durable Object request context, whose lifetime is automatically extended.
// test/index.spec.ts
import { SELF } from "cloudflare:test";
import { it, expect } from "vitest";
import "../src/index";

it("sends request", async () => {
   const response = await SELF.fetch("https://example.com");
   expect(await response.text()).toMatchInlineSnapshot(`"body"`);
});
Isolated per-test storage
Most Workers applications will have at least one binding to a Cloudflare storage service, such as KV, R2 or D1. Ideally, tests should be self-contained and runnable in any order or on their own. To make this possible, writes to storage need to be undone at the end of each test, so reads by other tests aren’t affected. Whilst it’s possible to do this manually, it can be tricky to keep track of all writes and undo them in the correct order. For example, take the following two functions:
// helpers.ts
interface Env {
  NAMESPACE: KVNamespace;
}
// Get the current list stored in a KV namespace
export async function get(env: Env, key: string): Promise<string[]> {
  return await env.NAMESPACE.get(key, "json") ?? [];
}
// Add an item to the end of the list
export async function append(env: Env, key: string, item: string) {
  const value = await get(env, key);
  value.push(item);
  await env.NAMESPACE.put(key, JSON.stringify(value));
}
If we wanted to test these functions, we might write something like below. Note we have to keep track of all the keys we might write to, and restore their values at the end of tests, even if those tests fail.
// helpers.spec.ts
import { env } from "cloudflare:test";
import { beforeAll, beforeEach, afterEach, it, expect } from "vitest";
import { get, append } from "./helpers";

let startingList1: string | null;
let startingList2: string | null;
beforeEach(async () => {
  // Store values before each test
  startingList1 = await env.NAMESPACE.get("list 1");
  startingList2 = await env.NAMESPACE.get("list 2");
});
afterEach(async () => {
  // Restore starting values after each test
  if (startingList1 === null) {
    await env.NAMESPACE.delete("list 1");
  } else {
    await env.NAMESPACE.put("list 1", startingList1);
  }
  if (startingList2 === null) {
    await env.NAMESPACE.delete("list 2");
  } else {
    await env.NAMESPACE.put("list 2", startingList2);
  }
});

beforeAll(async () => {
  await append(env, "list 1", "one");
});

it("appends to one list", async () => {
  await append(env, "list 1", "two");
  expect(await get(env, "list 1")).toStrictEqual(["one", "two"]);
});

it("appends to two lists", async () => {
  await append(env, "list 1", "three");
  await append(env, "list 2", "four");
  expect(await get(env, "list 1")).toStrictEqual(["one", "three"]);
  expect(await get(env, "list 2")).toStrictEqual(["four"]);
});
This is slightly easier with the recently introduced onTestFinished() hook, but you still need to remember which keys were written to, or enumerate them at the start/end of tests. You’d also need to manage this for KV, R2, Durable Objects, caches and any other storage service you used. Ideally, the testing framework should just manage this all for you.
That’s exactly what the Workers Vitest pool does with the isolatedStorage option which is enabled by default. Any writes to storage performed in a test are automagically undone at the end of the test. To support seeding data in beforeAll() hooks, including those in nested describe()-blocks, a stack is used. Before each suite or test, a new frame is pushed to the storage stack. All writes performed by the test or associated beforeEach()/afterEach() hooks are written to the frame. After each suite or test, the top frame is popped from the storage stack, undoing any writes.
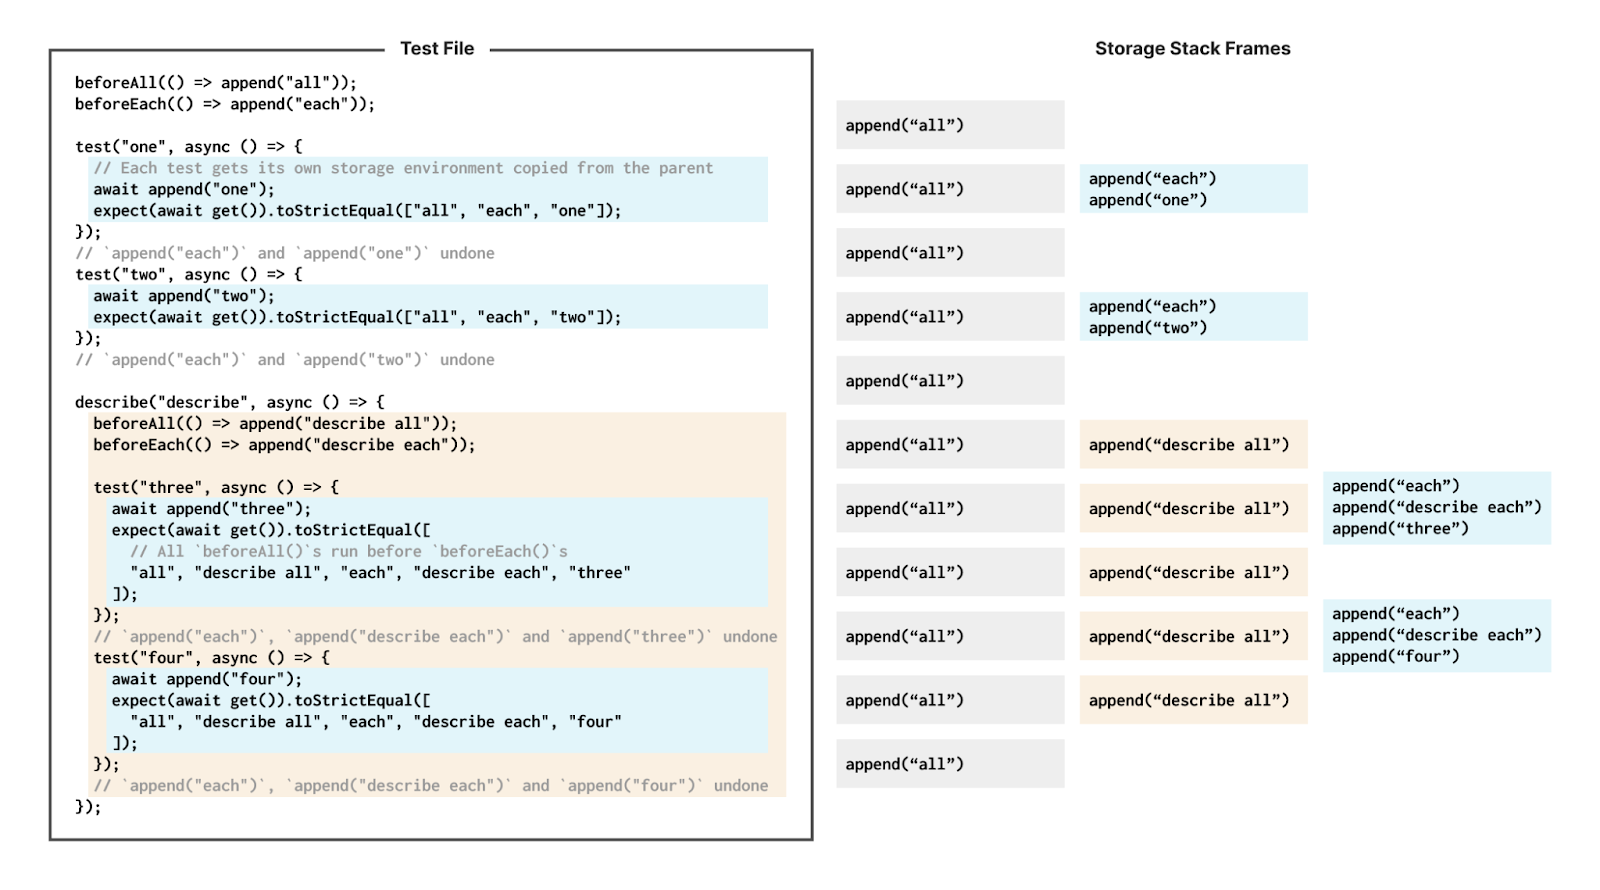
Miniflare implements simulators for storage services on top of Durable Objects with a separate blob store. When running locally, workerd uses SQLite for Durable Object storage. To implement isolated storage, we implement an on-disk stack of .sqlite database files by backing up the databases when “pushing”, and restoring backups when “popping”. Blobs stored in the separate store are retained through stack operations, and cleaned up at the end of each test run. Whilst this works, it involves copying lots of .sqlite files. Looking ahead, we’d like to explore using SQLite SAVEPOINTS for a more efficient solution.
Declarative request mocking
In addition to storage, most Workers will make outbound fetch() requests. For tests, it’s often useful to mock responses to these requests. Miniflare already allows you to specify an undici MockAgent to route all requests through. The MockAgent class provides a declarative interface for specifying requests to mock and the corresponding responses to return. This API is relatively simple, whilst being flexible enough for advanced use cases. We provide an instance of MockAgent as fetchMock in the cloudflare:test module.
import { fetchMock } from "cloudflare:test";
import { beforeAll, afterEach, it, expect } from "vitest";

beforeAll(() => {
  // Enable outbound request mocking...
  fetchMock.activate();
  // ...and throw errors if an outbound request isn't mocked
  fetchMock.disableNetConnect();
});
// Ensure we matched every mock we defined
afterEach(() => fetchMock.assertNoPendingInterceptors());

it("mocks requests", async () => {
  // Mock the first request to `https://example.com`
  fetchMock
    .get("https://example.com")
    .intercept({ path: "/" })
    .reply(200, "body");

  const response = await fetch("https://example.com/");
  expect(await response.text()).toBe("body");
});
To implement this, we bundled a stripped down version of undici containing just the MockAgent code. We then built a custom undici Dispatcher that used the Worker’s global fetch() function instead of undici’s built-in HTTP implementation based on llhttp and node:net.
Testing Durable Objects directly
Finally, Miniflare v2’s custom Vitest environment provided support for accessing the instance methods and state of Durable Objects in tests directly. This allowed you to unit test Durable Objects like any other JavaScript class—you could mock particular methods and properties, or immediately call specific handlers like alarm(). To implement this in workerd, we rely on our existing wrapping of user Durable Objects for Vite transforms and hot-module reloading. When you call the runInDurableObject(stub, callback) function from cloudflare:test, we store callback in a global cache and send a special fetch() request to stub which is intercepted by the wrapper. The wrapper executes the callback in the request context of the Durable Object, and stores the result in the same cache. runInDurableObject() then reads from this cache, and returns the result.
Note that this assumes the Durable Object is running in the same isolate as the runInDurableObject() call. While this is true for same-Worker Durable Objects running locally, it means Durable Objects defined in auxiliary workers can’t be accessed directly.
Try it out!
We are excited to release the @cloudflare/vitest-pool-workers package on npm, and to provide an improved testing experience for you.
Make sure to read the Write your first test guide and begin writing unit and integration tests today! If you’ve been writing tests using one of our previous options, our unstable_dev migration guide or our Miniflare 2 migration guide should explain key differences and help you move your tests over quickly.
If you run into issues or have suggestions for improvements, please file an issue in our GitHub repo or reach out via our Developer Discord.
Security updates for Friday
Post Syndicated from jzb original https://lwn.net/Articles/965576/
Security updates have been issued by Debian (composer and node-xml2js), Fedora (baresip), Mageia (fonttools, libgit2, mplayer, open-vm-tools, and packages), Red Hat (dnsmasq, gimp:2.8, and kernel-rt), and SUSE (389-ds, gdb, kernel, python-Django, python3, python36-pip, spectre-meltdown-checker, sudo, and thunderbird).
The First Dual Touchscreen Laptop! Libretto W100 from 2010
Post Syndicated from LGR original https://www.youtube.com/watch?v=Kla9W42o1uI
What’s Up, Home? – I created my first Zabbix 7.0 custom widget
Post Syndicated from Janne Pikkarainen original https://blog.zabbix.com/whats-up-home-i-created-my-first-zabbix-7-0-custom-widget/27668/
As Zabbix 7.0 will come with the new widget framework, allowing communication between different widgets on dashboards, of course, I had to try it out.
Creating the module
The blog post title is a bit of a clickbait in the sense that this example is just 1:1 from the Zabbix Summit 2023 custom widgets workshop session. I made some very, very minor modifications to the code, mainly just changing my name and so on to manifest.json files. Since the code itself was obtained from the workshop session, I’m not going to publish it, but this much I will tease:
{
   "manifest_version": 2.0,
   "id": "whatsuphome",
   "type": "widget",
   "name": "What's up, home?",
   "namespace": "WMHostNav",
   "version": "1.0",
   "author": "Janne Pikkarainen",
   "description": "Custom host filtering widget for my home monitoring purposes",
   "widget": {
       "js_class": "WidgetWMHostNav",
       "out": [
           {
               "type": "_hostids"
           }
       ]
   },
   "assets": {
       "js": [
           "class.widget.js"
       ],
       "css": [
           "widget.css"
       ]
   }
}
Beginning with Zabbix 7.0, you can create your own custom widgets with JavaScript & PHP, and easily make other widgets on the dashboard to react to clicks you made on some other widget. The manifest.json file in the root of your custom module can describe what kind of info your widget will broadcast to other dashboard widgets, or what kind of info it will be receiving and obeying. Other than that, the custom widget only has a 2.6-kilobyte JavaScript file and a 587-byte CSS file. Modules are placed under /usr/share/zabbix/modules.
Next, just like in older versions of Zabbix, to activate your module you just go to Administration->Modules and click on Scan modules. And, there you have it.
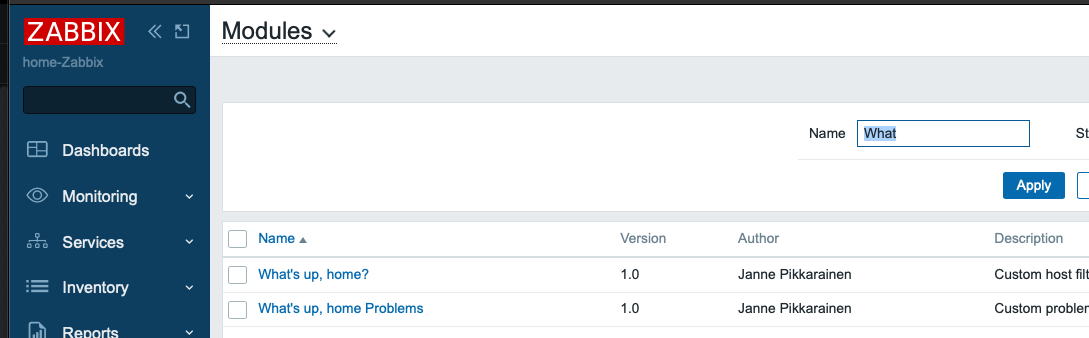
Then, in your widgets, you can enable the dynamic reactions to other widgets or dashboard query changes like this:

Great! But what will it do?
I now have a new way of filtering the visible alerts. The custom widget on the left lists my host groups and hosts that belong to them.
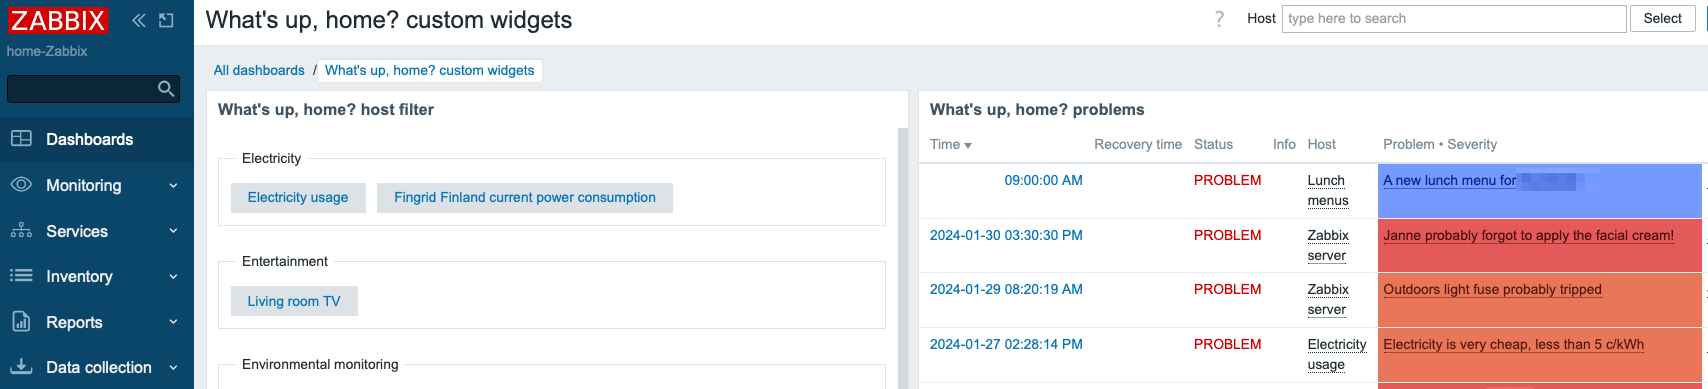
Observe what happens when I click on the Electricity usage button:
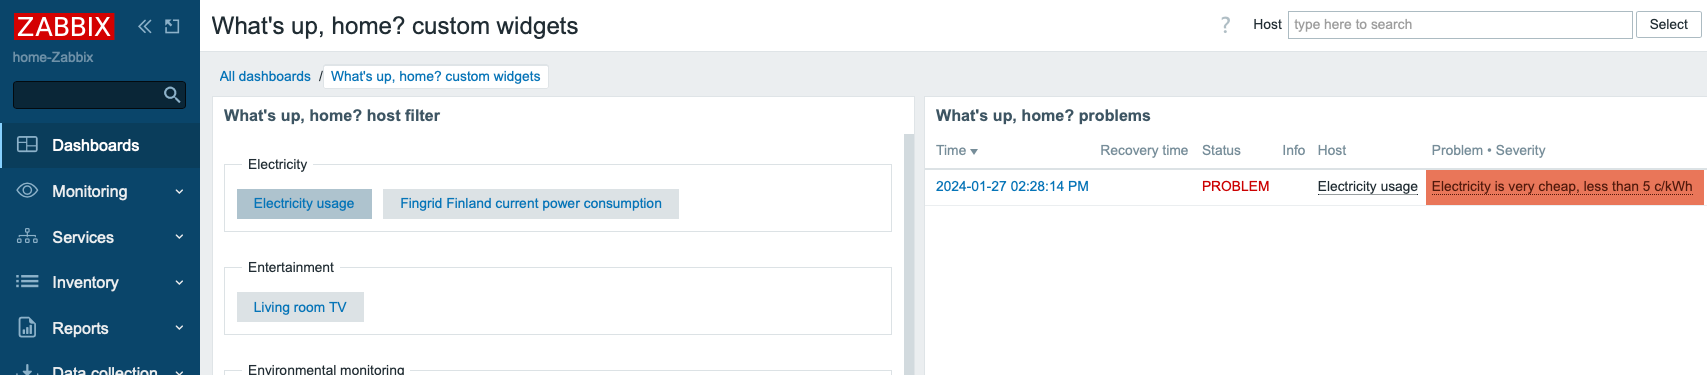
I’m not limited to only selecting one host at a time, I can click on multiple hosts. Now see what happens if I also choose Lunch menus from my hosts.

The possibilities are endless
This example is just a simple read-only example. But, as Alexei mentioned to me after my speech at the Zabbix Summit 2023, this new framework could be used for controlling stuff, too. When I have time, I’ll try to run custom scripts and do other write operations through Zabbix API and this new framework.
Having a proper control panel for switching on/off the lights, music, and other things would be really cool, and now it certainly is possible. The future of the Zabbix user interface is really exciting thanks to new custom widgets.
This post was originally published on the author’s page.
The post What’s Up, Home? – I created my first Zabbix 7.0 custom widget appeared first on Zabbix Blog.
This Day in History, March 15
Post Syndicated from The History Guy: History Deserves to Be Remembered original https://www.youtube.com/watch?v=APHuaaKDQgo
Защо ГЕРБ иска точно тези (шест) министерства?
Post Syndicated from Емилия Милчева original https://www.toest.bg/zashto-gerb-iska-tochno-tezi-shest-ministerstva/

„… изглежда като коалиционно, но ние ще казваме, че е само Мария Габриел“, казва съпредседателят на „Продължаваме промяната“ Кирил Петков в записа от Националния съвет на партията в края на май миналата година. Партийният елит обсъжда бъдещия управленски формат между ПП–ДБ и ГЕРБ–СДС. Десет месеца по-късно двете политически сили преговарят за коалиционен кабинет – все едно как ще го нарекат – с първия мандат на ГЕРБ–СДС, начело на който по силата на договорената ротация е Мария Габриел.
На 25 март Габриел ще занесе в Президентството папка с имената на министрите и засега единствено сигурното е, че сред тях ще са Николай Денков (като вицепремиер), Асен Василев (на финансите), Калин Стоянов (на вътрешните работи) и Андрей Цеков (на регионалното развитие и благоустройството). Дотогава ПП–ДБ и ГЕРБ, преговарящи за състава на бъдещия кабинет, за механизма за назначения и за мястото на ДПС в разпределението на властта, ще са приключили разговорите.
След първоначалното затишие в медиите започнаха да се появяват съобщения за кои министерски кресла претендира партията на Бойко Борисов. Общото кратно между публикациите на „24 часа“, „Клуб Z“ и „Капитал“ са шестте министерства – външното, на енергетиката, на отбраната, на земеделието, на иновациите и на околната среда. Почти всички те управляват европейски програми за милиарди – с изключение на МВнР, което се оказа въпрос на престиж и трамплин към позиция в международна институция за Габриел.
Апетитите за енергетиката
Министерството на енергетиката (МЕ) и държавните предприятия и дружества под неговата опека са притегателни за всяка власт и в контекста на енергийната трансформация тези апетити нарастват в геометрична прогресия. А при разпределението и управлението на средствата в Плана за възстановяване и устойчивост (ПВУ) енергетиката няма равна.
1,6 милиарда лева по ПВУ са за изграждане на инфраструктура от съоръжения за съхранение на електроенергия с 6000 МВт/ч използваем енергиен капацитет – в близост до мощности за възобновяема енергия (ветрогенератори, фотоволтаици, ВЕЦ, геотермална енергия и др.). Над 343 млн. лв. са безвъзмездни средства за централа за комбинирано производство на топлинна и електрическа енергия от геотермални източници; 179 млн. лв. – за енергийно ефективно улично осветление; 240 млн. лв. – за домакинства, които ще поставят слънчеви инсталации за битова гореща вода и фотоволтаични системи до 10 кВп, включително системи за съхранение на електрическа енергия; 139,6 млн. лв. – за пилотни проекти за производство на зелен водород и биогаз.
Под контрола на МЕ е и друг огромен ресурс – отговорността за териториалните планове на трите въглищни района Стара Загора, Перник и Кюстендил за общо 1,1 млрд. евро (близо 2,2 млрд. лв.) и инвестиционните предложения за бизнеси.
Наред с това, съгласно приета наскоро законова промяна, и министърът на енергетиката вече ще дава становище за промяна на предназначението на земеделска земя с площ над 50 дка, когато върху нея ще се изграждат мощности за производство на възобновяема енергия. Това означава, че без министерски подпис нито един голям проект за зелена енергия няма да види бял свят.
ГЕРБ бездруго контролира държавната енергетика – правителството на премиера в оставка Николай Денков възстанови на поста изпълнителен директор на „Булгартрансгаз“ Владимир Малинов и назначи за шеф на АЕЦ „Козлодуй“ друг стар кадър на партията на Борисов – Валентин Николов. Друг енергиен шеф от времето на ГЕРБ – Петьо Иванов, оглави дружеството, което ще строи новите ядрени мощности на площадката на АЕЦ „Козлодуй“.
Кой ще има думата в земеделието?
Независимо как се казва министърът, ДПС винаги е имало контрол върху Министерството на земеделието и храните, в което също са съсредоточени значими ресурси.
За периода 2023–2027 г. Европейският съюз осигурява почти 2,6 млрд. лв. чрез различни програми, а още 335 млн. лв. предоставя държавният бюджет. От тези около 3 млрд. лв. над 590 млн. се предоставят безвъзмездно за проекти в областта на земеделието и животновъдството.
Името, спрягано за министър на земеделието, е на Георги Тахов, чиято кариера на попрището на държавните служби започва при кабинета „Орешарски“ – управлението на БСП и ДПС. Тогава той става началник на НАП – Пловдив, а служебният кабинет на президента го постави начело и на ДФ „Земеделие“.
Най-могъщият министър
Министерството на околната среда и водите управлява средствата по програма „Околна среда“ (2021–2027 г.), които надхвърлят 3,6 млрд. лв. заедно с националното съфинансиране. Близо една трета от тези средства са предвидени за разширяване и модернизация на ВиК инфраструктурата за вече консолидираните райони Велико Търново, Габрово, Плевен, София-град, Софийска област, Търговище, Хасково и Добрич. Това означава обществени поръчки за харчене на около 1,4 млрд. лв. Без София, в останалите центрове кметовете са от ГЕРБ, в Добрич – от коалиционния партньор на Борисов СДС.
Проекти, свързани с околната среда, се финансират и от Програмата за развитие на селските райони, както и от ПУДООС. Министърът на околната среда и водите обаче е по-силен от премиера – законът му дава право да спре и пусне всяко производство. Така екоминистърът в кабинета на тройната коалиция Джевдет Чакъров, настоящ съпредседател на ДПС, не одобри доклада за ОВОС на канадската компания „Дънди Прешъс Металс“ за разширение на добива им в златната мина „Челопеч“. Наред с това бавеше свикването на Висш експертен екологичен съвет, който да разгледа доклада за ОВОС за находището „Ада тепе“ в Крумовград, и така блокираше инвестиционните планове на компанията.
Вече действа скрининг за чуждите инвестиции
Министерството на иновациите и растежа управлява две европейски програми – „Конкурентоспособност и иновации в предприятията“ (2021–2027) с бюджет от близо 3 млрд. лв. и „Научни изследвания, иновации и дигитализация за интелигентна трансформация“ (2021–2027) с бюджет от 2,14 млрд. лв.
В мандата на бъдещия премиер Мария Габриел започва да действа скринингът на преките чуждестранни инвестиции в България – в съответствие с европейски регламент, за да не се допуска т.нар. корозивен капитал в стратегически сектори. През март влязоха в сила промените за скрининг на чуждестранните инвестиции, предложени от съпредседателя на ДПС Делян Пеевски, санкциониран за значима корупция по Глобалния закон „Магнитски“. По силата на закона към Министерския съвет се създава междуведомствен съвет с представители на осем министерства и на спецслужбите, който ще разглежда всяка чуждестранна инвестиция над 2 млн. евро и съответно ще я разрешава или ще я отказва.
ГЕРБ настояват да получат и министерството на отбраната (МО)
Критикуваният и от свои, и от чужди министър Тодор Тагарев обаче може и да запази поста си. Причината е до голяма степен имиджова – ако партията на Борисов получи и МО, символ на евроатлантизма, какво остава за ПП–ДБ?
Но освен това военното министерство движи големи проекти за модернизация на армията. Приоритетните проекти до 2026 г. са десет, сред които придобиване на 8 Ф-16 Блок 70 за доизграждане на изтребителна авиационна ескадрила; придобиване на нови трикоординатни радари и др. Именно поръчката за радарите, за която са предвидени 400 млн. лв., повлия на искането за смяната му. Критиката към него е, че не е изискал подобрение на офертата на френската компания „Талес“, но настояваше правителството на Денков да одобри бързо сделката.
В периода 2026–2032 г. за българската армия са предвидени други три големи проекта – специални бронирани инженерни машини за батальонните бойни групи, тактически комуникационно-информационни системи и ракетни катери за повишаване на способностите на военноморските сили. Необходимите за всичките 13 проекта средства са 6,6 млрд. лв.
Небалансирано
Ако тези промени в кабинета се осъществят, ПП–ДБ ще имат твърде малко позиции, макар че запазват Министерството на финансите. Ще се наложи да запазят проблемното Министерство на здравеопазването, което никой от партньорите не иска, бъдещото Министерство на европейското развитие, което ще бъде създадено за Николай Денков, за тях е и Министерството на правосъдието.
Предвид разкритията, че министърът на вътрешните работи Калин Стоянов е бил номинация на ГЕРБ, балансът на силите рязко се променя. Засега е ясно, че процедурите за избор на нов състав на регулатори и контролни органи няма да стартират веднага. Процедурите по номиниране и проверки за интегритет ще отнемат дълго време, а през май предстои и кампания за евроизборите. Разбира се, за ГЕРБ и ДПС подобно бавене е добре дошло – ще продължи да управлява тяхната гарнитура. Тяхната сглобка се оказа трайна, а на ПП–ДБ и ГЕРБ все така изглежда като коалиция.
Improving C++
Post Syndicated from Bruce Schneier original https://www.schneier.com/blog/archives/2024/03/improving-c.html
C++ guru Herb Sutter writes about how we can improve the programming language for better security.
The immediate problem “is” that it’s Too Easy By Default™ to write security and safety vulnerabilities in C++ that would have been caught by stricter enforcement of known rules for type, bounds, initialization, and lifetime language safety.
His conclusion:
We need to improve software security and software safety across the industry, especially by improving programming language safety in C and C++, and in C++ a 98% improvement in the four most common problem areas is achievable in the medium term. But if we focus on programming language safety alone, we may find ourselves fighting yesterday’s war and missing larger past and future security dangers that affect software written in any language.
За тайните на имущественото застраховане
Post Syndicated from VassilKendov original https://kendov.com/%D0%B7%D0%B0-%D1%82%D0%B0%D0%B9%D0%BD%D0%B8%D1%82%D0%B5-%D0%BD%D0%B0-%D0%B8%D0%BC%D1%83%D1%89%D0%B5%D1%81%D1%82%D0%B2%D0%B5%D0%BD%D0%BE%D1%82%D0%BE-%D0%B7%D0%B0%D1%81%D1%82%D1%80%D0%B0%D1%85%D0%BE/
В това видео с моя приятел Атанас Куманов разказваме за имущественото застраховане и нещата, които голяма част от хората не подозират
– Имуществените застраховки са евтини
– По-добре е застраховката да се сключи от застраховател, а не през онлайн портал
– Имуществената застраховка в банката е задължителна при кредит, но е доста по-одобрена
– Хората живели в чужбина, по-често застраховат имуществото си

Моля използвайте приложената форма за записване на час за среща
[contact-form-7]
The post За тайните на имущественото застраховане appeared first on Kendov.com.
Еманципирано мастило: жени, калиграфия, ислям (продължение)
Post Syndicated from Атанас Шиников original https://www.toest.bg/emantsipirano-mastilo-zheni-kalighrafiya-islyam-2/
<< Към първа част

Упражняването на занаята калиграфия от самото начало е инструментално подчинено на нуждата от разпространяване на исляма. Постепенно обаче женските писарски умения се превръщат в част от развиващата се висока култура в двора на халифа и елита от Изтока на мюсюлманския свят до Запада и мюсюлманска Испания. Два века след появата на исляма вече има среда, в която образованите жени намират своето място, често пъти като част от семейства богослови и специалисти по право, понякога и като част от харема, наложници или робини.
Интелектуалецът, философ и литератор Ал-Джахиз от Багдад през IX век говори, че управниците и елитът притежавали прислужници (Маргарет Атууд не харесва това!), които движат обществено важни дейности, част от администрацията са, дори се появяват публично, облечени добре, без никой да възразява. Е, да, това все пак е метрополията на Абасидския халифат, ще кажем ние, милионен град, в който съжителстват представители на цялата империя.
Известният поет Абу ал-Атахия от X век (известен от часовете по стара арабска литература като автор на мистични и аскетични поеми) имал прислужница, която да записва стиховете му. Същото е положението и с някой си Ал-Фурат, пак от този период, автор на коментари към Корана, събирач на религиозни предания. И той също имал прислужница, която сверявала преписите му от други книги, за да се увери, че са добри.
Тук и там може да се прочете, че жени, владеещи добре калиграфия, успявали да се издигнат в обществото, например някоя си Фатима през XI век, дъщеря на Ал-Хасан ал-Акра’. Веднъж, твърди разказът, тя писала на везира на селджукския султан Тогрул. Той бил толкова впечатлен от почерка и красноречието ѝ (дали само от това, продължава кулоарното ми хихикане), че я дарил с хиляда динара.
А чували ли сте за египетската калиграфка от XII век, известна в изворите като Бинт Худауарди (Бинт-и Хюдаверди на турски), още Би-Дест? Това, второто, значело „без ръце“, защото по рождение била така. Пишела с краката (но не като пословичния израз от българското училище) и даже я довели пред един от египетските везири, за да проверят учителите по краснопис дали наистина е толкова добра. А след това везирът, очевидно доволен от видяното, я удостоил с официална длъжност.
Особен е случаят на Падишах Хатун, за която биографите казват, че била единствената жена управник (султан) и в същото време активно практикуващ калиграф. Историята ѝ е достойна за ориенталски римейк на „Игра на тронове“. За период от около четири години управлява иранската провинция Керман в края на XIII век и преди да бъде удушена в династични боричкания, става известна като покровителка на учени, поетеса и преписвачка на Корана, оставила след себе си няколко копия от свещената мюсюлманска книга.
Всички тези разкази са неизбежно оцветени от доза романтизъм и фикционалност.
Оскъдни, разпръснати тук и там из съчинения по литература и история, хроники, дворцова литература и поезия, те в повечето случаи подхранват представа за Близкия и Средния изток, сродна по дух с „Приказки от хиляда и една нощ“.
Разказите за калиграфките придобиват малко по-ясна структура с възхода на Османската империя. Най-малкото, вече може да четем биографични речници, посветени на калиграфската история. Хилал Казан, най-популярната съвременна турска изследователка на женската калиграфска традиция (и самата тя практикуваща този занаят), отбелязва, че в традиционните енциклопедии от Османската империя се идентифицират общо около двайсет жени. Към тях тя добавя открита информация за още десетина, т.е. общо около трийсет за няколко столетия от началото на империята до края на XIX век.
Сходно е положението и в Иран, където има информация за множество жени калиграфи по времето на управлението на Каджарската династия през XIX век, но пък свидетелствата по време на Сафавидите в периода XVI–XVII век са за само три жени. Защо това е така, може да се спекулира.
В интерес на сравнителните изследвания, може да се провери колко са жените художници в Западна Европа по същото време. Подозрението ми е, че броят е сходен.
Обучението по краснопис е неотменна част от възпитанието на дворцовия и интелектуален елит и често върви заедно с умението за изработване на мраморна хартия (осм.-тур. ебру) и геометрична или растителна орнаментация (осм.-тур. тезхиб). Историята на Умми Хатун, дъщеря на ковач от Галиполи през XVI век, е по-скоро забележително изключение. От друга страна, отношението към личното пространство и мястото на жената в обществото няма как да бъде пренебрегнато.
Артистична изява от този тип остава подчинена на културните условности на епохата. Крие се по кьошетата на традицията и само от време на време излиза на светло – като в живота на Есма Ибрет Ханъм, може би най-известната османска калиграфка. Родена през 1780 г., Есма е дъщеря на служител в двора на султан Селим III. От детството си тя била ученичка на известния калиграф Махмуд Джеляледдин (един от любимците ми). Учил с много майстори на занаята, но с никого от тях не успял да се спогоди, защото бил много инатлив. Османските извори тук употребяват думата серт. Накрая се превърнал в пример за самоук калиграф. Това е рядкост в рамките на
традиция, в която приемствеността между ученик и учител е съществена част от качеството на обучението.
Неговият стил – отражение на характера му, казват, не успява да се превърне в част от мейнстрийма, подобно на съдбата на другия ми любимец – Ахмет Карахисари, изписал джамията „Сюлеймание“.
Не знам какво да мисля за брака му с неговата по-млада ученичка (дали може да говорим за ориенталска калиграфска история, подобна на историята на Абелар и Елоиз на Запад), но ученичката му успява да придобие официалната калиграфска диплома, т.нар. иджаза, преди да навърши петнайсет години, и изработва подарък за султан Селим III по поръчка. Подаръкът е в калиграфския жанр на хилйе, т.е. описание на Пророка Мохамед със стандартизирана определена форма. Смятало се е за особено престижно калиграфите да изработват такива. (Известно време подобно произведение висеше в пловдивската Джумая джамия, дарение от Истанбулската община, но после го снеха.) В знак на благодарност султанът я дарява с 500 гроша и дневна надница.
В същия дух върви и друга анекдотична история за Есма Ибрет Ханъм. Един ден високопоставен клиент поръчал на Махмуд Джеляледдин по време на Рамазана копие от книга с молитви. Той нямал подръка готова и наскърбен се прибрал вкъщи. Есма го посрещнала и като разбрала, му казала, че вече има готов препис, в който имитирала стила на своя учител и съпруг. Тогава той прегледал почерка ѝ, поправил нещо тук-там, сложил подписа си под преписа и изпратил готовата поръчка.
След Кемал Ататюрк полето на калиграфията претърпява промени.
Замяната на арабицата с латиница в модерна Турция няма как да не се отрази на популярността на този занаят. И все пак традицията устоява. В едно противоположно идеологическо движение Ислямската революция в Иран пък дава тласък на традиционните мюсюлмански книжни изкуства. И в двете държави – както и в арабския свят, впрочем с известни изключения – калиграфията остава традиционен занаят, чието откъсване от люлката на религиозното е нежелано и ненужно.
Интересно наблюдение прави Давид Симоновиц през 2010 г. Известният калиграф Хасан Челеби, активно подкрепян в дейността си от Центъра за ислямска история, изкуство и култура (IRCICA), дотогава е успял да обучи около 500 мъже. От тях 48 са получили официалната калиграфска диплома. В същото време е обучил около 300 жени. Само три от тях (по времето, когато е направено наблюдението) са придобили калиграфска диплома – Айтен Тиряки, Хилал Казан и Налан Кутсал. Оттогава със сигурност числата са други. Много повече жени получават формално потвърждение за майсторство в занаята, а и не е задължително всички, които са били обучени, да са преминали през официалния процес по сертифициране. Но самият Хасан Челеби прави изказване, което заслужава внимание.
Жените, твърди той, били твърде заети, за да учат калиграфия, защото имали повече домашни задължения от мъжете.
Но не бил против да ги обучава. И това често става под покровителството на организации като IRCICA, която от години полага целенасочени усилия за популяризирането и опазването на калиграфията. Или пък на Истанбулската община, която в миналото организира симпозиуми, посветени на жените калиграфи под егидата на Ердоган, по онова време премиер.
Подобни събития без съмнение обслужват политическия дневен ред и носят отсянката на държавната синекурност, съпътстваща официалните културни политики. Не може да се каже, че допринасят за разчупването на калиграфския канон. Всъщност точно обратното – съхраняват традиционния образ на жената калиграф, която упражнява изкуството си в идеологизираните рамки на позволеното и приемливото от обществената, културна и религиозна норма. Но със сигурност служат като трамплин за вече утвърдени калиграфи като Сорая Сийед или Нурия Гарсия Масип, които пък на свой ред в частната си калиграфска практика и уъркшопи привнасят експериментален елемент във вече утвърдените конвенции.
Има и нещо друго. Не бива да забравяме, че формалното предаване на уменията в рамките на консервативната традиция не е единствената възможност за практикуване. По примера на Махмуд Джеляледдин винаги е възможно човек да се занимава с калиграфия, дори и без да учи при някой утвърден майстор и да се стреми към получаване на официален сертификат. Новите медии и глобализираният обмен на информация могат да бъдат само от полза. Дистанционното обучение по калиграфия, което преди се осъществяваше чрез традиционна кореспонденция на хартия, сега е ускорено от дигиталните средства и социалните мрежи. Съществува огромно пространство за експерименти с модерни интерпретации на арабската азбука в полето на абстрактните визуални изкуства или смесването им с графити.
По този път поема например Мауада Мухтасиб от Саудитска Арабия, която не просто комбинира латинската и арабската азбука, но и набира популярност чрез техниката на огледалното изписване на арабската фраза в модернистични, опростени, енергични шрифтове. Или пък Джумана Медлеж от Ливан, която използва високостилизирани варианти на стари арабски шрифтове от вариацията на куфийския, получил наименованието си от град Куфа в Багдад. Явно тепърва предстои да разберем дали ще станем свидетели на обособени калиграфски школи, в които жените да заемат по-пълноценно място сред „синовете Адамови“.
В рубриката „Ориент кафе“ Атанас Шиников поднася любопитни теми, свързани не толкова с горещата политика, колкото с историята и културата на Близкия изток. А той, древен и днешен, е по-близко до нас и съвремието ни, отколкото си представяме.
Съвременната турска музика и европейската сцена
Post Syndicated from Емине Садкъ original https://www.toest.bg/suvremennata-turska-muzika-i-evropeyskata-scena/

Преди да започнете да четете, може да си пуснете плейлист с повече от двайсет съвременни турски банди. Ако пък нямате време за плейлисти, не пропускайте следните имена: Аyyuka; Islandman; Collectif Medz Bazar; Nekropsi; Gayes Su Akyol.
В предишните две статии говорихме за музиката на турските гастарбайтери в Германия през 60-те и 80-те години – музика, която се превръща както в дом, така и във форма на протест за стотици хиляди работници, намиращи се в една болезнено непозната страна. Представихме също и т.нар. ориенталски хип-хоп от 90-те години, служещ за съпротива срещу неонацизма и отстояване на идентичността на второто поколение турци – децата на гурбетчиите, родени през 70-те години в Германия.
В тази заключителна статия ще се фокусираме върху съвременната турска музика като цяло, която не разчита на нищо друго, освен на идентичността и автентичността си. Ще стане дума и за сливането ѝ с различни музикални форми, както и за мястото ѝ на европейската и световната сцена.
Съвременната алтернативна турска музика е отделен жанр със собствена уникалност и ритъм,
които трудно могат да бъдат сбъркани, но за да бъде поставен този жанр на мястото му в музикалните магазини, критиците най-често го причисляват към необятното и не съвсем ясно понятие World music. Според мен по-скоро е Crossing worlds music.
Във филма на Фатих Акин „Музиката на Истанбул“ (2005) членовете на една от най-емблематичните турски рок-гръндж банди – Replikas, заявяват, че дълго време са се борили с това да не принадлежат на голямата сцена и каквото и да правят, никога да не звучат така, както звучат западните банди. Накрая осъзнават, че точно в това е тяхната сила и че използването на традиционната турска (ориенталска) музика им дава по-голяма дълбочина и автентичност.
Трудно се изкоренява ориенталската мелодия от душата на един народ и е особено ценно, че сегашната турска музика успява така изкусно да вплете нишката на своето ДНК, без да звучи нито остаряло, нито досадно.
През 1934 г., по време на културните промени на Ататюрк, турската музика в радиостанциите е забранена.
На нейно място звучи класическа и европейска, но тъкмо затова повечето хора по онова време слушат египетски радиа.
Първото истинско западно влияние върху турската музика е на „Бийтълс“,
които вдъхновяват както великана на турския рок Баръш Манчо (Barış Manco), така и Джем Караджа и Еркин Корай, създали жанра анадолски рок. Преди няколко години беше осъществен проектът Аnatolian Rock Revival Project, представящ част от този стил. Освен че са преведени на английски, песните са анимирани по много красив начин.



Отляво надясно: Баръш Манчо, Джем Караджа, Еркин Корай
Бих ви окуражила да изгледате клипове на споменатите по-горе изпълнители, за да разберете колко много са повлияли на съвременните турски банди, както и защо хипарското, психеделично, груув излъчване и звучене са все още част от облика на турската алтернативна музика, част от нейната уникалност.
В този ред на мисли, не можем да продължим нататък, без да споменем BaBa ZuLa и тяхната отдаденост на експерименталния ориенталски ъндърграунд психеделичен рок, познат с изтънчеността си, доброто познаване на традиционното звучене, но и със задължителната изненада, която бих нарекла „сладка лудост“.
За мен беше удоволствие да чуя дарк-ембиънт-психеделичния албум Bu Bir Ruya („Това е сън“) през 2018-та. Албумът е част от проекта DirtMusic на Hugo Race – бивш член на бандата Nick Cave and The Bad Seeds, и BaBa ZuLa пасват невероятно. Албумът е многолик, преплита ориенталска музика и дарк ембиънт китара, а текстовете на песните са или силно политически, или твърде лични. Пее се както на английски, така и на турски. Човек би си помислил, че специално за мен са го записали този албум! Слушах го до припадък.
Друг албум, който слушах безброй пъти, беше Gece („Нощ“), на една от най-нашумелите по света турскоезични банди, изпълняваща анадолски рок – Altın Gün („Златен ден“). Тя затвърди и популяризира хипарското, груув усещане за анадолския рок, но и вдигна летвата с талантливо и умело адаптиране. Групата е базирана в Амстердам. Създадена е от нидерландеца Яспер Ферхюлст (басист), бивш член на инди банда, който иска да свири анадолски рок, но не знае турски. Разлепя обяви в турските бакалии из цял Амстердам, пуска публикации в социалните мрежи и след известно време намира Мерве Дасдемир (вокал) и Ердиндж Еджевит (баглама и вокал). Така се сформира единствената (до този момент) турскoезична банда, номинирана за „Грами“ през 2019 г., която Турция разпознава като своя. Един от водещите ежедневници на Турция Hürriyet я нарича „нашата гордост на червения килим“.
Във връзка с наградите и популярността обръщам специално внимание на лейбъла GlitterBeat, част от който са BaBa ZuLa, Gaye Su Akyol и Altın Gün. Каталогът им е пъстър и пълен с качествена музика от Африка, Азия, Южна Америка и др.


Altın Gün © Sanja Marusic
През 2021 г. започва проектът #60JahreMusik, с който се отбелязва 60-годишнината на турската музика в Германия. Сайтът, в който са събрани интервюта, видеоклипове, статии за музиката на различните поколения, е наречен Истанбул-Берлин. Това е много смислен проект и единствен по рода си архив и каталог на турски музиканти, живеещи в Германия. В сайта може да се намерят статии на английски и всеки, който проявява по-голям интерес по темата, ще открие достатъчно лични истории и още музика.
Проследяването на присъствието на турската култура от последните шейсет години в Европа чрез музиката за мен е интересен начин да се ориентираме къде се намира тя на европейската карта в момента. Колкото далечна и непозната е в началото на 60-те в Германия, толкова разпознаваема е през последните няколко години.
Съвременната турска музика вече е част от европейската и световната сцена. И не се бори за нищо – просто е.
Свободна е да бъде себе си; приета е като равна. За това помагат не само глобализацията и открехнатата врата, през която успяват да преминат нови културни течения, но и стабилното присъствие на турската музика в Европа вече шест десетилетия. Помага и приемането на алтернативната западна музика в турската култура.
Културният диалог, който тече в момента, и приемствеността са важни за нас, живеещи между звуците на Изтока и Запада.
Казват, че най-лесният начин да научиш за един народ е да слушаш неговата музика. Мисля, че ние все повече се опознаваме едни други. Но този процес е крехък, затова е добре към него да се подхожда с внимание и разбиране. За да продължим да се срещаме отвъд границите, отвъд мисълта за тях.
Run and manage open source InfluxDB databases with Amazon Timestream
Post Syndicated from Donnie Prakoso original https://aws.amazon.com/blogs/aws/run-and-manage-open-source-influxdb-databases-with-amazon-timestream/
Starting today, you can use InfluxDB as a database engine in Amazon Timestream. This support makes it easy for you to run near real-time time-series applications using InfluxDB and open source APIs, including open source Telegraf agents that collect time-series observations.
Now you have two database engines to choose in Timestream: Timestream for LiveAnalytics and Timestream for InfluxDB.
You should use the Timestream for InfluxDB engine if your use cases require near real-time time-series queries or specific features in InfluxDB, such as using Flux queries. Another option is the existing Timestream for LiveAnalytics engine, which is suitable if you need to ingest more than tens of gigabytes of time-series data per minute and run SQL queries on petabytes of time-series data in seconds.

With InfluxDB support in Timestream, you can use a managed instance that is automatically configured for optimal performance and availability. Furthermore, you can increase resiliency by configuring multi-Availability Zone support for your InfluxDB databases.
Timestream for InfluxDB and Timestream for LiveAnalytics complement each other for low-latency and large-scale ingestion of time-series data.
Getting started with Timestream for InfluxDB
Let me show you how to get started.
First, I create an InfluxDB instance. I navigate to the Timestream console, go to InfluxDB databases in Timestream for InfluxDB and select Create Influx database.

On the next page, I specify the database credentials for the InfluxDB instance.

I also specify my instance class in Instance configuration and the storage type and volume to suit my needs.

In the next part, I can choose a multi-AZ deployment, which synchronously replicates data to a standby database in a different Availability Zone or just a single instance of InfluxDB. In the multi-AZ deployment, if a failure is detected, Timestream for InfluxDB will automatically fail over to the standby instance without data loss.

Then, I configure how to connect to my InfluxDB instance in Connectivity configuration. Here, I have the flexibility to define network type, virtual private cloud (VPC), subnets, and database port. I also have the flexibility to configure my InfluxDB instance to be publicly accessible by specifying public subnets and set the public access to Publicly Accessible, allowing Amazon Timestream will assign a public IP address to my InfluxDB instance. If you choose this option, make sure that you have proper security measures to protect your InfluxDB instances.
In this demo, I set my InfluxDB instance as Not publicly accessible, which also means I can only access it through the VPC and subnets I defined in this section.

Once I configure my database connectivity, I can define the database parameter group and the log delivery settings. In Parameter group, I can define specific configurable parameters that I want to use for my InfluxDB database. In the log delivery settings, I also can define which Amazon Simple Storage Service (Amazon S3) bucket I have to export the system logs. To learn more about the required AWS Identity and Access Management (IAM) policy for the Amazon S3 bucket, visit this page.
Once I’m happy with the configuration, I select Create Influx database.

Once my InfluxDB instance is created, I can see more information on the detail page.

With the InfluxDB instance created, I can also access the InfluxDB user interface (UI). If I configure my InfluxDB as publicly accessible, I can access the UI using the console by selecting InfluxDB UI. As shown on the setup, I configured my InfluxDB instance as not publicly accessible. In this case, I need to access the InfluxDB UI with SSH tunneling through an Amazon Elastic Compute Cloud (Amazon EC2) instance within the same VPC as my InfluxDB instance.
With the URL endpoint from the detail page, I navigate to the InfluxDB UI and use the username and password I configured in the creation process.

With access to the InfluxDB UI, I can now create a token to interact with my InfluxDB instance.

I can also use the Influx command line interface (CLI) to create a token. Before I can create the token, I create a configuration to interact with my InfluxDB instance. The following is the sample command to create a configuration:
influx config create --config-name demo  \
    --host-url https://<TIMESTREAM for INFLUX DB ENDPOINT> \
   --org demo-org
   --username-password [USERNAME] \
   --active
With the InfluxDB configuration created, I can now create an operator, all-access or read/write token. The following is an example for creating an all-access token to grant permissions to all resources in the organization that I defined:
influx auth create --org demo-org --all-accessWith the required token for my use case, I can use various tools, such as the Influx CLI, Telegraf agent, and InfluxDB client libraries, to start ingesting data into my InfluxDB instance. Here, I’m using the Influx CLI to write sample home sensor data in the line protocol format, which you can also get from the InfluxDB documentation page.
influx write \
  --bucket demo-bucket \
  --precision s "
home,room=Living\ Room temp=21.1,hum=35.9,co=0i 1641024000
home,room=Kitchen temp=21.0,hum=35.9,co=0i 1641024000
home,room=Living\ Room temp=21.4,hum=35.9,co=0i 1641027600
home,room=Kitchen temp=23.0,hum=36.2,co=0i 1641027600
home,room=Living\ Room temp=21.8,hum=36.0,co=0i 1641031200
home,room=Kitchen temp=22.7,hum=36.1,co=0i 1641031200
home,room=Living\ Room temp=22.2,hum=36.0,co=0i 1641034800
home,room=Kitchen temp=22.4,hum=36.0,co=0i 1641034800
home,room=Living\ Room temp=22.2,hum=35.9,co=0i 1641038400
home,room=Kitchen temp=22.5,hum=36.0,co=0i 1641038400
home,room=Living\ Room temp=22.4,hum=36.0,co=0i 1641042000
home,room=Kitchen temp=22.8,hum=36.5,co=1i 1641042000
home,room=Living\ Room temp=22.3,hum=36.1,co=0i 1641045600
home,room=Kitchen temp=22.8,hum=36.3,co=1i 1641045600
home,room=Living\ Room temp=22.3,hum=36.1,co=1i 1641049200
home,room=Kitchen temp=22.7,hum=36.2,co=3i 1641049200
home,room=Living\ Room temp=22.4,hum=36.0,co=4i 1641052800
home,room=Kitchen temp=22.4,hum=36.0,co=7i 1641052800
home,room=Living\ Room temp=22.6,hum=35.9,co=5i 1641056400
home,room=Kitchen temp=22.7,hum=36.0,co=9i 1641056400
home,room=Living\ Room temp=22.8,hum=36.2,co=9i 1641060000
home,room=Kitchen temp=23.3,hum=36.9,co=18i 1641060000
home,room=Living\ Room temp=22.5,hum=36.3,co=14i 1641063600
home,room=Kitchen temp=23.1,hum=36.6,co=22i 1641063600
home,room=Living\ Room temp=22.2,hum=36.4,co=17i 1641067200
home,room=Kitchen temp=22.7,hum=36.5,co=26i 1641067200
"
Finally, I can query the data using the InfluxDB UI. I navigate to the Data Explorer page in the InfluxDB UI, create a simple Flux script, and select Submit.

Timestream for InfluxDB makes it easier for you to develop applications using InfluxDB, while continuing to use your existing tools to interact with the database. With the multi-AZ configuration, you can increase the availability of your InfluxDB data without worrying about the underlying infrastructure.
AWS and InfluxDB partnership
Celebrating this launch, here’s what Paul Dix, Founder and Chief Technology Officer at InfluxData, said about this partnership:

“The future of open source is powered by the public cloud—reaching the broadest community through simple entry points and practical user experience. Amazon Timestream for InfluxDB delivers on that vision. Our partnership with AWS turns InfluxDB open source into a force multiplier for real-time insights on time-series data, making it easier than ever for developers to build and scale their time-series workloads on AWS.”
Things to know
Here are some additional information that you need to know:
Availability – Timestream for InfluxDB is now generally available in the following AWS Regions: US East (Ohio, N. Virginia), US West (Oregon), Asia Pacific (Mumbai, Singapore, Sydney, Tokyo), and Europe (Frankfurt, Ireland, Stockholm).
Migration scenario – To migrate from a self-managed InfluxDB instance, you can simply restore a backup from an existing InfluxDB database into Timestream for InfluxDB. If you need to migrate from existing Timestream LiveAnalytics engine to Timestream for InfluxDB, you can leverage Amazon S3. Read more on how to do migration for various use cases on Migrating data from self-managed InfluxDB to Timestream for InfluxDB page.
Supported version – Timestream for InfluxDB currently supports the open source 2.7.5 version of InfluxDB
Pricing – To learn more about pricing, please visit Amazon Timestream pricing.
Demo – To see Timestream for InfluxDB in action, have a look at this demo created by my colleague, Derek:
Start building time-series applications and dashboards with millisecond response times using Timestream for InfluxDB. To learn more, visit Amazon Timestream for InfluxDB page.
Happy building!
— Donnie
Comic for 2024.03.15 – Sick Dog
Post Syndicated from Explosm.net original https://explosm.net/comics/sick-dog
New Cyanide and Happiness Comic
Schwa
Post Syndicated from xkcd.com original https://xkcd.com/2907/

Broadcom Now Sampling 51.2T Co-Packaged Optics Switch
Post Syndicated from Rohit Kumar original https://www.servethehome.com/broadcom-now-sampling-51-2t-co-packaged-optics-switch/
Broadcom is now sampling its Tomahawk 5 Bailly 51.2T co-packaged optics switch solution to transition the industry to more efficient networks
The post Broadcom Now Sampling 51.2T Co-Packaged Optics Switch appeared first on ServeTheHome.
Undersea cable failures cause Internet disruptions for multiple African countries
Post Syndicated from João Tomé original https://blog.cloudflare.com/undersea-cable-failures-cause-internet-disruptions-across-africa-march-14-2024

Internet connectivity in several African countries was disrupted today, March 14, 2024. Beginning at approximately 05:00 UTC, west and central African countries were most impacted, as was South Africa. Based on published reports and social media posts from impacted network providers, the disruption is believed to be due to multiple undersea cable failures in the region. From The Gambia to Côte d’Ivoire, including a major network in South Africa (Vodacom), a total of 11 African countries were impacted, based on our observations.
Cloudflare Radar data shows a pattern of disruptions from the north to the south of West Africa over time. It began south of Senegal, with The Gambia, Guinea, and Liberia experiencing disruptions around 05:00 UTC.
In The Gambia and Guinea, the disruptions lasted about 30 minutes, while in Liberia, the disruption has lasted more than 12 hours.
Moving south, around 07:30 UTC, disruptions were observed in Côte d’Ivoire and Ghana.
Niger, a landlocked nation in Central Africa, experienced a disruption at 09:15, lasting just over two hours.
This was followed by disruptions starting around 10:30 UTC in Nigeria, Benin, Cameroon, and Togo. These disruptions were ongoing at the time of writing.
At approximately the same time, a significant disruption was observed on Vodacom’s South African network (AS29975). Traffic began to recover after 13:30 UTC, and appears to have reached close to normal levels by 16:00 UTC.
The importance of submarine cables
This series of disruptions serves as a reminder of how dependent the Internet is on submarine cables, which are estimated to carry over 90% of intercontinental data traffic. Only a small percentage of general use is done via satellite networks. There are 529 active submarine cables and 1,444 landings that are currently active or under construction, running to an estimated 1.3 million km around the globe.
We have written about submarine cable-related outages before, from Tonga to the AAE-1 & SMW5 cable cuts of June 2022.
Reports from several local networks, including South Africa’s Vodacom, MTN in Nigeria, and Celtiis in Bénin, reference multiple submarine cable failures. Microsoft was more detailed, stating on their Azure status page that “multiple fiber cables on the West Coast of Africa — WACS, MainOne, SAT3, ACE — have been impacted which reduced total capacity supporting our Regions in South Africa”. The company also explains that the recent cable cuts in the Red Sea in combination with today’s cable issues, “has impacted all Africa capacity”.
In addition to the impacts to the Microsoft Azure cloud platform, the website of MainOne, owners of the MainOne submarine cable, was offline for several hours. DNS for mainone.net is handled by name servers located in MainOne’s address space. It appears that a portion of the IPv4 address space for AS37282 (MAINONE) stopped being announced between 07:30 and 15:00 UTC, and once this address space was being routed again, both the nameservers and website became reachable.
This map from TeleGeography highlights the impacted submarine cables: WACS (West Africa Cable System), MainOne, SAT-3/WASC, and ACE.

The disruptions are now being reported by news media outlets, including in South Africa, where the emphasis is not only on the latest outage but also on the problem with the submarine cable operator Seacom. This operator experienced a service-impacting outage on its cable system in the Red Sea. On March 8, the company stated that it is waiting for permits to start repairing its broken submarine cable in the Red Sea.
We will keep monitoring the situation. Follow the Cloudflare Radar Outage Center for the latest updates, and follow us on social media at @CloudflareRadar (X), cloudflare.social/@radar (Mastodon), and radar.cloudflare.com (Bluesky).
Abby Wambach | International Women’s Day 2024 | Talks at Google
Post Syndicated from Talks at Google original https://www.youtube.com/watch?v=a2VhBwQwDTo
How VMware Tanzu CloudHealth migrated from self-managed Kafka to Amazon MSK
Post Syndicated from Rivlin Pereira original https://aws.amazon.com/blogs/big-data/how-vmware-tanzu-cloudhealth-migrated-from-self-managed-kafka-to-amazon-msk/
This is a post co-written with Rivlin Pereira & Vaibhav Pandey from Tanzu CloudHealth (VMware by Broadcom).
VMware Tanzu CloudHealth is the cloud cost management platform of choice for more than 20,000 organizations worldwide, who rely on it to optimize and govern their largest and most complex multi-cloud environments. In this post, we discuss how the VMware Tanzu CloudHealth DevOps team migrated their self-managed Apache Kafka workloads (running version 2.0) to Amazon Managed Streaming for Apache Kafka (Amazon MSK) running version 2.6.2. We discuss the system architectures, deployment pipelines, topic creation, observability, access control, topic migration, and all the issues we faced with the existing infrastructure, along with how and why we migrated to the new Kafka setup and some lessons learned.
Kafka cluster overview
In the fast-evolving landscape of distributed systems, VMware Tanzu CloudHealth’s next-generation microservices platform relies on Kafka as its messaging backbone. For us, Kafka’s high-performance distributed log system excels in handling massive data streams, making it indispensable for seamless communication. Serving as a distributed log system, Kafka efficiently captures and stores diverse logs, from HTTP server access logs to security event audit logs.
Kafka’s versatility shines in supporting key messaging patterns, treating messages as basic logs or structured key-value stores. Dynamic partitioning and consistent ordering ensure efficient message organization. The unwavering reliability of Kafka aligns with our commitment to data integrity.
The integration of Ruby services with Kafka is streamlined through the Karafka library, acting as a higher-level wrapper. Our other language stack services use similar wrappers. Kafka’s robust debugging features and administrative commands play a pivotal role in ensuring smooth operations and infrastructure health.
Kafka as an architectural pillar
In VMware Tanzu CloudHealth’s next-generation microservices platform, Kafka emerges as a critical architectural pillar. Its ability to handle high data rates, support diverse messaging patterns, and guarantee message delivery aligns seamlessly with our operational needs. As we continue to innovate and scale, Kafka remains a steadfast companion, enabling us to build a resilient and efficient infrastructure.
Why we migrated to Amazon MSK
For us, migrating to Amazon MSK came down to three key decision points:
- Simplified technical operations – Running Kafka on a self-managed infrastructure was an operational overhead for us. We hadn’t updated Kafka version 2.0.0 for a while, and Kafka brokers were going down in production, causing issues with topics going offline. We also had to run scripts manually for increasing replication factors and rebalancing leaders, which was additional manual effort.
- Deprecated legacy pipelines and simplified permissions – We were looking to move away from our existing pipelines written in Ansible to create Kafka topics on the cluster. We also had a cumbersome process of giving team members access to Kafka machines in staging and production, and we wanted to simplify this.
- Cost, patching, and support – Because Apache Zookeeper is completely managed and patched by AWS, moving to Amazon MSK was going to save us time and money. In addition, we discovered that running Amazon MSK with the same type of brokers on Amazon Elastic Compute Cloud (Amazon EC2) was cheaper to run on Amazon MSK. Combined with the fact that we get security patches applied on brokers by AWS, migrating to Amazon MSK was an easy decision. This also meant that the team was freed up to work on other important things. Finally, getting enterprise support from AWS was also critical in our final decision to move to a managed solution.
How we migrated to Amazon MSK
With the key drivers identified, we moved ahead with a proposed design to migrate existing self-managed Kafka to Amazon MSK. We conducted the following pre-migration steps before the actual implementation:
- Assessment:
- Conducted a meticulous assessment of the existing EC2 Kafka cluster, understanding its configurations and dependencies
- Verified Kafka version compatibility with Amazon MSK
- Amazon MSK setup with Terraform
- Used Terraform to provision an MSK cluster, embracing infrastructure as code (IaC) principles for repeatability and version control
- Configured Amazon Virtual Private Cloud (Amazon VPC) security groups, AWS Identity and Access Management (IAM) roles, and VPC settings through Terraform to establish a robust foundation for Amazon MSK
- Network configuration:
- Ensured seamless network connectivity between the EC2 Kafka and MSK clusters, fine-tuning security groups and firewall settings
After the pre-migration steps, we implemented the following for the new design:
- Automated deployment, upgrade, and topic creation pipelines for MSK clusters:
- In the new setup, we wanted to have automated deployments and upgrades of the MSK clusters in a repeatable fashion using an IaC tool. Therefore, we created custom Terraform modules for MSK cluster deployments as well as upgrades. These modules where called from a Jenkins pipeline for automated deployments and upgrades of the MSK clusters. For Kafka topic creation, we were using an Ansible-based home-grown pipeline, which wasn’t stable and led to a lot of complaints from dev teams. As a result, we evaluated options for deployments to Kubernetes clusters and used the Strimzi Topic Operator to create topics on MSK clusters. Topic creation was automated using Jenkins pipelines, which dev teams could self-service.
- Better observability for clusters:
- The old Kafka clusters didn’t have good observability. We only had alerts on Kafka broker disk size. With Amazon MSK, we took advantage of open monitoring using Prometheus. We stood up a standalone Prometheus server that scraped metrics from MSK clusters and sent them to our internal observability tool. As a result of improved observability, we were able to set up robust alerting for Amazon MSK, which wasn’t possible with our old setup.
- Improved COGS and better compute infrastructure:
- For our old Kafka infrastructure, we had to pay for managing Kafka, Zookeeper instances, plus any additional broker storage costs and data transfer costs. With the move to Amazon MSK, because Zookeeper is completely managed by AWS, we only have to pay for Kafka nodes, broker storage, and data transfer costs. As a result, in final Amazon MSK setup for production, we saved not only on infrastructure costs but also operational costs.
- Simplified operations and enhanced security:
- With the move to Amazon MSK, we didn’t have to manage any Zookeeper instances. Broker security patching was also taken care by AWS for us.
- Cluster upgrades became simpler with the move to Amazon MSK; it’s a straightforward process to initiate from the Amazon MSK console.
- With Amazon MSK, we got broker automatic scaling out of the box. As a result, we didn’t have to worry about brokers running out of disk space, thereby leading to additional stability of the MSK cluster.
- We also got additional security for the cluster because Amazon MSK supports encryption at rest by default, and various options for encryption in transit are also available. For more information, refer to Data protection in Amazon Managed Streaming for Apache Kafka.
During our pre-migration steps, we validated the setup on the staging environment before moving ahead with production.
Kafka topic migration strategy
With the MSK cluster setup complete, we performed a data migration of Kafka topics from the old cluster running on Amazon EC2 to the new MSK cluster. To achieve this, we performed the following steps:
- Set up MirrorMaker with Terraform – We used Terraform to orchestrate the deployment of a MirrorMaker cluster consisting of 15 nodes. This demonstrated the scalability and flexibility by adjusting the number of nodes based on the migration’s concurrent replication needs.
- Implement a concurrent replication strategy – We implemented a concurrent replication strategy with 15 MirrorMaker nodes to expedite the migration process. Our Terraform-driven approach contributed to cost optimization by efficiently managing resources during the migration and ensured the reliability and consistency of the MSK and MirrorMaker clusters. It also showcased how the chosen setup accelerates data transfer, optimizing both time and resources.
- Migrate data – We successfully migrated 2 TB of data in a remarkably short timeframe, minimizing downtime and showcasing the efficiency of the concurrent replication strategy.
- Set up post-migration monitoring – We implemented robust monitoring and alerting during the migration, contributing to a smooth process by identifying and addressing issues promptly.
The following diagram illustrates the architecture after the topic migration was complete.

Challenges and lessons learned
Embarking on a migration journey, especially with large datasets, is often accompanied by unforeseen challenges. In this section, we delve into the challenges encountered during the migration of topics from EC2 Kafka to Amazon MSK using MirrorMaker, and share valuable insights and solutions that shaped the success of our migration.
Challenge 1: Offset discrepancies
One of the challenges we encountered was the mismatch in topic offsets between the source and destination clusters, even with offset synchronization enabled in MirrorMaker. The lesson learned here was that offset values don’t necessarily need to be identical, as long as offset sync is enabled, which makes sure the topics have the correct position to read the data from.
We addressed this problem by using a custom tool to run tests on consumer groups, confirming that the translated offsets were either smaller or caught up, indicating synchronization as per MirrorMaker.
Challenge 2: Slow data migration
The migration process faced a bottleneck—data transfer was slower than anticipated, especially with a substantial 2 TB dataset. Despite a 20-node MirrorMaker cluster, the speed was insufficient.
To overcome this, the team strategically grouped MirrorMaker nodes based on unique port numbers. Clusters of five MirrorMaker nodes, each with a distinct port, significantly boosted throughput, allowing us to migrate data within hours instead of days.
Challenge 3: Lack of detailed process documentation
Navigating the uncharted territory of migrating large datasets using MirrorMaker highlighted the absence of detailed documentation for such scenarios.
Through trial and error, the team crafted an IaC module using Terraform. This module streamlined the entire cluster creation process with optimized settings, enabling a seamless start to the migration within minutes.
Final setup and next steps
As a result of the move to Amazon MSK, our final setup after topic migration looked like the following diagram.

We’re considering the following future improvements:
- Move to AWS Graviton based nodes for Amazon MSK for faster performance and cost savings. For more details about Graviton with Amazon MSK, refer to Amazon MSK now supports Graviton3-based M7g instances for new provisioned clusters.
- Use tiered storage to save even more on COGS.
- Create dedicated clusters for certain needs, because we can now create these clusters much faster with automation.
Conclusion.
In this post, we discussed how VMware Tanzu CloudHealth migrated their existing Amazon EC2-based Kafka infrastructure to Amazon MSK. We walked you through the new architecture, deployment and topic creation pipelines, improvements to observability and access control, topic migration challenges, and the issues we faced with the existing infrastructure, along with how and why we migrated to the new Amazon MSK setup. We also talked about all the advantages that Amazon MSK gave us, the final architecture we achieved with this migration, and lessons learned.
For us, the interplay of offset synchronization, strategic node grouping, and IaC proved pivotal in overcoming obstacles and ensuring a successful migration from Amazon EC2 Kafka to Amazon MSK. This post serves as a testament to the power of adaptability and innovation in migration challenges, offering insights for others navigating a similar path.
If you’re running self-managed Kafka on AWS, we encourage you to try the managed Kafka offering, Amazon MSK.
About the Authors
 Rivlin Pereira is Staff DevOps Engineer at VMware Tanzu Division. He is very passionate about Kubernetes and works on CloudHealth Platform building and operating cloud solutions that are scalable, reliable and cost effective.
 Vaibhav Pandey, a Staff Software Engineer at Broadcom, is a key contributor to the development of cloud computing solutions. Specializing in architecting and engineering data storage layers, he is passionate about building and scaling SaaS applications for optimal performance.
 Raj Ramasubbu is a Senior Analytics Specialist Solutions Architect focused on big data and analytics and AI/ML with Amazon Web Services. He helps customers architect and build highly scalable, performant, and secure cloud-based solutions on AWS. Raj provided technical expertise and leadership in building data engineering, big data analytics, business intelligence, and data science solutions for over 18 years prior to joining AWS. He helped customers in various industry verticals like healthcare, medical devices, life science, retail, asset management, car insurance, residential REIT, agriculture, title insurance, supply chain, document management, and real estate.
 Todd McGrath is a data streaming specialist at Amazon Web Services where he advises customers on their streaming strategies, integration, architecture, and solutions. On the personal side, he enjoys watching and supporting his 3 teenagers in their preferred activities as well as following his own pursuits such as fishing, pickleball, ice hockey, and happy hour with friends and family on pontoon boats. Connect with him on LinkedIn.
 Satya Pattanaik is a Sr. Solutions Architect at AWS. He has been helping ISVs build scalable and resilient applications on AWS Cloud. Prior joining AWS, he played significant role in Enterprise segments with their growth and success. Outside of work, he spends time learning “how to cook a flavorful BBQ” and trying out new recipes.