Tag Archives: community

Coolest Projects Global 2022: Celebrating young tech creators & creative ideas

Post Syndicated from original https://www.raspberrypi.org/blog/coolest-projects-2022-celebration-favourites/

Congratulations to the thousands of creators from 46 countries who participated in Coolest Projects Global 2022. Their projects awed and inspired us. Yesterday STEM advocate and television host Fig O’Reilly helped us celebrate each and every one of these creators in our online event. Check out the gallery to see all the amazing projects.

During the celebration, Fig also revealed which projects were picked by the special judges as their favourites from among the 2092 projects in this year’s showcase gallery. Let’s meet the special judges and check out their picks!

Ruth Amos’s favourites

Ruth Amos is an inventor, entrepreneur, and EduTuber. She co-founded the #GirlsWithDrills movement and ‘Kids Invent Stuff’, a YouTube channel where 5- to 11-year-olds see their invention ideas become reality with the help of engineers.

Here are Ruth’s favourites:
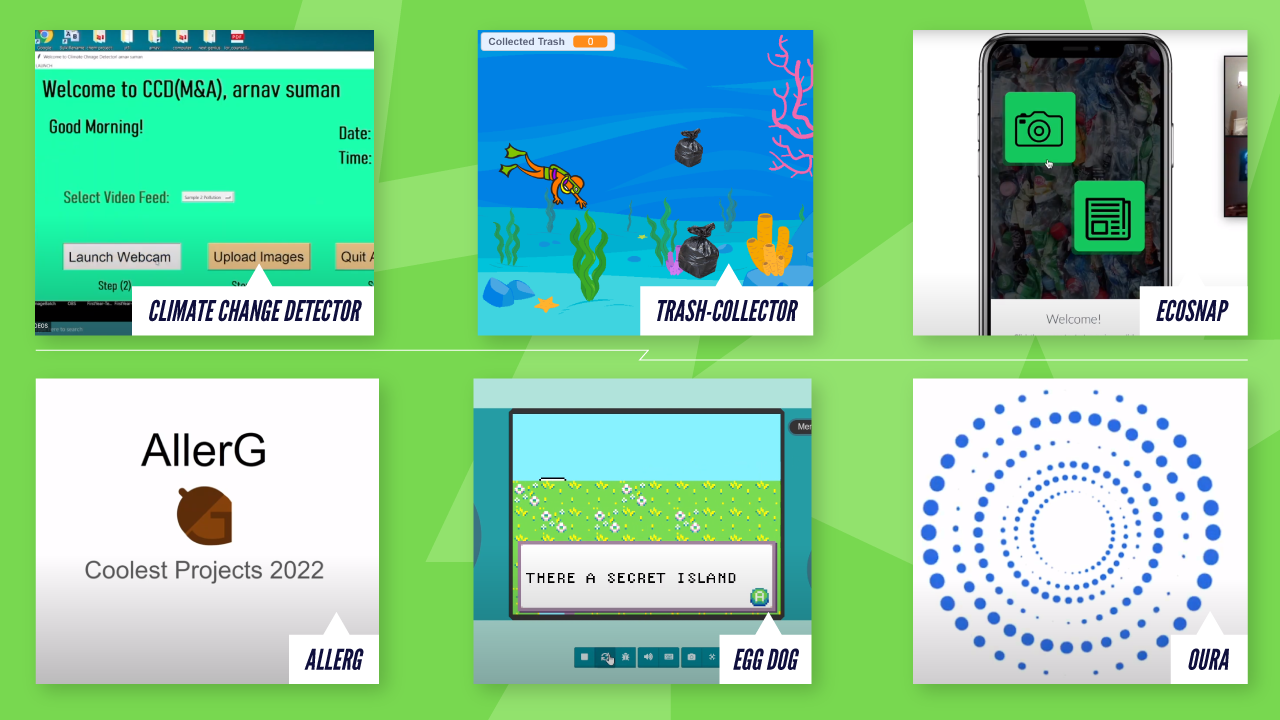
  • The Hardware project Oura, made by Angelina and Catherine in the United States. Oura is an indoor air quality monitoring device that is tailorable, portable, and inexpensive. Ruth especially liked this project because she saw “[s]ome great prototyping and use of data.”
  • The Games project Egg Dog, made by Oakley and Alex from a Code Club in Australia. In the game, players explore for collectibles and fight off enemies as they try to find the exit for the next level. Ruth said that Egg Dog was a “[r]eally fun game, they obviously learnt a lot in the process of making the game.”
  • The Web project AllerG, made by Noah from a CoderDojo in the United States. AllerG is an accessible and crowdsourced database of menu allergens for people with food allergies. Ruth said, “The whole project was very well thought out”.
  • The Mobile Apps project EcoSnap, made by Uma and Bella in the United States. EcoSnap serves as an all-in-one toolkit for anyone hoping to help the environment. Ruth said, “You really thought about the user and changing perceptions.”
  • The Scratch project Trash-Collector, made by Rajan in the United Kingdom. In Rajan’s game, players take on the role of a scuba diver who needs to collect trash in the ocean. Ruth said, “I can’t wait to see more levels; it’s quite addictive!”
  • The Advanced Programming project Climate Change Detector, made by Arnav from a CoderDojo in India. The project is a data dashboard and platform to track pollution. Ruth said, “I love that you can change parameters and see the effect that would have.”

Shawn Brown’s favourites

Shawn Brown is an award-winning engineer, designer, and YouTuber. He’s also a practical pioneer for neurodiversity and innovation — raising awareness of learning differences and promoting science, engineering, and invention to young people. Together with Ruth, Shawn co-runs the YouTube channel ‘Kids Invent Stuff.’

Here are Shawn’s favourites:
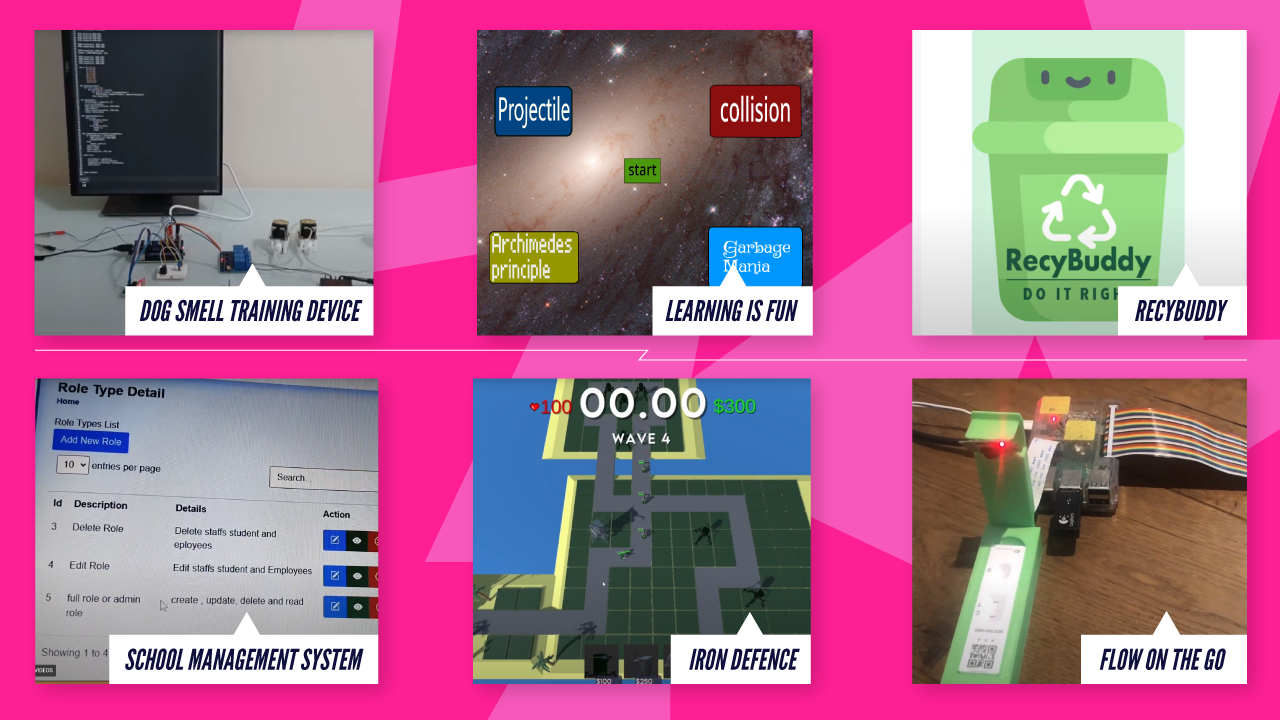
  • The Hardware project Flow On the Go, made by Donal from a Code Club in the United Kingdom. Flow On the Go is a COVID-19 lateral flow test holder with a built-in camera that takes a picture of the test results after 15 minutes and sends a photo of the results via email. Shawn said, “I’ve absolutely been late for things before because I forgot to leave time to do a lateral flow test and your invention totally solves that problem in a really clever and effective way.”
  • The Games project Iron Defence, made by James in the United Kingdom. Iron Defence is a tower defence game where players defend against waves of enemies in a steampunk-themed assault. Shawn said, “Amazing work on seizing the opportunity to learn a new coding language”.
  • The Web project School Management System, made by Nebyu Daniel in Ethiopia. The project is a system used to store centralised data for a school. Shawn said, “The level of detail and the amount of different areas you’ve considered is really impressive!”
  • The Mobile Apps project RecyBuddy, made by Ryan in the United States. RecyBuddy is designed to assist and teach recycling to all ages. Shawn said, “I love how you’ve considered and implemented three distinct input options, giving the application a really high level of accessibility for users of a wide range of abilities and ages.”
  • The Scratch project Learning Is Fun, made by Mihir Ram in India. Mihir’s project is about making learning about science and the environment more enjoyable. Shawn said, “I got pretty addicted to playing Garbage Mania, and the timing was perfect to make it just stressful enough to have to think and grab the item in the right bin in time before you miss it!”
  • The Advanced Programming project Dog Smell Training Device, made by Roland in the United Kingdom. Roland’s project is designed to train dogs to identify different smells. Shawn said, “Well done on starting with achievable bitesize parts and then building it up from there”.

Richa Shrivastava’s favourites

Richa Shrivastava is the Director of Maker’s Asylum. It is India’s first community makerspace that fosters innovation through purpose-based learning, based on the United Nations Sustainable Development Goals.

Here are Richa’s favourites:
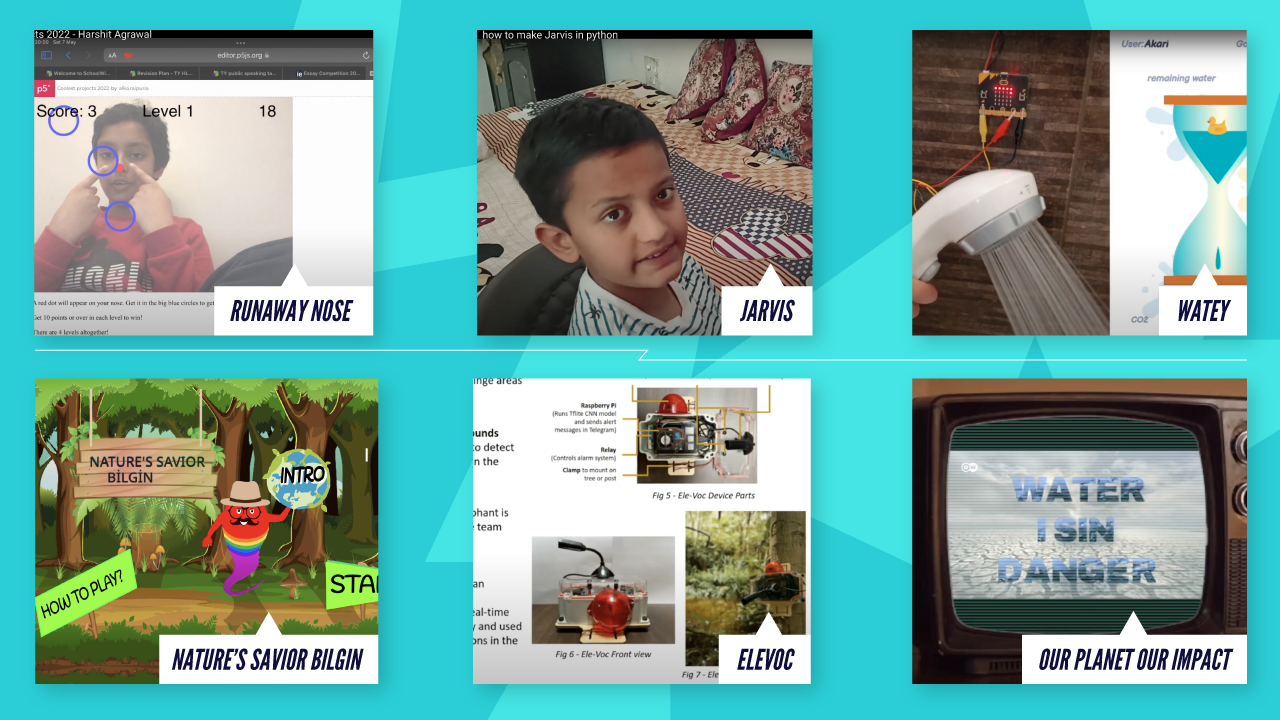
  • The Hardware project EleVoc, made by Chinmayi in India. Chinmayi’s device determines the proximity and behaviour of elephants by classifying their vocalisations. Richa said, “I personally loved the project because it addressed a problem statement that you do not see in cities but is common in villages and forest areas where humans and animals inhabit together.”
  • The Games project Runaway Nose, made by Harshit from a CoderDojo in Ireland. Harshit’s game uses facial recognition and players have to think (and act!) fast to score points. Richa said, “I have never played anything like this before and I can see that it can be really addictive.”
  • The Web project Our Planet, Our Impact, made by Amaury from a CoderDojo in Belgium. This multilingual website calculates the user’s environmental footprint. Richa chose this project because “the calculators were a really cool way to really bring out the impact of plastic waste that we create!”
  • The Mobile Apps project Watey, made by Yuuka, Akari, Otowa, and Lila from a CoderDojo in Japan. Watey helps families to save water easily and enjoyably. Richa said, “I loved the element of family bonding and competition that could motivate people to use water with scarcity.”
  • The Scratch project Nature’s Savior Bilgin, made by Çağatay and Mert from a Code Club in Turkey. It’s a game to teach players about the environment. Richa said, “I personally really loved the fact that the project was focussed on the environment and also problems that we see in real life almost every other day.”
  • The Advanced Programming project Jarvis, made by Siddhant in India. Jarvis is a personal assistant. Richa said, “I always wanted a personal Jarvis and this was so cool to see!” 

Elaine Atherton’s favourites

Elaine Atherton is Director of Scratch Education Collaborative. Elaine was first introduced to Scratch as an instructional coach while working with teachers in North Carolina. “It was amazing to see the kids so excited about what they were creating. I wanted to help them transfer that same energy to designing, making, and sharing other things, too — I wanted them to stretch their creativity.”

Here are Elaine’s favourites:
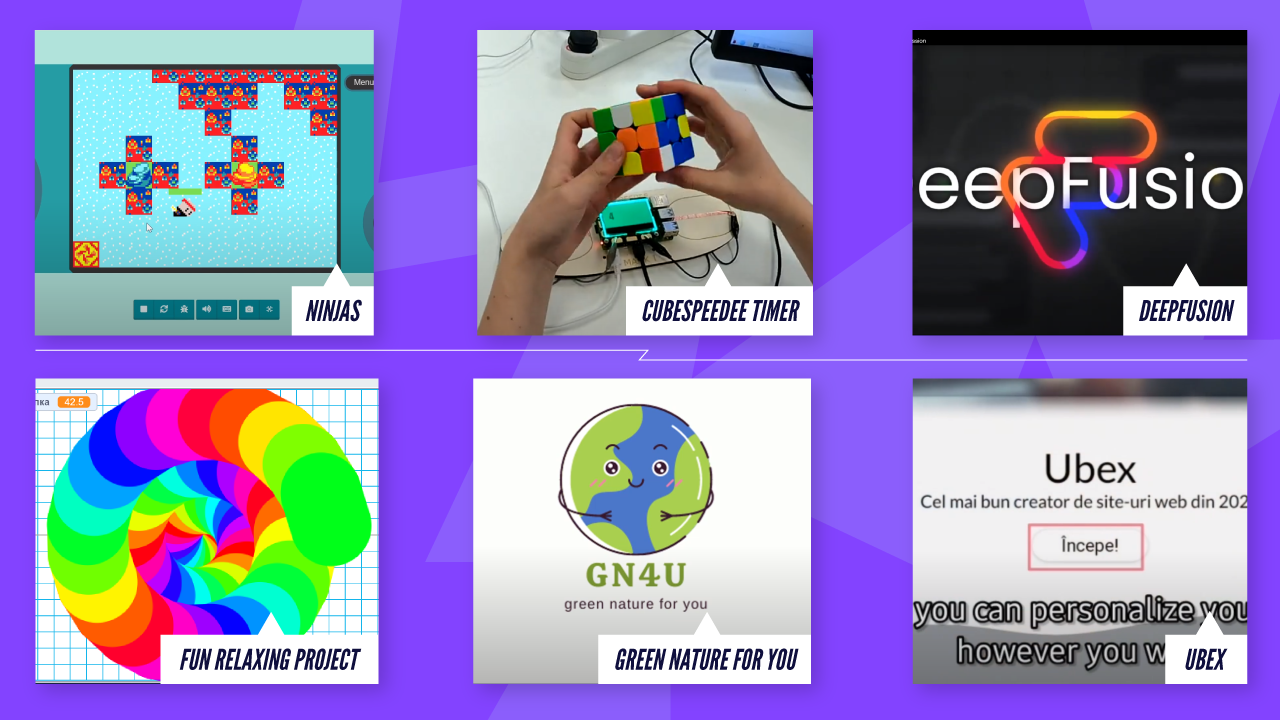
  • The Hardware project CubeSpeedee Timer, made by Tom from a CoderDojo in the United Kingdom. Tom’s project is a DIY timing device for solving puzzle cubes. Elaine said the project was “fun, playful, creative, and challenging!”
  • The Games project Ninjas, made by Jaiden and Eli from a Code Club in Australia. Ninjas is an open-world action-adventure game. Elaine said, “The transitions between the different worlds are really cool”.
  • The Web project Ubex Site Creator, made by Menagi from a Code Club in Romania. Ubex makes it easy for anyone to create their own website. Elaine said, “It is clear to see how you thought about how to use your passion for coding to create something for your peers.”
  • The Mobile Apps project Green Nature For You, made by Iana and Cristina in Moldova. The app lets users report when trash cans are full. Elaine said, “[Y]ou thoughtfully consider accessibility and access needs of those who may use it”.
  • The Scratch project Fun Relaxing Project, made by Konstantin from a CoderDojo in Bulgaria. Konstantin’s game is to help players relax while watching beautiful geometric shapes and colours. Elaine said, “The colors and patterns are truly relaxing”. 
  • The Advanced Programming project DeepFusion, made by Justin in the United States. DeepFusion is a web app that provides a graphical method for creating, training, and testing neural networks. Elaine said, “Your presentation is funny, thoughtful, and clever.”

Broadcom Coding with Commitment recognition

Broadcom Foundation has partnered with us for Coolest Projects Global to encourage young people who are solving problems that impact their communities. Their projects could relate to health, sanitation, energy, climate change, or other challenges set out in the United Nations Sustainable Development Goals. Broadcom Coding with Commitment illuminates how coding is a language, skill set, and invaluable tool for college and careers.

The Broadcom Coding with Commitment recognition goes to A Guide to Climate Change, a website created by Sabrina in the United Kingdom. Sabrina’s site not only provides vital information about the effects of climate change, but also gives users a visual to show how important it is to lower our carbon footprint. Congratulations to Sabrina for using her coding skills to give people a guide to understanding climate change in an easily digestible and stylish project webpage.

Sabrina’s project, A Guide to Climate Change

And there’s so much more to celebrate!

You can explore all the young tech creators’ projects — games, hardware builds, Scratch projects, mobile apps, websites, and more — in our showcase gallery now.

All creators who are taking part this year can now log into their Coolest Projects accounts to:

  1. Find personalised feedback on their project
  2. Request their limited-edition Coolest Projects swag

The support of our Coolest Projects Global sponsors has enabled us to make this year’s online showcase the inspiring experience it is for the young people taking part. We want to say a big thank you to all of them!

The post Coolest Projects Global 2022: Celebrating young tech creators & creative ideas appeared first on Raspberry Pi.


We’ll see you at CSTA 2022 Annual Conference

Post Syndicated from James Robinson original https://www.raspberrypi.org/blog/csta-2022/

Connecting face to face with educators around the world is a key part of our mission at the Raspberry Pi Foundation, and it’s something that we’ve sorely missed doing over the last two years. We’re therefore thrilled to be joining over 1000 computing educators in the USA at the Computer Science Teachers Association (CSTA) Annual Conference in Chicago in July.

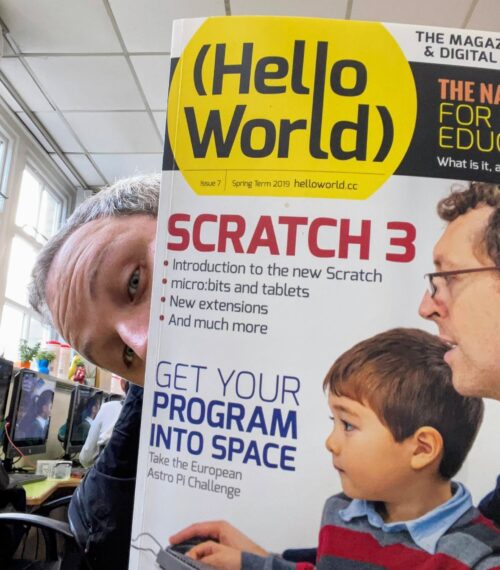
You will find us at booth 521 in the expo hall throughout the conference, as well as running four sessions. Gemma, Kevin, James, Sue, and Jane are team members representing Hello World magazine, the Raspberry Pi Computing Education Research Centre, and our other free programmes and education initiatives. We thank the team at CSTA for involving us in what we know will be an amazing conference.

Talk to us about computer science pedagogy

Developing and sharing effective computing pedagogy is our theme for CSTA 2022. We’ll be talking to you about our 12 pedagogy principles, laid out in The Big Book of Computing Pedagogy, available to download for free.

Cover of The Big Book of Computing Pedagogy.

An exciting piece of news is that everyone attending CSTA 2022 will find a free print copy of the Big Book in their conference goodie bag!

We’re really looking forward to sharing and discussing the book and all our work with US educators, and to seeing some familiar faces. We’re also hoping to interview lots of old and new friends about your approaches to teaching computing and computer science for future Hello World podcast episodes.

Your sessions with us

Our team will also be running a number of sessions where you can join us to learn, discuss, and prepare lesson plans.

Semantic Waves and Wavy Lessons: Connecting Theory to Practical Activities and Back Again

Thursday 14 July, 9am–12pm: Pre-conference workshop (booking required) with James Robinson and Jane Waite

If you enjoy explaining concepts using unplugged activities, analogy, or storytelling, then this practical pre-conference session is for you. In the session, we’ll introduce the idea of semantic waves, a learning theory that supports learners in building knowledge of new concepts through careful consideration of vocabulary and contexts. Across the world, this approach has been successfully used to teach topics ranging from ballet to chemistry — and now computing.

Three computer science educators discuss something at a screen.

You’ll learn how this theory can be applied to deliver powerful explanations that connect abstract ideas and concrete experiences. By taking part in the session, you’ll gain a solid understanding of semantic wave theory, see it in practice in some freely available lesson plans, and apply it to your own planning.

Write for a Global Computing Community with Hello World Magazine

Friday 15 July, 1–2pm: Workshop with Gemma Coleman

Do you enjoy sharing your teaching ideas, successes, and challenges with others? Do you want to connect with a global community of over 30,000 computing educators? Have you always wanted to be a published author? Then come along to this workshop session.

Issues of Hello World magazine arranged to form a number five.
Hello World has been going strong for five years — find out how you can become one of its authors.

Every single computing or CS teacher out there has at least one lesson to share, idea to voice, or story to tell. In the session, you’ll discuss what makes a good article with Gemma Coleman, Hello World’s Editor, and you’ll learn top tips for how to communicate your ideas in writing. Gemma will also guide you through writing a plan for your very own article. Even if you’re not sure whether you want to write an article, doing this is a powerful way to reflect on your teaching practice.

Developing a Toolkit for Teaching Computer Science in School

Saturday 16 July, 4–5pm: Keynote talk by Sue Sentance

To teach any subject requires good teaching skills, knowledge about the subject being taught, and specific knowledge that a teacher gains about how to teach a particular topic, to their particular students, in a particular context. Teaching computer science is no different, and it’s a challenge for teachers to develop a go-to set of pedagogical strategies for such a new subject, especially for elements of the subject matter that they are just getting to grips with themselves.

12 principles of computing pedagogy: lead with concepts; structure lessons; make concrete; unplug, unpack, repack; work together; read and explore code first; foster program comprehension; model everything; challenge misconceptions; create projects; get hands-on; add variety.

In this keynote talk, our Chief Learning Officer Sue Sentance will focus on some of the 12 pedagogy principles that we developed to support the teaching of computer science. We created this set of principles together with other teachers and researchers to help us and everyone in computing and computer science education reflect on how we teach our learners. Sue will share how we arrived at the principles, and she’ll use classroom examples to illustrate how you can apply them in practice.

Exploring the Hello World Big Book of Computing Pedagogy

Sunday 17 July, 9–10am: Workshop with Sue Sentance

The set of 12 pedagogy principles we’ve developed for teaching computing are presented in our Hello World Big Book of Computing Pedagogy. The book includes summaries, teachers’ perspectives, and lesson plans for each of the 12 principles.

A tweet praising The Big Book of Computing Pedagogy.

All CSTA attendees will get their own print copy of the Big Book, and in this practical session, we will use the book to explore together how you can use the 12 principles in the planning and delivery of your lessons. The session will be very hands-on, so bring along something you know you want or need to teach.

See you at CSTA in July

CSTA is now just a month away, and we can’t wait to meet old friends, make new connections, and learn from each other! Come find us at booth 521 or at our sessions to meet the team, discover Hello World magazine and the Hello World podcast, and find out more about our educational work. We hope to see you soon.

The post We’ll see you at CSTA 2022 Annual Conference appeared first on Raspberry Pi.

JSON is your friend – Certificate monitoring on Microsoft CA server

Post Syndicated from Tibor Volanszki original https://blog.zabbix.com/json-is-your-friend-certificate-monitoring-on-microsoft-ca-server/20697/

Introduction

By transforming our data into JSON we can achieve great results with Zabbix without the need to have a complex external script logic. The article will provide an example of obtaining a set of master data with a single PowerShell script and then using the Zabbix native functionality to configure low-level discovery and collect the required metrics from the master JSON data set.

In this example, we will implement certificate monitoring by using a Microsoft Windows Certificate Authority server. The goal is to see how many days we have before our internally signed certificates will expire. As an extra, we will be able to filter the monitored items by requestors and template names.

  • Target system version: MS Windows Server 2019 (also tested on 2012)
  • Zabbix server & agent version: 6.0.3 (Other Zabbix versions should be supported too with no or minimal changes)

Core logic

The below diagram shows the concept itself and you will find a detailed guide to implement this step by step in the next sections.

Core workflow


Sample output of Latest Data:

Prerequisites

To start, you will need to deploy Zabbix agent 2 on your target system – confirm that the Zabbix agent can communicate with your Zabbix server.  For the calculated item, we will require local time monitoring. The easiest way is to use the key “system.localtime”, which is already provided by the default Windows OS monitoring template. This item is intentionally not included within the certificate monitoring template to avoid key conflicts.

Below you can find the Powershell script which you have to implement: (name: “certmon_get_certs.ps1″) :

To import module PSPKI you may have to install the module first: https://pkisolutions.com/tools/pspki/

Import-Module PSPKI
$ca_hostname=$args[0]
$start = (Get-Date).AddDays(-7)
Get-IssuedRequest -CertificationAuthority $ca_hostname -Filter "NotAfter -ge $start" | Select-Object -Property RequestID,Request.RequesterName,CommonName,NotAfter,CertificateTemplateOid | ConvertTo-Json -Compress

*for Windows 2012 systems use CertificateTemplate instead of CertificateTemplateOid within this script.

This script expects one parameter, which is your CA server’s FQDN. That name will be loaded into variable “$ca_hostname”, so for testing purposes, you can just replace it with a static entry. Based on your needs you can adjust the “AddDays” parameter. Essentially this means to track back certificates, which are already expired for up to 7 days. Consider a situation, when you miss one just before a long weekend.

Script output

Let’s check the first part of the main command without further piping:

Simple script output without additional properties

As you can see, we are getting some basic information about the certificate. We do not need all the returned lines for the next steps, so it is better to filter the output down. Before we do that, we will use the option called “-Property”, and if you use it with a wildcard character, then it will list all the available parameters for a certificate. If you need more than the basic output, then you can list the extra parameters by using this option. Please be aware, that this will add extra lines compared to the basic output, but it will not do any filtering (the common lines will always remain visible).

Output with “-Property *”

Compare this with the output after using “Select-Object -Property RequestID,Request.RequesterName,CommonName,NotAfter,CertificateTemplateOid”

Output after using property filters

This looks good for us, but it is still not machine-readable. Let’s add the JSON output conversion, but without the “-Compress” option first:

JSON converted compressed output

What is especially great in this conversion, is that the “CertificateTemplateOid” part got 2 child entries, so later we can target the “FriendlyName” entry for discovery. Lastly, adding the “-Compress” option will help us to use less space by removing the white spaces and newlines from the output.

Depending on the amount of issued and valid certificates the output can be huge, especially without any filtering and compression (even megabytes in size). The current Zabbix server version (6.0.3) supports only 512KB as item output, this is why the output reduction is crucial. In my example the text data of one certificate takes approx 300 bytes, so 512KB will result in a limit of 1747 certificates. In case you are expecting more than this amount of ACTIVE certs within your CA, then I recommend cloning the PS script and adding some extra filtering to each variant (filter for template name / requestor / OU) and adjusting the template accordingly. Another approach would be to monitor the certificates, which will expire in the coming N days in case you have too many entries.

Agent configuration

To run the defined script, you have to allow it within the Zabbix Agent configuration file. You can either modify the main config or just define the extra lines within an additional file under zabbix_agent2.d folder. Below you can find the additional Zabbix agent configuration lines:

AllowKey=system.run[powershell -NoProfile -ExecutionPolicy bypass -File "C:\Program Files\Zabbix Agent 2\scripts\certmon_get_certs.ps1" *]
Timeout=20

The wildcard character at the end is needed to specify any hostname, which is expected by the script. The default timeout is 3 seconds, which is unfortunately insufficient. Importing Module PSPKI alone takes a few seconds, so the overall execution time is somewhere between 5 and 10 seconds. My assumption is that more certificates will not increase this significantly, but some extra seconds can be expected. 20 seconds sounds like a safe bet.

We are done with the pre-requisites, now we can start the real work!

Template

Let’s create our template from scratch.

  • Name: “Microsoft Certificate Authority – Certificate monitoring”
  • Host group: any group will do
Master item

We need only the following item:

  • Name: “Get certificate data”
  • Type: “Zabbix agent / Zabbix agent (active)” – for testing I recommend the passive mode
  • Key: system.run[powershell -NoProfile -ExecutionPolicy bypass -File “C:\Program Files\Zabbix Agent 2\scripts\certmon_get_certs.ps1″ {HOST.DNS}]”
  • Type of information: Text”
  • Update interval: 6h”
  • History: 1d”
Item configuration example

Assign the template to a CA server and you can test the item already. The result should be a big block of data in JSON format. To review the output I recommend the following external websites:

The latter one is especially helpful to find the correct JSON path, which we will require in the upcoming steps.

Item output sample
Measuring the script execution time

To measure the execution time, you can test it by using Zabbix get, which can connect to your Zabbix agent and request the item value over a CLI:

time zabbix_get -s [CA_SERVER_FQDN] --tls-connect psk --tls-psk-identity [PSK_IDEN] --tls-psk-file [PSK_FILE] -k 'system.run[powershell -NoProfile -ExecutionPolicy bypass -File "C:\Program Files\Zabbix Agent 2\scripts\certmon_get_certs.ps1" [CA_SERVER_FQDN]]'

This will give you the normal output and the execution time info:

real   0m5.771s
user   0m0.003s
sys    0m0.005s

To test the size of the output, redirect your command output to any file and measure it by “du -sk” to get it in kilobytes.

zabbix_get -s [CA_SERVER_FQDN] --tls-connect psk --tls-psk-identity [PSK_IDEN] --tls-psk-file [PSK_FILE] -k 'system.run[powershell -NoProfile -ExecutionPolicy bypass -File "C:\Program Files\Zabbix Agent 2\scripts\certmon_get_certs.ps1" [CA_SERVER_FQDN]]' > output.test
du -sk output.test
Low-level discovery rule definition

If the above part works just fine, then proceed with defining the low-level discovery rule as per the below example:

  • Name: Certificate discovery”
  • Type: Dependent item”
  • Key: certificate.discovery”
  • Master item: select our previously created item
  • Keep lost resources period: “6h”
Discovery rule configuration example

Then switch to LLD macros and define the below lines:

  • “{#COMMON_NAME}”: $.CommonName”
  • “{#REQUESTOR_NAME}”: $.[“Request.RequesterName”]”
  • “{#REQUEST_ID}”: $.RequestID”
  • “{#TEMPLATE_NAME1}”: “$.CertificateTemplate”
  • “{#TEMPLATE_NAME2}”: $.CertificateTemplateOid.FriendlyName”
Discovery rule LLD macro definitions

Some explanation:
The first LLD macro is self-explanatory – it obtains the certificate’s common name. The second one is also trivial, except the special marking, which is required due to the dot character in the middle. The third one is also simple, but the last 2 lines are somewhat special. If you have a fresh OS version, then most probably you will need only the 5th line without the 4th. In case you have a Windows server 2012 system, then you will need only the 4th line without the 5th. Why? Because of Windows 🙂 For testing you can keep both and then later remove the unnecessary one as well as the number suffix.

Now you are ready to create your item prototypes and this is where the real magic starts.

Certificate expiration date item prototype – Dependent item

Define the new item prototype as follows:

  • Name: Certificate [ ID #{#REQUEST_ID} ] {#COMMON_NAME} – Expiration date”
  • Type: Dependent item”
  • Key: certificate.expiration_date[{#REQUEST_ID}]”
  • Type of information: “Numeric (unsigned)”
  • Master item: pick the previously created master item
  • Units: unixtime”
  • History: 1d”
Item prototype example

Tags

  • cert_requestor“:  “{{#REQUESTOR_NAME}.regsub(“\\(\w+)”, “\1″)}”
  • cert_template1“: {#TEMPLATE_NAME1}”
  • cert_template2“: “{#TEMPLATE_NAME2}”
  • “scope”: certifcate / expiration date”
Item prototype tag definitions

As mentioned previously, it makes sense to keep only one template tag later, but for now, such an approach is fine.

The first line requires some explanation:
The requestor name starts with a domain prefix followed by 2 backslashes. If you are submitting CSRs from different domains to this CA server, then you can remove the extra formatting, but in a simple setup, we do not need the domain prefix, since it will be the same for all requestors.
Example: “DOMAIN\\someuser → someuser”

Preprocessing

  • JSONPath: $[?(@.RequestID == {#REQUEST_ID})].NotAfter”
  • Regular expression: (\d+) \1″
  • Custom multiplier: 0.001″
  • Discard unchanged with heartbeat: 1d”
Item prototype preprocessing step definitions

Explanation:
Since this item is a dependent item, it will point back to our master item, which returns a data block in JSON. Due to the nature of the discovery definitions, we are running a while loop, which is already loaded with our variables (the LLD macros). Therefore the “{#REQUEST_ID}” already has a numerical value within each cycle. With this number, we can go back to the original item and target that exact certificate, which has the same ID. Then we are interested in the NotAfter value considering the selected certificate.

You can find many other examples within Zabbix documentation: jsonpath functionality
At this point, we have the extracted value of the expiration date, but it is quite raw at the moment:

\/Date(1673594922000)\/

In the next step, we are taking the numerical part and then we have to apply a multiplier of 0.001 since by default the time is given in milliseconds. After this, we have an integer, which can be converted to a human-readable form by using the unit unixtime”. The last line is just a standard discard unchanged entry.

Since our discovery object is also a dependent item, you have to execute our master item to run the low-level discovery rule. The first execution will result in the creation of your certificate items and only the second execution of the master item will execute them all at once. After this point, you should have N certificate objects created and each should have a valid expiration date. This is already something, for which you could define a trigger, but personally, I prefer to see the remaining days and not the exact date itself.

Days to expire item prototype – Calculated item

Let’s define yet another item prototype as follows:

  • Name: Certificate [ ID #{#REQUEST_ID} ] {#COMMON_NAME} – Days to expire”
  • Type: Calculated”
  • Key: certificate.remaining_days[{#REQUEST_ID}]”
  • Type of information: Numeric (float)”
  • Formula: (last(//certificate.expiration_date[{#REQUEST_ID}])-last(//system.localtime))/86400″
  • Update interval: 6h”
  • History: 1d”
Remaining days to expiration item prototype example

Please do not forget, that you require an existing local time item, which is not provided by this template (but available within Windows by Zabbix agent*” template).

Tags:

Copy the same tags from the first prototype and only change the last tag to scope: certificate / remaining days

Remaining days to expiration item prototype tag definitions

Preprocessing:

  • Regular expression: ^(-?\d+)”: “\1”
  • Discard unchanged with heartbeat: 1d”
Remaining days to expiration item prototype preprocessing steps

As a result, this will give you a simple number with the remaining days to the expiration date. Then you can decide which item to use in the trigger to implement proper alerting based on your needs.

Certificate expiration trigger prototype

In my case I am just using a simple trigger expression for the remaining days:

  • Name:Certificate will expire within 30 days – {#COMMON_NAME}”
  • Operational data:Expires in {ITEM.LASTVALUE1} days”
  • Severity: up to you
  • Expression:last(/Microsoft Certificate Authority – Certificate monitoring/certificate.remaining_days[{#REQUEST_ID}])<=30″
Trigger prototype example

Tags:

  • cert_cn: “{#COMMON_NAME}”
  • cert_id“:{#REQUEST_ID}”
Trigger prototype tag definitions

When you check the relevant certificates in the Latest data section, then you can do the filtering by the item-based tags. Since we are adding the cert CN and ID only to the trigger, these will appear only in case of alerts. Based on your needs you can implement additional tags, you just have to adjust the PS script to show more properties. When you extend the input data, please always consider the 512KB limit or the configured timeout.

The logic defined in this example can be applied to any JSON formatted data.

Enjoy!

The post JSON is your friend – Certificate monitoring on Microsoft CA server appeared first on Zabbix Blog.

What’s Up, Home? – Don’t Forget the Facial Cream

Post Syndicated from Janne Pikkarainen original https://blog.zabbix.com/whats-up-home-dont-forget-the-facial-cream/21063/

Can you monitor the regular use of facial cream with Zabbix? Of course, you can! Here’s how. This same method could be very useful for monitoring if the elderly remember to take their meds or so.

What the heck?

A little background story. My forehead has a tendency for dry skin, so I should be using facial cream daily. Of course, as a man, I can guarantee you that 100% of the days I remember to use the cream, I apply it, so in practice, this means about 40-50% hit ratio.

As lately I have been adding more monitored targets to my home Zabbix, one night my wife probably thought she was being snarky or funny when she said “One monitor I could happily receive data about would be how often you remember to use your facial cream.

A monitoring nerd does not take such ideas lightly.

Howdy door sensor, would you like to do some work?

I found a spare magnetic door sensor and a handy box where to store the cream.

You can see where this is going. This totally beautiful prototype of my Facial Cream Smart Storage Box is now deployed to test. If I open or close the box, the door sensor status changes, thus the facial cream mercy countdown timer resets.

How does it work? And does it really work?

Cozify smart IoT hub is keeping an eye on the magnetic door sensor’s last status change. And look, that awesome brown tape does not bother the magnets at all, Cozify reported the status as changed.

Now that I got the Cozify part working, my Zabbix can then receive the last change time as in Unix time.

On my Grafana, there’s now this absolutely gorgeous new panel, converting the Unix time to the “How long ago the last event happened?” indicator.

So the dashboard part is now working. But that is not all we need to do.

Alerting and escalation

Dashboards and monitoring are not useful at all if proper alerts are not being sent out. I now have this new alert trigger action rule in place.

In other words, if I forget to apply the facial cream, I have a one-hour time window to apply it, or otherwise, the alert gets escalated to my wife.

Will this method work? Is my prototype box reliable? I will tell you next time.

I have been working at Forcepoint since 2014 and never get tired of finding out new areas to monitor. — Janne Pikkarainen

The post What’s Up, Home? – Don’t Forget the Facial Cream appeared first on Zabbix Blog.

What’s Up, Home? – Use the Zabbix, Luke

Post Syndicated from Janne Pikkarainen original https://blog.zabbix.com/whats-up-home-use-the-zabbix-luke/20953/

Welcome to my weekly blog about how I monitor my home with Zabbix. Like Batman, I have a casual day job as a monitoring tech lead, and by night I tinker around with my home Zabbix. (Except that Batman does not do monitoring, or who knows.)

Anyone using Zabbix knows how it can gather data from just about anywhere, and it can send its alerts to just about anything — pager systems like PagerDuty or OpsGenie, ticketing systems like Jira, e-mail, SMS, etc. Integrating with those takes minutes, is officially supported, very well documented, and would not make sense at home. But, what if at home I would like to show any possible alerts in a completely different way?

Zabbix, meet Star Wars

So, if I want to integrate my Zabbix with a screen saver, how would that work? And how long would that take? Is it even possible?

My friend, in the case of the good old xscreensaver you have many, many options. For its text-based screen saver modules, you can feed it a text file, or an URL from where it downloads the text to show on the screen. Making xscreensaver contents dynamic is easy.

For Zabbix, to make it send its alerts as text, you have many options. At least:

  1. Configure an action that runs whatever command to save the alert to a text file; even echo would do
  2. Let your Other System fetch the alerts over Zabbix API
  3. Let your Other System fetch the alerts directly from the Zabbix database
  4. Send out your alerts as e-mails and let your Other System parse those e-mails
  5. Configure a new custom media type to do something
  6. Use Zabbix real-time export functionality
Internals of my xscreensaver showcase

For this exercise, I decided to use the sixth option: Zabbix real-time export functionality.

What’s that, you ask?

It makes Zabbix save history, trends and/or triggers to JSON files, which any 3rd party program can then parse and utilize. Enabling it happens in practice by commenting out three lines in the Zabbix server config file, altering the path where you want the JSON files to be created, deciding the maximum size of the created files, and what kind of events you want to export. Restart the Zabbix server process, done.

My Zabbix is now running on Raspberry Pi 4. Then, I have a FreeBSD laptop for anything nerdy I want to do, and the FreeBSD laptop has xscreensaver for this demonstration.

So, my FreeBSD laptop does rsync the JSON files from Zabbix server every minute, extracts the event host name and trigger name using jq, and saves the output to text file. Surround that with header and footer text files, and you are done.

Now every time I don’t touch my FreeBSD laptop in a while, it turns on its screensaver and shows me the recent Zabbix alerts. Zabbix, meet Star Wars.

For now, the alert format shown on scroller is not perfect, but it works and took three or four lines of bash in total to accomplish. That’s easy, and in total took maybe 15 minutes to implement to its current stage.

Other news about my home monitoring project
  • My facial cream usage monitoring is going great! I have not missed applying my facial cream even once — I mean, I have received alerts from Zabbix, but each and every time I have then proceeded to apply the cream and my wife has received zero alerts so far. Good boy, me! (Read more about this project next week!)
  • As the trains stopping at our station are not always reliable (they can be either very late or canceled), I now have a live map showing the real-time status of the trains we are interested in. This part actually does not have anything to do with Zabbix at the moment, it’s Grafana and its GraphQL plugin querying data from an official train traffic open data system.
  • Zabbix 6.0 gained a new official weather template, so I now have a local weather dashboard as well provided by Zabbix.
  • I made a “home status shown as emojis” dashboard to make monitoring fun(?) and interesting(?) for the whole family — now our home status can be observed from our living room TV easily.

Some screenshots are below:

I have been working at Forcepoint since 2014 and never get bored of showing the alerts in new ways. — Janne Pikkarainen

The post What’s Up, Home? – Use the Zabbix, Luke appeared first on Zabbix Blog.

Celebrating the community: Jay

Post Syndicated from Rosa Brown original https://www.raspberrypi.org/blog/celebrating-the-community-jay/

We love being able to share how young people across the world are getting creative with technology and solving problems that matter to them. That’s why we put together a series of films that celebrate the personal stories of young tech creators.

Jay at an outside basketball court.

For our next story, we met up with young digital maker Jay in Preston, UK, who wants to share what coding and robotics mean to him.

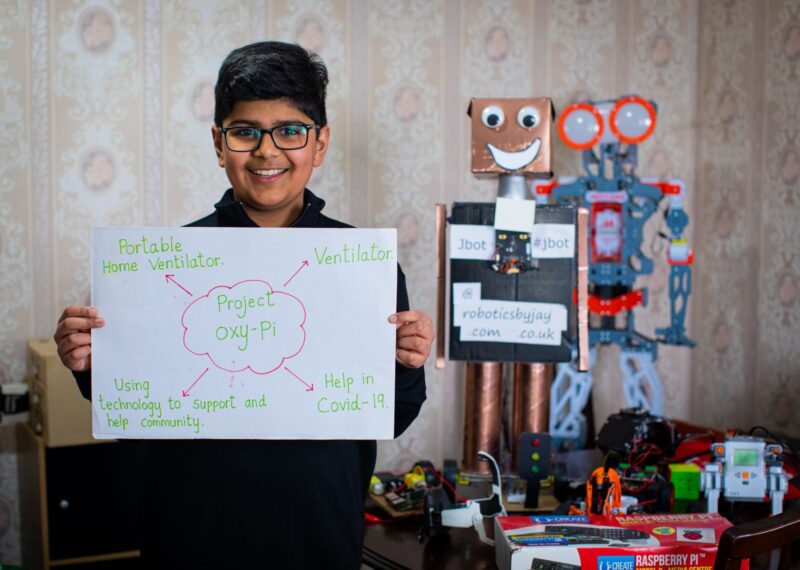
Watch Jay’s video to see how Jay created a homemade ventilator, Oxy-Pi, and how he’s making sure people in his local community also have the opportunity to create with technology. 

Meet Jay

Help us celebrate Jay by sharing his story on Twitter, LinkedIn, or Facebook!

Jay (11) wants everyone to learn about programming. At a young age, Jay started to experiment with code to make his own games. He attended free coding groups in his area, such as CoderDojo, and was introduced to the block-based programming language Scratch. Soon Jay was combining his interests in programming with robotics to make his own inventions. 

“My mission is to spread the word of computing and programming, because not many people know about these subjects.”

Jay

Jay teaches a group of schoolchildren how to use the programming language Scratch on a computer.
“The class teachers learn a lot from him, not just the children.” Mr Aspinall, Head teacher at Queen’s Drive Primary School

When he found out about Coolest Projects, our global tech showcase where young creators share their projects, Jay decided to channel his creativity into making something to exhibit there. He brought along a security alarm he had built, and he left Coolest Projects having made lots of new friends who were young tech creators just like himself.   

“With robotics and coding, what Jay has learned is to think outside of the box and without any limits.”

Biren, Jay’s dad

While Jay has made many different tech projects, all of his ideas involve materials that are easily accessible and low-cost. Lots of his creations start out made with cardboard, and repurposed household items often feature in his final projects. Jay says, “I don’t want to spend much money, because it’s not necessary when you actually have an alternative that works perfectly fine.” 

Jay holds a poster that has a plan of his Oxy-Pi project.
Jay uses his digital making skills to help others.

One of Jay’s recent projects, which he made from repurposed materials, is called Oxy-Pi. It’s a portable ventilator for use at home. Jay was inspired to make Oxy-Pi during the COVID-19 pandemic, and this project is especially important to him as his dad was hospitalised during this time. With his digital making approach, Jay is an example to everyone that you can use anything you have to hand to create something important to you.

Young coder Jay at home with his family.
Jay and his family in Preston, UK.

Digital making has helped Jay express himself creatively, test his skills, and make new friends, which is why he is motivated to help others learn about digital making too. In his local community, Jay has been teaching children, teenagers, and adults about coding and robotics for the last few years. He says that he and the people around him get a lot from the experience.  

“When I go out and teach, I love it so much because it’s really accessible. It helps me build my confidence, it helps them to discover, to learn, to create. And it’s really fun.”

Jay

Using tech to create things and solve problems, and helping others to learn to do the same, is incredibly important to Jay, and he wants it to be important to you too!

Help us celebrate Jay and inspire other young people to discover coding and digital making as a passion, by sharing his story on Twitter, LinkedIn, and Facebook     

The post Celebrating the community: Jay appeared first on Raspberry Pi.

What’s Up, Home? – Zabbix the Weatherman

Post Syndicated from Janne Pikkarainen original https://blog.zabbix.com/whats-up-home-zabbix-the-weatherman/20897/

This week, I advanced my project on multiple fronts, so welcome to this little smorgasbord of different topics. In my future posts, I will go deeper into each topic as my project goes forward.

Zabbix the weatherman

Let me begin with a monitoring blooper.

As Zabbix has very well-working forecast/prediction functions for your usual IT capacity trending, I tried what happens if I let it predict the outdoor temperature based on recent temperatures. On my first try, this did not go as I planned.

You see, currently, here in Finland the temperatures change a lot during a 24 hours period: from nightly -10C or below temperatures to maybe +5C to +10C during the day. As I asked Zabbix to predict the weather based only on one hour of data one day ago, this did not go as planned.

OK, clearly the one hour worth of data was too little. What if ask Zabbix to base its forecast on one week worth of data?

The prediction slightly improves — at least it won’t predict a nuclear winter anymore — but only slightly. Zabbix in its little mind has no idea that the weather could get warmer due to the springtime. Or, in case Zabbix was right, I’ll let you know in a week.

Average data for Joe Average

As my monitoring setup collects more data, one thing I can get out of it will be averages. What’s the average temperature? What’s the average for this and that?

Above shows the average data for the last 24 hours, and on my Grafana dashboard the values change dynamically based on the time period I choose on it.

Who wouldn’t need home SLA reports?

Everybody knows how The Suits love their reports. I have this mental image where I think during their mornings they are like

[x] coffee
[x] warm bread
[x] orange juice
[x] classical music
[x] latest reports

And oh dear, their morning is ruined if the [x] is missing from the last entry. Poor Suits.

Anyway, as the recent Zabbix 6.0 brought us revamped Business Services Monitoring, why not use it for home monitoring, too? This part includes very much work in progress, but I will show you the current results.

When I’m finished, each room will be configured as its own Business Service. For now, I only have entered the room names and some other stuff. There is only one room with some actual content, for now, and it’s our bedroom. What happens if I click on it?

I will get to see if the lights and temperature are OK, both from a technical standpoint and for their values. In case the status would not be OK, the root cause column would show me the reason why everything is not OK — though I would not need to click my way this far, the data would be shown on the previous page already.

As for SLAs (Service Level Agreement, for example, if you promise that your service will be available 99.9% of the time, it better be or your customer will be a sad panda and yell at you), those are also a work in progress. Zabbix can be let to generate daily/weekly/whatever SLA reports for any of the configured Business Services. I have yet to build them, but I have one for my home router already.

Come on, it’s sunny, let’s go out, Zabbix!

True story: this morning my wife asked that could I add pollen monitoring to Zabbix. My non-technical wife is getting excited about home monitoring, too! (I think she’s only pretending. Still AWESOME!)
I still need to add pollen monitoring — the data is available as open data — but I initialized The Great Outdoors Monitoring in two other areas.

Where’s my train?

Just before creating this post, I proved to myself that I can show live train data on Grafana. I sure got a screenful, as I have not played around with GraphQL too much, and for now, I got way more trains than I planned to get, and the data contains extra fields I need to filter out with Grafana’s Organise Fields. Still, connection established! Wooooo!

What’s for lunch?

Only added one lunch restaurant for now, but in theory, I will receive an alert whenever the restaurant posts its new weekly lunch menu. Zabbix is configured to be a good netizen though and it will only try to fetch the menu every one hour on Monday morning, no point to poll them all week, so let’s see how this will work.

That’s all for now. See you next week!

I have been working at Forcepoint since 2014 and I am a walking monitoring unit. — Janne Pikkarainen

* Please note, that this blog post was originally written a few months ago, in early Spring, and the temperature records do not correspond to the actual weather at the time of publication.

The post What’s Up, Home? – Zabbix the Weatherman appeared first on Zabbix Blog.

Why we translate our free online projects for young people to learn coding

Post Syndicated from Nina Szymor original https://www.raspberrypi.org/blog/translating-free-coding-computing-resources-improved-educational-social-outcomes/

All young people deserve meaningful opportunities to learn how to create with digital technologies. But according to UNESCO, as much as 40% of people around the world don’t have access to education in a language they speak or understand. At the Raspberry Pi Foundation, we offer more than 200 free online projects that people all over the world use to learn about computing, coding, and creating things with digital technologies. To make these projects more accessible, we’ve published over 1700 translated versions so far, in 32 different languages. You can check out these translated resources by visiting projects.raspberrypi.org and choosing your language from the drop-down menu.

Two young children code in Scratch on a laptop.
Two young children in Uganda code on a laptop at a CoderDojo session.

Most of this translation work was completed by an amazing community of volunteer translators. In 2021 alone, learners engaged in more than 570,000 learning experiences in languages other than English using our projects.

So how do we know it’s important to put in the effort to make our projects available in many different languages? Various studies show that learning in one’s first language leads to better educational and social outcomes. 

Improved access and attainment for girls

Education policy specialists Chloe O’Gara and Nancy Kendall describe in a USAID-funded guide document (1996, p. 100) that girls living in multilingual communities are less likely to know the official language of school instruction than boys, because girls’ lives tend to be more restricted to home and family, where they have fewer opportunities to become proficient in a second language. These restrictions limit their access to education, and if they go to school, they are more likely to have a limited understanding of the dominant language, and therefore learn less. Observations in research studies (Hovens, 2002; Benson 2002a, 2002b) suggest that making education available in a local language greatly increases female students’ opportunities for educational access and attainment.

In rural India, a group of girls cluster around a computer.

Improved self-efficacy

Research studies conducted in Guinea and Senegal (Clemons & Yerende, 2009) suggest that education in a local language, which is more likely to focus on the learner’s circumstances, community, and learning and development needs, increases the learner’s belief in their abilities and skills, compared to education in a dominant language.

young people programming in Scratch on a Raspberry Pi, Co-creation Hub, Nigeria.
Young people program in Scratch on a Raspberry Pi, at Co-creation Hub, Nigeria.

Improved test scores

Learning in a language other than one’s own has a negative effect on learning outcomes, especially for learners living in poverty. For example, a UNESCO-funded case study in Honduras showed that 94% of pupils learned reading skills if their home language was the same as the language of assessment. In contrast, among pupils who spoke a different language at home, this proportion dropped to 62%. Similarly, a UNESCO-funded case study in Guatemala showed that when students were able to learn in a bilingual environment, attendance and promotion rates increased, while rates of repetition and dropout rates decreased. Moreover, students attained higher scores in all subjects and skills, including the mastery of the dominant language (UNESCO Global Education Monitoring Report, Policy Paper 24, February 2016).

Three teenage girls at a laptop.
Three girls in Brazil code on a laptop in a Code Club session.

Improved acquisition of programming concepts

A survey conducted by a researcher from the University of California San Diego showed that non-native English speakers found it challenging to learn programming languages when the majority of instructional materials and technical communications were only available in English (Guo, 2018). Moreover, a computing education research study of the association between local language use and the rate at which young people learn to program showed that beginners who learned to program in a programming language with keywords and environment localised into their primary language demonstrated new programming concepts at a faster rate, compared with beginners from the same language group who learned using a programming interface in English (Dasgupta & Hill, 2017).

A group of Coolest Projects participants from all over the world wave their flags.

You can help with translations and empower young people

It is clear from these studies that in order to achieve the most impact and to benefit disadvantaged and underserved communities, educational initiatives must work to make learning resources available in the language that learners are most familiar with.

By translating our learning resources, we not only support people who have English as a second language, we also make the resources useful for people who don’t speak any English — estimated as four out of every five people on Earth.

If you’re interested in helping us translate our learning resources, which are completely free, you can find out more at rpf.io/translate.

The post Why we translate our free online projects for young people to learn coding appeared first on Raspberry Pi.

What’s Up, Home? – Thumbs up!

Post Syndicated from Janne Pikkarainen original https://blog.zabbix.com/whats-up-home-thumbs-up/20677/

In my previous blog post, I wrote about how I monitor my home with Zabbix. This week, I am showing how I utilize Grafana to visualize the data collected by Zabbix and what are my plans to further improve all this.

What’s on TV, honey?

First of all, one of the reasons I am building my home Grafana dashboards is that they can look fantastic. Combine that with the fact that nowadays it is super easy to cast your screen to the living room TV — or even access Grafana by using TV’s built-in web browser –, and you have one heck of a situational awareness screen. Not that it would really be needed at home, but hey, a real-time dashboard easily beats your average soap opera. I am sure my wife would not appreciate the idea that we would stare at Grafana all night long, but that is a different story altogether. I digress.

The other reason why I am building all this? I have monitored all kinds of IT stuff since 2001, and have done some very creative gymnastics with Nagios and Zabbix, so now it’s time to try out monitoring The Real World™. So far I have found out it is very similar to monitoring IT (duh).

Let’s dive into details

Above you can see a glimpse of my overall status Grafana dashboard. That’s actually all I have now, though it scrolls down for a page or two more.

The page provides me some really interesting information from battery levels to light status to firmware status of our devices. I will create some sub-dashboards and a Grafana playlist (slideshow), so our living room Mission Control TV can then show all the nuts and bolts of our home. Actually, we only have one TV and again, I am sure my wife would not appreciate The Grafana TV Show for too long, but one can dream.

Implemented so far:

  • Smart power outlet on/off status
  • Smart light bulbs on/off status
  • Info if our kitchen speaker is playing or not
  • Reachability status of different IoT devices we have around
  • Firmware status (is an upgrade needed or not) of our IoT devices
  • Amount of light (lux) status reported by Philips Hue motion sensors
  • Battery level monitoring of IoT devices; very good info to know especially about the smoke alarm device
  • Temperature monitoring in different rooms and outdoors
  • Humidity monitoring in different rooms and outdoors
  • Tons of details about our home Internet router; operational status of network ports, incoming/outgoing bandwidth, uplink status, errors, uptime, memory, CPU, disk and so on reported over SNMP
Let’s Explore!

For now, for the panels I chose to show a single stat and would like to see the timeline history of the values, I can quickly click on Explore and see my data in a different way. Explore is a very powerful feature of Grafana, so if you are a Grafana user and have not yet realized its potential, try it out!

Still to come

This public blog about monitoring my home kind of forces me to progress with it. So, here’s what is still to come:

  • Create a sensible Zabbix template; I have made some progress on investigating the JSON provided by Cozify, so stay tuned!
  • Buy a Raspberry Pi (that rhymes, yo) and move this setup from two virtual machines running on my ages-old MacBook Pro Retina mid-2012 to it. And, I gotta say, for a ten-year-old machine this MacBook is still fantastic!
  • For a Finn, a catastrophic, show-stopping missing feature is that our sauna is not monitored. AIEEE! Need to fix that.
  • The spring is coming and so is the gardening time. Not that I would understand anything about it, but I’m sure that this is an area my wife would totally approve — I’ll buy some sensors so we get alerted if our flowers and other plants are threatened by excessive heat and dryness.
  • Buy some air quality sensors so I can track the air quality both indoors and outdoors.
  • Extend the monitoring to cover not only our home, but nearby services as well. I already have a Python script that can tell me if our local train is gonna be late or is canceled, but that was for different reasons a long time ago and not even used in Zabbix or Grafana. However, inserting that data into Zabbix is trivial, so I will add that.
  • Add upcoming/active weather alerts to Grafana
  • Grafana is perfectly capable to display for example the lunch menus of the nearby restaurants, so why not?

I have worked at Forcepoint since 2014 and never get bored of visualizing and analyzing data. — Janne Pikkarainen

The post What’s Up, Home? – Thumbs up! appeared first on Zabbix Blog.

Celebrate Scratch Week with us

Post Syndicated from Joanne Vincent original https://www.raspberrypi.org/blog/scratch-week/

Scratch Week is a global celebration of Scratch that takes place from 15 to 21 May this year. Below, we’ve put together some free resources to help get kids coding with this easy-to-use, block-based programming language. If you’re not sure what Scratch is, check out our introduction video for parents.

""

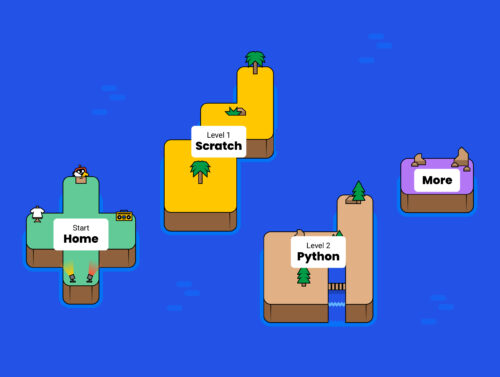
Visit Scratch Island on Code Club World

Code Club World is a great place to start coding for children who have never done any coding or programming before. The Code Club World online platform lets them begin their coding journey with fun activities, starting by creating their own personal avatar.

The islands on Code Club World.

Then on Scratch Island, kids can code a game to find a hidden bug, design a fun ‘silly eyes’ app, or animate a story. No experience necessary! We’ve just added a parents’ guide to explain how Code Club World works.

Explore Scratch projects 

For kids who feel ready to move beyond the basics of Scratch this Scratch Week, our Projects site offers a catalogue of projects that further enhance kids’ coding skills as they earn badges and explore, design, and invent.

A platform game your kids can code in Scratch with our project path.

With the More Scratch path, they will create six projects to make apps, games, and simulations using message broadcasting, if..then and if..then..else decisions, and variables. Then with the Further Scratch path, they can explore the advanced features of Scratch in another six projects to use boolean logic, functions, and clones while creating apps, games, computer-generated art, and simulations.

Discover young people’s Scratch creations

Be inspired by the amazing things young tech creators worldwide code in Scratch by visiting the Coolest Projects Global 2022 showcase. Young people are showing off Scratch games, stories, art, and more. In our Coolest Projects online gallery, these creations are displayed amongst hundreds of others from around the world — it’s the ideal place to get inspired.

A young coder shows off her tech project for Coolest Projects to two other young tech creators.

Learn something new with our Introduction to Scratch course 

Are you curious about coding too? If you would like to start learning so you can better help young people with their creative projects, our online course Introduction to Programming with Scratch is perfect for you. It’s available on-demand, so you can join at any time and receive four weeks’ free access (select the ‘limited access’ option when you register). This course is a fun, inspiring, and colourful starting point if you have never tried coding before. 

If you’re a parent looking for more coding activities to share with your kids, you can sign up to our parent-focused newsletter.

We hope you enjoy exploring these resources during Scratch Week. 

The post Celebrate Scratch Week with us appeared first on Raspberry Pi.
Marrying Zabbix and Cozify IoT hub

Post Syndicated from Janne Pikkarainen original https://blog.zabbix.com/marrying-zabbix-and-cozify-iot-hub/20377/

For those of you who know me, this should not come as a surprise: I absolutely love Zabbix. It gives me the ultimate freedom to monitor whatever I need to monitor and is flexible enough to be able to monitor absolutely everything you can imagine. It’s free, it’s open-source, and scales to whatever needs you might have.

What does a monitoring nerd who is a technical lead for monitoring in a global cyber security company do during his downtime? That’s a silly question, mind you. Of course, he monitors his home with a home Zabbix instance.

Temperatures at our home, measured by Cozify, data collected by Zabbix

Hello, Cozify

We have had a Cozify home automation system in our household since 2017. It is a nice central hub that supports IoT devices from a plethora of vendors and a vast selection of device categories, ranging from Philips Hue lights to motion sensors to cameras to fire alarm systems. You can then configure actions on some other device based on actions on one device: for example, turn on a light if a motion sensor detects movement.

Cozify is a very capable device, but where it definitely lacks is monitoring and analytics about what’s going on underneath.

As a monitoring addict, that is something I simply cannot stand.

Let’s build a bridge between Cozify and Zabbix

Someone has built an unofficial Python library for communicating with Cozify API. The library is a bit limited in functionality, the most limiting factor being that it only supports read-only operations. However, for my monitoring purposes, that does not matter, as I anyway need to read data.

For my initial testing purposes, I wrote a couple of small Python scripts to gather temperature and humidity data from our temperature sensors, and one script to monitor the general availability of the different IoT devices we have around. The scripts are run from cron every five minutes, and the results are written to text files that Zabbix reads. Zabbix has master items for temperature, humidity and reachability files, and using the dependent items, it can populate the data for all the 40+ data points I have now using just three polls.

Benefits of such project

Other than the cool geek factor, what’s the benefit of monitoring your home IoT hub? There’s plenty!

  • I get to learn all kinds of patterns about our home status: temperatures, reliability of individual devices, and the amount of time any device has been on/off
  • I get notified immediately if a critical device, like a smoke alarm, does not function properly
  • I get notified if the battery level on any battery-operated IoT device is getting low and can react before a device dies
  • I can follow how quickly the battery is draining on some device
Still for me to do

The current implementation is way too manual. It would be possible to utilize Zabbix low-level discovery to parse the JSON received from Cozify, but if I just dump everything from it, it contains all the possible device categories with different parameters: Philips Hue lights do report everything from their current brightness/color settings to if their firmware has been upgraded, and then the temperature or motion sensors do report back completely different set of data. That makes creating the monitored items automatically in a sane way a bit difficult.

So, I need to think a bit and figure out how to make my Cozify template more automatic.

I also need to set up a home Grafana instance speaking to Zabbix. Zabbix is excellent at collecting the monitoring data and sending out alerts, but Grafana is the perfect partner for Zabbix to do all the analytics and eye candy.

I have 20+ years of sysadmin/monitoring experience. Forcepoint has been my landing spot since 2014, and there I have been a monitoring technical lead since 2016. Everything Linux/FreeBSD, Zabbix, Grafana and open source in general is close to my heart. So close, in fact, that monitoring is also my hobby and I do weird experiments with Zabbix & Grafana at home. — Janne Pikkarainen

The post Marrying Zabbix and Cozify IoT hub appeared first on Zabbix Blog.

Docker Container Monitoring With Zabbix

Post Syndicated from Dmitry Lambert original https://blog.zabbix.com/docker-container-monitoring-with-zabbix/20175/

In this blog post, I will cover Docker container monitoring with Zabbix. We will use the official Docker by Zabbix agent 2 template to make things as simple as possible. The template download link and configuration steps can be found on the Zabbix Integrations page. If you require a visual guide, I invite you to check out my video covering this topic.

Importing the official Docker template

Importing the Docker by Zabbix agent 2 template

Since we will be using the official Docker by Zabbix agent 2 template, first, we need to make sure that the template is actually available in our Zabbix instance. The template is available for Zabbix versions 5.0, 5.4, and 6.0. If you cannot find this template under Configuration – Templates, chances are that you haven’t imported it into your environment after upgrading Zabbix to one of the aforementioned versions. Remember that Zabbix does not modify or import any templates during the upgrade process, so we will have to import the template manually. If that is so, simply download the template from the official Zabbix git page (or use the link in the introduction) and import it into your Zabbix instance by using the Import button in the Configuration – Templates section.

Installing and configuring Zabbix agent 2

Before we get started with configuring our host, we first have to install Zabbix agent 2 and configure it according to the template guidelines. Follow the steps in the download section of the Zabbix website and install the zabbix-agent2 package. Feel free to use any other agent deployment methods if you want to (like compiling the agent from the source files)

Installing Zabbix agent2 from packages takes just a few simple steps:

Install the Zabbix repository package:

rpm -Uvh https://repo.zabbix.com/zabbix/6.0/rhel/8/x86_64/zabbix-release-6.0-1.el8.noarch.rpm

Install the Zabbix agent 2 package:

dnf install zabbix-agent2

Configure the Server parameter by populating it with your Zabbix server/proxy address

vi /etc/zabbix/zabbix_agent2.conf
### Option: Server
# List of comma delimited IP addresses, optionally in CIDR notation, or DNS names of Zabbix servers and Zabbix proxies.
# Incoming connections will be accepted only from the hosts listed here.
# If IPv6 support is enabled then '127.0.0.1', '::127.0.0.1', '::ffff:127.0.0.1' are treated equally
# and '::/0' will allow any IPv4 or IPv6 address.
# '0.0.0.0/0' can be used to allow any IPv4 address.
# Example: Server=127.0.0.1,192.168.1.0/24,::1,2001:db8::/32,zabbix.example.com
#
# Mandatory: yes, if StartAgents is not explicitly set to 0
# Default:
# Server=

Server=192.168.50.49

Plugin specific Zabbix agent 2 configuration

Zabbix agent 2 provides plugin-specific configuration parameters. Mostly these are optional parameters related to a specific plugin. You can find the full list of plugin-specific configuration parameters in the Zabbix documentation. In the newer versions of Zabbix agent 2, the plugin-specific parameters are defined in separate plugin configuration files, located in /etc/zabbix/zabbix_agent2.d/plugins.d/, while in older versions, they are defined directly in the zabbix_agent2.conf file.

For the Zabbix agent 2 Docker plugin, we have to provide the Docker daemon unix-socket location. This can be done by specifying the following plugin parameter:

### Option: Plugins.Docker.Endpoint
# Docker API endpoint.
#
# Mandatory: no
# Default: unix:///var/run/docker.sock
# Plugins.Docker.Endpoint=unix:///var/run/docker.sock

The default socket location will be correct for your Docker environment – in that case, you can leave the configuration file as-is.

Once we have made the necessary changes in the Zabbix agent 2 configuration files, start and enable the agent:

systemctl enable zabbix-agent2 --now

Check if the Zabbix agent2 is running:

tail -f /var/log/zabbix/zabbix_agent2.log

Before we move on to Zabbix frontend, I would like to point your attention to the Docker socket file permission – the zabbix user needs to have access to the Docker socket file. The zabbix user should be added to the docker group to resolve the following error messages.

[Docker] cannot fetch data: Get http://1.28/info: dial unix /var/run/docker.sock: connect: permission denied
ZBX_NOTSUPPORTED: Cannot fetch data.

You can add the zabbix user to the Docker group by executing the following command:

usermod -aG docker zabbix

Configuring the docker host

Configuring the host representing our Docker environment

After importing the template, we have to create a host which will represent our Docker instance. Give the host a name and assign it to a Host group – I will assign it to the Linux servers host group. Assign the Docker by Zabbix agent 2 template to the host. Since the template uses Zabbix agent 2 to collect the metrics, we also have to add an agent interface on this host. The address of the interface should point to the machine running your Docker containers. Finish up the host configuration by clicking the Add button.

Docker by Zabbix agent 2 template

Regular docker template items

The template contains a set of regular items for the general Docker instance metrics, such as the number of available images, Docker architecture information, the total number of containers, and more.

Docker tempalte Low-level discovery rules

On top of that, the template also gathers container and image-specific information by using low-level discovery rules.

Once Zabbix discovers your containers and images, these low-level discovery rules will then be used to create items, triggers, and graphs from prototypes for each of your containers and images. This way, we can monitor container or image-specific metrics, such as container memory, network information, container status, and more.

Docker templates Low-level discovery item prototypes

Verifying the host and template configuration

To verify that the agent and the host are configured correctly, we can use Zabbix get command-line tool and try to poll our agent. If you haven’t installed Zabbix get, do so on your Zabbix server or Zabbix proxy host:

dnf install zabbix-get

Now we can use zabbix-get to verify that our agent can obtain the Docker-related metrics. Execute the following command:

zabbix_get -s docker-host -k docker.info

Use the -s parameter to specify your agent host’s host name or IP address. The -k parameter specifies the item key for which we wish to obtain the metrics by polling the agent with Zabbix get.

zabbix_get -s 192.168.50.141 -k docker.info

{"Id":"SJYT:SATE:7XZE:7GEC:XFUD:KZO5:NYFI:L7M5:4RGO:P2KX:QJFD:TAVY","Containers":2,"ContainersRunning":2,"ContainersPaused":0,"ContainersStopped":0,"Images":2,"Driver":"overlay2","MemoryLimit":true,"SwapLimit":true,"KernelMemory":true,"KernelMemoryTCP":true,"CpuCfsPeriod":true,"CpuCfsQuota":true,"CPUShares":true,"CPUSet":true,"PidsLimit":true,"IPv4Forwarding":true,"BridgeNfIptables":true,"BridgeNfIP6tables":true,"Debug":false,"NFd":39,"OomKillDisable":true,"NGoroutines":43,"LoggingDriver":"json-file","CgroupDriver":"cgroupfs","NEventsListener":0,"KernelVersion":"5.4.17-2136.300.7.el8uek.x86_64","OperatingSystem":"Oracle Linux Server 8.5","OSVersion":"8.5","OSType":"linux","Architecture":"x86_64","IndexServerAddress":"https://index.docker.io/v1/","NCPU":1,"MemTotal":1776848896,"DockerRootDir":"/var/lib/docker","Name":"localhost.localdomain","ExperimentalBuild":false,"ServerVersion":"20.10.14","ClusterStore":"","ClusterAdvertise":"","DefaultRuntime":"runc","LiveRestoreEnabled":false,"InitBinary":"docker-init","SecurityOptions":["name=seccomp,profile=default"],"Warnings":null}

In addition, we can also use the low-level discovery key – docker.containers.discovery[false] to check the result of the low-level discovery.

zabbix_get -s 192.168.50.141 -k docker.containers.discovery[false]

[{"{#ID}":"a1ad32f5ee680937806bba62a1aa37909a8a6663d8d3268db01edb1ac66a49e2","{#NAME}":"/apache-server"},{"{#ID}":"120d59f3c8b416aaeeba50378dee7ae1eb89cb7ffc6cc75afdfedb9bc8cae12e","{#NAME}":"/mysql-server"}]

We can see that Zabbix will discover and start monitoring two containers – apache-server and mysql-server. Any agent low-level discovery rule or item can be checked with Zabbix get.

Docker template in action

Discovered items on our Docker host

Now that we have configured our agent and host, applied the Docker template, and verified that everything is working, we should be able to see the discovered entities in the frontend.

Collected Docker container metrics

In addition, our metrics should have also started coming in. We can check the Latest data section and verify that they are indeed getting collected.

Macros inherited from the Docker template

Lastly, we have a few additional options for further modifying the template and the results of our low-level discovery. If you open the Macros section of your host and select Inherited and host macros, you will notice that there are 4 macros inherited from the Docker template. These macros are responsible for filtering in/out the discovered containers and images. Feel free to modify these values if you wish to filter in/out the discovery of these entities as per your requirements.

Notice that the container discovery item also has one parameter, which is defined as false on the template:

  • docker.containers.discovery[false] – Discover only running containers
  • docker.containers.discovery[true] – Discover all containers, no matter their state.

And that’s it! We successfully imported the template, installed and configured Zabbix agent 2, created a host, and applied the Docker template. Finally – our Zabbix instance is now monitoring our Docker environment! If you have any other questions or comments, feel free to leave a response in the comments section of this post.


The post Docker Container Monitoring With Zabbix appeared first on Zabbix Blog.

Zabbix 6 IT Infrastructure Monitoring Cookbook: Interview with the Co-Author

Post Syndicated from Jekaterina Sizova original https://blog.zabbix.com/zabbix-6-it-infrastructure-monitoring-cookbook-interview-with-the-co-author/20122/

We say Zabbix is a universal monitoring system, which is true. In many cases, the Zabbix potential is limited only by knowledge and the ability to use all the functions properly. That is why various training materials, including books, are so important. Nathan Liefting and Brian van Baekel recently presented their new Monitoring Cookbook on Zabbix 6.0 features and made a huge contribution to the existing knowledge pool. One of the book’s authors kindly agreed to tell us more about the issue.

Hi, Nathan! A year ago, we already had an interview with you to mark the Zabbix 5 IT Infrastructure Monitoring Cookbook launch. And now, just a month after the release of Zabbix 6.0 LTS, you published a new version of the book devoted to the latest Zabbix version. How did you manage to do it so quickly?

The last interview was a lot of fun to work on, so I am glad to do one again. Thanks for having me.

Let me jump right in by saying it took a lot of Alpha releases to write all of the new content. Normally we are already on top of new features, compiling them from sources even, to inform the community about the Zabbix development process and make sure our knowledge is up to par to ensure the highest quality for our training. But, with this book, we took it to the next level. Using the early releases, we worked hard to get the book ready by giving ourselves a hard deadline of getting the book to market just 1 month after the official Zabbix 6 release while the publisher needed 3 weeks to perform the copy editing and such. It was challenging, as we didn’t know exactly which features were to be included, and how they were built. We wrote parts of the book without knowing the feature in-depth, during the development phase, as a result, we had to rewrite whole chapters to reflect the actual integration. In the end, we made it and the entire Zabbix community can now use our book to get their Zabbix 6 environment up and running right from the start, with the added benefit for us that we can serve our customers perfectly due to all our in-depth knowledge we’ve gained in the process.

Comparing these two issues, how much do their contents overlap? Should users who already have the 5.0 book consider buying this edition (Zabbix 6 IT Infrastructure Monitoring Cookbook) as well?

It’s important to know that there is definitely an overlap in content. We specifically wanted to include that in the description for the book as well, as we don’t want anyone to think that all content has been remade.

That out of the way, there are a lot of new things as well. For example, all the new major Zabbix 6 features have been added like:

  • High Availability for Zabbix server
  • Business Service Monitoring (SLA’s)
  • The new widgets (Geomaps, single item and top hosts)
  • User roles
  • New trigger syntax

Not only that, but we also made sure to include all the new best practices. Redoing all the tags using the new tag policy and making sure all UI changes are included as well. Every recipe has had a Zabbix 6.0 touch-up and thus everything is current.

Even though it is a second edition you will find a lot of new things, and nothing has been left behind from the older Zabbix version. It can thus be a good purchase, even if you already own the Zabbix 5 version since there was a lot changed, added and improved in the product itself as well.

What background knowledge about Zabbix should the reader of this book have? Are you targeting more beginners or experienced software users?

We target both actually! A lot of technical books take you through the process of settings things up start-to-finish and we are no different. What is different with our Cookbook you don’t have to execute every single chapter to end up with the right result. This is a Packt Cookbook and everything in the cookbook format (as defined by the publisher) has to be able to be configured separately. You can follow the book from Chapter 1 Installing Zabbix and Getting Started Using the Frontend up until the end or you can pick any subject and dive right in.

It’s set up in such a way that it works for everyone, the very beginners and the more advanced users, we want to be there for the community as a whole, and not just the super experienced engineers.

Can you please tell us briefly about the book’s content, in particular, what challenging monitoring aspects have you managed to explain, making them easy to understand and implement?

We tried to include most of the important Zabbix subjects. You will find the basics in the book on Installing Zabbix, using the frontend and setting up users, groups and roles. But besides that, most types of monitoring are also included. We’ll discuss monitoring using the Zabbix agent, SNMP, ODBC, HTTP, JMX, dependent items, calculated/aggregated checks and even external checks.

Of course, Low-Level Discovery is also explained to make sure that we can automate the entity (items, triggers, etc.) creation. Besides that, we think that when working with monitoring data it is important to keep things structured. Thus, we also spend time on using the best practices to set up templates, and use methods like tags to easily filter out data and keep things structured.

For the real Zabbix gurus, we’ll even dive into using the Zabbix API and Python scripts to extend upon the Zabbix functionality. There really is something for everyone. Check out the full list of included subjects here.

Fun fact: Brian van Baekel has a cat named Zabbix

You probably got a lot of feedback and comments about the Zabbix 5 IT Infrastructure Monitoring Cookbook. Can you please share with us what people are saying?

Well, with a lot of pride I can say that the Zabbix 5 book was met with great reviews! We’re happy to be able to help out the Zabbix community because our goal with the book was to give people access to a bundle of Zabbix information. It can be a lot easier to get information in a book format, instead of having to search for separate resources on the internet.

The community has been great with their reviews and we’ve had compliments like

“I found this book a great resource for my network monitoring needs. It has everything I needed. The authors do a fantastic job at explaining Zabbix.

“Excellent book. Highly recommended for IT infrastructure monitoring. I was in the need of server and network devices monitoring so I tried Zabbix.”

We’re super happy with how well the books have been received and really appreciate all of the (Amazon) reviews people have left! If you have to book and would like to leave a review, it is much appreciated and we personally read all of them.

Where is the book available to purchase?

You can get your copy at our publisher’s website, Amazon, or a local retailer. Packt has a great network of suppliers throughout the world that might just have a copy for you. But you can always check out the links below to get your copy:

https://www.packtpub.com/product/zabbix-6-it-infrastructure-monitoring-cookbook-second-edition/9781803246918

https://www.amazon.com/Zabbix-Infrastructure-Monitoring-Cookbook-maintaining-ebook/product-reviews/B08NX17XT8/ref=cm_cr_dp_d_show_all_btm?ie=UTF8&reviewerType=all_reviews

We’re actually still looking to work with a publisher in Japan, China and/or other locations where a local language might help out the Zabbix community. If you have any ideas for that, feel free to contact me on LinkedIn.

Time flies and the Zabbix 7.0 LTS version is also not too far off. Should the community expect a new book when the new release comes out?

We had a lot of fun working on this Zabbix 6 edition, but at the same time it has taken up a considerable part of our personal time to get this book ready for everyone again. As a full-time Zabbix engineer and Zabbix trainer for Opensource ICT Solutions, there isn’t much time left in the weeks to write. That means that writing is mostly done on the weekends.

But if we find the time to do it again, we’ll definitely get a Zabbix 7 edition out as well! Already trying to make a plan to see if it is in the cards for us again.

The post Zabbix 6 IT Infrastructure Monitoring Cookbook: Interview with the Co-Author appeared first on Zabbix Blog.

Making the most of Hello World magazine | Hello World #18

Post Syndicated from Gemma Coleman original https://www.raspberrypi.org/blog/making-the-most-of-hello-world-18-five-years/

Hello World magazine, our free magazine written by computing educators for computing educators, has been running for 5 years now. In the newest issue, Alan O’Donohoe shares his top tips for educators to make the most out of Hello World.

Issues of Hello World magazine arranged to form a number five.

Alan has over 20 years’ experience teaching and leading technology, ICT, and computing in schools in England. He runs exa.foundation, delivering professional development to engage digital makers, supporting computing teaching, and promoting the appropriate use of technology.

Alan’s top tips

Years before there was a national curriculum for computing, Hello World magazines, or England’s National Centre for Computing Education (NCCE), I had ambitious plans to overhaul our school’s ICT curriculum with the introduction of computer science. Since the subject team I led consisted mostly of non-specialist teachers, it was clear I needed to be the one steering the change. To do this successfully, I realised I’d need to look for examples and case studies outside of our school, to explore exactly what strategies, resources and programming languages other teachers were using. However, I drew a blank. I couldn’t find any local schools teaching computer science. It was both daunting and disheartening not knowing anyone else I could refer to for advice and experience.

An educator holds up a copy of Hello World magazine in front of their face.
“Hello World helps me keep up with the current trends in our thriving computing community.” – Matt Moore

Thankfully, ten years later, the situation has significantly improved. Even with increased research and resources, though, there can still be the sense of feeling alone. With scarce prospects to meet other computing teachers, there’s fewer people to be inspired by, to bounce ideas off, to celebrate achievement, or share the challenges of teaching computing with. Some teachers habitually engage with online discussion forums and social media platforms to plug this gap, but these have their own drawbacks. 

It’s great news then that there’s another resource that teachers can turn to. You all know by now that Hello World magazine offers another helping hand for computing teachers searching for richer experiences for their students and opportunities to hone their professional practice. In this Insider’s Guide, I offer practical suggestions for how you can use Hello World to its full potential.  

Put an article into practice  

Teachers have often told me that strategies like PRIMM and pair programming have had a positive impact on their teaching, after first reading about them in Hello World. Over the five years of its publication, there’s likely to have been an article or research piece that particularly struck a chord with you — so why not try putting the learnings from that article into practice?

An educator holds up a copy of Hello World magazine in front of their face.
“Hello World gives me loads of ideas that I’m excited to try out in my own classroom.” – Steve Rich

You may choose to go this route on your own, but you could persuade colleagues to join you. Not only is there safety in numbers, but the shared rewards and motivation that come from teamwork. Start by choosing an article. This could be an approach that made an impression on you, or something related to a particular theme or topic that you and your colleagues have been seeking to address. You could then test out some of the author’s suggestions in the article; if they represent something very different from your usual approach, then why not try them first with a teaching group that is more open to trying new things? For reflection and analysis, consider conducting some pupil voice interviews with your classes to see what their opinions are of the activity, or spend some time reflecting on the activity with your colleagues. Finally, you could make contact with the author to compare your experiences, seek further support, or ask questions. 

Strike up a conversation

Authors generally welcome correspondence from readers, even those that don’t agree with their opinions! While it’s difficult to predict exactly what the outcome may be, it could lead to a productive professional correspondence. Here are some suggestions: 

  • Establish the best way to contact the author. Some have contact details or clues about where to find them in their articles. If not, you might try connecting with them on LinkedIn, or social media. Don’t be disappointed if they don’t respond promptly; I’ve often received replies many months after sending. 
  • Open your message with an introduction to yourself moving onto some positive praise, describing your appreciation for the article and points that resonated deeply with you.
  • If you have already tried some of the author’s suggestions, you could share your experiences and pupil outcomes, where appropriate, with them.
An educator holds up a copy of Hello World magazine in front of their face.
“One of the things I love about Hello World is the huge number of interesting articles that represent a wide range of voices and experiences in computing education.” – Catherine Elliott
  • Try to maintain a constructive tone. Even if you disagree with the piece, the author will be more receptive to a supportive tone than criticism. If the article topic is a ‘work in progress’, the author may welcome your suggestions.
  • Enquire as to whether the author has changed their practice since writing the article or if their thinking has developed.
  • You might take the opportunity to direct questions at the author asking for further examples, clarity or advice.  
  • If the author has given you an idea for an article, project, or research on a similar theme, they’re likely to be interested in hearing more. Describe your proposal in a single sentence summary and see if they’d be interested in reading an early draft or collaborating with you.

Start a reading group

Take inspiration from book clubs, but rather than discuss works of fiction, instead invite members of your professional groups or curriculum teams to discuss content from issues of Hello World. This could become a regular feature of your meetings where attendees can be invited to contribute their own opinions. To achieve this, firstly identify a group that you’re a part of where this is most likely to be received well. This may be with your colleagues, or fellow computing teachers you’ve met at conferences or training days. To begin, you might prescribe one specific single article or broaden it to include a whole issue. It makes sense to select an article likely to be popular with your group, or one that addresses a current or future area of concern.

An educator holds up a copy of Hello World magazine in front of their face.
“I love Hello World! I encourage my teaching students to sign up, and give out copies when I can. I refer to articles in my lectures.” – Fiona Baxter

To familiarise attendees with the content, share a link to the issue for them to read in advance of the meeting. If you’re reviewing a whole issue, suggest pages likely to be most relevant. If you’re reviewing a single article, make it clear whether you are referring to the page numbers as printed or those in the PDF. You could make it easier by removing all other pages from the PDF and sending it as an attachment. Remember that you can download back issues of Hello World as PDFs, which you can then edit or print. 

Encourage your attendees to share the aspects of the article that appealed to them, or areas they could not agree with the author or struggled to see working in their particular setting. Invite any points of issue for further discussion and explanation — somebody in the group might volunteer to strike up a conversation with the author by passing on the feedback from the group. Alternatively, you could invite the author of the piece to join your meeting via video conference to address questions and promote discussion of the themes. This could lead to developing a productive friendship or professional association with the author.  

Propose an article

“I wish!” is a typical response I hear when I suggest to a teacher that they should seriously consider writing an article for Hello World. I often get the responses, “I don’t have enough time”, “Nobody would read anything I write”, or, “I don’t do anything worth writing about”. The most common concern I hear, though, is, “But I’m not a writer!”. So you’re not the only one thinking that! 

“We strongly encourage first-time writers. My job is to edit your work and worry about grammar and punctuation — so don’t worry if this isn’t your strength! Remember that as an educator, you’re writing all the time. Lesson plans, end-of-term reports, assessment feedback…you’re more of a writer than you think! If you’re not sure where to start, you could write a lesson plan, or contribute to our ‘Me and my Classroom’ feature.”

— Gemma Coleman, Editor of Hello World

Help and support is available from the editorial team. I for one have found this to be extremely beneficial, especially as I really don’t rate my own writing skills! Don’t forget, you’re writing about your own practice, something that you’ve done in your career — so you’ll be an expert on you. Each article starts with a proposal, the editor replies with some suggestions, then a draft follows and some more refinements. I ask friends and colleagues to review parts of what I’ve written to help me and I even ask non-teaching members of my family for their opinions. 

Writing an article for Hello World can really help boost your own professional development and career prospects. Writing about your own practice requires humility, analytical thinking and self reflection. To ensure you have time to write an article, make it fit in with something of interest to you. This could be an objective from your own performance management or appraisal. This reduces the need for additional work and adds a level of credibility.

An educator reads a copy of Hello World magazine on public transport.
“Professionally, writing for Hello World provides recognition that you know what you’re talking about and that you share your knowledge in a number of different ways.” – Neil Rickus

If that isn’t enough to persuade you, for contributors based outside of the UK (who usually aren’t eligible for free print copies), Hello World will send you a complimentary print copy of the magazine that you feature in to say thank you. Picture the next Hello World issue arriving featuring an article written by you. How does this make you feel? Be honest — your heart flutters as you tear off the wrapper to go straight to your article. You’ll be impressed to see how much smarter it looks in print than the draft you did in Microsoft Word. You’ll then want to show others, because you’ll be proud of your work. It generates a tremendous sense of pride and achievement in seeing your own work published in a professional capacity. 

Hello World offers busy teachers a fantastic, free and accessible resource of shared knowledge, experience and inspiring ideas. When we feel most exhausted and lacking inspiration, we should treasure those mindful moments where we can sit down with a cup of tea and make the most of this wonderful publication created especially for us.

Celebrate 5 years of Hello World with us

We marked Hello World’s fifth anniversary with a recent Twitter Spaces event with Alan and Catherine Elliot as our guests. You can catch up with the event recording on the Hello World podcast. And the newest Hello World issue, with a focus on cybersecurity, is available as a free PDF download — dive it today.

Cover of Hello World issue 18.

How have you been using Hello World in your practice in the past five years? What do you hope to see in the magazine in the next five? Let us know on Twitter by tagging @HelloWorld_Edu.

The post Making the most of Hello World magazine | Hello World #18 appeared first on Raspberry Pi.

Celebrating 10 years of Raspberry Pi with a new museum exhibition

Post Syndicated from original https://www.raspberrypi.org/blog/10-years-raspberry-pi-national-museum-of-computing-exhibition/

Ten years ago, Raspberry Pi started shipping its first computers in order to inspire young people to reimagine the role of technology in their lives. What started with a low-cost, high-performance computer has grown into a movement of millions of people of all ages and backgrounds.

A group of children and an adult have fun using Raspberry Pi hardware.

Today, Raspberry Pi is the UK’s best-selling computer, and the Raspberry Pi Foundation is one of the world’s leading educational non-profits. Raspberry Pi computers make technology accessible to people and businesses all over the world. They are used everywhere from homes and schools to factories, offices, and shops.

Several models of the Raspberry Pi computer.

Visit the history of Raspberry Pi

To help celebrate this 10-year milestone, we’ve partnered with The National Museum of Computing, located at the historic Bletchley Park, to open a new temporary exhibit dedicated to telling the story of the Raspberry Pi computer, the Raspberry Pi Foundation, and the global community of innovators, learners, and educators we’re a part of.

A young person programs a robot buggy built with LEGO bricks and the Raspberry Pi Build HAT.

In the exhibit, you’ll be able to get hands-on with Raspberry Pi computers, hear the story of how Raspberry Pi came to be, and see a few of the many ways that Raspberry Pi has made an impact on the world.

Join us for the exhibition opening

We know that not everyone will be able to experience the exhibit in person, and so we’ll live-stream the grand opening this Saturday 5 March 2022 at 11:15am GMT. Keep an eye on our social media channels for the link to watch the video feed. If you’re able to make it to the National Museum of Computing on Saturday, tickets are available to purchase.

We’re delighted to celebrate 10 years with all of you, and we’re excited about the next 10 years of Raspberry Pi.

The post Celebrating 10 years of Raspberry Pi with a new museum exhibition appeared first on Raspberry Pi.
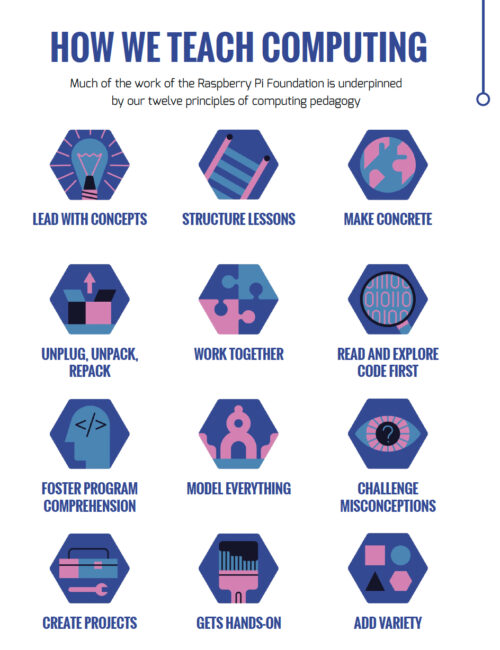
Share your tech project with the world through Coolest Projects Global 2022

Post Syndicated from original https://www.raspberrypi.org/blog/coolest-projects-global-2022-registration-open/

It’s time for young tech creators to share with the world what they’ve made! Coolest Projects Global 2022 registration is NOW OPEN. Starting today, young people can register their technology creation on the Coolest Projects Global website, where it will be featured in the online showcase gallery for the whole world to see.

Five young coders show off their robotic garden tech project for Coolest Projects.

By registering a tech project, you’ll represent your community, and you’ll get the coolest, limited-edition swag. You may even win a prize and earn the recognition of the special project judges.

What you need to know about Coolest Projects Global

Now in its 10th year, Coolest Projects is all about celebrating young people and what they create with code. Here’s what you need to know:

  • Coolest Projects Global is completely free for all participants around the world, and it’s entirely online.
  • Coolest Projects Global is open to tech creators up to 18 years old, working independently or in teams of up to 5.
  • We welcome creators of all skill levels: this world-leading technology showcase is for young people who are coding their very first project, or who are already experienced, or anything in between.
  • You’re invited to a live online celebration, which we will live-stream in early June — more details to follow.
  • Opening today, project registration stays open until 11 May.
A young coder shows off her tech project tech project for Coolest Projects to two other young tech creators.
  • Projects can be registered in the following categories: Scratch, games, web, mobile apps, hardware, and advanced programming.
  • Judges will evaluate projects based on their coolness, complexity, design, usability, and presentation.

Why Coolest Projects Global is so cool

Here are just a few of the reasons why young tech creators should register their project for the Coolest Projects Global showcase:

  • Share your project with the world. Coolest Projects Global is the world’s leading technology showcase for young people, and it’s your chance to shine on the global stage.
  • Get feedback on your project. A great team of judges will check out your project and give you feedback, which will land in your inbox after registration closes.
  • Earn some swag. Every creator who registers a project will be eligible to receive some limited-edition digital or physical swag. Pssst… Check out the sneak peek below.
  • Win a prize. Creators of projects that are selected as the judges’ favourites in the six showcase categories will receive a Coolest Projects medal to commemorate their accomplishment. The judges’ favourites will be announced at our live online celebration in June.
Two young coders work on their tech project on a laptop to control a sewing machine for Coolest Projects.

If you don’t have a tech project or an idea for one yet, you’ve got plenty of time to imagine and create, and we’re here to support you. Check out our guides to designing and building a tech creation — one that you’ll be proud to share with the Coolest Projects community in the online showcase gallery. And there’s no shortage of inspiration among the projects that young tech creators shared in last year’s showcase gallery.

Four young coders show off their tech project for Coolest Projects.

We have a lot more exciting stuff to share about Coolest Projects Global in the coming months, so be sure to subscribe for email updates. Until next time… be cool, creators!

""
A hint at the swag Coolest Projects Global participants will receive 👀

The post Share your tech project with the world through Coolest Projects Global 2022 appeared first on Raspberry Pi.

Celebrate Black history this month with code!

Post Syndicated from Kevin Johnson original https://www.raspberrypi.org/blog/black-history-month-2022-free-coding-resources/

For those of us living in the USA, February is Black History Month, our month-long celebration of Black history. This is an occasion to highlight the amazing accomplishments of Black Americans through time. Simply put, the possibilities are endless! Black history touches every area of our lives, and it is so important that we seize the opportunity to honor Black freedom fighters who fought for the equality and freedom of ALL people.

That’s why we encourage you to join us in celebrating Black History Month with the help of free, specially chosen coding and computing education resources. We’ve got something for everyone: whether you’re a learner, an educator, a volunteer, or any lover of tech, everyone can participate.

For learners: Celebrate Black History Month with free coding resources

This month, we want to empower young people to think about how they can use code as a tool to celebrate Black history with innovation and creativity. We’ve designed a project card listing the perfect projects to jumpstart young learners’ imagination: 

There are projects for beginner coders, as well as intermediate and advanced coders, in Scratch, Python, HTML/CSS, and Ruby plus Raspberry Pi.

Three young tech creators show off their tech project at Coolest Projects.

For educators: Support Black learners and their communities

We’re working on research to better understand how to support the Black community and other underrepresented communities to engage with computer science.

At Coolest Projects, a group of people explore a coding project.

Take some time this month to explore the following resources to make sure we’re growing into a more diverse and inclusive community: 

  • Culturally relevant pedagogy guide: We’ve worked with a group of teachers and researchers to co-create a guide sharing the key elements of a culturally relevant and responsive teaching approach to curriculum design and teaching in the classroom. Download the guide to see how to teach computing and computer science in a way that values all your learners’ knowledge, ways of learning, and heritage.
A female computing educator with three female students at laptops in a classroom.

For everyone: Listen to Black voices

Uplifting Black voices is one of the best things we can all do this February in observance of Black History Month. We’ve had the privilege of hearing from members in our community about their experiences in tech, and their stories are incredibly insightful and inspiring. 

  • Community stories: Yolanda Payne
    • Meet Yolanda Payne, a highly regarded community member from Atlanta, Georgia who is passionate about connecting young people in her community to opportunities to create with technology.
  • Community stories: Avye 
    • Meet Avye, an accomplished 13-year old girl who is taking the world of robotics by storm and works to help other girls get involved too.

Happy Black History Month! Share with us on Twitter, LinkedIn, Facebook, or Instagram how you’re celebrating in your community.

The post Celebrate Black history this month with code! appeared first on Raspberry Pi.

Monitoring Juniper Mist wireless network

Post Syndicated from Brian van Baekel original https://blog.zabbix.com/monitoring-juniper-mist-wireless-network/19093/

As Premium Zabbix partner, Opensource ICT Solutions is building Zabbix solutions all over the world. That means we have customers with a broad variety of requirements, thoughts on how to monitor things, which metrics are important and how to alert upon it. If one of those customers approaches us with a question concerning a task the likes of which we have never done before, it’s a challenge. And we love challenges! This blog post will cover one such challenge that we solved some time ago.

Quanza is a leading infrastructure operator offering a broad portfolio of services to completely take over the management of networks, data centers and cloud services. With more than 70 colleagues and at least as many specializations, everyone at Quanza works towards the same goal: designing, building, and operating an optimal IT infrastructure. Exactly like you would expect it… and then some. Quanza understands that you prefer to focus on your own innovation. By continuously mapping out your wishes, Quanza provides customized solutions that keep your network up and running 24×7. Today and in the future.

With a relentless focus on mission-critical environments, often of relevance to society, Quanza has an impressive line-up of customers. Some enterprises that chose to partner up with Quanza are SURF, Payvision, the Volksbank, and the Amsterdam Internet Exchange (AMS-IX), one of the world’s largest internet hubs.

Recently, customers started asking Quanza to embed Juniper MIST products for wired and wireless networks in their service portfolio. In order to fully support the network’s lifecycle (build, operate and innovate), the Juniper MIST products will need to be monitored by their 24×7 NOC. This is where we came into play, with our Zabbix knowledge.

We quickly decided to combine the knowledge Quanza has of the Juniper MIST equipment and API and our Zabbix knowledge to build the best possible monitoring solution.

SNMP or cloud?

The Juniper MIST solution is a cloud-based solution that provides a single pane of management for Juniper Networks products. As it’s cloud-based, it’s not a “traditional” network solution. As such, SNMP is not an option for device monitoring as they are communicating only with “the cloud” and we cannot access them directly like we used to do with traditional network equipment.

So, we started to investigate other options. One of the most common options right now is talking to some sort of API and pulling the metrics from that API. With Zabbix “HTTP agent” item key, this is no problem at all. Unfortunately, that’s not how the MIST API works. It’s pushing data instead of letting you pull it (actually, it does – but this doesn’t scale at all). Now, the Zabbix HTTP Agent item type allows trapping, but only in a specific Zabbix sender format. Of course, the MIST API does not allow that.

This means we have a problem. SNMP is not available. Pulling data is not a viable, scalable option. Pushing the data is an option, but Zabbix does not understand that.

Since we are not talking about some sort of proprietary monitoring tool which is completely closed and way too static, there is always a solution with Zabbix as long as you’re creative enough.

Getting data into Zabbix

We needed some middleware. Something that was able to receive that data from MIST and convert it into something that we can push into Zabbix.

That’s exactly what we did. We, together with Quanza, built a middleware that uses an API token to authenticate against the MIST API endpoint. Once the authentication is successful, the middleware is allowed to subscribe to certain “channels”. These channels provide event and performance data. You can compare it with MQTT, where a subscription to channels/topics is needed to get the information you are interested in.

Mist Middleware explained

  • Step 1:  Authenticate using an API token.
  • Step 2: Subscribe to channels
  • Step 3: Receive performance and event data
  • Step 4: Filter out only the relevant (performance) data for Zabbix
  • Step 5: Push into Zabbix

Once we had this in place, the MIST part was finished. We had our data and were able to push it into the monitoring solution.

Parsing in Zabbix

So, right now we have the data available for Zabbix. Time to find a neat way to use it. As the environments (both inventory and the types of equipment that are used) might be dynamic, we definitely do not want to apply any manual work to monitor newly added sites/equipment.

That means that low-level discovery rules are pretty much the only viable solution.

Here we go:

Describing host prototypes


Within Zabbix, we configure 1 host (the Discovery host) and apply a template on that host, with exactly 1 LLD rule: Query our middleware, and based on the information received, create new hosts (Host prototypes).
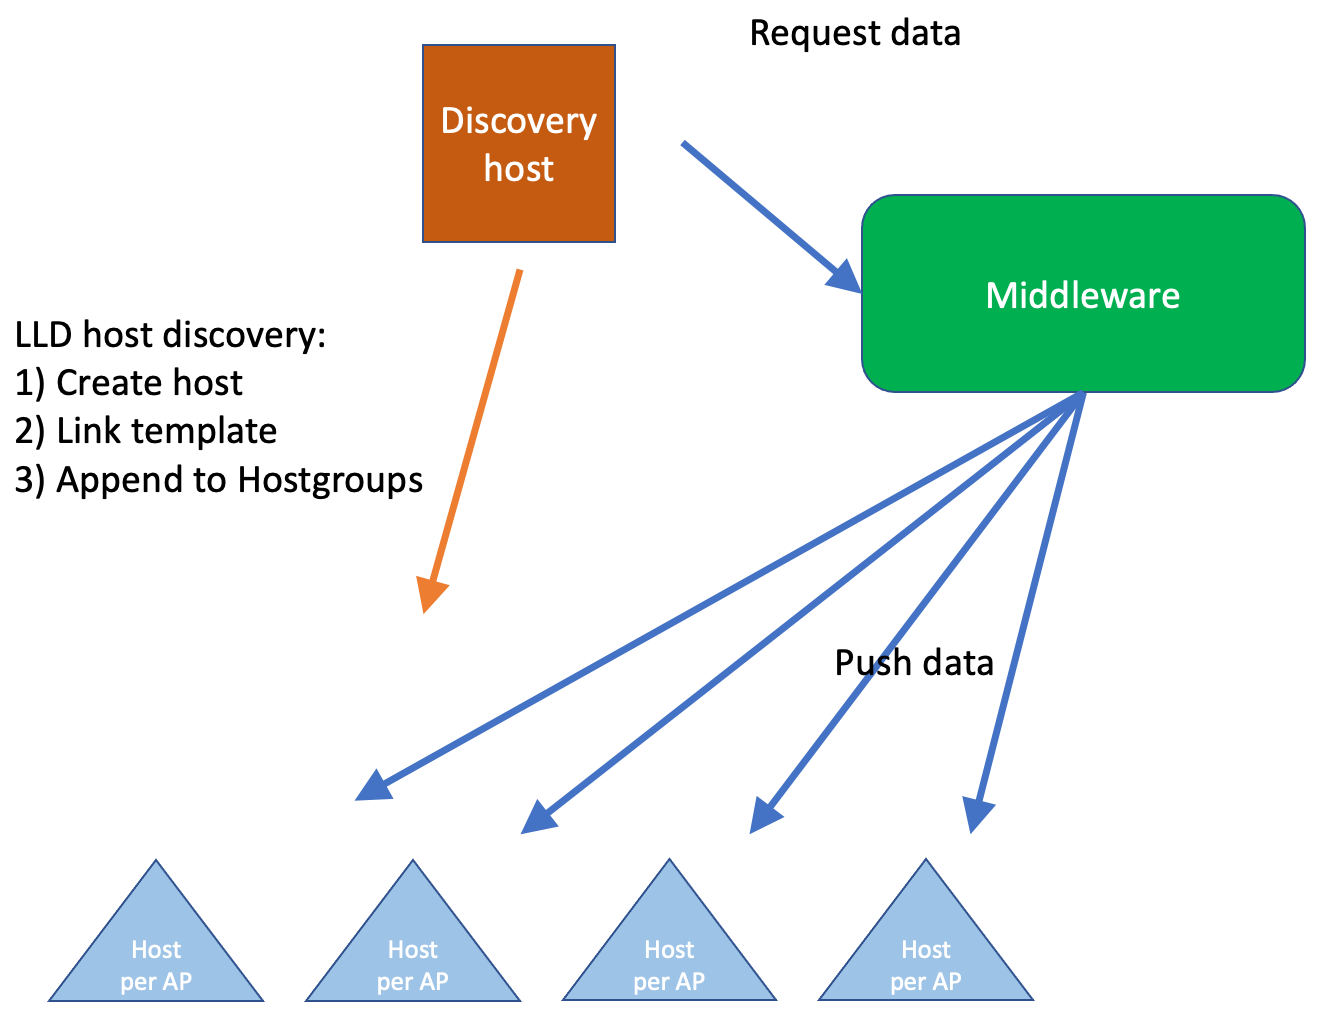
The data that is received looks like this:

{
"NODEID":"<NODEID>",
"NAME":"AP-<SITE>-<NUMBER",
"SITENAME":"<SITENAME>",
"SITEID":"<SITEID>",
"MAC":"<MAC ADDRESS>",
"ORGNAME":"<ORG NAME>"
},

Those new/discovered hosts will have the names of the AP and corresponding organization and location (in Mist: site). We also link a template to the discovered host and add it to a Host group with the variables we’ll need later, such as the organization, site name, siteID etc.

So, We need to parse those JSON elements. Luckily Zabbix provides, within the LLD rule config the option to parse this into LLD macros, so for example the Node id is parsed into {#ID} with the use of JSONPath $.NODEID:

LLD macro configuration

Once this process is complete, we have a new host per AP. Of course, there is no data on that host and querying the middleware or Mist is a bad idea. Scalability will be extremely problematic with more than a few organizations and sites configured in the Mist environment. As we’re building this with a big network integrator, scalability is a thing and we do not want to risk having a noticeable performance impact by using polling.

How about pushing data from the middleware into Zabbix? Once the data is received from Mist by the middleware, it’s parsed, filtered and then it pushes out whatever must be pushed out to Zabbix. We decided the best option is to push per host as we have those already available in Zabbix.

Now we should ensure two things:

    • do not overwhelm Zabbix with data being pushed in
    • Getting all the data with the least number of ‘pushes’ into Zabbix

Again, the flexibility of Zabbix is extremely useful here. On the AP hosts, there is a template with exactly 1 trapper item: receive performance data. From there, everything will be handled by the Zabbix ‘Master/Dependent’ item concept. We then extract data like temperatures, CPU load, memory usage, etc.

At the same time, we receive data regarding network usage (interface statistics) and radio information. As we do not know upfront how many network interfaces and radio’s there are on a particular Access Point, we do not want to hard-code such information. Here we are combining the concept of low-level discovery with dependent items (The following blog post covers the logic behind such an approach: Low-Level Discovery with Dependent items – Zabbix Blog)

Using ‘low-level discovery with dependent Items’, all relevant items are created ‘dynamically’ in such a way that a change on the MIST side (for example a new type of Access Point) doesn’t require changes on the Zabbix side. Monitoring starts within minutes and you’ll never miss any problem that might arise!
Just to give you an idea of the flow:
The Master Item gets a JSON format like this (and we’ve parsed only a small portion here) pushed into it from the middleware:

{
"mac":"<MAC ADDRESS>",
"model":"<MODEL>",
"port_stat":{
"eth0":{
"up":true,
"speed":1000,
"full_duplex":true,
"tx_bytes":37291245,
"tx_pkts":169443,
"rx_bytes":123742282,
"rx_pkts":779249,
"rx_errors":0,
"rx_peak_bps":14184,
"tx_peak_bps":5444
}
},
"cpu_util":2,
"cpu_user":652611,
"cpu_system":901455,
"radio_stat":{
"band_5":{
"num_clients":<CLIENTS>,
"channel":<CHANNEL>,
"bandwidth":0,
"power":0,
"tx_bytes":0,
"tx_pkts":0,
"rx_bytes":0,
"rx_pkts":0,
"noise_floor":<NOISE>,
"disabled":true,
"usage":"5",
"util_all":0,
"util_tx":0,
"util_rx_in_bss":0,
"util_rx_other_bss":0,
"util_unknown_wifi":0,
"util_non_wifi":0
}
"env_stat":{
"cpu_temp":<CPU TEMP>,
"ambient_temp":<AMBIENT TEMP>,
"humidity":0,
"attitude":0,
"pressure":0
}
}

Within the Master item, we’re basically not parsing anything, it’s just there to receive the values and push them into the Dependent items. In the dependent items, we start “cherry-picking” only those metrics that we would like to see. As it’s JSON format, preprocessing step “JSONPath” comes in handy. At the same time, we’re looking into efficiency, so a second step is added: discard unchanged with heartbeat (1d):

Example: Getting out the statistics of the 2.4Ghz band radio:

Item prototype proprocessing

Of course, this has to be done with all items.

So far, we’ve heavily focussed on the technical part, but Zabbix does have quite a few options to visualize the data as well. As we’re waiting on the next LTS release, we have only set up a very small dashboard with a few widgets. One of the better ones:

number_clients

Here we’re using the new graph type widget, but instead of plotting the number of clients per AP, we’re plotting a dataset with an “aggregate” function. Of course, if we look at the dashboard widgets, there are many more things that can be visualized…

Efficiency and security considerations

As we were building this, we had 2 main considerations:

    • Efficiency
    • Security

Efficiency, as we are anticipating that Quanza will be responsible for quite a few MIST environments on top of the current environments in the near future, combined with a strict limit of allowed API calls against the MIST API. As such, it is really important to keep those API calls as low as possible. Next to that, with every new Access Point added, the load on the Zabbix server is increasing. Now that is not really a problem, as Zabbix is perfectly capable of monitoring thousands of metrics simultaneously, though it has its limits. And you do not want to hit those limits in a production environment with the only solution being migration to beefier hardware.

Security-wise this challenge had a few things going on since we’re talking to an external exposed API. MIST can invoke webhooks. This might’ve been a bit easier (we explored it, but there were of course other things to keep in mind while going down that road), but the main concern was the requirement that Zabbix / an interface to Zabbix is exposed to the internet. That didn’t look too appealing and required a bit more maintenance. The preferable solution was to create that middleware where we have full control of what queries are executed, how the API token is protected, which connections are established etc. etc.

Conclusion

Although this question was challenging, together with Quanza we created a scalable, secure, and dynamic solution. Zabbix is flexible enough to facilitate the tricks required to provide reliable monitoring and alerting in an efficient and secure manner. We strongly believe the only limitation is your own creativity and this case proves that once again.

Quanza can now ensure the availability of their customer Juniper MIST-based networks, and in case something breaks their 24×7 manned NOC will be able to take whatever action is required to ensure the availability of the customers’ network – all thanks to the flexibility of Zabbix.

The post Monitoring Juniper Mist wireless network appeared first on Zabbix Blog.

Integrating Zabbix with your existing IT solutions by Aleksandrs Larionovs / Zabbix Summit Online 2021

Post Syndicated from Alexandrs Larionovs original https://blog.zabbix.com/integrating-zabbix-with-your-existing-it-solutions-by-aleksandrs-larionovs-zabbix-summit-online-2021/18671/

Zabbix 6.0 LTS comes packed with many new integrations and templates. As the total number of templates and integrations grows, we plan to make major improvements to our template repository. This will greatly improve the workflow of developing a new community template, submitting template pull requests, following the development process of a template, and much more.

The full recording of the speech is available on the official Zabbix Youtube channel.

What are integrations?

By definition, integrations are connections between systems and applications that work together as a whole to share information and data. In Zabbix, we separate integrations into two types:

  • Out-of-the-box templates
    • Templates contain items, triggers, graphs, and other entities that allow you to monitor any device, service, application, and other monitoring endpoints.
  • Webhook integrations
    • Webhooks allow you to send the information from Zabbix to any sort of 3rd party system like ITSM or messaging applications.

Where to find the latest integrations?

If you’re installing a fresh Zabbix instance, it will come pre-packaged with the latest set of official templates and webhooks. If you wish to download and import the integrations manually, you can find them in:

How do you benefit from integrations?

What are the benefits of using the official Zabbix integrations for you as a Zabbix user?

  • Monitor your endpoints in a tested and optimized manner
  • Monitor a large variety of 3rd party systems
  • Official templates come with a guarantee of quality and official support
  • Official templates provide quick deployment of monitoring logic for your monitoring endpoints

Having supported integrations can also be important from the standpoint of a vendor. Having an official Zabbix integration can provide multiple benefits for vendors:

  • Supported vendors get the ability to engage the Zabbix community
  • Collaborate with Zabbix and receive additional recognition
  • Provide higher quality monitoring support by collaborating in the development of the integration
  • Set higher monitoring standards for your product
  • Improve your public image

What if I wish to request a new official integration?

There are multiple ways how you can approach a scenario when there is no official integration for a specific product:

  • Option 1:
    • Create a ZBXNEXT ticket with your request at support.zabbix.com
    • Ask your friends and colleagues to vote on a request
    • If there is community interest in the integration – we will develop it!
  • Option 2:
  • Option 3:
    • Look for an unofficial community template

How are the official Zabbix integrations made?

Our first step in developing a new template is prioritizing which template should we tackle first. This includes looking at the current IT landscape and deciding which of the components are vastly considered as Essential services. Then, we look at the community requests and the number of votes behind each request. We also continuously work on improving the existing templates and evaluating the priority of the requested improvements. There is also the option to sponsor an integration by contacting our Sales department.

After we prioritize our list, we proceed to development – we do research, talk to community experts, create focus groups and proceed with the development. Once the development is finished, we proceed with validation – this includes internal reviews from the Integrations team as well as giving our colleagues from the Support team the chance to take a look at the newly developed template. Community feedback is also important for us – the feedback regarding the template can be left either in the comments under the specific feature request or in our Suggestions and Feedback forum section.

Community templates

While we pride ourselves on the rapid growth of our integrations team and the pace at which we have been delivering new official templates and integrations, we, of course, can’t instantly develop a template for every vendor and device out there. This is where our community has been of great help to us.

Moving from share.zabbix.com

Previously, if you were to find Zabbix lacking a template or an integration that you require, you would visit share.zabbix.com and look for a community solution to your problem. At this point, we have decided to migrate away from share.zabbix.com since, over the years, we have found it lacking in multiple aspects:

  • The website was hard to navigate
  • The underlying platform was outdated
  • Once uploaded, the templates were rarely maintained
  • It was hard to collaborate on templates
  • Lacking standardization – each template could use different naming conventions or metric collection approaches
  • Zombie templates – templates developed for old versions but never updated along the way.

Community template repository

The new go-to place for community templates will be our Community template repository. The repository will serve as a platform for collaboration. Once uploaded, the templates can be maintained by either the original developer or other community members. The platform will be moderated by the Integrations team, who will also provide feedback on the community templates to ensure a higher quality of the templates and additional validation. The documentation will also be generated for the community templates, containing the contents of each template – this way, you can have a transparent look at the template before downloading it.

The process

Let’s go through the whole process of developing and maintaining a community template.

1. Collaborate

  • For existing templates – you can start a discussion on Github issues to discuss issues or potential improvements on the template.
  • You can create a new bug report related to the template
  • For older community templates – you will be able to take over the maintenance of this template and continue improving it down the line
  • Develop and publish a new template or an integration

When it comes to community development, Zabbix does provide an official set of guidelines that the developers can follow to ensure that the template uses the official best practice conventions and approaches:

  • Naming conventions for templates and template entities
  • A set of best practices helps the community developers to simplify the decision making regarding best template and integration development approaches
  • Practical and ethical framework for template and integration development
  • This enables the community developers to follow the same set of development guidelines as the official Zabbix Integrations team

2. Pull request

Once you have decided to make a new integration or modify an existing integration, create a pull request describing the proposed changes and be ready to participate in a discussion related to the proposed set of changes. We will review and moderate the discussion and assist you in ensuring a smooth template development process.

3. Validation

The validation process consists of two parts. First, we will review if the template is valid, can be imported in Zabbix, and is usable by our community members. Next, the Integrations team will check if the template is developed according to the Zabbix standard and suggest any necessary changes.

4. Merge

If the validation process has been passed, we will accept the pull request and merge the integration into the repository. Afterward, the readme file for the integration will be generated. Finally, the template will be added to the template directory, and it will be available for everyone to see and download.

The Templates directory will have a similar structure to what you are used to in share.zabbix.com, so you should feel right at home here. We tried to check and migrate each and every valid template, but if you don’t find your template in the list – simply submit a pull request to us, and we will review it.

The generated Readme file will contain a list of entities included in the template – such as User macros, Template linkages, Discovery rules, Items, and more.

Where can I find the repository?

The Zabbix community template repository can be found in https://github.com/zabbix/community-templates. All you need to participate is a Github account and the willingness to participate in the integration development process.

To report an issue with the template repository or the official integrations, feel free to use our support portal: https://support.zabbix.com/

  • To report a bug – open a ZBX ticket
  • To suggest an improvement – open a ZBXNEXT ticket

For any discussions related to the Zabbix integrations, you can use (but are not limited to) the following channels:

Questions

Q: What is the workflow for our users that wish for Zabbix to develop new integration for a specific product?

A: We’re actively listening to our community. The best way to voice your request is to look for an existing feature request on https://support.zabbix.com/ and vote on it. If there is no such feature request – feel free to create it and vote on it. Thirdly, you can always contact our sales department and use our integration services to have the required template developed for you.


Q: Where can I see which integrations are currently developed or scheduled for the next release?

A: You can track the development process of a template by following the particular feature request in our support portal. You can also take a look at the official Zabbix roadmap and see what features, fixes, and integrations are currently scheduled for the upcoming Zabbix versions.


The post Integrating Zabbix with your existing IT solutions by Aleksandrs Larionovs / Zabbix Summit Online 2021 appeared first on Zabbix Blog.

Summary of Zabbix Summit Online 2021, Zabbix 6.0 LTS release date and Zabbix Workshops

Post Syndicated from Arturs Lontons original https://blog.zabbix.com/summary-of-zabbix-summit-online-2021-zabbix-6-0-lts-release-date-and-zabbix-workshops/17155/

Now that the Zabbix Summit Online 2021 has concluded, we are thrilled to report we hosted attendees from over 3000 organizations from more than 130 countries all across the globe.

This year, the main focus of the speeches was the upcoming Zabbix 6.0 LTS release, as well as speeches focused on automating Zabbix data collection and configuration, Integrating Zabbix within existing company infrastructures, and migrating from legacy tools to Zabbix. 21 speakers in total presented their use cases and talked about new Zabbix features during the Summit with over 8 hours of content.

In case you missed the Summit or wish to come back to some of the speeches – both the presentations (in PDF format) and the videos of the speeches are available on the Zabbix Summit Online 2021 Event page.

Zabbix 6.0 LTS release date

As for Zabbix 6.0 LTS – as per our statement during the event, you can expect Zabbix 6.0 LTS to release in early 2022. At the time of this post, the latest pre-release version is Zabbix 6.0 Alpha 7, with the first Beta version scheduled for release VERY soon. Feel free to deploy the latest pre-release version and take a look at features such as Geomaps, Business Service monitoring, improved Audit log, UX improvements, Anomaly detection with Machine Learning, and more! The list of the latest released Zabbix 6.0 versions as well as the improvements and fixes they contain is available in the Release notes section of our website.

Zabbix 6.0 LTS Workshops

The workshops will focus on particular Zabbix 6.0 LTS features and will be available once the Zabbix 6.0 LTS is released. The workshops will provide a unique chance to learn and practice the configuration of specific Zabbix 6.0 LTS features under the guidance of a certified Zabbix trainer at absolutely no cost! Some of the topics covered in the workshops will include – Deploying Zabbix server HA cluster, Creating triggers for Baseline monitoring and Anomaly detection, Displaying your infrastructure status on Geomaps, Deploying Business Service monitoring with root cause analysis, and more!

Upcoming events

But there’s more! On December 9 2021 Zabbix will host PostgreSQL Monitoring Day with Zabbix & Postgres Pro. The speeches will focus on monitoring PostgreSQL databases, running Zabbix on PostgreSQL DB backends with TimescaleDB, and securing your Zabbix + PostgreSQL instances. If you’re currently using PostgreSQL DB backends r plan to do so in the future – you definitely don’t want to miss out!

As for 2022 – you can expect multiple meetups regarding Zabbix 6.0 LTS features and use cases, as well as events focused on specific monitoring use cases. More information will be publicly available with the release of Zabbix 6.0 LTS.