Tag Archives: Featured

Seamless Data Migration with Custom Upload Timestamps

Post Syndicated from Bala Krishna Gangisetty original https://www.backblaze.com/blog/seamless-data-migration-with-custom-upload-timestamps/

A decorative image showing two cubes, representing data, moving from cloud to cloud. There are clocks above each cube.

Migrating data to the cloud? Ensuring that original timestamps remain intact through a cloud migration can be a critical factor for successful data management at scale. Losing these timestamps can lead to operational challenges that hinder your ability to track data effectively, set proper lifecycle rules, create custom events, and more.

Backblaze B2 Cloud Storage now offers the Custom Upload Timestamps feature to help you manage your data. Today, I’m sharing details on the new feature, benefits, and how to enable it.

What are Custom Upload Timestamps?

The Custom Upload Timestamps feature is designed specifically to retain the original timestamps of your files during a migration. It is especially beneficial for users who rely on lifecycle rules to dictate file deletion or archiving based on age for compliance, to track file age manually, or maintain historical context of file.

Imagine this scenario: You have a critical file on another cloud storage provider, governed by a lifecycle rule that deletes it after 1,000 days. If you move the file to Backblaze B2 on day 999, the timestamp would be overwritten and you’d have to restart that lifecycle from day one. However, with this new feature, the original timestamp remains intact, and the file will still get deleted on day 1,000, just as planned. This capability not only simplifies the migration process, but also ensures continuity in your data retention policies, keeping your storage costs in line with expectations.

Benefits of Custom Upload Timestamps

Lifecycle rules play a crucial role in managing data retention, particularly when migrating large datasets. Losing the original timestamps means you’d have to manually reconfigure your rules or wait much longer for lifecycle events to take effect. The benefits of retaining original timestamps extend beyond just lifecycle rules.

Here is why this feature is essential:

  1. Operational efficiency: Knowing the original timestamp of files allows for better organization and tracking. This is vital for businesses that rely on historical data to inform decisions or manage projects. When timestamps reset, it can lead to confusion and disarray in managing files. You may find yourself dealing with files that should have been deleted or archived but aren’t because of the reset timeline.
  2. Compliance: For organizations that must adhere to regulatory standards for data retention, preserving timestamps can help meet legal requirements. It provides a clear audit trail and evidence of when files were created or modified.
  3. Decreased workload: Manually tracking and reconfiguring lifecycle rules consumes valuable time and resources. By retaining the original timestamps, you eliminate unnecessary workloads.
  4. File age tracking: Whether you’re managing backups, archival processes, or simple organizational tasks, knowing the age of a file can inform your decisions regarding when to review or delete files.
  5. Historical context: For projects that span long periods, retaining timestamps helps maintain the context of data. This can be critical for collaborative efforts or projects that require consistent documentation.

Ultimately, the custom upload timestamps feature supports greater data portability, making it easier to move and manage large datasets. It ensures that migration to B2 Cloud Storage is as seamless as possible—without the need to reset or alter your data management policies. 

Ready to get started?

The Custom Upload Timestamps feature is enabled by default for all B2 Cloud Storage customers. To utilize this feature, you need to include the X-Bz-Custom-Upload-Timestamp parameter when calling the b2_upload_file API. This simple addition allows you to retain the original timestamp of your file, thereby preserving its lifecycle state without interruptions and ensuring that your data remains organized and easy to track.

By retaining the original timestamps, Backblaze B2 helps increase the ease and granularity with which you can manage your data, especially for organizations migrating large volumes of data. You can transition your data while maintaining control over important metadata like the original timestamp, streamlining your operations, improving overall efficiency, and avoiding the stress of potential compliance issues.

What next?

To make the most of the Custom Upload Timestamp feature, consider the following actionable steps:

  1. Review your migration workflow. Before starting the migration, ensure that your processes include the X-Bz-Custom-Upload-Timestamp parameter in your upload scripts or APIs. This will help prevent any disruption in tracking important metadata.
  2. Test the feature. Conduct a pilot migration with a small number of files. This will allow you to confirm that the timestamps are retained correctly. Monitor the behavior of your data tracking after this test migration to ensure everything operates as expected.
  3. Verify lifecycle rules. Once you complete the migration, take the time to check that your lifecycle policies continue to function as intended on B2 Cloud Storage. This verification step is crucial to avoid unexpected data retention issues.
  4. Engage with Support. If you have any questions or encounter challenges, don’t hesitate to reach out to our Support team. We’re here to help you make the most of B2 Cloud Storage.

For more details, visit our API documentation to ensure you’re ready for a smooth migration. By leveraging the Custom Upload Timestamps feature, you can simplify your data management processes.

The post Seamless Data Migration with Custom Upload Timestamps appeared first on Backblaze Blog | Cloud Storage & Cloud Backup
Introducing Buy with AWS: an accelerated procurement experience on AWS Partner sites, powered by AWS Marketplace

Post Syndicated from Prasad Rao original https://aws.amazon.com/blogs/aws/introducing-buy-with-aws-an-accelerated-procurement-experience-on-aws-partner-sites-powered-by-aws-marketplace/

Today, we are announcing Buy with AWS, a new way to discover and purchase solutions available in AWS Marketplace from AWS Partner sites. You can use Buy with AWS to accelerate and streamline your product procurement process on websites outside of Amazon Web Services (AWS). This feature provides you the ability to find, try, and buy solutions from Partner websites using your AWS account

AWS Marketplace is a curated digital store for you to find, buy, deploy, and manage cloud solutions from Partners. Buy with AWS is another step towards AWS Marketplace making it easy for you to find and procure the right Partner solutions, when and where you need them. You can conveniently find and procure solutions in AWS Marketplace, through integrated AWS service consoles, and now on Partner websites.

Accelerate cloud solution discovery and evaluation

You can now discover solutions from Partners available for purchase through AWS Marketplace as you explore solutions on the web beyond AWS.

Look for products that are “Available in AWS Marketplace” when browsing on Partner sites, then accelerate your evaluation process with fast access to free trials, demo requests, and inquiries for custom pricing.

For example, I want to evaluate Wiz to see how it can help with my cloud security requirements. While browsing the Wiz website, I come across a page where I see “Connect Wiz with Amazon Web Services (AWS)”.

Wiz webpage featuring Buy With AWS

I choose Try with AWS. It asks me to sign in to my AWS account if I’m not signed in already. I’m then presented with a Wiz and AWS co-branded page for me to sign up for the free trial.

Wiz and AWS co-branded page to sign up for free trial using Buy with AWS through AWS Marketplace

The discovery experience that you see will vary depending on type of the Partner website you’re shopping from. Wiz is an example of how Buy with AWS can be implemented by an independent software vendor (ISV). Now, let’s look at an example of an AWS Marketplace Channel Partner, or reseller, who operates a storefront of their own.

I browse to the Bytes storefront with product listings from AWS Marketplace. I have the option to filter and search from the curated product listings, which are available in AWS Marketplace, on the Bytes site.

Bytes storefront with product listings from AWS Marketplace

I choose View Details for Fortinet and see an option to Request Private Offer from AWS.

Bytes storefront with option to Request Private Offer for Fortinet from AWS Marketplace

As you can tell, on a Channel Partner site, you can browse curated product listings available in AWS Marketplace, filter products, and request custom pricing using your AWS account directly from their website.

Streamline product procurement on AWS Partner sites
I had a seamless experience using Buy with AWS to access a free trial for Wiz and browse through the Bytes storefront to request a private offer.

Now I want to try Databricks for one of the applications I’m building. I sign up for a Databricks trial through their website.

Database homepage after login with option to Upgrade

I chose Upgrade and see Databricks is available in AWS Marketplace, which gives me the option to Buy with AWS.

Option to upgrade to Databricks premium using Buy with AWS feature of AWS marketplace

I choose Buy with AWS, and after I sign in to my AWS account, I land on a Databricks and AWS Marketplace co-branded procurement page.

Databricks and AWS co-branded page to subscribe using Buy with AWS

I complete the purchase on the co-branded procurement page and continue to set up my Databricks account.

Databricks and AWS co-branded page after subscribing using Buy with AWS

As you can tell, I didn’t have to navigate the challenge of managing procurement processes for multiple vendors. I also didn’t have to speak with a sales representative or onboard a new vendor in my billing system, which would have required multiple approvals and delayed the overall process.

Access centralized billing and benefits through AWS Marketplace
Because Buy with AWS purchases are transacted through and managed in AWS Marketplace, you also benefit from the post-purchase experience of AWS Marketplace, including consolidated AWS billing, centralized subscription management, and access to cost optimization tools.

For example, through the AWS Billing and Cost Management console, I can centrally manage all my AWS purchases, including Buy with AWS purchases, from one dashboard. I can easily access and process invoices for all of my organization’s AWS purchases. I also need to have valid AWS Identity and Access Management (IAM) permissions to manage subscriptions and make a purchase through AWS Marketplace.

AWS Marketplace not only simplifies my billing but also helps in maintaining governance over spending by helping me manage purchasing authority and subscription access for my organization with centralized visibility and controls. I can manage my budget with pricing flexibility, cost transparency, and AWS cost management tools.

Buy with AWS for Partners
Buy with AWS enables Partners who sell or resell products in AWS Marketplace to create new solution discovery and buying experiences for customers on their own websites. By adding call to action (CTA) buttons to their websites such as “Buy with AWS”, “Try free with AWS”, “Request private offer”, and “Request demo”, Partners can help accelerate product evaluation and the path-to-purchase for customers.

By integrating AWS Marketplace APIs, Partners can display products from the AWS Marketplace catalog, allow customers to sort and filter products, and streamline private offers. Partners implementing Buy with AWS can access AWS Marketplace creative and messaging resources for guidance on building their own web experiences. Partners who implement Buy with AWS can access metrics for insights into engagement and conversion performance.

The Buy with AWS onboarding guide in the AWS Marketplace Management Portal details how Partners can get started.

Learn more
Visit the Buy with AWS page to learn more and explore Partner sites that offer Buy with AWS.

To learn more about selling or reselling products using Buy with AWS on your website, visit:

Prasad

Accelerate foundation model training and fine-tuning with new Amazon SageMaker HyperPod recipes

Post Syndicated from Channy Yun (윤석찬) original https://aws.amazon.com/blogs/aws/accelerate-foundation-model-training-and-fine-tuning-with-new-amazon-sagemaker-hyperpod-recipes/

Today, we’re announcing the general availability of Amazon SageMaker HyperPod recipes to help data scientists and developers of all skill sets to get started training and fine-tuning foundation models (FMs) in minutes with state-of-the-art performance. They can now access optimized recipes for training and fine-tuning popular publicly available FMs such as Llama 3.1 405B, Llama 3.2 90B, or Mixtral 8x22B.

At AWS re:Invent 2023, we introduced SageMaker HyperPod to reduce time to train FMs by up to 40 percent and scale across more than a thousand compute resources in parallel with preconfigured distributed training libraries. With SageMaker HyperPod, you can find the required accelerated compute resources for training, create the most optimal training plans, and run training workloads across different blocks of capacity based on the availability of compute resources.

SageMaker HyperPod recipes include a training stack tested by AWS, removing tedious work experimenting with different model configurations, eliminating weeks of iterative evaluation and testing. The recipes automate several critical steps, such as loading training datasets, applying distributed training techniques, automating checkpoints for faster recovery from faults, and managing the end-to-end training loop.

With a simple recipe change, you can seamlessly switch between GPU- or Trainium-based instances to further optimize training performance and reduce costs. You can easily run workloads in production on SageMaker HyperPod or SageMaker training jobs.

SageMaker HyperPod recipes in action
To get started, visit the SageMaker HyperPod recipes GitHub repository to browse training recipes for popular publicly available FMs.

You only need to edit straightforward recipe parameters to specify an instance type and the location of your dataset in cluster configuration, then run the recipe with a single line command to achieve state-of-art performance.

You need to edit the recipe config.yaml file to specify the model and cluster type after cloning the repository.

$ git clone --recursive https://github.com/aws/sagemaker-hyperpod-recipes.git
$ cd sagemaker-hyperpod-recipes
$ pip3 install -r requirements.txt.
$ cd ./recipes_collections
$ vim config.yaml

The recipes support SageMaker HyperPod with Slurm, SageMaker HyperPod with Amazon Elastic Kubernetes Service (Amazon EKS), and SageMaker training jobs. For example, you can set up a cluster type (Slurm orchestrator), a model name (Meta Llama 3.1 405B language model), an instance type (ml.p5.48xlarge), and your data locations, such as storing the training data, results, logs, and so on.

defaults:
- cluster: slurm # support: slurm / k8s / sm_jobs
- recipes: fine-tuning/llama/hf_llama3_405b_seq8k_gpu_qlora # name of model to be trained
debug: False # set to True to debug the launcher configuration
instance_type: ml.p5.48xlarge # or other supported cluster instances
base_results_dir: # Location(s) to store the results, checkpoints, logs etc.

You can optionally adjust model-specific training parameters in this YAML file, which outlines the optimal configuration, including the number of accelerator devices, instance type, training precision, parallelization and sharding techniques, the optimizer, and logging to monitor experiments through TensorBoard.

run:
  name: llama-405b
  results_dir: ${base_results_dir}/${.name}
  time_limit: "6-00:00:00"
restore_from_path: null
trainer:
  devices: 8
  num_nodes: 2
  accelerator: gpu
  precision: bf16
  max_steps: 50
  log_every_n_steps: 10
  ...
exp_manager:
  exp_dir: # location for TensorBoard logging
  name: helloworld 
  create_tensorboard_logger: True
  create_checkpoint_callback: True
  checkpoint_callback_params:
    ...
  auto_checkpoint: True # for automated checkpointing
use_smp: True 
distributed_backend: smddp # optimized collectives
# Start training from pretrained model
model:
  model_type: llama_v3
  train_batch_size: 4
  tensor_model_parallel_degree: 1
  expert_model_parallel_degree: 1
  # other model-specific params

To run this recipe in SageMaker HyperPod with Slurm, you must prepare the SageMaker HyperPod cluster following the cluster setup instruction.

Then, connect to the SageMaker HyperPod head node, access the Slurm controller, and copy the edited recipe. Next, you run a helper file to generate a Slurm submission script for the job that you can use for a dry run to inspect the content before starting the training job.

$ python3 main.py --config-path recipes_collection --config-name=config

After training completion, the trained model is automatically saved to your assigned data location.

To run this recipe on SageMaker HyperPod with Amazon EKS, clone the recipe from the GitHub repository, install the requirements, and edit the recipe (cluster: k8s) on your laptop. Then, create a link between your laptop and running the EKS cluster and subsequently use the HyperPod Command Line Interface (CLI) to run the recipe.

$ hyperpod start-job –recipe fine-tuning/llama/hf_llama3_405b_seq8k_gpu_qlora \
--persistent-volume-claims fsx-claim:data \
--override-parameters \
'{
  "recipes.run.name": "hf-llama3-405b-seq8k-gpu-qlora",
  "recipes.exp_manager.exp_dir": "/data/<your_exp_dir>",
  "cluster": "k8s",
  "cluster_type": "k8s",
  "container": "658645717510.dkr.ecr.<region>.amazonaws.com/smdistributed-modelparallel:2.4.1-gpu-py311-cu121",
  "recipes.model.data.train_dir": "<your_train_data_dir>",
  "recipes.model.data.val_dir": "<your_val_data_dir>",
}'

You can also run recipe on SageMaker training jobs using SageMaker Python SDK. The following example is running PyTorch training scripts on SageMaker training jobs with overriding training recipes.

...
recipe_overrides = {
    "run": {
        "results_dir": "/opt/ml/model",
    },
    "exp_manager": {
        "exp_dir": "",
        "explicit_log_dir": "/opt/ml/output/tensorboard",
        "checkpoint_dir": "/opt/ml/checkpoints",
    },   
    "model": {
        "data": {
            "train_dir": "/opt/ml/input/data/train",
            "val_dir": "/opt/ml/input/data/val",
        },
    },
}
pytorch_estimator = PyTorch(
           output_path=<output_path>,
           base_job_name=f"llama-recipe",
           role=<role>,
           instance_type="p5.48xlarge",
           training_recipe="fine-tuning/llama/hf_llama3_405b_seq8k_gpu_qlora",
           recipe_overrides=recipe_overrides,
           sagemaker_session=sagemaker_session,
           tensorboard_output_config=tensorboard_output_config,
)
...

As training progresses, the model checkpoints are stored on Amazon Simple Storage Service (Amazon S3) with the fully automated checkpointing capability, enabling faster recovery from training faults and instance restarts.

Now available
Amazon SageMaker HyperPod recipes are now available in the SageMaker HyperPod recipes GitHub repository. To learn more, visit the SageMaker HyperPod product page and the Amazon SageMaker AI Developer Guide.

Give SageMaker HyperPod recipes a try and send feedback to AWS re:Post for SageMaker or through your usual AWS Support contacts.

Channy

AWS Education Equity Initiative: Applying generative AI to educate the next wave of innovators

Post Syndicated from Jeff Barr original https://aws.amazon.com/blogs/aws/aws-education-equity-initiative-applying-generative-ai-to-educate-the-next-wave-of-innovators/

Building on the work that we and our partners have been doing for many years, Amazon is committing up to $100 million in cloud technology and technical resources to help existing, dedicated learning organizations reach more learners by creating new and innovative digital learning solutions, all as part of the AWS Education Equity Initiative.

The Work So Far
AWS and Amazon have a long-standing commitment to learning and education. Here’s a sampling of what we have already done:

AWS AI & ML Scholarship Program – This program has awarded $28 million in scholarships to approximately 6000 students.

Machine Learning University – MLU offers a free program helping community colleges and Historically Black Colleges and Universities (HBCUs) teach data management, artificial intelligence, and machine learning concepts. The program is designed to address opportunity gaps by supporting students who are historically underserved and underrepresented in technology disciplines.

Amazon Future Engineer – Since 2021, up to $46 million in scholarships has been awarded to 1150 students through this program. In the past year, more than 2.1 million students received over 17 million hours of STEM education, literacy, and career exploration courses through this and other Amazon philanthropic education programs in the United States. I was able to speak to one such session last year and it was an amazing experience:

Free Cloud Training – In late 2020 we set a goal of helping 29 million people grow their tech skills with free cloud computing training by 2025. We worked hard and met that target a year ahead of time!

There’s More To Do
Despite all of this work and progress, there’s still more to be done. The future is definitely not evenly distributed: over half a billion students cannot be reached by digital learning today.

We believe that Generative AI can amplify the good work that socially-minded edtech organizations, non-profits, and governments are already doing. Our goal is to empower them to build new and innovative digital learning systems that can amplify their work and allow them to reach a bigger audience.

With the launch of the AWS Education Equity Initiative, we want to help pave the way for the next generation of technology pioneers as they build powerful tools, train foundation models at scale, and create AI-powered teaching assistants.

We are committing up to $100 million in cloud technology and comprehensive technical advising over the next five years. The awardees will have access to the portfolio of AWS services and technical expertise so that they can build and scale learning management systems, mobile apps, chatbots, and other digital learning tools. As part of the application process, applicants will be asked to demonstrate how their proposed solution will benefit students from underserved and underrepresented communities.

As I mentioned earlier, our partners are already doing a lot of great work in this area. For example:

Code.org has already used AWS to scale their free computer science curriculum to millions of students in more than 100 countries. With this initiative, they will expand their use of Amazon Bedrock to provide an automated assessment of student projects, freeing up educator time that can be use for individual instruction and tailored learning.

Rocket Learning focuses on early childhood education in India. They will use Amazon Q in QuickSight to enhance learning outcomes for more than three million children.

I’m super excited about this initiative and look forward to seeing how it will help to create and educate the next generation of technology pioneers!

Jeff;

Solve complex problems with new scenario analysis capability in Amazon Q in QuickSight

Post Syndicated from Veliswa Boya original https://aws.amazon.com/blogs/aws/solve-complex-problems-with-new-scenario-analysis-capability-in-amazon-q-in-quicksight/

Today, we announced a new capability of Amazon Q in QuickSight that helps users perform scenario analyses to find answers to complex problems quickly. This AI-assisted data analysis experience helps business users find answers to complex problems by guiding them step-by-step through in-depth data analysis—suggesting analytical approaches, automatically analyzing data, and summarizing findings with suggested actions—using natural language prompts. This new capability eliminates hours of tedious and error-prone manual work traditionally required to perform analyses using spreadsheets or other alternatives. In fact, Amazon Q in QuickSight enables business users to perform complex scenario analysis up to 10x faster than spreadsheets. This capability expands upon existing data Q&A capabilities of Amazon QuickSight so business professionals can start their analysis by simply asking a question.

How it works
Business users are often faced with complex questions that have traditionally required specialized training and days or weeks of time analyzing data in spreadsheets or other tools to address. For example, let’s say you’re a franchisee with multiple locations to manage. You might use this new capability in Amazon Q in QuickSight to ask, “How can I help our new Chicago store perform as well as the flagship store in New York?” Using an agentic approach, Amazon Q would then suggest analytical approaches needed to address the underlying business goal, automatically analyze data, and present results complete with visualizations and suggested actions. You can conduct this multistep analysis in an expansive analysis canvas, giving you the flexibility to make changes, explore multiple analysis paths simultaneously, and adapt to situations over time.

This new analysis experience is part of Amazon QuickSight meaning it can read from QuickSight dashboards which connect to sources such as Amazon Athena, Amazon Aurora, Amazon Redshift, Amazon Simple Storage Service (Amazon S3), and Amazon OpenSearch Service. Specifically, this new experience is part of Amazon Q in QuickSight, which allows it to seamlessly integrate with other generative business intelligence (BI) capabilities such as data Q&A. You can also upload either a .csv or a single-table, single-sheet .xlsx file to incorporate into your analysis.

Here’s a visual walkthrough of this new analysis experience in Amazon Q in QuickSight.

I’m planning a customer event, and I’ve received an Excel spreadsheet of all who’ve registered to attend the event. I want to learn more about the attendees, so I analyze the spreadsheet and ask a few questions. I start by describing what I want to explore.

I upload the spreadsheet to start my analysis. Firstly, I want to understand how many people have registered for the event.

To design an agenda that’s suitable for the audience, I want to understand the various roles that will be attending. I select on the + icon to add a new block for asking a question following along the thread from the previous block.

I can continue to ask more questions. However, there are suggested questions for analyzing my data even further, and I now select one of these suggested questions. I want to increase marketing efforts at companies that don’t currently have a lot of attendees in this case, companies with fewer than two attendees.

Amazon Q executes the required analysis and keeps me updated of the progress. Step 1 of the process identifies companies that have fewer than two attendees and lists them.

Step 2 gives an estimate of how many more attendees I might get from each company if marketing efforts are increased.

In Step 3 I can see the potential increase in total attendees (including the percentage increase) in line with the increase in marketing efforts.

Lastly, Step 4 goes even further to highlight companies I should prioritize for these increased marketing efforts.

To increase the potential number of attendees even more, I wanted to change the analysis to identify companies with fewer than three attendees instead of two attendees. I choose the AI sparkle icon in the upper right to launch a modal that I then use to provide more context and make specific changes to the previous result.


This change resulted in new projections, and I can choose to consider them for my marketing efforts or keep to the previous projections.


Now available
Amazon Q in QuickSight Pro users can use this new capability in preview in the following AWS Regions at launch: US East (N. Virginia) and US West (Oregon). Get started with a free 30-day trial of QuickSight today. To learn more, visit the Amazon QuickSight User Guide. You can submit your questions to AWS re:Post for Amazon QuickSight, or through your usual AWS Support contacts.

Veliswa.

Use Amazon Q Developer to build ML models in Amazon SageMaker Canvas

Post Syndicated from Elizabeth Fuentes original https://aws.amazon.com/blogs/aws/use-amazon-q-developer-to-build-ml-models-in-amazon-sagemaker-canvas/

As a data scientist, I’ve experienced firsthand the challenges of making machine learning (ML) accessible to business analysts, marketing analysts, data analysts, and data engineers who are experts in their domains without ML experience. That’s why I’m particularly excited about today’s Amazon Web Services (AWS) announcement that Amazon Q Developer is now available in Amazon SageMaker Canvas. What catches my attention is how Amazon Q Developer helps connect ML expertise with business needs, making ML more accessible across organizations.

Amazon Q Developer helps domain experts build accurate, production-quality ML models through natural language interactions, even if they don’t have ML expertise. Amazon Q Developer guides these users by breaking down their business problems and analyzing their data to recommend step-by-step guidance for building custom ML models. It transforms users’ data to remove anomalies, and builds and evaluates custom ML models to recommend the best one, while providing users control and visibility into every step of the guided ML workflow. This empowers organizations to innovate faster with reduced time to market. It also reduces their reliance on ML experts so their specialists can focus on more complex technical challenges.

For example, a marketing analyst can state, “I want to predict home sales prices using home characteristics and past sales data”, and Amazon Q Developer will translate this into a set of ML steps, analyzing relevant customer data, building multiple models, and recommending the best approach.

Let’s see it in action
To start using Amazon Q Developer, I follow the Getting started with using Amazon SageMaker Canvas guide to launch the Canvas application. In this demo, I use natural language instructions to create a model to predict house prices for marketing and finance teams. From the SageMaker Canvas page, I select Amazon Q and then choose Start a new conversation.

In the new conversation I write:

I am an analyst and need to predict house prices for my marketing and finance teams.

Next, Amazon Q Developer explains the problem and recommends the appropriate ML model type. It also outlines the solution requirements, including the necessary dataset characteristics. Amazon Q Developer then asks if I want to upload my dataset or I want to choose a target column. I select it to upload my dataset.

In the next step, Amazon Q Developer lists the dataset requirements, which include relevant information about houses, current house prices, and the target variable for the regression model. It then recommended next steps, including: I want to upload my dataset, Select an existing dataset, Create a new dataset or I want to choose a target column. For this demo, I’ll use the canvas-sample-housing.csv sample dataset as my existing dataset.

select_an_existing_dataset

After selecting and loading the dataset, Amazon Q Developer analyzes it and suggests median_house_value as the target column for the regression model. I accept by selecting I would like to predict the “median_house_value” column. Moving on to the next step, Amazon Q Developer details which dataset features (such as “location”, “housing_median_age”, and “total_rooms”) it will use to predict the median_house_value.

Before moving forward with model training, I ask about the data quality, because without good data we can’t build a reliable model. Amazon Q Developer responds with quality insights for my entire dataset.

I can ask specific questions about individual features and their distributions to better understand the data quality.

columns in dataset

To my surprise, through the previous question, I discovered that the “households” column has a wide variation between extreme values, which could affect the model’s prediction accuracy. Therefore, I ask Amazon Q Developer to fix this outlier problem.

After the transformation is done, I can ask what steps Amazon Q Developer followed to make this change. Behind the scenes, Amazon Q Developer applies advanced data preparation steps using SageMaker Canvas data preparation capabilities, which I can review and see the steps so that I can visualize and replicate the process to get the final, prepared dataset for training the model.

After reviewing the data preparation steps, I select Launch my training job.

launch training job

After the training job is launched, I can see its progress in the conversation, and the datasets created.

As a data scientist, I particularly appreciate that, with Amazon Q Developer, Ican see detailed metrics such as the confusion matrix and precision-recall scores for classification models and root mean square error (RMSE) for regression models. These are crucial elements I always look for when evaluating model performance and making data-driven decisions, and it’s refreshing to see them presented in a way that’s accessible to nontechnical users to build trust and enable proper governance while maintaining the depth that technical teams need.

You can access these metrics by selecting the new model from My Models or from the Amazon Q conversation menu:

  • Overview – This tab shows the Column impact analysis. In this case, median_income emerges as the primary factor influencing my model.
  • Scoring – This tab provides model accuracy insights, including RMSE metrics.
  • Advanced metrics – This tab displays the detailed Metrics table, Residuals and Error density for in-depth model evaluation.

Analyze My Model

After reviewing these metrics and validating the model’s performance, I can move to the final stages of the ML workflow:

  • Predictions – I can test my model using the Predictions tab to validate its real-world performance.
  • Deployment – I can create an endpoint deployment to make my model available for production use.

This simplifies the deployment process, a step that traditionally requires significant DevOps knowledge, into a straightforward operation that business analysts can handle confidently.

predictions and deploy

Things to know
Amazon Q Developer democratizes ML across organizations:

Empowering all skill levels with ML – Amazon Q Developer is now available in SageMaker Canvas, helping business analysts, marketing analysts, and data professionals who don’t have ML experience create solutions for business problems through a guided ML workflow. From data analysis and model selection to deployment, users can solve business problems using natural language, reducing dependence on ML experts such as data scientists and enabling organizations to innovate faster with reduced time to market.

Streamlining the ML workflow – With Amazon Q Developer available in SageMaker Canvas, users can prepare data, and build, analyze, and deploy ML models through a guided, transparent workflow. Amazon Q Developer provides advanced data preparation and AutoML capabilities that democratize ML, and allows non-ML experts to produce highly-accurate ML models.

Providing full visibility into the ML workflow – Amazon Q Developer provides full transparency by generating the underlying code and technical artifacts such as data transformation steps, model explainability, and accuracy measures. This allows cross-functional teams, including ML experts, to review, validate, and update the models as needed, facilitating collaboration in a secure environment.

Availability – Amazon Q Developer is now in preview release in Amazon SageMaker Canvas.

Pricing – Amazon Q Developer is now available in SageMaker Canvas at no additional cost to both Amazon Q Developer Pro Tier and Amazon Q Developer Free tier users. However, standard charges apply for resources such as SageMaker Canvas workspace instances and any resources used for building or deploying models. For detailed pricing information, visit the Amazon SageMaker Canvas Pricing.

To learn more about getting started visit the Amazon Q Developer product web page.

Eli

Amazon SageMaker Lakehouse integrated access controls now available in Amazon Athena federated queries

Post Syndicated from Esra Kayabali original https://aws.amazon.com/blogs/aws/amazon-sagemaker-lakehouse-integrated-access-controls-now-available-in-amazon-athena-federated-queries/

Today, we announced the next generation of Amazon SageMaker, which is a unified platform for data, analytics, and AI, bringing together widely-adopted AWS machine learning and analytics capabilities. At its core is SageMaker Unified Studio (preview), a single data and AI development environment for data exploration, preparation and integration, big data processing, fast SQL analytics, model development and training, and generative AI application development. This announcement includes Amazon SageMaker Lakehouse, a capability that unifies data across data lakes and data warehouses, helping you build powerful analytics and artificial intelligence and machine learning (AI/ML) applications on a single copy of data.

In addition to these launches, I’m happy to announce data catalog and permissions capabilities in Amazon SageMaker Lakehouse, helping you connect, discover, and manage permissions to data sources centrally.

Organizations today store data across various systems to optimize for specific use cases and scale requirements. This often results in data siloed across data lakes, data warehouses, databases, and streaming services. Analysts and data scientists face challenges when trying to connect to and analyze data from these diverse sources. They must set up specialized connectors for each data source, manage multiple access policies, and often resort to copying data, leading to increased costs and potential data inconsistencies.

The new capability addresses these challenges by simplifying the process of connecting to popular data sources, cataloging them, applying permissions, and making the data available for analysis through SageMaker Lakehouse and Amazon Athena. You can use the AWS Glue Data Catalog as a single metadata store for all data sources, regardless of location. This provides a centralized view of all available data.

Data source connections are created once and can be reused, so you don’t need to set up connections repeatedly. As you connect to the data sources, databases and tables are automatically cataloged and registered with AWS Lake Formation. Once cataloged, you grant access to those databases and tables to data analysts, so they don’t have to go through separate steps of connecting to each data source and don’t have to know built-in data source secrets. Lake Formation permissions can be used to define fine-grained access control (FGAC) policies across data lakes, data warehouses, and online transaction processing (OLTP) data sources, providing consistent enforcement when querying with Athena. Data remains in its original location, eliminating the need for costly and time-consuming data transfers or duplications. You can create or reuse existing data source connections in Data Catalog and configure built-in connectors to multiple data sources, including Amazon Simple Storage Service (Amazon S3), Amazon Redshift, Amazon Aurora, Amazon DynamoDB (preview), Google BigQuery, and more.

Getting started with the integration between Athena and Lake Formation
To showcase this capability, I use a preconfigured environment that incorporates Amazon DynamoDB as a data source. The environment is set up with appropriate tables and data to effectively demonstrate the capability. I use the SageMaker Unified Studio (preview) interface for this demonstration.

To begin, I go to SageMaker Unified Studio (preview) through the Amazon SageMaker domain. This is where you can create and manage projects, which serve as shared workspaces. These projects allow team members to collaborate, work with data, and develop ML models together. Creating a project automatically sets up AWS Glue Data Catalog databases, establishes a catalog for Redshift Managed Storage (RMS) data, and provisions necessary permissions.

To manage projects, you can either view a comprehensive list of existing projects by selecting Browse all projects, or you can create a new project by choosing Create project. I use two existing projects: sales-group, where administrators have full access privileges to all data, and marketing-project, where analysts operate under restricted data access permissions. This setup effectively illustrates the contrast between administrative and limited user access levels.

In this step, I set up a federated catalog for the target data source, which is Amazon DynamoDB. I go to Data in the left navigation pane and choose the + (plus) sign to Add data. I choose Add connection and then I choose Next.

I choose Amazon DynamoDB and choose Next.

I enter the details and choose Add data. Now, I have the Amazon DynamoDB federated catalog created in SageMaker Lakehouse. This is where your administrator gives you access using resource policies. I’ve already configured the resource policies in this environment. Now, I’ll show you how fine-grained access controls work in SageMaker Unified Studio (preview).

I begin by selecting the sales-group project, which is where administrators maintain and have full access to customer data. This dataset contains fields such as zip codes, customer IDs, and phone numbers. To analyze this data, I can execute queries using Query with Athena.

Upon selecting Query with Athena, the Query Editor launches automatically, providing a workspace where I can compose and execute SQL queries against the lakehouse. This integrated query environment offers a seamless experience for data exploration and analysis.

In the second part, I switch to marketing-project to show what an analyst experiences when they run their queries and observe that the fine-grained access control permissions are in place and working.

In the second part, I demonstrate the perspective of an analyst by switching to the marketing-project environment. This helps us verify that the fine-grained access control permissions are properly implemented and effectively restricting data access as intended. Through example queries, we can observe how analysts interact with the data while being subject to the established security controls.

Using the Query with Athena option, I execute a SELECT statement on the table to verify the access controls. The results confirm that, as expected, I can only view the zipcode and cust_id columns, while the phone column remains restricted based on the configured permissions.

With these new data catalog and permissions capabilities in Amazon SageMaker Lakehouse, you can now streamline your data operations, enhance security governance, and accelerate AI/ML development while maintaining data integrity and compliance across your entire data ecosystem.

Now available
Data catalog and permissions in Amazon SageMaker Lakehouse simplifies interactive analytics through federated query when connecting to a unified catalog and permissions with Data Catalog across multiple data sources, providing a single place to define and enforce fine-grained security policies across data lakes, data warehouses, and OLTP data sources for a high-performing query experience.

You can use this capability in US East (N. Virginia), US West (Oregon), US East (Ohio), Europe (Ireland), and Asia Pacific (Tokyo) AWS Regions.

To get started with this new capability, visit the Amazon SageMaker Lakehouse documentation.

— Esra

Amazon SageMaker Lakehouse and Amazon Redshift supports zero-ETL integrations from applications

Post Syndicated from Veliswa Boya original https://aws.amazon.com/blogs/aws/introducing-amazon-sagemaker-lakehouse-support-for-zero-etl-integrations-from-applications/

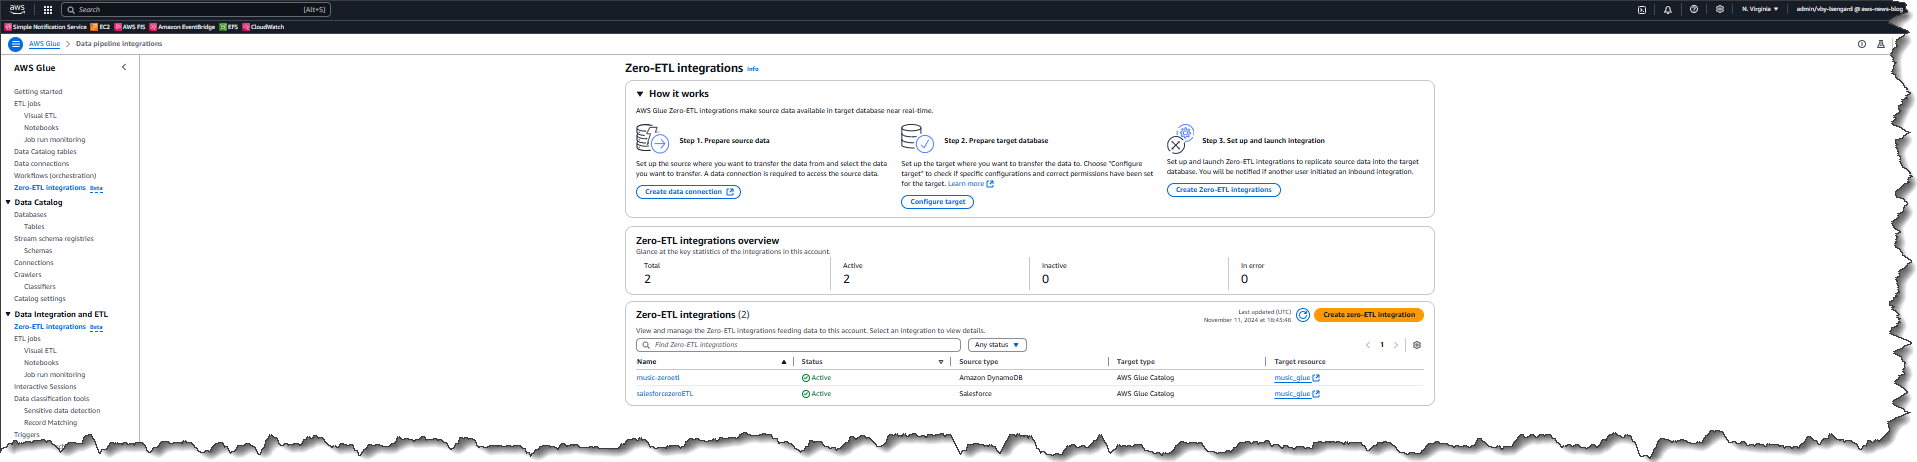
Today, we announced the general availability of Amazon SageMaker Lakehouse and Amazon Redshift support for zero-ETL integrations from applications. Amazon SageMaker Lakehouse unifies all your data across Amazon Simple Storage Service (Amazon S3) data lakes and Amazon Redshift data warehouses, helping you build powerful analytics and AI/ML applications on a single copy of data. SageMaker Lakehouse gives you the flexibility to access and query your data in-place with all Apache Iceberg compatible tools and engines. Zero-ETL is a set of fully managed integrations by AWS that minimizes the need to build ETL data pipelines for common ingestion and replication use cases. With zero-ETL integrations from applications such as Salesforce, SAP, and Zendesk, you can reduce time spent building data pipelines and focus on running unified analytics on all your data in Amazon SageMaker Lakehouse and Amazon Redshift.

As organizations rely on an increasingly diverse array of digital systems, data fragmentation has become a significant challenge. Valuable information is often scattered across multiple repositories, including databases, applications, and other platforms. To harness the full potential of their data, businesses must enable access and consolidation from these varied sources. In response to this challenge, users build data pipelines to extract and load (EL) from multiple applications into centralized data lakes and data warehouses. Using zero-ETL, you can efficiently replicate valuable data from your customer support, relationship management, and enterprise resource planning (ERP) applications for analytics and AI/ML to datalakes and data warehouses, saving you weeks of engineering effort needed to design, build, and test data pipelines.

Prerequisites

  • An Amazon SageMaker Lakehouse catalog configured through AWS Glue Data Catalog and AWS Lake Formation.
  • An AWS Glue database that is configured for Amazon S3 where the data will be stored.
  • A secret in AWS Secret Manager to use for the connection to the data source. The credentials must contain the username and password that you use to sign in to your application.
  • An AWS Identity and Access Management (IAM) role for the Amazon SageMaker Lakehouse or Amazon Redshift job to use. The role must grant access to all resources used by the job, including Amazon S3 and AWS Secrets Manager.
  • A valid AWS Glue connection to the desired application.

How it works – creating a Glue connection prerequisite
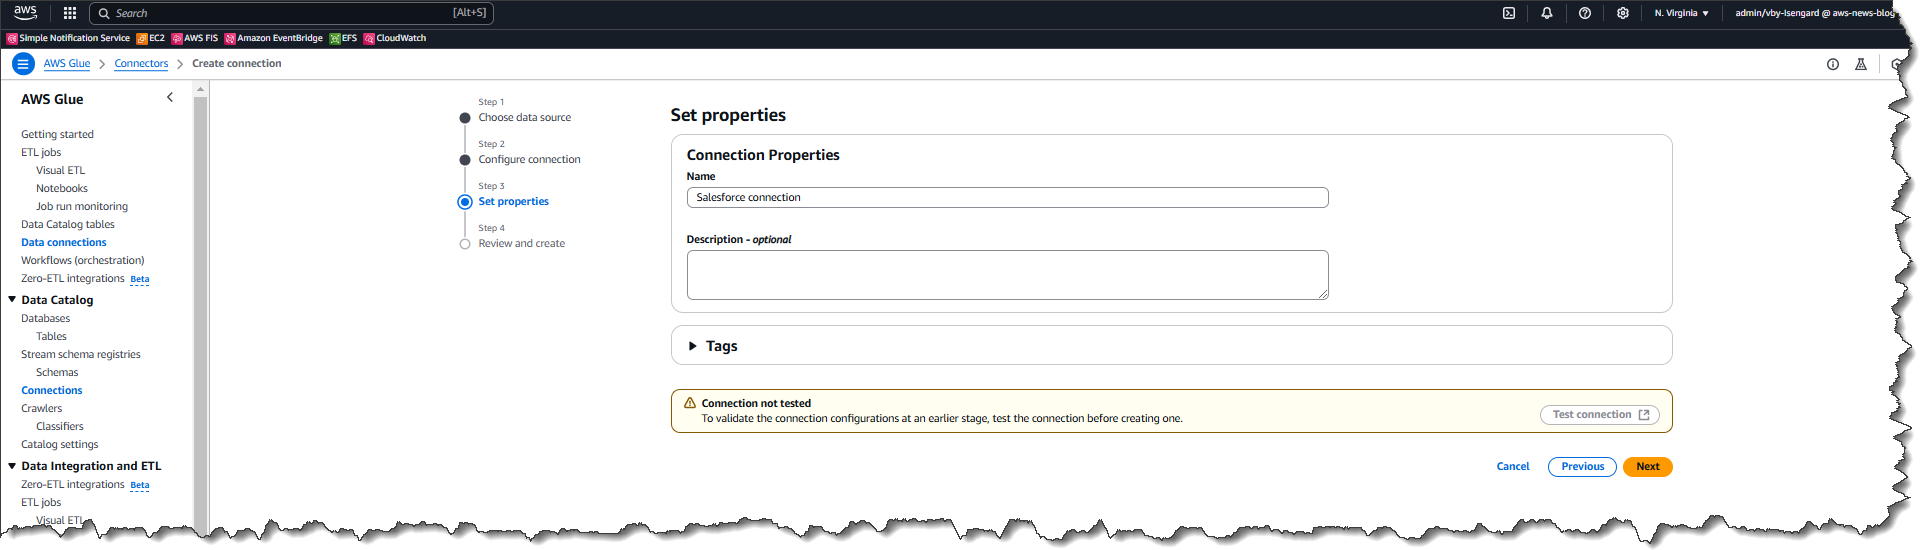
I start by creating a connection using the AWS Glue console. I opt for a Salesforce integration as the data source.

Next, I provide the location of the Salesforce instance to be used for the connection, together with the rest of the required information. Be sure to use the .salesforce.com domain instead of .force.com. Users can choose between two authentication methods, JSON Web Token (JWT), which is obtained through Salesforce access tokens, or OAuth login through the browser.

I review all the information and then choose Create connection.

After I sign into the Salesforce instance through a popup (not shown here), the connection is successfully created.

How it works – creating a zero-ETL integration
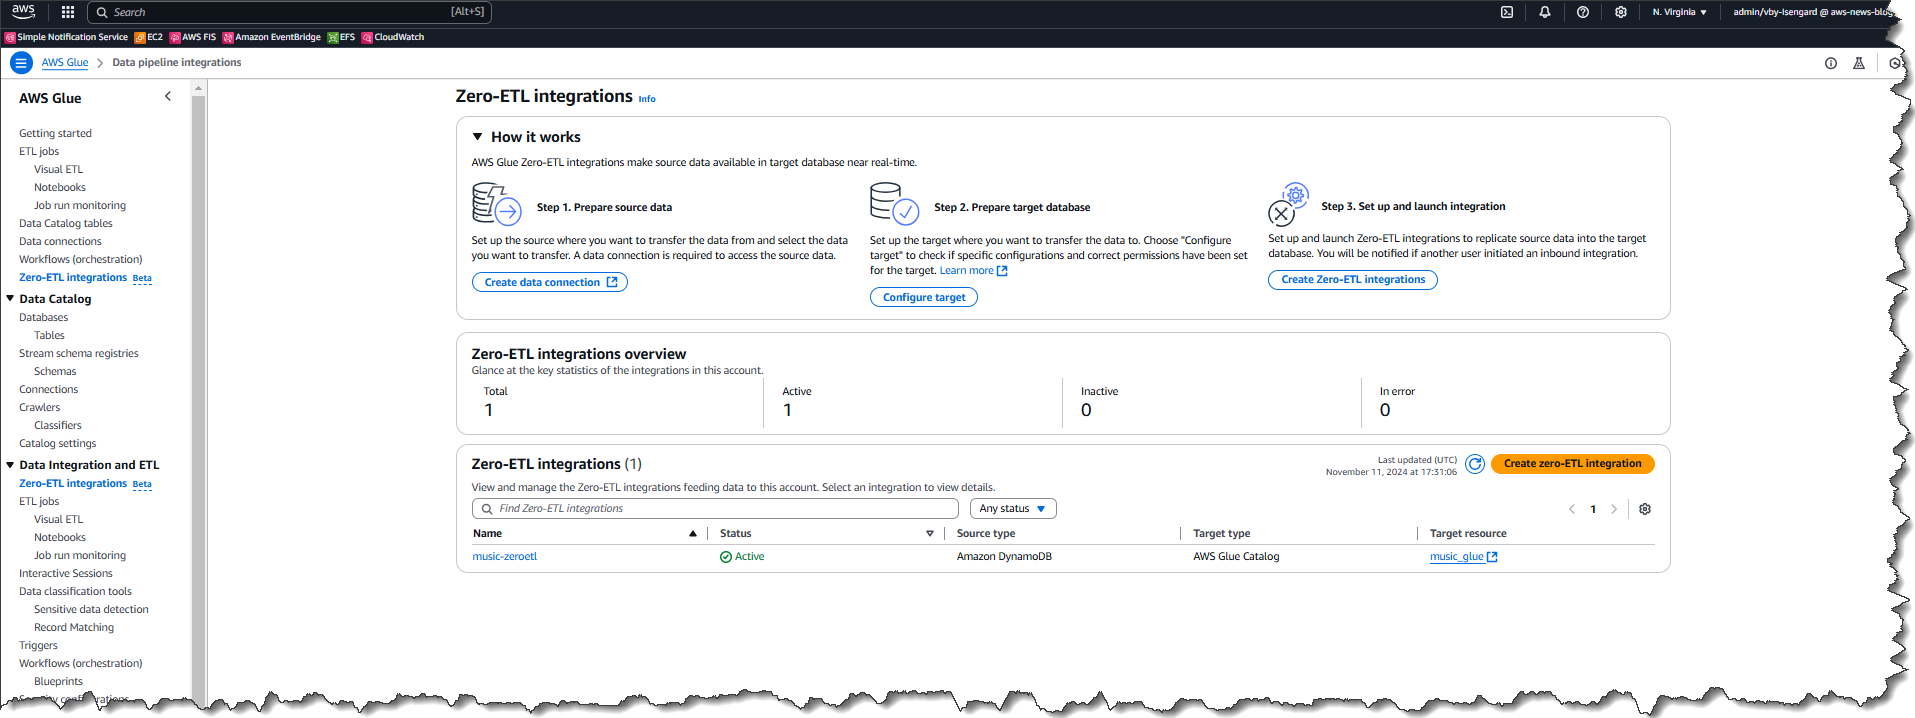
Now that I have a connection, I choose zero-ETL integrations from the left navigation panel, then choose Create zero-ETL integration.

First I choose the source type for my integration – in this case Salesforce so I can use my recently created connection.

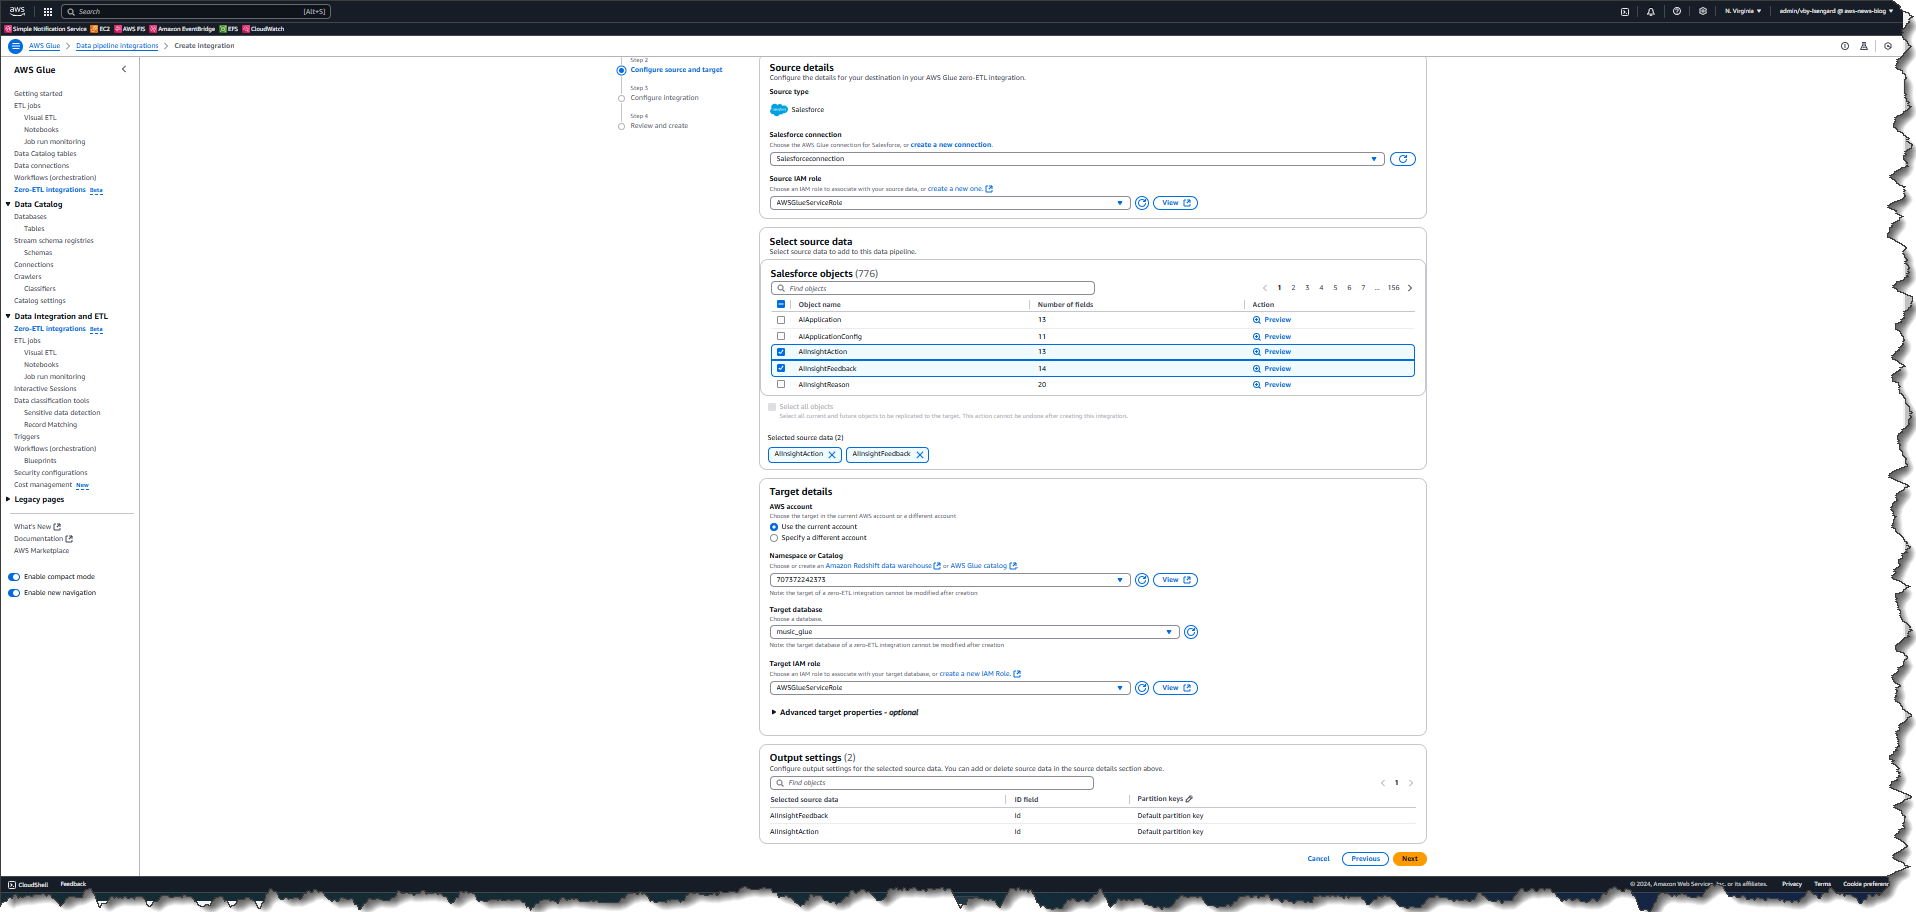
Next, I select objects from the data source that I want to replicate to the target database in AWS Glue.

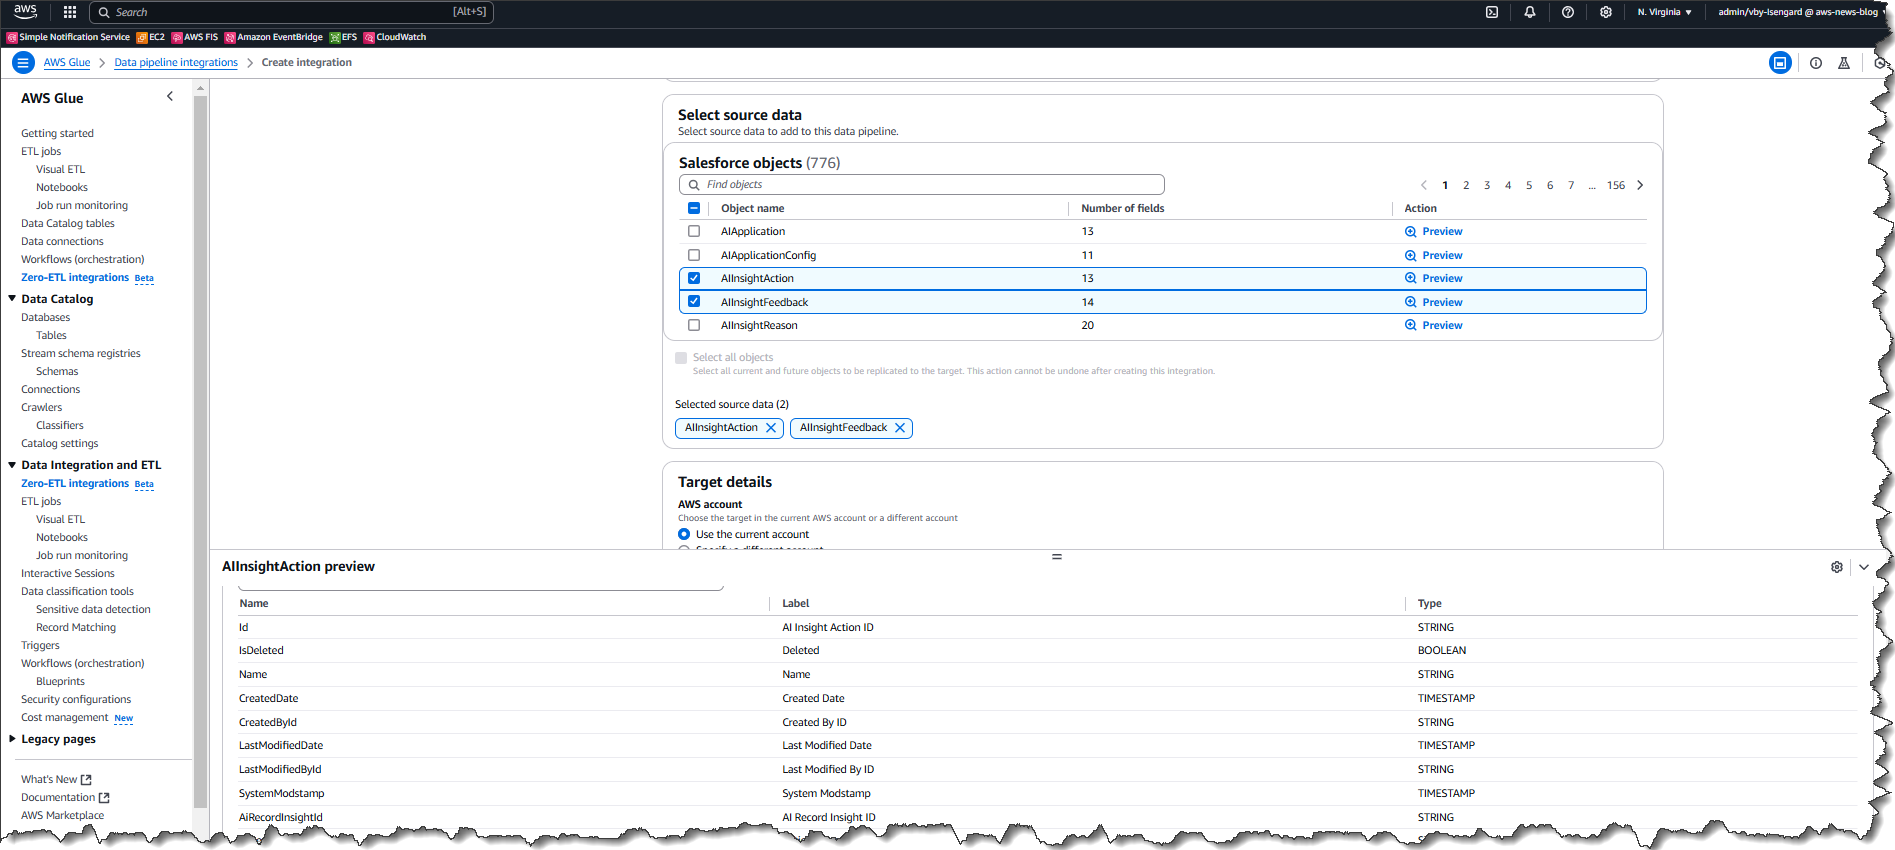
While in the process of adding objects, I can quickly preview both data and metadata to confirm that I am selecting the correct object.

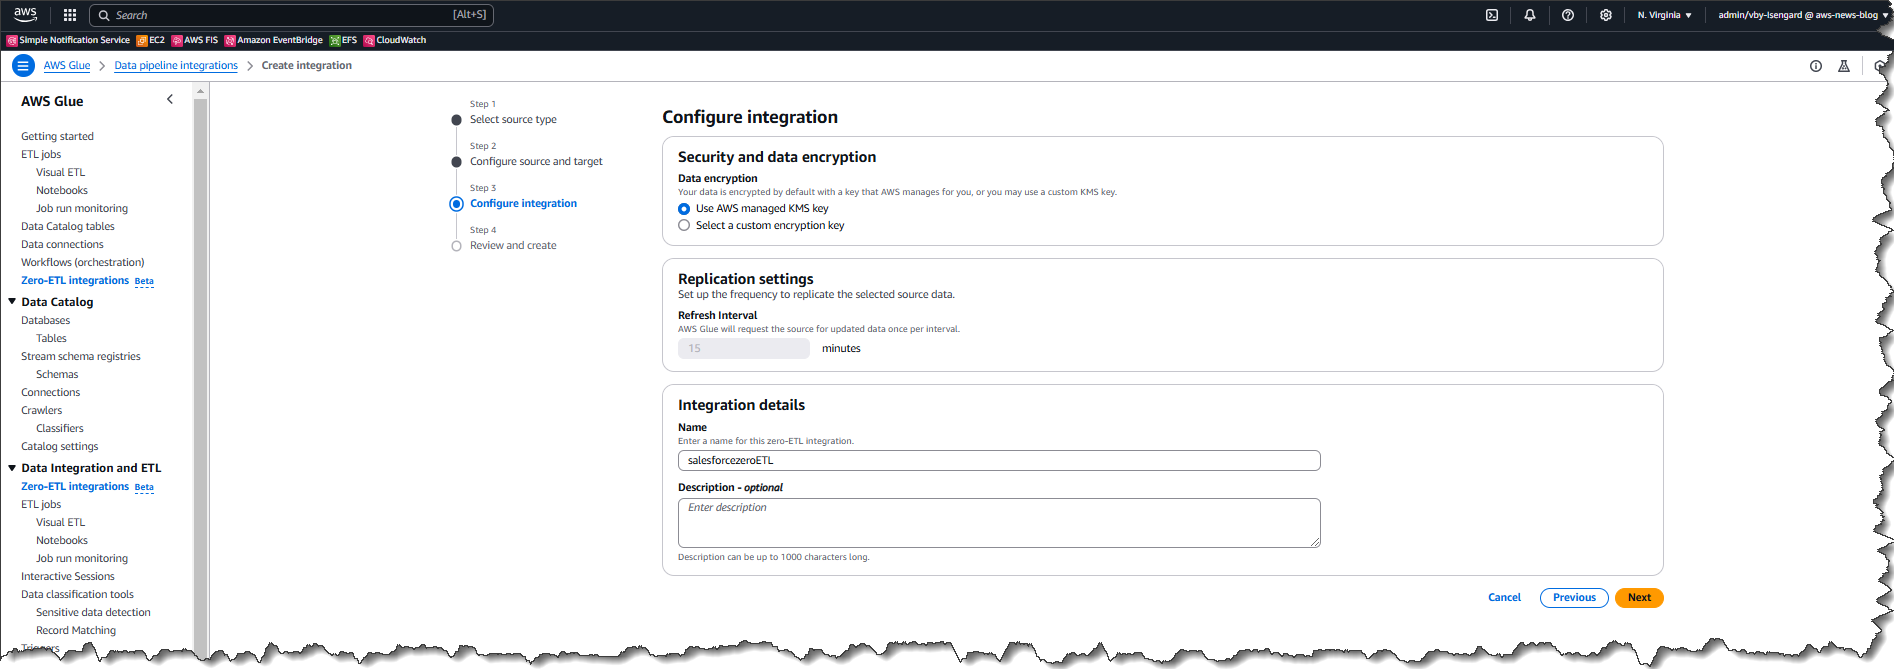
By default, zero-ETL integration will synchronize data from the source to the target every 60 minutes. However, you can change this interval to reduce the cost of replication for cases that do not require frequent updates.

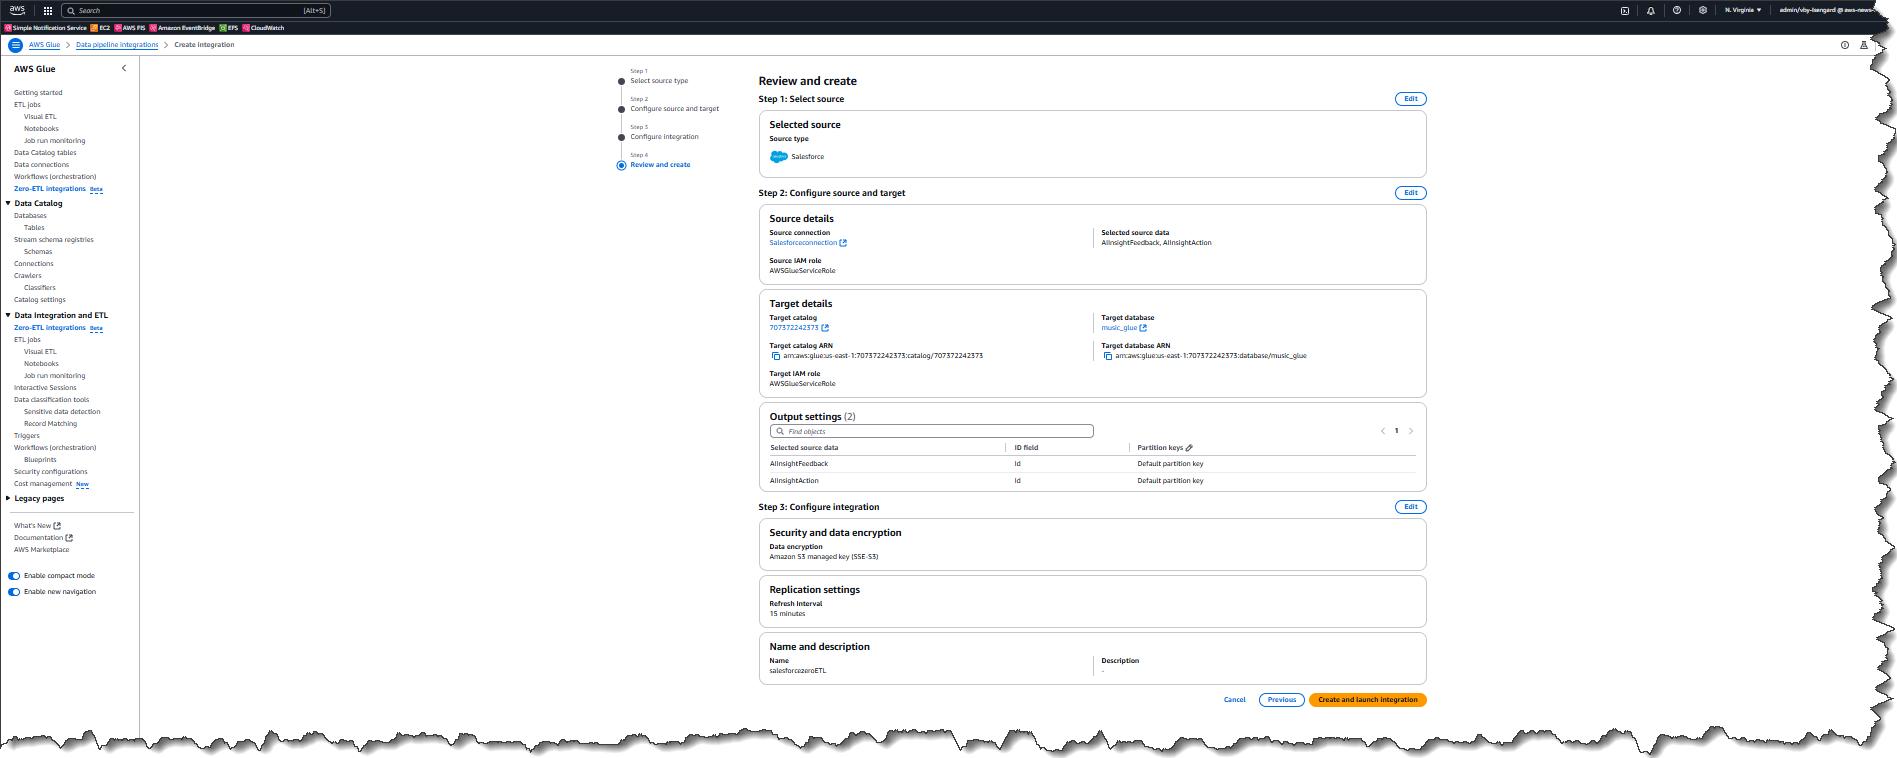
I review and then choose Create and launch integration.

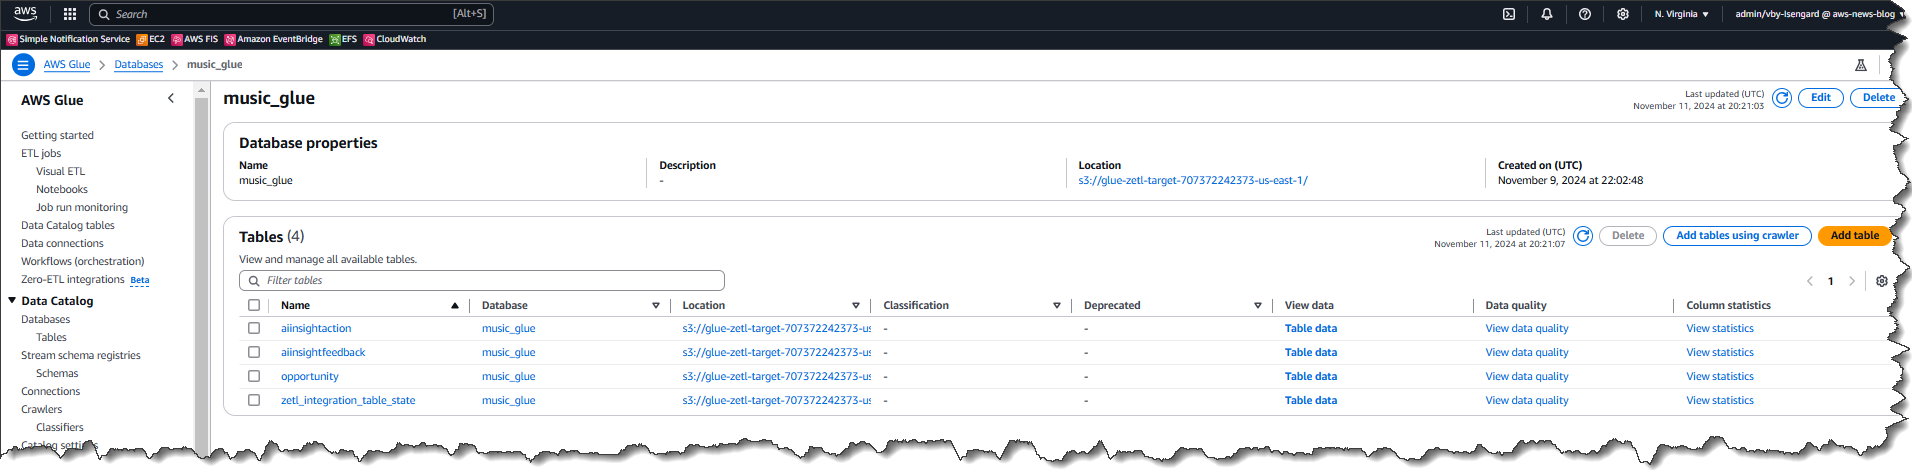
The data in the source (Salesforce instance) has now been replicated to the target database salesforcezeroETL in my AWS account. This integration has two phases. Phase 1: initial load will ingest all the data for the selected objects and may take between 15 min to a few hours depending on the size of the data in these objects. Phase 2: incremental load will detect any changes (such as new records, updated records, or deleted records) and apply these to the target.

Each of the objects that I selected earlier has been stored in its respective table within the database. From here I can view the Table data for each of the objects that have been replicated from the data source.

Lastly, here’s a view of the data in Salesforce. As new entities are created, or existing entities are updated or changed in Salesforce, the data changes will synchronize to the target in AWS Glue automatically.

Now available
Amazon SageMaker Lakehouse and Amazon Redshift support for zero-ETL integrations from applications is now available in US East (N. Virginia), US East (Ohio), US West (Oregon), Asia Pacific (Hong Kong), Asia Pacific (Singapore), Asia Pacific (Sydney), Asia Pacific (Tokyo), Europe (Frankfurt), Europe (Ireland), and Europe (Stockholm) AWS Regions. For pricing information, visit the AWS Glue pricing page.

To learn more, visit our AWS Glue User Guide. Send feedback to AWS re:Post for AWS Glue or through your usual AWS Support contacts. Get started by creating a new zero-ETL integration today.

– Veliswa

Simplify analytics and AI/ML with new Amazon SageMaker Lakehouse

Post Syndicated from Esra Kayabali original https://aws.amazon.com/blogs/aws/simplify-analytics-and-aiml-with-new-amazon-sagemaker-lakehouse/

Today, I’m very excited to announce the general availability of Amazon SageMaker Lakehouse, a capability that unifies data across Amazon Simple Storage Service (Amazon S3) data lakes and Amazon Redshift data warehouses, helping you build powerful analytics and artificial intelligence and machine learning (AI/ML) applications on a single copy of data. SageMaker Lakehouse is a part of the next generation of Amazon SageMaker, which is a unified platform for data, analytics and AI, that brings together widely-adopted AWS machine learning and analytics capabilities and delivers an integrated experience for analytics and AI.

Customers want to do more with data. To move faster with their analytics journey, they are picking the right storage and databases to store their data. The data is spread across data lakes, data warehouses, and different applications, creating data silos that make it difficult to access and utilize. This fragmentation leads to duplicate data copies and complex data pipelines, which in turn increases costs for the organization. Furthermore, customers are constrained to use specific query engines and tools, as the way and where the data is stored limits their options. This restriction hinders their ability to work with the data as they would prefer. Lastly, the inconsistent data access makes it challenging for customers to make informed business decisions.

SageMaker Lakehouse addresses these challenges by helping you to unify data across Amazon S3 data lakes and Amazon Redshift data warehouses. It offers you the flexibility to access and query data in-place with all engines and tools compatible with Apache Iceberg. With SageMaker Lakehouse, you can define fine-grained permissions centrally and enforce them across multiple AWS services, simplifying data sharing and collaboration. Bringing data into your SageMaker Lakehouse is easy. In addition to seamlessly accessing data from your existing data lakes and data warehouses, you can use zero-ETL from operational databases such as Amazon Aurora, Amazon RDS for MySQL, Amazon DynamoDB, as well as applications such as Salesforce and SAP. SageMaker Lakehouse fits into your existing environments.

Get started with SageMaker Lakehouse
For this demonstration, I use a preconfigured environment that has multiple AWS data sources. I go to the Amazon SageMaker Unified Studio (preview) console, which provides an integrated development experience for all your data and AI. Using Unified Studio, you can seamlessly access and query data from various sources through SageMaker Lakehouse, while using familiar AWS tools for analytics and AI/ML.

This is where you can create and manage projects, which serve as shared workspaces. These projects allow team members to collaborate, work with data, and develop AI models together. Creating a project automatically sets up AWS Glue Data Catalog databases, establishes a catalog for Redshift Managed Storage (RMS) data, and provisions necessary permissions. You can get started by creating a new project or continue with an existing project.

To create a new project, I choose Create project.

I have 2 project profile options to build a lakehouse and interact with it. First one is Data analytics and AI-ML model development, where you can analyze data and build ML and generative AI models powered by Amazon EMR, AWS Glue, Amazon Athena, Amazon SageMaker AI, and SageMaker Lakehouse. Second one is SQL analytics, where you can analyze your data in SageMaker Lakehouse using SQL. For this demo, I proceed with SQL analytics.

I enter a project name in the Project name field and choose SQL analytics under Project profile. I choose Continue.

I enter the values for all the parameters under Tooling. I enter the values to create my Lakehouse databases. I enter the values to create my Redshift Serverless resources. Finally, I enter a name for my catalog under Lakehouse Catalog.

On the next step, I review the resources and choose Create project.

After the project is created, I observe the project details.

I go to Data in the navigation pane and choose the + (plus) sign to Add data. I choose Create catalog to create a new catalog and choose Add data.

After the RMS catalog is created, I choose Build from the navigation pane and then choose Query Editor under Data Analysis & Integration to create a schema under RMS catalog, create a table, and then load table with sample sales data.

After entering the SQL queries into the designated cells, I choose Select data source from the right dropdown menu to establish a database connection to Amazon Redshift data warehouse. This connection allows me to execute the queries and retrieve the desired data from the database.

Once the database connection is successfully established, I choose Run all to execute all queries and monitor the execution progress until all results are displayed.

For this demonstration, I use two additional pre-configured catalogs. A catalog is a container that organizes your lakehouse object definitions such as schema and tables. The first is an Amazon S3 data lake catalog (test-s3-catalog) that stores customer records, containing detailed transactional and demographic information. The second is a lakehouse catalog (churn_lakehouse) dedicated to storing and managing customer churn data. This integration creates a unified environment where I can analyze customer behavior alongside churn predictions.

From the navigation pane, I choose Data and locate my catalogs under the Lakehouse section. SageMaker Lakehouse offers multiple analysis options, including Query with Athena, Query with Redshift, and Open in Jupyter Lab notebook.

Note that you need to choose Data analytics and AI-ML model development profile when you create a project, if you want to use Open in Jupyter Lab notebook option. If you choose Open in Jupyter Lab notebook, you can interact with SageMaker Lakehouse using Apache Spark via EMR 7.5.0 or AWS Glue 5.0 by configuring the Iceberg REST catalog, enabling you to process data across your data lakes and data warehouses in a unified manner.

Here’s how querying using Jupyter Lab notebook looks like:

I continue by choosing Query with Athena. With this option, I can use serverless query capability of Amazon Athena to analyze the sales data directly within SageMaker Lakehouse. Upon selecting Query with Athena, the Query Editor launches automatically, providing an workspace where I can compose and execute SQL queries against the lakehouse. This integrated query environment offers a seamless experience for data exploration and analysis, complete with syntax highlighting and auto-completion features to enhance productivity.

I can also use Query with Redshift option to run SQL queries against the lakehouse.

SageMaker Lakehouse offers a comprehensive solution for modern data management and analytics. By unifying access to data across multiple sources, supporting a wide range of analytics and ML engines, and providing fine-grained access controls, SageMaker Lakehouse helps you make the most of your data assets. Whether you’re working with data lakes in Amazon S3, data warehouses in Amazon Redshift, or operational databases and applications, SageMaker Lakehouse provides the flexibility and security you need to drive innovation and make data-driven decisions. You can use hundreds of connectors to integrate data from various sources. Additionally, you can access and query data in-place with federated query capabilities across third-party data sources.

Now available
You can access SageMaker Lakehouse through the AWS Management Console, APIs, AWS Command Line Interface (AWS CLI), or AWS SDKs. You can also access through AWS Glue Data Catalog and AWS Lake Formation. SageMaker Lakehouse is available in US East (N. Virginia), US West (Oregon), US East (Ohio), Europe (Ireland), Europe (Frankfurt), Europe (Stockholm), Asia Pacific (Sydney), Asia Pacific (Hong Kong), Asia Pacific (Tokyo), and Asia Pacific (Singapore) AWS Regions.

For pricing information, visit the Amazon SageMaker Lakehouse pricing.

For more information on Amazon SageMaker Lakehouse and how it can simplify your data analytics and AI/ML workflows, visit the Amazon SageMaker Lakehouse documentation.

— Esra

New Amazon DynamoDB zero-ETL integration with Amazon SageMaker Lakehouse

Post Syndicated from Donnie Prakoso original https://aws.amazon.com/blogs/aws/new-amazon-dynamodb-zero-etl-integration-with-amazon-sagemaker-lakehouse/

Amazon DynamoDB, a serverless NoSQL database, has been a go-to solution for over one million customers to build low-latency and high-scale applications. As data grows, organizations are constantly seeking ways to extract valuable insights from operational data, which is often stored in DynamoDB. However, to make the most of this data in Amazon DynamoDB for analytics and machine learning (ML) use cases, customers often build custom data pipelines—a time-consuming infrastructure task that adds little unique value to their core business.

Starting today, you can use Amazon DynamoDB zero-ETL integration with Amazon SageMaker Lakehouse to run analytics and ML workloads in just a few clicks without consuming your DynamoDB table capacity. Amazon SageMaker Lakehouse unifies all your data across Amazon S3 data lakes and Amazon Redshift data warehouses, helping you build powerful analytics and AI/ML applications on a single copy of data.

Zero-ETL is a set of integrations that eliminates or minimizes the need to build ETL data pipelines. This zero-ETL integration reduces the complexity of engineering efforts required to build and maintain data pipelines, benefiting users running analytics and ML workloads on operational data in Amazon DynamoDB without impacting production workflows.

Let’s get started
For the following demo, I need to set up zero-ETL integration for my data in Amazon DynamoDB with an Amazon Simple Storage Service data lake managed by Amazon SageMaker Lakehouse. Before setting up the zero-ETL integration, there are prerequisites to complete. If you want to learn more on how to set up, refer to this Amazon DynamoDB documentation page.

With all the prerequisites completed, I can get started with this integration. I navigate to the AWS Glue console and select Zero-ETL integrations under Data Integration and ETL. Then, I choose Create zero-ETL integration.

Here, I have options to select my data source. I choose Amazon DynamoDB and choose Next.

Next, I need to configure the source and target details. In the Source details section, I select my Amazon DynamoDB table. In the Target details section, I specify the S3 bucket that I’ve set up in the AWS Glue Data Catalog.

To set up this integration, I need an IAM role that grants AWS Glue the necessary permissions. For guidance on configuring IAM permissions, visit the Amazon DynamoDB documentation page. Also, if I haven’t configured a resource policy for my AWS Glue Data Catalog, I can select Fix it for me to automatically add the required resource policies.

Here, I have options to configure the output. Under Data partitioning, I can either use DynamoDB table keys for partitioning or specify custom partition keys. After completing the configuration, I choose Next.

Because I select the Fix it for me checkbox, I need to review the required changes and choose Continue before I can proceed to the next step.

On the next page, I have the flexibility to configure data encryption. I can use AWS Key Management Service (AWS KMS) or a custom encryption key. Then, I assign a name to the integration and choose Next.

On the last step, I need to review the configurations. When I’m happy, I choose Next to create the zero-ETL integration.

After the initial data ingestion completes, my zero-ETL integration will be ready for use. The completion time varies depending on the size of my source DynamoDB table.

If I navigate to Tables under Data Catalog in the left navigation panel, I can observe more details including Schema. Under the hood, this zero-ETL integration uses Apache Iceberg to transform related to data format and structure in my DynamoDB data into Amazon S3.

Lastly, I can tell that all my data is available in my S3 bucket. 

This zero-ETL integration significantly reduces the complexity and operational burden of data movement, and I can therefore focus on extracting insights rather than managing pipelines.

Available now
This new zero-ETL capability is available in the following AWS Regions: US East (N. Virginia, Ohio), US West (Oregon), Asia Pacific (Hong Kong, Singapore, Sydney, Tokyo), Europe (Frankfurt, Ireland, Stockholm).

Explore how to streamline your data analytics workflows using Amazon DynamoDB zero-ETL integration with Amazon SageMaker Lakehouse. Learn more how to get started on the Amazon DynamoDB documentation page.

Happy building!
Donnie

Discover, govern, and collaborate on data and AI securely with Amazon SageMaker Data and AI Governance

Post Syndicated from Esra Kayabali original https://aws.amazon.com/blogs/aws/discover-govern-and-collaborate-on-data-and-ai-securely-with-amazon-sagemaker-data-and-ai-governance/

Today, we announced the next generation of Amazon SageMaker, which is a unified platform for data, analytics, and AI, bringing together widely-adopted AWS machine learning and analytics capabilities. This announcement includes Amazon SageMaker Data and AI Governance, a set of capabilities that streamline the management of data and AI assets.

Data teams often face challenges when trying to locate, access, and collaborate on data and AI models across their organizations. The process of discovering relevant assets, understanding their context, and obtaining proper access can be time-consuming and complex, potentially hindering productivity and innovation.

SageMaker Data and AI Governance offers a comprehensive set of features by providing a unified experience for cataloging, discovering, and governing data and AI assets. It’s centered around SageMaker Catalog built on Amazon DataZone, providing a centralized repository that is accessible through Amazon SageMaker Unified Studio (preview). The catalog is built directly into the SageMaker platform, offering seamless integration with existing SageMaker workflows and tools, helping engineers, data scientists, and analysts to safely find and use authorized data and models through advanced search features. With the SageMaker platform, users can safeguard and protect their AI models using guardrails and implementing responsible AI policies.

Here are some of the key Data and AI governance features of SageMaker:

  1. Enterprise-ready business catalog – To add business context and make data and AI assets discoverable by everyone in the organization, you can customize the catalog with automated metadata generation which uses machine learning (ML) to automatically generate business names of data assets and columns within those assets. We improved metadata curation functionality, helping you attach multiple business glossary terms to assets and glossary terms to individual columns in the asset.
  2. Self-service for data and AI workers – To provide data autonomy for users to publish and consume data, you can customize and bring any type of asset to the catalog using APIs. Data publishers can automate metadata discovery through data source runs or manually published files from the supported data sources and enrich metadata with generative AI–generated data descriptions automatically as datasets are brought into the catalog. Data consumers can then use faceted search to quickly find, understand, and request access to data.
  3. Simplified access to data and tools – To govern data and AI assets based on business purpose, projects serve as business use case–based logical containers. You can create a project and collaborate on specific business use case–based groupings of people, data, and analytics tools. Within the project, you can create an environment that provides the necessary infrastructure to project members such as analytics and AI tools and storage so that project members can easily produce new data or consume data they have access to. This helps you add multiple capabilities and analytics tools to the same project, depending on your needs.
  4. Governed data and model sharing – Data producers own and manage access to data with a subscription approval workflow that allows consumers to request access and data owners to approve. You can now set up subscription terms to be attached to assets when published and automate subscription grant fulfillment for AWS managed data lakes and Amazon Redshift with customizations using Amazon EventBridge events for other sources.
  5. Bring a consistent level of AI safety across all your applications: Amazon Bedrock Guardrails helps evaluate user inputs and Foundation Model (FM) responses based on use case specific policies, and provides an additional layer of safeguards regardless of the underlying Foundation Models. AWS AI portfolio provides hundreds of built-in algorithms with pre-trained models from model hubs, including TensorFlow Hub, PyTorch Hub, Hugging Face, and MxNet GluonCV. You can also access built-in algorithms using the SageMaker Python SDK. Built-in algorithms cover common ML tasks, such as data classifications (image, text, tabular) and sentiment analysis.

For seamless integration with existing processes, SageMaker Data and AI Governance provides API support, enabling programmatic access for setup and configuration.

How to use Amazon SageMaker Data and AI Governance
For this demonstration, I use a preconfigured environment. I go to the Amazon SageMaker Unified Studio (preview) console, which provides an integrated development experience for all your data and AI use cases. This is where you can create and manage projects, which serve as shared workspaces. These projects allow team members to collaborate, work with data, and develop ML models together.

Let me start with the Govern menu in the navigation bar.

New data governance capabilities called domain units and authorization policies that help you create business unit- and team-level organization and manage policies according to your business needs. With the addition of domain units, you can organize, create, search, and find data assets and projects associated with business units or teams. With authorization policies, you can set access policies for creating projects and glossaries.

Domain units also help you with self-service governance over critical actions such as publishing data assets and utilizing compute resources within Amazon SageMaker. I choose a project and navigate to the Data sources tab in the left navigation pane. You can use this section to add new or manage existing data sources for publishing data assets to the business data catalog, making them discoverable for all users.

I return to the homepage and continue exploring by choosing Data Catalog, which serves as a centralized hub where users can explore and discover all available data assets across multiple data sources within the organization. This catalog connects to various data sources, including Amazon Simple Storage Service (Amazon S3), Amazon Redshift, and AWS Glue.

The semantic search feature helps you find relevant data assets quickly and efficiently using natural language queries, which makes data discovery more intuitive. I enter events in the Search data area.

You can apply filters based on asset type, such as AWS Glue table and Amazon Redshift.

Amazon Q Developer integration helps you interact with data using conversational language, making it easier for users to find and understand data assets. You can use example commands such as “Show me datasets that relate to events” and “Show me datasets that relate to revenue.” The detailed view provides comprehensive information about each dataset, including AI-generated descriptions, data quality metrics, and data lineage, helping you understand the content and origin of the data.

The subscription process implements a controlled access mechanism where users must justify their need for data access, providing proper data governance and security. I choose Subscribe to request access.

In the pop-up window, I select a Project, provide a Reason for request such as need access, and choose Request. The request is sent to the data owner.

This final step makes sure that data access is properly governed through a structured approval workflow, maintaining data security and compliance requirements. During the owner approval process, the data owner receives a notification and can review the request details before choosing to approve or deny access, after which the requester can access the data table if approved.

Now available
Amazon SageMaker Data and AI Governance offers significant benefits for organizations looking to improve their data and AI asset management. The solution helps data scientists, engineers, and analysts overcome challenges in discovering and accessing resources by offering comprehensive features for cataloging, discovering, and governing data and AI assets, while providing security and compliance through structured approval workflows.

For pricing information, visit Amazon SageMaker pricing.

To get started with Amazon SageMaker Data and AI Governance, visit Amazon SageMaker Documentation.

— Esra

Announcing the general availability of data lineage in the next generation of Amazon SageMaker and Amazon DataZone

Post Syndicated from Esra Kayabali original https://aws.amazon.com/blogs/aws/announcing-the-general-availability-of-data-lineage-in-the-next-generation-of-amazon-sagemaker-and-amazon-datazone/

Today, I’m happy to announce the general availability of data lineage in Amazon DataZone, following its preview release in June 2024. This feature is also extended as part of the catalog capabilities in the next generation of Amazon SageMaker, a unified platform for data, analytics, and AI.

Traditionally, business analysts have relied on manual documentation or personal connections to validate data origins, leading to inconsistent and time-consuming processes. Data engineers have struggled to evaluate the impact of changes to data assets, especially as self-service analytics adoption increases. Additionally, data governance teams have faced difficulties in enforcing practices and responding to auditor queries about data movement.

Data lineage in Amazon DataZone addresses the challenges faced by organizations striving to remain competitive by using their data for strategic analysis. It enhances data trust and validation by providing a visual, traceable history of data assets, enabling business analysts to quickly understand data origins without manual research. For data engineers, it facilitates impact analysis and troubleshooting by clearly showing relationships between assets and allowing easy tracing of data flows.

The feature supports data governance and compliance efforts by offering a comprehensive view of data movement, helping governance teams to quickly respond to compliance queries and enforce data policies. It improves data discovery and understanding, helping consumers grasp the context and relevance of data assets more efficiently. Additionally, data lineage contributes to better change management, increased data literacy, reduced data duplication, and enhanced cross-team collaboration. By tackling these challenges, data lineage in Amazon DataZone helps organizations build a more trustworthy, efficient, and compliant data ecosystem, ultimately enabling more effective data-driven decision-making.

Automated lineage capture is a key feature of the data lineage in Amazon DataZone, which focuses on automatically collecting and mapping lineage information from AWS Glue and Amazon Redshift. This automation significantly reduces the manual effort required to maintain accurate and up-to-date lineage information.

Get started with data lineage in Amazon DataZone
Data producers and domain administrators get started by setting up the data source run jobs for the AWS Glue Data Catalog and Amazon Redshift sources to Amazon DataZone to periodically collect metadata from the source catalog. Additionally, the data producers can hydrate the lineage information programmatically by creating custom lineage nodes using APIs that accept OpenLineage compatible events from existing pipeline components—such as schedulers, warehouses, analysis tools, and SQL engines—to send data about datasets, jobs, and runs directly to Amazon DataZone API endpoint. With the information being sent, Amazon DataZone will start populating the lineage model and map them to the assets already cataloged. As new lineage events are captured, Amazon DataZone maintains versions of events that were already captured, so users can navigate to previous versions if needed.

From the consumer’s perspective, lineage can help with three scenarios. First, a business analyst browsing an asset, can go to the Amazon DataZone portal, search for an asset by name, and select an asset that interests them to dive into the details. Initially, they’ll be presented with details in the Business Metadata tab and move right to neighboring tabs. To view lineage, the analyst can go the Lineage tab for details of upstream nodes to find the source. The analyst is presented with a view of that asset’s lineage with 1-level upstream and downstream. To get the source, the analyst can choose upstream and get to the source of the asset. When the analyst is sure that this is the correct asset, they can subscribe to the asset and continue with their work.

Second, if a data issue is reported—for instance, when a dashboard unexpectedly shows a significant increase in customer count—a data engineer can use the Amazon DataZone portal to locate and examine the relevant asset details. In the asset details page, the data engineer navigates to the Lineage tab to view the details of upstream nodes of the asset in question. The engineer can dive into the details of each node, its snapshots, column mapping between each table node, the jobs that ran in between, and view the query that was executed in the job run. Using this information, the data engineer can spot that a new input table was added to the pipeline, which has introduced an uptick in customer count, because they notice that this new table wasn’t part of the previous snapshots of the job runs. This helps them clarify that a new source was added and hence the data shown in the dashboard is accurate.

Lastly, a steward looking to respond to questions from an auditor can go to the asset in question and navigates to the Lineage tab of that asset. The steward traverses the graph upstream to see where the data is coming from and notices that the data is from two different teams—for instance, from two different on-premises databases—that has its own pipelines until it reaches a point where the pipelines merge. While navigating through the lineage graph, the steward can expand the columns to make sure sensitive columns are dropped during the transformations processes and respond to the auditors with details in a timely manner.

How Amazon DataZone automates lineage collection
Amazon DataZone now enables automatic capture of lineage events, helping data producers and administrators to streamline the tracking of data relationships and transformations across their AWS Glue and Amazon Redshift resources. To allow automatic capture of lineage events from AWS Glue and Amazon Redshift, you have to opt in because some of your jobs or connections might be for testing and you might not need any lineage to be captured. With the integrated experience available, the services will provide you an option in your configuration settings to opt-in to collect and emit lineage events directly to Amazon DataZone.

These events should capture the various data transformation operations you perform on tables and other objects, such as table creation with column definitions, schema changes, and transformation queries, including aggregations and filtering. By obtaining these lineage events directly from your processing engines, Amazon DataZone can build a foundation of accurate and consistent data lineage information. This will then help you, as a data producer, to further curate the lineage data as part of the broader business data catalog capabilities.

Administrators can enable lineage when setting up the built-in DefaultDataLake or the DefaultDataWarehouse blueprints.

Data producers can view the status of automated lineage while setting up the data source runs.

With the recent launch of the next generation of Amazon SageMaker, data lineage is available as one of the catalog capabilities in the Amazon SageMaker Unified Studio (preview). Data users can set up lineage using connections, and that configuration will automate the capture of lineage in the platform for all users to browse and understand the data. Here’s how data lineage in next generation Amazon SageMaker will look.

Now available
You can begin using this capability to gain deeper insights into your data ecosystem and drive more informed, data-driven decision-making.

Data lineage is generally available in all AWS Regions where Amazon DataZone is available. For a list of Regions where Amazon DataZone domains can be provisioned, visit AWS Services by Region.

Data lineage costs are dependent on storage usage and API requests, which are already included in the Amazon DataZone pricing model. For more details, visit Amazon DataZone pricing.

To get started with data lineage in Amazon DataZone, visit the Amazon DataZone User Guide.

— Esra

Introducing the next generation of Amazon SageMaker: The center for all your data, analytics, and AI

Post Syndicated from Antje Barth original https://aws.amazon.com/blogs/aws/introducing-the-next-generation-of-amazon-sagemaker-the-center-for-all-your-data-analytics-and-ai/

Today, we’re announcing the next generation of Amazon SageMaker, a unified platform for data, analytics, and AI. The all-new SageMaker includes virtually all of the components you need for data exploration, preparation and integration, big data processing, fast SQL analytics, machine learning (ML) model development and training, and generative AI application development.

The current Amazon SageMaker has been renamed to Amazon SageMaker AI. SageMaker AI is integrated within the next generation of SageMaker while also being available as a standalone service for those who wish to focus specifically on building, training, and deploying AI and ML models at scale.

Highlights of the new Amazon SageMaker
At its core is SageMaker Unified Studio (preview), a single data and AI development environment. It brings together functionality and tools from the range of standalone “studios,” query editors, and visual tools that we have today in Amazon Athena, Amazon EMR, AWS Glue, Amazon Redshift, Amazon Managed Workflows for Apache Airflow (MWAA), and the existing SageMaker Studio. We’ve also integrated Amazon Bedrock IDE (preview), an updated version of Amazon Bedrock Studio, to build and customize generative AI applications. In addition, Amazon Q provides AI assistance throughout your workflows in SageMaker.

Here’s a list of key capabilities:

In this post, I give you a quick tour of the new SageMaker Unified Studio experience and how to get started with data processing, model development, and generative AI app development.

Working with Amazon SageMaker Unified Studio (preview)
With SageMaker Unified Studio, you can discover your data and put it to work using familiar AWS tools to complete end-to-end development workflows, including data analysis, data processing, model training, and generative AI app building, in a single governed environment.

An integrated SQL editor lets you query data from multiple sources, and a visual extract, transform, and load (ETL) tool simplifies the creation of data integration and transformation workflows. New unified Jupyter notebooks enable seamless work across different compute services and clusters. With the new built-in data catalog functionality, you can find, access, and query data and AI assets across your organization. Amazon Q is integrated to streamline tasks across the development lifecycle.

Amazon SageMaker Unified Studio

Let’s explore the individual capabilities in more detail.

Data processing
SageMaker integrates with SageMaker Lakehouse and lets you analyze, prepare, integrate, and orchestrate your data in a unified experience. You can integrate and process data from various sources using the provided connectivity options.

Start by creating a project in SageMaker Unified Studio, choosing the SQL analytics or data analytics and AI-ML model development project profile. Projects are a place to collaborate with your colleagues, share data, and use tools to work with data in a secure way. Project profiles in SageMaker define the preconfigured set of resources and tools that are provisioned when you create a new project. In your project, choose Data in the left menu and start adding data sources.

Amazon SageMaker Unified Studio

The built-in SQL query editor lets you query your data stored in data lakes, data warehouses, databases, and applications directly within SageMaker Unified Studio. In the top menu of SageMaker Unified Studio, select Build and choose Query Editor to get started. Also, try creating SQL queries using natural language with Amazon Q while you’re at it.

Amazon SageMaker Unified Studio

You should also explore the built-in visual ETL tool to create data integration and transformation workflows using a visual, drag-and-drop interface. In the top menu, select Build and choose Visual ETL flow to get started.

Amazon SageMaker Unified Studio

If Amazon Q is enabled, you can also use generative AI to author flows. Visual ETL comes with a wide range of data connectors, pre-built transformations, and features such as scheduling, monitoring, and data previewing to streamline your data workflows.

Model development
SageMaker Unified Studio includes capabilities from SageMaker AI, which provides infrastructure, tools, and workflows for the entire ML lifecycle. From the top menu, select Build to access tools for data preparation, model training, experiment tracking, pipeline creation, and orchestration. You can also use these tools for model deployment and inference, machine learning operations (MLOps) implementation, model monitoring and evaluation, as well as governance and compliance.

To start your model development, create a project in SageMaker Unified Studio using the data analytics and AI-ML model development project profile and explore the new unified Jupyter notebooks. In the top menu, select Build and choose JupyterLab. You can use the new unified notebooks to seamlessly work across different compute services and clusters. You can use these notebooks to switch between environments without leaving your workspace, streamlining your model development process.

Amazon SageMaker Unified Studio

You can also use Amazon Q Developer to assist with tasks such as code generation, debugging, and optimization throughout your model development process.

Generative AI app development
Use the new Amazon Bedrock IDE to develop generative AI applications within Amazon SageMaker Unified Studio. The Amazon Bedrock IDE includes tools to build and customize generative AI applications using FMs and advanced capabilities such as Amazon Bedrock Knowledge Bases, Amazon Bedrock Guardrails, Amazon Bedrock Agents, and Amazon Bedrock Flows to create tailored solutions aligned with your requirements and responsible AI guidelines.

Choose Discover in the top menu of SageMaker Unified Studio to browse Amazon Bedrock models or experiment with the model playgrounds.

Amazon Bedrock IDE

Create a project using the GenAI Application Development profile to start building generative AI applications. Choose Build in the top menu of SageMaker Unified Studio and select Chat agent.

Amazon Bedrock IDE

With the Amazon Bedrock IDE, you can build chat agents and create knowledge bases from your proprietary data sources with just a few clicks, enabling Retrieval-Augmented Generation (RAG). You can add guardrails to promote safe AI interactions and create functions to integrate with any system. With built-in model evaluation features, you can test and optimize your AI applications’ performance while collaborating with your team. Design flows for deterministic genAI-powered workflows, and when ready, share your applications or prompts within the domain or export them for deployment anywhere—all while maintaining control of your project and domain assets.

For a detailed description of all Amazon SageMaker capabilities, check the SageMaker Unified Studio User Guide.

Getting started
To begin using SageMaker Unified Studio, administrators need to complete several setup steps. This includes setting up AWS IAM Identity Center, configuring the necessary virtual private cloud (VPC) and AWS Identity and Access Management (IAM) roles, creating a SageMaker domain, and enabling Amazon Q Developer Pro. Instead of IAM Identity Center, you can also configure SAML through IAM federation for user management.

After the environment is configured, users sign in through the provided SageMaker Unified Studio domain URL with single sign-on. You can create projects to collaborate with team members, choosing from pre-configured project profiles for different use cases. Each project connects to a Git repository for version control and includes an example unified Jupyter notebook to get you started.

For detailed setup instructions, check the SageMaker Unified Studio Administrator Guide.

Now available
The next generation of Amazon SageMaker is available today in the US East (N. Virginia, Ohio), US West (Oregon), Asia Pacific (Tokyo), and Europe (Ireland) AWS Regions. Amazon SageMaker Unified Studio and Amazon Bedrock IDE are available today in preview in these AWS Regions. Check the full Region list for future updates.

For pricing information, visit Amazon SageMaker pricing and Amazon Bedrock pricing. To learn more, visit Amazon SageMaker, SageMaker Unified Studio, and Amazon Bedrock IDE.

Existing Amazon Bedrock Studio preview domains will be available until February 28, 2025, but you may not create new workspaces. To experience the advanced features of Bedrock IDE, create a new SageMaker domain following the instructions in the Administrator Guide.

Give the new Amazon SageMaker a try in the console today and let us know what you think! Send feedback to AWS re:Post for Amazon SageMaker or through your usual AWS Support contacts.

— Antje

Amazon Q Business is adding new workflow automation capability and 50+ action integrations

Post Syndicated from Donnie Prakoso original https://aws.amazon.com/blogs/aws/amazon-q-business-is-adding-new-workflow-automation-capability-and-50-action-integrations/

Amazon Q Business, a generative AI–powered assistant designed to enhance productivity across various business applications, became generally available earlier this year. Since its launch, Amazon Q Business has been helping customers tackle the challenges of improving workforce productivity.

In this post, we have two announcements for Amazon Q Business:

  1. AI-powered workflow automation in Amazon Q Business (coming soon)
  2. Supports for more than 50 action integrations (generally available)

Let’s get started with these new announcements from Amazon Q Business:

AI-powered workflow automation in Amazon Q Business (coming soon)
Organizations handle hundreds, if not thousands, of complex workflows that demand precise, repeatable execution. Automating these workflows has been a time-consuming process, often taking months and requiring specialized expertise. As a result, many potentially valuable business processes remain manual, leading to inefficiencies and missed opportunities.

Available soon, Amazon Q Business will have a new capability to simplify the creation and maintenance of complex business workflows.

With this capability, you only need to describe your desired workflow using natural language, upload a standard operating procedure (SOP), or record a video of the process being performed. Amazon Q Business uses generative AI to automatically author a detailed workflow plan from your inputs in minutes. Then, with the recommended workflow, you can review, test, modify, or approve.

Let’s consider an example of automotive claim processing. This process typically involves manually reading claim emails, reviewing attachments, and creating claims in the system. With the new capability in Amazon Q Business, I can create this workflow more efficiently, reducing the time and complexity typically associated with workflow creation.

First, I upload the relevant SOP.

During the workflow creation process, Amazon Q Business may ask questions to clarify and gather any additional information needed to complete the workflow design.

Based on the provided inputs, Amazon Q Business generates an initial workflow template. As an automation author, I can then customize this workflow using a visual drag-and-drop interface and integrate it with supported third-party applications for testing. The workflow can include API calls, automatic UI actions, execution logic, AI agents, and human-in-the-loop steps to cater to the unique needs of every business process across a wide range of industries and business functions.

When it’s finalized, I can publish the workflow and configure it to run either on a schedule or in response to specific triggers. Once published, I can actively track its performance using a feature-rich monitoring dashboard. This dashboard offers built-in analytics, providing detailed insights into the execution and efficiency of all published workflows.

When executing the workflow, Amazon Q Business uses a UI agent trained on thousands of websites and desktop applications to seamlessly navigate changes to page layouts and unexpected pop-up windows in real time. Amazon Q Business includes UI automation, API integrations, and workflow orchestration in a single system, eliminating the need to integrate multiple products and services to create a complete enterprise workflow automation system.

Supports for more than 50 action integrations
With Amazon Q Business plugins, you have the flexibility to connect to third-party apps and perform specific tasks related to supported third-party services directly within your web experience chat. These plugins are accessible through Amazon Q Apps, a feature within Amazon Q Business that helps you create AI-powered apps that streamline tasks and boost productivity. Additionally, when workflow automation capabilities launch, you will be able to integrate these plugins directly into your workflows.

In this announcement, we’re introducing a ready-to-use library of platforms with over 50 action integrations and 11 popular business applications. These business applications include Microsoft Teams, PagerDuty Advance, Salesforce, ServiceNow, and more. 

To get started with the new integrations, access Amazon Q Business through your existing account and explore the new plugins and action integrations.

With these integrations, you can perform various tasks across multiple applications within the Amazon Q Business web application.

Let’s say I need to create a new opportunity with Salesforce. First, I open my Amazon Q Business web application.

Then, I trigger Amazon Q Business plugins and select the Create Opportunity action.

Then, I ask Amazon Q Business to create an opportunity record.

If the action plugin requires more information, it will prompt me to gather more information.

The Amazon Q Business plugin will automatically create the record for me with the Salesforce action plugin.

From here, I can complete additional tasks, such as associating the opportunity record with the account.

Get started with Amazon Q Business today
The new Amazon Q Business plugins are available today in all AWS Regions where Amazon Q Business is available. The new capability to orchestrate workflows in Amazon Q Business will be available in preview soon.

Boost productivity and innovation in your organization with Amazon Q Business. Learn more about how to get started on the Amazon Q Business documentation page.

Happy building,
Donnie

New capabilities from Amazon Q Business enable ISVs to enhance generative AI experiences

Post Syndicated from Donnie Prakoso original https://aws.amazon.com/blogs/aws/new-capabilities-from-amazon-q-business-enable-isvs-to-enhance-generative-ai-experiences/

Since its launch, companies have been using Amazon Q Business to improve their employees’ productivity with a generative AI–powered assistant that helps them make better decisions based on company data and information. Employees also use various software applications provided by independent software vendors (ISVs) to complete their tasks. Many ISVs are creating their own generative AI features intended to make their users more productive, but ISVs are often limited to data within their own application, resulting in end users still shifting between applications to complete tasks.

Today, we’re excited to announce new Amazon Q Business capabilities for ISVs. ISVs can now integrate with the Amazon Q index to retrieve data from multiple sources through a single API and customize the design of their Amazon Q embedded assistant.

These new capabilities enable ISVs and application developers to rapidly deploy personalized, AI-powered experiences within their applications, leveraging both enterprise knowledge and user context across multiple software-as-a-service (SaaS) applications, while accelerating their generative AI roadmap with Amazon Q Business capabilities.

Enhance your generative AI features with additional data using the Amazon Q index
With this new capability, ISVs can access content and context from outside their application, helping them to build richer experiences, improve engagement and retention, while complementing their existing generative AI and Retrieval Augmented Generation (RAG) workflows using their preferred large language models (LLMs). Importantly, customers maintain full ownership of their index and have complete control over which applications can access their data.

Software providers register their applications with Amazon Q Business to allow their customers to grant access to their indexed data. After verification, software providers can use this additional data to enhance their built-in generative AI features, delivering more personalized responses to customers. Visit the Amazon Q index for software providers web page to learn more.

After ISVs complete their integration with the Amazon Q index, they have two paths to onboard their customers to use this new, cross-application experience.

  1. Onboarding through the ISV’s application — Customers initiate the process through the ISV’s platform. The ISV creates an Amazon Q Business application and index on behalf of each customer. Customers then provide the ISV with credentials to connect additional data sources. In this scenario, the ISV maintains complete control over the onboarding experience and user interface.
  2. Onboarding through AWS Management Console – Customers create their Amazon Q Business application directly through the AWS console, where they can connect data sources and grant ISV access to their index. Verified ISVs will be listed as “data accessors” on the Amazon Q Business console. This verification status is granted when the ISV has completed the necessary verification process mentioned above and is ready to launch their customer experience.

Next, we’ll outline the process for a customer to grant a verified ISV access to their existing index.

After customers create their application and add their index, they can grant access to verified ISVs. They can do this by selecting Data accessors in the left navigation panel and then choosing Add data accessor.

On the Add data accessor page, customer will find the list of all verified ISV applications.

After selecting the ISV application, the customer configures what data the ISV can access. The customer also chooses which users will be granted access to the ISV’s updated features.

After granting access, customers must complete the setup by linking their Amazon Q Business application in the ISV’s admin console. Once completed, ISVs can begin retrieving data from the designated index using the SearchRelevantContent API to retrieve data from the index to enrich their generative AI capabilities. Here’s a sample code snippet to use this API:

import boto3
import pprint
qbiz = boto3.client("qbusiness", region_name="us-east-1", **credentials)
 
Q_BIZ_APP_ID = ${Q_BIZ_APP_ID}
 
Q_RETRIEVER_ID = ${Q_RETRIEVER_ID}
 
Q_DATA_SOURCE_ID = ${Q_DATA_SOURCE_ID}
search_params = {
    'applicationId': Q_BIZ_APP_ID,
    'contentSource': {
        'retriever': {
            'retrieverId': Q_RETRIEVER_ID
        }
    },
    'queryText': 'Order coffee API',
    'maxResults': 5,
    'attributeFilter': {
        'documentAttributeFilter': {
            'andAllFilters': [{
                'equalsTo': {
                    'name': '_data_source_id',
                    'value': {
                        'stringValue': DATA_SOURCE_ID
                    }
                }
            }]
        }
    }
}
search_response = qbiz.search_relevant_content(**search_params)

Customize the design of the embedded assistant
Amazon Q embedded is a capability that helps ISVs extend Amazon Q Business to their end users by embedding an AI-powered assistant into their user interface. This capability helps ISV users complete various tasks, such as summarizing documents and answering questions.

Now, software providers have the option to customize the embeddable generative-AI assistant user interface (UI) with Amazon Q embedded to match their corporate branding. To get started, select Amazon Q embedded in the left navigation panel and choose Customize web experience.

On this page, select Theme to start customizing generative AI assistant UI look and feel, such as configuring the assistant name, welcome message, color scheme, and logo.

Available today
The Amazon Q index and Amazon Q embedded with customizable UI are generally available today in the US East (N. Virginia) and US West (Oregon) AWS Regions, with availability in additional AWS Regions coming soon.

ISVs can now use Amazon Q Business features to innovate and enhance their user experiences with powerful AI capabilities. To learn more about how ISVs can enhance their applications, visit Amazon Q Business page for software providers.

Happy coding!

Donnie

New Amazon Q Developer agent capabilities include generating documentation, code reviews, and unit tests

Post Syndicated from Channy Yun (윤석찬) original https://aws.amazon.com/blogs/aws/new-amazon-q-developer-agent-capabilities-include-generating-documentation-code-reviews-and-unit-tests/

Last year at AWS re:Invent, we previewed Amazon Q Developer, a generative AI–powered assistant for designing, building, testing, deploying, and maintaining software across integrated development environments (IDEs) such as Visual Studio, Visual Studio Code, JetBrains IDEs, Eclipse (preview), JupyterLab, Amazon EMR Studio, or AWS Glue Studio.

You can also use Amazon Q Developer in the AWS Management Console, AWS Console Mobile Application, Amazon CodeCatalyst, AWS Support, AWS website, or through Slack and Microsoft Teams with AWS Chatbot.

Due to the rapid pace of innovation, we announced the general availability of Amazon Q Developer in April and added more capabilities, such as supporting AWS Command Line Interface (AWS CLI), Amazon SageMaker Studio, AWS CloudShell, as well as inline chat for seamless coding operations in your IDE. AWS was also named as a Leader in the first Gartner Magic Quadrant for AI Code Assistants.

Amazon Q Developer has agents that can generate real-time code suggestions based on your comments and existing code, bootstrap new projects from a single prompt (/dev), automate the process of upgrading and transforming legacy Java applications with the Amazon Q Developer transformation capability (/transform), generate customized code recommendations from your private repositories securely, and quickly understand what resources are running in your AWS account with a simple prompt.

Today, we’re expanding Amazon Q Developer agent capabilities for: 1) enhanced documentation in codebases (/doc), 2) supporting code reviews to detect and resolve security and code quality issues (/review), and 3) generating unit tests automatically and improving test coverage (/test) across the software development lifecycle in your preferred IDE or GitLab Duo with Amazon Q (in preview), which is one of the most popular enterprise DevOps platforms.

Get started with Amazon Q Developer agents for software development capabilities
To get started with all the new capabilities, you can install the latest Amazon Q IDE extension for your favorite IDEs. Sign in for the Free or Pro Tier of Amazon Q Developer, and open your project in your IDE. You can authenticate for the Free Tier with AWS Builder ID or for the Pro Tier with AWS IAM Identity Center.

1. Enhanced documentation in codebases
You can now generate comprehensive documentation, such as readmes and data flow diagrams about the codebase in your preferred IDE. With Amazon Q Developer handling the labor-intensive task of documentation, you can focus your efforts on designing and authoring code—all while maintaining quality based on software engineering best practices.

To start the documentation with your IDE, open the chat panel and type /doc.

Now you can create a README or update an existing README in your project. It will scan source files, create knowledge graph, summarize source files, and generation documents. When complete, check out the created REAME file and choose Accept to use this document in the code editor.

2. Supporting code reviews to detect and resolve code quality issues
You can identify and resolve a spectrum of code quality issues pertaining to code smells, anti-patterns, naming convention violations, potential bugs, logical errors, code duplication, poor documentation and security vulnerabilities, as well as AWS best practices across your IDE or GitLab repository.

This automated code review process empowers your development teams to save substantial time, improve productivity, and maintain consistency in code quality, ultimately enabling faster feature releases while adhering to security standards and best practices.

To start the code reviews with your IDE, open the chat panel and type /review.

Amazon Q Developer will review your project or a particular file you select and identify issues before code commit, provide a list of findings from where you can follow up with Amazon Q to find solution, and generate on-demand code fixes inline. When complete, check out the suggested code fixes for code issues and choose Accept Fix to apply the changes in the code editor.

3. Generating unit tests automatically and improving test coverage
You can automate the unit test process from identifying test cases to writing unit tests for your project files. Within unit tests, you can generate basic cases such as boundary conditions, null values, off-by-1 cases, and checking multiple input types.

To start the unit test workflow with your IDE, open the chat panel and type /test.

Amazon Q Developer will generate unit tests in your specific source file, place them into the relevant test file and self-debug test errors. When complete, choose View diff to check out the generated unit tests in the code editor. Then, you can accept or reject the generated unit tests.

Now available
Three new Amazon Q Developer agent capabilities for software development are now available in all AWS Regions where Amazon Q Developer is available.

To learn more, visit the Amazon Q Developer product page and the latest blog posts in the AWS DevOps & Developer Productivity Blog channel. My team also focuses on creating content on Amazon Q Developer that directly supports software developers’ jobs-to-be-done, enabled and enhanced by generative AI in the Amazon Q Developer Center and Community.aws.

Give new Amazon Q Developer agent capabilities a try in your favorite IDE with AWS Builder ID and send feedback to AWS re:Post for Amazon Q Developer or through your usual AWS Support contacts.

Channy

Announcing Amazon Q Developer transformation capabilities for .NET (preview)

Post Syndicated from Prasad Rao original https://aws.amazon.com/blogs/aws/announcing-amazon-q-developer-transformation-capabilities-for-net-preview/

.NET Framework, introduced in 2002, runs only on Windows and although it’s still supported, it’s no longer in active development. However, cross-platform .NET, launched in 2016, is open source, runs on Linux, and is lightweight and higher performing. It receives regular updates, with new features and performance improvements every year. By porting your .NET applications from .NET Framework to cross-platform .NET, you can migrate from Windows to Linux. As a result, you can not only take advantage of the latest innovations in the .NET platform, you can also reduce your Microsoft licensing spend.

At Amazon Web Services (AWS), we have been helping you port and modernize your .NET applications from Windows to Linux with tools such as Porting Assistant for .NET, AWS Toolkit for .NET Refactoring, and AWS Microservice Extractor for .NET.

Today, we’re announcing the public preview of new Amazon Q Developer transformation capabilities for .NET, mainframe, and VMware workloads.

In this post, I introduce you to Amazon Q Developer .NET transformation capabilities, a new generative AI–powered experience for porting your .NET Framework applications to cross-platform .NET within your integrated development environment (IDE).

Amazon Q Developer transform for .NET automatically analyzes the codebase, generates a transformation plan, and executes transformation tasks. These tasks include upgrading and replacing NuGet packages and APIs, rewriting deprecated and inefficient code components, and porting to cross-platform .NET.

Let’s see it in action!

Porting a .NET Framework application to cross-platform .NET
I’m using Visual Studio in this walkthrough because Amazon Q Developer transform for .NET is available as a Visual Studio extension. I install the latest version of AWS Toolkit with Amazon Q and sign in using the AWS IAM Identity Center credentials provided by my organization.

Getting started with AWS Toolkit with Amazon Q by connecting to IAM Identity Center

I open a .NET Framework solution that I need to port to the latest long-term support (LTS) version of supported cross-platform .NET, which is currently .NET 8. In the Solution Explorer, the option to transform is available as a context menu item for both the entire solution and individual projects. Depending on the size and complexity of the application, I can transform the entire application at once or transform the projects in the application step-by-step. In this walkthrough, I showcase the transformation of one of the projects of the solution.

I choose the context menu for one of the projects, and then choose Port Project with Amazon Q Developer.

Context menu of Solution Explorer to choose Port project with Amazon Q Developer

This opens a dialog where I choose additional projects to transform and select the target .NET version. I select .NET 8 and choose Confirm to proceed with the transformation.

Popup of Port project with Q Developer

I see the status in the Code Transformation Plan window and the progress in Amazon Q Developer Code Transformation Hub window.

Though I have selected only one project to transform, all dependent projects will also be transformed by Amazon Q Developer. The selected project and its dependent projects are combined to form a decomposable buildable unit. This is to make sure that the codebase after the transformation is in a successful build state.

Code Transformation Plan Window and AmazonQ Developer Code Transformation Hub Window

Amazon Q Developer first builds the project locally and then copies the selected code and dependencies to a secure and ephemeral sandbox environment in AWS for processing. You can use customer managed keys for encrypting your code in this environment.

Amazon Q Developer analyzes the codebase and generates a transformation plan. It then kicks off the transformation workflow and steps through the plan iteratively for each project in the transformation plan. For each project, it upgrades NuGet packages and APIs, updates the startup or runtime configuration, rewrites deprecated code, and debugs errors.

Showing transformation progress in Amazon Q Developer Code Transformation Hub

After the transformation is complete, I choose Transformation Summary by Q Developer to see the summary. I see the transformation status as succeeded. For each project, it shows Files changed, Packages updated, APIs changed, and Linux porting status. In the Linux porting status column, I can see if the project is ported automatically or needs inputs to resolve any pending issues.

Code Transformation Status as Succeeded

I can download the Linux readiness report to look into the issues that require manual resolution.

Screenshot showing download Linux readiness report

All the code changes are done in the sandbox, and I can review them before applying the updates to my local working repository. To manually review the changes done by Amazon Q Developer, I choose View Diff view and then choose Show changes for one of the files in the Amazon Q Developer Transformation Hub window.

Screnshot showing difference between updated and original code

After reviewing the changes, I choose Accept suggested changes in the Transformation Summary by Q Developer window to apply changes to my local working repository.

Screenshot showing Accept suggested changes

I can now continue to work on my local working repository to fix the pending issues in the Linux readiness report and then use the same steps to transform the remaining projects iteratively.

Things to know

  • Availability – Amazon Q Developer transformation capabilities for .NET porting are available today in preview with Amazon Q Developer Pro Tier subscription.
  • .NET versions supported – Amazon Q Developer transformation capabilities for .NET supports transforming applications written using .NET Framework versions 3.5+, .NET Core 3.1, and .NET 5+ to the currently supported cross-platform .NET versions such as .NET 8 and .NET 9.
  • Application types supported – Amazon Q Developer transformation capabilities for .NET supports porting C# code projects of the following types: console application, class library, unit tests, web API, Windows Communication Foundation (WCF) service, and business logic layers of Model View Controller (MVC) and Single Page Application (SPA). However, the UI layer such as Razor Views and WebForms are not ported. Also, only the projects with Microsoft authored NuGet package dependencies are supported. For .NET Framework applications dependent on Internet Information Server (IIS), only default IIS configurations are supported for porting to cross-platform .NET.

To get started, install AWS Toolkit for Visual Studio and follow instructions in the documentation to port and upgrade your .NET applications.

Prasad

Announcing Amazon Q Developer transformation capabilities for .NET, mainframe, and VMware workloads (preview)

Post Syndicated from Prasad Rao original https://aws.amazon.com/blogs/aws/announcing-amazon-q-developer-transformation-capabilities-for-net-mainframe-and-vmware-workloads-preview/

Today, we’re announcing the public preview of new Amazon Q Developer transformation capabilities for .NET, mainframe, and VMware workloads

Amazon Q Developer accelerates large-scale transformation of enterprise workloads with domain-expert generative AI agents supervised by modernization teams in a unified collaborative web experience.

Using the transformation capabilities of Amazon Q Developer, modernization teams can deliver large and complex projects, accelerating .NET porting, mainframe modernization, and VMware migration, while enhancing application security, resilience, performance, and scalability.

In this post, I give you a quick tour of the Amazon Q Developer transformation web experience.

Getting started with Amazon Q Developer transformation web experience
My organization’s Amazon Q Developer administrator previously provided me access to the web experience. The prerequisites are that I need to be part of the Amazon Q Developer Pro Tier subscription and a member of my organization’s AWS IAM Identity Center.

I sign in to the web experience using my credentials and create a new workspace. I’m presented with a page to create a transformation job with Amazon Q Developer.

I choose Ask Q to create a job, and it presents me with three options to choose from for creating a transformation job: Mainframe modernization, .NET modernization, and VMware migration.

Amazon Q Developer works collaboratively with me throughout the transformation journey spanning assessment, planning, and migration and modernization. I can add other team members to work alongside me, and Amazon Q Developer seamlessly integrates as a dependable part of my team. Amazon Q Developer helps me through every step of the transformation, including asset discovery, codebase analysis, wave planning, code refactoring, addressing incompatibilities, and implementing network automation.

Let’s have a closer look at the transformation process of each of the three workloads.

Porting of .NET applications from Windows to Linux
To start, I ask Amazon Q Developer to create a job for .NET modernization.

Amazon Q Developer provides a default name for the .NET modernization job and asks me if I would like to change anything before it creates the job. I continue with the default name and choose Create Job.

After the request is initiated, I can see the transformation steps and their progress in the left-side pane labeled Job Plan. On the right-side pane, I can see the details in the Dashboard section, any activities pending for me to act on in the Collaboration section, and the sequence of actions that have occurred in the Worklog section.

To begin the assessment, I connect Amazon Q Developer to my source code repositories using the steps outlined in the documentation. I was able to ask Amazon Q Developer about these steps, to receive in-product guidance as I progressed.

After connecting the source code repositories, Amazon Q Developer discovers the supported .NET applications. It then prepares for the transformation process by requesting from me specific inputs, such as selecting the target .NET version and choosing which repositories need to be transformed.

I provide the required inputs, save the information and choose Send to Q.

Amazon Q Developer automatically ports .NET applications I selected to the target version and commits the transformed code to a new branch in my repository when the task is complete, preserving the original source code. I can monitor the transformation’s progress on the Dashboard.

Modernization of mainframe applications
Now, let’s explore how Amazon Q Developer assists in the modernization of mainframe applications.

I ask Amazon Q Developer to create a new job for mainframe modernization. I see four phases in the Job Plan: Kick off modernization, Analyze code, Decompose code, and Plan migration wave.

I kick off the modernization by connecting my Amazon Web Services (AWS) account and specifying the resource location of mainframe applications by following the steps in the documentation.

Amazon Q Developer then analyzes the codebase, maps dependencies, and creates detailed documentation.

Next, Amazon Q Developer works with me to decompose my large monolith into simple and more loosely coupled business domains. I provide input on the files I need to group into different domains, and Amazon Q Developer decomposes them accordingly.

Then, using built-in mainframe and cloud domain expertise, Amazon Q Developer proposes a wave plan that I can review, update, and approve.

After approval, Amazon Q Developer implements automated refactoring of COBOL to Java, providing alerts when it needs input and status updates for tracking.

As you can see, Amazon Q Developer reduces timelines for large-scale assessment and modernization of mainframe applications through automated code analysis, documentation, decomposition, iterative planning, and refactoring.

Migration of VMware workloads
Let’s now examine how Amazon Q Developer helps me in migrating VMware applications.

I ask Amazon Q Developer to create a new job, and it creates an initial job plan for me to migrate my VMware virtual machines to Amazon Elastic Compute Cloud (Amazon EC2).

A typical VMware migration job consists of data discovery, application grouping, network migration and server migration steps. As the job progresses, Amazon Q Developer dynamically updates job plans and adds new steps, based on continual learning.

To discover on-premises data, I have an option to upload exports from tools such as RVtools, or I can use the AWS Application Discovery Service agentless or agent-based collectors to collect on-premises, server, and network traffic data.

Amazon Q Developer analyzes the discovered data, classifies it, and provides me a summary that includes data completeness indicators such as whether it has received enough network connection data to optimally group application servers and generate wave plans.

Amazon Q Developer then works collaboratively with me to build migration waves. It automatically suggests the waves and provides me with an option to edit by downloading the recommendations and uploading the new file.

Next, I select a target AWS account and ask Amazon Q Developer to use the uploaded network configuration to generate my AWS network. Amazon Q Developer translates the on-premises VMware network to generate the corresponding AWS network constructs.

Amazon Q Developer continues to work in collaboration with me to deploy the generated network and verifies its reach ability and performs reachability testing.

When the network migration is complete, Amazon Q Developer lets me select the waves I want to migrate. It prompts me to set Amazon EC2 instance preferences and generates a migration plan combining its previously generated artifacts. I can review and edit this plan according to my needs before uploading it to Amazon Q Developer to initiate migration with AWS Application Migration Service.

During the migration, I can track the overall transformation progress, including the state of network deployment and individual servers and waves, using the dashboard.

Join the preview
The transformation capabilities of Amazon Q Developer are available today in preview with an Amazon Q Developer Pro Tier subscription. To get started, visit the Amazon Q Developer User Guide.

Prasad

Investigate and remediate operational issues with Amazon Q Developer (in preview)

Post Syndicated from Donnie Prakoso original https://aws.amazon.com/blogs/aws/investigate-and-remediate-operational-issues-with-amazon-q-developer/

The growing complexity of modern software makes troubleshooting difficult, requiring deep knowledge and manual work across various systems. This results in slower problem-solving and less efficient operations. More and more customers need automated tools to handle routine tasks and simplify complex processes, so they can resolve issues faster and focus on delivering inovations for their customers.

Today, we’re announcing a new capability in Amazon Q Developer to investigate and remediation operational issues, which is now in preview. This generative AI-powered capability guides you through operational diagnostics and automates root cause analysis for problems in your workloads.

Here’s a quick look at how you can now use Amazon Q Developer for operational investigations.

AWS has more operational experience and scale than any other major cloud provider, delivering cloud services to customers around the world for over 17 years. AWS built this experience into Amazon Q Developer operational capabilities to create and present investigation hypotheses, and guide you through troubleshooting and remediation – capabilities that no other major cloud provider offers.

Get started with operational investigation using Amazon Q Developer
This new capability from Amazon Q Developer seamlessly integrates with Amazon CloudWatch and AWS Systems Manager, providing a unified experience while troubleshooting issues. To get started with this capability, you need to complete some prerequisites. You can learn more on the Get Started with Amazon Q Developer Operational Investigations page.

I’ve completed the setup and configured a CloudWatch alarm to monitor the metrics for my application. After receiving a notification email, I navigate to that alarm in Amazon CloudWatch. I observe that the metric has exceeded its threshold over several time periods.

With this finding, I select Investigate. Then, I have two options: Start new investigation or Add to existing investigation. Because I’m just getting started, I select Start a new investigation and provide some details and notes if necessary.

After I’ve created the investigation, I can view the details by choosing View Details on the banner.

The investigation page is divided into two main sections: the left-hand Feed panel, which contains all findings added during the investigation, and the right-hand Suggestions panel, which displays a list of finding suggestions from Amazon Q Developer to assist in the investigation.

Amazon Q Developer uses its knowledge of my AWS resources to automatically discover the relationships between them and create a topology map of the application. This makes it possible for Amazon Q Developer to follow the architecture and quickly find the component that caused an alarm, helping me get back into production faster than ever before.

As I investigate further, Amazon Q Developer proposes hypotheses based on a series of related metrics from various AWS services such as Amazon DynamoDB, AWS Lambda, Amazon Elastic Container Service (Amazon ECS) and others. I can choose Show reasoning to understand why.

One of the hypotheses suggests that the slowness is caused by throttling on a DynamoDB table, with read and write capacity units frequently exceeding the provisioned limits. I find this hypothesis makes sense, and I can Accept it, which will bring it into my Feed.

With all these findings, I can collect all the supporting data to troubleshoot this issue. In one of the hypotheses from Amazon Q Developer, I can also view suggested actions. I select View actions to understand my options for remediation.

In the Suggested actions menu, Amazon Q Developer proposes AWS Systems Manager Automation runbooks related to the hypothesis. Where applicable, it suggests automated runbooks from the AWS Systems Manager library, which includes over 400 AWS-authored and thousands of customer-authored runbooks to help remediate observed issues. Each runbook defines the actions that Systems Manager performs to help resolve the issue. Additionally, Amazon Q Developer provides relevant documentation links from AWS re:Post articles and AWS Documentation pages.

Here’s the list of suggested actions from Amazon Q Developer. I choose View runbook to understand more on how I can solve this issue by modifying DynamoDB provisioned capacity.

Here, I can read more information on this runbook. It will offer a description of the runbook, including execution history telling me if I ran this runbook successfully in this account in the past.

I can enter the required parameters as defined in the configuration. Under Execution preview segment, I can review a summary highlighting the impact on targeted resources. After confirming the details, I select Execute to implement the necessary changes for my workloads.

After running the runbook, I can see the results, which are then added to my feed.

Another feature I appreciate is the multiple ways to access this capability. For example, in my CloudWatch metrics for my AWS Lambda function, I can initiate an investigation and add findings directly. I can also select the Amazon Q Developer operational investigations icon to open the investigation panel.

This new capability from Amazon Q Developer feels like having an AWS expert available 24/7 to assist with operational troubleshooting. It lowers the barrier to operational experience and saves valuable time and effort.

Now in preview
The new capability of Amazon Q Developer to help you investigate and remediate operational issues is now in preview in the US East (N. Virginia) Region. Transform your operational investigation today and accelerate remediation with Amazon Q Developer. Visit Amazon CloudWatch documentation page to get started.

Happy troubleshooting!

Donnie

Introducing GitLab Duo with Amazon Q

Post Syndicated from Matheus Guimaraes original https://aws.amazon.com/blogs/aws/introducing-gitlab-duo-with-amazon-q/

Amazon Q Developer has transformed the traditional development workflow by integrating a wide range of generative AI capabilities within the environments where developers work from. This seamless integration helps to maintain focus while accelerating a wide range of development tasks beyond coding for enhanced productivity.

With its vast community of developers, GitLab is a popular DevSecOps platform where many development teams spend their time building and collaborating on projects. That’s why we are so excited to introduce GitLab Duo with Amazon Q. This is a new integration that brings the power of Amazon Q Developer agent capabilities to GitLab using GitLab Duo, transforming it into a unified development experience powering AI-driven DevSecOps. GitLab Duo with Amazon Q leverages AI agents to assist complex, multi-step tasks such as new feature development and codebase upgrades for Java 8 and 11. It also offers enhanced capabilities for code review and unit testing – all within the same familiar GitLab platform.

Interacting with Amazon Q Developer is straightforward through GitLab quick actions— type /q directly inside either the issue description, a general comment, or a merge request comment to start using it to help you accelerate your daily tasks or tackle more complex workflows.

Let’s have a quick tour.

Feature development
Let me show you first how straightforward it is to start using Amazon Q Developer within your GitLab environment when developing new features or improving existing ones.

Imagine that you are working on a web application and you’ve been assigned the task to create a full signup flow. You can ask Amazon Q Developer to generate the whole code for you based on the contents of the issue by adding the /q dev command as a comment.

invoking q dev

Amazon Q Developer analyzes your entire codebase and generates new code, whether in the form of updates to existing files or entirely new ones. After it’s done, it automatically creates a merge request and adds an entry to the Activity history with a link so it can be reviewed.

q generated solution with merge request

On the merge request review page, you’ll notice two interesting things. The first is that Amazon Q Developer has added a comment giving context about the request with instructions for how to request changes if you want to keep iterating. The second one is a follow-up comment where Amazon Q Developer warns that the generated code contains some third-party source material. It provides you with a file that you can download to look up the original code and decide for yourself whether this is something that you’re happy to include in your codebase or not. This makes it effortless to make use of open source responsibly while keeping records for traceability and audit.

the merge request

Before proceeding, you can look through the code and make in-line comments, much like you would with any other merge request. You can then instruct Amazon Q Developer to make changes to the code based on the comments and continue to iterate like that until you’re fully happy with the results . Let’s imagine that your company’s coding standards include a requirement to implement logging for key operations in your code. Unfortunately, this was not included with the initial requirements in the issue’s description before running the /q dev command. However, you can still use Amazon Q Developer to seamlessly add that code during the review process.

To do this, navigate to the Changes tab, find the relevant code lines, and add in-line comments as you would when reviewing a developer’s merge request. For instance, below line 39, a comment is added stating “add logging” to highlight a part of the code that handles errors when calling the signup API. Below it, another comment is added with only /q dev as the text. This standalone comment triggers a quick action to invoke Amazon Q Developer, so it’s essential to keep it separate. Amazon Q Developer will then generate a new revision based on all the comments provided.

It’s worth noting that the /q dev command can be issued from anywhere in GitLab where comments are supported. Although it was convenient to add it here on line 39, the outcome would be the same if the command was issue as a comment on the Overview page, or against any other line of code in the Merge requests page.

After it’s done, Amazon Q Developer notifies you by adding another comment to the merge request history. Again, it also notifies that the generated content contains open source code providing more information about it so you can review it prior to accepting the merge. Upon closer inspection, it’s clear that it has used the logger library, which makes perfect sense considering the request.

Reviewing the code, it’s impressive to see that Amazon Q Developer didn’t only add the calls to log operations where they happen, but also used context to add the relevant log levels, such as info, and warning. Moreover, it also modified the code in other places to make sure the build doesn’t break. For example, it added the import statement at the top of the file and initiated the logger variable.

By using this new development flow, you can move much faster from requirements to code by relying on Amazon Q Developer to help get the tasks done from the convenience of your GitLab environment. After submitting a merge request though, it’s time to perform a code review. Again, you can also use GitLab Duo with Amazon Q Developer to help you accelerate and improve the quality of that process.

Performing code reviews
Let’s work with a different code base, in this case, a Java application. To initiate the assisted code review process, in the merge request overview page, you can submit a comment with the text of /q review. Amazon Q Developer will add an automatic comment to the history informing that it has initiated a review of the merge. It scans all changes looking for security vulnerabilities, quality issues such as code that doesn’t follow best practices, and any other potential problems with the code.

After it’s finished, it will add each finding as a comment that includes a snippet of the problematic code found, a description of the issue, and a severity rating.

You can then take it one step further and ask Amazon Q Developer for a fix! Reply to the findings comment by entering the /q fix command and it will inform you that it is generating a fix for the issue before following it up on the same thread with a solution that you can review. It provides you with a diff view of the changes and an opportunity to accept and commit them.

Upgrading legacy code
In addition to helping you with new code and features, GitLab Duo with Amazon Q Developer can also help automate and accelerate code base migration from Java 8 or 11 to Java 17. Start by creating a new issue and give it a descriptive title such as “Upgrade project to Java 17”. Then, in the Description field, add the command /q transform.

After you create the issue, Amazon Q Developer will follow the same pattern as before and add a comment to the issue’s history to inform you that it’s working on migrating the code base. This comment will be updated after Amazon Q Developer is finished and contain a link to the merge request much like we encountered earlier. It’ll also generate a migration plan that you can review while you wait. The plan contains a collapsible step-by-step list of actions to be taken with detailed information plus links that you can use for further reading.

The merge request produced is rich in details too. It contains general stats such as the number of lines of code that were migrated and the total time taken, among others. It also has a full report with links that you can you use to navigate to different sections so you can read the build log summary, review changes in dependencies, inspect all files changes, and more.

When yo’re ready to review the code, you can accept changes partially or fully, much like with any other merge request.

Conclusion
GitLab Duo with Amazon Q bring together the most comprehensive DevSecOps platform with the most capable generative AI powered assistant for software development. Together, GitLab Duo and Amazon Q offer a seamless developer experience with new capabilities to accelerate feature development and transform workloads, all within the same familiar GitLab environment that developers are used to.

Things to know

  • Getting started – GitLab Duo with Amazon Q is available in preview for GitLab self-managed customers with an Ultimate subscription. Read more on how to get started to learn more about it.
  • Availability – GitLab Duo with Amazon Q is available now under preview for all GitLab self-managed customers with an ultimate tier subscription.

Matheus Guimaraes | @codingmatheus