Many applications these days require authentication to external systems with resources, such as users and passwords to access databases and service accounts to access cloud services, and so on. In such cases, private information, like passwords and keys, becomes necessary. It is essential to take extra care in managing such sensitive data. For example, if you write your AWS key information or password in a script for deployment and then push it to a Git repository, all users who can read it will also be able to access it, and you could be in trouble. Even if it’s an internal repository, you run the risk of a potential leak.
How we were managing secrets in the service
Before we talk about Vault, let’s take a look at how we’ve used to manage secrets.
Salt
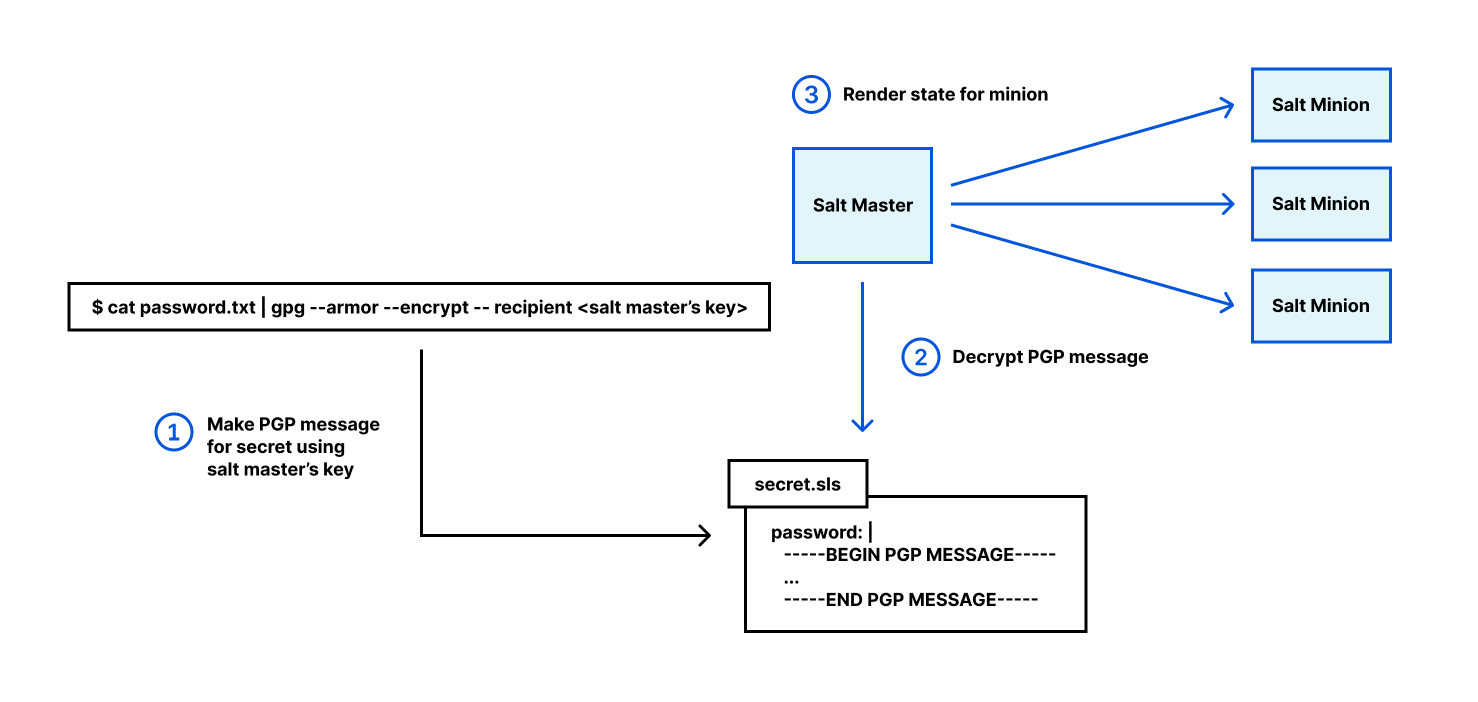
We use SaltStack as a bare-metal configuration management tool. The core of the Salt ecosystem consists of two major components: the Salt Master and the Salt Minion. The configuration state is owned by Salt Master, and thousands of Salt Minions automatically install packages, generate configuration files, and start services to the node based on the state. The state may contain secrets, such as passwords and API keys. When we deploy secrets to the node, we encrypt plaintext using a Salt Master owned GPG key and fill an ASCII-armored secret into the state file. Once it is applied, the Salt Master decrypts the PGP message using its own key, then the Salt Minion retrieves rendered data from the Master.
Kubernetes
We were using Lockbox, a secure way to store your Kubernetes secrets offline. The secret is asymmetrically encrypted and can only be decrypted with the Lockbox Kubernetes controller. The controller synchronizes with Secret objects. A Secret generated from Lockbox will also be created in the corresponding namespace. Since namespaces have been assigned administrator privileges by each engineering team, ordinary users cannot read Secret objects.
Why these secrets management were insufficient
Prior to Vault, GnuPG and Lockbox were used in this way to encrypt and decrypt most secrets in the data center. Nevertheless, they were inadequate in certain cases:
Lack of scoping secrets: The secret data in ASCII-armor could only be decrypted by a specific node when the client read it. This was still not enough control. Salt owns a GPG key for each Salt Master, and Core services (k8s, Databases, Storage, Logging, Tracing, Monitoring, etc) are deployed to hundreds of Salt Minions by a few Salt Masters. Nodes are often reused as different services after repairing hardware failure, so we use the same GPG key to decrypt the secrets of various services. Therefore, having a GPG key for each service is complicated. Also, a specific secret is used only for a specific service. For example, an access key for object storage is needed to back up the repository. In previous configurations, the API key is decrypted by a common Salt Master, so there is a risk that the API key will be referenced by another service or for another purpose. It is impossible to scope secret access, as long as we use the same GPG key.
Another case is Kubernetes. Namespace-scoped access control and API access restrictions by the RBAC model are excellent. And the etcd used by Kubernetes as storage is not encrypted by default, and the Secret object is also saved. We need to think about encryption-at-rest by a third party KMS, or how to prevent Secrets from being stored in etcd. In other words, it is also required to properly control access to the secret for the secret itself.
Rotation and static secret: Anyone who has access to the Salt Master GPG key can theoretically decrypt all current and future secrets. And as long as we have many secrets, it’s impossible to rotate the encryption of all the secrets. Current and future secret management requires a process for easy rotation and using dynamically generated secrets instead.
Session management: Users/Services with GPG keys can decrypt secrets at any time. So GPG secret decryption is like having no TTL. (You can set an expiration date against the GPG key, but it’s just metadata. If you try to encrypt a new secret, after the expiration date, you’ll get a warning, but you can decrypt the existing secret). A temporary session is required to limit access when not needed.
Audit: GPG doesn’t have a way to keep an audit trail. Audit trails help us to trace the event who/when/where read secrets. The audit trail should contain details including the date, time, and user information associated with the secret read (and login), which is required regardless of user or service.
HashiCorp Vault
Armed with our set of requirements, we chose HashiCorp Vault to make better secret management with a better security model.
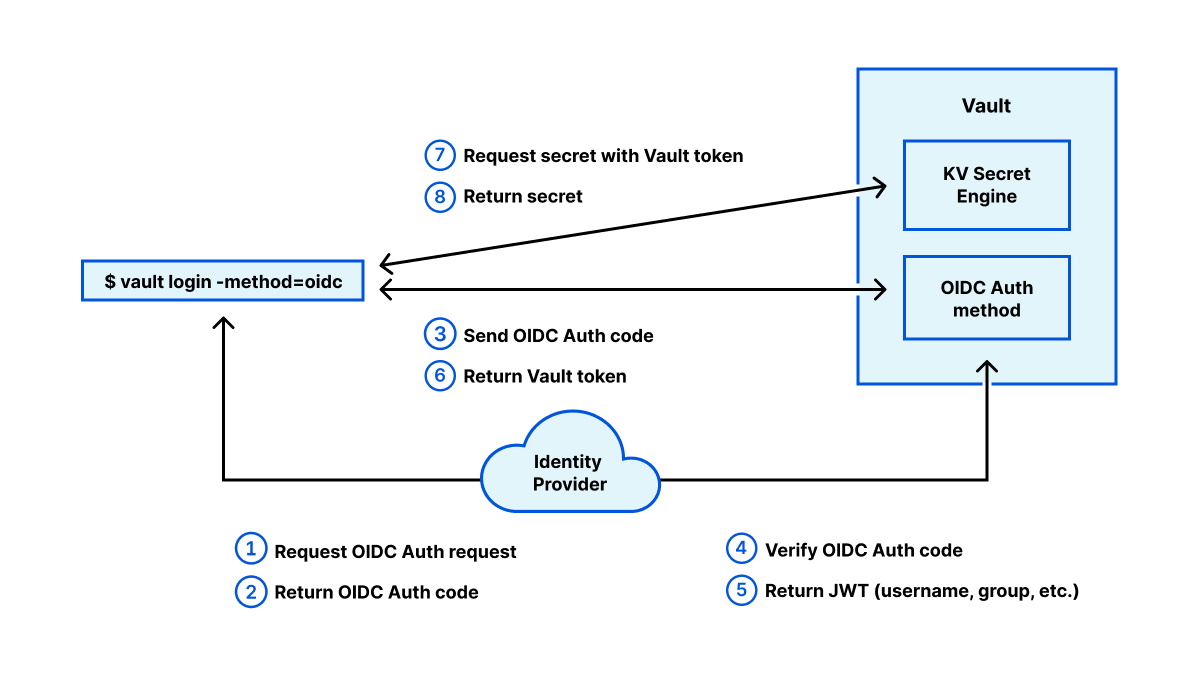
Scoping secrets: When a client logs in, a Vault token is generated through the Auth method (backend). This token has a policy that defines access policies, so it is clear what the client can access the data after logging in.
Rotation and dynamic secret: Version-controlled static secret with KV V2 Secret Engine helps us to easily update/rollback secrets with a single request. In addition, dynamic secrets and credentials are available to eliminate manual rotation. Ideally, these are required to be short-lived and have frequent rotation. Service should have restricted access. These are essential to reduce the impact of an attack, but they are operationally difficult, and it is impossible to satisfy them without automation. Vault can solve this problem by allowing operators to provide dynamically generated credentials to their services. Vault manages the credential lifecycle and rotates and revokes it as needed.
Session management: Vault provides a login process to get the token and various auth methods are provided. It is possible to link with an Identity Provider and authenticate using JWT. Since the vault token has a TTL, it can be managed as a short-lived credential to access secrets.
Audit: Vault supports audit that records who accessed which Vault API, when, and from where.
We also built Vault clusters for HA, Reliability, and handling large numbers of requests.
Use Integrated Storage that every node in the Vault cluster has a duplicate copy of Vault’s data. A client can retrieve the same result from any node.
Requests from clients are routed from a single Service IP to one of the Clusters. Anycast routes incoming traffic to the nearest cluster that handles requests efficiently. If one cluster goes down, the request will be automatically routed to another available cluster.
Service integrations
Use the appropriate Auth backend and Secret Engine to integrate the Service and Vault that are responsible for each core component.
Salt
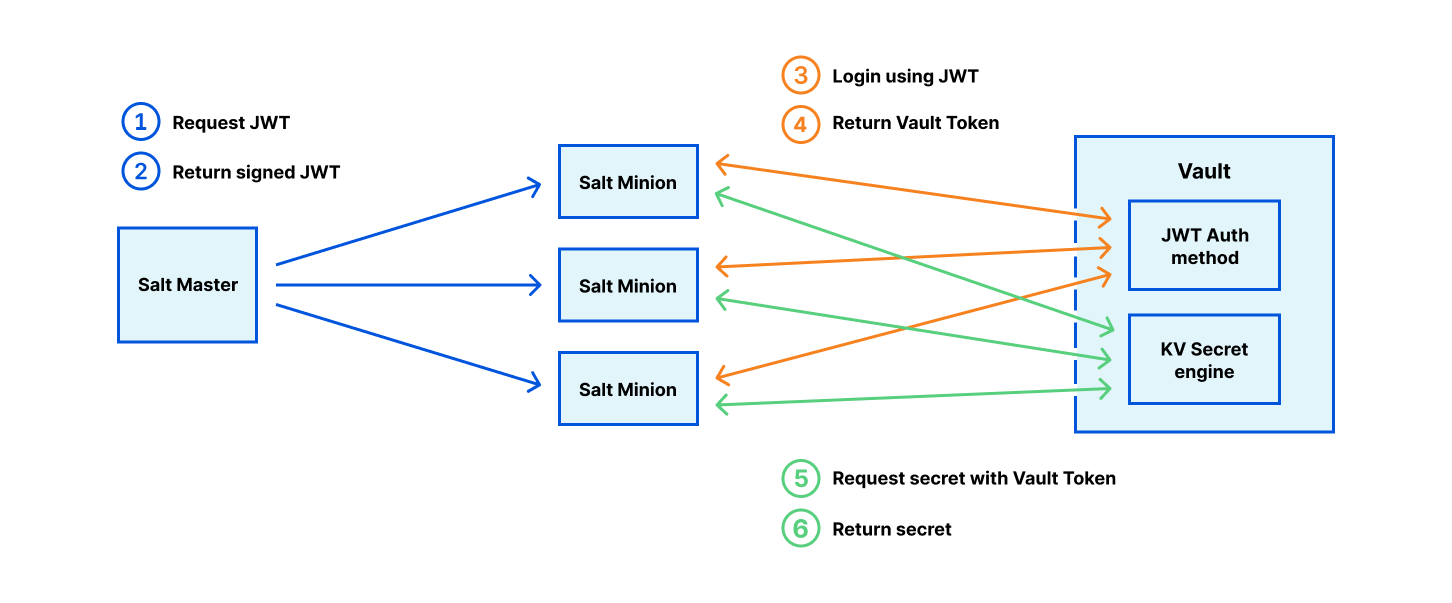
The configuration state is owned by Salt Master, and hundreds of Salt Minions automatically install packages, generate configuration files, and start services to the node based on the role. The state data may contain secrets, such as API keys, and Salt Minion retrieves them from Vault. Salt uses a JWT signed by the Salt Master to log in to the vault using the JWT Auth method.
Kubernetes
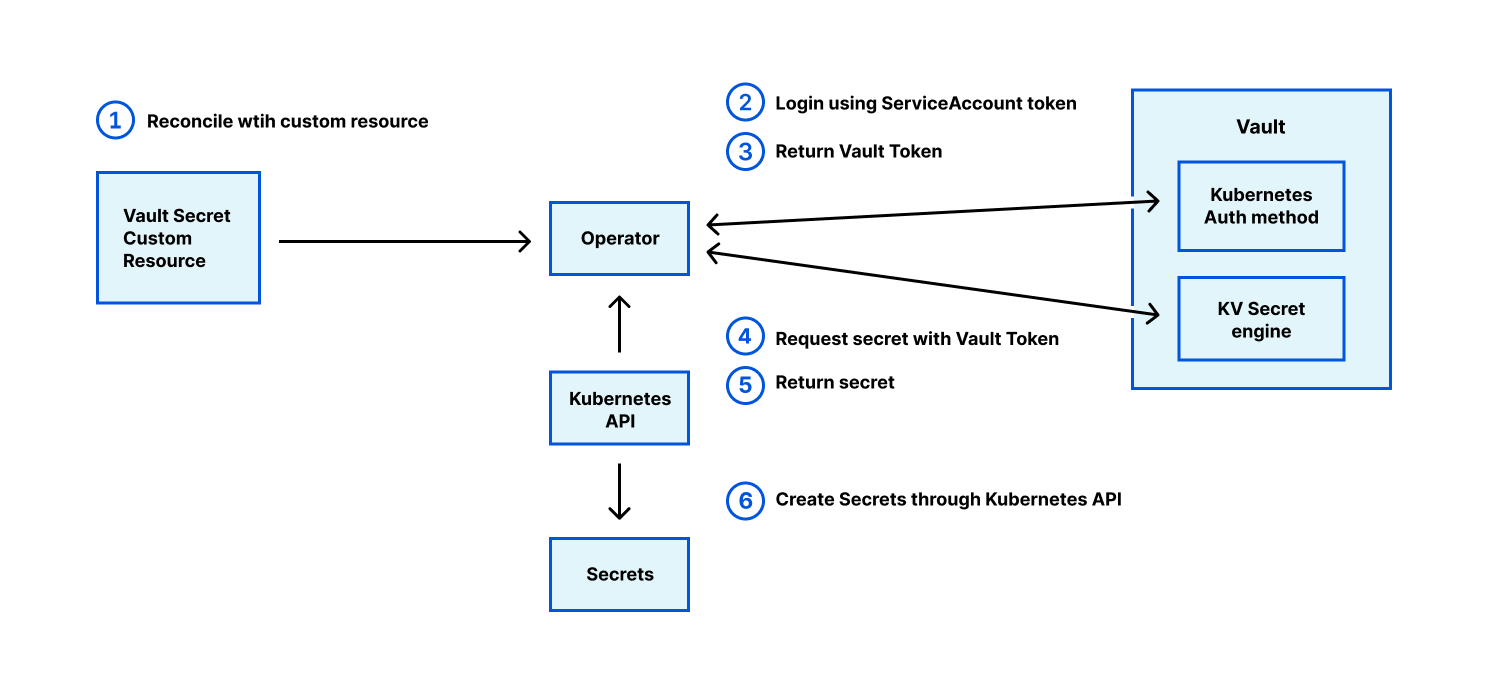
Kubernetes reads Vault secrets through an operator that synchronizes with Secret objects. The Kubernetes Auth method uses the Service Account token JWT to login, just like the JWT Auth method. This JWT contains the service account name, UID, and namespace. Vault can scope namespace based on dynamic policy.
Identity Provider – User login
Additionally, Vault can work with the Identity Provider through a delegated authorization method based on OAuth 2.0 so that users can get tokens with the right policies. The JWT issued by the Identity Provider contains the group or user ID to which it belongs, and this metadata can be used to assign a Vault policy.
Integrated ecosystem – Auth x Secret
Vault provides a plugin system for two major components: authentication (Auth method) and secret management (Secret Engine). Vault can enable the officially provided plugins and the custom plugins you can build. The Auth method provides authentication for obtaining a Vault token by various methods. As mentioned in the service integration example above, we mainly use JWT, OIDC, and Kubernetes for login. On the other hand, the secret engine provides secrets in various ways, such as KV for a static secret, PKI for certificate signing, issuing, etc.
And they have an ecosystem. Vault can easily integrate auth methods and secret engines with each other. For instance, if we add a DB dynamic credential secret engine, all existing platforms will instantly be supported, without needing to reinvent the wheel, on how they will auth to a separate service. Similarly, we can add a platform into the mix, and it would instantly have access to all the existing secret engines and their functionalities. Additionally, the Vault can perform permission to the arbitrary endpoint path provided by secret engines based on the authentication method and policies.
Wrap up
Vault integration for the core component is already ongoing and many GPG secrets have been migrated to Vault. We aim to make service integrations in our data centers, dynamic credentials, and improve CI/CD for Vault. Interested? We’re hiring for security platform engineering!
We built Cloudflare’s Zero Trust platform to help companies rely on our network to connect their private networks securely, while improving performance and reducing operational burden. With it, you could build a single virtual private network, where all your connected private networks had to be uniquely identifiable.
Starting today, we are thrilled to announce that you can start building many segregated virtual private networks over Cloudflare Zero Trust, beginning with virtualized connectivity for the connectors Cloudflare WARP and Cloudflare Tunnel.
Connecting your private networks through Cloudflare
Consider your team, with various services hosted across distinct private networks, and employees accessing those resources. More than ever, those employees may be roaming, remote, or actually in a company office. Regardless, you need to ensure only they can access your private services. Even then, you want to have granular control over what each user can access within your network.
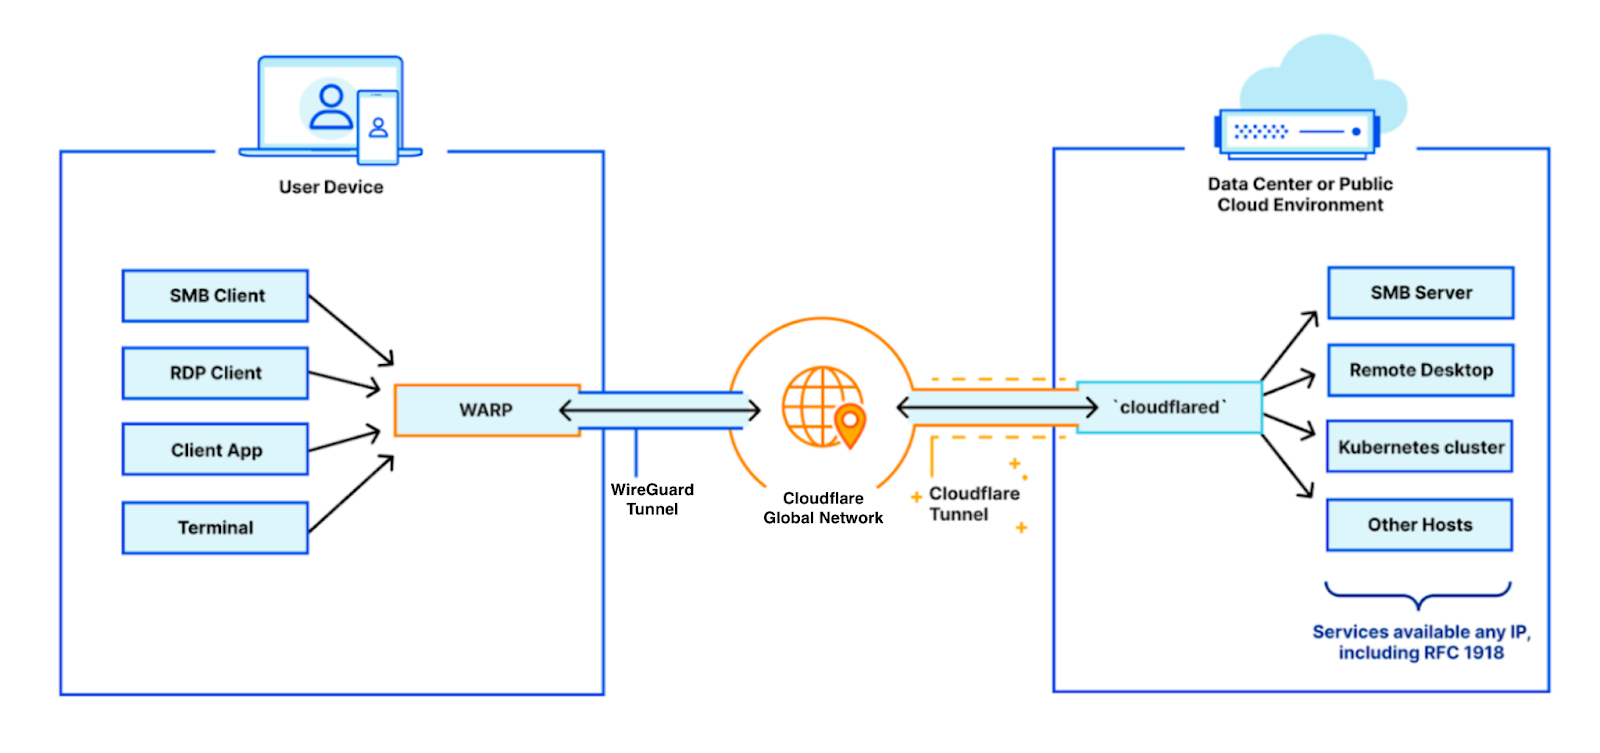
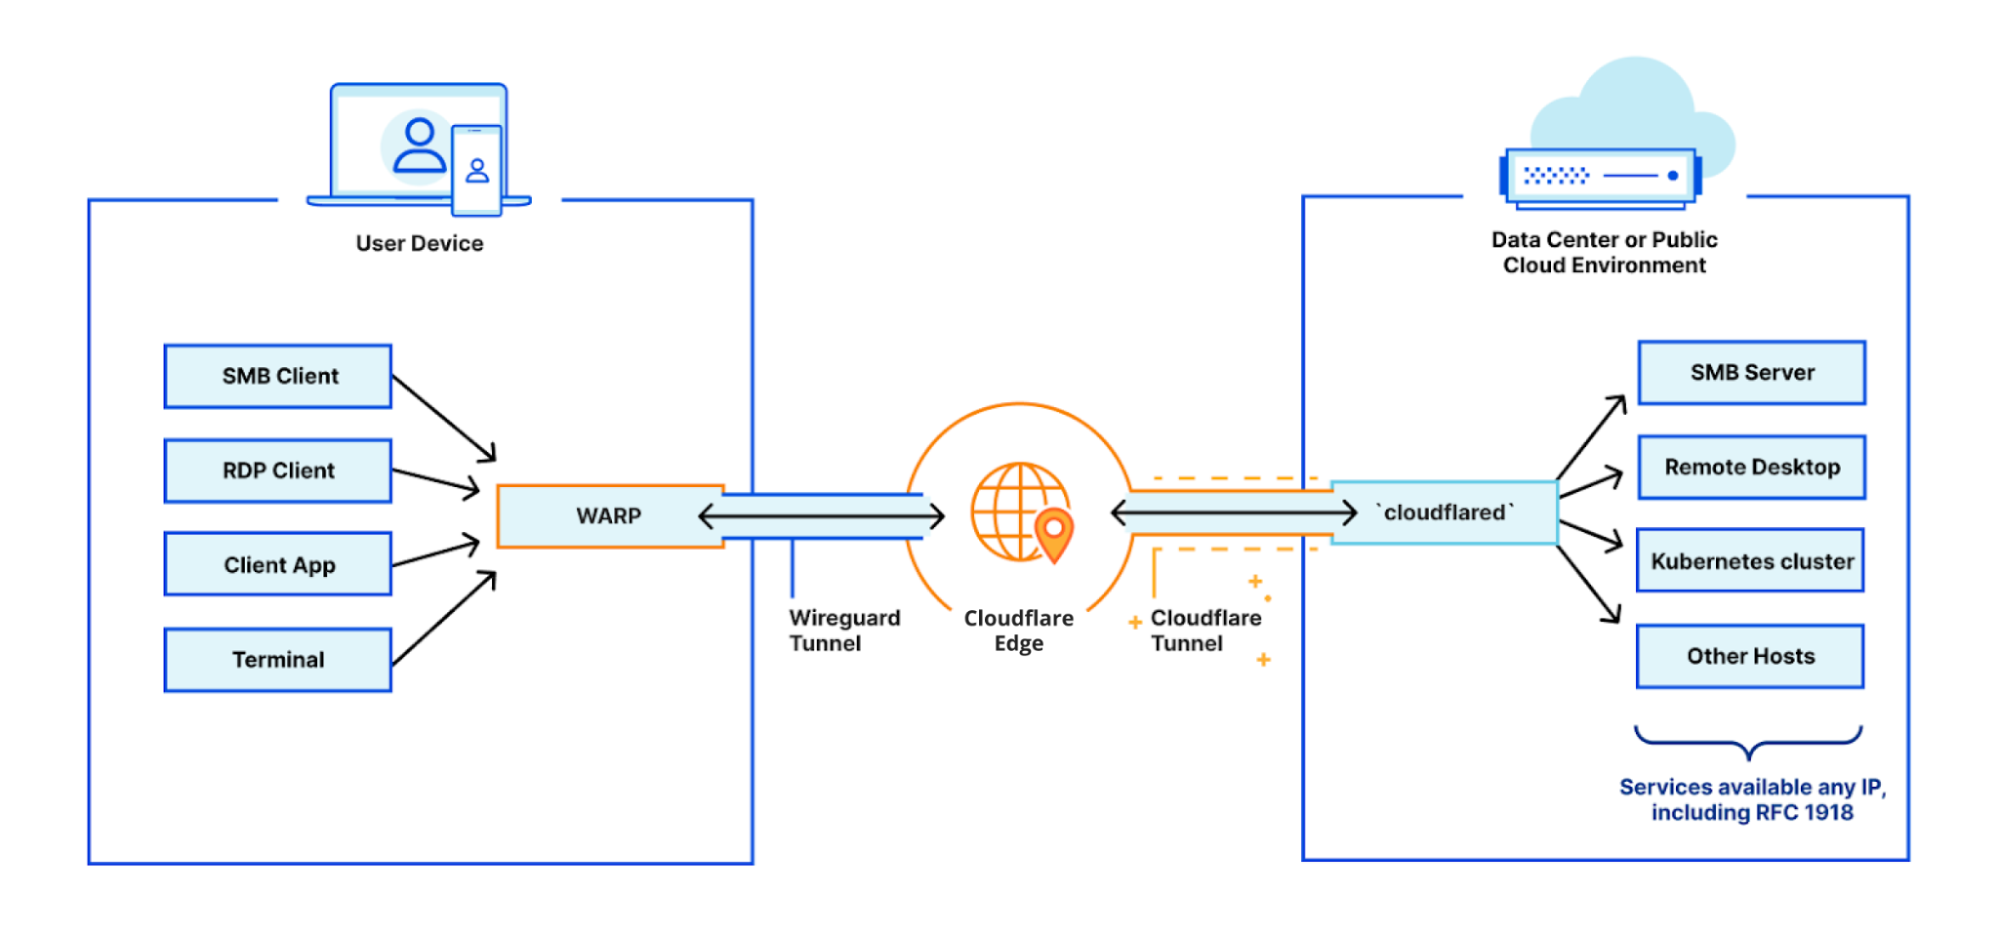
This is where Cloudflare can help you. We make our global, performant network available to you, acting as a virtual bridge between your employees and private services. With your employees’ devices running Cloudflare WARP, their traffic egresses through Cloudflare’s network. On the other side, your private services are behind Cloudflare Tunnel, accessible only through Cloudflare’s network. Together, these connectors protect your virtual private network end to end.
The beauty of this setup is that your traffic is immediately faster and more secure. But you can then take it a step further and extract value from many Cloudflare services for your private network routed traffic: auditing, fine-grained filtering, data loss protection, malware detection, safe browsing, and many others.
Our customers are already in love with our Zero Trust private network routing solution. However, like all things we love, they can still improve.
The problem of overlapping networks
In the image above, the user can access any private service as if they were physically located within the network of that private service. For example, this means typing jira.intra in the browser or SSH-ing to a private IP 10.1.2.3 will work seamlessly despite neither of those private services being exposed to the Internet.
However, this has a big assumption in place: those underlying private IPs are assumed to be unique in the private networks connected to Cloudflare in the customer’s account.
Suppose now that your Team has two (or more) data centers that use the same IP space — usually referred to as a CIDR — such as 10.1.0.0/16. Maybe one is the current primary and the other is the secondary, replicating one another. In such an example situation, there would exist a machine in each of those two data centers, both with the same IP, 10.1.2.3.
Until today, you could not set up that via Cloudflare. You would connect data center 1 with a Cloudflare Tunnel responsible for traffic to 10.1.0.0/16. You would then do the same in data center 2, but receive an error forbidding you to create an ambiguous IP route:
$ cloudflared tunnel route ip add 10.1.0.0/16 dc-2-tunnel

API error: Failed to add route: code: 1014, reason: You already have a route defined for this exact IP subnet
In an ideal world, a team would not have this problem: every private network would have unique IP space. But that is just not feasible in practice, particularly for large enterprises. Consider the case where two companies merge: it is borderline impossible to expect them to rearrange their private networks to preserve IP addressing uniqueness.
Getting started on your new virtual networks
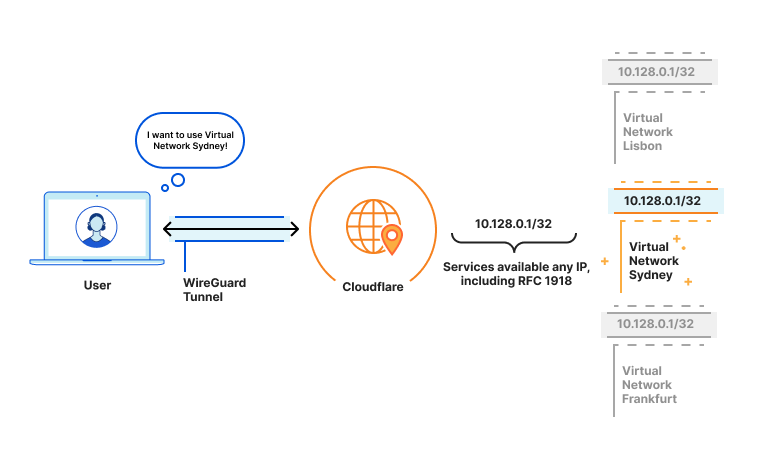
You can now overcome the problem above by creating unique virtual networks that logically segregate your overlapping IP routes. You can think of a virtual network as a group of IP subspaces. This effectively allows you to compose your overall infrastructure into independent (virtualized) private networks that are reachable by your Cloudflare Zero Trust organization through Cloudflare WARP.
Let us set up this scenario.
We start by creating two virtual networks, with one being the default:
$ cloudflared tunnel vnet add —-default vnet-frankfurt "For London and Munich employees primarily"

Successfully added virtual network vnet-frankfurt with ID: 8a6ea860-cd41-45eb-b057-bb6e88a71692 (as the new default for this account)

$ cloudflared tunnel vnet add vnet-sydney "For APAC employees primarily"

Successfully added virtual network vnet-sydney with ID: e436a40f-46c4-496e-80a2-b8c9401feac7
We can then create the Tunnels and route the CIDRs to them:
$ cloudflared tunnel create tunnel-fra

Created tunnel tunnel-fra with id 79c5ba59-ce90-4e91-8c16-047e07751b42

$ cloudflared tunnel create tunnel-syd

Created tunnel tunnel-syd with id 150ef29f-2fb0-43f8-b56f-de0baa7ab9d8

$ cloudflared tunnel route ip add --vnet vnet-frankfurt 10.1.0.0/16 tunnel-fra

Successfully added route for 10.1.0.0/16 over tunnel 79c5ba59-ce90-4e91-8c16-047e07751b42

$ cloudflared tunnel route ip add --vnet vnet-sydney 10.1.0.0/16 tunnel-syd

Successfully added route for 10.1.0.0/16 over tunnel 150ef29f-2fb0-43f8-b56f-de0baa7ab9d8
And that’s it! Both your Tunnels can now be run and they will connect your private data centers to Cloudflare despite having overlapping IPs.
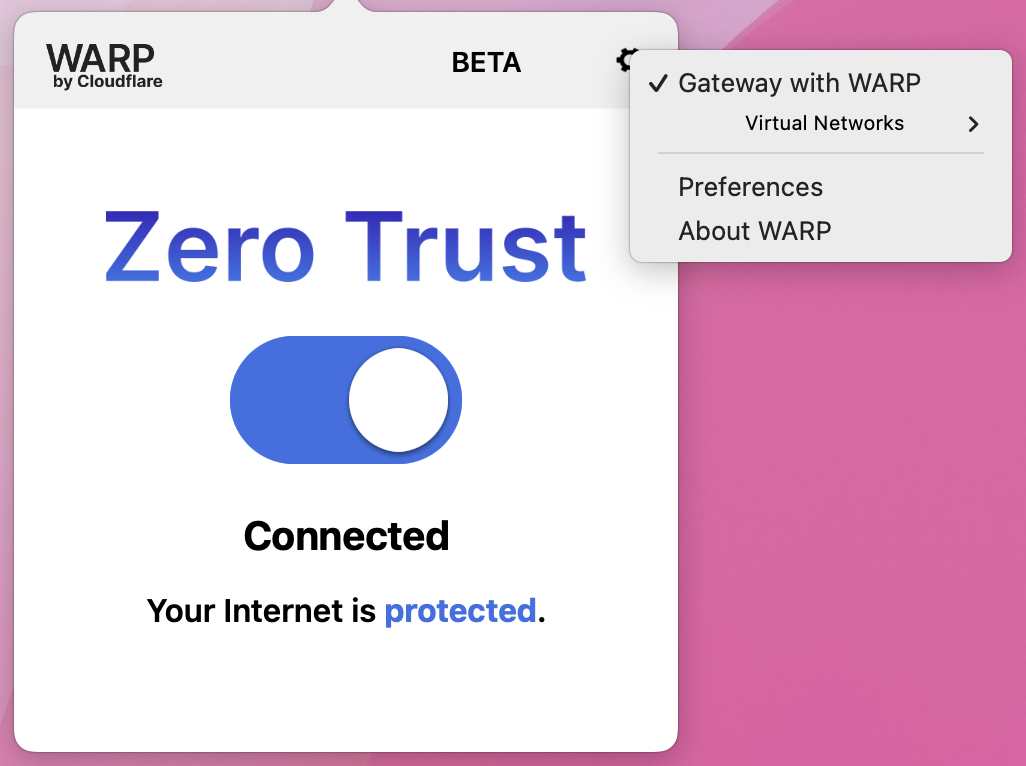
Your users will now be routed through the virtual network vnet-frankfurt by default. Should any user want otherwise, they could choose on the WARP client interface settings, for example, to be routed via vnet-sydney.
When the user changes the virtual network chosen, that informs Cloudflare’s network of the routing decision. This will propagate that knowledge to all our data centers via Quicksilver in a matter of seconds. The WARP client then restarts its connectivity to our network, breaking existing TCP connections that were being routed to the previously selected virtual network. This may be perceived as if you were disconnecting and reconnecting the WARP client.
Every current Cloudflare Zero Trust organization using private network routing will now have a default virtual network encompassing the IP Routes to Cloudflare Tunnels. You can start using the commands above to expand your private network to have overlapping IPs and reassign a default virtual network if desired.
If you do not have overlapping IPs in your private infrastructure, no action will be required.
What’s next
This is just the beginning of our support for distinct virtual networks at Cloudflare. As you may have seen, last week we announced the ability to create, deploy, and manage Cloudflare Tunnels directly from the Zero Trust dashboard. Today, virtual networks are only supported through the cloudflared CLI, but we are looking to integrate virtual network management into the dashboard as well.
Our next step will be to make Cloudflare Gateway aware of these virtual networks so that Zero Trust policies can be applied to these overlapping IP ranges. Once Gateway is aware of these virtual networks, we will also surface this concept with Network Logging for auditability and troubleshooting moving forward.
Have you ever wanted to try a new email service but worried it might lead to you missing any emails? If you have, you’re definitely not alone. Some of us email ourselves to make sure it reaches the correct destination, others don’t rely on a new address for anything serious until they’ve seen it work for a few days. In any case, emails often contain important information, and we need to trust that our emails won’t get lost for any reason.
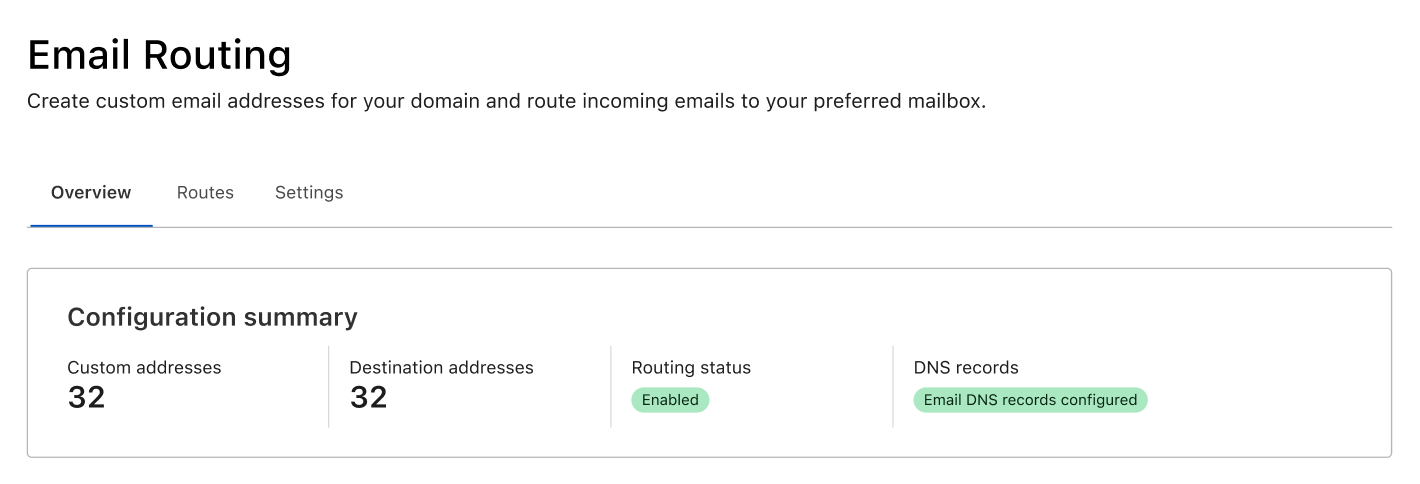
To help reduce these worries about whether emails are being received and forwarded – and for troubleshooting if needed – we are rolling out a new Overview page to Email Routing. On the Overview tab people now have full visibility into our service and can see exactly how we are routing emails on their behalf.
Routing Status and Metrics
The first thing you will see in the new tab is an at a glance view of the service. This includes the routing status (to know if the service is configured and running), whether the necessary DNS records are configured correctly, and the number of custom and destination addresses on the zone.
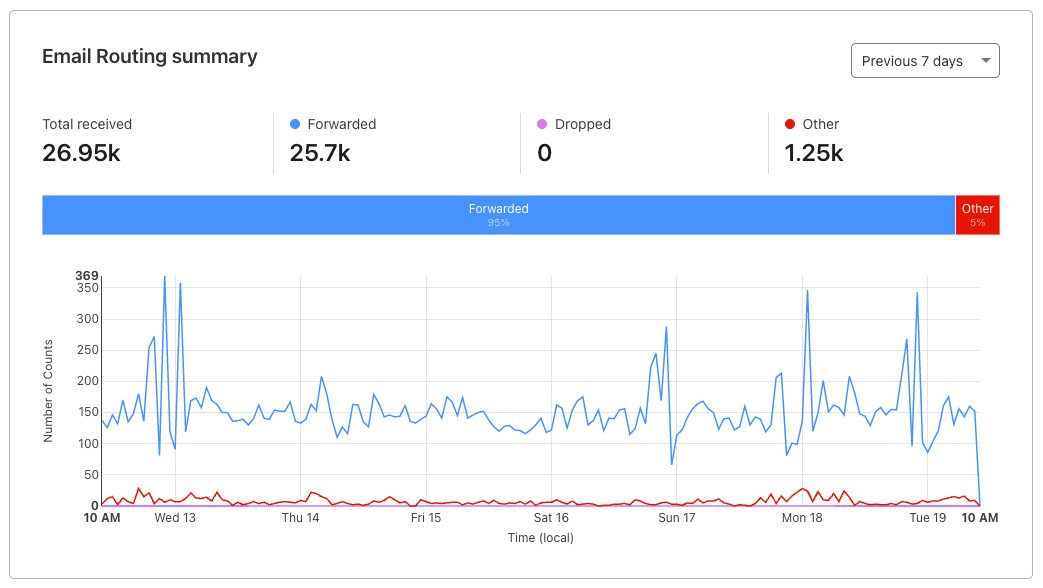
Below the configuration summary, you will see more advanced statistics about the number of messages received on your custom addresses, and what happened to those messages. You will see information about the number of emails forwarded or dropped by Email Routing (based on the rules you created), and the number that fall under other scenarios such as being rejected by Email Routing (due to errors, not passing security checks or being considered spam) or rejected by your destination mailbox. You now have the exact counts and a chart, so that you can track these metrics over time.
Activity Log
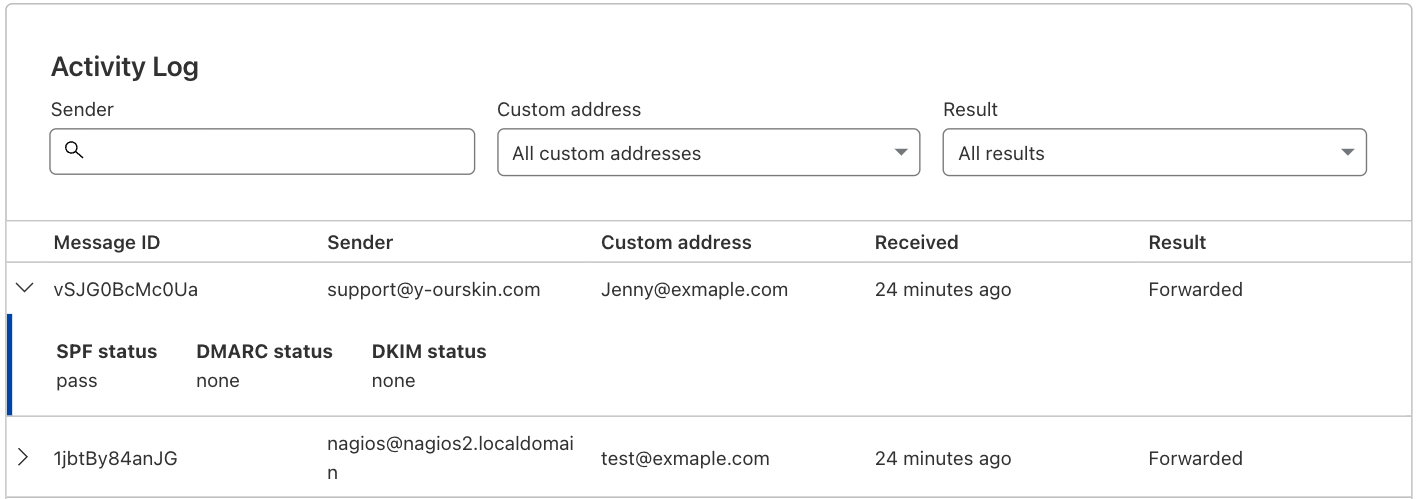
On the Cloudflare Email Routing tab you’ll also see the Activity Log, where you can drill deeper into specific behaviors. These logs show you details about the email messages that reached one of the custom addresses you have configured on your Cloudflare zone.
For each message the logs will show you the Message ID, Sender, Custom Address, when Cloudflare Email Routing received it, and the action that was taken. You can also expand the row to see the SPF, DMARC, and DKIM status of that message along with any relevant error messaging.
And we know looking at every message can be overwhelming, especially when you might be resorting to the logs for troubleshooting purposes, so you have a few options for filtering:
Search for specific people (email addresses) that have messaged you.
Filter to show only one of your custom addresses.
Filter to show only messages where a specific action was taken.
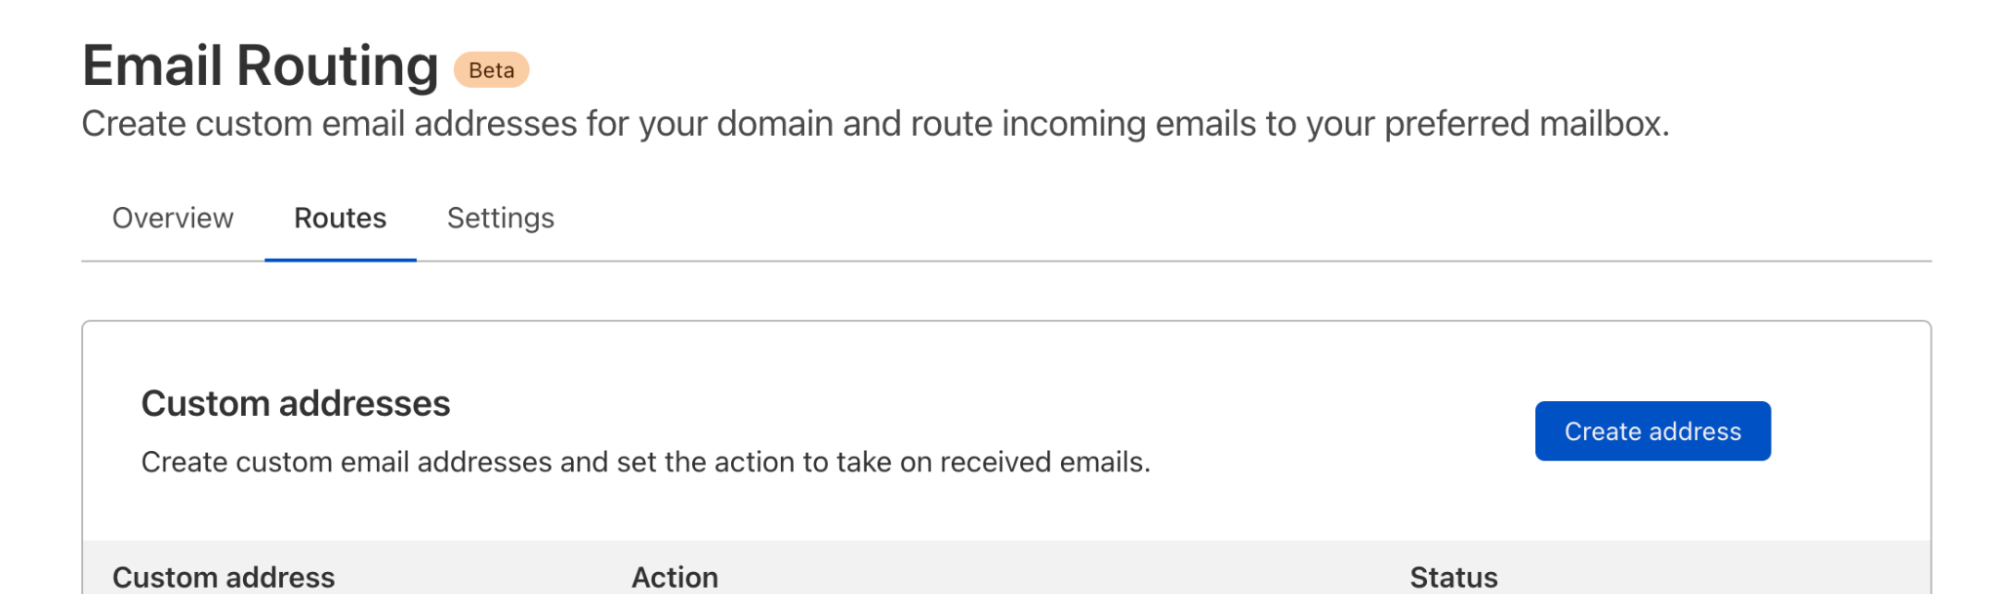
Routes and Settings
Next to the Overview tab, you will find the Routes tab with the configuration UI that is likely already familiar to you. That’s where you create custom addresses, add and verify destination addresses, and create rules with the relationships between the custom and destination addresses.
Lastly the Settings tab includes less common actions such as the DNS configuration and the options for off boarding from Email Routing.
We hope you enjoy this update. And if you have any questions or feedback about this product, please come see us in the Cloudflare Community and the Cloudflare Discord.
Today, Cloudflare is making it easier for enterprise account owners to manage their team’s access to Cloudflare by allowing user access to be scoped to sets of domains. Ensuring users have exactly the access they need and no more is critical, and Domain Scoped Roles provide a significant step forward. Additionally, with the introduction of Domain Groups, account owners can grant users access to domains by group instead of individually. Domains can be added or removed from these groups to automatically update the access of those who have access to the group. This reduces toil in managing user access.
One of the most common uses we have seen for Domain Scoped Roles is to limit access to production domains to a small set of team members, while still allowing development and pre-production domains to be open to the rest of the team. That way, someone can’t make changes to a production domain unless they are given access.
How to use Domain Scoped Roles
If you are an enterprise customer please talk with your CSM to get you and your team enrolled. Note that you must have Super Administrator privileges to be able to modify account memberships.
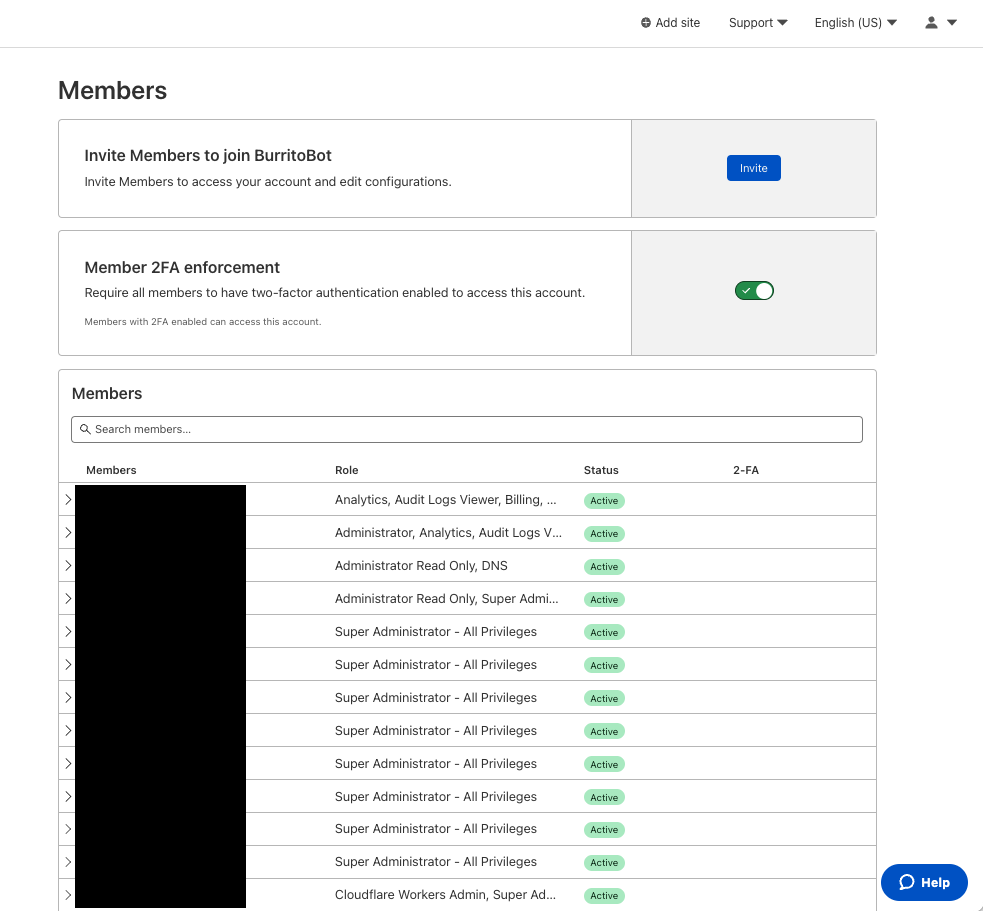
Once the beta has been enabled for you, here is how to start using it:
From here, you can either invite a new member with a Domain Scoped Role or modify an existing user’s permissions. In this case, we will invite a new user.
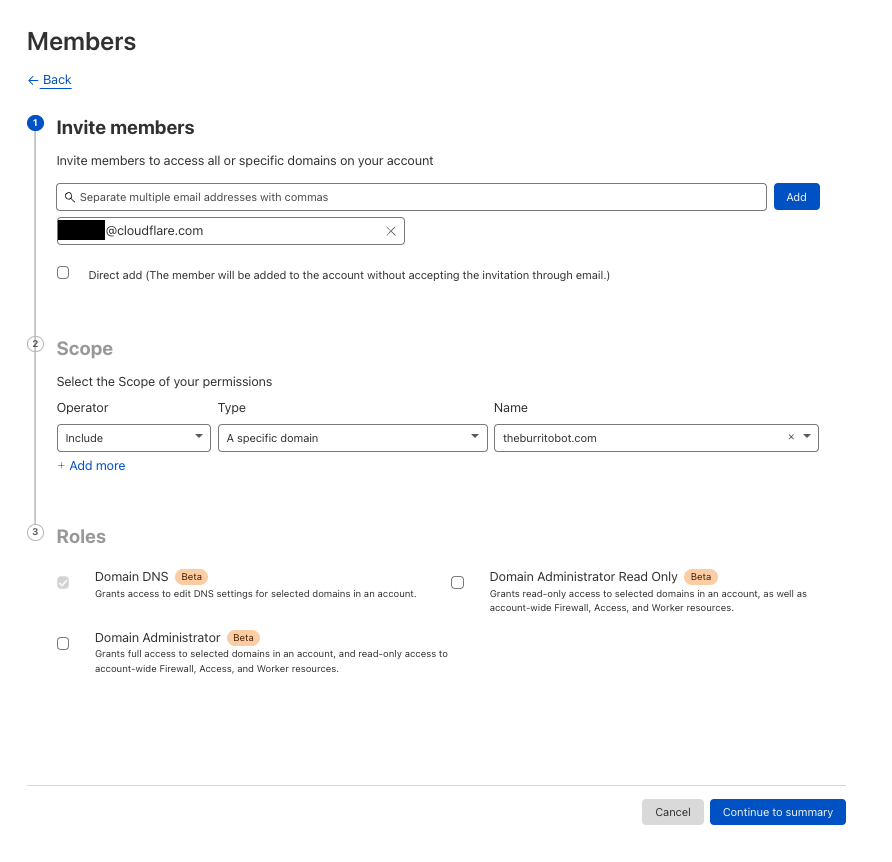
When inviting new members there are three things to provide:
Which users to invite.
The scope of which resource they will have access to:
Selecting “All Domains” will allow you to select legacy roles.
The role(s) which will decide what permissions are granted.
Before sending the invite, you will be able to confirm the users, scope, and roles.
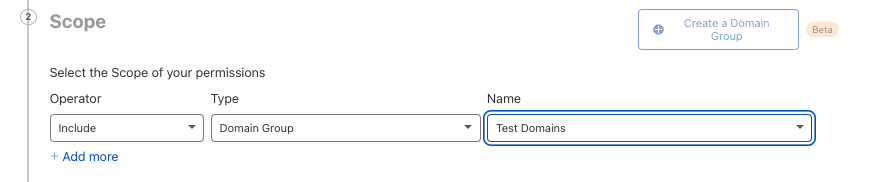
Domain Groups
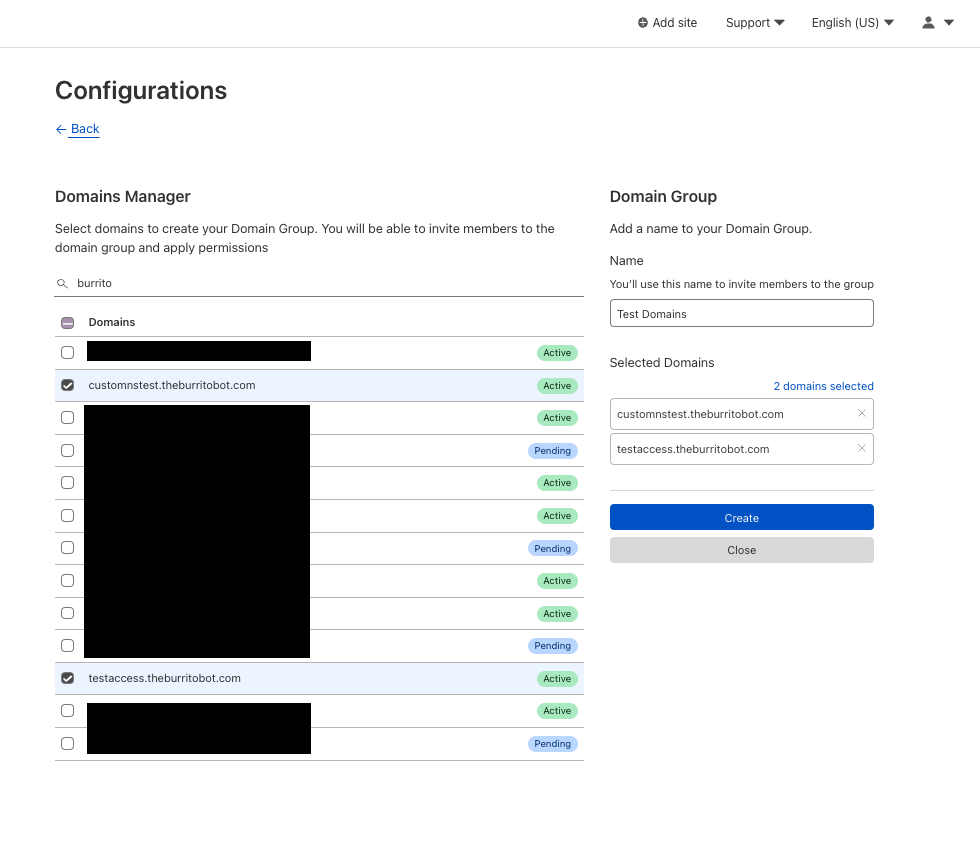
In addition to manually creating inclusion or exclusion lists per user, account owners can also create Domain Groups to allow granting one or more users to a group of domains. Domain Groups can be created from the member invite flow or directly from Account Configurations -> Lists. When creating a domain group, the user selects the domains to include and, from that point on, the group can be used when inviting a user to the account.
Domain Group Creation Screen
Domain Group selection during member invite
Introducing Bach
Domain Scoped Roles is possible because of a new permission system called Bach. Bach provides a policy based system for defining authorization to Cloudflare’s control plane. Authorization defines what someone can do in a system. Bach has been powering API Tokens, but going forward all authorization will use Bach. This gives customers the ability to define more granular permissions and resource scoping. Resources can be any object a user interacts with whether that be accounts, zones, worker environments, or DNS records to name a few.. Whereas before Cloudflare’s RBAC system relied on assigning a set of roles in which each role defined broad permissions that applied to an entire account, Bach’s policies allow for deeper permission grants that can be scoped to sets of resources.
Let’s take a look at the legacy system and how it compares to what Bach supports. Typically, user’s permissions are defined by the ‘roles’ that they are assigned to. These included: ‘Super Administrator’, ‘Administrator’, ‘Cloudflare for Teams’, and ‘Cloudflare Workers Admin’ to name a few. In the legacy system, each of these maps to an explicit set of simple permissions like ‘workers:read’, ‘workers:edit’ or ‘zones:edit’. When requests get made either via the Cloudflare API or the Cloudflare dashboard, Cloudflare’s API Gateway would check to see if, for the endpoint requested, an actor had the correct permissions to perform the action. In order to change a zone setting, the actor would need to have the ‘zone:edit’ permission – which could be granted from one of many roles. Below is what a user with only ‘DNS’ permissions is granted in the legacy system:
Legacy DNS User Role Permissions
Permission
Edit
Read
dns_records
✔
✔
legal
✔
account
✔
subscription
✔
zone
✔
zone_settings
✔
While straightforward, this had many drawbacks. First, this meant the inability to define limits on the resources the permissions applied to, whether that be a set of resources or attributes of resources. Second, permissions for a given ‘resource’ were simply read or edit, where edit included creating and deleting. These don’t fully capture the needs that may exist – for example, limiting deletions while allowing edits.
With Bach we have an expanded capability to define granular permissions for authorization. An example policy defining the aforementioned ‘DNS’ member’s access would look like this:
You can see a greater granularity in the permissions that are defined. In both cases, the user can perform the same actions, but the granularity means we are more explicit about what can be done. Here for DNS records (under com.cloudflare.api.account.zone.dns-record) there are explicit create, read, update, delete and list permissions. In the resource group section, we can see that the scope section defines an account. Any objects like domains in that account will match to the “*” value under ‘objects’. This means that these permissions apply throughout the entire account. Now, let’s modify this user’s permissions to be scoped to a single domain and see how the policy changes.
Bach DNS User Role with Domain Scoping Policy
(slightly modified for readability)
# Zone Scoped DNS role - scoped to 1 zone
policies:
- id: 80b25dd735b040708155c85d0ed8a508
  permission_groups:
  - id: 132c52e7e6654b999c183cfcbafd37d7
    name: Zone DNS
    meta:
      description: Grants access to edit DNS settings for zones in an account.
      editable: 'false'
      label: zone_dns_admin
      scopes: com.cloudflare.api.account.zone
    permissions:
    - key: com.cloudflare.api.account.zone.secondary-dns.*
    - key: com.cloudflare.api.account.zone.dnssec.*
    - key: com.cloudflare.api.account.zone.dns-record.*
    - key: com.cloudflare.api.account.zone.analytics.dns-report.*
    - key: com.cloudflare.api.account.zone.analytics.dns-bytime.*
    - key: com.cloudflare.api.account.zone.setting.read
    - key: com.cloudflare.api.account.zone.setting.list
    - key: com.cloudflare.api.account.zone.rate-plan.read
    - key: com.cloudflare.api.account.zone.subscription.read
    - key: com.cloudflare.api.account.zone.read
    - key: com.cloudflare.api.account.subscription.read
    - key: com.cloudflare.api.account.subscription.list
    - key: com.cloudflare.api.account.read
  resource_groups:
  - scope:
      key: com.cloudflare.api.account.a67e14daa5f8dceeb91fe5449ba496eb
      objects:
      - key: com.cloudflare.api.account.zone.b1fbb152bbde3bd28919a7f4bdca841f
  access: allow
Once we scope the user’s permissions to only include one explicit zone, we see two main differences. First, there is a large reduction in permissions. This is because we do not grant the user access to read or list many account level resources that the legacy account scoped roles grant. The only account level permissions granted are account.read, subscriptions.read, and subscriptions.list. These permissions are necessary for a user to be able to use the dashboard. When viewing the account in the dashboard the only account level product that will be shown is domains. Other products like Cloudflare Workers, Zero Trust, etc will be hidden.
Second, in the resource groups scope section, we see an explicit mention of a zone (line X: com.cloudflare.api.account.zone.b1fbb152bbde3bd28919a7f4bdca841f). This means that the zone permissions outlined in the policy only apply to that specific zone. Any attempt to access other features of that zone or to modify DNS for any other zones will be rejected by Cloudflare.
What’s next
If you are an enterprise customer and interested in getting started with Domain Scoped Roles, please contact your CSM to get enabled for the Early Access period. This announcement represents a significant milestone in our migration to Bach, an authorization system built for Coudflare’s scale. This will allow us to expand these same capabilities to more products in the future and to create an authorization system that puts customers more in control of their team’s access across all of Cloudflare’s services. Stay tuned as we are just getting started!
Whether you’re a software engineer deploying a new feature, network engineer updating routes, or a security engineer configuring a new firewall rule: You need visibility to know if your system is behaving as intended — and if it’s not, to know how to fix it.
Cloudflare is committed to helping our customers get visibility into the services they have protected behind Cloudflare. Being a single pane of glass for all network activity has always been one of Cloudflare’s goals. Today, we’re outlining the future vision for Cloudflare observability.
What is observability?
Observability means gaining visibility into the internal state of a system. It’s used to give users the tools to figure out what’s happening, where it’s happening, and why.
At Cloudflare, we believe that observability has three core components: monitoring, analytics, and forensics. Monitoring measures the health of a system – it tells you when something is going wrong. Analytics give you the tools to visualize data to identify patterns and insights. Forensics helps you answer very specific questions about an event.
Observability becomes particularly important in the context of security to validate that any mitigating actions performed by our security products, such as Firewall or Bot Management, are not false positives. Was that request correctly classified as malicious? And if it wasn’t, which detection system classified it as such?
Cloudflare, additionally, has products to improve performance of applications and corporate networks and allow developers to write lightning fast code that runs on our global network. We want to be able to provide our customers with insights into every request, packet, and fetch that goes through Cloudflare’s network.
Monitoring and Notifying
Analytics are fantastic for summarizing data, but how do you know when to look at them? No one wants to sit on the dashboard clicking refresh over and over again just in case something looks off. That’s where notifications come in.
When we talk about something “looking off” on an analytics page, what we really mean is that there’s a significant change in your traffic or network which is reflected by spikes or drops in our analytics. Availability and performance directly affect end users, and our goal is to monitor and notify our customers as soon as we see things going wrong.
Today, we have many different types of notifications from Origin Error Rates, Security Events, and Advanced Security Events to Usage Based Billing and Health Checks. We’re continuously adding more notification types to have them correspond with our awesome analytics. As our analytics get more customizable, our notifications will as well.
There’s tons of different algorithms that can be used to detect spikes, including using burn rates and z-scores. We’re continuing to iterate on the algorithms that we use for detections to offer more variations, make them smarter, and make sure that our notifications are both accurate and not too noisy.
Analytics
So, you’ve received an alert from Cloudflare. What comes next?
Analytics can be used to get a birds eye view of traffic or focus on specific types of events by adding filters and time ranges. After you receive an alert, we want to show you exactly what’s been triggered through graphs, high level metrics, and top Ns on the Cloudflare dashboard.
Whether you’re a developer, security analyst, or network engineer, the Cloudflare dashboard should be the spot for you to see everything you need. We want to make the dashboard more customizable to serve the diverse use cases of our customers. Analyze data by specifying a timeframe and filter through dropdowns on the dashboard, or build your own metrics and graphs that work alongside the raw logs to give you a clear picture of what’s happening.
Focusing on security, we believe analytics are the best tool to build confidence before deploying security policies. Moving forward, we plan to layer all of our security related detection signals on top of HTTP analytics so you can use the dashboard to answer questions such as: if I were to block all requests that the WAF identifies as an XSS attack, what would I block?
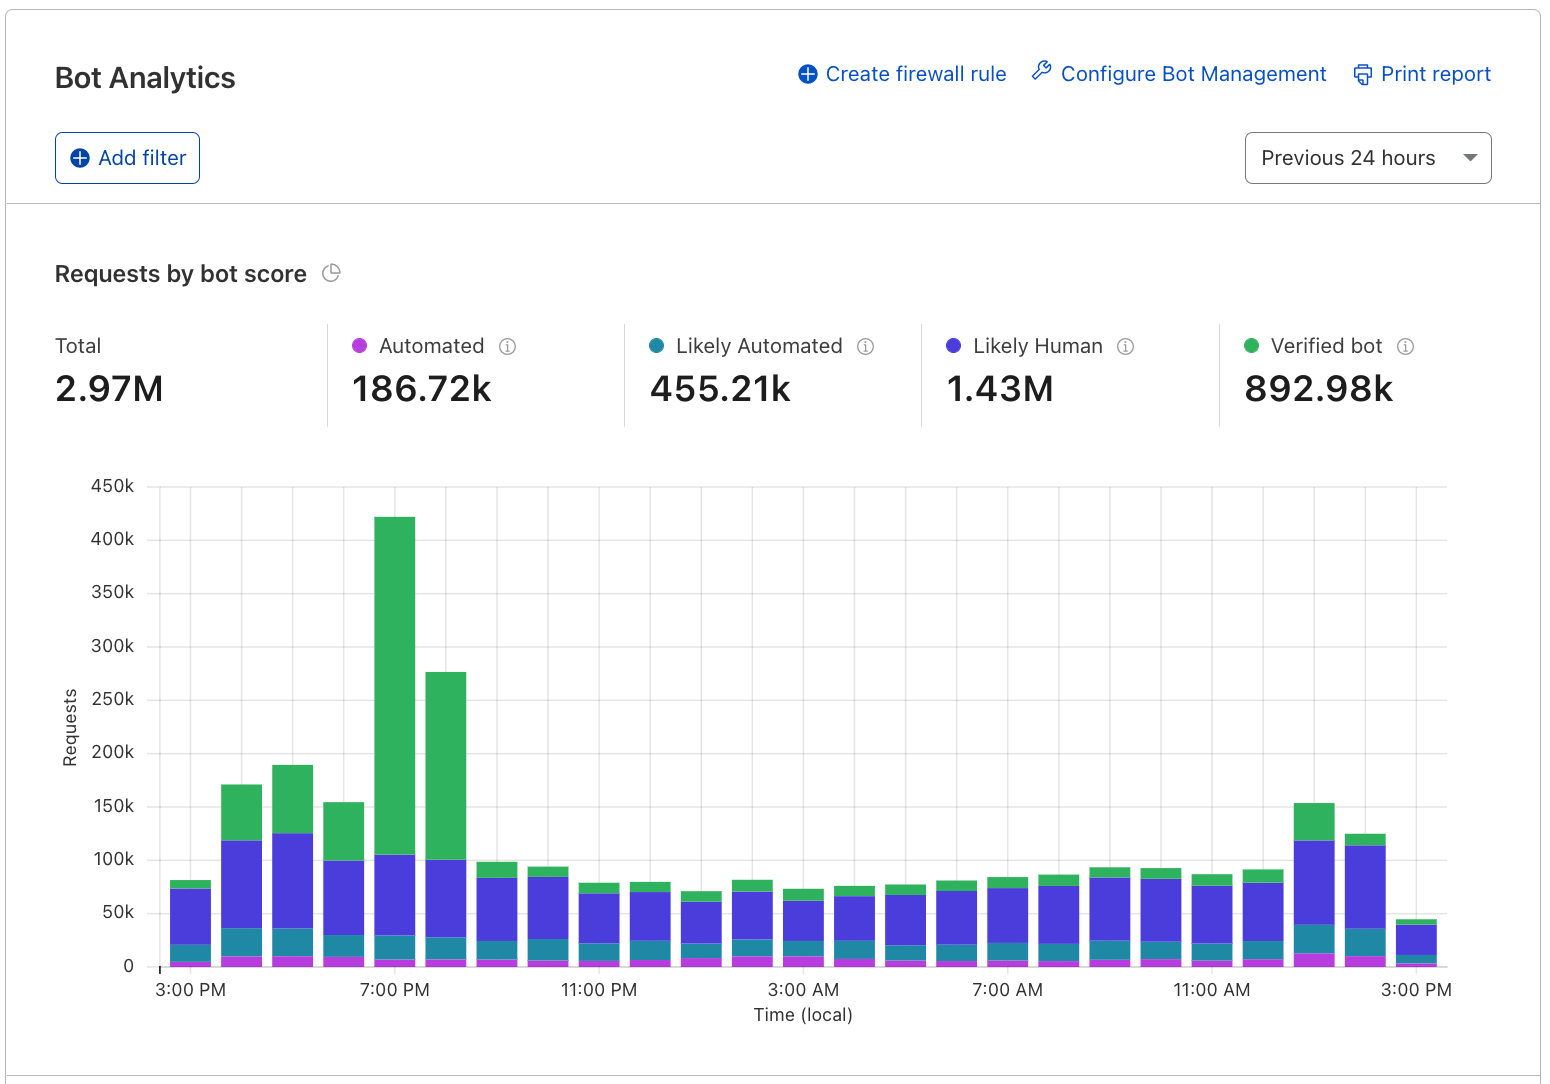
Customers using our enterprise Bot Management may already be familiar with this experience, and as we improve it and build upon it further, all of our other security products will follow.
Analytics are a powerful tool to see high level patterns and identify anomalies that indicate that something unusual is happening. We’re working on new dashboards, customizations, and features that widen the use cases for our customers. Stay tuned!
Logs
Logs are used when you want to examine specific details about an event. They consist of a timestamp and fields that describe the event and are used to get visibility on a granular level when you need a play-by-play.
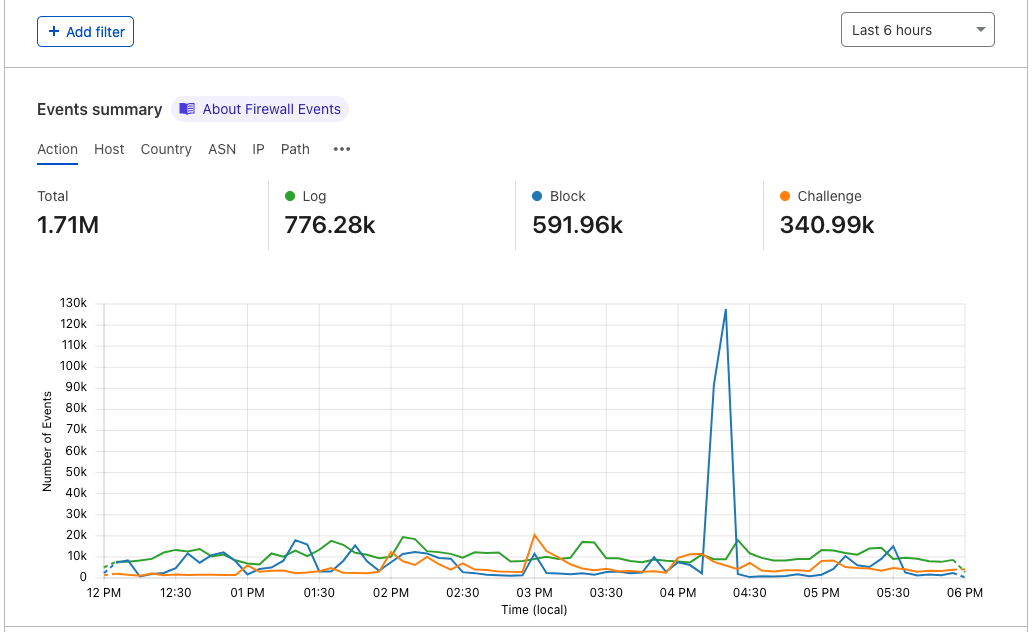
In each of our datasets, an event measures something different. For example, in HTTP request logs, an event is when an end user requests content from or sends content to a server. For Firewall logs, an event occurs when the Firewall takes an action on an HTTP request. There can be multiple Firewall events for each HTTP request.
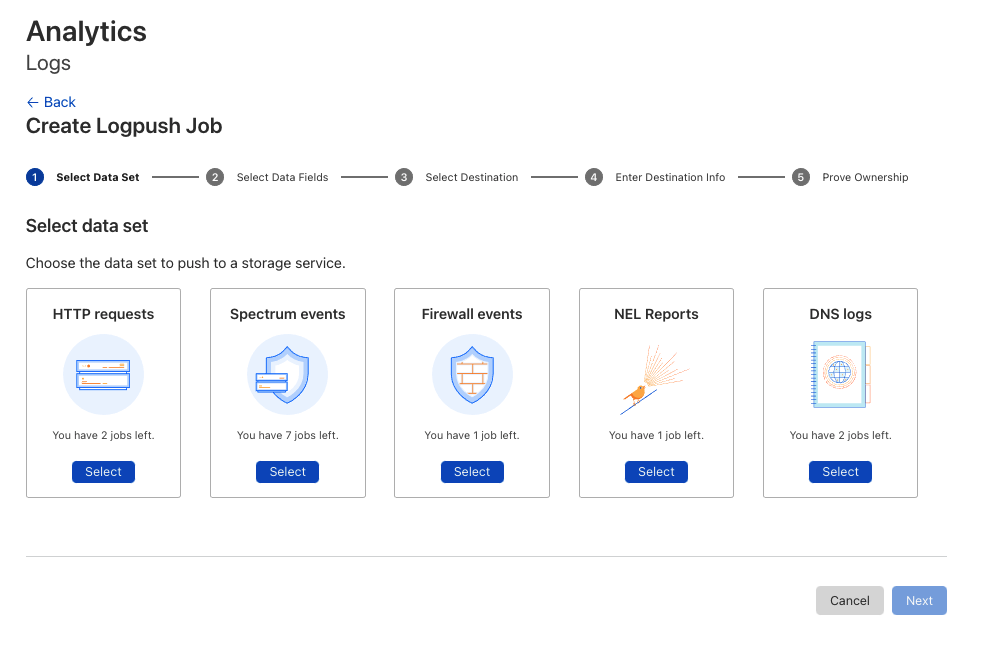
Today, our customers access logs using Logpull, Logpush, or Instant Logs. Logpull and Logpush are great for customers that want to send their logs to third parties (like our Analytics Partners) to store, analyze, and correlate with other data sources. With Instant Logs, our customers can monitor and troubleshoot their traffic in real-time straight from the dashboard or CLI. We’re planning on building out more capabilities to dig into logs on Cloudflare. We’re hard at work on building log storage on R2 – but what’s next?
We’ve heard from customers that the activity log on the Firewall analytics dashboard is incredibly useful. We want to continue to bring the power of logs to the dashboard by adding the same functionality across our products. For customers that will store their logs on Cloudflare R2, this means that we can minimize the use of sampled data.
If you’re looking for something very specific, querying logs is also important, which is where forensics comes in. The goal is to let you investigate from high level analytics all the way down to individual logs lines that make them up. Given a unique identifier, such as the ray ID, you should be able to look up a single request, and then correlate it with all other related activity. Find out the client IP of that ray ID and from there, use cases are plentiful: what other requests from this IP are malicious? What paths did the client follow?
Tracing
Logs are really useful, but they don’t capture the context around a request. Traces show the end-to-end life cycle of a request from when a user requests a resource to each of the systems that are involved in its delivery. They’re another way of applying forensics to help you find something very specific.
These are used to differentiate each part of the application to identify where errors or bottlenecks are occurring. Let’s say that you have a Worker that performs a fetch event to your origin and a third party API. Analytics can show you average execution times and error rates for your Worker, but it doesn’t give you visibility into each of these operations.
Using wrangler dev and console.log statements are really helpful ways to test and debug your code. They bring some of the visibility that’s needed, but it can be tedious to instrument your code like this.
As a developer, you should have the tools to understand what’s going on in your applications so you can deliver the best experience to your end users. We can help you answer questions like: Where is my Worker execution failing? Which operation is causing a spike in latency in my application?
Putting it all together
Notifications, analytics, logs, and tracing each have their distinct use cases, but together, these are powerful tools to provide analysts and developers visibility. Looking forward, we’re excited to bring more and more of these capabilities on the Cloudflare dashboard.
We would love to hear from you as we build these features out. If you’re interested in sharing use cases and helping shape our roadmap, contact your account team!
Over the past decade, the Internet has experienced a tectonic shift. It used to be composed of static websites: with text, images, and the occasional embedded movie. But the Internet has grown enormously. We now rely on API-driven applications to help with almost every aspect of life. Rather than just download files, we are able to engage with apps by exchanging rich data. We track workouts and send the results to the cloud. We use smart locks and all kinds of IoT devices. And we interact with our friends online.
This is all wonderful, but it comes with an explosion of complexity on the back end. Why? Developers need to manage APIs in order to support this functionality. They need to monitor and authenticate every single request. And because these tasks are so difficult, they’re usually outsourced to an API gateway provider.
Unfortunately, today’s gateways leave a lot to be desired. First: they’re not cheap. Then there’s the performance impact. And finally, there’s a data and privacy risk, since more than 50% of traffic reaches APIs (and is presumably sent through a third party gateway). What a mess.
Today we’re announcing the Cloudflare API Gateway. We’re going to completely replace your existing gateway at a fraction of the cost. And our solution uses the technology behind Workers, Bot Management, Access, and Transform Rules to provide the most advanced API toolset on the market.
What is API Gateway?
In short, it’s a package of features that will do everything for your APIs. We break it down into three categories:
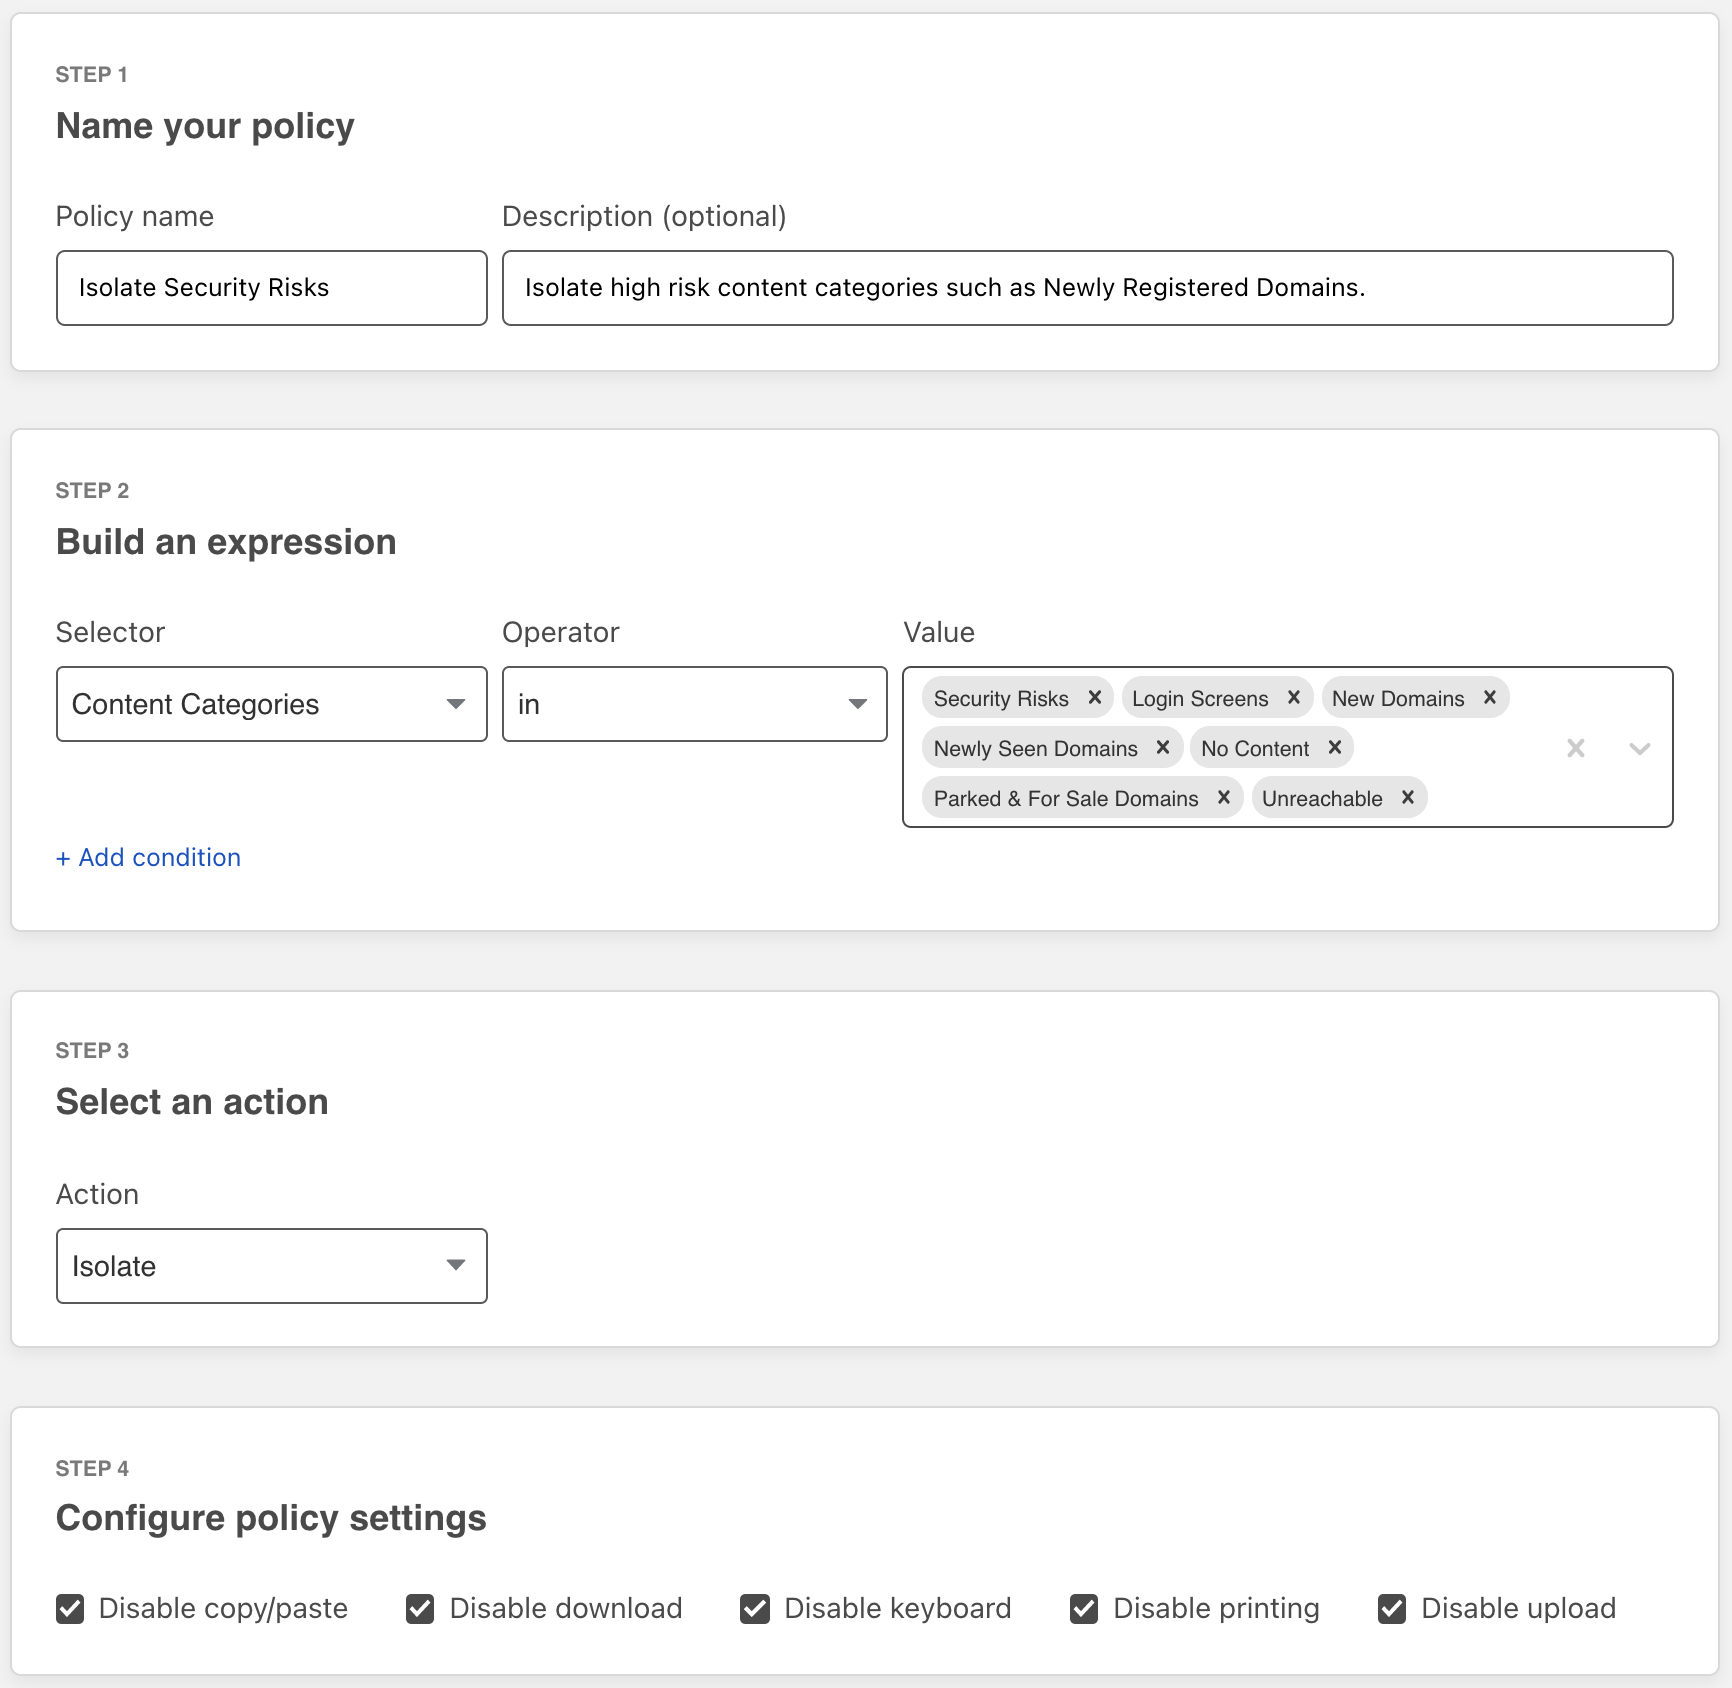
Security These are the products we have already blogged about. Tools like Discovery, Schema Validation, Abuse Detection, and more. We’ve spent a lot of time applying our security expertise to the world of APIs.
Management & Monitoring These are the foundational tools that keep your APIs in order. Some examples: analytics, routing, and authentication. We are already able to do these things with existing products like Cloudflare Access, and more features are on the way.
Everything Else These are the small (but crucial) items that keep everything running. Cloudflare already offers SSL/TLS termination, load balancing, and proxy services that can run by default.
Today’s blog post describes each feature in detail. We’re excited to announce that all the security features are now generally available, so let’s start by discussing those.
Discovery
Our customers are eager to protect their APIs. Unfortunately, they don’t always have these endpoints documented—or worse, they think everything is documented, but have unknowingly lost or modified endpoints. These hidden endpoints are sometimes called shadow APIs. We need to begin our journey with an exhaustive (and accurate) picture of API surface area.
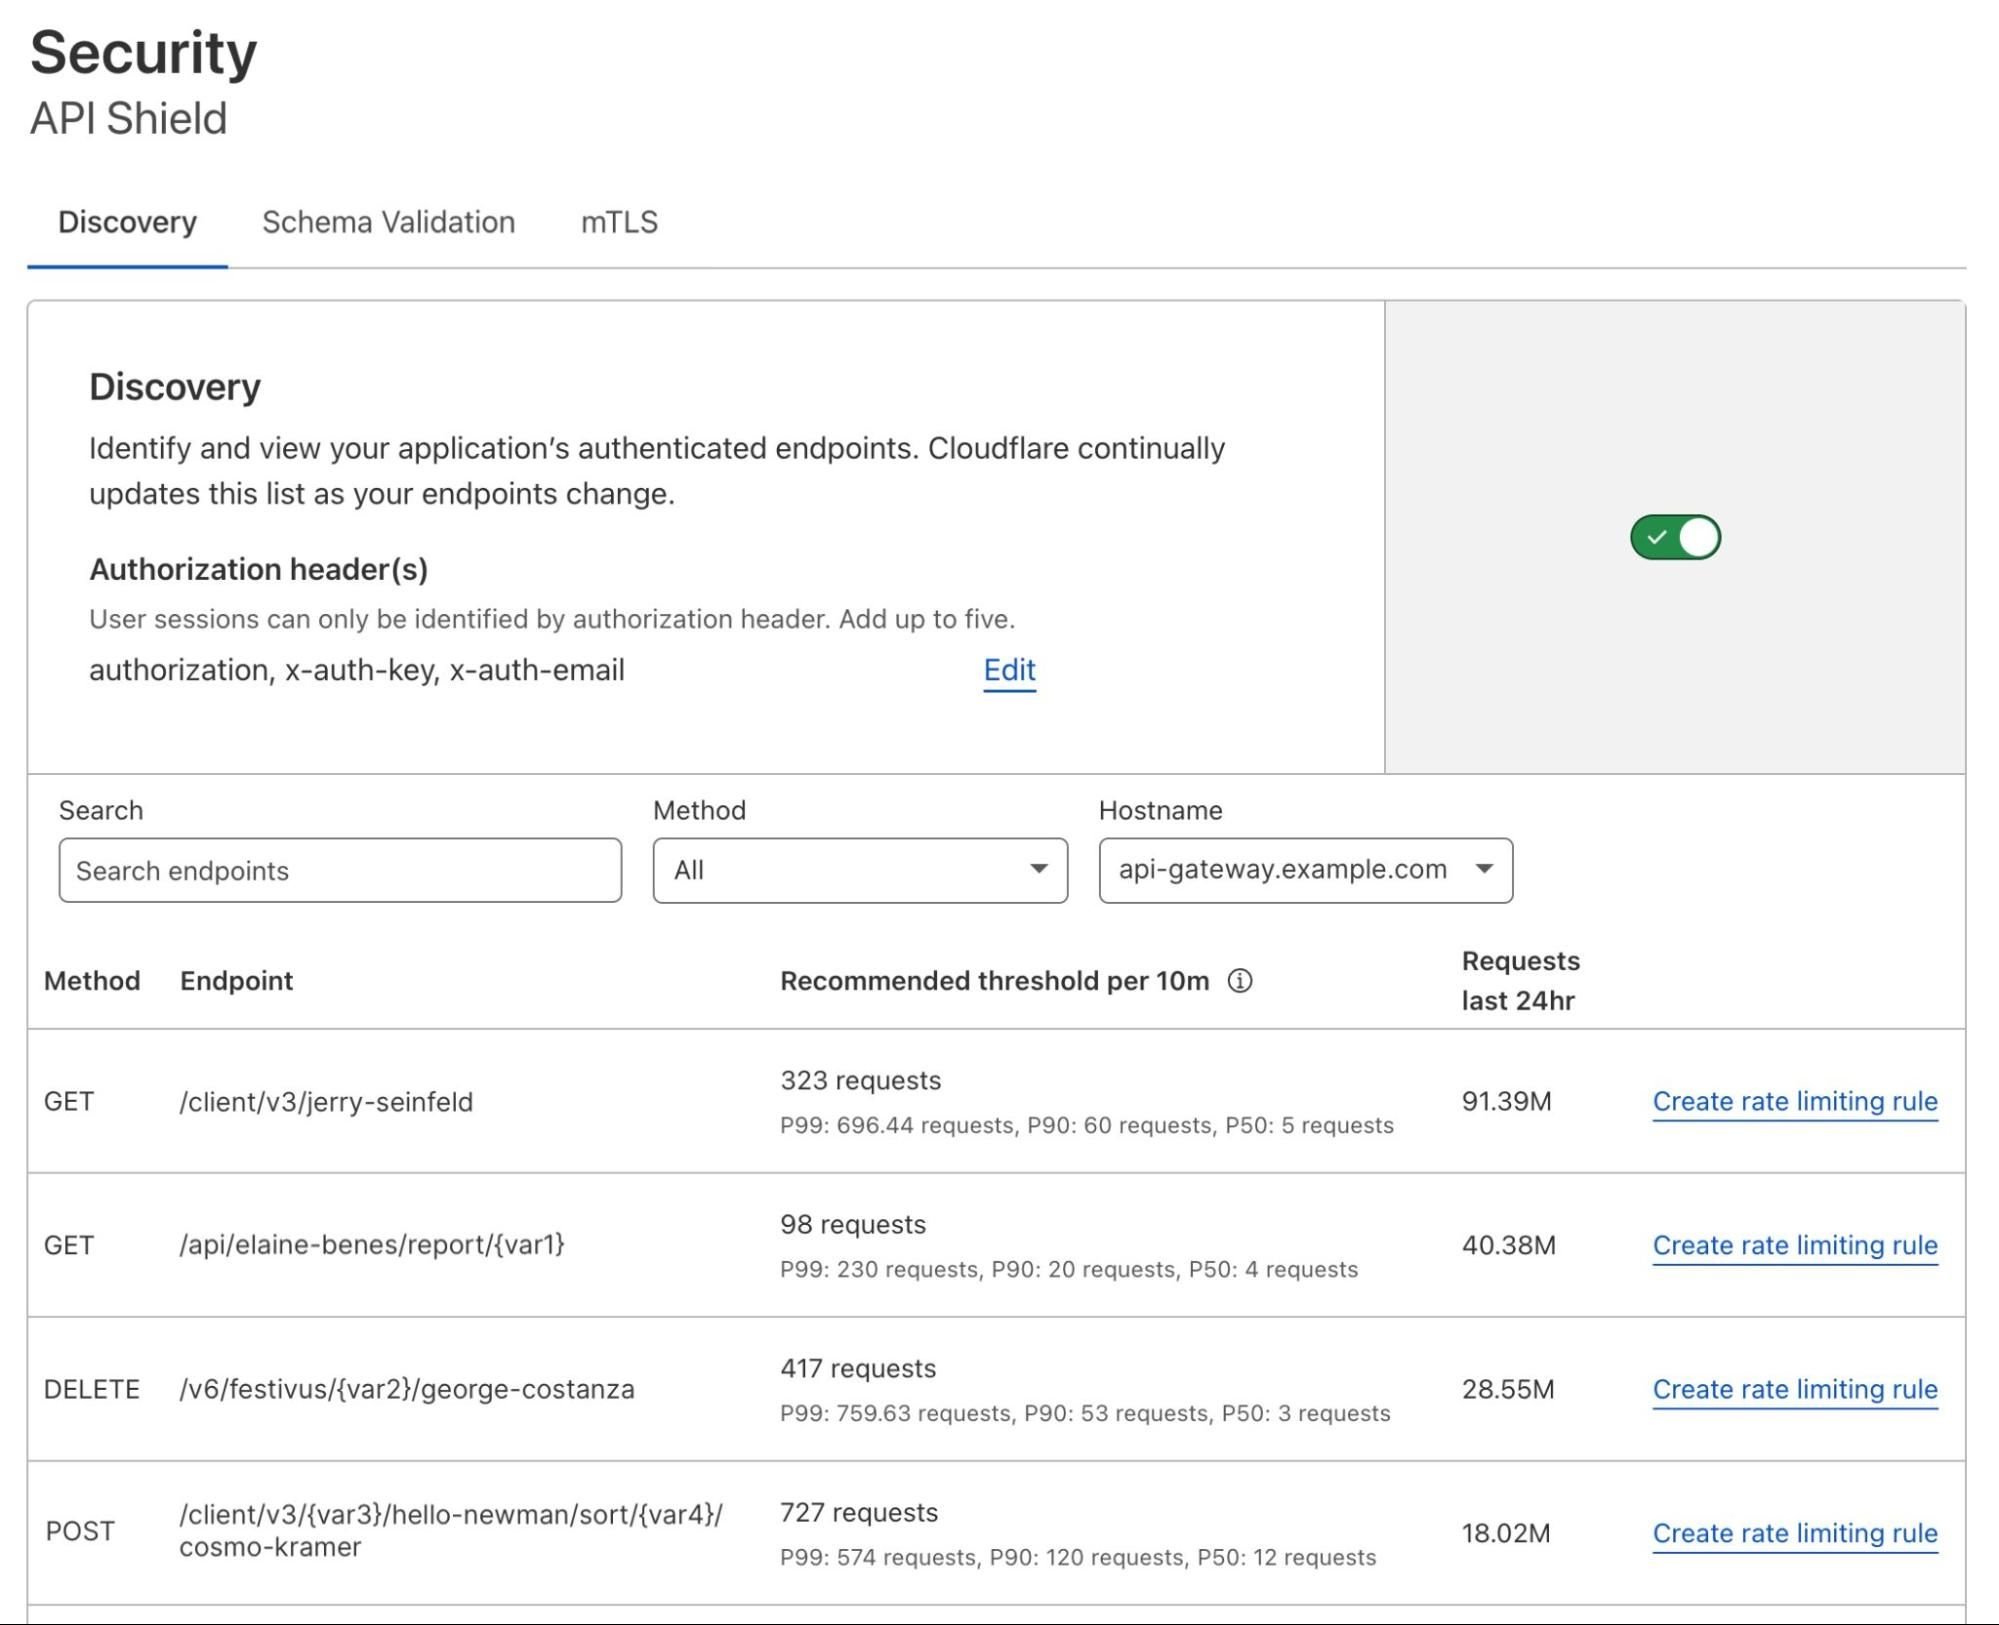
That’s where Discovery comes in. Head to the Cloudflare dashboard, select the Security tab, then choose “API Shield.” Activate the feature and tell us how you want to identify your API traffic. Most users provide a header (available today), but we can also use the request body or cookie (available soon).
We provide an exhaustive list of your API endpoints. Cloudflare lists each method, path, and additional metadata to help you understand your surface area. We even collapse endpoints that include variables (e.g., /account/217) to become generally applicable (e.g., /account/{var1}).
Discovery is a powerful countermeasure to entropy. Our customers often expect to find 30 endpoints, but are surprised to learn they have over 100 active endpoints.
Schema Validation
Perhaps you already have a schema for your API endpoints. A schema is like a template: it provides the paths, methods, and additional data you expect API requests to include. Many developers follow the OpenAPI standard to generate (and maintain) a schema.
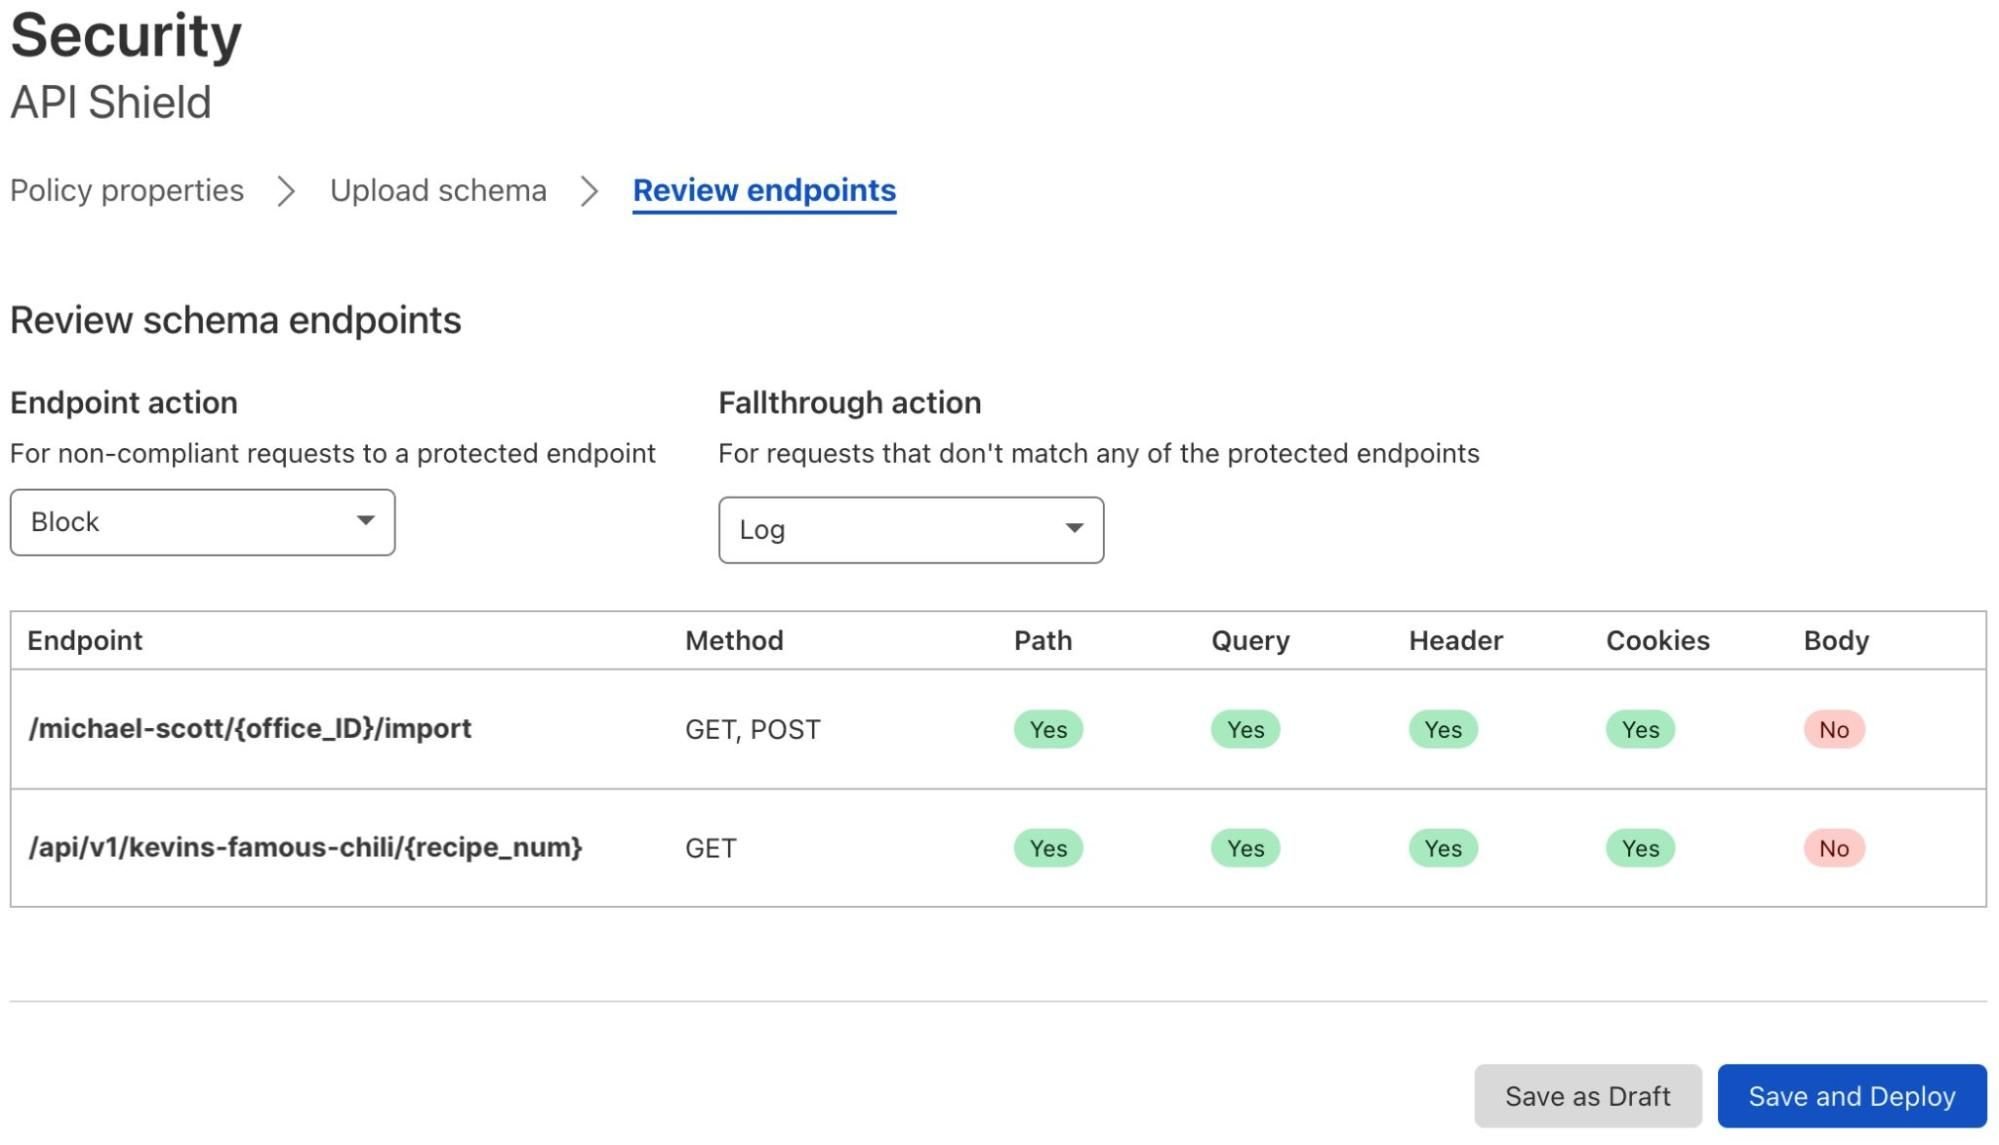
To harden your security, we can validate incoming traffic against this schema. This is a great way to stop basic attacks. Cloudflare will turn away nonconforming requests, discarding nonsense traffic that ignored the dress code. Simply upload your schema to the dashboard, select the actions you want to take, and deploy:
Schema Validation has already vetted traffic for some of the world’s largest crypto sites, delivery services, and payment platforms. It’s available now, and we’ll add body validation soon.
Abuse Detection
A robust security approach will use Schema Validation and Discovery in tandem, ensuring traffic matches the expected format. But what about abusive traffic that makes it through?
As Cloudflare discovers new API endpoints, we actually suggest rate limits for each one. That’s the role of Abuse Detection, and it opens the door to a more sophisticated kind of security.
Consider an API endpoint that returns weather updates. Specifically, the endpoint will return “yes” if it is likely to snow in the next hour, and “no” otherwise. Our algorithm might detect that the average user requests this data once every 10 minutes. A small group of scrapers, however, makes 37 requests per 10 minutes. Cloudflare automatically recommends a threshold in between, weighted to provide normal users with some breathing room. This would prevent abusive scraping services from fetching the weather too often.
We provide the option to create a rule using our new Advanced Rate Limiting engine. You can use cookies, headers, and more to tune thresholds. We’ve been using Abuse Detection to protect api.cloudflare.com for months now.
Our favorite part of this feature: it relies on the machine learning approach we use for Bot Management. Just another way our products can feed into (and benefit from) each other.
Abuse Detection is available now. If you’re interested in Sequential Abuse Detection, which we use to flag anomalous request flows, check out our previous blog post. The sequential piece is in early access, and we’re continuing to tune it before an official launch.
mTLS
Mutual TLS takes security to a new level. You can use certificates to validate incoming traffic as it reaches your APIs—which is especially useful for mobile and IoT devices. Moreover, this is an excellent positive security model that can (and should) be adopted for most device ecosystems.
As an example, let’s return to our weather API. Perhaps this service includes a second endpoint that receives the current temperature from a thermometer. But there’s a problem: anyone can make fake requests, providing inaccurate readings to the endpoint. To prevent this, use mTLS to install a client certificate on the legitimate thermometer, then let Cloudflare validate that certificate. Any other requests will be turned away. Problem solved!
We already offer a set of free certificates to every Cloudflare customer. That will continue. But starting today, API Gateway customers get unlimited certificates by default.
Authentication
Many modern APIs require authentication. In fact, authentication unlocks all sorts of capabilities—it allows sessions (with login), personal data exchange, and infrastructure efficiency. And of course, Cloudflare protects authenticated traffic as it passes through our network.
But with API Gateway, Cloudflare plays a more active role in authenticating traffic, helping to issue and validate the following:
API keys
JSON web tokens (JWT)
OAuth 2.0 tokens
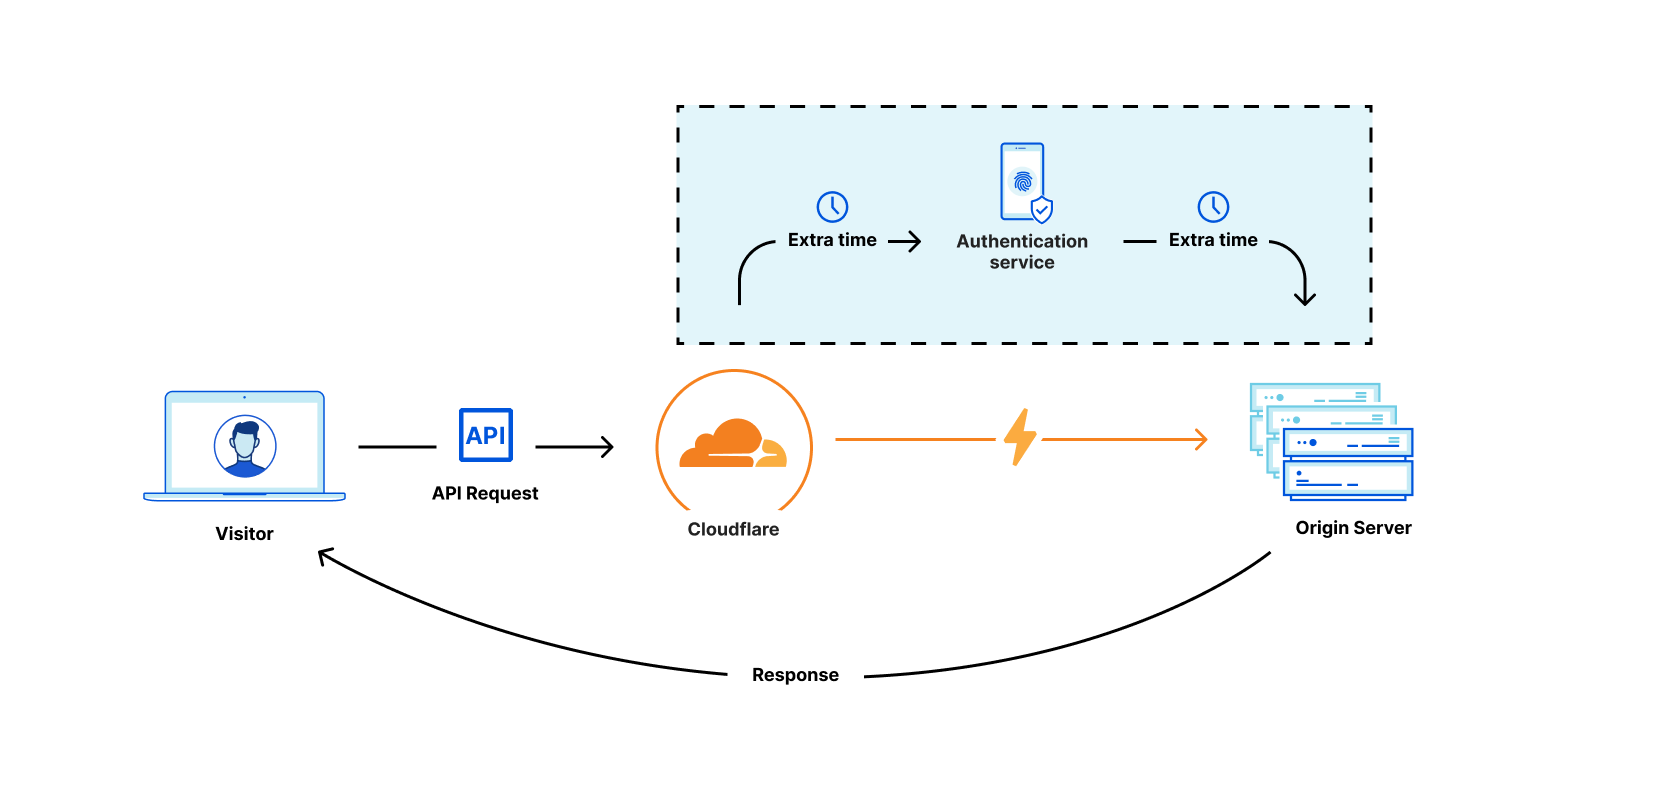
Using access control lists, we help you manage different user groups with varying permissions. And this matters—because your current provider is introducing tons of latency and unnecessary data exchange. If a request has to go somewhere outside the Cloudflare ecosystem, it’s traveling farther than it needs to:
Cloudflare can authenticate on our global network and handle requests in a fraction of the time. This kind of technology is difficult to implement, but we felt it was too important to ignore. How did we build it so quickly? Cloudflare Access. We took our experience working with identity providers and, once again, ported it over to the world of APIs. Our gateway includes unlimited authentication and token exchange. These features will be available soon.
Routing & Management
Let’s talk briefly about microservices. Modern applications are behemoths, so developers break them up into smaller chunks called “microservices.”
Consider an application that helps you book a hotel room. It might use a microservice to fetch available dates, another to fetch prices, and still another to fetch room types. Perhaps a different team manages each microservice, but they all need to be available from a single public entry point:
That single entry point—traditionally managed by an API gateway—is responsible for routing each request to the right microservice. Many of our customers have been paying standalone services to do this for years. That’s no longer necessary. We’ve built on our Transform Rules product to dynamically re-write and re-route at our edge. It’s easy to configure, fast to deploy, and natively built into API Gateway. Cloudflare can now be your API’s single point of entry.
That’s just the tip of the iceberg. API Gateway can actually replace your microservices through an integration with our Workers product. How? Consider writing a Worker that performs some action; perhaps return hotel prices, which are stored with Durable Objects on our network. With API Gateway, requests arrive at our network, are routed to the correct microservice with Transform Rules, and then are fully served with Workers (still on our network!). These Workers may contact your origin for additional information, where necessary.
Workers are faster, cheaper, and simpler than microservice alternatives. This integration will be available soon.
API Analytics
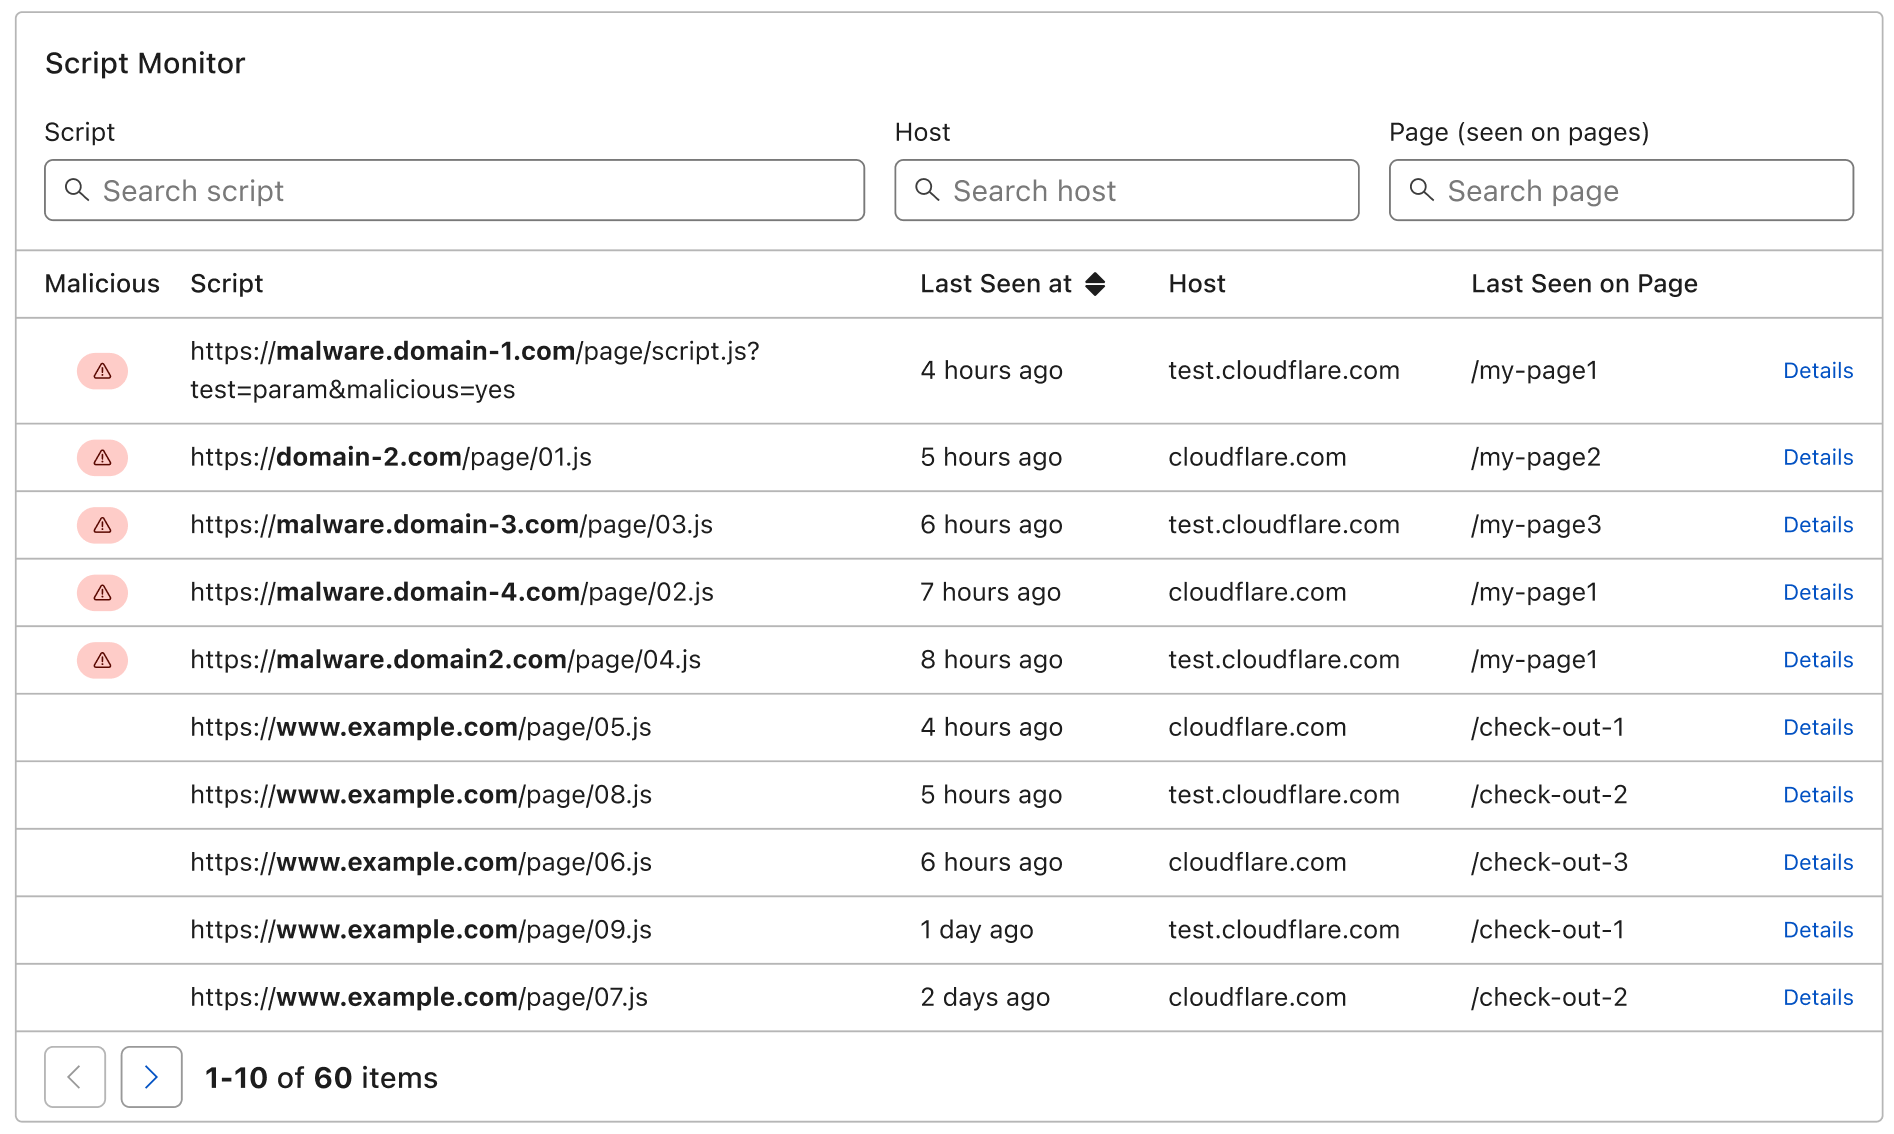
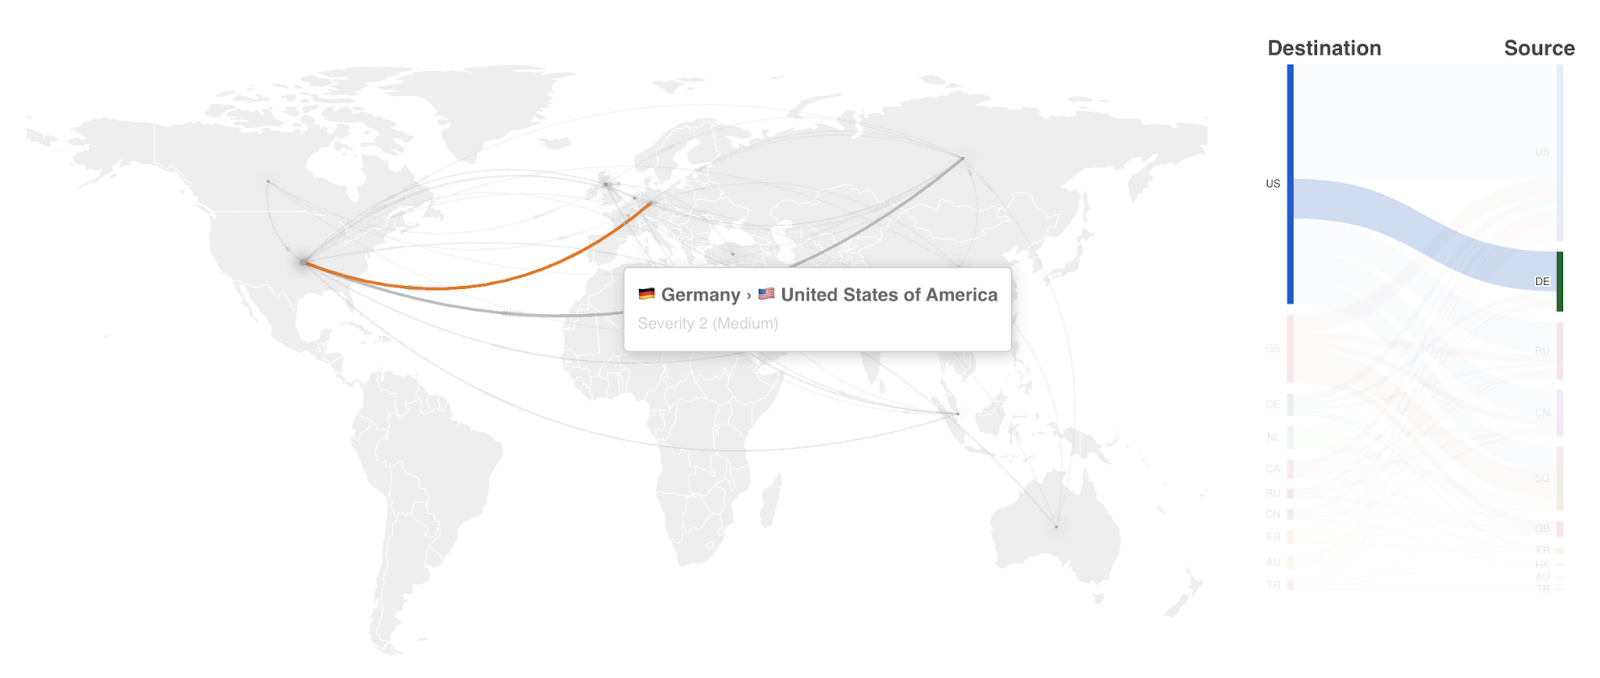
Customers tell us that seeing API traffic is sometimes more important than even acting on it. In fact, this trend isn’t specific to APIs. We published another blog today that explores how one customer uses our bot intelligence to passively log information about threats.
With API Analytics, we’ve drawn on our other products to show useful data in real time. You can view popular endpoints, filter by ML-driven insights, see histograms of abuse thresholds, and capture trends.
API Analytics will be available soon. When this happens, you’ll also be able to export custom reports and share insights within your organization.
Logging, Quota Management, and More
All of our established features, like caching, load balancing, and log integrations work natively with API Gateway. These shouldn’t be overlooked as primitive gateway features; they’re essential. And because Cloudflare performs all of these functions in the same place, you get the latency benefits without having to do a thing.
We are also expanding our Enterprise Logs functionality to perform real-time logging. If you choose to authenticate on Cloudflare’s network, you can view detailed logs of each user who has accessed an API. Similarly, we keep track of each request’s lifespan as it is received, validated, routed, and responded to. Everything is logged.
Finally, we are building Quota Management, a feature that counts API requests over a longer period of time (like a month) and allows you to manage thresholds for your users. We’ve also launched Advanced Rate Limiting to help with more sophisticated cases (including body inspection for GraphQL).
Conclusion
Our API security features—Discovery, Schema Validation, Abuse Detection, and mTLS—are available now! We call these features API Shield because they form the shield that protects the remaining gateway functions. Enterprise customers can ask their account teams for access today.
Many of the other portions of API Gateway are now in early access. According to Gartner®, “by 2025, less than 50% of enterprise APIs will be managed, as explosive growth in APIs surpasses the capabilities of API management tools.” Our goal is to offer an affordable gateway that will fight this trend. If you have a specific feature you want to test, let your account team know, so we can onboard you as soon as possible.
Source: Gartner, “Predicts 2022: APIs Demand Improved Security and Management”, Shameen Pillai, Jeremy D’Hoinne, John Santoro, Mark O’Neill, Sham Gill, 6 December 2021. GARTNER is a registered trademark and service mark of Gartner, Inc. and/or its affiliates in the U.S. and internationally and is used herein with permission. All rights reserved.
When someone mentions bots on the Internet, what’s your first reaction?
It’s probably negative. Most of us conjure up memories of CAPTCHAs, stolen passwords, or some other pain caused by bad bots.
But the truth is, there are plenty of well-behaved bots on the Internet. These include Google’s search crawler and Stripe’s payment bot. At Cloudflare, we manually “verify” good bots, so they don’t get blocked. Our customers can choose to allowlist any bot that is verified. Unfortunately, new bots are popping up faster than we can verify them. So today we’re announcing a solution: Friendly Bots.
Let’s begin with some background.
How does a bot get verified?
We often find good bots via our public form. Anyone can submit a bot, but we prefer that bot operators complete the form to provide us with the information we need. We ask for some standard bits of information: your bot’s name, its public documentation, and its user agent (or regex). Then, we ask for information that will help us validate your bot. There are four common methods:
IP list Send us a list of IP addresses used by your bot. This doesn’t have to be a static list — you can give us a dynamic page that changes — just provide us with the URL, and we’ll fetch updates every day. These IPs must be publicly documented and exclusive to your bot. If you provide a shared IP address (like one used by a proxy service), our systems will detect risk and refuse to cooperate. We want to avoid accidentally allowing other traffic.
rDNS This one is fun. You’ve heard of DNS: the phone book of the Internet, which helps map domain names to IP addresses. rDNS works in the reverse, allowing us to take an IP address and deduce the domain name associated with it.
In other words: give us a hostname suffix, and in many cases we’ll be able to validate your bot’s identity!
User agent + ASN validation In some cases, we can verify bots that consistently come from the same network (known as an “ASN”) with the same user agent. Note that we can’t always do this — traffic becomes easier to spoof — but we’re often confident enough to use this as a validation method.
Machine learning This is the most flashy method. Cloudflare sees 32+ million requests every second, and we’ve been able to feed those requests into a model that can accurately profile good bots. If the previous validation methods don’t work for you, there’s a good chance we can use ML to spot your bot. But we need enough traffic (thousands of requests) to detect a usable pattern.
We usually approve Verified Bot requests within a few weeks, after taking some time to quality test and ensure everything is safe. But as mentioned before, we often have to reserve this process for trusted partners and larger bots, even though plenty of our users still need their bots allowlisted.
What if my bot isn’t a huge global service?
We keep our ears open (and our eyes on Twitter), so we know that folks want their own “personal” version of Verified Bots.
For example: let’s say you built your own monitoring service that crawls a few of your personal websites. It doesn’t make sense for us to verify this bot, because it doesn’t meet any of our criteria:
It’s your bot (and to you, it might be good!), but our other users might feel differently. Imagine if someone else’s bot could waltz into your infrastructure at any time!
Here’s another case. Perhaps Cloudflare has labeled a particular proxy as automated, possibly because a mix of humans and bots use the proxy to access the Internet. You may want to allow this traffic on your site without affecting other Cloudflare customers.
Lastly, if you work at a startup, your company may run automated services that haven’t reached the scale we require. But you still need a way to allowlist these services.
Announcing Friendly Bots
The bots described above, especially common services, are not bad. They deserve to sit in a state between bad and verified. They’re friendly.
And we’ve come up with a really cool way to help you manage them.
Our new feature, Friendly Bots, allows you to instantly auto-validate any traffic with the help of IP lists, rDNS, and more.
Here’s how it works: in the Cloudflare dashboard, tell us about your bot. You can point us toward a public IP list, give us a hostname suffix, or even select other methods like machine learning. Cloudflare’s anycast network allows us to run all of these mechanisms at each one of our data centers. This means you’ll have performant, secure, and scalable bot verification.
Build a collection of Friendly Bots and share them between your sites, creating custom policies that allow, rate limit, or log this type of traffic. You may just want to keep tabs on a particular bot; that’s fine. The response options are flexible and directly integrate with our Workers platform.
In the past, we’ve struggled to verify bots that did not crawl the web at a large scale. Why? Our system relies on a cache of verified traffic, ensuring that certain IPs or other data have widely shown good behavior on the Internet. This means that bots were sometimes difficult to verify if they did not make thousands of requests to Cloudflare. With Friendly Bots, we’ve eliminated that requirement, introducing a new, dynamic cache that optimizes for fun-sized projects.
The downstream benefits
Friendly Bots will streamline your dashboard experience. But there are a few hidden, downstream benefits we want to highlight:
Easier verification Admittedly, it’s challenging to keep up with all the good bots on the Internet. In order to verify a bot, we’ve relied on manual submissions that may come weeks, or even months after a good bot is created. Friendly Bots will change all of that. If we notice many of our customers allowlisting a particular bot — say, a certain IP address or hostname suffix, our systems will automatically queue that bot for verification. We can intelligently use your Friendly Bots to help the rest of Cloudflare’s customers.
Instant feedback In the past, users have been confused by the verification process. Do I need to provide documentation for my IPs? What about my user agent: can it change over time? If any piece of the validation data was broken, it could take us weeks to identify and fix.
That’s no longer the case. With Friendly Bots, we perform validation almost instantly. So if something isn’t right — perhaps your rDNS validation uses the wrong hostname — you’ll know immediately because the bot won’t be allowlisted. No more waiting to hear from our support team.
Better sourcing Previously, we required bot operators (e.g., Google) to submit verification data themselves. If there was a bot you wanted to verify, but did not own, you were out of luck.
Friendly Bots eliminates this dependency on bot operators. Anyone who can find identifying information can register a bot on their site.
No arbitration If a scraper shows up to your site, is that a good thing? To some, yes, because it’s exposure. To others, no, because that scraper may take data. This is a question we’ve carefully considered with every Verified Bots submission to date.
Now: it’s your choice to make. Friendly Bots puts the control in your hands, allowing you to categorize bots at a domain level. We’ll continue to verify bots at a global level (when behavior is objectively good).
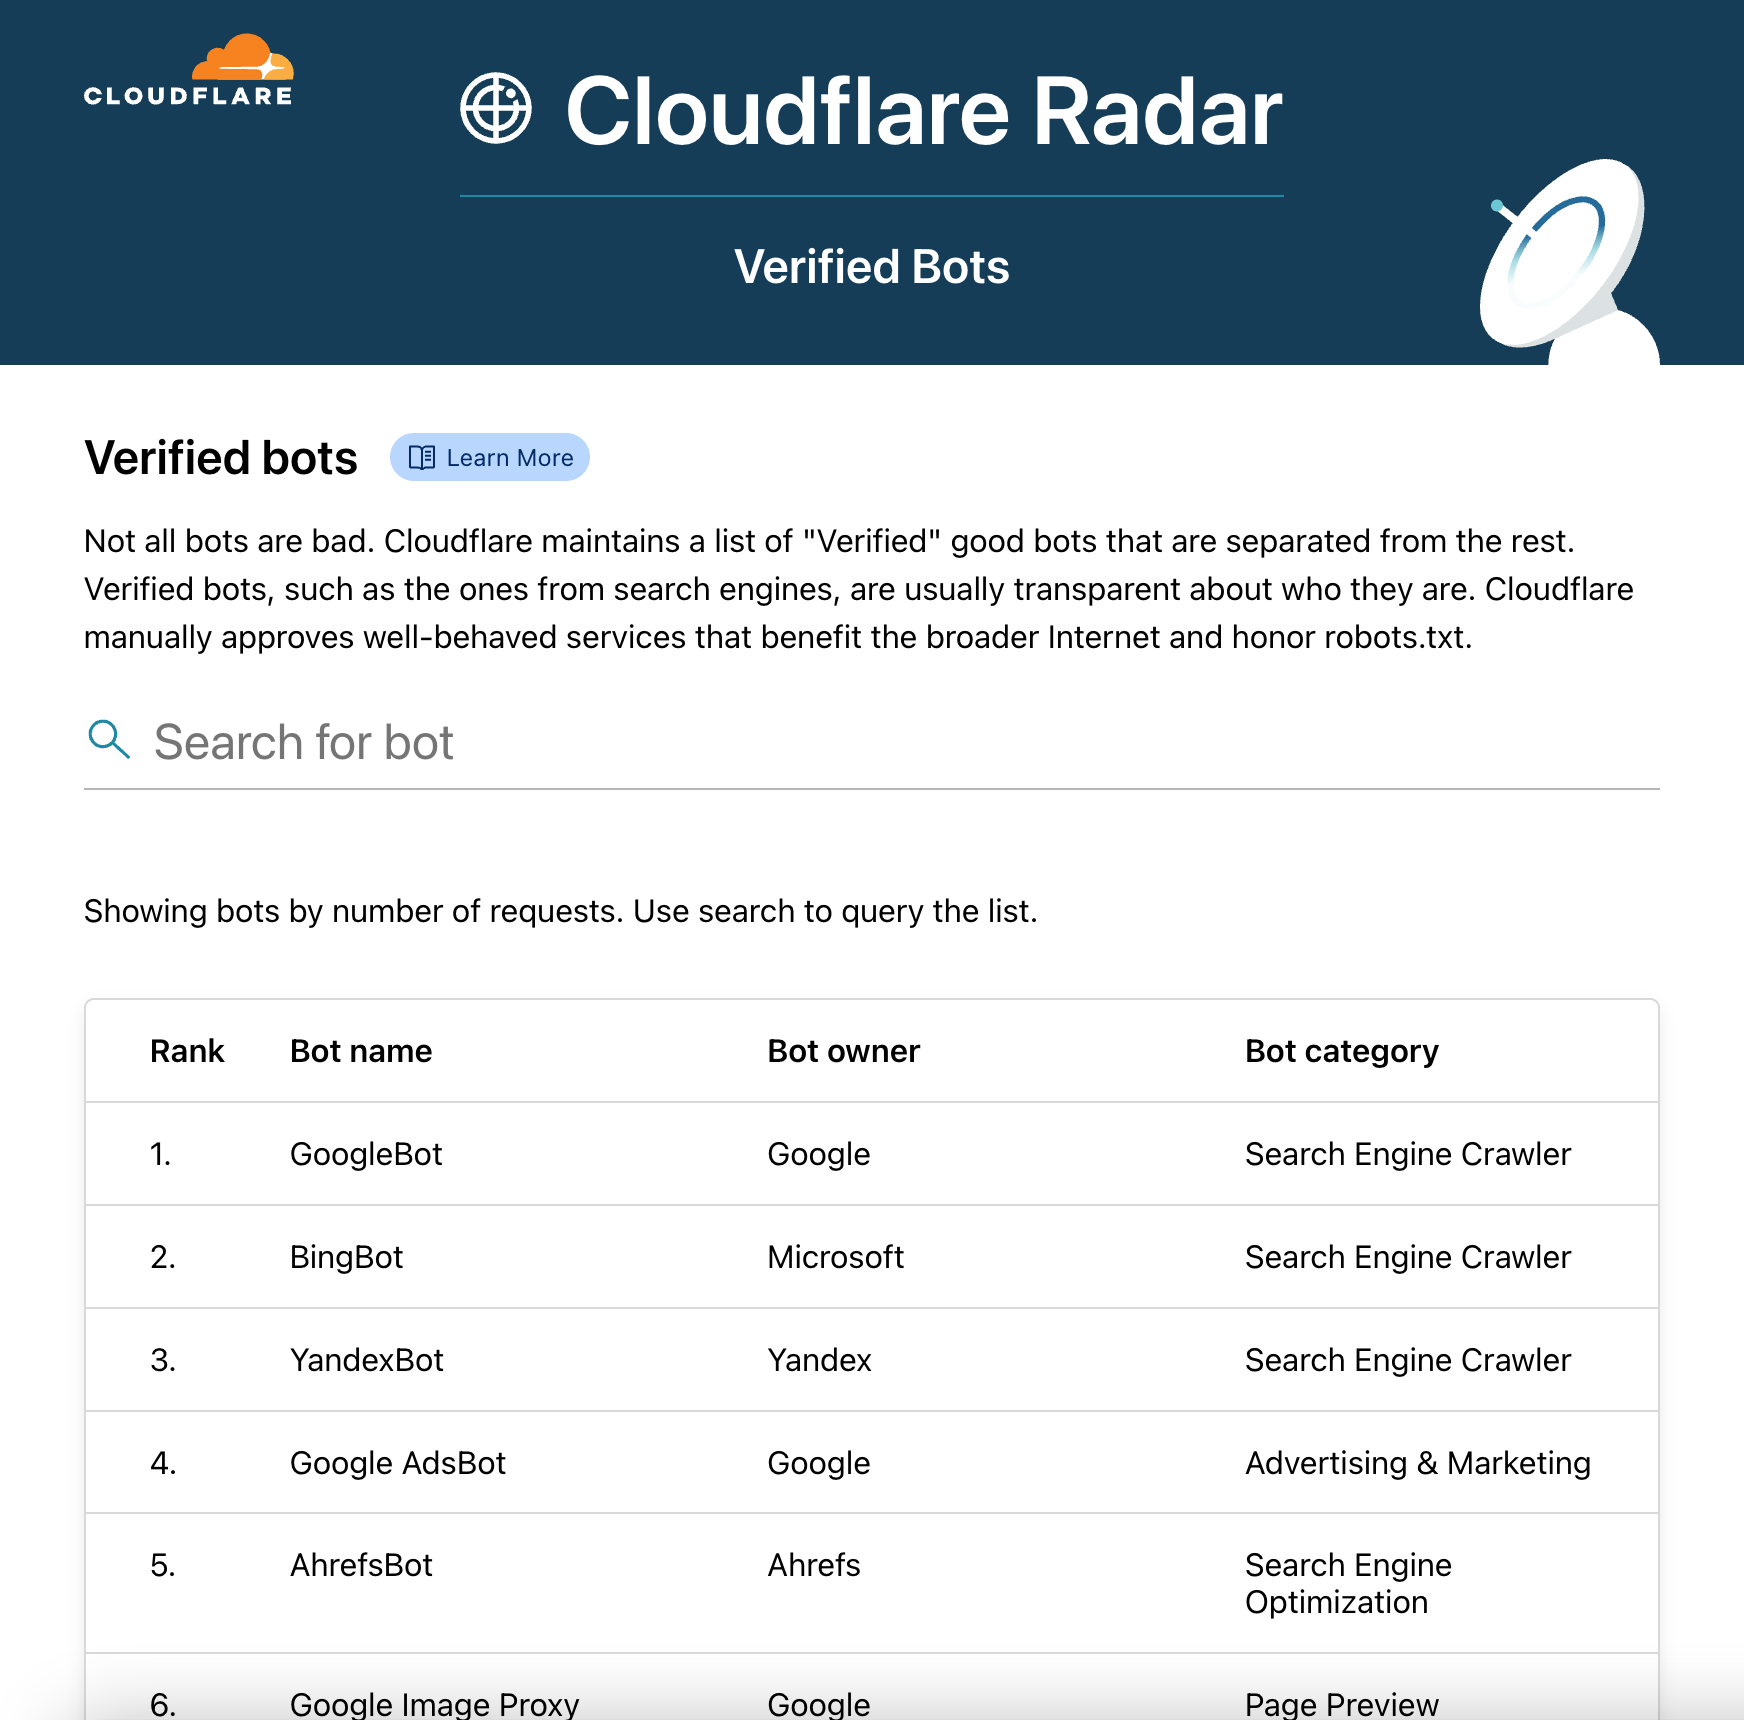
Cloudflare Radar
Here’s a fun bonus: in addition to today’s Friendly Bots announcement, we’re also making some changes to Cloudflare Radar.
Beginning immediately, you can see a list of many Verified Bots in Radar. This is exciting; we’ve never published a detailed list like this before.
All data is updated in real time. As we verify new bots, they will appear here in the Radar module.
We’re also beginning to add specific Verified Bots to our Logs product. You’ll see them as Bot Tags, so a request might include the string “pinterest” if it came from Pinterest’s bot.
What’s next?
Our team is excited to launch Friendly Bots soon. We anticipate the impact will radiate throughout Bot Management, reducing false positives, improving crawl-ability, and generally stabilizing sites.
If you have Bot Management and want to give this new feature a try, please tell your account team (and we’ll be sure to include you in the early access period). You can also continue to tell us about bots that should be verified.
At Cloudflare, we pride ourselves in giving every customer the ability to provision a TLS certificate for their Internet application — for free. Today, we are responsible for managing the certificate lifecycle for almost 45 million certificates from issuance to deployment to renewal. As we build out the most resilient, robust platform, we want it to be “future-proof” and resilient against events we can’t predict.
Events that cause us to re-issue certificates for our customers, like key compromises, vulnerabilities, and mass revocations require immediate action. Otherwise, customers can be left insecure or offline. When one of these events happens, we want to be ready to mitigate impact immediately. But how?
By having a backup certificate ready to deploy — wrapped with a different private key and issued from a different Certificate Authority than the primary certificate that we serve.
Events that lead to certificate re-issuance
Cloudflare re-issues certificates every day — we call this a certificate renewal. Because certificates come with an expiration date, when Cloudflare sees that a certificate is expiring soon, we initiate a new certificate renewal order. This way, by the time the certificate expires, we already have an updated certificate deployed and ready to use for TLS termination.
Unfortunately, not all certificate renewals are initiated by the expiration date. Sometimes, unforeseeable events like key compromises can lead to certificate renewals. This is because a new key needs to be issued, and therefore a corresponding certificate does as well.
Key Compromises
A key compromise is when an unauthorized person or system obtains the private key that is used to encrypt and decrypt secret information — security personnel’s worst nightmare. Key compromises can be the result of a vulnerability, such as Heartbleed, where a bug in a system can cause the private key to be leaked. They can also be the result of malicious actions, such as a rogue employee accessing unauthorized information. In the event of a key compromise, it’s crucial that (1) new private keys are immediately issued, (2) new certificates are deployed, and (3) the old certificates are revoked.
The Heartbleed Vulnerability
In 2014, the Heartbleed vulnerability was exposed. It allowed attackers to extract the TLS certificate private key for any server that was running the affected version of OpenSSL, a popular encryption library. We patched the bug and then as a precaution, quickly reissued private keys and TLS certificates belonging to all of our customers, even though none of our keys were leaked. Cloudflare’s ability to act quickly protected our customers’ data from being exposed.
Heartbleed was a wake-up call. At the time, Cloudflare’s scale was a magnitude smaller. A similar vulnerability at today’s scale would take us weeks, not hours to re-issue all of our customers certificates.
Now, with backup certificates, we don’t need to worry about initiating a mass re-issuance in a small time frame. Instead, customers will already have a certificate that we’ll be able to instantly deploy. Not just that, but the backup certificate will also be wrapped with a different key than the primary certificate, preventing it from being impacted by a key compromise.
Key compromises are one of the main reasons certificates need to be re-issued at scale. But other events can prompt re-issuance as well, including mass revocations by Certificate Authorities.
Mass Revocations from CAs
Today, the Certificate Authority/Browser Forum (CA/B Forum) is the governing body that sets the rules and standards for certificates. One of the Baseline Requirements set by the CA/B Forum states that Certificate Authorities are required to revoke certificates whose keys are at risk of being compromised within 24 hours. For less immediate issues, such as certificate misuse or violation of a CA’s Certificate Policy, certificates need to be revoked within five days. In both scenarios, certificates will be revoked by the CA in a short timeframe and immediate re-issuance of certificates is required.
While mass revocations aren’t commonly initiated by CAs, there have been a few occurrences throughout the last few years. Recently, Let’s Encrypt had to revoke roughly 2.7 million certificates when they found a non-compliance in their implementation of a DCV challenge. In this case, Cloudflare customers were unaffected.
Another time, one of the Certificate Authorities that we use found that they were renewing certificates based on validation tokens that did not comply with the CA/B Forum standards. This caused them to invoke a mass revocation, impacting about five thousand Cloudflare-managed domains. We worked with our customers and the CA to issue new certificates before the revocation, resulting in minimal impact.
We understand that mistakes happen, and we have been lucky enough that as these issues have come up, our engineering teams were able to mitigate quickly so that no customers were impacted. But that’s not enough: our systems need to be future-proof so that a revocation of 45 million certificates will have no impact on our customers. With backup certificates, we’ll be ready for a mass re-issuance, no matter the scale.
To be resilient against mass revocations initiated by our CAs, we are going to issue every backup certificate from a different CA than the primary certificate. This will add a layer of protection if one of our CAs will have to invoke a mass revocation — something that when initiated, is a ticking time bomb.
Challenges when Renewing Certificates
Scale: With great power, comes great responsibility
When the Heartbleed vulnerability was exposed, we had to re-issue about 100,000 certificates. At the time, this wasn’t a challenge for Cloudflare. Now, we are responsible for tens of millions of certificates. Even if our systems are able to handle this scale, we rely on our Certificate Authority partners to be able to handle it as well. In the case of an emergency, we don’t want to rely on systems that we do not control. That’s why it’s important for us to issue the certificates ahead of time, so that during a disaster, all we need to worry about is getting the backup certificates deployed.
Manual intervention for completing DCV
Another challenge that comes with re-issuing certificates is Domain Control Validation (DCV). DCV is a check used to validate the ownership of a domain before a Certificate Authority can issue a certificate for it. When customers onboard to Cloudflare, they can either delegate Cloudflare to be their DNS provider, or they can choose to use Cloudflare as a proxy while maintaining their current DNS provider.
When Cloudflare acts as the DNS provider for a domain, we can add Domain Control Validation (DCV) records on our customer’s behalf. This makes the certificate issuance and renewal process much simpler.
Domains that don’t use Cloudflare as their DNS provider — we call them partial zones — have to rely on other methods for completing DCV. When those domains proxy their traffic through us, we can complete HTTP DCV on their behalf, serving the HTTP DCV token from our Edge. However, customers that want their certificate issued before proxying their traffic need to manually complete DCV. In an event where Cloudflare has to re-issue thousands or millions of certificates, but cannot complete DCV on behalf of the customer, manual intervention will be required. While completing DCV is not an arduous task, it’s not something that we should rely on our customers to do in an emergency, when they have a small time frame, with high risk involved.
This is where backup certificates come into play. From now on, every certificate issuance will fire two orders: one for a certificate from the primary CA and one for the backup certificate. When we can complete the DCV on behalf of the customer, we will do so for both CAs.
Today, we’re only issuing backup certificates for domains that use Cloudflare as an Authoritative DNS provider. In the future, we’ll order backup certificates for partial zones. That means that for backup certificates for which we are unable to complete DCV, we will give customers the corresponding DCV records to get the certificate issued.
Backup Certificates Deployment Plan
We are happy to announce that Cloudflare has started deploying backup certificates on Universal Certificate orders for Free customers that use Cloudflare as an Authoritative DNS provider. We have been slowly ramping up the number of backup certificate orders and in the next few weeks, we expect every new Universal certificate pack order initiated on a Free, Pro, or Biz account to include a backup certificate, wrapped with a different key and issued from a different CA than the primary certificate.
At the end of April we will start issuing backup certificates for our Enterprise customers. If you’re an Enterprise customer and have any questions about backup certificates, please reach out to your Account Team.
Next Up: Backup Certificates for All
Today, Universal certificates make up 72% of the certificates in our pipeline. But we want full coverage! That’s why our team will continue building out our backup certificates pipeline to support Advanced Certificates and SSL for SaaS certificates. In the future, we will also issue backup certificates for certificates that our customers upload themselves, so they can have a backup they can rely on.
In addition, we will continue to improve our pipeline to make the deployment of backup certificates instantaneous — leaving our customers secure and online in an emergency.
At Cloudflare, our mission is to help build a better Internet. With backup certificates, we’re helping build a secure, reliable Internet that’s ready for any disaster. Interested in helping us out? We’re hiring.
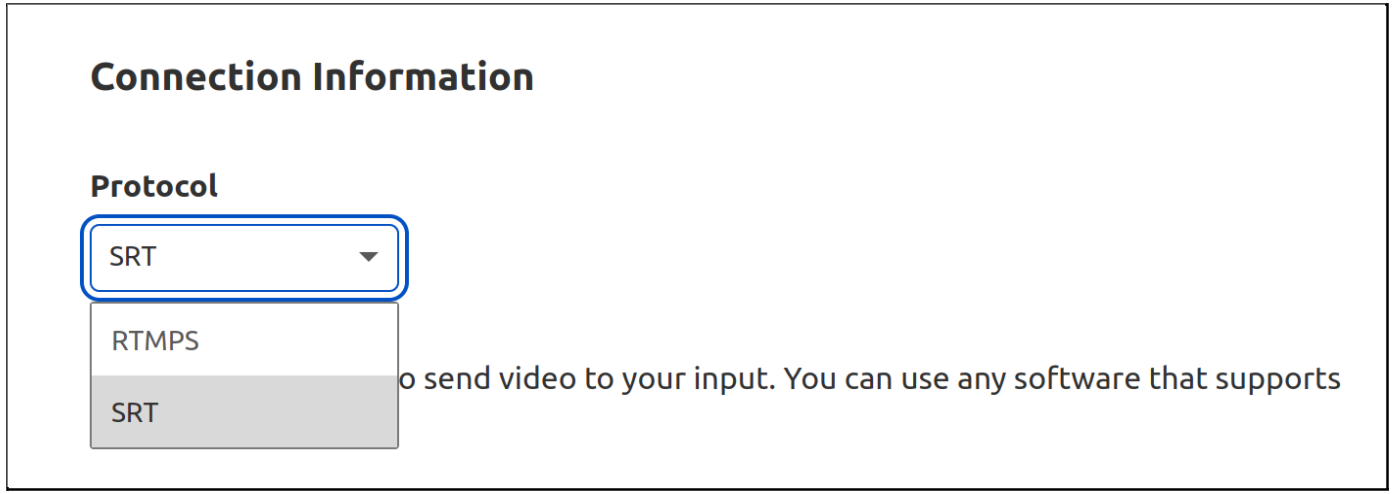
SRT is a new and modern live video transport protocol. It features many improvements to the incumbent popular video ingest protocol, RTMP, such as lower latency, and better resilience against unpredictable network conditions on the public Internet. SRT supports newer video codecs and makes it easier to use accessibility features such as captions and multiple audio tracks. While RTMP development has been abandoned since at least 2012, SRT development is maintained by an active community of developers.
We don’t see RTMP use going down anytime soon, but we can do something so authors of new broadcasting software, as well as video streaming platforms, can have an alternative.
Starting today, in open beta, you can use Stream Connect as a gateway to translate SRT to RTMP or RTMP to SRT with your existing applications. This way, you can get the last-mile reliability benefits of SRT and can continue to use the RTMP service of your choice. It’s priced at $1 per 1,000 minutes, regardless of video encoding parameters.
You can also use SRT to go live on Stream Live, our end-to-end live streaming service to get HLS and DASH manifest URLs from your SRT input, and do simulcasting to multiple platforms whether you use SRT or RTMP.
Stream’s SRT and RTMP implementation supports adding or removing RTMP or SRT outputs without having to restart the source stream, scales to tens of thousands of concurrent video streams per customer and runs on every Cloudflare server in every Cloudflare location around the world.
Go live like it’s 2022
When we first started developing live video features on Cloudflare Stream earlier last year we had to decide whether to reimplement an old and unmaintained protocol, RTMP, or focus on the future and start off fresh by using a modern protocol. If we launched with RTMP, we would get instant compatibility with existing clients but would give up features that would greatly improve performance and reliability. Reimplementing RTMP would also mean we’d have to handle the complicated state machine that powers it, demux the FLV container, parse AMF and even write a server that sends the text “Genuine Adobe Flash Media Server 001” as part of the RTMP handshake.
Even though there were a few new protocols to evaluate and choose from in this project, the dominance of RTMP was still overwhelming. We decided to implement RTMP but really don’t want anybody else to do it again.
Eliminate head of line blocking
A common weakness of TCP when it comes to low latency video transfer is head of line blocking. Imagine a camera app sending videos to a live streaming server. The camera puts every frame that is captured into packets and sends it over a reliable TCP connection. Regardless of the diverse set of Internet infrastructure it may be passing through, TCP makes sure all packets get delivered in order (so that your video frames don’t jump around) and reliably (so you don’t see any parts of the frame missing). However, this type of connection comes at a cost. If a single packet is dropped, or lost in the network somewhere between two endpoints like it happens on mobile network connections or wifi often, it means the entire TCP connection is brought to a halt while the lost packet is found and re-transmitted. This means that if one frame is suddenly missing, then everything that would come after the lost video frame needs to wait. This is known as head of line blocking.
RTMP experiences head of line blocking because it uses a TCP connection. Since SRT is a UDP-based protocol, it does not experience head of line blocking. SRT features packet recovery that is aware of the low-latency and high reliability requirements of video. Similar to QUIC, it achieves this by implementing its own logic for a reliable connection on top of UDP, rather than relying on TCP.
SRT solves this problem by waiting only a little bit, because it knows that losing a single frame won’t be noticeable by the end viewer in the majority of cases. The video moves on if the frame is not re-transmitted right away. SRT really shines when the broadcaster is streaming with less-than-stellar Internet connectivity. Using SRT means fewer buffering events, lower latency and a better overall viewing experience for your viewers.
RTMP to SRT and SRT to RTMP
Comparing SRT and RTMP today may not be that useful for the most pragmatic app developers. Perhaps it’s just another protocol that does the same thing for you. It’s important to remember that even though there might not be a big improvement for you today, tomorrow there will be new video use cases that will benefit from a UDP-based protocol that avoids head of line blocking, supports forward error correction and modern codecs beyond H.264 for high-resolution video.
Switching protocols requires effort from both software that sends video and software that receives video. This is a frustrating chicken-or-the-egg problem. A video streaming service won’t implement a protocol not in use and clients won’t implement a protocol not supported by streaming services.
Starting today, you can use Stream Connect to translate between protocols for you and deprecate RTMP without having to wait for video platforms to catch up. This way, you can use your favorite live video streaming service with the protocol of your choice.
Stream is useful if you’re a live streaming platform too! You can start using SRT while maintaining compatibility with existing RTMP clients. When creating a video service, you can have Stream Connect to terminate RTMP for you and send SRT over to the destination you intend instead.
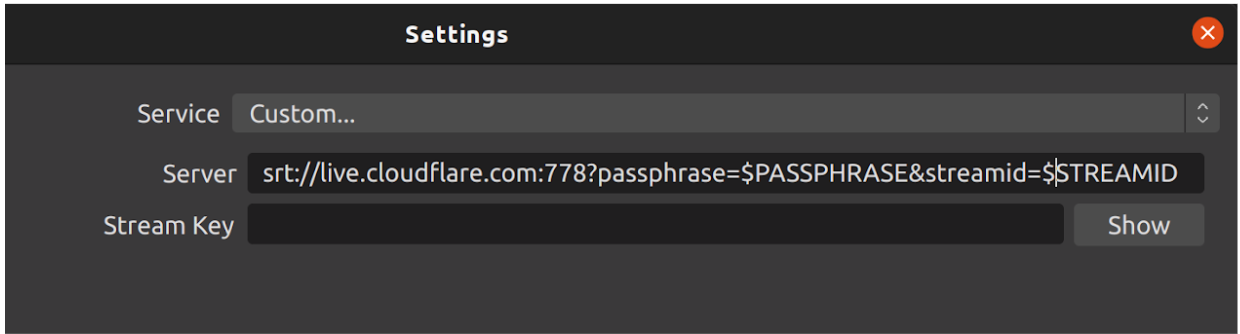
SRT is already implemented in software like FFmpeg and OBS. Here’s how to get it working from OBS:
Get started with signing up for Cloudflare Stream and adding a live input.
Protocol-agnostic Live Streaming
We’re working on adding support for more media protocols in addition to RTMP and SRT. What would you like to see next? Let us know! If this post vibes with you, come work with the engineers building with video and more at Cloudflare!
One of the things that makes Cloudflare unique is our Innovation Weeks. Rather than having one large conference annually, we have multiple Innovation Weeks throughout the year to highlight new product announcements, beta products opening up to general availability, and share how our customers are using Cloudflare to help build a better Internet.
Internally, these weeks generate a lot of energy and excitement as well, as they provide an opportunity for teams from across Cloudflare to work together on product delivery and celebrate company-wide successes. In 2021, we had seven Cloudflare Innovation Weeks. As we start planning our 2022 Innovation Weeks, we are reflecting back on the highlights from each of these weeks.
Security Week kicked off Cloudflare’s 2021 Innovation Weeks with a series of foundational security announcements. The Internet wasn’t built with security in mind, but the products and partnerships announced this week continued Cloudflare’s core mission of helping build a better Internet—one that companies of all sizes can plug into and be protected by default from the types of attacks that have historically resulted in loss of data, computing resources, and customer confidence.
During our first Impact Week, we reflected on how we are achieving Cloudflare’s mission–helping build a better Internet– and why we continue to prioritize projects that give back to the Internet. Impact Week highlighted some of the things we are doing as a company around environmental, social and governance initiatives. We launched Project Pangea, a free program to provide secure, reliable access to the Internet for community networks that support under-served communities. We also shared how we are committed to helping build a green Internet through efficiency, renewable energy, and providing developers a choice to run their workloads in the most energy efficient data centers. In addition, we published our first human rights policy in order to better serve our mission and core values.
We launched two amazing performance features with Signed Exchanges reducing load times and increasing SEO rankings with one click as well as Early Hints which can reduce loading times by 30%.
As part of Speed week, we also announced Cloudflare Images which stores, resizes, optimizes and serves images so that all of our customers can build a scalable, affordable image pipeline.
This is the week in which we celebrate Cloudflare’s birthday. We launched the company 11 years ago: September 27, 2010. It has been our tradition, since our first birthday, to use this week to launch innovative products that we think of as our gift back to the Internet. In 2021, we announced Cloudflare R2, our object-based storage with no egress fees, tackled solutions to Email Spoofing and Phishing, shared how we are expanding our network into office buildings as well as many more product announcements and Cloudflare TV executive fireside chats and product discussions.
During Full Stack Week, we brought the vision of the Network is the Computer to life — allowing developers to build their entire application on our network, soup to nuts. Over the course of the week, we made a series of announcements, each providing another critical piece of the puzzle, necessary to build a full stack application.
In July 2021, as part of Impact Innovation Week, we announced our intention to launch Crawler Hints as a means to reduce the environmental impact of web searches. We spent the weeks following the announcement hard at work, and in October 2021, we announced General Availability for the first iteration of the product. This post explains how we built it, some of the interesting engineering problems we had to solve, and shares some metrics on how it’s going so far.
Before We Begin…
Search indexers crawl sites periodically to check for new content. Algorithms vary by search provider, but are often based on either a regular interval or cadence of past updates, and these crawls are often not aligned with real world content changes. This naive crawling approach may harm customer page rank and also works to the detriment of search engines with respect to their operational costs and environmental impact. To make the Internet greener and more energy efficient, the goal of Crawler Hints is to help search indexers make more informed decisions on when content has changed, saving valuable compute cycles/bandwidth and having a net positive environmental impact.
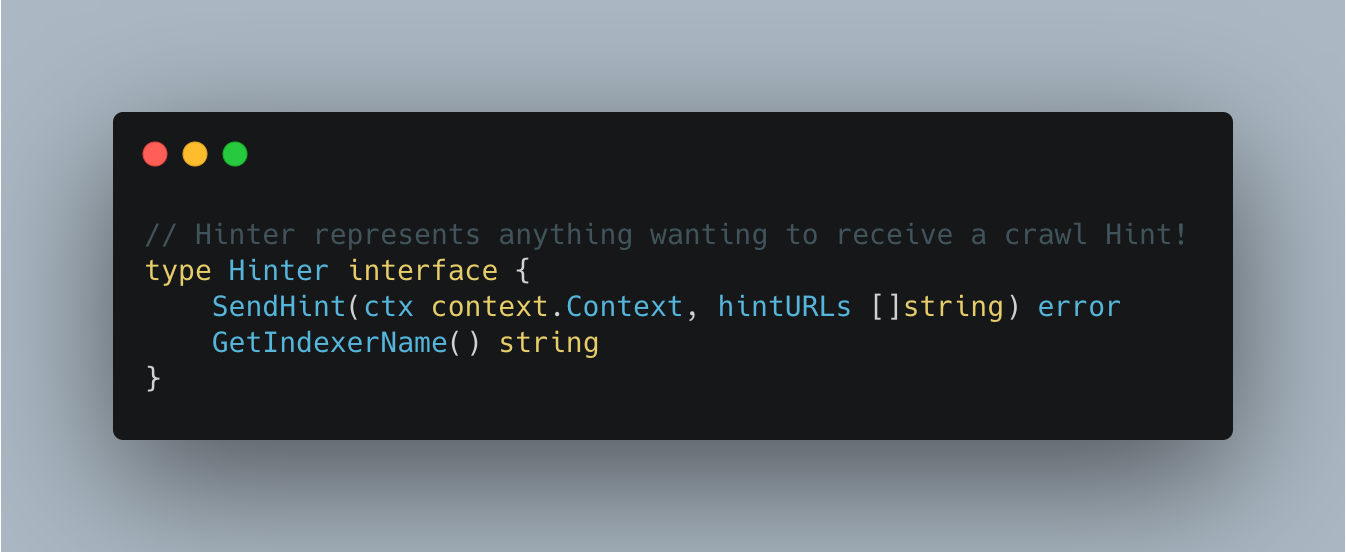
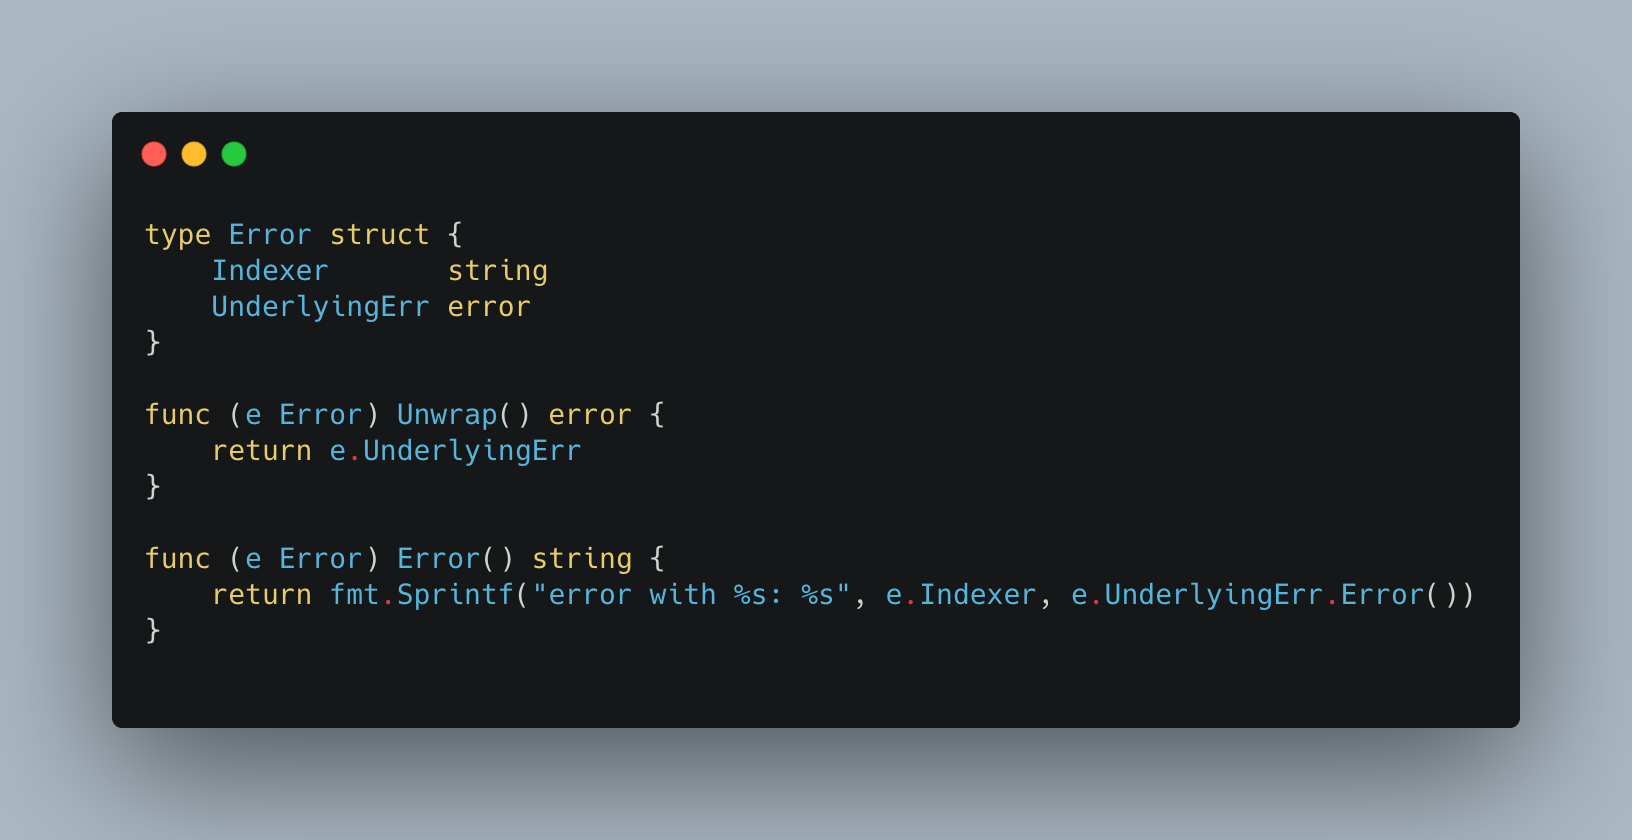
Cloudflare is in an advantageous position to help inform crawlers of content changes, as we are often the “front line” of the interface between site visitors and the origin server where the content updates take place. This grants us knowledge of some key data points like headers, content hashes, and site purges among others. For customers who have opted in to Crawler Hints, we leverage this data to generate a “content freshness score” using an ensemble of active and passive signals from our customer base and request flow. To help with efficiency, Crawler Hints helps to improve SEO for websites behind Cloudflare, improves relevance for search engine users, and improves origin responsiveness by reducing bot traffic to our customers’ origin servers.
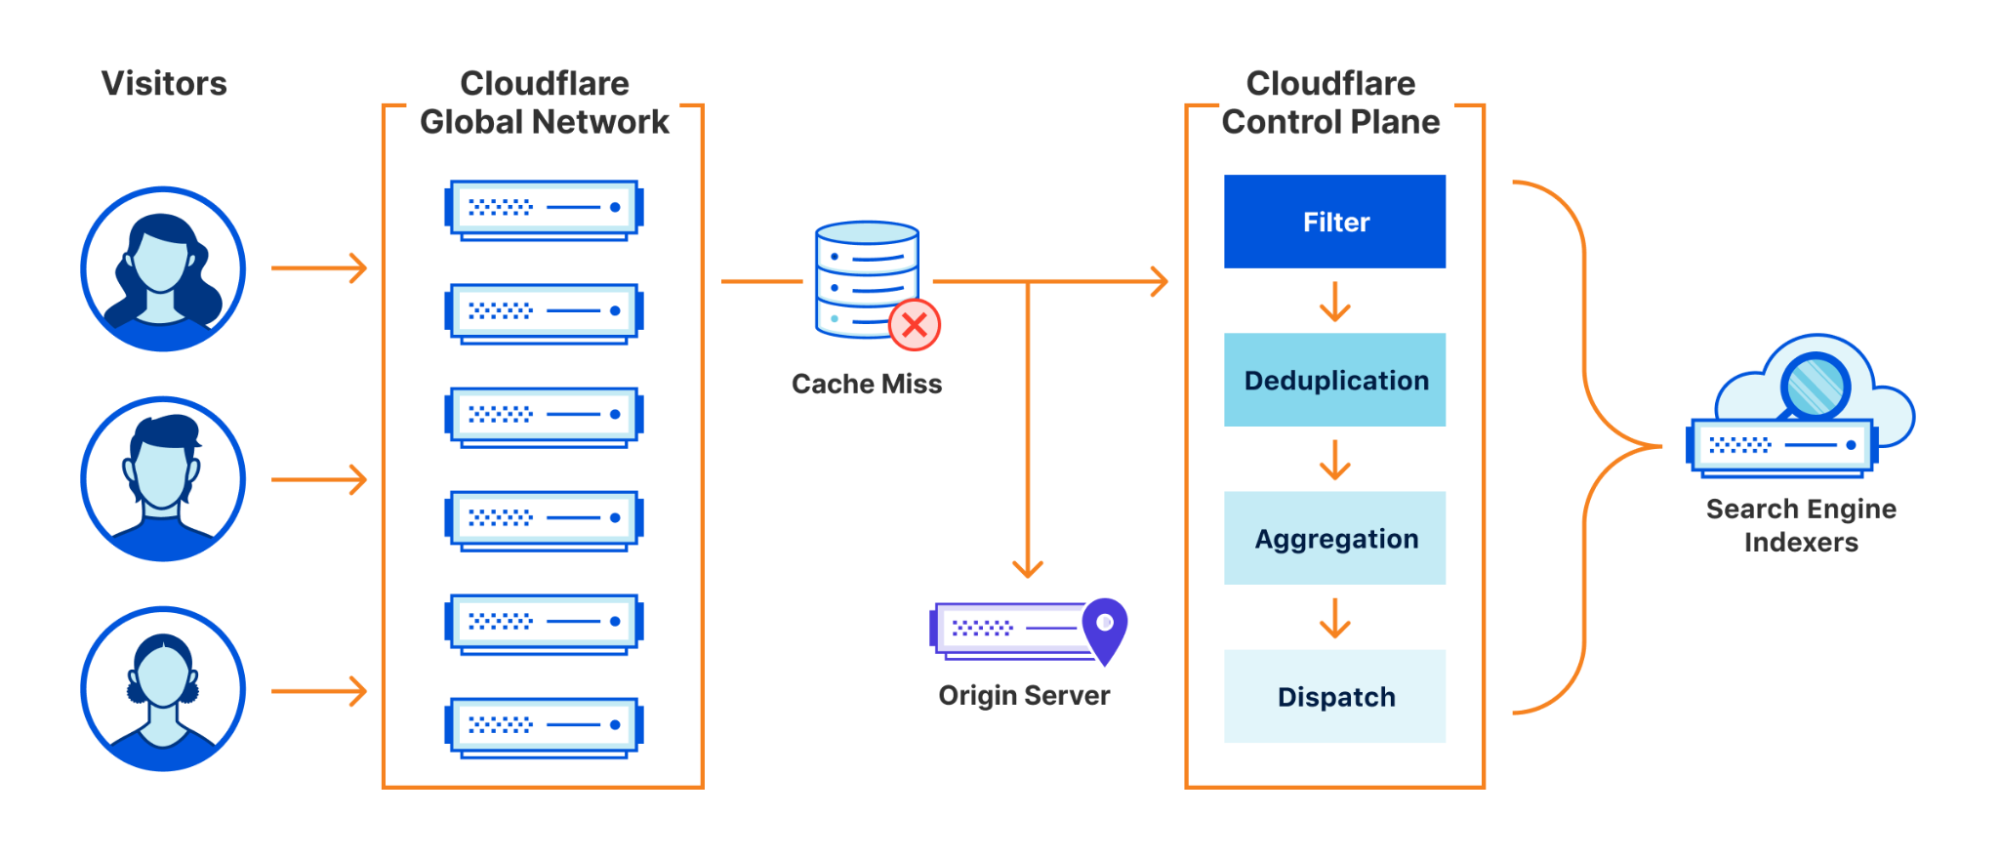
A high level design of the system we built looks as follows:
In this blog we will dig into each aspect of it in more detail.
Keeping Things Fresh
Cloudflare has a large global network spanning 250 cities. A popular use case for Cloudflare is to use our CDN product to cache your website’s assets so that users accessing your site can benefit from lightning fast response times. You can read more about how Cloudflare manages our cache here. The important thing to call out for the purpose of this post is that the cache is Data Center local. A cache hit in London might be a cache miss in San Francisco unless you have opted-in to tiered-caching, but that is beyond the scope of this post.
For Crawler Hints to work, we make use of a number of signals available at request time to make an informed decision on the “freshness” of content. For our first iteration of Crawler Hints, we used a cache miss from Cloudflare’s cache as a starting basis. Although a naive signal on its own, getting the data pipelines in place to forward cache miss data from our global network to our control plane meant we would have everything in place to iterate on and improve the signal processing quickly going forward. To do this, we leveraged some existing services from our data team that takes request data , marshalls it into Cap’n Proto format, and forwards it to a message bus (we use apache Kafka). These messages include the URLs of the resources that have met the signal criteria, along with some additional metadata for analytics/future improvement.
The amount of traffic our global network receives is substantial. We serve over 28 million HTTP requests per second on average, with more than 35 million HTTP requests per second at peak. Typically, Cloudflare teams sample this data to enable products such as being alerted when you are under attack. For Crawler Hints, every cache miss is important. Therefore, 100% of all cache misses for opted-in sites were sent for further processing, and we’ll discuss more on opt-in later.
Redis as a Distributed Buffer
With messages buffered in Kafka, we can now begin the work of aggregation and deduplication. We wrote a consumer service that we call an ingestor. The ingestor reads the data from Kafka. The ingestor performs validation to ensure proper sanitization and data integrity and passes this data onto the next stage of the system. We run the ingestor as part of a Kafka consumer group, allowing us to scale our consumer count up to the partition size as throughput increases.
We ultimately want to deliver a set of “fresh” content to our search partners on a dynamic interval. For example, we might want to send a batch of 10,000 URLs every two minutes. There are, however, a couple of important things to call out though:
There should be no duplicate resources in each batch.
We should strike a balance in our size and frequency such that overall request size isn’t too large, but big enough to remove some pressure on the receiving API by not sending too many requests at once.
For the deduplication, the simplest thing to do would be to have an in-memory map in our service to track resources between a pre-specified interval. A naive implementation in Go might look something like this.
The problem with this approach is we have little resilience. If the service was to crash, we would lose all the data for our current batch. Furthermore, if we were to run multiple instances of our services, they would all have a different “view” of which resources they had seen before and therefore we would not be deduplicating.To mitigate this issue, we decided to use a specialist caching service. There are a number of distributed caches that would fit the bill, but we chose Redis given our team’s familiarity with operating it at scale.
Redis is well known as a Key Value(KV) store often used for caching things,optionally with a specified Time To Live(TTL). Perhaps slightly less obvious is its value as a distributed buffer, housing ephemeral data with periodic flush/tear-downs. For Crawler Hints, we leveraged both these traits via a multi-generational, multi-cluster setup to achieve a highly available rolling aggregation service.
Two standalone Redis clusters were spun up. For each generation of request data, one cluster would be designated as the active primary. The validated records would be inserted as keys on the primary, serving the dual purpose of buffering while also deduplicating since Redis keys are unique. Separately, a downstream service (more on this later!) would periodically issue the command for these inserters to switch from the active primary (cluster A) to the inactive cluster (cluster B). Cluster A could then be flushed with records being batch read in a size of our choosing.
Buffering for Dispatch
At this point, we have clean, batched data. Things are looking good! However, there’s one small hiccup in the plan: we’re reading these batches from Redis at some set interval. What if it takes longer to dispatch than the interval itself? What if the search partner API is having issues?
We need a way to ensure the durability of the batch URLs and reduce the impact of any dispatch issues. To do this, we revisit an old friend from earlier: Kafka. The batches that get read from Redis are then fed into a Kafka topic. We wrote a Kafka consumer that we call the “dispatcher service” which runs within a consumer group to enable us to scale it if necessary just like the ingestor. The dispatcher reads from the Kafka topic and sends a batch of resources to each of our API partners.
Launching in tandem with Cloudflare, Crawler Hints was a joint venture between a few early adopters in the search engine space to provide a means for sites to inform indexers of content changes called IndexNow. You can read more about this launch here. IndexNow is a large part of what makes Crawler Hints possible. As part of its manifest, it provides a common API spec to publish resources that should be re-indexed. The standardized API makes abstracting the communication layer quite simple for the partners that support it. “Pushing” these signals to our search engine partners is a big step away from the inefficient “Pull” based model that is used today (you can read more about that here). We launched with Yandex and Bing as Search Engine Partners.
To ensure we can add more partners in the future, we defined an interface which we call a “Hinter”.
We then satisfy this interface for each partner that we work with. We return a custom error from the Hinter service that is of type *indexers.Error. The definition of which is:
This allows us to “bubble up” information about which indexer has failed and increment metrics and retry only those calls to indexers which have failed.
This all culminates together with the following in our service layer:
Simple, performant, maintainable, AND easy to add more partners in the future.
Rolling out Crawler Hints
At Cloudflare, we often release things that haven’t been done before at scale. This project is a great example of that. Trying to gauge how many users would be interested in this product and what the uptake might be like on day one, day ten, and day one thousand is close to impossible. As engineers responsible for running this system, it is essential we build in checks and balances so that the system does not become overwhelmed and responds appropriately. For this particular project, there are three different types of “protection” we put in place. These are:
Customer opt-in
Monitoring & Alerts
System resilience via “self-healing”
Customer opt-in
Cloudflare takes any changes that can impact customer traffic flow seriously. Considering Crawler Hints has the potential to change how sites are seen externally (even if in this instance the site’s viewers are robots!) and can impact things like SEO and bandwidth usage, asking customers to opt-in is a sensible default. By asking customers to opt-in to the service, we can start to get an understanding of our system’s capacity and look for bottle necks and how to remove them. To do this, we make extensive use of Prometheus, Grafana, and Kibana.
Monitoring & Alerting
We do our best to make our systems as “self-healing” and easy to run as possible, but as they say, “By failing to prepare, you are preparing to fail.” We therefore invest a lot of time creating ways to track the health and performance of our system and creating automated alerts when things fall outside of expected bounds.
Below is a small sample of the Grafana dashboard we created for this project. As you can see, we can track customer enablement and the rate of hint dispatch in real time. The bottom two panels show the throughput of our Kafka clusters by partition. Even just these four metrics give us a lot of insight into how things are going, but we also track (as well as other things):
Lag on Kafka by partition (how far behind real time we are)
Bad messages received from Kafka
Amount of URLs processed per “run”
Response code per index partner over time
Response time of partner API over time
Health of the Redis clusters (how much memory is used, frequency of commands we are using received by the cluster)
Memory, CPU usage, and pods available against configured limits/requests
It seems a lot to track, but this information is invaluable to us, and we use it to generate alerts that notify the on-call engineer if a threshold is breached. For example, we have an alert that would escalate to an engineer if our Redis cluster approached 80% capacity. For some thresholds we specify, we may want the system to “self-heal.” In this instance, we would want an engineer to investigate as this is outside the bounds of “normal,” and it might be that something is not working as expected. An alternative reason that we might receive alerts is that our product has increased in popularity beyond our expectations, and we simply need to increase the memory limit. This requires context and is therefore best left to a human to make this decision.
System Resilience via “self-healing”
We do everything we can to not disturb on-call engineers, and therefore, we try to make the system as “self-healing” as possible. We also don’t want to have too much extra resource running as it can be expensive and use limited capacity that another Cloudflare service might need more – it’s a trade off. To do this, we make use of a few patterns and tools common in every distributed engineer’s toolbelt. Firstly, we deploy on Kubernetes. This enables us to make use of great features like Horizontal Pod Autoscaling. When any of our pods reach ~80% memory usage, a new pod is created which will pick up some of the slack up to a predefined limit.
Secondly, by using a message bus, we get a lot of control over the amount of “work” our services have to do in a given time frame. In general, a message bus is “pull” based. If we want more work, we ask for it. If we want less work, we pull less. This holds for the most part, but with a system where being close to real time is important, it is essential that we monitor the “lag” of the topic, or how far we are behind real time. If we are too far behind, we may want to introduce more partitions or consumers.
Finally, networks fail. We therefore add retry policies to all HTTP calls we make before reporting them a failure. For example, if we were to receive a 500 (Internal Server Error) from one of our partner APIs, we would retry up to five times using an exponential backoff strategy before reporting a failure.
Data from the first couple of months
Since the release of Crawler Hints on October 18, 2021 until December 15, 2021, Crawler Hints has processed over twenty five billion crawl signals, has been opted-in to by more than 81,000 customers, and has handled roughly 18,000 requests per second. It’s been an exciting project to be a part of, and we are just getting started.
What’s Next?
We will continue to work with our partners to improve the standard even further and continue to improve the signaling on our side to ensure the most valuable information is being pushed on behalf of our customers in a timely manner.
If you’re interested in building scalable services and solving interesting technical problems, we are hiring engineers on our team in Austin, Lisbon, and London.
The Internet is a dynamic place. Websites are constantly changing as technologies and business practices evolve. What was front-page news is quickly moved into a sub-directory. To ensure website visitors continue to see the correct webpage even if it has been moved, administrators often implement URL redirects.
A URL redirect is a mapping from one location on the Internet to another, effectively telling the visitor’s browser that the location of the page has changed, and where they can now find it. This is achieved by providing a virtual ‘link’ between the content’s original and new location.
URL Redirects have typically been implemented as Page Rules within Cloudflare, up to a maximum of 125 URL redirects per zone. This limitation meant customers with a need for more URL redirects had to implement alternative solutions such Cloudflare Workers to achieve their goals.
To simplify the management and implementation of URL redirects at scale we have created Bulk Redirects. Bulk Redirects is a new product that allows an administrator to upload and enable hundreds of thousands of URL redirects within minutes, without having to write a single line of code.
We’ve moved!
Mail forwarding is a product offered by postal services such as USPS and Royal Mail that allows you to continue to receive letters and parcels even if they are sent to an address where you no longer reside.
The postal services achieve this by effectively maintaining a register of your new location and your old location. This allows the systems to detect ‘this letter is for Sam Marsh at address A, but he now lives at address B, therefore send the mail there’.
This problem can be solved by manually updating my bank, online shops, etc. and having them send the parcels and letters directly to my new address. However, that assumes I know of every person and business who has my address. And it also relies on those people to remember I moved address and make updates on their side. For example, Grandma Marsh might have forgotten about my new address — I’ve moved a lot — and she may send my birthday card to my old address. Or all those Christmas cards from people who I don’t speak with regularly. Those will go to my old address also. To solve this, I can use mail forwarding to ensure I still receive my cards and other mail, even though I no longer live at that address.
URL redirects are the Internet equivalent of mail forwarding.
With this technology, our sales and marketing teams can use the vanity URL all across the Internet, safe in the knowledge that should the backend systems change they won’t need to go to all the places this URL has been posted and update it. Instead, the intermediary system that handles the URL redirects can be updated. One location. Not thousands.
Why use URL redirects?
URL redirects are used to solve a number of use cases. One such common use case is to use URL redirects to force all visitors to connect to the website over a secure HTTPS connection, instead of via plain HTTP, to improve security. It’s such a common use case we created a toggle in the Cloudflare dashboard, “Always use HTTPS”, which redirects all HTTP requests to HTTPS when enabled.
URL redirects are also used for vanity domains and hyperlinks. In these scenarios, URL redirects are deployed to provide a mapping of short, user-friendly URLs to long, server-friendly URLs. Not only are shorter URLs more memorable, but they are better scoring from an SEO perspective. According to Backlinko, ‘Excessively long URLs may hurt a page’s search engine visibility. In fact, several industry studies have found that short URLs tend to have a slight edge in Google’s search results.’.
Another use case is where a company may have a local domain for each of their markets, which they want to redirect back to the main website, e.g., redirect www.example.fr and www.example.de to www.example.com/eu/fr and www.example.com/eu/de, respectively.
This also covers company acquisition, where a company is acquired and the acquiring company wants to redirect hyperlinks to the relevant pages on their own website, e.g., redirect www.example.com to www.companyB.com/portfolio/example.
Finally, one of the most common use cases for URL redirects is to maintain uptime during a website migration. As companies migrate their websites from one platform to another, or one domain to another, URL redirects ensure visitors continue to see the correct content. Without these URL redirects, hyperlinks in emails, blogs, marketing brochures, etc. would fail to load, potentially costing the business revenue in lost sales and brand damage. For example, www.example.com/products/golf/product-goes-here would redirect to the new website at products.example.com/golf/product-goes-here.
How are URL redirects implemented today?
Ensuring these URL redirects are executed correctly is often the job of the reverse proxy — a server which sits between the client and the origin whose job is, amongst many others, to re-route received traffic to the correct destination.
For example, when using NGINX, a popular web server, the administrator would have a line in the config similar to the one below to implement a URL redirect:
Historically, these web servers were located physically within a company’s data center. Administrators then had full control over the URLs received, and could create the redirect rules as and when needed.
As the world rapidly migrates on-premise applications and solutions to the cloud, administrators can find themselves in a situation where they can no longer do what they previously could. Not being responsible for the origin has a number of benefits, but it also comes with drawbacks such as lack of ‘control’. Previously, an administrator could quickly add a few config lines to the web server in front of their ecommerce platform. Moving to an online hosted platform makes this much more difficult to do.
As such, administrators have moved to platforms like Cloudflare where functionality such as URL redirects can be implemented in the cloud without the need to have administrator access to the origin.
The first way to implement a URL Redirect in Cloudflare is via a Forwarding URLPage Rule. Users can create a Page Rule which matches on a specific URL and redirects matching traffic to another specific URL, along with a status code — either a permanent redirect (301) or a temporary redirect (302):
Another method is to use Cloudflare Workers to implement URL redirects, either individually or as a map. For example, the code below is used to create a URL redirect map which runs when the Worker is invoked:
This snippet is taken from the Cloudflare Workers examples library and can be used to scale beyond the 125 URL redirect limit of Page Rules. However, it does require the administrator to be comfortable working with code and correctly configuring their Cloudflare Workers.
Introducing: Bulk Redirects
Speaking with Cloudflare users about URL redirects and their experience with our product offerings, “Give me a product which lets me upload thousands of URL redirects to Cloudflare via a GUI” was a very common request. Customers we interviewed typically wanted a simple way to upload a list of ‘from,to,response code’ without having to write a single line of code. And that’s what we are announcing today.
Bulk Redirects is now available for all Cloudflare plans. It is an account/organization-level product capable of supporting hundreds of thousands of URL redirects, all configured via the dashboard without having to write a single line of code.
The system is implemented in two parts. The first part is the Bulk Redirect List. This is effectively the redirect map, or ‘edge dictionary’, where users can upload their URL redirects:
Each URL redirect within the list contains three main elements. The first two elements are Source URL (the URL we are looking for) and TargetURL (the URL we are going to redirect matching traffic to).
There is also the Status code. This is the ‘type’ of redirect. In addition to 301 (Moved Permanently) and 302 (Moved Temporarily) redirects, we have added support for the newer 307 (Temporary Redirect) and 308 (Permanent Redirect) redirect status codes.
We have added support for specifying destination ports within the Target URL field also, allowing URL redirects to non-standard ports, e.g., “Target URL: www.example.com:8443”.
If you have many URL redirects, you can upload them via a CSV file.
There are also four additional parameters available for each individual URL redirect.
Firstly, we have added two options to replace the ambiguity and confusion caused by the use of asterisks as wildcards. Take this source URL as an example: *.example.com/a/b. Would you expect www.example.com/a/b to match? How about example.com/a/b, or www.example.com/path*? Asterisks used as wildcards cause confusion and misunderstanding, and also increase the cost of implementation and maintenance from an engineering perspective. Therefore, we are not implementing them in Bulk Redirects.
Instead, we have added two discrete options: Include subdomains and Subpath matching. The Include subdomains option, once enabled, will match all subdomains to the left of the domain portion of the URL as well as the domain specified. For example, if there is a URL redirect with a source URL of example.com/a then traffic to b.example.com/a and c.b.example.com/a will also be redirected.
The Subpath matching option focuses on the opposite end of the URL. If this option is enabled, the redirect applies to the URL as well as all its subpaths. For example, if we have a URL redirect on www.example.com/foo with subpath matching enabled, we will match on that specific URL as well as all subpaths, e.g., www.example.com/foo/a, www.example.com/foo/a/, ` www.example.com/foo/a/b/c`, etc., but not www.example.com/foobar.
These options provide a tremendous amount of flexibility and granularity for each URL redirect. However, for most use cases only the source URL, target URL, and status code options will need to be set.
Secondly, we have added two options relating to retaining portions of the original HTTP request: Preserve path suffix and Preserve query string. If subpath matching is enabled, Preserve path suffix can be used to copy the URI path from the originally requested URL and add it to the destination URL. For example, if there is a URL redirect of Source URL: example.co.uk, Target URL: www.example.com/a, then requests to example.co.uk/target will be redirected to www.example.com/a/target with both options enabled. Preserve query string can be used independently of the other options, and carries forward the URI query from the originally requested URL to the new URL.
Lists by themselves do not provide any redirection, they are simply the ‘lookup table’. To enable them we need to reference them via a Bulk Redirect Rule.
The rules themselves are very simple. By default, the user experience is to provide a name for the rule, a description, and select the Bulk Redirect List that should be invoked.
For users who require more granularity and control there are additional settings available under the Advanced options toggle. Within this section there are two editable sections: Expression and Key.
The first field, Expression,specifies the conditions that must be met in order for the rule to run. By default, all URL redirects of the specified list will apply.
The second field, Key, is closely related to the expression. The key is used in combination with the specified list to select the URL redirect to apply. The field used for the key should always be the same as the field used in the expression, i.e., the key should be http.request.full_uri if the field in the expression is http.request.full_uri, or conversely, the key should be raw.http.request.full_uri if the field in the expression is raw.http.request.full_uri.
There are two main use cases for modifying these settings. Firstly, users can edit these options to increase specificity in the trigger, e.g., ip.src.country == "GB" and http.request.full_uri in $redirect_list. This is useful for ensuring Bulk Redirect Lists are only applied when a visitor comes from specific countries, subnets, or ASNs — or also only applying a URL redirect list if the visitor is a verified bot, or the bot score is >35.
Secondly, users can edit these options to amend the URL being matched and used as a lookup in the given list, i.e., the user may choose to have URL redirects in their list(s) specifically for URLs that would be normalized, e.g., URLs containing specific percent-encoding. To ensure these URL redirects still trigger, the settings in Advanced options should be used to edit the expression and key to use the raw.http.request.full_uri field instead.
Automating via the API
Another way to manage bulk redirects is via our API. Customers wishing to automate the addition of bulk redirects can use the API to either simply add URL redirects to an existing list, or automate the entire workflow — creating a list, adding URL redirects to the list, and enabling the list via a new redirect rule.
There are three main calls when creating bulk redirects via the API:
Create the redirect list
Load with URL redirects
Enable via a rule (You will also need to create the ruleset if doing this for the first time).
For step 1, first create a mass redirect list via the API call:
curl --location --request POST 'https://api.cloudflare.com/client/v4/accounts/<ACCOUNT_ID>/rules/lists' \
--header 'X-Auth-Email: <EMAIL_ADDRESS>' \
--header 'Content-Type: application/json' \
--header 'X-Auth-Key: <API_KEY>' \
--data-raw '{
 "name": "my_redirect_list_2",
 "description": "My redirect list 2",
 "kind": "redirect"
}'
Capture the value of “id”, as this is the list id we will then add URL redirects to.
Next, in step 2 we will add URL redirects to our newly created list by executing a POST call to the id we captured previously – with our URL redirects in the body:
In step 3 we enable this list by creating a new mass redirect rule within the mass redirect account-level ruleset.
Note, if this is the first time you are creating a redirect rule you will need to use a different API call to create the ruleset. See the documentation here for more details. All subsequent updates to the rulesets are made by calls similar to below.
Firstly, we need to find our account-level rulesets id. To do this we need to get a list of all account-level rulesets and look for the ruleset with the phase http_request_redirect:
{
   "result": [
       {
           "id": "efb7b8c949ac4650a09736fc376e9aee",
           "name": "Cloudflare Managed Ruleset",
           "description": "Created by the Cloudflare security team, this ruleset is designed to provide fast and effective protection for all your applications. It is frequently updated to cover new vulnerabilities and reduce false positives.",
           "source": "firewall_managed",
           "kind": "managed",
           "version": "34",
           "last_updated": "2021-10-25T18:33:27.512161Z",
           "phase": "http_request_firewall_managed"
       },
       {
           "id": "4814384a9e5d4991b9815dcfc25d2f1f",
           "name": "Cloudflare OWASP Core Ruleset",
           "description": "Cloudflare's implementation of the Open Web Application Security Project (OWASP) ModSecurity Core Rule Set. We routinely monitor for updates from OWASP based on the latest version available from the official code repository",
           "source": "firewall_managed",
           "kind": "managed",
           "version": "33",
           "last_updated": "2021-10-25T18:33:29.023088Z",
           "phase": "http_request_firewall_managed"
       },
       {
           "id": "5ff4477e596448749d67da859230ac3d",
           "name": "My redirect ruleset",
           "description": "",
           "kind": "root",
           "version": "1",
           "last_updated": "2021-12-04T06:32:58.058744Z",
           "phase": "http_request_redirect"
       }
   ],
   "success": true,
   "errors": [],
   "messages": []
}
Our redirect ruleset is at the bottom of the output. Next we will add our new bulk redirect rule to this ruleset:
With those API calls executed, our new list is created, loaded with URL redirects and enabled by the bulk redirect rule. Visitors to the URLs specified in our list will now be redirected appropriately.
Account-level benefits
One of the driving forces behind this product is the desire to make life easier for those customers with a large number of zones on Cloudflare. For these customers, URL redirects are a pain point when using Page Rules, as they need to navigate into each zone and configure URL redirects one at a time. This doesn’t scale very well.
Bulk Redirects add real value for customers in this situation. Instead of having to navigate into 400 zones and create one or two Page Rules for each, an administrator can now create and upload a single Bulk Redirect List, which contains all the URL redirects for the zones under management.
This means that if the customer simply wants 399 of those 400 zones to redirect to the “primary zone”, they can create a bulk redirect list with 399 entries, all pointing to example.com, and enable the Subpath matching and Include subdomains options on each. This vastly simplifies the management of the estate.
The same premise also applies to SSL for SaaS customers. For example, if example.com has 20 custom hostnames in their zone, customers can now create a Bulk Redirect List and Rule for each custom hostname, grouping each customer’s URL redirects into their own logical buckets.
Bulk Redirects is a game changer for companies with a large number of zones and customers under management.
Allowances
Bulk Redirects are available for all accounts. The packaging model for Bulk Redirects closely resembles that of “IP Lists”. Accounts are entitled to a set number of Edge Rules (from which “Bulk Redirect Rules” draws down), Bulk Redirect Lists, and URL Redirects depending on the highest Cloudflare plan within their account.
Feature
Enterprise
Business
Pro
Free
Edge Rules (for use of Bulk Redirect Rules)
50+
15
15
15
Bulk Redirect Lists
25+
5
5
5
URL Redirects
10,000+
500
500
20
For example, an account with ten zones, all on the Free plan, would be entitled to 15 Edge Rules, 5 Bulk Redirect Lists, and 20 URL Redirects that can be stored within those lists.
An account with one Pro zone and 2 Free plan zones would be entitled to 15 Edge Rules, 5 Bulk Redirect Lists, and 500 URL Redirects that can be stored within those lists.
Enterprise customers have a default of 10,000 URL Redirects to be used across 25 lists. However, these numbers are negotiable on enquiry.
Planned enhancements
We intend to make a number of incremental improvements to the product in the coming months, specifically to the list experience to allow for the editing of URL redirects and also for searching within lists.
In the near future we intend to bring to market a product to fulfill the other common request for URL redirects, and deliver ‘Dynamic URL Redirects’. Whilst Bulk Redirects supports hundreds of thousands of URL redirects, those URL redirects are relatively prescriptive — from a.com/b to b.com/a, for example. There is still a requirement for supporting more complex, rich URL redirects, e.g., device-specific URL redirects, country-specific URL redirects, URL redirects that allow regular expressions in their target URL, and so forth. We aspire to offer a full range of functionality to support as many use cases as possible.
Try it now
Bulk Redirects can be used to improve operations, simplify complex configurations, and ease website management, amongst many other use cases. Try out Bulk Redirects yourself today.
After initially providing our customers control over the HTTP-layer DDoS protection settings earlier this year, we’re now excited to extend the control our customers have to the packet layer. Using these new controls, Cloudflare Enterprise customers using the Magic Transit and Spectrum services can now tune and tweak their L3/4 DDoS protection settings directly from the Cloudflare dashboard or via the Cloudflare API.
The new functionality provides customers control over two main DDoS rulesets:
Network-layer DDoS Protectionruleset — This ruleset includes rules to detect and mitigate DDoS attacks on layer 3/4 of the OSI model such as UDP floods, SYN-ACK reflection attacks, SYN Floods, and DNS floods. This ruleset is available for Spectrum and Magic Transit customers on the Enterprise plan.
Advanced TCP Protectionruleset — This ruleset includes rules to detect and mitigate sophisticated out-of-state TCP attacks such as spoofed ACK Floods, Randomized SYN Floods, and distributed SYN-ACK Reflection attacks. This ruleset is available for Magic Transit customers only.
A Distributed Denial of Service (DDoS) attack is a type of cyberattack that aims to disrupt the victim’s Internet services. There are many types of DDoS attacks, and they can be generated by attackers at different layers of the Internet. One example is the HTTP flood. It aims to disrupt HTTP application servers such as those that power mobile apps and websites. Another example is the UDP flood. While this type of attack can be used to disrupt HTTP servers, it can also be used in an attempt to disrupt non-HTTP applications. These include TCP-based and UDP-based applications, networking services such as VoIP services, gaming servers, cryptocurrency, and more.
To defend organizations against DDoS attacks, we built and operate software-defined systems that run autonomously. They automatically detect and mitigate DDoS attacks across our entire network. You can read more about our autonomous DDoS protection systems and how they work in our deep-dive technical blog post.
Unmetered and unlimited DDoS Protection
The level of protection that we offer is unmetered and unlimited — It is not bounded by the size of the attack, the number of the attacks, or the duration of the attacks. This is especially important these days because as we’ve recently seen, attacks are getting larger and more frequent. Consequently, in Q3, network-layer attacks increased by 44% compared to the previous quarter. Furthermore, just recently, our systems automatically detected and mitigated a DDoS attack that peaked just below 2 Tbps — the largest we’ve seen to date.
Mirai botnet launched an almost 2 Tbps DDoS attack
You can think of our autonomous DDoS protection systems as groups (rulesets) of intelligent rules. There are rulesets of HTTP DDoS Protection rules, Network-layer DDoS Protection rules and Advanced TCP Protection rules. In this blog post, we will cover the latter two rulesets. We’ve already covered the former in the blog post How to customize your HTTP DDoS protection settings.
Cloudflare L3/4 DDoS Managed Rules
In the Network-layer DDoS Protection rulesets, each rule has a unique set of conditional fingerprints, dynamic field masking, activation thresholds, and mitigation actions. These rules are managed (by Cloudflare), meaning that the specifics of each rule is curated in-house by our DDoS experts. Before deploying a new rule, it is first rigorously tested and optimized for mitigation accuracy and efficiency across our entire global network.
In the Advanced TCP Protection ruleset, we use a novel TCP state classification engine to identify the state of TCP flows. The engine powering this ruleset is flowtrackd — you can read more about it in our announcement blog post. One of the unique features of this system is that it is able to operate using only the ingress (inbound) packet flows. The system sees only the ingress traffic and is able to drop, challenge, or allow packets based on their legitimacy. For example, a flood of ACK packets that don’t correspond to open TCP connections will be dropped.
How attacks are detected and mitigated
Sampling
Initially, traffic is routed through the Internet via BGP Anycast to the nearest Cloudflare edge data center. Once the traffic reaches our data center, our DDoS systems sample it asynchronously allowing for out-of-path analysis of traffic without introducing latency penalties. The Advanced TCP Protection ruleset needs to view the entire packet flow and so it sits inline for Magic Transit customers only. It, too, does not introduce any latency penalties.
Analysis & mitigation
The analysis for the Advanced TCP Protection ruleset is straightforward and efficient. The system qualifies TCP flows and tracks their state. In this way, packets that don’t correspond to a legitimate connection and its state are dropped or challenged. The mitigation is activated only above certain thresholds that customers can define.
The analysis for the Network-layer DDoS Protection ruleset is done using data streaming algorithms. Packet samples are compared to the conditional fingerprints and multiple real-time signatures are created based on the dynamic masking. Each time another packet matches one of the signatures, a counter is increased. When the activation threshold is reached for a given signature, a mitigation rule is compiled and pushed inline. The mitigation rule includes the real-time signature and the mitigation action, e.g., drop.
Example
As a simple example, one fingerprint could include the following fields: source IP, source port, destination IP, and the TCP sequence number. A packet flood attack with a fixed sequence number would match the fingerprint and the counter would increase for every packet match until the activation threshold is exceeded. Then a mitigation action would be applied.
However, in the case of a spoofed attack where the source IP addresses and ports are randomized, we would end up with multiple signatures for each combination of source IP and port. Assuming a sufficiently randomized/distributed attack, the activation thresholds would not be met and mitigation would not occur. For this reason, we use dynamic masking, i.e. ignoring fields that may not be a strong indicator of the signature. By masking (ignoring) the source IP and port, we would be able to match all the attack packets based on the unique TCP sequence number regardless of how randomized/distributed the attack is.
Configuring the DDoS Protection Settings
For now, we’ve only exposed a handful of the Network-layer DDoS protection rules that we’ve identified as the ones most prone to customizations. We will be exposing more and more rules on a regular basis. This shouldn’t affect any of your traffic.
Overriding the sensitivity level and mitigation action
For the Network-layer DDoS Protection ruleset, for each of the available rules, you can override the sensitivity level (activation threshold), customize the mitigation action, and apply expression filters to exclude/include traffic from the DDoS protection system based on various packet fields. You can create multiple overrides to customize the protection for your network and your various applications.
Configuring expression fields for the DDoS Managed Rules to match on
In the past, you’d have to go through our support channels to customize the rules. In some cases, this may have taken longer to resolve than desired. With today’s announcement, you can tailor and fine-tune the settings of our autonomous edge system by yourself to quickly improve the accuracy of the protection for your specific network needs.
For the Advanced TCP Protection ruleset, for now, we’ve only exposed the ability to enable or disable it as a whole in the dashboard. To enable or disable the ruleset per IP prefix, you must use the API. At this time, when initially onboarding to Cloudflare, the Cloudflare team must first create a policy for you. After onboarding, if you need to change the sensitivity thresholds, use Monitor mode, or add filter expressions you must contact Cloudflare Support. In upcoming releases, this too will be available via the dashboard and API without requiring help from our Support team.
Pre-existing customizations
If you previously contacted Cloudflare Support to apply customizations, your customizations have been preserved, and you can visit the dashboard to view the settings of the Network-layer DDoS Protection ruleset and change them if you need. If you require any changes to your Advanced TCP Protection customizations, please reach out to Cloudflare Support.
If so far you didn’t have the need to customize this protection, there is no action required on your end. However, if you would like to view and customize your DDoS protection settings, follow this dashboard guide or review the API documentation to programmatically configure the DDoS protection settings.
Helping Build a Better Internet
At Cloudflare, everything we do is guided by our mission to help build a better Internet. The DDoS team’s vision is derived from this mission: our goal is to make the impact of DDoS attacks a thing of the past. Our first step was to build the autonomous systems that detect and mitigate attacks independently. Done. The second step was to expose the control plane over these systems to our customers (announced today). Done. The next step will be to fully automate the configuration with an auto-pilot feature — training the systems to learn your specific traffic patterns to automatically optimize your DDoS protection settings. You can expect many more improvements, automations, and new capabilities to keep your Internet properties safe, available, and performant.
At the end of 2020, Cloudflare empowered organizations to start building a private network on top of our network. Using Cloudflare Tunnel on the server side, and Cloudflare WARP on the client side, the need for a legacy VPN was eliminated. Fast-forward to today, and thousands of organizations have gone on this journey with us — unplugging their legacy VPN concentrators, internal firewalls, and load balancers. They’ve eliminated the need to maintain all this legacy hardware; they’ve dramatically improved speeds for end users; and they’re able to maintain Zero Trust rules organization-wide.
We started with TCP, which is powerful because it enables an important range of use cases. However, to truly replace a VPN, you need to be able to cover UDP, too. Starting today, we’re excited to provide early access to UDP on Cloudflare’s Zero Trust platform. And even better: as a result of supporting UDP, we can offer Internal DNS — so there’s no need to migrate thousands of private hostnames by hand to override DNS rules. You can get started with Cloudflare for Teams for free today by signing up here; and if you’d like to join the waitlist to gain early access to UDP and Internal DNS, please visit here.
The topology of a private network on Cloudflare
Building out a private network has two primary components: the infrastructure side, and the client side.
The infrastructure side of the equation is powered by Cloudflare Tunnel, which simply connects your infrastructure (whether that be a singular application, many applications, or an entire network segment) to Cloudflare. This is made possible by running a simple command-line daemon in your environment to establish multiple secure, outbound-only, load-balanced links to Cloudflare. Simply put, Tunnel is what connects your network to Cloudflare.
On the other side of this equation, we need your end users to be able to easily connect to Cloudflare and, more importantly, your network. This connection is handled by our robust device client, Cloudflare WARP. This client can be rolled out to your entire organization in just a few minutes using your in-house MDM tooling, and it establishes a secure, WireGuard-based connection from your users’ devices to the Cloudflare network.
Now that we have your infrastructure and your users connected to Cloudflare, it becomes easy to tag your applications and layer on Zero Trust security controls to verify both identity and device-centric rules for each and every request on your network.
Up until now though, only TCP was supported.
Extending Cloudflare Zero Trust to support UDP
Over the past year, with more and more users adopting Cloudflare’s Zero Trust platform, we have gathered data surrounding all the use cases that are keeping VPNs plugged in. Of those, the most common need has been blanket support for UDP-based traffic. Modern protocols like QUIC take advantage of UDP’s lightweight architecture — and at Cloudflare, we believe it is part of our mission to advance these new standards to help build a better Internet.
Today, we’re excited to open an official waitlist for those who would like early access to Cloudflare for Teams with UDP support.
What is UDP and why does it matter?
UDP is a vital component of the Internet. Without it, many applications would be rendered woefully inadequate for modern use. Applications which depend on near real time communication such as video streaming or VoIP services are prime examples of why we need UDP and the role it fills for the Internet. At their core, however, TCP and UDP achieve the same results — just through vastly different means. Each has their own unique benefits and drawbacks, which are always felt downstream by the applications that utilize them.
Here’s a quick example of how they both work, if you were to ask a question to somebody as a metaphor. TCP should look pretty familiar: you would typically say hi, wait for them to say hi back, ask how they are, wait for their response, and then ask them what you want.
UDP, on the other hand, is the equivalent of just walking up to someone and asking what you want without checking to make sure that they’re listening. With this approach, some of your question may be missed, but that’s fine as long as you get an answer.
Like the conversation above, with UDP many applications actually don’t care if some data gets lost; video streaming or game servers are good examples here. If you were to lose a packet in transit while streaming, you wouldn’t want the entire stream to be interrupted until this packet is received — you’d rather just drop the packet and move on. Another reason application developers may utilize UDP is because they’d prefer to develop their own controls around connection, transmission, and quality control rather than use TCP’s standardized ones.
For Cloudflare, end-to-end support for UDP-based traffic will unlock a number of new use cases. Here are a few we think you’ll agree are pretty exciting.
Internal DNS Resolvers
Most corporate networks require an internal DNS resolver to disseminate access to resources made available over their Intranet. Your Intranet needs an internal DNS resolver for many of the same reasons the Internet needs public DNS resolvers. In short, humans are good at many things, but remembering long strings of numbers (in this case IP addresses) is not one of them. Both public and internal DNS resolvers were designed to solve this problem (and much more) for us.
In the corporate world, it would be needlessly painful to ask internal users to navigate to, say, 192.168.0.1 to simply reach Sharepoint or OneDrive. Instead, it’s much easier to create DNS entries for each resource and let your internal resolver handle all the mapping for your users as this is something humans are actually quite good at.
Under the hood, DNS queries generally consist of a single UDP request from the client. The server can then return a single reply to the client. Since DNS requests are not very large, they can often be sent and received in a single packet. This makes support for UDP across our Zero Trust platform a key enabler to pulling the plug on your VPN.
Thick Client Applications
Another common use case for UDP is thick client applications. One benefit of UDP we have discussed so far is that it is a lean protocol. It’s lean because the three-way handshake of TCP and other measures for reliability have been stripped out by design. In many cases, application developers still want these reliability controls, but are intimately familiar with their applications and know these controls could be better handled by tailoring them to their application. These thick client applications often perform critical business functions and must be supported end-to-end to migrate. As an example, legacy versions of Outlook may be implemented through thick clients where most of the operations are performed by the local machine, and only the sync interactions with Exchange servers occur over UDP.
Again, UDP support on our Zero Trust platform now means these types of applications are no reason to remain on your legacy VPN.
And more…
A huge portion of the world’s Internet traffic is transported over UDP. Often, people equate time-sensitive applications with UDP, where occasionally dropping packets would be better than waiting — but there are a number of other use cases, and we’re excited to be able to provide sweeping support.
How can I get started today?
You can already get started building your private network on Cloudflare with our tutorials and guides in our developer documentation. Below is the critical path. And if you’re already a customer, and you’re interested in joining the waitlist for UDP and Internal DNS access, please skip ahead to the end of this post!
Connecting your network to Cloudflare
First, you need to install cloudflared on your network and authenticate it with the command below:
cloudflared tunnel login
Next, you’ll create a tunnel with a user-friendly name to identify your network or environment.
cloudflared tunnel create acme-network
Finally, you’ll want to configure your tunnel with the IP/CIDR range of your private network. By doing this, you’re making the Cloudflare WARP agent aware that any requests to this IP range need to be routed to our new tunnel.
cloudflared tunnel route ip add 192.168.0.1/32
Then, all you need to do is run your tunnel!
Connecting your users to your network
To connect your first user, start by downloading the Cloudflare WARP agent on the device they’ll be connecting from, then follow the steps in our installer.
Next, you’ll visit the Teams Dashboard and define who is allowed to access our network by creating an enrollment policy. This policy can be created under Settings > Devices > Device Enrollment. In the example below, you can see that we’re requiring users to be located in Canada and have an email address ending @cloudflare.com.
Once you’ve created this policy, you can enroll your first device by clicking the WARP desktop icon on your machine and navigating to preferences > Account > Login with Teams.
Last, we’ll remove the IP range we added to our Tunnel from the Exclude list in Settings > Network > Split Tunnels. This will ensure this traffic is, in fact, routed to Cloudflare and then sent to our private network Tunnel as intended.
In addition to the tutorial above, we also have in-product guides in the Teams Dashboard which go into more detail about each step and provide validation along the way.
To enroll your first device into WARP, navigate to My Team > Devices.
What’s Next
We’re incredibly excited to release our waitlist today and even more excited to launch this feature in the coming weeks. We’re just getting started with private network Tunnels and plan to continue adding more support for Zero Trust access rules for each request to each internal DNS hostname after launch. We’re also working on a number of efforts to measure performance and to ensure we remain the fastest Zero Trust platform — making using us a delight for your users, compared to the pain of using a legacy VPN.
Supply chain attacks are a growing concern for CIOs and security professionals.
During a supply chain attack, an attacker compromises a third party tool or library that is being used by the target application. This normally results in the attacker gaining privileged access to the application’s environment allowing them to steal private data or perform subsequent attacks. For example, Magecart, is a very common type of supply chain attack, whereby the attacker skimms credit card data from e-commerce site checkout forms by compromising third party libraries used by the site.
To help identify and mitigate supply chain attacks in the context of web applications, today we are launching Page Shield in General Availability (GA).
With Page Shield you gain visibility on what scripts are running on your application and can be notified when they have been compromised or are showing malicious behaviour such as attempting to exfiltrate user data.
We’ve worked hard to make Page Shield easy to use: you can find it under the Firewall tab and turn it on with one simple click. No additional configuration required. Alerts can be set up separately on an array of different events.
Earlier today, we announced our acquisition of Zaraz, a tool built on Workers that allows customers to easily load third-party tools on the cloud, instead of loading their JavaScript code in the browser, directly from the Cloudflare UI with immediate performance and security benefits. But not all applications use, or wish to use, a third-party manager. Nonetheless, we have got you covered.
Page Shield leverages our position in the network as a reverse proxy to receive information directly from the browser about what JavaScript files and modules are being loaded. We then provide visibility, analyse, and warn you whenever a JavaScript file is showing malicious behaviour.
Examples of compromised JavaScript files include Magecart attacks, cryptomining, and adware. With the ever-growing popularity of SaaS-based applications and services, it is very rare to find an application that does not leverage or load JavaScript code directly from third parties out of the application owner’s control, making detecting and mitigating compromised files even harder.
How hard is client-side security?
Early indications from Page Shield indicate that, on average, any given application is loading scripts from eight third-party hosts. These hosts could be owned by large enterprises such as Google, to smaller companies that provide “plug and play” modules that quickly enhance web application functionality (think chat systems, date pickers, checkout platforms etc.). Each one of these third parties can be a target for a potential supply chain attack, making the attack surface very large and difficult to monitor.
To make matters worse, things change fast. On average about 50% of applications are loading scripts from new third party hosts every month. This indicates that the attack surface is not only large, but also changing rapidly.
How does Page Shield work?
As with any security product, we can think of Page Shield as providing visibility, detection, mitigation, and prevention. The first step is visibility.
Visibility
When turned on, the current iteration of Page Shield uses a content security policy (CSP) deployed with a report-only directive to collect information from the browser. This allows us to provide you with a list of all scripts running on your application.
In HTTP terms, this is an HTTP response header added to a sample of page responses from the origin server back to the browser. The CSP header looks like this:
The above header instructs the browser that no scripts should be loaded (script-src 'none') and to report any violation to the endpoint provided (report-uri /cdn-cgi/script_monitor/report). Also note that the violation report endpoint resolves to the Cloudflare network where it is processed, so no additional traffic reaches the origin server.
Each violation report sent by the browser, implemented as an HTTP POST request, provides us with information on the script. Here is an example:
The page the script was loaded from (document-uri)
The referrer, if applicable
Which CSP directive was violated
The full CSP that contains the directive
The full link to the JavaScript file
The response code the browser received when loading the file. In the example above, the response code is 200, which indicates that the file was loaded successfully.
By collating all the information provided in the reports and enhancing it with additional data, we are able to provide detailed information on every script being loaded by your application, both via the Cloudflare UI and API.
All Cloudflare Pro zones have access to our Page Shield script reports. Additionally, Business and Enterprise zones have access to page attribution information, allowing you to quickly identify where a script is being loaded from within your application. Business and Enterprise zones can also set up alerts on a number of script change events.
Detection
Application owners might be leveraging content security policies already to ensure only specific scripts are loaded. However, CSPs often tend to be too liberal, and browsers provide no native mechanisms to detect when JavaScript files show malicious behaviour. This includes JavaScript code that is allowed to be loaded according to a content security policy, highly reducing their effectiveness.
With Page Shield we believe to have a real opportunity to help our customers with malicious behaviour detection.
For any JavaScript file found in your zone by the system, we will perform a number of actions aimed at detecting malicious behaviour:
Any JavaScript file loaded from a hostname categorised as malicious in our threat feeds will be flagged appropriately. This includes parent domains.
Similarly, if specific URLs are categorised as malicious in our feeds, these will also be flagged. In this latter case, given the exact file has been categorized as malicious, an attack is likely ongoing.
Finally, we will download the file and run it through our classifier. The classifier performs deobfuscation, normalisation and decoding steps before looking for correlations between form field fetches and data exfiltration calls. The stronger the correlation the more likely the script is performing a Magecart type attack. We will post additional technical details about our technology in follow-up posts — stay tuned!
Our Enterprise customers can purchase the full set of Page Shield capabilities, including the detection capabilities. Please contact your account manager.
As we build the product further through next year, we plan to add additional detection signals as well as improve upon our classifier and detect additional attack types, including adware, ransomware and crypto mining.
Once a malicious signal triggers on a JavaScript file, Cloudflare is able to notify you via an alert that can be set up via email, webhook, PagerDuty, and other formats.
Although not included in this immediate release, we are already hard at work to bring both prevention and mitigation options to Page Shield:
Prevention by allowing easy CSP generation based on observed active scripts, allowing for editing and redeploying of policies as required either via the dashboard or directly via API as part of a deployment pipeline.
Blocking by leveraging our proxy to allow for malicious scripts to be removed inline from HTTP response bodies.
Get started
If you already have a website on Cloudflare, upgrade to any of our paid plans to start leveraging Page Shield features today without any additional configuration required. You can also use our API to leverage Page Shield features.
If you do not have a website on Cloudflare, signing up only takes 5 minutes!
Today, we’re announcing Foundation DNS, Cloudflare’s new premium DNS offering that provides unparalleled reliability, supreme performance and is able to meet the most complex requirements of infrastructure teams.
Let’s talk money first
When you’re signing an enterprise DNS deal, usually DNS providers request three inputs from you in order to generate a quote:
Number of zones
Total DNS queries per month
Total DNS records across all zones
Some are considerably more complicated and many have pricing calculators or opaque “Contact Us” pricing. Planning a budget around how you may grow brings unnecessary complexity, and we think we can do better. Why not make this even simpler? Here you go: We decided to charge Foundation DNS based on a single input for our enterprise customers: Total DNS queries per month.This way, we expect to save companies money and even more importantly, remove complexity from their DNS bill.
And don’t worry, just like the rest of our products, DDoS mitigation is still unmetered. There won’t be any hidden overage fees in case your nameservers are DDoS’d or the number of DNS queries exceeds your quota for a month or two.
Why is DNS so important?
The Domain Name System (DNS) is nearly as old as the Internet itself. It was originally defined in RFC882 and RFC883 in 1983 out of the need to create a mapping between hostnames and IP addresses. Back then, the authors wisely stated: “[The Internet] is a large system and is likely to grow much larger.” [RFC882]. Today there are almost 160 Million domain names just under the .com, one of the largest Top Level Domains (TLD) [source].
By design, DNS is a hierarchical and highly distributed system, but as an end user you usually only communicate with a resolver (1) that is either assigned or operated by your Internet Service Provider (ISP) or directly configured by your employer or yourself. The resolver communicates with one of the root servers (2), the responsible TLD server (3) and the authoritative nameserver (4) of the domain in question. In many cases all of these four parties are operated by a different entity and located in different regions, maybe even continents.
As we have seen in the recent past, if your DNS infrastructure goes down you are in serious trouble, and it likely will cost you a lot of money and potentially damage your reputation. So as a domain owner you want that DNS lookups to your domain are answered 100% of the time and ideally as quickly as possible. So what can you do? You cannot influence which resolver your users have configured. You cannot influence the root server. You can choose which TLD server is involved by picking a domain name with the respective TLD. But if you are bound to a certain TLD for other reasons then that is out of your control as well. What you can easily influence is the provider for your authoritative nameservers. So let’s take a closer look at Cloudflare’s authoritative DNS offering.
A look at Cloudflare’s Authoritative DNS
Authoritative DNS is one of our oldest products, and we have spent a lot of time making it great. All DNS queries are answered from our global anycast network with a presence in more than 250 cities. This way we can deliver supreme performance while always guaranteeing global availability. And of course, we leverage our extensive experience in mitigating DDoS attacks to prevent anyone from knocking down our nameservers and with that the domains of our customers.
DNS is critically important to Cloudflare because up until the release of Magic Transit, DNS was how every user on the Internet was directed to Cloudflare to protect and accelerate our customer’s applications. If our DNS answers were slow, Cloudflare was slow. If our DNS answers were unavailable, Cloudflare was unavailable. Speed and reliability of our authoritative DNS is paramount to the speed and reliability of Cloudflare, as it is to our customers. We have also had our customers push our DNS infrastructure as they’ve grown with Cloudflare. Today our largest customer zone has more than 3 million records and the top 5 are reaching almost 10 million records combined. Those customers rely on Cloudflare to push new DNS record updates to our edge in seconds, not minutes. Due to this importance and our customer’s needs, over the years we have grown our dedicated DNS engineering team focused on keeping our DNS stack fast and reliable.
The security of the DNS ecosystem is also important. Cloudflare has always been a proponent of DNSSEC. Signing and validating DNS answers through DNSSEC ensures that an on-path attacker cannot hijack answers and redirect traffic. Cloudflare has always offered DNSSEC for free on all plan levels, and it will continue to be a no charge option for Foundation DNS. For customers who also choose to use Cloudflare as a registrar, simple one-click deployment of DNSSEC is another key feature that ensures our customers’ domains are not hijacked, and their users are protected. We support RFC 8078 for one-click deployment on external registrars as well.
But there are other issues that can bring parts of the Internet to a halt and these are mostly out of our control: route leaks or even worse route hijacking. While DNSSEC can help with mitigating route hijacks, unfortunately not all recursive resolvers will validate DNSSEC. And even if the resolver does validate, a route leak or hijack to your nameservers will still result in downtime. If all your nameserver IPs are affected by such an event, your domain becomes unresolvable.
With many providers each of your nameservers usually resolves to only one IPv4 and one IPv6 address. If that IP address is not reachable — for example because of network congestion or, even worse, a route leak — the entire nameserver becomes unavailable leading to your domain becoming unresolvable. Even worse, some providers even use the same IP subnet for all their nameservers. So if there is an issue with that subnet all nameservers are down.
All nameserver IPs are part of 205.251.192.0/21. Thankfully, AWS is now signing their ranges through RPKI and this makes it less likely to leak… provided that the resolver ISP is validating RPKI. But if the resolver ISP does not validate RPKI and should this subnet be leaked or hijacked, resolvers wouldn’t be able to reach any of the nameservers and aws.com would become unresolvable.
It goes without saying that Cloudflare signs all of our routes and are pushing the rest of the Internet to minimize the impact of route leaks, but what else can we do to ensure that our DNS systems remain resilient through route leaks while we wait for RPKI to be ubiquitously deployed?
Today, when you’re using Cloudflare DNS on the Free, Pro, Business or Enterprise plan, your domain gets two nameservers of the structure <name>.ns.cloudflare.com where <name> is a random first name.
Now, as we learned before, in order for a domain to be available, its nameservers have to be available. This is why each of these nameservers resolves to 3 anycast IPv4 and 3 anycast IPv6 addresses.
The essential detail to notice here is that each of the 3 IPv4 and 3 IPv6 addresses is from a different /8 IPv4 (/45 for IPv6) block. So in order for your nameservers to become unavailable via IPv4, the route leak would have to affect exactly the corresponding subnets across all three /8 IPv4 blocks. This type of event, while theoretically is possible, is virtually impossible in practical terms.
How can this be further improved?
Customers using Foundation DNS will be assigned a new set of advanced nameservers hosted on foundationdns.com and foundationdns.net. These nameservers will be even more resilient than the default Cloudflare nameservers. We will be announcing more details about how we’re achieving this early next year, so stay tuned. All external Cloudflare domains (such as cloudflare.com) will transition to these nameservers in the new year.
There is even more
We’re glad to announce that we are launching two highly requested features:
Support for outgoing zone transfers for Secondary DNS
Logpush for authoritative and secondary DNS queries
Both of them will be available as part of Foundation DNS and to enterprise customers without any additional costs. Let’s take a closer look at each of these and see how they make our DNS offering even better.
Support for outgoing zone transfers for Secondary DNS
What is Secondary DNS, and why is it important? Many large enterprises have requirements to use more than one DNS provider for redundancy in case one provider becomes unavailable. They can achieve this by adding their domain’s DNS records on two independent platforms and manually keeping the zone files in sync — this is referred to as “multi-primary” setup. With Secondary DNS there are two mechanisms how this can be automated using a “primary-secondary” setup:
DNS NOTIFY: The primary nameserver notifies the secondary on every change on the zone. Once the secondary receives the NOTIFY, it sends a zone transfer request to the primary to get in sync with it.
SOA query: Here, the secondary nameserver regularly queries the SOA record of the zone and checks if the serial number that can be found on the SOA record is the same with the latest serial number the secondary has stored in it’s SOA record of the zone. If there is a new version of the zone available, it sends a zone transfer request to the primary to get those changes.
Alex Fattouche has written a very insightful blog post about how Secondary DNS works behind the scenes if you want to learn more about it. Another flavor of the primary-secondary setup is to hide the primary, thus referred to as “hidden primary”. The difference of this setup is that only the secondary nameservers are authoritative — in other words configured at the domain’s registrar. The diagram below illustrates the different setups.
Since 2018, we have been supporting primary-secondary setups where Cloudflare takes the role of the secondary nameserver. This means from our perspective that we are accepting incoming zone transfers from the primary nameservers.
Starting today, we are now also supporting outgoing zone transfers, meaning taking the role of the primary nameserver with one or multiple external secondary nameservers receiving zone transfers from Cloudflare. Exactly as for incoming transfers, we are supporting
zone transfers via AXFR and IXFR
automatic notifications via DNS NOTIFY to trigger zone transfers on every change
signed transfers using TSIG to ensure zone files are authenticated during transfer
Logpush for authoritative and secondary DNS
Here at Cloudflare we love logs. In Q3 2021, we processed 28 Million HTTP requests per second and 13.6 Million DNS queries per second on average and blocked 76 Billion threats each day. All these events are stored as logs for a limited time frame in order to provide our users near real-time analytics in the dashboard. For those customers who want to — or have to — permanently store these logs we’ve built Logpush back in 2019. Logpush allows you to stream logs in near real time to one of our analytics partners Microsoft Azure Sentinel, Splunk, Datadog and Sumo Logic or to any cloud storage destination with R2-compatible API.
Today, we’re adding one additional data set for Logpush: DNS logs. In order to configure Logpush and stream DNS logs for your domain, just head over to the Cloudflare dashboard, create a new Logpush job, select DNS logs and configure the log fields you’re interested in:
Check out our developer documentation for detailed instructions on how to do this through the API and for a thorough description of the new DNS log fields.
One more thing (or two…)
When looking at the entirety of DNS within your infrastructure, it’s important to review how your traffic is flowing through your systems and how that traffic is behaving. At the end of the day, there is only so much processing power, memory, server capacity, and overall compute resources available. One of the best and important tools we have available is Load Balancing and Health Monitoring!
Cloudflare has provided a Load Balancing solution since 2016, supporting customers to leverage their existing resources in a scalable and intelligent manner. But our Load Balancer was limited to A, AAAA, and CNAME records. This covered a lot of major use cases required by customers, but did not cover all of them. Many customers have more needs such as load balancing MX or email server traffic, SRV records to declare which ports and weight that respective traffic should travel across for a specific service, HTTPS records to ensure the respective traffic uses the secure protocol regardless of port and many more. We want to ensure that our customers’ needs are covered and support their ability to align business goals with technical implementation.
We are happy to announce that we have added additional Health Monitoring methods to support Load Balancing MX, SRV, HTTPS and TXT record traffic without any additional configuration necessary. Create your respective DNS records in Cloudflare and set your Load Balancer as the destination…it’s as easy as that! By leveraging ICMP Ping, SMTP, and UDP-ICMP methods, customers will always have a pulse on the health of their servers and be able to apply intelligent steering decisions based on the respective health information.
When thinking about intelligent steering, there is no one size fits all answer. Different businesses have different needs, especially when looking at where your servers are located around the globe, and where your customers are situated. A common rule of thumb to follow is to place servers where your customers are. This ensures they have the most performant and localized experience possible. One common scenario is to steer your traffic based on where your end-user request originates and create a mapping to the server closest to that area. Cloudflare’s geo steering capability allows our customers to do just that — easily create a mapping of regions to pools, ensuring if we see a request originate from Eastern Europe, to send that request to the proper server to suffice that request. But sometimes, regions can be quite large and lend to issues around not being able to tightly couple together that mapping as closely as one might like.
Today, we are very excited to announce country support within our Geo Steering functionality. Now, customers will be able to choose either one of our thirteen regions, or a specific country to map against their pools to give further granularity and control to how customers traffic should behave as it travels through their system. Both country-level steering and our new health monitoring methods to support load balancing more DNS records will be available in January 2022!
Advancing the DNS Ecosystem
Furthermore, we have some other exciting news to share: We’re finishing the work on Multi-Signer DNSSEC (RFC8901) and plan to roll this out in Q1 2022. Why is this important? Two common requirements of large enterprises are:
Redundancy: Having multiple DNS providers responding authoritatively for their domains
Authenticity: Deploying DNSSEC to ensure DNS responses can be properly authenticated
Both can be achieved by having the primary nameserver sign the domain and transfer its DNS records plus the record signatures to the secondary nameserver which will serve both as is. This setup is supported with Cloudflare Secondary DNS today. What cannot be supported when transferring pre-signed zones are non-standard DNS features like country-level steering. This is where Multi-Signer DNSSEC comes in. Both DNS providers need to know the signing keys of the other provider and perform their own online (or on-the-fly) signing. If you’re curious to learn more about how Multi-Signer DNSSEC works, go check out this excellent blog post published by APNIC.
Last but not least, Cloudflare is joining the DNS Operations, Analysis, and Research Center (DNS-OARC) as a gold member. Together with other researchers and operators of DNS infrastructure we want to tackle the most challenging problems and continuously work on implementing new standards and features.
While we’ve been at DNS since day one of Cloudflare, we’re still just getting started. We know there are more granular and specific features our future customers will ask of us and the launch of Foundation DNS is our stake in the ground that we will continue to invest in all levels of DNS while building the most feature rich enterprise DNS platform on the planet. If you have ideas, let us know what you’ve always dreamed your DNS provider would do. If you want to help build these features, we are hiring.
We’re excited to announce that customers will soon be able to store their Cloudflare logs on Cloudflare R2 storage. Storing your logs on Cloudflare will give CIOs and Security Teams an opportunity to consolidate their infrastructure; creating simplicity, savings and additional security.
Cloudflare protects your applications from malicious traffic, speeds up connections, and keeps bad actors out of your network. The logs we produce from our products help customers answer questions like:
Why are requests being blocked by the Firewall rules I’ve set up?
Why are my users seeing disconnects from my applications that use Spectrum?
Why am I seeing a spike in Cloudflare Gateway requests to a specific application?
Storage on R2 adds to our existing suite of logging products. Storing logs on R2 fills in gaps that our customers have been asking for: a cost-effective solution to store logs for any of our products for any period of time.
Goodbye to old school logging
Let’s rewind to the early 2000s. Most organizations were running their own self-managed infrastructure: network devices, firewalls, servers and all the associated software. Each company has to manage logs coming from hundreds of sources in the IT stack. With dedicated storage needed for retaining an endless volume of logs, specialized teams are required to build an ETL pipeline and make the data actionable.
Fast-forward to the 2010s. Organizations are transitioning to using managed services for their IT functions. As a result of this shift, the way that customers collect logs for all their services have changed too. With managed services, much of the logging load is shifted off of the customer.
The challenge now: collecting logs from a combination of managed services, each of which has its own quirks. Logs can be sent at varying latencies, in different formats and some are too detailed while others not detailed enough. To gain a single pane view of their IT infrastructure, companies need to build or buy a SIEM solution.
Cloudflare replaces these sets of managed services. When a customer onboards to Cloudflare, we make it super easy to gain visibility to their traffic that hits our network. We’ve built analytics for many of our products, such as CDN, Firewall, Magic Transit and Spectrum to both view high level trends and dig into patterns by slicing and dicing data.
Analytics are a great way to see data at an aggregate level, but we know that raw logs are important to our customers as well, so we’ve built out a set of logging products.
Logging today
During Speed Week we announced Instant Logs to show customers traffic as it hits their domain. Instant Logs is perfect for live debugging and triaging use cases. Monitor your traffic, make a config change and instantly view its impacts. In cases where you need to retroactively inspect your logs, we have Logpush.
We’ve built an impressive logging pipeline to get data from the 250+ cities that house our data centers to our customers in under a minute using Logpush. If your organization has existing practices for getting data across your stack into one place, we support Logpush to a variety of cloud storage or SIEM destinations. We also have partnerships in place with major SIEM platforms to surface Cloudflare data in ways that are meaningful to our customers.
Last but not least is Logpull. Using Logpull, customers can access HTTP request logs using our REST API. Our customers like Logpull because it’s easy to configure, they don’t have to worry about storing logs on a third party, and you can pull data ad hoc for up to seven days.
Why Cloudflare storage?
The top four requests we’ve heard from customers when it comes to logs are:
I have tight budgets and need low cost log storage.
They should be low effort to set up and maintain.
I should be able to store logs for as long as I need to.
I want to access my logs on Cloudflare for any product.
For many of our customers, Cloudflare is one of the most important data sources, and it also generates more data than other applications on their IT stack. R2 is significantly cheaper than other cloud providers, so our customers don’t need to compromise by sampling or leaving out logs from products all together in order to cut down on costs.
Just like the simplicity of Logpull, log storage on R2 will be quick and easy. With a one click setup, we’ll store your logs, and you don’t have to worry about any configuration details. Retention is totally in our customer’s control to match the security and compliance needs of their business. With R2, you can also store your logs for any products we have logging for today (and we’re always adding more as our product line expands).
Log storage; we’re just getting started
With log storage on Cloudflare, we’re creating the building blocks to allow customers to perform log analysis and forensics capabilities directly on Cloudflare. Whether conducting an investigation, responding to a support request or addressing an incident, using analytics for a birds eye view and inspecting logs to determine the root cause is a powerful combination.
If you’re interested in getting notified when you can store your logs on Cloudflare, sign up through this form.
We’re always looking for talented engineers to take on the challenges of working with data at an incredible scale. If you’re interested apply here.
Your team can now use Cloudflare’s Browser Isolation service to protect against phishing attacks and credential theft inside the web browser. Users can browse more of the Internet without taking on the risk. Administrators can define Zero Trust policies to prohibit keyboard input and transmitting files during high risk browsing activity.
Earlier this year, Cloudflare Browser Isolation introduced data protection controls that take advantage of the remote browser’s ability to manage all input and outputs between a user and any website. We’re excited to extend that functionality to apply more controls such as prohibiting keyboard input and file uploads to avert phishing attacks and credential theft on high risk and unknown websites.
Challenges defending against unknown threats
Administrators protecting their teams from threats on the open Internet typically implement a Secure Web Gateway (SWG) to filter Internet traffic based on threat intelligence feeds. This is effective at mitigating known threats. In reality, not all websites fit neatly into malicious or non-malicious categories.
For example, a parked domain with typo differences to an established web property could be legitimately registered for an unrelated product or become weaponized as a phishing attack. False-positives are tolerated by risk-averse administrators but come at the cost of employee productivity. Finding the balance between these needs is a fine art, and when applied too aggressively it leads to user frustration and the increased support burden of micromanaging exceptions for blocked traffic.
Legacy secure web gateways are blunt instruments that provide security teams limited options to protect their teams from threats on the Internet. Simply allowing or blocking websites is not enough, and modern security teams need more sophisticated tools to fully protect their teams without compromising on productivity.
Intelligent filtering with Cloudflare Gateway
Cloudflare Gateway provides a secure web gateway to customers wherever their users work. Administrators can build rules that include blocking security risks, scanning for viruses, or restricting browsing based on SSO group identity among other options. User traffic leaves their device and arrives at a Cloudflare data center close to them, providing security and logging without slowing them down.
Unlike the blunt instruments of the past, Cloudflare Gateway applies security policies based on the unique magnitude of data Cloudflare’s network processes. For example, Cloudflare sees just over one trillion DNS queries every day. We use that data to build a comprehensive model of what “good” DNS queries look like — and which DNS queries are anomalous and could represent DNS tunneling for data exfiltration, for example. We use our network to build more intelligent filtering and reduce false positives. You can review that research as well with Cloudflare Radar.
However, we know some customers want to allow users to navigate to destinations in a sort of “neutral” zone. Domains that are newly registered, or newly seen by DNS resolvers, can be the home of a great new service for your team or a surprise attack to steal credentials. Cloudflare works to categorize these as soon as possible, but in those initial minutes users have to request exceptions if your team blocks these categories outright.
Safely browsing the unknown
Cloudflare Browser Isolation shifts the risk of executing untrusted or malicious website code from the user’s endpoint to a remote browser hosted in a low-latency data center. Rather than aggressively blocking unknown websites, and potentially impacting employee productivity, Cloudflare Browser Isolation provides administrators control over how users can interact with risky websites.
Cloudflare’s network intelligence tracks higher risk Internet properties such as Typosquatting and New Domains. Websites in these categories could be benign websites, or phishing attacks waiting to be weaponized. Risk-averse administrators can protect their teams without introducing false-positives by isolating these websites and serving the website in a read-only mode by disabling file uploads, downloads and keyboard input.
Users are able to safely browse the unknown website without risk of leaking credentials, transmitting files and falling victim to a phishing attack. Should the user have a legitimate reason to interact with an unknown website they are advised to contact their administrator to obtain elevated permissions while browsing the website.
Cloudflare Browser Isolation is integrated natively into Cloudflare’s Secure Web Gateway and Zero Trust Network Access services, and unlike legacy remote browser isolation solutions does not require IT teams to piece together multiple disparate solutions or force users to change their preferred web browser.
The Zero Trust threat and data protection that Browser Isolation provides make it a natural extension for any company trusting a secure web gateway to protect their business. We’re currently including it with our Cloudflare for Teams Enterprise Plan at no additional charge.1Get started at our Zero Trust web page.
Cloudflare Radar launched as part of last year’s Birthday Week. We described it as a“newspaper for the Internet”, that gives“any digital citizen the chance to see what’s happening online [which] is part of our pursuit to help build a better, more informed, Internet”.
Since then, we have made considerable strides, including adding dedicated pages to cover how key events such as the UEFA Euro 2020 Championship and the Tokyo Olympics shaped Internet usage in participating countries, and added a Radar section for interactive deep-dive reports on topics such as DDoS.
Today, Radar has four main sections:
Main page with near real-time information about global Internet usage.
Internet usage details by country (see, for example, Portugal).
Domain insights, where searching for a domain returns traffic, registration and certificate information about it.
Deep-dive reports on complex and often underreported topics.
Cloudflare’s global network spans more than 250 cities in over 100 countries. Because of this, we have the unique ability to see both macro and micro trends happening online, including insights on how traffic is flowing around the world or what type of attacks are prevalent in a certain country.
Radar Maps will make this information even richer and easier to consume.
Introducing Radar Maps
Starting today, Radar has two new data visualizations to help us share more insights from our data and represent what’s happening on the Internet.
Geographical distribution of application-level attacks
Note: The identified location of the devices involved in the attack may not be the actual location of the people performing the attack.
Geographical distribution of application-level attacks, in both directions
Cyber threats are more common than ever. In the third quarter of 2021 Cloudflare blocked an average of 76 billion cyber threats each day and had visibility over many more. Helping build a better Internet also means giving people more visibility over our data. That’s why we’ve made a near real-time view of the types of attacks, protocol distribution, and attack volume over time available on Radar from day one.
Now we’re adding a geographical representation of origin and target of such attacks using two new visualizations.
First, we have a global map drawing near real-time directional lines of the attacks, also known as a “pew pew” map — thank you, 1983 and WarGames.
Second, we have Sankey diagrams that are great for representing how strongly the attacks are flowing from one country to the other.
We hope you like what we’ve built with our new Radar Maps. Radar, unlike any other insights platform out there, is totally built on Cloudflare components and our edge computing platform — Workers and Workers KV. This gives us new and unique ways of representing data at scale. So do keep checking back radar.cloudflare.com to see the Internet evolving in (near) real-time.
Until today, Cloudflare Workers has been a great solution to setting headers, but we wanted to create an even smoother developer experience. Today, we’re excited to announce that Pages now natively supports custom headers on your projects! Simply create a _headers file in the build directory of your project and within it, define the rules you want to apply.
/developer-docs/*
  X-Hiring: Looking for a job? We're hiring engineers
(https://www.cloudflare.com/careers/jobs)
What can you set with custom headers?
Being able to set custom headers is useful for a variety of reasons — let’s explore some of your most popular use cases.
Search Engine Optimization (SEO)
When you create a Pages project, a pages.dev deployment is created for your project which enables you to get started immediately and easily preview changes as you iterate. However, we realize this poses an issue — publishing multiple copies of your website can harm your rankings in search engine results. One way to solve this is by disabling indexing on all pages.dev subdomains, but we see many using their pages.dev subdomain as their primary domain. With today’s announcement you can attach headers such as X-Robots-Tag to hint to Google and other search engines how you’d like your deployment to be indexed.
For example, to prevent your pages.dev deployment from being indexed, you can add the following to your _headers file:
Customizing headers doesn’t just help with your site’s search result ranking — a number of browser security features can be configured with headers. A few headers that can enhance your site’s security are:
X-Frame-Options: You can prevent click-jacking by informing browsers not to embed your application inside another (e.g. with an <iframe>).
X-Content-Type-Option: nosniff: To prevent browsers from interpreting a response as any other content-type than what is defined with the Content-Type header.
Referrer-Policy: This allows you to customize how much information visitors give about where they’re coming from when they navigate away from your page.
Permissions-Policy: Browser features can be disabled to varying degrees with this header (recently renamed from Feature-Policy).
Content-Security-Policy: And if you need fine-grained control over the content in your application, this header allows you to configure a number of security settings, including similar controls to the X-Frame-Options header.
You can configure these headers to protect an /app/* path, with the following in your _headers file:
Modern browsers implement a security protection called CORS or Cross-Origin Resource Sharing. This prevents one domain from being able to force a user’s action on another. Without CORS, a malicious site owner might be able to do things like make requests to unsuspecting visitors’ banks and initiate a transfer on their behalf. However, with CORS, requests are prevented from one origin to another to stop the malicious activity.
There are, however, some cases where it is safe to allow these cross-origin requests. So-called, “simple requests” (such as linking to an image hosted on a different domain) are permitted by the browser. Fetching these resources dynamically is often where the difficulty arises, and the browser is sometimes overzealous in its protection. Simple static assets on Pages are safe to serve to any domain, since the request takes no action and there is no visitor session. Because of this, a domain owner can attach CORS headers to specify exactly which requests can be allowed in the _headers file for fine-grained and explicit control.
For example, the use of the asterisk will enable any origin to request any asset from your Pages deployment:
/*
  Access-Control-Allow-Origin: *
To be more restrictive and limit requests to only be allowed from a ‘staging’ subdomain, we can do the following:
To support all these use cases for custom headers, we had to build a new engine to determine which rules to apply for each incoming request. Backed, of course, by Workers, this engine supports splats and placeholders, and allows you to include those matched values in your headers.
Although we don’t support all of its features, we’ve modeled this matching engine after the URLPattern specification which was recently shipped with Chrome 95. We plan to be able to fully implement this specification for custom headers once URLPattern lands in the Workers runtime, and there should hopefully be no breaking changes to migrate.
Enhanced support for redirects
With this same engine, we’re bringing these features to your _redirects file as well. You can now configure your redirects with splats, placeholders and status codes as shown in the example below:
Custom headers and redirects for Cloudflare Pages can be configured today. Check out our documentation to get started, and let us know how you’re using it in our Discord server. We’d love to hear about what this unlocks for your projects!
Coming up…
And finally, if a _headers file and enhanced support for _redirects just isn’t enough for you, we also have something big coming very soon which will give you the power to build even more powerful projects. Stay tuned!
The collective thoughts of the interwebz
Manage Consent
To provide the best experiences, we use technologies like cookies to store and/or access device information. Consenting to these technologies will allow us to process data such as browsing behavior or unique IDs on this site. Not consenting or withdrawing consent, may adversely affect certain features and functions.
Functional
Always active
The technical storage or access is strictly necessary for the legitimate purpose of enabling the use of a specific service explicitly requested by the subscriber or user, or for the sole purpose of carrying out the transmission of a communication over an electronic communications network.
Preferences
The technical storage or access is necessary for the legitimate purpose of storing preferences that are not requested by the subscriber or user.
Statistics
The technical storage or access that is used exclusively for statistical purposes.The technical storage or access that is used exclusively for anonymous statistical purposes. Without a subpoena, voluntary compliance on the part of your Internet Service Provider, or additional records from a third party, information stored or retrieved for this purpose alone cannot usually be used to identify you.
Marketing
The technical storage or access is required to create user profiles to send advertising, or to track the user on a website or across several websites for similar marketing purposes.