New – Amazon EC2 Hpc7a Instances Powered by 4th Gen AMD EPYC Processors Optimized for High Performance Computing

Post Syndicated from Channy Yun original https://aws.amazon.com/blogs/aws/new-amazon-ec2-hpc7a-instances-powered-by-4th-gen-amd-epyc-processors-optimized-for-high-performance-computing/

In January 2022, we launched Amazon EC2 Hpc6a instances for customers to efficiently run their compute-bound high performance computing (HPC) workloads on AWS with up to 65 percent better price performance over comparable x86-based compute-optimized instances.

As their jobs grow more complex, customers have asked for more cores with more compute performance and more memory and network performance to reduce the time to complete jobs. Additionally, as customers look to bring more of their HPC workloads to EC2, they have asked how we can make it easier to distribute processes to make the best use of memory and network bandwidth, to align with their workload requirements.

Today, we are announcing the general availability of Amazon EC2 Hpc7a instances, the next generation of instance types that are purpose-built for tightly coupled HPC workloads. Hpc7a instances powered by the 4th Gen AMD EPYC processors (Genoa) deliver up to 2.5 times better performance compared to Hpc6a instances. These instances offer 300 Gbps Elastic Fabric Adapter (EFA) bandwidth powered by the AWS Nitro System, for fast and low-latency internode communications.

Hpc7a instances feature Double Data Rate 5 (DDR5) memory, which provides 50 percent higher memory bandwidth compared to DDR4 memory to enable high-speed access to data in memory. These instances are ideal for compute-intensive, latency-sensitive workloads such as computational fluid dynamics (CFD) and numerical weather prediction (NWP).

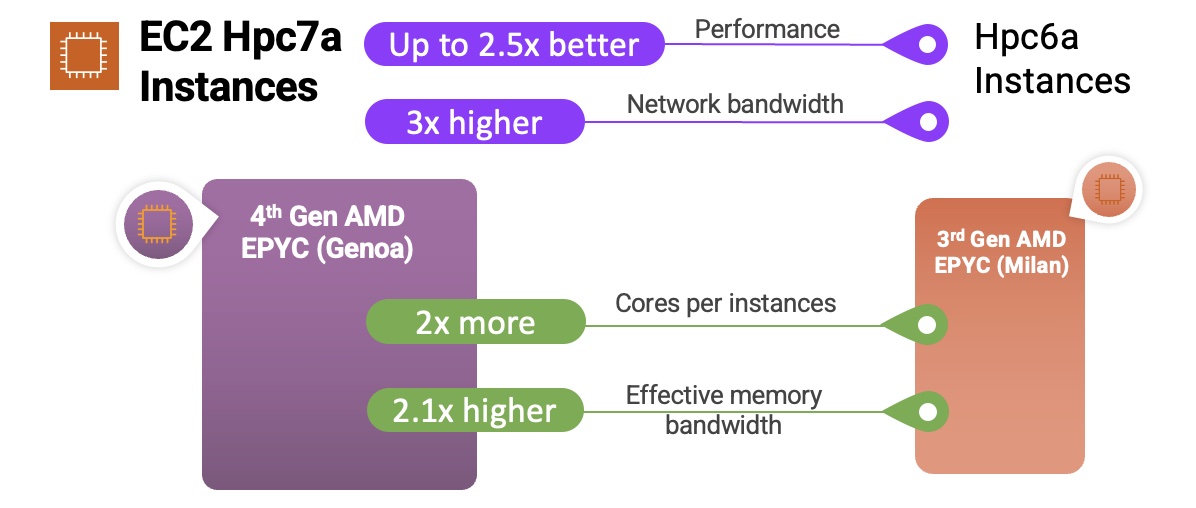
If you are running on Hpc6a, you can use Hpc7a instances and take advantage of the 2 times higher core density, 2.1 times higher effective memory bandwidth, and 3 times higher network bandwidth to lower the time needed to complete jobs compared to Hpc6a instances.

Here’s a quick infographic that shows you how the Hpc7a instances and the 4th Gen AMD EPYC processor (Genoa) compare to the previous instances and processor:

Hpc7a instances feature sizes of up to 192 cores of the AMD EPYC processors CPUs with 768 GiB RAM. Here are the detailed specs:

Instance Name CPUs RAM (Gib)
EFA Network Bandwidth (Gbps)
Attached Storage
Hpc7a.12xlarge 24 768 Up to 300 EBS Only
Hpc7a.24xlarge 48 768 Up to 300 EBS Only
Hpc7a.48xlarge 96 768 Up to 300 EBS Only
Hpc7a.96xlarge 192 768 Up to 300 EBS Only

These instances provide higher compute, memory, and network performance to run the most compute-intensive workloads, such as CFD, weather forecasting, molecular dynamics, and computational chemistry on AWS.

Similar to EC2 Hpc7g instances released a month earlier, we are offering smaller instance sizes that makes it easier for customers to pick a smaller number of CPU cores to activate while keeping all other resources constant based on their workload requirements. For HPC workloads, common scenarios include providing more memory bandwidth per core for CFD workloads, allocating fewer cores in license-bound scenarios, and supporting more memory per core. To learn more, see Instance sizes in the Amazon EC2 Hpc7 family – a different experience in the AWS HPC Blog.

As with Hpc6a instances, you can use the Hpc7a instance to run your largest and most complex HPC simulations on EC2 and optimize for cost and performance. You can also use the new Hpc7a instances with AWS Batch and AWS ParallelCluster to simplify workload submission and cluster creation. You can also use Amazon FSx for Lustre for submillisecond latencies and up to hundreds of gigabytes per second of throughput for storage.

To achieve the best performance for HPC workloads, these instances have Simultaneous Multithreading (SMT) disabled, they’re available in a single Availability Zone, and they have limited external network and EBS bandwidth.

Now Available
Amazon EC2 Hpc7a instances are available today in three AWS Regions: US East (Ohio), EU (Ireland), and US GovCloud for purchase in On-Demand, Reserved Instances, and Savings Plans. For more information, see the Amazon EC2 pricing page.

To learn more, visit our Hpc7a instances page and get in touch with our HPC team, AWS re:Post for EC2, or through your usual AWS Support contacts.

— Channy

SUSE to be acquired, taken private

Post Syndicated from corbet original https://lwn.net/Articles/941985/

SUSE’s long story of corporate ownership is gaining a new chapter; the
company has announced
that it’s majority shareholder (Marcel LUX III SARL) will acquiring the
remaining shares, and will take the company private and off of the stock
exchange. “SUSE’s Management Board and Supervisory Board support the
strategic opportunity from delisting of the company as it will allow SUSE
to focus fully on its operational priorities and execution of its long-term
strategy.
”

How to Connect Your On-Premises Active Directory to AWS Using AD Connector

Post Syndicated from Jeremy Cowan original https://aws.amazon.com/blogs/security/how-to-connect-your-on-premises-active-directory-to-aws-using-ad-connector/

August 17, 2023: We updated the instructions and screenshots in this post to align with changes to the AWS Management Console.

April 25, 2023: We’ve updated this blog post to include more security learning resources.


AD Connector is designed to give you an easy way to establish a trusted relationship between your Active Directory and AWS. When AD Connector is configured, the trust allows you to:

  • Sign in to AWS applications such as Amazon WorkSpaces, Amazon WorkDocs, and Amazon WorkMail by using your Active Directory credentials.
  • Seamlessly join Windows instances to your Active Directory domain either through the Amazon EC2 launch wizard or programmatically through the EC2 Simple System Manager (SSM) API.
  • Provide federated sign-in to the AWS Management Console by mapping Active Directory identities to AWS Identity and Access Management (IAM) roles.

AD Connector cannot be used with your custom applications, as it is only used for secure AWS integration for the three use-cases mentioned above. Custom applications relying on your on-premises Active Directory should communicate with your domain controllers directly or utilize AWS Managed Microsoft AD rather than integrating with AD Connector. To learn more about which AWS Directory Service solution works best for your organization, see the service documentation.

With AD Connector, you can streamline identity management by extending your user identities from Active Directory. It also enables you to reuse your existing Active Directory security policies such as password expiration, password history, and account lockout policies. Also, your users will no longer need to remember yet another user name and password combination. Since AD Connector doesn’t rely on complex directory synchronization technologies or Active Directory Federation Services (AD FS), you can forego the added cost and complexity of hosting a SAML-based federation infrastructure. In sum, AD Connector helps foster a hybrid environment by allowing you to leverage your existing on-premises investments to control different facets of AWS.

This blog post will show you how AD Connector works as well as walk through how to enable federated console access, assign users to roles, and seamlessly join an EC2 instance to an Active Directory domain.

AD Connector – Under the Hood

AD Connector is a dual Availability Zone proxy service that connects AWS apps to your on-premises directory. AD Connector forwards sign-in requests to your Active Directory domain controllers for authentication and provides the ability for applications to query the directory for data. When you configure AD Connector, you provide it with service account credentials that are securely stored by AWS. This account is used by AWS to enable seamless domain join, single sign-on (SSO), and AWS Applications (WorkSpaces, WorkDocs, and WorkMail) functionality. Given AD Connector’s role as a proxy, it does not store or cache user credentials. Rather, authentication, lookup, and management requests are handled by your Active Directory.

In order to create an AD Connector, you must also provide a pair of DNS IP addresses during setup. These are used by AD Connector to retrieve Service (SRV) DNS records to locate the nearest domain controllers to route requests to. The AD connector proxy instances use an algorithm similar to the Active Directory domain controller locator process to decide which domain controllers to connect to for LDAP and Kerberos requests.

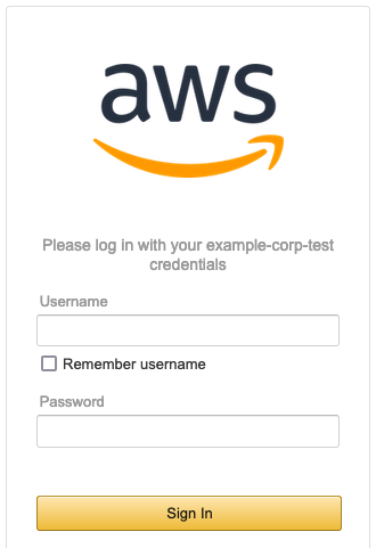
For authentication to AWS applications and the AWS Management Console, you can configure an access URL from the AWS Directory Service console. This access URL is in the format of https://<alias>.awsapps.com and provides a publicly accessible sign-in page. You can visit https://<alias>.awsapps.com/workdocs to sign in to WorkDocs, and https://<alias>.awsapps.com/console to sign in to the AWS Management Console. The following image shows the sign-in page for the AWS Management Console.

Figure 1: Login

Figure 1: Login

For added security you can enable multi-factor authentication (MFA) for AD Connector, but you’ll need to have an existing RADIUS infrastructure in your on-premises network set up to leverage this feature. See AD Connector – Multi-factor Authentication Prerequisites for more information about requirements and configuration. With MFA enabled with AD Connector, the sign-in page hosted at your access URL will prompt users for an MFA code in addition to their standard sign-in credentials.

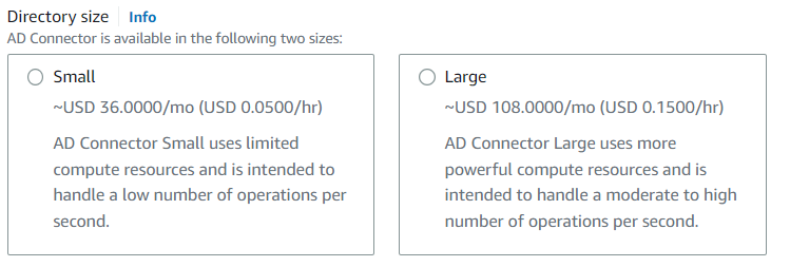
AD Connector comes in two sizes: small and large. A large AD Connector runs on more powerful compute resources and is more expensive than a small AD Connector. Depending on the volume of traffic to be proxied by AD Connector, you’ll want to select the appropriate size for your needs.

Figure 2: Directory size

Figure 2: Directory size

AD Connector is highly available, meaning underlying hosts are deployed across multiple Availability Zones in the region you deploy. In the event of host-level failure, Directory Service will promptly replace failed hosts. Directory Service also applies performance and security updates automatically to AD Connector.

The following diagram illustrates the authentication flow and network path when you enable AWS Management Console access:

  1. A user opens the secure custom sign-in page and supplies their Active Directory user name and password.
  2. The authentication request is sent over SSL to AD Connector.
  3. AD Connector performs LDAP authentication to Active Directory.

    Note: AD Connector locates the nearest domain controllers by querying the SRV DNS records for the domain.

  4. After the user has been authenticated, AD Connector calls the STS AssumeRole method to get temporary security credentials for that user. Using those temporary security credentials, AD Connector constructs a sign-in URL that users use to access the console.

    Note: If a user is mapped to multiple roles, the user will be presented with a choice at sign-in as to which role they want to assume. The user session is valid for 1 hour.

    Figure 3: Authentication flow and network path

    Figure 3: Authentication flow and network path

Before getting started with configuring AD Connector for federated AWS Management Console access, be sure you’ve read and understand the prerequisites for AD Connector. For example, as shown in Figure 3 there must be a VPN or Direct Connect circuit in place between your VPC and your on-premises environment. Your domain also has to be running at Windows 2003 functional level or later. Also, various ports have to be opened between your VPC and your on-premises environment to allow AD Connector to communicate with your on-premises directory.

Configuring AD Connector for federated AWS Management Console access

Enable console access

To allow users to sign in with their Active Directory credentials, you need to explicitly enable console access. You can do this by opening the Directory Service console and clicking the Directory ID name (Figure 4).

This opens the Directory Details page, where you’ll find a dropdown menu on the Apps & Services tab to enable the directory for AWS Management Console access.

Figure 4: Directories

Figure 4: Directories

Choose the Application management tab as seen in Figure 5.

Figure 5: Application Management

Figure 5: Application Management

Scroll down to AWS Management Console as shown in Figure 6, and choose Enable from the Actions dropdown list.

Figure 6: Enable console access

Figure 6: Enable console access

After enabling console access, you’re ready to start configuring roles and associating Active Directory users and groups with those roles.

Follow these steps to create a new role. When you create a new role through the Directory Service console, AD Connector automatically adds a trust relationship to Directory Service. The following code example shows the IAM trust policy for the role, after a role is created.

{
   "Version": "2012-10-17",
   "Statement": [
     {
       "Sid": "",
       "Effect": "Allow",
       "Principal": {
         "Service": "ds.amazonaws.com"
       },
       "Action": "sts:AssumeRole",
       "Condition": {
         "StringEquals": {
           "sts:externalid": "482242153642"
	  }
	}
     }
   ]
}

Assign users to roles

Now that AD Connector is configured and you’ve created a role, your next job is to assign users or groups to those IAM roles. Role mapping is what governs what resources a user has access to within AWS. To do this you’ll need to do the following steps:

  1. Open the Directory Service console and navigate to the AWS Management Console section.
  2. In the search bar, type the name of the role you just created.
  3. Select the role that you just created by choosing the name under the IAM role field.
  4. Choose Add, and enter the name to be added to find users or groups for this role.
  5. Choose Add, and the user or group is now assigned to the role.

When you’re finished, you should see the name of the user or group along with the corresponding ID for that object. It is also important to note that this list can be used to remove users or groups from the role. The next time the user signs in to the AWS Management Console from the custom sign-in page, they will be signed in under the EC2ReadOnly security role.

Seamlessly join an instance to an Active Directory domain

Another advantage to using AD Connector is the ability to seamlessly join Windows (EC2) instances to your Active Directory domain. This allows you to join a Windows Server to the domain while the instance is being provisioned instead of using a script or doing it manually. This section of this blog post will explain the steps necessary to enable this feature in your environment and how the service works.

Step 1: Create a role

Until recently you had to manually create an IAM policy to allow an EC2 instance to access the SSM, an AWS service that allows you to configure Windows instances while they’re running and on first launch. Now, there’s a managed policy called AmazonEC2RoleforSSM that you can use instead. The role you are about to create will be assigned to an EC2 instance when it’s provisioned, which will grant it permission to access the SSM service.

To create the role:

  1. Open the IAM console.
  2. Click Roles in the navigation pane.
  3. Click Create Role.
  4. Type a name for your role in the Role Name field.
  5. Under AWS Service Roles, select Amazon EC2 and then click Select.
  6. On the Attach Policy page, select AmazonEC2RoleforSSM and then click Next Step.
  7. On the Review page, click Create Role.

If you click the role you created, you’ll see a trust policy for EC2, which looks like the following code example.

{
     "Version": "2012-10-17",
     "Statement": [
       {
         "Sid": "",
         "Effect": "Allow",
         "Principal": {
           "Service": "ec2.amazonaws.com"
         },
         "Action": "sts:AssumeRole"
       }
     ]
}

Step 2: Create a new Windows instance from the EC2 console

With this role in place, you can now join a Windows instance to your domain via the EC2 launch wizard. For a detailed explanation about how to do this, see Joining a Domain Using the Amazon EC2 Launch Wizard.

If you’re instantiating a new instance from the API, however, you will need to create an SSM configuration document and upload it to the SSM service beforehand. We’ll step through that process next.

Note: The instance will require internet access to communicate with the SSM service.

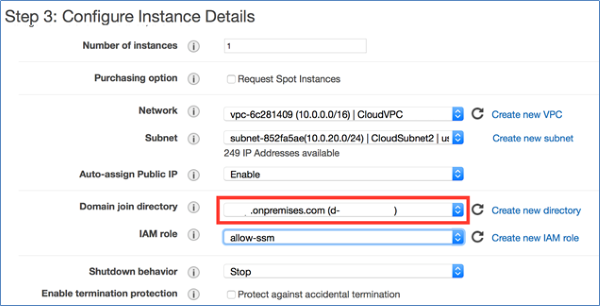
Figure 7: Configure instance details

Figure 7: Configure instance details

When you create a new Windows instance from the EC2 launch wizard as shown in Figure 7, the wizard automatically creates the SSM configuration document from the information stored in AD Connector. Presently, the EC2 launch wizard doesn’t allow you to specify which organizational unit (OU) you want to deploy the member server into.

Step 3: Create an SSM document (for seamlessly joining a server to the domain through the AWS API)

If you want to provision new Windows instances from the AWS CLI or API or you want to specify the target OU for your instances, you will need to create an SSM configuration document. The configuration document is a JSON file that contains various parameters used to configure your instances. The following code example is a configuration document for joining a domain.

{
	"schemaVersion": "1.0",
	"description": "Sample configuration to join an instance to a domain",
	"runtimeConfig": {
	   "aws:domainJoin": {
	       "properties": {
	          "directoryId": "d-1234567890",
	          "directoryName": "test.example.com",
	          "directoryOU": "OU=test,DC=example,DC=com",
	          "dnsIpAddresses": [
	             "198.51.100.1",
	             "198.51.100.2"
	          ]
	       }
	   }
	}
}

In this configuration document:

  • directoryId is the ID for the AD Connector you created earlier.
  • directoryName is the name of the domain (for example, examplecompany.com).
  • directoryOU is the OU for the domain.
  • dnsIpAddresses are the IP addresses for the DNS servers you specified when you created the AD Connector.

For additional information, see aws:domainJoin. When you’re finished creating the file, save it as a JSON file.

Note: The name of the file has to be at least 1 character and at most 64 characters in length.

Step 4: Upload the configuration document to SSM

This step requires that the user have permission to use SSM to configure an instance. If you don’t have a policy that includes these rights, create a new policy by using the following JSON, and assign it to an IAM user or group.

{
   "Version": "2012-10-17",
   "Statement": [
     {
       "Effect": "Allow",
       "Action": "ssm:*",
       "Resource": "*"
     }
   ]
}

After you’ve signed in with a user that associates with the SSM IAM policy you created, run the following command from the AWS CLI.

aws ssm create-document ‐‐content file://path/to/myconfigfile.json ‐‐name "My_Custom_Config_File"

Note: On Linux/Mac systems, you need to add a “/” at the beginning of the path (for example, file:///Users/username/temp).

This command uploads the configuration document you created to the SSM service, allowing you to reference it when creating a new Windows instance from either the AWS CLI or the EC2 launch wizard.

Conclusion

This blog post has shown you how you can simplify account management by federating with your Active Directory for AWS Management Console access. The post also explored how you can enable hybrid IT by using AD Connector to seamlessly join Windows instances to your Active Directory domain. Armed with this information you can create a trust between your Active Directory and AWS. In addition, you now have a quick and simple way to enable single sign-on without needing to replicate identities or deploy additional infrastructure on premises.

We’d love to hear more about how you are using Directory Service, and welcome any feedback about how we can improve the experience. You can post comments below, or visit the Directory Service forum to post comments and questions.

If you have feedback about this post, submit comments in the Comments section below. If you have questions about this post, start a new thread on the AWS Directory Service knowledge Center re:Post or contact AWS Support.

Want more AWS Security news? Follow us on Twitter.

Jeremy Cowan

Jeremy Cowan

Jeremy is a Specialist Solutions Architect for containers at AWS, although his family thinks he sells “cloud space”. Prior to joining AWS, Jeremy worked for several large software vendors, including VMware, Microsoft, and IBM. When he’s not working, you can usually find on a trail in the wilderness, far away from technology.

Bright Dike

Bright Dike

Bright is a Solutions Architect with Amazon Web Services. He works with AWS customers and partners to provide guidance assessing and improving their security posture, as well as executing automated remediation techniques. His domains are threat detection, incident response, and security hub.

David Selberg

David Selberg

David is an Enterprise Solutions Architect at AWS who is passionate about helping customers build Well-Architected solutions on the AWS cloud. With a background in cybersecurity, David loves to dive deep on security topics when he’s not creating technical content like the “All Things AWS” Twitch series.

Abhra Sinha

Abhra Sinha

Abhra is a Toronto-based Enterprise Solutions Architect at AWS. Abhra enjoys being a trusted advisor to customers, working closely with them to solve their technical challenges and help build a secure scalable architecture on AWS. In his spare time, he enjoys photography and exploring new restaurants.

How to add notifications and manual approval to an AWS CDK Pipeline

Post Syndicated from Jehu Gray original https://aws.amazon.com/blogs/devops/how-to-add-notifications-and-manual-approval-to-an-aws-cdk-pipeline/

A deployment pipeline typically comprises several stages such as dev, test, and prod, which ensure that changes undergo testing before reaching the production environment. To improve the reliability and stability of release processes, DevOps teams must review Infrastructure as Code (IaC) changes before applying them in production. As a result, implementing a mechanism for notification and manual approval that grants stakeholders improved access to changes in their release pipelines has become a popular practice for DevOps teams.

Notifications keep development teams and stakeholders informed in real-time about updates and changes to deployment status within release pipelines. Manual approvals establish thresholds for transitioning a change from one stage to the next in the pipeline. They also act as a guardrail to mitigate risks arising from errors and rework because of faulty deployments.

Please note that manual approvals, as described in this post, are not a replacement for the use of automation. Instead, they complement automated checks within the release pipeline.

In this blog post, we describe how to set up notifications and add a manual approval stage to AWS Cloud Development Kit (AWS CDK) Pipeline.

Concepts

CDK Pipeline

CDK Pipelines is a construct library for painless continuous delivery of CDK applications. CDK Pipelines can automatically build, test, and deploy changes to CDK resources. CDK Pipelines are self-mutating which means as application stages or stacks are added, the pipeline automatically reconfigures itself to deploy those new stages or stacks. Pipelines need only be manually deployed once, afterwards, the pipeline keeps itself up to date from the source code repository by pulling the changes pushed to the repository.

Notifications

Adding notifications to a pipeline provides visibility to changes made to the environment by utilizing the NotificationRule construct. You can also use this rule to notify pipeline users of important changes, such as when a pipeline starts execution. Notification rules specify both the events and the targets, such as Amazon Simple Notification Service (Amazon SNS) topic or AWS Chatbot clients configured for Slack which represents the nominated recipients of the notifications. An SNS topic is a logical access point that acts as a communication channel while Chatbot is an AWS service that enables DevOps and software development teams to use messaging program chat rooms to monitor and respond to operational events.

Manual Approval

In a CDK pipeline, you can incorporate an approval action at a specific stage, where the pipeline should pause, allowing a team member or designated reviewer to manually approve or reject the action. When an approval action is ready for review, a notification is sent out to alert the relevant parties. This combination of notifications and approvals ensures timely and efficient decision-making regarding crucial actions within the pipeline.

Solution Overview

The solution explains a simple web service that is comprised of an AWS Lambda function that returns a static web page served by Amazon API Gateway. Since Continuous Deployment and Continuous Integration (CI/CD) are important components to most web projects, the team implements a CDK Pipeline for their web project.

There are two important stages in this CDK pipeline; the Pre-production stage for testing and the Production stage, which contains the end product for users.

The flow of the CI/CD process to update the website starts when a developer pushes a change to the repository using their Integrated Development Environment (IDE). An Amazon CloudWatch event triggers the CDK Pipeline. Once the changes reach the pre-production stage for testing, the CI/CD process halts. This is because a manual approval gate is between the pre-production and production stages. So, it becomes a stakeholder’s responsibility to review the changes in the pre-production stage before approving them for production. The pipeline includes an SNS notification that notifies the stakeholder whenever the pipeline requires manual approval.

After approving the changes, the CI/CD process proceeds to the production stage and the updated version of the website becomes available to the end user. If the approver rejects the changes, the process ends at the pre-production stage with no impact to the end user.

The following diagram illustrates the solution architecture.


This diagram shows the CDK pipeline process in the solution and how applications or updates are deployed using AWS Lambda Function to end users.

Figure 1. This image shows the CDK pipeline process in our solution and how applications or updates are deployed using AWS Lambda Function to end users.

Prerequisites

For this walkthrough, you should have the following prerequisites:

Add notification to the pipeline

In this tutorial, perform the following steps:

  • Add the import statements for AWS CodeStar notifications and SNS to the import section of the pipeline stack py
import aws_cdk.aws_codestarnotifications as notifications
import aws_cdk.pipelines as pipelines
import aws_cdk.aws_sns as sns
import aws_cdk.aws_sns_subscriptions as subs
  • Ensure the pipeline is built by calling the ‘build pipeline’ function.

pipeline.build_pipeline()

  • Create an SNS topic.

topic = sns.Topic(self, "MyTopic1")

  • Add a subscription to the topic. This specifies where the notifications are sent (Add the stakeholders’ email here).

topic.add_subscription(subs.EmailSubscription("[email protected]"))

  • Define a rule. This contains the source for notifications, the event trigger, and the target .

rule = notifications.NotificationRule(self, "NotificationRule", )

  • Assign the source the value pipeline.pipeline The first pipeline is the name of the CDK pipeline(variable) and the .pipeline is to show it is a pipeline(function).

source=pipeline.pipeline,

  • Define the events to be monitored. Specify notifications for when the pipeline starts, when it fails, when the execution succeeds, and finally when manual approval is needed.
events=["codepipeline-pipeline-pipeline-execution-started", "codepipeline-pipeline-pipeline-execution-failed","codepipeline-pipeline-pipeline-execution-succeeded", 
"codepipeline-pipeline-manual-approval-needed"],
  • For the complete list of supported event types for pipelines, see here
  • Finally, add the target. The target here is the topic created previously.

targets=[topic]

The combination of all the steps becomes:

pipeline.build_pipeline()
topic = sns.Topic(self, "MyTopic1")
topic.add_subscription(subs.EmailSubscription("[email protected]"))
rule = notifications.NotificationRule(self, "NotificationRule",
source=pipeline.pipeline,
events=["codepipeline-pipeline-pipeline-execution-started", "codepipeline-pipeline-pipeline-execution-failed","codepipeline-pipeline-pipeline-execution-succeeded", 
"codepipeline-pipeline-manual-approval-needed"],
targets=[topic]
)

Adding Manual Approval

  • Add the ManualApprovalStep import to the aws_cdk.pipelines import statement.
from aws_cdk.pipelines import (
CodePipeline,
CodePipelineSource,
ShellStep,
ManualApprovalStep
)
  • Add the ManualApprovalStep to the production stage. The code must be added to the add_stage() function.
 prod = WorkshopPipelineStage(self, "Prod")
        prod_stage = pipeline.add_stage(prod,
            pre = [ManualApprovalStep('PromoteToProduction')])

When a stage is added to a pipeline, you can specify the pre and post steps, which are arbitrary steps that run before or after the contents of the stage. You can use them to add validations like manual or automated gates to the pipeline. It is recommended to put manual approval gates in the set of pre steps, and automated approval gates in the set of post steps. So, the manual approval action is added as a pre step that runs after the pre-production stage and before the production stage .

  • The final version of the pipeline_stack.py becomes:
from constructs import Construct
import aws_cdk as cdk
import aws_cdk.aws_codestarnotifications as notifications
import aws_cdk.aws_sns as sns
import aws_cdk.aws_sns_subscriptions as subs
from aws_cdk import (
    Stack,
    aws_codecommit as codecommit,
    aws_codepipeline as codepipeline,
    pipelines as pipelines,
    aws_codepipeline_actions as cpactions,
    
)
from aws_cdk.pipelines import (
    CodePipeline,
    CodePipelineSource,
    ShellStep,
    ManualApprovalStep
)


class WorkshopPipelineStack(cdk.Stack):
    def __init__(self, scope: Construct, id: str, **kwargs) -> None:
        super().__init__(scope, id, **kwargs)
        
        # Creates a CodeCommit repository called 'WorkshopRepo'
        repo = codecommit.Repository(
            self, "WorkshopRepo", repository_name="WorkshopRepo",
            
        )
        
        #Create the Cdk pipeline
        pipeline = pipelines.CodePipeline(
            self,
            "Pipeline",
            
            synth=pipelines.ShellStep(
                "Synth",
                input=pipelines.CodePipelineSource.code_commit(repo, "main"),
                commands=[
                    "npm install -g aws-cdk",  # Installs the cdk cli on Codebuild
                    "pip install -r requirements.txt",  # Instructs Codebuild to install required packages
                    "npx cdk synth",
                ]
                
            ),
        )

        
         # Create the Pre-Prod Stage and its API endpoint
        deploy = WorkshopPipelineStage(self, "Pre-Prod")
        deploy_stage = pipeline.add_stage(deploy)
    
        deploy_stage.add_post(
            
            pipelines.ShellStep(
                "TestViewerEndpoint",
                env_from_cfn_outputs={
                    "ENDPOINT_URL": deploy.hc_viewer_url
                },
                commands=["curl -Ssf $ENDPOINT_URL"],
            )
    
        
        )
        deploy_stage.add_post(
            pipelines.ShellStep(
                "TestAPIGatewayEndpoint",
                env_from_cfn_outputs={
                    "ENDPOINT_URL": deploy.hc_endpoint
                },
                commands=[
                    "curl -Ssf $ENDPOINT_URL",
                    "curl -Ssf $ENDPOINT_URL/hello",
                    "curl -Ssf $ENDPOINT_URL/test",
                ],
            )
            
        )
        
        # Create the Prod Stage with the Manual Approval Step
        prod = WorkshopPipelineStage(self, "Prod")
        prod_stage = pipeline.add_stage(prod,
            pre = [ManualApprovalStep('PromoteToProduction')])
        
        prod_stage.add_post(
            
            pipelines.ShellStep(
                "ViewerEndpoint",
                env_from_cfn_outputs={
                    "ENDPOINT_URL": prod.hc_viewer_url
                },
                commands=["curl -Ssf $ENDPOINT_URL"],
                
            )
            
        )
        prod_stage.add_post(
            pipelines.ShellStep(
                "APIGatewayEndpoint",
                env_from_cfn_outputs={
                    "ENDPOINT_URL": prod.hc_endpoint
                },
                commands=[
                    "curl -Ssf $ENDPOINT_URL",
                    "curl -Ssf $ENDPOINT_URL/hello",
                    "curl -Ssf $ENDPOINT_URL/test",
                ],
            )
            
        )
        
        # Create The SNS Notification for the Pipeline
        
        pipeline.build_pipeline()
        
        topic = sns.Topic(self, "MyTopic")
        topic.add_subscription(subs.EmailSubscription("[email protected]"))
        rule = notifications.NotificationRule(self, "NotificationRule",
            source = pipeline.pipeline,
            events = ["codepipeline-pipeline-pipeline-execution-started", "codepipeline-pipeline-pipeline-execution-failed", "codepipeline-pipeline-manual-approval-needed", "codepipeline-pipeline-manual-approval-succeeded"],
            targets=[topic]
            )


When a commit is made with git commit -am "Add manual Approval" and changes are pushed with git push, the pipeline automatically self-mutates to add the new approval stage.

Now when the developer pushes changes to update the build environment or the end user application, the pipeline execution stops at the point where the approval action was added. The pipeline won’t resume unless a manual approval action is taken.

Image showing the CDK pipeline with the added Manual Approval action on the AWS Management Console

Figure 2. This image shows the pipeline with the added Manual Approval action.

Since there is a notification rule that includes the approval action, an email notification is sent with the pipeline information and approval status to the stakeholder(s) subscribed to the SNS topic.

Image showing the SNS email notification sent when the pipeline starts

Figure 3. This image shows the SNS email notification sent when the pipeline starts.

After pushing the updates to the pipeline, the reviewer or stakeholder can use the AWS Management Console to access the pipeline to approve or deny changes based on their assessment of these changes. This process helps eliminate any potential issues or errors and ensures only changes deemed relevant are made.

Image showing the review action on the AWS Management Console that gives the stakeholder the ability to approve or reject any changes.

Figure 4. This image shows the review action that gives the stakeholder the ability to approve or reject any changes. 

If a reviewer rejects the action, or if no approval response is received within seven days of the pipeline stopping for the review action, the pipeline status is “Failed.”

Image showing when a stakeholder rejects the action

Figure 5. This image depicts when a stakeholder rejects the action.

If a reviewer approves the changes, the pipeline continues its execution.

Image showing when a stakeholder approves the action

Figure 6. This image depicts when a stakeholder approves the action.

Considerations

It is important to consider any potential drawbacks before integrating a manual approval process into a CDK pipeline. one such consideration is its implementation may delay the delivery of updates to end users. An example of this is business hours limitation. The pipeline process might be constrained by the availability of stakeholders during business hours. This can result in delays if changes are made outside regular working hours and require approval when stakeholders are not immediately accessible.

Clean up

To avoid incurring future charges, delete the resources. Use cdk destroy via the command line to delete the created stack.

Conclusion

Adding notifications and manual approval to CDK Pipelines provides better visibility and control over the changes made to the pipeline environment. These features ideally complement the existing automated checks to ensure that all updates are reviewed before deployment. This reduces the risk of potential issues arising from bugs or errors. The ability to approve or deny changes through the AWS Management Console makes the review process simple and straightforward. Additionally, SNS notifications keep stakeholders updated on the status of the pipeline, ensuring a smooth and seamless deployment process.
Jehu Gray

Jehu Gray is an Enterprise Solutions Architect at Amazon Web Services where he helps customers design solutions that fits their needs. He enjoys exploring whats possible with IaC such as CDK.

Abiola Olanrewaju

Abiola Olanrewaju is an Enterprise Solutions Architect at Amazon Web Services where he helps customers design and implement scalable solutions that drive business outcomes. He has a keen interest in Data Analytics, Security and Automation.

Serge Poueme

Serge Poueme is a Solutions Architect on the AWS for Games Team. He started his career as a software development engineer and enjoys building new products. At AWS, Serge focuses on improving Builders Experience for game developers and optimize servers hosting using Containers. When he is not working he enjoys playing Far Cry or Fifa on his XBOX

[$] Out-of-memory victim selection with BPF

Post Syndicated from corbet original https://lwn.net/Articles/941614/

In its default configuration, the Linux kernel will allow processes to
allocate more memory than the system can actually provide; this policy
enables better utilization of physical memory and works just fine — most of
the time. On occasions, though, the kernel may find itself unable to
provide memory that processes may think already belongs to them. If the
situation gets bad enough, the only solution (short of rebooting) is to
declare a sort of memory bankruptcy and write off some of the kernel’s
debts by killing one or more processes. Over the years, a great deal of
effort has gone into heuristics to select the processes that the user is
least likely to miss. This problem is still clearly not solved to
everybody’s satisfaction, though, so it was only a matter of time before
somebody introduced a way to select the out-of-memory (OOM) victim using
BPF.

NAS Ransomware Guide: How to Protect Your NAS From Attacks

Post Syndicated from Vinodh Subramanian original https://www.backblaze.com/blog/nas-ransomware-guide-how-to-protect-your-nas-from-attacks/

A decorative image showing a NAS device locked up with chains. The title reads NAS Ransomware.

You probably invested in a network attached storage (NAS) device to centralize your storage, manage data more efficiently, and implement on-site backups. So, keeping that data safe is important to you. Unfortunately, as NAS devices have risen in popularity, cybercriminals have taken notice.  

Recent high-profile ransomware campaigns have targeted vast numbers of NAS devices worldwide. These malicious attacks can lock away users’ NAS data, holding it hostage until a ransom is paid—or the user risks losing all their data. 

If you are a NAS user, learning how to secure your NAS device against ransomware attacks is critical if you want to protect your data. In this guide, you’ll learn why NAS devices are attractive targets for ransomware and how to safeguard your NAS device from ransomware attacks. Let’s get started.

What Is Ransomware?

To begin, let’s quickly understand what ransomware actually is. Ransomware is a type of malicious software or malware that infiltrates systems and encrypts files. Upon successful infection, ransomware denies users access to their files or systems, effectively holding data hostage. 

Its name derives from its primary purpose—to demand a “ransom” from the victim in exchange for restoring access to their data. Ransomware actors often threaten to delete, sell, or leak data if the ransom is not paid. 

Ransomware threat messages often imitate law enforcement agencies, claiming that the user violated laws and must pay a fine. Other times, it’s a blunt threat—pay or lose your data forever. This manipulative strategy preys on fears and urgency, often pressuring the unprepared victims into paying the ransom. 

The consequences of a ransomware attack can be severe. The most immediate impact is data loss, which can be catastrophic if the encrypted files contain sensitive or critical information. There’s also the financial loss from the ransom payment itself which can range from a few hundred dollars to several million dollars. 

Moreover, an attack can cause significant operational downtime, with systems unavailable while the malware is removed and data is restored. For businesses, especially the unprepared, the downtime can be disastrous, leading to substantial revenue loss. 

A picture of Earth from space with light-up areas around cities.
Cybersecurity Ventures expects that by 2031, businesses will fall victim to a ransomware attack every other second. Source.

However, the damage doesn’t stop there. The reputational damage caused by a ransomware attack can make customers, partners, and stakeholders lose trust in a business that falls victim to such an attack, especially if it results in a data breach. 

As you can see, ransomware is not just malicious code that disrupts your business, it can cause significant harm on multiple fronts. Therefore, it’s important to understand the basics of ransomware as the first step in building a robust defense strategy for your NAS device.

Types of Ransomware

While the modus operandi of ransomware—to deny access to users’ data and demand ransom—remains relatively constant, there are multiple ransomware variants, each with unique characteristics. 

Some of the most common types of ransomware include:

Locker Ransomware

Locker ransomware takes an all-or-nothing approach. It locks users out of their entire system, preventing them from accessing any files, applications, or even the operating system itself. 

The only thing the users can access is a ransomware note, demanding payment in exchange for restoring access to their system. 

Crypto Ransomware

As its name suggests, crypto ransomware encrypts the users’ files and makes them inaccessible. This type of ransomware does not lock the entire system, but rather targets specific file types such as documents, spreadsheets, and multimedia files. The victims can still use their system but cannot access or open the encrypted files without the encryption key. 

Ransomware as a Service (RaaS)

RaaS represents a new business model in the dark world of cybercrime. It is essentially a cloud-based platform where ransomware developers sell or rent their ransomware codes to other cybercriminals, who then distribute and manage the ransomware attacks. The ransomware developers receive a cut of the ransom payments.  

Leakware

Leakware steals sensitive or confidential information and threatens to publicize them if ransom is not paid. This type of ransomware is particularly damaging as even if the ransom is paid and the data is not leaked, the mere fact that the data was accessed can have significant legal and reputational implications. 

A decorative image showing several stacked cubes with some of them breaking apart.
Only 4% of victims who paid ransoms actually got all of their data back. Source.

Scareware

Scareware uses social engineering to trick victims into believing that their system is infected with viruses or other malware. They scare people into visiting spoofed or infected websites or downloading malicious software (malware). While not as directly damaging as other forms of ransomware, scareware can be used as the gateway to a more intricate cyberattack and may not be an attack in and of itself. 

Can Ransomware Attack NAS?

Yes, ransomware can and frequently does target NAS devices. These storage solutions, while highly effective and efficient, have certain characteristics that make them attractive to cybercriminals. 

Let’s explore some of these reasons in more detail below.

Centralized Storage

NAS devices act as centralized storage locations with all data stored in one place. This makes them an attractive target for ransomware attacks. By infiltrating a single NAS device, bad actors can gain access to a significant amount of company data, maximizing the impact of their attack and the potential ransom.

Security Vulnerabilities

Unlike traditional PCs or servers, NAS devices often lack robust security measures. Most NAS systems may not have an antivirus installed, leaving them exposed to various forms of malware including ransomware. Additionally, outdated firmware can further weaken the device’s defenses, offering potential loopholes for attackers to exploit. 

Always Online

NAS devices are designed to be continuously online, allowing for convenient and seamless data access. However, this also means they are constantly exposed to the internet, making them a target for online threats around the clock. 

Default Configuration Settings

NAS devices, like many other hardware devices, often come with default configurations that prioritize ease of access over security. For example, they may have simple, easy-to-guess default passwords or open access permissions for all users. Not changing these default settings can leave the devices vulnerable to attacks. 

Risk Factors: The Human Element

NAS devices are an easy-to-use, accessible way to expand on-site storage and manage data, making them attractive for people without an IT background to use. However, novice users, and even many of your smartest power users, may not know to follow key best practices to prevent ransomware. As humans, all of us are vulnerable to error. In addition to NAS devices having some unique characteristics that make them prime targets for cybercriminals, you can’t discount the human element in ransomware protection. Understanding the following risks can help you shore up your defenses: 

Lack of User Awareness

There is often a lack of awareness among NAS users about the potential security risks associated with these devices. Most users may not realize the importance of regularly updating their NAS systems or implementing security measures. This can result in NAS devices being unprotected, making them easy prey for ransomware attacks. 

Insufficient Backup Practices

While NAS devices provide local data storage, it has to be noted that they are not a full 3-2-1 backup solution. Data on NAS devices needs to be backed up off-site to protect against hardware failures, theft, natural disasters, and ransomware attacks. If users don’t have an off-site backup, they risk losing all their data or paying a huge ransom to get access to their NAS data. 

Lack of Regular Audits

Conducting regular security checks and audits can help identify and rectify any potential vulnerabilities. But, most NAS users take regular security audits as an afterthought and let security gaps go unnoticed and unaddressed.

Uncontrolled User Access

In some organizations, NAS devices may be accessed by numerous employees, some of whom may not be trained in security best practices. This can increase the chances of ransomware attacks via tactics like phishing emails.

An image of a computer with a lock in front of it. Several phishing hooks are attacking from all angles.
Up to 70% of phishing emails are opened by the recipient. Source.

Neglected Software Updates

NAS device manufacturers often release software updates that include patches for security vulnerabilities. If users neglect to regularly update the software on their NAS devices, they can leave the devices exposed to ransomware attacks that exploit those vulnerabilities.

How Do I Protect My NAS From Ransomware?

Now that you understand the NAS devices vulnerabilities and threats that expose them to ransomware attacks, let’s take a look at some of the practical measures that you can take to protect your NAS from these attacks.

  1. Update regularly: One of the most straightforward yet effective measures you can take is to keep your NAS devices’ applications up-to-date. This includes applying patches, firmware, and operating system updates as soon as they’re available and released by your NAS device manufacturer or backup application provider. These updates often contain security enhancements and fixes for vulnerabilities that could otherwise be exploited by ransomware.
  2. Use strong credentials: Make sure all user accounts, especially admin accounts, are protected by strong, unique passwords. Strong credentials are a simple but effective way to avoid falling victim to brute force attacks that use a trial and error method to crack passwords.
  3. Disable default admin accounts: Like we discussed above, most NAS devices come with default admin accounts with well-known usernames and passwords, making them easy targets for attackers. It’s a good idea to disable all these default accounts or change their credentials. 
  4. Limit access to NAS: Most businesses provide wide open access to all their users to access NAS data. However, chances are that not every user needs access to every file on your NAS. Limiting access based on user roles and responsibilities can minimize the potential impact in case of a ransomware attack. 
  5. Create different user access levels: Along the same lines of limiting access, consider creating different levels of user access. This can prevent a ransomware infection from spreading if a user with a lower level of access falls victim to an attack. 
  6. Block suspicious IP addresses: Consider utilizing network security tools to monitor and block IP addresses that have made multiple failed login attempts and/or seem suspicious. This can help prevent brute force attacks. 
  7. Implement a firewall and intrusion detection system: Firewalls can prevent unauthorized access to your NAS, while intrusion detection systems can alert you to any potential security breaches. Both can be crucial ways of defense against ransomware. 
  8. Adopt the 3-2-1 backup rule with Object Lock: Like we discussed above, NAS devices offer a centralized storage solution that is local, fast, and easy to share. However, NAS is not a backup solution as it doesn’t protect your data from theft, natural disasters, or hardware failures. Therefore, it’s essential to implement a 3-2-1 backup strategy, where three copies of your data is stored on two different types of storage with one copy stored off-site. This can ensure that you have a secure and uninfected backup even if your NAS is hit by ransomware. The Object Lock feature, available with cloud storage providers such as Backblaze, prevents data from being deleted, ensuring your backup remains intact even in the event of a ransomware attack.

The Role of Cybersecurity Training

While technical measures are a crucial part of NAS ransomware protection, they are only as effective as the people who use them. Human error is often cited as one of the leading causes of successful cyber-attacks, including ransomware. 

This is where cybersecurity training comes in, playing an important role in helping individuals identify and avoid threats. 

A photo of network cables.
Studies have shown that in 93% of cases, an external attacker can breach an organizations network perimeter and gain access to local network resources. Source.

So, what kind of training can you do to help your staff avoid threats?

  • Identification training: Provide staff members with the knowledge and tools they need to recognize potential threats. This includes identifying suspicious emails, websites, or software, and understanding the dangers of clicking on unverified links or downloading unknown attachments, and also knowing how to handle and report a suspected threat when one arises. 
  • Understanding human attack vendors: Cybercriminals often target individuals within an organization, exploiting common human weaknesses such as lack of awareness or curiosity. By understanding how these attacks work, employees can be better equipped to avoid falling victim to them. 
  • Preventing attacks: Ultimately, the goal of cyber security training is to prevent attacks. By training staff on how to recognize and respond to potential threats, businesses can drastically reduce their risk of a successful ransomware attack. This not only helps the company’s data but also its reputation and financial well-being. 

Also, it is important to remember that cybersecurity training should not be a one-time event. Cyber threats are constantly evolving, so regular training is necessary to ensure that staff members are aware of the latest threats and the best practices for dealing with them.

Protecting Your NAS Data From Threats

Ransomware is an ever evolving threat in our digital world and NAS devices are no exception. With the rising popularity of NAS devices among businesses, cybercriminals have been targeting NAS devices with high profile ransomware campaigns. 

Having a comprehensive understanding of the basics of ransomware to recognize why NAS devices are attractive targets is the first step toward protecting your NAS devices from these attacks. By keeping systems and applications updated, enforcing robust credentials, limiting access, employing proactive network security measures, and backing up data, you can create a strong defense line against ransomware attacks.

Additionally, investing in regular cybersecurity training for all users can significantly decrease the risk of an attack being successful due to human error. Remember, cybersecurity is not a one-time effort but a continuous process of learning, adapting, and implementing best practices. Stay informed about the latest NAS ransomware types and tactics, maintain regular audits of your NAS devices, and continuously reevaluate and improve your security measures. 

Every step you take towards better security not only protects your NAS data, but sends a strong message to cybercriminals and contributes towards a safer digital ecosystem for all. 

The post NAS Ransomware Guide: How to Protect Your NAS From Attacks appeared first on Backblaze Blog | Cloud Storage & Cloud Backup.

Join us for VeloCON 2023: Digging Deeper Together!

Post Syndicated from Carlos Canto original https://blog.rapid7.com/2023/08/17/join-us-for-velocon-2023-digging-deeper-together/

September 13, 2023 at 9 am ET

Join us for VeloCON 2023: Digging Deeper Together!

Rapid7 is thrilled to announce that the 2nd annual VeloCON: Digging Deeper Together virtual summit will be held this September 13th at 9 am ET. Once again, the conference will be online and completely free!

VeloCON is a one-day event focused on the Velociraptor community. It’s a place to share experiences in using and developing Velociraptor to address the needs of the wider DFIR community and an opportunity to take a look ahead at the future of our platform.

This year’s event calls for even more of the stimulating and informative content that made last year’s VeloCON so much fun. Don’t miss your chance at being a part of the marquee event of the open-source DFIR calendar.

Registration is now OPEN!  Click here to register and get event updates and start time reminders.

Last year’s event was a tremendous success, with over 500 unique participants enjoying fascinating discussions, tech talks and the opportunity to get to know real members of our own community.

Leading Edge Panel

Rapid7 and the Velociraptor team have invited industry leading DFIR professionals, community advocates and thought leaders to host an exciting presentation panel.  Proposals underwent a thorough review process to select presentations of maximum interest to VeloCON attendees and the wider Velociraptor community.

VeloCON focuses on work that pushes the envelope of what is currently possible using Velociraptor. Potential topics to be addressed by the panel include, but are not limited to:

  • Use cases of Velociraptor in real investigations
  • Novel deployment modes to cater for specific requirements
  • Contributions to Velociraptor to address new capabilities
  • Potential future ideas and features that Velociraptor
  • Integration of Velociraptor with other tools/frameworks
  • Analysis and acquisition on novel Forensic Artifacts

Register Today

Please register for VeloCON 2023 by following this link.  You’ll be able to preview panelist bios as well as receive email confirmations and reminders as we get closer to the event.

Learn more about Velociraptor by visiting any of our web and social media channels below:

Amazon OpenSearch Serverless expands support for larger workloads and collections

Post Syndicated from Prashant Agrawal original https://aws.amazon.com/blogs/big-data/amazon-opensearch-serverless-expands-support-for-larger-workloads-and-collections/

We recently announced new enhancements to Amazon OpenSearch Serverless that can scan and search source data sizes of up to 6 TB. At launch, OpenSearch Serverless supported searching one or more indexes within a collection, with the total combined size of up to 1 TB. With the support for 6 TB source data, you can now scale up your log analytics, machine learning applications, and ecommerce data more effectively. With OpenSearch Serverless, you can enjoy the benefits of these expanded limits without having to worry about sizing, monitoring your usage, or manually scaling an OpenSearch domain. If you are new to OpenSearch Serverless, refer to Log analytics the easy way with Amazon OpenSearch Serverless to get started.

The compute capacity in OpenSearch Serverless used for data ingestion and search and query is measured in OpenSearch Compute Units (OCUs). To support larger datasets, we have raised the OCU limit from 50 to 100 for indexing and search, including redundancy for Availability Zone outages and infrastructure failures. These OCUs are shared among various collections, each containing one or more indexes of varied sizes. You can configure maximum OCU limits on search and indexing independently using the AWS Command Line Interface (AWS CLI), SDK, or AWS Management Console to manage costs. Furthermore, you can have multiple 6 TB collections. If you wish to expand the OCU limits for indexes and collection sizes beyond 6 TB, reach out to us through AWS Support.

Set max OCU to 100

To get started, you must first change the OCU limits for indexing and search to 100. Note that you only pay for the resources consumed and not for the max OCU configuration.

Ingesting the data

You can use the load generation scripts shared in the following workshop or you can use your own application or data generator to create load. You can run multiple instances of these scripts to generate a burst in indexing requests. As seen in the following screenshot, in this test, we created six indexes approximating to 1 TB or more.

Auto scaling resources in OpenSearch Serverless

The highlighted points in the following figures show how OpenSearch Serverless responds to the increasing indexing traffic from 2,000 bulk request operations to 7,000 bulk requests per second by auto scaling the OCUs. Each bulk request includes 7,500 documents. OpenSearch Serverless uses various system signals to automatically scale out the OCUs based on your workload demand.

OpenSearch Serverless also scales down indexing OCUs when there is a decrease in your workload’s activity level. The highlighted points in the following figures show a gradual decrease in indexing traffic from 7,000 bulk ingest operations to less than 1,000 operations per second. OpenSearch Serverless reacts to the changes in load by reducing the number of OCUs.

Conclusion

We encourage you to take advantage of the 6 TB index support and put it to the test! Migrate your data, explore the improved throughput, and take advantage of the enhanced scaling capabilities. Our goal is to deliver a seamless and efficient experience that aligns with your requirements.

To get started, refer to Log analytics the easy way with Amazon OpenSearch Serverless. To get hands-on with OpenSearch Serverless, follow the Getting started with Amazon OpenSearch Serverless workshop, which has a step-by-step guide for configuring and setting up an OpenSearch Serverless collection.

If you have feedback about this post, share it in the comments section. If you have questions about this post, start a new thread on the Amazon OpenSearch Service forum or contact AWS Support.


About the author

Prashant Agrawal is a Sr. Search Specialist Solutions Architect with Amazon OpenSearch Service. He works closely with customers to help them migrate their workloads to the cloud and helps existing customers fine-tune their clusters to achieve better performance and save on cost. Before joining AWS, he helped various customers use OpenSearch and Elasticsearch for their search and log analytics use cases. When not working, you can find him traveling and exploring new places. In short, he likes doing Eat → Travel → Repeat.

Security updates for Thursday

Post Syndicated from jake original https://lwn.net/Articles/941935/

Security updates have been issued by Debian (open-vm-tools, openjdk-11, and openssh), Fedora (librsvg2, llhttp, opensc, and rust), Oracle (.NET 6.0, .NET 7.0, iperf3, microcode_ctl, postgresql:10, and python-requests), SUSE (openssl-1_0_0, perl-Cpanel-JSON-XS, postgresql12, and postgresql15), and Ubuntu (ceph, haproxy, heat, libpod, and postgresql-12, postgresql-14, postgresql-15).

Rapid7’s Mid-Year Threat Review

Post Syndicated from Tom Caiazza original https://blog.rapid7.com/2023/08/17/rapid7s-mid-year-threat-review/

Rapid7’s Mid-Year Threat Review

It will come as little surprise to most people that cyber threats in 2023 have been rather prolific. From widely exploited vulnerabilities to high-profile ransomware and extortion campaigns, the first half of the year has seen more than its fair share of large-scale incidents.

Rapid7’s 2023 Mid-Year Threat Review aggregates data and analysis from our vulnerability intelligence, managed services, and threat analytics teams to provide a mid-year snapshot of the attack landscape and give organizations actionable guidance on protecting themselves from common threats.

From January to June 2023, our team tracked:

  • 1,500+ ransomware incidents
  • 79 attacks attributed to state-sponsored threat actors
  • More than a dozen new vulnerabilities that were exploited en masse
  • A significant uptick (69%) in incident response case volume

Exploitation of public-facing applications has been a popular initial access strategy so far this year, including for advanced persistent threat actors (APTs) and state-sponsored adversaries. APTs exploited both zero-day and known vulnerabilities in routers, security appliances, printer management software, Voice over Internet Protocol (VoIP) technologies, and more. Cyber espionage, cyber warfare, and financial gain were the main motives attributed to state-sponsored threat campaigns.

Our mid-year data also shows that basic security hygiene is still a challenge for many businesses — 39% of incidents our managed services teams responded to stemmed from either lax or lacking multi-factor authentication. As always, our mid-year report provides actionable guidance to help businesses improve their security posture, including tactics to mitigate the risk of data exfiltration.
For more findings and risk management strategies, read the full report here. An infographic of key takeaways is also available here.

Detecting “Violations of Social Norms” in Text with AI

Post Syndicated from Bruce Schneier original https://www.schneier.com/blog/archives/2023/08/detecting-violations-of-social-norms-in-text-with-ai.html

Researchers are trying to use AI to detect “social norms violations.” Feels a little sketchy right now, but this is the sort of thing that AIs will get better at. (Like all of these systems, anything but a very low false positive rate makes the detection useless in practice.)

News article.

Кой контролира вътрешните одитори в най-богатите държавни компании Регулаторите – превзети от ГЕРБ, в одитните комитети в енергетиката – конфликт на интереси с по до 3 заплати

Post Syndicated from Николай Марченко original https://bivol.bg/regulatori-beh.html

четвъртък 17 август 2023


Българските регулатори и одитни комитети в сектора с най-високите в държавата възнаграждения – енергетиката, са завладени от кадри на ГЕРБ и са в тотален предполагае конфликт на интереси. Това установи…

Introducing AWS Glue crawler and create table support for Apache Iceberg format

Post Syndicated from Sandeep Adwankar original https://aws.amazon.com/blogs/big-data/introducing-aws-glue-crawler-and-create-table-support-for-apache-iceberg-format/

Apache Iceberg is an open table format for large datasets in Amazon Simple Storage Service (Amazon S3) and provides fast query performance over large tables, atomic commits, concurrent writes, and SQL-compatible table evolution. Iceberg has become very popular for its support for ACID transactions in data lakes and features like schema and partition evolution, time travel, and rollback. Iceberg captures metadata information on the state of datasets as they evolve and change over time.

AWS Glue crawlers now support Iceberg tables, enabling you to use the AWS Glue Data Catalog and migrate from other Iceberg catalogs easier. AWS Glue crawlers will extract schema information and update the location of Iceberg metadata and schema updates in the Data Catalog. You can then query the Data Catalog Iceberg tables across all analytics engines and apply AWS Lake Formation fine-grained permissions.

The Iceberg catalog helps you manage a collection of Iceberg tables and tracks the table’s current metadata. Iceberg provides several implementation options for the Iceberg catalog, including the AWS Glue Data Catalog, Hive Metastore, and JDBC catalogs. Customers prefer using or migrating to the AWS Glue Data Catalog because of its integrations with AWS analytical services such as Amazon Athena, AWS Glue, Amazon EMR, and Lake Formation.

With today’s launch, you can create and schedule an AWS Glue crawler to existing Iceberg tables into in the Data Catalog. You can then provide one or multiple S3 paths where the Iceberg tables are located. You have the option to provide the maximum depth of S3 paths that the crawler can traverse. With each crawler run, the crawler inspects each of the S3 paths and catalogs the schema information, such as new tables, deletes, and updates to schemas in the Data Catalog. Crawlers support schema merging across all snapshots and update the latest metadata file location in the Data Catalog that AWS analytical engines can directly use.

Additionally, AWS Glue is launching support for creating new (empty) Iceberg tables in the Data Catalog using the AWS Glue console or AWS Glue CreateTable API. Before the launch, customers who wanted to adopt Iceberg table format were required to generate Iceberg’s metadata.json file on Amazon S3 using PutObject separately in addition to CreateTable. Often, customers have used the create table statement on analytics engines such as Athena, AWS Glue, and so on. The new CreateTable API eliminates the need to create the metadata.json file separately, and automates generating metadata.json based on the given API input. Also, customers who manage deployments using AWS CloudFormation templates can now create Iceberg tables using the CreateTable API. For more details, refer to Creating Apache Iceberg tables.

For accessing the data using Athena, you can also use Lake Formation to secure your Iceberg table using fine-grained access control permissions when you register the Amazon S3 data location with Lake Formation. For source data in Amazon S3 and metadata that is not registered with Lake Formation, access is determined by AWS Identity and Access Management (IAM) permissions policies for Amazon S3 and AWS Glue actions.

Solution overview

For our example use case, a customer uses Amazon EMR for data processing and Iceberg format for the transactional data. They store their product data in Iceberg format on Amazon S3 and host the metadata of their datasets in Hive Metastore on the EMR primary node. The customer wants to make product data accessible to analyst personas for interactive analysis using Athena. Many AWS analytics services don’t integrate natively with Hive Metastore, so we use an AWS Glue crawler to populate the metadata in the AWS Glue Data Catalog. Athena supports Lake Formation permissions on Iceberg tables, so we apply fine-grained access for data access.

We configure the crawler to onboard the Iceberg schema to the Data Catalog and use Lake Formation access control for crawling. We apply Lake Formation grants on the database and crawled table to enable analyst users to query the data and verify using Athena.

After we populate the schema of the existing Iceberg dataset to the Data Catalog, we onboard new Iceberg tables to the Data Catalog and load data into the newly created data using Athena. We apply Lake Formation grants on the database and newly created table to enable analyst users to query the data and verify using Athena.

The following diagram illustrates the solution architecture.

Set up resources with AWS CloudFormation

To set up the solution resources using AWS CloudFormation, complete the following steps:

  1. Log in to the AWS Management Console as IAM administrator.
  2. Choose Launch Stack to deploy a CloudFormation template.
  3. Choose Next.
  4. On the next page, choose Next.
  5. Review the details on the final page and select I acknowledge that AWS CloudFormation might create IAM resources.
  6. Choose Create.

The CloudFormation template generates the following resources:

  • VPC, subnet, and security group for the EMR cluster
  • Data lake bucket to store Iceberg table data and metadata
  • IAM roles for the crawler and Lake Formation registration
  • EMR cluster and steps to create an Iceberg table with Hive Metastore
  • Analyst role for data access
  • Athena bucket path for results

  1. When the stack is complete, on the AWS CloudFormation console, navigate to the Resources tab of the stack.
  2. Note down the values of EmrClusterId, DataLakeBucketName, LFRegisterLocationServiceRole, AWSGlueServiceRole, AthenaBucketName, and LFBusinessAnalystRole.
  3. Navigate to the Amazon EMR console and choose the EMR cluster you created.
  4. Navigate to the Steps tab and verify that the steps were run.

This script run creates the database icebergcrawlerblodb using Hive and the Iceberg table product. It uses the Hive Metastore server on Amazon EMR as the metastore and stores the data on Amazon S3.

  1. Navigate to the S3 bucket you created and verify if the data and metadata are created for the Iceberg table.

Some of the resources that this stack deploys incur costs when in use.

Now that the data is on Amazon S3, we can register the bucket with Lake Formation to implement access control and centralize the data governance.

Set up Lake Formation permissions

To use the AWS Glue Data Catalog in Lake Formation, complete the following steps to update the Data Catalog settings to use Lake Formation permissions to control Data Catalog resources instead of IAM-based access control:

  1. Sign in to the Lake Formation console as admin.
    • If this is the first time accessing the Lake Formation console, add yourself as the data lake administrator.
  2. In the navigation pane, under Data catalog, choose Settings.
  3. Deselect Use only IAM access control for new databases.
  4. Deselect Use only IAM access control for new tables in new databases.
  5. Choose Version 3 for Cross account version settings.
  6. Choose Save.

Now you can set up Lake Formation permissions.

Register the data lake S3 bucket with Lake Formation

To register the data lake S3 bucket, complete the following steps:

  1. On the Lake Formation console, in the navigation pane, choose Data lake locations.
  2. Choose Register location.
  3. For Amazon S3 path, enter the data lake bucket path.
  4. For IAM role, choose the role noted from the CloudFormation template for LFRegisterLocationServiceRole.
  5. Choose Register location.

Grant crawler role access to the data location

To grant access to the crawler, complete the following steps:

  1. On the Lake Formation console, in the navigation pane, choose Data locations.
  2. Choose Grant.
  3. For IAM users and roles, choose the role for the crawler.
  4. For Storage locations, enter the data lake bucket path.
  5. Choose Grant.

Create database and grant access to the crawler role

Complete the following steps to create your database and grant access to the crawler role:

  1. On the Lake Formation console, in the navigation pane, choose Databases.
  2. Choose Create database.
  3. Provide the name icebergcrawlerblogdb for the database.
  4. Make sure Use only IAM access control for new tables in this database option is not selected.
  5. Choose Create database.
  6. On the Action menu, choose Grant.
  7. For IAM users and roles, choose the role for the crawler.
  8. Leave the database specified as icebergcrawlerblogdb.
  9. Select Create table, Describe, and Alter for Database permissions.
  10. Choose Grant.

Configure the crawler for Iceberg

To configure your crawler for Iceberg, complete the following steps:

  1. On the AWS Glue console, in the navigation pane, choose Crawlers.
  2. Choose Create crawler.
  3. Enter a name for the crawler. For this post, we use icebergcrawler.
  4. Under Data source configuration, choose Add data source.
  5. For Data source, choose Iceberg.
  6. For S3 path, enter s3://<datalakebucket>/icebergcrawlerblogdb.db/.
  7. Choose Add a Iceberg data source.

Support for Iceberg tables is available through CreateCrawler and UpdateCrawler APIs and adding the additional IcebergTarget as a target, with the following properties:

  • connectionId – If your Iceberg tables are stored in buckets that require VPC authorization, you can set your connection properties here
  • icebergTables – This is an array of icebergPaths strings, each indicating the folder with which the metadata files for an Iceberg table resides

See the following code:

{
    "IcebergTarget": {
        "connectionId": "iceberg-connection-123",
        "icebergMetaDataPaths": [
            "s3://bucketA/",
            "s3://bucketB/",
            "s3://bucket3/financedb/financetable/"
        ]
        "exclusions": ["departments/**", "employees/folder/**"]
        "maximumDepth": 5
    }
}
  1. Choose Next.
  2. For Existing IAM role, enter the crawler role created by the stack.
  3. Under Lake Formation configuration, select Use Lake Formation credentials for crawling S3 data source.
  4. Choose Next.
  5. Under Set output and scheduling, specify the target database as icebergcrawlerblogdb.
  6. Choose Next.
  7. Choose Create crawler.
  8. Run the crawler.

During each crawl, for each icebergTable path provided, the crawler calls the Amazon S3 List API to find the most recent metadata file under that Iceberg table metadata folder and updates the metadata_location parameter to the latest manifest file.

The following screenshot shows the details after a successful run.

The crawler was able to crawl the S3 data source and successfully populate the schema for Iceberg data in the Data Catalog.

You can now start using the Data Catalog as your primary metastore and create new Iceberg tables directly in the Data Catalog or using the createtable API.

Create a new Iceberg table

To create an Iceberg table in the Data Catalog using the console, complete the steps in this section. Alternatively, you can use a CloudFormation template to create an Iceberg table using the following code:

Type: AWS::Glue::Table
Properties: 
  CatalogId:"<account_id>"
  DatabaseName:"icebergcrawlerblogdb"
  TableInput:
    Name: "product_details"
    StorageDescriptor:
       Columns:
         - Name: "product_id"
           Type: "string"
         - Name: "manufacture_name"
           Type: "string"
         - Name: "product_rating"
           Type: "int"
       Location: "s3://<datalakebucket>/icebergcrawlerblogdb.db/"
    TableType: "EXTERNAL_TABLE"
  OpenTableFormatInput:
    IcebergInput:
      MetadataOperation: "CREATE"
      Version: "2"

Grant the IAM role access to the data location

First, grant the IAM role access to the data location:

  1. On the Lake Formation console, in the navigation pane, choose Data locations.
  2. Choose Grant.
  3. Select Admin IAM role for IAM users and roles.
  4. For Storage location, enter the data lake bucket path.
  5. Choose Grant.

Create the Iceberg table

Complete the following steps to create the Iceberg table:

  1. On the Lake Formation console, in the navigation pane, choose Tables.
  2. Choose Create table.
  3. For Name, enter product_details.
  4. Choose icebergcrawlerblogdb for Database.
  5. Select Apache Iceberg table for Table format.
  6. Provide the path for <datalakebucket>/icebergcrawlerblogdb.db/ for Table location.
  7. Provide the following schema and choose Upload schema:
    [
         {
             "Name": "product_id",
             "Type": "string"
         },
         {
             "Name": "manufacture_name",
             "Type": "string"
         },
         {
             "Name": "product_rating",
             "Type": "int"
         }
     ]

  8. Choose Submit to create the table.

Add a record to the new Iceberg table

Complete the following steps to add a record to the Iceberg table:

  1. On the Athena console, navigate to the query editor.
  2. Choose Edit settings to configure the Athena query results bucket using the value noted from the CloudFormation output for AthenaBucketName.
  3. Choose Save.
  4. Run the following query to add a record to the table:
    insert into icebergcrawlerblogdb.product_details values('00001','ABC Company',10)

Configure Lake Formation permissions on the Iceberg table in the Data Catalog

Athena supports Lake Formation permission on Iceberg tables, so for this post, we show you how to set up fine-grained access on the tables and query them using Athena.

Now the data lake admin can delegate permissions on the database and table to the LFBusinessAnalystRole-IcebergBlogIAM role via the Lake Formation console.

Grant the role access to the database and describe permissions

To grant the LFBusinessAnalystRole-IcebergBlogIAM role access to the database with describe permissions, complete the following steps:

  1. On the Lake Formation console, under Permissions in the navigation pane, choose Data lake permissions.
  2. Choose Grant
  3. Under Principals, select IAM users and roles.
  4. Choose the IAM role LFBusinessAnalystRole-IcebergBlog.
  5. Under LF-Tags or catalog resources, choose icebergcrawlerblogdb for Databases.
  6. Select Describe for Database permissions.
  7. Choose Grant to apply the permissions.

Grant column access to the role

Next, grant column access to the LFBusinessAnalystRole-IcebergBlogIAM role:

  1. On the Lake Formation console, under Permissions in the navigation pane, choose Data lake permissions.
  2. Choose Grant.
  3. Under Principals, select IAM users and roles.
  4. Choose the IAM role LFBusinessAnalystRole-IcebergBlog.
  5. Under LF-Tags or catalog resources, choose icebergcrawlerblogdb for Databases and product for Tables.
  6. Choose Select for Table permissions.
  7. Under Data permissions, select Column-based access.
  8. Select Include columns and choose product_name and price.
  9. Choose Grant to apply the permissions.

Grant table access to the role

Lastly, grant table access to the LFBusinessAnalystRole-IcebergBlogIAM role:

  1. On the Lake Formation console, under Permissions in the navigation pane, choose Data lake permissions.
  2. Choose Grant.
  3. Under Principals, select IAM users and roles.
  4. Choose the IAM role LFBusinessAnalystRole-IcebergBlog.
  5. Under LF-Tags or catalog resources, choose icebergcrawlerblogdb for Databases and product_details for Tables.
  6. Choose Select and Describe for Table permissions.
  7. Choose Grant to apply the permissions.

Verify the tables using Athena

To verify the tables using Athena, switch to LFBusinessAnalystRole-IcebergBlogrole and complete the following steps:

  1. On the Athena console, navigate to the query editor.
  2. Choose Edit settings to configure the Athena query results bucket using the value noted from the CloudFormation output for AthenaBucketName.
  3. Choose Save.
  4. Run the queries on product and product_details to validate access.

The following screenshot shows column permissions on product.

The following screenshot shows table permissions on product_details.

We have successfully crawled the Iceberg dataset created from Hive Metastore with data on Amazon S3 and created an AWS Glue Data Catalog table with the schema populated. We registered the data lake bucket with Lake Formation and enabled crawling access to the data lake using Lake Formation permissions. We granted Lake Formation permissions on the database and table to the analyst user and validated access to the data using Athena.

Clean up

To avoid unwanted charges to your AWS account, delete the AWS resources:

  1. Sign in to the CloudFormation console as the IAM admin used for creating the CloudFormation stack.
  2. Delete the CloudFormation stack you created.

Conclusion

With the support for Iceberg crawlers, you can quickly move to using the AWS Glue Data Catalog as your primary Iceberg table catalog. You can automatically register Iceberg tables into the Data Catalog by running an AWS Glue crawler, which doesn’t require any DDL or manual schema definition. You can start building your serverless transactional data lake on AWS using the AWS Glue crawler, create a new table using the Data Catalog, and utilize Lake Formation fine-grained access controls for querying Iceberg tables formats by Athena.

Refer to Working with other AWS services for Lake Formation support for Iceberg tables across various AWS analytical services.

Special thanks to everyone who contributed to this crawler and createtable feature launch: Theo Xu, Kyle Duong, Anshuman Sharma, Atreya Srivathsan, Eric Wu, Jack Ye, Himani Desai, Atreya Srivathsan, Masoud Shahamiri and Sachet Saurabh.

If you have questions or suggestions, submit them in the comments section.


About the authors

Sandeep Adwankar is a Senior Technical Product Manager at AWS. Based in the California Bay Area, he works with customers around the globe to translate business and technical requirements into products that enable customers to improve how they manage, secure, and access data.

Srividya Parthasarathy is a Senior Big Data Architect on the AWS Lake Formation team. She enjoys building data mesh solutions and sharing them with the community.

Mahesh Mishra is a Principal Product Manager with AWS Lake Formation team. He works with many of AWS largest customers on emerging technology needs, and leads several data and analytics initiatives within AWS including strong support for Transactional Data Lakes.

HashiCorp’s license change

Post Syndicated from corbet original https://lwn.net/Articles/941799/

Readers have been pointing us to HashiCorp’s announcement
that it is moving to its own “Business Source License” for some of its
(formerly) open-source products. Like other companies (example) that have taken this path, HashiCorp
is removing the freedom to use its products commercially in ways that it
sees as competitive. This is, in a real sense, an old and tiresome story.

The lessons to be drawn from this change are old as well. One is to beware
of depending on any platform, free or proprietary, that is controlled by a
single company. It is a rare company that will not try to take advantage
of that control at some point.

The other is to beware of contributor license agreements. HashiCorp’s
agreement used
to read
that it existed “to ensure that our projects remain licensed
under Free and Open Source licenses
“; the current version doesn’t say that
anymore. But both versions give HashiCorp the right to play exactly this
kind of game with any code contributed by outsiders. Developers who were
contributing to a free-software project will now have their code used in a
rather more proprietary setting. When a company is given the right to take
somebody else’s code proprietary, many of them will eventually make use of
that right.

[$] Kernel security reporting for distributions

Post Syndicated from jake original https://lwn.net/Articles/941745/

The call for topics for the Linux
Kernel
Maintainers Summit
went out on August 15; one proposed topic has
generated some interesting discussion about security-bug reporting for the
kernel.
A recent patch
to the kernel’s documentation about how to report security bugs recommends
avoiding posting to the linux-distros
mailing list
because its goals and rules do not mesh well with kernel
security practices. That led Jiri Kosina to suggest
a discussion on security reporting
, especially with regard to Linux
distributions.

The collective thoughts of the interwebz