Post Syndicated from digiblurDIY original https://www.youtube.com/watch?v=NR12_B79vxU
Security Vulnerabilities in Honda’s Keyless Entry System
Post Syndicated from Bruce Schneier original https://www.schneier.com/blog/archives/2022/07/security-vulnerabilities-in-hondas-keyless-entry-system.html
Honda vehicles from 2021 to 2022 are vulnerable to this attack:
On Thursday, a security researcher who goes by Kevin2600 published a technical report and videos on a vulnerability that he claims allows anyone armed with a simple hardware device to steal the code to unlock Honda vehicles. Kevin2600, who works for cybersecurity firm Star-V Lab, dubbed the attack RollingPWN.
[…]
In a phone call, Kevin2600 explained that the attack relies on a weakness that allows someone using a software defined radio—such as HackRF—to capture the code that the car owner uses to open the car, and then replay it so that the hacker can open the car as well. In some cases, he said, the attack can be performed from 30 meters (approximately 98 feet) away.
In the videos, Kevin2600 and his colleagues show how the attack works by unlocking different models of Honda cars with a device connected to a laptop.
The Honda models that Kevin2600 and his colleagues tested the attack on use a so-called rolling code mechanism, which means that—in theory—every time the car owner uses the keyfob, it sends a different code to open it. This should make it impossible to capture the code and use it again. But the researchers found that there is a flaw that allows them to roll back the codes and reuse old codes to open the car, Kevin2600 said.
Are you technocentric? Shifting from technology to people
Post Syndicated from Jane Waite original https://www.raspberrypi.org/blog/technocentrism-shifting-from-technology-to-people-computing-education-pratim-sengupta-research-seminar/
When we teach children and young people about computing, do we consider how the subject has developed over time, how it relates to our students’ lives, and importantly, what our values are? Professor Pratim Sengupta shared some of the research he and his colleagues have been working on related to these questions in our June 2022 research seminar.

Pratim revealed a complex landscape where we as educators can be easily trapped by what may seem like good intentions, thereby limiting learning and excluding some students. His presentation, entitled Computational heterogeneity in STEM education, introduced me to the concept of technocentrism and profoundly impacted my thinking about the essence of programming and how I research it. In this blog post, particularly for those unable to attend this stimulating seminar, I give my simplified view of the rich philosophy shared by Pratim, and my fledgling steps to admit to my technocentrism and overcome it.
Our seminars on teaching cross-disciplinary computing
Between May 2022 and November 2022, we are hosting a new series of free research seminars about teaching computing in different ways and in different contexts. This second seminar of the series was well attended with participants from the USA, Asia, Africa, and Europe, including teachers, researchers, and industry professionals, who contributed to a lively and thought-provoking discussion.

Pratim is a learning scientist based in Canada with a long and distinguished career. He has studied how to teach computational modelling in K-12 STEM classrooms and investigates the complexity of learning. Grounded in working with teachers and students, he brings together computing, science, education, and social justice. Based on his work at Northwestern University, Vanderbilt University, and now with the Mind, Matter and Media lab at the University of Calgary, Pratim has published hundreds of academic papers over some 20 years. Pratim and his team challenge how we focus on making technological artefacts — code for code’s sake — in computing education, and refocuses us on the human experience of coding and learning to code.
What is technocentrism?
Pratim started the seminar by giving us an overview of some of the key ideas that underpin the way that computing is usually taught in schools, including technocentrism (Figure 1).

I have come to a simplified understanding of technocentrism. To me, it appears to be a way of looking at how we learn about computer science, where one might:
- Focus on the finished product (e.g. a computer program), rather than thinking about the people who create, learn about, or use a program
- Ignore the context and the environment, rather than paying attention to the history, the political situation, and the social context of the task at hand
- View computing tasks as being implemented (enacted) by writing code, rather than seeing computing activities as rich and complex jumbles of meaning-making and communication that involve people using chatter, images, and lots of gestures
- Anchor learning in concepts and skills, rather than placing the values and viewpoints of learners at the heart of teaching
Examples of technocentrism and how to overcome it
Pratim recounted several research activities that he and his team have engaged with. These examples highlight instances of potential technocentrism and investigate how we might overcome it.
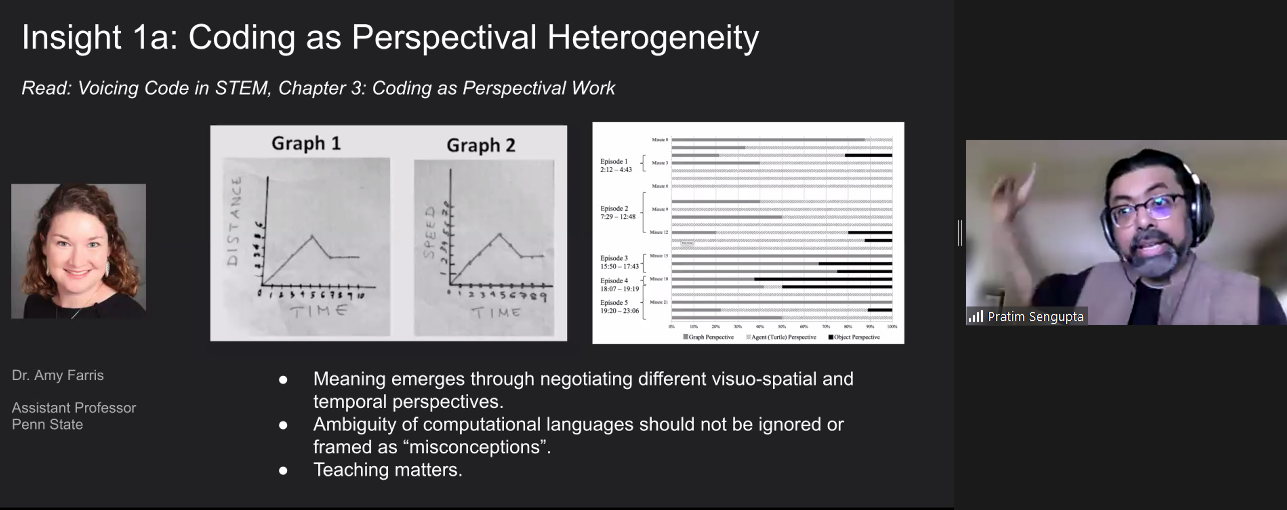
In the first example research activity, Pratim explained how in maths and physics lessons, middle school students were asked to develop models to solve time and distance problems. Rather than immediately coding a potential solution, the researcher and teacher supported the learners to spend much time developing a shared perspective to understand and express the problems first. Students grappled with different ways of representing the context, including graphs and diagrams (see Figure 2). Gradually and carefully, teachers shifted students to recognise what was important and what was not, to move them toward a meaningful language to describe and solve the problems.
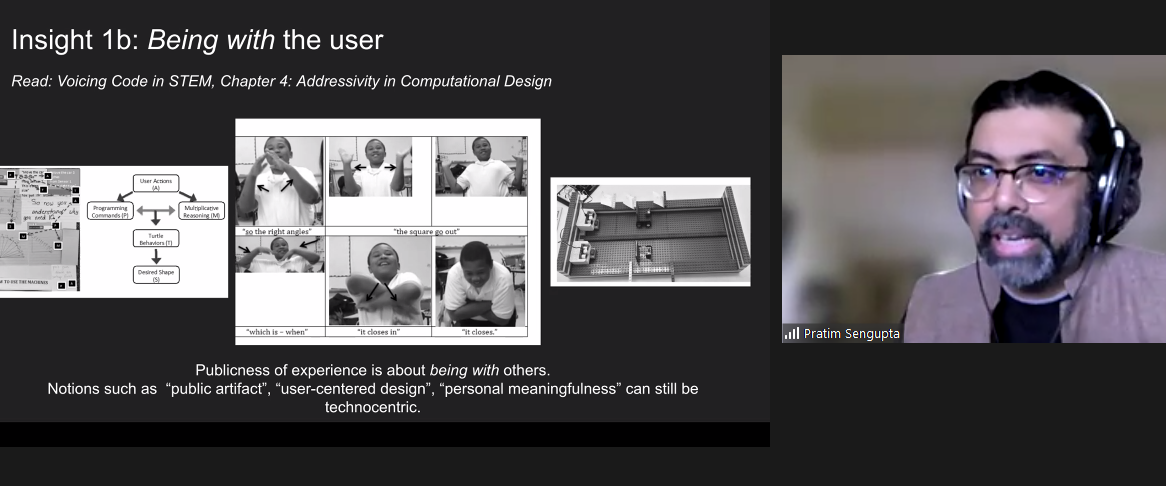
In a second example research activity, students were asked to build a machine that draws shapes using sensors, motors, and code. Rather than jumping straight to a solution, the students spent time with authentic users of their machines. Throughout the process, students worked with others, expressing the context through physical movement, clarifying their thoughts by drawing diagrams, and finding the sweet spot between coding, engineering design, and maths (see Figure 3).
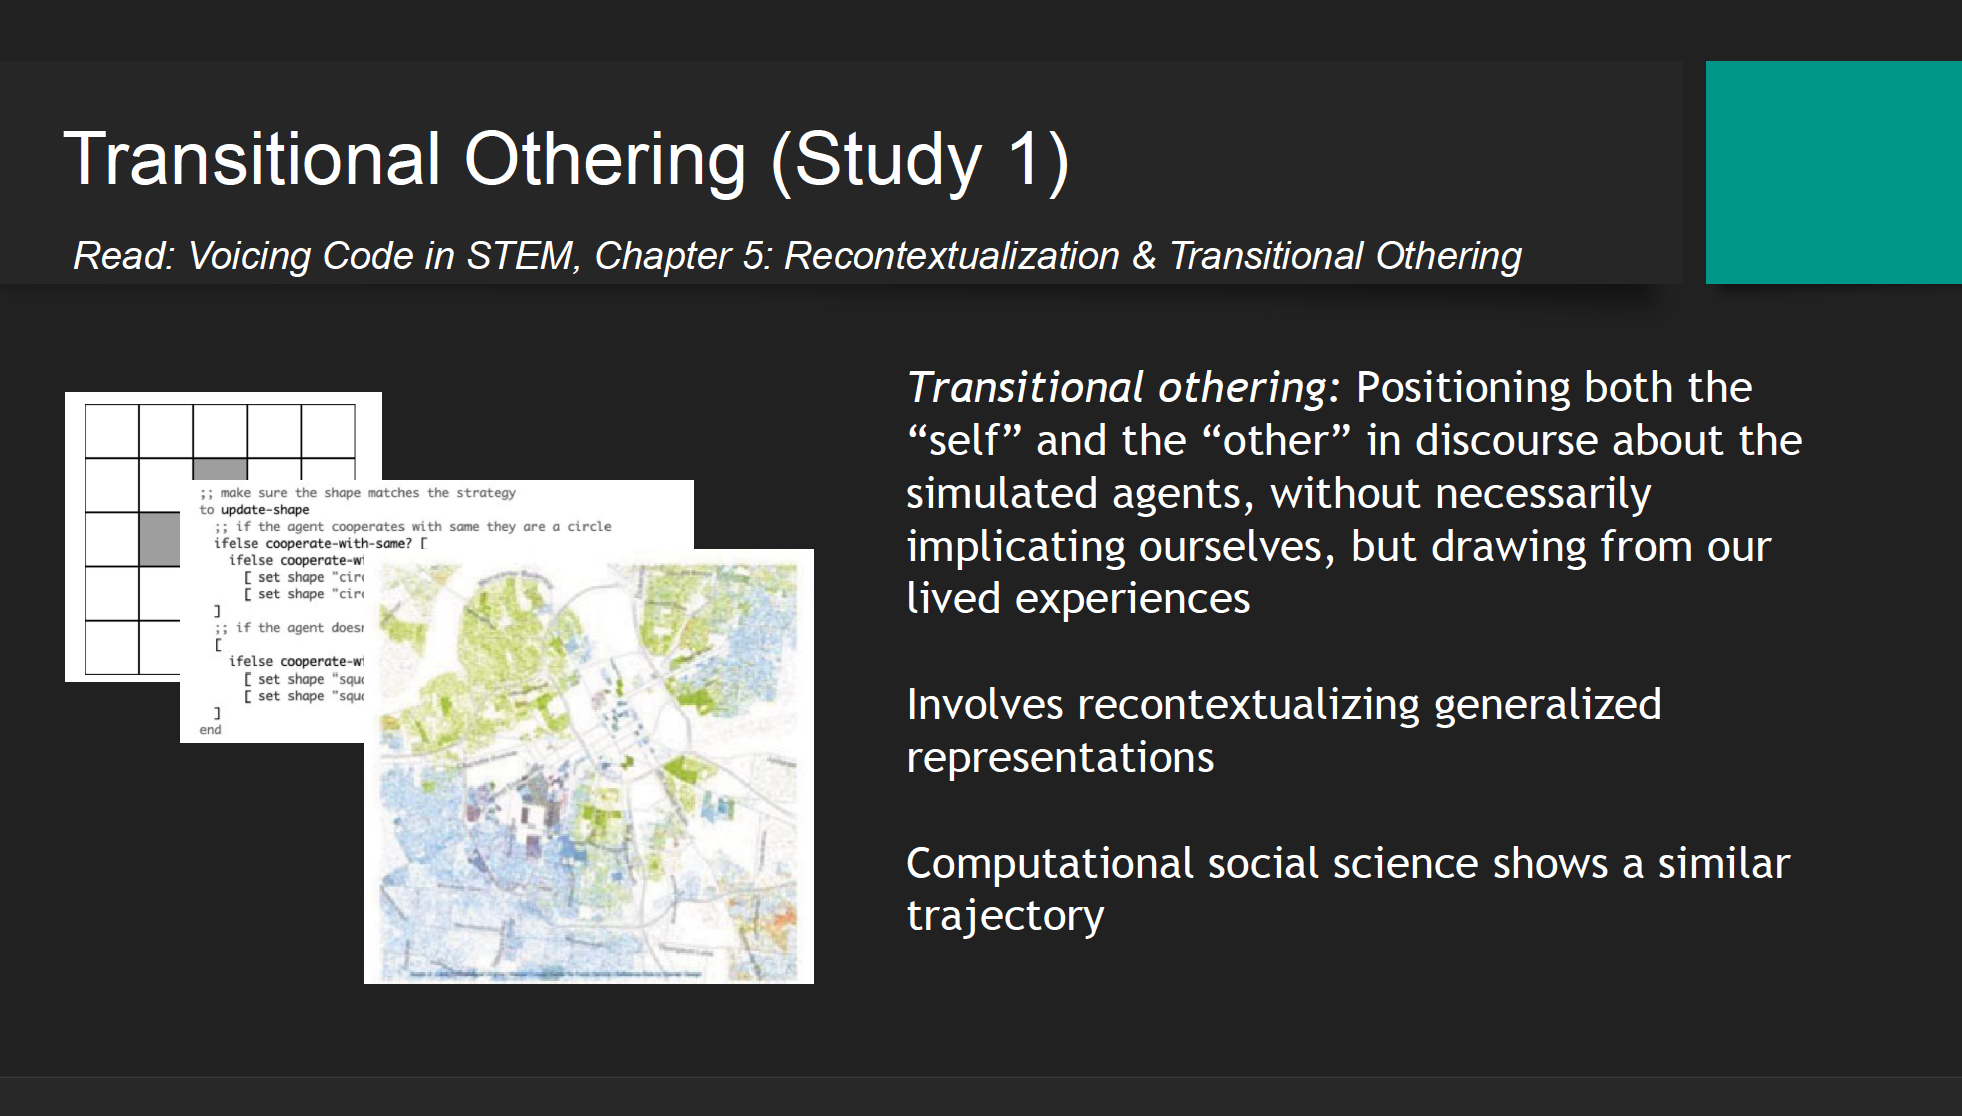
In a third example research activity, racial segregation of US communities was discussed with pre-service teachers. The predominately white teachers found talking about the topic very difficult at the beginning of the activity. To overcome this hesitancy, teachers were first asked to work with a simulation that modelled the process of segregation through abstracted dots (or computational agents), a transitional other. Following this hypothetical representation, the context was then recontextualised through a map of real data points of the ethnicity of residents in an area of the US. This kind of map is called a Racial Dot Map based on US census data. When the teachers were able to interpret the link between the abstracted dot simulation and the real-world data they were able to talk about racism and segregation in a way they could not do before. The initial simulation and the recontextualisation were a pedagogical tool to reveal racism and provide a space where students felt comfortable discussing their values and beliefs that would otherwise have remained implicit.
My takeaways
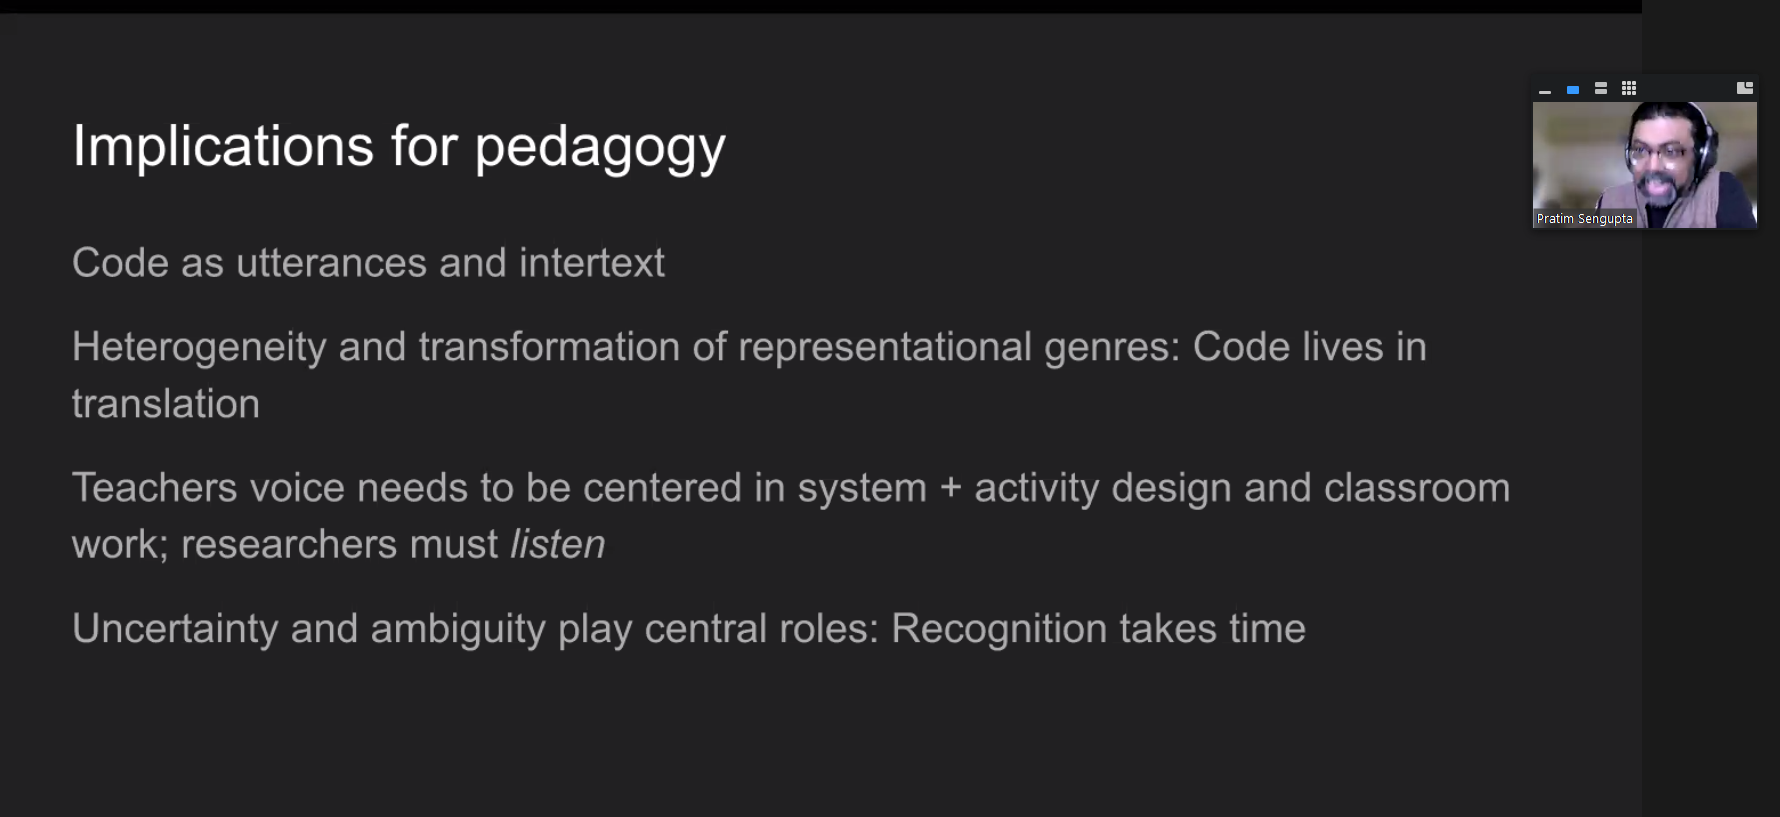
Pratim shared four implications of this research for computing pedagogy (see Figure 5).
As a researcher of pedagogy, these points provide takeaways that I can relate to my own research practice:
- Code is a voice within an experience rather than symbols at a point in time. For example, when I listen to students predicting what a snippet of code will do, I think of the active nature of each carefully chosen command and how for each student, the code corresponds with them differently.
- Code lives as a translation bridging many dimensions, such as data representation, algorithms, syntax, and user views. This statement resonates deeply with my liking of Carsten Schultes’s block model [1] but extends to include the people involved.
- We should listen carefully and attentively to teachers, rather than making assumptions about what happens in classrooms. Teachers create new ideas. This takeaway is very important and reminds me about the trust and relationships built between teachers and researchers and how important it is to listen.
- Uncertainty and ambiguity exist in learning, and this can take time to recognise. This final point makes me smile. As a developer, teacher, and researcher, I have found dealing with ambiguity hard at various points in my career. Still, over time, I think I am getting better at seeing it and celebrating it.
Listening to Pratim share his research on the teaching and learning of computing and the pitfalls of technocentrism has made me think deeply about how I view computer science as a subject and do research about it. I have shared some of my reflections in this blog, and I plan to incorporate the underlying theory and ideas in my ongoing research projects.
If you would like to find out more about Pratim’s work, please look over his slides, watch his presentation, read the upcoming chapter in our seminar proceedings, or respond to this blog by leaving a comment so we can discuss!
Join our next seminar
We have another four seminars in our current series on cross-disciplinary computing.
At our next seminar on 12 July 2022 at 17:00–18:30 BST / 12:00–13:30 EDT / 9:00–10:30 PDT / 18:00–19:30 CEST, we will welcome Prof. Yasmin Kafai and Elaine Griggs, who are going to present research on introductory equity-oriented computer science with electronic textiles for high school students.
We look forward to meeting you there.
[1] You can learn more in the Hello World article where our Chief Learning Officer Sue Sentance talks about the block model.
The post Are you technocentric? Shifting from technology to people appeared first on Raspberry Pi.
Do More With Your Data With the Backblaze + Aparavi Joint Solution
Post Syndicated from Jennifer Newman original https://www.backblaze.com/blog/do-more-with-your-data-with-the-backblaze-aparavi-joint-solution/

It’s almost a guarantee that no data analyst, data manager, CIO, or CEO for that matter, ever uttered the words, “I wish we did less with our data.” You always want to do more—squeeze more value out of it, learn more from it, and make it work harder for you.
Aparavi helps customers do just that. The cloud-based platform is designed to unlock the value of data, no matter where it lives. Backblaze’s new partnership with Aparavi offers joint customers simple, scalable cloud storage services for unstructured data management. Read on to learn more about the partnership.
What Is Aparavi?
Aparavi is a cloud-based data intelligence and automation platform that helps customers identify, classify, optimize, and move unstructured data no matter where it resides. The platform finds, automates, governs, and consolidates distributed data easily using deep intelligence. It ensures secure access for modern data demands of analytics, machine learning, and collaboration, connecting business and IT to transform data into a competitive asset.
How Does Backblaze Integrate With Aparavi?
The Aparavi Data Intelligence and Automation Platform and Backblaze B2 Cloud Storage together provide data lifecycle management and universal data migration services. Joint customers can choose Backblaze B2 as a destination for their unstructured data.
“We are very excited about our partnership with Backblaze. This partnership will combine Aparavi’s automated and continuous data movement with Backblaze B2’s simple, scalable cloud storage services to help companies know and visualize their data, including the impact of risk, cost, and value they may or may not be aware of today.”
—Adrian Knapp, CEO and Founder, Aparavi
How Does This Partnership Benefit Joint Customers?
The partnership delivers in three key value areas:
- It facilitates redundant, obsolete, trivial—commonly referred to as ROT—data cleanup, helping to reduce on-premises operational costs, redundancies, and complexities.
- It recognizes personally identifiable information to deliver deeper insights into organizational data.
- It enables data lifecycle management and automation to low-cost, secure, and highly available Backblaze B2 Cloud Storage.
“Backblaze helps organizations optimize their infrastructure in B2 Cloud Storage by eliminating their biggest barrier to choosing a new provider: excessive costs and complexity. By partnering with Aparavi, we can take that to the next level for our joint customers, providing cost-effective data management, storage, and access.”
—Nilay Patel, Vice President of Sales and Partnerships, Backblaze
Getting Started With Backblaze B2 and Aparavi
Ready to do more with your data affordably? Contact our Sales team today to get started.
The post Do More With Your Data With the Backblaze + Aparavi Joint Solution appeared first on Backblaze Blog | Cloud Storage & Cloud Backup.
Robotic Vacuum Buyers Guide – Must Have Features For Every Budget
Post Syndicated from The Hook Up original https://www.youtube.com/watch?v=dRPqvrvgQGU
Responsible stewardship of the UEFI secure boot ecosystem
Post Syndicated from original https://mjg59.dreamwidth.org/60248.html
After I mentioned that Lenovo are now shipping laptops that only boot Windows by default, a few people pointed to a Lenovo document that:Starting in 2022 for Secured-core PCs it is a Microsoft requirement for the 3rd Party Certificate to be disabled by default.
“Secured-core” is a term used to describe machines that meet a certain set of Microsoft requirements around firmware security, and by and large it’s a good thing – devices that meet these requirements are resilient against a whole bunch of potential attacks in the early boot process. But unfortunately the 2022 requirements don’t seem to be publicly available, so it’s difficult to know what’s being asked for and why. But first, some background.
Most x86 UEFI systems that support Secure Boot trust at least two certificate authorities:
1) The Microsoft Windows Production PCA – this is used to sign the bootloader in production Windows builds. Trusting this is sufficient to boot Windows.
2) The Microsoft Corporation UEFI CA – this is used by Microsoft to sign non-Windows UEFI binaries, including built-in drivers for hardware that needs to work in the UEFI environment (such as GPUs and network cards) and bootloaders for non-Windows.
The apparent secured-core requirement for 2022 is that the second of these CAs should not be trusted by default. As a result, drivers or bootloaders signed with this certificate will not run on these systems. This means that, out of the box, these systems will not boot anything other than Windows[1].
Given the association with the secured-core requirements, this is presumably a security decision of some kind. Unfortunately, we have no real idea what this security decision is intended to protect against. The most likely scenario is concerns about the (in)security of binaries signed with the third-party signing key – there are some legitimate concerns here, but I’m going to cover why I don’t think they’re terribly realistic.
The first point is that, from a boot security perspective, a signed bootloader that will happily boot unsigned code kind of defeats the point. Kaspersky did it anyway. The second is that even a signed bootloader that is intended to only boot signed code may run into issues in the event of security vulnerabilities – the Boothole vulnerabilities are an example of this, covering multiple issues in GRUB that could allow for arbitrary code execution and potential loading of untrusted code.
So we know that signed bootloaders that will (either through accident or design) execute unsigned code exist. The signatures for all the known vulnerable bootloaders have been revoked, but that doesn’t mean there won’t be other vulnerabilities discovered in future. Configuring systems so that they don’t trust the third-party CA means that those signed bootloaders won’t be trusted, which means any future vulnerabilities will be irrelevant. This seems like a simple choice?
There’s actually a couple of reasons why I don’t think it’s anywhere near that simple. The first is that whenever a signed object is booted by the firmware, the trusted certificate used to verify that object is measured into PCR 7 in the TPM. If a system previously booted with something signed with the Windows Production CA, and is now suddenly booting with something signed with the third-party UEFI CA, the values in PCR 7 will be different. TPMs support “sealing” a secret – encrypting it with a policy that the TPM will only decrypt it if certain conditions are met. Microsoft make use of this for their default Bitlocker disk encryption mechanism. The disk encryption key is encrypted by the TPM, and associated with a specific PCR 7 value. If the value of PCR 7 doesn’t match, the TPM will refuse to decrypt the key, and the machine won’t boot. This means that attempting to attack a Windows system that has Bitlocker enabled using a non-Windows bootloader will fail – the system will be unable to obtain the disk unlock key, which is a strong indication to the owner that they’re being attacked.
The second is that this is predicated on the idea that removing the third-party bootloaders and drivers removes all the vulnerabilities. In fact, there’s been rather a lot of vulnerabilities in the Windows bootloader. A broad enough vulnerability in the Windows bootloader is arguably a lot worse than a vulnerability in a third-party loader, since it won’t change the PCR 7 measurements and the system will boot happily. Removing trust in the third-party CA does nothing to protect against this.
The third reason doesn’t apply to all systems, but it does to many. System vendors frequently want to ship diagnostic or management utilities that run in the boot environment, but would prefer not to have to go to the trouble of getting them all signed by Microsoft. The simple solution to this is to ship their own certificate and sign all their tooling directly – the secured-core Lenovo I’m looking at currently is an example of this, with a Lenovo signing certificate. While everything signed with the third-party signing certificate goes through some degree of security review, there’s no requirement for any vendor tooling to be reviewed at all. Removing the third-party CA does nothing to protect the user against the code that’s most likely to contain vulnerabilities.
Obviously I may be missing something here – Microsoft may well have a strong technical justification. But they haven’t shared it, and so right now we’re left making guesses. And right now, I just don’t see a good security argument.
But let’s move on from the technical side of things and discuss the broader issue. The reason UEFI Secure Boot is present on most x86 systems is that Microsoft mandated it back in 2012. Microsoft chose to be the only trusted signing authority. Microsoft made the decision to assert that third-party code could be signed and trusted.
We’ve certainly learned some things since then, and a bunch of things have changed. Third-party bootloaders based on the Shim infrastructure are now reviewed via a community-managed process. We’ve had a productive coordinated response to the Boothole incident, which also taught us that the existing revocation strategy wasn’t going to scale. In response, the community worked with Microsoft to develop a specification for making it easier to handle similar events in future. And it’s also worth noting that after the initial Boothole disclosure was made to the GRUB maintainers, they proactively sought out other vulnerabilities in their codebase rather than simply patching what had been reported. The free software community has gone to great lengths to ensure third-party bootloaders are compatible with the security goals of UEFI Secure Boot.
So, to have Microsoft, the self-appointed steward of the UEFI Secure Boot ecosystem, turn round and say that a bunch of binaries that have been reviewed through processes developed in negotiation with Microsoft, implementing technologies designed to make management of revocation easier for Microsoft, and incorporating fixes for vulnerabilities discovered by the developers of those binaries who notified Microsoft of these issues despite having no obligation to do so, and which have then been signed by Microsoft are now considered by Microsoft to be insecure is, uh, kind of impolite? Especially when unreviewed vendor-signed binaries are still considered trustworthy, despite no external review being carried out at all.
If Microsoft had a set of criteria used to determine whether something is considered sufficiently trustworthy, we could determine which of these we fell short on and do something about that. From a technical perspective, Microsoft could set criteria that would allow a subset of third-party binaries that met additional review be trusted without having to trust all third-party binaries[2]. But, instead, this has been a decision made by the steward of this ecosystem without consulting major stakeholders.
If there are legitimate security concerns, let’s talk about them and come up with solutions that fix them without doing a significant amount of collateral damage. Don’t complain about a vendor blocking your apps and then do the same thing yourself.
[1] They’ll also refuse to run any drivers that are stored in flash on Thunderbolt devices, which means eGPU setups may be more complicated, as will netbooting off Thunderbolt-attached NICs
[2] Use a different leaf cert to sign the new trust tier, add the old leaf cert to dbx unless a config option is set, leave the existing intermediate in db
 comments
A sneak peek at the governance, risk, and compliance sessions for AWS re:Inforce 2022
Post Syndicated from Greg Eppel original https://aws.amazon.com/blogs/security/a-sneak-peek-at-the-governance-risk-and-compliance-sessions-for-aws-reinforce-2022/
Register now with discount code SALUZwmdkJJ to get $150 off your full conference pass to AWS re:Inforce. For a limited time only and while supplies last.
Today we want to tell you about some of the exciting governance, risk, and compliance sessions planned for AWS re:Inforce 2022. AWS re:Inforce is a conference where you can learn more about security, compliance, identity, and privacy. When you attend the event, you have access to hundreds of technical and business sessions, an AWS Partner expo hall, a keynote speech from AWS Security leaders, and more. AWS re:Inforce 2022 will take place in person in Boston, MA on July 26 and 27. AWS re:Inforce 2022 features content in the following five areas:
- Data protection and privacy
- Governance, risk, and compliance
- Identity and access management
- Network and infrastructure security
- Threat detection and incident response
This post will highlight of some of the governance, risk, and compliance offerings that you can sign up for, including breakout sessions, chalk talks, builders’ sessions, and workshops. For the full catalog of all tracks, see the AWS re:Inforce session preview.
Breakout sessions
These are lecture-style presentations that cover topics at all levels and are delivered by AWS experts, builders, customers, and partners. Breakout sessions typically include 10–15 minutes of Q&A at the end.
GRC201: Learn best practices for auditing AWS with Cloud Audit Academy
Do you want to know how to audit in the cloud? Today, control framework language is catered toward on-premises environments, and security IT auditing techniques have not been reshaped for the cloud. The AWS Cloud–specific Cloud Audit Academy provides auditors with the education and tools to audit for security on AWS using a risk-based approach. In this session, experience a condensed sample domain from a four-day Cloud Audit Academy workshop.
GRC203: Panel discussion: Continuous compliance and auditing on AWS
In this session, an AWS leader speaks with senior executives from enterprise customer and AWS Partner organizations as they share their paths to success with compliance and auditing on AWS. Join this session to hear how they have used AWS Cloud Operations to help make compliance and auditing more efficient and improve business outcomes. Also hear how AWS Partners are supporting customer organizations as they automate compliance and move to the cloud.
GRC205: Crawl, walk, run: Accelerating security maturity
Where are you on your cloud security journey? Where do you want to end up? What are your next steps? In this step-by-step roadmap, we provide a comprehensive overview of the AWS security journey based on lessons learned with other organizations. Learn where you are, how to take the next step and how to improve your cloud security program. In this session, we will leverage cloud-native tools like AWS Control Tower, AWS Config, and AWS Security Hub to demonstrate how knowing your current state of security can drive more effective and efficient story telling of your posture.
GRC302: Using AWS security services to build our cloud operations foundation
Organizations new to the cloud need to quickly understand what foundational security capabilities should be considered as a baseline. In this session, learn how AWS security services can help you improve your cloud security posture. Learn how to incorporate security into your AWS architecture based on the AWS Cloud Operations model, which will help you implement governance, manage risk, and achieve compliance while proactively discovering opportunities for improvement.
GRC331: Automating security and compliance with OSCAL
Documentation exports can be very time consuming. In this session, learn how the National Institute of Science and Technology is developing the Open Security Controls Assessment Language (OSCAL) to provide common translation between XML, JSON, and YAML formats. OSCAL also provides a common means to identify and version shared resources, and standardize the expression of assessment artifacts. Learn how AWS is working to implement OSCAL for our security documentation exports so that you can save time when creating and maintaining ATO packages.
Builders’ sessions
These are small-group sessions led by an AWS expert who guides you as you build the service or product on your own laptop. Use your laptop to experiment and build along with the AWS expert.
GRC351: Implementing compliance as code on AWS
To manage compliance at the speed and scale the cloud requires, organizations need to implement automation and have an effective mechanism to manage it. In this builders’ session, learn how to implement compliance as code (CaC). CaC shares many of the same benefits as infrastructure as code: speed, automation, peer review, and auditability. Learn about defining controls with AWS Config rules, customizing those controls, using remediation actions, packaging and deploying with AWS Config conformance packs, and validating using a CI/CD pipeline.
GRC352: Deploying repeatable, secure, and compliant Amazon EKS clusters
In this builders’ session, learn how to deploy, manage, and scale containerized applications that run Kubernetes on AWS with AWS Service Catalog. Walk through how to deploy the Kubernetes control plane into a virtual private cloud (VPC), connect worker nodes to the cluster, and configure a bastion host for cluster administrative operations. Using AWS CloudFormation registry resource types, learn how to declare Kubernetes manifests or Helm charts to deploy and manage your Kubernetes applications. With AWS Service Catalog, you can empower your teams to deploy securely configured Amazon Elastic Kubernetes Service (Amazon EKS) clusters in multiple accounts and Regions.
GRC354: Building remediation workflows to simplify compliance
Automation and simplification are key to managing compliance at scale. Remediation is one of the key elements of simplifying and managing risk. In this builders’ session, walk through how to build a remediation workflow using AWS Config and AWS Systems Manager Automation. Then, explore how the workflow can be deployed at scale and monitored with AWS Security Hub to oversee your entire organization.
GRC355: Build a Security Posture Leaderboard using AWS Security Hub
This builders’ session introduces you to the possibilities of creating a robust and comprehensive leaderboard using AWS Security Hub findings to improve security and compliance visibility in your organization. Learn how to design and support various use cases, such as combining security and compliance data into a single, centralized dashboard that allows you to make more informed decisions; correlating Security Hub findings with operational data for deeper insights; building a security and compliance scorecard across various dimensions to share across different stakeholders; and supporting a decentralized organization structure with centralized or shared security function.
Chalk talks
These are highly interactive sessions with a small audience. Experts lead you through problems and solutions on a digital whiteboard as the discussion unfolds.
GRC233: Critical infrastructure: Supply chain and compliance impacts
In this chalk talk, learn how you can benefit from cloud-based solutions that build in security from the beginning. Review technical details around cybersecurity best practices for OT systems in adherence with government partnership with public and private industries. Dive deep into use cases and best practices for using AWS security services to help improve cybersecurity specifically for water utilities. Hear about opportunities to receive AWS cybersecurity training designed to teach you the skills necessary to support cloud adoption.
GRC304: Scaling the possible: Digitizing the audit experience
Do you want to increase the speed and scale of your audits? As companies expand to new industries and environments, so too does the scale of regulatory compliance. AWS undergoes over 500 audits in a year. In this session, hear from AWS experts as they digitize and automate the regulator/auditor experience. Walk through pre-audit educational training, self-service of control evidence and walkthrough information, live chatting with an audit control owner, and virtual data center tours. This session discusses how innovation and digitization allows companies to build trust with regulators and auditors while reducing the level of effort for internal audit teams and compliance executives.
GRC334: Shared responsibility deep dive at the service level
Auditors and regulators often need assistance understanding which configuration settings and security responsibilities are in the company’s control. Depending on the service, the AWS shared responsibility model can vary, which can affect the process for meeting compliance goals. Join AWS subject-matter experts in this chalk talk for an in-depth discussion on the next wave of compliance activation for AWS customers. Explore the configurable security decisions that users have for each service and how you can map to AWS best practices and security controls.
GRC431: Building purpose-driven and data-rich GRC solutions
Are you getting everything you need out of your data? Or do you not have enough information to make data-driven security decisions? Many organizations trying to modernize and innovate using data often struggle with finding the right data security solutions to build data-driven applications. In this chalk talk, explore how you can use Amazon Virtual Private Cloud (Amazon VPC), AWS Identity and Access Management (IAM), AWS Key Management Service (AWS KMS), AWS Systems Manager, AWS Single Sign-On (AWS SSO), and AWS Config to drive valuable insights to make more informed decisions. Hear about best practices and lessons learned to help you on your journey to garner purpose-filled information.
Workshops
These are interactive learning sessions where you work in small teams to solve problems using AWS Cloud security services. Come prepared with your laptop and a willingness to learn!
GRC272: Executive Security Simulation
The Executive Security Simulation takes senior security management and IT/business executive teams through an experiential exercise that illuminates key decision points for a successful and secure cloud journey. During this team-based, game-like competitive simulation, participants leverage an industry case study to make strategic security, risk, and compliance time-based decisions and investments. Participants experience the impact of these investments and decisions on the critical aspects of their secure cloud adoption. Join this workshop to understand the major success factors to lead security, risk, and compliance in the cloud, and learn applicable decision and investment approaches to specific secure cloud adoption journeys.
GRC371: Automate your compliance and evidence collection with AWS
Automation and simplification are key to managing compliance at scale. Remediation is one of the key elements of simplifying and managing risk. In this workshop, we will walk through building a remediation workflow using AWS Config and AWS Systems Manager and show how it can be deployed at scale and then monitored with Security Hub across the entire organization. In this workshop, you will learn how you can set up a continuous collection process that not only establishes controls to help meet the requirements of compliance but also automates the process of collecting evidence to avoid the time-consuming manual effort to prepare for audits.
GRC372: How to implement governance on AWS with ServiceNow
Many AWS customers use IT service management (ITSM) solutions such as ServiceNow to implement governance and compliance and manage security incidents. In this workshop, learn how to use AWS services such as AWS Service Catalog, AWS Config, AWS Systems Manager, and AWS Security Hub on the ServiceNow service portal. Learn how AWS services align to service management standards by integrating AWS capabilities through ITSM process integration with ServiceNow. Design and implement a curated provisioning strategy, along with incident management and resource transparency/compliance, by using the AWS Service Management Connector for ServiceNow.
GRC471: Building guardrails to meet your custom control requirements
In this session, you will experience the process of identifying, designing, and implementing security configurations, as well as detective and preventive guardrails, to meet custom control requirements. You will use a pre-built environment, read a customer scenario to identify specific control needs, and then learn how to design and implement the custom controls.
If any of these sessions look interesting to you, consider joining us in Boston by registering for re:Inforce 2022. We look forward to seeing you there!
How to Mitigate Docker Hub’s pull rate limit error through AWS Code build and ECR
Post Syndicated from Bijith Nair original https://aws.amazon.com/blogs/devops/how-to-mitigate-docker-hubs-pull-rate-limit-error-through-aws-code-build-and-ecr/
How to mitigate Docker Hub’s pull rate limit errors
Docker, Inc. has announced that its hosted repository service, Docker Hub, will begin limiting the rate at which the Docker images are being pulled. The pull rate limit will purely be based on the individual IP Address. The anonymous user can do 100 pulls per 6 hours per IP Address, while the authenticated user can do 200 pulls per 6 hours.
This post shows how you can overcome those errors while you’re working with AWS Developer Tools, such as AWS CodeCommit, AWS CodeBuild, and Amazon Elastic Container Registry (Amazon ECR).
Solution overview
The workflow and architecture of the solution work as follows:
- The developer will push the code, in this case (buildspec, Dockerfile, README.md) to CodeCommit by using Git client installed locally.
- CodeBuild will pull the latest commit id from CodeCommit.
- CodeBuild will build the base Docker image by going through the build steps listed in buildspec and Dockerfile.
Finally, Docker image will be pushed to Amazon ECR, and it can be used for future deployments.
AWS Services Overview:

Figure 1. Architectural Overview – Leverage AWS Developer tools to mitigate Docker hub’s pull rate limit error.
For this post, we’ll be using the following AWS services
- AWS CodeCommit – a fully-managed source control service that hosts secure Git-based repositories.
- AWS CodeBuild – a fully managed continuous integration service that compiles source code, runs tests, and produces software packages that are ready to deploy.
- Amazon ECR – an AWS managed container image registry service that is secure, scalable, and reliable.
Prerequisites
The prerequisites, before we build the pipeline, are as follows:
- Install a Git client to clone the source code and to push the code to CodeCommit.
- Dockerfile – Sample file to produce the Docker image and push it to an Amazon ECR.
- Install Docker daemon on your localhost or laptop, and make sure that it’s up and running.The latest version of the AWS Command Line Interface (AWS CLI). For more information, see Installing, updating, and uninstalling the AWS CLI.
- An AWS account with local credentials properly configured (typically under
~/.aws/credentials). - An IAM user with Git credentials.
Setup Amazon ECR repositories
We’ll be setting up two Amazon ECR repositories. The first repository, “golang”, will hold the base image which we will be migrating from Docker hub. And the second repository, “mydemorepo”, will hold the final image for your sample application.
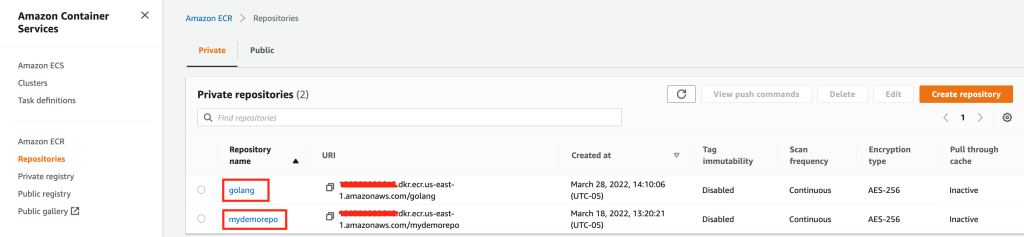
Figure 2. ECR Repositories with Source and Target image.
Migrate your existing Docker image from Docker Hub to Amazon ECR
Note that for this post, I’ll be using golang:1.12-alpine as the base Docker image to be migrated to Amazon ECR.
Once you have your base repository setup, the next step is to pull the golang:1.12-alpine public image from docker hub to you laptop/Server.
To do that, log in to your local server where you have deployed all of the prerequisites. This includes the Docker engine, Git Client, AWS CLI, etc., and run the following command:
docker pull golang:1.12-alpine
Authenticate to your Amazon ECR private registry, and click here to learn more about private registry authentication.
aws ecr get-login-password --region us-east-1 | docker login --username AWS --password-stdin 12345678910.dkr.ecr.us-east-1.amazonaws.com
Apply the appropriate Tag to your image.
docker tag golang:1.12-alpine 12345678910.dkr.ecr.us-east-1.amazonaws.com/golang:1.12-alpine
Push your image to the Amazon ECR repository.
docker push 150359982618.dkr.ecr.us-east-1.amazonaws.com/golang:1.12-alpine

Figure 3. The Source Image.
Once your image gets pushed to Amazon ECR with all of the required tags, the next step is to use this base image as the source image to build our sample application. Furthermore, while going through the “Overview of the Solution” section, you might have noticed that we must have a source code repository for CodeBuild to fetch the latest code from, and to build a sample application. Let’s go through how to set up your source code repository.
Set up a source code repository using CodeCommit
Let’s start by setting up the repository name. In this case, let’s call it “mysampleapp”. Keep rest of the settings as is, and then select create.
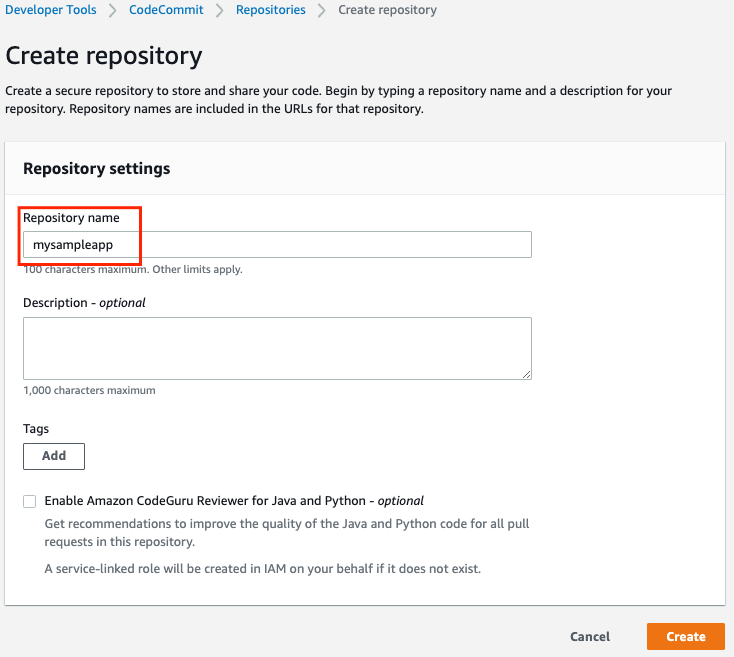
Figure 4. Screenshot for creating a repository under AWS Code Commit.
Once the repository gets created, go to the top-right corner. Under Clone URL, select Clone HTTPS.

Figure 5. Clone URL to copy the code Locally on your desktop or server.
Go back to your local server or laptop where you want to clone the repo, and authenticate your repository. Learn more about how to HTTPS connections to AWS Codecommit repositories.
git clone https://git-codecommit.us-east-1.amazonaws.com/v1/repos/mysampleapp mysampleapp
Note that you have your empty repository cloned locally with a folder name “mysampleapp”. The next step is to set up Dockerfile and buildspec.
Set up a Dockerfile and buildspec for building the base image of your Sample Application
To build a Docker image, we’ll set up three files under the “mysampleapp” folder.
Buildspec.yml
Dockerfile
README.md

Figure 6. List out the base code pushed to AWS Code commit.
Note that I have also listed the content inside of buildspec.yml, Dockerfile, and ReadME.md in case you want a sample code to test the scenario.
buildspec.yml
Dockerfile
Point your Dockfile to use Amazon ECR repository instead of Docker hub.
FROM golang:1.12-alpine AS build << Replace the public Image with ECR private image
FROM 150359982618.dkr.ecr.us-east-1.amazonaws.com/golang: 1.12-alpine
AS build
#Install git
RUN apk add --no-cache git
#Get the hello world package from a GitHub repository
RUN go get github.com/golang/example/hello
WORKDIR /go/src/github.com/golang/example/hello
#Build the project and send the output to /bin/HelloWorld
RUN go build -o /bin/HelloWorld
README.md
> Demo Repository has files related to CodeBuild spec and Dockerfile
* buildspec.yaml
* Dockerfile
Now, commit your changes locally, and push them to Amazon ECR. Note that to learn more about how to set up HTTPS users using Git Credentials, click here.
git add .
git commit -m "My First Commit - Sample App"
git push -u origin master
Now, go back to your AWS Management Console, and Under Developer Tools, select CodeCommit. Go to mysampleapp, and you should see three files with the latest commits.

Figure 7. Screenshot with buildspec, Dockerfile and README
That concludes our setup to CodeCommit. Next, we’ll set up a build project.
Set up a CodeBuild project
Enter the project name, in this case let’s use “mysamplbuild”.

Figure 8. Setting up a Build Project.
Select the provider as CodeCommit, followed by the repository and the branch that contains the latest commit.

Figure 9. Selecting the source code provider which is Code Commit and the source repository.
Select the runtime as standard, and then choose the latest Amazon Linux image. Make sure that the environment type is set to Linux. Privileged option should be checked. For the rest of the options, go with the defaults.
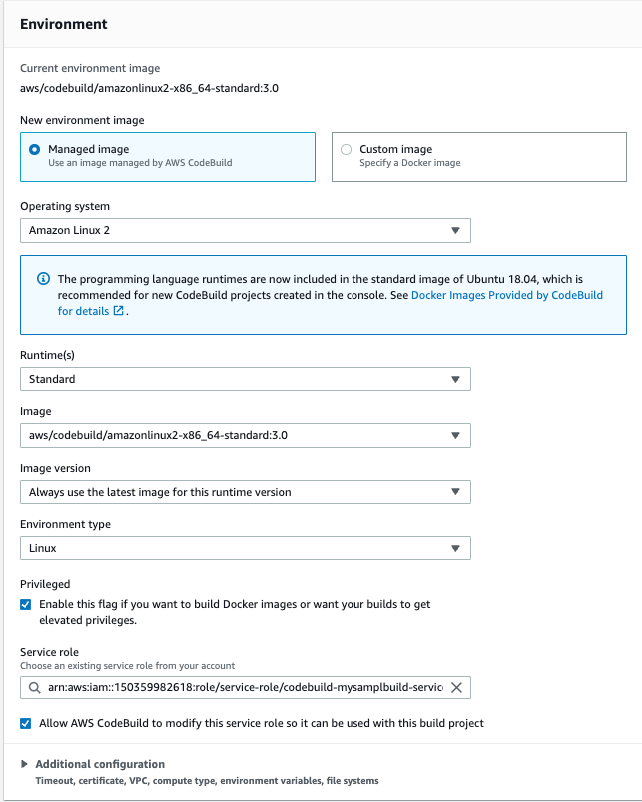
Figure 10. Required environment variables and attributes.
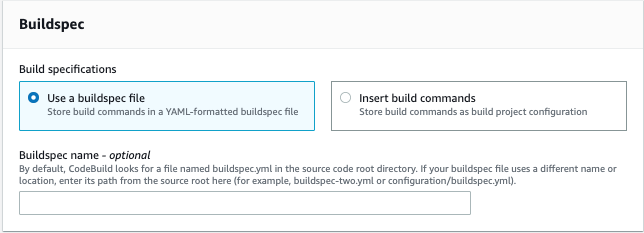
Figure 11. Choose the buildspec.
Once the project gets created, select the project, and select start Build.

Figure 12. Screenshot of the build project along with details.
Once you trigger the build, you will notice that CodeBuild is pulling the image from Amazon ECR instead of Docker hub.

Figure 13. The log file for the build.
Clean up
To avoid incurring future charges, delete the resources.
- Delete an AWS CodeCommit Repository.
- Delete a build project in AWS CodeBuild.
- Delete an Amazon ECR repository.
Conclusion
Developers can use AWS to host both their private and public container images. This decreases the need to use different public websites and registries. Public images will be geo-replicated for reliable availability around the world, and they’ll offer fast downloads to quickly serve up images on-demand. Anyone (with or without an AWS account) will be able to browse and pull containerized software for use in their own applications.
Author:
AWS Week In Review – July 11, 2022
Post Syndicated from Sébastien Stormacq original https://aws.amazon.com/blogs/aws/aws-week-in-review-july-11/
In France, we know summer has started when you see the Tour de France bike race on TV or in a city nearby. This year, the tour stopped in the city where I live, and I was blocked on my way back home from a customer conference to let the race pass through.
It’s Monday today, so let’s make another tour—a tour of the AWS news, announcements, or blog posts that captured my attention last week. I selected these as being of interest to IT professionals and developers: the doers, the builders that spend their time on the AWS Management Console or in code.
Last Week’s Launches
Here are some launches that got my attention during the previous week:
Amazon EC2 Mac M1 instances are generally available – this new EC2 instance type allows you to deploy Mac mini computers with M1 Apple Silicon running macOS using the same console, API, SDK, or CLI you are used to for interacting with EC2 instances. You can start, stop them, assign a security group or an IAM role, snapshot their EBS volume, and recreate an AMI from it, just like with Linux-based or Windows-based instances. It lets iOS developers create full CI/CD pipelines in the cloud without requiring someone in your team to reinstall various combinations of macOS and Xcode versions on on-prem machines. Some of you had the chance the enter the preview program for EC2 Mac M1 instances when we announced it last December. EC2 Mac M1 instances are now generally available.
AWS IAM Roles Anywhere – this is one of those incremental changes that has the potential to unlock new use cases on the edge or on-prem. AWS IAM Roles Anywhere enables you to use IAM roles for your applications outside of AWS to access AWS APIs securely, the same way that you use IAM roles for workloads on AWS. With IAM Roles Anywhere, you can deliver short-term credentials to your on-premises servers, containers, or other compute platforms. It requires an on-prem Certificate Authority registered as a trusted source in IAM. IAM Roles Anywhere exchanges certificates issued by this CA for a set of short-term AWS credentials limited in scope by the IAM role associated to the session. To make it easy to use, we do provide a CLI-based signing helper tool that can be integrated in your CLI configuration.
A streamlined deployment experience for .NET applications – the new deployment experience focuses on the type of application you want to deploy instead of individual AWS services by providing intelligent compute recommendations. You can find it in the AWS Toolkit for Visual Studio using the new “Publish to AWS” wizard. It is also available via the .NET CLI by installing AWS Deploy Tool for .NET. Together, they help easily transition from a prototyping phase in Visual Studio to automated deployments. The new deployment experience supports ASP.NET Core, Blazor WebAssembly, console applications (such as long-lived message processing services), and tasks that need to run on a schedule.
For a full list of AWS announcements, be sure to keep an eye on the What’s New at AWS page.
Other AWS News
This week, I also learned from these blog posts:
TLS 1.2 to become the minimum TLS protocol level for all AWS API endpoints – this article was published at the end of June, and it deserves more exposure. Starting in June 2022, we will progressively transition all our API endpoints to TLS 1.2 only. The good news is that 95 percent of the API calls we observe are already using TLS 1.2, and only five percent of the applications are impacted. If you have applications developed before 2014 (using a Java JDK before version 8 or .NET before version 4.6.2), it is worth checking your app and updating them to use TLS 1.2. When we detect your application is still using TLS 1.0 or TLS 1.1, we inform you by email and in the AWS Health Dashboard. The blog article goes into detail about how to analyze AWS CloudTrail logs to detect any API call that would not use TLS 1.2.
How to implement automated appointment reminders using Amazon Connect and Amazon Pinpoint – this blog post guides you through the steps to implement a system to automatically call your customers to remind them of their appointments. This automated outbound campaign for appointment reminders checked the campaign list against a “do not call” list before making an outbound call. Your customers are able to confirm automatically or reschedule by speaking to an agent. You monitor the results of the calls on a dashboard in near real time using Amazon QuickSight. It provides you with AWS CloudFormation templates for the parts that can be automated and detailed instructions for the manual steps.
Using Amazon CloudWatch metrics math to monitor and scale resources – AWS Auto Scaling is one of those capabilities that may look like magic at first glance. It uses metrics to take scale-out or scale-in decisions. Most customers I talk with struggle a bit at first to define the correct combination of metrics that allow them to scale at the right moment. Scaling out too late impacts your customer experience while scaling out too early impacts your budget. This article explains how to use metric math, a way to query multiple Amazon CloudWatch metrics, and use math expressions to create new time series based on these metrics. These math metrics may, in turn, be used to trigger scaling decisions. The typical use case would be to mathematically combine CPU, memory, and network utilization metrics to decide when to scale in or to scale out.
How to use Amazon RDS and Amazon Aurora with a static IP address – in the cloud, it is better to access network resources by referencing their DNS name instead of IP addresses. IP addresses come and go as resources are stopped, restarted, scaled out, or scaled in. However, when integrating with older, more rigid environments, it might happen, for a limited period of time, to authorize access through a static IP address. You have probably heard that scary phrase: “I have to authorize your IP address in my firewall configuration.” This new blog post explains how to do so for Amazon Relational Database Service (Amazon RDS) database. It uses a Network Load Balancer and traffic forwarding at the Linux-kernel level to proxy your actual database server.
Amazon S3 Intelligent-Tiering significantly reduces storage costs – we estimate our customers saved up to $250 millions in storage costs since we launched S3 Intelligent-Tiering in 2018. A recent blog post describes how Amazon Photo, a service that provides unlimited photo storage and 5 GB of video storage to Amazon Prime members in eight marketplaces world-wide, uses S3 Intelligent-Tiering to significantly save on storage costs while storing hundreds of petabytes of content and billions of images and videos on S3.
Upcoming AWS Events
Check your calendars and sign up for these AWS events:
AWS re:Inforce is the premier cloud security conference, July 26-27. This year it is hosted at the Boston Convention and Exhibition Center, Massachusetts, USA. The conference agenda is available and there is still time to register.
AWS Summit Chicago, August 25, at McCormick Place, Chicago, Illinois, USA. You may register now.
AWS Summit Canberra, August 31, at the National Convention Center, Canberra, Australia. Registrations are already open.
That’s all for this week. Check back next Monday for another tour of AWS news and launches!
OpenFest 2022 призиви
Post Syndicated from original https://vasil.ludost.net/blog/?p=3454
Добрутро.
Ще има пак OpenFest, 20-то издание, пак в София Тех Парк.
Изданието е юбилейно (поне в десетичната бройна система), та събираме желаещи да говорят, да правят работилници (т.е. workshop-и), както и да помагат. Както обикновено, записването е на cfp.openfest.org, срокът за лекции и т.н. е до 1.09.2022.
Чакаме с нетърпение 🙂
Using AWS Backup and Oracle RMAN for backup/restore of Oracle databases on Amazon EC2: Part 2
Post Syndicated from Jeevan Shetty original https://aws.amazon.com/blogs/architecture/using-aws-backup-and-oracle-rman-for-backup-restore-of-oracle-databases-on-amazon-ec2-part-2/
Customers running Oracle databases on Amazon Elastic Compute Cloud (Amazon EC2) often take database and schema backups using Oracle native tools like Data Pump and Recovery Manager (RMAN) to satisfy data protection, disaster recovery (DR), and compliance requirements. A priority is to reduce backup time as the data grows exponentially and recover sooner in case of failure/disaster.
In Part 1 of this two-part series, we explain how we can use AWS Backup and Amazon Simple Storage Service (Amazon S3) bucket to perform the backup and restore of an Oracle Database on AWS EC2.
In Part 2, we provide a mechanism to use AWS Backup to create a full backup of the EC2 instance, including the OS image, Oracle binaries, logs, and data files. The mechanism also uses Oracle RMAN to perform archived redo log backup to Amazon Elastic File System (Amazon EFS). Then, we demonstrate the steps to restore a database to a specific point-in-time using AWS Backup and Oracle RMAN.
Solution overview
Figure 1 demonstrates the workflow:
- Oracle database on Amazon EC2 configured with Oracle Secure Backup.
- AWS Backup service to backup EC2 instance at regular intervals.
- Amazon EFS for storing Oracle RMAN archive log backups.

Figure 1. Oracle Database in Amazon EC2 using AWS Backup and EFS for backup and restore
Prerequisites
- An AWS account
- Oracle database and AWS CLI in an EC2 instance
- Access to configure AWS Backup
- Access to configure EFS to store the Oracle RMAN archive log backups
1. Configure AWS Backup
Configure AWS Backup as detailed in Step 1 of Part 1.
Oracle RMAN archive log backup
While AWS Backup is now creating a daily backup of the EC2 instance, we also want to make sure we backup the archived log files to a protected location. This will let us do point-in-time restores and restore to more recent times than just the last daily EC2 backup. Below we provide the steps to backup archive log using RMAN to Amazon EFS.
Backup/restore archive logs to/from Amazon EFS
Backing up the Oracle Archive logs is an important part of the process. In this section, we will describe how you can backup their Oracle archive logs to Amazon EFS. One advantage of this option (as compared with using Oracle Secure Backup [detailed in Part 1 of this series]) is that it does not require any additional Oracle licensing.
2. Configure Amazon EFS
a. Create an Amazon EFS file system that will be used to store Oracle RMAN Archive log backups. The image below details the steps involved in creation of an Amazon EFS. Consider that a sample file system ID: fs-0123abcdef012345 is created and will be used to store RMAN archive log backup.


Figure 2. Configure Amazon EFS which is used to store Oracle RMAN archive log backups
b. Install the Amazon EFS Client and follow instructions to install EFS client on RHEL EC2 instance. Note: next steps were tested on RHEL 7.9.
sudo yum -y install git
sudo yum -y install rpm-build
git clone https://github.com/aws/efs-utils
cd efs-utils/
sudo yum -y install make
sudo make rpm
sudo yum -y install ./build/amazon-efs-utils*rpm
c. Mount the EFS file system on your EC2 instance. In this example, we show the steps to mount EFS filesystem on EC2 Instance (if the command requests to upgrade stunnel, refer to Upgrading stunnel. Ensure that the EC2 instance profile attached has necessary policies to access EFS. /rman for mount point and file system ID: fs-0123abcdef012345 are examples for EFS file system.
sudo mkdir /rman
sudo mount -t efs -o tls,iam fs-0123abcdef012345 /rman
d. To mount EFS file system automatically on EC2 instance reboot, add an entry in /etc/fstab. This example is for RHEL EC2 instance:
fs-0123abcdef012345:/ /rman efs _netdev,tls,iam 0 03. Configure RMAN backup to Amazon EFS
With Amazon EFS mounted on EC2 instance, we can configure Oracle RMAN archive log backups to EFS. In below commands oratst is used as an example of your ORACLE_SID.
a. Configure RMAN repository to take control file backup to Amazon EFS automatically.
CONFIGURE CONTROLFILE AUTOBACKUP FORMAT FOR DEVICE TYPE DISK TO '/rman/ctrl-D_%d_%F';
CONFIGURE CONTROLFILE AUTOBACKUP ON;
b. Create a script (for example, rman_archive.sh) with below commands and schedule using crontab (example entry: */5 * * * * rman_archive.sh) to run every 5 minutes. This will ensure that Oracle Archive logs are backed up to Amazon EFS (/rman) frequently, ensuring an recovery point objective (RPO) of 5 minutes.
dt=`date +%Y%m%d_%H%M%S`

rman target / log=/rman/rman_arch_bkup_oratst_${dt}.log <<EOF

RUN
{
    allocate channel c1_efs device type disk format '/rman/arch-D-%d_%T_s%s_p%p' MAXPIECESIZE 10G;
    BACKUP ARCHIVELOG ALL delete all input;
    release channel c1_efs;
}

EOF
4. Perform database point-in-time recovery
In event of a database crash/corruption, we can use AWS Backup service and Oracle RMAN archive log backup to recover database to a specific point-in-time.
a. Typically, you would pick the most recent Recovery Point completed before the time to which you wish to recover. Using AWS Backup, identify the Recovery point ID to restore by following the steps from Restoring an Amazon EC2 instance. Note: when following the steps, be sure to set the “User data” settings as described in the next bulleted item.
After the EBS volumes are created from the snapshot, there is no need to wait for all of the data to transfer from Amazon S3 to your Amazon EBS volume before your attached instance can start accessing the volume. Amazon EBS Snapshots implement lazy loading, so that you can begin using them right away.
b. Ensure that database does not start automatically after restoring the EC2 instance, by renaming /etc/oratab. Use below command in “User data” section while restoring EC2 instance. After database recovery, we can rename it back to /etc/oratab.
#!/usr/bin/sh
sudo su -
mv /etc/oratab /etc/oratab_bk
c. Login to the EC2 instance once it is up and execute the RMAN recovery commands mentioned below. Identify the DBID from RMAN logs saved in the EFS. Below commands use database oratst as an example.
rman target /

RMAN> startup nomount

RMAN> set dbid DBID


# Below command is to restore the controlfile from autobackup

RMAN> RUN
{
    set controlfile autobackup format for device type disk to '/rman/ctrl-D_%d_%F';
    RESTORE CONTROLFILE FROM AUTOBACKUP;
    alter database mount;
}


#Identify the recovery point (sequence_number) by listing the backups available in catalog.

RMAN> list backup;
In Figure 3, the most recent archive log backed up is 460, so you can use this sequence number in the next set of RMAN commands.
RMAN> RUN
{
    allocate channel c1_efs device type disk format '/rman/arch-D-%d_%T_s%s_p%p';
    recover database until sequence sequence_number;
    ALTER DATABASE OPEN RESETLOGS;
    release channel c1_efs;
}
Figure 3. Sample output of Oracle RMAN “list backup” command
d. To avoid performance issues due to lazy loading, after the database is open, you can run below command to force a faster restoration of the blocks from S3 bucket to EBS volumes (below example allocates two channels and validates the entire database).
RMAN> RUN
{
  ALLOCATE CHANNEL c1 DEVICE TYPE DISK;
  ALLOCATE CHANNEL c2 DEVICE TYPE DISK;
  VALIDATE database section size 1200M;
}
e. This completes the recovery of database, and we can let the database to auto start by renaming file back to /etc/oratab.
mv /etc/oratab_bk /etc/oratab5. Backup retention
Ensure that the AWS Backup Lifecycle policy match Oracle archive log backup retention. Also, follow documentation to configure Oracle backup retention and deleting expired backup. Below is a sample command for Oracle backup retention.
CONFIGURE BACKUP OPTIMIZATION ON;
CONFIGURE RETENTION POLICY TO RECOVERY WINDOW OF 31 DAYS;

RMAN> RUN
{
    allocate channel c1_efs device type disk format '/rman/arch-D-%d_%T_s%s_p%p';

    crosscheck backup;
    delete noprompt obsolete;
    delete noprompt expired backup;

    release channel c1_efs;
}
Cleanup
Follow below instructions to remove or cleanup the setup:
- Delete the backup plan created in Step 1.
- Remove the cron entry from the EC2 instance configured in Step 3b.
- Delete the EFS that was created in Step 2 to store Oracle RMAN archive log backups.
Conclusion
In this post, we demonstrated the use for AWS Backup for EC2 snapshot and EFS as storage for Oracle RMAN archive log backups. With this strategy for backup, Oracle Database running on EC2 can be restored and recovered to a point-in-time faster than oracle native backup and recovery strategies. Also, by using EFS for Oracle RMAN archive log backups, we can avoid the additional licensing required to use Oracle Secure Backup, explained in Part 1. You can leverage this solution to facilitate restoring copies of your production database for development or testing purposes and to Recover from a user error that removes data or corrupts existing data.
To learn more about AWS Backup, refer to the AWS Backup Documentation.
Rust frontend approved for GCC
Post Syndicated from original https://lwn.net/Articles/900721/
The GCC steering committee has approved
the contribution of the Rust frontend to the compiler suite. “We look
“.
forward to including a preliminary, beta version of GCC Rust in GCC 13 as a
non-default language
[$] Kernel support for hardware-based control-flow integrity
Post Syndicated from original https://lwn.net/Articles/900099/
Once upon a time, a simple stack overflow was enough to mount a
code-injection attack on a running system. In modern systems, though,
stacks are not executable and, as a result, simple overflow-based attacks
are no longer possible. In response, attackers have shifted to
control-flow attacks that make use of the code already present in the
target system. Hardware vendors have added a number of features intended to
thwart control-flow attacks; some of these features have better support
than other in the Linux kernel.
Eligible customers can now order a free MFA security key
Post Syndicated from CJ Moses original https://aws.amazon.com/blogs/security/eligible-customers-can-now-order-a-free-mfa-security-key/
One of the best ways for individuals and businesses to protect themselves online is through multi-factor authentication (MFA). MFA offers an additional layer of protection to help prevent unauthorized individuals from gaining access to systems or data.
In fall 2021, Amazon Web Services (AWS) Security began offering a free MFA security key to AWS account owners in the United States. I’m happy to announce that eligible customers can now order the free security key through the ordering portal in the AWS Management Console. In response to customer demand, we’ve streamlined the ordering process, especially for linked accounts. At this time, only U.S.-based AWS account root users who have spent more than $100 each month over the past 3 months are eligible to place an order.
To order your free security key
- Confirm your eligibility at the ordering portal. You will be prompted to sign in if you haven’t already.
- Choose your free security key from the available options.
- Provide your email address for order confirmation and your shipping address.
- Place your order.
You can connect the security key to AWS, as well as other security key–enabled applications, such as Dropbox, GitHub, and Gmail. If your organization is still early in adopting MFA, the free security key is another way to help protect your AWS account credentials, as well as to jump start your MFA journey by showing how convenient modern security keys are to use. As you expand your AWS usage, all your users should obtain and enable MFA. This can be done at the AWS Identity and Access Management (IAM) user level in the AWS identity system or upstream in your federated identity provider, since using federated identities is a best practice.
We encourage everyone to use MFA to help protect themselves online. Although some applications do not yet support security keys, nearly all provide an MFA option, such as time-based password codes or mobile push notifications. So, whether you’re signing in to your AWS account, your favorite social networks, or your bank account, MFA can help level-up your security posture.
If you’re not eligible for a free security key but would still like a security key, check out our MFA recommendations, which are available for purchase from many sellers, including Amazon. For more information about the MFA program, see our Free MFA Security Key page.
If you have feedback about this post, submit comments in the Comments section below.
Want more AWS Security how-to content, news, and feature announcements? Follow us on Twitter.
Rapid7 MDR Reduced Breaches by 90% via Greater Efficiency to Detect, Investigate, Respond to, and Remediate Breaches
Post Syndicated from Jake Godgart original https://blog.rapid7.com/2022/07/11/rapid7-mdr-reduced-breaches-by-90-via-greater-efficiency-to-detect-investigate-respond-to-and-remediate-breaches/

When a security operations center (SOC) is operating at a deficit, they increase the possibility of beach reductions. That is, the likelihood they won’t be able to travel to any beaches – or any vacation destinations whatsoever – anytime in the near future. That can lead to burnout, which can lead to security talent loss, which can lead to the entire business being incredibly vulnerable.
So now let’s talk about breach reduction. As in, the charter of any security team.
No team can investigate every alert, but forging a valuable partnership with a Managed Detection and Response (MDR) provider can provide a turnkey solution and near-immediate headcount extension to your SOC.
A June 2022 Total Economic Impact™ study by Forrester Consulting commissioned by Rapid7 found that Rapid7’s SOC expertise – with XDR technology that generated improved visibility – enabled a composite organization using Rapid7 MDR to reduce the likelihood of a breach by 90% in the first year of partnership
The analysis was conducted using a hypothetical composite organization created for the purposes of the study, with insights gleaned from four real-life MDR customers. This composite reflects a security team profile we see often: a small team of two security analysts tasked with protecting 1,800 employees and 2,100 assets. We at Rapid7 see this as a tall order, but it’s one that (unfortunately) represents the state of security operations today.
The study concluded that partnering with Rapid7 MDR services experts enabled the composite organization to achieve end-to-end coverage and cut down on detection and response times. Let’s break down how Rapid7 MDR helped security teams reduce the likelihood of breaches by 90%.
1. Complete visibility into security environments
OK, so extended detection and response (XDR) isn’t exactly apples-to-apples with X-ray technology, but it’s an apt metaphor. Greater visibility, after all, helps to improve your overall security risk posture, and customers interviewed for the TEI study said their organizations were more secure thanks in part to this improved visibility. Rapid7’s InsightIDR uses its XDR superpowers to unify data from all over and beyond your modern environment, so it’s easier than ever to see and respond to a transgression.
The Rapid7 MDR team’s expertise in cloud-scalable XDR technology enables stronger signal-to-noise capabilities, so you only become aware of alerts that matter and get the peace of mind that comes from knowing we’ve got you covered. After all, being aware of a breach is better than not being aware of one – or having a customer alert you to the existence of a breach, which could lead to a different kind of breach: the relationship.
2. Detect and respond literally all day, every day
According to the Forrester TEI study, interviewed organizations had outdated technology that was used by staff to manually investigate each alert prior to partnering with Rapid7 MDR. These organizations’ security teams lacked expertise, were understaffed, and lacked visibility – the perfect storm to miss security incidents. Interviewees said there would be no way for them to implement a 24×7 detection and response program on their own without using Rapid7 MDR. As an interviewed director of information security for a financial services company said, “If we didn’t acquire Rapid7 MDR, I would have had to do a lot more manual work, and it would have kept me from other tasks.”
With the modern proliferation of threats, the only thing to do is to have 24x7x365 coverage of your entire network. As referenced above, that can be expensive and near-impossible to maintain, unless you’re gaining leverage with the right MDR partner.
For example, with Rapid7 MDR, customers can opt in to Active Response, which enables our expert SOC analysts to respond to a validated threat on your behalf. The service also removes quite a few headaches, providing the flexibility to configure or cancel responses so that unauthorized quarantines occur less frequently (as they may with automated containment actions).
A customer SOC team will also have their own access to InsightIDR, the underlying technology of Rapid7’s MDR services. With the ability to also run your own investigations, your team will be able to see what we see, and follow along with the process. No black boxes or Wizard of Oz reenactments here.
These days we say that round-the-clock monitoring isn’t just important – it’s a must. A good MDR provider will be able to take on those duties, raising any incidents discovered and validated, day and night. In particular, Rapid7 utilizes a follow-the-sun methodology. This purpose-built monitoring engine leverages incident-response (IR) teams all over the world – Australia, Ireland, the United States, and more – to ensure awake and active detection and response experts are investigating security alerts and only notifying you when there’s an actual incident. From the SOC or remote locations, these IR teams can perform real-time log analysis, threat hunting, and alert validation, for any customer.
Redundancy is key here. Attackers never take a day off, but security professionals working 9 to 5 do. Whether it’s national holidays or vacation season, the majority of attacks occur around these specific times security experts might set their status to “away.”
3. Gain more freedom to focus their energy elsewhere
In the TEI study, Forrester found that Rapid7 MDR was able to provide security teams with greater information and curated alert detections, with the ability to block specific threats. MDR also improved response times to detections by providing teams with a security resource dedicated to security incidents that require any response. This meant internal security teams could focus on other priorities and business objectives without dealing with:
Alert triage and investigations
An interviewed senior cybersecurity analyst at a technology solutions firm said analysts previously spent three to four hours a day on alert management. Now, with MDR, that same process only takes 10 minutes of their time! That means the small team can focus on other elements of their security program knowing there’s another team of experts monitoring their environment around the clock.
Threat response
An interviewed CISO at a healthcare firm reported that their response could take up to two weeks prior to MDR. That’s a long time! With Rapid7 MDR, the security team was able to detect and respond in three days instead. The interviewed senior cybersecurity analyst from the technology solutions firm said response may have taken days prior to Rapid7 MDR, but now the security team can respond in 30 minutes! Greater efficiency (and faster response) meant lower likelihood of future breaches and lower impact of any breaches.
Post-detection reporting
The interviewed cybersecurity analyst from the technology solutions firm said that before Rapid7 MDR, it took an entire day to compile a quarterly executive summary and two monthly reports because it meant parsing through log data and finding the right information. Now with MDR, the report is created for them and their ability to create and deliver this to their team is more efficient. That means they can spend more time protecting the organization, not reporting.
4. $1.6 million in savings over 3 years
When an organization can reduce the likelihood of attacks by 90%, that can result in some serious ROI. How serious? The composite organization profiled in the Forrester study was able to see a breach cost avoidance – or savings – of $1.6 million over three years when partnered with Rapid7 MDR.
The composite organization saw an average of 2.5 incidents per year, with an average cost per security breach $654,846. This average cost included damage to brand equity and customer loyalty. We at Rapid7 are also cognizant of the mental toll those incidents take on the entire business, as well as the loss of forward momentum on any current initiatives – it all comes to a stop when a breach occurs and disrupts. This is why it’s critical to have a team spot threats early and respond to them quickly.
For the more advanced, large-scale breaches, sometimes it requires backup. Luckily, Rapid7 MDR now includes Unlimited IR to ensure major incidents are handled by our Digital Forensics and Incident Response (DFIR) experts. The merger of the MDR and IR Consulting teams accelerates a breach investigation by instantly pulling in senior-level IR experts to an emergency situation and ensuring the response is as efficient as possible.
Rapid7 MDR teams use our open-source DFIR tool, Velociraptor, the same tools and experience you’d receive if you called the breach hotline. These experts leverage multiple types of forensics (file-system, memory, and network), as well as attack intelligence and enhanced endpoint visibility to quickly organize and interpret data. Then? Kick the threat out and slam the door behind them.
Defense in depth
Beyond the need for agile detection and response abilities, preventive solutions are also of critical importance. At a device level, it is of course always prudent to ensure things like multifactor authentication (MFA), antivirus or NGAV (NextGen Antivirus) software, and/or an endpoint protection platform (EPP) – designed to detect suspicious behavior and stop attacks – are part of your preventive behavior.
At a more macro level (i.e., a SOC in the security organization of a Fortune 500 company independent of the Forrester study), the following preventive solutions should always be part of the mix:
- Vulnerability Risk Management: It’s easier to detect and respond to the bad guys in the environment when you limit the number of doors they can walk through. Vulnerabilities are always at risk of exploitation. Managing that risk is what InsightVM was made to do. It helps to secure your entire attack surface with visibility and behavioral assessment of your network-wide assets, as well as analyzing business context so it can prioritize the most critical issues.
- Cloud Security: It takes cloud-native to protect cloud-based. InsightCloudSec provides visibility of all of your cloud assets in one, user-friendly place. Get immediate risk assessment with full context across infrastructure, orchestration, workload, and data tiers.
- Application Security: More complex apps means more security required. With the ability to crawl and assess these modern web apps, InsightAppSec returns fewer false positives via features like the Universal Translator and its ability to bring flexibility to the security testing process. Finding threats with Dynamic Application Security Testing (DAST) – using the same exploits that an attacker would – is one of the keys to stopping web application-based attacks.
- Security Orchestration Automation and Response (SOAR): The composite organization from the Forrester study took advantage of Rapid7 MDR’s utilization of Active Response, Rapid7’s Security Orchestration, Automation, and Response (SOAR) technology, as well as skilled SOC experts to quickly respond to and remediate threats.
By incorporating preventive and responsive solutions, you’ll work less by working smarter. Which, oftentimes, means letting someone else take on key aspects of your program. You can read the entire Forrester TEI study to get the deep-dive from interviewed customers – along with the numbers and stories they shared – on Rapid7 MDR.
But what the study does not quantify is Rapid7’s commitment to partnering with our customers to improve their security maturity, providing expertise that drives returns for your detection and response program where and when you need it. Considering MDR but don’t know where to start? We put together an MDR Buyer’s Guide that includes priority questions to ask when you’re seeking the right partner.
Additional reading:
- Today’s SOC Strategies Will Soon Be Inadequate
- What’s New in InsightIDR: Q2 2022 in Review
- Velociraptor Version 0.6.5: Table Transformations, Multi-Lingual Support, and Better VQL Error-Handling Let You Dig Deeper Than Ever
- Rapid7 MDR Delivered 549% ROI via Headcount Avoidance, Time Savings, and Breach Risk Reduction
Use Amazon Athena parameterized queries to provide data as a service
Post Syndicated from Blayze Stefaniak original https://aws.amazon.com/blogs/big-data/use-amazon-athena-parameterized-queries-to-provide-data-as-a-service/
Amazon Athena now provides you more flexibility to use parameterized queries for any query you send to Athena, and we recommend you use them as the best practice for your Athena queries moving forward so you benefit from the security, reusability, and simplicity they offer. In a previous post, Improve reusability and security using Amazon Athena parameterized queries, we explained how parameterized queries with prepared statements provide reusability of queries, protection against SQL injection, and masking of query strings from AWS CloudTrail events. In this post, we explain how you can run Athena parameterized queries using the ExecutionParameters property in your StartQueryExecution requests. We provide a sample application you can reference for using parameterized queries, with and without prepared statements. Athena parameterized queries can be integrated into many data driven applications, and we walk you through a sample data as a service application to see how parameterized queries can plug in.
Customers tell us they are finding new ways to make effective use of their data assets by providing data as a service (DaaS). In this post, we share a sample architecture using parameterized queries applied in the form of a DaaS application. This is helpful for many types of organizations, whether you’re working with an enterprise making data available to other lines of business, a regulator making reports available to your industry, a company monetizing your data assets, an independent software vendor (ISV) enabling your applications’ tenants to query their data when they need it, or trying to share data at scale in other ways. In DaaS applications, you can provide predefined queries to run against your governed datasets with values your users input. You can expand your DaaS application to break away from monolithic data infrastructure by treating data as a product (DaaP) and providing a distribution of datasets, which have distinct domain-specific data pipelines. You can authorize these datasets to consumers in your DaaS application permissions. You can use Athena parameterized queries as a way to predefine your queries, which you can use to run queries across your datasets, and serve as a layer of protection for your DaaS applications. This post first describes how parameterized queries work, then applies parameterized queries in the form of a DaaS application.
Feature overview
In any query you send to Athena, you can use positional parameters declared by a question mark (?) in your query string, then declare values as execution parameters sequentially in your StartQueryExecution request. You can use execution parameters with your existing prepared statements and also with any SQL queries in Athena. You can still take advantage of the reusability and security benefits of parameterized queries, and using execution parameters also masks your query’s parameters when viewing recent queries in Athena. You can also change from building SQL query strings manually to using execution parameters; this allows you to run parameterized queries without needing to first create prepared statements. For more information on using execution parameters, refer to StartQueryExecution.
Previously, you could only run parameterized queries by first creating prepared statements in your Athena workgroup, then running parameterized queries while passing variables into an EXECUTE SQL statement with the USING clause. You are no longer required to create and maintain prepared statements across all of your Athena workgroups to take advantage of parameterization. This is helpful if you run the same queries across multiple workgroups or otherwise do not need the prepared statements feature.
You can continue to use Athena workgroups to isolate, implement individual cost constraints, and track query-related metrics for tenants within your multi-tenant application. For example, your DaaS application’s customers can run the same queries against your dataset with separate workgroups. For more information on Athena workgroups, refer to Using workgroups for running queries.
Changing your code to use parameterized queries
Changing your existing code to use parameterized queries is a small change which will have an immediate positive impact. Previously, you were required to build your query string value manually using environment variables as parameter placeholders. Manipulating the query string can be burdensome and has an inherent risk for injecting undesired values or SQL fragments (such as SQL operators), regardless of intent. You can now replace variables in your query string with a question mark (?), and declare your variable values sequentially with the ExecutionParameters option. By doing so, you take advantage of the security benefits of parameterized queries, and your queries are less complicated to author and maintain. The syntax change is shown in the following code, using the AWS Command Line Interface (AWS CLI) as an example.
Previously, running queries against Athena without execution parameters:
aws athena start-query-execution \
--query-string "SELECT * FROM table WHERE x = $ARG1 AND y = $ARG2 AND z = $ARG3" \
--query-execution-context "Database"="default" \
--work-group myWorkGroup
Now, running parameterized queries against Athena with execution parameters:
aws athena start-query-execution \
--query-string "SELECT * FROM table WHERE x = ? AND y = ? AND z = ?" \
--query-execution-context "Database"="default" \
--work-group myWorkGroup \
--execution-parameters $ARG1 $ARG2 $ARG3
The following is an example of a command that creates a prepared statement in your Athena workgroup. To learn more about creating prepared statements, refer to Querying with prepared statements.
aws athena start-query-execution \
--query-string "PREPARE my-prepared-statement FROM SELECT * FROM table WHERE x = ? AND y = ? AND z = ?" \
--query-execution-context "Database"="default" \
--work-group myWorkGroup
Previously, running parameterized queries against prepared statements without execution parameters:
aws athena start-query-execution \
--query-string "EXECUTE my-prepared-statement USING $ARG1, $ARG2, $ARG3“ \
--query-execution-context "Database"="default" \
--work-group myWorkGroup
Now, running parameterized queries against prepared statements with execution parameters:
aws athena start-query-execution \
--query-string "EXECUTE my-prepared-statement" \
--query-execution-context "Database"="default" \
--work-group myWorkGroup \
--execution-parameters $ARG1 $ARG2 $ARG3
Sample architecture
The purpose of this sample architecture is to apply the ExecutionParameters feature when running Athena queries, with and without prepared statements. This is not intended to be a DaaS solution for use with your production data.
This sample architecture exhibits a DaaS application with a user interface (UI) that presents three Athena parameterized queries written against the public Amazon.com customer reviews dataset. The following figure depicts this workflow when a user submits a query to Athena. This example uses AWS Amplify to host a front-end application. The application calls an Amazon API Gateway HTTP API, which invokes AWS Lambda functions to authenticate requests, fetch the Athena prepared statements and named queries, and run the parameterized queries against Athena. The Lambda function uses the name of the Athena workgroup, statement name, statement type (prepared statement or not), and a list of query parameters input by the user. Athena queries data in an Amazon Simple Storage Service (Amazon S3), bucket which is cataloged in AWS Glue, and presents results to the user on the DaaS application UI.

End-users of the DaaS application UI can run only parameterized queries against Athena. The DaaS application UI demonstrates two ways to run parameterized queries with execution parameters: with and without prepared statements. In both cases, the Lambda function submits the query, waits for the query to complete, and provides the results that match the query parameters. The following figure depicts the DaaS application UI.

You may want your users to have the ability to list all Athena prepared statements within your Athena workgroup, select a statement, input arguments, and run the query; on the left side of the DaaS application UI, you use an EXECUTE statement to query the data lake with an Athena prepared statement. You may have several reporting queries maintained in your code base. In this case, your users select a statement, input arguments, and run the query. On the right side of the DaaS application UI, you use a SELECT statement to use Athena parameterized queries without prepared statements.
Prerequisites
This post uses the following AWS services to demonstrate a DaaS architecture pattern that uses Athena to query the Amazon.com customer reviews dataset:
- AWS Amplify
- Amazon API Gateway
- Amazon Athena
- AWS CloudFormation
- Amazon DynamoDB
- AWS Glue and the AWS Glue Data Catalog
- AWS Identity and Access Management (IAM)
- AWS Lambda
- Amazon S3
This post assumes you have the following:
- An AWS account. For instructions, refer to Creating an AWS account.
- A CloudTrail trail created. For instructions, refer to Creating a trail.
- An S3 bucket created. For instructions, refer to Creating a bucket.
- Node.js version 16+ installed on your device.
Deploy the CloudFormation stack
In this section, you deploy a CloudFormation template that creates the following resources:
- AWS Glue Data Catalog database
- AWS Glue Data Catalog table
- An Athena workgroup
- Three Athena prepared statements
- Three Athena named queries
- The API Gateway HTTP API
- The Lambda execution role for Athena queries
- The Lambda execution role for API Gateway HTTP API authorization
- Five Lambda functions:
- Update the AWS Glue Data Catalog
- Authorize API Gateway requests
- Submit Athena queries
- List Athena prepared statements
- List Athena named queries
Note that this CloudFormation template was tested in AWS Regions ap-southeast-2, ca-central-1, eu-west-2, us-east-1, us-east-2, and us-west-2. Note that deploying this into your AWS account will incur cost. Steps for cleaning up the resources are included later in this post.
To deploy the CloudFormation stack, follow these steps:
- Navigate to this post’s GitHub repository.
- Clone the repository or copy the CloudFormation template
athena-parameterized-queries.yaml. - On the AWS CloudFormation console, choose Create stack.
- Select Upload a template file and choose Choose file.
- Upload
athena-parameterized-queries.yaml, then choose Next. - On the Specify stack details page, enter the stack name
athena-parameterized-queries. - On the same page, there are two parameters:
- For S3QueryResultsBucketName, enter the S3 bucket name in your AWS account and in the same AWS Region as where you’re running your CloudFormation stack. (For this post, we use the bucket name value, like
my-bucket). - For APIPassphrase, enter a passphrase to authenticate API requests. You use this later.
- For S3QueryResultsBucketName, enter the S3 bucket name in your AWS account and in the same AWS Region as where you’re running your CloudFormation stack. (For this post, we use the bucket name value, like
- Choose Next.
- On the Configure stack options page, choose Next.
- On the Review page, select I acknowledge that AWS CloudFormation might create IAM resources with custom names, and choose Create stack.
The script takes less than two minutes to run and change to a CREATE_COMPLETE state. If you deploy the stack twice in the same AWS account and Region, some resources may already exist, and the process fails with a message indicating the resource already exists in another template.
- On the Outputs tab, copy the
APIEndpointvalue to use later.
For least-privilege authorization for deployment of the CloudFormation template, you can create an AWS CloudFormation service role with the following IAM policy actions. To do this, you must create an IAM policy and IAM role, and choose this role when configuring stack options. You need to replace the values for ${Partition}, ${AccountId}, and ${Region} with your own values; for more information on these values, refer to Pseudo parameters reference.
{
    "Version": "2012-10-17",
    "Statement": [
        {
            "Sid": "IAM",
            "Effect": "Allow",
            "Action": [
                "iam:GetRole",
                "iam:UntagRole",
                "iam:TagRole",
                "iam:CreateRole",
                "iam:DeleteRole",
                "iam:PassRole",
                "iam:GetRolePolicy",
                "iam:PutRolePolicy",
                "iam:AttachRolePolicy",
                "iam:TagPolicy",
                "iam:DeleteRolePolicy",
                "iam:DetachRolePolicy",
                "iam:UntagPolicy"
            ],
            "Resource": [
                "arn:${Partition}:iam::${AccountId}:role/LambdaAthenaExecutionRole-athena-parameterized-queries",
                "arn:${Partition}:iam::${AccountId}:role/service-role/LambdaAthenaExecutionRole-athena-parameterized-queries",
                "arn:${Partition}:iam::${AccountId}:role/service-role/LambdaAuthorizerExecutionRole-athena-parameterized-queries",
                "arn:${Partition}:iam::${AccountId}:role/LambdaAuthorizerExecutionRole-athena-parameterized-queries"
            ]
        },
        {
            "Sid": "LAMBDA",
            "Effect": "Allow",
            "Action": [
                "lambda:CreateFunction",
                "lambda:GetFunction",
                "lambda:InvokeFunction",
                "lambda:AddPermission",
                "lambda:DeleteFunction",
                "lambda:RemovePermission",
                "lambda:UpdateFunctionConfiguration"
            ],
            "Resource": [
                "arn:${Partition}:lambda:${Region}:${AccountId}:function:LambdaRepairFunction-athena-parameterized-queries",
                "arn:${Partition}:lambda:${Region}:${AccountId}:function:LambdaAthenaFunction-athena-parameterized-queries",
                "arn:${Partition}:lambda:${Region}:${AccountId}:function:LambdaAuthorizerFunction-athena-parameterized-queries",
                "arn:${Partition}:lambda:${Region}:${AccountId}:function:GetPrepStatements-athena-parameterized-queries",
                "arn:${Partition}:lambda:${Region}:${AccountId}:function:GetNamedQueries-athena-parameterized-queries"
            ]
        },
        {
            "Sid": "ATHENA",
            "Effect": "Allow",
            "Action": [
                "athena:GetWorkGroup",
                "athena:CreateWorkGroup",
                "athena:DeleteWorkGroup",
                "athena:DeleteNamedQuery",
                "athena:CreateNamedQuery",
                "athena:CreatePreparedStatement",
                "athena:DeletePreparedStatement",
                "athena:GetPreparedStatement"
            ],
            "Resource": [
                "arn:${Partition}:athena:${Region}:${AccountId}:workgroup/ParameterizedStatementsWG"
            ]
        },
        {
            "Sid": "GLUE",
            "Effect": "Allow",
            "Action": [
                "glue:CreateDatabase",
                "glue:DeleteDatabase",
                "glue:CreateTable",
                "glue:DeleteTable"
            ],
            "Resource": [
                "arn:${Partition}:glue:${Region}:${AccountId}:catalog",
                "arn:${Partition}:glue:${Region}:${AccountId}:database/athena_prepared_statements",
                "arn:${Partition}:glue:${Region}:${AccountId}:table/athena_prepared_statements/*",
                "arn:${Partition}:glue:${Region}:${AccountId}:userDefinedFunction/athena_prepared_statements/*"
            ]
        },
        {
            "Sid": "APIGATEWAY",
            "Effect": "Allow",
            "Action": [
                "apigateway:DELETE",
                "apigateway:PUT",
                "apigateway:PATCH",
                "apigateway:POST",
                "apigateway:TagResource",
                "apigateway:UntagResource"
            ],
            "Resource": [
                "arn:${Partition}:apigateway:${Region}::/apis/*/integrations*",
                "arn:${Partition}:apigateway:${Region}::/apis/*/stages*",
                "arn:${Partition}:apigateway:${Region}::/apis/*/authorizers*",
                "arn:${Partition}:apigateway:${Region}::/apis/*/routes*",
                "arn:${Partition}:apigateway:${Region}::/tags/arn%3Aaws%3Aapigateway%3A${Region}%3A%3A%2Fv2%2Fapis%2F*"
            ]
        },
        {
            "Sid": "APIGATEWAYMANAGEAPI",
            "Effect": "Allow",
            "Action": [
                "apigateway:DELETE",
                "apigateway:PUT",
                "apigateway:PATCH",
                "apigateway:POST",
                "apigateway:GET"
            ],
            "Resource": [
                "arn:${Partition}:apigateway:${Region}::/apis"
            ],
            "Condition": {
                "StringEquals": {
                    "apigateway:Request/ApiName": "AthenaAPI-athena-parameterized-queries"
                }
            }
        },
        {
            "Sid": "APIGATEWAYMANAGEAPI2",
            "Effect": "Allow",
            "Action": [
                "apigateway:DELETE",
                "apigateway:PUT",
                "apigateway:PATCH",
                "apigateway:POST",
                "apigateway:GET"
            ],
            "Resource": [
                "arn:${Partition}:apigateway:${Region}::/apis/*"
            ],
            "Condition": {
                "StringEquals": {
                    "apigateway:Resource/ApiName": "AthenaAPI-athena-parameterized-queries"
                }
            }
        },
        {
            "Sid": "APIGATEWAYGET",
            "Effect": "Allow",
            "Action": [
                "apigateway:GET"
            ],
            "Resource": [
                "arn:${Partition}:apigateway:${Region}::/apis/*"
            ]
        },
        {
            "Sid": "LAMBDALAYER",
            "Effect": "Allow",
            "Action": [
                "lambda:GetLayerVersion"
            ],
            "Resource": [
                "arn:${Partition}:lambda:*:280475519630:layer:boto3-1_24*"
            ]
        }
    ]
}
After you create the CloudFormation stack, you use the AWS management console to deploy an Amplify application and view the Lambda functions. The following is the scoped-down IAM policy that you can attach to an IAM user or role to perform these operations:
{
    "Version": "2012-10-17",
    "Statement": [
        {
            "Sid": "AmplifyCreateApp",
            "Effect": "Allow",
            "Action": [
                "amplify:CreateBranch",
                "amplify:StartDeployment",
                "amplify:CreateDeployment",
                "amplify:CreateApp",
                "amplify:StartJob"
            ],
            "Resource": "arn:${Partition}:amplify:${Region}:${AccountId}:apps/*"
        },
        {
            "Sid": "AmplifyList",
            "Effect": "Allow",
            "Action": "amplify:List*",
            "Resource": "arn:${Partition}:amplify:${Region}:${AccountId}:apps/*"
        },
        {
            "Sid": "AmplifyGet",
            "Effect": "Allow",
            "Action": "amplify:GetJob",
            "Resource": "arn:${Partition}:amplify:${Region}:${AccountId}:apps/*"
        },
        {
            "Sid": "LambdaList",
            "Effect": "Allow",
            "Action": [
                "lambda:GetAccountSettings",
                "lambda:ListFunctions"
            ],
            "Resource": "*"
        },
        {
            "Sid": "LambdaFunction",
            "Effect": "Allow",
            "Action": [
                "lambda:GetFunction"
            ],
            "Resource": "arn:${Partition}:lambda:${Region}:${AccountId}:function:LambdaAthenaFunction-athena-parameterized-queries"
        }
    ]
}
Note that you need the following IAM policy when deploying your Amplify application to set a global password, and when cleaning up your resources to delete the Amplify application. Remember to replace ${AppARN} with the ARN of the Amplify application. You can find the ARN after creating the Amplify app on the General tab in the App Settings section of the Amplify console.
{
   "Version": "2012-10-17",
   "Statement": [
       {
           "Sid": "UpdateAndDeleteAmplifyApp",
           "Effect": "Allow",
            "Action": [
                "amplify:DeleteApp",
                "amplify:UpdateApp"
            ],
           "Resource": "${AppARN}"
       }
   ]
}
Deploy the Amplify application
In this section, you deploy your Amplify application.
- In the cloned repository, open
web-application/.envin a text editor. - Set
AWS_API_ENDPOINTas theAPIEndpointvalue from the CloudFormation stack Outputs For example:AWS_API_ENDPOINT="https://123456abcd.execute-api.your-region.amazonaws.com". - Set
API_AUTH_CODEas the value you input as the CloudFormation stack’sAPIPassphraseparameter argument. For example:API_AUTH_CODE="YOUR_PASSPHRASE". - Navigate to the
web-application/directory and runnpm install. - Run
npm run buildto compile distribution assets. - On the Amplify console, choose All apps.
- Choose New app.
- Select Host web app, select Deploy without Git provider, then choose Continue.
- For App name, enter
Athena Parameterized Queries App. - For Environment name¸ you don’t need to enter a value.
- Select Drag and Drop.
- Locate the
dist/directory insideweb-application/, drag it into the window and drop it. Ensure you drag the entire directory, not the files within it.
- Choose Save and deploy to deploy the web application on Amplify.

This step takes less than a minute to complete.
- Under App settings, choose Access control, then choose Manage access.
- Select Apply a global password, then enter values for Username and Password.
You use these credentials to access your Amplify application.
Access your Amplify application and run queries
In this section, you use the Amplify application to run Athena parameterized queries against the Amazon.com customer reviews dataset. The left side of the application shows how you can run parameterized queries using Athena prepared statements. The right side of the application shows how you can run parameterized queries without prepared statements, such as if the queries are written in your code. The sample in this post uses named queries within the Athena workgroup. For more information about named queries, refer to NamedQuery.
- Open the Amplify web application link located under Domain. For example:
https://dev123.abcd12345xyz.amplifyapp.com/. - In the Sign in prompt, enter the user name and password you provided as the Amplify application global password.
- For Workgroup Name, choose the
ParameterizedStatementsWGworkgroup. - Choose a statement example on the Prepared Statement or SQL Statement drop-down menu.
Selecting a statement displays a description about the query, including examples of parameters you can try with this statement, and the original SQL query string. SQL parameters of type string must be surrounded by single quotes, for example: 'your_string_value'.
- Enter your query parameters.
The following figure shows an example of the parameters to input for the product_helpful_reviews prepared statement.

- Choose Run Query to send the query request to the API endpoint.
After the query runs, the sample application presents the results in a table format, as depicted in the following screenshot. This is one of many ways to present results, and your application can display results in the format which makes the most sense for your users. The complete query workflow is depicted in the previous architecture diagram.

Using execution parameters with the AWS SDK for Python (Boto3)
In this section, you inspect the Lambda function code for using the StartQueryExecution API with and without prepared statements.
- On the Lambda console, choose Functions.
- Navigate to the
LambdaAthenaFunction-athena-parameterized-queriesfunction. - Choose the Code Source window.
Examples of passing parameters to the Athena StartQueryExecution API using the AWS SDK for Python (Boto3) begin on lines 39 and 49. Note the ExecutionParameters option on lines 45 and 55.
The following code uses execution parameters with Athena prepared statements:
response = athena.start_query_execution(
    QueryString=f'EXECUTE {statement}', # Example: "EXECUTE prepared_statement_name"
    WorkGroup=workgroup,
    QueryExecutionContext={
        'Database': 'athena_prepared_statements'
    },
    ExecutionParameters=input_parameters
)
The following code uses execution parameters without Athena prepared statements:
response = athena.start_query_execution(
    QueryString=statement, # Example: "SELECT * FROM TABLE WHERE parameter_name = ?"
    WorkGroup=workgroup,
    QueryExecutionContext={
        'Database': 'athena_prepared_statements'
    },
    ExecutionParameters=input_parameters
)
Clean up
In this post, you created several components, which generate cost. To avoid incurring future charges, remove the resources with the following steps:
- Delete the S3 bucket’s results prefix created after you ran a query on your workgroup.
With the default template, the prefix is named <S3QueryResultsBucketName>/athena-results. Use caution in this step. Unless you are using versioning on your S3 bucket, deleting S3 objects can’t be undone.
- On the Amplify console, select the app to delete and on the Actions menu, choose Delete app, then confirm.
- On the AWS CloudFormation console, select the stack to delete, choose Delete, and confirm.
Conclusion
In this post, we showed how you can build a DaaS application using Athena parameterized queries. The StartQueryExecution API in Athena now supports execution parameters, which allows you to run any Athena query as a parameterized query. You can decouple your execution parameters from your query strings, and use parameterized queries without being limited to the Athena workgroups where you have created prepared statements. You can take advantage of the security benefits Athena offers with parameterized queries, and developers no longer need to build query strings manually. In this post, you learned how to use execution parameters, and you deployed a DaaS reference architecture to see how parameterized queries can be applied.
You can get started with Athena parameterized queries by using the Athena console, the AWS CLI, or the AWS SDK. To learn more about Athena, refer to the Amazon Athena User Guide.
Thanks for reading this post! If you have questions about Athena prepared statements and parameterized queries, don’t hesitate to leave a comment.
About the Authors
 Blayze Stefaniak is a Senior Solutions Architect for the Technical Strategist Program supporting Executive Customer Programs in AWS Marketing. He has experience working across industries including healthcare, automotive, and public sector. He is passionate about breaking down complex situations into something practical and actionable. In his spare time, you can find Blayze listening to Star Wars audiobooks, trying to make his dogs laugh, and probably talking on mute.
 Daniel Tatarkin is a Solutions Architect at Amazon Web Services (AWS) supporting Federal Financial organizations. He is passionate about big data analytics and serverless technologies. Outside of work, he enjoys learning about personal finance, coffee, and trying out new programming languages for fun.
 Matt Boyd is a Senior Solutions Architect at AWS working with federal financial organizations. He is passionate about effective cloud management and governance, as well as data governance strategies. When he’s not working, he enjoys running, weight lifting, and teaching his elementary-age son ethical hacking skills.
Calibre 6.0 released
Post Syndicated from original https://lwn.net/Articles/900674/
Version 6.0 of the
calibre ebook management system is out.
It has been a year and a half since calibre 5.0. The headline
feature is Full text search, calibre can now optionally index all
the books in your library so you can search your entire library for
a word or phrase.
Other changes introduced since 5.0 include 64-bit Arm support, the removal
of 32-bit support, and an update to Qt 6.
Ronacher: Congratulations: We Now Have Opinions on Your Open Source Contributions
Post Syndicated from original https://lwn.net/Articles/900671/
On his blog, Armin Ronacher comments about a recent security key giveaway by the Python Package Index (PyPI) to provide two-factor authentication (2FA) tokens to the maintainers of the “critical” projects on the index. While (eventually) requiring maintainers to use 2FA before being able to update PyPI packages is reasonable, Ronacher worries about where the idea might lead:
Instead of putting the burden to the user of packages, we’re now piling stuff onto the developer who already puts their own labor and time into it. From the index’ point of view there is a benefit to not enforce rules on everybody as some of these rules might make the use of the index burdensome, but putting the burden only on critical packages does not hurt the adoption just as much. As mentioned earlier I would not make the case that 2FA is not burdensome, it’s a sensible thing. But clearly the index considers it burdensome enough to not enforce it for everybody. More importantly though is what could come next.
There is a hypothetical future where the rules tighten. One could imagine that an index would like to enforce cryptographic signing of newly released packages. Or the index wants to enable reclaiming of critical packages if the author does not respond or do bad things with the package. For instance a critical package being unpublished is a problem for the ecosystem. One could imagine a situation where in that case the Index maintainers take over the record of that package on the index to undo the damage. Likewise it’s more than imaginable that an index of the future will require packages to enforce a minimum standard for critical packages such as a certain SLO for responding to critical incoming requests (security, trademark laws etc.).
Security updates for Monday
Post Syndicated from original https://lwn.net/Articles/900670/
Security updates have been issued by Debian (php7.4), Fedora (gerbv, kernel, openssl, and podman-tui), Oracle (squid:4), Slackware (wavpack), and SUSE (apache2, chafa, containerd, docker and runc, fwupd, fwupdate, libqt5-qtwebengine, oracleasm, and python).
Introducing Location-Aware DDoS Protection
Post Syndicated from Omer Yoachimik original https://blog.cloudflare.com/location-aware-ddos-protection/


We’re thrilled to introduce Cloudflare’s Location-Aware DDoS Protection.
Distributed Denial of Service (DDoS) attacks are cyber attacks that aim to make your Internet property unavailable by flooding it with more traffic than it can handle. For this reason, attackers usually aim to generate as much attack traffic as they can — from as many locations as they can. With Location-Aware DDoS Protection, we take this distributed characteristic of the attack, that is thought of being advantageous for the attacker, and turn it on its back — making it into a disadvantage.
Location-Aware DDoS Protection is now available in beta for Cloudflare Enterprise customers that are subscribed to the Advanced DDoS service.
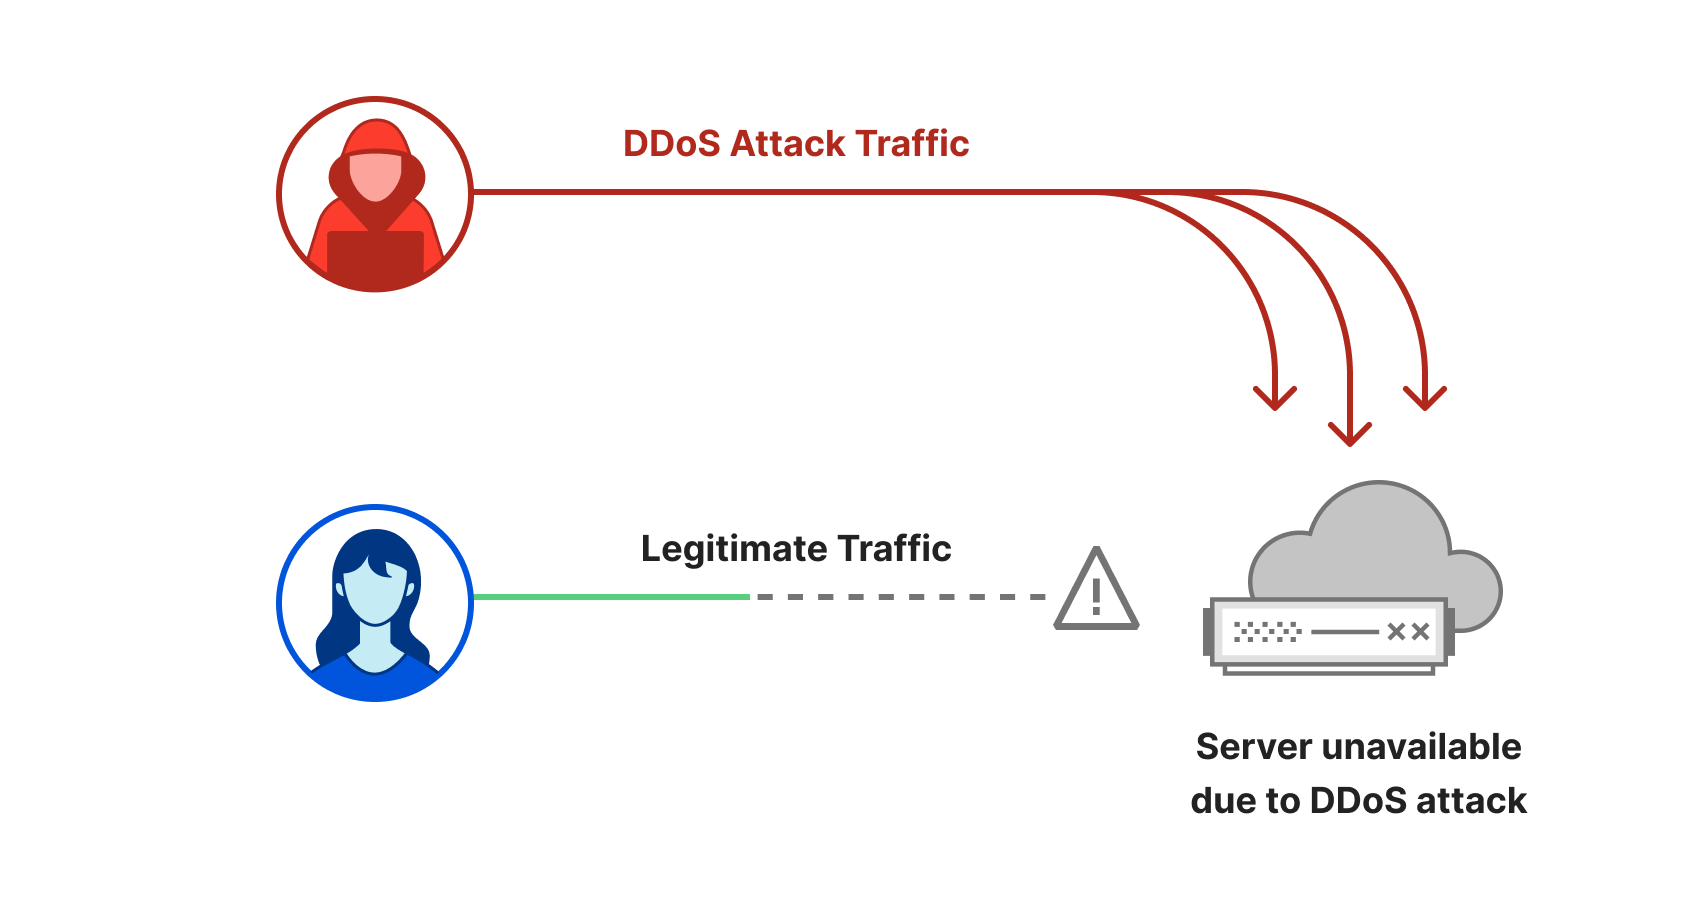
Distributed attacks lose their edge
Cloudflare’s Location-Aware DDoS Protection takes the attacker’s advantage and uses it against them. By learning where your traffic comes from, the system becomes location-aware and constantly asks “Does it make sense for your website?” when seeing new traffic.
For example, if you operate an e-commerce website that mostly serves the German consumer, then most of your traffic would most likely originate from within Germany, some from neighboring European countries, and a decreasing amount as we expand globally to other countries and geographies. If sudden spikes of traffic arrive from unexpected locations outside your main geographies, the system will flag and mitigate the unwanted traffic.
Location-Aware DDoS Protection also leverages Cloudflare’s Machine Learning models to identify traffic that is likely automated. This is used as an additional signal to provide more accurate protection.
Enabling Location-Aware Protection
Enterprise customers subscribed to the Advanced DDoS service can customize and enable the Location-Aware DDoS Protection system. By default, the system will only show what it thinks is suspicious traffic based on your last 7-day P95 rates, bucketed by client country and region (recalculated every 24 hours).
Customers can view what the system flagged in the Security Overview dashboard.
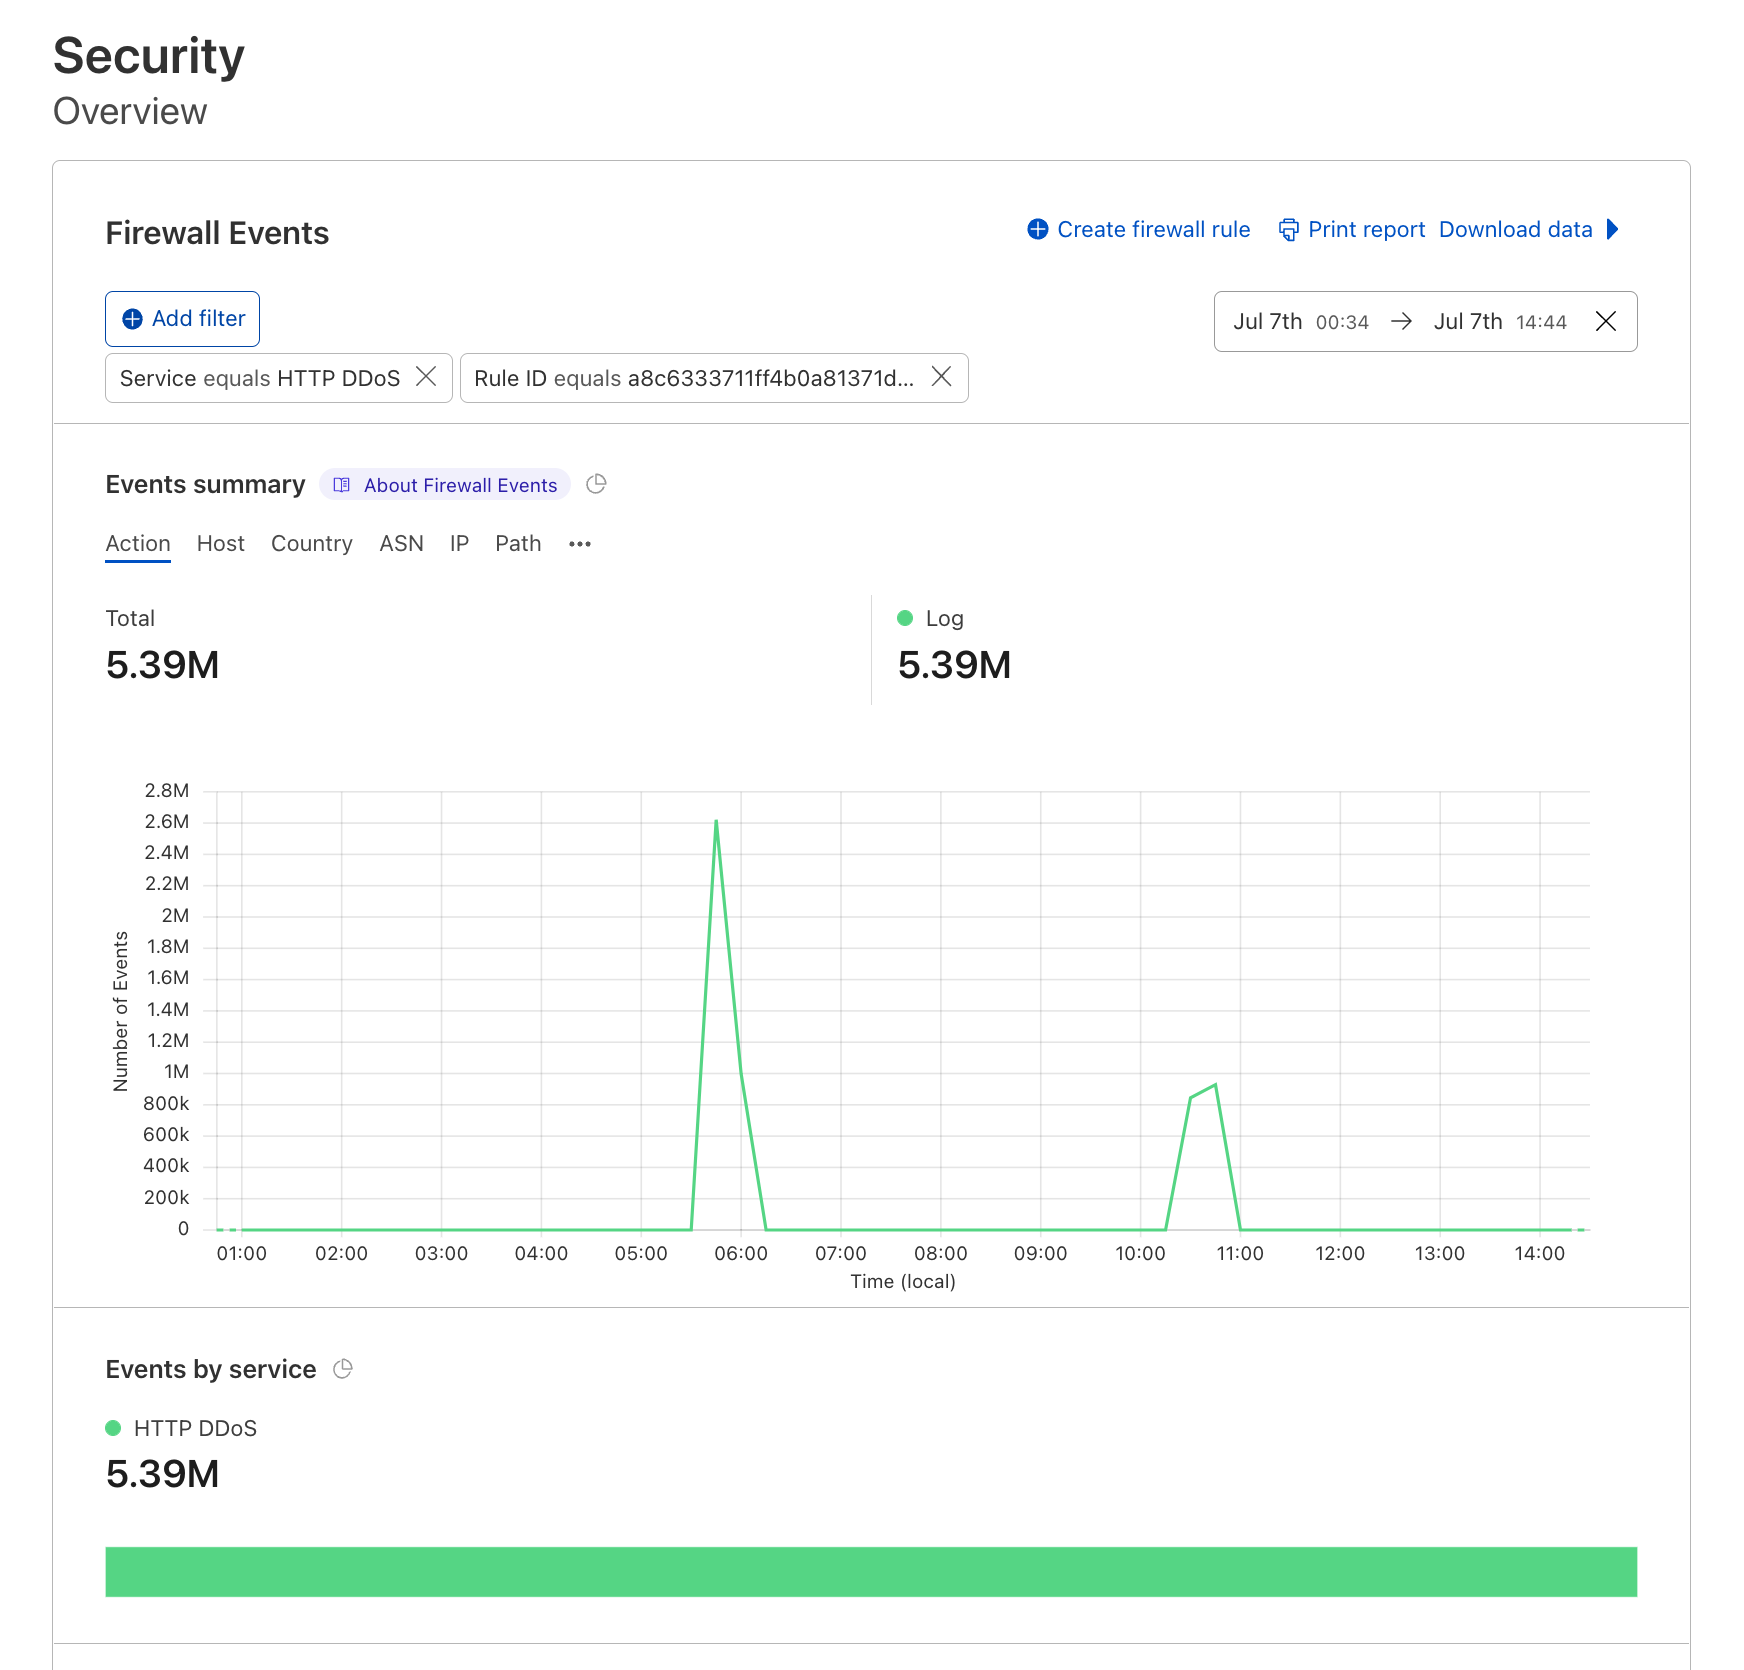
Location-Aware DDoS Protection is exposed to customers as a new HTTP DDoS Managed rule within the existing ruleset. To enable it, change the action to Managed Challenge or Block. Customers can adjust its sensitivity level to define how much tolerance you permit for traffic that deviates from your observed geographies. The lower the sensitivity, the higher the tolerance.
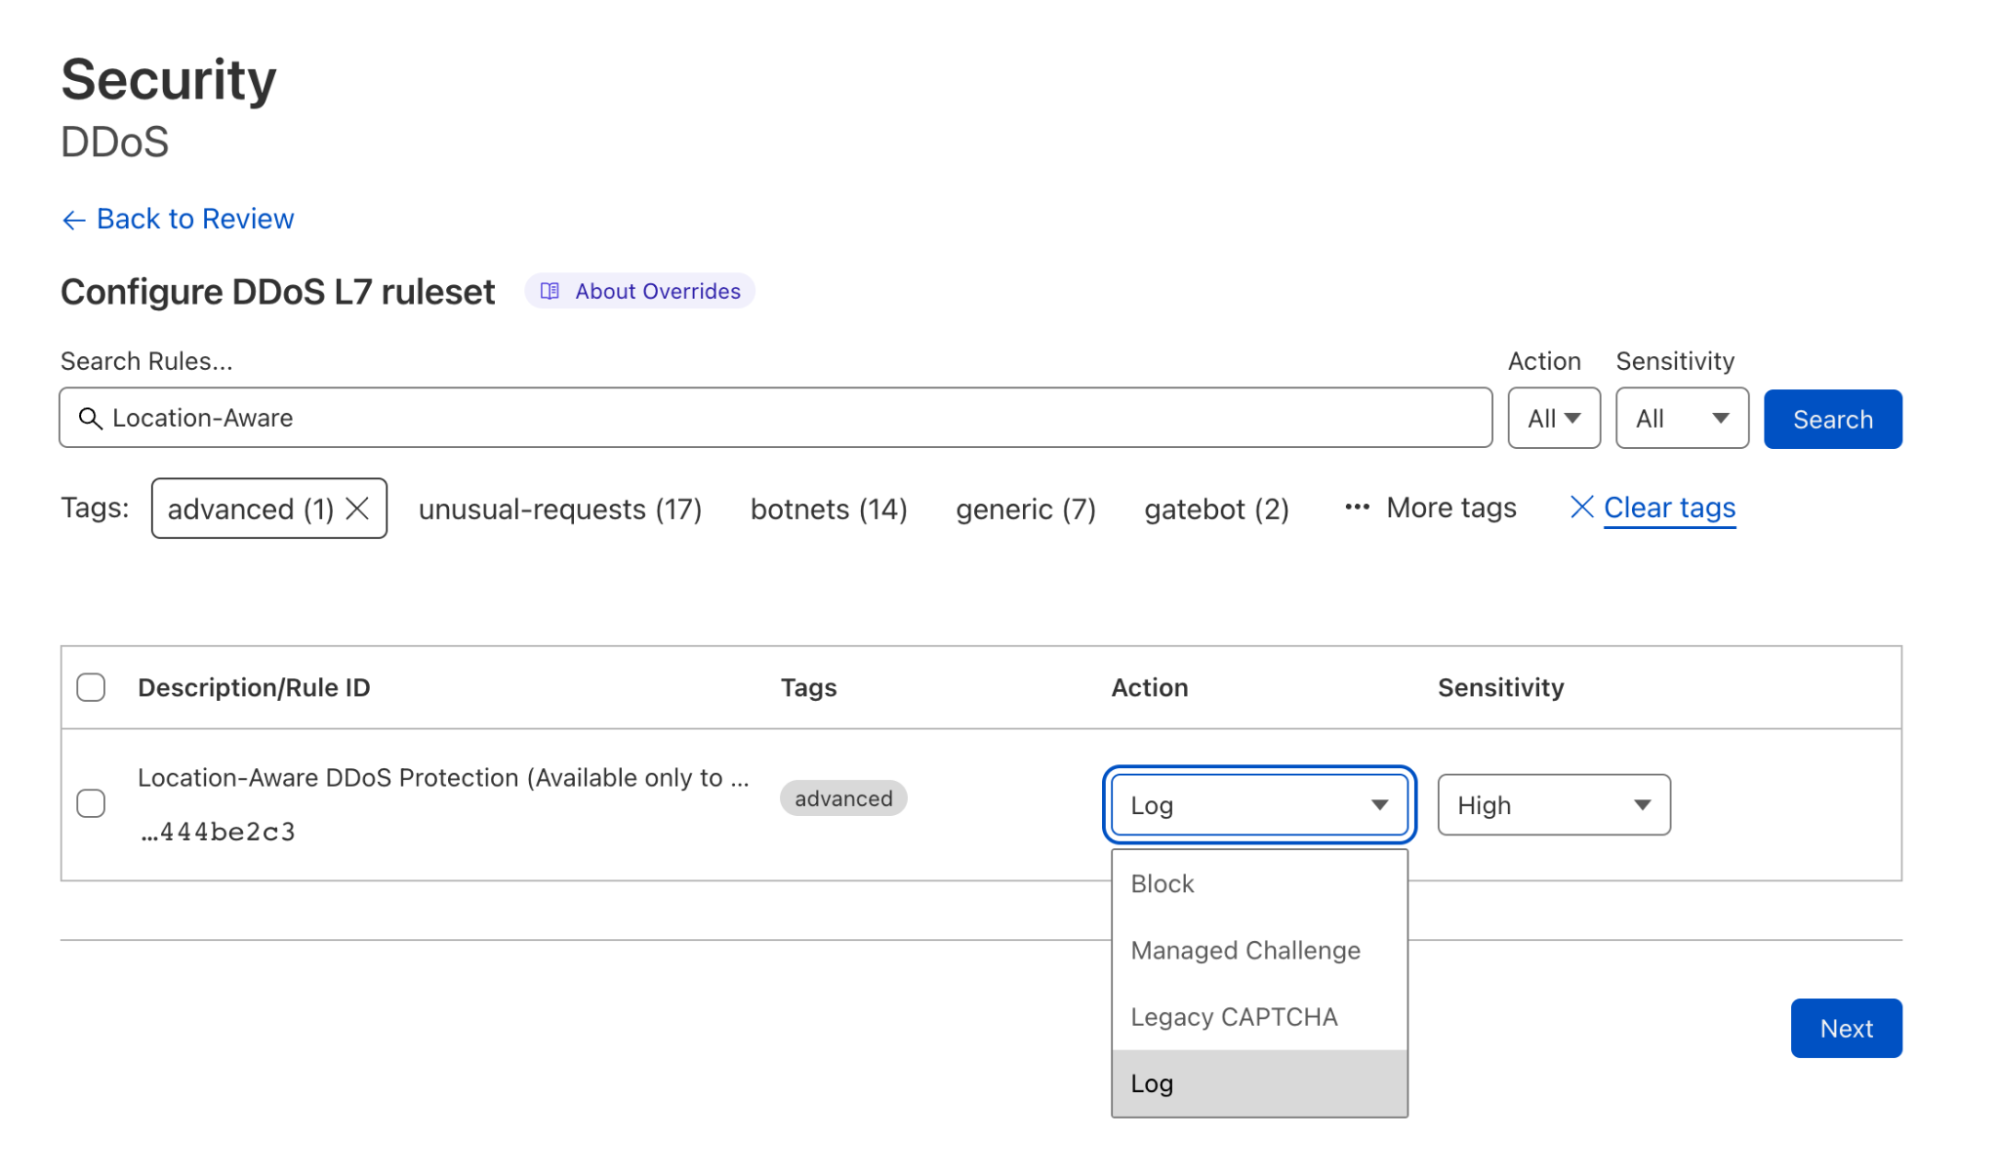
To learn how to view flagged traffic and how to configure the Location-Aware DDoS Protection, visit our developer docs site.
Making the impact of DDoS attacks a thing of the past
Our mission at Cloudflare is to help build a better Internet. The DDoS Protection team’s vision is derived from this mission: our goal is to make the impact of DDoS attacks a thing of the past. Location-aware protection is only the first step to making Cloudflare’s DDoS protection even more intelligent, sophisticated, and tailored to individual needs.
Not using Cloudflare yet? Start now with our Free and Pro plans to protect your websites, or contact us to learn more about the Enterprise Advanced DDoS Protection package.