GitHub Issues search now supports nested queries and boolean operators: Here’s how we (re)built it

Post Syndicated from Deborah Digges original https://github.blog/developer-skills/application-development/github-issues-search-now-supports-nested-queries-and-boolean-operators-heres-how-we-rebuilt-it/


Originally, Issues search was limited by a simple, flat structure of queries. But with advanced search syntax, you can now construct searches using logical AND/OR operators and nested parentheses, pinpointing the exact set of issues you care about.

Building this feature presented significant challenges: ensuring backward compatibility with existing searches, maintaining performance under high query volume, and crafting a user-friendly experience for nested searches. We’re excited to take you behind the scenes to share how we took this long-requested feature from idea to production.

Here’s what you can do with the new syntax and how it works behind the scenes

Issues search now supports building queries with logical AND/OR operators across all fields, with the ability to nest query terms. For example is:issue state:open author:rileybroughten (type:Bug OR type:Epic) finds all issues that are open AND were authored by rileybroughten AND are either of type bug or epic.

Screenshot of an Issues search query involving the logical OR operator.

How did we get here?

Previously, as mentioned, Issues search only supported a flat list of query fields and terms, which were implicitly joined by a logical AND. For example, the query assignee:@me label:support new-project translated to “give me all issues that are assigned to me AND have the label support AND contain the text new-project.”

But the developer community has been asking for more flexibility in issue search, repeatedly, for nearly a decade now. They wanted to be able to find all issues that had either the label support or the label question, using the query label:support OR label:question. So, we shipped an enhancement towards this request in 2021, when we enabled an OR style search using a comma-separated list of values.

However, they still wanted the flexibility to search this way across all issue fields, and not just the labels field. So we got to work. 

Technical architecture and implementation
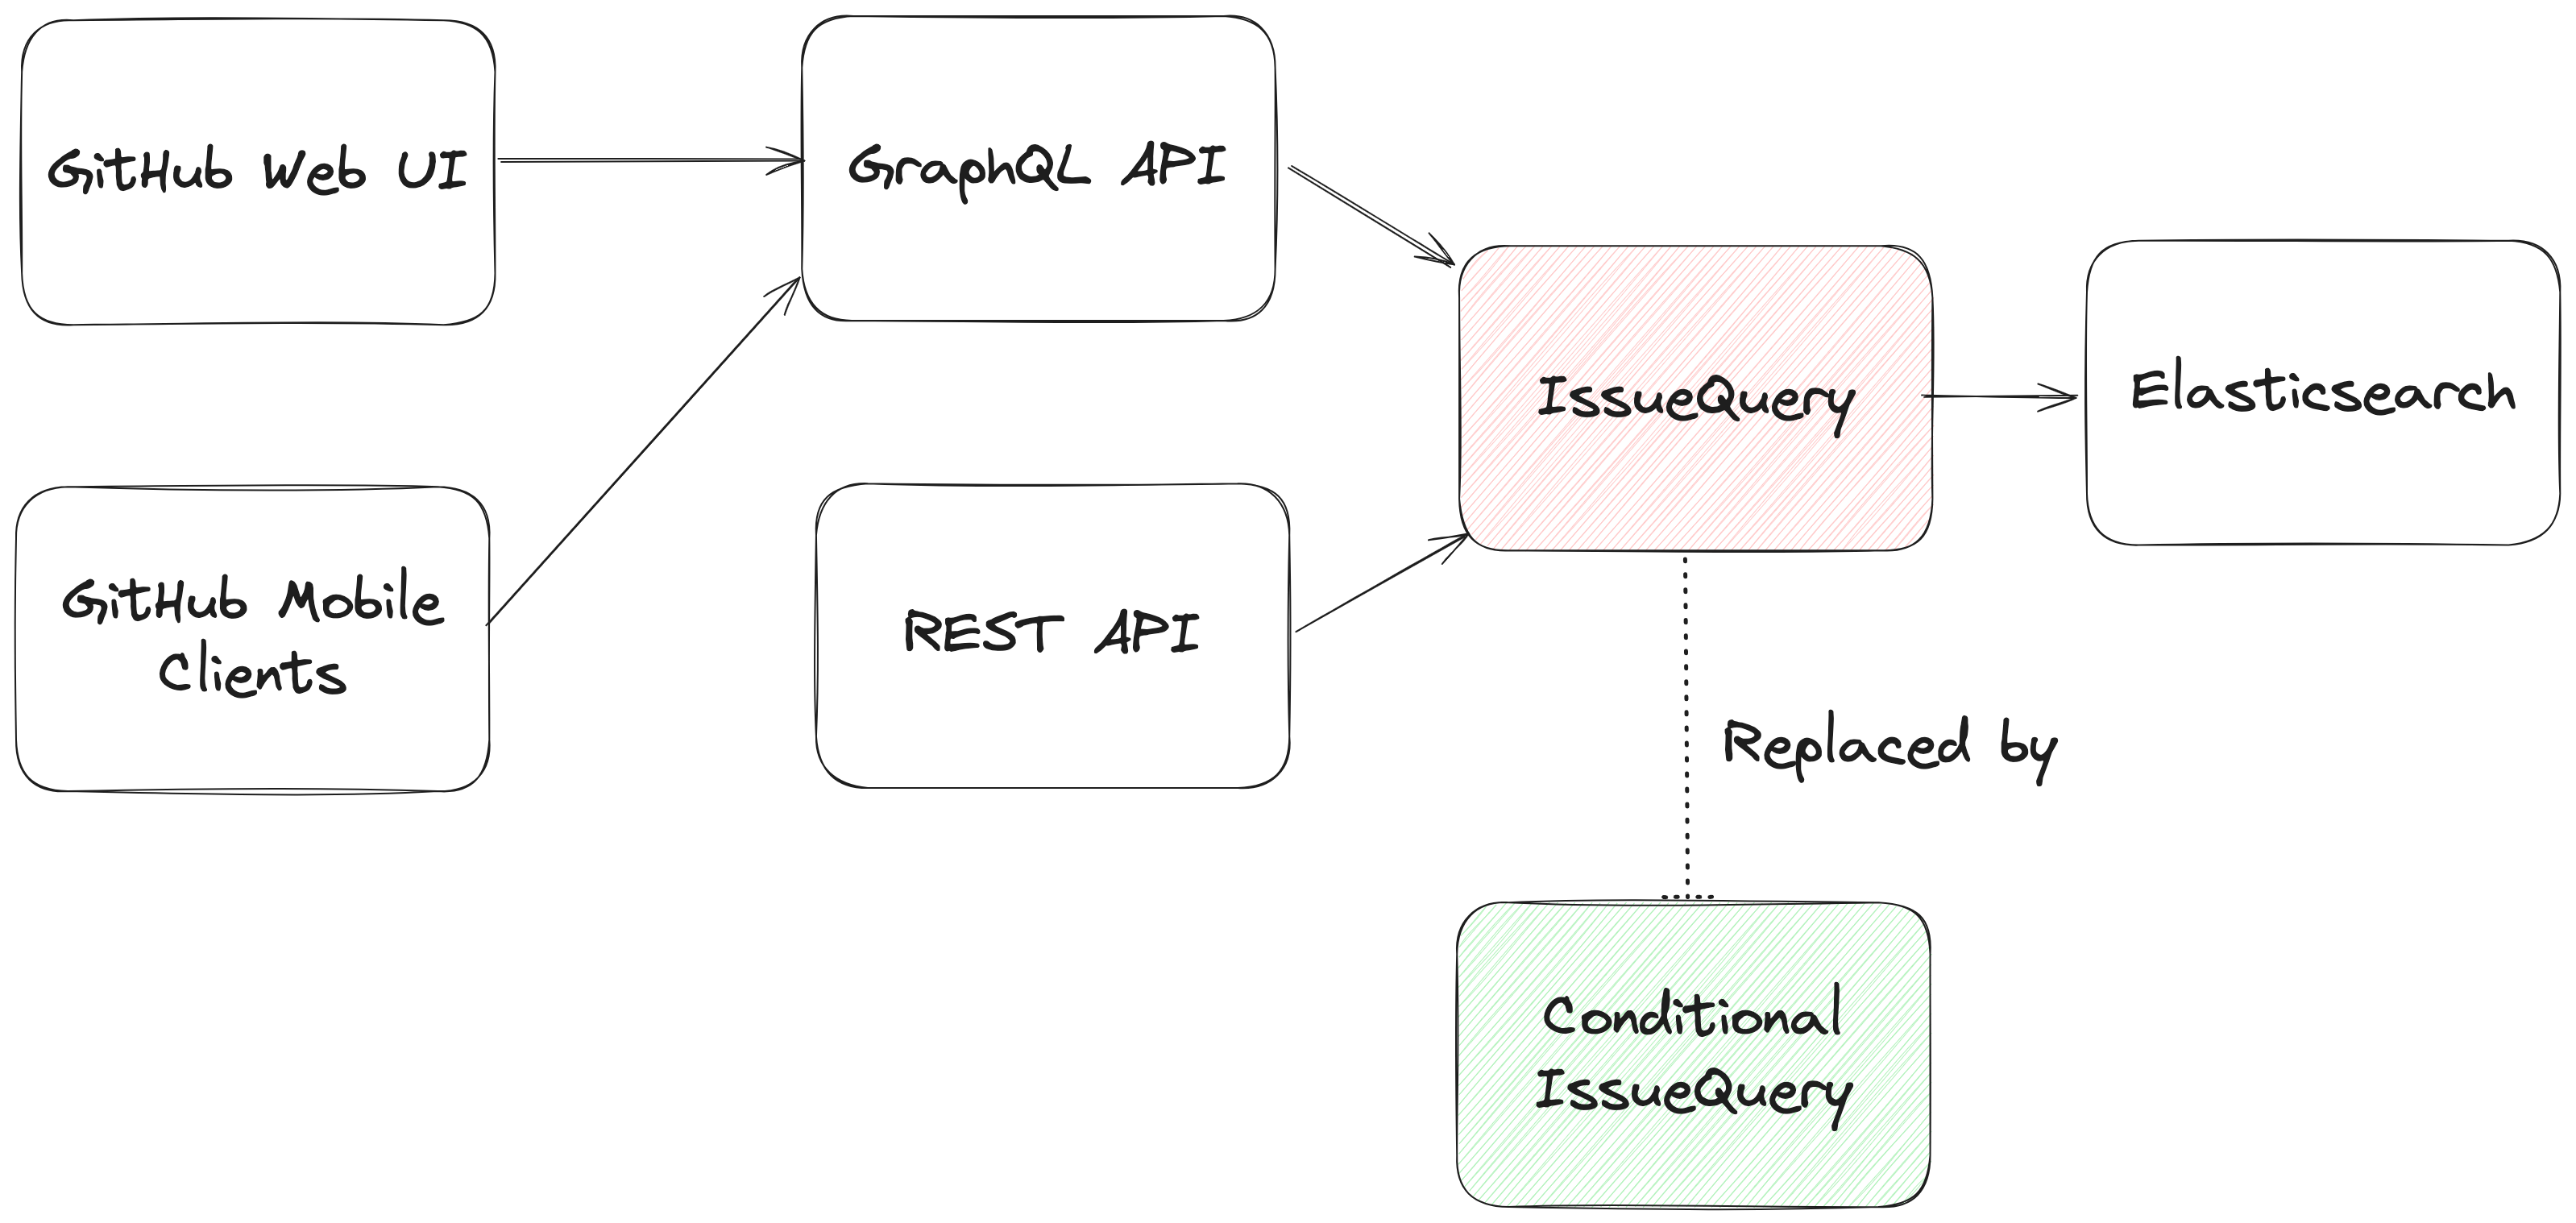
The architecture of the Issues search system (and the changes needed to build this feature).

From an architectural perspective, we swapped out the existing search module for Issues (IssuesQuery), with a new search module (ConditionalIssuesQuery), that was capable of handling nested queries while continuing to support existing query formats.

This involved rewriting IssueQuery, the search module that parsed query strings and mapped them into Elasticsearch queries.

Search Architecture

To build a new search module, we first needed to understand the existing search module, and how a single search query flowed through the system. At a high level, when a user performs a search, there are three stages in its execution:

  1. Parse: Breaking the user input string into a structure that is easier to process (like a list or a tree)
  2. Query: Transforming the parsed structure into an Elasticsearch query document, and making a query against Elasticsearch.
  3. Normalize: Mapping the results obtained from Elasticsearch (JSON) into Ruby objects for easy access and pruning the results to remove records that had since been removed from the database.

Each stage presented its own challenges, which we’ll explore in more detail below. The Normalize step remained unchanged during the re-write, so we won’t dive into that one.

Parse stage

The user input string (the search phrase) is first parsed into an intermediate structure. The search phrase could include:

  • Query terms: The relevant words the user is trying to find more information about (ex: “models”)
  • Search filters: These restrict the set of returned search documents based on some criteria (ex: “assignee:Deborah-Digges”)

 Example search phrase: 

  • Find all issues assigned to me that contain the word “codespaces”:
    • is:issue assignee:@me codespaces
  • Find all issues with the label documentation that are assigned to me:
    • assignee:@me label:documentation

The old parsing method: flat list

When only flat, simple queries were supported, it was sufficient to parse the user’s search string into a list of search terms and filters, which would then be passed along to the next stage of the search process.

The new parsing method: abstract syntax tree

As nested queries may be recursive, parsing the search string into a list was no longer sufficient. We changed this component to parse the user’s search string into an Abstract Syntax Tree (AST) using the parsing library parslet.

We defined a grammar (a PEG or Parsing Expression Grammar) to represent the structure of a search string. The grammar supports both the existing query syntax and the new nested query syntax, to allow for backward compatibility.

A simplified grammar for a boolean expression described by a PEG grammar for the parslet parser is shown below:

class Parser < Parslet::Parser
  rule(:space)  { match[" "].repeat(1) }
  rule(:space?) { space.maybe }

  rule(:lparen) { str("(") >> space? }
  rule(:rparen) { str(")") >> space? }

  rule(:and_operator) { str("and") >> space? }
  rule(:or_operator)  { str("or")  >> space? }

  rule(:var) { str("var") >> match["0-9"].repeat(1).as(:var) >> space? }

  # The primary rule deals with parentheses.
  rule(:primary) { lparen >> or_operation >> rparen | var }

  # Note that following rules are both right-recursive.
  rule(:and_operation) { 
    (primary.as(:left) >> and_operator >> 
      and_operation.as(:right)).as(:and) | 
    primary }
    
  rule(:or_operation)  { 
    (and_operation.as(:left) >> or_operator >> 
      or_operation.as(:right)).as(:or) | 
    and_operation }

  # We start at the lowest precedence rule.
  root(:or_operation)
end

For example, this user search string:
is:issue AND (author:deborah-digges OR author:monalisa ) 
would be parsed into the following AST:

{
  "root": {
    "and": {
      "left": {
        "filter_term": {
          "attribute": "is",
          "value": [
            {
              "filter_value": "issue"
            }
          ]
        }
      },
      "right": {
        "or": {
          "left": {
            "filter_term": {
              "attribute": "author",
              "value": [
                {
                  "filter_value": "deborah-digges"
                }
              ]
            }
          },
          "right": {
            "filter_term": {
              "attribute": "author",
              "value": [
                {
                  "filter_value": "monalisa"
                }
              ]
            }
          }
        }
      }
    }
  }
}

Query

Once the query is parsed into an intermediate structure, the next steps are to:

  1. Transform this intermediate structure into a query document that Elasticsearch understands
  2. Execute the query against Elasticsearch to obtain results

Executing the query in step 2 remained the same between the old and new systems, so let’s only go over the differences in building the query document below.

The old query generation: linear mapping of filter terms using filter classes

Each filter term (Ex: label:documentation) has a class that knows how to convert it into a snippet of an Elasticsearch query document. During query document generation, the correct class for each filter term is invoked to construct the overall query document.

The new query generation: recursive AST traversal to generate Elasticsearch bool query

We recursively traversed the AST generated during parsing to build an equivalent Elasticsearch query document. The nested structure and boolean operators map nicely to Elasticsearch’s boolean query with the AND, OR, and NOT operators mapping to the must, should, and should_not clauses.

We re-used the building blocks for the smaller pieces of query generation to recursively construct a nested query document during the tree traversal.

Continuing from the example in the parsing stage, the AST would be transformed into a query document that looked like this:

{
  "query": {
    "bool": {
      "must": [
        {
          "bool": {
            "must": [
              {
                "bool": {
                  "must": {
                    "prefix": {
                      "_index": "issues"
                    }
                  }
                }
              },
              {
                "bool": {
                  "should": {
                    "terms": {
                      "author_id": [
                        "<DEBORAH_DIGGES_AUTHOR_ID>",
                        "<MONALISA_AUTHOR_ID>"
                      ]
                    }
                  }
                }
              }
            ]
          }
        }
      ]
    }
    // SOME TERMS OMITTED FOR BREVITY
  }
}

With this new query document, we execute a search against Elasticsearch. This search now supports logical AND/OR operators and parentheses to search for issues in a more fine-grained manner.

Considerations

Issues is one of the oldest and most heavily -used features on GitHub. Changing core functionality like Issues search, a feature with an average of  nearly 2000 queries per second (QPS)—that’s almost 160M queries a day!—presented a number of challenges to overcome.

Ensuring backward compatibility

Issue searches are often bookmarked, shared among users, and linked in documents, making them important artifacts for developers and teams. Therefore, we wanted to introduce this new capability for nested search queries without breaking existing queries for users. 

We validated the new search system before it even reached users by:

  • Testing extensively: We ran our new search module against all unit and integration tests for the existing search module. To ensure that the GraphQL and REST API contracts remained unchanged, we ran the tests for the search endpoint both with the feature flag for the new search system enabled and disabled.
  • Validating correctness in production with dark-shipping: For 1% of issue searches, we ran the user’s search against both the existing and new search systems in a background job, and logged differences in responses. By analyzing these differences we were able to fix bugs and missed edge cases before they reached our users.
    • We weren’t sure at the outset how to define “differences,” but we settled on “number of results” for the first iteration. In general, it seemed that we could determine whether a user would be surprised by the results of their search against the new search capability if a search returned a different number of results when they were run within a second or less of each other.

Preventing performance degradation

We expected more complex nested queries to use more resources on the backend than simpler queries, so we needed to establish a realistic baseline for nested queries, while ensuring no regression in the performance of existing, simpler ones.

For 1% of Issue searches, we ran equivalent queries against both the existing and the new search systems. We used scientist, GitHub’s open source Ruby library, for carefully refactoring critical paths, to compare the performance of equivalent queries to ensure that there was no regression.

Preserving user experience

We didn’t want users to have a worse experience than before just because more complex searches were possible. 

We collaborated closely with product and design teams to ensure usability didn’t decrease as we added this feature by:

  • Limiting the number of nested levels in a query to five. From customer interviews, we found this to be a sweet spot for both utility and usability.
  • Providing helpful UI/UX cues: We highlight the AND/OR keywords in search queries, and provide users with the same auto-complete feature for filter terms in the UI that they were accustomed to for simple flat queries.

Minimizing risk to existing users

For a feature that is used by millions of users a day, we needed to be intentional about rolling it out in a way that minimized risk to users.

We built confidence in our system by:

  • Limiting blast radius: To gradually build confidence, we only integrated the new system in the GraphQL API and the Issues tab for a repository in the UI to start. This gave us time to collect, respond to, and incorporate feedback without risking a degraded experience for all consumers. Once we were happy with its performance, we rolled it out to the Issues dashboard and the REST API.
  • Testing internally and with trusted partners: As with every feature we build at GitHub, we tested this feature internally for the entire period of its development by shipping it to our own team during the early days, and then gradually rolling it out to all GitHub employees. We then shipped it to trusted partners to gather initial user feedback.

And there you have it, that’s how we built, validated, and shipped the new and improved Issues search!

Feedback

Want to try out this exciting new functionality? Head to our docs to learn about how to use boolean operators and parentheses to search for the issues you care about!

If you have any feedback for this feature, please drop us a note on our community discussions.

Acknowledgements

Special thanks to AJ Schuster, Riley Broughten, Stephanie Goldstein, Eric Jorgensen Mike Melanson and Laura Lindeman for the feedback on several iterations of this blog post!

The post GitHub Issues search now supports nested queries and boolean operators: Here’s how we (re)built it appeared first on The GitHub Blog.

Mapping AWS security services to MITRE frameworks for threat detection and mitigation

Post Syndicated from Pratima Singh original https://aws.amazon.com/blogs/security/mapping-aws-security-services-to-mitre-frameworks-for-threat-detection-and-mitigation/

In the cloud security landscape, organizations benefit from aligning their controls and practices with industry standard frameworks such as MITRE ATT&CK®, MITRE EngageTM, and MITRE D3FENDTM. MITRE frameworks are structured, openly accessible models that document threat actor behaviors to help organizations improve threat detection and response.

Figure 1: Interaction between the various MITRE frameworks

Figure 1: Interaction between the various MITRE frameworks

Figure 1 showcases how the frameworks interact with each other to identify threatening behavior and provide actionable defensive measures. MITRE ATT&CK provides insights into threat actor behavior while D3FEND translates insights from ATT&CK into actionable defensive measures. MITRE Engage uses both ATT&CK and D3FEND to plan proactive engagement strategies that disrupt threat actor activity. As organizations use AWS to enhance their operational capabilities, implementing comprehensive security strategies becomes an important part of cloud adoption.

This blog post explores how AWS security services align with the MITRE frameworks to provide a systematic approach for threat detection and mitigation. We’ll examine how organizations can use AWS security tools such as Amazon GuardDuty, Amazon Security Lake, and AWS Security Hub in conjunction with MITRE frameworks to implement security controls across different stages of their cloud security operations.

Understanding MITRE frameworks

Today’s security teams face increasingly sophisticated threats, with actors continuously evolving their tactics, techniques, and procedures (TTPs). To help organizations strengthen their security posture, industry frameworks such as MITRE ATT&CK, D3FEND, and Engage provide structured methodologies for understanding and responding to these threats.

Understanding these threats through a risk lifecycle approach is crucial for security teams. This structured methodology enables teams to detect anomalies early, map threats to known risk stages, and implement proactive defense mechanisms. By following a risk lifecycle approach, organizations can enhance threat intelligence, improve incident response, and minimize dwell time, ultimately strengthening their security posture against evolving cyber threats.

The integration of MITRE ATT&CK, D3FEND, and Engage frameworks offers organizations a comprehensive approach across the security operations lifecycle. At the foundation, MITRE ATT&CK provides a common language for describing threat actor TTPs. This knowledge base is invaluable during threat modeling and risk assessment, helping teams identify potential vulnerabilities and threat vectors.

Building upon ATT&CK, MITRE D3FEND complements the tactical knowledge with a framework for defensive countermeasures. It suggests proactive security controls, such as implementing least privilege access or securing system configurations. This allows organizations to align their defenses directly with known exploit patterns.

MITRE Engage then adds a layer of active defense capabilities. It guides security teams in planning and implementing strategies that can help in three different ways and potentially simultaneously. Defenders can expose threat actors by detecting them as they attempt to access or operate on infrastructure. Defenders can use Engage to help impose costs by causing threat actors to focus on fake infrastructure rather than legitimate assets. Finally, defenders can set up enticing fake targets to lure threat actors into exploiting them and thereby revealing tradecraft.

A MITRE operation that was run in conjunction with a partner might clarify how this is valuable. MITRE worked with a partner to set up a fake network to appear as a specific type of entity. The goal was to elicit TTPs from a specific advanced persistent threat (APT) for which MITRE and the partner had a recent malware sample. MITRE ran the sample on the fake network and observed the APT’s activities. From that operation, MITRE gathered a list of specific TTPs that were executed by a script in a particular order that helped the partner develop a novel analytic. Plus, in reviewing event traces, MITRE found a flaw in a well-known security tool that missed a specific type of process-tampering event. This was disclosed to the vendor, who fixed that in later versions. Finally, every minute of operating in this environment imposed a cost on the APT by diverting resources from real victims. Full details of the exercise were presented at Shmoocon 2022.

As we move through the security operations lifecycle, these three MITRE frameworks continue to work in concert:

  • During detection and monitoring, ATT&CK informs threat hunting and log analysis and correlation, D3FEND strengthens real-time detection and anomaly tracking, and Engage enables strategic detection through deception techniques.
  • When responding to incidents, ATT&CK helps map incident progression, D3FEND automates response actions, and Engage provides methods to gather additional intelligence about threat activities.
  • In the post-incident phase, ATT&CK helps map the incident chain for better detection tuning, D3FEND refines security controls, and Engage expands deception tactics based on lessons learned. By integrating these efforts, organizations can implement a systematic approach to security operations that combines tactical knowledge, defensive measures, and strategic engagement capabilities.

Aligning AWS to MITRE frameworks

AWS offers a broad set of cloud services with high security at global scale, and has proven experience helping businesses innovate faster. Customers use AWS services in various configurations to build solutions for their bespoke business needs. A fundamental aspect of using AWS is understanding the Shared Responsibility Model, shown in Figure 2 that follows.

Figure 2: AWS Shared Responsibility Model

Figure 2: AWS Shared Responsibility Model

AWS is responsible for security of the cloud, while customers are responsible for security in the cloud. This means that AWS is responsible for protecting the infrastructure that runs the services offered in the AWS Cloud, while customer responsibility is determined by the AWS Cloud services that a customer selects. As customers embark on their cloud security journey, we help them understand two important concepts of cloud-scale environments:

  • Interconnected resources and configurations: Cloud architectures consist of interconnected entities—ranging from virtual machines using Amazon Elastic Compute Cloud (Amazon EC2) to serverless functions using AWS Lambda. To help customers maintain visibility and control, AWS offers native tools designed for cloud-scale management.
  • Dynamic access management and least privilege: Cloud environments require robust authentication mechanisms and fine-grained permissions. AWS provides comprehensive identity and access management tools to implement least privilege access and manage dynamic workloads effectively.

To support our customers’ security needs, AWS offers native security services that align with industry-standard frameworks like MITRE ATT&CK, D3FEND, and Engage. Here’s how these services map across the security lifecycle:

For threat modeling and risk assessment, Security Lake aggregates logs for MITRE ATT&CK-based analytics, while Amazon Inspector scans for vulnerabilities mapped to threat actor techniques. Amazon Macie detects sensitive data exposure across AWS resources.

When implementing preventive controls, implementing least privilege for access is fundamental. AWS Identity and Access Management (IAM) and AWS Organizations provide capabilities to enforce least privilege across your AWS environment. You can use IAM permissions and service control policies (SCPs) to build an identity perimeter. AWS Web Application Firewall (AWS WAF) provides application-layer protections, while you can use AWS Secrets Manager to store honey tokens. Secrets Manager is an AWS service that you can use to centrally manage the lifecycle of secrets. Honey tokens act as digital decoys that simulate legitimate credentials or sensitive data, enticing threat actors to reveal their presence when they interact with them. When triggered, these tokens generate real-time alerts and detailed event logs, enabling swift investigation and deeper insights into threat actor tactics. Deploying honey tokens on AWS involves creating decoy credentials or sensitive data entries that serve no legitimate purpose yet are closely monitored for unauthorized access attempts. One common approach is to use Secrets Manager to store fake secrets that mimic real credentials. When such tokens, stored in Secrets Manager, are accessed, the service generates detailed event logs with AWS CloudTrail and Amazon CloudWatch. You can continuously monitor these logs and events and configure them to alert you if the decoys are ever accessed.

During the detection and monitoring phase, GuardDuty identifies unusual activity patterns across your AWS accounts and workloads, Amazon Detective helps investigate these anomalies by analyzing root causes and plotting out the incident scope in an interactive way, while Security Hub centralizes security alerts and enables automated responses across your environment.

For incident response, containment, and recovery, Lambda and Step Functions help automate responses when security events occur. AWS Shield and WAF work together to provide real-time threat mitigation against denial-of-service type threats like distributed denial of service (DDoS), while Security Lake and Detective provide the necessary data and tools for conducting thorough forensic analysis. In 2024, AWS announced the AWS Security Incident Response service that uses automated monitoring and investigation through the AWS Customer Incident Response Team to prepare for, respond to, and recover from security events. You can use the service to augment your cloud-based security response function aligned with AWS security best practices.

By blocking malicious traffic, Shield and WAF provide real-time DDoS mitigation. AWS deception tactics could include redirecting threat actors to honeypots or deploying decoy Amazon Simple Storage Service (Amazon S3) files to enhance engagement strategies, like the honey token deployment and storage using Secrets Manager explained earlier in this post. Post incident, Security Lake and Detective assist in forensic analysis, while Security Hub and IAM policies refine security controls based on past exploit trends. MITRE Engage tactics can further evolve by analyzing honeypot interactions. By integrating these AWS security services, you can detect, prevent, and deceive threat actors effectively, strengthening your organization’s overall security posture. The following table maps MITRE lifecycle stages to AWS services and tools.

Lifecycle stage AWS tools for MITRE ATT&CK (detect and map) AWS tools for MITRE D3FEND (prevent and contain) AWS tools for MITRE Engage (deceive and disrupt)
Threat modeling and risk assessment Security Lake, Amazon Inspector, Macie, and Security Hub IAM policies and AWS WAF Secrets Manager and honey tokens
Detection and monitoring GuardDuty, CloudTrail, and Security Hub Detective, auto-remediation using AWS services such as Amazon EventBridge, Lambda, and Step Functions. Fake IAM users, and decoy Amazon S3 files
Incident response and containment Step Functions, Lambda, GuardDuty, AWS Security Incident Response, and Detective Auto-block using AWS WAF, multi-factor authentication (MFA) enforcement, and AWS Security Incident Response Redirect exploits to honeypots
Post-incident and intelligence Analyze and correlate logs with Security Lake, Amazon Athena, and Detective IAM hardening and AWS Config Adaptive deception traps

You can use Table 1 as a guide to understand how AWS services map to the various lifecycle stages in the incident response lifecycle. We will now demonstrate how GuardDuty, an AWS security service that continuously monitors your AWS accounts and workloads to provide automated threat detection, works in line with the MITRE ATT&CK framework.

GuardDuty: MITRE framework integration in action

In 2024, AWS worked extensively with MITRE to create new techniques and sub-techniques, and to update some of the existing detection objects in the MITRE ATT&CK cloud matrix. The work that AWS did with MITRE drew from real-world threat actor techniques performed against AWS customers and helped to provide more detailed information and specific detections on how threat actors abuse AWS services. For example, AWS threat detection teams observed a new tactic in the cloud environment (T1485.001 | Data Destruction: Lifecycle-Triggered Deletion) where threat actors could modify lifecycle policies for S3 buckets to delete all objects stored in the bucket. This technique, along with associated mitigations, detection, and references was submitted back to the MITRE ATT&CK framework.

AWS security services such as AWS Security Incident Response and GuardDuty use MITRE ATT&CK to provide threat intelligence and detailed information on threats identified in an AWS account. You can examine how these AWS security services integrate with MITRE ATT&CK through a specific example. GuardDuty Extended Threat Detection helps customers with contextual threat detection in their AWS environment and aligns the signals with the MITRE ATT&CK lifecycle. GuardDuty automatically detects and correlates individual findings with connected resources to produce an attack sequence finding. Consider an attack sequence finding generated by GuardDuty detecting data compromise in your AWS account. We will use this as an example in this post.

To begin, the finding summary includes a textual description of the sequence of events and the TTPs detected, as shown in Figure 3. It also shows a summary of the observed TTP identifiers, AWS API calls, and IP addresses.

Figure 3: GuardDuty finding summary visible in the service console

Figure 3: GuardDuty finding summary visible in the service console

As seen in Figure 4, every attack sequence finding highlights the signals and the MITRE tactic associated with the activity. The finding shown in Figure 4 shows the full lifecycle of the threat from discovery to impact.

Figure 4: Signals and MITRE tactics alignment

Figure 4: Signals and MITRE tactics alignment

Diving deeper into each signal reveals the specific MITRE tactic associated with the activity and the technique identifier. Another interesting feature is that you can see the correlation between the AWS API call associated with the resources involved in the attack sequence and the user agent.

Figure 5 shows one of the signals associated with the attack sequence in the previous finding. A data exfiltration activity has been reported because of the nature of the AWS API call (s3:GetObject) and the user agent (Kali Linux) that was used to perform the activity. The level of detail for each signal is contextual based on the type of activity and tactic.

Figure 5: Details for a single signal within a GuardDuty attack sequence finding

Figure 5: Details for a single signal within a GuardDuty attack sequence finding

Figure 6 shows another signal from the same finding, but in this case the level of detail includes the malicious IP lists and suspicious network activity detected in relation to the signal and associated resources.

Figure 6: Details of TTPs associated with an indicator within a GuardDuty attack sequence finding

Figure 6: Details of TTPs associated with an indicator within a GuardDuty attack sequence finding

This information can be downloaded in a JSON-formatted file. The information from the JSON document can be used to automate responses and remediations for the detections.

Conclusion

AWS security services work together to support the implementation of MITRE frameworks—ATT&CK for threat detection, D3FEND for preventative security, and Engage for threat actor engagement across the cybersecurity lifecycle. As demonstrated through the GuardDuty Extended Threat Detection example, these integrations provide customers with practical, actionable security capabilities across their AWS environment. The alignment of AWS security services with MITRE frameworks helps you build security operations using industry-standard methodologies, implement automated detection and response capabilities, maintain visibility across your AWS environment, and continuously enhance your security controls.

Through this integration of AWS security services with MITRE frameworks, you can implement comprehensive security operations that evolve with your organization’s business needs. To get started, visit the GuardDuty console to enable Extended Threat Detection, and explore our documentation to learn more about implementing these security capabilities in your AWS environment. Join us at AWS re:Inforce 2025 to learn more about AWS security services, including deep dives into the integration of Amazon GuardDuty with MITRE frameworks and hands-on workshops with AWS security experts.

If you have feedback about this post, submit comments in the Comments section below.

Pratima Singh
Pratima Singh

Pratima is a Security Specialist Solutions Architect with AWS, based out of Sydney, Australia. She is a security enthusiast who enjoys helping customers find innovative solutions to complex business challenges. Outside of work, Pratima enjoys going on long drives and spending time with her family at the beach.

Contributors

Special thanks to Dr. Stanley Barr, Senior Principal Scientist at MITRE, and Jess Modini, former Advisory Solutions Architect at AWS, who made significant contributions to this post.

Vendor-Agnostic Security: The Key To Smarter Risk Management

Post Syndicated from Michael Chroney original https://blog.rapid7.com/2025/05/13/vendor-agnostic-security-the-key-to-smarter-risk-management/

Vendor-Agnostic Security: The Key To Smarter Risk Management

Security teams are investing in more tools than ever – but visibility into real risk is still elusive. Why? Because too many tools are locked inside closed ecosystems that don’t share data or context.

A vendor-agnostic security strategy changes that. It gives you the flexibility to integrate best-in-class tools, eliminate blind spots, and build a stronger, more agile cybersecurity program. It’s also a core enabler of modern frameworks like continuous threat exposure management (CTEM).

In this post, we’ll explore how a vendor-agnostic approach, powered by exposure assessment platforms (EAPs), helps you manage risk smarter – by unifying your attack surface and helping your team focus on what matters most.

The risks of vendor lock-in in cybersecurity

Security teams rely on a mix of tools from different vendors. According to the 2023 Gartner® Technology Adoption Roadmap for Large Enterprises Survey, “cybersecurity leaders indicated that on average their organizations had 43 tools in their cybersecurity product portfolios, and 5% of the leaders indicated their organizations had over 100 tools”. When those tools don’t speak the same language, you’re left with siloed data and a fragmented security strategy. That’s how blind spots are born – and how critical vulnerabilities slip through the cracks.

On top of that, being locked into a single vendor makes it costly and complicated to switch solutions, often forcing organizations to stick with suboptimal tools. Instead of driving innovation, you have limited options that lead to unnecessary spending on add-ons that may not fully meet your needs.

How a vendor-agnostic approach powers CTEM

CTEM is designed to be proactive, contextual, and continuous. It’s about knowing what exposures exist, which ones to prioritize, and how to remediate them – before attackers take advantage. To get the most out of CTEM, your security framework needs to be as flexible as the threats you’re defending against.

That means looking beyond a single vendor’s lens. A vendor-agnostic approach helps you:

  • Ingest data from anywhere – across endpoints, cloud, identities, networks, threat intel, and more.
  • Correlate and prioritize with context – so your team can focus on what’s urgent and actionable.
  • Act faster across teams – with remediation workflows that plug into existing tools and processes.

Unlocking CTEM with exposure assessment platforms

This is where EAPs make a real difference. These platforms unify and enrich data from across your hybrid environment, continuously identifying and prioritizing exposures – like vulnerabilities and misconfigurations – across a wide range of asset types. This gives security teams the context they need to act with clarity and confidence.

With a vendor-agonostic EAP, security teams can:

  • Continuously discover exposures across hybrid environments
  • Prioritize based on actual risk, not just raw severity scores
  • Correlate findings across sources to surface exploitable attack paths
  • Enable confident, fast decisions using context like business criticality and threat intel

It’s a centralized command center for everything that puts your organization at risk – and helps provide insight into what you can do about it.

Real-world example: Why risk context matters

Let’s say your team spots a misconfiguration in a firewall. On its own, that might trigger a red flag. But without deeper context, it’s hard to know if it’s actually a risk – or just noise.

Now imagine you can instantly cross-reference that misconfiguration with endpoint telemetry. If those endpoints aren’t exposed or already have compensating controls in place, you can safely deprioritize the issue. But if it opens the door to vulnerable assets? You’ve got the clarity (and urgency) to act.

That level of insight is only possible with a centralized, vendor-agnostic platform that brings together telemetry from across your environment. It filters out the noise and empowers your team to make informed, high-impact decisions.

Key takeaways

Strengthen your organization’s overall security posture by adopting a vendor-agnostic strategy that helps your team:

  • Break free from vendor lock-in for more flexibility and control
  • Unify security tools to drive a more effective CTEM program
  • Enhance decision-making with EAPs
  • Extract more value from the tools and telemetry you already have

Build a future-ready cybersecurity strategy

Rapid7’s Exposure Command embraces a vendor-agnostic approach to provide a unified, transparent view of your security landscape. It aggregates telemetry and risk signals from across your existing tools – endpoint, cloud, identity, vulnerability management, and more – so you can:

  • Uncover blind spots hidden in fragmented vendor ecosystems
  • Correlate and contextualize risk with a unified, real-time view
  • Streamline decisions and accelerate remediation with automated workflows and prioritization

By moving to a vendor-agnostic approach with Rapid7, you’re not just reducing risk — you’re building a security program that’s resilient, scalable, and built for what’s next.


1Gartner, Infrastructure Security Primer for 2025, John Watts, Franz Hinner, 29 January 2025 (For Gartner subscribers only)

GARTNER is a registered trademark and service mark of Gartner, Inc. and/or its affiliates in the U.S. and internationally and is used herein with permission. All rights reserved.

Backblaze Drive Stats for Q1 2025

Post Syndicated from Drive Stats Team original https://www.backblaze.com/blog/backblaze-drive-stats-for-q1-2025/

A decorative image showing the title Backblaze Q1 2025 Drive Stats.

Welcome to the first Drive Stats of 2025. In case you missed it, the 2024 Drive Stats report was the last for long-time Drive Stats guru, Andy Klein, who is happily retired—off putting the “green” in greener pastures by working on his golf game. We–being Backblaze staff writer Stephanie Doyle and Chief Technical Evangelist Pat Patterson–are picking up where Andy left off, bringing you the metrics and analysis you know and love. Now, on to the numbers! 

As of March 31, 2025, we had 312,831 drives under management. Of that total, there were 3,970 boot drives and 308,861 data drives. We’ll review their annualized failure rates (AFRs) as of Q1 2025, and we’ll dig into the average age of drive failure by model, drive size, and more. Along the way, we’ll share our observations and insights on the data presented and, this time around, we’ve got some exciting updates to share about how we produce Drive Stats. (Stay tuned, fellow Snowflake fans.) 

As always, we look forward to your thoughts—we’ll see you in the comments section. 

Sign up for the Drive Stats LinkedIn Live

Ready to dive deeper into the data? Tune in Thursday, May 15, 2025 at 10:00 a.m. PT, to query the new Drive Stats team, Stephanie Doyle and Pat Patterson. Feel free to drop us a line with any questions you want us to answer.

Sign Up for the LinkedIn Live ➔

Q1 2025 hard drive failure rates

As mentioned above, at the end of Q1 2025, we were running 312,831 drives. During the quarter as a whole, however, we were monitoring a total of 318,426 drives; this count includes those that were taken out of service during the quarter, either because they failed or were only used temporarily. 

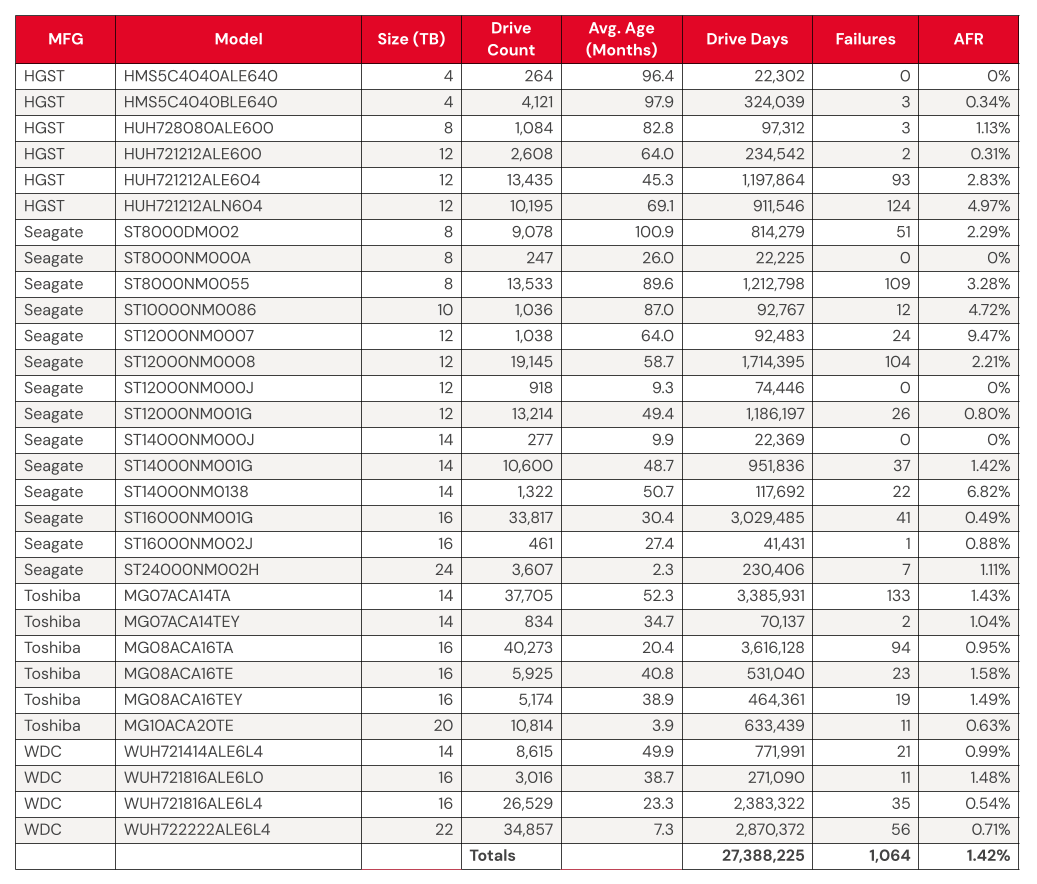
We’ll discuss the criteria we used in the next section of this report. Removing these drives leaves us with 317,833 hard drives to analyze. The table below shows the annualized failure rates (AFR) for Q1 2025 for this collection of drives.

Backblaze Hard Drive Failure Rates for Q1 2025

Reporting period January 1, 2025–March 31, 2025 inclusive
Drive models with drive count > 100 as of March 31, 2025 and drive days > 10,000 in Q1 2025. 

Notes and observations

  • The 4TB drives are hanging on and finishing strong. Good news: We have another quarter’s worth of data on our beloved 4TB drives (though the planned migration is well underway). True to their history, the 4TB drives showed wonderfully low failure rates, with yet another quarter of zero failures from model HMS5C4040ALE640 and 0.34% AFR from model HMS5C4040BLE640. 
  • Keeping an eye on the 20TB+ pool. The 24TB Seagate (model ST24000NM002H) no longer has a perfect record, with eight failures for the quarter. Still, the drives put up a respectable 1.00% AFR. Meanwhile, the 20TB+ drives as a pool are averaging a 0.72% AFR, coming in lower than the overall failure rates—always a promising sign. 
  • Zero failures for the quarter. Four drives get a gold star for zero failures this quarter:
    • The 4TB HGST (model HMS5C4040ALE640) 
    • The Seagate 8TB (model ST8000NM000A) 
    • Seagate 12TB (model ST12000NM000J)
    • Seagate 14TB (model ST14000NM000J) 

Three out of the four also had zero failures last quarter, all but the Seagate 12TB. 

  • The quarterly failure rate is slightly higher. The quarterly failure rate went up from 1.35% to 1.42%. As with the zero-failure club, our higher-end outlier AFRs show some of the usual suspects:
    • Seagate 10TB (model ST10000NM0086). Q4 2024: 5.72%. Q1 2025: 4.72%.
    • HGST 12TB (model HUH721212ALN604). Q4 2024: 5.15%. Q1 2025: 4.97%.
    • Seagate 12TB (model ST12000NM0007). Q4 2024: 8.72%. Q1 2025: 9.47%.
    • Seagate 14TB (model ST14000NM0138). Q4 2024: 5.95%. Q1 2025: 6.82%.

Drive model criteria

We noted earlier we removed 593 drives from consideration when we produced the table above covering Q4 2024. There are two primary reasons we did not consider these drive models.

  • Testing. These are drives of a given model that we monitor and collect Drive Stats data on, but are not considered production drives at this time. For example, drives undergoing certification testing to determine if they are performant enough for our environment are not included in our Drive Stats calculations.
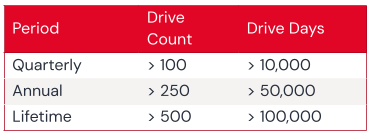
  • Insufficient data points. When we calculate the annualized failure rate for a drive model for a given period of time (quarterly, annual, or lifetime), we want to ensure we have enough data to reliably do so. Therefore we have defined criteria for a drive model to be included in the tables and charts for the specified period of time. Models that do not meet these criteria are not included in the tables and charts for the period in question.

Regardless of whether or not a given drive model is included in the charts and tables, all of the data for all of the drives we use is included in our Drive Stats dataset which you can download by visiting our Drive Stats page.

As with the Q4 quarterly results, we will apply these criteria to the annual and lifetime charts that follow in this report.

Lifetime hard drive failure rates

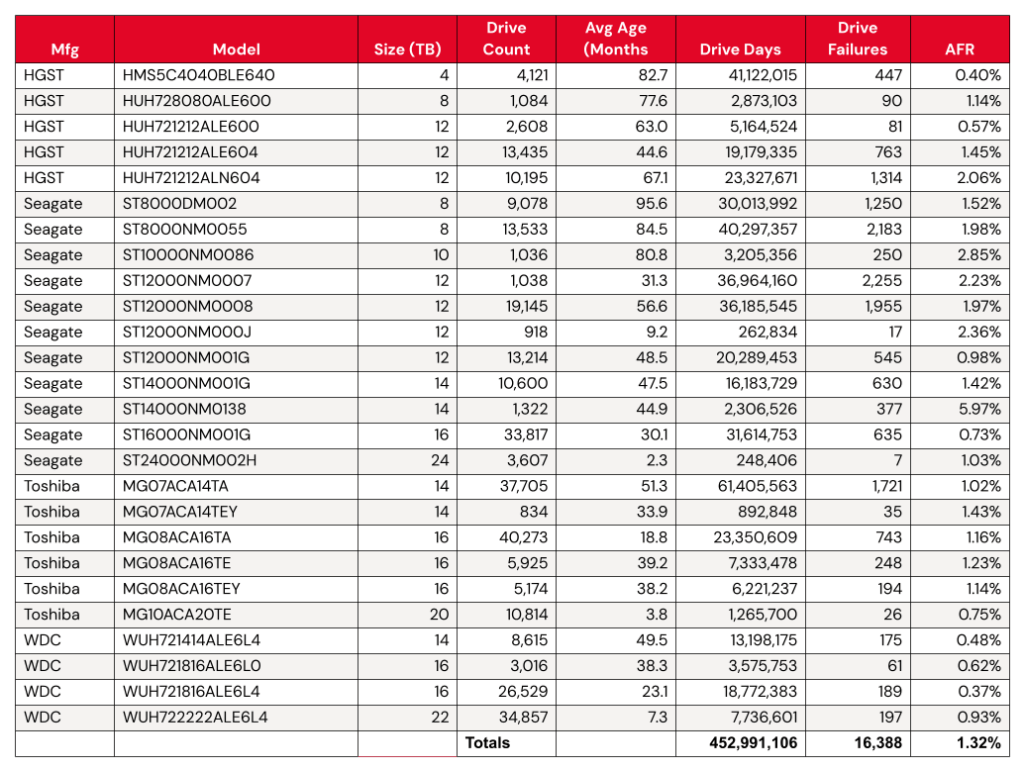
As of the end of Q1 2025, we were tracking 312,831 data hard drives. To be considered for the lifetime review, a drive model was required to have 500 or more drives as of the end of Q1 2025 and have over 100,000 accumulated drive days during their lifetime. When we removed those drive models which did not meet the lifetime criteria, we had 312,493 drives grouped into 26 models remaining for analysis as shown in the table below.

Backblaze Lifetime Hard Drive Failure Rates 

Reporting period ending March 31, 2025 inclusive
Drive models with > 500 drives and > 100,000 lifetime drive days

Notes and observations

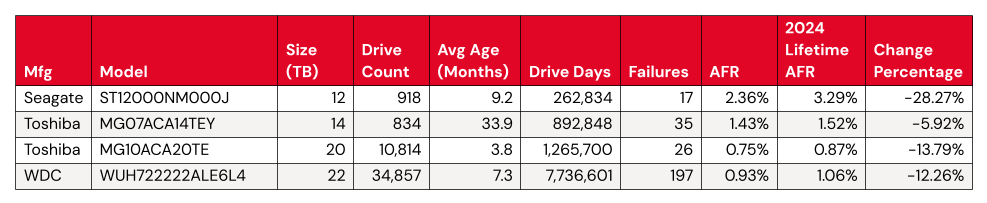
The lifetime AFR remains steady, despite some drives having significant change. We see virtually no change in our overall lifetime AFR, which we last tracked at 1.31% in the 2024 Year-End Drive Stats Report. But, with some drive models showing significant change in year-over-year AFR, it’s worth digging in a little deeper. 

Statistically significant improved AFRs: 

  • Both the 12TB and the 14TB had the same number of failures (or nearly so). Meanwhile, the Toshiba 20TB and WDC 22TB had more failures, but added a significant number of drives to the fleet. Both of these activities increase the number of drive days we tracked for the model’s drive pool, so these results are unsurprising. 

Statistically significant worsened AFRs:

  • Meanwhile, we have a few things happening for the significantly worsened AFRs. The WDC drive models are all top performers from a failure perspective, even a change from .45 to .48 shows up in the numbers. 
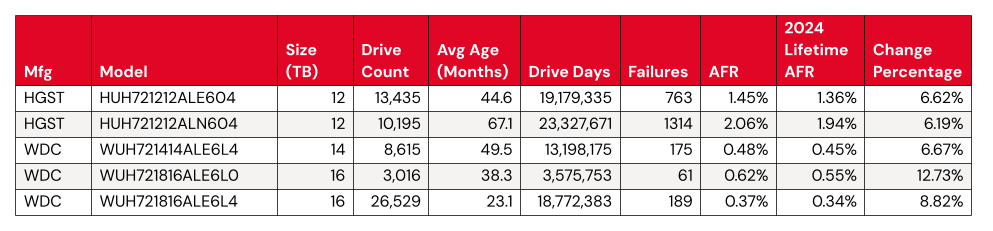
  • That leaves us with two HGST 12TB drives. Both come in above the average failure rate, at 1.45% (model: HUH721212ALE604) and 2.06% (model: HUH721212ALN604). We can give HUH721212ALE604 a pass—with the drive pool showing an average age of 67.1 months, or about five and a half years, it’s firmly on track with the expected pattern defined by the bathtub curve. 
  • Where does that leave us with model HUH721212ALE604? We’ll keep an eye on it. Given that its AFR rate isn’t too far off from the total AFR of the Backblaze drive fleet, it’s not hugely concerning unless we see the rate of change continue. 

What’s new with Drive Stats?

In taking on this report, our main focus was to ensure continuity with our decades-old dataset. That said, we also saw some opportunities to streamline the process of data collection, a continuation of the work that David Winings talked about in Overload to Overhaul: How We Upgraded the Drive Stats Data and Drive Stats Data Deep Dive: The Architecture. All of these things set us up for not just an easier time generating this report, but some bigger plans in the future. (We won’t tip our hand yet—but stay tuned.) 

Drive Stats gets a Snowflake upgrade

When we first started tracking Drive Stats way back in 2013, data collection was very ad hoc. For the first few years, when Brian Beach was at the helm, we published stats once a year. When Andy took over in 2015, he moved to publishing quarterly data (starting in 2016). As the dataset grew, and Andy’s collection of lightweight desktop apps started to run out of steam, it became apparent that we needed to upgrade to more capable analytical tooling. For a variety of operational reasons, Andy was gamely running SQL queries against CSV data imported into a MySQL instance running on his laptop—and having to do a ton of manual data cleanup to boot. (Pun obviously intended.) 

This year, with the help of our colleagues on the database engineering team (shoutout to Tom Roden—thanks so much!), we were able to get the Drive Stats data included in the Backblaze Snowflake instance. Gone are the days of us bugging folks for exports that take hours to process! We can run lightweight queries against a cached, structured table.

We started from Andy’s SQL queries and tweaked them a bit to match the logic and nomenclature of Snowflake fields. Once we had that worked out, the first thing we did was validate our methodology by running the Q4 Drive Stats numbers and comparing them to Andy’s—success. 

It helps that Pat has experimented with our Drive Stats dataset in Trino and other analytical tools like Apache Iceberg, so it’s certainly not the first time he’s considered methodology and tooling for this problem. Going forward, we may further refine the process, but for now, the migration to Snowflake saved us a ton of time and manual data cleanup.

The Hard Drive Stats data

The complete dataset used to create the tables and charts in this report is available on our Hard Drive Test Data page. You can download and use this data for free for your own purpose. All we ask are three things: 1) you cite Backblaze as the source if you use the data, 2) you accept that you are solely responsible for how you use the data, and 3) you do not sell this data itself to anyone; it is free.

Good luck, and let us know if you find anything interesting.

The post Backblaze Drive Stats for Q1 2025 appeared first on Backblaze Blog | Cloud Storage & Cloud Backup

Кого не пази Законът за защита от домашно насилие?

Post Syndicated from original https://www.toest.bg/kogo-ne-pazi-zakonut-za-zashtita-ot-domashno-nasilie/

Кого не пази Законът за защита от домашно насилие?

В началото на 2023 г. със съквартирантките ми решихме да гледаме обсъждането на измененията в Закона за защита от домашно насилие (ЗЗДН) в Народното събрание. Очаквахме интересна дискусия, но уви, станахме свидетели само на скандали, невежество и тук-там реч на омразата. Това, което не можахме да проумеем с 21-годишните си мозъци, беше: защо дебатът не се концентрира около защитата от домашно насилие, при положение че всеки се изказва колко е против него и колко е загрижен за пострадалите?

Вместо това обаче се говореше за „джендър идеология“ (каквото и да означава това), а Десислава Атанасова и Корнелия Нинова открито се хвалеха, че техните парламентарни групи са спрели ратифицирането на Конвенцията на Съвета на Европа за превенция и борба с насилието над жени и домашното насилие, по-известна като Истанбулската конвенция. И тези хвалби – на фона на нарастващите случаи на брутално насилие над жени и бездействието от страна на държавата. 

Предположихме, че голяма част от депутатите може да се страхуват – да не би случайно да дадат права и защита на една група граждани. Народният представител от БСП Иван Ченчев беше възмутен, че законопроектът на Надежда Йорданова и група народни представители предвижда замяна на термина „фактическо съпружеско съжителство“ с „интимна връзка“, тъй като второто е по-широко понятие и ще може да предостави защита на всички двойки (такова предложение в законопроекта към онзи момент нямаше). Ченчев едва ли е предполагал, че няколко месеца по-късно Народното събрание ще се опитва да дефинира понятието „интимна връзка“, за да може законът да предоставя адекватна защита и на пострадалите в хетеросексуални отношения. Защото в опити да не се дадат права на едните, пострадаха и другите, както показа случаят с Дебора Михайлова, обезобразена от мъж, с когото не е съжителствала. Това даде тласък на включването на интимните връзка в закона.

Въпреки заявката на правителството да се бори с домашното насилие, все още не са изградени ключови механизми за справяне с проблема. 

Домашното насилие, на което са изложени ЛГБТИ+ хората в България днес

Две години по-късно ЗЗДН все още не защитава еднополовите двойки. А тези връзки не са имунизирани от насилие. Изследване на Фондация „Билитис“ по проблема с домашното насилие сред ЛГБТИ+ двойки, в което са се включили 91 респонденти, констатира, че една трета от интервюираните са преживели насилие от страна на партньор, а две трети – от страна на родител.

Осъзнаването обаче, че това, през което пострадалите преминават, е домашно насилие, идва доста по-късно, споделя Робин Златаров, проектен мениджър във Фондация „Билитис“. Нито един от респондентите в проучването не е докладвал в полицията, че е подложен на някакъв вид тормоз. Пострадалите не са сметнали, че ще ги вземат на сериозно, обясни Златаров.

И има защо. Адвокат Силвия Петкова, която и е официална сътрудничка на „Билитис“, разказа пред „Тоест“ за случай на насилие между гей мъже, продължило година и половина след прекратяване на връзката. В един от случаите при подаден сигнал до тел. 112 патрул не е изпратен с аргумента, че полицията не се занимава с „педерастки работи“. 

Пострадалите не търсят полиция от страх, че ще станат обект на дискриминация и че тя няма да си свърши работата. Това потвърждава и Робин Златаров: 

„Когато хората се обръщат към нас за каквото и да е насилие, те не знаят към кого [другиго – б.р.] да се обърнат. Те ни се доверяват като ЛГБТИ+ хора, които имат нужда от някакъв вид подкрепа, ние сме първата инстанция и първият праг на доверие.“ 

Къде може да се потърси помощ?

„Билитис“ поддържа чат линия за подкрепа, която е активна всеки делничен ден между 18:00 и 22:00 часа. Доброволците в нея са поне в четвъртата си година на обучение по психология и получават допълнителна подготовка от страна на фондацията, а работата им се наблюдава от сътрудник на „Билитис“. Доброволците се опитват „с въпроси, с побутване“, по думите на Златаров, да разберат от каква помощ има нужда пострадалият, за да го пренасочат към психотерапевт, адвокат или към по-подходяща за конкретния случай организация.

По-често подавани сигнали към организации като „Билитис“ и Single step са за тормоз от страна на родител. ЛГБТИ+ хората могат да търсят закрила по ЗЗДН, ако са подложени на системен тормоз от страна на членове на семейството, а децата между 14 и 18 години имат право да поискат от съда издаване на ограничителна заповед без подпис на родител. Неясно е какво би станало с деца, чийто родител или осиновител е във връзка с човек от същия пол. Според закона извършител на домашно насилие може да бъде съпруг или партньор на родителя, но ако държавата не признава съществуването на еднополови връзки, как може да се докаже, че детето е пострадало в условията на домашно насилие? 

Една от известните организации, които оказват помощ при домашно насилие, е Фондация „Асоциация Анимус“. Оттам обаче уточниха пред „Тоест“, че рядко ги търсят ЛГБТИ+ хора. В „Билитис“ сигнали за домашно насилие от страна на партньор почти липсват, макар данните от проведеното от фондацията изследване да сочат, че такова насилие съществува. 

На теория всеки ЛГБТИ+ човек би трябвало да може да потърси защита в кризисен център. Но в много общини няма такъв, а в наличните местата са крайно недостатъчни. По-сложна е ситуацията с транс жените, които не могат да бъдат настанени в център за жени, защото по документи са мъже. Това е и общността, която докладва най-малко случаи на насилие. 

Спорната дефиниция на „интимна връзка“

Домашното насилие не е феномен само за хетеросексуалните двойки, но те получават защита от закона, а останалите – не. „Причината за това се състои във формулировките „семейна връзка“ и „фактическо съпружеско съжителство“ – понятия, които българското национално право тълкува стеснително, считайки, че обхващат семейството в тесен смисъл (брачна връзка)“, разяснява адв. Петкова в доклада на „Билитис“ за насилието в ЛГБТИ+ двойки. 

През август 2023 г. Народното събрание се опитваше да дефинира „интимна връзка“, като защитата на ЛГБТИ+ хората отново беше пренебрегната и интимната връзка си остана запазена само за хетеросексуални двойки. Въпреки законовото ограничение обаче понятието все още има двойствено значение. 

В цитирания доклад Петкова изказва мнението, че макар в тесния смисъл дефиницията за интимна връзка да включва само лицата в разнополови двойки, е възможно и по-широко тълкуване. Основанието за него е, че формулировката в закона изключва интерсекс хората, а техният пол не може да се определи еднозначно като мъжки или женски. Тя стига до извода: 

„При това по-широко тълкуване може да се приеме, че нововъведената възможност за закрила от домашно насилие обхваща както интимната връзка между две лица от мъжки и женски пол, така и интимната връзка между две лица от мъжки пол и две лица от женски пол.“ 

Ето един пример, от който става по-ясно как понякога и за държавата не е лесно да определи дали става въпрос за хетеросексуални, или хомосексуални отношения:

Има интерсекс хора, които са записани като жени при раждането си, тъй като тялото им прилича на женско, но впоследствие се оказва, че имат мъжки хромозоми и полови органи. На много от тях им е извършена т.нар. „нормализираща“ операция за „утвърждаване“ на пола, за да продължат да живеят като жени, само че Конституционният съд и Върховният касационен съд приемат, че полът може да бъде единствено биологичен. Тези хора са жени по документи, но мъже според двете съдилища. И ако имат връзка с мъж и във връзката има насилие, то ще бъде ли насилие при еднополова двойка, или не?

Възможността за двойствено тълкуване би довела до противоречива съдебна практика, но тъй като такава все още няма, не може да се заведе и тълкувателно дело.

От описаното по-горе обаче възникват три въпроса.

Първият е къде попадат интерсекс хората, тъй като те не могат да бъдат категоризирани в мъжки или женски пол. 

Вторият въпрос е не следва ли да подлежат на закрила по Закона за защита от домашно насилие еднополови двойки със сключен в чужбина брак.

И третият важен въпрос е започната ли е процедура по създаване на правна рамка за признаване на еднополови връзки, както предвижда решение срещу България на Европейския съд по правата на човека от 2023 г. И ако не, защо?

Компетентно да отговори на тези въпроси е Министерството на правосъдието. На 31 март 2025 г. отправих питане към него по електронната поща. В началото на април се свързах с Министерството по телефона и получих уверение, че имейлът ми е пристигнал. До редакционното приключване на статията не съм получила отговор на въпросите си. 

Какво пише в Наказателния кодекс?

Макар законът да изключва ЛГБТИ+ хората, Наказателният кодекс (НК) би могъл да обхване еднополови връзки. В него липсва уточнението, че домашното насилие трябва да е между мъж и жена. Според чл. 93, т. 31 от НК престъплението е извършено в „условията на домашно насилие“, ако то е физическо, сексуално, икономическо или психическо и е осъществено спрямо член на семейството или някого, с когото насилникът живее в едно домакинство. 

Домашното насилие само по себе си не е престъпление, уточни Силвия Петкова за „Тоест“. С други думи, човек може да бъде съден не просто за домашно насилие, а че е извършил нещо в условията на домашно насилие. То може да бъде утежняващо вината обстоятелство за някои престъпления и съответно те да подлежат на по-тежко наказание. 

Според ЗЗДН при нанасяне на средна телесна повреда на съпруг наказателното производство се извършва само при сигнал на пострадалия до прокуратурата. Българската Конституция обаче приема, че „съпругът“ може да е само лице с противоположен пол. Ако се позовем на дефиницията в НК, насилие в еднополова връзка ще се преследва по общия наказателен ред и независимо от волята на пострадалия (тоест без да се налага жертвата да подава сигнал до прокуратурата), което пък предоставя по-добра защита на лица от един и същ пол, които са в интимна връзка. 

Адв. Петкова обобщи ситуацията така: ако се позовем на НК, пострадал от насилие може да бъде човек, който живее или е живял с извършител от същия пол. В този случай пострадалият може да сезира прокуратурата, която трябва да се заеме с разследването. „Друг е въпросът вече доколко ще се осъществи качествено разследване, така че да се стигне до реално предаване на съд на извършител на престъпление в условията на домашно насилие и до реалното му осъждане. При всички положения, когато се намираме в условията на наказателно производство, съдът се позовава на дефинициите в НК“, заключи Петкова. 

Тя допълни и че при престъпления, извършени в условията на домашно насилие, се търси закрила и по двата закона. Ограничителната заповед се издава в срок от 24 часа след подаване на искането по ЗЗДН, докато издаването на такава забрана по НК изисква привличане на лице като „обвиняем“. За да има обаче „обвиняем“, са нужни достатъчно доказателства, чието събиране може да отнеме месеци или години. 

Недоверие в институциите

Във всеки случай, при непосредствена опасност за живота трябва да се звъни на 112, съветва адв. Петкова. Тя обаче обръща внимание, че диспечерът на телефонната линия винаги задава въпроса дали пострадалият и извършителят се познават. И ако разбере, че са в еднополова връзка, има риск да не изпрати патрул. 

Това обяснява притесненията на ЛГБТИ+ хората да звънят на 112, които е констатирал Робин Златаров. Той разказа, че пострадалите обикновено питат за други алтернативи в чата на „Билитис“. 

Златаров уточни, че е напълно възможно да има позитивни примери на добро отношение от страна на полицията към пострадал, но в практиката си се е сблъсквал най-вече със сигнали за негативно отношение.

Както гражданите имат задължение да спазват законите на държавата, така и държавата би следвало да защитава гражданите си безусловно. Случаите на пострадали и дори убити в условията на домашно насилие няма да намалеят, докато институциите не започнат да приемат сериозно всеки сигнал за пострадал.

Всеки, преживял домашно насилие, следва да може да получи защита. Законът обаче оставя една уязвима група без подкрепа, като не припознава съществуването на еднополови връзки. Домашно насилие сред ЛГБТИ+ двойките има, но липсата на доверие в институциите кара много от пострадалите да не търсят помощ. Тези случаи остават скрити за държавата, което повдига въпроса: може ли да се борим ефективно с проблема, ако не знаем действителните му измерения?

Court Rules Against NSO Group

Post Syndicated from Bruce Schneier original https://www.schneier.com/blog/archives/2025/05/court-rules-against-nso-group.html

The case is over:

A jury has awarded WhatsApp $167 million in punitive damages in a case the company brought against Israel-based NSO Group for exploiting a software vulnerability that hijacked the phones of thousands of users.

I’m sure it’ll be appealed. Everything always is.

What do we even mean by digital literacy?

Post Syndicated from Rachel Arthur original https://www.raspberrypi.org/blog/what-do-we-even-mean-by-digital-literacy/

’Digital literacy’ is a term that seems to pop up everywhere. In the early 2000s, it was the next big thing; some even suggested it might replace traditional literacy and numeracy. But, like many educational trends, it soon faded from the spotlight, and became something that schools ‘should’ do, or something left to the lone teacher who had been handed the role of IT coordinator. 

For many teachers, at least in the UK, digital literacy meant booking a set of laptops (and hoping the last class had remembered to charge them) and ticking off history learning objectives by making a PowerPoint about Henry VIII’s wives. It became a bit of an afterthought. 

More recently, digital literacy seems to have been rebranded as ‘digital skills’, often framed as the capabilities young people need for the workplace of tomorrow. But I don’t think that tells the full story. 

Digital literacy beyond employability

Digital literacy isn’t just about employability; it’s about fairness and access. It’s about more than just learning to use spreadsheets (though my love for Excel remains strong); it’s about ensuring that all young people have the knowledge and confidence to navigate the digital world we live in today.

Digital literacy is about understanding the digital tools we rely on every day, securely accessing online services, making informed decisions about sharing personal information, and critically evaluating the endless stream of news and misinformation online. 

It’s also about artificial intelligence: not just playing with the latest tools, but understanding how they work, the biases built into them, and the ways they shape our lives.

Three ways to help students learn about the impact of technology

True digital literacy empowers young people to engage with technology thoughtfully, critically, and confidently. And that’s something worth making space for. To truly ensure that young people have fair access to the digitally enabled world we live in, we must equip them with the skills to understand and use technology effectively. This means making space for digital literacy within the curriculum and ensuring that all teachers feel confident in delivering it.

Digital literacy as a core part of teaching

Every teacher has a role to play in helping students develop these essential skills. This requires high-quality curriculum resources that integrate digital tools meaningfully into different subjects, as well as comprehensive teacher training to ensure every educator feels empowered to teach digital literacy as part of their everyday practice. 

So, let’s not treat digital literacy like that forgotten box of tangled charging cables in the staffroom (important, but nobody is quite sure what to do with it). Instead, let’s make it a core part of teaching, just like reading, writing, and knowing how to keep a straight face when a student asks if they really need to save their work.

Two girls code at a desktop computer while a female mentor observes them.

If we get this right, we’re not just preparing young people for the jobs of tomorrow, we’re making sure they can navigate today’s digital world safely, confidently, and with the critical thinking skills to tell fact from fiction (because let’s face it, the internet isn’t exactly short on absolute nonsense). 

Now, who’s up for making a PowerPoint about Henry VIII’s wives? 

More on digital literacy

You can discover our free teacher training and classroom resources, and read about how we’ve integrated digital literacy in The Computing Curriculum.

A version of this article appears in the newest issue of Hello World magazine, which is all about digital literacy. Explore issue 26 and download your free PDF copy today.

You can also listen to our recent Hello World podcast episode exploring three teachers’ digital literacy tips for the classroom.

The post What do we even mean by digital literacy? appeared first on Raspberry Pi Foundation.

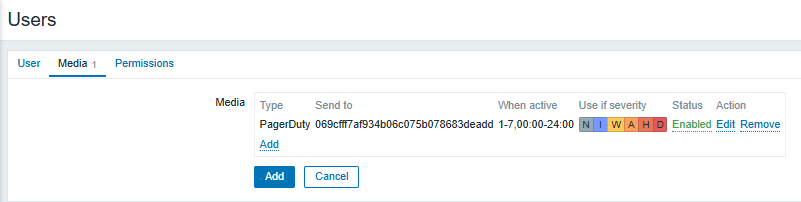
Optimizing Incident Management with Zabbix and PagerDuty

Post Syndicated from Zabbix LatAm original https://blog.zabbix.com/optimizing-incident-management-with-zabbix-and-pagerduty/30114/

When monitoring environments, we sometimes need to rely on third-party tools to better manage functionality and optimize responses to alerts. Let’s explore how to integrate Zabbix with PagerDuty, a real-time incident management solution designed to improve the reliability of digital services, including best practices and configuration details.

What is PagerDuty?

PagerDuty is a real-time incident management platform designed to help IT teams react quickly to critical events. The tool helps organizations automate and manage incident response through a system of alerts, escalation, and coordination between teams. When a problem is detected in the system, PagerDuty notifies the responsible individuals and ensures that corrective action is taken quickly. This reduces downtime and improves operational efficiency. Integration with monitoring tools such as Zabbix makes it easy to identify issues before they impact users.

Some of PagerDuty’s key features include:

• Integration with monitoring tools (such as Zabbix)
• Notifications in multiple channels (email, SMS, calls)
• Automatic escalation of incidents to ensure agile responses
• Event analysis to improve the detection of recurring problems

How to integrate PagerDuty with Zabbix

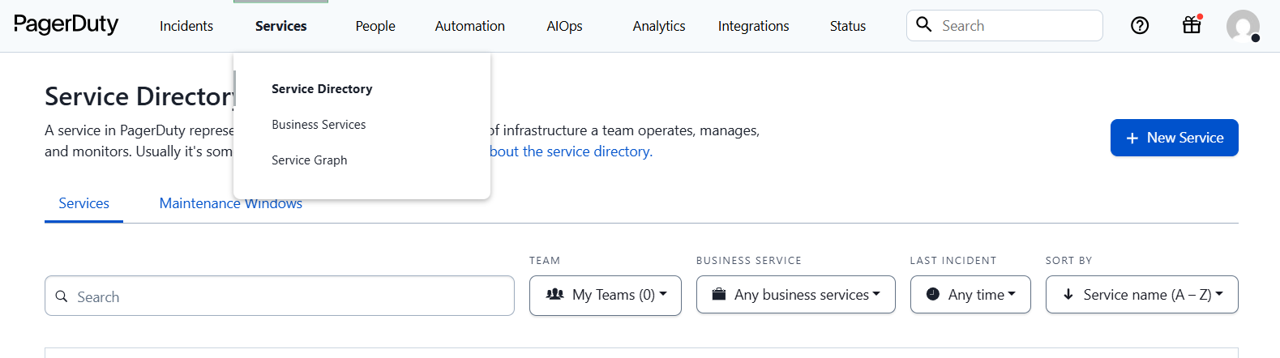
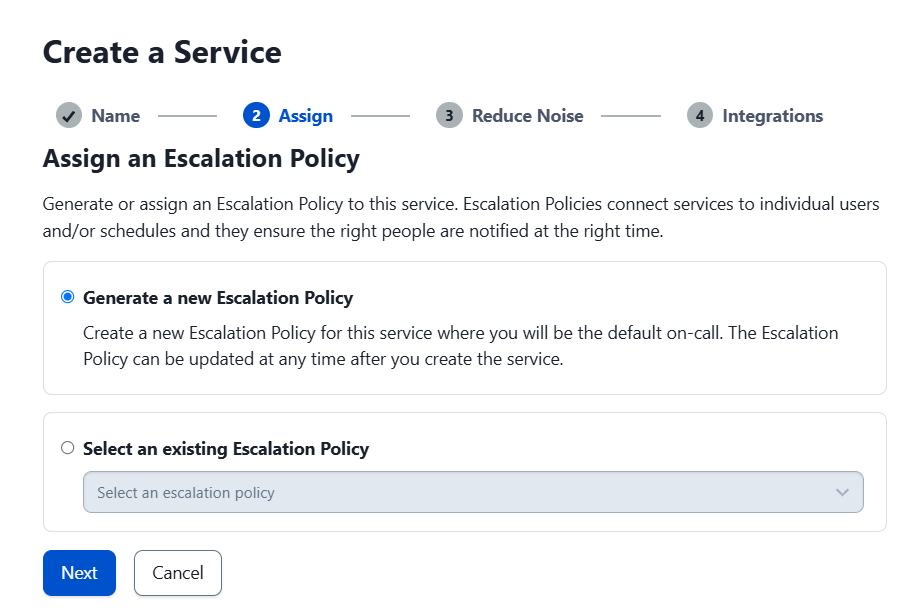
In PagerDuty, go to “Services” and click on “Service Directory.” Create a new service.

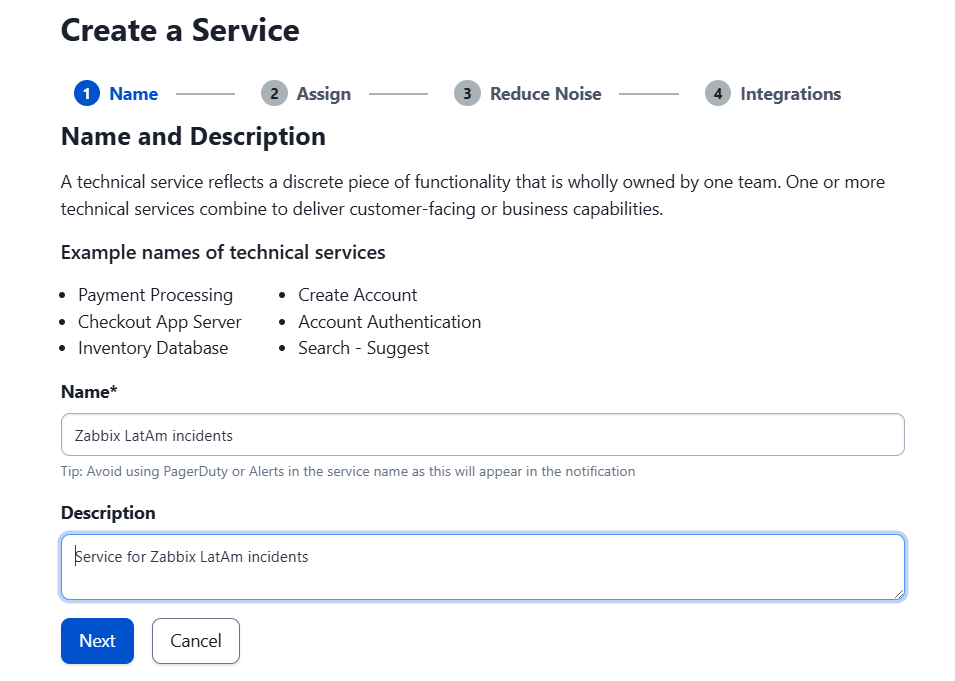
Give it a proper name and description.

Accept the escalation terms and click “Next.”

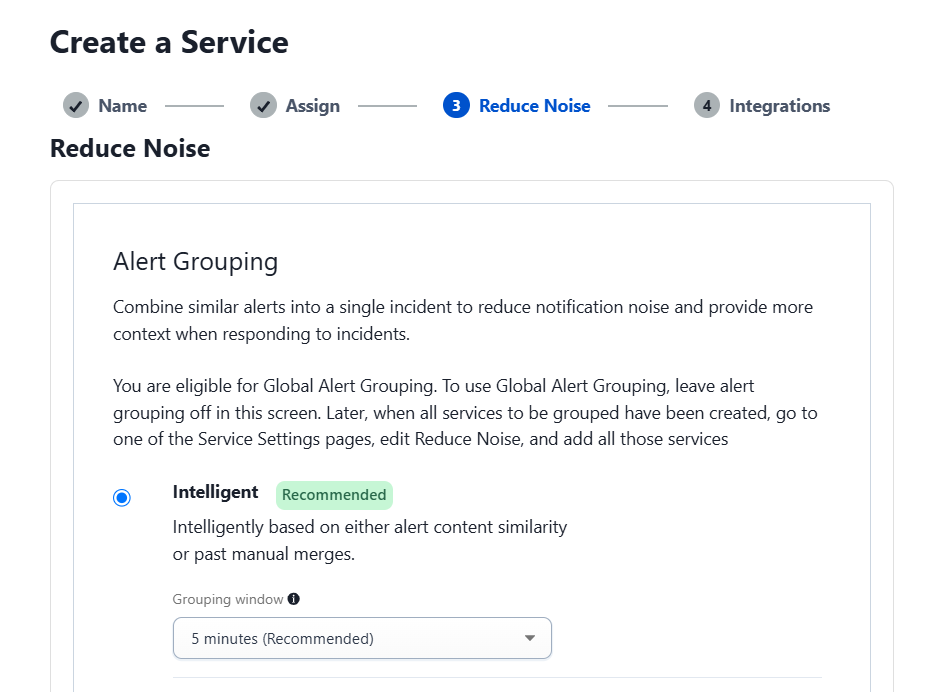
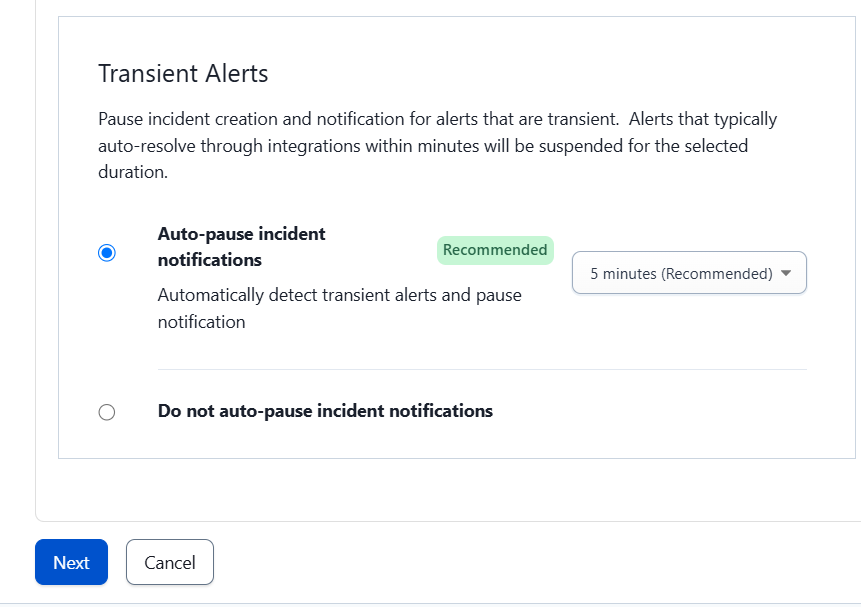
On the next screen, select “Intelligent” and the “Auto-pause incident notifications” option, then click “Next.”

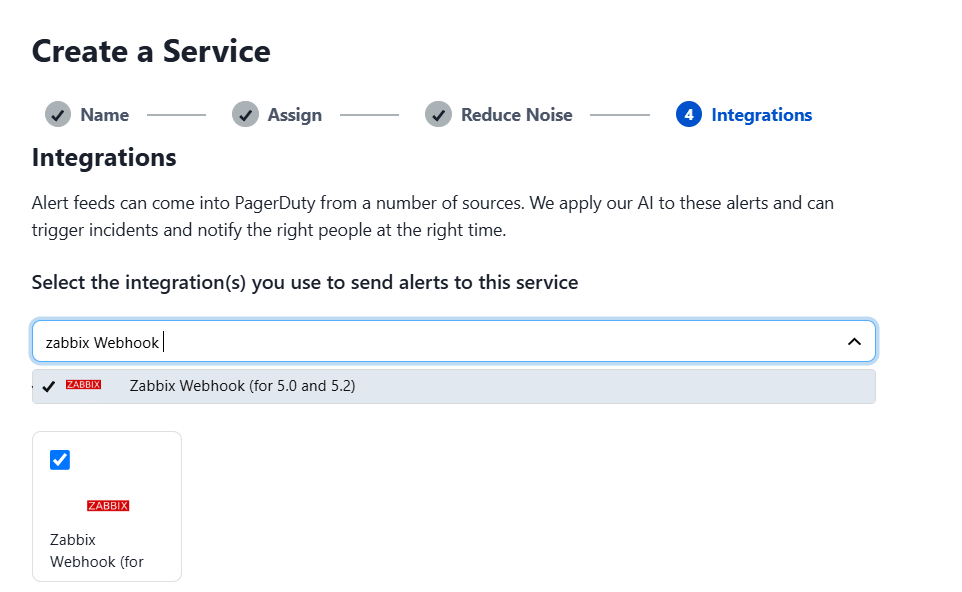
The next step is to add the Zabbix Webhook service, which will allow integration with Zabbix, and then click “Next.”

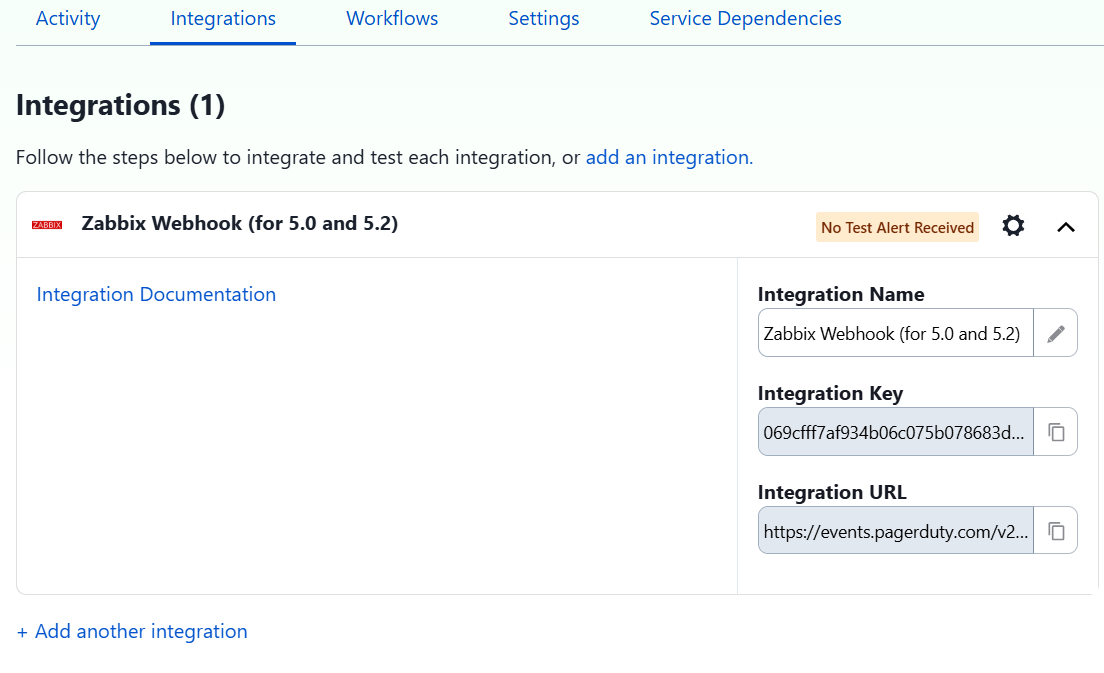
In Services > Service Directory, select the name of the service. In the “Integrations” tab, copy the integration token that is generated.

It is important to note that the PagerDuty webhook only shows the option of Zabbix versions 5.0 to 5.2, but it works correctly in later versions such as Zabbix 7.2, which was tested without any issues.

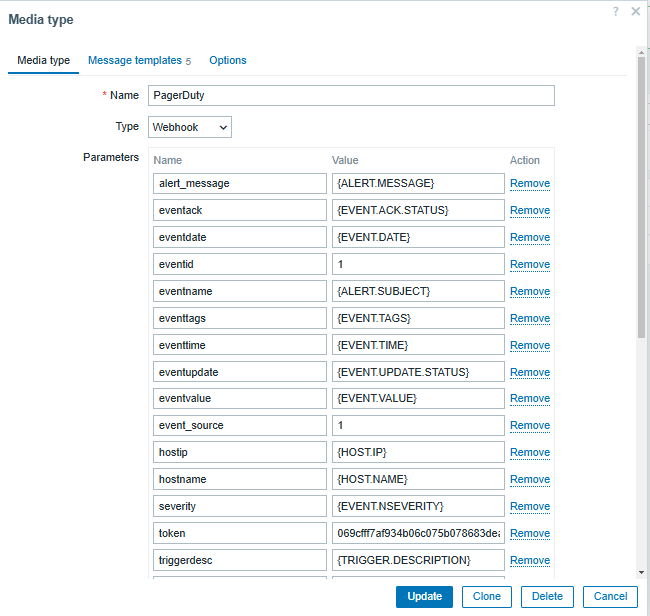
On Zabbix Server, go to Alerts > Media types > PagerDuty. Enter the integration token, the Zabbix URL, and select “Update.”

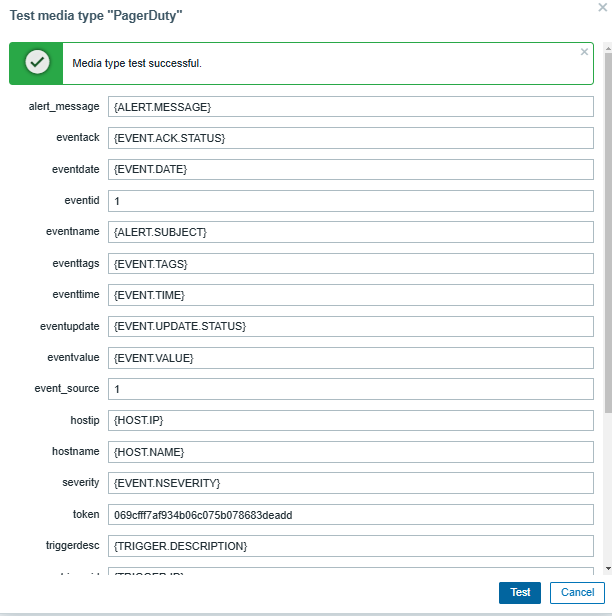
Send a test message to confirm that the integration is working correctly.

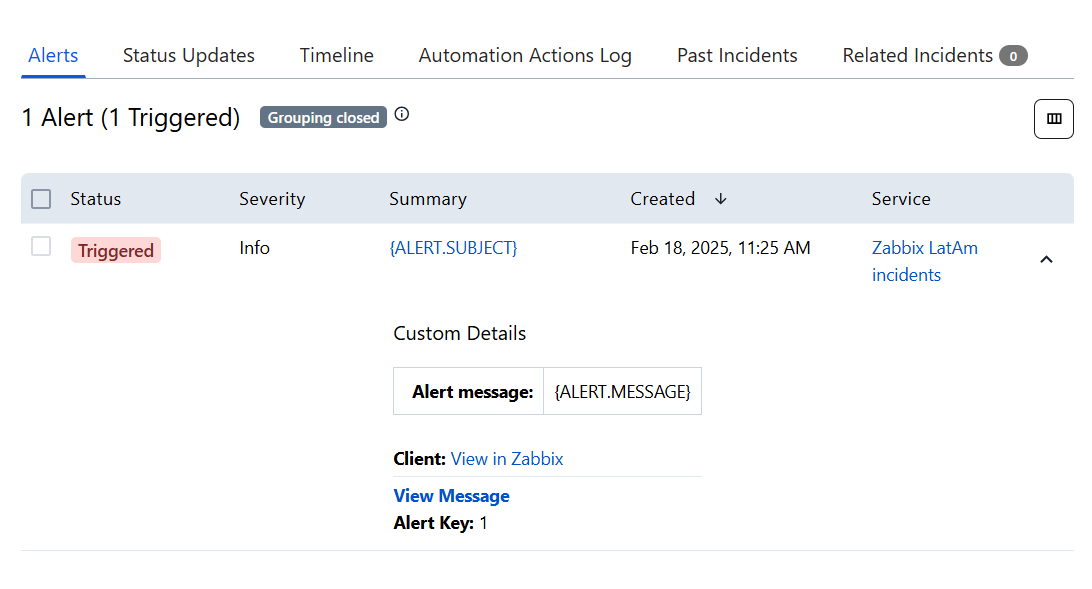
In the PagerDuty application, verify that the test alert was received.

To send notifications, you need to grant permissions to a user in Zabbix. Go to Users > Create User. In the “Media” tab, select PagerDuty as the notification method. Set the severity of the alerts you want to receive.

Subsequently, set up a Trigger Action in Alerts > Actions > Trigger Actions to define what types of alerts will be received (either by item or trigger) according to the needs of your team.

Best practices for integrating Zabbix and PagerDuty

• Customize notifications: Set rules to send only truly critical alerts, avoiding unnecessary notifications.
• Optimize escalations: Set up escalation rules so that alerts reach the right people at the right time.
• Monitor key metrics: Measure incident response times and adjust workflows as needed.
• Automate incident responses: Use PagerDuty’s capabilities to perform automated tasks in response to specific events.
• Notify about service failures: Use PagerDuty to start running recovery scripts, send notifications to the responsible teams, or even escalate the problem to a higher level if there is no solution in a stipulated length of time.

Conclusion

Zabbix’s integration with PagerDuty allows you to monitor the status of critical services in real time, even outside of working hours. This facilitates rapid incident response and improves your IT team’s ability to react.

This combination not only optimizes incident management but also helps minimize downtime, improve operational efficiency, and ensure the reliability of monitored systems.

With proper configuration and best practices, integrating Zabbix with PagerDuty can become essential for the proactive management of your technological infrastructure.


The post Optimizing Incident Management with Zabbix and PagerDuty appeared first on Zabbix Blog.

Multiple security issues in Screen

Post Syndicated from jzb original https://lwn.net/Articles/1020901/

The SUSE Security Team has published
an article detailing several security
issues
it has uncovered with GNU Screen. This includes
a local root exploit when Screen is shipped setuid-root, as it is in
some Linux and BSD distributions. The security team also reports problems
in coordinating disclosure
with the upstream Screen project.

We are not satisfied with how this coordinated disclosure developed,
and we will try to be more attentive to such problematic situations
early on in the future. This experience also sheds light on the
overall situation of Screen upstream. It looks like it suffers from a
lack of manpower and expertise, which is worrying for such a
widespread open source utility. We hope this publication can help to
draw attention to this and to improve this situation in the future.

The article includes a table
of operating systems, screen versions, and which vulnerabilities they
may be affected by.

Enhance governance with asset type usage policies in Amazon SageMaker

Post Syndicated from Pradeep Misra original https://aws.amazon.com/blogs/big-data/enhance-governance-with-asset-type-usage-policies-in-amazon-sagemaker/

Amazon SageMaker Catalog, part of the next generation of Amazon SageMaker, now supports authorization policy for asset type usage — a new governance capability that gives organizations fine-grained control over who can create and manage custom assets based on specific asset types. This enhancement brings scalable, policy-driven governance to enterprise data publishing workflows across diverse business domains.

Challenge: Scaling governance across diverse asset types

In large organizations, teams often define custom asset templates (also known as asset types) to standardize how specific business data is cataloged, discovered, and governed. For example, a life sciences company might define a ClinicalStudyAsset template to capture trial metadata, while a financial institution could use a FinancialReportAsset template for regulatory filings.

However, as usage of custom asset types grows across departments and teams, organizations face new governance challenges:

  • Who should be allowed to create assets using certain templates?
  • How can sensitive or business-specific templates be restricted to specific users or projects?
  • How do you avoid template misuse, duplication, or accidental exposure of critical data formats?

Without built-in enforcement, asset governance relies heavily on user knowledge or manual oversight—both error-prone and difficult to scale.

Solution: Authorization policies for asset type usage

To address this, SageMaker Catalog now enables domain administrators, project owners and domain unit owners to define authorization policies that control which asset types can be used by specific project users. These policies allow organizations to enforce usage boundaries for sensitive or business-critical templates, aligning asset publishing with security and compliance requirements. For example:

  • A life sciences organization can restrict the ClinicalStudyAsset template to R&D users only, ensuring clinical trial data is handled in controlled environments.
  • A financial services firm can limit the use of the FinancialReportAsset template to audit and compliance teams, safeguarding regulatory disclosures.

With this capability, customers can:

  • Define policies at the asset type level to allow or deny creation of assets using specific templates.
  • Apply policies to project members (users or groups) — supporting flexible governance at scale.
  • Maintain centralized oversight while empowering decentralized teams to operate within clear, enforceable boundaries.

Customer Spotlight

As a large-scale organization with diverse data needs, Amazon’s Business Data Technologies (BDT) team manages thousands of assets. BDT team wants to ensure that these asset types can be used by specific groups responsible for those assets.

BDT team would use asset type usage policies in Amazon SageMaker Catalog. These policies enable them to control which teams can use specific Andes asset types to create and govern these assets in the catalog.

“This new addition is instrumental in helping us scale data onboarding across business units without compromising governance. By enforcing who can use specific Andes asset templates to create assets in the SageMaker Catalog, we’re able to accelerate consolidation of siloed data across the company while maintaining tight control over ownership and governance. This not only strengthens compliance, but also reduces duplication, prevents mismanagement, and enables us to move fast with confidence.”

— Eunji Kang, Principal Product Manager Tech, Business Data Technologies, Amazon.com

Key Benefits

The introduction of asset type usage policies in Amazon SageMaker Catalog delivers meaningful governance at scale—especially for organizations managing hundreds of teams, projects, and templates. Here’s how this capability adds value:

  • Enforce authorization policies for cataloging asset. With asset type usage policies, governance shifts from after-the-fact audits to proactive controls. By defining who can create assets using a specific template, organizations prevent accidental or unauthorized use of sensitive formats. This ensures the right teams are working with the right templates—aligned with compliance, domain policies, or business criticality.
  • Minimize asset sprawl and reduce duplication. Without controls, teams may clone or re-create similar templates across business units, leading to inconsistencies and catalog clutter. By standardizing usage boundaries, asset type usage policies promote template reuse and ensure data is structured consistently across businesses.
  • Strengthen compliance and audit posture. In regulated environments (e.g., financial reporting, healthcare data management), template misuse can lead to compliance violations. Usage policies enforce access controls automatically—helping security and audit teams ensure that critical templates are used in accordance with internal and external standards.
  • Accelerate onboarding while preserving control. Central data teams can define and expose approved templates to relevant users without opening the door to misuse. This allows new teams to onboard quickly, using standardized asset types, while still operating within clearly defined governance boundaries.

Solution overview : Asset type usage policy

In the following sections, we walk through how to create a custom asset and associate a usage policy with it. In this scenario, the marketing team from AnyCompany.com creates a custom asset MarketingMetric asset type, which only users from projects in the Marketing domain unit can use. Users using projects associated with the Sales domain unit can’t create a MarketingMetric custom asset.

Prerequisites

To follow this post, you should have an Amazon SageMaker Unified Studio domain set up with domain owner privileges. Create two domain units, Sales and Marketing, and have a project associated with each domain unit. For instructions, refer to the following Getting started guide.

Create a metadata form in the Marketing domain unit

Complete the following steps to create a metadata form in the Marketing domain unit:

  1. On the SageMaker Unified Studio console, choose the project in the Marketing domain unit where you want to create the custom asset.
  2. Choose Metadata entities in the navigation pane.
  3. Choose Create metadata form.

In this solution, we create a custom asset type of MarketingMetric, which only users belonging to projects in the Marketing domain can use to create assets.

  1. Provide details about the form and choose Create metadata form.

In this form, we create two fields: Calculation and Dashboard Link.

  1. Choose Create field.
  2. Create Dashboard Link as the first field.
  3. Choose Create field to create the second field.
  4. Provide details for the Calculation field.
  5. Turn on Enabled to enable the metadata form.

Create a custom asset using the metadata form and associate the usage policy

Complete the following steps to create a custom asset (MarketingMetric) using the metadata form you created and associate the usage policy:

  1. On the project page, choose Metadata entities in the navigation pane.
  2. On the Asset types tab, choose Create asset type.

Project owners or domain unit owners can have permissions to create assets of this selected asset type, and usage permissions can be provided to:

    • All projects – Any project in the domain can create an asset using this asset type
    • Owning project – Only the project creating this asset type can create assets
    • Selected projects or domain units – Specific projects or domain units can create assets using this asset type
  1. For Name, enter a name (for this example, MarketingMetric).
  2. For Metric, select Required and add the metadata form you created.
  3. For Usage Permission, select Selected projects or domain units.
  4. Choose Add usage permission.
  5. Select all projects in the Marketing domain unit and choose Add policy grant.
  6. Choose Create to create the asset type.

The MarketingMetric asset type is created.

Create a marketing metric from a project associated to the Marketing domain unit

For this step, we use project publish-1, which belongs to the Marketing domain unit, to create a new marketing metric. Complete the following steps:

  1. On your project page, choose Assets in the navigation pane.
  2. On the Create menu, choose Create asset.
  3. Provide a metric name and description, then choose Next.
  4. For Asset type, choose MarketingMetric.
  5. Provide details for the metadata form and choose Apply.
  6. Choose Create.

The asset Conversion Rate Metric with asset type MarketingMetric is created.

Test the asset type usage policy

When a user tries to create a marketing metric from a project associated with the Sales domain unit, they will get an error.

As defined in the usage policy, only projects associated with the Marketing domain unit can create MarketingMetric assets.

Clean up

To avoid incurring additional charges, delete the SageMaker domain. Refer to Delete domains for instructions.

Conclusion

In this post, we introduced authorization policies for custom asset types—a new governance capability in Amazon SageMaker that gives organizations fine-grained control over who can create and manage assets using specific templates. This feature enhances data governance by allowing teams to enforce usage policies that align with business and security requirements across the organization.

Asset type usage policies are available in all AWS Commercial Regions where Amazon SageMaker is supported.

To get started, refer to the user guide and begin defining policies for your custom asset types today.


About the Authors

Pradeep Misra PicPradeep Misra is a Principal Analytics Solutions Architect at AWS. He works across Amazon to architect and design modern distributed analytics and AI/ML platform solutions. He is passionate about solving customer challenges using data, analytics, and AI/ML. Outside of work, Pradeep likes exploring new places, trying new cuisines, and playing board games with his family. He also likes doing science experiments, building LEGOs and watching anime with his daughters.

Ramesh H Singh is a Senior Product Manager Technical (External Services) at AWS in Seattle, Washington, currently with the Amazon SageMaker team. He is passionate about building high-performance ML/AI and analytics products that enable enterprise customers to achieve their critical goals using cutting-edge technology. Connect with him on LinkedIn.

Harsh Singh is a Software Dev. Engineer at AWS based in the Bay Area. He currently works with the Amazon DataZone team, enhancing security for Amazon DataZone and SageMaker Unified Studio while developing features that help customers achieve their data, analytics, and AI goals faster. With a background in building ML and analytics systems at scale, Harsh enjoys solving complex problems in data engineering, AI/ML, and security. Outside of work, he can be found hiking the west coast trails and exploring new cuisines.

Monitoring and optimizing the cost of the unused access analyzer in IAM Access Analyzer

Post Syndicated from Oscar Diaz original https://aws.amazon.com/blogs/security/monitoring-and-optimizing-the-cost-of-the-unused-access-analyzer-in-iam-access-analyzer/

AWS Identity and Access Management (IAM) Access Analyzer is a feature that you can use to identify resources in your AWS organization and accounts that are shared with external entities and to identify unused access. In this post, we explore how the unused access analyzer in IAM Access Analyzer works, dive into the cost implications, and share practical approaches to manage and optimize how you use it with a primary focus on cost optimization.

Note: While security best practices for managing AWS Identity and Access Management (IAM) resources are critical, this post emphasizes cost-saving strategies rather than detailed security guidance. We don’t cover step-by-step implementation details for the recommendations here; instead, we provide links to resources that you can use as guides for the process.

Understanding the unused access analyzer in IAM Access Analyzer

IAM Access Analyzer has two capabilities to generate findings:

  • External access analysis (no additional charge): Identifies resources shared with external entities. It requires one analyzer per AWS Region where you have resources.
  • Unused access analysis (paid): Detects unused roles, access keys, and permissions. It requires only one analyzer per AWS account and analyzes IAM roles and users across Regions from a single analyzer.

Both external access analysis and unused access analysis support AWS Organizations and you can create a single analyzer per organization (in the case of external access analysis, per organization per Region).

IAM Access Analyzer unused access analysis costs $0.20 per IAM role or user analyzed each month. The charges for existing roles and users happen at the beginning of the month. As new roles and users are added throughout the month, they are analyzed and charged at a rate of $0.20 per role or user. To help avoid duplicate charges, create only one unused access analyzer per account if using an account-level analyzer, or one unused access analyzer for the entire organization if using an organizational-level analyzer. You should avoid deleting and recreating an analyzer. If you recreate an analyzer, you will be charged again for the analysis.

Reviewing and optimizing your usage

Before taking any actions to reduce costs, it’s crucial to understand your current usage. You can use the AWS Cost and Usage Report (AWS CUR) to identify how many unused access analyzers you have in your environment. To learn more, see Querying Cost and Usage Reports using Amazon Athena.

Use the following Athena query on your CUR data to identify the unused access analyzers within your organization. Replace <CUR_TABLE> with the name of your CUR table.

SELECT
line_item_usage_type,
product_region,
line_item_resource_id,
bill_payer_account_id,
line_item_usage_account_id,
SUM(line_item_unblended_cost)
FROM <CUR_TABLE>
WHERE line_item_product_code = 'AWSIAMAccessAnalyzer'
AND line_item_line_item_type = 'Usage'
GROUP BY
line_item_usage_type,
product_region,
line_item_resource_id,
bill_payer_account_id,
line_item_usage_account_id

This query will give you a comprehensive view of your IAM Access Analyzer usage across your organization, including the cost per analyzer.

Now, let’s walk through four things that you can do today to optimize your IAM Access Analyzer unused access analysis costs.

Consolidate unused analyzers

Review your AWS CUR analysis results to identify opportunities for consolidation. If you’re using an organizational unused access analyzer, you should use a single analyzer. If you’re using an unused access analyzer per account, make sure a single account doesn’t have more than one analyzer.

Use tags to exclude some roles or users

Consider using tags to exclude certain roles or users from analysis. This approach can help scope your analysis and reduce costs by avoiding roles and users that you don’t want to analyze. To do this, you’ll need to implement a tagging strategy for your IAM roles and users, identifying principals that might not require regular access analysis. Then, when creating or modifying an analyzer, use exclusion to skip analysis of tagged IAM roles and users. Regularly review your exclusion strategy to validate that it aligns with your organization’s security policies and compliance requirements.

For a deeper dive into this process, including step-by-step guidance and practical examples, see Customize the scope of IAM Access Analyzer unused access analysis.

Regular clean-up of IAM roles and users

Periodically review and remove unnecessary IAM roles and users. Because IAM Access Analyzer unused access analysis charges are based on the number of roles and users analyzed, removing unused roles and users will help reduce unused access findings cost. This is also a security best practice for IAM.

Monitor and adjust

Set up AWS Budgets or AWS Cost Anomaly Detection to track your IAM Access Analyzer unused access analysis costs. Create alerts for when costs exceed expected thresholds. By using the proactive approach, you can quickly identify and address unexpected cost increases.

Conclusion

IAM Access Analyzer is a valuable tool for improving your organization’s security posture by detecting unused IAM roles, unused access keys for IAM users, unused passwords for IAM users, and unused services and actions for active IAM roles and users. You can then act based on those findings and support your effort to achieve least privilege access. By understanding the billing model and implementing these cost optimization strategies, you can maximize benefits while keeping costs under control. Remember, cost optimization is an ongoing process. Regularly review your usage and adjust your strategy as your needs evolve.

To learn more about IAM Access Analyzer and its pricing, see Getting started with AWS Identity and Access Management Access Analyzer. We’re here to help you optimize your AWS environment, so reach out to AWS Support and your AWS account team if you need further assistance.

If you have feedback about this post, submit comments in the Comments section below.

Oscar Diaz

Oscar Diaz Cordovez

Oscar is a Senior Technical Account Manager specializing in cloud operations and security. His passion for technology and innovation drives his expertise in cloud-native architectures, DevOps practices, and automation.

Avi Harari

Avi Harari

Avi is a Senior Technical Account Manager at AWS supporting Enterprise customers with the adoption and use of AWS services. He is part of the AWS Cloud Operations technical community, focusing on Cloud governance and compliance on AWS.

AWS Weekly Roundup: South America expansion, Q Developer in OpenSearch, and more (May 12, 2025)

Post Syndicated from Micah Walter original https://aws.amazon.com/blogs/aws/aws-weekly-roundup-south-america-expansion-q-developer-in-opensearch-and-more-may-12-2025/

I’ve always been fascinated by how quickly we’re able to stand up new Regions and Availability Zones at AWS. Today there are 36 launched Regions and 114 launched Availability Zones. That’s amazing!

This past week at AWS was marked by significant expansion to our global infrastructure. The announcement of a new Region in the works for South America means customers will have more options for meeting their low latency and data residency requirements. Alongside the expansion, AWS announced the availability of numerous instance types in additional Regions.

In addition to the infrastructure expansion, AWS is also expanding the reach of Amazon Q Developer into Amazon OpenSearch Service.

Last week’s launches

Instance announcements

AWS expanded instance availability for an array of instance types across additional Regions.

Additional updates

Upcoming events

We are in the middle of AWS Summit season! AWS Summits run throughout the summer in cities all around the world. Be sure to check the calendar to find out when a AWS Summit is happening near you. Here are the remaining Summits for May, 2025.


How is the News Blog doing? Take this 1 minute survey!

(This survey is hosted by an external company. AWS handles your information as described in the AWS Privacy Notice. AWS will own the data gathered via this survey and will not share the information collected with survey respondents.)

The collective thoughts of the interwebz