Post Syndicated from Technology Connextras original https://www.youtube.com/watch?v=HQtwULiTEmo
Touring the Intel AI Playground – Inside the Intel Developer Cloud
Post Syndicated from Patrick Kennedy original https://www.servethehome.com/touring-the-intel-ai-playground-inside-the-intel-developer-cloud/
We tour Intel’s AI playground as we get inside the Intel Developer Cloud’s Oregon location to show hardware being made available to developers
The post Touring the Intel AI Playground – Inside the Intel Developer Cloud appeared first on ServeTheHome.
Approaches for migrating users to Amazon Cognito user pools
Post Syndicated from Edward Sun original https://aws.amazon.com/blogs/security/approaches-for-migrating-users-to-amazon-cognito-user-pools/
Update: An earlier version of this post was published on September 14, 2017, on the Front-End Web and Mobile Blog.
Amazon Cognito user pools offer a fully managed OpenID Connect (OIDC) identity provider so you can quickly add authentication and control access to your mobile app or web application. User pools scale to millions of users and add layers of additional features for security, identity federation, app integration, and customization of the user experience. Amazon Cognito is available in regions around the globe, processing over 100 billion authentications each month. You can take advantage of security features when using user pools in Cognito, such as email and phone number verification, multi-factor authentication, and advanced security features, such as compromised credentials detection, and adaptive authentications.
Many customers ask about the best way to migrate their existing users to Amazon Cognito user pools. In this blog post, we describe several different recommended approaches and provide step-by-step instructions on how to implement them.
Key considerations
The main consideration when migrating users across identity providers is maintaining a consistent end-user experience. Ideally, users can continue to use their existing passwords so that their experience is seamless. However, security best practices dictate that passwords should never be stored directly as cleartext in a user store. Instead, passwords are used to compute cryptographic hashes and verifiers that can later be used to verify submitted passwords. This means that you cannot securely export passwords in cleartext form from an existing user store and import them into a Cognito user pool. You might ask your users to choose a new password during the migration. Or, if you want to retain the existing passwords, you need to retain access to the existing hashes and verifiers, at least during the migration period.
A secondary consideration is the migration timeline. For example, do you need a faster migration timeline because your current identity store’s license is expiring? Or do you prefer a slow and steady migration because you are modernizing your current application, and it takes time to connect your existing systems to the new identity provider?
The following two methods define our recommended approaches for migrating existing users into a user pool:
- Bulk user import – Export your existing users into a comma-separated (.csv) file, and then upload this .csv file to import users into a user pool. Your desired user attributes (except passwords) can be included and mapped to attributes in the target user pool. This approach requires users to reset their passwords when they sign in with Cognito. You can choose to migrate your existing user store entirely in a single import job or split users into multiple jobs for parallel or incremental processing.
- Just-in-time user migration – Migrate users just in time into a Cognito user pool as they sign in to your mobile or web app. This approach allows users to retain their current passwords, because the migration process captures and verifies the password during the sign-in process, seamlessly migrating them to the Cognito user pool.
In the following sections, we describe the bulk user import and just-in-time user migration methods in more detail and then walk through the steps of each approach.
Bulk user import
You perform bulk import of users into an Amazon Cognito user pool by uploading a .csv file that contains user profile data, including usernames, email addresses, phone numbers, and other attributes. You can download a template .csv file for your user pool from Cognito, with a user schema structured in the template header.
Following is an example of performing bulk user import.
To create an import job
- Open the Cognito user pool console and select the target user pool for migration.
- On the Users tab, navigate to the Import users section, and choose Create import job.
- In the Create import job dialog box, download the template.csv file for user import.
- Export your existing user data from your existing user directory or store your data into the .csv file
- Match the user attribute types with column headings in the template. Each user must have an email address or a phone number that is marked as verified in the .csv file, in order to receive the password reset confirmation code.
- Go back to the Create import job dialog box (as shown in Figure 2) and do the following:
- Enter a Job name.
- Choose to Create a new IAM role or Use an existing IAM role. This role grants Amazon Cognito permission to write to Amazon CloudWatch Logs in your account, so that Cognito can provide logs for successful imports and errors for skipped or failed transactions.
- Upload the .csv file that you have prepared, and choose Create and start job.

Figure 1: Create import job
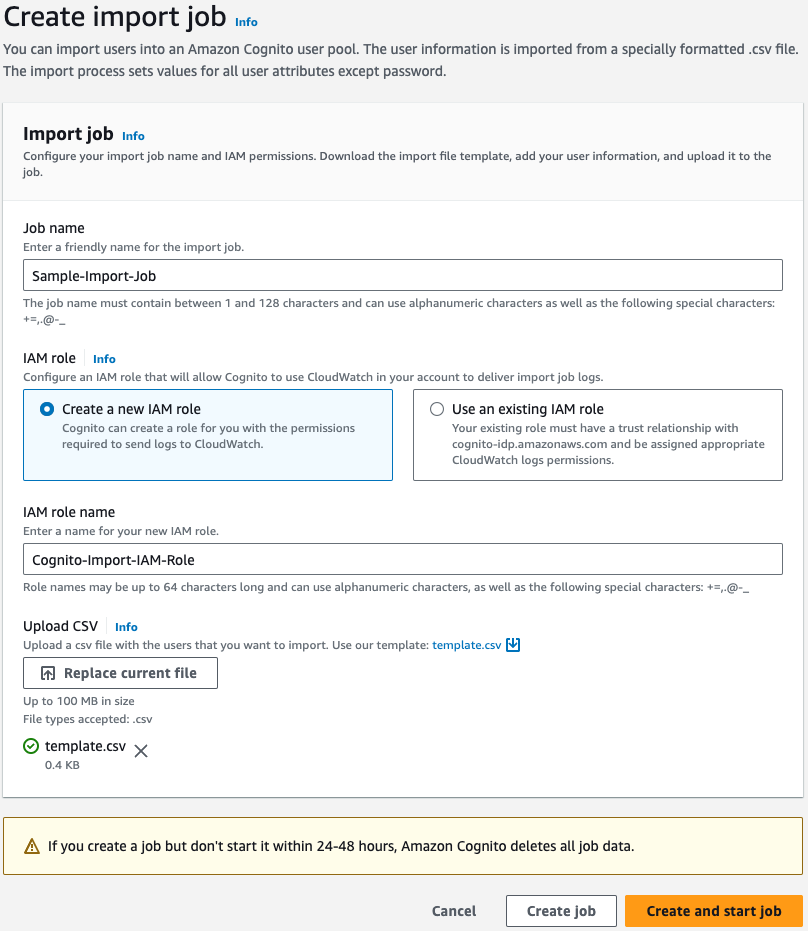
Figure 2: Configure import job
Depending on the size of the .csv file, the job can run for minutes or hours, and you can follow the status from that same page in the Amazon Cognito console.
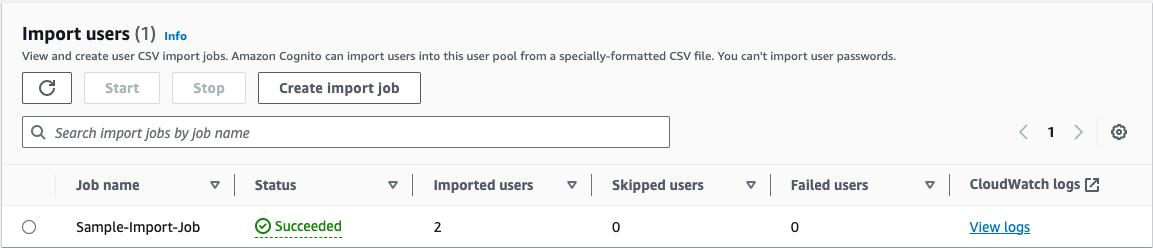
Figure 3: Check import job status
Cognito runs through the import job and imports users with a RESET_REQUIRED state. When users attempt to sign in, Cognito will return PasswordResetRequiredException from the sign-in API, and the app should direct the user into the ForgotPassword flow.
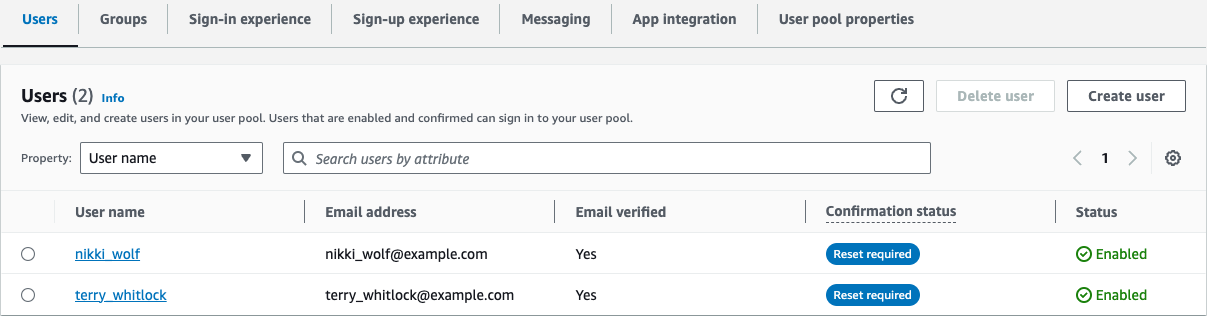
Figure 4: View imported user
The bulk import approach can also be used continuously to incrementally import users. You can set up an Extract-Transform-Load (ETL) batch job process to extract incremental changes to your existing user directories, such as the new sign-ups on the existing systems before you switch over to a Cognito user pool. Your batch job will transform the changes into a .csv file to map user attribute schemas, and load the .csv file as a Cognito import job through the CreateUserImportJob CLI or SDK operation. Then start the import job through the StartUserImportJob CLI or SDK operation. For more information, see Importing users into user pools in the Amazon Cognito Developer Guide.
Just-in-time user migration
The just-in-time (JIT) user migration method involves first attempting to sign in the user through the Amazon Cognito user pool. Then, if the user doesn’t exist in the Cognito user pool, Cognito calls your Migrate User Lambda trigger and sends the username and password to the Lambda trigger to sign the user in through the existing user store. If successful, the Migrate User Lambda trigger will also fetch user attributes and return them to Cognito. Then Cognito silently creates the user in the user pool with user attributes, as well as salts and password verifiers from the user-provided password. With the Migrate User Lambda trigger, your client app can start to use the Cognito user pool to sign in users who have already been migrated, and continue migrating users who are signing in for the first time towards the user pool. This just-in-time migration approach helps to create a seamless authentication experience for your users.
Cognito, by default, uses the USER_SRP_AUTH authentication flow with the Secure Remote Password (SRP) protocol. This flow doesn’t involve sending the password across the network, but rather allows the client to exchange a cryptographic proof with the Cognito service to prove the client’s knowledge of the password. For JIT user migration, Cognito needs to verify the username and password against the existing user store. Therefore, you need to enable a different Cognito authentication flow. You can choose to use either the USER_PASSWORD_AUTH flow for client-side authentication or the ADMIN_USER_PASSWORD_AUTH flow for server-side authentication. This will allow the password to be sent to Cognito over an encrypted TLS connection, and allow Cognito to pass the information to the Lambda function to perform user authentication against the original user store.
This JIT approach might not be compatible with existing identity providers that have multi-factor authentication (MFA) enabled, because the Lambda function cannot support multiple rounds of challenges. If the existing identity provider requires MFA, you might consider the alternative JIT migration approach discussed later in this blog post.
Figure 5 illustrates the steps for the JIT sign-in flow. The mobile or web app first tries to sign in the user in the user pool. If the user isn’t already in the user pool, Cognito handles user authentication and invokes the Migrate User Lambda trigger to migrate the user. This flow keeps the logic in the app simple and allows the app to use the Amazon Cognito SDK to sign in users in the standard way. The migration logic takes place in the Lambda function in the backend.
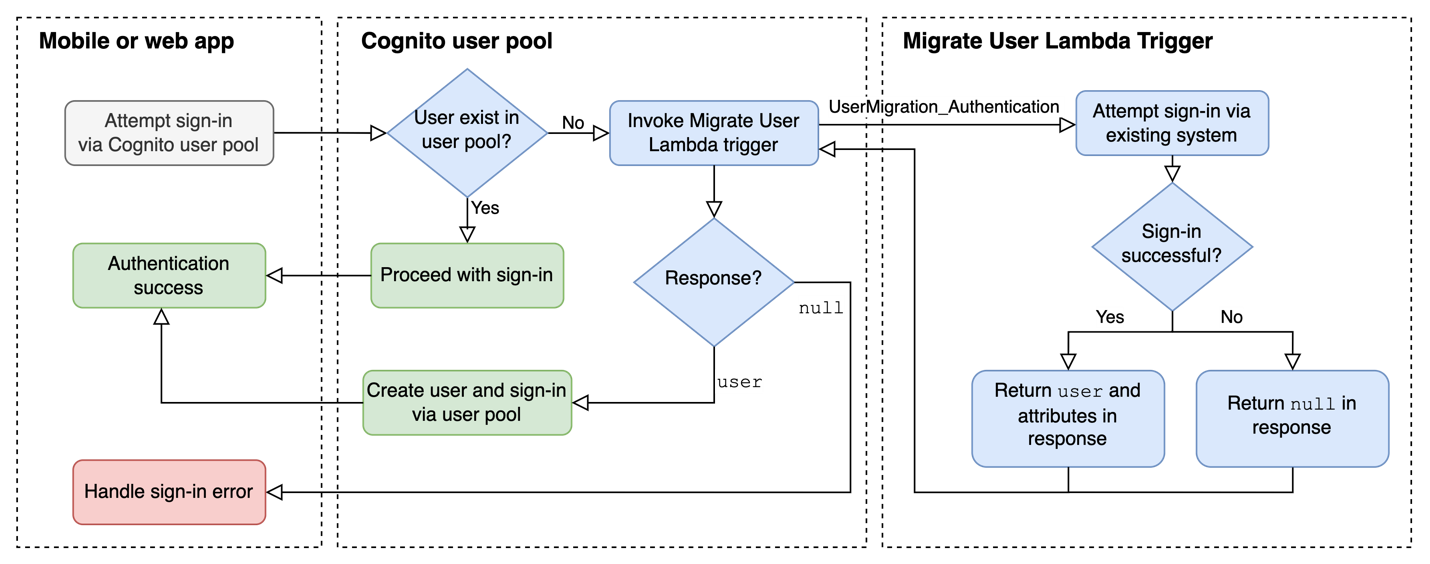
Figure 5: JIT migration user authentication flow
The flow in Figure 5 starts in the mobile or web app, which attempts to sign in the user by using the AWS SDK. If the user doesn’t exist in the user pool, the migration attempt starts. Cognito calls the Migrate User Lambda trigger with triggerSource set to UserMigration_Authentication, and passes the user’s username and password in the request in order to attempt to migrate the user.
This approach also works in the forgot password flow shown in Figure 6, where the user has forgotten their password and hasn’t been migrated yet. In this case, once the user makes a “Forgot Password” request, your mobile or web app will send a forgot password request to Cognito. Cognito invokes your Migrate User Lambda trigger with triggerSource set to UserMigration_ForgotPassword, and passes the username in the request in order to attempt user lookup, migrate the user profile, and facilitate the password reset process.

Figure 6: JIT migration forgot password flow
Just-in-time user migration sample code
In this section, we show sample source codes for a Migrate User Lambda trigger overall structure. We will fill in the commented sections with additional code, shown later in the section. When you set up your own Lambda function, configure a Lambda execution role to grant permissions for CloudWatch logs.
const handler = async (event) => {
    if (event.triggerSource == "UserMigration_Authentication") {
        //***********************************************************************
        // Attempt to sign in the user or verify the password with existing identity store
        // (shown in the Section A – Migrate User of this post)
        //***********************************************************************
    }
    else if (event.triggerSource == "UserMigration_ForgotPassword") {
       //***********************************************************************
       // Attempt to look up the user in your existing identity store
       // (shown in the section B – Forget Password of this post)
       //***********************************************************************
    }
    return event;
};
export { handler };
In the migration flow, the Lambda trigger will sign in the user and verify the user’s password in the existing user store. That may involve a sign-in attempt against your existing user store or a check of the password against a stored hash. You need to customize this step based on your existing setup. You can also create a function to fetch user attributes that you want to migrate. If your existing user store conforms to the OIDC specification, you can parse the ID Token claims to retrieve the user’s attributes. The following example shows how to set the username and attributes for the migrated user.
// Section A – Migrate User
if (event.triggerSource == "UserMigration_Authentication") {
// Attempt to sign in the user or verify the password with the existing user store.
// Add an authenticateUser() functionbased on your existing user store setup.
    const user = await authenticateUser(event.userName, event.request.password);
    if (user) {
        // Migrating user attributes from the source user store. You can migrate additional attributes as needed.
        event.response.userAttributes = {
            // Setting username and email address
            username: event.userName,
            email: user.emailAddress,
            email_verified: "true",
        };
        // Setting user status to CONFIRMED to autoconfirm users so they can sign in to the user pool
        event.response.finalUserStatus = "CONFIRMED";
        // Setting messageAction to SUPPRESS to decline to send the welcome message that Cognito usually sends to new users
        event.response.messageAction = "SUPPRESS";
        }
    }
The user is now migrated from the existing user store to the user pool, as well as the user’s attributes. Users will also be redirected to your application with the authorization code or JSON Web Tokens, depending on the OAuth 2.0 grant types you configured in the user pool.
Let’s look at the forgot password flow. Your Lambda function calls the existing user store and migrates other attributes in the user’s profile first, and then Lambda sets user attributes in the response to the Cognito user pool. Cognito initiates the ForgotPassword flow and sends a confirmation code to the user to confirm the password reset process. The user needs to have a verified email address or phone number migrated from the existing user store to receive the forgot password confirmation code. The following sample code demonstrates how to complete the ForgotPassword flow.
// Section B – Forgot Password
else if (event.triggerSource == "UserMigration_ForgotPassword") {
        // Look up the user in your existing user store service.
		// Add a lookupUser() function based on your existing user store setup.
        const lookupResult = await lookupUser(event.userName);
        if (lookupResult) {
            // Setting user attributes from the source user store
            event.response.userAttributes = {
                username: event.userName,
                // Required to set verified communication to receive password recovery code
                email: lookupResult.emailAddress,
                email_verified: "true",
            };
            event.response.finalUserStatus = "RESET_REQUIRED";
            event.response.messageAction = "SUPPRESS";
        }
    }
Just-in-time user migration – alternative approach
Using the Migrate User Lambda trigger, we showed the JIT migration approach where the app switches to use the Cognito user pool at the beginning of the migration period, to interface with the user for signing in and migrating them from the existing user store. An alternative JIT approach is to maintain the existing systems and user store, but to silently create each user in the Cognito user pool in a backend process as users sign in, then switch over to use Cognito after enough users have been migrated.
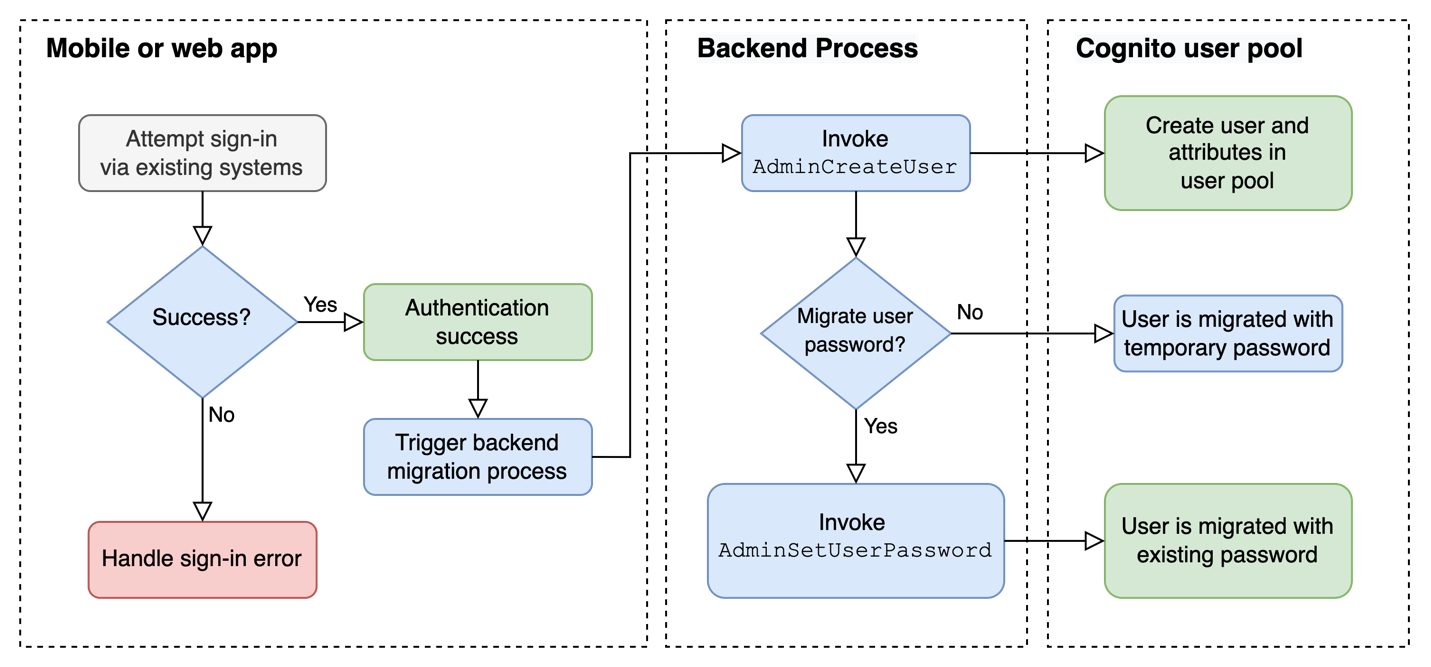
Figure 7: JIT migration alternative approach with backend process
Figure 7 shows this alternative approach in depth. When an end user signs in successfully in your mobile or web app, the backend migration process is initiated. This backend process first calls the Cognito admin API operation, AdminCreateUser, to create users and map user attributes in the destination user pool. The user will be created with a temporary password and be placed in FORCE_CHANGE_PASSWORD status. If you capture the user password during the sign-in process, you can also migrate the password by setting it permanently for the newly created user in the Cognito user pool using the AdminSetUserPassword API operation. This operation will also set the user status to CONFIRMED to allow the user to sign in to Cognito using the existing password.
Following is a code example for the AdminCreateUser function using the AWS SDK for JavaScript.
var params = {
    MessageAction: "SUPPRESS",
    UserAttributes: [{
        Name: "name",
        Value: "Nikki Wolf"
    },
    {
        Name: "email",
        Value: "[email protected]"
    },
    {
        Name: "email_verified",
        Value: "True"
    }
    ],
    UserPoolId: "us-east-1_EXAMPLE",
    Username: "nikki_wolf"
};
const cognito = new CognitoIdentityProviderClient();
const createUserCommand  = new AdminCreateUserCommand(params);
await cognito.send (createUserCommand);
The following is a code example for the AdminSetUserPassword function.
var params = {
    UserPoolId: 'us-east-1_EXAMPLE' ,
    Username: 'nikki_wolf' ,
    Password: 'ExamplePassword1$' ,
    Permanent: true
};
const cognito = new CognitoIdentityProviderClient();
const setUserPasswordCommand = new AdminSetUserPasswordCommand(params);
await cognito.send(setUserPasswordCommand);
This alternative approach does not require the app to update its authentication codebase until a majority of users are migrated, but you need to propagate user attribute changes and new user signups from the existing systems to Cognito. If you are capturing and migrating passwords, you should also build a similar logic to capture password changes in existing systems and set the new password in the user pool to keep it synchronized until you perform a full switchover from the existing identity store to the Cognito user pool.
Summary and best practices
In this post, we described our two recommended approaches for migrating users into an Amazon Cognito user pool. You can decide which approach is best suited for your use case. The bulk method is simpler to implement, but it doesn’t preserve user passwords like the just-in-time migration does. The just-in-time migration is transparent to users and mitigates the potential attrition of users that can occur when users need to reset their passwords.
You could also consider a hybrid approach, where you first apply JIT migration as users are actively signing in to your app, and perform bulk import for the remaining less-active users. This hybrid approach helps provide a good experience for your active user communities, while being able to decommission existing user stores in a manageable timeline because you don’t need to wait for every user to sign in and be migrated through JIT migration.
We hope you can use these explanations and code samples to set up the most suitable approach for your migration project.
If you have feedback about this post, submit comments in the Comments section below. If you have questions about this post, contact AWS Support.
Want more AWS Security news? Follow us on Twitter.
Orchestrating dependent file uploads with AWS Step Functions
Post Syndicated from Benjamin Smith original https://aws.amazon.com/blogs/compute/orchestrating-dependent-file-uploads-with-aws-step-functions/
This post is written by Nelson Assis, Enterprise Support Lead, Serverless and Jevon Liburd, Technical Account Manager, Serverless
Amazon S3 is an object storage service that many customers use for file storage. With the use of Amazon S3 Event Notifications or Amazon EventBridge customers can create workloads with event-driven architecture (EDA). This architecture responds to events produced when changes occur to objects in S3 buckets.
EDA involves asynchronous communication between system components. This serves to decouple the components allowing each component to be autonomous.
Some scenarios may introduce coupling in the architecture due to dependency between events. This blog post presents a common example of this coupling and how it can be handled using AWS Step Functions.
Overview
In this example, an organization has two distributed autonomous teams, the Sales team and the Warehouse team. Each team is responsible for uploading a monthly data file to an S3 bucket so it can be processed.
The files generate events when they are uploaded, initiating downstream processes. The processing of the Warehouse file cleans the data and joins it with data from the Shipping team. The processing of the Sales file correlates the data with the combined Warehouse and Shipping data. This enables analysts to perform forecasting and gain other insights.

For this correlation to happen, the Warehouse file must be processed before the Sales file. As the two teams are autonomous, there is no coordination among the teams. This means that the files can be uploaded at any time with no assurance that the Warehouse file is processed before the Sales file.
For scenarios like these, the Aggregator pattern can be used. The pattern collects and stores the events, and triggers a new event based on the combined events. In the described scenario, the combined events are the processed Warehouse file and the uploaded Sales file.
The requirements of the aggregator pattern are:
- Correlation – A way to group the related events. This is fulfilled by a unique identifier in the file name.
- Event aggregator – A stateful store for the events.
- Completion check and trigger – A condition when the combined events have been received and a way to publish the resulting event.
Architecture overview
The architecture uses the following AWS services:
- Amazon DynamoDB as the event aggregator.
- Step Functions to orchestrate the workflow.
- AWS Lambda to parse the file name and extract the correlation identifier.
- AWS Serverless Application Model (AWS SAM) for infrastructure as code and deployment.


- File upload: The Sales and Warehouse teams upload their respective files to S3.
- EventBridge: The ObjectCreated event is sent to EventBridge where there is a rule with a target of the main workflow.
- Main state machine: This state machine orchestrates the aggregator operations and the processing of the files. It encapsulates the workflows for each file to separate the aggregator logic from the files’ workflow logic.
- File parser and correlation: The business logic to identify the file and its type is run in this Lambda function.
- Stateful store: A DynamoDB table stores information about the file such as the name, type, and processing status. The state machine reads from and writes to the DynamoDB table. Task tokens are also stored in this table.
- File processing: Depending on the file type and any pre-conditions, state machines corresponding to the file type are run. These state machines contain the logic to process the specific file.
- Task Token & Callback: The task token is generated when the dependent file tries to be processed before the independent file. The Step Functions “Wait for a Callback” pattern continues the execution of the dependent file after the independent file is processed.
Walkthrough
You need the following prerequisites:
- AWS CLI and AWS SAM CLI installed.
- An AWS account.
- Sufficient permissions to manage the AWS resources.
- Git installed.
To deploy the example, follow the instructions in the GitHub repo.
This walkthrough shows what happens if the dependent file (Sales file) is uploaded before the independent one (Warehouse file).
- The workflow starts with the uploading of the Sales file to the dedicated Sales S3 bucket. The example uses separate S3 buckets for the two files as it assumes that the Sales and Warehouse teams are distributed and autonomous. You can find sample files in the code repository.

- Uploading the file to S3 sends an event to EventBridge, which the aggregator state machine acts on. The event pattern used in the EventBridge rule is:
{ "detail-type": ["Object Created"], "source": ["aws.s3"], "detail": { "bucket": { "name": ["sales-mfu-eda-09092023", "warehouse-mfu-eda-09092023"] }, "reason": ["PutObject"] } } - The aggregator state machine starts by invoking the file parser Lambda function. This function parses the file type and uses the identifier to correlate the files. In this example, the name of the file contains the file type and the correlation identifier (the year_month). To use other ways of representing the file type and correlation identifier, you can modify this function to parse that information.

- The next step in the state machine inserts a record for the event in the event aggregator DynamoDB table. The table has a composite primary key with the correlation identifier as the partition key and the file type as the sort key. The processing status of the file is tracked to give feedback on the state of the workflow.

- Based on the file type, the state machine determines which branch to follow. In the example, the Sales branch is run. The state machine tries to get the status of the (dependent) Warehouse file from DynamoDB using the correlation identifier. Using the result of this query, the state machine determines if the corresponding Warehouse file has already been processed.
- Since the Warehouse file is not processed yet, the waitForTaskToken integration pattern is used. The state machine waits at this step and creates a task token, which the external services use to trigger the state machine to continue its execution. The Sales record in the DynamoDB table is updated with the Task Token.

- Navigate to the S3 console and upload the sample Warehouse file to the Warehouse S3 bucket. This invokes a new instance of the Step Functions workflow, which flows through the other branch after the file type choice step. In this branch, the Warehouse state machine is run and the processing status of the file is updated in DynamoDB.


When the status of the Warehouse file is changed to “Completed”, the Warehouse state machine checks DynamoDB for a pending Sales file. If there is one, it retrieves the task token and calls the SendTaskSuccess method. This triggers the Sales state machine, which is in a waiting state to continue. The Sales state machine is started and the processing status is updated.


Conclusion
This blog post shows how to handle file dependencies in event driven architectures. You can customize the sample provided in the code repository for your own use case.
This solution is specific to file dependencies in event driven architectures. For more information on solving event dependencies and aggregators read the blog post: Moving to event-driven architectures with serverless event aggregators.
To learn more about event driven architectures, visit the event driven architecture section on Serverless Land.
Има ли право Палестина на литература?
Post Syndicated from Йоанна Елми original https://www.toest.bg/ima-li-pravo-palestina-na-literatura/

„Литпром“: диалог през литературата“, четем на едноименния сайт на германската асоциация на професионалисти в сферата на издателския бизнес, журналистиката, литературните науки и критиката.
Следващо съобщение, малко по-долу:
Поради войната, започната от „Хамас“, причинила страдание на милиони израелци и палестинци, организаторът „Литпром“ реши да отмени церемонията по връчване на наградата „ЛиБературпрайс“ […]
Носителката на въпросната награда? Адания Шибли, палестинска писателка, чиято дискусия в рамките на Франкфуртския панаир на книгата също бе отменена („Литпром“ се финансира частично от германското правителство, Франкфуртския панаир на книгата и други организации).
Първото прессъобщение на „Литпром“ от 13 октомври гласеше, че авторката сама е изявила желание събитията да не се състоят. Но по-късно Шибли отрече и заяви, че ако възможността ѝ е била предоставена, е щяла да се възползва и да инициира разговор за ролята на литературата във време на жестокости и болка. Следват протестни писма от издателите на Шибли в САЩ и Великобритания, както и отворено писмо срещу решението, подписано от над 350 писатели, редактори, литературни агенти и издатели, сред които нобелистите Абдулразак Гурна, Ани Ерно и Олга Токарчук, авторите Колм Тойбин, Олга Равн и други.
For the entirety of Frankfurt @Book_Fair, we've made the eBook of Adania Shibli's MINOR DETAIL, tr. Elisabeth Jaquette, free to download: https://t.co/eD0dL6bx1e
Amazon: https://t.co/t6UVnHJXFP
Apple: https://t.co/r09qEM6lXS
Kobo: https://t.co/iZyTdbV0fq— Fitzcarraldo Editions (@FitzcarraldoEds) October 17, 2023
След отмяната на събитията британският издател на Адания Шибли предостави книгата за свободно теглене в рамките на дните на Франкфуртския панаир
„Същият панаир, който отмени церемонията на Шибли, беше критикуван за включването на крайнодясното издателство Antaios, както и за гостуването на членове на „Алтернатива за Германия“ (AfD), написа в есе босненската писателка Лана Басташич.
Докато артисти и писатели биват заглушавани заради предполагаем антисемитизъм, истинският неонацизъм се завръща с крайнодесните AfD, които печелят местни избори, a опитни политици обмислят варианти за сделки с тях.
Разговор за ролята на литературата и конфликта между Израел и Палестина нямаше. Но се появиха задължителните лагери „за“ и „против“, безпочвени обвинения в антисемитизъм, истински антисемитизъм, също толкова истинска омраза към палестинците… Решението на Франкфуртския панаир е още по-интересно в контекста на провелия се преди шест месеца Книжен панаир в Лайпциг, на който голямата награда получи руската писателка Мария Степанова (украинската общност, а и други протестираха това решение). Никой не сметна за нужно да „търси други формати“ за награждаването на Степанова, която не живее в Русия, но пише на руски и е рускиня. Необходима ли е отмяната на Шибли? И какви глобални тенденции биха могли да обяснят това решение?
Кой се страхува от Адания Шибли?
Родена в Палестина през 1974 г., Шибли живее между Йерусалим и Берлин, говори шест езика и е авторка на романи, пиеси, разкази и есета. Преподава философия и културология в Бирзейтския университет в Палестина.
Награденият ѝ в Германия роман Minor Detail („Незначителен детайл“*) не е преведен на български. Действието в него се развива през лятото на 1949-та, година след т.нар. Накба, или Палестинската катастрофа, когато са унищожени около 500 палестински села, а над 700 000 палестинци са принудени да напуснат домовете си. Катастрофата е следствие от сложни събития в контекста на Плана на ООН за разделяне на териториите на Палестина.

„Незначителен детайл“ се основава на истински случай – историята на млада бедуинка, изнасилена от израелски военни. Читателят прекарва няколко горещи дни през 1949 г. с войниците, които „прочистват“ пустинята от арабите. Другата сюжетна линия е в настоящето, където героиня на име Рамала търси исторически сведения за престъплението. Чрез двете линии пред читателя се разкрива абсурдният свят на болка без начало и край, без смисъл, неизбежна. Всъщност болката е такава, каквато е и в живия живот.
Да го пишем ли това (сега)?
Адания Шибли не е маргинален глас, не е пропагандаторка, не поддържа терористи. Във Великобритания романът ѝ се издава от независимото издателство „Фицкаралдо“, чиито автори печелят Нобеловата награда вече няколко поредни години. През 2020 г. книгата е финалист за престижната американска Национална литературна награда, а през 2021 г. е в дългия списък за Международния „Букър“. Получава признание от критиците на New York Review of Books, Guardian, New York Times, Words Without Borders и редица други издания.
Друг роман на Шибли разглежда събитията по време на Гражданската война в Ливан, свързани с убийствата на палестински бежанци и ливански шиити в Сабра и Шатила. Действието се развива през 1982 г. в Бейрут, тогава окупиран от Израел. Книгата We Are All Equally Far from Love („Всички сме еднакво далеч от любовта“) пък изследва ограниченията на живота под окупация, физическата и психическата клаустрофобия, емоционалната парализа. „Когато човек живее на място, което му се струва като наказание за неизвършено престъпление, от много ранна възраст започва да си задава трудни въпроси относно простички идеи като справедливост – или нейното отсъствие“, казва Шибли пред LitHub.
Спомням си как два пъти ме разпитваха членове на израелското разузнаване, които искаха да знаят за какво пиша. Когато казах, че са истории за нещастна любов, те изгубиха всякакъв интерес към мен.
Няма книга, няма проблем
Франкфуртският панаир на книгата е най-големият панаир по брой представени издатели. Смятан е за най-важният книжен панаир в света. Не е преувеличено да се каже, че това е литературен макет на света. Тази година „Литпром“ дава наградата на Шибли заради „безкомпромисно написаната ѝ творба, която разказва за силата на границите и за онова, което жестоките конфликти причиняват и правят с хората“. След 7 октомври обаче Израел, Палестина и светът осъмнаха различни. Адания Шибли ли е виновна за това? Справедливо ли е „наказанието“ нейният глас да бъде погълнат от взривовете на бомбите на „Хамас“ и Израел?

„Добрата литература ни показва сложността на живота, който не може да влезе в тесни идеологически рамки, било то леви или десни. И обратното – слабата литература следва идеологически схеми и не се различава особено от манифест“, коментира случая за „Тоест“ писателят и журналист Димитър Кенаров.
Точно тук е и трагедията в днешно време – може би в което и да било време. Хората, които мислят по-сложно за живота (независимо дали се занимават с писане, или с нещо друго), не са особено популярни.
В есето си „Крахът“ от февруари 1936 г. Франсис Скот Фицджералд пише, че „проверка за един първокласен ум е умението едновременно да държиш в съзнанието си две противостоящи идеи и въпреки това да не изгубиш способността си да действаш“ (превод от английски Рада Шарланджиева). Всъщност „Крахът“ се занимава с разпадите – както големите исторически, така и вътрешните разпади. Двата процеса, разбира се, са взаимносвързани.
А XXI в. е време на разпади: разпадат се обществата ни, демокрациите ни, способността ни да общуваме; пандемията разби на пух и прах увереността, че сме победили смъртта и че можем да предскажем бъдещето; разпадна се и идеята, че Студената война или която и да е война има еднозначен край… Разпада се и планетата. Какво друго във време на разпади, ако не литература, тоест разговор, съпреживяване? Пълната противоположност, разбира се – война.
„Циничното възползване от ужасите, причинени от насилието на „Хамас“, за да се обявят всички палестински гласове за нелегитимни, е част от кампания за ограничаване на пространството за емпатия, мисъл, дебат и истина“, коментира журналистката Урсула Линдзи, покриваща теми, свързани с Близкия изток, в свое есе за Washington Post. Но тенденцията за „отмяна“ на литературата не принадлежи на Франкфурт. Тя е естествен рефлекс, придобит след поне десетилетие публична реактивност.
В книгата си Professing Criticism: Essays on the Organization of Literary Study („Професия критик: есета върху организацията на литературната наука“) Джон Гилъри, американски литературен критик и професор в Нюйоркския университет, разглежда идеологическите борби и културните войни около литературния канон – например кои автори трябва да се четат и кои да се забранят, защото например от определена гледна точка са расисти, евгеници и т.н.
В западните метрополиси борбата за многообразие в учебния план се оказа много по-лесна от реалното осигуряване на многообразие сред учениците и още по-лесна от налагането на многообразие в университетските среди и администрации. Западната „висока култура“ стана лесната битка на движението за деколонизация.
Изливаме гнева си от неспособността да поправим несправедливостите и неравенствата в настоящето върху мъртвите автори, разсъждава Гилъри. Но ако литературата (на миналото), която не отговаря на нечии морални стандарти в настоящето, наистина бъде премахната, спряна от изучаване, забранена, заглушена – нима това няма да доведе до изкривена представа за историята, а оттам и за реалността? Не би ли се случило същото и с изтриването на палестинските, руските гласове? Не на онези, които насърчават насилието (тук не става въпрос за пропаганда, а за литература), а които изговарят травмите, довели до него, и то отвътре?
„Тези, които проблематизират черно-белите идеологически модели (свобода–робство, цивилизация–варварство, Европа–Азия, Украйна–Русия, Израел–Палестина), се оказват в доста сложна ситуация. Никой не обича сложните неща“, смята и Кенаров.
Към тази сложност се стреми Гилъри, който пише:
Искаме студентите ни да се интересуват от другостта, включително от хора, които са различни от тях, но и нещо повече – искаме да се интересуват от цели светове другост и непреодолими различия.
В американската среда, която влияе върху целия западен свят, амбицията на Гилъри и амбивалентността на Фицджералд са подложени на изпитание. Трудно е да се мисли сложно в свят на политика на идентичностите, където човек не е изграден от истории, а е еднолинеен сюжет, който се развива или не според определени критерии. И който може да бъде прекъснат, редактиран и дори изтрит от публичното пространство. Подобни тенденции се наблюдават както в левия, така и в десния политически спектър.

Без литература няма разговор
Това не е експертен анализ по въпроса Израел–Палестина. Социалните мрежи превръщат привилиегированите да живеят далеч от света на жестоките конфликти, в които реална смърт застига истински хора, в кризисни запалянковци, заемащи една или друга страна, викащи за една или друга смърт, понякога единствено в името на това да бъдат чути гласовете им. Про- или антиваксър? Консервативен или либерален? Комунист или фашист? Русофил или русофоб? Кой заслужава да умре повече – палестинец или израелец? Страшно е, когато светът се преживява в бинарности. Страшно е и другото – когато изберем моралния релативизъм: в него няма зло, което да заслужава осъждане.
Това е текст за литературата, която – когато е добра – помага да преодолеем всичко: политиката, хюбриса, пропагандата, говорещите глави, социалните мрежи и първосигналното, мненията, фоновия шум… За да се върнем към съществените, съвсем реални проблеми. Към човешкото. Защото ако сме способни да зачеркнем цели групи хора (а и тяхната литература, техния разговор), вече сме загубили частица от човечността си. Така се продължава и цикълът на жестокост. Литературата остава сред редките антидоти срещу тези отрови, както казва Милан Кундера.
Романът е пространство, в което моралното порицание временно се отменя. Тази отмяна не означава, че на романa му липсва морал; именно тя е неговата моралност. Моралността, която застава срещу неизкоренимия човешки навик да съдим светкавично, непрестанно и всички; да съдим, преди да сме разбрали, както и в отсъствието на разбиране. От гледната точка на мъдростта на романа тази трескава готовност да се съди е най-омразната глупост, най-гибелното зло. Не че романистът изцяло отрича, че моралната присъда е легитимна. Той просто отказва да я постави в романа.
А че романът на Шибли е литература, която приканва към разговор, доказват множеството международни признания. Включително от хората, които „отмениха“ писателката. Именно заради тази отмяна, заради страха от нещо неопределено, нямахме шанс да чуем разговора за Израел–Палестина през литературата. Но предстоят няколко участия на Шибли, които може би ще ни дадат другите истории на Палестина – не на терора и вендетата; не на западняците, за които това е поредната криза, която ще преживеят в риалити формата на социалните мрежи и с която ще смажат стрелките на моралния си компас в съответните посоки, разбира се, на всеослушание; а на хората, които живеят тази история. Които са направени от тази история. Които единствени могат да я разкажат. И единствени имат силата да я променят.
Независимо дали авторите избират да говорят за определени събития, или да стоят встрани от тях, добрата литература се занимава с много просто нещо: животът (човешки, но не само) като основна ценност, казва Димитър Кенаров. „Литературата може да бъде всякаква, дори в най-ужасните моменти от историята. Важното е изкуството да бъде смело и свободно, независимо какъв подход или тема ще избере. Адорно казва, че не може да има поезия след Аушвиц, но всъщност поезия е имало и ще има винаги.“
В интервю за New York Times, публикувано ден преди завършването на този текст, израелският писател Едгар Керет каза някои от нещата, които изредихме и тук: за бинарния свят, за хляба и зрелищата, за болката, която е захапала опашката си.
Преди доста време написах есе за New York Times, в което казах, че не харесвам етикетите „про-Израел“ или „про-Палестина“ […] Тоест ако си „про-Израел“, значи си за бомбардирането на деца в Газа? Идеята ми е, че реалността е сложна, и за мен най-важна е отговорността към човека. Когато виждам как хората гледат ужасната трагедия, разиграваща се тук, все едно е надпревара кой ще излезе по-голяма жертва, в която подкрепяш единия отбор и не ти пука за другия, емпатията става много, много избирателна. Виждаш само едната болка. Отказваш да видиш другата.
Превърнала ли се е реалността в арената на Колизея? А социалните мрежи – в скамейките, от които осъждаме чуждите борби и решаваме кой е достоен да говори, да живее и кой не? Отменянето на легитимни гласове не разплита възлите в реалността, дори напротив. Защото в тази реалност хората не са аватари – те кървят, умират, губят близки, мразят и убиват съвсем наистина. Когато откажем да проведем трудния разговор, оставаме само с насилието. Защото времената на криза не търпят вакуум. Думи винаги трябват. Въпросът е кой говори. На кого позволяваме? От чие име? А как слушаме? От това зависи най-малкото дали ще останем хора.
*Всички преводи в текста са на авторката Йоанна Елми, освен там, където е изрично посочено друго.
Reggie Watts | Great Falls, MT | Talks at Google
Post Syndicated from Talks at Google original https://www.youtube.com/watch?v=lDUDUjoK3SA
Linptech ES1 simple but powerful presence sensor
Post Syndicated from BeardedTinker original https://www.youtube.com/watch?v=ywPGzyZg9JU
GoDaddy benchmarking results in up to 24% better price-performance for their Spark workloads with AWS Graviton2 on Amazon EMR Serverless
Post Syndicated from Mukul Sharma original https://aws.amazon.com/blogs/big-data/godaddy-benchmarking-results-in-up-to-24-better-price-performance-for-their-spark-workloads-with-aws-graviton2-on-amazon-emr-serverless/
This is a guest post co-written with Mukul Sharma, Software Development Engineer, and Ozcan IIikhan, Director of Engineering from GoDaddy.
GoDaddy empowers everyday entrepreneurs by providing all the help and tools to succeed online. With more than 22 million customers worldwide, GoDaddy is the place people come to name their ideas, build a professional website, attract customers, and manage their work.
GoDaddy is a data-driven company, and getting meaningful insights from data helps us drive business decisions to delight our customers. At GoDaddy, we embarked on a journey to uncover the efficiency promises of AWS Graviton2 on Amazon EMR Serverless as part of our long-term vision for cost-effective intelligent computing.
In this post, we share the methodology and results of our benchmarking exercise comparing the cost-effectiveness of EMR Serverless on the arm64 (Graviton2) architecture against the traditional x86_64 architecture. EMR Serverless on Graviton2 demonstrated an advantage in cost-effectiveness, resulting in significant savings in total run costs. We achieved 23.85% improvement in price-performance for sample production Spark workloads—an outcome that holds tremendous potential for businesses striving to maximize their computing efficiency.
Solution overview
GoDaddy’s intelligent compute platform envisions simplification of compute operations for all personas, without limiting power users, to ensure out-of-box cost and performance optimization for data and ML workloads. As a part of this vision, GoDaddy’s Data & ML Platform team plans to use EMR Serverless as one of the compute solutions under the hood.
The following diagram shows a high-level illustration of the intelligent compute platform vision.

Benchmarking EMR Serverless for GoDaddy
EMR Serverless is a serverless option in Amazon EMR that eliminates the complexities of configuring, managing, and scaling clusters when running big data frameworks like Apache Spark and Apache Hive. With EMR Serverless, businesses can enjoy numerous benefits, including cost-effectiveness, faster provisioning, simplified developer experience, and improved resilience to Availability Zone failures.
At GoDaddy, we embarked on a comprehensive study to benchmark EMR Serverless using real production workflows at GoDaddy. The purpose of the study was to evaluate the performance and efficiency of EMR Serverless and develop a well-informed adoption plan. The results of the study have been extremely promising, showcasing the potential of EMR Serverless for our workloads.
Having achieved compelling results in favor of EMR Serverless for our workloads, our attention turned to evaluating the utilization of the Graviton2 (arm64) architecture on EMR Serverless. In this post, we focus on comparing the performance of Graviton2 (arm64) with the x86_64 architecture on EMR Serverless. By conducting this apples-to-apples comparative analysis, we aim to gain valuable insights into the benefits and considerations of using Graviton2 for our big data workloads.
By using EMR Serverless and exploring the performance of Graviton2, GoDaddy aims to optimize their big data workflows and make informed decisions regarding the most suitable architecture for their specific needs. The combination of EMR Serverless and Graviton2 presents an exciting opportunity to enhance the data processing capabilities and drive efficiency in our operations.
AWS Graviton2
The Graviton2 processors are specifically designed by AWS, utilizing powerful 64-bit Arm Neoverse cores. This custom-built architecture provides a remarkable boost in price-performance for various cloud workloads.
In terms of cost, Graviton2 offers an appealing advantage. As indicated in the following table, the pricing for Graviton2 is 20% lower compared to the x86 architecture option.
| x86_64 | arm64 (Graviton2) | |
| per vCPU per hour | $0.052624 | $0.042094 |
| per GB per hour | $0.0057785 | $0.004628 |
| per storage GB per hour* | $0.000111 | |
*Ephemeral storage: 20 GB of ephemeral storage is available for all workers by default—you pay only for any additional storage that you configure per worker.
For specific pricing details and current information, refer to Amazon EMR pricing.
AWS benchmark
The AWS team performed benchmark tests on Spark workloads with Graviton2 on EMR Serverless using the TPC-DS 3 TB scale performance benchmarks. The summary of their analysis are as follows:
- Graviton2 on EMR Serverless demonstrated an average improvement of 10% for Spark workloads in terms of runtime. This indicates that the runtime for Spark-based tasks was reduced by approximately 10% when utilizing Graviton2.
- Although the majority of queries showcased improved performance, a small subset of queries experienced a regression of up to 7% on Graviton2. These specific queries showed a slight decrease in performance compared to the x86 architecture option.
- In addition to the performance analysis, the AWS team considered the cost factor. Graviton2 is offered at a 20% lower cost than the x86 architecture option. Taking this cost advantage into account, the AWS benchmark set yielded an overall 27% better price-performance for workloads. This means that by using Graviton2, users can achieve a 27% improvement in performance per unit of cost compared to the x86 architecture option.
These findings highlight the significant benefits of using Graviton2 on EMR Serverless for Spark workloads, with improved performance and cost-efficiency. It showcases the potential of Graviton2 in delivering enhanced price-performance ratios, making it an attractive choice for organizations seeking to optimize their big data workloads.
GoDaddy benchmark
During our initial experimentation, we observed that arm64 on EMR Serverless consistently outperformed or performed on par with x86_64. One of the jobs showed a 7.51% increase in resource usage on arm64 compared to x86_64, but due to the lower price of arm64, it still resulted in a 13.48% cost reduction. In another instance, we achieved an impressive 43.7% reduction in run cost, attributed to both the lower price and reduced resource utilization. Overall, our initial tests indicated that arm64 on EMR Serverless delivered superior price-performance compared to x86_64. These promising findings motivated us to conduct a more comprehensive and rigorous study.
Benchmark results
To gain a deeper understanding of the value of Graviton2 on EMR Serverless, we conducted our study using real-life production workloads from GoDaddy, which are scheduled to run at a daily cadence. Without any exceptions, EMR Serverless on arm64 (Graviton2) is significantly more cost-effective compared to the same jobs run on EMR Serverless on the x86_64 architecture. In fact, we recorded an impressive 23.85% improvement in price-performance across the sample GoDaddy jobs using Graviton2.
Like the AWS benchmarks, we observed slight regressions of less than 5% in the total runtime of some jobs. However, given that these jobs will be migrated from Amazon EMR on EC2 to EMR Serverless, the overall total runtime will still be shorter due to the minimal provisioning time in EMR Serverless. Additionally, across all jobs, we observed an average speed up of 2.1% in addition to the cost savings achieved.
These benchmarking results provide compelling evidence of the value and effectiveness of Graviton2 on EMR Serverless. The combination of improved price-performance, shorter runtimes, and overall cost savings makes Graviton2 a highly attractive option for optimizing big data workloads.
Benchmarking methodology
As an extension of a larger benchmarking EMR Serverless for GoDaddy study, where we divided Spark jobs into brackets based on total runtime (quick-run, medium-run, long-run), we measured effect of architecture (arm64 vs. x86_64) on total cost and total runtime. All other parameters were kept the same to achieve an apples-to-apples comparison.
The team followed these steps:
- Prepare the data and environment.
- Choose two random production jobs from each job bracket.
- Make necessary changes to avoid inference with actual production outputs.
- Run tests to execute scripts over multiple iterations to collect accurate and consistent data points.
- Validate input and output datasets, partitions, and row counts to ensure identical data processing.
- Gather relevant metrics from the tests.
- Analyze results to draw insights and conclusions.
The following table shows the summary of an example Spark job.
| Metric | EMR Serverless (Average) – X86_64 | EMR Serverless (Average) – Graviton | X86_64 vs Graviton (% Difference) |
| Total Run Cost | $2.76 | $1.85 | 32.97% |
|
Total Runtime (hh:mm:ss) |
00:41:31 | 00:34:32 | 16.82% |
| EMR Release Label | emr-6.9.0 | ||
| Job Type | Spark | ||
| Spark Version | Spark 3.3.0 | ||
| Hadoop Distribution | Amazon 3.3.3 | ||
| Hive/HCatalog Version | Hive 3.1.3, HCatalog 3.1.3 | ||
Summary of results
The following table presents a comparison of job performance between EMR Serverless on arm64 (Graviton2) and EMR Serverless on x86_64. For each architecture, every job was run at least three times to obtain the accurate average cost and runtime.
| Job | Average x86_64 Cost | Average arm64 Cost | Average x86_64 Runtime (hh:mm:ss) | Average arm64 Runtime (hh:mm:ss) | Average Cost Savings % | Average Performance Gain % |
| 1 | $1.64 | $1.25 | 00:08:43 | 00:09:01 | 23.89% | -3.24% |
| 2 | $10.00 | $8.69 | 00:27:55 | 00:28:25 | 13.07% | -1.79% |
| 3 | $29.66 | $24.15 | 00:50:49 | 00:53:17 | 18.56% | -4.85% |
| 4 | $34.42 | $25.80 | 01:20:02 | 01:24:54 | 25.04% | -6.08% |
| 5 | $2.76 | $1.85 | 00:41:31 | 00:34:32 | 32.97% | 16.82% |
| 6 | $34.07 | $24.00 | 00:57:58 | 00:51:09 | 29.57% | 11.76% |
| Average | 23.85% | 2.10% | ||||
Note that the improvement calculations are based on higher-precision results for more accuracy.
Conclusion
Based on this study, GoDaddy observed a significant 23.85% improvement in price-performance for sample production Spark jobs utilizing the arm64 architecture compared to the x86_64 architecture. These compelling results have led us to strongly recommend internal teams to use arm64 (Graviton2) on EMR Serverless, except in cases where there are compatibility issues with third-party packages and libraries. By adopting an arm64 architecture, organizations can achieve enhanced cost-effectiveness and performance for their workloads, contributing to more efficient data processing and analytics.
About the Authors
 Mukul Sharma is a Software Development Engineer on Data & Analytics (DnA) organization at GoDaddy. He is a polyglot programmer with experience in a wide array of technologies to rapidly deliver scalable solutions. He enjoys singing karaoke, playing various board games, and working on personal programming projects in his spare time.
 Ozcan Ilikhan is a Director of Engineering on Data & Analytics (DnA) organization at GoDaddy. He is passionate about solving customer problems and increasing efficiency using data and ML/AI. In his spare time, he loves reading, hiking, gardening, and working on DIY projects.
 Harsh Vardhan Singh Gaur is an AWS Solutions Architect, specializing in analytics. He has over 6 years of experience working in the field of big data and data science. He is passionate about helping customers adopt best practices and discover insights from their data.
 Ramesh Kumar Venkatraman is a Senior Solutions Architect at AWS who is passionate about containers and databases. He works with AWS customers to design, deploy, and manage their AWS workloads and architectures. In his spare time, he loves to play with his two kids and follows cricket.
[$] Guest-first memory for KVM
Post Syndicated from corbet original https://lwn.net/Articles/949277/
One of the core objectives of any confidential-computing implementation is
to protect a guest system’s memory from access by actors outside of the
guest itself. The host computer and hypervisor are part of the group that
is to be excluded from such access; indeed, they are often seen as
threat in their own right. Hardware vendors have added features like memory
encryption to make memory inaccessible to the host, but such features can
be difficult to use and are not available on all CPUs, so there is ongoing
interest in software-only solutions that can improve confidentiality. The
guest-first
memory patch set, posted by Sean Christopherson and containing work by
several developers, looks poised to bring some software-based protection to
an upcoming kernel release.
Evans: Confusing git terminology
Post Syndicated from corbet original https://lwn.net/Articles/949833/
Julia Evans has posted a list of
confusing Git terms and behavior along with explanations of what is
actually going on.
“Your branch is up to date with ‘origin/main’”
This message seems straightforward – it’s saying that your main branch is
up to date with the origin!But it’s actually a little misleading. You might think that this means that
your main branch is up to date. It doesn’t. What it actually means is – if
you last ran git fetch or git pull 5 days ago, then your main branch is up
to date with all the changes as of 5 days ago.So if you don’t realize that, it can give you a false sense of security.
Home Assistant 2023.11 released
Post Syndicated from corbet original https://lwn.net/Articles/949831/
Home
Assistant 2023.11 is available. New features include a to-do list
manager, Matter
1.2 support, customizable tile cards, new integrations, and more. (LWN
looked at Home Assistant last month).
Gawk 5.3.0 released
Post Syndicated from jake original https://lwn.net/Articles/949829/
The GNU awk text-processing utility, gawk has released version
5.3.0. The main new features add compatibility with “The One True Awk” (also known
as “BWK awk”); version 5.3.0 adds CSV (comma-separated values) parsing and
the ability to use \u escape sequences for Unicode code points.
Read on for other changes in the release.
Stable kernels 6.5.10 and 6.1.61
Post Syndicated from jake original https://lwn.net/Articles/949824/
The
6.5.10 and 6.1.61 stable kernels have been released. As
usual, they contain important fixes throughout the kernel tree; users of
those series should upgrade.
Security updates for Thursday
Post Syndicated from jake original https://lwn.net/Articles/949820/
Security updates have been issued by Gentoo (Netatalk), Oracle (firefox), Red Hat (.NET 6.0, .NET 6.0, .NET 7.0, binutils, and qemu-kvm), SUSE (gcc13, tomcat, and xorg-x11-server), and Ubuntu (axis, libvpx, linux-starfive, thunderbird, and xrdp).
How to share security telemetry per OU using Amazon Security Lake and AWS Lake Formation
Post Syndicated from Chris Lamont-Smith original https://aws.amazon.com/blogs/security/how-to-share-security-telemetry-per-ou-using-amazon-security-lake-and-aws-lake-formation/
This is the final part of a three-part series on visualizing security data using Amazon Security Lake and Amazon QuickSight. In part 1, Aggregating, searching, and visualizing log data from distributed sources with Amazon Athena and Amazon QuickSight, you learned how you can visualize metrics and logs centrally with QuickSight and AWS Lake Formation irrespective of the service or tool generating them. In part 2, How to visualize Amazon Security Lake findings with Amazon QuickSight (LINK NOT LIVE YET), you learned how to integrate Amazon Athena with Security Lake and create visualizations with QuickSight of the data and events captured by Security Lake.
For companies where security administration and ownership are distributed across a single organization in AWS Organizations, it’s important to have a mechanism for securely sharing and visualizing security data. This can be achieved by enriching data within Security Lake with organizational unit (OU) structure and account tags and using AWS Lake Formation to securely share data across your organization on a per-OU basis. Users can then analyze and visualize security data of only those AWS accounts in the OU that they have been granted access to. Enriching the data enables users to effectively filter information using business-specific criteria, minimizing distractions and enabling them to concentrate on key priorities.
Distributed security ownership
It’s not unusual to find security ownership distributed across an organization in AWS Organizations. Take for example a parent company with legal entities operating under it, which are responsible for the security posture of the AWS accounts within their lines of business. Not only is each entity accountable for managing and reporting on security within its area, it must not be able to view the security data of other entities within the same organization.
In this post, we discuss a common example of distributing dashboards on a per-OU basis for visualizing security posture measured by the AWS Foundational Security Best Practices (FSBP) standard as part of AWS Security Hub. In this post, you learn how to use a simple tool published on AWS Samples to extract OU and account tags from your organization and automatically create row-level security policies to share Security Lake data to AWS accounts you specify. At the end, you will have an aggregated dataset of Security Hub findings enriched with AWS account metadata that you can use as a basis for building QuickSight dashboards.
Although this post focuses on sharing Security Hub data through Security Lake, the same steps can be performed to share any data—including Security Hub findings in Amazon S3—according to OU. You need to ensure any tables you want to share contain an AWS account ID column and that the tables are managed by Lake Formation.
Prerequisites
This solution assumes you have:
- Followed the previous posts in this series and understand how Security Lake, Lake Formation, and QuickSight work together.
- Enabled Security Lake across your organization and have set up a delegated administrator account.
- Configured Security Hub across your organization and have enabled the AWS FSBP standard.
Example organization
AnyCorp Inc, a fictional organization, wants to provide security compliance dashboards to its two subsidiaries, ExampleCorpEast and ExampleCorpWest, so that each only has access to data for their respective companies.
Each subsidiary has an OU under AnyCorp’s organization as well as multiple nested OUs for each line of business they operate. ExampleCorpEast and ExampleCorpWest have their own security teams and each operates a security tooling AWS account and uses QuickSight for visibility of security compliance data. AnyCorp has implemented Security Lake to centralize the collection and availability of security data across their organization and has enabled Security Hub and the AWS FSBP standard across every AWS account.
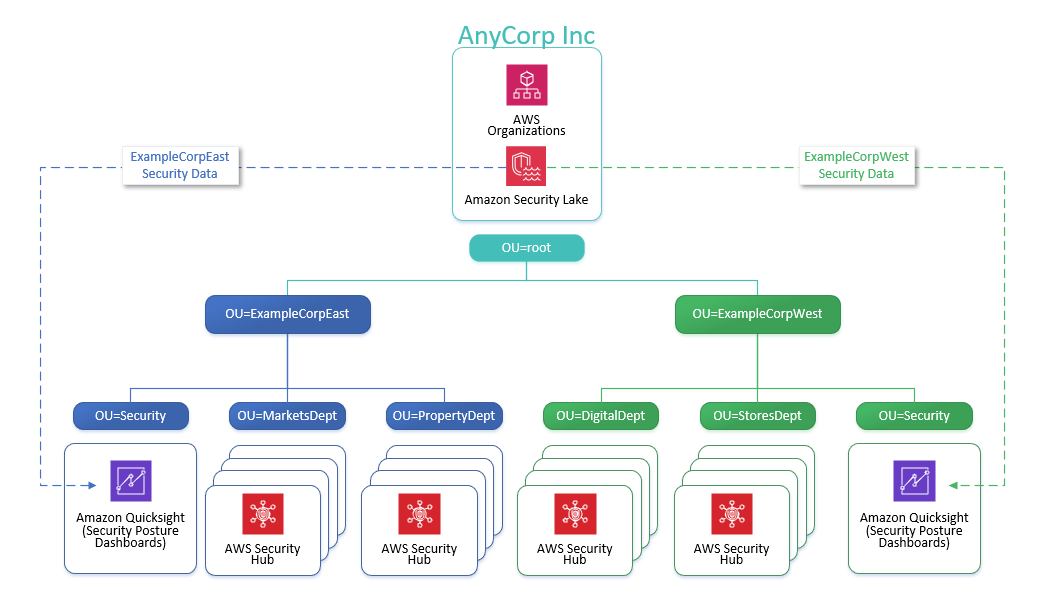
Figure 1: Overview of AnyCorp Inc OU structure and AWS accounts
Note: Although this post describes a fictional OU structure to demonstrate the grouping and distribution of security data, you can substitute your specific OU and AWS account details and achieve the same results.
Logical architecture
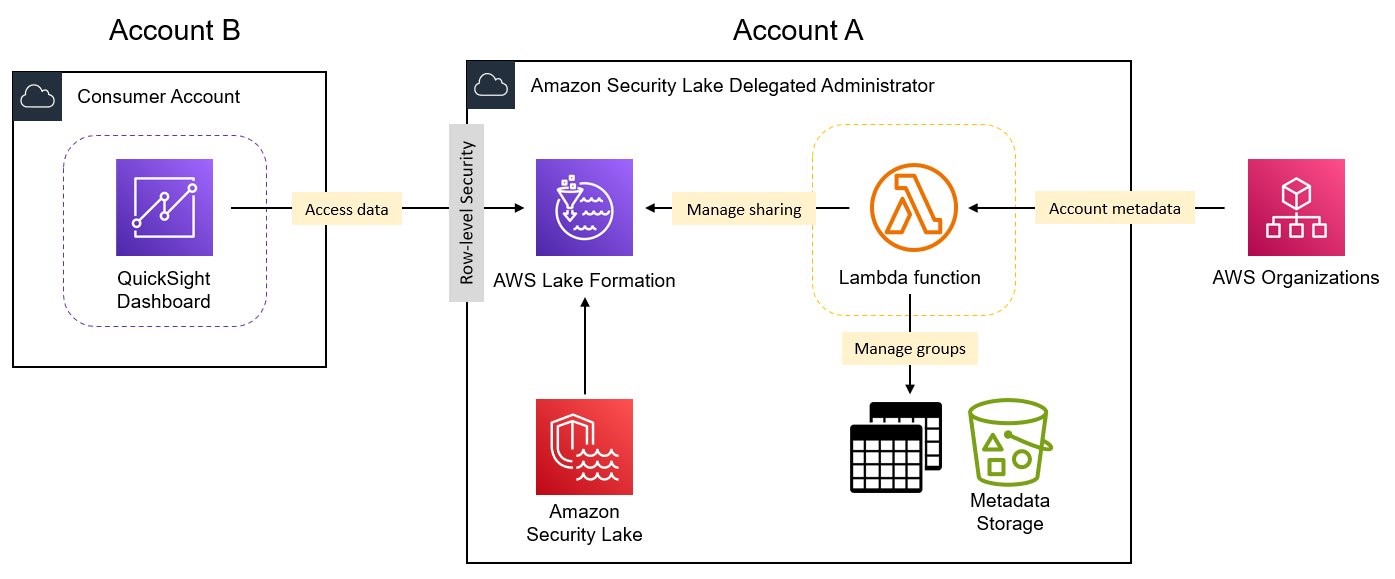
Figure 2: Logical overview of solution components
The solution includes the following core components:
- An AWS Lambda function is deployed into the Security Lake delegated administrator account (Account A) and extracts AWS account metadata for grouping Security Lake data and manages secure sharing through Lake Formation.
- Lake Formation implements row-level security using data filters to restrict access to Security Lake data to only records from AWS accounts in a particular OU. Lake Formation also manages the grants that allow consumer AWS accounts access to the filtered data.
- An Amazon Simple Storage Service (Amazon S3) bucket is used to store metadata tables that the solution uses. Apache Iceberg tables are used to allow record-level updates in S3.
- QuickSight is configured within each data consumer AWS account (Account B) and is used to visualize the data for the AWS accounts within an OU.
Deploy the solution
You can deploy the solution through either the AWS Management Console or the AWS Cloud Development Kit (AWS CDK).
To deploy the solution using the AWS Management Console, follow these steps:
- Download the CloudFormation template.
- In your Amazon Security Lake delegated administrator account (Account A), navigate to create a new AWS CloudFormation stack.
- Under Specify a template, choose Upload a template file and upload the file downloaded in the previous step. Then choose Next.
- Enter RowLevelSecurityLakeStack as the stack name.
The table names used by Security Lake include AWS Region identifiers that you might need to change depending on the Region you’re using Security Lake in. Edit the following parameters if required and then choose Next.
- MetadataDatabase: the name you want to give the metadata database.
- Default: aws_account_metadata_db
- SecurityLakeDB: the Security Lake database as registered by Security Lake.
- Default: amazon_security_lake_glue_db_ap_southeast_2
- SecurityLakeTable: the Security Lake table you want to share.
- Default: amazon_security_lake_table_ap_southeast_2_sh_findings_1_0
- MetadataDatabase: the name you want to give the metadata database.
- On the Configure stack options screen, leave all other values as default and choose Next.
- On the next screen, navigate to the bottom of the page and select the checkbox next to I acknowledge that AWS CloudFormation might create IAM resources. Choose Submit.
The solution takes about 5 minutes to deploy.
To deploy the solution using the AWS CDK, follow these steps:
- Download the code from the row-level-security-lake GitHub repository, where you can also contribute to the sample code. The CDK initializes your environment and uploads the Lambda assets to Amazon S3. Then, deploy the solution to your account.
- For a CDK deployment, you can edit the same Region identifier parameters discussed in the CloudFormation deployment option by editing the cdk.context.json file and changing the metadata_database, security_lake_db, and security_lake_table values if required.
- While you’re authenticated in the Security Lake delegated administrator account, you can bootstrap the account and deploy the solution by running the following commands:
cdk bootstrap
cdk deploy
Configuring the solution in the Security Lake delegated administrator account
After the solution has been successfully deployed, you can review the OUs discovered within your organization and specify which consumer AWS accounts (Account B) you want to share OU data with.
To specify AWS accounts to share OU security data with, follow these steps:
- While in the Security Lake delegated administrator account (Account A), go to the Lake Formation console.
- To view and update the metadata discovered by the Lambda function, you first must grant yourself access to the tables where it’s stored. Select the radio button for aws_account_metadata_db. Then, under the Action dropdown menu, select Grant.
- On the Grant data permissions page, under Principals, select the IAM users and roles dropdown and select the IAM role that you are currently logged in as.
- Under LF-Tags or catalog resources, select the Tables dropdown and select All tables.
- Under Table permissions, select Select, Insert, and Alter. These permissions let you view and update the data in the tables.
- Leave all other options as default and choose Grant.
- Now go to the AWS Athena console.
- On the left side, select aws_account_metadata_db> as the Database. You will see aws_account_metadata and ou_groups >as tables within the database.
- To view the OUs available within your organization, paste the following query into the Athena query editor window and choose Run.
- Next, you must specify an AWS account you want to share an OU’s data with. Run the following SQL query in Athena and replace <AWS account Id> and <OU to assign> with values from your organization:
- Repeat this process for each OU you want to assign different AWS accounts to.
- You can confirm that changes have been applied by running the Athena query from Step 3 again.
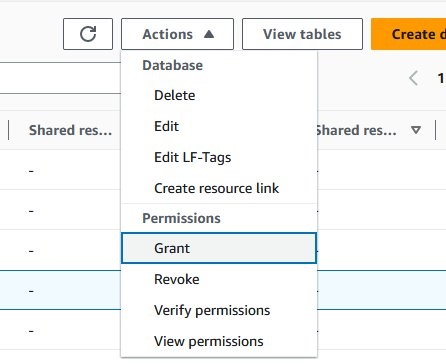
Figure 3: Creating a grant for your IAM role
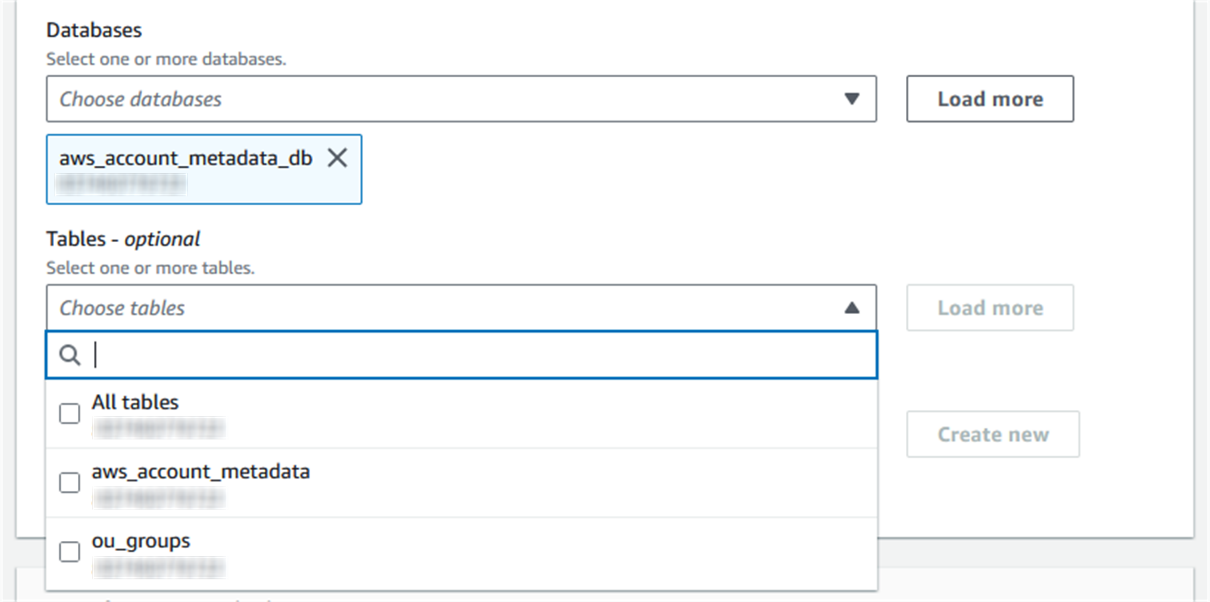
Figure 4: Choosing All Tables for the grant
Note: To use Athena for queries you must configure an S3 bucket to store query results. If this is the first time Athena is being used in your account, you will receive a message saying that you need to configure an S3 bucket. To do this, select the Edit settings button in the blue information notice and follow the instructions.

Figure 5: List of tables under the aws_accounts_metadata_db database
In the example organization, all ExampleCorpWest security data is shared with AWS account 123456789012 (Account B) using the following SQL query:
Note: You must specify the full OU path beginning with OU=root.
Note: You can only assign one AWS account ID to each OU group
You should see the AWS account ID you specified next to your OU.
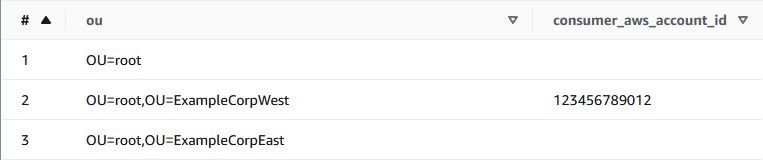
Figure 6: Consumer AWS account listed against ExampleCorpWest OU
Invoke the Lambda function manually
By default, the Lambda function is scheduled to run hourly to monitor for changes to AWS account metadata and to update Lake Formation sharing permissions (grants) if needed. To perform the remaining steps in this post without having to wait for the hourly run, you must manually invoke the Lambda function.
To invoke the Lambda function manually, follow these steps:
- Open the AWS Lambda console.
- Select the RowLevelSecurityLakeStack-* Lambda function.
- Under Code source, choose Test.
- The Lambda function doesn’t take any parameters. Enter rl-sec-lake-test as the Event name and leave all other options as the default. Choose Save.
- Choose Test again. The Lambda function will take approximately 5 minutes to complete in an environment with less than 100 AWS accounts.
After the Lambda function has finished, you can review the data cell filters and grants that have been created in Lake Formation to securely share Security Lake data with your consumer AWS account (Account B).
To review the data filters and grants, follow these steps:
- Open the Lake Formation console.
- In the navigation pane, select Data filters under Data catalog to see a list of data cells filters that have been created for each OU that you assigned a consumer AWS account to. One filter is created per table. Each consumer AWS account is granted restricted access to the aws_account_metadata table and the aggregated Security Lake table.
- Select one of the filters in the list and choose Edit. Edit data filter displays information about the filter such as the database and table it’s applied to, as well as the Row filter expression that enforces row-level security to only return rows where the AWS account ID is in the OU it applies to. Choose Cancel to close the window.
- To see how the filters are used to grant restricted access to your tables, select Data lake permission under Permissions from navigation pane. In the search bar under Data permissions, enter the AWS account ID for your consumer AWS account (Account B) and press Enter. You will see a list of all the grants applied to that AWS account. Scroll to the right to see a column titled Resource that lists the names of the data cell filters you saw in the previous step.

Figure 7: Viewing data filters in Lake Formation
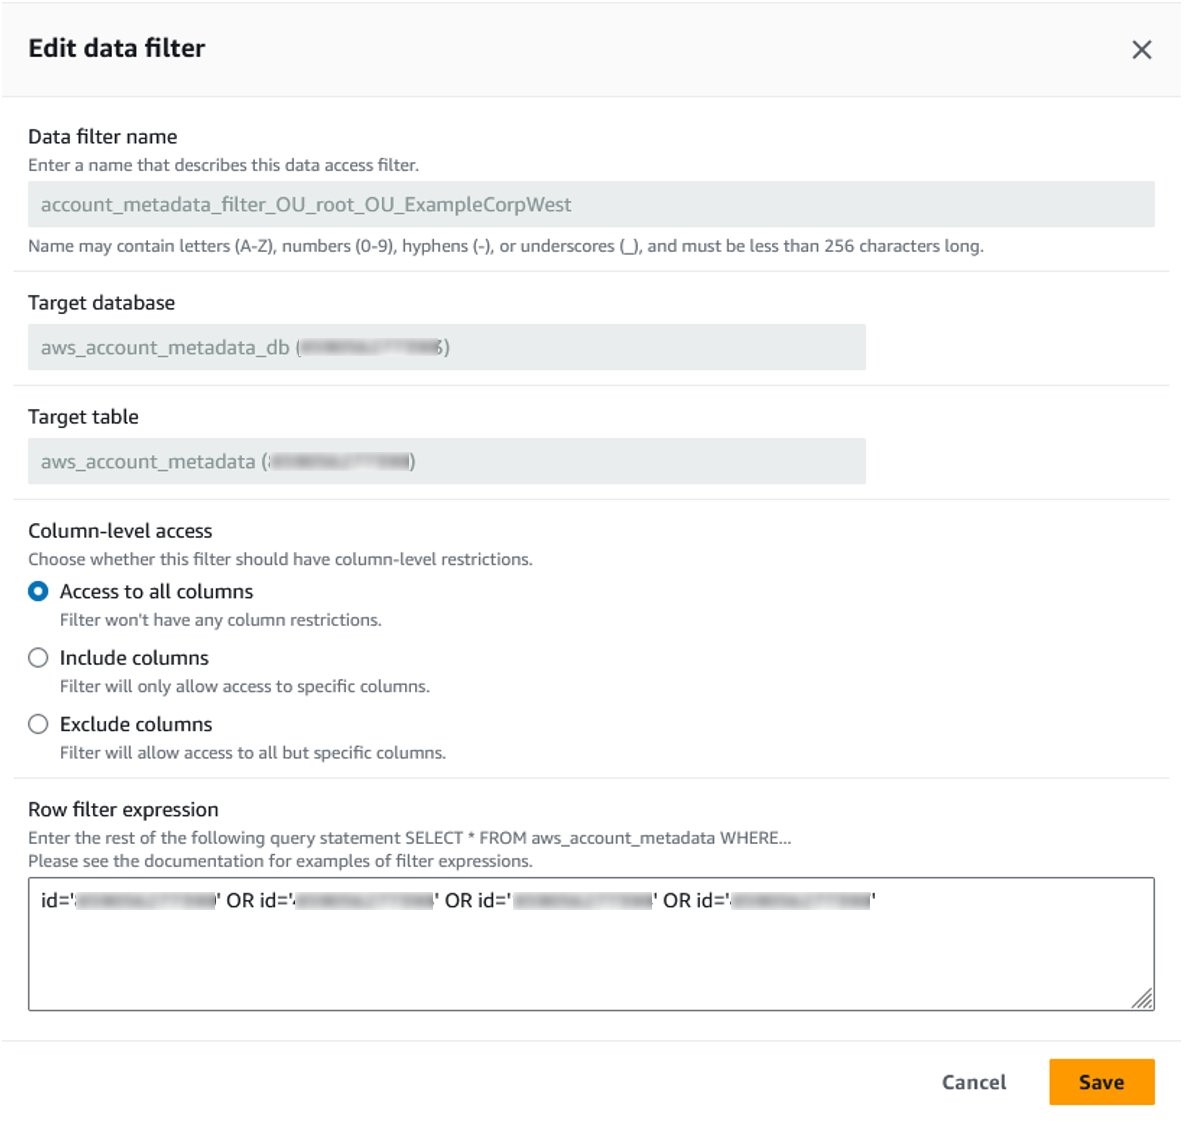
Figure 8: Details of a data filter showing row filter expression

Figure 9: Grants to the data consumer account for data filters
You can now move on to setting up the consumer AWS account.
Configuring QuickSight in the consumer AWS account (Account B)
Now that you’ve configured everything in the Security Lake delegated administrator account (Account A), you can configure QuickSight in the consumer account (Account B).
To confirm you can access shared tables, follow these steps:
- Sign in to your consumer AWS account (also known as Account B).
- Follow the same steps as outlined in this previous post (NEEDS 2ND POST IN SERIES LINK WHEN LIVE) to accept the AWS Resource Access Manager invitation, create a new database, and create resource links for the aws_account_metadata and amazon_security_lake_table_<region>_sh_findings_1_0 tables that have been shared with your consumer AWS account. Make sure you create resource links for both tables shared with the account. When done, return to this post and continue with step 3.
- [Optional] After the resource links have been created, test that you’re able to query the data by selecting the radio button next to the aws_account_metadata resource link, select Actions, and then select View data under Table. This takes you to the Athena query editor where you can now run queries on the shared tables.
- In the Editor configuration, select AwsDataCatalog from the Data source options. The Database should be the database you created in the previous steps, for example security_lake_visualization. After selecting the database, copy the SQL query that follows and paste it into your Athena query editor, and choose Run. You will only see rows of account information from the OU you previously shared.
- Next, to enrich your Security Lake data with the AWS account metadata you need to create an Athena View that will join the datasets and filter the results to only return findings from the AWS Foundational Security Best Practices Standard. You can do this by copying the below query and running it in the Athena query editor.
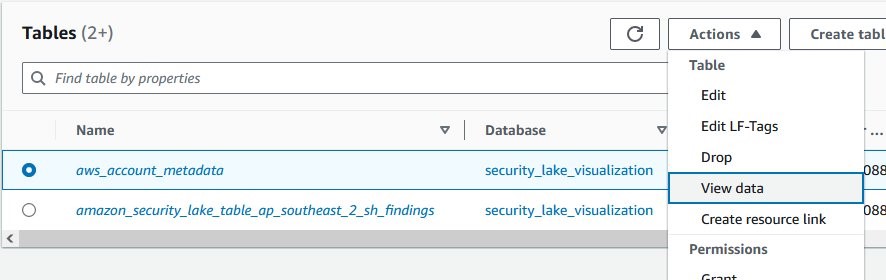
Figure 10: Selecting View data in Lake Formation to open Athena
Note: To use Athena for queries you must configure an S3 bucket to store query results. If this is the first time using Athena in your account, you will receive a message saying that you need to configure an S3 bucket. To do this, choose Edit settings in the blue information notice and follow the instructions.
The SQL above performs a subquery to find only those findings in the Security Lake table that are from the AWS FSBP standard and then joins those rows with the aws_account_metadata table based on the AWS account ID. You can see it has created a new view listed under Views containing enriched security data that you can import as a dataset in QuickSight.
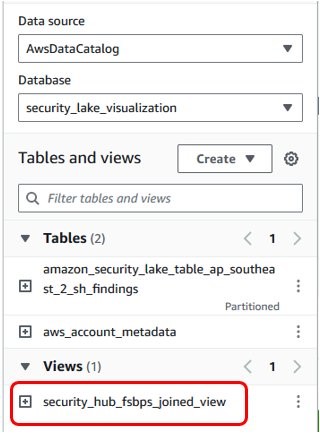
Figure 11: Additional view added to the security_lake_visualization database
Configuring QuickSight
To perform the initial steps to set up QuickSight in the consumer AWS account, you can follow the steps listed in the second post in this series. You must also provide the following grants to your QuickSight user:
| Type | Resource | Permissions |
| GRANT | security_hub_fsbps_joined_view | SELECT |
| GRANT | aws_metadata_db (resource link) | DESCRIBE |
| GRANT | amazon_security_lake_table_<region>_sh_findings_1_0 (resource link) | DESCRIBE |
| GRANT ON TARGET | aws_metadata_db (resource link) | SELECT |
| GRANT ON TARGET | amazon_security_lake_table_<region>_sh_findings_1_0 (resource link) | SELECT |
To create a new dataset in QuickSight, follow these steps:
- After your QuickSight user has the necessary permissions, open the QuickSight console and verify that you’re in same Region where Lake Formation is sharing the data.
- Add your data by choosing Datasets from the navigation pane and then selecting New dataset. To create a new dataset from new data sources, select Athena.
- Enter a data source name, for example security_lake_visualization, leave the Athena workgroup as [ primary ]. Then choose Create data source.
- The next step is to select the tables to build your dashboards. On the Choose your table prompt, for Catalog, select AwsDataCatalog. For Database, select the database you created in the previous steps, for example security_lake_visualization. For Table, select the security_hub_fsbps_joined_view you created previously and choose Edit/Preview data.
- You will be taken to a screen where you can preview the data in your dataset.
- After you confirm you’re able to preview the data from the view, select the SPICE radio button in the bottom left of the screen and then choose PUBLISH & VISUALIZE.
- You can now create analyses and dashboards from Security Hub AWS FSBP standard findings per OU and filter data based on business dimensions available to you through OU structure and account tags.
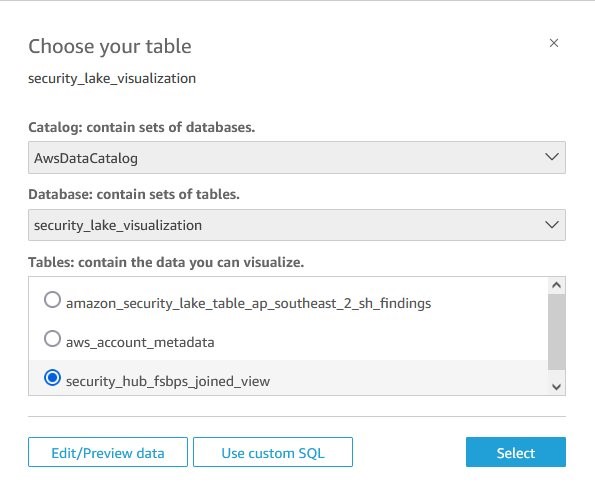
Figure 12 – Choosing the joined dataset in QuickSight

Figure 13: Previewing data in QuickSight
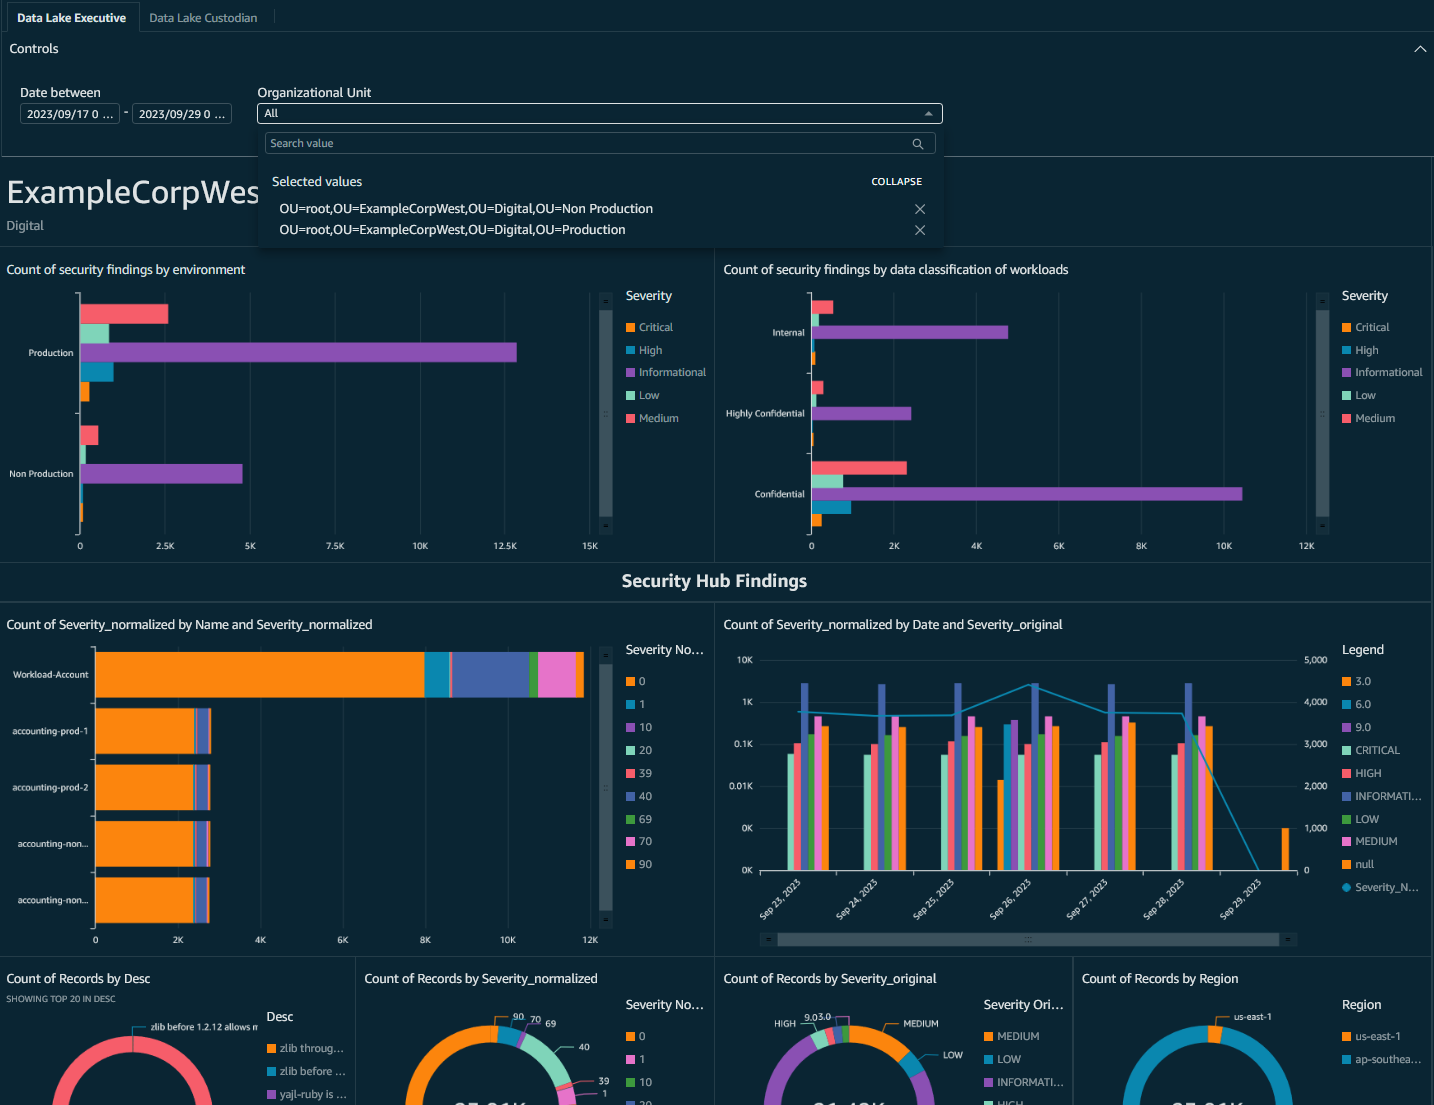
Figure 14: QuickSight dashboard showing only ExampleCorpWest OU data and incorporating business dimensions
Clean up the resources
To clean up the resources that you created for this example:
- Sign in to the Security Lake delegated admin account and delete the CloudFormation stack by either:
- Using the CloudFormation console to delete the stack, or
- Using the AWS CDK to run cdk destroy in your terminal. Follow the instructions and enter y when prompted to delete the stack.
- Remove any data filters you created by navigating to data filters within Lake Formation, selecting each one and choosing Delete.
Conclusion
In this final post of the series on visualizing Security Lake data with QuickSight, we introduced you to using a tool—available from AWS Samples—to extract OU structure and account metadata from your organization and use it to securely share Security Lake data on a per-OU basis across your organization. You learned how to enrich Security Lake data with account metadata and use it to create row-level security controls in Lake Formation. You were then able to address a common example of distributing security posture measured by the AWS Foundational Security Best Practices standard as part of AWS Security Hub.
If you have feedback about this post, submit comments in the Comments section below. If you have questions about this post, contact AWS Support.
Aggregating, searching, and visualizing log data from distributed sources with Amazon Athena and Amazon QuickSight
Post Syndicated from Pratima Singh original https://aws.amazon.com/blogs/security/aggregating-searching-and-visualizing-log-data-from-distributed-sources-with-amazon-athena-and-amazon-quicksight/
Customers using Amazon Web Services (AWS) can use a range of native and third-party tools to build workloads based on their specific use cases. Logs and metrics are foundational components in building effective insights into the health of your IT environment. In a distributed and agile AWS environment, customers need a centralized and holistic solution to visualize the health and security posture of their infrastructure.
You can effectively categorize the members of the teams involved using the following roles:
- Executive stakeholder: Owns and operates with their support staff and has total financial and risk accountability.
- Data custodian: Aggregates related data sources while managing cost, access, and compliance.
- Operator or analyst: Uses security tooling to monitor, assess, and respond to related events such as service disruptions.
In this blog post, we focus on the data custodian role. We show you how you can visualize metrics and logs centrally with Amazon QuickSight irrespective of the service or tool generating them. We use Amazon Simple Storage Service (Amazon S3) for storage, AWS Glue for cataloguing, and Amazon Athena for querying the data and creating structured query language (SQL) views for QuickSight to consume.
Target architecture
This post guides you towards building a target architecture in line with the AWS Well-Architected Framework. The tiered and multi-account target architecture, shown in Figure 1, uses account-level isolation to separate responsibilities across the various roles identified above and makes access management more defined and specific to those roles. The workload accounts generate the telemetry around the applications and infrastructure. The data custodian account is where the data lake is deployed and collects the telemetry. The operator account is where the queries and visualizations are created.
Throughout the post, I mention AWS services that reduce the operational overhead in one or more stages of the architecture.

Figure 1: Data visualization architecture
Ingestion
Irrespective of the technology choices, applications and infrastructure configurations should generate metrics and logs that report on resource health and security. The format of the logs depends on which tool and which part of the stack is generating the logs. For example, the format of log data generated by application code can capture bespoke and additional metadata deemed useful from a workload perspective as compared to access logs generated by proxies or load balancers. For more information on types of logs and effective logging strategies, see Logging strategies for security incident response.
Amazon S3 is a scalable, highly available, durable, and secure object storage that you will use as the storage layer. To build a solution that captures events agnostic of the source, you must forward data as a stream to the S3 bucket. Based on the architecture, there are multiple tools you can use to capture and stream data into S3 buckets. Some tools support integration with S3 and directly stream data to S3. Resources like servers and virtual machines need forwarding agents such as Amazon Kinesis Agent, Amazon CloudWatch agent, or Fluent Bit.
Amazon Kinesis Data Streams provides a scalable data streaming environment. Using on-demand capacity mode eliminates the need for capacity provisioning and capacity management for streaming workloads. For log data and metric collection, you should use on-demand capacity mode, because log data generation can be unpredictable depending on the requests that are being handled by the environment. Amazon Kinesis Data Firehose can convert the format of your input data from JSON to Apache Parquet before storing the data in Amazon S3. Parquet is naturally compressed, and using Parquet native partitioning and compression allows for faster queries compared to JSON formatted objects.
Scalable data lake
Use AWS Lake Formation to build, secure, and manage the data lake to store log and metric data in S3 buckets. We recommend using tag-based access control and named resources to share the data in your data store to share data across accounts to build visualizations. Data custodians should configure access for relevant datasets to the operators who can use Athena to perform complex queries and build compelling data visualizations with QuickSight, as shown in Figure 2. For cross-account permissions, see Use Amazon Athena and Amazon QuickSight in a cross-account environment. You can also use Amazon DataZone to build additional governance and share data at scale within your organization. Note that the data lake is different to and separate from the Log Archive bucket and account described in Organizing Your AWS Environment Using Multiple Accounts.

Figure 2: Account structure
Amazon Security Lake
Amazon Security Lake is a fully managed security data lake service. You can use Security Lake to automatically centralize security data from AWS environments, SaaS providers, on-premises, and third-party sources into a purpose-built data lake that’s stored in your AWS account. Using Security Lake reduces the operational effort involved in building a scalable data lake, as the service automates the configuration and orchestration for the data lake with Lake Formation. Security Lake automatically transforms logs into a standard schema—the Open Cybersecurity Schema Framework (OCSF) — and parses them into a standard directory structure, which allows for faster queries. For more information, see How to visualize Amazon Security Lake findings with Amazon QuickSight.
Querying and visualization

Figure 3: Data sharing overview
After you’ve configured cross-account permissions, you can use Athena as the data source to create a dataset in QuickSight, as shown in Figure 3. You start by signing up for a QuickSight subscription. There are multiple ways to sign in to QuickSight; this post uses AWS Identity and Access Management (IAM) for access. To use QuickSight with Athena and Lake Formation, you first must authorize connections through Lake Formation. After permissions are in place, you can add datasets. You should verify that you’re using QuickSight in the same AWS Region as the Region where Lake Formation is sharing the data. You can do this by checking the Region in the QuickSight URL.
You can start with basic queries and visualizations as described in Query logs in S3 with Athena and Create a QuickSight visualization. Depending on the nature and origin of the logs and metrics that you want to query, you can use the examples published in Running SQL queries using Amazon Athena. To build custom analytics, you can create views with Athena. Views in Athena are logical tables that you can use to query a subset of data. Views help you to hide complexity and minimize maintenance when querying large tables. Use views as a source for new datasets to build specific health analytics and dashboards.
You can also use Amazon QuickSight Q to get started on your analytics journey. Powered by machine learning, Q uses natural language processing to provide insights into the datasets. After the dataset is configured, you can use Q to give you suggestions for questions to ask about the data. Q understands business language and generates results based on relevant phrases detected in the questions. For more information, see Working with Amazon QuickSight Q topics.
Conclusion
Logs and metrics offer insights into the health of your applications and infrastructure. It’s essential to build visibility into the health of your IT environment so that you can understand what good health looks like and identify outliers in your data. These outliers can be used to identify thresholds and feed into your incident response workflow to help identify security issues. This post helps you build out a scalable centralized visualization environment irrespective of the source of log and metric data.
This post is part 1 of a series that helps you dive deeper into the security analytics use case. In part 2, How to visualize Amazon Security Lake findings with Amazon QuickSight, you will learn how you can use Security Lake to reduce the operational overhead involved in building a scalable data lake and centralizing log data from SaaS providers, on-premises, AWS, and third-party sources into a purpose-built data lake. You will also learn how you can integrate Athena with Security Lake and create visualizations with QuickSight of the data and events captured by Security Lake.
Part 3, How to share security telemetry per Organizational Unit using Amazon Security Lake and AWS Lake Formation, dives deeper into how you can query security posture using AWS Security Hub findings integrated with Security Lake. You will also use the capabilities of Athena and QuickSight to visualize security posture in a distributed environment.
If you have feedback about this post, submit comments in the Comments section below. If you have questions about this post, contact AWS Support.
Want more AWS Security news? Follow us on Twitter.
How to visualize Amazon Security Lake findings with Amazon QuickSight
Post Syndicated from Mark Keating original https://aws.amazon.com/blogs/security/how-to-visualize-amazon-security-lake-findings-with-amazon-quicksight/
In this post, we expand on the earlier blog post Ingest, transform, and deliver events published by Amazon Security Lake to Amazon OpenSearch Service, and show you how to query and visualize data from Amazon Security Lake using Amazon Athena and Amazon QuickSight. We also provide examples that you can use in your own environment to visualize your data. This post is the second in a multi-part blog series on visualizing data in QuickSight and provides an introduction to visualizing Security Lake data using QuickSight. The first post in the series is Aggregating, searching, and visualizing log data from distributed sources with Amazon Athena and Amazon QuickSight.
With the launch of Amazon Security Lake, it’s now simpler and more convenient to access security-related data in a single place. Security Lake automatically centralizes security data from cloud, on-premises, and custom sources into a purpose-built data lake stored in your account, and removes the overhead related to building and scaling your infrastructure as your data volumes increase. With Security Lake, you can get a more complete understanding of your security data across your entire organization. You can also improve the protection of your workloads, applications, and data.
Security Lake has adopted the Open Cybersecurity Schema Framework (OCSF), an open standard. With OCSF support, the service can normalize and combine security data from AWS and a broad range of enterprise security data sources. Using the native ingestion capabilities of the service to pull in AWS CloudTrail, Amazon Route 53, VPC Flow Logs, or AWS Security Hub findings, ingesting supported third-party partner findings, or ingesting your own security-related logs, Security Lake provides an environment in which you can correlate events and findings by using a broad range of tools from the AWS and APN partner community.
Many customers have already deployed and maintain a centralized logging solution using services such as Amazon OpenSearch Service or a third-party security information and event management (SIEM) tool, and often use business intelligence (BI) tools such as Amazon QuickSight to gain insights into their data. With Security Lake, you have the freedom to choose how you analyze this data. In some cases, it may be from a centralized team using OpenSearch or a SIEM tool, and in other cases it may be that you want the ability to give your teams access to QuickSight dashboards or provide specific teams access to a single data source with Amazon Athena.
Before you get started
To follow along with this post, you must have:
- A basic understanding of Security Lake, Athena, and QuickSight
- Security Lake already deployed and accepting data sources
- An existing QuickSight deployment that can be used to visualize Security Lake data, or an account where you can sign up for QuickSight to create visualizations
Accessing data
Security Lake uses the concept of data subscribers when it comes to accessing your data. A subscriber consumes logs and events from Security Lake, and supports two types of access:
- Data access — Subscribers can directly access Amazon Simple Storage Service (Amazon S3) objects and receive notifications of new objects through a subscription endpoint or by polling an Amazon Simple Queue Service (Amazon SQS) queue. This is the architecture typically used by tools such as OpenSearch Service and partner SIEM solutions.
- Query access — Subscribers with query access can directly query AWS Lake Formation tables in your S3 bucket by using services like Athena. Although the primary query engine for Security Lake is Athena, you can also use other services that integrate with AWS Glue, such as Amazon Redshift Spectrum and Spark SQL.
In the sections that follow, we walk through how to configure cross-account sharing from Security Lake to visualize your data with QuickSight, and the associated Athena queries that are used. It’s a best practice to isolate log data from visualization workloads, and we recommend using a separate AWS account for QuickSight visualizations. A high-level overview of the architecture is shown in Figure 1.
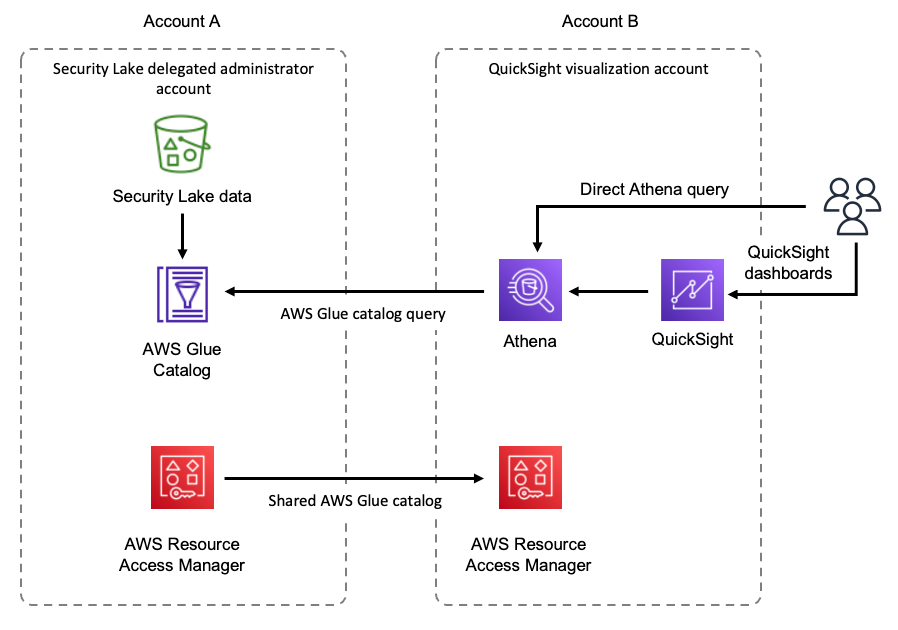
Figure 1: Security Lake visualization architecture overview
In Figure 1, Security Lake data is being cataloged by AWS Glue in account A. This catalog is then shared to account B by using AWS Resource Access Manager. Users in account B are then able to directly query the cataloged Security Lake data using Athena, or get visualizations by accessing QuickSight dashboards that use Athena to query the data.
Configure a Security Lake subscriber
The following steps guide you through configuring a Security Lake subscriber using the delegated administrator account.
To configure a Security Lake subscriber
- Sign in to the AWS Management Console and navigate to the Amazon Security Lake console in the Security Lake delegated administrator account. In this post, we’ll call this Account A.
- Go to Subscribers and choose Create subscriber.
- On the Subscriber details page, enter a Subscriber name. For example, cross-account-visualization.
- For Log and event sources, select All log and event sources. For Data access method, select Lake Formation.
- Add the Account ID for the AWS account that you’ll use for visualizations. In this post, we’ll call this Account B.
- Add an External ID to configure secure cross-account access. For more information, see How to use an external ID when granting access to your AWS resources to a third party.
- Choose Create.
Security Lake creates a resource share in your visualizations account using AWS Resource Access Manager (AWS RAM). You can view the configuration of the subscriber from Security Lake by selecting the subscriber you just created from the main Subscribers page. It should look like Figure 2.
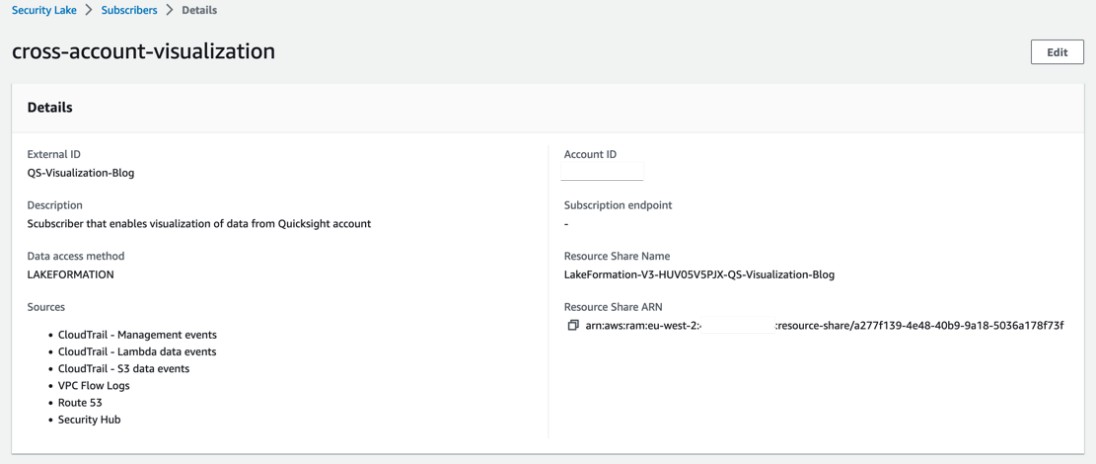
Figure 2: Subscriber configuration
Note: your configuration might be slightly different, based on what you’ve named your subscriber, the AWS Region you’re using, the logs being ingested, and the external ID that you created.
Configure Athena to visualize your data
Now that the subscriber is configured, you can move on to the next stage, where you configure Athena and QuickSight to visualize your data.
Note: In the following example, queries will be against Security Hub findings, using the Security Lake table in the ap-southeast-2 Region. If necessary, change the table name in your queries to match the Security Lake Region you use in the following configuration steps.
To configure Athena
- Sign in to your QuickSight visualization account (Account B).
- Navigate to the AWS Resource Access Manager (AWS RAM) console. You’ll see a Resource share invitation under Shared with me in the menu on the left-hand side of the screen. Choose Resource shares to go to the invitation.

Figure 3: RAM menu
- On the Resource shares page, select the name of the resource share starting with LakeFormation-V3, and then choose Accept resource share. The Security Lake Glue catalog is now available to Account B to query.
- For cross-account access, you should create a database to link the shared tables. Navigate to Lake Formation, and then under the Data catalog menu option, select Databases, then select Create database.
- Enter a name, for example security_lake_visualization, and keep the defaults for all other settings. Choose Create database.

Figure 4: Create database
- After you’ve created the database, you need to create resource links from the shared tables into the database. Select Tables under the Data catalog menu option. Select one of the tables shared by Security Lake by selecting the table’s name. You can identify the shared tables by looking for the ones that start with amazon_security_lake_table_.
- From the Actions dropdown list, select Create resource link.
Figure 5: Creating a resource link
- Enter the name for the resource link, for example amazon_security_lake_table_ap_southeast_2_sh_findings_1_0, and then select the security_lake_visualization database created in the previous steps.
- Choose Create. After the links have been created, the names of the resource links will appear in italics in the list of tables.
- You can now select the radio button next to the resource link, select Actions, and then select View data under Table. This takes you to the Athena query editor, where you can now run queries on the shared Security Lake tables.
Figure 6: Viewing data to query
To use Athena for queries, you must configure an S3 bucket to store query results. If this is the first time Athena is being used in your account, you’ll receive a message saying that you need to configure an S3 bucket. To do this, choose Edit settings in the information notice and follow the instructions.
- In the Editor configuration, select AwsDataCatalog from the Data source options. The Database should be the database you created in the previous steps, for example security_lake_visualization.
- After selecting the database, copy the query that follows and paste it into your Athena query editor, and then choose Run. This runs your first query to list 10 Security Hub findings:
Figure 7: Athena data query editor
This queries Security Hub data in Security Lake from the Region you specified, and outputs the results in the Query results section on the page. For a list of example Security Lake specific queries, see the AWS Security Analytics Bootstrap project, where you can find example queries specific to each of the Security Lake natively ingested data sources.
- To build advanced dashboards, you can create views using Athena. The following is an example of a view that lists 100 findings with failed checks sorted by created_time of the findings.
- You can now query the view to list the first 10 rows using the following query.


Create a QuickSight dataset
Now that you’ve done a sample query and created a view, you can use Athena as the data source to create a dataset in QuickSight.
To create a QuickSight dataset
- Sign in to your QuickSight visualization account (also known as Account B), and open the QuickSight console.
- If this is the first time you’re using QuickSight, you need to sign up for a QuickSight subscription.
- Although there are multiple ways to sign in to QuickSight, we used AWS Identity and Access Management (IAM) based access to build the dashboards. To use QuickSight with Athena and Lake Formation, you first need to authorize connections through Lake Formation.
- When using cross-account configuration with AWS Glue Catalog, you also need to configure permissions on tables that are shared through Lake Formation. For a detailed deep dive, see Use Amazon Athena and Amazon QuickSight in a cross-account environment. For the use case highlighted in this post, use the following steps to grant access on the cross-account tables in the Glue Catalog.
- In the AWS Lake Formation console, navigate to the Tables section and select the resource link for the table, for example amazon_security_lake_table_ap_southeast_2_sh_findings_1_0.
- Select Actions. Under Permissions, select Grant on target.
- For Principals, select SAML users and groups, and then add the QuickSight user’s ARN captured in step 2 of the topic Authorize connections through Lake Formation.
- For the LF-Tags or catalog resources section, use the default settings.
- For Table permissions, choose Select for both Table Permissions and Grantable Permissions.
- Choose Grant.
Figure 8: Granting permissions in Lake Formation
- After permissions are in place, you can create datasets. You should also verify that you’re using QuickSight in the same Region where Lake Formation is sharing the data. The simplest way to determine your Region is to check the QuickSight URL in your web browser. The Region will be at the beginning of the URL. To change the Region, select the settings icon in the top right of the QuickSight screen and select the correct Region from the list of available Regions in the drop-down menu.
- Select Datasets, and then select New dataset. Select Athena from the list of available data sources.
- Enter a Data source name, for example security_lake_visualizations, and leave the Athena workgroup as [primary]. Then select Create data source.
- Select the tables to build your dashboards. On the Choose your table prompt, for Catalog, select AwsDataCatalog. For Database, select the database you created in the previous steps, for example security_lake_visualization. For Table, select the table with the name starting with amazon_security_lake_table_. Choose Select.

Figure 9: Selecting the table for a new dataset
- On the Finish dataset creation prompt, select Import to SPICE for quicker analytics. Choose Visualize.
- In the left-hand menu in QuickSight, you can choose attributes from the data set to add analytics and widgets.


After you’re familiar with how to use QuickSight to visualize data from Security Lake, you can create additional datasets and add other widgets to create dashboards that are specific to your needs.
AWS pre-built QuickSight dashboards
So far, you’ve seen how to use Athena manually to query your data and how to use QuickSight to visualize it. AWS Professional Services is excited to announce the publication of the Data Visualization framework to help customers quickly visualize their data using QuickSight. The repository contains a combination of CDK tools and scripts that can be used to create the required AWS objects and deploy basic data sources, datasets, analysis, dashboards, and the required user groups to QuickSight with respect to Security Lake. The framework includes three pre-built dashboards based on the following personas.
| Persona | Role description | Challenges | Goals |
| CISO/Executive Stakeholder | Owns and operates, with their support staff, all security-related activities within a business; total financial and risk accountability |
|
|
| Security Data Custodian | Aggregates all security-related data sources while managing cost, access, and compliance |
|
|
| Security Operator/Analyst | Uses security tooling to monitor, assess, and respond to security-related events. Might perform incident response (IR), threat hunting, and other activities. |
|
|
After deploying through the CDK, you will have three pre-built dashboards configured and available to view. Once deployed, each of these dashboards can be customized according to your requirements. The Data Lake Executive dashboard provides a high-level overview of security findings, as shown in Figure 10.
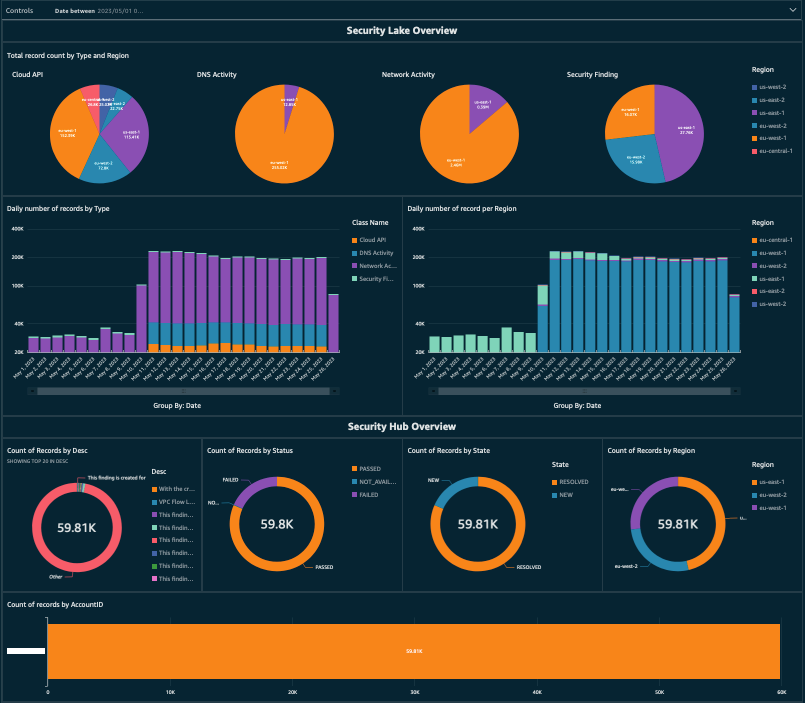
Figure 10: Example QuickSight dashboard showing an overview of findings in Security Lake
The Security Lake custodian role will have visibility of security related data sources, as shown in Figure 11.
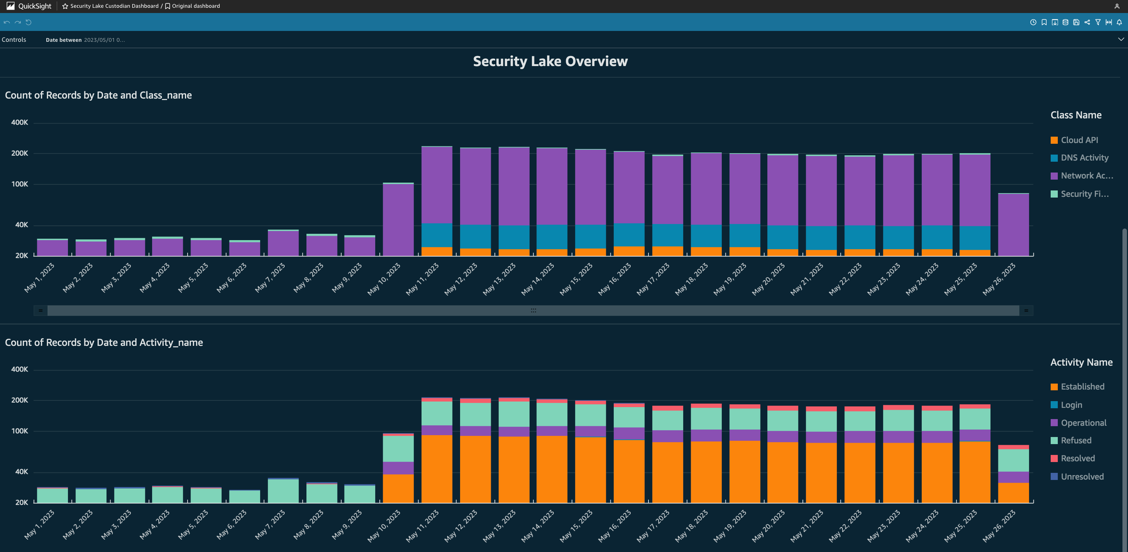
Figure 11: Security Lake custodian dashboard
And the Security Lake operator will have a view of security related events, as shown in Figure 12.

Figure 12: Security Operator dashboard
Conclusion
In this post, you learned about Security Lake, and how you can use Athena to query your data and QuickSight to gain visibility of your security findings stored within Security Lake. When using QuickSight to visualize your data, it’s important to remember that the data remains in your S3 bucket within your own environment. However, if you have other use cases or wish to use other analytics tools such as OpenSearch, Security Lake gives you the freedom to choose how you want to interact with your data.
We also introduced the Data Visualization framework that was created by AWS Professional Services. The framework uses the CDK to deploy a set of pre-built dashboards to help get you up and running quickly.
With the announcement of AWS AppFabric, we’re making it even simpler to ingest data directly into Security Lake from leading SaaS applications without building and managing custom code or point-to-point integrations, enabling quick visualization of your data from a single place, in a common format.
For additional information on using Athena to query Security Lake, have a look at the AWS Security Analytics Bootstrap project, where you can find queries specific to each of the Security Lake natively ingested data sources. If you want to learn more about how to configure and use QuickSight to visualize findings, we have hands-on QuickSight workshops to help you configure and build QuickSight dashboards for visualizing your data.
If you have feedback about this post, submit comments in the Comments section below. If you have questions about this post, contact AWS Support.
Want more AWS Security news? Follow us on Twitter.
How We Achieved Upload Speeds Faster Than AWS S3
Post Syndicated from Pat Patterson original https://www.backblaze.com/blog/2023-performance-improvements/

You don’t always need the absolute fastest cloud storage—your performance requirements depend on your use case, business objectives, and security needs. But still, faster is usually better. And Backblaze just announced innovation on B2 Cloud Storage that delivers a lot more speed: most file uploads will now be up to 30% faster than AWS S3.
Today, I’m diving into all of the details of this performance improvement, how we did it, and what it means for you.
The TL:DR
The Results: Customers who rely on small file uploads (1MB or less) can expect to see 10–30% faster uploads on average based on our tests, all without any change to durability, availability, or pricing.
What Does This Mean for You?
All B2 Cloud Storage customers will benefit from these performance enhancements, especially those who use Backblaze B2 as a storage destination for data protection software. Small uploads of 1MB or less make up about 70% of all uploads to B2 Cloud Storage and are common for backup and archive workflows. Specific benefits of the performance upgrades include:
- Secures data in offsite backup faster.
- Frees up time for IT administrators to work on other projects.
- Decreases congestion on network bandwidth.
- Deduplicates data more efficiently.
Veeam® is dedicated to working alongside our partners to innovate and create a united front against cyber threats and attacks. The new performance improvements released by Backblaze for B2 Cloud Storage furthers our mission to provide radical resilience to our joint customers.
—Andreas Neufert, Vice President, Product Management, Alliances, Veeam
When Can I Expect Faster Uploads?
Today. The performance upgrades have been fully rolled out across Backblaze’s global data regions.
How We Did It
Prior to this work, when a customer uploaded a file to Backblaze B2, the data was written to multiple hard disk drives (HDDs). Those operations had to be completed before returning a response to the client. Now, we write the incoming data to the same HDDs and also, simultaneously, to a pool of solid state drives (SSDs) we call a “shard stash,” waiting only for the HDD writes to make it to the filesystems’ in-memory caches and the SSD writes to complete before returning a response. Once the writes to HDD are complete, we free up the space from the SSDs so it can be reused.
Since writing data to an SSD is much faster than writing to HDDs, the net result is faster uploads.
That’s just a brief summary; if you’re interested in the technical details (as well as the results of some rigorous testing), read on!
The Path to Performance Upgrades
As you might recall from many Drive Stats blog posts and webinars, Backblaze stores all customer data on HDDs, affectionately termed ‘spinning rust’ by some. We’ve historically reserved SSDs for Storage Pod (storage server) boot drives.
Until now.
That’s right—SSDs have entered the data storage chat. To achieve these performance improvements, we combined the performance of SSDs with the cost efficiency of HDDs. First, I’ll dig into a bit of history to add some context to how we went about the upgrades.
HDD vs. SSD
IBM shipped the first hard drive way back in 1957, so it’s fair to say that the HDD is a mature technology. Drive capacity and data rates have steadily increased over the decades while cost per byte has fallen dramatically. That first hard drive, the IBM RAMAC 350, had a total capacity of 3.75MB, and cost $34,500. Adjusting for inflation, that’s about $375,000, equating to $100,000 per MB, or $100 billion per TB, in 2023 dollars.

Today, the 16TB version of the Seagate Exos X16—an HDD widely deployed in the Backblaze B2 Storage Cloud—retails for around $260, $16.25 per TB. If it had the same cost per byte as the IBM RAMAC 250, it would sell for $1.6 trillion—around the current GDP of China!
SSDs, by contrast, have only been around since 1991, when SanDisk’s 20MB drive shipped in IBM ThinkPad laptops for an OEM price of about $1,000. Let’s consider a modern SSD: the 3.2TB Micron 7450 MAX. Retailing at around $360, the Micron SSD is priced at $112.50 per TB, nearly seven times as much as the Seagate HDD.
So, HDDs easily beat SSDs in terms of storage cost, but what about performance? Here are the numbers from the manufacturers’ data sheets:
| Seagate Exos X16 | Micron 7450 MAX | |
| Model number | ST16000NM001G | MTFDKCB3T2TFS |
| Capacity | 16TB | 3.2TB |
| Drive cost | $260 | $360 |
| Cost per TB | $16.25 | $112.50 |
| Max sustained read rate (MB/s) | 261 | 6,800 |
| Max sustained write rate (MB/s) | 261 | 5,300 |
| Random read rate, 4kB blocks, IOPS | 170/440* | 1,000,000 |
| Random write rate, 4kB blocks, IOPS | 170/440* | 390,000 |
Since HDD platters rotate at a constant rate, 7,200 RPM in this case, they can transfer more blocks per revolution at the outer edge of the disk than close to the middle—hence the two figures for the X16’s transfer rate.
The SSD is over 20 times as fast at sustained data transfer than the HDD, but look at the difference in random transfer rates! Even when the HDD is at its fastest, transferring blocks from the outer edge of the disk, the SSD is over 2,200 times faster reading data and nearly 900 times faster for writes.
This massive difference is due to the fact that, when reading data from random locations on the disk, the platters have to complete an average of 0.5 revolutions between blocks. At 7,200 rotations per minute (RPM), that means that the HDD spends about 4.2ms just spinning to the next block before it can even transfer data. In contrast, the SSD’s data sheet quotes its latency as just 80µs (that’s 0.08ms) for reads and 15µs (0.015ms) for writes, between 84 and 280 times faster than the spinning disk.
Let’s consider a real-world operation, say, writing 64kB of data. Assuming the HDD can write that data to sequential disk sectors, it will spin for an average of 4.2ms, then spend 0.25ms writing the data to the disk, for a total of 4.5ms. The SSD, in contrast, can write the data to any location instantaneously, taking just 27µs (0.027ms) to do so. This (somewhat theoretical) 167x speed advantage is the basis for the performance improvement.
Why did I choose a 64kB block? As we mentioned in a recent blog post focusing on cloud storage performance, in general, bigger files are better when it comes to the aggregate time required to upload a dataset. However, there may be other requirements that push for smaller files. Many backup applications split data into fixed size blocks for upload as files to cloud object storage. There is a trade-off in choosing the block size: larger blocks improve backup speed, but smaller blocks reduce the amount of storage required. In practice, backup blocks may be as small as 1MB or even 256kB. The 64kB blocks we used in the calculation above represent the shards that comprise a 1MB file.
The challenge facing our engineers was to take advantage of the speed of solid state storage to accelerate small file uploads without breaking the bank.
Improving Write Performance for Small Files
When a client application uploads a file to the Backblaze B2 Storage Cloud, a coordinator pod splits the file into 16 data shards, creates four additional parity shards, and writes the resulting 20 shards to 20 different HDDs, each in a different Pod.
Note: As HDD capacity increases, so does the time required to recover after a drive failure, so we periodically adjust the ratio between data shards and parity shards to maintain our eleven nines durability target. In the past, you’ve heard us talk about 17 + 3 as the ratio but we also run 16 + 4 and our very newest vaults use a 15 + 5 scheme.
Each Pod writes the incoming shard to its local filesystem; in practice, this means that the data is written to an in-memory cache and will be written to the physical disk at some point in the near future. Any requests for the file can be satisfied from the cache, but the data hasn’t actually been persistently stored yet.
We need to be absolutely certain that the shards have been written to disk before we return a “success” response to the client, so each Pod executes an fsync system call to transfer (“flush”) the shard data from system memory through the HDD’s write cache to the disk itself before returning its status to the coordinator. When the coordinator has received at least 19 successful responses, it returns a success response to the client. This ensures that, even if the entire data center was to lose power immediately after the upload, the data would be preserved.
As we explained above, for small blocks of data, the vast majority of the time spent writing the data to disk is spent waiting for the drive platter to spin to the correct location. Writing shards to SSD could result in a significant performance gain for small files, but what about that 7x cost difference?
Our engineers came up with a way to have our cake and eat it too by harnessing the speed of SSDs without a massive increase in cost. Now, upon receiving a file of 1MB or less, the coordinator splits it into shards as before, then simultaneously sends the shards to a set of 20 Pods and a separate pool of servers, each populated with 10 of the Micron SSDs described above—a “shard stash.” The shard stash servers easily win the “flush the data to disk” race and return their status to the coordinator in just a few milliseconds. Meanwhile, each HDD Pod writes its shard to the filesystem, queues up a task to flush the shard data to the disk, and returns an acknowledgement to the coordinator.
Once the coordinator has received replies establishing that at least 19 of the 20 Pods have written their shards to the filesystem, and at least 19 of the 20 shards have been flushed to the SSDs, it returns its response to the client. Again, if power was to fail at this point, the data has already been safely written to solid state storage.
We don’t want to leave the data on the SSDs any longer than we have to, so, each Pod, once it’s finished flushing its shard to disk, signals to the shard stash that it can purge its copy of the shard.
Real-World Performance Gains
As I mentioned above, that calculated 167x performance advantage of SSDs over HDDs is somewhat theoretical. In the real world, the time required to upload a file also depends on a number of other factors—proximity to the data center, network speed, and all of the software and hardware between the client application and the storage device, to name a few.
The first Backblaze region to receive the performance upgrade was U.S. East, located in Reston, Virginia. Over a 12-day period following the shard stash deployment there, the average time to upload a 256kB file was 118ms, while a 1MB file clocked in at 137ms. To replicate a typical customer environment, we ran the test application at our partner Vultr’s New Jersey data center, uploading data to Backblaze B2 across the public internet.
For comparison, we ran the same test against Amazon S3’s U.S. East (Northern Virginia) region, a.k.a. us-east-1, from the same machine in New Jersey. On average, uploading a 256kB file to S3 took 157ms, with a 1MB file taking 153ms.
So, comparing the Backblaze B2 U.S. East region to the Amazon S3 equivalent, we benchmarked the new, improved Backblaze B2 as 30% faster than S3 for 256kB files and 10% faster than S3 for 1MB files.
These low-level tests were confirmed when we timed Veeam Backup & Replication software backing up 1TB of virtual machines with 256k block sizes. Backing the server up to Amazon S3 took three hours and 12 minutes; we measured the same backup to Backblaze B2 at just two hours and 15 minutes, 40% faster than S3.
Test Methodology
We wrote a simple Python test app using the AWS SDK for Python (Boto3). Each test run involved timing 100 file uploads using the S3 PutObject API, with a 10ms delay between each upload. (FYI, the delay is not included in the measured time.) The test app used a single HTTPS connection across the test run, following best practice for API usage. We’ve been running the test on a VM in Vultr’s New Jersey region every six hours for the past few weeks against both our U.S. East region and its AWS neighbor. Latency to the Backblaze B2 API endpoint averaged 5.7ms, to the Amazon S3 API endpoint 7.8ms, as measured across 100 ping requests.
What’s Next?
At the time of writing, shard stash servers have been deployed to all of our data centers, across all of our regions. In fact, you might even have noticed small files uploading faster already. It’s important to note that this particular optimization is just one of a series of performance improvements that we’ve implemented, with more to come. It’s safe to say that all of our Backblaze B2 customers will enjoy faster uploads and downloads, no matter their storage workload.
The post How We Achieved Upload Speeds Faster Than AWS S3 appeared first on Backblaze Blog | Cloud Storage & Cloud Backup.
Spyware in India
Post Syndicated from Bruce Schneier original https://www.schneier.com/blog/archives/2023/11/spyware-in-india.html
Apple has warned leaders of the opposition government in India that their phones are being spied on:
Multiple top leaders of India’s opposition parties and several journalists have received a notification from Apple, saying that “Apple believes you are being targeted by state-sponsored attackers who are trying to remotely compromise the iPhone associated with your Apple ID ….”
AccessNow puts this in context:
For India to uphold fundamental rights, authorities must initiate an immediate independent inquiry, implement a ban on the use of rights-abusing commercial spyware, and make a commitment to reform the country’s surveillance laws. These latest warnings build on repeated instances of cyber intrusion and spyware usage, and highlights the surveillance impunity in India that continues to flourish despite the public outcry triggered by the 2019 Pegasus Project revelations.
The Experience AI Challenge: Make your own AI project
Post Syndicated from Dan Fisher original https://www.raspberrypi.org/blog/experience-ai-challenge-announcement/
We are pleased to announce a new AI-themed challenge for young people: the Experience AI Challenge invites and supports young people aged up to 18 to design and make their own AI applications. This is their chance to have a taste of getting creative with the powerful technology of machine learning. And equally exciting: every young creator will get feedback and encouragement from us at the Raspberry Pi Foundation.

As you may have heard, we recently launched a series of classroom lessons called Experience AI in partnership with Google DeepMind. The lesson materials make it easy for teachers of all subjects to teach their learners aged up to 18 about artificial intelligence and machine learning. Now the Experience AI Challenge gives young people the opportunity to develop their skills further and build their own AI applications.
Key information
- Starts on 08 January 2024
- Free to take part in
- Designed for beginners, based on the tools Scratch and Machine Learning for Kids
- Open for official submissions made by UK-based young people aged up to 18 and their mentors
- Young people and their mentors around the world are welcome to access the Challenge resources and make AI projects
- Tailored resources for young people and mentors to support you to take part
- Register your interest and we’ll send you a reminder email on the launch day
The Experience AI Challenge
For the Experience AI Challenge, you and the young people you work with will learn how to make a machine learning (ML) classifier that organises data types such as audio, text, or images into different groupings that you specify.

The Challenge resources show young people the basic principles of using the tools and training ML models. Then they will use these new skills to create their own projects, and it’s a chance for their imaginations to run free. Here are some examples of projects your young tech creators could make:
- An instrument classifier to identify the type of musical instrument being played in pieces of music
- An animal sound identifier to determine which animal is making a particular sound
- A voice command recogniser to detect voice commands like ‘stop’, ‘go’, ‘left’, and ‘right’
- A photo classifier to identify what kind of food is shown in a photograph

All creators will receive expert feedback on their projects.
To make the Experience AI Challenge as familiar and accessible as possible for young people who may be new to coding, we designed it for beginners. We chose the free, easy-to-use, online tool Machine Learning for Kids for young people to train their machine learning models, and Scratch as the programming environment for creators to code their projects. If you haven’t used these tools before, don’t worry. The Challenge resources will provide all the support you need to get up to speed.
Training an ML model and creating a project with it teaches many skills beyond coding, including computational thinking, ethical programming, data literacy, and developing a broader understanding of the influence of AI on society.
The three Challenge stages
Our resources for creators and mentors walk you through the three stages of the Experience AI Challenge.
Stage 1: Explore and discover
The first stage of the Challenge is designed to ignite young people’s curiosity. Through our resources, mentors let participants explore the world of AI and ML and discover how these technologies are revolutionising industries like healthcare and entertainment.
Stage 2: Get hands-on
In the second stage, young people choose a data type and embark on a guided example project. They create a training dataset, train an ML model, and develop a Scratch application as the user interface for their model.
Stage 3: Design and create
In the final stage, mentors support young people to apply what they’ve learned to create their own ML project that addresses a problem they’re passionate about. They submit their projects to us online and receive feedback from our expert panel.
Things to do today
- Visit our new Experience AI Challenge homepage to find out more details
- Register your interest so you receive a reminder email on launch day, 8 January
- Get your young people excited and thinking about what kind of AI project they might like to create
We can’t wait to see how you and your young creators choose to engage with the Experience AI Challenge!
The post The Experience AI Challenge: Make your own AI project appeared first on Raspberry Pi Foundation.