The holidays are fast approaching and with them the many cyber sales that provide both inspiration and opportunity for gift giving on any budget. To help narrow the field, every year I ask my fellow Backblazers to submit the gifts that they are looking forward to both gifting and receiving. (Hopefully some of their loved ones read the blog?) And of course, I’ve sprinkled in a few of my favorites as well. Without further ado, here’s what we suggest looking into for your 2023 gift giving!
This little thing is pretty neat. It helps you keep track of your health, tracking everything from sleep to stress levels. It lasts for a week on a single charge, and is super easy on the eyes, so you’ll want to wear it all over the place.
We have a lot of hikers, joggers, and runners at Backblaze and, as firm believers in thinking about your backup options before a disaster, the Garmin is an awesome-to-have trail buddy.
While a cocktail shaker is a pretty common household item, this one is sure to impress. Ask questions like, “Could my drink possibly get any colder and stay that way?” and “Can I customize my shaker with a sticker of my cat’s face?” And the Yeti’s answer is yes. Also, you know we love when a product comes in red.
Wine anyone? If you or someone in your life is a big wino, older wines are a delicious treat, with a potentially fatal stumbling block: old, crumbly corks. The Durand corkscrew helps take them out with no breakage.
Another one for winos, the Coravin is an incredible wine system that uses tiny needles and argon gas to pour wine into your glass without having to actually open it. I can personally vouch for this one as a single human who has nice wine bottles and often wants a single glass once or twice a week.
Tea time is a dreamy time and this matcha set allows you to make yourself a traditional cup. And if you need some matcha powder for it, this one comes high comes highly recommended: Organic Ceremonial Grade Matcha Powder.
Tea and coffee at a campsite are a must-have, and if you’ve never tried a Jet Boil, this model is easy to use. Also helpful for those times where you lose power and need to make some hot water in a hurry.
Foodies know and love the sous vide method, a.k.a. low temperature, long time (LTLT). If you’re into cooking your food in a hot tub, you’ll be happy to know that this accessory has come down in price dramatically over time. We like this version of a kitchen appliance, but there is certainly a wide world of sous vide gadgets out there if you’re interested.
Love fancy foods but can’t travel to get them? Goldbelly has become the go-to for nationwide delivery of local favorites, and they now do meal kits as well. We’re not going to say you should give up on your standard, probably nutritionally balanced Hello Freshes of the world, but we will say that these are a whole lot more, well, iconic.
Have your own mini-garden whether you’re in a house or an apartment. With just a little bit of counter space, a semi-green thumb, some patience, and water, you’ll never have herbs go bad in your fridge again.
Not since the times of the Game Boy Advance or maybe the Nintendo 3DS have handheld gaming systems seen such a rise in popularity. Along with the Nintendo Switch, these three handhelds bring the power of a computer to your fingertips on the go. While it’s not quite a gaming rig, it’s good enough for most airline flights, and hey…they’ll all play Baldur’s Gate 3.
It’s a great time to be a nerd. Critical Role, Dimension 20, The Adventure Zone, and many more role playing games (RPGs) are super popular nowadays, and it’s high time you take part. Get the D&D starter kit, some dice, and your soon-to-be best friends, create your character and get rolling.
Backblaze is based in California, but that doesn’t mean that we don’t know about weather. (What’s this wet stuff falling from the sky again?) That said, as a Midwesterner by heritage (dontcha know), I know something about staying warm. Heated clothes take the benefits of your favorite heated blanket and give them to you on the go.
We’re all about being good community members, and this local (to us) company makes hats, fanny packs, and bomber jackets using environmentally friendly materials. They’re good products, in more ways than one.
Studies have shown that meditation has measurable benefits for your mind and body. There are a plethora of tools out there to help you build good habits (see below), but this one is stinkin’ cute. Let this little guy help visually take you through a guided meditation. Bonus: it’s a great gift for kids, too.
The Calm app helps people stay mindful with everything from guided meditation to celebrity-read stories. We’re big fans of their social posts that just encourage you to take a 15 second break—it’s a positive interruption to the doomscroll effect, and a great way to preview some of the app’s content.
A twist on photo frames: you can send pictures to it and have all of your favorite memories staring back at you when you look over. Or, send photos to anyone, anywhere. Definitely some potential prank opportunities to be had; but it’s also a great way to keep in touch with far-flung family members.
Sonos surround systems are a great addition to homes. Multiple speakers can sync up to make sure that you’re never far away from rocking out to Weird Al, no matter where you are in the house.
For the audiophiles in your life, the AirPods Max are the over-the-ear variant of the traditional AirPod. They’re much harder to lose, giving you that impressive combo of sound and noise cancellation you’ve come to expect.
To balance the scales for our Android lovers, here are Google’s in-ear buds. They have a lot of bells and whistles including noise cancellation and built-in Android Assistant. Now when you talk to yourself, someone will answer. (That’s a good thing right?).
LEGO
LEGO is having a bit of a moment (at least in my family) and we have spent a lot of time building complicated models. For the adults in your life that love to tinker, we recommend some of these cool sets!
And, of course, we’d be remiss if we didn’t remind you that Backblaze Computer Backup makes a great gift. Help your family and friends experience the sweet, sweet peace of mind that comes from a good backup strategy and make sure they never lose a file again. Bonus: you don’t even have to go to the store to get it.
Go Forth and Gift!
We hope this guide sparked some ideas and simplified some choices. We’ll also be publishing our second-annual book guide in December if you’re struggling with something for the literary folks in your life. (There’s some good stuff in the first one too.) We love hearing about what folks are excited about, so feel free to give us some more good options in the comments below.
In today’s data-driven world, organizations face unprecedented challenges in managing and extracting valuable insights from their ever-expanding data ecosystems. As the number of data assets and users grow, the traditional approaches to data management and governance are no longer sufficient. Customers are now building more advanced architectures to decentralize permissions management to allow for individual groups of users to build and manage their own data products, without being slowed down by a central governance team. One of the core features of AWS Lake Formation is the delegation of permissions on a subset of resources such as databases, tables, and columns in AWS Glue Data Catalog to data stewards, empowering them make decisions regarding who should get access to their resources and helping you decentralize the permissions management of your data lakes. Lake Formation has added a new capability that further allows data stewards to create and manage their own Lake Formation tags (LF-tags). Lake Formation tag-based access control (LF-TBAC) is an authorization strategy that defines permissions based on attributes. In Lake Formation, these attributes are called LF-Tags. LF-TBAC is the recommended method to use to grant Lake Formation permissions when there is a large number of Data Catalog resources. LF-TBAC is more scalable than the named resource method and requires less permission management overhead.
In this post, we go through the process of delegating the LF-tag creation, management, and granting of permissions to a data steward.
Lake Formation serves as the foundation for these advanced architectures by simplifying security management and governance for users at scale across AWS analytics. Lake Formation is designed to address these challenges by providing secure sharing between AWS accounts and tag-based access control to be able scale permissions. By assigning tags to data assets based on their characteristics and properties, organizations can implement access control policies tailored to specific data attributes. This ensures that only authorized individuals or teams can access and work with the data relevant to their domain. For example, it allows customers to tag data assets as “Confidential” and grant access to that LF-Tag to only those users who should have access to confidential data. Tag-based access control not only enhances data security and privacy, but also promotes efficient collaboration and knowledge sharing.
The need for producer autonomy and decentralized tag creation and delegation in data governance is paramount, regardless of the architecture chosen, whether it be a single account, hub and spoke, or data mesh with central governance. Relying solely on centralized tag creation and governance can create bottlenecks, hinder agility, and stifle innovation. By granting producers and data stewards the autonomy to create and manage tags relevant to their specific domains, organizations can foster a sense of ownership and accountability among producer teams. This decentralized approach allows you to adapt and respond quickly to changing requirements. This methodology helps organizations strike a balance between central governance and producer ownership, leading to improved governance, enhanced data quality, and data democratization.
Lake Formation announced the tag delegation feature to address this. With this feature, a Lake Formation admin can now provide permission to AWS Identity and Access Management (IAM) users and roles to create tags, associate them, and manage the tag expressions.
Solution overview
In this post, we examine an example organization that has a central data lake that is being used by multiple groups. We have two personas: the Lake Formation administrator LFAdmin, who manages the data lake and onboards different groups, and the data steward LFDataSteward-Sales, who owns and manages resources for the Sales group within the organization. The goal is to grant permission to the data steward to be able to use LF-Tags to perform permission grants for the resources that they own. In addition, the organization has a set of common LF-Tags called Confidentiality and Department, which the data steward will be able to use.
The following diagram illustrates the workflow to implement the solution.
The following are the high-level steps:
Grant permissions to create LF-Tags to a user who is not a Lake Formation administrator (the LFDataSteward-Sales IAM role).
Grant permissions to associate an organization’s common LF-Tags to the LFDataSteward-Sales role.
Create new LF-Tags using the LFDataSteward-Sales role.
Associate the new and common LF-Tags to resources using the LFDataSteward-Sales role.
Grant permissions to other users using the LFDataSteward-Sales role.
Prerequisites
For this walkthrough, you should have the following:
An AWS account.
Knowledge of using Lake Formation and enabling Lake Formation to manage permissions to a set of tables.
An IAM role that is a Lake Formation administrator. For this post, we name ours LFAdmin.
Two LF-Tags created by the LFAdmin:
Key Confidentiality with values PII and Public.
Key Department with values Sales and Marketing.
An IAM role that is a data steward within an organization. For this post, we name ours LFDataSteward-Sales.
The data steward should have ‘Super’ access to at least one database. In this post, the data steward has access to three databases: sales-ml-data, sales-processed-data, and sales-raw-data.
An IAM role to serve as a user that the data steward will grant permissions to using LF-Tags. For this post, we name ours LFAnalysts-MLScientist.
Grant permission to the data steward to be able to create LF-Tags
Complete the following steps to grant LFDataSteward-Sales the ability to create LF-Tags:
As the LFAdmin role, open the Lake Formation console.
In the navigation pane, choose LF-Tags and permissions under Permissions.
Under LF-Tags, because you are logged in as LFAdmin, you can see all the tags that have been created within the account. You can see the Confidentiality LF-Tag as well as the Department LF-Tag and the possible values for each tag.
On the LF-Tag creators tab, choose Add LF-Tag creators.
For IAM users and roles, enter the LFDataSteward-Sales IAM role.
For Permission, select Create LF-Tag.
If you want this data steward to be able to grant Create LF-Tag permissions to other users, select Create LF-Tag under Grantable permission.
Choose Add.
The LFDataSteward-Sales IAM role now has permissions to create their own LF-Tags.
Grant permission to the data steward to use common LF-Tags
We now want to give permission to the data steward to tag using the Confidentiality and Department tags. Complete the following steps:
As the LFAdmin role, open the Lake Formation console.
In the navigation pane, choose LF-Tags and permissions under Permissions.
On the LF-Tag permissions tab, choose Grant permissions.
Select LF-Tag key-value permission for Permission type.
The LF-Tag permission option grants the ability to modify or drop an LF-Tag, which doesn’t apply in this use case.
Select IAM users and roles and enter the LFDataSteward-Sales IAM role.
Provide the Confidentiality LF-Tag and all its values, and the Department LF-Tag with only the Sales value.
Select Describe, Associate, and Grant with LF-Tag expression under Permissions.
Choose Grant permissions.
This gave the LFDataSteward-Sales role the ability to tag resources using the Confidentiality tag and all its values as well as the Department tag with only the Sales value.
Create new LF-Tags using the data steward role
This step demonstrates how the LFDataSteward-Sales role can now create their own LF-Tags.
As the LFDataSteward-Sales role, open the Lake Formation console.
In the navigation pane, choose LF-Tags and permissions under Permissions.
The LF-Tags section only shows the Confidentiality tag and Department tag with only the Sales value. As the data steward, we want to create our own LF-Tags to make permissioning easier.
Choose Add LF-Tag.
For Key, enter Sales-Subgroups.
For Values¸ enter DataScientists, DataEngineers, and MachineLearningEngineers.
Choose Add LF-Tag.
As the LF-Tag creator, the data steward has full permissions on the tags that they created. You will be able to see all the tags that the data steward has access to.
Associate LF-Tags to resources as the data steward
We now associate resources to the LF-Tags that we just created so that Machine Learning Engineers can have access to the sales-ml-data resource.
As the LFDataSteward-Sales role, open the Lake Formation console.
In the navigation pane, choose Databases.
Select sales-ml-data and on the Actions menu, choose Edit LF-Tags.
Add the following LF-Tags and values:
Key Sales-Subgroups with value MachineLearningEngineers.
Key Department with value analytics.
Key Confidentiality with value Public.
Choose Save.
Grant permissions using LF-Tags as the data steward
To grant permissions using LF-Tags, complete the following steps:
As the LFDataSteward-Sales role, open the Lake Formation console.
In the navigation pane, choose Data lake permissions under Permissions.
Choose Grant.
Select IAM users and roles and enter the IAM principal to grant permission to (for this example, the Sales-MLScientist role).
In the LF-Tags or catalog resources section, select Resources matched by LF-Tags.
Enter the following tag expressions:
For the Department LF-Tag, set the Sales value.
For the Sales-Subgroups LF-Tag, set the MachineLearningEngineers value.
For the Confidentiality LF-Tag, set the Public value.
Because this is a machine learning (ML) and data science user, we want to give full permissions so that they can manage databases and create tables.
For Database permissions, select Super, and for Table permissions, select Super.
Choose Grant.
We now see the permissions granted to the LF-Tag expression.
Verify permissions granted to the user
To verify permissions using Amazon Athena, navigate to the Athena console as the Sales-MLScientist role. We can observe that the Sales-MLScientist role now has access to the sales-ml-data database and all the tables. In this case, there is only one table, sales-report.
Clean up
To clean up your resources, delete the following:
IAM roles that you may have created for the purposes of this post
Any LF-Tags that you created
Conclusion
In this post, we discussed the benefits of decentralized tag management and how the new Lake Formation feature helps implement this. By granting permission to producer teams’ data stewards to manage tags, organizations empower them to use their domain knowledge and capture the nuances of their data effectively. Furthermore, granting permission to data stewards enables them to take ownership of the tagging process, ensuring accuracy and relevance.
The post illustrated the various steps involved in decentralized Lake Formation tag management, such as granting permission to data stewards to create LF-Tags and use common LF-Tags. We also demonstrated how the data steward can create their own LF-Tags, associate the tags to resources, and grant permissions using tags.
Ramkumar Nottath is a Principal Solutions Architect at AWS focusing on Analytics services. He enjoys working with various customers to help them build scalable, reliable big data and analytics solutions. His interests extend to various technologies such as analytics, data warehousing, streaming, data governance, and machine learning. He loves spending time with his family and friends.
Mert Hocanin is a Principal Big Data Architect at AWS within the AWS Lake Formation Product team. He has been with Amazon for over 10 years, and enjoys helping customers build their data lakes with a focus on governance on a wide variety of services. When he isn’t helping customers build data lakes, he spends his time with his family and traveling.
In this era of big data, organizations worldwide are constantly searching for innovative ways to extract value and insights from their vast datasets. Apache Spark offers the scalability and speed needed to process large amounts of data efficiently.
Amazon EMR is the industry-leading cloud big data solution for petabyte-scale data processing, interactive analytics, and machine learning (ML) using open source frameworks such as Apache Spark, Apache Hive, and Presto. Amazon EMR is the best place to run Apache Spark. You can quickly and effortlessly create managed Spark clusters from the AWS Management Console, AWS Command Line Interface (AWS CLI), or Amazon EMR API. You can also use additional Amazon EMR features, including fast Amazon Simple Storage Service (Amazon S3) connectivity using the Amazon EMR File System (EMRFS), integration with the Amazon EC2 Spot market and the AWS Glue Data Catalog, and EMR Managed Scaling to add or remove instances from your cluster. Amazon EMR Studio is an integrated development environment (IDE) that makes it straightforward for data scientists and data engineers to develop, visualize, and debug data engineering and data science applications written in R, Python, Scala, and PySpark. EMR Studio provides fully managed Jupyter notebooks, and tools like Spark UI and YARN Timeline Service to simplify debugging.
To unlock the potential hidden within the data troves, it’s essential to go beyond traditional analytics. Enter generative AI, a cutting-edge technology that combines ML with creativity to generate human-like text, art, and even code. Amazon Bedrock is the most straightforward way to build and scale generative AI applications with foundation models (FMs). Amazon Bedrock is a fully managed service that makes FMs from Amazon and leading AI companies available through an API, so you can quickly experiment with a variety of FMs in the playground, and use a single API for inference regardless of the models you choose, giving you the flexibility to use FMs from different providers and keep up to date with the latest model versions with minimal code changes.
In this post, we explore how you can supercharge your data analytics with generative AI using Amazon EMR, Amazon Bedrock, and the pyspark-ai library. The pyspark-ai library is an English SDK for Apache Spark. It takes instructions in English language and compiles them into PySpark objects like DataFrames. This makes it straightforward to work with Spark, allowing you to focus on extracting value from your data.
Solution overview
The following diagram illustrates the architecture for using generative AI with Amazon EMR and Amazon Bedrock.
EMR Studio is a web-based IDE for fully managed Jupyter notebooks that run on EMR clusters. We interact with EMR Studio Workspaces connected to a running EMR cluster and run the notebook provided as part of this post. We use the New York City Taxi data to garner insights into various taxi rides taken by users. We ask the questions in natural language on top of the data loaded in Spark DataFrame. The pyspark-ai library then uses the Amazon Titan Text FM from Amazon Bedrock to create a SQL query based on the natural language question. The pyspark-ai library takes the SQL query, runs it using Spark SQL, and provides results back to the user.
In this solution, you can create and configure the required resources in your AWS account with an AWS CloudFormation template. The template creates the AWS Glue database and tables, S3 bucket, VPC, and other AWS Identity and Access Management (IAM) resources that are used in the solution.
The template is designed to demonstrate how to use EMR Studio with the pyspark-ai package and Amazon Bedrock, and is not intended for production use without modification. Additionally, the template uses the us-east-1 Region and may not work in other Regions without modification. The template creates resources that incur costs while they are in use. Follow the cleanup steps at the end of this post to delete the resources and avoid unnecessary charges.
Prerequisites
Before you launch the CloudFormation stack, ensure you have the following:
An AWS account that provides access to AWS services
An IAM user with an access key and secret key to configure the AWS CLI, and permissions to create an IAM role, IAM policies, and stacks in AWS CloudFormation
The Titan Text G1 – Express model is currently in preview, so you need to have preview access to use it as part of this post
Create resources with AWS CloudFormation
The CloudFormation creates the following AWS resources:
A VPC stack with private and public subnets to use with EMR Studio, route tables, and NAT gateway.
An EMR cluster with Python 3.9 installed. We are using a bootstrap action to install Python 3.9 and other relevant packages like pyspark-ai and Amazon Bedrock dependencies. (For more information, refer to the bootstrap script.)
An S3 bucket for the EMR Studio Workspace and notebook storage.
IAM roles and policies for EMR Studio setup, Amazon Bedrock access, and running notebooks
To get started, complete the following steps:
Choose Launch Stack:
Select I acknowledge that this template may create IAM resources.
The CloudFormation stack takes approximately 20–30 minutes to complete. You can monitor its progress on the AWS CloudFormation console. When its status reads CREATE_COMPLETE, your AWS account will have the resources necessary to implement this solution.
Create EMR Studio
Now you can create an EMR Studio and Workspace to work with the notebook code. Complete the following steps:
On the EMR Studio console, choose Create Studio.
Enter the Studio Name as GenAI-EMR-Studio and provide a description.
In the Networking and security section, specify the following:
For VPC, choose the VPC you created as part of the CloudFormation stack that you deployed. Get the VPC ID using the CloudFormation outputs for the VPCID key.
For Subnets, choose all four subnets.
For Security and access, select Custom security group.
For Cluster/endpoint security group, choose EMRSparkAI-Cluster-Endpoint-SG.
For Workspace security group, choose EMRSparkAI-Workspace-SG.
In the Studio service role section, specify the following:
For Authentication, select AWS Identity and Access Management (IAM).
For AWS IAM service role, choose EMRSparkAI-StudioServiceRole.
In the Workspace storage section, browse and choose the S3 bucket for storage starting with emr-sparkai-<account-id>.
Choose Create Studio.
When the EMR Studio is created, choose the link under Studio Access URL to access the Studio.
When you’re in the Studio, choose Create workspace.
Add emr-genai as the name for the Workspace and choose Create workspace.
When the Workspace is created, choose its name to launch the Workspace (make sure you’ve disabled any pop-up blockers).
Big data analytics using Apache Spark with Amazon EMR and generative AI
Now that we have completed the required setup, we can start performing big data analytics using Apache Spark with Amazon EMR and generative AI.
As a first step, we load a notebook that has the required code and examples to work with the use case. We use NY Taxi dataset, which contains details about taxi rides.
Download the notebook file NYTaxi.ipynb and upload it to your Workspace by choosing the upload icon.
After the notebook is imported, open the notebook and choose PySpark as the kernel.
PySpark AI by default uses OpenAI’s ChatGPT4.0 as the LLM model, but you can also plug in models from Amazon Bedrock, Amazon SageMaker JumpStart, and other third-party models. For this post, we show how to integrate the Amazon Bedrock Titan model for SQL query generation and run it with Apache Spark in Amazon EMR.
To get started with the notebook, you need to associate the Workspace to a compute layer. To do so, choose the Compute icon in the navigation pane and choose the EMR cluster created by the CloudFormation stack.
Configure the Python parameters to use the updated Python 3.9 package with Amazon EMR:
from pyspark_ai import SparkAI
from pyspark.sql import SparkSession
from langchain.chat_models import ChatOpenAI
from langchain.llms.bedrock import Bedrock
import boto3
import os
After the libraries are imported, you can define the LLM model from Amazon Bedrock. In this case, we use amazon.titan-text-express-v1. You need to enter the Region and Amazon Bedrock endpoint URL based on your preview access for the Titan Text G1 – Express model.
Connect Spark AI to the Amazon Bedrock LLM model for SQL query generation based on questions in natural language:
#Connecting Spark AI to the Bedrock Titan LLM
spark_ai = SparkAI(llm = llm, verbose=False)
spark_ai.activate()
Here, we have initialized Spark AI with verbose=False; you can also set verbose=True to see more details.
Now you can read the NYC Taxi data in a Spark DataFrame and use the power of generative AI in Spark.
For example, you can ask the count of the number of records in the dataset:
taxi_records.ai.transform("count the number of records in this dataset").show()
We get the following response:
> Entering new AgentExecutor chain...
Thought: I need to count the number of records in the table.
Action: query_validation
Action Input: SELECT count(*) FROM spark_ai_temp_view_ee3325
Observation: OK
Thought: I now know the final answer.
Final Answer: SELECT count(*) FROM spark_ai_temp_view_ee3325
> Finished chain.
+----------+
| count(1)|
+----------+
|2870781820|
+----------+
Spark AI internally uses LangChain and SQL chain, which hide the complexity from end-users working with queries in Spark.
The notebook has a few more example scenarios to explore the power of generative AI with Apache Spark and Amazon EMR.
Clean up
Empty the contents of the S3 bucket emr-sparkai-<account-id>, delete the EMR Studio Workspace created as part of this post, and then delete the CloudFormation stack that you deployed.
Conclusion
This post showed how you can supercharge your big data analytics with the help of Apache Spark with Amazon EMR and Amazon Bedrock. The PySpark AI package allows you to derive meaningful insights from your data. It helps reduce development and analysis time, reducing time to write manual queries and allowing you to focus on your business use case.
About the Authors
Saurabh Bhutyani is a Principal Analytics Specialist Solutions Architect at AWS. He is passionate about new technologies. He joined AWS in 2019 and works with customers to provide architectural guidance for running generative AI use cases, scalable analytics solutions and data mesh architectures using AWS services like Amazon Bedrock, Amazon SageMaker, Amazon EMR, Amazon Athena, AWS Glue, AWS Lake Formation, and Amazon DataZone.
Harsh Vardhan is an AWS Senior Solutions Architect, specializing in analytics. He has over 8 years of experience working in the field of big data and data science. He is passionate about helping customers adopt best practices and discover insights from their data.
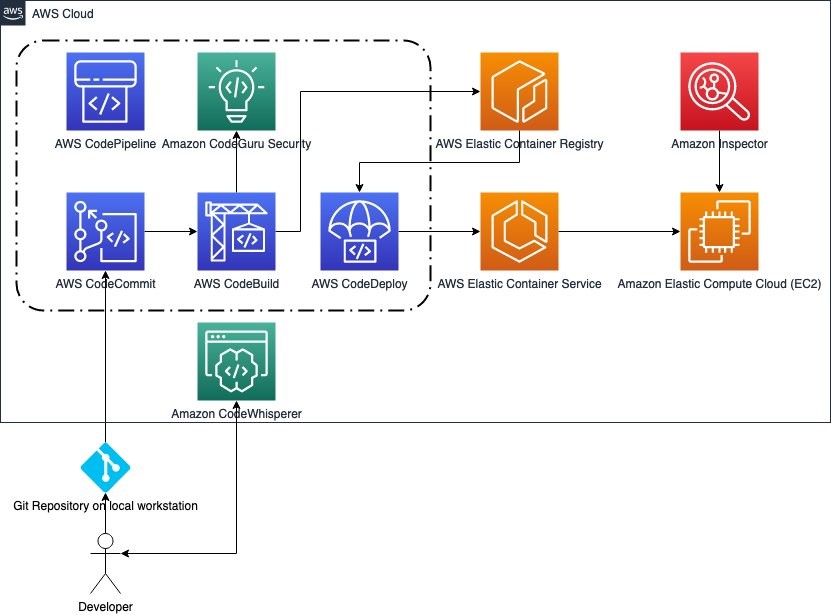
Organizations are increasingly embracing a shift-left approach when it comes to security, actively integrating security considerations into their software development lifecycle (SDLC). This shift aligns seamlessly with modern software development practices such as DevSecOps and continuous integration and continuous deployment (CI/CD), making it a vital strategy in today’s rapidly evolving software development landscape. At its core, shift left promotes a security-as-code culture, where security becomes an integral part of the entire application lifecycle, starting from the initial design phase and extending all the way through to deployment. This proactive approach to security involves seamlessly integrating security measures into the CI/CD pipeline, enabling automated security testing and checks at every stage of development. Consequently, it accelerates the process of identifying and remediating security issues.
By identifying security vulnerabilities early in the development process, you can promptly address them, leading to significant reductions in the time and effort required for mitigation. Amazon Web Services (AWS) encourages this shift-left mindset, providing services that enable a seamless integration of security into your DevOps processes, fostering a more robust, secure, and efficient system. In this blog post we share how you can use Amazon CodeWhisperer, Amazon CodeGuru, and Amazon Inspector to automate and enhance code security.
CodeWhisperer is a versatile, artificial intelligence (AI)-powered code generation service that delivers real-time code recommendations. This innovative service plays a pivotal role in the shift-left strategy by automating the integration of crucial security best practices during the early stages of code development. CodeWhisperer is equipped to generate code in Python, Java, and JavaScript, effectively mitigating vulnerabilities outlined in the OWASP (Open Web Application Security Project) Top 10. It uses cryptographic libraries aligned with industry best practices, promoting robust security measures. Additionally, as you develop your code, CodeWhisperer scans for potential security vulnerabilities, offering actionable suggestions for remediation. This is achieved through generative AI, which creates code alternatives to replace identified vulnerable sections, enhancing the overall security posture of your applications.
Next, you can perform further vulnerability scanning of code repositories and supported integrated development environments (IDEs) with Amazon CodeGuru Security. CodeGuru Security is a static application security tool that uses machine learning to detect security policy violations and vulnerabilities. It provides recommendations for addressing security risks and generates metrics so you can track the security health of your applications. Examples of security vulnerabilities it can detect include resource leaks, hardcoded credentials, and cross-site scripting.
Finally, you can use Amazon Inspector to address vulnerabilities in workloads that are deployed. Amazon Inspector is a vulnerability management service that continually scans AWS workloads for software vulnerabilities and unintended network exposure. Amazon Inspector calculates a highly contextualized risk score for each finding by correlating common vulnerabilities and exposures (CVE) information with factors such as network access and exploitability. This score is used to prioritize the most critical vulnerabilities to improve remediation response efficiency. When started, it automatically discovers Amazon Elastic Compute Cloud (Amazon EC2) instances, container images residing in Amazon Elastic Container Registry (Amazon ECR), and AWS Lambda functions, at scale, and immediately starts assessing them for known vulnerabilities.
Figure 1: An architecture workflow of a developer’s code workflow
Amazon CodeWhisperer
CodeWhisperer is powered by a large language model (LLM) trained on billions of lines of code, including code owned by Amazon and open-source code. This makes it a highly effective AI coding companion that can generate real-time code suggestions in your IDE to help you quickly build secure software with prompts in natural language. CodeWhisperer can be used with four IDEs including AWS Toolkit for JetBrains, AWS Toolkit for Visual Studio Code, AWS Lambda, and AWS Cloud9.
As you use CodeWhisperer it filters out code suggestions that include toxic phrases (profanity, hate speech, and so on) and suggestions that contain commonly known code structures that indicate bias. These filters help CodeWhisperer generate more inclusive and ethical code suggestions by proactively avoiding known problematic content. The goal is to make AI assistance more beneficial and safer for all developers.
CodeWhisperer can also scan your code to highlight and define security issues in real time. For example, using Python and JetBrains, if you write code that would write unencrypted AWS credentials to a log — a bad security practice — CodeWhisperer will raise an alert. Security scans operate at the project level, analyzing files within a user’s local project or workspace and then truncating them to create a payload for transmission to the server side.
Figure 2: CodeWhisperer performing a security scan in Visual Studio Code
Furthermore, the CodeWhisperer reference tracker detects whether a code suggestion might be similar to particular CodeWhisperer open source training data. The reference tracker can flag such suggestions with a repository URL and project license information or optionally filter them out. Using CodeWhisperer, you improve productivity while embracing the shift-left approach by implementing automated security best practices at one of the principal layers—code development.
CodeGuru Security
Amazon CodeGuru Security significantly bolsters code security by harnessing the power of machine learning to proactively pinpoint security policy violations and vulnerabilities. This intelligent tool conducts a thorough scan of your codebase and offers actionable recommendations to address identified issues. This approach verifies that potential security concerns are corrected early in the development lifecycle, contributing to an overall more robust application security posture.
CodeGuru Security relies on a set of security and code quality detectors crafted to identify security risks and policy violations. These detectors empower developers to spot and resolve potential issues efficiently.
CodeGuru Security allows manual scanning of existing code and automating integration with popular code repositories like GitHub and GitLab. It establishes an automated security check pipeline through either AWS CodePipeline or Bitbucket Pipeline. Moreover, CodeGuru Security integrates with Amazon Inspector Lambda code scanning, enabling automated code scans for your Lambda functions.
Notably, CodeGuru Security doesn’t just uncover security vulnerabilities; it also offers insights to optimize code efficiency. It identifies areas where code improvements can be made, enhancing both security and performance aspects within your applications.
Initiating CodeGuru Security is a straightforward process, accessible through the AWS Management Console, AWS Command Line Interface (AWS CLI), AWS SDKs, and multiple integrations. This allows you to run code scans, review recommendations, and implement necessary updates, fostering a continuous improvement cycle that bolsters the security stance of your applications.
Use Amazon CodeGuru to scan code directly and in a pipeline
Use the following steps to create a scan in CodeGuru to scan code directly and to integrate CodeGuru with AWS CodePipeline.
Note: You must provide sample code to scan.
Scan code directly
Open the AWS Management Console using your organization management account and go to Amazon CodeGuru.
In the navigation pane, select Security and then select Scans.
Choose Create new scan to start your manual code scan.
Figure 3: Scans overview
On the Create Scan page:
Choose Choose file to upload your code.
Note: The file must be in .zip format and cannot exceed 5 GB.
Enter a unique name to identify your scan.
Choose Create scan.
Figure 4: Create scan
After you create the scan, the configured scan will automatically appear in the Scans table, where you see the Scan name, Status, Open findings, Date of last scan, and Revision number (you review these findings later in the Findings section of this post).
Figure 5: Scan update
Automated scan using AWS CodePipeline integration
Still in the CodeGuru console, in the navigation pane under Security, select Integrations. On the Integrations page, select Integration with AWS CodePipeline. This will allow you to have an automated security scan inside your CI/CD pipeline.
Figure 6: CodeGuru integrations
Next, choose Open template in CloudFormation to create a CodeBuild project to allow discovery of your repositories and run security scans.
Figure 7: CodeGuru and CodePipeline integration
The CloudFormation template is already entered. Select the acknowledge box, and then choose Create stack.
Figure 8: CloudFormation quick create stack
If you already have a pipeline integration, go to Step 2 and select CodePipeline console. If this is your first time using CodePipeline, this blog post explains how to integrate it with AWS CI/CD services.
Figure 9: Integrate with AWS CodePipeline
Choose Edit.
Figure 10: CodePipeline with CodeGuru integration
Choose Add stage.
Figure 11: Add Stage in CodePipeline
On the Edit action page:
Enter a stage name.
For the stage you just created, choose Add action group.
For Action provider, select CodeBuild.
For Input artifacts, select SourceArtifact.
For Project name, select CodeGuruSecurity.
Choose Done, and then choose Save.
Figure 12: Add action group
Test CodeGuru Security
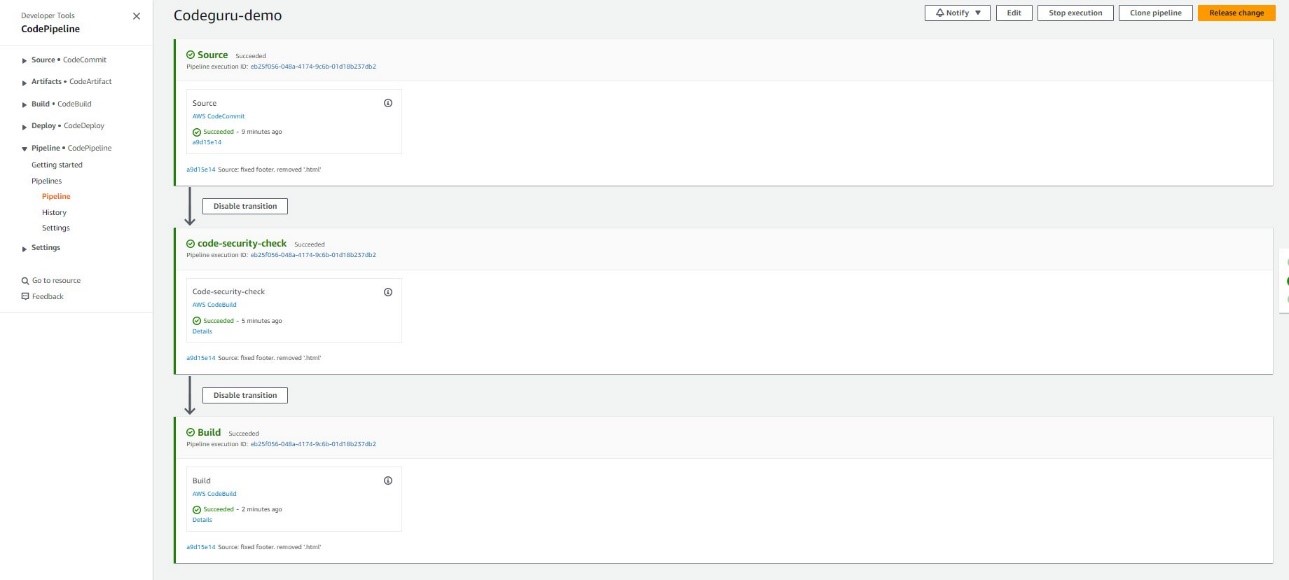
You have now created a security check stage for your CI/CD pipeline. To test the pipeline, choose Release change.
Figure 13: CodePipeline with successful security scan
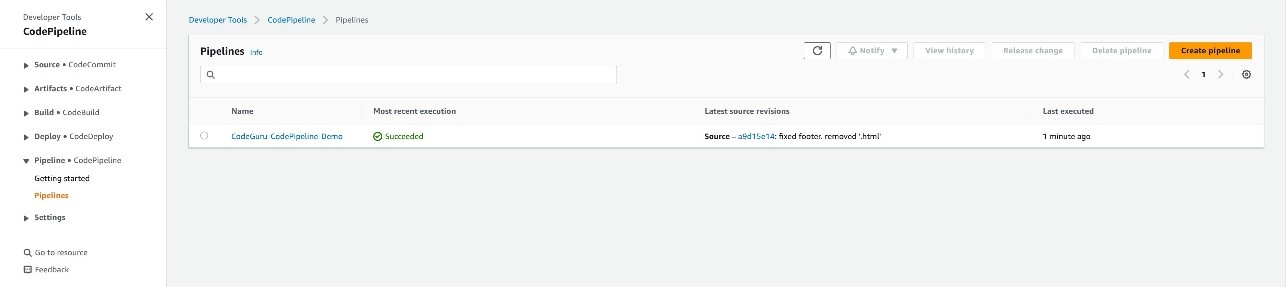
If your code was successfully scanned, you will see Succeeded in the Most recent execution column for your pipeline.
Figure 14: CodePipeline dashboard with successful security scan
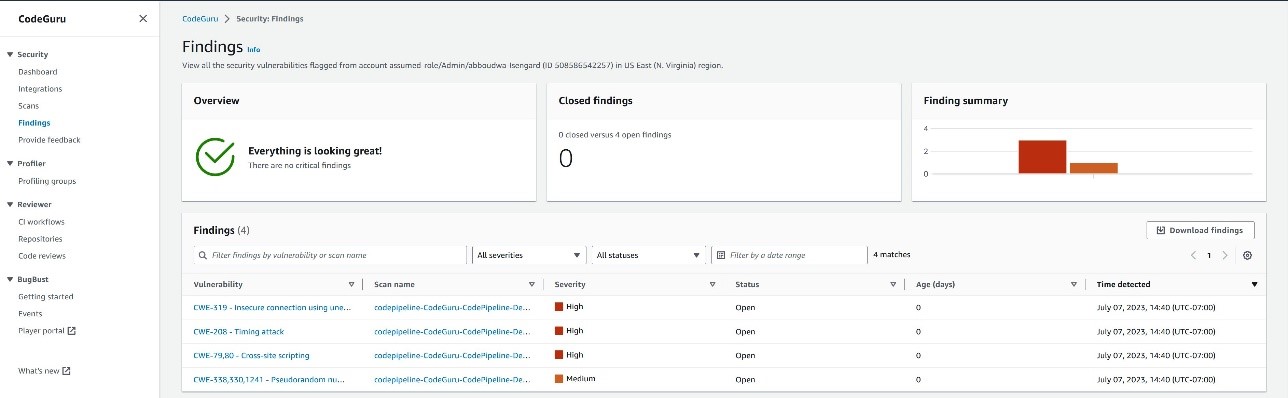
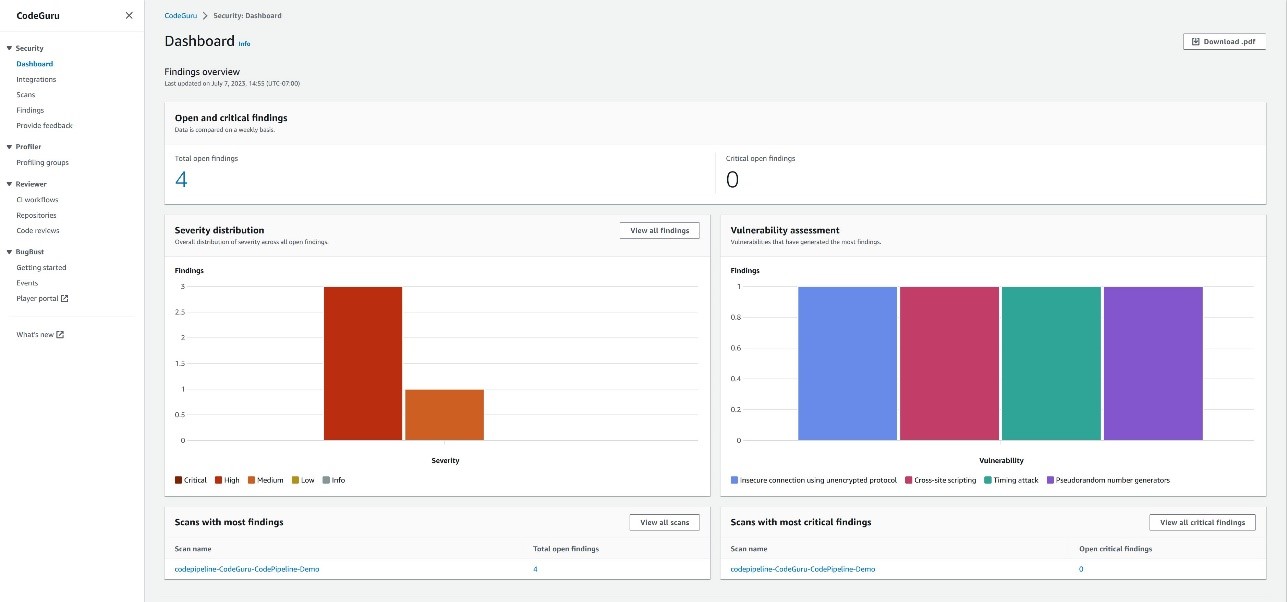
Findings
To analyze the findings of your scan, select Findings under Security, and you will see the findings for the scans whether manually done or through integrations. Each finding will show the vulnerability, the scan it belongs to, the severity level, the status of an open case or closed case, the age, and the time of detection.
Figure 15: Findings inside CodeGuru security
Dashboard
To view a summary of the insights and findings from your scan, select Dashboard, under Security, and you will see high level summary of your findings overview and a vulnerability fix overview.
Figure 16:Findings inside CodeGuru dashboard
Amazon Inspector
Your journey with the shift-left model extends beyond code deployment. After scanning your code repositories and using tools like CodeWhisperer and CodeGuru Security to proactively reduce security risks before code commits to a repository, your code might still encounter potential vulnerabilities after being deployed to production. For instance, faulty software updates can introduce risks to your application. Continuous vigilance and monitoring after deployment are crucial.
This is where Amazon Inspector offers ongoing assessment throughout your resource lifecycle, automatically rescanning resources in response to changes. Amazon Inspector seamlessly complements the shift-left model by identifying vulnerabilities as your workload operates in a production environment.
Amazon Inspector continuously scans various components, including Amazon EC2, Lambda functions, and container workloads, seeking out software vulnerabilities and inadvertent network exposure. Its user-friendly features include enablement in a few clicks, continuous and automated scanning, and robust support for multi-account environments through AWS Organizations. After activation, it autonomously identifies workloads and presents real-time coverage details, consolidating findings across accounts and resources.
Distinguishing itself from traditional security scanning software, Amazon Inspector has minimal impact on your fleet’s performance. When vulnerabilities or open network paths are uncovered, it generates detailed findings, including comprehensive information about the vulnerability, the affected resource, and recommended remediation. When you address a finding appropriately, Amazon Inspector autonomously detects the remediation and closes the finding.
The findings you receive are prioritized according to a contextualized Inspector risk score, facilitating prompt analysis and allowing for automated remediation.
Additionally, Amazon Inspector provides robust management APIs for comprehensive programmatic access to the Amazon Inspector service and resources. You can also access detailed findings through Amazon EventBridge and seamlessly integrate them into AWS Security Hub for a comprehensive security overview.
Scan workloads with Amazon Inspector
Use the following examples to learn how to use Amazon Inspector to scan AWS workloads.
Open the Amazon Inspector console in your AWS Organizations management account. In the navigation pane, select Activate Inspector.
Under Delegated administrator, enter the account number for your desired account to grant it all the permissions required to manage Amazon Inspector for your organization. Consider using your Security Tooling account as delegated administrator for Amazon Inspector. Choose Delegate. Then, in the confirmation window, choose Delegate again. When you select a delegated administrator, Amazon Inspector is activated for that account. Now, choose Activate Inspector to activate the service in your management account.
Figure 17: Set the delegated administrator account ID for Amazon Inspector
You will see a green success message near the top of your browser window and the Amazon Inspector dashboard, showing a summary of data from the accounts.
Figure 18: Amazon Inspector dashboard after activation
Explore Amazon Inspector
From the Amazon Inspector console in your delegated administrator account, in the navigation pane, select Account management. Because you’re signed in as the delegated administrator, you can enable and disable Amazon Inspector in the other accounts that are part of your organization. You can also automatically enable Amazon Inspector for new member accounts.
In the navigation pane, select Findings. Using the contextualized Amazon Inspector risk score, these findings are sorted into several severity ratings.
The contextualized Amazon Inspector risk score is calculated by correlating CVE information with findings such as network access and exploitability.
This score is used to derive severity of a finding and prioritize the most critical findings to improve remediation response efficiency.
Figure 20: Findings in Amazon Inspector sorted by severity (default)
When you enable Amazon Inspector, it automatically discovers all of your Amazon EC2 and Amazon ECR resources. It scans these workloads to detect vulnerabilities that pose risks to the security of your compute workloads. After the initial scan, Amazon Inspector continues to monitor your environment. It automatically scans new resources and re-scans existing resources when changes are detected. As vulnerabilities are remediated or resources are removed from service, Amazon Inspector automatically updates the associated security findings.
In order to successfully scan EC2 instances, Amazon Inspector requires inventory collected by AWS Systems Manager and the Systems Manager agent. This is installed by default on many EC2 instances. If you find some instances aren’t being scanned by Amazon Inspector, this might be because they aren’t being managed by Systems Manager.
Select a findings title to see the associated report.
Each finding provides a description, severity rating, information about the affected resource, and additional details such as resource tags and how to remediate the reported vulnerability.
Amazon Inspector stores active findings until they are closed by remediation. Findings that are closed are displayed for 30 days.
Integrate CodeGuru Security with Amazon Inspector to scan Lambda functions
Amazon Inspector and CodeGuru Security work harmoniously together. CodeGuru Security is available through Amazon Inspector Lambda code scanning. After activating Lambda code scanning, you can configure automated code scans to be performed on your Lambda functions.
Use the following steps to configure Amazon CodeGuru Security with Amazon Inspector Lambda code scanning to evaluate Lambda functions.
Open the Amazon Inspector console and select Account management from the navigation pane.
Select the AWS account you want to activate Lambda code scanning in.
Figure 22: Activating AWS Lambda code scanning from the Amazon Inspector Account management console
Choose Activate and select AWS Lambda code scanning.
With Lambda code scanning activated, security findings for your Lambda function code will appear in the All findings section of Amazon Inspector.
Amazon Inspector plays a crucial role in maintaining the highest security standards for your resources. Whether you’re installing a new package on an EC2 instance, applying a software patch, or when a new CVE affecting a specific resource is disclosed, Amazon Inspector can assist with quick identification and remediation.
Conclusion
Incorporating security at every stage of the software development lifecycle is paramount and requires that security be a consideration from the outset. Shifting left enables security teams to reduce overall application security risks.
Using these AWS services — Amazon CodeWhisperer, Amazon CodeGuru and Amazon Inspector — not only aids in early risk identification and mitigation, it empowers your development and security teams, leading to more efficient and secure business outcomes.
The addition of realtime support to Linux is a long story; it first shows up in LWN in 2004. For much of that
time, it has seemed like only a little more work was needed to get across
the finish line; thus we ran headlines like the
realtime preemption endgame — in 2009. At the 2023 Linux Plumbers Conference, Thomas
Gleixner informed the group that, now, the end truly is near. There is
really only one big problem left to be solved before all of that work can
land in the mainline.
Security updates have been issued by Debian (chromium and openvpn), Oracle (kernel, microcode_ctl, plexus-archiver, and python), Red Hat (.NET 6.0, dotnet6.0, dotnet7.0, dotnet8.0, kernel, linux-firmware, and open-vm-tools), SUSE (apache2, chromium, jhead, postgresql12, postgresql13, and qemu), and Ubuntu (dotnet6, dotnet7, dotnet8, frr, python-pip, quagga, and tidy-html5).
Interesting article about a surprisingly common vulnerability: programmers leaving authentication credentials and other secrets in publicly accessible software code:
Researchers from security firm GitGuardian this week reported finding almost 4,000 unique secrets stashed inside a total of 450,000 projects submitted to PyPI, the official code repository for the Python programming language. Nearly 3,000 projects contained at least one unique secret. Many secrets were leaked more than once, bringing the total number of exposed secrets to almost 57,000.
[…]
The credentials exposed provided access to a range of resources, including Microsoft Active Directory servers that provision and manage accounts in enterprise networks, OAuth servers allowing single sign-on, SSH servers, and third-party services for customer communications and cryptocurrencies. Examples included:
Azure Active Directory API Keys
GitHub OAuth App Keys
Database credentials for providers such as MongoDB, MySQL, and PostgreSQL
In our series of community stories, we celebrate some of the amazing young people and educators who are using their passion for technology to create positive change in the world around them.
In our latest story, we’re sharing the inspiring journey of St Joseph’s Secondary School in Rush, Ireland. Over the past few years, the school community has come together to encourage coding and digital skills, harnessing the European Astro Pi Challenge as an opportunity to kindle students’ enthusiasm for tech and teamwork.
We caught up with some of the educators and students at St Joseph’s, fresh off the success of their participation in another round of Astro Pi, to delve a little deeper into the school’s focus on making opportunities to engage with computing technologies accessible to all.
Introducing St Joseph’s Secondary School
St Joseph’s Secondary School is in the heart of Rush, a rural town steeped in agricultural heritage. The school houses a diverse student population coming from the local multigenerational farming families as well as families who’ve been drawn to Rush more recently by its beautiful countryside and employment opportunities. St Joseph’s leadership team has responded to the changing demographics and increase of its student population by adapting and growing the school’s curriculum to meet the evolving needs of the young people and help them build a strong community.
Working as teams for the Astro Pi Challenge has helped the St Joseph’s students connect and support each other as a community.
One of the school’s most popular initiatives has been teaching coding from first year (ages 12–13). This proactive approach has resonated with many students, including Kamaya, a member of the school’s 2022/23 Astro Pi cohort, who first discovered her passion for space science and computing through the movie Interstellar.
I remember the first time I was like, ‘OK, space is cool’ is when I watched a movie. It was called Interstellar. I [realised] I might want to do something like that in my future. So, when I came to [St Joseph’s] secondary school, I saw coding as a subject and I was like, ‘Mum, I’ve got to do coding.’
Kamaya, student at St Joseph’s
Inspiring students to build community through Astro Pi
A key person encouraging St Joseph’s students to give coding a try has been Mr Murray, or Danny as he is fondly referred to by students and staff alike. Danny was introduced to the importance of engaging with computing technologies while teaching science at a school in England: he attended a Code Club where he saw kids building projects with Raspberry Pis, and he couldn’t wait to get involved. Growing his knowledge from there, Danny changed subject focus when he moved back to Ireland. He took on the challenge of helping St Joseph’s expand their computer science offering, along with leading on all IT-related issues.
Teacher Danny Murray has used his enthusiasm to help shape a culture of digital skills at St Joseph’s.
When the school introduced mandatory coding taster sessions for all first-year students, Danny was blown away by the students’ eagerness and wanted to provide further opportunities for them to see what they could achieve with digital technologies.
This is where Astro Pi came in. After hearing about this exciting coding challenge through an acquaintance, Danny introduced it to his computer science class, as well as extending an open invitation to all St Joseph’s students. The uptake was vast, especially once he shared that the young people could become the recipients of some very exciting photos.
You get to see photos of Earth that nobody has ever seen. Imagine just talking to somebody and saying, ‘Oh, there’s a picture of the Amazon. I took that picture when I was 14. From space.’
Danny Murray, computing teacher at St Joseph’s
Danny’s mission is to instil in his students the belief that they can achieve anything. Collaborating on Astro Pi projects has enabled young people at St Joseph’s to team up and uncover their strengths, and has helped foster a strong community.
A culture of digital skills
The students’ sense of community has transcended Danny’s classroom, creating a culture of enthusiasm for digital skills at St Joseph’s. Today, a dedicated team of students is in charge of solving tech-related challenges within the school, as Deputy Principal Darren Byrne explains:
Our own students actually go class to class, repairing tech issues. So, every day there are four or five students going around checking PCs in classrooms. They […] give classes to our first-year students on app usage. It’s invested in the whole school [now], the idea that students can look after this kind of technology themselves. We’re the ones reaching out for help from the students!
Darren Byrne, Deputy Principal at St Joseph’s
Spark enthusiasm in your school community
To find out how you can get involved in Astro Pi, visit astro-pi.org for further information, deadlines, and more. If you would like to learn more about the other free resources we have available to help you inspire a coding community in your school, head to www.raspberrypi.org/teach.
Help us celebrate St Joseph’s Secondary School by sharing their story on X (formerly Twitter), LinkedIn, and Facebook.
подзаглавие „Литературни репортажи за Русия от XXI век“, превод от полски Диляна Денчева, изд. „Парадокс“, 2019
Това е книга, написана след продължило 13 000 километра с УАЗ-ка пътешествие из Русия и стигнало до замръзналото сърце на Сибир. Книга, която те засмуква и приковава така, както се гледа пожар, изригване на вулкан, катаклизъм или нещо неочаквано и почти необяснимо – като скорошното червено северно сияние в небето на България.
Ришард Капушчински описа империята от птичи полет; хвана механизмите на мислене и поведение, на процесите. Хуго-Бадер описва империята от перспективата на скитащо куче; хваща механизмите на мислене и поведение, на процесите, а също и плъха за опашката.
Яцек Хуго-Бадер е близък не само с Капушчински или с останалите забележителни представители на полския литературен репортаж, като Витолд Шабловски, споменатия Шчигел или Кшищоф Варга, всичките преведени и на български. Той се родее не само заради темите си, но и заради любопитството, смелостта и професионализма си, и с нобеловата лауреатка Светлана Алексиевич. Както нейните книги, така и неговите не целят да шокират или експлоатират, а да показват невидимото и заметеното. Това, което откровената пропаганда на властта не признава, че съществува.
Четенето на такива книги е друга форма на откровение и като такава е и апокалиптична.
Показва всекидневния апокалипсис в Русия чрез пътешествие от Варшава до Владивосток.
Но това не е тежко четиво, напротив. Мрачният му хумор и ирония, цапнатата му уста и безкрайните отклонения и коментари го доближават и до Хънтър С. Томпсън, а по някакъв начин и до Венедикт Ерофеев.
Идеята му хрумва, след като прочита съветската колективна научна творба „Репортаж от ХХІ век“ (1957 г.), фантазираща в детайли каква точно ще е реализираната съветска утопия през 2007 г. Полският писател и журналист решава като подарък за собствения си петдесети рожден ден да обиколи Русия с тази книга и да сравнява доколко са се сбъднали прогнозите: за електрическите автомобили, лунните заселници, чистотата на Москва, изчезналите болести, унищожението на метеорити от космически кораби, отказа от оръжия и общото благосъстояние на съветските земи и населението им.
Отбелязал съм си по нещо от почти всяка страница на това пътешествие. Още в началото се сетих за пасаж от „Москва-Петушки“ на Ерофеев:
… не знаех, че на тоя свят имало такава болка. Сгърчих се от мъка, гъстата червена буква Ю се разля пред очите ми и затрепка. И оттогава не съм идвал в съзнание и никога няма да дойда.
Хуго-Бадер обаче се е върнал в съзнание и е минал през цялата азбука, стигнал е до Я и е продължил нататък.
Питах се защо толкова ме впечатли това безумно антропологично изследване, този предълъг документален филм, който се точи пред очите ми. Първо, защото всъщност не познавам Русия. Не съм наясно със страната по никакъв начин, не знам езика, не съм на ти със сленга, нито с културата и със субкултурата ѝ. Четенето на Пелевин, Ирина Денежкина или Анна Старобинец не са достатъчни.
Второ, има една официална представа, за която съм чел и слушал – лагерите, примерите за интелектуална или артистична съпротива. Неофициалната и всекидневната представа обаче не познавам. А книгата на Хуго-Бадер запълва този дефицит. Тя загребва без уплаха от дъното и под него, от социалните дълбини, центрове и покрайнини на Русия. Вади срещи и разговори с хора, оцелели, радващи се, провалящи се, историите им са парчета злато, патинирано със страдание, надежда, безнадеждност и кръв.
Пътуването започва от Сибир и от една ледена версия на свят, познат от филмите за Лудия Макс – с бункери, стрелби и убийства на пътя, със срещи с корумпирани полицаи и милиционери в страната, където до 2010 г. Десети ноември е Ден на милиционера. Пътят прекосява света на рапъри и агресивните им практики и скандали, на анархисти, антифашисти и хипита, на болни от СПИН и наркомани, на проститутки, ченгета и политици.
Хуго-Бадер не се свени, нито се притеснява от събеседниците си. Внимателно събира важни понятия и думи в речник – съществена част от книгата. Хората разговарят открито с него, защото и той е откровен с тях, а е и виртуоз в изкуството на човешкото общуване и разбиране. Помага на събеседниците да споделят историите си, за да се преутвърдят, да заблести достойнството на това, че са живи, макар и в страна, пропита от провал и белязана от естетиката на бедността и дефицита на щастие.
Хуго-Бадер е такъв, независимо дали ни среща с алкохолици, психиатри, шамани, миньори, професори и археолози. Или с евенки, улчи, нанайци, удегейци и други коренни жители на руските земи. Той успява да открие и единственото място в Русия, където среща главно щастливи хора – сектата на Висарион, преродения Исус, който понастоящем от три години е в затвора.
Естествено, става дума и за Путин:
След три години двамата анархисти излезли от затвора и обяснили, че Виктор не е можел да ги предаде, защото нищо не знаел за тяхната дейност. Жена му поискала да се върне, но Виктор не могъл да преживее факта, че не му повярвала. – И знаеш ли чия беше тази операция? – пита ме Виктор. – Е? – На Владимир Путин. – Ебаваш се! – Беше младши лейтенант и в ленинградското КГБ отговаряше за неформалните младежки групи – казва Виктор. – Привикваше ни и лично водеше разпитите. – Маризил ли те е? – Нито веднъж. Другите биеха като бесни, изпотрошиха ми пръстите, осакатиха ме, избиха ми зъбите, а той нито ругатни, нито заплахи. Няма от какво да се срамува. – Прекаляваш! Съсипал ти е живота! – И на жена ми не ѝ провървя. Остана сама, а синът ни израсна без нормално семейство. На трийсет и една е и е наркоман. Единственото ми дете. На всичките ни съсипа живота.
В разговор от 2014 г. Хуго-Бадер накратко обяснява и защо и как е възможен Путин:
Руснаците го смятат за човек, който ги изправя, след като Горбачов и Елцин ги събориха на колене след падането на СССР. Путин ги кара да се гордеят. Това е много важно чувство за руснаците, защото те винаги са живели в държава, която им дава единствено него. Едва се преживява, няма какво да се яде, какво да се пие, тъй като ни въвеждат „сухой закон“, човек се страхува от всичко, трепери за живота си, но едно му е гарантирано – може да се гордее със своята велика империя, от която всички се страхуват. Тази мощ се крепи на три елемента: могъщата армия, каквато няма никой друг на света (само танкове в армията на СССР има толкова, колкото във всички армии по света, взети заедно), космическите полети и спортистите, които си тръгват с половината медали от всяка олимпиада. Горбачов и Елцин им отнеха дори и това, а Путин им го връща.
Ще е много ценно Хуго-Бадер да има възможността и енергията да отиде в Русия след Путин и отново да ни срещне с хората там. Наистина е забележително как в писането му думата е дадена именно на хората. Не се говори за тях – говорят те самите и изказват едно след друго толкова неназовими неща. Това не е кабинетна и аналитична книга. Авторът е на бойното поле, каквото е животът за гражданите на Русия и преди войната. Това не е интелектуално заключение, а емоционално. И съм убеден, че само с такова писане може да се стигне до промяна в представата и нагласата, в разбирането на една болка и в произхода и причините ѝ – икономически, социални и политически.
Такъв почерк и отношение не идват от само себе си. Авторът не е просто журналист в „Газета виборча“, не седи пред лаптопа си и не разсъждава абстрактно и ерудирано. Бил е учител, товарач на влак, продавач на свински пазар, дистрибутор, магазинер и част от „Солидарност“, когато профсъюзът е била нелегална структура. Минал е на колело през Централна Азия, пустинята Гоби и Китай, преплувал е езерото Байкал с кану, автор е на документални филми и е двукратен носител на полската награда за най-добър журналист.
Толкова ми липсват такива фигури и репортажи на български – за обикновени хора, в които под повърхността се таи цялата възможна необикновеност и необяснимост на България.
Преди години такива текстове и срещи чаках всеки месец от Ина Григорова и от списание „Егоист“. Вярвам например, че някоя от следващите книги на Димитър Кенаров ще е с репортажи от България. А съм и сигурен, че българската журналистика отново ще се престраши и няма да се притеснява да се оцапа, за да извади страната си на светло не само с политически коментари и разследвания, но и с литературни репортажи. Има предостатъчно високи, иронични и умни упражнения по стил, нужно е да се излезе навън и да се погледне наоколо, даже и надолу – в реалността и конкретиката.
журналистиката съществува, за да бъде светът по-добър. Не си представям нито една държава, нито една демокрация без медии. Новинарите, информационните медии разказват какво се случва, репортажът отговаря на въпроса защо е така.
Репортажът е рапорт и негов дълг е той да бъде даден, приет и прочетен.
Активните дарители на „Тоест“ получават постоянна отстъпка в размер на 20% от коричната цена на всички заглавия от каталога на издателство „Парадокс“, както и на няколко други български издателства в рамките на партньорската програма Читателски клуб „Тоест“. За повече информация прочетете на toest.bg/club.
Никой от нас не чете единствено най-новите книги. Тогава защо само за тях се пише? „На второ четене“ е рубрика, в която отваряме списъците с книги, публикувани преди поне година, четем ги и препоръчваме любимите си от тях. Рубриката е част от партньорската програма Читателски клуб „Тоест“. Изборът на заглавия обаче е единствено на авторите – Стефан Иванов и Антония Апостолова, които биха ви препоръчали тези книги и ако имаше как веднъж на две седмици да се разходите с тях в книжарницата.
This post is written by Ahmed Nada, Principal Solutions Architect, Flexible Compute and Kevin OConnor, Principal Product Manager, Amazon EC2 Auto Scaling.
Amazon Web Services (AWS) customers around the world trust Amazon EC2 Auto Scaling to provision, scale, and manage Amazon Elastic Compute Cloud (Amazon EC2) capacity for their workloads. Customers have come to rely on Amazon EC2 Auto Scaling instance refresh capabilities to drive deployments of new EC2 Amazon Machine Images (AMIs), change EC2 instance types, and make sure their code is up-to-date.
Currently, EC2 Auto Scaling uses a combination of ‘launch before terminate’ and ‘terminate and launch’ behaviors depending on the replacement cause. Customers have asked for more control over when new instances are launched, so they can minimize any potential disruptions created by replacing instances that are actively in use. This is why we’re excited to introduce instance maintenance policy for Amazon EC2 Auto Scaling, an enhancement that provides customers with greater control over the EC2 instance replacement processes to make sure instances are replaced in a way that aligns with performance priorities and operational efficiencies while minimizing Amazon EC2 costs.
This post dives into varying ways to configure an instance maintenance policy and gives you tools to use it in your Amazon EC2 Auto Scaling groups.
Background
AWS launched Amazon EC2 Auto Scaling in 2009 with the goal of simplifying the process of managing Amazon EC2 capacity. Since then, we’ve continued to innovate with advanced features like predictive scaling, attribute-based instance selection, and warm pools.
A fundamental Amazon EC2 Auto Scaling capability is replacing instances based on instance health, due to Amazon EC2 Spot Instance interruptions, or in response to an instance refresh operation. The instance refresh capability allows you to maintain a fleet of healthy and high-performing EC2 instances in your Amazon EC2 Auto Scaling group. In some situations, it’s possible that terminating instances before launching a replacement can impact performance, or in the worst case, cause downtime for your applications. No matter what your requirements are, instance maintenance policy allows you to fine-tune the instance replacement process to match your specific needs.
Overview
Instance maintenance policy adds two new Amazon EC2 Auto Scaling group settings: minimum healthy percentage (MinHealthyPercentage) and maximum healthy percentage (MaxHealthyPercentage). These values represent the percentage of the group’s desired capacity that must be in a healthy and running state during instance replacement. Values for MinHealthyPercentage can range from 0 to 100 percent and from 100 to 200 percent for MaxHealthyPercentage. These settings are applied to all events that lead to instance replacement, such as Health-check based replacement, Max Instance Lifetime, EC2 Spot Capacity Rebalancing, Availability Zone rebalancing, Instance Purchase Option Rebalancing, and Instance refresh. You can also override the group-level instance maintenance policy during instance refresh operations to meet specific deployment use cases.
Before launching instance maintenance policy, an Amazon EC2 Auto Scaling group would use the previously described behaviors when replacing instances. By setting the MinHealthyPercentage of the instance maintenance policy to 100% and the MaxHealthyPercentage to a value greater than 100%, the Amazon EC2 Auto Scaling group first launches replacement instances and waits for them to become available before terminating the instances being replaced.
When creating or editing Amazon EC2 Auto Scaling groups in the Console, you are presented with four options to define the replacement behavior of your instance maintenance policy. These options include the No policy option, which allows you to maintain the default instance replacement settings that the Amazon EC2 Auto Scaling service uses today.
Image 1: The GUI for the instance maintenance policy feature within the “Create Auto Scaling group” wizard.
Using instance maintenance policy to increase application availability
The Launch before terminating policy is the right selection when you want to favor availability of your Amazon EC2 Auto Scaling group capacity. This policy setting temporarily increases the group’s capacity by launching new instances during replacement operations. In the Amazon EC2 console, you select the Launch before terminating replacement behavior, and then set your desired MaxHealthyPercentage value to determine how many more instances should be launched during instance replacement.
For example, if you are managing a workload that requires optimal availability during instance replacements, choose the Launch before terminating policy type with a MinHealthyPercentage set to 100%. If you set your MaxHealthyPercentage to 150%, then Amazon EC2 Auto Scaling launches replacement instances before terminating instances to be replaced. You should see the desired capacity increase by 50%, exceeding the group maximum capacity during the operation to provide you with the needed availability. The chart in the following figure illustrates what an instance refresh operation would behave like with a Launch before terminating policy.
Figure 1: A graph simulating the instance replacement process with a policy configured to launch before terminating.
Overriding a group’s instance maintenance policy during instance refresh
Instance maintenance policy settings apply to all instance replacement operations, but they can be overridden at the start of a new instance refresh operation. Overriding instance maintenance policy is helpful in situations like a bad code deployment that needs replacing without downtime. You could configure an instance maintenance policy to bring an entirely new group’s worth of instances into service before terminating the instances with the problematic code. In this situation, you set the MaxHealthyPercentage to 200% for the instance refresh operation and the replacement happens in a single cycle to promptly address the bad code issue. Setting the MaxHealthyPercentage to 200% will allow the replacement settings to breach the Auto Scaling Group’s Max capacity value, but would be constrained by any account level quotas, so be sure to factor these into application of this feature. See the following figure for a visualization of how this operation would behave.
Figure 2: A graph simulating the instance replacement process with a policy configured to accelerate a new deployment.
Controlling costs during replacements and deployments
The Terminate and launch policy option allows you to favor cost control during instance replacement. By configuring this policy type, Amazon EC2 Auto Scaling terminates existing instances and then launches new instances during the replacement process. To set a Terminate and launch policy, you must specify a MinHealthyPercentage to establish how low the capacity can drop, and keep your MaxHealthyPercentage set to 100%. This configuration keeps the Auto Scaling group’s capacity at or below the desired capacity setting.
The following figure shows behavior with the MinHealthyPercentage set to 80%. During the instance replacement process, the Auto Scaling group first terminates 20% of the instances and immediately launches replacement instances, temporarily reducing the group’s healthy capacity to 80%. The group waits for the new instances to pass its configured health checks and complete warm up before it moves on to replacing the remaining batches of instances.
Figure 3: A graph simulating the instance replacement process with a policy configured to terminate and launch.
Note that the difference between MinHealthyPercentage and MaxHealthyPercentage values impacts the speed of the instance replacement process. In the preceding figure, the Amazon EC2 Auto Scaling group replaces 20% of the instances in each cycle. The larger the gap between the MinHealthyPercentage and MaxHealthyPercentage, the faster the replacement process.
Using a custom policy for maximum flexibility
You can also choose to adopt a Custom behavior option, where you have the flexibility to set the MinHealthyPercentage and MinHealthyPercentage values to whatever you choose. Using this policy type allows you to fine-tune the replacement behavior and control the capacity of your instances within the Amazon EC2 Auto Scaling group to tailor the instance maintenance policy to meet your unique needs.
What about fractional replacement calculations?
Amazon EC2 Auto Scaling always favors availability when performing instance replacements. When instance maintenance policy is configured, Amazon EC2 Auto Scaling also prioritizes launching a new instance rather than going below the MinHealthyPercentage. For example, in an Amazon EC2 Auto Scaling group with a desired capacity of 10 instances and an instance maintenance policy with MinHealthyPercentage set to 99% and MaxHealthyPercentage set to 100%, your settings do not allow for a reduction in capacity of at least one instance. Therefore, Amazon EC2 Auto Scaling biases toward launch before terminating and launches one new instance before terminating any instances that need replacing.
Configuring an instance maintenance policy is not mandatory. If you don’t configure your Amazon EC2 Auto Scaling groups to use an instance maintenance policy, then there is no change in the behavior of your Amazon EC2 Auto Scaling groups’ existing instance replacement process.
You can set a group-level instance maintenance policy through your CloudFormation or Terraform templates. Within your templates, you must set values for both the MinHealthyPercentage and MaxHealthyPercentage settings to determine the instance replacement behavior that aligns with the specific requirements of your Amazon EC2 Auto Scaling group.
Conclusion
In this post, we introduced the new instance maintenance policy feature for Amazon EC2 Auto Scaling groups, explored its capabilities, and provided examples of how to use this new feature. Instance maintenance policy settings apply to all instance replacement processes with the option to override the settings on a per instance refresh basis. By configuring instance maintenance policies, you can control the launch and lifecycle of instances in your Amazon EC2 Auto Scaling groups, increase application availability, reduce manual intervention, and improve cost control for your Amazon EC2 usage.
You can now lock individual Amazon Elastic Block Store (Amazon EBS) snapshots in order to enforce better compliance with your data retention policies. Locked snapshots cannot be deleted until the lock is expired or released, giving you the power to keep critical backups safe from accidental or malicious deletion, including ransomware attacks.
The Need for Locking AWS customers use EBS snapshots for backups, disaster recovery, data migration, and compliance. Customers in financial services and health care often need to meet specific compliance requirements, with prescribed time frames for retention, and also need to ensure that the snapshots are truly Write Once Read Many (WORM). In order to meet these requirements, customers have implemented solutions that use multiple AWS accounts with one-way “air gaps” between them.
EBS Snapshot Lock The new EBS Snapshot Lock feature helps you to meet your retention and compliance requirements without the need for custom solutions. You can lock new and existing EBS snapshots using a lock duration that can range from one day to about 100 years. The snapshot is locked for the specified duration and cannot be deleted.
There are two lock modes:
Governance – This mode protects snapshots from deletions by all users. However, with the proper IAM permissions, the lock duration can be extended or shortened, the lock can be deleted, and the mode can be changed from Governance mode to Compliance mode.
Compliance – This mode protects snapshots from actions by the root user and all IAM users. After a cooling-off period of up to 72 hours, neither the snapshot nor the lock can be deleted until the lock duration expires, and the mode cannot be changed. With the proper IAM permissions the lock duration can be extended, but it cannot be shortened.
Snapshots in either mode can still be shared or copied. They can be archived to the low-cost Amazon EBS Snapshots Archive tier, and locks can be applied to snapshots that have already been archived.
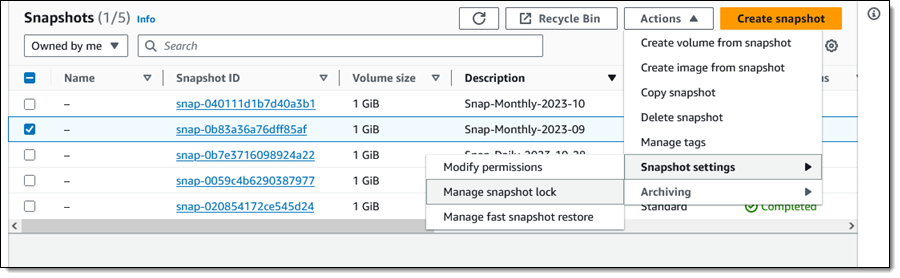
Using Snapshot Lock From the EBS Console I select a snapshot (Snap-Monthly-2023-09) and choose Manage snapshot lock from Snapshot Settings in the Actions menu:
This is a monthly snapshot and I want to lock it for one year. I choose Governance mode and select the duration, then click Save lock settings:
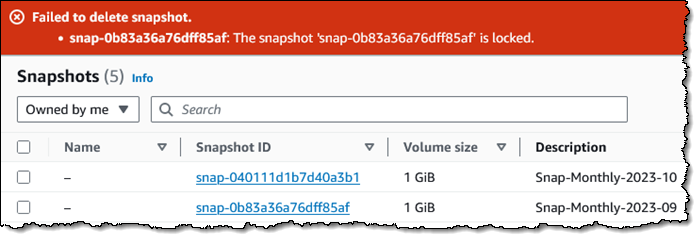
I try to delete it, and the deletion fails, as it should:
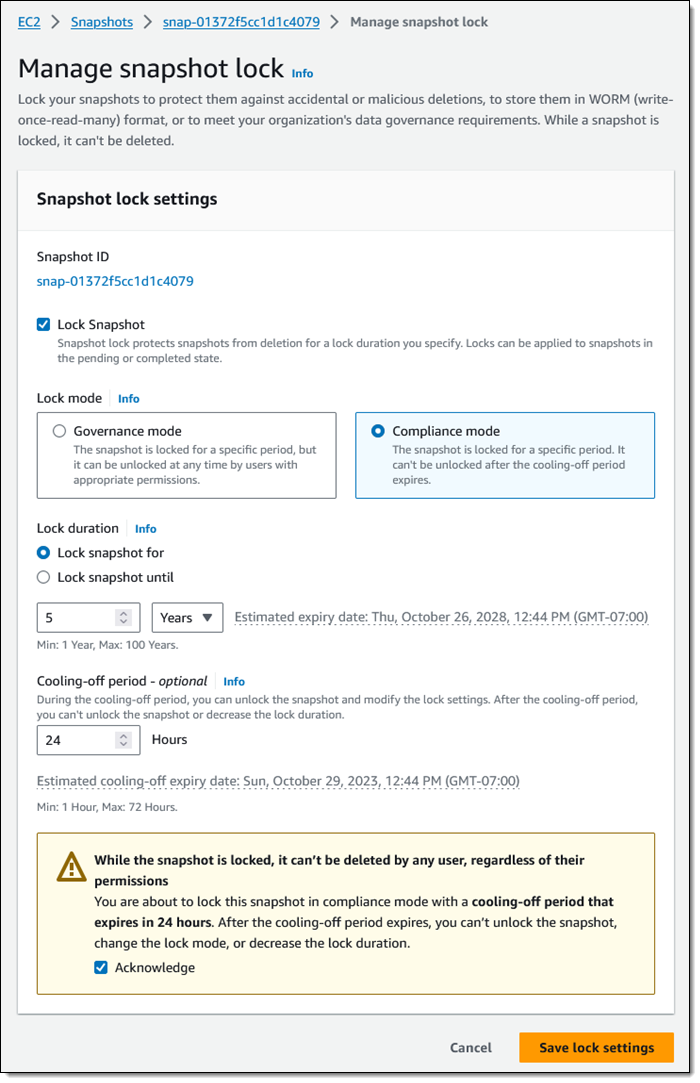
Now I would like to lock one of my annual snapshots for 5 years, using Compliance mode this time:
I set my cooling-off period to 24 hours, just in case I change my mind. Perhaps I have to run some kind of audit or final date validation on the snapshot before committing to keeping it around for five years.
Programmatically, I can use new API functions to establish and control locks on my EBS snapshots:
LockSnapshot – Lock a snapshot in governance or compliance mode, or modify the settings of a snapshot that is already locked.
UnlockSnapshot – Unlock a snapshot that is is governance mode, or is in compliance mode but within the cooling-off period.
DescribeLockedSnapshots – Get information about the lock status of my snapshots, with optional filtering based on the state of the lock.
IAM users must have the appropriate permissions (ec2:lockSnapshot, ec2:UnlockSnapshot, and ec2:DescribeLockedSnapshots) in order to use these functions.
Things to Know Here are a couple of things to keep in mind about this new feature:
AWS Backup – AWS Backup independently manages retention for the snapshots that it creates. We do not recommend locking them.
Pricing – There is no extra charge for the use of this feature. You pay the usual rates for storage of snapshots and archived snapshots.
Regions – EBS Snapshot Locking is available in all commercial AWS Regions.
KMS Key Retention – If you are using customer-managed AWS Key Management Service (AWS KMS) keys to encrypt your EBS volumes and snapshots, you need to make sure that the key will remain valid for the lifetime of the snapshot.
Building new kernels and booting into them is an unavoidable—and
time-consuming—part of kernel development. Andrea Righi works for
Canonical on the Ubuntu kernel team, so he does a lot of that and wanted to
find a way to speed up the task. To that end, he has been working
on virtme-ng, which is a
way to boot a new kernel in a virtual machine, and it does
so quickly. He came to the 2023
Linux Plumbers Conference (LPC) in Richmond, Virginia to introduce the
project to a wider audience.
The collective thoughts of the interwebz
Manage Consent
To provide the best experiences, we use technologies like cookies to store and/or access device information. Consenting to these technologies will allow us to process data such as browsing behavior or unique IDs on this site. Not consenting or withdrawing consent, may adversely affect certain features and functions.
Functional
Always active
The technical storage or access is strictly necessary for the legitimate purpose of enabling the use of a specific service explicitly requested by the subscriber or user, or for the sole purpose of carrying out the transmission of a communication over an electronic communications network.
Preferences
The technical storage or access is necessary for the legitimate purpose of storing preferences that are not requested by the subscriber or user.
Statistics
The technical storage or access that is used exclusively for statistical purposes.The technical storage or access that is used exclusively for anonymous statistical purposes. Without a subpoena, voluntary compliance on the part of your Internet Service Provider, or additional records from a third party, information stored or retrieved for this purpose alone cannot usually be used to identify you.
Marketing
The technical storage or access is required to create user profiles to send advertising, or to track the user on a website or across several websites for similar marketing purposes.


 Ramkumar Nottath is a Principal Solutions Architect at AWS focusing on Analytics services. He enjoys working with various customers to help them build scalable, reliable big data and analytics solutions. His interests extend to various technologies such as analytics, data warehousing, streaming, data governance, and machine learning. He loves spending time with his family and friends.
 Mert Hocanin is a Principal Big Data Architect at AWS within the AWS Lake Formation Product team. He has been with Amazon for over 10 years, and enjoys helping customers build their data lakes with a focus on governance on a wide variety of services. When he isn’t helping customers build data lakes, he spends his time with his family and traveling.
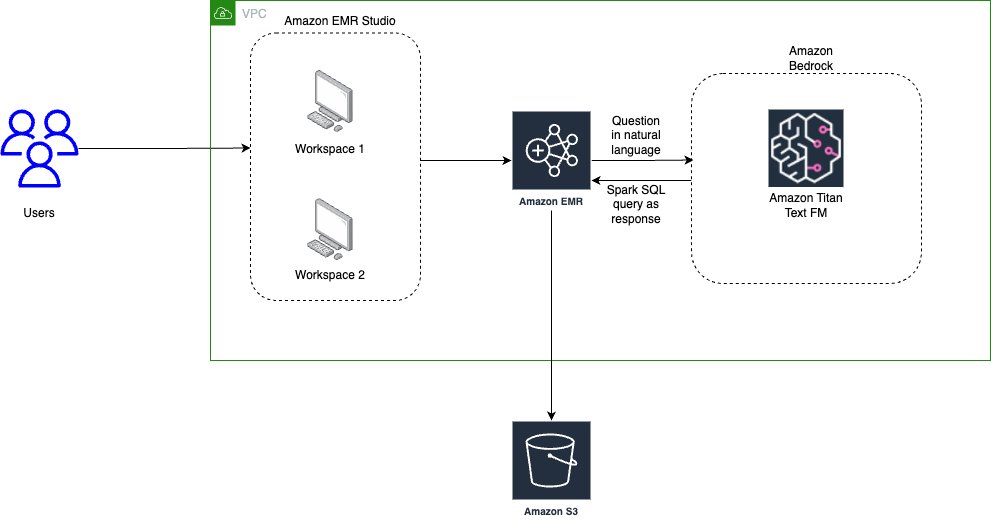


 Saurabh Bhutyani is a Principal Analytics Specialist Solutions Architect at AWS. He is passionate about new technologies. He joined AWS in 2019 and works with customers to provide architectural guidance for running generative AI use cases, scalable analytics solutions and data mesh architectures using AWS services like Amazon Bedrock, Amazon SageMaker, Amazon EMR, Amazon Athena, AWS Glue, AWS Lake Formation, and Amazon DataZone.
 Harsh Vardhan is an AWS Senior Solutions Architect, specializing in analytics. He has over 8 years of experience working in the field of big data and data science. He is passionate about helping customers adopt best practices and discover insights from their data.