Post Syndicated from Tyler Holmes original https://aws.amazon.com/blogs/messaging-and-targeting/10dlc-registration-best-practices-to-send-sms-with-amazon-pinpoint/
Updated 10/31/2024 to include additional Brand Registration steps for “Public Profit” companies
What is 10DLC?
Ten-Digit Long Code, or more commonly shortened as 10DLC, is intended specifically for sending Application-to-Person (A2P) SMS in the United States only. If you don’t send text messages to recipients in the US, then 10DLC doesn’t apply to you. 10DLC was designed to cover the volume and throughput middle ground between toll-free numbers on the low end and short codes on the high end. All senders using 10DLC are required to register both their company and their campaign(s), which is managed by a third-party company called The Campaign Registry (TCR). TCR maintains an industry-wide database of companies and use cases that are authorized to send messages, to US registered handsets, using 10DLC phone numbers.
How to Register for 10DLC
Registration can be done within the AWS console as well as programmatic registration via the SMS V2 API.
- Navigate to AWS End User Messaging
- Select “Registrations” from the left hand rail
- Click “Create registration” button

- If you have not already registered a company then select registration type “US 10DLC brand registration” as the Registration type and give it a “Registration friendly name” you will recognize later and proceed with the best practices below.

- If you have already successfully registered a company and require additional vetting proceed to “Additional Vetting” below
- If you have already successfully registered a company and completed the additional vetting process proceed to “Campaign Registration” below
- If you have not already registered a company then select registration type “US 10DLC brand registration” as the Registration type and give it a “Registration friendly name” you will recognize later and proceed with the best practices below.


To help ensure your registration is approved during this vetting process follow these best practices when registering.
Who Should Register for a 10DLC?
The information provided during registration should be for the company from whom SMS messages will be sent from.
- Examples:
- Example 1: Company X wants to send their customers alerts via SMS should their account be compromised and there is a need to reset passwords.
- In this example the company being registered is Company X.
- Example 2: Company Y is an Independent Software Vendor(ISV) with 100s of their customers using their software platform. Company Z wants to give their customers the ability to send SMS from within their platform.
- In this example each of Company Y’s customers who want to send SMS will need to provide their information. Each of these customers will need their own separate 10DLC for each use case that Company Y wants to enable for their customers.
- Company Y should define very clearly for their customers the types of messages that can be sent as each of their customers will be expected to send only messages that align with the Campaign(Use-Case) that they register for.
- Example 3: Company Z is an Independent Software Vendor(ISV) with 100s of their customers using their software platform. Company Z wants to provide One-Time Password(OTP) codes via SMS.
- In this example the company being registered will be Company Z.
- Example 1: Company X wants to send their customers alerts via SMS should their account be compromised and there is a need to reset passwords.
10DLC Registration Best Practices
As you progress through the steps of 10DLC registration follow these best practices to ensure a smooth process. Begin here if you have not registered your company(ies) yet.
Company Registration Info and Additional Company and Contact Info


Best practices for Company Registration and Additional Company and Contact Info
- Make sure to enter all information correctly.
- Dependent on the country in which you have a Tax ID, enter into the Tax ID field one of the following:
- US=EIN
- CA=BN
- Other=VAT
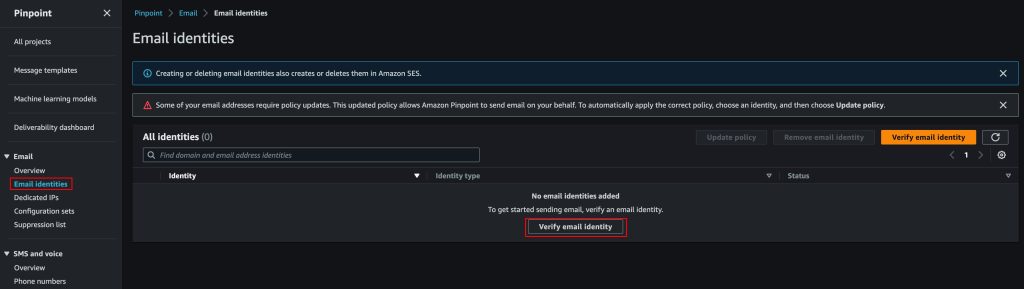
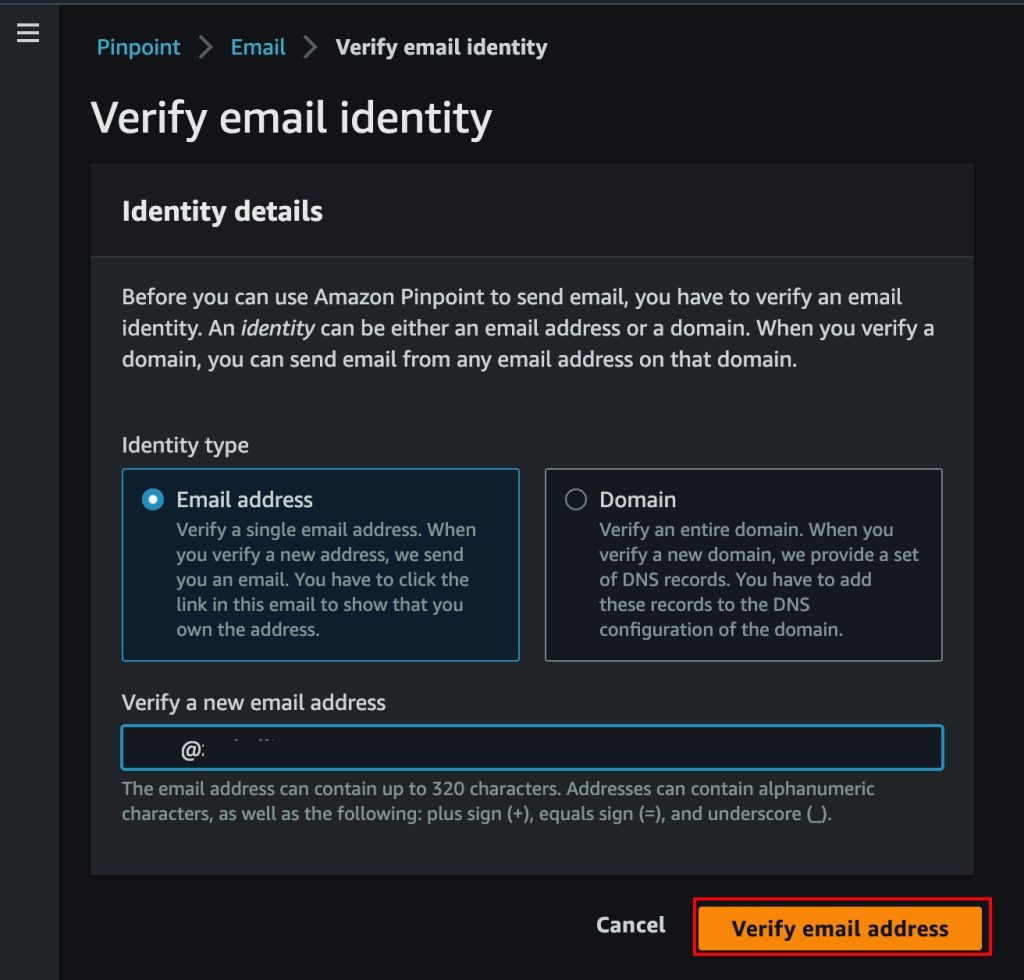
- If you select “PUBLIC_PROFIT” as your “Legal form of organization” you MUST fill out the following fields and complete the external brand verification shown in the screenshots below in the section titled “Public Profit Brand Verification Email Process”
- Make sure to complete:
- Stock symbol
- Stock exchange
- Brand verification email – Make sure to provide your personal company email. You will receive an email from [email protected] to complete the brand verification.
- Make sure to complete:
- Select the vertical that most closely aligns with your business
- Make sure that your website is publicly accessible. Your registration will be denied if the reviewer cannot access the site.
- It is a hard requirement to have both a support email and phone number
- Make sure your support email and support phone number are both active
- Make sure that your Company name and Email/Website domains match
- If you register the company Amazon Inc. but then list a support email of [email protected] your registration will likely be rejected if you are considered a large enough brand that should have a dedicated email domain.
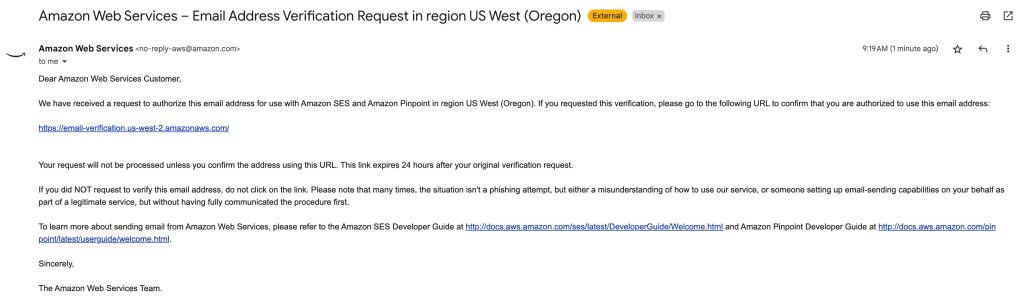
Public Profit Brand Verification Email Process – Required if you selected “PUBLIC_PROFIT” as your “Legal form of organization”
Once you submit your Brand Registration you will receive an email from [email protected] to complete the brand verification. This may take 1-3 days to arrive.
Step 1: Example email you will receive below

Step 2: Form to fill out from link in email

Step 3: Brand verification complete

Once you have completed and submitted your registration, as soon as you see your Brand Registration Status show as “Complete” you are ready to move on to “Brand Vetting.” Read “Additional Company Vetting for Potential Increased Quotas” below for next steps.

Additional Company Vetting for Potential Increased Quotas
Once you have completed the initial Company registration you have the following quotas assigned to your business:
- AT&T: 1.25 Messages Per Second(MPS) or 75 Transactions Per Minute(TPM)
- T-Mobile = 2000 messages/day
The quotas above do not mean that you cannot message recipients who use other carriers, these are just limits that these carriers have published. If the throughput above isn’t enough for your business’s needs you can apply for US 10DLC brand vetting, for a $40 fee.
- Click the “Create Registration” button again and select “US 10DLC brand vetting” as the “Registration type.”
- Select the radio button for the brand you previously registered. This vetting will be applied to that brand.
- If you have multiple brands you will need to do this for each of them

The Campaign Registry, a third-party provider, will then do a deeper vetting of the information you have already provided and will give your company a score that will determine the throughput and volume apportioned to you. Read here for a detailed breakdown of the possible scores and the quotas that are attached to them.
Note: Vetting doesn’t guarantee that your carrier throughput or daily volume will increase. It is possible for the vetting results to decrease carrier throughput and daily volume.
10DLC Campaign Registration
Once you have completed the registration process and the optional additional vetting you will need to register your Campaigns, which should align with your use-case(s). If you would like more detail for each of the 10DLC Campaign types that End User Messaging supports you can read more here.

Best Practices for Campaign Info
- Campaign Description
- Provide a clear and comprehensive overview of the campaign’s objectives and interactions the end-user would experience after opting in. Make sure to identify who the sender is, who the recipient is, and why messages are being sent to the intended recipient.
- Example: One-Time Password messages are sent by Company X to its customers for purposes of authentication to log into our application.
- Provide a clear and comprehensive overview of the campaign’s objectives and interactions the end-user would experience after opting in. Make sure to identify who the sender is, who the recipient is, and why messages are being sent to the intended recipient.
- Opt-In Workflow
- The primary purpose of the Opt-in workflow is to demonstrate that the end user explicitly consents to receive text messages and understands the nature of the program. Your application is being reviewed by a 3rd party reviewer so make sure to provide clear and thorough information about how your end-users opt-in to your SMS service and any associated fees or charges. If the reviewer cannot determine how your opt-in process works then your application will be denied and returned.
- This blog details the requirements that carriers have for a compliant SMS opt-in process
- Note: If you have a use case that is internal to your business, you are still required to demonstrate explicit opt-in consent from the recipients. There are no exceptions to having an opt-in workflow.
- The Opt-in workflow ideally is accessible by a 3rd party reviewer. If your Opt-in process requires a log-in, is not yet published publicly, is a verbal opt-in, or if it occurs on printed sources such as fliers and paper forms then make sure to thoroughly document how this process is completed by the end-user receiving messages. Provide a screenshot of the Call to Action in such cases. Host the screen shot on a publicly accessible website (like OneDrive or Google Drive) and provide the URL
- The description has to be a minimum of 40 characters
- The Opt-in location must include the following:
- Program (brand) name
- Link to a publicly accessible Terms & Conditions page
- Link to a publicly accessible Privacy Policy page
- Message frequency disclosure.
- Customer care contact information
- Opt-out information
- “Message and data rates may apply” disclosure.
- The primary purpose of the Opt-in workflow is to demonstrate that the end user explicitly consents to receive text messages and understands the nature of the program. Your application is being reviewed by a 3rd party reviewer so make sure to provide clear and thorough information about how your end-users opt-in to your SMS service and any associated fees or charges. If the reviewer cannot determine how your opt-in process works then your application will be denied and returned.
- Opt-in keyword
- This is optional but if you plan on allowing for opt-in by texting into your originator you should indicate that keyword here
- Opt-in confirmation message
- Provide the exact message that will be sent back to your end-users letting them know that they have successfully registered
- Example
- “Welcome to AnyCo! Reply “YES” to confirm your subscription and get special offers once a month. Msg & data rates may apply. Text ‘STOP’ to opt out.”
- Make sure to include:
- Brand Name
- It is best practice to do a “double opt-in” as seen in the example where the recipient will text back “YES” to confirm that they did want to register.
- Include “Msg & data rates may apply” as seen in the example
- Include opt-out language as seen in the example
- Example
- Provide the exact message that will be sent back to your end-users letting them know that they have successfully registered
- Help Message
- The “Help message” is the response that is required to be sent to end-users when they text the keyword “HELP” (or similar keywords). The purpose is to provide information to the end-user related to how they can get support or opt-out of the messaging program.
- The message has to be a minimum of 20 characters and a maximum of 160 characters
- The message must include:
- Program (brand) name OR product description.
- Additional customer care contact information.
- It is mandatory to include a phone number and/or email for end-user support
- The following is an example of a HELP response that complies with the requirements of the US mobile carriers:
- ExampleCorp Account Alerts: For help call 1-888-555-0142 or go to example.com. Msg&data rates may apply. Text STOP to cancel.
- Stop Message
- The “Stop message” is the response that is required to be sent to end-users when they text the keyword “STOP” (or similar keywords). End-users are required to be opted out of further messages when they text the STOP (or equivalent) keyword to your number and confirms with them that they will no longer receive messages for the program.
- The message has to be a minimum of 20 characters and a maximum of 160 characters
- The message must include:
- Program (brand) name OR product description
- Confirmation that no further messages will be delivered
- The following is an example of a compliant STOP response:
- You are unsubscribed from ExampleCorp Account Alerts. No more messages will be sent. Reply HELP for help or call 1-888-555-0142.
Campaign Capabilities
Number capability: Choose whether or not the numbers you associate to an approved campaign can support voice outbound calling in addition to SMS. If you only require SMS you can leave the default selection of SMS-only. If you require voice calling, you should select voice as well. Selecting voice will increase the registration processing time.
Message Type: The content of your messages need to align with the Campaign Type and Message Type that you select here — if it’s misaligned your registration will be denied. You can’t change the message type on a campaign after it’s in an approved state.

Campaign Use Case
End User Messaging supports all of the standard use cases available to be sent via 10DLC and a single Special use case for communications from a non-religious registered 501(c)(3) charity aimed at providing help and raising money for those in need. For a more detailed listing of the campaign use cases supported visit this page.

Best Practices for Campaign Use Case
- Select the Use case that most closely aligns to your use case.
- All of the information that you provide during this process needs to align with this selection or your registration will be rejected
- Make sure to ONLY select a Sub use case if you select a use case of MIXED or LOW_VOLUME
- Note: The “Low Volume” and “Mixed” campaigns have lower quotas which are the same as a company that does not opt for the increased vetting detailed above:
- AT&T: 1.25 Messages Per Second(MPS) or 75 Transactions Per Minute(TPM)
- T-Mobile = 2000 messages/day
- Note: The “Low Volume” and “Mixed” campaigns have lower quotas which are the same as a company that does not opt for the increased vetting detailed above:
- For each of the Yes/No drop down selections make sure to be truthful. These registrations are being done by humans who will be checking each of these. An untruthful answer can cause your registration to be rejected.
- If you plan on using links within your messages remember that generic URL shorteners e.g. “bit.ly/LONGLINK” will be rejected. If you would like to use shorteners make sure that it is a branded shortener such as “any.co/LONGLINK”
-
- Subscriber opt-in
- Subscriber opt-in is automatically set to “Yes” on your behalf. Explicit opt-in is required of all end-users regardless of your use case.
- Subscriber opt-out
- You are required by carriers to opt-out end users at their request. This is generally done through the opt-out keyword ‘STOP’. More information related to opt-outs and how to manage them effectively can be found here
- Subscriber Help
- Carriers require that your SMS numbers reply to the ‘HELP’ keyword or similar at all times regardless of the numbers opt-in status. More information related to HELP auto-response requirements can be found in End User Messaging best practices documentation here
- Direct Lending or Loan Arrangement
- If you are a 1st party lender you can get approval for transactional use cases (loan transaction receipts, OTPs, etc.). If your company is related to the lending business then you must mark this as “yes“
- Embedded Link
- If you have supplied messaging examples with an embedded link you must mark this as a “yes.” If this is misaligned with your content then your registration will be rejected
- Note: Generic link shorteners such as Bitly or TinyURL should not be used and may cause your registration to be rejected. Make sure that any links in your sample messages are branded and consistent with your domain
- If you have supplied messaging examples with an embedded link you must mark this as a “yes.” If this is misaligned with your content then your registration will be rejected
- Embedded Phone Number
- If you have supplied messaging examples with an embedded phone number you must mark this as a “yes.” If this is misaligned with your content then your registration will be rejected
- Age-Gated Content
- There is a potential to be rejected or for the campaign to be suspended later if your content includes age gated material and you do not mark “yes” here
- If they are do they need to do anything different here?
- Subscriber opt-in
Message Samples
Sample messages should reflect actual messages to be sent under the campaign you are registering for. It is critical to ensure that there is consistency between the use case, your campaign description, and the content of the messages.

Best Practices for Sample Messages
- Sample messages should reflect actual messages to be sent under campaign
- Indicate any templated fields that are variable with brackets and make sure to be clear with what information may be replaced
- Example: Hi, [FirstName] this is Amazon inc. letting you know that your delivery is ready
- Each sample message has to be a minimum of 20 characters. If you plan to use multiple message templates for this 10DLC campaign, include them as well
- Sample messages should identify who is sending the message (brand name)
- Ensure that at least one sample message includes your business name
- Include opt-out language to at least 1 sample message
- Example: You are unsubscribed from ExampleCorp Account Alerts. No more messages will be sent. Reply HELP for help or call 1-888-555-0142.
- Make sure your messaging does not involve prohibited content such as cannabis, hate speech, etc. and that your use case is compliant with AWS Messaging Policy
What to do if your 10DLC campaigns are rejected
If your Company registration or Campaign registration is rejected please follow the steps here to create a case and the AWS Support team will provide information about the reasons that your 10DLC campaign registration was rejected in your AWS Support case.


 Satyasovan Tripathy works as a Senior Specialist Solution Architect at AWS. He is situated in Bengaluru, India, and focuses on the AWS Digital User Engagement product portfolio. He enjoys reading and travelling outside of work.
 Nikhil Khokhar is a Solutions Architect at AWS. He specializes in building and supporting data streaming solutions that help customers analyze and get value out of their data. In his free time, he makes use of his 3D printing skills to solve everyday problems.


