Tag Archives: Data protection

Exploring digital sovereignty: learning opportunities at re:Invent 2024

Post Syndicated from Marta Taggart original https://aws.amazon.com/blogs/security/exploring-digital-sovereignty-learning-opportunities-at-reinvent-2024/

AWS re:Invent 2024, a learning conference hosted by Amazon Web Services (AWS) for the global cloud computing community, will take place December 2–6, 2024, in Las Vegas, Nevada, across multiple venues. At re:Invent, you can join cloud enthusiasts from around the world to hear the latest cloud industry innovations, meet with AWS experts, and build connections. Whether you want to build deep technical expertise, understand how to prioritize your investments, learn more about the infrastructure offerings of the sovereign-by-design AWS Cloud, or see how the AWS Nitro System enables enhanced security for your workloads, re:Invent is a great opportunity to explore our digital sovereignty solutions.

This year, there will be many ways that you can learn about our advanced sovereignty controls, security features, and infrastructure options that can help meet your unique digital sovereignty needs, including sessions and hands-on activities with AWS hybrid and edge services including AWS Local Zones, AWS Dedicated Local Zones, and AWS Outposts. In the Expo, you can visit the Digital Sovereignty & Data Protection kiosk in the AWS Village to watch demos, learn about the upcoming AWS European Sovereign Cloud, and get your questions answered by AWS team members. To see AWS designed chips and Outposts devices, check out the AWS Next Gen Infrastructure Hub in the AWS Village. You can also visit the AWS Partner Network (APN) booth to connect with AWS Digital Sovereignty Partners to learn about the benefits of partner programs.

Breakout sessions and lightning talks

To add sessions to your AWS re:Invent agenda and find time and location information, choose the session title link.

SEC229 | Breakout | Digital sovereignty: overcome complexity and enable future-readiness
Max Peterson, VP, Sovereign Cloud, AWS
Organizations are facing increasing complexity in an evolving sovereignty landscape. Building a strong digital foundation can help simplify efforts to meet requirements today and prepare your organization for the future, without slowing innovation. Join this session to learn how AWS sovereign cloud offerings, ranging from encryption services to the announced AWS European Sovereign Cloud, provides more control and choice to help meet your unique needs. Discover how customers are keeping critical workloads secure and protected when leveraging new technologies on AWS, including generative AI, and learn about new digital sovereignty solutions offered by AWS Partners.

HYB201 | Breakout | AWS wherever you need it: From the cloud to the edge
Jan Hofmeyr, VP, EC2 Networking and Hybrid Edge, AWS, and Jeff Feist, Executive Director – Hosting Solutions, Merck & Co., Inc.
While most workloads can be migrated to the cloud, some remain on premises or at the edge due to low latency, local data processing, or digital sovereignty needs. In this session, learn how AWS services like AWS Outposts, AWS Local Zones, AWS Dedicated Local Zones, and AWS IoT Core support hybrid cloud and edge computing workloads such as multiplayer gaming, high-frequency trading, medical imaging, smart manufacturing, and generative AI applications with data residency requirements.

HYB309 | Breakout | Well-architected for data residency with hybrid cloud services
Sherry Lin, Principal Product Manager, AWS; Lakshmi VP, Specialist SA – Hybrid Edge, AWS; and Kevin Ng, Senior Director, Core Engineering Products, GovTech
With concerns over data privacy, security, and digital sovereignty, many countries across the world are strengthening data residency laws to keep personal and sensitive data within their borders. For organizations operating across multiple geographies, it can be challenging to meet the evolving data residency laws. In this session, following the AWS Well-Architected Framework, explore the best practices around data residency when using hybrid cloud services, including AWS Local Zones, AWS Dedicated Local Zones, and AWS Outposts.

IOT202 | Breakout | AWS IoT for edge LLM deployment and execution
Nikit Pednekar, Principal Product Manager, AWS, and Stefano Marzani, WW Tech Leader, SDX, AWS
With the advent of generative AI and large language models (LLMs), you must be wondering, how can these technologies be applied at the IoT edge? After all, there are many benefits of running LLMs at the edge—from network bandwidth efficiencies, offline processing, lower latency, and data sovereignty to cost savings, security, and differentiation. In this session, learn how using AWS IoT services and LLMs at the edge can uplift your solutions with actionable outcomes and innovative capabilities, such as gesture recognition, natural language processing for voice control, real-time predictive maintenance, energy optimization, anomaly detection, and more.

KUB310 | Breakout | Amazon EKS for edge and hybrid use cases
Chris Splinter, Product Manager, AWS, and Gokul Chandra Purnachandra Reddy, Senior Solutions Architect, AWS
There are some workloads that may need to run on-premises, at the edge, or in a hybrid scenario due to low-latency, data dependencies, data sovereignty, or other regulatory reasons, especially in industries such as manufacturing, healthcare, telco, and financial services. Data dependent workloads may have to wait for the data to be on AWS services before fully migrating. In this session, we will share production-ready architectures leveraging services like Amazon EKS Anywhere to run container workloads on-premises and support modernizing VMware-based workloads. Also learn best practices on migration of on-premises Kubernetes deployments to AWS Cloud.

PEX110 | Lightening Talk | Supercharge your growth and capabilities with partner programs
Mike Cannady, Director, Partner Core Public Sector, AWS
Discover the latest AWS Partner program updates that propel your public sector business forward. Join this lightning talk to explore innovations tailored to partners: generative AI programs, digital sovereignty, solution building, and managed services. Whether you’re starting out or seasoned, glean insights and use cases to elevate your journey. Don’t miss this opportunity to supercharge your development and stay ahead in this ever-evolving landscape.

Interactive sessions (chalk talks and workshops)

HYB304 | Workshop | Implement RAG without compromising on digital sovereignty
Aditya Lolla, Senior Solutions Architect, Hybrid Edge, AWS, and Robert Belson, Senior Developer Advocate, AWS
As governments and standards bodies develop data protection and privacy regulations, organizations increasingly need to combine the use of generative AI tooling in the cloud with regulated data that need to remain on premises to meet data sovereignty requirements. In this workshop, learn how to extend Agents for Amazon Bedrock to hybrid and edge services like AWS Outposts and AWS Local Zones to build distributed Retrieval Augmented Generation (RAG) applications with on-premises data for improved model outcomes. Get hands-on with Amazon Bedrock, AWS Lambda, and AWS hybrid and edge services, and build Amazon Simple Storage Service (Amazon S3) compliant workflows using a hybrid S3 compatible solution. You must bring your laptop to participate.

WPS207 | Chalk Talk | How AWS can help you meet your digital sovereignty requirements
Mehmet Bakkaloglu, Principal Solutions Architect, AWS, and Addy Upreti, Principal Technical Product Manager – Digital Sovereignty, AWS
Customers in the public sector and regulated industries such as healthcare, financial services and telecom have shared how they face digital sovereignty concerns in their cloud journey. In this talk, you can learn about how AWS is sovereign-by-design and the range of capabilities that can enable you to meet your digital sovereignty needs. Plus, discover how the AWS European Sovereign Cloud is being built to provide further choice to meet these needs. We’ll talk through how AWS can help accelerate your cloud journey while meeting your requirements.

HYB310 | Chalk Talk | Addressing data residency requirements with hybrid and edge services
Sedji Gaouaou, Senior Solutions Architect, AWS, and Fabio Rodriguez, Head of Hybrid Cloud Solutions Architect, AWS
Data residency is a critical consideration for organizations that collect and store sensitive information, including personal identifiable information (PII), financial data, healthcare data, or information pertaining to national security. To help organizations operating across multiple geographies drive innovation while meeting data residency requirements, AWS offers multiple global infrastructure offerings like AWS Regions, AWS Dedicated Local Zones, AWS Local Zones, and AWS Outposts. In this interactive chalk talk, learn how these infrastructure offerings can help you accelerate digital transformation while meeting data residency needs.

For a full view of digital sovereignty content, including sessions with partners, explore the AWS re:Invent catalog and filter on the Digital Sovereignty area of interest. Not able to attend in-person? Register for free for the virtual-only pass to livestream keynotes and innovation talks, and access on-demand breakout sessions today. See you in Las Vegas or on the livestream!

If you have feedback about this post, submit comments in the Comments section below.

Author

Marta Taggart

Marta is a Principal Product Marketing Manager focused on digital sovereignty in AWS Security Product Marketing based in Seattle. Outside of work, you’ll find her helping her rescue dog, Jack, lives his best life.

Rachel Zheng

Rachel Zheng

Rachel is a Senior Product Marketing Manager focused on hybrid cloud and edge computing. Outside of work, you’ll find her hiking and exploring new restaurants in the Bay Area.

Cloudflare acquires Kivera to add simple, preventive cloud security to Cloudflare One

Post Syndicated from Noelle Kagan original https://blog.cloudflare.com/cloudflare-acquires-kivera

We’re excited to announce that Kivera, a cloud security, data protection, and compliance company, has joined Cloudflare. This acquisition extends our SASE portfolio to incorporate inline cloud app controls, empowering Cloudflare One customers with preventative security controls for all their cloud services.

In today’s digital landscape, cloud services and SaaS (software as a service) apps have become indispensable for the daily operation of organizations. At the same time, the amount of data flowing between organizations and their cloud providers has ballooned, increasing the chances of data leakage, compliance issues, and worse, opportunities for attackers. Additionally, many companies — especially at enterprise scale — are working directly with multiple cloud providers for flexibility based on the strengths, resiliency against outages or errors, and cost efficiencies of different clouds. 

Security teams that rely on Cloud Security Posture Management (CSPM) or similar tools for monitoring cloud configurations and permissions and Infrastructure as code (IaC) scanning are falling short due to detecting issues only after misconfigurations occur with an overwhelming volume of alerts. The combination of Kivera and Cloudflare One puts preventive controls directly into the deployment process, or ‘inline’, blocking errors before they happen. This offers a proactive approach essential to protecting cloud infrastructure from evolving cyber threats, maintaining data security, and accelerating compliance. 

An early warning system for cloud security risks 

In a significant leap forward in cloud security, the combination of Kivera’s technology and Cloudflare One adds preventive, inline controls to enforce secure configurations for cloud resources. By inspecting cloud API traffic, these new capabilities equip organizations with enhanced visibility and granular controls, allowing for a proactive approach in mitigating risks, managing cloud security posture, and embracing a streamlined DevOps process when deploying cloud infrastructure.

Kivera will add the following capabilities to Cloudflare’s SASE platform:

  • One-click security: Customers benefit from immediate prevention of the most common cloud breaches caused by misconfigurations, such as accidentally allowing public access or policy inconsistencies.

  • Enforced cloud tenant control: Companies can easily draw boundaries around their cloud resources and tenants to ensure that sensitive data stays within their organization. 

  • Prevent data exfiltration: Easily set rules to prevent data being sent to unauthorized locations.

  • Reduce ‘shadow’ cloud infrastructure: Ensure that every interaction between a customer and their cloud provider is in line with preset standards. 

  • Streamline cloud security compliance: Customers can automatically assess and enforce compliance against the most common regulatory frameworks.

  • Flexible DevOps model: Enforce bespoke controls independent of public cloud setup and deployment tools, minimizing the layers of lock-in between an organization and a cloud provider.

  • Complementing other cloud security tools: Create a first line of defense for cloud deployment errors, reducing the volume of alerts for customers also using CSPM tools or Cloud Native Application Protection Platforms (CNAPPs). 


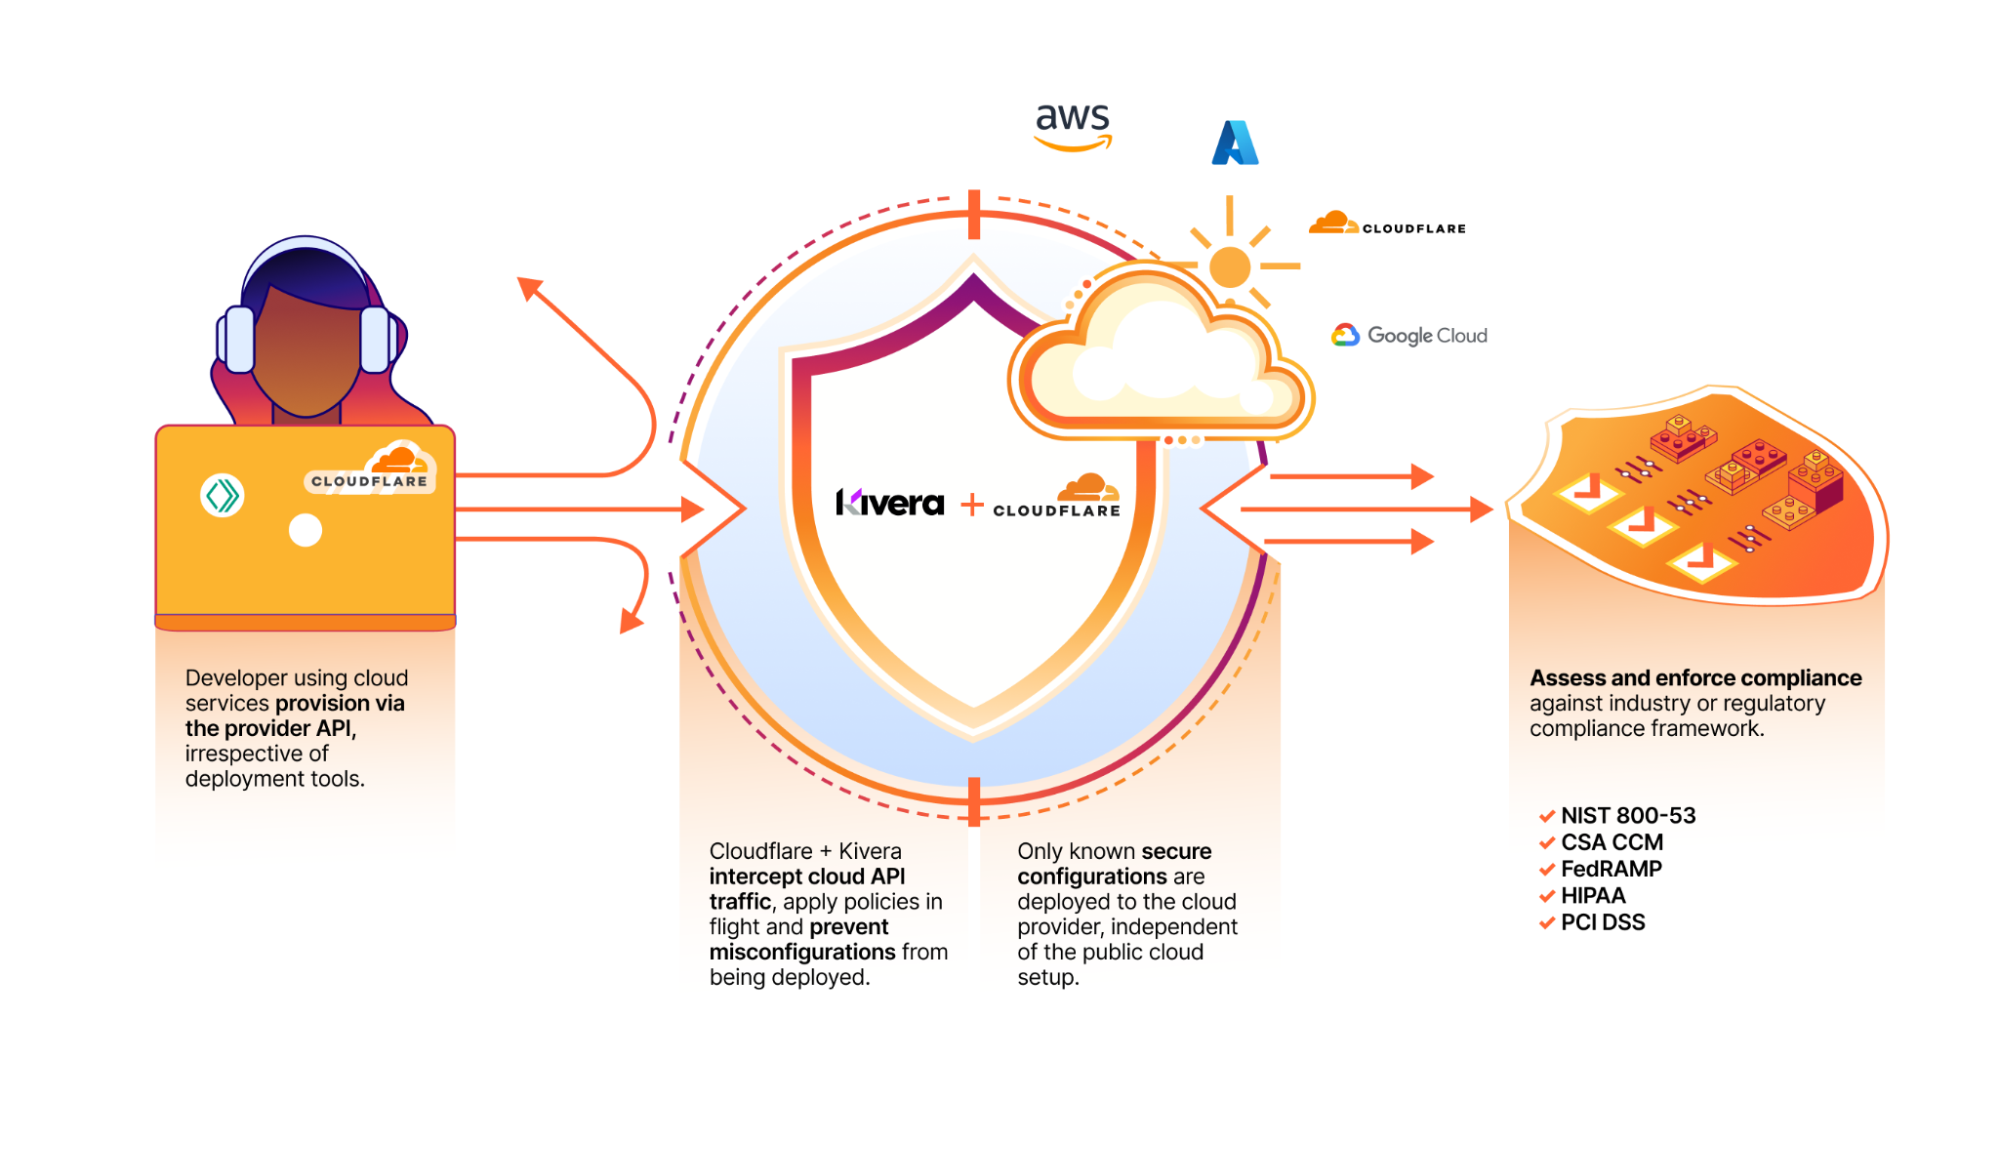
An intelligent proxy that uses a policy-based approach to
enforce secure configuration of cloud resources.

Better together with Cloudflare One

As a SASE platform, Cloudflare One ensures safe access and provides data controls for cloud and SaaS apps. This integration broadens the scope of Cloudflare’s SASE platform beyond user-facing applications to incorporate increased cloud security through proactive configuration management of infrastructure services, beyond what CSPM and CASB solutions provide. With the addition of Kivera to Cloudflare One, customers now have a unified platform for all their inline protections, including cloud control, access management, and threat and data protection. All of these features are available with single-pass inspection, which is 50% faster than Secure Web Gateway (SWG) alternatives.  

With the earlier acquisition of BastionZero, a Zero Trust infrastructure access company, Cloudflare One expanded the scope of its VPN replacement solution to cover infrastructure resources as easily as it does apps and networks. Together Kivera and BastionZero enable centralized security management across hybrid IT environments, and provide a modern DevOps-friendly way to help enterprises connect and protect their hybrid infrastructure with Zero Trust best practices.

Beyond its SASE capabilities, Cloudflare One is integral to Cloudflare’s connectivity cloud, enabling organizations to consolidate IT security tools on a single platform. This simplifies secure access to resources, from developer privileged access to technical infrastructure and expanding cloud services. As Forrester echoes, “Cloudflare is a good choice for enterprise prospects seeking a high-performance, low-maintenance, DevOps-oriented solution.”

The growing threat of cloud misconfigurations

The cloud has become a prime target for cyberattacks. According to the 2023 Cloud Risk Report, CrowdStrike observed a 95% increase in cloud exploitation from 2021 to 2022, with a staggering 288% jump in cases involving threat actors directly targeting the cloud.

Misconfigurations in cloud infrastructure settings, such as improperly set security parameters and default access controls, provide adversaries with an easy path to infiltrate the cloud. According to the 2023 Thales Global Cloud Security Study, which surveyed nearly 3,000 IT and security professionals from 18 countries, 44% of respondents reported experiencing a data breach, with misconfigurations and human error identified as the leading cause, accounting for 31% of the incidents.

Further, according to Gartner, “Through 2027, 99% of records compromised in cloud environments will be the result of user misconfigurations and account compromise, not the result of an issue with the cloud provider.”1

Several factors contribute to the rise of cloud misconfigurations:

  • Rapid adoption of cloud services: Leaders are often driven by the scalability, cost-efficiency, and ability to support remote work and real-time collaboration that cloud services offer. These factors enable rapid adoption of cloud services which can lead to unintentional misconfigurations as IT teams struggle to keep up with the pace and complexity of these services. 

  • Complexity of cloud environments: Cloud infrastructure can be highly complex with multiple services and configurations to manage. For example, AWS alone offers 373 services with 15,617 actions and 140,000+ parameters, making it challenging for IT teams to manage settings accurately. 

  • Decentralized management: In large organizations, cloud infrastructure resources are often managed by multiple teams or departments. Without centralized oversight, inconsistent security policies and configurations can arise, increasing the risk of misconfigurations.

  • Continuous Integration and Continuous Deployment (CI/CD): CI/CD pipelines promote the ability to rapidly deploy, change and frequently update infrastructure. With this velocity comes the increased risk of misconfigurations when changes are not properly managed and reviewed.

  • Insufficient training and awareness: Employees may lack the cross-functional skills needed for cloud security, such as understanding networks, identity, and service configurations. This knowledge gap can lead to mistakes and increases the risk of misconfigurations that compromise security.

Common exploitation methods 

Threat actors exploit cloud services through various means, including targeting misconfigurations, abusing privileges, and bypassing encryption. Misconfigurations such as exposed storage buckets or improperly secured APIs offer attackers easy access to sensitive data and resources. Privilege abuse occurs when attackers gain unauthorized access through compromised credentials or poorly managed identity and access management (IAM) policies, allowing them to escalate their access and move laterally within the cloud environment. Additionally, unencrypted data enables attackers to intercept and decrypt data in transit or at rest, further compromising the integrity and confidentiality of sensitive information.

Here are some other vulnerabilities that organizations should address: 

  • Unrestricted access to cloud tenants: Allowing unrestricted access exposes cloud platforms to data exfiltration by malicious actors. Limiting access to approved tenants with specific IP addresses and service destinations helps prevent unauthorized access.

  • Exposed access keys: Exposed access keys can be exploited by unauthorized parties to steal or delete data. Requiring encryption for the access keys and restricting their usage can mitigate this risk.

  • Excessive account permissions: Granting excessive privileges to cloud accounts increases the potential impact of security breaches. Limiting permissions to necessary operations helps prevent lateral movement and privilege escalation by threat actors.

  • Inadequate network segmentation: Poorly managed network security groups and insufficient segmentation practices can allow attackers to move freely within cloud environments. Drawing boundaries around your cloud resources and tenants ensures that data stays within your organization.

  • Improper public access configuration: Incorrectly exposing critical services or storage resources to the internet increases the likelihood of unauthorized access and data compromise. Preventing public access drastically reduces risk.

  • Shadow cloud infrastructure: Abandoned or neglected cloud instances are often left vulnerable to exploitation, providing attackers with opportunities to access sensitive data left behind. Preventing untagged or unapproved cloud resources to be created can reduce the risk of exposure.

Limitations of existing tools 

Many organizations turn to CSPM tools to give them more visibility into cloud misconfigurations. These tools often alert teams after an issue occurs, putting security teams in a reactive mode. Remediation efforts require collaboration between security teams and developers to implement changes, which can be time-consuming and resource-intensive. This approach not only delays issue resolution but also exposes companies to compliance and legal risks, while failing to train employees on secure cloud practices. On average, it takes 207 days to identify these breaches and an additional 70 days to contain them. 

Addressing the growing threat of cloud misconfigurations requires proactive security measures and continuous monitoring. Organizations must adopt proactive security solutions that not only detect and alert but also prevent misconfigurations from occuring in the first place and enforce best practices. Creating a first line of defense for cloud deployment errors reduces the volume of alerts for customers, especially those also using CSPM tools or CNAPPs. 

By implementing these proactive strategies, organizations can safeguard their cloud environments against the evolving landscape of cyber threats, ensuring robust security and compliance while minimizing risks and operational disruptions.

What’s next for Kivera

The Kivera product will not be a point solution add-on. We’re making it a core part of our Cloudflare One offering because integrating features from products like our Secure Web Gateway give customers a comprehensive solution that works better together.

We’re excited to welcome Kivera to the Cloudflare team. Through the end of 2024 and into early 2025, Kivera’s team will focus on integrating their preventive inline cloud app controls directly into Cloudflare One. We are looking for early access testers and teams to provide feedback about what they would like to see. If you’d like early access, please join the waitlist.

[1] Source: Outcome-Driven Metrics You Can Use to Evaluate Cloud Security Controls, Gartner, Charlie Winckless, Paul Proctor, Manuel Acosta, 09/28/2023 

GARTNER is a registered trademark and service mark of Gartner, Inc. and/or its affiliates in the U.S. and internationally and is used herein with permission. All rights reserved.

How to perform a proof of concept for automated discovery using Amazon Macie

Post Syndicated from Jason Stone original https://aws.amazon.com/blogs/security/proof-of-concept-for-automated-discovery-using-amazon-macie/

Amazon Web Services (AWS) customers of various sizes across different industries are pursuing initiatives to better classify and protect the data they store in Amazon Simple Storage Service (Amazon S3). Amazon Macie helps customers identify, discover, monitor, and protect sensitive data stored in Amazon S3. However, it’s important that customers evaluate and test the capabilities of Macie to verify that they can meet their specific data identification and protection goals. In this post, we show you how to define and run a proof of concept (POC) to validate using Macie and automated discovery to enhance your current data protection strategies. The POC steps demonstrate how you can use Macie to detect and alert you to sensitive data discovered in your AWS environment and help you determine the value of using Macie to enhance your current data protection strategies.

Note: This POC uses some features that offer a 30-day free trial and other features that will incur minimal charges during the POC phase. We highlight and summarize these throughout this post.

Data security business challenges

Data security is a broad concept that revolves around protecting digital information from unauthorized access, corruption, theft, and other forms of malicious activity throughout its lifecycle. There’s an exponential growth of digital data and organizations are grappling with not only managing it but also determining where their sensitive data exists. Additionally, many organizations have compliance requirements from government regulators and industry standards, such as PCI DSS or HIPAA. Organizations want to move fast, which means giving developers the tools to build quickly to stay ahead, while making sure that the correct data classification policies are defined and enforced.

Macie features

Amazon Macie is a data security service that discovers sensitive data using machine learning and pattern matching, provides visibility into data security risks, and enables automated protection against those risks. The following is a summary of the key features of Macie, many of which will be used in this POC. The core capabilities of Macie are focused on the security of your S3 buckets and helping to identify sensitive data including financial data, personal data, and credentials as well as sensitive data that’s unique to your organization, such as intellectual property.

S3 bucket security

Customers use Amazon S3 for a variety of use cases and store various types of data in S3 buckets, including sensitive data. Continuously monitoring these buckets for the presence of sensitive data is a vital part of a data protection strategy. Macie gives you visibility into your S3 bucket inventory and the security and access controls associated with your buckets. This visibility includes if the bucket is publicly accessible, the encryption level of the bucket, and if the bucket is shared with other accounts. Whenever the security posture of one of your buckets is reduced, Macie generates a finding about the change, enabling you to respond. These findings are consumable through the AWS Management Console for Macie, through Macie APIs, as Amazon EventBridge messages, or through AWS Security Hub.

Sensitive data discovery jobs

Sensitive data discovery jobs provide a way to target a specific S3 bucket or group of buckets to do a deep analysis of the objects in those buckets and identify if sensitive data is present in the objects and if so, the type of data. These jobs can run on a daily, weekly, or monthly basis for new or changed data or once for on-demand analysis.

Automated data discovery

Macie offers an automated data discovery feature that can continually discover sensitive data within your S3 buckets. This feature is intended to help customers who have large amounts of S3 buckets and data better understand where sensitive data might be stored without having to scan all their data. By using automated data discovery, you can focus your resources on deeper investigations of the security of buckets identified to have sensitive data. Macie selects samples of the objects within S3 buckets and inspects them for the presence of sensitive data daily, providing insight into where sensitive data might reside in your overall Amazon S3 data estate.

POC overview

This POC is intended to help you gain an understanding of what Macie is capable of and how you can use it to achieve your data discovery goals. The POC in this post includes the following tasks in Macie:

  • Reviewing managed data identifiers
  • Defining custom data identifiers
  • Staging POC data
  • Running a sensitive data discovery job
  • Reviewing the output of the discovery job
  • Enabling and reviewing the output of automated data discovery

Note: The amount of time required for each task depends on your preparation and analysis for each stage. Note that, in the automated data discovery phase, it will take 24–48 hours for Macie to perform the first scan after the feature is enabled.

Enable Macie

Macie must be enabled before you can proceed with the POC. If you haven’t yet enabled Macie, see Enable Macie for instructions.

Note: When you enable Macie and the 30-day free trial for S3, monitoring S3 bucket security and privacy is automatically enabled. There’s also a 30-day free trial for automated data discovery, which is covered later in this post. There is no free trial for running targeted data discovery jobs. Review the Macie pricing page for details.

Review managed data identifiers

A successful POC of Macie includes understanding what data Macie can detect. Macie comes with over 150 managed data identifiers that are designed to identify sensitive data in your S3 objects. It’s important to first understand the available managed data identifiers and which ones align with the use cases you want to address. Examples of Macie managed data identifiers include credit card numbers, AWS secret access keys, and national identification numbers. Macie offers a default collection of recommend managed data identifiers to use for detecting general categories and types of sensitive data while optimizing data discovery results and reducing noise.

Keywords are an important component for Macie to be able to detect sensitive data. Many managed data identifiers require keywords to be in proximity of the data for Macie to be able to detect findings. Understanding the keywords that are used as part of sensitive data detection is important when it comes to building test data for a POC.

Prior to beginning your POC, review the list of managed data identifiers and determine which ones you feel will be necessary to use for your data discovery requirements. Additionally, identify which managed data identifiers, which are applicable to your POC, fall outside of the default list of identifiers.

Define custom data identifiers

Macie covers a wide number of use cases with its managed data identifiers, but some use cases need custom data identifiers for data types that aren’t included in the managed data identifiers. For example, customers might need to identify sensitive data that’s specific to their company, such as an employee ID or project number. Other customers might operate in industries that have data types unique to that industry, such as a known traveler number in the airline industry. If your requirements for identifying sensitive data include detecting sensitive data that isn’t part of the current list of managed data identifiers, then you can create custom data identifiers for those data types. For a POC, you might not want to create a custom data identifier for every additional detection. Instead, you can create a few to help confirm that you can use custom data identifiers for sensitive data detection and that Macie can support your data discovery goals. Building custom data identifiers has a thorough explanation of how to define a custom data identifier. Similar to managed data identifiers, custom data identifiers have keyword requirements. Defining detection criteria for custom data identifiers provides details for the types of data that require keywords.

Stage POC data

After reviewing the managed data identifiers provided by Macie and creating the custom data identifiers needed for your POC, it’s time to stage data sets that will help demonstrate the capabilities of these identifiers and better understand how Macie identifies sensitive data. We recommend that you stage data sets that contain sensitive data as well as data sets that do not to gain a full understanding of how Macie detects and reports on each of these situations. You can stage a variety of data sets to use for your POC using just a few GB of data to help keep your initial POC scans’ cost low. Staged data must be in file formats that Macie supports.

When preparing data to stage, keep in mind the keyword requirements for many of the Macie managed data identifiers. To determine which managed data identifiers have keyword requirements, see Managed data identifiers by type. When you’re staging your data, reference the keywords that are supported for the managed data identifiers you are using to help ensure that the data can be identified in your POC tests.

We recommend staging the data in one S3 bucket that’s dedicated to the POC and to use S3 server-side encryption on the bucket. If you want to use a customer managed AWS KMS key to encrypt the S3 data at rest, follow the instructions in Allowing Macie to use a customer managed AWS KMS key to give Macie access to decrypt the data in the bucket. You should also follow best practices for the S3 bucket related to not allowing public access and implementing least privilege access.

You can use one or more of the following approaches to identify and stage data for your POC:

  • Stage data files created by synthetic data generator tools with sensitive data included. There are many tools available for generating sensitive data. The following are two that you can use to generate test data.
  • Stage data files from public data repositories. There are various repositories staged with information that could be used for sensitive data detection. These repositories are often comprised of publicly available data sets or were created to help with testing machine learning models or sensitive data detection.
  • Stage data files of your own data with sensitive information. Because the goal is to use Macie to identify sensitive information in your S3 buckets, including examples of your own data that contains sensitive information can be helpful to test the capabilities of Macie.
  • Stage data files that don’t contain sensitive information. This can help you understand how Macie handles data that you believe doesn’t contain sensitive information. With the managed data identifiers that Macie offers, you should stage data files that you believe don’t contain information that aligns to the managed data identifiers. The staged data files could be log files, documents, or data sets that meet the criteria of this step.
  • Stage data that contains information that’s representative of data that you would want to detect using custom data identifiers.

Run a data classification job

Now that you’ve reviewed the managed data identifiers, defined custom data identifiers, and staged sample data, it’s time to run a sensitive data discovery job. When configuring the job scope, we recommend the following:

  1. A specific S3 bucket where the POC data is staged.
  2. The scope is set to be a one-time job.
  3. Leave the sampling depth at 100 percent. Most customers leave this value at 100 percent, but some will lower it if they want a smaller random sample scan of their data. Most customers use automated data discovery to get sample scans instead of adjusting the sampling depth for individual jobs.
  4. Select the recommended managed data identifiers. If your testing requires that Macie identify additional sensitive data types that are offered as managed data identifiers but aren’t part of the recommended list, choose the Custom option and select the managed data identifiers that you need. Make sure that the recommended managed data identifiers are part of the custom list that you construct.
  5. Choose the custom data identifiers that you want to be used in the job.

After you configure your job, give it a name, review the final configuration, and then submit the job to run. A job that uses a data set of a few GB should complete within 30 minutes.

Review the findings from your job

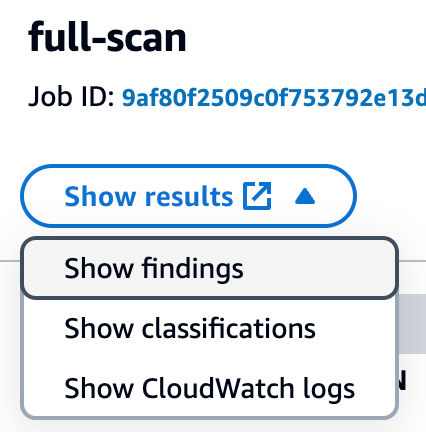
After the job completes, it’s time to review what Macie found in the data. Objects that Macie found with sensitive data will be presented as Findings in the Macie console. From the Jobs screen, choose the job you submitted. In the right-hand window, you will see the overview information for the job. From the overview window you can choose Show results menu and then select Show findings to view a list of the findings that were generated by the job.

Figure 1: Viewing Macie job findings

Figure 1: Viewing Macie job findings

Each object where Macie found sensitive data will be listed as a single finding. If there were multiple types of sensitive data found in the object, each type of sensitive data and a count will be included in the details. Choose each of the findings that was produced and review the details to confirm what sensitive data was identified and if the sensitive data was discovered as you expected. Additionally, confirm that you don’t have findings for objects that you staged that were not supposed to have sensitive data so that you can confirm how Macie handles these types of objects. If you created custom data identifiers, review findings for the objects that included the custom data that you detect to confirm that the data was detected.

Enable automated discovery

Now that you understand how to use Macie to discover sensitive data, the next step in the POC is to enable automated discovery and use Macie to discover sensitive data across a larger collection of your existing S3 data.

You will be enabling automated discovery in Macie as a 30-day free trial. For the free trial, the scope of total data storage to be evaluated will be 150 GB. Use the following steps to guide your setup of the automated discovery feature:

  1. To use automated discovery, ensure that you have a delegated administrator account defined for Macie. See Integrating and configuring an organization in Macie for steps on how to configure your delegated administrator account for Macie.
  2. After your delegated administrator account is configured, enable automated discovery. As part of enabling automated discovery, pay extra attention to the following items:
    • Set managed data identifiers. Ideally, choose the recommended data identifiers to help reduce noise. If there are specific managed data identifiers that you really want to see, then choose Custom to choose the ones you want.
    • Include custom data identifiers that you want to be used to evaluate your sensitive data.
    • Exclude buckets that you don’t want included in the scope for identifying sensitive data.
    • Include or exclude specific accounts that should be part of the POC. Step 5 of Enable automated discovery covers how to enable it for specific accounts.

You will see the first set of results 24 to 48 hours after you enable automated discovery. After that, you will see updates to the automated discovery results every 24 hours.

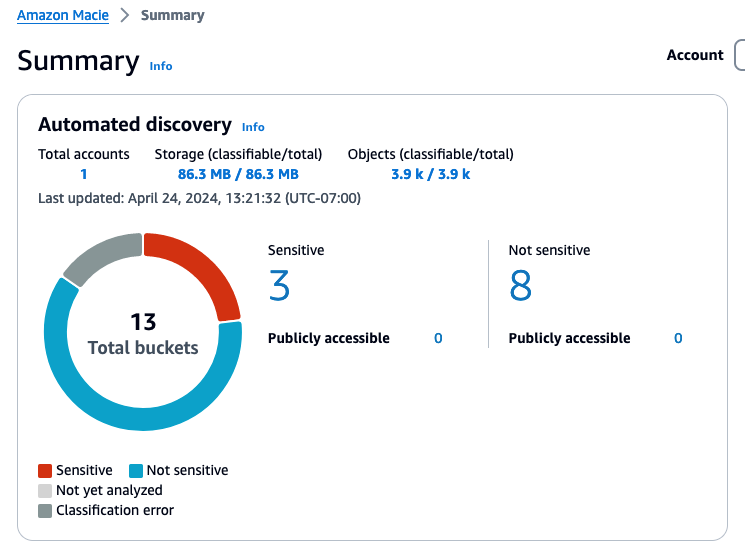
After automated discovery starts producing results, you will start seeing data in the Automated Discovery section of the Macie summary page in the console. The summary includes metrics for the total number of buckets eligible for discovery, counts for the number of buckets where sensitive data was or was not found, and how many of these buckets are public.

Figure 2: Example automated discovery summary metrics

Figure 2: Example automated discovery summary metrics

Choosing a link for one of the counts will take you to the S3 buckets view with the appropriate filters applied.

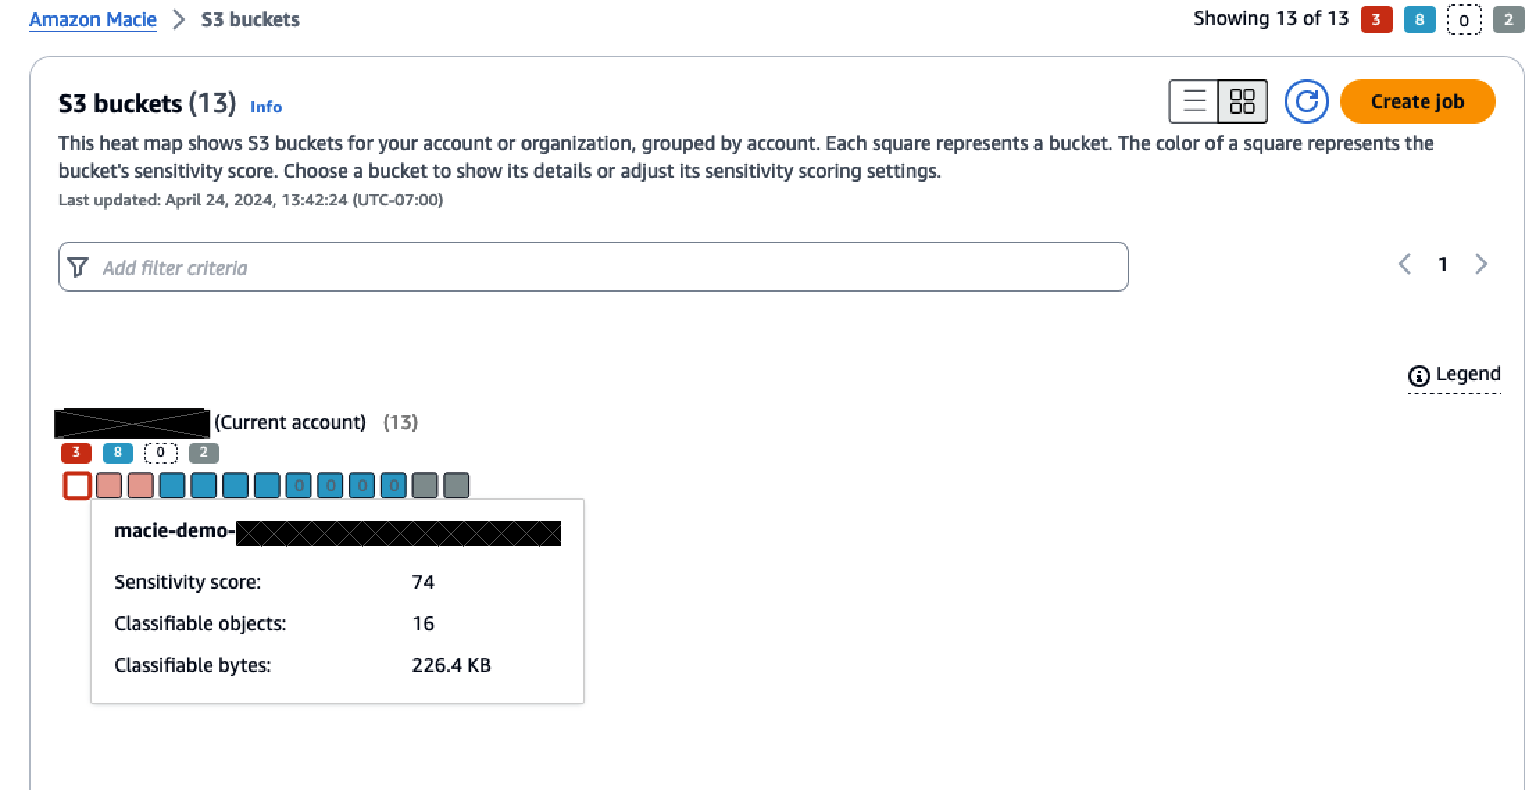
After reviewing the summary screen, choose S3 buckets from the navigation pane to see a heatmap that shows each account and the buckets within each account.

Figure 3: S3 bucket heatmap view in Macie

Figure 3: S3 bucket heatmap view in Macie

The heatmap provides point-in-time insights into the data that Macie has scanned, and in which buckets sensitive data has been identified or no sensitive data has been found.

Over time, this heatmap might change as automated data discovery continues sampling the data in each bucket. The heatmap view provides information on each organizational member account and insight about sensitive data within each bucket in the account.

The console displays the results as a set of colored squares for each account. Each square represents a bucket in that account and the color of the square indicates whether sensitive data was discovered in that bucket. Red indicates that some type of sensitive data has been found in the bucket, while blue indicates no sensitive data has been identified. If a bucket is blue, that means only that automated data discovery hasn’t identified sensitive data up to the point in time of the last scan, not that there is no sensitive data in the bucket.

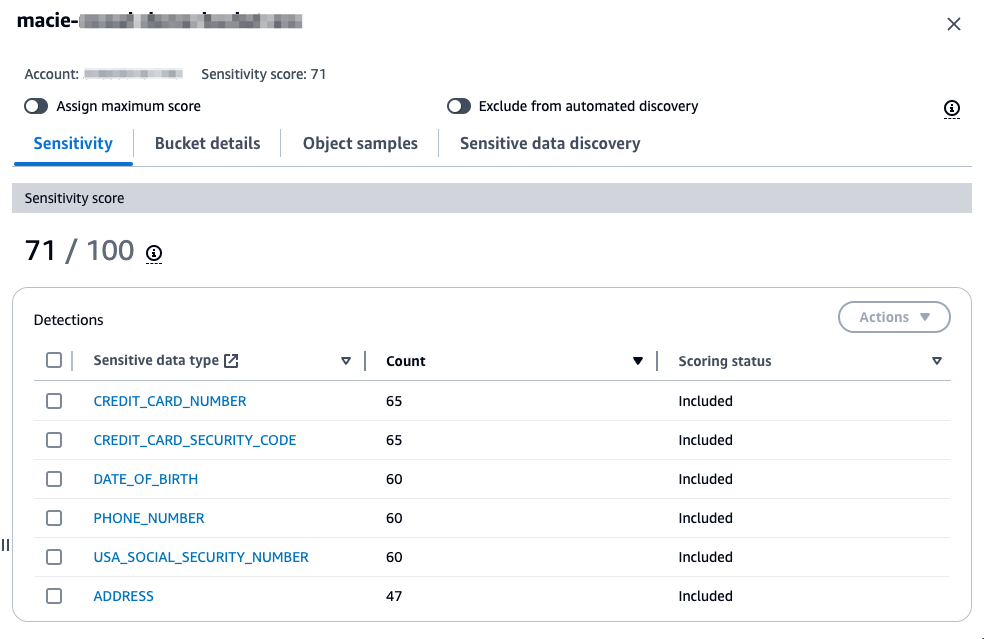
Hover over each bucket to see a summary of the sensitivity score of the bucket along with statistics about the data in the bucket. Choosing a bucket in the heatmap will open a window that provides more information about the bucket. This information includes the sensitivity score of the bucket, a summary of the types of sensitive data found in the bucket, which objects within the bucket have been sampled, statistics related to the data that has been scanned and data that is still to be scanned, and other information about the bucket.

Figure 4: S3 bucket sensitivity information in Macie

Figure 4: S3 bucket sensitivity information in Macie

As part of your POC, it’s recommended that you investigate buckets that are reported to contain sensitive data. For your investigation, validate if the data identified is sensitive based on your organization’s data classification policy. Each Macie finding contains not only the details on the types of sensitive data identified, but also the location within the file where the sensitive data is located so that you can confirm the identified data is sensitive. The following is an example of a Macie finding in an Excel file where bank account numbers were found. This example shows the row and column where the sensitive data was found.

{
  "count": 3,
  "occurrences": {
    "cells": [
      {
        "cellReference": "B2",
        "column": 2,
        "columnName": "Bank Account Number",
        "row": 2
      },
      {
        "cellReference": "C2",
        "column": 3,
        "columnName": "checking account",
        "row": 2
      },
      {
        "cellReference": "B3",
        "column": 2,
        "columnName": "Bank Account Number",
        "row": 3
      }
    ]
  },
  "type": "BANK_ACCOUNT_NUMBER"
}

Investigating sensitive data with findings has detailed guidance around locating sensitive data from Macie findings, retrieving the sensitive data, and the schema for sensitive data locations. If the findings are true positives, make sure that the bucket has the right level of security configurations and permissions based on the data stored in the bucket.

In addition to reviewing the bucket level statistics that are generated by automated discovery, you can view the individual findings that were generated for each S3 object that was identified as having sensitive data. You can view the findings through the Findings tab in Macie or by choosing the sensitive data type when looking at the summary detections for a bucket.

Next steps

With the preceding POC, you should now have a more complete understanding of how Macie identifies sensitive data and how you can use the information that Macie provides about that data identified. As you complete your POC, there are a few next steps that other customers have taken after completing their POC with Macie.

Operationalize Macie output

In the POC steps, we outlined how to view the findings and the insights that the automated discovery provides. Before you proceed with Macie, you should have a plan for how you will operationalize the Macie output. This will help ensure that the remediation steps for identified sensitive data are directed to the correct parties.

Depending on what operational tools you have in place, the steps that you take to operationalize the output of Macie will vary. Many customers implement operational processes that cover the following areas:

  • The privacy or security team that’s responsible for Macie does an initial triage on the findings to confirm if there are true positives.
  • The privacy or security team defines their operational processes related to the summary dashboard and bucket sensitivity information that’s provided by automated discovery.
  • The team that owns the bucket where the sensitive data is located is provided the information needed to investigate the identified data and provide a response. Responses will vary but could include removal of the data, correcting the application that is writing the data, or applying additional security to the bucket.

A key part of operationalizing Macie output is also how you are getting and reviewing the signals related to Macie findings. As outlined in this post, you can view and investigate findings in the Macie console. At a steady state, customers find it beneficial to consume Macie findings using Amazon EventBridge, through Macie APIs, or through the integration of Macie with AWS Security Hub. These options can be used to incorporate the findings that are reported by Macie into the operational workflows and tools that work best for your organization and allow you to consume and address findings at scale. Monitoring and processing findings provides more insight into these integration approaches.

Store and retain sensitive data discovery results

As you move forward with Macie, it’s important to enable logging for each of the S3 objects that Macie has scanned. Macie creates an analysis record for each S3 object that’s in scope for a data discovery job or an automated discovery scan. These records are an audit of every object that Macie attempted to scan, including objects that didn’t contain sensitive data. Data discovery results are written to an S3 bucket that you own and where you control the data retention. These data discovery results can assist with analysis of records over time or to get a broader sense of what data Macie has scanned and which objects had sensitive data and which did not.

The data discovery scan results are stored as JSON Lines files. You can use multiple approaches to analyze and query these log files. The Amazon Macie Results Analytics GitHub repository provides instructions on how to configure Amazon Athena with tables that allow you to query the results of Macie discovery scan files.

Define the scope for Macie use

After a POC with Macie, you can set the scope of how you will use Macie in production by deciding which buckets don’t need to be evaluated and so can be excluded, such as buckets used for AWS logs and buckets deemed not in scope for sensitive data identification.

You can also refine the managed data identifiers that are required for detecting sensitive data. Based on what they learned from the POC. You can create custom data identifiers to help meet your data detection needs if necessary.

As you identify the sensitive data discovery jobs to run as part of your production use of Macie, keep in mind that these jobs are immutable. To edit an existing scheduled job, you must create a copy of the job with the updated configuration and cancel the original job for changes to take effect. Depending on the updated criteria for your job, you must do one of the following to help avoid re-scanning objects that were covered by the previous job:

  • Clear include existing objects when setting the scope. This will cause the new job to schedule only objects that were created between when it was first created and when it was run for the first time.
  • When setting the job scope, set the object attributes so that the object last modified date is the date of the last time the previous job ran. This helps ensure that when the new scheduled job runs, it evaluates only objects that weren’t covered by the previous job.

Clean up

To avoid incurring additional charges, disable Macie while you evaluate the value of the additional data protection provided. If S3 buckets were created for this POC, those should also be deleted.

Call to action

After the POC is complete, evaluate the results to determine how much using Macie can strengthen your organization’s data protection program. Based on that evaluation, you can identify how and where to use Macie for maximum effectiveness. Also consider how the information provided can be factored into operational workflows to get additional value from Macie.

Conclusion

This post outlined how you can use a POC to better understand how Amazon Macie can help meet your data discovery and classification needs. A well thought-out and implemented POC can provide valuable early insights and help you develop a more thorough understanding of what your data discovery and classification strategy should be. Planning your POC using the guidance in this post can help you determine more quickly if Macie is a fit for your company.

 
If you have feedback about this post, submit comments in the Comments section below. If you have questions about this post, contact AWS Support.
 

Jason Stone
Jason Stone

Jason is a Senior Security Consultant for AWS Professional Services. He is an experienced cybersecurity expert with over 10 years in the field, specializing in data protection and vulnerability management. Passionate about safeguarding information, Jason has supported diverse sectors including public utilities, FinTech, healthcare, and manufacturing. He is dedicated to enhancing security and ensuring robust defenses against evolving threats.
Scott Ward
Scott Ward

Scott is a Principal Solutions Architect with the Security Services product team and has been with Amazon for over 20 years. Scott provides technical guidance to customers on how to use security services to help protect their AWS environments. Past roles include technical lead for the AWS Security Partner segment and member of the technical team for Amazon.com global financial systems.

Data Wallets Using the Solid Protocol

Post Syndicated from Bruce Schneier original https://www.schneier.com/blog/archives/2024/07/data-wallets-using-the-solid-protocol.html

I am the Chief of Security Architecture at Inrupt, Inc., the company that is commercializing Tim Berners-Lee’s Solid open W3C standard for distributed data ownership. This week, we announced a digital wallet based on the Solid architecture.

Details are here, but basically a digital wallet is a repository for personal data and documents. Right now, there are hundreds of different wallets, but no standard. We think designing a wallet around Solid makes sense for lots of reasons. A wallet is more than a data store—data in wallets is for using and sharing. That requires interoperability, which is what you get from an open standard. It also requires fine-grained permissions and robust security, and that’s what the Solid protocols provide.

I think of Solid as a set of protocols for decoupling applications, data, and security. That’s the sort of thing that will make digital wallets work.

CISPE Data Protection Code of Conduct Public Register now has 113 compliant AWS services

Post Syndicated from Gokhan Akyuz original https://aws.amazon.com/blogs/security/cispe-data-protection-code-of-conduct-public-register-now-has-113-compliant-aws-services/

We continue to expand the scope of our assurance programs at Amazon Web Services (AWS) and are pleased to announce that 113 services are now certified as compliant with the Cloud Infrastructure Services Providers in Europe (CISPE) Data Protection Code of Conduct. This alignment with the CISPE requirements demonstrates our ongoing commitment to adhere to the heightened expectations for data protection by cloud service providers. AWS customers who use AWS certified services can be confident that their data is processed in adherence with the European Union’s General Data Protection Regulation (GDPR).

The CISPE Code of Conduct is the first pan-European, sector-specific code for cloud infrastructure service providers, which received a favorable opinion that it complies with the GDPR. It helps organizations across Europe accelerate the development of GDPR compliant, cloud-based services for consumers, businesses, and institutions.

The accredited monitoring body EY CertifyPoint evaluated AWS on May 16, 2024, and successfully audited 104 certified services. AWS added nine additional services to the current scope in May 2024. As of the date of this blog post, 113 services are in scope of this certification. The Certificate of Compliance that illustrates AWS compliance status is available on the CISPE Public Register. For up-to-date information, including when additional services are added, search the CISPE Public Register by entering AWS as the Seller of Record; or see the AWS CISPE Data Protection Code of Conduct page.

AWS strives to bring additional services into the scope of its compliance programs to help you meet your architectural and regulatory needs. If you have questions or feedback about AWS compliance with CISPE, reach out to your AWS account team.

To learn more about our compliance and security programs, see AWS Compliance ProgramsAWS General Data Protection Regulation (GDPR) Center, and the EU data protection section of the AWS Cloud Security website. As always, we value your feedback and questions; reach out to the AWS Compliance team through the Contact Us page.

If you have feedback about this post, submit comments in the Comments section below.

Gokhan Akyuz

Gokhan Akyuz

Gokhan is a Security Audit Program Manager at AWS, based in Amsterdam. He leads security audits, attestations, and certification programs across Europe and the Middle East. He has 17 years of experience in IT and cybersecurity audits, IT risk management, and controls implementation in a wide range of industries.

Establishing a data perimeter on AWS: Analyze your account activity to evaluate impact and refine controls

Post Syndicated from Achraf Moussadek-Kabdani original https://aws.amazon.com/blogs/security/establishing-a-data-perimeter-on-aws-analyze-your-account-activity-to-evaluate-impact-and-refine-controls/

A data perimeter on Amazon Web Services (AWS) is a set of preventive controls you can use to help establish a boundary around your data in AWS Organizations. This boundary helps ensure that your data can be accessed only by trusted identities from within networks you expect and that the data cannot be transferred outside of your organization to untrusted resources. Review the previous posts in the Establishing a data perimeter on AWS series for information about the security objectives and foundational elements needed to define and enforce each perimeter type.

In this blog post, we discuss how to use AWS logging and analytics capabilities to help accelerate the implementation and effectively operate data perimeter controls at scale.

You start your data perimeter journey by identifying access patterns that you want to prevent and defining what trusted identities, trusted resources, and expected networks mean to your organization. After you define your trust boundaries based on your business and security requirements, you can use policy examples provided in the data perimeter GitHub repository to design the authorization controls for enforcing these boundaries. Before you enforce the controls in your organization, we recommend that you assess the potential impacts on your existing workloads. Performing the assessment helps you to identify unknown data access patterns missed during the initial design phase, investigate, and refine your controls to help ensure business continuity as you deploy them.

Finally, you should continuously monitor your controls to verify that they operate as expected and consistently align with your requirements as your business grows and relationships with your trusted partners change.

Figure 1 illustrates common phases of a data perimeter journey.

Figure 1: Data perimeter implementation journey

Figure 1: Data perimeter implementation journey

The usual phases of the data perimeter journey are:

  1. Examine your security objectives
  2. Set your boundaries
  3. Design data perimeter controls
  4. Anticipate potential impacts
  5. Implement data perimeter controls
  6. Monitor data perimeter controls
  7. Continuous improvement

In this post, we focus on phase 4: Anticipate potential impacts. We demonstrate how to analyze activity observed in your AWS environment to evaluate impact and refine your data perimeter controls. We also demonstrate how you can automate the analysis by using the data perimeter helper open source tool.

You can use the same techniques to support phase 6: Monitor data perimeter controls, where you will continuously monitor data access patterns in your organization and potentially troubleshoot permissions issues caused by overly restrictive or overly permissive policies as new data access paths are introduced.

Setting prerequisites for impact analysis

In this section, we describe AWS logging and analytics capabilities that you can use to analyze impact of data perimeter controls on your environment. We also provide instructions for configuring them.

While you might have some capabilities covered by other AWS tools (for example, AWS Security Lake) or external tools, the proposed approach remains applicable. For instance, if your logs are stored in an external security data lake or your configuration state recording is performed by an external cloud security posture management (CSPM) tool, you can extract and adapt the logic from this post to suit your context. The flexibility of this approach allows you to use the existing tools and processes in your environment while benefiting from the insights provided.

Pricing

Some of the required capabilities can generate additional costs in your environment.

AWS CloudTrail charges based on the number of events delivered to Amazon Simple Storage Service (Amazon S3). Note that the first copy of management events is free. To help control costs, you can use advanced event selectors to select only events that matter to your context. For more details, see CloudTrail pricing.

AWS Config charges based on the number of configuration items delivered, the AWS Config aggregator and advanced queries are included in AWS Config pricing. To help control costs, you can select which resource types AWS Config records or change the recording frequency. For more details, see AWS Config pricing.

Amazon Athena charges based on the number of terabytes of data scanned in Amazon S3. To help control costs, use the proposed optimized tables with partitioning and reduce the time frame of your queries. For more details, see Athena pricing.

AWS Identity and Access Management Access Analyzer doesn’t charge additional costs for external access findings. For more details, see IAM Access Analyzer pricing.

Create a CloudTrail trail to record access activity

The primary capability that you will use is a CloudTrail trail. CloudTrail records AWS API calls and events from your AWS accounts that contain the following information relevant to data perimeter objectives:

  • API calls performed by your identities or on your resources (record fields: eventSource, eventName)
  • Identity that performed API calls (record field: userIdentity)
  • Network origin of API calls (record fields: sourceIPAddress, vpcEndpointId)
  • Resources API calls are performed on (record fields: resources, requestParameters)

See the CloudTrail record contents page for the description of all available fields.

Data perimeter controls are meant to be applied across a broad set of accounts and resources, therefore, we recommend using a CloudTrail organization trail that collects logs across the AWS accounts in your organization. If you don’t have an organization trail configured, follow these steps or use one of the data perimeter helper templates for deploying prerequisites. If you use AWS services that support CloudTrail data events and want to analyze the associated API calls, enable the relevant data events.

Though CloudTrail provides you information about parameters of an API request, it doesn’t reflect values of AWS Identity and Access Management (IAM) condition keys present in the request. Thus, you still need to analyze the logs to help refine your data perimeter controls.

Create an Athena table to analyze CloudTrail logs

To ease and accelerate logs analysis, use Athena to query and extract relevant data from the log files stored by CloudTrail in an S3 bucket.

To create an Athena table

  1. Open the Athena console. If this is your first time visiting the Athena console in your current AWS Region, choose Edit settings to set up a query result location in Amazon S3.
  2. Next, navigate to the Query editor and create a SQL table by entering the following DDL statement into the Athena console query editor. Make sure to replace s3://<BUCKET_NAME_WITH_PREFIX>/AWSLogs/<ORGANIZATION_ID>/ to point to the S3 bucket location that contains your CloudTrail log data and <REGIONS> with the list of AWS regions where you want to analyze API calls. For example, to analyze API calls made in the AWS Regions Paris (eu-west-3) and North Virginia (us-east-1), use eu-west-3,us-east-1. We recommend that you include us-east-1 to retrieve API calls performed on global resources such as IAM roles.
    CREATE EXTERNAL TABLE IF NOT EXISTS cloudtrail_logs (
        eventVersion STRING,
        userIdentity STRUCT<
            type: STRING,
            principalId: STRING,
            arn: STRING,
            accountId: STRING,
            invokedBy: STRING,
            accessKeyId: STRING,
            userName: STRING,
            sessionContext: STRUCT<
                attributes: STRUCT<
                    mfaAuthenticated: STRING,
                    creationDate: STRING>,
                sessionIssuer: STRUCT<
                    type: STRING,
                    principalId: STRING,
                    arn: STRING,
                    accountId: STRING,
                    userName: STRING>,
                ec2RoleDelivery: STRING,
                webIdFederationData: MAP<STRING,STRING>>>,
        eventTime STRING,
        eventSource STRING,
        eventName STRING,
        awsRegion STRING,
        sourceIpAddress STRING,
        userAgent STRING,
        errorCode STRING,
        errorMessage STRING,
        requestParameters STRING,
        responseElements STRING,
        additionalEventData STRING,
        requestId STRING,
        eventId STRING,
        readOnly STRING,
        resources ARRAY<STRUCT<
            arn: STRING,
            accountId: STRING,
            type: STRING>>,
        eventType STRING,
        apiVersion STRING,
        recipientAccountId STRING,
        serviceEventDetails STRING,
        sharedEventID STRING,
        vpcEndpointId STRING,
        tlsDetails STRUCT<
            tlsVersion:string,
            cipherSuite:string,
            clientProvidedHostHeader:string
        >
    )
    PARTITIONED BY (
    `p_account` string,
    `p_region` string,
    `p_date` string
    )
    ROW FORMAT SERDE 'org.apache.hive.hcatalog.data.JsonSerDe'
    STORED AS INPUTFORMAT 'com.amazon.emr.cloudtrail.CloudTrailInputFormat'
    OUTPUTFORMAT 'org.apache.hadoop.hive.ql.io.HiveIgnoreKeyTextOutputFormat'
    LOCATION 's3://<BUCKET_NAME_WITH_PREFIX>/AWSLogs/<ORGANIZATION_ID>/'
    TBLPROPERTIES (
        'projection.enabled'='true',
        'projection.p_date.type'='date',
        'projection.p_date.format'='yyyy/MM/dd', 
        'projection.p_date.interval'='1', 
        'projection.p_date.interval.unit'='DAYS', 
        'projection.p_date.range'='2022/01/01,NOW', 
        'projection.p_region.type'='enum',
        'projection.p_region.values'='<REGIONS>',
        'projection.p_account.type'='injected',
    'storage.location.template'='s3://<BUCKET_NAME_WITH_PREFIX>/AWSLogs/<ORGANIZATION_ID>/${p_account}/CloudTrail/${p_region}/${p_date}'
    )

  3. Finally, run the Athena query and confirm that the cloudtrail_logs table is created and appears under the list of Tables.

Create an AWS Config aggregator to enrich query results

To further reduce manual steps for retrieval of relevant data about your environment, use the AWS Config aggregator and advanced queries to enrich CloudTrail logs with the configuration state of your resources.

To have a view into the resource configurations across the accounts in your organization, we recommend using the AWS Config organization aggregator. You can use an existing aggregator or create a new one. You can also use one of the data perimeter helper templates for deploying prerequisites.

Create an IAM Access Analyzer external access analyzer

To identify resources in your organization that are shared with an external entity, use the IAM Access Analyzer external access analyzer with your organization as the zone of trust.

You can use an existing external access analyzer or create a new one.

Install the data perimeter helper tool

Finally, you will use the data perimeter helper, an open-source tool with a set of purpose-built data perimeter queries, to automate the logs analysis process.

Clone the data perimeter helper repository and follow instructions in the Getting Started section.

Analyze account activity and refine your data perimeter controls

In this section, we provide step-by-step instructions for using the AWS services and tools you configured to effectively implement common data perimeter controls. We first demonstrate how to use the configured CloudTrail trail, Athena table, and AWS Config aggregator directly. We then show you how to accelerate the analysis with the data perimeter helper.

Example 1: Review API calls to untrusted S3 buckets and refine your resource perimeter policy

One of the security objectives targeted by companies is ensuring that their identities can only put or get data to and from S3 buckets belonging to their organization to manage the risk of unintended data disclosure or access to unapproved data. You can help achieve this security objective by implementing a resource perimeter on your identities using a service control policy (SCP). Start crafting your policy by referring to the resource_perimeter_policy template provided in the data perimeter policy examples repository:

{
  "Version": "2012-10-17",
  "Statement": [
    {
      "Sid": "EnforceResourcePerimeterAWSResourcesS3",
      "Effect": "Deny",
      "Action": [
        "s3:GetObject",
        "s3:PutObject",
        "s3:PutObjectAcl"
      ],
      "Resource": "*",
      "Condition": {
        "StringNotEqualsIfExists": {
          "aws:ResourceOrgID": "<my-org-id>",
          "aws:PrincipalTag/resource-perimeter-exception": "true"
        },
        "ForAllValues:StringNotEquals": {
          "aws:CalledVia": [
            "dataexchange.amazonaws.com",
            "servicecatalog.amazonaws.com"
          ]
        }
      }
    }
  ]
}

Replace the value of the aws:ResourceOrgID condition key with your organization identifier. See the GitHub repository README file for information on other elements of the policy.

As a security engineer, you can anticipate potential impacts by reviewing account activity and CloudTrail logs. You can perform this analysis manually or use the data perimeter helper tool to streamline the process.

First, let’s explore the manual approach to understand each step in detail.

Perform impact analysis without tooling

To assess the effects of the preceding policy before deployment, review your CloudTrail logs to understand on which S3 buckets API calls are performed. The targeted Amazon S3 API calls are recorded as CloudTrail data events, so make sure you enable the S3 data event for this example. CloudTrail logs provide request parameters from which you can extract the bucket names.

Below is an example Athena query to list the targeted S3 API calls made by principals in the selected account within the last 7 days. The 7-day timeframe is set to verify that the query runs quickly, but you can adjust the timeframe later to suit your specific requirements and obtain more realistic results. Replace <ACCOUNT_ID> with the AWS account ID you want to analyze the activity of.

SELECT
  useridentity.sessioncontext.sessionissuer.arn AS principal_arn,
  useridentity.type AS principal_type,
  eventname,
  JSON_EXTRACT_SCALAR(requestparameters, '$.bucketName') AS bucketname,
  resources,
  COUNT(*) AS nb_reqs
FROM "cloudtrail_logs"
WHERE
  p_account = '<ACCOUNT_ID>'
  AND p_date BETWEEN DATE_FORMAT(CURRENT_DATE - INTERVAL '7' day, '%Y/%m/%d') AND DATE_FORMAT(CURRENT_DATE, '%Y/%m/%d')
  AND eventsource = 's3.amazonaws.com'
  -- Get only requests performed by principals in the selected account
  AND useridentity.accountid = '<ACCOUNT_ID>'
  -- Keep only the targeted API calls
  AND eventname IN ('GetObject', 'PutObject', 'PutObjectAcl')
  -- Remove API calls made by AWS service principals - `useridentity.principalid` field in CloudTrail log equals `AWSService`.
  AND useridentity.principalid != 'AWSService'
  -- Remove API calls made by service-linked roles in the selected account
    AND COALESCE(NOT regexp_like(useridentity.sessioncontext.sessionissuer.arn, '(:role/aws-service-role/)'), True)
  -- Remove calls with errors
  AND errorcode IS NULL
GROUP BY
  useridentity.sessioncontext.sessionissuer.arn,
  useridentity.type,
  eventname,
  JSON_EXTRACT_SCALAR(requestparameters, '$.bucketName'),
  resources

As shown in Figure 2, this query provides you with a list of the S3 bucket names that are being accessed by principals in the selected account, while removing calls made by service-linked roles (SLRs) because they aren’t governed by SCPs. In this example, the IAM roles AppMigrator and PartnerSync performed API calls on S3 buckets named app-logs-111111111111, raw-data-111111111111, expected-partner-999999999999, and app-migration-888888888888.

Figure 2: Sample of the Athena query results

Figure 2: Sample of the Athena query results

The CloudTrail record field resources provides information on the list of resources accessed in an event. The field is optional and can notably contain the resource Amazon Resource Names (ARNs) and the account ID of the resource owner. You can use this record field to detect resources owned by accounts not in your organization. However, because this record field is optional, to scale your approach you can also use the AWS Config aggregator data to list resources currently deployed in your organization.

To know if the S3 buckets belong to your organization or not, you can run the following AWS Config advanced query. This query lists the S3 buckets inventoried in your AWS Config organization aggregator.

SELECT
  accountId,
  awsRegion,
  resourceId
WHERE
  resourceType = 'AWS::S3::Bucket'

As shown in Figure 3, buckets expected-partner-999999999999 and app-migration-888888888888 aren’t inventoried and therefore don’t belong to this organization.

Figure 3: Sample of the AWS Config advanced query results

Figure 3: Sample of the AWS Config advanced query results

By combining the results of the Athena query and the AWS Config advanced query, you can now pinpoint S3 API calls made by principals in the selected account on S3 buckets that are not part of your AWS organization.

If you do nothing, your starting resource perimeter policy would block access to these buckets. Therefore, you should investigate with your development teams why your principals performed those API calls and refine your policy if there is a legitimate reason, such as integration with a trusted third party. If you determine, for example, that your principals have a legitimate reason to access the bucket expected-partner-999999999999, you can discover the account ID (<third-party-account-a>) that owns the bucket by reviewing the record field resources in your CloudTrail logs or investigating with your developers and edit the policy as follows:

{
  "Version": "2012-10-17",
  "Statement": [
    {
      "Sid": "EnforceResourcePerimeterAWSResourcesS3",
      "Effect": "Deny",
      "Action": [
        "s3:GetObject",
        "s3:PutObject",
        "s3:PutObjectAcl"
      ],
      "Resource": "*",
      "Condition": {
        "StringNotEqualsIfExists": {
          "aws:ResourceOrgID": "<my-org-id>",
          "aws:ResourceAccount": "<third-party-account-a>",
          "aws:PrincipalTag/resource-perimeter-exception": "true"
        },
        "ForAllValues:StringNotEquals": {
          "aws:CalledVia": [
            "dataexchange.amazonaws.com",
            "servicecatalog.amazonaws.com"
          ]
        }
      }
    }
  ]
}

Now your resource perimeter policy helps ensure that access to resources that belong to your trusted third-party partner aren’t blocked by default.

Automate impact analysis with the data perimeter helper

Data perimeter helper provides queries that perform and combine the results of Athena and AWS Config aggregator queries on your behalf to accelerate policy impact analysis.

For this example, we use the s3_scp_resource_perimeter query to analyze S3 API calls made by principals in a selected account on S3 buckets not owned by your organization or inventoried in your AWS Config aggregator.

You can first add the bucket names of your trusted third-party partners that are already known in the data perimeter helper configuration file (resource_perimeter_trusted_bucket parameter). You then run the data perimeter helper query using the following command. Replace <ACCOUNT_ID> with the AWS account ID you want to analyze the activity of.

data_perimeter_helper --list-account <ACCOUNT_ID> --list-query s3_scp_resource_perimeter

Data perimeter helper performs these actions:

  • Runs an Athena query to list S3 API calls made by principals in the selected account, filtering out:
    • S3 API calls made at the account level (for example, s3:ListAllMyBuckets)
    • S3 API calls made on buckets that your organization owns
    • S3 API calls made on buckets listed as trusted in the data perimeter helper configuration file (resource_perimeter_trusted_bucket parameter)
    • API calls made by service principals and SLRs because SCPs don’t apply to them
    • API calls with errors
  • Gets the list of S3 buckets in your organization using an AWS Config advanced query.
  • Removes from the Athena query’s results API calls performed on S3 buckets inventoried in your AWS Config aggregator. This is done as a second clean-up layer in case the optional CloudTrail record field resources isn’t populated.

Data perimeter helper exports the results in the selected format (HTML, Excel, or JSON) so that you can investigate API calls that don’t align with your initial resource perimeter policy. Figure 4 shows a sample of results in HTML:

Figure 4: Sample of the s3_scp_resource_perimeter query results

Figure 4: Sample of the s3_scp_resource_perimeter query results

The preceding data perimeter helper query results indicate that the IAM role PartnerSync performed API calls on S3 buckets that aren’t part of the organization, giving you a head start in your investigation efforts. Following the investigation, you can document a trusted partner bucket in the data perimeter helper configuration file to filter out the associated API calls from subsequent queries:

111111111111:
  network_perimeter_expected_public_cidr: [
  ]
  network_perimeter_trusted_principal: [
  ]
  network_perimeter_expected_vpc: [
  ]
  network_perimeter_expected_vpc_endpoint: [
  ]
  identity_perimeter_trusted_account: [
  ]
  identity_perimeter_trusted_principal: [
  ]
  resource_perimeter_trusted_bucket: [
    expected-partner-999999999999
  ]

With a single command line, you have identified for your selected account the S3 API calls crossing your resource perimeter boundaries. You can now refine and implement your controls while lowering the risk of potential impacts. If you want to scale your approach to other accounts, you just need to run the same query against them.

Example 2: Review granted access and API calls by untrusted identities on your S3 buckets and refine your identity perimeter policy

Another security objective pursued by companies is ensuring that their S3 buckets can be accessed only by principals belonging to their organization to manage the risk of unintended access to company data. You can help achieve this security objective by implementing an identity perimeter on your buckets. You can start by crafting your identity perimeter policy using policy samples provided in the data perimeter policy examples repository.

{
  "Version": "2012-10-17",
  "Statement": [
    {
      "Sid": "EnforceIdentityPerimeter",
      "Effect": "Deny",
      "Principal": "*",
      "Action": "s3:*",
      "Resource": [
        "arn:aws:s3:::<my-data-bucket>",
        "arn:aws:s3:::<my-data-bucket>/*"
      ],
      "Condition": {
        "StringNotEqualsIfExists": {
          "aws:PrincipalOrgID": "<my-org-id>",
          "aws:PrincipalAccount": [
            "<load-balancing-account-id>",
            "<third-party-account-a>",
            "<third-party-account-b>"
          ]
        },
        "BoolIfExists": {
          "aws:PrincipalIsAWSService": "false"
        }
      }
    }
  ]
}

Replace values of the aws:PrincipalOrgID and aws:PrincipalAccount condition keys based on what trusted identities mean for your organization and on your knowledge of the intended access patterns you need to support. See the GitHub repository README file for information on elements of the policy.

To assess the effects of the preceding policy before deployment, review your IAM Access Analyzer external access findings to discover the external entities that are allowed in your S3 bucket policies. Then to accelerate your analysis, review your CloudTrail logs to learn who is performing API calls on your S3 buckets. This can help you accelerate the removal of granted but unused external accesses.

Data perimeter helper provides queries that streamline these processes for you:

Run these queries by using the following command, replacing <ACCOUNT_ID> with the AWS account ID of the buckets you want to analyze the access activity of:

data_perimeter_helper --list-account <ACCOUNT_ID> --list-query s3_external_access_org_boundary s3_bucket_policy_identity_perimeter_org_boundary

The query s3_external_access_org_boundary performs this action:

  • Extracts IAM Access Analyzer external access findings from either:
    • IAM Access Analyzer if the variable external_access_findings in the data perimeter variable file is set to IAM_ACCESS_ANALYZER
    • AWS Security Hub if the same variable is set to SECURITY_HUB. Security Hub provides cross-Region aggregation, enabling you to retrieve external access findings across your organization

The query s3_external_access_org_boundary performs this action:

  • Runs an Athena query to list S3 API calls made on S3 buckets in the selected account, filtering out:
    • API calls made by principals in the same organization
    • API calls made by principals belonging to trusted accounts listed in the data perimeter configuration file (identity_perimeter_trusted_account parameter)
    • API calls made by trusted identities listed in the data perimeter configuration file (identity_perimeter_trusted_principal parameter)

Figure 5 shows a sample of results for this query in HTML:

Figure 5: Sample of the s3_bucket_policy_identity_perimeter_org_boundary and s3_external_access_org_boundary queries results

Figure 5: Sample of the s3_bucket_policy_identity_perimeter_org_boundary and s3_external_access_org_boundary queries results

The result shows that only the bucket my-bucket-open-to-partner grants access (PutObject) to principals not in your organization. Plus, in the configured time frame, your CloudTrail trail hasn’t recorded S3 API calls made by principals not in your organization on buckets that the account 111111111111 owns.

This means that your proposed identity perimeter policy accounts for the access patterns observed in your environment. After reviewing with your developers, if the granted action on the bucket my-bucket-open-to-partner is not needed, you could deploy it on the analyzed account with a reduced risk of impacting business applications.

Example 3: Investigate resource configurations to support network perimeter controls implementation

The blog post Require services to be created only within expected networks provides an example of an SCP you can use to make sure that AWS Lambda functions can only be created or updated if associated with an Amazon Virtual Private Cloud (Amazon VPC).

{
  "Version": "2012-10-17",
  "Statement": [
    {
      "Sid": "EnforceVPCFunction",
      "Action": [
          "lambda:CreateFunction",
          "lambda:UpdateFunctionConfiguration"
       ],
      "Effect": "Deny",
      "Resource": "*",
      "Condition": {
        "Null": {
           "lambda:VpcIds": "true"
        }
      }
    }
  ]
}

Before implementing the preceding policy or to continuously review the configuration of your Lambda functions, you can use your AWS Config aggregator to understand whether there are functions in your environment that aren’t attached to a VPC.

Data perimeter helper provides the referential_lambda_function query that helps you automate the analysis. Run the query by using the following command:

data_perimeter_helper --list-query referential_lambda_function

Figure 6 shows a sample of results for this query in HTML:

Figure 6: Sample of the referential_lambda_function query results

Figure 6: Sample of the referential_lambda_function query results

By reviewing the inVpc column, you can quickly identify functions that aren’t currently associated with a VPC and investigate with your development teams before enforcing your network perimeter controls.

Example 4: Investigate access denied errors to help troubleshoot your controls

While you refine your data perimeter controls or after deploying them, you might encounter API calls that fail with an access denied error message. You can use CloudTrail logs to review those API calls and use the record to investigate the root-cause.

Data perimeter helper provides the common_only_denied query, which lists the API calls with access denied errors in the configured time frame. Run the query by using the following command, replacing <ACCOUNT_ID> with your account ID:

data_perimeter_helper --list-account <ACCOUNT_ID> --list-query common_only_denied

Figure 7 shows a sample of results for this query in HTML:

Figure 7: Sample of the common_only_denied query results

Figure 7: Sample of the common_only_denied query results

Let’s say you want to review S3 API calls with access denied error messages for one of your developers who uses a role called DevOps. You can update, in the HTML report, the input fields below the principal_arn and eventsource columns to match your lookup.

Then by reviewing the columns principal_arn, eventname, isAssumableBy, and nb_reqs, you learn that the role DevOps is assumable through a SAML provider and performed two GetObject API calls that failed with an access denied error message. By reviewing the sourceipaddress field you discover that the request has been performed from an IP address outside of your network perimeter boundary, you can then advise your developer to perform the API calls again from an expected network.

Data perimeter helper provides several ready-to-use queries and a framework to add new queries based on your data perimeter objectives and needs. See Guidelines to build a new query for detailed instructions.

Clean up

If you followed the configuration steps in this blog only to test the solution, you can clean up your account to avoid recurring charges.

If you used the data perimeter helper deployment templates, use the respective infrastructure as code commands to delete the provisioned resources (for example, for Terraform, terraform destroy).

To delete configured resources manually, follow these steps:

  • If you created a CloudTrail organization trail:
    • Navigate to the CloudTrail console, select the trail your created, and choose Delete.
    • Navigate to the Amazon S3 console and delete the S3 bucket you created to store CloudTrail logs from all accounts.
  • If you created an Athena table:
    • Navigate to the Athena console and select Query editor in the left navigation panel.
    • Run the following SQL query by replacing <TABLE_NAME> with the name of the created table:
      DROP TABLE <TABLE_NAME>

  • If you created an AWS Config aggregator:
    • Navigate to the AWS Config console and select Aggregators in the left navigation panel.
    • Select the created aggregator and select Delete from the Actions drop-down list.
  • If you installed data perimeter helper:
    • Follow the uninstallation steps in the data perimeter helper README file.

Conclusion

In this blog post, we reviewed how you can analyze access activity in your organization by using the CloudTrail logs to evaluate impact of your data perimeter controls and perform troubleshooting. We discussed how the log events data can be enriched using resource configuration information from AWS Config to streamline your analysis. Finally, we introduced the open source tool, data perimeter helper, that provides a set of data perimeter tailored queries to speed up your review process and a framework to create new queries.

For additional learning opportunities, see the Data perimeters on AWS page, which provides additional material such as a data perimeter workshop, blog posts, whitepapers, and webinar sessions.

If you have feedback about this post, submit comments in the Comments section below. If you have questions about this post, start a new thread on the AWS Security, Identity, and Compliance re:Post or contact AWS Support.

Want more AWS Security news? Follow us on X.

Achraf Moussadek-Kabdani

Achraf Moussadek-Kabdani

Achraf is a Senior Security Specialist at AWS. He works with global financial services customers to assess and improve their security posture. He is both a builder and advisor, supporting his customers to meet their security objectives while making security a business enabler.

Tatyana Yatskevich

Tatyana Yatskevich

Tatyana is a Principal Solutions Architect in AWS Identity. She works with customers to help them build and operate in AWS in the most secure and efficient manner.

AWS is issued a renewed certificate for the BIO Thema-uitwerking Clouddiensten with increased scope

Post Syndicated from Ka Yie Lee original https://aws.amazon.com/blogs/security/aws-is-issued-a-renewed-certificate-for-the-bio-thema-uitwerking-clouddiensten-with-increased-scope/

We’re pleased to announce that Amazon Web Services (AWS) demonstrated continuous compliance with the Baseline Informatiebeveiliging Overheid (BIO) Thema-uitwerking Clouddiensten while increasing the AWS services and AWS Regions in scope. This alignment with the BIO Thema-uitwerking Clouddiensten requirements demonstrates our commitment to adhere to the heightened expectations for cloud service providers.

AWS customers across the Dutch public sector can use AWS certified services with confidence, knowing that the AWS services listed in the certificate adhere to the strict requirements imposed on the consumption of cloud-based services.

Baseline Informatiebeveiliging Overheid (BIO)

The BIO framework is an information security framework that the four layers of the Dutch public sector are required to adhere to. This means that it’s mandatory for the Dutch central government, all provinces, municipalities, and regional water authorities to be compliant with the BIO framework.

To support AWS customers in demonstrating their compliance with the BIO framework, AWS developed a Landing Zone for the BIO framework. This Landing Zone for the BIO framework is a pre-configured AWS environment that includes a subset of the technical requirements of the BIO framework. It’s a helpful tool that provides a starting point from which customers can further build their own AWS environment.

For more information regarding the Landing Zone for the BIO framework, see the AWS Reference Guide for Dutch BIO Framework and BIO Theme-elaboration Cloud Services in AWS Artifact. You can also reach out to your AWS account team or contact AWS through the Contact Us page.

Baseline Informatiebeveiliging Overheid Thema-uitwerking Clouddiensten

In addition to the BIO framework, there’s another information security framework designed specifically for the use of cloud services, called BIO Thema-uitwerking Clouddiensten. The BIO Thema-uitwerking Clouddiensten is a guidance document for Dutch cloud service consumers to help them formulate controls and objectives when using cloud services. Consumers can consider it to be an additional control framework on top of the BIO framework.

AWS was evaluated by the monitoring body, EY CertifyPoint, in March 2024, and it was determined that AWS successfully demonstrated compliance for eight AWS services in total. In addition to Amazon Elastic Compute Cloud (Amazon EC2)Amazon Simple Storage Service (Amazon S3) and Amazon Relational Database Service (Amazon RDS), which were assessed as compliant in March 2023; Amazon Virtual Private Cloud (Amazon VPC), Amazon GuardDuty, AWS LambdaAWS Config and AWS CloudTrail are added to the scope. The renewed Certificate of Compliance illustrating the compliance status of AWS and the assessment summary report from EY CertifyPoint are available on AWS Artifact. The certificate is available in Dutch and English.

For more information regarding the BIO Thema-uitwerking Clouddiensten, see the AWS Reference Guide for Dutch BIO Framework and BIO Theme-elaboration Cloud Services in AWS Artifact. You can also reach out to your AWS account team or contact AWS through the Contact Us page.

AWS strives to continuously bring services into scope of its compliance programs to help you meet your architectural and regulatory needs.

To learn more about our compliance and security programs, see AWS Compliance Programs. As always, we value your feedback and questions; reach out to the AWS Compliance team through the Contact Us page.

If you have feedback about this post, submit comments in the Comments section below.

Ka Yie Lee

Ka Yie Lee

Ka Yie is a Security Assurance Specialist for the Benelux region at AWS, based in Amsterdam. She engages with regulators and industry groups in the Netherlands and Belgium. She also helps ensure that AWS addresses local information security frameworks. Ka Yie holds master’s degrees in Accounting, Auditing and Control, and Commercial and Company Law. She also holds professional certifications such as CISSP.

Gokhan Akyuz

Gokhan Akyuz

Gokhan is a Security Audit Program Manager at AWS, based in Amsterdam. He leads security audits, attestations, and certification programs across Europe and the Middle East. He has 17 years of experience in IT and cybersecurity audits, IT risk management, and controls implementation in a wide range of industries.

AWS Wickr achieves FedRAMP High authorization

Post Syndicated from Anne Grahn original https://aws.amazon.com/blogs/security/aws-wickr-achieves-fedramp-high-authorization/

Amazon Web Services (AWS) is excited to announce that AWS Wickr has achieved Federal Risk and Authorization Management Program (FedRAMP) authorization at the High impact level from the FedRAMP Joint Authorization Board (JAB).

FedRAMP is a U.S. government–wide program that promotes the adoption of secure cloud services by providing a standardized approach to security and risk assessment for cloud technologies and federal agencies.

Customers find security and control in Wickr

Wickr is an end-to-end encrypted messaging and collaboration service with features designed to help keep your communications secure, private, and compliant. Wickr protects one-to-one and group messaging, voice and video calling, file sharing, screen sharing, and location sharing with 256-bit encryption, and provides data retention capabilities.

You can create Wickr networks through the AWS Management Console. Administrative controls allow your Wickr administrators to add, remove, and invite users, and organize them into security groups to manage messaging, calling, security, and federation settings. You maintain full control over data, which includes addressing information governance polices, configuring ephemeral messaging options, and deleting credentials for lost or stolen devices.

You can log internal and external communications—including conversations with guest users, contractors, and other partner networks—in a private data store that you manage. This allows you to retain messages and files that are sent to and from your organization, to help meet requirements such as those that fall under the Federal Records Act (FRA) and the National Archives and Records Administration (NARA).

The FedRAMP milestone

In obtaining a FedRAMP High authorization, Wickr has been measured against a rigorous set of security controls, procedures, and policies established by the U.S. Federal Government, based on National Institute of Standards and Technology (NIST) standards.

“For many federal agencies and organizations, having the ability to securely communicate and share information—whether in an office or out in the field—is key to helping achieve their critical missions. AWS Wickr helps our government customers collaborate securely through messaging, calling, file and screen sharing with end-to-end encryption. The FedRAMP High authorization for Wickr demonstrates our commitment to delivering solutions that give government customers the control and confidence they need to support their sensitive and regulated workloads.” — Christian Hoff, Director, US Federal Civilian & Health at AWS

FedRAMP on AWS

AWS is continually expanding the scope of our compliance programs to help you use authorized services for sensitive and regulated workloads. We now offer 150 services that are authorized in the AWS US East/West Regions under FedRAMP Moderate authorization, and 132 services authorized in the AWS GovCloud (US) Regions under FedRAMP High authorization.

The FedRAMP High authorization of Wickr further validates our commitment at AWS to public-sector customers. With Wickr, you can combine the security of end-to-end encryption with the administrative flexibility you need to secure mission-critical communications, and keep up with recordkeeping requirements. Wickr is available under FedRAMP High in the AWS GovCloud (US-West) Region.

For up-to-date information, see our AWS Services in Scope by Compliance Program page. To learn more about AWS Wickr, visit the AWS Wickr product page, or email [email protected].

If you have feedback about this blog post, let us know in the Comments section below.

Anne Grahn

Anne Grahn

Anne is a Senior Worldwide Security GTM Specialist at AWS, based in Chicago. She has more than a decade of experience in the security industry, and focuses on effectively communicating cybersecurity risk. She maintains a Certified Information Systems Security Professional (CISSP) certification.

Randy Brumfield

Randy Brumfield

Randy leads technology business for new initiatives and the Cloud Support Engineering team for AWS Wickr. Prior to joining AWS, Randy spent close to two and a half decades in Silicon Valley across several start-ups, networking companies, and system integrators in various corporate development, product management, and operations roles. Randy currently resides in San Jose, California.

Build a pseudonymization service on AWS to protect sensitive data: Part 2

Post Syndicated from Edvin Hallvaxhiu original https://aws.amazon.com/blogs/big-data/build-a-pseudonymization-service-on-aws-to-protect-sensitive-data-part-2/

Part 1 of this two-part series described how to build a pseudonymization service that converts plain text data attributes into a pseudonym or vice versa. A centralized pseudonymization service provides a unique and universally recognized architecture for generating pseudonyms. Consequently, an organization can achieve a standard process to handle sensitive data across all platforms. Additionally, this takes away any complexity and expertise needed to understand and implement various compliance requirements from development teams and analytical users, allowing them to focus on their business outcomes.

Following a decoupled service-based approach means that, as an organization, you are unbiased towards the use of any specific technologies to solve your business problems. No matter which technology is preferred by individual teams, they are able to call the pseudonymization service to pseudonymize sensitive data.

In this post, we focus on common extract, transform, and load (ETL) consumption patterns that can use the pseudonymization service. We discuss how to use the pseudonymization service in your ETL jobs on Amazon EMR (using Amazon EMR on EC2) for streaming and batch use cases. Additionally, you can find an Amazon Athena and AWS Glue based consumption pattern in the GitHub repo of the solution.

Solution overview

The following diagram describes the solution architecture.

The account on the right hosts the pseudonymization service, which you can deploy using the instructions provided in the Part 1 of this series.

The account on the left is the one that you set up as part of this post, representing the ETL platform based on Amazon EMR using the pseudonymization service.

You can deploy the pseudonymization service and the ETL platform on the same account.

Amazon EMR empowers you to create, operate, and scale big data frameworks such as Apache Spark quickly and cost-effectively.

In this solution, we show how to consume the pseudonymization service on Amazon EMR with Apache Spark for batch and streaming use cases. The batch application reads data from an Amazon Simple Storage Service (Amazon S3) bucket, and the streaming application consumes records from Amazon Kinesis Data Streams.

PySpark code used in batch and streaming jobs

Both applications use a common utility function that makes HTTP POST calls against the API Gateway that is linked to the pseudonymization AWS Lambda function. The REST API calls are made per Spark partition using the Spark RDD mapPartitions function. The POST request body contains the list of unique values for a given input column. The POST request response contains the corresponding pseudonymized values. The code swaps the sensitive values with the pseudonymized ones for a given dataset. The result is saved to Amazon S3 and the AWS Glue Data Catalog, using Apache Iceberg table format.

Iceberg is an open table format that supports ACID transactions, schema evolution, and time travel queries. You can use these features to implement the right to be forgotten (or data erasure) solutions using SQL statements or programming interfaces. Iceberg is supported by Amazon EMR starting with version 6.5.0, AWS Glue, and Athena. Batch and streaming patterns use Iceberg as their target format. For an overview of how to build an ACID compliant data lake using Iceberg, refer to Build a high-performance, ACID compliant, evolving data lake using Apache Iceberg on Amazon EMR.

Prerequisites

You must have the following prerequisites:

  • An AWS account.
  • An AWS Identity and Access Management (IAM) principal with privileges to deploy the AWS CloudFormation stack and related resources.
  • The AWS Command Line Interface (AWS CLI) installed on the development or deployment machine that you will use to run the provided scripts.
  • An S3 bucket in the same account and AWS Region where the solution is to be deployed.
  • Python3 installed in the local machine where the commands are run.
  • PyYAML installed using pip.
  • A bash terminal to run bash scripts that deploy CloudFormation stacks.
  • An additional S3 bucket containing the input dataset in Parquet files (only for batch applications). Copy the sample dataset to the S3 bucket.
  • A copy of the latest code repository in the local machine using git clone or the download option.

Open a new bash terminal and navigate to the root folder of the cloned repository.

The source code for the proposed patterns can be found in the cloned repository. It uses the following parameters:

  • ARTEFACT_S3_BUCKET – The S3 bucket where the infrastructure code will be stored. The bucket must be created in the same account and Region where the solution lives.
  • AWS_REGION – The Region where the solution will be deployed.
  • AWS_PROFILE – The named profile that will be applied to the AWS CLI command. This should contain credentials for an IAM principal with privileges to deploy the CloudFormation stack of related resources.
  • SUBNET_ID – The subnet ID where the EMR cluster will be spun up. The subnet is pre-existing and for demonstration purposes, we use the default subnet ID of the default VPC.
  • EP_URL – The endpoint URL of the pseudonymization service. Retrieve this from the solution deployed as Part 1 of this series.
  • API_SECRET – An Amazon API Gateway key that will be stored in AWS Secrets Manager. The API key is generated from the deployment depicted in Part 1 of this series.
  • S3_INPUT_PATH – The S3 URI pointing to the folder containing the input dataset as Parquet files.
  • KINESIS_DATA_STREAM_NAMEThe Kinesis data stream name deployed with the CloudFormation stack.
  • BATCH_SIZEThe number of records to be pushed to the data stream per batch.
  • THREADS_NUM The number of parallel threads used in the local machine to upload data to the data stream. More threads correspond to a higher message volume.
  • EMR_CLUSTER_ID – The EMR cluster ID where the code will be run (the EMR cluster was created by the CloudFormation stack).
  • STACK_NAME – The name of the CloudFormation stack, which is assigned in the deployment script.

Batch deployment steps

As described in the prerequisites, before you deploy the solution, upload the Parquet files of the test dataset to Amazon S3. Then provide the S3 path of the folder containing the files as the parameter <S3_INPUT_PATH>.

We create the solution resources via AWS CloudFormation. You can deploy the solution by running the deploy_1.sh script, which is inside the deployment_scripts folder.

After the deployment prerequisites have been satisfied, enter the following command to deploy the solution:

sh ./deployment_scripts/deploy_1.sh \
-a <ARTEFACT_S3_BUCKET> \
-r <AWS_REGION> \
-p <AWS_PROFILE> \
-s <SUBNET_ID> \
-e <EP_URL> \
-x <API_SECRET> \
-i <S3_INPUT_PATH>

The output should look like the following screenshot.

The required parameters for the cleanup command are printed out at the end of the run of the deploy_1.sh script. Make sure to note down these values.

Test the batch solution

In the CloudFormation template deployed using the deploy_1.sh script, the EMR step containing the Spark batch application is added at the end of the EMR cluster setup.

To verify the results, check the S3 bucket identified in the CloudFormation stack outputs with the variable SparkOutputLocation.

You can also use Athena to query the table pseudo_table in the database blog_batch_db.

Clean up batch resources

To destroy the resources created as part of this exercise,

in a bash terminal, navigate to the root folder of the cloned repository. Enter the cleanup command shown as the output of the previously run deploy_1.sh script:

sh ./deployment_scripts/cleanup_1.sh \
-a <ARTEFACT_S3_BUCKET> \
-s <STACK_NAME> \
-r <AWS_REGION> \
-e <EMR_CLUSTER_ID>

The output should look like the following screenshot.

Streaming deployment steps

We create the solution resources via AWS CloudFormation. You can deploy the solution by running the deploy_2.sh script, which is inside the deployment_scripts folder. The CloudFormation stack template for this pattern is available in the GitHub repo.

After the deployment prerequisites have been satisfied, enter the following command to deploy the solution:

sh deployment_scripts/deploy_2.sh \
-a <ARTEFACT_S3_BUCKET> \
-r <AWS_REGION> \
-p <AWS_PROFILE> \
-s <SUBNET_ID> \
-e <EP_URL> \
-x <API_SECRET>

The output should look like the following screenshot.

The required parameters for the cleanup command are printed out at the end of the output of the deploy_2.sh script. Make sure to save these values to use later.

Test the streaming solution

In the CloudFormation template deployed using the deploy_2.sh script, the EMR step containing the Spark streaming application is added at the end of the EMR cluster setup. To test the end-to-end pipeline, you need to push records to the deployed Kinesis data stream. With the following commands in a bash terminal, you can activate a Kinesis producer that will continuously put records in the stream, until the process is manually stopped. You can control the producer’s message volume by modifying the BATCH_SIZE and the THREADS_NUM variables.

python3 -m pip install kiner
python3 \
consumption-patterns/emr/1_pyspark-streaming/kinesis_producer/producer.py \
<KINESIS_DATA_STREAM_NAME> \
<BATCH_SIZE> \
<THREADS_NUM>

To verify the results, check the S3 bucket identified in the CloudFormation stack outputs with the variable SparkOutputLocation.

In the Athena query editor, check the results by querying the table pseudo_table in the database blog_stream_db.

Clean up streaming resources

To destroy the resources created as part of this exercise, complete the following steps:

  1. Stop the Python Kinesis producer that was launched in a bash terminal in the previous section.
  2. Enter the following command:
sh ./deployment_scripts/cleanup_2.sh \
-a <ARTEFACT_S3_BUCKET> \
-s <STACK_NAME> \
-r <AWS_REGION> \
-e <EMR_CLUSTER_ID>

The output should look like the following screenshot.

Performance details

Use cases might differ in requirements with respect to data size, compute capacity, and cost. We have provided some benchmarking and factors that may influence performance; however, we strongly advise you to validate the solution in lower environments to see if it meets your particular requirements.

You can influence the performance of the proposed solution (which aims to pseudonymize a dataset using Amazon EMR) by the maximum number of parallel calls to the pseudonymization service and the payload size for each call. In terms of parallel calls, factors to consider are the GetSecretValue calls limit from Secrets Manager (10.000 per second, hard limit) and the Lambda default concurrency parallelism (1,000 by default; can be increased by quota request). You can control the maximum parallelism adjusting the number of executors, the number of partitions composing the dataset, and the cluster configuration (number and type of nodes). In terms of payload size for each call, factors to consider are the API Gateway maximum payload size (6 MB) and the Lambda function maximum runtime (15 minutes). You can control the payload size and the Lambda function runtime by adjusting the batch size value, which is a parameter of the PySpark script that determines the number of items to be pseudonymized per each API call. To capture the influence of all these factors and assess the performance of the consumption patterns using Amazon EMR, we have designed and monitored the following scenarios.

Batch consumption pattern performance

To assess the performance for the batch consumption pattern, we ran the pseudonymization application with three input datasets composed of 1, 10, and 100 Parquet files of 97.7 MB each. We generated the input files using the dataset_generator.py script.

The cluster capacity nodes were 1 primary (m5.4xlarge) and 15 core (m5d.8xlarge). This cluster configuration remained the same for all three scenarios, and it allowed the Spark application to use up to 100 executors. The batch_size, which was also the same for the three scenarios, was set to 900 VINs per API call, and the maximum VIN size was 5 bytes.

The following table captures the information of the three scenarios.

Execution ID Repartition Dataset Size Number of Executors Cores per Executor Executor Memory Runtime
A 800 9.53 GB 100 4 4 GiB 11 minutes, 10 seconds
B 80 0.95 GB 10 4 4 GiB 8 minutes, 36 seconds
C 8 0.09 GB 1 4 4 GiB 7 minutes, 56 seconds

As we can see, properly parallelizing the calls to our pseudonymization service enables us to control the overall runtime.

In the following examples, we analyze three important Lambda metrics for the pseudonymization service: Invocations, ConcurrentExecutions, and Duration.

The following graph depicts the Invocations metric, with the statistic SUM in orange and RUNNING SUM in blue.

By calculating the difference between the starting and ending point of the cumulative invocations, we can extract how many invocations were made during each run.

Run ID Dataset Size Total Invocations
A 9.53 GB 1.467.000 – 0 = 1.467.000
B 0.95 GB 1.467.000 – 1.616.500 = 149.500
C 0.09 GB 1.616.500 – 1.631.000 = 14.500

As expected, the number of invocations increases proportionally by 10 with the dataset size.

The following graph depicts the total ConcurrentExecutions metric, with the statistic MAX in blue.

The application is designed such that the maximum number of concurrent Lambda function runs is given by the amount of Spark tasks (Spark dataset partitions), which can be processed in parallel. This number can be calculated as MIN (executors x executor_cores, Spark dataset partitions).

In the test, run A processed 800 partitions, using 100 executors with four cores each. This makes 400 tasks processed in parallel so the Lambda function concurrent runs can’t be above 400. The same logic was applied for runs B and C. We can see this reflected in the preceding graph, where the amount of concurrent runs never surpasses the 400, 40, and 4 values.

To avoid throttling, make sure that the amount of Spark tasks that can be processed in parallel is not above the Lambda function concurrency limit. If that is the case, you should either increase the Lambda function concurrency limit (if you want to keep up the performance) or reduce either the amount of partitions or the number of available executors (impacting the application performance).

The following graph depicts the Lambda Duration metric, with the statistic AVG in orange and MAX in green.

As expected, the size of the dataset doesn’t affect the duration of the pseudonymization function run, which, apart from some initial invocations facing cold starts, remains constant to an average of 3 milliseconds throughout the three scenarios. This because the maximum number of records included in each pseudonymization call is constant (batch_size value).

Lambda is billed based on the number of invocations and the time it takes for your code to run (duration). You can use the average duration and invocations metrics to estimate the cost of the pseudonymization service.

Streaming consumption pattern performance

To assess the performance for the streaming consumption pattern, we ran the producer.py script, which defines a Kinesis data producer that pushes records in batches to the Kinesis data stream.

The streaming application was left running for 15 minutes and it was configured with a batch_interval of 1 minute, which is the time interval at which streaming data will be divided into batches. The following table summarizes the relevant factors.

Repartition Cluster Capacity Nodes Number of Executors Executor’s Memory Batch Window Batch Size VIN Size
17

1 Primary (m5.xlarge),

3 Core (m5.2xlarge)

6 9 GiB 60 seconds 900 VINs/API call. 5 Bytes / VIN

The following graphs depict the Kinesis Data Streams metrics PutRecords (in blue) and GetRecords (in orange) aggregated with 1-minute period and using the statistic SUM. The first graph shows the metric in bytes, which peaks 6.8 MB per minute. The second graph shows the metric in record count peaking at 85,000 records per minute.

We can see that the metrics GetRecords and PutRecords have overlapping values for almost the entire application’s run. This means that the streaming application was able to keep up with the load of the stream.

Next, we analyze the relevant Lambda metrics for the pseudonymization service: Invocations, ConcurrentExecutions, and Duration.

The following graph depicts the Invocations metric, with the statistic SUM (in orange) and RUNNING SUM in blue.

By calculating the difference between the starting and ending point of the cumulative invocations, we can extract how many invocations were made during the run. In specific, in 15 minutes, the streaming application invoked the pseudonymization API 977 times, which is around 65 calls per minute.

The following graph depicts the total ConcurrentExecutions metric, with the statistic MAX in blue.

The repartition and the cluster configuration allow the application to process all Spark RDD partitions in parallel. As a result, the concurrent runs of the Lambda function are always equal to or below the repartition number, which is 17.

To avoid throttling, make sure that the amount of Spark tasks that can be processed in parallel is not above the Lambda function concurrency limit. For this aspect, the same suggestions as for the batch use case are valid.

The following graph depicts the Lambda Duration metric, with the statistic AVG in blue and MAX in orange.

As expected, aside the Lambda function’s cold start, the average duration of the pseudonymization function was more or less constant throughout the run. This because the batch_size value, which defines the number of VINs to pseudonymize per call, was set to and remained constant at 900.

The ingestion rate of the Kinesis data stream and the consumption rate of our streaming application are factors that influence the number of API calls made against the pseudonymization service and therefore the related cost.

The following graph depicts the Lambda Invocations metric, with the statistic SUM in orange, and the Kinesis Data Streams GetRecords.Records metric, with the statistic SUM in blue. We can see that there is correlation between the amount of records retrieved from the stream per minute and the amount of Lambda function invocations, thereby impacting the cost of the streaming run.

In addition to the batch_interval, we can control the streaming application’s consumption rate using Spark streaming properties like spark.streaming.receiver.maxRate and spark.streaming.blockInterval. For more details, refer to Spark Streaming + Kinesis Integration and Spark Streaming Programming Guide.

Conclusion

Navigating through the rules and regulations of data privacy laws can be difficult. Pseudonymization of PII attributes is one of many points to consider while handling sensitive data.

In this two-part series, we explored how you can build and consume a pseudonymization service using various AWS services with features to assist you in building a robust data platform. In Part 1, we built the foundation by showing how to build a pseudonymization service. In this post, we showcased the various patterns to consume the pseudonymization service in a cost-efficient and performant manner. Check out the GitHub repository for additional consumption patterns.


About the Authors

Edvin Hallvaxhiu is a Senior Global Security Architect with AWS Professional Services and is passionate about cybersecurity and automation. He helps customers build secure and compliant solutions in the cloud. Outside work, he likes traveling and sports.

Rahul Shaurya is a Principal Big Data Architect with AWS Professional Services. He helps and works closely with customers building data platforms and analytical applications on AWS. Outside of work, Rahul loves taking long walks with his dog Barney.

Andrea Montanari is a Senior Big Data Architect with AWS Professional Services. He actively supports customers and partners in building analytics solutions at scale on AWS.

María Guerra is a Big Data Architect with AWS Professional Services. Maria has a background in data analytics and mechanical engineering. She helps customers architecting and developing data related workloads in the cloud.

Pushpraj Singh is a Senior Data Architect with AWS Professional Services. He is passionate about Data and DevOps engineering. He helps customers build data driven applications at scale.
Announcing two highly requested DLP enhancements: Optical Character Recognition (OCR) and Source Code Detections

Post Syndicated from Noelle Kagan original https://blog.cloudflare.com/dlp-ocr-sourcecode


We are excited to announce two enhancements to Cloudflare’s Data Loss Prevention (DLP) service: support for Optical Character Recognition (OCR) and predefined source code detections. These two highly requested DLP features make it easier for organizations to protect their sensitive data with granularity and reduce the risks of breaches, regulatory non-compliance, and reputational damage:

  • With OCR, customers can efficiently identify and classify sensitive information contained within images or scanned documents.
  • With predefined source code detections, organizations can scan inline traffic for common code languages and block those HTTP requests to prevent data leaks, as well as detecting the storage of code in repositories such as Google Drive.

These capabilities are available now within our DLP engine, which is just one of several Cloudflare services, including cloud access security broker (CASB), Zero Trust network access (ZTNA), secure web gateway (SWG), remote browser isolation (RBI), and cloud email security, that help organizations protect data everywhere across web, SaaS, and private applications.

About Optical Character Recognition (OCR)

OCR enables the extraction of text from images. It converts the text within those images into readable text data that can be easily edited, searched, or analyzed, unlike images.

Sensitive data regularly appears in image files. For example, employees are often asked to provide images of identification cards, passports, or documents as proof of identity or work status. Those images can contain a plethora of sensitive and regulated classes of data, including Personally Identifiable Information (PII) — for example, passport numbers, driver’s license numbers, birthdates, tax identification numbers, and much more.

OCR can be leveraged within DLP policies to prevent the unauthorized sharing or leakage of sensitive information contained within images. Policies can detect when sensitive text content is being uploaded to cloud storage or shared through other communication channels, and block the transaction to prevent data loss. This assists in enforcing compliance with regulatory requirements related to data protection and privacy.

About source code detection

Source code fuels digital business and contains high-value intellectual property, including proprietary algorithms and encrypted secrets about a company’s infrastructure. Source code has been and will continue to be a target for theft by external attackers, but customers are also increasingly concerned about the inadvertent exposure of this information by internal users. For example, developers may accidentally upload source code to a publicly available GitHub repository or to generative AI tools like ChatGPT. While these tools have their place (like using AI to help with debugging), security teams want greater visibility and more precise control over what data flows to and from these tools.

To help customers, Cloudflare now offers predefined DLP profiles for common code languages — specifically C, C++, C#, Go, Haskell, Java, Javascript, Lua, Python, R, Rust, and Swift. These machine learning-based detections train on public repositories for algorithm development, ensuring they remain up to date. Cloudflare’s DLP inspects the HTTP body of requests for these DLP profiles, and security teams can block traffic accordingly to prevent data leaks.

How to use these capabilities

Cloudflare offers you flexibility to determine what data you are interested in detecting via DLP policies. You can use predefined profiles created by Cloudflare for common types of sensitive or regulated data (e.g. credentials, financial data, health data, identifiers), or you can create your own custom detections.

To implement inline blocking of source code, simply select the DLP profiles for the languages you want to detect. For example, if my organization uses Rust, Go, and JavaScript, I would turn on those detections:

I would then create a blocking policy via our secure web gateway to prevent traffic containing source code. Here, we block source code from being uploaded to ChatGPT:

Adding OCR to any detection is similarly easy. Below is a profile looking for sensitive data that could be stored in scanned documents.

With the detections selected, simply enable the OCR toggle, and wherever you are applying DLP inspections, images in your content will be scanned for sensitive data. The detections work the same in images as they do in the text, including Match Counts and Context Analysis, so no additional logic or settings are needed.

Consistency across use cases is a core principle of our DLP solution, so as always, this feature is available for both data at rest, available via CASB, and data in transit, available via Gateway.

How do I get started?

DLP is available with other data protection services as part of Cloudflare One, our Secure Access Service Edge (SASE) platform that converges Zero Trust security and network connectivity services. To get started protecting your sensitive data, reach out for a consultation, or contact your account manager.

How AWS can help you navigate the complexity of digital sovereignty

Post Syndicated from Max Peterson original https://aws.amazon.com/blogs/security/how-aws-can-help-you-navigate-the-complexity-of-digital-sovereignty/

Customers from around the world often tell me that digital sovereignty is a top priority as they look to meet new compliance and industry regulations. In fact, 82% of global organizations are either currently using, planning to use, or considering sovereign cloud solutions in the next two years, according to the International Data Corporation (IDC). However, many leaders face complexity as policies and requirements continue to rapidly evolve, and have concerns on acquiring the right knowledge and skills, at an affordable cost, to simplify efforts in meeting digital sovereignty goals.

At Amazon Web Services (AWS), we understand that protecting your data in a world with changing regulations, technology, and risks takes teamwork. We’re committed to making sure that the AWS Cloud remains sovereign-by-design, as it has been from day one, and providing customers with more choice to help meet their unique sovereignty requirements across our offerings in AWS Regions around the world, dedicated sovereign cloud infrastructure solutions, and the recently announced independent European Sovereign Cloud. In this blog post, I’ll share how the cloud is helping organizations meet their digital sovereignty needs, and ways that we can help you navigate the ever-evolving landscape.

Digital sovereignty needs of customers vary based on multiple factors

Digital sovereignty means different things to different people, and every country or region has their own requirements. Adding to the complexity is the fact that no uniform guidance exists for the types of workloads, industries, and sectors that must adhere to these requirements.

Although digital sovereignty needs vary based on multiple factors, key themes that we’ve identified by listening to customers, partners, and regulators include data residency, operator access restriction, resiliency, and transparency. AWS works closely with customers to understand the digital sovereignty outcomes that they’re focused on to determine the right AWS solutions that can help to meet them.

Meet requirements without compromising the benefits of the cloud

We introduced the AWS Digital Sovereignty Pledge in 2022 as part of our commitment to offer all AWS customers the most advanced set of sovereignty controls and security features available in the cloud. We continue to deeply engage with regulators to help make sure that AWS meets various standards and achieves certifications that our customers directly inherit, allowing them to meet requirements while driving continuous innovation. AWS was recently named a leader in Sovereign Cloud Infrastructure Services (EU) by Information Services Group (ISG), a global technology research and IT advisory firm.

Customers who use our global infrastructure with sovereign-by-design features can optimize for increased scale, agility, speed, and reduced costs while getting the highest levels of security and protection. Our AWS Regions are powered by the AWS Nitro System, which helps ensure the confidentiality and integrity of customer data. Building on our commitment to provide greater transparency and assurances on how AWS services are designed and operated, the security design of our Nitro System was validated in an independent public report by the global cybersecurity consulting firm NCC Group.

Customers have full control of their data on AWS and determine where their data is stored, how it’s stored, and who has access to it. We provide tools to help you automate and monitor your storage location and encrypt your data, including data residency guardrails in AWS Control Tower. We recently announced more than 65 new digital sovereignty controls that you can choose from to help prevent actions, enforce configurations, and detect undesirable changes.

All AWS services support encryption, and most services also support encryption with customer managed keys that AWS can’t access such as AWS Key Management Service (KMS), AWS CloudHSM, and AWS KMS External Key Store (XKS). Both the hardware used in AWS KMS and the firmware used in AWS CloudHSM are FIPS 140-2 Level 3 compliant as certified by a NIST-accredited laboratory.

Infrastructure choice to support your unique needs and local regulations

AWS provides hybrid cloud storage and edge computing capabilities so that you can use the same infrastructure, services, APIs, and tools across your environments. We think of our AWS infrastructure and services as a continuum that helps meet your requirements wherever you need it. Having a consistent experience across environments helps to accelerate innovation, increase operational efficiencies and reduce costs by using the same skills and toolsets, and meet specific security standards by adopting cloud security wherever applications and data reside.

We work closely with customers to support infrastructure decisions that meet unique workload needs and local regulations, and continue to invent based on what we hear from customers. To help organizations comply with stringent regulatory requirements, we launched AWS Dedicated Local Zones. This is a type of infrastructure that is fully managed by AWS, built for exclusive use by a customer or community, and placed in a customer-specified location or data center to run sensitive or other regulated industry workloads. At AWS re:Invent 2023, I sat down with Cheow Hoe Chan, Government Chief Digital Technology Officer of Singapore, to discuss how we collaborated with Singapore’s Smart Nation and Digital Government Group to define and build this dedicated infrastructure.

We also recently announced our plans to launch the AWS European Sovereign Cloud to provide customers in highly regulated industries with more choice to help meet varying data residency, operational autonomy, and resiliency requirements. This is a new, independent cloud located and operated within the European Union (EU) that will have the same security, availability, and performance that our customers get from existing AWS Regions today, with important features specific to evolving EU regulations.

Build confidently with AWS and our AWS Partners

In addition to our AWS offerings, you can access our global network of more than 100,000 AWS Partners specialized in various competencies and industry verticals to get local guidance and services.

There is a lot of complexity involved with navigating the evolving digital sovereignty landscape—but you don’t have to do it alone. Using the cloud and working with AWS and our partners can help you move faster and more efficiently while keeping costs low. We’re committed to helping you meet necessary requirements while accelerating innovation, and can’t wait to see the kinds of advancements that you’ll continue to drive.

 
If you have feedback about this post, submit comments in the Comments section below. If you have questions about this post, contact AWS Support.

Max Peterson

Max Peterson

Max is the Vice President of AWS Sovereign Cloud. He leads efforts to ensure that all AWS customers around the world have the most advanced set of sovereignty controls, privacy safeguards, and security features available in the cloud. Before his current role, Max served as the VP of AWS Worldwide Public Sector (WWPS) and created and led the WWPS International Sales division, with a focus on empowering government, education, healthcare, aerospace and satellite, and nonprofit organizations to drive rapid innovation while meeting evolving compliance, security, and policy requirements. Max has over 30 years of public sector experience and served in other technology leadership roles before joining Amazon. Max has earned both a Bachelor of Arts in Finance and Master of Business Administration in Management Information Systems from the University of Maryland.

On IoT Devices and Software Liability

Post Syndicated from Bruce Schneier original https://www.schneier.com/blog/archives/2024/01/on-iot-devices-and-software-liability.html

New law journal article:

Smart Device Manufacturer Liability and Redress for Third-Party Cyberattack Victims

Abstract: Smart devices are used to facilitate cyberattacks against both their users and third parties. While users are generally able to seek redress following a cyberattack via data protection legislation, there is no equivalent pathway available to third-party victims who suffer harm at the hands of a cyberattacker. Given how these cyberattacks are usually conducted by exploiting a publicly known and yet un-remediated bug in the smart device’s code, this lacuna is unreasonable. This paper scrutinises recent judgments from both the Supreme Court of the United Kingdom and the Supreme Court of the Republic of Ireland to ascertain whether these rulings pave the way for third-party victims to pursue negligence claims against the manufacturers of smart devices. From this analysis, a narrow pathway, which outlines how given a limited set of circumstances, a duty of care can be established between the third-party victim and the manufacturer of the smart device is proposed.

Strengthen the DevOps pipeline and protect data with AWS Secrets Manager, AWS KMS, and AWS Certificate Manager

Post Syndicated from Magesh Dhanasekaran original https://aws.amazon.com/blogs/security/strengthen-the-devops-pipeline-and-protect-data-with-aws-secrets-manager-aws-kms-and-aws-certificate-manager/

In this blog post, we delve into using Amazon Web Services (AWS) data protection services such as Amazon Secrets Manager, AWS Key Management Service (AWS KMS), and AWS Certificate Manager (ACM) to help fortify both the security of the pipeline and security in the pipeline. We explore how these services contribute to the overall security of the DevOps pipeline infrastructure while enabling seamless integration of data protection measures. We also provide practical insights by demonstrating the implementation of these services within a DevOps pipeline for a three-tier WordPress web application deployed using Amazon Elastic Kubernetes Service (Amazon EKS).

DevOps pipelines involve the continuous integration, delivery, and deployment of cloud infrastructure and applications, which can store and process sensitive data. The increasing adoption of DevOps pipelines for cloud infrastructure and application deployments has made the protection of sensitive data a critical priority for organizations.

Some examples of the types of sensitive data that must be protected in DevOps pipelines are:

  • Credentials: Usernames and passwords used to access cloud resources, databases, and applications.
  • Configuration files: Files that contain settings and configuration data for applications, databases, and other systems.
  • Certificates: TLS certificates used to encrypt communication between systems.
  • Secrets: Any other sensitive data used to access or authenticate with cloud resources, such as private keys, security tokens, or passwords for third-party services.

Unintended access or data disclosure can have serious consequences such as loss of productivity, legal liabilities, financial losses, and reputational damage. It’s crucial to prioritize data protection to help mitigate these risks effectively.

The concept of security of the pipeline encompasses implementing security measures to protect the entire DevOps pipeline—the infrastructure, tools, and processes—from potential security issues. While the concept of security in the pipeline focuses on incorporating security practices and controls directly into the development and deployment processes within the pipeline.

By using Secrets Manager, AWS KMS, and ACM, you can strengthen the security of your DevOps pipelines, safeguard sensitive data, and facilitate secure and compliant application deployments. Our goal is to equip you with the knowledge and tools to establish a secure DevOps environment, providing the integrity of your pipeline infrastructure and protecting your organization’s sensitive data throughout the software delivery process.

Sample application architecture overview

WordPress was chosen as the use case for this DevOps pipeline implementation due to its popularity, open source nature, containerization support, and integration with AWS services. The sample architecture for the WordPress application in the AWS cloud uses the following services:

  • Amazon Route 53: A DNS web service that routes traffic to the correct AWS resource.
  • Amazon CloudFront: A global content delivery network (CDN) service that securely delivers data and videos to users with low latency and high transfer speeds.
  • AWS WAF: A web application firewall that protects web applications from common web exploits.
  • AWS Certificate Manager (ACM): A service that provides SSL/TLS certificates to enable secure connections.
  • Application Load Balancer (ALB): Routes traffic to the appropriate container in Amazon EKS.
  • Amazon Elastic Kubernetes Service (Amazon EKS): A scalable and highly available Kubernetes cluster to deploy containerized applications.
  • Amazon Relational Database Service (Amazon RDS): A managed relational database service that provides scalable and secure databases for applications.
  • AWS Key Management Service (AWS KMS): A key management service that allows you to create and manage the encryption keys used to protect your data at rest.
  • AWS Secrets Manager: A service that provides the ability to rotate, manage, and retrieve database credentials.
  • AWS CodePipeline: A fully managed continuous delivery service that helps to automate release pipelines for fast and reliable application and infrastructure updates.
  • AWS CodeBuild: A fully managed continuous integration service that compiles source code, runs tests, and produces ready-to-deploy software packages.
  • AWS CodeCommit: A secure, highly scalable, fully managed source-control service that hosts private Git repositories.

Before we explore the specifics of the sample application architecture in Figure 1, it’s important to clarify a few aspects of the diagram. While it displays only a single Availability Zone (AZ), please note that the application and infrastructure can be developed to be highly available across multiple AZs to improve fault tolerance. This means that even if one AZ is unavailable, the application remains operational in other AZs, providing uninterrupted service to users.

Figure 1: Sample application architecture

Figure 1: Sample application architecture

The flow of the data protection services in the post and depicted in Figure 1 can be summarized as follows:

First, we discuss securing your pipeline. You can use Secrets Manager to securely store sensitive information such as Amazon RDS credentials. We show you how to retrieve these secrets from Secrets Manager in your DevOps pipeline to access the database. By using Secrets Manager, you can protect critical credentials and help prevent unauthorized access, strengthening the security of your pipeline.

Next, we cover data encryption. With AWS KMS, you can encrypt sensitive data at rest. We explain how to encrypt data stored in Amazon RDS using AWS KMS encryption, making sure that it remains secure and protected from unauthorized access. By implementing KMS encryption, you add an extra layer of protection to your data and bolster the overall security of your pipeline.

Lastly, we discuss securing connections (data in transit) in your WordPress application. ACM is used to manage SSL/TLS certificates. We show you how to provision and manage SSL/TLS certificates using ACM and configure your Amazon EKS cluster to use these certificates for secure communication between users and the WordPress application. By using ACM, you can establish secure communication channels, providing data privacy and enhancing the security of your pipeline.

Note: The code samples in this post are only to demonstrate the key concepts. The actual code can be found on GitHub.

Securing sensitive data with Secrets Manager

In this sample application architecture, Secrets Manager is used to store and manage sensitive data. The AWS CloudFormation template provided sets up an Amazon RDS for MySQL instance and securely sets the master user password by retrieving it from Secrets Manager using KMS encryption.

Here’s how Secrets Manager is implemented in this sample application architecture:

  1. Creating a Secrets Manager secret.
    1. Create a Secrets Manager secret that includes the Amazon RDS database credentials using CloudFormation.
    2. The secret is encrypted using an AWS KMS customer managed key.
    3. Sample code:
      RDSMySQL:
          Type: AWS::RDS::DBInstance
          Properties: 
      		ManageMasterUserPassword: true
      		MasterUserSecret:
              		KmsKeyId: !Ref RDSMySqlSecretEncryption

    The ManageMasterUserPassword: true line in the CloudFormation template indicates that the stack will manage the master user password for the Amazon RDS instance. To securely retrieve the password for the master user, the CloudFormation template uses the MasterUserSecret parameter, which retrieves the password from Secrets Manager. The KmsKeyId: !Ref RDSMySqlSecretEncryption line specifies the KMS key ID that will be used to encrypt the secret in Secrets Manager.

    By setting the MasterUserSecret parameter to retrieve the password from Secrets Manager, the CloudFormation stack can securely retrieve and set the master user password for the Amazon RDS MySQL instance without exposing it in plain text. Additionally, specifying the KMS key ID for encryption adds another layer of security to the secret stored in Secrets Manager.

  2. Retrieving secrets from Secrets Manager.
    1. The secrets store CSI driver is a Kubernetes-native driver that provides a common interface for Secrets Store integration with Amazon EKS. The secrets-store-csi-driver-provider-aws is a specific provider that provides integration with the Secrets Manager.
    2. To set up Amazon EKS, the first step is to create a SecretProviderClass, which specifies the secret ID of the Amazon RDS database. This SecretProviderClass is then used in the Kubernetes deployment object to deploy the WordPress application and dynamically retrieve the secrets from the secret manager during deployment. This process is entirely dynamic and verifies that no secrets are recorded anywhere. The SecretProviderClass is created on a specific app namespace, such as the wp namespace.
    3. Sample code:
      apiVersion: secrets-store.csi.x-k8s.io/v1
      kind: SecretProviderClass
      spec:
        provider: aws
        parameters:
          objects: |
              - objectName: 'rds!db-0x0000-0x0000-0x0000-0x0000-0x0000'
      

When using Secrets manager, be aware of the following best practices for managing and securing Secrets Manager secrets:

  • Use AWS Identity and Access Management (IAM) identity policies to define who can perform specific actions on Secrets Manager secrets, such as reading, writing, or deleting them.
  • Secrets Manager resource policies can be used to manage access to secrets at a more granular level. This includes defining who has access to specific secrets based on attributes such as IP address, time of day, or authentication status.
  • Encrypt the Secrets Manager secret using an AWS KMS key.
  • Using CloudFormation templates to automate the creation and management of Secrets Manager secrets including rotation.
  • Use AWS CloudTrail to monitor access and changes to Secrets Manager secrets.
  • Use CloudFormation hooks to validate the Secrets Manager secret before and after deployment. If the secret fails validation, the deployment is rolled back.

Encrypting data with AWS KMS

Data encryption involves converting sensitive information into a coded form that can only be accessed with the appropriate decryption key. By implementing encryption measures throughout your pipeline, you make sure that even if unauthorized individuals gain access to the data, they won’t be able to understand its contents.

Here’s how data at rest encryption using AWS KMS is implemented in this sample application architecture:

  1. Amazon RDS secret encryption
    1. Encrypting secrets: An AWS KMS customer managed key is used to encrypt the secrets stored in Secrets Manager to ensure their confidentiality during the DevOps build process.
    2. Sample code:
      RDSMySQL:
          Type: AWS::RDS::DBInstance
          Properties:
            ManageMasterUserPassword: true
            MasterUserSecret:
              KmsKeyId: !Ref RDSMySqlSecretEncryption
      
      RDSMySqlSecretEncryption:
          Type: "AWS::KMS::Key"
          Properties:
            KeyPolicy:
              Id: rds-mysql-secret-encryption
              Statement:
                - Sid: Allow administration of the key
                  Effect: Allow
                  "Action": [
                      "kms:Create*",
                      "kms:Describe*",
                      "kms:Enable*",
                      "kms:List*",
                      "kms:Put*",
      					.
      					.
      					.
                  ]
                - Sid: Allow use of the key
                  Effect: Allow
                  "Action": [
                      "kms:Decrypt",
                      "kms:GenerateDataKey",
                      "kms:DescribeKey"
                  ]

  2. Amazon RDS data encryption
    1. Enable encryption for an Amazon RDS instance using CloudFormation. Specify the KMS key ARN in the CloudFormation stack and RDS will use the specified KMS key to encrypt data at rest.
    2. Sample code:
      RDSMySQL:
          Type: AWS::RDS::DBInstance
          Properties:
        KmsKeyId: !Ref RDSMySqlDataEncryption
              StorageEncrypted: true
      
      RDSMySqlDataEncryption:
          Type: "AWS::KMS::Key"
          Properties:
            KeyPolicy:
              Id: rds-mysql-data-encryption
              Statement:
                - Sid: Allow administration of the key
                  Effect: Allow
                  "Action": [
                      "kms:Create*",
                      "kms:Describe*",
                      "kms:Enable*",
                      "kms:List*",
                      "kms:Put*",
      .
      .
      .
                  ]
                - Sid: Allow use of the key
                  Effect: Allow
                  "Action": [
                      "kms:Decrypt",
                      "kms:GenerateDataKey",
                      "kms:DescribeKey"
                  ]

  3. Kubernetes Pods storage
    1. Use encrypted Amazon Elastic Block Store (Amazon EBS) volumes to store configuration data. Create a managed encrypted Amazon EBS volume using the following code snippet, and then deploy a Kubernetes pod with the persistent volume claim (PVC) mounted as a volume.
    2. Sample code:
      kind: StorageClass
      provisioner: ebs.csi.aws.com
      parameters:
        csi.storage.k8s.io/fstype: xfs
        encrypted: "true"
      
      kind: Deployment
      spec:
        volumes:      
            - name: persistent-storage
              persistentVolumeClaim:
                claimName: ebs-claim

  4. Amazon ECR
    1. To secure data at rest in Amazon Elastic Container Registry (Amazon ECR), enable encryption at rest for Amazon ECR repositories using the AWS Management Console or AWS Command Line Interface (AWS CLI). ECR uses AWS KMS to encrypt the data at rest.
    2. Create a KMS key for Amazon ECR and use that key to encrypt the data at rest.
    3. Automate the creation of encrypted ECR repositories and enable encryption at rest using a DevOps pipeline, use CodePipeline to automate the deployment of the CloudFormation stack.
    4. Define the creation of encrypted Amazon ECR repositories as part of the pipeline.
    5. Sample code:
      ECRRepository:
          Type: AWS::ECR::Repository
          Properties: 
            EncryptionConfiguration: 
              EncryptionType: KMS
              KmsKey: !Ref ECREncryption
      
      ECREncryption:
          Type: AWS::KMS::Key
          Properties:
            KeyPolicy:
              Id: ecr-encryption-key
              Statement:
                - Sid: Allow administration of the key
                  Effect: Allow
                  "Action": [
                      "kms:Create*",
                      "kms:Describe*",
                      "kms:Enable*",
                      "kms:List*",
                      "kms:Put*",
      .
      .
      .
       ]
                - Sid: Allow use of the key
                  Effect: Allow
                  "Action": [
                      "kms:Decrypt",
                      "kms:GenerateDataKey",
                      "kms:DescribeKey"
                  ]

AWS best practices for managing encryption keys in an AWS environment

To effectively manage encryption keys and verify the security of data at rest in an AWS environment, we recommend the following best practices:

  • Use separate AWS KMS customer managed KMS keys for data classifications to provide better control and management of keys.
  • Enforce separation of duties by assigning different roles and responsibilities for key management tasks, such as creating and rotating keys, setting key policies, or granting permissions. By segregating key management duties, you can reduce the risk of accidental or intentional key compromise and improve overall security.
  • Use CloudTrail to monitor AWS KMS API activity and detect potential security incidents.
  • Rotate KMS keys as required by your regulatory requirements.
  • Use CloudFormation hooks to validate KMS key policies to verify that they align with organizational and regulatory requirements.

Following these best practices and implementing encryption at rest for different services such as Amazon RDS, Kubernetes Pods storage, and Amazon ECR, will help ensure that data is encrypted at rest.

Securing communication with ACM

Secure communication is a critical requirement for modern environments and implementing it in a DevOps pipeline is crucial for verifying that the infrastructure is secure, consistent, and repeatable across different environments. In this WordPress application running on Amazon EKS, ACM is used to secure communication end-to-end. Here’s how to achieve this:

  1. Provision TLS certificates with ACM using a DevOps pipeline
    1. To provision TLS certificates with ACM in a DevOps pipeline, automate the creation and deployment of TLS certificates using ACM. Use AWS CloudFormation templates to create the certificates and deploy them as part of infrastructure as code. This verifies that the certificates are created and deployed consistently and securely across multiple environments.
    2. Sample code:
      DNSDomainCertificate:
          Type: AWS::CertificateManager::Certificate
          Properties:
            DomainName: !Ref DNSDomainName
            ValidationMethod: 'DNS'
      
      DNSDomainName:
          Description: dns domain name 
          TypeM: String
          Default: "example.com"

  2. Provisioning of ALB and integration of TLS certificate using AWS ALB Ingress Controller for Kubernetes
    1. Use a DevOps pipeline to create and configure the TLS certificates and ALB. This verifies that the infrastructure is created consistently and securely across multiple environments.
    2. Sample code:
      kind: Ingress
      metadata:
        annotations:
          alb.ingress.kubernetes.io/scheme: internet-facing
          alb.ingress.kubernetes.io/certificate-arn: arn:aws:acm:us-east-1:000000000000:certificate/0x0000-0x0000-0x0000-0x0000-0x0000
          alb.ingress.kubernetes.io/listen-ports: '[{"HTTPS":443}]'
          alb.ingress.kubernetes.io/security-groups:  sg-0x00000x0000,sg-0x00000x0000
      spec:
        ingressClassName: alb

  3. CloudFront and ALB
    1. To secure communication between CloudFront and the ALB, verify that the traffic from the client to CloudFront and from CloudFront to the ALB is encrypted using the TLS certificate.
    2. Sample code:
      CloudFrontDistribution:
          Type: AWS::CloudFront::Distribution
          Properties:
            DistributionConfig:
              Origins:
                - DomainName: !Ref ALBDNSName
                  Id: !Ref ALBDNSName
                  CustomOriginConfig:
                    HTTPSPort: '443'
                    OriginProtocolPolicy: 'https-only'
                    OriginSSLProtocols:
                      - LSv1
      	    ViewerCertificate:
      AcmCertificateArn: !Sub 'arn:aws:acm:${AWS::Region}:${AWS::AccountId}:certificate/${ACMCertificateIdentifier}'
                  SslSupportMethod:  'sni-only'
                  MinimumProtocolVersion: 'TLSv1.2_2021'
      
      ALBDNSName:
          Description: alb dns name
          Type: String
          Default: "k8s-wp-ingressw-x0x0000x000-x0x0000x000.us-east-1.elb.amazonaws.com"

  4. ALB to Kubernetes Pods
    1. To secure communication between the ALB and the Kubernetes Pods, use the Kubernetes ingress resource to terminate SSL/TLS connections at the ALB. The ALB sends the PROTO metadata http connection header to the WordPress web server. The web server checks the incoming traffic type (http or https) and enables the HTTPS connection only hereafter. This verifies that pod responses are sent back to ALB only over HTTPS.
    2. Additionally, using the X-Forwarded-Proto header can help pass the original protocol information and help avoid issues with the $_SERVER[‘HTTPS’] variable in WordPress.
    3. Sample code:
      define('WP_HOME','https://example.com/');
      define('WP_SITEURL','https://example.com/');
      
      define('FORCE_SSL_ADMIN', true);
      if (isset($_SERVER['HTTP_X_FORWARDED_PROTO']) && strpos($_SERVER['HTTP_X_FORWARDED_PROTO'], 'https') !== false) {
          $_SERVER['HTTPS'] = 'on';

  5. Kubernetes Pods to Amazon RDS
    1. To secure communication between the Kubernetes Pods in Amazon EKS and the Amazon RDS database, use SSL/TLS encryption on the database connection.
    2. Configure an Amazon RDS MySQL instance with enhanced security settings to verify that only TLS-encrypted connections are allowed to the database. This is achieved by creating a DB parameter group with a parameter called require_secure_transport set to ‘1‘. The WordPress configuration file is also updated to enable SSL/TLS communication with the MySQL database. Then enable the TLS flag on the MySQL client and the Amazon RDS public certificate is passed to ensure that the connection is encrypted using the TLS_AES_256_GCM_SHA384 protocol. The sample code that follows focuses on enhancing the security of the RDS MySQL instance by enforcing encrypted connections and configuring WordPress to use SSL/TLS for communication with the database.
    3. Sample code:
      RDSDBParameterGroup:
          Type: 'AWS::RDS::DBParameterGroup'
          Properties:
            DBParameterGroupName: 'rds-tls-custom-mysql'
            Parameters:
              require_secure_transport: '1'
      
      RDSMySQL:
          Type: AWS::RDS::DBInstance
          Properties:
            DBName: 'wordpress'
            DBParameterGroupName: !Ref RDSDBParameterGroup
      
      wp-config-docker.php:
      // Enable SSL/TLS between WordPress and MYSQL database
      define('MYSQL_CLIENT_FLAGS', MYSQLI_CLIENT_SSL);//This activates SSL mode
      define('MYSQL_SSL_CA', '/usr/src/wordpress/amazon-global-bundle-rds.pem');

In this architecture, AWS WAF is enabled at CloudFront to protect the WordPress application from common web exploits. AWS WAF for CloudFront is recommended and use AWS managed WAF rules to verify that web applications are protected from common and the latest threats.

Here are some AWS best practices for securing communication with ACM:

  • Use SSL/TLS certificates: Encrypt data in transit between clients and servers. ACM makes it simple to create, manage, and deploy SSL/TLS certificates across your infrastructure.
  • Use ACM-issued certificates: This verifies that your certificates are trusted by major browsers and that they are regularly renewed and replaced as needed.
  • Implement certificate revocation: Implement certificate revocation for SSL/TLS certificates that have been compromised or are no longer in use.
  • Implement strict transport security (HSTS): This helps protect against protocol downgrade attacks and verifies that SSL/TLS is used consistently across sessions.
  • Configure proper cipher suites: Configure your SSL/TLS connections to use only the strongest and most secure cipher suites.

Monitoring and auditing with CloudTrail

In this section, we discuss the significance of monitoring and auditing actions in your AWS account using CloudTrail. CloudTrail is a logging and tracking service that records the API activity in your AWS account, which is crucial for troubleshooting, compliance, and security purposes. Enabling CloudTrail in your AWS account and securely storing the logs in a durable location such as Amazon Simple Storage Service (Amazon S3) with encryption is highly recommended to help prevent unauthorized access. Monitoring and analyzing CloudTrail logs in real-time using CloudWatch Logs can help you quickly detect and respond to security incidents.

In a DevOps pipeline, you can use infrastructure-as-code tools such as CloudFormation, CodePipeline, and CodeBuild to create and manage CloudTrail consistently across different environments. You can create a CloudFormation stack with the CloudTrail configuration and use CodePipeline and CodeBuild to build and deploy the stack to different environments. CloudFormation hooks can validate the CloudTrail configuration to verify it aligns with your security requirements and policies.

It’s worth noting that the aspects discussed in the preceding paragraph might not apply if you’re using AWS Organizations and the CloudTrail Organization Trail feature. When using those services, the management of CloudTrail configurations across multiple accounts and environments is streamlined. This centralized approach simplifies the process of enforcing security policies and standards uniformly throughout the organization.

By following these best practices, you can effectively audit actions in your AWS environment, troubleshoot issues, and detect and respond to security incidents proactively.

Complete code for sample architecture for deployment

The complete code repository for the sample WordPress application architecture demonstrates how to implement data protection in a DevOps pipeline using various AWS services. The repository includes both infrastructure code and application code that covers all aspects of the sample architecture and implementation steps.

The infrastructure code consists of a set of CloudFormation templates that define the resources required to deploy the WordPress application in an AWS environment. This includes the Amazon Virtual Private Cloud (Amazon VPC), subnets, security groups, Amazon EKS cluster, Amazon RDS instance, AWS KMS key, and Secrets Manager secret. It also defines the necessary security configurations such as encryption at rest for the RDS instance and encryption in transit for the EKS cluster.

The application code is a sample WordPress application that is containerized using Docker and deployed to the Amazon EKS cluster. It shows how to use the Application Load Balancer (ALB) to route traffic to the appropriate container in the EKS cluster, and how to use the Amazon RDS instance to store the application data. The code also demonstrates how to use AWS KMS to encrypt and decrypt data in the application, and how to use Secrets Manager to store and retrieve secrets. Additionally, the code showcases the use of ACM to provision SSL/TLS certificates for secure communication between the CloudFront and the ALB, thereby ensuring data in transit is encrypted, which is critical for data protection in a DevOps pipeline.

Conclusion

Strengthening the security and compliance of your application in the cloud environment requires automating data protection measures in your DevOps pipeline. This involves using AWS services such as Secrets Manager, AWS KMS, ACM, and AWS CloudFormation, along with following best practices.

By automating data protection mechanisms with AWS CloudFormation, you can efficiently create a secure pipeline that is reproducible, controlled, and audited. This helps maintain a consistent and reliable infrastructure.

Monitoring and auditing your DevOps pipeline with AWS CloudTrail is crucial for maintaining compliance and security. It allows you to track and analyze API activity, detect any potential security incidents, and respond promptly.

By implementing these best practices and using data protection mechanisms, you can establish a secure pipeline in the AWS cloud environment. This enhances the overall security and compliance of your application, providing a reliable and protected environment for your deployments.

 
If you have feedback about this post, submit comments in the Comments section below. If you have questions about this post, contact AWS Support.

Want more AWS Security news? Follow us on Twitter.

Magesh Dhanasekaran

Magesh Dhanasekaran

Magesh has significant experience in the cloud security space especially in data protection, threat detection and security governance, risk & compliance domain. Magesh has a track record in providing Information Security consulting service to financial industry and government agencies in Australia. He is using his extensive experience in cloud security architecture, digital transformation, and secure application development practice to provide security advisory on AWS products and services to WWPS Federal Financial Customers. Magesh currently holds cybersecurity industry certifications such as ISC2’s CISSP, ISACA’s CISM, CompTIA Security+ and AWS Solution Architect / Security Specialty Certification.

Karna Thandapani

Karna Thandapani

Karna is a Cloud Consultant with extensive experience in DevOps/DevSecOps and application development activities as a Developer. Karna has in-depth knowledge and hands-on experience in the major AWS services (Cloudformation, EC2, Lambda, Serverless, Step Functions, Glue, API Gateway, ECS, EKS, LB, AutoScaling, Route53, etc.,)and holding Developer Associate, Solutions Architect Associate, and DevOps Engineer Professional.

New iPhone Security Features to Protect Stolen Devices

Post Syndicated from Bruce Schneier original https://www.schneier.com/blog/archives/2023/12/new-iphone-security-features-to-protect-stolen-devices.html

Apple is rolling out a new “Stolen Device Protection” feature that seems well thought out:

When Stolen Device Protection is turned on, Face ID or Touch ID authentication is required for additional actions, including viewing passwords or passkeys stored in iCloud Keychain, applying for a new Apple Card, turning off Lost Mode, erasing all content and settings, using payment methods saved in Safari, and more. No passcode fallback is available in the event that the user is unable to complete Face ID or Touch ID authentication.

For especially sensitive actions, including changing the password of the Apple ID account associated with the iPhone, the feature adds a security delay on top of biometric authentication. In these cases, the user must authenticate with Face ID or Touch ID, wait one hour, and authenticate with Face ID or Touch ID again. However, Apple said there will be no delay when the iPhone is in familiar locations, such as at home or work.

More details at the link.

Method to an Old Consultant’s Madness with Site Design

Post Syndicated from Landon Dalke original https://blog.rapid7.com/2023/12/04/method-to-an-old-consultants-madness-with-site-design/

Method to an Old Consultant's Madness with Site Design

If it’s your first time purchasing and setting up InsightVM – or if you are a seasoned veteran – I highly recommend a ‘less is more’ strategy with site design. After many thousands of health checks performed by security consultants for InsightVM customers, the biggest challenge most consultants agree on is site designs with too many sites not healthy. When you have too many sites, it also means you have too many scan schedules, which are the most complex elements of a deployment. Simplifying your site structure and scan schedules will allow you to better optimize your scan templates, leading to faster scanning and fewer potential issues from overlapping scans.

Weekly scanning cadence is the best practice.

The main goal is to use sites to bring data into the database as efficiently as possible and not to use sites to organize assets (data). For data organization, you will want to exclusively use Dynamic Asset Groups (DAGs) or Query Builder, then use these DAGs as your organized scope point for all reporting and remediation projects. Using Dynamic Asset Groups for all data organization will reduce the need for sites and their respective scan schedules, making for a much smoother, automatable, maintenance-free site experience.

For example, if you have a group of locations accessible by the same scan engine:

Site A, managed by the Desktop team using IP scope 10.10.16.0/20

Site B, managed by the Server team using 10.25.10/23

Site C, managed by the Linux team using 10.40.20.0/22

Instead of creating three separate sites for each location, which would require three separate schedule points, it would be better to put all three ranges in a single site (as long as they are using the same scan engine and same scan template), then create three Dynamic Asset Groups based on IP Address: ‘is in the range of’ filtering. This way, we can still use the DAGs to scope the reports and a single combined site with a single scan schedule. Example DAG:

Method to an Old Consultant's Madness with Site Design

Another reason why this is important is that over the last 10 years, scanning has become extremely fast and is way more efficient when it comes to bulk scanning. For example, 10 years ago, InsightVM (or Nexpose at the time) could only scan 10 assets at the same time using a 16GB Linux scan engine, whereas today, with the same scan engine, InsightVM can scan 400 assets at the same time. Nmap has also significantly increased in speed; it used to take a week to scan a class A network range, but now it should take less than a day, if not half a day. More information about scan template tuning can be found on this Scan template tuning blog.

Depending on your deployment size, it is okay to have more than one site per scan engine; the above is a guideline – not a policy – for a much easier-to-maintain experience. Just keep these recommendations in mind when creating your sites. Also, keep in mind that you’ll eventually want to get into Policy scanning. For that, you’ll need to account for at least 10 more policy-based sites, unless you use agent-based policy scanning. Keeping your site design simple will allow for adding these additional sites in the future without really feeling like it’s adding to the complexity. Check out my Policy Scanning blog for more insight into Policy scanning techniques:

Next, let’s quickly walk through a site and its components. The first tab is the ‘Info and Security’ tab. It contains the site name, description, importance, tagging options, organization options, and access options. Most companies only set a name on this page. I generally don’t recommend using tags with sites and only tagging DAGs. The ‘importance’ option is essentially obsolete, and the organization and access are optional. The only requirement in this section is the site Name.

Method to an Old Consultant's Madness with Site Design

The Assets tab is next, where you can add your site scope and exclusions. Assets can be added using IP address ranges, CIDR (slash notation), or hostname. If you have a large CSV of assets, you can copy them all and paste them in, and the tool should account for them. You can also use DAGs to scope and exclude assets. There are many fun strategies for scoping sites via DAGs, such as running a discovery scan against your IP ranges, populating the DAGs with the results, and vulnerability scanning those specific assets.

The last part of the assets tab is the connection option, where you can add dynamic scope elements to convert the site into a dynamic site. You can find additional information regarding dynamic site scoping here.

Method to an Old Consultant's Madness with Site Design

The authentication tab should only validate that you have the correct shared credentials for the site scope. You should always use shared credentials over credentials created within the site.

Method to an Old Consultant's Madness with Site Design

For the scan template section, I recommend using either the ‘full audit without web spider,’ discovery scan, or a custom-built scan template using recommendations from the scan template blog mentioned above.

Method to an Old Consultant's Madness with Site Design

In the scan engine tab, select the scan engine or pool you plan to use. Do not use the local scan engine if you’re scanning more than 1500 assets across all sites.

Method to an Old Consultant's Madness with Site Design

Mostly, I don’t use or recommend using site alerts. If you set up alerts based on vulnerability results, you could end up spamming your email. Two primary use cases for alerts are alerting based on the scan status of ‘failed’ or ‘paused’ or if you want additional alerting when scanning public-facing assets. You can read this blog for additional information on configuring public-facing scanning.

Method to an Old Consultant's Madness with Site Design

Next, we have schedules. For the most part, schedules are pretty easy to figure out; just note the “frequency” is context-sensitive based on what you choose for a start date. Also, note that sub-scheduling can be used to hide complexity within the schedule. I do not recommend using this option; if you do, only use it sparingly. This setting can add additional complexity, potentially causing problems for other system users if they’re not aware it is configured. You can also set a scan duration, which is a nice feature if you end up with too many sites. It lets you control how long the scan runs before pausing or stopping. If your site design is simple enough, for example, seven total sites for seven days of the week, one site can be scheduled for each day, and there would be no need for a scan duration to be set. Just let the scan run as long as it needs.

Site-level blackouts can also be used, although they’re rarely configured. 10 years ago, it was a great feature if you could only scan in a small window each day, and you wanted to continue scanning the next day in that same scan window. However, scanning is so fast these days that it is almost never used anymore.

Method to an Old Consultant's Madness with Site Design

Lastly, a weekly scanning cadence is a recommended best practice. Daily scanning is unnecessary and creates a ton of excess data – filling your hard drive – and monthly scanning is too far between scans, leading to reduced network visibility. Weekly scanning also allows you to set a smaller asset data retention interval of 30 days, or 4 times your scan cycle, before deleting assets with ‘last scan dates’ older than 30 days. Data retention can be set up in the Maintenance section of the Administration page, which you can read about here.

I am a big advocate of the phrase ‘Complexity is the enemy of security’; complexity is the biggest thing I recommend avoiding with your site design. Whether scanning a thousand assets or a hundred thousand, keep your sites set as close as possible to a 1:1 with your scan engines. Try to keep sites for data collection, not data organization. If you can use DAGs for your data organization, they can be easily used in the query builder, where they can be leveraged to scope dashboards and even projects. Here is a link with more information reporting workflows.

In the end, creating Sites can be easier than creating DAGs. If, however, you put in the extra effort upfront to create DAGs for all of your data organization and keep Sites simple, it will pay off big time. You’ll experience fewer schedules, less maintenance, and hopefully a reduction of that overwhelming feeling seen with so many customers when they have more than 100 sites in their InsightVM deployment.

Additional Reading: https://www.rapid7.com/blog/post/2022/09/12/insightvm-best-practices-to-improve-your-console/

Mask and redact sensitive data published to Amazon SNS using managed and custom data identifiers

Post Syndicated from Otavio Ferreira original https://aws.amazon.com/blogs/security/mask-and-redact-sensitive-data-published-to-amazon-sns-using-managed-and-custom-data-identifiers/

Today, we’re announcing a new capability for Amazon Simple Notification Service (Amazon SNS) message data protection. In this post, we show you how you can use this new capability to create custom data identifiers to detect and protect domain-specific sensitive data, such as your company’s employee IDs. Previously, you could only use managed data identifiers to detect and protect common sensitive data, such as names, addresses, and credit card numbers.

Overview

Amazon SNS is a serverless messaging service that provides topics for push-based, many-to-many messaging for decoupling distributed systems, microservices, and event-driven serverless applications. As applications become more complex, it can become challenging for topic owners to manage the data flowing through their topics. These applications might inadvertently start sending sensitive data to topics, increasing regulatory risk. To mitigate the risk, you can use message data protection to protect sensitive application data using built-in, no-code, scalable capabilities.

To discover and protect data flowing through SNS topics with message data protection, you can associate data protection policies to your topics. Within these policies, you can write statements that define which types of sensitive data you want to discover and protect. Within each policy statement, you can then define whether you want to act on data flowing inbound to an SNS topic or outbound to an SNS subscription, the AWS accounts or specific AWS Identity and Access Management (IAM) principals the statement applies to, and the actions you want to take on the sensitive data found.

Now, message data protection provides three actions to help you protect your data. First, the audit operation reports on the amount of sensitive data found. Second, the deny operation helps prevent the publishing or delivery of payloads that contain sensitive data. Third, the de-identify operation can mask or redact the sensitive data detected. These no-code operations can help you adhere to a variety of compliance regulations, such as Health Insurance Portability and Accountability Act (HIPAA), Federal Risk and Authorization Management Program (FedRAMP), General Data Protection Regulation (GDPR), and Payment Card Industry Data Security Standard (PCI DSS).

This message data protection feature coexists with the message data encryption feature in SNS, both contributing to an enhanced security posture of your messaging workloads.

Managed and custom data identifiers

After you add a data protection policy to your SNS topic, message data protection uses pattern matching and machine learning models to scan your messages for sensitive data, then enforces the data protection policy in real time. The types of sensitive data are referred to as data identifiers. These data identifiers can be either managed by Amazon Web Services (AWS) or custom to your domain.

Managed data identifiers (MDI) are organized into five categories:

In a data protection policy statement, you refer to a managed data identifier using its Amazon Resource Name (ARN), as follows:

{
    "Name": "__example_data_protection_policy",
    "Description": "This policy protects sensitive data in expense reports",
    "Version": "2021-06-01",
    "Statement": [{
        "DataIdentifier": [
            "arn:aws:dataprotection::aws:data-identifier/CreditCardNumber"
        ],
        "..."
    }]
}

Custom data identifiers (CDI), on the other hand, enable you to define custom regular expressions in the data protection policy itself, then refer to them from policy statements. Using custom data identifiers, you can scan for business-specific sensitive data, which managed data identifiers can’t. For example, you can use a custom data identifier to look for company-specific employee IDs in SNS message payloads. Internally, SNS has guardrails to make sure custom data identifiers are safe and that they add only low single-digit millisecond latency to message processing.

In a data protection policy statement, you refer to a custom data identifier using only the name that you have given it, as follows:

{
    "Name": "__example_data_protection_policy",
    "Description": "This policy protects sensitive data in expense reports",
    "Version": "2021-06-01",
    "Configuration": {
        "CustomDataIdentifier": [{
            "Name": "MyCompanyEmployeeId", "Regex": "EID-\d{9}-US"
        }]
    },
    "Statement": [{
        "DataIdentifier": [
            "arn:aws:dataprotection::aws:data-identifier/CreditCardNumber",
            "MyCompanyEmployeeId"
        ],
        "..."
    }]
}

Note that custom data identifiers can be used in conjunction with managed data identifiers, as part of the same data protection policy statement. In the preceding example, both MyCompanyEmployeeId and CreditCardNumber are in scope.

For more information, see Data Identifiers, in the SNS Developer Guide.

Inbound and outbound data directions

In addition to the DataIdentifier property, each policy statement also sets the DataDirection property (whose value can be either Inbound or Outbound) as well as the Principal property (whose value can be any combination of AWS accounts, IAM users, and IAM roles).

When you use message data protection for data de-identification and set DataDirection to Inbound, instances of DataIdentifier published by the Principal are masked or redacted before the payload is ingested into the SNS topic. This means that every endpoint subscribed to the topic receives the same modified payload.

When you set DataDirection to Outbound, on the other hand, the payload is ingested into the SNS topic as-is. Then, instances of DataIdentifier are either masked, redacted, or kept as-is for each subscribing Principal in isolation. This means that each endpoint subscribed to the SNS topic might receive a different payload from the topic, with different sensitive data de-identified, according to the data access permissions of its Principal.

The following snippet expands the example data protection policy to include the DataDirection and Principal properties.

{
    "Name": "__example_data_protection_policy",
    "Description": "This policy protects sensitive data in expense reports",
    "Version": "2021-06-01",
    "Configuration": {
        "CustomDataIdentifier": [{
            "Name": "MyCompanyEmployeeId", "Regex": "EID-\d{9}-US"
        }]
    },
    "Statement": [{
        "DataIdentifier": [
            "MyCompanyEmployeeId",
            "arn:aws:dataprotection::aws:data-identifier/CreditCardNumber"
        ],
        "DataDirection": "Outbound",
        "Principal": [ "arn:aws:iam::123456789012:role/ReportingApplicationRole" ],
        "..."
    }]
}

In this example, ReportingApplicationRole is the authenticated IAM principal that called the SNS Subscribe API at subscription creation time. For more information, see How do I determine the IAM principals for my data protection policy? in the SNS Developer Guide.

Operations for data de-identification

To complete the policy statement, you need to set the Operation property, which informs the SNS topic of the action that it should take when it finds instances of DataIdentifer in the outbound payload.

The following snippet expands the data protection policy to include the Operation property, in this case using the Deidentify object, which in turn supports masking and redaction.

{
    "Name": "__example_data_protection_policy",
    "Description": "This policy protects sensitive data in expense reports",
    "Version": "2021-06-01",
    "Configuration": {
        "CustomDataIdentifier": [{
            "Name": "MyCompanyEmployeeId", "Regex": "EID-\d{9}-US"
        }]
    },
    "Statement": [{
        "Principal": [
            "arn:aws:iam::123456789012:role/ReportingApplicationRole"
        ],
        "DataDirection": "Outbound",
        "DataIdentifier": [
            "MyCompanyEmployeeId",
            "arn:aws:dataprotection::aws:data-identifier/CreditCardNumber"
        ],
        "Operation": { "Deidentify": { "MaskConfig": { "MaskWithCharacter": "#" } } }
    }]
}

In this example, the MaskConfig object instructs the SNS topic to mask instances of CreditCardNumber in Outbound messages to subscriptions created by ReportingApplicationRole, using the MaskWithCharacter value, which in this case is the hash symbol (#). Alternatively, you could have used the RedactConfig object instead, which would have instructed the SNS topic to simply cut the sensitive data off the payload.

The following snippet shows how the outbound payload is masked, in real time, by the SNS topic.

// original message published to the topic:
My credit card number is 4539894458086459

// masked message delivered to subscriptions created by ReportingApplicationRole:
My credit card number is ################

For more information, see Data Protection Policy Operations, in the SNS Developer Guide.

Applying data de-identification in a use case

Consider a company where managers use an internal expense report management application where expense reports from employees can be reviewed and approved. Initially, this application depended only on an internal payment application, which in turn connected to an external payment gateway. However, this workload eventually became more complex, because the company started also paying expense reports filed by external contractors. At that point, the company built a mobile application that external contractors could use to view their approved expense reports. An important business requirement for this mobile application was that specific financial and PII data needed to be de-identified in the externally displayed expense reports. Specifically, both the credit card number used for the payment and the internal employee ID that approved the payment had to be masked.

Figure 1: Expense report processing application

Figure 1: Expense report processing application

To distribute the approved expense reports to both the payment application and the reporting application that backed the mobile application, the company used an SNS topic with a data protection policy. The policy has only one statement, which masks credit card numbers and employee IDs found in the payload. This statement applies only to the IAM role that the company used for subscribing the AWS Lambda function of the reporting application to the SNS topic. This access permission configuration enabled the Lambda function from the payment application to continue receiving the raw data from the SNS topic.

The data protection policy from the previous section addresses this use case. Thus, when a message representing an expense report is published to the SNS topic, the Lambda function in the payment application receives the message as-is, whereas the Lambda function in the reporting application receives the message with the financial and PII data masked.

Deploying the resources

You can apply a data protection policy to an SNS topic using the AWS Management Console, AWS Command Line Interface (AWS CLI), AWS SDK, or AWS CloudFormation.

To automate the provisioning of the resources and the data protection policy of the example expense management use case, we’re going to use CloudFormation templates. You have two options for deploying the resources:

Deploy using the individual CloudFormation templates in sequence

  1. Prerequisites template: This first template provisions two IAM roles with a managed policy that enables them to create SNS subscriptions and configure the subscriber Lambda functions. You will use these provisioned IAM roles in steps 3 and 4 that follow.
  2. Topic owner template: The second template provisions the SNS topic along with its access policy and data protection policy.
  3. Payment subscriber template: The third template provisions the Lambda function and the corresponding SNS subscription that comprise of the Payment application stack. When prompted, select the PaymentApplicationRole in the Permissions panel before running the template. Moreover, the CloudFormation console will require you to acknowledge that a CloudFormation transform might require access capabilities.
  4. Reporting subscriber template: The final template provisions the Lambda function and the SNS subscription that comprise of the Reporting application stack. When prompted, select the ReportingApplicationRole in the Permissions panel, before running the template. Moreover, the CloudFormation console will require, once again, that you acknowledge that a CloudFormation transform might require access capabilities.
Figure 2: Select IAM role

Figure 2: Select IAM role

Now that the application stacks have been deployed, you’re ready to start testing.

Testing the data de-identification operation

Use the following steps to test the example expense management use case.

  1. In the Amazon SNS console, select the ApprovalTopic, then choose to publish a message to it.
  2. In the SNS message body field, enter the following message payload, representing an external contractor expense report, then choose to publish this message:
    {
        "expense": {
            "currency": "USD",
            "amount": 175.99,
            "category": "Office Supplies",
            "status": "Approved",
            "created_at": "2023-10-17T20:03:44+0000",
            "updated_at": "2023-10-19T14:21:51+0000"
        },
        "payment": {
            "credit_card_network": "Visa",
            "credit_card_number": "4539894458086459"
        },
        "reviewer": {
            "employee_id": "EID-123456789-US",
            "employee_location": "Seattle, USA"
        },
        "contractor": {
            "employee_id": "CID-000012348-CA",
            "employee_location": "Vancouver, CAN"
        }
    }
    

  3. In the CloudWatch console, select the log group for the PaymentLambdaFunction, then choose to view its latest log stream. Now look for the log stream entry that shows the message payload received by the Lambda function. You will see that no data has been masked in this payload, as the payment application requires raw financial data to process the credit card transaction.
  4. Still in the CloudWatch console, select the log group for the ReportingLambdaFunction, then choose to view its latest log stream. Now look for the log stream entry that shows the message payload received by this Lambda function. You will see that the values for properties credit_card_number and employee_id have been masked, protecting the financial data from leaking into the external reporting application.
    {
        "expense": {
            "currency": "USD",
            "amount": 175.99,
            "category": "Office Supplies",
            "status": "Approved",
            "created_at": "2023-10-17T20:03:44+0000",
            "updated_at": "2023-10-19T14:21:51+0000"
        },
        "payment": {
            "credit_card_network": "Visa",
            "credit_card_number": "################"
        },
        "reviewer": {
            "employee_id": "################",
            "employee_location": "Seattle, USA"
        },
        "contractor": {
            "employee_id": "CID-000012348-CA",
            "employee_location": "Vancouver, CAN"
        }
    }
    

As shown, different subscribers received different versions of the message payload, according to their sensitive data access permissions.

Cleaning up the resources

After testing, avoid incurring usage charges by deleting the resources that you created. Open the CloudFormation console and delete the four CloudFormation stacks that you created during the walkthrough.

Conclusion

This post showed how you can use Amazon SNS message data protection to discover and protect sensitive data published to or delivered from your SNS topics. The example use case shows how to create a data protection policy that masks messages delivered to specific subscribers if the payloads contain financial or personally identifiable information.

For more details, see message data protection in the SNS Developer Guide. For information on costs, see SNS pricing.

If you have feedback about this post, submit comments in the Comments section below. If you have questions about this post, start a new thread on AWS re:Post or contact AWS Support.

Want more AWS Security how-to content, news, and feature announcements? Follow us on Twitter.

Otavio-Ferreira-author

Otavio Ferreira

Otavio is the GM for Amazon SNS, and has been leading the service since 2016, responsible for software engineering, product management, technical program management, and technical operations. Otavio has spoken at AWS conferences—AWS re:Invent and AWS Summit—and written a number of articles for the AWS Compute and AWS Security blogs.

Cars Have Terrible Data Privacy

Post Syndicated from Bruce Schneier original https://www.schneier.com/blog/archives/2023/09/cars-have-terrible-data-privacy.html

A new Mozilla Foundation report concludes that cars, all of them, have terrible data privacy.

All 25 car brands we researched earned our *Privacy Not Included warning label—making cars the official worst category of products for privacy that we have ever reviewed.

There’s a lot of details in the report. They’re all bad.

BoingBoing post.

Establishing a data perimeter on AWS: Allow access to company data only from expected networks

Post Syndicated from Laura Reith original https://aws.amazon.com/blogs/security/establishing-a-data-perimeter-on-aws-allow-access-to-company-data-only-from-expected-networks/

A key part of protecting your organization’s non-public, sensitive data is to understand who can access it and from where. One of the common requirements is to restrict access to authorized users from known locations. To accomplish this, you should be familiar with the expected network access patterns and establish organization-wide guardrails to limit access to known networks. Additionally, you should verify that the credentials associated with your AWS Identity and Access Management (IAM) principals are only usable within these expected networks. On Amazon Web Services (AWS), you can use the network perimeter to apply network coarse-grained controls on your resources and principals. In this fourth blog post of the Establishing a data perimeter on AWS series, we explore the benefits and implementation considerations of defining your network perimeter.

The network perimeter is a set of coarse-grained controls that help you verify that your identities and resources can only be used from expected networks.

To achieve these security objectives, you first must define what expected networks means for your organization. Expected networks usually include approved networks your employees and applications use to access your resources, such as your corporate IP CIDR range and your VPCs. There are also scenarios where you need to permit access from networks of AWS services acting on your behalf or networks of trusted third-party partners that you integrate with. You should consider all intended data access patterns when you create the definition of expected networks. Other networks are considered unexpected and shouldn’t be allowed access.

Security risks addressed by the network perimeter

The network perimeter helps address the following security risks:

Unintended information disclosure through credential use from non-corporate networks

It’s important to consider the security implications of having developers with preconfigured access stored on their laptops. For example, let’s say that to access an application, a developer uses a command line interface (CLI) to assume a role and uses the temporary credentials to work on a new feature. The developer continues their work at a coffee shop that has great public Wi-Fi while their credentials are still valid. Accessing data through a non-corporate network means that they are potentially bypassing their company’s security controls, which might lead to the unintended disclosure of sensitive corporate data in a public space.

Unintended data access through stolen credentials

Organizations are prioritizing protection from credential theft risks, as threat actors can use stolen credentials to gain access to sensitive data. For example, a developer could mistakenly share credentials from an Amazon EC2 instance CLI access over email. After credentials are obtained, a threat actor can use them to access your resources and potentially exfiltrate your corporate data, possibly leading to reputational risk.

Figure 1 outlines an undesirable access pattern: using an employee corporate credential to access corporate resources (in this example, an Amazon Simple Storage Service (Amazon S3) bucket) from a non-corporate network.

Figure 1: Unintended access to your S3 bucket from outside the corporate network

Figure 1: Unintended access to your S3 bucket from outside the corporate network

Implementing the network perimeter

During the network perimeter implementation, you use IAM policies and global condition keys to help you control access to your resources based on which network the API request is coming from. IAM allows you to enforce the origin of a request by making an API call using both identity policies and resource policies.

The following two policies help you control both your principals and resources to verify that the request is coming from your expected network:

  • Service control policies (SCPs) are policies you can use to manage the maximum available permissions for your principals. SCPs help you verify that your accounts stay within your organization’s access control guidelines.
  • Resource based policies are policies that are attached to resources in each AWS account. With resource based policies, you can specify who has access to the resource and what actions they can perform on it. For a list of services that support resource based policies, see AWS services that work with IAM.

With the help of these two policy types, you can enforce the control objectives using the following IAM global condition keys:

  • aws:SourceIp: You can use this condition key to create a policy that only allows request from a specific IP CIDR range. For example, this key helps you define your expected networks as your corporate IP CIDR range.
  • aws:SourceVpc: This condition key helps you check whether the request comes from the list of VPCs that you specified in the policy. In a policy, this condition key is used to only allow access to an S3 bucket if the VPC where the request originated matches the VPC ID listed in your policy.
  • aws:SourceVpce: You can use this condition key to check if the request came from one of the VPC endpoints specified in your policy. Adding this key to your policy helps you restrict access to API calls that originate from VPC endpoints that belong to your organization.
  • aws:ViaAWSService: You can use this key to write a policy to allow an AWS service that uses your credentials to make calls on your behalf. For example, when you upload an object to Amazon S3 with server-side encryption with AWS Key Management Service (AWS KMS) on, S3 needs to encrypt the data on your behalf. To do this, S3 makes a subsequent request to AWS KMS to generate a data key to encrypt the object. The call that S3 makes to AWS KMS is signed with your credentials and originates outside of your network.
  • aws:PrincipalIsAWSService: This condition key helps you write a policy to allow AWS service principals to access your resources. For example, when you create an AWS CloudTrail trail with an S3 bucket as a destination, CloudTrail uses a service principal, cloudtrail.amazonaws.com, to publish logs to your S3 bucket. The API call from CloudTrail comes from the service network.

The following table summarizes the relationship between the control objectives and the capabilities used to implement the network perimeter.

Control objective Implemented by using Primary IAM capability
My resources can only be accessed from expected networks. Resource-based policies aws:SourceIp
aws:SourceVpc
aws:SourceVpce
aws:ViaAWSService
aws:PrincipalIsAWSService
My identities can access resources only from expected networks. SCPs aws:SourceIp
aws:SourceVpc
aws:SourceVpce
aws:ViaAWSService

My resources can only be accessed from expected networks

Start by implementing the network perimeter on your resources using resource based policies. The perimeter should be applied to all resources that support resource- based policies in each AWS account. With this type of policy, you can define which networks can be used to access the resources, helping prevent access to your company resources in case of valid credentials being used from non-corporate networks.

The following is an example of a resource-based policy for an S3 bucket that limits access only to expected networks using the aws:SourceIp, aws:SourceVpc, aws:PrincipalIsAWSService, and aws:ViaAWSService condition keys. Replace <my-data-bucket>, <my-corporate-cidr>, and <my-vpc> with your information.

{
  "Version": "2012-10-17",
  "Statement": [
    {
      "Sid": "EnforceNetworkPerimeter",
      "Effect": "Deny",
      "Principal": "*",
      "Action": "s3:*",
      "Resource": [
        "arn:aws:s3:::<my-data-bucket>",
        "arn:aws:s3:::<my-data-bucket>/*"
      ],
      "Condition": {
        "NotIpAddressIfExists": {
          "aws:SourceIp": "<my-corporate-cidr>"
        },
        "StringNotEqualsIfExists": {
          "aws:SourceVpc": "<my-vpc>"
        },
        "BoolIfExists": {
          "aws:PrincipalIsAWSService": "false",
          "aws:ViaAWSService": "false"
        }
      }
    }
  ]
}

The Deny statement in the preceding policy has four condition keys where all conditions must resolve to true to invoke the Deny effect. Use the IfExists condition operator to clearly state that each of these conditions will still resolve to true if the key is not present on the request context.

This policy will deny Amazon S3 actions unless requested from your corporate CIDR range (NotIpAddressIfExists with aws:SourceIp), or from your VPC (StringNotEqualsIfExists with aws:SourceVpc). Notice that aws:SourceVpc and aws:SourceVpce are only present on the request if the call was made through a VPC endpoint. So, you could also use the aws:SourceVpce condition key in the policy above, however this would mean listing every VPC endpoint in your environment. Since the number of VPC endpoints is greater than the number of VPCs, this example uses the aws:SourceVpc condition key.

This policy also creates a conditional exception for Amazon S3 actions requested by a service principal (BoolIfExists with aws:PrincipalIsAWSService), such as CloudTrail writing events to your S3 bucket, or by an AWS service on your behalf (BoolIfExists with aws:ViaAWSService), such as S3 calling AWS KMS to encrypt or decrypt an object.

Extending the network perimeter on resource

There are cases where you need to extend your perimeter to include AWS services that access your resources from outside your network. For example, if you’re replicating objects using S3 bucket replication, the calls to Amazon S3 originate from the service network outside of your VPC, using a service role. Another case where you need to extend your perimeter is if you integrate with trusted third-party partners that need access to your resources. If you’re using services with the described access pattern in your AWS environment or need to provide access to trusted partners, the policy EnforceNetworkPerimeter that you applied on your S3 bucket in the previous section will deny access to the resource.

In this section, you learn how to extend your network perimeter to include networks of AWS services using service roles to access your resources and trusted third-party partners.

AWS services that use service roles and service-linked roles to access resources on your behalf

Service roles are assumed by AWS services to perform actions on your behalf. An IAM administrator can create, change, and delete a service role from within IAM; this role exists within your AWS account and has an ARN like arn:aws:iam::<AccountNumber>:role/<RoleName>. A key difference between a service-linked role (SLR) and a service role is that the SLR is linked to a specific AWS service and you can view but not edit the permissions and trust policy of the role. An example is AWS Identity and Access Management Access Analyzer using an SLR to analyze resource metadata. To account for this access pattern, you can exempt roles on the service-linked role dedicated path arn:aws:iam::<AccountNumber>:role/aws-service-role/*, and for service roles, you can tag the role with the tag network-perimeter-exception set to true.

If you are exempting service roles in your policy based on a tag-value, you must also include a policy to enforce the identity perimeter on your resource as shown in this sample policy. This helps verify that only identities from your organization can access the resource and cannot circumvent your network perimeter controls with network-perimeter-exception tag.

Partners accessing your resources from their own networks

There might be situations where your company needs to grant access to trusted third parties. For example, providing a trusted partner access to data stored in your S3 bucket. You can account for this type of access by using the aws:PrincipalAccount condition key set to the account ID provided by your partner.

The following is an example of a resource-based policy for an S3 bucket that incorporates the two access patterns described above. Replace <my-data-bucket>, <my-corporate-cidr>, <my-vpc>, <third-party-account-a>, <third-party-account-b>, and <my-account-id> with your information.

{
    "Version": "2012-10-17",
    "Statement": [
        {
            "Sid": "EnforceNetworkPerimeter",
            "Principal": "*",
            "Action": "s3:*",
            "Effect": "Deny",
            "Resource": [
              "arn:aws:s3:::<my-data-bucket>",
              "arn:aws:s3:::<my-data-bucket>/*"
            ],
            "Condition": {
                "NotIpAddressIfExists": {
                  "aws:SourceIp": "<my-corporate-cidr>"
                },
                "StringNotEqualsIfExists": {
                    "aws:SourceVpc": "<my-vpc>",
       "aws:PrincipalTag/network-perimeter-exception": "true",
                    "aws:PrincipalAccount": [
                        "<third-party-account-a>",
                        "<third-party-account-b>"
                    ]
                },
                "BoolIfExists": {
                    "aws:PrincipalIsAWSService": "false",
                    "aws:ViaAWSService": "false"
                },
                "ArnNotLikeIfExists": {
                    "aws:PrincipalArn": "arn:aws:iam::<my-account-id>:role/aws-service-role/*"
                }
            }
        }
    ]
}

There are four condition operators in the policy above, and you need all four of them to resolve to true to invoke the Deny effect. Therefore, this policy only allows access to Amazon S3 from expected networks defined as: your corporate IP CIDR range (NotIpAddressIfExists and aws:SourceIp), your VPC (StringNotEqualsIfExists and aws:SourceVpc), networks of AWS service principals (aws:PrincipalIsAWSService), or an AWS service acting on your behalf (aws:ViaAWSService). It also allows access to networks of trusted third-party accounts (StringNotEqualsIfExists and aws:PrincipalAccount: <third-party-account-a>), and AWS services using an SLR to access your resources (ArnNotLikeIfExists and aws:PrincipalArn).

My identities can access resources only from expected networks

Applying the network perimeter on identity can be more challenging because you need to consider not only calls made directly by your principals, but also calls made by AWS services acting on your behalf. As described in access pattern 3 Intermediate IAM roles for data access in this blog post, many AWS services assume an AWS service role you created to perform actions on your behalf. The complicating factor is that even if the service supports VPC-based access to your data — for example AWS Glue jobs can be deployed within your VPC to access data in your S3 buckets — the service might also use the service role to make other API calls outside of your VPC. For example, with AWS Glue jobs, the service uses the service role to deploy elastic network interfaces (ENIs) in your VPC. However, these calls to create ENIs in your VPC are made from the AWS Glue managed network and not from within your expected network. A broad network restriction in your SCP for all your identities might prevent the AWS service from performing tasks on your behalf.

Therefore, the recommended approach is to only apply the perimeter to identities that represent the highest risk of inappropriate use based on other compensating controls that might exist in your environment. These are identities whose credentials can be obtained and misused by threat actors. For example, if you allow your developers access to the Amazon Elastic Compute Cloud (Amazon EC2) CLI, a developer can obtain credentials from the Amazon EC2 instance profile and use the credentials to access your resources from their own network.

To summarize, to enforce your network perimeter based on identity, evaluate your organization’s security posture and what compensating controls are in place. Then, according to this evaluation, identify which service roles or human roles have the highest risk of inappropriate use, and enforce the network perimeter on those identities by tagging them with data-perimeter-include set to true.

The following policy shows the use of tags to enforce the network perimeter on specific identities. Replace <my-corporate-cidr>, and <my-vpc> with your own information.

{
  "Version": "2012-10-17",
  "Statement": [
    {
      "Sid": "EnforceNetworkPerimeter",
      "Effect": "Deny",
      "Action": "*",
      "Resource": "*",
      "Condition": {
        "BoolIfExists": {
          "aws:ViaAWSService": "false"
        },
        "NotIpAddressIfExists": {
          "aws:SourceIp": [
            "<my-corporate-cidr>"
          ]
        },
        "StringNotEqualsIfExists": {
          "aws:SourceVpc": [
            "<my-vpc>"
          ]
        }, 
       "ArnNotLikeIfExists": {
          "aws:PrincipalArn": [
            "arn:aws:iam::*:role/aws:ec2-infrastructure"
          ]
        },
        "StringEquals": {
          "aws:PrincipalTag/data-perimeter-include": "true"
        }
      }
    }
  ]
}

The above policy statement uses the Deny effect to limit access to expected networks for identities with the tag data-perimeter-include attached to them (StringEquals and aws:PrincipalTag/data-perimeter-include set to true). This policy will deny access to those identities unless the request is done by an AWS service on your behalf (aws:ViaAWSService), is coming from your corporate CIDR range (NotIpAddressIfExists and aws:SourceIp), or is coming from your VPCs (StringNotEqualsIfExists with the aws:SourceVpc).

Amazon EC2 also uses a special service role, also known as infrastructure role, to decrypt Amazon Elastic Block Store (Amazon EBS). When you mount an encrypted Amazon EBS volume to an EC2 instance, EC2 calls AWS KMS to decrypt the data key that was used to encrypt the volume. The call to AWS KMS is signed by an IAM role, arn:aws:iam::*:role/aws:ec2-infrastructure, which is created in your account by EC2. For this use case, as you can see on the preceding policy, you can use the aws:PrincipalArn condition key to exclude this role from the perimeter.

IAM policy samples

This GitHub repository contains policy examples that illustrate how to implement network perimeter controls. The policy samples don’t represent a complete list of valid access patterns and are for reference only. They’re intended for you to tailor and extend to suit the needs of your environment. Make sure you thoroughly test the provided example policies before implementing them in your production environment.

Conclusion

In this blog post you learned about the elements needed to build the network perimeter, including policy examples and strategies on how to extend that perimeter. You now also know different access patterns used by AWS services that act on your behalf, how to evaluate those access patterns, and how to take a risk-based approach to apply the perimeter based on identities in your organization.

For additional learning opportunities, see the Data perimeters on AWS. This information resource provides additional materials such as a data perimeter workshop, blog posts, whitepapers, and webinar sessions.

If you have feedback about this post, submit comments in the Comments section below. If you have questions about this post, start a new thread on the AWS Security, Identity, & Compliance re:Post or contact AWS Support.

Want more AWS Security news? Follow us on Twitter.

Author

Laura Reith

Laura is an Identity Solutions Architect at Amazon Web Services. Before AWS, she worked as a Solutions Architect in Taiwan focusing on physical security and retail analytics.

AWS launched a Landing Zone for the Baseline Informatiebeveiliging Overheid (BIO) and is issued a certificate for the BIO Thema-uitwerking Clouddiensten

Post Syndicated from Eric Washington original https://aws.amazon.com/blogs/security/aws-launched-a-landing-zone-for-the-baseline-informatiebeveiliging-overheid-bio-and-is-issued-a-certificate-for-the-bio-thema-uitwerking-clouddiensten/

We’re pleased to announce that we’ve launched a Landing Zone for the Baseline Informatiebeveiliging Overheid (BIO) framework to support our Dutch customers in their compliance needs with the BIO framework.

We also demonstrated compliance with the BIO Thema-uitwerking Clouddiensten. This alignment with the BIO Thema-uitwerking Clouddiensten requirements demonstrates our continuous commitment to adhere to the heightened expectations for cloud service providers.

Amazon Web Services (AWS) customers across the Dutch public sector can use AWS certified services with confidence, knowing that the AWS services listed in the certificate adhere to the strict requirements imposed on the consumption of cloud-based services.

Baseline Informatiebeveiliging Overheid

The BIO framework is an information security framework that the four layers of the Dutch public sector are required to adhere to. This means that it’s mandatory for the Dutch central government, all provinces, municipalities, and regional water authorities to be compliant with the BIO framework.

To support AWS customers in demonstrating their compliance with the BIO framework, AWS developed a Landing Zone for the BIO framework. This Landing Zone for the BIO framework is a pre-configured AWS environment that includes a subset of the technical requirements of the BIO framework. It’s a helpful tool that provides a starting point from which customers can further build their own AWS environment.

For more information regarding the Landing Zone for the BIO framework, see the AWS Reference Guide for Dutch BIO Framework and BIO Theme-elaboration Cloud Services in AWS Artifact. You can also reach out to your AWS account team or contact AWS through the Contact Us page.

Baseline Informatiebeveiliging Overheid Thema-uitwerking Clouddiensten

In addition to the BIO framework, there’s another information security framework designed specifically for the use of cloud services. It is called BIO Thema-uitwerking Clouddiensten. The BIO Thema-uitwerking Clouddiensten is a guidance document for Dutch cloud service consumers to help them formulate controls and objectives when using cloud services. Consumers can view it as an additional control framework on top of the BIO framework.

AWS was evaluated by the monitoring body, EY CertifyPoint, in February 2023, and it was determined that AWS successfully demonstrated compliance for Amazon Elastic Compute Cloud (Amazon EC2), Amazon Simple Storage Service (Amazon S3), and Amazon Relational Database Service (Amazon RDS) services. The Certificate of Compliance illustrating the compliance status of AWS and the assessment summary report from EY CertifyPoint are available on AWS Artifact. The certificate is available in Dutch and English.

For more information regarding the BIO Thema-uitwerking Clouddiensten, see the AWS Reference Guide for Dutch BIO Framework and BIO Theme-elaboration Cloud Services in AWS Artifact. You can also reach out to your AWS account team or contact AWS through the Contact Us page.

AWS strives to continuously bring services into scope of its compliance programs to help you meet your architectural and regulatory needs.

To learn more about our compliance and security programs, see AWS Compliance Programs. As always, we value your feedback and questions; reach out to the AWS Compliance team through the Contact Us page.

If you have feedback about this post, submit comments in the Comments section below.

Want more AWS Security how-to content, news, and feature announcements? Follow us on Twitter.

Eric Washington

Eric Washington

Eric is a Security Audit Program Manager at AWS based in Amsterdam. Eric manages security audits, attestations, and certification programs within the EU. Eric is an IT practitioner with 18 years of experience including risk management, cybersecurity, and networking across the industries of banking, telecommunications, automotive manufacturing, and education.

Ka Yie Lee

Ka Yie Lee

Ka Yie is a Security Assurance Specialist for the Benelux region at AWS based in Amsterdam. She engages with regulators and industry groups in Belgium, Netherlands, and Luxembourg. She also ensures that AWS addresses the local information security frameworks. Ka Yie holds master’s degrees in Accounting, Auditing and Control, and Commercial and Company Law. She also holds professional certifications such as CISSP.

Manuel Mazarredo

Manuel Mazarredo

Manuel is a Security Audit Program Manager at AWS based in Amsterdam. Manuel leads security audits, attestations, and certification programs across Europe, and is responsible for the Benelux. For the past 18 years, he helped organizations in improving their security posture, compliance, and governance management capabilities. He worked in information systems audits, ethical hacking, and vendor management across a variety of industries.

CISPE Code of Conduct Public Register now has 107 compliant AWS services

Post Syndicated from Gokhan Akyuz original https://aws.amazon.com/blogs/security/cispe-code-of-conduct-public-register-now-has-107-compliant-aws-services/

We continue to expand the scope of our assurance programs at Amazon Web Services (AWS) and are pleased to announce that 107 services are now certified as compliant with the Cloud Infrastructure Services Providers in Europe (CISPE) Data Protection Code of Conduct. This alignment with the CISPE requirements demonstrates our ongoing commitment to adhere to the heightened expectations for data protection by cloud service providers. AWS customers who use AWS certified services can be confident that their data is processed in adherence with the European Union’s General Data Protection Regulation (GDPR).

The CISPE Code of Conduct is the first pan-European, sector-specific code for cloud infrastructure service providers, which received a favorable opinion that it complies with the GDPR. It helps organizations across Europe accelerate the development of GDPR compliant, cloud-based services for consumers, businesses, and institutions.

The accredited monitoring body EY CertifyPoint evaluated AWS on January 26, 2023, and successfully audited 100 certified services. AWS added seven additional services to the current scope in June 2023. As of the date of this blog post, 107 services are in scope of this certification. The Certificate of Compliance that illustrates AWS compliance status is available on the CISPE Public Register. For up-to-date information, including when additional services are added, search the CISPE Public Register by entering AWS as the Seller of Record; or see the AWS CISPE page.

AWS strives to bring additional services into the scope of its compliance programs to help you meet your architectural and regulatory needs. If you have questions or feedback about AWS compliance with CISPE, reach out to your AWS account team.

To learn more about our compliance and security programs, see AWS Compliance Programs, AWS General Data Protection Regulation (GDPR) Center, and the EU data protection section of the AWS Cloud Security site. As always, we value your feedback and questions; reach out to the AWS Compliance team through the Contact Us page.

If you have feedback about this post, submit comments in the Comments section below.

Want more AWS Security how-to content, news, and feature announcements? Follow us on Twitter.

Gokhan Akyuz

Gokhan Akyuz

Gokhan is a Security Audit Program Manager at AWS based in Amsterdam, Netherlands. He leads security audits, attestations, and certification programs across Europe and the Middle East. Gokhan has more than 15 years of experience in IT and cybersecurity audits, and controls implementation in a wide range of industries.