Log4j is being exploited by all sorts of attackers, all over the Internet:
At that point it was reported that there were over 100 attempts to exploit the vulnerability every minute. “Since we started to implement our protection we prevented over 1,272,000 attempts to allocate the vulnerability, over 46% of those attempts were made by known malicious groups,” said cybersecurity company Check Point.
And according to Check Point, attackers have now attempted to exploit the flaw on over 40% of global networks.
And a secondvulnerability was found, in the patch for the first vulnerability. This is likely not to be the last.
Launching an application in AWS Elastic Beanstalk is straightforward. You define a name for your application, select the platform you want to run it on (for example, Ruby), and upload the source code. The default Elastic Beanstalk configuration is intended to be a starting point which prioritizes simplicity and ease of setup. This allows you to quickly deploy a web application on the AWS Cloud. For increased security of production applications, we recommend additional steps you can take to complement the default configuration.
In this post we will describe our recommendations, which are aligned with the AWS Well-Architected Framework, to help you harden the security posture of your Elastic Beanstalk applications. The Well-Architected Framework provides best practices to help you build secure, high-performing, resilient, and efficient infrastructure for your applications and workloads. Focusing on the Security pillar of the framework, we will walk you through additional configurations for increased network protection and protection of data at rest and in transit.
Introduction to Elastic Beanstalk
Elastic Beanstalk is an orchestration service that provisions and operates infrastructure in the AWS Cloud. You can use Elastic Beanstalk to deploy and manage applications in the cloud. Elastic Beanstalk supports many programming languages and frameworks, such as Java, .NET, PHP, Node.js, Python, Ruby, Go, and Docker. Elastic Beanstalk can help you decrease overhead by handling tasks such as resource provisioning, load balancing, auto scaling, and health monitoring. You only need to upload the application code. Elastic Beanstalk automatically integrates with other AWS services such as Amazon CloudWatch for logging and monitoring.
Target scenario for this post
This post shows you how to achieve the following things:
Attach a MySQL database to the application using Amazon RDS.
Protect your sensitive data.
Align your application’s security configuration to the Security pillar of the Well-Architected Framework.
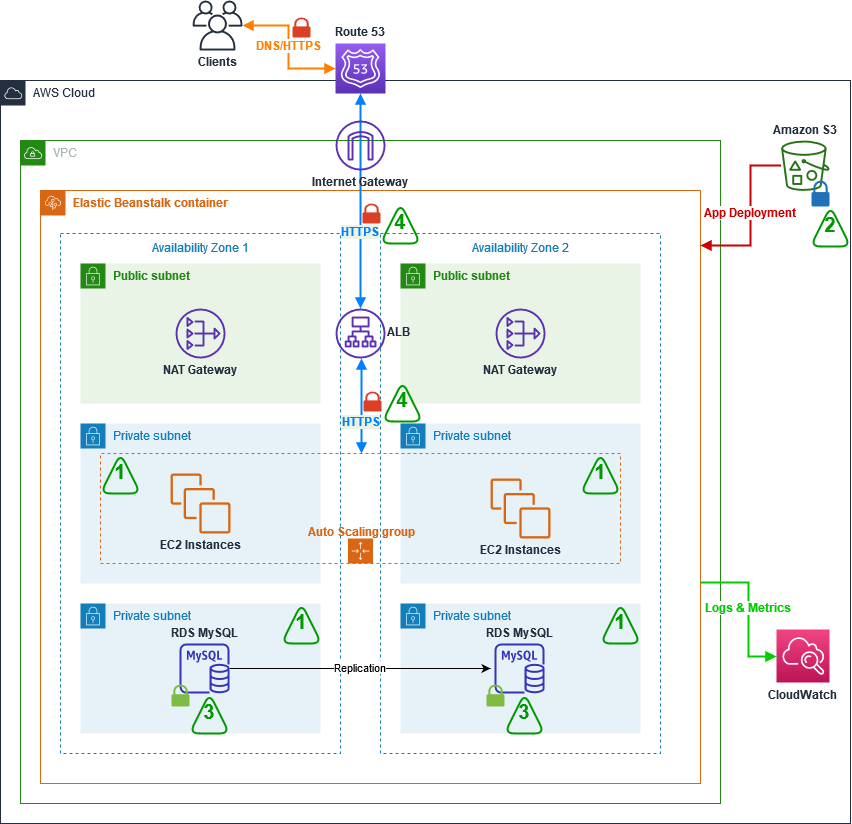
Figure 1: Target architecture for the two-tier web application deployed using Elastic Beanstalk
Figure 1 depicts the target architecture, which is a two-tier web application. Clients resolve the website’s domain name using the Domain Name System (DNS) service Amazon Route 53. An Application Load Balancer (ALB) is used to direct traffic to and from the Amazon EC2 instances which are running the web servers. The EC2 instances are deployed in an Auto Scaling group in private subnets. To ensure that clients can always access the application, the infrastructure is setup so that it can automatically deal with system failures and scale up when there’s an increase in demand. This is done by placing the EC2 instances in the Auto Scaling group across two Availability Zones for high availability. There is also an RDS MySQL database deployed in a private subnet, which is replicated to a stand-by instance in another Availability Zone for disaster recovery. Logs and Metrics are sent to CloudWatch, and Amazon Simple Storage Service (Amazon S3) is used to store logs and source code. Finally, a Network Address Translation (NAT) gateway and Internet gateway manage inbound and outbound traffic to subnets.
The following sections focus on the four main security configurations numbered in Figure 1:
Deploying the EC2 and RDS instances from the web and database layer in private subnets.
Encrypting the logging and source code S3 bucket.
Encrypting the RDS instance and its stand-by replica.
Encrypting data in transit by using the HTTPS protocol.
Strengthening your Elastic Beanstalk application based on the Security pillar of the Well-Architected Framework
To harden the security of your Elastic Beanstalk application, you can build on top of the default setup to incorporate the following security best practices:
Protect networks –In the default Elastic Beanstalk setup, the EC2 instances are deployed together with an Application Load Balancer (ALB) in a public subnet. In most cases, EC2 instances do not need to be directly accessible from the internet and therefore should be placed in private subnets. The ALB should be left in the public subnet to provide a single entry-point for inbound traffic from external clients and forward this traffic to the instances over a private network. If these instances need to make a direct outbound connection to the internet, for example to call third-party APIs, we recommend creating a Network Address Translation (NAT) gateway in a public subnet, and adding a route from the private subnet where your instances are running to the NAT Gateway. Your instances can then send requests to the internet and receive corresponding responses through the NAT gateway, but the instances themselves will not be directly accessible from the internet. For more options on interactively accessing instances see AWS Systems Manager.
Protect data at rest –We recommend encrypting data at rest. Elastic Beanstalk does not encrypt data stored in Amazon S3 buckets by default, so you should modify the default setup to encrypt the bucket. Similarly, when you set up an RDS database directly through Elastic Beanstalk, you don’t have the option to encrypt the database, so you need to set up your database independently and enable encryption.
Protect data in transit – Web traffic sent between your clients and the ALB over the internet should use HTTPS rather than HTTP. The HTTPS protocol creates an encrypted connection through TLS (Transport Layer Security) between client and server before sending any web traffic. The default setup in Elastic Beanstalk uses HTTP, so the choice to use HTTPS and how to enable it sits with the user. Setting up HTTPS can be done with SSL / TLS server certificates (X.509 certificates) which you manage inside AWS using AWS Certificate Manager or through an external provider. ALB supports TLS-termination, which means that it takes care of the encryption and decryption of the traffic communicated with clients, and then forwards the traffic to the instances over the AWS private network.
Implementing the recommended best practices for your application
To implement the best practices from the section above, you will take the following steps to launch your application, protect networks and to protect data at rest and in transit:
Create your own VPC with public and private subnets.
Create a highly-available Elastic Beanstalk application.
Modify the configuration to deploy instances in private subnets.
Encrypt the log and source code bucket.
Launch an encrypted RDS instance.
Set up encryption in-transit by using the HTTPS protocol.
Create your VPC with public and private subnets
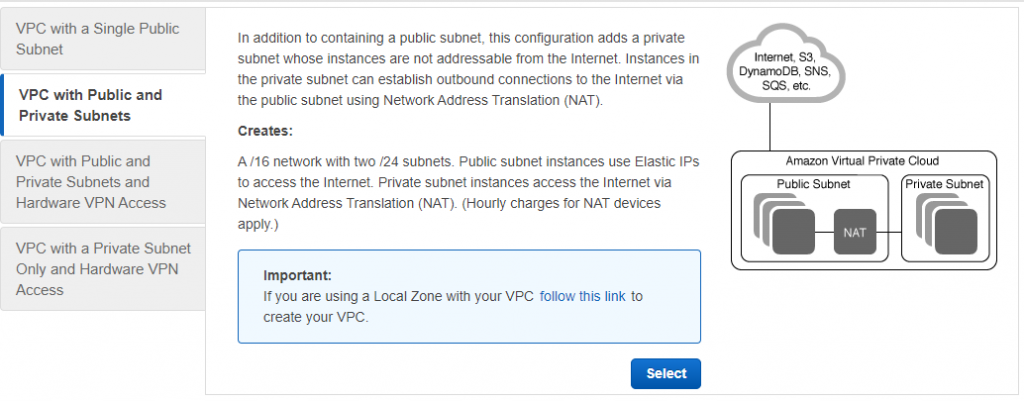
In the AWS Management Console, go to VPC, and select Launch VPC wizard.
Adjust the VPC specifications as needed. Specify a CIDR range and a name for the VPC. For the private and public subnets, you need to additionally specify the subnets CIDR range as well as which Availability Zone they should be created in. In order for instances in the private subnet to access the internet, the set-up creates a NAT gateway that resides in the public subnet. In order to do that, you need to specify an Elastic IP ID. If you don’t have an Elastic IP yet, under the VPC console go to Elastic IP addresses, click on Allocate Elastic IP address and Allocate. Use the Allocation ID in the VPC wizard.
Select Create VPC.
Because the target architecture is highly available, another set of public and private subnets needs to be created and set to reside in a different Availability Zone from the subnets you configured in step 4. This is done by going to the Subnets section in the VPC Console. Click on Create subnet, select the VPC you just created, add a new subnet, making sure to assign it to a different Availability Zone. Press Add new subnet to add a second subnet on the same configuration page. When done, press Create subnet.
By default, the subnets will use the main routing table, which will treat them as private subnets. In order to make one of the newly created subnets public, it needs to be added to the route table, which has a route to the Internet Gateway. Go to the Route Tables section in the VPC Console and find the route table associated with your newly created VPC, which has the route to the Internet Gateway. This should be the Route Table which has 1 explicit subnet association. Click on the Route Table’s ID, and verify that there’s a route to a target with the igw- prefix. Then, under the Subnet association tab, edit the explicit subnet associations to include the newly created subnet.
After this is done, you should have two public and two private subnets across two Availability Zones for your new VPC.
Create a highly available Elastic Beanstalk application
The following steps will show you how to create a highly available Elastic Beanstalk application.
In the AWS Management Console, choose Elastic Beanstalk, and then, in the Get Started section, select Create Application.
Provide a name for the application and define the platform it should run on. In our example, the platform is Ruby.
Provide the source code for your web application or use the sample code provided in the Elastic Beanstalk setup console.
To use the sample code, select Sample Application.
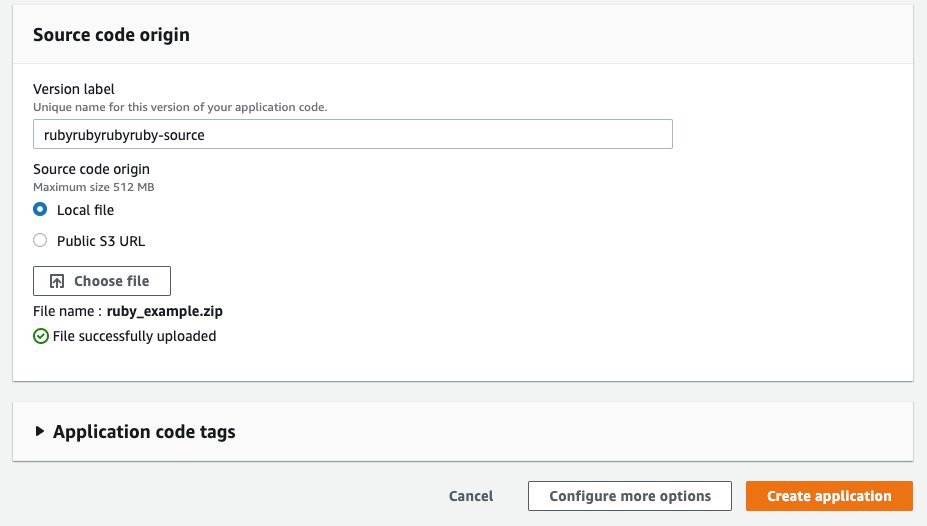
To upload your own source code, in the Source code origin section, for Version label, enter the name of your application code, and then for Source code origin, choose Local file, select Choose File, and navigate to the file that you want to use, as shown in Figure 3.
Figure 3: Source code origin section of the Elastic Beanstalk console
Select Configure more options
Depending on your application’s needs, you can select a configuration preset that includes recommended values for several configurations. Select High Availability to include a load balancer and auto scaling for multiple Availability Zones.
Deploy your instances in private subnets
In this step, you will set up Elastic Beanstalk to deploy the Application Load Balancer in public subnets to provide a point of access for inbound traffic from the internet, and you deploy the EC2 instances in a private subnet.
While still in the Configure more options settings:
In the Network section, select Edit, and then, from the dropdown list, select the VPC that you just created.
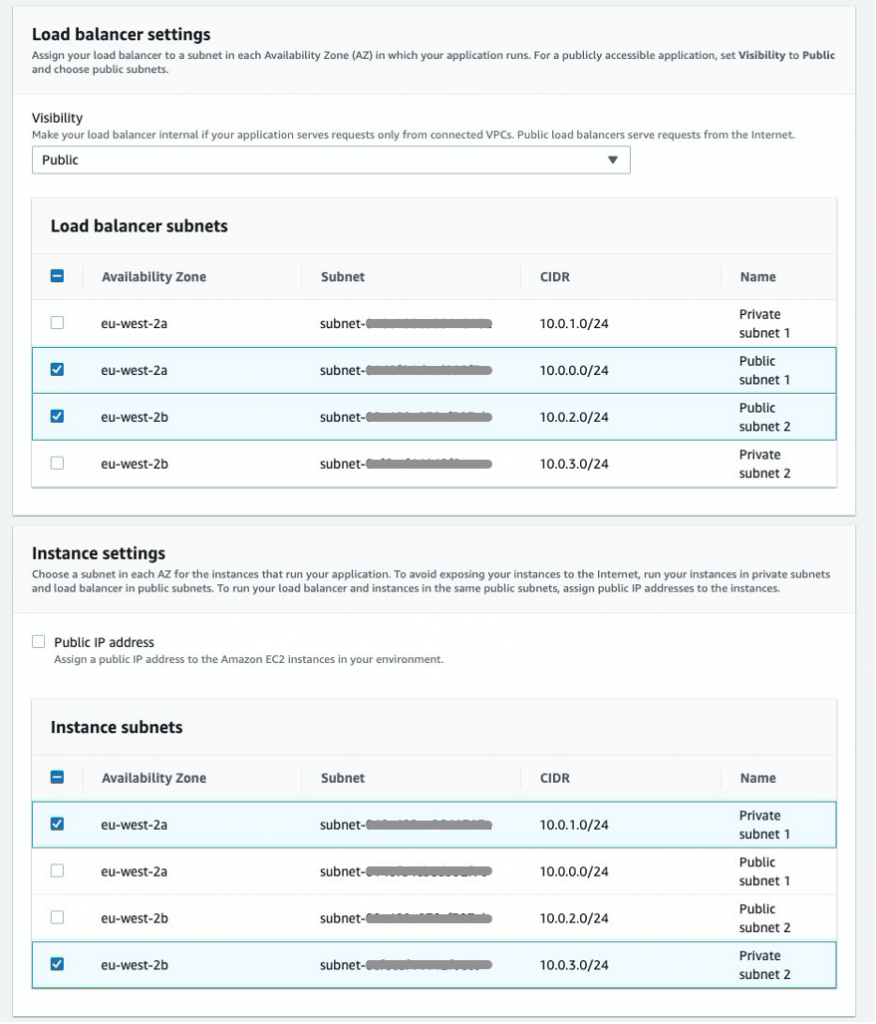
To deploy your instances in private subnets, in the Load balancer settings section, for Load balancer subnets, check the box next to each public subnet, and in the Instance settings section, for Instance subnets, check the box next to each private subnet, as shown in Figure 4.
Figure 4: Elastic Beanstalk subnet settings for Load Balancer and instances
Select Save.
Encrypt the log and source code bucket and block public access
After Elastic Beanstalk has created the application, you can encrypt the S3 bucket.
Open the S3 console and choose the bucket that was created automatically as part of the Elastic Beanstalk setup. The bucket name will have the following structure: elasticbeanstalk-region-account-id.
To encrypt the bucket, choose Properties, and then, for Default Encryption, select Edit, and for Server-side encryption, select Enable.
For Encryption key type, you can use an S3-managed encryption key by selecting Amazon S3 key (SSE-S3). If you want more control over the keys used for encryption, select AWS Key Management Service key (SSE-KMS), which is an encryption key protected by AWS Key Management Service (KMS). Here, you can specify to use an AWS managed key or one of your own Customer managed keys from KMS. For more information on SSE-KMS, visit Protecting Data Using Server-Side Encryption with KMS keys Stored in AWS Key Management Service (SSE-KMS).
Select Save changes.
Even though the bucket that was created by Elastic Beanstalk is non-public by default, we recommend to enable “S3 Block Public Access” at the account level or at least at the bucket level to prevent tampering or accidentally changing this setting in the future.
In your S3 console, click on Block Public Access settings for this account.
If Block all public access is not yet enabled, click on Edit, check the box next to Block all public access and click Save.
Apart from that, you can also block public access at the bucket level. For this, click on the respective bucket, open the Permissions section and edit Block public access (bucket settings) similarly to how you did in step 2.
Launch an encrypted RDS instance
Elastic Beanstalk allows you to set up and run RDS instances in your Elastic Beanstalk environment. Until recently, the database was tied to the lifecycle of the Elastic Beanstalk environment, and its use was recommended to be limited to development and testing environments only. For example, if you previously launched an RDS instance using Elastic Beanstalk, and the Elastic Beanstalk environment was terminated, the RDS instance would also be deleted. As of October 6, 2021, Elastic Beanstalk now supports Database Decoupling, so that the database will persist when the environment is deleted.
However, Elastic Beanstalk currently does not allow you to set up encryption for your database. For this reason, this post shows you how to set up your Elastic Beanstalk application with a decoupled database, by creating the database directly in the RDS service, separate from your Elastic Beanstalk application. RDS allows you to encrypt your database.
Decoupling your database and setting it up directly through the RDS service in the AWS console will require additional steps for integration with your Elastic Beanstalk application, which this post will walk you through.
Note: If you are using the Elastic Beanstalk service to create your RDS instance, you can select one of three options:
The first option, enabled by selecting the Create snapshot retention option in the database settings in the Elastic Beanstalk console, makes sure that Elastic Beanstalk creates a snapshot of your database prior to termination. You can restore an existing snapshot of your database through the Elastic Beanstalk console. Bear in mind that there will be downtime of your database between snapshot creation and snapshot restore.
The second option, Retain, creates a decoupled database, which persists if the Elastic Beanstalk environment has been terminated.
The third option Delete removes the database upon termination.
In this step, you will create an encrypted RDS database, allow access to the database from your application’s instances only, and add the required environment variables to your application so you can use your database in the application.
On the RDS service page in the console, select Create database.
For the database creation method, select Standard create.
For Engine options, choose MySQL and select the latest version.
For Templates choose either the Dev/Test or Production template according to your use case.
In the Settings section, provide a name to use as the database identifier and set a username and password.
Select the appropriate DB instance class that meets your processing power and memory requirements.
For Storage, select your storage type and allocate storage.
If you need Multi-AZ deployment, in the Availability & durability section, choose Create a standby instance.
In the Connectivity section, select the VPC that you created in the Create your VPC with public and private subnets section earlier in this blog post, and verify that Public access has been set to No.For VPC security group,choose Create new and provide a name to identify the group later on.
In the Additional configuration section, under Encryption, choose Enable Encryption. You can choose the default AWS KMS key if you’re happy with AWS managing the keys, or provide a custom key if you want more control. Bear in mind that the encryption option cannot be changed after the database has been created.
Leave the defaults for the remaining settings and select Create database.
After you set up the RDS database and your new Elastic Beanstalk application, you can add the database to your application.
In the RDS console, go to your newly created RDS database and scroll down to Security group rules.
Select the security group that has the CIDR/IP – Inbound type.
Under Inbound rules, select the rule that is listed, and then select Edit inbound rules.
Under the Source column, make sure Custom is selected, and in the search-box next to it, select the security group associated with your Elastic Beanstalk Auto Scaling group.
Important: As a security best practice, you should allow traffic to your RDS database from your instances only. Therefore, make sure the security group allows traffic only from the Auto Scaling group’s security group, and that it has no additional entries.
To add the RDS details to the Elastic Beanstalk environment properties, go to your application’s environment in the Elastic Beanstalk service and navigate to Configuration > Software > Edit > Environment Properties. Add RDS_HOSTNAME, RDS_PORT, RDS_DB_NAME, RDS_USERNAME and RDS_PASSWORD as properties and provide the values that you used to set up the database.
Restart the application by going back to your Elastic Beanstalk environment, and then under Environment actions, choose Restart app server(s).
After the server has restarted, you can access the RDS database in your web application by using the environment propertiesyou set in the console, just as you would if you attached the database directly through the Elastic Beanstalk setup. For more information on using environment properties, visit Environment properties and other software settings.
The new database is now separate from your application and it is encrypted to provide data protection at rest.
Important: The environment properties, including the database username and password, are visible and stored in plain text in the Environment Properties in Elastic Beanstalk.
Depending on your security requirements, you can choose to use AWS Secrets Manager to protect your database credentials, which you can then fetch programmatically in your Elastic Beanstalk instance or through Elastic Beanstalk’s custom environment configuration files (.ebextensions). To learn more about using Secrets Manager to protect and rotate database credentials, see Rotate Amazon RDS database credentials automatically with AWS Secrets Manager. However, this will require additional configuration for Elastic Beanstalk and is beyond the scope of this post.
A second possibility is to use IAM database authentication, which allows you to use your Elastic Beanstalk’s EC2 IAM role to connect to your database. This method leverages short-lived authentication tokens rather than a static database password. In order to set this up, you need to enable IAM database authentication, create an IAM policy to allow IAM database access and create a database account for IAM authentication using the AWSAuthenticationPlugin (for MySQL). Authentication tokens are valid for 15 minutes, and if your web instances need to create a new database connection, or reconnect, authentication tokens will need to be refreshed if they have expired, otherwise the connection will be rejected.
Set up encryption in transit using the HTTPS protocol
In the Elastic Beanstalk architecture, you can encrypt data in transit at three connection points: from your clients to the load balancer, from the load balancer to the EC2 instances, and from the EC2 instances to the RDS database.
Securing the connection from clients to the ALB
You can use a custom domain name to use HTTPS for your Elastic Beanstalk environment and have your clients can connect securely to your environment. If you don’t have a domain name, you can assign a self-signed server certificate to your ALB to use HTTPS for development and testing purposes.
To secure the connection to your ALB, add a HTTPS listener for the traffic inbound port (typically 443) and attach an TLS / SSL server certificate (X.509 certificate). To generate certificates, use AWS Certificate Manager or third-party providers such as Let’s Encrypt. For a walkthrough on how to set up an HTTPS listener through the console or through .ebextensions configuration files, see the Configuring your Elastic Beanstalk environment’s load balancer to terminate HTTPS.
Securing the connection from the ALB to the EC2 instances
While securing the connection between clients and the ALB is enough for most applications, in some cases a complete end-to-end encryption may be required; for example, to comply with (external) regulations. To secure the connection from your ALB to your application running on an EC2 instance, you must use the .ebextensions configuration files to modify the software running on the instance. You then need to allow the HTTPS traffic to pass through from the ALB to your EC2 instance by allowing inbound traffic on port 443 on the instance’s security group. For a Ruby specific example, see Terminating HTTPS on EC2 instances running Ruby.
To securely connect from your application to your RDS database, you can use SSL or TLS to encrypt the connection. You will need to download an RDS root certificate and require your application to use this certificate when connecting to the RDS instance to verify the RDS server certificate. For more information on how to download and use the root certificate to setup a secure RDS connection, see the Using SSL with a MySQL DB instance documentation page.
This post has shown you how to align your application with some of the security best practices of the Well-Architected Framework. After completing these steps, your architecture includes four key modifications to improve security:
The EC2 and RDS instances are deployed in a private subnet.
The logging and source code S3 bucket is encrypted.
An encrypted RDS instance is attached.
Encryption occurs in transit by using the HTTPS protocol.
Conclusion
In this post, we’ve covered the additional configuration you should be aware of to harden the security posture of your Elastic Beanstalk applications, aligning to the Security pillar of the Well-Architected Framework. The final setup you created uses a VPC and private subnets to allow internet access only to resources that require it, and provides encryption at rest and in transit using AWS Cloud Security services and secure protocols. The Well-Architected Framework describes additional concepts, design principles, and architectural best practices for designing and running workloads in the cloud. To learn more, see AWS Well-Architected.
If you have feedback about this post, submit comments in the Comments section below.
Want more AWS Security news? Follow us on Twitter.
AWS recently released the Ransomware Risk Management on AWS Using the NIST Cyber Security Framework (CSF) whitepaper. This whitepaper aligns the National Institute of Standards and Technology (NIST) recommendations for security controls that are related to ransomware risk management, for workloads built on AWS. The whitepaper maps the technical capabilities to AWS services and implementation guidance. While this whitepaper is primarily focused on managing the risks associated with ransomware, the security controls and AWS services outlined are consistent with general security best practices.
The National Cybersecurity Center of Excellence (NCCoE) at NIST has published Practice Guides (NIST 1800-11, 1800-25, and 1800-26) to demonstrate how organizations can develop and implement security controls to combat the data integrity challenges posed by ransomware and other destructive events. Each of the Practice Guides include a detailed set of goals that are designed to help organizations establish the ability to identify, protect, detect, respond, and recover from ransomware events.
Identify systems, users, data, applications, and entities on the network.
Identify vulnerabilities in enterprise components and clients.
Create a baseline for the integrity and activity of enterprise systems in preparation for an unexpected event.
Create backups of enterprise data in advance of an unexpected event.
Protect these backups and other potentially important data against alteration.
Manage enterprise health by assessing machine posture.
Detect and respond
Detect malicious and suspicious activity generated on the network by users, or from applications that could indicate a data integrity event.
Mitigate and contain the effects of events that can cause a loss of data integrity.
Monitor the integrity of the enterprise for detection of events and after-the-fact analysis.
Use logging and reporting features to speed response time for data integrity events.
Analyze data integrity events for the scope of their impact on the network, enterprise devices, and enterprise data.
Analyze data integrity events to inform and improve the enterprise’s defenses against future attacks.
Recover
Restore data to its last known good configuration.
Identify the correct backup version (free of malicious code and data for data restoration).
Identify altered data, as well as the date and time of alteration.
Determine the identity/identities of those who altered data.
To achieve the above goals, the Practice Guides outline a set of technical capabilities that should be established, and provide a mapping between the generic application term and the security controls that the capability provides.
AWS services can be mapped to theses technical capabilities as outlined in the Ransomware Risk Management on AWS Using the NIST Cyber Security Framework (CSF) whitepaper. AWS offers a comprehensive set of services that customers can implement to establish the necessary technical capabilities to manage the risks associated with ransomware. By following the mapping in the whitepaper, AWS customers can identify which services, features, and functionality can help their organization identify, protect, detect, respond, and from ransomware events. If you’d like additional information about cloud security at AWS, please contact us.
If you have feedback about this post, submit comments in the Comments section below.
Want more AWS Security how-to content, news, and feature announcements? Follow us on Twitter.
After being compelled by a Swiss court to monitor IP logs for a particular user, ProtonMail nolonger claims that “we do not keep any IP logs.”
EDITED TO ADD (9/14): This seems to be more complicated. ProtonMail is not yet saying that they keep logs. Their privacy policy still states that they do not keep logs except in certain circumstances, and outlines those circumstances. And ProtonMail’s warrant canary has an interesting list of data orders they have received from various authorities, whether they complied, and why or why not.
Treating data like it is property fails to recognize either the value that varieties of personal information serve or the abiding interest that individuals have in their personal information even if they choose to “sell” it. Data is not a commodity. It is information. Any system of information rights — whether patents, copyrights, and other intellectual property, or privacy rights — presents some tension with strong interest in the free flow of information that is reflected by the First Amendment. Our personal information is in demand precisely because it has value to others and to society across a myriad of uses.
From the conclusion:
Privacy legislation should empower individuals through more layered and meaningful transparency and individual rights to know, correct, and delete personal information in databases held by others. But relying entirely on individual control will not do enough to change a system that is failing individuals, and trying to reinforce control with a property interest is likely to fail society as well. Rather than trying to resolve whether personal information belongs to individuals or to the companies that collect it, a baseline federal privacy law should directly protect the abiding interest that individuals have in that information and also enable the social benefits that flow from sharing information.
ESET says that based on evidence its researchers gathered, a threat actor compromised one of the company’s official API (api.bignox.com) and file-hosting servers (res06.bignox.com).
Using this access, hackers tampered with the download URL of NoxPlayer updates in the API server to deliver malware to NoxPlayer users.
[…]
Despite evidence implying that attackers had access to BigNox servers since at least September 2020, ESET said the threat actor didn’t target all of the company’s users but instead focused on specific machines, suggesting this was a highly-targeted attack looking to infect only a certain class of users.
Until today, and based on its own telemetry, ESET said it spotted malware-laced NoxPlayer updates being delivered to only five victims, located in Taiwan, Hong Kong, and Sri Lanka.
I don’t know if there are actually more supply-chain attacks occurring right now. More likely is that they’ve been happening for a while, and we have recently become more diligent about looking for them.
Welcome to Data Privacy Day 2021! Last year at this time, I was writing about how Cloudflare builds privacy into everything we do, with little idea about how dramatically the world was going to change. The tragedy of the COVID-19 pandemic has reshaped the way we go about our daily lives. Our dependence on the Internet grew exponentially in 2020 as we started working from home, attending school from home, and participating in online weddings, concerts, parties, and more. So as we begin this new year, it’s impossible to think about data privacy in 2021 without thinking about how an always-on, always secure, always private Internet is more important than ever.
The pandemic wasn’t the only thing to dramatically shape data privacy conversations last year. We saw a flurry of new activity on data protection legislation around the globe, and a trend toward data localization in a variety of jurisdictions.
I don’t think I’m taking any risks when I say that 2021 looks to be another busy year in the world of privacy and data protection. Let me tell you a bit about what that looks like for us at Cloudflare. We’ll be spending a lot of time in 2021 helping our customers find the solutions they need to meet data protection obligations; enhancing our technical, organizational, and contractual measures to protect the privacy of personal data no matter where in the world it is processed; and continuing to develop privacy-enhancing technologies that can help everyone on the Internet.
Focus on International Data Transfers
One of the biggest stories in data protection in 2020 was the Court of Justice of the European Union’s decision in the “Schrems II” case (Case C-311/18, Data Protection Commissioner v Facebook Ireland and Maximillian Schrems) that invalidated the EU-U.S. Privacy Shield. The court’s interpretation of U.S. surveillance laws meant that data controllers transferring EU personal data to U.S. data processors now have an obligation to make sure additional safeguards are in place to provide the same level of data protection as the General Data Protection Regulation (“GDPR”).
The court decision was followed by draft guidance from the European Data Protection Board (EDPB) that created new expectations and challenges for transfers of EU personal data to processors outside the EU pursuant to the GDPR. In addition, the EU Commission issued new draft standard contractual clauses that further emphasized the need for data transfer impact assessments and due diligence to be completed prior to transferring EU personal data to processors outside the EU. Meanwhile, even before the EDPB and EU Commission weighed in, France’s data protection authority, the CNIL, challenged the use of a U.S. cloud service provider for the processing of certain health data.
This year, the EDPB is poised to issue its final guidance on international data transfers, the EU Commission is set to release a final version of new standard contractual clauses, and the new Biden administration in the United States has already appointed a deputy assistant secretary for services at the U.S. Department of Commerce who will focus on negotiations around a new EU-U.S. Privacy Shield or another data transfer mechanism.
However, the trend to regulate international data transfers isn’t confined to Europe. India’s Personal Data Protection Bill, likely to become law in 2021, would bar certain types of personal data from leaving India. And Brazil’s Lei Geral de Proteção de Dados (“LGPD”), which went into effect in 2020, contains requirements for contractual guarantees that need to be in place for personal data to be processed outside Brazil.
Meanwhile, we’re seeing more data protection regulation across the globe: The California Consumer Privacy Act (“CCPA”) was amended by a new ballot initiative last year. Countries like Japan, China, Singapore, Canada, and New Zealand, that already had data protection legislation in some form, proposed or enacted amendments to strengthen those protections. And even the United States is considering comprehensive Federal data privacy regulation.
In light of last year’s developments and those we expect to see in 2021, Cloudflare is thinking a lot about what it means to process personal data outside its home jurisdiction. One of the key messages to come out of Europe in the second half of 2020 was the idea that to be able to transfer EU personal data to the United States, data processors would have to provide additional safeguards to ensure GDPR-level protection for personal data, even in light of the application of U.S. surveillance laws. While we are eagerly awaiting the EDPB’s final guidance on the subject, we aren’t waiting to ensure that we have in place the necessary additional safeguards.
In fact, Cloudflare has long maintained policies to address concerns about access to personal data. We’ve done so because we believe it’s the right thing to do, and because the conflicts of law we are seeing today seemed inevitable. We feel so strongly about our ability to provide that level of protection for data processed in the U.S., that today we are publishing a paper, “Cloudflare’s Policies around Data Privacy and Law Enforcement Requests,” to describe how we address government and other legal requests for data.
Our paper describes our policies around data privacy and data requests, such as providing notice to our customers of any legal process requesting their data, and the measures we take to push back on any legal process requesting data where we believe that legal process creates a conflict of law. The paper also describes our public commitments about how we approach requests for data and public statements about things we have never done and, in CEO Matthew Prince’s words, that we “will fight like hell to never do”:
Cloudflare has never turned over our encryption or authentication keys or our customers’ encryption or authentication keys to anyone.
Cloudflare has never installed any law enforcement software or equipment anywhere on our network.
Cloudflare has never provided any law enforcement organization a feed of our customers’ content transiting our network.
Cloudflare has never modified customer content at the request of law enforcement or another third party.
In 2021, the Cloudflare team will continue to focus on these safeguards to protect all our customers’ personal data.
Addressing Data Localization Challenges
We also recognize that attention to international data transfers isn’t just a jurisdictional issue. Even if jurisdictions don’t require data localization by law, highly regulated industries like banking and healthcare may adopt best practice guidance asserting more requirements for data if it is to be processed outside a data subject’s home country.
With so much activity around data localization trends and international data transfers, companies will continue to struggle to understand regulatory requirements, as well as update products and business processes to meet those requirements and trends. So while we believe that Cloudflare can provide adequate protections for this data regardless of whether it is processed inside or outside its jurisdiction of origin, we also recognize that our customers are dealing with unique compliance challenges that we can help them face.
That means that this year we’ll also continue the work we started with our Cloudflare Data Localization Suite, which we announced during our Privacy & Compliance Week in December 2020. The Data Localization Suite is designed to help customers build local requirements into their global online operations. We help our customers ensure that their data stays as private as they want it to, and only goes where they want it to go in the following ways:
DDoS attacks are detected and mitigated at the data center closest to the end user.
Data centers inside the preferred region decrypt TLS and apply services like WAF, CDN, and Cloudflare Workers.
Keyless SSL and Geo Key Manager store private SSL keys in a user-specified region.
Edge Log Delivery securely transmits logs from the inspection point to the log storage location of your choice.
Doubling Down on Privacy-Enhancing Technologies
Cloudflare’s mission is to “Help Build a Better Internet,” and we’ve said repeatedly that a privacy-respecting Internet is a better Internet. We believe in empowering individuals and entities of all sizes with technological tools to reduce the amount of personal data that gets funnelled into the data ocean — regardless of whether someone lives in a country with laws protecting the privacy of their personal data. If we can build tools to help individuals share less personal data online, then that’s a win for privacy no matter what their country of residence.
For example, when Cloudflare launched the 1.1.1.1 public DNS resolver — the Internet’s fastest, privacy-first public DNS resolver — we committed to our public resolver users that we would not retain any personal data about requests made using our 1.1.1.1 resolver. And because we baked anonymization best practices into the 1.1.1.1 resolver when we built it, we were able to demonstrate that we didn’t have any personal data to sell when we asked independent accountants to conduct a privacy examination of the 1.1.1.1 resolver.
2021 will also see a continuation of a number of initiatives that we announced during Privacy and Compliance Week that are aimed at improving Internet protocols related to user privacy:
Fixing one of the last information leaks in HTTPS through Encrypted Client Hello (ECH), the evolution of Encrypted SNI.
Developing a superior protocol for password authentication, OPAQUE, that makes password breaches less likely to occur.
Making DNS even more private by supporting Oblivious DNS-over-HTTPS (ODoH).
Encrypted Client Hello (ECH)
Under the old TLS handshake, privacy-sensitive parameters were negotiated completely in the clear and available to network observers. One example is the Server Name Indication (SNI), used by the client to indicate to the server the website it wants to reach — this is not information that should be exposed to eavesdroppers. Previously, this problem was mitigated through the Encrypted SNI (ESNI) extension. While ESNI took a significant step forward, it is an incomplete solution; a major shortcoming is that it protects only SNI. The Encrypted Client Hello (ECH) extension aims to close this gap by enabling encryption of the entire ClientHello, thereby protecting all privacy-sensitive handshake parameters. These changes represent a significant upgrade to TLS, one that will help preserve end-user privacy as the protocol continues to evolve. As this work continues, Cloudflare is committed to doing its part, along with close collaborators in the standards process, to ensure this important upgrade for TLS reaches Internet-scale deployment.
OPAQUE
Research has repeatedly shown that passwords are hard for users to manage — and they are also a challenge for servers: passwords are difficult to store securely, they’re frequently leaked and subsequently brute-forced. As long as people still use passwords, we’d like to make the process as secure as possible. Current methods rely on the risky practice of handling plaintext passwords on the server side while checking their correctness. One potential alternative is to use OPAQUE, an asymmetric Password-Authenticated Key Exchange (aPAKE) protocol that allows secure password login without ever letting the server see the passwords.
With OPAQUE, instead of storing a traditional salted password hash, the server stores a secret envelope associated with the user that is “locked” by two pieces of information: the user’s password (known only by the user), and a random secret key (known only by the server). To log in, the client initiates a cryptographic exchange that reveals the envelope key only to the client (but not to the server). The server then sends this envelope to the user, who now can retrieve the encrypted keys. Once those keys are unlocked, they will serve as parameters for an Authenticated Key Exchange (AKE) protocol, which establishes a secret key for encrypting future communications.
Cloudflare has been pushing the development of OPAQUE forward, and has released a reference core OPAQUE implementation in Go and a demo TLS integration (with a running version you can try out). A Typescript client implementation of OPAQUE is coming soon.
Oblivious DNS-over-HTTPS (ODoH)
Encryption is a powerful tool that protects the privacy of personal data. This is why Cloudflare has doubled down on its implementation of DNS over HTTPS (DoH). In the snail mail world, courts have long recognized a distinction between the level of privacy afforded to the contents of a letter vs. the addressing information on an envelope. But we’re not living in an age where the only thing someone can tell from the outside of the envelope are the “to” and “from” addresses and place of postage. The “digital envelopes” of DNS requests can contain much more information about a person than one might expect. Not only is there information about the sender and recipient addresses, but there is specific timestamp information about when requests were submitted, the domains and subdomains visited, and even how long someone stayed on a certain site. Encrypting those requests ensures that only the user and the resolver get that information, and that no one involved in the transit in between sees it. Given that our digital envelopes tell a much more robust story than the envelope in your physical mailbox, we think encrypting these envelopes is just as important as encrypting the messages they carry.
However, there are more ways in which DNS privacy can be enhanced, and Cloudflare took another incremental step in December 2020 by announcing support for Oblivious DoH (ODoH). ODoH is a proposed DNS standard — co-authored by engineers from Cloudflare, Apple, and Fastly — that separates IP addresses from queries, so that no single entity can see both at the same time. ODoH requires a proxy as a key part of the communication path between client and resolver, with encryption ensuring that the proxy does not know the contents of the DNS query (only where to send it), and the resolver knowing what the query is but not who originally requested it (only the proxy’s IP address). Barring collusion between the proxy and the resolver, the identity of the requester and the content of the request are unlinkable.
As with DoH, successful deployment requires partners. A key component of ODoH is a proxy that is disjoint from the target resolver. Cloudflare is working with several leading proxy partners — currently PCCW, SURF, and Equinix — who are equally committed to privacy, and hopes to see this list grow.
Post-Quantum Cryptography
Even with all of these encryption measures, we also know that everything encrypted with today’s public key cryptography can likely be decrypted with tomorrow’s quantum computers. This makes deploying post-quantum cryptography a pressing privacy concern. We’re likely 10 to 15 years away from that development, but as our Head of Research Nick Sullivan described in his blog post in December, we’re not waiting for that future. We’ve been paying close attention to the National Institute of Standards and Technology (NIST)’s initiative to define post-quantum cryptography algorithms to replace RSA and ECC. Last year, Cloudflare and Google performed the TLS Post-Quantum Experiment, which involved implementing and supporting new key exchange mechanisms based on post-quantum cryptography for all Cloudflare customers for a period of a few months.
In addition, Cloudflare’s Research Team has been working with researchers from the University of Waterloo and Radboud University on a new protocol called KEMTLS. KEMTLS is designed to be fully post-quantum and relies only on public-key encryption. On the implementation side, Cloudflare has developed high-speed assembly versions of several of the NIST finalists (Kyber, Dilithium), as well as other relevant post-quantum algorithms (CSIDH, SIDH) in our CIRCL cryptography library written in Go. Cloudflare is endeavoring to use post-quantum cryptography for most internal services by the end of 2021, and plans to be among the first services to offer post-quantum cipher suites to customers as standards emerge.
Looking forward to 2021
If there’s anything 2020 taught us, it’s that our world can change almost overnight. One thing that doesn’t change, though, is that people will always want privacy for their personal data, and regulators will continue to define rules and requirements for what data protection should look like. And as these rules and requirements evolve, Cloudflare will be there every step of the way, developing innovative product and security solutions to protect data, and building privacy into everything we do.
Cloudflare is also celebrating Data Privacy Day on Cloudflare TV. Tune in for a full day of special programming.
Researchers have been able to find all sorts of personal information within GPT-2. This information was part of the training data, and can be extracted with the right sorts of queries.
Abstract: It has become common to publish large (billion parameter) language models that have been trained on private datasets. This paper demonstrates that in such settings, an adversary can perform a training data extraction attack to recover individual training examples by querying the language model.
We demonstrate our attack on GPT-2, a language model trained on scrapes of the public Internet, and are able to extract hundreds of verbatim text sequences from the model’s training data. These extracted examples include (public) personally identifiable information (names, phone numbers, and email addresses), IRC conversations, code, and 128-bit UUIDs. Our attack is possible even though each of the above sequences are included in just one document in the training data.
We comprehensively evaluate our extraction attack to understand the factors that contribute to its success. For example, we find that larger models are more vulnerable than smaller models. We conclude by drawing lessons and discussing possible safeguards for training large language models.
We generated a total of 600,000 samples by querying GPT-2 with three different sampling strategies. Each sample contains 256 tokens, or roughly 200 words on average. Among these samples, we selected 1,800 samples with abnormally high likelihood for manual inspection. Out of the 1,800 samples, we found 604 that contain text which is reproduced verbatim from the training set.
The rest of the blog post discusses the types of data they found.
Where did the last month go? Were you able to catch all of the sessions in the Security, Identity, and Compliance track you hoped to see at AWS re:Invent? If you missed any, don’t worry—you can stream all the sessions released in 2020 via the AWS re:Invent website. Additionally, we’re starting 2021 with all new sessions that you can stream live January 12–15. Here are the new Security, Identity, and Compliance sessions—each session is offered at multiple times, so you can find the time that works best for your location and schedule.
Protecting sensitive data with Amazon Macie and Amazon GuardDuty – SEC210 Himanshu Verma, AWS Speaker
Tuesday, January 12 – 11:00 AM to 11:30 AM PST Tuesday, January 12 – 7:00 PM to 7:30 PM PST Wednesday, January 13 – 3:00 AM to 3:30 AM PST
As organizations manage growing volumes of data, identifying and protecting your sensitive data can become increasingly complex, expensive, and time-consuming. In this session, learn how Amazon Macie and Amazon GuardDuty together provide protection for your data stored in Amazon S3. Amazon Macie automates the discovery of sensitive data at scale and lowers the cost of protecting your data. Amazon GuardDuty continuously monitors and profiles S3 data access events and configurations to detect suspicious activities. Come learn about these security services and how to best use them for protecting data in your environment.
BBC: Driving security best practices in a decentralized organization – SEC211 Apurv Awasthi, AWS Speaker Andrew Carlson, Sr. Software Engineer – BBC
Tuesday, January 12 – 1:15 PM to 1:45 PM PST Tuesday, January 12 – 9:15 PM to 9:45 PM PST Wednesday, January 13 – 5:15 AM to 5:45 AM PST
In this session, Andrew Carlson, engineer at BBC, talks about BBC’s journey while adopting AWS Secrets Manager for lifecycle management of its arbitrary credentials such as database passwords, API keys, and third-party keys. He provides insight on BBC’s secrets management best practices and how the company drives these at enterprise scale in a decentralized environment that has a highly visible scope of impact.
Get ahead of the curve with DDoS Response Team escalations – SEC321 Fola Bolodeoku, AWS Speaker
Tuesday, January 12 – 3:30 PM to 4:00 PM PST Tuesday, January 12 – 11:30 PM to 12:00 AM PST Wednesday, January – 7:30 AM to 8:00 AM PST
This session identifies tools and tricks that you can use to prepare for application security escalations, with lessons learned provided by the AWS DDoS Response Team. You learn how AWS customers have used different AWS offerings to protect their applications, including network access control lists, security groups, and AWS WAF. You also learn how to avoid common misconfigurations and mishaps observed by the DDoS Response Team, and you discover simple yet effective actions that you can take to better protect your applications’ availability and security controls.
Network security for serverless workloads – SEC322 Alex Tomic, AWS Speaker
Thursday, January 14 -1:30 PM to 2:00 PM PST Thursday, January 14 – 9:30 PM to 10:00 PM PST Friday, January 15 – 5:30 AM to 6:00 AM PST
Are you building a serverless application using services like Amazon API Gateway, AWS Lambda, Amazon DynamoDB, Amazon Aurora, and Amazon SQS? Would you like to apply enterprise network security to these AWS services? This session covers how network security concepts like encryption, firewalls, and traffic monitoring can be applied to a well-architected AWS serverless architecture.
Building your cloud incident response program – SEC323 Freddy Kasprzykowski, AWS Speaker
Wednesday, January 13 – 9:00 AM to 9:30 AM PST Wednesday, January 13 – 5:00 PM to 5:30 PM PST Thursday, January 14 – 1:00 AM to 1:30 AM PST
You’ve configured your detection services and now you’ve received your first alert. This session provides patterns that help you understand what capabilities you need to build and run an effective incident response program in the cloud. It includes a review of some logs to see what they tell you and a discussion of tools to analyze those logs. You learn how to make sure that your team has the right access, how automation can help, and which incident response frameworks can guide you.
Wednesday, January 13 – 2:15 PM to 2:45 PM PST Wednesday, January 13 – 10:15 PM to 10:45 PM PST Thursday, January 14 – 6:15 AM to 6:45 AM PST
Amazon Cognito is a flexible user directory that can meet the needs of a number of customer identity management use cases. Web and mobile applications can integrate with Amazon Cognito in minutes to offer user authentication and get standard tokens to be used in token-based authorization scenarios. This session covers best practices that you can implement in your application to secure and protect tokens. You also learn about new Amazon Cognito features that give you more options to improve the security and availability of your application.
Event-driven data security using Amazon Macie – SEC325 Neha Joshi, AWS Speaker
Thursday, January 14 – 8:00 AM to 8:30 AM PST Thursday, January 14 – 4:00 PM to 4:30 PM PST Friday, January 15 – 12:00 AM to 12:30 AM PST
Amazon Macie sensitive data discovery jobs for Amazon S3 buckets help you discover sensitive data such as personally identifiable information (PII), financial information, account credentials, and workload-specific sensitive information. In this session, you learn about an automated approach to discover sensitive information whenever changes are made to the objects in your S3 buckets.
Thursday, January 14 – 10:15 AM to 10:45 AM PST Thursday, January 14 – 6:15 PM to 6:45 PM PST Friday, January 15 – 2:15 AM to 2:45 AM PST
In this session, learn about several instance containment and isolation techniques, ranging from simple and effective to more complex and powerful, that leverage native AWS networking services and account configuration techniques. If an incident happens, you may have questions like “How do we isolate the system while preserving all the valuable artifacts?” and “What options do we even have?”. These are valid questions, but there are more important ones to discuss amidst a (possible) incident. Join this session to learn highly effective instance containment techniques in a crawl-walk-run approach that also facilitates preservation and collection of valuable artifacts and intelligence.
Trusted connects for government workloads – SEC402 Brad Dispensa, AWS Speaker
Wednesday, January 13 – 11:15 AM to 11:45 AM PST Wednesday, January 13 – 7:15 PM to 7:45 PM PST Thursday, January 14 – 3:15 AM to 3:45 AM PST
Cloud adoption across the public sector is making it easier to provide government workforces with seamless access to applications and data. With this move to the cloud, we also need updated security guidance to ensure public-sector data remain secure. For example, the TIC (Trusted Internet Connections) initiative has been a requirement for US federal agencies for some time. The recent TIC-3 moves from prescriptive guidance to an outcomes-based model. This session walks you through how to leverage AWS features to better protect public-sector data using TIC-3 and the National Institute of Standards and Technology (NIST) Cybersecurity Framework (CSF). Also, learn how this might map into other geographies.
I look forward to seeing you in these sessions. Please see the re:Invent agenda for more details and to build your schedule.
If you have feedback about this post, submit comments in the Comments section below.
Want more AWS Security how-to content, news, and feature announcements? Follow us on Twitter.
More than 100,000 Zyxel firewalls, VPN gateways, and access point controllers contain a hardcoded admin-level backdoor account that can grant attackers root access to devices via either the SSH interface or the web administration panel.
[…]
Installing patches removes the backdoor account, which, according to Eye Control researchers, uses the “zyfwp” username and the “PrOw!aN_fXp” password.
“The plaintext password was visible in one of the binaries on the system,” the Dutch researchers said in a report published before the Christmas 2020 holiday.
Data is a crucial part of every business and is used for strategic decision making at all levels of an organization. To extract value from their data more quickly, Amazon Web Services (AWS) customers are building automated data pipelines—from data ingestion to transformation and analytics. As part of this process, my customers often ask how to prevent sensitive data, such as personally identifiable information, from being ingested into data lakes when it’s not needed. They highlight that this challenge is compounded when ingesting unstructured data—such as files from process reporting, text files from chat transcripts, and emails. They also mention that identifying sensitive data inadvertently stored in structured data fields—such as in a comment field stored in a database—is also a challenge.
In this post, I show you how to integrate Amazon Macie as part of the data ingestion step in your data pipeline. This solution provides an additional checkpoint that sensitive data has been appropriately redacted or tokenized prior to ingestion. Macie is a fully managed data security and privacy service that uses machine learning and pattern matching to discover sensitive data in AWS.
When Macie discovers sensitive data, the solution notifies an administrator to review the data and decide whether to allow the data pipeline to continue ingesting the objects. If allowed, the objects will be tagged with an Amazon Simple Storage Service (Amazon S3) object tag to identify that sensitive data was found in the object before progressing to the next stage of the pipeline.
This combination of automation and manual review helps reduce the risk that sensitive data—such as personally identifiable information—will be ingested into a data lake. This solution can be extended to fit your use case and workflows. For example, you can define custom data identifiers as part of your scans, add additional validation steps, create Macie suppression rules to archive findings automatically, or only request manual approvals for findings that meet certain criteria (such as high severity findings).
Solution overview
Many of my customers are building serverless data lakes with Amazon S3 as the primary data store. Their data pipelines commonly use different S3 buckets at each stage of the pipeline. I refer to the S3 bucket for the first stage of ingestion as the raw data bucket. A typical pipeline might have separate buckets for raw, curated, and processed data representing different stages as part of their data analytics pipeline.
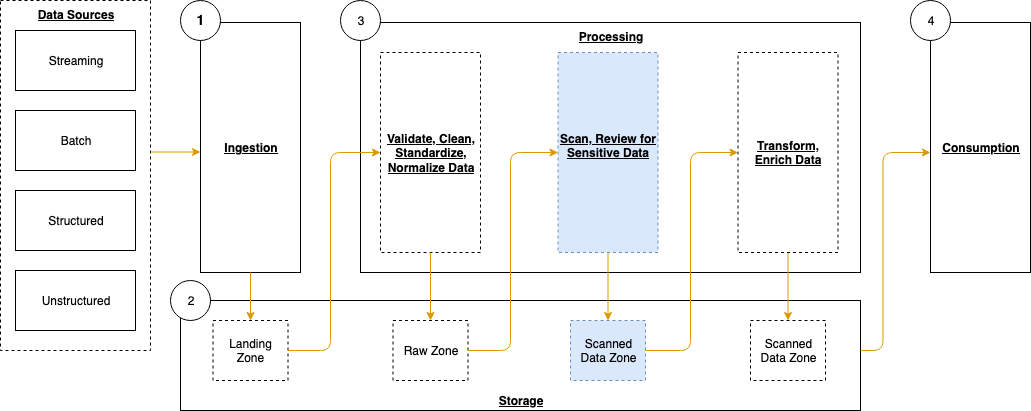
Typically, customers will perform validation and clean their data before moving it to a raw data zone. This solution adds validation steps to that pipeline after preliminary quality checks and data cleaning is performed, noted in blue (in layer 3) of Figure 1. The layers outlined in the pipeline are:
Ingestion – Brings data into the data lake.
Storage – Provides durable, scalable, and secure components to store the data—typically using S3 buckets.
Processing – Transforms data into a consumable state through data validation, cleanup, normalization, transformation, and enrichment. This processing layer is where the additional validation steps are added to identify instances of sensitive data that haven’t been appropriately redacted or tokenized prior to consumption.
Consumption – Provides tools to gain insights from the data in the data lake.
Figure 1: Data pipeline with sensitive data scan
The application runs on a scheduled basis (four times a day, every 6 hours by default) to process data that is added to the raw data S3 bucket. You can customize the application to perform a sensitive data discovery scan during any stage of the pipeline. Because most customers do their extract, transform, and load (ETL) daily, the application scans for sensitive data on a scheduled basis before any crawler jobs run to catalog the data and after typical validation and data redaction or tokenization processes complete.
You can expect that this additional validation will add 5–10 minutes to your pipeline execution at a minimum. The validation processing time will scale linearly based on object size, but there is a start-up time per job that is constant.
If sensitive data is found in the objects, an email is sent to the designated administrator requesting an approval decision, which they indicate by selecting the link corresponding to their decision to approve or deny the next step. In most cases, the reviewer will choose to adjust the sensitive data cleanup processes to remove the sensitive data, deny the progression of the files, and re-ingest the files in the pipeline.
Additional considerations for deploying this application for regular use are discussed at the end of the blog post.
Application components
The following resources are created as part of the application:
S3 buckets store data in various stages of processing: A raw data bucket for uploading objects for the data pipeline, a scanning bucket where objects are scanned for sensitive data, a manual review bucket holding objects where sensitive data was discovered, and a scanned data bucket for starting the next ingestion step of the data pipeline.
Lambda functions execute the logic to run the sensitive data scans and workflow.
Note: the application uses various AWS services, and there are costs associated with these resources after the Free Tier usage. See AWS Pricing for details. The primary drivers of the solution cost will be the amount of data ingested through the pipeline, both for Amazon S3 storage and data processed for sensitive data discovery with Macie.
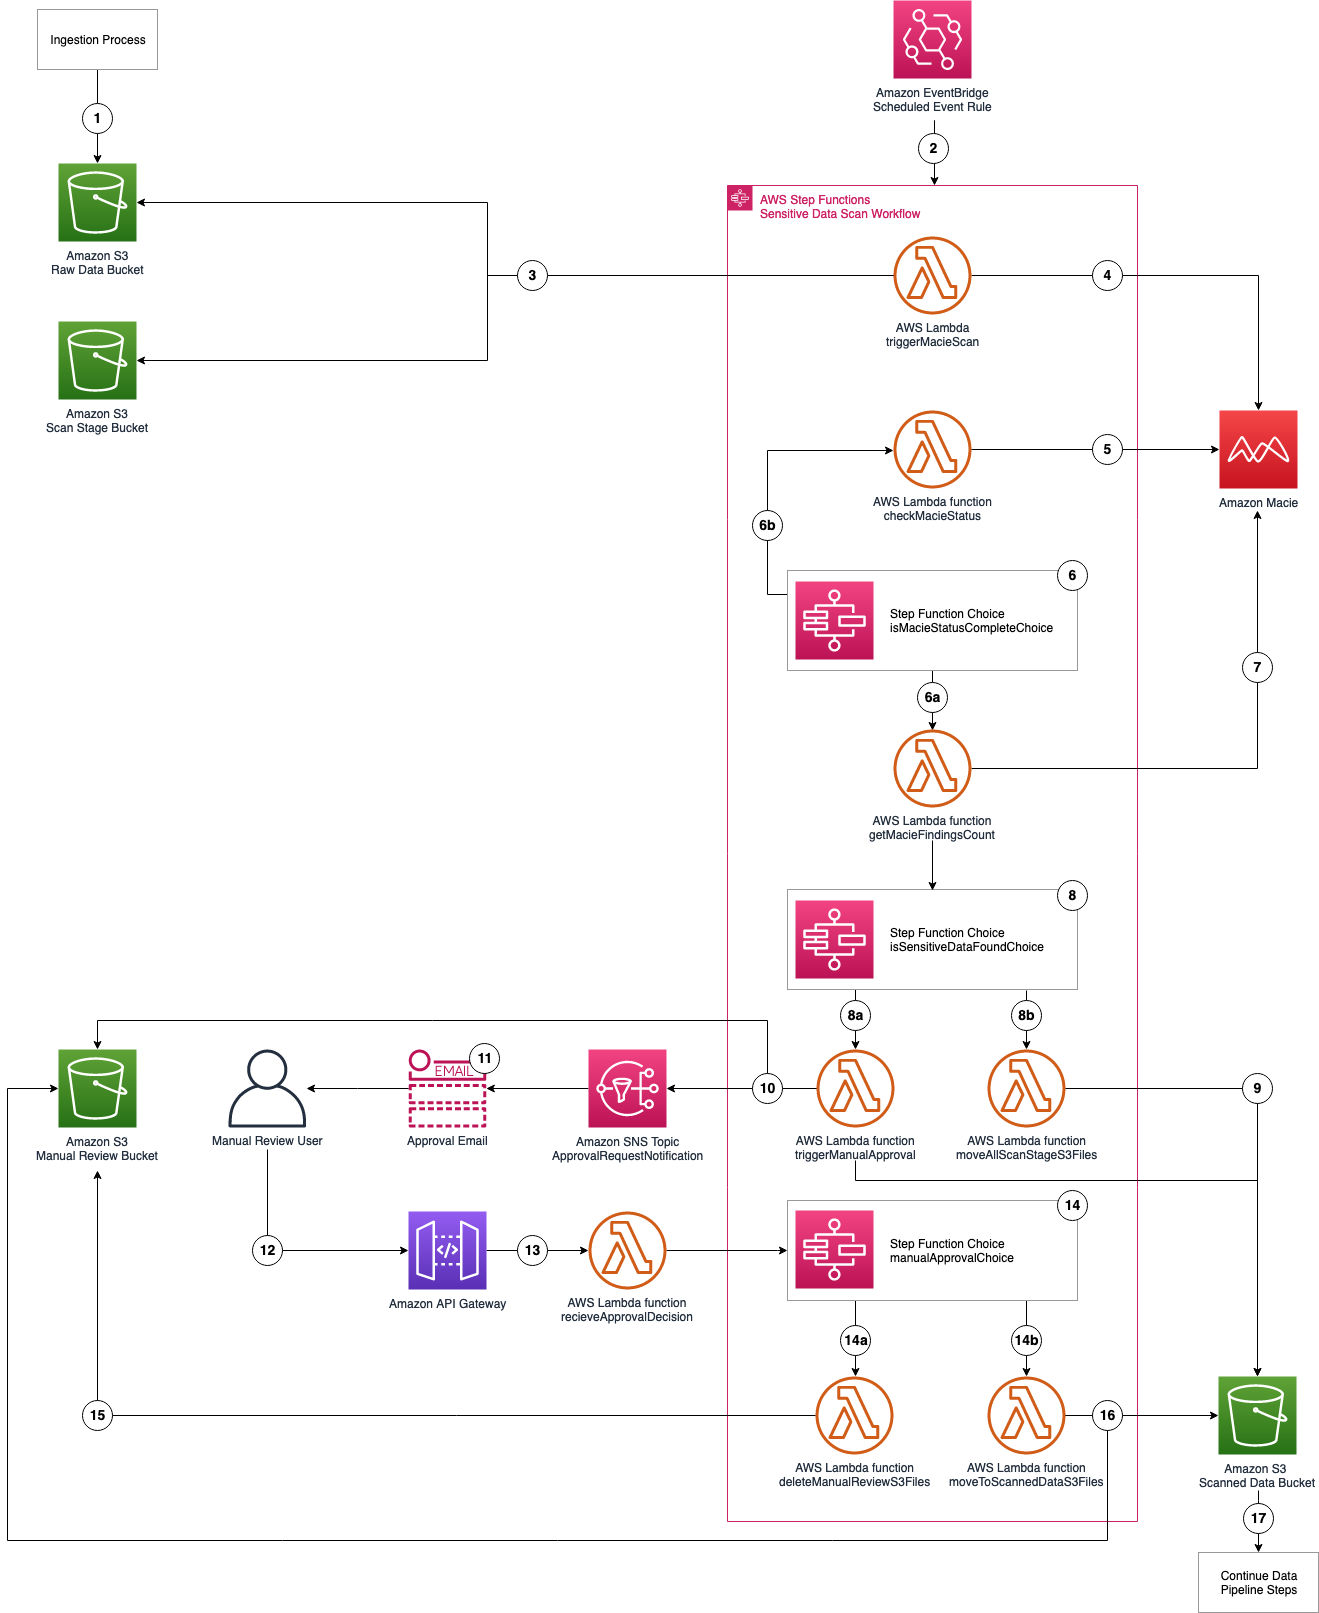
The architecture of the application is shown in Figure 2 and described in the text that follows.
Figure 2: Application architecture and logic
Application logic
Objects are uploaded to the raw data S3 bucket as part of the data ingestion process.
A scheduled EventBridge rule runs the sensitive data scan Step Functions workflow.
triggerMacieScan Lambda function moves objects from the raw data S3 bucket to the scan stage S3 bucket.
triggerMacieScan Lambda function creates a Macie sensitive data discovery job on the scan stage S3 bucket.
checkMacieStatus Lambda function checks the status of the Macie sensitive data discovery job.
isMacieStatusCompleteChoiceStep Functions Choice state checks whether the Macie sensitive data discovery job is complete.
If yes, the getMacieFindingsCount Lambda function runs.
getMacieFindingsCount Lambda function counts all of the findings from the Macie sensitive data discovery job.
isSensitiveDataFound Step Functions Choice state checks whether sensitive data was found in the Macie sensitive data discovery job.
If there was sensitive data discovered, run the triggerManualApproval Lambda function.
If there was no sensitive data discovered, run the moveAllScanStageS3Files Lambda function.
moveAllScanStageS3Files Lambda function moves all of the objects from the scan stage S3 bucket to the scanned data S3 bucket.
triggerManualApproval Lambda function tags and moves objects with sensitive data discovered to the manual review S3 bucket, and moves objects with no sensitive data discovered to the scanned data S3 bucket. The function then sends a notification to the ApprovalRequestNotification Amazon SNS topic as a notification that manual review is required.
Email is sent to the email address that’s subscribed to the ApprovalRequestNotification Amazon SNS topic (from the application deployment template) for the manual review user with the option to Approve or Deny pipeline ingestion for these objects.
Manual review user assesses the objects with sensitive data in the manual review S3 bucket and selects the Approve or Deny links in the email.
The decision request is sent from the Amazon API Gateway to the receiveApprovalDecision Lambda function.
manualApprovalChoice Step Functions Choice state checks the decision from the manual review user.
If denied, run the deleteManualReviewS3Files Lambda function.
If approved, run the moveToScannedDataS3Files Lambda function.
deleteManualReviewS3Files Lambda function deletes the objects from the manual review S3 bucket.
moveToScannedDataS3Files Lambda function moves the objects from the manual review S3 bucket to the scanned data S3 bucket.
The next step of the automated data pipeline will begin with the objects in the scanned data S3 bucket.
Prerequisites
For this application, you need the following prerequisites:
You can use AWS Cloud9 to deploy the application. AWS Cloud9 includes the AWS CLI and AWS SAM CLI to simplify setting up your development environment.
Deploy the application with AWS SAM CLI
You can deploy this application using the AWS SAM CLI. AWS SAM uses AWS CloudFormation as the underlying deployment mechanism. AWS SAM is an open-source framework that you can use to build serverless applications on AWS.
To deploy the application
Initialize the serverless application using the AWS SAM CLI from the GitHub project in the aws-samples repository. This will clone the project locally which includes the source code for the Lambda functions, Step Functions state machine definition file, and the AWS SAM template. On the command line, run the following:
sam init --location gh: aws-samples/amazonmacie-datapipeline-scan
Alternatively, you can clone the Github project directly.
Deploy your application to your AWS account. On the command line, run the following:
sam deploy --guided
Complete the prompts during the guided interactive deployment. The first deployment prompt is shown in the following example.
Configuring SAM deploy
======================

        Looking for config file [samconfig.toml] :  Found
        Reading default arguments  :  Success

        Setting default arguments for 'sam deploy'
        =========================================
        Stack Name [maciepipelinescan]:
Settings:
Stack Name – Name of the CloudFormation stack to be created.
AWS Region – Region—for example, us-west-2, eu-west-1, ap-southeast-1—to deploy the application to. This application was tested in the us-west-2 and ap-southeast-1 Regions. Before selecting a Region, verify that the services you need are available in those Regions (for example, Macie and Step Functions).
Parameter StepFunctionName – Name of the Step Functions state machine to be created—for example, maciepipelinescanstatemachine).
Parameter BucketNamePrefix – Prefix to apply to the S3 buckets to be created (S3 bucket names are globally unique, so choosing a random prefix helps ensure uniqueness).
Parameter ApprovalEmailDestination – Email address to receive the manual review notification.
Parameter EnableMacie – Whether you need Macie enabled in your account or Region. You can select yes or no; select yes if you need Macie to be enabled for you as part of this template, select no, if you already have Macie enabled.
Confirm changes and provide approval for AWS SAM CLI to deploy the resources to your AWS account by responding y to prompts, as shown in the following example. You can accept the defaults for the SAM configuration file and SAM configuration environment prompts.
#Shows you resources changes to be deployed and require a 'Y' to initiate deploy
Confirm changes before deploy [y/N]: y
#SAM needs permission to be able to create roles to connect to the resources in your template
Allow SAM CLI IAM role creation [Y/n]: y
ReceiveApprovalDecisionAPI may not have authorization defined, Is this okay? [y/N]: y
ReceiveApprovalDecisionAPI may not have authorization defined, Is this okay? [y/N]: y
Save arguments to configuration file [Y/n]: y
SAM configuration file [samconfig.toml]:
SAM configuration environment [default]:
Note: This application deploys an Amazon API Gateway with two REST API resources without authorization defined to receive the decision from the manual review step. You will be prompted to accept each resource without authorization. A token (Step Functions taskToken) is used to authenticate the requests.
This creates an AWS CloudFormation changeset. Once the changeset creation is complete, you must provide a final confirmation of y to Deploy the changeset? [y/N] when prompted as shown in the following example.
Changeset created successfully. arn:aws:cloudformation:ap-southeast-1:XXXXXXXXXXXX:changeSet/samcli-deploy1605213119/db681961-3635-4305-b1c7-dcc754c7XXXX


Previewing CloudFormation changeset before deployment
======================================================
Deploy this changeset? [y/N]:
Your application is deployed to your account using AWS CloudFormation. You can track the deployment events in the command prompt or via the AWS CloudFormation console.
After the application deployment is complete, you must confirm the subscription to the Amazon SNS topic. An email will be sent to the email address entered in Step 3 with a link that you need to select to confirm the subscription. This confirmation provides opt-in consent for AWS to send emails to you via the specified Amazon SNS topic. The emails will be notifications of potentially sensitive data that need to be approved. If you don’t see the verification email, be sure to check your spam folder.
Test the application
The application uses an EventBridge scheduled rule to start the sensitive data scan workflow, which runs every 6 hours. You can manually start an execution of the workflow to verify that it’s working. To test the function, you will need a file that contains data that matches your rules for sensitive data. For example, it is easy to create a spreadsheet, document, or text file that contains names, addresses, and numbers formatted like credit card numbers. You can also use this generated sample data to test Macie.
We will test by uploading a file to our S3 bucket via the AWS web console. If you know how to copy objects from the command line, that also works.
Upload test objects to the S3 bucket
Navigate to the Amazon S3 console and upload one or more test objects to the <BucketNamePrefix>-data-pipeline-raw bucket. <BucketNamePrefix> is the prefix you entered when deploying the application in the AWS SAM CLI prompts. You can use any objects as long as they’re a supported file type for Amazon Macie. I suggest uploading multiple objects, some with and some without sensitive data, in order to see how the workflow processes each.
Start the Scan State Machine
Navigate to the Step Functions state machines console. If you don’t see your state machine, make sure you’re connected to the same region that you deployed your application to.
Choose the state machine you created using the AWS SAM CLI as seen in Figure 3. The example state machine is maciepipelinescanstatemachine, but you might have used a different name in your deployment.
Figure 3: AWS Step Functions state machines console
Select the Start execution button and copy the value from the Enter an execution name – optional box. Change the Input – optional value replacing <execution id> with the value just copied as follows:
{
    “id”: “<execution id>”
}
In my example, the <execution id> is fa985a4f-866b-b58b-d91b-8a47d068aa0c from the Enter an execution name – optional box as shown in Figure 4. You can choose a different ID value if you prefer. This ID is used by the workflow to tag the objects being processed to ensure that only objects that are scanned continue through the pipeline. When the EventBridge scheduled event starts the workflow as scheduled, an ID is included in the input to the Step Functions workflow. Then select Start execution again.
Figure 4: New execution dialog box
You can see the status of your workflow execution in the Graph inspector as shown in Figure 5. In the figure, the workflow is at the pollForCompletionWait step.
Figure 5: AWS Step Functions graph inspector
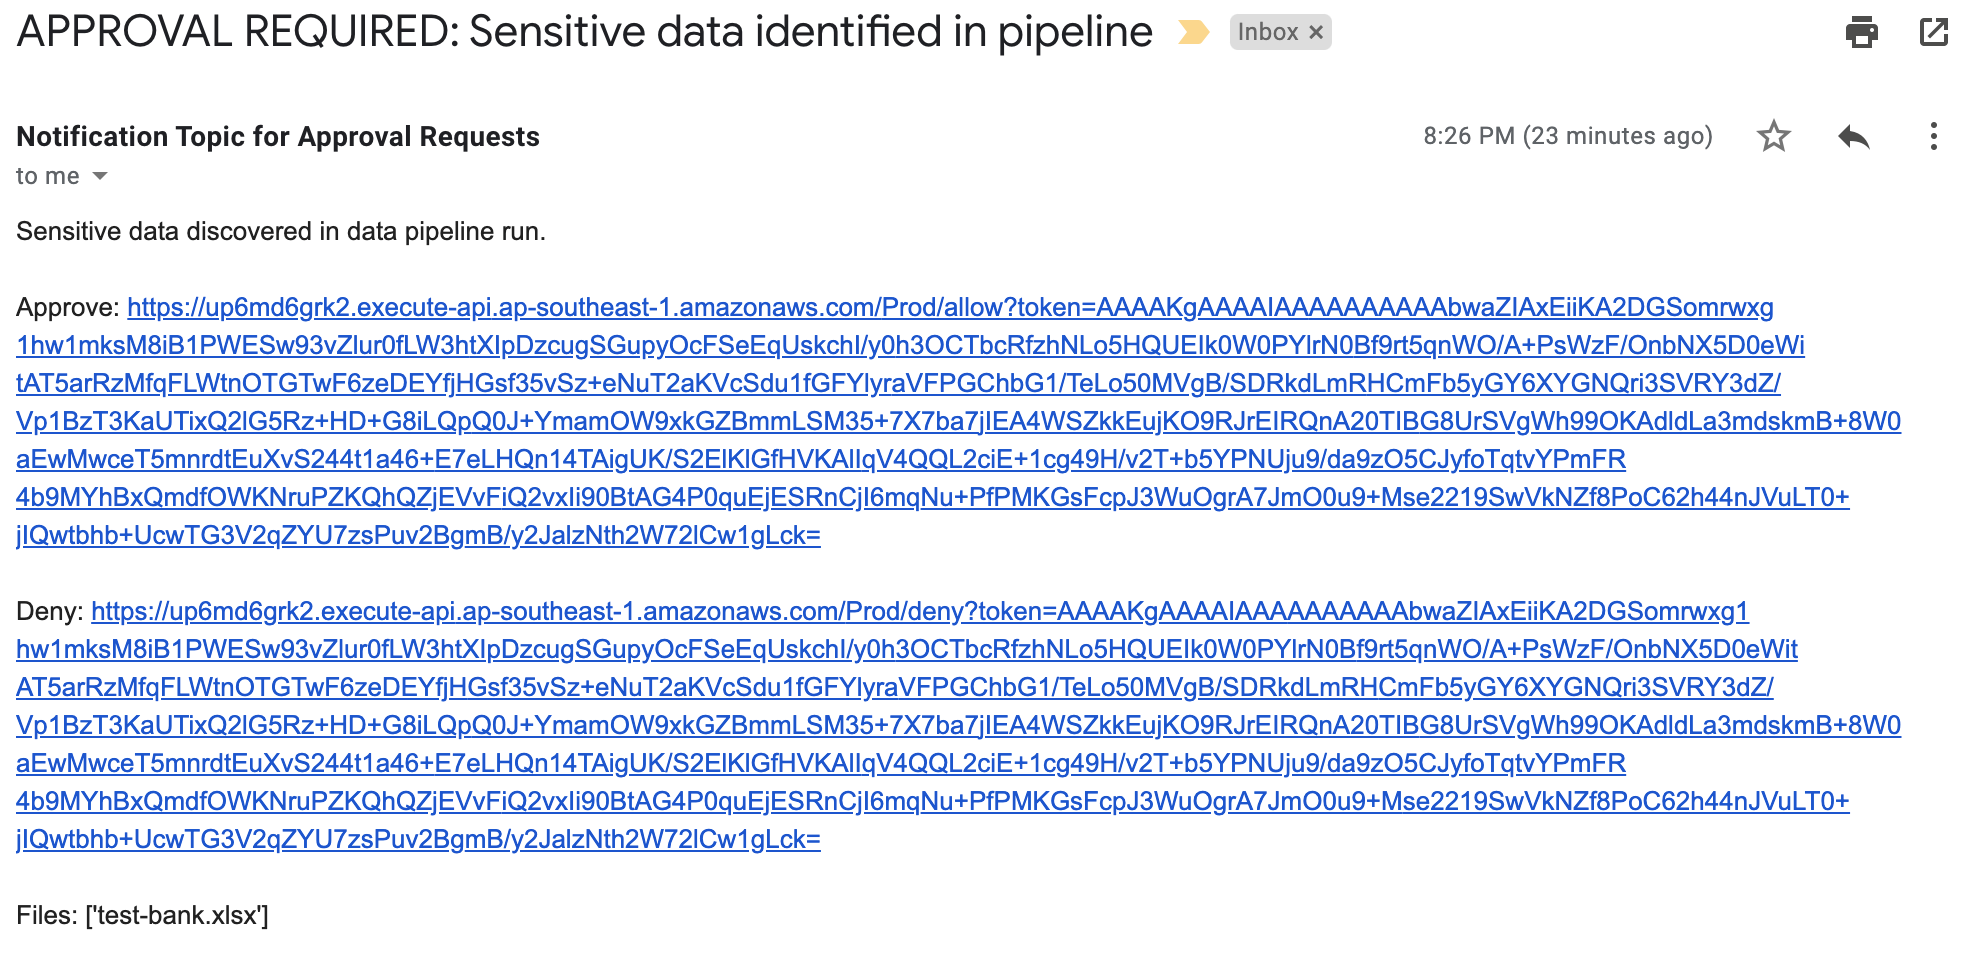
The sensitive discovery job should run for about five to ten minutes. The jobs scale linearly based on object size, but there is a start-up time per job that is constant. If sensitive data is found in the objects uploaded to the <BucketNamePrefix>-data-pipeline-upload S3 bucket, an email is sent to the address provided during the AWS SAM deployment step, notifying the recipient requesting of the need for an approval decision, which they indicate by selecting the link corresponding to their decision to approve or deny the next step as shown in Figure 6.
Figure 6: Sensitive data identified email
When you receive this notification, you can investigate the findings by reviewing the objects in the <BucketNamePrefix>-data-pipeline-manual-review S3 bucket. Based on your review, you can either apply remediation steps to remove any sensitive data or allow the data to proceed to the next step of the data ingestion pipeline. You should define a standard response process to address discovery of sensitive data in the data pipeline. Common remediation steps include review of the files for sensitive data, deleting the files that you do not want to progress, and updating the ETL process to redact or tokenize sensitive data when re-ingesting into the pipeline. When you re-ingest the files into the pipeline without sensitive data, the files will not be flagged by Macie.
The workflow performs the following:
If you select Approve, the files are moved to the <BucketNamePrefix>-data-pipeline-scanned-data S3 bucket with an Amazon S3 SensitiveDataFound object tag with a value of true.
If you select Deny, the files are deleted from the <BucketNamePrefix>-data-pipeline-manual-review S3 bucket.
If no action is taken, the Step Functions workflow execution times out after five days and the file will automatically be deleted from the <BucketNamePrefix>-data-pipeline-manual-review S3 bucket after 10 days.
Clean up the application
You’ve successfully deployed and tested the sensitive data pipeline scan workflow. To avoid ongoing charges for resources you created, you should delete all associated resources by deleting the CloudFormation stack. In order to delete the CloudFormation stack, you must first delete all objects that are stored in the S3 buckets that you created for the application.
To delete the application
Empty the S3 buckets created in this application (<BucketNamePrefix>-data-pipeline-raw S3 bucket, <BucketNamePrefix>-data-pipeline-scan-stage, <BucketNamePrefix>-data-pipeline-manual-review, and <BucketNamePrefix>-data-pipeline-scanned-data).
Before using this application in a production data pipeline, you will need to stop and consider some practical matters. First, the notification mechanism used when sensitive data is identified in the objects is email. Email doesn’t scale: you should expand this solution to integrate with your ticketing or workflow management system. If you choose to use email, subscribe a mailing list so that the work of reviewing and responding to alerts is shared across a team.
Second, the application is run on a scheduled basis (every 6 hours by default). You should consider starting the application when your preliminary validations have completed and are ready to perform a sensitive data scan on the data as part of your pipeline. You can modify the EventBridge Event Rule to run in response to an Amazon EventBridge event instead of a scheduled basis.
Third, the application currently uses a 60 second Step Functions Wait state when polling for the Macie discovery job completion. In real world scenarios, the discovery scan will take 10 minutes at a minimum, likely several orders of magnitude longer. You should evaluate the typical execution times for your application execution and tune the polling period accordingly. This will help reduce costs related to running Lambda functions and log storage within CloudWatch Logs. The polling period is defined in the Step Functions state machine definition file (macie_pipeline_scan.asl.json) under the pollForCompletionWait state.
Fourth, the application currently doesn’t account for false positives in the sensitive data discovery job results. Also, the application will progress or delete all objects identified based on the decision by the reviewer. You should consider expanding the application to handle false positives through automation rather than manual review / intervention (such as deleting the files from the manual review bucket or removing the sensitive data tags applied).
Last, the solution will stop the ingestion of a subset of objects into your pipeline. This behavior is similar to other validation and data quality checks that most customers perform as part of the data pipeline. However, you should test to ensure that this will not cause unexpected outcomes and address them in your downstream application logic accordingly.
Conclusion
In this post, I showed you how to integrate sensitive data discovery using Macie as an additional validation step in an automated data pipeline. You’ve reviewed the components of the application, deployed it using the AWS SAM CLI, tested to validate that the application functions as expected, and cleaned up by removing deployed resources.
You now know how to integrate sensitive data scanning into your ETL pipeline. You can use automation and—where required—manual review to help reduce the risk of sensitive data, such as personally identifiable information, being inadvertently ingested into a data lake. You can take this application and customize it to fit your use case and workflows, such as using custom data identifiers as part of your scans, adding additional validation steps, creating Macie suppression rules to define cases to archive findings automatically, or only request manual approvals for findings that meet certain criteria (such as high severity findings).
If you have feedback about this post, submit comments in the Comments section below. If you have questions about this post, start a new thread on the Amazon Macie forum.
Want more AWS Security how-to content, news, and feature announcements? Follow us on Twitter.
AWS re:Invent will certainly be different in 2020! Instead of seeing you all in Las Vegas, this year re:Invent will be a free, three-week virtual conference. One thing that will remain the same is the variety of sessions, including many Security, Identity, and Compliance sessions. As we developed sessions, we looked to customers—asking where they would like to expand their knowledge. One way we did this was shared in a recent Security blog post, where we introduced a new customer polling feature that provides us with feedback directly from customers. The initial results of the poll showed that Identity and Access Management and Data Protection are top-ranking topics for customers. We wanted to highlight some of the re:Invent sessions for these two important topics so that you can start building your re:Invent schedule. Each session is offered at multiple times, so you can sign up for the time that works best for your location and schedule.
Managing your Identities and Access in AWS
AWS identity: Secure account and application access with AWS SSO Ron Cully, Principal Product Manager, AWS
AWS SSO provides an easy way to centrally manage access at scale across all your AWS Organizations accounts, using identities you create and manage in AWS SSO, Microsoft Active Directory, or external identity providers (such as Okta Universal Directory or Azure AD). This session explains how you can use AWS SSO to manage your AWS environment, and it covers key new features to help you secure and automate account access authorization.
Getting started with AWS identity services Becky Weiss, Senior Principal Engineer, AWS
The number, range, and breadth of AWS services are large, but the set of techniques that you need to secure them is not. Your journey as a builder in the cloud starts with this session, in which practical examples help you quickly get up to speed on the fundamentals of becoming authenticated and authorized in the cloud, as well as on securing your resources and data correctly.
AWS identity: Ten identity health checks to improve security in the cloud Cassia Martin, Senior Security Solutions Architect, AWS
Get practical advice and code to help you achieve the principle of least privilege in your existing AWS environment. From enabling logs to disabling root, the provided checklist helps you find and fix permissions issues in your resources, your accounts, and throughout your organization. With these ten health checks, you can improve your AWS identity and achieve better security every day.
AWS identity: Choosing the right mix of AWS IAM policies for scale Josh Du Lac, Principal Security Solutions Architect, AWS
This session provides both a strategic and tactical overview of various AWS Identity and Access Management (IAM) policies that provide a range of capabilities for the security of your AWS accounts. You probably already use a number of these policies today, but this session will dive into the tactical reasons for choosing one capability over another. This session zooms out to help you understand how to manage these IAM policies across a multi-account environment, covering their purpose, deployment, validation, limitations, monitoring, and more.
Zero Trust: An AWS perspective Quint Van Deman, Principal WW Identity Specialist, AWS
AWS customers have continuously asked, “What are the optimal patterns for ensuring the right levels of security and availability for my systems and data?” Increasingly, they are asking how patterns that fall under the banner of Zero Trust might apply to this question. In this session, you learn about the AWS guiding principles for Zero Trust and explore the larger subdomains that have emerged within this space. Then the session dives deep into how AWS has incorporated some of these concepts, and how AWS can help you on your own Zero Trust journey.
This session is for central security teams and developers who manage application permissions. This session reviews a permissions model that enables you to scale your permissions management with confidence. Learn how to set your organization up for access management success with permission guardrails. Then, learn about granting workforce permissions based on attributes, so they scale as your users and teams adjust. Finally, learn about the access analysis tools and how to use them to identify and reduce broad permissions and give users and systems access to only what they need.
Goldman Sachs takes security and access to AWS accounts seriously. While empowering teams with the freedom to build applications autonomously is critical for scaling cloud usage across the firm, guardrails and controls need to be set in place to enable secure administrative access. In this session, learn how the company built its credential brokering workflow and administrator access for its users. Learn how, with its simple application that uses proprietary and AWS services, including Amazon DynamoDB, AWS Lambda, AWS CloudTrail, Amazon S3, and Amazon Athena, Goldman Sachs is able to control administrator credentials and monitor and report on actions taken for audits and compliance.
Data Protection
Do you need an AWS KMS custom key store? Tracy Pierce, Senior Consultant, AWS
AWS Key Management Service (AWS KMS) has integrated with AWS CloudHSM, giving you the option to create your own AWS KMS custom key store. In this session, you learn more about how a KMS custom key store is backed by an AWS CloudHSM cluster and how it enables you to generate, store, and use your KMS keys in the hardware security modules that you control. You also learn when and if you really need a custom key store. Join this session to learn why you might choose not to use a custom key store and instead use the AWS KMS default.
Using certificate-based authentication on containers & web servers on AWS Josh Rosenthol, Senior Product Manager, AWS Kevin Rioles, Manager, Infrastructure & Security, BlackSky
In this session, BlackSky talks about its experience using AWS Certificate Manager (ACM) end-entity certificates for the processing and distribution of real-time satellite geospatial intelligence and monitoring. Learn how BlackSky uses certificate-based authentication on containers and web servers within its AWS environment to help make TLS ubiquitous in its deployments. The session details the implementation, architecture, and operations best practices that the company chose and how it was able to operate ACM at scale across multiple accounts and regions.
The busy manager’s guide to encryption Spencer Janyk, Senior Product Manager, AWS
In this session, explore the functionality of AWS cryptography services and learn when and where to deploy each of the following: AWS Key Management Service, AWS Encryption SDK, AWS Certificate Manager, AWS CloudHSM, and AWS Secrets Manager. You also learn about defense-in-depth strategies including asymmetric permissions models, client-side encryption, and permission segmentation by role.
Building post-quantum cryptography for the cloud Alex Weibel, Senior Software Development Engineer, AWS
This session introduces post-quantum cryptography and how you can use it today to secure TLS communication. Learn about recent updates on standards and existing deployments, including the AWS post-quantum TLS implementation (pq-s2n). A description of the hybrid key agreement method shows how you can combine a new post-quantum key encapsulation method with a classical key exchange to secure network traffic today.
Data protection at scale using Amazon Macie Neel Sendas, Senior Technical Account Manager, AWS
Data Loss Prevention (DLP) is a common topic among companies that work with sensitive data. If an organization can’t identify its sensitive data, it can’t protect it. Amazon Macie is a fully managed data security and data privacy service that uses machine learning and pattern matching to discover and protect your sensitive data in AWS. In this session, we will share details of the design and architecture you can use to deploy Macie at large scale.
While sessions are virtual this year, they will be offered at multiple times with live moderators and “Ask the Expert” sessions available to help answer any questions that you may have. We look forward to “seeing” you in these sessions. Please see the re:Invent agenda for more details and to build your schedule.
If you have feedback about this post, submit comments in the Comments section below.
Want more AWS Security how-to content, news, and feature announcements? Follow us on Twitter.
The collective thoughts of the interwebz
Manage Consent
To provide the best experiences, we use technologies like cookies to store and/or access device information. Consenting to these technologies will allow us to process data such as browsing behavior or unique IDs on this site. Not consenting or withdrawing consent, may adversely affect certain features and functions.
Functional
Always active
The technical storage or access is strictly necessary for the legitimate purpose of enabling the use of a specific service explicitly requested by the subscriber or user, or for the sole purpose of carrying out the transmission of a communication over an electronic communications network.
Preferences
The technical storage or access is necessary for the legitimate purpose of storing preferences that are not requested by the subscriber or user.
Statistics
The technical storage or access that is used exclusively for statistical purposes.The technical storage or access that is used exclusively for anonymous statistical purposes. Without a subpoena, voluntary compliance on the part of your Internet Service Provider, or additional records from a third party, information stored or retrieved for this purpose alone cannot usually be used to identify you.
Marketing
The technical storage or access is required to create user profiles to send advertising, or to track the user on a website or across several websites for similar marketing purposes.