Tag Archives: news

Simplify How You Manage Authorization in Your Applications with Amazon Verified Permissions – Now Generally Available

Post Syndicated from Danilo Poccia original https://aws.amazon.com/blogs/aws/simplify-how-you-manage-authorization-in-your-applications-with-amazon-verified-permissions-now-generally-available/

When developing a new application or integrating an existing one into a new environment, user authentication and authorization require significant effort to be correctly implemented. In the past, you would have built your own authentication system, but today you can use an external identity provider like Amazon Cognito. Yet, authorization logic is typically implemented in code.

This might begin simply enough, with all users assigned a role for their job function. However, over time, these permissions grow increasingly complex. The number of roles expands, as permissions become more fine-grained. New use cases drive the need for custom permissions. For instance, one user might share a document with another in a different role, or a support agent might require temporary access to a customer account to resolve an issue. Managing permissions in code is prone to errors, and presents significant challenges when auditing permissions and deciding who has access to what, particularly when these permissions are expressed in different applications and using multiple programming languages.

At re:Invent 2022, we introduced in preview Amazon Verified Permissions, a fine-grained permissions management and authorization service for your applications that can be used at any scale. Amazon Verified Permissions centralizes permissions in a policy store and helps developers use those permissions to authorize user actions within their applications. Similar to how an identity provider simplifies authentication, a policy store let you manage authorization in a consistent and scalable way.

To define fine-grained permissions, Amazon Verified Permissions uses Cedar, an open-source policy language and software development kit (SDK) for access control. You can define a schema for your authorization model in terms of principal types, resource types, and valid actions. In this way, when a policy is created, it is validated against your authorization model. You can simplify the creation of similar policies using templates. Changes to the policy store are audited so that you can see of who made the changes and when.

You can then connect your applications to Amazon Verified Permissions through AWS SDKs to authorize access requests. For each authorization request, the relevant policies are retrieved and evaluated to determine whether the action is permitted or not. You can reproduce those authorization requests to confirm that permissions work as intended.

Today, I am happy to share that Amazon Verified Permissions is generally available with new capabilities and a simplified user experience in the AWS Management Console.

Let’s see how you can use it in practice.

Creating a Policy Store with Amazon Verified Permissions
In the Amazon Verified Permissions console, I choose Create policy store. A policy store is a logical container that stores policies and schema. Authorization decisions are made based on all the policies present in a policy store.

To configure the new policy store, I can use different methods. I can start with a guided setup, a sample policy store (such as for a photo-sharing app, an online store, or a task manager), or an empty policy store (recommended for advanced users). I select Guided setup, enter a namespace for my schema (MyApp), and choose Next.

Console screenshot.

Resources are the objects that principals can act on. In my application, I have Users (principals) that can create, read, update, and delete Documents (resources). I start to define the Documents resource type.

I enter the name of the resource type and add two required attributes:

  • owner (String) to specify who is the owner of the document.
  • isPublic (Boolean) to flag public documents that anyone can read.

Console screenshot.

I specify four actions for the Document resource type:

  • DocumentCreate
  • DocumentRead
  • DocumentUpdate
  • DocumentDelete

Console screenshot.

I enter User as the name of the principal type that will be using these actions on Documents. Then, I choose Next.

Console screenshot.

Now, I configure the User principal type. I can use a custom configuration to integrate an external identity source, but in this case, I use an Amazon Cognito user pool that I created before. I choose Connect user pool.

Console screenshot.

In the dialog, I select the AWS Region where the user pool is located, enter the user pool ID, and choose Connect.

Console screenshot.

Now that the Amazon Cognito user pool is connected, I can add another level of protection by validating the client application IDs. For now, I choose not to use this option.

In the Principal attributes section, I select which attributes I am planning to use for attribute-based access control in my policies. I select sub (the subject), used to identify the end user according to the OpenID Connect specification. I can select more attributes. For example, I can use email_verified in a policy to give permissions only to Amazon Cognito users whose email has been verified.

Console screenshot.

As part of the policy store creation, I create a first policy to give read access to user danilop to the doc.txt document.

Console screenshot.

In the following code, the console gives me a preview of the resulting policy using the Cedar language.

permit(
  principal == MyApp::User::"danilop",
  action in [MyApp::Action::"DocumentRead"],
  resource == MyApp::Document::"doc.txt"
) when {
  true
};

Finally, I choose Create policy store.

Adding Permissions to the Policy Store
Now that the policy store has been created, I choose Policies in the navigation pane. In the Create policy dropdown, I choose Create static policy. A static policy contains all the information needed for its evaluation. In my second policy, I allow any user to read public documents. By default everything is forbidden, so in Policy Effect I choose Permit.

In the Policy scope, I leave All principals and All resources selected, and select the DocumentRead action. In the Policy section, I change the when condition clause to limit permissions to resources where isPublic is equal to true:

permit (
  principal,
  action in [MyApp::Action::"DocumentRead"],
  resource
)
when { resource.isPublic };

I enter a description for the policy and choose Create policy.

For my third policy, I create another static policy to allow full access to the owner of a document. Again, in Policy Effect, I choose Permit and, in the Policy scope, I leave All principals and All resources selected. This time, I also leave All actions selected.

In the Policy section, I change the when condition clause to limit permissions to resources where the owner is equal to the sub of the principal:

permit (principal, action, resource)
when { resource.owner == principal.sub };

In my application, I need to allow read access to specific users that are not owners of a document. To simplify that, I create a policy template. Policy templates let me create policies from a template that uses placeholders for some of their values, such as the principal or the resource. The placeholders in a template are keywords that start with the ? character.

In the navigation pane, I choose Policy templates and then Create policy template. I enter a description and use the following policy template body. When using this template, I can specify the value for the ?principal and ?resource placeholders.

permit(
  principal == ?principal,
  action in [MyApp::Action::"DocumentRead"],
  resource == ?resource
);

I complete the creation of the policy template. Now, I use the template to simplify the creation of policies. I choose Policies in the navigation pane, and then Create a template-linked policy in the Create policy dropdown. I select the policy template I just created and choose Next.

To give access to a user (danilop) for a specific document (new-doc.txt), I just pass the following values (note that MyApp is the namespace of the policy store):

  • For the Principal: MyApp::User::"danilop"
  • For the Resource: MyApp::Document::"new-doc.txt"

I complete the creation of the policy. It’s now time to test if the policies work as expected.

Testing Policies in the Console
In my applications, I can use the AWS SDKs to run an authorization request. The console provides a way to to simulate what my applications would do. I choose Test bench in the navigation pane. To simplify testing, I use the Visual mode. As an alternative, I have the option to use the same JSON syntax as in the SDKs.

As Principal, I pass the janedoe user. As Resource, I use requirements.txt. It’s not a public document (isPublic is false) and the owner attribute is equal to janedoe‘s sub. For the Action, I select MyApp::Action::"DocumentUpdate".

When running an authorization request, I can pass Additional entities with more information about principals and resources associated with the request. For now, I leave this part empty.

I choose Run authorization request at the top to see the decision based on the current policies. As expected, the decision is allow. Here, I also see which policies hav been satisfied by the authorization request. In this case, it is the policy that allows full access to the owner of the document.

I can test other values. If I change the owner of the document and the action to DocumentRead, the decision is deny. If I then set the resource attribute isPublic to true, the decision is allow because there is a policy that permits all users to read public documents.

Handling Groups in Permissions
The administrative users in my application need to be able to delete any document. To do so, I create a role for admin users. First, I choose Schema in the navigation pane and then Edit schema. In the list of entity types, I choose to add a new one. I use Role as Type name and add it. Then, I select User in the entity types and edit it to add Role as a parent. I save changes and create the following policy:

permit (
  principal in MyApp::Role::"admin",
  action in [MyApp::Action::"DocumentDelete"],
  resource
);

In the Test bench, I run an authorization request to check if user jeffbarr can delete (DocumentDelete) resource doc.txt. Because he’s not the owner of the resource, the request is denied.

Now, in the Additional entities, I add the MyApp::User entity with jeffbarr as identifier. As parent, I add the MyApp::Role entity with admin as identifier and confirm. The console warns me that entity MyApp::Role::"admin" is referenced, but it isn’t included in additional entities data. I choose to add it and fix this issue.

I run an authorization request again, and it is now allowed because, according to the additional entities, the principal (jeffbarr) is an admin.

Using Amazon Verified Permissions in Your Application
In my applications, I can run an authorization requests using the isAuthorized API action (or isAuthrizedWithToken, if the principal comes from an external identity source).

For example, the following Python code uses the AWS SDK for Python (Boto3) to check if a user has read access to a document. The authorization request uses the policy store I just created.

import boto3
import time

verifiedpermissions_client = boto3.client("verifiedpermissions")

POLICY_STORE_ID = "XAFTHeCQVKkZhsQxmAYXo8"

def is_authorized_to_read(user, resource):

    authorization_result = verifiedpermissions_client.is_authorized(
        policyStoreId=POLICY_STORE_ID, 
        principal={"entityType": "MyApp::User", "entityId": user}, 
        action={"actionType": "MyApp::Action", "actionId": "DocumentRead"},
        resource={"entityType": "MyApp::Document", "entityId": resource}
    )

    print('Can {} read {} ?'.format(user, resource))

    decision = authorization_result["decision"]

    if decision == "ALLOW":
        print("Request allowed")
        return True
    else:
        print("Request denied")
        return False

if is_authorized_to_read('janedoe', 'doc.txt'):
    print("Here's the doc...")

if is_authorized_to_read('danilop', 'doc.txt'):
    print("Here's the doc...")

I run this code and, as you can expect, the output is in line with the tests run before.

Can janedoe read doc.txt ?
Request denied
Can danilop read doc.txt ?
Request allowed
Here's the doc...

Availability and Pricing
Amazon Verified Permissions is available today in all commercial AWS Regions, excluding those that are based in China.

With Amazon Verified Permissions, you only pay for what you use based on the number of authorization requests and API calls made to the service.

Using Amazon Verified Permissions, you can configure fine-grained permissions using the Cedar policy language and simplify the code of your applications. In this way, permissions are maintained in a centralized store and are easier to audit. Here, you can read more about how we built Cedar with automated reasoning and differential testing.

Manage authorization for your applications with Amazon Verified Permissions.

Danilo

Zabbix SNMP monitoring one-day training course

Post Syndicated from Arturs Lontons original https://blog.zabbix.com/zabbix-snmp-monitoring-one-day-training-course/25746/

SNMP – Simple network management protocol is a networking protocol that is extremely prevalent in network hardware such as switches and routers, as well as a variety of other devices such as printers, power supplies and even regular server hosts. Depending on the device, a wide array of metrics can be retrieved by using SNMP without the need to deploy any additional software on the target device. Our newly introduced Zabbix SNMP monitoring one-day extra course will teach you all you need to know about SNMP and how to use Zabbix to get the most out of your SNMP devices with the most optimal data collection approach.

Course contents

The goal of the course is to introduce the core concepts behind SNMP and provide the attendees with the skills necessary to extract the required metrics from SNMP endpoints. The course covers topics such as:

  • SNMP core concepts
  • SNMP command line utilities
  • Differences between SNMP versions
  • SNMP resource discovery with Zabbix Low-level discovery feature
  • Optimizing SNMP data collection with the SNMP walk[*] item introduced in Zabbix 6.4
  • Configuring and monitoring SNMP traps

The course will be hosted by a Zabbix Certified Trainer with thorough experience in SNMP monitoring and Zabbix configuration. The courses are designed with open Q&A sessions in mind, where attendees can discuss their current and potential use cases and how the course contents can be applied to their own real-life scenarios.

Zabbix Certified Specialist on-site training

SNMP monitoring in Zabbix 6.4 and newer versions

Zabbix 6.4 introduces a whole new approach to bulk SNMP monitoring – the walk[*] item. During the course, attendees will learn how the new bulk data collection approach greatly increases the metric collection speed and reduces the potential performance impact on the monitoring endpoint. The course covers the main differences between the old and new approaches and demonstrates how the new SNMP items can be configured in the correct manner. Trainers will also demonstrate and provide the opportunity to practice SNMP resource discovery with the new walk[*] item and Zabbix low-level discovery (LLD) features.

Practical tasks

Depending on the device and vendor, configuring SNMP monitoring can be both very simple or it may require understanding the underlying OID structure to find the data that you’re looking for. To guide our students through real-life scenarios in understanding how SNMP monitoring may differ across devices and vendors, the course includes practical tasks, during which the participants will get the opportunity to configure Zabbix SNMP monitoring for an array of network devices belonging to a selection of the most popular vendors, such as Cisco, HP and Mikrotik. By the end of the course, students will have both a theoretical and practical understanding of SNMP as a protocol and how it can be used by Zabbix for metric collection and problem detection.

At the end of the course, every attendee will receive the course attendance certificate.

Sign up for the SNMP monitoring Zabbix training course and check our other one-day extra courses by visiting the Zabbix Training Extra Courses page.

The post Zabbix SNMP monitoring one-day training course appeared first on Zabbix Blog.

AWS Week in Review – Automate DLQ Redrive for SQS, Lambda Supports Ruby 3.2, and More – June 12, 2023

Post Syndicated from Marcia Villalba original https://aws.amazon.com/blogs/aws/aws-week-in-review-automate-dlq-redrive-for-sqs-lambda-supports-ruby-3-2-and-more-june-12-2023/

Today I’m boarding a plane for Madrid. I will attend the AWS Summit Madrid this Thursday, and I will take Serverlesspresso with me. Serverlesspresso is a demo that we take to events, in where you can learn how to build event-driven architectures with serverless. If you are visiting an AWS Summit, most probably you will find one of our booths.

Serverlesspresso at Madrid

Last Week’s Launches
Here are some launches that got my attention during the previous week.

Amazon SQS – Customers were very excited when we announced the DLQ redrive for Amazon SQS as that feature helped them to easily redirect the failed messages. This week we added support for AWS SDK and CLI for this feature, allowing you to redrive the messages on the DLQ automatically, making it even easier to use this feature. You can read Seb’s blog post about this new feature to learn how to get started.

AWS Lambda – AWS Lambda now supports Ruby 3.2. Ruby 3.2 has many new improvements, for example, passing anonymous arguments to functions or having endless methods. Check out this blog post that goes in depth into each of the new features.

Amazon Fraud DetectorAmazon Fraud Detector supports event orchestration with Amazon EventBridge. This is a very important feature because now you can act on the different events that Fraud Detector emits, for example, send notifications to different stakeholders.

AWS Glue – This week, AWS Glue made two important announcements. First, it announced the general availability of AWS Glue for Ray, a new data integration engine option for AWS Glue. Ray is a popular new open-source compute framework that helps developers to scale their Python workloads. In addition, AWS Glue announced AWS Glue Data Quality, a new capability that automatically measures and monitors data lake and data pipeline quality.

Amazon Elastic Container Registry (Amazon ECR)AWS Signer and Amazon ECR announced a new feature that allows you to sign and verify container images. You can use Signer to validate that only container images you have approved are deployed in your Amazon Elastic Kubernetes Service (Amazon EKS) clusters.

Amazon QuickSightAmazon QuickSight now supports APIs to automate asset deployment, so you can replicate the same QuickSight assets in multiple Regions and account easily. You can read more on how to use those APIs in this blog post.

For a full list of AWS announcements, be sure to keep an eye on the What’s New at AWS page.

Other AWS News
Some other updates and news that you may have missed:

Upcoming AWS Events
Check your calendars and sign up for these AWS events:

  • AWS Silicon Innovation Day (June 21) – A one-day virtual event that focuses on AWS Silicon and how you can take advantage of AWS’s unique offerings. Learn more and register here.
  • AWS Global Summits – There are many summits going on right now around the world: Toronto (June 14), Madrid (June 15), and Milano (June 22).
  • AWS Community Day – Join a community-led conference run by AWS user group leaders in your region: Chicago (June 15), Manila (June 29–30), Chile (July 1), and Munich (September 14).
  • CDK Day CDK Day is happening again this year on September 29. The call for papers for this event is open, and this year we are also accepting talks in Spanish. Submit your talk here.

That’s all for this week. Check back next Monday for another Week in Review!

This post is part of our Week in Review series. Check back each week for a quick roundup of interesting news and announcements from AWS!

— Marcia

New – Move Payment Processing to the Cloud with AWS Payment Cryptography

Post Syndicated from Danilo Poccia original https://aws.amazon.com/blogs/aws/new-move-payment-processing-to-the-cloud-with-aws-payment-cryptography/

Cryptography is everywhere in our daily lives. If you’re reading this blog, you’re using HTTPS, an extension of HTTP that uses encryption to secure communications. On AWS, multiple services and capabilities help you manage keys and encryption, such as:

HSMs are physical devices that securely protect cryptographic operations and the keys used by these operations. HSMs can help you meet your corporate, contractual, and regulatory compliance requirements. With CloudHSM, you have access to general-purpose HSMs. When payments are involved, there are specific payment HSMs that offer capabilities such as generating and validating the personal identification number (PIN) and the security code of a credit or debit card.

Today, I am happy to share the availability of AWS Payment Cryptography, an elastic service that manages payment HSMs and keys for payment processing applications in the cloud.

Applications using payments HSMs have challenging requirements because payment processing is complex, time sensitive, and highly regulated and requires the interaction of multiple financial service providers and payment networks. Every time you make a payment, data is exchanged between two or more financial service providers and must be decrypted, transformed, and encrypted again with a unique key at each step.

This process requires highly performant cryptography capabilities and key management procedures between each payment service provider. These providers might have thousands of keys to protect, manage, rotate, and audit, making the overall process expensive and difficult to scale. To add to that, payment HSMs historically employ complex and error-prone processes, such as exchanging keys in a secure room using multiple hand-carried paper forms, each with separate key components printed on them.

Introducing AWS Payment Cryptography
AWS Payment Cryptography simplifies your implementation of cryptographic functions and key management used to secure data in payment processing in accordance with various payment card industry (PCI) standards.

With AWS Payment Cryptography, you can eliminate the need to provision and manage on-premises payment HSMs and use the provided tools to avoid error-prone key exchange processes. For example, with AWS Payment Cryptography, payment and financial service providers can begin development within minutes and plan to exchange keys electronically, eliminating manual processes.

To provide its elastic cryptographic capabilities in a compliant manner, AWS Payment Cryptography uses HSMs with PCI PTS HSM device approval. These capabilities include encryption and decryption of card data, key creation, and pin translation. AWS Payment Cryptography is also designed in accordance with PCI security standards such as PCI DSS, PCI PIN, and PCI P2PE, and it provides evidence and reporting to help meet your compliance needs.

You can import and export symmetric keys between AWS Payment Cryptography and on-premises HSMs under key encryption key (KEKs) using the ANSI X9 TR-31 protocol. You can also import and export symmetric KEKs with other systems and devices using the ANSI X9 TR-34 protocol, which allows the service to exchange symmetric keys using asymmetric techniques.

To simplify moving consumer payment processing to the cloud, existing card payment applications can use AWS Payment Cryptography through the AWS SDKs. In this way, you can use your favorite programming language, such as Java or Python, instead of vendor-specific ASCII interfaces over TCP sockets, as is common with payment HSMs.

Access can be authorized using AWS Identity and Access Management (IAM) identity-based policies, where you can specify which actions and resources are allowed or denied and under which conditions.

Monitoring is important to maintain the reliability, availability, and performance needed by payment processing. With AWS Payment Cryptography, you can use Amazon CloudWatch, AWS CloudTrail, and Amazon EventBridge to understand what is happening, report when something is wrong, and take automatic actions when appropriate.

Let’s see how this works in practice.

Using AWS Payment Cryptography
Using the AWS Command Line Interface (AWS CLI), I create a double-length 3DES key to be used as a card verification key (CVK). A CVK is a key used for generating and verifying card security codes such as CVV, CVV2, and similar values.

Note that there are two commands for the CLI (and similarly two endpoints for API and SDKs):

  • payment-cryptography for control plane operation such as listing and creating keys and aliases.
  • payment-cryptography-data for cryptographic operations that use keys, for example, to generate PIN or card validation data.

Creating a key is a control plane operation:

aws payment-cryptography create-key \
    --no-exportable \
    --key-attributes KeyAlgorithm=TDES_2KEY,
                     KeyUsage=TR31_C0_CARD_VERIFICATION_KEY,
                     KeyClass=SYMMETRIC_KEY,
                     KeyModesOfUse='{Generate=true,Verify=true}'
{
    "Key": {
        "KeyArn": "arn:aws:payment-cryptography:us-west-2:123412341234:key/42cdc4ocf45mg54h",
        "KeyAttributes": {
            "KeyUsage": "TR31_C0_CARD_VERIFICATION_KEY",
            "KeyClass": "SYMMETRIC_KEY",
            "KeyAlgorithm": "TDES_2KEY",
            "KeyModesOfUse": {
                "Encrypt": false,
                "Decrypt": false,
                "Wrap": false,
                "Unwrap": false,
                "Generate": true,
                "Sign": false,
                "Verify": true,
                "DeriveKey": false,
                "NoRestrictions": false
            }
        },
        "KeyCheckValue": "B2DD4E",
        "KeyCheckValueAlgorithm": "ANSI_X9_24",
        "Enabled": true,
        "Exportable": false,
        "KeyState": "CREATE_COMPLETE",
        "KeyOrigin": "AWS_PAYMENT_CRYPTOGRAPHY",
        "CreateTimestamp": "2023-05-26T14:25:48.240000+01:00",
        "UsageStartTimestamp": "2023-05-26T14:25:48.220000+01:00"
    }
}

To reference this key in the next steps, I can use the Amazon Resource Name (ARN) as found in the KeyARN property, or I can create an alias. An alias is a friendly name that lets me refer to a key without having to use the full ARN. I can update an alias to refer to a different key. When I need to replace a key, I can just update the alias without having to change the configuration or the code of your applications. To be recognized easily, alias names start with alias/. For example, the following command creates the alias alias/my-key for the key I just created:

aws payment-cryptography create-alias --alias-name alias/my-key \
    --key-arn arn:aws:payment-cryptography:us-west-2:123412341234:key/42cdc4ocf45mg54h
{
    "Alias": {
        "AliasName": "alias/my-key",
        "KeyArn": "arn:aws:payment-cryptography:us-west-2:123412341234:key/42cdc4ocf45mg54h"
    }
}

Before I start using the new key, I list all my keys to check their status:

aws payment-cryptography list-keys
{
    "Keys": [
        {
            "KeyArn": "arn:aws:payment-cryptography:us-west-2:123421341234:key/42cdc4ocf45mg54h",
            "KeyAttributes": {
                "KeyUsage": "TR31_C0_CARD_VERIFICATION_KEY",
                "KeyClass": "SYMMETRIC_KEY",
                "KeyAlgorithm": "TDES_2KEY",
                "KeyModesOfUse": {
                    "Encrypt": false,
                    "Decrypt": false,
                    "Wrap": false,
                    "Unwrap": false,
                    "Generate": true,
                    "Sign": false,
                    "Verify": true,
                    "DeriveKey": false,
                    "NoRestrictions": false
                }
            },
            "KeyCheckValue": "B2DD4E",
            "Enabled": true,
            "Exportable": false,
            "KeyState": "CREATE_COMPLETE"
        },
        {
            "KeyArn": "arn:aws:payment-cryptography:us-west-2:123412341234:key/ok4oliaxyxbjuibp",
            "KeyAttributes": {
                "KeyUsage": "TR31_C0_CARD_VERIFICATION_KEY",
                "KeyClass": "SYMMETRIC_KEY",
                "KeyAlgorithm": "TDES_2KEY",
                "KeyModesOfUse": {
                    "Encrypt": false,
                    "Decrypt": false,
                    "Wrap": false,
                    "Unwrap": false,
                    "Generate": true,
                    "Sign": false,
                    "Verify": true,
                    "DeriveKey": false,
                    "NoRestrictions": false
                }
            },
            "KeyCheckValue": "905848",
            "Enabled": true,
            "Exportable": false,
            "KeyState": "DELETE_PENDING"
        }
    ]
}

As you can see, there is another key I created before, which has since been deleted. When a key is deleted, it is marked for deletion (DELETE_PENDING). The actual deletion happens after a configurable period (by default, 7 days). This is a safety mechanism to prevent the accidental or malicious deletion of a key. Keys marked for deletion are not available for use but can be restored.

In a similar way, I list all my aliases to see to which keys they are they referring:

aws payment-cryptography list-aliases
{
    "Aliases": [
        {
            "AliasName": "alias/my-key",
            "KeyArn": "arn:aws:payment-cryptography:us-west-2:123412341234:key/42cdc4ocf45mg54h"
        }
    ]
}

Now, I use the key to generate a card security code with the CVV2 authentication system. You might be familiar with CVV2 numbers that are usually written on the back of a credit card. This is the way they are computed. I provide as input the primary account number of the credit card, the card expiration date, and the key from the previous step. To specify the key, I use its alias. This is a data plane operation:

aws payment-cryptography-data generate-card-validation-data \
    --key-identifier alias/my-key \
    --primary-account-number=171234567890123 \
    --generation-attributes CardVerificationValue2={CardExpiryDate=0124}
{
    "KeyArn": "arn:aws:payment-cryptography:us-west-2:123412341234:key/42cdc4ocf45mg54h",
    "KeyCheckValue": "B2DD4E",
    "ValidationData": "343"
}

I take note of the three digits in the ValidationData property. When processing a payment, I can verify that the card data value is correct:

aws payment-cryptography-data verify-card-validation-data \
    --key-identifier alias/my-key \
    --primary-account-number=171234567890123 \
    --verification-attributes CardVerificationValue2={CardExpiryDate=0124} \
    --validation-data 343
{
    "KeyArn": "arn:aws:payment-cryptography:us-west-2:123412341234:key/42cdc4ocf45mg54h",
    "KeyCheckValue": "B2DD4E"
}

The verification is successful, and in return I get back the same KeyCheckValue as when I generated the validation data.

As you might expect, if I use the wrong validation data, the verification is not successful, and I get back an error:

aws payment-cryptography-data verify-card-validation-data \
    --key-identifier alias/my-key \
    --primary-account-number=171234567890123 \
    --verification-attributes CardVerificationValue2={CardExpiryDate=0124} \
    --validation-data 999

An error occurred (com.amazonaws.paymentcryptography.exception#VerificationFailedException)
when calling the VerifyCardValidationData operation:
Card validation data verification failed

In the AWS Payment Cryptography console, I choose View Keys to see the list of keys.

Console screenshot.

Optionally, I can enable more columns, for example, to see the key type (symmetric/asymmetric) and the algorithm used.

Console screenshot.

I choose the key I used in the previous example to get more details. Here, I see the cryptographic configuration, the tags assigned to the key, and the aliases that refer to this key.

Console screenshot.

AWS Payment Cryptography supports many more operations than the ones I showed here. For this walkthrough, I used the AWS CLI. In your applications, you can use AWS Payment Cryptography through any of the AWS SDKs.

Availability and Pricing
AWS Payment Cryptography is available today in the following AWS Regions: US East (N. Virginia) and US West (Oregon).

With AWS Payment Cryptography, you only pay for what you use based on the number of active keys and API calls with no up-front commitment or minimum fee. For more information, see AWS Payment Cryptography pricing.

AWS Payment Cryptography removes your dependencies on dedicated payment HSMs and legacy key management systems, simplifying your integration with AWS native APIs. In addition, by operating the entire payment application in the cloud, you can minimize round-trip communications and latency.

Move your payment processing applications to the cloud with AWS Payment Cryptography.

Danilo

Announcing the latest AWS Heroes – June 2023

Post Syndicated from Taylor Jacobsen original https://aws.amazon.com/blogs/aws/announcing-the-latest-aws-heroes-june-2023/

AWS Heroes dedicate their time to help others build better and faster on AWS. Heroes support and give back to the community in a variety of ways: contributing to open source projects, organizing AWS Community Days, speaking at conferences, leading workshops, mentoring builders, hosting meetups, and much more.

Please welcome and say hello to our newest AWS Heroes!

AJ Stuyvenberg – Boston, USA

Serverless Hero AJ Stuyvenberg is a Staff Engineer at Datadog, and has been a member of the serverless community since early 2017. His work focuses on serverless and distributed system observability. AJ is an open source author and maintains several projects, which improve the serverless developer experience. He has also spoken at multiple conferences, including AWS re:Invent and AWS Summits, and frequently writes about serverless topics on his blog.

Danielle Heberling – Hillsboro, USA

Serverless Hero Danielle Heberling is a software engineer with a background that includes being a musician, teaching at a K-8 public school, and working in technical support. She’s passionate about building things that make the world a better place, whether that be through social change or a good laugh. When she’s not coding or talking about serverless, you can often find her reaching back to her teaching roots by mentoring folks from underrepresented groups that would like to make a career switch into tech.

Dominik Grzywaczewski – Lublin, Poland

Community Hero Dominik Grzywaczewski is a Senior Cloud Site Reliability Engineer at Chaos Gears with more than 15 years of experience in IT. His primary objective is to assist companies in gaining a deeper understanding of Cloud Computing technologies, and effectively leveraging them to drive faster and more secure innovation. Dominik shares his passion by organizing technical meetups and workshops, and consistently collaborates with AWS community members. He also founded the AWS User Group in Lublin (Poland) and co-organizes the AWS Community Day conference in Warsaw (Poland).

Johannes Koch – Hessen, Germany

DevTools Hero Johannes Koch is a Sr. DevOps Engineer, Developer Experience, GTS at FICO where he contributes to the FICO®️ Platform. He shares his best practices related to Continuous Integration and Continuous Deployment (CI/CD) on his YouTube channel: cicdonaws. Johannes also founded the AWS User Group Bergstrasse, helped to start the AWS Community DACH Förderverein, and is part of the team that organizes the AWS Community Day in the DACH region.

Michael Walmsley – Melbourne, Australia

Serverless Hero Michael Walmsley is a Lead Technology Architect in the myWizard®️ Automation Group at Accenture, where he is focused on building event-driven products in the cloud. He is excited by the AWS Lambda Powertools open-source projects, and has been using and actively contributing to them since 2020. Michael is also a passionate AWS community member in Australia, supporting local meetups and conferences. He helps organize and run the AWS Programming and Tools Meetup in Melbourne, which focuses on running monthly hands-on training workshops that are open to everyone.

Mikey Fan – Beijing, China

Community Hero Mikey Fan is a Cloud-native Application Architect and SDN Developer. Since 2020, he has been actively exploring how to build innovative applications based on AWS EKS, Private 5G, and SD-WAN technology, and then applying them to 5G Edge Computing scenarios. Mikey is also a cloud-computing technology evangelist and an open-source enthusiast. He enjoys contributing code to open-source projects, such as Kubernetes and Tungsten Fabric, and he likes to demo how these open-source technologies can be combined with AWS cloud computing to create greater value.

Ran Isenberg – Kfar Saba, Israel

Serverless Hero Ran Isenberg is a principal software architect at CyberArk, where he designs and builds serverless services. He is passionate about CI/CD and AWS CDK, and has contributed several utilities to the AWS Lambda Powertools open-source project. Ran also maintains numerous serverless related open-source projects on his GitHub account, such as the AWS Lambda cookbook – a serverless service template that gets you started in the serverless world with all of the best practices in seconds.

Sabiha Ali – Dubai, United Arab Emirates

Community Hero Sabiha Ali is a Solutions Architect at ScaleCapacity. She specializes in Amazon Connect, architecting resilient and secure systems in the cloud. As an Amazon Connect Ambassador, she helps businesses enhance their customer experiences. Her unwavering passion for learning has earned her numerous AWS certifications (9X), solidifying her expertise in the field. She became an AWS User Group Leader in Dubai after starting out as an active AWS Community Builder. Sabiha is also committed to empowering women in the tech industry, making her a valued professional and an advocate for change.

Tomasz Dudek – Wroclaw, Poland

Machine Learning Hero Tomasz Dudek works as a Data & AI Team Lead and a Solutions Architect at Chaos Gears. He guides customers on how leveraging machine learning powered solutions can help their businesses thrive. He also designs AWS architectures and manages a data-focused team. Additionally, Tomasz co-organizes the AWS Community Day Poland, and as well as hosts the AWS User Group in his hometown Wroclaw. He often conducts workshops, such as SageMaker Immersion Days, speaks at conferences, and shares his knowledge in the form of short posts on LinkedIn, and longer ones on his blog, ‘MLOps and how you tame it.’

Wojciech Dąbrowski – Katowice, Poland

Community Hero Wojciech Dąbrowski is Head of Cloud Architecture at DTiQ, where he leads the team responsible for the architecture of cloud solutions and the cloud adaptation strategy in the organization. He has been an AWS User Group Silesia leader since 2019, and has managed to organize multiple online and offline meetups. In addition, Wojciech leads workshops and presents cloud computing and software engineering topics at various events.

Learn More

If you’d like to learn more about the new Heroes or connect with a Hero near you, please visit the AWS Heroes website or browse the AWS Heroes Content Library.

Taylor

A New Set of APIs for Amazon SQS Dead-Letter Queue Redrive

Post Syndicated from Sébastien Stormacq original https://aws.amazon.com/blogs/aws/a-new-set-of-apis-for-amazon-sqs-dead-letter-queue-redrive/

Today, we launch a new set of APIs for Amazon Simple Queue Service (Amazon SQS). These new APIs allow you to manage dead-letter queue (DLQ) redrive programmatically. You can now use the AWS SDKs or the AWS Command Line Interface (AWS CLI) to programmatically move messages from the DLQ to their original queue, or to a custom queue destination, to attempt to process them again. A DLQ is a queue where Amazon SQS automatically moves messages that are not correctly processed by your consumer application.

To fully appreciate how this new API might help you, let’s have a quick look back at history.

Message queues are an integral part of modern application architectures. They allow developers to decouple services by allowing asynchronous and message-based communications between message producers and consumers. In most systems, messages are persisted in shared storage (the queue) until the consumer processes them. Message queues allow developers to build applications that are resilient to temporary service failure. They help prioritize message processing and scale their fleet of worker nodes that process the messages. Message queues are also popular in event-driven architectures.

Asynchronous message exchange is not new in application architectures. The concept of exchanging messages asynchronously between applications appeared in the 1960s and was first made popular when IBM launched TCAM for OS/360 in 1972. The general adoption came 20 years later with IBM MQ Series in 1993 (now IBM MQ) and when Sun Microsystems released Java Messaging Service (JMS) in 1998, a standard API for Java applications to interact with message queues.

AWS launched Amazon SQS on July 12, 2006. Amazon SQS is a highly scalable, reliable, and elastic queuing service that “just works.” As Werner wrote at the time: “We have chosen a concurrency model where the process working on a message automatically acquires a leased lock on that message; if the message is not deleted before the lease expires, it becomes available for processing again. Makes failure handling very simple.

On January 29, 2014, we introduced dead-letter queues (DLQ). DLQs help you avoid a message that failed to be processed from staying forever on top of the queue, possibly preventing other messages in the queue from processing. With DLQs, each queue has an associated property telling Amazon SQS how many times a message may be presented for processing (maxReceiveCount). Each message also has an associated receive counter (ReceiveCount). Each time a consumer application picks up a message for processing, the message receive count is incremented by 1. When ReceiveCount > maxReceiveCount, Amazon SQS moves the message to your designated DLQ for human analysis and debugging. You generally associate alarms with the DLQ to send notifications when such events happen. Typical reasons to move a message to the DLQ are because they are incorrectly formatted, there are bugs in the consumer application, or it takes too long to process the message.

At AWS re:Invent 2021, AWS announced dead-letter queue redrive on the Amazon SQS console. The redrive addresses the second part of the failed message lifecycle. It allows you to reinject the message in its original queue to attempt processing it again. After the consumer application is fixed and ready to consume the failed messages, you can redrive the messages from the DLQ back in the source queue or a customized queue destination. It just requires a couple of clicks on the console.

Today, we are adding APIs allowing you to write applications and scripts that handle the redrive programmatically. There is no longer a need to have a human clicking on the console. Using the API increases the scalability of your processes and reduces the risk of human error.

Let’s See It in Action
To try out this new API, I open a terminal for a command-line only demo. Before I get started, I make sure I have the latest version of the AWS CLI. On macOS I enter brew upgrade awscli.

I first create two queues. One is the dead-letter queue, and the other is my application queue:

# First, I create the dead-letter queue (notice the -dlq I choose to add at the end of the queue name)
➜ ~ aws sqs create-queue \
            --queue-name awsnewsblog-dlq                                            
{
    "QueueUrl": "https://sqs.us-east-2.amazonaws.com/012345678900/awsnewsblog-dlq"
}

# second, I retrieve the Arn of the queue I just created
➜  ~ aws sqs get-queue-attributes \
             --queue-url https://sqs.us-east-2.amazonaws.com/012345678900/awsnewsblog-dlq \
             --attribute-names QueueArn
{
    "Attributes": {
        "QueueArn": "arn:aws:sqs:us-east-2:012345678900:awsnewsblog-dlq"
    }
}

# Third, I create the application queue. I enter a redrive policy: post messages in the DLQ after three delivery attempts
➜  ~ aws sqs create-queue \
             --queue-name awsnewsblog \
             --attributes '{"RedrivePolicy": "{\"deadLetterTargetArn\":\"arn:aws:sqs:us-east-2:012345678900:awsnewsblog-dlq\",\"maxReceiveCount\":\"3\"}"}' 
{
    "QueueUrl": "https://sqs.us-east-2.amazonaws.com/012345678900/awsnewsblog"
}

Now that the two queues are ready, I post a message to the application queue:

➜ ~ aws sqs send-message \
            --queue-url https://sqs.us-east-2.amazonaws.com/012345678900/awsnewsblog \
            --message-body "Hello World"
{
"MD5OfMessageBody": "b10a8db164e0754105b7a99be72e3fe5",
"MessageId": "fdc26778-ce9a-4782-9e33-ae73877cfcb2"
}

Next, I consume the message, but I don’t delete it from the queue. This simulates a crash in the message consumer application. Message consumers are supposed to delete the message after successful processing. I set the maxReceivedCount property to 3 when I entered the redrivePolicy. I therefore repeat this operation three times to force Amazon SQS to move the message to the dead-letter queue after three delivery attempts. The default visibility timeout is 30 seconds, so I have to wait 30 seconds or more between the retries.

➜ ~ aws sqs receive-message \
            --queue-url https://sqs.us-east-2.amazonaws.com/012345678900/awsnewsblog
{
"Messages": [
{
"MessageId": "fdc26778-ce9a-4782-9e33-ae73877cfcb2",
"ReceiptHandle": "AQEBP8yOfgBlnjlkGXjyeLROiY7xg7cZ6Znq8Aoa0d3Ar4uvTLPrHZptNotNfKRK25xm+IU8ebD3kDwZ9lja6JYs/t1kBlwiNO6TBACN5srAb/WggQiAAkYl045Tx3CvsOypbJA3y8U+MyEOQRwIz6G85i7MnR8RgKTlhOzOZOVACXC4W8J9GADaQquFaS1wVeM9VDsOxds1hDZLL0j33PIAkIrG016LOQ4sAntH0DOlEKIWZjvZIQGdlRJS65PJu+I/Ka1UPHGiFt9f8m3SR+Y34/ttRWpQANlXQi5ByA47N8UfcpFXXB5L30cUmoDtKucPewsJNG2zRCteR0bQczMMAmOPujsKq70UGOT8X2gEv2LfhlY7+5n8z3yew8sdBjWhVSegrgj6Yzwoc4kXiMddMg==",
"MD5OfBody": "b10a8db164e0754105b7a99be72e3fe5",
"Body": "Hello World"
}
]
}

# wait 30 seconds,
# then repeat two times (for a total of three receive-message API calls)

After three processing attempts, the message is not in the queue anymore:

➜  ~ aws sqs receive-message \
             --queue-url  https://sqs.us-east-2.amazonaws.com/012345678900/awsnewsblog
{
    "Messages": []
}

The message has been moved to the dead-letter queue. I check the DLQ to confirm (notice the queue URL ending with -dlq):

➜  ~ aws sqs receive-message \
             --queue-url  https://sqs.us-east-2.amazonaws.com/012345678900/awsnewsblog-dlq
{
    "Messages": [
        {
            "MessageId": "fdc26778-ce9a-4782-9e33-ae73877cfcb2",
            "ReceiptHandle": "AQEBCLtBMoZYVMMq7fUGNHeCliqE3mFXnkuJ+nOXLK1++uoXWBG31nDejCpxElmiBZWfbcfGJrEdKj4P9HJdrQMYDbeSqB+u1ZlB7CYzQBiQps4SEG0biEoubwqjQbmDZlPrmkFsnYgLD98D1XYWk/Ik6Z2n/wxDo9ko9rbZ15izK5RFnbwveNy8dfc6ireqVB1EGbeGkHcweHGuoeKWXEab1ynZWhNqZsQgCR6pWRkgtn59lJcLv4cJ4UMewNzvt7tMHH69GvVjXdYDYvJJI2vj+6RHvcvSHWWhTNT+CuPEXguVNuNrSya8gho1fCnKpVwQre6HhMlLPjY4wvn/tXY7+5rmte9eXagCqLQXaENB2R7qWNVPiWRIJy8/cTf37NLYVzBom030DNJlH9EeceRhCQ==",
            "MD5OfBody": "b10a8db164e0754105b7a99be72e3fe5",
            "Body": "Hello World"
        }
    ]
}

Now that the setup is ready, let’s programmatically redrive the message to its original queue. Let’s assume I understand why the consumer didn’t correctly process the message and that I fixed the consumer application code. I use start-message-move-task on the DLQ to start the asynchronous redrive. There is an optional attribute (MaxNumberOfMessagesPerSecond) to control the velocity of the redrive:

➜ ~ aws sqs start-message-move-task \
            --source-arn arn:aws:sqs:us-east-2:012345678900:awsnewsblog-dlq
{
    "TaskHandle": "eyJ0YXNrSWQiOiI4ZGJmNjBiMy00MmUwLTQzYTYtYjg4Zi1iMTZjYWRjY2FkNmEiLCJzb3VyY2VBcm4iOiJhcm46YXdzOnNxczp1cy1lYXN0LTI6NDg2NjUyMDY2NjkzOmF3c25ld3NibG9nLWRscSJ9"
}

I can list and check status the of the move tasks I initiated with list-message-move-tasks or cancel a running task by calling the cancel-message-move-task API:

➜ ~ aws sqs list-message-move-tasks \
            --source-arn arn:aws:sqs:us-east-2:012345678900:awsnewsblog-dlq
{
    "Results": [
        {
            "Status": "COMPLETED",
            "SourceArn": "arn:aws:sqs:us-east-2:012345678900:awsnewsblog-dlq",
            "ApproximateNumberOfMessagesMoved": 1,
            "ApproximateNumberOfMessagesToMove": 1,
            "StartedTimestamp": 1684135792239
        }
    ]
}

Now my application can consume the message again from the application queue:

➜  ~ aws sqs receive-message \
             --queue-url  https://sqs.us-east-2.amazonaws.com/012345678900/awsnewsblog                                   
{
    "Messages": [
        {
            "MessageId": "a7ae83ca-cde4-48bf-b822-3d4bc1f4dcae",
            "ReceiptHandle": "AQEB9a+Dm2nvb3VUn9+46j9UsDidU/W6qFwJtXtNWTyfoSDOKT7h73e6ctT9RVZysEw3qqzJOx1cxblTTOSrYwwwoBA2qoJMGsqsrsRGGYojBvf9X8hqi8B8MHn9rTm8diJ2wT2b7WC+TDrx3zIvUeiSEkP+EhqyYOvOs7Q9aETR+Uz02kQxZ/cUJWsN4MMSXBejwW+c5ivv5uQtpfUrfZuCWa9B9O67Kj/q52clriPHpcqCCfJwFBSZkGTXYwTpnjxD4QM7DPS+xVeVfTyM7DsKCAOtpvFBmX5m4UNKT6TROgCnGxTRglUSMWQp8ufVxXiaUyM1dwqxYekM9uX/RCb01gEyCZHas4jeNRV5nUJlhBkkqPlw3i6w9Uuc2y9nH0Df8nH3g7KTXo4lv5Bl3ayh9w==",
            "MD5OfBody": "b10a8db164e0754105b7a99be72e3fe5",
            "Body": "Hello World"
        }
    ]
}

Availability
DLQ redrive APIs are available today in all commercial Regions where Amazon SQS is available.

Redriving the messages from the dead-letter queue to the source queue or a custom destination queue generates additional API calls billed based on existing pricing (starting at $0.40 per million API calls, after the first million, which is free every month). Amazon SQS batches the messages while redriving them from one queue to another. This makes moving messages from one queue to another a simple and low-cost option.

To learn more about DLQ and DLQ redrive, check our documentation.

Remember that we live in an asynchronous world—so should your applications. Get started today and write your first redrive application.

— seb

AWS Week in Review – Amazon Security Lake Now GA, New Actions on AWS Fault Injection Simulator, and More – June 5, 2023

Post Syndicated from Veliswa Boya original https://aws.amazon.com/blogs/aws/aws-week-in-review-amazon-security-lake-now-ga-new-actions-on-aws-fault-injection-simulator-and-more-june-5-2023/

Last Wednesday, I traveled to Cape Town to speak at the .Net Developer User Group. My colleague Francois Bouteruche also gave a talk but joined virtually. I enjoyed my time there—what an amazing community! Join the group in order to learn about upcoming events.

Now onto the AWS updates from last week. There was a lot of news related to AWS, and I have compiled a few announcements you need to know. Let’s get started!

Last Week’s Launches
Here are a few launches from last week that you might have missed:

Amazon Security Lake is now Generally Available – This service automatically centralizes security data from AWS environments, SaaS providers, on-premises environments, and cloud sources into a purpose-built data lake stored in your account, making it easier to analyze security data, gain a more comprehensive understanding of security across your entire organization, and improve the protection of your workloads, applications, and data. Read more in Channy’s post announcing the preview of Security Lake.

New AWS Direct Connect Location in Santiago, Chile – The AWS Direct Connect service lets you create a dedicated network connection to AWS. With this service, you can build hybrid networks by linking your AWS and on-premises networks to build applications that span environments without compromising performance. Last week we announced the opening of a new AWS Direct Connect location in Santiago, Chile. This new Santiago location offers dedicated 1 Gbps and 10 Gbps connections, with MACsec encryption available for 10 Gbps. For more information on over 115 Direct Connect locations worldwide, visit the locations section of the Direct Connect product detail pages.

New actions on AWS Fault Injection Simulator for Amazon EKS and Amazon ECS – Had it not been for Adrian Hornsby’s LinkedIn post I would have missed this announcement. We announced the expanded support of AWS Fault Injection Simulator (FIS) for Amazon Elastic Kubernetes Service (EKS) and Amazon Elastic Container Service (ECS). This expanded support adds additional AWS FIS actions for Amazon EKS and Amazon ECS. Learn more about Amazon ECS task actions here, and Amazon EKS pod actions here.

Other AWS News
A few more news items and blog posts you might have missed:

Autodesk Uses Sagemaker to Improve Observability – One of our customers, Autodesk, used AWS services including Amazon Sagemaker, Amazon Kinesis, and Amazon API Gateway to build a platform that enables development and deployment of near-real time personalization experiments by modeling and responding to user behavior data. All this delivered a dynamic, personalized experience for Autodesk’s customers. Read more about the story at AWS Customer Stories.

AWS DMS Serverless – We announced AWS DMS Serverless which lets you automatically provision and scale capacity for migration and data replication. Donnie wrote about this announcement here.

For AWS open-source news and updates, check out the latest newsletter curated by my colleague Ricardo Sueiras to bring you the most recent updates on open-source projects, posts, events, and more.

For a full list of AWS announcements, be sure to keep an eye on the What’s New at AWS page.

Upcoming AWS Events
We have the following upcoming events. These give you the opportunity to meet with other tech enthusiasts and learn:

AWS Silicon Innovation Day (June 21) – A one-day virtual event that will allow you to understand AWS Silicon and how you can use AWS’s unique silicon offerings to innovate. Learn more and register here.

AWS Global Summits – Sign up for the AWS Summit closest to where you live: London (June 7), Washington, DC (June 7–8), Toronto (June 14).

AWS Community Days – Join these community-led conferences where event logistics and content are planned, sourced, and delivered by community leaders: Chicago, Illinois (June 15), and Chile (July 1).

And with that, I end my very first Week in Review post, and this was such fun to write. Come back next Monday for another Week in Review!

Veliswa x

This post is part of our Week in Review series. Check back each week for a quick roundup of interesting news and announcements from AWS!

New – AWS DMS Serverless: Automatically Provisions and Scales Capacity for Migration and Data Replication

Post Syndicated from Donnie Prakoso original https://aws.amazon.com/blogs/aws/new-aws-dms-serverless-automatically-provisions-and-scales-capacity-for-migration-and-data-replication/

With the vast amount of data being created today, organizations are moving to the cloud to take advantage of the security, reliability, and performance of fully managed database services. To facilitate database and analytics migrations, you can use AWS Database Migration Service (AWS DMS). First launched in 2016, AWS DMS offers a simple migration process that automates database migration projects, saving time, resources, and money.

Although you can start AWS DMS migration with a few clicks through the console, you still need to do research and planning to determine the required capacity before migrating. It can be challenging to know how to properly scale capacity ahead of time, especially when simultaneously migrating many workloads or continuously replicating data. On top of that, you also need to continually monitor usage and manually scale capacity to ensure optimal performance.

Introducing AWS DMS Serverless
Today, I’m excited to tell you about AWS DMS Serverless, a new serverless option in AWS DMS that automatically sets up, scales, and manages migration resources to make your database migrations easier and more cost-effective.

Here’s a quick preview on how AWS DMS Serverless works:

AWS DMS Serverless removes the guesswork of figuring out required compute resources and handling the operational burden needed to ensure a high-performance, uninterrupted migration. It performs automatic capacity provisioning, scaling, and capacity optimization of migrations, allowing you to quickly begin migrations with minimal oversight.

At launch, AWS DMS Serverless supports Microsoft SQL Server, PostgreSQL, MySQL, and Oracle as data sources. As for data targets, AWS DMS Serverless supports a wide range of databases and analytics services, from Amazon Aurora, Amazon Relational Database Service (Amazon RDS), Amazon Simple Storage Service (Amazon S3), Amazon Redshift, Amazon DynamoDB, and more. AWS DMS Serverless continues to add support for new data sources and targets. Visit Supported Engine Versions to stay updated.

With a variety of sources and targets supported by AWS DMS Serverless, many scenarios become possible. You can use AWS DMS Serverless to migrate databases and help to build modern data strategies by synchronizing ongoing data replications into data lakes (e.g., Amazon S3) or data warehouses (e.g., Amazon Redshift) from multiple, perhaps disparate data sources.

How AWS DMS Serverless Works
Let me show you how you can get started with AWS DMS Serverless. In this post, I migrate my data from a source database running on PostgreSQL to a target MySQL database running on Amazon RDS. The following screenshot shows my source database with dummy data:

As for the target, I’ve set up a MySQL database running in Amazon RDS. The following screenshot shows my target database:

Getting starting with AWS DMS Serverless is similar to how AWS DMS works today. AWS DMS Serverless requires me to complete the setup tasks such as creating a virtual private cloud (VPC) to defining source and target endpoints. If this is your first time working with AWS DMS, you can learn more by visiting Prerequisites for AWS Database Migration Service.

To connect to a data store, AWS DMS needs endpoints for both source and target data stores. An endpoint provides all necessary information including connection, data store type, and location to my data stores. The following image shows an endpoint I’ve created for my target database:

When I have finished setting up the endpoints, I can begin to create a replication by selecting the Create replication button on the Serverless replications page. Replication is a new concept introduced in AWS DMS Serverless to abstract instances and tasks that we normally have in standard AWS DMS. Additionally, the capacity resources are managed independently for each replication.

On the Create replication page, I need to define some configurations. This starts with defining Name, then specifying Source database endpoint and Target database endpoint. If you don’t find your endpoints, make sure you’re selecting database engines supported by AWS DMS Serverless.

After that, I need to specify the Replication type. There are three types of replication available in AWS DMS Serverless:

  • Full load — If I need to migrate all existing data in source database
  • Change data capture (CDC) — If I have to replicate data changes from source to target database.
  • Full load and change data capture (CDC) — If I need to migrate existing data and replicate data changes from source to target database.

In this example, I chose Full load and change data capture (CDC) because I need to migrate existing data and continuously update the target database for ongoing changes on the source database.

In the Settings section, I can also enable logging with Amazon CloudWatch, which makes it easier for me to monitor replication progress over time.

As with standard AWS DMS, in AWS DMS Serverless, I can also configure Selection rules in Table mappings to define filters that I need to replicate from table columns in the source data store.

I can also use Transformation rules if I need to rename a schema or table or add a prefix or suffix to a schema or table.

In the Capacity section, I can set the range for required capacity to perform replication by defining the minimum and maximum DCU (DMS capacity units). The minimum DCU setting is optional because AWS DMS Serverless determines the minimum DCU based on an assessment of the replication workload. During replication process, AWS DMS uses this range to scale up and down based on CPU utilization, connections, and available memory.

Setting the maximum capacity allows you to manage costs by making sure that AWS DMS Serverless never consumes more resources than you have budgeted for. When you define the maximum DCU, make sure that you choose a reasonable capacity so that AWS DMS Serverless can handle large bursts of data transaction volumes. If traffic volume decreases, AWS DMS Serverless scales capacity down again, and you only pay for what you need. For cases in which you want to change the minimum and maximum DCU settings, you have to stop the replication process first, make the changes, and run the replication again.

When I’m finished with configuring replication, I select Create replication.

When my replication is created, I can view more details of my replication and start the process by selecting Start.

After my replication runs for around 40 minutes, I can monitor replication progress in the Monitoring tab. AWS DMS Serverless also has a CloudWatch metric called Capacity utilization, which indicates the use of capacity to run replication according to the range defined as minimum and maximum DCU. The following screenshot shows the capacity scales up in the CloudWatch metrics chart.

When the replication finishes its process, I see the capacity starting to decrease. This indicates that in addition to AWS DMS Serverless successfully scaling up to the required capacity, it can also scale down within the range I have defined.

Finally, all I need to do is verify whether my data has been successfully replicated into the target data store. I need to connect to the target, run a select query, and check if all data has been successfully replicated from the source.

Now Available
AWS DMS Serverless is now available in all commercial regions where standard AWS DMS is available, and you can start using it today. For more information about benefits, use cases, how to get started, and pricing details, refer to AWS DMS Serverless.

Happy migrating!
Donnie

New – Snowball Edge Storage Optimized Devices with More Storage and Bandwidth

Post Syndicated from Jeff Barr original https://aws.amazon.com/blogs/aws/new-snowball-edge-storage-optimized-devices-with-more-storage-and-bandwidth/

AWS Snow Family family devices are used to cost-effectively move data to the cloud and to process data at the edge. The enhanced Snowball Edge Storage Optimized devices are designed for your petabyte-scale data migration projects, with 210 terabytes of NVMe storage and the ability to transfer up to 1.5 gigabytes of data per second. The devices also include several connectivity options: 10GBASE-T, SFP48, and QSFP28.

Large Data Migration
In order to make your migration as smooth and efficient as possible, we now have a well-defined Large Data Migration program. As part of this program, we will work with you to make sure that your site is able to support rapid data transfer, and to set up a proof-of-concept migration. If necessary, we will also recommend services and solutions from our AWS Migration Competency Partners. After successful completion of the proof-of-concept you will be familiar with the Snow migration process, and you will be ready to order devices using the process outlined below.

You can make use of the Large Data Migration program by contacting AWS Sales Support.

Ordering Devices
While you can order and manage devices individually, you can save time and reduce complexity by using a large data migration plan. Let’s walk through the process of creating one. I open the AWS Snow Family Console and click Create your large data migration plan:

I enter a name for my migration plan (MediaMigrationPlan), and select or enter the shipping address of my data center:

Then I specify the amount of data that I plan to migrate, and the number of devices that I want to use concurrently (taking into account space, power, bandwidth, and logistics within my data center):

When everything looks good I click Create data migration plan to proceed and my plan becomes active:

I can review the Monitoring section my my plan to see how my migration is going (these are simply Amazon CloudWatch metrics and I can add them to a dashboard, set alarms, and so forth):

The Jobs section includes a recommended job ordering schedule that takes the maximum number of concurrent devices into account:

When I am ready to start transferring data, I visit the Jobs ordered tab and create a Snow job:

As the devices arrive, I connect them to my network and copy data to them via S3 (read Managing AWS Storage) or NFS (read Using NFS File Shares to Manage File Storage), then return it to AWS for ingestion!

Things to Know
Here are a couple of fun facts about this enhanced device:

Regions – Snowball Edge Storage Optimized Devices with 210 TB of storage are available in the US East (N. Virginia) and US West (Oregon) AWS Regions.

Pricing – You pay for the use of the device and for data transfer in and out of AWS, with on-demand and committed upfront pricing available. To learn more about pricing for Snowball Edge Storage Optimized 210 TB devices contact your AWS account team or AWS Sales Support.

Jeff;

AWS Week in Review – AWS Wickr, Amazon Redshift, Generative AI, and More – May 29, 2023

Post Syndicated from Donnie Prakoso original https://aws.amazon.com/blogs/aws/aws-week-in-review-aws-wickr-amazon-redshift-generative-ai-and-more-may-29-2023/

This edition of Week in Review marks the end of the month of May. In addition, we just finished all of the in-person AWS Summits in Asia-Pacific and Japan starting from AWS Summit Sydney and AWS Summit Tokyo in April to AWS Summit ASEAN, AWS Summit Seoul, and AWS Summit Mumbai in May.

Thank you to everyone who attended our AWS Summits in APJ, especially the AWS Heroes, AWS Community Builders, and AWS User Group leaders, for your collaboration in supporting activities at AWS Summit events.

Last Week’s Launches
Here are some launches that caught my attention last week:

AWS Wickr is now HIPAA eligible — AWS Wickr is an end-to-end encrypted enterprise messaging and collaboration tool that enables one-to-one and group messaging, voice and video calling, file sharing, screen sharing, and location sharing, without increasing organizational risk. With this announcement, you can now use AWS Wickr for workloads that are within the scope of HIPAA. Visit AWS Wickr to get started.

Amazon Redshift announces support for auto-commit statements in stored procedure — If you’re using stored procedures in Amazon Redshift, you now have enhanced transaction controls that enable you to automatically commit the statements inside the procedure. This new NONATOMIC mode can be used to handle exceptions inside a stored procedure. You can also use the new PL/pgSQL statement RAISE to programmatically raise the exception, which helps prevent disruptions in applications due to an error inside a stored procedure. For more information on using this feature, refer to Managing transactions.

AWS Chatbot supports access to Amazon CloudWatch dashboards and logs insights in chat channels — With this launch, you now can receive Amazon CloudWatch alarm notifications for an incident directly in your chat channel, analyze the diagnostic data from the dashboards, and remediate directly from the chat channel without switching context. Visit the AWS Chatbot page to learn more.

For a full list of AWS announcements, be sure to keep an eye on the What’s New at AWS page.

AWS Open Source Updates
As always, my colleague Ricardo has curated the latest updates for open source news at AWS. Here are some of the highlights:

OpenEMR on AWS Fargate — OpenEMR is a popular Electronic Health and Medical Practice management solution. If you’re looking to deploy OpenEMR on AWS, then this repo will help you to get your OpenEMR up and running on AWS Fargate using Amazon ECS.

Cloud-Radar — If you’re working with AWS Cloudformation and looking for performing unit tests, then you might want to try Cloud-Radar. You can also perform functional testing with Cloud-Radar as this tool also acts a wrapper around Taskcat.

Amazon and Generative AI
Using generative AI to improve extreme multilabel classification — In their research on extreme multilabel classification (XMC), Amazon scientists explored a generative approach, in which a model generates a sequence of labels for input sequences of words. The generative models with clustering consistently outperformed them. This demonstrates the effectiveness of incorporating hierarchical clustering in improving XMC performance.

Upcoming AWS Events
Don’t miss upcoming AWS-led events happening soon:

Also, let’s learn from our fellow builders and give them support by attending AWS Community Days:

That’s all for this week. Check back next Monday for another Week in Review!

Happy building
— Donnie

This post is part of our Week in Review series. Check back each week for a quick roundup of interesting news and announcements from AWS!

Intel Agilex 7 with R Tile Launched Integrated PCIe Gen5 and CXL

Post Syndicated from Cliff Robinson original https://www.servethehome.com/intel-agilex-7-with-r-tile-launched-integrated-pcie-gen5-and-cxl/

The new Intel Agilex 7 with R-Tile provides hardened PCIe Gen5 and CXL IP to accelerate bringing new solutions to market

The post Intel Agilex 7 with R Tile Launched Integrated PCIe Gen5 and CXL appeared first on ServeTheHome.

AWS Week in Review – AWS Documentation Updates, Amazon EventBridge is Faster, and More – May 22, 2023

Post Syndicated from Danilo Poccia original https://aws.amazon.com/blogs/aws/aws-week-in-review-aws-documentation-updates-amazon-eventbridge-is-faster-and-more-may-22-2023/

AWS Data Hero Anahit Pogosova keynote at CloudConf 2023Here are your AWS updates from the previous 7 days. Last week I was in Turin, Italy for CloudConf, a conference I’ve had the pleasure to participate in for the last 10 years. AWS Hero Anahit Pogosova was also there sharing a few serverless tips in front of a full house. Here’s a picture I took from the last row during her keynote.

On Thursday, May 25, I’ll be at the AWS Community Day in Dublin to celebrate the 10 years of the local AWS User Group. Say hi if you’re there!

Last Week’s Launches
Last week was packed with announcements! Here are the launches that got my attention:

Amazon SageMakerGeospatial capabilities are now generally available with security updates and more use case samples.

Amazon DetectiveSimplify the investigation of AWS Security Findings coming from new sources such as AWS IAM Access Analyzer, Amazon Inspector, and Amazon Macie.

Amazon EventBridge – EventBridge now delivers events up to 80% faster than before, as measured by the time an event is ingested to the first invocation attempt. No change is required on your side.

AWS Control Tower – The service has launched 28 new proactive controls that allow you to block non-compliant resources before they are provisioned for services such as AWS OpenSearch Service, AWS Auto Scaling, Amazon SageMaker, Amazon API Gateway, and Amazon Relational Database Service (Amazon RDS). Check out the original posts from when proactive controls were launched.

Amazon CloudFront – CloudFront now supports two new control directives to help improve performance and availability: stale-while-revalidate (to immediately deliver stale responses to users while it revalidates caches in the background) and the stale-if-error cache (to define how long stale responses should be reused if there’s an error).

Amazon Timestream – Timestream now enables to export query results to Amazon S3 in a cost-effective and secure manner using the new UNLOAD statement.

AWS Distro for OpenTelemetryThe tail sampling and the group-by-trace processors are now generally available in the AWS Distro for OpenTelemetry (ADOT) collector. For example, with tail sampling, you can define sampling policies such as “ingest 100% of all error cases and 5% of all success cases.”

AWS DataSync – You can now use DataSync to copy data to and from Amazon S3 compatible storage on AWS Snowball Edge Compute Optimized devices.

AWS Device Farm – Device Farm now supports VPC integration for private devices, for example, when an unreleased version of an app is accessing a staging environment and tests are accessing internal packages only accessible via private networking. Read more at Access your private network from real mobile devices using AWS Device Farm.

Amazon Kendra – Amazon Kendra now helps you search across different content repositories with new connectors for Gmail, Adobe Experience Manager Cloud, Adobe Experience Manager On-Premise, Alfresco PaaS, and Alfresco Enterprise. There is also an updated Microsoft SharePoint connector.

Amazon Omics – Omics now offers pre-built bioinformatic workflows, synchronous upload capability, integration with Amazon EventBridge, and support for Graphical Processing Units (GPUs). For more information, check out New capabilities make it easier for healthcare and life science customers to get started, build applications, and scale-up on Amazon Omics.

Amazon Braket – Braket now supports Aria, IonQ’s largest and highest fidelity publicly available quantum computing device to date. To learn more, read Amazon Braket launches IonQ Aria whith built-in error mitigation.

For a full list of AWS announcements, be sure to keep an eye on the What’s New at AWS page.

Other AWS News
A few more news items and blog posts you might have missed:

AWS Documentation home page screenshot.AWS Documentation – The AWS Documentation home page has been redesigned. Leave your feedback there to let us know what you think or to suggest future improvements. Last week we also announced that we are retiring the AWS Documentation GitHub repo to focus our resources to directly improve the documentation and the website.

Peloton case studyPeloton embraces Amazon Redshift to unlock the power of data during changing times.

Zoom case studyLearn how Zoom implemented streaming log ingestion and efficient GDPR deletes using Apache Hudi on Amazon EMR.

Nice solutionIntroducing an image-to-speech Generative AI application using SageMaker and Hugging Face.

For AWS open-source news and updates, check out the latest newsletter curated by Ricardo to bring you the most recent updates on open-source projects, posts, events, and more.

Upcoming AWS Events
Here are some opportunities to meet and learn:

AWS Data Insights Day (May 24) – A virtual event to discover how to innovate faster and more cost-effectively with data. This event focuses on customer voices, deep-dive sessions, and best practices of Amazon Redshift. You can register here.

AWS Silicon Innovation Day (June 21) – AWS has designed and developed purpose-built silicon specifically for the cloud. Join to learn AWS innovations in custom-designed Amazon EC2 chips built for high performance and scale in the cloud. Register here.

AWS re:Inforce (June 13–14) – You can still register for AWS re:Inforce. This year it is taking place in Anaheim, California.

AWS Global Summits – Sign up for the AWS Summit closest to where you live: Hong Kong (May 23), India (May 25), Amsterdam (June 1), London (June 7), Washington, DC (June 7-8), Toronto (June 14), Madrid (June 15), and Milano (June 22). If you want to meet, I’ll be at the one in London.

AWS Community Days – Join these community-led conferences where event logistics and content is planned, sourced, and delivered by community leaders: Dublin, Ireland (May 25), Shenzhen, China (May 28), Warsaw, Poland (June 1), Chicago, USA (June 15), and Chile (July 1).

That’s all from me for this week. Come back next Monday for another Week in Review!

Danilo

This post is part of our Week in Review series. Check back each week for a quick roundup of interesting news and announcements from AWS!

NVIDIA Notches a Modest Grace Superchip Win at ISC 2023

Post Syndicated from Patrick Kennedy original https://www.servethehome.com/nvidia-notches-a-modest-grace-superchip-win-at-isc-2023-arm/

That title may be a bit challenging, but it is valid. With the UK-based Isambard 3 supercomputer NVIDIA Grace will have a 2.7PF supercomputer that NVIDIA is pointing out is one of the three greenest. Perhaps the bigger part of this announcement is that it is a vote of confidence for Grace. NVIDIA Notches a […]

The post NVIDIA Notches a Modest Grace Superchip Win at ISC 2023 appeared first on ServeTheHome.

Amazon SageMaker Geospatial Capabilities Now Generally Available with Security Updates and More Use Case Samples

Post Syndicated from Channy Yun original https://aws.amazon.com/blogs/aws/amazon-sagemaker-geospatial-capabilities-now-generally-available-with-security-updates-and-more-use-case-samples/

At AWS re:Invent 2022, we previewed Amazon SageMaker geospatial capabilities, allowing data scientists and machine learning (ML) engineers to build, train, and deploy ML models using geospatial data. Geospatial ML with Amazon SageMaker supports access to readily available geospatial data, purpose-built processing operations and open source libraries, pre-trained ML models, and built-in visualization tools with Amazon SageMaker’s geospatial capabilities.

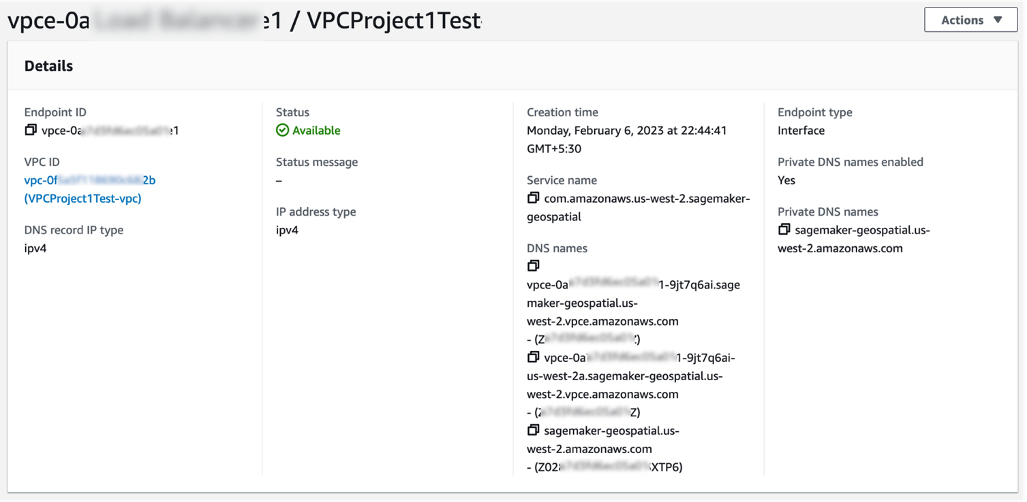
During the preview, we had lots of interest and great feedback from customers. Today, Amazon SageMaker geospatial capabilities are generally available with new security updates and additional sample use cases.

Introducing Geospatial ML features with SageMaker Studio
To get started, use the quick setup to launch Amazon SageMaker Studio in the US West (Oregon) Region. Make sure to use the default Jupyter Lab 3 version when you create a new user in the Studio. Now you can navigate to the homepage in SageMaker Studio. Then select the Data menu and click on Geospatial.

Here is an overview of three key Amazon SageMaker geospatial capabilities:

  • Earth Observation jobs – Acquire, transform, and visualize satellite imagery data using purpose-built geospatial operations or pre-trained ML models to make predictions and get useful insights.
  • Vector Enrichment jobs – Enrich your data with operations, such as converting geographical coordinates to readable addresses.
  • Map Visualization – Visualize satellite images or map data uploaded from a CSV, JSON, or GeoJSON file.

You can create all Earth Observation Jobs (EOJ) in the SageMaker Studio notebook to process satellite data using purpose-built geospatial operations. Here is a list of purpose-built geospatial operations that are supported by the SageMaker Studio notebook:

  • Band Stacking – Combine multiple spectral properties to create a single image.
  • Cloud Masking – Identify cloud and cloud-free pixels to get improved and accurate satellite imagery.
  • Cloud Removal – Remove pixels containing parts of a cloud from satellite imagery.
  • Geomosaic – Combine multiple images for greater fidelity.
  • Land Cover Segmentation – Identify land cover types such as vegetation and water in satellite imagery.
  • Resampling – Scale images to different resolutions.
  • Spectral Index – Obtain a combination of spectral bands that indicate the abundance of features of interest.
  • Temporal Statistics – Calculate statistics through time for multiple GeoTIFFs in the same area.
  • Zonal Statistics – Calculate statistics on user-defined regions.

A Vector Enrichment Job (VEJ) enriches your location data through purpose-built operations for reverse geocoding and map matching. While you need to use a SageMaker Studio notebook to execute a VEJ, you can view all the jobs you create using the user interface. To use the visualization in the notebook, you first need to export your output to your Amazon S3 bucket.

  • Reverse Geocoding – Convert coordinates (latitude and longitude) to human-readable addresses.
  • Map Matching – Snap inaccurate GPS coordinates to road segments.

Using the Map Visualization, you can visualize geospatial data, the inputs to your EOJ or VEJ jobs as well as the outputs exported from your Amazon Simple Storage Service (Amazon S3) bucket.

Security Updates
At GA, we have two major security updates—AWS Key Management Service (AWS KMS) for customer managed AWS KMS key support and Amazon Virtual Private Cloud (Amazon VPC) for geospatial operations in the customer Amazon VPC environment.

AWS KMS customer managed keys offer increased flexibility and control by enabling customers to use their own keys to encrypt geospatial workloads.

You can use KmsKeyId to specify your own key in StartEarthObservationJob and StartVectorEnrichmentJob as an optional parameter. If the customer doesn’t provide KmsKeyId, a service owned key will be used to encrypt the customer content. To learn more, see SageMaker geospatial capabilities AWS KMS Support in the AWS documentation.

Using Amazon VPC, you have full control over your network environment and can more securely connect to your geospatial workloads on AWS. You can use SageMaker Studio or Notebook in your Amazon VPC environment for SageMaker geospatial operations and execute SageMaker geospatial API operations through an interface VPC endpoint in SageMaker geospatial operations.

To get started with Amazon VPC support, configure Amazon VPC on SageMaker Studio Domain and create a SageMaker geospatial VPC endpoint in your VPC in the Amazon VPC console. Choose the service name as com.amazonaws.us-west-2.sagemaker-geospatial and select the VPC in which to create the VPC endpoint.

All Amazon S3 resources that are used for input or output in EOJ and VEJ operations should have internet access enabled. If you have no direct access to those Amazon S3 resources via the internet, you can grant SageMaker geospatial VPC endpoint ID access to it by changing the corresponding S3 bucket policy. To learn more, see SageMaker geospatial capabilities Amazon VPC Support in the AWS documentation.

Example Use Case for Geospatial ML
Customers across various industries use Amazon SageMaker geospatial capabilities for real-world applications.

Maximize Harvest Yield and Food Security
Digital farming consists of applying digital solutions to help farmers optimize crop production in agriculture through the use of advanced analytics and machine learning. Digital farming applications require working with geospatial data, including satellite imagery of the areas where farmers have their fields located.

You can use SageMaker to identify farm field boundaries in satellite imagery through pre-trained models for land cover classification. Learn about How Xarvio accelerated pipelines of spatial data for digital farming with Amazon SageMaker Geospatial in the AWS Machine Learning Blog. You can find an end-to-end digital farming example notebook via the GitHub repository.

Damage Assessment
As the frequency and severity of natural disasters increase, it’s important that we equip decision-makers and first responders with fast and accurate damage assessment. You can use geospatial imagery to predict natural disaster damage and geospatial data in the immediate aftermath of a natural disaster to rapidly identify damage to buildings, roads, or other critical infrastructure.

From an example notebook, you can train, deploy, and predict natural disaster damage from the floods in Rochester, Australia, in mid-October 2022. We use images from before and after the disaster as input to its trained ML model. The results of the segmentation mask for the Rochester floods are shown in the following images. Here we can see that the model has identified locations within the flooded region as likely damaged.

You can train and deploy a geospatial segmentation model to assess wildfire damages using multi-temporal Sentinel-2 satellite data via GitHub repository. The area of interest for this example is located in Northern California, from a region that was affected by the Dixie Wildfire in 2021.

Monitor Climate Change
Earth’s climate change increases the risk of drought due to global warming. You can see how to acquire data, perform analysis, and visualize the changes with SageMaker geospatial capabilities to monitor shrinking shoreline caused by climate change in the Lake Mead example, the largest reservoir in the US.

Lake Mead surface area animation

You can find the notebook code for this example in the GitHub repository.

Predict Retail Demand
The new notebook example demonstrates how to use SageMaker geospatial capabilities to perform a vector-based map-matching operation and visualize the results. Map matching allows you to snap noisy GPS coordinates to road segments. With Amazon SageMaker geospatial capabilities, it is possible to perform a VEJ for map matching. This type of job takes a CSV file with route information (such as longitude, latitude, and timestamps of GPS measurements) as input and produces a GeoJSON file that contains the predicted route.

Support Sustainable Urban Development
Arup, one of our customers, uses digital technologies like machine learning to explore the impact of heat on urban areas and the factors that influence local temperatures to deliver better design and support sustainable outcomes. Urban Heat Islands and the associated risks and discomforts are one of the biggest challenges cities are facing today.

Using Amazon SageMaker geospatial capabilities, Arup identifies and measures urban heat factors with earth observation data, which significantly accelerated their ability to counsel clients. It enabled its engineering teams to carry out analytics that weren’t possible previously by providing access to increased volumes, types, and analysis of larger datasets. To learn more, see Facilitating Sustainable City Design Using Amazon SageMaker with Arup in AWS customer stories.

Now Available
Amazon SageMaker geospatial capabilities are now generally available in the US West (Oregon) Region. As part of the AWS Free Tier, you can get started with SageMaker geospatial capabilities for free. The Free Tier lasts 30 days and includes 10 free ml.geospatial.interactive compute hours, up to 10 GB of free storage, and no $150 monthly user fee.

After the 30-day free trial period is complete, or if you exceed the Free Tier limits defined above, you pay for the components outlined on the pricing page.

To learn more, see Amazon SageMaker geospatial capabilities and the Developer Guide. Give it a try and send feedback to AWS re:Post for Amazon SageMaker or through your usual AWS support contacts.

Channy

New – Simplify the Investigation of AWS Security Findings with Amazon Detective

Post Syndicated from Danilo Poccia original https://aws.amazon.com/blogs/aws/new-simplify-the-investigation-of-aws-security-findings-with-amazon-detective/

With Amazon Detective, you can analyze and visualize security data to investigate potential security issues. Detective collects and analyzes events that describe IP traffic, AWS management operations, and malicious or unauthorized activity from AWS CloudTrail logs, Amazon Virtual Private Cloud (Amazon VPC) Flow Logs, Amazon GuardDuty findings, and, since last year, Amazon Elastic Kubernetes Service (EKS) audit logs. Using this data, Detective constructs a graph model that distills log data using machine learning, statistical analysis, and graph theory to build a linked set of data for your security investigations.

Starting today, Detective offers investigation support for findings in AWS Security Hub in addition to those detected by GuardDuty. Security Hub is a service that provides you with a view of your security state in AWS and helps you check your environment against security industry standards and best practices. If you’ve turned on Security Hub and another integrated AWS security services, those services will begin sending findings to Security Hub.

With this new capability, it is easier to use Detective to determine the cause and impact of findings coming from new sources such as AWS Identity and Access Management (IAM) Access Analyzer, Amazon Inspector, and Amazon Macie. All AWS services that send findings to Security Hub are now supported.

Let’s see how this works in practice.

Enabling AWS Security Findings in the Amazon Detective Console
When you enable Detective for the first time, Detective now identifies findings coming from both GuardDuty and Security Hub, and automatically starts ingesting them along with other data sources. Note that you don’t need to enable or publish these log sources for Detective to start its analysis because this is managed directly by Detective.

If you are an existing Detective customer, you can enable investigation of AWS Security Findings as a data source with one click in the Detective Management Console. I already have Detective enabled, so I add the source package.

In the Detective console, in the Settings section of the navigation pane, I choose General. There, I choose Edit in the Optional source packages section to enable Detective for AWS Security Findings.

Console screenshot.

Once enabled, Detective starts analyzing all the relevant data to identify connections between disparate events and activities. To start your investigation process, you can get a visualization of these connections, including resource behavior and activities. Historical baselines, which you can use to provide comparisons against recent activity, are established after two weeks.

Investigating AWS Security Findings in the Amazon Detective Console
I start in the Security Hub console and choose Findings in the navigation pane. There, I filter findings to only see those where the Product name is Inspector and Severity label is HIGH.

Console screenshot.

The first one looks suspicious, so I choose its Title (CVE-2020-36223 – openldap). The Security Hub console provides me with information about the corresponding Common Vulnerabilities and Exposures (CVE) ID and where and how it was found. At the bottom, I have the option to Investigate in Amazon Detective. I follow the Investigate finding link, and the Detective console opens in another browser tab.

Console screenshot.

Here, I see the entities related to this Inspector finding. First, I open the profile of the AWS account to see all the findings associated with this resource, the overall API call volume issued by this resource, and the container clusters in this account.

For example, I look at the successful and failed API calls to have a better understanding of the impact of this finding.

Console screenshot.

Then, I open the profile for the container image. There, I see the images that are related to this image (because they have the same repository or registry as this image), the containers running from this image during the scope time (managed by Amazon EKS), and the findings associated with this resource.

Depending on the finding, Detective helps me correlate information from different sources such as CloudTrail logs, VPC Flow Logs, and EKS audit logs. This information makes it easier to understand the impact of the finding and if the risk has become an incident. For Security Hub, Detective only ingests findings for configuration checks that failed. Because configuration checks that passed have little security value, we’re filtering these outs.

Availability and Pricing
Amazon Detective investigation support for AWS Security Findings is available today for all existing and new Detective customers in all AWS Regions where Detective is available, including the AWS GovCloud (US) Regions. For more information, see the AWS Regional Services List.

Amazon Detective is priced based on the volume of data ingested. By enabling investigation of AWS Security Findings, you can increase the volume of ingested data. For more information, see Amazon Detective pricing.

When GuardDuty and Security Hub provide a finding, they also suggest the remediation. On top of that, Detective helps me investigate if the vulnerability has been exploited, for example, using logs and network traffic as proof.

Currently, findings coming from Security Hub are not included in the Finding groups section of the Detective console. Our plan is to expand Finding groups to cover the newly integrated AWS security services. Stay tuned!

Start using Amazon Detective to investigate potential security issues.

Danilo