Centralize near-real-time governance through alerts on Amazon Redshift data warehouses for sensitive queries

Post Syndicated from Rajdip Chaudhuri original https://aws.amazon.com/blogs/big-data/centralize-near-real-time-governance-through-alerts-on-amazon-redshift-data-warehouses-for-sensitive-queries/

Amazon Redshift is a fully managed, petabyte-scale data warehouse service in the cloud that delivers powerful and secure insights on all your data with the best price-performance. With Amazon Redshift, you can analyze your data to derive holistic insights about your business and your customers. In many organizations, one or multiple Amazon Redshift data warehouses run daily for data and analytics purposes. Therefore, over time, multiple Data Definition Language (DDL) or Data Control Language (DCL) queries, such as CREATE, ALTER, DROP, GRANT, or REVOKE SQL queries, are run on the Amazon Redshift data warehouse, which are sensitive in nature because they could lead to dropping tables or deleting data, causing disruptions or outages. Tracking such user queries as part of the centralized governance of the data warehouse helps stakeholders understand potential risks and take prompt action to mitigate them following the operational excellence pillar of the AWS Data Analytics Lens. Therefore, for a robust governance mechanism, it’s crucial to alert or notify the database and security administrators on the kind of sensitive queries that are run on the data warehouse, so that prompt remediation actions can be taken if needed.

To address this, in this post we show you how you can automate near-real-time notifications over a Slack channel when certain queries are run on the data warehouse. We also create a simple governance dashboard using a combination of Amazon DynamoDB, Amazon Athena, and Amazon QuickSight.

Solution overview

An Amazon Redshift data warehouse logs information about connections and user activities taking place in databases, which helps monitor the database for security and troubleshooting purposes. These logs can be stored in Amazon Simple Storage Service (Amazon S3) buckets or Amazon CloudWatch. Amazon Redshift logs information in the following log files, and this solution is based on using an Amazon Redshift audit log to CloudWatch as a destination:

  • Connection log – Logs authentication attempts, connections, and disconnections
  • User log – Logs information about changes to database user definitions
  • User activity log – Logs each query before it’s run on the database

The following diagram illustrates the solution architecture.

Solution Architecture

The solution workflow consists of the following steps:

  1. Audit logging is enabled in each Amazon Redshift data warehouse to capture the user activity log in CloudWatch.
  2. Subscription filters on CloudWatch capture the required DDL and DCL commands by providing filter criteria.
  3. The subscription filter triggers an AWS Lambda function for pattern matching.
  4. The Lambda function processes the event data and sends the notification over a Slack channel using a webhook.
  5. The Lambda function stores the data in a DynamoDB table over which a simple dashboard is built using Athena and QuickSight.

Prerequisites

Before starting the implementation, make sure the following requirements are met:

  • You have an AWS account.
  • The AWS Region used for this post is us-east-1. However, this solution is relevant in any other Region where the necessary AWS services are available.
  • Permissions to create Slack a workspace.

Create and configure an Amazon Redshift cluster

To set up your cluster, complete the following steps:

  1. Create a provisioned Amazon Redshift data warehouse.

For this post, we use three Amazon Redshift data warehouses: demo-cluster-ou1, demo-cluster-ou2, and demo-cluster-ou3. In this post, all the Amazon Redshift data warehouses are provisioned clusters. However, the same solution applies for Amazon Redshift Serverless.

  1. To enable audit logging with CloudWatch as the log delivery destination, open an Amazon Redshift cluster and go to the Properties tab.
  2. On the Edit menu, choose Edit audit logging.

Redshift edit audit logging

  1. Select Turn on under Configure audit logging.
  2. Select CloudWatch for Log export type.
  3. Select all three options for User log, Connection log, and User activity log.
  4. Choose Save changes.

  1. Create a parameter group for the clusters with enable_user_activity_logging set as true for each of the clusters.
  2. Modify the cluster to attach the new parameter group to the Amazon Redshift cluster.

For this post, we create three custom parameter groups: custom-param-grp-1, custom-param-grp-2, and custom-param-grp-3 for three clusters.

Note, if you enable only the audit logging feature, but not the associated parameter, the database audit logs log information for only the connection log and user log, but not for the user activity log.

  1. On the CloudWatch console, choose Log groups under Logs in the navigation pane.
  2. Search for /aws/redshift/cluster/demo.

This will show all the log groups created for the Amazon Redshift clusters.

Create a DynamoDB audit table

To create your audit table, complete the following steps:

  1. On the DynamoDB console, choose Tables in the navigation pane.
  2. Choose Create table.
  3. For Table name, enter demo_redshift_audit_logs.
  4. For Partition key, enter partKey with the data type as String.

  1. Keep the table settings as default.
  2. Choose Create table.

Create Slack resources

Slack Incoming Webhooks expect a JSON request with a message string corresponding to a "text" key. They also support message customization, such as adding a user name and icon, or overriding the webhook’s default channel. For more information, see Sending messages using Incoming Webhooks on the Slack website.

The following resources are created for this post:

  • A Slack workspace named demo_rc
  • A channel named #blog-demo in the newly created Slack workspace
  • A new Slack app in the Slack workspace named demo_redshift_ntfn (using the From Scratch option)
  • Note down the Incoming Webhook URL, which will be used in this post for sending the notifications

Create an IAM role and policy

In this section, we create an AWS Identity and Access Management (IAM) policy that will be attached to an IAM role. The role is then used to grant a Lambda function access to a DynamoDB table. The policy also includes permissions to allow the Lambda function to write log files to Amazon CloudWatch Logs.

  1. On the IAM console, choose Policies in navigation pane.
  2. Choose Create policy.
  3. In the Create policy section, choose the JSON tab and enter the following IAM policy. Make sure you replace your AWS account ID in the policy (replace XXXXXXXX with your AWS account ID).
{
    "Version": "2012-10-17",
    "Statement": [
        {
            "Sid": "ReadWriteTable",
            "Effect": "Allow",
            "Action": [
                "dynamodb:BatchGetItem",
                "dynamodb:BatchWriteItem",
                "dynamodb:PutItem",
                "dynamodb:GetItem",
                "dynamodb:Scan",
                "dynamodb:Query",
                "dynamodb:UpdateItem",
                "logs:PutLogEvents"
            ],
            "Resource": [
                "arn:aws:dynamodb:us-east-1:XXXXXXXX:table/demo_redshift_audit_logs",
                "arn:aws:logs:*:XXXXXXXX:log-group:*:log-stream:*"
            ]
        },
        {
            "Sid": "WriteLogStreamsAndGroups",
            "Effect": "Allow",
            "Action": [
                "logs:CreateLogStream",
                "logs:CreateLogGroup"
            ],
            "Resource": "arn:aws:logs:*:XXXXXXXX:log-group:*"
        }
    ]
}
  1. Choose Next: Tags, then choose Next: Review.
  2. Provide the policy name demo_post_policy and choose Create policy.

To apply demo_post_policy to a Lambda function, you first have to attach the policy to an IAM role.

  1. On the IAM console, choose Roles in the navigation pane.
  2. Choose Create role.
  3. Select AWS service and then select Lambda.
  4. Choose Next.

  1. On the Add permissions page, search for demo_post_policy.
  2. Select demo_post_policy from the list of returned search results, then choose Next.

  1. On the Review page, enter demo_post_role for the role and an appropriate description, then choose Create role.

Create a Lambda function

We create a Lambda function with Python 3.9. In the following code, replace the slack_hook parameter with the Slack webhook you copied earlier:

import gzip
import base64
import json
import boto3
import uuid
import re
import urllib3

http = urllib3.PoolManager()
dynamodb = boto3.resource('dynamodb')
table = dynamodb.Table("demo_redshift_audit_logs")
slack_hook = "https://hooks.slack.com/services/xxxxxxx"

def exe_wrapper(data):
    cluster_name = (data['logStream'])
    for event in data['logEvents']:
        message = event['message']
        reg = re.match(r"'(?P<ts>\d{4}-\d\d-\d\dT\d\d:\d\d:\d\dZ).*?\bdb=(?P<db>\S*).*?\buser=(?P<user>\S*).*?LOG:\s+(?P<query>.*?);?$", message)
        if reg is not None:
            filter = reg.groupdict()
            ts = filter['ts']
            db = filter['db']
            user = filter['user']
            query = filter['query']
            query_type = ' '.join((query.split(" "))[0 : 2]).upper()
            object = query.split(" ")[2]
            put_dynamodb(ts,cluster_name,db,user,query,query_type,object,message)
            slack_api(cluster_name,db,user,query,query_type,object)
            
def put_dynamodb(timestamp,cluster,database,user,sql,query_type,object,event):
    table.put_item(Item = {
        'partKey': str(uuid.uuid4()),
        'redshiftCluster': cluster,
        'sqlTimestamp' : timestamp,
        'databaseName' : database,
        'userName': user,
        'sqlQuery': sql,
        'queryType' : query_type,
        'objectName': object,
        'rawData': event
        })
        
def slack_api(cluster,database,user,sql,query_type,object):
    payload = {
	'channel': '#blog-demo',
	'username': 'demo_redshift_ntfn',
	'blocks': [{
			'type': 'section',
			'text': {
				'type': 'mrkdwn',
				'text': 'Detected *{}* command\n *Affected Object*: `{}`'.format(query_type, object)
			}
		},
		{
			'type': 'divider'
		},
		{
			'type': 'section',
			'fields': [{
					'type': 'mrkdwn',
					'text': ':desktop_computer: *Cluster Name:*\n{}'.format(cluster)
				},
				{
					'type': 'mrkdwn',
					'text': ':label: *Query Type:*\n{}'.format(query_type)
				},
				{
					'type': 'mrkdwn',
					'text': ':card_index_dividers: *Database Name:*\n{}'.format(database)
				},
				{
					'type': 'mrkdwn',
					'text': ':technologist: *User Name:*\n{}'.format(user)
				}
			]
		},
		{
			'type': 'section',
			'text': {
				'type': 'mrkdwn',
				'text': ':page_facing_up: *SQL Query*\n ```{}```'.format(sql)
			}
		}
	]
	}
    encoded_msg = json.dumps(payload).encode('utf-8')
    resp = http.request('POST',slack_hook, body=encoded_msg)
    print(encoded_msg) 

def lambda_handler(event, context):
    print(f'Logging Event: {event}')
    print(f"Awslog: {event['awslogs']}")
    encoded_zipped_data = event['awslogs']['data']
    print(f'data: {encoded_zipped_data}')
    print(f'type: {type(encoded_zipped_data)}')
    zipped_data = base64.b64decode(encoded_zipped_data)
    data = json.loads(gzip.decompress(zipped_data))
    exe_wrapper(data)

Create your function with the following steps:

  1. On the Lambda console, choose Create function.
  2. Select Author from scratch and for Function name, enter demo_function.
  3. For Runtime, choose Python 3.9.
  4. For Execution role, select Use an existing role and choose demo_post_role as the IAM role.
  5. Choose Create function.

  1. On the Code tab, enter the preceding Lambda function and replace the Slack webhook URL.
  2. Choose Deploy.

Create a CloudWatch subscription filter

We need to create the CloudWatch subscription filter on the useractivitylog log group created by the Amazon Redshift clusters.

  1. On the CloudWatch console, navigate to the log group /aws/redshift/cluster/demo-cluster-ou1/useractivitylog.
  2. On the Subscription filters tab, on the Create menu, choose Create Lambda subscription filter.

  1. Choose demo_function as the Lambda function.
  2. For Log format, choose Other.
  3. Provide the subscription filter pattern as ?create ?alter ?drop ?grant ?revoke.
  4. Provide the filter name as Sensitive Queries demo-cluster-ou1.
  5. Test the filter by selecting the actual log stream. If it has any queries with a match pattern, then you can see some results. For testing, use the following pattern and choose Test pattern.
'2023-04-02T04:18:43Z UTC [ db=dev user=awsuser pid=100 userid=100 xid=100 ]' LOG: alter table my_table alter column string type varchar(16);
'2023-04-02T04:06:08Z UTC [ db=dev user=awsuser pid=100 userid=100 xid=200 ]' LOG: create user rs_user with password '***';

  1. Choose Start streaming.

  1. Repeat the same steps for /aws/redshift/cluster/demo-cluster-ou2/useractivitylog and /aws/redshift/cluster/demo-cluster-ou3/useractivitylog by giving unique subscription filter names.
  2. Complete the preceding steps to create a second subscription filter for each of the Amazon Redshift data warehouses with the filter pattern ?CREATE ?ALTER ?DROP ?GRANT ?REVOKE, ensuring uppercase SQL commands are also captured through this solution.

Test the solution

In this section, we test the solution in the three Amazon Redshift clusters that we created in the previous steps and check for the notifications of the commands on the Slack channel as per the CloudWatch subscription filters as well as data getting ingested in the DynamoDB table. We use the following commands to test the solution; however, this is not restricted to these commands only. You can check with other DDL commands as per the filter criteria in your Amazon Redshift cluster.

create schema sales;
create schema marketing;
create table dev.public.demo_test_table_1  (id int, string varchar(10));
create table dev.public.demo_test_table_2  (empid int, empname varchar(100));
alter table dev.public.category alter column catdesc type varchar(65);
drop table dev.public.demo_test_table_1;
drop table dev.public.demo_test_table_2;

In the Slack channel, details of the notifications look like the following screenshot.

To get the results in DynamoDB, complete the following steps:

  1. On the DynamoDB console, choose Explore items under Tables in the navigation pane.
  2. In the Tables pane, select demo_redshift_audit_logs.
  3. Select Scan and Run to get the results in the table.

Athena federation over the DynamoDB table

The Athena DynamoDB connector enables Athena to communicate with DynamoDB so that you can query your tables with SQL. As part of the prerequisites for this, deploy the connector to your AWS account using the Athena console or the AWS Serverless Application Repository. For more details, refer to Deploying a data source connector or Using the AWS Serverless Application Repository to deploy a data source connector. For this post, we use the Athena console.

  1. On the Athena console, under Administration in the navigation pane, choose Data sources.
  2. Choose Create data source.

  1. Select the data source as Amazon DynamoDB, then choose Next.

  1. For Data source name, enter dynamo_db.
  2. For Lambda function, choose Create Lambda function to open a new window with the Lambda console.

  1. Under Application settings, enter the following information:
    • For Application name, enter AthenaDynamoDBConnector.
    • For SpillBucket, enter the name of an S3 bucket.
    • For AthenaCatalogName, enter dynamo.
    • For DisableSpillEncryption, enter false.
    • For LambdaMemory, enter 3008.
    • For LambdaTimeout, enter 900.
    • For SpillPrefix, enter athena-spill-dynamo.

  1. Select I acknowledge that this app creates custom IAM roles and choose Deploy.
  2. Wait for the function to deploy, then return to the Athena window and choose the refresh icon next to Lambda function.
  3. Select the newly deployed Lambda function and choose Next.

  1. Review the information and choose Create data source.
  2. Navigate back to the query editor, then choose dynamo_db for Data source and default for Database.
  3. Run the following query in the editor to check the sample data:
SELECT partkey,
       redshiftcluster,
       databasename,
       objectname,
       username,
       querytype,
       sqltimestamp,
       sqlquery,
       rawdata
FROM dynamo_db.default.demo_redshift_audit_logs limit 10;

Visualize the data in QuickSight

In this section, we create a simple governance dashboard in QuickSight using Athena in direct query mode to query the record set, which is persistently stored in a DynamoDB table.

  1. Sign up for QuickSight on the QuickSight console.
  2. Select Amazon Athena as a resource.
  3. Choose Lambda and select the Lambda function created for DynamoDB federation.

  1. Create a new dataset in QuickSight with Athena as the source.
  2. Provide the name of the data source name as demo_blog.
  3. Choose dynamo_db for Catalog, default for Database, and demo_redshift_audit_logs for Table.
  4. Choose Edit/Preview data.

  1. Choose String in the sqlTimestamp column and choose Date.

  1. In the dialog box that appears, enter the data format yyyy-MM-dd'T'HH:mm:ssZZ.
  2. Choose Validate and Update.

  1. Choose PUBLISH & VISUALIZE.
  2. Choose Interactive sheet and choose CREATE.

This will take you to the visualization page to create the analysis on QuickSight.

  1. Create a governance dashboard with the appropriate visualization type.

Refer to the Amazon QuickSight learning videos in QuickSight community for basic to advanced level of authoring. The following screenshot is a sample visualization created on this data.

Clean up

Clean up your resources with the following steps:

  1. Delete all the Amazon Redshift clusters.
  2. Delete the Lambda function.
  3. Delete the CloudWatch log groups for Amazon Redshift and Lambda.
  4. Delete the Athena data source for DynamoDB.
  5. Delete the DynamoDB table.

Conclusion

Amazon Redshift is a powerful, fully managed data warehouse that can offer significantly increased performance and lower cost in the cloud. In this post, we discussed a pattern to implement a governance mechanism to identify and notify sensitive DDL/DCL queries on an Amazon Redshift data warehouse, and created a quick dashboard to enable the DBA and security team to take timely and prompt action as required. Additionally, you can extend this solution to include DDL commands used for Amazon Redshift data sharing across clusters.

Operational excellence is a critical part of the overall data governance on creating a modern data architecture, as it’s a great enabler to drive our customers’ business. Ideally, any data governance implementation is a combination of people, process, and technology that organizations use to ensure the quality and security of their data throughout its lifecycle. Use these instructions to set up your automated notification mechanism as sensitive queries are detected as well as create a quick dashboard on QuickSight to track the activities over time.


About the Authors

Rajdip Chaudhuri is a Senior Solutions Architect with Amazon Web Services specializing in data and analytics. He enjoys working with AWS customers and partners on data and analytics requirements. In his spare time, he enjoys soccer and movies.

Dhiraj Thakur is a Solutions Architect with Amazon Web Services. He works with AWS customers and partners to provide guidance on enterprise cloud adoption, migration, and strategy. He is passionate about technology and enjoys building and experimenting in the analytics and AI/ML space.
AI 101: How Cognitive Science and Computer Processors Create Artificial Intelligence

Post Syndicated from Stephanie Doyle original https://www.backblaze.com/blog/ai-101-how-cognitive-science-and-computer-processors-create-artificial-intelligence/

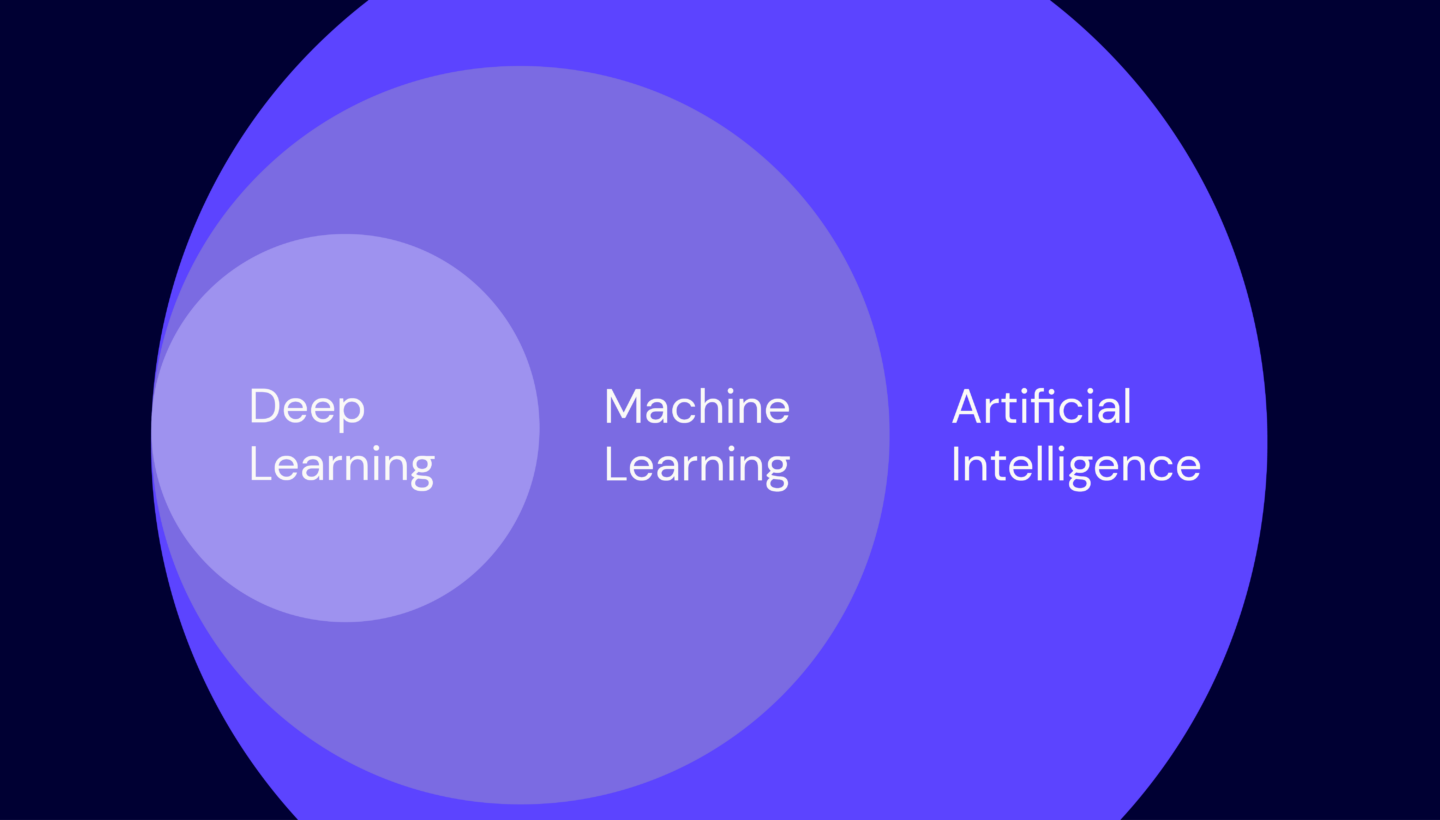
A decorative image with three concentric circles. The smallest says "deep learning;" the medium says "machine learning;" the largest says "artificial intelligence."

Recently, artificial intelligence has been having a moment: It’s gone from an abstract idea in a sci-fi movie, to an experiment in a lab, to a tool that is impacting our everyday lives. With headlines from Bing’s AI confessing its love to a reporter to the struggles over who’s liable in an accident with a self-driving car, the existential reality of what it means to live in an era of rapid technological change is playing out in the news. 

The headlines may seem fun, but it’s important to consider what this kind of tech means. In some ways, you can draw a parallel to the birth of the internet, with all the innovation, ethical dilemmas, legal challenges, excitement, and chaos that brought with it. (We’re totally happy to discuss in the comments section.)

So, let’s keep ourselves grounded in fact and do a quick rundown of some of the technical terms in the greater AI landscape. In this article, we’ll talk about three basic terms to help you define the playing field: artificial intelligence (AI), machine learning (ML), and deep learning (DL).

What Is Artificial Intelligence (AI)?

If you were to search “artificial intelligence,” you’d see varying definitions. Here are a few from good sources. 

From Google, and not Google as in the search engine, but Google in their thought leadership library:

Artificial intelligence is a broad field, which refers to the use of technologies to build machines and computers that have the ability to mimic cognitive functions associated with human intelligence, such as being able to see, understand, and respond to spoken or written language, analyze data, make recommendations, and more. 

Although artificial intelligence is often thought of as a system in itself, it is a set of technologies implemented in a system to enable it to reason, learn, and act to solve a complex problem.

From IBM, a company that has been pivotal in computer development since the early days:

At its simplest form, artificial intelligence is a field, which combines computer science and robust datasets, to enable problem-solving. It also encompasses sub-fields of machine learning and deep learning, which are frequently mentioned in conjunction with artificial intelligence. These disciplines are comprised of AI algorithms which seek to create expert systems which make predictions or classifications based on input data.

From Wikipedia, the crowdsourced and scholarly-sourced oversoul of us all:

Artificial intelligence is intelligence demonstrated by machines, as opposed to intelligence displayed by humans or by other animals. “Intelligence” encompasses the ability to learn and to reason, to generalize, and to infer meaning. Example tasks… include speech recognition, computer vision, translation between (natural) languages, as well as other mappings of inputs.

Allow us to give you the Backblaze summary: Each of these sources are saying that artificial intelligence is what happens when computers start thinking (or appearing to think) for themselves. It’s the what. You call a bot you’re training “an AI;” you also call the characteristic of a computer making decisions AI; you call the entire field of this type of problem solving and programming AI. 

However, using the term “artificial intelligence” does not define how bots are solving problems. Terms like “machine learning” and “deep learning” are how that appearance of intelligence is created—the complexity of the algorithms and tasks to perform, whether the algorithm learns, what kind of theoretical math is used to make a decision, and so on. For the purposes of this article, you can think of artificial intelligence as the umbrella term for the processes of machine learning and deep learning. 

What Is Machine Learning (ML)?

Machine learning (ML) is the study and implementation of computer algorithms that improve automatically through experience. In contrast with AI and in keeping with our earlier terms, AI is when a computer appears intelligent, and ML is when a computer can solve a complex, but defined, task. An algorithm is a set of instructions (the requirements) of a task. 

We engage with algorithms all the time without realizing it—for instance, when you visit a site using a URL starting with “https:” your browser is using SSL (or, more accurately in 2023, TLS), a symmetric encryption algorithm that secures communication between your web browser and the site. Basically, when you click “play” on a cat video, your web browser and the site engage in a series of steps to ensure that the site is what it purports to be, and that a third-party can neither eavesdrop on nor modify any of the cuteness exchanged.

Machine learning does not specify how much knowledge the bot you’re training starts with—any task can have more or fewer instructions. You could ask your friend to order dinner, or you could ask your friend to order you pasta from your favorite Italian place to be delivered at 7:30 p.m. 

Both of those tasks you just asked your friend to complete are algorithms. The first algorithm requires your friend to make more decisions to execute the task at hand to your satisfaction, and they’ll do that by relying on their past experience of ordering dinner with you—remembering your preferences about restaurants, dishes, cost, and so on. 

By setting up more parameters in the second question, you’ve made your friend’s chances of a satisfactory outcome more probable, but there are a ton of things they would still have to determine or decide in order to succeed—finding the phone number of the restaurant, estimating how long food delivery takes, assuming your location for delivery, etc. 

I’m framing this example as a discrete event, but you’ll probably eat dinner with your friend again. Maybe your friend doesn’t choose the best place this time, and you let them know you don’t want to eat there in the future. Or, your friend realizes that the restaurant is closed on Mondays, so you can’t eat there. Machine learning is analogous to the process through which your friend can incorporate feedback—yours or the environment’s—and arrive at a satisfactory dinner plan.

Machines Learning to Teach Machines

A real-world example that will help us tie this down is teaching robots to walk (and there are a ton of fun videos on the subject, if you want to lose yourself in YouTube). Many robotics AI experiments teach their robots to walk in simulated, virtual environments before the robot takes on the physical world.

The key is, though, that the robot updates its algorithm based on new information and predicts outcomes without being programmed to do so. With our walking robot friend, that would look like the robot avoiding an obstacle on its own instead of an operator moving a joystick to avoid the obstacle. 

There’s an in-between step here, and that’s how much human oversight there is when training an AI. In our dinner example, it’s whether your friend is improving dinner plans from your feedback (“I didn’t like the food.”) or from the environment’s feedback (the restaurant is closed). With our robot friend, it’s whether their operator tells them there is an obstacle, or they sense it on their own. These options are defined as supervised learning and unsupervised learning. 

Supervised Learning

An algorithm is trained with labeled input data and is attempting to get to a certain outcome. A good example is predictive maintenance. Here at Backblaze, we closely monitor our fleet of over 230,000 hard drives; every day, we record the SMART attributes for each drive, as well as which drives failed that day. We could feed a subset of that data into a machine learning algorithm, building a model that captures the relationships between those SMART attributes (the input data) and a drive failure (the label). After this training phase, we could test the algorithm and model on a separate subset of data to verify its accuracy at predicting failure, with the ultimate goal of preventing failure by flagging problematic drives based on unlabeled, real-time data.

Unsupervised Learning

An AI is given unlabeled data and asked to identify patterns and probable outcomes. In this case, you’re not asking the bot for an outcome (“Find me an article on AI.”), you’re asking what exists in the dataset (“What types of articles are in this library? What’s the best way to organize this library?”). For example, Google News uses unsupervised learning to categorize articles on the same story from various online news outlets. It recognizes clusters of contemporaneous articles that share key words, and groups them under a suitable heading.

Generative AI: ChatGPT and Bing, DALL-E and Lensa

Most folks’ exposure to AI has been in the form of generative AI. What generative AIs have done that’s revolutionary is to allow us to make a human-speak query to generate “new” material. You can almost think of a generative AI as a DJ with a huge song library—it’s rapidly pulling information from a huge dataset, remixing that information, and presenting you the result. 

So, when you ask ChatGPT to write you a story about a spy, they’re going to go back to all the spy text they’ve seen and give you a story based on those patterns. If you ask it to write a story about James Bond, it’s got a more limited dataset with more predictable patterns. If you ask it to write a six sentence paragraph giving you a good spy plot based on James Bond with the main character Oogly Boogly, you might confuse it (or come up with something totally awesome) because “Oogly Boogly” doesn’t really sound like a name you’d see in spy novels. 

Obviously We Had ChatGPT Write the Story

And here it is, for your amusement:

In the realm of espionage, Oogly Boogly, a suave and cunning agent, embarks on a high-stakes mission akin to James Bond’s daring escapades. Sent to retrieve a stolen prototype weapon, he finds himself entangled in a web of international intrigue. Posing as a debonair art collector, Oogly infiltrates an extravagant gala hosted by a nefarious arms dealer known only as “The Viper.” With his wit and charm, Oogly seduces the Viper’s right-hand woman, gaining access to the secret underground lair where the weapon is hidden. In a thrilling climax, Oogly engages in a heart-stopping duel with The Viper, narrowly escaping the clutches of death. With the weapon recovered, Oogly delivers a clever one-liner before vanishing into the night, leaving the world in awe of his daring exploits and longing for his next thrilling adventure.

I couldn’t live without knowing the clever one-liner, so I asked ChatGPT: “Based on the previous response, what was Oogly’s clever one-liner?”

As Oogly outwitted The Viper and secured the weapon, he flashed a sly smile and uttered his clever one-liner, “Looks like this snake’s venom has run dry.”

We can only assume that Oogly then put on sunglasses while the CSI: Miami theme started in the background.

As a tool, generative AI certainly has both possibilities and limitations. In order to train an AI, you need huge amounts of data, which can come from various sources—one example is when consumers share data in exchange for free or improved apps or services, as evidenced by some (ahem) surprising photos surfacing from a Roomba. 

Also, just to confuse things before we’ve even gotten to defining deep learning: Some people are calling generative AI’s processes “deep machine learning” based on its use of metadata as well as tools like image recognition, and because the algorithms are designed to learn from themselves in order to give you better results in the future. 

An important note for generative AI: It’s certainly not out of the question to make your own library of content—folks call that “training” an AI, though it’s usually done on a larger scale. Check out Backblaze Director of Solution Engineers Troy Liljedahl’s article on Stable Diffusion to see why and how you might want to do that. 

What Is Deep Learning (DL)?

Deep learning is the process of training an AI for complex decision making. “Wait,” you say. “I thought ML was already solving complex tasks.” And you’re right, but the difference is in orders of magnitude, branching possibilities, assumptions, task parameters, and so on. 

To understand the difference between machine learning and deep learning, we’re going to take a brief time-out to talk about programmable logic. And, we’ll start by using our robot friend to help us see how decision making works in a seemingly simple task, and what that means when we’re defining “complex tasks.” 

The direction from the operator is something like, “Robot friend, get yourself from the lab to the front door of the building.” Here are some of the possible decisions the robot then has to make and inputs the robot might have to adjust for: 

  • Now?
    • If yes, then take a step.
    • If no, then wait.
      • What are valid reasons to wait?
      • If you wait, when should you resume the command?
  • Take a step.
    • That step could land on solid ground.
    • Or, there could be a pencil on the floor.
      • If you step on the pencil, was it inconsequential or do you slip?
        • If you slip, do you fall?
          • If you fall, did you sustain damage?
          • If yes, do you need to call for help? 
          • If not or if it’s minor, get back up.
            • If you sustained damage but you could get back up, do you proceed or take the time to repair? 
          • If there’s no damage, then take the next step.
            • First, you’ll have to determine your new position in the room.
  • Take the next step. All of the first-step possibilities exist, and some new ones, too.
    • With the same foot or the other foot? 
    • In a straight line or make a turn? 

And so on and so forth. Now, take that direction that has parameters—where and how—and get rid of some of them. Your direction for a deep learning AI might be, “Robot, come to my house.” Or, it might be telling the robot to go about a normal day, which means it would have to decide when and how to walk for itself without a specific “walk” command from an operator. 

Neural Networks: Logic, Math, and Processing Power

Thus far in the article, we’ve talked about intelligence as a function of decision making. Algorithms outline the decision we want made or the dataset we want the AI to engage with. But, when you think about the process of decision making, you’re actually talking about many decisions getting made in a series. With machine learning, you’re giving more parameters for how to make decisions. With deep learning, you’re asking open-ended questions. 

You can certainly view these definitions as having a big ol’ swath of gray area and overlap in their definitions. But at a certain point, all those decisions a computer has to make starts to slow a computer down and require more processing power. There are processors for different kinds of AI by the way, all designed to increase processing power. Whatever that point is, you’ve reached a deep learning threshold. 

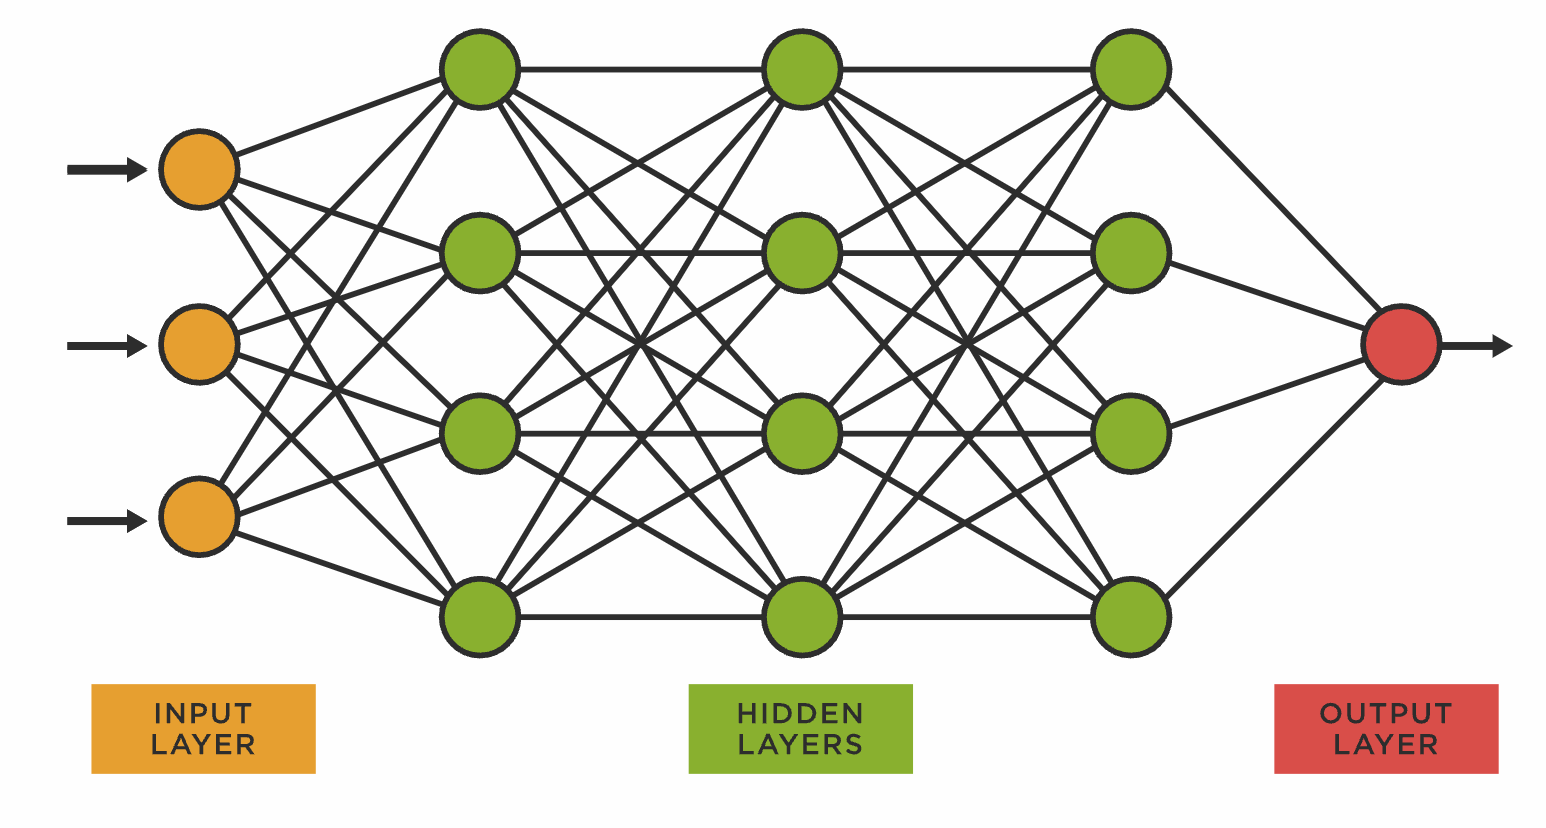
If we’re looking at things as yes/nos, we assume there’s only one outcome to each choice. Ultimately, yes, our robot is either going to take a step or not. But all of those internal choices, as you can see from the above messy and incomplete list, create nested dependencies. When you’re solving a complex task, you need a structure that is not a strict binary, and that’s when you create a neural network. 

An image showing how a neural network is mapped.
Image source.

Neural networks learn, just like other ML mechanisms. As its name suggests, a neural network is an interlinked network of artificial neurons based on the structure of biological brains. Each neuron processes data from its incoming connections, passing on results to its outgoing connections. As we train the network by feeding it data, the training algorithm adjusts those processes to optimize the output of the network as a whole. Our robot friend may slip the first few times it steps on a pencil, but, each time, it’s fine-tuning its processing with the goal of staying upright.

You’re Giving Me a Complex!

As you can probably tell, training is important, and the more complex the problem, the more time and data you need to train to consider all possibilities. All possibilities necessarily means providing as much data as possible so that an AI can learn what’s relevant to solving a problem and give you a good solution to your question. Frankly, if or when you’ve succeeded, often scientists have difficulty tracking how neural networks make decisions.

That’s not surprising, in some ways. Deep learning has to solve for shades of gray—for the moment when one user would choose one solution and another would use another solution and it’s hard to tell which was the “better” solution between the two. Take natural language models: You’re translating “I want to drive a car” from English to Spanish. Do you include the implied subject—”yo quiero” instead of “quiero”—when both are correct? Do you use “el coche” or “el carro” or “el auto” as your preferred translation of “car”? Great, now do all that for poetry, with its layers of implied meanings even down to using a single word, cultural and historical references, the importance of rhythm, pagination, lineation, etc. 

And that’s before we even get to ethics. Just like in the trolley problem, you have to define how you define what’s “better,” and “better” might just change with context. The trolley problem presents you with a scenario: a train is on course to hit and kill people on the tracks. You can change the direction of the train, but you can’t stop the train. You have two choices:

  • You can do nothing, and the train will hit five people. 
  • You can pull a lever and the train will move to a side track where it will kill one person. 

The second scenario is better from a net-harm perspective, but it makes you directly responsible for killing someone. And, things become complicated when you start to add details. What if there are children on the track? Does it matter if the people are illegally on the track? What if pulling the lever also kills you—how much do you/should you value your own survival against other peoples’? These are just the sorts of scenarios that self-driving cars have to solve for. 

Deep learning also leaves room for assumptions. In our walking example above, we start with challenging a simple assumption—Do I take the first step now or later? If I wait, how do I know when to resume? If my operator is clearly telling me to do something, under what circumstances can I reject the instruction? 

Yeah, But Is AI (or ML or DL) Going to Take Over the World?

Okay, deep breaths. Here’s the summary:

  • Artificial intelligence is what we call it when a computer appears intelligent. It’s the umbrella term. 
  • Machine learning and deep learning both describe processes through which the computer appears intelligent—what it does. As you move from machine learning to deep learning, the tasks get more complex, which means they take more processing power and have different logical underpinnings. 

Our brains organically make decisions, adapt to change, process stimuli—and we don’t really know how—but the bottom line is: it’s incredibly difficult to replicate that process with inorganic materials, especially when you start to fall down the rabbit hole of the overlap between hardware and software when it comes to producing chipsets, and how that material can affect how much energy it takes to compute. And don’t get us started on quantum math.

AI is one of those areas where it’s easy to get lost in the sauce, so to speak. Not only does it play on our collective anxieties, but it also represents some seriously complicated engineering that brings together knowledge from various disciplines, some of which are unexpected to non-experts. (When you started this piece, did you think we’d touch on neuroscience?) Our discussions about AI—what it is, what it can do, and how we can use it—become infinitely more productive once we start defining things clearly. Jump into the comments to tell us what you think, and look out for more stories about AI, cloud storage, and beyond.

The post AI 101: How Cognitive Science and Computer Processors Create Artificial Intelligence appeared first on Backblaze Blog | Cloud Storage & Cloud Backup.

Silicom P4CG2BPi81 Dual-Port 100GbE Intel E810 Bypass Adapter Review

Post Syndicated from Rohit Kumar original https://www.servethehome.com/silicom-p4cg2bpi81-dual-port-100gbe-intel-e810-bypass-adapter-review/

In our Silicom P4CG2BPi81 review, we see how this 100GbE bypass adapter works and just how easy it is to switch from standard to bypass modes

The post Silicom P4CG2BPi81 Dual-Port 100GbE Intel E810 Bypass Adapter Review appeared first on ServeTheHome.

[$] Emacs for Android

Post Syndicated from original https://lwn.net/Articles/936576/

The Emacs editor is not tied to the Linux kernel; indeed, it was created
some years before Linux existed. The Emacs code base is intended to be
portable, and the editor runs, with varying levels of support, on a wide
variety of systems. Recently, an energetic developer has worked to extend
the set of supported systems to Android; the result is a working port, but
whether that port will be accepted into the Emacs mainline is the topic of
ongoing conversation.

Redacting Documents with a Black Sharpie Doesn’t Work

Post Syndicated from Bruce Schneier original https://www.schneier.com/blog/archives/2023/06/redacting-documents-with-a-black-sharpie-doesnt-work.html

We have learned this lesson again:

As part of the FTC v. Microsoft hearing, Sony supplied a document from PlayStation chief Jim Ryan that includes redacted details on the margins Sony shares with publishers, its Call of Duty revenues, and even the cost of developing some of its games.

It looks like someone redacted the documents with a black Sharpie ­ but when you scan them in, it’s easy to see some of the redactions. Oops.

I don’t particularly care about the redacted information, but it’s there in the article.

How to verify an email address in SES which does not have an inbox

Post Syndicated from ajibho original https://aws.amazon.com/blogs/messaging-and-targeting/how-to-verify-an-email-address-in-ses-which-does-not-have-an-inbox/

Overview of solution

Amazon Simple Email Service (Amazon SES) is an email platform that provides a straightforward and cost-effective solution for sending and receiving emails using your own email addresses and domains.

One of the most common use cases for using separate verified from email address is in online retails/e-commerce platforms. Online/e-commerce platform need to send emails to their customers where the from address should look like “[email protected]. In these cases, the From addresses like [email protected] does not have inbox setup for receiving emails. Using the following solution, you can avoid setting up an inbox for the email identity while still verifying the email address for sending and receiving.

In order to send emails from SES using email/domain identity, we need to have the From email identity or domain verified in Amazon SES in a supported region. When verifying a domain,you have the option to use Easy DKIM or Bring Your Own DKIM(BYOD). For verifying an email address, you need to create an identity in Amazon SES for the respective region. Once the required email address identity is created, you will receive a verification link in your inbox. To successfully verify the email address, simply open the link in your browser. In this case, you would need to have inbox setup for email address to receive the verification link from [email protected].

Verifying a domain in Amazon SES allows you to send emails from any identity associated with that domain. For example, if you create and verify a domain identity called example.com, you don’t need to create separate subdomain identities for a.example.com, a.b.example.com, nor separate email address identities for [email protected], [email protected], and so on. Therefore, the settings for the domain remain the same for all From addresses and you cannot separate you sending activity. You can use this solution to verify the From address without setting up an inbox and differentiate sending activity and tracking based on settings. The benefits of having different email settings from the domain are mentioned below.

Benefits of verifying the email separately for the same domain:

1) When you verify the email along with your domain, you can keep the settings different for the two Identities. You can setup different Configuration sets, notifications and dedicated IP pools for the verified email. This separation enables you to manage domain and email settings independently.
2) You can have two separate emails for sending transaction ([email protected]) and Marketing emails ([email protected]). After assigning different configuration sets, you can monitor the bounces and complaints separately for the sender. A best practice here would be separating the Transactional and Marketing in sub domains. Having both types in the same domain can adversely affect the reputation for your domain, and reduce deliverability of your transactional emails.
3) Using different dedicated IP pools, you can separate the sending IPs for Marketing and transaction or any other emails. Thus, your IP reputation for one use case is not affected by any other emails.

Prerequisite

1) An active AWS account.
2) Administrative Access to the Amazon SES Console and Amazon Simple Storage Service(S3) console.
3) A verified identity (Domain) with an MX record for the domain pointing to a Receiving Endpoint in one of the following region in Amazon SES.

Region Name Region Receiving Endpoint
US East (N. Virginia) us-east-1 inbound-smtp.us-east-1.amazonaws.com
US West (Oregon) us-west-2 inbound-smtp.us-west-2.amazonaws.com
Europe (Ireland) eu-west-1 inbound-smtp.eu-west-1.amazonaws.com

Solution walkthrough

In order to verify the email in SES, we need to verify the link send from Amazon SES in the email inbox. We will setup receiving rule set and add S3 bucket with required permissions to store emails from Amazon SES in S3 bucket. After receiving the email in S3 bucket, download the email to get the verification link. Open the verification link in a browser to complete the process.

Step 1 : How to setup SES Email Receiving Ruleset for S3 bucket

1) Open the Amazon SES console.
2) In the navigation pane, under Configuration, choose Email Receiving.
Email Receiving Rule set

3) To create a new rule set, choose Create a Rule Set, enter a rule set name, and then choose Create a Rule Set.
Note: If you create a new rule set, select the rule set, and then choose Set as Active Rule Set. Only one of your receipt rule sets can be the active rule set at any given time.


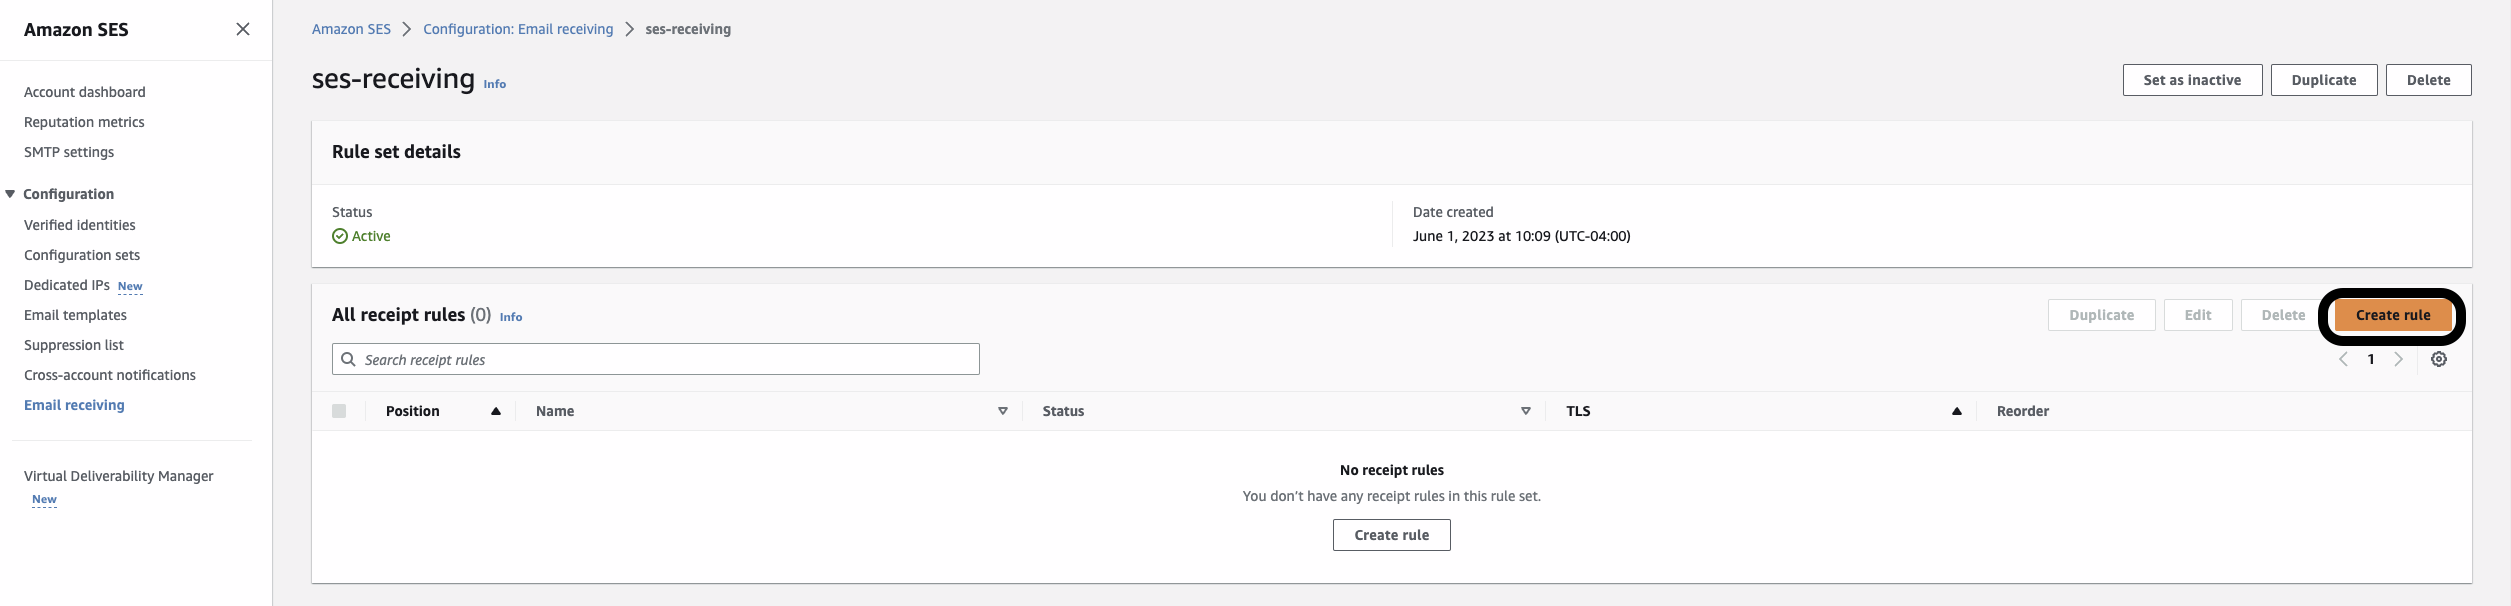
4) Choose Active Rule Set and Choose Create Rule.

Active Ruleset

5) Enter a unique rule name. If your use case requires TLS or spam and virus scanning, then choose Require TLS or Enable spam and virus scanning. To make this an active rule, select the Enabled checkbox. Choose Next.
Receiving Rule Setting

6) To receive emails for specific verified domain, click Add new recipient condition and enter the domain/email address. You can leave it blank and it will store for all the verified domain addresses with receiving setup.
Add recipient condition

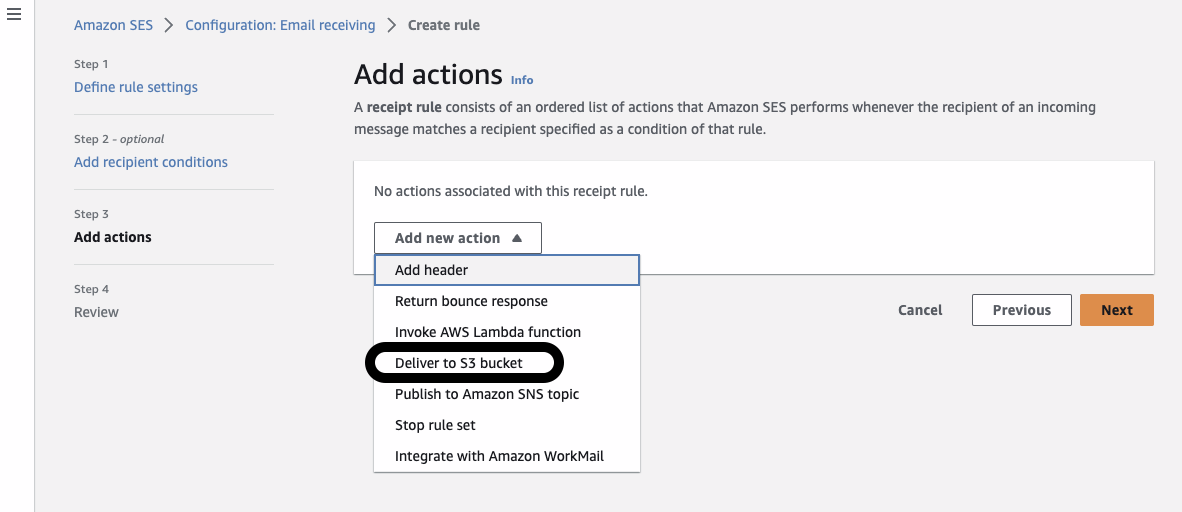
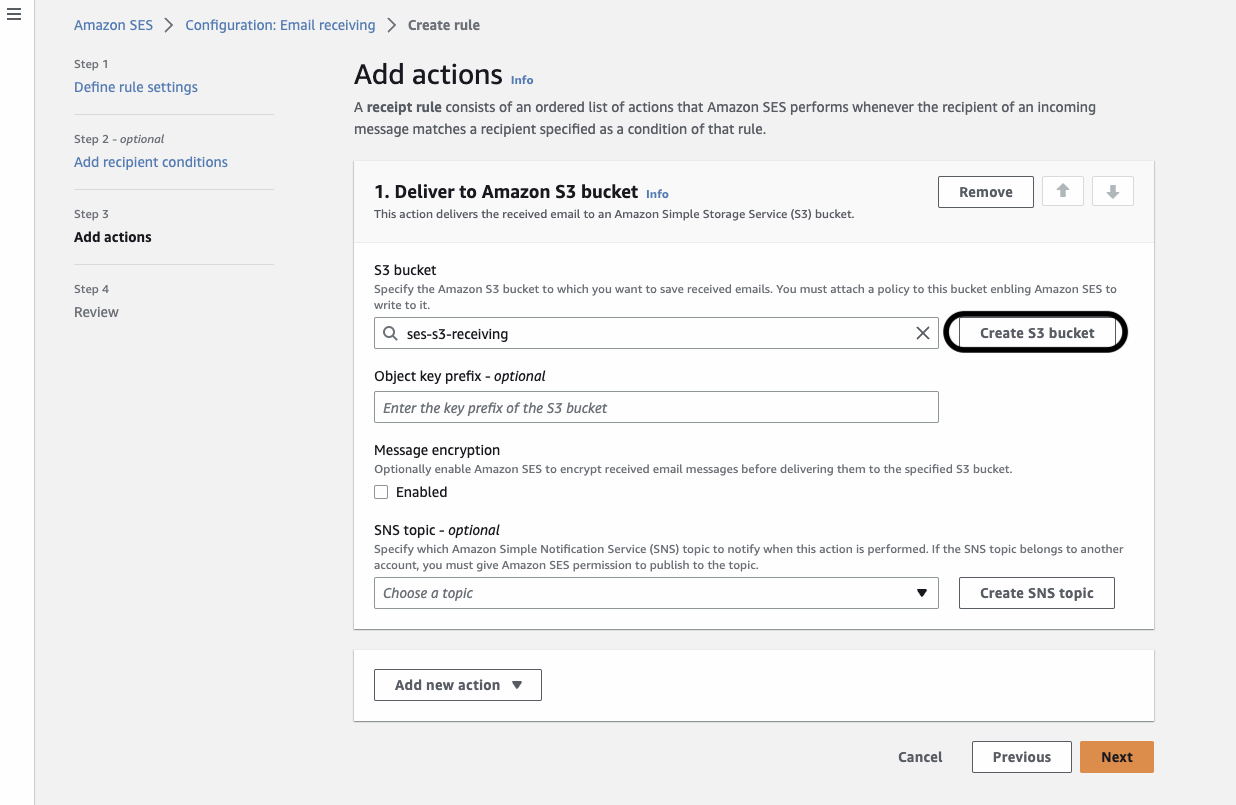
7) Choose Add new action, and then choose Deliver to S3 bucket
Action Deliver to S3 bucket

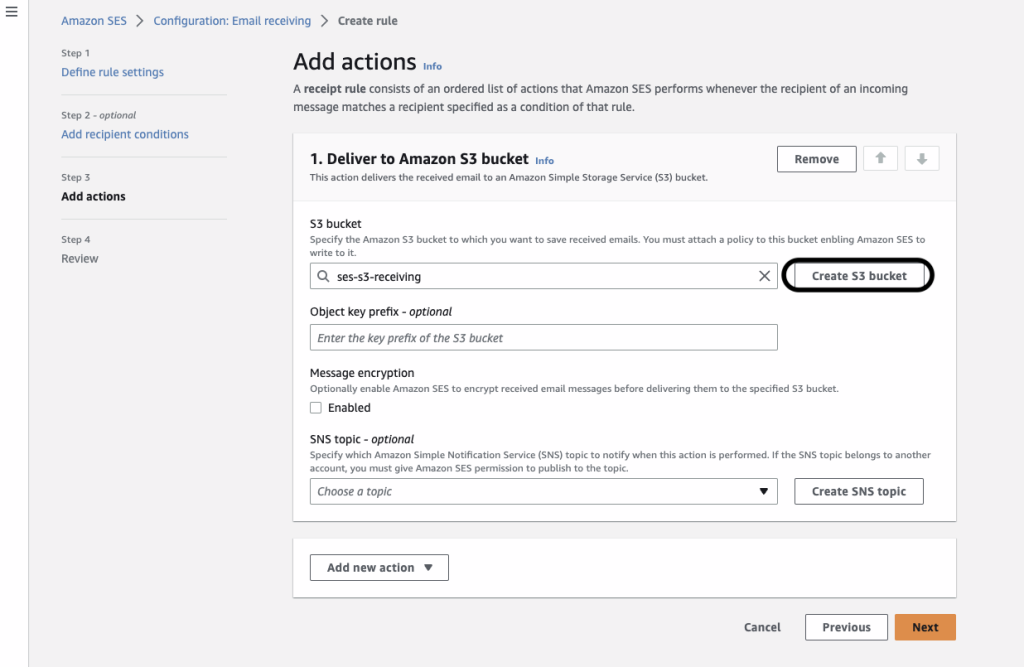
8) Click on Create S3 bucket
Create S3 bucket

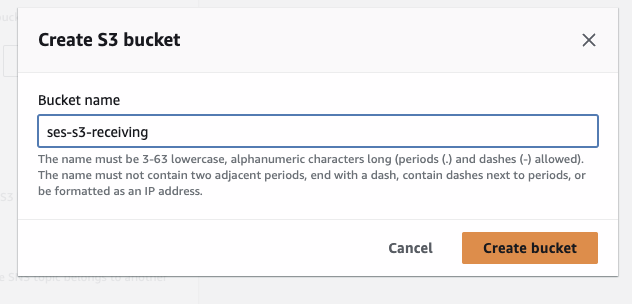
9) Enter a unique S3 bucket name and click on ‘Create Bucket’
Note: S3 Bucket policy will be added automatically.
Provide Unique S3 bucket name

(Optional) Choose Message encryption for Amazon SES to use an Amazon Key Management Server (Amazon KMS) key to encrypt your emails.
(Optional) For SNS topic, select an Amazon Simple Notification Service (Amazon SNS) topic to notify you when Amazon SES delivers an email to the S3 bucket.
Add Action in Receiving rule set

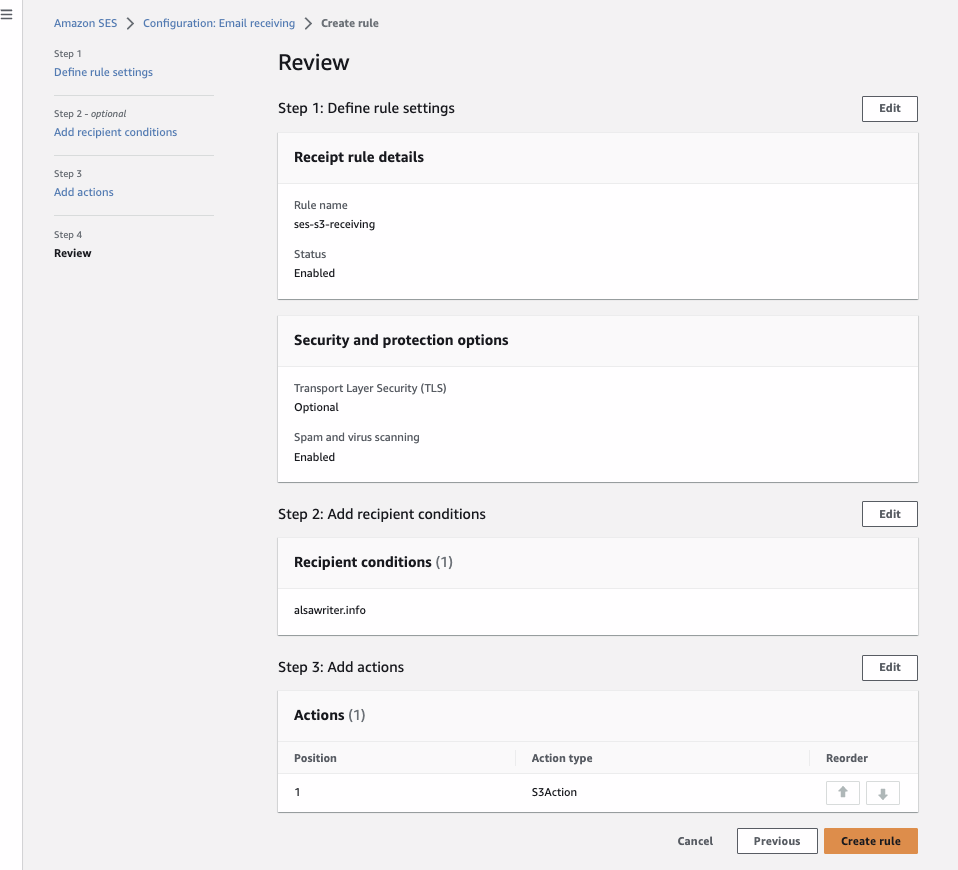
10) Click Next and Create Rule.
Review and Create Ruleset

Step 2: Verifying email address in Amazon SES using S3

The following procedure shows you how to verify Email address in Amazon SES.
1) Open the Amazon SES console.
2) In the navigation pane, under Configuration, choose Verified identities.
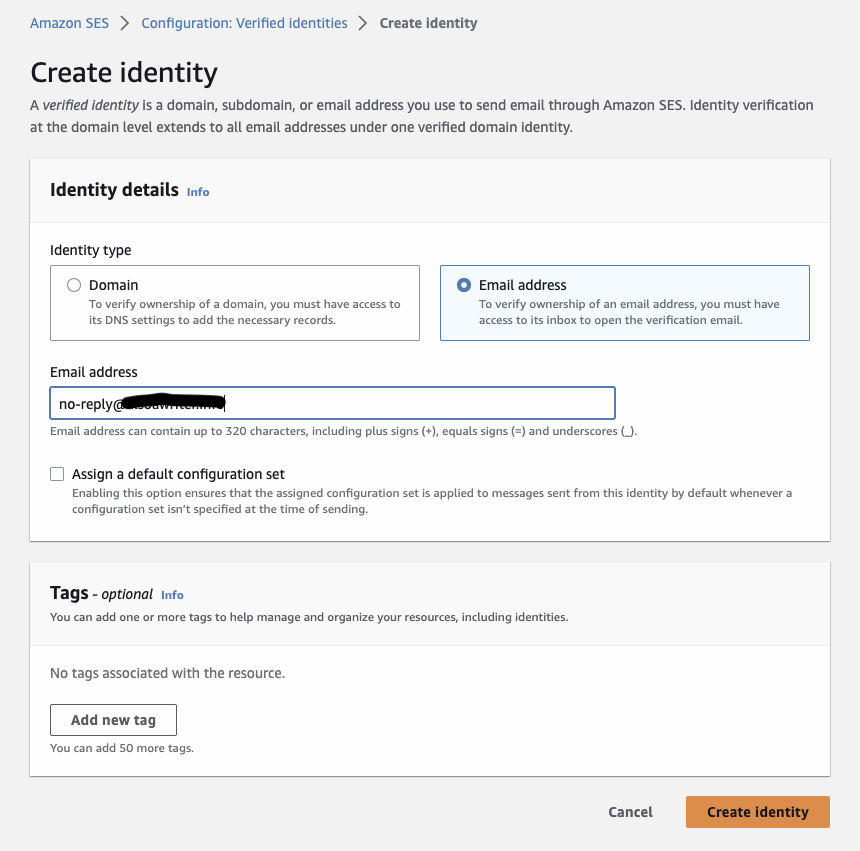
3) Choose Create identity.
Create Verified Identity

4) Under Identity details, choose Email address as the identity type you want to create.
5) For Email address, enter the email address that you want to use. The email address must be an address that’s able to receive mail and that you have access to.
(Optional) If you want to Assign a default configuration set, select the check box.
6) To create your email address identity, choose Create identity. After it’s created, you should receive a verification email within five minutes from [email protected].

Create Verified identity and Enter
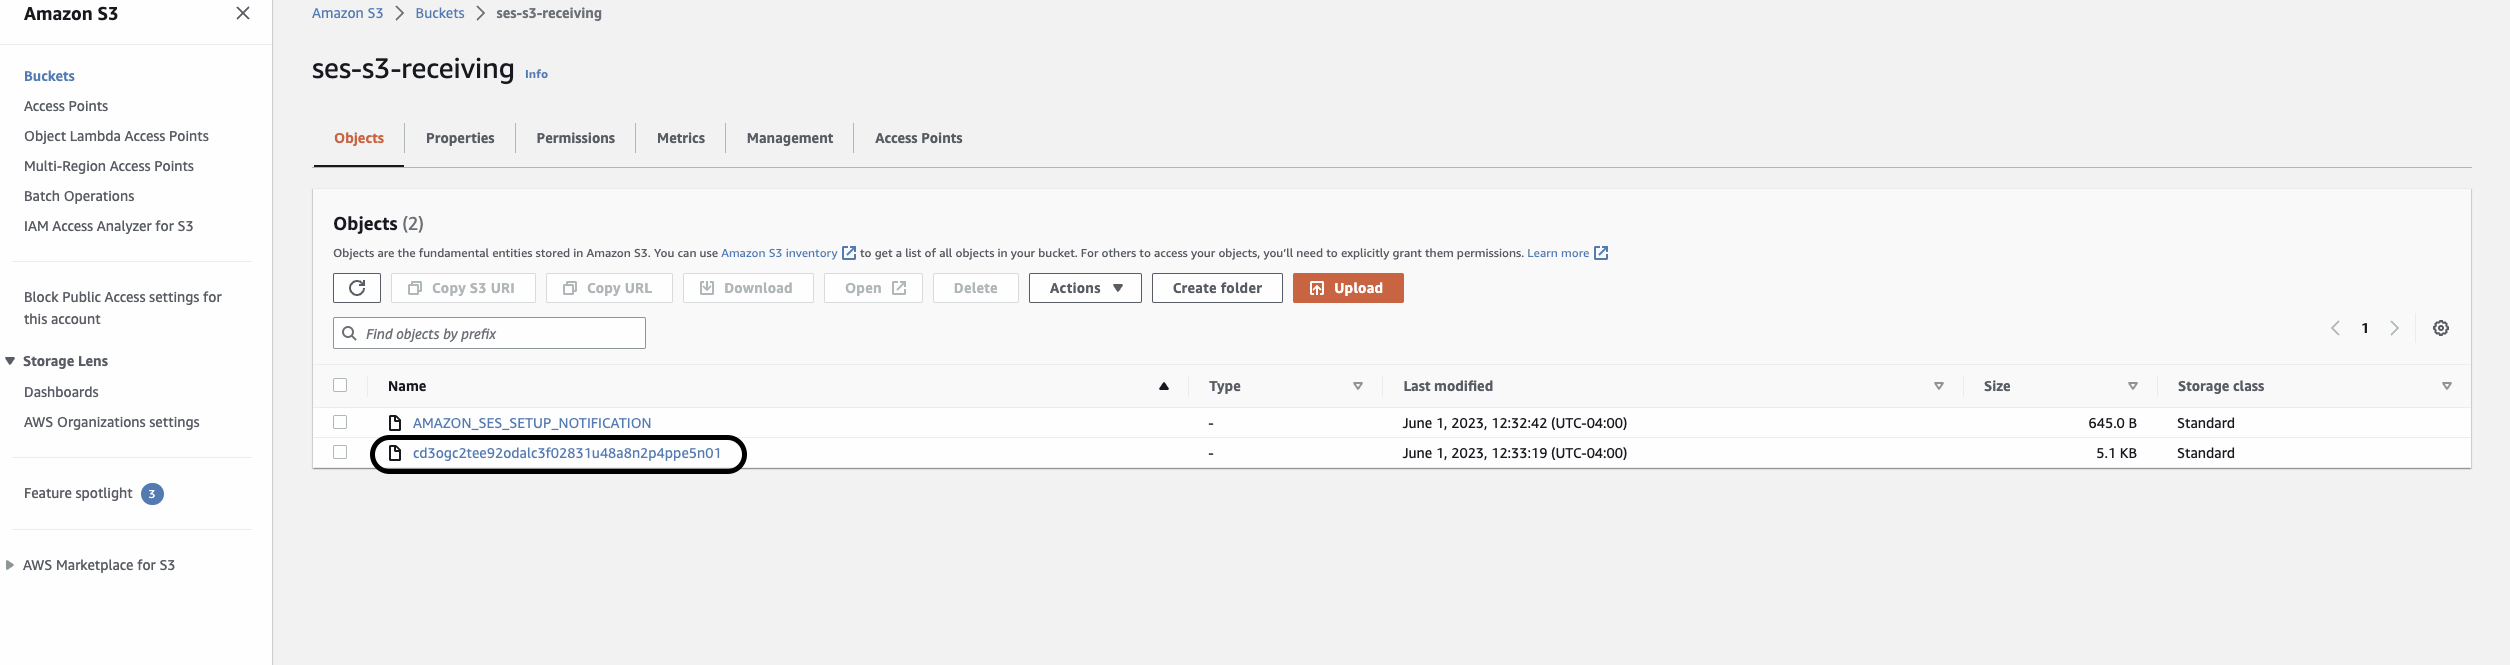
7) Open the Amazon S3 console.
Go to S3 bucket

8) Open the S3 Bucket that you configured to store the Amazon SES emails. Verify that the bucket contains the test email that you sent. It can take a few minutes for the test email to appear.
Select the Received Email in S3 bucket

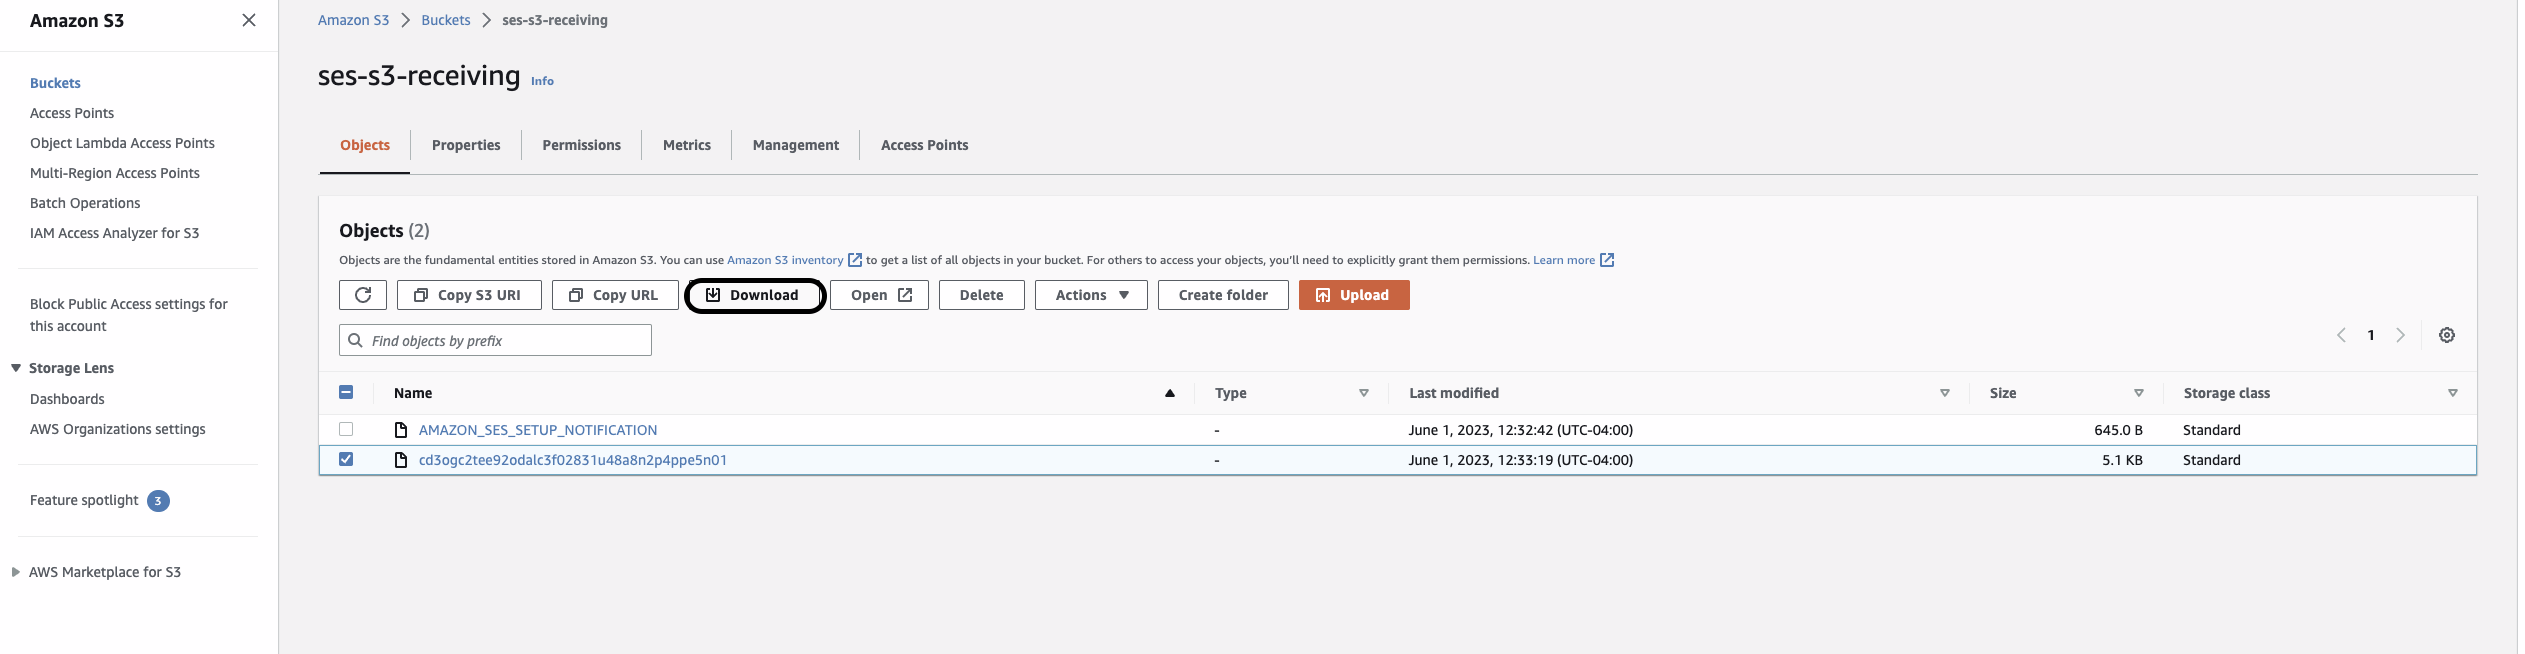
9) Select the email/object received in S3 bucket. Click Download.
Download the received email/object

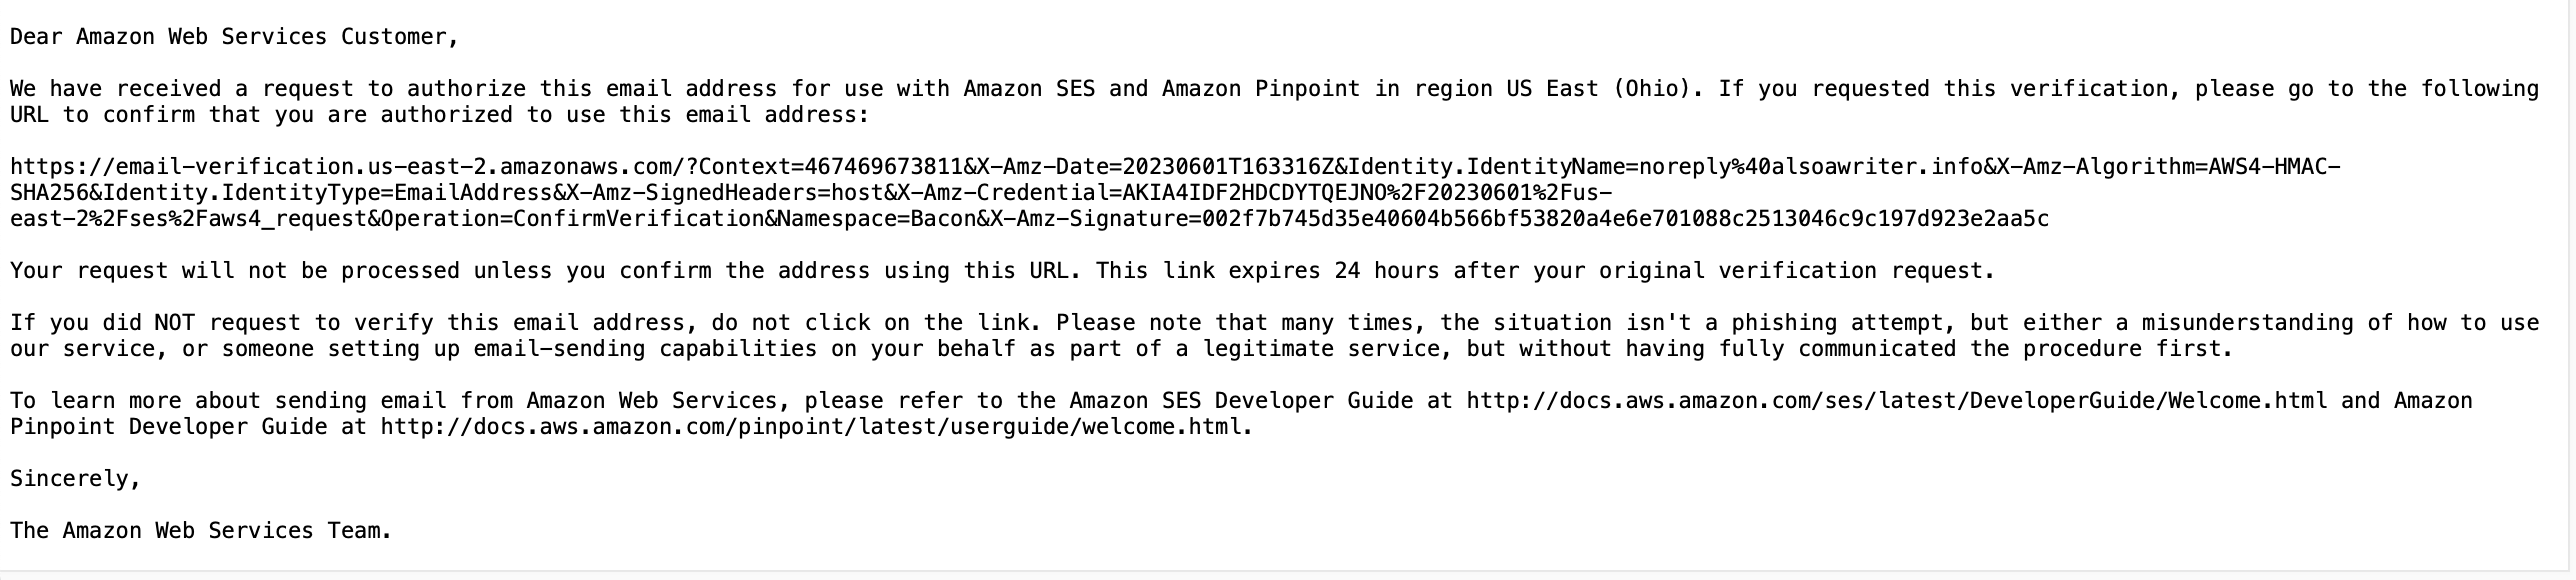
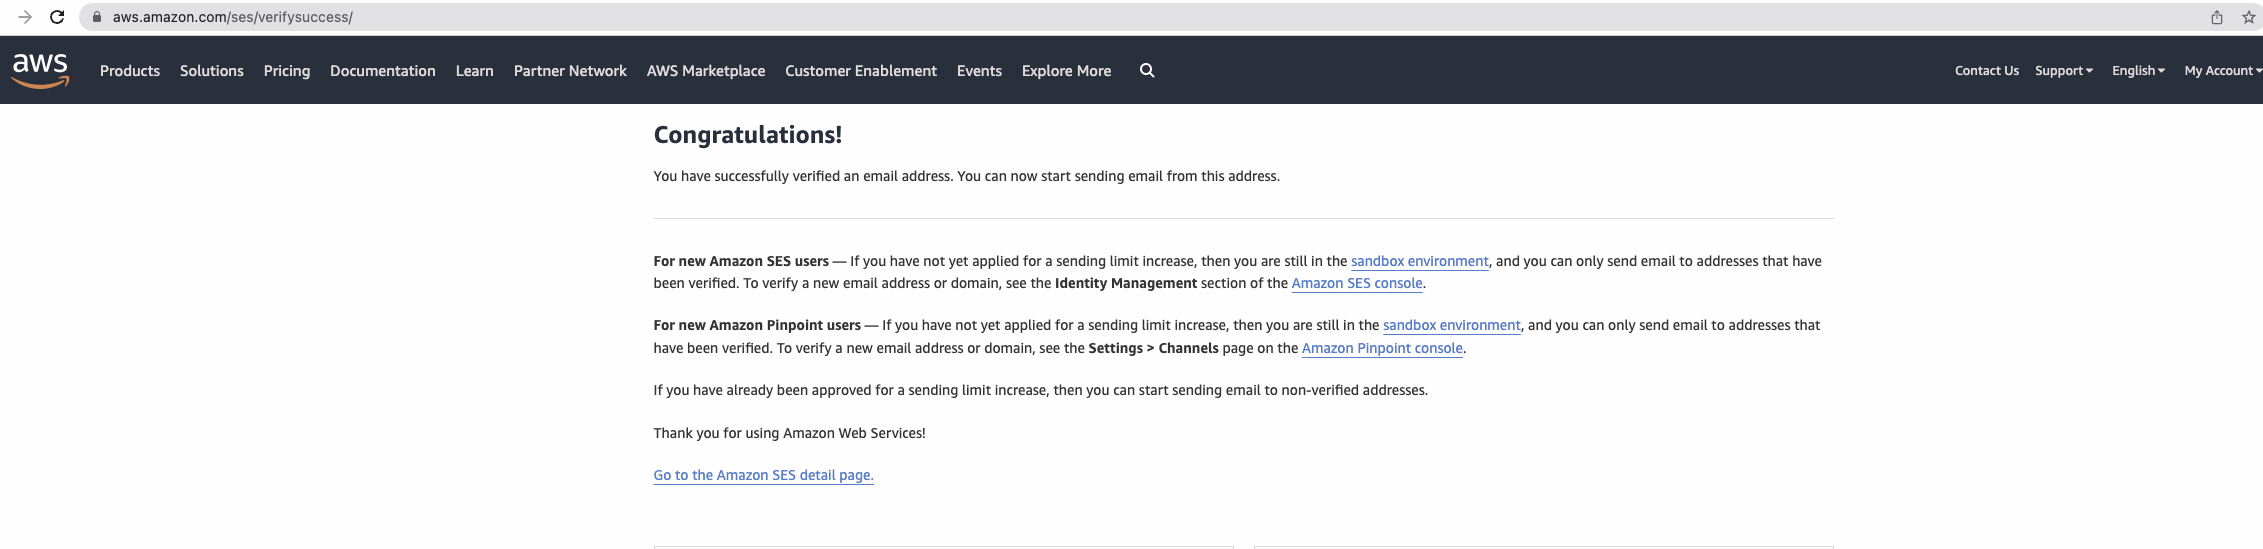
10) Open the Downloaded file in Notepad and copy the verification link under the Subject. Paste the link in your Browser and confirm it.
Open the Downloaded email in Notepad

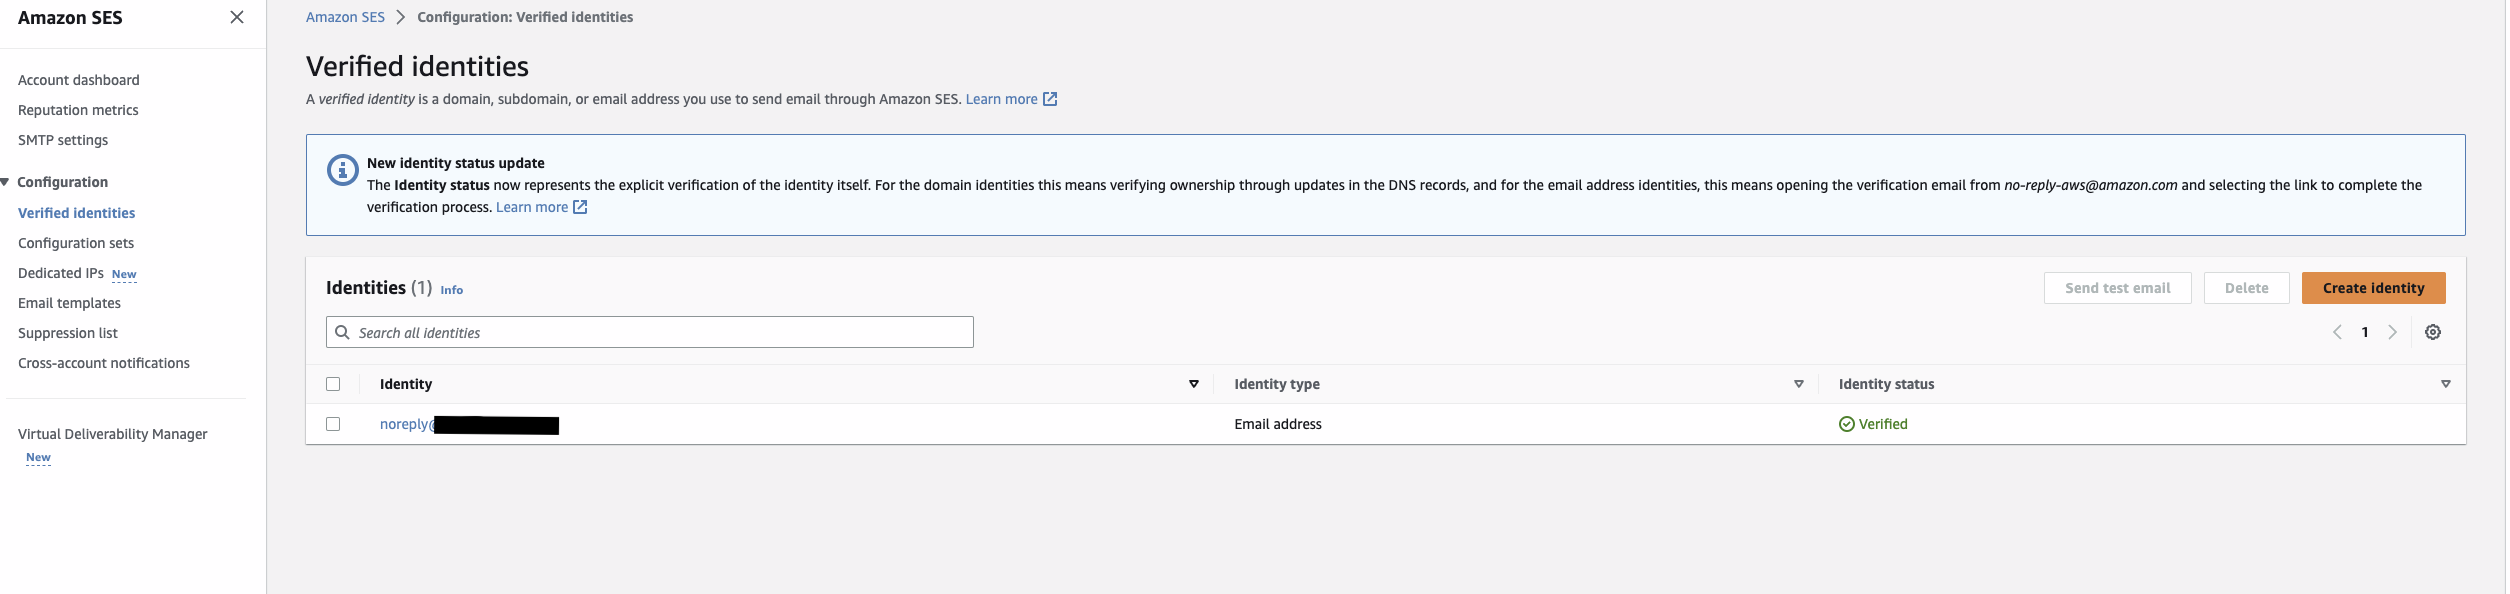
11) Once the link is confirmed, you can check in SES console and confirm under verified identities that your email address is in verified Status.
Browser link after pasting the verification link

Verified Identity confirmation in SES console

Cleaning up:

You should have successfully verified email address in Amazon SES using S3 bucket. To avoid incurring any extra charges, remember to delete any resources created manually if you no longer need them for monitoring.

Steps for removing the resources:

1) Delete all the created/verified Identities.
2) Delete data regarding Amazon SES receiving Rules.
3) Delete data regarding Amazon S3 bucket.

Conclusion:

In this blog post, we explained the benefits of verifying a separate email address for the verified domain without setting up an inbox. Having separate identities for different use cases helps in efficient management of bounces, complaints, and delivery. You can setup different IP pools using configuration set for different use cases.

Follow-up:

https://aws.amazon.com/blogs/messaging-and-targeting/manage-incoming-emails-with-ses/
https://docs.aws.amazon.com/ses/latest/dg/receiving-email.html
https://repost.aws/knowledge-center/ses-receive-inbound-emails

About the Author

Ajinkya bhoite_1Ajinkya Bhoite is Cloud Support Engineer II in AWS and Service Matter Expert in Amazon Simple Email Service(SES). Along with Amazon SES, he is an Amazon S3 enthusiast. He loves helping customers in solving issues related to SES and S3 in their environment. He loves reading, writing and running but not in the same order. He has a fictional novel published on Amazon Kindle by the name Shiva Stone: Hampi’s Hidden treasure.


Retrieving parameters and secrets with Powertools for AWS Lambda (TypeScript)

Post Syndicated from Pascal Vogel original https://aws.amazon.com/blogs/compute/retrieving-parameters-and-secrets-with-powertools-for-aws-lambda-typescript/

This post is written by Andrea Amorosi, Senior Solutions Architect and Pascal Vogel, Solutions Architect.

When building serverless applications using AWS Lambda, you often need to retrieve parameters, such as database connection details, API secrets, or global configuration values at runtime. You can make these parameters available to your Lambda functions via secure, scalable, and highly available parameter stores, such as AWS Systems Manager Parameter Store or AWS Secrets Manager.

The Parameters utility for Powertools for AWS Lambda (TypeScript) simplifies the integration of these parameter stores inside your Lambda functions. The utility provides high-level functions for retrieving secrets and parameters, integrates caching and transformations, and reduces the amount of boilerplate code you must write.

The Parameters utility supports the following parameter stores:

The Parameters utility is part of the Powertools for AWS Lambda (TypeScript), which you can use in both JavaScript and TypeScript code bases. Implementing guidance from the Serverless Applications Lens of the AWS Well-Architected Framework, Powertools provides utilities to ease the adoption of best practices such as distributed tracing, structured logging, and asynchronous business and application metrics.

For more details, see the Powertools for AWS Lambda (TypeScript) documentation on GitHub and the introduction blog post.

This blog post shows how to use the new Parameters utility to retrieve parameters and secrets in your JavaScript and TypeScript Lambda functions securely.

Getting started with the Parameters utility

Initial setup

The Powertools toolkit is modular, meaning that you can install the Parameters utility independently from the Logger, Tracing, or Metrics packages. Install the Parameters utility library in your project via npm:

npm install @aws-lambda-powertools/parameters

In addition, you must add the AWS SDK client for the parameter store you are planning to use. The Parameters utility supports AWS SDK v3 for JavaScript only, which allows the utility to be modular. You install only the needed SDK packages to keep your bundle size small.

Next, assign appropriate AWS Identity and Access Management (IAM) permissions to the Lambda function execution role of your Lambda function that allow retrieving parameters from the parameter store.

The following sections illustrate how to perform the previously mentioned steps for some typical parameter retrieval scenarios.

Retrieving a single parameter from SSM Parameter Store

To retrieve parameters from SSM Parameter Store, install the AWS SDK client for SSM in addition to the Parameters utility:

npm install @aws-sdk/client-ssm

To retrieve an individual parameter, the Parameters utility provides the getParameter function:

import { getParameter } from '@aws-lambda-powertools/parameters/ssm';

export const handler = async (): Promise<void> => {
  // Retrieve a single parameter
  const parameter = await getParameter('/my/parameter');
  console.log(parameter);
};

Finally, you need to assign an IAM policy with the ssm:GetParameter permission to your Lambda function execution role. Apply the principle of least privilege by scoping the permission to the specific parameter resource as shown in the following policy example:

{
  "Version": "2012-10-17",
  "Statement": [
    {
      "Effect": "Allow",
      "Action": [
        "ssm:GetParameter"
      ],
      "Resource": [
        "arn:aws:ssm:AWS_REGION:AWS_ACCOUNT_ID:my/parameter"
      ]
    }
  ]
}

Adjusting cache TTL

By default, the retrieved parameters are cached in-memory for 5 seconds. This cached value is used for further invocations of the Lambda function until it expires. If your application requires a different behavior, the Parameters utility allows you to adjust the time-to-live (TTL) via the maxAge argument.

Building on the previous example, if you want to cache your retrieved parameter for 30 instead of 5 seconds, you can adapt your function code as follows:

import { getParameter } from '@aws-lambda-powertools/parameters/ssm';

export const handler = async (): Promise<void> => {
  // Retrieve a single parameter with a 30 seconds cache TTL
  const parameter = await getParameter('/my/parameter', { maxAge: 30 });
  console.log(parameter);
};

In other cases, you may want to always retrieve the latest value from the parameter store and ignore any cached value. To achieve this, set the forceFetch parameter to true:

import { getParameter } from '@aws-lambda-powertools/parameters/ssm';

export const handler = async (): Promise<void> => {
  // Always retrieve the latest value of a single parameter
  const parameter = await getParameter('/my/parameter', { forceFetch: true });
  console.log(parameter);
};

For details, see Always fetching the latest in the Powertools for AWS Lambda (TypeScript) documentation.

Decoding parameters stored in JSON or base64 format

If some of your parameters are stored in base64 or JSON, you can deserialize them via the Parameters utility’s transform argument.

Considering a parameter stored in SSM as JSON, it can be retrieved and deserialized as follows:

import { Transform } from '@aws-lambda-powertools/parameters';
import { getParameter } from '@aws-lambda-powertools/parameters/ssm';

export const handler = async (): Promise => {
  // Retrieve and deserialize a single JSON parameter
  const valueFromJson = await getParameter('/my/json/parameter', { transform: Transform.JSON });
  console.log(valueFromJson);
};

The Parameters utility supports the transform argument for all parameter store providers and high-level functions. For details, see Deserializing values with transform parameters.

Working with encrypted parameters in SSM Parameter Store

SSM Parameter Store supports encrypted secure string parameters via the AWS Key Management Service (AWS KMS). The Parameters utility allows you to retrieve these encrypted parameters by adding the decrypt argument to your request.

For example, you could retrieve an encrypted parameter as follows:

import { getParameter } from '@aws-lambda-powertools/parameters/ssm';

export const handler = async (): Promise<void> => {
  // Decrypt the parameter
  const decryptedParameter = await getParameter('/my/encrypted/parameter', { decrypt: true });
  console.log(decryptedParameter);
};

In this case, the Lambda function execution role needs to have the kms:Decrypt IAM permission in addition to ssm:GetParameter.

Retrieving multiple parameters from SSM Parameter Store

Besides retrieving a single parameter using getParameter, you can also use getParameters to recursively retrieve multiple parameters under a SSM Parameter Store path, or getParametersByName to retrieve multiple distinct parameters by their full name.

You can also apply custom caching, transform, or decrypt configurations per parameter when using getParametersByName. The following example retrieves three distinct parameters from SSM Parameter Store with different caching and transform configurations:

import { getParametersByName } from '@aws-lambda-powertools/parameters/ssm';
import type {
  SSMGetParametersByNameOptionsInterface
} from '@aws-lambda-powertools/parameters/ssm/types';

const props: Record<string, SSMGetParametersByNameOptionsInterface> = {
  '/develop/service/commons/telemetry/config': { maxAge: 300, transform: 'json' },
  '/no_cache_param': { maxAge: 0 },
  '/develop/service/payment/api/capture/url': {}, // When empty or undefined, it uses default values
};

export const handler = async (): Promise<void> => {
  // This returns an object with the parameter name as key
  const parameters = await getParametersByName(props);
  for (const [ key, value ] of Object.entries(parameters)) {
    console.log(`${key}: ${value}`);
  }
};

Retrieving multiple parameters requires the GetParameter and GetParameters permissions to be present in the Lambda function execution role.

Retrieving secrets from Secrets Manager

To securely store sensitive parameters such as passwords or API keys for external services, Secrets Manager is a suitable option. To retrieve secrets from Secrets Manager using the Parameters utility, install the AWS SDK client for Secrets Manager in addition to the Parameters utility:

npm install @aws-sdk/client-secrets-manager

Now you can access a secret using its key as follows:

import { getSecret } from '@aws-lambda-powertools/parameters/secrets';

export const handler = async (): Promise<void> => {
  // Retrieve a single secret
  const secret = await getSecret('my-secret');
  console.log(secret);
};

Getting a secret from Secrets Manager requires you to add the secretsmanager:GetSecretValue IAM permission to your Lambda function execution role.

Retrieving an application configuration from AppConfig

If you plan to leverage feature flags or dynamic application configurations in your applications built on Lambda, AppConfig is a suitable option. The Parameters utility makes it easy to fetch configurations from AppConfig while benefitting from utility features such as caching and transformations.

For example, considering an AppConfig application called my-app with an environment called my-env, you can retrieve its configuration profile my-configuration as follows:

import { getAppConfig } from '@aws-lambda-powertools/parameters/appconfig';

export const handler = async (): Promise<void> => {
  // Retrieve a configuration, latest version
  const config = await getAppConfig('my-configuration', {
    environment: 'my-env',
    application: 'my-app'
  });
  console.log(config);
};

Retrieving a configuration requires both the appconfig:GetLatestConfiguration and appconfig:StartConfigurationSession IAM permissions to be attached to the Lambda function execution role.

Retrieving a parameter from a DynamoDB table

DynamoDB’s low latency and high flexibility make it a great option for storing parameters. To use DynamoDB as a parameter store via the Parameters utility, install the DynamoDB AWS SDK client and utility package in addition to the Parameters utility.

npm install @aws-sdk/client-dynamodb @aws-sdk/util-dynamodb

By default, the Parameters utility expects the DynamoDB table containing the parameters to have a partition key of id and an attribute called value. For example, assuming an item with an id of my-parameter and a value of my-value stored in an DynamoDB table called my-table, you can retrieve it as follows:

import { DynamoDBProvider } from '@aws-lambda-powertools/parameters/dynamodb';

const dynamoDBProvider = new DynamoDBProvider({ tableName: 'my-table' });

export const handler = async (): Promise<void> => {
  // Retrieve a value from DynamoDB
  const value = await dynamoDBProvider.get('my-parameter');
  console.log(value);
};

In case of retrieving a single parameter from DynamoDB, the Lambda function execution role needs to have the dynamodb:GetItem IAM permission.

The Parameters utility DynamoDB provider can also retrieve multiple parameters from a table with a single request via a DynamoDB query. See DynamoDB provider in the Powertools for AWS Lambda (TypeScript) documentation for details.

Conclusion

This blog post introduces the Powertools for AWS Lambda (TypeScript) Parameters utility and demonstrates how it is used with different parameter stores. The Parameters utility allows you to retrieve secrets and parameters in your Lambda function from SSM Parameter Store, Secrets Manager, AppConfig, DynamoDB, and custom parameter stores. By using the utility, you get access to functionality such as caching and transformation, and reduce the amount of boilerplate code you need to write for your Lambda functions.

To learn more about the Parameters utility and its full set of functionality, take a look at the Powertools for AWS Lambda (TypeScript) documentation.

Share your feedback for Powertools for AWS Lambda (TypeScript) by opening a GitHub issue.

For more serverless learning resources, visit Serverless Land.

Celebrating the community: Spencer

Post Syndicated from Sophie Ashford original https://www.raspberrypi.org/blog/celebrating-the-community-spencer/

We love hearing from members of the community and how they use their passion for computing and digital making to inspire others. Our community stories series takes you on a tour of the globe to meet educators and young tech creators from the USA, Iraq, Romania, and more.

A smiling computer science teacher stands in front of a school building.

For our latest story, we are in the UK with Spencer, a Computer Science teacher at King Edward VI Sheldon Heath Academy (KESH), Birmingham. After 24 years as a science teacher, Spencer decided to turn his personal passion for digital making into a career and transitioned to teaching Computer Science.

Meet Spencer

From the moment he printed his name on the screen of an Acorn Electron computer at age ten, Spencer was hooked on digital making. He’s remained a member of the digital making community throughout his life, continuing to push himself with his creations and learn new skills whenever possible. Wanting to spread his knowledge and make sure the students at his school had access to computer science, he began running a weekly Code Club in his science lab:

“Code Club was a really nice vehicle for me to get students into programming and digital making, before computer science was an option at the school. So Code Club originally ran in my science lab around the Bunsen burners and all the science equipment, and we do some programming on a Friday afternoon making LEDs flash and a little bit of Minecraft. And from that, the students really got an exciting sense of what programming and digital making could be.”

– Spencer

While running his Code Club, Spencer really embedded himself in the Raspberry Pi community, attending Raspberry Jams, engaging with like-minded people on Twitter, and continuing to rely on our free training to upskill.

A computer science teacher sits with students at computers in a classroom.

When leadership at KESH began to explore introducing Computer Science to the curriculum, Spencer knew he was the right person for the job, and just where to look to make sure he had the right support:

“So when I decided to change from being a science teacher to a computer science teacher, there were loads of course options you could find online, and a lot of them required some really specific prior knowledge and skills. The Foundation’s resources take you from a complete novice, complete beginner — my very first LED flashing on and off — to being able to teach computational thinking and algorithms. So it was a really clear progression from using the Foundation resources that helped take me from a Physics teacher, who could use electricity to light and LED on, to a programmer who could teach how to use this in our digital making for our students.”

– Spencer

Thanks to the support from KESH and Spencer’s compelling can-do attitude, he was soon heading up a brand-new Computer Science department. This was met with great enthusiasm from the learners at KESH, with a willing cohort eagerly signing up for the new subject.

Two smiling computer science students at a desktop computer in a classroom.

“It’s really exciting to see how students have embraced Computer Science as a brand-new subject at school. The take-up for our first year at GCSE was fantastic with 25 students, and this year I’ve really got students asking about, ‘Is there an option for next year, and how can I get on to it?’ Students are almost blown away by the resources now.”

– Spencer

Supporting all students

Spencer has a mission to make sure all of KESH’s learners can learn about computing, and making his lessons accessible to all means he’s become a firm favourite amongst the students for his collaborative teaching approach.

“Mr Organ teaches you, and then he just puts you in. If you do need help, you can ask people around you, or him, but he lets you make your own mistakes and learn from there. He will then give you help so you don’t make those mistakes the next time.”

– Muntaha, 16, GCSE Computer Science student, KESH

Computer science students at a desktop computer in a classroom.

Spencer’s work is shaped by his awareness that many of the learners at KESH come from under-resourced areas of Birmingham and backgrounds that are underrepresented in computing. He knows that many of them have previously had limited opportunities to use digital tools. This is something he is driven to change.

“I want my young students here, regardless of their background, regardless of their area they’ve been brought up in, to have the same experiences as all other students in the country. And the work I do with Raspberry Pi, and the work I do with Code Club, is a way of opening those doors for our young people.”

– Spencer

Share Spencer’s story and inspire other educators

As a passionate member of the Raspberry Pi Foundation community, Spencer has been counted on as a friendly face for many years, sharing his enthusiasm on training courses, at Foundation events, and as a part of discussions on Twitter. With the goal to introduce Computer Science at A level shortly, and an ever-growing collection of digital makes housed in his makerspace, Spencer shows no signs of slowing down.

If you are interested in changing your teaching path to focus on Computer Science, take a look at the free resources we have available to support you on your journey.

Help us celebrate Spencer and his dedication to opening doors for his learners by sharing his story on Twitter, LinkedIn, and Facebook.

The post Celebrating the community: Spencer appeared first on Raspberry Pi Foundation.

What’s New in InsightVM and Nexpose: Q2 2023 in Review

Post Syndicated from Roshnee Mistry Shah original https://blog.rapid7.com/2023/06/29/whats-new-in-insightvm-and-nexpose-q2-2023-in-review/

What’s New in InsightVM and Nexpose: Q2 2023 in Review

The past few weeks have been extraordinary for the global threat landscape with zero-day vulnerabilities like MOVEit (CVE-2023-34362) and Barracuda’s Email Security Gateway (ESG) (CVE-2023-2868). Rapid7’s security research team was one of the first to detect exploitation of Progress Software’s MOVEit Transfer solution—four days before the vendor issued public advisory. From there, the team moved quickly to provide prompt remediation guidance to InsightVM and Nexpose customers.

With continued focus to drive better customer outcomes, this quarter is filled with product upgrades like improved UI for the Console, custom policy for Agent-Based assessment, an updated dashboard card, and more. Let’s take a look at some of the key updates in InsightVM and Nexpose from Q2.

[InsightVM] Agent-Based Policy supports custom policy assessment

Guidelines from Center for Internet Security (CIS) and Security Technical Implementation Guides (STIG) are widely used industry benchmarks for configuration assessment. However, a benchmark or guideline alone may not meet the unique needs of every business.

So, Agent-Based Policy assessment now supports Custom Policies. Global Administrators can now customize built-in policies, upload policies, or enable a copy of existing custom policies for agent-based assessments. Learn more here.

What’s New in InsightVM and Nexpose: Q2 2023 in Review

[InsightVM] Top Riskiest Asset Locations dashboard card provides even more details

The Top Riskiest Asset Locations dashboard card previously showed site location and risk score. This card was enhanced, on customer request, to also include total assets and total vulnerabilities in the card preview. This provides customers additional context around why a location has a large risk score and helps alert users to sites requiring additional attention.

What’s New in InsightVM and Nexpose: Q2 2023 in Review

[InsightVM and Nexpose] A new look for the Users section of the Console Administration

This quarter, we also continued updating the user interface (UI) of the Console Administration to facilitate a more intuitive and consistent user experience across the Console and the Insight Platform, including InsightVM.

The latest section to be updated is the Users section of the Console Administration. The update improves accessibility and the overall user experience of the Users page. We also made some cool new additions like light mode, a wizard to make adding new users under “Add Users” section more intuitive, and the ability to Manage columns displayed on the Users overview section.

What’s New in InsightVM and Nexpose: Q2 2023 in Review

[InsightVM and Nexpose] Support for Ubuntu 22.04 LTS

Security Console and Scan Engine now support Ubuntu 22.04 Operating System. Ubuntu is one of the most popular Linux distributions. Version 22.04 of Ubuntu will receive long term support from the vendor for hardware and maintenance updates as well as extended security maintenance. Customers on the previous versions of Ubuntu can now upgrade to 22.04!

[InsightVM and Nexpose] Containerized scan engine – continuous release

Containerized Scan Engine delivers the Scan Engine as a packaged or portable application that can easily be deployed to modern infrastructure. Now a new Containerized Engine image is automatically created and posted to Docker Hub with every InsightVM Product or Content update. This ensures you’re continuously working with the latest release. Prior versions are also available, denoted by tag. Learn more about containerized scan engines.

[InsightVM and Insight Platform] New retention setting for tracking Insight Agents

You can now configure the retention period that determines how long Insight Agents are tracked in your Agents table. In addition to the default 30 day period, this new setting allows you to set retention periods of 7 and 15 days. See our updated Agent management settings documentation for configuration instructions and more details.

[InsightVM and Nexpose] Checks for notable vulnerabilities

We have been committed to providing swift coverage for the emergent threats Rapid7 responds to under our Emergent Threat Response (ETR) program. Since Q4 2022, we provided coverage the same day or within 24 hours for over 20 emergent threats, which includes zero-day vulnerabilities.

Rapid7’s Emergent Threat Response (ETR) program flagged multiple CVEs this quarter. InsightVM and Nexpose customers can assess their exposure to many of these CVEs with vulnerability checks, including:

  • MOVEit Transfer solution CVE-2023-34362: Rapid7’s research team saw the first instances of compromise in Progress Software’s MOVEit Transfer solution. This was four days before the vendor issues public advisory. Since then our team has been tracking this critical zero-day vulnerability. Rapid7 has remote and authenticated vulnerability checks available to InsightVM and Nexpose customers for both MOVEit Transfer vulnerabilities. Learn more here.
  • Widespread Exploitation of Zyxel Network Devices CVE-2023-28771: Added to the Known Exploited Vulnerabilities (KEV) list by CISA, this vulnerability impacted the Zyxel networking devices. The vulnerability is present in the default configuration of vulnerable devices and is exploitable in the Wide Area Network (WAN) interface, which is intended to be exposed to the internet. Learn more about Rapid7’s response here.
  • PaperCut Remote Code Execution Vulnerability CVE-2023-27350: an unauthenticated remote code execution vulnerability in PaperCut MF/NG print management software that allows attackers to bypass authentication and execute arbitrary code as SYSTEM on vulnerable targets. InsightVM customers have an authenticated check available for the CVE on Windows and MacOS systems. Learn more about Rapid7’s response here.
  • Barracuda ESG Appliances CVE-2023-2868: The Email Security Gateway (ESG) appliances of Barracuda Networks were impacted by a remote command injection vulnerability that the firm said had been exploited in the wild by threat actors since at least October 2022. Learn more about the CVE and mitigation guidance here.
  • Fortinet’s Fortigate Firewall CVE-2023-27997: A critical remote code execution (RCE) vulnerability was discovered in Fortigate SSL VPN firewalls. Fortinet device vulnerabilities are historically popular with attackers of all skill levels, though exploitability varies on a vuln-by-vuln basis. An authenticated vulnerability check is available for Rapid7 customers to assess their exposure. Learn more here.

Security updates for Thursday

Post Syndicated from original https://lwn.net/Articles/936752/

Security updates have been issued by Debian (chromium and maradns), SUSE (iniparser, kubernetes1.23, python-reportlab, and python-sqlparse), and Ubuntu (accountsservice and linux, linux-aws, linux-aws-hwe, linux-azure, linux-azure-4.15,
linux-dell300x, linux-gcp, linux-gcp-4.15, linux-hwe, linux-kvm,
linux-oracle, linux-raspi2, linux-snapdragon).

Иван Вирипаев: „Въпросът е как общуваме в ситуация на война“

Post Syndicated from original https://www.toest.bg/ivan-vyrypaev-interview/

Иван Вирипаев: „Въпросът е как общуваме в ситуация на война“

От 12 до 18 юни в София се проведе третото издание на Фестивала за нова драматургия New Stages Southeast, организиран от Гьоте-институт, България. Специален гост беше Иван Вирипаев, драматург, театрален и филмов режисьор, в момента сред петимата най-поставяни живи драматурзи в Европа според Henschel Schauspiel – издателите му в Германия. Автор е на 26 пиеси, играни в повече от 250 театъра. У нас е познат с „Танцът Делхи“, „Пияните“, „Кислород“, „Валентиновден“, „Илюзии“, „Непоносимо дълги прегръдки“ и др. Гостуването му бе по покана на Народния театър „Иван Вазов“, където на 18 юни се състоя дискусия с него и Галин Стоев на тема „Театър и политика – полета на пресичане“.

С Иван Вирипаев разговаря Галина Д. Георгиева

Нека да започнем със следното допускане: ако имахте контрол върху времето, машина на времето, къде бихте искали да сте сега, в коя година – в 1968-ма или в 2068-ма, в миналото или в бъдещето?

Бих се възползвал от трети вариант – бих искал да остана да живея сега, бих се отказал и от миналото, и от бъдещето и бих останал в настоящето. Това, струва ми се, би било най-полезно.

Вижте, и миналото, и бъдещето са илюзорни конструкти. Миналото често пренаписваме, а бъдещето градим спрямо личните си фантазии. Аз намирам смисъл в това да градя живота тук и сега, секунда по секунда. Като цяло имам една по-скоро медитативна нагласа към живота, а при медитацията знаете, че най-важно е присъствието в настоящето, присъствието във всяко вдишване и издишване, присъствието в момента. И от това черпя своята енергия, това е моят наркотик.

Що се отнася до социалното живеене, до живота, който водя днес в социален план, той е свързан с един проект, към който съм насочил всичките си сили. И този проект е пряко следствие от войната в Украйна, казва се „Тюркоазената къща“ (във Варшава – б.р.). Най-общо, това е проект от и за бежанци от войната, който има две страни – артистична и чисто битова. С това се занимавам от сутрин до вечер.

Как протича един ден на Иван Вирипаев?

Сутрин правя йога, имаме платени занятия, защото в „Тюркоазената къща“ се опитваме да се издържаме от това, което правим. Аз лично ставам в 6 часа, водя дъщеря си на училище, следва йогата с бежанците, често има новодошли, които настаняваме, после се храним заедно, а след това се занимаваме с битови въпроси.

Нещо като комуна?

Нещо като комуна, в която всички заедно се грижим за ежедневието си. След закуската се заемаме с поддръжката на мястото – градината, покъщнината, дори мебелите си правим сами. Помагаме на някого да си извади документи, попълваме формуляри и в 4 следобед започваме репетиции. Голяма част от хората в къщата са свързани с театъра – актьори, сценографи. Подготвяме се за представления, чрез тях събираме средства. Миналата година написах специална пиеса за целта.

След репетиция вземам дъщеря си, ако жена ми е на снимки (съпругата на Вирипаев е полската актриса Каролина Грушка – б.р.), а после ставам сервитьор, защото имаме и ресторант, отворен за външни посетители. Лично аз отговарям за какаото – приготвям, сервирам… Какаото е най-специалната напитка в заведението ни. А после всички заедно разтребваме, мием съдовете, почистваме. Към един-два часа след полунощ се прибирам вкъщи и на другия ден отново същото. На практика нямам почивни дни.

Кога започнахте този проект?

През май 2022 г., три месеца след войната, към нас се обърнаха бежанци, които търсеха помощ. В началото с жена ми помагахме с лични средства, влагахме парите, които имахме, но бежанците се увеличаваха, продадохме един апартамент, парите пак свършиха и разбрахме, че трябва да направим нещо друго. Не може просто да чакаме войната да приключи. Докато приключи, трябва нещо да се прави, нали?!

Тръгнах по срещи, имах лекции в университета в Калифорния и се възползвах от случая да се срещна с богати хора и да ги помоля за помощ, за директни пари. Защото хората, когато бягат от война, бягат без нищо и както знаете, става дума най-вече за жени и деца. Това е най-интересното нещо, с което съм се занимавал в своя живот, и много ми харесва да го правя. Да, тежко е, но е най-полезното нещо, което съм правил.

Казвате, че сте написал специална пиеса за Вашата „Тюркоазена къща“. Как започва писането при Вас, има ли някаква изходна точка, от която започвате да пишете?

Имам такава изходна точка, да, и това при мен винаги е темата. Появява се темата, живее с мен известно време, а понякога не забелязвам кога точно се е появила, но в един момент я усещам толкова набъбнала, че не мога да се отърва от нея.

През последните 15–16 години пиша основно по поръчка, тоест даден театър ми предлага да напиша пиеса, аз сядам и пиша. Темите са си мои, театрите не ми поставят изискване за теми, те ми поставят само срок, но аз харесвам този начин на работа, защото иначе мога да си ходя с темата подръка цяла вечност, а като имам срок и договор, сядам и пиша.

Признавам, че последната една година беше особено интензивна, защото трябваше да напиша цели три пиеси. Обикновено пиша по една на година, а през последната – три: за нашия проект, за театъра в Прага и за театъра в Мадрид. Парите, които ми плащат за тези пиеси, влагам в „Тюркоазената къща“.

Какво идва след темата?

След темата започвам да мисля за изразните средства. Представям си самия спектакъл, как би изглеждал, как аз бих го поставил. И тогава започвам да разработвам сюжета, появява се първият персонаж, после вторият и така нататък.

А какви теми ви вълнуват днес?

Днес най-важната тема за мен е войната, но тук трябва да добавя някои нюанси. Войната внесе в моя живот големи… поправки. Все пак съм руснак, роден съм в Русия и имам руски корени, въпреки че от няколко години съм полски гражданин и се водя подсъдим от Руската федерация, където моите текстове са изцяло забранени.

Но аз усещам върху себе си отговорност за това, че руският народ продължава да извършва ужасни престъпления на територията на Украйна, и не мога да пиша за нищо друго освен за това.

Войната заема голямо място в моето съзнание. И тук не става въпрос за военна фактология, аз не работя с фактите от войната. Днес живея с бежанци, виждам страданията на тези хора – в Полша има 4 милиона бежанци, това ми е полето. Последната пиеса, която написах, е със заглавие „Вишневият човек“. Тя е за театъра в Прага, главната тема в нея е комуникацията, системата за комуникация. Въпросът за мен днес е как комуникираме, как общуваме в ситуация на война.

И? Как общуваме?

Казах го и вчера, по време на разговора с Галин Стоев в Народния театър – настъпва изцяло нова епоха. Така мисля аз, така го усещам. Епохата се сменя и тук не става въпрос за дребни неща, промените са епохални. Гранично е. Както в миналото имаме Средновековие, Ренесанс, Просвещение, Модернизъм… така сега имаме нещо друго, не знам как ще се нарече, но е радикално ново.

Виждам как много хора въобще не осъзнават това, не си дават сметка, защото, разбира се, от това следва пълна пренагласа, а хората искат да им е същото. Но промяната е започнала и тя е пряко свързана с общуването, с комуникацията, по няколко линии: аз със себе си, аз с другия, аз с природата. И тук стигаме до изкуството… Ще го кажа така:

свърши епохата на културата, на изкуството в досегашния му вид, в досегашната му форма, с досегашните му индустрии.

Днес е напълно очевидно, че цялото знание, което имаме – научно, културно, знанието от сферата на изкуството и религията, – вече няма никакво значение. Днес тези неща имат значение само в качеството им на инструмент за разкриване на творческото съзнание вътре в човека, инструмент за достигане до нов еволюционен стадий. Науката и изкуството са – или поне трябва да бъдат – инструмент за развитие на личния човешки потенциал. А не да са сами за себе си. Всичко според мен, дори и политиката, трябва да бъде подчинено на тази идея, на идеята за личностно развитие.

Иван Вирипаев: „Въпросът е как общуваме в ситуация на война“
Иван Вирипаев в разговор с Галин Стоев. Снимка: © Стефан Здравески

Ако правилно Ви разбирам, Вие не сте привърженик на идеята изкуство заради самото изкуство, изкуството като ценност само по себе си?

Точно така. Изкуството не може да е ценност само по себе си. То не може да струва милиони и да въздишаме по него с възхищение и отдалеч. Изкуството не е в музеите, не е в театрите, в залите, то трябва да е навсякъде около нас, да е наш личен инструмент. Другото е изкуствено създаден авторитет. Изкуството не бива да е институция. Хората – виждам го все по-често – много повече се впечатляват от процеса на комуникация с живия човек. Изкуството е процес преди всичко, то не е зала, музей или салон.

Ето пример: аз много обичам електронна музика, занимавам се с електронна музика, но тя вече е съвсем различна от онова, което беше в началото на века. Един от факторите е, че днес огромен брой африкански артисти посягат към тази музика. Даже в нашата комуна онази вечер пускаше един диджей от Африка. И тези нови хора внасят ново усещане, нови аспекти – внасят контакт със Земята, с Космоса, внасят друго усещане за пространството, ако щете, и резултатът е ново звучене. Днес най-интересната музика се прави по мазета, в частните домове, в малките забутани клубове, а не в студиата. Свърши периодът на изкуството заради самото изкуство – изкуството трябва да е инструмент за комуникация.

Изкуството и преди е имало тази функция – да бъде средство за комуникация.

Имало е, да, но… вижте, аз имам съпротива срещу самата система, по която работи сферата на изкуството днес. Да вземем филмовата индустрия – например Вие правите филм, някой го гледа, възхищава му се, някой критик казва нещо положително, филмът Ви отива на фестивал, придобива някакъв статут… и зад всичко това стои немалък ресурс, стои система.

Друг пример – с операта. Знаете ли какви са хонорарите на оперните певци – това са огромни пари, огромни! Та моят въпрос е: за какво точно плащаме? Какъв е проблемът този оперен певец вместо за 15 000 евро да пее за 1000 евро? Какво – ще пее по-лошо ли? А какво би било, ако всички звезди на операта заработват само от билети? Както правят редовите музиканти – „Рейдиохед“, „Ю Ту“, Моби, всички диджеи, цялата сцена на стендъп комедията, цялата индустрия на живото изпълнение!? Да, те също имат малък хонорар, но основните им приходи идват от билети. А с операта и балета не е така.

Тоест притеснява Ви начинът, по който работят днес културните индустрии?

На тези индустрии им се отдава прекалено голямо значение. Нещата се правят от псевдоилюзорното разбиране, че всичко това има значение. Операта сама по себе си няма да те направи културен, няма да те развие, ще те развие разбирането кой си ти в края на краищата. Отговорът на този въпрос понякога предполага контакт с изкуството, друг път предполага контакт с природата, но със сигурност не предполага контакт с индустриите, които днес са обхванали и сферата на изкуството, и сферата на природата.

Наскоро свирих с едни пакистанци, двама дядовци от Източен Пакистан, и те свиреха, уверявам Ви, не по-зле от всеки професионален музикант от България или Полша. А това бяха много бедни хора. И защо трябва да е така? Защото тези уникални дядовци не са се уредили в музикалния бизнес? Аз също не съм се уредил, никъде не съм на щат. На мен ми поръчват пиеси, защото пиесите ми продават билети. Въобще системата на културните институции е много проблематична. И не ме разбирайте погрешно, аз не съм против изкуството, дума да не става,

аз съм против всички тези институти, агенти, фондове, субсидии, фестивали, кръгове и мрежи, от които, ако не си част, сякаш не правиш изкуство днес; ако не си в тях, никой няма да те забележи.

Това ме дразни. Иначе, хората никога няма да престанат да имат нужда от изкуство, от хубава музика, от хубави книги и филми, просто трябва да се променят каналите на тяхното производство и потребление.

Имате ли предложение?

Старият модел на меценатството е бил много по-добър и по-достъпен. Тъкмо там се вижда по-ясно дали имаш талант, или не. Някой инвестира директно в теб, както е било при Молиер, при Шекспир… плаща ти, за да правиш изкуство, а хората, ако им харесва това, което си създал, плащат и водят нови. В тази ситуация нещата повече зависят от теб самия, а не от това дали си в някакви мрежи, дали си бил по фестивали или на подбрани партита в Кан. Аз съм за директния продуцент, за частния комерсиален театър, само там е възможно истинското, живото изкуство – там имаш ясна и чиста връзка автор–зрител.

Как мислите, има ли разлика между източната и западната драматургия, между тази, която идва от славянския свят, и тази от англосаксонския?

Мисля, че има и тази разлика идва от факта, че славянските народи са много свързани с езическата природна култура, с дохристиянските практики и традиции. Християнството ни е откъснало от природата, защото природното за християнството е грях, природното е свързано с ниските страсти. Това откъсване за мен е противоестествено. Но в нашите славянски култури все пак е останала тягата към природното, към произхода, към шаманството, ако щете.

Западноевропейският театър е много социален (пише се за протести, за социална идентичност), докато славянската драматургия ми се струва, че е по-екзистенциална, занимава се с екзистенциални проблеми, но точно затова пък не е зряла. Какво имам предвид? Работа е там, че сама по себе си социалността без контакт с духовността, с екзистенцията е празна, повърхностна. Опитва се да изясни някакъв социален въпрос, но зад него често стои по-дълбока причина от духовен характер. Духовното обаче само по себе си, без социалност, е инфантилно.

Нашите два народа например – българският и полският – поради факта, че са били много години несвободни, под нечия зависимост, не са развили социални умения. Те са деца, има нещо инфантилно в тях.

Нашите пиеси може да говорят за Бога дори, но всичко е много наивно. Докато в немската или в американската драматургия личи израстването на народите, от които тази драматургия идва. Ние, славянските народи, не сме се състояли като социум, не сме пораснали социално.

Затова обикновено пиесите от нашия район не се поставят в САЩ, много рядко в Англия и ако това се случи, те трябва да имат задължително социален елемент, например това трябва да е пиеса за лошите българи, за поляците като крадци и пр. Целта на подобна постановка в Англия би била да се покаже как живеят хората в България или в Полша. Поставят те не като име в драматургията, а като етнически автор. Това за мен е по-скоро екзотика, презентация, от която аз лично бягам.

Мартин Макдона например е драматург, за когото никой не говори като за етнически автор, нещо повече – той работи и със социални, и с духовни теми. Това е пример за зрял драматург. Няма да скрия, че едно от най-приятните неща за мен е, че днес не ме поставят като руски автор, и това е не само защото героите ми не са руски.

В разговор с филмовия критик Антон Долин казвате, че източникът на войната е чудовищната необразованост. Кое е онова знание, което, ако го имахме, войната нямаше да започне?

Това е добър въпрос. Може би ако имахме повече знания за живия живот, знания за това, че всеки човек притежава по природа вътрешна свобода, не бихме тръгнали на война. Но става въпрос за дълбинно знание, а не за информация. Защото знанието не е информация, знанието е опит.

Ето ви случка. Днес сутринта в хотела при мен дойде възрастна дама, американка, около седемдесетгодишна, която ми каза: „Имате много хубав парфюм, ухае страхотно, как го правите?“ А аз наистина сам си правя парфюма. В Полша има такъв магазин, където може да смесиш различни съставки и на практика да си направиш сам парфюм. И дамата каза: „Ох, може ли да ми пръснете малко, отивам на летището и искам да ми мирише на този парфюм.“

Защо го разказвам? Поведението на тази дама говори за нейната вътрешна свобода. В Русия това е невъзможно. Там хората са много затворени, няма да дойдат при теб да и ти кажат нещо хубаво, да ти кажат добра новина, а камо ли да коментират парфюма ти. Контактът с другите хора е много трудна работа там, да не говорим за контакта с украинците или със Запада. В Русия всички говорят за някакъв Запад, без да имат понятие какво означава това. Сякаш на Запад не живеят живи хора. Наричат ги пластмасови американци.

Ето тази жена от хотела е по-жива от всички! На седемдесет години общува без никакво притеснение, тя е в контакт, тя няма да тръгне да воюва с мен, нито аз с нея. Но ако това се беше случило в Сибир, ако беше отишла и казала на някого „Вие ухаете чудесно, може ли да ми пръснете малко от вашия парфюм?“, щеше да получи отговори от рода на „Дърта краво, какво правиш тук, какво ми се месиш, ма…“ или пък щяха да почнат да ѝ се подиграват.

Там отсъства живият контакт, отсъства осъзнаването, че пред теб стои жив човек. Липсата на жив контакт води до затвореност, до страх, отгоре се появяват бандити… И тук визирам кръга около Путин, защото е голяма грешка да се мисли, че Путин е политик. Аз говоря за това от много години, това не са политици, това е групировка и тази групировка много добре управлява хората, които ги е страх.

Ако народът ти е затворен и изплашен, можеш лесно да му кажеш, че ей сега ще те убият, че трябва да се воюва, че друг избор нямаш. И ако си затворен и изплашен, лесно ще повярваш. А тези лелички, които ходят и питат за парфюма ти, знаете ли какви са всъщност?! Ами че те отглеждат джендър хора, развъждат гейове! Това е необразоваността. Незнание, несъобразяване, че във всеки от нас струи живот. Ако не ти харесва Америка – никой не те заставя да ходиш там; ако не харесваш хомосексуални – не бъди хомосексуален. А хората в Русия вярват, че някой ще ги накара да бъдат хомосексуални.

В същото интервю за Антон Долин казвате, че след края на войната искате да създадете център за лечение на травмите. Кой ще има по-голяма нужда от това лечение – руснаците или украинците?

Първо, аз и в момента правя това. В нашата „Тюркоазена къща“ се занимаваме с лечението на травмата на всички, независимо от тяхната националност – украинци, руснаци, а имаме и бежанци от Беларус. И второ, аз не се занимавам с руско-украинската дружба. Да се занимава човек с това сега е много инфантилно и неправилно. Такава дружба сега е невъзможна, защото, докато руснаци убиват украински деца и жени, е инфантилно, даже жестоко въобще да се говори за това.

Дружбата е възможна евентуално след разкаяние, след като си поискал прошка. И руснаците трябва да поискат прошка. В това не би имало нищо унизително, напротив, би било благородно действие. Аз лично съм готов да поискам прошка веднага. Но това е действие, свързано с нивото на самосъзнание. Руснаците не са готови за такова нещо.

Според наскорошно изследване 90% от руснаците не се срамуват от случващото се в Украйна. Кога ще дойде покаянието, за което говорите? През какъв механизъм трябва да стане това?

Не знам, това е много сложен въпрос, аз лично си го задавам всеки ден. Преди да има покаяние, трябва да има осмисляне. Руският народ трябва да разбере какво въобще се случва; към момента той не разбира, а за да разбере, знаете ли, той трябва да се отпусне.

Да се отпусне?

Думата е точно тази – да се отпусне. Не можеш да поискаш прошка в напрежение. А агресията не помага да се отпуснеш. Ако ви нападне бясно куче, имате две възможности – да го убиете или по някакъв начин да го примамите. Ако махаш с пръчка към него, то ще се настърви повече.

С това не казвам, че по някакъв начин трябва да примамим Путин, да го съблазним и нахраним, защото мисля, че в случая с Путин това е невъзможно. Пак повтарям, той не е политик, той е част от структура, затова мисля, че с него трябва се говори единствено през съдебна институция.

Що се отнася до народа, до руския народ, който не знае какво прави Путин и какво точно се случва в Украйна – виж, с него трябва да се говори открито. Да се затваря агресивно зад четвърта стена би било огромна грешка. Това е грешката, която днес допуска Европейският съюз. Ако тези хора, ако руският народ бъде затворен зад стена, оттам рано или късно ще долети атомна бомба. Напълно съм убеден. С тези хора трябва да се разговоря и това би било по-безопасно за всички нас, в това число и за украинците.

Нека обърнем за малко поглед към руската литература. Вчера, когато говорихте за имперското минало на Русия, казахте, че даже Пушкин има имперски код. Какво да правим тогава с Пушкин днес?

Нищо не трябва да правим – у Пушкин има имперски код и с това трябва да сме наясно. Трябва да сме наясно, когато говорим за Пушкин, когато го рецитираме или го поставяме на сцена, когато го преподаваме в училище или в университета.

Имперското мислене на Пушкин е факт, но това не го прави слаб поет.

Същото важи и за други писатели от руската класическа литература. Не можем просто така да ги отречем, но днес, особено днес, трябва да си даваме сметка за времето, в което са живели, за това, че са били част от голяма империя. Имперски код има и у Байрон. Дори у Марк Твен, автор на приключенски романи, но в него също личат белезите на времето и мястото, в които е живял. Обвиняват го в расизъм – нагласата му към чернокожите не е като нагласата ни днес.

Но Марк Твен не може просто да бъде скрит в чекмеджето, Пушкин също. Напротив, трябва да кажем на нашите деца: ето, има го Пушкин, има го Марк Твен. В своето време те са писали ето така. Има нещо прекрасно в тези автори, но има и неща, с които те – бидейки част от една различна култура, част от един различен ментален код – звучат архаично днес. И този архаизъм не идва от думите или от темите, идва от позицията, от която са писали – позицията на силния бял мъж, позицията на властелин на този свят.

Тъкмо в това е смисълът на културата – да търси разбирателство, да показва, да разяснява, а не да забранява! Не бива да се забранява руската класика. Защо да се прави?! Там има много интересни неща. Известно е, че Достоевски се е изказвал много лошо за поляците, никак не ги е обичал. И даже, знаете ли, днес Достоевски би бил на страната на Путин, не се съмнявам в това. Ако беше наш съвременник, Достоевски би поддържал войната. Но… това не означава, че трябва да забраним Достоевски. Той е продукт на своето време, на тогавашните условия. Трябва да покажем неприемливото у него от днешна гледна точка заедно с ценното в него като писател.

Как би звучала Вашата пиеса „Пияните“, ако беше написана от Chat GPT?

Ха, не знам как би звучала тази пиеса точно. В нея е закодиран софизмът, учението на софистите. За софистите виното е символ на бог. Моите герои пият вино и виното ги изпълва със знание за света, все едно бог говори през тях. Чатботът, струва ми се, не би могъл да направи това, защото той засега само възпроизвежда информация, а тук има преработка. И преработката е свързана с опит, с човешки опит.

А плаши ли Ви настъпването на изкуствения интелект в писането?

Не само в писането, в света въобще. Много ме безпокои този въпрос. Защото войната с изкуствения интелект всъщност ние вече сме я загубили, късно е и не бива да си правим илюзии. Днес, ако някой си изгуби телефона, ще умре от глад, няма да може да си купи храна за вечеря, няма да може да напазарува за вкъщи или да плати в болницата. И контролът, който днес се упражнява в страни като Русия и Китай, дигиталният контрол, следенето – това вече е властта на машините.

В момента контролът, упражняван от Путин, е и благодарение на дигиталните устройства. Нужно е да си даваме сметка за това. Писмото, което наскоро публикуваха Илън Мъск и компания, трябва да се вземе много на сериозно. То не е плод на хора, които в един момент са се побъркали или са истерясали. В писмото се говори за това, че остават броени минути до момента, в който системата ще излезе от контрол – и това, изречено от тъкмо тези хора, никак не е за подминаване. Системата се саморазвива, на нея не ѝ трябват хора. Не че ще ги убие, просто не са ѝ нужни. Системата не е жива материя, защо са ѝ живите? И когато тя излезе изпод контрола на живите – тогава какво?!

Интервюто е взето на 19 юни 2023 г.

Източването на евросредства във ведомството стига до Лаура Кьовеши АДФИ, ГДБОП и ДАНС: по следите на Биволъ и корупционно усвоените европари в социалното министерство

Post Syndicated from Екип на Биволъ original https://bivol.bg/%D0%B0%D0%B4%D1%84%D0%B8-%D0%B3%D0%B4%D0%B1%D0%BE%D0%BF-%D0%B8-%D0%B4%D0%B0%D0%BD%D1%81-%D0%BF%D0%BE-%D1%81%D0%BB%D0%B5%D0%B4%D0%B8%D1%82%D0%B5-%D0%BD%D0%B0-%D0%B1%D0%B8%D0%B2%D0%BE%D0%BB%D1%8A.html

четвъртък 29 юни 2023


Както вече „Биволъ“ разследва в редица одитни доклади за дейността на Министерството на труда и социалната политика (МТСП) са констатирани крупни закононарушния, с корупционна конотация, ощетили бюджета и европейските фондове…

Getting started guide for near-real time operational analytics using Amazon Aurora zero-ETL integration with Amazon Redshift

Post Syndicated from Rohit Vashishtha original https://aws.amazon.com/blogs/big-data/getting-started-guide-for-near-real-time-operational-analytics-using-amazon-aurora-zero-etl-integration-with-amazon-redshift/

Amazon Aurora zero-ETL integration with Amazon Redshift was announced at AWS re:Invent 2022 and is now available in public preview for Amazon Aurora MySQL-Compatible Edition 3 (compatible with MySQL 8.0) in regions us-east-1, us-east-2, us-west-2, ap-northeast-1 and eu-west-1. For more details, refer to the What’s New Post.

In this post, we provide step-by-step guidance on how to get started with near-real time operational analytics using this feature.

Challenges

Customers across industries today are looking to increase revenue and customer engagement by implementing near-real time analytics use cases like personalization strategies, fraud detection, inventory monitoring, and many more. There are two broad approaches to analyzing operational data for these use cases:

  • Analyze the data in-place in the operational database (e.g. read replicas, federated query, analytics accelerators)
  • Move the data to a data store optimized for running analytical queries such as a data warehouse

The zero-ETL integration is focused on simplifying the latter approach.

A common pattern for moving data from an operational database to an analytics data warehouse is via extract, transform, and load (ETL), a process of combining data from multiple sources into a large, central repository (data warehouse). ETL pipelines can be expensive to build and complex to manage. With multiple touchpoints, intermittent errors in ETL pipelines can lead to long delays, leaving applications that rely on this data to be available in the data warehouse with stale or missing data, further leading to missed business opportunities.

For customers that need to run unified analytics across data from multiple operational databases, solutions that analyze data in-place may work great for accelerating queries on a single database, but such systems have a limitation of not being able to aggregate data from multiple operational databases.

Zero-ETL

At AWS, we have been making steady progress towards bringing our zero-ETL vision to life. With Aurora zero-ETL integration with Amazon Redshift, you can bring together the transactional data of Aurora with the analytics capabilities of Amazon Redshift. It minimizes the work of building and managing custom ETL pipelines between Aurora and Amazon Redshift. Data engineers can now replicate data from multiple Aurora database clusters into the same or a new Amazon Redshift instance to derive holistic insights across many applications or partitions. Updates in Aurora are automatically and continuously propagated to Amazon Redshift so the data engineers have the most recent information in near-real time. Additionally, the entire system can be serverless and can dynamically scale up and down based on data volume, so there’s no infrastructure to manage.

When you create an Aurora zero-ETL integration with Amazon Redshift, you continue to pay for Aurora and Amazon Redshift usage with existing pricing (including data transfer). The Aurora zero-ETL integration with Amazon Redshift feature is available at no additional cost.

With Aurora zero-ETL integration with Amazon Redshift, the integration replicates data from the source database into the target data warehouse. The data becomes available in Amazon Redshift within seconds, allowing users to use the analytics features of Amazon Redshift and capabilities like data sharing, workload optimization autonomics, concurrency scaling, machine learning, and many more. You can perform real-time transaction processing on data in Aurora while simultaneously using Amazon Redshift for analytics workloads such as reporting and dashboards.

The following diagram illustrates this architecture.

Solution overview

Let’s consider TICKIT, a fictional website where users buy and sell tickets online for sporting events, shows, and concerts. The transactional data from this website is loaded into an Aurora MySQL 3.03.1 (or higher version) database. The company’s business analysts want to generate metrics to identify ticket movement over time, success rates for sellers, and the best-selling events, venues, and seasons. They would like to get these metrics in near-real time using a zero-ETL integration.

The integration is set up between Amazon Aurora MySQL-Compatible Edition 3.03.1 (source) and Amazon Redshift (destination). The transactional data from the source gets refreshed in near-real time on the destination, which processes analytical queries.

You can use either the provisioned or serverless option for both Amazon Aurora MySQL-Compatible Edition as well as Amazon Redshift. For this illustration, we use a provisioned Aurora database and an Amazon Redshift Serverless data warehouse. For the complete list of public preview considerations, please refer to the feature AWS documentation.

The following diagram illustrates the high-level architecture.

The following are the steps needed to set up zero-ETL integration. For complete getting started guides, refer to the following documentation links for Aurora and Amazon Redshift.

  1. Configure the Aurora MySQL source with a customized DB cluster parameter group.
  2. Configure the Amazon Redshift Serverless destination with the required resource policy for its namespace.
  3. Update the Redshift Serverless workgroup to enable case-sensitive identifiers.
  4. Configure the required permissions.
  5. Create the zero-ETL integration.
  6. Create a database from the integration in Amazon Redshift.

Configure the Aurora MySQL source with a customized DB cluster parameter group

To create an Aurora MySQL database, complete the following steps:

  1. On the Amazon RDS console, create a DB cluster parameter group called zero-etl-custom-pg.

Zero-ETL integrations require specific values for the Aurora DB cluster parameters that control binary logging (binlog). For example, enhanced binlog mode must be turned on (aurora_enhanced_binlog=1).

  1. Set the following binlog cluster parameter settings:
    1. binlog_backup=0
    2. binlog_replication_globaldb=0
    3. binlog_format=ROW
    4. aurora_enhanced_binlog=1
    5. binlog_row_metadata=FULL
    6. binlog_row_image=FULL
  2. Choose Save changes.
  3. Choose Databases in the navigation pane, then choose Create database.
  4. For Available versions, choose Aurora MySQL 3.03.1 (or higher).
  5. For Templates, select Production.
  6. For DB cluster identifier, enter zero-etl-source-ams.
  7. Under Instance configuration, select Memory optimized classes and choose a suitable instance size (the default is db.r6g.2xlarge).
  8. Under Additional configuration, for DB cluster parameter group, choose the parameter group you created earlier (zero-etl-custom-pg).
  9. Choose Create database.

In a couple of minutes, it should spin up an Aurora MySQL database as the source for zero-ETL integration.

Configure the Redshift Serverless destination

For our use case, create a Redshift Serverless data warehouse by completing the following steps:

  1. On the Amazon Redshift console, choose Serverless dashboard in the navigation pane.
  2. Choose Create preview workgroup.
  3. For Workgroup name, enter zero-etl-target-rs-wg.
  4. For Namespace, select Create a new namespace and enter zero-etl-target-rs-ns.
  5. Navigate to the namespace zero-etl-target-rs-ns and choose the Resource policy tab.
  6. Choose Add authorized principals.
  7. Enter either the Amazon Resource Name (ARN) of the AWS user or role, or the AWS account ID (IAM principals) that are allowed to create integrations in this namespace.

An account ID is stored as an ARN with root user.

  1. Add an authorized integration source to the namespace and specify the ARN of the Aurora MySQL DB cluster that’s the data source for the zero-ETL integration.
  2. Choose Save changes.

You can get the ARN for the Aurora MySQL source on the Configuration tab as shown in the following screenshot.

Update the Redshift Serverless workgroup to enable case-sensitive identifiers

Use the AWS Command Line Interface (AWS CLI) to run the update-workgroup action:

aws redshift-serverless update-workgroup --workgroup-name zero-etl-target-rs-wg --config-parameters parameterKey=enable_case_sensitive_identifier,parameterValue=true --region us-east-1

You can use AWS CloudShell or another interface like Amazon Elastic Compute Cloud (Amazon EC2) with an AWS user configuration that can update the Redshift Serverless parameter group. The following screenshot illustrates how to run this on CloudShell.

The following screenshot shows how to run the update-workgroup command on Amazon EC2.

Configure required permissions

To create a zero-ETL integration, your user or role must have an attached identity-based policy with the appropriate AWS Identity and Access Management (IAM) permissions. The following sample policy allows the associated principal to perform the following actions:

  • Create zero-ETL integrations for the source Aurora DB cluster.
  • View and delete all zero-ETL integrations.
  • Create inbound integrations into the target data warehouse. This permission is not required if the same account owns the Amazon Redshift data warehouse and this account is an authorized principal for that data warehouse. Also note that Amazon Redshift has a different ARN format for provisioned and serverless:
    • Provisioned cluster – arn:aws:redshift:{region}:{account-id}:namespace:namespace-uuid
    • Serverless – arn:aws:redshift-serverless:{region}:{account-id}:namespace/namespace-uuid

Complete the following steps to configure the permissions:

  1. On the IAM console, choose Policies in the navigation pane.
  2. Choose Create policy.
  3. Create a new policy called rds-integrations using the following JSON:
    {
        "Version": "2012-10-17",
        "Statement": [{
            "Effect": "Allow",
            "Action": [
                "rds:CreateIntegration"
            ],
            "Resource": [
                "arn:aws:rds:{region}:{account-id}:cluster:source-cluster",
                "arn:aws:rds:{region}:{account-id}:integration:*"
            ]
        },
        {
            "Effect": "Allow",
            "Action": [
                "rds:DescribeIntegration"
            ],
            "Resource": ["*"]
        },
        {
            "Effect": "Allow",
            "Action": [
                "rds:DeleteIntegration"
            ],
            "Resource": [
                "arn:aws:rds:{region}:{account-id}:integration:*"
            ]
        },
        {
            "Effect": "Allow",
            "Action": [
                "redshift:CreateInboundIntegration"
            ],
            "Resource": [
                "arn:aws:redshift:{region}:{account-id}:cluster:namespace-uuid"
            ]
        }]
    }

Policy preview:

If you see IAM policy warnings for the RDS policy actions, this is expected because the feature is in public preview. These actions will become part of IAM policies when the feature is generally available. It’s safe to proceed.

  1. Attach the policy you created to your IAM user or role permissions.

Create the zero-ETL integration

To create the zero-ETL integration, complete the following steps:

  1. On the Amazon RDS console, choose Zero-ETL integrations in the navigation pane.
  2. Choose Create zero-ETL integration.
  3. For Integration name, enter a name, for example zero-etl-demo.
  4. For Aurora MySQL source cluster, browse and choose the source cluster zero-etl-source-ams.
  5. Under Destination, for Amazon Redshift data warehouse, choose the Redshift Serverless destination namespace (zero-etl-target-rs-ns).
  6. Choose Create zero-ETL integration.

To specify a target Amazon Redshift data warehouse that’s in another AWS account, you must create a role that allows users in the current account to access resources in the target account. For more information, refer to Providing access to an IAM user in another AWS account that you own.

Create a role in the target account with the following permissions:

{
   "Version":"2012-10-17",
   "Statement":[
      {
         "Effect":"Allow",
         "Action":[
            "redshift:DescribeClusters",
            "redshift-serverless:ListNamespaces"
         ],
         "Resource":[
            "*"
         ]
      }
   ]
}

The role must have the following trust policy, which specifies the target account ID. You can do this by creating a role with a trusted entity as an AWS account ID in another account.

{
   "Version":"2012-10-17",
   "Statement":[
      {
         "Effect":"Allow",
         "Principal":{
            "AWS": "arn:aws:iam::{external-account-id}:root"
         },
         "Action":"sts:AssumeRole"
      }
   ]
}

The following screenshot illustrates creating this on the IAM console.

Then while creating the zero-ETL integration, choose the destination account ID and the name of the role you created to proceed further, for Specify a different account option.

You can choose the integration to view the details and monitor its progress. It takes a few minutes to change the status from Creating to Active. The time varies depending on size of the dataset already available in the source.

Create a database from the integration in Amazon Redshift

To create your database, complete the following steps:

  1. On the Redshift Serverless dashboard, navigate to the zero-etl-target-rs-ns namespace.
  2. Choose Query data to open Query Editor v2.
  3. Connect to the preview Redshift Serverless data warehouse by choosing Create connection.
  4. Obtain the integration_id from the svv_integration system table:

    select integration_id from svv_integration; ---- copy this result, use in the next sql

  5. Use the integration_id from the previous step to create a new database from the integration:
    CREATE DATABASE aurora_zeroetl FROM INTEGRATION '<result from above>';

The integration is now complete, and an entire snapshot of the source will reflect as is in the destination. Ongoing changes will be synced in near-real time.

Analyze the near-real time transactional data

Now we can run analytics on TICKIT’s operational data.

Populate the source TICKIT data

To populate the source data, complete the following steps:

  1. Connect to your Aurora MySQL cluster and create a database/schema for the TICKIT data model, verify that the tables in that schema have a primary key, and initiate the load process:
    mysql -h <amazon_aurora_mysql_writer_endpoint> -u admin -p

You can use the script from the following HTML file to create the sample database demodb (using the tickit.db model) in Amazon Aurora MySQL-Compatible edition.

  1. Run the script to create the tickit.db model tables in the demodb database/schema:
  2. Load data from Amazon Simple Storage Service (Amazon S3), record the finish time for change data capture (CDC) validations at destination, and observe how active the integration was.

The following are common errors associated with load from Amazon S3:

  • For the current version of the Aurora MySQL cluster, we need to set the aws_default_s3_role parameter in the DB cluster parameter group to the role ARN that has the necessary Amazon S3 access permissions.
  • If you get an error for missing credentials (for example, Error 63985 (HY000): S3 API returned error: Missing Credentials: Cannot instantiate S3 Client), you probably haven’t associated your IAM role to the cluster. In this case, add the intended IAM role to the source Aurora MySQL cluster.

Analyze the source TICKIT data in the destination

On the Redshift Serverless dashboard, open Query Editor v2 using the database you created as part of the integration setup. Use the following code to validate the seed or CDC activity:

SELECT * FROM SYS_INTEGRATION_ACTIVITY;

Choose the cluster or workgroup and database created from integration on the drop-down menu and run tickit.db sample analytic queries.

Monitoring

You can query the following system views and tables in Amazon Redshift to get information about your Aurora zero-ETL integrations with Amazon Redshift:

In order to view the integration-related metrics published to Amazon CloudWatch, navigate to Amazon Redshift console. Choose Zero-ETL integrations from left navigation pane and click on the integration links to display activity metrics.

Available metrics on the Redshift console are Integration metrics and table statistics, with table statistics providing details of each table replicated from Aurora MySQL to Amazon Redshift.

Integration metrics contains table replication success/failure counts and lag details:

Clean up

When you delete a zero-ETL integration, Aurora removes it from your Aurora cluster. Your transactional data isn’t deleted from Aurora or Amazon Redshift, but Aurora doesn’t send new data to Amazon Redshift.

To delete a zero-ETL integration, complete the following steps:

  1. On the Amazon RDS console, choose Zero-ETL integrations in the navigation pane.
  2. Select the zero-ETL integration that you want to delete and choose Delete.
  3. To confirm the deletion, choose Delete.

Conclusion

In this post, we showed you how to set up Aurora zero-ETL integration from Amazon Aurora MySQL-Compatible Edition to Amazon Redshift. This minimizes the need to maintain complex data pipelines and enables near-real time analytics on transactional and operational data.

To learn more about Aurora zero-ETL integration with Amazon Redshift, visit documentation for Aurora and Amazon Redshift.


About the Authors

Rohit Vashishtha is a Senior Analytics Specialist Solutions Architect at AWS based in Dallas, Texas. He has 17 years of experience architecting, building, leading, and maintaining big data platforms. Rohit helps customers modernize their analytic workloads using the breadth of AWS services and ensures that customers get the best price/performance with utmost security and data governance.

Vijay Karumajji is a Database Solutions Architect with Amazon Web Services. He works with AWS customers to provide guidance and technical assistance on database projects, helping them improve the value of their solutions when using AWS.

BP Yau is a Sr Partner Solutions Architect at AWS. He is passionate about helping customers architect big data solutions to process data at scale. Before AWS, he helped Amazon.com Supply Chain Optimization Technologies migrate its Oracle data warehouse to Amazon Redshift and build its next generation big data analytics platform using AWS technologies.

Jyoti Aggarwal is a Product Manager on the Amazon Redshift team based in Seattle. She has spent the last 10 years working on multiple products in the data warehouse industry.

Adam Levin is a Product Manager on the Amazon Aurora team based in California. He has spent the last 10 years working on various cloud database services.

With a zero-ETL approach, AWS is helping builders realize near-real-time analytics

Post Syndicated from Swami Sivasubramanian original https://aws.amazon.com/blogs/big-data/realizing-near-real-time-analytics-with-a-zero-etl-future/

Data is at the center of every application, process, and business decision. When data is used to improve customer experiences and drive innovation, it can lead to business growth. According to Forrester, advanced insights-driven businesses are 8.5 times more likely than beginners to report at least 20% revenue growth. However, to realize this growth, managing and preparing the data for analysis has to get easier.

That’s why AWS is investing in a zero-ETL future so that builders can focus more on creating value from data, instead of preparing data for analysis.

Challenges with ETL

What is ETL? Extract, Transform, Load is the process data engineers use to combine data from different sources. ETL can be challenging, time-consuming, and costly. Firstly, it invariably requires data engineers to create custom code. Next, DevOps engineers have to deploy and manage the infrastructure to make sure the pipelines scale with the workload. In case the data sources change, data engineers have to manually make changes in their code and deploy it again. While all of this is happening—a process that can take days—data analysts can’t run interactive analysis or build dashboards, data scientists can’t build machine learning (ML) models or run predictions, and end-users can’t make data-driven decisions.

Furthermore, the time required to build or change pipelines makes the data unfit for near-real-time use cases such as detecting fraudulent transactions, placing online ads, and tracking passenger train schedules. In these scenarios, the opportunity to improve customer experiences, address new business opportunities, or lower business risks can simply be lost.

On the flip side, when organizations can quickly and seamlessly integrate data that is stored and analyzed in different tools and systems, they get a better understanding of their customers and business. As a result, they can make data-driven predictions with more confidence, improve customer experiences, and promote data-driven insights across the business.

AWS is bringing its zero-ETL vision to life

We have been making steady progress towards bringing our zero-ETL vision to life. For example, customers told us that they want to ingest streaming data into their data stores for doing analytics—all without delving into the complexities of ETL.

With Amazon Redshift Streaming Ingestion, organizations can configure Amazon Redshift to directly ingest high-throughput streaming data from Amazon Managed Streaming for Apache Kafka (Amazon MSK) or Amazon Kinesis Data Streams and make it available for near-real-time analytics in just a few seconds. They can connect to multiple data streams and pull data directly into Amazon Redshift without staging it in Amazon Simple Storage Service (Amazon S3). After running analytics, the insights can be made available broadly across the organization with Amazon QuickSight, a cloud-native, serverless business intelligence service. QuickSight makes it incredibly simple and intuitive to get to answers with Amazon QuickSight Q, which allows users to ask business questions about their data in natural language and receive answers quickly through data visualizations.

Another example of AWS’s investment in zero-ETL is providing the ability to query a variety of data sources without having to worry about data movement. Using federated query in Amazon Redshift and Amazon Athena, organizations can run queries across data stored in their operational databases, data warehouses, and data lakes so that they can create insights from across multiple data sources with no data movement. Data analysts and data engineers can use familiar SQL commands to join data across several data sources for quick analysis, and store the results in Amazon S3 for subsequent use. This provides a flexible way to ingest data while avoiding complex ETL pipelines.

More recently, AWS introduced Amazon Aurora zero-ETL integration with Amazon Redshift at AWS re:Invent 2022. Check out the following video:

We learned from customers that they spend significant time and resources building and managing ETL pipelines between transactional databases and data warehouses. For example, let’s say a global manufacturing company with factories in a dozen countries uses a cluster of Aurora databases to store order and inventory data in each of those countries. When the company executives want to view all of the orders and inventory, the data engineers would have to build individual data pipelines from each of the Aurora clusters to a central data warehouse so that the data analysts can query the combined dataset. To do this, the data integration team has to write code to connect to 12 different clusters and manage and test 12 production pipelines. After the team deploys the code, it has to constantly monitor and scale the pipelines to optimize performance, and when anything changes, they have to make updates across 12 different places. It is quite a lot of repetitive work.

No more need for custom ETL pipelines between Aurora and Amazon Redshift

The Aurora zero-ETL integration with Amazon Redshift brings together the transactional data of Aurora with the analytics capabilities of Amazon Redshift. It minimizes the work of building and managing custom ETL pipelines between Aurora and Amazon Redshift. Unlike the traditional systems where data is siloed in one database and the user has to make a trade-off between unified analysis and performance, data engineers can replicate data from multiple Aurora database clusters into the same or new Amazon Redshift instance to derive holistic insights across many applications or partitions. Updates in Aurora are automatically and continuously propagated to Amazon Redshift so the data engineers have the most recent information in near-real time. The entire system can be serverless and dynamically scales up and down based on data volume, so there’s no infrastructure to manage. Now, organizations get the best of both worlds—fast, scalable transactions in Aurora together with fast, scalable analytics in Amazon Redshift—all in one seamless system. With near-real-time access to transactional data, organizations can leverage Amazon Redshift’s analytics and capabilities such as built-in ML, materialized views, data sharing, and federated access to multiple data stores and data lakes to derive insights from transactional and other data.

Improving the zero-ETL performance is a continuous goal for AWS. For instance, one of our early zero-ETL preview customers observed that the hundreds of thousands of transactions produced every minute from their Amazon Aurora MySQL databases appeared in less than 10 seconds into their Amazon Redshift warehouse. Previously, they had more than a 2-hour delay moving data from their ETL pipeline into Amazon Redshift. With the zero-ETL integration between Aurora and Redshift, they are now able to achieve near-real time analytics.

This integration is now available in Public Preview. To learn more, refer to Getting started guide for near-real-time analytics using Amazon Aurora zero-ETL integration with Amazon Redshift.

Zero-ETL makes data available to data engineers at the point of use through direct integrations between services and direct querying across a variety of data stores. This frees the data engineers to focus on creating value from the data, instead of spending time and resources building pipelines. AWS will continue investing in its zero-ETL vision so that organizations can accelerate their use of data to drive business growth.


About the Author

Swami Sivasubramanian is the Vice President of AWS Data and Machine Learning.

Rapid7 Solutions for Partners

Post Syndicated from Tom Caiazza original https://blog.rapid7.com/2023/06/28/rapid7-solutions-for-partners/

Rapid7 Solutions for Partners

Central to our mission at Rapid7 is building long-term relationships with partners who deliver valuable security solutions to customers. As customers increasingly seek managed services to meet their security needs, we’ve eagerly expanded our partner ecosystem to support a rapidly growing body of Managed Security Service Provider (MSSP) partners.

As a unified security operations (SecOps) technology platform, Rapid7 makes it easy for MSSPs to build services around an array of solutions, including detection and response, vulnerability management, cloud security, external threat intelligence, and more.

Rapid7’s Insight platform is designed with an obsessive focus on the practitioner experience. This includes the following special considerations for the MSSP security operations center (SOC) analyst.

Multi-tenancy

Multi-tenancy and customer data separation is foundational to the MSSP product experience. We understand there are strict regulatory requirements necessitating data separation across all end-customers. Ensuring partners leverage multi-tenancy across all core components of their portfolio is critical to optimal service delivery for end-customers.

Single Pane of Glass (Introducing Multi-Customer Investigations)

Whereas other vendors may require partners to individually manage investigations and security posture for each customer independently, we realize this is not an optimal experience for a partner who may have tens, hundreds, or even thousands of end-customers. Our solution offers a single pane of glass for aggregated data visibility across all customers in one place.

One example of this is our multi-customer investigations experience which we launched in April. With this capability, MSSPs are empowered to conduct investigations at scale across their customer bases. After a few months, feedback on this experience has been overwhelmingly positive. Early users of the capability say this has yielded up to a 20 percent decrease in time spent investigating workflows.

And this is just the beginning. The multi-customer investigations functionality represents just the first step in a larger cross-portfolio product strategy to unlock operational efficiencies for MSSPs – no matter where they are in their security journey.

Easy deployment

Whether a partner is more of a managed service provider (MSP) with emerging security workflows or a mature MSSP with an established way of working, we’ve heard a consistent message: Partners need fast time-to-value for end-customers. That’s why we’ve made it easy for MSSPs to rapidly deploy new customers across all solution offerings. We understand security solutions are most valuable when partners deliver value quickly, and that starts with speedy deployment across the Insight platform.

A dedicated support experience

When partners encounter issues, it’s critical they are resolved quickly. It’s equally important to easily generate cases, track tickets, and escalate as needed. That’s why we introduced an exclusive support experience. Partners can easily navigate to this new experience via a dedicated tile in the Rapid7 partner portal. From there, creating a case is easy and intuitive. Support staff has also been trained to handle partner-specific use cases—such as multi-customer investigations—to ensure issues are resolved efficiently.

One platform to support many service offerings

Our mission is to be the ideal SecOps platform of choice for partners. This means it needs to be easy to navigate the different solutions available for partners. Many partners have started their journeys with Rapid7 detection and response capabilities and, as their needs have grown, evolved into delivering a comprehensive security suite that includes forensic analysis, vulnerability management, cloud security, and threat intelligence solutions. API support also enables partners to integrate Rapid7 with their own technology stacks.

Today, partners leverage Rapid7’s detection, assessment, and response capabilities to service hundreds of end-customers with an eye towards scaling rapidly. We look forward to continually growing this program alongside our partners and their meaningful feedback. Learn more about becoming a partner.

[$] JupyterLab 4.0: a development environment for education and research

Post Syndicated from original https://lwn.net/Articles/936340/

JupyterLab is a
web-based development environment widely used by data scientists,
engineers, and educators for data visualization, data analysis,
prototyping, and interactive learning materials. The Jupyter community has recently announced the
release of JupyterLab 4.0, introducing lots of new features and performance
improvements to enhance its capabilities both in research and educational
settings.

The collective thoughts of the interwebz