Post Syndicated from The Hook Up original https://www.youtube.com/watch?v=zJFlvvITHuU
Comic for 2021.11.24
Post Syndicated from Explosm.net original http://explosm.net/comics/6037/
New Cyanide and Happiness Comic
Embed interactive dashboards in your apps and portals in minutes with Amazon QuickSight’s new 1-click embedding feature
Post Syndicated from Kareem Syed-Mohammed original https://aws.amazon.com/blogs/big-data/embed-interactive-dashboards-in-your-apps-and-portals-in-minutes-with-amazon-quicksights-new-1-click-embedding-feature/
Amazon QuickSight is a fully-managed, cloud-native business intelligence (BI) service that makes it easy to connect to your data, create interactive dashboards, and share these with tens of thousands of users, either directly within a QuickSight application, or embedded in web apps and portals.
QuickSight Enterprise Edition now supports 1-click embedding, a feature that allows you to embed rich, interactive dashboards in apps, wikis, and portals without needing to call embedding APIs. Authorized end-users can start accessing these dashboards instantly, without any server deployments or infrastructure licensing needed! 1-click embedding allows you to enable your users with insights in minutes.
In this post, we discuss the steps to implement this solution, the end-user experience, and a sample use case.
Solution overview
To implement the solution, we will walk through the following steps:
- Enable permissions on the dashboard (through the UI or API).
- Allow list the domain where you want to embed the dashboard in QuickSight.
- Embed the dashboard.
Step 1: Enable permissions on the dashboard
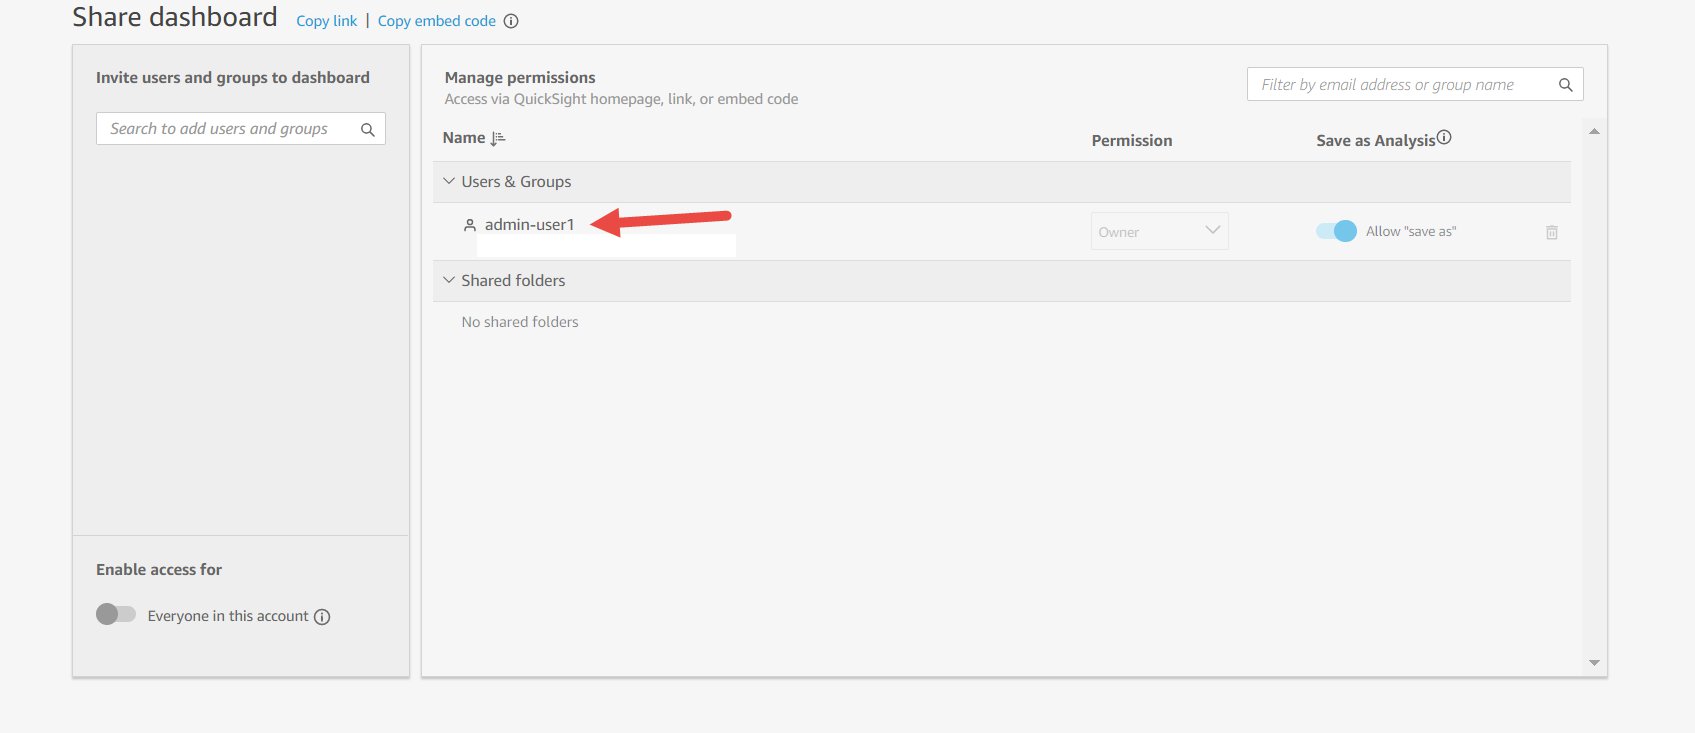
After you create a QuickSight dashboard, to enable access, open the dashboard and on the top right choose the share icon and choose Share dashboard.

This opens the share screen. By default, a dashboard in QuickSight isn’t shared with anyone and is only accessible to the owner. In the following screenshot, the dashboard is shared with (and therefore accessible by) admin-user1 (the owner of the dashboard).
You can search for individual users or groups in your account that you want to share this dashboard with. For example, see the following screenshot.
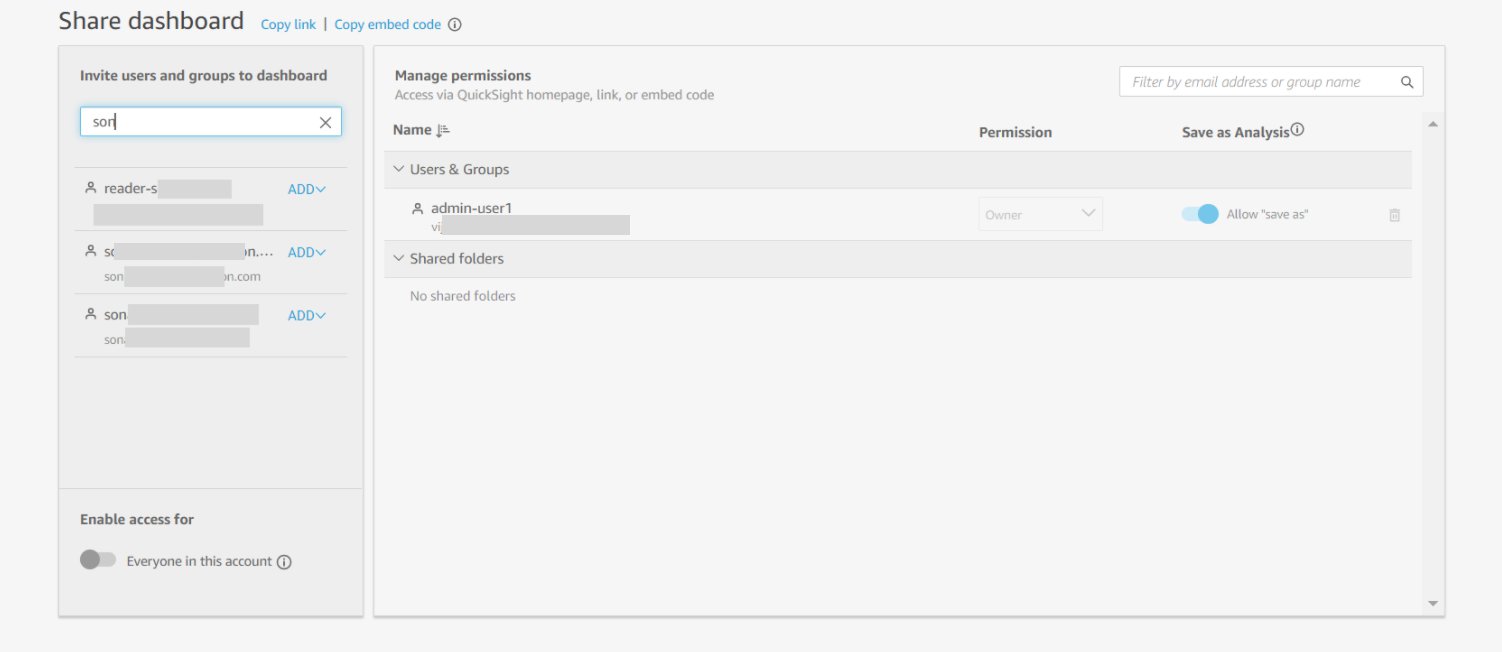
In this example, the owner of the dashboard searches for a user whose email starts with son, which returns three options. The listed users can be authors or readers in the account. When you choose ADD next to every search result, based on the role (author or reader), you can select the permission level (viewer or co-owner) and add the user to access the dashboard. Authors can be added to this dashboard as viewers or co-owners. Viewers can view, export, and print a dashboard. Co-owners can do all actions that viewers can do and can also edit, delete, or share the dashboard, or build new dashboards from this dashboard. Readers can be added only as viewers. Dashboard owners can similarly search for and add groups to access the dashboard.
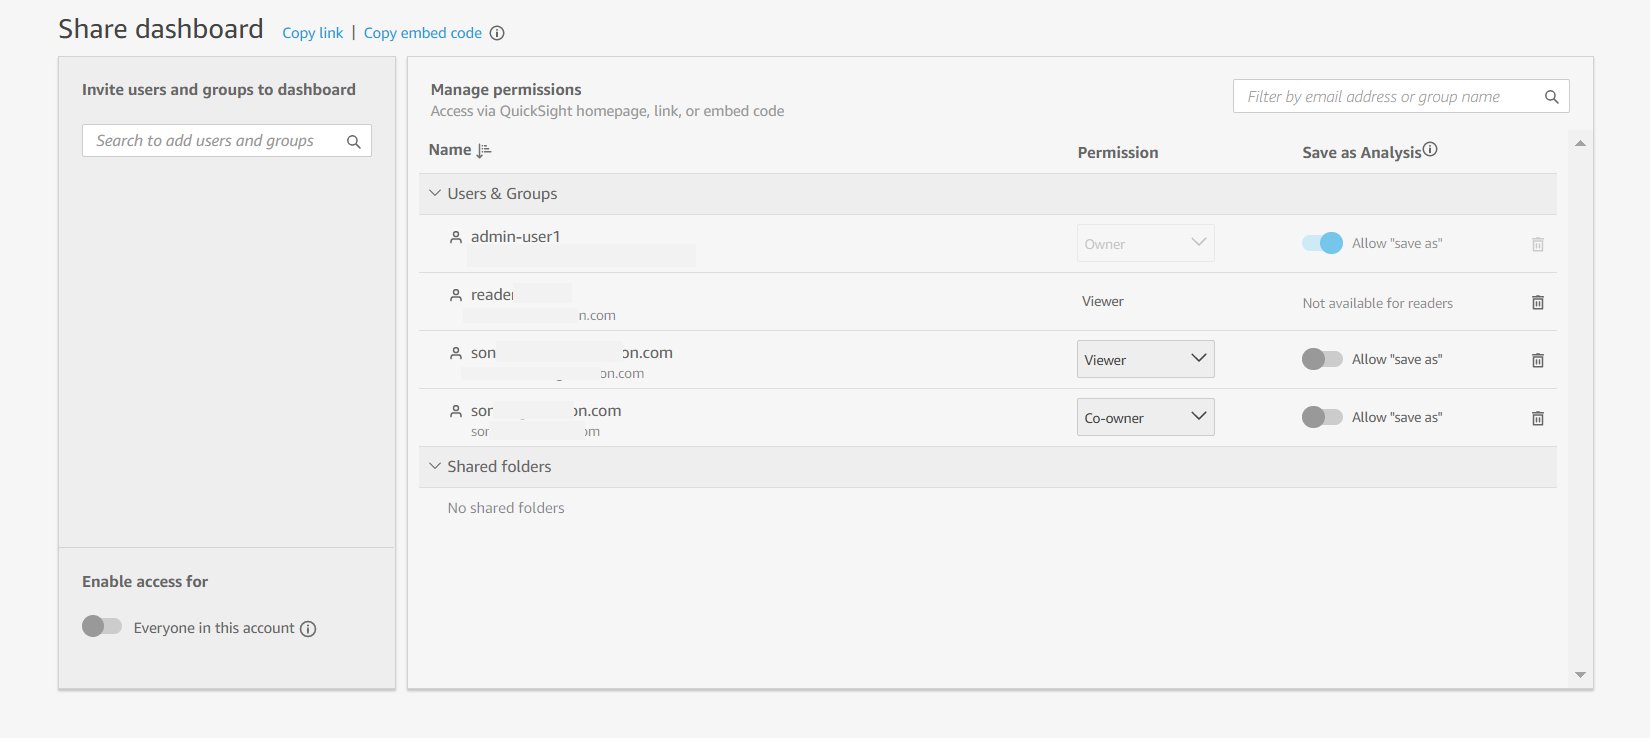
The following screenshot shows all the added users with whom we want to share this dashboard.
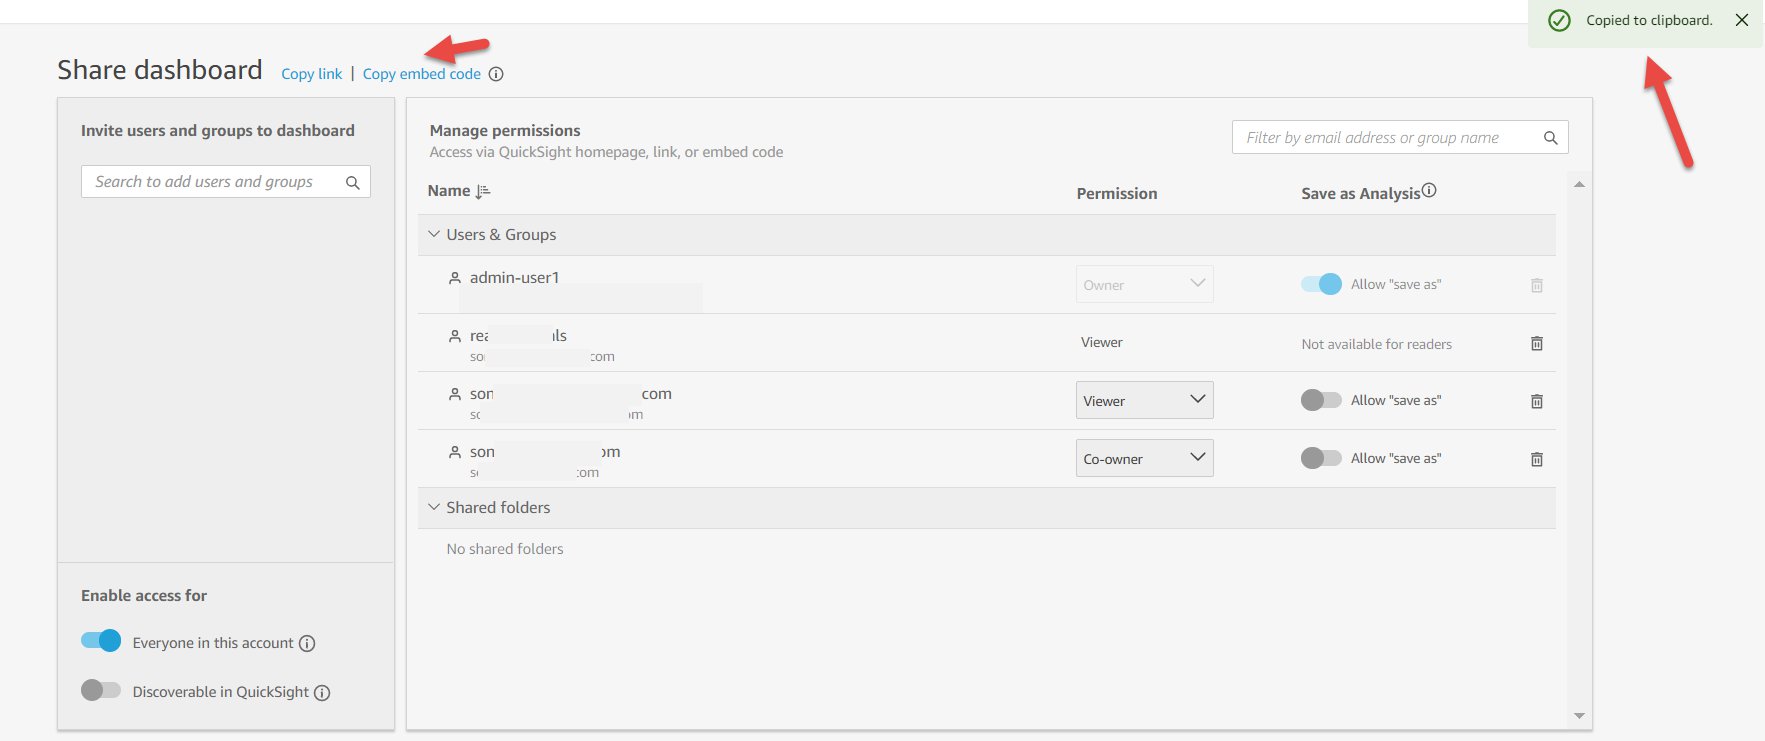
You can also enable all users on your QuickSight account to access the dashboard by enabling access to Everyone in this account, as shown in the following screenshot.

When this option is enabled, users who haven’t been added explicitly to access the dashboard can now access the dashboard via the link available via the Copy option (available on the top of the Share dashboard page) or when embedded. To revoke this account-wide dashboard access to everyone on your account, you disable the same toggle.
Also, when this option is enabled, owners have the option to enable the dashboard to show this dashboard in all users’ QuickSight accounts, as shown in the following screenshot. Enabling this option ensures that the dashboard is visible in the Dashboards list for every user in the account. If this is disabled, they can still access the dashboard if they have the link, or if it’s embedded, but they can’t see it in their list of dashboards on the home screen.

Step 2: Allow list the embedding domain
The domain where the dashboard is to be embedded must be allow listed in QuickSight. For instructions, see Adding Domains for Embedded Users.
Step 3: Embed the dashboard
After you set your desired access to the dashboard, you can choose Copy embed code, which copies the embed code for that dashboard. This code embeds the dashboard when added to the internal application.
The copied embed code is similar to the following code (the QuickSight domain is the URL you use to access your QuickSight account):
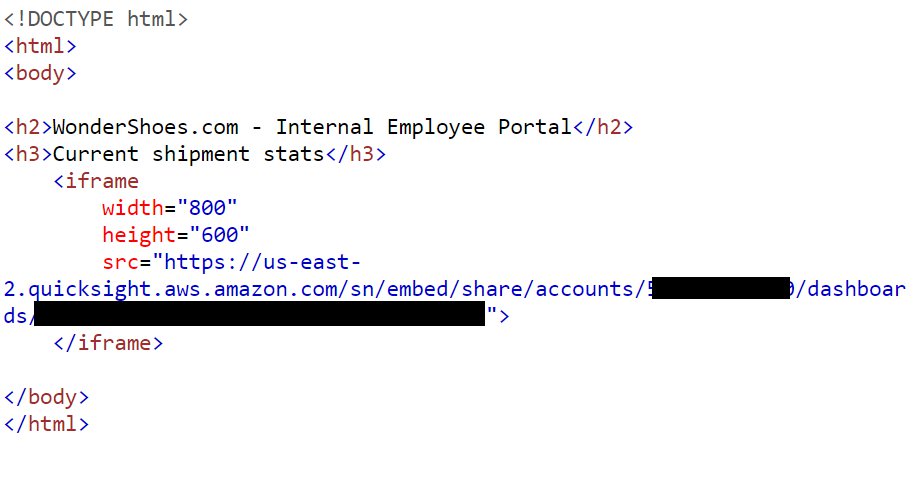
Embed a dashboard in an HTML page
To embed the dashboard in an HTML page, open the HTML of the page where you want to embed the dashboard and enter the copied embed code into the HTML code.
Now, let’s look at some common embedding scenarios in an organization.
Embed a dashboard in a Google site
If you have your internal applications built on Google sites, to embed your dashboard, open the page on Google site, and choose Insert and Embed. A pop-up window appears with a prompt to enter a URL or embed code. Choose Embed code and enter the copied embed code in the text box.

Make sure to allow list the following domains in QuickSight when embedding in Google sites https://googleusercontent.com (enable subdomains), https://www.gstatic.com and https://sites.google.com.
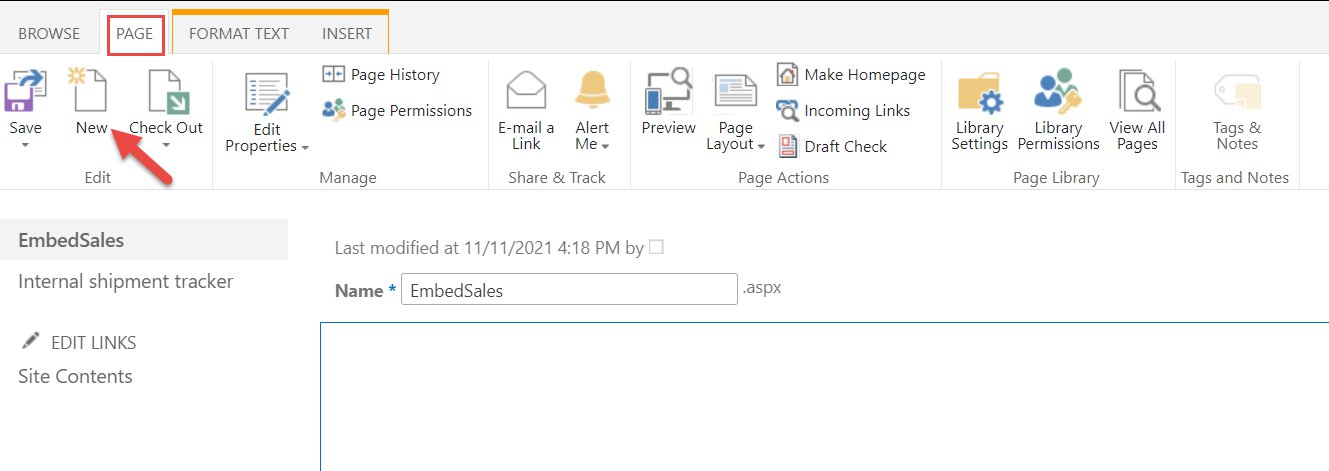
Embed a dashboard in a SharePoint site
You can embed a dashboard when you’re creating a SharePoint site (template type Publishing). Choose New to create a new page.
On the Insert ribbon, choose Embed Code.
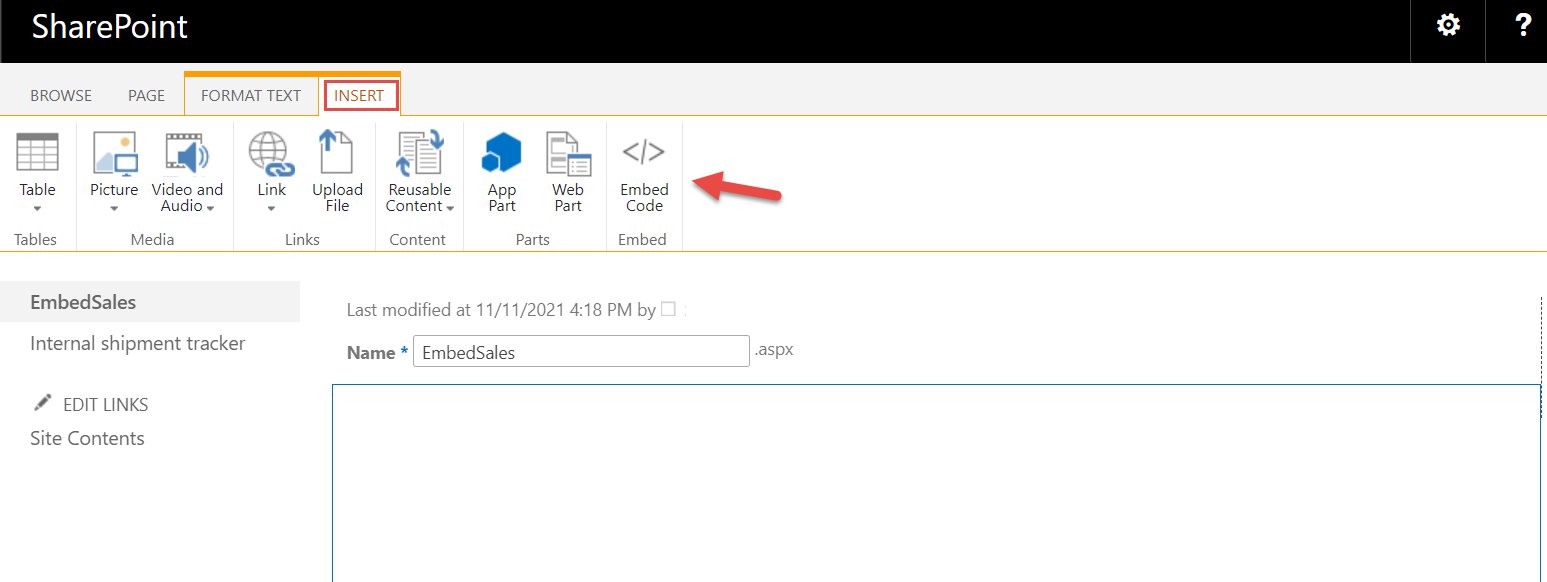
In the pop-up that opens, insert the embed code that you copied.

If you’re embedding dashboards in software as a service (SaaS) apps or portals that have their own authentication schemes, you can continue using these and seamlessly serve dashboard to the users. For more information, see Embed multi-tenant dashboards in SaaS apps using Amazon QuickSight without provisioning or managing users.
End-user experience
After you embed the dashboard in your application, users that you enabled earlier can access it. In this section, we walk through the user experience with and without single sign-on (SSO) integration with QuickSight.
Experience when QuickSight has SSO integration enabled
When SSO is enabled, when users access the application, they are single signed-on to QuickSight and aren’t presented with the authentication pop-up. If users have access to the dashboard, they see the data on the dashboard and can interact with it. If they don’t have access to the dashboard, they see a message that they’re not authorized to view the dashboard.
In the following screenshot, the user is authenticated with SSO and sees the dashboard.

You can set up SP-initiated SSO if you’re using an existing identity provider (IdP) such as Ping, Okta, or Azure AD. To learn more about enabling SSO on QuickSight, see Using Identity Federation and Single Sign-on (SSO) with Amazon QuickSight and Federate Amazon QuickSight access with Okta.
Experience when QuickSight doesn’t have SSO integration enabled
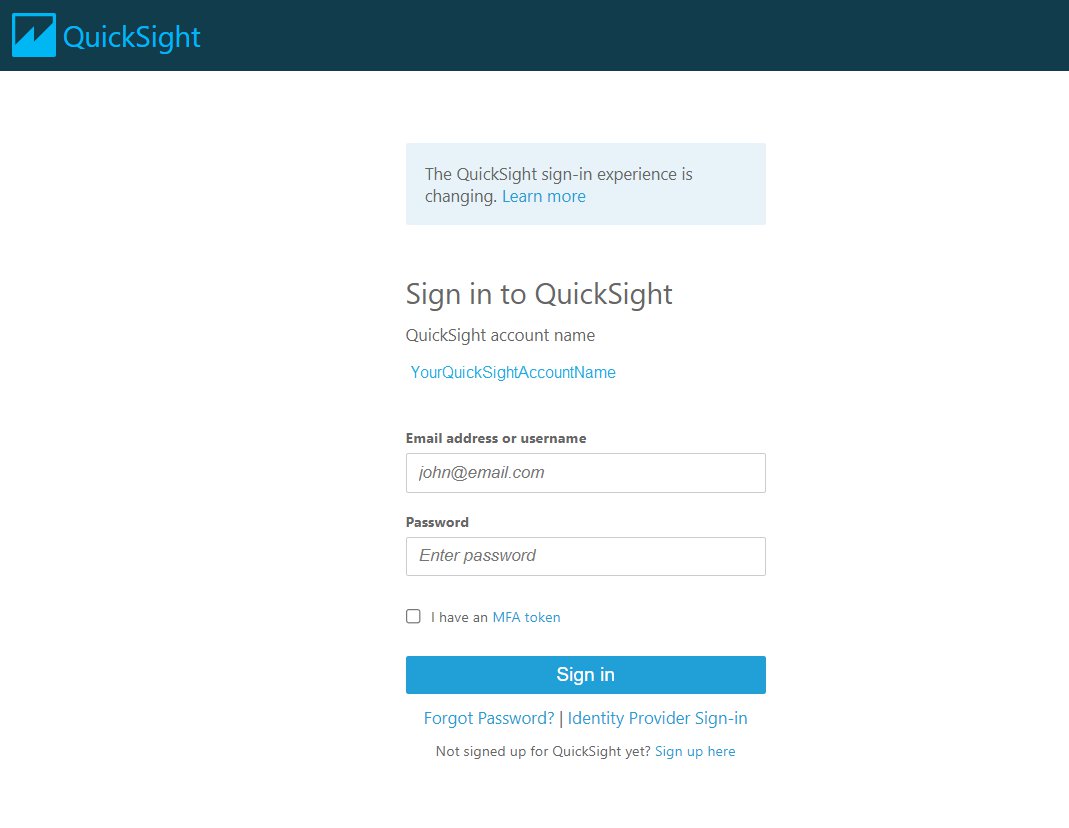
Without SSO integration, when end-users access the application, they see the embedded dashboard (requiring authentication) along with a pop-up to authenticate into QuickSight. After users enter their QuickSight credentials, the pop-up closes and the dashboard is loaded on the application. If the user has access to the dashboard, they see the data on the dashboard and can interact with it.
The following screenshot shows a dashboard that is embedded in an internal SharePoint site that tracks weekly shipped orders, and users are asked to authenticate.
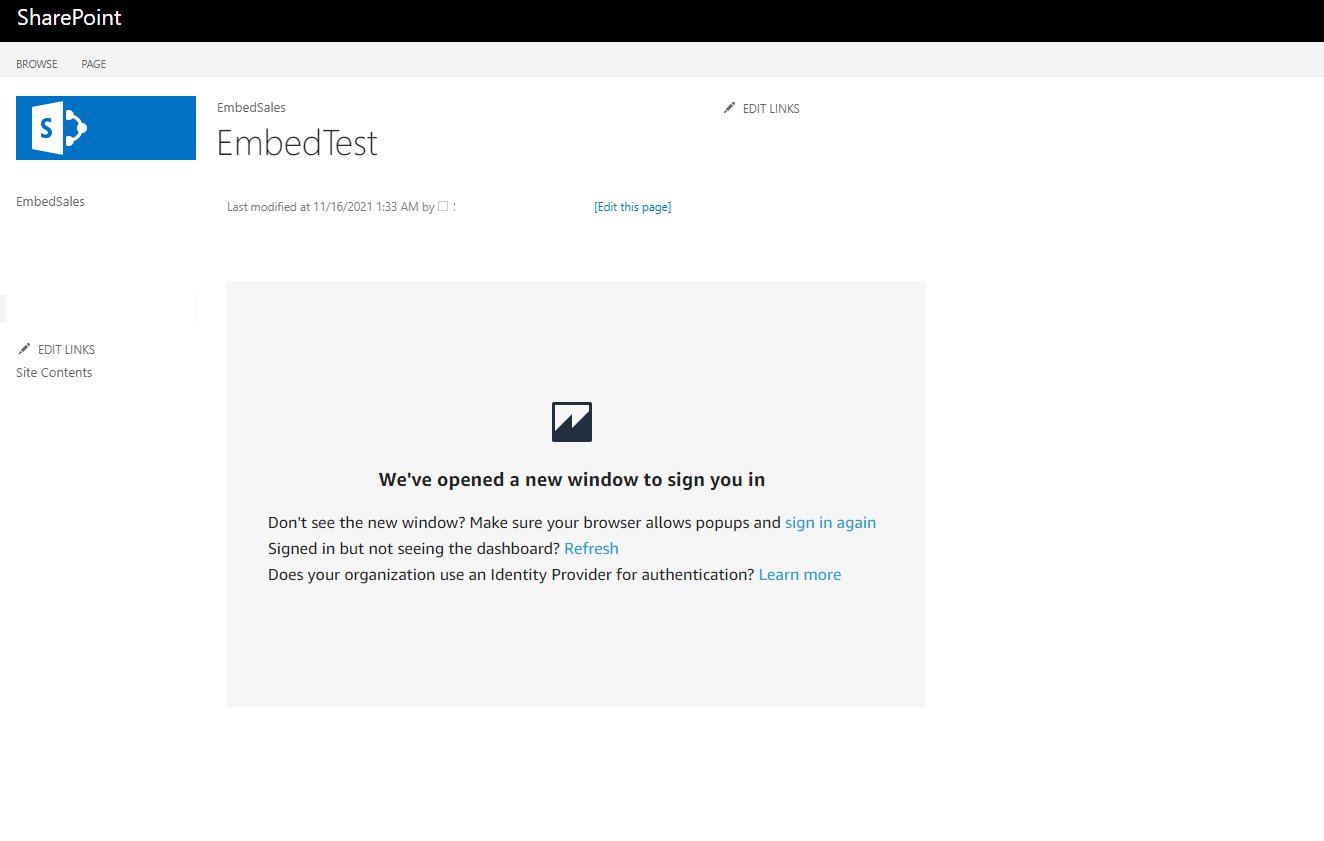
The following is the pop-up to authenticate.
Use case
In this section, we explore an example use case of a small enterprise, a shoe retailer named WonderShoes. They have recently ventured into telecommerce (selling via phone channel) and have set up call centers in their company to take customer calls from those who are interested in buying shoes.
They’re embedding a dashboard in their internal site that tracks the call volume, other call-related metrics, and sales metrics that they measure on daily business. They have built out a dashboard and enabled all their internal users to be able to access this dashboard. With the 1-click embed feature, they have embedded the following embed code in their internal application’s page:
The following screenshot shows their internal application with the embedded dashboard and authentication prompt.

Users are authenticated and then can see the dashboard. If they come back to the site with valid authentication cookies, they can see the dashboard without needing to authenticate again.
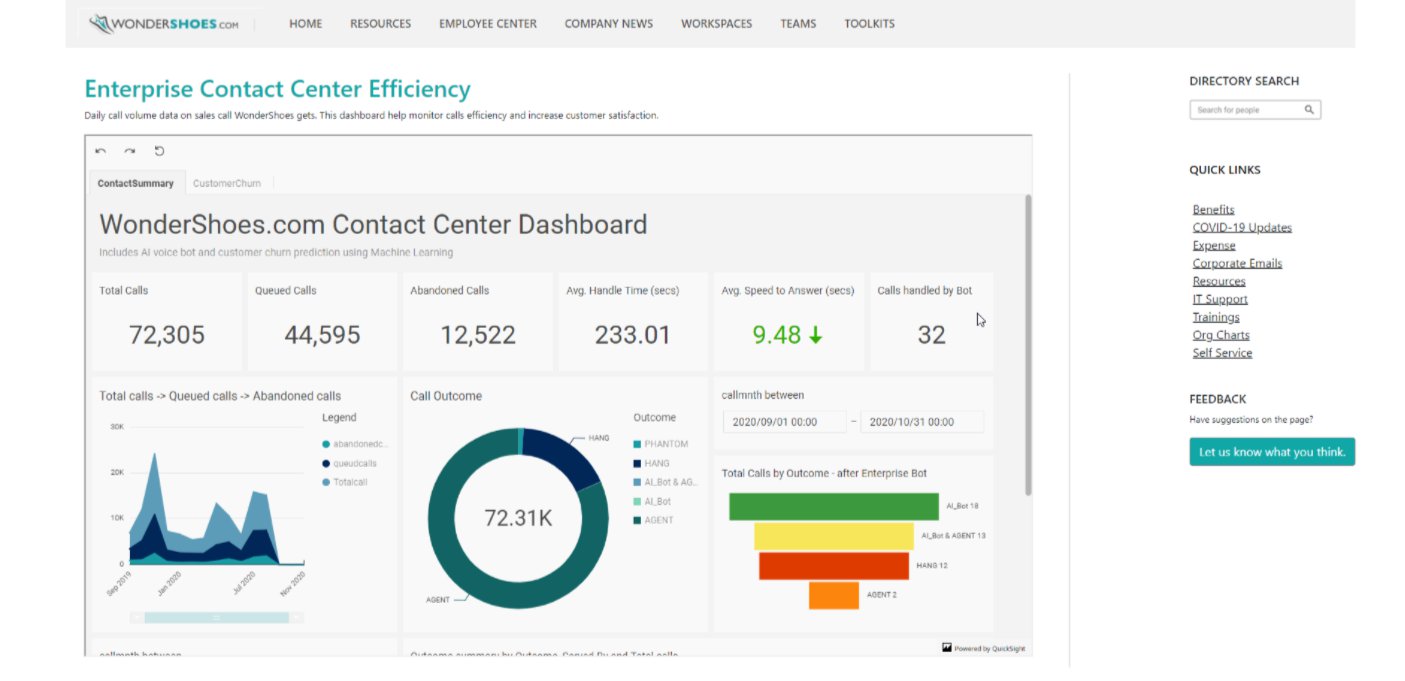
This feature enabled WonderShoes to embed their dashboard quickly and have all their internal employees access the embedded dashboard. They can now gather rich insights and make quick data-driven business decisions to grow their new telecommerce business division.
Conclusion
With 1-click enterprise embedding, enterprises can now embed rich and interactive QuickSight dashboards quickly and easily. This enables you to share important metrics and data insights with all users in your account with a click of a button – all without any infrastructure setup or management while scaling to millions of users. QuickSight also supports embedding in SaaS apps without any user management needed. To learn more about this, read this blogpost.
For more updates about QuickSight embedded analytics, see What’s New in the Amazon QuickSight User Guide.
About the Authors
 Kareem Syed-Mohammed is a Product Manager at Amazon QuickSight. He focuses on embedded analytics, APIs, and developer experience. Prior to QuickSight he has been with AWS Marketplace and Amazon retail as a PM. Kareem started his career as a developer and then PM for call center technologies, Local Expert and Ads for Expedia. He worked as a consultant with McKinsey and Company for a short while.
 Kenz Shane is a UI Designer for Amazon QuickSight. As part of the product’s Business Intelligence User Experience (BIUX) team, she specializes in creating customer-focused visual interfaces. Previously, she worked with the Experience Innovation Group at Dell, serving as a subject matter expert in enterprise-grade user interface (UI) design, accessible data visualization, and design systems. Kenz has provided art direction and design for clients across multiple industries, including Nordstrom, Columbia Hospitality, AIGA, and Warner Bros.
 Raji Sivasubramaniam is a Specialist Solutions Architect at AWS, focusing on Analytics. Raji has 20 years of experience in architecting end-to-end Enterprise Data Management, Business Intelligence and Analytics solutions for Fortune 500 and Fortune 100 companies across the globe. She has in-depth experience in integrated healthcare data and analytics with wide variety of healthcare datasets including managed market, physician targeting and patient analytics. In her spare time, Raji enjoys hiking, yoga and gardening.
 Srikanth Baheti is a Specialized World Wide Sr. Solution Architect for Amazon QuickSight. He started his career as a consultant and worked for multiple private and government organizations. Later he worked for PerkinElmer Health and Sciences & eResearch Technology Inc, where he was responsible for designing and developing high traffic web applications, highly scalable and maintainable data pipelines for reporting platforms using AWS services and Serverless computing.-
Send custom branded email reports from Amazon QuickSight
Post Syndicated from Kareem Syed-Mohammed original https://aws.amazon.com/blogs/big-data/send-custom-branded-email-reports-from-amazon-quicksight/
Amazon QuickSight is a fully-managed, cloud-native business intelligence (BI) service that makes it easy to connect to your data, create interactive dashboards, and share these with tens of thousands of users, either directly within QuickSight application, or embedded in web apps and portals.
QuickSight Enterprise Edition now supports the ability to send custom branded email reports. You can customize the email sender domain for email reports sent from QuickSight, along with the logo and header color of the email, as well as footer text of the email. If you have your dashboard embedded in your own application, you can also customize the URL to open the dashboard from the email to the URL of your application. This lets you customize emails to reflect your corporate branding, whether you want to send these reports to 1000s of your internal users or external customers.
In this post, we will go through the following:
- Steps to implement the solution
- Create a customized email template
- Create an email schedule and subscribe email recipients
- End user experience
- Sample use case
Solution overview
Step 1: Create a customized email template
This new feature lets you customize your email with the following customization options:
- Custom sender email address
- Custom logo in the email header and custom header color
- Custom link to open the dashboard (if your dashboard is embedded in your own application)
- Custom footer
You can customize all or any of these options. To customize, create an email template in your QuickSight account, which will be used when sending email reports for any dashboard to any user. This email template is specific to the AWS region and account it is created in.
Log in to QuickSight as an admin, and select your name in the top right, then in the menu select “Manage QuickSight” as shown in the following screenshot:

In the next screen, select “Account Customization”, and you will see the available account customization options. Under the “Email report template” section, select “Update” as shown in the following screenshot. You must have the right IAM Identity-Based Policies assigned to you to create or edit the template.

In the next screen, you can set customizations that we will see one by one.
Customize sender email address
This option lets you set a custom email address or use QuickSight’s email address <[email protected]> to send email reports. To select sending via QuickSight email address, select the radio button for QuickSight.
To send a custom email, select the radio button for custom email setting. At this time, only verified email addresses can be used for a custom email address. SES and QuickSight must be in the same AWS account and region. If you do not have an SES account, then you can get started <HERE> with SES’ free tier of XX. Steps to add a custom email address.
- Add a verified SES email address and click “Verify email”. If you get an error, then refer here for creating a verified SES email address.

- Once the email address is verified, you must authorize QuickSight to send emails on your behalf. To do this, copy the given “Authorization Policy”, and add it as a “Sending authorization policy” for your verified email address in SES. Refer here to learn about SES sending authorization policy.

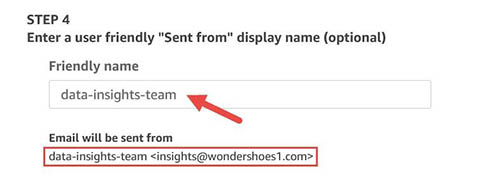
As we can see in the screenshot above, once the authorization policy is verified, QuickSight is authorized to send email using the SES email address. - You can set a friendly name for the email address as shown in the following screenshot.


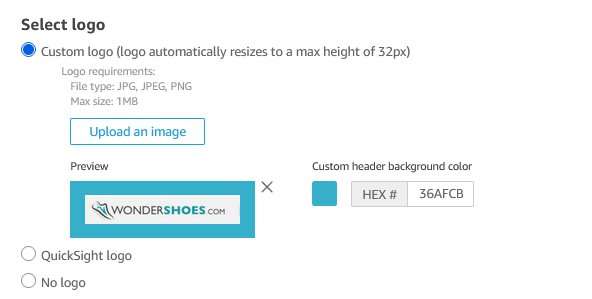
Customize logo
Email reports from QuickSight have a QuickSight logo in the header of the email body. You can choose to select a custom logo, use QuickSight logo, or have no logo by selecting the corresponding radio button.
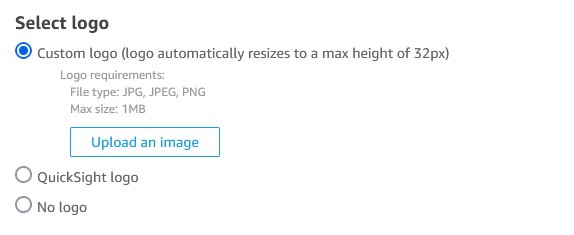
When you select the “Custom logo” option, you can select your own logo (for format jpg, jpeg, or png) and a maximum file size of 1MB. Your logo will be scaled to a height of 32px, maintaining the aspect ratio. When you upload the logo image, you get an option to set the background color (as a HEX code) of the header in the email report.
Select where the dashboard opens
Email reports have an image of the first sheet of the QuickSight dashboards. In order for the recipient to interact with the dashboard, email reports also provide a link to open the dashboard. By default, this link opens the dashboard in the QuickSight application. Now you can select where the dashboard opens. If you have embedded the dashboard in your application, then you can provide the URL of your application. Moreover, you can choose to hide the option to disable opening the dashboard from the email entirely. Please see the following screenshot for reference.
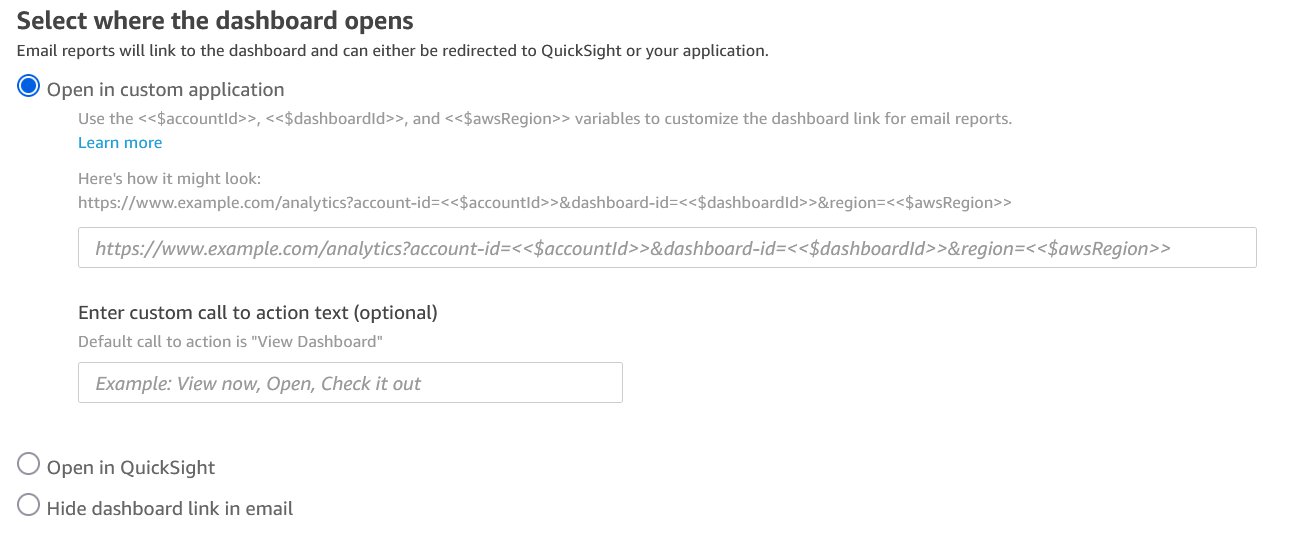
If you want to add your custom link, then you will have to add the following query parameters – account-id, dashboard-id, and region – to your link. QuickSight will populate these parameters at runtime, and when your customers select the open dashboard link from the email, they will be taken to the link you have provided. With the account-id, dashboard-id, and region now available with the link, you can provide logic to take your customers to where you have embedded the dashboard in your application.
Custom footer
Email reports default QuickSight footers have content and a link related to QuickSight and QuickSight application. You have an option to customize the footer or hide the entire footer. Please refer to the following screenshot for reference.
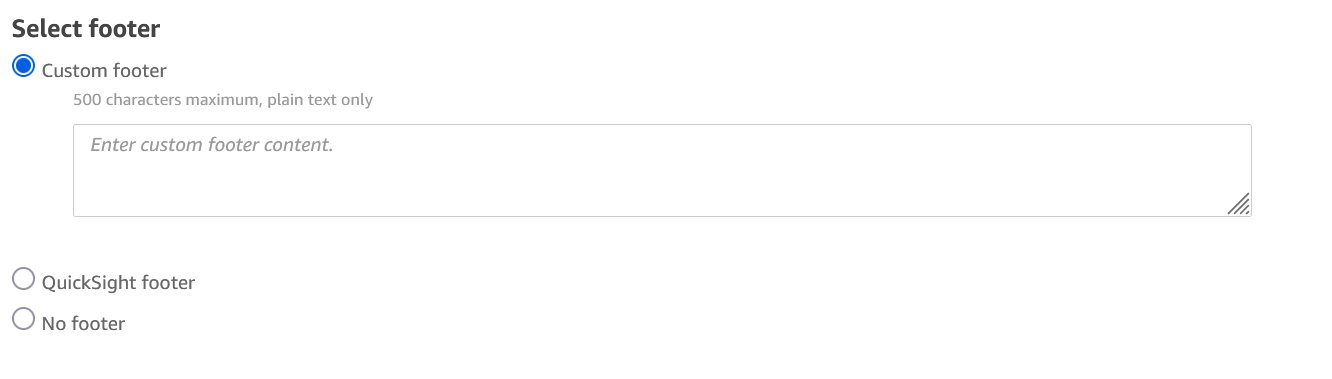
If you select the option to set a custom footer, then you can provide custom text and hyperlink content in the textbox. At this time, we only allow plain text.
Step 2: Create an email schedule and subscribe recipients
Once your QuickSight account has an email template saved, any email report sent in the same AWS region will use this template. To send an email report, the author of the dashboard should create an email schedule for the dashboard and assign recipients to that schedule.
To set a schedule, the dashboard author should open the dashboard in QuickSight application, select “Share” in the top right, and select “Email report” in the menu. Please refer to the following screenshot for reference.

You will be taken to the “Edit email report” screen, where you can create a schedule for the email to be sent and add email recipients. Please refer to this documentation on sending reports by email and this post for sending personalized email reports.
If you are embedding dashboards in your application, then your readers cannot subscribe to the schedule from the embedded dashboard. Authors must add those readers to the recipient list through the steps stated above. Therefore, your readers must be provisioned in QuickSight.
End user experience
The end user gets the email as per the schedule set. If the email template has been set, then recipients get the look and feel of the email based on the customization done on the template. The following screenshot shows the email with a custom look and feel.

As you can see, this email has the following:
- From address customized to [email protected] with a friendly name, “data-insights-team”
- Logo customized to a brand logo, and header customized to the brand green shade
- Dashboard open link customized to take customers to your app if the dashboard is embedded in that app
- Footer customized with a custom message
Use case
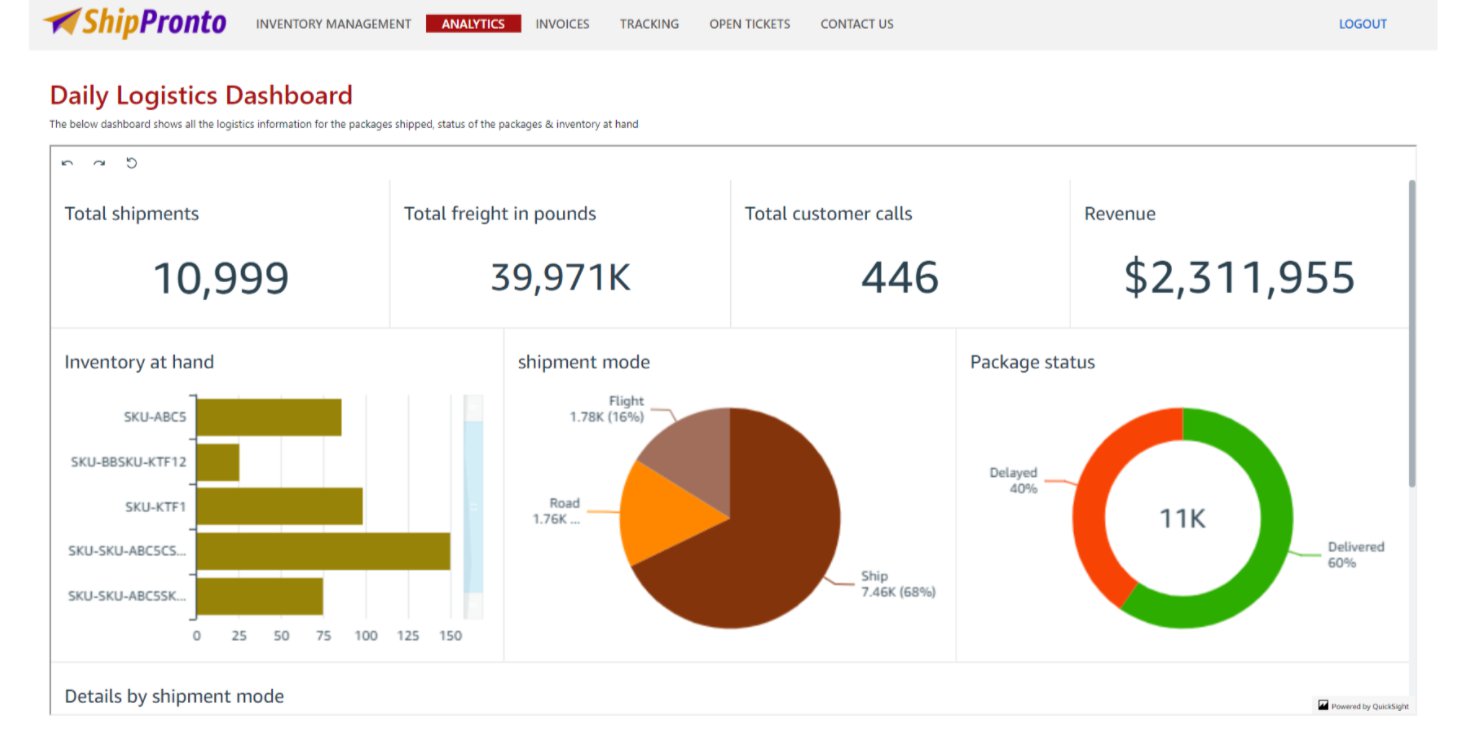
ShipPronto is a logistics service provider for heavy machinery. It has many customers that store their heavy machinery at ShipPronto’s warehouse. When customers get purchase orders on these machineries, they have ShipPronto fulfill those orders on their behalf from its warehouse. ShipPronto has an application where each customer can login and see rich data on their order shipment and machinery quantity at the warehouse. ShipPronto uses QuickSight dashboard embedded in its application to provide the insights. Furthermore, it sends daily emails to its customers on this dashboard. It’s using the email customization feature of QuickSight to customize the look and feel of the email so that customers receiving the email get a seamless experience.
Below is the customized email that their customers receive daily with the sender email address, logo, header color, and footer customized.
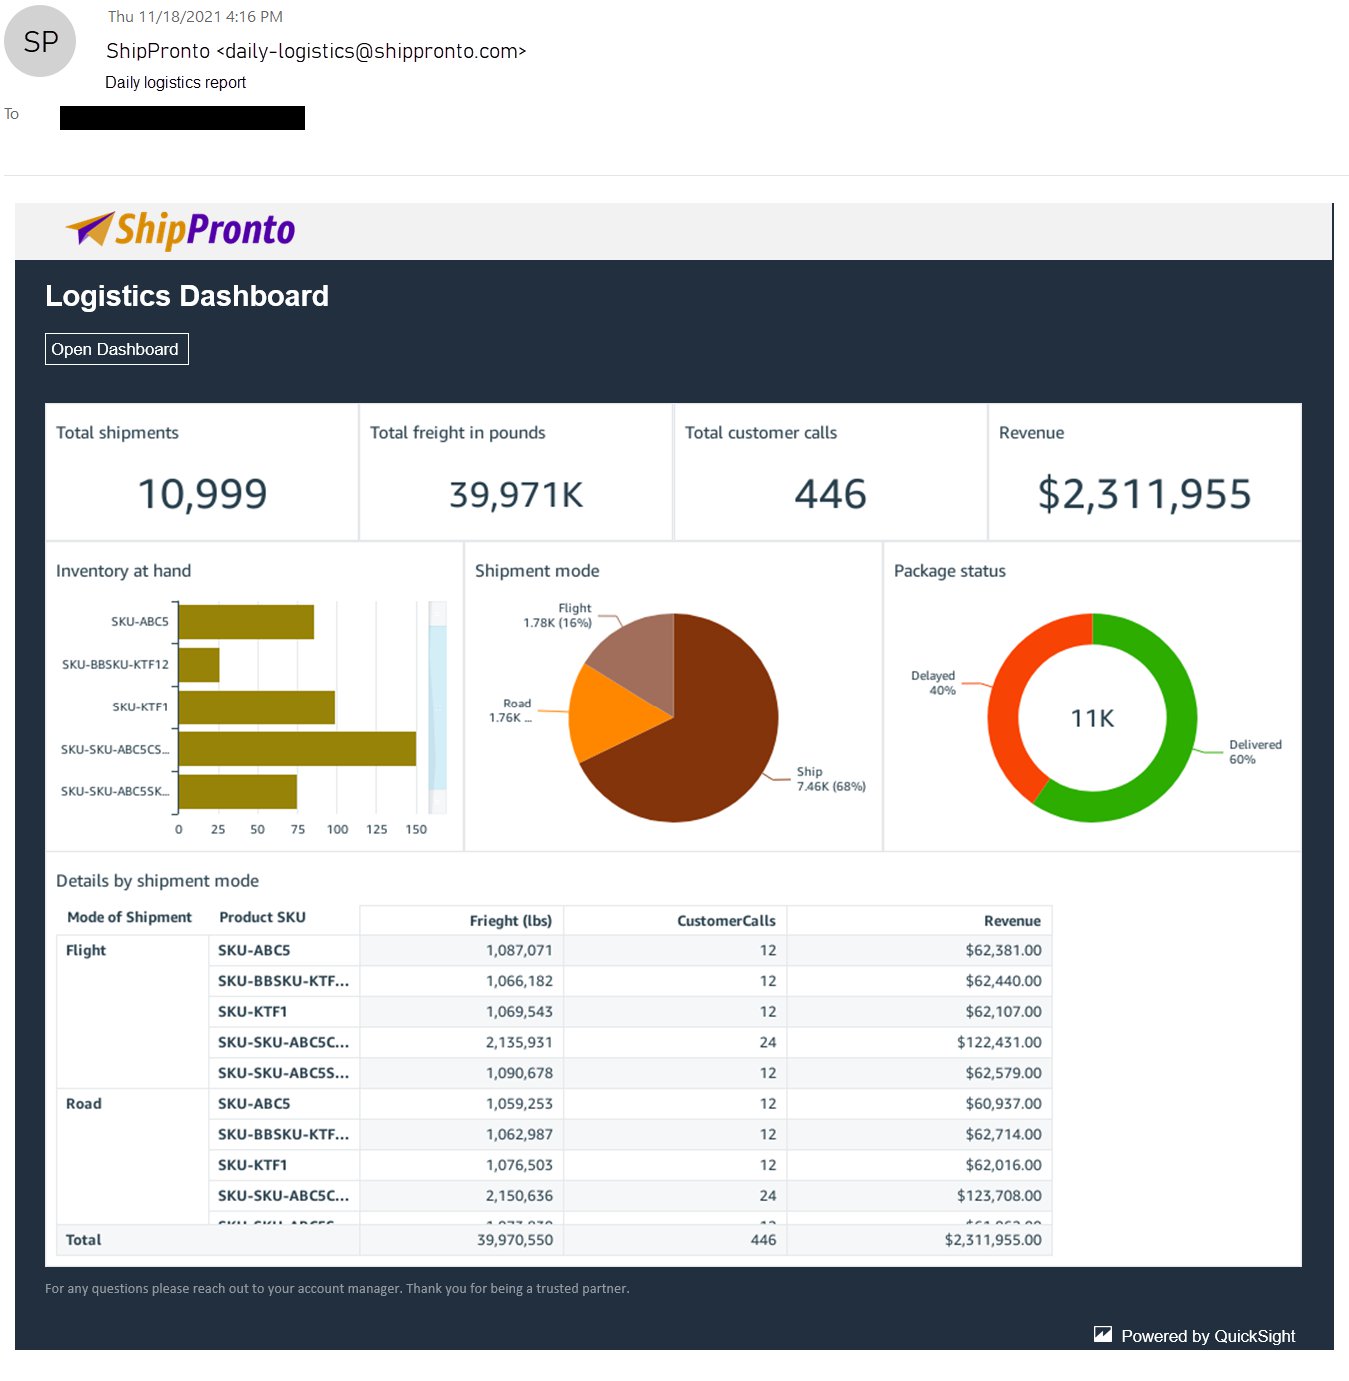
When customers click on the “Open Dashboard” link in the email, they are taken to ShipPronto’s app, on which they must log in, as shown in the following screenshot.

Once the customers log in, based on the query string parameters that were passed along with the custom URL (which was set as part of the URL, to open the dashboard in the email template), ShipPronto can take its customers to the page where they have this dashboard embedded.
This experience means that ShipPronto’s end users see the ShipPronto branded email and get a seamless experience where they access the embedded dashboard, in the application, from the email.
Conclusion
Email customizations let you send branded email reports to your customers, thereby enabling a seamless experience when customers are accessing the email or the application where the dashboard is embedded. And all of this is done without any infrastructure setup or management, while scaling to millions of users. For more updates from QuickSight embedded analytics, see What’s New in the Amazon QuickSight User Guide.
About the Author
Kareem Syed-Mohammed is a Product Manager at Amazon QuickSight. He focuses on embedded analytics, APIs, and developer experience. Prior to QuickSight he has been with AWS Marketplace and Amazon retail as a PM. Kareem started his career as a developer and then PM for call center technologies, Local Expert and Ads for Expedia. He worked as a consultant with McKinsey and Company for a short while.
Kenz Shane is a UI Designer for Amazon QuickSight. As part of the product’s Business Intelligence User Experience (BIUX) team, she specializes in creating customer-focused visual interfaces. Previously, she worked with the Experience Innovation Group at Dell, serving as a subject matter expert in enterprise-grade user interface (UI) design, accessible data visualization, and design systems. Kenz has provided art direction and design for clients across multiple industries, including Nordstrom, Columbia Hospitality, AIGA, and Warner Bros.
Raji Sivasubramaniam is a Specialist Solutions Architect at AWS, focusing on Analytics. Raji has 20 years of experience in architecting end-to-end Enterprise Data Management, Business Intelligence and Analytics solutions for Fortune 500 and Fortune 100 companies across the globe. She has in-depth experience in integrated healthcare data and analytics with wide variety of healthcare datasets including managed market, physician targeting and patient analytics. In her spare time, Raji enjoys hiking, yoga and gardening.
Srikanth Baheti is a Specialized World Wide Sr. Solution Architect for Amazon QuickSight. He started his career as a consultant and worked for multiple private and government organizations. Later he worked for PerkinElmer Health and Sciences & eResearch Technology Inc, where he was responsible for designing and developing high traffic web applications, highly scalable and maintainable data pipelines for reporting platforms using AWS services and Serverless computing.-
Fiction vs Nonfiction
Post Syndicated from original https://xkcd.com/2546/

How to enable secure seamless single sign-on to Amazon EC2 Windows instances with AWS SSO
Post Syndicated from Todd Rowe original https://aws.amazon.com/blogs/security/how-to-enable-secure-seamless-single-sign-on-to-amazon-ec2-windows-instances-with-aws-sso/
Today, we’re launching new functionality that simplifies the experience to securely access your AWS compute instances running Microsoft Windows. We took on this update to respond to customer feedback around creating a more streamlined experience for administrators and users to more securely access their EC2 Windows instances. The new experience utilizes your existing identity solutions to run and manage your Microsoft Windows workloads on AWS. You can create and administer users in AWS Single Sign-On (AWS SSO) or an AWS SSO supported identity provider (such as Okta, Ping, and OneLogin), and provide a one-click single sign-on to your EC2 Windows instances from the AWS Fleet Manager console. You can also use your existing corporate usernames, passwords, and multi-factor authentication devices to securely access your EC2 windows instances, without having to enter your credentials multiple times.
Using AWS SSO eliminates the use of shared administrator credentials and the need to configure remote access client software. You can centrally grant and revoke access to your EC2 Windows instances at scale across multiple AWS accounts. For example, if you remove an employee from your AWS SSO integrated identity system, their access to all AWS resources (including EC2 Windows instances) is automatically revoked. Individual user actions can now be viewed in the Amazon EC2 Windows instances event log, making it easier to meet audit and compliance requirements.
AWS SSO background
AWS SSO simplifies managing SSO access to AWS accounts and business applications, and it is the central location where you can create or connect your workforce identities in AWS. You can control SSO access and user permissions across all your AWS accounts in AWS Organizations. You can choose to manage access to your AWS accounts, to cloud applications, or both.
When managing access to AWS accounts, AWS SSO enables you to define and assign roles centrally across your AWS Organizations account using permission sets. Permission sets are role definitions (templates) that AWS SSO uses to create and maintain roles in your AWS Organizations accounts. The permission set defines the session duration and policies for the role. When you assign a permission set to a user or group in a selected AWS account, AWS SSO creates a corresponding role in the target account, and AWS SSO controls access to the role through the AWS SSO user portal.
This post uses a permission set that manages access to AWS Fleet Manager to deliver one-click access into EC2 instances.
You will accomplish this in three steps:
- Create an AWS SSO permission set (for example, demoFMPermissionSet)
- Assign the permission set to an existing AWS SSO group (for example, demoFMGroup)
- Login to the AWS SSO User Portal and connect to your EC2 Windows instance via the AWS Fleet Manager console
Prerequisites
The prerequisites for this example are that you have:
- Configured AWS SSO in your account with provisioned users and groups
- An EC2 Windows instance managed by AWS Systems Manager Fleet Manager
Solution architecture
The following diagram shows the steps you will follow to configure and use an AWS SSO user identity to login to an EC2 Windows instance.
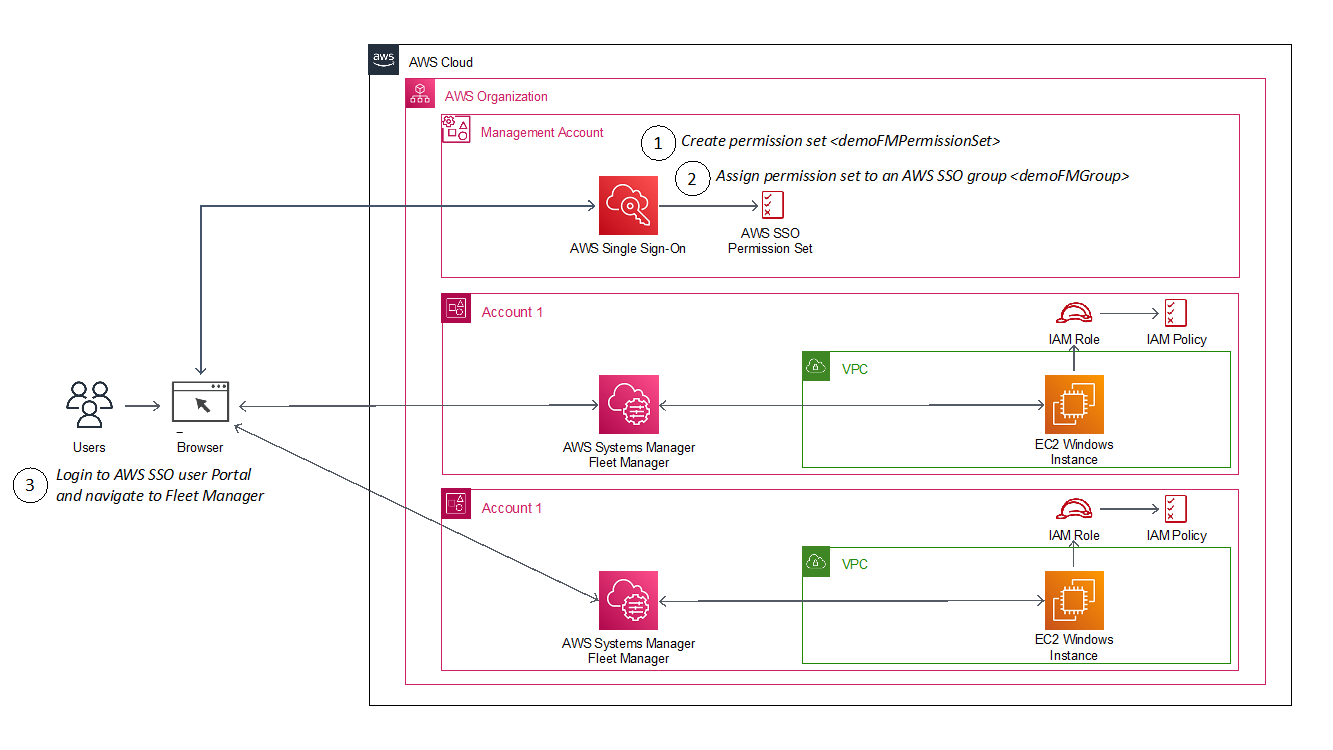
Figure 1: Architecture diagram showing steps implemented in this solution
How it works
The AWS SSO permission set creates a role in a target account that gives an authorized user permissions to use AWS Fleet Manager to sign into EC2 Windows instances. When a user chooses the role in the account, the user signs onto the AWS Fleet Manager console and selects the EC2 instance where they want to sign in.
AWS Fleet Manager creates a local Windows user account and a credential for that user, and then automates their sign-in to the instance.
To create an AWS SSO permission set
This procedure creates a permission set that grants assigned users and groups permissions to use AWS Fleet Manager for single sign-on to EC2 instances.
- From the AWS SSO console, go to AWS Accounts, select the Permission sets tab, select Create permission set and choose Create a custom permission set.
- Name your permission set, and fill out the required fields, making sure to select Create a custom permissions policy at the bottom of the page. See Sample custom permissions policy below for details on the policy.
- After creating the custom permissions policy, you can also apply optional tagging. When you are done, review and choose Create to complete creating your custom permission set, as shown in Figure 2.
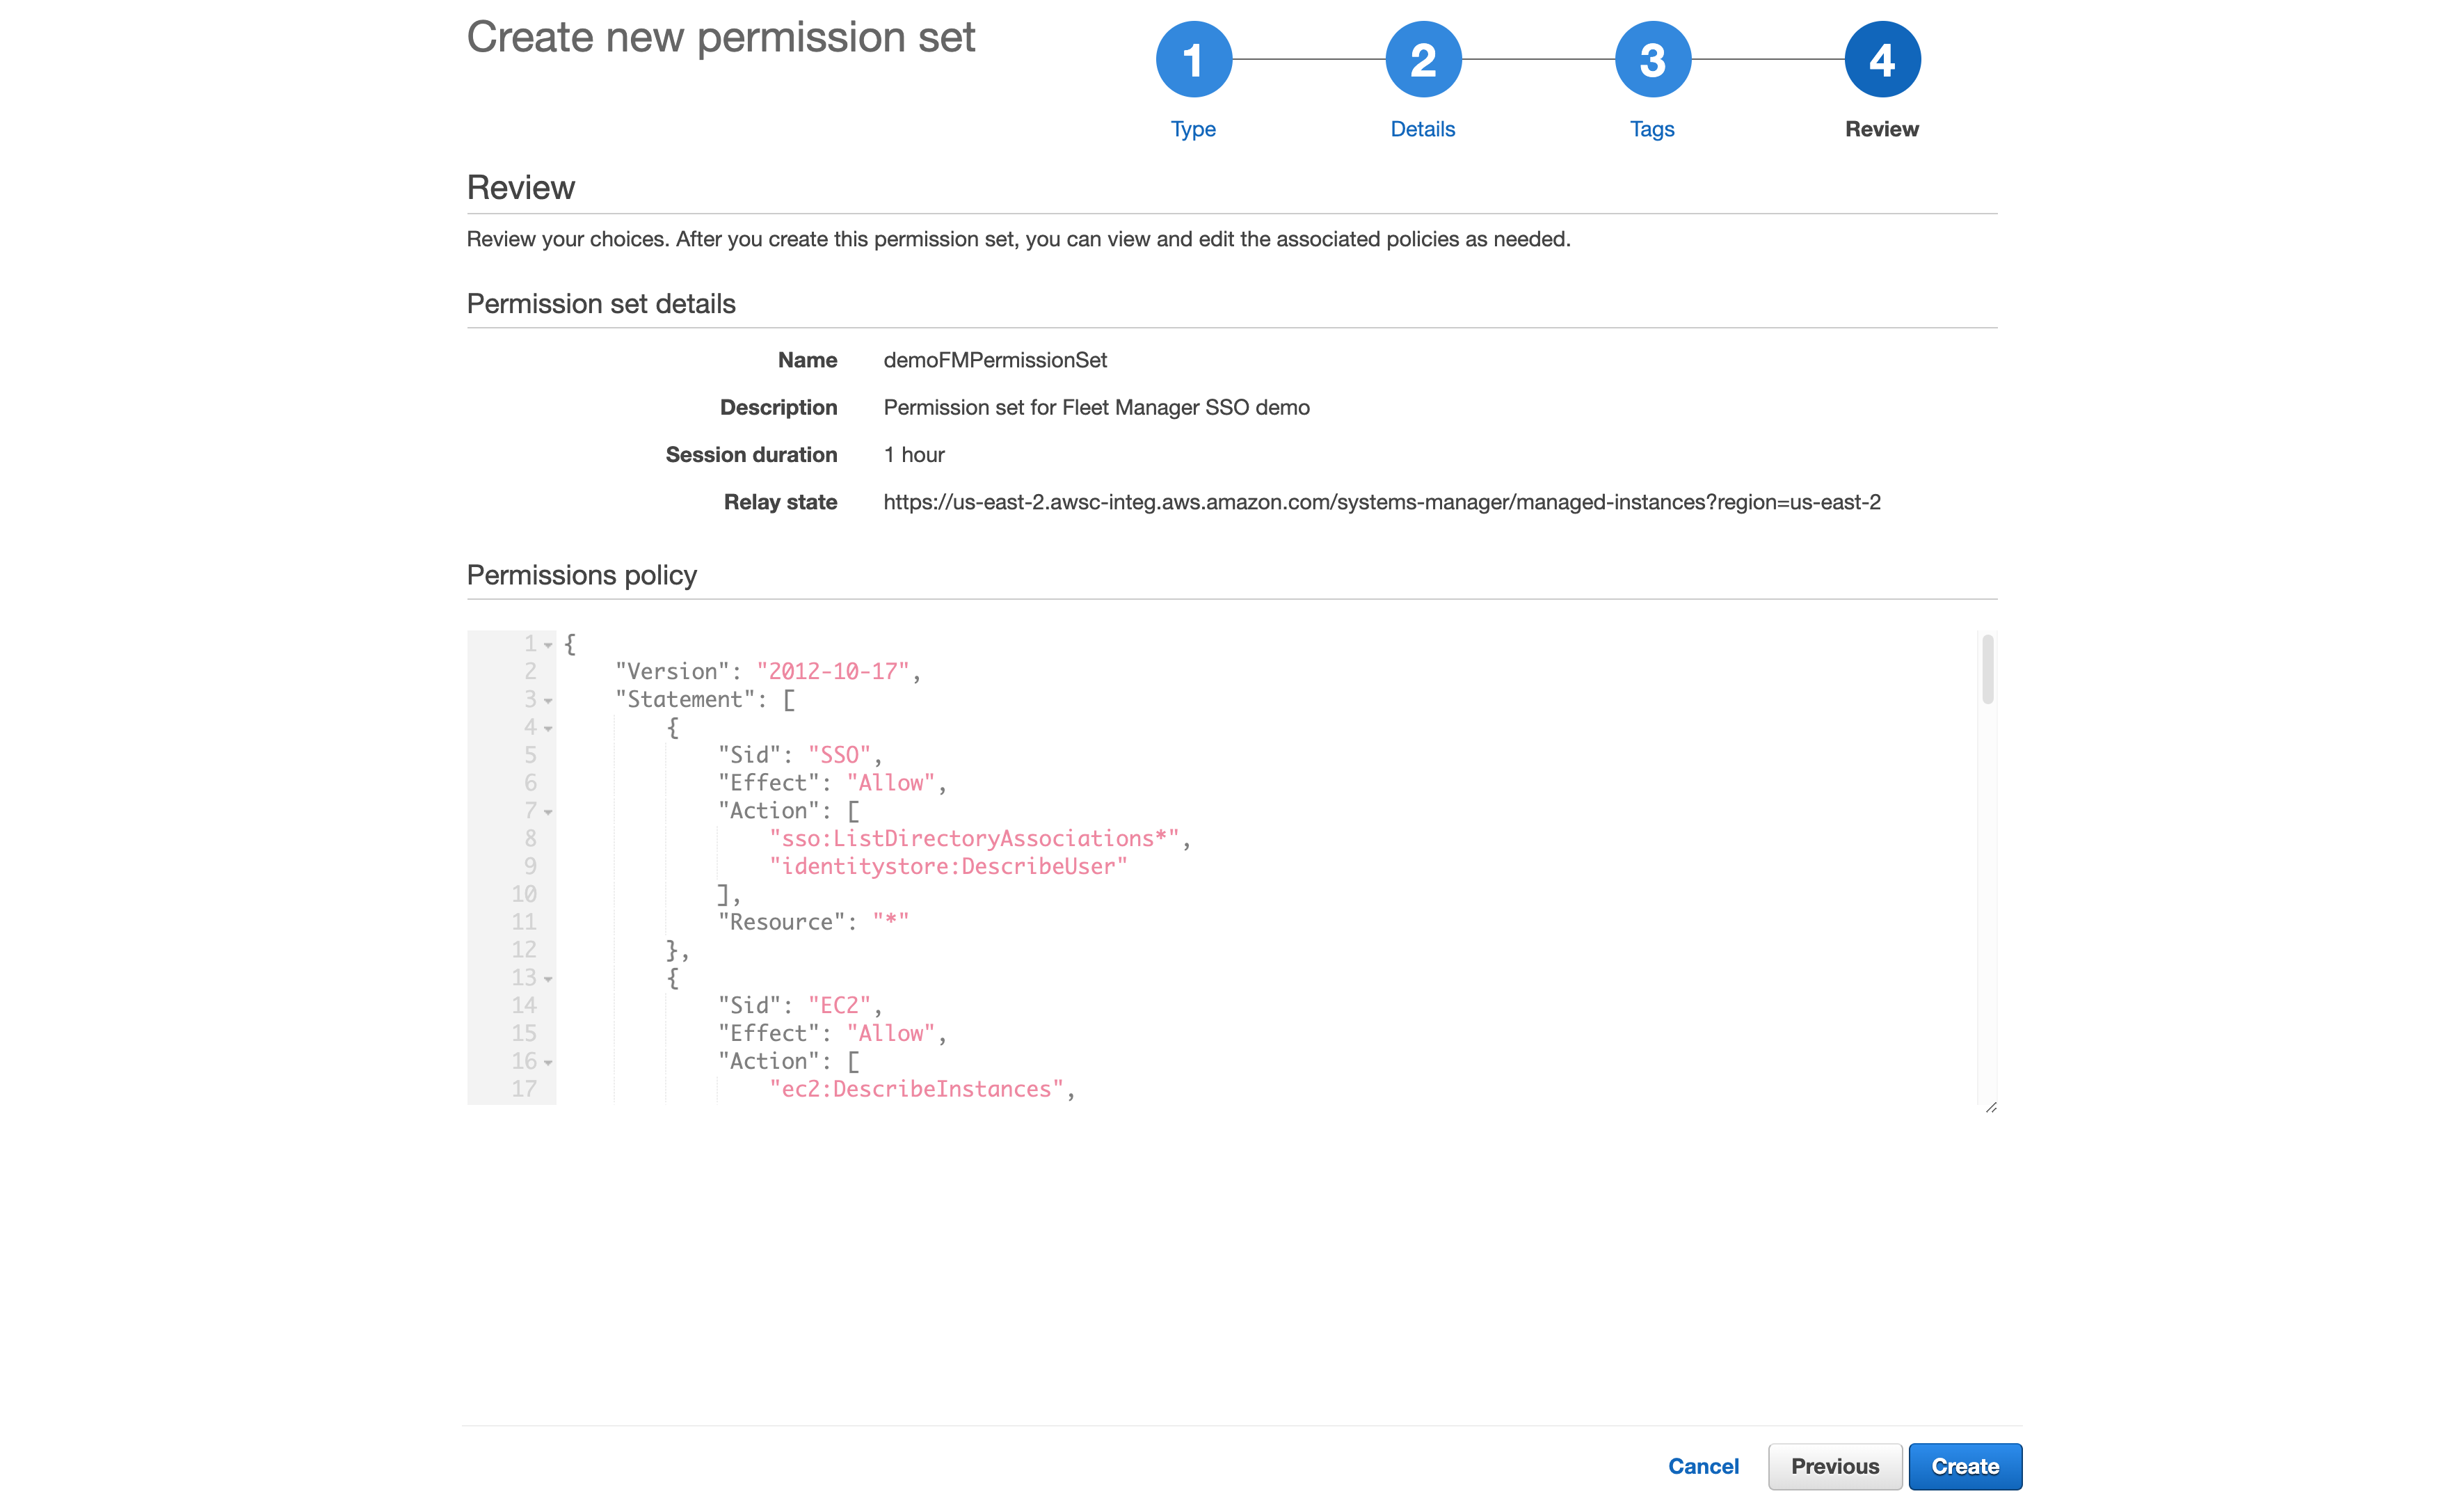
Figure 2: Reviewing the custom permission set
Sample custom permissions policy
This is the sample policy you’ll use; you can download it here.

This permission policy contains a separate statement ID (Sid) for each service, with the required actions for each.
On line 84, notice the reference to an AWSSSO-CreateSSOUser document resource. This document is responsible for creating a local Windows account based on the AWS SSO logged in user, as well as setting/resetting the user’s password for automatic log in to the Windows instance.
On lines 96-98, you will see a new ssm-guiconnect action. This is used to make the secure connection to your EC2 Windows instance, and render the GUI desktop in the Fleet Manager console.
To assign your AWS SSO group
Assign your AWS SSO group to the AWS Fleet Manager permission set in your selected accounts
In this procedure, we will select two AWS accounts in our AWS organization, and grant our AWS SSO group access to the previously-created permission set that enables sign-in via Fleet manager.
- From the AWS SSO console, navigate to AWS accounts and select an account (for example, demoAccount1 and demoAccount2), as shown in Figure 3.
- Choose the Assign users button. If you wish, you may also assign access to multiple groups or to users individually.
- To enable multiple AWS SSO users to access this feature, choose an AWS SSO group from the Groups tab and then choose the Next button, as shown in Figure 4
- Select the permission set you created previously and choose the Next button.
- Review your choices, and press Submit to submit your assignments, as shown in Figure 6.

Figure 3: Selecting AWS Account to assign users or groups
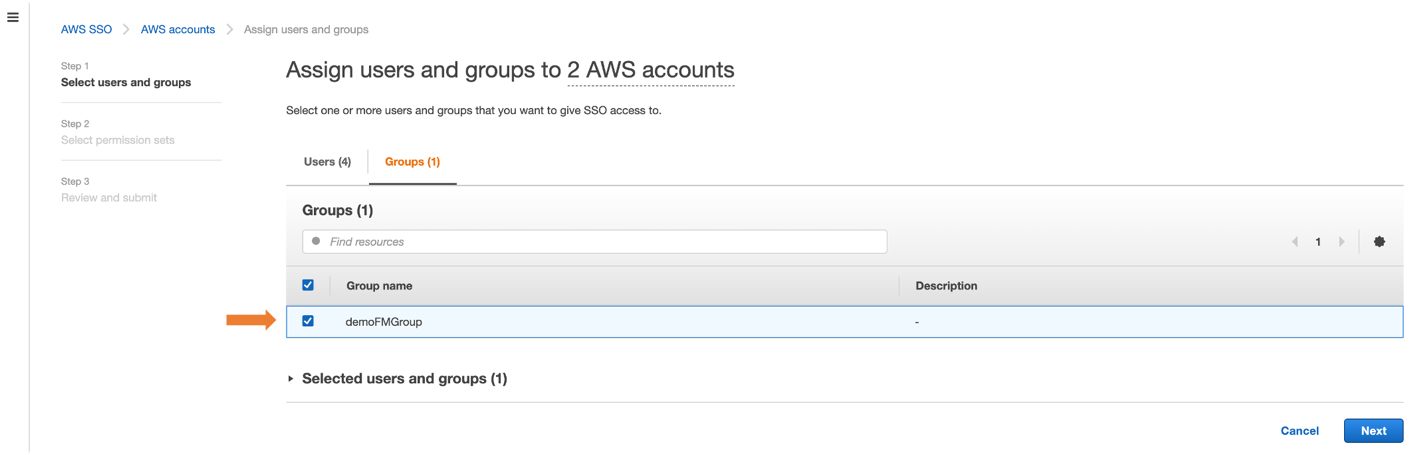
Figure 4: Assigning group to AWS accounts
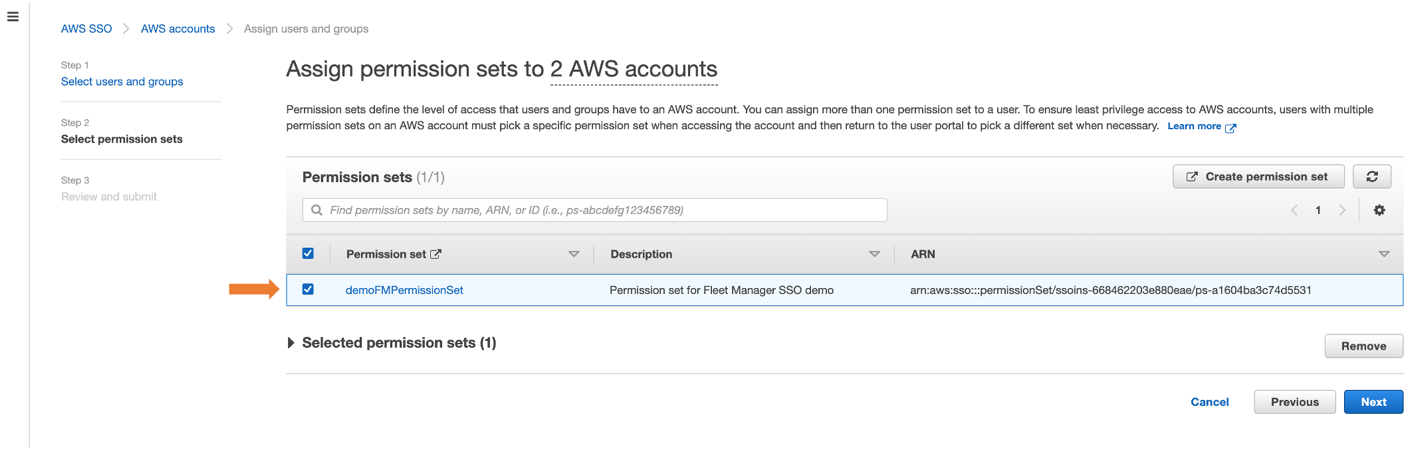
Figure 5: Selecting permission set to AWS accounts
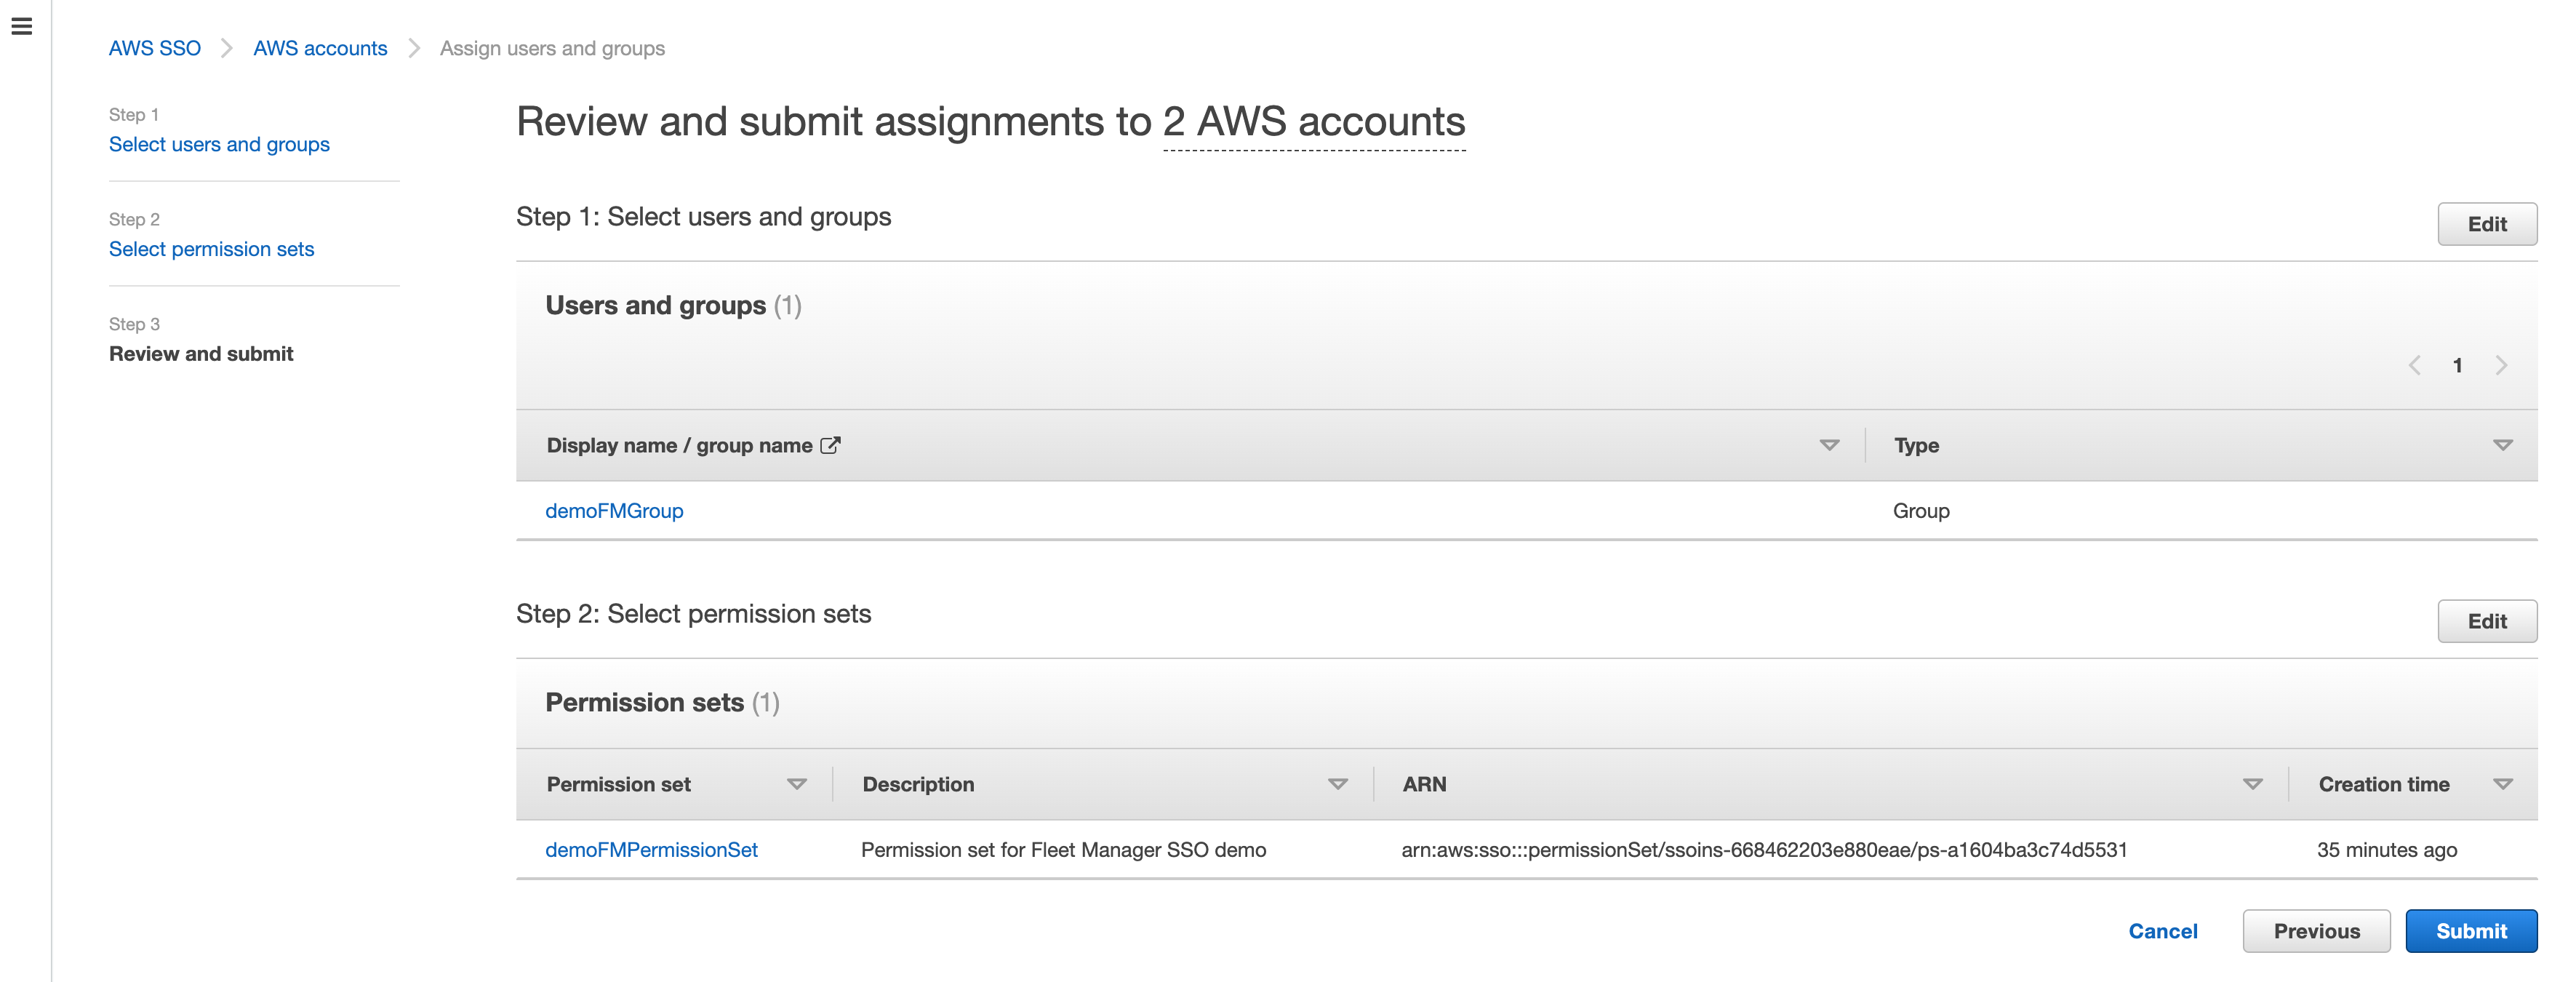
Figure 6: Reviewing submit assignments to AWS accounts
AWS SSO will now use the permission set definition to create a role in each selected account, which grants users access to sign in via Fleet Manager. Users gain access to that role by signing into the AWS SSO user portal.
To access Fleet Managed EC2 instances
- From the console, navigate to your AWS SSO user portal URL and login as any AWS SSO user who is a member of the group (e.g., demoFMGroup) you selected in step 3 above.
- From the AWS SSO user portal page, choose Management console and navigate to the Fleet Manager console where you have your EC2 Windows managed instance, as shown in Figure 7
- Select a managed Windows instance and select Instance actions and then Connect with Remote Desktop as shown in Figure 8.
- Select Single Sign-On and then select Connect, as shown in Figure 9.
- From the single session tab, we can see that AWS Fleet Manager created a local Windows Server user for the AWS SSO user (demoUser1).
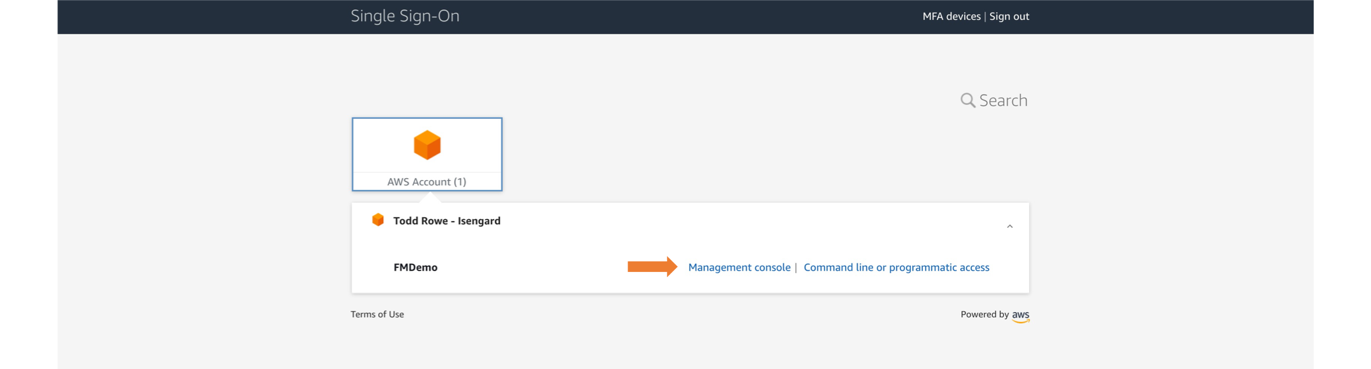
Figure 7: Navigating to the Management console from the user portal
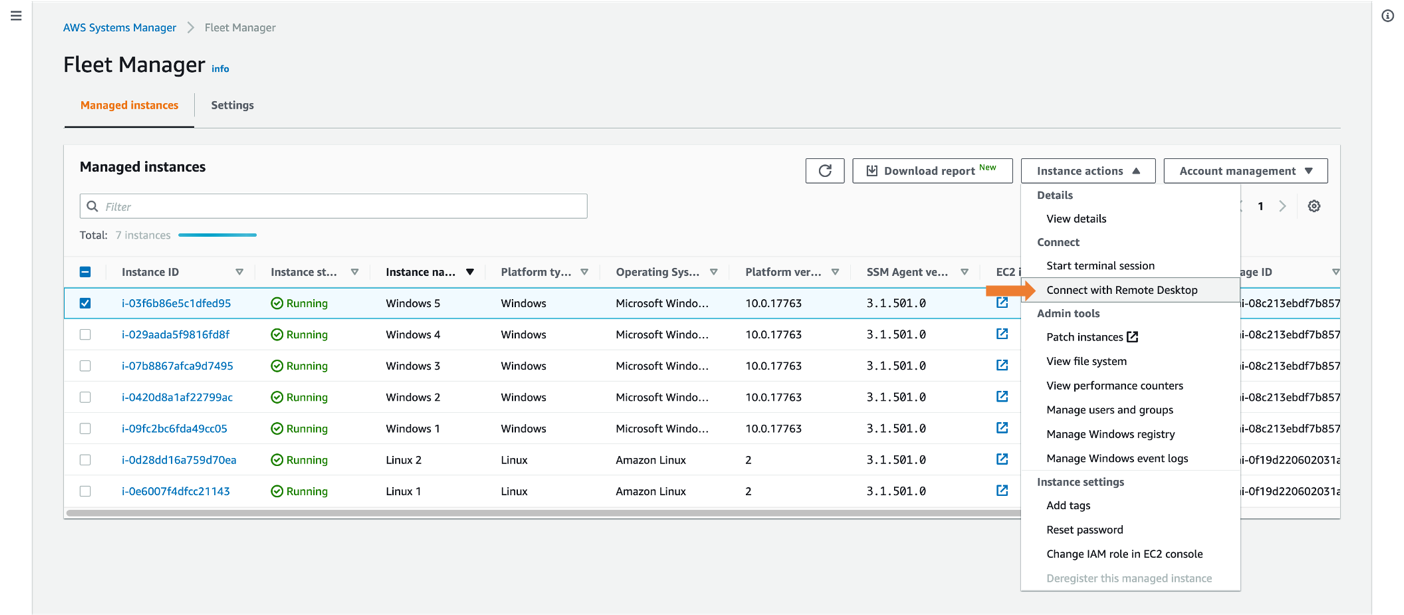
Figure 8: Connecting with Remote Desktop
This automatically logs you in using your AWS SSO credential. If this is the first time connecting to the instance, a new local user will be created.
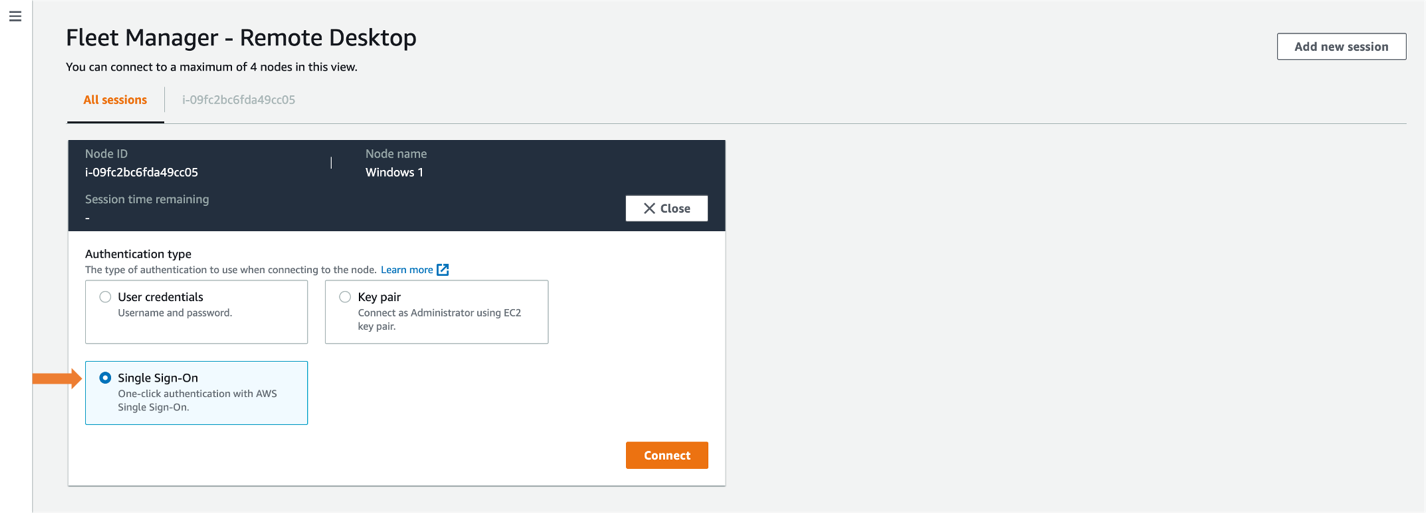
Figure 9: Selecting Single Sign-On
Once connected, you will see your EC2 Windows instance in the All sessions tab, enabling you to have up to four concurrent sessions in a single view, as shown in Figure 10. For a single session view, select the Instance ID tab.
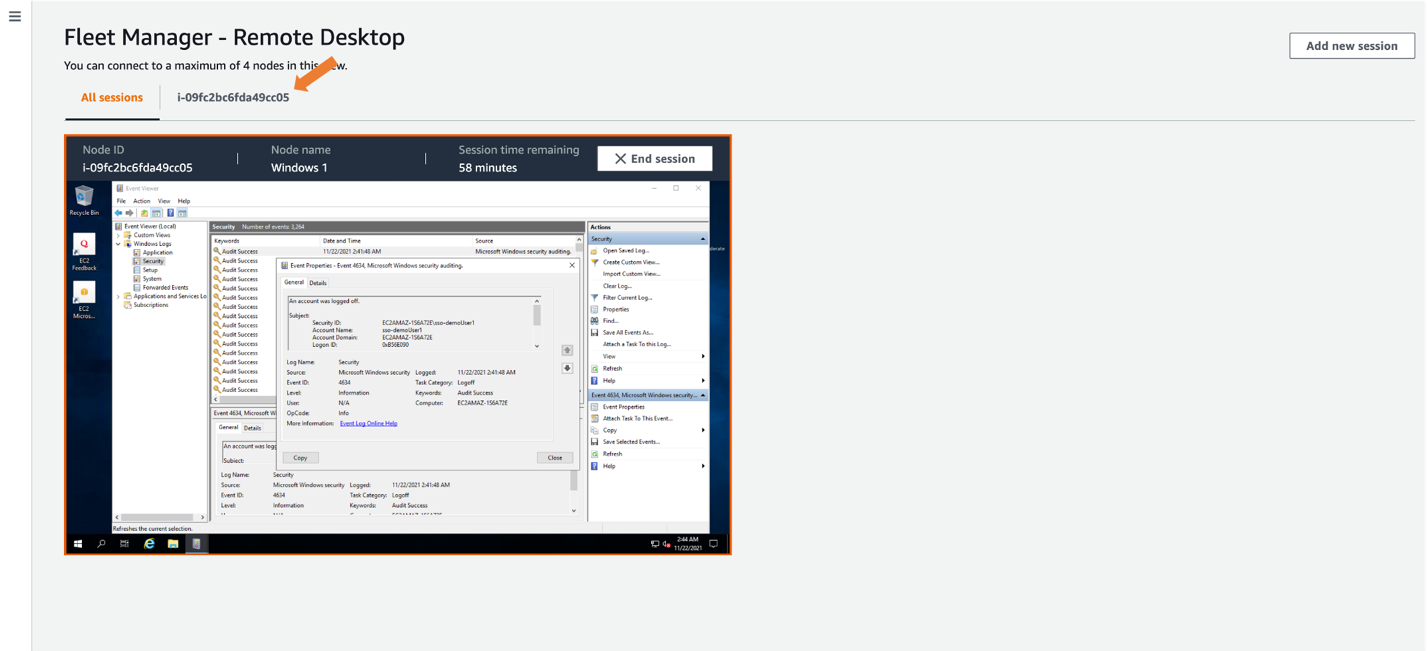
Figure 10: Selecting expanded desktop view
After creating the local user, AWS Fleet Manager used the credentials it created to sign into the EC2 Windows server as sso-demoUser1 from the Windows Event Viewer, giving you individual user logging on your EC2 Windows servers. These logs are also available from within the Fleet Manager console.
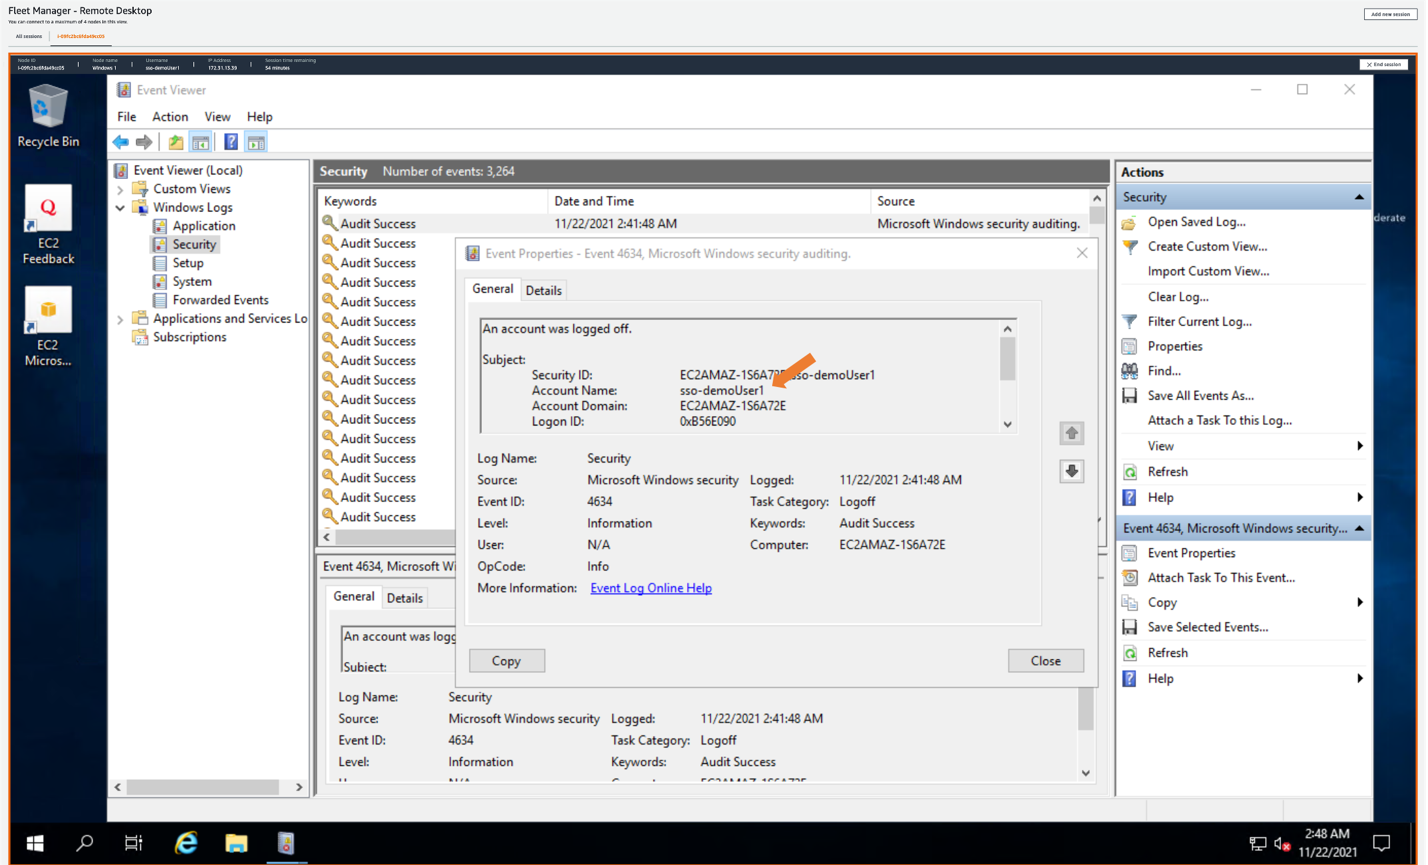
Figure 11: Showing AWS SSO username in Amazon EC2 Windows instance event log
Conclusion
This post described how to provide a single sign-in experience to Windows EC2 instances using AWS Fleet Manager with AWS Single Sign-On. Doing this allows you to create users in AWS SSO, or to connect any supported identity provider to AWS SSO, and to give users one-click access to their EC2 instances through AWS Fleet Manager.
This is done by creating an AWS SSO permission set that grants users access to AWS Fleet Manager, then assigning a group from AWS SSO to the permission set in the selected AWS accounts. Users can sign into the AWS SSO user portal, navigate to the AWS Fleet Manager, select their Windows EC2 instance, and land in the Windows user experience without having to enter Windows credentials separately.
To learn more about AWS SSO, visit the AWS Single Sign-On Documentation. To learn more about Fleet Manager, visit the AWS Systems Manager Fleet Manager Documentation.
If you have feedback about this blog post, submit comments in the Comments section below. If you have questions about this post, start a new thread on the AWS Single Sign-On forum.
Want more AWS Security news? Follow us on Twitter.
2021 PCI 3DS report now available
Post Syndicated from Michael Oyeniya original https://aws.amazon.com/blogs/security/2021-pci-3ds-report-now-available/
We are excited to announce that Amazon Web Services (AWS) has released the latest 2021 PCI 3-D Secure (3DS) attestation to support our customers implementing EMV® 3-D Secure services on AWS. Although AWS doesn’t directly perform the functions of 3DS Server (3DSS), 3DS Directory Server (DS), or 3DS Access Control Server (ACS), AWS customers can host their 3DS environments on AWS, using services such as Amazon Elastic Compute Cloud (Amazon EC2), Amazon Elastic Container Service (Amazon ECS) and Amazon Virtual Private Cloud (Amazon VPC).
The new AWS PCI 3DS attestation of compliance means customers can now attain their own PCI 3DS compliance for services running on AWS. All AWS Regions in scope for PCI DSS are included in the 3DS attestation. AWS was assessed by Coalfire, an independent Qualified Security Assessor (QSA). AWS compliance reports, including this latest PCI 3DS attestation, are available on demand through AWS Artifact. The 3DS package available in AWS Artifact includes the 3DS Attestation of Compliance (AOC) and a Shared Responsibility Guide.
To learn more about our PCI program and other compliance and security programs, please visit AWS Compliance Programs.
We value your feedback and questions—feel free to reach out to our team or give feedback about this post through our Contact Us page.
If you have feedback about this post, submit comments in the Comments section below.
Want more AWS Security news? Follow us on Twitter.
Announcing AWS Graviton2 Support for AWS Fargate – Get up to 40% Better Price-Performance for Your Serverless Containers
Post Syndicated from Channy Yun original https://aws.amazon.com/blogs/aws/announcing-aws-graviton2-support-for-aws-fargate-get-up-to-40-better-price-performance-for-your-serverless-containers/
AWS Graviton2 processors are custom-built by AWS using 64-bit Arm Neoverse cores to deliver the best price-performance for your cloud workloads running in Amazon Elastic Compute Cloud (Amazon EC2). They provide up to 40 percent better price-performance over comparable x86-based instances for a wide variety of workloads. Many of our customers such as Intuit, SmugMug, Snap, Formula One, and Honeycomb.io use Graviton2-based instances to run their workloads for better price-performance in Amazon EC2 for their workloads and enjoy better price-performance.
Many fully-managed services including Amazon Relational Database Service (Amazon RDS), Amazon Aurora, Amazon ElastiCache, Amazon OpenSearch Service (successor of Amazon Elasticsearch Service), and Amazon EMR have extended the benefits of Graviton2 to their customers. Recently, we also extended the benefits of Graviton2 to our serverless computing customers using AWS Lambda. AWS Lambda functions powered by AWS Graviton2 offer up to 19 percent better performance at 20 percent lower cost compared to running them on x86-based instances.
Today, I am happy to announce AWS Graviton2 support for AWS Fargate with Amazon Elastic Container Service (Amazon ECS). AWS Fargate is the serverless compute engine for containers on AWS that removes the need to provision, scale, and manage servers. AWS Fargate powered by AWS Graviton2 processors delivers up to 40 percent better price-performance at 20 percent lower cost over comparable Intel x86-based Fargate for containerized applications.
With Graviton2 support for Fargate, you get the serverless benefits of Fargate, the price-performance advantages of Graviton2, and the flexibility to use a container compute processor of your choice. You can upload multi-architecture images or images that have ARM64 in your image manifest with your container registry, such as Amazon Elastic Container Registry (Amazon ECR). When orchestrated via Amazon ECS, Fargate will run these applications on Graviton2-powered compute.
Multi-architecture container images consist of two main parts: layers and a manifest. Each container image has one or more layers of file system content. The manifest specifies the groups of layers that make up the image as well as its runtime characteristics, either ARM64 and X86_64.

This allows you to have the same repository that supports multiple architectures, and the container runtime does the work of selecting which image layers to pull based on the system architecture, including ARM64. To learn more, visit Introducing multi-architecture container images for Amazon ECR.
Getting Started With Fargate powered by Graviton2 processors
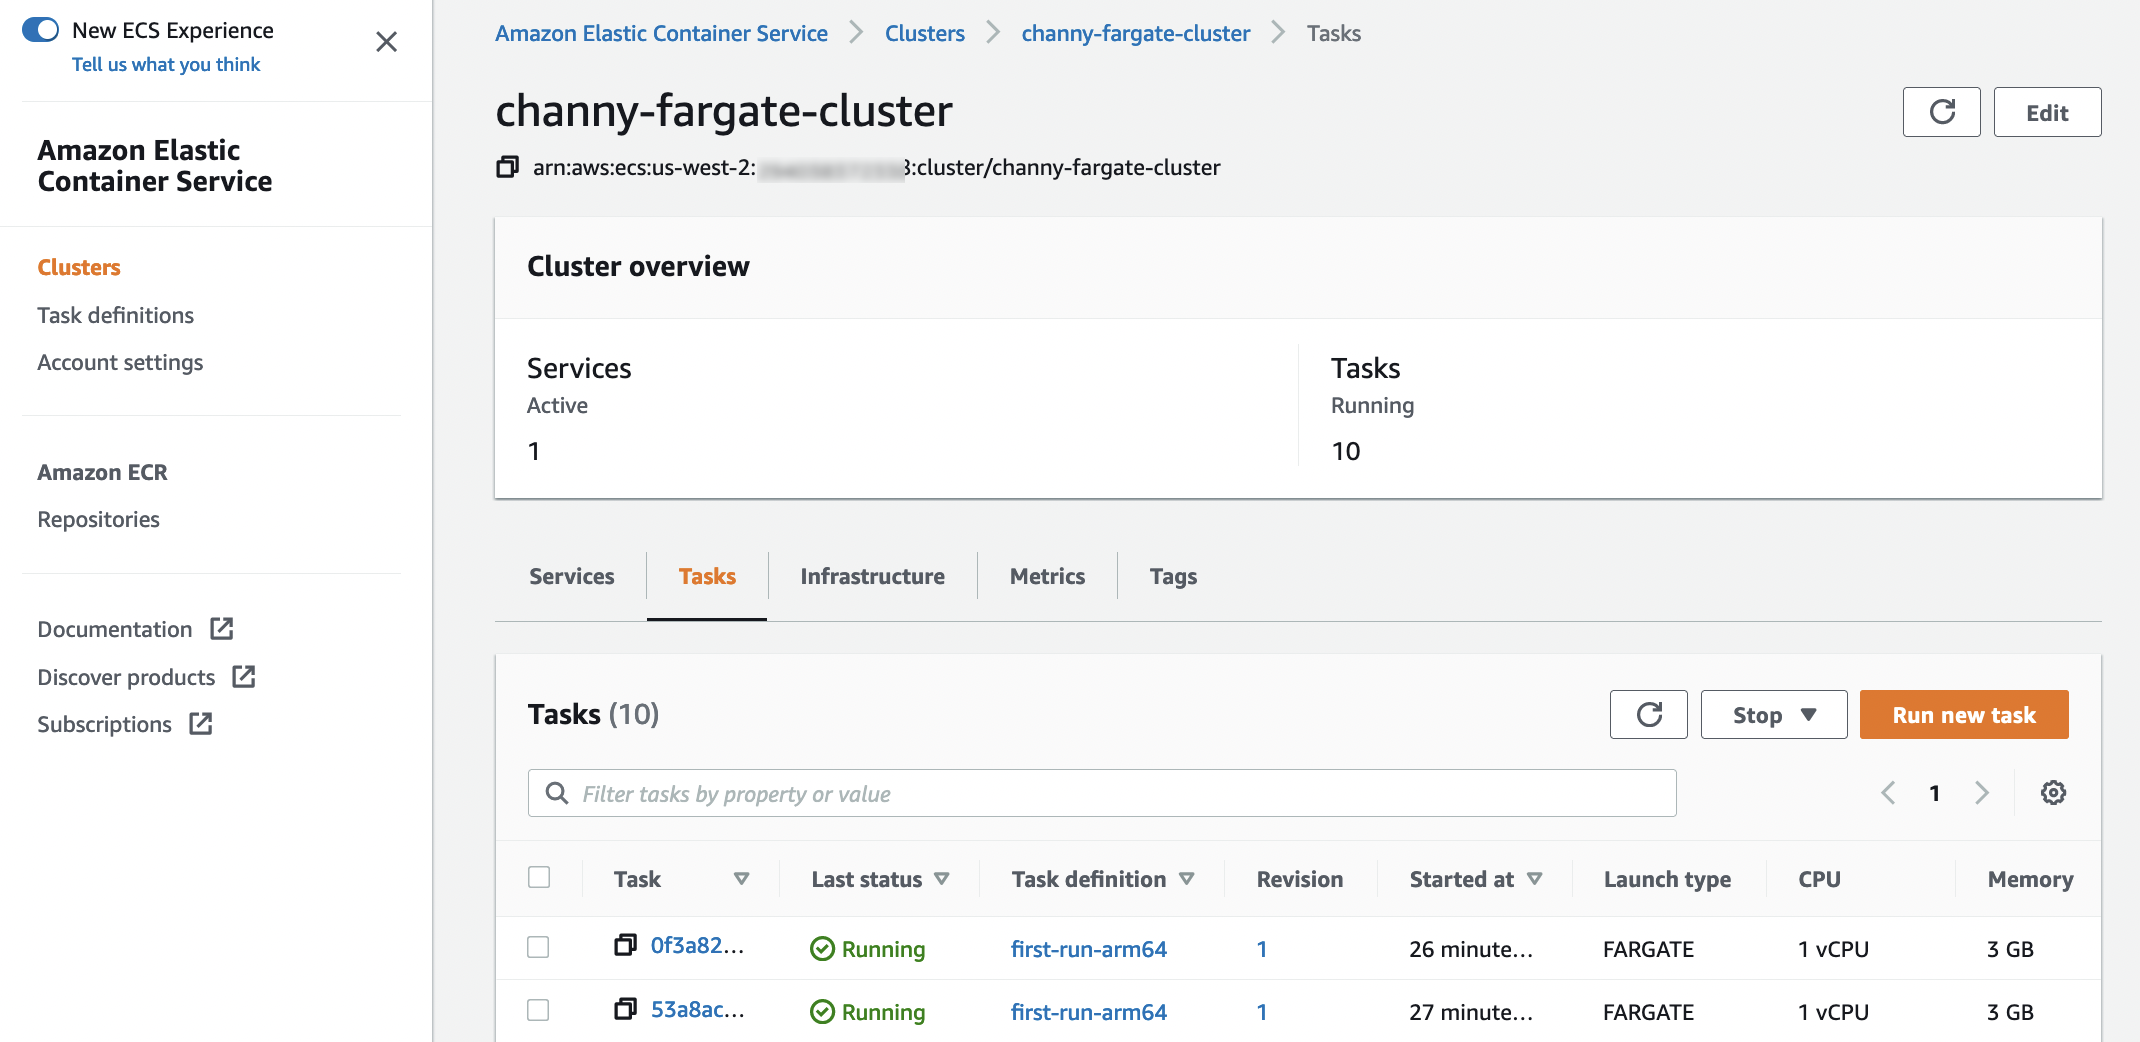
To enable Graviton2 support for Fargate, you opt in to Arm compatibility in your ECS cluster. In the ECS console, when creating a new task definition, you can simply select Linux/ARM64 in the Operating system/Architecture dropdown list.
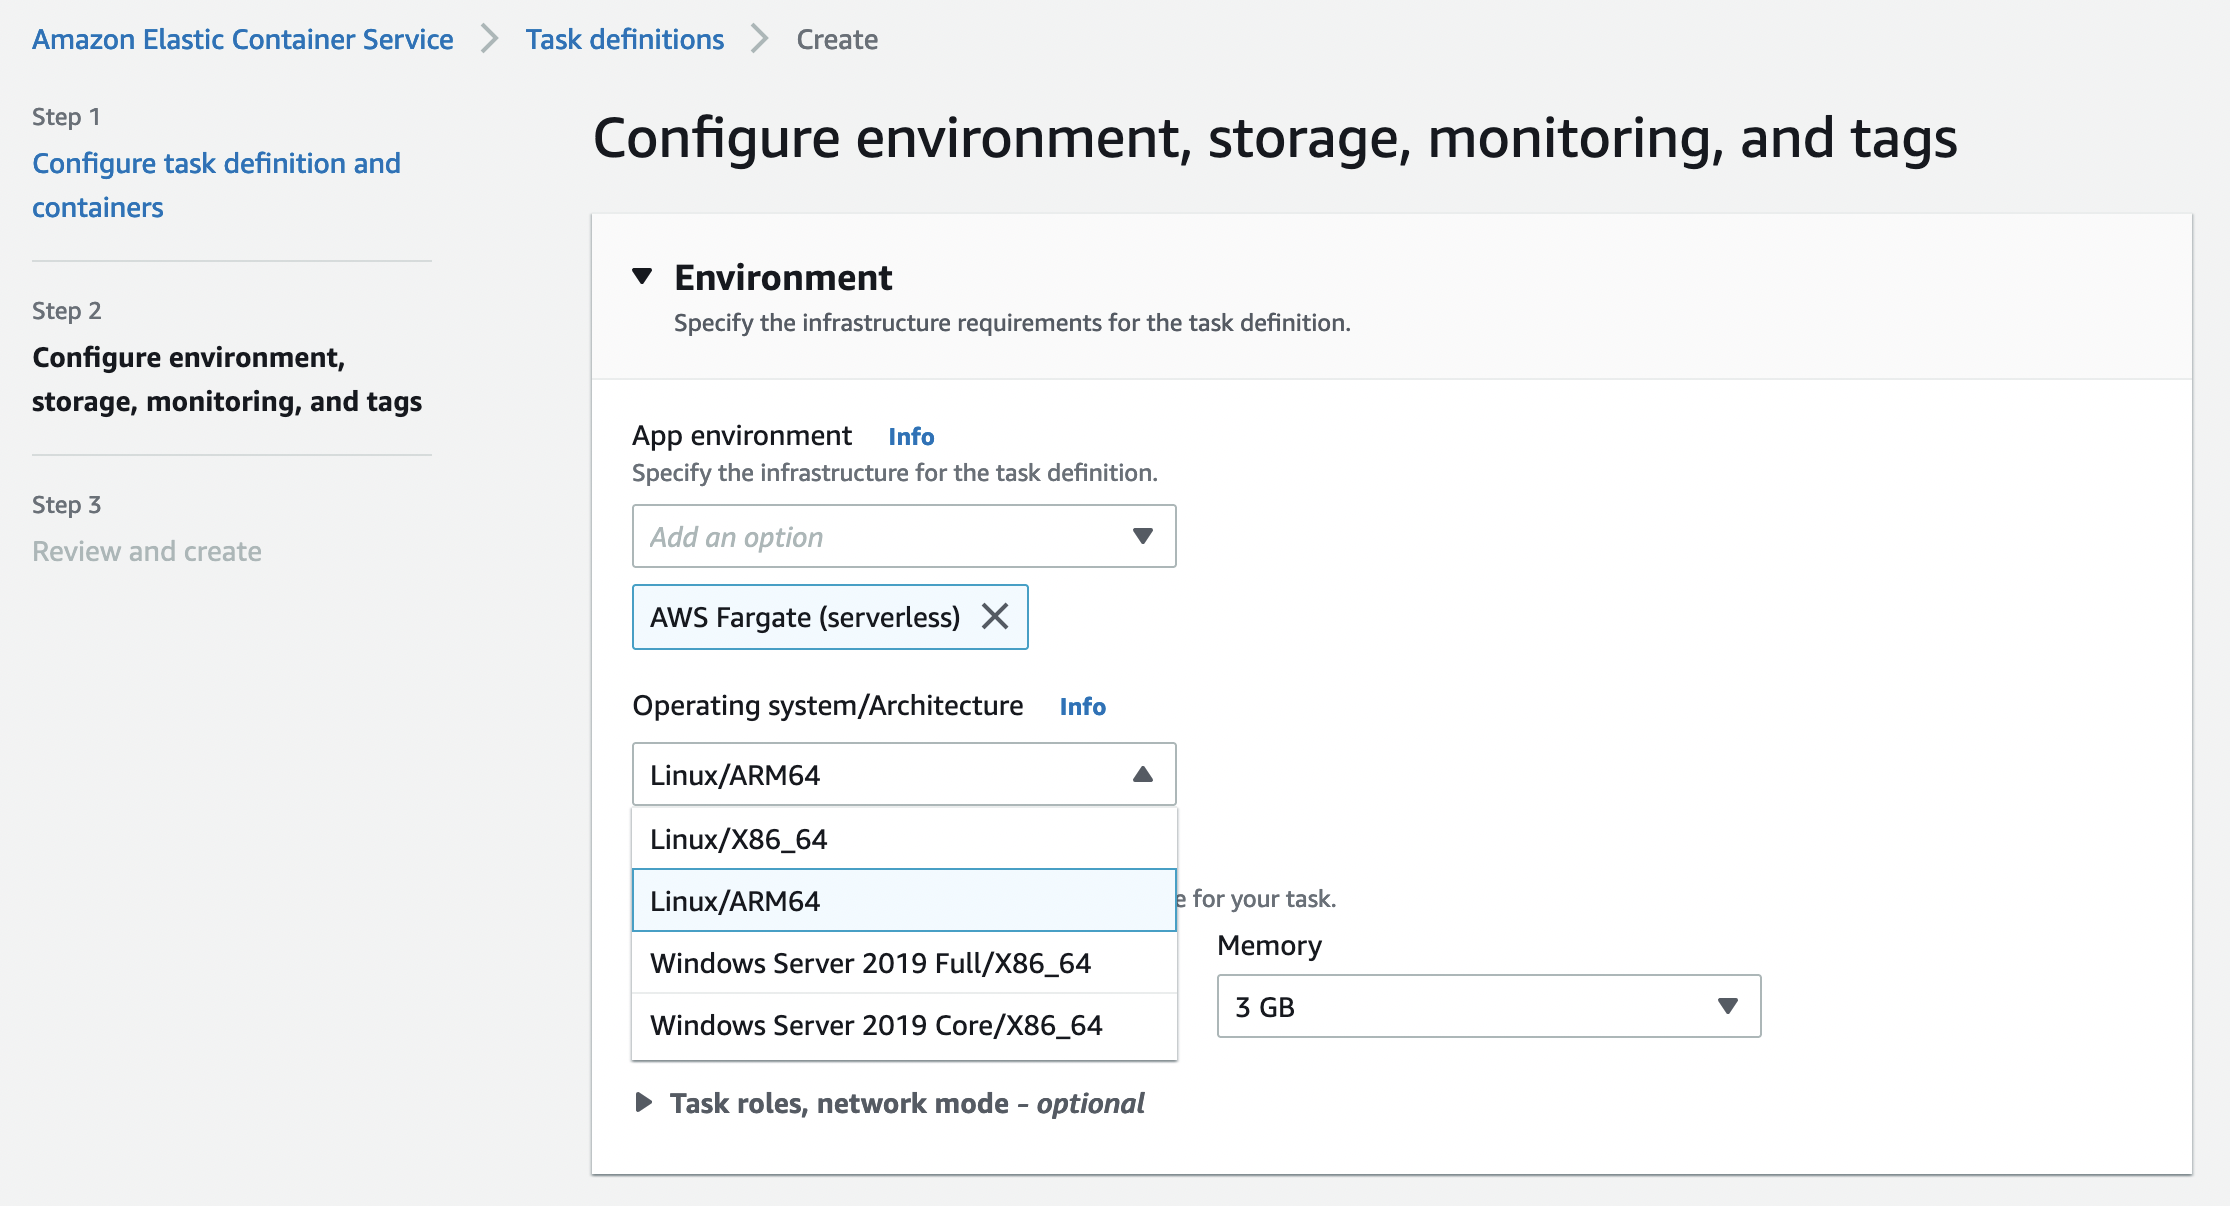
The following is an example of a task definition containing a simple container using the Fargate launch type with an optional parameter cpuArchitecture to ARM64. (The default value is X86_64).
{
 "family": "bb-arm64",
 "networkMode": "awsvpc",
 "containerDefinitions": [
    {
        "name": "sleep",
        "image": "arm64v8/busybox",
        "cpu": 100,
        "memory": 100,
        "essential": true,
        "command": [ "echo hello" ],
        "entryPoint": [ "sh", "-c" ]
    }
 ],
 "requiresCompatibilities": [ "FARGATE" ],
 "cpu": "1 vCpu",
 "memory": "3 GB",
 "runtimePlatform": { "cpuArchitecture": "ARM64" },
 "executionRoleArn": "arn:aws:iam::1234567890:role/ecsTaskExecutionRole"
}
When you run your tasks with the Graviton-based compute, you can see the value of Linux/ARM64 for Operating system/Architecture in each task detail page of the ECS console.

With AWS Command-line Interface (AWS CLI), you simply find which architecture is used in your ECS cluster.
$ aws ecs describe-tasks \
    --cluster MyCluster \
    --tasks arn:aws:ecs:us-west-2:123456789012:task/MyCluster/1234567890123456789
Here is an output of CPU architecture in the response of DescribeTasks or will have it as a filter to ListTasks.
{
    "tasks": [
    {
        "family": "...",
        "attributes": [
            {
                "name": "ecs.cpu-architecture",
                "value": "arm64"
            }
        ]
    }]
}
Migration to Gaviton2-based Fargate Containers
You get all the same Fargate features you’re used to for your containerized applications with Intel x86-based offering. With logging, monitoring, tracing, extensible ephemeral storage by Amazon Elastic File System (Amazon EFS) file systems, and more, you can easily migrate your applications to Graviton2-based Fargate containers. You get out-of-the-box logging via Amazon CloudWatch logs and metrics via Container Insights and AWS Distro for Open Telemetry agent as a sidecar to enable traces via ServiceLens.
With Amazon ECS, you can use Amazon ECS Exec for break-glass or developer debugging scenarios. With ECS Exec, you can directly interact with containers without needing to first interact with the host container operating system, open inbound ports, or manage SSH keys. You can use ECS Exec to run commands in or get a shell to a container running on an Amazon EC2 instance or on AWS Fargate. To learn more, see Using Amazon ECS Exec for debugging in the AWS documentation.
Once your development teams test and validate that applications are ARM64 compatible, in addition to using AWS CodeBuild that has supported Graviton for a long time, you can now run Jenkins or Gitlab runners. This will give you an end-to-end serverless experience, right from testing to building containers to running them on Fargate.
To get more support with the monitoring and logging, security, and continuous delivery on AWS Fargate, see the list of AWS Fargate Partners such as Aqua Security, Datadog, New Relic, Splunk, and Sumo Logic that have extended Fargate’s capabilities.
Available Now
AWS Graviton2 support on AWS Fargate is available in all AWS Regions where Fargate is available except Bahrain, Cape Town, China, and GovCloud regions. This feature is supported on Fargate Platform Version (PV) 1.4.0 or later. If you are not already using PV 1.4.0, see the AWS Fargate platform versions section in the AWS documentation to learn how to migrate.
You can get up to 40 percent better price-performance for Arm-compatible container-based applications. You can further reduce your costs by getting up to a 52 percent discount off on-demand pricing in exchange for a commitment of a one- or three-year term with Compute Savings Plans. For more information, see the AWS Fargate pricing page.
Give it a try, and please send us feedback either on the public AWS containers roadmap in the AWS forum for Amazon ECS, or through your usual AWS support contacts.
– Channy
Scammer Update – What to do When You Get Scammed!
Post Syndicated from Crosstalk Solutions original https://www.youtube.com/watch?v=IYi1mls-9lU
AWS Security Profiles: Merritt Baer, Principal in OCISO
Post Syndicated from Maddie Bacon original https://aws.amazon.com/blogs/security/aws-security-profiles-merritt-baer-principal-in-ociso/

In the week leading up AWS re:Invent 2021, we’ll share conversations we’ve had with people at AWS who will be presenting, and get a sneak peek at their work.
How long have you been at Amazon Web Services (AWS), and what do you do in your current role?
I’m a Principal in the Office of the Chief Information Security Officer (OCISO), and I’ve been at AWS about four years. In the past, I’ve worked in all three branches of the U.S. Government, doing security on behalf of the American people.
My current role involves both internal- and external- facing security.
I love having C-level conversations around hard but simple questions about how to prioritize the team’s resources and attention. A lot of my conversations revolve around organizational change, and how to motivate the move to the cloud from a security perspective. Within that, there’s a technical “how”—we might talk about the move to an intelligent multi-account governance structure using AWS Organizations, or the use of appropriate security controls, including remediations like AWS Config Rules and Amazon EventBridge. We might also talk about the ability to do forensics, which in the cloud looks like logging and monitoring with AWS CloudTrail, Amazon CloudWatch, Amazon GuardDuty, and others aggregated in AWS Security Hub.
I also handle strategic initiatives for our security shop, from operational considerations like how we share threat intelligence internally, to the ways we can better streamline our policy and contract vehicles, to the ways that we can incorporate customer feedback into our products and services. The work I do for AWS’ security gives me the empathy and credibility to talk with our customers—after all, we’re a security organization, running on AWS.
What drew you to security?
(Sidebar: it’s a little bit of who I am— I mean, doesn’t everyone rely on polaroid photos? just kidding— kind of :))

I always wanted to matter.
I was in school post-9/11, and security was an imperative. Meanwhile, I was in Mark Zuckerberg’s undergrad class at Harvard. A lot of the technologies that feel so intimate and foundational—cloud, AI/ML, IoT, and the use of mobile apps, for example—were just gaining traction back then. I loved both emerging tech and security, and I was convinced that they needed to speak to and with one another. I wanted our approach to include considerations around how our systems impact vulnerable people and communities. I became an expert in child pornography law, which continues to be an important area of security definition.
I am someone who wonders what we’re all doing here, and I got into security because I wanted to help change the world. In the words of Poet Laureate Joy Harjo, “There is no world like the one surfacing.”
How do you explain your job to non-tech friends?
I often frame my work relative to what they do, or where we are when we’re chatting. Today, nearly everyone interacts with cloud infrastructure in our everyday lives. If I’m talking to a person who works in finance, I might point to AWS’ role providing IT infrastructure to the global financial system; if we’re walking through a pharmacy I might describe how research and development cycles have accelerated because of high-performance computing (HPC) on AWS.
What are you currently working on that you’re excited about?
Right now, I’m helping customer executives who’ve had a tumultuous (different, not necessarily all bad) couple of years. I help them adjust to a new reality in their employee behavior and access needs, like the move to fully remote work. I listen to their challenges in the ability to democratize security knowledge through their organizations, including embedding security in dev teams. And I help them restructure their consumption of AWS, which has been changing in light of the events of the last two years.
On a strategic level, I have a lot going on … here’s a good sampling: I’ve been championing new work based on customers asking our experts to be more proactive by “snapshotting” metadata about their resources and evaluating that metadata against our well-architected security framework. I work closely with our Trust and Safety team on new projects that both increase automation for high volume issues but also provide more “high touch” and prioritized responses to trusted reporters. I’m also building the business case for security service teams to make their capabilities even more broadly available by extended free tiers and timelines. I’m providing expertise to our private equity folks on a framework for evaluating the maturity of security capabilities of target acquisitions. Finally, I’ve helped lead our efforts to add tighter security controls when AWS teams provide prototyping and co-development work. I live in Miami, Florida, USA, and I also work on building out the local tech ecosystem here!
I’m also working on some of the ways we can address ransomware. During our interview process, Amazon requests that folks do an hour-long presentation on a topic of your choice. I did mine on ransomware in the cloud, and when I came on board I pointed to that area of need for security solutions. Now we have a ransomware working group I help lead, with efforts underway to help out customers doing both education and architectural guidance, as well as curated solutions with industries and partners, including healthcare.
You’re presenting at AWS re:Invent this year—can you give readers a sneak peek at what you’re covering?
One talk is on cloud-native approaches to ransomware defense, encouraging folks to think innovatively as they mature their IT infrastructure. And a second talk highlights partner solutions that can help meet customers where they are, and improve their anti-ransomware posture using vendors—from MSSPs and systems integrators, to endpoint security, DNS filtering, and custom backup solutions.
What are you hoping the audience will take away from the sessions?
These days, security doesn’t just take the form of security services (like GuardDuty and AWS WAF), but will also manifest in the ways you design a cloud-aware architecture. For example, our managed database service Aurora can be cloned; that clone might act as a canary when you see data drift (a canary is security concept for testing your expectations). You can use this to get back to a known good state.
Security is a bottom line proposition. What I mean by that is:
- It’s a business criticality to avoid a bad day
- Embracing mature security will enable your entity’s development innovation
- The security of your products is a meaningful part of what you deliver on to your customers.
From your perspective, what’s the most important thing to know about ransomware?
Ransomware is a big headline-maker right now, but it’s not new. Most ransomware attacks are not based on zero days; they’re knowable but opportunistic. So, without victim-blaming, I mean to equip us with the confidence to confront the security issue. There’s no need to be ransomed.
I try not to get wrapped around particular issues, and instead emphasize building the foundation right. So sure, we can call it ransomware defense, but we can also point to these security maturity measures as best practices in general.
I think it’s fair to say that you’re passionate about women in tech and in security specifically. You recently presented at the Day of Shecurity conference and the Women in Business Summit, and did an Instagram takeover for Women in CyberSecurity (WiCyS). Why do you feel passionately about this?
I see security as an inherently creative field. As security professionals, we’re capable of freeing the business to get stuff done, and to get it done securely. That sounds simple, and it’s hard!
Any time you’re working in a creative field, you rely on human ingenuity and pragmatism to ensure you’re doing it imaginatively instead of simply accepting old realities. When we want to be creative, we need more of the stuff life is made of: human experience. We know that people who move through the world with different identities and experiences think differently. They approach problems differently. They code differently.
So, I think having women in security is important, both for the women who choose to work in security, and for the security field as a whole.
What advice would you give a woman just starting out in the security industry?
No one is born with a brain full of security knowledge. Technology is human-made and imperfect, and we all had to learn it at some point. Start somewhere. No one is going to tap you on the shoulder and invite you to your life 🙂
Operationally, I recommend:
- Curate your “elevator pitch” about who you are and what you’re looking for, and be explicit when asking for folks for a career conversation or a referral (you can find me on Twitter @MerrittBaer, feel free to send a note).
- Don’t accept a first job offer—ask for more.
- Beware of false choices. For example, sometimes there’s a job that’s not in the description—consider writing your own value proposition and pitching it to the organization. This is a field that’s developing all the time, and you may be seeing a need they hadn’t yet solidified.
What’s your favorite Leadership Principle at Amazon and why?
I think Bias for Action takes precedence for me— there’s a business decision here to move fast. We know that comes with some costs and risks, but we’ve made that calculated decision to pursue high velocity.
I have a law degree, and I see the Leadership Principles sort of like the Bill of Rights: they are frequently in tension and sometimes even at odds with one another (for example, Bias for Action and Are Right, A Lot might demand different modes). That is what makes them timeless—yet even more contingent on our interpretation—as we derive value from them. As a security person, I want us to pursue the good, and also to transcend the particular fears of the day.
If you had to pick any other industry, what would you want to do?
Probably public health. I think if I wasn’t doing security, I would want to do something else landscape-level.
Even before I had a daughter, but certainly now that I have a one-year-old, I would calculate the ROI of my life’s existence and my investment in my working life.
That being said, there are days I just need to come home to some unconditional love from my rescue pug, Peanut Butter.

If you have feedback about this post, submit comments in the Comments section below.
Want more AWS Security news? Follow us on Twitter.
Security considerations for Amazon Redshift cross-account data sharing
Post Syndicated from Rajesh Francis original https://aws.amazon.com/blogs/big-data/security-considerations-for-amazon-redshift-cross-account-data-sharing/
Data driven organizations recognize the intrinsic value of data and realize that monetizing data is not just about selling data to subscribers. They understand the indirect economic impact of data and the value that good data brings to the organization. They must democratize data and make it available for business decision makers to realize its benefits. Today, this would mean replicating data across multiple disparate databases, which requires moving the data across various platforms.
Amazon Redshift data sharing lets you securely and easily share live data across Amazon Redshift clusters or AWS accounts for read purposes. Data sharing can improve the agility of your organization by giving you instant, granular, and high-performance access to data across Amazon Redshift clusters without manually copying or moving it. Data sharing provides you with live access to data so that your users can see the most up-to-date and consistent information as it’s updated in Amazon Redshift clusters.
Cross-account data sharing lets you share data across multiple accounts. The accounts can be within the same organization or across different organizations. We have built in additional authorization steps for security control, since sharing data across accounts could also mean sharing data across different organizations. Please review AWS documentation on cross-account data sharing and a blog from our colleague for detailed steps. We also have a YouTube video on setting up cross-account data sharing for a business use case which you can refer as well.
Cross-account data sharing scenario
For this post, we will use this use case to demonstrate how you could setup cross-account data sharing with the option to control data sharing to specific consumer accounts from the producer account. The producer organization has one AWS account and one Redshift cluster. The consumer organization has two AWS accounts and three Redshift clusters in each of the accounts. The producer organization wants to share data from the producer cluster to one of the consumer accounts “ConsumerAWSAccount1”, and the consumer organization wants to restrict access to the data share to a specific Redshift cluster, “ConsumerCluster1”. Sharing to the second consumer account “ConsumerAWSAccount2” should be disallowed. Similarly, access to the data share should be restricted to the first consumer cluster, “ConsumerCluster1”.
Walkthrough
You can setup this behavior using the following steps:
Setup on the producer account:
- Create a data share in the Producer cluster and add schema and tables.
- Setup IAM policy to control which consumer accounts can be authorized for data share.
- Grant data share usage to a consumer AWS account.
Setup on the consumer account:
- Setup IAM policy to control which of the consumer Redshift clusters can be associated with the producer data share.
- Associate consumer cluster to the data share created on the producer cluster.
- Create database referencing the associated data share.

Prerequisites
To set up cross-account data sharing, you should have the following prerequisites:
- Three AWS accounts. Once for producer < ProducerAWSAccount1>, and two consumer accounts – <ConsumerAWSAccount1> and < ConsumerAWSAccount2>.
- AWS permissions to provision Amazon Redshift and create an IAM role and policy.
We assume you have provisioned the required Redshift clusters: one for the producer in the producer AWS Account, two Redshift clusters in ConsumerCluster1, and optionally one Redshift cluster in ConsumerCluster2
- Two users in producer account, and two users in consumer account 1
- ProducerClusterAdmin
- ProducerCloudAdmin
- Consumer1ClusterAdmin
- Consumer1CloudAdmin
Security controls from producer and consumer
Approved list of consumer accounts from the producer account
When you share data across accounts, the producer admin can grant usage of the data share to a specific account. For additional security to allow the separation of duty between the database admin and the cloud security administrator, organizations might want to have an approved list of AWS accounts that can be granted access. You can achieve this by creating an IAM policy listing all of the approved accounts, and then add this policy to the role attached to the producer cluster.
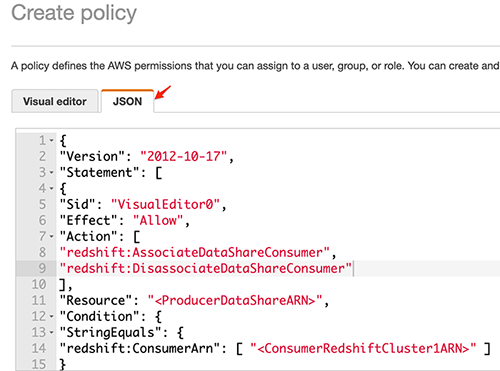
Creating the IAM Policy for the approved list of consumer accounts
- On the AWS IAM Console, choose Policies.
- Choose Create policy.

- On the JSON tab, enter the following policy:
This is the producer side policy. Note: you should replace the following text with the specific details for your cluster and account.

-
- “Resource”: “*” – Replace “*” with the ARN of the specific data share.
- <AWSAccountID> – Add one or more consumer account numbers based on the requirement.


- From the Amazon Redshift console in the producer AWS Account, choose Query Editor V2 and connect to the producer cluster using temporary credentials.

- After connecting to the producer cluster, create the data share and add the schema and tables to the data share. Then, grant usage to the consumer accounts<ConsumerAWSAccount1> and <ConsumerAWSAccount2>

Note: the GRANT will be successful even though the account is not listed in the IAM policy. But the Authorize step will validate against the list of approved accounts in the IAM policy, and it will fail if the account is not in the approved list.
- Now the producer admin can authorize the data share by using the AWS CLI command line interface or the console. When you authorize the data share to <ConsumerAWSAccount1>, then the authorization is successful.


- When you authorize the data share to <ConsumerAWSAccount2>, the authorization fails, as the IAM policy we setup in the earlier step does not allow data share to <ConsumerAWSAccount2>.


We have demonstrated how you can restrict access to the data share created on the producer cluster to specific consumer accounts by using a conditional construct with an approved account list in the IAM policy.
Approved list of Redshift clusters on consumer account
When you grant access to a data share to a consumer account, the consumer admin can determine which Redshift clusters can read the data share by associating it with the appropriate cluster. If the organization wants to control which of the Redshift clusters the admin can associate with the data share, then you can specify the approved list of Redshift clusters by using the cluster ARN in an IAM policy.
- On the AWS IAM Console, choose Policies.
- Choose Create policy.

- On the JSON tab, enter the following policy:
This is the consumer side policy. Note: you should replace the following text with the specific details for your cluster and account.

-
- “Resource”: “*” – Replace “*” with the ARN of the specific data share.
- Replace “<ProducerDataShareARN>” with the ARN of the data share created in the Redshift cluster in AWS Consumer account 1.
- Replace “<ConsumerRedshiftCluster1ARN>” with the ARN of the first Redshift cluster in AWS Consumer account 1.

- Now the consumer admin can associate the data share using the AWS CLI command line interface or the console. When you associate the Redshift cluster 1
<ConsumerRedshiftCluster1ARN >, the association is successful.


- Now the consumer admin can associate the data share by using the AWS CLI command line interface or the console. When you associate the Redshift cluster 2
<ConsumerRedshiftCluster2ARN >, the association fails.

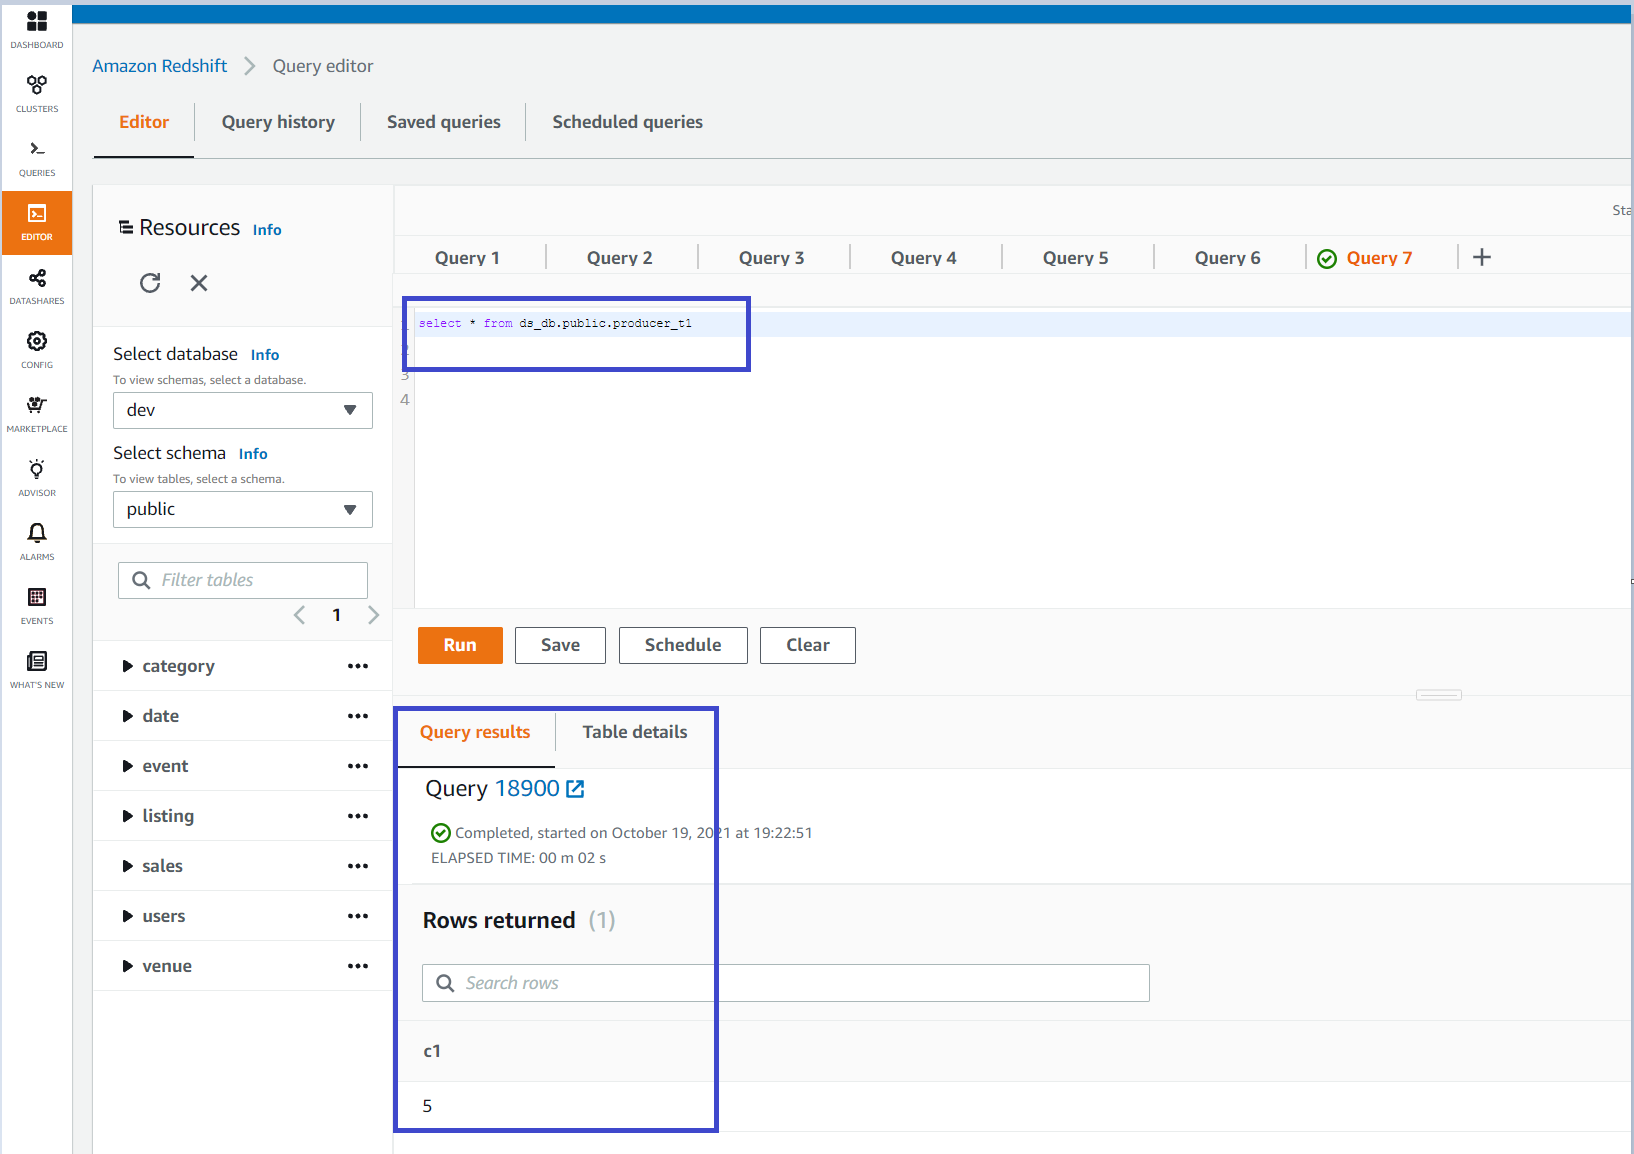
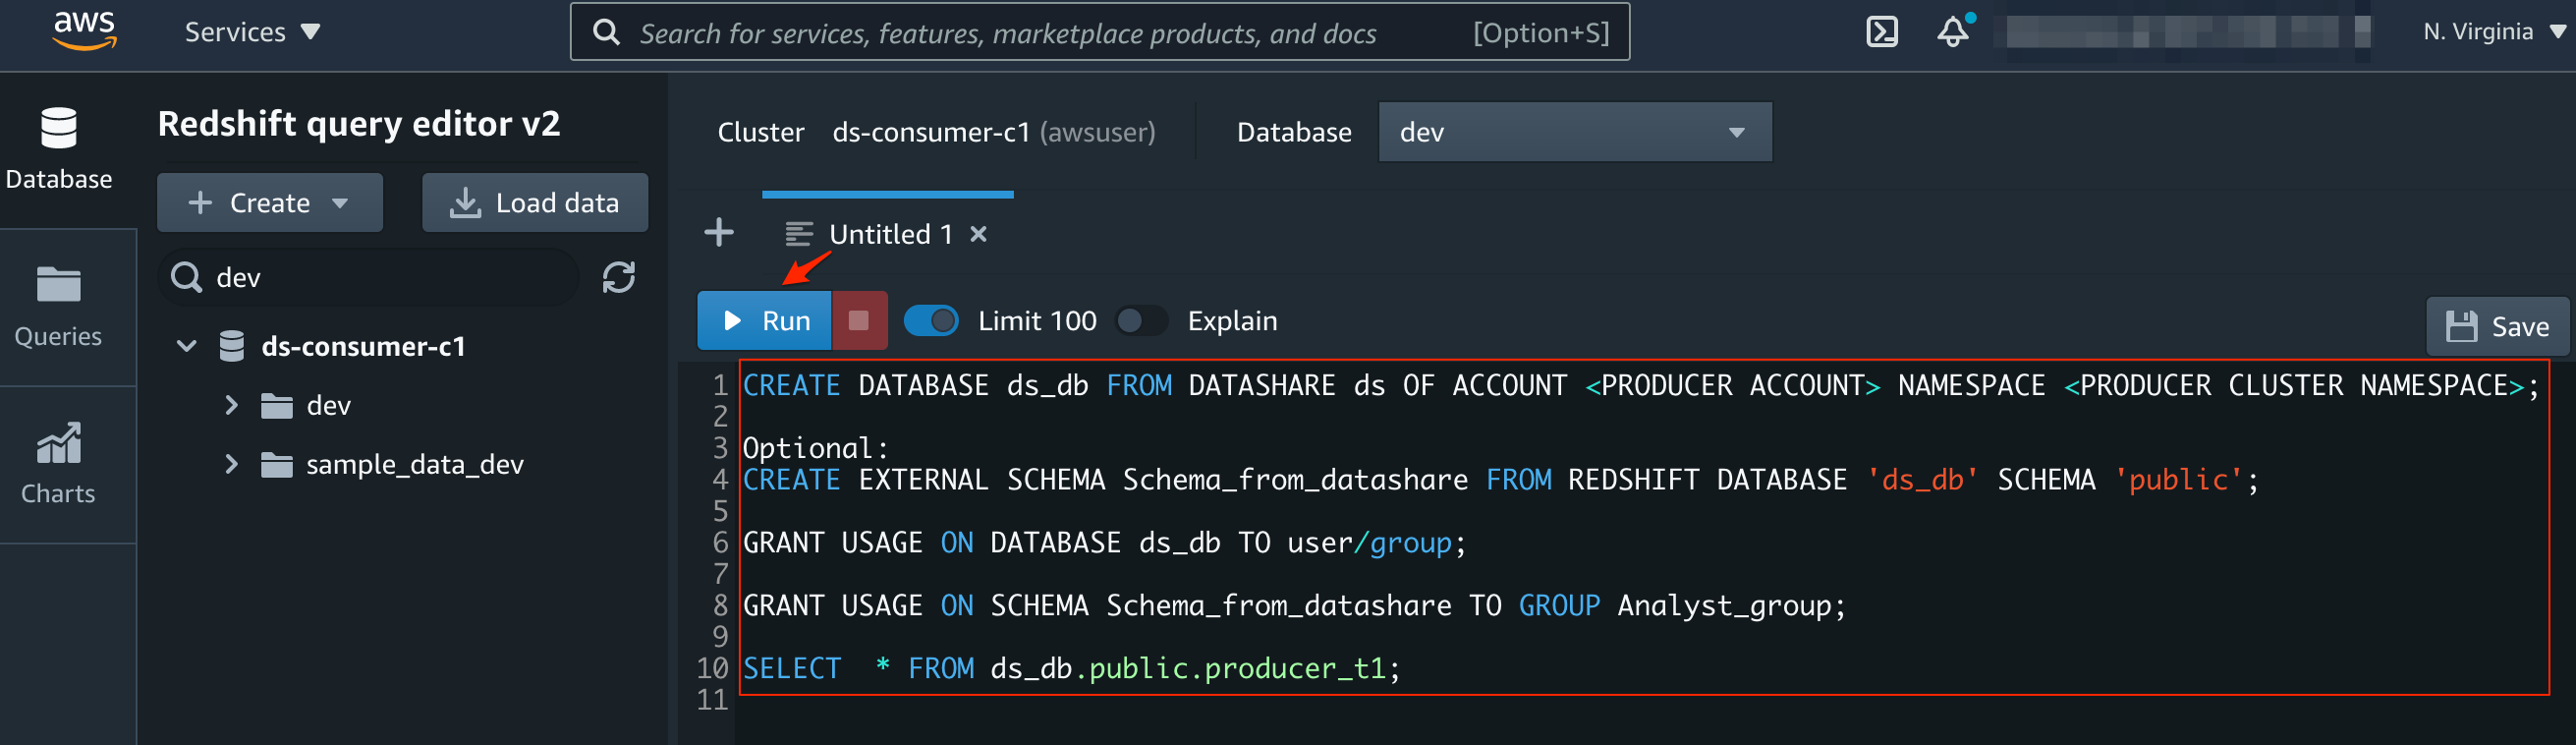
- After associating the Consumer Redshift cluster 1 to the producer data share, from the Amazon Redshift console in the Consumer AWS Account, choose Query Editor V2 and connect to the consumer cluster using temporary credentials.
- After connecting to the consumer cluster, you can create a database referencing the data share on the producer cluster, and then start querying the data.
You can use the query editor or the new Amazon Redshift Query Editor V2 to run the statements above to read the shared data from the producer by creating an external database reference from the consumer cluster.
Conclusion
We have demonstrated how you can restrict access to the data share created on the producer cluster to specific consumer accounts by listing approved accounts in the IAM policy.
On the consumer side, we have also demonstrated how you can restrict access to a particular Redshift cluster on the consumer account for the data share created on the producer cluster by listing approved Redshift cluster(s) in the IAM policy. Enterprises and businesses can use this approach to control the boundaries of Redshift data sharing at account and cluster granularity.
We encourage you to try cross-account data sharing with these additional security controls to securely share data across Amazon Redshift clusters both within your organizations and with your customers or partners.
About the Authors
 Rajesh Francis is a Senior Analytics Customer Experience Specialist at AWS. He specializes in Amazon Redshift and focuses on helping to drive AWS market and technical strategy for data warehousing and analytics. Rajesh works closely with large strategic customers to help them adopt our new services and features, develop long-term partnerships, and feed customer requirements back to our product development teams to guide the direction of our product offerings.
 Kiran Sharma is a Senior Big Data Consultant for AWS Professional Services. She works with our customers to architect and implement Big Data Solutions on variety of projects on AWS.
 Eric Hotinger is a Software Engineer at AWS. He enjoys solving seemingly impossible problems in the areas of analytics, streaming, containers, and serverless.
Visualizing AWS Step Functions workflows from the Amazon Athena console
Post Syndicated from James Beswick original https://aws.amazon.com/blogs/compute/visualizing-aws-step-functions-workflows-from-the-amazon-athena-console/
This post is written by Dhiraj Mahapatro, Senior Specialist SA, Serverless.
In October 2021, AWS announced visualizing AWS Step Functions from the AWS Batch console. Now you can also visualize Step Functions from the Amazon Athena console.
Amazon Athena is an interactive query service that makes it easier to analyze Amazon S3 data using standard SQL. Athena is a serverless service and can interact directly with data stored in S3. Athena can process unstructured, semistructured, and structured datasets.
AWS Step Functions is a low-code visual workflow service used to orchestrate AWS services, automate business processes, and build serverless applications. Step Functions workflows manage failures, retries, parallelization, service integrations, and observability so builders can focus on business logic. Athena is one of the service integrations that are available for Step Functions.
This blog walks through Step Functions integration in Amazon Athena console. It shows how you can visualize and operate Athena queries at scale using Step Functions.
Introducing workflow orchestration in Amazon Athena console
AWS customers store large amounts of historical data on S3 and query the data using Athena to get results quickly. They also use Athena to process unstructured data or analyze structured data as part of a data processing pipeline.
Data processing involves discrete steps for ingesting, processing, storing the transformed data, and post-processing, such as visualizing or analyzing the transformed data. Each step involves multiple AWS services. With Step Functions workflow integration, you can orchestrate these steps. This helps to create repeatable and scalable data processing pipelines as part of a larger business application and visualize the workflows in the Athena console.
With Step Functions, you can run queries on a schedule or based on an event by using Amazon EventBridge. You can poll long-running Athena queries before moving to the next step in the process, and handle errors without writing custom code. Combining these two services provides developers with a single method that is scalable and repeatable.
Step Functions workflows in the Amazon Athena console allow orchestration of Athena queries with Step Functions state machines:

Using Athena query patterns from Step Functions
Execute multiple queries
In Athena, you run SQL queries in the Athena console against Athena workgroups. With Step Functions, you can run Athena queries in a sequence or run independent queries simultaneously in parallel using a parallel state. Step Functions also natively handles errors and retries related to Athena query tasks.
Workflow orchestration in the Athena console provides these capabilities to run and visualize multiple queries in Step Functions. For example:

- Choose Get Started from Execute multiple queries.
- From the pop-up, choose Create your own workflow and select Continue.
A new browser tab opens with the Step Functions Workflow Studio. The designer shows a workflow pattern template pre-created. The workflow loads data from a data source running two Athena queries in parallel. The results are then published to an Amazon SNS topic.
Alternatively, choosing Deploy a sample project from the Get Started pop-up deploys a sample Step Functions workflow.
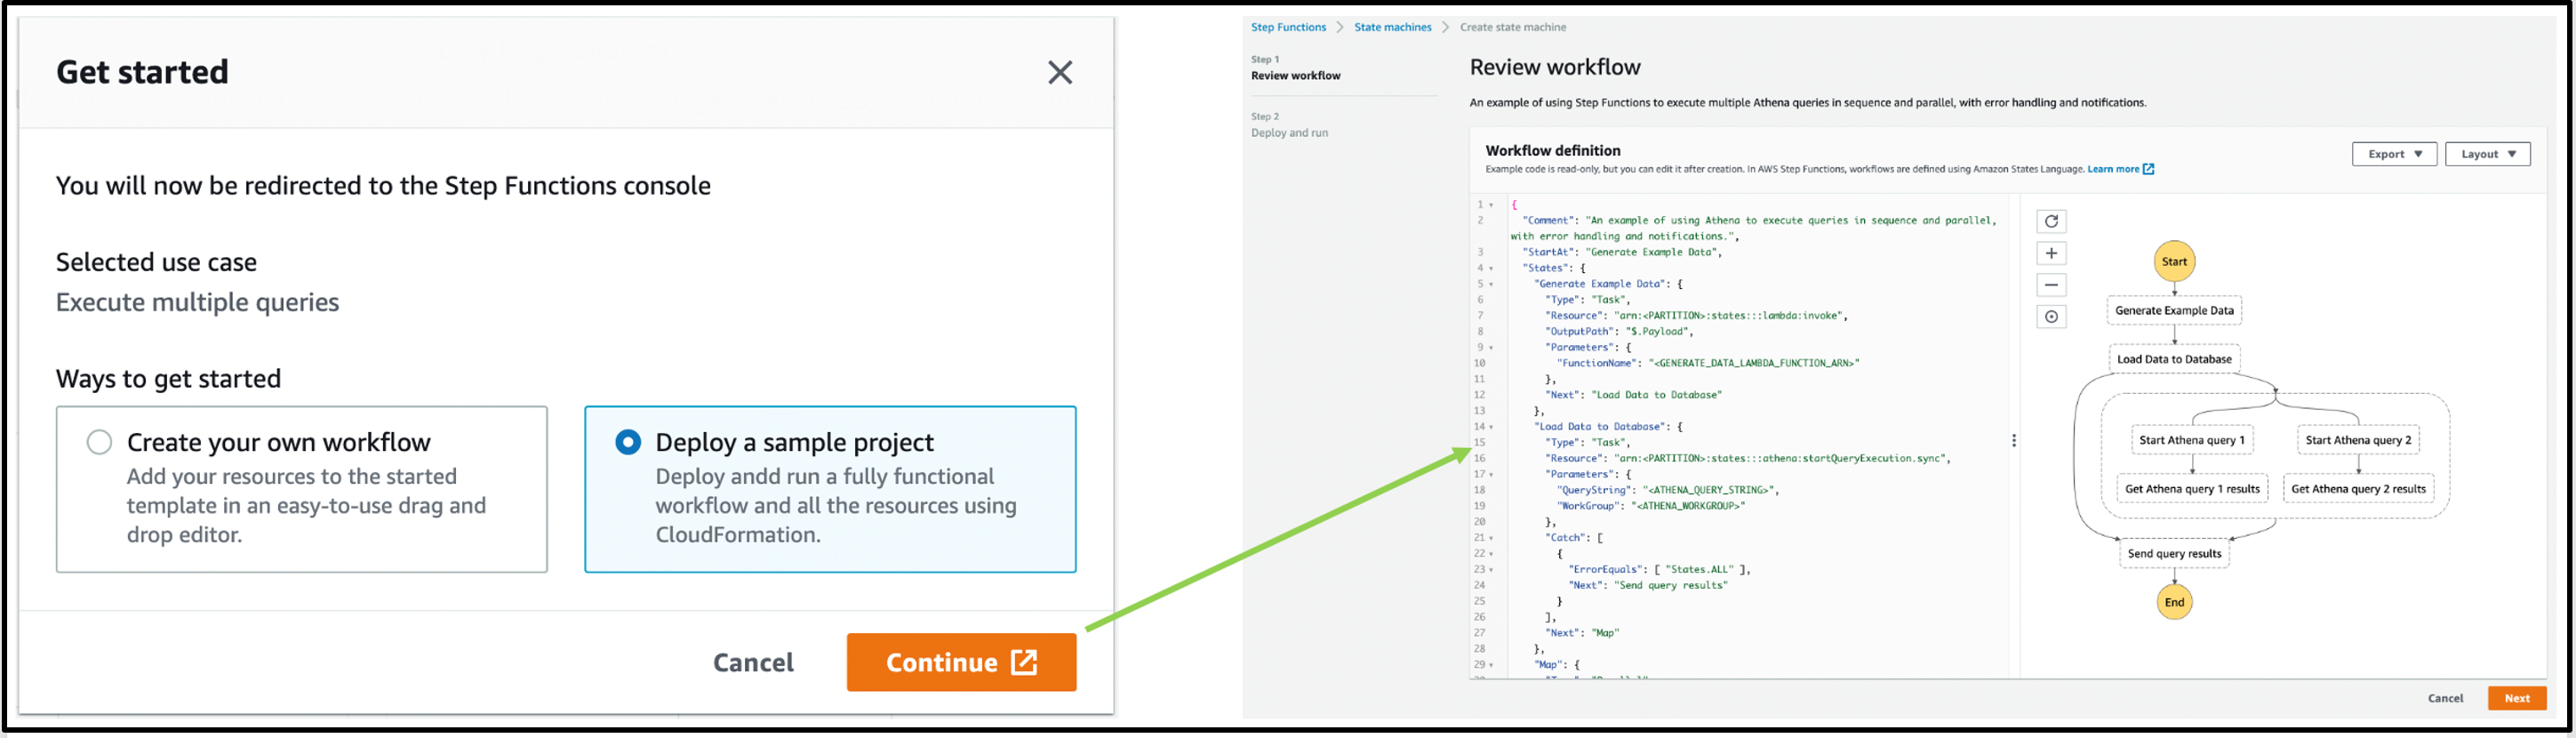
This option creates a state machine. You then review the workflow definition, deploy an AWS CloudFormation stack, and run the workflow in the Step Functions console.

Once deployed, the state machine is visible in the Step Functions console as:

Select the AthenaMultipleQueriesStateMachine to land on the details page:
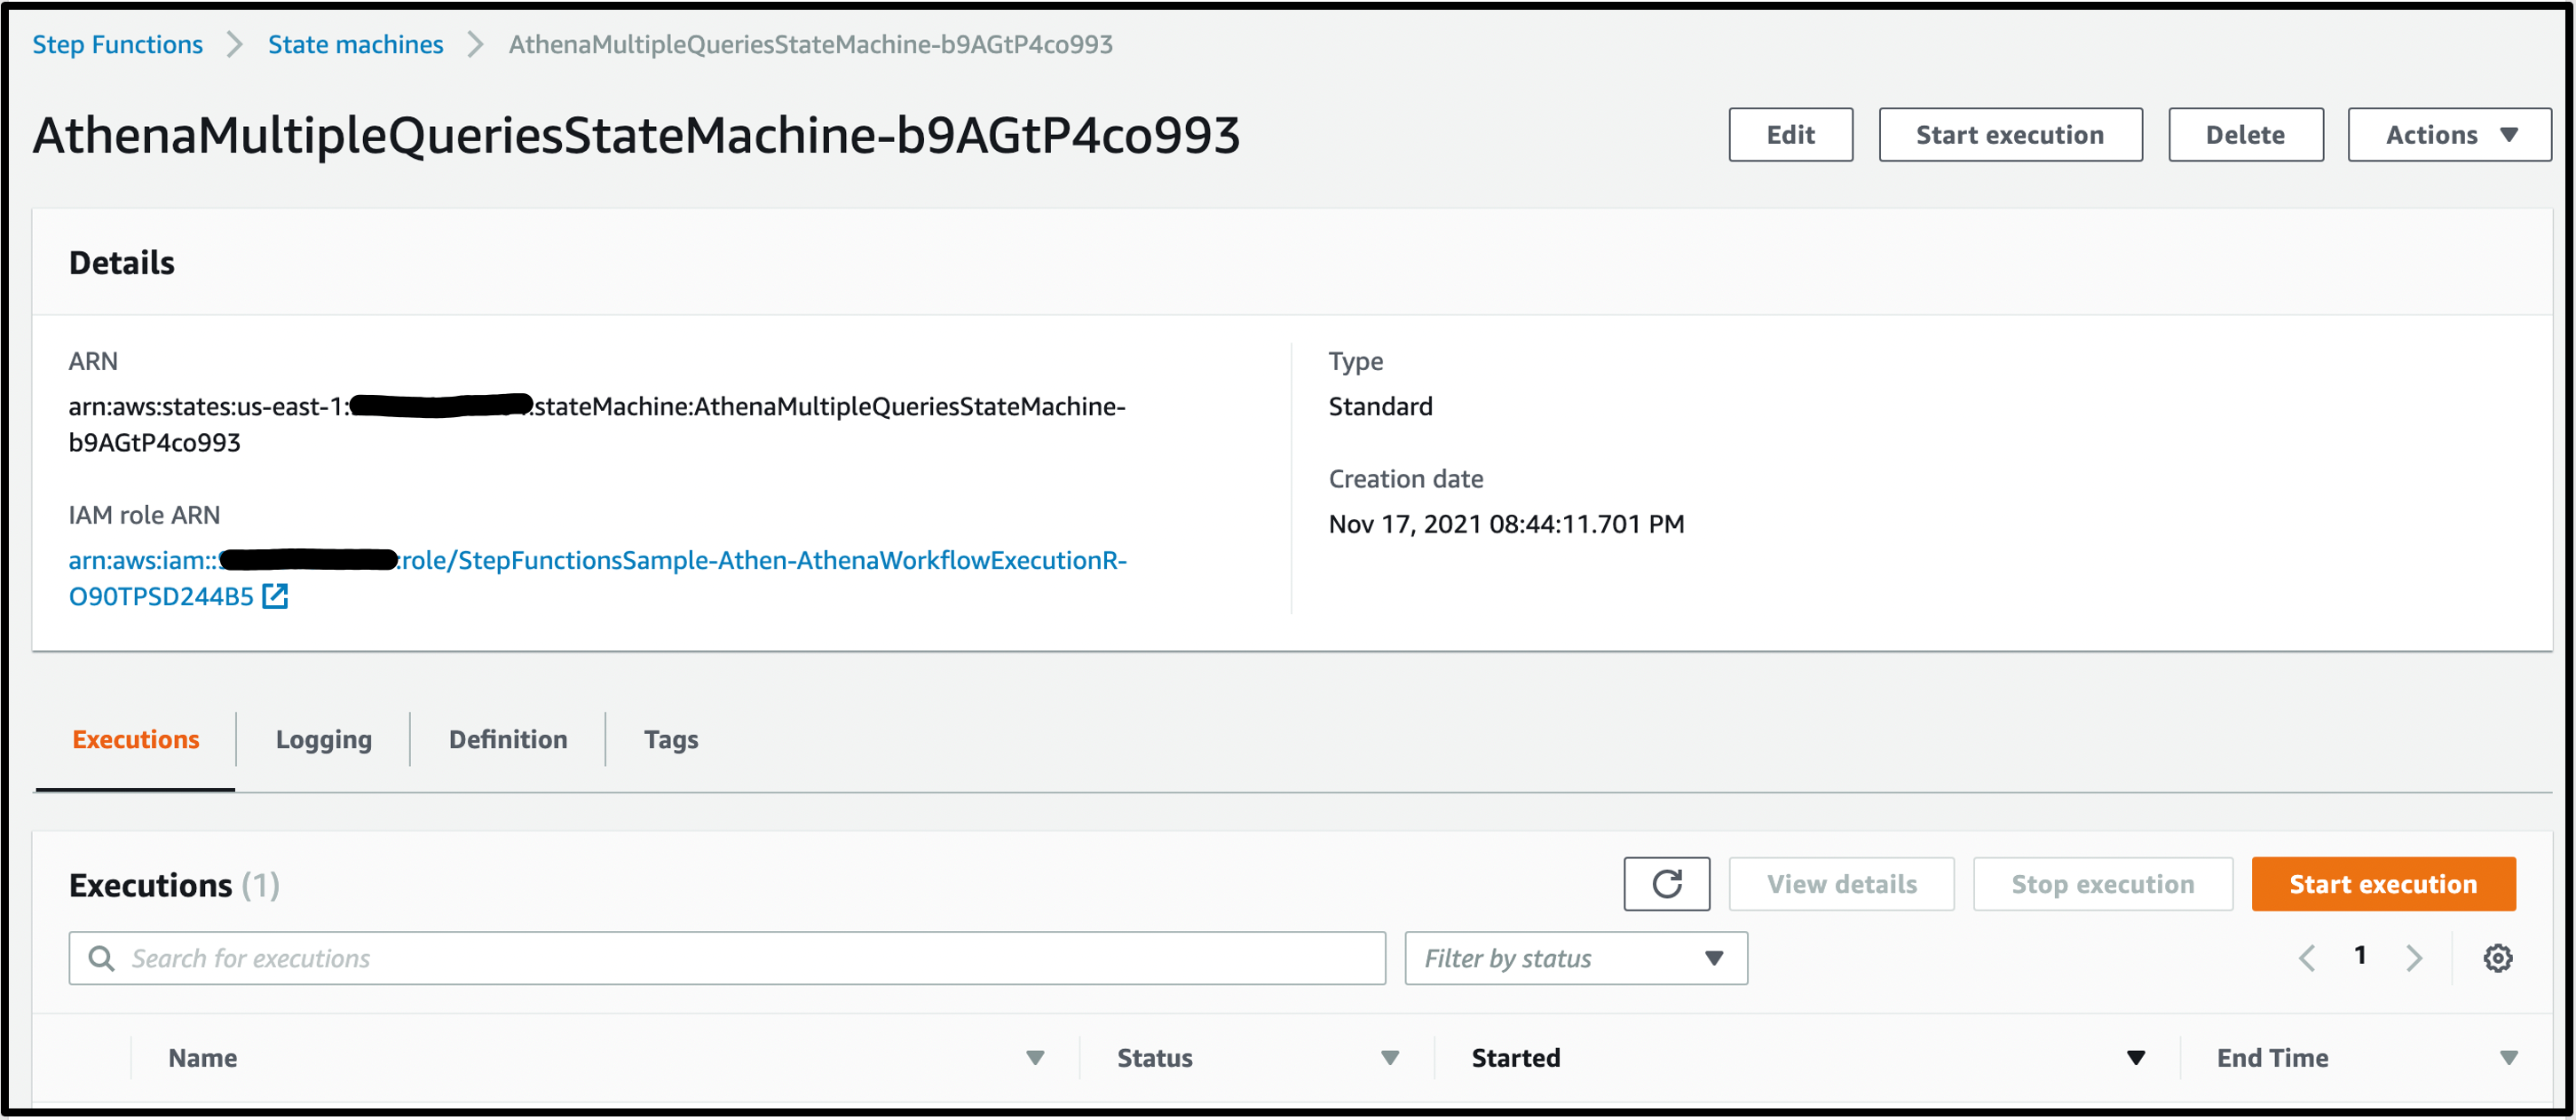
The CloudFormation template provisions the required AWS Glue database, S3 bucket, an Athena workgroup, the required AWS Lambda functions, and the SNS topic for query results notification.
To see the Step Functions workflow in action, choose Start execution. Keep the optional name and input and choose Start execution:

The state machine completes the tasks successfully by Executing multiple queries in parallel using Amazon Athena and Sending query results using the SNS topic:

The state machine used the Amazon Athena StartQueryExecution and GetQueryResults tasks. The Workflow orchestration in Athena console now highlights this newly created Step Functions state machine:

Any state machine that uses this task in Step Functions in this account is listed here as a state machine that orchestrates Athena queries.
Query large datasets
You can also ingest an extensive dataset in Amazon S3, partition it using AWS Glue crawlers, then run Amazon Athena queries against that partition.
Select Get Started from the Query large datasets pop-up, then choose Create your own workflow and Continue. This action opens the Step Functions Workflow studio with the following pattern. The Glue crawler starts and partitions large datasets for Athena to query in the subsequent query execution task:

Step Functions allows you to combine Glue crawler tasks and Athena queries to partition where necessary before querying and publishing the results.
Keeping data up to date
You can also use Athena to query a target table to fetch data, then update it with new data from other sources using Step Functions’ choice state. The choice state in Step Functions provides branching logic for a state machine.

You are not limited to the previous three patterns shown in workflow orchestration in the Athena console. You can start from scratch and build Step Functions state machine by navigating to the bottom right and using Create state machine:

Create State Machine in the Athena console opens a new tab showing the Step Functions console’s Create state machine page.
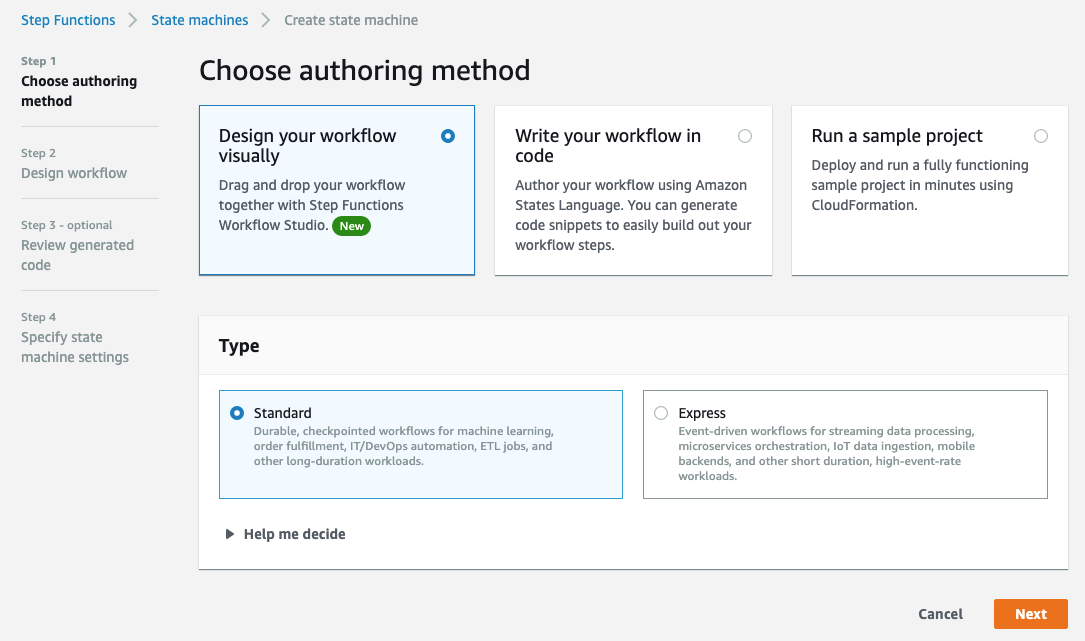
Refer to building a state machine AWS Step Functions Workflow Studio for additional details.
Step Functions integrates with all Amazon Athena’s API actions
In September 2021, Step Functions announced integration support for 200 AWS services to enable easier workflow automation. With this announcement, Step Functions can integrate with all Amazon Athena API actions today.
Step Functions can automate the lifecycle of an Athena query: Create/read/update/delete/list workGroups; Create/read/update/delete/list data catalogs, and more.
Other AWS service integrations
Step Functions’ integration with the AWS SDK provides support for 200 AWS Services and over 9,000 API actions. Athena tasks in Step Functions can evolve by integrating available AWS services in the workflow for their pre and post-processing needs.
For example, you can read Athena query results that are put to an S3 bucket by using a GetObject S3 task AWS SDK integration in Step Functions. You can combine different AWS services into a single business process so that they can ingest data through Amazon Kinesis, do processing via AWS Lambda or Amazon EMR jobs, and send notifications to interested parties via Amazon SNS or Amazon SQS or Amazon EventBridge to trigger other parts of their business application.
There are multiple ways to decorate around an Amazon Athena job task. Refer to AWS SDK service integrations and optimized integrations for Step Functions for additional details.
Important considerations
Workflow orchestrations in the Athena console only show Step Functions state machines that use Athena’s optimized API integrations. This includes StartQueryExecution, StopQueryExecution, GetQueryExecution, and GetQueryResults.
Step Functions state machines do not show in the Athena console when:
- A state machine uses any other AWS SDK Athena API integration task.
- The APIs are invoked inside a Lambda function task using an AWS SDK client (like Boto3 or Node.js or Java).
Cleanup
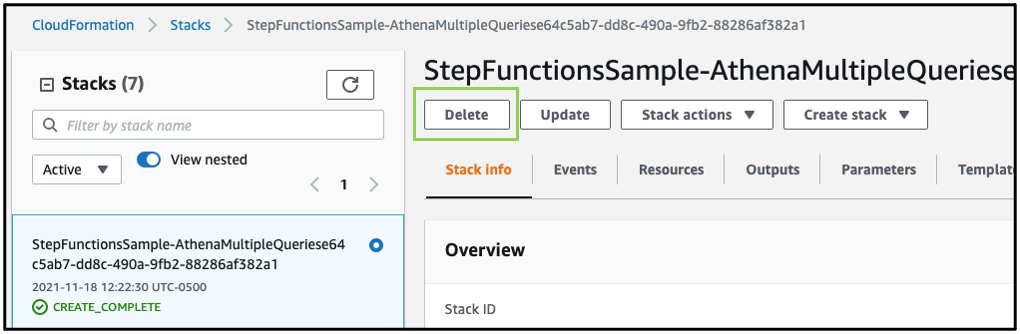
First, empty DataBucket and AthenaWorkGroup to delete the stack successfully. To delete the sample application stack, use the latest version of AWS CLI and run:
aws cloudformation delete-stack --stack-name <stack-name>Alternatively, delete the sample application stack in the CloudFormation console by selecting the stack and choosing Delete:
Conclusion
Amazon Athena console now provides an integration with AWS Step Functions’ workflows. You can use the provided patterns to create and visualize Step Functions’ workflows directly from the Amazon Athena console. Step Functions’ workflows that use Athena’s optimized API integration appear in the Athena console. To learn more about Amazon Athena, read the user guide.
To get started, open the Workflows page in the Athena console. Select Create Athena jobs with Step Functions Workflows to deploy a sample project, if you are new to Step Functions.
For more serverless learning resources, visit Serverless Land.
How to Connect Your QNAP NAS to Backblaze B2 Cloud Storage
Post Syndicated from Troy Liljedahl original https://www.backblaze.com/blog/guide-qnap-backup-b2-cloud-storage/
Network attached storage (NAS) devices are a popular solution for data storage, sharing files for remote collaboration purposes, syncing files that are part of a workflow, and more. QNAP, one of the leading NAS manufacturers, makes it incredibly easy to backup and/or sync your business or personal data for these purposes with the inclusion of its application, Hybrid Backup Sync (HBS). HBS consolidates backup, restoration, and synchronization functions into a single application.
Protecting your data with a NAS is a great first step, but you shouldn’t stop there. NAS devices are still vulnerable to any kind of on-premises disaster like fires, floods, and tornados. They’re also not safe from ransomware attacks that might hit your network. To truly protect your data, it’s important to back up or sync to an off-site cloud storage destination like Backblaze B2 Cloud Storage. Backblaze B2 offers a geographically distanced location for your data for $5/TB per month, and you can also embed it into your NAS-based workflows to streamline access across multiple locations.
Read on for more information on whether you should use backup or sync for your purposes and how to connect your QNAP NAS to Backblaze B2 step-by-step. We’ve even provided videos that show you just how easy it is—it typically takes less than 15 minutes!

Should I Back Up or Sync?
It’s easy to confuse backup and sync. They’re essentially both making a copy of your data, but they have different use cases. It’s important to understand the difference so you’re getting the right protection and accessibility for your data.
Check out the table below. You’ll see that backup is best for being able to recover from a data disaster, including the ability to access previous versions of data. However, if you’re just looking for a mirror copy of your data, sync functionality is all you need. Sync is also useful as part of remote workflows: you can sync your data between your QNAP and Backblaze B2, and then remote workers can pull down the most up-to-date files from the B2 cloud.
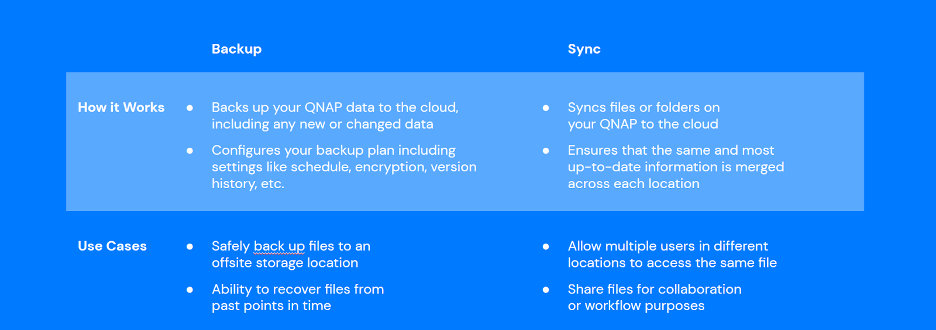
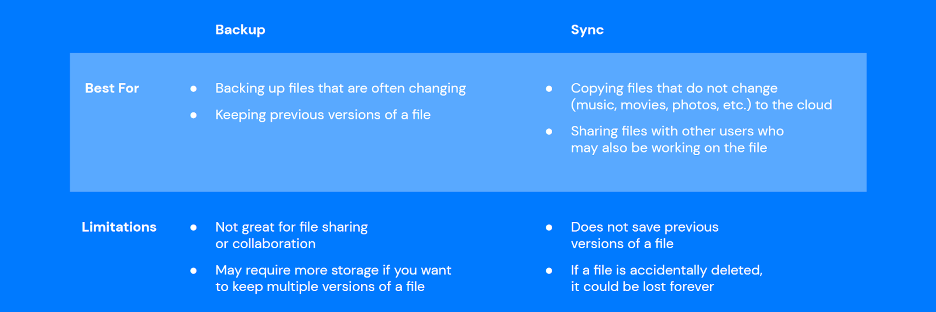
Because Hybrid Backup Sync provides both functions in one application, you should first identify which feature you truly need. The setup process is similar, but you will need to take different steps to configure backup vs. sync in HBS.
How to Set Up Your Backblaze B2 Account
Now that you’ve determined whether you want to back up or sync your data, it’s time to create your Backblaze B2 Cloud Storage account to securely protect your on-premises data.
If you already have a B2 Cloud Storage account, feel free to skip ahead. Otherwise, you can sign up for an account and get started with 10GB of free storage to test it out.
Ready to get started? You can follow along with the directions in this blog or take a look at our video guides. Greg Hamer, Senior Technical Evangelist, demonstrates how to get your data into B2 Cloud Storage in under 15 minutes using HBS for either backup or sync.
Video: Back Up QNAP to Backblaze B2 Cloud Storage with QNAP Hybrid Backup Sync
Video: Sync QNAP to Backblaze B2 Cloud Storage with QNAP Hybrid Backup Sync
How to Set Up a Bucket, Application Key ID, and Application Key
Once you’ve signed up for a Backblaze B2 Account, you’ll need to create a bucket, Application Key ID, and Application Key. This may sound like a lot, but all you need are a few clicks, a couple names, and less than a minute!
- On the Buckets page of your account, click the Create a Bucket button.
- Give your bucket a name and enable encryption for added security.
- Click the Create a Bucket button and you should see your new bucket on the Buckets page.
- Navigate to the App Keys page of your account and click Add a New Application Key.
- Name your Application Key and click the Create New Key button. Make sure that your key has both read and write permissions (the default option).
- Your Application Key ID and Application Key will appear on your App Keys page. Important: Make sure to copy these somewhere secure as the Application Key will not appear again!
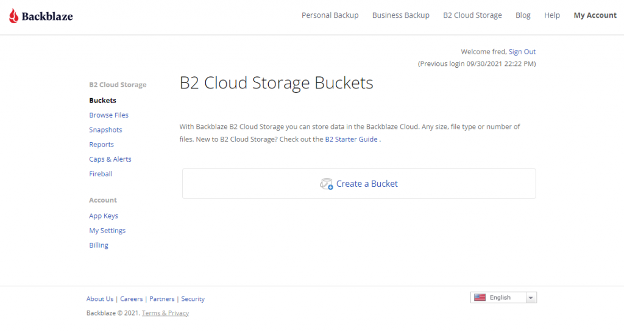
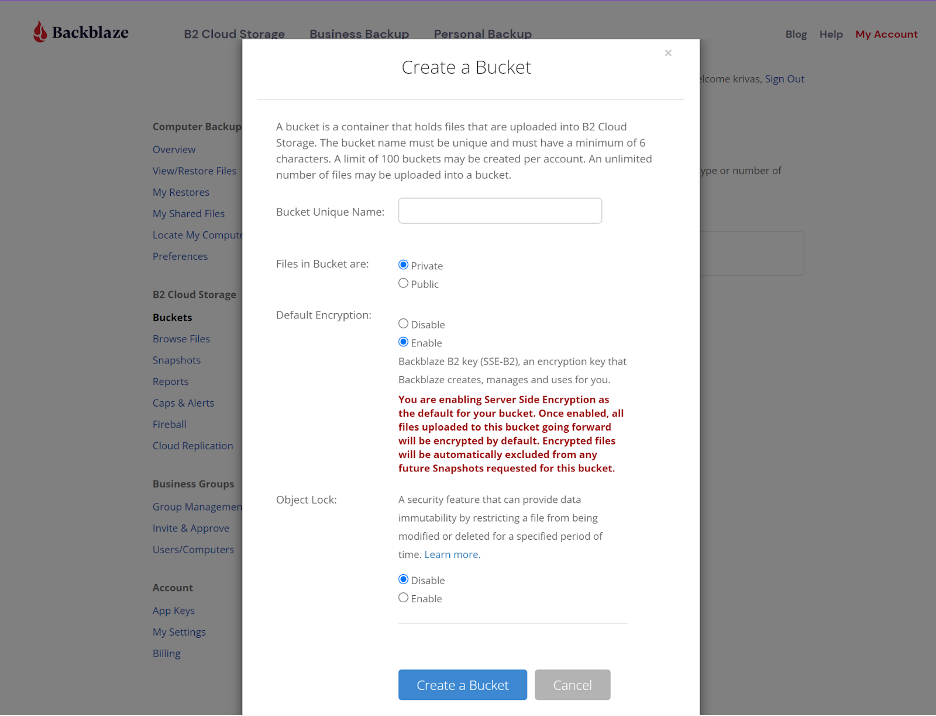
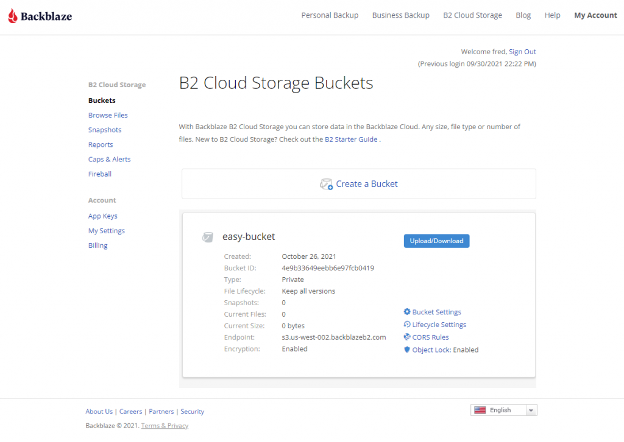
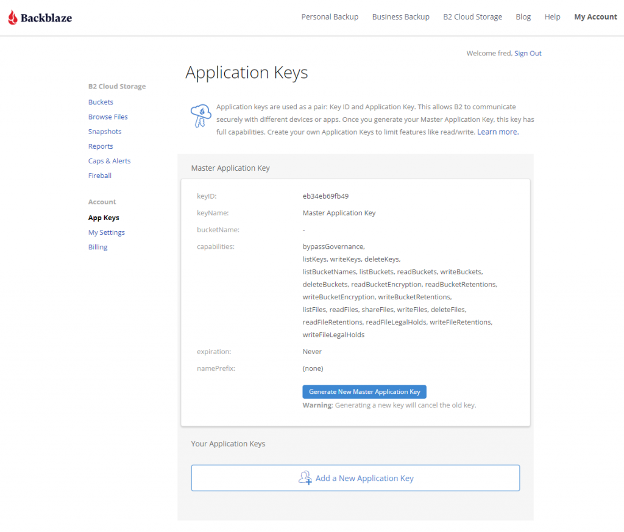
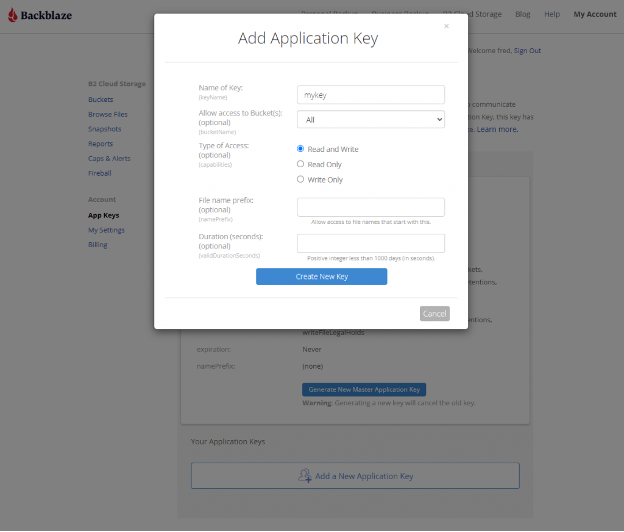

How to Set Up QNAP’s Hybrid Backup Sync to Work With B2 Cloud Storage
To set up your QNAP with Backblaze B2 sync support, you’ll need access to your B2 Cloud Storage account. You’ll also need your B2 Cloud Storage account ID, Application Key, and bucket name—all of which are available after you log in to your Backblaze account. Finally, you’ll need the Hybrid Backup Sync application installed in QTS. You’ll need QTS 4.3.3 or later and Hybrid Backup Sync v2.1.170615 or later.
To configure a backup or sync job, simply follow the rest of the steps in this integration guide or reference the videos posted above. Once you follow the rest of the configuration steps, you’ll have a set-it-and-forget-it solution in place.
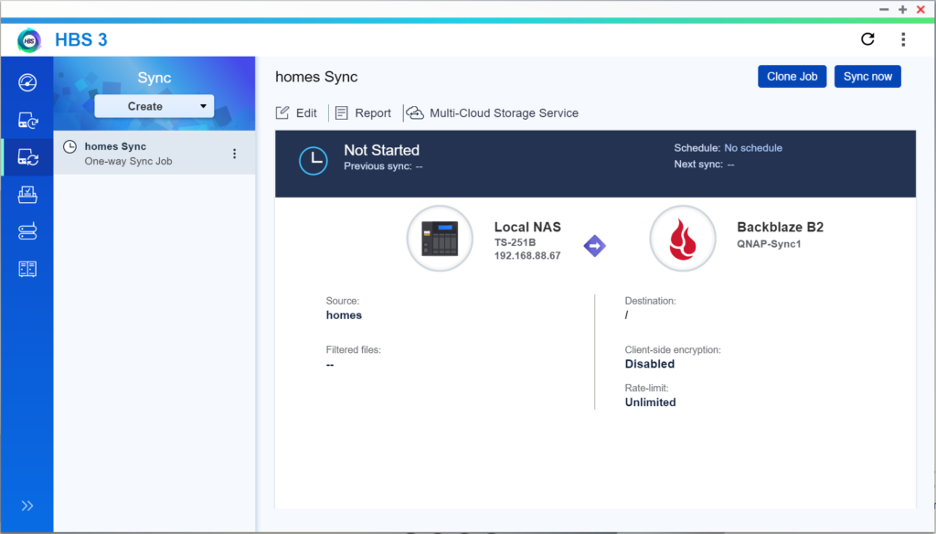
What Can You Do With Backblaze B2 and QNAP Hybrid Backup Sync?
With QNAP’s Hybrid Backup Sync software, you can easily back up and sync data to the cloud. Here’s some more information on what you can do to make the most of your setup.
Hybrid Backup Sync 3.0
QNAP and Backblaze B2 users can take advantage of Hybrid Backup Sync, as explained above. Hybrid Backup Sync is a powerful tool that provides true backup capability with features like version control, client-side encryption, and block-level deduplication. QNAP’s operating system, QTS, continues to deliver innovation and add thrilling new features. The ability to preview backed up files using the QuDedup Extract Tool, a feature first released in QTS 4.4.1, allowed QNAP users to save on bandwidth costs.
You can download the latest QTS update here and Hybrid Backup Sync is available in the App Center on your QNAP device.
Hybrid Mount and VJBOD Cloud
The Hybrid Mount and VJBOD Cloud apps allow QNAP users to designate a drive in their system to function as a cache while accessing B2 Cloud Storage. This allows users to interact with Backblaze B2 just like you would a folder on your QNAP device while using Backblaze B2 as an active storage location.
Hybrid Mount and VJBOD Cloud are both included in the QTS 4.4.1 versions and higher, and function as a storage gateway on a file-based or block-based level, respectively. Hybrid Mount enables Backblaze B2 to be used as a file server and is ideal for online collaboration and file-level data analysis. VJBOD Cloud is ideal for a large number of small files or singular massively large files (think databases!) since it’s able to update and change files on a block-level basis. Both apps offer the ability to connect to B2 Cloud Storage via popular protocols to fit any environment, including server message block (SMB), Apple Filing Protocol (AFP), network file sharing (NFS), file transfer protocol (FTP), and WebDAV.
QuDedup
QuDedup introduces client-side deduplication to the QNAP ecosystem. This helps users at all levels save on space on their NAS by avoiding redundant copies in storage. Backblaze B2 users have something to look forward to as well since these savings carry over to cloud storage via the HBS 3.0 update.
Why Backblaze B2?
QNAP continues to innovate and unlock the potential of B2 Cloud Storage in the NAS ecosystem. If you haven’t given B2 Cloud Storage a try yet, now is the time. You can get started with Backblaze B2 and your QNAP NAS right now, and make sure your NAS is synced securely and automatically to the cloud.
The post How to Connect Your QNAP NAS to Backblaze B2 Cloud Storage appeared first on Backblaze Blog | Cloud Storage & Cloud Backup.
Security updates for Tuesday
Post Syndicated from original https://lwn.net/Articles/876723/rss
Security updates have been issued by Debian (mbedtls), Red Hat (kernel and rpm), and Ubuntu (freerdp2).
Choose the right storage tier for your needs in Amazon OpenSearch Service
Post Syndicated from Changbin Gong original https://aws.amazon.com/blogs/big-data/choose-the-right-storage-tier-for-your-needs-in-amazon-opensearch-service/
Amazon OpenSearch Service (successor to Amazon Elasticsearch Service) enables organizations to perform interactive log analytics, real-time application monitoring, website search, and more. OpenSearch is an open-source, distributed search and analytics suite derived from Elasticsearch. Amazon OpenSearch Service offers the latest versions of OpenSearch, support for 19 versions of Elasticsearch (1.5 to 7.10 versions), and visualization capabilities powered by OpenSearch Dashboards and Kibana (1.5 to 7.10 versions).
In this post, we present three storage tiers of Amazon OpenSearch Service—hot, UltraWarm, and cold storage—and discuss how to effectively choose the right storage tier for your needs. This post can help you understand how these storage tiers integrate together and what the trade-off is for each storage tier. To choose a storage tier of Amazon OpenSearch Service for your use case, you need to consider the performance, latency, and cost of these storage tiers in order to make the right decision.
Amazon OpenSearch Service storage tiers overview
There are three different storage tiers for Amazon OpenSearch Service: hot, UltraWarm, and cold. The following diagram illustrates these three storage tiers.

Hot storage
Hot storage for Amazon OpenSearch Service is used for indexing and updating, while providing fast access to data. Standard data nodes use hot storage, which takes the form of instance store or Amazon Elastic Block Store (Amazon EBS) volumes attached to each node. Hot storage provides the fastest possible performance for indexing and searching new data.
You get the lowest latency for reading data in the hot tier, so you should use the hot tier to store frequently accessed data driving real-time analysis and dashboards. As your data ages, you access it less frequently and can tolerate higher latency, so keeping data in the hot tier is no longer cost-efficient.
If you want to have low latency and fast access to the data, hot storage is a good choice for you.
UltraWarm storage
UltraWarm nodes use Amazon Simple Storage Service (Amazon S3) with related caching solutions to improve performance. UltraWarm offers significantly lower costs per GiB for read-only data that you query less frequently and don’t need the same performance as hot storage. Although you can’t modify the data while in UltraWarm, you can move the data to the hot storage tier for edits before moving it back.
When calculating UltraWarm storage requirements, you consider only the size of the primary shards. When you query for the list of shards in UltraWarm, you still see the primary and replicas listed. Both shards are stubs for the same, single copy of the data, which is in Amazon S3. The durability of data in Amazon S3 removes the need for replicas, and Amazon S3 abstracts away any operating system or service considerations. In the hot tier, accounting for one replica, 20 GB of index uses 40 GB of storage. In the UltraWarm tier, it’s billed at 20 GB.
The UltraWarm tier acts like a caching layer on top of the data in Amazon S3. UltraWarm moves data from Amazon S3 onto the UltraWarm nodes on demand, which speeds up access for subsequent queries on that data. For that reason, UltraWarm works best for use cases that access the same, small slice of data multiple times. You can add or remove UltraWarm nodes to increase or decrease the amount of cache against your data in Amazon S3 to optimize your cost per GB. To dial in your cost, be sure to test using a representative dataset. To monitor performance, use the WarmCPUUtilization and WarmJVMMemoryPressure metrics. See UltraWarm metrics for a complete list of metrics.
The combined CPU cores and RAM allocated to UltraWarm nodes affects performance for simultaneous searches across shards. We recommend deploying enough UltraWarm instances so that you store no more than 400 shards per ultrawarm1.medium.search node and 1,000 shards per ultrawarm1.large.search node (including both primaries and replicas). We recommend a maximum shard size of 50 GB for both hot and warm tiers. When you query UltraWarm, each shard uses a CPU and moves data from Amazon S3 to local storage. Running single or concurrent queries that access many indexes can overwhelm the CPU and local disk resources. This can cause longer latencies through inefficient use of local storage, and even cause cluster failures.
UltraWarm storage requires OpenSearch 1.0 or later, or Elasticsearch version 6.8 or later.
If you have large amounts of read-only data and want to balance the cost and performance, use UltraWarm for your infrequently accessed, older data.
Cold storage
Cold storage is optimized to store infrequently accessed or historical data at $0.024 per GB per month. When you use cold storage, you detach your indexes from the UltraWarm tier, making them inaccessible. You can reattach these indexes in a few seconds when you need to query that data. Cold storage is a great fit for scenarios in which a low ROI necessitates an archive or delete action on historical data, or if you need to conduct research or perform forensic analysis on older data with Amazon OpenSearch Service.
Cold storage doesn’t have specific instance types because it doesn’t have any compute capacity attached to it. You can store any amount of data in cold storage.
Cold storage requires OpenSearch 1.0 or later, or Elasticsearch version 7.9 or later and UltraWarm.
Manage storage tiers in OpenSearch Dashboards
OpenSearch Dashboards installed on your Amazon OpenSearch Service domain provides a useful UI for managing indexes in different storage tiers on your domain. From the OpenSearch Dashboards main menu, you can view all indexes in hot, UltraWarm, and cold storage. You can also see the indexes managed by Index State Management (ISM) policies. OpenSearch Dashboards enables you to migrate indexes between UltraWarm and cold storage, and monitor index migration status, without using the AWS Command Line Interface (AWS CLI) or configuration API. For more information on OpenSearch Dashboards, see Using OpenSearch Dashboards with Amazon OpenSearch Service.
Cost considerations
The hot tier requires you to pay for what is provisioned, which includes the hourly rate for the instance type. Storage is either Amazon EBS or a local SSD instance store. For Amazon EBS-only instance types, additional EBS volume pricing applies. You pay for the amount of storage you deploy.
UltraWarm nodes charge per hour just like other node types, but you only pay for the storage actually stored in Amazon S3. For example, although the instance type ultrawarm1.large.elasticsearch provides up to 20 TiB addressable storage on Amazon S3, if you only store 2 TiB of data, you’re only billed for 2 TiB. Like the standard data node types, you also pay an hourly rate for each UltraWarm node. For more information, see Pricing for Amazon OpenSearch Service.
Cold storage doesn’t incur compute costs, and like UltraWarm, you’re only billed for the amount of data stored in Amazon S3. There are no additional transfer charges when moving data between cold and UltraWarm storage.
Example use case
Let’s look at an example with 1 TB of source data per day, 7 days hot, 83 days warm, 365 days cold. For more information on sizing the cluster, see Sizing Amazon OpenSearch Service domains.
For hot storage, you can go through a baseline estimation with the calculation as: storage needed = (daily source data in bytes * 1.25) * (number_of_replicas + 1) * number of days retention. With the best practice for two replicas, we should use two replicas here. The minimum storage requirement to retain 7 TB of data on the hot tier is (7TB*1.25)*(2+1)= 26.25 TB. For this amount of storage, we need 6x R6g.4xlarge.search instances given the Amazon EBS size limit.
We also need to verify from the CPU side, we need 25 primary shards (1TB*1.25/50GB) =25. We have two replicas. With that, we have total 75 active shards. With that, the total vCPU needed is 75*1.5=112.5 vCPU. This means 8x R6g.4xlarge.search instances. This also requires three dedicated c6g.xlarge.search leader nodes.
When calculating UltraWarm storage requirements, you consider only the size of the primary shards, because that’s the amount of data stored in Amazon S3. For this example, the total primary shard size for warm storage is 83*1.25=103.75 TB. Each ultrawarm1.large.search instance has 16 CPU cores and can address up to 20 TiB of storage on Amazon S3. A minimum of six ultrawarm1.large.search nodes is recommended. You’re charged for the actual storage, which is 103.75 TB.
For cold storage, you only pay for the cost of storing 365*1.25=456.25 TB on Amazon S3. The following table contains a breakdown of the monthly costs (USD) you’re likely to incur. This assumes a 1-year reserved instance for the cluster instances with no upfront payment in the US East (N. Virgina) Region.
| Cost Type | Pricing | Usage | Cost per month |
| Instance Usage | R6g.4xlarge.search = $0.924 per hour | 8 instances * 730 hours in a month = 5,840 hours | 5,840 hours * $0.924 = $5,396.16 |
| c6g.xlarge.search = $0.156 per hour | 3 instances (leader nodes) * 730 hours in a month = 2,190 hours | 2,190 hours * $0.156 = $341.64 | |
| ultrawarm1.large.search = $2.68 per hour | 6 instances * 730 hours = 4,380 hours | 4,380 hours * $2.68 = $11,738.40 | |
| Storage Cost | Hot storage cost (Amazon EBS) EBS general purpose SSD (gp3) = $0.08 per GB per month | 7 days host = 26.25TB | 26,880 GB * $0.08 = $2,150.40 |
| UltraWarm managed storage cost = $0.024 per GB per month | 83 days warm = 103.75 TB per month | 106,240 GB * $0.024 = $2,549.76 | |
| Cold storage cost on Amazon S3 = $0.022 per GB per month | 365 days cold = 456.25 TB per month | 467,200 GB * $0.022 = $10,278.40 |
The total monthly cost is $32,454.76. The hot tier costs $7,888.20, UltraWarm costs $14,288.16, and cold storage is $10,278.40. UltraWarm allows 83 days of additional retention for slightly more cost than the hot tier, which only provides 7 days. For nearly the same cost as the hot tier, the cold tier stores the primary shards for up to 1 year.
Conclusion
Amazon OpenSearch Service supports three integrated storage tiers: hot, UltraWarm, and cold storage. Based on your data retention, query latency, and budgeting requirements, you can choose the best strategy to balance cost and performance. You can also migrate data between different storage tiers. To start using these storage tiers, sign in to the AWS Management Console, use the AWS SDK, or AWS CLI, and enable the corresponding storage tier.
About the Author
 Changbin Gong is a Senior Solutions Architect at Amazon Web Services (AWS). He engages with customers to create innovative solutions that address customer business problems and accelerate the adoption of AWS services. In his spare time, Changbin enjoys reading, running, and traveling.
 Rich Giuli is a Principal Solutions Architect at Amazon Web Service (AWS). He works within a specialized group helping ISVs accelerate adoption of cloud services. Outside of work Rich enjoys running and playing guitar.
AWS Cloud Adoption Framework (CAF) 3.0 is Now Available
Post Syndicated from Jeff Barr original https://aws.amazon.com/blogs/aws/aws-cloud-adoption-framework-caf-3-0-is-now-available/
The AWS Cloud Adoption Framework (AWS CAF) is designed to help you to build and then execute a comprehensive plan for your digital transformation. Taking advantage of AWS best practices and lessons learned from thousands of customer engagements, the AWS CAF will help you to identify and prioritize transformation opportunities, evaluate and improve your cloud readiness, and iteratively evolve the roadmaps that you follow to guide your transformation.
Version 3.0 Now Available
I am happy to announce the version 3.0 of the AWS CAF is now available. This version represents what we have learned since we released version 2.0, with a focus on digital transformation and an emphasis on the use of data & analytics.
The framework starts by identifying six groups of foundational perspectives (Business, People, Governance, Platform, Security, and Operations), totaling 47 discrete capabilities, up from 31 in the previous version.
From there it identifiers four transformation domains (Technology, Process, Organization, and Product) that must participate in a successful digital transformation.
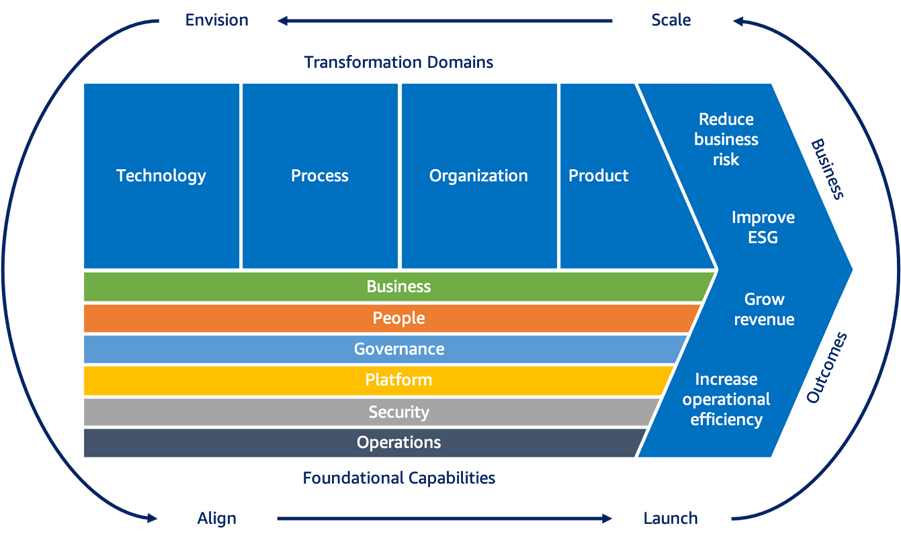
With the capabilities and the transformation domains as a base, the AWS Cloud Adoption Framework then recommends a set of four iterative and incremental cloud transformation phases:
Envision – Demonstrate how the cloud will accelerate business outcomes. This phase is delivered as a facilitator-led interactive workshop that will help you to identify transformation opportunities and create a foundation for your digital transformation.
Align – Identify capability gaps across the foundational capabilities. This phase also takes the form of a facilitator-led workshop and results in an action plan.
Launch – Build and deliver pilot initiatives in production, while demonstrating incremental business value.
Scale – Expand pilot initiatives to the desired scale while realizing the anticipated & desired business benefits.
All in all, the AWS Cloud Adoption Framework is underpinned by hundreds of AWS offerings and programs that help you achieve specific business and technical outcomes.
Getting Started with the AWS Cloud Adoption Framework
You can use the following resources to learn more and to get started:
Web Page – Visit the AWS Cloud Adoption Framework web page.
White Paper – Download and read the AWS CAF Overview.
AWS Account Team – Your AWS account team stands ready to assist you with any and all of the phases of the AWS Cloud Adoption Framework.
— Jeff;
OWASP Top 10 Deep Dive: Defending Against Server-Side Request Forgery
Post Syndicated from Neville O'Neill original https://blog.rapid7.com/2021/11/23/owasp-top-10-deep-dive-defending-against-server-side-request-forgery/

Web applications are no longer just assets to a company — they’re an organization’s identity, playing a major role in how customers, clients, and users see a brand. Due to this importance, web apps have also become a primary target for attack.
Over the years, these applications have grown more complex and bigger in size. Meanwhile, attackers have gotten more skillful. This has created greater opportunities for malicious actors to exploit potential vulnerabilities in web applications.
With the recent release of the 2021 Open Web Application Security Project (OWASP) top 10, we’re taking a deep dives into some of the new items added to the list. So far, we’ve covered injection and vulnerable and outdated components. In this post, we’ll focus on server-side request forgery (SSRF), which comes in at number 10 on the updated list.
SSRF attacks present a range of risks, from potentially stealing sensitive information from the application to bringing the entire web application down. These attacks target systems that are located behind firewalls and restrict access from non-trusted networks. Protecting your application from such attacks is vitally important. Here, we’ll talk about the different types of SSRF attacks and go over some mitigation techniques
What is server-side request forgery (SSRF)?
SSRF allows an attacker to force the server-side application into making arbitrary web requests to an unintended domain. This can result in the server making connections to internal-only services or arbitrary external systems.
A successful SSRF attack can result in unauthorized actions or access to data within the organization, either in the vulnerable application itself or on other back-end systems that the application can communicate with. In some situations, the SSRF vulnerability may even allow an attacker to perform arbitrary command execution. This can result in:
- Information exposure
- Internal reconnaissance
- Denial-of-Service (DoS) attack
- Remote code execution (RCE)
In general, SSRF attacks are made possible by a lack of user input validation in the web application. Without strict validation, the attacker can alter parameters that control what gets executed server-side, e.g. potentially malicious commands or establishing HTTP connections to arbitrary systems. Vulnerabilities will arise when the web application is unable to identify and validate requests from trusted applications or when the web application can send requests to any external IP address or domain
A closer look
Consider a scenario where the target web application provides functionality for importing, publishing, or reading data using a URL query parameter. The user can control the source of the data accessed by changing the value of the query parameter, which modifies the web request made by the server.
Once the manipulated request is received by the server, it will attempt to read the data by making a request to the user-supplied URL. If the web application lacks sufficient validation of user supplied data (in this case the source URL), then an attacker could potentially supply a URL that returns information from services that aren’t directly exposed publicly.
In some cases, the application server is able to interact with other back-end systems that are not directly reachable by users. Such systems often have private IP addresses and are designed not to be accessed publicly. Internal back-end systems may contain sensitive functionality that can be accessed without authentication by anyone who is able to interact with the systems.
A common example of this is cloud server metadata. Cloud services like Azure and AWS provide a representational state transfer (REST) service for querying metadata about the service itself. For example, AWS provides Instance Metadata Service (IMDS), which is used for querying information about an Amazon EC2 instance. This service is not publicly accessible and can only be accessed from the EC2 instance itself, by making a local HTTP request on http://169.254.169.254/.
The reason for this is that applications can sometimes hold important configuration files and authentication keys in these metadata directories. Endpoints that expose sensitive metadata like this are prime targets for attackers who wish to exploit SSRF vulnerabilities in applications with weak input validation.
Other examples of target data include Database HTTP interfaces such as NoSQL and MongoDB, as well as Internal REST interfaces and standard files structures.
Types of SSRF
Based on how a server responds to the request, SSRF can be divided into two types.
Basic SSRF: This when data from the malicious, forced back-end request is reflected in the application front-end. A hacker would use Basic SSRF when they want to exfiltrate data from the server directly or want to access unauthorized features.
Blind SSRF: As the name describes, with this type of SSRF attack, the application is forced to make a back-end HTTP request to a malicious domain. In this type of SSRF, the attacker doesn’t get data back from the server directly. The response from the back-end request triggers an action on the target without getting reflected in the application front-end. Hackers use this type of SSRF when they want to make some changes using the victim server.
Typical attack approach
Next, we’ll look at a sample attack that an attacker may use to test for SSRF vulnerabilities that are exposed when trying to acquire metadata from an Azure instance.
<AttackConfig>
      <Id>SSRF_13</Id>
      <Description><![CDATA[Azure Metadata]]></Description>
      <CustomParameterList>
        <CustomParameter>
          <Name>AttackString</Name>
          <Value>
              <![CDATA[http://169.254.169.254/metadata/instance/compute?api-version=2019-08-15]]>
          </Value>
        </CustomParameter>
        <CustomParameter>
          <name>vulnregex</name>
          <value>"(azEnvironment|osType|resourceId|vmSize)":\"</value>
        </CustomParameter>
      </CustomParameterList>
    </AttackConfig>
Upon identifying an injection point in, for example, a post parameter sent in the body of the request, the attacker may attempt to inject the value wrapped in CDATA — i.e. http://169.254.169.254/metadata/instance/compute?api-version=2019-08-15 in our example.
That might look something like this:
POST /users/search HTTP/1.0 Content-Type: application/x-www-form-urlencoded
searchApi=http://169.254.169.254/metadata/instance/compute?api-version=2019-08-15
The injected value contains the domain that retrieves metadata about the Azure instance that the web application is served on. Assuming that the web application is vulnerable to SSRF, no input validation will be performed to reject this malicious domain, and the web application will arbitrarily make a HTTP request that should result in Azure metadata being reflected in the web response.
If the application returns a valid response, the attacker could then search the web response for the value identified by “vulnregex” above. Matches should occur for information corresponding to the Azure instance — i.e. environment name, operating system, available resources or its storage size. This is a strong indication that the forged request was successful and therefore the application is vulnerable to SSRF attacks.
Validation
The above attack can be validated by attempting to visualize the information yourself. You can do this by navigating to the location on the application where a query parameter is being passed in the URL and injecting the value:
http://169.254.169.254/metadata/instance/compute?api-version=2019-08-15
When the forged request is submitted, you should look to see if any unexpected, sensitive information is returned in the response. In this case, since we are injecting an instance metadata domain, relevant information like operating system and storage size should be returned. If it is, this provides confirmation that the application is vulnerable to SSRF. An attacker could leverage this further to access and possibly even alter information in the metadata directory for that instance.
Sample vulnerable code
public String documentPreview(HttpServletRequest httpRequest,
Model model)
{
String queryStringParams = httpRequest.getQueryString();
String queryString =
StringUtils.substringAfter(queryStringParams, "url=");
if (StringUtils.isBlank(queryString)) {
log.error("Missed 'url' query param");
return "preview";
}
try {
DownloadFileResponse downloadFileResponse = storageService.load(queryString);
model.addAttribute("image", new String(Base64.getEncoder().encode(
IOUtils.toByteArray(downloadFileResponse.getContent()))
));
}
catch (Exception e) {
// Exception handling here.
}
return "preview";
}
HttpGet httpGet = new HttpGet(url);
This example code has been created to upload images to an application and render them. However, it is vulnerable to SSRF attacks that will allow the attacker to make arbitrary requests to internal systems, such as metadata information.
The documentPreview() method is used for rendering an uploaded image file. This works by extracting a pre-signed image location URL passed via the “url=” parameter and assigns it to the variable named queryString. This variable is then passed into a storageService method which loads the image from where it is stored.
The load()method will invoke the HttpGet() function in order to retrieve the image. However, without proper input validation on the request parameter “url=”, the httpGet()method will perform arbitrary get requests on anything malicious that is input via that parameter.
Sample fixed code and remediation
The standard approach for preventing SSRF attacks can include denylist- and allowlist-based input validation for the URL.
Denylisting can include blocking hostnames like 127.0.0.1 or 169.254.169.254 so that the attacker cannot actively access internal information by injecting these parameters. This is useful when the application is required to send requests to external IP addresses or domains.
When the application is only required to send requests to trusted/identified applications, allowlist validation is available. This means the web application will only accept certain values as valid parameters. For example, you could implement embedded credentials in a URL before the hostname using the @ character so that the application can only access directories after the provided hostname.
To remediate our above example, the approach would be to implement some allowlist validation, as we only need to load images from a trusted single file storage service.
You could use regex to see if the parameter matches the trusted file storage hostname:
//Regex validation for a data having a simple format
if(Pattern.matches("http:\/\/trustedimages.com.*", queryString)){
    //Continue the processing because the input data is valid
	HttpGet httpGet = new HttpGet(url);
}else{
    //Stop the processing and reject the request
}
After the above code is implemented, only parameters beginning with http://trustedimages.com/ will be able to be sent to the httpGet()method and will prevent attackers from accessing hostnames outside of that domain.
Fighting a new contender
Don’t let the No. 10 spot fool you — SSRF is a serious threat that more than deserves its recognition in this year’s OWASP Top 10 list. In fact, 2021 is SSRF’s first year on the OWASP list, and security pros should expect to encounter this threat more and more in the coming years. But if you’re effectively testing your applications and remediating issues quickly and correctly, you’ll be prepared to spot and resolve SSRF vulnerabilities before an attacker exploits them.
Announcing Argo for Spectrum
Post Syndicated from Achiel van der Mandele original https://blog.cloudflare.com/argo-spectrum/


Today we’re excited to announce the general availability of Argo for Spectrum, a way to turbo-charge any TCP based application. With Argo for Spectrum, you can reduce latency, packet loss and improve connectivity for any TCP application, including common protocols like Minecraft, Remote Desktop Protocol and SFTP.
The Internet — more than just a browser
When people think of the Internet, many of us think about using a browser to view websites. Of course, it’s so much more! We often use other ways to connect to each other and to the resources we need for work. For example, you may interact with servers for work using SSH File Transfer Protocol (SFTP), git or Remote Desktop software. At home, you might play a video game on the Internet with friends.
To help people that protect these services against DDoS attacks, Spectrum launched in 2018 and extends Cloudflare’s DDoS protection to any TCP or UDP based protocol. Customers use it for a wide variety of use cases, including to protect video streaming (RTMP), gaming and internal IT systems. Spectrum also supports common VoIP protocols such as SIP and RTP, which have recently seen an increase in DDoS ransomware attacks. A lot of these applications are also highly sensitive to performance issues. No one likes waiting for a file to upload or dealing with a lagging video game.
Latency and throughput are the two metrics people generally discuss when talking about network performance. Latency refers to the amount of time a piece of data (a packet) takes to traverse between two systems. Throughput refers to the amount of bits you can actually send per second. This blog will discuss how these two interplay and how we improve them with Argo for Spectrum.
Argo to the rescue
There are a number of factors that cause poor performance between two points on the Internet, including network congestion, the distance between the two points, and packet loss. This is a problem many of our customers have, even on web applications. To help, we launched Argo Smart Routing in 2017, a way to reduce latency (or time to first byte, to be precise) for any HTTP request that goes to an origin.
That’s great for folks who run websites, but what if you’re working on an application that doesn’t speak HTTP? Up until now people had limited options for improving performance for these applications. That changes today with the general availability of Argo for Spectrum. Argo for Spectrum offers the same benefits as Argo Smart Routing for any TCP-based protocol.
Argo for Spectrum takes the same smarts from our network traffic and applies it to Spectrum. At time of writing, Cloudflare sits in front of approximately 20% of the Alexa top 10 million websites. That means that we see, in near real-time, which networks are congested, which are slow and which are dropping packets. We use that data and take action by provisioning faster routes, which sends packets through the Internet faster than normal routing. Argo for Spectrum works the exact same way, using the same intelligence and routing plane but extending it to any TCP based application.
Performance
But what does this mean for real application performance? To find out, we ran a set of benchmarks on Catchpoint. Catchpoint is a service that allows you to set up performance monitoring from all over the world. Tests are repeated at intervals and aggregate results are reported. We wanted to use a third party such as Catchpoint to get objective results (as opposed to running themselves).
For our test case, we used a file server in the Netherlands as our origin. We provisioned various tests on Catchpoint to measure file transfer performance from various places in the world: Rabat, Tokyo, Los Angeles and Lima.
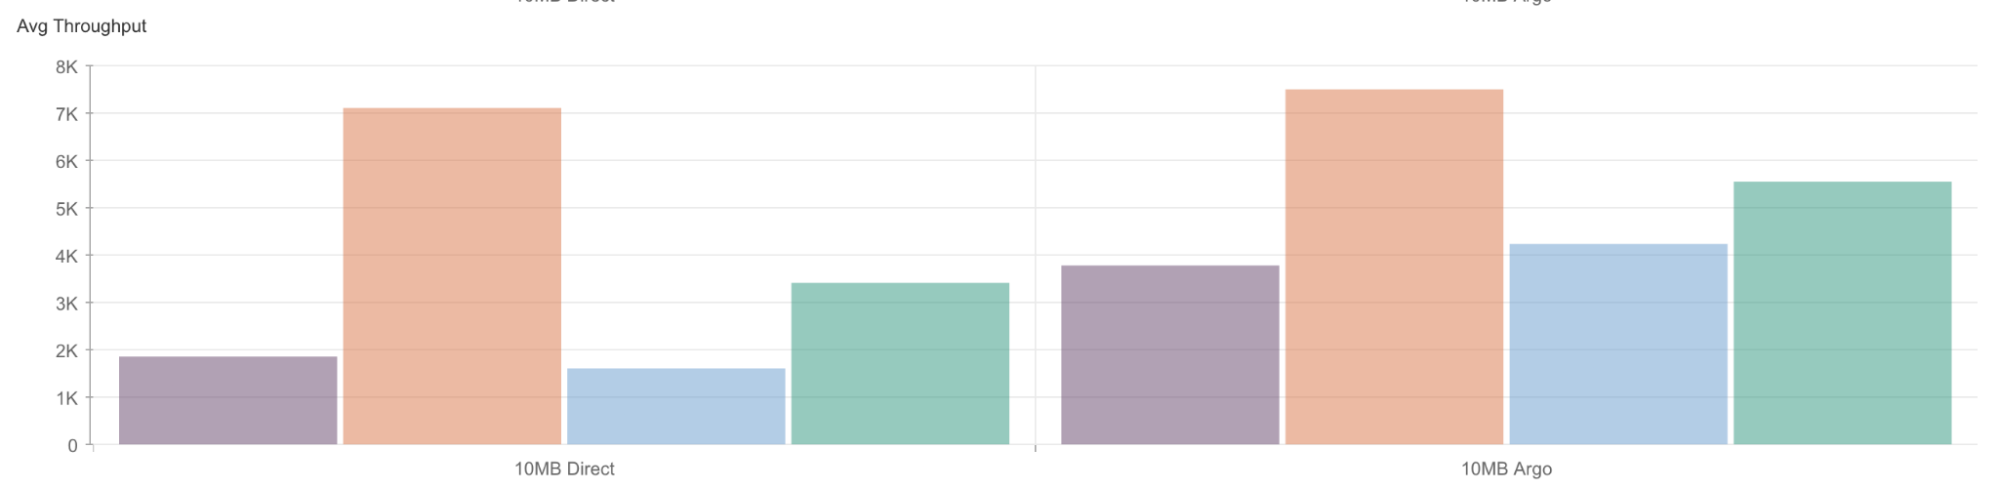
Depending on location, transfers saw increases of up to 108% (for locations such as Tokyo) and 85% on average. Why is it so much faster? The answer is bandwidth delay product. In layman’s terms, bandwidth delay product means that the higher the latency, the lower the throughput. This is because with transmission protocols such as TCP, we need to wait for the other party to acknowledge that they received data before we can send more.
As an analogy, let’s assume we’re operating a water cleaning facility. We send unprocessed water through a pipe to a cleaning facility, but we’re not sure how much capacity the facility has! To test, we send an amount of water through the pipe. Once the water has arrived, the facility will call us up and say, “we can easily handle this amount of water at a time, please send more.” If the pipe is short, the feedback loop is quick: the water will arrive, and we’ll immediately be able to send more without having to wait. If we have a very, very long pipe, we have to stop sending water for a while before we get confirmation that the water has arrived and there’s enough capacity.
The same happens with TCP: we send an amount of data to the wire and wait to get confirmation that it arrived. If the latency is high it reduces the throughput because we’re constantly waiting for confirmation. If latency is low we can throttle throughput at a high rate. With Spectrum and Argo, we help in two ways: the first is that Spectrum terminates the TCP connection close to the user, meaning that latency for that link is low. The second is that Argo reduces the latency between our edge and the origin. In concert, they create a set of low-latency connections, resulting in a low overall bandwidth delay product between users in origin. The result is a much higher throughput than you would otherwise get.
Argo for Spectrum supports any TCP based protocol. This includes commonly used protocols like SFTP, git (over SSH), RDP and SMTP, but also media streaming and gaming protocols such as RTMP and Minecraft. Setting up Argo for Spectrum is easy. When creating a Spectrum application, just hit the “Argo Smart Routing” toggle. Any traffic will automatically be smart routed.
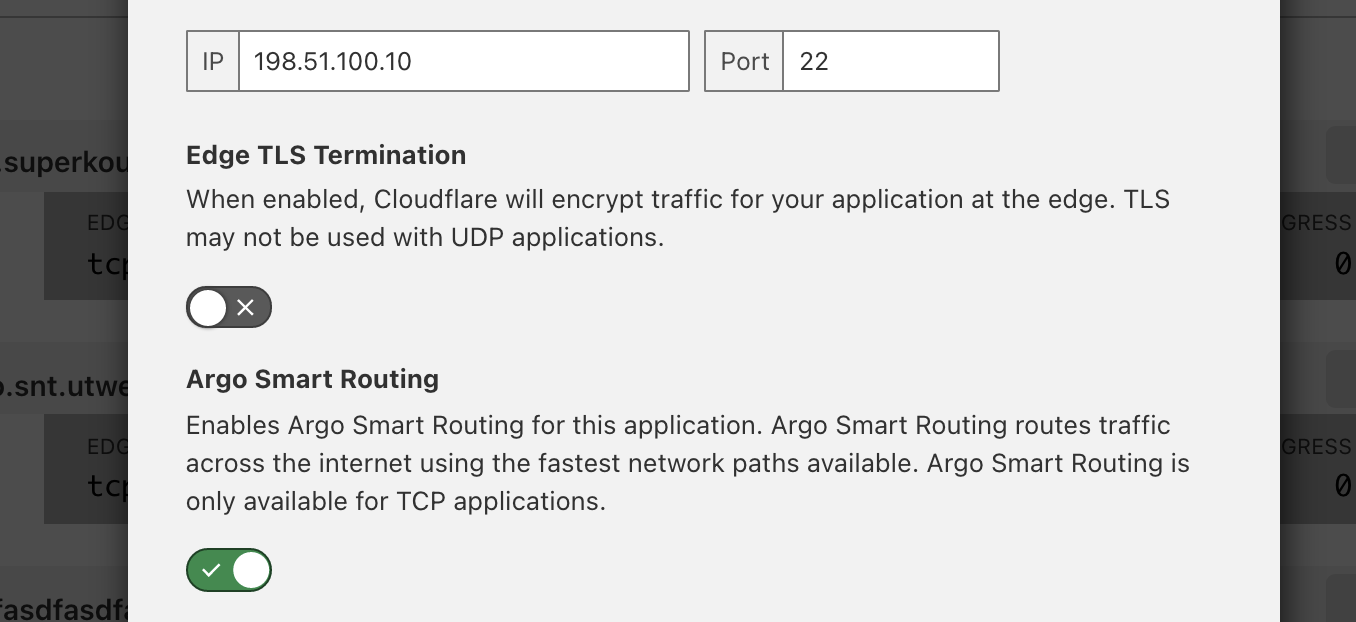
Argo for Spectrum covers much more than just these applications: we support any TCP-based protocol. If you’re interested, reach out to your account team today to see what we can do for you.
A preview of Amazon’s AL2022 distribution
Post Syndicated from original https://lwn.net/Articles/876696/rss
Amazon has announced
a preview release of its upcoming AL2022 distribution. The company plans
to support AL2022 for five years after its release.
AL2022 uses the Fedora project as its upstream to provide customers
with a wide variety of the latest software, such as updated
language runtimes, as part of quarterly releases. In addition,
AL2022 has SELinux enabled and enforced by default.
Young people can name a piece of space history with Astro Pi Mission Zero
Post Syndicated from Claire Given original https://www.raspberrypi.org/blog/free-beginner-coding-activity-astro-pi-mission-zero-name-space-history/
Your young people don’t need to wait to become astronauts to be part of a space mission! In Mission Zero, the free beginners’ coding activity of the European Astro Pi Challenge, young people can create a simple computer program to send to the International Space Station (ISS) today.

This year, young people taking part in Astro Pi Mission Zero have the historic chance to help name the special Raspberry Pi computers we are sending up to the ISS for the Astro Pi Challenge. Their voices will decide the names of these unique pieces of space exploration hardware.

Your young people can become part of a space mission today!
The European Astro Pi Challenge is a collaboration by us and ESA Education. Astro Pi Mission Zero is free, open to all young people up to age 19 from eligible countries*, and it’s designed for beginner coders.
You can support participants easily, whether at home, in the classroom, or in a youth club. Simply sign up as a mentor and let your young people follow the step-by-step instructions we provide (in 19 European languages!) for writing their Mission Zero code online. Young people can complete Mission Zero in around an hour, and they don’t need any previous coding experience.

Mission Zero is the perfect coding activity for parents and their children at home, for STEM or Scouts club leaders and attendees, and for teachers and students who are new to computer programming. You don’t need any special tech for Mission Zero participants. Any computer with a web browser and internet connection works for Mission Zero, because everything is done online.
We need young people to help name the Raspberry Pis we’re sending to space
Mission Zero participants follow our step-by-step instructions to create a simple program that takes a humidity reading on board the ISS and displays it for the astronauts — together with the participants’ own unique messages. And as part of their messages, they can vote for the name of the new hardware for the Astro Pi Challenge, hardware with Raspberry Pi computers at its heart.

The new Astro Pi hardware, which will travel up in a rocket to the ISS on 21 December, is so new that these special augmented computers don’t even have names yet. Participants in Astro Pi Mission Zero get to vote for a name inspired by our list of ten renowned European scientists. Their vote will be part of the message they send to space.

What do your young people want to say in space?
Your young people’s messages to the ISS astronauts can say anything they like (apart from swear words, of course). Maybe they want to send some encouraging words to the astronauts or tell them a joke. They can even design a cool pixel art image to show on the Astro Pi hardware’s display:

Whatever else they code for their Mission Zero entry, they’re supporting the astronauts with their important work on board the ISS. Since Mission Zero participants tell the Astro Pi hardware to read and display the humidity level inside the ISS, they provide helpful information for the astronauts as they go about their tasks.
Their own place in space history
After a participant’s Mission Zero code has run and their message has been shown in the ISS, we’ll send you a special certificate for them so you can commemorate their space mission.


The certificate will feature their name, the exact date and time their code ran, and a world map to mark the place on Earth above which the ISS was while their message was visible up there in space.
10 key things about Astro Pi Mission Zero
- It’s young people’s unique chance to be part of a real space mission
- Participation is free
- Participants send the ISS astronauts their own unique message
- This year only, participants can help name the two special Raspberry Pi computers that are travelling up to the ISS
- Mission Zero is open to young people up to age 19 who live in eligible countries (more about eligibility here)
- It’s a beginners’ coding activity with step-by-step instructions, available in 19 languages
- Completing the activity takes about one hour — at home, in the classroom, or in a Scouts or coding club session
- The activity can be done online in a web browser on any computer
- Participants will receive a special certificate to help celebrate their space mission
- Mission Zero is open until 18 March 2022
If you don’t want to let any young people in your life miss out on this amazing opportunity, sign up as their Mission Zero mentor today.
* The European Astro Pi Challenge is run as a collaboration by us at the Raspberry Pi Foundation and ESA Education. That’s why participants need to be from an ESA Member State, or from Slovenia, Canada, Latvia, Lithuania, or Malta, which have agreements with ESA.
If you live elsewhere, it’s possible to partner with Mission Zero mentors and young people in an eligible country. You can work together to support the young people to form international Mission Zero teams that write programs together.
If you live elsewhere and cannot partner with people in an eligible country, Mission Zero is still an awesome and inspiring project for your young people to try out coding. While these young people’s code unfortunately won’t run on the ISS, they will receive a certificate to mark their efforts.
The post Young people can name a piece of space history with Astro Pi Mission Zero appeared first on Raspberry Pi.