Attendee guide for the AWS Analytics track at AWS re:Invent 2021

Post Syndicated from Imtiaz Sayed original https://aws.amazon.com/blogs/big-data/attendee-guide-for-the-aws-analytics-track-at-aws-reinvent-2021/

AWS re:Invent is a learning conference hosted by Amazon Web Services (AWS) for the global cloud computing community. We’re super excited to join you at the 10th annual re:Invent to share the latest from AWS leaders and discover more ways to learn and build. Let’s celebrate this milestone, which will be offered in person in Las Vegas (November 29–December 3) and virtually (November 29–December 10). The health and safety of our customers and partners remains our top priority. You can find additional information on the health measures page. For details about the virtual format, check out the virtual section.

The AWS Analytics track at re:Invent offers sessions in various analytics disciplines delivered by AWS Analytics experts and AWS customers. The sessions vary from intermediate (200) through expert (400) levels, share new AWS innovations, discuss exciting customer experiences, and provide you opportunities to learn how to easily extract more out of your data in the most cost-effective and performant manner.

Keynotes

Adam Selipsky – CEO, Amazon Web Services – Keynote
Adam Selipsky, AWS CEO, takes the stage to share his insights and the latest news about AWS customers, products, and services including Analytics services announcements

Swami Sivasubramanian – Vice President, Amazon Machine Learning – Keynote
Join Swami Sivasubramanian, Vice President, Amazon Machine Learning, on an exploration of what it takes to put data in action with an end to end data strategy including the latest news on databases, analytics, and machine learning.

Leadership session

ANT214-L – Reinvent your business for the future with AWS Analytics
The next wave of digital transformation will be data-driven, and organizations will have to reinvent themselves using data to make decisions quickly and gain faster and deeper insights to serve their customers. In this session, Rahul Pathak, VP of AWS Analytics, addresses the current state of analytics on AWS, focusing on the latest service innovations. Learn how you can put your data to work with the best of both data lakes and purpose-built data stores. Also, discover how AWS can help you build new experiences and reimagine old processes with a modern data architecture on AWS.

Breakout sessions

re:Invent breakout sessions are lecture-style and 1 hour long. These sessions are delivered by AWS experts, customers, and partners, and typically include 10–15 minutes of Q&A at the end. For our virtual attendees, breakout sessions will be made available on-demand in the week after re:Invent.

ANT215 – Introduction to AWS Data Exchange for Amazon Redshift
AWS Data Exchange for Amazon Redshift allows you to combine third-party data found on AWS Data Exchange with your own data from your Amazon Redshift cloud data warehouse, requiring no ETL and accelerating time to value. AWS Data Exchange allows an organization’s line of business to immediately access and analyze a provider’s data once access has been granted, eliminating the need to depend on IT teams to provision the necessary data. Data providers can license access to their Amazon Redshift cloud data warehouses or allow subscribers to download files from Amazon S3 with no heavy lifting.

ANT203 – What’s new in Amazon OpenSearch Service
Amazon OpenSearch Service (successor to Amazon Elasticsearch Service), is a fully managed service that makes it easy for you to deploy, secure, and run OpenSearch and Apache 2.0-licensed Elasticsearch clusters cost-effectively at scale. The OpenSearch project is a community-driven, open-source fork of Elasticsearch and Kibana. This session discusses customer use cases, best practices, and newly launched features. In addition, it discusses how AWS has made the move to OpenSearch seamless and what to expect going forward.

ANT201 – What’s new with Amazon Redshift
Join this session to hear about important new features of Amazon Redshift. Learn about the architectural evolution of Amazon Redshift and how it uses machine learning to create a self-optimizing data warehouse. Additionally, explore how Amazon Redshift integrates with other popular AWS services.

ANT202 – What’s new with Amazon EMR
Amazon EMR simplifies running open-source data processing applications such as Apache Spark, Apache Hive, and Presto on AWS, enabling users to run ETL, ML, real-time processing, data science, and low-latency SQL at petabyte scale. This session covers the latest on Amazon EMR and how Amazon EMR runtimes provide excellent performance to open-source versions of such engines without breaking API compatibility. Discover how Amazon EMR Studio and Amazon SageMaker Studio simplify building applications and pipelines for data scientists and engineers. Learn how to add support for transactions and real-time streams in data lakes with Apache Hudi and Apache Iceberg. See how to enforce fine-grained access control over data in Amazon S3.

ANT318 – Data lakes: Easily build, secure, and share data with AWS Lake Formation
Organizations are breaking down data silos and building petabyte-scale data lakes on AWS to democratize access to thousands of end-users. In this session, learn about recent innovations in AWS Lake Formation that make it easy to build, secure, and manage your data lakes. Hear how an AWS customer built their data mesh architecture using Lake Formation to share data across their lines of business and inform data-driven decisions.

ANT303 – Democratizing data for self-service analytics and ML
Access to all your data for fast analytics at scale is foundational for 360-degree projects involving data engineers, database developers, data analysts, data scientists, BI professionals, and the line of business. In this session, learn how easy-to-use ML can help your organization imagine new products or services, transform your customer experiences, streamline your business operations, and improve your decision-making. A secure, integrated platform that’s easy to use and supports nonproprietary data formats can improve collaboration through data sharing and can also improve customer responsiveness. Learn how AWS developer tools, including the Data API, and native support for semi-structured data using standard SQL commands can improve software time to market.

ANT316 – How Coinbase uses Amazon MSK as an event store for applications
In this session, learn how focusing on security, availability, and customer obsession has translated into operational excellence and product innovations with Amazon MSK, a managed service for Apache Kafka. This session features cryptocurrency exchange company Coinbase’s experience managing streaming events and analyzing billions of daily cryptocurrency transactions with Amazon MSK. Dive into Coinbase’s event streaming architecture to learn how it leverages Amazon MSK as an enterprise event bus to ingest and analyze a huge scale of events from users, applications, databases, and cryptocurrency sources across products.

ANT310 – How VMware uses Amazon Kinesis to keep customers safe from cyberattacks
Streaming data with Amazon Kinesis Data Streams is an easy and cost-effective way to capture data from hundreds of thousands of sources and make it available for analysis in milliseconds. VMware Carbon Black’s cloud-native intelligent threat detection system uses Kinesis Data Streams and other AWS services. Join this session to dive deep into how VMware Carbon Black, a leader in cybersecurity, processes trillions of events per day to uncover concerning behavioral patterns and detect and prevent cybersecurity risks. VMware Carbon Black shares lessons learned while scaling its multi-tenant streaming data infrastructure and best practices for cost-effective data processing in real time.

ANT317 – Serverless data integration with AWS Glue
The first step in an analytics or machine learning project is to prepare your data to obtain quality results. AWS Glue is a serverless data integration service that makes data preparation simpler, faster, and cheaper. In this session, learn about the latest innovations in AWS Glue and hear how an AWS customer uses AWS Glue to enable self-service data preparation across their organization.

ANT307 – What’s new with Amazon Athena
Amazon Athena is a highly scalable analytics service that makes it easy to analyze data in Amazon S3 and other data stores. Athena is serverless, so there is no infrastructure to manage, and you pay only for the queries that you run. This session offers a deep dive into the service, customer use cases, best practices, newly launched features, and what is next for Athena.

ANT401 – Deep dive: Accelerating Apache Spark with Amazon EMR
Running Apache Spark workloads on Amazon EMR is becoming faster and more cost-effective. In this session, explore the features that Amazon EMR offers to improve performance and reduce the cost of operating big data analytics workloads. In this session, dive deep into the architectures and design patterns that organizations have employed when migrating their open-source analytics applications to Amazon EMR, and explore features such as the performance-optimized Amazon EMR runtime for Apache Spark, Graviton2 instance support, and more.

Chalk talks

Chalk talks are highly interactive sessions with a small audience. Experts lead you through problems and solutions on a digital whiteboard as the discussion unfolds. Each begins with a short lecture (10–15 minutes) delivered by an AWS expert, followed by a Q&A session of 45–50 minutes with the audience.

ANT322 – Amazon EMR on EKS
Is your organization considering a move to Kubernetes and Amazon EKS and wondering how to run Apache Spark applications on Amazon EKS? In this chalk talk, learn how Amazon EMR on EKS simplifies running Spark applications on Amazon EKS. Learn about the benefits of moving to containerization and moving to Amazon EKS. Also, dive into architectures and best practices and learn from customers who are using Spark on Amazon EKS at 3,000 or more nodes.

ANT308 – Building analytics at scale with Amazon Athena
Organizations want analytics solutions that are easy to set up and maintain while delivering the powerful analytics required to succeed with a modern data strategy. This chalk talk covers how you can use Amazon Athena to build powerful capabilities, like real-time fraud detection, and enable data scientists to build and train ML models across all of your data. Learn how Athena offers this capability with no infrastructure for you to manage and offers simple centralized governance and security.

ANT320 – Building data lakes and sharing data with AWS Lake Formation
Building data lakes and sharing data across your organization can be challenging. In this chalk talk, learn how to use AWS Lake Formation to simplify building, securing, and managing your data lakes. Discover best practices for reliably building your data lakes and sharing this data across your lines of business and thousands of users.

ANT301 – Concurrency and scalability strategies with Amazon Redshift
Amazon Redshift provides multiple features to help you deliver consistent performance, even as workloads grow and vary. Learn how to use concurrency scaling, data sharing, and more on their own and together to manage your workloads. In this chalk talk, you have the opportunity to ask Amazon Redshift service team experts about your unique situation.

ANT319 – Data preparation: Building scalable ETL pipelines with AWS Glue
Do you have questions about how AWS Glue works? Join this chalk talk to learn more about the best practices for building data integration pipelines at scale. Learn how to use the different components of AWS Glue to discover, catalog, and prepare your data for machine learning and analytics. Also learn best practices for optimizing your Apache Spark scripts.

ANT306 – Modernize your log analytics solution with Amazon OpenSearch Service
Amazon OpenSearch Service (successor to Amazon Elasticsearch Service) is a fully managed service that makes it easy for you to deploy, secure, and run OpenSearch and Apache 2.0-licensed Elasticsearch clusters cost-effectively at scale. In this chalk talk, learn how to ingest data into Amazon OpenSearch Service from Amazon ECS using FireLens for logging and AWS Distro for OpenTelemetry for distributed tracing. Discover how to leverage OpenSearch Dashboards to analyze your application health and performance.

ANT302 – New use cases for Amazon Redshift
Amazon Redshift continuous innovations provide cloud data warehousing capabilities that deliver price performance leadership and ease of use with scale. Learn how Amazon Redshift features, built on the reliability and performance this service is known for today, can help you empower developers with automated capabilities, reduce time to business insights, or integrate across data types, AWS, and third-party services. Join this chalk talk to explore new features and learn from the experts about ways that you can use them.

ANT314 – Process streaming data using Amazon MSK & Amazon Kinesis Data Analytics
As data streaming architectures evolve, it’s vital to continuously improve your streaming data pipelines and take advantage of new features and updates to streaming services. With fully managed Apache Kafka and Apache Flink services, AWS makes it easy for developers to run streaming applications without managing infrastructure. In this chalk talk, learn how to use Amazon MSK, Amazon Kinesis Data Analytics for Apache Flink, and AWS Lambda to build serverless streaming data pipelines. Discover best practices for application operations and reliability, and see how AWS managed services can help you avoid potential challenges.

ANT321 – Set up capital markets analytics, integrated with your data, using FinSpace
Are you a financial services firm such as a hedge fund, sell side bank, or asset manager with quantitative financial analysts using Jupyter notebooks to perform financial analysis such as time series, portfolio, or risk analytics? Do your analysts require secure access to data across your enterprise? Do your analysts need scalable Apache Spark to process petabytes of data such as trade and quote data? In this chalk talk, learn how Amazon FinSpace provides a managed research notebook environment with the security controls you need and the ability to integrate with data from internal systems and third-party data feeds.

ANT309 – Simplifying Amazon S3 analytics with Amazon Kinesis Data Firehose
Join this chalk talk to learn how Amazon Kinesis Data Firehose enables you to reliably load your streaming data into data lakes, data warehouses, and analytics services built on AWS, with AWS Partners, and using open-source tools. This talk includes a demonstration showcasing how Kinesis Data Firehose easily captures, transforms, and delivers streaming data to a data lake built on Amazon S3. Dive deep into reducing the cost of Amazon S3 analytics queries and simplifying Amazon S3 analytics workflows using Kinesis Data Firehose, Apache Parquet, and dynamic partitioning.

ANT315 – Using Amazon Redshift to directly query third-party data on AWS
In this chalk talk, learn how companies spanning multiple industries are using AWS Data Exchange and Amazon Redshift to find, subscribe to, and immediately access and analyze third-party datasets without having to set up data ingestion pipelines.

ANT405 – Enforcing data access control on Amazon EMR
Organizations often want to enforce fine-grained data access controls across data lakes throughout a company. In this chalk talk, learn about what these controls are and how you can you enforce them when using Apache Spark, Presto, and Hive on Amazon EMR. Discover various ways of authenticating users and how each of these authentication mechanisms impact authorization policies. Lastly, review the use of IAM roles, AWS Lake Formation, and Apache Ranger as tools to enforce fine-grained data access controls, and learn when you should use which. This chalk talk covers the basic tools required to enforce fine-grained authorization and how to use them.

ANT402 – Sizing Amazon OpenSearch Service domains
Whether you’re searching your product catalog or storing your logs for infrastructure monitoring, application performance monitoring, or observability, Amazon OpenSearch Service is the ideal tool. Its distributed search engine scales to support high-volume ingest and query rates. How you scale affects the performance of your workload and your cost running that workload, so it’s important to get it right. How do you find your way through all of the configuration options to create an optimal cluster? Come to this chalk talk with your workload description—source data, velocity, query types, and quantity—and we’ll help you get sized right.

Builders’ sessions

Builders’ sessions are small group sessions led by an AWS expert who demonstrates and builds a solution on AWS. Each builders’ session is an interactive, hour-long engagement. It begins with a short explanation followed by a practical walkthrough of the demonstration. When the demonstration is complete, feel free to use the shared artifacts to build on your own.

ANT311 – Build a data mesh with AWS Lake Formation and AWS Glue
In this builders’ session, learn how to build a data mesh design pattern using AWS Glue and AWS Lake Formation that supports a proliferation of data producers and data consumers with consistent, centralized governance. The design approach facilitates best practices for building scalable data platforms, ubiquitous data sharing, and centralized governance, and enables self-service analytics on AWS.

ANT312 – Building a secure, modern data architecture with AWS analytics
In this builders’ session, learn how to build a secure modern data architecture to combine various disparate data sources using AWS Lake Formation, Amazon AppFlow, AWS Database Migration Service (AWS DMS), and AWS Glue. Gain an understanding of key architecture tenets for ingestion patterns, design factors for securely storing data, how to apply granular security policies, data cataloging, and transformation for consumption.

ANT313 – Security essentials with Amazon MSK
Organizations have unique security and compliance mandates. A well-informed understanding of authentication features is critical to making the right choice for an organization’s security posture. Amazon MSK provides several authentication options to control access to Apache Kafka clusters. In this builders’ session, explore the available Amazon MSK authentication mechanisms, industry best practices, and recommendations for running secure Amazon MSK clusters.

Workshops

Workshops are 2-hour interactive learning sessions where you work in small group teams to solve problems using AWS services. Each workshop starts with a short lecture (10–15 minutes) by the main speaker, and the rest of the time is spent working as a group. Come prepared with your laptop and a willingness to learn!

ANT205- Create and train ML models with ease using Amazon Redshift ML
Amazon Redshift is the most widely deployed data warehouse and is the cornerstone of AWS data lake strategy. Experience how quickly you can build your data warehouse with Amazon Redshift and gain insights using the integrated SQL query editor. In this workshop, data analysts and data scientists can easily train machine learning (ML) models using SQL with Amazon Redshift ML, with zero data movement required. Data engineers can learn how the data API simplifies access and allows you to easily integrate applications with Amazon Redshift and build event-driven applications systems.

ANT204 – Dive into Amazon OpenSearch Service
OpenSearch is an Apache 2.0-licensed tool that provides you with rich, relevant search results for your data. Paired with OpenSearch Dashboards, you can analyze and visualize your log data. In this workshop, discover how Amazon OpenSearch Service enables you to focus on your search or monitoring problem and not worry about managing your infrastructure. Explore the console and deploy an OpenSearch Service domain in Amazon VPC, use OpenSearch search APIs, and work with OpenSearch Dashboards to build out visualizations. Come see how Amazon OpenSearch Service can help you solve your search and analytics needs.

ANT305 – Data science and DataOps workflows with Amazon EMR Studio
Have you ever felt that building data science applications, data engineering pipelines, or machine learning models was hard with Apache Spark on Amazon EMR? Join this workshop to learn how Amazon EMR Studio makes it simple to do these things. The workshop includes a walkthrough of a couple of examples with sample data so you can see how collaboration works with Amazon EMR Studio.

 ANT404 – Event detection using Amazon MSK and Amazon Kinesis Data Analytics
In this workshop, you take on the role of an acting technology manager for a Las Vegas casino. Your assignment is to create a stream processing application that identifies customers entering your casino who have gambled heavily in the past and then sends you a text message when big spenders sit down at a gambling table. To do this, use Amazon MSK to capture events, Amazon Kinesis Data Analytics Studio to detect events of interest, and AWS Lambda with Amazon SNS to send you an email for any events.

ANT403 – Powering observability with Amazon OpenSearch Service
Amazon OpenSearch Service’s Trace Analytics functionality allows you to go beyond simple monitoring to understand not just what events are happening, but why they are happening. In this workshop, learn how to instrument, collect, and analyze metrics, traces, and log data all the way from user front ends to service backends and everything in between. Put this together with Amazon OpenSearch Service, AWS Distro for OpenTelemetry, and Data Prepper.

AWS Analytics Kiosk

Join us at the AWS Analytics Kiosk in the AWS Village at the Expo. Dive deep into AWS Analytics with AWS subject matter experts, see the latest demos, ask questions, or just drop by to chat with your peers.

AWS Analytics Meet-and-Greet Cocktail Hour

Date: Tuesday, November 30, 8:00 PM – 9:00 PM PST

Location: Canaletto Ristorante Veneto (The Venetian), Las Vegas, NV

Socialize with the AWS Analytics technical community. Join us and network over hors d’oeuvres and drinks with AWS leaders and specialists.

Looking forward to seeing you there!


About the Authors

Taz Sayed is the world-wide Analytics Tech Leader at AWS. He enjoys engaging with the wider data analytics community, and designing well-architected solutions for AWS customers.

Navnit Shukla is an Analytics Specialist Solution Architect with AWS. He is passionate about helping customers uncover insights from their data. He has been building solutions to help organizations make data-driven decisions.
Metasploit Wrap-Up

Post Syndicated from Erin Bleiweiss original https://blog.rapid7.com/2021/11/19/metasploit-wrap-up-139/

Azure Active Directory login scanner module

Metasploit Wrap-Up

Community contributor k0pak4 added a new login scanner module for Azure Active Directory. This module exploits a vulnerable authentication endpoint in order to enumerate usernames without generating log events. The error code returned by the endpoint can be used to discover the validity of usernames in the target Azure tenant. If a tenant’s domain is known, the module can also be used to brute-force login credentials by providing a list of usernames and passwords.

Aerohive NetConfig RCE module

Also new this week, community contributor Erik Wynter added an exploit module for Aerohive NetConfig, versions 10.0r8a build-242466 and below. These versions are vulnerable to local file inclusion and log poisoning, as they rely on a version of PHP 5 that is affected by string truncation attacks. This allows users to achieve unauthenticated remote code execution as root on vulnerable systems.

2021 Metasploit community CTF

In case you missed the announcement earlier this week, the 2021 edition of the Metasploit community CTF is set to kick off two weeks from today! Registration starts Monday, November 22 for up to 750 teams, with capacity for an additional 250 teams once play starts on Friday, December 3. Many thanks to TryHackMe for sponsoring the event and providing some great prizes. Find some teammates and mark your calendars, because this year’s event should be a great challenge and a lot of fun for both beginners and CTF veterans!

New module content (4)

  • Jetty WEB-INF File Disclosure by Mayank Deshmukh, cangqingzhe, charlesk40, h00die, and lachlan roberts, which exploits CVE-2021-28164 – This adds an auxiliary module that retrieves sensitive files from Jetty versions 9.4.37.v20210219, 9.4.38.v20210224, 9.4.37-9.4.42, 10.0.1-10.0.5, and 11.0.1-11.0.5 . Protected resources behind the WEB-INF path can be accessed due to servlet implementations improperly handling URIs containing certain encoded characters.
  • Microsoft Azure Active Directory Login Enumeration by Matthew Dunn – k0pak4 – This adds an auxiliary scanner module that leverages Azure Active Directory authentication flaw to enumerate usernames without generating log events. The module also supports brute-forcing passwords against this tenant.
  • Aerohive NetConfig 10.0r8a LFI and log poisoning to RCE by Erik Wynter and Erik de Jong, which exploits CVE-2020-16152 – This change adds a new module to exploit LFI and log poisoning vulnerabilities (CVE-2020-16152) in Aerohive NetConfig, version 10.0r8a build-242466 and older in order to achieve unauthenticated remote code execution as the root user.
  • Sitecore Experience Platform (XP) PreAuth Deserialization RCE by AssetNote and gwillcox-r7, which exploits CVE-2021-42237 – This adds an exploit for CVE-2021-42237 which is an unauthenticated RCE within the Sitecore Experience Platform. The vulnerability is due to the deserialization of untrusted data submitted by the attacker.

Enhancements and features

  • #15796 from zeroSteiner – Support for pivoted SSL server connections as used by capture modules and listeners has been added to Metasploit. The support works for both Meterpreter sessions and SSH sessions.
  • #15851 from smashery – Update several modules and core libraries so that now when sending HTTP requests that include user agents, the user agents are modernized, and are randomized at msfconsole start time. Users can also now request Rex to generate a random user agent from one of the ones in the User Agent pool should they need a random user agent for a particular module.
  • #15862 from smashery – Updates have been made to Linux Meterpreter libraries to support expanding environment variables in several different commands. This should provide users with a smoother experience when using environment variables in commands such as cd, ls, download, upload, mkdir and similar commands.
  • #15867 from h00die – The example modules have been updated to conform to current RuboCop rules and to better reflect recent changes in the Metasploit Framework coding standards, as well as to better showcase various features that may be needed when developing exploits.
  • #15878 from smashery – This fixes an issue whereby tab-completing a remote folder in Meterpreter would append a space onto the end. This change resolves that by not appending the space if we’re potentially in the middle of a tab completion journey, and adding a slash if we’ve completed a directory, providing a smoother tab completion experience for users.

Bugs fixed

  • #15875 from smashery – This fixes an issue with the reverse Bash command shell payloads where they would not work outside of the context of bash.
  • #15879 from jmartin-r7 – Updates batch scanner modules to no longer crash when being able to unable to correctly calculate a scanner thread’s batch size

Get it

As always, you can update to the latest Metasploit Framework with msfupdate
and you can get more details on the changes since the last blog post from
GitHub:

If you are a git user, you can clone the Metasploit Framework repo (master branch) for the latest.
To install fresh without using git, you can use the open-source-only Nightly Installers or the
binary installers (which also include the commercial edition).

Send personalized email reports with Amazon QuickSight

Post Syndicated from Sahitya Pandiri original https://aws.amazon.com/blogs/big-data/send-personalized-email-reports-with-amazon-quicksight/

Amazon QuickSight now supports personalization of email reports by user, which allows you to send customized snapshots of data in either PDF or image formats. This allows you to create a single dashboard that you can configure to load with different defaults for each user, providing a customized view of the dashboard in both email and interactive formats. In this post, we walk you through how to roll out customized daily, weekly, or monthly reports for thousands of users – without any servers to set up or manage.

Solution overview

QuickSight supports personalized emails via row-level or column-level security, or dynamic defaults for parameters. You can use row-level or column-level security when you want to restrict data available on dashboards by user, and only present data that they are authorized to see. Dynamic defaults, on the other hand, allow users to access all the data but make sure that each user gets a personalized view without data restrictions if they wish to browse other views of the data.

When used with emails, both models allow you to provide personalized email reports for each user. Dynamic defaults, however, also allow you to handle conditional rendering of visuals using parameter settings that allow you to personalize dashboards and email reports by the user by showing and hiding visuals as needed.

Let’s start with the following example dashboard, which shows sales insights and trends across different segments, categories, and states for any given date.

This dashboard is built with the new free-form layout that allows you to build pixel-perfect dashboards. You can define visual placement with X and Y coordinates, define height and width of visuals at the pixel level, and overlay visuals if needed. In addition to flexible visual placements, you can also set background, borders on visuals and filter controls. To learn more about building dashboards with free-form layouts, see Create stunning, pixel perfect dashboards with the new free-form layout mode in Amazon QuickSight.

Personalizing your dashboard

You can further customize this view for your readers so it always shows insights relevant to them on the dashboard, email reports, and the PDF attached to the email.

To personalize the dashboard, create a data table with dynamic default rules similar to the following table. In this table, you need to have the following columns: UserID for QuickSight usernames of dashboard readers, followed by one column each for parameters to set defaults to. For example, after we apply the following dynamic defaults dataset to our sample dashboard, when Ben Brown with username [email protected] accesses the dashboard, it shows business metrics for the Strategic segment within Aluminium category and Washington state.

To apply this dynamic default table to the dashboard, complete the following steps:

  1. Create a dataset with your dynamic default table on QuickSight.

This can be a SPICE or direct query dataset depending on where the rules are and how frequently the rules are updated. If rules are maintained in your backend source tables and updated often, create a direct query dataset. If the rules are uploaded from a flat file or are maintained in your backend source tables but not updated often, you can keep them in SPICE and schedule a refresh if needed.

  1. Add the dynamic default dataset to the analysis.
  2. Navigate to the analysis you want to set default rules on.
  3. In the navigation pane, choose Parameters.
  4. Choose the parameter you want to set defaults on and choose Set a dynamic default.
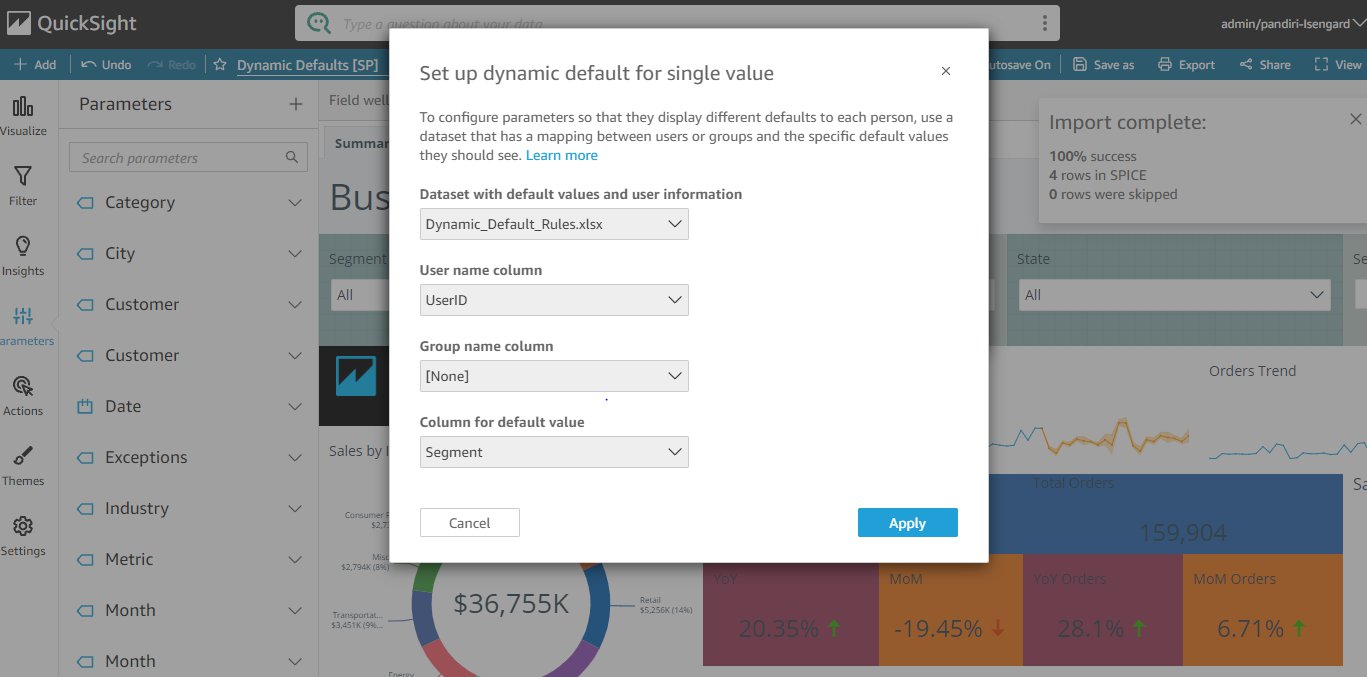
  5. Configure dynamic defaults by choosing the rules dataset, and mapping the user name, group name, and default columns to those from the dataset.

You can set dynamic defaults for individual users and also user groups.

  1. Repeat these steps for all parameters you want to set dynamic defaults on.

You can also add these parameters within titles and subtitles for a personalized view so readers know what fields the dashboard is filtered by.

Show and hide visuals

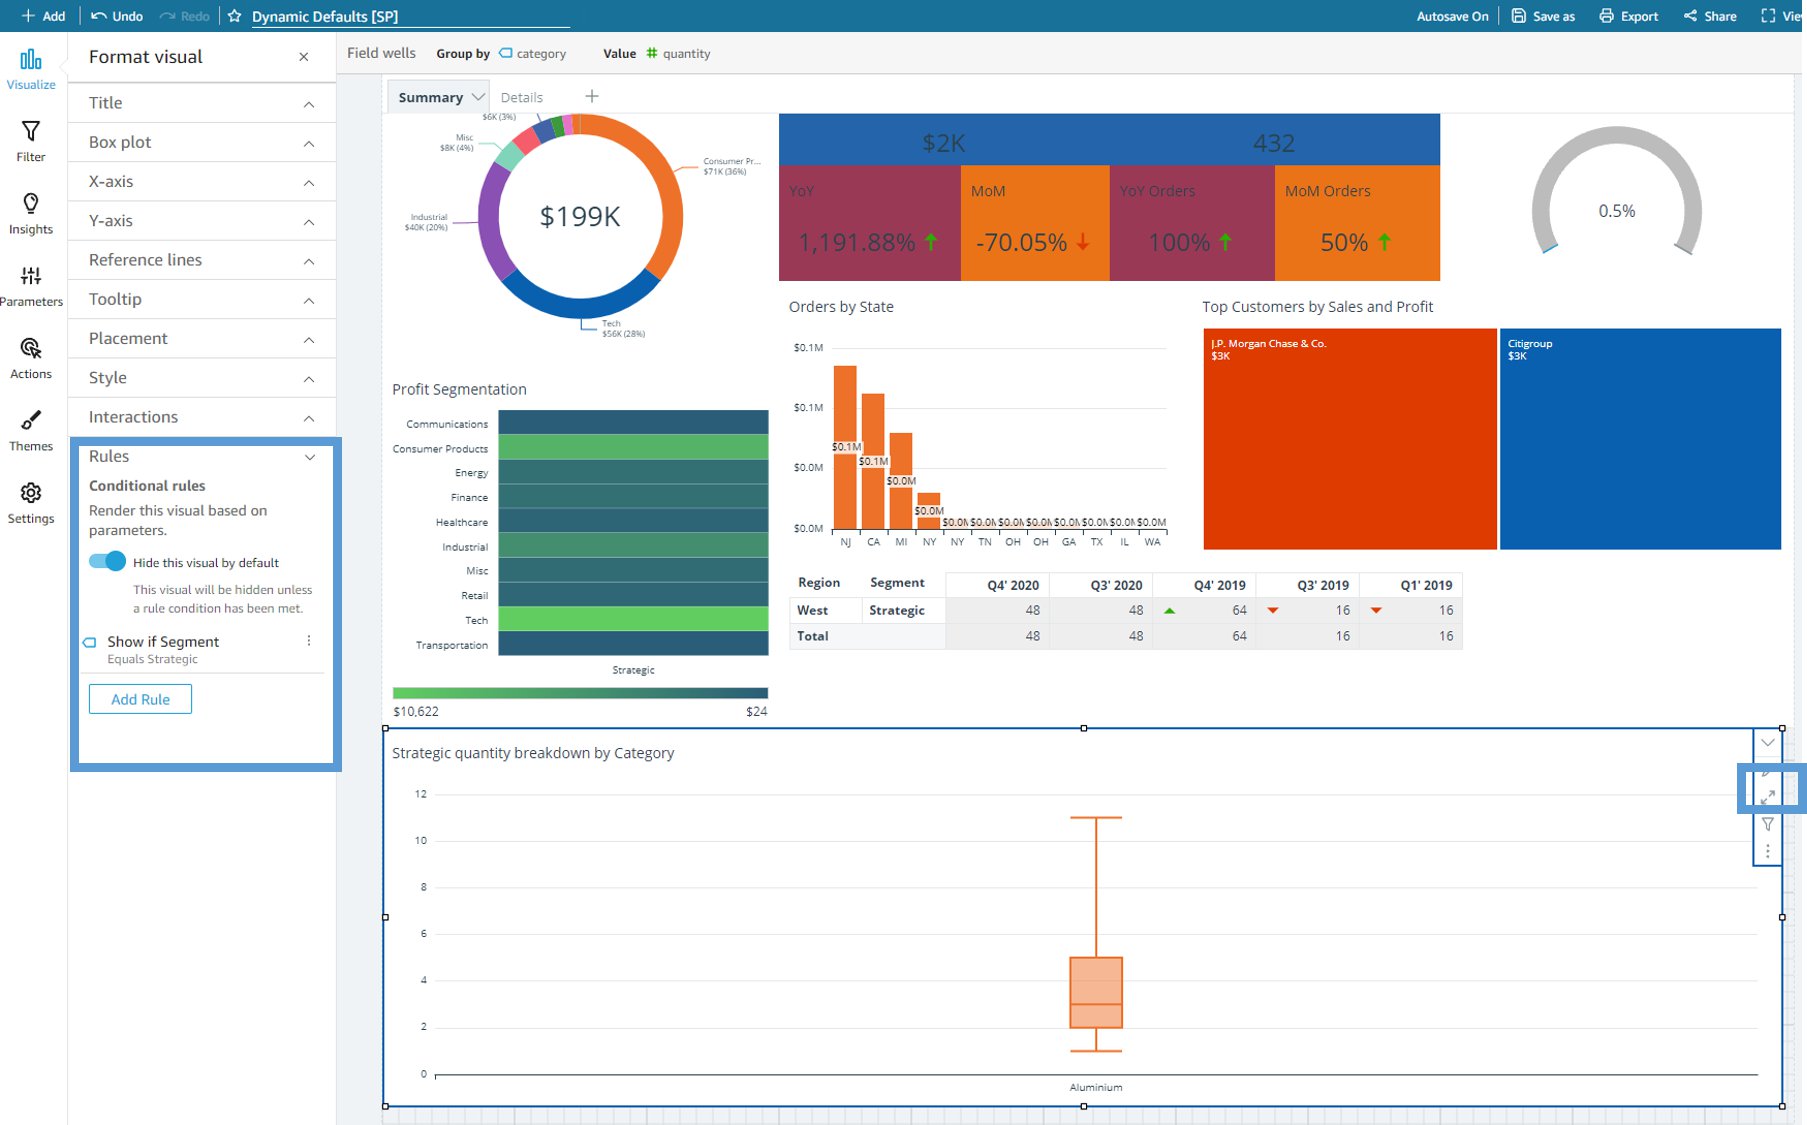
Additionally, you can conditionally show and hide visuals based on parameter values. You can use this in many creative ways, such as changing the visual type based on the parameter selected. For example, selecting Strategic as the segment could show a box plot of order quantity range grouped by Category. If you set the segment to SMB, you can replace the box plot with a different chart type. To conditionally show and hide visuals, complete the following steps:

  1. Create the visual you want to conditionally show and hide on the analysis.
  2. Click the pencil icon to edit the visual’s settings.
  3. Expand Rules and turn Hide this visual by default on.

In the following dashboard, the box plot is hidden by default, and is configured to show only when the segment parameter is set to Strategic.

  1. Similarly, create a scatter plot and configure the dashboard to hide this visual by default and only show when the segment parameter is set to SMB.
  2. Overlap this visual with the box plot visual so that either visual shows within this placement depending on the segment selected.

Publish and schedule email reports

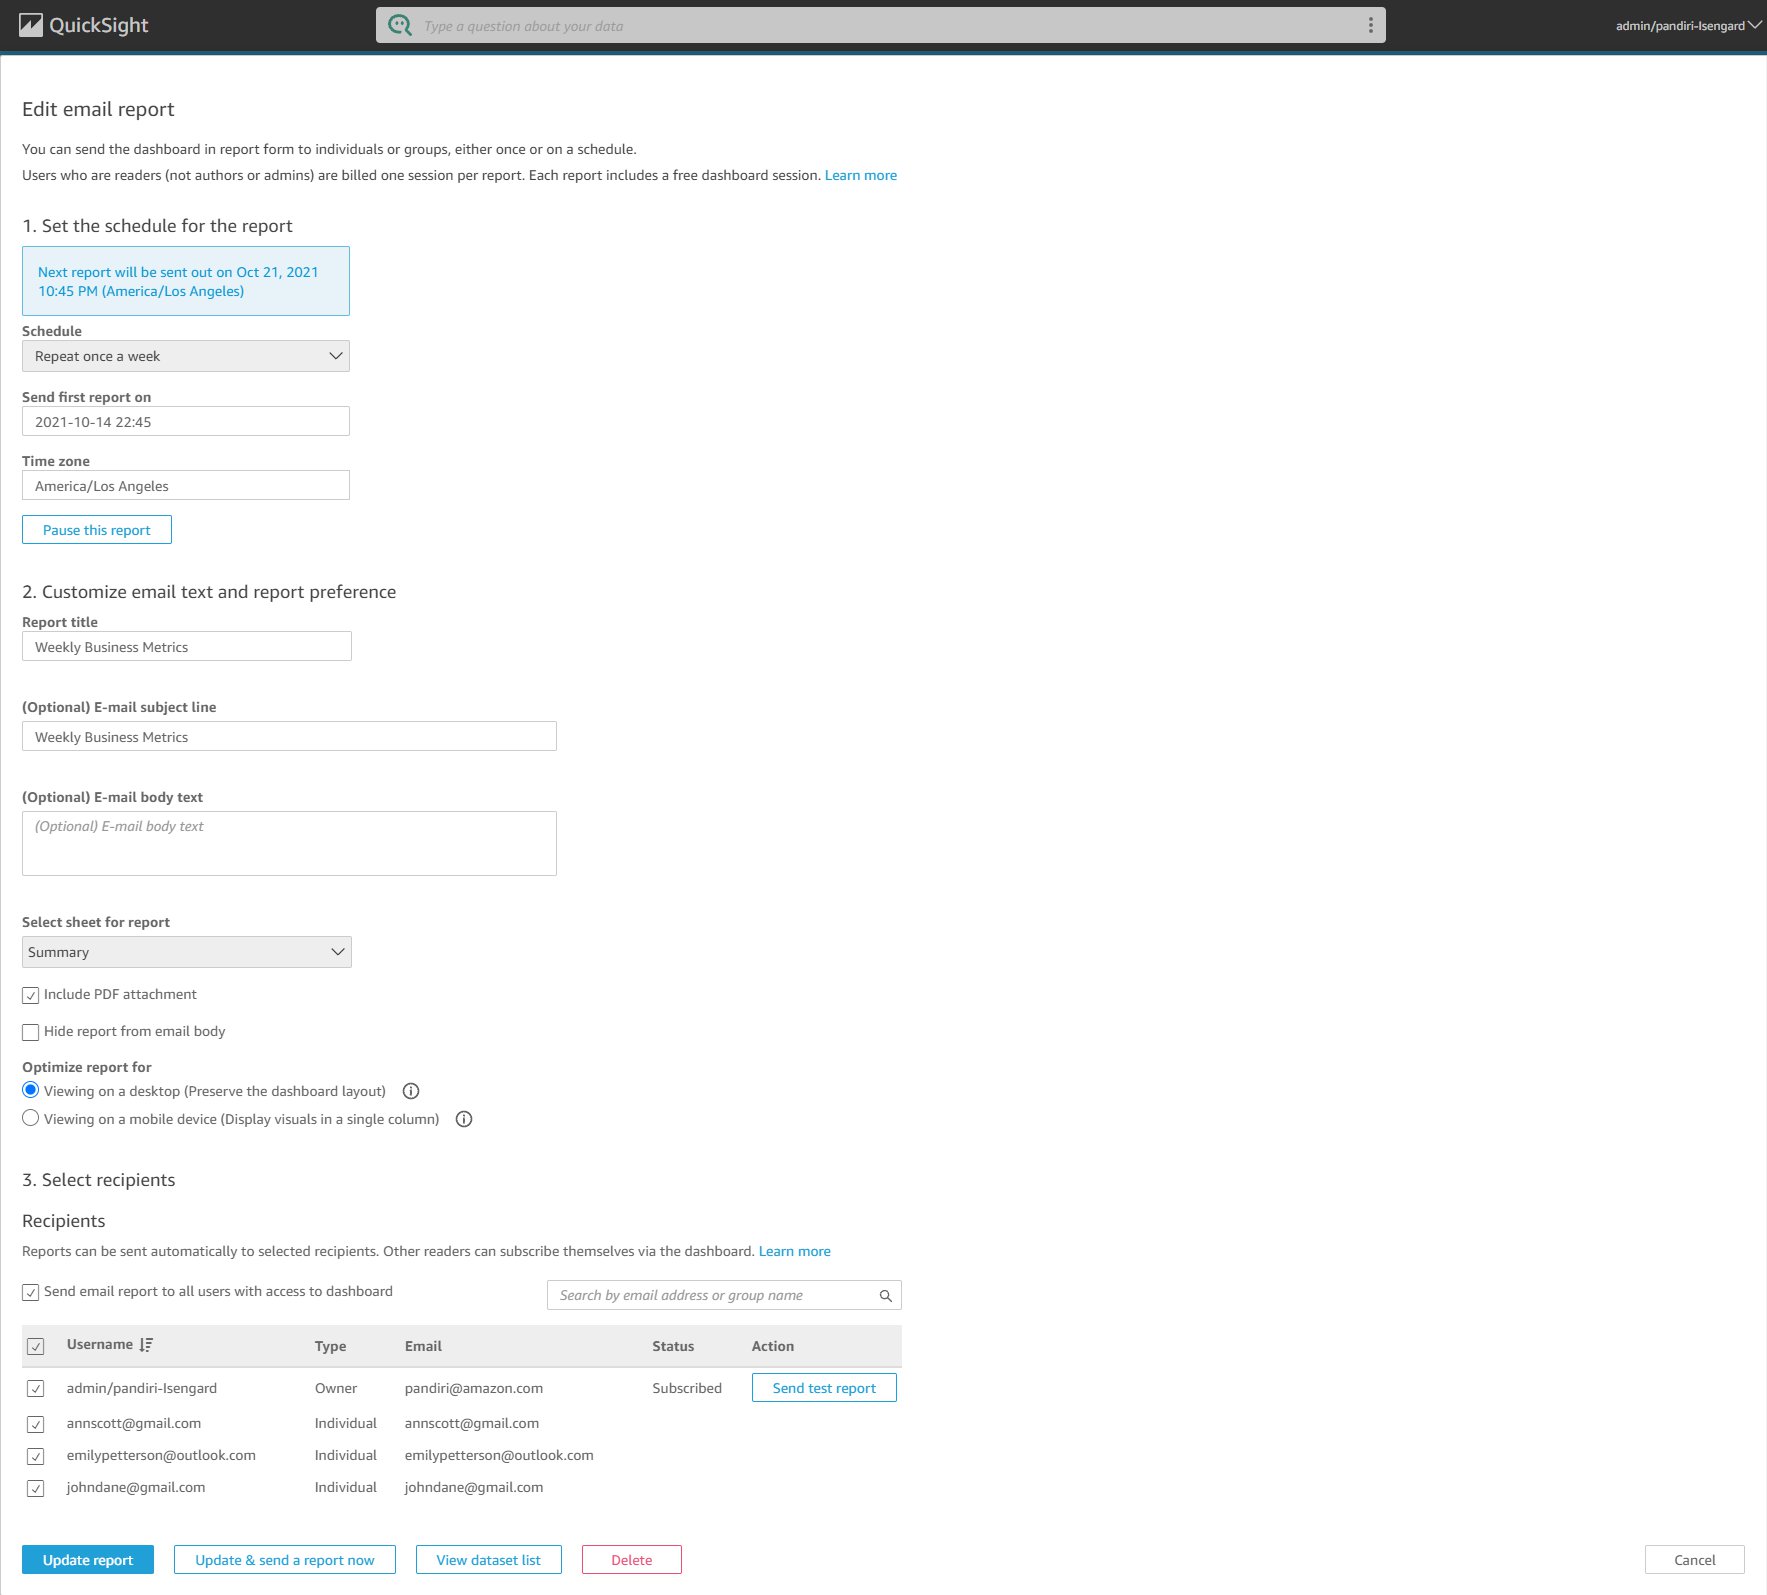
Finally, publish the dashboard and share with all your readers, and schedule an email report and also configure to attach dashboard PDF to the report.

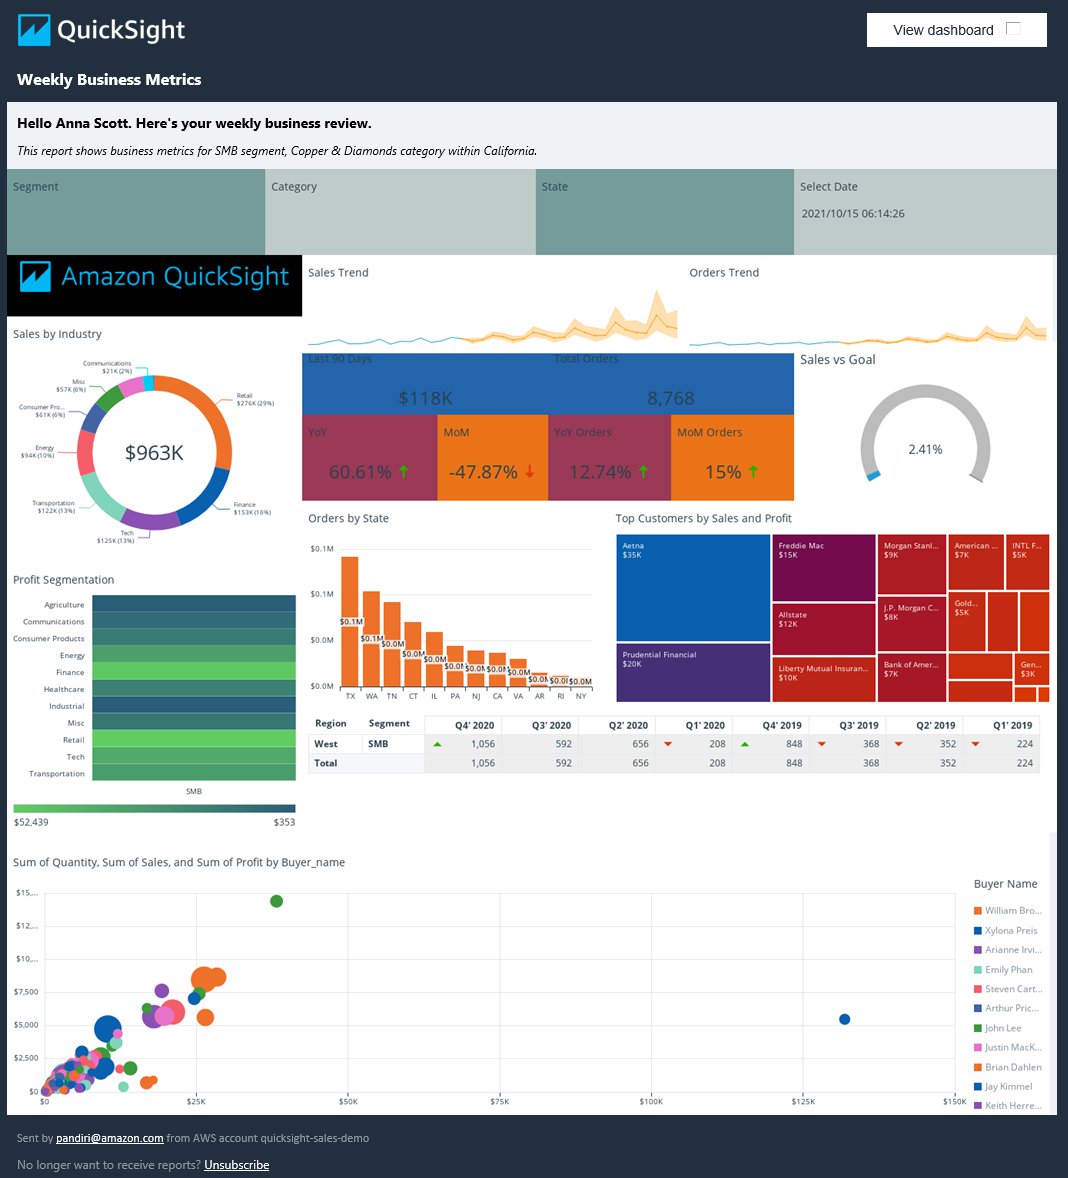
Readers now receive different views of the same dashboard, personalized to them, and showing metrics on the business sectors they care about.

For our example dashboard, Ben Brown receives an email report with business metrics for the Strategic segment and Aluminum category within Washington.

Anna Scott receives an email report of the same dashboard with for the SMB segment, Copper & Diamond category, and California state.

Conclusion

With the support for dynamic defaults on email reports, free form layout, and condition rendering of visuals, QuickSight allows you to build and deliver custom dashboards with personalized insights with end-users, directly to their email inboxes.

Learn more about other core capabilities such as Natural Language Querying with QuickSight Q and Embedded Analytics here.


About the Author

Sahitya Pandiri is a technical program manager with Amazon Web Services.

Improve Amazon Athena query performance using AWS Glue Data Catalog partition indexes

Post Syndicated from Noritaka Sekiyama original https://aws.amazon.com/blogs/big-data/improve-amazon-athena-query-performance-using-aws-glue-data-catalog-partition-indexes/

The AWS Glue Data Catalog provides partition indexes to accelerate queries on highly partitioned tables. In the post Improve query performance using AWS Glue partition indexes, we demonstrated how partition indexes reduce the time it takes to fetch partition information during the planning phase of queries run on Amazon EMR, Amazon Redshift Spectrum, and AWS Glue extract, transform, and load (ETL) jobs.

We’re pleased to announce Amazon Athena support for AWS Glue Data Catalog partition indexes. You can use the same indexes configured for Amazon EMR, Redshift Spectrum, and AWS Glue ETL jobs with Athena to reduce query planning times for highly partitioned tables, which is common in most data lakes on Amazon Simple Storage Service (Amazon S3).

In this post, we describe how to set up partition indexes and perform a few sample queries to demonstrate the performance improvement on Athena queries.

Set up resources with AWS CloudFormation

To help you get started quickly, we provide an AWS CloudFormation template, the same template we used in a previous post. You can review and customize it to suit your needs. Some of the resources this stack deploys incur costs when in use.

The CloudFormation template generates the following resources:

If you’re using AWS Lake Formation permissions, you need to make sure that the IAM user or role running AWS CloudFormation has the required permissions to create a database on the AWS Glue Data Catalog.

The tables created by the CloudFormation template use sample data located in an S3 public bucket. The data is partitioned by the columns year, month, day, and hour. There are 367,920 partition folders in total, and each folder has a single file in JSON format that contains an event similar to the following:

{
  "id": "95c4c9a7-4718-4031-9e79-b56b72220fbc",
  "value": 464.22130592811703
}

To create your resources, complete the following steps:

  1. Sign in to the AWS CloudFormation console.
  2. Choose Launch Stack:
  3. Choose Next.
  4. For DatabaseName, leave as the default.
  5. Choose Next.
  6. On the next page, choose Next.
  7. Review the details on the final page and select I acknowledge that AWS CloudFormation might create IAM resources.
  8. Choose Create.

Stack creation can take up to 5 minutes. When the stack is complete, you have two Data Catalog tables: table_with_index and table_without_index. Both tables point to the same S3 bucket, as mentioned previously, which holds data for more than 42 years (1980–2021) in 367,920 partitions. Each partition folder includes a data.json file containing the event data. In the following sections, we demonstrate how the partition indexes improve query performance with these tables using an example that represents large datasets in a data lake.

Set up partition indexes

You can create up to three partition indexes per table for new and existing tables. If you want to create a new table with partition indexes, you can include a list of PartitionIndex objects with the CreateTable API call. To add a partition index to an existing table, use the CreatePartitionIndex API call. You can also perform these actions from the AWS Glue console.

Let’s configure a new partition index for the table table_with_index we created with the CloudFormation template.

  1. On the AWS Glue console, choose Tables.
  2. Choose the table table_with_index.
  3. Choose Partitions and indices.
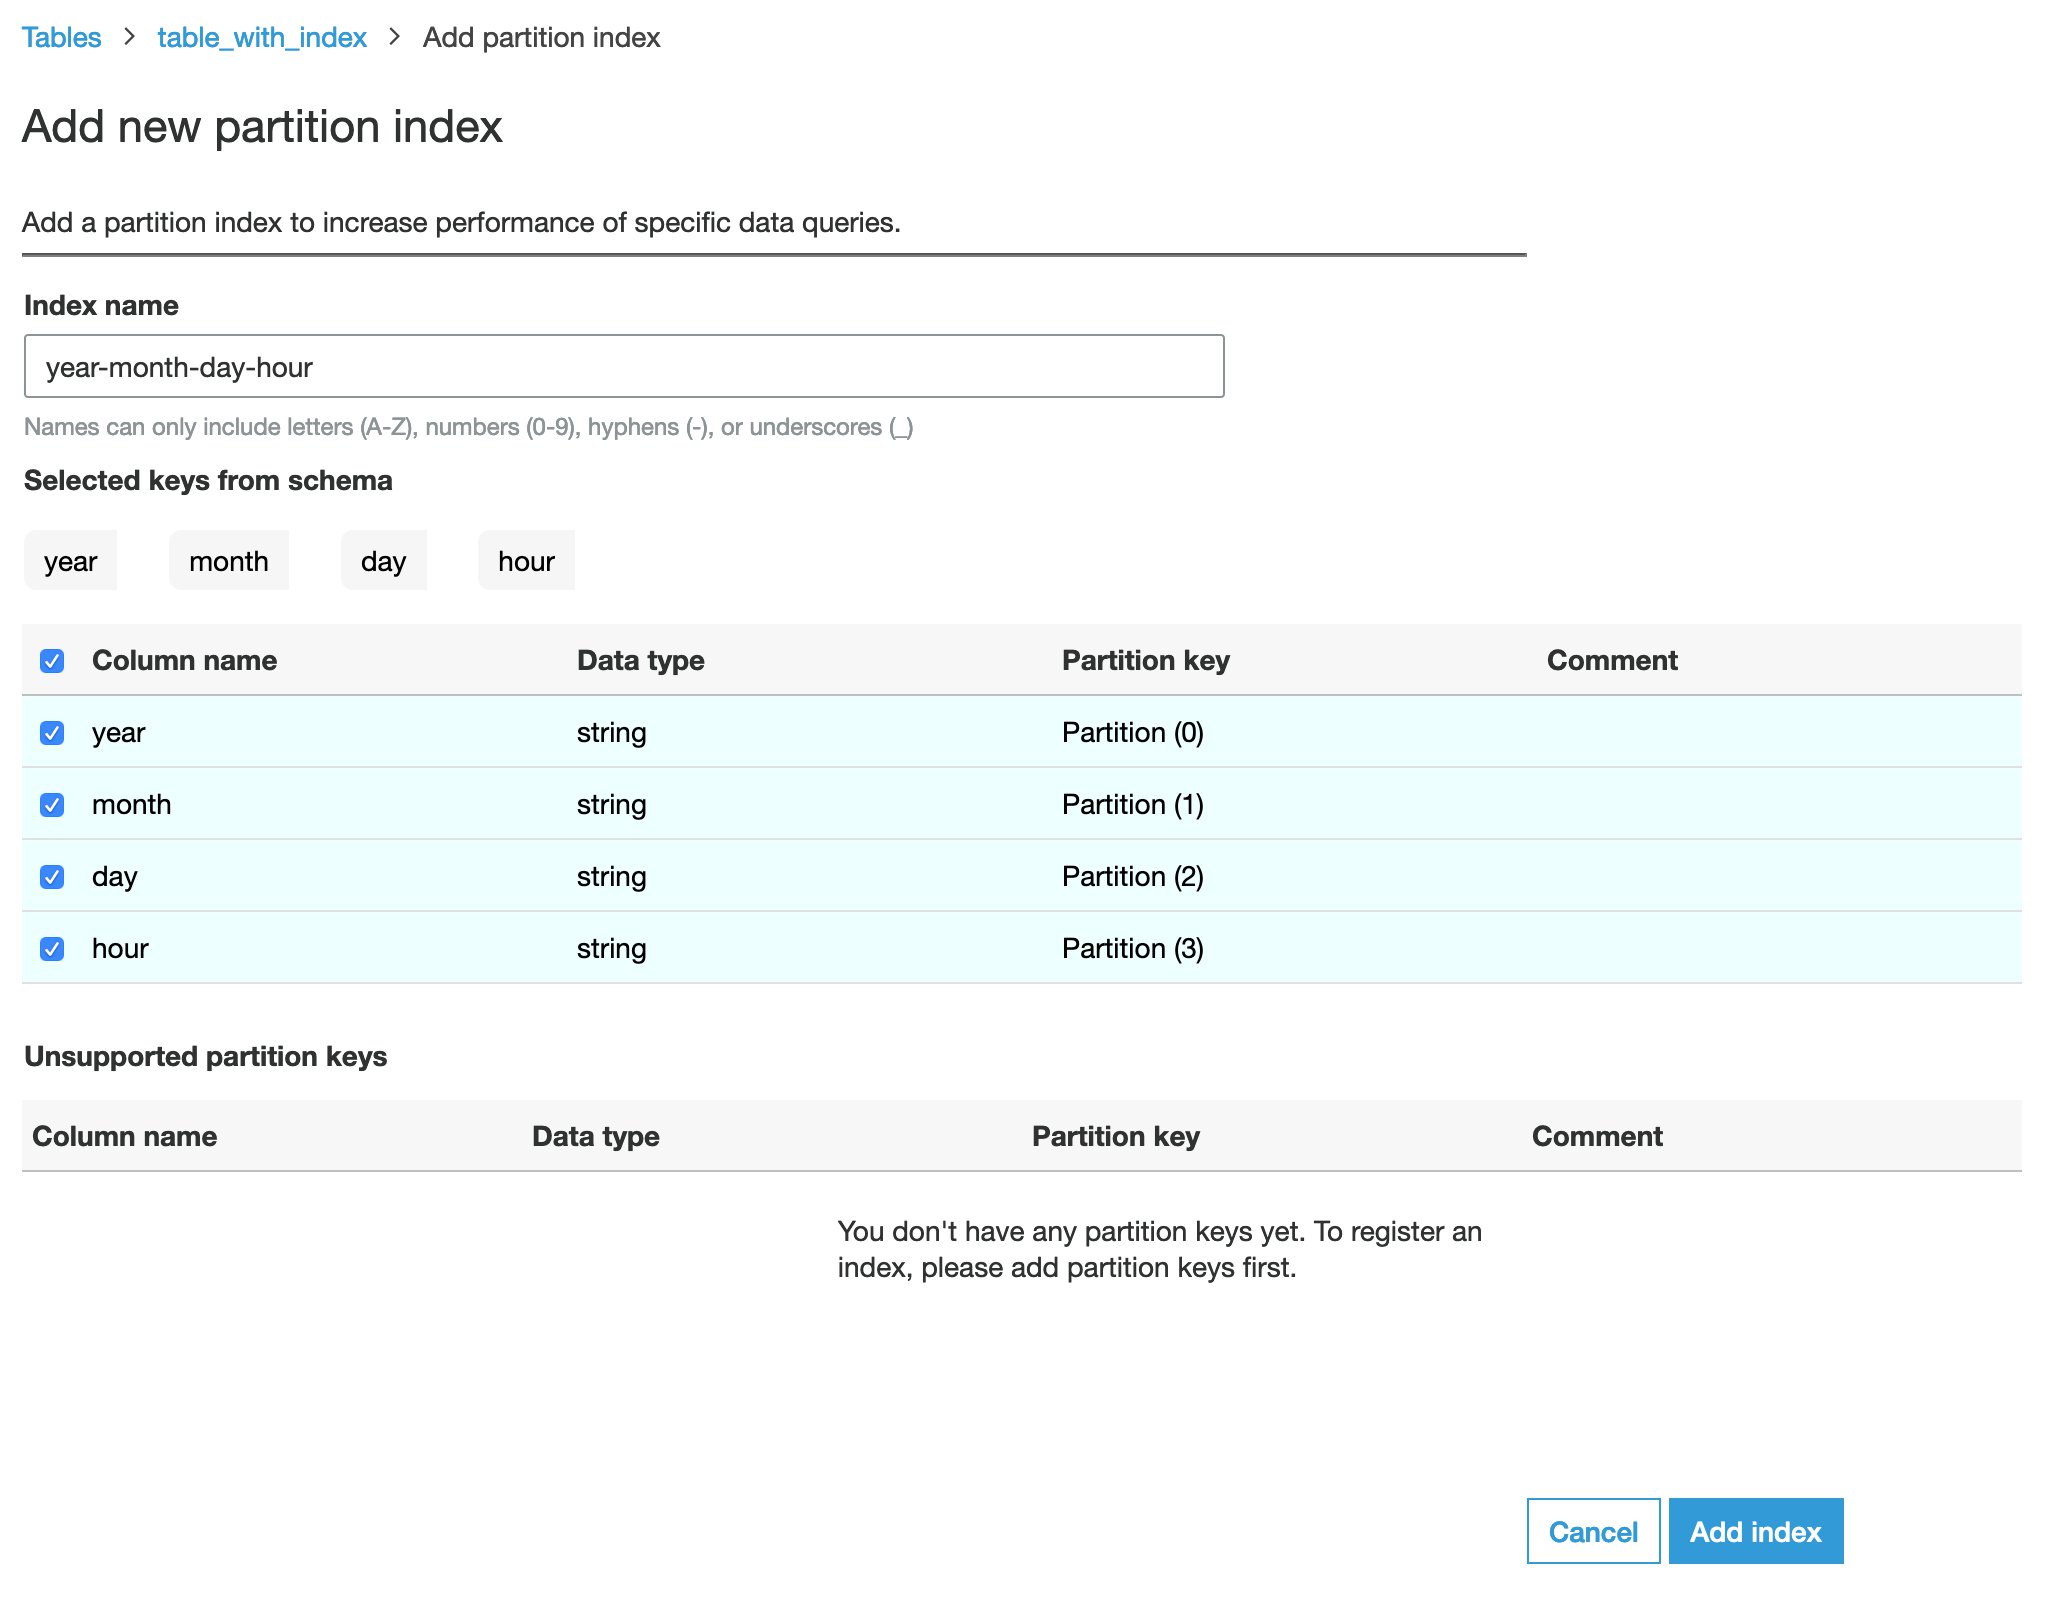
  4. Choose Add new index.
  5. For Index name, enter year-month-day-hour.
  6. For Selected keys from schema, select year, month, day, and hour. Make that you choose each column in this order, and confirm that Partition key for each column is correctly configured as follows:
    1. year: Partition (0)
    2. month: Partition (1)
    3. day: Partition (2)
    4. hour: Partition (3)
  7. Choose Add index.

The Status column of the newly created partition index shows as Creating. We need to wait for the partition index to be Active before it can be used by query engines. It should take about 1 hour to process and build the index for 367,920 partitions.

When the partition index is ready for table_with_index, you can use it when querying with Athena. For table_without_index, you should expect to see no change in query latency because no partition indexes were configured.

Enable partition filtering

To enable partition filtering in Athena, you need to update the table properties as follows:

  1. On the AWS Glue console, choose Tables.
  2. Choose the table table_with_index.
  3. Choose Edit table.
  4. Under Table properties, add the following:
    1. Key – partition_filtering.enabled
    2. Value – true
  5. Choose Apply.

Alternatively, you can set this parameter by running an ALTER TABLE SET PROPERTIES query in Athena:

ALTER TABLE partition_index.table_with_index
SET TBLPROPERTIES ('partition_filtering.enabled' = 'true')

Query tables using Athena

Now that your table has filtering enabled for Athena, let’s query both tables to see the performance differences.

First, query the table without using the partition index. In the Athena query editor, enter the following query:

SELECT count(*), sum(value) 
FROM partition_index.table_without_index 
WHERE year='2021' AND month='04' AND day='01'

The following screenshot shows the query took 44.9 seconds.

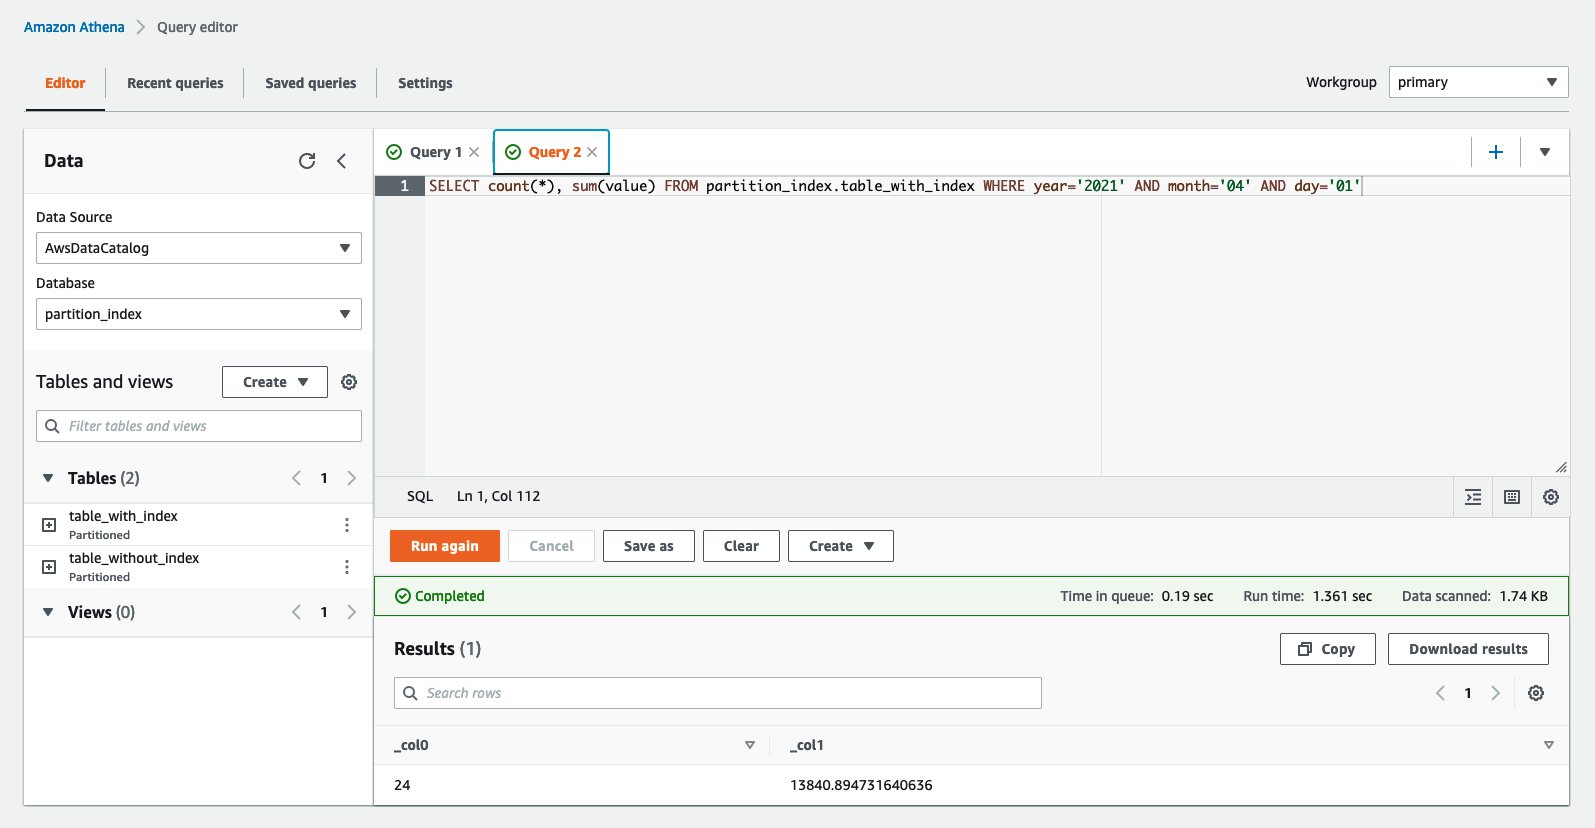
Next, query the table with using the partition index. You need to use the columns that are configured for the indexes in the WHERE clause to gain these performance benefits. Run the following query:

SELECT count(*), sum(value) 
FROM partition_index.table_with_index 
WHERE year='2021' AND month='04' AND day='01'

The following screenshot shows the query took just 1.3 seconds to complete, which is significantly faster than the table without indexes.

Query planning is the phase where the table and partition metadata are fetched from the AWS Glue Data Catalog. With partition indexes enabled, retrieving only the partitions required by the query can be done more efficiently and therefore quicker. Let’s retrieve the execution details of each query by using the AWS Command Line Interface (AWS CLI) to compare planning statistics.

The following is the query execution details for the query that ran against a table without partition indexes:

$ aws athena get-query-execution --query-execution-id 5e972df6-11f8-467a-9eea-77f509a23573 --query QueryExecution.Statistics --output table
--------------------------------------------
|             GetQueryExecution            |
+---------------------------------+--------+
|  DataScannedInBytes             |  1782  |
|  EngineExecutionTimeInMillis    |  44914 |
|  QueryPlanningTimeInMillis      |  44451 |
|  QueryQueueTimeInMillis         |  278   |
|  ServiceProcessingTimeInMillis  |  47    |
|  TotalExecutionTimeInMillis     |  45239 |
+---------------------------------+--------+

The following is the query execution details for a query that ran against a table with partition indexes:

% aws athena get-query-execution --query-execution-id 31d0b4ae-ae8d-4836-b20b-317fa9d9b79a --query QueryExecution.Statistics --output table
-------------------------------------------
|            GetQueryExecution            |
+---------------------------------+-------+
|  DataScannedInBytes             |  1782 |
|  EngineExecutionTimeInMillis    |  1361 |
|  QueryPlanningTimeInMillis      |  384  |
|  QueryQueueTimeInMillis         |  190  |
|  ServiceProcessingTimeInMillis  |  58   |
|  TotalExecutionTimeInMillis     |  1609 |
+---------------------------------+-------+

QueryPlanningTimeInMillis represents the number of milliseconds that Athena took to plan the query processing flow. This includes the time spent retrieving table partitions from the data source. Because the query engine performs the query planning, the query planning time is a subset of engine processing time.

Comparing the stats for both queries, we can see that QueryPlanningTimeInMillis is significantly lower in the query using partition indexes. It went from 44 seconds to 0.3 seconds when using partition indexes. The improvement in query planning resulted in a faster overall query runtime, going from 45 seconds to 1.3 seconds—a 35 times greater performance improvement.

Clean up

Now to the final step, cleaning up the resources:

  1. Delete the CloudFormation stack.
  2. Confirm both tables have been deleted from the AWS Glue Data Catalog.

Conclusion

At AWS, we strive to improve the performance of our services and our customers’ experience. The AWS Glue Data Catalog is a fully managed, Apache Hive compatible metastore that enables a wide range of big data, analytics, and machine learning services, like Athena, Amazon EMR, Redshift Spectrum, and AWS Glue ETL, to access data in the data lake. Athena customers can now further reduce query latency by enabling partition indexes for your tables in Amazon S3. Using partition indexes can improve the efficiency of retrieving metadata for highly partitioned tables ranging in the tens and hundreds of thousands and millions of partitions.

You can learn more about AWS Glue Data Catalog partition indexes in Working with Partition Indexes, and more about Athena best practices in Best Practices When Using Athena with AWS Glue.


About the Author

Noritaka Sekiyama is a Principal Big Data Architect on the AWS Glue team. He is passionate about architecting fast-growing data platforms, diving deep into distributed big data software like Apache Spark, building reusable software artifacts for data lakes, and sharing the knowledge in AWS Big Data blog posts. In his spare time, he enjoys having and watching killifish, hermit crabs, and grubs with his children.

How to set up Amazon Cognito for federated authentication using Azure AD

Post Syndicated from Ratan Kumar original https://aws.amazon.com/blogs/security/how-to-set-up-amazon-cognito-for-federated-authentication-using-azure-ad/

In this blog post, I’ll walk you through the steps to integrate Azure AD as a federated identity provider in Amazon Cognito user pool. A user pool is a user directory in Amazon Cognito that provides sign-up and sign-in options for your app users.

Identity management and authentication flow can be challenging when you need to support requirements such as OAuth, social authentication, and login using a Security Assertion Markup Language (SAML) 2.0 based identity provider (IdP) to meet your enterprise identity management requirements. Amazon Cognito provides you a managed, scalable user directory, user sign-up and sign-in, and federation through third-party identity providers. An added benefit for developers is that it provides you a standardized set of tokens (Identity, Access and Refresh Token). So, in situations when you have to support authentication with multiple identity providers (e.g. Social authentication, SAML IdP, etc.), you don’t have to write code for handling different tokens issued by different identity providers. Instead, you can just work with a consistent set of tokens issued by Amazon Cognito user pool.
 

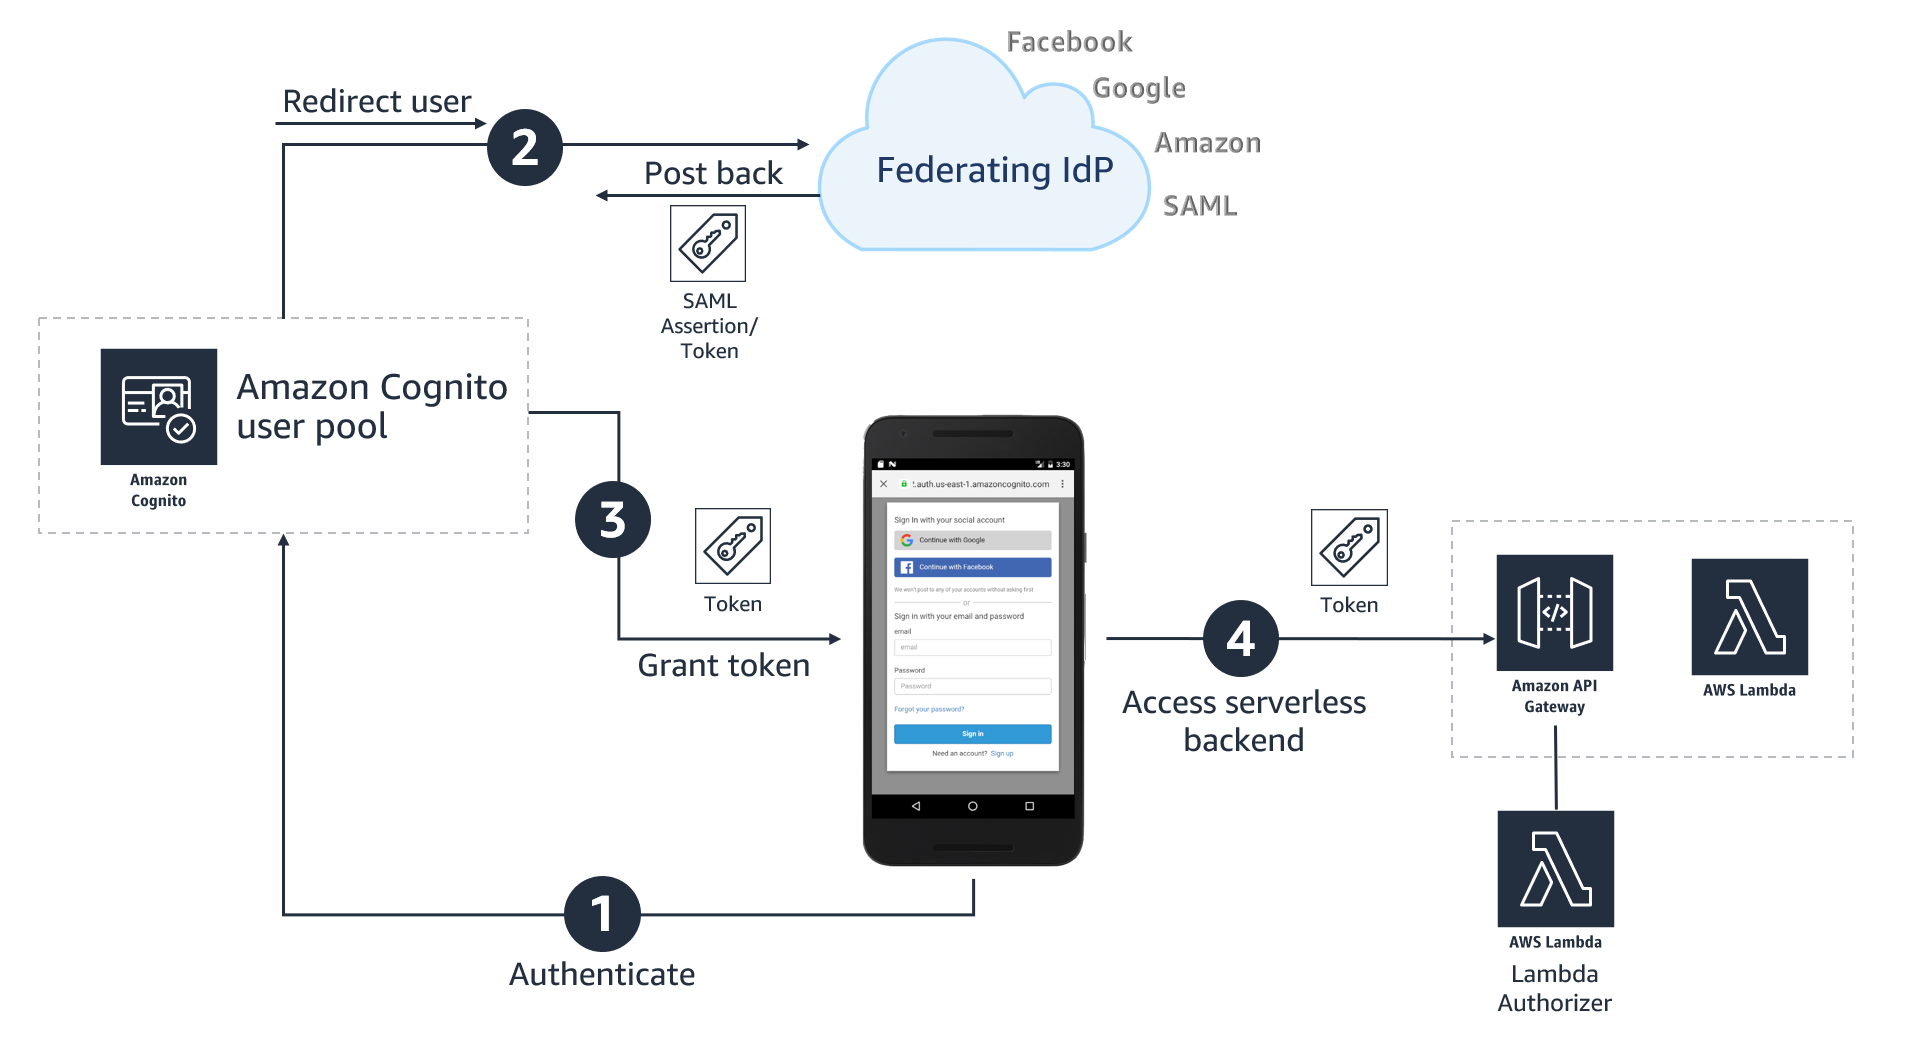
Figure 1: High-level architecture for federated authentication in a web or mobile app

Figure 1: High-level architecture for federated authentication in a web or mobile app

As shown in Figure 1, the high-level application architecture of a serverless app with federated authentication typically involves following steps:

  1. User selects their preferred IdP to authenticate.
  2. User gets re-directed to the federated IdP for login. On successful authentication, the IdP posts back a SAML assertion or token containing user’s identity details to an Amazon Cognito user pool.
  3. Amazon Cognito user pool issues a set of tokens to the application
  4. Application can use the token issued by the Amazon Cognito user pool for authorized access to APIs protected by Amazon API Gateway.

To learn more about the authentication flow with SAML federation, see the blog post Building ADFS Federation for your Web App using Amazon Cognito User Pools.

Step-by-step instructions for enabling Azure AD as federated identity provider in an Amazon Cognito user pool

This post will walk you through the following steps:

  1. Create an Amazon Cognito user pool
  2. Add Amazon Cognito as an enterprise application in Azure AD
  3. Add Azure AD as SAML identity provider (IDP) in Amazon Cognito
  4. Create an app client and use the newly created SAML IDP for Azure AD

Prerequisites

You’ll need to have administrative access to Azure AD, an AWS account and the AWS Command Line Interface (AWS CLI) installed on your machine. Follow the instructions for installing, updating, and uninstalling the AWS CLI version 2; and then to configure your installation, follow the instructions for configuring the AWS CLI. If you don’t want to install AWS CLI, you can also run these commands from AWS CloudShell which provides a browser-based shell to securely manage, explore, and interact with your AWS resources.

Step 1: Create an Amazon Cognito user pool

The procedures in this post use the AWS CLI, but you can also follow the instructions to use the AWS Management Console to create a new user pool.

To create a user pool in the AWS CLI

  1. Use the following command to create a user pool with default settings. Be sure to replace <yourUserPoolName> with the name you want to use for your user pool.
    aws cognito-idp create-user-pool \
    --pool-name <yourUserPoolName>
    

    You should see an output containing number of details about the newly created user pool.

  2. Copy the value of user pool ID, in this example, ap-southeast-2_xx0xXxXXX. You will need this value for the next steps.
    "UserPool": {
            "Id": "ap-southeast-2_xx0xXxXXX",
            "Name": "example-corp-prd-userpool"
           "Policies": { …
    

Add a domain name to user pool

One of the many useful features of Amazon Cognito is hosted UI which provides a configurable web interface for user sign in. Hosted UI is accessible from a domain name that needs to be added to the user pool. There are two options for adding a domain name to a user pool. You can either use an Amazon Cognito domain, or a domain name that you own. This solution uses an Amazon Cognito domain, which will look like the following:

https://<yourDomainPrefix>.auth.<aws-region>.amazoncognito.com

To add a domain name to user pool

  1. Use following CLI command to add an Amazon Cognito domain to the user pool. Replace <yourDomainPrefix> with a unique domain name prefix (for example example-corp-prd). Note that you cannot use keywords aws, amazon, or cognito for domain prefix.
    aws cognito-idp create-user-pool-domain \
    --domain <yourDomainPrefix> \
    --user-pool-id <yourUserPoolID>
    

Prepare information for Azure AD setup

Next, you prepare Identifier (Entity ID) and Reply URL, which are required to add Amazon Cognito as an enterprise application in Azure AD (done in Step 2 below). Azure AD expects these values in a very specific format. In a text editor, note down your values for Identifier (Entity ID) and Reply URL according to the following formats:

  • For Identifier (Entity ID) the format is:
    urn:amazon:cognito:sp:<yourUserPoolID>
    

    For example:

    urn:amazon:cognito:sp:ap-southeast-2_nYYYyyYyYy
    

  • For Reply URL the format is:
    https://<yourDomainPrefix>.auth.<aws-region>.amazoncognito.com/saml2/idpresponse
    

    For example:

    https://example-corp-prd.auth.ap-southeast-2.amazoncognito.com/saml2/idpresponse
    

    Note: The Reply URL is the endpoint where Azure AD will send SAML assertion to Amazon Cognito during the process of user authentication.

Update the placeholders above with your values (without < >), and then note the values of Identifier (Entity ID) and Reply URL in a text editor for future reference.

For more information, see Adding SAML Identity Providers to a User Pool in the Amazon Cognito Developer Guide.

Step 2: Add Amazon Cognito as an enterprise application in Azure AD

In this step, you add an Amazon Cognito user pool as an application in Azure AD, to establish a trust relationship between them.

To add new application in Azure AD

  1. Log in to the Azure Portal.
  2. In the Azure Services section, choose Azure Active Directory.
  3. In the left sidebar, choose Enterprise applications.
  4. Choose New application.
  5. On the Browse Azure AD Gallery page, choose Create your own application.
  6. Under What’s the name of your app?, enter a name for your application and select Integrate any other application you don’t find in the gallery (Non-gallery), as shown in Figure 2. Choose Create.
     
    Figure 2: Add an enterprise app in Azure AD

    Figure 2: Add an enterprise app in Azure AD

It will take few seconds for the application to be created in Azure AD, then you should be redirected to the Overview page for the newly added application.

Note: Occasionally, this step can result in a Not Found error, even though Azure AD has successfully created a new application. If that happens, in Azure AD navigate back to Enterprise applications and search for your application by name.

To set up Single Sign-on using SAML

  1. On the Getting started page, in the Set up single sign on tile, choose Get started, as shown in Figure 3.
     
    Figure 3: Application configuration page in Azure AD

    Figure 3: Application configuration page in Azure AD

  2. On the next screen, select SAML.
  3. In the middle pane under Set up Single Sign-On with SAML, in the Basic SAML Configuration section, choose the edit icon ().
  4. In the right pane under Basic SAML Configuration, replace the default Identifier ID (Entity ID) with the Identifier (Entity ID) you copied previously. In the Reply URL (Assertion Consumer Service URL) field, enter the Reply URL you copied previously, as shown in Figure 4. Choose Save.
     
    Figure 4: Azure AD SAML-based Sign-on setup

    Figure 4: Azure AD SAML-based Sign-on setup

  5. In the middle pane under Set up Single Sign-On with SAML, in the User Attributes & Claims section, choose Edit.
  6. Choose Add a group claim.
  7. On the User Attributes & Claims page, in the right pane under Group Claims, select Groups assigned to the application, leave Source attribute as Group ID, as shown in Figure 5. Choose Save.
     
    Figure 5: Option to select group claims to release to Amazon Cognito

    Figure 5: Option to select group claims to release to Amazon Cognito

    This adds the group claim so that Amazon Cognito can receive the group membership detail of the authenticated user as part of the SAML assertion.

  8. In a text editor, note down the Claim names under Additional claims, as shown in Figure 5. You’ll need these when creating attribute mapping in Amazon Cognito.
  9. Close the User Attributes & Claims screen by choosing the X in the top right corner. You’ll be redirected to the Set up Single Sign-on with SAML page.
  10. Scroll down to the SAML Signing Certificate section, and copy the App Federation Metadata Url by choosing the copy into clipboard icon (highlighted with red arrow in Figure 6). Keep this URL in a text editor, as you’ll need it in the next step.
     
    Figure 6: Copy SAML metadata URL from Azure AD

    Figure 6: Copy SAML metadata URL from Azure AD

Step 3: Add Azure AD as SAML IDP in Amazon Cognito

Next, you need an attribute in the Amazon Cognito user pool where group membership details from Azure AD can be received, and add Azure AD as an identity provider.

To add custom attribute to user pool and add Azure AD as an identity provider

  1. Use the following CLI command to add a custom attribute to the user pool. Replace <yourUserPoolID> and <customAttributeName> with your own values.
    aws cognito-idp add-custom-attributes \
    --user-pool-id <yourUserPoolID> \
    --custom-attributes Name=<customAttributeName>,AttributeDataType="String"
    

    If the command succeeds, you’ll not see any output.

  2. Use the following CLI command to add Azure AD as an identity provider. Be sure to replace the following with your own values:
    • Replace <yourUserPoolID> with Amazon Cognito user pool ID copied previously.
    • Replace <IDProviderName> with a name for your identity provider (for example, Example-Corp-IDP).
    • Replace <MetadataURLCopiedFromAzureAD> with the Metadata URL copied from Azure AD.
    • Replace <customAttributeName> with custom attribute name created previously.
    aws cognito-idp create-identity-provider \
    --user-pool-id <yourUserPoolID> \
    --provider-name=<IDProviderName> \
    --provider-type SAML \
    --provider-details MetadataURL=<MetadataURLCopiedFromAzureAD> \
    --attribute-mapping email=http://schemas.xmlsoap.org/ws/2005/05/identity/claims/emailaddress,<customAttributeName>=http://schemas.microsoft.com/ws/2008/06/identity/claims/groups
    

    Successful running of this command adds Azure AD as a SAML IDP to your Amazon Cognito user pool.

Step 4: Create an app client and use the newly created SAML IDP for Azure AD

Before you can use Amazon Cognito in your web application, you need to register your app with Amazon Cognito as an app client. An app client is an entity within an Amazon Cognito user pool that has permission to call unauthenticated API operations (operations that do not require an authenticated user), for example to register, sign in, and handle forgotten passwords.

To create an app client

  1. Use following command to create an app client. Be sure to replace the following with your own values:
    • Replace <yourUserPoolID> with the Amazon Cognito user pool ID created previously.
    • Replace <yourAppClientName> with a name for your app client.
    • Replace <callbackURL> with the URL of your web application that will receive the authorization code. It must be an HTTPS endpoint, except for in a local development environment where you can use http://localhost:PORT_NUMBER.
    • Use parameter –allowed-o-auth-flows for allowed OAuth flows that you want to enable. In this example, we use code for Authorization code grant.
    • Use parameter –allowed-o-auth-scopes to specify which OAuth scopes (such as phone, email, openid) Amazon Cognito will include in the tokens. In this example, we use openid.
    • Replace <IDProviderName> with the same name you used for ID provider previously.
    aws cognito-idp create-user-pool-client \
    --user-pool-id <yourUserPoolID> \
    --client-name <yourAppClientName> \
    --no-generate-secret \
    --callback-urls <callbackURL> \
    --allowed-o-auth-flows code \
    --allowed-o-auth-scopes openid email\
    --supported-identity-providers <IDProviderName> \
    --allowed-o-auth-flows-user-pool-client
    

Successful running of this command will provide an output in following format. In a text editor, note down the ClientId for referencing in the web application. In this following example, the ClientId is 7xyxyxyxyxyxyxyxyxyxy.

{
    "UserPoolClient": {
        "UserPoolId": "ap-southeast-2_xYYYYYYY",
        "ClientName": "my-client-name",
        "ClientId": "7xyxyxyxyxyxyxyxyxyxy",
        "LastModifiedDate": "2021-05-04T17:33:32.936000+12:00",
        "CreationDate": "2021-05-04T17:33:32.936000+12:00",
        "RefreshTokenValidity": 30,
        "SupportedIdentityProviders": [
            "Azure-AD"
        ],
        "CallbackURLs": [
            "http://localhost:3030"
        ],
        "AllowedOAuthFlows": [
            "code"
        ],
        "AllowedOAuthScopes": [
            "openid", "email"
        ],
        "AllowedOAuthFlowsUserPoolClient": true
    }
}

Test the setup

Next, do a quick test to check if everything is configured properly.

  1. Open the Amazon Cognito console.
  2. Choose Manage User Pools, then choose the user pool you created in Step 1: Create an Amazon Cognito user pool.
  3. In the left sidebar, choose App client settings, then look for the app client you created in Step 4: Create an app client and use the newly created SAML IDP for Azure AD. Scroll to the Hosted UI section and choose Launch Hosted UI, as shown in Figure 7.
     
    Figure 7: App client settings showing link to access Hosted UI

    Figure 7: App client settings showing link to access Hosted UI

  4. On the sign-in page as shown in Figure 8, you should see all the IdPs that you enabled on the app client. Choose the Azure-AD button, which redirects you to the sign-in page hosted on https://login.microsoftonline.com/.
     
    Figure 8: Amazon Cognito hosted UI

    Figure 8: Amazon Cognito hosted UI

  5. Sign in using your corporate ID. If everything is working properly, you should be redirected back to the callback URL after successful authentication.

(Optional) Add authentication to a single page application

One way to add secure authentication using Amazon Cognito into a single page application (SPA) is to use the Auth.federatedSignIn() method of Auth class from AWS Amplify. AWS Amplify provides SDKs to integrate your web or mobile app with a growing list of AWS services, including integration with Amazon Cognito user pool. The federatedSign() method will render the hosted UI that gives users the option to sign in with the identity providers that you enabled on the app client (in Step 4), as shown in Figure 8. One advantage of hosted UI is that you don’t have to write any code for rendering it. Additionally, it will transparently implement the Authorization code grant with PKCE and securely provide your client-side application with the tokens (ID, Access and Refresh) that are required to access the backend APIs.

For a sample web application and instructions to connect it with Amazon Cognito authentication, see the aws-amplify-oidc-federation GitHub repository.

Conclusion

In this blog post, you learned how to integrate an Amazon Cognito user pool with Azure AD as an external SAML identity provider, to allow your users to use their corporate ID to sign in to web or mobile applications.

For more information about this solution, see our video Integrating Amazon Cognito with Azure Active Directory (from timestamp 25:26) on the official AWS twitch channel. In the video, you’ll find an end-to-end demo of how to integrate Amazon Cognito with Azure AD, and then how to use AWS Amplify SDK to add authentication to a simple React app (using the example of a pet store). The video also includes how you can access group membership details from Azure AD for authorization and fine-grained access control.

If you have feedback about this post, submit comments in the Comments section below. If you have questions about this post, start a new thread on the Amazon Cognito forum or contact AWS Support.

Want more AWS Security how-to content, news, and feature announcements? Follow us on Twitter.

Author

Ratan Kumar

Ratan is a solutions architect based out of Auckland, New Zealand. He works with large enterprise customers helping them design and build secure, cost-effective, and reliable internet scale applications using the AWS cloud. He is passionate about technology and likes sharing knowledge through blog posts and twitch sessions.

Author

Vishwanatha Nayak

Vish is a solutions architect at AWS. He engages with customers to create innovative solutions that are secure, reliable, and cost optimised to address business problems and accelerate the adoption of AWS services. He has over 15 years of experience in various software development, consulting, and architecture roles.

Introducing mutual TLS authentication for Amazon MSK as an event source

Post Syndicated from Julian Wood original https://aws.amazon.com/blogs/compute/introducing-mutual-tls-authentication-for-amazon-msk-as-an-event-source/

This post is written by Uma Ramadoss, Senior Specialist Solutions Architect, Integration.

Today, AWS Lambda is introducing mutual TLS (mTLS) authentication for Amazon Managed Streaming for Apache Kafka (Amazon MSK) and self-managed Kafka as an event source.

Many customers use Amazon MSK for streaming data from multiple producers. Multiple subscribers can then consume the streaming data and build data pipelines, analytics, and data integration. To learn more, read Using Amazon MSK as an event source for AWS Lambda.

You can activate any combination of authentication modes (mutual TLS, SASL SCRAM, or IAM access control) on new or existing clusters. This is useful if you are migrating to a new authentication mode or must run multiple authentication modes simultaneously. Lambda natively supports consuming messages from both self-managed Kafka and Amazon MSK through event source mapping.

By default, the TLS protocol only requires a server to authenticate itself to the client. The authentication of the client to the server is managed by the application layer. The TLS protocol also offers the ability for the server to request that the client send an X.509 certificate to prove its identity. This is called mutual TLS as both parties are authenticated via certificates with TLS.

Mutual TLS is a commonly used authentication mechanism for business-to-business (B2B) applications. It’s used in standards such as Open Banking, which enables secure open API integrations for financial institutions. It is one of the popular authentication mechanisms for customers using Kafka.

To use mutual TLS authentication for your Kafka-triggered Lambda functions, you provide a signed client certificate, the private key for the certificate, and an optional password if the private key is encrypted. This establishes a trust relationship between Lambda and Amazon MSK or self-managed Kafka. Lambda supports self-signed server certificates or server certificates signed by a private certificate authority (CA) for self-managed Kafka. Lambda trusts the Amazon MSK certificate by default as the certificates are signed by Amazon Trust Services CAs.

This blog post explains how to set up a Lambda function to process messages from an Amazon MSK cluster using mutual TLS authentication.

Overview

Using Amazon MSK as an event source operates in a similar way to using Amazon SQS or Amazon Kinesis. You create an event source mapping by attaching Amazon MSK as event source to your Lambda function.

The Lambda service internally polls for new records from the event source, reading the messages from one or more partitions in batches. It then synchronously invokes your Lambda function, sending each batch as an event payload. Lambda continues to process batches until there are no more messages in the topic.

The Lambda function’s event payload contains an array of records. Each array item contains details of the topic and Kafka partition identifier, together with a timestamp and base64 encoded message.

Kafka event payload

Kafka event payload

You store the signed client certificate, the private key for the certificate, and an optional password if the private key is encrypted in the AWS Secrets Manager as a secret. You provide the secret in the Lambda event source mapping.

The steps for using mutual TLS authentication for Amazon MSK as event source for Lambda are:

  1. Create a private certificate authority (CA) using AWS Certificate Manager (ACM) Private Certificate Authority (PCA).
  2. Create a client certificate and private key. Store them as secret in AWS Secrets Manager.
  3. Create an Amazon MSK cluster and a consuming Lambda function using the AWS Serverless Application Model (AWS SAM).
  4. Attach the event source mapping.

This blog walks through these steps in detail.

Prerequisites

1. Creating a private CA.

To use mutual TLS client authentication with Amazon MSK, create a root CA using AWS ACM Private Certificate Authority (PCA). We recommend using independent ACM PCAs for each MSK cluster when you use mutual TLS to control access. This ensures that TLS certificates signed by PCAs only authenticate with a single MSK cluster.

  1. From the AWS Certificate Manager console, choose Create a Private CA.
  2. In the Select CA type panel, select Root CA and choose Next.
  3. Select Root CA

    Select Root CA

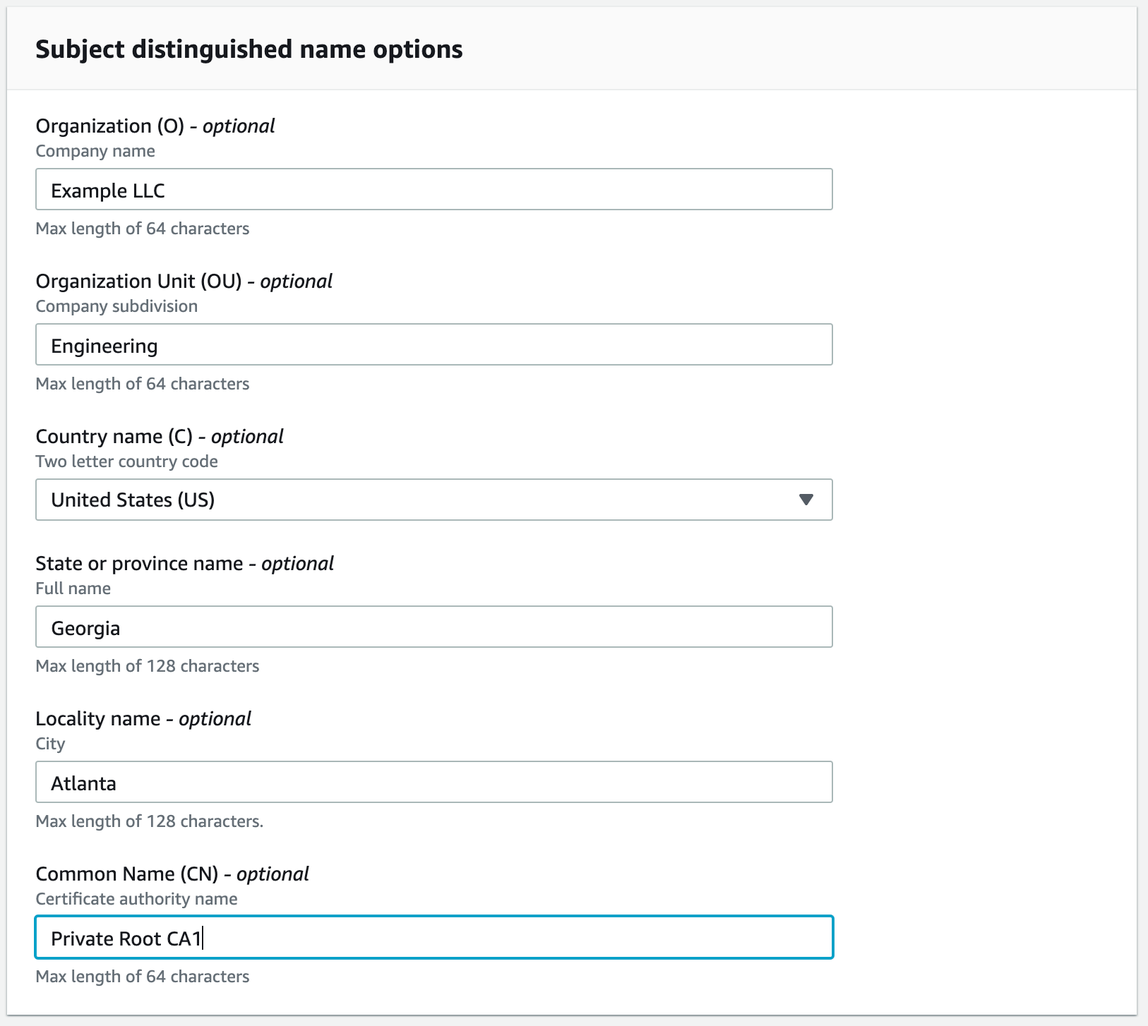
  4. In the Configure CA subject name panel, provide your certificate details, and choose Next.
  5. Provide your certificate details

    Provide your certificate details

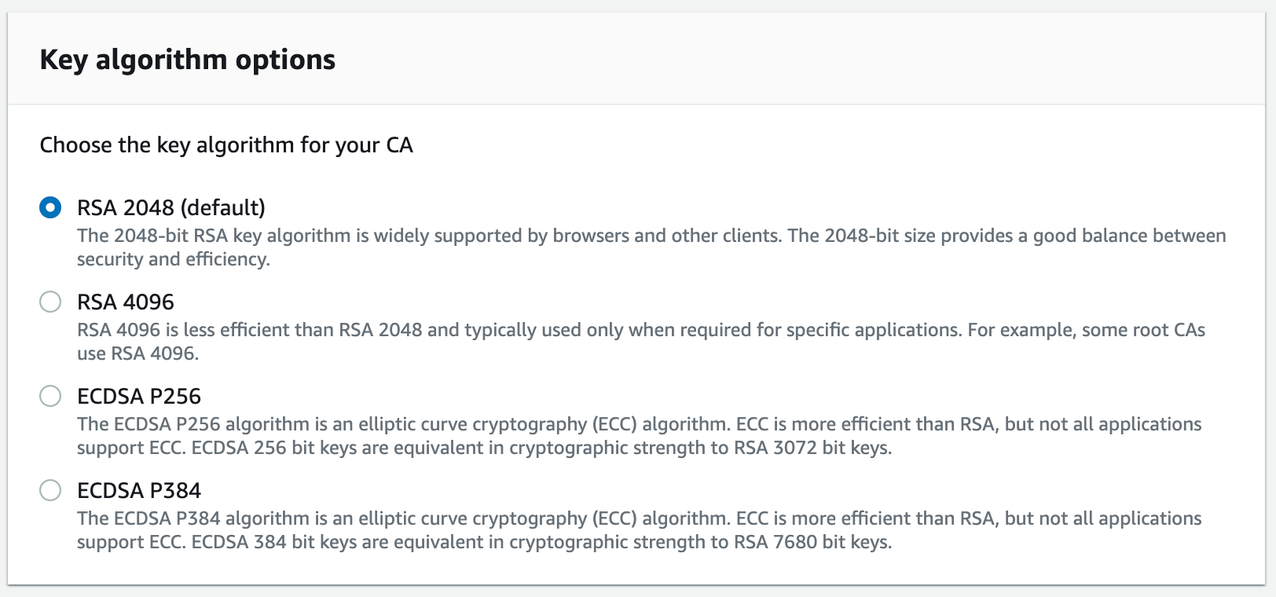
  6. From the Configure CA key algorithm panel, choose the key algorithm for your CA and choose Next.
  7. Configure CA key algorithm

    Configure CA key algorithm

  8. From the Configure revocation panel, choose any optional certificate revocation options you require and choose Next.
  9. Configure revocation

    Configure revocation

  10. Continue through the screens to add any tags required, allow ACM to renew certificates, review your options, and confirm pricing. Choose Confirm and create.
  11. Once the CA is created, choose Install CA certificate to activate your CA. Configure the validity of the certificate and the signature algorithm and choose Next.
  12. Configure certificate

    Configure certificate

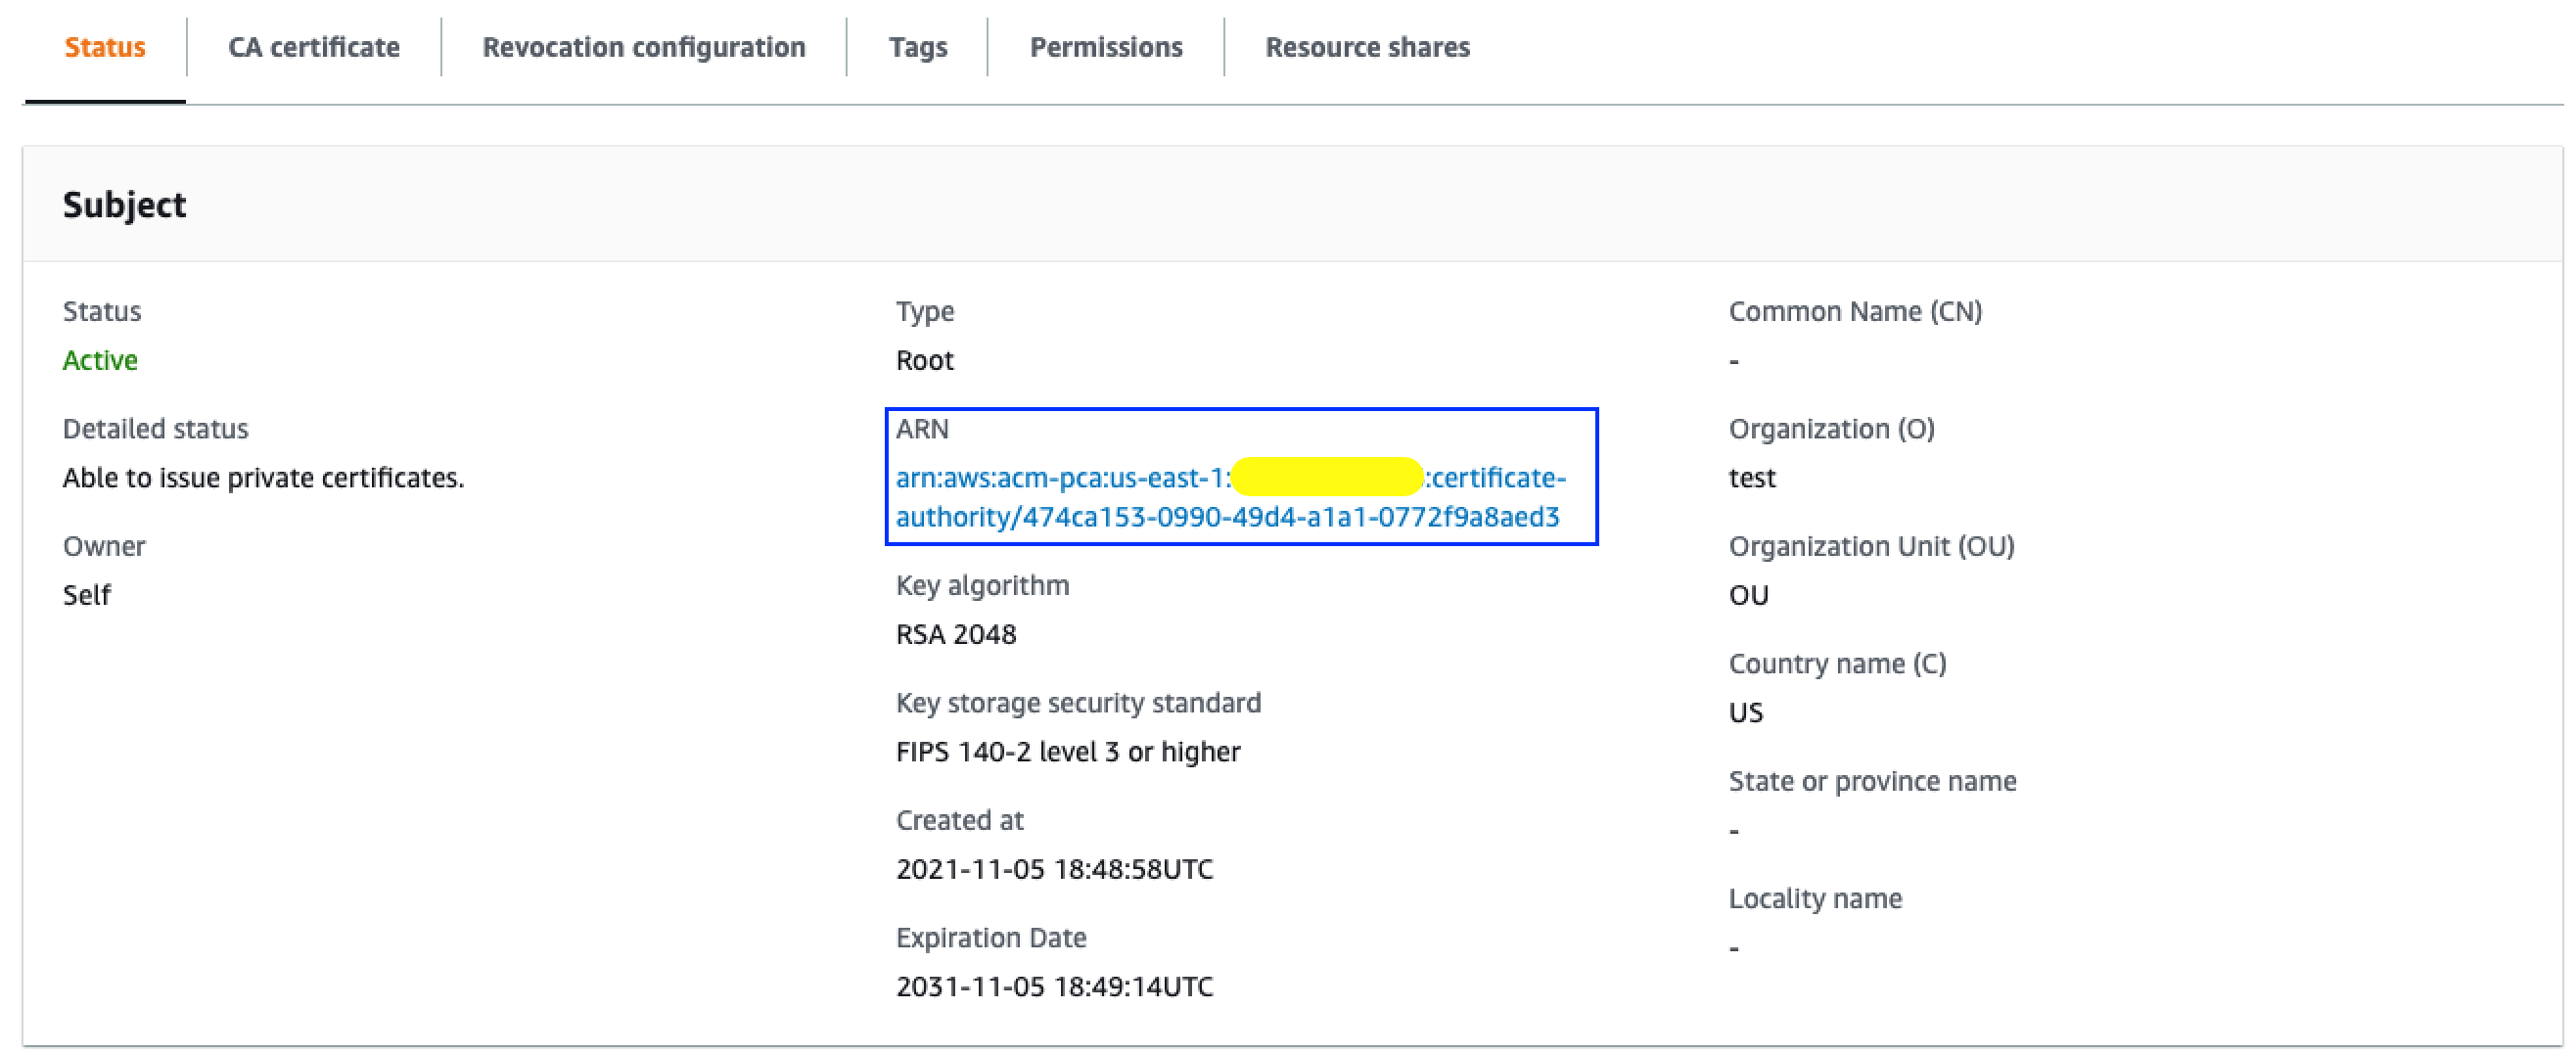
  13. Review the certificate details and choose Confirm and install. Note down the Amazon Resource Name (ARN) of the private CA for the next section.
  14. Review certificate details

    Review certificate details

2. Creating a client certificate.

You generate a client certificate using the root certificate you previously created, which is used to authenticate the client with the Amazon MSK cluster using mutual TLS. You provide this client certificate and the private key as AWS Secrets Manager secrets to the AWS Lambda event source mapping.

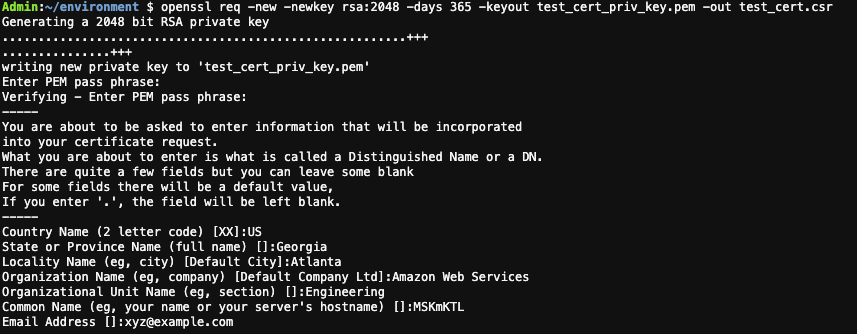
  1. On your local machine, run the following command to create a private key and certificate signing request using OpenSSL. Enter your certificate details. This creates a private key file and a certificate signing request file in the current directory.
  2. openssl req -new -newkey rsa:2048 -days 365 -keyout key.pem -out client_cert.csr -nodes
    OpenSSL create a private key and certificate signing request

    OpenSSL create a private key and certificate signing request

  3. Use the AWS CLI to sign your certificate request with the private CA previously created. Replace Private-CA-ARN with the ARN of your private CA. The certificate validity value is set to 300, change this if necessary. Save the certificate ARN provided in the response.
  4. aws acm-pca issue-certificate --certificate-authority-arn Private-CA-ARN --csr fileb://client_cert.csr --signing-algorithm "SHA256WITHRSA" --validity Value=300,Type="DAYS"
  5. Retrieve the certificate that ACM signed for you. Replace the Private-CA-ARN and Certificate-ARN with the ARN you obtained from the previous commands. This creates a signed certificate file called client_cert.pem.
  6. aws acm-pca get-certificate --certificate-authority-arn Private-CA-ARN --certificate-arn Certificate-ARN | jq -r '.Certificate + "\n" + .CertificateChain' >> client_cert.pem
  7. Create a new file called secret.json with the following structure
  8. {
    "certificate":"",
    "privateKey":""
    }
    
  9. Copy the contents of the client_cert.pem in certificate and the content of key.pem in privatekey. Ensure that there are no extra spaces added. The file structure looks like this:
  10. Certificate file structure

    Certificate file structure

  11. Create the secret and save the ARN for the next section.
aws secretsmanager create-secret --name msk/mtls/lambda/clientcert --secret-string file://secret.json

3. Setting up an Amazon MSK cluster with AWS Lambda as a consumer.

Amazon MSK is a highly available service, so it must be configured to run in a minimum of two Availability Zones in your preferred Region. To comply with security best practice, the brokers are usually configured in private subnets in each Region.

You can use AWS CLI, AWS Management Console, AWS SDK and AWS CloudFormation to create the cluster and the Lambda functions. This blog uses AWS SAM to create the infrastructure and the associated code is available in the GitHub repository.

The AWS SAM template creates the following resources:

  1. Amazon Virtual Private Cloud (VPC).
  2. Amazon MSK cluster with mutual TLS authentication.
  3. Lambda function for consuming the records from the Amazon MSK cluster.
  4. IAM roles.
  5. Lambda function for testing the Amazon MSK integration by publishing messages to the topic.

The VPC has public and private subnets in two Availability Zones with the private subnets configured to use a NAT Gateway. You can also set up VPC endpoints with PrivateLink to allow the Amazon MSK cluster to communicate with Lambda. To learn more about different configurations, see this blog post.

The Lambda function requires permission to describe VPCs and security groups, and manage elastic network interfaces to access the Amazon MSK data stream. The Lambda function also needs two Kafka permissions: kafka:DescribeCluster and kafka:GetBootstrapBrokers. The policy template AWSLambdaMSKExecutionRole includes these permissions. The Lambda function also requires permission to get the secret value from AWS Secrets Manager for the secret you configure in the event source mapping.

  ConsumerLambdaFunctionRole:
    Type: AWS::IAM::Role
    Properties:
      AssumeRolePolicyDocument:
        Version: "2012-10-17"
        Statement:
          - Effect: Allow
            Principal:
              Service: lambda.amazonaws.com
            Action: sts:AssumeRole
      ManagedPolicyArns:
        - arn:aws:iam::aws:policy/service-role/AWSLambdaMSKExecutionRole
      Policies:
        - PolicyName: SecretAccess
          PolicyDocument:
            Version: "2012-10-17"
            Statement:
              - Effect: Allow
                Action: "SecretsManager:GetSecretValue"
                Resource: "*"

This release adds two new SourceAccessConfiguration types to the Lambda event source mapping:

1. CLIENT_CERTIFICATE_TLS_AUTH – (Amazon MSK, Self-managed Apache Kafka) The Secrets Manager ARN of your secret key containing the certificate chain (PEM), private key (PKCS#8 PEM), and private key password (optional) used for mutual TLS authentication of your Amazon MSK/Apache Kafka brokers. A private key password is required if the private key is encrypted.

2. SERVER_ROOT_CA_CERTIFICATE – This is only for self-managed Apache Kafka. This contains the Secrets Manager ARN of your secret containing the root CA certificate used by your Apache Kafka brokers in PEM format. This is not applicable for Amazon MSK as Amazon MSK brokers use public AWS Certificate Manager certificates which are trusted by AWS Lambda by default.

Deploying the resources:

To deploy the example application:

  1. Clone the GitHub repository
  2. git clone https://github.com/aws-samples/aws-lambda-msk-mtls-integration.git
  3. Navigate to the aws-lambda-msk-mtls-integration directory. Copy the client certificate file and the private key file to the producer lambda function code.
  4. cd aws-lambda-msk-mtls-integration
    cp ../client_cert.pem code/producer/client_cert.pem
    cp ../key.pem code/producer/client_key.pem
  5. Navigate to the code directory and build the application artifacts using the AWS SAM build command.
  6. cd code
    sam build
  7. Run sam deploy to deploy the infrastructure. Provide the Stack Name, AWS Region, ARN of the private CA created in section 1. Provide additional information as required in the sam deploy and deploy the stack.
  8. sam deploy -g
    Running sam deploy -g

    Running sam deploy -g

    The stack deployment takes about 30 minutes to complete. Once complete, note the output values.

  9. Create the event source mapping for the Lambda function. Replace the CONSUMER_FUNCTION_NAME and MSK_CLUSTER_ARN from the output of the stack created by the AWS SAM template. Replace SECRET_ARN with the ARN of the AWS Secrets Manager secret created previously.
  10. aws lambda create-event-source-mapping --function-name CONSUMER_FUNCTION_NAME --batch-size 10 --starting-position TRIM_HORIZON --topics exampleTopic --event-source-arn MSK_CLUSTER_ARN --source-access-configurations '[{"Type": "CLIENT_CERTIFICATE_TLS_AUTH","URI": "SECRET_ARN"}]'
  11. Navigate one directory level up and configure the producer function with the Amazon MSK broker details. Replace the PRODUCER_FUNCTION_NAME and MSK_CLUSTER_ARN from the output of the stack created by the AWS SAM template.
  12. cd ../
    ./setup_producer.sh MSK_CLUSTER_ARN PRODUCER_FUNCTION_NAME
  13. Verify that the event source mapping state is enabled before moving on to the next step. Replace UUID from the output of step 5.
  14. aws lambda get-event-source-mapping --uuid UUID
  15. Publish messages using the producer. Replace PRODUCER_FUNCTION_NAME from the output of the stack created by the AWS SAM template. The following command creates a Kafka topic called exampleTopic and publish 100 messages to the topic.
  16. ./produce.sh PRODUCER_FUNCTION_NAME exampleTopic 100
  17. Verify that the consumer Lambda function receives and processes the messages by checking in Amazon CloudWatch log groups. Navigate to the log group by searching for aws/lambda/{stackname}-MSKConsumerLambda in the search bar.
Consumer function log stream

Consumer function log stream

Conclusion

Lambda now supports mutual TLS authentication for Amazon MSK and self-managed Kafka as an event source. You now have the option to provide a client certificate to establish a trust relationship between Lambda and MSK or self-managed Kafka brokers. It supports configuration via the AWS Management Console, AWS CLI, AWS SDK, and AWS CloudFormation.

To learn more about how to use mutual TLS Authentication for your Kafka triggered AWS Lambda function, visit AWS Lambda with self-managed Apache Kafka and Using AWS Lambda with Amazon MSK.

[$] In search of an appropriate RLIMIT_MEMLOCK default

Post Syndicated from original https://lwn.net/Articles/876288/rss

One does not normally expect a lot of disagreement over a 13-line patch
that effectively tweaks a single line of code. Occasionally, though, such
a patch can expose a disagreement over how the behavior of the kernel
should be managed. This patch
from Drew DeVault
, who is evidently taking a break from stirring up
the npm community
, is a case in point. It brings to light the question
of how the kernel community should pick default values for configurable
parameters like resource limits.

2022 Planning: A First-Year CISO Shares Her Point of View

Post Syndicated from Jesse Mack original https://blog.rapid7.com/2021/11/19/2022-planning-a-first-year-ciso-shares-her-point-of-view/

2022 Planning: A First-Year CISO Shares Her Point of View

When you’re planning for the year ahead in cybersecurity, there’s always part of you that’s trying to play fortune-teller. You know what risks matter now, and the processes and resources you need to respond to them, but what threats might emerge over the coming 12 months — or 12 weeks, for that matter? What if the landscape changes before you have a chance to react?

Now, imagine you’re doing that crystal-ball-peering exercise while still in your first 6 months in a leadership role. That’s the situation a first-year CISO finds themselves in — and while it’s a little precarious, it’s equally ripe with opportunity.

On Thursday, November 17, Rapid7’s Chief Security Data Scientist Bob Rudis sat down with Katie Ledoux, Chief Information Security Officer at SMS marketing startup Attentive, to dive into how she’s tackling the challenges of planning for her security team’s needs in 2022 while navigating her new role.

Freedom to build from the ground up

At just 4 months into her tenure at Attentive as of November 2021, Katie has found a sense of freedom and clarity in being able to start from square one.

“Getting to build a program from scratch is actually kind of amazing… especially because I’ve made so many mistakes before,” she said. It was the process of learning from those mistakes in less high-stakes roles — including a 5-year stint at Rapid7 — and building back more effectively that helped her understand what to prioritize as a new CISO. Now, she has the opportunity start with the things she knows she and her first few hires can do well, addressing lower-complexity, higher-risk areas and seeing progress quickly.

“I’m starting off as very trusted — and I won’t lose that trust unless I screw up,” she quipped.

The importance of mentorship

For Katie, her own experience is only one part of keeping leadership’s trust and avoiding unforced errors. Getting the insights and expertise of others is essential.

“I have the most amazing mentor,” she said, going on to note that she cold-LinkedIn-messaged him after hearing him speak on a cybersecurity podcast. He responded, they connected, and the rest is history. He was particularly instrumental in helping her navigate the executive planning process as she ramped into her new role. While she wasn’t as well-versed in this area when she started, she leaned on the advice of her mentor and her teammates where she needed to.

“I consider my willingness to very loudly share things that I don’t know how to do to be one of my greatest strengths,” Katie said. “I’m constantly, constantly asking for help, which I think leads to better outcomes,” she continued.

Creating alignment on risk — and budget — priorities

One of the first things Katie’s mentor told her was to rethink the way she went about determining top-priority risks.

“I actually don’t dictate what our top risks are,” Katie said. Instead, she leads and facilitates a security committee and insists on collaborative input.


2022 Planning: A First-Year CISO Shares Her Point of View

Head to our 2022 Planning series page for more – full replay available soon!

“You basically lay out the facts and let people decide what the company’s risk appetite is,” she explained. “They’re going to try to get you to tell them what the biggest risks are,” she went on to say. But if you simply dictate the risk priorities unilaterally, it’s easy to lose buy-in as the months go on.

“They don’t really feel ownership over that work,” Katie pointed out, “and as soon as other priorities get in the way — you know, the job description that they were hired to do — they drop the security and risk remediation work.”

One of the keys of this setup is to keep the committee small — 6 to 8 people, Katie recommended. The right stakeholders will do a better job of ranking risks than one individual ever could.

Plus, with collective buy-in, getting budget for your security priorities becomes easier. For example, at Attentive, Katie shares a budgeting bucket with the engineering team. If the head of engineering helps decide what the top risks are, that makes it a whole lot less likely that Katie will end up in a tug-of-war with them over resources.

A new CISO’s top 3 priorities for 2022

With a solid structure in place for collaborative risk prioritization, what core components should CISOs include in their 2022 plan? Katie highlighted 3 key areas to put center-stage.

1. Hiring

It’s no secret that there’s a cybersecurity skills shortage, and building a pipeline of talent is critical for the coming year. In Katie’s case, she came in with a map of functions to hire for, job descriptions, and requisitions to post on the website — only to realize she had to rethink her approach. Her mentor suggested she spend 25% of her time interviewing general security candidates, regardless of whether or not she had a specific job opening for them right now.

There are a few reasons why this approach makes sense. As Bob pointed out, when talent is tough to find, you might not be able to bring in people who are mature enough in their careers to fill a specific niche. Plus, at startups and other fast-moving companies, the problem you had in mind when you posted a job listing might be gone by the time you fill the position.

Now, Katie has several evergreen, general cybersecurity job postings that specifically call out that it’s not necessary to have all the skill sets listed. Instead, she prioritizes bringing on talented candidates who can help meaningfully in any of the key areas that matter to the organization.


2022 Planning: A First-Year CISO Shares Her Point of View

2. Compliance

While compliance has become something of a dirty word in some security circles, Katie believes it can provide a great floor for a security program. The key is to do it thoughtfully.

After all, working toward a compliance certification like SOC 2 provides a clear priority that you can act on and show progress toward. If you design the components and controls you’re using carefully around this framework — and steer clear of the companies that tell you they can get you SOC 2-compliant in a month — you’ll avoid having a bunch of check-boxes and instead build a solid base of accountability.

For example, are all your assets really encrypted at rest? If you’re touting SOC 2 compliance and actively controlling for those requirements, you’ll know — and be able to remediate quickly if needed.

3. Identifying your top risks

Let’s face it: If you’re a new CISO, you’re going to need to go a board meeting some time soon (if you haven’t already) and explain what your organization’s most urgent risks are — and what you’re doing to fix them.

Build an initial risk matrix, and take your findings to your security committee for input and prioritization. From there, you’ll have a solid foundation to work from that will help you show the board, leadership, and yourself how you and your team are progressing toward your 2022 priorities.

Measuring success

While others tend to favor quantitative metrics in charting their security plan’s progress, Katie suggested going a level above that. The scores and numbers that make sense to security pros might not resonate with the CTO or other leadership.

“The best way for me to measure progress is probably in looking at risk management,” she said. “It’s my job to mitigate risks at an acceptable level.”

The top risks you identify for 2022 should be improving over time — and by 2023, you should have new ones. If you’re able to leave last year’s risks behind and move onto new ones, that’s a good sign you’re making progress. And if you need help in charting that course, don’t be afraid to rely on others’ expertise.

“LinkedIn-message random people and be like, ‘How do I do my job?'” Katie recommended, only half-jokingly. “Don’t be shy,” she went on to insist. “No one knows everything.”

So far, the collaborative, advice-seeking strategy is working out for Katie. It won’t be long before her own LinkedIn inbox is full of first-year CISOs looking to learn how a seasoned pro gets it done.

Want more 2022 planning tips from industry experts?

Sign up for our webinar series

Insulating AWS Outposts Workloads from Amazon EC2 Instance Size, Family, and Generation Dependencies

Post Syndicated from Emma White original https://aws.amazon.com/blogs/compute/insulating-aws-outposts-workloads-from-amazon-ec2-instance-size-family-and-generation-dependencies/

This post is written by Garry Galinsky, Senior Solutions Architect.

AWS Outposts is a fully managed service that offers the same AWS infrastructure, AWS services, APIs, and tools to virtually any datacenter, co-location space, or on-premises facility for a truly consistent hybrid experience. AWS Outposts is ideal for workloads that require low-latency access to on-premises systems, local data processing, data residency, and application migration with local system interdependencies.

Unlike AWS Regions, which offer near-infinite scale, Outposts are limited by their provisioned capacity, EC2 family and generations, configured instance sizes, and availability of compute capacity that is not already consumed by other workloads. This post explains how Amazon EC2 Fleet can be used to insulate workloads running on Outposts from EC2 instance size, family, and generation dependencies, reducing the likelihood of encountering an error when launching new workloads or scaling existing ones.

Product Overview

Outposts is available as a 42U rack that can scale to create pools of on-premises compute and storage capacity. When you order an Outposts rack, you specify the quantity, family, and generation of Amazon EC2 instances to be provisioned. As of this writing, five EC2 families, each of a single generation, are available on Outposts (m5, c5, r5, g4dn, and i3en). However, in the future, more families and generations may be available, and a given Outposts rack may include a mix of families and generations. EC2 servers on Outposts are partitioned into instances of homogenous or heterogeneous sizes (e.g., large, 2xlarge, 12xlarge) based on your workload requirements.

Workloads deployed through AWS CloudFormation or scaled through Amazon EC2 Auto Scaling generally assume that the required EC2 instance type will be available when the deployment or scaling event occurs. Although in the Region this is a reasonable assumption, the same is not true for Outposts. Whether as a result of competing workloads consuming the capacity, the Outpost having been configured with limited capacity for a given instance size, or an Outpost update resulting in instances being replaced with a newer generation, a deployment or scaling event tied to a specific instance size, family, and generation may encounter an InsufficentInstanceCapacity error (ICE). And this may occur even though sufficient unused capacity of a different size, family, or generation is available.

EC2 Fleet

Amazon EC2 Fleet simplifies the provisioning of Amazon EC2 capacity across different Amazon EC2 instance types and Availability Zones, as well as across On-Demand, Amazon EC2 Reserved Instances (RI), and Amazon EC2 Spot purchase models. A single API call lets you provision capacity across EC2 instance types and purchase models in order to achieve the desired scale, performance, and cost.

An EC2 Fleet contains a configuration to launch a fleet, or group, of EC2 instances. The LaunchTemplateConfigs parameter lets multiple instance size, family, and generation combinations be specified in a priority order.

This feature is commonly used in AWS Regions to optimize fleet costs and allocations across multiple deployment strategies (reserved, on-demand, and spot), while on Outposts it can be used to eliminate the tight coupling of a workload to specific EC2 instances by specifying multiple instance families, generations, and sizes.

Launch Template Overrides

The EC2 Fleet LaunchTemplateConfigs definition describes the EC2 instances required for the fleet. A specific parameter of this definition, the Overrides, can include prioritized and/or weighted options of EC2 instances that can be launched to satisfy the workload. Let’s investigate how you can use Overrides to decouple the EC2 size, family, and generation dependencies.

Overriding EC2 Instance Size

Let’s assume our Outpost was provisioned with an m5 server. The server is the equivalent of an m5.24xlarge, which can be configured into multiple instances. For example, the server can be homogeneously provisioned into 12 x m5.2xlarge, or heterogeneously into 1 x m5.8xlarge, 3 x m5.2xlarge, 8 x m5.xlarge, and 4 x m5.large. Let’s assume the heterogeneous configuration has been applied.

Our workload requires compute capacity equivalent to an m5.4xlarge (16 vCPUs, 64 GiB memory), but that instance size is not available on the Outpost. Attempting to launch this instance would result in an InsufficentInstanceCapacity error. Instead, the following LaunchTemplateConfigs override could be used:

"Overrides": [
    {
        "InstanceType": "m5.4xlarge",
        "WeightedCapacity": 1.0,
        "Priority": 1.0
    },
    {
        "InstanceType": "m5.2xlarge",
        "WeightedCapacity": 0.5,
        "Priority": 2.0
    },
    {
        "InstanceType": "m5.8xlarge",
        "WeightedCapacity": 2.0,
        "Priority": 3.0
    }
]

The Priority describes our order of preference. Ideally, we launch a single m5.4xlarge instance, but that’s not an option. Therefore, in this case, the EC2 Fleet would move to the next priority option, an m5.2xlarge. Given that an m5.2xlarge (8 vCPUs, 32 GiB memory) offers only half of the resource of the m5.4xlarge, the override includes the WeightedCapacity parameter of 0.5, resulting in two m5.2xlarge instances launching instead of one.

Our overrides include a third, over-provisioned and less preferable option, should the Outpost lack two m5.2xlarge capacity: launch one m5.8xlarge. Operating within finite resources requires tradeoffs, and priority lets us optimize them. Note that had the launch required 2 x m5.4xlarge, only one instance of m5.8xlarge would have been launched.

Overriding EC2 Instance Family

Let’s assume our Outpost was provisioned with an m5 and a c5 server, homogeneously partitioned into 12 x m5.2xlarge and 12 x c5.2xlarge instances. Our workload requires compute capacity equivalent to a c5.2xlarge instance (8 vCPUs, 16 GiB memory). As our workload scales, more instances must be launched to meet demand. If we couple our workload to c5.2xlarge, then our scaling will be blocked as soon as all 12 instances are consumed. Instead, we use the following LaunchTemplateConfigs override:

"Overrides": [
    {
        "InstanceType": "c5.2xlarge",
        "WeightedCapacity": 1.0,
        "Priority": 1.0
    },
    {
        "InstanceType": "m5.2xlarge",
        "WeightedCapacity": 1.0,
        "Priority": 2.0
    }
]

The Priority describes our order of preference. Ideally, we scale more c5.2xlarge instances, but when those are not an option EC2 Fleet would launch the next priority option, an m5.2xlarge. Here again the outcome may result in over-provisioned memory capacity (32 vs 16 GiB memory), but it’s a reasonable tradeoff in a finite resource environment.

Overriding EC2 Instance Generation

Let’s assume our Outpost was provisioned two years ago with an m5 server. Since then, m6 servers have become available, and there’s an expectation that m7 servers will be available soon. Our single-generation Outpost may unexpectedly become multi-generation if the Outpost is expanded, or if a hardware failure results in a newer generation replacement.

Coupling our workload to a specific generation could result in future scaling challenges. Instead, we use the following LaunchTemplateConfigs override:

"Overrides": [
    {
        "InstanceType": "m6.2xlarge",
        "WeightedCapacity": 1.0,
        "Priority": 1.0
    },
    {
        "InstanceType": "m5.2xlarge",
        "WeightedCapacity": 1.0,
        "Priority": 2.0
    },
    {
        "InstanceType": "m7.2xlarge",
        "WeightedCapacity": 1.0,
        "Priority": 3.0
    }

]

Note the Priority here, our preference is for the current generation m6, even though it’s not yet provisioned in our Outpost. The m5 is what would be launched now, given that it’s the only provisioned generation. However, we’ve also future-proofed our workload by including the yet unreleased m7.

Deploying an EC2 Fleet

To deploy an EC2 Fleet, you must:

  1. Create a launch template, which streamlines and standardizes EC2 instance provisioning by simplifying permission policies and enforcing best practices across your organization.
  2. Create a fleet configuration, where you set the number of instances required and specify the prioritized instance family/generation combinations.
  3. Launch your fleet (or a single EC2 instance).

These steps can be codified through AWS CloudFormation or executed through AWS Command Line Interface (CLI) commands. However, fleet definitions cannot be implemented by using the AWS Console. This example will use CLI commands to conduct these steps.

Prerequisites

To follow along with this tutorial, you should have the following prerequisites:

Create a Launch Template

Launch templates let you store launch parameters so that you do not have to specify them every time you launch an EC2 instance. A launch template can contain the Amazon Machine Images (AMI) ID, instance type, and network settings that you typically use to launch instances. For more details about launch templates, reference Launch an instance from a launch template .

For this example, we will focus on these specifications:

  • AMI image ImageId
  • Subnet (the SubnetId associated with your Outpost)
  • Availability zone (the AvailabilityZone associated with your Outpost)
  • Tags

Create a launch template configuration (launch-template.json) with the following content:

{
    "ImageId": "<YOUR-AMI>",
    "NetworkInterfaces": [
        {
            "DeviceIndex": 0,
            "SubnetId": "<YOUR-OUTPOST-SUBNET>"
        }
    ],
    "Placement": {
        "AvailabilityZone": "<YOUR-OUTPOST-AZ>"
    },
    "TagSpecifications": [
        {
            "ResourceType": "instance",
            "Tags": [
                {
                    "Key": "<YOUR-TAG-KEY>",
                    "Value": "<YOUR-TAG-VALUE>"
                }
            ]
        }
    ]
}

Create your launch template using the following CLI command:

aws ec2 create-launch-template \
  --launch-template-name <YOUR-LAUNCH-TEMPLATE-NAME> \
  --launch-template-data file://launch-template.json

You should see a response like this:

{
    "LaunchTemplate": {
        "LaunchTemplateId": "lt-010654c96462292e8",
        "LaunchTemplateName": "<YOUR-LAUNCH-TEMPLATE-NAME>",
        "CreateTime": "2021-07-12T15:55:00+00:00",
        "CreatedBy": "arn:aws:sts::<YOUR-AWS-ACCOUNT>:assumed-role/<YOUR-AWS-ROLE>",
        "DefaultVersionNumber": 1,
        "LatestVersionNumber": 1
    }
}

The value for LaunchTemplateId is the identifier for your newly created launch template. You will need this value lt-010654c96462292e8 in the subsequent step.

Create a Fleet Configuration

Refer to Generate an EC2 Fleet JSON configuration file for full documentation on the EC2 Fleet configuration.

For this example, we will use this configuration to override a mix of instance size, family, and generation. The override includes three EC2 instance types:

  • m5.large, the instance family and generation currently available on the Outpost.
  • m6.large, a forthcoming family and generation not yet available for Outposts.
  • m7.large, a potential future family and generation.

Create an EC2 fleet configuration (ec2-fleet.json) with the following content (note that the LaunchTemplateId was the value returned in the prior step):

{
    "TargetCapacitySpecification": {
        "TotalTargetCapacity": 1,
        "OnDemandTargetCapacity": 1,
        "SpotTargetCapacity": 0,
        "DefaultTargetCapacityType": "on-demand"
    },
    "OnDemandOptions": {
        "AllocationStrategy": "prioritized",
        "SingleInstanceType": true,
        "SingleAvailabilityZone": true,
        "MinTargetCapacity": 1
    },
    "LaunchTemplateConfigs": [
        {
            "LaunchTemplateSpecification": {
                "LaunchTemplateId": "lt-010654c96462292e8",
                "Version": "1"
            },
            "Overrides": [
                {
                    "InstanceType": "m6.2xlarge",
                    "WeightedCapacity": 1.0,
                    "Priority": 1.0
                },
                {
                    "InstanceType": "c5.2xlarge",
                    "WeightedCapacity": 1.0,
                    "Priority": 2.0
                },
                {
                    "InstanceType": "m5.large",
                    "WeightedCapacity": 0.25,
                    "Priority": 3.0
                },
                {
                    "InstanceType": "m5.2xlarge",
                    "WeightedCapacity": 1.0,
                    "Priority": 4.0
                },
                {
                    "InstanceType": "r5.2xlarge",
                    "WeightedCapacity": 1.0,
                    "Priority": 5.0
                }


            ]
        }
    ],
    "Type": "instant"
}

Launch the Single Instance Fleet

To launch the fleet, execute the following CLI command (this will launch a single instance, but a similar process can be used to launch multiple):

aws ec2 create-fleet \
  --cli-input-json file://ec2-fleet.json

You should see a response like this:

{
    "FleetId": "fleet-dc630649-5d77-60b3-2c30-09808ef8aa90",
    "Errors": [
        {
            "LaunchTemplateAndOverrides": {
                "LaunchTemplateSpecification": {
                    "LaunchTemplateId": "lt-010654c96462292e8",
                    "Version": "1"
                },
                "Overrides": {
                    "InstanceType": "m6.2xlarge",
                    "WeightedCapacity": 1.0,
                    "Priority": 1.0
                }
            },
            "Lifecycle": "on-demand",
            "ErrorCode": "InvalidParameterValue",
            "ErrorMessage": "The instance type 'm6.2xlarge' is not supported in Outpost 'arn:aws:outposts:us-west-2:111111111111:outpost/op-0000ffff0000fffff'."
        },
        {
            "LaunchTemplateAndOverrides": {
                "LaunchTemplateSpecification": {
                    "LaunchTemplateId": "lt-010654c96462292e8",
                    "Version": "1"
                },
                "Overrides": {
                    "InstanceType": "c5.2xlarge",
                    "WeightedCapacity": 1.0,
                    "Priority": 2.0
                }
            },
            "Lifecycle": "on-demand",
            "ErrorCode": "InsufficientCapacityOnOutpost",
            "ErrorMessage": "There is not enough capacity on the Outpost to launch or start the instance."
        }
    ],
    "Instances": [
        {
            "LaunchTemplateAndOverrides": {
                "LaunchTemplateSpecification": {
                    "LaunchTemplateId": "lt-010654c96462292e8",
                    "Version": "1"
                },
                "Overrides": {
                    "InstanceType": "m5.large",
                    "WeightedCapacity": 0.25,
                    "Priority": 3.0
                }
            },
            "Lifecycle": "on-demand",
            "InstanceIds": [
                "i-03d6323c8a1df8008",
                "i-0f62593c8d228dba5",
                "i-0ae25baae1f621c15",
                "i-0af7e688d0460a60a"
            ],
            "InstanceType": "m5.large"
        }
    ]
}

Results

Navigate to the EC2 Console where you will find new instances running on your Outpost. An example is shown in the following screenshot:

EC2 running instances, AWS console, network view, filtered by tag

Although multiple instance size, family, and generation combinations were included in the Overrides, only the c5.large was available on the Outpost. Instead of launching one m6.2xlarge, four c5.large were launched in order to compensate for their lower WeightedCapacity. From the fleet-create response, the overrides were clearly evaluated in priority order with the error messages explaining why the top two overrides were ignored.

Clean up

AWS CLI EC2 commands can be used to create fleets but can also be used to delete them.

To clean up the resources created in this tutorial:

    1. Note the FleetId values returned in the create-fleet command.
    2. Run the following command for each fleet created:
aws ec2 delete-fleets \
  --fleet-ids  \
  --terminate-instances
  1. Note the launch-template-name used in the create-launch-template command.
  2. Run the following command for each fleet created:
{
    "SuccessfulFleetDeletions": [
        {
            "CurrentFleetState": "deleted_terminating",
            "PreviousFleetState": "active",
            "FleetId": "fleet-dc630649-5d77-60b3-2c30-09808ef8aa90"
        }
    ],
    "UnsuccessfulFleetDeletions": []
}
  1. Clean up any resources you created for the prerequisites.

Conclusion

This post discussed how EC2 Fleet can be used to decouple the availability of specific EC2 instance sizes, families, and generation from the ability to launch or scale workloads. On an Outpost provisioned with multiple families of EC2 instances (say m5 and c5) and different sizes (say m5.large and m5.2xlarge), EC2 Fleet can be used to satisfy a workload launch request even if the capacity of the preferred instance size, family, or generation is unavailable.

To learn more about AWS Outposts, check out the Outposts product page. To see a full list of pre-defined Outposts configurations, visit the Outposts pricing page

Interview for FAKTI.bg Assen Yordanov: If a lustration law had been passed, Bulgaria would not be in this state

Post Syndicated from Екип на Биволъ original https://bivol.bg/assen-yordanov-if-a-lustration-law-had-been-passed-bulgaria-would-not-be-in-this-state.html

петък 19 ноември 2021


Interview by Peter Zdravkov (FAKTI.bg)  Thirty-two years after 10 November 1989 Bulgaria has changed a lot but at the same time, looking at that change, many more opportunities to transform…

Make Room for Cloud Security in Your 2022 Budget

Post Syndicated from Shelby Matthews original https://blog.rapid7.com/2021/11/19/make-room-for-cloud-security-in-your-2022-budget/

Make Room for Cloud Security in Your 2022 Budget

Are you thinking about cloud security when making your 2022 budget? You should be. Cloud is the key to innovation and business transformation. It can make life so much easier. The cloud enables companies to expand their products or services, rapidly develop new products, and reach new customers. In fact, 70% of companies that have moved to the cloud plan on increasing their budgets in the future.

But the cloud can also bring unwanted problems. Hackers have figured out new creative ways to get to your data, human error causes misconfigurations, and security is often implemented too far down the workflow.

Cloud security is growing

In the recent years, there has been a growing reliance on cloud-based services as more companies have adopted the cloud. According to Rapid7 survey data, 4 out of 5 organizations say cloud adoption was necessary to keep their business competitive. The global cloud security market is estimated to reach $34.8 billion at the end of 2021 and expected to grow 14.2% over the next 5 years.

So, why are companies adopting the cloud?

  • It saves you money. According to TechnologyAdvice, companies can save an average of 15% on technology costs by moving to the cloud.
  • You can work on the go. This is a big one, especially during the pandemic. Employees switched to remote work and the cloud enabled a smooth transition.
  • The cloud adapts to what you want. Want more storage? The cloud can do it. Want to switch to a private network? The cloud can do it.

Our Rapid7 researchers found 121 publicly reported cloud misconfigurations that resulted in data being exposed. Looking at 2021, we are seeing the same patterns of misconfigured buckets that are exposed online. The median number of files being exposed in a breach was 10 million last year. Those files range from small things like names or ages to more serious data like social security numbers and addresses.

2021 has already seen a couple of mega breaches, one exposing over 12 billion records and another two that exposed over a billion. Polecat, a UK reputation firm, exposed over 12 billion records in March after leaving an Elasticsearch server open with no protection. Cybercrimes and attacks have become more sophisticated and security has been slow to adapt. There is a simple solution to keep this from happening to your company: investing in cloud security. Most misconfigurations are the result of human error, and having cloud security tools in place will help mitigate the risk.

What can cloud security look like for you?

So how can you keep your data safe in the cloud? In 2022 and beyond, effective cloud security relies on three core concepts.

  • Shift left: Prevent problems before they even happen by implementing security earlier in your workflows. Having a consistent set of security checkpoints early in your pipeline will stop misconfigurations and policy violations before they deploy.
  • Reduce noise: It’s easy for security professionals to get lost in the noise from constant notifications about tickets being opened and closed or constant alerts that don’t need their attention. Reducing noise means having full visibility into cloud environments.
  • Automation and remediation: Automation is the key to achieving cloud security at the speed of scale. Having automated security resources prevents human error and catches misconfigurations before they are even noticed. InsightCloudSec provides automation tools such as bots that are customizable to fit your needs.

Cloud is the future of technology, and no one wants to be left behind. Invest in cloud security now to ensure that you aren’t featured in our next misconfigurations report. You don’t have to choose between innovation and security anymore.

Security is the next big step in cloud adoption

Learn why in our Trust in the Cloud report

New Rowhammer Technique

Post Syndicated from Bruce Schneier original https://www.schneier.com/blog/archives/2021/11/new-rowhammer-technique.html

Rowhammer is an attack technique involving accessing — that’s “hammering” — rows of bits in memory, millions of times per second, with the intent of causing bits in neighboring rows to flip. This is a side-channel attack, and the result can be all sorts of mayhem.

Well, there is a new enhancement:

All previous Rowhammer attacks have hammered rows with uniform patterns, such as single-sided, double-sided, or n-sided. In all three cases, these “aggressor” rows — meaning those that cause bitflips in nearby “victim” rows — are accessed the same number of times.

Research published on Monday presented a new Rowhammer technique. It uses non-uniform patterns that access two or more aggressor rows with different frequencies. The result: all 40 of the randomly selected DIMMs in a test pool experienced bitflips, up from 13 out of 42 chips tested in previous work from the same researchers.

[…]

The non-uniform patterns work against Target Row Refresh. Abbreviated as TRR, the mitigation works differently from vendor to vendor but generally tracks the number of times a row is accessed and recharges neighboring victim rows when there are signs of abuse. The neutering of this defense puts further pressure on chipmakers to mitigate a class of attacks that many people thought more recent types of memory chips were resistant to.

Security updates for Friday

Post Syndicated from original https://lwn.net/Articles/876528/rss

Security updates have been issued by Arch Linux (chromium, grafana, kubectl-ingress-nginx, and opera), Debian (netkit-rsh and salt), Fedora (freeipa and samba), Mageia (opensc, python-django-filter, qt4, tinyxml, and transfig), openSUSE (opera and transfig), Red Hat (devtoolset-11-annobin, devtoolset-11-binutils, and llvm-toolset:rhel8), SUSE (php72 and php74), and Ubuntu (mailman and thunderbird).

Announcing native support for Stripe’s JavaScript SDK in Cloudflare Workers

Post Syndicated from Kristian Freeman original https://blog.cloudflare.com/announcing-stripe-support-in-workers/

Announcing native support for Stripe’s JavaScript SDK in Cloudflare Workers

This post is also available in 日本語, 简体中文.

Announcing native support for Stripe’s JavaScript SDK in Cloudflare Workers

Handling payments inside your apps is crucial to building a business online. For many developers, the leading choice for handling payments is Stripe. Since my first encounter with Stripe about seven years ago, the service has evolved far beyond simple payment processing. In the e-commerce example application I shared last year, Stripe managed a complete seller marketplace, using the Connect product. Stripe’s product suite is great for developers looking to go beyond accepting payments.

Earlier versions of Stripe’s SDK had core Node.js dependencies, like many popular JavaScript packages. In Stripe’s case, it interacted directly with core Node.js libraries like net/http, to handle HTTP interactions. For Cloudflare Workers, a V8-based runtime, this meant that the official Stripe JS library didn’t work; you had to fall back to using Stripe’s (very well-documented) REST API. By doing so, you’d lose the benefits of using Stripe’s native JS library — things like automatic type-checking in your editor, and the simplicity of function calls like stripe.customers.create(), instead of manually constructed HTTP requests, to interact with Stripe’s various pieces of functionality.

In April, we wrote that we were focused on increasing the number of JavaScript packages that are compatible with Workers:

We won’t stop until our users can import popular Node.js libraries seamlessly. This effort will be large-scale and ongoing for us, but we think it’s well worth it.

I’m excited to announce general availability for the stripe JS package for Cloudflare Workers. You can now use the native Stripe SDK directly in your projects! To get started, install stripe in your project: npm i stripe.

This also opens up a great opportunity for developers who have deployed sites to Cloudflare Pages to begin using Stripe right alongside their applications. With this week’s announcement of serverless function support in Cloudflare Pages, you can accept payments for your digital product, or handle subscriptions for your membership site, with a few lines of JavaScript added to your Pages project. There’s no additional configuration, and it scales automatically, just like your Pages site.

To showcase this, we’ve prepared an example open-source repository, showing how you can integrate Stripe Checkout into your Pages application. There’s no additional configuration needed — as we announced yesterday, Pages’ new Workers Functions features allows you to deploy infinitely-scalable functions just by adding a new functions folder to your project. See it in action at stripe.pages.dev, or check out the open-source repository on GitHub.

With the SDK installed, you can begin accepting payments directly in your applications. The below example shows how to initiate a new Checkout session and redirect to Stripe’s hosted checkout page:

const Stripe = require("stripe");

const stripe = Stripe(STRIPE_API_KEY, {
  httpClient: Stripe.createFetchHttpClient()
});

export default {
  async fetch(request) {
    const session = await stripe.checkout.sessions.create({
      line_items: [{
        price_data: {
          currency: 'usd',
          product_data: {
            name: 'T-shirt',
          },
          unit_amount: 2000,
        },
        quantity: 1,
      }],
      payment_method_types: [
        'card',
      ],
      mode: 'payment',
      success_url: `${YOUR_DOMAIN}/success.html`,
      cancel_url: `${YOUR_DOMAIN}/cancel.html`,
    });

    return Response.redirect(session.url)
  }
}

With support for the Stripe SDK natively in Cloudflare Workers, you aren’t just limited to payment processing either. Any JavaScript example that’s currently in Stripe’s extensive documentation works directly in Workers, without needing to make any changes.

In particular, using Workers to handle the multitude of available Stripe webhooks means that you can get better visibility into how your existing projects are working, without needing to spin up any new infrastructure. The below example shows how you can securely validate incoming webhook requests to a Workers function, and perform business logic by parsing the data inside that webhook:

const Stripe = require("stripe");

const stripe = Stripe(STRIPE_API_KEY, {
  httpClient: Stripe.createFetchHttpClient()
});

export default {
  async fetch(request) {
    const body = await request.text()
    const sig = request.headers.get('stripe-signature')
    const event = stripe.webhooks.constructEvent(body, sig, secret)

    // Handle the event
    switch (event.type) {
      case 'payment_intent.succeeded':
        const paymentIntent = event.data.object;
        // Then define and call a method to handle the successful payment intent.
        // handlePaymentIntentSucceeded(paymentIntent);
        break;
      case 'payment_method.attached':
        const paymentMethod = event.data.object;
        // Then define and call a method to handle the successful attachment of a PaymentMethod.
        // handlePaymentMethodAttached(paymentMethod);
        break;
      // ... handle other event types
      default:
        console.log(`Unhandled event type ${event.type}`);
    }

    // Return a response to acknowledge receipt of the event
    return new Response(JSON.stringify({ received: true }), {
      headers: { 'Content-type': 'application/json' }
    })
  }
}

We’re also announcing a new Workers template in partnership with Stripe. The template will help you get up and running with Stripe and Workers, using our best practices.

In less than five minutes, you can begin accepting payments for your next digital product or membership business. You can also handle and validate incoming webhooks at the edge, from a single codebase. This comes with no upfront cost, server provisioning, or any of the standard scaling headaches. Take your serverless functions, deploy them to Cloudflare’s edge, and start making money!

“We’re big fans of Cloudflare Workers over here at Stripe. Between the wild performance at the edge and fantastic serverless development experience, we’re excited to see what novel ways you all use Stripe to make amazing apps.”
— Brian Holt, Stripe

We’re thrilled with this incredible update to Stripe’s JavaScript SDK. We’re also excited to see what you’ll build with native Stripe support in Workers. Join our Discord server and share what you’ve built in the #what-i-built channel — get your invite here.

New Stream Player customizations to boost your video experience

Post Syndicated from Kevin Kipp original https://blog.cloudflare.com/stream-player-customizations-to-boost-your-video-experience/

New Stream Player customizations to boost your video experience

New Stream Player customizations to boost your video experience

When we launched Stream, one of our goals was to provide the most performant video player. We focused on building a player that loads fast, works across different browsers and frameworks, and intelligently switches video quality levels depending on your end user’s connectivity.

We are expanding the Stream Player vision, so you can control the look and feel of the viewing experience. Today, we are announcing a series of new customization options to help you deliver the best video playback experience.

Add Your Own Color

One thing we kept hearing from customers is that they would like to be able to customize the Stream Player to better reflect their brand. Stream Player now supports setting a primary color to match your company’s color. Here is an example of us using the primaryColor property to set the primary color to the Cloudflare Orange.

To use the primaryColor property, simply add it to the iframe URL. In this example, the hex code is #F48120 and the uri-encoded value is %23F48120.

https://iframe.videodelivery.net/fcfa5c97795ba90251cbbae1880a0e18?primaryColor=%23F48120

If you are using the React or Angular wrapper, you can use the primaryColor prop to customize the player color.

Currently, setting the primary color property will change the colors of the play button and the seekbar to the primary color you specify. We plan to offer more ways to brand the Stream Player in the future.

Previously, if you wanted the video to start at a certain point in time, you would need to write custom code that uses the Stream Player SDK to fast-forward the viewer to the precise start time. Stream Player now supports a startTime property, which eliminates the need to load the SDK and write custom code if you simply want to deep link the view to a point-in-time in the video.

Let’s say you run an e-learning platform and would like the instructors to be able to answer questions by deep linking to a specific part of an hour-long video. If you set the new startTime querystring parameter or prop, video playback in the Stream Player will begin at the specified timestamp.

Enable localized captions by default

Cloudflare Stream has long supported video captions for multiple languages. But we heard from customers that they would like to be able to turn on captions by default and specify the default language. This is now natively supported and makes it significantly easier to make your video accessible for a global audience.

If you have a website with localization support, you likely want captions to be turned on with a preset language. Auto-enabling captions can also improve the viewer experience in instances where the video is auto-played while also muted. This is a growing trend and, in fact, Facebook reports that over 85% of videos watched on the platform are played with sound off.

Auto-enabling captions with the Stream Player is now as simple as specifying a language code in the iframe URL.

Revamped Embed Tab

Finally, we’ve revamped the Embed tab, so you can experiment with all the player customization options without writing a single line of code. You can easily configure properties like the poster image and primary color from the Embed tab. The Embed tab lets you see an instant preview of the customized player and provides the embed code that you can paste in your app or website.

Stream users often struggled with setting the perfect poster image for individual videos. The process would involve watching the video, finding the right timestamp to use as a cover image, reading the API docs and finally, modifying the query parameters manually until you land on the right cover image. With the new enhancements, you can play the video to the right point in the video and click Copy from player to set the poster image timestamp.

New Stream Player customizations to boost your video experience

We are just starting our journey of making the Stream Player super customizable. If you have a particular customization that you’d like to see supported, we’d love to hear from you.

Launching a Startup on Cloudflare Workers

Post Syndicated from Erwin van der Koogh original https://blog.cloudflare.com/developer-spotlight-tejas-metha-cclip/

Launching a Startup on Cloudflare Workers

Launching a Startup on Cloudflare Workers

Closing out the Developer Spotlight series for this week is Tejas Mehta who shares how he built his startup, cClip.

cClip is a great tool that allows you to “copy/paste” and transfer files between any of your devices, regardless of what OS they run.

What is so interesting about cClip though is that it is a fully serverless application built on top of Workers and KV, but not exclusively. It uses Firebase for authentication, RevenueCat for a consolidated view over the Apple and Google Play store, and Stripe for all other billing related work.

This is a peek into the future of application development. This is a future where we will be “importing” other SaaS applications as easily as we currently import a package from a package manager. And not only unidirectional by calling APIs on that external application, but bi-directional communication through events with Webhooks.

Here is Tejas telling his story.

The origins of cClip

The abrupt transition to virtual schooling last year led to all my school communications and assignments transitioning online. With a MacBook laptop and an Android phone, submitting my precalculus homework meant I had to take a picture of each page, email each picture to myself, access the email on my computer, and finally upload each file to the submission portal. Doing this once or twice? It was no issue. Doing this every day for the rest of my sophomore and junior years? Just the thought of that got on my nerves.

This led me to make cClip, a simple transfer tool that sends images and links from my phone to my laptop. After a few friends saw it, they wanted it too, and that was when I realized it could bring enhanced productivity and platform-agnostic fluidity to a multitude of virtual workspaces.

After adding in end-to-end encryption, live-time updates, and a subscription model, I debuted cClip to the public.

Architecture

As Erwin mentioned, the architecture for cClip isn’t just Workers, but it integrates with a few other SaaS products as well. I use RevenueCat to easily integrate with the mobile app stores and Stripe via Webhooks. Firebase is used for both authentication and messaging, and, lastly, B2 for cloud storage. (At least until R2 is available!)

And of course we need clients for every single platform.

In a diagram it looks something like this:

Launching a Startup on Cloudflare Workers

The Clients

One of the major challenges was to create clients for every single OS and platform out there. At a minimum, we would need both an iOS and Android app, a Windows, Mac, and a web application.

Flutter to the rescue

Flutter is a cross-platform application development framework. It allowed me to have a single codebase for the UI and a majority of the logic, while allowing some specific portions, like encryption, to be able to interface with the platform-specific libraries.

Both iOS and Android are well-supported by Flutter, but Flutter Web was still relatively new. I had to use a bunch of JavaScript for tasks such as encryption, because Flutter Web doesn’t have WebWorker support yet, and file uploads and downloads. I wanted to use StreamSaver.js for streamed decryption to download to save on memory consumption for larger files.

Additionally, using Flutter Web allowed me to create an Electron app for Windows or Linux Users if they desired a native app for cClip instead of accessing the website.

macOS

macOS has its own application, written in Swift, which was built before the web one and further maintained for its performance benefits. The macOS and iOS applications share code for password hashing, file uploads and downloads, and encryption.

Backend

cClip uses five main backend technologies: Backblaze B2, Firebase Auth, Firebase Database, RevenueCat, and Cloudflare Workers. Workers acts as the main bridge between all backend services, whether in the contexts of access control or subscription management.

Authentication and Authorization

The authentication flow starts by using Firebase Authentication to validate a user’s identity through a sign in with Google, Apple, or Email/Password and uses Workers for all sensitive API calls. Workers validates the identity of the caller using the ‘idToken’ provided by Firebase, which is a JWT that contains the user’s UID when decoded successfully. Each sensitive operation, such as upload/download file, subscribe/unsubscribe, etc., is put behind Workers, which validates the JWT provided as a ‘Token’ header in the correlating API call before performing the operation itself.

Workers handles all access control after a user has been authenticated, such as ensuring the user can access a file at a given location or updating a user’s subscription status when notified by RevenueCat.

Workers acts as a gatekeeper for a user’s upload or download authorizations. When the request is sent, Workers verifies the user’s identity, checks the requested location, and the user’s subscription status. If all three check out, Workers authorize the requested action with B2 and return the corresponding information.

Storage and Messaging

Because files could be larger than 25MB, it wasn’t practical to store them in Workers KV, so I chose B2 Cloud Storage. B2 Cloud Storage is part of the Bandwidth Alliance with Cloudflare, which meant I wouldn’t be paying any egress fees for those files, which is a nice bonus.

As mentioned above, the Worker in front of B2 does all the authentication and authorization for both uploads, downloads, and any other B2 operation.

Firebase is used for real-time communication with all clients. Subscription information is stored there, for example, and we use the Cloud Messaging APIs to send notifications to different clients when necessary.

Subscription Management

Of course a large part of any SaaS application is spent dealing with billing and subscriptions. Luckily, RevenueCat simplifies that a lot and gives you one place for all information related to the mobile app stores and Stripe.

That meant I only had to implement one set of Webhooks to receive events from all three providers, and all received events followed the same format.

Most of the outgoing subscription API calls also go through RevenueCat, but there are a few edge-cases where we need a direct connection to Stripe and the Google Play Store.

Biggest Challenges

Cross-platform subscriptions

Cross-platform subscriptions, or the synchronization of a user’s subscription across every platform, were a HUGE challenge. Everything had to be integrated perfectly, from ensuring double subscriptions don’t occur to live-time changes for status. RevenueCat simplified the process substantially, but I still had to manage cross-platform cancellations and updates. I managed this by storing the status in Firebase Database and having the user listen for updates on their end. The information was write-locked to allow only the verified Worker update to modify statuses to prevent any status spoofs.

File Quotas

Another tough challenge was file storage tracking. In my initial planning, I learned B2’s API doesn’t support any getters for a directory’s storage total and needs to sum up all file values returned with the ‘b2_list_file_names’ API. This was costly, in terms of time and money, as the API is classed as one of the more expensive operations. On top of that, the API would’ve been called each time a user uploads or deletes a file. As a result I created a counter that synchronizes with B2 on different file modifications (uploads or deletion), which is stored in Firebase’s Database by the Worker to allow for real-time updates on a user’s device through Firebase’s SDK change listeners.

However, I wanted to ensure  users couldn’t modify their used storage count and that every upload operation was valid to verify users had enough storage available for the file. The app interacts with Workers first, and upon determining that the user has enough storage, returns an authorization for upload.

Overall experience

Workers & KV acted as a core solution to save on costly API calls and provide a completely serverless backend for cClip. On top of the quick nature of the platform, testing changes was extremely easy and needed just a quick preview or staging environment to test the newest changes to my API.

My biggest challenge with Workers was the lack of a Stripe library, as the node.js Stripe isn’t Workers compatible yet, but I used the Stripe API endpoints directly with fetch which worked without any issues. It is great, however, to see that Stripe launched their Workers-compatible SDK earlier today!

I am currently working on a revamped implementation of cClip Direct, the peer-to-peer transfer protocol that allows you to share any file across devices. Using Workers to manage notifications and signaling, the initial handshake process has been reworked, and I am looking to move the real-time communication from Firebase to Durable Objects and WebSockets. And of course, I can’t wait to try out R2 when that becomes available.

It has been so great to see an application that I made to scratch my own itch was able to scale into a fully fledged product without any problems whatsoever.

Thank you for following along with our Developer Spotlight series this week. We hope you enjoyed reading about how our customers are using the Cloudflare ecosystem to solve interesting problems. We are looking to do more spotlights in the future, so if you want to read more of these, or have a use-case you want us to write about, feel free to let me know on Twitter or any of the discussions linked below.

An Open-Source CMS on the Cloudflare Stack: Introductory Post

Post Syndicated from Luke Edwards original https://blog.cloudflare.com/production-saas-intro/

An Open-Source CMS on the Cloudflare Stack: Introductory Post

An Open-Source CMS on the Cloudflare Stack: Introductory Post

The Cloudflare documentation is a great resource when learning concepts, reviewing API usage notes, or when you’re in need of a concise snippet to illustrate those APIs or concepts. But, as comprehensive as it is, new users to the Cloudflare Workers platform must bridge a large gap to go from the introductory example snippets to a real, production-ready application. While some of this may be specific to Workers (as with any platform), developers everywhere are figuring out how applications should be built in a serverless world. Building large serverless applications entails a learning curve journey, regardless of a developer’s experience level.

At Cloudflare, we’re intimately aware of this because we also had to go through the same transition. Our engineers are world-class and expertfully design and craft products that compliment the distributed paradigm… but experts aren’t born overnight! We have been there, and we want to help jumpstart and aid others’ understanding.

With this in mind, we decided to do something unique to the industry: we are developing an example feature-complete SaaS application that will be built entirely on the Cloudflare stack. It is and will continue to be completely free, open-sourced on GitHub, and developed in public. This will be an incredible time as it can be used as a template for launching your own SaaS applications, too! In fact, you can clone the GitHub repository, update a few service tokens, and deploy the pre-built application to your own Cloudflare account within minutes!

Of course, examples and templates are great, but technologies and best practices never stop evolving. Cloudflare is no exception and is constantly iterating and introducing new products and product features. By extension, this requires the SaaS application to be a living example that evolves alongside the Workers platform — and this is part of our commitment.

|| Don’t miss out! Watch the project on GitHub to track its development progress and stay current with our latest changes and recommendations.

Application Overview

Now, aside from actually building the application, we needed to find a balance between picking an example SaaS application that is both complex enough to serve as a convincing case study and simple — or self-contained — enough so that developers can quickly dive in, follow the source, and understand the components involved and the reasons why and/or how they are used.

Ultimately we decided to build an example content management system (CMS) which, as an application archetype, has also transformed over the years. Traditionally, a CMS operated on rented hardware, which was home to a long-lived server that handled incoming requests and queried an SQL-like database in order to retrieve the requested content, render it to an HTML page, and repeat the process over and over again. WordPress was — and still is — a very common example of this approach.

Naturally, this application architecture was improved over the years: layers of caching were introduced, database schemas were redesigned to minimize the number of rows processed, and some frameworks began to skip the database entirely, preferring a build-step to render all content upfront as static HTML pages. (This is now known as “static-site generation” and is still a very popular approach.)

Today, in the serverless era, there are a number of “headless CMS” options available. These are made “headless” because they are not monolithic web servers that render HTML for each request. Instead, they offer API endpoints that will return the content as raw JSON data. This allows web developers to build completely custom templates for their website using whatever tools and/or frameworks they prefer. This approach grants an enormous amount of flexibility to the developer without losing the ability to organize their content, image assets, etc. WordPress, the seasoned veteran, is one of few that is able to offer a headless and a “headful” mode. Other headless choices, like Sanity.io and Contentful, are also quite popular.

The CMS application model is a great case study for our open-source example. One of the primary tenets of an edge-first design is that content should be made available as close as physically possible to the users asking for it. And the serverless architecture means that there’s no longer — or should not be — a single point of failure. These both directly benefit the CMS archetype and, when implemented, will yield clear performance gains.

Current Progress

Before diving into the roadmap and explaining how this project will progress, it’s important to call out that this project has already been — and will continue to be — an ongoing effort! Today, you can find the project on GitHub and inspect the work that’s already been completed. As of now, the application already combines Workers, Workers KV, Cloudflare for SaaS, and Rate Limiting with Pages and Durable Objects additions to come in later milestones.

Phase 1 (see below) is nearing completion and, when finished, will mark the end of a very significant milestone. A new update to this blog post series will be issued, covering the highlights and technical overview of the project so far. This is important and immediately useful because on its own, Phase 1 qualifies for a successful, full-stack application.

Development Milestones

The CMS application will progress in milestones. We have already released the project and will continue to build upon it in accordance with the roadmap (below). GitHub stargazers will be able to keep tabs on its progress, or at the very least, only subscribe to updates for the milestones they’re interested in following.

Each milestone is a sizable checkpoint on its own. As you’ll see below, the project roadmap is planned in a way such that each phase adds a considerable amount of new features and/or integrates with a new Cloudflare product. At every point, the application will remain functional and maintain a live, interactive demo to immediately demonstrate the latest functionality to passersby.

This format is chosen because it’s how real applications — and real products — are developed. Our goal is to ensure that the GitHub repository is never out of date. And, because of the development structure, one may always traverse the list of past milestones to review the changes that were necessary to migrate X or how product Y was integrated.

|| Note: Visit the GitHub milestones to view more details and to subscribe for updates. There is so much more than can be listed here.

Phase 1 – JSON API

The project must begin with some API endpoints to start managing and manipulating data. Using Workers and Workers KV, the work within this milestone will focus on building a robust JSON API that handles the core functionality that the rest of the application will need.

There is no HTML, CSS, or client-side JavaScript involved in this phase. Instead, work here should focus solely on the data: how it’s accessed, how models relate to one another, and how best to structure and store these relationships within Workers KV. For example, individuals should be able to create and manage workspaces that belong to their personal user accounts or to the organization(s) that they belong to.

Additionally, when creating content, the document should be validated against an existing schema that the document was assigned. This feature is critical in any CMS platform that plans to handle thousands of documents within a workspace. Without it, there’s very little confidence that your contents’ JSON representation is consistently structured.

A number of other features are planned — subscription management and invoicing through Stripe, sending transactional emails through SendGrid, and assigning vanity domains to workspaces through Cloudflare for SaaS. Finally, of course, the standard house-keeping tasks will be set up. This includes continuous integration (CI) with API testing and automated, continuous deployments (CD).

An Open-Source CMS on the Cloudflare Stack: Introductory Post

By the end of this phase, the project will exist as a collection of API endpoints that, on its own, is a complete application. While it may only be accessible through curl commands — or any other preferred method for manually constructing HTTP requests, the completion of Phase 1 already qualifies the project as a full-stack application and could serve a real-world SaaS product.

Additionally, the repository will include all the best practices for writing tests, automating deployments, and organizing the source in a way for long-term growth and maintenance. And, because we started with the JSON API, the project is immediately useful and capable of integrating with your existing build tools and frameworks. In other words, stargazers could deploy the project to their own accounts as their own personalized Headless CMS. Perhaps some of you will build Gatsby or Eleventy plugins — if you do, please let us know!

Phase 2 — Dashboard UI

As fun as curl may be, most people prefer some form of visual interface they can interact with. This phase will be all about assembling a frontend to serve as the CMS application’s dashboard.

We will use Svelte, a JavaScript framework for building user interfaces. While not everyone may enjoy or agree with this decision, the templating syntax resembles standard HTML markup, which will allow non-frontend developers to follow along and gauge what’s going on.

Svelte will be paired with Tailwind CSS for the design system. Tailwind is a very popular, utility-first CSS framework that allows developers to compose styles through predefined, reusable HTML ”class” names.

The result will be a single-page application (SPA) and will be hosted on Cloudflare Pages. This means that, out of the box, the dashboard will be able to take advantage of Access-protected preview deployments, instant rollbacks, automated deployments, comprehensive analytics, and more.

An Open-Source CMS on the Cloudflare Stack: Introductory Post

Finally, now that Pages integrates with Workers directly, the JSON API from Phase 1 will migrate into a new repository structure. While this may seem like an innocent refactor, it actually unlocks an incredible set of features for the JSON API: Access-protected preview deployments, instant rollbacks, and automated deployments. Yes — these are the same Pages features mentioned above! This is amazing because it means that our API is continuously and atomically versioned, allowing its development to continue safely alongside the client dashboard that depends on it. In other words, there is zero risk of the API and the dashboard diverging, which would have allowed their expectations of one another to misalign. Instant rollbacks will also apply to the API since the entire application operates as a single Pages unit.

The previous phase will have built the core SaaS product functionality, but completing this phase will make it feel like a real-world product that can be launched and used on a daily basis. In fact, the end of Phase 2 marks the application as a possible contender in the Headless CMS service space.

Phase 3 — Article Edge-Rendering

The previous phases are focused on assembling a minimum viable Headless CMS product, but Phase 3 looks to grow outside this archetypal box. This will happen by allowing the application to render HTML web pages by injecting the JSON content into predefined templates.

Like WordPress, the CMS application should allow its users to choose whether they want to continue using the “headless” feature or enlist the complete template engine. Should they opt for HTML output, the Cloudflare project will only include a few premade templates that a user may select from — but, of course, this can be customized in your own projects.

Even though this phase reintroduces the monolithic CMS archetype, it’s a significantly safer, faster, and more resilient architecture than the single, all-in-one server of yesteryear. The CMS contents will still be distributed around the world, close to the customers’ readers — but now, the content can be rendered from anywhere in the world at extremely low latencies, too.

Phase 4 — Feature Upgrades

At this stage, the application is — for the most part — complete. It’s functional, looks nice, performs well globally, and can be used in two very distinct ways.

In the context of a real SaaS product, development begins to shift towards adding new features that excite users or towards maintenance health of the project. For example, Phase 4 will utilize Durable Objects to introduce a document editor that allows multiple users to edit the same document in a real-time, collaborative environment.

It’s also very likely that Cloudflare R2 Storage will be introduced as a backend for media assets, allowing users to upload and manage images within a workspace. Or perhaps we decide to use Cloudflare Images for this and R2 is used for importing and exporting content backups.

As you may expect, this milestone is full of unknowns, but that’s because the future holds unlimited possibilities. The project will continue to evolve and expand with Cloudflare and with time.

Of course, if you have ideas or suggestions for features, start a discussion with us on GitHub. We would love to hear from you!

Next Steps

This was the introductory post of (what will be) an ongoing series. When each milestone is completed, we will publish a new post in this series with a retrospective and with technical walkthroughs of key aspects from that chapter’s work.

We’re at the beginning of an exciting journey, and we hope you’re as interested as we are!

You can show your support by starring or following the project on GitHub. All releases, discussions, and milestone tracking will reside within the repository. The next generation of SaaS applications will be built on Cloudflare — subscribe and dive in early!

Build your next video application on Cloudflare

Post Syndicated from Jonathan Kuperman original https://blog.cloudflare.com/build-video-applications-cloudflare/

Build your next video application on Cloudflare

Build your next video application on Cloudflare

Historically, building video applications has been very difficult. There’s a lot of complicated tech behind recording, encoding, and playing videos. Luckily, Cloudflare Stream abstracts all the difficult parts away, so you can build custom video and streaming applications easily. Let’s look at how we can combine Cloudflare Stream, Access, Pages, and Workers to create a high-performance video application with very little code.

Today, we’re going to build a video application inspired by Cloudflare TV. We’ll have user authentication and the ability for administrators to upload recorded videos or livestream new content. Think about being able to build your own YouTube or Twitch using Cloudflare services!

Fetching a list of videos

On the main page of our application, we want to display a list of all videos. The videos are uploaded and stored with Cloudflare Stream, but more on that later! This code could be changed to display only the “trending” videos or a selection of videos chosen for each user. For now, we’ll use the search API and pass in an empty string to return all.

import { getSignedStreamId } from "../../src/cfStream"

export async function onRequestGet(context) {
    const {
        request,
        env,
        params,
    } = context

    const { id } = params

    if (id) {
        const res = await fetch(`https://api.cloudflare.com/client/v4/accounts/${env.CF_ACCOUNT_ID}/stream/${id}`, {
            method: "GET",
            headers: {
                "Authorization": `Bearer ${env.CF_API_TOKEN_STREAM}`
            }
        })

        const video = (await res.json()).result

        if (video.meta.visibility !== "public") {
            return new Response(null, {status: 401})
        }

        const signedId = await getSignedStreamId(id, env.CF_STREAM_SIGNING_KEY)

        return new Response(JSON.stringify({
            signedId: `${signedId}`
        }), {
            headers: {
                "content-type": "application/json"
            }
        })
    } else {
        const url = new URL(request.url)
        const res = await (await fetch(`https://api.cloudflare.com/client/v4/accounts/${env.CF_ACCOUNT_ID}/stream?search=${url.searchParams.get("search") || ""}`, {
            headers: {
                "Authorization": `Bearer ${env.CF_API_TOKEN_STREAM}`
            }
        })).json()

        const filteredVideos = res.result.filter(x => x.meta.visibility === "public") 
        const videos = await Promise.all(filteredVideos.map(async x => {
            const signedId = await getSignedStreamId(x.uid, env.CF_STREAM_SIGNING_KEY)
            return {
                uid: x.uid,
                status: x.status,
                thumbnail: `https://videodelivery.net/${signedId}/thumbnails/thumbnail.jpg`,
                meta: {
                    name: x.meta.name
                },
                created: x.created,
                modified: x.modified,
                duration: x.duration,
            }
        }))
        return new Response(JSON.stringify(videos), {headers: {"content-type": "application/json"}})
    }
}

We’ll go through each video, filter out any private videos, and pull out the metadata we need, such as the thumbnail URL, ID, and created date.

Playing the videos

To allow users to play videos from your application, they need to be public, or you’ll have to sign each request. Marking your videos as public makes this process easier. However, there are many reasons you might want to control access to your videos. If you want users to log in before they play them or the ability to limit access in any way, mark them as private and use signed URLs to control access. You can find more information about securing your videos here.

If you are testing your application locally or expect to have fewer than 10,000 requests per day, you can call the /token endpoint to generate a signed token. If you expect more than 10,000 requests per day, sign your own tokens as we do here using JSON Web Tokens.

Allowing users to upload videos

The next step is to build out an admin page where users can upload their videos. You can find documentation on allowing user uploads here.

This process is made easy with the Cloudflare Stream API. You use your API token and account ID to generate a unique, one-time upload URL. Just make sure your token has the Stream:Edit permission. We hook into all POST requests from our application and return the generated upload URL.

export const cfTeamsAccessAuthMiddleware = async ({request, data, env, next}) => {
    try {
        const userEmail = request.headers.get("cf-access-authenticated-user-email")

        if (!userEmail) {
            throw new Error("User not found, make sure application is behind Cloudflare Access")
        }
  
        // Pass user info to next handlers
        data.user = {
            email: userEmail
        }
  
        return next()
    } catch (e) {
        return new Response(e.toString(), {status: 401})
    }
}

export const onRequest = [
    cfTeamsAccessAuthMiddleware
]

The admin page contains a form allowing users to drag and drop or upload videos from their computers. When a logged-in user hits submit on the upload form, the application generates a unique URL and then posts the FormData to it. This code would work well for building a video sharing site or with any application that allows user-generated content.

async function getOneTimeUploadUrl() {
    const res = await fetch('/api/admin/videos', {method: 'POST', headers: {'accept': 'application/json'}})
    const upload = await res.json()
    return upload.uploadURL
}

async function uploadVideo() {
    const videoInput = document.getElementById("video");

    const oneTimeUploadUrl = await getOneTimeUploadUrl();
    const video = videoInput.files[0];
    const formData = new FormData();
    formData.append("file", video);

    const uploadResult = await fetch(oneTimeUploadUrl, {
        method: "POST",
        body: formData,
    })
}

Adding real time video with Stream Live

You can add a livestreaming section to your application as well, using Stream Live in conjunction with the techniques we’ve already covered.  You could allow logged-in users to start a broadcast and then allow other logged-in users, or even the public, to watch it in real-time! The streams will automatically save to your account, so they can be viewed immediately after the broadcast finishes in the main section of your application.

Securing our app with middleware

We put all authenticated pages behind this middleware function. It checks the request headers to make sure the user is sending a valid authenticated user email.

export const cfTeamsAccessAuthMiddleware = async ({request, data, env, next}) => {
    try {
        const userEmail = request.headers.get("cf-access-authenticated-user-email")

        if (!userEmail) {
            throw new Error("User not found, make sure application is behind Cloudflare Access")
        }
  
        // Pass user info to next handlers
        data.user = {
            email: userEmail
        }
  
        return next()
    } catch (e) {
        return new Response(e.toString(), {status: 401})
    }
}

export const onRequest = [
    cfTeamsAccessAuthMiddleware
]

Putting it all together with Pages

We have Cloudflare Access controlling our log-in flow. We use the Stream APIs to manage uploading, displaying, and watching videos. We use Workers for managing fetch requests and handling API calls. Now it’s time to tie it all together using Cloudflare Pages!

Pages provides an easy way to deploy and host static websites. But now, Pages seamlessly integrates with the Workers platform (link to announcement post). With this new integration, we can deploy this entire application with a single, readable repository.

Controlling access

Some applications are better public; others contain sensitive data and should be restricted to specific users. The main page is public for this application, and we’ve used Cloudflare Access to limit the admin page to employees. You could just as easily use Access to protect the entire application if you’re building an internal learning service or even if you want to beta launch a new site!

When a user clicks the admin link on our demo site, they will be prompted for an email address. If they enter a valid Cloudflare email, the application will send them an access code. Otherwise, they won’t be able to access that page.

Check out the source code and get started building your own video application today!

The collective thoughts of the interwebz