Post Syndicated from The Atlantic original https://www.youtube.com/watch?v=jb_2J7-Es6g
GStreamer Conference 2025 video recordings now available
Post Syndicated from jzb original https://lwn.net/Articles/1047055/
Recordings from the GStreamer
Conference 2025, held in London in late October, are now
available on the GStreamer Conferences Archive site. Includes the
GStreamer
State of the Union talk by Tim-Philipp Müller, State
of MPEG 2 Transport Stream (MPEG-TS) by Edward Hervey, and many
others.
Security updates for Wednesday
Post Syndicated from jzb original https://lwn.net/Articles/1047021/
Security updates have been issued by Debian (pdfminer), Fedora (chromium and firefox), Mageia (bubblewrap, flatpak, cups-filters, and thunderbird), Oracle (container-tools:rhel8, kernel, and squid), Red Hat (kernel), Slackware (libarchive), SUSE (gimp, itextpdf, kernel, thunderbird, and unbound), and Ubuntu (lasso).
The Surprising History of the Cotton Feed Sack
Post Syndicated from The History Guy: History Deserves to Be Remembered original https://www.youtube.com/watch?v=CJtbr8B6yXc
Legal Restrictions on Vulnerability Disclosure
Post Syndicated from Bruce Schneier original https://www.schneier.com/blog/archives/2025/11/legal-restrictions-on-vulnerability-disclosure.html
Kendra Albert gave an excellent talk at USENIX Security this year, pointing out that the legal agreements surrounding vulnerability disclosure muzzle researchers while allowing companies to not fix the vulnerabilities—exactly the opposite of what the responsible disclosure movement of the early 2000s was supposed to prevent. This is the talk.
Thirty years ago, a debate raged over whether vulnerability disclosure was good for computer security. On one side, full disclosure advocates argued that software bugs weren’t getting fixed and wouldn’t get fixed if companies that made insecure software wasn’t called out publicly. On the other side, companies argued that full disclosure led to exploitation of unpatched vulnerabilities, especially if they were hard to fix. After blog posts, public debates, and countless mailing list flame wars, there emerged a compromise solution: coordinated vulnerability disclosure, where vulnerabilities were disclosed after a period of confidentiality where vendors can attempt to fix things. Although full disclosure fell out of fashion, disclosure won and security through obscurity lost. We’ve lived happily ever after since.
Or have we? The move towards paid bug bounties and the rise of platforms that manage bug bounty programs for security teams has changed the reality of disclosure significantly. In certain cases, these programs require agreement to contractual restrictions. Under the status quo, that means that software companies sometimes funnel vulnerabilities into bug bounty management platforms and then condition submission on confidentiality agreements that can prohibit researchers from ever sharing their findings.
In this talk, I’ll explain how confidentiality requirements for managed bug bounty programs restrict the ability of those who attempt to report vulnerabilities to share their findings publicly, compromising the bargain at the center of the CVD process. I’ll discuss what contract law can tell us about how and when these restrictions are enforceable, and more importantly, when they aren’t, providing advice to hackers around how to understand their legal rights when submitting. Finally, I’ll call upon platforms and companies to adapt their practices to be more in line with the original bargain of coordinated vulnerability disclosure, including by banning agreements that require non-disclosure.
And this is me from 2007, talking about “responsible disclosure”:
This was a good idea—and these days it’s normal procedure—but one that was possible only because full disclosure was the norm. And it remains a good idea only as long as full disclosure is the threat.
Женското здраве като пазарна ниша – ползи и рискове
Post Syndicated from Надежда Цекулова original https://www.toest.bg/zhenskoto-zdrave-kato-pazarna-nisha-polzi-i-riskove/

Макар жените да продължават да са недостатъчно представени в клиничните и медицинските проучвания, познанието за женското здраве вече е достатъчно, за да генерира огромен пазар на специфични продукти и услуги. Той е толкова всеобхватен, че започва от чорапите, минава през коучинг, хранителни добавки и технологични приложения и завършва със сложни, радикални и скъпи естетични хирургични интервенции.
На следващите редове ще разгледаме само тази малка част от него, която е насочена към репродуктивния апарат на жената, доколкото именно той се визира най-често с понятието „женско здраве“. Доколко е коректно да твърдим, че женското здраве се изчерпва със здравето на женската репродуктивна система, би било интересна дискусия, но ще я оставим за друг текст.
„Менструацията е проблем на момичетата…“, отговаря в час девойка на около 12–13 години, заеквайки. Млада жена разказва как се е наложило да спре да ходи на училище, след като се е сдобила с редовен цикъл, защото това налагало да се преоблича непрекъснато, което няма как да се прави в училище.
Така започва филмът Period. End of sentence, който през 2019 г. взе „Оскар“ за късометражен филм. Историята е вдъхновена от работата на индийския социален предприемач Аруначалам Муруганантам, създал евтина машина за производство на дамски хигиенни продукти. Документалният разказ проследява как тази машина е инсталирана в село близо до Ню Делхи и как местните жени започват да произвеждат достъпни превръзки, да ги продават и така да изграждат собствен малък бизнес. Историята е прелюбопитна, защото за 25 минути успява да покаже как нещо толкова неизбежно като физиологията прави жените подвластни на дълбоки културни табута, образователни и социални неравенства и извънредни здравни рискове.
Успехът на филма провокира глобален разговор за „менструалната бедност“, която далеч не включва само достъпа до дамски превръзки. Сред условията, от които момичетата и жените се нуждаят, за да бъде защитено фундаменталното им право на менструално здраве, са също достъпът до подходящи хигиенни помещения, до достатъчна, навременна и научно базирана информация и дори до адекватно обучени учители и ръководители на работното място.
Розовият данък
Period. End of sentence разказва история от развиващия се свят, където дори достъпът до чиста вода не е гарантиран. Изследвания обаче показват, че жените по цял свят – дори в най-благоденстващите държави – си плащат за „удоволствието“ да кървят всеки месец. Някои буквално.
В САЩ например много щати класифицират продуктите за менструация като „луксозни стоки“ и това води до по-високо данъчно облагане, докато изделия като лекарството за еректилна дисфункция виагра често са освободени от данъци.
Отделно, множество други продукти за жени (лосиони, сапуни, дезодоранти, самобръсначки) са по-скъпи от мъжките им аналози. Феноменът е наречен „розовият данък“.
През 2022 г. в света живеят около 2 млрд. души, които имат менструация.
Това са много пари за хигиенни продукти, но също и много дни, в които не можеш да отидеш на работа поради тежки менструални симптоми, прегледи и медикаменти при усложнения и др. През 2024 г. в свой анализ британската Национална здравна служба изчислява, че ако в Англия се инвестира допълнително по 1 паунд на всяка жена за акушеро-гинекологични услуги, потенциалната възвръщаемост за икономиката се равнява на над 10 паунда чрез увеличена производителност и работоспособност.
А колко пъти ще родиш в живота си?
Но докато менструацията е събитие, с което жената се научава да се справя още в ранното тийнейджърство и ѝ се налага да го прави ежемесечно десетилетия наред, раждането се случва 1–2 пъти на повечето съвременни жени.
Уникалността му и големият залог – животът и здравето както на жената, така и на бебето – са благодатна почва за мащабен бизнес, продаващ основно страх и влошено женско здраве.
Коментарна статия в научния журнал npj Women’s Health на Springer Nature поставя на дневен ред доказано негативните ефекти от комерсиализацията на родилните грижи върху качеството им. Като очеваден лош пример е дадена здравната система на САЩ – от всички развити страни това е държавата с трайно най-висока майчина смъртност, която в близо 80% от случаите се смята за предотвратима.
Като илюстрация на уязвимостта на майките на съмнителни практики, мотивирани от комерсиални подбуди, в статията се посочват високите нива на планови цезарови сечения, обусловени от финансова полза за акушер-гинеколозите и доставчиците на услуги и промотирани като удобни за пациентките.
Авторите подчертават, че е съмнително доколко е етично подхранването на страхове относно рисковете от перинеална травма на майката или от мозъчно увреждане на бебето при вагинални раждания.
Обратната страна на същата монета е влошаването на достъпността на качествена акушерска грижа за жените, които не могат да си я позволят. През 2019 г. Европейският парламент публикува изследване, посветено на достъпа до акушерска и гинекологична помощ на жените от уязвими групи. Без особена изненада в доклада се изнасят данни, че мигрантките и бежанките, ромските жени и жените с увреждания срещат най-големи затруднения в достъпа до акушерска грижа и това се отразява както върху тяхното здраве, така и върху здравето на децата им.
Сред разгледаните примери е проучване в Италия, включващо 37 000 жени, което показва, че ако една жена е с нисък социално-икономически статус, ниско образование, ако е имигрантка, твърде млада, самотна майка или безработна, това драстично повишава риска да не получи акушерски грижи в първите месеци от бременността си.
Сравнително изследване на екип от Университета в Копенхаген дава обективен прочит
къде е България в баланса между комерсиализацията и качеството на майчиното здравеопазване.
Изследователите предоставят онлайн въпросник на жени от България, Румъния и Молдова, родили между 2015 и 2018 г. От България в изследването се включват 4951 жени, участващи в различни майчински групи в социалните мрежи. Може да се направи обосновано предположение, че именно най-уязвимите групи (без достъп до интернет, без принадлежност към онлайн групи, с ниско образование или в изолирани общности) са слабо представени. Като се има това предвид, от събраните отговори става ясно, че:
- 53% от запитаните са родили с цезарово сечение;
- 79% са заплащали услуги от джоба си по официални тарифи;
- 46% са направили неформални плащания;
- 38% са използвали лични връзки за получаване на грижи.
Адски е фенси да си в менопауза
Макар комерсиализирането на раждането да изглежда най-фрапиращо, всички аспекти на женскостта са подложени на безмилостен маркетинг и с излизането от фертилната възраст не се освобождаваме от него. Може би сте попадали на някоя от тези суперпозитивни реклами на конференции, уебинари и обучения, които ни открехват как да остареем красиво, да останем активни, да имаме своите най-хубави години след 50-те и прочее.
Безспорно разчупването на табуто около перименопаузата и менопаузата е добра новина и носи потенциал за по-добро познаване на трудностите, с които жените се сблъскват в този период от живота си, както и с начините за преодоляването им.
Научни и клинични автори обаче настояват за разграничаване между реалните нужди и пазарните интереси. Представянето на менопаузата като неизбежна катастрофа всъщност е същото като разказите за раждането, при което „жената е с единия крак в гроба“. Това усилва тревожността и симптомите, насърчава свръхпотребление на различни средства за „подмладяване“ и отклонява вниманието от по-широки социални решения, каквито могат да бъдат по-добрите условия на труд, гъвкавото работно време и широкият достъп до коректна информация.
В същото време икономически анализи показват, че менопаузата има реална цена за жените и за пазара на труда (например приблизително 10% среден спад на доходите според нови изследвания за Европа и САЩ), а различният достъп до средства за облекчаване на симптомите – включително до хормонозаместителна терапия – задълбочава социалните неравенства.
Паралелно с медицинския пазар уелнес индустрията развива собствена „менопаузална“ линия: добавки, витамини, храни, чайове, специално бельо, козметика, ароматерапия, коучинг програми, приложения и онлайн „менопауза клиники“ с абонаментни планове.
Журналистическо разследване в The Guardian описва „новия менопаузален пазар“ като място, където към жените се насочват продукти и услуги за стотици милиарди долари, често с неясни или недоказани ползи. Други анализи предупреждават, че много от тези продукти се промотират с изрази като „балансиране на хормоните“ или „детокс на естрогена“ без сериозна научна подкрепа и че жените се оказват обект на силно таргетиран маркетинг в момент на уязвимост.
FemTech – вашите данни са важни за нас
За всеки един от казусите, които обсъдихме по-горе, може да намерите десетки разработени приложения. Поддържайте „женски“ календар, въведете теглото си, ръста си, колко вода пиете на ден, колко калории приемате, колко крачки правите, кога имате студени/горещи вълни, колко е спало бебето днес…
Под FemTech обикновено се разбират дигитални и технологични решения за „женско здраве“ – приложения за следене на цикъла и фертилността, устройства за проследяване на бременността, платформи за асистирана репродукция, менопауза, сексуално здраве, телемедицина и др.
Според пазарни анализи глобалният FemTech пазар се оценява на около 39 млрд. долара през 2024 г. и се очаква да достигне близо 97 млрд. долара до 2030 г. със среден годишен ръст над 16%. Това експлозивно развитие е мотивирано от два на пръв поглед положителни аргумента: 1) „запълване на празнини“ в традиционното здравеопазване, което често игнорира женските нужди, и 2) идеята за „овластяване“ на жените чрез самопроследяване и достъп до интернет базирани грижи. Но изследвания показват, че понякога зад това стои силно комерсиализирана логика.
Анализ на Minderoo Centre към Университета в Кеймбридж показва, че менструалните и фертилитетни приложения събират огромни масиви чувствителна информация – цикъл, сексуален живот, планове за бременност, настроение, тегло, медикаменти – и ги използват в бизнес модели, базирани на продажба на данни и профилиране за реклама. Данните са описани като „златна мина“ за рекламодатели, а потребителките масово подценяват реалната им стойност.
Рисковете от свръхупотребата на технологични решения за здравето ни, за които анализатори алармират, са свързани не само със сигурността на данните, но и с нееднозначното им влияние върху решенията, вземани често от потребителките въз основа на здравни съвети, които не са клинично валидирани или които дори са основани не на наука, а на пазарни подбуди.
Комерсиализацията като форма на прогрес
Комерсиализацията на женското здраве безспорно крие рискове – от подмяна на реални нужди с маркетингови обещания до задълбочаване на неравенствата. Но тя създава и потенциал: фактът, че днес толкова индустрии се конкурират да печелят от менструация, раждане, менопауза или фертилитет дава реален шанс женското здраве да напусне периферията на медицинската наука.
Това означава повече изследвания за динамиката на женското тяло, по-висока чувствителност към нуждите на менструиращите жени, по-широк разговор за усложненията и спецификите, по-голямо уважение към естеството на раждането, повече публичност за менопаузата. Ако този интерес се насочи към устойчиви, научно базирани и по-широко достъпни решения, пазарната динамика може да бъде съюзник, а не заплаха. Самите жени също могат да допринесат за това, като бъдат по-взискателни в изборите, които правят.
Ето няколко съвета, които заедно с Chat GPT формулирахме за вас в търсене на решения как технологичният и икономическият напредък да работят за нас, а не само ние за тях:
- Тялото е ваше, изборът също. Шумът по дадена тема понякога създава натиск да постъпите по точно определен начин, но всяка здравна интервенция трябва да започва с вашия комфорт, информираност и съгласие.
- Проверявайте научната достоверност. Избирайте продукти и услуги, които се основават на публично достъпни научни данни, а не на сензационни формулировки.
- Ако имате съмнения, че дадена препоръка се основава на финансов интерес, а не на медицинска целесъобразност, потърсете второ мнение и допълнителна информация.
- Информирайте се какви приложения ползвате – по-безопасни са тези, които имат прозрачна политика за данните и поемат ангажимент да не ги продават на трети страни.
- Опознайте тялото си, не алгоритъма. Приложенията могат да бъдат полезен ориентир, но те рядко са в състояние да диагностицират или прогнозират с точност. Ако нещо ви тревожи, консултирайте се със специалист.
„Анатомия на пола: Жена“ разглежда здравето на жените като неразривна част от обществото, историята и културата. В поредицата изследваме как са се променяли нагласите към женското здраве, как медицината е възприемала специфичните потребности на жените и какви процеси са повлияли на достъпа им до качествени здравни грижи. Вглеждаме се в научните открития, но и в културните митове; в официалните политики, но и в личните истории на жени, борещи се за правото си на здраве и достойнство.
Елегантната игра: Синхронизация и резонанс (втора част)
Post Syndicated from original https://www.toest.bg/elegantnata-igra-sinhronizatsiya-i-rezonans-vtora-chast/
<< Към първа част

Миглена Николчина: Игронаративният резонанс или дисонанс непременно би трябвало да включва и музиката като елемент – всъщност самото название предполага съзвучие или липсата му, тоест основното му значение е акустично. Вие отдавна приключихте с превъртането на „Болдърсгейт 3“ – една игра, която в разнородната си романтическа мощ е всичко друго, но не и елегантна – и дори я обсъждахте вече тук, но аз я играх месеци наред, започвах я с различни аватари, връщах се, преигравах… Така че доста след вас достигнах до мисията, където можем да освободим Надеждата – изтерзано и истерясало момиченце, пленено от демона Рафаел. Героите ми се измъкваха от огнено меле заедно с Надеждата и бяха пред вратата, зад която по всички правила на жанра трябваше да се очаква битката със самия Рафаел. Зад вратата обаче нямаше никой. Празната зала, където пламти сиглата на изхода, събуди у мен надеждата, че някак си сме се измъкнали. В този момент обаче като отникъде се вряза кристално сопрано, което пропя:
Животът, всеки смъртен живот издъхва.
Вклиняването на този отвъдно прекрасен, вещаещ неизбежна смърт глас (изпълняван от оперната певица Мария Анастасова) – тъкмо когато сякаш бях успяла да спася Надеждата – беше толкова непоносимо, че стените на игровото се сринаха и аз, единственият смъртен живот насред виртуалната баталия, се оказах с прегазени защити и бариери, запокитена в реалното.
Какво направих? Свалих си слушалките. Излязох от играта.
Спасих се от реалното в реалното. Няколко такта по-късно емоционалният удар от вокала е снизен и съответно смекчен от злокобно-комедиен речитатив на Рафаел, срещата с когото се оказва неизбежна. Милостиво, битката продължава.
Впоследствие открих, че обикновено вокалът зазвучава след, а не преди появата му. Успях да възпроизведа моя случай след многократни опити. Търсех ефекта вокалът да се отключи преди появата на Рафаел – при невидима противостояща сила гласът на празнотата разбива стената между виртуалната схватка и смъртния живот на играча.
Не се оказа лесно да се отключи този вариант. Някои условия трябваше да бъдат спазени, но и те невинаги проработваха, така че не знам дали ефектът е „заров“, дали е глич, или просто не съм разбрала кой е отключвателят. Тук с пълна сила е валидно твърдението на Матиас Ердбеер, че заснемането не може да предаде ефекта на „образдеепространството“ на играта, към което аз добавям, че това пространство е и „дееакустично“ – особено в този пластичен, „адаптивен“ към действието музикален модел, който Борислав Славов създава.
В „Болдърсгейт 3“ музиката на Борислав Славов е много съществен аспект на играта. Именно за нея Славов получава BAFTA (за саундтрак).
Видеоигрите са тоталното изкуство на XXI век, така както е киното за ХХ век и операта за предходните столетия. Какво още според вас определя успеха на „Лариан“, студиото, разработило играта?
Северина Станкева: Обобщаващо бих казала, че с „Болдърсгейт 3“ „Лариан“ направиха нещо, което изглеждаше невъзможно – третата част на култова поредица, след като се сдоби с огромен бюджет, вдигна летвата за компютърните ролеви игри не като се отклони, а като стъпи на наследството на предходниците си. И в същото време успя да проговори на широка аудитория от играчи. Получи се нещо като касова (ААA) независима игра (пусната на пазара практически като самиздат), което не беше се случвало досега в такъв мащаб. Ще започна с малко история.
Първата част от поредицата излиза през 1998 г. и дава началото на ролевите игри такива, каквито ги познаваме днес, успявайки да преведе правилата и системите на „Подземия и дракони“ във видеоигра. След нея повечето игри с ролеви елементи в различна степен правят същото.
Втората част (2000 г.) разширява възможностите на жанра. Някои от характеристиките ѝ продължават да са негови маркери – например събирането на спътници със свои предистории. Други, за съжаление, така и не се повториха до третата част. Пример за последното е обхватът на сюжетните линии, които са разработени в детайл, но напълно незадължителни. „Болдърсгейт 3“ продължава да не те води за ръка, докато играеш, като в същото време ти дава свобода на всяко равнище, и това е едно от най-добрите ѝ качества. Дава ти и инструментариум, благодарение на който всичко, което измислиш да правиш, едновременно е изпипано технически и се усеща като твое лично откритие.
Третата част, повече от двайсет години по-късно, увеличава допълнително сюжетните възможности, но и добавя аналогично многообразие в игродействието. „Лариан“ са известни с последното – игри като „Божественост“ (Divinity) и „Божественост 2“ (Divinity: Original sin 2) позволяват небивала креативност по отношение на околната среда. Част от тактиката на походовите битки е да използваш подръчното в своя полза – ако искаш да спасиш някой висящ в клетка, можеш да простреляш със стрела въжето, да телепортираш герой вътре в клетката, за да я отключи, да смалиш затворника, за да мине през решетките, да се биеш със стражите, да ги убедиш да го освободят и какво ли още не. Когато към това се добави прекрасната музика, която също звучи, като да се развива процесуално спрямо действията на играча (в „Божественост 2“ всеки герой, включително този на играча, има характерен инструмент, чиято мелодия зазвучава, щом е на ход), се получава страхотен унисон. Така се създава илюзията, че всичко е възможно. Изборите значително започват да се затварят, ако човек иска да играе като злодей, но това е трудно да се избегне в жанра и може би изисква отделен разговор. В „Болдърсгейт 3“ затварянето е поне донякъде сюжетно оправдано, доколкото съдбата на героя разчита на това какви съмишленици ще намери и най-общо казано, на кого може да се довери.
Чавдар Парушев: „Болдърсгейт 3“ е изключително богата на възможности за изобретателност от страна на играча – Северина добре го е описала. Заедно с това преобладаващата част от тях не са направени очевидни, а са оставени на играчите да бъдат откривани.
Едно такова „откритие“ е начинът, по който е зададено да работи физическото тегло в играта, и възможността за атака „метеор“. Може да се увеличи максимално масата на героя – като се натовари с предмети в инвентара, като се преобрази в тежко животно и допълнително изпие еликсир за удвояване на размера – след което от подходящо високо място може да се скочи върху противника с целия така натрупан тонаж. Играта е пълна с такива възможности – отключване на диалог, чрез който се преодолява иначе трудно предизвикателство, печелене на съюзници, справяне с цели лагери от противници (например като се отрови от разстояние питието на гуляещите гоблини чрез заклинание).
Този алгоритъм на изработване на неочаквано решение чрез сръчно комбиниране на игрови ресурси и механики ефективно вади зъбите на иначе тягостната наративна дилема. Внушава от игрово към наративно ниво, че може да се намери трети, четвърти или пети изход от на пръв поглед двурогия избор. В същото време тъкмо този тягостен наратив допълнително подтиква към търсене на нестандартни и неочевидни решения и усилва удоволствието от намирането им за играча чрез вдигнатия залог.
Майсторското съчетаване между разказ и игрова механика във взаимно усилваща роля прави според мен играта толкова успешна.
Миглена Николчина: Но играта е звук, цвят, интерактивна опера, не само разказ и алгоритъм. В много случаи оперните либрета са посредствени, музиката им придава друго измерение. При всичките други качества на „Болдърсгейт 3“ мисля, че и тук се случва нещо такова.
Еньо Стоянов: Струва ми се, че епизодът с пеенето на злодея Рафаел в „Болдърсгейт 3“ работи като своеобразен цитат – то е оперетно, дори водевилно. Прилича на пълнометражните анимации на „Дисни“ от миналото, в които злодеят пее злите си планове, докато неговите помощници му пригласят, а и конфронтацията с него често е с песен. Може би в подобни запявания на героите в оперети, мюзикъли и пр. можем да видим отново нещо „дисонансно“, този път в недигитални медии. Което пък подсказва, че подобни „дисонанси“ всъщност въвеждат нещо като ефектен контраст между форма и съдържание, който не е за пренебрегване и може да се окаже не по-малко въздействащ от резонанса на пълната хармонизация на елементите.
Миглена Николчина: Връзката с „Дисни“ я прави и един оперен певец, когато коментира, пропявайки от време навреме, този епизод. Анализирайки включването на органа, той прави и друга асоциация – със сцената в църквата от трето действие на „Фауст“ на Гуно. Добавя и още по-далечна препратка по повод на акапела пеенето, което толкова ме стресна – свързва го с древногръцкия хор. Ние не знаем как точно е звучал този хор; операта възниква във Флоренция като опит да се реконструира древногръцката трагедия, да се измисли отново заедно с музиката. Във всеки случай подобни коментари демонстрират, че е постигнато това, към което Борислав Славов в множество интервюта казва, че се стреми – музиката му да има самостоятелен живот.
Славов е попаднал на точното място, тъй като характерна особеност на „Лариан“ е амбицията всеки компонент от сглобката на различни изкуства в играта – но и собствено игровият, шахматен и заров компонент – да e отчетливо обособен и на основата на това обособяване да е хармонизиран с останалите. В „Божественост 2“ тази обособеност е още по-отчетлива, особено що се отнася до дикторския текст и театралността на диалозите, които са придружени с ремарки в разгърната на екрана книга. Редица моменти в „Болдърсгейт 3“ постигат като че ли самостоен литературен живот (някои монолози на Карлах, вътрешният монолог на Гейл, ако той ти е аватар, и пр.), но не бих твърдяла, че като цяло литературният текст в тези игри би могъл да съществува самостоятелно. Докато музиката на Славов (той е композиторът и на „Божественост 2“, но „Болдърсгейт 3“ вдига залозите) може.


Кадри от „Болдърсгейт 3“. Играчът влага в изграждането на Посетителя на сънищата фантазиите си за обаятелен помощник.
Северина Станкева: Връщам се към репликата на Еньо – наистина Рафаел е типичният харизматичен и хитър ала Дисни злодей, но това, с което играта впечатлява, е, че е един от многото. Макар и да има обща заплаха, тегнеща над аватара на играча и съмишлениците му (отвлечени от раса, която иска да владее света, като имплантира паразити в мозъците им, a целта на играта е по някакъв начин главният герой да успее да избегне контрола над ума си), тази заплаха се разпръсква в сложни интереси и взаимоотношения. Всеки от спътниците води собствена борба, която се концентрира около специфична антагонистична фигура и може да кулминира в морално падение или напротив – в триумф на личността, като в повечето случаи и двата варианта са разработени с достатъчна емоционална дълбочина и сложност и обемат теми като героизма, отмъщението, гордостта, религиозната отдаденост и др.
Това важи, макар и в по-малка степен, и за аватара на играча. В началото на играта освен собствения персонаж играчът създава и „Посетител на сънищата“, който впоследствие започва да се появява в сънищата и се представя за стожер в мрачния и объркан свят на „Болдърсгейт 3“. Посетителят на сънищата има собствен план и в крайна сметка се оказва лъжец и манипулатор, придобил лика, който аватарът на играча иска да види. Всъщност самият той заразява героите с паразита и е показан в началната сцена да поставя ларвата в очите им. Тук по-скоро имаме пример за резонанс, доколкото създаването на този фалшив облик (макар и да се случва, преди сюжетът да започне) е вписан директно в него и има своите последствия – много играчи например споделят, че в повторните си изигравания съзнателно придават на Посетителя гротесков вид, за да отнемат от обаянието му и да си припомнят истинските му намерения. В този смисъл и в „Болдърсгейт 3“ има нещо елегантно, макар и обхватът ѝ като че ли предварително да го изключва.
В рубриката „Игромислие“ публикуваме разговори, в които се срещат, съпоставят и противопоставят различни гледни точки към многоизмерния, многожанров феномен на видеоигрите – не толкова като електронен спорт, колкото като нов синтез на изкуствата и като ново поле на общуване и социалност.
Service Outage
Post Syndicated from xkcd.com original https://xkcd.com/3170/

Accelerate infrastructure development with CloudFormation pre-deployment validation and simplified troubleshooting
Post Syndicated from Idriss Laouali Abdou original https://aws.amazon.com/blogs/devops/accelerate-infrastructure-development-with-cloudformation-pre-deployment-validation-and-simplified-troubleshooting/
AWS CloudFormation makes it easy to model and provision your cloud application infrastructure as code. CloudFormation templates can be written directly in JSON or YAML, or they can be generated by tools like the AWS Cloud Development Kit (CDK). Resources are created and managed by CloudFormation as units called Stacks. Additionally, change set enable you to preview the stack changes before deployment.
CloudFormation now offers powerful new features that transform how you develop and troubleshoot infrastructure as code, pre-deployment validation that catches errors in seconds, enhanced operation tracking, and simplified failure debugging. These capabilities shift-left infrastructure code validation, helping you prevent infrastructure deployment failures that impacts development velocity.
In this blog post, we’ll explore how these new features accelerate development cycles by catching common errors during change set creation and providing precise troubleshooting through operation tracking and failure filtering. Whether you’re a platform engineer managing complex multi-service deployments or a developer iterating on infrastructure templates, we’ll show you how to:
- Validate resource properties and detect naming conflicts before deployment
- Prevent deployment failures by checking S3 bucket emptiness before deletion operations
- Track operations with unique IDs for focused troubleshooting
- Quickly identify root causes using the new describe-events API
This comprehensive guide will walk through real-world scenarios demonstrating how these capabilities can reduce infrastructure deployment failures from hours of debugging to seconds of validation, helping you deliver cloud infrastructure faster and more reliably.
Key Capabilities
- Pre-deployment Validation: Catch template errors instantly instead of discovering them after resource provisioning attempts. These include pre-deployment validation for resource property syntax errors, resource naming conflicts for existing resources in your account, and S3 bucket emptiness constraint violations on delete operations.
- Operation Tracking: Say goodbye to long debugging sessions. Each stack action now comes with a unique Operation ID, transforming the “needle in haystack” troubleshooting experience into precise, targeted problem-solving.
- Streamlined Events API for simplified Debugging: Use the new describe-events API and FailedEvents=true filter to instantly pinpoint issues. One command tells you exactly what went wrong, eliminating the need to scroll through endless logs.
- Immediate Feedback: Transform your CI/CD pipeline from a potential bottleneck into a rapid iteration engine. Get immediate feedback on common deployment issues, allowing your team to fix and deploy faster than ever before.
How It works
Pre-deployment Validation
The following scenarios show how you can leverage CloudFormation pre-deployment validation to detect property syntax errors, resource naming conflicts, and constraint violations during change set creation.
Understanding Validation Modes
CloudFormation pre-deployment validation operates in two modes that determine how validation failures are handled.
- FAIL mode prevents change set execution when validation detects errors, ensuring problematic templates cannot proceed to deployment. This applies to property syntax errors and resource naming conflicts.
- WARN mode allows change set creation to succeed despite validation failures, providing warnings that developers can review and address before execution. This applies to constraint violations like S3 bucket emptiness that may be resolvable through manual intervention.
Understanding these modes helps you anticipate whether validation issues will block your deployment workflow or simply require attention before execution.
Let’s walk you through practical scenarios:
Scenario 1: Validate Resource Property Syntax
CloudFormation evaluates each resource property definition or value before provisioning begins. The following example illustrates several common resource property errors:
- The “AWS::Lambda::Function”
Roleproperty requires an ARN pattern. - The “AWS::Lambda::Function”
Timeoutproperty expects an integer instead of a string. - The “AWS::Lambda::Function”
TracingConfig.Modenested property ENUM value is invalid. - The “AWS::Lambda::Alias”
Nameproperty is required but not defined. - The “AWS::Lambda::Alias” the extra property
Descriptionin a nested pathRoutingConfig.AdditionalVersionWeights.0is not supported.
Prior to this launch, these resource configuration errors would be detected at the resource provisioning time only. However, with the pre-deployment validations feature, these errors can be identified ahead of the deployment phase, streamlining the development-test lifecycle efficiency and minimizing rollbacks during deployments.
Template
AWSTemplateFormatVersion: "2010-09-09"

Description: This template demonstrates how pre-deployment validation and enhanced troubleshooting work

Resources:
  MyLambdaFunction:
    Type: "AWS::Lambda::Function"
    Properties:
      FunctionName: "dev-test"
      Role: 'MyRole'          #1. Non-matching pattern
      Runtime: "python3.11"
      Handler: "index.lambda_handler"
      Code:
        ZipFile: |
          import json

          def lambda_handler(event, context):
              return {
                  'statusCode': 200,
                  'body': json.dumps('Hello from Lambda!')
              }
      Timeout: "30s"          #2. Type mismatch
      MemorySize: 128
      TracingConfig:
        Mode: "DISABLED"       #3. Invalid ENUM

  MyCandidateReleaseVersion:
    Type: "AWS::Lambda::Version"
    Properties:
      FunctionName: !Ref "MyLambdaFunction"
      Description: "v2"

  MyLambdaAlias:
    Type: AWS::Lambda::Alias
    Properties:
                              #4. Missing required property "Name"
      FunctionName: !Ref "MyLambdaFunction"
      FunctionVersion: "$LATEST"
      RoutingConfig:
        AdditionalVersionWeights:
          - FunctionVersion: !GetAtt "MyCandidateReleaseVersion.Version"
            FunctionWeight: 0.1
            Description: "10% traffic to the new version" #5. Unsupported property
Step 1: Create Change Set
Console
Create a new stack using the change set creation flow, provide the template and all required parameters.
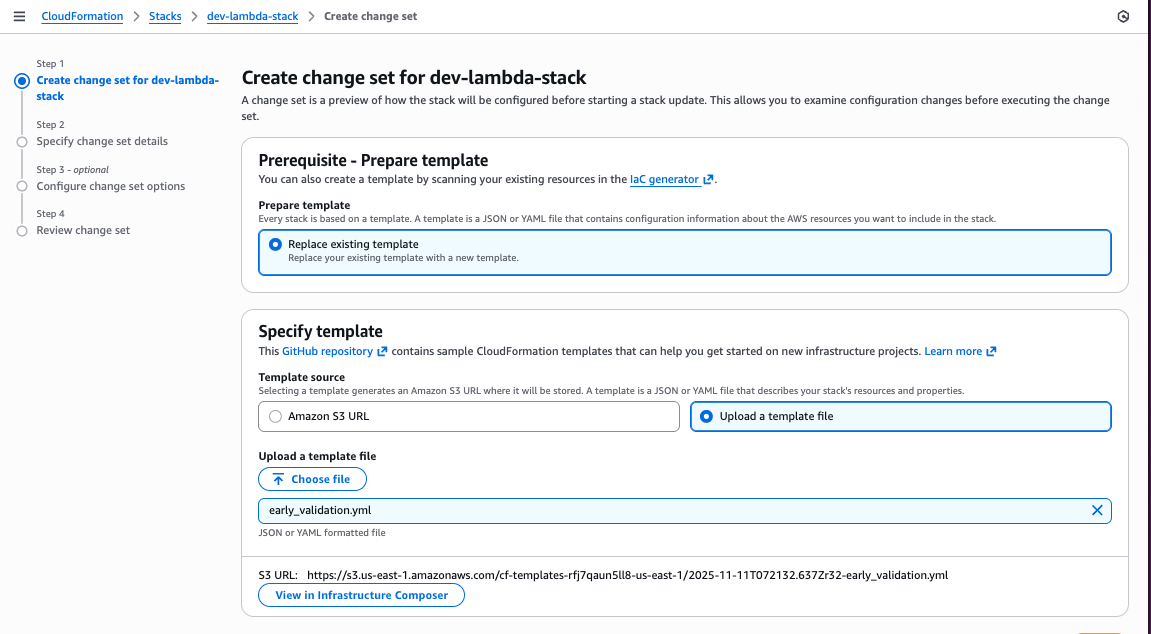
Figure 1: Create a change set view
CLI Command
aws cloudformation create-change-set \
    --stack-name "dev-lambda-stack" \
    --change-set-name "updateAlias" \
    --change-set-type "CREATE" \
    --template-body file://lambda-with-alias-template.yaml
Step 2: Check Change Set Status
To review the status of your change set
Console
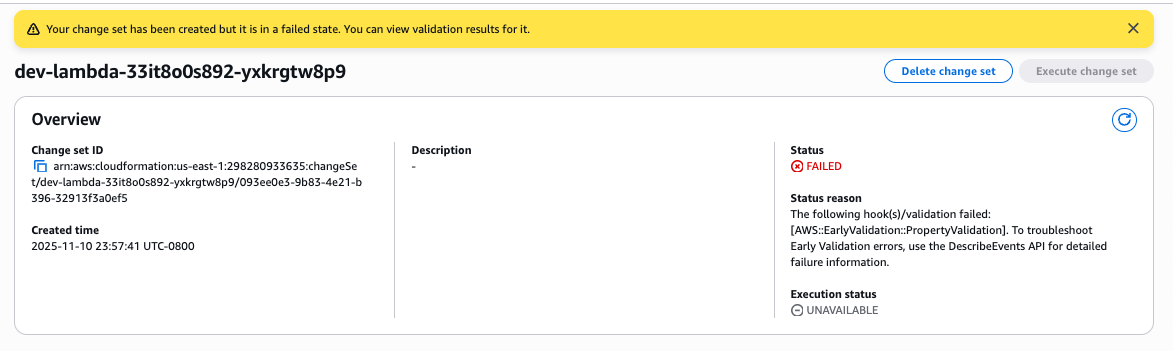
Figure 2: Describe change set status
CLI command
aws cloudformation describe-change-set \
  --change-set-name "arn:aws:cloudformation:us-west-2:123456789012:changeSet/updateAlias/94498df5-1afb-43b1-9869-9f82b2d877ac"
{
"ChangeSetName": "updateAlias",
"ChangeSetId": "arn:aws:cloudformation:us-west-2:123456789012:changeSet/updateAlias/94498df5-1afb-43b1-9869-9f82b2d877ac",
"StackId": "arn:aws:cloudformation:us-west-2:123456789012:stack/dev-lambda-stack/2d2c3240-bb59-11f0-b080-0613dc96740d",
"StackName": "dev-lambda-stack",
"CreationTime": "2025-11-06T21:40:13.333000+00:00",
<strong> "ExecutionStatus": "UNAVAILABLE",
"Status": "FAILED",
"StatusReason": "The following hook(s)/validation failed: [AWS::EarlyValidation::PropertyValidation]. To troubleshoot Early Validation errors, use the DescribeEvents API for detailed failure information.",
"NotificationARNs": [],</strong>
"RollbackConfiguration": {},
"Capabilities": [],
"Changes": [
{
"Type": "Resource",
"ResourceChange": {
"Action": "Add",
"LogicalResourceId": "MyCandidateReleaseVersion",
"ResourceType": "AWS::Lambda::Version",
"Scope": [],
"Details": []
}
},
{
"Type": "Resource",
"ResourceChange": {
"Action": "Add",
"LogicalResourceId": "MyLambdaAlias",
"ResourceType": "AWS::Lambda::Alias",
"Scope": [],
"Details": []
}
},
{
"Type": "Resource",
"ResourceChange": {
"Action": "Add",
"LogicalResourceId": "MyLambdaFunction",
"ResourceType": "AWS::Lambda::Function",
"Scope": [],
"Details": []
}
}
],
"IncludeNestedStacks": false
}You can see the status of the change set is failed with a detailed status reason. You can now proceed to review the change set validation results.
Step 3: Review validation results
Console
With the console, you can review multiple validation errors in a single interface. When you click on a validation, CloudFormation pinpoints the location of the invalid property error in your template.
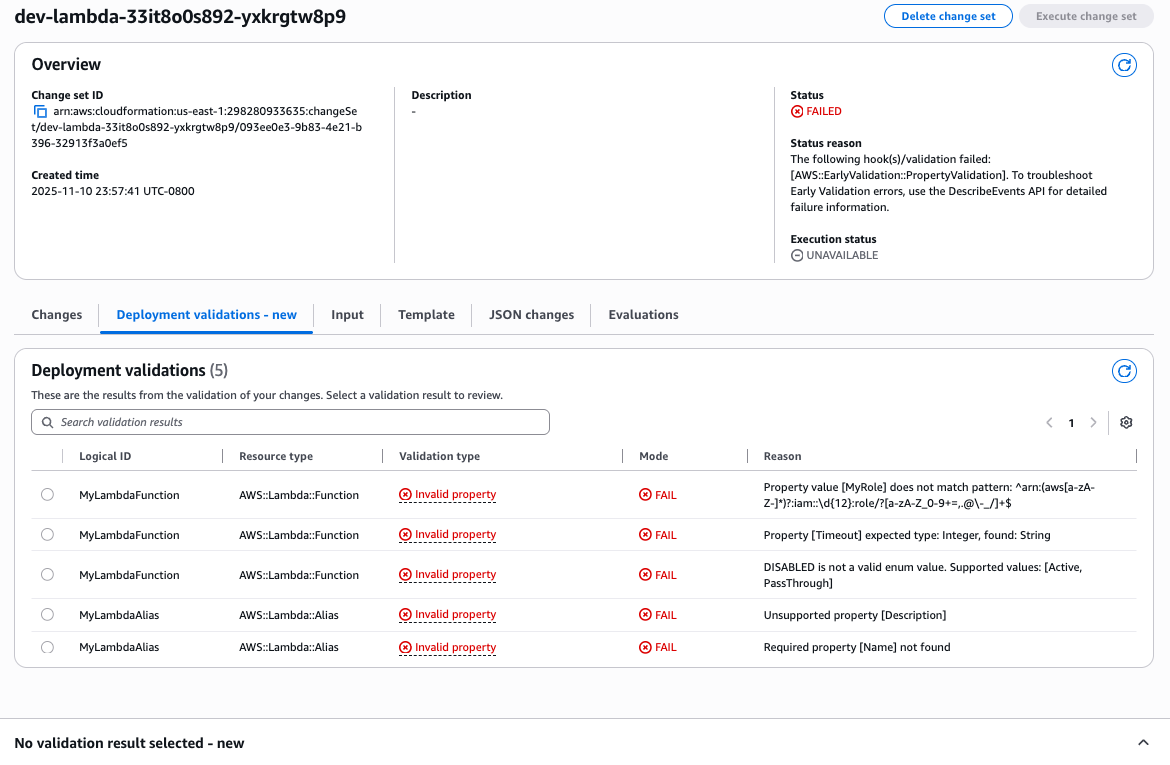
Figure 3: Pre-deployment validations view
Use Case: Invalid ENUM value for nested property
Catching invalid configuration values before deployment. This demonstrates validation of nested properties like TracingConfig.Mode. The tool helpfully shows the supported values “Active” & “Pass through” as well as the provided invalid value “DISABLED”.
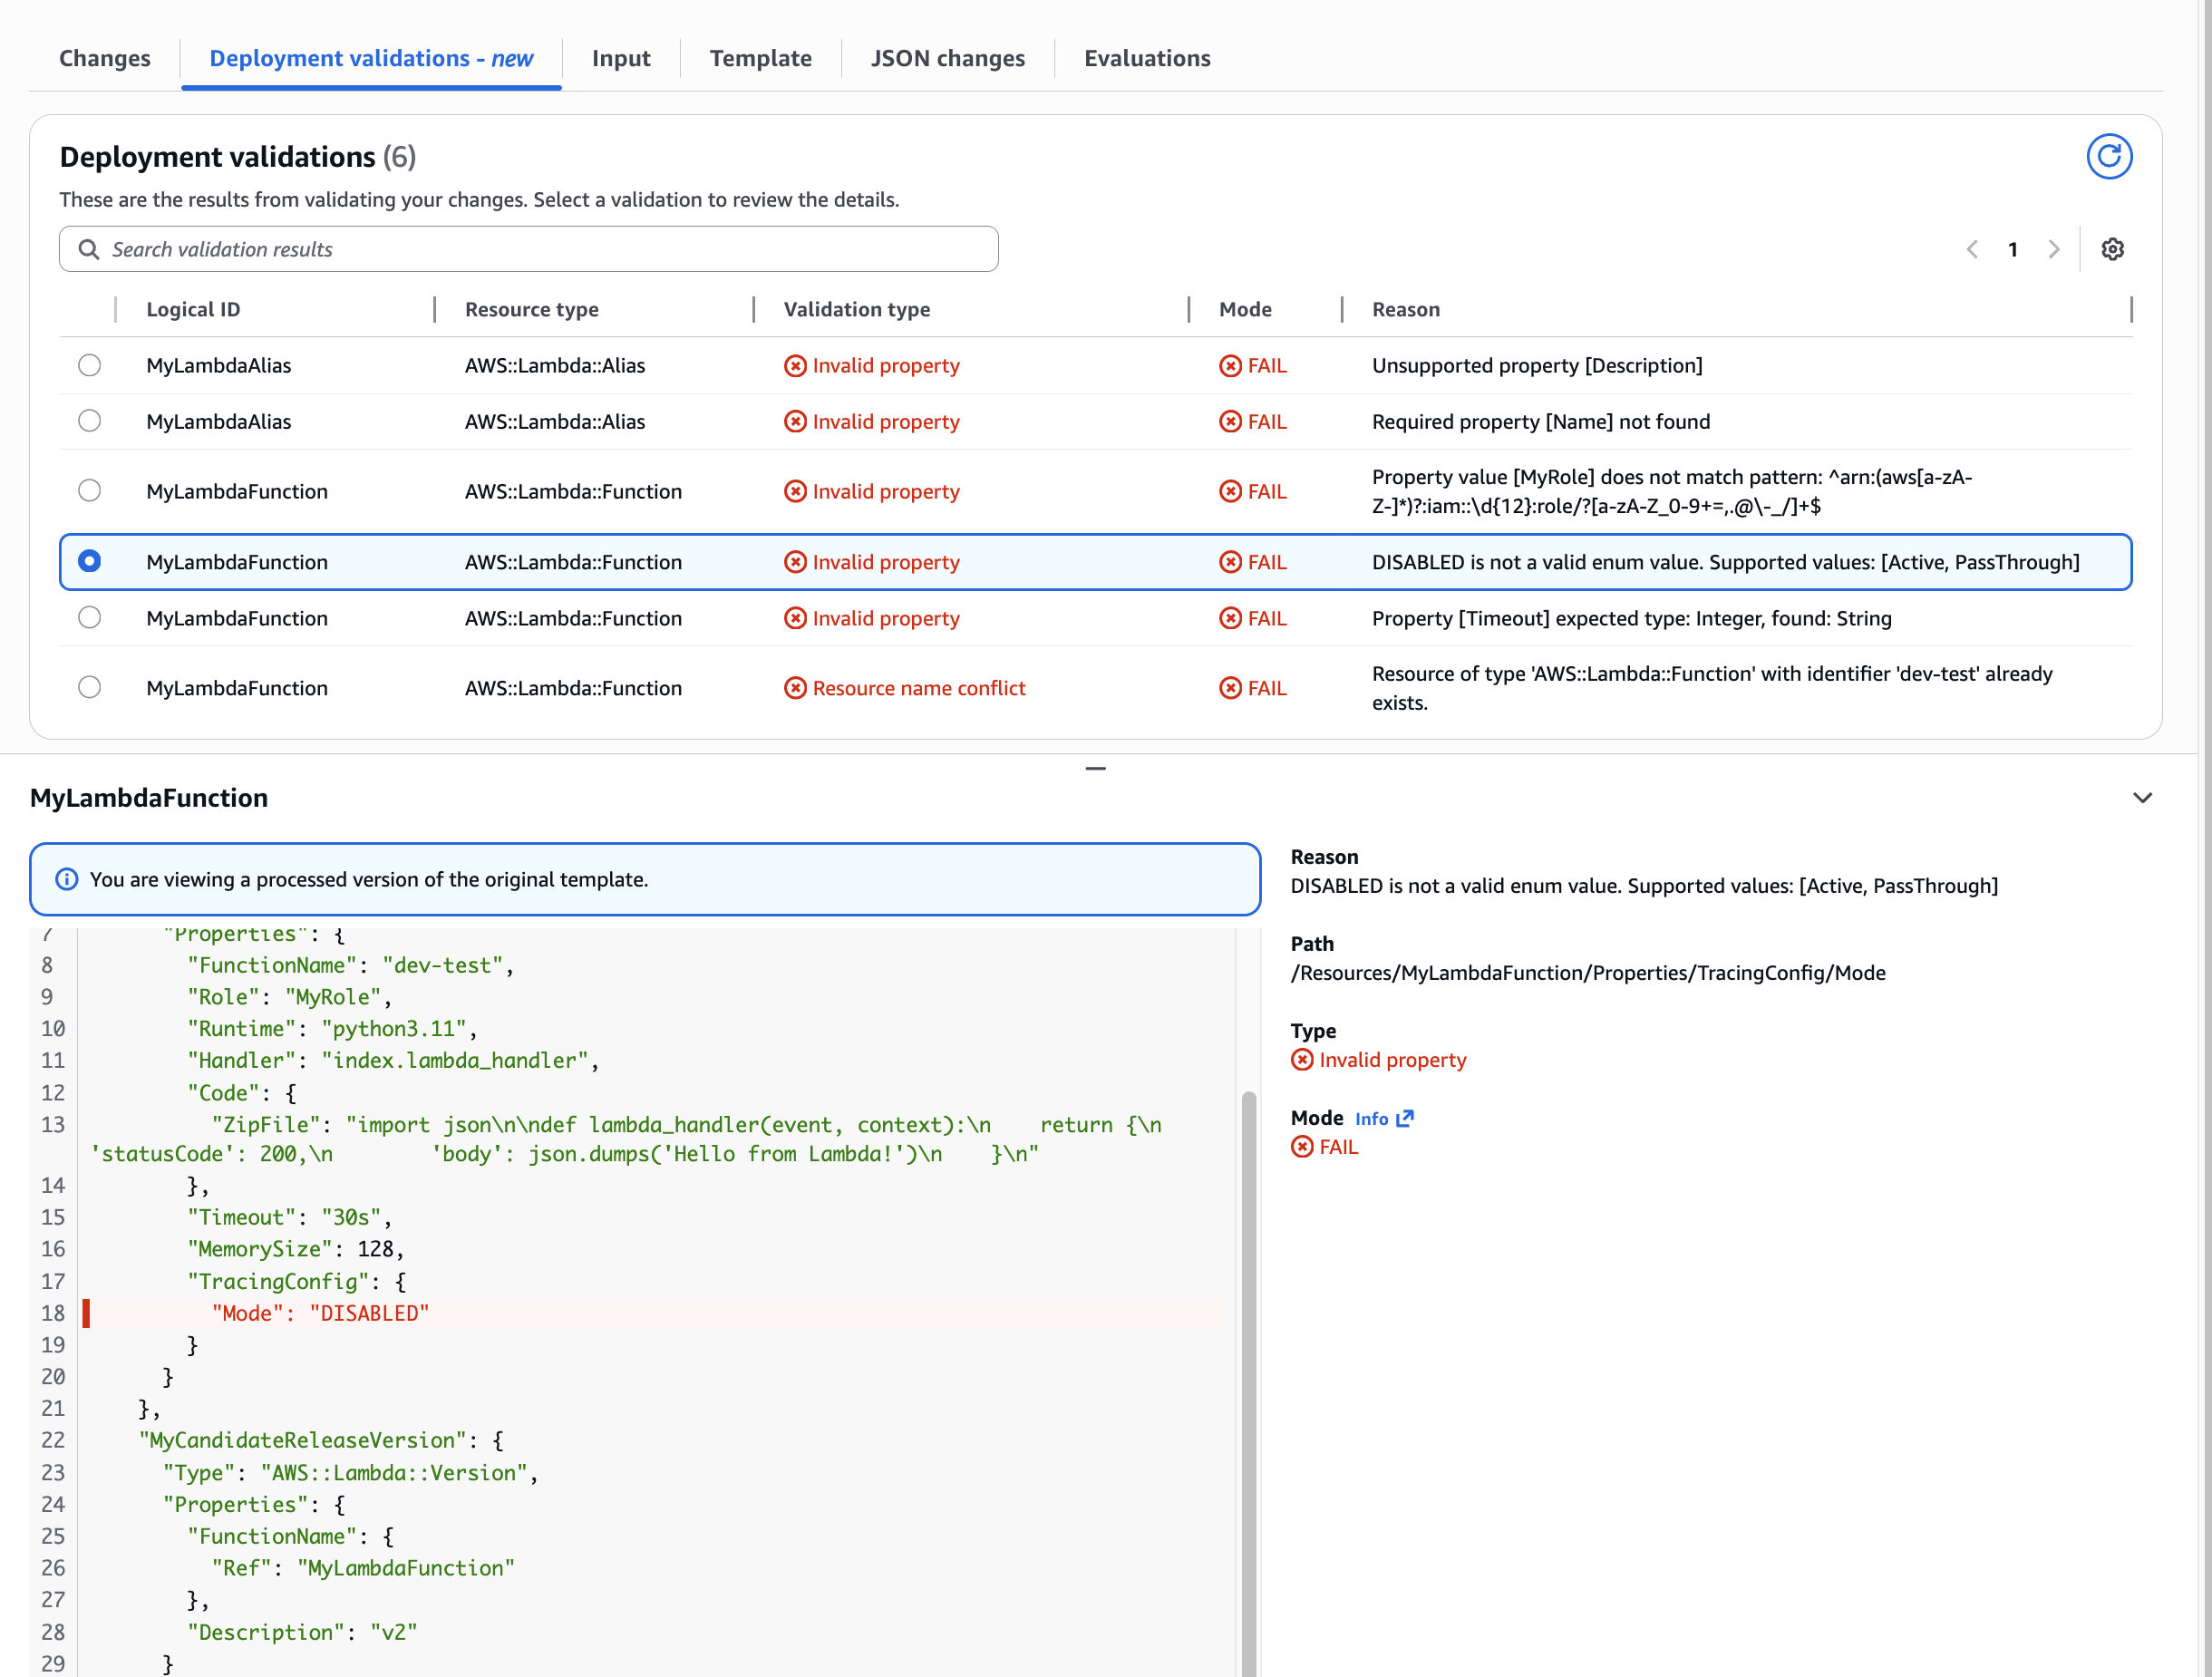
Figure 4: Validation of Invalid ENUM value for nested property
Use Case: Lambda Function Timeout property type mismatch
Preventing type-related deployment failures. Shows how validation catches string values (“30s”) where integers are required, saving developers from runtime errors.
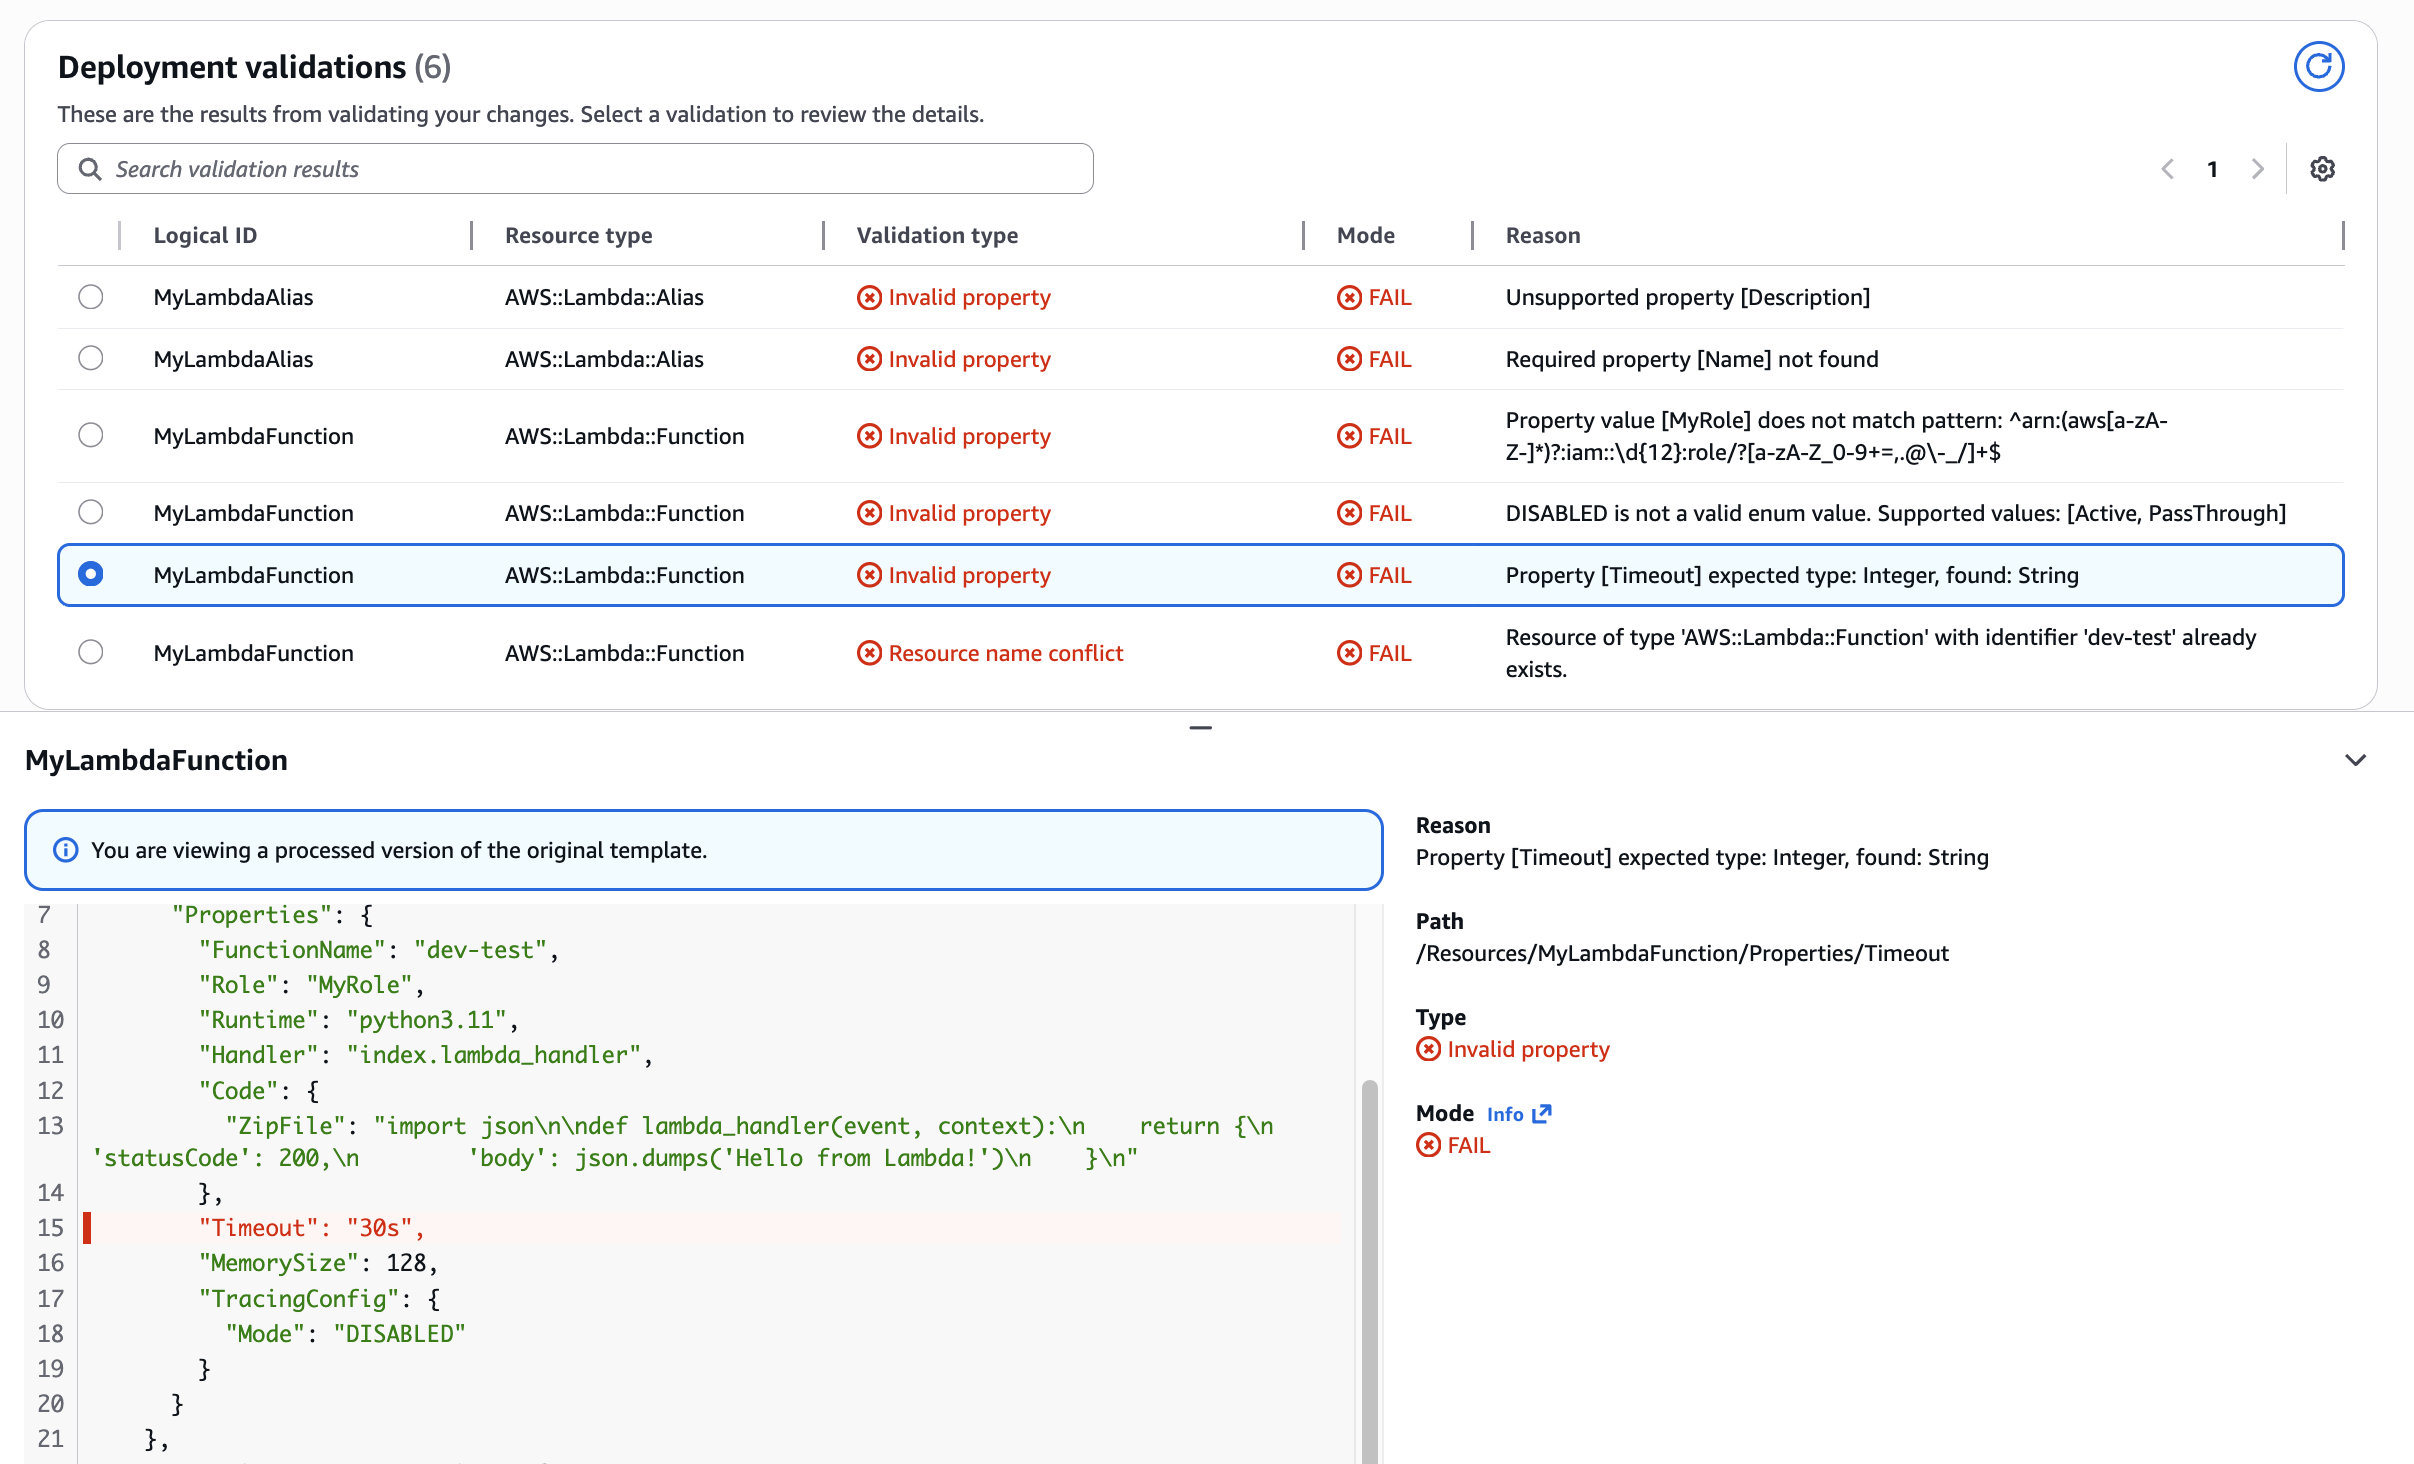
Figure 5: Validation of Lambda Function Timeout property type mismatch
Use Case: Lambda Function Role property pattern mismatch
Validating ARN format requirements. Demonstrates pattern validation ensuring Role properties match required ARN format.
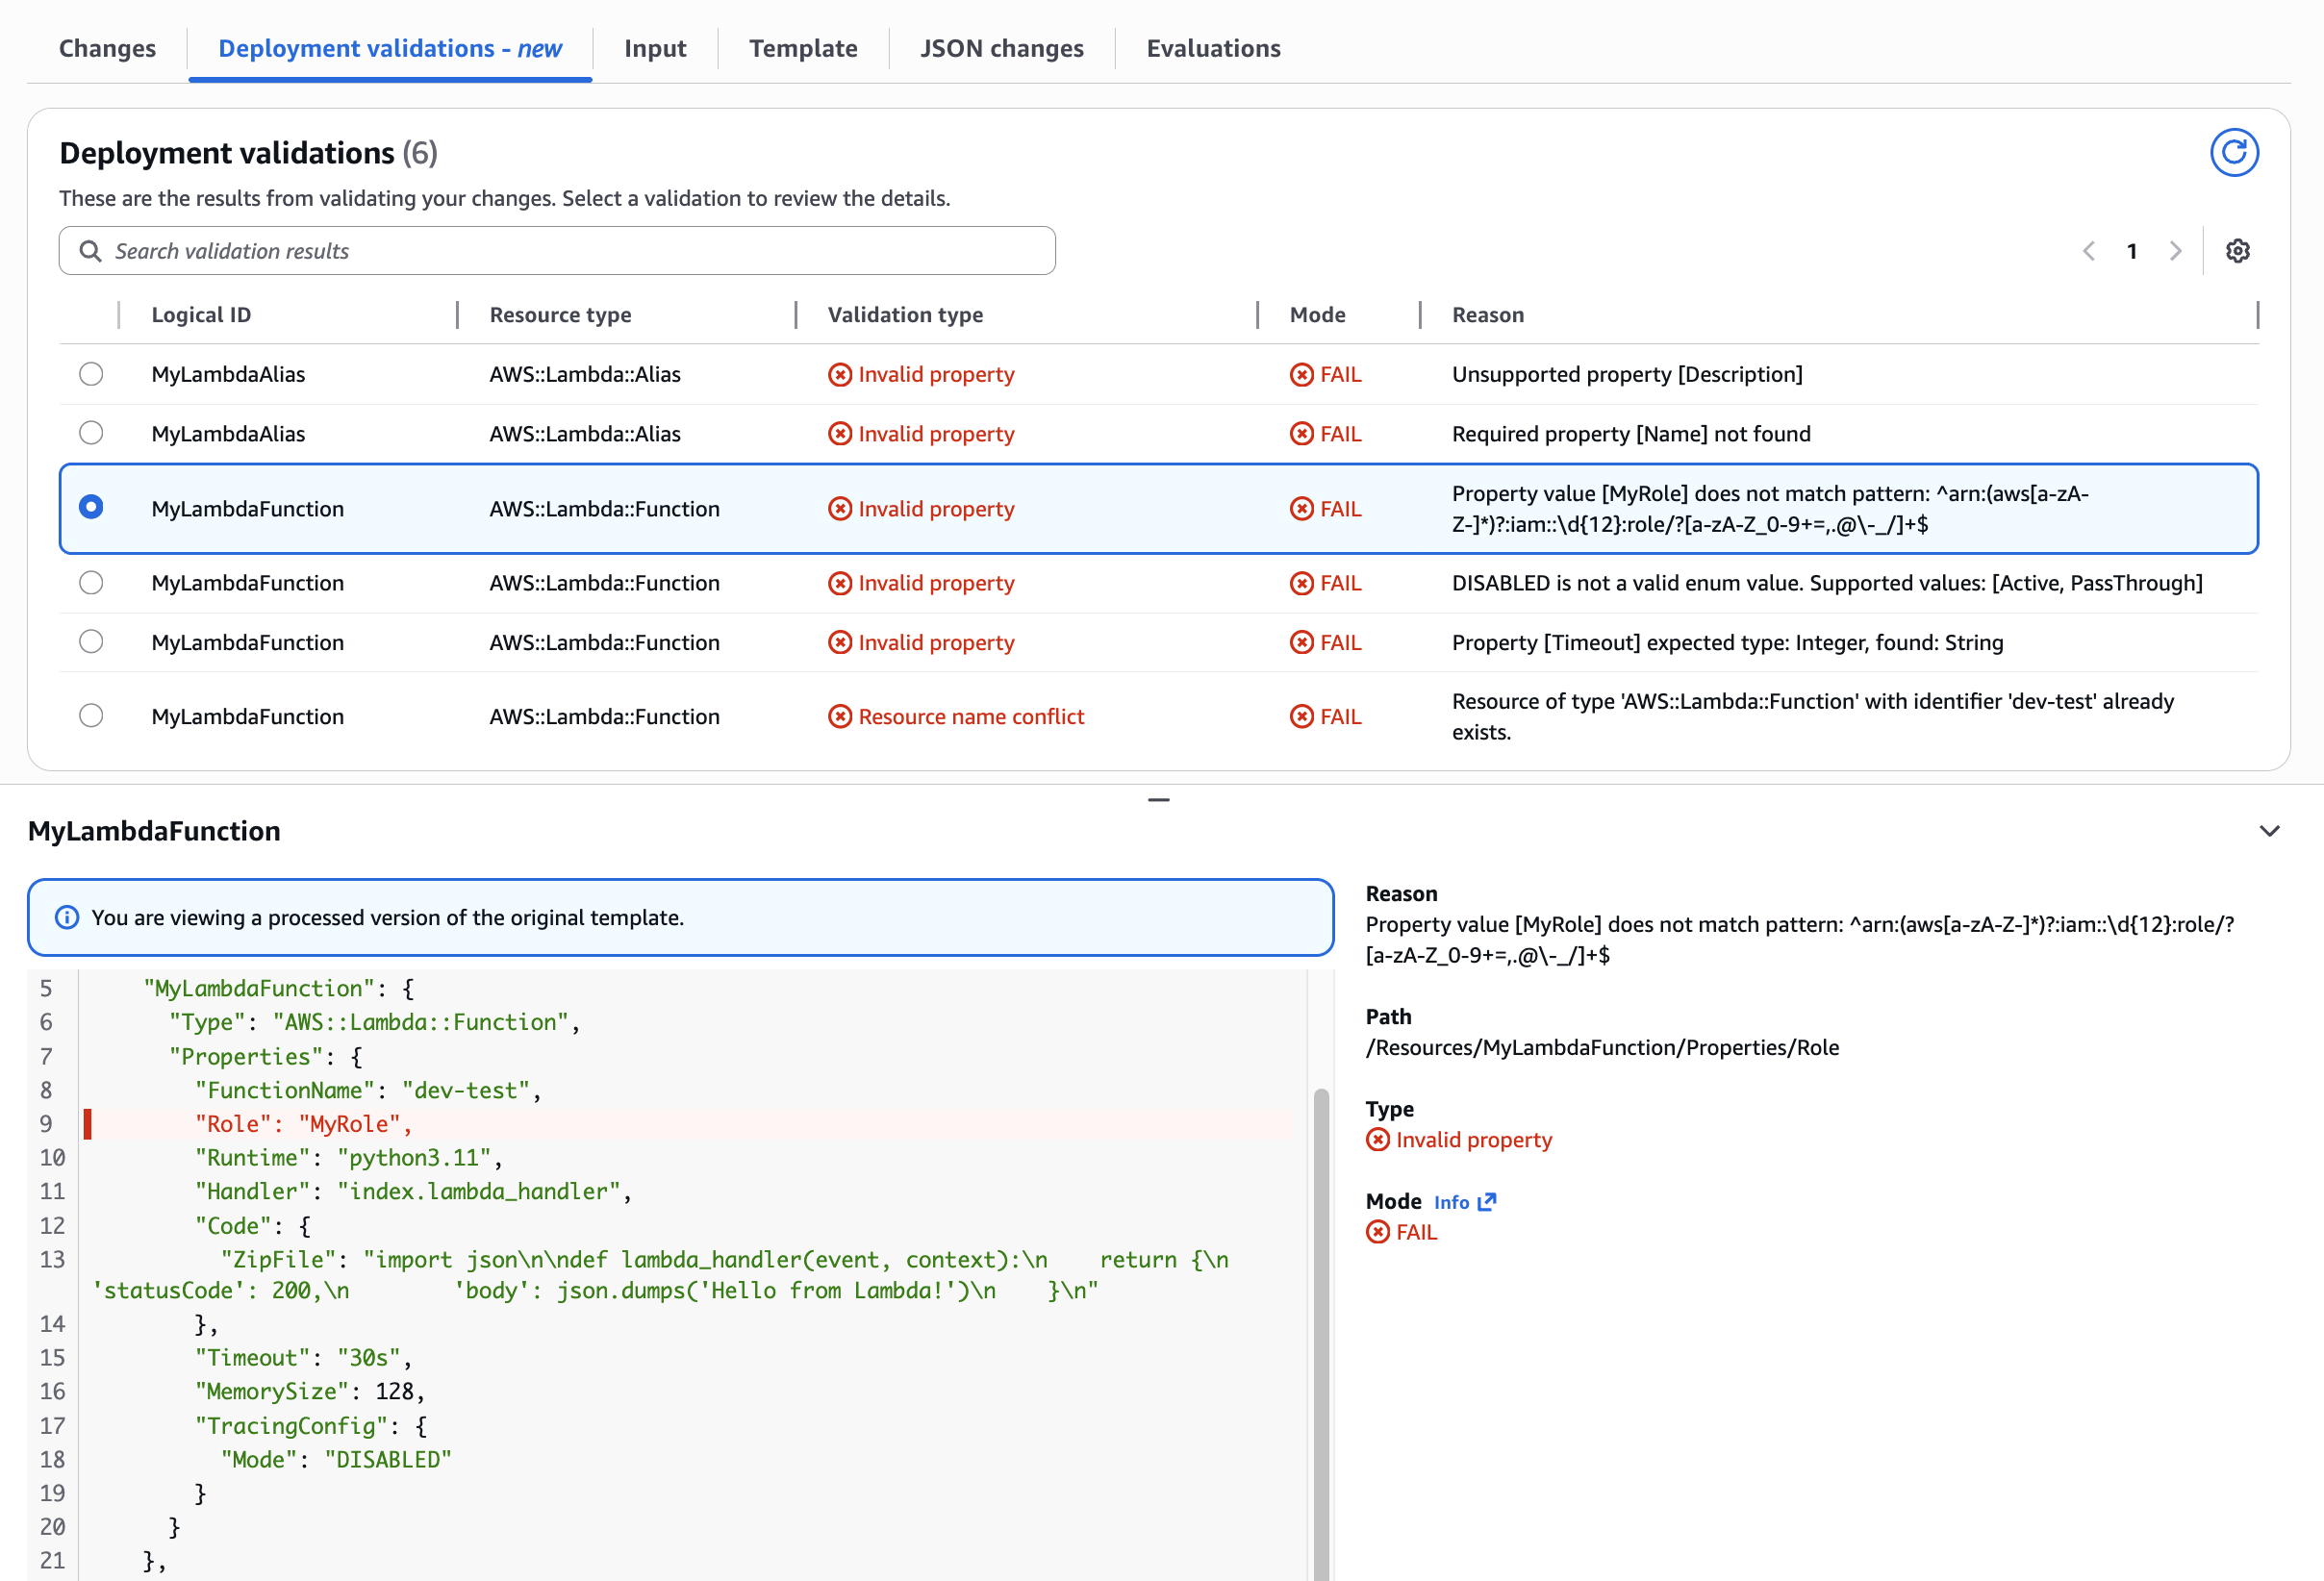
Figure 6: Lambda Function Role property pattern mismatch
Use Case: Undefined required Lambda Alias Name property
Catching missing required properties. Shows validation detecting absent mandatory fields, preventing incomplete resource definitions from reaching deployment.
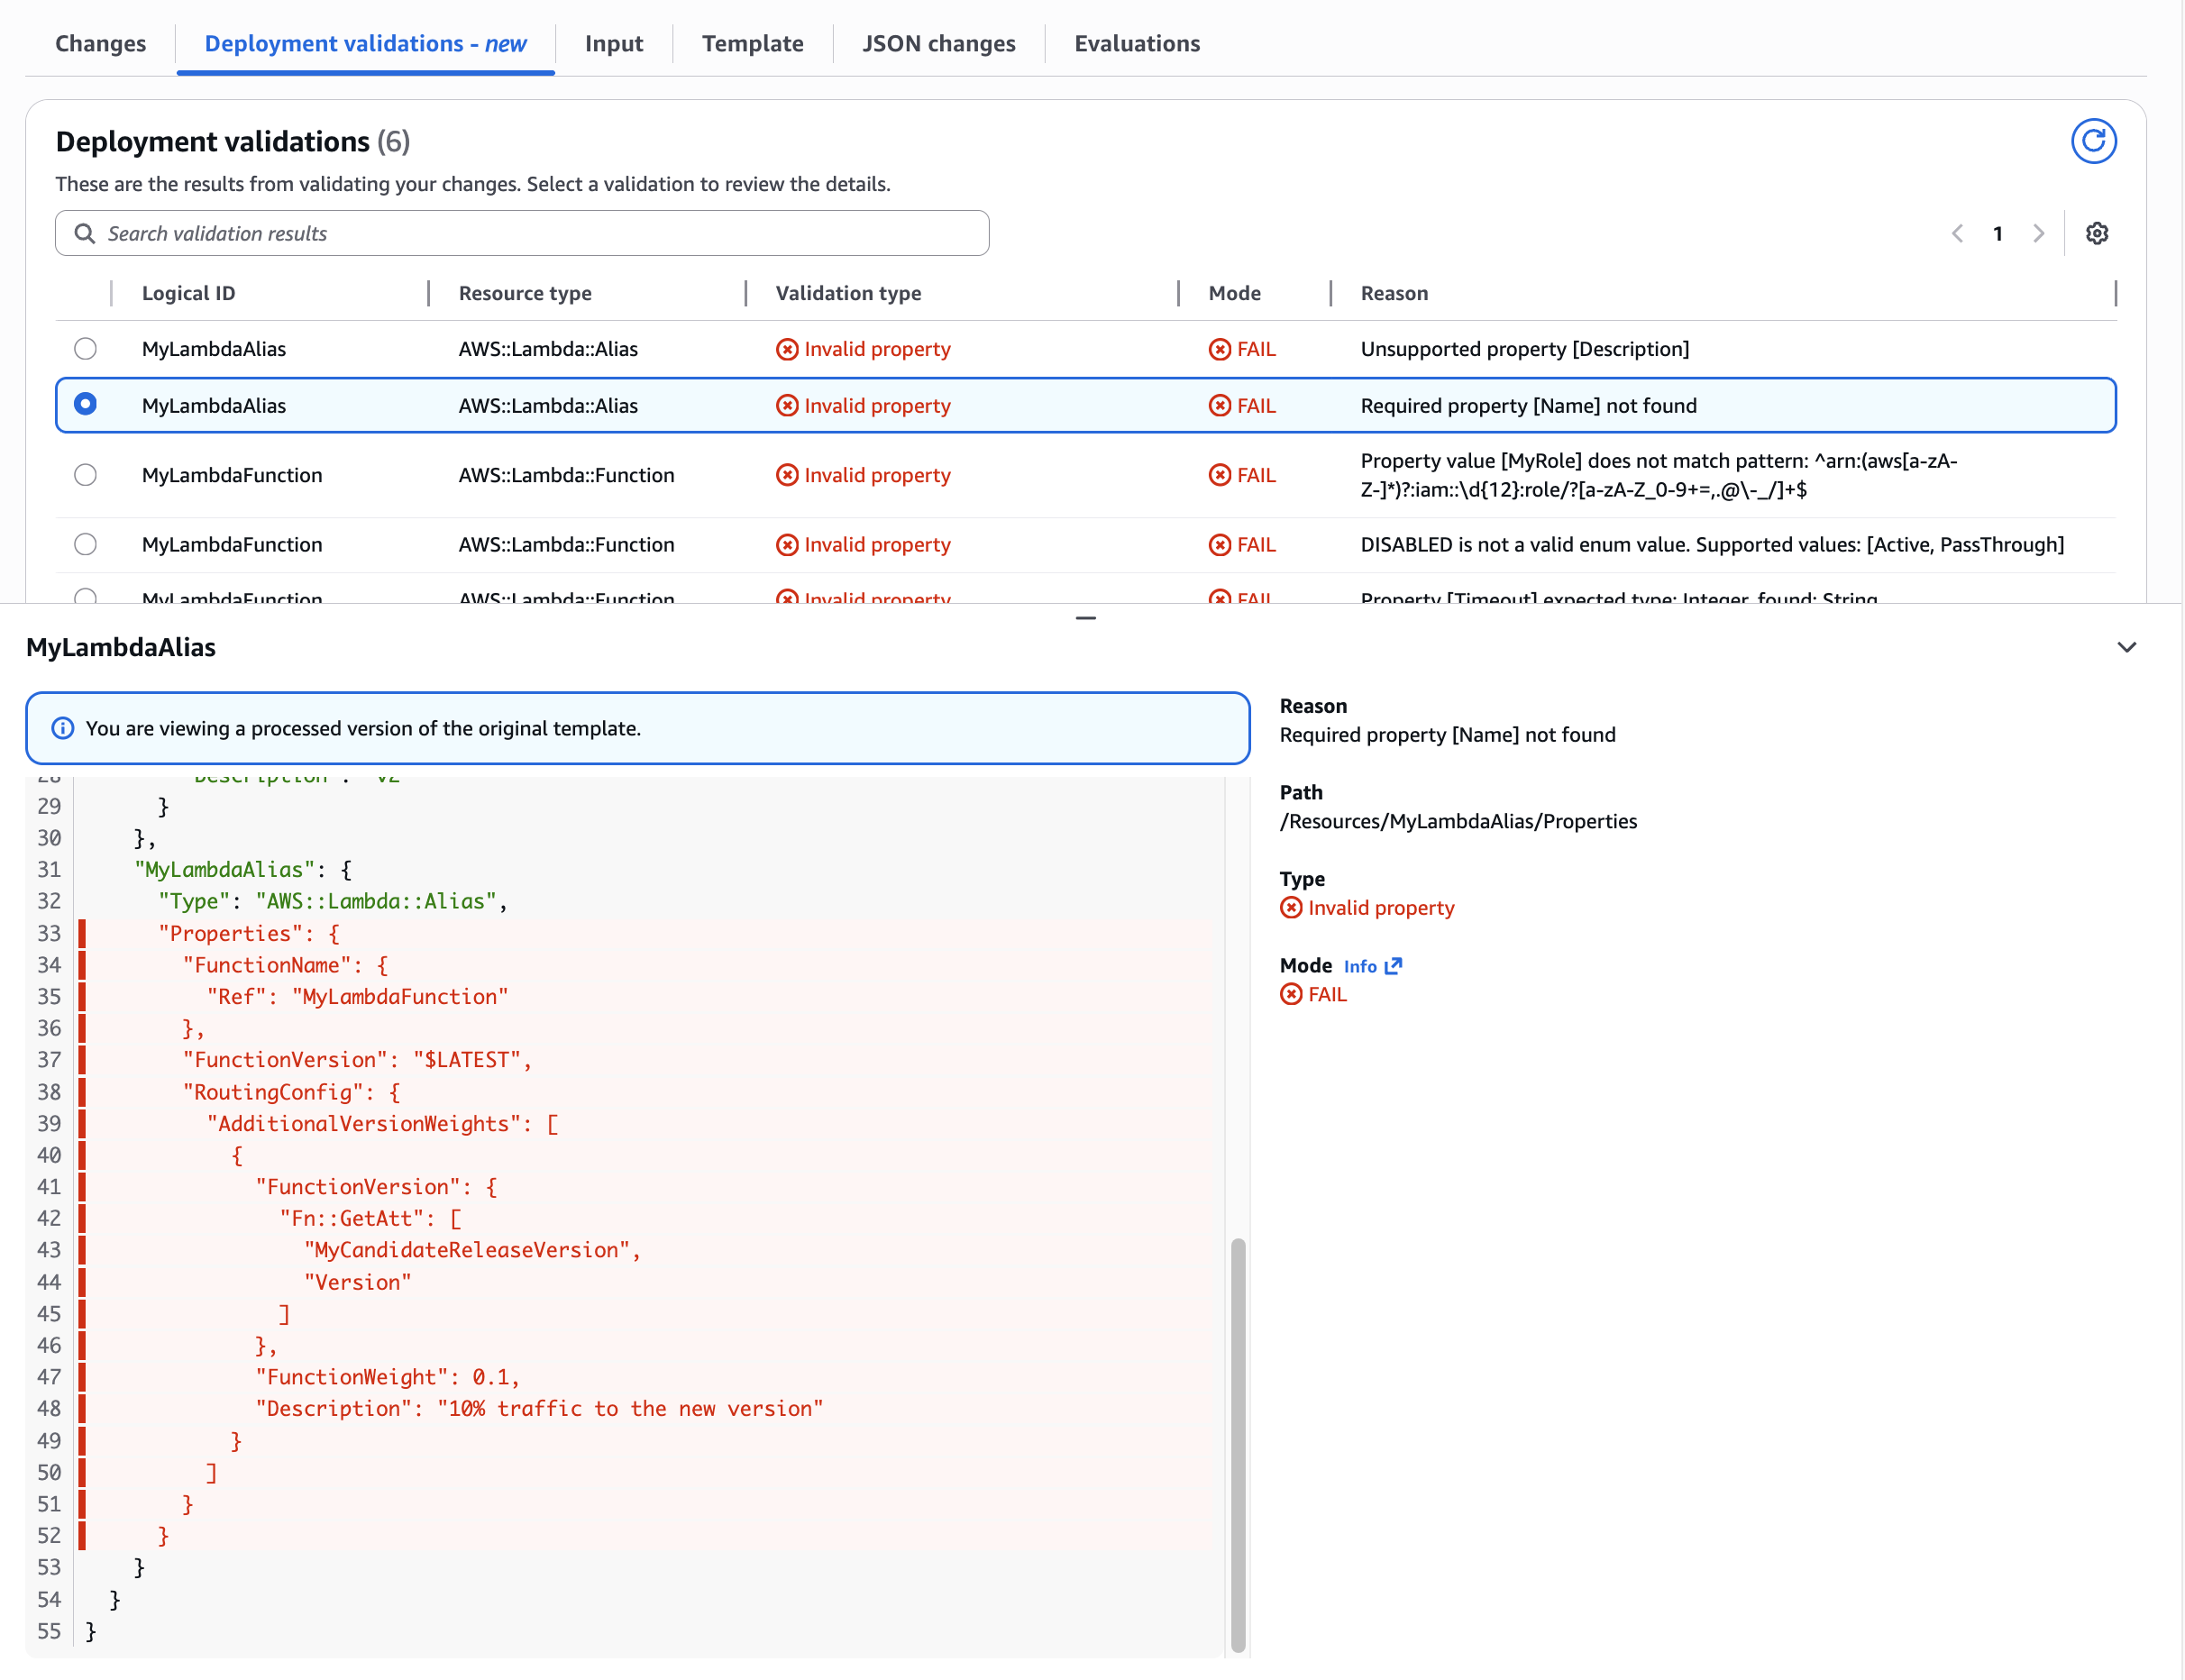
Figure 7: Validation of undefined required Lambda Alias Name property
Notice how the validation Path field (e.g., “/Resources/MyLambdaFunction/Properties/TracingConfig/Mode”) pinpoints the exact template location of each error. This eliminates manual searching through hundreds of lines of infrastructure code – a common time sink that can take minutes in complex templates.
Use case: Unsupported property
Shows how CloudFormation validation catches unsupported properties. In this example, the AWS::Lambda::Alias resource had an unsupported extra property Description in a nested path RoutingConfig.AdditionalVersionWeights.0.
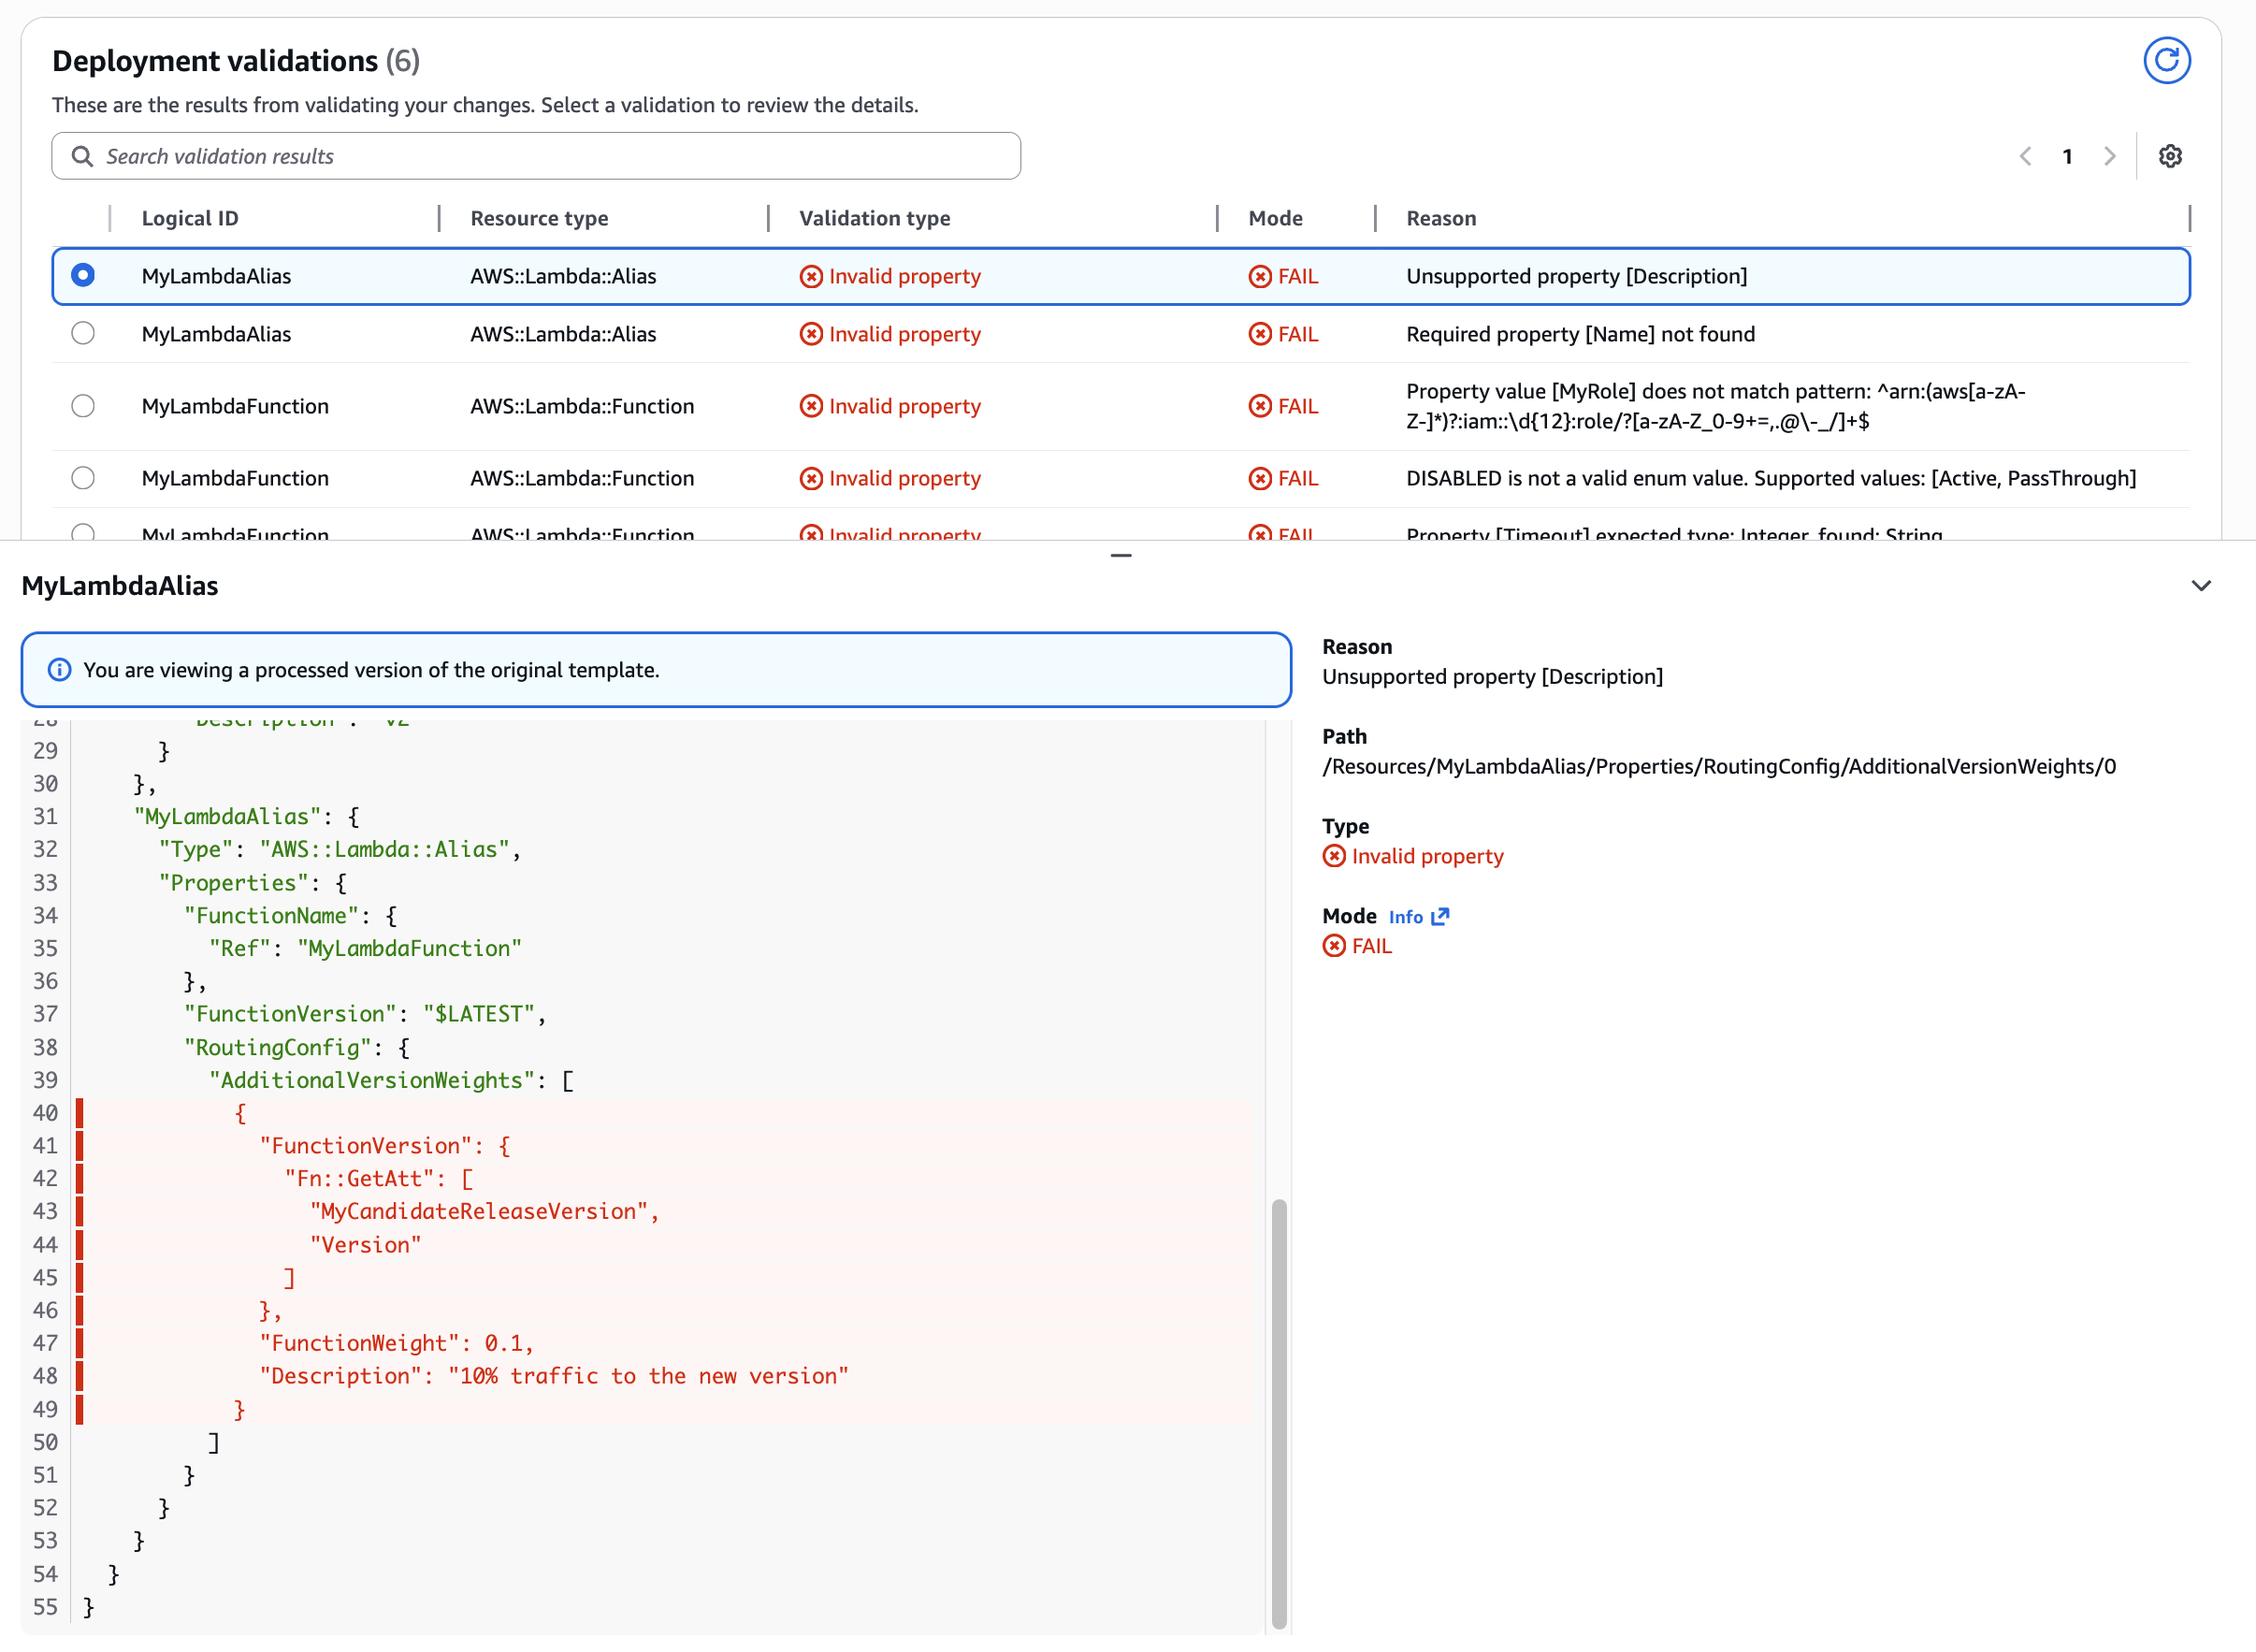
Figure 8: CloudFormation validation of unsupported resource property
CLI command
You can also use the new describe-events API to review the validation responses.
aws cloudformation describe-events \
  --change-set-id "arn:aws:cloudformation:us-west-2:123456789012:changeSet/updateAlias/94498df5-1afb-43b1-9869-9f82b2d877ac"
{
"OperationEvents": [
{
"EventId": "d3221796-d6a4-40c3-a987-93b103e7fcc1",
"StackId": "arn:aws:cloudformation:us-west-2:123456789012:stack/dev-lambda-stack/2d2c3240-bb59-11f0-b080-0613dc96740d",
"OperationId": "94498df5-1afb-43b1-9869-9f82b2d877ac",
"OperationType": "CREATE_CHANGESET",
"OperationStatus": "FAILED",
"EventType": "STACK_EVENT",
"Timestamp": "2025-11-06T21:40:18.428000+00:00",
"StartTime": "2025-11-06T21:40:13.399000+00:00",
"EndTime": "2025-11-06T21:40:18.428000+00:00"
},
{
"EventId": "87b628b4-fbcb-42b0-bf07-779007bf0d85",
"StackId": "arn:aws:cloudformation:us-west-2:123456789012:stack/dev-lambda-stack/2d2c3240-bb59-11f0-b080-0613dc96740d",
"OperationId": "94498df5-1afb-43b1-9869-9f82b2d877ac",
"OperationType": "CREATE_CHANGESET",
"EventType": "VALIDATION_ERROR",
"LogicalResourceId": "MyLambdaFunction",
"PhysicalResourceId": "",
"ResourceType": "AWS::Lambda::Function",
"Timestamp": "2025-11-06T21:40:18.163000+00:00",
"ValidationFailureMode": "FAIL", "ValidationName": "PROPERTY_VALIDATION", "ValidationStatus": "FAILED", "ValidationStatusReason": "DISABLED is not a valid enum value. Supported values: [Active, PassThrough]", "ValidationPath": "/Resources/MyLambdaFunction/Properties/TracingConfig/Mode" },
{
"EventId": "2f89cf64-e810-4285-8936-b77f7b72228c",
"StackId": "arn:aws:cloudformation:us-west-2:123456789012:stack/dev-lambda-stack/2d2c3240-bb59-11f0-b080-0613dc96740d",
"OperationId": "94498df5-1afb-43b1-9869-9f82b2d877ac",
"OperationType": "CREATE_CHANGESET",
"EventType": "VALIDATION_ERROR",
"LogicalResourceId": "MyLambdaFunction",
"PhysicalResourceId": "",
"ResourceType": "AWS::Lambda::Function",
"Timestamp": "2025-11-06T21:40:18.163000+00:00",
"ValidationFailureMode": "FAIL", "ValidationName": "PROPERTY_VALIDATION", "ValidationStatus": "FAILED", "ValidationStatusReason": "Property [Timeout] expected type: Integer, found: String", "ValidationPath": "/Resources/MyLambdaFunction/Properties/Timeout" },
{
"EventId": "b2448484-4e41-4c53-b19e-6355dafeac6b",
"StackId": "arn:aws:cloudformation:us-west-2:123456789012:stack/dev-lambda-stack/2d2c3240-bb59-11f0-b080-0613dc96740d",
"OperationId": "94498df5-1afb-43b1-9869-9f82b2d877ac",
"OperationType": "CREATE_CHANGESET",
"EventType": "VALIDATION_ERROR",
"LogicalResourceId": "MyLambdaAlias",
"PhysicalResourceId": "",
"ResourceType": "AWS::Lambda::Alias",
"Timestamp": "2025-11-06T21:40:18.134000+00:00",
"ValidationFailureMode": "FAIL", "ValidationName": "PROPERTY_VALIDATION", "ValidationStatus": "FAILED", "ValidationStatusReason": "Required property [Name] not found", "ValidationPath": "/Resources/MyLambdaAlias/Properties" },
{
"EventId": "694e94f0-a2f1-49fd-8045-545a9cb41ca9",
"StackId": "arn:aws:cloudformation:us-west-2:123456789012:stack/dev-lambda-stack/2d2c3240-bb59-11f0-b080-0613dc96740d",
"OperationId": "94498df5-1afb-43b1-9869-9f82b2d877ac",
"OperationType": "CREATE_CHANGESET",
"EventType": "VALIDATION_ERROR",
"LogicalResourceId": "MyLambdaAlias",
"PhysicalResourceId": "",
"ResourceType": "AWS::Lambda::Alias",
"Timestamp": "2025-11-06T21:40:18.132000+00:00",
"ValidationFailureMode": "FAIL",
"ValidationName": "PROPERTY_VALIDATION",
"ValidationStatus": "FAILED",
"ValidationStatusReason": "Unsupported property [Description]",
"ValidationPath": "/Resources/MyLambdaAlias/Properties/RoutingConfig/AdditionalVersionWeights/0"
},
{
"EventId": "935cbd72-a637-4ad5-908d-e2ce241022ad",
"StackId": "arn:aws:cloudformation:us-west-2:123456789012:stack/dev-lambda-stack/2d2c3240-bb59-11f0-b080-0613dc96740d",
"OperationId": "94498df5-1afb-43b1-9869-9f82b2d877ac",
"OperationType": "CREATE_CHANGESET",
"EventType": "VALIDATION_ERROR",
"LogicalResourceId": "MyLambdaFunction",
"PhysicalResourceId": "",
"ResourceType": "AWS::Lambda::Function",
"Timestamp": "2025-11-06T21:40:18.126000+00:00",
"ValidationFailureMode": "FAIL", "ValidationName": "PROPERTY_VALIDATION", "ValidationStatus": "FAILED", "ValidationStatusReason": "Property value [MyRole] does not match pattern: ^arn:(aws[a-zA-Z-]*)?:iam::\\d{12}:role/?[a-zA-Z_0-9+=,.@\\-_/]+$", "ValidationPath": "/Resources/MyLambdaFunction/Properties/Role" },
{
"EventId": "c4d25b22-9e8f-42f9-bd2e-3391b9bdacbd",
"StackId": "arn:aws:cloudformation:us-west-2:123456789012:stack/dev-lambda-stack/2d2c3240-bb59-11f0-b080-0613dc96740d",
"OperationId": "94498df5-1afb-43b1-9869-9f82b2d877ac",
"OperationType": "CREATE_CHANGESET",
"OperationStatus": "IN_PROGRESS",
"EventType": "STACK_EVENT",
"Timestamp": "2025-11-06T21:40:13.399000+00:00",
"StartTime": "2025-11-06T21:40:13.399000+00:00"
}
]
}Scenario 2: Resource Name Conflict Validation
Resource name conflict validation makes sure that new resources added to a template are not already present in your AWS account or globally (e.g: Amazon S3, Amazon Route 53 DNS), preventing deployment errors caused due to resource name conflicts
After reviewing the property validation exceptions, let’s assume that you resolved all the issues and successfully deployed the stack. Next, the you have decided to include a S3 bucket resource in the template. You name the bucket “dev-thumbnails” but didn’t verify if the bucket with this name already exists. If a bucket with this name already exists, the CreateChangeSet operation will fail, reporting to the developer that the bucket already exists.
...

  MyDevThumbnailsBucket:
    Type: "AWS::S3::Bucket"
    Properties:
      BucketName: "dev-thumbnails"
Step 1: Create Change Set
aws cloudformation create-change-set \
    --stack-name "dev-lambda-stack" \
    --change-set-name "addBucket" \
    --template-body file://lambda-with-alias-template.yaml | jq .
Step 2: Review Deployment Validations
Use CloudFormation change set console to review validations response or use the new DescribeEvents API in the CLi.
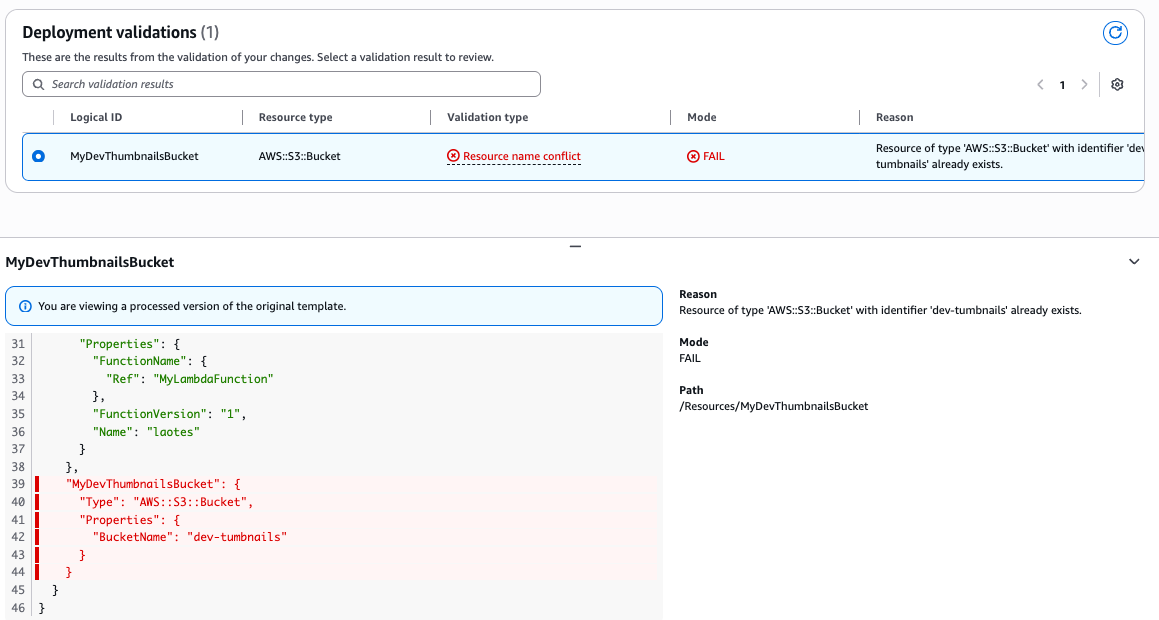
Figure 9: Resource name conflict validation
CLI Command
aws cloudformation describe-events \
    --change-set-name "arn:aws:cloudformation:us-west-2:123456789012:changeSet/addBucket/eafcdb2b-e018-4e0f-9e87-86b251f4eac5"
{
"OperationEvents": [
{
"EventId": "e6049394-30e4-466d-9fb4-b5f525144058",
"StackId": "arn:aws:cloudformation:us-west-2:123456789012:stack/dev-lambda-stack/2d2c3240-bb59-11f0-b080-0613dc96740d",
"OperationId": "eafcdb2b-e018-4e0f-9e87-86b251f4eac5",
"OperationType": "CREATE_CHANGESET",
"OperationStatus": "FAILED",
"EventType": "STACK_EVENT",
"Timestamp": "2025-11-06T21:58:49.872000+00:00",
"StartTime": "2025-11-06T21:58:44.252000+00:00",
"EndTime": "2025-11-06T21:58:49.872000+00:00"
},
{
"EventId": "bca310c3-61e6-4478-9b0a-3a89f816aec0",
"StackId": "arn:aws:cloudformation:us-west-2:123456789012:stack/dev-lambda-stack/2d2c3240-bb59-11f0-b080-0613dc96740d",
"OperationId": "eafcdb2b-e018-4e0f-9e87-86b251f4eac5",
"OperationType": "CREATE_CHANGESET",
"EventType": "VALIDATION_ERROR",
"LogicalResourceId": "MyDevThumbnailsBucket",
"PhysicalResourceId": "",
"ResourceType": "AWS::S3::Bucket",
"Timestamp": "2025-11-06T21:58:49.606000+00:00",
"ValidationFailureMode": "FAIL", "ValidationName": "NAME_CONFLICT_VALIDATION", "ValidationStatus": "FAILED", "ValidationStatusReason": "Resource of type 'AWS::S3::Bucket' with identifier 'dev-thumbnails' already exists.", "ValidationPath": "/Resources/MyDevThumbnailsBucket" },
{
"EventId": "8158f79f-ee58-4c3b-b3eb-3beace064139",
"StackId": "arn:aws:cloudformation:us-west-2:123456789012:stack/dev-lambda-stack/2d2c3240-bb59-11f0-b080-0613dc96740d",
"OperationId": "eafcdb2b-e018-4e0f-9e87-86b251f4eac5",
"OperationType": "CREATE_CHANGESET",
"OperationStatus": "IN_PROGRESS",
"EventType": "STACK_EVENT",
"Timestamp": "2025-11-06T21:58:44.252000+00:00",
"StartTime": "2025-11-06T21:58:44.252000+00:00"
}
]
}Scenario 3: S3 bucket not empty
Since AWS S3 service does not allow customers to delete S3 Buckets when there are objects in them, the new pre-deployment validations will warn you if you try to delete a bucket that is not empty.
Resuming our journey, let’s assume that you fix the name conflict issue by renaming the bucket to “dev-test-tumbnails”, and then updates the stack. After testing the lambda function’s integration with S3, the dev-cycle generated a few thumbnail objects in the S3 bucket.
Later, you decide to fix the bucket name because you notice a typo: “dev-test-tumbnails” should be “dev-test-thumbnails” (missing “h”). When you update the template to use the corrected name, CloudFormation will need to create the new bucket then delete the old one during the clean-up phase.
Step 1: Create Change Set
aws cloudformation create-change-set \
    --stack-name "dev-lambda-stack" \
    --change-set-name "renameBucket" \
    --template-body file://lambda-with-alias-template.yaml | jq .
Step 2: Review Validation
Use CloudFormation change set console to review validations response or use the new DescribeEvents API in the CLI.
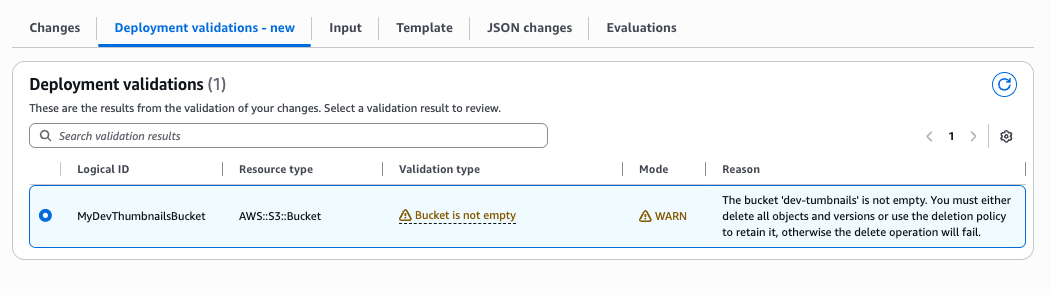
Figure 10: S3 bucket emptiness on delete operation validation
CLI Command
aws cloudformation describe-events \
    --change-set-name "arn:aws:cloudformation:us-west-2:123456789012:changeSet/addBucket/eafcdb2b-e018-4e0f-9e87-86b251f4eac5"
{
"OperationEvents": [
{
"EventId": "24920e0f-1941-45a5-9177-786bc805b724",
"StackId": "arn:aws:cloudformation:us-west-2:123456789012:stack/dev-lambda-stack/2d2c3240-bb59-11f0-b080-0613dc96740d",
"OperationId": "8fef2b60-b411-4d0e-920e-7ec7c7aa39f2",
"OperationType": "CREATE_CHANGESET",
"OperationStatus": "SUCCEEDED",
"EventType": "STACK_EVENT",
"Timestamp": "2025-11-06T22:52:26.355000+00:00",
"StartTime": "2025-11-06T22:52:21.071000+00:00",
"EndTime": "2025-11-06T22:52:26.355000+00:00"
},
{
"EventId": "c117e02d-a652-4755-9586-6d4ccb0f6504",
"StackId": "arn:aws:cloudformation:us-west-2:123456789012:stack/dev-lambda-stack/2d2c3240-bb59-11f0-b080-0613dc96740d",
"OperationId": "8fef2b60-b411-4d0e-920e-7ec7c7aa39f2",
"OperationType": "CREATE_CHANGESET",
"EventType": "VALIDATION_ERROR",
"LogicalResourceId": "MyDevThumbnailsBucket",
"PhysicalResourceId": "",
"ResourceType": "AWS::S3::Bucket",
"Timestamp": "2025-11-06T22:52:25.960000+00:00",
"ValidationFailureMode": "WARN", "ValidationName": "BUCKET_EMPTINESS_VALIDATION", "ValidationStatus": "FAILED", "ValidationStatusReason": "The bucket 'dev-tumbnails' is not empty. You must either delete all objects and versions or use the deletion policy to retain it, otherwise the delete operation will fail.", "ValidationPath": "/Resources/MyDevThumbnailsBucket"
},
{
"EventId": "6c66ff53-6751-4b4c-96b8-d1a33fc43b4f",
"StackId": "arn:aws:cloudformation:us-west-2:123456789012:stack/dev-lambda-stack/2d2c3240-bb59-11f0-b080-0613dc96740d",
"OperationId": "8fef2b60-b411-4d0e-920e-7ec7c7aa39f2",
"OperationType": "CREATE_CHANGESET",
"OperationStatus": "IN_PROGRESS",
"EventType": "STACK_EVENT",
"Timestamp": "2025-11-06T22:52:21.071000+00:00",
"StartTime": "2025-11-06T22:52:21.071000+00:00"
}
]
}Bucket emptiness validation uses WARN mode, which allows change set creation to succeed even when the validation check fails. This gives you time to review and empty the bucket before execution. However, if you execute the change set without emptying the bucket, the delete operation will fail.
Notice in the output above:
ValidationStatus: "FAILED"– The emptiness check detected objects in the bucketValidationFailureMode: "WARN"– This is a warning, not a blocking errorOperationStatus: "SUCCEEDED"– Change set creation completed successfully despite the warning
This design allows you to review the warning, take corrective action (such as emptying the bucket), and then proceed with execution.
Beyond catching errors early, these capabilities also transform how you troubleshoot failed deployments with enhanced operation tracking and filtering.
New DescribeEvents API with Operation IDs and root cause filtering
The new DescribeEvents API retrieves CloudFormation events based on flexible query criteria. It groups stack operations by operation ID, enabling you to focus specifically on individual stack operations involved during your stack deployment.
Operation: An operation is any action performed on a stack, including stack lifecycle actions (Create, Update, Delete, Rollback), change set creation, nested stack creation, and automatic rollbacks triggered by failures. Each operation has a unique identifier and represents a discrete change attempt on the stack.
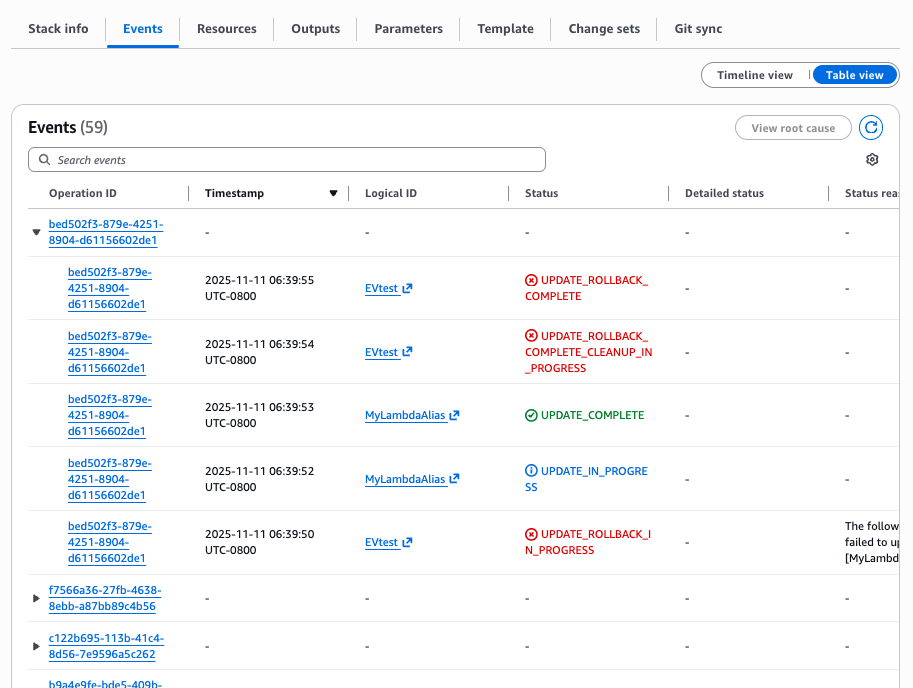
Figure 11: Stack Events grouped by Operation Id
Scenario
When an update operation on an existing stack fails and results in a rollback, and you want to understand the reason behind the update stack failure. Using the operation ID obtained from the update stack response or from the describe stacks response, you can call describe events to get details on the failure.
Step 1: Update Stack
aws cloudformation update-stack \
 --stack-name test-1106 \
 --template-body file://test-1106-update.yaml
Output:
{
"StackId": "arn:aws:cloudformation:us-west-2:012345678901:stack/test-1106/07580010-bb79-11f0-8f6c-0289bb5c804f",
"OperationId": "1c211b5a-4538-4dc9-bfed-e07734371e57"
}Step 2: Review stack status with describe stacks
The stack description available via describe-stacks API now includes LastOperations information showing recent operation IDs and their types. This enables you to quickly identify which operations occurred and their current status without parsing through event logs.
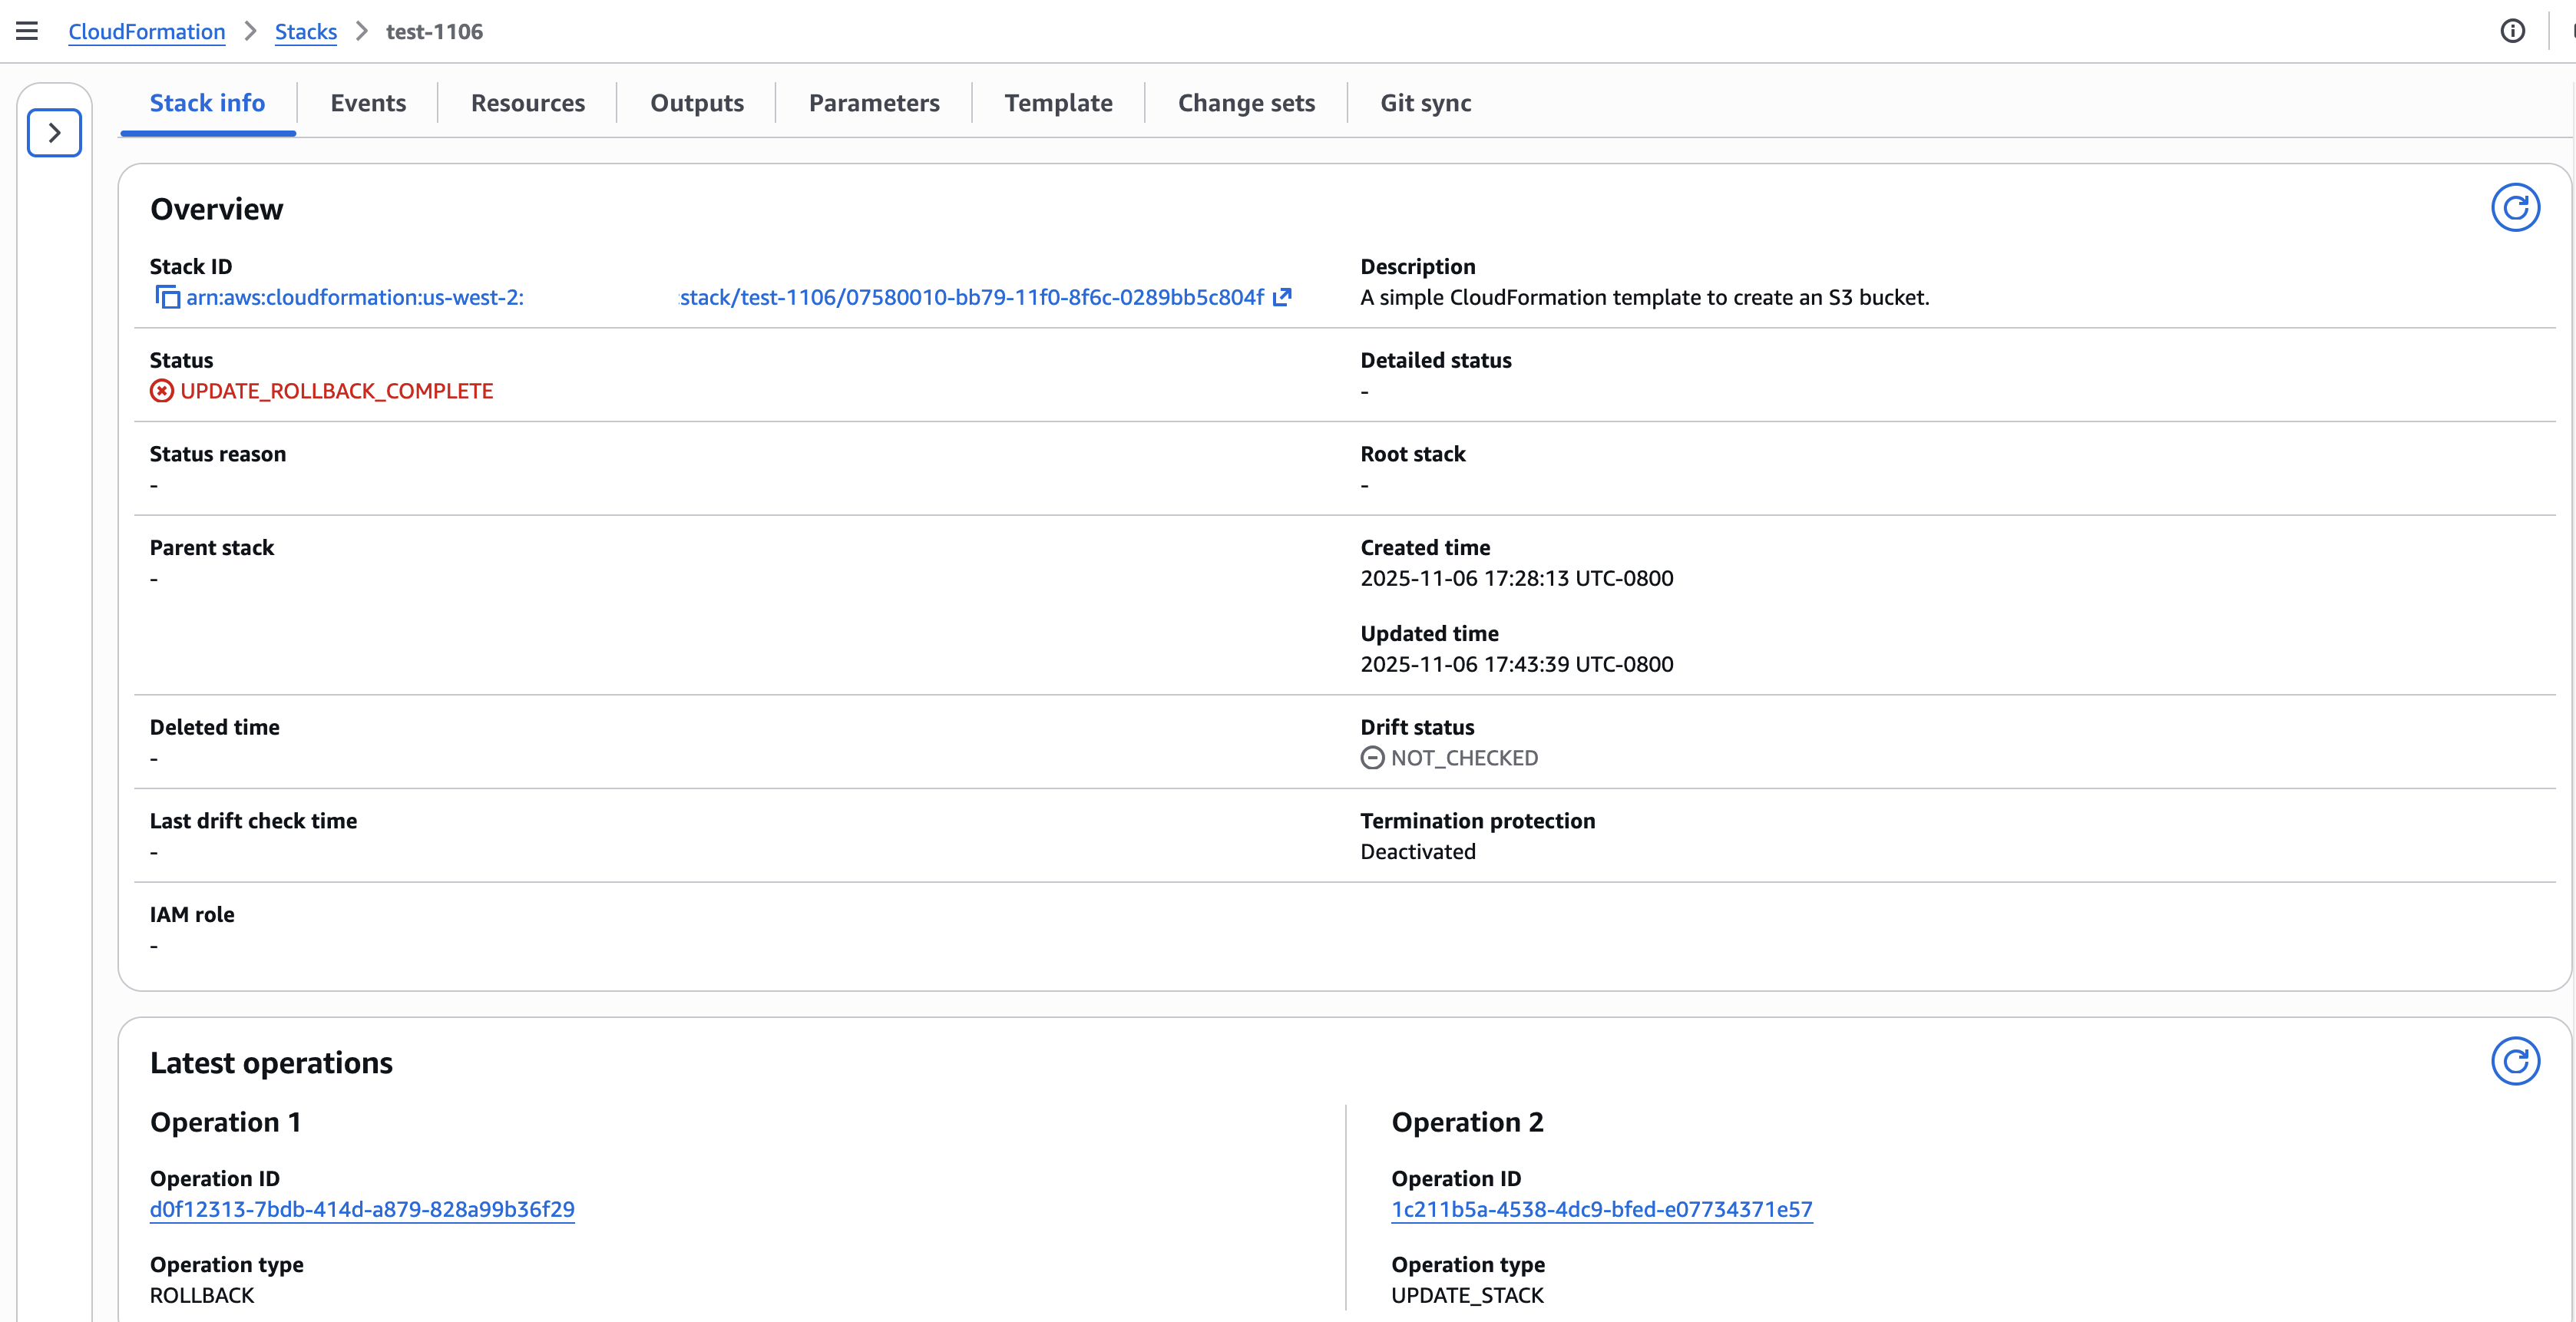
Figure 11: CloudFormation Stack Info page showing new operation IDs
CLI Command
aws cloudformation describe-stacks \
 --stack-name test-1106
{
"Stacks": [
{
"StackId": "arn:aws:cloudformation:us-west-2:012345678901:stack/test-1106/07580010-bb79-11f0-8f6c-0289bb5c804f",
"StackName": "test-1106",
"Description": "A simple CloudFormation template to create an S3 bucket.",
"CreationTime": "2025-11-07T01:28:13.778000+00:00",
"LastUpdatedTime": "2025-11-07T01:43:39.838000+00:00",
"RollbackConfiguration": {},
"StackStatus": "UPDATE_ROLLBACK_COMPLETE",
"DisableRollback": false,
"NotificationARNs": [],
"Tags": [],
"EnableTerminationProtection": false,
"DriftInformation": {
"StackDriftStatus": "NOT_CHECKED"
},
"LastOperations": [ { "OperationType": "ROLLBACK", "OperationId": "d0f12313-7bdb-414d-a879-828a99b36f29" }, { "OperationType": "UPDATE_STACK", "OperationId": "1c211b5a-4538-4dc9-bfed-e07734371e57" }
]
}
]
}Step 3: Review operation status with describe events API and operation id
Using the operation ID from the previous step, you can now query specific operation events to understand exactly what happened during that operation. This targeted approach eliminates the need to search through all stack events to find relevant information.
 Figure 12: New CloudFormation stack operation page
CLI Command
aws cloudformation describe-stacks \
 --stack-name test-1106
{
"OperationEvents": [
{
"EventId": "76358afe-01ff-45e1-bf4d-8b89109aca57",
"StackId": "arn:aws:cloudformation:us-west-2:012345678901:stack/test-1106/07580010-bb79-11f0-8f6c-0289bb5c804f",
"OperationId": "1c211b5a-4538-4dc9-bfed-e07734371e57", "OperationType": "UPDATE_STACK",
"OperationStatus": "FAILED",
"EventType": "STACK_EVENT",
"Timestamp": "2025-11-07T01:43:44.322000+00:00",
"StartTime": "2025-11-07T01:43:39.820000+00:00",
"EndTime": "2025-11-07T01:43:44.322000+00:00"
},
{
"EventId": "01fcd898-38f3-477d-891d-e950d964d594",
"StackId": "arn:aws:cloudformation:us-west-2:012345678901:stack/test-1106/07580010-bb79-11f0-8f6c-0289bb5c804f",
"OperationId": "1c211b5a-4538-4dc9-bfed-e07734371e57", "EventType": "PROVISIONING_ERROR",
"LogicalResourceId": "MyS3Bucket",
"PhysicalResourceId": "test-1106-bucket",
"ResourceType": "AWS::S3::Bucket",
"Timestamp": "2025-11-07T01:43:43.561000+00:00",
"ResourceStatus": "UPDATE_FAILED",
"ResourceStatusReason": "The target bucket for logging does not exist (Service: Amazon S3; Status Code: 400; Error Code: InvalidTargetBucketForLogging; Request ID: ZQAPTT7646A9GQ0H; S3 Extended Request ID: 5Cl/xSAfQgs8UJ7rdq4EvsJT8pxnYLZlc3FzTgpQCxZlukoIiWYXkuds6xDzkmpurH+6epy2s9g7Ro7XN4ZFoQ==; Proxy: null)",
"ResourceProperties": "{\"BucketName\":\"test-1106-bucket\",\"LoggingConfiguration\":{\"LogFilePrefix\":\"access-logs/\",\"DestinationBucketName\":\"logs-1106-bucket\"},\"LifecycleConfiguration\":{\"Rules\":[{\"Status\":\"Enabled\",\"ExpirationInDays\":\"90\",\"Id\":\"DeleteOldVersions\"}]},\"Tags\":[{\"Value\":\"Development\",\"Key\":\"Environment\"},{\"Value\":\"CloudFormationDemo\",\"Key\":\"Project\"}]}"
},
{
"EventId": "2976d65e-44cc-4674-b771-a22d86a7d3f8",
"StackId": "arn:aws:cloudformation:us-west-2:012345678901:stack/test-1106/07580010-bb79-11f0-8f6c-0289bb5c804f",
"OperationId": "1c211b5a-4538-4dc9-bfed-e07734371e57", "EventType": "PROGRESS",
"LogicalResourceId": "MyS3Bucket",
"PhysicalResourceId": "test-1106-bucket",
"ResourceType": "AWS::S3::Bucket",
"Timestamp": "2025-11-07T01:43:43.034000+00:00",
"ResourceStatus": "UPDATE_IN_PROGRESS",
"ResourceProperties": "{\"BucketName\":\"test-1106-bucket\",\"LoggingConfiguration\":{\"LogFilePrefix\":\"access-logs/\",\"DestinationBucketName\":\"logs-bucket\"},\"LifecycleConfiguration\":{\"Rules\":[{\"Status\":\"Enabled\",\"ExpirationInDays\":\"90\",\"Id\":\"DeleteOldVersions\"}]},\"Tags\":[{\"Value\":\"Development\",\"Key\":\"Environment\"},{\"Value\":\"CloudFormationDemo\",\"Key\":\"Project\"}]}"
},
{
"EventId": "daf7e299-df02-4eab-b3e9-11a4659f789f",
"StackId": "arn:aws:cloudformation:us-west-2:012345678901:stack/test-1106/07580010-bb79-11f0-8f6c-0289bb5c804f",
"OperationId": "1c211b5a-4538-4dc9-bfed-e07734371e57", "EventType": "PROGRESS",
"LogicalResourceId": "test-1106",
"PhysicalResourceId": "arn:aws:cloudformation:us-west-2:012345678901:stack/test-1106/07580010-bb79-11f0-8f6c-0289bb5c804f",
"ResourceType": "AWS::CloudFormation::Stack",
"Timestamp": "2025-11-07T01:43:39.838000+00:00",
"ResourceStatus": "UPDATE_IN_PROGRESS",
"ResourceStatusReason": "User Initiated"
},
{
"EventId": "0b1ebf05-4496-4a8c-978e-7c081def3e4d",
"StackId": "arn:aws:cloudformation:us-west-2:012345678901:stack/test-1106/07580010-bb79-11f0-8f6c-0289bb5c804f",
"OperationId": "1c211b5a-4538-4dc9-bfed-e07734371e57", "OperationType": "UPDATE_STACK",
"OperationStatus": "IN_PROGRESS",
"EventType": "STACK_EVENT",
"Timestamp": "2025-11-07T01:43:39.820000+00:00",
"StartTime": "2025-11-07T01:43:39.820000+00:00"
}
]
}Step 4: Identify failure root cause(s) with FailedEvents filter
The new failure root cause filter instantly surfaces only the events that caused the operation to fail. This eliminates the need to manually scan through progress events to identify the root cause of deployment failures.
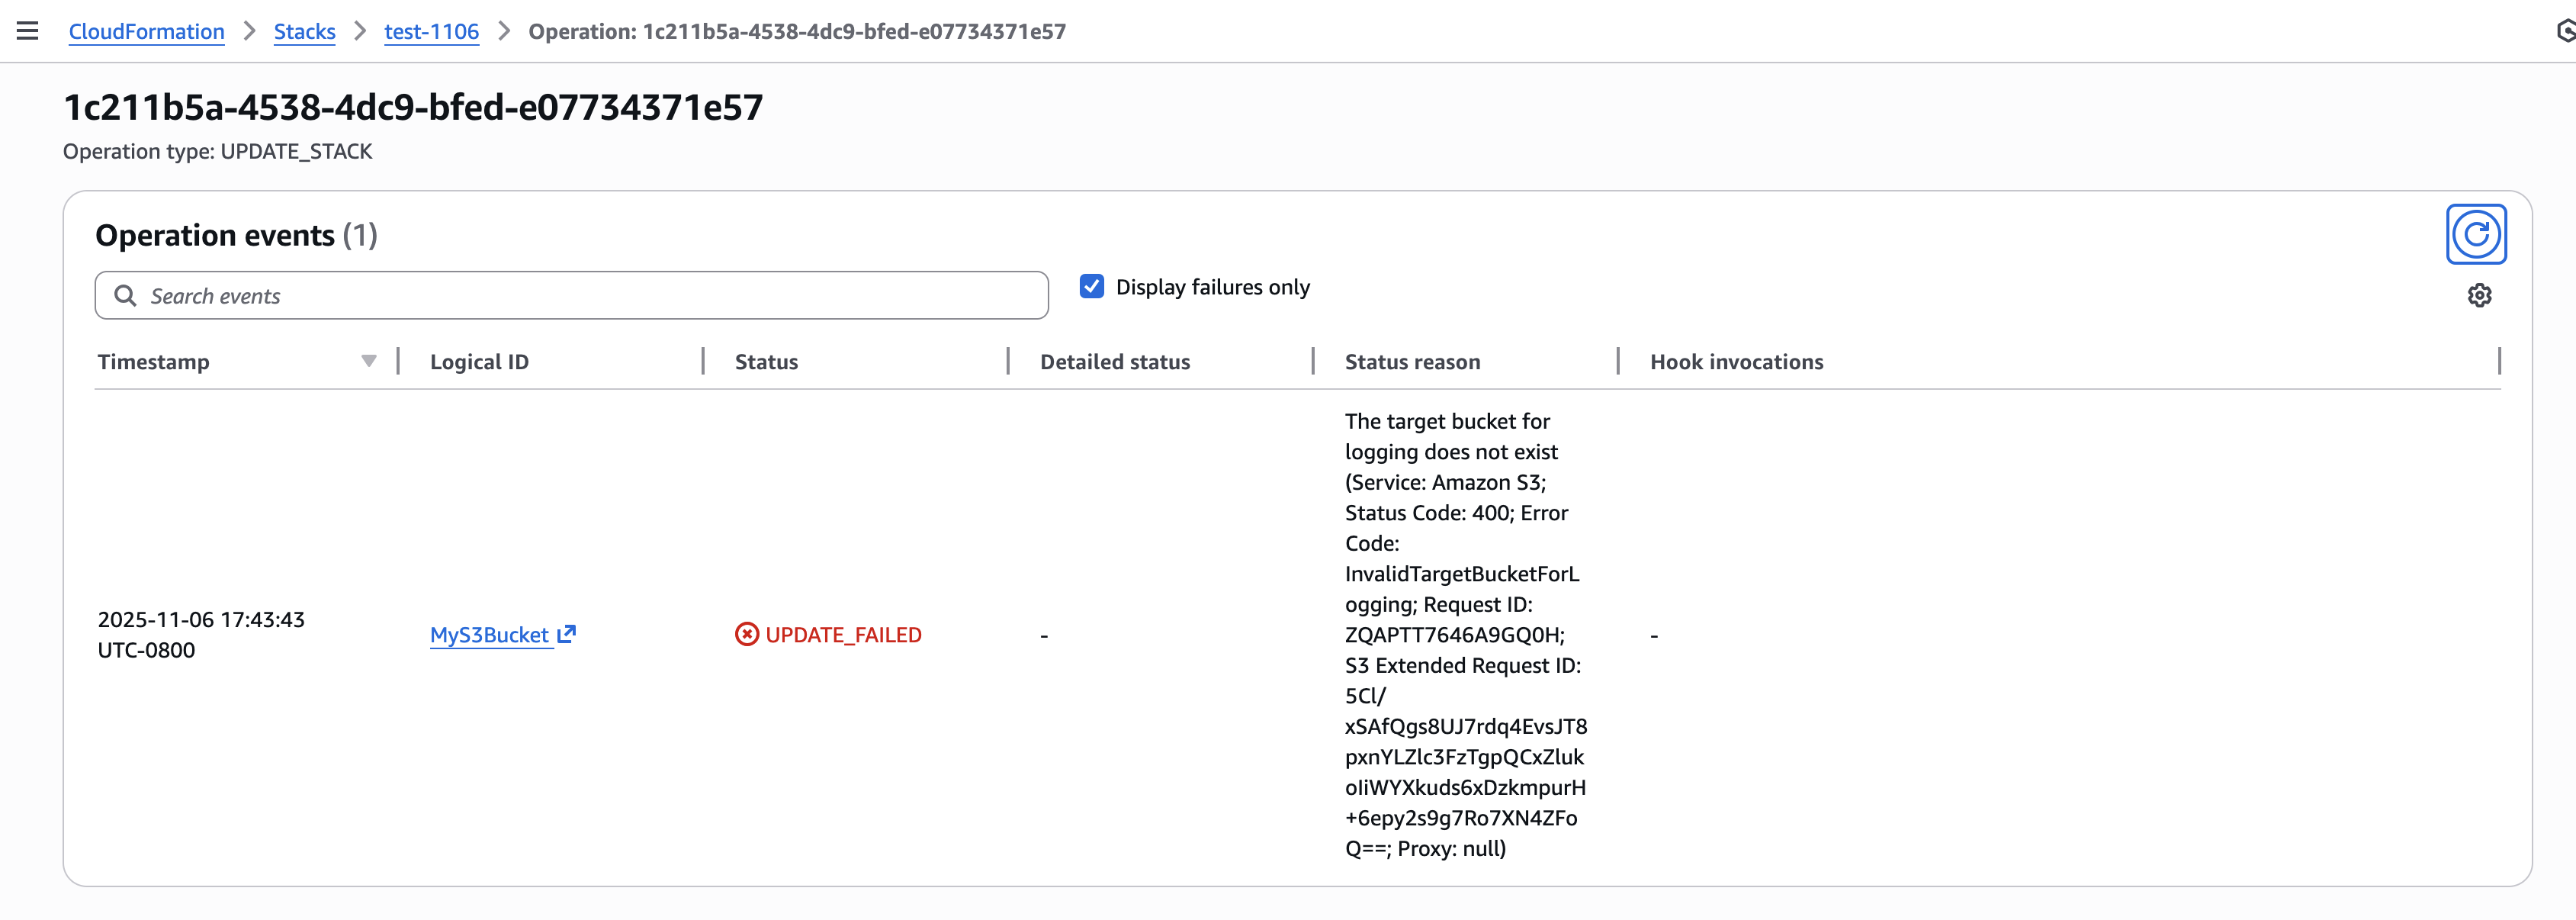
Figure 13: Filter operation failure root causes
CLI Command
aws cloudformation describe-events \
 --operation-id 1c211b5a-4538-4dc9-bfed-e07734371e57 \
 --filter FailedEvents=true
{
"OperationEvents": [
{
"EventId": "01fcd898-38f3-477d-891d-e950d964d594",
"StackId": "arn:aws:cloudformation:us-west-2:012345678901:stack/test-1106/07580010-bb79-11f0-8f6c-0289bb5c804f",
"OperationId": "1c211b5a-4538-4dc9-bfed-e07734371e57",
"EventType": "PROVISIONING_ERROR",
"LogicalResourceId": "MyS3Bucket",
"PhysicalResourceId": "test-1106-bucket",
"ResourceType": "AWS::S3::Bucket",
"Timestamp": "2025-11-07T01:43:43.561000+00:00",
"ResourceStatus": "UPDATE_FAILED",
"ResourceStatusReason": "The target bucket for logging does not exist (Service: Amazon S3; Status Code: 400; Error Code: InvalidTargetBucketForLogging; Request ID: ZQAPTT7646A9GQ0H; S3 Extended Request ID: 5Cl/xSAfQgs8UJ7rdq4EvsJT8pxnYLZlc3FzTgpQCxZlukoIiWYXkuds6xDzkmpurH+6epy2s9g7Ro7XN4ZFoQ==; Proxy: null)",
"ResourceProperties": "{\"BucketName\":\"test-1106-bucket\",\"LoggingConfiguration\":{\"LogFilePrefix\":\"access-logs/\",\"DestinationBucketName\":\"logs-bucket\"},\"LifecycleConfiguration\":{\"Rules\":[{\"Status\":\"Enabled\",\"ExpirationInDays\":\"90\",\"Id\":\"DeleteOldVersions\"}]},\"Tags\":[{\"Value\":\"Development\",\"Key\":\"Environment\"},{\"Value\":\"CloudFormationDemo\",\"Key\":\"Project\"}]}"
}
]
}The FailedEvents=true filter transforms troubleshooting from parsing dozens of progress events to instantly seeing only what matters. This can make diagnosis of issues during an incident much easier..
Real-World Impact
These features improve your Infrastructure development experience with CloudFormation:
- Template syntax errors: Previously discovered after minutes of provisioning, now caught in seconds
- Resource conflicts: No more failed deployments due to existing resources
- Debugging complexity: Transform troubleshooting sessions into faster targeted fixes
- CI/CD reliability: Reduce pipeline failures and improve deployment confidence
Getting Started
These capabilities are available today in all AWS Regions where CloudFormation is supported. Pre-deployment validation is automatically enabled for all change set operations, no configuration required.
Try it now:
- Create any change set from the CloudFormation console or via SDK or CLI with aws cloudformation create-change-set
- Use `aws cloudformation describe-events –change-set-name <your-changeset-arn>` to see validation results
- Filter failure root causes instantly: via console or CLI with aws cloudformation describe-events –operation-id <id> –filter FailedEvents=true
Best Practices
- Always use change sets: Even for simple updates, change sets now provide validation feedback
- Leverage Operation IDs: Use the unique identifiers for focused troubleshooting
- Filter events strategically: Use –filters FailedEvents=true to focus on problems
- Automate validation: Integrate the describe-events API into your CI/CD pipelines
- Use Console: CloudFormation console provides a visual experience with error source mapping to the specific line on your template.
Conclusion
Start using these features today in your development workflow. Whether you’re building new infrastructure or maintaining existing stacks, early validation and enhanced troubleshooting will accelerate your deployment cycles and make it easier to manage infrastructure.
Ready to experience faster CloudFormation development? Create your first change set and see validation in action.
Blog Authors Bio:
David Frum: What’s behind the Trump administration’s hostile approach to Canada?
Post Syndicated from The Atlantic original https://www.youtube.com/shorts/24mxRfQ3074
Cross-account lakehouse governance with Amazon S3 Tables and SageMaker Catalog
Post Syndicated from Sneha Rao original https://aws.amazon.com/blogs/big-data/cross-account-lakehouse-governance-with-amazon-s3-tables-and-sagemaker-catalog/
Organizations increasingly face challenges when analyzing data stored across multiple AWS accounts and storage formats. Data teams often need to query both traditional Amazon Simple Storage Service (Amazon S3) objects and Apache Iceberg tables, leading to costly data duplication, potential inconsistencies, and complex permission management across accounts.
To address these challenges, you can combine Amazon S3 Tables, which provides native Apache Iceberg support within S3, with Amazon SageMaker Catalog for unified data governance. This solution supports secure cross-account data access without duplicating datasets or compromising security controls.
In this post, we walk you through a practical solution for secure, efficient cross-account data sharing and analysis. You’ll learn how to set up cross-account access to S3 Tables using federated catalogs in Amazon SageMaker, perform unified queries across accounts with Amazon Athena in Amazon SageMaker Unified Studio, and implement fine-grained access controls at the column level using AWS Lake Formation.
This post helps you establish proper governance and security controls for S3 Tables in a multi-account environment, enabling secure and efficient cross-account data access.
Solution overview
We walk you through implementing a three-account lakehouse governance architecture where you can securely share data. As shown in the following diagram, Account A serves as your data producer with S3 Tables, Account B acts as your central governance hub with SageMaker Catalog, and Account C represents your data consumers. We’ll demonstrate step-by-step how to configure cross-account access and implement governance controls so consumers can discover and query data from both S3 tables and traditional S3 buckets.

Prerequisite and Set up
In this post, we focus on how to do the cross account set up and how to onboard S3 Tables. All three accounts are in the same AWS Region. To implement this solution, you will need three individual accounts (A, B, C). The setup in the accounts should look like the following:
- Account A (Producer): Create an Amazon S3 Table on the account.
- Account B (Central governance and producer): This is another account where you have data in Amazon S3 buckets catalog via Glue Catalog. You would onboard these into domain portal.
- S3 cataloged in Glue Data Catalog.
- Create a SageMaker Domain in Account B.
- Account C (Consumer account): Identify an account where you have consumers query data using Athena to follow along.
The following are the high-level implementation steps for this solution:
Step 1: Configure cross-account association for governance.
Step 2: Create three Project Profiles in Account B pointing to tables in Account A, B, and C.
Step 3: Create three Projects.
Step 4: Set up permissions for Projects in AWS Lake Formation.
Step 5: In Account B, create Datasource to connect S3 Table from Account A and Glue Catalog Tables from Account B.
Step 6: Publish and Subscribe to asset.
Step 7: Query S3 table (Account A) and S3 (Account B) data together in SQL editor (Account C).
Step 1
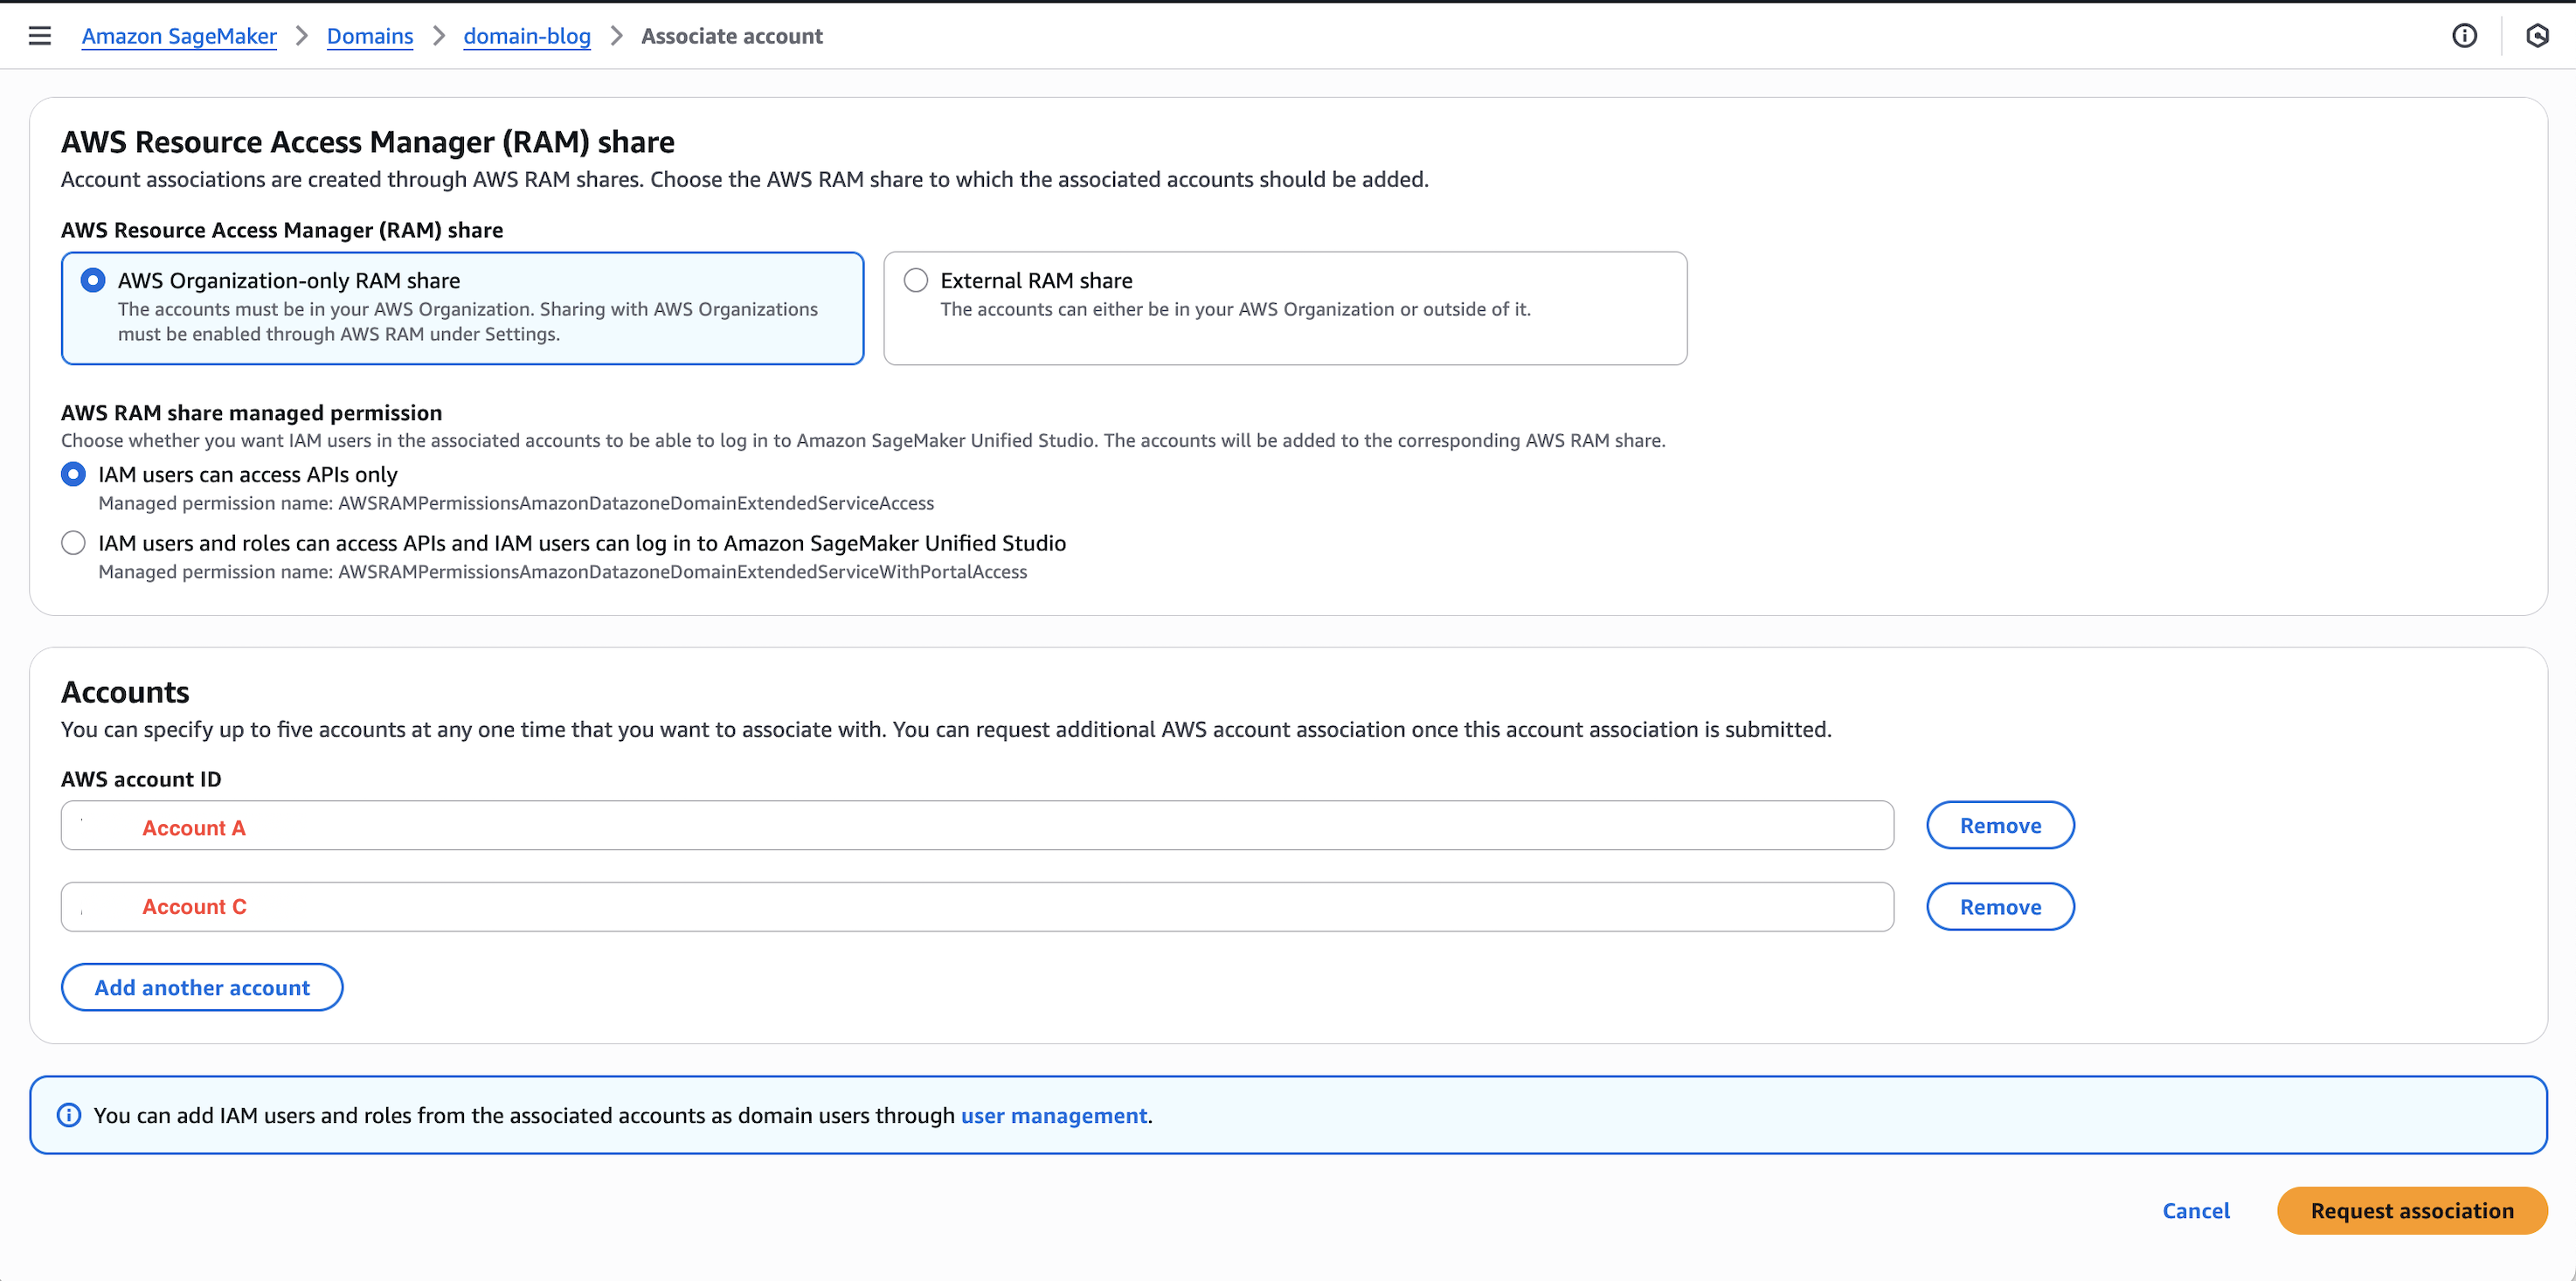
A. Configure cross-account association for governance
In this section, we associate Account A and C in the Governance account B.
- Open the SageMaker Unified Studio console in Account B.
- Navigate to Domains, select your domain, then choose the Account associations tab.
- Choose Request association and enter the Account IDs for Account A and Account C.
- Submit the association request and verify the accounts appear with “Requested” status.

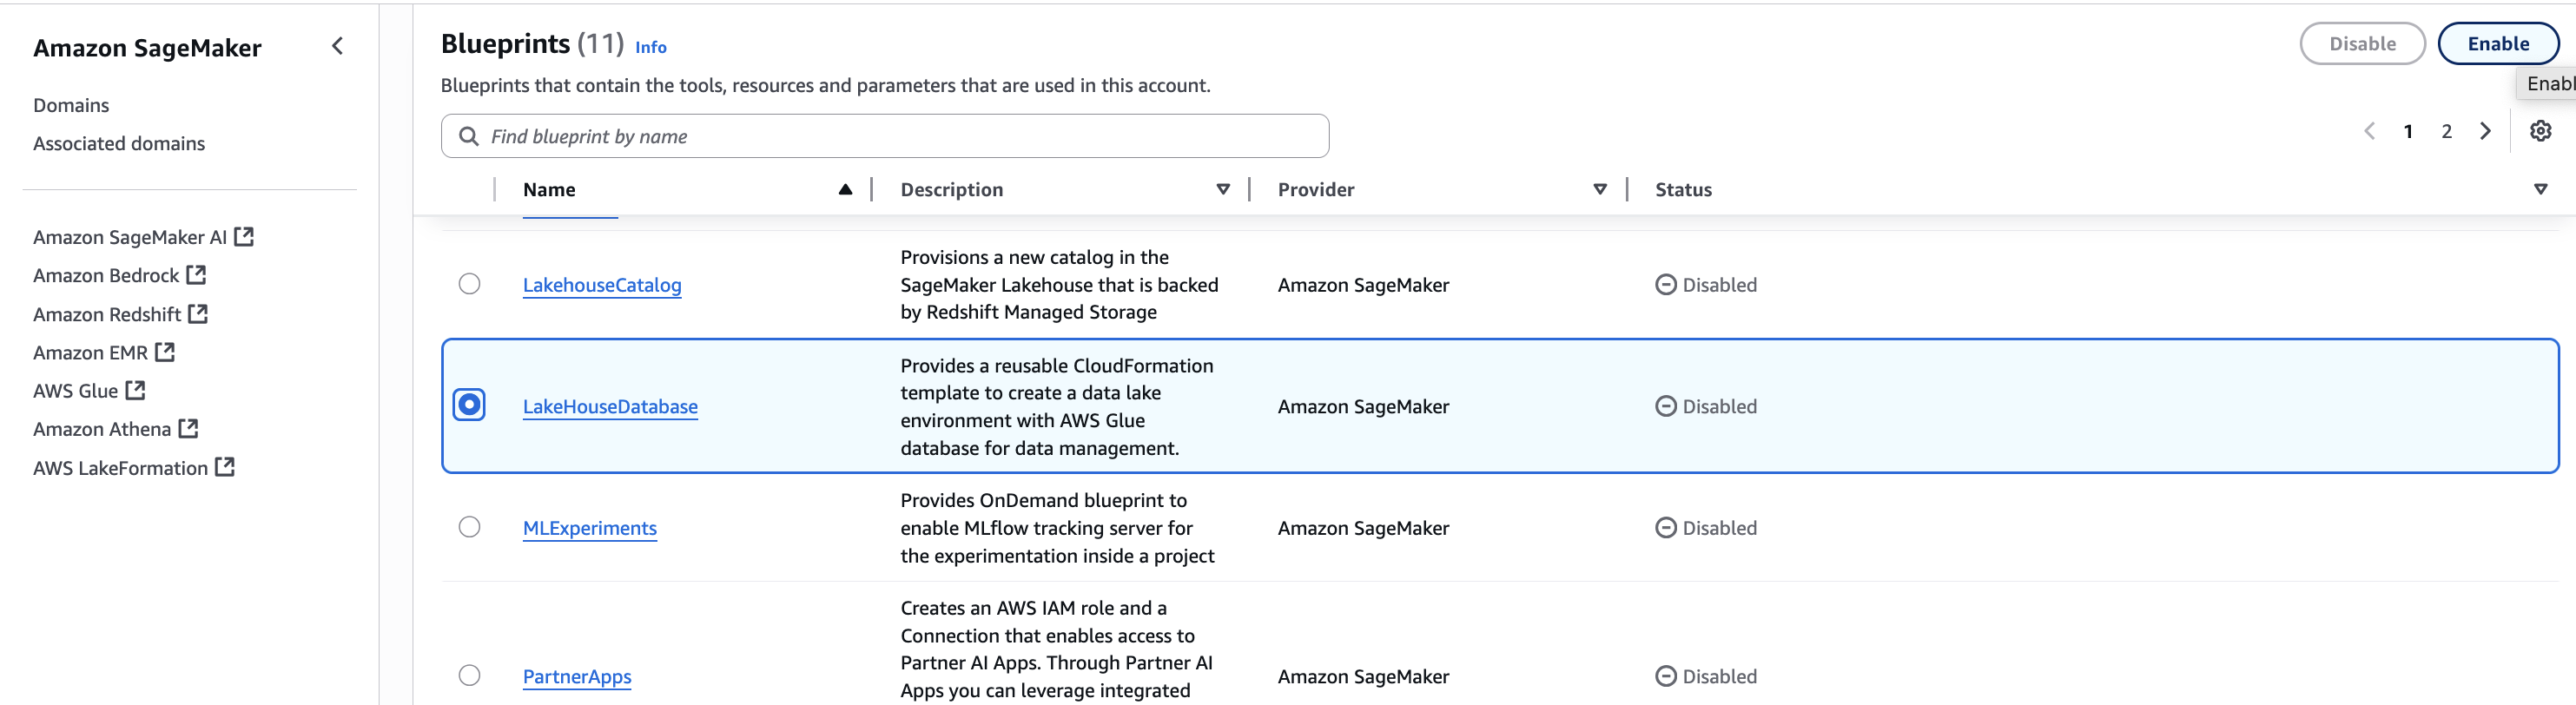
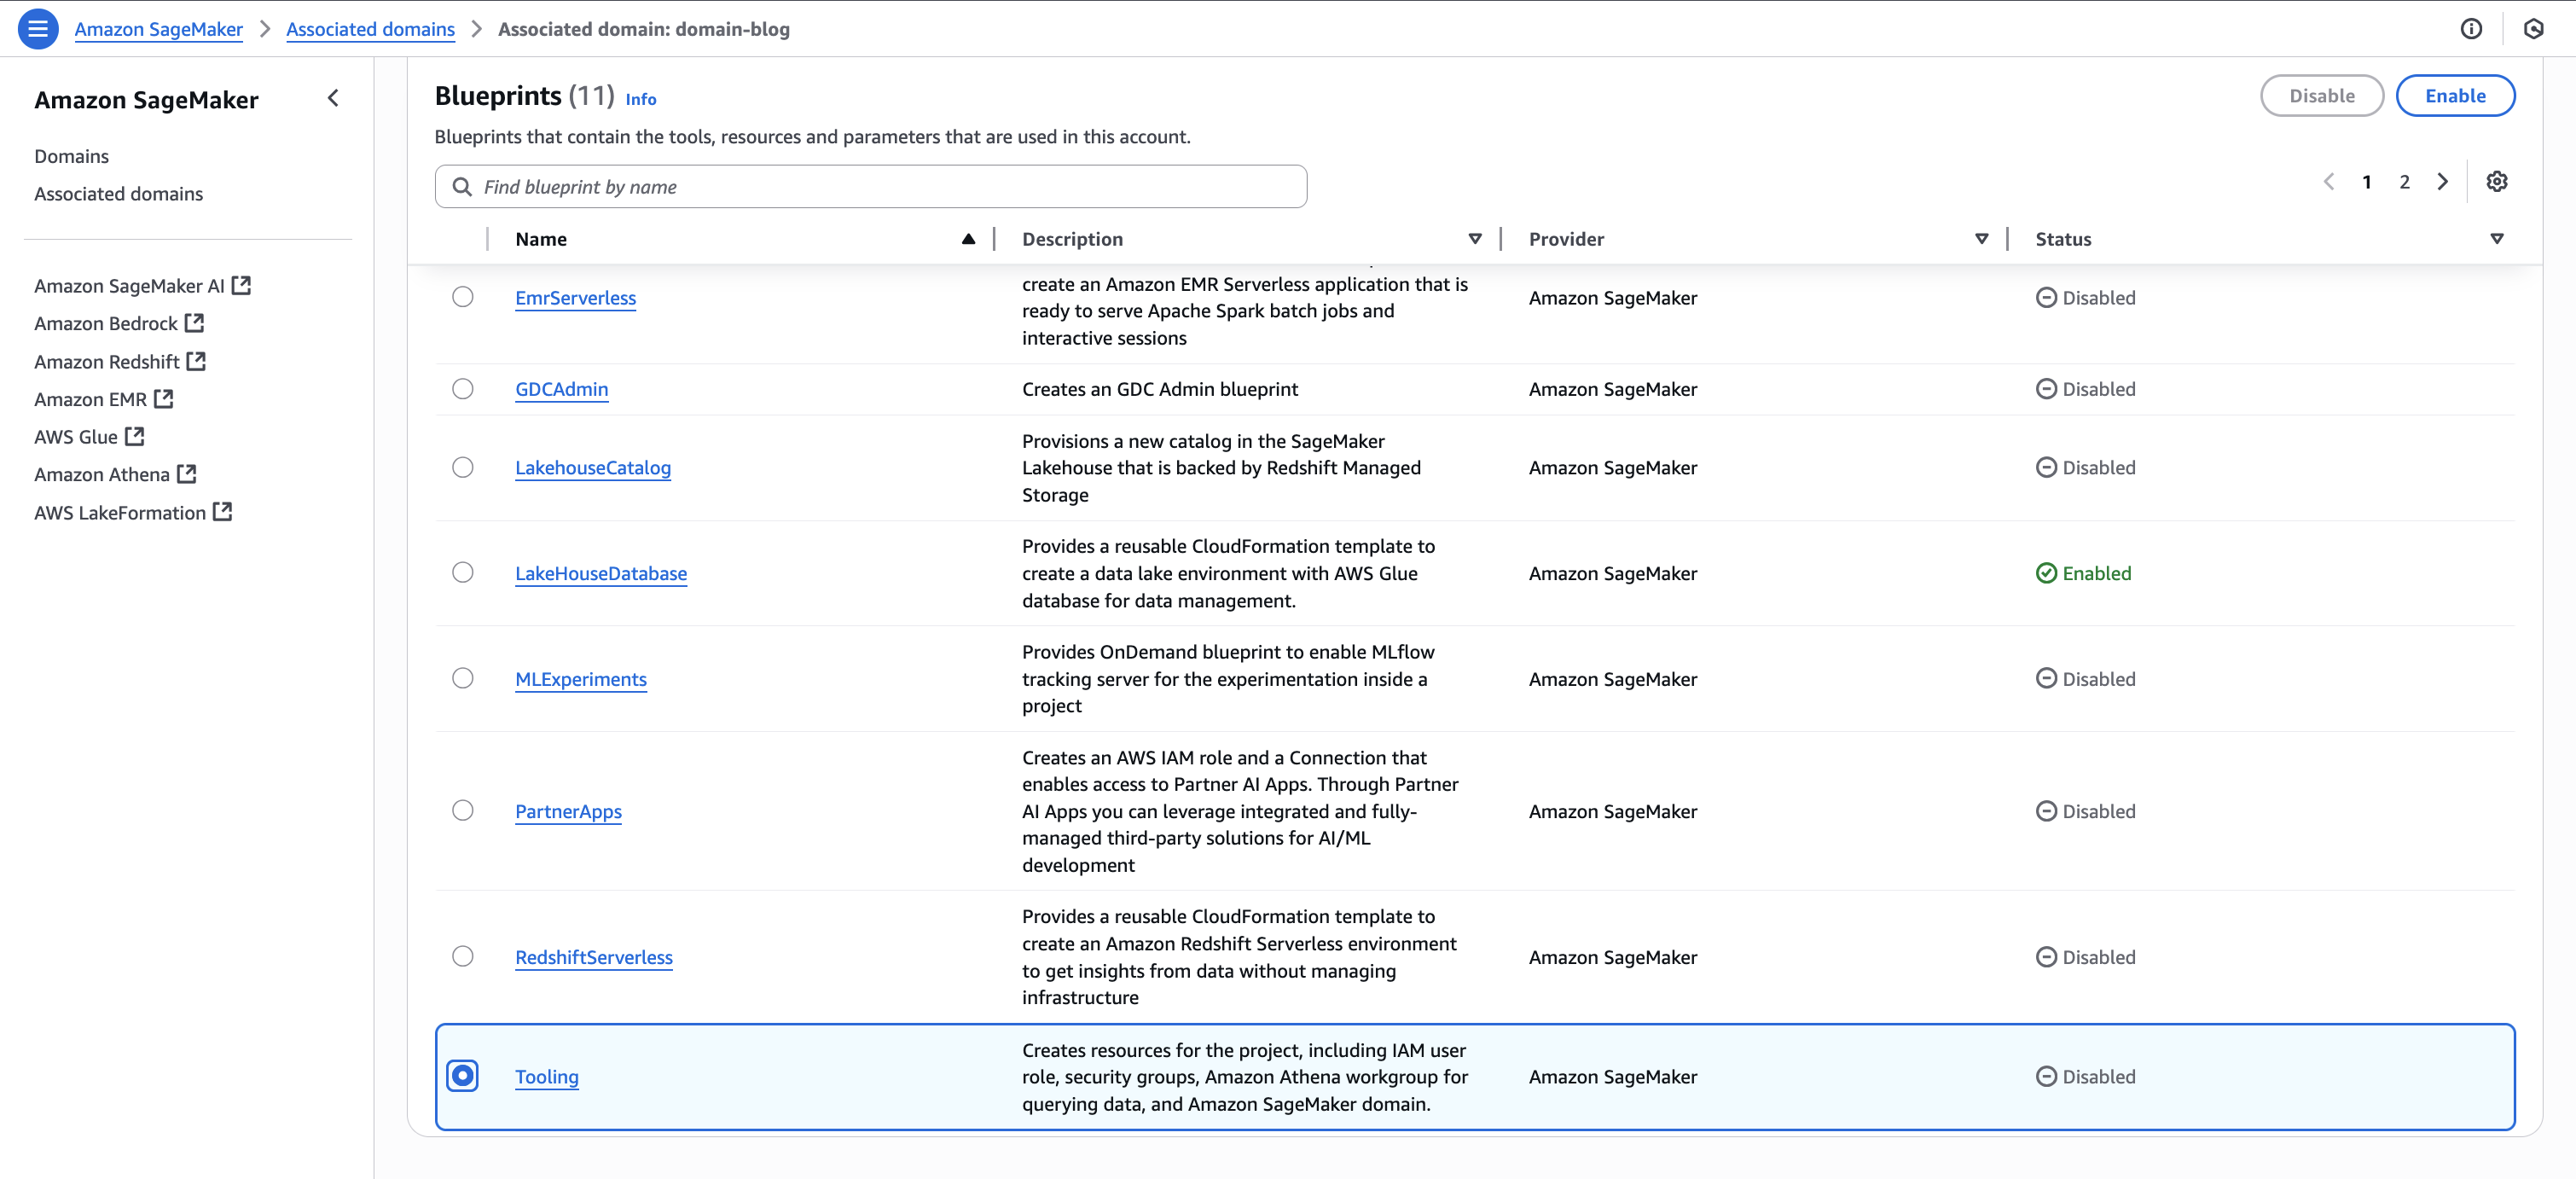
B. Enable Blueprints for your domain in Accounts A, B, and C
The LakeHouseDatabase blueprint enables SageMaker Unified Studio to securely manage, query, and share data from S3, Redshift, and other sources using open standards—so in this step, you enable it in Accounts A, B, and C to support unified data access and collaboration.
- In Account A, in the SageMaker console, navigate to your domain and select the Blueprints tab.
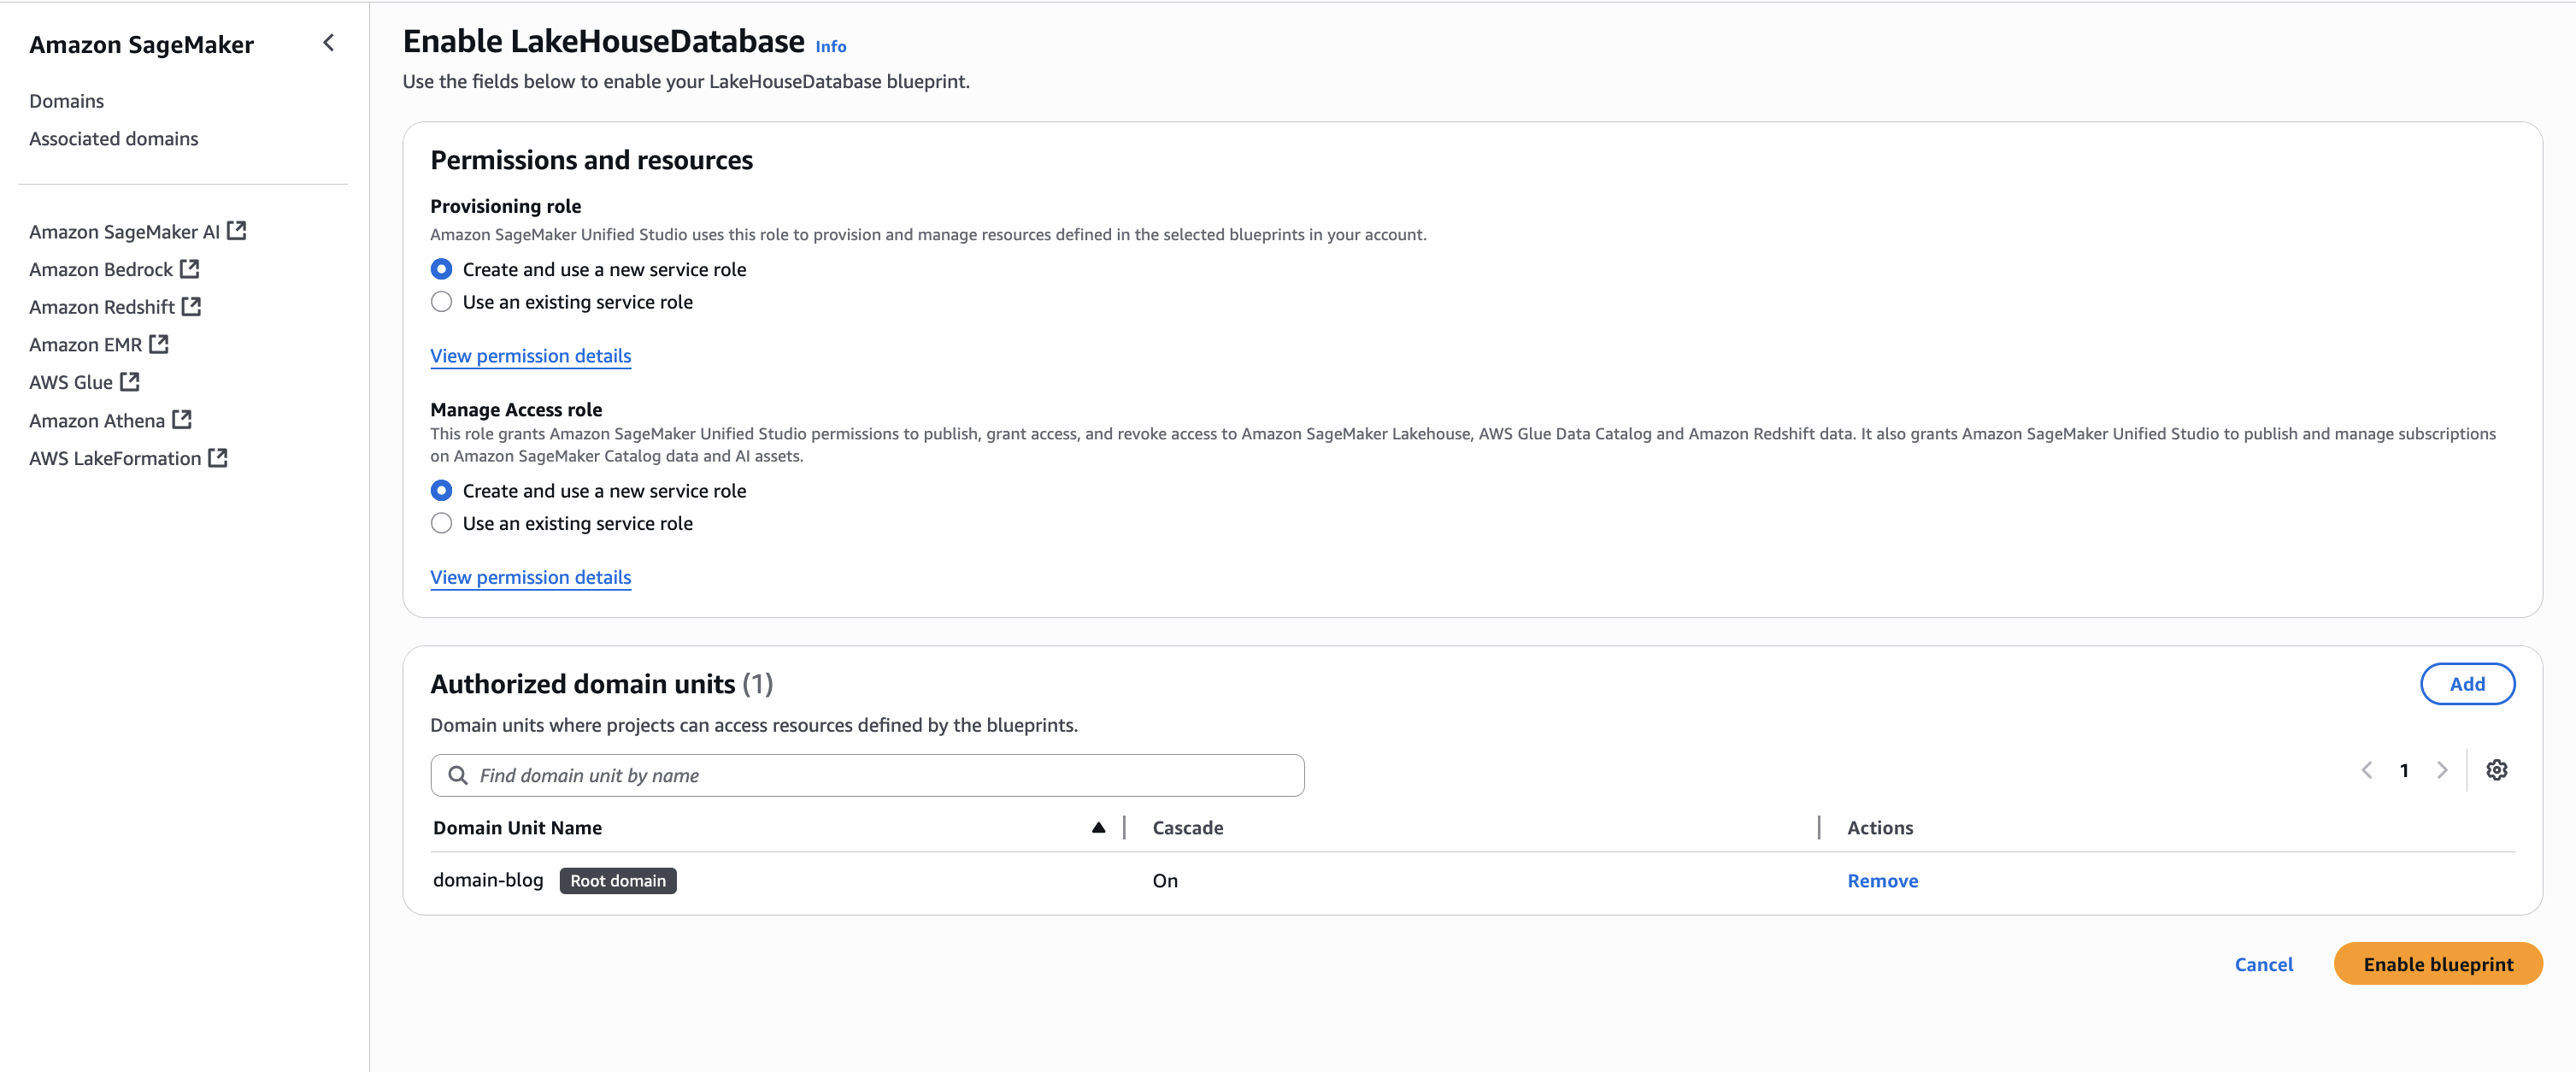
- Select the LakeHouseDatabase blueprint and choose Enable.

- Keeping the Permissions and resources section at the default settings, choose Enable Blueprint.

- Back on the blueprints screen, select the Tooling blueprint and choose Enable.

- Keeping the Permissions and resources section at the default settings, configure the Networking section with the desired VPC and subnet configurations.
- Choose Enable Blueprint.

- Repeat Step1.B and enable the same blueprints in Account B to make S3 data publishable and Account C so consumers can query the data using Athena.

Step 2: Create Project Profiles in Account B
Use the documentation to create three project profiles in Account B using the ‘LakeHouseDatabase’ Blueprint, with each profile configured for Accounts A, B, and C respectively. For this post, we use the following naming convention:
- datalake-project-profile-s3tables (for Account A)
- datalake-project-profile (for Account B)
- datalake-project-profile-consumer (for Account C)
Step 3: Create three Projects for accounts A, B, and C
- Using the documentation, create one Project in each account. For this post, we use the following naming convention:
- ‘producer-s3tables’ – This is configured for Account A
- ‘producer-s3’ – This is configured for Account B
- ‘consumer’ – This is configured for Account C
- After creating the Project, locate and make note of the Project role ARN listed under Project details on the project overview page.


Step 4: Set up permissions for Projects in AWS Lake Formation
In Account A, onboard the S3 table in SageMaker Lakehouse and grant permissions to the project role:
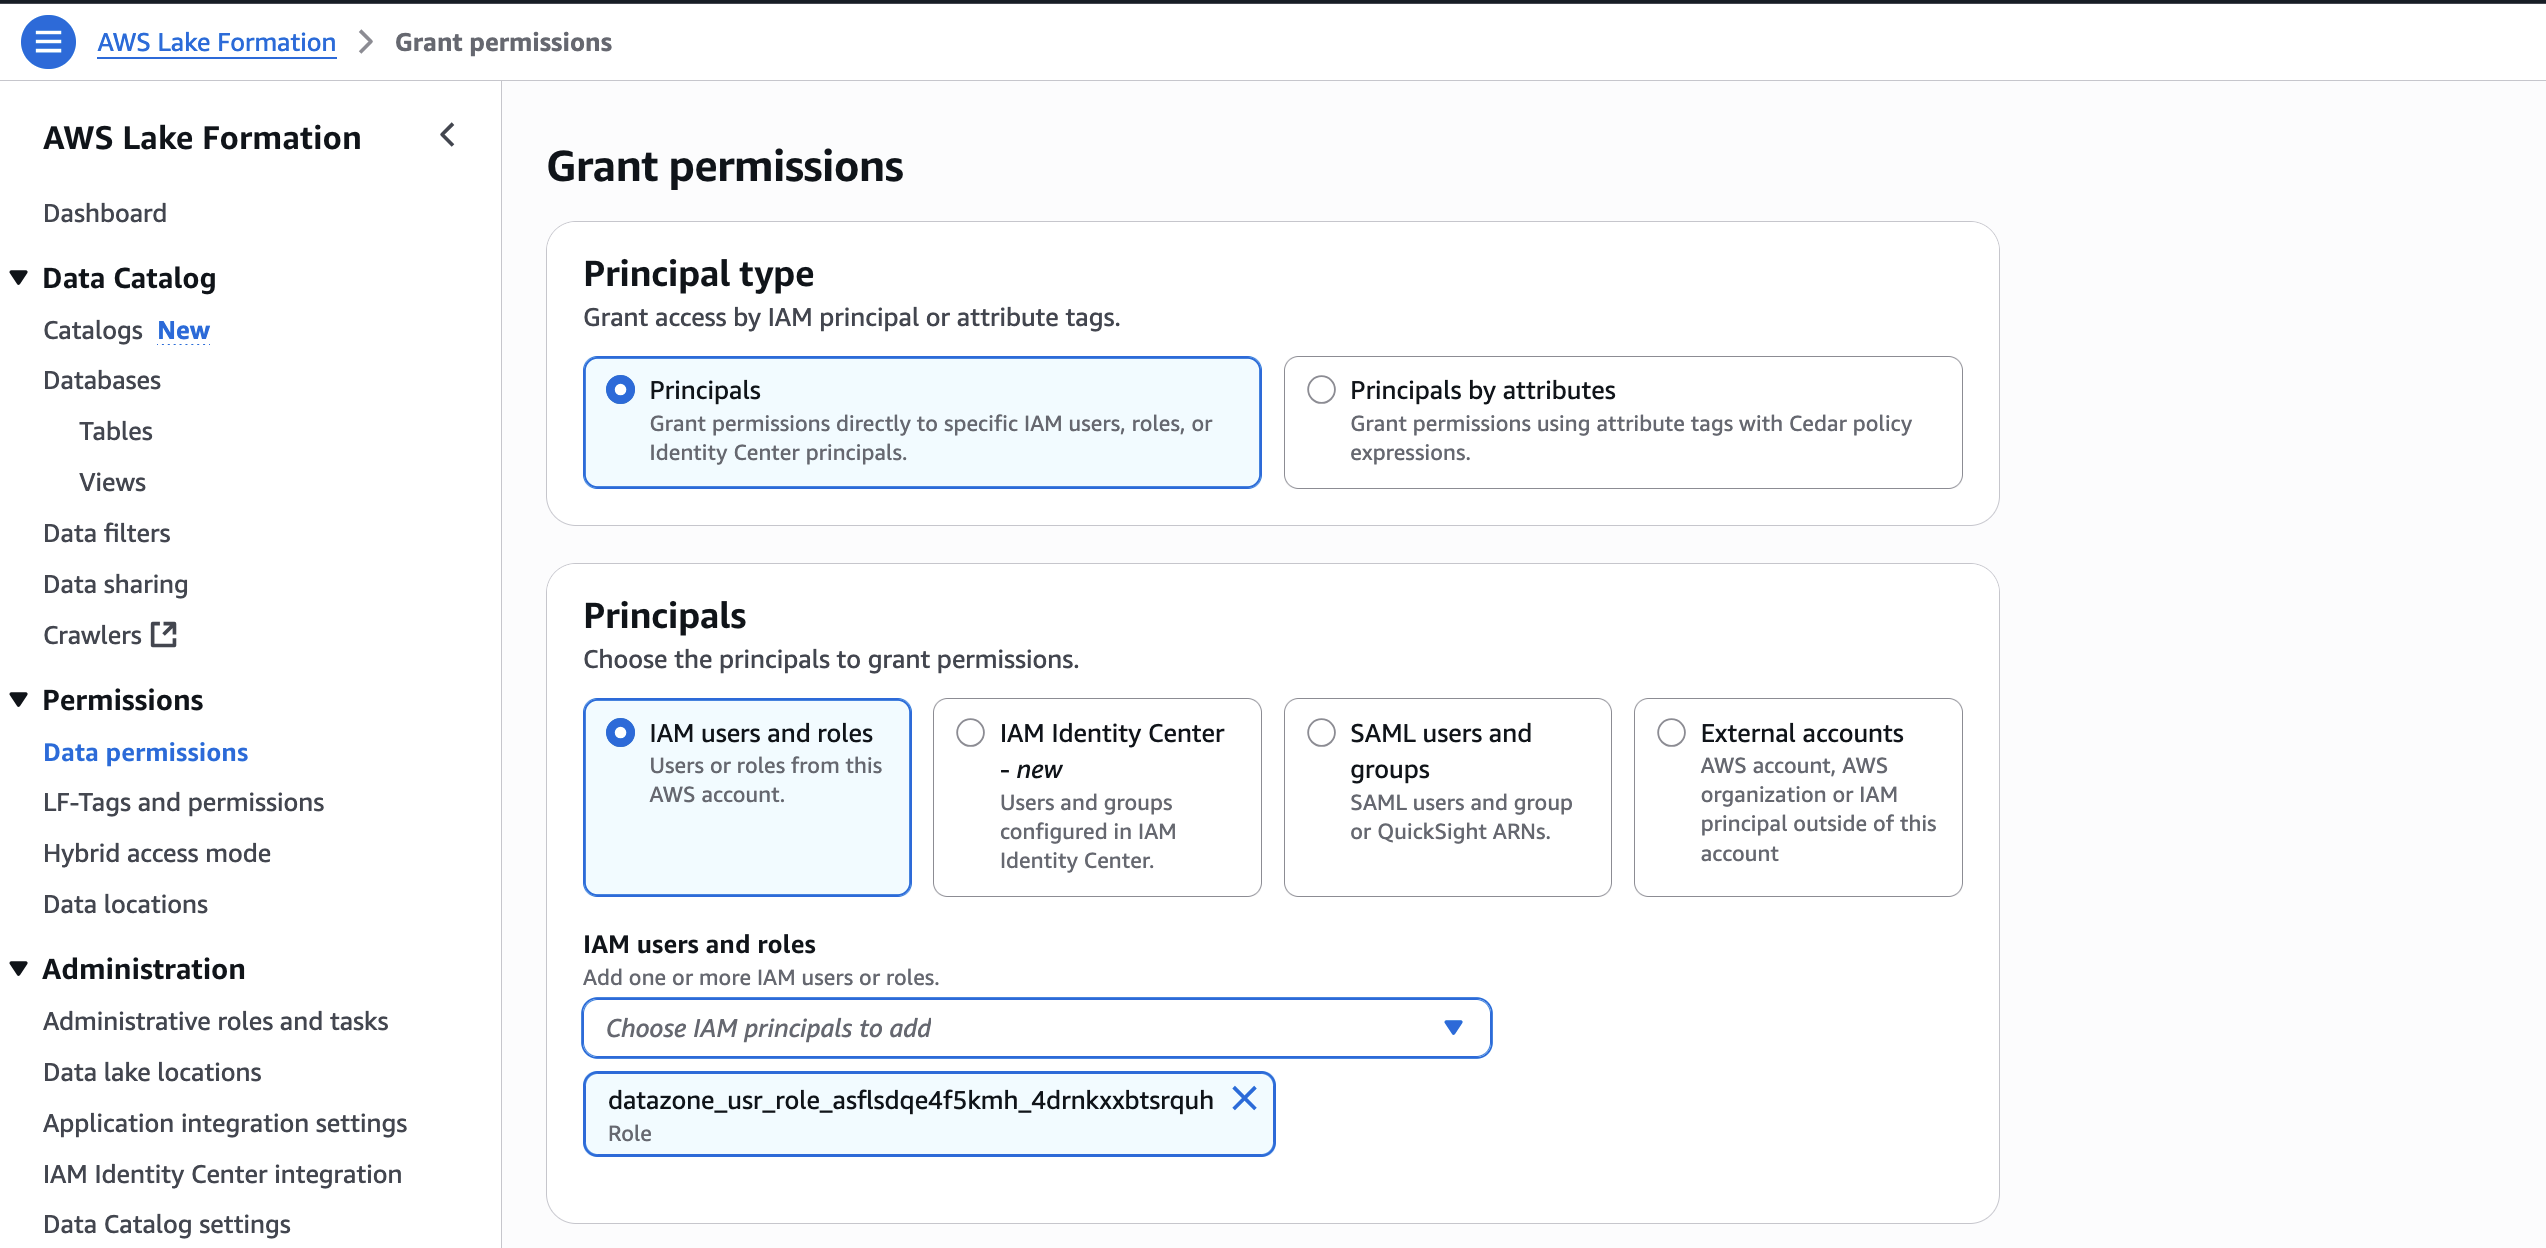
- In the AWS Lake Formation console, choose Permissions, choose Data permissions, and then choose Grant.
- Choose Principals, select IAM users and roles, then select the role generated by the project
producer-s3tablesin Step 3.

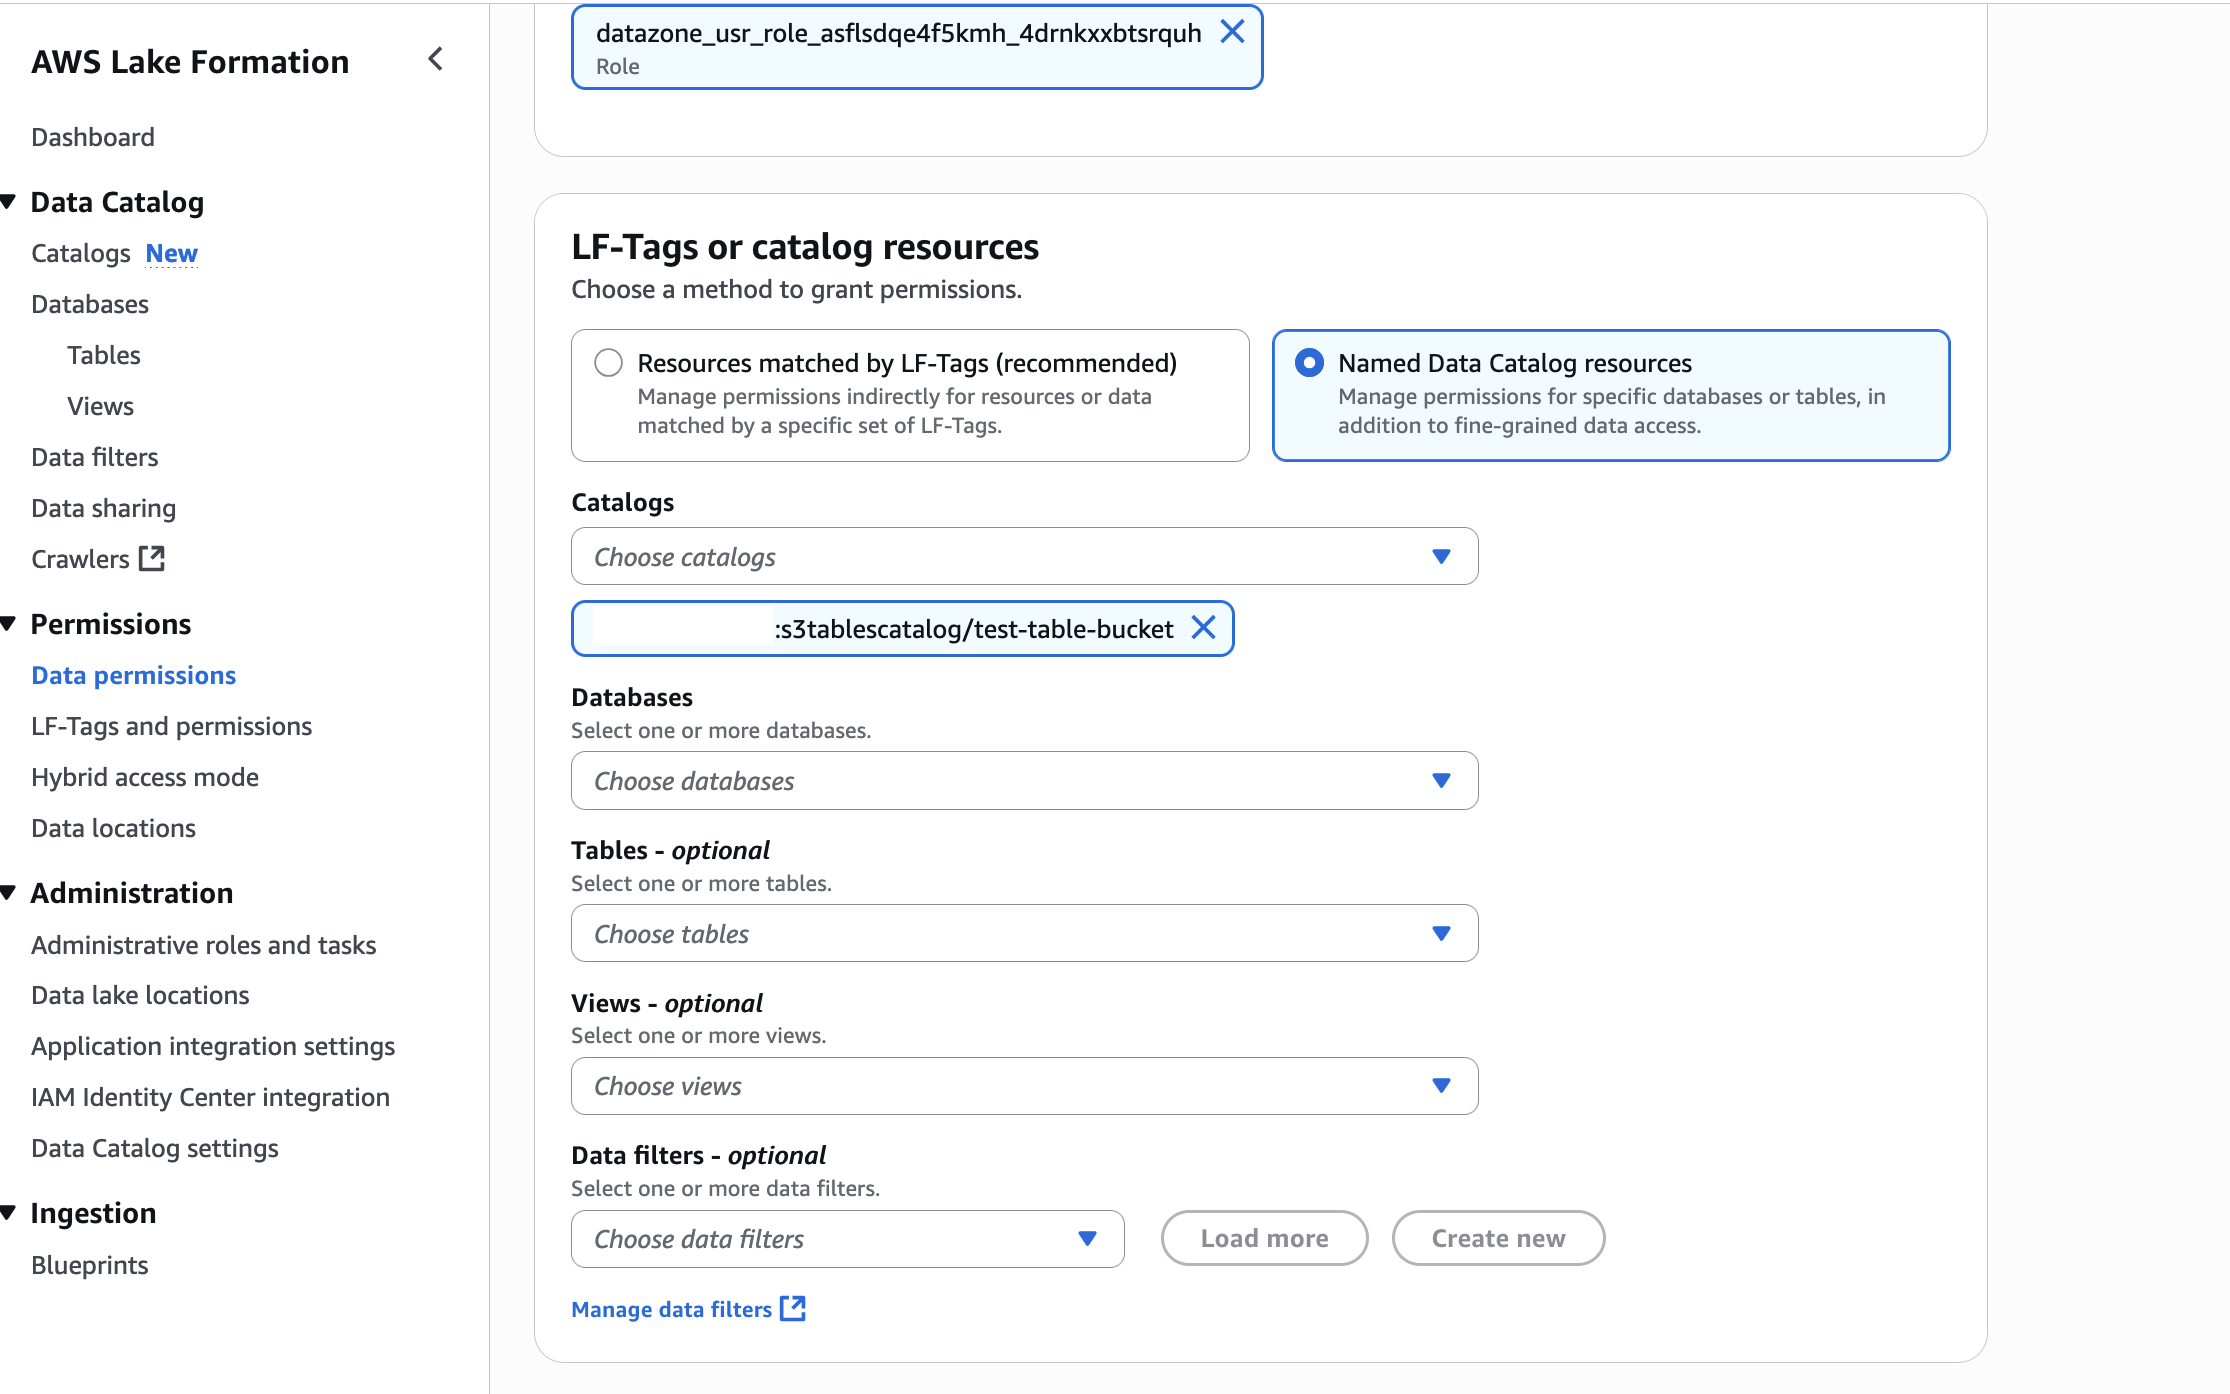
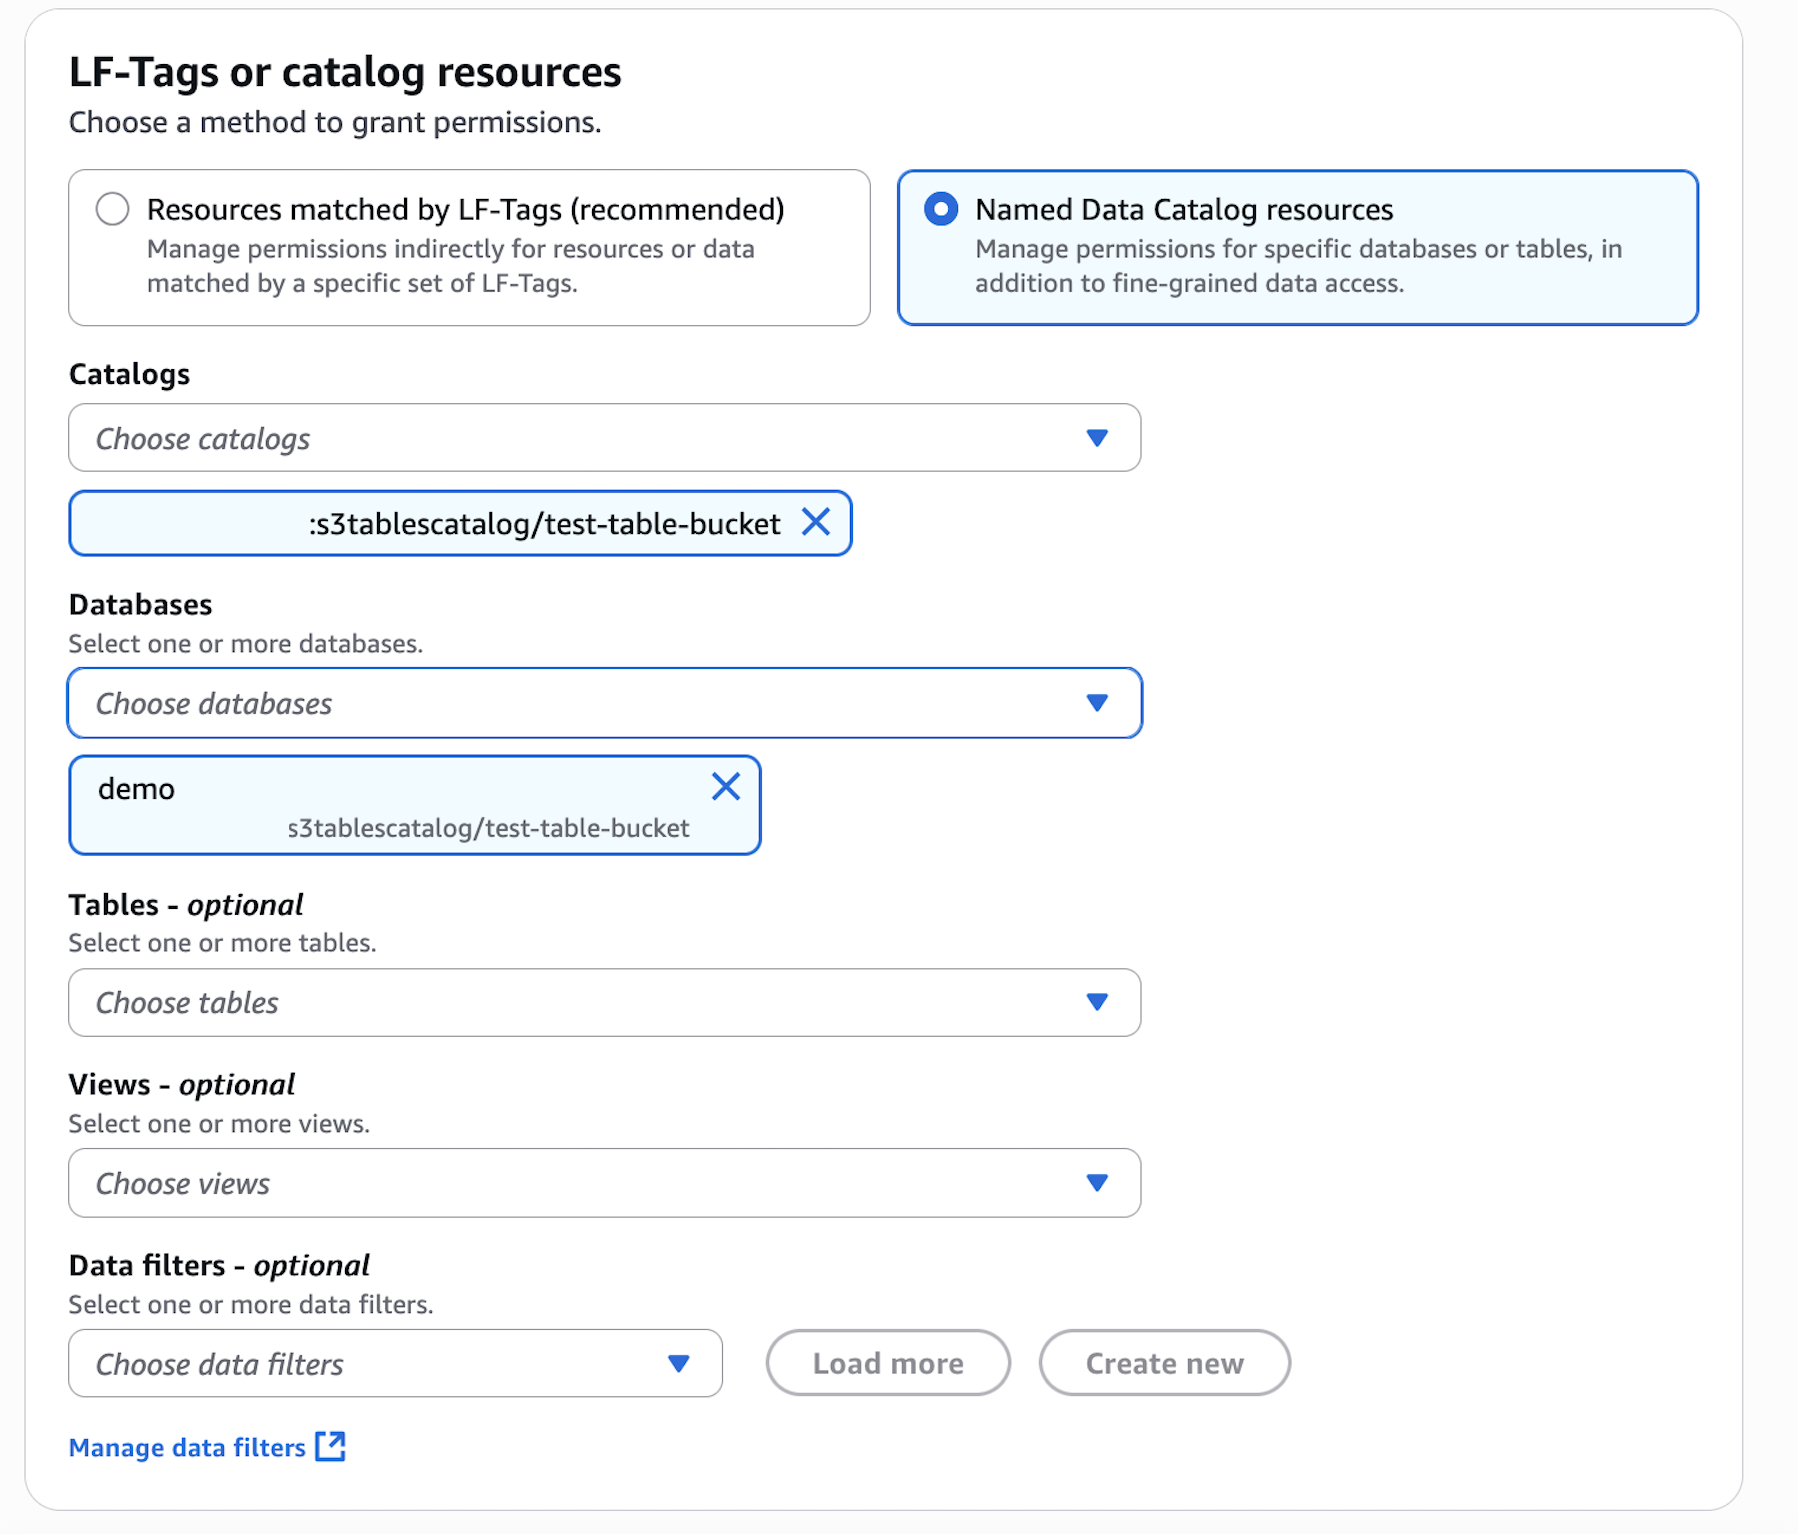
- In LF-Tags or catalog resources, choose Named data catalog resources, select the S3 table catalog from the Catalogs list.

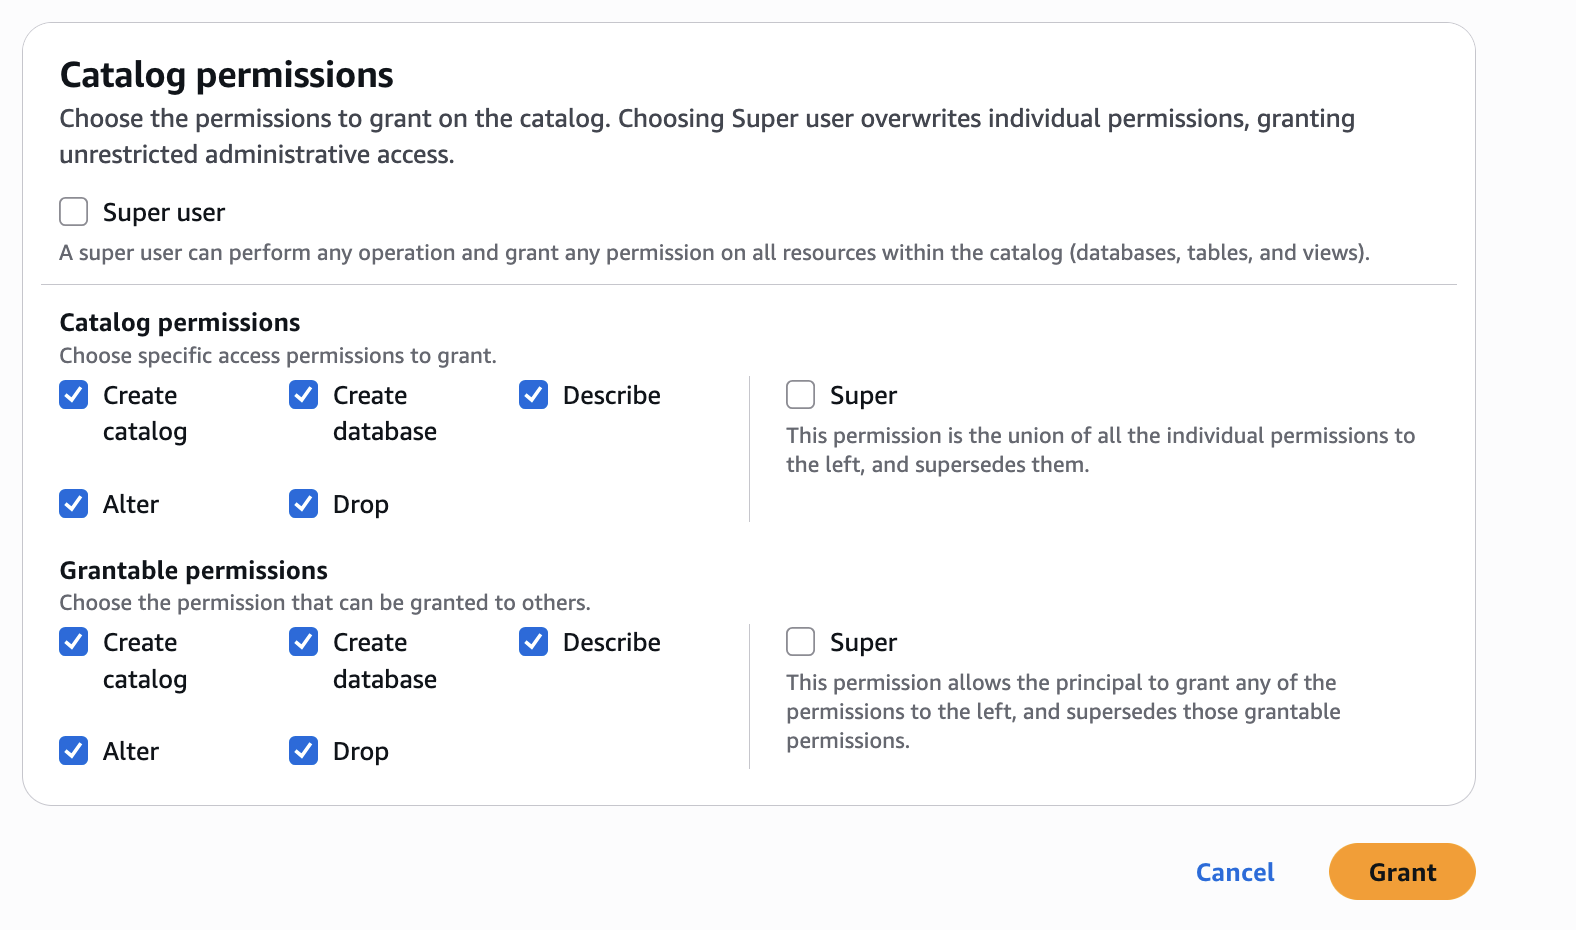
- In Catalog permissions, configure the Catalog permissions and grantable permissions. Choose Grant to apply the following permissions.

In Account A, we repeat these steps for grant permissions to the database:
- In the AWS Lake Formation console, choose Permissions, choose Data permissions, and then choose Grant.
- Choose Principals, select IAM users and roles, then select the role generated by the project
producer-s3tablesin Step 3.
- In LF-Tags or catalog resources, choose Named data catalog resources, choose both the S3 table catalog and database from their respective dropdown lists.

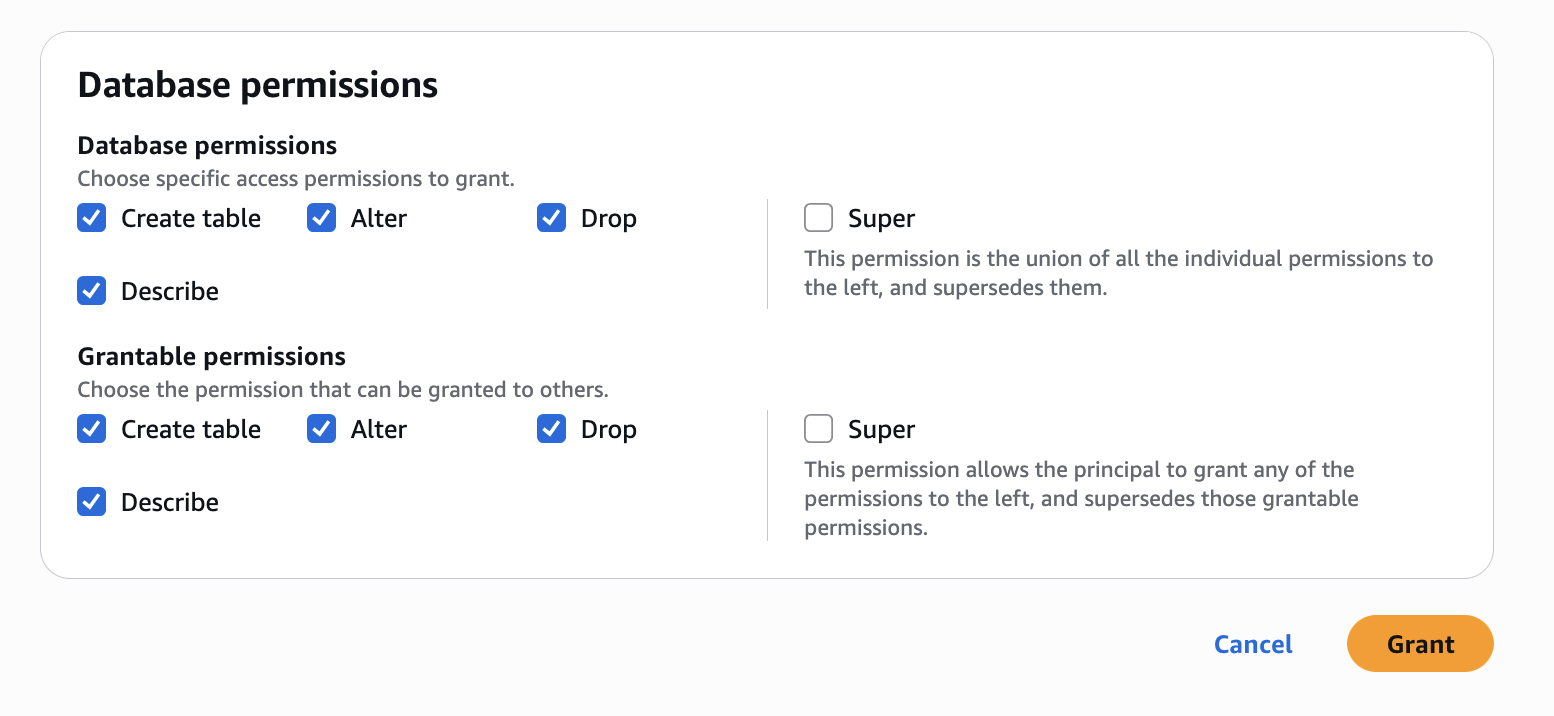
- Configure database permissions and grantable permissions. Choose Grant to apply the following permissions.

In Account A, repeat these steps for grant permissions to the table in the database:
- In the AWS Lake Formation console, choose Permissions, choose Data permissions, and then choose Grant.
- Choose Principals, select IAM users and roles, then select the role generated by the project
producer-s3tablesin Step 3.
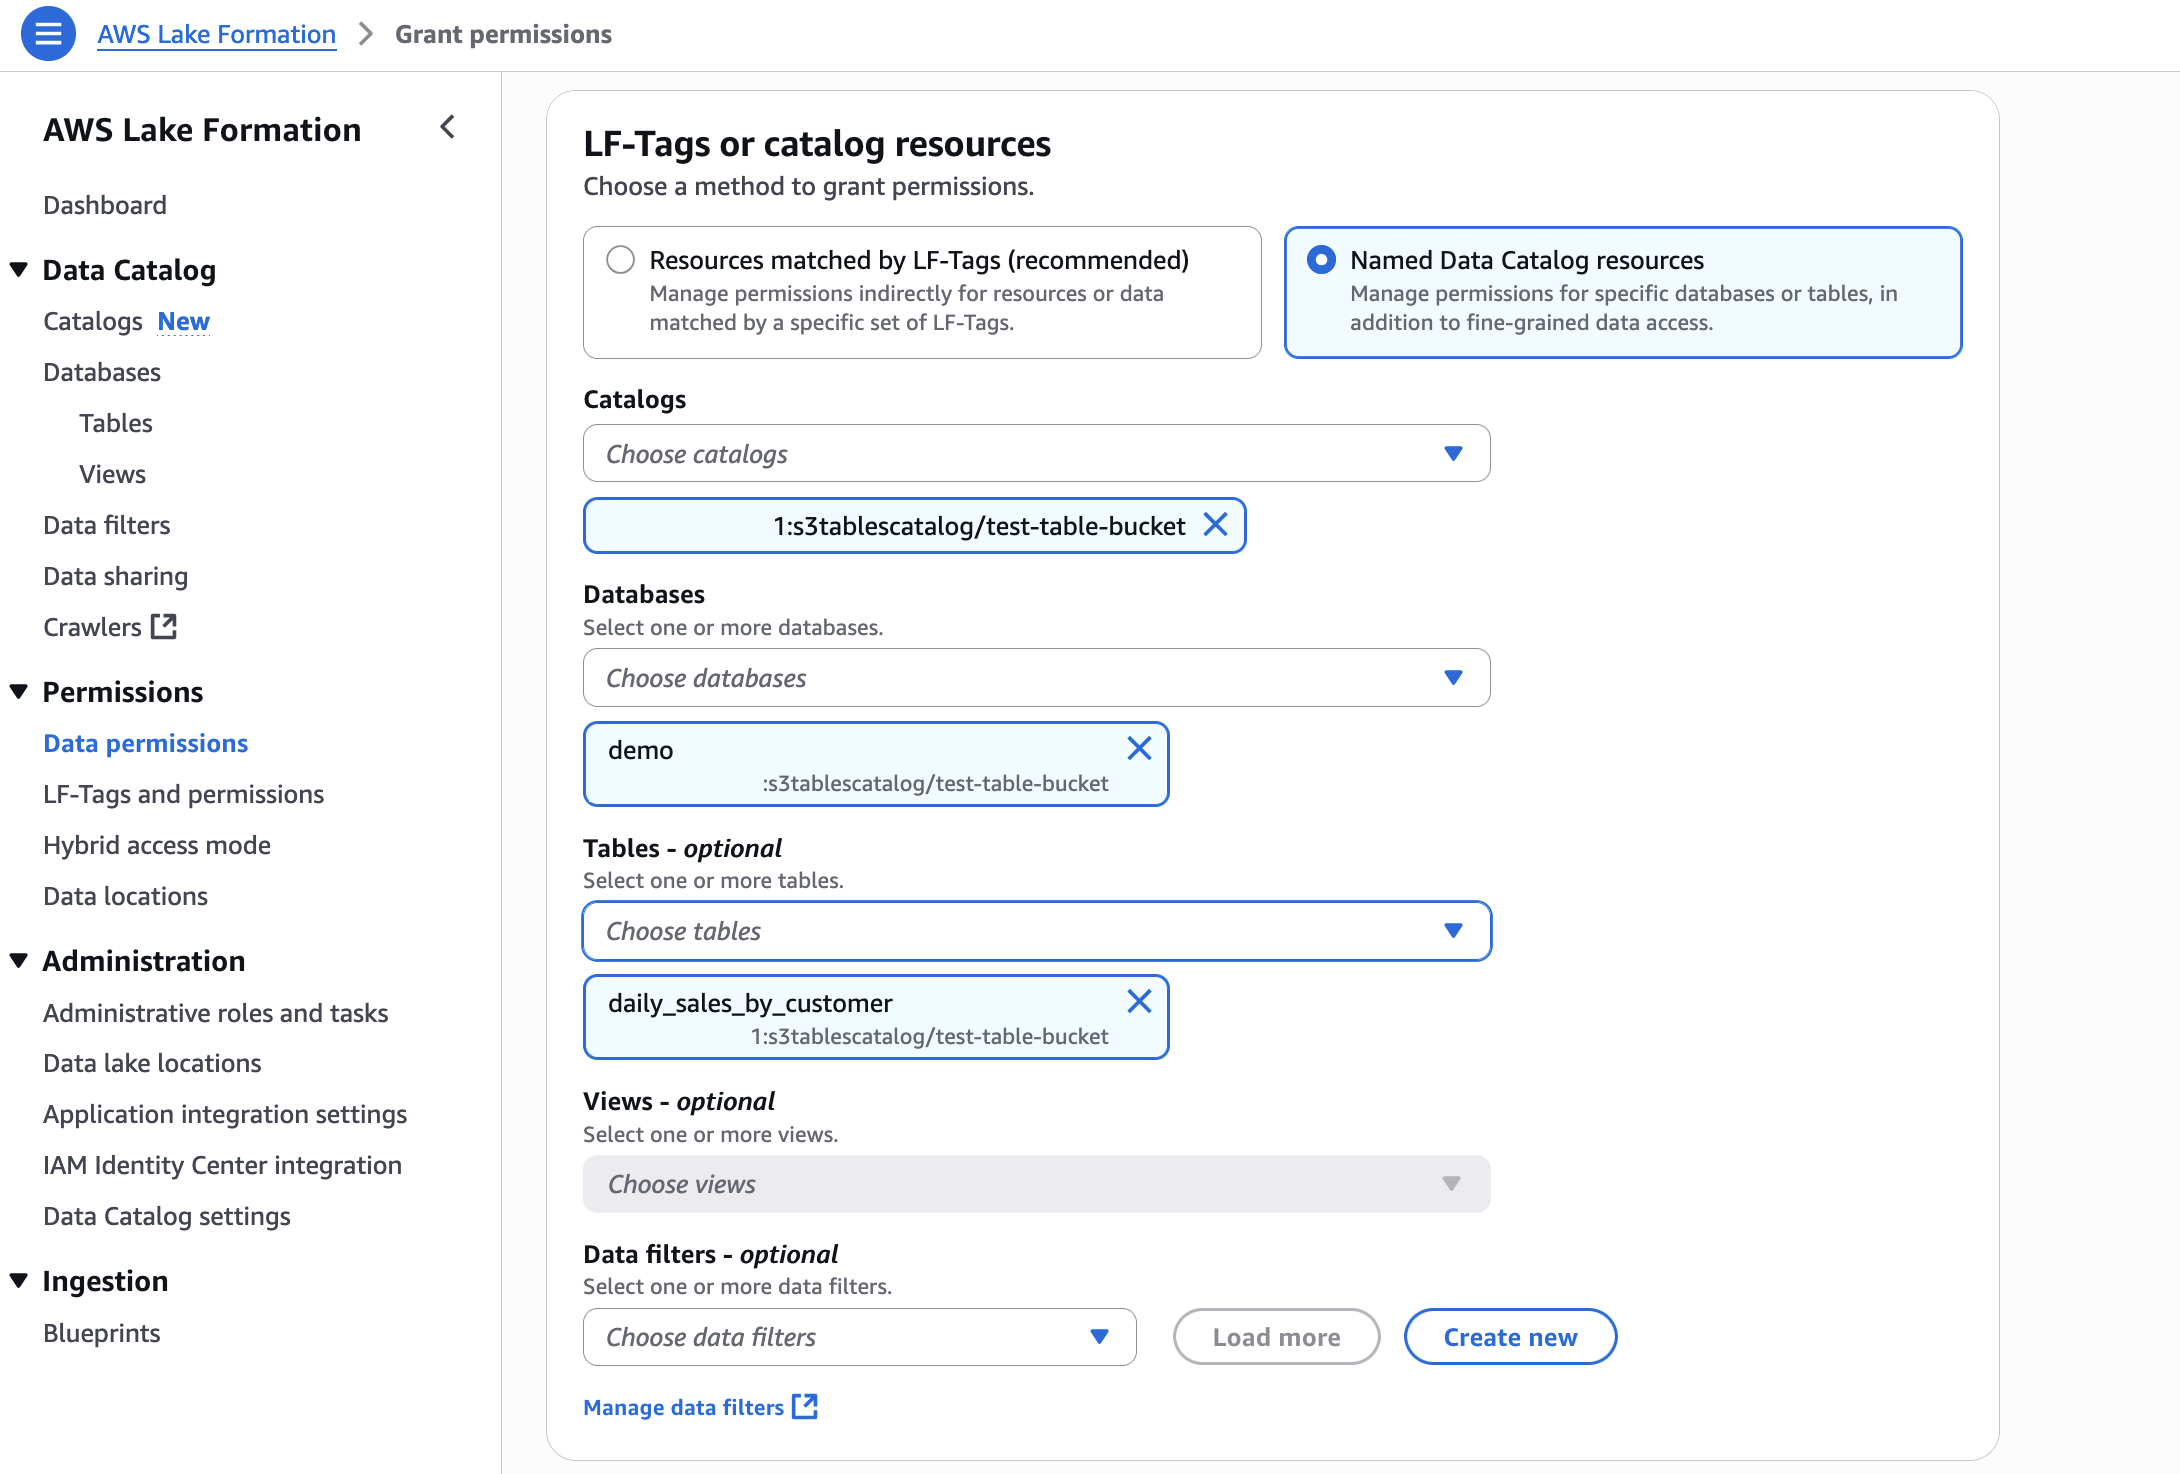
- In LF-Tags or catalog resources, choose Named data catalog resources, choose both the S3 table catalog, database, and S3 table from their respective dropdown lists.

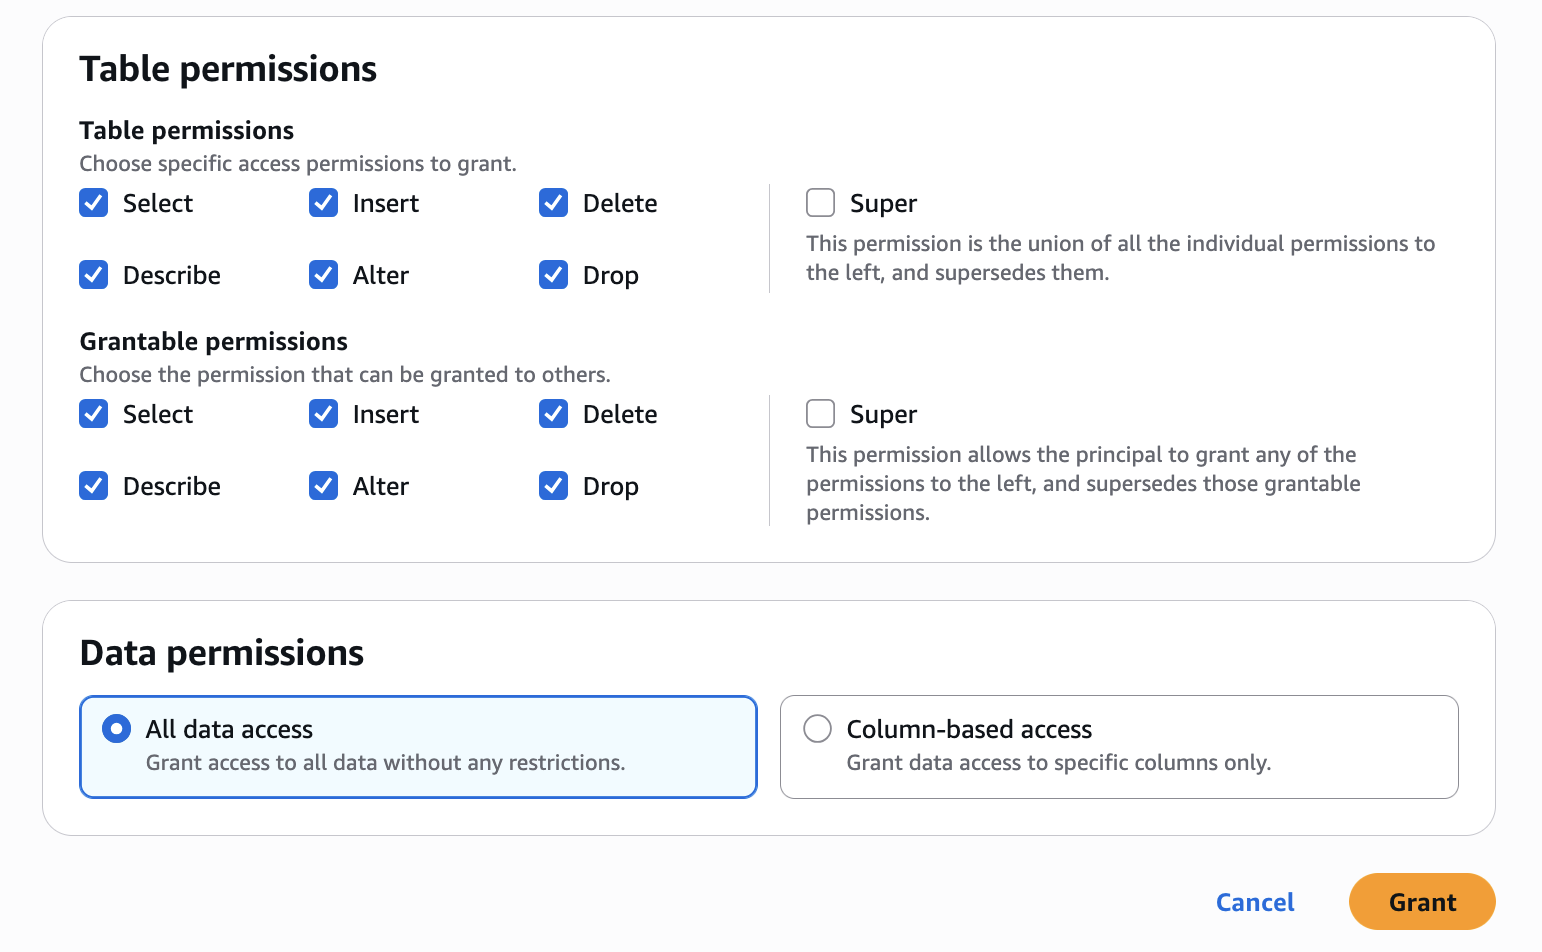
- Configure table permissions and grantable permissions. Choose Grant to apply the following permissions.

Repeat Step 4 in Accounts B to onboard S3 to SageMaker Lakehouse and grant the necessary permissions to the role created by your project for Account B.
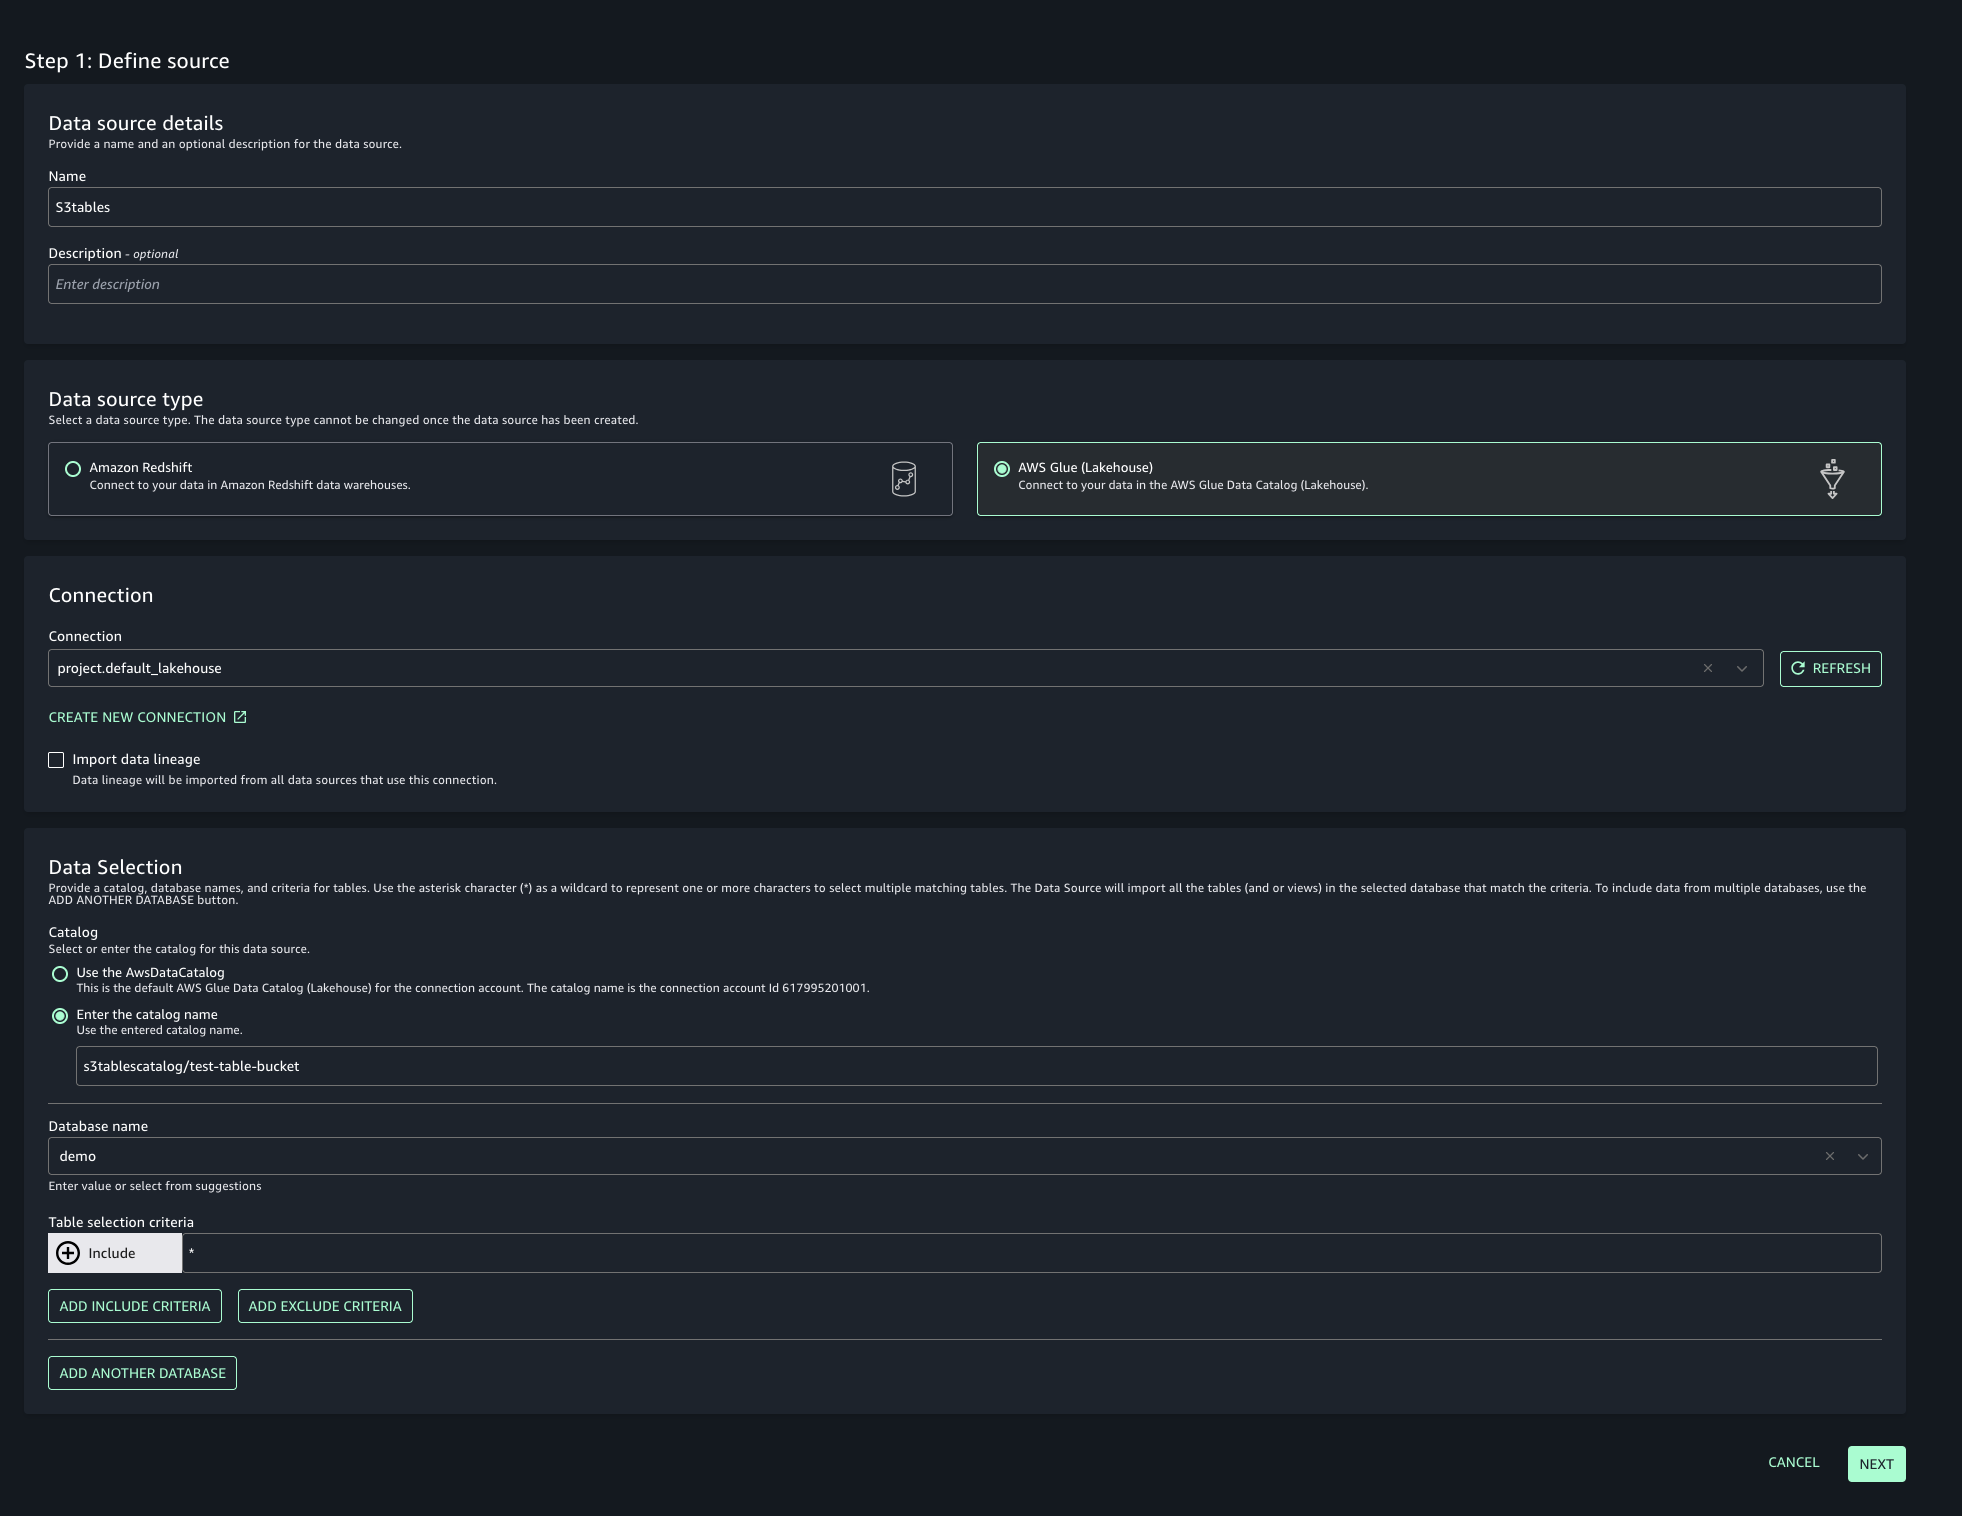
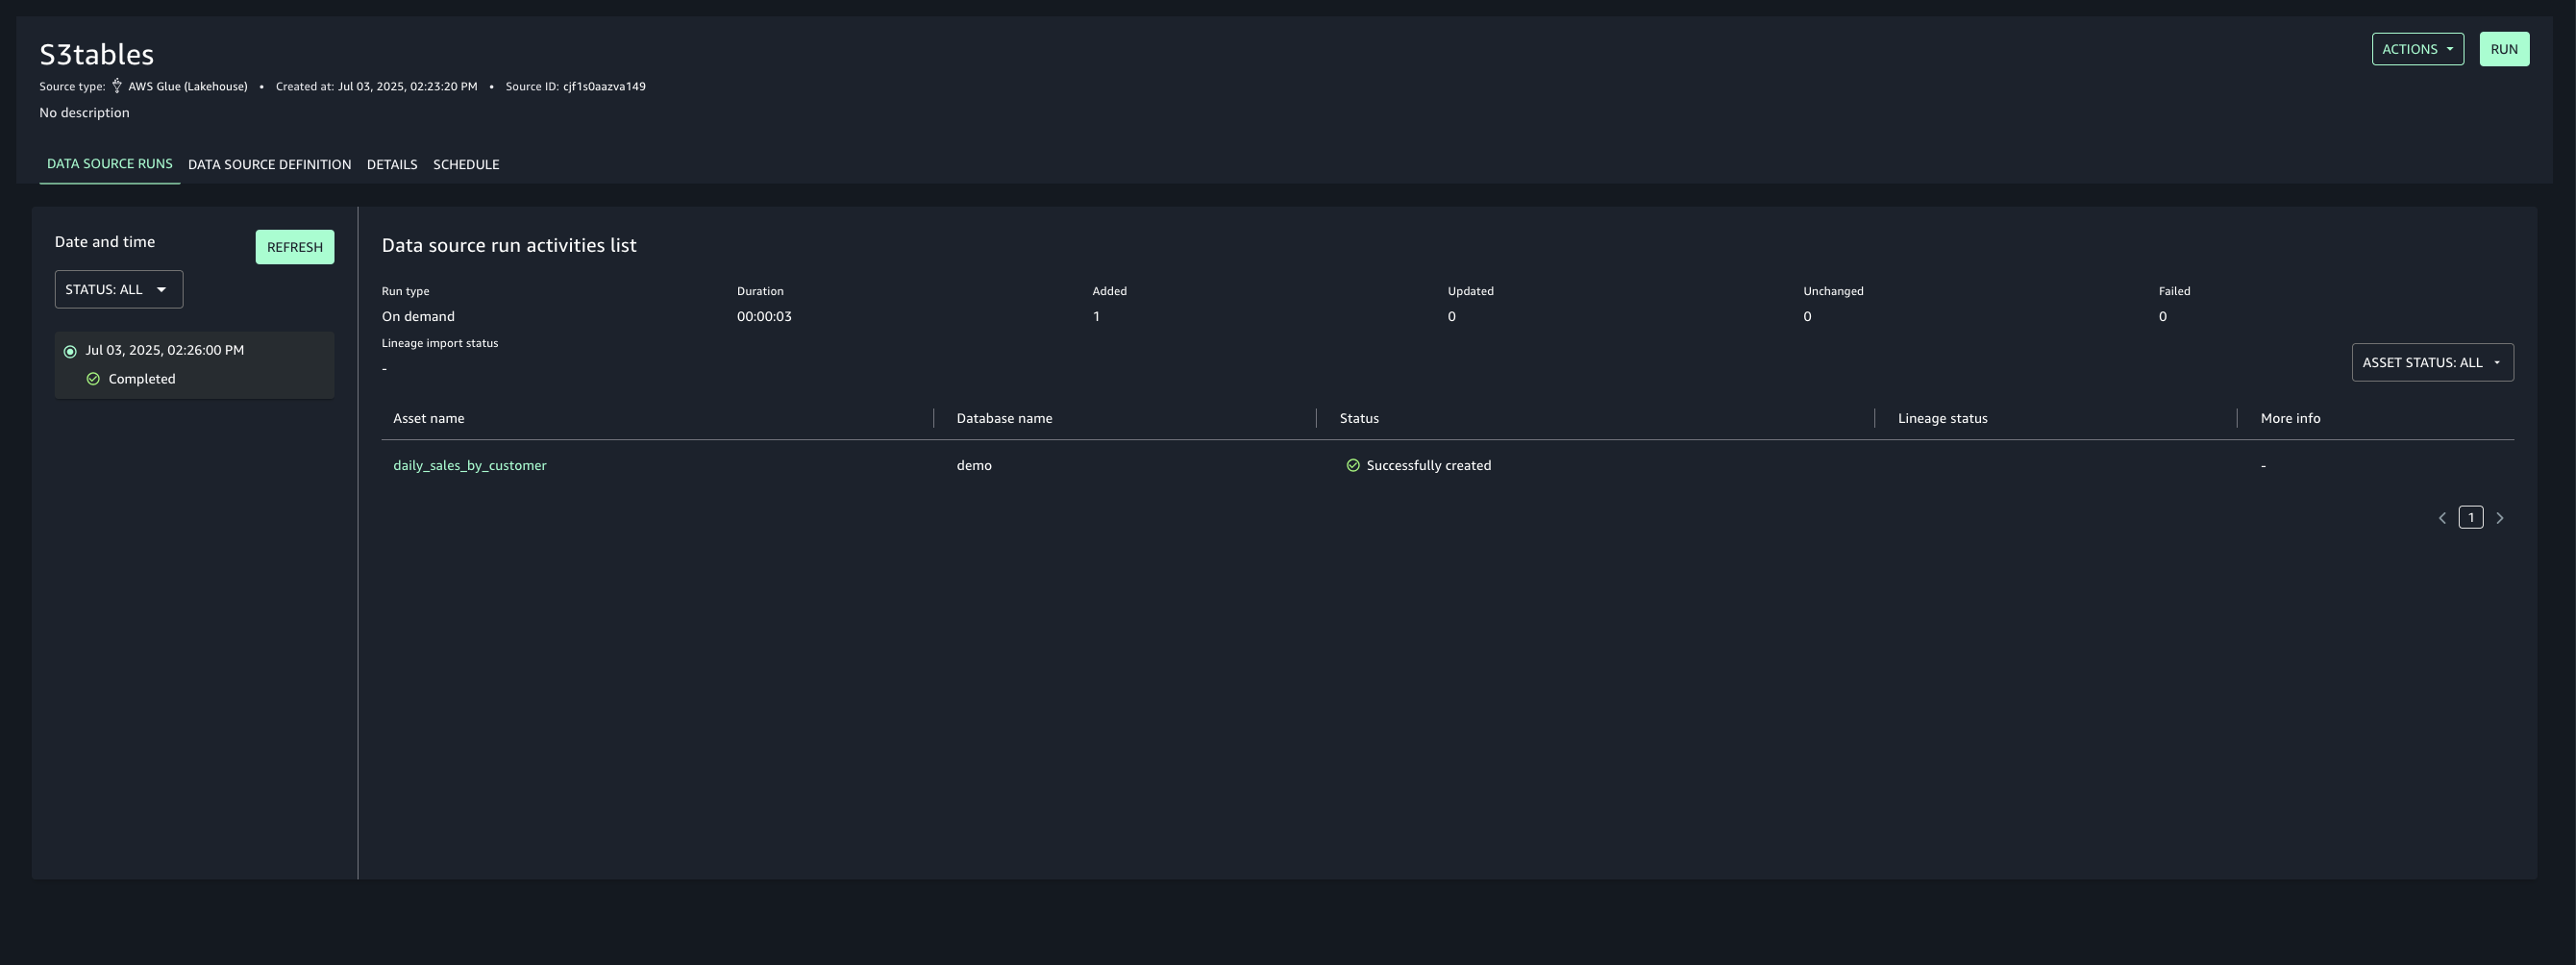
Step 5: Create Datasource and onboard S3 Table from Account A and Glue Catalog Tables from Account B
To enable unified access and cross-account analytics with data lineage tracking, you’ll connect your SageMaker Unified Studio project to S3 tables from both accounts:
- Navigate to your project in SageMaker Unified Studio, select Data sources under the Project catalog section and choose Create data source.
- Enter a name, description, and select AWS Glue as the Data source type. Under Data selection, specify the S3 table catalog name.

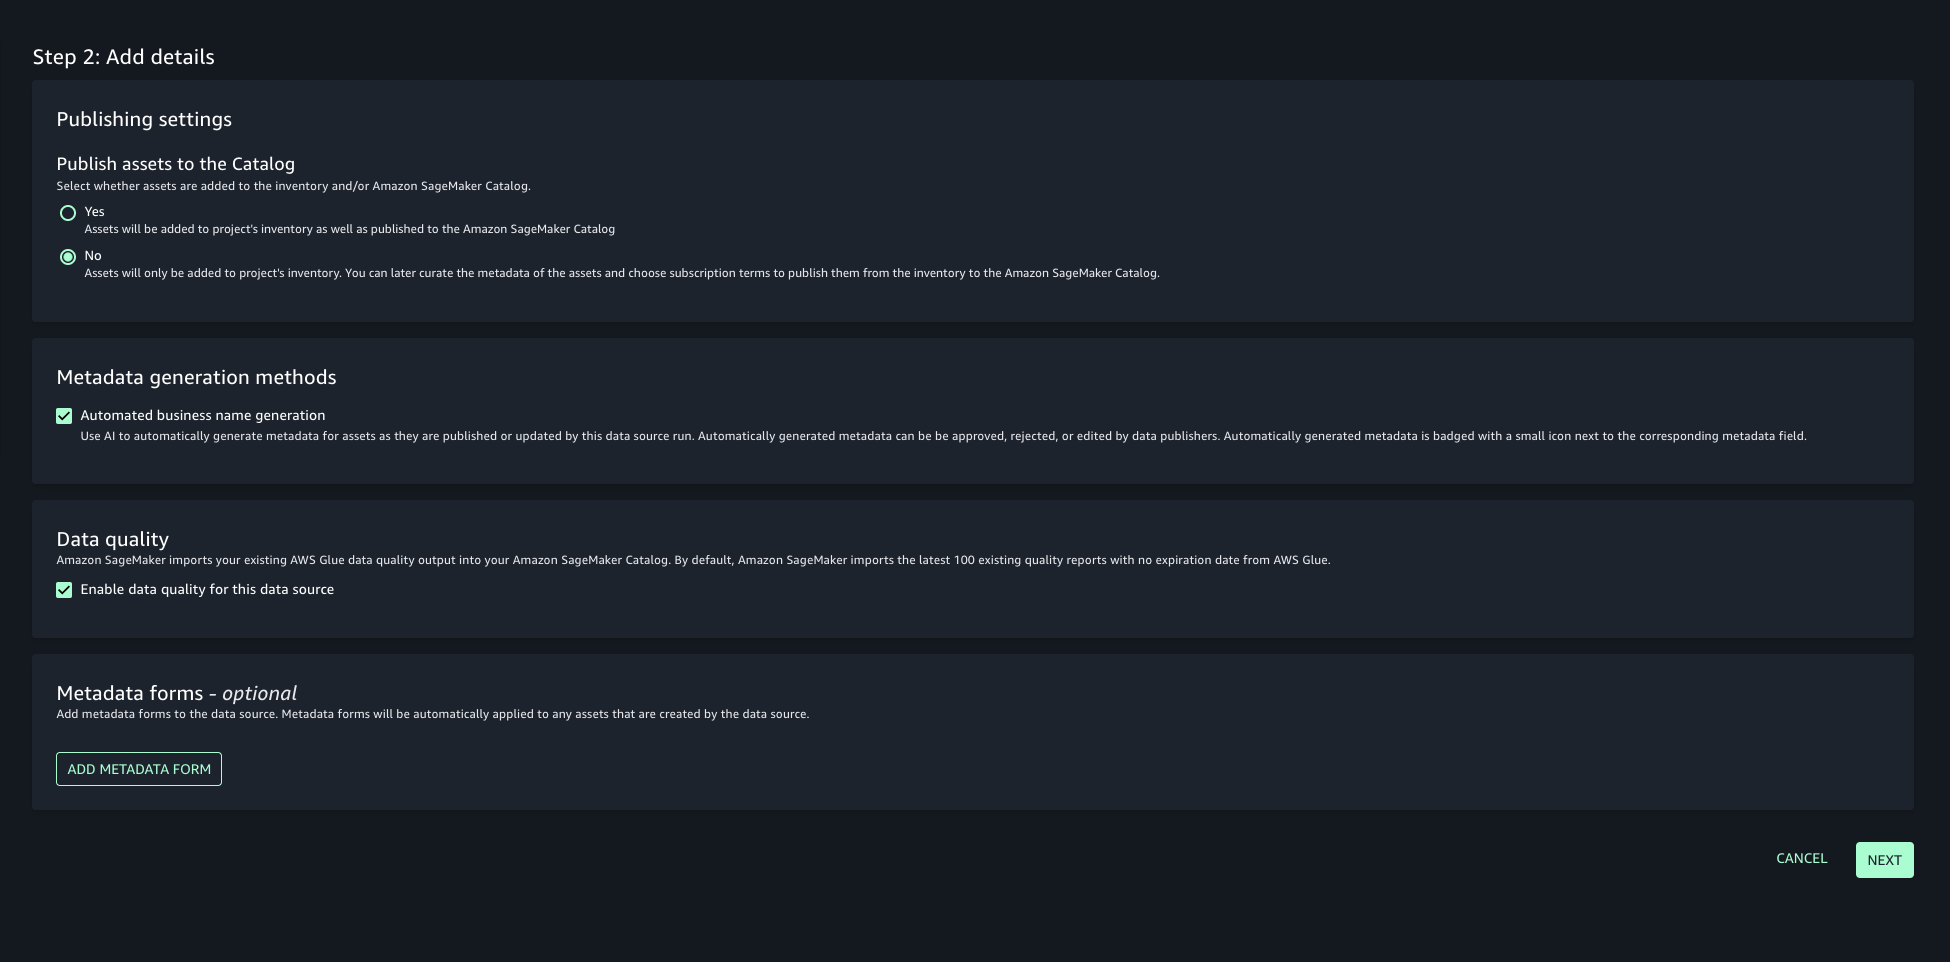
- In this post, we will keep the Publishing setting and Metadata settings as the default configuration.

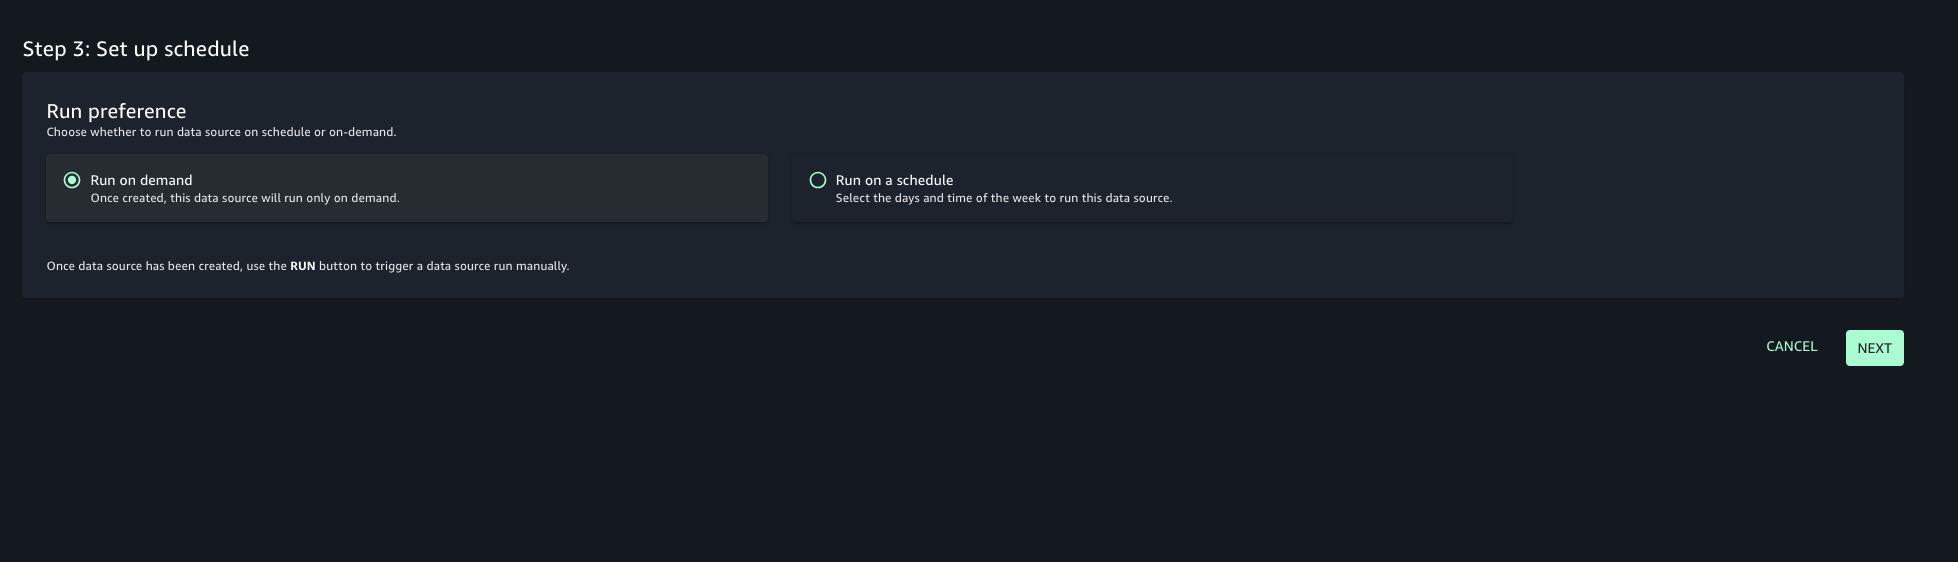
- Choose the run preference as Run on demand to manually initiate data source runs.

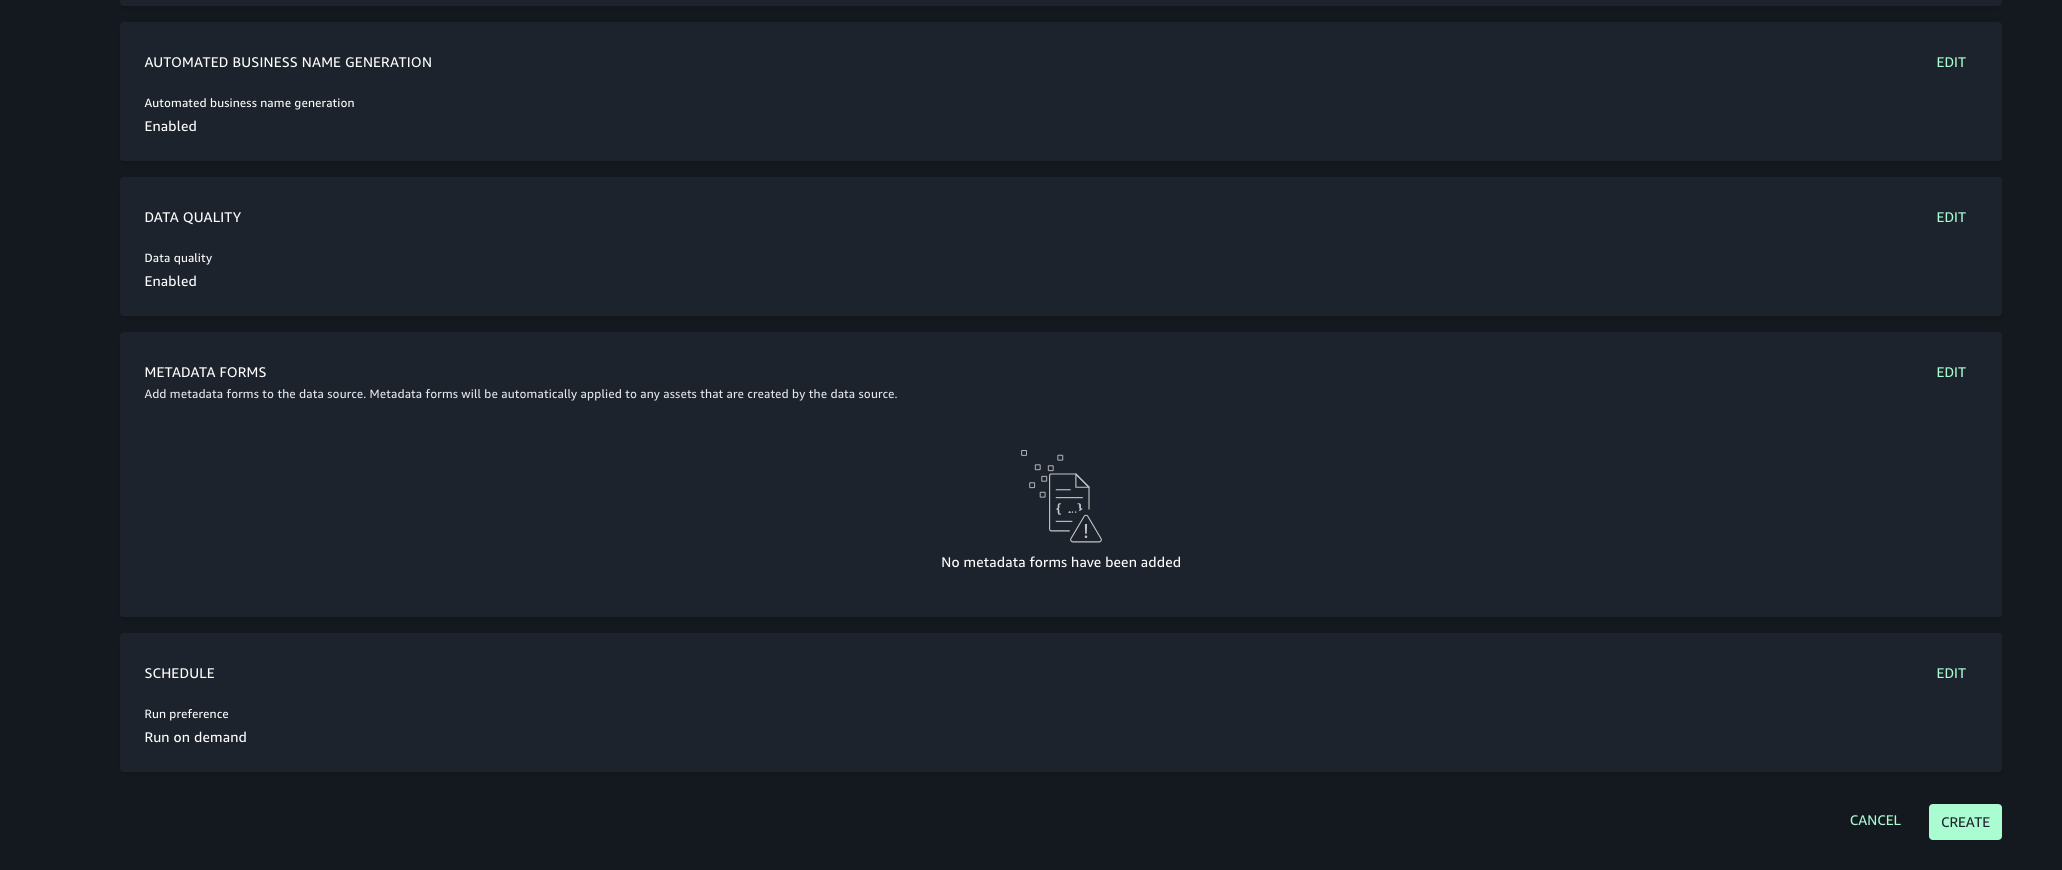
- Configure any optional connection settings, such as importing data lineage or setting up data quality options. Review your configuration and create the data source.

- Once created, run the data source to import the Glue assets into your project’s inventory.

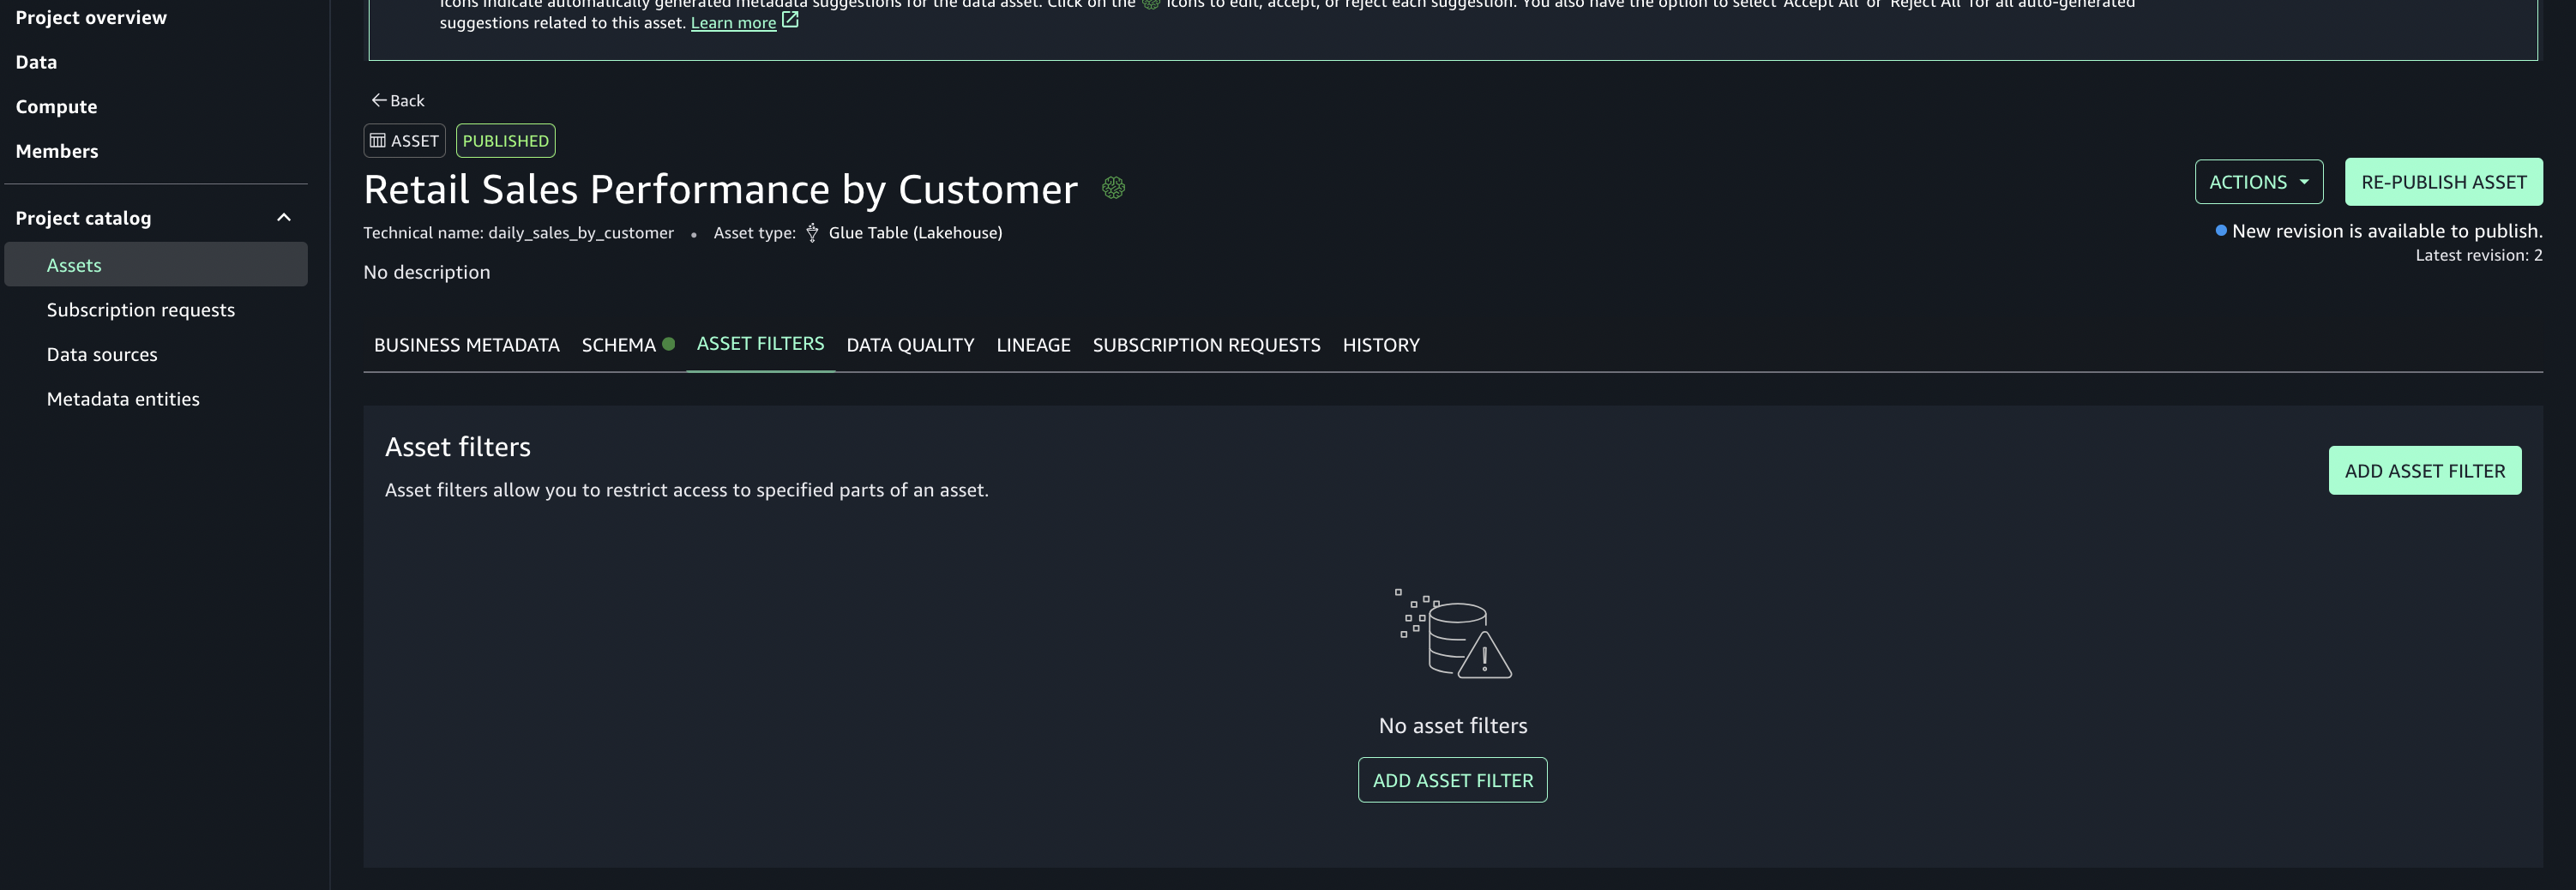
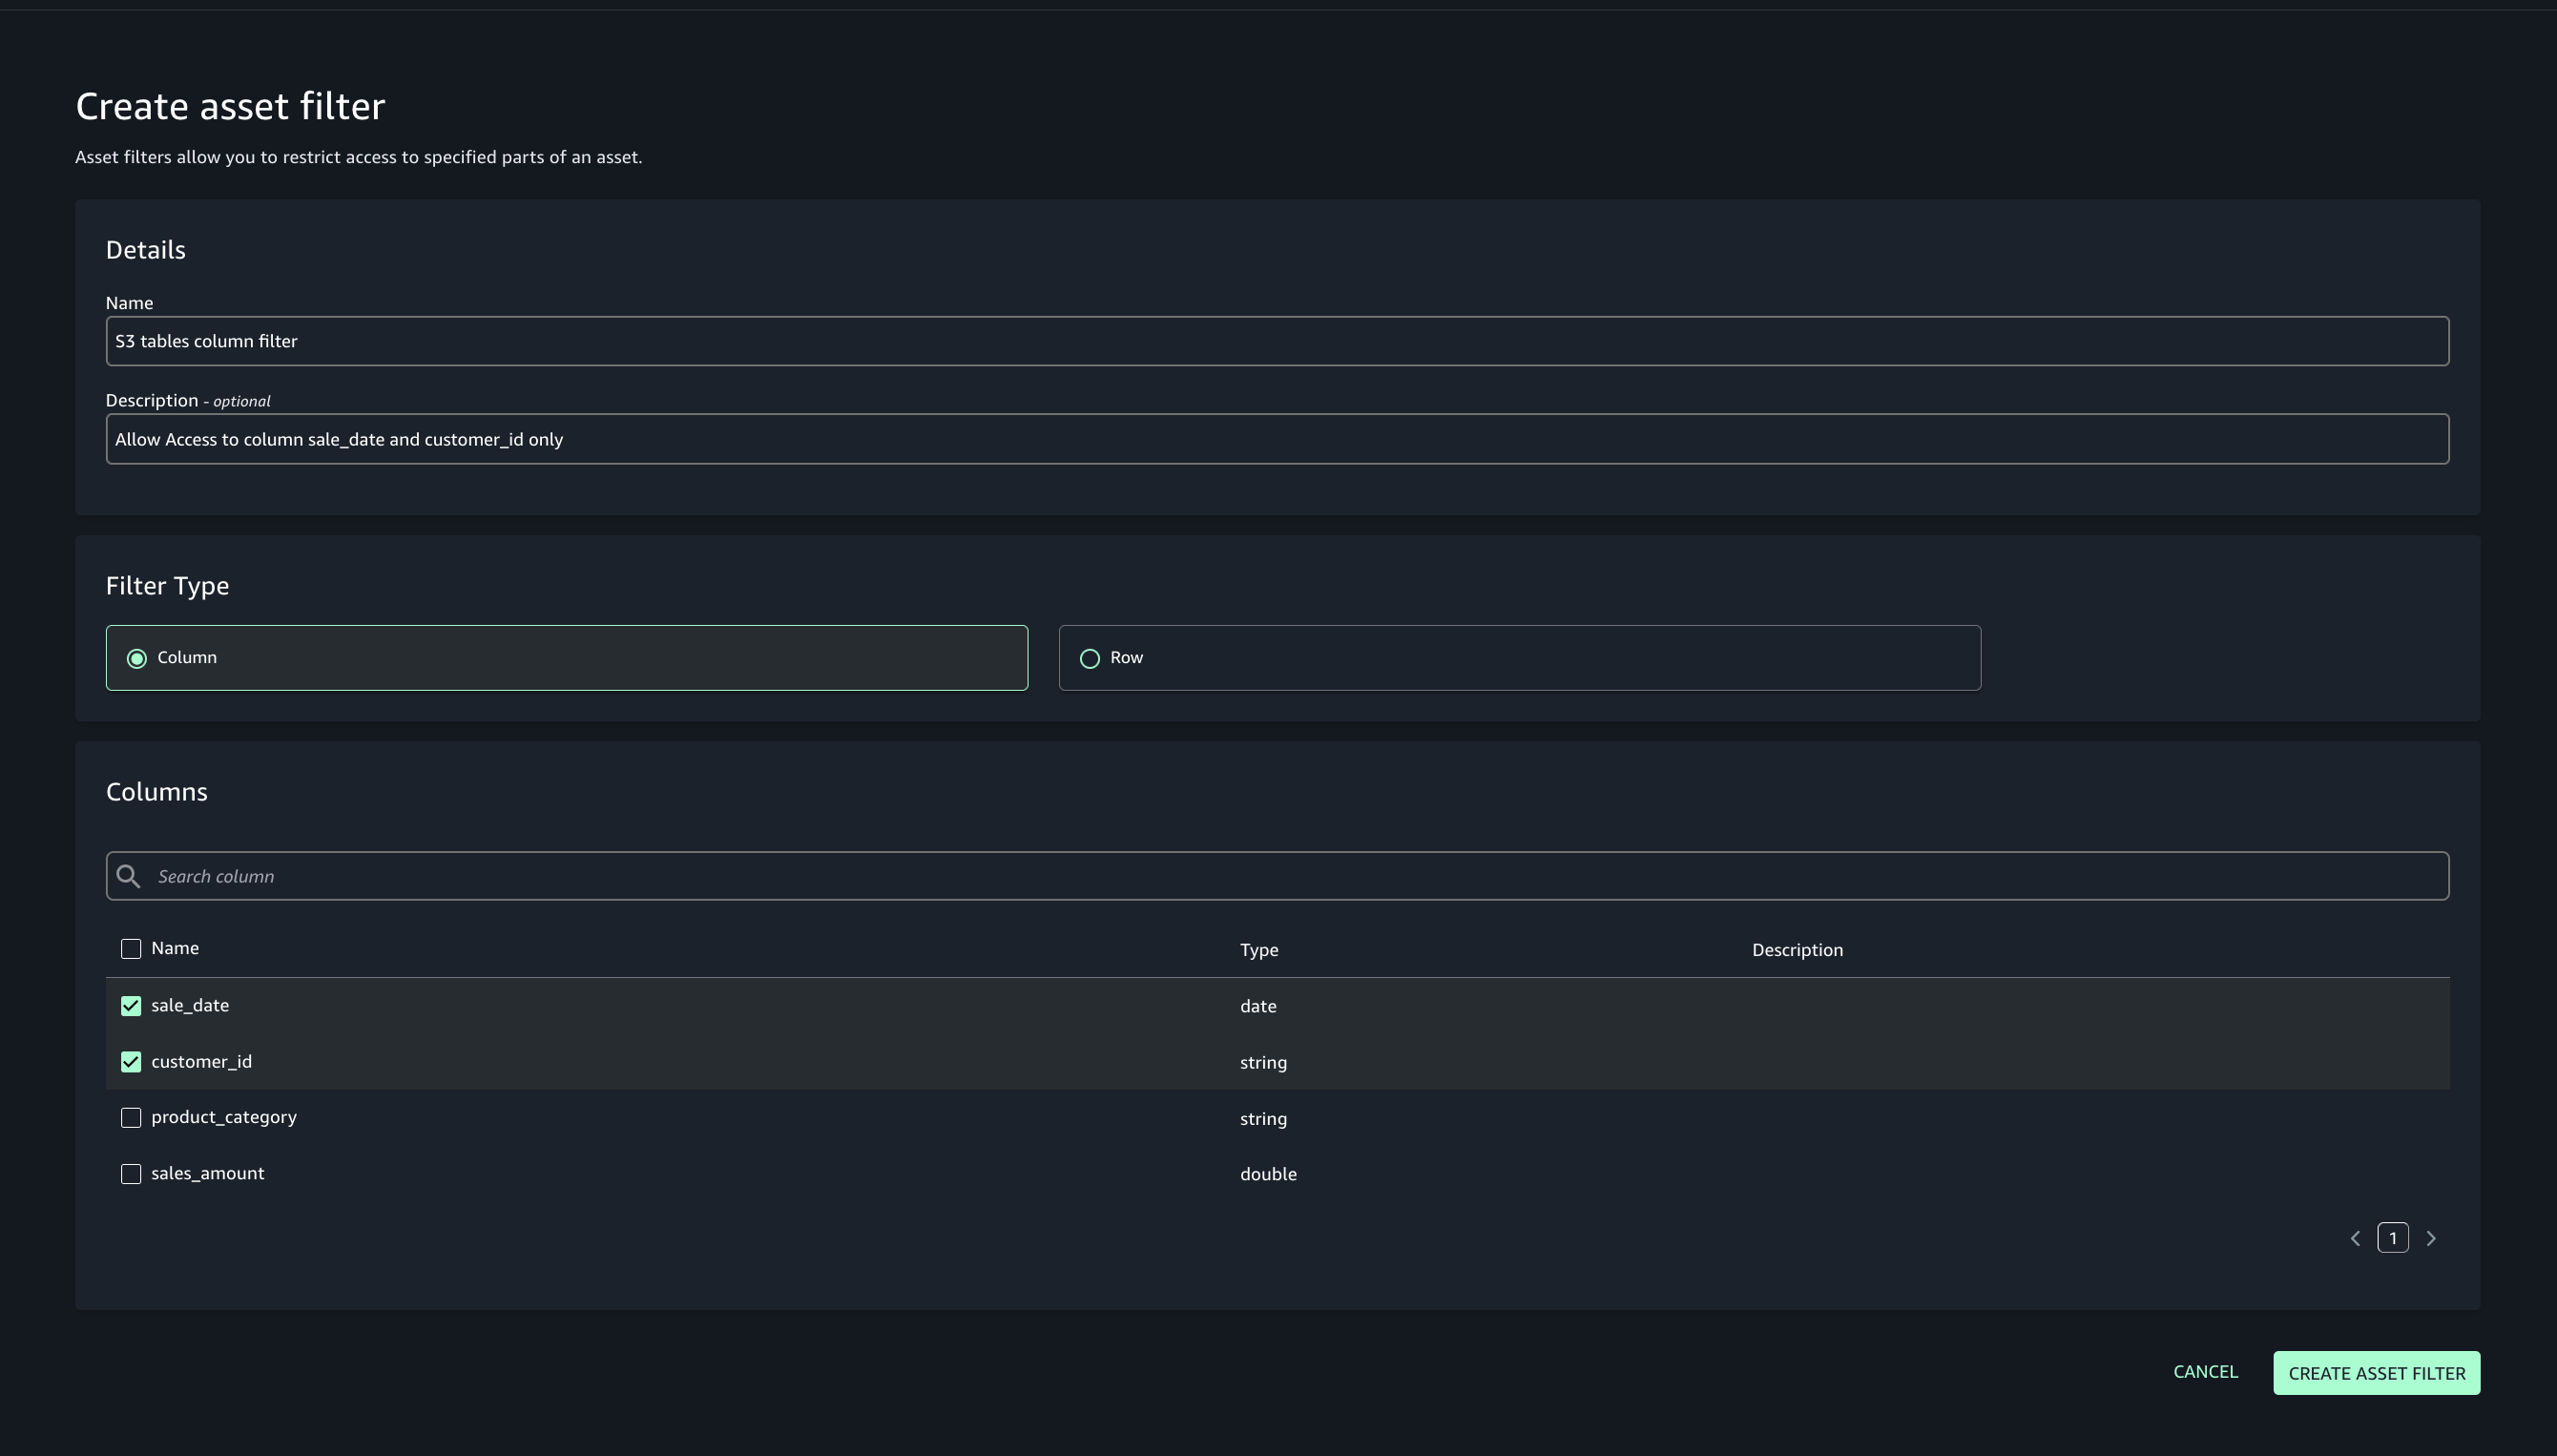
- Add asset filter to restrict consumer access, On the Asset filters tab, choose Add asset filter.

- Select Column as the filter type, choose the columns for consumer access, and create the asset filter.

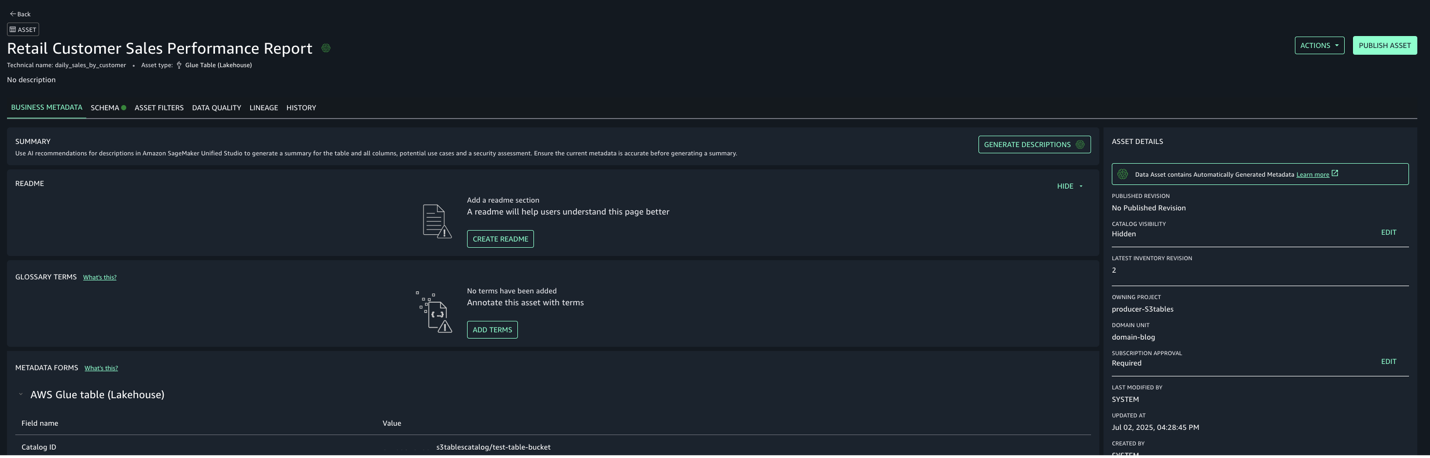
- Select the assets created and choose Publish assets to the SageMaker Unified Studio catalog to make them discoverable by other users.

- Use the documentation to add Glue catalog as data source for S3.
Step 6: Subscribe to the asset from Consumer account in Account C
In Account C, enable the consumer teams to discover, request, and subscribe to those assets for secure, governed data sharing and collaboration across projects.
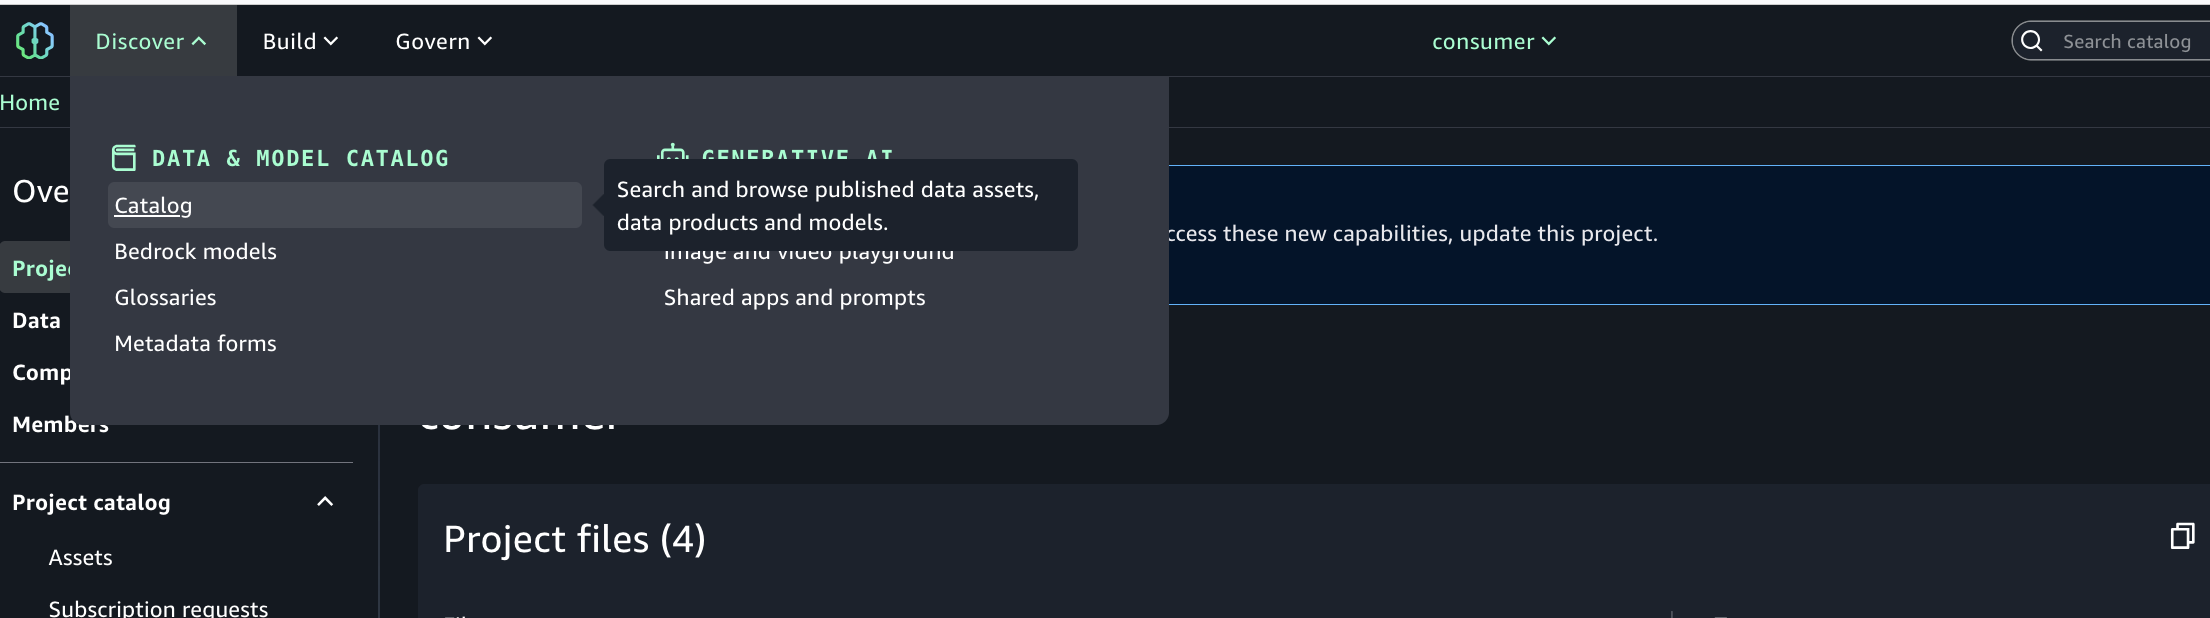
- In SageMaker Unified Studio, select the consumer project.
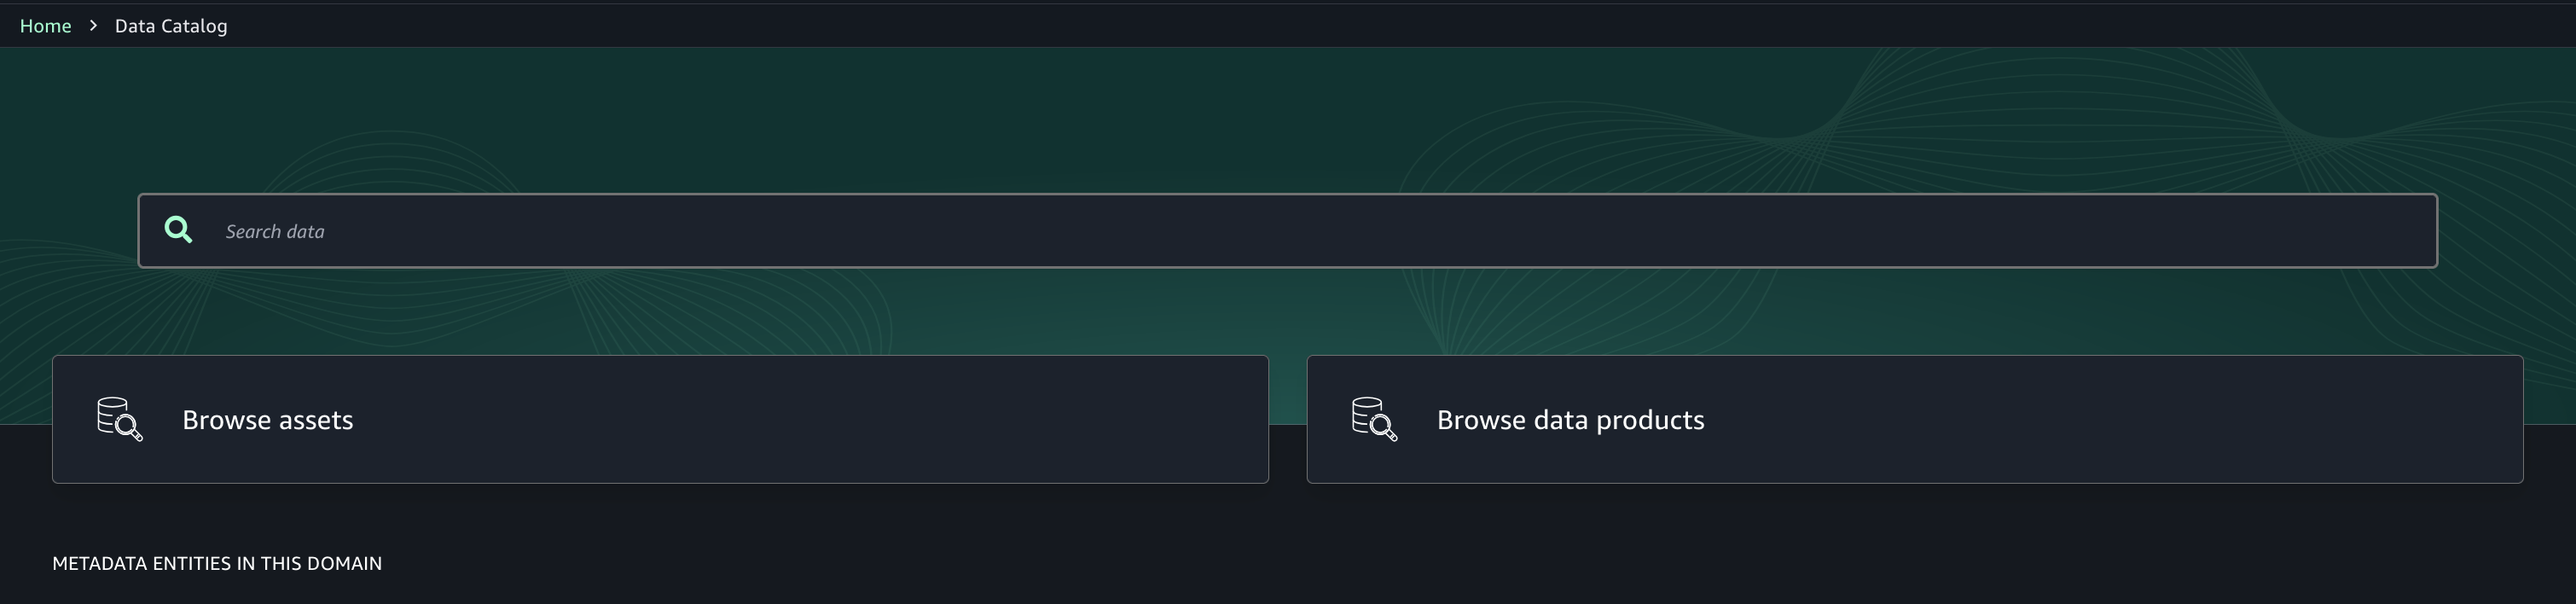
- Use the Discover menu (top navigation) and go to Catalog.

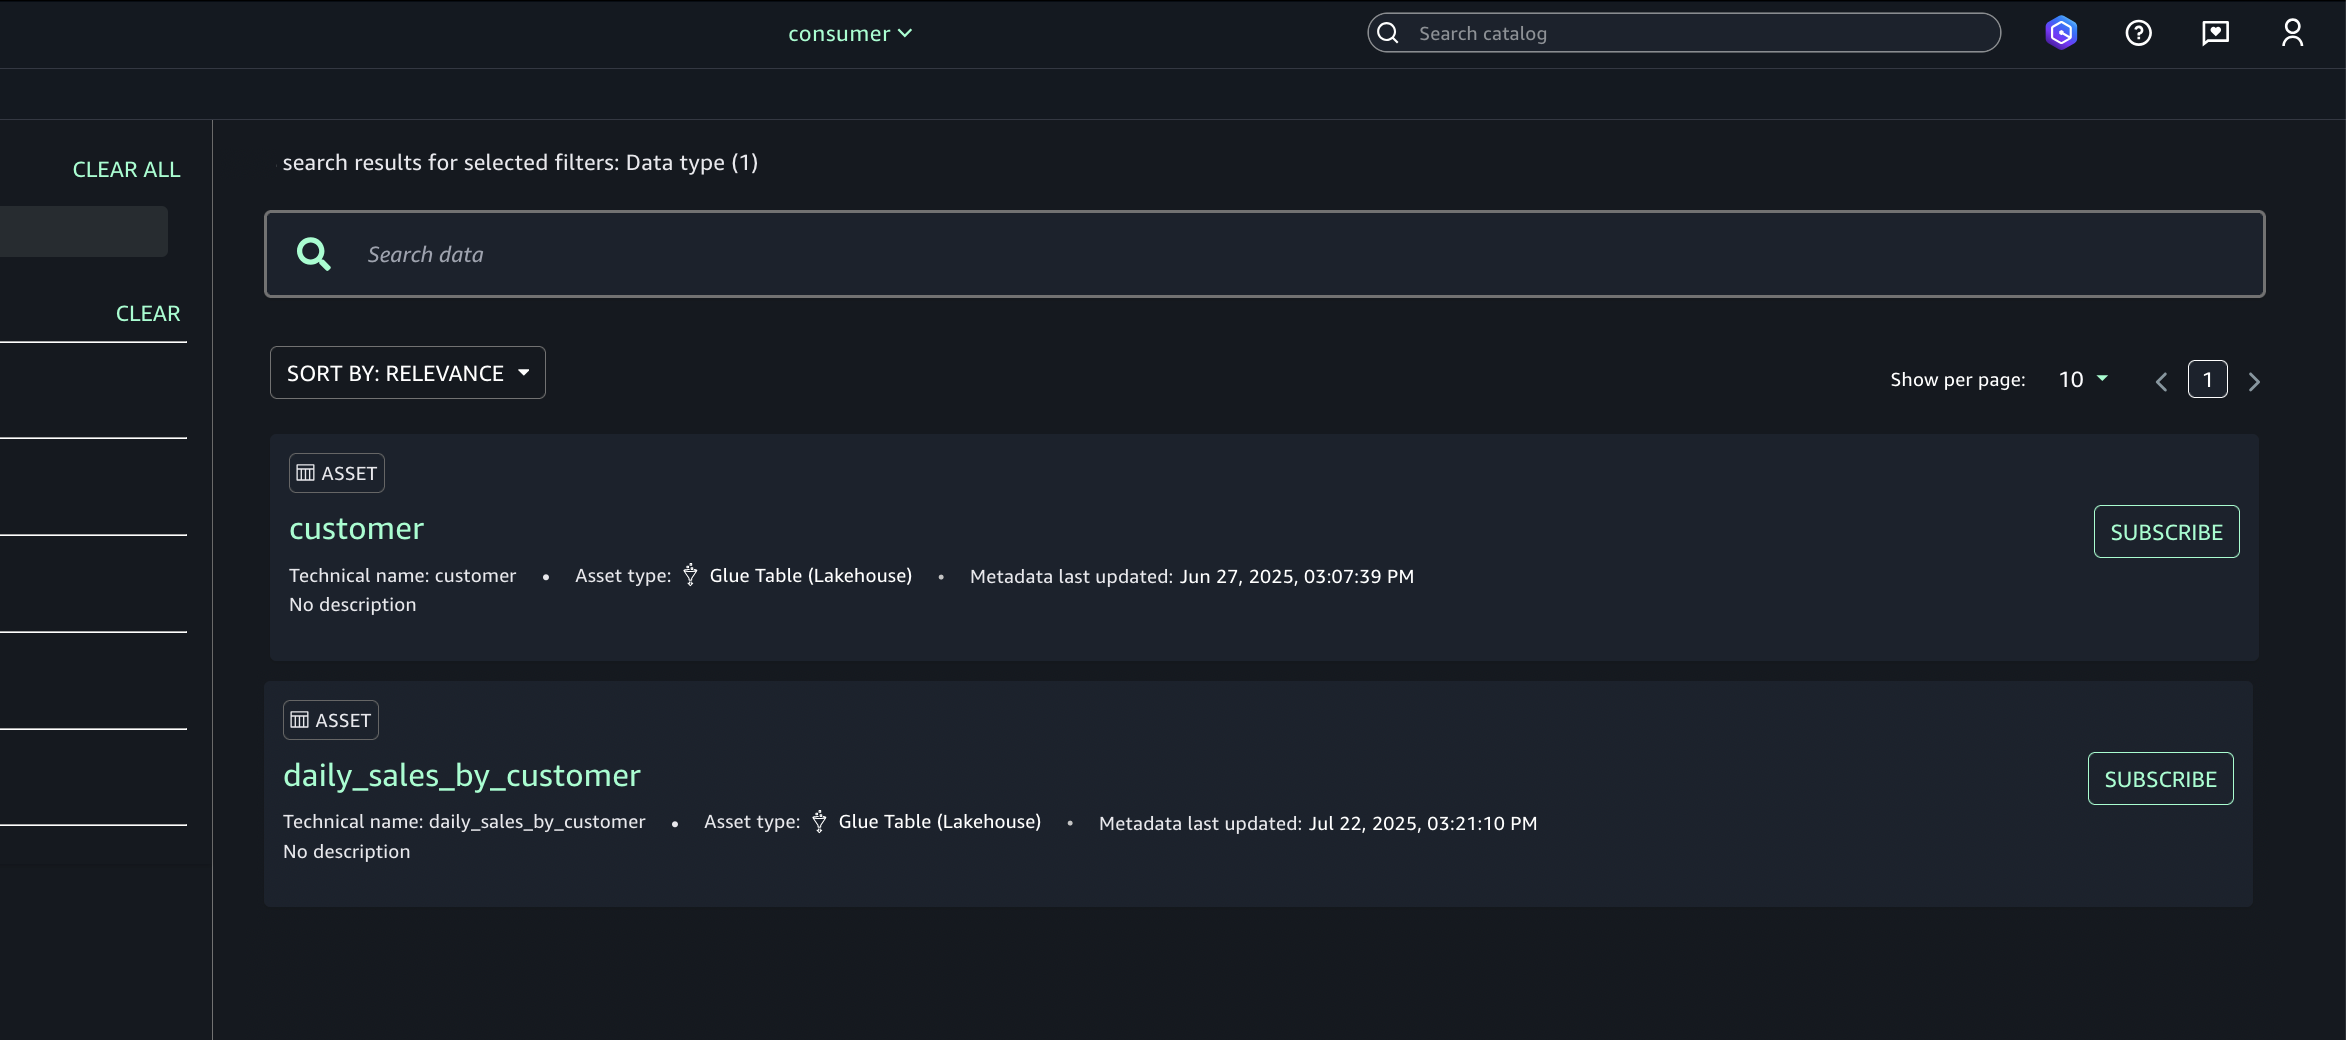
- Browse or search for the published asset (S3 tables from Account A).

- Select the desired asset (S3 tables from Account A) and choose Subscribe.

- In the subscription pop-up:
- Choose the target project for asset access.
- Provide a short justification for the access request.
- Submit the subscription request.
- Repeat step 6 to enable the consumer (Account C) teams to discover assets in Account B.
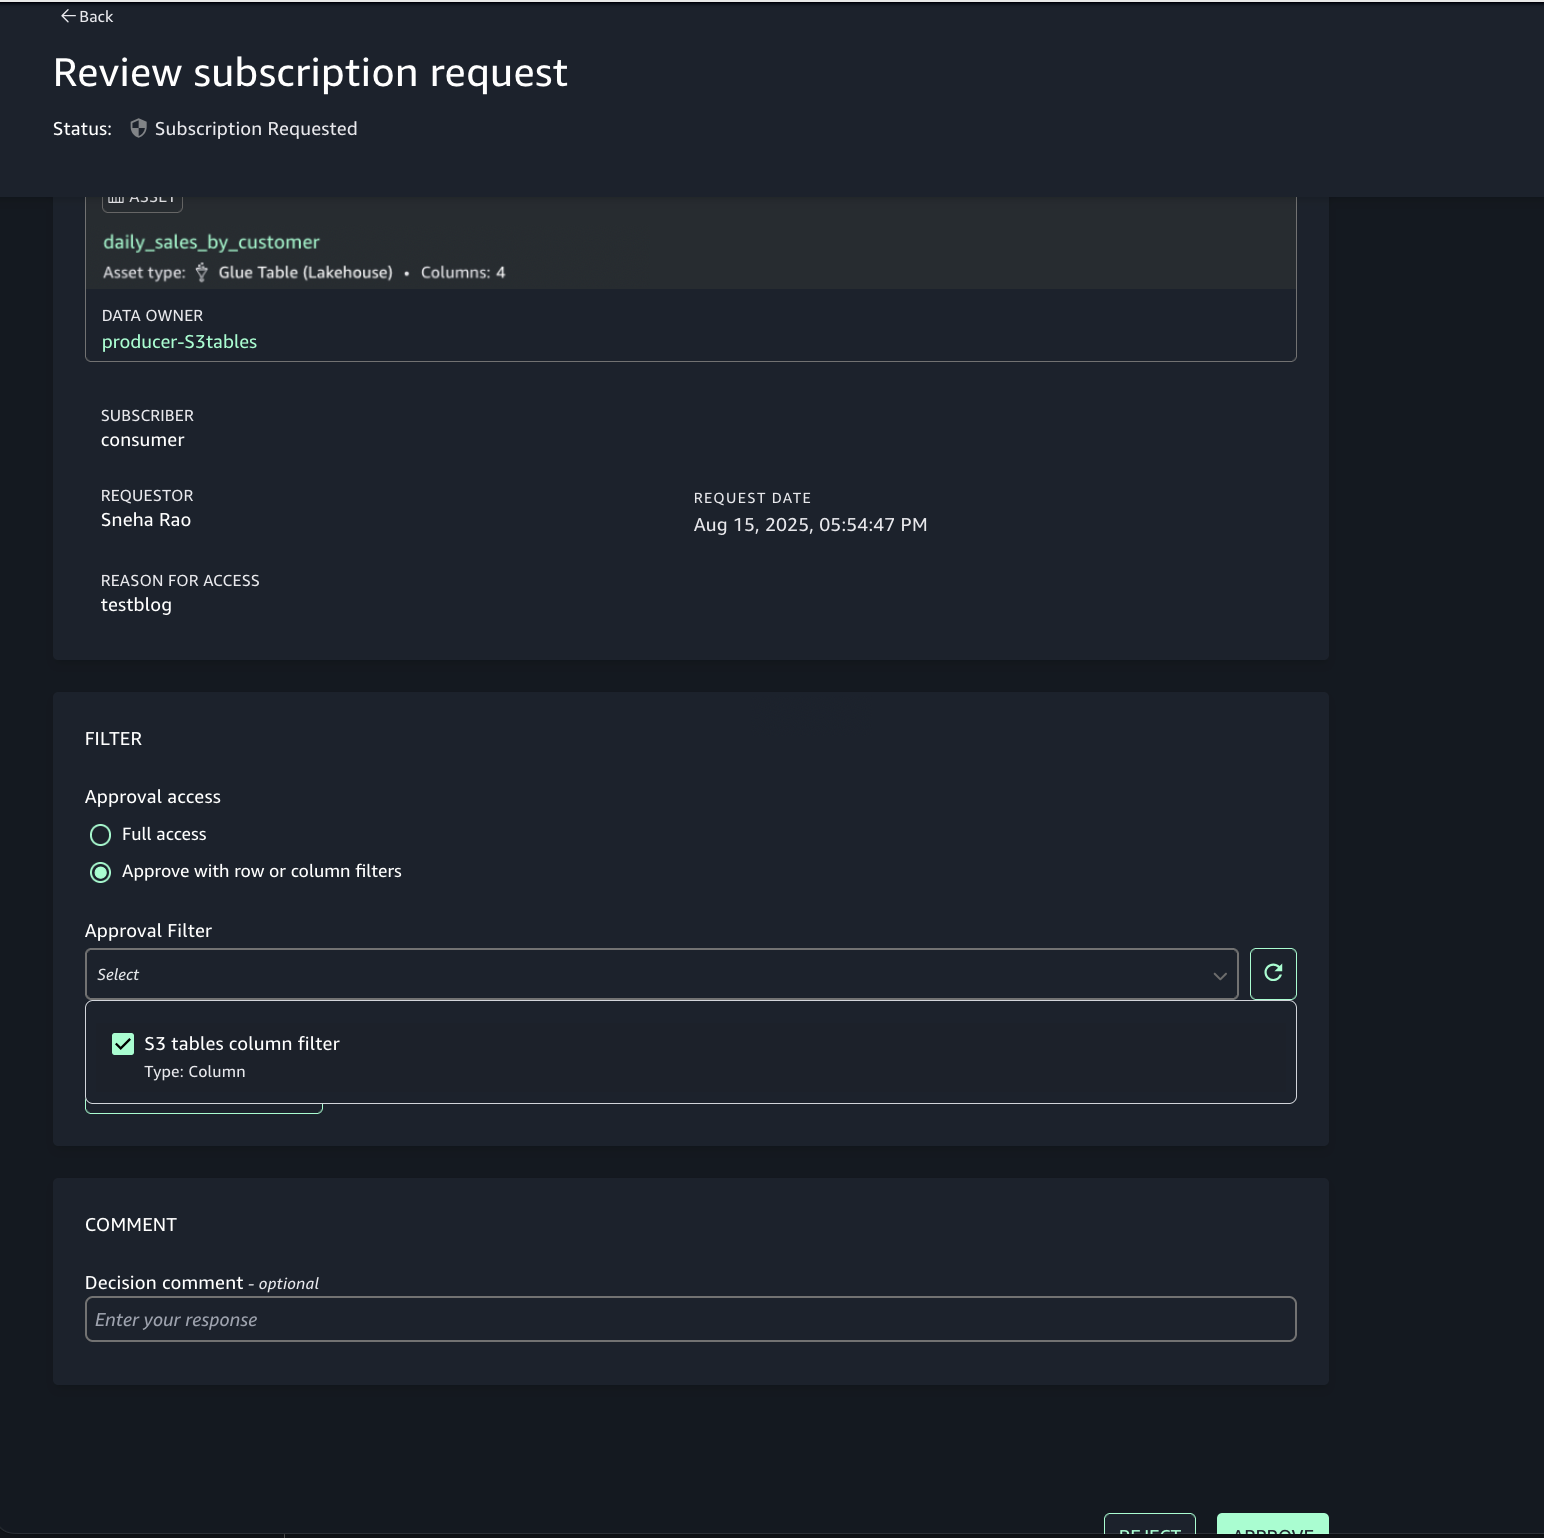
Approve or reject a subscription request
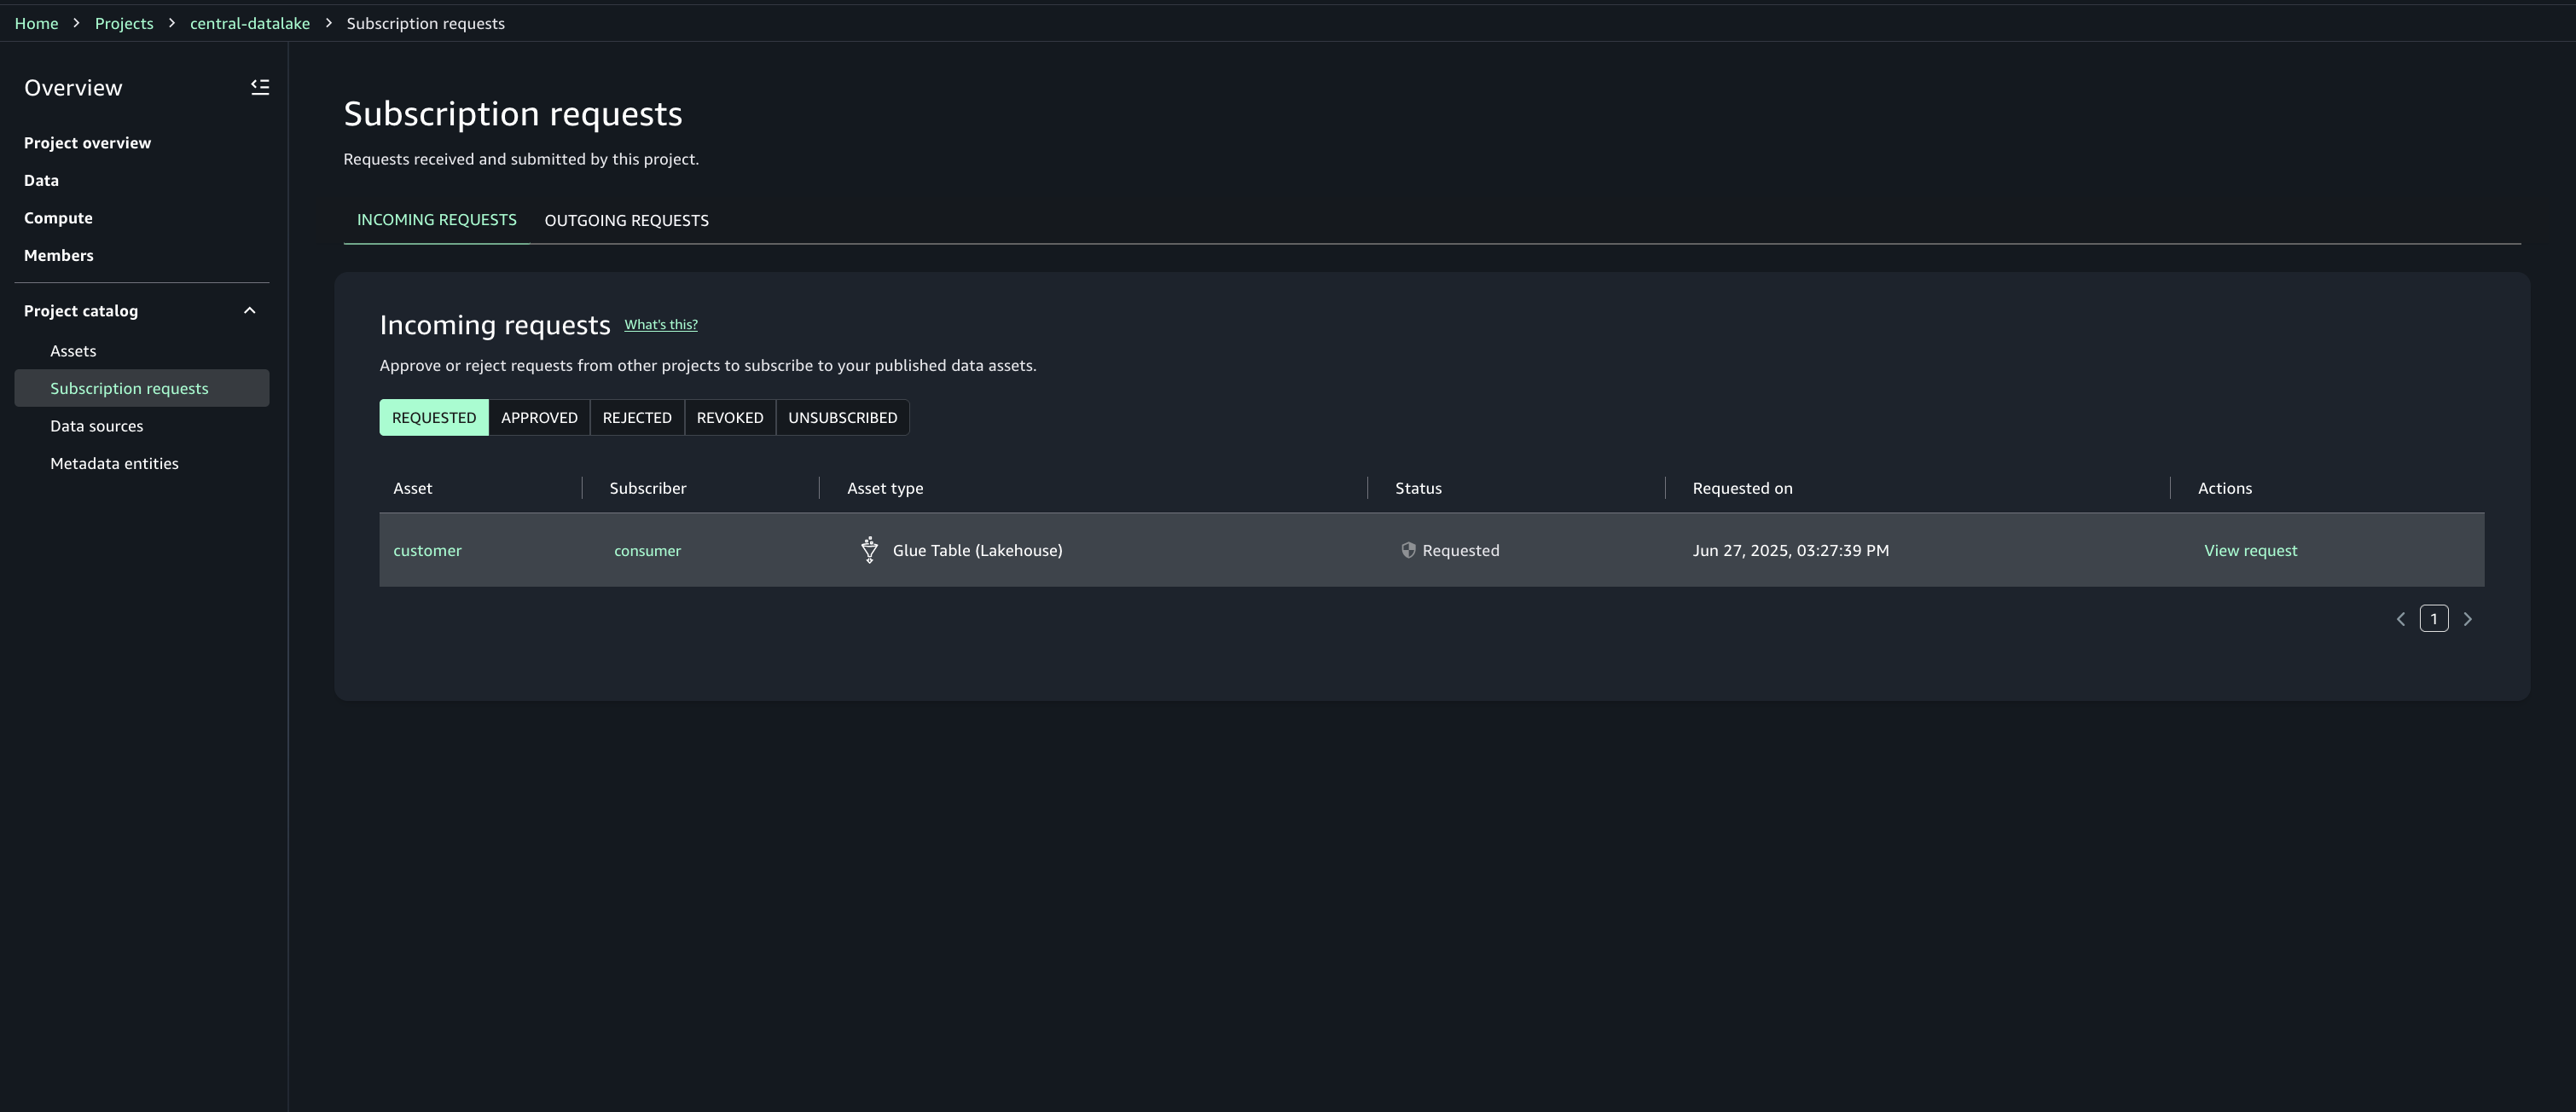
- In Account A, open the SageMaker Unified Studio portal.
- Under Project catalog, Subscription requests, Incoming requests tab locate and view the subscription request.

- Review the requester and justification.
- Choose the option to approve with row and column filters. For this post, we use the filter that we created earlier.

- Repeat step 6 to enable the consumer (Account C) teams to discover assets in Account B.
Step 7: Analyze S3 table and S3 data together in query editor
Account C (consumer) now has full access to the customer data in S3 from Account B, and the daily_sales_by_customer data in S3 tables from Account A with restricted columns. Both datasets contain a common column Customer_id.
To generate combined insights, assets from Account A and Account B can be queried and joined on Customer_id.
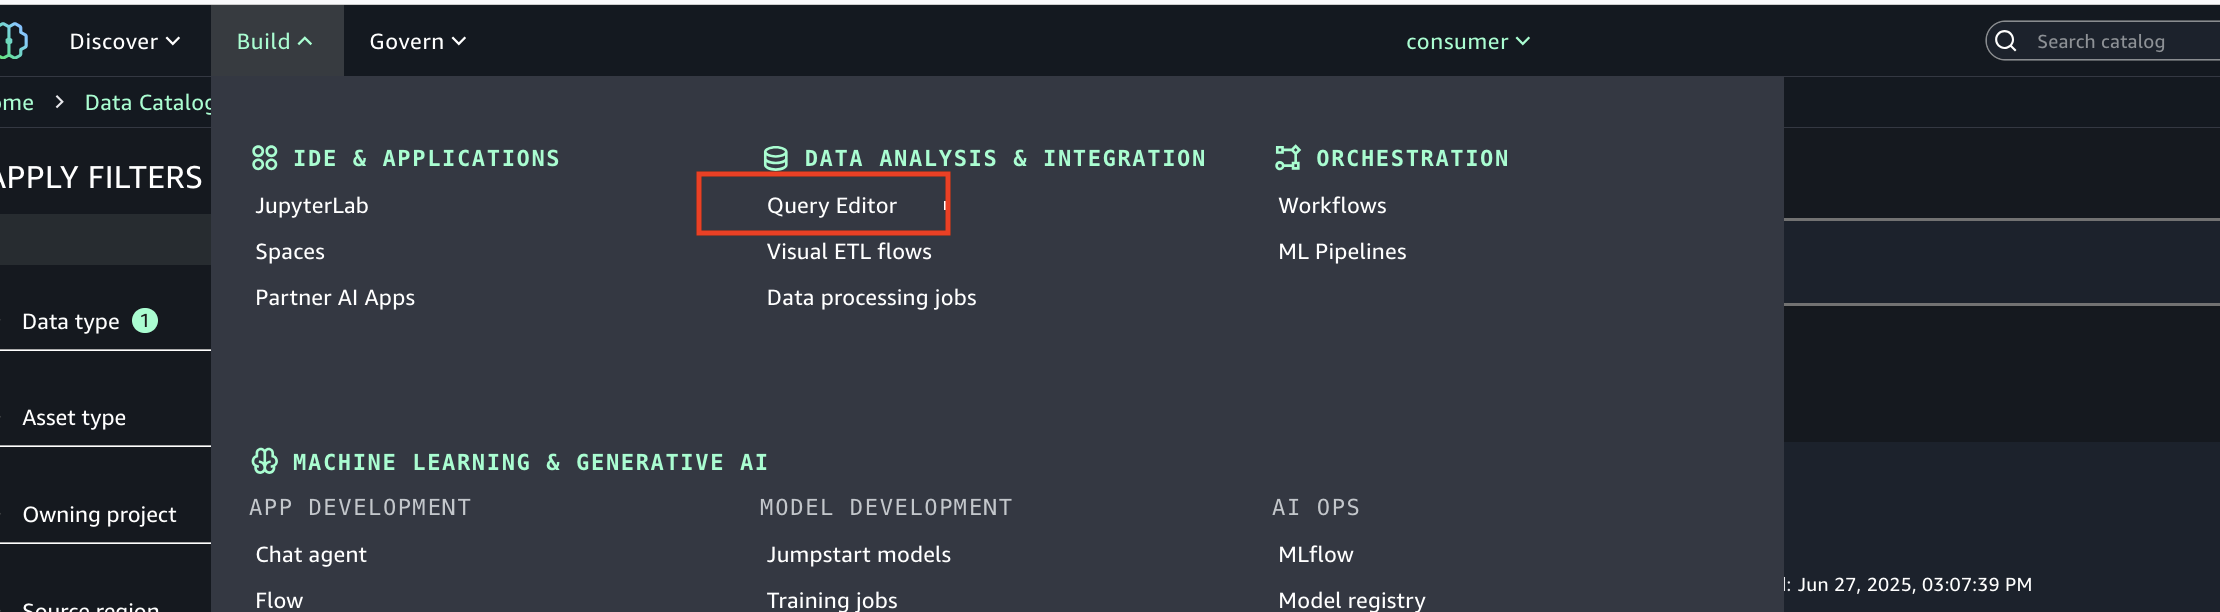
- In SageMaker Unified Studio (consumer project in Account C), go to the Build section and select Query Editor.

- Run the following SQL query to join the assets from Account B and Account A on the common column Customer_id, enabling unified cross-account analytics.

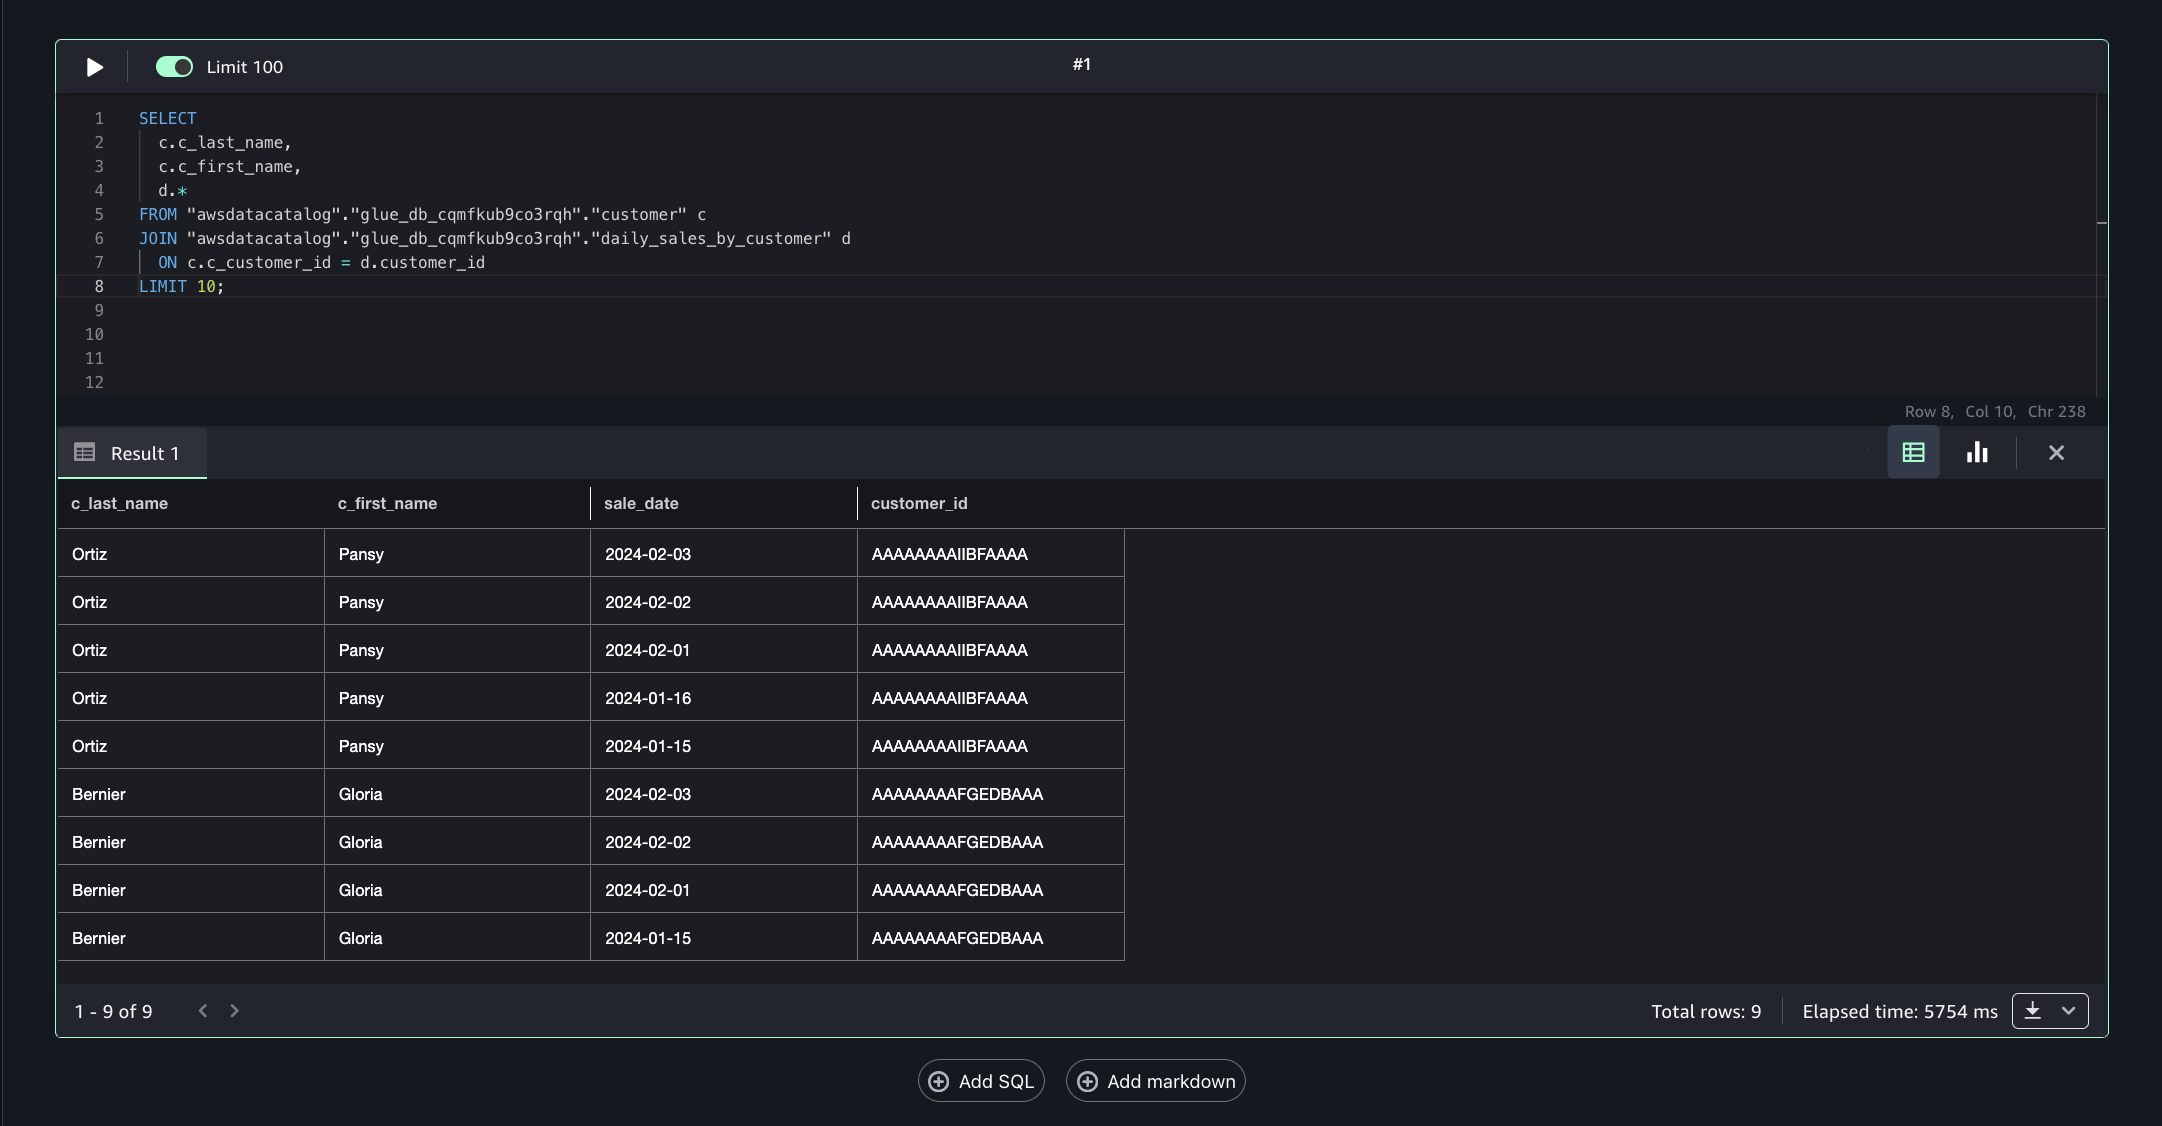
This approach allows combining filtered, governed data from multiple accounts into a single query for comprehensive insights.
Clean up
To avoid ongoing charges, clean up the resources created during this walkthrough. Complete these steps in the specified order to facilitate proper resource deletion. You might need to add respective delete permissions for databases, table buckets, and tables if your IAM user or role doesn’t already have them.
- Delete any created IAM roles or policies.
- Delete all the projects you created in the SageMaker Unified Studio domain.
- Delete the SageMaker Unified Studio domain you created.
Conclusion
In this post, we explored how Amazon SageMaker Catalog integrates with S3 Tables to provide comprehensive data governance in cross-account environments. We demonstrated how data publishers can onboard S3 Tables to SageMaker Lakehouse while data consumers can efficiently search, request access, and leverage approved datasets for analytics and AI development.
The integration between SageMaker Catalog, S3 Tables, and AWS AWS Lake Formation creates a unified governance framework that eliminates data silos while maintaining robust security controls. Through automated subscription workflows and fine-grained access permissions, organizations can implement self-service data access without compromising compliance or data quality.
About the authors
New Amazon Bedrock service tiers help you match AI workload performance with cost
Post Syndicated from Sébastien Stormacq original https://aws.amazon.com/blogs/aws/new-amazon-bedrock-service-tiers-help-you-match-ai-workload-performance-with-cost/
Today, Amazon Bedrock introduces new service tiers that give you more control over your AI workload costs while maintaining the performance levels your applications need.
I’m working with customers building AI applications. I’ve seen firsthand how different workloads require different performance and cost trade-offs. Many organizations running AI workloads face challenges balancing performance requirements with cost optimization. Some applications need rapid response times for real-time interactions, whereas others can process data more gradually. With these challenges in mind, today we’re announcing additional options pricing that give you more flexibility in matching your workload requirements with cost optimization.
Amazon Bedrock now offers three service tiers for workloads: Priority, Standard, and Flex. Each tier is designed to match specific workload requirements. Applications have varying response time requirements based on the use case. Some applications—such as financial trading systems—demand the fastest response times, others need rapid response times to support business processes like content generation, and applications such as content summarization can process data more gradually.
The Priority tier processes your requests ahead of other tiers, providing preferential compute allocation for mission-critical applications like customer-facing chat-based assistants and real-time language translation services, though at a premium price point. The Standard tier provides consistent performance at regular rates for everyday AI tasks, ideal for content generation, text analysis, and routine document processing. For workloads that can handle longer latency, the Flex tier offers a more cost-effective option with lower pricing, which is well suited for model evaluations, content summarization, and multistep analysis and agentic workflows.
You can now optimize your spending by matching each workload to the most appropriate tier. For example, if you’re running a customer service chat-based assistant that needs quick responses, you can use the Priority tier to get the fastest processing times. For content summarization tasks that can tolerate longer processing times, you can use the Flex tier to reduce costs while maintaining reliable performance. For most models that support Priority Tier, customers can realize up to 25% better output tokens per second (OTPS) latency compared to standard tier.
Check the Amazon Bedrock documentation for an up-to-date list of models supported for each service tier.
Choosing the right tier for your workload
Here is a mental model to help you choose the right tier for your workload.
| Category | Recommended service tier | Description |
|---|---|---|
| Mission-critical | Priority | Requests are handled ahead of other tiers. Lower latency responses for user-facing apps (for example, customer service chat assistants, real-time language translation, interactive AI assistants) |
| Business-standard | Standard | Responsive performance for important workloads (for example, content generation, text analysis, routine document processing) |
| Business-noncritical | Flex | Cost-efficient for less urgent workloads (for example, model evaluations, content summarization, multistep agentic workflows) |
Start by reviewing with application owners your current usage patterns. Next, identify which workloads need immediate responses and which ones can process data more gradually. You can then begin routing a small portion of your traffic through different tiers to test performance and cost benefits.
The AWS Pricing Calculator helps you estimate costs for different service tiers by entering your expected workload for each tier. You can estimate your budget based on your specific usage patterns.
To monitor your usage and costs, you can use the AWS Service Quotas console or turn on model invocation logging in Amazon Bedrock and observe the metrics with Amazon CloudWatch. These tools provide visibility into your token usage and help you track performance across different tiers.

You can start using the new service tiers today. You choose the tier on a per-API call basis. Here is an example using the ChatCompletions OpenAI API, but you can pass the same service_tier parameter in the body of InvokeModel, InvokeModelWithResponseStream, Converse, andConverseStream APIs (for supported models):
from openai import OpenAI

client = OpenAI(
    base_url="https://bedrock-runtime.us-west-2.amazonaws.com/openai/v1",
    api_key="$AWS_BEARER_TOKEN_BEDROCK" # Replace with actual API key
)

completion = client.chat.completions.create(
    model= "openai.gpt-oss-20b-1:0",
    messages=[
        {
            "role": "developer",
            "content": "You are a helpful assistant."
        },
        {
            "role": "user",
            "content": "Hello!"
        }
    ]
    service_tier= "priority"  # options: "priority | default | flex"
)

print(completion.choices[0].message)
To learn more, check out the Amazon Bedrock User Guide or contact your AWS account team for detailed planning assistance.
I’m looking forward to hearing how you use these new pricing options to optimize your AI workloads. Share your experience with me online on social networks or connect with me at AWS events.
Analyze AWS Network Firewall logs using Amazon OpenSearch dashboard
Post Syndicated from Hoorang Broujerdi original https://aws.amazon.com/blogs/security/analyze-aws-network-firewall-logs-using-amazon-opensearch-dashboard/
Amazon CloudWatch and Amazon OpenSearch Service have launched a new dashboard that simplifies the analysis of AWS Network Firewall logs. Previously, in our blog post How to analyze AWS Network Firewall logs using Amazon OpenSearch Service we demonstrated the required services and steps to create an OpenSearch dashboard. The new dashboard removes these extra steps and streamlines the entire process. In this post, I show you how to build and use the new OpenSearch Service dashboards to analyze Network Firewall logs more efficiently.
Network Firewall is a managed security service that protects Amazon Virtual Private Cloud (Amazon VPC) VPCs by monitoring and filtering network traffic. Network Firewall provides stateful inspection, which gives you information that you can use to create custom rules to control incoming and outgoing traffic. It automatically scales, offers high availability, and integrates with other AWS security services, in addition to helping to block unexpected traffic, prevent unauthorized access, and filter traffic based on domains and IP addresses.
Analyzing Network Firewall logs provides you with insight into the traffic entering or leaving your VPC and helps you troubleshoot issues and understand your security posture over time. This analysis is crucial for maintaining effective security controls.
Network Firewall generates three types of logs from its stateful engine:
- Flow logs: These capture standard network traffic flow information based on your stateless rules
- Alert logs: These show traffic that matches stateful rules configured with
DROP,ALERT, orREJECTactions - TLS logs: These provide details about TLS inspection events (requires TLS inspection configuration)
Prerequisites
This post assumes that you’re familiar with the fundamentals of AWS networking concepts and services such as Amazon VPC, subnets, routing tables, and other services such as Network Firewall, Amazon CloudWatch, and OpenSearch Service.
To analyze Network Firewall logs using OpenSearch Service, you must have:
- An active Network Firewall in your VPC
- CloudWatch log groups configured for:
- Flow logs, for example
/inspection-nwfw-flow-logs - Alert logs, for example
/inspection-nwfw-alert-logs
- Flow logs, for example
If you haven’t deployed Network Firewall in your VPC, you can use one of the available Network Firewall deployment architecture templates to create a firewall. After creating a firewall, configure CloudWatch log groups for the firewall flow and alert logs and configure stateful logging. Fine-tune your firewall policy and rule configuration and make sure that you’re routing traffic symmetrically through the firewall. Verify that your CloudWatch log groups are receiving firewall logs. You can do this by navigating to the AWS Management Console for CloudWatch, selecting your log group, and viewing the log streams under the Log streams tab.
With the firewall in the routed path and publishing metrics and log events, you can proceed with creating a Network Firewall OpenSearch dashboard.
Scenario
In this post, I show you how to set up a centralized architecture, single Availability Zone deployment as shown in Figure 1. Then, you will create an OpenSearch dashboard for your firewall to monitor and analyze traffic.
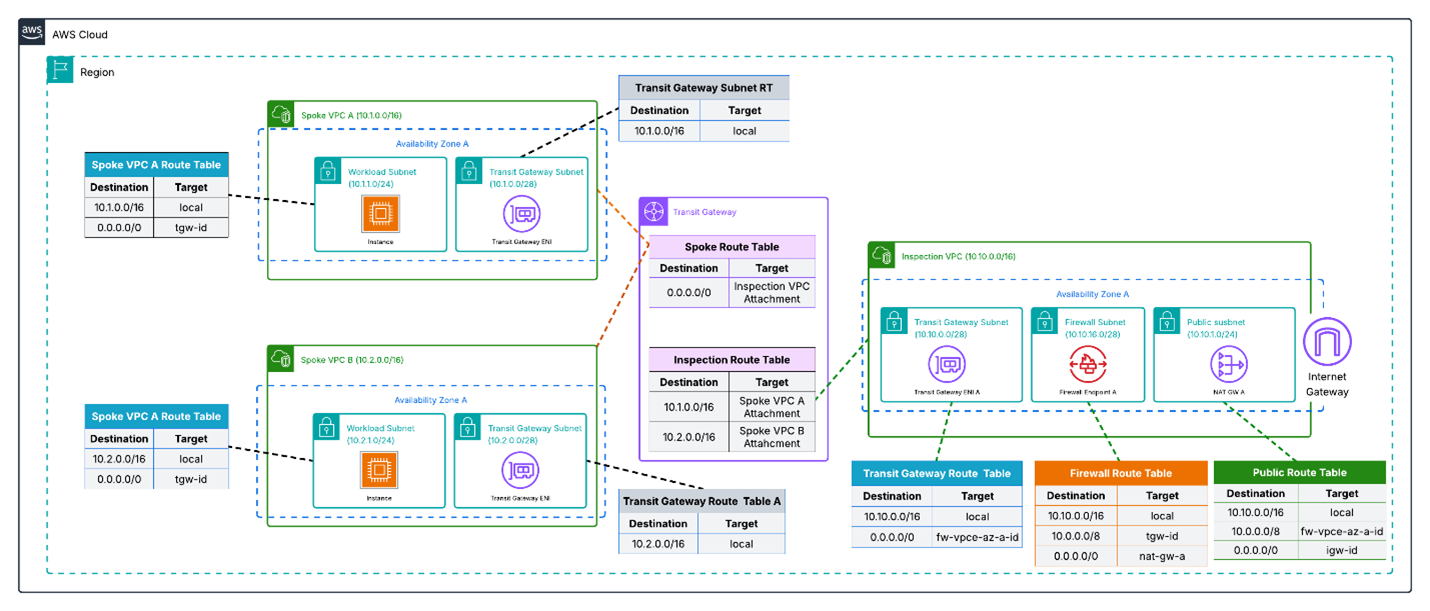
Figure 1: Network Firewall centralized architecture, single Availability Zone deployment
Solution deployment
To analyze Network Firewall logs in OpenSearch Service, you first need to create an OpenSearch integration.
To create an OpenSearch Service integration:
- Open the Amazon CloudWatch console.
- Choose Settings in the navigation pane.
- Choose the Logs tab.
- Scroll down to find OpenSearch integration and choose Create integration.
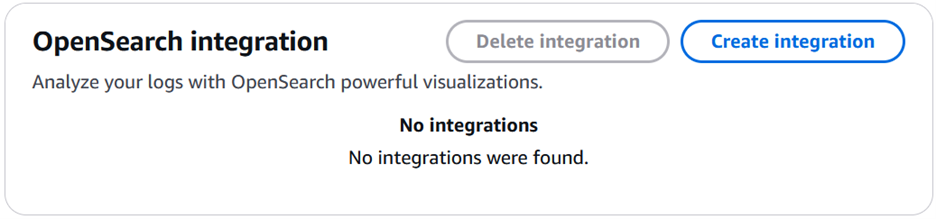
Figure 2: Create an OpenSearch integration
- There are three items to be configured under OpenSearch collection:
- Enter a name for Integration name. For example,
CW-AOS-Integration01. - KMS key ARN – optional is optional. If you leave that empty, your data will be encrypted by default with a key that AWS owns and manages. You also have an option to create and use an AWS Key Management Service (AWS KMS) key.
- For Data retention, select a number between 1 and 30 depending on your retention policy. For example, select 10 to retain logs for 10 days.
- Enter a name for Integration name. For example,
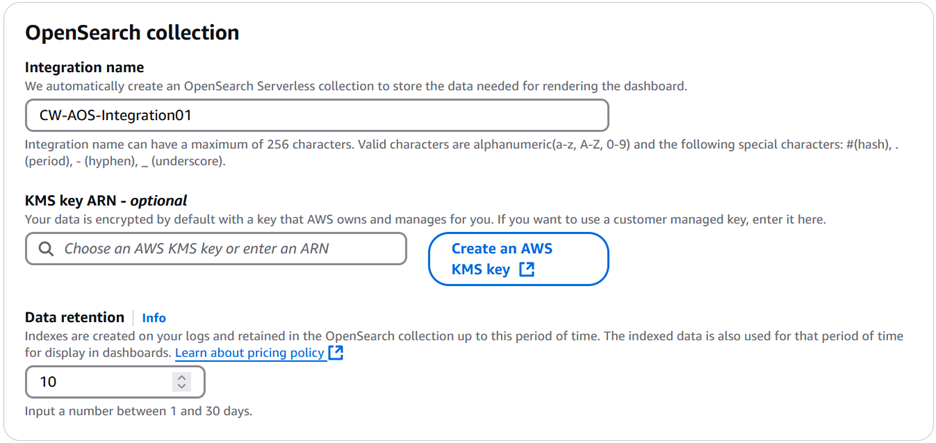
Figure 3: Configure an OpenSearch collection
- Next, you need to configure AWS Identity and Access Management (IAM) permissions.
- For the IAM role for writing to OpenSearch collection, you can either create a new role or use an existing role. If you choose Create new role, then you need to provide an IAM role name. For example,
CWLogQueryOS. This role must have permissions to read from all log groups in the account. See Permissions that the integration needs for an example of the permission that the integration needs. - IAM roles and users who can view dashboards defines who can view the dashboards. Select either:
- Allow all roles and users in this account to view dashboards.
- Specify roles and users who can view dashboards. By choosing Specify roles…, you can select the IAM roles and users who can view the dashboard.
- Choose Confirm integration setup to create the integration. It might take 1–5 minutes for the integration to be created.
- For the IAM role for writing to OpenSearch collection, you can either create a new role or use an existing role. If you choose Create new role, then you need to provide an IAM role name. For example,
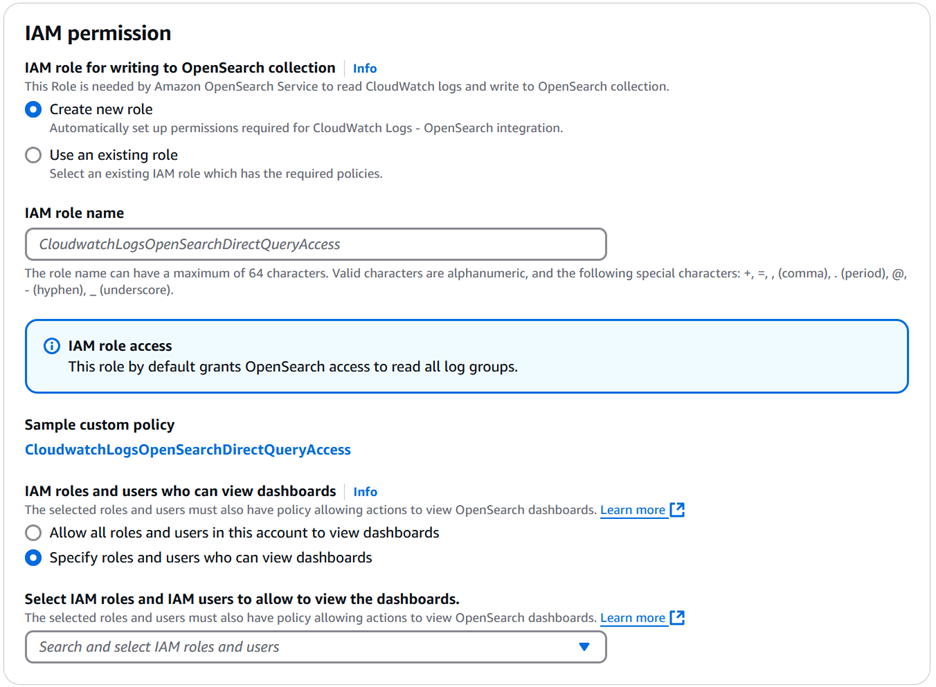
Figure 4: Configure IAM permissions
After you receive notification of successful creation of the OpenSearch integration, you can create an OpenSearch dashboard.
To create an OpenSearch dashboard:
- Navigate to Amazon CloudWatch console and choose Logs insights in the navigation pane.
- In Logs Insights, choose the Analyze with OpenSearch tab.
- Choose Create dashboard.
- Under Select dashboard type, select AWS Network Firewall.
- Enter a name for the dashboard, such as
InspectionFirewall.
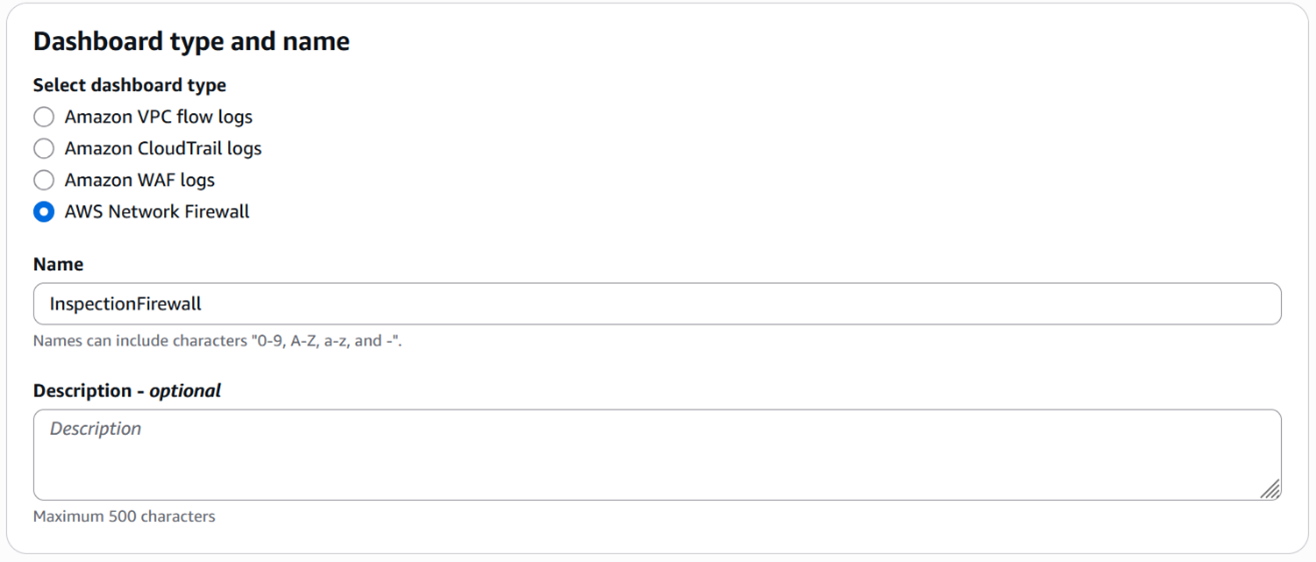
Figure 5: Select the dashboard type and enter a name
- Under Dashboard data configuration, select Every 5 minutes.
- Under Select log groups, select Inspection-nwfw-alert-logs and Inspection-nwfw-flow-logs.
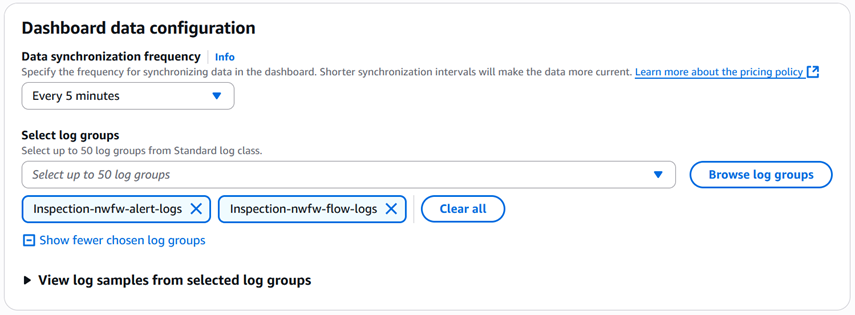
Figure 6: Select data synchronization frequency and log groups
- Choose Create dashboard. If you have multiple firewalls in your environment, repeat steps 1–8 to create a dashboard for each Firewall.
- Choose Select a dashboard and select and select a dashboard to view.
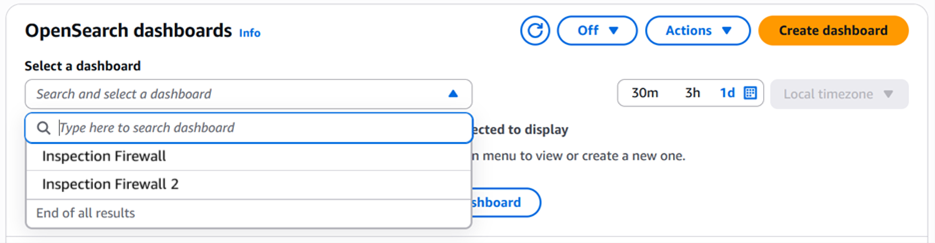
Figure 7: View a list of existing firewalls in OpenSearch dashboards
Dashboard overview
Your new OpenSearch dashboard, similar to Figure 8, provides you with visual insight into some of your firewall events such as:
- Top talkers
- Top protocols
- Alert log analysis
- Firewall engines
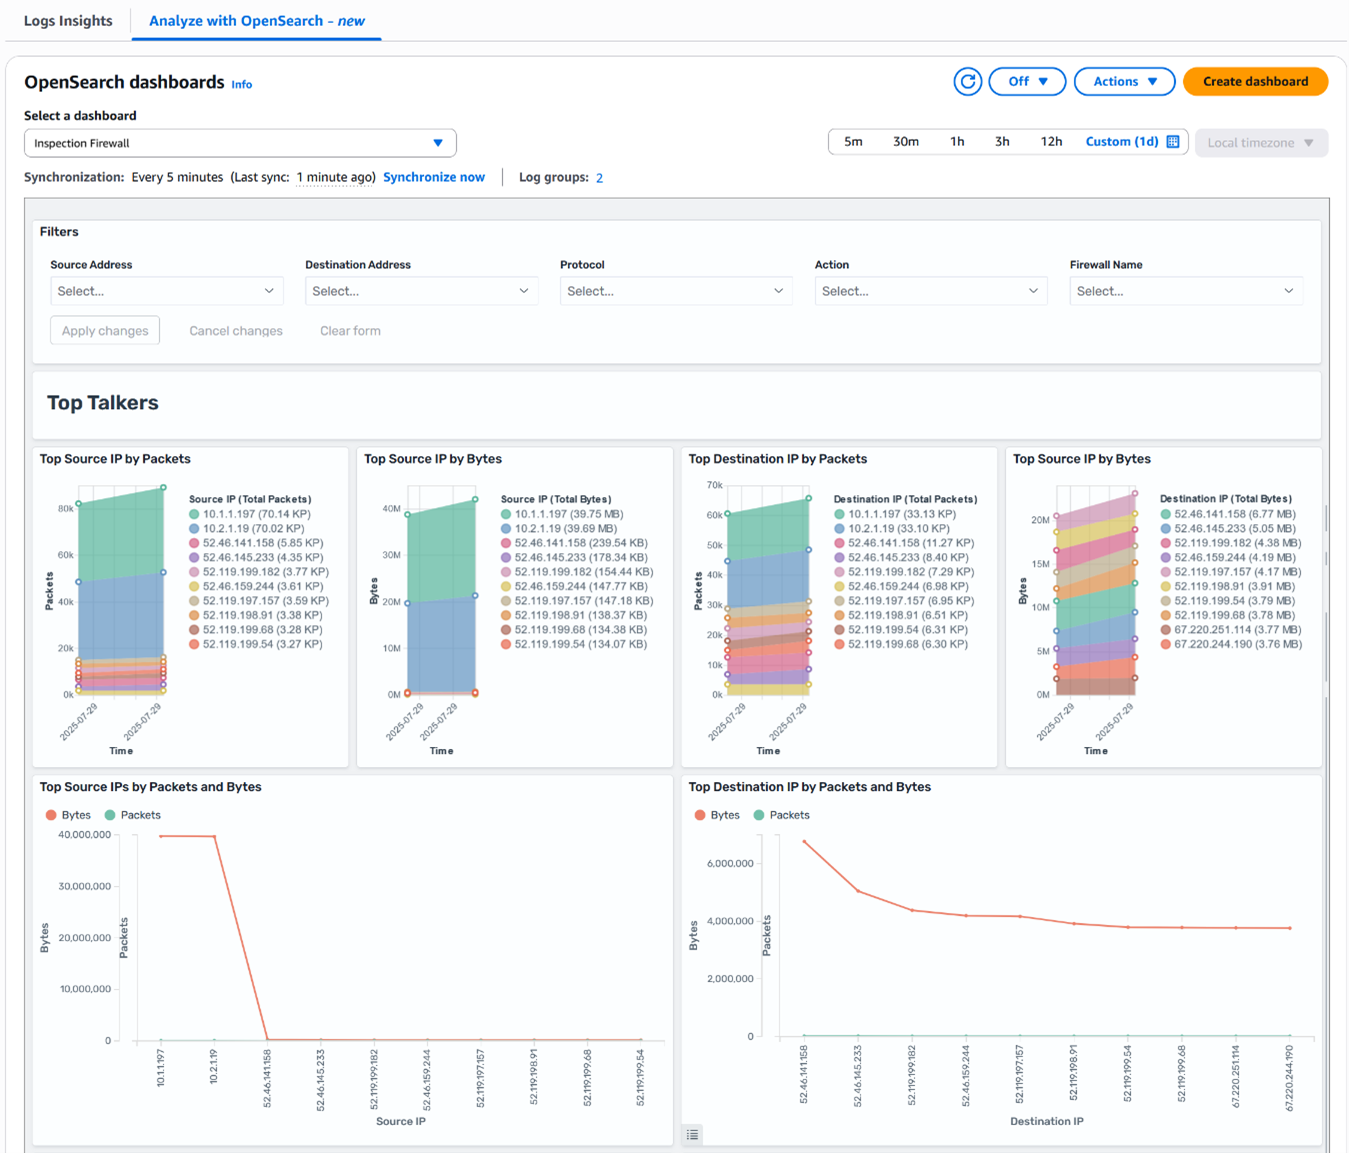
Figure 8: Network Firewall OpenSearch dashboard
As shown in Figure 9, you can refine your analysis to focus on a specific traffic pattern or security event by using the filters at the top of the dashboard to focus on traffic based on:
- Source or destination addresses
- Protocols
- Actions
- Firewall names
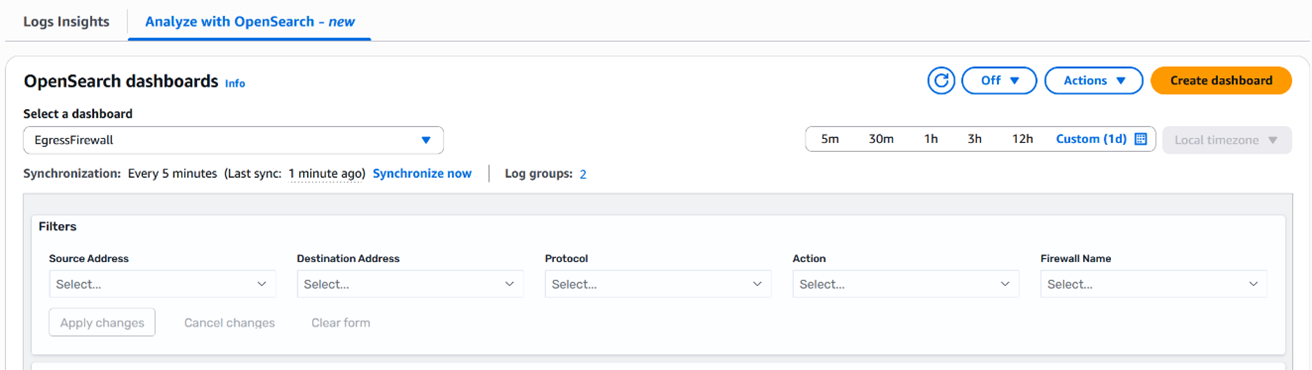
Figure 9: Network Firewall OpenSearch dashboard filters
To dive deep into a widget:
- Hover your cursor over a widget in the dashboard to reveal the options menu icon (…) in the top right corner of the widget.
- Choose the options menu icon (…) to maximize the widget or open the Inspect view, as shown in Figure 10.
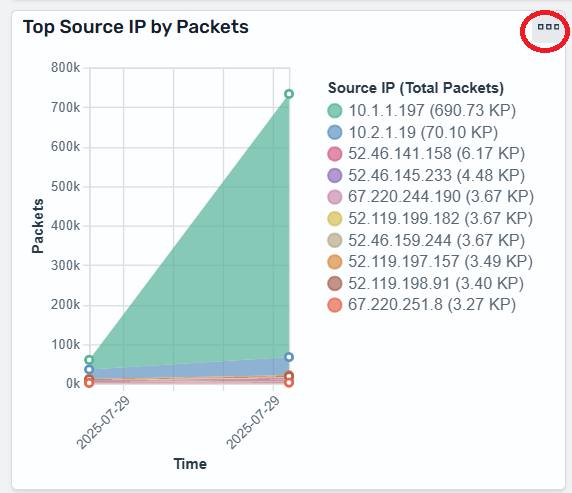
Figure 10: Top Source IP by Packets widget showing the options menu icon (…)
Figure 11 shows the Inspect window for the Top Source IP by Packets widget. In this window, you can get information by selecting Statistics, Request, or Response.
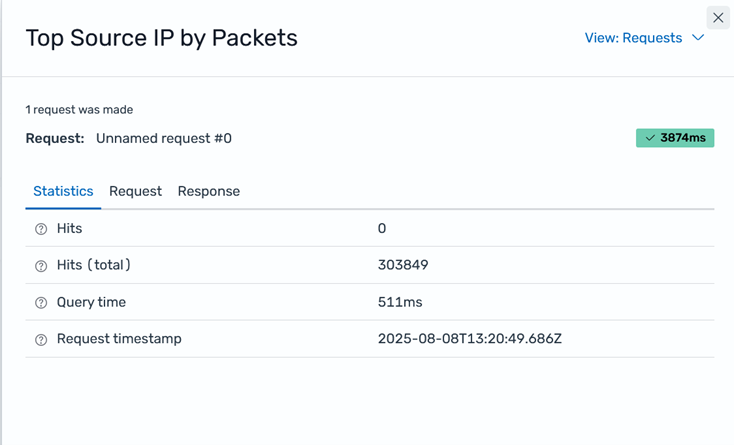
Figure 11: Inspect window for Top Source IP by Packets widget
This window might look different depending on the widget you choose. Some widget options menus provide more information than others and include an option to download the information in CSV format. For example, you can use the Top Source IPs by Packets and Bytes widget to view data and download it in CSV format, as shown in Figure 12.
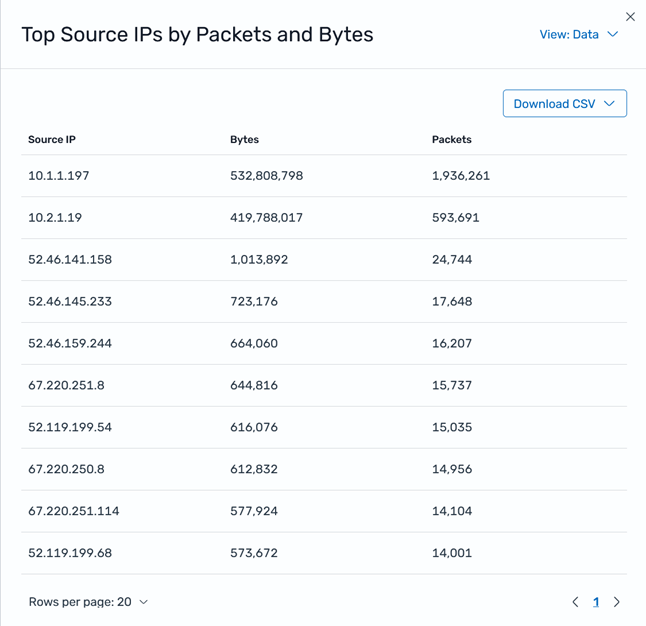
Figure 12: Inspect window for Top Source IPs by Packets and Bytes widget
When using the Top Source IPs by Packets and Bytes, you can use the View menu to switch the view from Data to Requests to access more information, as shown in Figure 13.
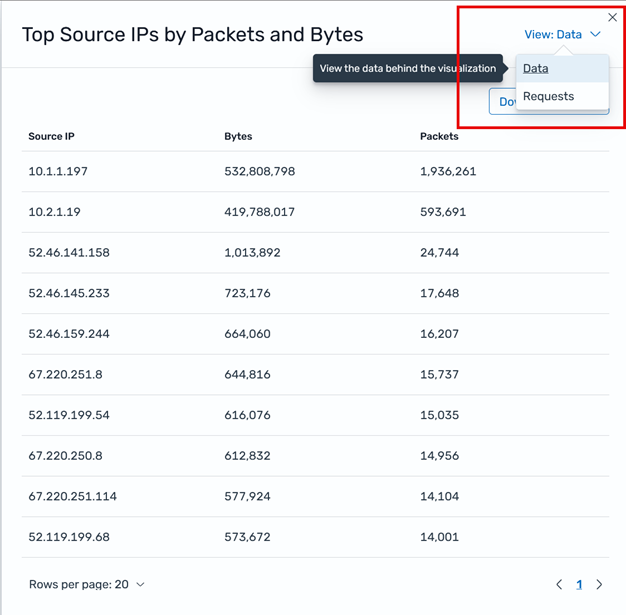
Figure 13: Switch the Inspect window view for Top Source IPs by Packets and Bytes widgets between Data and Requests
Example use cases
The following are some examples of how you can use the Network Firewall OpenSearch dashboard to facilitate monitoring and troubleshooting:
- Identify unusual traffic patterns:
- Use the Top Source IPs by Packets and Bytes widget
- Look for unexpected spikes or outliers
- Monitor security rule effectiveness:
- Analyze the Alert Log Analysis section
- Track which rules are triggering most frequently
- Troubleshoot connectivity issues:
- Use filters to isolate traffic for specific IP ranges
- Examine flow logs for blocked connections
- Verify compliance:
- Review TLS logs to verify encryption standards
- Use filters to focus on traffic to and from sensitive resources
Cost considerations
You will incur charges for AWS Network Firewall and the OpenSearch services used. For more information, see AWS Network Firewall Pricing and Amazon CloudWatch Pricing.
Conclusion
By building Amazon OpenSearch Service dashboards for AWS Network Firewall logs to transform complex security data into actionable insights, you can monitor and analyze your network security posture more effectively. By combining the robust security features of Network Firewall with the powerful visualization capabilities offered by OpenSearch Service, you gain real-time visibility into network traffic patterns, can quickly identify potential security threats, and streamline your troubleshooting workflows. This solution reduces the mean time to detect security incidents and improves operational efficiency through visual analytics to support data-driven decision making. Whether you’re focusing on threat detection, compliance monitoring, or security optimization, these dashboards can provide the visibility and insights needed to strengthen your overall security posture.
If you have feedback about this post, submit comments in the Comments section below. If you have questions about this post, contact AWS Support.
Accelerate large-scale AI applications with the new Amazon EC2 P6-B300 instances
Post Syndicated from Veliswa Boya original https://aws.amazon.com/blogs/aws/accelerate-large-scale-ai-applications-with-the-new-amazon-ec2-p6-b300-instances/
Today, we’re announcing the general availability of Amazon Elastic Compute Cloud (Amazon EC2) P6-B300 instances, our next-generation GPU platform accelerated by NVIDIA Blackwell Ultra GPUs. These instances deliver 2 times more networking bandwidth, and 1.5 times more GPU memory compared to previous generation instances, creating a balanced platform for large-scale AI applications.
With these improvements, P6-B300 instances are ideal for training and serving large-scale AI models, particularly those employing sophisticated techniques such as Mixture of Experts (MoE) and multimodal processing. For organizations working with trillion-parameter models and requiring distributed training across thousands of GPUs, these instances provide the perfect balance of compute, memory, and networking capabilities.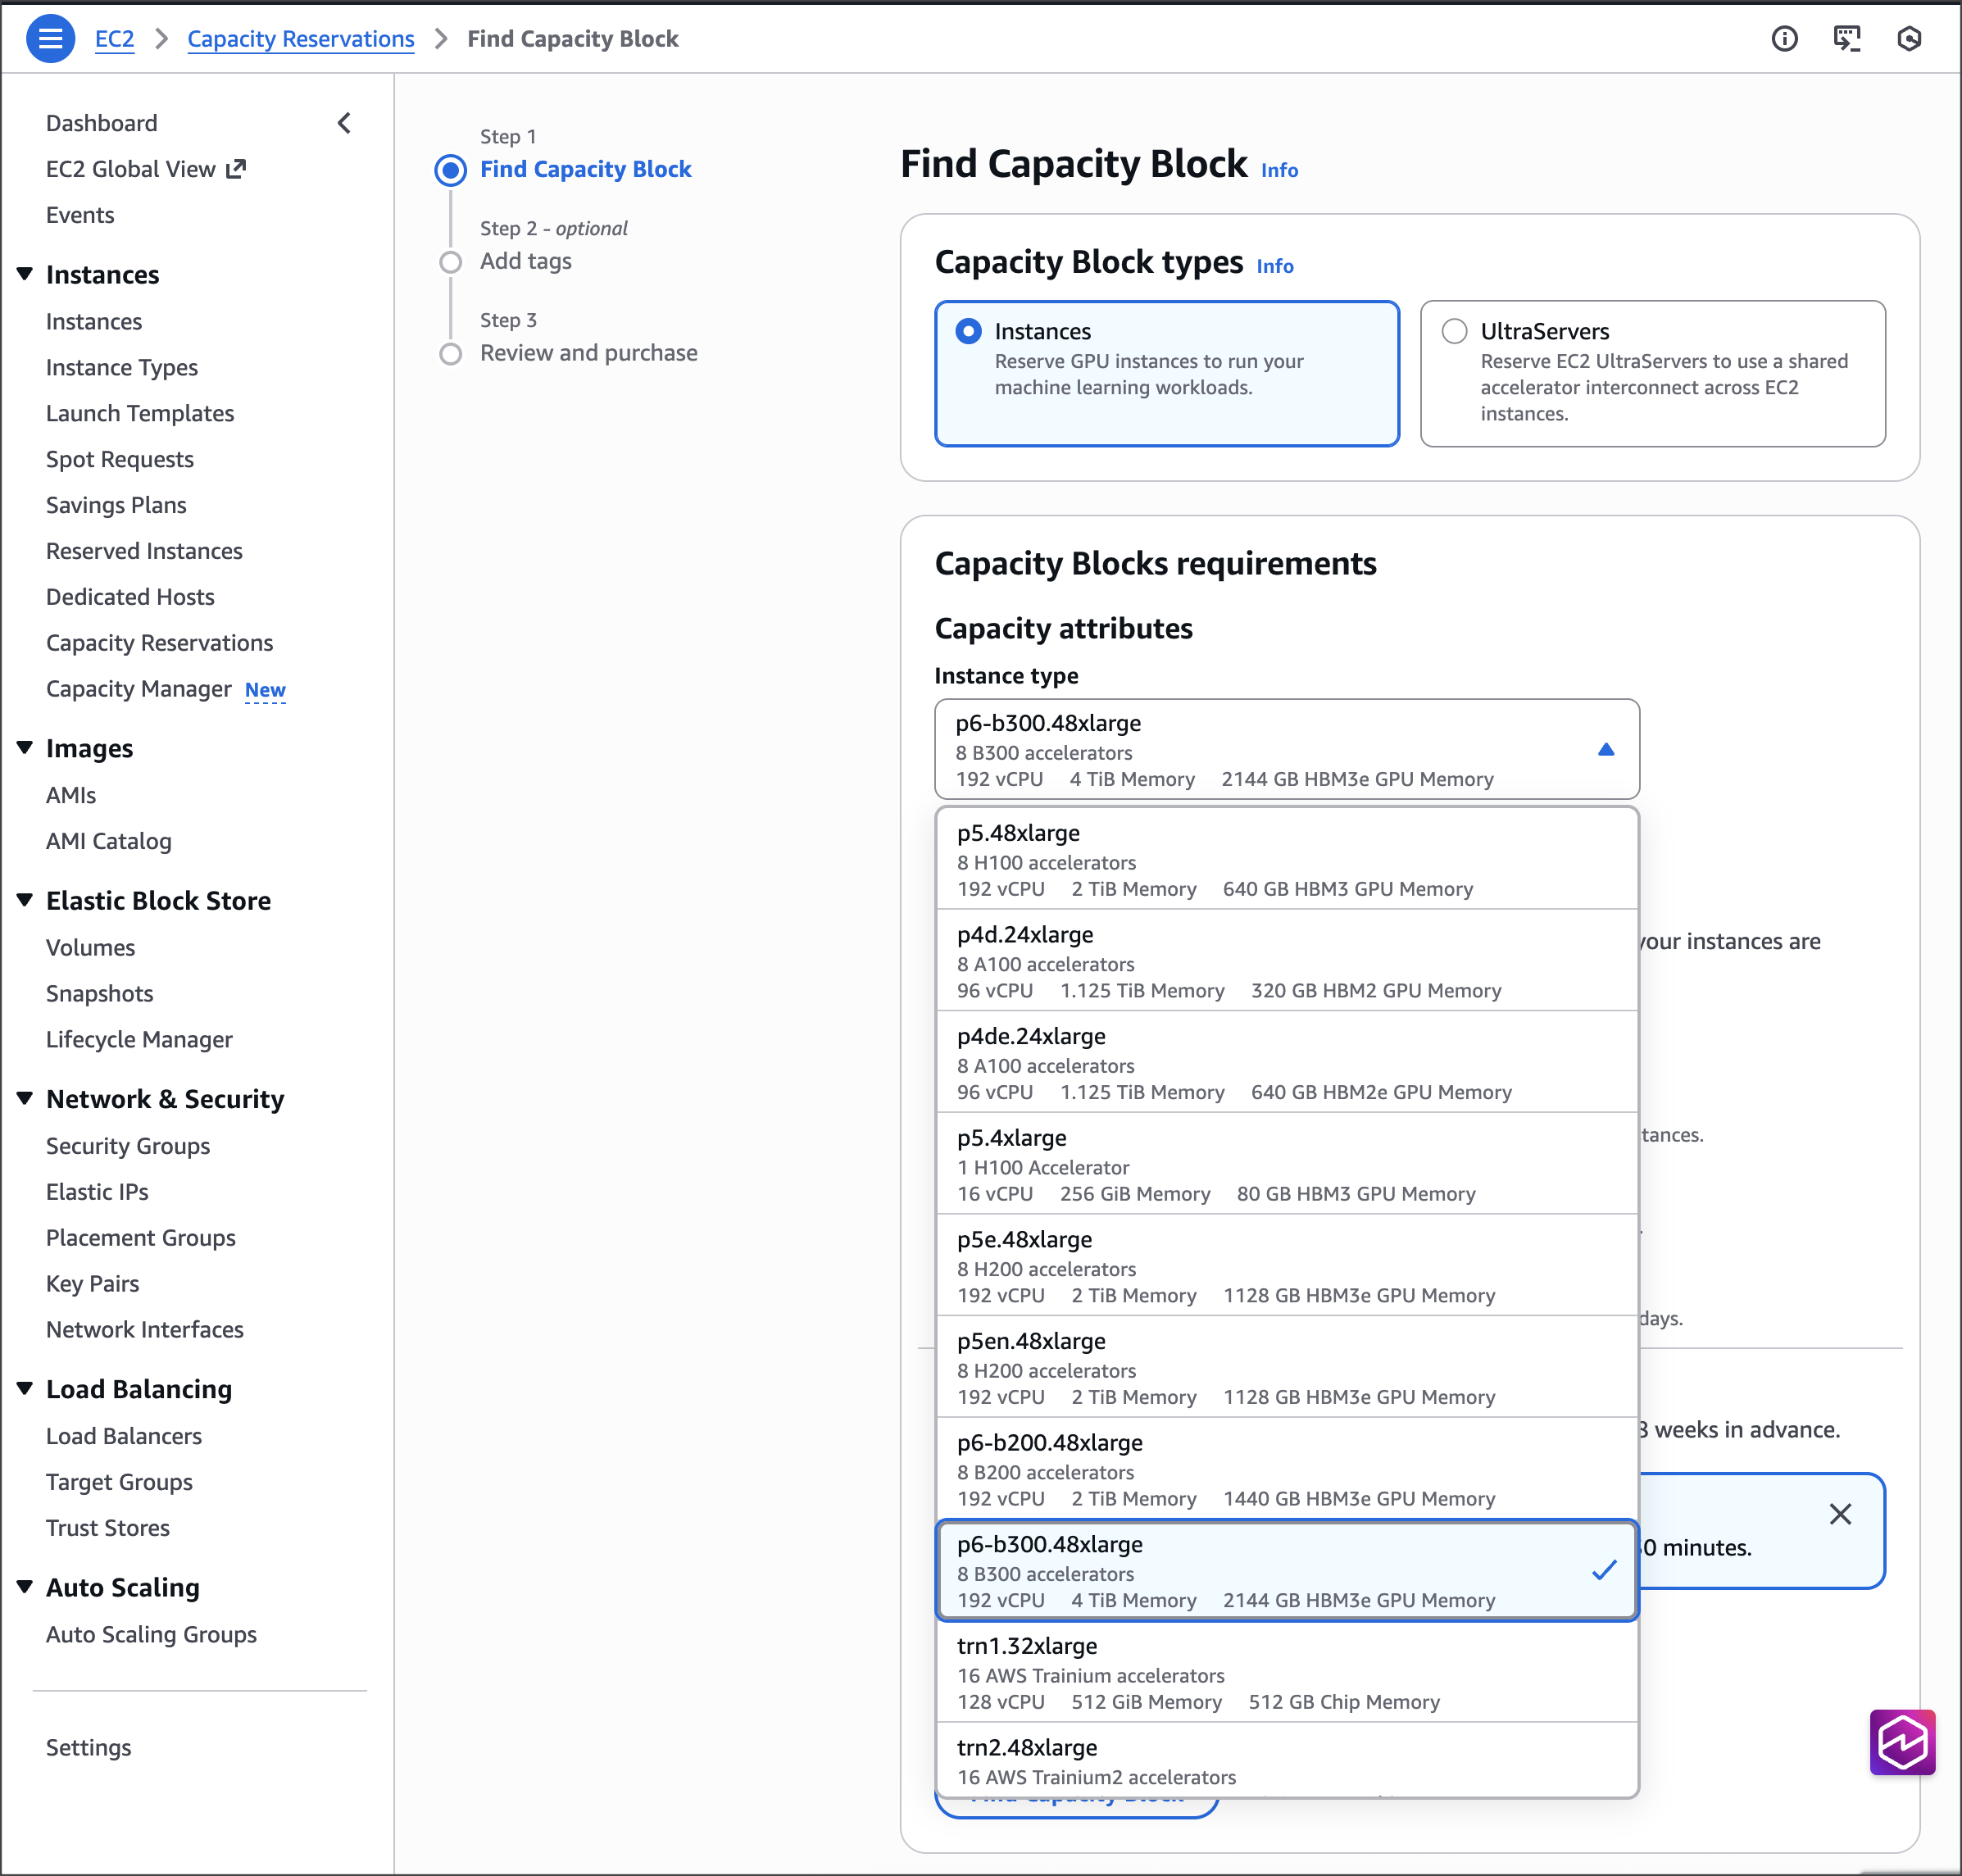
Improvements made compared to predecessors
The P6-B300 instances deliver 6.4Tbps Elastic Fabric Adapter (EFA) networking bandwidth, supporting efficient communication across large GPU clusters. These instances feature 2.1TB of GPU memory, allowing large models to reside within a single NVLink domain, which significantly reduces model sharding and communication overhead. When combined with EFA networking and the advanced virtualization and security capabilities of AWS Nitro System, these instances provide unprecedented speed, scale, and security for AI workloads.
The specs for the EC2 P6-B300 instances are as follows.
| Instance size | VCPUs | System memory | GPUs | GPU memory | GPU-GPU interconnect | EFA network bandwidth | ENA bandwidth | EBS bandwidth | Local storage |
| P6-B300.48xlarge | 192 | 4TB | 8x B300 GPU | 2144GB HBM3e | 1800 GB/s | 6.4 Tbps | 300 Gbps | 100 Gbps | 8x 3.84TB |
Good to know
In terms of persistent storage, AI workloads primarily use a combination of high performance persistent storage options such as Amazon FSx for Lustre, Amazon S3 Express One Zone, and Amazon Elastic Block Store (Amazon EBS), depending on price performance considerations. For illustration, the dedicated 300Gbps Elastic Network Adapter (ENA) networking on P6-B300 enables high-throughput hot storage access with S3 Express One Zone, supporting large-scale training workloads. If you’re using FSx for Lustre, you can now use EFA with GPUDirect Storage (GDS) to achieve up to 1.2Tbps of throughput to the Lustre file system on the P6-B300 instances to quickly load your models.
Available now
The P6-B300 instances are now available through Amazon EC2 Capacity Blocks for ML and Savings Planin the US West (Oregon) AWS Region.
For on-demand reservation of P6-B300 instances, please reach out to your account manager. As usual with Amazon EC2, you pay only for what you use. For more information, refer to Amazon EC2 Pricing. Check out the full collection of accelerated computing instances to help you start migrating your applications.
To learn more, visit our Amazon EC2 P6-B300 instances page. Send feedback to AWS re:Post for EC2 or through your usual AWS Support contacts.
– Veliswa
Python 3.14 runtime now available in AWS Lambda
Post Syndicated from Leandro Cavalcante Damascena original https://aws.amazon.com/blogs/compute/python-3-14-runtime-now-available-in-aws-lambda/
AWS Lambda now supports Python 3.14 as both a managed runtime and container base image. Python is a popular language for building serverless applications. Developers can now take advantage of new features and enhancements when creating serverless applications on Lambda.
You can develop Lambda functions in Python 3.14 using the AWS Management Console, AWS Command Line Interface (AWS CLI), AWS SDK for Python (Boto3), AWS Serverless Application Model (AWS SAM), AWS Cloud Development Kit (AWS CDK), and other infrastructure as code tools.
The Python 3.14 runtime supports Powertools for AWS Lambda (Python), a developer toolkit that helps you to implement serverless best practices. Powertools includes observability, batch processing, AWS Systems Manager Parameter Store integration, idempotency, feature flags, Amazon CloudWatch metrics, structured logging, and more.
Lambda@Edge allows you to use Python 3.14 to customize low-latency content delivered through Amazon CloudFront.
This blog post highlights notable Python language updates, Python Lambda runtime features and support, and how you can use the new Python 3.14 runtime in your serverless applications.
New Python features
Python 3.14 contains the following notable updates.
Template strings literal
Template strings introduce a new mechanism for custom string processing using the t prefix instead of f for f-strings. Unlike f-strings that return a simple string, t-strings return an object representing both static and interpolated parts.
Evaluation of type annotations
With the implementation of PEP 649, Python 3.14 defers type annotation evaluation until required. This reduces import time overhead and resolves forward reference issues.
Improved Error Messages
The interpreter now provides helpful suggestions when it detects typos in Python keywords. These include incorrect control flow structures, misused conditional expressions, string syntax errors, incompatible type usage in dicts/sets, and context manager protocol mismatches.
Standard library
The standard library includes a new compression.zstd module that provides native support for zstandard compression, offering better compression ratios and faster decompression compared to existing algorithms.
Python 3.14 also includes improved error messages and enhanced asyncio introspection capabilities.
Lambda runtime changes
The Lambda Python runtime contains the following changes.
Python 3.14 features that are not available
Python 3.14 includes some features that are not enabled for the Lambda managed runtime or base images. These features must be enabled when the Python runtime is compiled and cannot be enabled via an execution-time flag. The just-in-time (JIT) compiler is not available in the Lambda runtime because it’s still in an experimental phase. Free-threaded mode, running Python without the global interpreter lock, is supported in Python 3.14, but it is not enabled in the Lambda runtime due to potential performance impact. To use these features in Lambda, you can deploy your own Python runtime build with these features enabled, using a container image or custom runtime.
Amazon Linux 2023
As with the Python 3.12 and Python 3.13 runtimes, the Python 3.14 runtime is based on the provided.al2023 runtime, which is based on the Amazon Linux 2023 minimal container image. The Amazon Linux 2023 minimal image uses microdnf as a package manager, symlinked as dnf. This replaces the yum package manager used in Python 3.11 and earlier AL2-based images. If you deploy your Lambda functions as container images, you must update your Dockerfiles to use dnf instead of yum when upgrading to the Python 3.14 base image from Python 3.11 or earlier base images.
Learn more about the provided.al2023 runtime in the blog post Introducing the Amazon Linux 2023 runtime for AWS Lambda and the Amazon Linux 2023 launch blog post.
Using Python 3.14 in Lambda
You can use Python 3.14 for your Lambda functions in the AWS Management Console, an AWS Lambda container image, or the AWS Cloud Development Kit (AWS CDK).
AWS Management Console
To use the Python 3.14 runtime to develop your Lambda functions, specify a runtime parameter value of Python 3.14 when creating or updating a function. On the Create Function page of the AWS Lambda console, Python 3.14 is available in the Runtime dropdown menu.
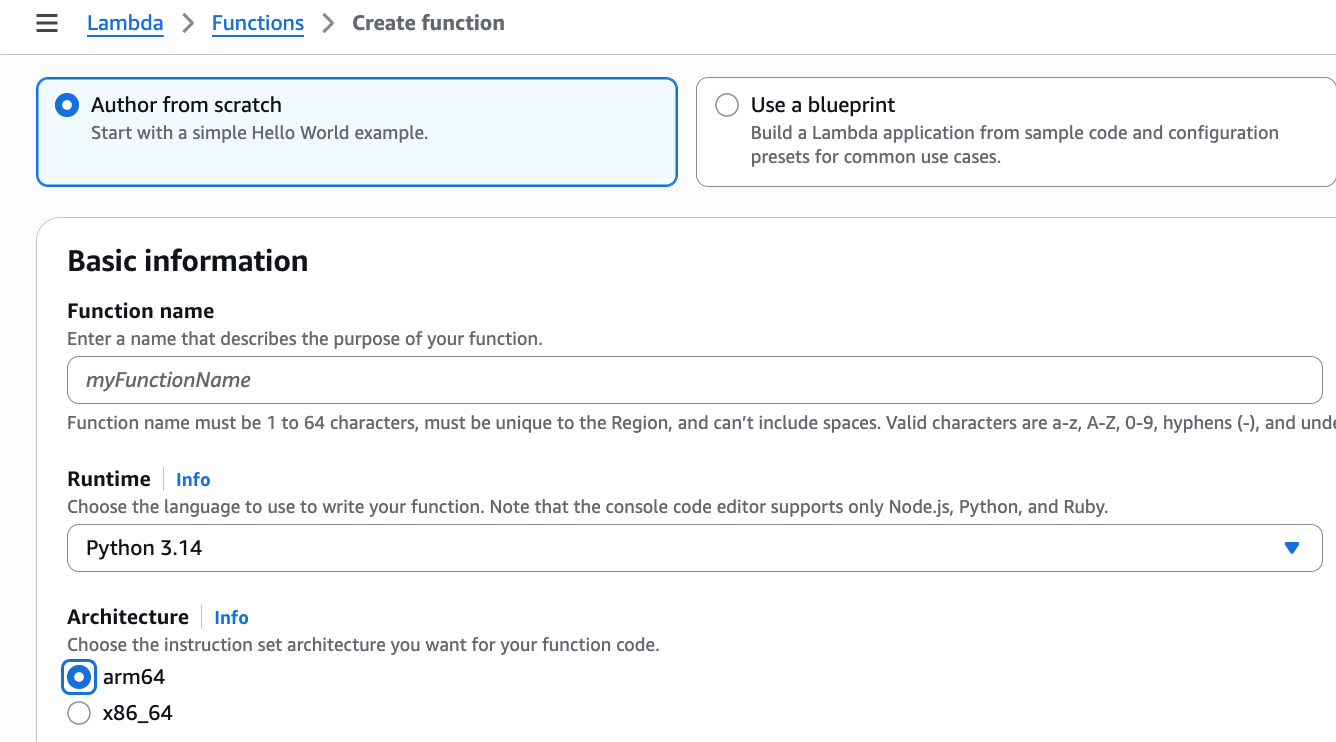
To update an existing Lambda function to Python 3.14, navigate to the function in the Lambda console and choose Edit in the Runtime settings panel. The new version of Python is available in the Runtime dropdown menu.
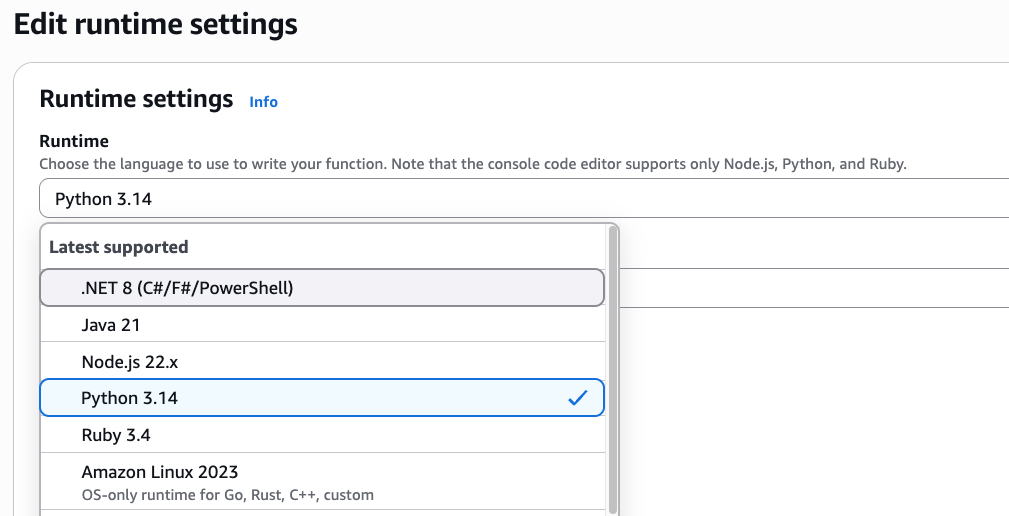
Upgrading a function to Python 3.14
To upgrade a function to Python 3.14, check your code and dependencies for compatibility with Python 3.14, run tests, and update as necessary. Consider using generative AI coding assistants like Amazon Q Developer, Amazon Q Developer for CLI, or Kiro to help with upgrades.
AWS Lambda container image
Change the Python base image version by modifying the FROM statement in your Dockerfile:
AWS Serverless Application Model (AWS SAM)
In AWS SAM set the Runtime attribute to python3.14 to use this version.
AWS SAM supports generating this template with Python 3.14 for new serverless applications using the sam init command. Refer to the AWS SAM documentation.
AWS Cloud Development Kit
In the AWS CDK, set the runtime attribute to lambda.Runtime.PYTHON_3_14 to use this version.
In Python CDK:
In TypeScript CDK:
Serverless Land Patterns AWS Top Picks for Python, now use Python 3.14.
Performance considerations
At launch, new Lambda runtimes receive less usage than existing established runtimes. This can result in longer cold start times due to reduced cache residency within internal Lambda sub-systems. Cold start times typically improve in the weeks following launch as usage increases. As a result, AWS recommends not drawing conclusions from side-by-side performance comparisons with other Lambda runtimes until the performance has stabilized. Since performance is highly dependent on workload, customers with performance-sensitive workloads should conduct their own testing instead of relying on generic test benchmarks.
Conclusion
Lambda now supports Python 3.14 as a managed language runtime to help developers build more efficient, powerful, and scalable serverless applications. Python 3.14 language additions include data model improvements, typing changes, and updates to the standard library. The Lambda managed runtime does not include the option to disable the global interpreter lock (GIL) or use the experimental JIT compiler.
You can build and deploy functions using Python 3.14 using the AWS Management Console, AWS CLI, AWS SDK, AWS SAM, AWS CDK, or your choice of infrastructure as code tool. You can also use the Python 3.14 container base image if you prefer to build and deploy your functions using container images.
Try the Python 3.14 runtime in Lambda today and experience the benefits of this updated language version.
To find more Python examples, use the Serverless Patterns Collection. For more serverless learning resources, visit Serverless Land.
Blender 5.0 released
Post Syndicated from jzb original https://lwn.net/Articles/1046962/
Version
5.0 of the Blender animation system has been released. Notable
improvements include improved color management, HDR capabilities, and
a new storyboarding template. See the release
notes for a lengthy list of new features and changes, and the bugfixes
page for the 588 commits that fixed bugs in Blender 4.5 or older.
HPE Shows off AMD EPYC Venice and SP7 Supercomputing Node at SC25
Post Syndicated from Cliff Robinson original https://www.servethehome.com/hpe-shows-off-amd-epyc-venice-and-sp7-supercomputing-node-at-sc25/
HPE showed off its next-generation AMD EPYC “Venice” socket SP7 supercomputing platform at SC25 along with its Slingshot 400 interconnect
The post HPE Shows off AMD EPYC Venice and SP7 Supercomputing Node at SC25 appeared first on ServeTheHome.
Shielded vs Unshielded Ethernet – Stop Wasting Money on the Wrong Cable
Post Syndicated from Crosstalk Solutions original https://www.youtube.com/shorts/2Cr9DbzTlNI
Public Media #lastweektonight
Post Syndicated from LastWeekTonight original https://www.youtube.com/shorts/7hkuCkya9IQ
How to automate Session Manager preferences across your organization
Post Syndicated from Nima Fotouhi original https://aws.amazon.com/blogs/security/how-to-automate-session-manager-preferences-across-your-organization/
AWS Systems Manager Session Manager is a fully managed service that provides secure, interactive, one-click access to your Amazon Elastic Compute Cloud (Amazon EC2) instances, edge devices, and virtual machines (VMs) through a browser-based shell or AWS Command Line Interface (AWS CLI), without requiring open inbound ports, bastion hosts, or SSH keys. Session Manager helps you maintain security compliance and controlled access while providing users with access to managed nodes. When starting a session, you must specify a preferences document (known as the Session Manager preferences document) to set the session parameters.
While providing users with access to managed nodes, managing these preferences consistently across multiple AWS Regions and accounts in a large organization can be challenging. Organizations often need to maintain standardized security settings, logging configurations, and session controls across their entire AWS footprint. Manual configuration of these preferences in each Region and account is not only time-consuming but also prone to human error and can lead to security gaps or compliance violations. Additionally, tracking and maintaining these configurations becomes increasingly complex as the organization scales.
You can use Session Manager to control various session options including data encryption for session data in transit and session logs at rest, session duration, and logging. For example, you can specify whether to store session log data in an Amazon Simple Storage Service (Amazon S3) bucket or Amazon CloudWatch Logs log group. In this post, I demonstrate how to manage Session Manager preferences across your organization using AWS CloudFormation StackSets. You can use CloudFormation StackSets to manage resources and configurations, such as Session Manager preferences, across different AWS accounts and Regions using standardized templates to maintain consistent security and compliance standards across your entire AWS infrastructure.
Prerequisites
You need to meet the following prerequisites to deploy the solution in this post:
- Basic understanding of CloudFormation
- Trusted access enabled between CloudFormation StackSets and AWS Organizations
- Access to an AWS management account or StackSet delegated admin account
- Appropriate AWS Identity and Access Management (IAM) permissions to create and manage StackSets
The Session Manager environment has some additional prerequisites:
- For EC2 instances with internet access, allow HTTPS (port 443) outbound traffic to:
ec2messages.<region>.amazonaws.comssm.<region>.amazonaws.comssmmessages.<region>.amazonaws.com
Note:
<region>represents the actual Region where you are deploying your instances. - Additional endpoints required for specific features:
- For CloudWatch Logs integration:
logs.<region>.amazonaws.com - For Amazon S3 log storage:
s3.<region>.amazonaws.com - For session data encryption:
kms.<region>.amazonaws.com
Note: For EC2 instances without internet access, you must configure virtual private cloud (VPC) endpoints to maintain connectivity with Systems Manager and related services.
- For CloudWatch Logs integration:
- SSM Agent requirements:
- Minimum version 2.3.68.0 for basic session connectivity
- Version 3.0.222.0 or later for port forwarding and SSH sessions
Note: Many AWS-provided and trusted third-party Amazon Machine Images (AMIs) come with the SSM Agent pre-installed. For more information, see Find AMIs with the SSM Agent preinstalled.
For a complete list of requirements, see Setting up Session Manager.
Solution overview
This solution, shown in Figure 1, automatically configures the SSM-SessionManagerRunShell document with customizable preferences that govern how Session Manager behaves across your AWS accounts. It creates resources for logging, encryption, and session controls, and updates the SSM-SessionManagerRunShell document with these preferences. The document is updated by an AWS Lambda function that helps make sure that the preferences are correctly applied. It transforms the default Session Manager preferences document to meet your enterprise compliance requirements. Changes are deployed using CloudFormation template provided in the GitHub repository. The solution supports multiple logging destinations, encryption options, and session controls to meet various security and compliance requirements.
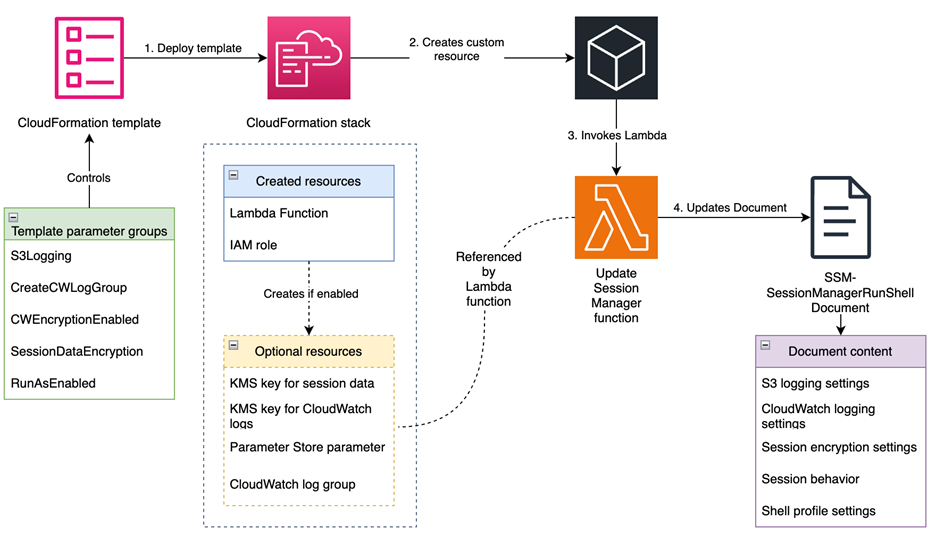
Figure 1: Solution overview
Walkthrough
To deploy the solution, complete the following steps.
Step 1: Download or clone the repository
The first step is to download or clone the GitHub repository.
To download the repository:
- Go to the main page of the repository on GitHub.
- Choose Code and then choose Download ZIP.
To clone the repository:
- Make sure that you have Git installed.
- Run the following command in your terminal:
git clone https://github.com/aws-samples/<repo-link>
Step 2: Create the CloudFormation StackSet
In this step, you deploy the solution’s resources by creating a CloudFormation StackSet using the provided CloudFormation template. Sign in to your management account or StackSet delegated admin account. To create the stack, follow the steps in Get started with StackSets using a sample template. Create the StackSet in each of the accounts and Regions where you plan to implement the solution. Note that you need to provide values for the parameters defined in the template to deploy the stack. The following table lists the parameters that you need to provide.
|
Parameter |
Description |
|
|
Enables storing session logs to an S3 bucket. |
|
|
Name of the S3 bucket for session logs. The bucket must exist or the deployment will fail. |
|
|
Key prefix for session logs, will be appended by account ID and Region |
|
|
If set to |
|
|
Creates the CloudWatch log group. If set to |
|
|
The name of the CloudWatch log group you want to send session logs to. |
|
|
If set to |
|
|
If set to |
|
|
If set to |
|
|
If set to |
|
|
The name of the user account to start sessions with on Linux and macOS managed nodes when the |
|
|
The amount of time of inactivity you want to allow before a session ends. This input is measured in minutes. |
|
|
The maximum amount of time you want to allow before a session ends. This input is measured in minutes. |
|
|
The shell preferences, environment variables, working directories, and commands you specify for sessions on Windows Server managed nodes. |
|
|
The shell preferences, environment variables, working directories, and commands you specify for sessions on Linux and macOS managed nodes. |
Step 3: Update your EC2 instance profiles with proper permissions
Depending on the parameter values you pass when deploying the template, you need to update your EC2 instance profiles with proper permissions. For example, if you have enabled session data and session log encryption, you need to add the following policy to your instance profiles.
Note: If you enable S3 logging, you need to add the required permissions for that as well. See Configure a central S3 bucket for Session Manager logging article on AWS re:Post for more information about how to properly configure your S3 bucket and EC2 instance profile for centralized logging. Same-account logging follows a similar pattern.
Step 4: Verify the solution implementation
You can verify that the Session Manager preferences are correctly configured across your environment. Here’s a systematic approach to validation:
Verify preference configuration
Through the AWS Management Console, navigate to AWS Systems Manager Session Manager, choose Preferences and review the configured Session Manager preferences. Alternatively, verify the configuration through AWS CLI using:
aws ssm get-document --name "SSM-SessionManagerRunShell" --document-version \$LATEST
Validate session functionality
Start a new session following the AWS Systems Manager User Guide and perform the following validations:
- Verify the encryption configuration by starting a new session. If session data encryption is enabled, you should see the message This session is encrypted using AWS KMS when the session begins.
- For CloudWatch logging verification, navigate to the CloudWatch console and access the Log groups section. Confirm that your specified log group exists and KMS encryption is enabled if you configured it during deployment. Execute some commands in your session and observe the real-time log streaming to your configured log group.
- To verify S3 logging, establish a session and execute several commands. Terminate the session and check your configured S3 bucket for the session logs. Remember that S3 logs are only generated after the session is terminated.
- If you enabled the
RunAsEnabledoption, verify the configuration by executing thewhoamicommand in your session. The output should match your configuredRunAsuser.
Resources
The following is a list of resources created by this solution:
AWS::Lambda::Function (UpdateSessionManagerFunction)
This resource creates a Lambda function that:
- Updates the
SSM-SessionManagerRunShelldocument with the specified preferences - Handles CloudFormation create, update, and delete events
- Performs deep comparison of document contents to avoid unnecessary updates
- Includes error handling and retry logic
AWS::IAM::Role (LambdaExecutionRole)
This resource creates an IAM role that allows the Lambda function to:
- Execute with basic Lambda permissions
- Access and modify the
SSM-SessionManagerRunShelldocument - Access SSM parameters storing session data encryption key ID
AWS::KMS::Key (SessionDataKMSKey)
This conditional resource creates a KMS key for encrypting session data when SessionDataEncryption parameter is set to enabled. The key has a policy allowing key management with IAM.
AWS::KMS::Alias (SessionDataKeyAlias)
This conditional resource creates a friendly alias (alias/session-manager/data) for the session data encryption key. This value cannot be changed.
AWS::SSM::Parameter (SessionKeyID)
This conditional resource creates an Systems Manager parameter to store the KMS key ID for session data encryption, making it accessible to other components.
Note: The session data KMS key ID is stored in a Systems Manager parameter to decouple components and help prevent circular dependency and failures to due race conditions.
AWS::KMS::Key (SessionLogsKMSKey)
This conditional resource creates a KMS key for encrypting CloudWatch logs when CWEncryptionEnabled parameter is set to enabled. The key has a policy allowing CloudWatch Logs service to use it
Note:
SessionLogsKMSKeyis used to encrypt logs at-rest and is not used by the SSM Agent, so your instance profile does not need to have permission to this key. Logs are encrypted in-transit and will be encrypted by CloudWatch service after they are received.
AWS::KMS::Alias (SessionLogsKeyAlias)
This conditional resource creates a friendly alias (alias/session-manager/logs) for the CloudWatch Logs encryption key.
AWS::Logs::LogGroup (SessionManagerLogGroup)
This conditional resource creates a CloudWatch Logs group for session logs when the CreateCWLogGroup paremeter is set to enabled. The log group:
- Uses the specified name (controlled by the
CWLogGroupNameparameter, and defaults tossm-sessionmanager-logs) - Sets a 90-day retention period
- Uses KMS encryption if enabled
Custom::UpdateSessionManager (UpdateSessionManagerCustomResource)
This custom resource invokes the Lambda function to update the SSM-SessionManagerRunShell document with the specified preferences.
Parameter groups
The following template parameters are available for customizing Session Manager behavior:
|
Parameter group |
Parameters |
Description |
|
S3 logging |
|
Controls logging to Amazon S3 |
|
CloudWatch logging |
|
Controls logging to CloudWatch Logs |
|
Encryption |
|
Controls encryption of session data |
|
Session controls |
|
Controls session behavior |
|
Shell profiles |
|
Controls shell environment |
Conclusion
In this post, we explored how to implement and manage Session Manager preferences across your organization using CloudFormation StackSets. This solution enables centralized management of Session Manager configurations across multiple accounts and Regions from a single account, significantly simplifying the administration of remote access to your compute resources. Through automated deployment of security controls including session encryption, logging, and access restrictions, the solution helps facilitate consistent compliance with organizational security requirements while reducing manual configuration efforts and the risk of human error. As your organization grows, this solution scales seamlessly to accommodate new accounts and Regions while maintaining uniform security standards across your infrastructure.
Remember to regularly review and update your Session Manager preferences to align with evolving security requirements and organizational needs. For more information about AWS Systems Manager Session Manager, visit the official AWS documentation.
If you have feedback about this post, submit comments in the Comments section below.