Interesting article on people with nonstandard faces and how facial recognition systems fail for them.
Some of those living with facial differences tell WIRED they have undergone multiple surgeries and experienced stigma for their entire lives, which is now being echoed by the technology they are forced to interact with. They say they haven’t been able to access public services due to facial verification services failing, while others have struggled to access financial services. Social media filters and face-unlocking systems on phones often won’t work, they say.
It’s easy to blame the tech, but the real issue are the engineers who only considered a narrow spectrum of potential faces. That needs to change. But also, we need easy-to-access backup systems when the primary ones fail.
Тя идва от малък южняшки град, където гласът се ражда още в църквата и музиката е едновременно молитва и игра. Първо е пианото, после песента – топла, дълбока, носеща спомен за корените и същевременно търсеща нови посоки. С времето открива, че госпълът и джазът могат да се прегърнат, че блусът има място до тях, че една история може да се разкаже и с шепот, и с крясък, и с тишина. Гласът ѝ е разпознаваем, земен и въздушен едновременно; кара публиката да се чувства не като статичен наблюдател, а като част от разговор. Всеки неин концерт е покана за близост, за споделяне на вътрешни светове, за тиха сила и откровение.
Вече две десетилетия тя е сред най-значимите съвременни американски изпълнители, чиито песни прекосяват жанрове и социални граници, за да дават любов, човечност и близост. В кариерата си е записвала за водещи компании, издавала е албуми, попадали в класациите на Billboard, а песните ѝ са стигали дори до плейлиста на Барак Обама. Паралелно с музиката тя развива и друга страст – кулинарията, като създава пространство в Чикаго, посветено на храната и общността. В последните години основава собствен лейбъл, с който си връща правата върху записите и изгражда нов модел за артистична независимост. С най-новия си албум Shadow отново се връща към темите за любовта, загубата и изцелението, съчетавайки американската традиция с международни музикални влияния. На тазгодишния Plovdiv Jazz Fest Лиз Райт ще има концерт на 8 ноември заедно със своя квартет в Дома на културата „Борис Христов“.
Какво е музикалното наследство от детството Ви – питам най-вече за църковните корени. Кои елементи все още резонират в музиката Ви днес?
Песните винаги са начин да бъдеш в общение. С природата и с хората. Мисля, че именно това научих от времето, прекарано в църквата. Църковната служба, поне в американската църква на чернокожите, е наистина специална, защото хората не само четат Библията и се опитват да разберат как да живеят, но и споделят много. Разговаряме за това, което се случва в живота ни, и се насърчаваме един друг. И така, тази идея да се опитвам винаги да намирам нещо подхранващо и вдъхновяващо в музиката се е пренесла и в мен. Винаги мисля за това как ще се почувстват хората; усещам, че имам мисията да нося радост и сила и да подхранвам. Това е много важна част от мен като артист. И е важно призвание, което съм приела от детските си години в църквата и все още го приемам много сериозно.
Но Вие също сте култивирана и подхранена от много хора и артисти. В албума си Grace сте избрала някои песни, които са Ви дали много – на Рей Чарлз, Нина Симон и други. Какво търсите в тях?
Знаете ли, винаги се опитвам да си спомням. Опитвам се да си спомня радостта и мъдростта на моите предшественици. В тези песни и в начина, по който са изпълнени, има страхотен талант и много мъдрост. Искам също да си спомня и какво е преживявала Америка като страна, когато са били записани тези песни. Винаги се опитвам да си припомня тази сила и тази издръжливост. И наистина гледам да размишлявам, докато ги пея. Питам се какво са преживели, каква смелост са имали тези артисти, за да продължат напред. Каква вяра са имали, за да живея сега в реалността, която имам. Та затова пея техните песни. За да си спомня силата им. Така аз също мога да бъда част от напредъка.
Като артист с дълбоки духовни корени чувствате ли призвание да говорите за социални проблеми и чрез музиката си, или предпочитате по-личен и споделен подход?
Склонна съм да напомням на хората чрез музиката за красотата на нашата обща човечност. Да се позовавам на мъдростта на природата, така че хората да могат да я приложат към това, което става в политиката. Смятам също, че пеенето пред публика е и акт да си пред хората и да си различен от тях. И дали е за шоу или не, да си уязвим и прозрачен е само по себе си акт на кураж, както и политически акт.
Във Вашите песни, почти като в онова зрънце пясък на Уилям Блейк, се вижда музикална вселена. Понякога дори в една песен има джаз, госпъл, блус, фолк музика, но все пак имате ли предпочитан жанр?
Не мисля в жанрове. Отразявам своя опит като човек, като американка, като жена и намирам за съвсем естествено жанровете да се смесват. Мисля за тях не като за културни традиции, а по-скоро като за места, които дават силен принос. Струва ми се, че стилът ми вероятно има доста общо със стила на визуален артист. Реагирам и правя неща, които може да са от различни традиции, медии, стилове, материали, за да изразя онова, което става в ума ми, в сърцето ми. Мисля, че има граница на степента, до която мога да се придържам към рамката и езика на пазара. Ако създаваш изкуство, трябва да позволиш на изкуството да те води, но ако го продаваш, просто правиш всичко възможно, за да го продадеш. Същевременно обаче смятам, че хората, които продават изкуство, не трябва винаги да диктуват как един артист вижда себе си или своето творчество. Моят житейски опит е дълбоко американски, дълбоко свързан с хората, от които съм се учила, които съм обичала и с които съм се сприятелила.
Мислите ли, че в днешното разделено общество музиката може да вдъхновява промяна и обединение?
Мисля, че да. Тя е чудесен начин да покажем уважение и загриженост един за друг. Не е нужно да приемам напълно някой конкретен жанр, за да уверя определени хора, че наистина ме е грижа за тях, че ценя тяхното присъствие. Но понякога, за да покажа съчувствие и уважение, пея – за да разберат, че ги гледам и ги слушам. Например работих с един млад блестящ композитор от най-северната част на Холандия на име Тан Вабенга и той ми разказа история за свой приятел, сириец, преживял много войни, свидетел на бомбардировки и сражения близо до дома си. Човекът даже си разработил специална техника, с която се научил да заспива. И това е вид умствена и духовна практика, която се е развила от суровата необходимост да спи. Историята ме развълнува много. Като потомка на роби аз мислих за историята с месеци. Когато написах песента, в крайна сметка изпях припева на арабски, защото английският ми се струваше твърде беден за емоциите, които изпитвах. Накрая се запознах с този млад мъж, Васим, който е прекрасен. Благодарна съм, че имах шанса да пея на неговия език и за пореден път да си дам сметка, че никога не бих загърбила възможността, която изкуството ни дава, да се свързваме с хората и да споделяме нашата човечност.
Ще се върнете в Пловдив, където бяхте преди шест години… Какво беше Вашето най-силно впечатление от този опит?
Много харесвам българската публика. Усещам някаква гордост, която излъчват хората, и разпознавам тази енергия. Чувствам се много добре в Пловдив. За моя изненада, когато потъна по-дълбоко и пея песни, с които семейството ми или хората в южните щати наистина биха се идентифицирали, получавам много отзиви от български слушатели, че и те усещат свързаност. Това за мен е наистина изненадващо. Много е забавно да наблюдавам на какво реагират хората.
Къде според Вас се крие магията на живото изпълнение?
Мисля, че се крие в чувствата. Толкова е красиво това, което усещаме заедно! Емоциите представляват една много интелигентна част от нас като човешки същества. Невинаги им вярваме, не разчитаме на тях толкова, колкото бихме могли. Но те са чудесен път към разбирането, към истинското осъзнаване. Затова съм много щастлива, че имаме тези възможности да преживяваме концерти на живо. Преди няколко години някой ме попита: „Какво искаш да изпитват хората след твоите концерти?“ И аз казах, че повече от всичко искам просто да се радват, че са живи. Искам да си спомнят за миг, че поезията е жива и че са хора. Ако по някакъв начин почувстват това, ще бъда наистина щастлива.
Кой беше първият албум, който сте си купили?
Помня първия билет за концерт, който си купих, но не и първия албум. Вкъщи имахме плочата Amazing Grace на Арета Франклин. Като дете се взирах във винила толкова много – това е едно от първите ми визуални преживявания с плоча. Тремейн Хокинс също е част от моята същност, тъй като съм роденa по времето на съвременното госпъл движение. Тогава имаше много артисти, които се занимаваха с госпъл музика и можеха да пеят във всеки жанр наистина много добре. Те просто говореха за Бога. Това бяха християнски песни.
А кой беше първият концерт, първият Ви билет?
Баща ми беше много строг, а аз точно преди да вляза в гимназията, си купих билет за концерт на Кърк Франклин. И той, подобно на други съвременни госпъл артисти, беше много популярен и в поп света. Така че за първи път щях да видя група, за която да разкажа на приятелите си в училище.
Смятате ли, че в момента е важно християнството да бъде приобщаващо?
Да, разбира се. Според най-важния пасаж в Светото писание Бог е любов. Със сигурност сме загубили пътя си, ако разпространяваме нещо, което е противоположно на любовта. Християнството трябва винаги да бъде врата, която се отваря лесно и остава отворена, защото, ако някой наистина се интересува от посланието на Христос или от библейските ценности, то любовта трябва да бъде в центъра. Затова винаги усещам кога хората са загубили сигнала – когато любовта не е там.
This is a guest post by Hossein Johari, Lead and Senior Architect at Stifel Financial Corp, Srinivas Kandi and Ahmad Rawashdeh, Senior Architects at Stifel, in partnership with AWS.
Stifel Financial Corp, a diversified financial services holding company is expanding its data landscape that requires an orchestration solution capable of managing increasingly complex data pipeline operations across multiple business domains. Traditional time-based scheduling systems fall short in addressing the dynamic interdependencies between data products, requires event-driven orchestration. Key challenges include coordinating cross-domain dependencies, maintaining data consistency across business units, meeting stringent SLAs, and scaling effectively as data volumes grow. Without a flexible orchestration solution, these issues can lead to delayed business operations and insights, increased operational overhead, and heightened compliance risks due to manual interventions and rigid scheduling mechanisms that cannot adapt to evolving business needs.
In this post, we walk through how Stifel Financial Corp, in collaboration with AWS ProServe, has addressed these challenges by building a modular, event-driven orchestration solution using AWS native services that enables precise triggering of data pipelines based on dependency satisfaction, supporting near real-time responsiveness and cross-domain coordination.
Data platform orchestration
Stifel and AWS technology teams identified several key requirements that would guide their solution architecture to overcome the above listed challenges along with traditional data pipeline orchestration.
Coordinated pipeline execution across multiple data domains based on events
The orchestration solution must support triggering data pipelines across multiple business domains based on events such as data product publication or completion of upstream jobs.
Smart dependency management
The solution should intelligently manage pipeline dependencies across domains and accounts.
It must ensure that downstream pipelines wait for all necessary upstream data products, regardless of which team or AWS account owns them.
Dependency logic should be dynamic and adaptable to changes in data availability.
Business-aligned configuration
A no-code architecture should allow business users and data owners to define pipeline dependencies and triggers using metadata.
All changes to dependency configurations should be version-controlled, traceable, and auditable.
Scalable and flexible architecture
The orchestration solution should support hundreds of pipelines across multiple domains without performance degradation.
It should be easy to onboard new domains, define new dependencies, and integrate with existing data mesh components.
Visibility and monitoring
Business users and data owners should have access showing pipeline status, including success, failure, and progress.
Alerts and notifications should be sent when issues occur, with clear diagnostics to support rapid resolution.
Example Scenario
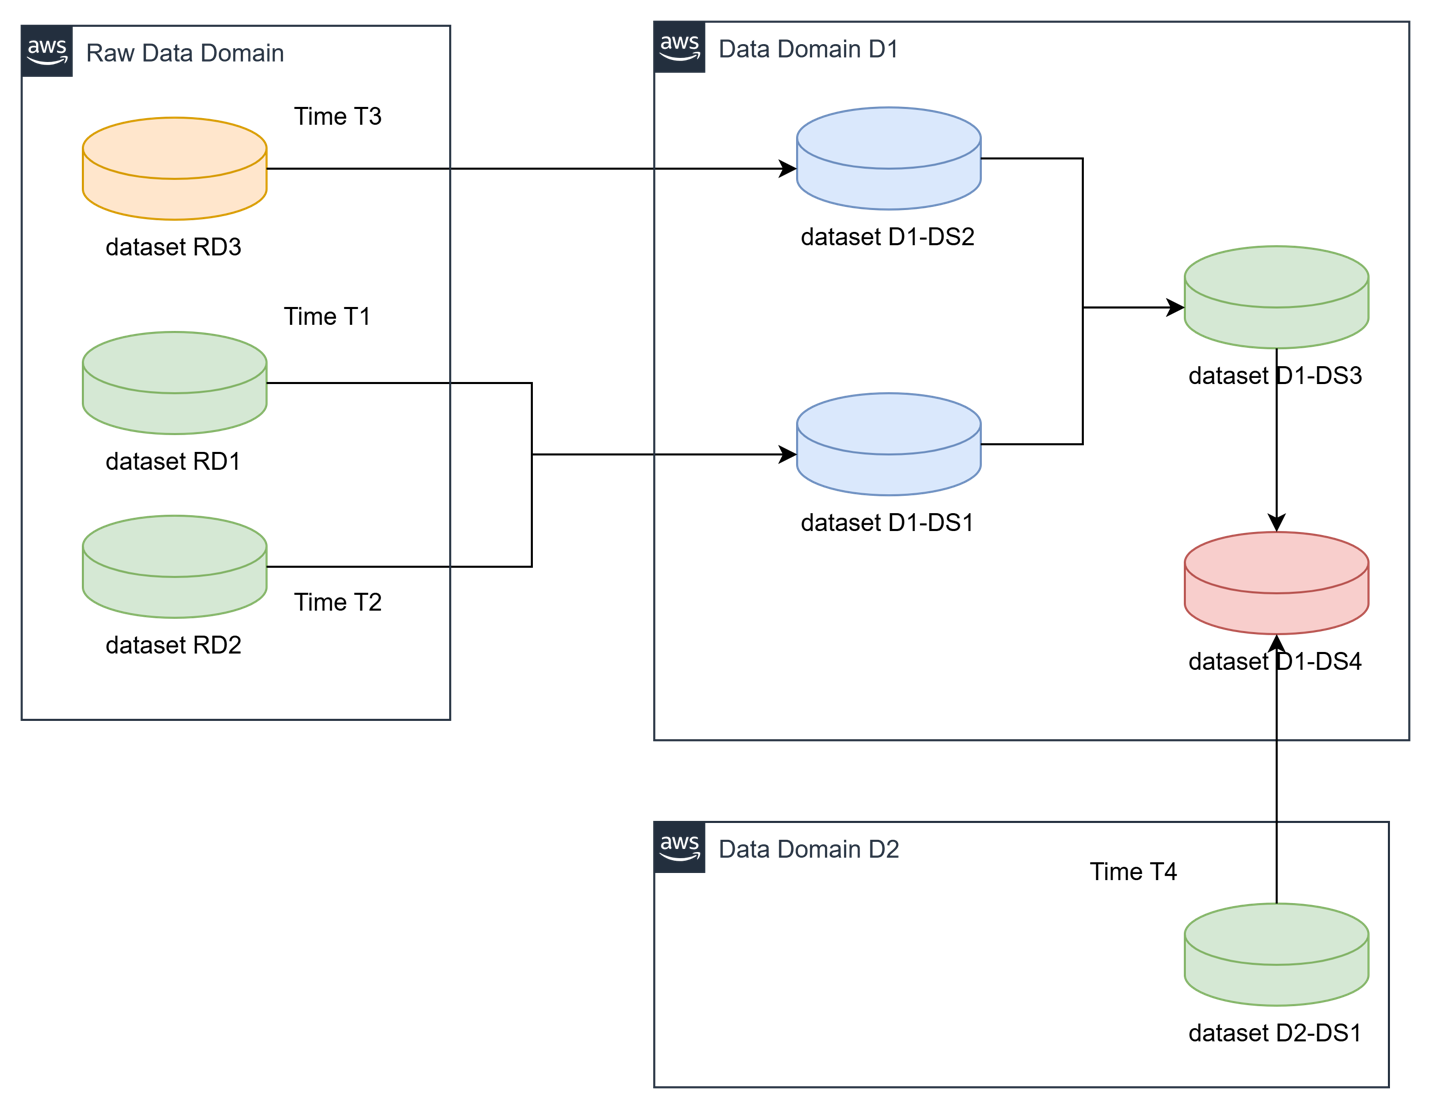
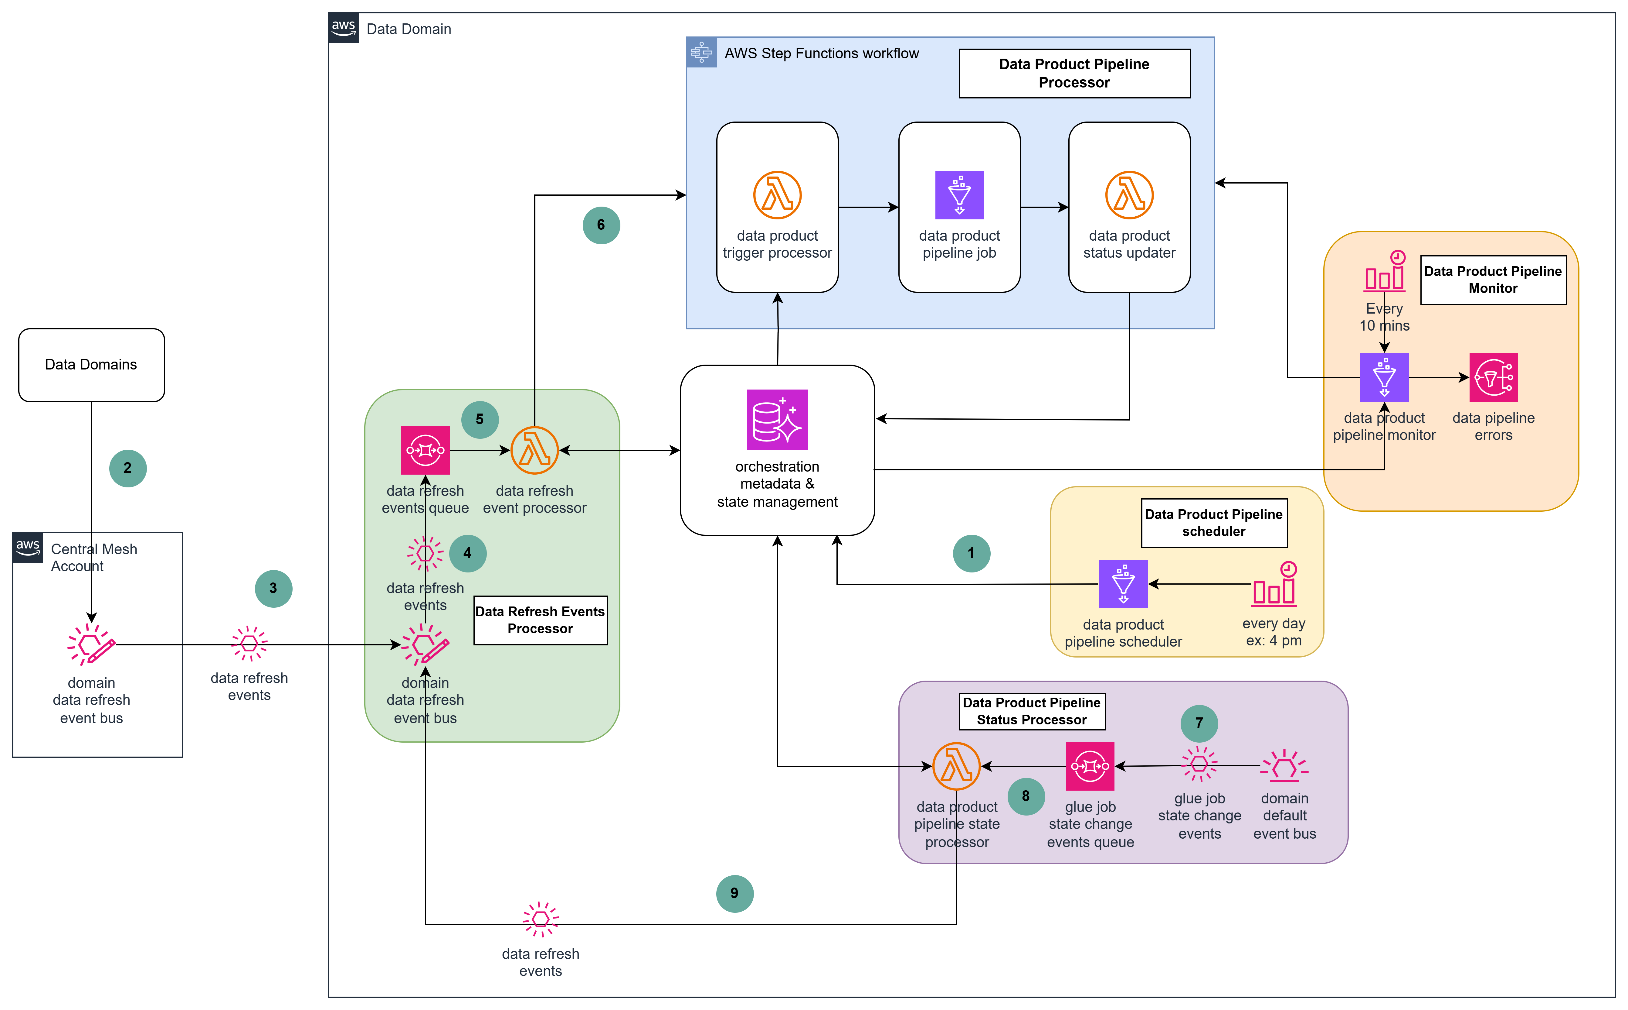
The following below illustrates a cross-domain data dependency scenario, where a data product in domain (D1 and D2) relies on the prompt refresh of data products from other domains, each operating on distinct schedules. Upon completion, these upstream data products emit refresh events that automatically trigger the execution of a dependent downstream pipeline.
Dataset DS1 for Domain D1 depends on RD1 and RD2 from raw data domain which gets refreshed at different times T1 and T2
Dataset DS2 for Domain D1 depends on RD3 from raw data domain which gets refreshed at different times T3
Dataset DS3 for Domain D1 depends on data refresh of datasets DS1 and DS2 from Domain D1
Dataset DS4 for Domain D1 depends on datasets DS3 from Domain D1 and dataset DS1 from Domain D2 which is refreshed at time T4.
Solution Overview
The orchestration solution involves two main components.
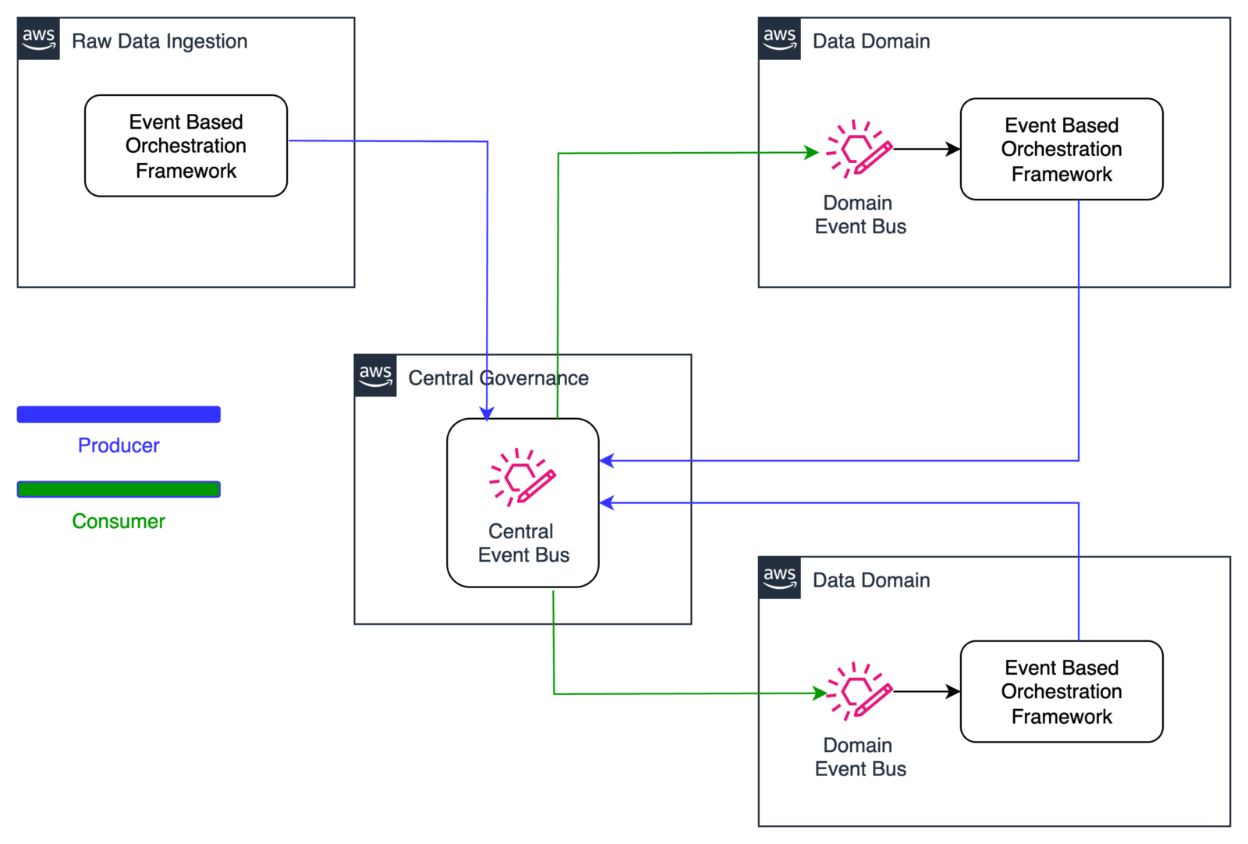
1. Cross account event sharing
The following diagram illustrates the architecture for distributing data refresh events across domains within the orchestration solution using Amazon EventBridge. Data producers emit refresh events to a centralized event bus upon completing their updates. These events are then propagated to all subscribing domains. Each domain evaluates incoming events against its pipeline dependency configurations, enabling precise and prompt triggering of downstream data pipelines.
The orchestration solution revolves around five core processors.
Data product pipeline scheduler
The scheduler is a daily scheduled Glue job that finds data products that are due for data refresh based on orchestration metadata and, for each identified data product, the scheduler retrieves both internal and external dependencies and stores them in the orchestration state management system database tables with a status of WAITING.
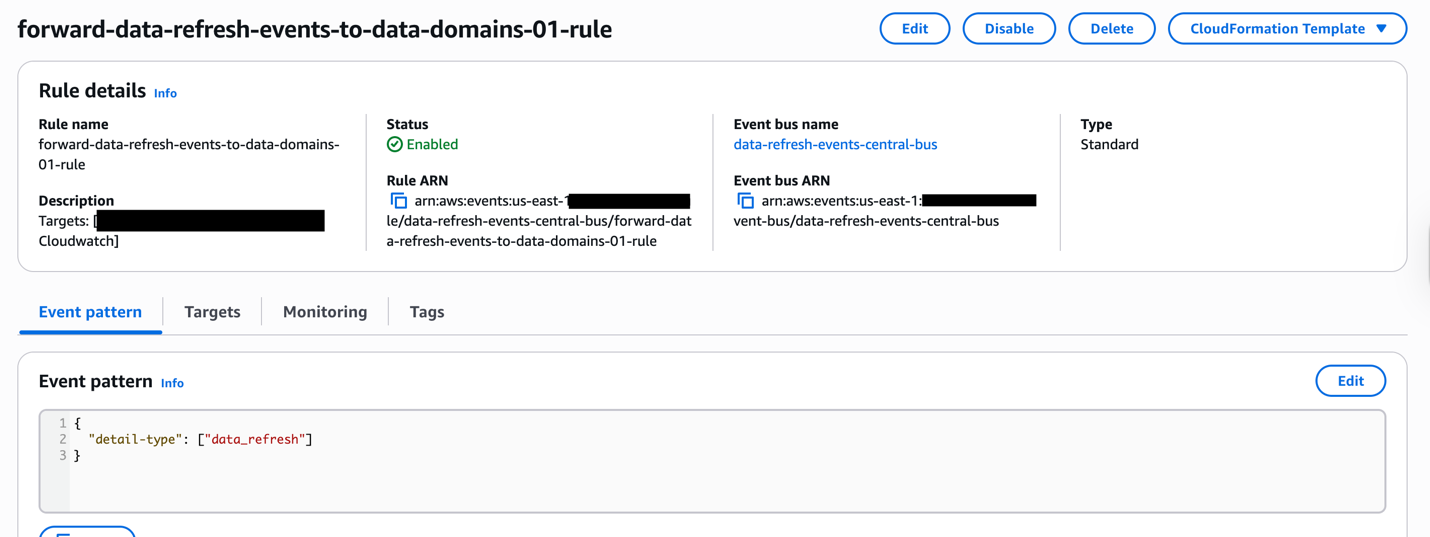
Data refresh events processor
Data refresh events are emitted from a central event bus and routed to domain-specific event buses. These domain buses send the events to a message queue for asynchronous processing. Any undeliverable events are redirected to a dead-letter queue for further inspection and recovery.
The event processor Lambda function consumes messages from the queue and evaluates whether the incoming event corresponds to any defined dependencies within the domain. If a match is found, the dependency status is updated from WAITING to ARRIVED. The processor also checks whether all dependencies for a given data product have been satisfied. If so, it starts the corresponding pipeline execution workflow by triggering an AWS Step Functions state machine.
Data product pipeline processor
Retrieves orchestration metadata to find the pipeline configuration and associated Glue job and parameters for the target data product. Triggers the Glue job using the retrieved configuration and parameters. This step ensures that the pipeline is launched with the correct context and input values. It also captures the Glue job run Id and updates the data product status to PROCESSING within the orchestration state management database, enabling downstream monitoring and status tracking.
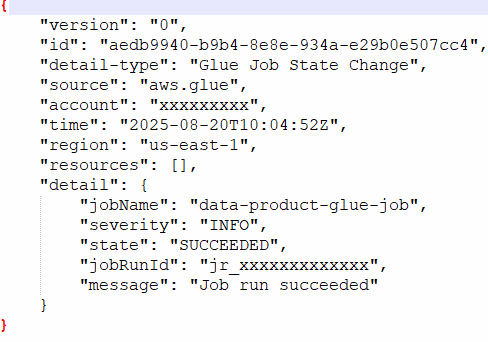
Data product pipeline status processor
Each domain’s EventBridge is configured to listen for AWS Glue job state change events, which are routed to a message queue for asynchronous processing. A processing function evaluates incoming job state events:
For successful job completions, the corresponding pipeline status is updated from PROCESSING to COMPLETED in the orchestration state database. If the pipeline is configured to publish downstream events, a data refresh event is emitted to the central event bus.
For failed jobs, the pipeline status is updated from PROCESSING to ERROR, enabling downstream systems to manage exceptions or start retrying of a failed job.
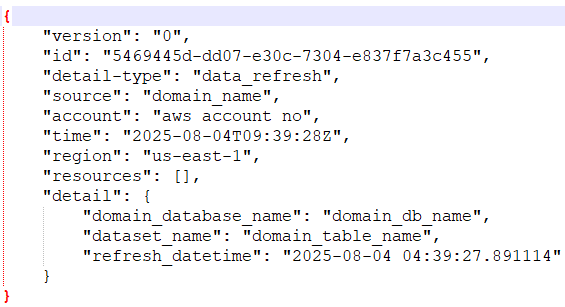
Sample Glue Job state change events for successful completion. The glue job name from the event is used to update the status of the data product.
Data product pipeline monitor
The pipeline monitoring system operates through an EventBridge scheduled trigger that activates every 10 minutes to scan the orchestration state. During this scan, it identifies data products with satisfied dependencies but pending pipeline execution and initiates those pipelines automatically. When pipeline reruns are necessary, the system resets the orchestration state, allowing the monitor to reassess dependencies and trigger the appropriate pipelines. Any pipeline failures are promptly captured as exception notifications and directed to a dedicated notification queue for thorough analysis and team alerting.
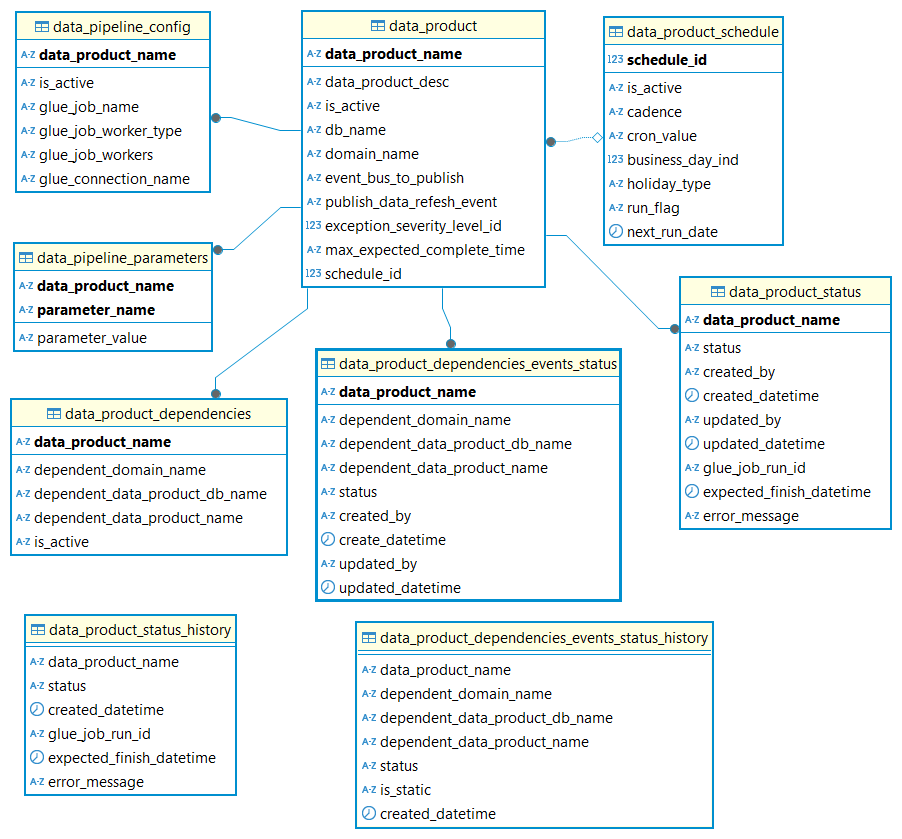
Orchestration metadata data model
The following diagram describes the reference data model for storing the dependencies and state management of the data pipelines.
Table Name
Description
data_product
This table stores information on the data product and settings such publishing event for the data product.
data_product_dependencies
This table stores information on the data product dependencies for both internal and external data products.
data_product_schedule
This table stores information on the data product run schedule (Ex: daily / weekly)
data_pipeline_config
This table stores information about the Glue job used for the data pipeline (ex: Name of the glue job, connections)
data_pipeline_parameters
This table stores the Glue job parameters
data_product_status
This table tracks the execution status of the data product pipeline, transitioning states from ‘Waiting’ to either ‘Complete’ or ‘Error’ based on runtime outcomes
data_product_dependencies_events_status
This table stores the status of data dependencies refresh status. It is used to keep track of the dependencies and updates the status as the data refresh events arrive
data_product_status_history
This table stores the historical data of data product data pipeline executions for audit and reporting
data_product_dependencies_events_status_history
This table stores the historical data of data product data dependency status for audit and reporting
Outcome
With data pipeline orchestration and use of AWS serverless services, Stifel was able to speed up the data refresh process by cutting down the lag time associated with fixed scheduling of triggering data pipelines as well increase the parallelism of executing the data pipelines which was a constraint with on-premises data platform. This approach offers:
Scalability by supporting coordination across multiple data domains.
Reliability through automated tracking and resolution of pipeline dependencies.
Timeliness by ensuring pipelines are executed precisely when their prerequisites are met.
Cost optimization by leveraging AWS serverless technologies Lambda for compute, EventBridge for event routing, Aurora Serverless for database operations, and Step Functions for workflow orchestration and pay only for actual usage rather than provisioned capacity while providing automatic scaling to handle varying workloads.
Conclusion
In this post, we showed how a modular, event-driven orchestration solution can effectively manage cross-domain data pipelines. Organizations can refer to this blog post to build robust data pipeline orchestration avoiding rigid schedules and dependencies by leveraging event-based triggers.
Special thanks: This implementation success is a result of close collaboration between Stifel Financial leadership team (Kyle Broussard Managing Director, Martin Nieuwoudt Director of Data Strategy & Analytics) , AWS ProServe, and the AWS account team. We want to thank Stifel Financial Executives and the Leadership Team for the strong sponsorship and direction.
Amazon SageMaker Catalog simplifies the discovery, governance, and collaboration for data and AI across Data Lakehouse, AI models, and applications. With Amazon SageMaker Catalog, you can securely discover and access approved data and models using semantic search with generative AI–created metadata or could just ask Amazon Q Developer with natural language to find their data.
Large enterprise customers have multiple lines of businesses who produce and consume data using a central SageMaker Data Catalog. Many customers have a central data governance team that is responsible for creating, publishing, and maintaining data governance standards and best practices across the firm. As the customer’s data platform scales, it becomes challenging for the central governance team to maintain the standards across all data producers and consumers. Because of this, many governance teams need to monitor user activity in Amazon SageMaker Catalog to ensure data assets are published according to established organizational governance standards and best practices. In this scenario, there is a need for automation where the central governance teams can be notified when critical events happen in Amazon SageMaker Catalog.
In this post, we show you how to create custom notifications for events occurring in SageMaker Catalog using Amazon EventBridge, AWS Lambda, and Amazon Simple Notification Service (Amazon SNS). You can expand this solution to automatically integrate SageMaker Catalog with in-house enterprise workflow tools like ServiceNow and Helix.
Solution overview
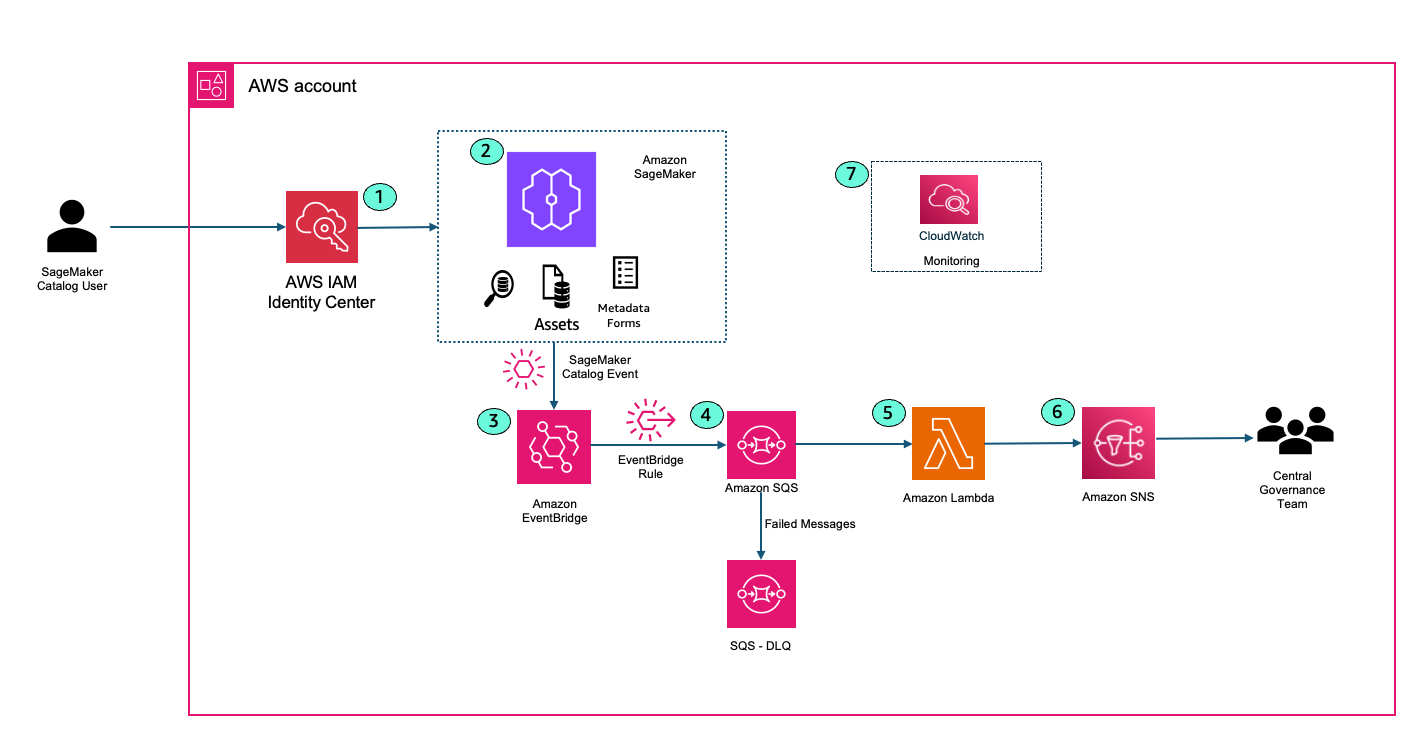
The following solution architecture shows how SageMaker Catalog integrates with other AWS services like AWS IAM Identity Center, Amazon EventBridge, Amazon SQS, AWS Lambda, and Amazon SNS to generate automated notifications to capture critical events in the enterprise catalog.
A SageMaker Catalog user logs into Amazon SageMaker Unified Studio using IAM Identity center. This could be a data scientist, machine learning engineer, or analyst looking for published data sets in the firm. AWS IAM Identity center ensures that only authorized personnel can access the cataloged assets and ML resources.
User performs an activity within SageMaker Catalog. Example user creates a new project or user searches for a data asset and creates a subscription request to access the asset.
User events from SageMaker Catalog are captured in Amazon EventBridge. Amazon EventBridge is a fully managed, serverless event bus service designed to help you build scalable, event-driven applications across AWS, SaaS, and custom applications. Amazon EventBridge provides the ability to filter events and allow users to take action on specific events.The following example event pattern in EventBridge filters DataZone create project events.
Amazon EventBridge sends the filtered events to Amazon SQS. Routing events to an SQS queue improves reliability and durability. Amazon SQS acts as a buffer between Amazon EventBridge and AWS Lambda, decoupling event producers from consumers. This allows your Lambda functions to process messages at their own pace, preventing overload during traffic spikes or when downstream resources are temporarily slow or unavailable. Amazon SQS provides durable, persistent storage for events. If Lambda service is unavailable or throttled, messages remain in the queue until they can be successfully processed, reducing the risk of data loss. There is a Dead Letter Queue (DLQ) attached to the main SQS queue. Attaching a DLQ to SQS ensures that any messages that can’t be processed after multiple attempts are safely captured for inspection and troubleshooting, preventing them from blocking or endlessly circulating in the main queue.
AWS Lambda function reads the messages from SQS queue. Lambda function formats the notification based on your needs.
AWS Lambda publishes the message to Amazon SNS. End users and Central Governance team can subscribe to the SNS topic to receive email alerts when an event happens in SageMaker catalog.
Amazon CloudWatch integrates with AWS Lambda to monitor performance, logs events, and can trigger alarms if anything goes awry, ensuring your workflows run smoothly.
Prerequisites
You need to setup the following prerequisite resources:
Grant Lambda Access in SageMaker Unified Studio (required for Publishing the assets)
Add the Lambda execution role as an IAM role in SageMaker Unified Studio.
Assign the Lambda execution role to your project within the SageMaker Unified Studio portal.
This configuration ensures that Lambda function has the required authorization to access Data Zone resources and successfully publish assets from your SageMaker Unified Studio projects.
Code Deployment
Review the instructions on our GitHub repository to deploy the framework in your AWS account using AWS CDK. The CDK provisions an event-driven notification architecture for Amazon SageMaker Unified Studio, focusing on project creation and asset publishing events.
Core AWS Resources Deployed – The following are the core AWS resourced deployed:
DataZonePublishAssetRule: Captures DataZone asset publishing events (CreateListingChangeSet with PUBLISH action for ASSET entity type).
SQS Queue
DataZoneEventQueue: Buffers DataZone events from EventBridge before processing.
Queue Policy: Allows EventBridge to send messages to the SQS queue.
Lambda Function
ProjectNotificationLambda: Processes messages from the SQS queue, retrieves event details from DataZone, and sends notifications to an SNS topic.
IAM Role: Grants permissions to access SQS, SNS, CloudWatch Logs, and DataZone services.
Event Source Mapping: Triggers the Lambda function for each SQS message.
SNS Topic
LambdaSNSTopic: Receives notifications from the Lambda function.
Email Subscriptions: Two email endpoints are subscribed to receive notifications.
Add your email ID to the SNS topic. You’ll receive an email to request for subscription, click on ‘Confirm Subscription’
Permissions
Amazon EventBridge sends events to SQS (requiring SQS permissions), Lambda poll reads messages from Amazon SQS (requiring Lambda role in SQS permissions), and Lambda publishes to Amazon SNS (requiring SNS permissions).
IAM Policies: Lambda execution role has necessary permissions for SQS, SNS, logging, and Data Zone operations.
Outputs Provided (CloudFormation Output)
Amazon SNS Topic ARN: For notification publishing.
Amazon SQS Queue ARN: For event buffering.
AWS Lambda Function ARN: For event processing.
Amazon EventBridge Rule ARNs: For both asset publishing and project creation events.
Project Creation Notification
Execute the following steps to login to SageMaker Unified Studio and create a project.
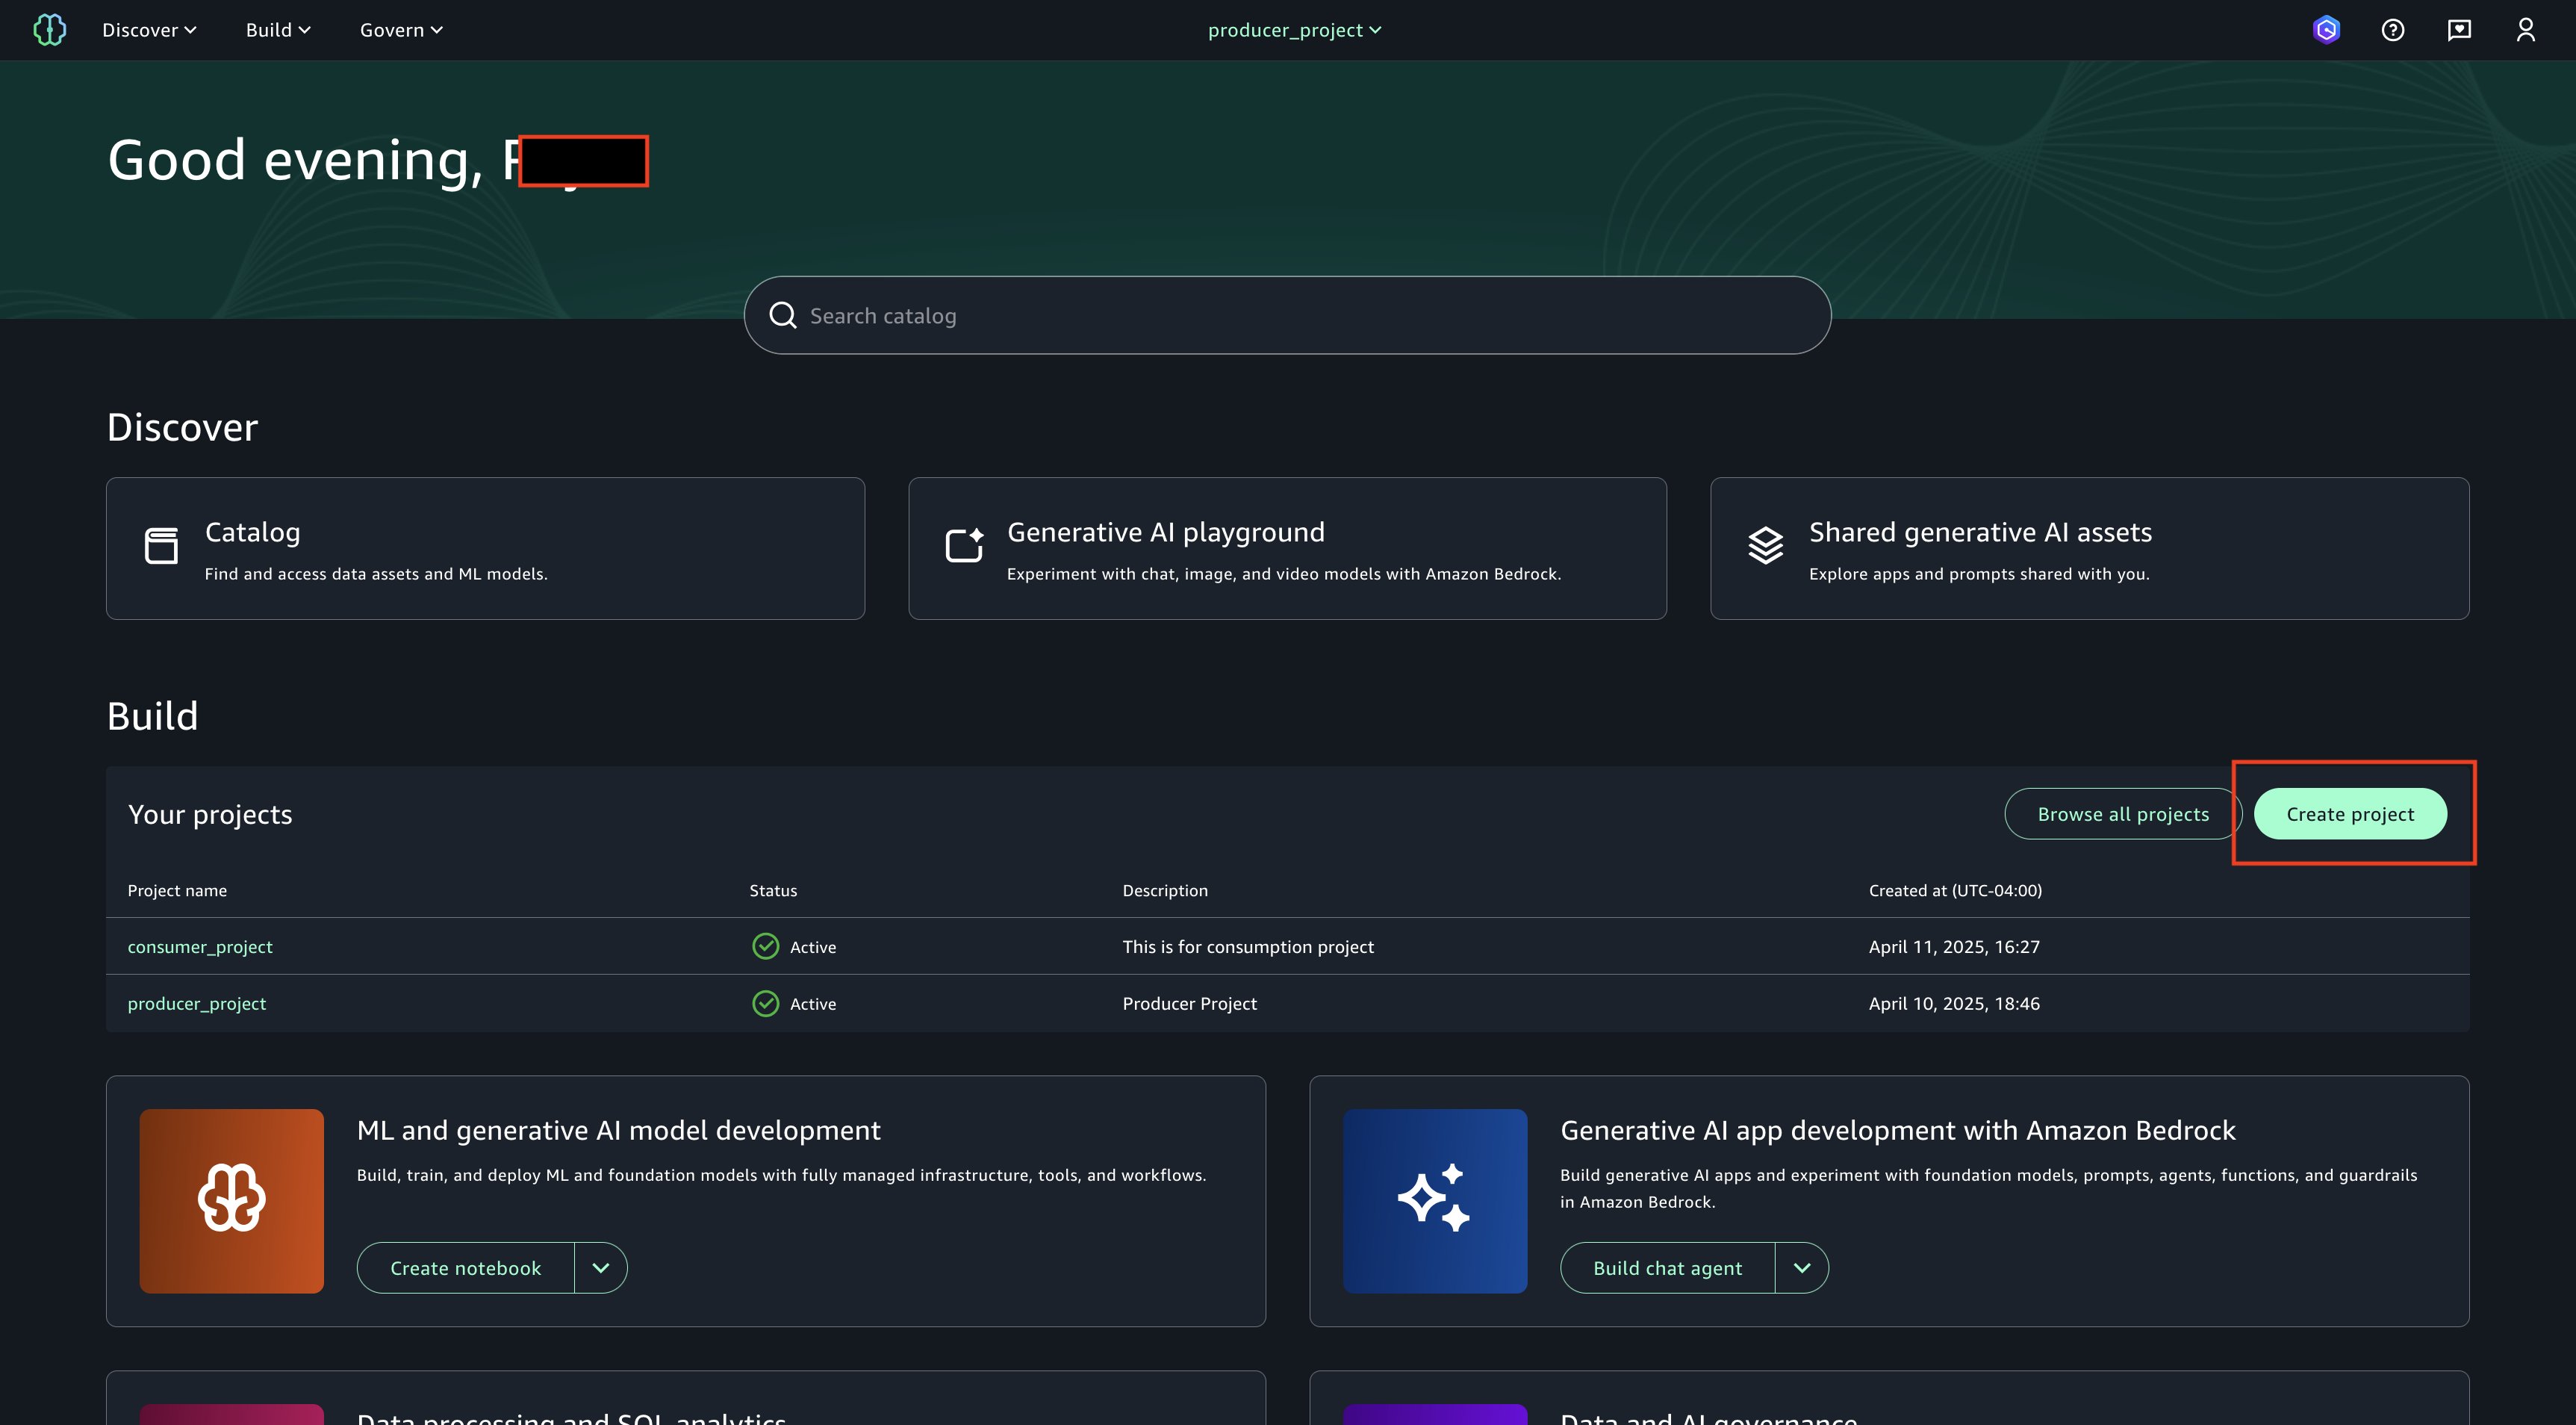
Login to SageMaker Unified Studio Console. This takes you to Amazon SageMaker Unified Studio domain login screen (SSO and IAM sign-in options).
Choose Create Project on SageMaker Unified Studio login page.
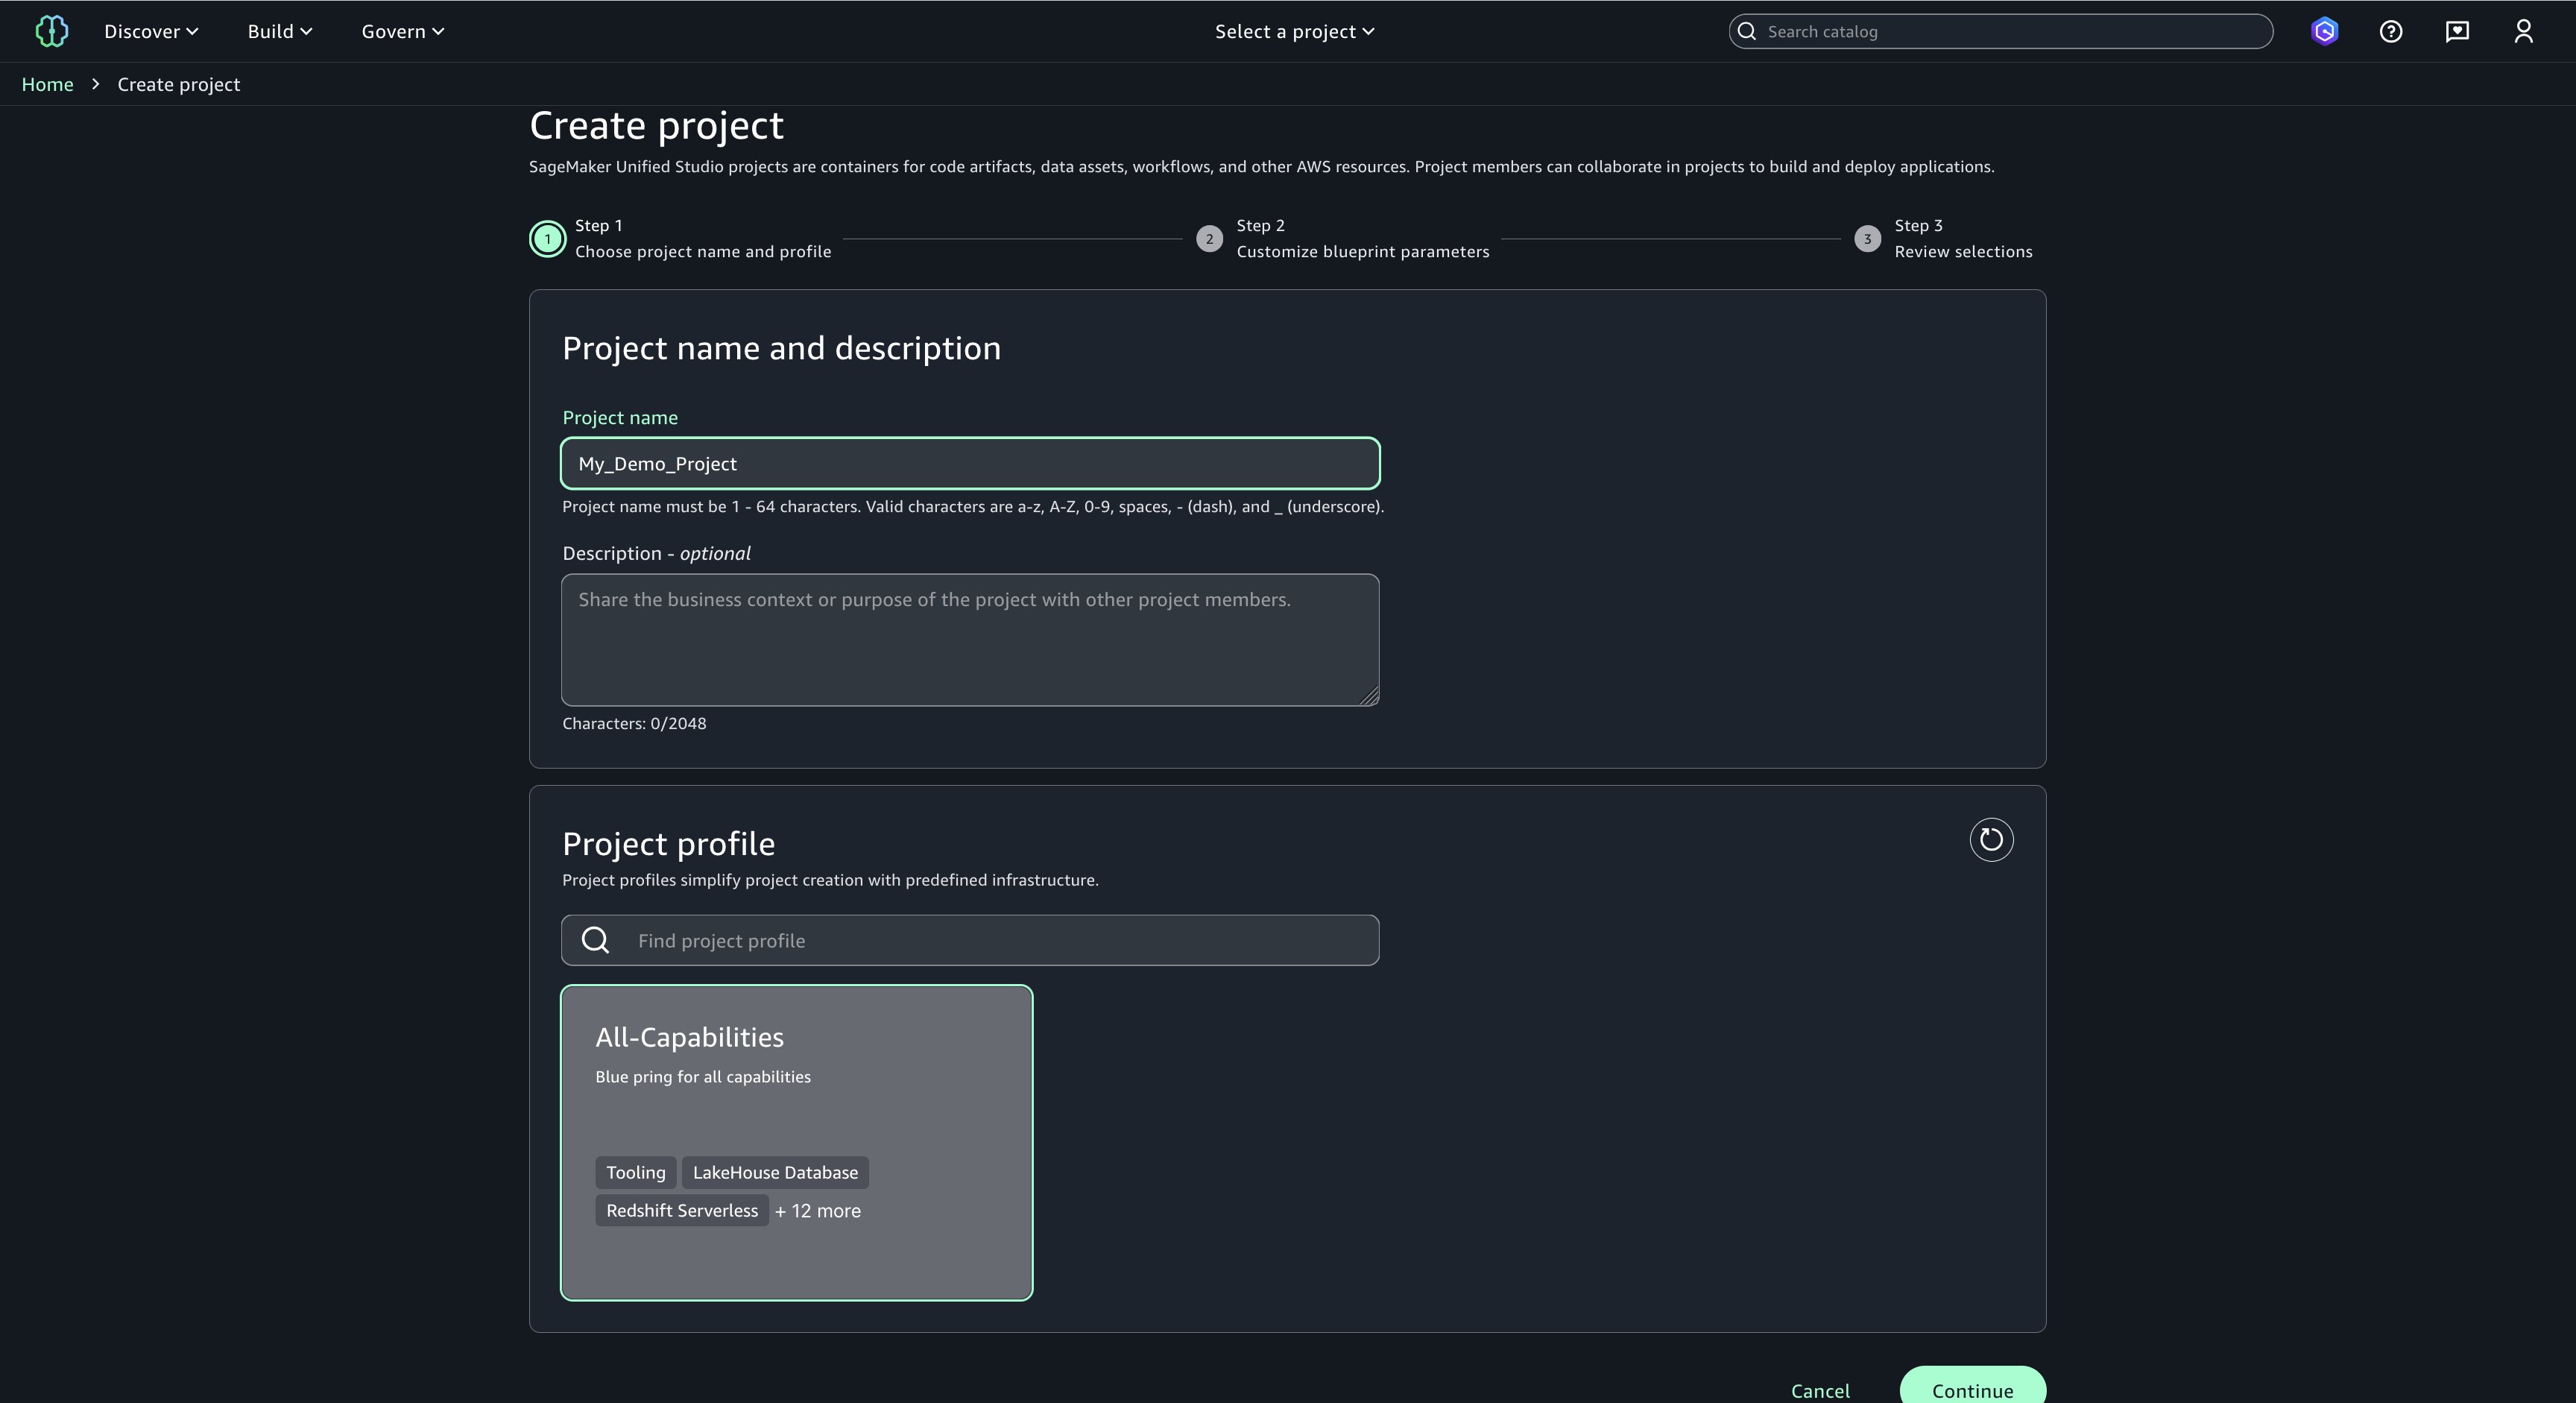
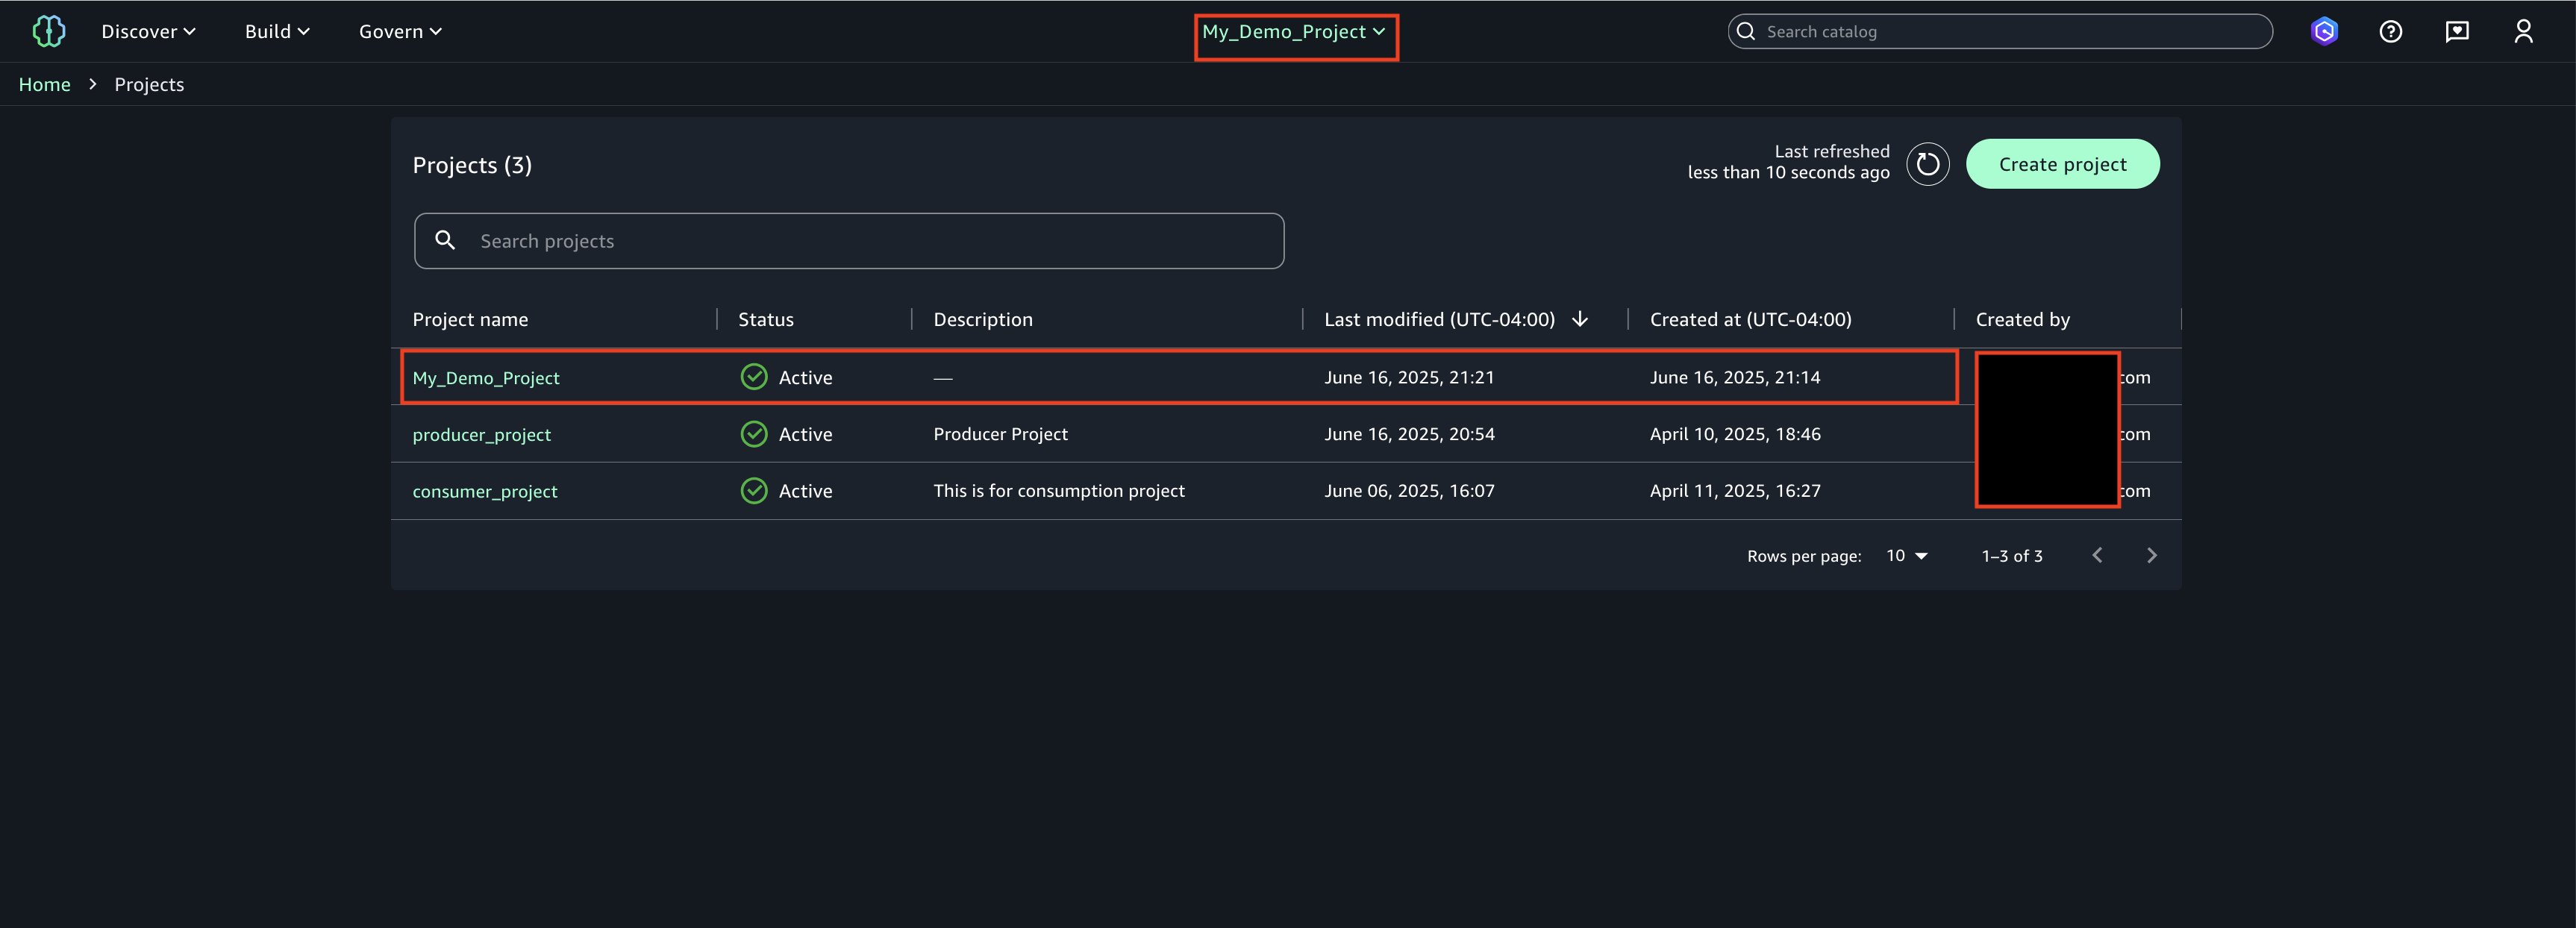
Choose a project name of your choice, such as ‘My_Demo_Project’. In Project profile, select ‘All-Capabilities’.
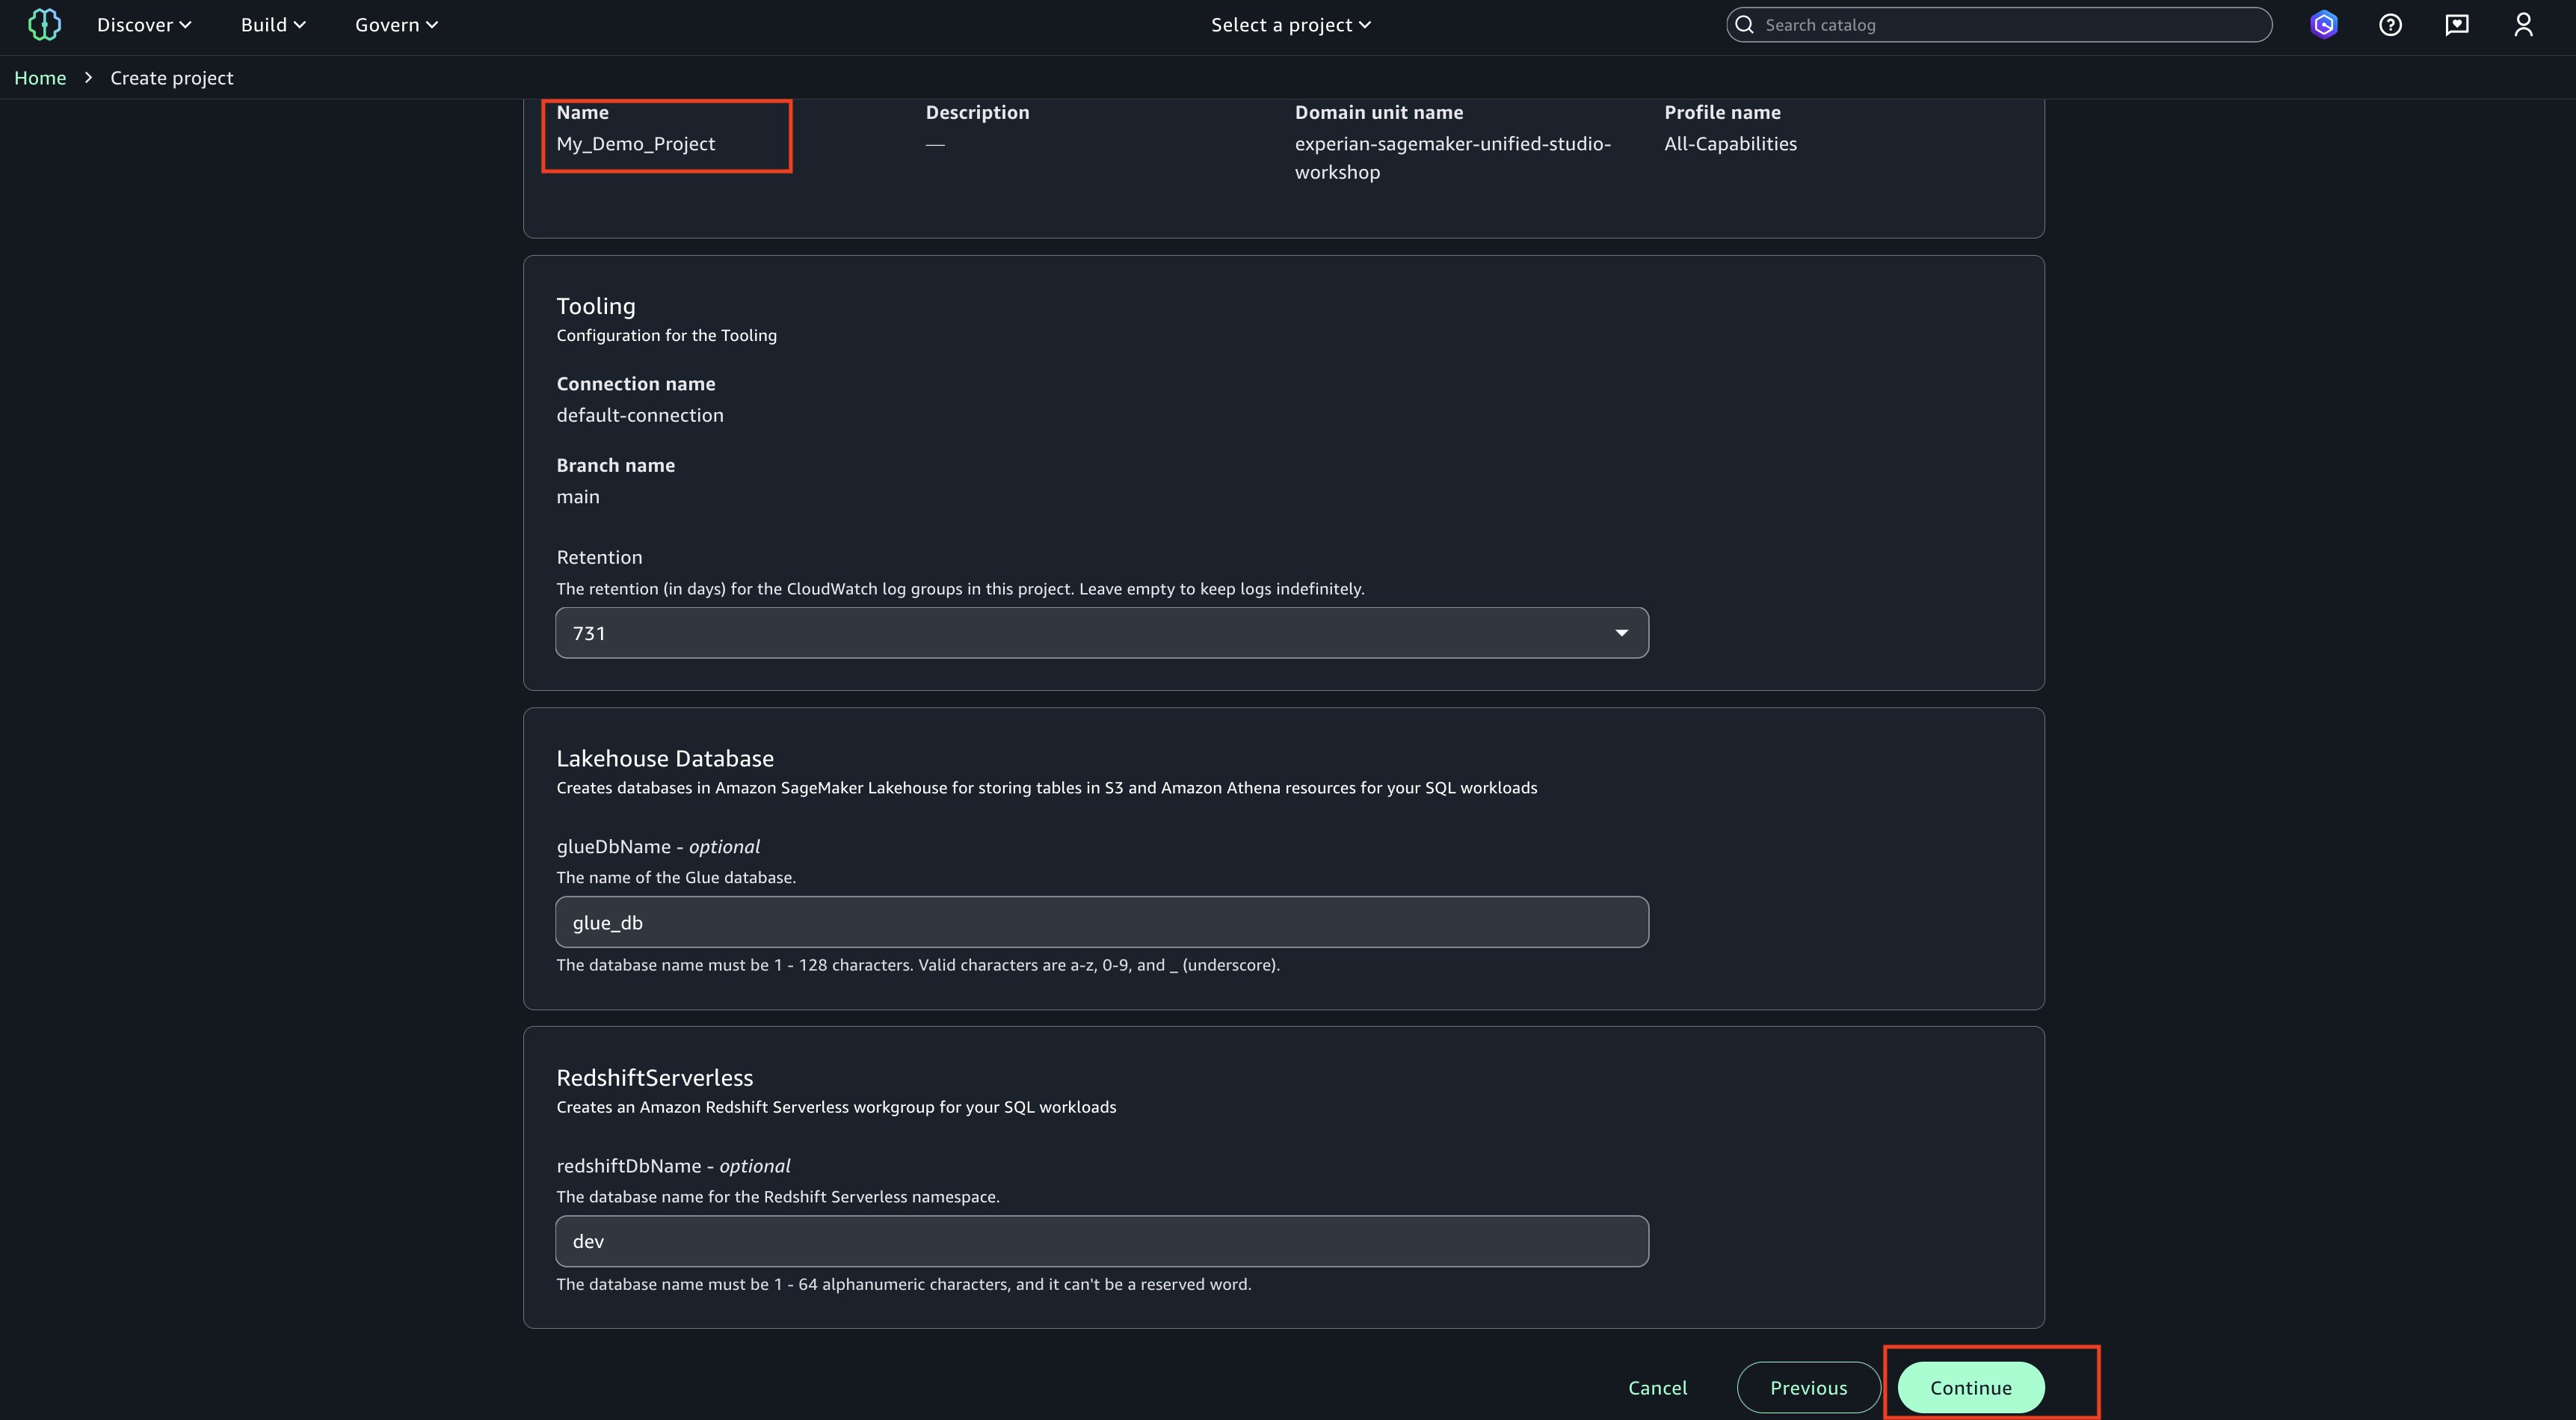
Choose Continue. Keep everything as default.
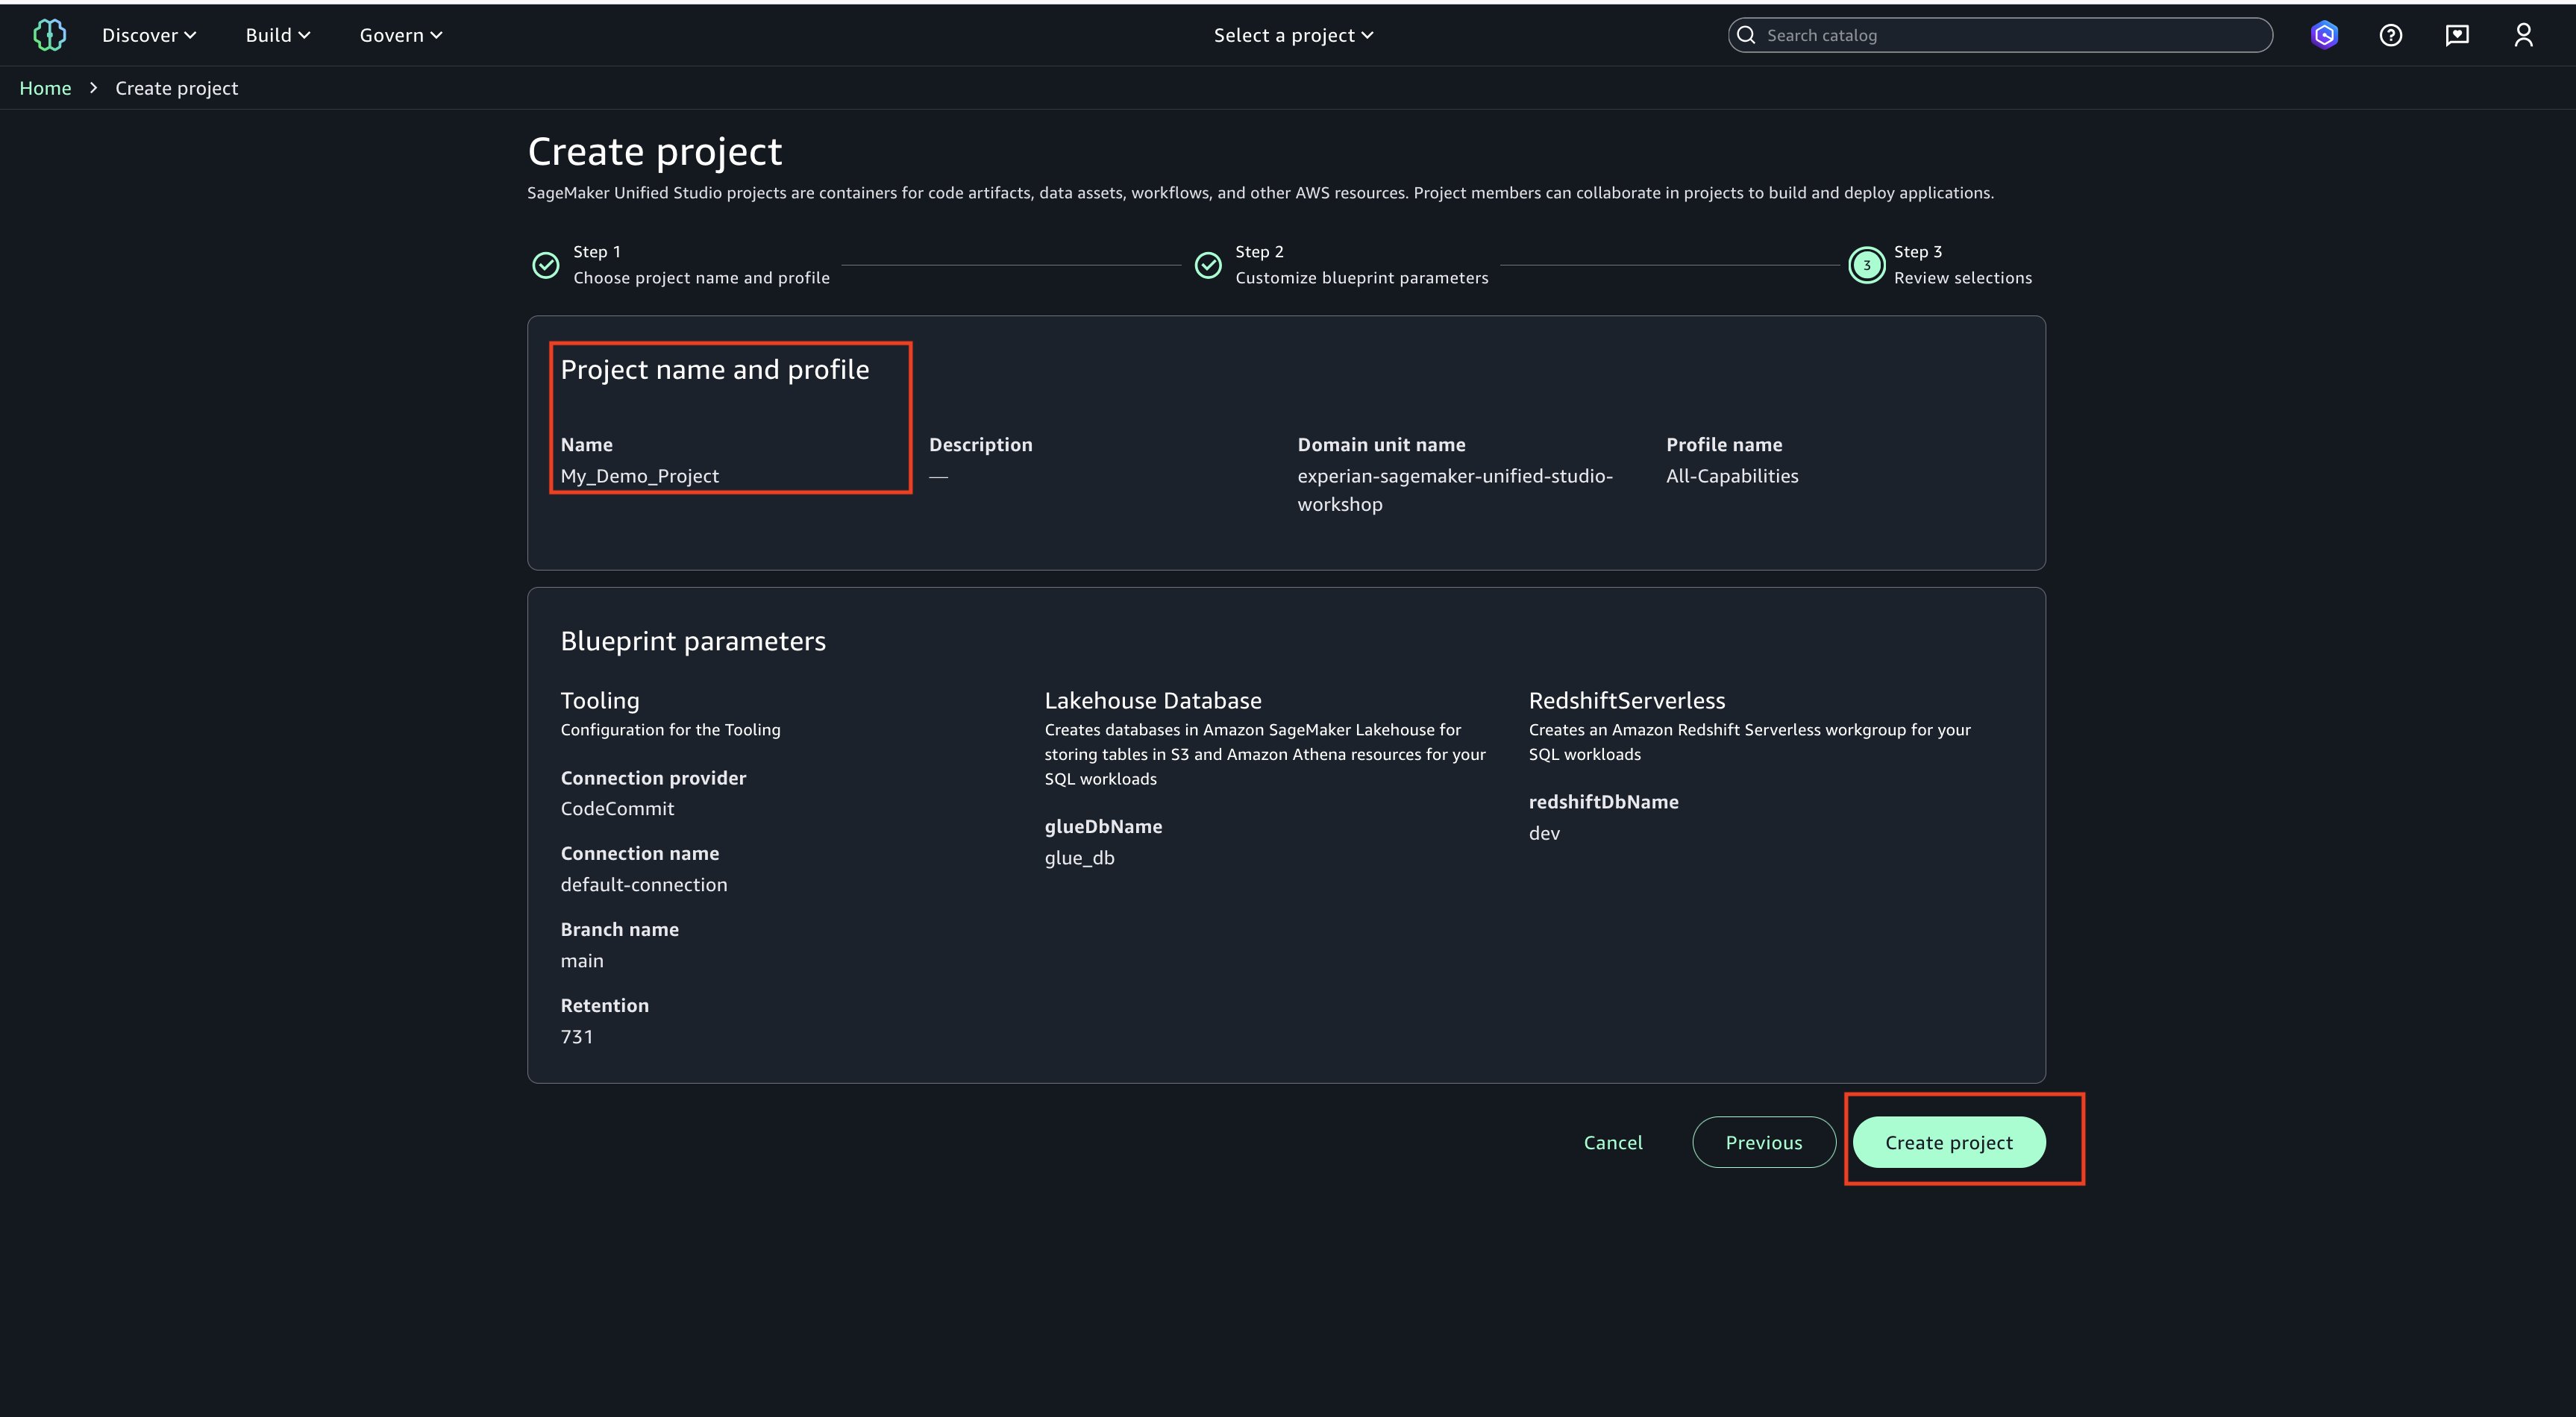
Choose Continue. On next page, create on ‘Create project’.
Project creation final screen
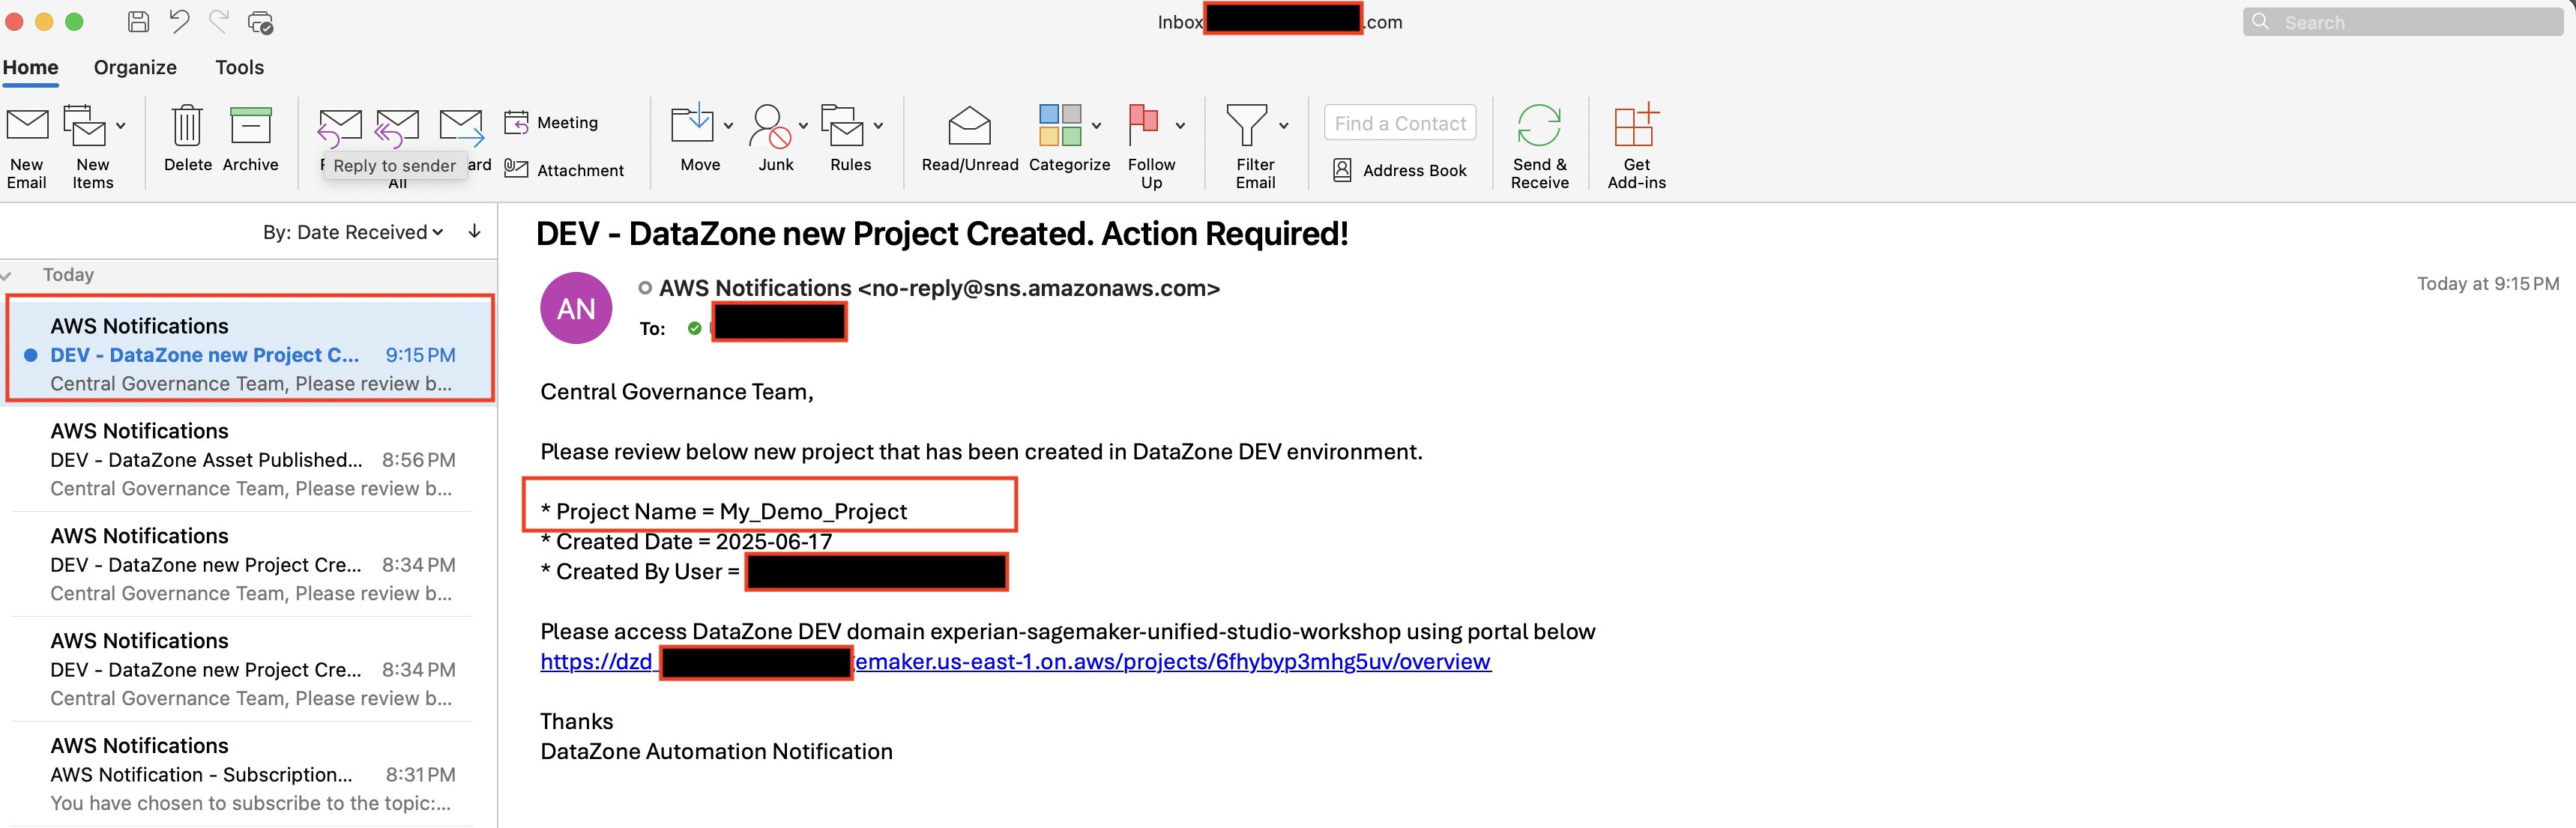
Email Notification. Once project creation is successful, you should see an email notification sent by the above deployed automation.
Asset Publish Notification
To publish a sample asset in SageMaker Unified Studio.
Lambda Permissions After the CDK Stack creates the Lambda execution role ‘DatazoneStack-LambdaExecutionRole’, use the following procedure to integrate this role into your SageMaker Studio project. This integration enables Lambda functions to interact with DataZone API in SageMaker Unified Studio project.
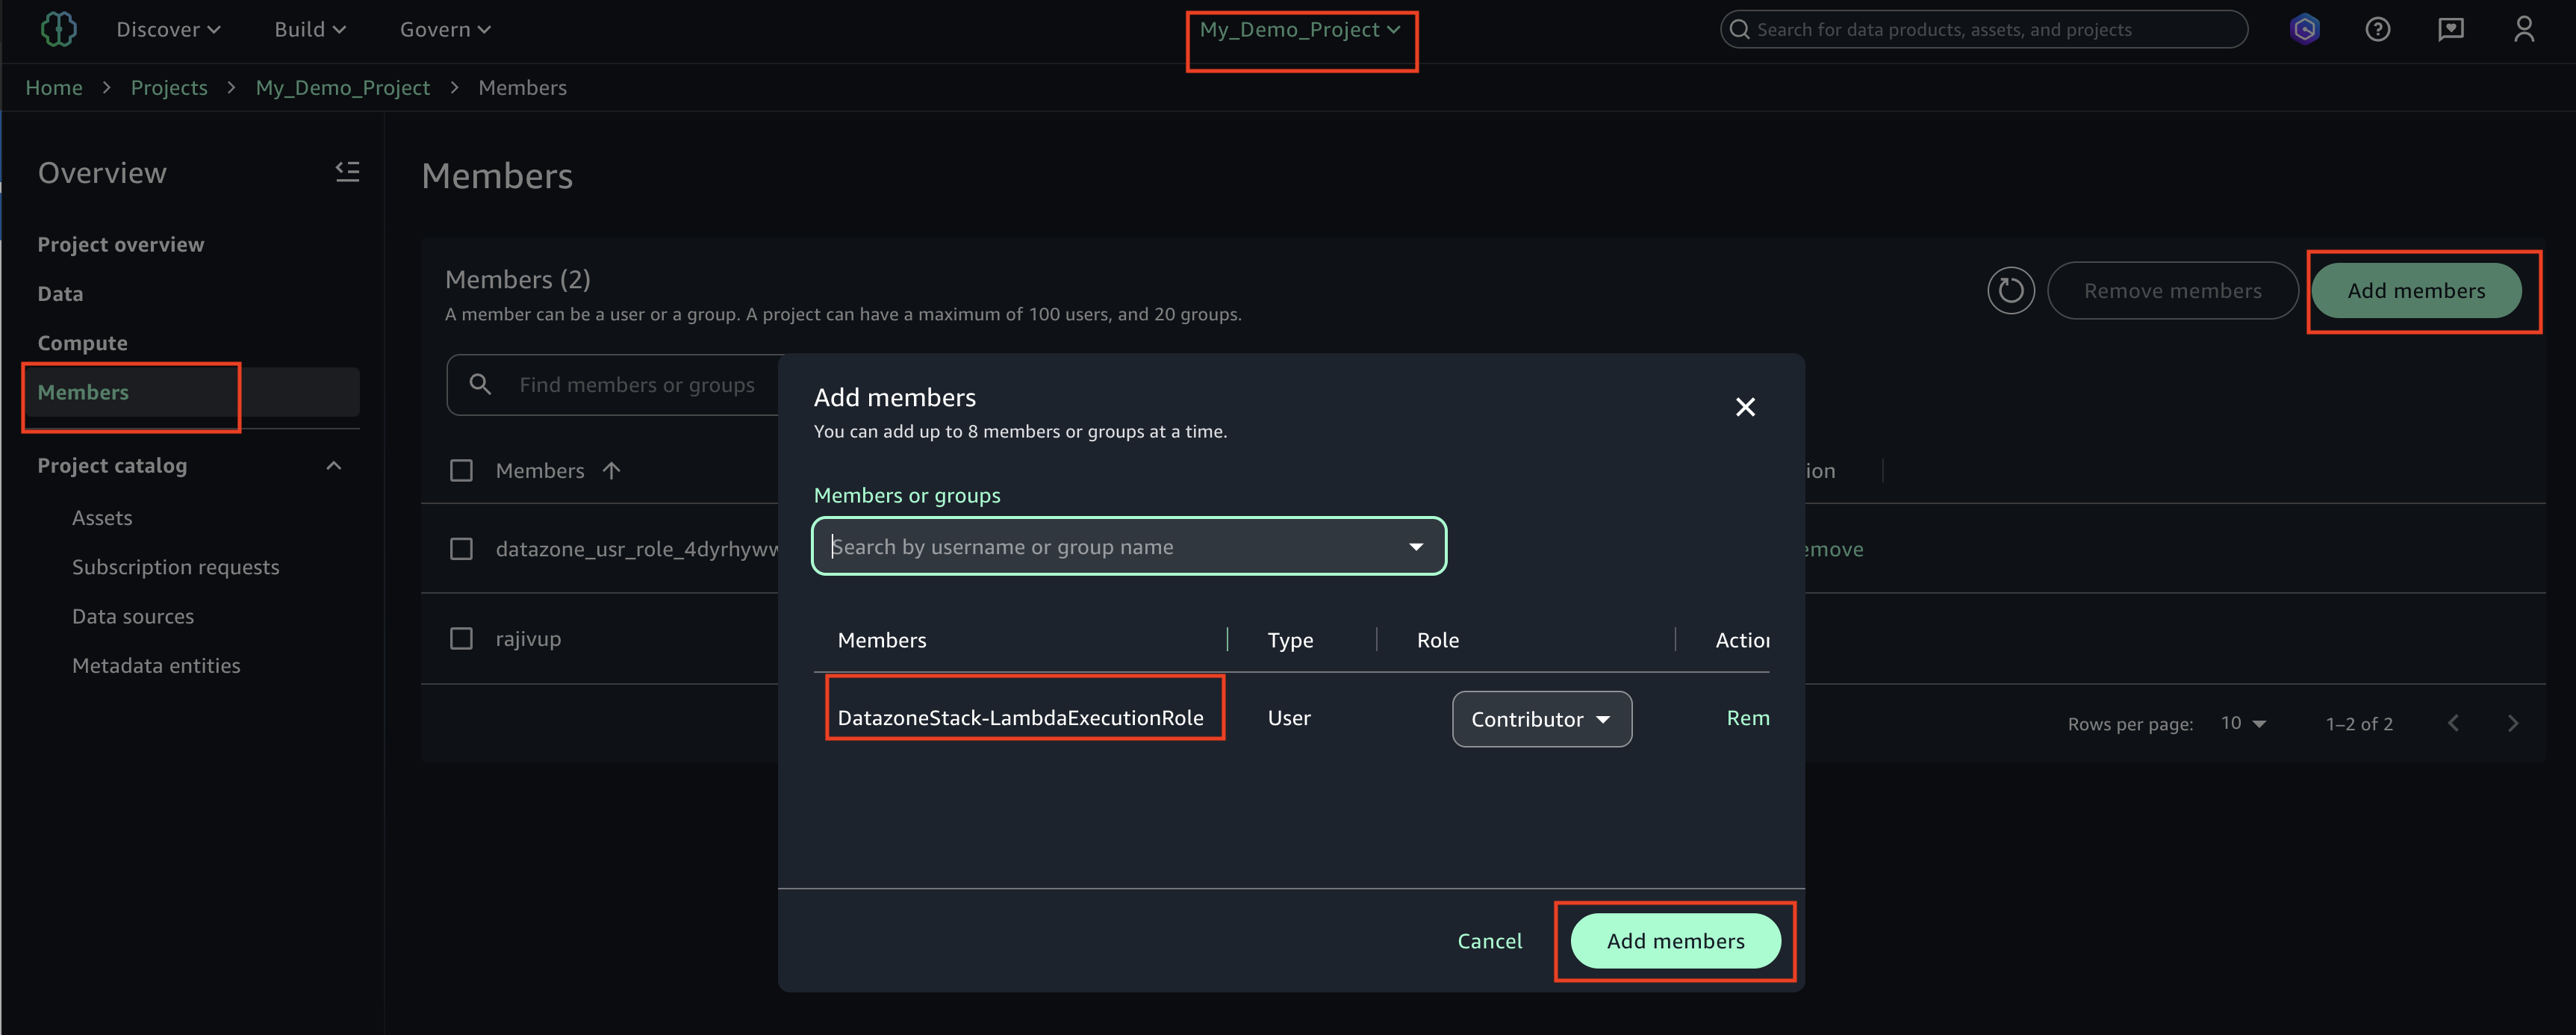
Login to SageMaker Unified studio using SSO, click on Members, Add members.
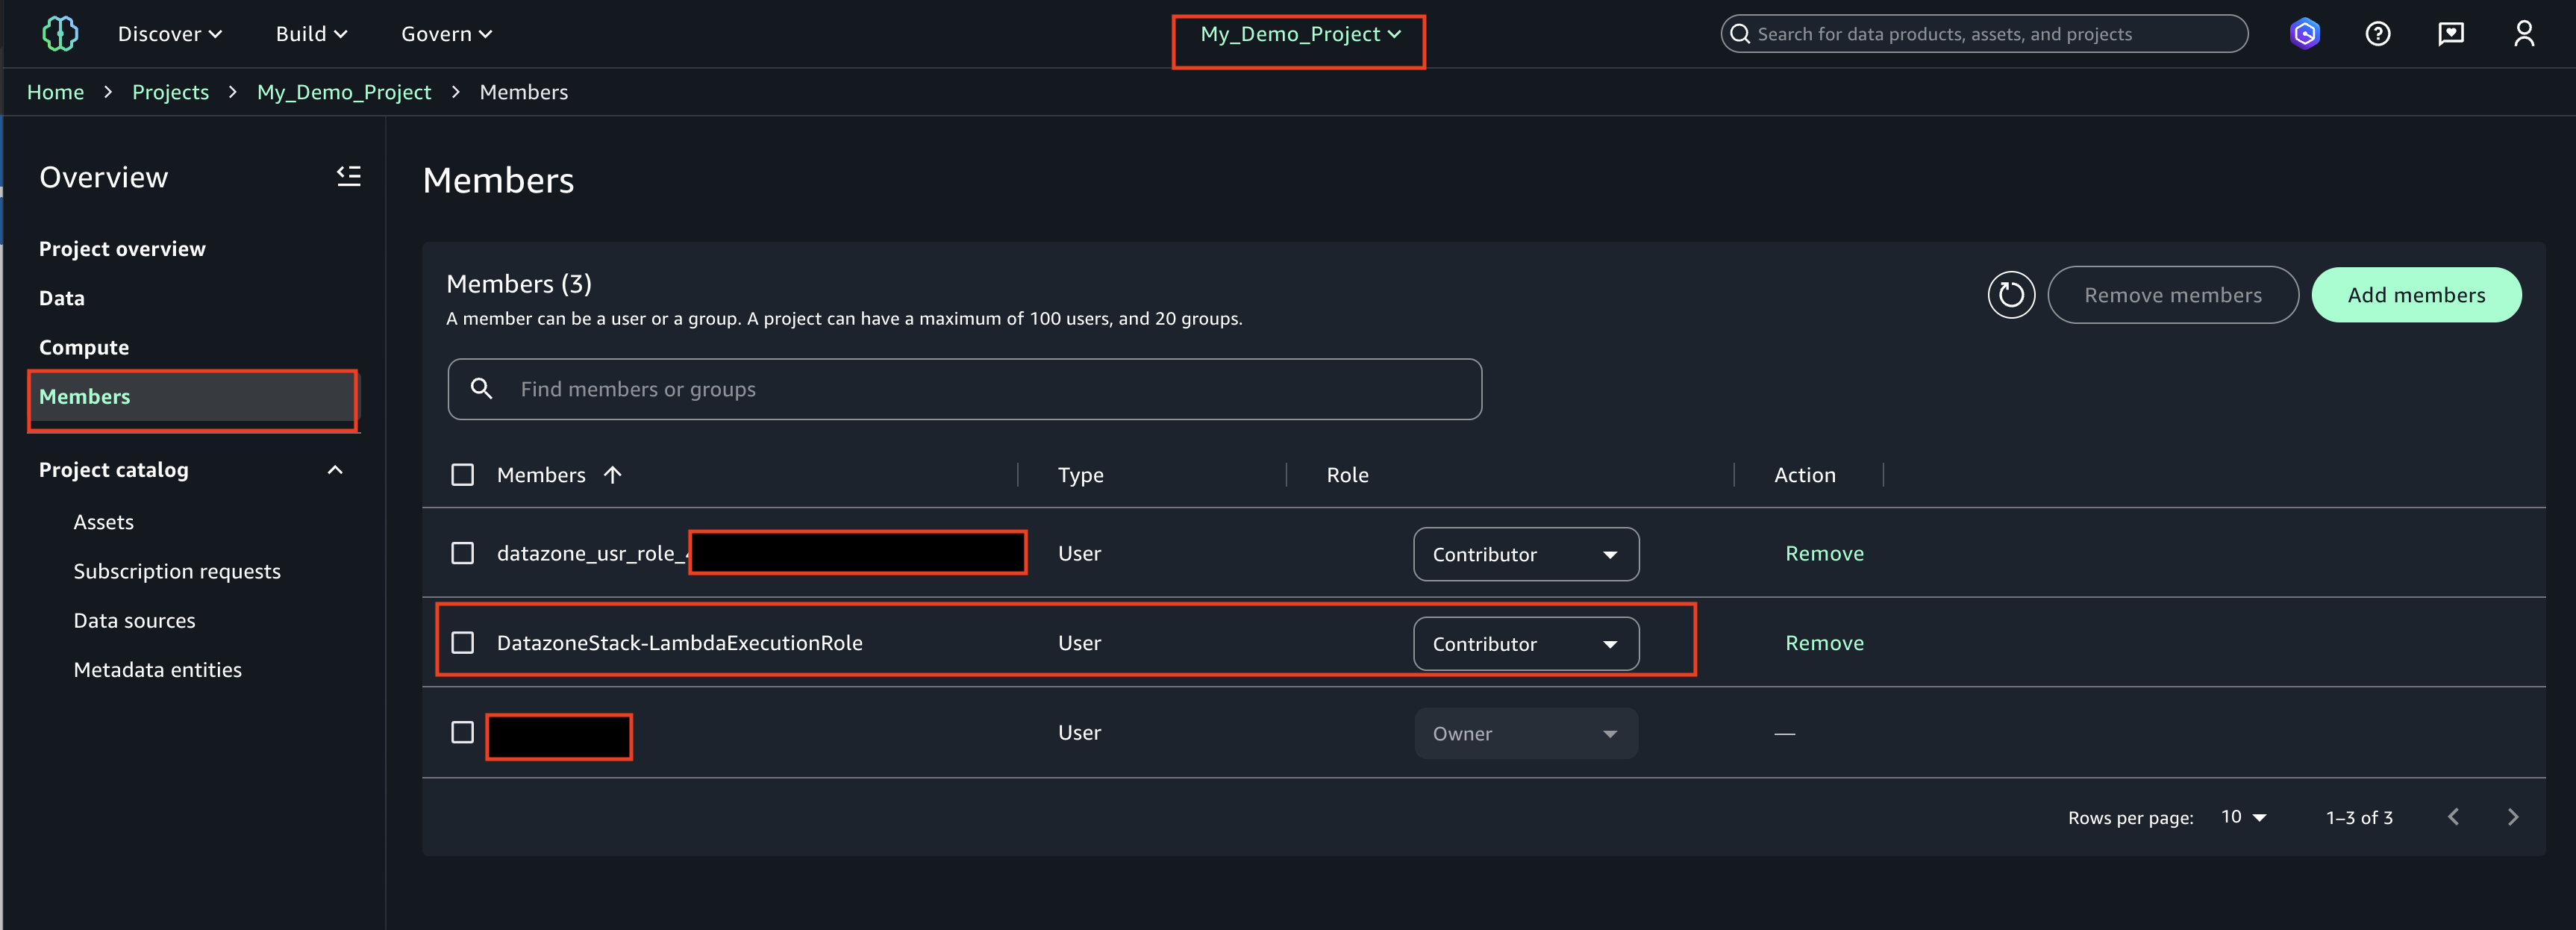
Find the role ‘DatazoneStack-LambdaExecutionRole’ and add as a ‘Contributor’
The LambdaExecutionRole (<cf-stack-name>-LambdaExecutionRole) has been added as a member to a project in SageMaker Unified Studio.
Create Asset
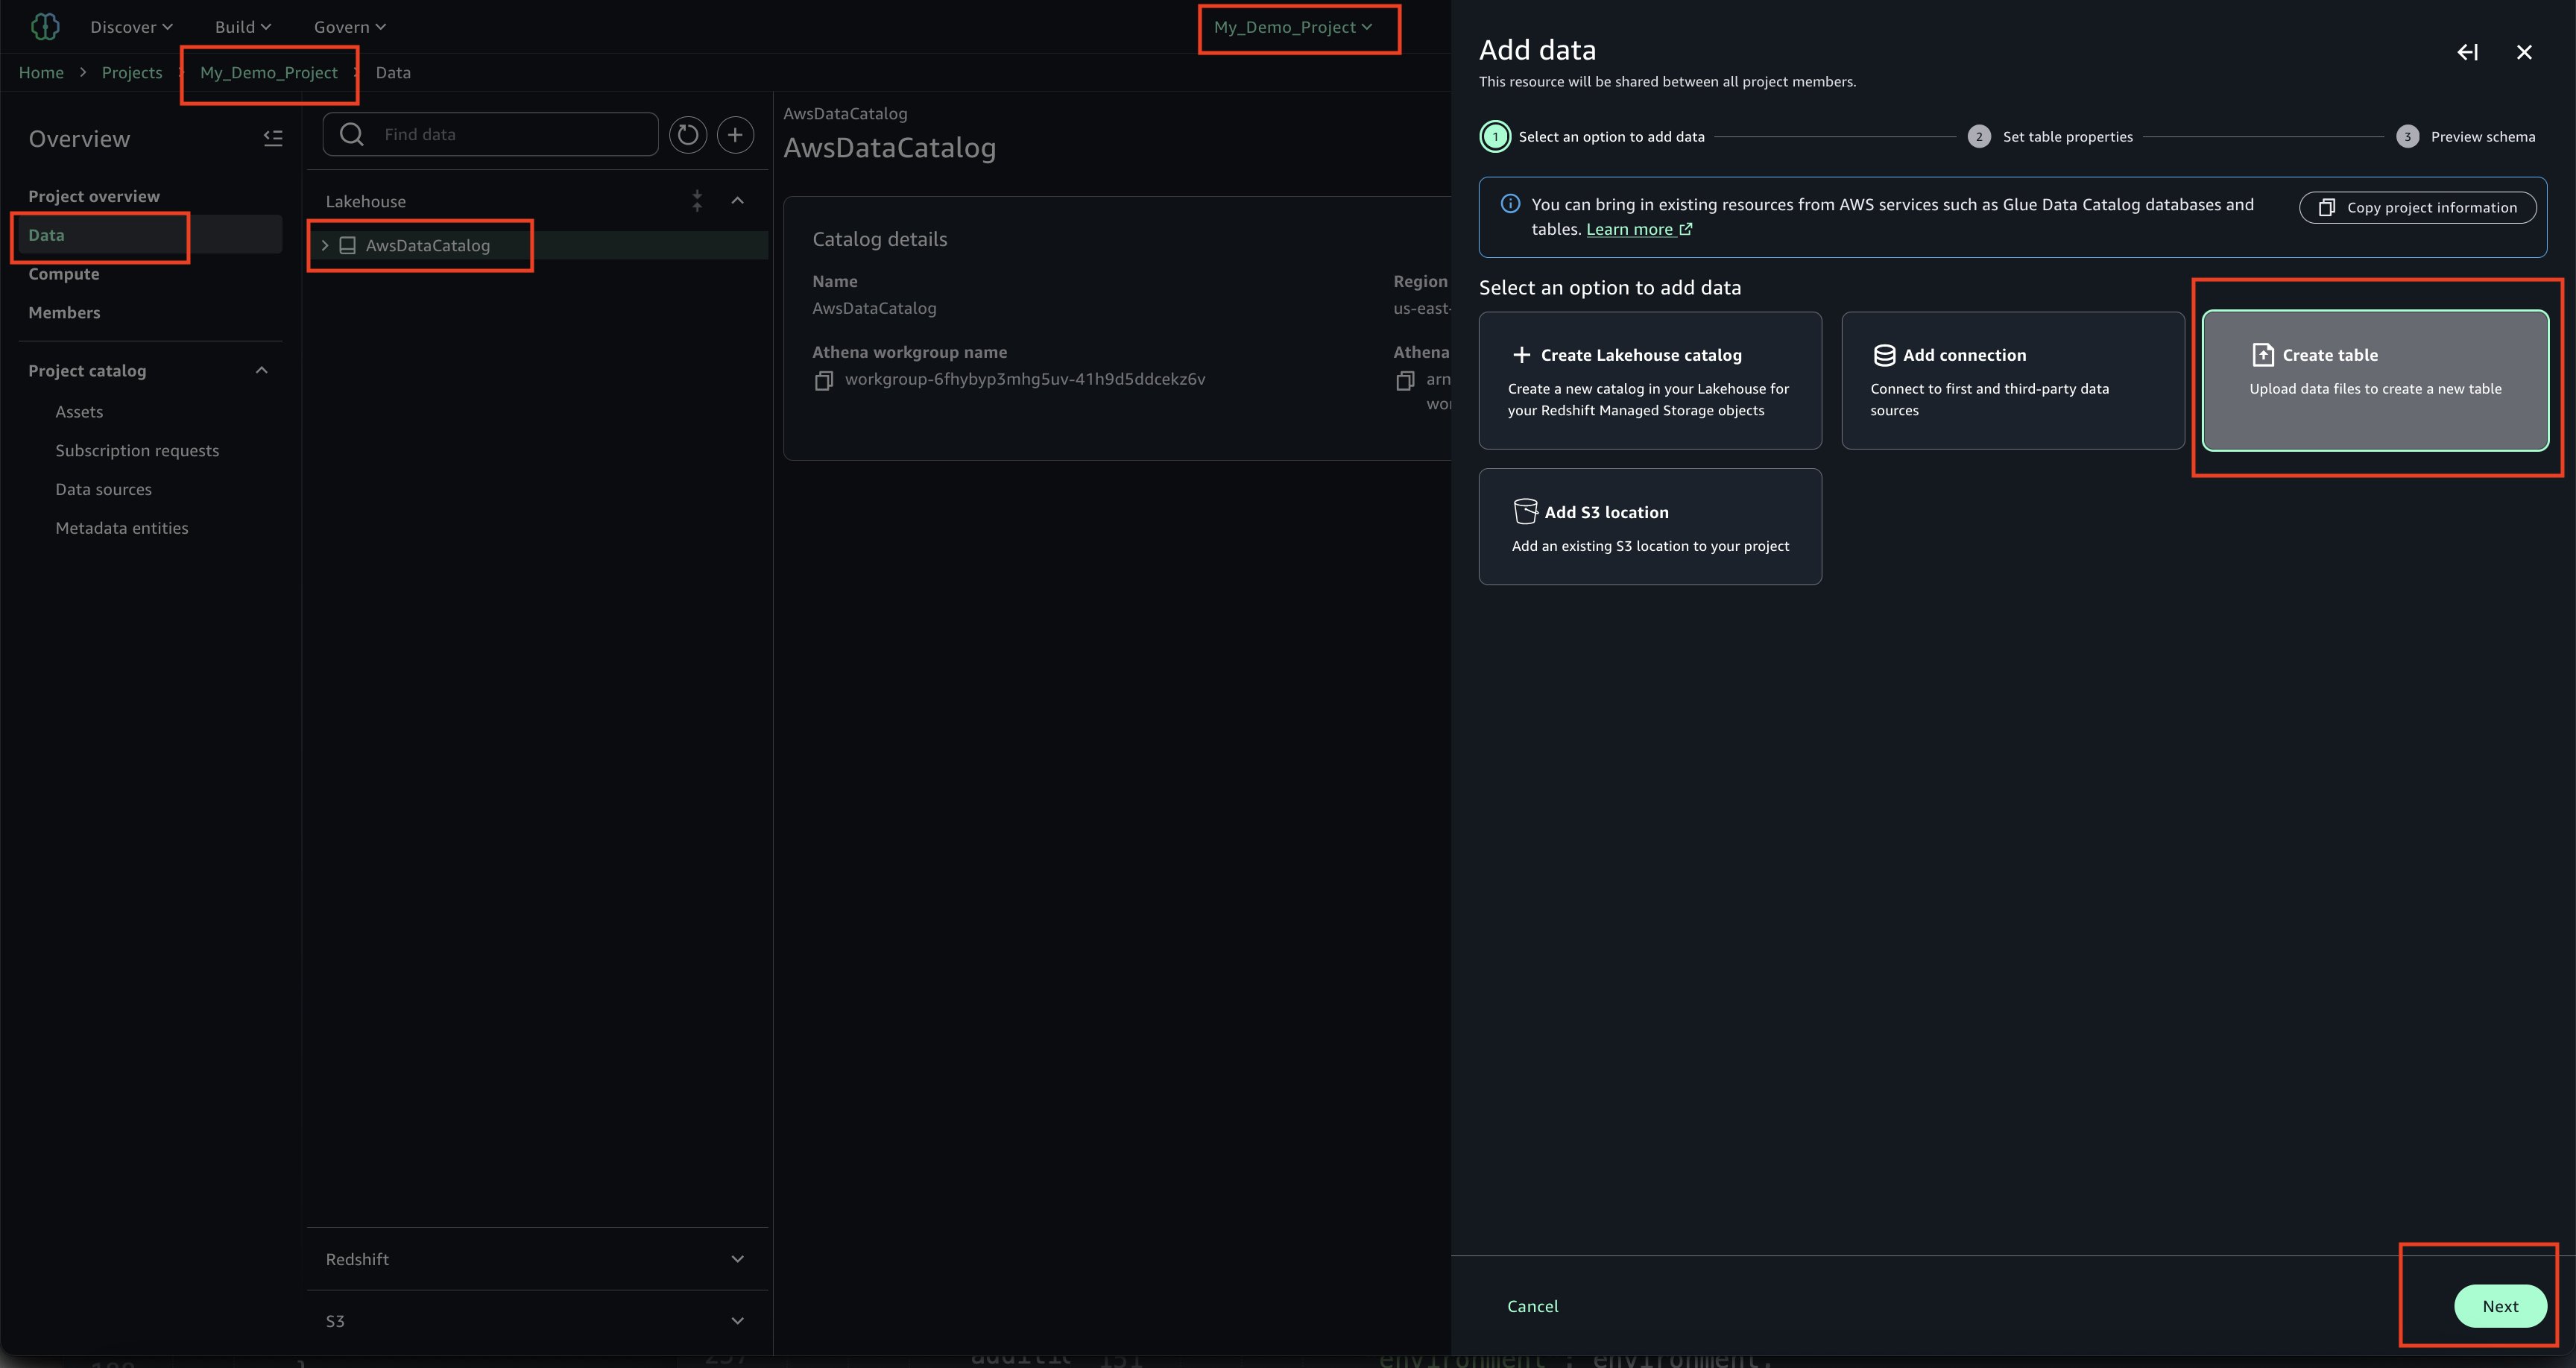
In your project ‘My_Demo_Project’, click on Data. Choose the plus sign to add a data set.
Upload your CSV file using the sample ‘Product_v6.csv’ found in the checkout folder of the ‘sample-sagemaker-unified-studio-governance-notifications’ GitHub repository.
Use table type as S3/external table.
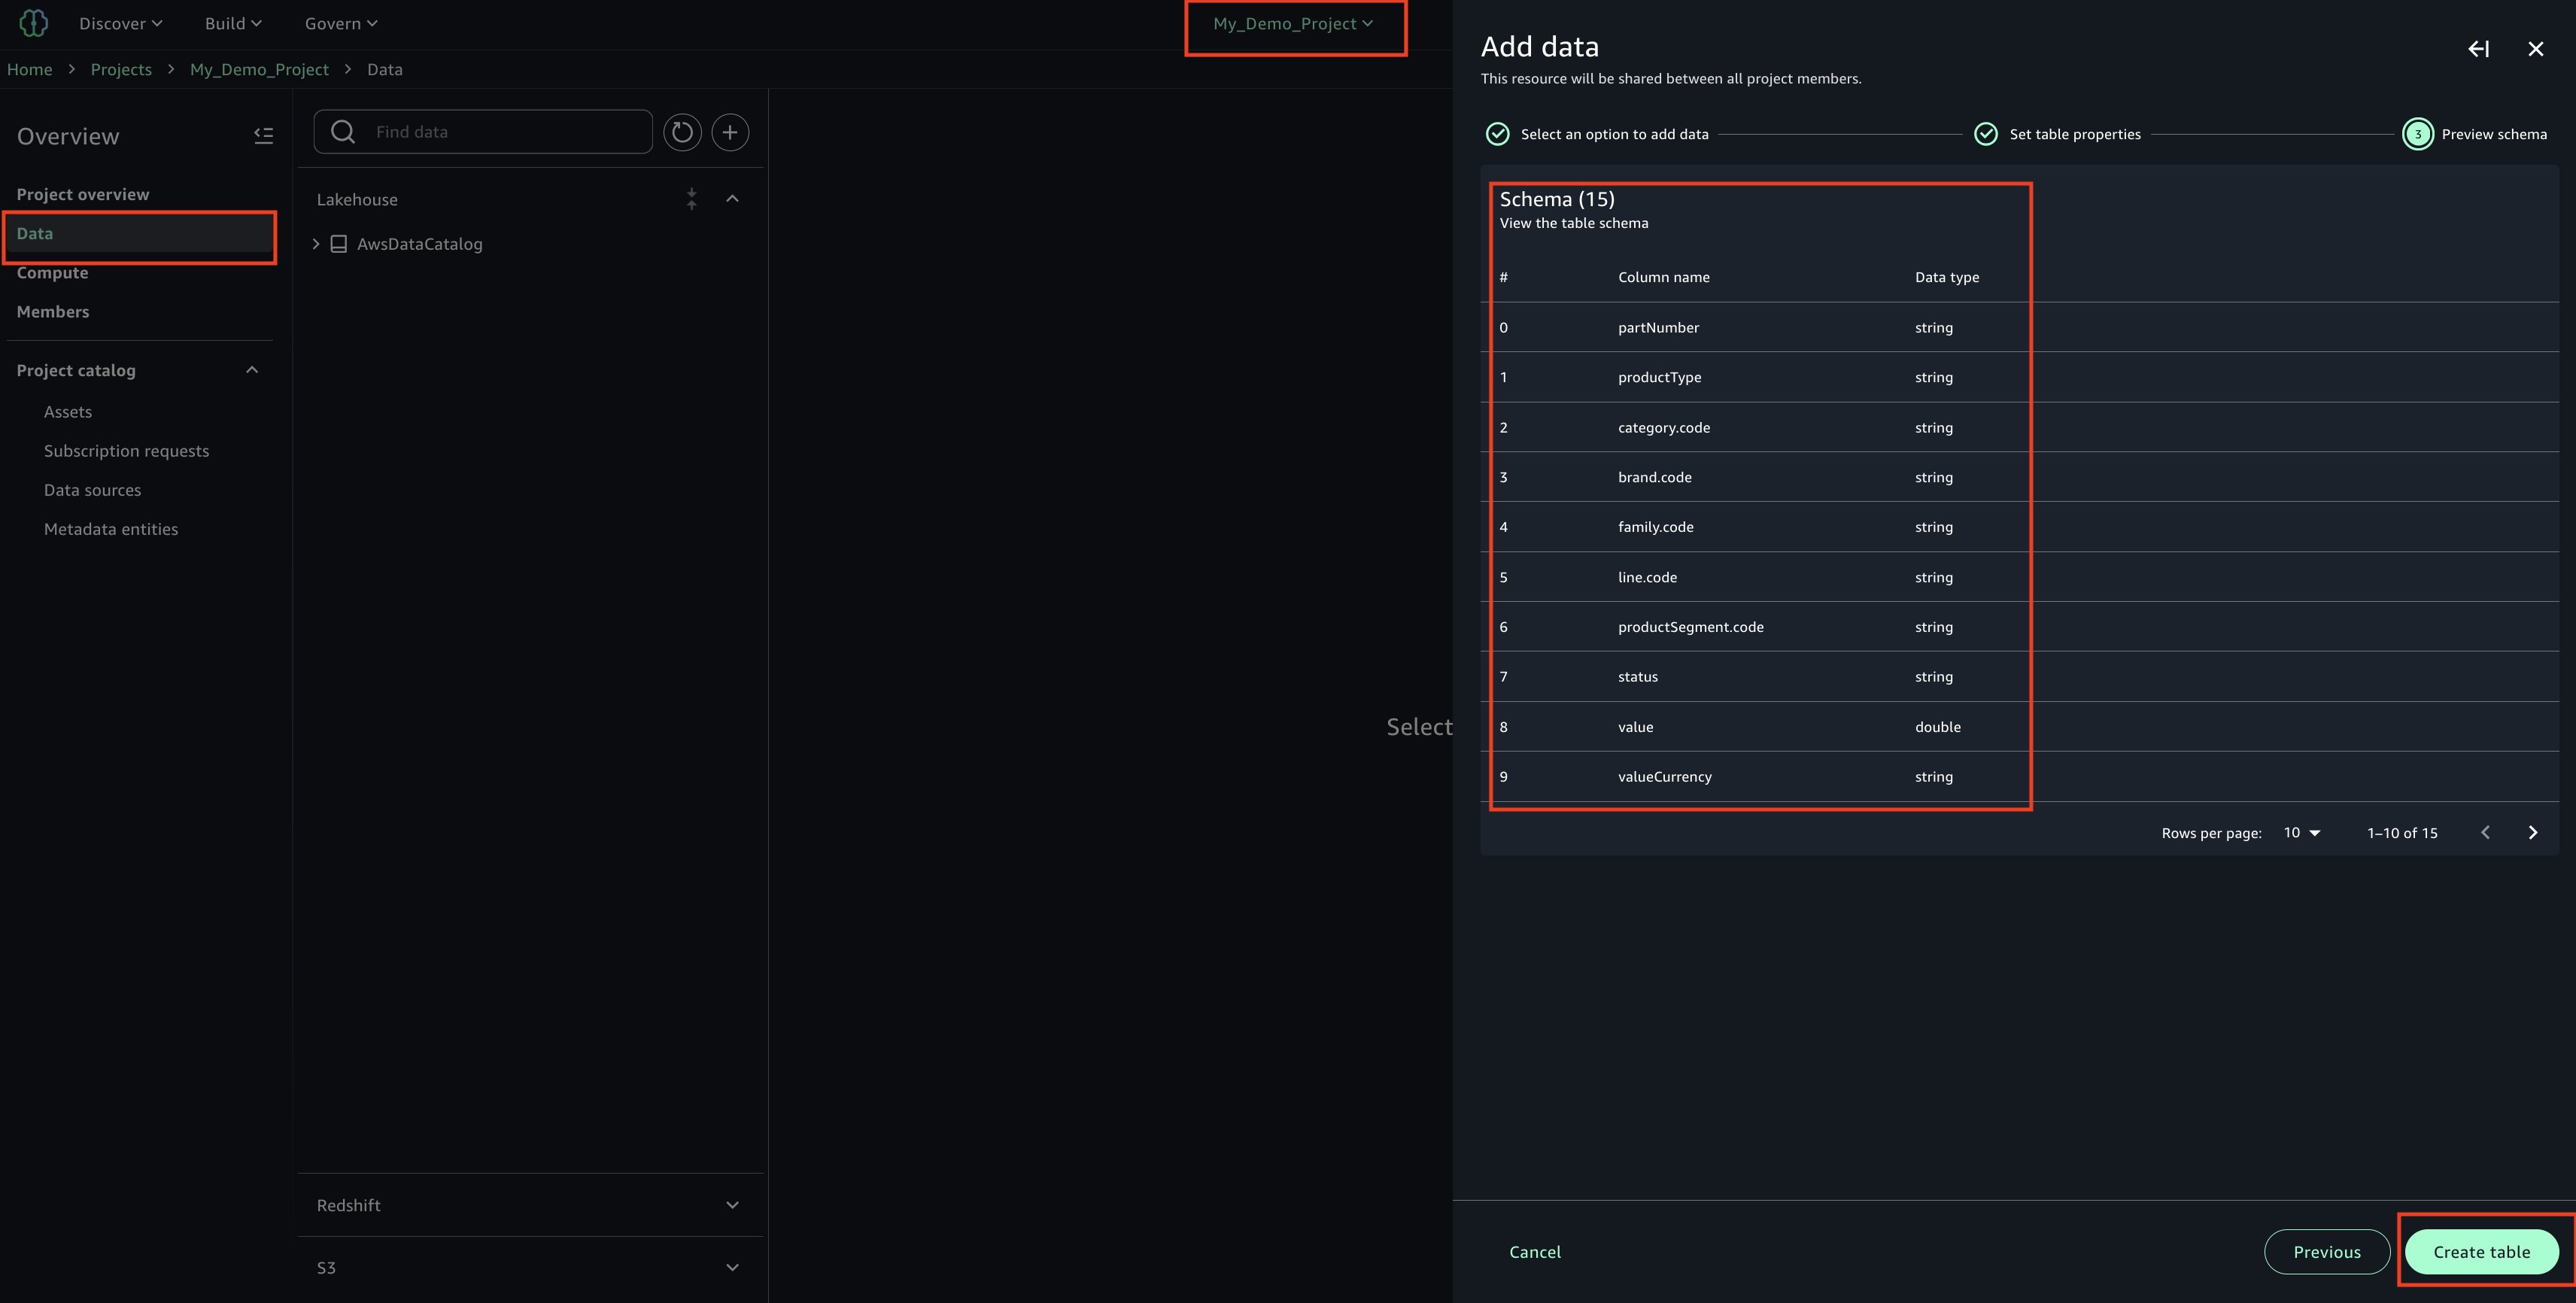
Review and confirm that the column/attribute names in the uploaded CSV file.
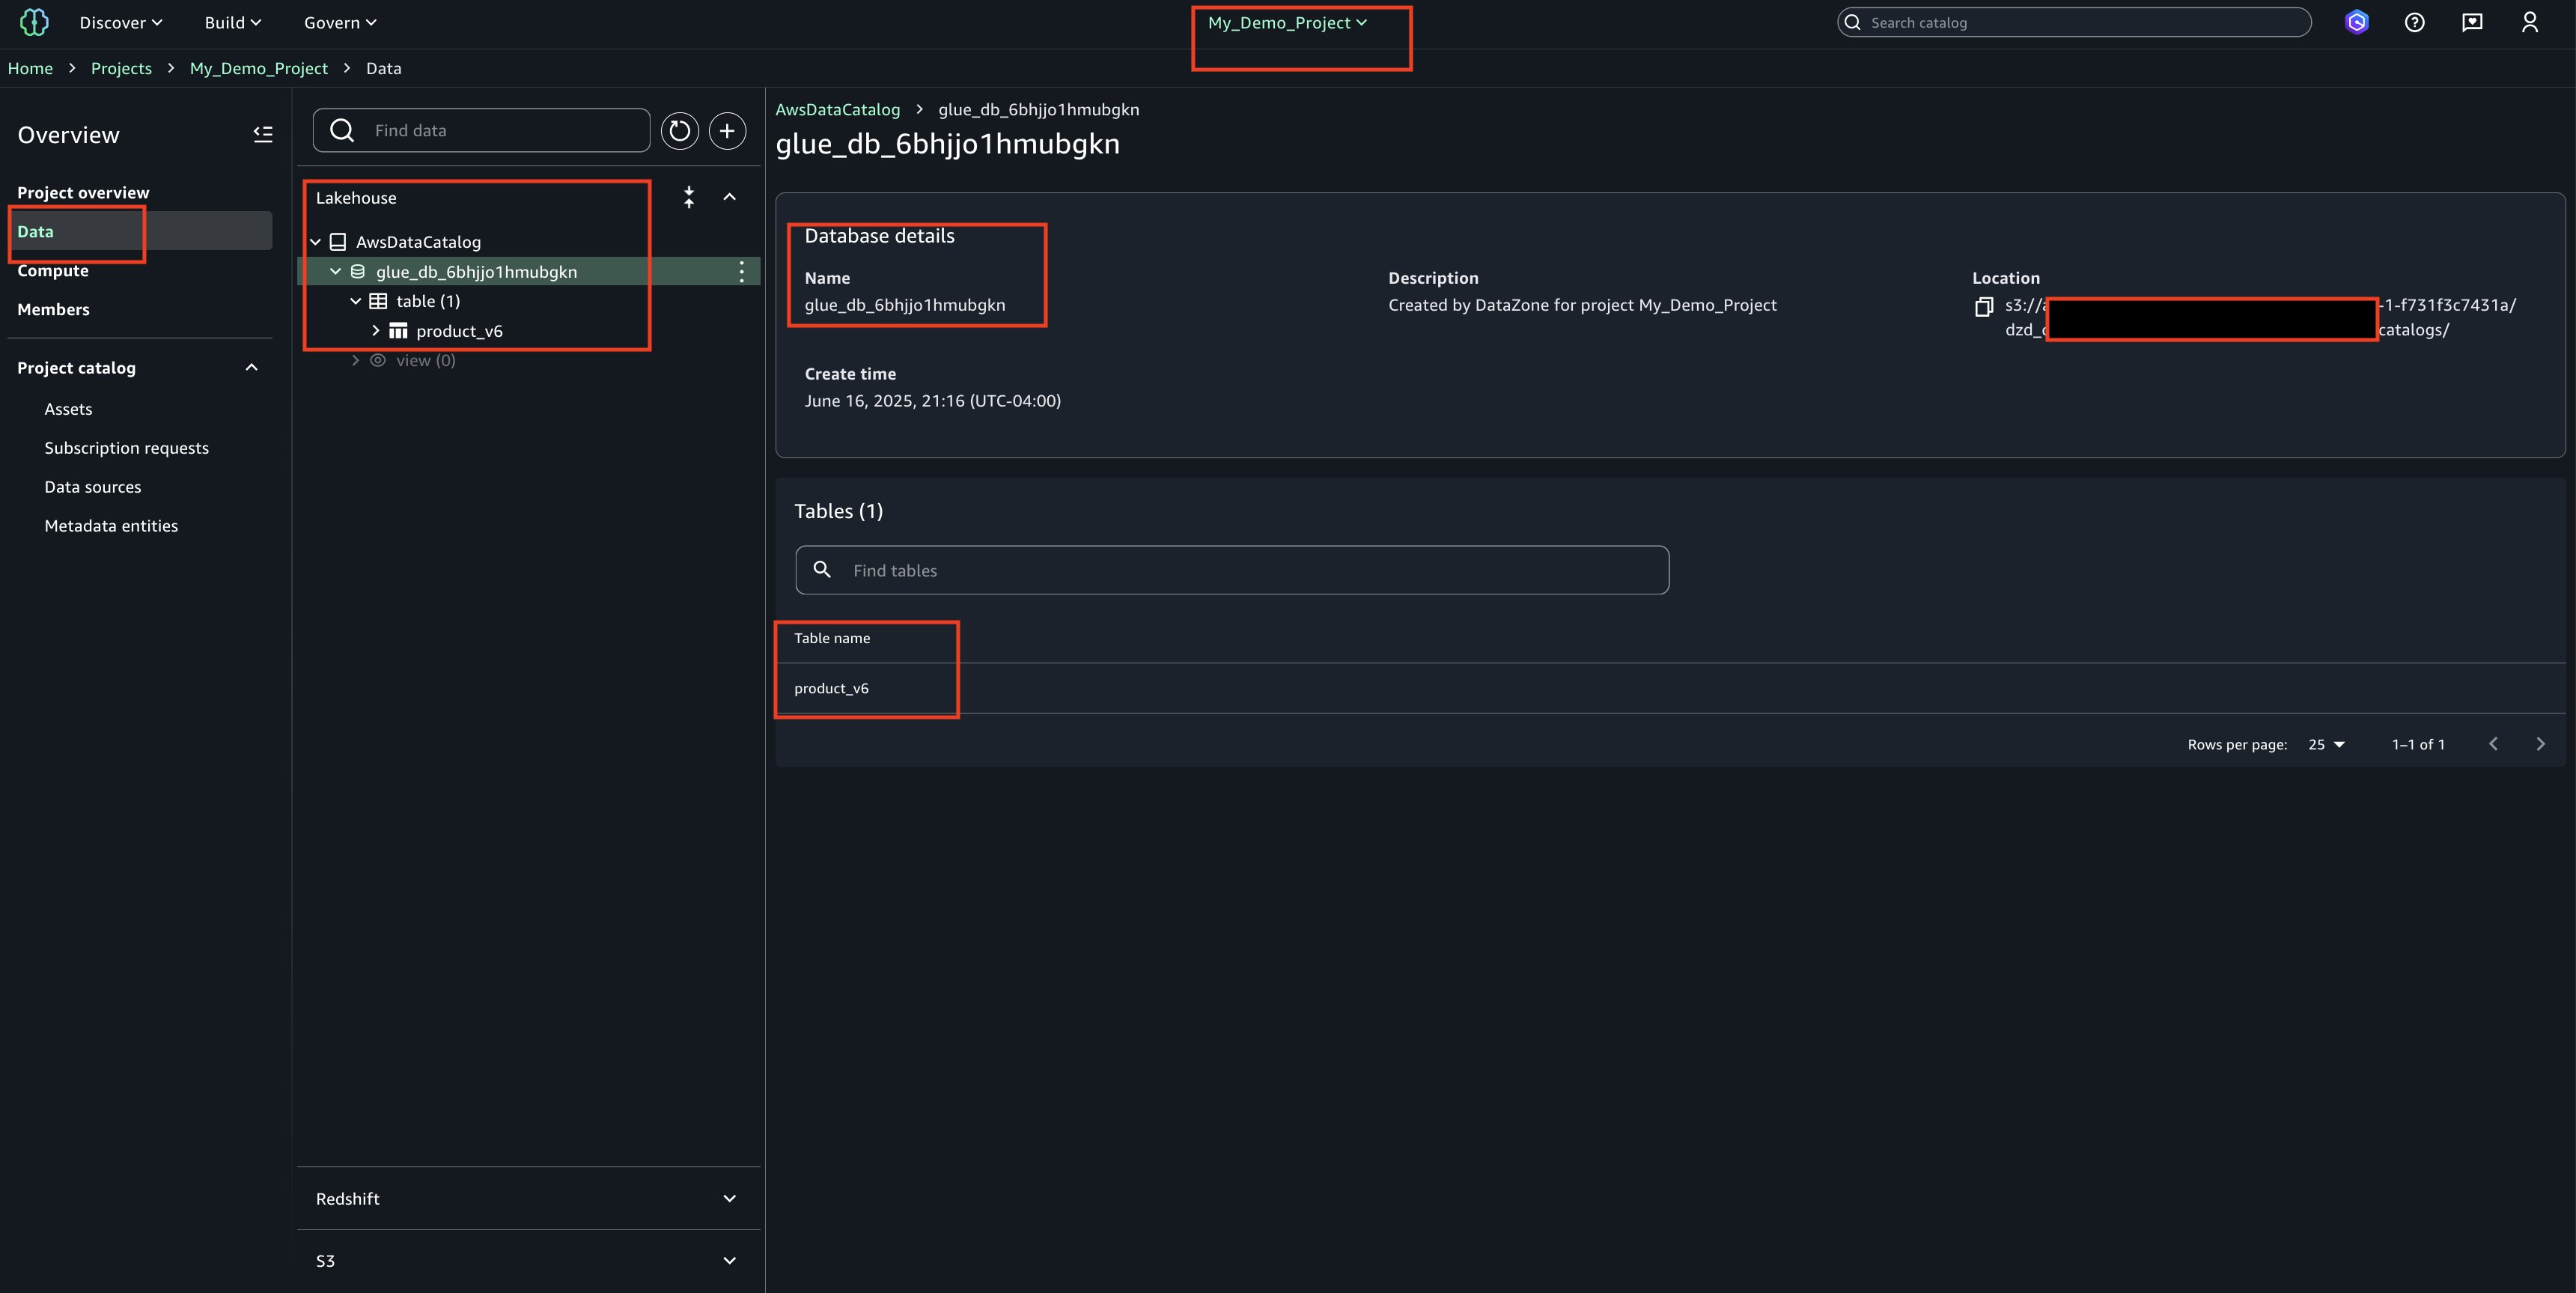
Check the Glue database(glue_db_<unique_id>) to confirm that the table has been created and properly imported
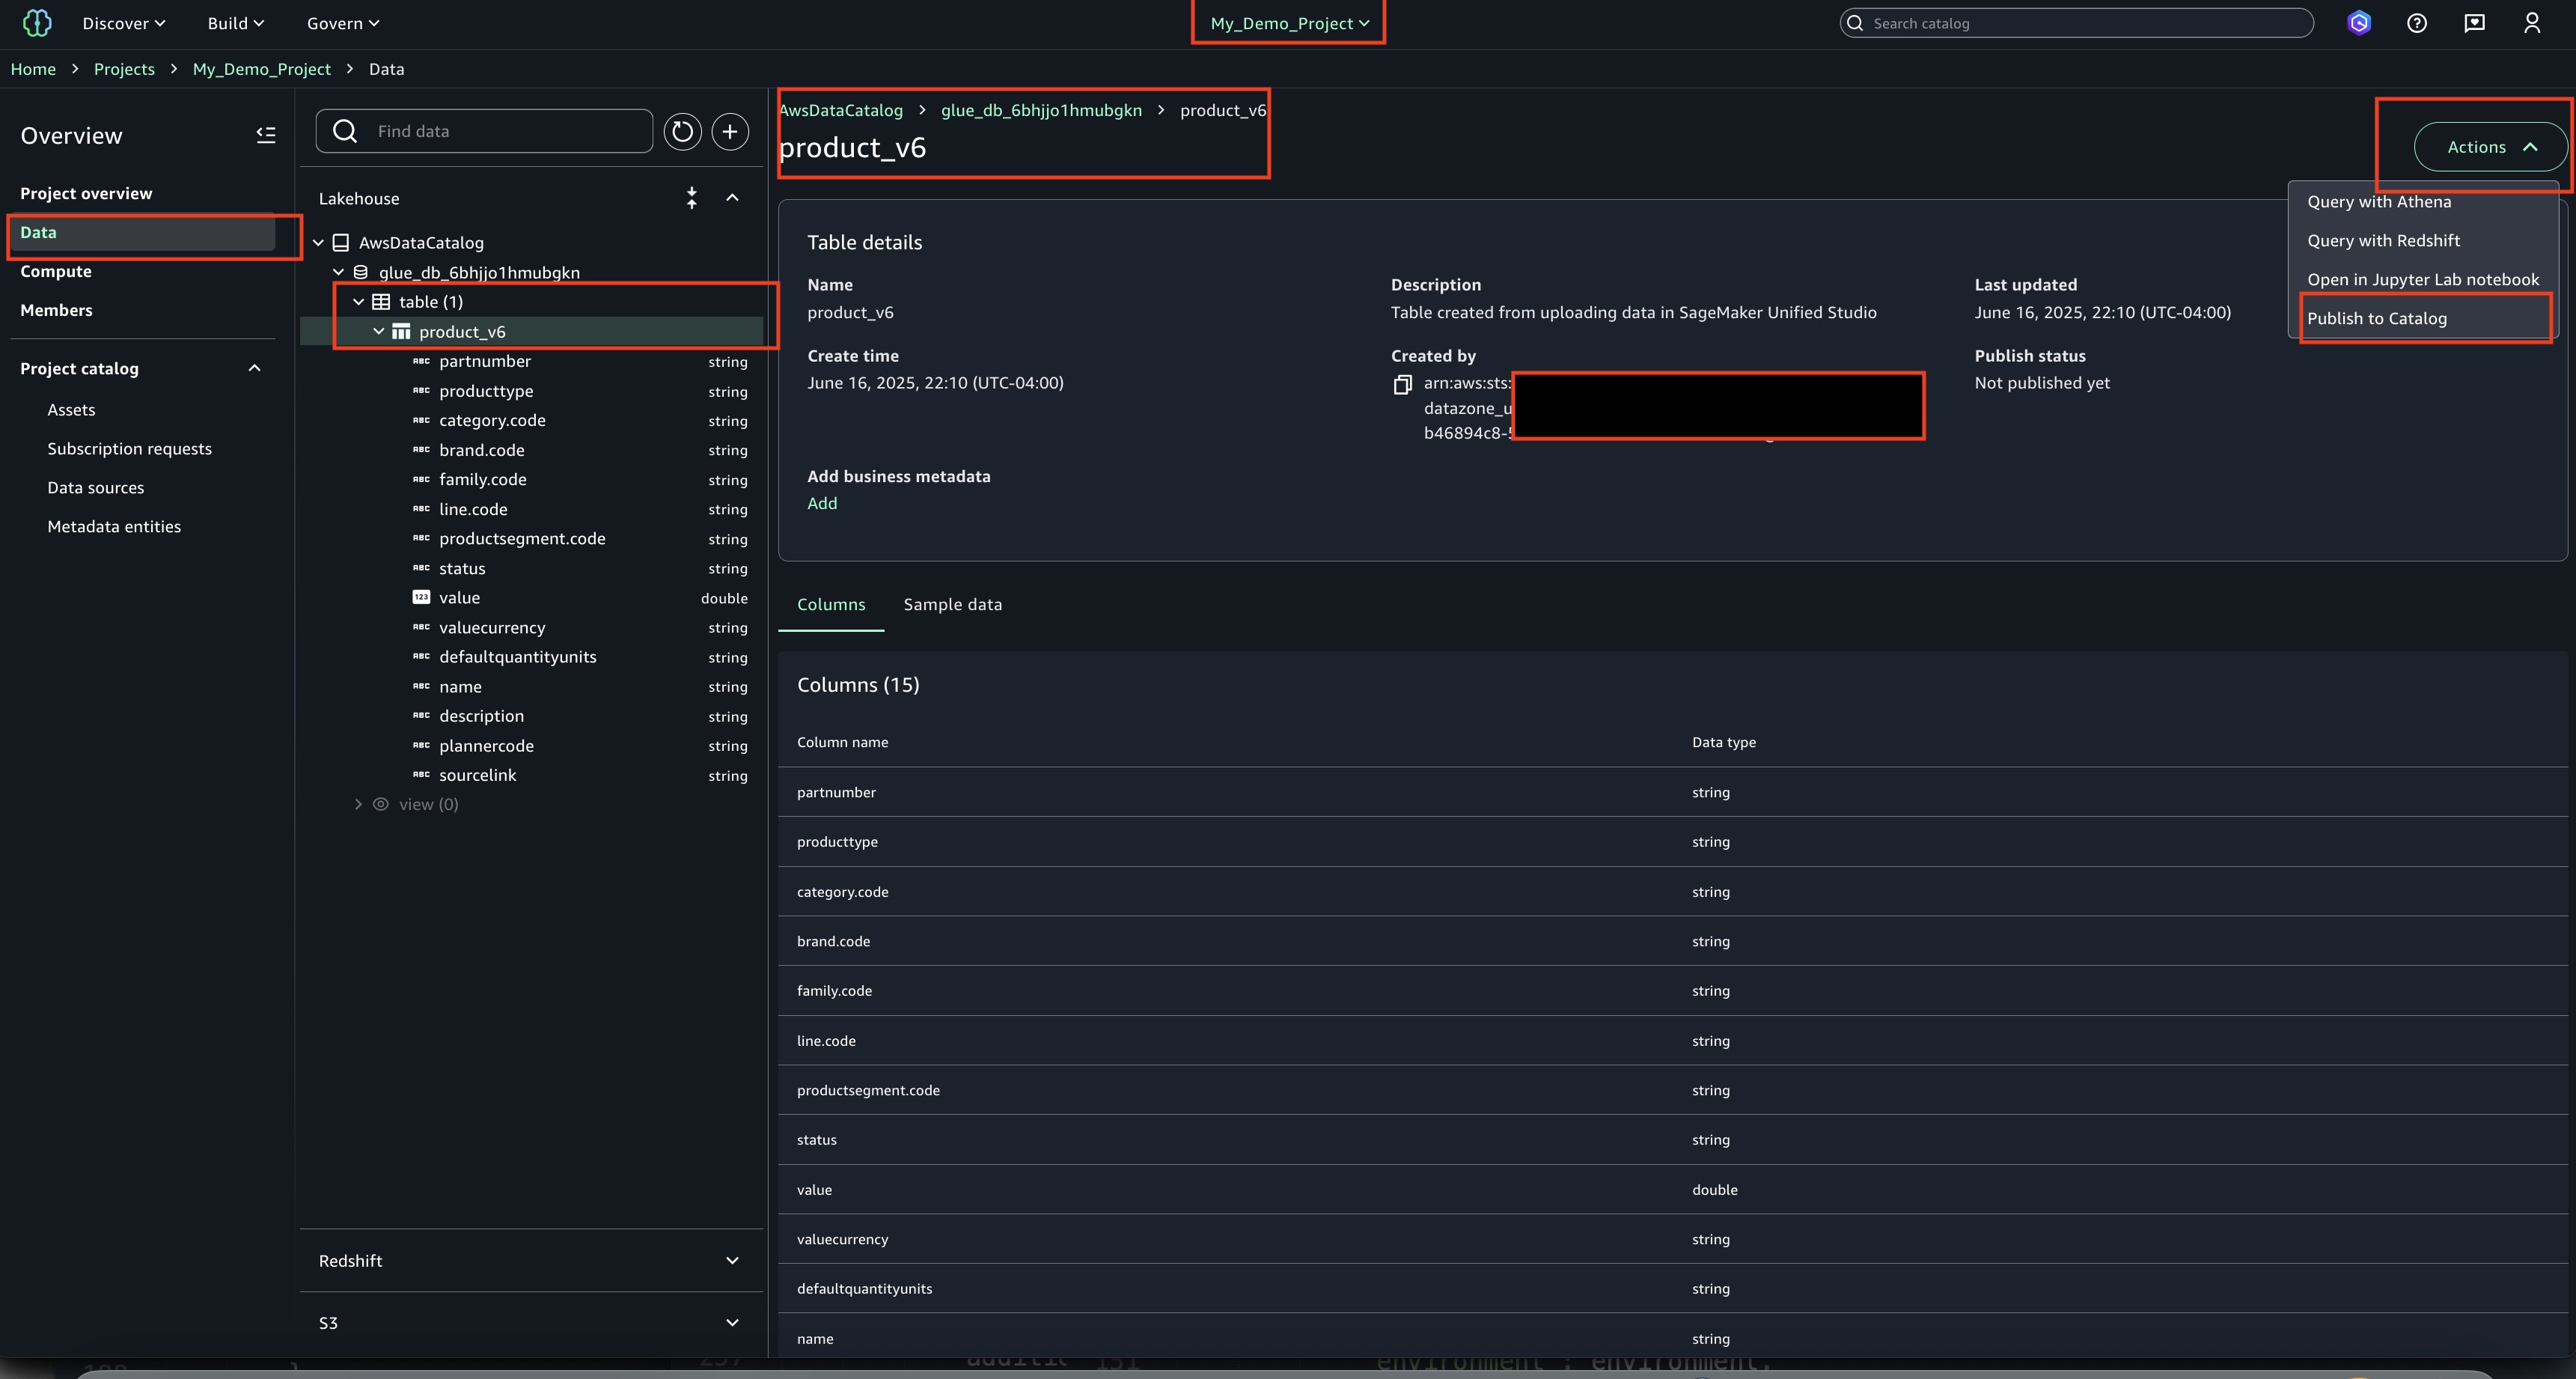
Publish Asset
Select the asset, choose Actions and Publish to Catalog.
View the published asset below.
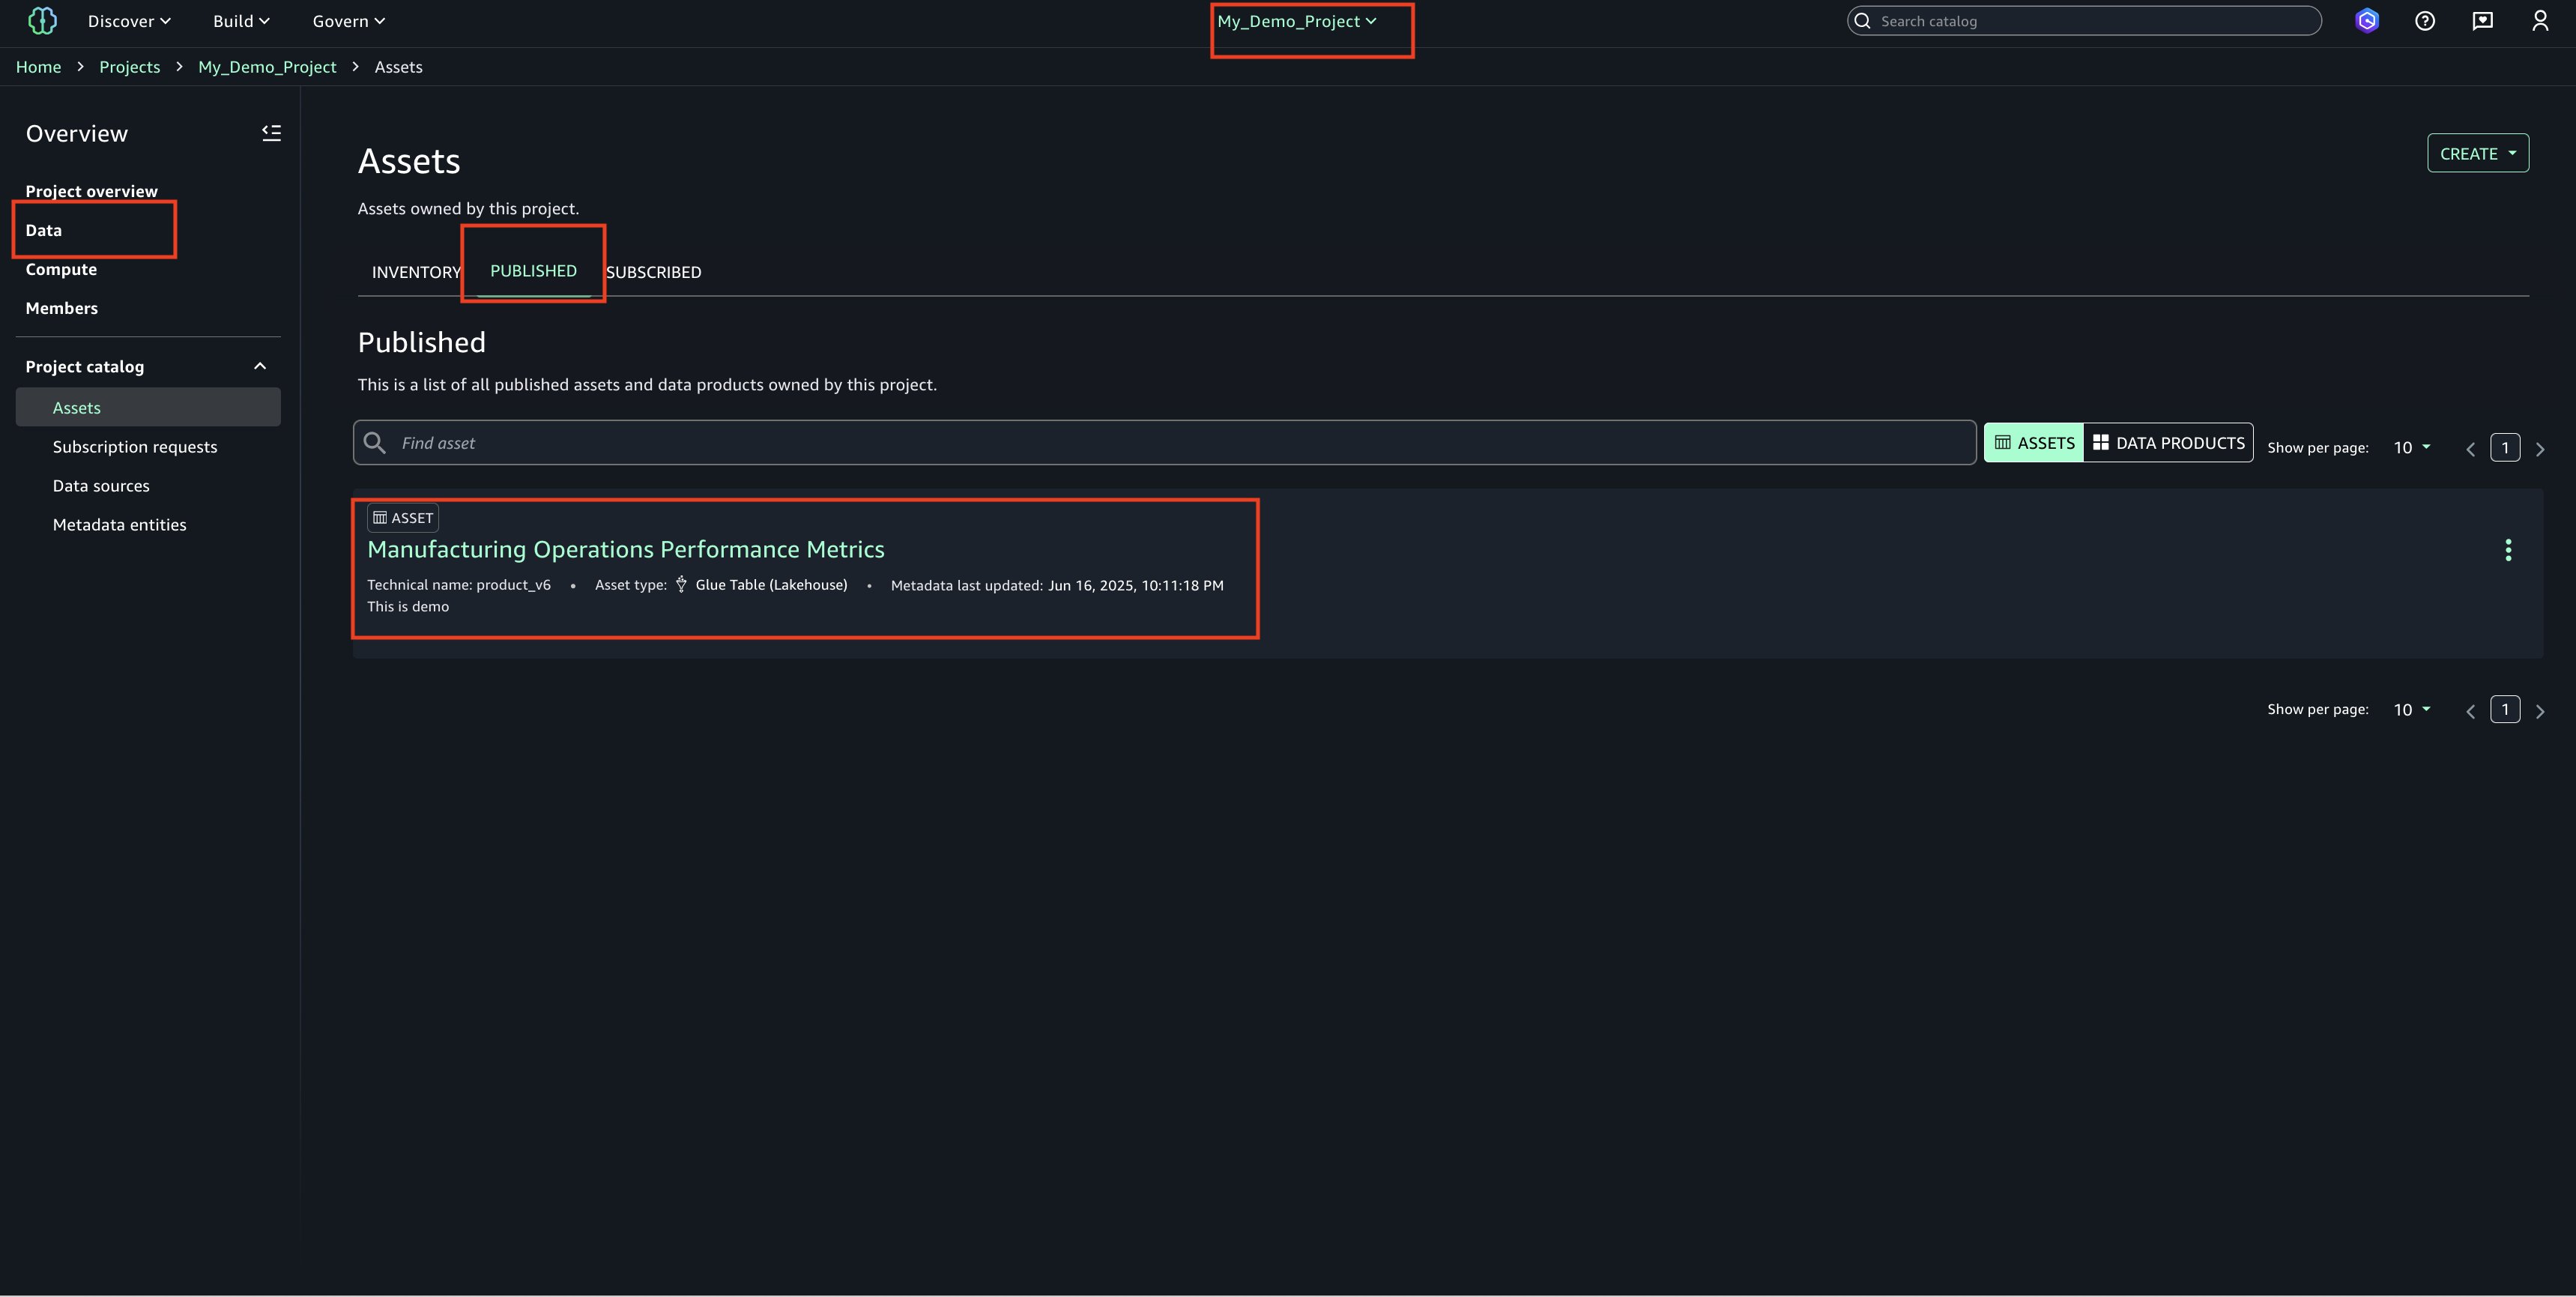
In the Project Catalog’s Assets section, locate the highlighted entry and verify the published table’s name
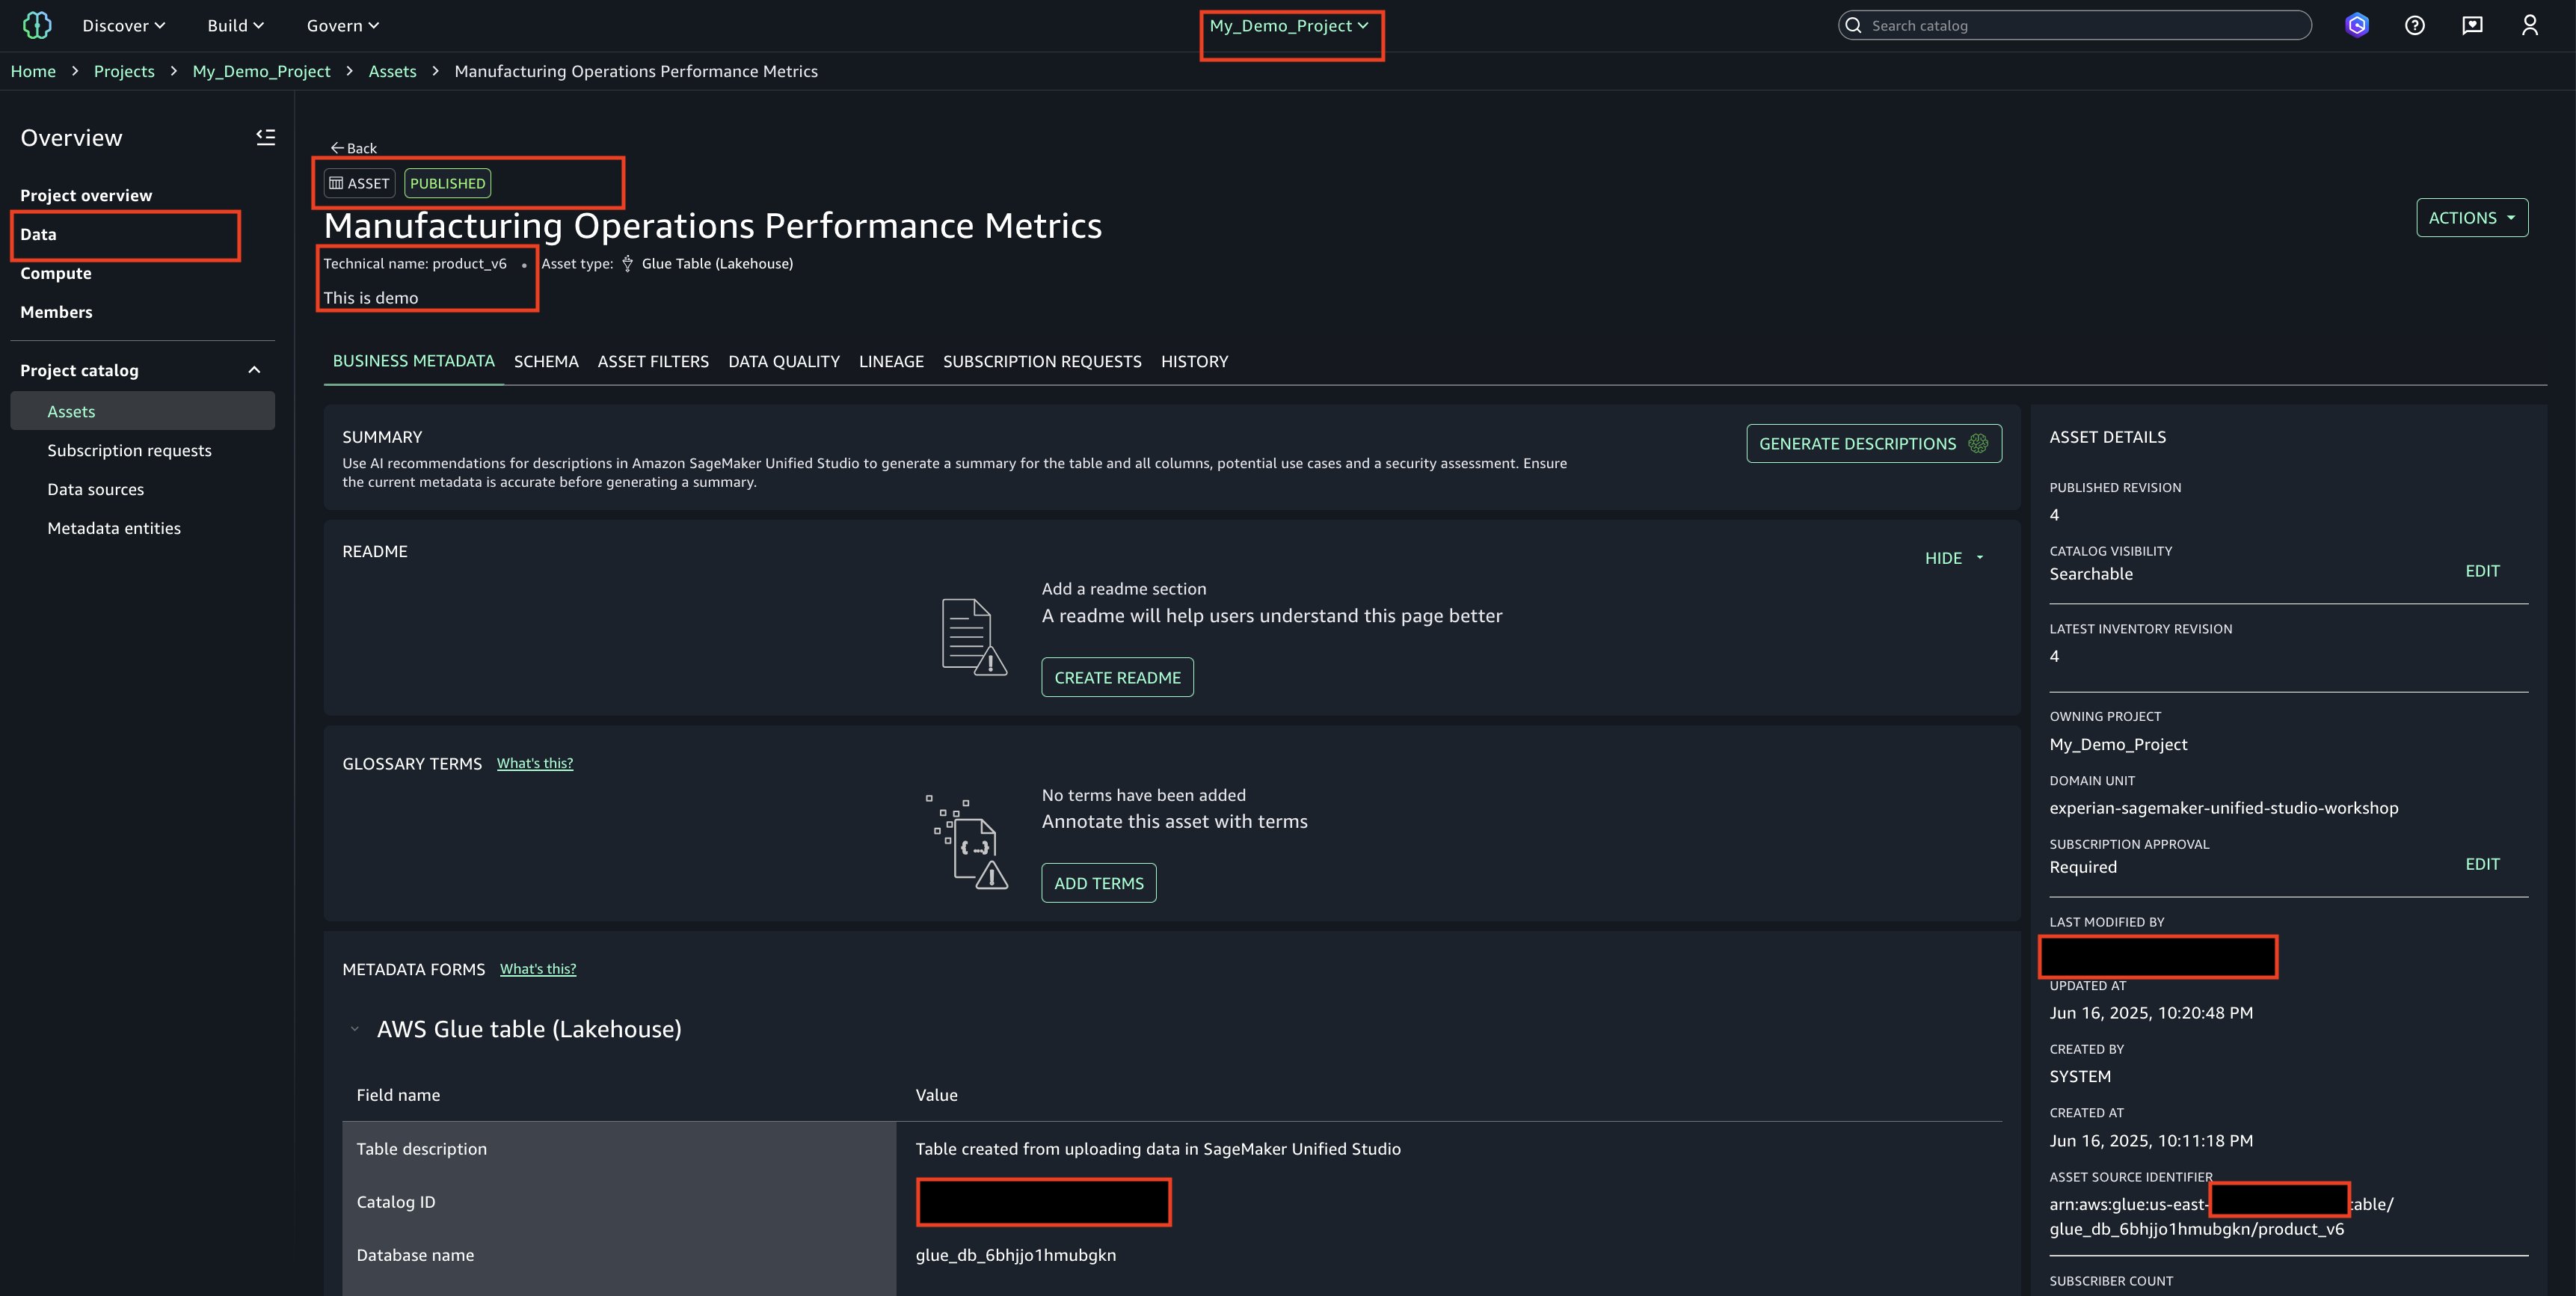
Choose the asset name to display additional details and properties about the table/asset.
Email Alerts
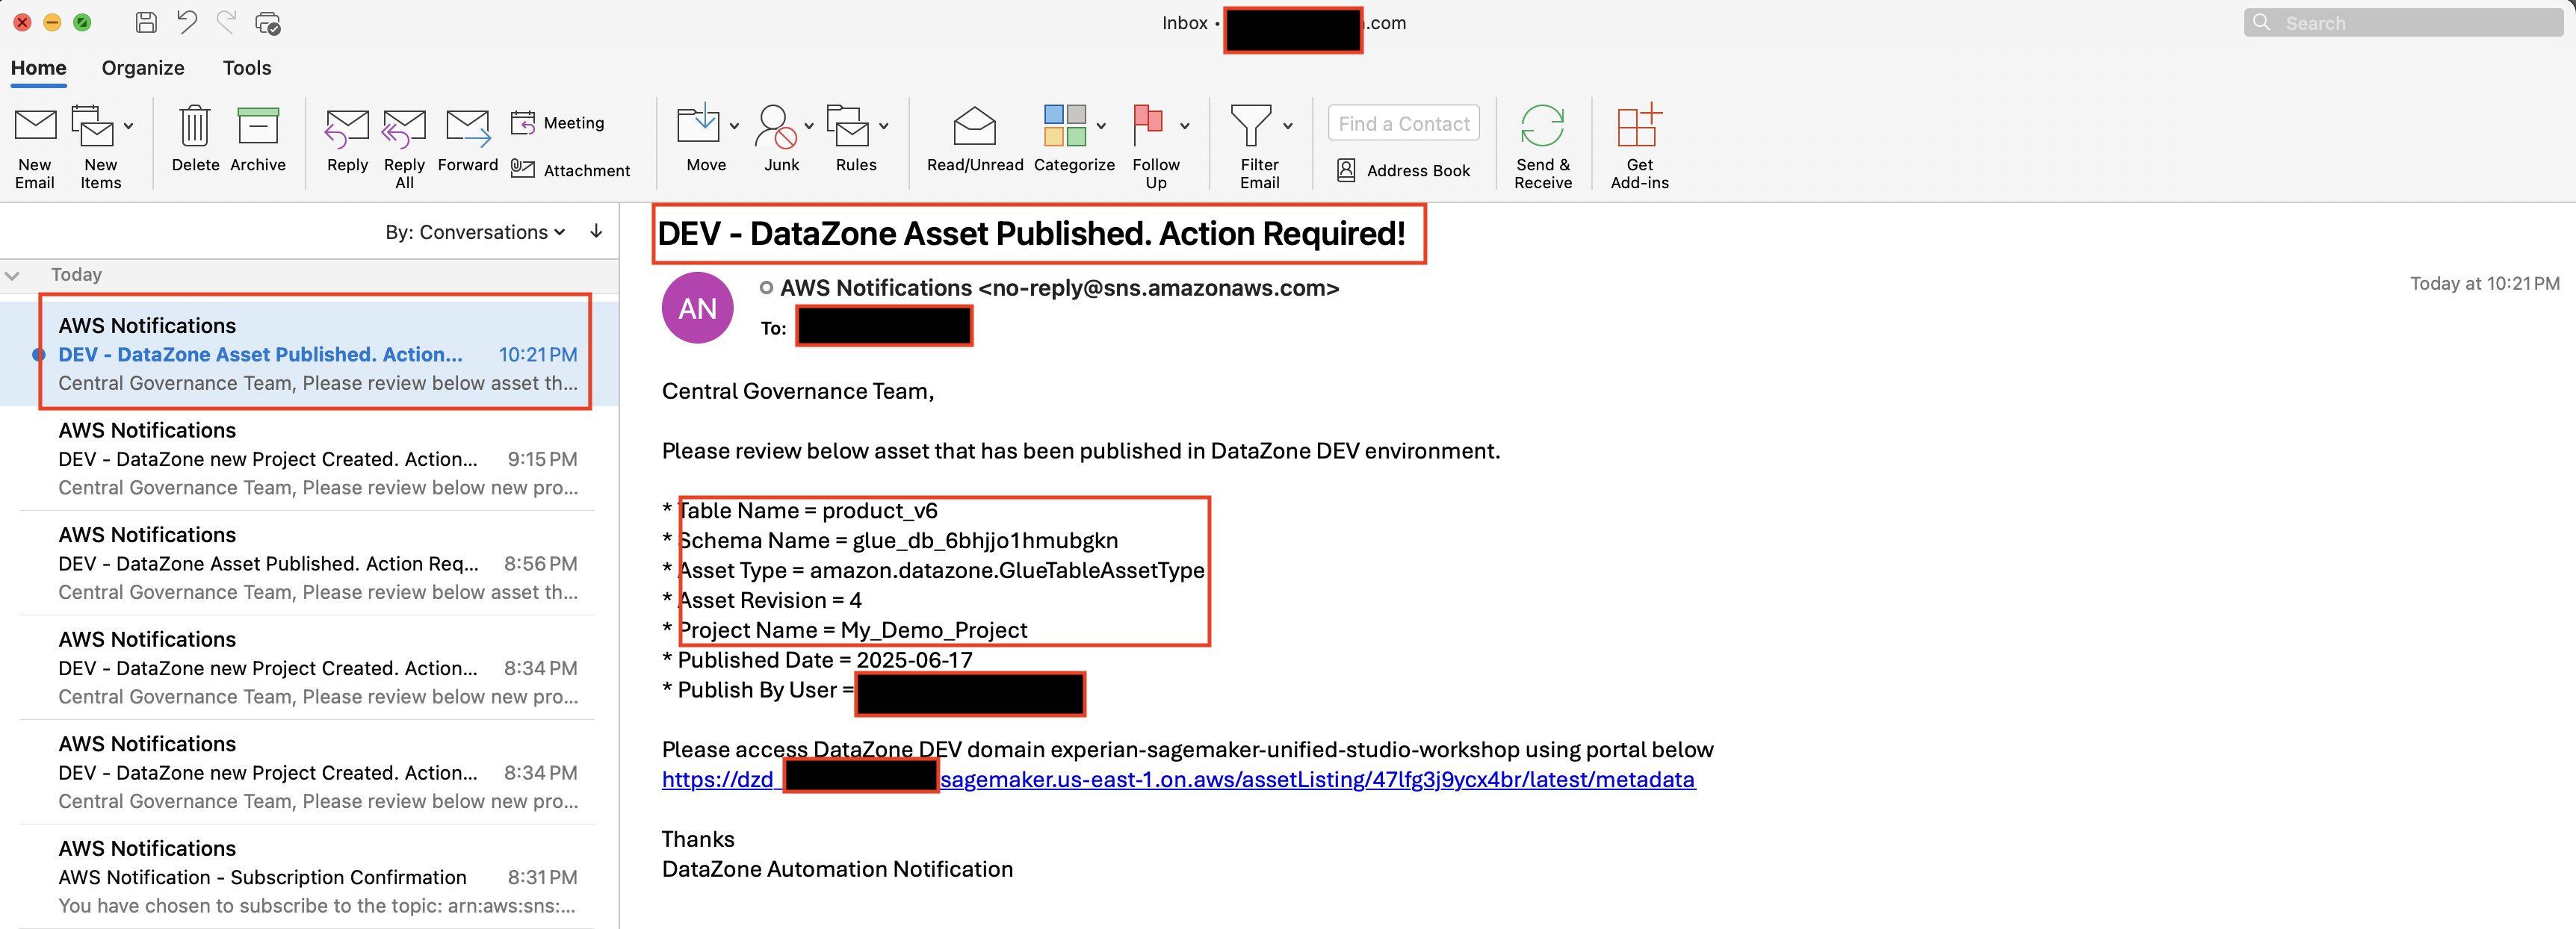
Once the asset is published to SageMaker Unified studio, you’ll receive an email alert sent with details of the published asset. Central governance teams can use this alert to review the published asset to ensure it aligns with the enterprise standards.
Email alerts are sent to notify users when assets have been published
Cleanup
To clean up your resources, complete the following steps:
cdk destroy --profile <PIPELINE-PROFILE>
Conclusion
In this post, you learned how to build an automated notification system for Amazon SageMaker Unified Studio using AWS services. Specifically, we covered:
How to set up event-driven notifications from Amazon SageMaker Unified Studio leveraging Amazon EventBridge, AWS Lambda, and Amazon SNS
The step-by-step process of deploying the solution using AWS CDK
Practical examples of monitoring critical events like project creation and asset publishing
How to integrate AWS Lambda permissions with SageMaker Unified Studio for secure operations
Best practices for implementing governance controls through automated notifications
Amazon SageMaker Catalog helps governance teams stay informed of catalog activities in real-time, enabling them to maintain organizational standards as their Data and ML platforms scale. The architecture is flexible and can be extended to integrate with enterprise workflow tools like ServiceNow or to monitor additional event types based on your organization’s needs.
We look forward to hearing how you adapt this solution for your organization’s governance needs. Fork the CDK code from our repository and share your implementation experience in the comments below
Twilio is a customer engagement platform that powers real-time, personalized customer experiences for leading brands through APIs that democratize communications channels like voice, text, chat, and video.
At Twilio, we manage a 20 petabyte-scale Amazon Simple Storage Service (Amazon S3) data lake that serves the analytics needs of over 1,500 users, processing 2.5 million queries monthly, and scanning an average of 85 PB of data. To meet our growing demands for scalability, emerging technology support, and data mesh architecture adoption, we built Odin, a multi-engine query platform that provides an abstraction layer built on top of Presto Gateway.
In this post, we discuss how we designed and built Odin, combining Amazon Athena with open-source Presto to create a flexible, scalable data querying solution.
A growing need for a multi-engine platform
Our data platform has been built on Presto since its inception, but over the years as we expanded to support multiple business lines and diverse use cases, we began to encounter challenges related to scalability, operational overhead, and cost management. Maintaining the platform through frequent version upgrades also became difficult. These upgrades required significant time to evaluate backwards compatibility, integrate with our existing data ecosystem, and determine optimal configurations across releases.
The administrative burden of upgrades and our commitment to minimizing user disruption caused our Presto version to fall behind. This prevented us from accessing the latest features and optimizations available in later releases. The adoption of Apache Hudi for our transaction-dependent critical workloads created a new requirement which our existing Presto deployment version couldn’t support. We needed an up-to-date Presto or Trino compatible service to accommodate these use cases while still reducing the operational overhead of maintaining our own query infrastructure.
Building a comprehensive data platform required us to balance multiple competing requirements and business constraints. We needed a solution that could support diverse workload types, from interactive analytics to ETL batch processing, while providing the flexibility to optimize compute resources based on specific use cases. We also wanted to improve upon cost management and attribution in our shared multi-tenanted query platform. Additionally, we needed to ensure that adopting any new technology did not cause any disruption to our users and maintained backward compatibility with existing systems during the transition period.
Selecting Amazon Athena as our modern analytics engine
Our users relied on SQL for interactive analysis, and we wanted to preserve this experience and make use of our existing jobs and application code. This meant we needed a Presto-compatible analytics service to modernize our data platform.
Amazon Athena is a serverless interactive query service built on Presto and Trino that allows you to run queries using a familiar ANSI SQL interface. Athena appealed to us due to its compatibility with open-source Trino and its seamless upgrade experience. Athena helps to ease the burden of managing a large-scale query infrastructure, and with provisioned capacity, offers predictable and scalable pricing for our largest query workloads. Athena’s workgroups provided the query and cost management capabilities we needed to efficiently support diverse teams and workload patterns with minimal overhead.
The ability to blend on-demand and dedicated serverless capacity models allows us to optimize workload distribution for our requirements, achieving the flexibility and scalability needed in a managed query environment. To address latency-sensitive and predictive query workloads, we adopted provisioned capacity for its serverless capacity guarantee and workload concurrency control features. For queries that may be ad-hoc and more flexible in scheduling, we opted to use the cost-efficient multi-tenant on-demand model, which optimizes resource utilization through shared infrastructure. In parallel to migrating workloads to Athena, we also needed a way to support legacy workloads that use custom implementations of Presto features. This requirement drove us to abstract the underlying implementation, allowing us to present users with a unified interface. This would give us the flexibility key to future proof our infrastructure and use the most appropriate compute for the workload and use case.
The birth of Odin
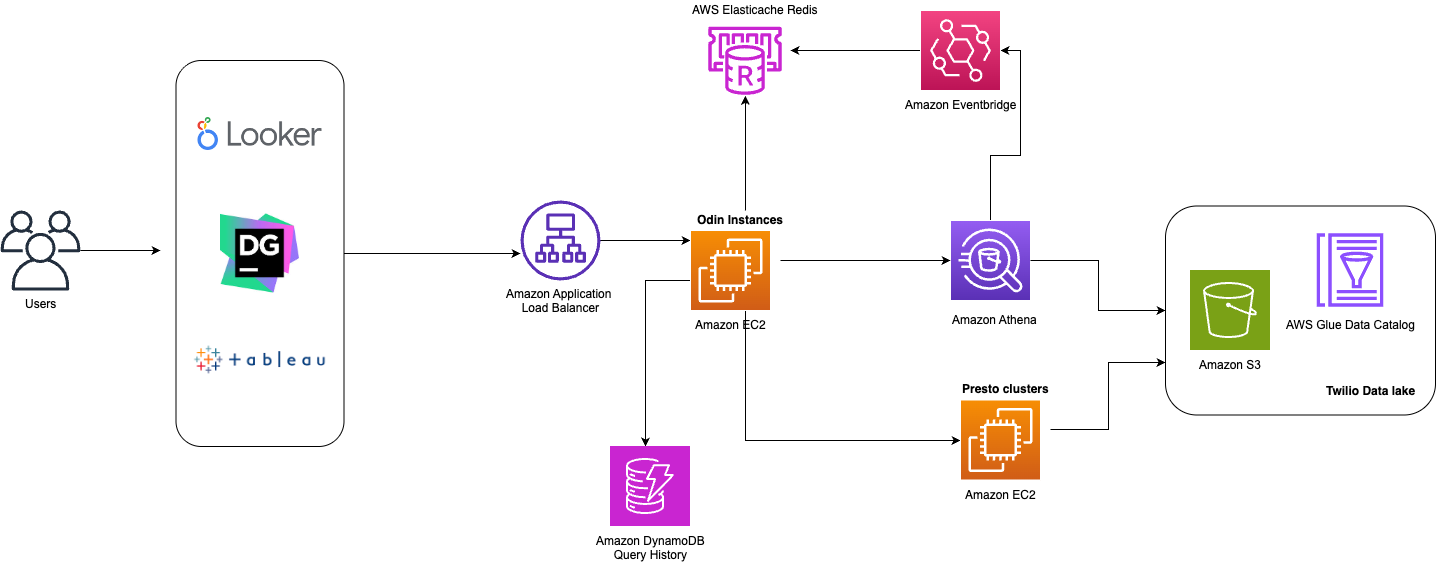
The following diagram shows Twilio’s multi-engine query platform that incorporates both Amazon Athena and open-source Presto.
High Level Architecture of Odin’s Query Engines
Odin is a Presto-based gateway built on Zuul, an open-source L7 application gateway developed by Netflix. Zuul had already demonstrated its scalability at Twilio, having been successfully adopted by other internal teams. Since end users primarily connect to the platform via a JDBC connector using the Presto Driver (which operates through HTTP calls), Zuul’s specialization in HTTP call management made it an ideal technical choice for our needs.
Odin functions as a central hub for query processing, employing a pluggable design that accommodates various query frameworks for maximum extensibility and flexibility. To interact with the Odin platform users are initially directed to an Amazon Application Load Balancer that sits in front of the Odin instances running on Amazon EC2. The Odin instances handle the authentication, routing, and entire query workflow throughout the query’s lifetime. Amazon ElastiCache for Redis handles the query tracking for Athena and Amazon DynamoDB is responsible for the maintaining the query history. Both query engines, Amazon Athena and the Presto clusters running on Amazon EC2,are supported by the AWS Glue Data Catalog as the metastore repository and query data from our Amazon S3-based data lake.
Routing queries to multiple engines
We had a variety of use cases that were being served by this query platform and therefore we opted to use Amazon Athena as our primary query engine while continuing to route certain legacy workloads to our Presto clusters. Prior to our architectural redesign, we encountered operational challenges due to our end users being tightly bound to specific Presto clusters which led to inevitable disruptions during maintenance windows. Additionally, users frequently overloaded individual clusters with diverse workloads ranging from lightweight ad-hoc analytics to complex data warehousing queries and resource-intensive ETL processes. This prompted us to implement a more sophisticated routing solution, one that was use case focused and not tightly bound to the specific underlying compute.
To enable routing across multiple query engines within the same platform, we developed a query hint mechanism that allows users to specify their intended use case. Users append this hint to the JDBC string via the X-Presto-Extra-Credential header, which Odin’s logical routing layer then evaluates alongside multiple factors including user identity, query origin, and fallback planning. The system also assesses whether the target resource has sufficient capacity, if not, it reroutes the query to an alternative resource with available capacity. While users provide initial context through their hints, Odin makes the final routing decisions intelligently on the server side. This approach balances user input with centralized orchestration, ensuring consistent performance and resource availability.
For example, say a user might specify the following connection string when connecting to the Odin platform from a Tableau client:
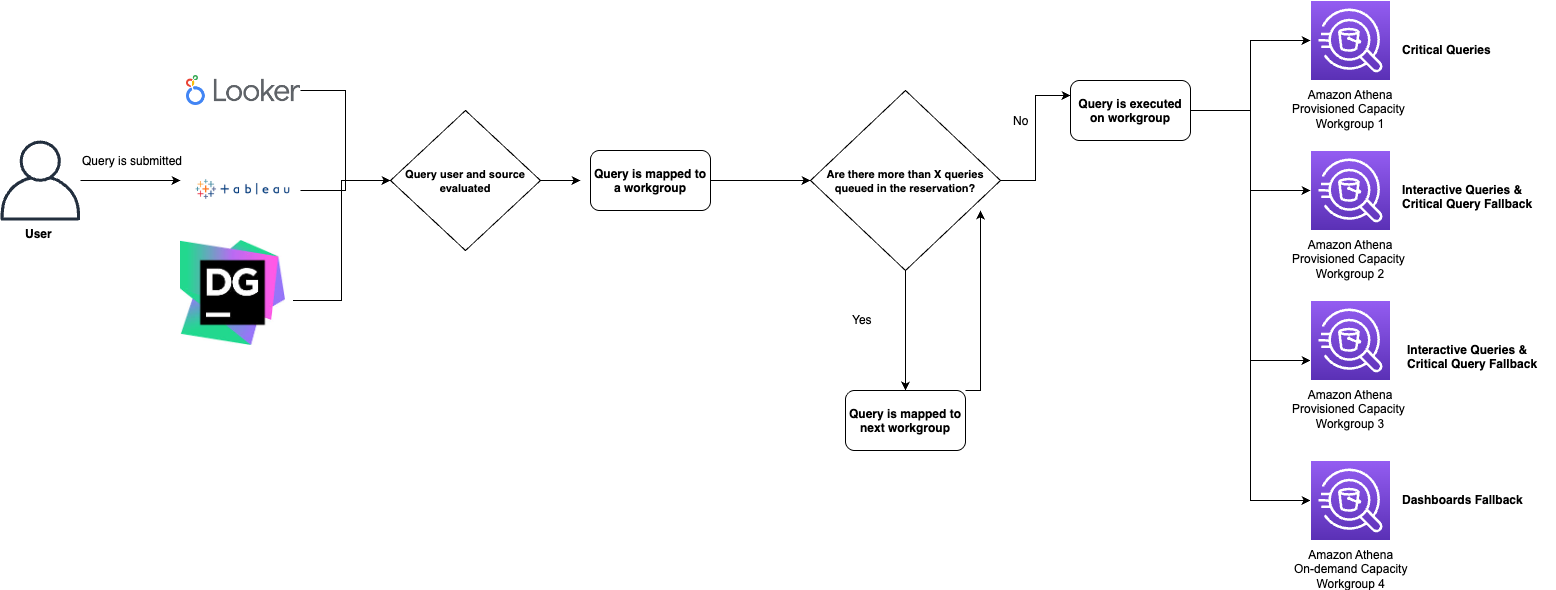
The connection string uses the extraCredentials header to signal execution on Athena, where Odin validates query submission details, including the submitting user and tool, before determining the appropriate Athena workgroup for initial routing. Since this Tableau data source and user qualify as “critical queries,” the system routes them to a workgroup backed by capacity reservations. However, if that workgroup has too many pending queries in the execution queue, Odin’s routing logic automatically redirects to alternative workgroups with greater available resources. When necessary, queries may ultimately route to workgroups running on on-demand capacity. Through this fallback logic, Odin provides built-in load balancing at the routing layer, ensuring optimal utilization across the underlying compute infrastructure.
Here is an example workflow of how our queries are routed to Athena workgroups:
Once a query has been submitted to a workgroup for execution, Odin will also log the routing decision in our tracking system based on Amazon ElastiCache for Redis so that Odin’s routing logic can maintain real-time awareness of queue depths across all Athena workgroups. Additionally, Odin uses Amazon EventBridge to integrate with Amazon Athena to keep track of a query state change and create event-based workflows. Our Redis-based query tracking system effectively handles edge cases, such as when a JDBC client terminates mid-query. Even during such unexpected interruptions, the platform consistently maintains and updates the accurate state of the query.
Query history
Following successful query routing to either an Athena workgroup or one of our open-source Presto clusters, Odin persists the query identifier and destination endpoint in a query history table in DynamoDB. This design utilizes a RESTful architecture where initial query submissions operate as POST requests, while subsequent status checks function as GET requests that utilize DynamoDB as the authoritative lookup mechanism to locate and poll the appropriate execution engine. By centralizing query execution records in DynamoDB rather than maintaining state on individual servers, we’ve created a truly stateless system where incoming requests can be handled by any Amazon EC2 instance hosting our Odin web service.
Lessons learned
The transition from open-source Presto to Athena required some adaptation time, due to subtle differences in how these query engines operate. Since our Odin framework was built on the Presto driver, we needed to modify our processing approach to ensure compatibility between both systems.
As we began to adopt Athena for more use cases, we noticed a difference in the record counts between Athena and the original Presto queries. We discovered this was due to open-source Presto returning results with every page containing a header column, whereas Athena results only contain the header column on the first page and subsequent pages containing records only. This difference meant that for a 60-page result set, Athena would return 59 fewer rows than open-source Presto. Once we identified this pagination behavior, we optimized Odin’s result handling logic to properly interpret and process Athena’s format, so that queries would return accurate results.
Due to the nature of using the Odin platform, most of our interactions with the Athena service are API driven so we make use of the ResultSet object with the GetQueryResults API to retrieve query execution data. Using this mechanism, the API returns the data as all VARCHAR data type, even for complex types such as row, map, or array. This created a challenge because Odin uses the Presto driver for query parsing, resulting in a type mismatch between the expected formats and actual returned data. To address this, we implemented a translation layer within the Odin framework that converts all data types to VARCHAR and handles any downstream implications of this conversion internally.
These technical adjustments, while initially challenging, highlighted the importance of carefully managing the subtle differences between different query execution engines when building a unified data platform.
Scale of Odin and looking ahead
The Odin platform serves over 1,500 users who execute approximately 80,000 queries daily, totaling 2.5 million queries per month. Odin also powers more than 5,000 Business Intelligence (BI) reports and dashboards for Tableau and Looker. The queries are executed across our multi-engine landscape of more than 30 workgroups in Athena based on both provisioned capacity and on-demand workgroups and 4 Presto clusters on running on EC2 instances with Auto Scaling enabled that run on average 180 instances each. As Twilio continues to experience rapid growth, our Odin platform has enabled us to mature our technology stacks by both upgrading existing compute resources and integrating new technologies. We can do all this without disrupting the experience for our end users. While Odin serves as our foundation, we’re excited to continue to expand this pluggable infrastructure. Our roadmap includes migrating our self-managed open-source Presto implementation to EMR Trino, introducing Apache Spark as a compute engine via Amazon EMR Serverless or AWS Glue jobs, and integrating generative AI capabilities to intelligently route queries across Odin’s various compute options.
Conclusion
In this post, we’ve shared how we built Odin, our unified multi-engine query platform. By combining AWS services like Amazon Athena, Amazon ElastiCache for Redis, and Amazon DynamoDB with our open-source technology stack, we created a transparent abstraction layer for users. This integration has resulted in a highly available and resilient platform environment that serves our query processing needs.
By embracing this multi-engine approach, not only did we solve our query infrastructure challenges but we also established a flexible foundation that will continue to evolve with our data needs, ensuring we can deliver powerful insights at scale regardless of how technology trends shift in the future.
To learn more and get started using Amazon Athena, please see the Athena User Guide.
AWS Secrets Manager is a service that you can use to manage, retrieve, and rotate database credentials, application credentials, API keys, and other secrets throughout their lifecycles. You can also use Secrets Manager to replace hard-coded credentials in application source code with runtime calls to retrieve credentials dynamically when needed.
Managing secrets in Amazon Elastic Kubernetes Service (Amazon EKS) environments creates three main challenges: dependency on language-specific AWS SDKs, network dependencies from direct API calls, and complex secret rotation across multiple pods.
The AWS Secrets Manager Agent addresses these challenges by providing a language-agnostic HTTP interface that runs locally within your compute environment. In this post, we show you how to deploy the Secrets Manager Agent as a sidecar container in Amazon EKS to retrieve secrets through HTTP calls.
New approach: Secrets Manager Agent
The Secrets Manager Agent is a client-side agent that you can use to standardize consumption of secrets from Secrets Manager across your AWS compute environments. The agent pulls and caches secrets in your compute environment and allows your applications to consume secrets directly from the in-memory cache through a local HTTP endpoint (localhost:2773).
Instead of making network calls to Secrets Manager, you fetch secret values from the local agent, improving application availability while reducing API calls. Because the Secrets Manager Agent is language agnostic, you can use it across different programming languages without requiring AWS SDK dependencies.
Post-quantum cryptography protection
The Secrets Manager Agent implements ML-KEM (Machine Learning-based Key Encapsulation Mechanism) key exchange, which provides additional cryptographic protection for secret retrieval operations. This feature is enabled by default and requires no additional configuration.
Authentication and access control
This solution uses Amazon EKS Pod Identity for secure authentication to AWS services. Pod Identity provides a simplified way to associate AWS Identity and Access Management (IAM) roles with Kubernetes service accounts, avoiding the need for OpenID Connect (OIDC) provider configuration. IAM principals need GetSecretValue and DescribeSecret permissions to retrieve secrets through the agent.
The Secrets Manager Agent offers protection against server-side request forgery (SSRF). When you install the agent, it generates a random SSRF token and stores it in /var/run/awssmatoken. The agent actively blocks requests that don’t include this token in the X-Aws-Parameters-Secrets-Token header.
Solution overview
In this solution, you deploy the Secrets Manager Agent as a sidecar container in an Amazon EKS pod alongside an NGINX application. The sidecar pattern helps make sure that each pod has its own agent instance, providing isolation and fine-grained security boundaries.
This post demonstrates the Secrets Manager Agent sidecar approach, complementing the AWS Secrets and Configuration Provider (ASCP) guidance covered in Announcing ASCP integration with Pod Identity.
Amazon EKS supports multiple patterns for consuming Secrets Manager secrets. The ASCP for the Kubernetes Secrets Store CSI Driver works well when you want secrets mounted as files and prefer Kubernetes-native secret management. Use the Secrets Manager Agent when you need HTTP-based secret access, want to avoid pod restarts during secret rotation, or need granular refresh control via the refreshNow parameter.
Choosing between Secrets Manager Agent and CSI Driver:
Kubernetes-native secret management and file-based secret consumption
Each secret management approach has specific advantages for different use cases. The Secrets Manager Agent works well for applications requiring HTTP-based access and dynamic secret updates, while the ASCP with CSI Driver is ideal for applications that need file-based secret mounting. Consider your application’s specific requirements, operational patterns, and security needs when choosing between these approaches.
To deploy the solution, you build the agent binary, containerize it, and deploy it to Amazon EKS using Kubernetes manifests with Amazon EKS Pod Identity for secure access to Secrets Manager.
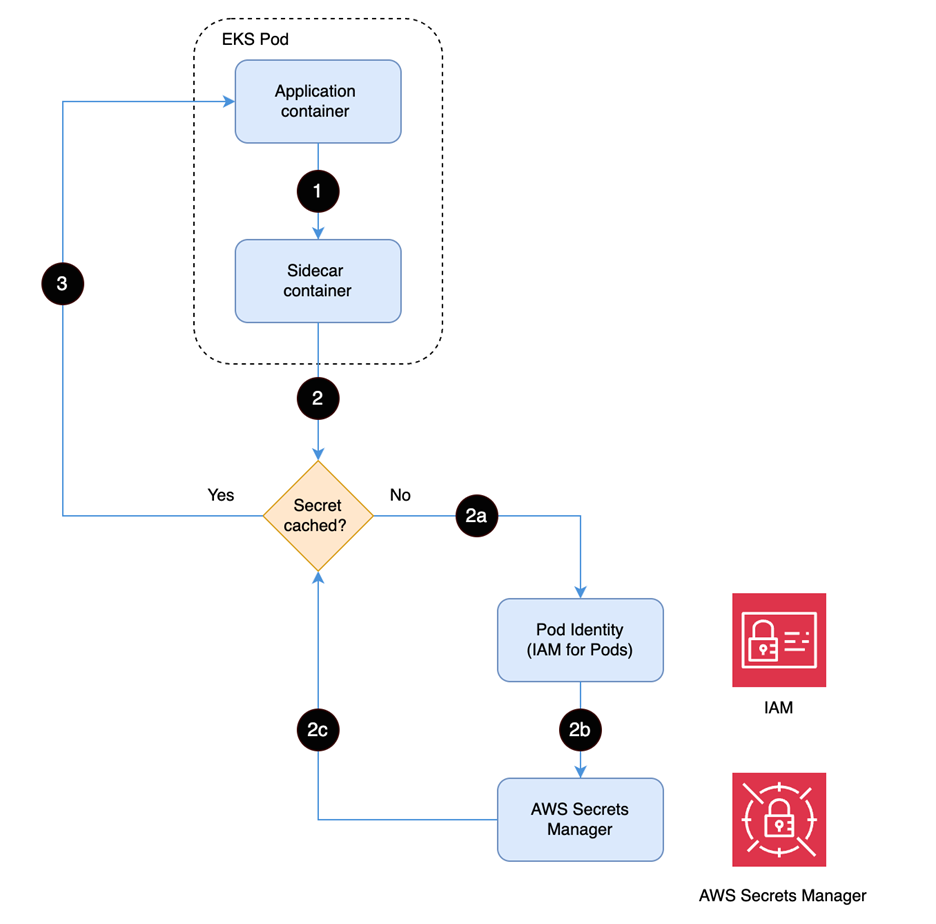
Figure 1: Solution workflow
The workflow of the solution is shown in Figure 1 and includes the following steps:
The application container sends GET /secretsmanager/get (localhost:2773) to retrieve secret
Secrets Manager Agent checks the local cache to determine if the secret is already stored in memory
If not cached, authenticate using Pod Identity to establish secure access to AWS Secrets Manager
Assume the IAM role to retrieve the secret from AWS Secrets Manager
Return the secret to the sidecar container for caching
Return the secret to the application container to fulfill the original request
Prerequisites
To build the solution in this post, you must have the following:
Please note, the AWS Secrets Manager Agent supports the versions of Amazon EKS and Kubernetes available since its initial launch, providing universal compatibility for secure secrets management across cluster versions.
In this section, you install the Secrets Manager Agent. With the agent installed, you then create the Pod Identity association, Secrets Manager binary image, push the binary image to Amazon Elastic Container Registry (Amazon ECR), and create a secret in Secrets Manager.
Verify the Pod Identity Agent installation:
kubectl get daemonset eks-pod-identity-agent -n kube-system
Create the Pod Identity association using the following commands:
Create a file named install and add the following content:
#!/bin/bash -e
PATH=/bin:/usr/bin:/sbin:/usr/sbin # Use a safe path
AGENTTARGETDIR=/opt/aws/secretsmanageragent
AGENTSOURCEDIR=/etc/aws_secretsmanager_agent/configuration
AGENTBIN=aws_secretsmanager_agent
TOKENGROUP=awssmatokenreader
AGENTUSER=awssmauser
TOKENSCRIPT=/etc/aws_secretsmanager_agent/configuration/awssmaseedtoken
AGENTSCRIPT=awssmastartup
if [ `id -u` -ne 0 ]; then
	echo "This script must be run as root" >&2
	exit 1
fi
if [ ! -r ${TOKENSCRIPT} ]; then
	echo "Can not read ${TOKENSCRIPT}" >&2
	exit 1
fi
if [ ! -r ${AGENTSOURCEDIR}/${AGENTBIN} ]; then
	echo "Can not read ${AGENTBIN}" >&2
	exit 1
fi
groupadd -f ${TOKENGROUP}
useradd -r -m -g ${TOKENGROUP} -d ${AGENTTARGETDIR} ${AGENTUSER} || true
chmod 755 ${AGENTTARGETDIR}
install -D -T -m 755
${AGENTSOURCEDIR}/${AGENTBIN} ${AGENTTARGETDIR}/bin/${AGENTBIN}
chown -R ${AGENTUSER} ${AGENTTARGETDIR}
exit 0
Build the agent binary on a Linux based instance using the following commands:
#!/bin/bash -e
# Here we are building the Secrets Manager Agent Binary for Linux x86_64 architecture
sudo yum -y groupinstall "Development Tools"
sudo yum install -y git
curl --proto '=https' --tlsv1.2 -sSf https://sh.rustup.rs | sh -s -- -y
source $HOME/.cargo/env
git clone https://github.com/aws/aws-secretsmanager-agent
cd aws-secretsmanager-agent
mv ../install aws_secretsmanager_agent/configuration
cargo build --release --target x86_64-unknown-linux-gnu
Create a file named startup.sh for the entry point and add the following content:
#!/bin/bash
set -e

echo "Starting AWS Secrets Manager Agent initialization..."

# Step 1: Run the install script (equivalent to install-agent init container)
echo "Running agent installation..."
/etc/aws_secretsmanager_agent/configuration/install

# Step 2: Initialize the token (equivalent to token-init init container)
echo "Starting token initialization..."
chmod +x
/etc/aws_secretsmanager_agent/configuration/awssmaseedtoken /etc/aws_secretsmanager_agent/configuration/awssmaseedtoken start

# Step 3: Start the main secrets manager agent
echo "Starting secrets manager agent..."
exec
/etc/aws_secretsmanager_agent/configuration/aws_secretsmanager_agent
Create a file named Docker-eks and add the following content:
FROM public.ecr.aws/amazonlinux/amazonlinux:2023

# Install required dependencies
RUN yum install -y ca-certificates bash shadow-utils && yum clean all
RUN mkdir -p /opt/aws/secretsmanageragent /var/run

# Copy in the agent binary and configuration scripts
COPY aws_secretsmanager_agent/configuration/
/etc/aws_secretsmanager_agent/configuration
COPY target/x86_64-unknown-linux-
gnu/release/aws_secretsmanager_agent
/etc/aws_secretsmanager_agent/configuration

# Make binaries and scripts executable
RUN chmod -R +x /etc/aws_secretsmanager_agent/configuration

# Copy and setup startup script
COPY startup.sh /startup.sh
RUN chmod +x /startup.sh

WORKDIR /
# Use the startup script as entrypoint
ENTRYPOINT ["/startup.sh"]
Build and publish the image using the following commands:
#!/bin/bash -e

#Create the ECR Repo ( us-west-2 region)
aws ecr create-repository --repository-name secrets-manager-agent --image-tag-mutability MUTABLE

#Build the image
docker build -f Dockerfile-eks -t secrets-manager-agent:eks .

#Tag the image
docker tag secrets-manager-agent:eks <ACCOUNT_ID>.dkr.ecr.us-west-2.amazonaws.com/secrets-manager-agent:eks

# Login into ECR
aws ecr get-login-password --region us-west-2 | docker login --username AWS --password-stdin <ACCOUNT_ID>.dkr.ecr.us-west-2.amazonaws.com

#Push the image
docker push  <ACCOUNT_ID>.dkr.ecr.us-west-2.amazonaws.com/secrets-manager-agent:eks
When successful, your private Amazon ECR repo will display the published image.
Create the secret
With the image successfully published, you’re ready to create the secret.
Create a secret in Secrets Manager by using the AWS CLI to enter the following command in a terminal.
2. Enter the following command in a terminal to create the IAM role: aws iam create-role --role-name eks-secrets-manager-role\ --assume-role-policy-document file://eks_iam_policy.json 3. Create a file named iam_permission.json with the following content, replacing <SECRET_ARN> with the secret ARN you noted earlier:
4. Enter the following command to create a policy: aws iam create-policy \ --policy-name get-secret-policy \ --policy-document file://iam_permission.json 5. Record the policy ARN to use in the next step.
6. Enter the following command to add this policy to the IAM role, replacing <POLICY_ARN> with the value you just noted: aws iam attach-role-policy \ --role-name eks-secrets-manager-role \ --policy-arn <POLICY_ARN>
Configure the application and deploy Secrets Manager Agent to Amazon EKS
Here is the sample Kubernetes deployment YAML for installing the Secrets Manager Agent as a sidecar container along with an application container. Replace <ACCOUNT_ID> with your AWS account number and run the code to deploy the NGINX application to the Amazon EKS cluster.
If successful, the pod will run with two active containers.
Retrieve the secret
Now you can run the following command to use the local web server to retrieve the agent. kubectl exec into the app container to retrieve the secret with a REST API call from the web server. kubectl exec -it nginx-with-secrets-c7945f8dc-7hrzr -c nginx -- sh curl -v -H “X-Aws-Parameters-Secrets-Token: $(cat /var/run/awssmatoken)” ‘http://localhost:2773/secretsmanager/get?secretId=<SecretID>'
You should see a Success 200 message and the secret value if IAM permissions are configured correctly.
Clean up
Run the following cleanup script to delete the resources created for the solution: bash chmod +x cleanup.sh ./cleanup.sh
When done, you can check the file named cleanup.sh in the repo to verify that the cleanup was successful:
bash
#!/bin/bash
set -e

echo "Cleaning up EKS resources..."
kubectl delete deployment nginx-with-secrets-simplified --ignore-not-found=true
kubectl delete service nginx-service --ignore-not-found=true
kubectl delete serviceaccount secrets-manager-sa --ignore-not-found=true

echo "Cleaning up Pod Identity association..."
# Replace with your actual cluster name
read -p "Enter your CLUSTER_NAME: " CLUSTER_NAME

if [ -n "$CLUSTER_NAME" ]; then
	ASSOCIATION_ID=$(aws eks list-pod-identity-associations \
                     --cluster-name $CLUSTER_NAME \
                     --query 'associations[?serviceAccount==`secrets-manager-sa`].associationId' \
                     --output text)

if [ -n "$ASSOCIATION_ID" ] && [ "$ASSOCIATION_ID" !=
"None" ]; then
		aws eks delete-pod-identity-association \
			--cluster-name $CLUSTER_NAME \
			--association-id $ASSOCIATION_ID || echo "Pod Identity
association already deleted"
		echo "Pod Identity association deleted"
	else
		eiifcbfhcfglkdirgljchvkildrknntukkidjtldeekk
echo "No Pod Identity association found"
	fi
fi

echo "Cleaning up IAM resources..."
# Replace with your actual policy ARN from the create-policy
output
read -p "Enter your POLICY_ARN: " POLICY_ARN

if [ -n "$POLICY_ARN" ]; then
		aws iam detach-role-policy \
			--role-name eks-secrets-manager-role \
			--policy-arn $POLICY_ARN || echo "Policy already detached"

		aws iam delete-policy --policy-arn $POLICY_ARN || echo
"Policy already deleted"
fi
aws iam delete-role --role-name eks-secrets-manager-role || echo
"Role already deleted"

echo "Cleaning up secret..."
aws secretsmanager delete-secret --secret-id MySecret || echo
"Secret already deleted"

echo "Cleaning up container image..."
aws ecr delete-repository \
	--repository-name secrets-manager-agent \
	--force || echo "Repository already deleted"

echo "Cleanup complete!"
Conclusion
In this post, we showed you how to deploy the AWS Secrets Manager Agent as a sidecar container in Amazon EKS. This approach provides a language-agnostic way to retrieve secrets through HTTP calls, reducing SDK dependencies while maintaining security through SSRF protection and IAM-based access controls.
The Secrets Manager Agent can be deployed as either a sidecar container or DaemonSet. Use sidecar deployment for isolated secrets and fine-grained security boundaries and use DaemonSet deployment for shared secrets across multiple applications with optimized resource utilization.
This approach complements existing secret management patterns and provides teams with HTTP-based secret access, immediate refresh control, and consistent interfaces across AWS compute environments.
In this post, we show how to implement message feedback for SMS one-time passwords (OTPs) using AWS End User Messaging. OTP verification through SMS is a fundamental component of modern authentication systems. Although sending OTPs follows an established pattern, tracking their delivery and usage presents several challenges. This post shows how to implement the AWS End User Messaging Message Feedback API to monitor OTP delivery and conversion rates effectively. This post highlights the Message Feedback API in an OTP use case; for practical examples and detailed guidance on building a secure OTP architecture, see Build a Secure One-Time Password Architecture with AWS.
Challenges with OTP tracking
Organizations commonly face these key challenges with OTP tracking:
Relying solely on Delivery Receipt (DLR) data for confirming message delivery, which is third-party carrier data that can be subject to interpretation by carriers or message providers, whereas conversion tracking through message feedback provides first-party data that can more accurately reflect actual message delivery and usage
Measuring accurate user authentication success rates
Identifying OTP verification issues across different geographic regions, carriers and delivery paths
To address these challenges, you can use the AWS End User Messaging Message Feedback API to track delivery and conversion rates, providing first-party data for more accurate insights into message delivery and usage patterns. Although OTP use cases are the most common and serve as our example implementation of message feedback, the same tracking logic can also be applied to other types of SMS conversions, such as promotional link clicks, shopping cart additions, account activations, appointment confirmations, and delivery notifications.
Solution overview
The OTP message flow consists of two main phases. Let’s first examine how the system handles the initial OTP request.
Phase 1: OTP request flow
When a customer initiates an OTP request, your system begins a carefully orchestrated process. First, your application receives this request and generates a unique OTP. With the OTP generated, your system prepares to send it through the AWS End User Messaging API, specifically enabling message feedback tracking by setting the MessageFeedbackEnabled parameter to true when calling SendTextMessage.
Upon successful sending, it returns a unique message ID, which your system must store alongside the generated OTP. This message ID serves as a crucial tracking identifier for the entire verification process. The message is then dispatched to the customer’s device, and your system enters a waiting state, ready to process the verification attempt.
The following diagram illustrates the OTP request flow.
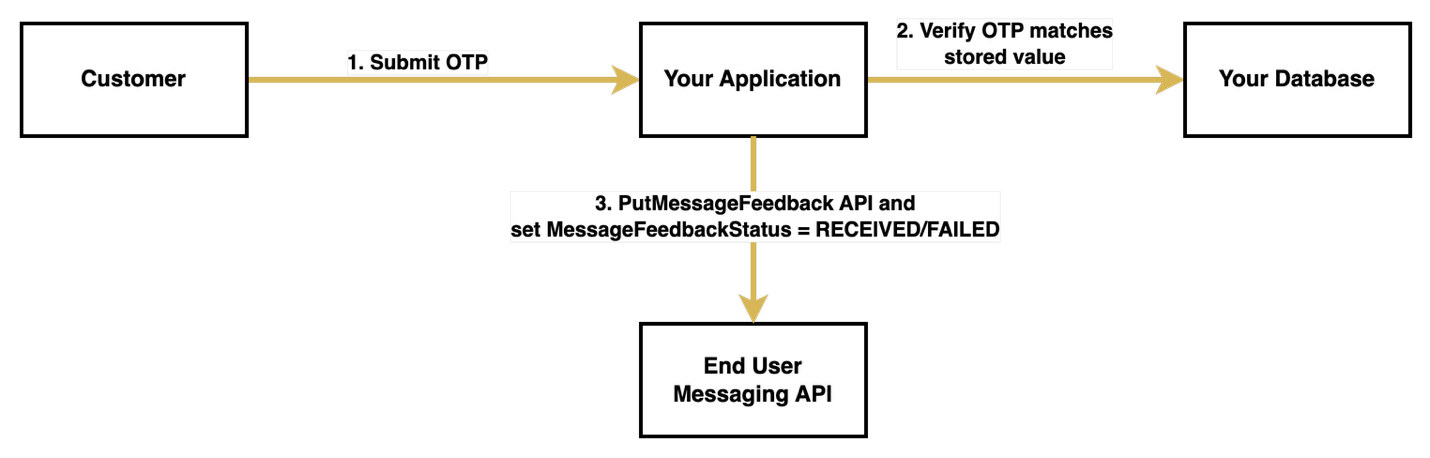
Phase 2: OTP verification flow
The verification process begins when the customer receives the OTP through SMS and submits it back to your system. Upon receiving the submission, your system first validates the OTP against the stored value. This verification step is critical, because its outcome determines how you will update the message feedback status.
If the customer successfully verifies the OTP, your system calls the PutMessageFeedback API with the stored message ID and sets the status to "RECEIVED", indicating successful delivery and usage of the OTP. However, if the verification fails or the customer doesn’t respond within the timeout period, your system sets the status to "FAILED".
If your system doesn’t explicitly update the feedback status within 1 hour, AWS automatically sets it to "FAILED".
The following diagram illustrates the OTP verification flow.
Prerequisites
Before you begin implementing OTP message feedback, make sure you have the following components and permissions in place:
AWS account (if you don’t have one, you can sign up for one)
An origination identity (sender ID, short code, long code) for AWS End User Messaging
AWS SDK version greater than or equal to 1.35.84 (make sure it has pinpoint-sms-voice-v2)
Send SMS with message feedback enabled
You can enable message feedback in two ways. The first method is to use the MessageFeedbackEnabled parameter when sending an SMS, the second is to send a message with a configuration set with message feedback already enabled. Using a configuration set is often more convenient for bulk implementations because you don’t need to specify message feedback settings in each API call.
To send an SMS with message feedback enabled directly, you can use the following function:
import boto3

# Initialize the End User Messaging client
client = boto3.client('pinpoint-sms-voice-v2')

def send_otp_with_feedback():
    # Generate a unique OTP
    otp = generate_otp()

    # Send SMS with feedback enabled
    response = client.send_text_message(
        DestinationPhoneNumber='+15555550123',  # Replace with your destination phone number
        OriginationIdentity='+14255550120',  # Replace with your origination identity
        MessageBody=f'Your verification code is: {otp}',
        MessageFeedbackEnabled=True
    )

    # Store OTP details for verification
    store_otp_details(response['MessageId'], otp)
    return response['MessageId']
The function uses the following details:
store_otp_details() is a placeholder function where you store the OTP details in a database for later retrieval
generate_otp() is a placeholder function where you generate your OTPs to send using SMS
If you prefer to use a configuration set with message feedback enabled, you can use the following alternative function:
def send_otp_with_feedback_using_configuration_set():
    # Initialize the End User Messaging client
    client = boto3.client('pinpoint-sms-voice-v2')

    # Generate OTP
    otp = generate_otp()

    # Send SMS using configuration set
    response = client.send_text_message(
        DestinationPhoneNumber='+15555550123',  # Replace with your destination phone number
        OriginationIdentity='pool-201d59fffd554bdfbaf9ee8aEXAMPLE',  # Replace with your origination identity
        MessageBody=f'Your verification code is: {otp}',
        ConfigurationSetName='example-us-east-configuration-set'  # Replace with your configuration set name
    )

    # Store OTP details for later verification
    store_otp_details(response['MessageId'], otp)

    return response['MessageId']
Your configuration set must have message feedback enabled to use this option. You can enable it using the AWS Command Line Interface (AWS CLI) with the following command:
Another option is to use the AWS End User Messaging console, where you can enable message feedback under Set Settings for the desired configuration set.
Update feedback
After you send a message, you can update the message status to indicate whether a user has successfully completed an action, such as entering the OTP on your application or webpage:
def update_message_feedback(message_id: str, status: str) -> dict:
    try:
        # Initialize the End User Messaging client
        client = boto3.client('pinpoint-sms-voice-v2')

        # Update the message feedback status
        response = client.put_message_feedback(
            MessageId=message_id,
            MessageFeedbackStatus=status
        )

        return response

    except Exception as e:
        print(f"Error updating message feedback: {str(e)}")
        raise

# Example usage
message_id = "a1b2c3d4-5678-90ab-cdef-EXAMPLE11111"  # Replace with your message ID
status = "RECEIVED"  # Use "FAILED" for unsuccessful verifications

result = update_message_feedback(message_id, status)
print(f"Feedback status updated: {result}")
Verify feedback metrics
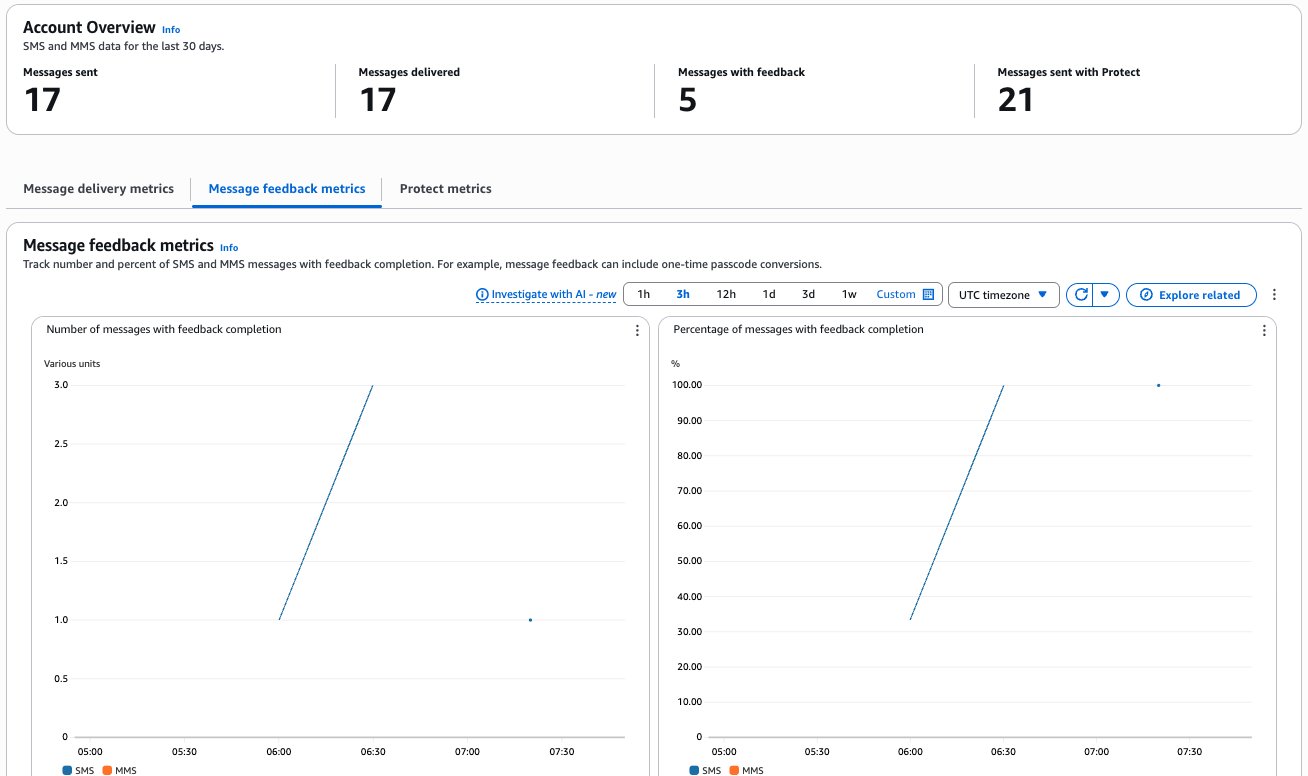
The AWS End User Messaging dashboard provides comprehensive metrics to help you monitor your OTP performance. The following metrics are available for customizable time periods:
Number of messages with feedback completion
Percentage of messages with feedback completion
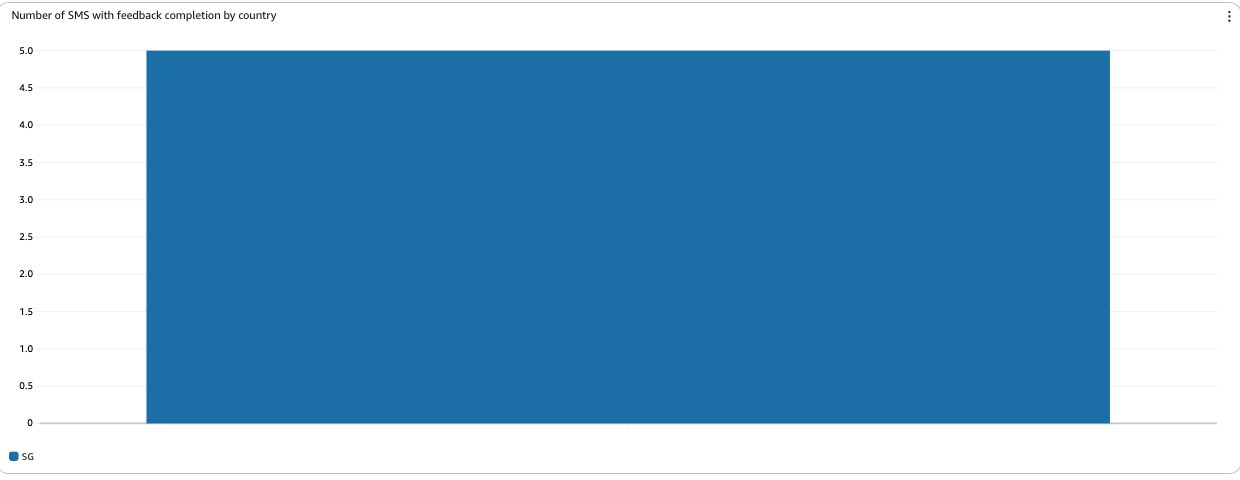
Number of SMS with feedback completion by country
To review your application’s overall message feedback metrics, choose Dashboard in the AWS End User Messaging console navigation pane, then choose Message Feedback Metrics.
The dashboard presents three key metrics:
Number of messages with feedback completion – The count of SMS and MMS messages where the message feedback record is set to RECEIVED
Percentage of messages with feedback completion – The percentage of SMS and MMS messages where the message feedback record is set to RECEIVED
Number of SMS with feedback completion by country – The count of message feedback received by country
The progression to 100% completion indicates optimal system performance, where all sent OTPs were successfully received and verified by users, and the message feedback record is set to RECEIVED within the expected timeframe. This high completion rate suggests effective message delivery and a smooth user verification experience. Variations in completion rates across countries can help identify potential regional delivery challenges or user behavior patterns.
The 30% conversion starting point shown in this example is used for illustration purposes only, demonstrating messages that were intentionally left unconverted during testing.
Best practices for OTP implementation
For a secure and reliable OTP implementation, follow these best practices to balance security with user experience:
Include rate limiting to prevent abuse
Implement proper timeout mechanisms for OTPs
Make sure error handling provides clear feedback to users
Maintain comprehensive logging for security audits
Conclusion
By implementing the Message Feedback API for OTP tracking, you can gain valuable insights into your authentication system’s effectiveness in real time. This approach helps you monitor successful OTP usage and identify potential delivery issues that might affect user authentication, with granular metrics broken down by geographic regions. The data collected through message feedback offers a more accurate picture of actual user interactions compared to carrier-provided delivery receipts, helping you make data-driven decisions about your authentication system.
To build upon this foundation, consider implementing Amazon CloudWatch alerts for your conversion metrics, and optimizing your message templates based on performance data. The combination of real-time feedback, detailed analytics, and proactive monitoring can help make sure your OTP system remains both secure and efficient.
For additional implementation guidance and best practices, refer to the following resources:
AWS re:Invent 2025, the premier cloud computing conference hosted by Amazon Web Services (AWS), returns to Las Vegas, Nevada, from December 1–5, 2025. This flagship event brings together the global cloud community for an immersive week of learning, collaboration, and innovation across multiple venues. Whether you’re a cloud expert, business leader, or technology enthusiast, re:Invent offers unparalleled opportunities to explore cutting-edge cloud solutions, engage with AWS experts, and build valuable connections with peers from around the world.
From technical deep dives to strategic business sessions, re:Invent 2025 is your gateway to understanding and using the most advanced cloud technologies. In the Expo, you can visit the Digital Sovereignty and Hybrid Cloud kiosks in the AWS Village to learn about the upcoming AWS European Sovereign Cloud and other digital sovereignty solutions, and get your questions answered by AWS experts.
Join us to discover the latest cloud industry innovations, gain deep technical insights, and learn how to optimize your cloud investments for digital sovereignty. Sessions this year will include comprehensive coverage of the AWS sovereign-by-design approach, including the enhanced security capabilities of the AWS Nitro System, our expanding portfolio of digital sovereignty solutions, and the latest developments of the AWS European Sovereign Cloud. With the growing momentum around digital sovereignty, explore how AWS continues to innovate with sovereign cloud solutions that help customers maintain control over their data while using the full power of the cloud. You can customize your learning path by reserving session seating now by signing in to your attendee portal or the AWS Events mobile app.
Breakout sessions and code talks
To add sessions to your AWS re:Invent agenda and find time and location information, choose the session title link.
Security track
SEC201 | Breakout | AWS European Sovereign Cloud: From concept to reality Colm MacCárthaigh, VP/Distinguished Engineer – EC2 Networking, AWS Addy Upreti, Principal Technical Product Manager – EC2 Core Product Management, AWS Get a firsthand look at the AWS European Sovereign Cloud. Explore this new, independent infrastructure’s dedicated architecture, EU-based operations, operational controls coupled with governance and legal framework that powers this cloud. Learn how this cloud solution is built, operated, and secured entirely within Europe.
Cloud operations track
COP409 | Code Talk | Building Sovereign Cloud Environments Bo Lechangeur, Pr. Delivery Engineer – STCE, AWS, and Randy Domingo, Sr. Software Development Manager – STCE, AWS As organizations scale their operations globally, they need to meet evolving data residency, security, compliance, and business continuity requirements. This session explores how AWS Control Tower and Landing Zone Accelerator on AWS support key sovereignty requirements, including country-specific compliance frameworks, regional service selection, automated controls for data movement, and cross-border transfers. Through real-world examples, the session demonstrates how organizations can leverage AWS to implement country-specific security controls, maintain operational consistency across multi-region deployments, accelerate cloud compliance, and deploy automated security and compliance at scale.
Hybrid cloud and multicloud track
HMC202 | Breakout | AWS wherever you need it: From the cloud to the edge Speakers: Spencer Dillard, Director, Software Development – EC2 Edge, AWS, Madhura Kale, Senior Manager, Technical Product Management – EC2 Core, AWS While most workloads can be migrated to the cloud, some remain on-premises or at the edge due to low latency, local data processing, or digital sovereignty needs. In this session, learn how AWS services like AWS Outposts, AWS Local Zones, AWS Dedicated Local Zones, and AWS IoT support hybrid cloud and edge computing workloads such as multiplayer gaming, high-frequency trading, medical imaging, smart manufacturing, and generative AI applications with data residency requirements.
HMC308 | Breakout | Build generative and agentic AI applications on-premises and at the edge Speakers: Chris McEvilly, Senior Solutions Architect – Hybrid Edge, AWS, Pranav Chachra, Principal Technical Product Manager – EC2 Core, AWS, and Fernando Galves, Senior Solutions Architect – Generative AI, AWS As customers scale generative AI and agentic AI implementations from pilots to production, they need to balance speed of innovation with data sovereignty requirements, low-latency edge processing needs, and space, power, and cost efficiency. This session explores how to build generative and agentic AI solutions using AWS Local Zones, AWS Outposts, and AWS Dedicated Local Zones. Discover architectural patterns and best practices for deploying foundation models across distributed locations. Learn how to implement Retrieval Augmented Generation (RAG) with locally stored data. Gain insights into strategies for model selection and optimization.
HMC310 | Breakout | Digital sovereignty and data residency with AWS Hybrid and Edge services Speakers: Mallory Gershenfeld, Senior Technical Product Manager – S3, AWS, Ben Lavasani, Senior Specialist – Hybrid and Edge, AWS, and Majd Aldeen Masriah, Director of Enterprise – Architecture, Geida Countries around the world are increasingly introducing or updating data residency and digital sovereignty laws that require at least one copy, or sometimes all data, to be stored or processed in a specific geographic or sovereign location that introduces new challenges for customers. This session explores how AWS services, including AWS Dedicated Local Zones, AWS Local Zones, and AWS Outposts can help you with your digital sovereignty use cases. We’ll examine best practices for data residency, security controls, and operational consistency across deployments at the edge.
Interactive sessions (chalk talks and workshops)
Security track
SEC301| Chalk Talk | Architecting for Digital Sovereignty: From Foundation to Practice Speakers: Eric Rose, Principal Security SA – Global Services Security, AWS and Armin Schneider, Digital Sovereignty Specialist SA – Global Services Security Digital Sovereignty Join this chalk talk that bridges security fundamentals with practical architecture strategies for implementing digital sovereignty in the cloud. Through real-world examples from the United Arab Emirates Cybersecurity Council and the upcoming AWS European Sovereign Cloud, we’ll explore how organizations can use AWS sovereignty features effectively. We’ll cover practical architectural patterns for data residency, operational control, and security measures that help customers maintain full control of their data. Perfect for cloud architects and security teams, this session will show you how to design solutions that balance sovereignty requirements with cloud advantages, illustrated with examples from government and enterprise deployments.
Hybrid cloud and multicloud track
HMC301| Workshop | Build and operate resilient and performant distributed applications Speakers: Saravanan Shanmugam, Senior Solutions Architect – Hybrid Edge, AWS and Sedji Gaouaou, Senior Solutions Architect – Networking, AWS This workshop explores how to design and implement applications for multi-geo operations while meeting data residency and performance requirements. You will learn how to design fault-tolerant, latency-sensitive applications across distributed locations with limited hardware resources. You will also explore distributed hybrid architectures, edge networking implementations, and traffic management solutions that balance regulatory requirements with high availability needs. Learn practical strategies for optimizing performance while maintaining data sovereignty across distributed locations.
HMC302| Workshop| Implementing agentic AI solutions on-premises and at the edge Speakers: Fernando Galves, Senior Solutions Architect – Generative AI, AWS and Kyle Palasti, Senior Solutions Architect – Hybrid Edge, AWS As governments and standards bodies develop data protection and privacy regulations, organizations increasingly need to combine the use of generative AI tooling in the cloud with regulated data that needs to remain on-premises to meet data residency requirements. In this workshop, learn how to extend Amazon Bedrock AgentCore to hybrid and edge services like AWS Outposts and AWS Local Zones to build distributed agentic applications using Model Context Protocol (MCP) and agent-to-agent (A2A) communication with on-premises data for improved model outcomes. Get hands-on with hybrid agentic AI using Amazon Bedrock and Strands Agents while exploring AWS hybrid and edge services.
HMC305 | Workshop | Low-latency SLM deployment: Optimizing inference on AWS Hybrid and Edge Services Speakers: Leonardo Solano, Principal Solutions Architect – Networking & Hybrid Edge, AWS and Obed Gutierrez, Senior Solutions Architect, AWS This hands-on workshop demonstrates a fully local deployment approach for running Small Language Models (SLMs) at the edge using AWS Local Zones and AWS Outposts. The implementation focuses on achieving low-latency inference and enabling data sovereignty compliance through Retrieval Augmented Generation (RAG) applications within local infrastructure. Using Amazon Elastic Compute Cloud (Amazon EC2) instances and publicly available models, you will learn how to deploy, optimize, and manage SLMs in edge environments, ensuring the RAG system and language model operate locally to meet strict latency and data residency requirements for production scenarios.
HMC312 | Chalk Talk | Implement RAG while meeting data residency requirements Speakers: Lakshmi VP, Solutions Architect, AWS and Akshata Ketkar, Senior Product Manager – EC2 Edge, AWS As governments develop data protection and privacy regulations, organizations increasingly need to leverage generative AI with regulated data that needs to remain on-premises to meet data sovereignty requirements. This session explores how to implement Retrieval Augmented Generation (RAG) with on-premises and edge data. Learn how to extend Amazon Bedrock AgentCore to AWS Outposts and AWS Local Zones for a hybrid RAG architecture, or build a local RAG architecture for more stringent data residency requirements. Discover the latest techniques like reranker models to improve precision without increasing model size, reduce inference cost, and enforce more governance and control over prompt outcomes.
HMC314 | Chalk Talk | Deploying for resilience: HA/DR strategies for AWS Outposts and Local Zones Speakers: Afaq Khan, Senior Product Manager – EC2 Edge, AWS and Brianna Rosentrater, Senior Solutions Architect – Hybrid Edge, AWS Critical workloads at the edge demand robust high-availability and disaster recovery strategies. In this chalk talk, learn how to plan and implement resilient deployments using AWS hybrid cloud and edge computing services. We’ll examine how to architect edge infrastructure using AWS Local Zones and AWS Outposts, covering key aspects of networking, compute, and storage redundancy. Through real customer examples and reference architectures, we’ll explore deployment patterns and best practices for maintaining business continuity across failure modes. Join us to learn practical strategies for achieving your RPO/RTO objectives with edge deployments.
HMC403 | Code Talk | Build and optimize edge architects for resiliency with AI Speakers: Jesus Federico, Principal Solutions Architect – Generative AI, AWS and Robert Belson, Senior Solutions Architect & Developer Advocate, AWS This live coding session explores how to automate edge infrastructure operations with AI. Discover how to build truly resilient architectures with the latest AWS Outposts and AWS Local Zones APIs. We’ll walk through real-world code examples for querying Outposts hardware inventory, implementing intelligent resource placement, and automating failover configurations. You’ll learn how Amazon Bedrock can analyze architecture patterns and generate Infrastructure as Code (IaC) recommendations for optimal component distribution. Walk away with practical techniques for API integration, automated health checks, and dynamic resource allocation, plus working code samples and deployment templates for building adaptive, highly available edge solutions.
HMC316 | Chalk Talk | Address digital sovereignty with hybrid cloud solutions Speakers: Sherry Lin, Principal Product Manager – EC2 Core, AWS and Enrico Liguori, Solutions Architect – Networking, AWS As organizations scale innovative solutions globally, they need to navigate complex digital sovereignty requirements. This session explores how AWS can help you accelerate global scaling while meeting regulatory obligations. We’ll compare various sovereign infrastructure options with a focus on AWS Local Zones, AWS Dedicated Local Zones, AWS Outposts, and AWS European Sovereign Cloud. Learn how to choose the best option for your sovereign needs and architect applications for data residency and resiliency. Discover how to implement security controls to regulate how data can be stored, processed, and transferred, and how to prevent unauthorized data access.
For a full view of digital sovereignty content, including sessions with partners, explore the AWS re:Invent catalog and filter on the Digital Sovereignty area of interest. Not able to attend in-person? Register forthe virtual-only pass offered at no additional cost to livestream keynotes and innovation talks, and access on-demand breakout sessions today. See you in Las Vegas or on the livestream!
If you have feedback about this post, submit comments in the Comments section below.
According to a recent blog post, this
release includes major improvements to performance and scaling of
Valkey clusters to more than 2,000 nodes and one billion requests per
second. Valkey began as a
fork of the Redis key-value database in March 2024, but has
evolved separately since then.
The Git source-code management system is a foundational tool upon which
much of the free-software community is based. For many people, Git simply
works, though perhaps in quirky ways, so the activity of its development
community may not often appear on their radar. There is a lot happening in
the Git world at the moment, though, as the project works toward a 3.0
release sometime in 2026. Topics of interest in the Git community include
the SHA-256 transition, the introduction of code written in Rust, and how
the project should view contributions created with the assistance of large
language models.
Version
8.8.0 of the digiKam photo-management system has been released.
“This version delivers significant improvements in performance,
stability, and user experience, with a particular focus on image
processing, color management, and workflow efficiency“. Changes
include an import/export feature for tag hierarchies, focus-point
visualization for some camera models, automatic use of the monitor color
profile, and a background-blur tool.
It started with a mysterious soft lockup message in production. A single, cryptic line that led us down a rabbit hole into the performance of one of the most fundamental data structures we use: the BPF LPM trie.
BPF trie maps (BPF_MAP_TYPE_LPM_TRIE) are heavily used for things like IP and IP+Port matching when routing network packets, ensuring your request passes through the right services before returning a result. The performance of this data structure is critical for serving our customers, but the speed of the current implementation leaves a lot to be desired. We’ve run into several bottlenecks when storing millions of entries in BPF LPM trie maps, such as entry lookup times taking hundreds of milliseconds to complete and freeing maps locking up a CPU for over 10 seconds. For instance, BPF maps are used when evaluating Cloudflare’s Magic Firewall rules and these bottlenecks have even led to traffic packet loss for some customers.
This post gives a refresher of how tries and prefix matching work, benchmark results, and a list of the shortcomings of the current BPF LPM trie implementation.
A brief recap of tries
If it’s been a while since you last looked at the trie data structure (or if you’ve never seen it before), a trie is a tree data structure (similar to a binary tree) that allows you to store and search for data for a given key and where each node stores some number of key bits.
Searches are performed by traversing a path, which essentially reconstructs the key from the traversal path, meaning nodes do not need to store their full key. This differs from a traditional binary search tree (BST) where the primary invariant is that the left child node has a key that is less than the current node and the right child has a key that is greater. BSTs require that each node store the full key so that a comparison can be made at each search step.
Here’s an example that shows how a BST might store values for the keys:
ABC
ABCD
ABCDEFGH
DEF
In comparison, a trie for storing the same set of keys might look like this.
This way of splitting out bits is really memory-efficient when you have redundancy in your data, e.g. prefixes are common in your keys, because that shared data only requires a single set of nodes. It’s for this reason that tries are often used to efficiently store strings, e.g. dictionaries of words – storing the strings “ABC” and “ABCD” doesn’t require 3 bytes + 4 bytes (assuming ASCII), it only requires 3 bytes + 1 byte because “ABC” is shared by both (the exact number of bits required in the trie is implementation dependent).
Tries also allow more efficient searching. For instance, if you wanted to know whether the key “CAR” existed in the BST you are required to go to the right child of the root (the node with key “DEF”) and check its left child because this is where it would live if it existed. A trie is more efficient because it searches in prefix order. In this particular example, a trie knows at the root whether that key is in the trie or not.
This design makes tries perfectly suited for performing longest prefix matches and for working with IP routing using CIDR. CIDR was introduced to make more efficient use of the IP address space (no longer requiring that classes fall into 4 buckets of 8 bits) but comes with added complexity because now the network portion of an IP address can fall anywhere. Handling the CIDR scheme in IP routing tables requires matching on the longest (most specific) prefix in the table rather than performing a search for an exact match.
If searching a trie does a single-bit comparison at each node, that’s a binary trie. If searching compares more bits we call that a multibit trie. You can store anything you like in a trie, including IP and subnet addresses – it’s all just ones and zeroes.
Nodes in multibit tries use more memory than in binary tries, but since computers operate on multibit words anyhow, it’s more efficient from a microarchitecture perspective to use multibit tries because you can traverse through the bits faster, reducing the number of comparisons you need to make to search for your data. It’s a classic space vs time tradeoff.
There are other optimisations we can use with tries. The distribution of data that you store in a trie might not be uniform and there could be sparsely populated areas. For example, if you store the strings “A” and “BCDEFGHI” in a multibit trie, how many nodes do you expect to use? If you’re using ASCII, you could construct the binary trie with a root node and branch left for “A” or right for “B”. With 8-bit nodes, you’d need another 7 nodes to store “C”, “D”, “E”, “F”, “G”, “H”, “I”.
Since there are no other strings in the trie, that’s pretty suboptimal. Once you hit the first level after matching on “B” you know there’s only one string in the trie with that prefix, and you can avoid creating all the other nodes by using path compression. Path compression replaces nodes “C”, “D”, “E” etc. with a single one such as “I”.
If you traverse the tree and hit “I”, you still need to compare the search key with the bits you skipped (“CDEFGH”) to make sure your search key matches the string. Exactly how and where you store the skipped bits is implementation dependent – BPF LPM tries simply store the entire key in the leaf node. As your data becomes denser, path compression is less effective.
What if your data distribution is dense and, say, all the first 3 levels in a trie are fully populated? In that case you can use level compressionand replace all the nodes in those levels with a single node that has 2**3 children. This is how Level-Compressed Tries work which are used for IP route lookup in the Linux kernel (see net/ipv4/fib_trie.c).
There are other optimisations too, but this brief detour is sufficient for this post because the BPF LPM trie implementation in the kernel doesn’t fully use the three we just discussed.
How fast are BPF LPM trie maps?
Here are some numbers from running BPF selftests benchmark on AMD EPYC 9684X 96-Core machines. Here the trie has 10K entries, a 32-bit prefix length, and an entry for every key in the range [0, 10K).
Operation
Throughput
Stddev
Latency
lookup
7.423M ops/s
0.023M ops/s
134.710 ns/op
update
2.643M ops/s
0.015M ops/s
378.310 ns/op
delete
0.712M ops/s
0.008M ops/s
1405.152 ns/op
free
0.573K ops/s
0.574K ops/s
1.743 ms/op
The time to free a BPF LPM trie with 10K entries is noticeably large. We recently ran into an issue where this took so long that it caused soft lockup messages to spew in production.
This benchmark gives some idea of worst case behaviour. Since the keys are so densely populated, path compression is completely ineffective. In the next section, we explore the lookup operation to understand the bottlenecks involved.
Why are BPF LPM tries slow?
The LPM trie implementation in kernel/bpf/lpm_trie.c has a couple of the optimisations we discussed in the introduction. It is capable of multibit comparisons at leaf nodes, but since there are only two child pointers in each internal node, if your tree is densely populated with a lot of data that only differs by one bit, these multibit comparisons degrade into single bit comparisons.
Here’s an example. Suppose you store the numbers 0, 1, and 3 in a BPF LPM trie. You might hope that since these values fit in a single 32 or 64-bit machine word, you could use a single comparison to decide which next node to visit in the trie. But that’s only possible if your trie implementation has 3 child pointers in the current node (which, to be fair, most trie implementations do). In other words, you want to make a 3-way branching decision but since BPF LPM tries only have two children, you’re limited to a 2-way branch.
A diagram for this 2-child trie is given below.
The leaf nodes are shown in green with the key, as a binary string, in the center. Even though a single 8-bit comparison is more than capable of figuring out which node has that key, the BPF LPM trie implementation resorts to inserting intermediate nodes (blue) to inject 2-way branching decisions into your path traversal because its parent (the orange root node in this case) only has 2 children. Once you reach a leaf node, BPF LPM tries can perform a multibit comparison to check the key. If a node supported pointers to more children, the above trie could instead look like this, allowing a 3-way branch and reducing the lookup time.
This 2-child design impacts the height of the trie. In the worst case, a completely full trie essentially becomes a binary search tree with height log2(nr_entries) and the height of the trie impacts how many comparisons are required to search for a key.
The above trie also shows how BPF LPM tries implement a form of path compression – you only need to insert an intermediate node where you have two nodes whose keys differ by a single bit. If instead of 3, you insert a key of 15 (0b1111), this won’t change the layout of the trie; you still only need a single node at the right child of the root.
And finally, BPF LPM tries do not implement level compression. Again, this stems from the fact that nodes in the trie can only have 2 children. IP route tables tend to have many prefixes in common and you typically see densely packed tries at the upper levels which makes level compression very effective for tries containing IP routes.
Here’s a graph showing how the lookup throughput for LPM tries (measured in million ops/sec) degrades as the number of entries increases, from 1 entry up to 100K entries.
Once you reach 1 million entries, throughput is around 1.5 million ops/sec, and continues to fall as the number of entries increases.
Why is this? Initially, this is because of the L1 dcache miss rate. All of those nodes that need to be traversed in the trie are potential cache miss opportunities.
As you can see from the graph, L1 dcache miss rate remains relatively steady and yet the throughput continues to decline. At around 80K entries, dTLB miss rate becomes the bottleneck.
Because BPF LPM tries to dynamically allocate individual nodes from a freelist of kernel memory, these nodes can live at arbitrary addresses. Which means traversing a path through a trie almost certainly will incur cache misses and potentially dTLB misses. This gets worse as the number of entries, and height of the trie, increases.
Where do we go from here?
By understanding the current limitations of the BPF LPM trie, we can now work towards building a more performant and efficient solution for the future of the Internet.
We’ve already contributed these benchmarks to the upstream Linux kernel — but that’s only the start. We have plans to improve the performance of BPM LPM tries, particularly the lookup function which is heavily used for our workloads. This post covered a number of optimisations that are already used by the net/ipv4/fib_trie.c code, so a natural first step is to refactor that code so that a common Level Compressed trie implementation can be used. Expect future blog posts to explore this work in depth.
Did you realize that you can monitor a Starlink dish using just Zabbix? The idea (or rather the need) to use Starlink came to me almost as soon as I moved to a fairly rural area. Local internet providers have not yet “provided” fiberoptic or stable mobile connectivity to places like this, and while searching for a solution I accidentally discovered that Starlink was already providing service to some local companies. As I later found out, they also offered service in my area for residential customers.
To make a long story short, since internet access is crucial in the IT field, I decided to acquire and then monitor my very own Starlink dish. At first, this proved challenging because regular user data access is quite limited. However, thanks to Zabbix browser monitoring, I managed to solve it fairly easily. In this post I will share my solution with you, including the template.
Table of Contents
Monitoring configuration
First, you need to make sure you have Zabbix installed (either a Zabbix proxy or server) on the same network that the Starlink dish and router are on. The next step is to configure Zabbix for browser monitoring.
Port 4444 will be the port on which the WebDriver will be listening, and port 7900 will be used by NoVNC, which allows us to observe browser behavior in case a browser with a GUI is used.
Zabbix server/proxy configuration
After WebDriver is installed, we need to set up the communication between Zabbix and the driver. This can be done by editing the Zabbix server/proxy configuration file and updating the following parameters:
### Option: WebDriverURL
# WebDriver interface HTTP[S] URL. For example http://localhost:4444 used with
# Selenium WebDriver standalone server.
#
# WebDriverURL=
WebDriverURL=http://localhost:4444
### Option: StartBrowserPollers
# Number of pre-forked instances of browser item pollers.
#
# Range: 0-1000
# StartBrowserPollers=1
StartBrowserPollers=5
With the configuration parameters in place, restart the Zabbix server/proxy to apply the changes:
systemctl restart zabbix-server
Creating a host
First, we need to navigate to the “Data collection” > “Hosts” section and create a host that represents our Starlink dish. The host in my example will look like this:
Starlink dish host
The host also has a user macro:
{$LINK} with value: http://webapp.starlink.com to point to the correct Starlink dish web app:
Link macro
Creating a browser item
We will now configure our browser item to collect and monitor the list of metrics exposed in the Starlink browser app:
Starlink browser item
We are using the bare minimum here, so make sure the update intervals are as frequent as you need. However, I would not recommend updating it more frequently than every 5 minutes. It’s also not a good idea to store the history, since it is already stored trough dependent items.
The most important part of the item is the script itself:
var browser, result;
var opts = Browser.chromeOptions();

opts.capabilities.alwaysMatch['goog:chromeOptions'].args = [];
browser = new Browser(opts);
browser.setScreenSize(Number(1980), Number(1020));

try {
    var params = JSON.parse(value);
    browser.navigate(params.url);

 // Wait for the dish to report status
    Zabbix.sleep(2000);

    // Find the JSON text element(s)
    var jsonElements = browser.findElements("xpath", "//div[@id='root']/div[@class='App']/div[@class='Main']/div[2]/div[@class='Section'][2]/pre[@class='Json-Format']/div[@class='Json-Text']");
    var extractedData = [];

    for (var i = 0; i < jsonElements.length; i++) {
        var text = jsonElements[i].getText();

        // Try parsing JSON
        try {
            extractedData.push(JSON.parse(text));
        } catch (e) {
            // If not valid JSON, include raw text instead
            extractedData.push({ raw: text, error: "Invalid JSON format" });
        }
    }

    // Collect result
    result = browser.getResult();

    // Replace with parsed JSON data
    result.extractedJsonData = extractedData.length === 1 ? extractedData[0] : extractedData;

}
catch (err) {
    if (!(err instanceof BrowserError)) {
        browser.setError(err.message);
    }
    result = browser.getResult();
}
finally {
    // Return a clean JSON object
    return JSON.stringify(result.extractedJsonData);
}
So what does this script do? It opens the Starlink web app, waits for the Starlink dish to output all the status data, and, after a bit of parsing, returns the data highlighted in the screenshot:
Starlink dish diagnostic data
Now we can click on the three dots on the left of our newly created item in the items page and proceed to create dependent items for each value we are interested in!
Creating dependent items
Now we just click here:
As an example, to create an item that monitors the hardware version we can create an item like this:
Hardware version dependent item
With JSONPath preprocessing:
Hardware version item preprocessing
In the end we get the data in Zabbix:
Starlink dish hardware version
All other items (except alerts) will follow the same logic – just update the item name, key, and JSONPath in preprocessing to extract the required values.
Creating dependent LLD item prototypes
To automate the alerts items creation, we can create a dependent discovery rule. In the “Discovery” section, create a new discovery rule:
Starlink dish alerts discovery
With preprocessing using Java Script:
var data = JSON.parse(value);
var alerts = data.alerts;
var lld = [];

for (var key in alerts) {
    if (alerts.hasOwnProperty(key)) {
        lld.push({
            "{#ALERT}": key
        });
    }
}

return JSON.stringify({ data: lld });
All that’s left ‘to do is to create a dependent item prototype:
Starlink dish alert prototype
With preprocessing, of course:
JSONPath will transform to extract each specific alert and “Boolean to Decimal” will save us some space in the database by tranforming true/false booleans to digits.
Result
In the end, we can monitor all the data:
Starlink dish latest data
Even more data can be collected using exporters – if you are willing to do a bit of extra configuration, of course! Let me know if you are interested, and I will show you a completely different approach with a template.
Before I forget, the template used in this tutorial can be found here.
This post is cowritten by Danilo Tommasina and Lalit Kumar B from Thomson Reuters.
Large organizations often struggle with infrastructure management challenges including compliance issues, development bottlenecks and errors from inconsistent AWS resource creation across teams. Without standardized naming, tagging and policy enforcement, teams face repeated boilerplate code and difficulty accessing centrally-managed resources.
In this post, we will show you how Thomson Reuters developed an extension of the AWS Cloud Development Kit (CDK) to automate compliance, standardization and policy enforcement in Infrastructure as Code (IaC) scripts. We will explore the strategic reasoning behind this initiative, outline foundational design principles, and provide technical details on TR’s journey from concept to implementation. The solution accelerates and standardizes cloud infrastructure deployment and management through seamless integration between TR’s custom library and AWS CDK.
Thomson Reuters (TR) is one of the world’s leading information organizations for businesses and professionals. TR provides companies with the intelligence, technology, and human expertise they need to find trusted answers, enabling them to make better decisions more quickly. TR’s customers span the financial, risk, legal, tax, accounting, and media industries.
Overview
In a large organization that offers a variety of customer products, it is essential to manage numerous cloud resources effectively. This involves overseeing multiple AWS accounts, implementing access control or addressing financial tracking challenges. These tasks require the application of centrally defined standards and conventions, with additional requirements tailored to specific sub-organizations.
Infrastructure as Code (IaC) is an effective method for managing cloud resources. However, utilizing vanilla AWS CloudFormation for extensive and intricate infrastructure can pose challenges. It requires careful attention to naming conventions, tagging standards, security, and best practices for infrastructure deployments. Additionally, repeating infrastructure patterns across various services and products often leads to excessive use of copy-paste and dealing with boilerplate code. When projects require configurable and dynamic components – including conditionals, loops, repeatable patterns, and distribution to a large user base – delivering CloudFormation scripts can become quite cumbersome and prone to errors.
AWS CDK addresses these challenges by enabling IaC development in high-level programming languages like TypeScript, JavaScript, Python, Java. AWS CDK Level 2 and 3 constructs simplify and reduce the amount of code to be written to manage complex infrastructure. It allows TR to create custom libraries that extend the vanilla AWS CDK with additional patterns and utilities. The extension libraries can also be distributed for multiple programming languages and package managers thanks to JSII. JSII enables TypeScript libraries to be automatically compiled and packaged for native consumption in each target language, allowing CDK libraries to be written once but used in many different programming environments.
Solution to optimize the process
In a medium to large company, different teams provide the fundamental infrastructure services (e.g. authentication and authorization, networking, security, financial tracking and optimization, base infrastructure provisioning, etc.) to enable use of the cloud for a large community of developers.
Figure 1 illustrates the conventional method involving teams producing documentation that outlines the usage of pre-deployed infrastructure. This includes naming and tagging standards, required security boundaries, default settings and other relevant guidelines. Subsequently, the implementation team reviews these documents and integrates the established rules into their tool chain consistently, often working in isolation. This results in inefficiencies, misinterpretation risks and maintenance challenges when specifications change.
Figure 1: The traditional approach
TR’s optimized approach replaces documentation with working code as shown in Figure 2.
Figure 2: The optimized approach
Infrastructure teams contribute their specifications into an extension library for AWS CDK, while the implementation teams can also contribute common patterns back into the central extension. The central extension library is released as polyglot packages allowing the implementation teams to pick the programming language that fits best to their knowledge.
With this approach, TR introduce a “shift-left” in the development and delivery lifecycle. Standards and best practices are introduced early, things are done right by default, and TR minimizes the risks of getting inappropriately configured resources to be deployed, which leads to a reduction in the number of governance and security incidents. Implementation delivery teams can share well architected patterns for re-use by other teams to improve overall effectiveness.
Implementation
Design principles
Key factors for the adoption of a framework are:
Simplicity, ease-of-use, self-service, and fast onboarding
Low maintenance effort and cost
Controlled roll-out, ability to quickly roll-back
With the above in mind, TR delivered a minimally invasive framework that can be enabled with a tiny set of custom code on top of vanilla AWS CDK code.
Using the TR-AWS CDK core library is straightforward – users simply import the package and adapt their entry point. From there, they can leverage standard AWS CDK code and documentation for most development tasks. There’s no need to learn custom construct classes or follow extensive specialized tutorials – vanilla AWS CDK knowledge is sufficient for most requirements. Additionally, developers can quickly incorporate open-source construct libraries through standard package managers. These third-party libraries integrate seamlessly with the TR implementation, automatically conforming to company standards without requiring additional configuration.
By managing distribution of the library following standard software packaging and release procedures TR enable consumers to adopt new capabilities in a controlled way, with the ability to roll-back to previous versions if something goes wrong during an update.
All this together allows TR to tick off the key factors listed above.
The monorepo approach
TR created a monorepo (monolithic repository) which is a version control strategy where multiple projects or packages are stored in a single repository. This approach offers several advantages over maintaining separate repositories for each package: unified versioning, simplified dependency management, consistent tooling, atomic changes across packages and improved collaboration.
This setup mirrors the configuration used by AWS CDK itself.
TR organized their monorepo following this structure:
repo/package.json: Defines dev dependencies and global scripts used by all packages
repo/packages: contains the different modules
repo/packages/core/package.json: deps of core module and scripts for core module
repo/packages/core/lib/*: typescript code that composes the core module
repo/packages/core/lib/augmentation/*: module augmentations for AWS CDK core components
repo/packages/constructs-pattern-X: define multiple reusable and independent level 3 constructs
repo/packages/tr-cdk-lib/package.json: assembly module that defines scripts to assemble the final mono package that will be shared via a npm repository
Figure 3: Repo structure
This structure enables TR to maintain a collection of related, but distinct CDK constructs while making sure they work together seamlessly.
The modules are assembled and released into one single versioned package which simplifies the end-user’s consumption.
The core module: Foundation of TR AWS CDK library
The core module is the foundation of TR’s CDK extension library, it consists of several key components that work together to “TR-ify” AWS resources and offer simplified access to centrally managed infrastructure resources that are provided by TR’s AWS landing zone teams.
TR refers to “TR-ification”, as the process of dynamically adapting AWS CDK constructs to meet their standards and best practices. From a user perspective, the process happens in a minimally invasive way, for most of the time the user is coding with vanilla AWS CDK components, while having access to short-cuts to a variety of TR specific resources.
The core module serves several critical purposes:
Standardization: makes sure the AWS resources follow TR naming conventions and tagging standards
Simplification: abstracts away complex configurations required for TR compliance
Integration: provides seamless access to TR-managed resources like VPCs, security groups, and Route53 hosted zones
Policy Enforcement: automatically applies custom security and financial optimization policies
The “TR-ification” process happens on every construct following a consistent order, for each construct it will:
If applicable, set a name following a consistent pattern
Apply custom initialization logic (e.g. set IAM permission boundary)
Apply security and financial optimization defaults (if not set)
Perform custom validations
Verify security and financial optimization policies
Tag resources
TR uses a single root-level Aspect instead of multiple Aspects to avoid complex resource type checking and improve maintainability:
// This is the entrypoint that triggers the trification process on all CDK constructs
// we apply all TR specific transformations at this point
Aspects.of(this).add({
  visit: (node: IConstruct) => {
    node.getTRifier().trify();
  },
});
The careful readers at this point will scream: Wait a moment! node.getTRifier().trify() won’t compile!
Which is absolutely correct… unless you know a topic in TypeScript called module augmentation, in TR’s case, they augment the IConstruct interface and Construct class as follows:
/** Defines the set of functionality needed when trifying resources */
export interface ITRifier {
    trify(): void;
    readonly name: string | undefined;
    readonly nameFromTree: string;
}

declare module 'constructs/lib/construct' {
    interface IConstruct {
        /** Obtain the ITRifier responsible to add TR specific features to this CDK IConstruct */
        getTRifier(): ITRifier;

        trContext(): AppContext | StageContext | StackContext;
    }

    interface Construct extends IConstruct {
        /** Build the ITRifier responsible to add TR specific features to this CDK IConstruct */
        buildTRifier(): ITRifier;
    }
}
Then provide default implementations for the generic Construct:
Construct.prototype.getTRifier = function () {
    // Lazy getter, build the TRifier only when needed and cache it
    return ObjectUtils.lazyGetFrom(this, 'trifier', () => this.buildTRifier());
};

Construct.prototype.buildTRifier = function () {
    return new ConstructTRifier(this); // Default dummy implementation
};

Construct.prototype.trContext = function (): StackContext {
    return Stack.of(this).trContext() as StackContext;
};
Since AWS CDK constructs implement the IConstruct interface, respectively extend the Construct class automatically, the “TR-ification” process becomes available for many types of constructs. All you need to do now is inject your custom logic for all resources you need customization and make sure the module is loaded, e.g. in case of a Lambda function, it uses:
lambda.CfnFunction.prototype.buildTRifier = function () {
    return new CfnResourceTRifierLambda.CfnFunction(
        this,
        () => { // Accessor for retrieving the lambda function name
            return this.functionName;
        },
        (name: string) => { // Accessor for setting the lambda function name
                this.functionName = name;
        },
        () => {
            // Our own stuff to set defaults for financial optimizations
            const policyChecker = FinOps.Lambda.Defaults.apply(this);

            this.node.addValidation({
                validate: () => {
                    // Inject a custom validation logic to check compliance with financial policies
                    return policyChecker.addErrorIfNotCompliant(this);
                }
            });
        }
    );
};
TR targets L1 (Cfn) constructs like CfnFunction because the higher-level L2 and L3 constructs internally create L1 constructs during synthesis. This architectural decision makes sure TR-ification is applied universally, whether users write new lambda.Function() or new lambda.CfnFunction(), both will be TR-ified. This approach provides complete coverage with a single implementation point while remaining completely transparent to library users who can continue using their preferred abstraction level without awareness of this internal mechanism.
Naming standardization
TR uses standardized naming to support IAM policy filtering and consistent resource management. In order to support a broad range of use-cases, TR defined the resource name pattern as follows: <segregationPrefix>[-appPrefix]-<resourceName>[-region]-<envSuffix> where the elements mean:
segregationPrefix: A prefix used for grouping resources for a specific asset, it implies that a segregated administrative group is responsible for this resource, where applicable it is used for ARN based IAM resource filtering.
appPrefix: Optional, a prefix used to map a resource to a specific application or service, this is shared across stacks within a CDK app.
resourceName: The name of a resource indicating its purpose.
region: Optional, applied only to resources that are global but are part of a CDK stack that is bound to a specific region.
envSuffix: A suffix used to segregate different deployment environments, e.g. development, continuous integration, quality assurance, production.
Traditional approaches require developers to manually construct these names, propagating prefixes and suffixes throughout their code:
new lambda.Function(stack, 'foo', {
    runtime: lambda.Runtime.NODEJS_LATEST,
    handler: 'index.handler',
    code: new lambda.InlineCode('bar'),
    functionName: `\${segregationPrefix}-\${appPrefix}-compute-stats-\${envSuffix}`,
});
With TR AWS CDK extension, the code is simplified to:
new lambda.Function(stack, 'MyFunction', {
  runtime: lambda.Runtime.NODEJS_LATEST,
  handler: 'index.handler',
  code: new lambda.InlineCode('foo'),
  functionName: 'compute-stats',
});
The functionName describes what the function does without “noise”, TR AWS CDK will transparently generate and inject the name into the synthetized CloudFormation script, matching the specification. Note that functionName is optional and TR-CDK will either TR-ify a provided name or automatically generate a valid one if the user omits it, making sure CloudFormation receives a properly formatted name.
Access to “Landing Zone” resources
TR’s central AWS Landing Zone team is responsible of inflating a set of standard resources (e.g. VPC, subnets, security groups, Route 53 zones, golden AMIs, etc.) into AWS accounts that are made available to application development teams.
Through module augmentation (shown earlier), the TR-ifier defines the function trContext() which provides access to a context-aware utility. When calling this function on a resource that resides within a Stack, it will return an object that implements StackContext interface.
export interface StackContext extends StageContext {
  /** Get access to the TR IVpc */
  readonly vpc: IVpc;

  /** Provides access to standard security groups that are available in all TR accounts */
  readonly securityGroups: trparams.ISecurityGroupsResolver;

  /** Provides access to private and public hosted zones (with numeric digits) that are available in all TR accounts */
  readonly route53: trparams.IRoute53Resolver;

  /** Provides access to TR golden AMIs that are available in all TR accounts */
  readonly goldenAMI: TRGoldenAMI;
}
The readonly attributes are accessors for the AWS Landing Zones resources listed above. With calls like the following examples, you have a simple way to obtain access to the standard VPC, subnets selections, route 53 private hosted zone, …
// Get the IVpc:
const trVpc: IVpc = stack.trContext().vpc;

// Get the private subnets as array
const privateSubnets: ISubnet[] = trVpc.privateSubnets;

// Get the private subnets as SubnetSelection
const privateSubSel: SubnetSelection = trVpc.selectSubnets({
    subnetType: SubnetType.PRIVATE_WITH_EGRESS,
});

// Get the private Route53 hosted zone
const privateHZ = stack.trContext().route53.privateHostedZone;
You might now wonder how TR resolves the resources and obtain objects implementing IVpc, ISubnet, ISecurityGroup, …
Instead of using hard-coded resource attributes (e.g. Id, ARN, …) or complex lookups, TR uses CloudFormation’s ability to resolve Systems Manager parameters at execution time, as part of the AWS account initial inflation along with the resources, Systems Manager parameters are registered as well. The parameter names are the same across TR’s AWS accounts, the value contains e.g. the id of the matching AWS Landing Zone standard resource, e.g. /landing-zone/vpc/vpc-id, /landing-zone/vpc/subnets/private-1-id, /landing-zone/vpc/subnets/private-2-id, …
TR then defined custom IVpc, ISubnet, IHostedZone… implementations and for each function they implemented dynamic resolution of resource attributes via Systems Manager parameters. With this approach, TR obtains portable code that runs on AWS accounts initialized via TR inflation process. There are no hard-coded resource identifiers, and there is no need for lookups via AWS SDK during synthesis.
As a user of the TR AWS CDK library, TR developers interact with an object implementing the IVpc interface and do not have to care about how to obtain e.g. the VPC-id and subnet ids. The same principle applies to Route53 hosted zones, Golden AMI ids, etc.
Application initialization
As mentioned previously, one key design principle is to minimize the custom code that a user of TR AWS CDK is required to use compared to using vanilla AWS CDK. This approach leverages existing AWS CDK and reduces the learning curve for developers.
This is how TR developers initialize an App with vanilla CDK, compared to how they initialize it with TR AWS CDK.
From this point on, the developers can continue using vanilla AWS CDK code, the value returned by TRCdk.newApp(…) is an instance of an extension of CDK’s App class and is fully compatible with it. It, however, injects the TR-ification aspect, manages the tagging process, and initializes contextual information.
Here and there, e.g. when they need to pass the VPC into a construct, they will need to call TR AWS CDK code via the trContext() entry point that is exposed on CDK constructs through TypeScript’s module augmentation feature, but that’s it! 99% of the code is vanilla AWS CDK code.
The segregationId, namingProps, and deploymentEnv attributes are used for multiple purposes like formatting resource names and tagging resources.
Standardized Tagging
TR defines tagging standards, there are mandatory tags (e.g. for attribution to a specific product asset and for tracking resource ownership), and there are optional tags (e.g. for specifying resources that belong to different services within the same product asset).
The segregationId, the resourceOwner, and deploymentEnv attributes are used to set mandatory tags using CDK’s built-in functionality for tagging. TR also defines a standardized set of optional tags that can be passed into the application context or set ad-hoc on individual constructs.
This approach maintains consistency in the use of tag names and setting the values, it happens automatically behind the scenes and will be applied to the taggable constructs. No copy-pasting of tag definitions like in AWS CloudFormation, no issues dealing with CloudFormation’s inconsistent syntax for tag declarations, no forgetting of tagging resources.
Conclusion
In this post, we discussed how the monorepo approach to AWS CDK development, centered around the core module, has significantly improved the infrastructure management at Thomson Reuters. By providing well-architected L3 constructs, standardizing and simplifying AWS resource creation, they’ve reduced errors, enhanced governance, and accelerated development.
The core module’s ability to enforce policies, standardize naming and tagging, and provide access to TR-managed resources makes it an invaluable tool for teams working with AWS infrastructure at Thomson Reuters.
To get started with AWS CDK and build your CDK solutions, check out the AWS CDK Developer Guide.
The collective thoughts of the interwebz
Manage Consent
To provide the best experiences, we use technologies like cookies to store and/or access device information. Consenting to these technologies will allow us to process data such as browsing behavior or unique IDs on this site. Not consenting or withdrawing consent, may adversely affect certain features and functions.
Functional
Always active
The technical storage or access is strictly necessary for the legitimate purpose of enabling the use of a specific service explicitly requested by the subscriber or user, or for the sole purpose of carrying out the transmission of a communication over an electronic communications network.
Preferences
The technical storage or access is necessary for the legitimate purpose of storing preferences that are not requested by the subscriber or user.
Statistics
The technical storage or access that is used exclusively for statistical purposes.The technical storage or access that is used exclusively for anonymous statistical purposes. Without a subpoena, voluntary compliance on the part of your Internet Service Provider, or additional records from a third party, information stored or retrieved for this purpose alone cannot usually be used to identify you.
Marketing
The technical storage or access is required to create user profiles to send advertising, or to track the user on a website or across several websites for similar marketing purposes.