Tag Archives: Amazon SES

Handling Bounces and Complaints

Post Syndicated from Tyler Holmes original https://aws.amazon.com/blogs/messaging-and-targeting/handling-bounces-and-complaints/

As you may have seen in Jeff Barr’s blog post or in an announcement, Amazon Simple Email Service (Amazon SES) now provides bounce and complaint notifications via Amazon Simple Notification Service (Amazon SNS). You can refer to the Amazon SES Developer Guide or Jeff’s post to learn how to set up this feature. In this post, we will show you how you might manage your email list using the information you get in the Amazon SNS notifications.

Background

Amazon SES assigns a unique message ID to each email that you successfully submit to send. When Amazon SES receives a bounce or complaint message from an ISP, we forward the feedback message to you. The format of bounce and complaint messages varies between ISPs, but Amazon SES interprets these messages and, if you choose to set up Amazon SNS topics for them, categorizes them into JSON objects.

Scenario

Let’s assume you use Amazon SES to send monthly product announcements to a list of email addresses. You store the list in a database and send one email per recipient through Amazon SES. You review bounces and complaints once each day, manually interpret the bounce messages in the incoming email, and update the list. You would like to automate this process using Amazon SNS notifications with a scheduled task.

Solution

To implement this solution, we will use separate Amazon SNS topics for bounces and complaints to isolate the notification channels from each other and manage them separately. Also, since the bounce and complaint handler will not run 24/7, we need these notifications to persist until the application processes them. Amazon SNS integrates with Amazon Simple Queue Service (Amazon SQS), which is a durable messaging technology that allows us to persist these notifications. We will configure each Amazon SNS topic to publish to separate SQS queues. When our application runs, it will process queued notifications and update the email list. We have provided sample C# code below.

Configuration

Set up the following AWS components to handle bounce notifications:

  1. Create an Amazon SQS queue named ses-bounces-queue.
  2. Create an Amazon SNS topic named ses-bounces-topic.
  3. Configure the Amazon SNS topic to publish to the SQS queue.
  4. Configure Amazon SES to publish bounce notifications using ses-bounces-topic to ses-bounces-queue.

Set up the following AWS components to handle complaint notifications:

  1. Create an Amazon SQS queue named ses-complaints-queue.
  2. Create an Amazon SNS topic named ses-complaints-topic.
  3. Configure the Amazon SNS topic to publish to the SQS queue.
  4. Configure Amazon SES to publish complaint notifications using ses-complaints-topic to ses-complaints-queue.

Ensure that IAM policies are in place so that Amazon SNS has access to publish to the appropriate SQS queues.

Bounce Processing

Amazon SES will categorize your hard bounces into two types: permanent and transient. A permanent bounce indicates that you should never send to that recipient again. A transient bounce indicates that the recipient’s ISP is not accepting messages for that particular recipient at that time and you can retry delivery in the future. The amount of time you should wait before resending to the address that generated the transient bounce depends on the transient bounce type. Certain transient bounces require manual intervention before the message can be delivered (e.g., message too large or content error). If the bounce type is undetermined, you should manually review the bounce and act accordingly.

You will need to define some classes to simplify bounce notification parsing from JSON into .NET objects. We will use the open-source JSON.NET library.

/// <summary>Represents the bounce or complaint notification stored in Amazon SQS.</summary>
class AmazonSqsNotification
{
    public string Type { get; set; }
    public string Message { get; set; }
}

/// <summary>Represents an Amazon SES bounce notification.</summary>
class AmazonSesBounceNotification
{
    public string NotificationType { get; set; }
    public AmazonSesBounce Bounce { get; set; }
}
/// <summary>Represents meta data for the bounce notification from Amazon SES.</summary>
class AmazonSesBounce
{
    public string BounceType { get; set; }
    public string BounceSubType { get; set; }
    public DateTime Timestamp { get; set; }
    public List<AmazonSesBouncedRecipient> BouncedRecipients { get; set; }
}
/// <summary>Represents the email address of recipients that bounced
/// when sending from Amazon SES.</summary>
class AmazonSesBouncedRecipient
{
    public string EmailAddress { get; set; }
}

Sample code to handle bounces:

/// <summary>Process bounces received from Amazon SES via Amazon SQS.</summary>
/// <param name="response">The response from the Amazon SQS bounces queue 
/// to a ReceiveMessage request. This object contains the Amazon SES  
/// bounce notification.</param> 
private static void ProcessQueuedBounce(ReceiveMessageResponse response)
{
    int messages = response.ReceiveMessageResult.Message.Count;
 
    if (messages > 0)
    {
        foreach (var m in response.ReceiveMessageResult.Message)
        {
            // First, convert the Amazon SNS message into a JSON object.
            var notification = Newtonsoft.Json.JsonConvert.DeserializeObject<AmazonSqsNotification>(m.Body);
 
            // Now access the Amazon SES bounce notification.
            var bounce = Newtonsoft.Json.JsonConvert.DeserializeObject<AmazonSesBounceNotification>(notification.Message);
 
            switch (bounce.Bounce.BounceType)
            {
                case "Transient":
                    // Per our sample organizational policy, we will remove all recipients 
                    // that generate an AttachmentRejected bounce from our mailing list.
                    // Other bounces will be reviewed manually.
                    switch (bounce.Bounce.BounceSubType)
                    {
                        case "AttachmentRejected":
                            foreach (var recipient in bounce.Bounce.BouncedRecipients)
                            {
                                RemoveFromMailingList(recipient.EmailAddress);
                            }
                            break;
                        default:
                            ManuallyReviewBounce(bounce);
                            break;
                    }
                    break;
                default:
                    // Remove all recipients that generated a permanent bounce 
                    // or an unknown bounce.
                    foreach (var recipient in bounce.Bounce.BouncedRecipients)
                    {
                        RemoveFromMailingList(recipient.EmailAddress);
                    }
                    break;
            }
        }
    }
}

Complaint Processing

A complaint indicates the recipient does not want the email that you sent them. When we receive a complaint, we want to remove the recipient addresses from our list. Again, define some objects to simplify parsing complaint notifications from JSON to .NET objects.

/// <summary>Represents an Amazon SES complaint notification.</summary>
class AmazonSesComplaintNotification
{
    public string NotificationType { get; set; }
    public AmazonSesComplaint Complaint { get; set; }
}
/// <summary>Represents the email address of individual recipients that complained 
/// to Amazon SES.</summary>
class AmazonSesComplainedRecipient
{
    public string EmailAddress { get; set; }
}
/// <summary>Represents meta data for the complaint notification from Amazon SES.</summary>
class AmazonSesComplaint
{
    public List<AmazonSesComplainedRecipient> ComplainedRecipients { get; set; }
    public DateTime Timestamp { get; set; }
    public string MessageId { get; set; }
}

Sample code to handle complaints is:

/// <summary>Process complaints received from Amazon SES via Amazon SQS.</summary>
/// <param name="response">The response from the Amazon SQS complaint queue 
/// to a ReceiveMessage request. This object contains the Amazon SES 
/// complaint notification.</param>
private static void ProcessQueuedComplaint(ReceiveMessageResponse response)
{
    int messages = response.ReceiveMessageResult.Message.Count;
 
    if (messages > 0)
    {
        foreach (var
  message in response.ReceiveMessageResult.Message)
        {
            // First, convert the Amazon SNS message into a JSON object.
            var notification = Newtonsoft.Json.JsonConvert.DeserializeObject<AmazonSqsNotification>(message.Body);
 
            // Now access the Amazon SES complaint notification.
            var complaint = Newtonsoft.Json.JsonConvert.DeserializeObject<AmazonSesComplaintNotification>(notification.Message);
 
            foreach (var recipient in complaint.Complaint.ComplainedRecipients)
            {
                // Remove the email address that complained from our mailing list.
                RemoveFromMailingList(recipient.EmailAddress);
            }
        }
    }
}

Final Thoughts

We hope that you now have the basic information on how to use bounce and complaint notifications. For more information, please review our API reference and Developer Guide; it describes all actions, error codes and restrictions that apply to Amazon SES.

If you have comments or feedback about this feature, please post them on the Amazon SES forums. We actively monitor the forum and frequently engage with customers. Happy sending with Amazon SES!

How quirion created nested email templates using Amazon Simple Email Service (SES)

Post Syndicated from Dominik Richter original https://aws.amazon.com/blogs/messaging-and-targeting/how-quirion-created-nested-email-templates-using-amazon-simple-email-service-ses/

This is part two of the two-part guest series on extending Simple Email Services with advanced functionality. Find part one here.

quirion, founded in 2013, is an award-winning German robo-advisor with more than 1 billion Euro under management. At quirion, we send out five thousand emails a day to more than 60,000 customers.

Managing many email templates can be challenging

We chose Amazon Simple Email Service (SES) because it is an easy-to-use and cost-effective email platform. In particular, we benefit from email templates in SES, which ensure a consistent look and feel of our communication. These templates come with a styled and personalized HTML email body, perfect for transactional emails. However, managing many email templates can be challenging. Several templates share common elements, such as the company’s logo, name or imprint. Over time, some of these elements may change. If they are not updated across all templates, the result is an inconsistent set of templates. To overcome this problem, we created an application to extend the SES template functionality with an interface for creating and managing nested templates.

This post shows how you can implement this solution using Amazon Simple Storage Service (Amazon S3), Amazon API Gateway, AWS Lambda and Amazon DynamoDB.

Solution: compose email from nested templates using AWS Lambda

The solution we built is fully serverless, which means we do not have to manage the underlying infrastructure. We use AWS Cloud Development Kit (AWS CDK) to deploy the architecture.

The figure below describes the architecture diagram for the proposed solution.

  1. The entry point to the application is an API Gateway that routes requests to a Lambda function. A request consists of an HTML file that represents a part of an email template and metadata that describes the structure of the template.
  2. The Lambda function is the key component of the application. It takes the HTML file and the metadata and stores them in a S3 Bucket and a DynamoDB table.
  3. Depending on the metadata, it takes an existing template from storage, inserts the HTML from the request into it and creates a SES email template.

Architecture diagram of the solution: new templates in Amazon SES are created by a Lambda function accessed through API Gateway. THe Lambda function reads and writes HTML from S3 and reads and writes metadata from DynamoDB.

The solution is simplified for this blog post and is used to show the possibilities of SES. We will not discuss the code of the Lambda function as there are several ways to implement it depending on your preferred programming language.

Prerequisites

Walkthrough

Step 1: Use the AWS CDK to deploy the application
To download and deploy the application run the following commands:

$ git clone https://github.com/quirionit/aws-ses-examples.git
$ cd aws-ses-examples/projects/go-src
$ go mod tidy
$ cd ../../projects/template-api
$ npm install
$ cdk deploy

Step 2: Create nested email templates

To create a nested email template, complete the following steps:

  1. On the AWS Console, choose the API Gateway.
  2. You should see an API with a name that includes SesTemplateApi.
    Console screenshot displaying the SesTemplateApi
  3. Click on the name and note the Invoke URL from the details page.

    AWS console showing the invoke URL of the API

  4. In your terminal, navigate to aws-ses-examples/projects/template-api/files and run the following command. Note that you must use your gateway’s Invoke URL.
    curl -F [email protected] -F "isWrapper=true" -F "templateName=m-full" -F "child=content" -F "variables=FIRSTNAME" -F "variables=LASTNAME" -F "plain=Hello {{.FIRSTNAME}} {{.LASTNAME}},{{template \"content\" .}}" YOUR INVOKE URL/emails

    The request triggers the Lambda function, which creates a template in DynamoDB and S3. In addition, the Lambda function uses the properties of the request to decide when and how to create a template in SES. With “isWrapper=true” the template is marked as a template that wraps another template and therefore no template is created in SES. “child=content” specifies the entry point for the child template that is used within m-full.html. It also uses FIRSTNAME and LASTNAME as replacement tags for personalization.

  5. In your terminal, run the following command to create a SES email template that uses the template created in step 4 as a wrapper.

Step 3: Analyze the result

  1. On the AWS Console, choose DynamoDB.
  2. From the sidebar, choose Tables.
  3. Select the table with the name that includes SesTemplateTable.
  4. Choose Explore table items. It should now return two new items.
    Screenshot of the DynamoDB console, displaying two items: m-full and order-confirmation.
    The table stores the metadata that describes how to create a SES email template. Creating an email template in SES is initiated when an element’s Child attribute is empty or null. This is the case for the item with the name order-confirmation. It uses the BucketKey attribute to identify the required HTML stored in S3 and the Parent attribute to determine the metadata from the parent template. The Variables attribute is used to describe the placeholders that are used in the template.
  5. On the AWS Console, choose S3.
  6. Select the bucket with the name that starts with ses-email-templates.
  7. Select the template/ folder. It should return two objects.
    Screenshot of the S3 console, displaying two items: m-full and order-confirmation.
    The m-full.html contains the structure and the design of an email template and is used with the order-confirmation.html which contains the content.
  8. On the AWS Console, choose the Amazon Simple Email Service.
  9. From the sidebar, choose Email templates. It should return the following template.
    Screenshot of the SES console, displaying the order confirmation template

Step 4: Send an email with the created template

  1. Open the send-order-confirmation.json file from aws-ses-examples/projects/template-api/files in a text editor.
  2. Set a verified email address as Source and ToAddresses and save the file.
  3. Navigate your terminal to aws-ses-examples/projects/template-api/files and run the following command:
    aws ses send-templated-email --cli-input-json file://send-order-confirmation.json
  4. As a result, you should get an email.

Step 5: Cleaning up

  1. Navigate your terminal to aws-ses-examples/projects/template-api.
  2. Delete all resources with cdk destroy.
  3. Delete the created SES email template with:
    aws ses delete-template --template-name order-confirmation

Next Steps

There are several ways to extend this solution’s functionality, including the ones below:

  • If you send an email that contains invalid personalization content, Amazon SES might accept the message, but won’t be able to deliver it. For this reason, if you plan to send personalized email, you should configure Amazon SES to send Rendering Failure event notifications.
  • The Amazon SES template feature does not support sending attachments, but you can add the functionality yourself. See part one of this blog series for instructions.
  • When you create a new Amazon SES account, by default your emails are sent from IP addresses that are shared with other SES users. You can also use dedicated IP addresses that are reserved for your exclusive use. This gives you complete control over your sender reputation and enables you to isolate your reputation for different segments within email programs.

Conclusion

In this blog post, we explored how to use Amazon SES with email templates to easily create complex transactional emails. The AWS CLI was used to trigger SES to send an email, but that could easily be replaced by other AWS services like Step Functions. This solution as a whole is a fully serverless architecture where we don’t have to manage the underlying infrastructure. We used the AWS CDK to deploy a predefined architecture and analyzed the deployed resources.

About the authors

Mark Kirchner is a backend engineer at quirion AG. He uses AWS CDK and several AWS services to provide a cloud backend for a web application used for financial services. He follows a full serverless approach and enjoys resolving problems with AWS.
Dominik Richter is a Solutions Architect at Amazon Web Services. He primarily works with financial services customers in Germany and particularly enjoys Serverless technology, which he also uses for his own mobile apps.

The content and opinions in this post are those of the third-party author and AWS is not responsible for the content or accuracy of this post.

How quirion sends attachments using email templates with Amazon Simple Email Service (SES)

Post Syndicated from Dominik Richter original https://aws.amazon.com/blogs/messaging-and-targeting/how-quirion-sends-attachments-using-email-templates-with-amazon-simple-email-service-ses/

This is part one of the two-part guest series on extending Simple Email Services with advanced functionality. Find part two here.

quirion is an award-winning German robo-advisor, founded in 2013, and with more than 1 billion euros under management. At quirion, we send out five thousand emails a day to more than 60,000 customers.

We chose Amazon Simple Email Service (SES) because it is an easy-to-use and cost-effective email platform. In particular, we benefit from email templates in SES, which ensure a consistent look and feel of our communication. These templates come with a styled and personalized HTML email body, perfect for transactional emails. Sometimes it is necessary to add attachments to an email, which is currently not supported by the SES template feature. To overcome this problem, we created a solution to use the SES template functionality and add file attachments.

This post shows how you can implement this solution using Amazon Simple Storage Service (Amazon S3), Amazon EventBridge, AWS Lambda and AWS Step Functions.

Solution: orchestrate different email sending options using AWS Step Functions

The solution we built is fully serverless, which means we do not have to manage the underlying infrastructure. We use AWS Cloud Development Kit (AWS CDK) to deploy the architecture and analyze the resources.

The solution extends SES to send attachments using email templates. SES offers three possibilities for sending emails:

  • Simple  — A standard email message. When you create this type of message, you specify the sender, the recipient, and the message body, and Amazon SES assembles the message for you.
  • Raw — A raw, MIME-formatted email message. When you send this type of email, you have to specify all of the message headers, as well as the message body. You can use this message type to send messages that contain attachments. The message that you specify has to be a valid MIME message.
  • Templated — A message that contains personalization tags. When you send this type of email, Amazon SES API v2 automatically replaces the tags with values that you specify.

In this post, we will combine the Raw and the Templated options.

The figure below describes the architecture diagram for the proposed solution.

  1. The entry point to the application is an EventBridge event bus that routes incoming events to a Step Function workflow.
  2. An event consists of the personalization parameters, the sender and recipient addresses, the template name and optionally the document-related properties such as a reference to the S3 bucket in which the document is stored. Depending on whether the event contains document-related properties, the Step Function workflow decides how the email is prepared and sent.
  3. In case the event does not contain document-related properties, it uses the SendEmail action to send a templated email. The action requires the template name and the data to replace the personalization tags.
  4. If the event contains document-related properties, the raw sending option of the SendEmail action must be used. If we also want to use an email template, we need to use that as a raw MIME message. So, we use the TestRenderEmailTemplate action to get the raw MIME message from the template and use a Lambda function to get and add the document. The Lambda function then triggers SES to send the email.

The solution is simplified for this blog post and is used to show the possibilities of SES. We will not discuss the code of the lambda function as there are several ways to implement it depending on your preferred programming language.

Architecture diagram of the solution: an AWS Step Functions workflow is triggered by EventBridge. If the event contains no document, the workflow triggers Amazon SES SendEmail. Otherwise, it uses SES TestRenderEmailTemplate as input for a Lambda function, which gets the document from S3 and then sends the email.

Prerequisites

Walkthrough

Step 1: Use the AWS CDK to deploy the application

To download and deploy the application run the following commands:

$ git clone [email protected]:quirionit/aws-ses-examples.git
$ cd aws-ses-examples/projects/go-src
$ go mod tidy
$ cd ../../projects/email-sender
$ npm install
$ cdk deploy

Step 2: Create a SES email template

In your terminal, navigate to aws-ses-examples/projects/email-sender and run:

aws ses create-template --cli-input-json file://files/hello_doc.json

Step 3: Upload a sample document to S3

To upload a document to S3, complete the following steps:

  1. On the AWS Console, choose the S3.
  2. Select the bucket with the name that starts with ses-documents.
  3. Copy and save the bucket name for later.
  4. Create a new folder called test.
  5. Upload the hello.txt from aws-ses-examples/projects/email-sender/files into the folder.

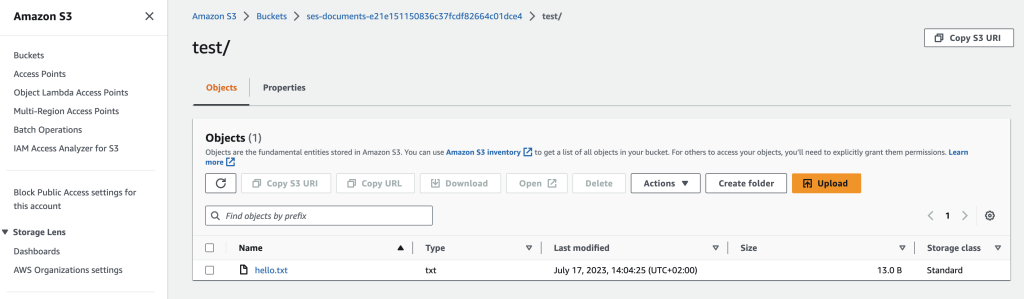
Screenshot of Amazon S3 console, showing the ses-documents bucket containing the file tes/hello.txt

Step 4: Trigger sending an email using Amazon EventBridge

To trigger sending an email, complete the following steps:

  1. On the AWS Console, choose the Amazon EventBridge.
  2. Select Event busses from the sidebar.
  3. Select Send events.
  4. Create an event as the following image shows. You can copy the Event detail from aws-ses-examples/projects/email-sender/files/event.json. Don’t forget to replace the sender, recipient and bucket with your values.
    Screenshot of EventBridge console, showing how the sample event with attachment is sent.
  5. As a result of sending the event, you should receive an email with the document attached.
  6. To send an email without attachment, edit the event as follows:
    Screenshot of EventBridge console, showing how the sample event without attachment is sent.

Step 5: Analyze the result

  1. On the AWS Console, choose Step Functions.
  2. Select the state machine with the name that includes EmailSender.
  3. You should see two Succeeded executions. If you select them the dataflows should look like this:
    Screenshot of Step Functions console, showing the two successful invocations.
  4. You can select each step of the dataflows and analyze the inputs and outputs.

Step 6: Cleaning up

  1. Navigate your terminal to aws-ses-examples/projects/email-sender.
  2. Delete all resources with cdk destroy.
  3. Delete the created SES email template with:

aws ses delete-template --template-name HelloDocument

Next Steps

There are several ways to extend this solution’s functionality, see some of them below:

  • If you send an email that contains invalid personalization content, Amazon SES might accept the message, but won’t be able to deliver it. For this reason, if you plan to send personalized email, you should configure Amazon SES to send Rendering Failure event notifications.
  • You can create nested templates to share common elements, such as the company’s logo, name or imprint. See part two of this blog series for instructions.
  • When you create a new Amazon SES account, by default your emails are sent from IP addresses that are shared with other SES users. You can also use dedicated IP addresses that are reserved for your exclusive use. This gives you complete control over your sender reputation and enables you to isolate your reputation for different segments within email programs.

Conclusion

In this blog post, we explored how to use Amazon SES to send attachments using email templates. We used an Amazon EventBridge to trigger a Step Function that chooses between sending a raw or templated SES email. This solution uses a full serverless architecture without having to manage the underlying infrastructure. We used the AWS CDK to deploy a predefined architecture and analyzed the deployed resources.

About the authors

Mark Kirchner is a backend engineer at quirion AG. He uses AWS CDK and several AWS services to provide a cloud backend for a web application used for financial services. He follows a full serverless approach and enjoys resolving problems with AWS.
Dominik Richter is a Solutions Architect at Amazon Web Services. He primarily works with financial services customers in Germany and particularly enjoys Serverless technology, which he also uses for his own mobile apps.

The content and opinions in this post are those of the third-party author and AWS is not responsible for the content or accuracy of this post.

Building Generative AI into Marketing Strategies: A Primer

Post Syndicated from nnatri original https://aws.amazon.com/blogs/messaging-and-targeting/building-generative-ai-into-marketing-strategies-a-primer/

Introduction

Artificial Intelligence has undoubtedly shaped many industries and is poised to be one of the most transformative technologies in the 21st century. Among these is the field of marketing where the application of generative AI promises to transform the landscape. This blog post explores how generative AI can revolutionize marketing strategies, offering innovative solutions and opportunities.

According to Harvard Business Review, marketing’s core activities, such as understanding customer needs, matching them to products and services, and persuading people to buy, can be dramatically enhanced by AI. A 2018 McKinsey analysis of more than 400 advanced use cases showed that marketing was the domain where AI would contribute the greatest value. The ability to leverage AI can not only help automate and streamline processes but also deliver personalized, engaging content to customers. It enhances the ability of marketers to target the right audience, predict consumer behavior, and provide personalized customer experiences. AI allows marketers to process and interpret massive amounts of data, converting it into actionable insights and strategies, thereby redefining the way businesses interact with customers.

Generating content is just one part of the equation. AI-generated content, no matter how good, is useless if it does not arrive at the intended audience at the right point of time. Integrating the generated content into an automated marketing pipeline that not only understands the customer profile but also delivers a personalized experience at the right point of interaction is also crucial to getting the intended action from the customer.

Amazon Web Services (AWS) provides a robust platform for implementing generative AI in marketing strategies. AWS offers a range of AI and machine learning services that can be leveraged for various marketing use cases, from content creation to customer segmentation and personalized recommendations. Two services that are instrumental to delivering customer contents and can be easily integrated with other generative AI services are Amazon Pinpoint and Amazon Simple Email Service. By integrating generative AI with Amazon Pinpoint and Amazon SES, marketers can automate the creation of personalized messages for their customers, enhancing the effectiveness of their campaigns. This combination allows for a seamless blend of AI-powered content generation and targeted, data-driven customer engagement.

As we delve deeper into this blog post, we’ll explore the mechanics of generative AI, its benefits and how AWS services can facilitate its integration into marketing communications.

What is Generative AI?

Generative AI is a subset of artificial intelligence that leverages machine learning techniques to generate new data instances that resemble your training data. It works by learning the underlying patterns and structures of the input data, and then uses this understanding to generate new, similar data. This is achieved through the use of models like Generative Adversarial Networks (GANs), Variational Autoencoders (VAEs), and Transformer models.

What do Generative AI buzzwords mean?

In the world of AI, buzzwords are abundant. Terms like “deep learning”, “neural networks”, “machine learning”, “generative AI”, and “large language models” are often used interchangeably, but they each have distinct meanings. Understanding these terms is crucial for appreciating the capabilities and limitations of different AI technologies.

Machine Learning (ML) is a subset of AI that involves the development of algorithms that allow computers to learn from and make decisions or predictions based on data. These algorithms can be ‘trained’ on a dataset and then used to predict or classify new data. Machine learning models can be broadly categorized into supervised learning, unsupervised learning, semi-supervised learning, and reinforcement learning.

Deep Learning is a subset of machine learning that uses neural networks with many layers (hence “deep”) to model and understand complex patterns. These layers of neurons process different features, and their outputs are combined to produce a final result. Deep learning models can handle large amounts of data and are particularly good at processing images, speech, and text.

Generative AI refers specifically to AI models that can generate new data that mimic the data they were trained on. This is achieved through the use of models like Generative Adversarial Networks (GANs) and Variational Autoencoders (VAEs). Generative AI can create anything from written content to visual designs, and even music, making it a versatile tool in the hands of marketers.

Large Language Models (LLMs) are a type of generative AI that are trained on a large corpus of text data and can generate human-like text. They predict the probability of a word given the previous words used in the text. They are particularly useful in applications like text completion, translation, summarization, and more. While they are a type of generative AI, they are specifically designed for handling text data.

Simply put, you can understand that Large Language Model is a subset of Generative AI, which is then a subset of Machine Learning and they ultimately falls under the umbrella term of Artificial Intelligence.

What are the problems with generative AI and marketing?

While generative AI holds immense potential for transforming marketing strategies, it’s important to be aware of its limitations and potential pitfalls, especially when it comes to content generation and customer engagement. Here are some common challenges that marketers should be aware of:

Bias in Generative AI Generative AI models learn from the data they are trained on. If the training data is biased, the AI model will likely reproduce these biases in its output. For example, if a model is trained primarily on data from one demographic, it may not accurately represent other demographics, leading to marketing campaigns that are ineffective or offensive. Imagine if you are trying to generate an image for a campaign targeting females, a generative AI model might not generate images of females in jobs like doctors, lawyers or judges, leading your campaign to suffer from bias and uninclusiveness.

Insensitivity to Cultural Nuances Generative AI models may not fully understand cultural nuances or sensitive topics, which can lead to content that is insensitive or even harmful. For instance, a generative AI model used to create social media posts for a global brand may inadvertently generate content that is seen as disrespectful or offensive by certain cultures or communities.

Potential for Inappropriate or Offensive Content Generative AI models can sometimes generate content that is inappropriate or offensive. This is often because the models do not fully understand the context in which certain words or phrases should be used. It’s important to have safeguards in place to review and approve content before it’s published. A common problem with LLMs is hallucination: whereby the model speaks false knowledge as if it is accurate. A marketing team might mistakenly publish a auto-generated promotional content that contains a 20% discount on an item when no such promotions were approved. This could have disastrous effect if safeguards are not in place and erodes customers’ trust.

Intellectual Property and Legal Concerns Generative AI models can create new content, such as images, music, videos, and text, which raises questions of ownership and potential copyright infringement. Being a relatively new field, legal discussions are still ongoing to discuss legal implications of using Generative AI, e.g. who should own generated AI content, and copyright infringement.

Not a Replacement for Human Creativity Finally, while generative AI can automate certain aspects of marketing campaigns, it cannot replace the creativity or emotional connections that marketers use in crafting compelling campaigns. The most successful marketing campaigns touch the hearts of the customers, and while Generative AI is very capable of replicating human content, it still lacks in mimicking that “human touch”.

In conclusion, while generative AI offers exciting possibilities for marketing, it’s important to approach its use with a clear understanding of its limitations and potential pitfalls. By doing so, marketers can leverage the benefits of generative AI while mitigating risks.

How can I use generative AI in marketing communications?

Amazon Web Services (AWS) provides a comprehensive suite of services that facilitate the use of generative AI in marketing. These services are designed to handle a variety of tasks, from data processing and storage to machine learning and analytics, making it easier for marketers to implement and benefit from generative AI technologies.

Overview of Relevant AWS Services

AWS offers several services that are particularly relevant for generative AI in marketing:

  • Amazon Bedrock: This service makes FMs accessible via an API. Bedrock offers the ability to access a range of powerful FMs for text and images, including Amazon’s Titan FMs. With Bedrock’s serverless experience, customers can easily find the right model for what they’re trying to get done, get started quickly, privately customize FMs with their own data, and easily integrate and deploy them into their applications using the AWS tools and capabilities they are familiar with.
  • Amazon Titan Models: These are two new large language models (LLMs) that AWS is announcing. The first is a generative LLM for tasks such as summarization, text generation, classification, open-ended Q&A, and information extraction. The second is an embeddings LLM that translates text inputs into numerical representations (known as embeddings) that contain the semantic meaning of the text. In response to the pitfalls mentioned above around Generative AI hallucinations and inaccurate information, AWS is actively working on improving accuracy and ensuring its Titan models produce high-quality responses, said Bratin Saha, an AWS vice president.
  • Amazon SageMaker: This fully managed service enables data scientists and developers to build, train, and deploy machine learning models quickly. SageMaker includes modules that can be used for generative AI, such as Generative Adversarial Networks (GANs) and Variational Autoencoders (VAEs).
  • Amazon Pinpoint: This flexible and scalable outbound and inbound marketing communications service enables businesses to engage with customers across multiple messaging channels. Amazon Pinpoint is designed to scale with your business, allowing you to send messages to a large number of users in a short amount of time. It integrates with AWS’s generative AI services to enable personalized, AI-driven marketing campaigns.
  • Amazon Simple Email Service (SES): This cost-effective, flexible, and scalable email service enables marketers to send transactional emails, marketing messages, and other types of high-quality content to their customers. SES integrates with other AWS services, making it easy to send emails from applications being hosted on services such as Amazon EC2. SES also works seamlessly with Amazon Pinpoint, allowing for the creation of customer engagement communications that drive user activity and engagement.

How to build Generative AI into marketing communications

Dynamic Audience Targeting and Segmentation: Generative AI can help marketers to dynamically target and segment their audience. It can analyze customer data and behavior to identify patterns and trends, which can then be used to create more targeted marketing campaigns. Using Amazon Sagemaker or the soon-to-be-available Amazon Bedrock and Amazon Titan Models, Generative AI can suggest labels for customers based on unstructured data. According to McKinsey, generative AI can analyze data and identify consumer behavior patterns to help marketers create appealing content that resonates with their audience.

Personalized Marketing: Generative AI can be used to automate the creation of marketing content. This includes generating text for blogs, social media posts, and emails, as well as creating images and videos. This can save marketers a significant amount of time and effort, allowing them to focus on other aspects of their marketing strategy. Where it really shines is the ability to productionize marketing content creation, reducing the needs for marketers to create multiple copies for different customer segments. Previously, marketers would need to generate many different copies for each granularity of customers (e.g. attriting customers who are between the age of 25-34 and loves food). Generative AI can automate this process, providing the opportunities to dynamically create these contents programmatically and automatically send out to the most relevant segments via Amazon Pinpoint or Amazon SES.

Marketing Automation: Generative AI can automate various aspects of marketing, such as email marketing, social media marketing, and search engine marketing. This includes automating the creation and distribution of marketing content, as well as analyzing the performance of marketing campaigns. Amazon Pinpoint currently automates customer communications using journeys which is a customized, multi-step engagement experience. Generative AI could create a Pinpoint journey based on customer engagement data, engagement parameters and a prompt. This enables GenAI to not only personalize the content but create a personalized omnichannel experience that can extend throughout a period of time. It then becomes possible that journeys are created dynamically by generative AI and A/B tested on the fly to achieve an optimal pre-defined Key Performance Indicator (KPI).

A Sample Generative AI Use Case in Marketing Communications

AWS services are designed to work together, making it easy to implement generative AI in your marketing strategies. For instance, you can use Amazon SageMaker to build and train your generative AI models which assist with automating marketing content creation, and Amazon Pinpoint or Amazon SES to deliver the content to your customers.

Companies using AWS can theoretically supplement their existing workloads with generative AI capabilities without the needs for migration. The following reference architecture outlines a sample use case and showcases how Generative AI can be integrated into your customer journeys built on the AWS cloud. An e-commerce company can potentially receive many complaints emails a day. Companies spend a lot of money to acquire customers, it’s therefore important to think about how to turn that negative experience into a positive one.

GenAIMarketingSolutionArchitecture

When an email is received via Amazon SES (1), its content can be passed through to generative AI models using GANs to help with sentiment analysis (2). An article published by Amazon Science utilizes GANs for sentiment analysis for cases where a lack of data is a problem. Alternatively, one can also use Amazon Comprehend at this step and run A/B tests between the two models. The limitations with Amazon Comprehend would be the limited customizations you can perform to the model to fit your business needs.

Once the email’s sentiment is determined, the sentiment event is logged into Pinpoint (3), which then triggers an automatic winback journey (4).

Generative AI (e.g. HuggingFace’s Bloom Text Generation Models) can again be used here to dynamically create the content without needing to wait for the marketer’s input (5). Whereas marketers would need to generate many different copies for each granularity of customers (e.g. attriting customers who are between the age of 25-34 and loves food), generative AI provides the opportunities to dynamically create these contents on the fly given the above inputs.

Once the campaign content has been generated, the model pumps the template backs into Amazon Pinpoint (6), which then sends the personalized copy to the customer (7).

Result: Another customer is saved from attrition!

Conclusion

The landscape of generative AI is vast and ever-evolving, offering a plethora of opportunities for marketers to enhance their strategies and deliver more personalized, engaging content. AWS plays a pivotal role in this landscape, providing a comprehensive suite of services that facilitate the implementation of generative AI in marketing. From building and training AI models with Amazon SageMaker to delivering personalized messages with Amazon Pinpoint and Amazon SES, AWS provides the tools and infrastructure needed to harness the power of generative AI.

The potential of generative AI in relation to the marketer is immense. It offers the ability to automate content creation, personalize customer interactions, and derive valuable insights from data, among other benefits. However, it’s important to remember that while generative AI can automate certain aspects of marketing, it is not a replacement for human creativity and intuition. Instead, it should be viewed as a tool that can augment human capabilities and free up time for marketers to focus on strategy and creative direction.

Get started with Generative AI in marketing communications

As we conclude this exploration of generative AI and its applications in marketing, we encourage you to:

  • Brainstorm potential Generative AI use cases for your business. Consider how you can leverage generative AI to enhance your marketing strategies. This could involve automating content creation, personalizing customer interactions, or deriving insights from data.
  • Start leveraging generative AI in your marketing strategies with AWS today. AWS provides a comprehensive suite of services that make it easy to implement generative AI in your marketing strategies. By integrating these services into your workflows, you can enhance personalization, improve customer engagement, and drive better results from your campaigns.
  • Watch out for the next part in the series of integrating Generative AI into Amazon Pinpoint and SES. We will delve deeper into how you can leverage Amazon Pinpoint and SES together with generative AI to enhance your marketing campaigns. Stay tuned!

The journey into the world of generative AI is just beginning. As technology continues to evolve, so too will the opportunities for marketers to leverage AI to enhance their strategies and deliver more personalized, engaging content. We look forward to exploring this exciting frontier with you.

About the Author

Tristan (Tri) Nguyen

Tristan (Tri) Nguyen

Tristan (Tri) Nguyen is an Amazon Pinpoint and Amazon Simple Email Service Specialist Solutions Architect at AWS. At work, he specializes in technical implementation of communications services in enterprise systems and architecture/solutions design. In his spare time, he enjoys chess, rock climbing, hiking and triathlon.

How to list over 1000 email addresses from account-level suppression list

Post Syndicated from vmgaddam original https://aws.amazon.com/blogs/messaging-and-targeting/how-to-list-over-1000-email-addresses-from-account-level-suppression-list/

Overview of solution

Amazon Simple Email Service (SES) offers an account-level suppression list, which assists customers in avoiding sending emails to addresses that have previously resulted in bounce or complaint events. This feature is designed to protect the sender’s reputation and enhance message delivery rates. There are various types of suppression lists available, including the global suppression List, account-level suppression list, and configuration set-level suppression. The account-level suppression list is owned and managed by the customer, providing them with control over their list and account reputation. Additionally, customers can utilize the configuration set-level suppression feature for more precise control over suppression list management, which overrides the account-level suppression list.

Maintaining a healthy sender reputation with email providers (such as Gmail, Yahoo, or Hotmail) increases the probability of emails reaching recipients’ inboxes instead of being marked as spam. One effective approach to uphold sender reputation involves refraining from sending emails to invalid email addresses and disinterested recipients.

The account-level suppression list can be managed using Amazon SES console or AWS CLI which provides an easy way to manage addresses including bulk actions to add or remove addresses.

Currently, If the account-level suppression list contains more than 1000 records, we need to use NextToken to obtain a complete list of email addresses in a paginated manner. If the email address you are looking for is not within the first 1000 records of the response, you won’t be able to obtain the information from the account-level suppression list with one single command. To list all the email addresses within the account-level suppression, we use Amazon SES ListSuppressedDestinations API. This API allows you to fetch the NextToken and pass it to a follow-up request in order to retrieve another page of results.

The code below creates a loop that makes multiple requests, in each iteration, the next token is replaced, aiding in retrieving all email addresses that have been added to the account-level suppression list.

Prerequisite

The code below can be used to run in your local machine or using AWS CloudShell As part of this blog spot, we will be using AWS CloudShell to fetch the list.

Note: Python 3 and Python 2 are both ready to use in the shell environment. Python 3 is now considered the default version of the programming language (support for Python 2 ended in January 2020).

1) An active AWS account.
2) User logged in to AWS management console must have “ses:ListSuppressedDestinations” permissions.

Walkthrough

  1. Sign in to AWS management console and select the region where you are using Amazon SES
  2. Launch AWS CloudShell
  3. Save the code specified below as a file in your local environment. Example: List_Account_Level.py
  4. Click Actions and Upload File (List_Account_Level.py)

Upload File to AWS CloudShell

5. Run Python code.

Python3 List_Account_Level.py >> Email_Addresses_List.json

6. The file Email_Addresses_List.json will be saved in current directory
7. To download the file – Click Actions and Download File providing File name Email_Addresses_List.json

Download File from AWS CloudShell

List the Email addresses in your Amazon SES account suppression list added to recent bounce or complaint event using Python.

We used the ListSuppressedDestinations operation in the SES API v2 to create a list with all the email addresses that are on your account-level suppression list for your account including bounces and complaints.

Note: SES account-level suppression list applies to your AWS account in the current AWS Region.

import boto3
from datetime import datetime
import json

def showTimestamp(results):
    updated_results = []
    for eachAddress in results:
        updated_address = eachAddress.copy()
        updated_address['LastUpdateTime'] = eachAddress['LastUpdateTime'].strftime("%m/%d/%Y, %H:%M:%S")
        updated_results.append(updated_address)
    return updated_results

def get_resources_from(supression_details):
    results = supression_details['SuppressedDestinationSummaries']
    next_token = supression_details.get('NextToken', None)
    return results, next_token

def main():
    client = boto3.client('sesv2')
    next_token = ''  # Variable to hold the pagination token
    results = []   # List for the entire resource collection
    # Call the `list_suppressed_destinations` method in a loop

    while next_token is not None:
        if next_token:
            suppression_response = client.list_suppressed_destinations(
                PageSize=1000,
                NextToken=next_token
            )
        else:
            suppression_response = client.list_suppressed_destinations(
                PageSize=1000
            )
        current_batch, next_token = get_resources_from(suppression_response)
        results += current_batch

    results = showTimestamp(results)

    print(json.dumps(results, indent=2, sort_keys=False))

if __name__ == "__main__":
    main()

Sample Response

Returns all of the email addresses and the output resembles the following example:

[{
    "EmailAddress": "[email protected]",
    "Reason": "BOUNCE",
    "LastUpdateTime": "04/30/2021, 15:43:01"
}, {
    "EmailAddress": "[email protected]",
    "Reason": "BOUNCE",
    "LastUpdateTime": "04/30/2021, 15:43:01"
}, {
    "EmailAddress": "[email protected]",
    "Reason": "BOUNCE",
    "LastUpdateTime": "04/30/2021, 15:43:01"
}, {
    "EmailAddress": "[email protected]",
    "Reason": "BOUNCE",
    "LastUpdateTime": "04/30/2021, 15:43:00"
}, {
    "EmailAddress": "[email protected]",
    "Reason": "COMPLAINT",
    "LastUpdateTime": "06/22/2023, 12:59:31"
}]

Cleaning up

The response file Email_Addresses_List.json will contain the list of all the email addresses on your account-level suppression list even if there are more than 1000 records. Please free to delete files that were created as part of the process if you no longer need them.

Conclusion

In this blog post, we explained listing of all email addresses if the account-level suppression list contains more than 1000 records using AWS CouldShell. Having complete list of email addresses will help you identify email addresses you are looking for and that are not included in the first 1000 records of the response. You can validate email address and determine who can receive email that can be removed from the account-level suppression list. This protect the sender reputations and improving delivery rates.

Follow-up

  1. https://docs.aws.amazon.com/ses/latest/dg/sending-email-suppression-list.html
  2. https://repost.aws/knowledge-center/ses-remove-email-from-suppresion-list

About the Author

vmgaddam

Venkata Manoj Gaddam is Cloud Support Engineer II at AWS and Service Matter Expert in Amazon Simple Email Service (SES) and Amazon Simple Storage Service (S3). Along with Amazon SES and S3, he is AWS Snow Family enthusiast. In his free time, he enjoys hanging out with friends and traveling.

How to verify an email address in SES which does not have an inbox

Post Syndicated from ajibho original https://aws.amazon.com/blogs/messaging-and-targeting/how-to-verify-an-email-address-in-ses-which-does-not-have-an-inbox/

Overview of solution

Amazon Simple Email Service (Amazon SES) is an email platform that provides a straightforward and cost-effective solution for sending and receiving emails using your own email addresses and domains.

One of the most common use cases for using separate verified from email address is in online retails/e-commerce platforms. Online/e-commerce platform need to send emails to their customers where the from address should look like “[email protected]. In these cases, the From addresses like [email protected] does not have inbox setup for receiving emails. Using the following solution, you can avoid setting up an inbox for the email identity while still verifying the email address for sending and receiving.

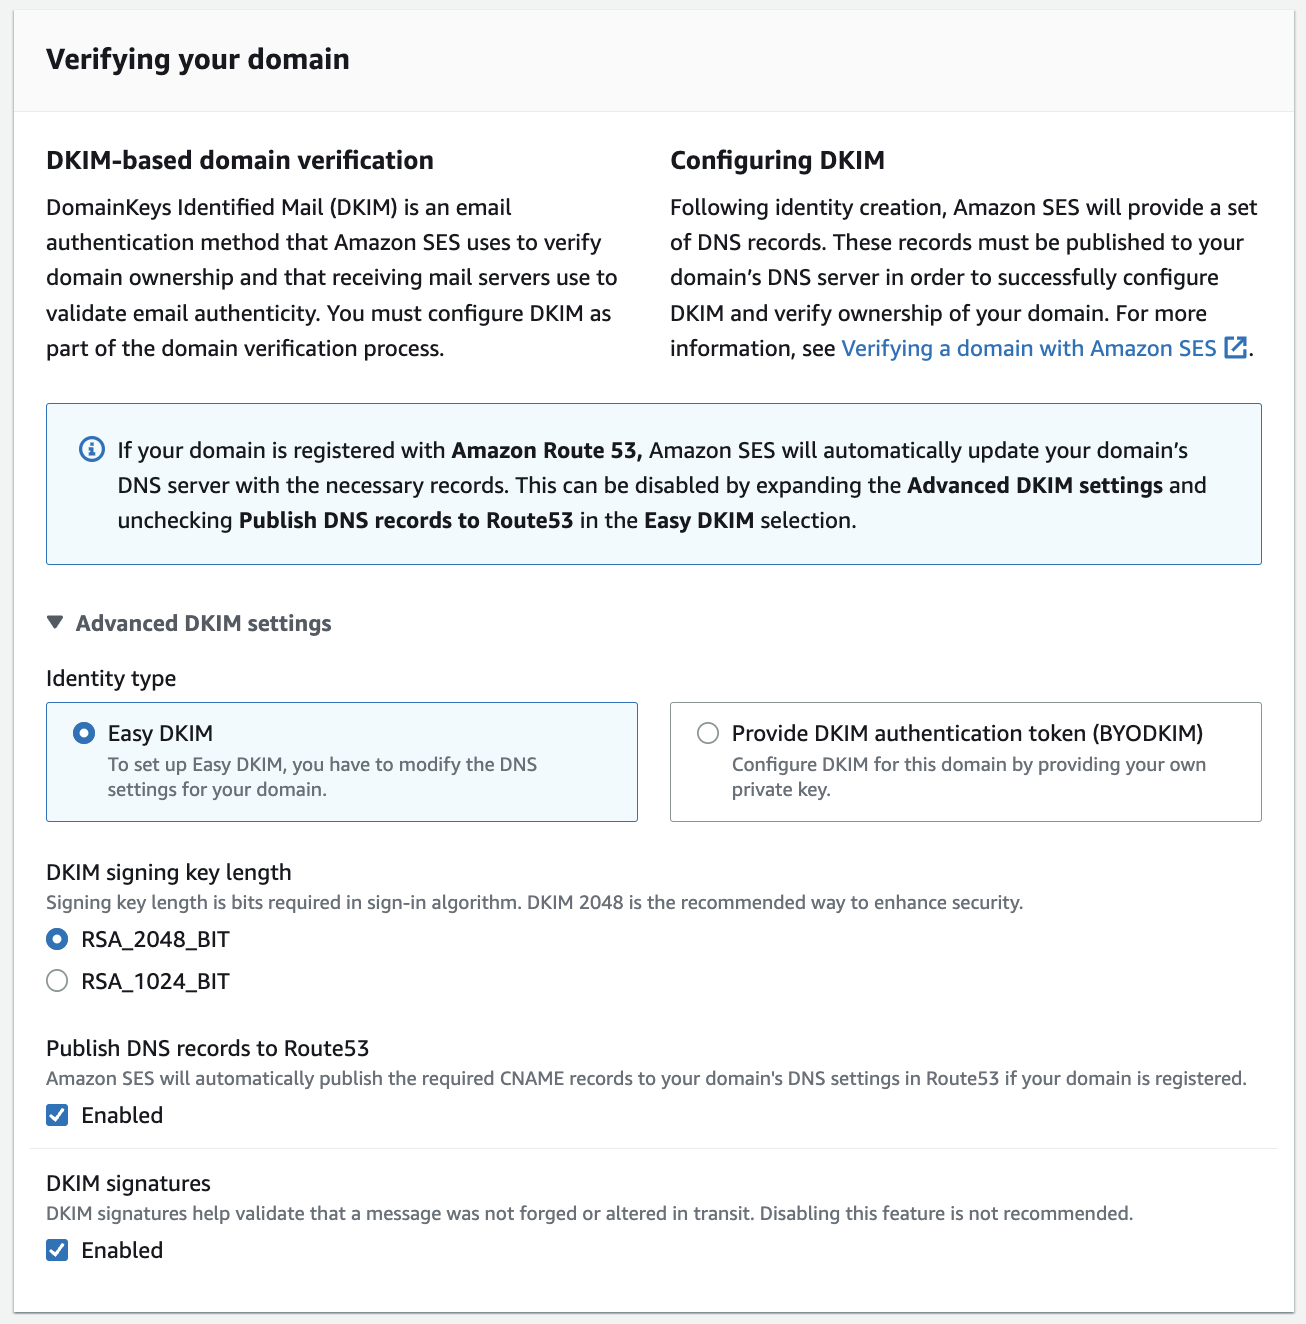
In order to send emails from SES using email/domain identity, we need to have the From email identity or domain verified in Amazon SES in a supported region. When verifying a domain,you have the option to use Easy DKIM or Bring Your Own DKIM(BYOD). For verifying an email address, you need to create an identity in Amazon SES for the respective region. Once the required email address identity is created, you will receive a verification link in your inbox. To successfully verify the email address, simply open the link in your browser. In this case, you would need to have inbox setup for email address to receive the verification link from [email protected].

Verifying a domain in Amazon SES allows you to send emails from any identity associated with that domain. For example, if you create and verify a domain identity called example.com, you don’t need to create separate subdomain identities for a.example.com, a.b.example.com, nor separate email address identities for [email protected], [email protected], and so on. Therefore, the settings for the domain remain the same for all From addresses and you cannot separate you sending activity. You can use this solution to verify the From address without setting up an inbox and differentiate sending activity and tracking based on settings. The benefits of having different email settings from the domain are mentioned below.

Benefits of verifying the email separately for the same domain:

1) When you verify the email along with your domain, you can keep the settings different for the two Identities. You can setup different Configuration sets, notifications and dedicated IP pools for the verified email. This separation enables you to manage domain and email settings independently.
2) You can have two separate emails for sending transaction ([email protected]) and Marketing emails ([email protected]). After assigning different configuration sets, you can monitor the bounces and complaints separately for the sender. A best practice here would be separating the Transactional and Marketing in sub domains. Having both types in the same domain can adversely affect the reputation for your domain, and reduce deliverability of your transactional emails.
3) Using different dedicated IP pools, you can separate the sending IPs for Marketing and transaction or any other emails. Thus, your IP reputation for one use case is not affected by any other emails.

Prerequisite

1) An active AWS account.
2) Administrative Access to the Amazon SES Console and Amazon Simple Storage Service(S3) console.
3) A verified identity (Domain) with an MX record for the domain pointing to a Receiving Endpoint in one of the following region in Amazon SES.

Region Name Region Receiving Endpoint
US East (N. Virginia) us-east-1 inbound-smtp.us-east-1.amazonaws.com
US West (Oregon) us-west-2 inbound-smtp.us-west-2.amazonaws.com
Europe (Ireland) eu-west-1 inbound-smtp.eu-west-1.amazonaws.com

Solution walkthrough

In order to verify the email in SES, we need to verify the link send from Amazon SES in the email inbox. We will setup receiving rule set and add S3 bucket with required permissions to store emails from Amazon SES in S3 bucket. After receiving the email in S3 bucket, download the email to get the verification link. Open the verification link in a browser to complete the process.

Step 1 : How to setup SES Email Receiving Ruleset for S3 bucket

1) Open the Amazon SES console.
2) In the navigation pane, under Configuration, choose Email Receiving.
Email Receiving Rule set

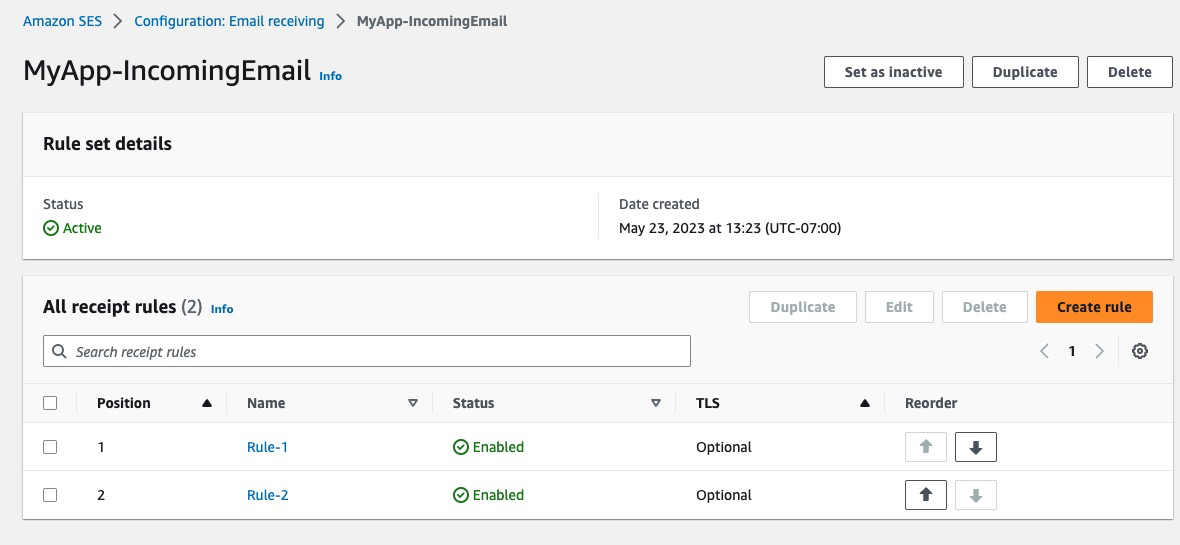
3) To create a new rule set, choose Create a Rule Set, enter a rule set name, and then choose Create a Rule Set.
Note: If you create a new rule set, select the rule set, and then choose Set as Active Rule Set. Only one of your receipt rule sets can be the active rule set at any given time.


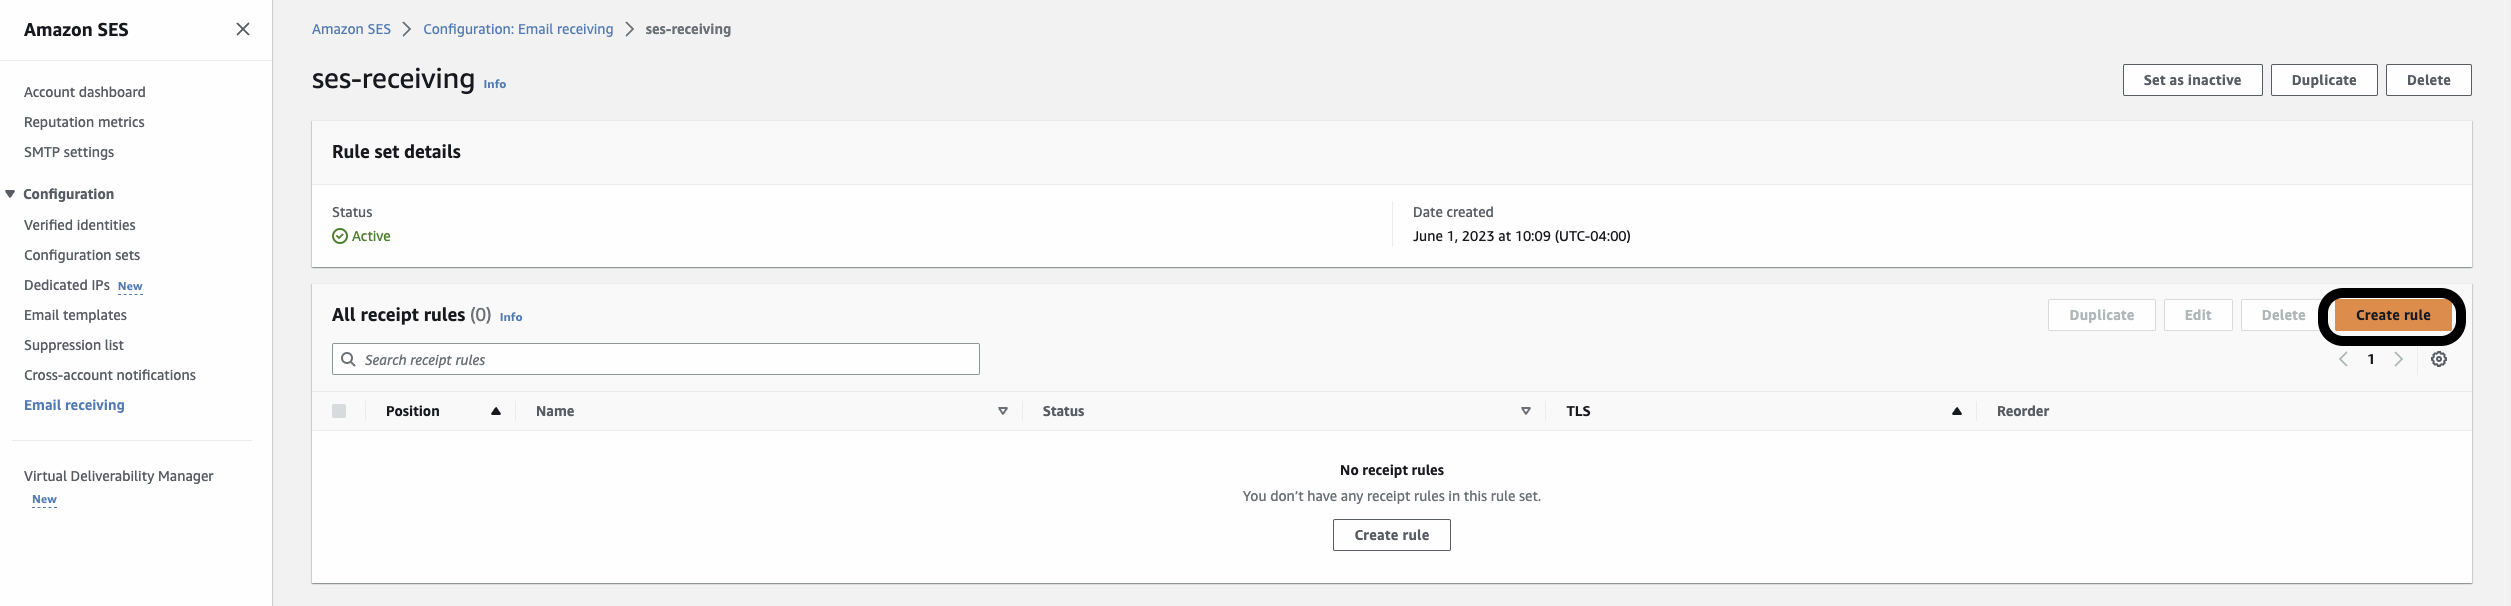
4) Choose Active Rule Set and Choose Create Rule.

Active Ruleset

5) Enter a unique rule name. If your use case requires TLS or spam and virus scanning, then choose Require TLS or Enable spam and virus scanning. To make this an active rule, select the Enabled checkbox. Choose Next.
Receiving Rule Setting

6) To receive emails for specific verified domain, click Add new recipient condition and enter the domain/email address. You can leave it blank and it will store for all the verified domain addresses with receiving setup.
Add recipient condition

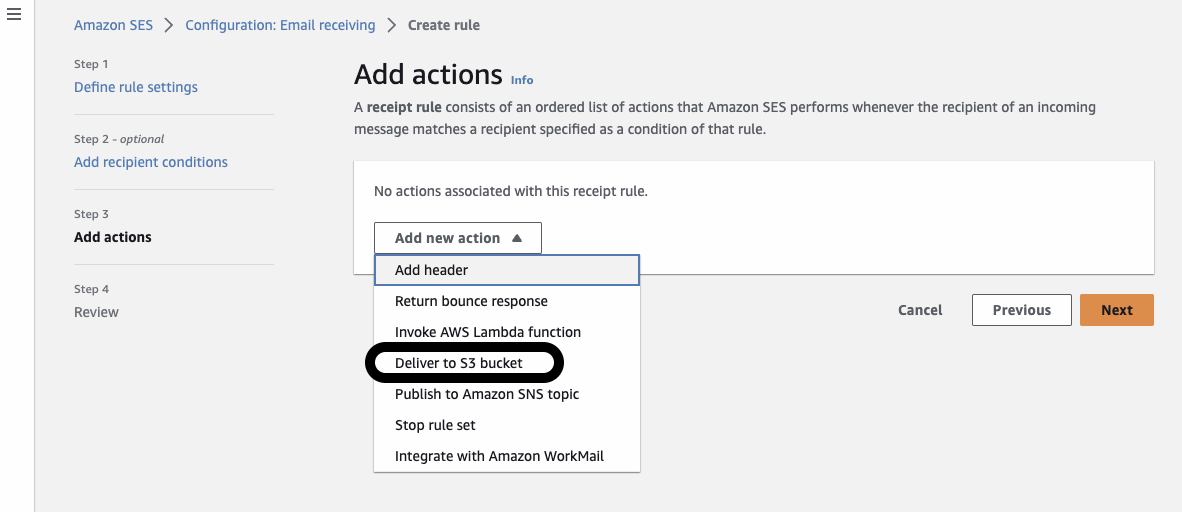
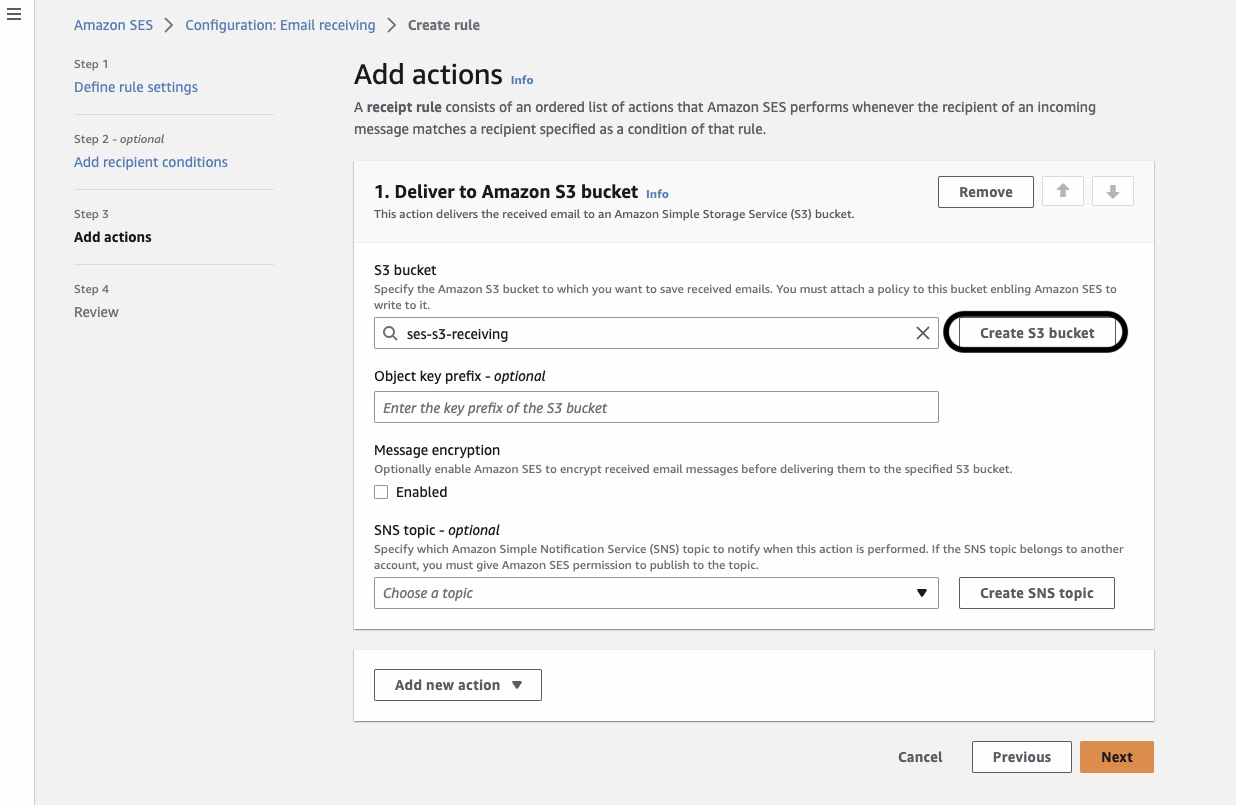
7) Choose Add new action, and then choose Deliver to S3 bucket
Action Deliver to S3 bucket

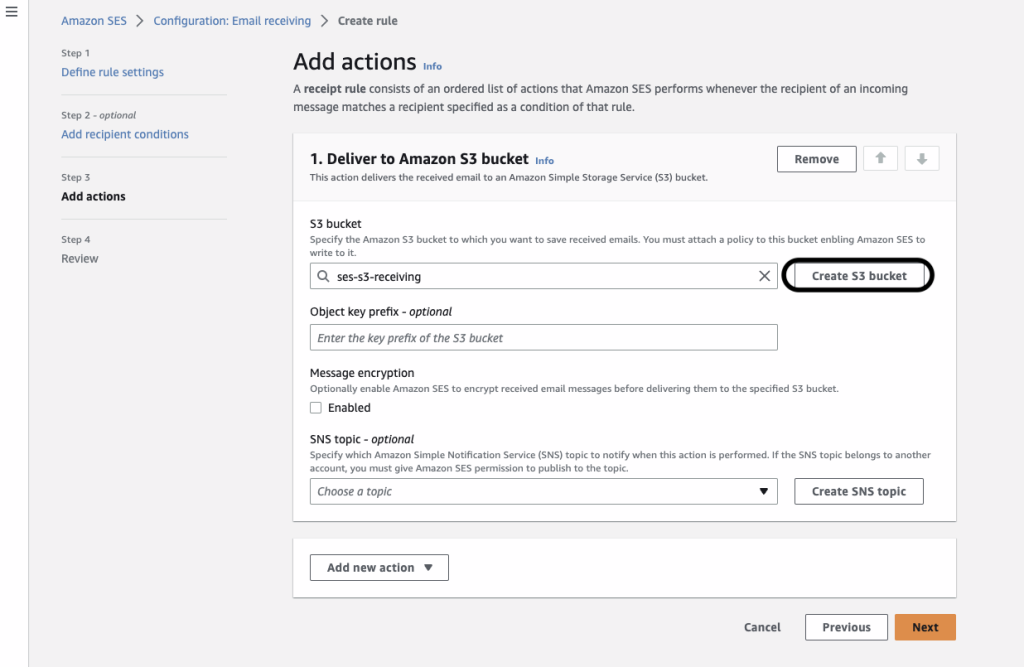
8) Click on Create S3 bucket
Create S3 bucket

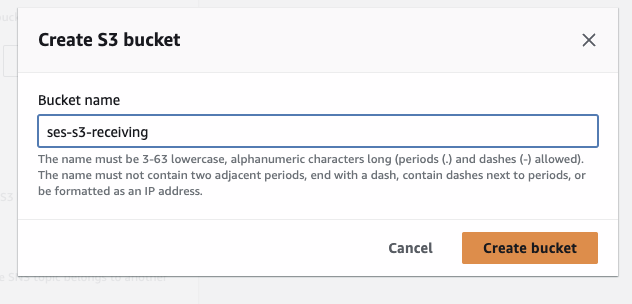
9) Enter a unique S3 bucket name and click on ‘Create Bucket’
Note: S3 Bucket policy will be added automatically.
Provide Unique S3 bucket name

(Optional) Choose Message encryption for Amazon SES to use an Amazon Key Management Server (Amazon KMS) key to encrypt your emails.
(Optional) For SNS topic, select an Amazon Simple Notification Service (Amazon SNS) topic to notify you when Amazon SES delivers an email to the S3 bucket.
Add Action in Receiving rule set

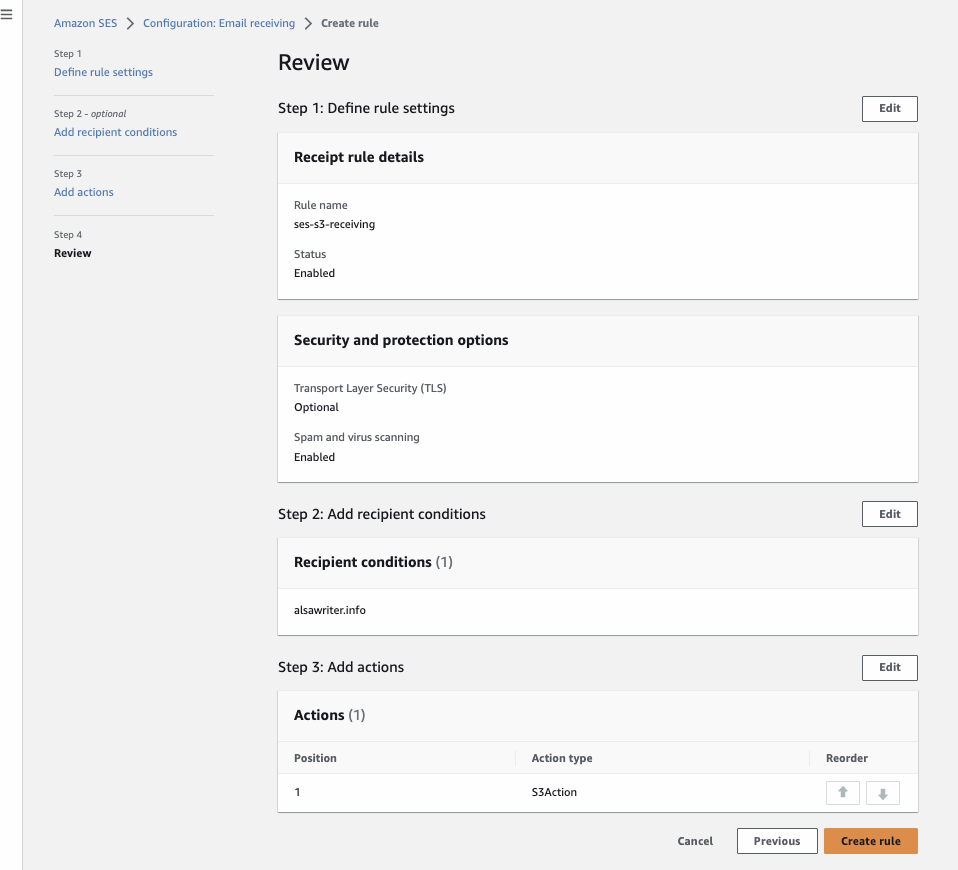
10) Click Next and Create Rule.
Review and Create Ruleset

Step 2: Verifying email address in Amazon SES using S3

The following procedure shows you how to verify Email address in Amazon SES.
1) Open the Amazon SES console.
2) In the navigation pane, under Configuration, choose Verified identities.
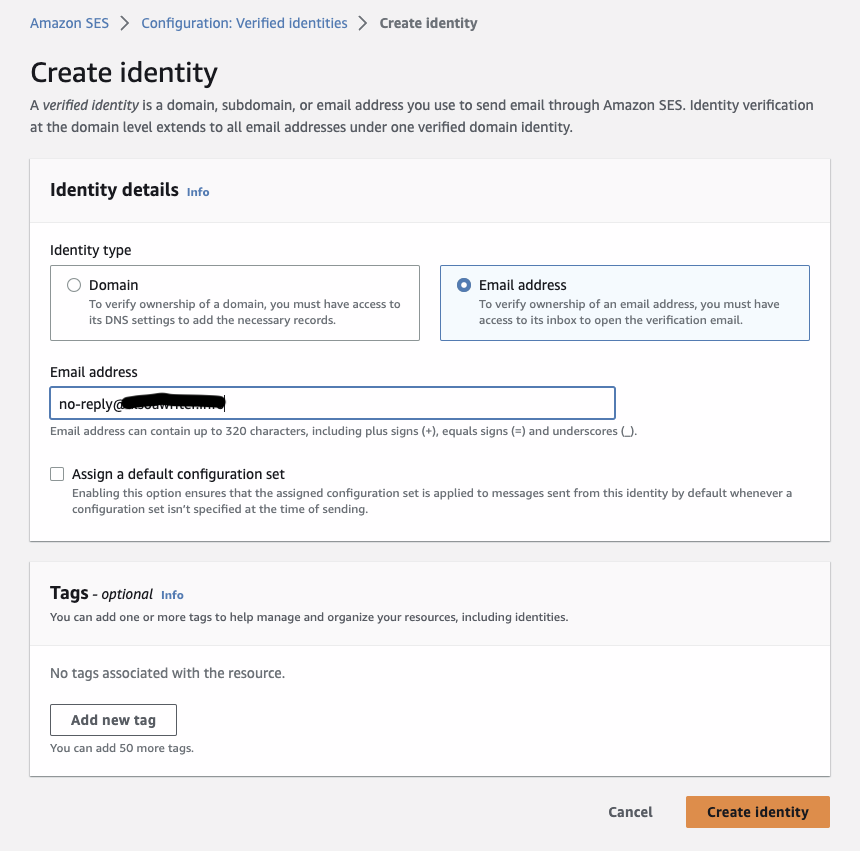
3) Choose Create identity.
Create Verified Identity

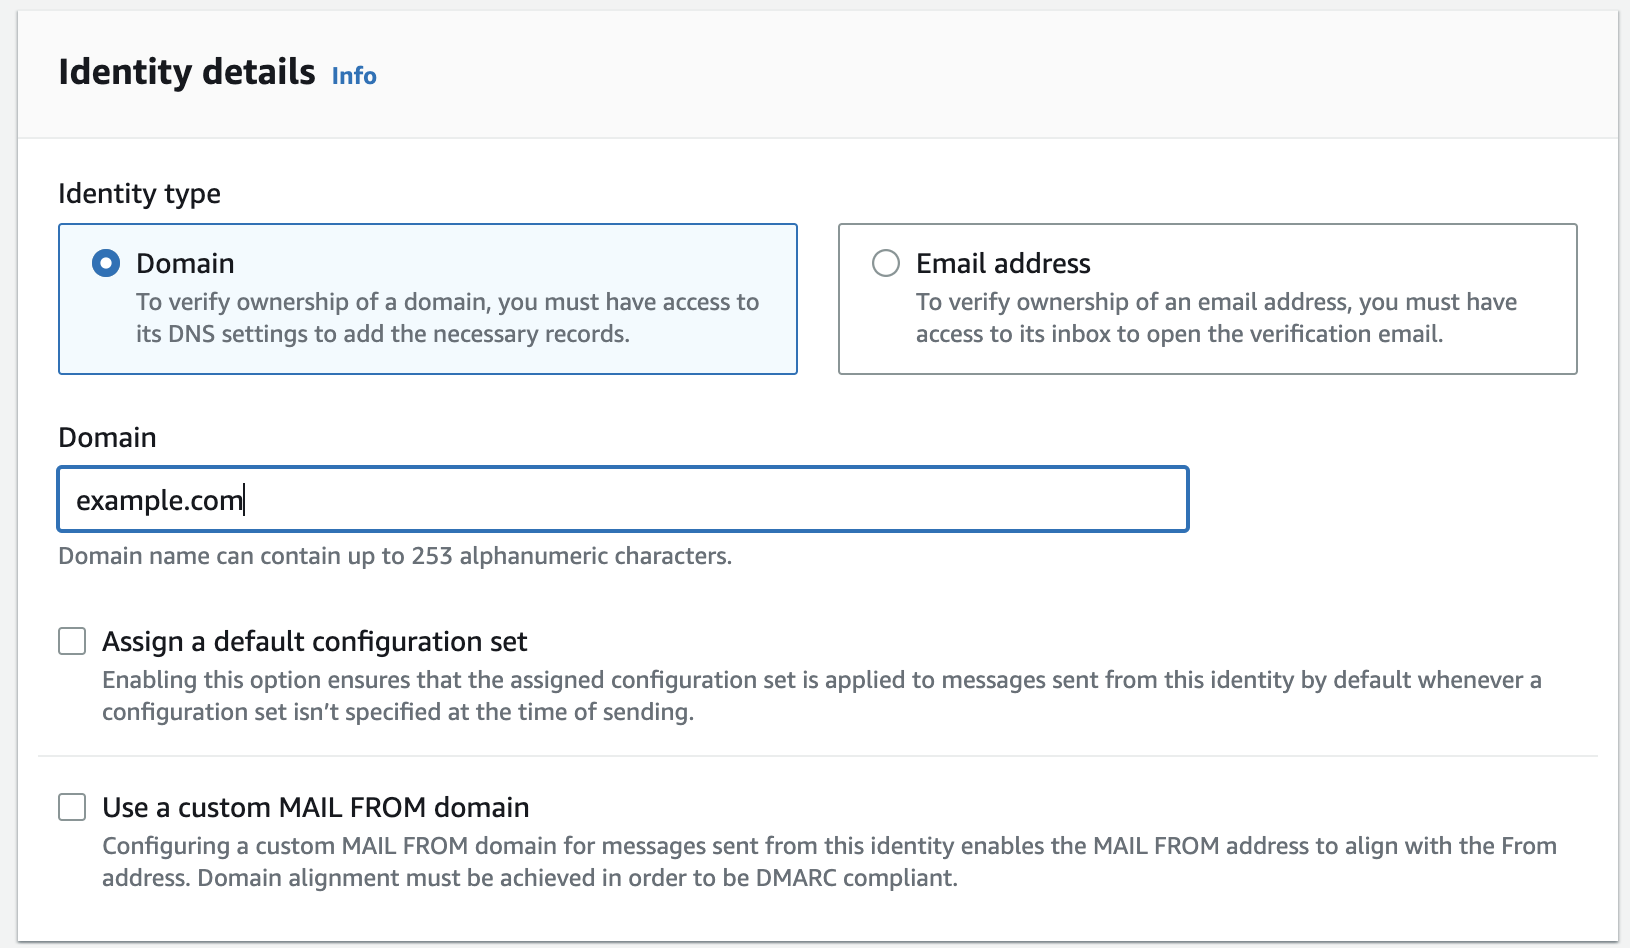
4) Under Identity details, choose Email address as the identity type you want to create.
5) For Email address, enter the email address that you want to use. The email address must be an address that’s able to receive mail and that you have access to.
(Optional) If you want to Assign a default configuration set, select the check box.
6) To create your email address identity, choose Create identity. After it’s created, you should receive a verification email within five minutes from [email protected].

Create Verified identity and Enter
7) Open the Amazon S3 console.
Go to S3 bucket

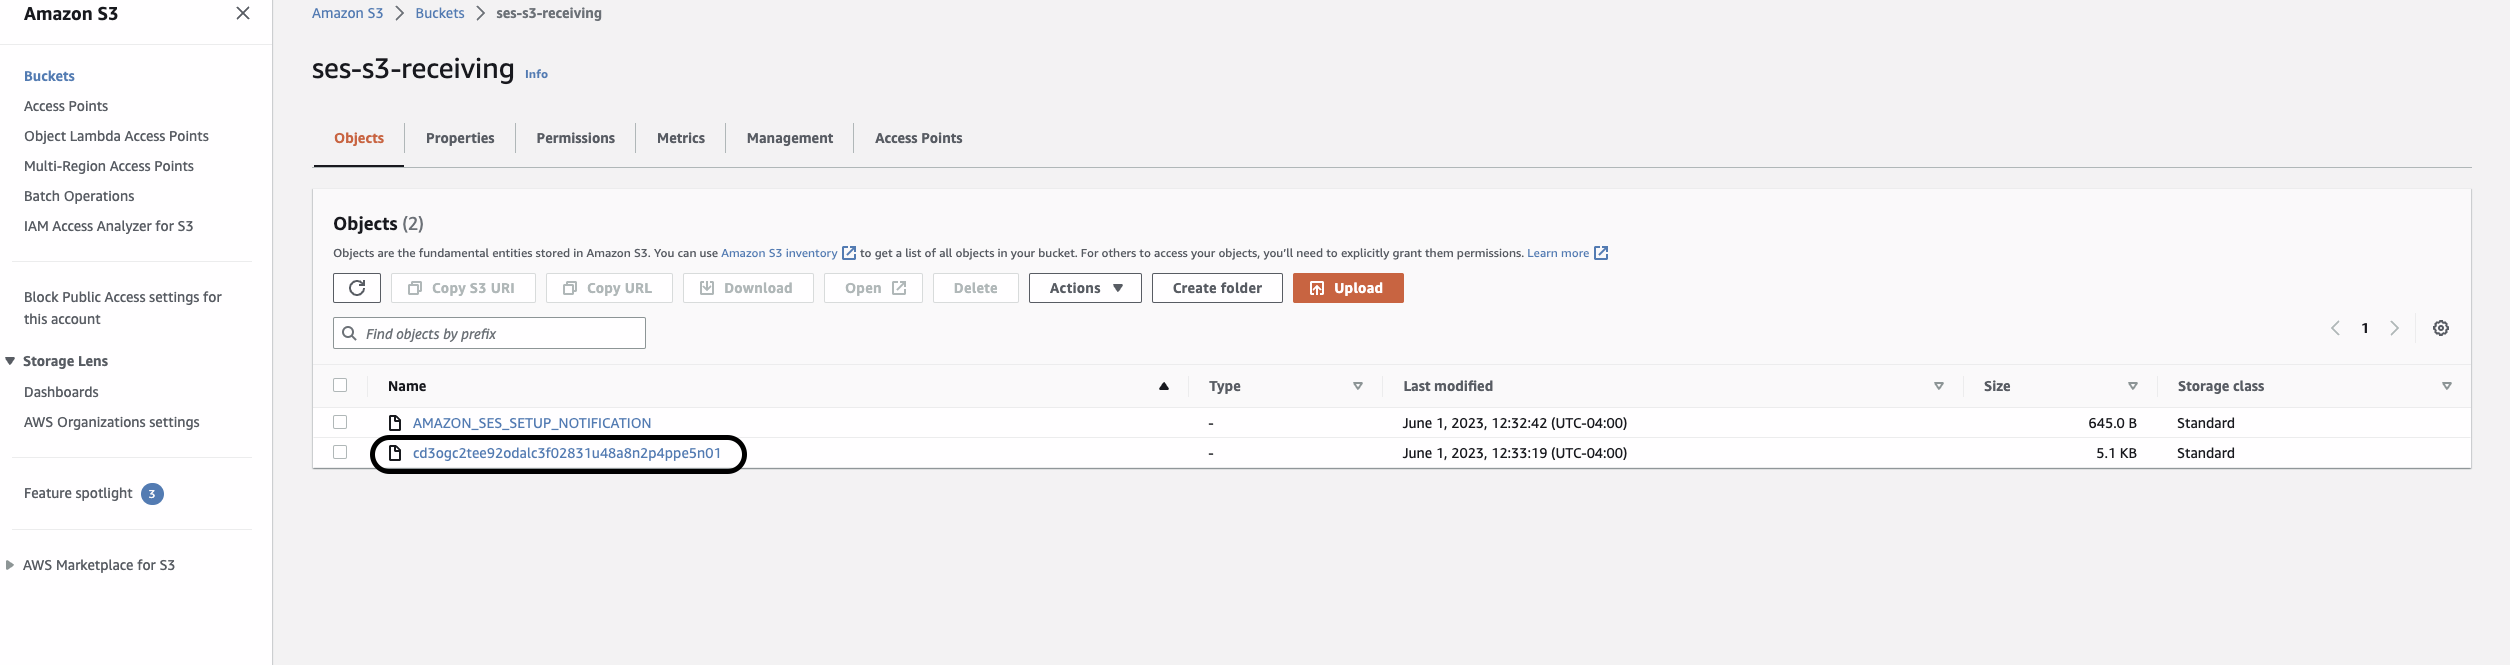
8) Open the S3 Bucket that you configured to store the Amazon SES emails. Verify that the bucket contains the test email that you sent. It can take a few minutes for the test email to appear.
Select the Received Email in S3 bucket

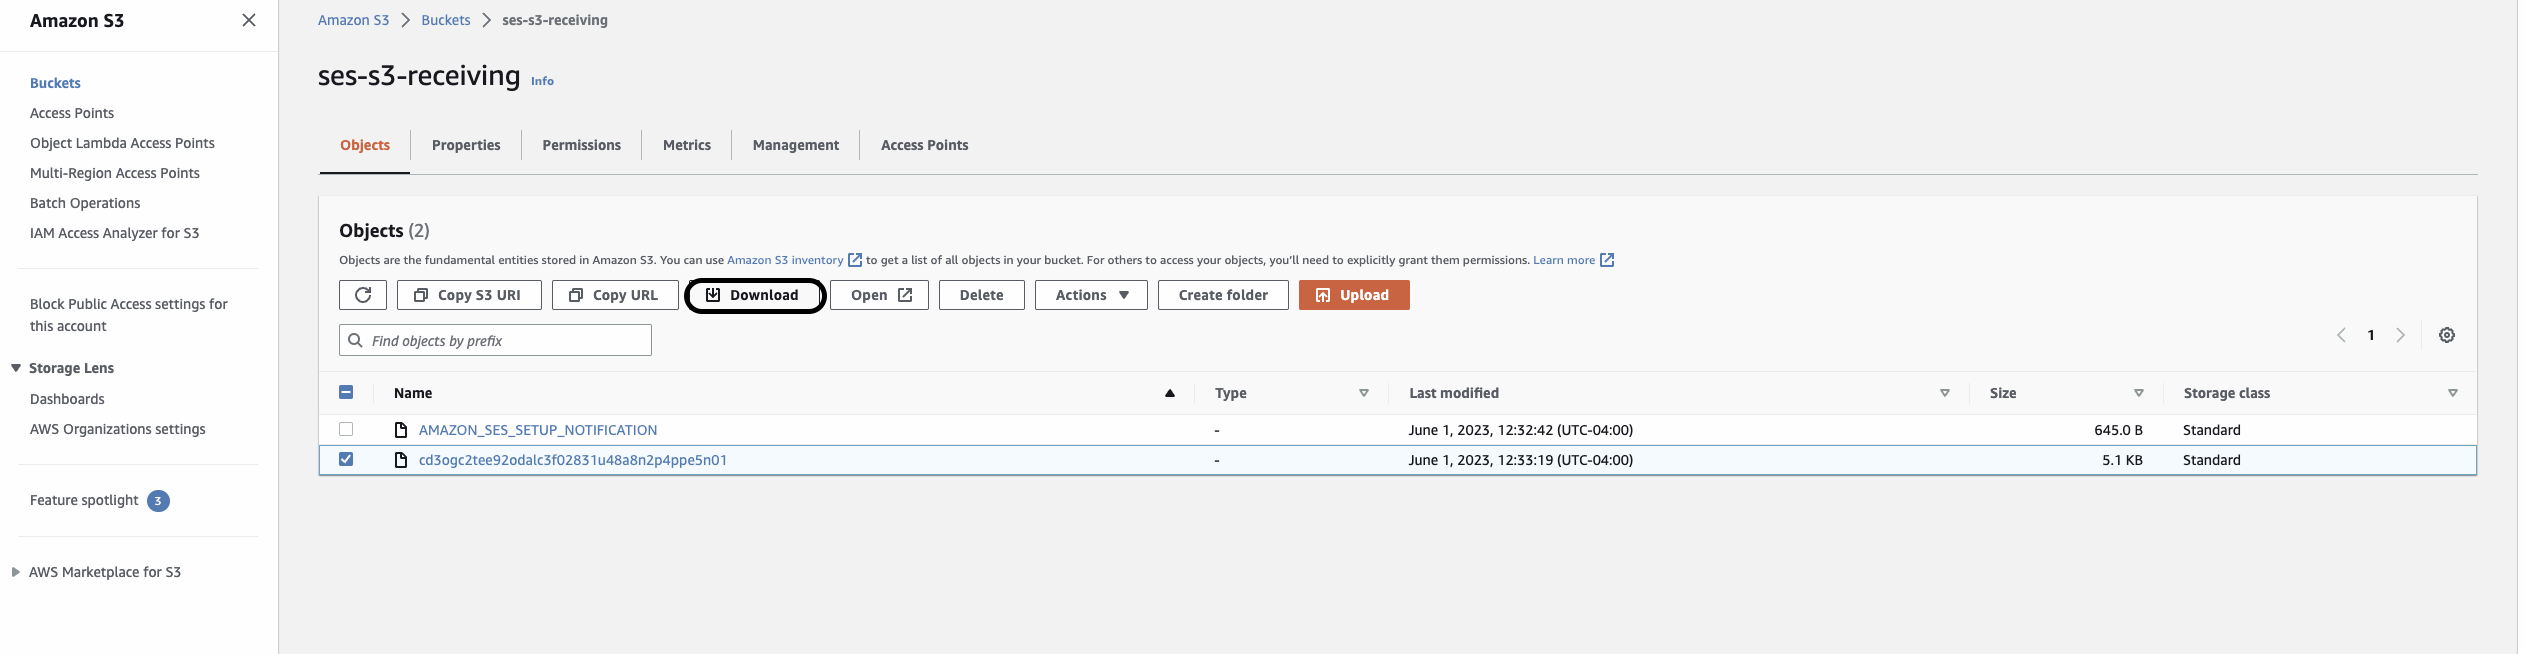
9) Select the email/object received in S3 bucket. Click Download.
Download the received email/object

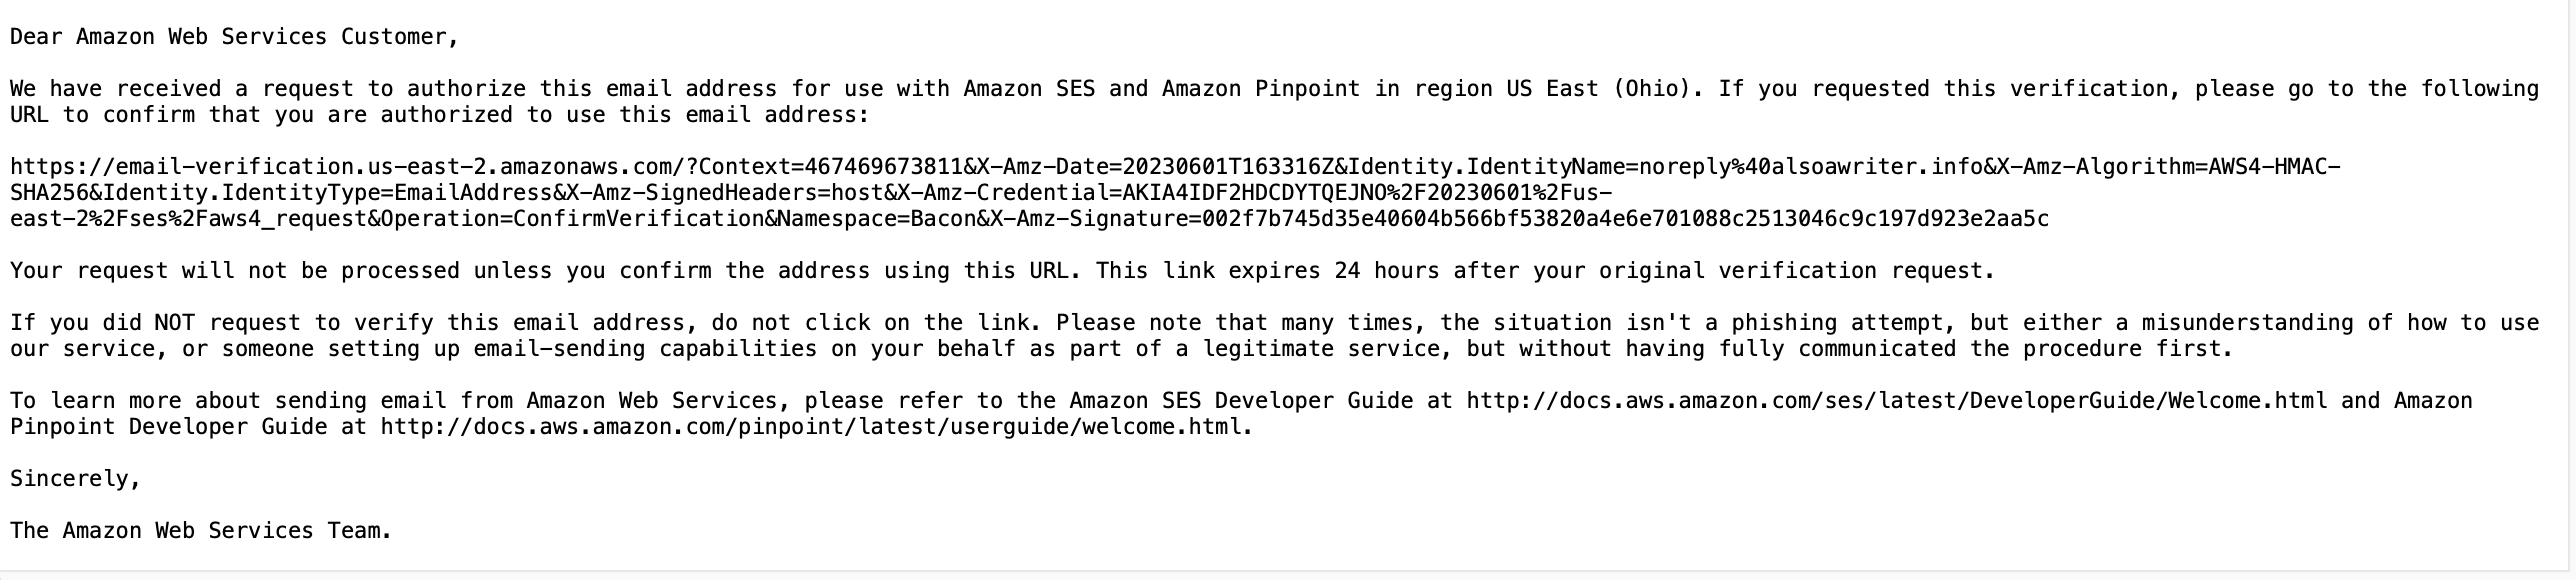
10) Open the Downloaded file in Notepad and copy the verification link under the Subject. Paste the link in your Browser and confirm it.
Open the Downloaded email in Notepad

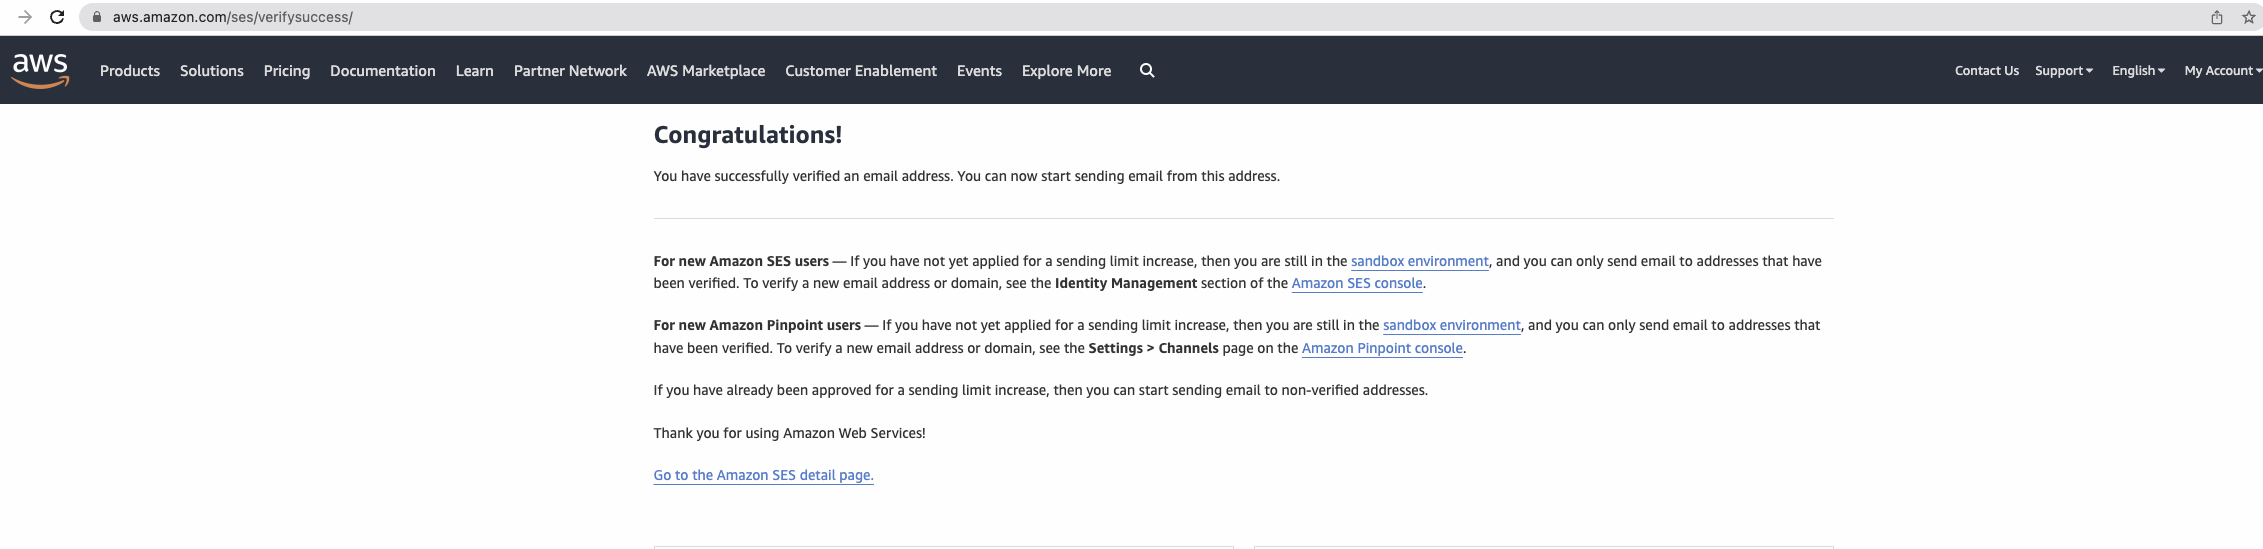
11) Once the link is confirmed, you can check in SES console and confirm under verified identities that your email address is in verified Status.
Browser link after pasting the verification link

Verified Identity confirmation in SES console

Cleaning up:

You should have successfully verified email address in Amazon SES using S3 bucket. To avoid incurring any extra charges, remember to delete any resources created manually if you no longer need them for monitoring.

Steps for removing the resources:

1) Delete all the created/verified Identities.
2) Delete data regarding Amazon SES receiving Rules.
3) Delete data regarding Amazon S3 bucket.

Conclusion:

In this blog post, we explained the benefits of verifying a separate email address for the verified domain without setting up an inbox. Having separate identities for different use cases helps in efficient management of bounces, complaints, and delivery. You can setup different IP pools using configuration set for different use cases.

Follow-up:

https://aws.amazon.com/blogs/messaging-and-targeting/manage-incoming-emails-with-ses/
https://docs.aws.amazon.com/ses/latest/dg/receiving-email.html
https://repost.aws/knowledge-center/ses-receive-inbound-emails

About the Author

Ajinkya bhoite_1Ajinkya Bhoite is Cloud Support Engineer II in AWS and Service Matter Expert in Amazon Simple Email Service(SES). Along with Amazon SES, he is an Amazon S3 enthusiast. He loves helping customers in solving issues related to SES and S3 in their environment. He loves reading, writing and running but not in the same order. He has a fictional novel published on Amazon Kindle by the name Shiva Stone: Hampi’s Hidden treasure.

What is a spam trap and why you should care

Post Syndicated from Jeremy Pierce original https://aws.amazon.com/blogs/messaging-and-targeting/what-is-a-spam-trap-and-why-you-should-care/

Introduction

While there are many variations of spam traps, they all share one thing in common: they are all addresses that should not be receiving mail. According to Spamhaus, an industry leader in anti-spam efforts that many ISPs and email service providers refer to and ingest spam trap listing data from, “A spam trap is an email address traditionally used to expose illegitimate senders who add email addresses to their lists without permission. They effectively identify email marketers with poor permission and list management practices.” (https://www.spamhaus.com/resource-center/spamtraps-fix-the-problem-not-the-symptom/). Having been identified as sending mail to a spam trap, a sender may find that a significant portion of their mail will be blocked until the listing has been addressed and removed.

By following the best practices outlined in this post, starting with ensuring you are only sending high quality mail to those that have explicitly requested it and continue to find value in it, you can reduce the potential of sending to a spam trap and avoiding the negative impacts that event can cause.

Spam traps are secret, on purpose

The owners of spam traps keep them secret and never reveal them; this is by design. If a spam trap were to be identified then those not following best practices could simply filter and remove that address from lists thus defeating their purpose. The creation and use of spam traps is to highlight possible issues with data collection, list management, and list hygiene. A sender who has sent to a spam trap may be tempted to try to locate and delete a specific spam trap or traps but this doesn’t solve the issue and is highly unlikely to succeed.

What impact can sending to a spam trap have

The impact can vary, depending on items such as the type of trap you sent to, how many times you sent to it, and how the spam trap owner handles these events. It might result in an immediate, public listing on an RBL (real-time block list). ISPs and email providers subscribe to various block lists as a means of supplementing their own anti-spam methods and processes and often move to block mail from both domains and IP addresses identified as sending to spam traps. For some senders, a public RBL listing will result in a significant amount of their mail being blocked. As email is typically a vital part of how business today operates, this could be devastating and difficult to manage after the fact.

Types of spam traps

Below are many of the most common types of spam traps, but this is not an exhaustive list.

  • Classic or Pure Spam traps – Classic spam traps are email addresses that were not created or used by a live person, nor available on any website. In some cases, these are addresses at domains that accept mail to any address before the @ (wildcard domains: e.g., *@example.com).
  • Seeded Traps – Seeded traps are email addresses that anti-spam organizations and others create and purposely plant in various locations online in non-obvious places. The purpose of this “seeding” is to identify when a sender is scraping addresses across the internet and/or has purchased a list from someone who has. This process highlights senders who are sending mail without consent and may not be honoring requests to unsubscribe.
  • Recycled email addresses – These were once-valid email addresses and are the kind of trap a sender can send to even if every address on their list was originally confirmed opt-in. Recycled spam traps are often quite old addresses that were no longer in use or abandoned by the original owner. Abandoned for so long, in fact, the provider has repurposed it as a trap to identify senders who have not properly maintained the hygiene of their sending lists. This indicates a sender has not been active in keeping lists up to date and pruning inactive subscribers or bounced emails. Often, as part of repurposing these addresses, the provider will ensure the address will bounce for 12 months or more, indicating to the sender that the address is no longer valid and only moving to listing the spam trap and sender after having given them that grace period.
  • Typo traps – Email addresses that have a typo in the domain, such as @gmial or @yaho, instead of @gmail or @yahoo respectively. These may also be typos in the username, before the @. These may occur when email addresses are collected offline and entered into a database later, or potentially entered incorrectly by the user themselves and was not confirmed. These traps are quite common, but are not “pure” spam traps and anti-spam organizations typically weigh them with this in mind.
  • Fake addresses – Registration and shopping cart forms often attract fake email addresses. Perhaps an offer is presented on a site that requires an entry, wherein someone enters submits an address like [email protected], which may very well be a spam trap address.

How to avoid sending to spam traps

The first step to avoiding sending to a spam trap is to ensure you are only sending mail to those that have explicitly requested it. Your subscribers should find value in your mail and should fully expect to receive it. The key is getting permission from those users and meeting those expectations. It is strongly recommended that you implement confirmed opt-in or double opt-in, the process of sending a message to the address provided that contains a link or other mechanism for the subscriber to confirm that they approve of the subscription. If there is no response received, that address should not be sent any further mail.

Do not purchase a sending list from a third party. It should go without saying, considering the first step above, however, some senders may be tempted to “kick start” their sending with every intention to transition to best practices but just want a quick boost. This will often result in excessive bounces, recipients marking mail as spam (known as complaints), and ending up with spam traps on sending lists.

Once you have an established list of recipients, addresses that have confirmed opt-in to your mail and value the content you are sending, you need to look at your list management. You should be tracking user engagement for things such as: has a recipient opened your mail recently, has a recipient clicked through a link in your mail, has that user logged in to your site or service. With this tracking in place you should be regularly, preferably automatically, pruning your sending list of non-engaged subscribers. It isn’t recommended to send mail to subscribers who have not engaged for 6 months or longer.

You should also be consistently addressing and removing bounce and complaint addresses. As noted, some spam traps may bounce for 12 months or more before going “live” as a spam trap, providing senders ample time to remove a no longer valid address. This involves tracking and monitoring your sending, ingesting that data, and acting upon those events.

Make sure all webforms have been secured by means such as adding CAPTCHA, in conjunction with confirmed opt-in to help prevent bots from maliciously submitting addresses to your sending lists.

You should immediately honor any and all unsubscribe requests. These addresses may be used by real individuals, and that user may very well be involved in anti-spam efforts and organizations themselves in some way. By not honoring an unsubscribe request you may be sending mail to someone who takes part in blocking decisions, or you may end up with excessive complaints that also negatively impact your sending reputation.

What to do if you have sent to a spam trap

If you haven’t already put in place the methods and best practices above to avoid sending to a spam trap, you should work to immediately implement them. You should also regularly perform rigorous reviews of your data collection and verification practices, identifying and addressing any potential areas of concern or lists/subscribers that cannot be sourced and verified. Segment your lists into recipient activity such as opens, clicks and forwards, immediately removing unengaged addresses for a lesser time frame than what you should already have in place. You may consider performing a permission pass, a one-time campaign to recipients (specifically those left after segmenting and removing of all non-verifiable addresses and older non-engaged recipients) providing users the opportunity to confirm that they would still like to receive mail from you. Only those that have confirmed their subscription status should be kept on future sending lists.

In conclusion

Implementing these best practices, before you begin sending in bulk, can be key in gaining and maintaining a quality sending reputation and is a vital part of successful marketing for businesses both large and small. These processes can significantly improve ROI, mail list quality and integrity, and reduce the possibility of sending to a spam trap, resulting in the best chance of getting your mail in the inboxes of your subscribers

For more information on best practices see:

https://docs.aws.amazon.com/ses/latest/dg/best-practices.html

https://aws.amazon.com/blogs/messaging-and-targeting/handling-bounces-and-complaints/

https://aws.amazon.com/blogs/messaging-and-targeting/guide-to-maintaining-healthy-email-database/

https://aws.amazon.com/blogs/messaging-and-targeting/amazon-ses-set-up-notifications-for-bounces-and-complaints/

Amazon SES – How to track email deliverability to domain level with CloudWatch

Post Syndicated from Alaa Hammad original https://aws.amazon.com/blogs/messaging-and-targeting/amazon-ses-how-to-track-email-deliverability-to-domain-level-with-cloudwatch/

Why is it important to track email deliverability per domain with Amazon Simple Email Service (SES)?

Amazon Simple Email Service (Amazon SES) is a scalable cloud email service provider that enables businesses to build a large-scale email solution and host multiple domains from the same SES account for different purposes ex: one domain for sending marketing emails such as special offers, another domain to send transactional emails such as order confirmations, and other types of correspondence such as newsletters.

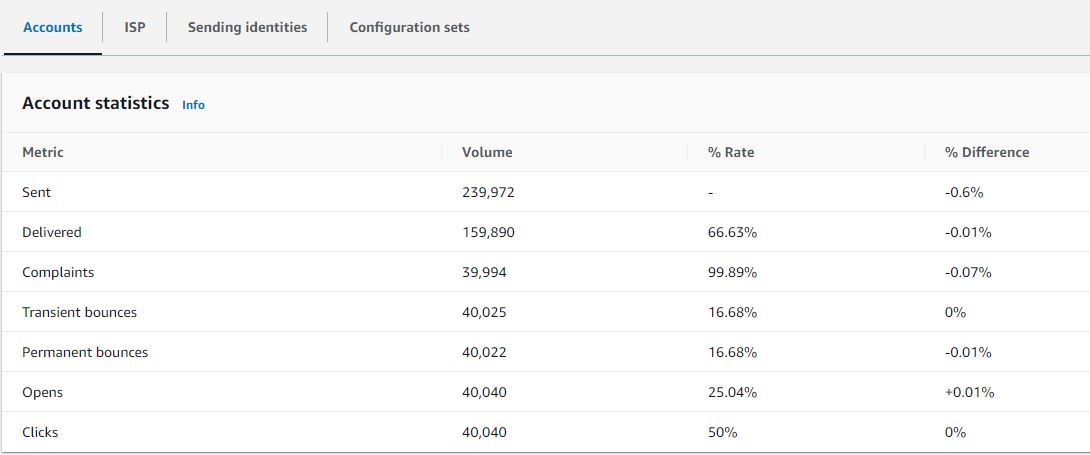
As your product, service or solution built on Amazon SES grows and you require multiple domains verified, it is important to track email deliverability for emails you send from each domain for business continuity, billing purposes or incidents investigations. This can be useful to identify if you have low email deliverability for your business domain or if you have a domain generating high bounce or complaint rates and take proactive actions before impacting the account’s ability to send emails from any other domains.

SES offers features that automatically manage deliverability per domain through Virtual Deliverability Manager. Virtual Deliverability Manager helps enhance email deliverability and provides insights into sending and delivery data, as well as offering solutions to fix negative email sending reputation. You can learn more about Virtual Deliverability Manager here.

Solution Walkthrough

Amazon SES provides a way to monitor sender reputation metrics such as bounce and complaint rates per account or configuration sets using event publishing. This blog will discuss how you can use Amazon SES message auto-tags to monitor and publish email deliverability events (Send, Delivery, Bounce, Complaints) to CloudWatch custom metrics per domain. In addition, you will see how to create a custom CloudWatch dashboard that’s easy to access in a single view to monitor your domain metrics. This CloudWatch dashboard can help to provide guidance for your team members during operational events about how to respond to specific incidents for your sending domain.

What are Amazon SES Auto-Tags:

Message tags are a form of name/value pairs to categorize the email you are sending. For example, if you advertise books, you could name a message tag general, and assign a value of sci-fi or western, when you send an email for the associated campaign. Depending on which email sending interface you use, you can provide the message tag as a parameter to the API call (SendEmail, SendRawEmail) or as an Amazon SES-specific email header.

In addition to the message tags you add to any emails you send, Amazon SES adds a set of Auto-Tags that are automatically included in any emails you send. You don’t need to pass the parameters of the auto-tags to the API call or email headers since SES does this automatically.

The auto-tags in the list below are used to track the email deliverability for specific events ( ex: Send, Delivery, Bounce, Complaint). SES does this by using the name/value pairs of the auto-tag name as a dimension in CloudWatch metric to track the count of events of specific auto-tag. This blog post will use “ses:from-domain” auto-tag to configure event publishing for tracking and publish email deliverability events (Send, Delivery, Bounce, Complaints) you receive per domain to CloudWatch metrics and CloudWatch dashboard.

Amazon SES auto-tags added to messages you send

Prerequisites:

For this walkthrough, you should have the following prerequisites:

Configure Amazon SES to publish email deliverability events to CloudWatch destination:

To configure event publishing for tracking email deliverability events, you first need to create a configuration set. Configuration sets in SES are groups of rules, that you can apply to your verified identities. When you apply a configuration set to an email, all of the rules in that configuration set are applied to the email.

After your configuration set is created, you need to create Amazon SES event destination. Amazon SES will send all email deliverability events you intend to track to this event destination. In this blog the event destination is Amazon CloudWatch.

    1. Sign in to the Amazon SES console.
    2. In the navigation pane, under Configuration, choose Configuration sets. Choose Create set.
    3. Enter Configuration set name, leave the rest of fields to default, scroll to the send and click on Create set.
    4. Under configuration set home page click on Event destinations tab and select Add destination
    5. Add SES event destination to configuration set
    6. Under Select event types, check Sends, Deliveries, Hard bounces and Complaints boxes and click Next.
    7. selecting event types to track
    8. Under Specify destination, Select Amazon CloudWatch.
    9. Select event destination as Amazon CloudWatch
    10. Name – enter the name of the destination for this configuration set. The name can include letters, numbers, dashes, and hyphens. (example : Tracking_per_Domain)
    11. Under Amazon CloudWatch dimensions, Select Value source: Message tag , Dimension name: ses:from-domain and Default value: example.com (you will need to add the verified domain name you want to track) as shown below:
    12. add message auto-tag as CloudWatch dimension to track
    13. Review, When you are satisfied that your entries are correct, Click Add destination to add your event destination.

Send a test email via Amazon SES mailbox simulator to trigger events in CloudWatch custom metric.

After selected Amazon CloudWatch as event destination , Amazon CloudWatch will create a custom metric with the auto-tag dimension and value you chose. For this custom metric to appear in CloudWatch Console, you must send an email to trigger each selected event. We recommend using the Amazon SES Mailbox Simulator to avoid generating real bounces or complaints that could impact your account’s reputation.

In the below section, This blog will show how to send those test emails to the following recipients manually using CLI. If you would like to use the console method to send those emails. you will need to send three separate test emails since the console will only allow one recipient per message:

Amazon SES Mailbox Simulator recipients to trigger the events in CloudWatch metrics:
[email protected]
[email protected]
[email protected]

Note: You must pass the name of the configuration set when sending an email. This can be done by either specifying the configuration set name in the headers of emails, or specifying it as a default configuration set. This can be done at the time of identity creation, or later while editing a verified identity.

The following example uses send-emailCLI command to send a formatted email to the Amazon SES simulator recipients:

Before you run any commands, set your default credentials by following Configuring the AWS CLI. The IAM user must has “ses:SendEmail” permission to send email.

  1. Navigate to your terminal where the AWS CLI is installed and configured. Create message.json file for the message to send and add the following content:
  2. {
    "Subject": {
    "Data": "Testing CW events with email simulator",
    "Charset": "UTF-8"
    },
    "Body": {
    "Text": {
    "Data": "This is the message body of testing CW events with email similulator.",
    "Charset": "UTF-8"
    }
    }
    }
  3. Create a destination.json file to add Amazon SES simulator recipients for bounces, complaints and delivery events as shown below:
  4. { 
    
    "ToAddresses": ["[email protected]", "[email protected]" , "[email protected]"]
    
    }
  5. Send a test email using send-email CLI command to send a formatted email to the Amazon SES simulator recipients:
  6. aws ses send-email --from [email protected] --destination file://destination.json --message file://message.json --configuration-set-name SES_Config_Set --region <AWS Region>
  7. After the message sent, you are expected to see the following output:
  8. {
    
    "MessageId": "EXAMPLEf3a5efcd1-51adec81-d2a4-4e3f-9fe2-5d85c1b23783-000000"
    
    }

Now you sent a test email to trigger the events you want to track in CloudWatch custom metrics. Lets create the CloudWatch dashboard to see those metrics.

Create CloudWatch dashboard to track the email deliverability events for my domain.

  1. Sign in to the Amazon CloudWatch console.
  2. In the navigation pane, choose Dashboards, and then choose Create dashboard.
  3. In the Create new dashboard dialog box, enter a name like ‘CW_Domain_Tracking’ for the dashboard, and then choose Create dashboard.
  4. In the Add Widget dialog box, Choose Number to add a number displaying a metric to the dashboard and then choose Next
  5. Under Add metric graph, click on edit sign to rename the graph with your domain example.com . this will make it easy for you to select the dashboard of the domain if you have multiple domains.
  6. In the Browse tab , Select the AWS region where you are running your SES account and in the search bar, search for “ses:from-domain”.
  7. You will get four metrics returned with your domain name “example.com”. Select checkbox beside the four metrics and click Create widget.
  8. CloudWatch dashboard with the metrics
  9. Save dashboard in the top right corner of the dashboard page to save the widget settings.
  10. Save CloudWatch dashboard settings

After the CloudWatch dashboard created, for any email you send from example.com domain with configuration set name passed in the email header, The email deliverability events will be counted in your CloudWatch metrics and you will be able to see them in the CloudWatch dashboard.

As an additional step. You can also setup a CloudWatch alarms for this custom metrics and add a threshold for each metric. When the metric breach the threshold, the alarm goes on and send an SNS notification to you to take the necessary actions.

Cleaning Up:

This setup includes Amazon CloudWatch and Amazon SES service charges. To avoid incurring any extra charges, remember to delete any resources created manually if you no longer need them for monitoring.

Resources to delete from Amazon SES console.

  1. In the navigation pane, under Configuration, choose Configuration sets.
  2. Check the box beside Configuration set you created and select Delete.

Resources to delete from Amazon CloudWatch console.

  1. In the navigation pane, choose Dashboards, and then choose the dashboard you created.
  2. In the upper-right corner of the graph that you want to remove, choose Actions, and then choose Delete Dashboard.
  3. Save dashboard.

Conclusion:

You have now seen how to configure Amazon SES to track email deliverability at domain level with CloudWatch dashboard. Tracking email deliverability for emails you send from each domain is essential for business continuity, billing purposes or incidents investigations. Using SES message auto-tags and CloudWatch metrics you can identify the domains that have low email deliverability quickly and take necessary actions to maximize your email deliverability and take proactive actions before impacting the account’s ability to send emails from any other domains.

About the author:

Alaa Hammad

Alaa Hammad is a Senior Cloud Support Engineer at AWS and subject matter expert in Amazon Simple Email Service and AWS Backup service. She has a 10 years of diverse experience in supporting enterprise customers across different industries. She enjoys cooking and try new recipes from different cuisines.

How to send your first email on SES

Post Syndicated from Dustin Taylor original https://aws.amazon.com/blogs/messaging-and-targeting/how-to-send-your-first-email-on-ses/

Introduction

Sending your first email on any service can be complicated. In this blog we will walk you through how to send your first email on Amazon Simple Email Service (SES) through the SES Console and to direct you to examples of how you can send email through the AWS SDK. Our public documentation includes additional information on how you can configure SES. We encourage you to read through these documents to learn about these other mechanisms in the future.

Getting Started

Getting started with sending an email on SES requires three actions which are: 1) verifying a domain or email address 2) requesting production access to SES and 3) sending your first email. Let’s walk through each of these steps and send our first email.

Verifying an Identity

To start, you will configure what email address or domain your customers will receive emails from. As part of this verification, you will need to be able to either receive a confirmation email at the email address you are trying to setup, or to publish CNAME records for your intended domain. Generally, we recommend using a domain for your email sending as this gives you the ability to set up SPF, DKIM, and DMARC alignment which will increase recipient trust in your emails. Email addresses can be used for account-specific email sending where a customer may not own a domain, but this type of use-case is prone to receiving entities having low trust in the sender and a lower probability of inbox placement. For more in-depth instructions please review our public documentation as I will briefly touch on the most important pieces to verifying a domain or email address.

To verify an identity, you can go to the SES Console and click the ‘Verified identities’ link on the left-hand side of the screen. It will then present you with a list of verified domains or email addresses currently in your account if they were previously verified. There is a yellow button that states ‘Create identity’, when you click this you will be presented with a screen to choose whether to verify an email address or domain.

Email Address Verification

To verify an email address, you will be prompted with the following dialog:

The dialog presented to a sender when they choose to verify an email address in the SES console.

To verify an email address to use as your sending identity, you will include the address in the ‘Email address’ field and then click the ‘Create identity’ button. This will trigger an automated email to the address with a verification link that will need to be clicked to verify ownership of the email address. Once verified, you can begin sending emails from your new email address identity.

Domain Verification

To start verifying a domain you will click the ‘Verified identities’ option from the ‘Configuration’ dropdown which can be found on the left side of the screen. When choosing to verify a domain, you will be presented with a series of dialogs which include:

The dialog presented to a sender that prompts a decision to verify a domain or email address.

Here you will need to include the domain you intend to use for email sending. If you are keeping to a basic configuration on SES this will be the only data you need to add to this dialog. However, it is recommended to also use a custom mail-from. A custom mail-from is a way for you to remove the amazonses.com domain from your mail-from header to ensure domain alignment throughout your headers. You can find more information about the custom mail-from addresses in our documentation.

After finishing your changes in the first dialog you will then be presented with a second dialog that looks like the following:

The dialog which allows a sender to verify the domain they intend to use to send email.

To verify the domain, you will need to utilize either the Easy DKIM feature, or to provide a DKIM authentication token if you plan to DKIM sign your own messages. In selecting the ‘Easy DKIM’ option, you will be presented with the option to use either 1024 bit or 2048 bit signing key length. We would recommend utilizing the 2048 bit signing key length for most customers as this is the more secure key.

If you use Amazon Route53 as your DNS provider, SES can automatically publish DNS records for your domain. If not, this step will require you to edit your DNS records to include three CNAME records which are used for the DKIM signature process and as a mechanism to prove domain ownership. An example of the CNAME records is as follows:

An example dialog of the CNAME records that are generated when attempting to verify an identity.

Once you have placed these DNS records SES will periodically attempt to look-up the records to change the status of your domain verification. If SES doesn’t automatically update the status, you are presented with the option to force another check to verify the records are present.

After your domain verification is successful, you are now ready to send emails from any email address for your domain.

Requesting Production Access

Now that you’ve verified an identity, the next step is to be able to send an email to an unverified identity you will need to request production access. If you only want to test to your own domain or email address you can skip this step until you are ready to send to unverified recipients.

Note: This is region-based, a request for production access is limited to the region in which you are requesting. 

To begin this process, you will navigate to the SES Console and the ‘Account dashboard’ section. Once you are on this page you will be presented with the following dialog at the top of your screen.

Clicking the ‘Request production access’ button will then navigate to the ‘Request details’ page which you can reference below.

The dialog from the SES console showing that the SES account is still in the sandbox.
Fill out each section with the details of your mail-type, website URL, use case description, and then acknowledging that you have read and agree to the AWS Service Terms and Acceptable Use Policy (AUP). When filling out the use case description, provide as much detail as you can for your request as our teams will review to determine if we need more information before approving or denying your request. An example of a good use case description would look like the following:

“Example.com is the domain my company intends to use to send our transactional emails. Our recipients are all customers who have either signed up for an account, requested a new password, or have made purchases through our website. We require confirmation of opt-in for all our new accounts and if no confirmation is received, we do not attempt to send an email to that address.”

Note: SES will review your production access request and will provide feedback on your use case and whether it could pose a risk to the sending reputation of SES, our customers, or your own sending domain.

Finally, click the ‘Submit request’ button to submit your request for production access. This will create an AWS Support case and will be reviewed by our team. These requests are reviewed with a 24-hour Service Level Agreement (SLA). While you are waiting for production access you can send test emails to any of the Mailbox Simulator endpoints or to your own verified domain(s) or email address(es).

Sending Your First Email

From the Console

To send your first email from the SES Console you will need to start by clicking the ‘Verified identities’ option from the ‘Configuration’ dropdown which can be found on the left side of the screen. From here you will select the domain and/or email address you want to send your email from and then click the ‘Send test email’ button, which will open the following screen:

The message details dialog where a sender can send an email from the SES console

From here you will fill out the ‘From-address’ box with the local name (anything before the @ sign) that you want to use to send the email. If you want to test SES functionality you can choose any of the dropdown events present, or you can choose the ‘Custom’ option which will allow you to set a ‘Custom recipient’ address of your choosing. Then you will fill out the ‘Subject’ and ‘Body’ fields with the content you will use for this first test email and then click the ‘Send test email’ button.

Congratulations, you’ve sent your first email from the SES Console! Now, utilizing SES to send single emails from the console isn’t the most scalable way to send email. In the next section, I will provide you links to our documentation for the 5 programming languages supported with the AWS SDK so that you can begin building your integration with SES.

From Code

The AWS Documentation includes some code snippets on how to send an email with SES via the AWS SDK. You can find examples of how to send an email from languages such as: .NET, Java, PHP, Ruby, and Python. We highly recommend reviewing our documentation to see these introductory code snippets to get you started.

Conclusion

Hopefully this blog post has aided you in your journey to send your first email through SES. From verifying a domain, requesting production access, and finally sending an email through the console. Take this knowledge and build upon it for future success in sending email through SES. Happy sending!

How to send messages to multiple recipients with Amazon Simple Email Service (SES)

Post Syndicated from Joydeep Dutta original https://aws.amazon.com/blogs/messaging-and-targeting/how-to-send-messages-to-multiple-recipients-with-amazon-simple-email-service-ses/

Introduction

Customers frequently ask what is the best way to send messages to multiple recipients using Amazon Simple Email Service (SES) with the best deliverability and without exceeding the maximum recipient’s per message limit. In this blog, we will show you how to determine the best approach for sending a message to multiple recipients based on different use-cases. We will also discuss why in most situations sending messages to a single recipient at a time is the best approach.

Difference between message Header addresses and Envelope addresses

Before we dive into the use cases, let’s discuss how message addressing works in SES. When a client makes a request, SES constructs an email message compliant with the RFC 5322 Internet Message Format specification . An email comprises of a header, a body, and an RFC 5321 envelope, as described in the Email format in Amazon SES document.

The email addresses in the RFC 5322 To, Cc and Bcc headers are for display. These headers enable your email client interface to display to whom the message was addressed. These addresses do not control which recipients receive the messages; the envelope addresses do. The sending mail client provides the envelope recipient addresses to a mail server using the RFC 5321 RCPT TO commands. RCPT is an abbreviation for recipient.

An apt analogy (see diagram below) is how a physical letter within an envelope can address a person whose address is not the envelope. The address on the envelope is what the mail carrier to deliver the envelope. The postal worker should not need to open the envelope to know which address to deliver the mail.

Analogy to show physical mail compares to electronic mail

As an example, a school district may send letters informing residents of enrollment details for their children, but they do not know all of the names of the people who live at each address. The envelope may only list the address, and the letter may just be addressed “To Resident” if the school district doesn’t have a name to address the letter. The message is delivered to the resident’s address regardless of the accuracy of the information on the letter.

To simplify, let’s summarize the differences between To & Cc header and envelope addresses:

Header To & Cc Addresses Envelope Addresses (RCPT)
Used by email clients to display the list of recipients Used by mail servers to deliver the email message
Not used for mail delivery Used for mail delivery
Displayed to recipients Not displayed to recipients

The Bcc address is different than the To and Cc headers because it is used to send a copy of the message to an additional set of recipients that are “blind” to the other recipients. Bcc addresses are only defined by envelope addresses, not as a header address. Mail servers will commonly remove a Bcc header when handling a message, but delivery to the envelope recipient address still occurs.

When to use multiple recipients in a Destination

SES supports sending messages to multiple recipients in a single SendEmail operation. The Destination argument of the SendEmail operation represents the destination of the message. A Destination consists of To, Cc, and Bcc fields which represent both the header addresses and the envelope addresses.

When multiple recipients are defined in the Destination argument to the SendEmail operation, the defining characteristic is that every recipient receives the exact same message with the same message-id. A message-id is used for event handling (bounces, complaints, etc) among other purposes. A message-id pertains to exactly one version of a particular message.

Did you know: The use cases for recipients having a message with the same message-id are limited to situations in which the recipients are expected to interact with the message as a group. For example, recipients may reply-all to the email and have a resulting email conversation. The original message-id is used by email client applications to display a “conversation” view using the References and In-Reply-To headers. This behavior may be a good fit if the use case is a mailing list or internal announcement to employees within a company.

The recipient limit in the Destination argument is 50 because that is a reasonable break-point when the “conversational” use case runs the risk of the “reply all storm“ described in the next section. Consider using a robust mailing list solution or hosted service with capabilities similar to GNU Mailman to facilitate large group email conversations.

Why bulk mail recipients should not see other recipients

For bulk sending purposes, and most transactional sending, the recipients don’t need to know that other recipients also received the message:

  • The recipients likely gain no value from seeing the other recipient addresses, as they may be arbitrarily segmented into batches of 50 or less, and most email client interfaces have trouble displaying more than 50 addresses.
  • There is a risk of a “reply-all storm“, which is when a recipient replies to all of the To and Cc addresses from the original message, and then those people reply back asking everyone to stop replying. This scenario is fun to talk about around the water cooler, but should be avoided.
  • If recipients are defined as Bcc recipients in the Destinations argument of the SendEmail operation, it would not contain a To address, and that can look suspicious when read by the recipients.

Note: There is no authentication mechanism protecting the To or Cc headers from spoofing, so be careful about assuming any trust placed into the values of those headers. This means that it is possible for an attacker to spoof the To or Cc headers in an email message. Therefor the only meaningful address to include in the To header is the recipient’s own address, which they know isn’t spoofed because of the fact that they are reading the message.

For bulk mail it is best practice to have each recipient see only their own name and email address in the To header of the messages they receive. This makes the messages look more personable and can improve deliverability and recipient engagement.

This approach can be achieved by sending the message to each recipient individually via the SendEmail operation. You would use a single address in the “ToAddressses” field of the “Destination” argument.

Use the ToAddress field to individual message in the SendEmail API

How email event notifications are associated with recipients

If you need email event notifications to be associated to each recipient, then you will need each recipient to receive a message with a unique message-id; one recipient per Destination.

The following event types will be associated with every recipient in the Destination:

  • asynchronous bounces
  • complaints
  • opens
  • clicks

Learn more about Amazon SES events in the documentation: how email sending works in Amazon SES

For example, if one of the recipients triggers a open engagement event, and if that recipient was in a group of 50 recipients within the Destination argument to the SendEmail operation, then all 50 of those recipients will be registered as having opened the message.

Other considerations:

  • If the recipients are defined by ToAddresses and CcAddresses they will all appear in the message headers, but the To and Cc headers will be truncated in the event notifications if the headers are over 10 KB. Multi-recipient Destinations may cause you to lose observability needed to troubleshoot deliverability issues.
  • SES Virtual Deliverability Manager only tracks metrics from emails that have one recipient. Multi-recipient Destinations are not counted in any of the Virtual Deliverability Manager dashboard metrics.
  • SES counts the number of envelope recipients in an email toward the account’s sending quotas. Multi-recipient Destinations is not a way to achieve higher sending limits.
  • SES charges for each recipient receiving a message regardless of how many recipients are included in the Destination for each API invocation. Multi-recipient Destinations is not a way to reduce costs.

For bulk sending use cases, it is best practice to have each recipient have a copy of the message with a unique message-id to achieve the highest level of observability of your email sending program. High observability leads to high deliverability. This can be achieved by sending the message to each recipient individually.

How to send Emails to multiple recipients with SES

At this point, you should understand why it is a best practice to send a message to multiple recipients by iteratively using a single recipient in the Destination argument of the SendEmail operation.

Sending a message to a single recipient at a time is the best way to get started delivering messages to multiple recipients. Sending email in this fashion ensures that your deliverability metrics are giving you the observability needed to achieve the highest engagement with your recipients.

The following example uses the SES version 2 command line interface (CLI) to send a message to a list of recipients. If you do not want to use the CLI, use SES with an AWS SDK and adapt the commands into the syntax of the SDK of your choice.

#!/bin/bash

# Replace these variables with your own values
# sender 
# - Consider not using no-reply@, and instead use SES Inbound to receive replies
# - Consider a descriptive username@; some mobile clients will display it prominently, so it should make sense to the recipient.
# - Consider using a subdomain for bulk and transactional mail. Don't use the domain used by your users.
# - Consider using a verified domain identity. Don't use an email address identity within a domain that has a DMARC policy.
sender="[email protected]"
subject="Email subject"
body="Email body"
region="us-east-1"

# List of recipients, one per line. Defaults to SES mailbox simulator addresses (https://docs.aws.amazon.com/ses/latest/dg/send-an-email-from-console.html#send-email-simulator-how-to-use)
recipients=(
  "[email protected]"
# ... 
  "[email protected]"
)

# Send an email to each recipient
# Iterate through the list of recipients.
# Invoke the AWS SES SendEmail operation with a single recipient defined in the Destination
for recipient in "${recipients[@]}"; do
  aws sesv2 send-email \
    --from-email-address "$sender" \
    --destination "ToAddresses=$recipient" \
    --content "Simple={Subject={Data='$subject',Charset='UTF-8'},Body={Text={Data='$body',Charset='UTF-8'}}}" \
    --region "$region"
done

# The output will look similar to this, with a unique MessageID associated with each recipent.
# {
#    "MessageId": "010001874edd1765-be4ea5c2-d2b1-4ffb-bfb9-46461d18d80c-000000"
# }
# ... 51 total message-ids
# {
#    "MessageId": "010001874edd1b94-468ecee9-9198-4356-9f53-a108097777e5-000000"
# }

In this example script, the SendEmail operation is invoked multiple times using the CLI to deliver the message individually to each recipient, and each recipient only sees their own address in the To header. We called the SendEmail operation 51 times and a total of 51 Message Ids were returned in the response.

How to use SendEmail for multiple recipient advanced use cases

Consider a scenario where a memo needs to be sent to an entire team, the team is large, and only a few of the recipients need to be displayed in the headers. In this use case, it is desirable to send multiple copies of an email to many recipients who all receive the same To and Cc headers.

To customize the headers, you must use the Raw field of the Content argument instead of the Simple field.

The example below will reference another internet standard called Multipurpose Internet Mail Extensions (MIME): Format of Internet Message Bodies.

What’s in a MIME object:

  • Headers (such as From, Subject, and Reply-to)
  • Body – Plain text and HTML
  • Attachments – Files and images

MIME extends the capabilities of RFC 5322 and is used to format most email messages to this day. There are a variety of packages that can assist in creating a MIME structured messages, which you can find by searching relevant package managers.

This is an example in Python to create a MIME formatted message for the next script.

#!/usr/bin/env python
from email.mime.multipart import MIMEMultipart
from email.mime.text import MIMEText
import base64

# You must change the 'fromAddress' variable for this example to work in your environment.
#
# When choosing a From header address:
# - Consider not using no-reply@, and instead use SES Inbound to receive replies
# - Consider a descriptive username@; some mobile clients will display it prominently, so it should make sense to the recipient.
# - Consider using a subdomain for bulk and transactional mail. Don't use the domain used by your users.
# - Consider using a verified domain identity. Don't use an email address identity within a domain that has a DMARC policy.

fromAddress = "Descriptive Name <[email protected]>"

# The To and Cc addresses here are for the email header. They are what will be displayed to the recipient.
# The actual recipient, or evelope recipient, will be set later.
toAddresses = ['Founder Name <[email protected]>']
ccAddresses = ['President <[email protected]>', 'Director <[email protected]>']
subjectTxt = "Success and Scale Bring Broad Responsibility"
messageTxt = "We started in a garage, but we’re not there anymore. We are big, we impact the world, and we are far from perfect. We must be humble and thoughtful about even the secondary effects of our actions. Our local communities, planet, and future generations need us to be better every day. We must begin each day with a determination to make better, do better, and be better for our customers, our employees, our partners, and the world at large. And we must end every day knowing we can do even more tomorrow. Leaders create more than they consume and always leave things better than how they found them."
messageHtml = "<html><body><p>" + messageTxt + "</p></body></html>"
CHARSET = "utf-8"

multiPartEmail = MIMEMultipart()
multiPartEmail['From'] = fromAddress
toAddressesJoined = ",".join(toAddresses)
multiPartEmail['To'] = toAddressesJoined
ccAddressesJoined = ",".join(ccAddresses)
multiPartEmail['Cc'] = ccAddressesJoined
multiPartEmail['Subject'] = subjectTxt
msg_body = MIMEMultipart('alternative')
textpart = MIMEText(messageTxt.encode(CHARSET), 'plain', CHARSET)
htmlpart = MIMEText(messageHtml.encode(CHARSET), 'html', CHARSET)
msg_body.attach(textpart)
msg_body.attach(htmlpart)
multiPartEmail.attach(msg_body)

print("Human readable blob:")
print((multiPartEmail.as_string()))
print("Base64 Encoded Blob:")
print(base64.b64encode(multiPartEmail.as_bytes()))
Running this script will produce output similar to the following:
Human readable blob:
Content-Type: multipart/mixed; boundary="===============0865862865556646150=="
MIME-Version: 1.0
From: [email protected]
To: [email protected]
Cc: [email protected], [email protected]
Subject: Success and Scale Bring Broad Responsibility

--===============0865862865556646150==
Content-Type: text/text/plain; charset="us-ascii"
MIME-Version: 1.0
Content-Transfer-Encoding: 7bit

We started in a garage, but we’re not there anymore. We are big, we impact the world, and we are far from perfect. We must be humble and thoughtful about even the secondary effects of our actions. Our local communities, planet, and future generations need us to be better every day. We must begin each day with a determination to make better, do better, and be better for our customers, our employees, our partners, and the world at large. And we must end every day knowing we can do even more tomorrow. Leaders create more than they consume and always leave things better than how they found them.

--===============0865862865556646150==--

Base64 Encoded Blob:
b'Q29udGVudC1U...TRIMMED...'

The following script has an option to divide the list into batches of 50 or fewer for each SendEmail operation and will send a Base 64 encoded MIME object to a list of recipients. The headers of the message are always the same for every recipient because the headers are defined within the MIME object, which is obtained from running the previous script With SendEmail, the Destination argument does not define the To or Cc headers.

#!/bin/bash

# Replace these variables with your own values
region="us-east-1"

# List of recipients, one per line. Defaults to SES mailbox simulator addresses (https://docs.aws.amazon.com/ses/latest/dg/send-an-email-from-console.html#send-email-simulator-how-to-use)
# These are the actual envelope recipients who will get the above email in their inbox. The To and Cc addresses set above will be displayed, not these.
recipients=(
"[email protected]"
# ...
"[email protected]"
)

# Raw message content
# Paste the base64 encoded message blob that is returned from the python script (the string within b'')
content=''

# Maximum number of recipients per batch
# Increase batch_size up to 50 if your use case requires every recipient have the same message-it. This sacrifices observability into deliverability metrics.
batch_size=1

# Send an email to batch size of 1 to 50 recipients
recipients_count=${#recipients[@]}
echo $recipients_count
for ((i=0; i<$recipients_count; i+=batch_size)); do
to_addresses="${recipients[@]:${i}:${batch_size}}"
to_addresses="${to_addresses// /,}"
aws sesv2 send-email \
--destination "ToAddresses=$to_addresses" \
--content "Raw={Data='$content'}" \
--region "$region"
done

# The output will look similar to this, with a unique MessageID associated with each send-email.
#{
# "MessageId": "010001874ee5cdca-3fe4fb4b-4d36-4ae7-b4e4-cc7fae988a42-000000"
#}
#... 51 total message-ids
#{
# "MessageId": "010001874ee5d210-9225f471-e330-4f01-9044-63a941358477-000000"
#}

Screenshot of email client, viewing email sent by the above code. The sender of the email is “Descriptive Name”, the To recipient is Founder Name, and the President and Director are displayed as Cc addresses.

Remember: If you increase the batch size to greater than 1. Every recipient in each batch will have a message with the same message-id and will all be treated the same for event processing.

Running these scripts will have the effect of each team member receiving exactly the same looking message regardless of how many recipients were defined in each SendEmail Destination. The To and CC addresses were set in the email headers, but the actual envelope recipients were set in the API operation.

SES SendEmail and SendBulkEmail APIs

The latest version of SES API (version 2) offers SendEmail and SendBulkEmail APIs.

With SendBulkEmail, you can only use a pre-defined SES template while, with SendEmail, you can send any email format including raw, text, HTML and templates.

SendEmail operation can send a single email to one Destination (50 recipients across the To:, Cc:, and Bc: fields) while the SendBulkEmail operation can send 50 unique emails to 50 Destinations by leveraging a SES template.

Both operations have the capability to send templated emails, but the SendBulkEmail operation requires less computational resources. This is due to its ability to send emails to 50 Destinations using just a single API call.

Conclusion

In this blog post we discussed how message recipient addresses are displayed by email clients, how message delivery is defined by envelope recipients, and how email sending events are associated with the recipients. Defining multiple recipients in a message destination can lead to poor observability and therefore poor deliverability and should not be used unless your use case specifically requires it

Sending messages to one recipient at a time is a best practice and leads to the highest engagement with your recipients.

About the authors

Jesse Thompson is an Email Deliverability Manager with the Amazon Simple Email Service team. His background is in enterprise IT development and operations, with a focus on email abuse mitigation and encouragement of authenticity practices with open standard protocols. Jesse’s favorite activity outside of technology is recreational curling.
Samuel Wallan is a Software Development Engineer at AWS Simple Email Service. Within SES, Sam works on the Digital User Experience Deliverability team. In his free time, he enjoys hanging out with friends and staying fit.
Farnam Farshneshani is a Technical Account Manager at AWS. He specializes in AWS Simple Email service and helps customers with operational and architectural issues.  In his free time, he enjoys traveling and participating in various outdoor activities.
Joydeep Dutta is a Senior Solutions architect at AWS. Joydeep enjoys working with AWS customers to migrate their workloads to the AWS Cloud, optimize for cost and help with architectural best practices. He is passionate about enterprise architecture to help reduce cost and complexity in the enterprise. He lives in New Jersey and enjoys listening to music and spending time in the outdoors in his spare time.

Manage Incoming Emails at Scale with Amazon SES

Post Syndicated from Bruno Giorgini original https://aws.amazon.com/blogs/messaging-and-targeting/manage-incoming-emails-with-ses/

Introduction

Are you looking for an efficient way to handle incoming emails and streamline your email processing workflows? In this blog post, we’ll guide you through setting up Amazon Simple Email Service (SES) for incoming email, focusing on the setup, monitoring, and use of receipt rules to optimize your email handling.

Amazon SES is a powerful and flexible cloud-based email service that enables you to send and receive emails at scale, while ensuring high deliverability and maintaining compliance with email best practices. By using Amazon SES for incoming email, you can customize your email processing pipeline and seamlessly integrate with other AWS services such as Amazon S3, AWS Lambda, and Amazon SNS.

We’ll start by walking you through the process of verifying your domain and setting up DomainKeys Identified Mail (DKIM) to ensure your emails are secure and authenticated. Next, we’ll explain how to create and manage receipt rule sets and add receipt rules with various actions for different processing scenarios. We’ll also cover monitoring your email processing using Amazon CloudWatch metrics.

As we progress, we’ll dive into advanced topics such as conditional receipt rules and chaining receipt rules, which can help you build complex and tailored email processing workflows, including multi-tenant scenarios. By the end of this post, you’ll have a comprehensive understanding of how to harness the power of Amazon SES for your incoming email needs.

So, let’s get started on simplifying your incoming email processing with Amazon SES!

Setting up Amazon SES for email receiving

Identifying the AWS region

For new users of the Amazon Simple Email Service (SES) inbound feature, it’s important to understand that all AWS resources used for receiving email with Amazon SES, except for Amazon S3 buckets, need to be in the same AWS Region as the Amazon SES endpoint. This means that if you are using Amazon SES in a specific region, such as US West (Oregon), any additional resources like Amazon SNS topics, AWS KMS keys, and Lambda functions also need to be created in the same US West (Oregon) Region. Additionally, to successfully receive email with Amazon SES within a particular Region, you must create an active receipt rule set specifically in that Region. By adhering to these guidelines, new users can effectively configure and utilize the inbound feature of Amazon SES, ensuring seamless email reception and efficient management of related resources. Amazon SES only supports email receiving in certain AWS Regions. For a complete list of Regions where email receiving is supported, see Amazon Simple Email Service endpoints and quotas in the AWS General Reference.

Verifying your domain

Before you can start receiving emails with Amazon SES, you must verify your domain. Domain verification is a crucial step in the setup process, as it confirms your ownership of the domain and helps prevent unauthorized use. In this section, we’ll walk you through the process of verifying your domain in the Amazon SES console.

  1. Sign in to the AWS Management Console and open the Amazon SES console.
  2. In the navigation pane, under Configuration, choose Verified identities.
  3. In the list of Identities section, choose Create identity.
  4. Under Identity details, choose Domain as the Identity type field. You must have access to the domain’s DNS settings to complete the domain verification process.
  5. Enter the name of the domain or subdomain in the Domain field.
  6. You must configure DKIM as part of the domain verification process. For Advanced DKIM settings, ensure that the Enabled box is checked in the DKIM signatures field.
  7. Choose Create identity. 
  8. This will generate a list of DNS records that you need to add to your domain’s DNS configuration. These can be found in the DomainKeys Identified Mail (DKIM) container, under Publish DNS records.

    SES DomainKeys Identified Mail (DKIM)

    Publish DNS records

  9. Add the generated DNS records to your domain’s DNS configuration. These records include a Legacy TXT record for domain verification and CNAME records for DKIM authentication. You may need to consult your domain registrar’s documentation for instructions on adding DNS records.
  10. Once the DNS records have been added, return to the Amazon SES console and wait for your domain’s verification status to change from “Verification pending” to “Verified.” This process may take up to 72 hours, depending on your domain registrar’s DNS propagation time.

Publishing an MX record for Amazon SES email receiving

To enable email receiving with Amazon SES, you need to publish an MX (Mail Exchange) record in your domain’s DNS configuration. The MX record directs incoming emails to Amazon SES for processing. Follow these steps to publish the MX record:

  1. Log in to your domain registrar or DNS management console.
  2. Locate the DNS management section for your domain.
  3. Create a new MX record by specifying the following details:
    • Host/Name/Record: Leave this field blank or enter “@” to represent the root domain.
    • Value/Points to/Target: Enter the value “10 inbound-smtp.[AWS Region].amazonaws.com“, replacing [AWS Region] with the AWS region where you are using Amazon SES for email receiving. For example, if you are using US West (Oregon) region, the value should be “10 inbound-smtp.us-west-2.amazonaws.com“.
    • TTL (Time to Live): Set a TTL value according to your preference or leave it as the default.
  4. Save the MX record.

Once the MX record is published with the correct value, incoming emails addressed to your domain will be routed to Amazon SES for processing. Remember to ensure that any other email-related resources, such as SNS topics or Lambda functions, are also created in the same AWS region as your Amazon SES endpoint.

For more detailed information on publishing MX records for Amazon SES email receiving, you can refer to the official documentation.

Creating a Receipt Rule set

A receipt rule set is a collection of rules that define how Amazon SES processes incoming emails for your domain. Each rule contains one or more actions that determine the processing flow of incoming emails. In this section, we’ll guide you through the process of creating a new receipt rule set in the Amazon SES console and activating it for your domain.

  1. Sign in to the AWS Management Console and open the Amazon SES console.
  2. In the navigation pane, under Configuration, choose Email receiving.
    • Note: if you don’t see the Email receiving option in the menu, check again that you’re in fact in a region supporting this feature.
  3. Under the Receipt rule sets tab in the Email receiving pane, choose Create rule setimage-20230523131953561.png
  4. Enter a name for your new rule set in the Rule set name field. This name should be descriptive and easy to identify, such as “MyApp-IncomingEmail.”
  5. After entering a unique name, choose Create rule setimage-20230523132526096.png
  6. To activate the newly created rule set, choose Set as active next to your rule set’s name. This action will ensure that Amazon SES uses this rule set for processing incoming emails to your domain. Your new rule set will now be listed in the Active rule set section.

For more information on creating and managing receipt rule sets, you can refer to the official documentation.

In the next section, we’ll explore adding receipt rules to your rule set, which define the specific actions to be taken for incoming emails.

Adding Receipt Rules

Receipt rules define the specific actions that Amazon SES should take when processing incoming emails for your domain. Common actions include saving the email to an Amazon S3 bucket, invoking an AWS Lambda function, or publishing a notification to an Amazon SNS topic. In this section, we’ll guide you through the process of adding receipt rules to your rule set in the Amazon SES console and provide examples of when to use each action.

  1. Sign in to the AWS Management Console and open the Amazon SES console.
  2. In the navigation pane, under Configuration, choose Email receiving.
  3. Under the Email receiving pane, in the Receipt rule sets tab, select the name of your active rule set from the All rule sets section. This will navigate to the details page for that rule set.
  4. Choose Create rule to begin creating a new receipt rule.
  5. On the Define rule settings page, under Receipt rule details, enter a unique Rule name.
    • For Status, only clear the Enabled checkbox if you don’t want to run this rule after creation.
    • (Optional) For Transport Layer Security (TLS), by selecting Required you can enforce a specific TLS policy for incoming emails that match this rule. By default, Amazon SES will use the Optional policy, which means it will attempt to use TLS but will not require it.
    • For Spam and virus scanning, only clear the Enabled checkbox if you don’t want Amazon SES to scan incoming messages for spam and viruses.
  6. After entering a unique rule name, choose Next.
  7. On the Add recipients conditions page, under Recipients conditions, use the following procedure to specify one or more recipient conditions. You can have a maximum of 100 recipient conditions per receipt rule.
    • Under Recipient condition, specify the email addresses or domains that this rule should apply to. You can use wildcards to match multiple addresses or domains. For example, you can enter example.com and .example.com to apply the rule to all email addresses within the example.com domain and within all of its subdomains.
    • Repeat this step for each recipient condition you want to add. When you finish adding recipient conditions, choose Next.
  8. On the Add actions page, open the Add new action menu and select the desired action from the list, such as Deliver to S3 bucket, Invoke AWS Lambda function, or Publish to Amazon SNS topic. Configure the selected action’s settings as required.
    • Deliver to S3 bucket: Choose this action if you’re expecting emails with large attachments, need to store emails for archival purposes, or plan to process emails using other AWS services that integrate with Amazon S3. You’ll need to specify the Amazon S3 bucket where the incoming emails should be stored.
    • Invoke AWS Lambda function: Choose this action if you want to process incoming emails using custom logic, such as filtering, parsing, or modifying the email content. You’ll need to specify the AWS Lambda function that should be invoked when an incoming email matches this rule.
    • Publish to Amazon SNS topic: Choose this action if you’re processing smaller emails or want to receive real-time notifications when an email arrives. You’ll need to specify the Amazon SNS topic where notifications should be published.
    • For more information and additional actions, see the Action options section of the Developer Guide.
  9. Once configured, choose Next to proceed to the Review page.
  10. On the Review page, review the settings and actions of the rule. If you need to make changes, choose the Edit option.
  11. When finished, choose Create rule to add the new receipt rule to your rule set. The rule will now be applied to incoming emails that match the specified recipient conditions.
image.png

You can create multiple receipt rules within a rule set, each with different actions and conditions. Amazon SES will apply the rules in the order they appear in the rule set. For more information on creating and managing receipt rules, you can refer to the official documentation.

Monitoring your incoming email

Configuring Amazon CloudWatch metrics

Once you have enabled email receiving in Amazon SES and created receipt rules for your emails, you can monitor and view the metrics using Amazon CloudWatch. Follow these steps to configure Amazon CloudWatch metrics for Amazon SES email receiving:

  1. Open the Amazon CloudWatch console.
  2. Navigate to the Metrics section and select All metrics.
  3. In the list of available metrics, locate and select SES to view SES-related metrics.
  4. Expand the Receipt Rule Set Metrics and Receipt Rule Metrics sections to access the specific metrics for your receipt rule sets and rules.
  5. Under Receipt Rule Set Metrics, you will find the following metrics:
    • “Received”: Indicates whether SES successfully received a message that has at least one rule applying. The metric value is always 1.
    • “PublishSuccess”: Indicates whether SES successfully executed all rules within a rule set.
    • “PublishFailure”: Indicates if SES encountered an error while executing rules within a rule set. The error may allow for retrying the execution.
    • “PublishExpired”: Indicates that SES will no longer retry executing the rules within a rule set after four hours.

These metrics can be filtered by the dimension RuleSetName to obtain data specific to individual rule sets.

  1. Under Receipt Rule Metrics, you will find the following metrics:
    • “Received”: Indicates whether SES successfully received a message and will try to process the applied rule. The metric value is always 1.
    • “PublishSuccess”: Indicates whether SES successfully executed a rule that applies to the received message.
    • “PublishFailure”: Indicates if SES encountered an error while executing the actions in a rule. The error may allow for retrying the execution.
    • “PublishExpired”: Indicates that SES will no longer retry executing the actions of a rule after four hours.

These metrics can be filtered by the dimension RuleName to obtain data specific to individual rules.

  1. Note that the metrics will only appear in the CloudWatch console if you have enabled email receiving, created receipt rules, and received mail that matches any of your rules.
  2. Keep in mind that changes made to fix your receipt rule set will only apply to emails received by Amazon SES after the update. Emails are always evaluated against the receipt rule set in place at the time of receipt.

Amazon SES also provides an Automatic Dashboard for SES in the CloudWatch console, which offers a preconfigured set of SES metrics and alarms to monitor your email sending and receiving activity. This dashboard provides a consolidated view of key metrics, making it easier to track the performance and health of your Amazon SES environment.

By configuring Amazon CloudWatch metrics, you can gain valuable insights into the performance and execution of your receipt rule sets and rules within Amazon SES. For more detailed information on viewing metrics for Amazon SES email receiving using Amazon CloudWatch, refer to the official documentation.

Using receipt rules effectively

Chaining Receipt Rules

Chaining receipt rules enable you to create sophisticated email processing workflows by linking multiple rules together, allowing each rule to apply specific actions based on the outcome of the previous rule. This advanced technique can help you achieve greater flexibility and precision in handling your incoming emails with Amazon SES. In this section, we’ll explain how to create chained receipt rules and provide examples of common use cases.

  1. Sign in to the AWS Management Console and open the Amazon SES console.
  2. Under the Email receiving pane, in the Receipt rule sets tab, select the name of your active rule set from the All rule sets section
  3. Review the existing rules in your rule set and ensure that they are ordered correctly. Chaining relies on the order of the rules, as each rule’s conditions and actions are evaluated sequentially. Under the Reorder tab, the rule orders can be modified by selecting the corresponding arrow associated with each.
  4. To chain additional rules, follow the steps previously outlined in the Adding Receipt Rules section and adjust the rule orders as necessary.

Chaining receipt rules can help you build complex email processing workflows with Amazon SES. Some common use cases include:

  • Executing multiple filtering criteria in an order that you specify. For example, adding a specific header value and then sending to additional AWS services such as Amazon S3, Amazon SNS, or AWS Lambda.
  • Creating multi-stage processing pipelines, where the output of one action (e.g., saving an email to Amazon S3) is used as the input for the next action (e.g., processing the email with AWS Lambda).
  • Implementing fallback actions, where the first rule in the chain attempts a specific action (e.g., saving an email to a primary S3 bucket), and if it fails, the next rule in the chain applies a different action (e.g., saving the email to a secondary S3 bucket).

The following figure shows how receipt rules, rule sets, and actions relate to each other.

SES Chaining multiple rules in a rule set

For more information on creating and managing receipt rules, you can refer to the official documentation.

Handling the 200 Receipt Rules per Rule Set limit

For each AWS account, Amazon SES imposes a limit of 200 receipt rules per receipt rule set. While this limit is sufficient for most use cases, there might be situations where you need to process a higher volume of incoming emails with more complex rule sets. These are some strategies to work around the 200 receipt rule limit using Amazon SES and other AWS services:

  • Utilize rule chaining: As mentioned earlier, chaining receipt rules allows you to link multiple rules together, effectively extending the number of actions you can perform for a single email. By chaining rules, you can create more complex processing workflows without exceeding the 200 rule limit.
  • Combine rules with actions: Instead of creating separate rules for each scenario, consider combining multiple actions within a single rule. This approach can help you reduce the total number of rules while still catering to various email processing requirements.
  • Use AWS Lambda for custom processing: Leverage AWS Lambda to perform custom processing on incoming emails. By incorporating Lambda functions in your receipt rules, you can handle more complex processing tasks without increasing the number of rules. This approach also allows you to offload some processing logic from Amazon SES to Lambda, providing additional flexibility.
  • Consolidate similar actions: If you have several rules performing similar actions, it is advisable to consolidate them into a single rule with multiple actions. This consolidation can help you reduce the total number of rules while maintaining the desired functionality.
  • Evaluate rule usage: Regularly review and evaluate your existing receipt rules to identify any rules that are no longer in use or can be optimized. Removing or consolidating unnecessary rules can help you stay within the 200 rule limit while still addressing your email processing requirements.

By implementing these strategies, you can effectively work around the 200 receipt rule limit in Amazon SES and build more complex email processing workflows to cater to your specific needs. Remember to monitor and optimize your rule sets regularly to make the most of the available resources and maintain efficient email processing.

For more information on the inbound quotas and limits in Amazon SES, you can refer to the official AWS documentation at Quotas related to email receiving.

Best Practices for multi-tenant scenarios

When dealing with multi-tenant scenarios in your application, it’s crucial to manage incoming emails efficiently to ensure smooth operation and a seamless experience for your users. In this section, we’ll provide best practices to handle incoming emails in multi-tenant environments using Amazon SES.

In a multi-tenant scenario, where multiple customers or tenants share a single AWS account, it’s important to consider the limit of 200 receipt rules per receipt rule set imposed by Amazon SES. To ensure compliance with this limit and maintain optimal email processing, the following practices are recommended:

  • Segregate tenants using email subdomains: Create unique subdomains for each tenant and route their incoming emails accordingly. This approach makes it easier to manage email processing rules and helps isolate tenants from potential issues.
  • Create separate rule sets for each tenant: By creating dedicated rule sets for each tenant, you can maintain better control over email processing rules and actions specific to their needs. This can simplify management and make it easier to update rules for individual tenants without affecting others.
  • Use tags to identify tenant-specific emails: Apply tags to incoming emails using the AddHeader action in your receipt rules. These tags can include tenant-specific identifiers, which will help you route and process emails correctly. You can later use these tags in other AWS services (e.g., AWS Lambda) to process tenant-specific emails.
  • Leverage conditional receipt rules: Utilize conditional receipt rules to apply tenant-specific processing based on email headers, recipients, or other criteria. This way, you can ensure that the right actions are taken for each tenant’s incoming emails.
  • Monitor tenant-specific metrics: Configure Amazon CloudWatch metrics and alarms for each tenant to track their email processing performance separately. This enables you to keep a close eye on individual tenants and take appropriate actions when needed.
  • Implement rate limiting: To prevent tenants from overwhelming your email processing pipeline, consider implementing rate limiting based on the number of incoming emails per tenant. This can help ensure fair resource allocation and prevent potential abuse.
  • Ensure security and privacy: Always encrypt tenant data at rest and in transit, and follow best practices for data protection and privacy. Consider using AWS Key Management Service (KMS) to manage encryption keys for each tenant.
  • Test and validate rule sets: Before deploying rule sets for tenants, thoroughly test and validate them to ensure they function as intended. This can help prevent unexpected behavior and maintain a high level of service quality.

By following these best practices for handling incoming emails in multi-tenant scenarios with Amazon SES, you can ensure a robust and efficient email processing pipeline that caters to each tenant’s unique requirements. As you continue to work with Amazon SES in multi-tenant environments, stay up to date with AWS documentation and best practices to further optimize your email processing workflows.

Conclusion

In this blog post, we’ve explored how to set up Amazon Simple Email Service (SES) for incoming email processing using receipt rules, rule sets, and various actions. We’ve covered domain verification, DKIM setup, creating and managing rule sets, adding receipt rules, and configuring Amazon CloudWatch metrics and alarms. We’ve also delved into advanced topics such as chaining receipt rules for more complex email processing workflows.

By following this guide, you can effectively leverage Amazon SES to process and manage your incoming emails, optimizing your email workflows, and maintaining high email deliverability standards. With Amazon SES, you can customize your email processing pipeline to meet your specific needs and seamlessly integrate with other AWS services such as Amazon S3, AWS Lambda, Amazon SNS, and Amazon CloudWatch.

In future blog posts, we will explore monitoring and alerting in more detail, providing you with additional insights on how to effectively monitor your email processing pipelines and set up alerts for critical events. Stay tuned for more information on this important aspect of managing your email infrastructure.

As you continue to work with Amazon SES and its email receiving capabilities, remember to review AWS best practices and documentation to stay up to date with new features and improvements. Don’t hesitate to experiment with different rule sets, actions, and conditions to find the perfect email processing solution for your use case.

A Guide to Maintaining a Healthy Email Database

Post Syndicated from nnatri original https://aws.amazon.com/blogs/messaging-and-targeting/guide-to-maintaining-healthy-email-database/

Introduction

In the digital age, email remains a powerful tool for businesses to communicate with their customers. Whether it’s for marketing campaigns, customer service updates, or important announcements, a well-maintained email database is crucial for ensuring that your messages reach their intended recipients. However, managing an email database is not just about storing email addresses. It involves keeping the database healthy, which means it’s up-to-date, accurate, and filled with engaged subscribers.

Amazon Simple Email Service (SES) offers robust features that help businesses manage their email environments effectively. Trusted by customers such as Amazon.com, Netflix, Duolingo and Reddit, SES helps customers deliver high-volume email campaigns of hundreds of billions of emails per year. Introduced in 2020, the list and subscription management feature of Amazon SES has added a new dimension to email database management, thereby reducing effort and time-to-value of managing a subscription list by allowing you to manage your list of contacts via its REST API, SDK or AWS CLI.

In this blog post, we will delve into the world of email database management in Amazon SES. You will explore two ways to manage your email database: building out your own email database functionality and using the built-in list and subscription management service. You will also learn the pros and cons of each approach and provide examples of customer use cases that would benefit from each approach. Regardless of the approach you ultimately decide to take, the blog will also share updated strategies for email database management to help with improving deliverability and customer engagement.

This guide is designed to help you navigate the complexities of email database management and make informed decisions that best suit your business needs. So, whether you’re new to Amazon SES or looking to optimize your existing email database management practices, this guide is for you. Let’s get started!

Email Database Management in Amazon SES

Amazon Simple Email Service (SES) offers two primary ways to manage your email database: building out your own email database functionality and using the built-in list and subscription management service. Each approach has its own set of advantages and potential drawbacks, and the best choice depends on your specific use case and business needs.

Building Out Your Email Database Functionality

When you choose to build out your own email database functionality, you have the flexibility to customize the database to suit your specific needs and leverage SES’ scalability as an email channel to send email at high volumes to your customer. Depending on the business requirement, the customizations could involve creating custom fields for subscriber data, implementing complex logic for categorizing and segmenting users, or integrating with other systems in your tech stack.

Using the Built-in List and Subscription Management Service

Alternatively, you can look at Amazon SES’s built-in list and subscription management service, which offers a ready-made solution for managing your email database. It handles tasks such as managing subscriptions to different topics and maintaining your customer email database through contact lists. Additionally, you can insert up to two links per email to the subscription preference page, which allow users to manage their topic preferences within Amazon SES.

SubscriptionPage

The non-configurable subscription page will automatically populate the customer’s current subscribed topic and allow setting of granular topic’s preferences. More information on how to configure that can be found here.

The following table should serve as a guideline to help you with deciding your approach for Email Database Management.
Building Your Own Email Database Functionality Using Built-in List and Subscription Management Service
Pros

Customization: Full control over the database structure and functionality, allowing for tailoring to specific needs. This includes creating custom fields for subscriber data, implementing own algorithms for handling bounces and complaints, and integrating with other systems in the tech stack.

Integration: Flexible flow of data across the business due to the ability to integrate the email database with other systems in the tech stack. You’ve already built your own email database or have one in mind which supports querying, building that database external to Amazon SES would make for a more customizable implementation.

Data Ownership: When you manage your own database, you have full ownership and control over your data. This can be important for businesses with strict data governance or regulatory requirements.

Ease of Use: The built-in service provides readily-available API to create, update and delete contacts. These operations are also available via REST API, AWS CLI and SDK. Once you’ve set up the subscription topics and contact lists, you can leverage the preference center to allow your customers to easily sub/unsubscribe from different topics.

Cost-Effective: More cost-effective than building own functionality as it requires less time and resources. The built-in service is also available free of charge unlike building out own infrastructure which would require ongoing infrastructure service costs.

Cons

Time and Resources: Building your own email database functionality requires a significant investment of time and resources. This includes the initial setup of the database, designing the schema, setting up the servers, and configuring the database software. Additionally, you’ll need to develop the functionality for managing subscriptions, and database cleanup in upon receiving bounces and complaints. Databases require ongoing maintenance to ensure they remain operational and efficient. This includes tasks like updating the database software, managing backups, optimizing queries, and scaling the database as your subscriber base grows.

Complexity: As your subscriber base grows, managing your own email database can become increasingly complex. You’ll need to handle more data, which can slow down queries and make the database more difficult to manage. You’ll also need to deal with more complex issues like data integrity, redundancy, and normalization. Additionally, as you add more features to your email database functionality, the codebase can become more complex, making it harder to maintain and debug.

Security: When you manage your own email database, you’re responsible for its security. This includes protecting the data from unauthorized access, ensuring the confidentiality of your subscribers’ information, and complying with data protection regulations. You’ll need to implement security measures like encryption, access controls, and regular security audits. If your database is compromised, it could lead to data loss or a breach of your subscribers’ privacy, which could damage your reputation and potentially lead to legal consequences.

Limited Customization: The built-in service may not offer the same level of customization as building own functionality. It may not meet all needs if there are specific requirements. For example, the preference center management page cannot be customized.

Dependence: Using the built-in service means you’re reliant on Amazon SES for your email database management. If the service experiences downtime or issues, it could impact your ability to manage your email database. This could potentially disrupt your email campaigns and affect your relationship with your subscribers. Furthermore, if you decide to switch to a different email service provider in the future, migrating your email database from the built-in service could be a complex and time-consuming process. Additionally, if your email database needs to be accessed or manipulated by other systems in your tech stack, this dependency on Amazon SES could complicate the integration process and limit your flexibility.

Customer Use Cases Best suited for businesses with specific needs that aren’t met by standard list management services, or those who wish to integrate their email database with other systems. For example, a large e-commerce company might choose to build out their own email database functionality to integrate with their customer relationship management (CRM) and inventory systems. Ideal for small to medium-sized businesses that need a straightforward, cost-effective solution for managing their email database. It’s also a good fit for businesses without the resources or technical expertise to build their own email database functionality.

Strategies for Email Database Management with Amazon Simple Email Service

Once you’ve made the decision on whether to manage your email database within Amazon SES or build your own, that’s only half of the equation. It’s important to recognize that your email databases will only work best to serve the business needs when you have processes in place to maintain them. In this section, let’s go through some of the best practices on how to do so.

  • Maintaining email list hygiene:
    • Both Amazon SES and a custom-built email database require maintaining a healthy email list. This involves regularly cleaning your list to remove invalid email addresses, hard bounces, and unengaged subscribers. With Amazon SES, the process to handle hard bounces and complaints is automated.
    • With a custom-built email database, you have more control over how and when this cleaning occurs. Rather than focusing on only email addresses that either hard bounces or complained, you can remove unengaged users. Every business will have their own definition of an un-engaged users based on business needs. Regardless, you will need to store the engagement attribute (e.g. days since last interaction). This will be simpler to architect in an external database which supports querying and bulk modification.
  • Managing Subscriptions:
    • With Amazon SES, you can easily manage subscriptions using the built-in functionality. This includes adding new subscribers, removing unsubscribed users, and updating user topic preferences. However, you will not be able to customize the look-and-feel of your subscription preference pages.
    • If you build your own email database, you’ll need to create your own system for managing subscriptions, which could require significant time and resources. The trade-off is that you can fully customize your subscription management system to showcase your branding on the subscription preference page and also handle custom logic for subscription/unsubscription.
  • Encouraging Engagement: Low engagement rates can indicate that your recipients are not interested in your content. To stimulate action, you can include a survey in the email, ask for feedback, or run a giveaway. You can then filter out inactive subscribers who still aren’t interacting with your emails. For engaged subscribers, you can segment these audiences into sub-groups by preference and send tailored email marketing campaigns. Before removing less active subscribers, consider what other kinds of content you could provide that might be more appealing. Unengaged subscribers can sometimes be re-engaged with the right offer, such as a free gift, a special perk, or exclusive content.
  • Renewing Opt-In: For your disengaged subscribers, send a re-optin campaign and remove them if they don’t re-subscribe. Be transparent! Notify inactive subscribers that you’ve noticed their lack of engagement and let them know that you don’t want to clutter their inbox if they’re not interested. Ask them if they want to continue to receive emails with a clear call-to-action button that will re-sign them up for future emails.
  • Making It Easy to Unsubscribe: Including an easy-to-find unsubscribe button and a one-step opt-out process won’t encourage subscribers to leave if you’re giving them a reason to stay. If recipients feel like they can’t leave, they’ll just mark your emails as spam, which counts as a big strike against your sender reputation.

Remember, effective email database management is a continuous process that requires regular attention and maintenance. By following these best practices, you can maximize the effectiveness of your email marketing efforts and build strong relationships with your subscribers.

Conclusion

In conclusion, maintaining a healthy email database is a critical aspect of successful email marketing. Whether you choose to build out your own email database functionality or use Amazon SES’s built-in list and subscription management service, it’s important to understand the pros and cons of each approach and align your decision with your business needs.

Building your own email database functionality offers the advantage of customization and integration with other systems in your tech stack. However, it requires significant time, resources, and technical expertise. On the other hand, Amazon SES’s built-in service is easy to use, cost-effective, and handles many complexities of email database management, but it may not offer the same level of customization.

Regardless of the approach you choose, following best practices for email database management is essential. This includes handling bounces and complaints, managing subscriptions, encouraging engagement, sending re-engagement email campaigns, renewing opt-ins, and making it easy to unsubscribe.

These practices will help you maintain a healthy email list, improve engagement rates, and ultimately, enhance the effectiveness of your email marketing efforts.It’s important to stay updated with the latest trends and strategies in email database management. So, keep exploring, learning, and implementing the best practices that suit your business needs.

For more information on Amazon SES and its features, visit the Amazon SES Documentation. Here, you’ll find comprehensive guides, tutorials, and API references to help you make the most of Amazon SES.

How to implement multi tenancy with Amazon SES

Post Syndicated from satyaso original https://aws.amazon.com/blogs/messaging-and-targeting/how-to-manage-email-sending-for-multiple-end-customers-using-amazon-ses/

In this blog post, you will learn how to design multi-tenancy with Amazon SES, as well as the fundamental best practices for implementing a multi-tenant architecture that can effectively handle bulk the email sending needs of your downstream customers.

Amazon Simple Email Service (SES) is utilized by customers across various industries to send emails to their recipients. Often, they need to send emails on behalf of their downstream customers or for other business divisions. Organizations commonly refer to these use cases as “multi-tenant email sending practices. To implement email sending multi-tenancy practices (i.e. to send bulk emails on behalf of end customers), Amazon SES customers need to adopt an architecture that enables them to effectively meet the email sending needs of thousands of downstream customers while also ensuring that the email sending reputation of each customer or the tenant is isolated.

Use cases

  1. Onboard multiple brands from different Business units (BUs) with different domains.
  2. Separate marketing and transaction tenants.
  3. ISV Customer’s requirement to segregate email sending reputation of their end customers.
  4. Domain management via configuration sets.
  5. Track individual customer’s email sending repurataion and control their email sending process.

Prerequisites

For this post, you should be familiar with the following:

Solution Overview

In the email ecosystem, domain and IP reputation are critical in getting emails delivered to the inbox. Tenants in a multi-tenant scenario might be unique businesses or an internal team (eg marketing team, customer service team and so on). Because the maturity of each tenant varies greatly, implementing a multi-tenant environment may be increasingly complicated and difficult. While one tenant may have a well-validated and highly-engaged recipient list, another tenant may have an untrusted email recipient list, and sending emails to such email addresses may result in bounces or spam, lowering the IP and domain reputation. So, organizations have to build safe guards to prevent an unsophisticated sender or a bad actor from impacting the other tenants.

To better understand multi-tenancy, let us first look at how Amazon SES sends emails. Any emails sent via Amazon SES to end users are sent using IP addresses that have been mapped within Amazon SES. Amazon SES offers two types of IP addresses: shared IP addresses and dedicated IP addresses. (Currently Amazon SES offers two kinds of dedicated IPs, which are 1/ Standard dedicated IPs, 2/ Managed dedicated IPs). Shared IPs are shared across many SES customers, and all your emails are sent using shared IP addresses by default unless you have requested for dedicated IPs. Dedicated IP addresses/addresses are designated for a single customer or tenant, where the tenant might be a business unit within the customer’s own eco system or a downstream customer of an ISV.

If a customer is using shared IPs to send email via SES and trying to achieve multi tenancy, then they can do so to segregate the business functions of multiple tenants such as tenant tagging, SES event destination routing, cost allocation for each tenant, and so on; but it won’t help to manage or isolate email sending reputation from one tenant to another. This is because; these shared IPs are mapped to an AWS region and incase one rogue tenant is trying to send spam emails then it will impact other customers in the same region who are using same set of shared IPs.

If you are an Amazon SES user and wish to separate the reputation of one end-customer from another then dedicated IPs are the ideal solution. Dedicated IP or Dedicated IPs (also known as dedicated IP pool) can be assigned to a tenant, and the email sending reputation for that tenant can be readily isolated from that of another tenant. If tenant one is a problematic sender and internet service providers (ISPs) such as Gmail, Hotmail, Yahoo and, so on, flags the respective domain or IPs, the reputation of the other tenants’ domains and IPs are unaffected since they are mutually exclusive.

Amazon SES supports multi-tenancy primarily through two constructs: 1/configuration sets, 2/Dedicate IP pools. Configuration sets are setup rules that are applicable to your verified identities, whereas  dedicated IP pool is to group dedicated IPs into a pool, which can then be mapped to a configuration set, such that the respective Identity/Identities may only utilize the same IP Pool without affecting other tenants. Let’s now witness a simplified architecture view.

Amazon SES multi tenancy using a single AWS account

Multi tenancy using a single AWS account

In this architecture, if you notice tenant 1, tenant 2 and tenant 3 are using the distinct configurations with respective dedicated IPs while tenant 4 is using shared IPs. i.e. the tenants can chose which configuration sets needs to be used for their domain. This provides customers capability to achieve multi tenancy.

Amazon SES multi tenancy – best practices

Always proactively reach out to your account team or raise a support case under “service limit increase” category informing that you will be sending on behalf of tens of thousands of customers. This will help AWS in rightly setup limits within your account and be cognizant of your sending patterns.

While the architecture described above will most of the time help Amazon SES users manage multiple end customers effectively, in rare cases; Amazon SES users may receive a notification from AWS support stating that their Amazon SES account is being reviewed. This indicates that your Amazon SES account is being used to send problematic email to end recipients, or that the account has been paused (if you haven’t reacted proactively upon controlling the faulty senders within the review timeframe), which means you can’t send email from your SES account because your spam or complaint rate has exceeded a certain threshold. These type of situations occurs because, Amazon SES sanitization process is implemented at the AWS account level by default. So, even if any of the tenants using a dedicated IP or a dedicated IP pool and their spam or complaint rates exceed the approved SES limit, Amazon SES sends a notification to the account admin, flagging the concern in their account. In such cases, it is recommended to implement a process known as “automatically pausing email sending for a configuration set“. You can configure Amazon SES to export reputation metrics that are specific to emails that are sent using a specific configuration set to Amazon CloudWatch. You can then use these metrics to create CloudWatch alarms that are specific to those configuration sets. When these alarms exceed certain thresholds, you can automatically pause the sending of emails that use the specified configuration sets, without impacting the overall email sending capabilities of your Amazon SES account.

If you are an Enterprise ISV customer and you have tens of thousands of downstream customers then there is a possibility that you will hit Amazon SES provided maximum quota. In those scenarios you have two options; 1/ Ask for an exception for your AWS SES account – In this approach, you need to request AWS to increase your quota applicable for the existing account to a higher threshold and depending upon your previous usage and reputation AWS shall increase your account limit to accommodate more customers/tenants. To do this you need to raise an AWS support case under “service limit increase” and present your requirement on why you want to increase your Amazon SES account quota to a higher limit. There is no guaranty that the exception will always be granted. If your exception request is denied, you must proceed to the second option, which is to 2/ segment your customers across multiple AWS accounts. In this approach, you must calculate your customer base ahead of time and distribute your downstream customers across multiple accounts within the same AWS region in order to set up their email sending mechanism using SES. To better understand option 2, refer to the architecture diagram below.

Amazon SES multi tenancy using multiple AWS account

Multi tenancy using multiple AWS account

In the above architecture various tenants are connecting to Amazon SES in different AWS accounts to implement multi tenancy. Email event responses can be taken back to a central data lake located in the same AWS region or in different region. Furthermore, as shown in the diagram above, all AWS accounts mapped to different tenants are under a Parent AWS account; this hierarchical structure is known as AWS Organizations. it is recommended to use AWS Organizations which enables you to consolidate multiple AWS accounts into an organization that you create and centrally manage. It helps in security and compliance guide lines, managing consolidated billing for all the child accounts.

Conclusion

Appropriate multi-tenancy implementation within Amazon SES not only helps you manage end-customer reputation but also aids in tracking usage of each user independently from one another. In this post, we have showcased how Amazon SES users can utilize Amazon SES to manage large number of end customer, what are the design best practices to implement multi-tenant architecture with Amazon SES.


Satyasovan Tripathy works at Amazon Web Services as a Senior Specialist Solution Architect. He is based in Bengaluru, India, and specialises on the AWS customer developer service product portfolio. He likes reading and travelling outside of work.


 

How to test email sending and monitoring

Post Syndicated from Dustin Taylor original https://aws.amazon.com/blogs/messaging-and-targeting/how-to-test-email-sending/

Introduction

When setting up your email sending infrastructure and connections to APIs it is necessary to ensure proper setup. It is also important to ensure that after making changes to your sending pipeline that you verify that your application is working as expected. Not only is it important to test your sending processes, but it’s also important to test your monitoring to ensure that sending event tracking is working as intended. A common pitfall for email senders is that when they attempt to test their email sending infrastructure or event monitoring they send to invalid addresses and/or test accounts that generate no, or negative, reputation as a result of these sends.

The Amazon Simple Email Service (SES) provides you with an easy-to-use mechanism to accomplish these tests. Amazon SES offers the mailbox simulator feature which enables a sender the ability to test different sending events to ensure your service is working as expected. Using the mailbox simulator you can test: delivery success, bounces, complaints, automated responses (like out of office messages), and when a recipient address is on the suppression list.

In this blog we will outline some information about the mailbox simulator and how to interact with the feature to test your email sending services.

What is the mailbox simulator?

The mailbox simulator is a feature offered to help Amazon SES senders test their sending services to verify normal operation. It provides mechanisms to test their monitoring and event notification services. This feature gives a sender the ability to test their service and email monitoring to verify that it is working as expected without the risk of negatively impacting their sending reputation. The mailbox simulator is an MTA operated by SES that is set to receive mail and to simulate different sending events based on the recipient address used.

Why use the mailbox simulator?

The mailbox simulator provides an easy-to-use mechanism to test your integration with Amazon SES. This gives senders the ability to test their sending environment without triggering actual bounces or complaints, which negatively impact their account sending reputation, as well as not counting against a sender’s email sending quotas.  It is important to test these events to ensure that event monitoring is properly setup and function. A gap in monitoring these events could lead to a decrease in sender reputation from bounces or complaint events going unnoticed. The mailbox simulator gives a sender the ability to programmatically evaluate whether their event monitoring process has been set up properly without the negative impact to their sending reputation that would occur if sending test emails to differing mailbox providers or invalid email addresses.

How do I use the mailbox simulator?

Your first step is setting up a destination for your event notifications. This can be done using Amazon Simple Notification Service (SNS) or by using event publishing depending on your use-case.  Once you have set up an event destination and configured it for your sending identity (either an email address or domain) you are ready to proceed to testing the configuration.

Using the Amazon SES mailbox simulator is simple. In practice, you will be sending an email to an Amazon SES owned mailbox. This mailbox will respond based on the event-type you want to test. Below is a map of the event types and the corresponding email addresses to test the events:

Event Type Email Destination
Delivery Success [email protected]
Bounce [email protected]
Complaint [email protected]
Suppression List [email protected]
Automatic Responses (OOTO) [email protected]

If you are using the Amazon SES console to test these events, SES has already included the addresses to simplify the testing experience and you can find these under the ‘Scenario’ dropdown.

After sending an email to one of the five destinations, you should soon receive a notification, or event, to your publishing destination. This is an example of a success event.

{
    "notificationType": "Delivery",
    "mail": {
        "timestamp": "2023-05-05T21:00:23.244Z",
        "source": "[email protected]",
        "sourceArn": "arn:aws:ses:us-west-2:012345678910:identity/example.com",
        "sourceIp": "192.168.0.1",
        "callerIdentity": "root",
        "sendingAccountId": "012345678910",
        "messageId": "01010187edb7434c-4187f4b8-3e2b-404c-a5f6-72b9b64e5d66-000000",
        "destination": ["[email protected]"]
    },
    "delivery": {
        "timestamp": "2023-05-05T21:00:24.300Z",
        "processingTimeMillis": 1056,
        "recipients": ["[email protected]"],
        "smtpResponse": "250 2.6.0 Message received",
        "remoteMtaIp": "54.165.247.113",
        "reportingMTA": "a62-102.smtp-out.us-west-2.amazonses.com"
    }
}

If you have not received confirmation of the event, it is likely there is a problem with your monitoring configuration. We recommend reviewing the documentation on SNS topic setup and/or event publishing to uncover if an error was made during initial setup.

Note: A sender may have verified an email address and a domain to use for testing. The domain may have the appropriate configuration while the email address does not. When sending an email from SES, SES will use the most specific identity (email address is used before the domain) and will use the configuration associated with that identity. This means that in this instance you can either remove the email address verification for that domain and re-test or set up the same configuration for that email address that is verified.

What next?

Now that your initial setup of event publishing is complete and you have tested your first event through the mailbox simulator, it is time to set up automated testing using the mailbox simulator. Testing email events after a successful update to your application is recommended to confirm that updates have not caused bugs in your event ingestion mechanisms.

Happy sending!

Choosing the Right Domain for Optimal Deliverability with Amazon SES

Post Syndicated from komaio original https://aws.amazon.com/blogs/messaging-and-targeting/choosing-the-right-domain-for-optimal-deliverability-with-amazon-ses/

Choosing the Right Domain for Optimal Deliverability with Amazon SES

As a sender, selecting the right domain for the visible From header of your outbound messages is crucial for optimal deliverability. In this blog post, we will guide you through the process of choosing the best domain to use with Amazon Simple Email Service (SES)

Understanding domain selection and its impact on deliverability

With SES, you can create an identity at the domain level or you can create an email address identity. Both types of verified identities permit SES to use the email address in the From header of your outbound messages. You should only use email address identities for testing purposes, and you should use a domain identity to achieve optimal deliverability.

Choosing the right email domain is important for deliverability for the following reasons:

  • The domain carries a connotation to the brand associated with the content and purpose of the message.
  • Mail receiving organizations are moving towards domain-based reputational models; away from IP-based reputation.
  • Because the email address is a common target for forgery, domain owners are increasingly publishing policies to control who can and cannot use their domains.

The key takeaway from this blog is that you must be aware of the domain owner’s preference when choosing an identity to use with SES. If you do not have a relationship with the domain owner then you should plan on using your own domain for any email you send from SES.

Let’s dive deep into the technical reasons behind these recommendations.

What is DMARC?

Domain-based Message Authentication, Reporting, and Conformance (DMARC) is a domain-based protocol for authenticating outbound email and for controlling how unauthenticated outbound email should be handled by the mail receiving organization. DMARC has been around for over a decade and has been covered by this blog in the past.

DMARC permits the owner of an email author’s domain name to enable verification of the domain’s use. Mail receiving organizations can use this information when evaluating handling choices for incoming mail. You, as a sender, authenticate your email using DKIM and SPF.

  • DKIM works by applying a cryptographic signature to outbound messages. Mail receiving organizations will use the public key associated with the signing key that was used to verify the signature. The public key is stored in the DNS.
  • SPF works by defining the IP addresses permitted to send email as the MAIL FROM domain. The record of IP addresses is stored in the DNS. The MAIL FROM domain is not the same domain as the domain in the From header of messages sent via SES. It is either domain within amazonses.com or it is a custom MAIL FROM domain that is a subdomain of the verified domain identity. Read more about SPF and Amazon SES.

A message passes the domain’s DMARC policy when the evaluation DKIM or SPF indicate that the message is authenticated with an identifier that matches (or is a subdomain of) the domain in the visible From header.

How can I look up the domain’s DMARC policy?

You must be aware of the DMARC policy of the domain in which your SES identities reside. The domain owner may be using DMARC to protect the domain from forgery by unauthenticated sources. If you are the domain owner, you can use this method to confirm your domain’s current DMARC policy.

You can look up the domain’s DMARC policy in the following ways:

  • Perform a DNS query of type TXT against the hostname called _dmarc.<domain>. For example, you can use the ‘dig’ or ‘nslookup’ command on your computer, or make the same query using a web-based public DNS resolver, such as https://dns.google/
  • Use a 3rd party tool such as:

https://tools.wordtothewise.com/dmarc/
https://mxtoolbox.com/dmarc.aspx
https://dmarcian.com/dmarc-inspector/

The “p” tag in the DMARC record indicates the domain’s policy.

How does the domain’s policy affect how I can use it with SES?

This section will cover each policy scenario and provide guidance to your usage of the domain with SES.

Policy How to Interpret You have verified the domain identity with EasyDKIM You have only email address identities with the domain
No DMARC record The domain owner has not published a DMARC policy. They may not yet be aware of DMARC There is no DMARC policy for mail receiving organizations to apply. Your messages are authenticated with DKIM, so mail receiving organization may leverage a domain-based reputational model for your email. There is no DMARC policy for mail receiving organizations to apply. Your messages are not authenticated, so reputation remains solely based on IP.
none The domain owner is evaluating the DMARC reports that the mail receiving organizations send to the domain owner, but has requested the mail receiving organizations not use DMARC policy logic to evaluate incoming email. There is no DMARC policy for mail receiving organizations to apply. Your messages are authenticated with DKIM, so mail receiving organization may leverage a domain-based reputational model for your email. There is no DMARC policy for mail receiving organizations to apply. Your messages are not authenticated, so reputation remains solely based on IP.
quarantine The domain owner has instructed mail receiving organizations to send any non-authenticated email to a quarantine or to the Junk Mail folders of the recipients. Your messages are authenticated with DKIM and will not be subjected to the domain’s DMARC policy. Mail receiving organizations may not deliver your messages to the inboxes of your intended recipients.
reject The domain owner has instructed mail receiving organizations to reject any non-authenticated email sending from the domain. Your messages are authenticated with DKIM and will not be subjected to the domain’s DMARC policy. Mail receiving organizations may reject these messages which will result in ‘bounce’ events within SES.

Other considerations

If the domain has a none or quarantine policy, you must be aware that the domain owner may have a plan to migrate to a more restrictive policy without consulting with you. This will affect your deliverability in the form of low inboxing/open rates, or high bounce rates. You should consult with the domain owner to determine if they recommend an alternative domain for your email use case.

Not all mail receiving organizations enforce DMARC policies. Some may use their own logic, such as quarantining messages that fail a reject policy. Some may use DMARC logic to build a domain-based reputational model based on your sending patterns even if you do not publish a policy. For example, here is a blueprint showing how you can set up custom filtering logic with SES Inbound.

If you have verified the domain identity with the legacy TXT record method, you must sign your email using a DKIM signature. The DKIM records in the DNS must be within the same domain as the domain in the From header of the messages you are signing.

If you have the domain identity verified with EasyDKIM and you also have email address identities verified within the same domain, then the email address identities will inherit the DKIM settings from the domain identity. Your email will be authenticated with DKIM and will not be subjected to the domain’s DMARC policy.

Can I use SPF instead of DKIM to align to the domain’s DMARC policy?

Messages can also pass a DMARC policy using SPF in addition to DKIM. This is enabled through the use of a custom MAIL FROM domain. The custom MAIL FROM domain needs to be a subdomain of the SES identity and the SES domain identity’s DMARC policy must not be set to strict domain alignment due to the way SES handles feedback forwarding. The domain owner enables a custom MAIL FROM domain by publishing records in the DNS. There is no way to authenticate email without publishing records in the DNS. Read Choosing a MAIL FROM domain to learn more.

The recommended approach is to use EasyDKIM primarily, and optionally enable a custom MAIL FROM domain as an additive form of authentication.

What should I do if I am not the domain owner?

The process of enabling DKIM and SPF authentication involves publishing DNS records within the domain. Only the domain owner may modify DNS for their domain. If you are not the domain owner, here are some alternative solutions.

Option 1: Segregate your email sending programs into subdomains.

This option is best for people within large or complex organizations, or vendors who are contracted to send email on behalf of an organization.

Ask the domain owner to delegate a subdomain for your use case (e.g. marketing.domain.example). Many domain owners are willing to delegate use of a subdomain because allowing for multiple use cases on a single domain becomes a very difficult management and governance challenge.

Through the use of subdomains they can segregate your email sending program from the email sent by normal mailbox users and other email sending programs. This also gives mail receiving organizations the ability to create a reputational model that is specific to your sending patterns, which means that you do not need to inherit any negative reputation incurred by others.

Option 2: Use a domain in which you are the domain owner.

This option is best if you have end-customers (or tenants) who have email addresses within domains which have domain owners that will not allow any form of delegation to you.

Use your own domain as the domain identity, and use subdomains within your domain to distinguish your end-customers from each other (e.g. tenant1.yourdomain.example, tenant2.yourdomain.example, tenant3.yourdomain.example, …). Amazon WorkMail uses this strategy for the awsapps.com domain.

This gives you complete control over the domain as well as your reputation. Use subdomains to segregate reputation between your end-customers if you have a multi-tenant business model.

Here are some additional suggestions to make your email more personable while remaining aligned to the domains’ DMARC policies.

  • You may format the From header of your outgoing messages so that the display name clearly reflects the name of the message author.

From: “John Doe via My App” <[email protected]>

  • Set the Reply-to header of your outbound messages so that when recipients reply, the return messages will go to the intended recipient.

Reply-to: [email protected]

What should I do if the domain is already being used for a different email sending program?

From a deliverability perspective, it is beneficial to compartmentalize your sending into different domains, or subdomains, for different email sending programs. That will limit the reputational blast radius if something were to go wrong with one campaign. Consider using different subdomains for each sending program. For example:

  • marketing.domain.example
  • receipts.domain.example

DMARC was designed for marketing and transactional email use cases, so it is good practice to publish ‘reject’ DMARC policies for those subdomains. Having a strong policy doesn’t give a free pass into recipient inboxes, but it allows the mail receiving organization to know what to do with messages that aren’t authenticated, which can lead to better trust. Building trust is the best way to gain a positive reputation.

If the domain is used by normal users for day-to-day correspondences, the domain owner should be very careful about publishing a DMARC policy because it is known to create interoperability issues with mailing lists and other email providers. Many of these email domains may never publish a ‘reject’ DMARC policy. For new email sending programs, you should strongly consider using a subdomain rather than any domain that is being used for user correspondences.

Conclusion

To ensure optimal deliverability with Amazon SES, it’s essential to be aware of the domain owner’s preferences and use a domain identity for outbound messages. Keep in mind that email address identities should only be used for testing purposes or with domains without DMARC policies. Domain owners can use subdomains to segregate email sending programs, making management and governance easier while allowing mail receiving organizations to build isolated reputational models.

By following the recommendations in this blog, you’ll be better prepared to align with the domain owner’s preferences, achieve higher deliverability rates for your authenticated outbound email, and be compatible with future DMARC developments.

Amazon SES – How to set up EasyDKIM for a new domain

Post Syndicated from Vinay Ujjini original https://aws.amazon.com/blogs/messaging-and-targeting/amazon-ses-how-to-set-up-easydkim-for-a-new-domain/

What is email authentication and why is it important?

Amazon Simple Email Service (SES) lets you reach customers confidently without an on-premises Simple Mail Transfer Protocol (SMTP) system. Amazon SES provides built-in support for email authentication protocols, including DKIM, SPF, and DMARC, which help improve the deliverability and authenticity of outgoing emails.

Email authentication is the process of verifying the authenticity of an email message to ensure that it is sent from a legitimate source and has not been tampered with during transmission. Email authentication methods use cryptographic techniques to add digital signatures or authentication headers to outgoing emails, which can be verified by email receivers to confirm the legitimacy of the email.

Email authentication helps establish a sender’s reputation as a trusted sender. Additionally, when email receivers can verify that emails are legitimately sent from a sender’s domain using authentication methods, it also helps establish the sender’s reputation as a trusted sender. Email authentication involves one or more technical processes used by mail systems (sending and receiving) that make certain key information in an email message verifiable. Email authentication generates signals about the email, which can be utilized in decision-making processes related to spam filtering and other email handling tasks.

There are currently two widely used email authentication mechanisms – SPF (Sender Policy Framework) and DKIM (DomainKeys Identified Mail). They provide information that the receiving domain can use to verify that the sending of the message was authorized in some way by the sending domain. DKIM can also help determine that the content was not altered in transit. And the DMARC (Domain-based Message Authentication, Reporting and Conformance) protocol allows sending domains to publish verifiable policies that can help receiving domains decide how best to handle messages that fail authentication by SPF and DKIM.

Email authentication protocols:

  1. SPF (Sender Policy Framework): SPF is an email authentication protocol that checks which IP addresses are authorized to send mail on behalf of the originating domain. Domain owners use SPF to tell email providers which servers are allowed to send email from their domains. This is an email validation standard that’s designed to prevent email spoofing.
  2. DKIM (DomainKeys Identified Mail): DKIM is an email authentication protocol that allows a domain to attach its identifier to a message. This asserts some level of responsibility or involvement with the message. A sequence of messages signed with the same domain name is assumed to provide a reliable base of information about mail associated with the domain name’s owner, which may feed into an evaluation of the domain’s “reputation”. It uses public-key cryptography to sign an email with a private key. Recipient servers can then use a public key published to a domain’s DNS to verify that parts of the emails have not been modified during the transit.
  3. DMARC (Domain-based Message Authentication, Reporting and Conformance): is an email authentication protocol that uses Sender Policy Framework (SPF) and DomainKeys Identified Mail (DKIM) to detect email spoofing. In order to comply with DMARC, messages must be authenticated through either SPF or DKIM, or both.

Let us dive deep into DKIM in this blog. Amazon SES provides three options for signing your messages using a DKIM signature:

  1. Easy DKIM: To set up a sending identity so that Amazon SES generates a public-private key pair and automatically adds a DKIM signature to every message that you send from that identity.
  2. BYODKIM (Bring Your Own DKIM): To provide your own public-private key pair for so SES adds a DKIM signature to every message that you send from that identity, see Provide your own DKIM authentication token (BYODKIM) in Amazon SES.
  3. Manually add DKIM signature: To add your own DKIM signature to email that you send using the SendRawEmail API, see Manual DKIM signing in Amazon SES.

The purpose of EasyDKIM is to simplify the process of generating DKIM keys, adding DKIM signatures to outgoing emails, and managing DKIM settings, making it easier for users to implement DKIM authentication for their email messages. Using EasyDKIM, Amazon SES aims to improve email deliverability, prevent email fraud and phishing attacks, establish sender reputation, enhance brand reputation, and comply with industry regulations or legal requirements. EasyDKIM doubles as domain verification (simplification) and it eliminates the need for customers to worry about DKIM key rotation (managed automation). By automating and simplifying the DKIM process, EasyDKIM helps users ensure the integrity and authenticity of their email communications, while reducing the risk of fraudulent activities and improving the chances of emails being delivered to recipients’ inboxes.

Setting up Easy DKIM in Amazon SES:

When you set up Easy DKIM for a domain identity, Amazon SES automatically adds a 2048-bit DKIM signature to every email that you send from that identity. You can configure EasyDKIM by using the Amazon SES console, or by using the API.

The procedure in this section is streamlined to just show the steps necessary to configure Easy DKIM on a domain identity that you’ve already created. If you haven’t yet created a domain identity or you want to see all available options for customizing a domain identity, such as using a default configuration set, custom MAIL FROM domain, and tags, see Creating a domain identity. Part of creating an Easy DKIM domain identity is configuring its DKIM-based verification where you will have the choice to either accept the Amazon SES default of 2048 bits, or to override the default by selecting 1024 bits. Steps to set up easyDKIM for a verified identity:

  1. Sign in to the AWS Management Console and open the Amazon SES console at https://console.aws.amazon.com/ses/
  2. In the navigation pane, under Configuration, choose Verified identities.
  3. List of verified identities in SES console

    Verified identities

  4. In the list of identities, choose an identity where the Identity type is Domain.
  5. Under the Authentication tab, in the DomainKeys Identified Mail (DKIM) container, choose Edit.
  6. In the Advanced DKIM settings container, choose the Easy DKIM button in the Identity type field.
  7. Choose EasyDKIM as identity type; RSA_2048_BITT in DKIM signing key length; Check Enabled checkbox under DKIM signatures.

    DKIM settings

  8. In the DKIM signing key length field, choose either RSA_2048_BIT or RSA_1024_BIT.
  9. In the DKIM signatures field, check the Enabled box.
  10. Choose Save changes.
  11. After configuring your domain identity with Easy DKIM, you must complete the verification process with your DNS provider – proceed to Verifying a DKIM domain identity with your DNS provider and follow the DNS authentication procedures for Easy DKIM.

Conclusion:

Email authentication, especially DKIM, is crucial in securing your emails, establishing sender reputation, and improving email deliverability. EasyDKIM provides a simplified and automated way to implement DKIM authentication. It removes the hassles of generating DKIM keys and managing settings, while additionally reducing risks and and enhancing sender authenticity. By following the steps outlined in this blog post, you can easily set up easyDKIM in Amazon SES and start using DKIM authentication for your email campaigns.

About the Author

Vinay Ujjini is an Amazon Pinpoint and Amazon Simple Email Service Worldwide Principal Specialist Solutions Architect at AWS. He has been solving customer’s omni-channel challenges for over 15 years. He is an avid sports enthusiast and in his spare time, enjoys playing tennis & cricket.

Three ways to boost your email security and brand reputation with AWS

Post Syndicated from Michael Davie original https://aws.amazon.com/blogs/security/three-ways-to-boost-your-email-security-and-brand-reputation-with-aws/

If you own a domain that you use for email, you want to maintain the reputation and goodwill of your domain’s brand. Several industry-standard mechanisms can help prevent your domain from being used as part of a phishing attack. In this post, we’ll show you how to deploy three of these mechanisms, which visually authenticate emails sent from your domain to users and verify that emails are encrypted in transit. It can take as little as 15 minutes to deploy these mechanisms on Amazon Web Services (AWS), and the result can help to provide immediate and long-term improvements to your organization’s email security.

Phishing through email remains one of the most common ways that bad actors try to compromise computer systems. Incidents of phishing and related crimes far outnumber the incidents of other categories of internet crime, according to the most recent FBI Internet Crime Report. Phishing has consistently led to large annual financial losses in the US and globally.

Overview of BIMI, MTA-STS, and TLS reporting

An earlier post has covered how you can use Amazon Simple Email Service (Amazon SES) to send emails that align with best practices, including the IETF internet standards: Sender Policy Framework (SPF), DomainKeys Identified Mail (DKIM), and Domain-based Message Authentication, Reporting, and Conformance (DMARC). This post will show you how to build on this foundation and configure your domains to align with additional email security standards, including the following:

  • Brand Indicators for Message Identification (BIMI) – This standard allows you to associate a logo with your email domain, which some email clients will display to users in their inbox. Visit the BIMI Group’s Where is my BIMI Logo Displayed? webpage to see how logos are displayed in the user interfaces of BIMI-supporting mailbox providers; Figure 1 shows a mock-up of a typical layout that contains a logo.
  • Mail Transfer Agent Strict Transport Security (MTA-STS) – This standard helps ensure that email servers always use TLS encryption and certificate-based authentication when they send messages to your domain, to protect the confidentiality and integrity of email in transit.
  • SMTP TLS reporting – This reporting allows you to receive reports and monitor your domain’s TLS security posture, identify problems, and learn about attacks that might be occurring.
Figure 1: A mock-up of how BIMI enables branded logos to be displayed in email user interfaces

Figure 1: A mock-up of how BIMI enables branded logos to be displayed in email user interfaces

These three standards require your Domain Name System (DNS) to publish specific records, for example by using Amazon Route 53, that point to web pages that have additional information. You can host this information without having to maintain a web server by storing it in Amazon Simple Storage Service (Amazon S3) and delivering it through Amazon CloudFront, secured with a certificate provisioned from AWS Certificate Manager (ACM).

Note: This AWS solution works for DKIM, BIMI, and DMARC, regardless of what you use to serve the actual email for your domains, which services you use to send email, and where you host DNS. For purposes of clarity, this post assumes that you are using Route 53 for DNS. If you use a different DNS hosting provider, you will manually configure DNS records in your existing hosting provider.

Solution architecture

The architecture for this solution is depicted in Figure 2.

Figure 2: The architecture diagram showing how the solution components interact

Figure 2: The architecture diagram showing how the solution components interact

The interaction points are as follows:

  1. The web content is stored in an S3 bucket, and CloudFront has access to this bucket through an origin access identity, a mechanism of AWS Identity and Access Management (IAM).
  2. As described in more detail in the BIMI section of this blog post, the Verified Mark Certificate is obtained from a BIMI-qualified certificate authority and stored in the S3 bucket.
  3. When an external email system receives a message claiming to be from your domain, it looks up BIMI records for your domain in DNS. As depicted in the diagram, a DNS request is sent to Route 53.
  4. To retrieve the BIMI logo image and Verified Mark Certificate, the external email system will make HTTPS requests to a URL published in the BIMI DNS record. In this solution, the URL points to the CloudFront distribution, which has a TLS certificate provisioned with ACM.

A few important warnings

Email is a complex system of interoperating technologies. It is also brittle: a typo or a missing DNS record can make the difference between whether an email is delivered or not. Pay close attention to your email server and the users of your email systems when implementing the solution in this blog post. The main indicator that something is wrong is the absence of email. Instead of seeing an error in your email server’s log, users will tell you that they’re expecting to receive an email from somewhere and it’s not arriving. Or they will tell you that they sent an email, and their recipient can’t find it.

The DNS uses a lot of caching and time-out values to improve its efficiency. That makes DNS records slow and a little unpredictable as they propagate across the internet. So keep in mind that as you monitor your systems, it can be hours or even more than a day before the DNS record changes have an effect that you can detect.

This solution uses AWS Cloud Development Kit (CDK) custom resources, which are supported by AWS Lambda functions that will be created as part of the deployment. These functions are configured to use CDK-selected runtimes, which will eventually pass out of support and require you to update them.

Prerequisites

You will need permission in an AWS account to create and configure the following resources:

  • An Amazon S3 bucket to store the files and access logs
  • A CloudFront distribution to publicly deliver the files from the S3 bucket
  • A TLS certificate in ACM
  • An origin access identity in IAM that CloudFront will use to access files in Amazon S3
  • Lambda functions, IAM roles, and IAM policies created by CDK custom resources

You might also want to enable these optional services:

  • Amazon Route 53 for setting the necessary DNS records. If your domain is hosted by another DNS provider, you will set these DNS records manually.
  • Amazon SES or an Amazon WorkMail organization with a single mailbox. You can configure either service with a subdomain (for example, [email protected]) such that the existing domain is not disrupted, or you can create new email addresses by using your existing email mailbox provider.

BIMI has some additional requirements:

  • BIMI requires an email domain to have implemented a strong DMARC policy so that recipients can be confident in the authenticity of the branded logos. Your email domain must have a DMARC policy of p=quarantine or p=reject. Additionally, the domain’s policy cannot have sp=none or pct<100.

    Note: Do not adjust the DMARC policy of your domain without careful testing, because this can disrupt mail delivery.

  • You must have your brand’s logo in Scaled Vector Graphics (SVG) format that conforms to the BIMI standard. For more information, see Creating BIMI SVG Logo Files on the BIMI Group website.
  • Purchase a Verified Mark Certificate (VMC) issued by a third-party certificate authority. This certificate attests that the logo, organization, and domain are associated with each other, based on a legal trademark registration. Many email hosting providers require this additional certificate before they will show your branded logo to their users. Others do not currently support BIMI, and others might have alternative mechanisms to determine whether to show your logo. For more information about purchasing a Verified Mark Certificate, see the BIMI Group website.

    Note: If you are not ready to purchase a VMC, you can deploy this solution and validate that BIMI is correctly configured for your domain, but your branded logo will not display to recipients at major email providers.

What gets deployed in this solution?

This solution deploys the DNS records and supporting files that are required to implement BIMI, MTA-STS, and SMTP TLS reporting for an email domain. We’ll look at the deployment in more detail in the following sections.

BIMI

BIMI is described by the Internet Engineering Task Force (IETF) as follows:

Brand Indicators for Message Identification (BIMI) permits Domain Owners to coordinate with Mail User Agents (MUAs) to display brand-specific Indicators next to properly authenticated messages. There are two aspects of BIMI coordination: a scalable mechanism for Domain Owners to publish their desired Indicators, and a mechanism for Mail Transfer Agents (MTAs) to verify the authenticity of the Indicator. This document specifies how Domain Owners communicate their desired Indicators through the BIMI Assertion Record in DNS and how that record is to be interpreted by MTAs and MUAs. MUAs and mail-receiving organizations are free to define their own policies for making use of BIMI data and for Indicator display as they see fit.

If your organization has a trademark-protected logo, you can set up BIMI to have that logo displayed to recipients in their email inboxes. This can have a positive impact on your brand and indicates to end users that your email is more trustworthy. The BIMI Group shows examples of how brand logos are displayed in user inboxes, as well as a list of known email service providers that support the display of BIMI logos.

As a domain owner, you can implement BIMI by publishing the relevant DNS records and hosting the relevant files. To have your logo displayed by most email hosting providers, you will need to purchase a Verified Mark Certificate from a BIMI-qualified certificate authority.

This solution will deploy a valid BIMI record in Route 53 (or tell you what to publish in the DNS if you’re not using Route 53) and will store your provided SVG logo and Verified Mark Certificate files in Amazon S3, to be delivered through CloudFront with a valid TLS certificate from ACM.

To support BIMI, the solution makes the following changes to your resources:

  1. A DNS record of type TXT is published at the following host:
    default._bimi.<your-domain>. The value of this record is: v=BIMI1; l=<url-of-your-logo> a=<url-of-verified-mark-certificate>. The value of <your-domain> refers to the domain that is used in the From header of messages that your organization sends.
  2. The logo and optional Verified Mark Certificate are hosted publicly at the HTTPS locations defined by <url-of-your-logo> and <url-of-verified-mark-certificate>, respectively.

MTA-STS

MTA-STS is described by the IETF in RFC 8461 as follows:

SMTP (Simple Mail Transport Protocol) MTA Strict Transport Security (MTA-STS) is a mechanism enabling mail service providers to declare their ability to receive Transport Layer Security (TLS) secure SMTP connections and to specify whether sending SMTP servers should refuse to deliver to MX hosts that do not offer TLS with a trusted server certificate.

Put simply, MTA-STS helps ensure that email servers always use encryption and certificate-based authentication when sending email to your domains, so that message integrity and confidentiality are preserved while in transit across the internet. MTA-STS also helps to ensure that messages are only sent to authorized servers.

This solution will deploy a valid MTA-STS policy record in Route 53 (or tell you what value to publish in the DNS if you’re not using Route 53) and will create an MTA-STS policy document to be hosted on S3 and delivered through CloudFront with a valid TLS certificate from ACM.

To support MTA-STS, the solution makes the following changes to your resources:

  1. A DNS record of type TXT is published at the following host: _mta-sts.<your-domain>. The value of this record is: v=STSv1; id=<unique value used for cache invalidation>.
  2. The MTA-STS policy document is hosted at and obtained from the following location: https://mta-sts.<your-domain>/.well-known/mta-sts.txt.
  3. The value of <your-domain> in both cases is the domain that is used for routing inbound mail to your organization and is typically the same domain that is used in the From header of messages that your organization sends externally. Depending on the complexity of your organization, you might receive inbound mail for multiple domains, and you might choose to publish MTA-STS policies for each domain.

Is it ever bad to encrypt everything?

In the example MTA-STS policy file provided in the GitHub repository and explained later in this post, the MTA-STS policy mode is set to testing. This means that your email server is advertising its willingness to negotiate encrypted email connections, but it does not require TLS. Servers that want to send mail to you are allowed to connect and deliver mail even if there are problems in the TLS connection, as long as you’re in testing mode. You should expect reports when servers try to connect through TLS to your mail server and fail to do so.

Be fully prepared before you change the MTA-STS policy to enforce. After this policy is set to enforce, servers that follow the MTA-STS policy and that experience an enforceable TLS-related error when they try to connect to your mail server will not deliver mail to your mail server. This is a difficult situation to detect. You will simply stop receiving email from servers that comply with the policy. You might receive reports from them indicating what errors they encountered, but it is not guaranteed. Be sure that the email address you provide in SMTP TLS reporting (in the following section) is functional and monitored by people who can take action to fix issues. If you miss TLS failure reports, you probably won’t receive email. If the TLS certificate that you use on your email server expires, and your MTA-STS policy is set to enforce, this will become an urgent issue and will disrupt the flow of email until it is fixed.

SMTP TLS reporting

SMTP TLS reporting is described by the IETF in RFC 8460 as follows:

A number of protocols exist for establishing encrypted channels between SMTP Mail Transfer Agents (MTAs), including STARTTLS, DNS-Based Authentication of Named Entities (DANE) TLSA, and MTA Strict Transport Security (MTA-STS). These protocols can fail due to misconfiguration or active attack, leading to undelivered messages or delivery over unencrypted or unauthenticated channels. This document describes a reporting mechanism and format by which sending systems can share statistics and specific information about potential failures with recipient domains. Recipient domains can then use this information to both detect potential attacks and diagnose unintentional misconfigurations.

As you gain the security benefits of MTA-STS, SMTP TLS reporting will allow you to receive reports from other internet email providers. These reports contain information that is valuable when monitoring your TLS security posture, identifying problems, and learning about attacks that might be occurring.

This solution will deploy a valid SMTP TLS reporting record on Route 53 (or provide you with the value to publish in the DNS if you are not using Route 53).

To support SMTP TLS reporting, the solution makes the following changes to your resources:

  1. A DNS record of type TXT is published at the following host: _smtp._tls.<your-domain>. The value of this record is: v=TLSRPTv1; rua=mailto:<report-receiver-email-address>
  2. The value of <report-receiver-email-address> might be an address in your domain or in a third-party provider. Automated systems that process these reports must be capable of processing GZIP compressed files and parsing JSON.

Deploy the solution with the AWS CDK

In this section, you’ll learn how to deploy the solution to create the previously described AWS resources in your account.

  1. Clone the following GitHub repository:

    git clone https://github.com/aws-samples/serverless-mail
    cd serverless-mail/email-security-records

  2. Edit CONFIG.py to reflect your desired settings, as follows:
    1. If no Verified Mark Certificate is provided, set VMC_FILENAME = None.
    2. If your DNS zone is not hosted on Route 53, or if you do not want this app to manage Route 53 DNS records, set ROUTE_53_HOSTED = False. In this case, you will need to set TLS_CERTIFICATE_ARN to the Amazon Resource Name (ARN) of a certificate hosted on ACM in us-east-1. This certificate is used by CloudFront and must support two subdomains: mta-sts and your configured BIMI_ASSET_SUBDOMAIN.
  3. Finalize the preparation, as follows:
    1. Place your BIMI logo and Verified Mark Certificate files in the assets folder.
    2. Create an MTA-STS policy file at assets/.well-known/mta-sts.txt to reflect your mail exchange (MX) servers and policy requirements. An example file is provided at assets/.well-known/mta-sts.txt.example
  4. Deploy the solution, as follows:
    1. Open a terminal in the email-security-records folder.
    2. (Recommended) Create and activate a virtual environment by running the following commands.
      python3 -m venv .venv
      source .venv/bin/activate
    3. Install the Python requirements in your environment with the following command.
      pip install -r requirements.txt
    4. Assume a role in the target account that has the permissions outlined in the Prerequisites section of this post.

      Using AWS CDK version 2.17.0 or later, deploy the bootstrap in the target account by running the following command. To learn more, see Bootstrapping in the AWS CDK Developer Guide.
      cdk bootstrap

    5. Run the following command to synthesize the CloudFormation template. Review the output of this command to verify what will be deployed.
      cdk synth
    6. Run the following command to deploy the CloudFormation template. You will be prompted to accept the IAM changes that will be applied to your account.
      cdk deploy

      Note: If you use Route53, these records are created and activated in your DNS zones as soon as the CDK finishes deploying. As the records propagate through the DNS, they will gradually start affecting the email in the affected domains.

    7. If you’re not using Route53 and instead are using a third-party DNS provider, create the CNAME and TXT records as indicated. In this case, your email is not affected by this solution until you create the records in DNS.

Testing and troubleshooting

After you have deployed the CDK solution, you can test it to confirm that the DNS records and web resources are published correctly.

BIMI

  1. Query the BIMI DNS TXT record for your domain by using the dig or nslookup command in your terminal.

    dig +short TXT default._bimi.<your-domain.example>

    Verify the response. For example:

    "v=BIMI1; l=https://bimi-assets.<your-domain.example>/logo.svg"

  2. In your web browser, open the URL from that response (for example, https://bimi-assets.<your-domain.example>/logo.svg) to verify that the logo is available and that the HTTPS certificate is valid.
  3. The BIMI group provides a tool to validate your BIMI configuration. This tool will also validate your VMC if you have purchased one.

MTA-STS

  1. Query the MTA-STS DNS TXT record for your domain.

    dig +short TXT _mta-sts.<your-domain.example>

    The value of this record is as follows:

    v=STSv1; id=<unique value used for cache invalidation>

  2. You can load the MTA-STS policy document using your web browser. For example, https://mta-sts.<your-domain.example>/.well-known/mta-sts.txt
  3. You can also use third party tools to examine your MTA-STS configuration, such as MX Toolbox.

TLS reporting

  1. Query the TLS reporting DNS TXT record for your domain.

    dig +short TXT _smtp._tls.<your-domain.example>

    Verify the response. For example:

    "v=TLSRPTv1; rua=mailto:<your email address>"

  2. You can also use third party tools to examine your TLS reporting configuration, such as Easy DMARC.

Depending on which domains you communicate with on the internet, you will begin to see TLS reports arriving at the email address that you have defined in the TLS reporting DNS record. We recommend that you closely examine the TLS reports, and use automated analytical techniques over an extended period of time before changing the default testing value of your domain’s MTA-STS policy. Not every email provider will send TLS reports, but examining the reports in aggregate will give you a good perspective for making changes to your MTA-STS policy.

Cleanup

To remove the resources created by this solution:

  1. Open a terminal in the cdk-email-security-records folder.
  2. Assume a role in the target account with permission to delete resources.
  3. Run cdk destroy.

Note: The asset and log buckets are automatically emptied and deleted by the cdk destroy command.

Conclusion

When external systems send email to or receive email from your domains they will now query your new DNS records and will look up your domain’s BIMI, MTA-STS, and TLS reporting information from your new CloudFront distribution. By adopting the email domain security mechanisms outlined in this post, you can improve the overall security posture of your email environment, as well as the perception of your brand.

 
If you have feedback about this post, submit comments in the Comments section below. If you have questions about this post, contact AWS Support.

Want more AWS Security news? Follow us on Twitter.

Michael Davie

Michael Davie

Michael is a Senior Industry Specialist with AWS Security Assurance. He works with our customers, their regulators, and AWS teams to help raise the bar on secure cloud adoption and usage. Michael has over 20 years of experience working in the defence, intelligence, and technology sectors in Canada and is a licensed professional engineer.

Jesse Thompson

Jesse Thompson

Jesse is an Email Deliverability Manager with the Amazon Simple Email Service team. His background is in enterprise IT development and operations, with a focus on email abuse mitigation and encouragement of authenticity practices with open standard protocols. Jesse’s favorite activity outside of technology is recreational curling.

How to set up Amazon Quicksight dashboard for Amazon Pinpoint and Amazon SES engagement events

Post Syndicated from satyaso original https://aws.amazon.com/blogs/messaging-and-targeting/how-to-set-up-amazon-quicksight-dashboard-for-amazon-pinpoint-and-amazon-ses-events/

In this post, we will walk through using Amazon Pinpoint and Amazon Quicksight to create customizable messaging campaign reports. Amazon Pinpoint is a flexible and scalable outbound and inbound marketing communications service that allows customers to connect with users over channels like email, SMS, push, or voice. Amazon QuickSight is a scalable, serverless, embeddable, machine learning-powered business intelligence (BI) service built for the cloud. This solution allows event and user data from Amazon Pinpoint to flow into Amazon Quicksight. Once in Quicksight, customers can build their own reports that shows campaign performance on a more granular level.

Engagement Event Dashboard

Customers want to view the results of their messaging campaigns in ever increasing levels of granularity and ensure their users see value from the email, SMS or push notifications they receive. Customers also want to analyze how different user segments respond to different messages, and how to optimize subsequent user communication. Previously, customers could only view this data in Amazon Pinpoint analytics, which offers robust reporting on: events, funnels, and campaigns. However, does not allow analysis across these different parameters and the building of custom reports. For example, show campaign revenue across different user segments, or show what events were generated after a user viewed a campaign in a funnel analysis. Customers would need to extract this data themselves and do the analysis in excel.

Prerequisites

  • Digital user engagement event database solution must be setup at 1st.
  • Customers should be prepared to purchase Amazon Quicksight because it has its own set of costs which is not covered within Amazon Pinpoint cost.

Solution Overview

This Solution uses the Athena tables created by Digital user engagement events database solution. The AWS CloudFormation template given in this post automatically sets up the different architecture components, to capture detailed notifications about Amazon Pinpoint engagement events and log those in Amazon Athena in the form of Athena views. You still need to manually configure Amazon Quicksight dashboards to link to these newly generated Athena views. Please follow the steps below in order for further information.

Use case(s)

Event dashboard solutions have following use cases: –

  • Deep dive into engagement insights. (eg: SMS events, Email events, Campaign events, Journey events)
  • The ability to view engagement events at the individual user level.
  • Data/process mining turn raw event data into useful marking insights.
  • User engagement benchmarking and end user event funneling.
  • Compute campaign conversions (post campaign user analysis to show campaign effectiveness)
  • Build funnels that shows user progression.

Getting started with solution deployment

Prerequisite tasks to be completed before deploying the logging solution

Step 1 – Create AWS account, Pinpoint Project, Implement Event-Database-Solution.
As part of this step customers need to implement DUE Event database solution as the current solution (DUE event dashboard) is an extension of DUE event database solution. The basic assumption here is that the customer has already configured Amazon Pinpoint project or Amazon SES within the required AWS region before implementing this step.

The steps required to implement an event dashboard solution are as follows.

a/Follow the steps mentioned in Event database solution to implement the complete stack. Prior installing the complete stack copy and save the name Athena events database name as shown in the diagram. For my case it is due_eventdb. Database name is required as an input parameter for the current Event Dashboard solution.

b/Once the solution is deployed, navigate to the output page of the cloud formation stack, and copy, and save the following information, which will be required as input parameters in step 2 of the current Event Dashboard solution.

Step 2 – Deploy Cloud formation template for Event dashboard solution
This step generates a number of new Amazon Athena views that will serve as a data source for Amazon Quicksight. Continue with the following actions.

  • Download the cloud formation template(“Event-dashboard.yaml”) from AWS samples.
  • Navigate to Cloud formation page in AWS console, click up right on “Create stack” and select the option “With new resources (standard)”
  • Leave the “Prerequisite – Prepare template” to “Template is ready” and for the “Specify template” option, select “Upload a template file”. On the same page, click on “Choose file”, browse to find the file “Event-dashboard.yaml” file and select it. Once the file is uploaded, click “Next” and deploy the stack.

  • Enter following information under the section “Specify stack details”:
    • EventAthenaDatabaseName – As mentioned in Step 1-a.
    • S3DataLogBucket- As mentioned in Step 1-b
    • This solution will create additional 5 Athena views which are
      • All_email_events
      • All_SMS_events
      • All_custom_events (Custom events can be Mobile app/WebApp/Push Events)
      • All_campaign_events
      • All_journey_events

Step 3 – Create Amazon Quicksight engagement Dashboard
This step walks you through the process of creating an Amazon Quicksight dashboard for Amazon Pinpoint engagement events using the Athena views you created in step-2

  1. To Setup Amazon Quicksight for the 1st time please follow this link (this process is not needed if you have already setup Amazon Quicksight). Please make sure you are an Amazon Quicksight Administrator.
  2. Go/search Amazon Quicksight on AWS console.
  3. Create New Analysis and then select “New dataset”
  4. Select Athena as data source
  5. As a next step, you need to select what all analysis you need for respective events. This solution provides option to create 5 different set of analysis as mentioned in Step 2. They are a/All email events, b/All SMS Events, c/All Custom Events (Mobile/Web App, web push etc), d/ All Campaign events, e/All Journey events. Dashboard can be created from Quicksight analysis and same can be shared among the organization stake holders. Following are the steps to create analysis and dashboards for different type of events.
  6. Email Events –
    • For all email events, name the analysis “All-emails-events” (this can be any kind of customer preferred nomenclature), select Athena workgroup as primary, and then create a data source.
    • Once you create the data source Quicksight lists all the views and tables available under the specified database (in our case it is:-  due_eventdb). Select the email_all_events view as data source.
    • Select the event data location for analysis. There are mainly two options available which are a/ Import to Spice quicker analysis b/ Directly query your data. Please select the preferred options and then click on “visualize the data”.
    • Import to Spice quicker analysis – SPICE is the Amazon QuickSight Super-fast, Parallel, In-memory Calculation Engine. It’s engineered to rapidly perform advanced calculations and serve data. In Enterprise edition, data stored in SPICE is encrypted at rest. (1 GB of storage is available for free for extra storage customer need to pay extra, please refer cost section in this document )
    • Directly query your data – This process enables Quicksight to query directly to the Athena or source database (In the current case it is Athena) and Quicksight will not store any data.
    • Now that you have selected a data source, you will be taken to a blank quick sight canvas (Blank analysis page) as shown in the following Image, please drag and drop what visualization type you need to visualize onto the auto-graph pane. Please note that Amazon QuickSight is a Busines intelligence platform, so customers are free to choose the desired visualization types to observe the individual engagement events.
    • As part of this blog, we have displayed how to create some simple analysis graphs to visualize the engagement events.
    • As an initial step please Select tabular Visualization as shown in the Image.
    • Select all the event dimensions that you want to put it as part of the Table in X axis. Amazon Quicksight table can be extended to show as many as tables columns, this completely depends upon the business requirement how much data marketers want to visualize.
    • Further filtering on the table can be done using Quicksight filters, you can apply the filter on specific granular values to enable further filtering. For Eg – If you want to apply filtering on the destination email Id then 1/Select the filter from left hand menu 2/Add destination field as the filtering criterion 3/ Tick on the destination field you are trying to filter or search for the Destination email ID that 4/ All the result in the table gets further filtered as per the filter criterion
    • As a next step please add another visual from top left corner “Add -> Add Visual”, then select the Donut Chart from Visual types pane. Donut charts are always used for displaying aggregation.
    • Then select the “event_type” as the Group to visualize the aggregated events, this helps marketers/business users to figure out how many email events occurred and what are the aggregated success ratio, click ratio, complain ratio or bounce ratio etc for the emails/Campaign that’s sent to end users.
    • To create a Quicksight dashboards from the Quicksight analysis click Share menu option at the top right corner then select publish dashboard”. Provide required dashboard name while publishing the dashboard”. Same dashboard can be shared with multiple audiences in the Organization.
    • Following is the final version of the dashboard. As mentioned above Quicksight dashboards can be shared with other stakeholders and also complete dashboard can be exported as excel sheet.
  7. SMS Events-
    • As shown above SMS events can be analyzed using Quicksight and dash boards can be created out of the analysis. Please repeat all of the sub-steps listed in step 6. Following is a sample SMS dashboard.
  8. Custom Events-
    • After you integrate your application (app) with Amazon Pinpoint, Amazon Pinpoint can stream event data about user activity, different type custom events, and message deliveries for the app. Eg :- Session.start, Product_page_view, _session.stop etc. Do repeat all of the sub-steps listed in step 6 create a custom event dashboards.
  9. Campaign events
    • As shown before campaign also can be included in the same dashboard or you can create new dashboard only for campaign events.

Cost for Event dashboard solution
You are responsible for the cost of the AWS services used while running this solution. As of the date of publication, the cost for running this solution with default settings in the US West (Oregon) Region is approximately $65 a month. The cost estimate includes the cost of AWS Lambda, Amazon Athena, Amazon Quicksight. The estimate assumes querying 1TB of data in a month, and two authors managing Amazon Quicksight every month, four Amazon Quicksight readers witnessing the events dashboard unlimited times in a month, and a Quicksight spice capacity is 50 GB per month. Prices are subject to change. For full details, see the pricing webpage for each AWS service you will be using in this solution.

Clean up

When you’re done with this exercise, complete the following steps to delete your resources and stop incurring costs:

  1. On the CloudFormation console, select your stack and choose Delete. This cleans up all the resources created by the stack,
  2. Delete the Amazon Quicksight Dashboards and data sets that you have created.

Conclusion

In this blog post, I have demonstrated how marketers, business users, and business analysts can utilize Amazon Quicksight dashboards to evaluate and exploit user engagement data from Amazon SES and Pinpoint event streams. Customers can also utilize this solution to understand how Amazon Pinpoint campaigns lead to business conversions, in addition to analyzing multi-channel communication metrics at the individual user level.

Next steps

The personas for this blog are both the tech team and the marketing analyst team, as it involves a code deployment to create very simple Athena views, as well as the steps to create an Amazon Quicksight dashboard to analyse Amazon SES and Amazon Pinpoint engagement events at the individual user level. Customers may then create their own Amazon Quicksight dashboards to illustrate the conversion ratio and propensity trends in real time by integrating campaign events with app-level events such as purchase conversions, order placement, and so on.

Extending the solution

You can download the AWS Cloudformation templates, code for this solution from our public GitHub repository and modify it to fit your needs.


About the Author


Satyasovan Tripathy works at Amazon Web Services as a Senior Specialist Solution Architect. He is based in Bengaluru, India, and specialises on the AWS Digital User Engagement product portfolio. He likes reading and travelling outside of work.