Tag Archives: announcements

New – Amazon EC2 C7g Instances, Powered by AWS Graviton3 Processors

Post Syndicated from Sébastien Stormacq original https://aws.amazon.com/blogs/aws/new-amazon-ec2-c7g-instances-powered-by-aws-graviton3-processors/

I am excited to announce that Amazon Elastic Compute Cloud (Amazon EC2) C7g instances powered by the latest AWS Graviton3 processors that have been available in preview since re:Invent last year are now available for all.

Let’s decompose the name C7g: the “C” instance family is designed for compute-intensive workloads. This is the 7th generation of this instance family. And the “g” means it is based on AWS Graviton, the silicon designed by AWS. These instances are the first instances to be powered by the latest generation of AWS Graviton, the Graviton3 processors.

As you bring more diverse workloads to the cloud, and as your compute, storage, and networking demands increase at a rapid pace, you are asking us to push the price performance boundary even further so that you can accelerate your migration to the cloud and optimize your costs. Additionally, you are looking for more energy-efficient compute options to help you reduce your carbon footprint and achieve your sustainability goals. We do this by working back from your requests, and innovating at a rapid pace across all levels of the AWS infrastructure. Our Graviton chips offer better performance at lower cost along with enhanced capabilities. For example, AWS Graviton3 processors offer you enhanced security with always-on memory encryption, dedicated caches for every vCPU, and support for pointer authentication.

Let’s illustrate this with numbers. When we launched Graviton2-based instances, they provided up to 40 percent better price/performance for a wide variety of workloads over comparable fifth-generation x86-based instances. We now have 12 instance families (M6g, M6gd, C6g, C6gd, C6gn, R6g, R6gd, T4g, X2gd, Im4gn, Is4gen, and G5g) that are powered by AWS Graviton2 processors that provide significant price performance benefits for a wide range of workloads. In 2021, we saw tens of thousands of AWS customers take advantage of this innovation by using Graviton2-based EC2 instances.

Our next generation, Graviton3 processors, deliver up to 25 percent higher performance, up to 2x higher floating-point performance, and 50 percent faster memory access based on leading-edge DDR5 memory technology compared with Graviton2 processors.

Graviton3 also uses up to 60 percent less energy for the same performance as comparable EC2 instances, which helps you reduce your carbon footprint.

Snap Inc, known for its popular social media services such as Snapchat and Bitmoji, adopted AWS Graviton2-based instances to optimize their price performance on Amazon EC2. Aaron Sheldon, software engineer at Snap, told us: “We trialed the new AWS Graviton3-based Amazon EC2 C7g instances and found that they provide significant performance improvements on real workloads compared to previous generation C6g instances. We are excited to migrate our Graviton2-based workloads to Graviton3, including messaging, storage, and friend graph workloads.”

The C7g instances are available in eight sizes with 1, 2, 4, 8, 16, 32, 48, and 64 vCPUs. C7g instances support configurations up to 128 GiB of memory, 30 Gbps of network performance, and 20 Gbps of Amazon Elastic Block Store (EBS) performance. These instances are powered by the AWS Nitro System, a combination of dedicated hardware and a lightweight hypervisor.

The following table summarizes the key characteristics of each instance type in this family.

Instance Name vCPUs
Memory
Network Bandwidth
EBS Bandwidth
c7g.medium 1 2 GiB up to 12.5 Gbps up to 10 Gbps
c7g.large 2 4 GiB up to 12.5 Gbps up to 10 Gbps
c7g.xlarge 4 8 GiB up to 12.5 Gbps up to 10 Gbps
c7g.2xlarge 8 16 GiB up to 15 Gbps up to 10 Gbps
c7g.4xlarge 16 32 GiB up to 15 Gbps up to 10 Gbps
c7g.8xlarge 32 64 GiB 15 Gbps 10 Gbps
c7g.12xlarge 48 96 GiB 22.5 Gbps 15 Gbps
c7g.16xlarge 64 128 GiB 30 Gbps 20 Gbps

C7g instances are initially available in US East (N. Virginia) and US West (Oregon) AWS Regions; other Regions will be added shortly after launch.

As usual, you can purchase C7g capacity on demand, as Reserved Instances, or as Spot instances, and use your Saving Plans. The pricing details are available on the EC2 pricing page.

I have the chance to talk with AWS customers on a daily basis, and many of my discussions are around price performance and the sustainability of their workloads. With more than 500 instance types to choose from, one question I often receive is: what are the workloads that would benefit from C7g?

You will find that C7g instances provide the best price performance within their instance families for a broad spectrum of compute-intensive workloads, including application servers, micro services, high-performance computing, electronic design automation, gaming, media encoding, or CPU-based ML inference. These instances are ideal for all Linux-based workloads, including containerized and micro service-based applications built using Amazon Elastic Kubernetes Service (EKS), Amazon Elastic Container Service (Amazon ECS), Amazon Elastic Container Registry, Kubernetes, and Docker, and written in popular programming languages such as C/C++, Rust, Go, Java, Python, .NET Core, Node.js, Ruby, and PHP.

The next question I receive is: given that Graviton instances are based on Arm architecture, how difficult is it to migrate from x86?

Graviton3 instances are supported by a broad choice of operating systems, independent software vendors, container services, agents, and developer tools, enabling you to migrate your workloads with minimal effort.

Applications and scripts written in high-level programming languages such as Python, Node.js, Ruby, Java, or PHP will typically just require a redeployment. Applications written in lower-level programming languages such as C/C++, Rust, or Go will require a re-compilation.

But you don’t always need to migrate your applications. Several managed services are based on Graviton already, such as Amazon ElastiCache, Amazon EKS, Amazon ECS, Amazon Relational Database Service (RDS), Amazon EMR, Amazon Aurora, and Amazon OpenSearch Service, and your application can benefit from Graviton with minimal efforts. A French customer told me recently they migrated a significant portion of their Amazon EMR clusters to Graviton by doing just one line change in their Terraform scripts; all the rest worked as-is.

For those of you building with serverless, we have also released Graviton support for AWS Fargate and AWS Lambda, extending the price, efficiency, and performance benefits of Graviton to serverless workloads. Lambda functions using Graviton2 can see up to 34 percent better price/performance.

Reducing the carbon footprint of your organization is also of paramount importance. Reducing the carbon footprint of cloud-based workloads is a shared responsibility between you and us. We do our part by innovating at all levels: from the materials used to build our facilities, the usage of water for cooling, and the production of renewable energy, down to inventing new silicons that are more energy efficient. To help you meet your own sustainability goals, we added a sustainability pillar to the AWS Well-Architected framework, and we released the Customer Carbon Footprint tool. Graviton3 fits into that context. It uses up to 60 percent less energy for the same performance as comparable EC2 instances.

We do our part in this shared responsibility model, and now, it is your turn. You can use our innovations and tools to help you optimize your workloads and only use the resources you need. Take the occasion to write clever code that uses fewer CPU cycles, less storage, or less network bandwidth. And be sure to select energy-efficient options, such as Graviton3-based instance types or managed services, when deploying your code.

To help you to get started migrating your applications to Graviton instance types today, we curated this list of technical resources. Have a look at it. To learn more about Graviton-based instances, visit the Graviton page or the C7g page and check out this video:

If you’d like to get started with Graviton-based instances for free, we also just reintroduced the free trial on T4g.small instances for up to 750 hours/month until the end of this year (December 31, 2022).

And now, go build 😉

— seb

Spring 2022 SOC reports now available with 150 services in scope

Post Syndicated from Emma Zhang original https://aws.amazon.com/blogs/security/spring-2022-soc-reports-now-available-with-150-services-in-scope/

At Amazon Web Services (AWS), we’re committed to providing our customers with continued assurance over the security, availability and confidentiality of the AWS control environment. We’re proud to deliver the Spring 2022 System and Organizational (SOC) 1, 2 and 3 reports, which cover October 1, 2021 to March 31, 2022, to support our AWS customers’ confidence in AWS services.

The Spring 2022 SOC reports now include the Asia Pacific (Jakarta) Region, newly added to scope. The associated infrastructure supporting our in-scope products and services is also updated to reflect new edge locations, AWS Wavelength zones, and AWS Local Zones.

The Spring 2022 SOC reports include an additional 9 new services in scope, for a total of 150 services. See the full list on our Services in Scope by Compliance Program page.

Here are the 9 new services in scope for the Spring 2022 SOC reports:

The Spring 2022 SOC reports are now available to AWS customers through AWS Artifact in the AWS Management Console, or you can see our publicly-accessible PDF of the SOC 3 Report.

AWS strives to bring services into scope of our compliance programs to help you meet your architectural and regulatory needs. If there are additional AWS services you would like to see added to the scope of our SOC reports or other compliance programs, reach out to your AWS representatives.

As always, we value your feedback and questions. Feel free to reach out to the team through the Contact Us page. If you have feedback about this post, submit comments in the Comments section below.

Want more AWS Security how-to-content, news, and feature announcements? Follow us on Twitter.

Andrew Najjar

Andrew Najjar

Andrew is a Compliance Program Manager at Amazon Web Services. He leads multiple security and privacy initiatives within AWS and has 8 years of experience in security assurance. Andrew holds a master’s degree in information systems and bachelor’s degree in accounting from Indiana University. He is a CPA and AWS Certified Cloud Practitioner.

Emma Zhang

Emma Zhang

Emma is a Compliance Program Manager at Amazon Web Services. She leads multiple process improvement projects across multiple compliance programs within AWS. Emma has 8 years of experience in risk management, IT risk assurance, and technology risk advisory.

Ryan Wilks

Ryan Wilks

Ryan is a Compliance Program Manager at Amazon Web Services. He leads multiple security and privacy initiatives within AWS. Ryan has 11 years of experience in information security and holds ITIL, CISM and CISA certifications.

AWS Backup Now Supports Amazon FSx for NetApp ONTAP

Post Syndicated from Jeff Barr original https://aws.amazon.com/blogs/aws/aws-backup-now-supports-amazon-fsx-for-netapp-ontap/

If you are a long-time reader of this blog, you know that I categorize some posts as “chocolate and peanut butter” in homage to an ancient (1970 or so) series of TV commercials for Reese’s Peanut Butter Cups. Today, I am happy to bring you the latest such post, combining AWS Backup and Amazon FSx for NetApp ONTAP. Before I dive into the specifics, let’s review each service:

AWS Backup helps you to automate and centrally manage your backups (read my post, AWS Backup – Automate and Centrally Manage Your Backups, for a detailed look). After you create policy-driven plans, you can monitor the status of on-going backups, verify compliance, and find/restore backups, all from a central console. We launched in 2019 with support for Amazon EBS volumes, Amazon EFS file systems, Amazon RDS databases, Amazon DynamoDB tables, and AWS Storage Gateway volumes. After that, we added support for EC2 instances, Amazon Aurora clusters, Amazon FSx for Lustre and Amazon FSx for Window File Server file systems, Amazon Neptune databases, VMware workloads, Amazon DocumentDB clusters, and Amazon S3.

Amazon FSx for NetApp ONTAP gives you the features, performance, and APIs of NetApp ONTAP file systems with the agility, scalability, security, and resiliency of AWS (again, read my post, New – Amazon FSx for NetApp ONTAP to learn more). ONTAP is an enterprise data management product that is designed to provide high-performance storage suitable for use with Oracle, SAP, VMware, Microsoft SQL Server, and so forth. Each file system supports multi-protocol access and can scale up to 176 PiB, along with inline data compression, deduplication, compaction, thin provisioning, replication, and point-in-time cloning. We launched with a multi-AZ deployment type, and introduced a single-AZ deployment type earlier this year.

Chocolate and Peanut Butter
AWS Backup now supports Amazon FSx for NetApp ONTAP file systems. All of the existing AWS Backup features apply, and you can add this support to an existing backup plan or you can create a new one.

Suppose I have a couple of ONTAP file systems:

I go to the AWS Backup Console and click Create Backup plan to get started:

I decide to Start with a template, and choose Daily-Monthly-1yr-Retention, then click Create plan:

Next, I examine the Resource assignments section of my plan and click Assign resources:

I create a resource assignment (Jeff-ONTAP-Resources), and select the FSx resource type. I can leave the assignment as-is in order to include all of my Amazon FSx volumes in the assignment, or I can uncheck All file systems, and then choose volumes on the file systems that I showed you earlier:

I review all of my choices, and click Assign resources to proceed. My backups will be performed in accord with the backup plan.

I can also create an on-demand backup. To do this, I visit the Protected resources page and click Create on-demand backup:

I choose a volume, set a one week retention period for my on-demand backup, and click Create on-demand backup:

The backup job starts within seconds, and is visible on the Backup jobs page:

After the job completes I can examine the vault and see my backup. Then I can select it and choose Restore from the Actions menu:

To restore the backup, I choose one of the file systems from it, enter a new volume name, and click Restore backup.

Also of Interest
We recently launched two new features for AWS Backup that you may find helpful. Both features can now be used in conjunction with Amazon FSx for ONTAP:

AWS Backup Audit Manager – You can use this feature to monitor and evaluate the compliance status of your backups. This can help you to meet business and regulatory requirements, and lets you generate reports that you can use to demonstrate compliance to auditors and regulators. To learn more, read Monitor, Evaluate, and Demonstrate Backup Compliance with AWS Backup Audit Manager.

AWS Backup Vault Lock – This feature lets you prevent your backups from being accidentally or maliciously deleted, and also enhances protection against ransomware. You can use this feature to make selected backup values WORM (write-once-read-many) compliant. Once you have done this, the backups in the vault cannot be modified manually. You can also set minimum and maximum retention periods for each vault. To learn more, read Enhance the security posture of your backups with AWS Backup Vault Lock.

Available Now
This new feature is available now and you can start using it today in all regions where AWS Backup and Amazon FSx for NetApp ONTAP are available.

Jeff;

Coming June 2022: An updated Amazon QuickSight dashboard experience

Post Syndicated from Rushabh Vora original https://aws.amazon.com/blogs/big-data/coming-june-2022-an-updated-amazon-quicksight-dashboard-experience/

Starting June 30, 2022, Amazon QuickSight is introducing the new look and feel for your dashboards. In this post, we walk through the changes to expect with the new look. The new dashboard experience includes the following improvements:

  • Simplified toolbar
  • Discoverable visual menu
  • Polished controls, menu, and submenus
  • Non-blocking right pane for secondary experiences like filters, threshold alerts, and downloads

Simplified toolbar

The simplified toolbar experience offers updated icons for key actions for better visual clarity.

The following screenshot shows the old look.

screenshot shows the old look

The following screenshot shows the new look with updated icons.

screenshot shows the new look with updated icons

Discoverable visual menu

The visual menu is visible on-hover to improve the discoverability of drills, export, and filter restatements.

To use the visual menu with the old version, you needed to select the visual.

visual menu with the old look, where you needed to select the visual

With the new look, you can view the menu by hovering over it.

With new look, you can view the menu by hovering over it

Polished controls, menu, and submenus

The new look features improved controls, menu, submenus, toast notifications, and other dashboard elements to provide more polished visual experience.

For example, the following screenshot shows the old look for calendar controls.

screenshot shows the old look for calendar controls

The following screenshot shows the new look.

screenshot shows the new look for calendar control

The following screenshot shows the old look for the menu and submenus.

screenshot shows the old look for the menu and submenus

The following screenshot shows the new look.

screenshot shows the new look for menu and submenus

Non-blocking right pane

The new look features a non-blocking right pane for secondary experiences like filters, threshold alerts, and downloads, to improve focus on the content of the dashboard.‘

The following animation shows the old look for ad-hoc filtering.

animation shows the old look for ad-hoc filtering

The filters are now moved to the right pane.

animation shows the new look for ad-hoc filtering that is now moved to the right pane

The following animation shows the old look for creating threshold alerts.

animation shows the old look for creating threshold alerts

Threshold alert creation is now in the right pane.

animation shows the new look for creating threshold alerts, now moved to right pane

The following animation shows the old look for the downloading experience.

animation shows the old look for the downloading experience

The new look offers a downloads pane.

animation shows the new look for the downloading experience in the right pane

Summary

The new look for the QuickSight dashboard experience will be available starting June 30, 2022. If you have any questions or feedback, please reach out to us by leaving a comment.


About the Author

Rushabh Vora is a Senior Technical Product Manager for Amazon QuickSight, Amazon Web Service’s cloud-native, fully managed BI service. He is passionate about Data Visualization. Prior to QuickSight, he was working with Amazon Business as a Product Manager.

Amazon EC2 Now Supports NitroTPM and UEFI Secure Boot

Post Syndicated from Sébastien Stormacq original https://aws.amazon.com/blogs/aws/amazon-ec2-now-supports-nitrotpm-and-uefi-secure-boot/

In computing, Trusted Platform Module (TPM) technology is designed to provide hardware-based, security-related functions. A TPM chip is a secure crypto-processor that is designed to carry out cryptographic operations. There are three key advantages of using TPM technology. First, you can generate, store, and control access to encryption keys outside of the operating system. Second, you can use a TPM module to perform platform device authentication by using the TPM’s unique RSA key, which is burned into it. And third, it may help to ensure platform integrity by taking and storing security measurements.

During re:Invent 2021, we announced the future availability of NitroTPM, a virtual TPM 2.0-compliant TPM module for your Amazon Elastic Compute Cloud (Amazon EC2) instances, based on AWS Nitro System. We also announced Unified Extensible Firmware Interface (UEFI) Secure Boot availability for EC2.

I am happy to announce you can start to use both NitroTPM and Secure Boot today in all AWS Regions outside of China, including the AWS GovCloud (US) Regions.

You can use NitroTPM to store secrets, such as disk encryption keys or SSH keys, outside of the EC2 instance memory, protecting them from applications running on the instance. NitroTPM leverages the isolation and security properties of the Nitro System to ensure only the instance can access these secrets. It provides the same functions as a physical or discrete TPM. NitroTPM follows the ISO TPM 2.0 specification, allowing you to migrate existing on-premises workloads that leverage TPMs to EC2.

The availability of NitroTPM unlocks a couple of use cases to strengthen the security posture of your EC2 instances, such as secured key storage and access for OS-level volume encryption or platform attestation for measured boot or identity access.

Secured Key Storage and Access
NitroTPM can create and store keys that are wrapped and tied to certain platform measurements (known as Platform Configuration Registers – PCR). NitroTPM unwraps the key only when those platform measurements have the same value as they had at the moment the key was created. This process is referred to as “sealing the key to the TPM.” Decrypting the key is called unsealing. NitroTPM only unseals keys when the instance and the OS are in a known good state. Operating systems compliant with TPM 2.0 specifications use this mechanism to securely unseal volume encryption keys. You can use NitroTPM to store encryption keys for BitLocker on Microsoft Windows. Linux Unified Key Setup (LUKS) or dm-verity on Linux are examples of OS-level applications that can leverage NitroTPM too.

Platform Attestation
Another key feature that NitroTPM provides is “measured boot” a process where the bootloader and operating system extend PCRs with measurements of the software or configuration that they load during the boot process. This improves security in the event that, for example, a malicious program overwrites part of your kernel with malware. With measured boot, you can also obtain signed PCR values from the TPM and use them to prove to remote servers that the boot state is valid, enabling remote attestation support.

How to Use NitroTPM
There are three prerequisites to start using NitroTPM:

  • You must use an operating system that has Command Response Buffer (CRB) drivers for TPM 2.0, such as recent versions of Windows or Linux. We tested the following OSes: Red Hat Enterprise Linux 8, SUSE Linux Enterprise Server 15, Ubuntu 18.04, Ubuntu 20.04, and Windows Server 2016, 2019, and 2022.
  • You must deploy it on a Nitro-based EC2 instance. At the moment, we support all Intel and AMD instance types that support UEFI boot mode. Graviton1, Graviton2, Xen-based, Mac, and bare-metal instances are not supported.
  • Note that NitroTPM does not work today with some additional instance types, but support for these instance types will come soon after the launch. The list is: C6a, C6i, G4ad, G4dn, G5, Hpc6a, I4i, M6a, M6i, P3dn, R6i, T3, T3a, U-12tb1, U-3tb1, U-6tb1, U-9tb1, X2idn, X2iedn, and X2iezn.
  • When you create your own AMI, it must be flagged to use UEFI as boot mode and NitroTPM. Windows AMIs provided by AWS are flagged by default. Linux-based AMI are not flagged by default; you must create your own.

How to Create an AMI with TPM Enabled
AWS provides AMIs for multiple versions of Windows with TPM enabled. I can verify if an AMI supports NitroTPM using the DescribeImagesAPI call. For example:

aws ec2 describe-images --image-ids ami-0123456789

When NitroTPM is enabled for the AMI, “TpmSupport”: “v2.0” appears in the output, such as in the following example.

{
   "Images": [
      {
         ...
         "BootMode": "uefi",
         "TpmSupport": "v2.0"
      }
   ]
}

I may also query for tpmSupport using the DescribeImageAttribute API call.

When creating my own AMI, I may enable TPM support using the RegisterImage API call, by setting boot-mode to uefi and tpm-support to v2.0.

aws ec2 register-image             \
       --region us-east-1           \
       --name my-image              \
       --boot-mode uefi             \
       --architecture x86_64        \
       --root-device-name /dev/xvda \
       --block-device-mappings DeviceName=/dev/xvda,Ebs={SnapshotId=snap-0123456789example} DeviceName=/dev/xvdf,Ebs={VolumeSize=10} \
       --tpm-support v2.0

Now that you know how to create an AMI with TPM enabled, let’s create a Windows instance and configure BitLocker to encrypt the root volume.

A Walk Through: Using NitroTPM with BitLocker
BitLocker automatically detects and uses NitroTPM when available. There is no extra configuration step beyond what you do today to install and configure BitLocker. Upon installation, BitLocker recognizes the TPM module and starts to use it automatically.

Let’s go through the installation steps. I start the instance as usual, using an AMI that has both uefi and TPM v2.0 enabled. I make sure I use a supported version of Windows. Here I am using Windows Server 2022 04.13.

Once connected to the instance, I verify that Windows recognizes the TPM module. To do so, I launch the tpm.msc application, and the Trusted Platform Module (TPM) Management window opens. When everything goes well, it shows Manufacturer Name: AMZN under TPM Manufacturer Information.

Trusted Platform Module ManagementNext, I install BitLocker.

I open the servermanager.exe application and select Manage at the top right of the screen. In the dropdown menu, I select Add Roles and Features.

Add roles and featuresI select Role-based or feature-based installation from the wizard.

Install BitLocker - Step 1I select Next multiple times until I reach the Features section. I select BitLocker Drive Encryption, and I select Install.

Install BitLocker - Step 2I wait a bit for the installation and then restart the server at the end of the installation.

After reboot, I reconnect to the server and open the control panel. I select BitLocker Drive Encryption under the System and Security section.

Turn on Bitlocker - part 1I select Turn on BitLocker, and then I select Next and wait for the verification of the system and the time it takes to encrypt my volume’s data.

Just for extra safety, I decide to reboot at the end of the encryption. It is not strictly necessary. But I encrypted the root volume of the machine (C:) so I am wondering if the machine can still boot.

After the reboot, I reconnect to the instance, and I verify the encryption status.

Turn on Bitlocker - part 2I also verify BitLocker’s status and key protection method enabled on the volume. To do so, I open PowerShell and type

manage-bde -protectors -get C:

Bitlocker statusI can see on the resulting screen that the C: volume encryption key is coming from the NitroTPM module and the instance used Secure Boot for integrity validation. I can also view the recovery key.

I left the recovery key in plain text in the previous screenshot because the instance and volume I used for this demo will not exist anymore by the time you will read this. Do not share your recovery keys publicly otherwise.

Important Considerations
Now that I have shown how to use NitroTPM to protect BitLocker’s volume encryption key, I’ll go through a couple of additional considerations:

  • You can only enable an AMI for NitroTPM support by using the RegisterImage API via the AWS CLI and not via the Amazon EC2 console.
  • NitroTPM support is enabled by setting a flag on an AMI. After you launch an instance with the AMI, you can’t modify the attributes on the instance. The ModifyInstanceAttribute API is not supported on running or stopped instances.
  • Importing or exporting EC2 instances with NitroTPM, such as with the ImportImage API, will omit NitroTPM data.
  • The NitroTPM state is not included in EBS snapshots. You can only restore an EBS snapshot to the same EC2 instance.
  • BitLocker volumes that are encrypted with TPM-based keys cannot be restored on a different instance. It is possible to change the instance type (stop, change instance type, and restart it).

At the moment, we support all Intel and AMD instance types that supports UEFI boot mode. Graviton1, Graviton2, Xen-based, Mac, and bare-metal instances are not supported. Some additional instance types are not supported at launch (I shared the exact list previously). We will add support for these soon after launch.

There is no additional cost for using NitroTPM. It is available today in all AWS Regions, including the AWS GovCloud (US) Regions, except in China.

And now, go build 😉

— seb

AWS Week in Review – May 9, 2022

Post Syndicated from Danilo Poccia original https://aws.amazon.com/blogs/aws/aws-week-in-review-may-9-2022/

This post is part of our Week in Review series. Check back each week for a quick roundup of interesting news and announcements from AWS!

Another week starts, and here’s a collection of the most significant AWS news from the previous seven days. This week is also the one-year anniversary of CloudFront Functions. It’s exciting to see what customers have built during this first year.

Last Week’s Launches
Here are some launches that caught my attention last week:

Amazon RDS supports PostgreSQL 14 with three levels of cascaded read replicas – That’s 5 replicas per instance, supporting a maximum of 155 read replicas per source instance with up to 30X more read capacity. You can now build a more robust disaster recovery architecture with the capability to create Single-AZ or Multi-AZ cascaded read replica DB instances in same or cross Region.

Amazon RDS on AWS Outposts storage auto scalingAWS Outposts extends AWS infrastructure, services, APIs, and tools to virtually any datacenter. With Amazon RDS on AWS Outposts, you can deploy managed DB instances in your on-premises environments. Now, you can turn on storage auto scaling when you create or modify DB instances by selecting a checkbox and specifying the maximum database storage size.

Amazon CodeGuru Reviewer suppression of files and folders in code reviews – With CodeGuru Reviewer, you can use automated reasoning and machine learning to detect potential code defects that are difficult to find and get suggestions for improvements. Now, you can prevent CodeGuru Reviewer from generating unwanted findings on certain files like test files, autogenerated files, or files that have not been recently updated.

Amazon EKS console now supports all standard Kubernetes resources to simplify cluster management – To make it easy to visualize and troubleshoot your applications, you can now use the console to see all standard Kubernetes API resource types (such as service resources, configuration and storage resources, authorization resources, policy resources, and more) running on your Amazon EKS cluster. More info in the blog post Introducing Kubernetes Resource View in Amazon EKS console.

AWS AppConfig feature flag Lambda Extension support for Arm/Graviton2 processors – Using AWS AppConfig, you can create feature flags or other dynamic configuration and safely deploy updates. The AWS AppConfig Lambda Extension allows you to access this feature flag and dynamic configuration data in your Lambda functions. You can now use the AWS AppConfig Lambda Extension from Lambda functions using the Arm/Graviton2 architecture.

AWS Serverless Application Model (SAM) CLI now supports enabling AWS X-Ray tracing – With the AWS SAM CLI you can initialize, build, package, test on local and cloud, and deploy serverless applications. With AWS X-Ray, you have an end-to-end view of requests as they travel through your application, making them easier to monitor and troubleshoot. Now, you can enable tracing by simply adding a flag to the sam init command.

Amazon Kinesis Video Streams image extraction – With Amazon Kinesis Video Streams you can capture, process, and store media streams. Now, you can also request images via API calls or configure automatic image generation based on metadata tags in ingested video. For example, you can use this to generate thumbnails for playback applications or to have more data for your machine learning pipelines.

AWS GameKit supports Android, iOS, and MacOS games developed with Unreal Engine – With AWS GameKit, you can build AWS-powered game features directly from the Unreal Editor with just a few clicks. Now, the AWS GameKit plugin for Unreal Engine supports building games for the Win64, MacOS, Android, and iOS platforms.

For a full list of AWS announcements, be sure to keep an eye on the What’s New at AWS page.

Other AWS News
Some other updates you might have missed:

🎂 One-year anniversary of CloudFront Functions – I can’t believe it’s been one year since we launched CloudFront Functions. Now, we have tens of thousands of developers actively using CloudFront Functions, with trillions of invocations per month. You can use CloudFront Functions for HTTP header manipulation, URL rewrites and redirects, cache key manipulations/normalization, access authorization, and more. See some examples in this repo. Let’s see what customers built with CloudFront Functions:

  • CloudFront Functions enables Formula 1 to authenticate users with more than 500K requests per second. The solution is using CloudFront Functions to evaluate if users have access to view the race livestream by validating a token in the request.
  • Cloudinary is a media management company that helps its customers deliver content such as videos and images to users worldwide. For them, Lambda@Edge remains an excellent solution for applications that require heavy compute operations, but lightweight operations that require high scalability can now be run using CloudFront Functions. With CloudFront Functions, Cloudinary and its customers are seeing significantly increased performance. For example, one of Cloudinary’s customers began using CloudFront Functions, and in about two weeks it was seeing 20–30 percent better response times. The customer also estimates that they will see 75 percent cost savings.
  • Based in Japan, DigitalCube is a web hosting provider for WordPress websites. Previously, DigitalCube spent several hours completing each of its update deployments. Now, they can deploy updates across thousands of distributions quickly. Using CloudFront Functions, they’ve reduced update deployment times from 4 hours to 2 minutes. In addition, faster updates and less maintenance work result in better quality throughout DigitalCube’s offerings. It’s now easier for them to test on AWS because they can run tests that affect thousands of distributions without having to scale internally or introduce downtime.
  • Amazon.com is using CloudFront Functions to change the way it delivers static assets to customers globally. CloudFront Functions allows them to experiment with hyper-personalization at scale and optimal latency performance. They have been working closely with the CloudFront team during product development, and they like how it is easy to create, test, and deploy custom code and implement business logic at the edge.

AWS open-source news and updates – A newsletter curated by my colleague Ricardo to bring you the latest open-source projects, posts, events, and more. Read the latest edition here.

Reduce log-storage costs by automating retention settings in Amazon CloudWatch – By default, CloudWatch Logs stores your log data indefinitely. This blog post shows how you can reduce log-storage costs by establishing a log-retention policy and applying it across all of your log groups.

Observability for AWS App Runner VPC networking – With X-Ray support in App runner, you can quickly deploy web applications and APIs at any scale and take advantage of adding tracing without having to manage sidecars or agents. Here’s an example of how you can instrument your applications with the AWS Distro for OpenTelemetry (ADOT).

Upcoming AWS Events
It’s AWS Summits season and here are some virtual and in-person events that might be close to you:

You can now register for re:MARS to get fresh ideas on topics such as machine learning, automation, robotics, and space. The conference will be in person in Las Vegas, June 21–24.

That’s all from me for this week. Come back next Monday for another Week in Review!

Danilo

Smithy Server and Client Generator for TypeScript (Developer Preview)

Post Syndicated from Adam Thomas original https://aws.amazon.com/blogs/devops/smithy-server-and-client-generator-for-typescript/

We’re excited to announce the Developer Preview of Smithy’s server and client generators for TypeScript. This enables developers to write concise, type-safe code in the same model-first manner that AWS has used to develop its services. Smithy is AWS’s open-source Interface Definition Language (IDL) for web services. AWS uses Smithy and its internal predecessor to model services, generate server scaffolding, and generate rich clients in multiple languages, such as the AWS SDKs.

If you’re unfamiliar with Smithy, check out the Smithy website and watch an introductory talk from Michael Dowling, Smithy’s Principal Engineer.

This post will demonstrate how you can write a simple Smithy model, write a service that implements the model, deploy it to AWS Lambda, and call it using a generated client.

What can the server generator do for me?

Using Smithy and its server generator unlocks model-first development. Model-first development puts your customers first. This forces you to define your interface first rather than let your API to become implicitly defined by your implementation choices.

Smithy’s server generator for TypeScript enables development at a higher level of abstraction. By making serialization, deserialization, and routing an implementation detail in generated code, service developers can focus on writing code against modeled types, rather than against raw HTTP requests. Your business logic and unit tests will be cleaner and more readable, and the way that your messages are represented on the wire is defined explicitly by a protocol, not implicitly by your JSON parser.

The server generator also lets you leverage TypeScript’s type safety. Not only is the business logic of your service written against strongly typed interfaces, but also you can reference your service’s types in your AWS Cloud Development Kit (AWS CDK) definition. This makes sure that your stack will fail at build time rather than deployment time if it’s out of sync with your model.

Finally, using Smithy for service generation lets you ship clients in Smithy’s growing portfolio of generated clients. We’re unveiling a developer preview of the client generator for TypeScript today as well, and we’ll continue to unveil more implementations in the future.

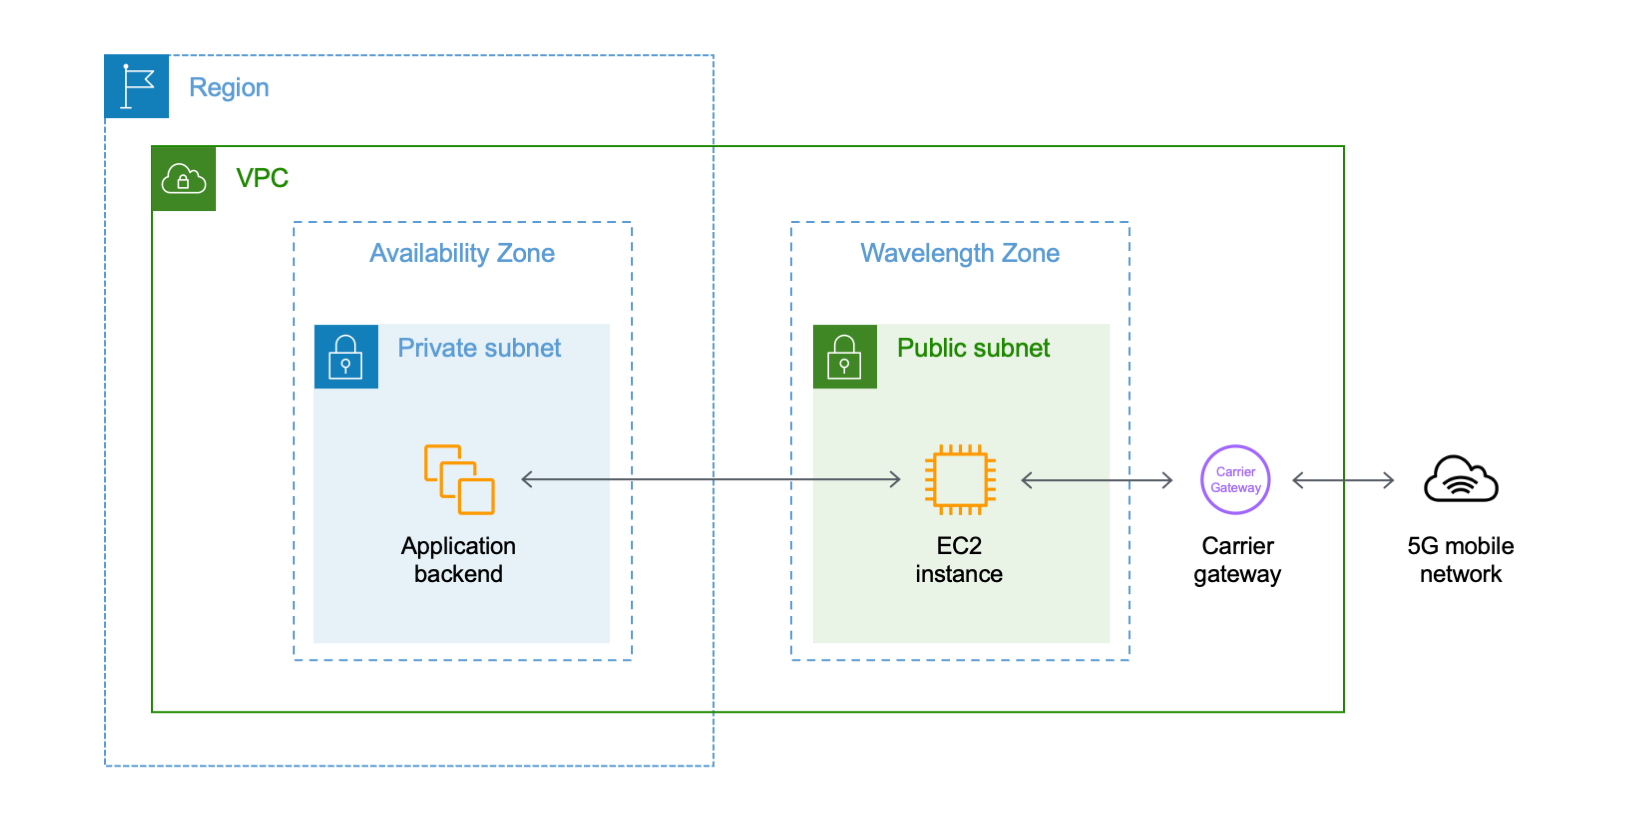
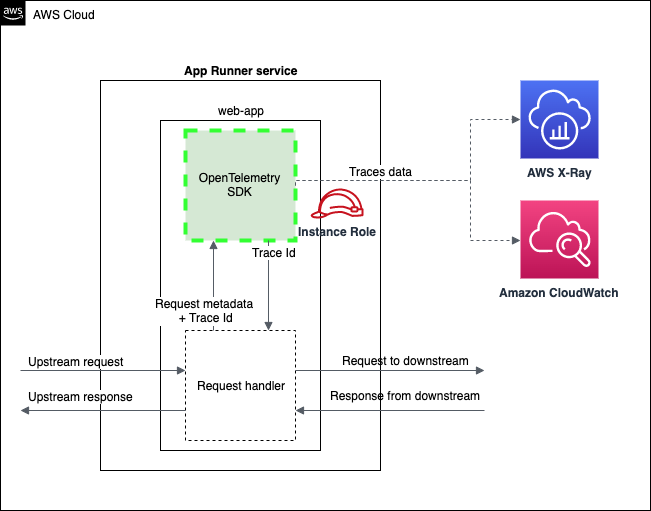
The architecture of a Smithy service

A Smithy service looks much like any other web service running on Lambda behind Amazon API Gateway. The difference lies in the code itself. Where a standard service might use a generic deserializer to parse an incoming request and bind it to an object, a Smithy service relies on code generation for deserialization, serialization, validation, and the object model itself. These functions are generated into a standalone library known as a Smithy server SDK. Using a server SDK with one of AWS’s prepackaged request converters, service developers can focus on their business logic, rather than the undifferentiated heavy lifting of parsing and generating HTTP requests and responses.

A data flow diagram for a Smithy service

Walkthrough

This post will walk you through the process of building and using a Smithy service, from modeling to deployment.

By the end, you should be able to:

  • Model a simple REST service in Smithy
  • Generate a Smithy server SDK for TypeScript
  • Implement a service in Lambda using the generated server SDK
  • Deploy the service to AWS using the AWS CDK
  • Generate a client SDK, and use it to call the deployed service

The complete example described in this post can be found here.

Prerequisites

For this walkthrough, you should have the following prerequisites:

Checking out the sample repository

Create a new repository from the template repository here.

To clone the application in your browser

  1. Open https://github.com/aws-samples/smithy-server-generator-typescript-sample in your browser
  2. Select “Use this template” in the top right-hand corner
  3. Fill out the form, and select “Create repository from template”
  4. Clone your new repository from GitHub by following the instructions in the “Code” dropdown

Exploring and setting up the sample application

The sample application is split into three separate submodules:

  • model – contains the Smithy model that defines the service
  • Server – contains the code generation setup, application logic, and CDK stack for the service
  • typescript-client – contains the code generation setup for a rich client generated in TypeScript

To bootstrap the sample application and run the initial build

  1. Open a terminal and navigate to the root of the sample application
  2. Run the following command:
    ./gradlew build && yarn install
  3. Wait until the build finishes successfully

Modeling a service using Smithy

In an IDE of your choice, open the file at model/src/main/smithy/main.smithy. This file defines the interface for the sample web service, a service that can echo strings back to the caller, as well as provide the string length.

The service definition forms the root of a Smithy model. It defines the operations that are available to clients, as well as common errors that are thrown by all of the operations in a service.


@sigv4(name: "execute-api")
@restJson1
service StringWizard {
    version: "2018-05-10",
    operations: [Echo, Length],
    errors: [ValidationException],
}

This service uses the @sigv4 trait to indicate that calls must be signed with AWS Signature V4. In the sample application, API Gateway’s Identity and Access Management (IAM) Authentication support provides this functionality.

@restJson1 indicates the protocol supported by this service. RestJson1 is Smithy’s built-in protocol for RESTful web services that use JSON for requests and responses.

This service advertises two operations: Echo and Length. Furthermore, it indicates that every operation on the service must be expected to throw ValidationException, if an invalid input is supplied.

Next, let’s look at the definition of the Length operation and its input type.

/// An operation that computes the length of a string
/// provided on the URI path
@readonly
@http(code: 200, method: "GET", uri: "/length/{string}",)
operation Length {
     input: LengthInput,
     output: LengthOutput,
     errors: [PalindromeException],
}

@input
structure LengthInput {
     @required
     @httpLabel
     string: String,
}

This operation uses the @http trait to model how requests are processed with restJson1, including the method (GET) and how the URI is formed (using a label to bind the string field from LengthInput to a path segment). HTTP binding with Smithy can be explored in depth at Smithy’s documentation page.

Note that this operation can also throw a PalindromeException, which we’ll explore in more detail when we check out the business logic.

Updating the Smithy model to add additional constraints to the input

Smithy constraint traits are used to enable additional validation for input types. Server SDKs automatically perform validation based on the Smithy constraints in the model. Let’s add a new constraint to the input for the Length operation. Moreover, let’s make sure that only alphanumeric characters can be passed in by the caller.

  1. Open model/src/main/smithy/main.smithy in an editor
  2. Add a @pattern constraint to the string member of Length input. It should look like this:
    structure LengthInput {
        @required
        @httpLabel
        @pattern(“^[a-zA-Z0-9]$”)
        string: String,
    }
  3. Open a terminal, and navigate to the root of the sample application
  4. Run the following command:
    yarn build
  5. Wait for the build to finish successfully

Using the Smithy Server Generator for TypeScript

The key component of a Smithy web service is its code generator, which translates the Smithy model into actual code. You’ve already run the code generator – it runs every time that you build the sample application.

The codegen directory inside of the server submodule is where the Smithy Server Generator for TypeScript is configured and run. The server generator uses Smithy Build to build, and it’s configured by smithy-build.json.

{
  "version" : "1.0",
  "outputDirectory" : "build/output",
  "projections" : {
      "ts-server" : {
         "plugins": {
           "typescript-ssdk-codegen" : {
              "package" : "@smithy-demo/string-wizard-service-ssdk",
              "packageVersion": "0.0.1"
           }
        }
      },
      "apigateway" : {
        "plugins" : {
          "openapi": {
             "service": "software.amazon.smithy.demo#StringWizard",
             "protocol": "aws.protocols#restJson1",
             "apiGatewayType" : "REST"
           }
         }
      }
   }
}

This smithy-build configures two projections. The ts-server projection generates the server SDK by invoking the typescript-ssdk-codegen plugin. The package and packageVersion arguments are used to generate an npm package that you can add as a dependency in your server code.

The OpenAPI projection configures Smithy’s OpenAPI converter to generate a file that can be imported into API Gateway to host this service. It uses Smithy’s ability to extend models via the imports keyword to extend the base model with an additional API Gateway configuration. The generated OpenAPI specification is used by the CDK stack, which we’ll explore later.

If you open package.json in the server submodule, then you’ll notice this line in the dependencies section:

"@smithy-demo/string-wizard-service-ssdk": "workspace:server/codegen/build/smithyprojections/server-codegen/ts-server/typescript-ssdk-codegen"

The key, @smithy-demo/string-wizard-service-ssdk, matches the package key in the smithy-build.json file. The value uses Yarn’s workspaces feature to set up a local dependency on the generated server SDK. This lets you use the server SDK as a standalone npm dependency without publishing it to a repository. Since we bundle the server application into a zip file before uploading it to Lambda, you can treat the server SDK as an implementation detail that isn’t published externally.

We won’t get into the details here, but you can see the specifics of how the code generator is invoked by looking at the regenerate:ssdk script in the server’s package.json, as well as the build.gradle file in the server’s codegen directory.

Implementing an operation using a server SDK

The server generator takes care of the undifferentiated heavy lifting of writing a Smithy service. However, there are still two tasks left for the service developer: writing the Lambda entrypoint, and implementing the operation’s business logic.

First, let’s look at the entrypoint for the Length operation. Open server/src/length_handler.ts in an editor. You should see the following content:

import { getLengthHandler } from "@smithy-demo/string-wizard-service-ssdk";
import { APIGatewayProxyHandler } from "aws-lambda";
import { LengthOperation } from "./length";
import { getApiGatewayHandler } from "./apigateway";
// This is the entry point for the Lambda Function that services the LengthOperation
export const lambdaHandler: APIGatewayProxyHandler = getApiGatewayHandler(getLengthHandler(LengthOperation));

If you’ve written a Lambda entry-point before, then exporting a function of type APIGatewayProxyHandler will be familiar to you. However, there are a few new pieces here. First, we have a function from the server SDK, called getLengthHandler, that takes a Smithy Operation type and returns a ServiceHandler. Operation is the interface that the server SDK uses to encapsulate business logic. The core task of implementing a Smithy service is to implement Operations. ServiceHandler is the interface that encapsulates the generated logic of a server SDK. It’s the black box that handles serialization, deserialization, error handling, validation, and routing.

The getApiGatewayHandler function simply invokes the request and response conversion logic, and then builds a custom context for the operation. We won’t go into their details here.

Next, let’s explore the operation implementation. Open server/src/length.ts in an editor. You should see the following content:

import { Operation } from "@aws-smithy/server-common";
import {
  LengthServerInput,
  LengthServerOutput,
  PalindromeException,
} from "@smithy-demo/string-wizard-service-ssdk";
import { HandlerContext } from "./apigateway";
import { reverse } from "./util";

// This is the implementation of business logic of the LengthOperation
export const LengthOperation: Operation<LengthServerInput, LengthServerOutput, HandlerContext> = async (
  input,
  context
) => {
  console.log(`Received Length operation from: ${context.user}`);

  if (input.string != undefined && input.string === reverse(input.string)) {
     throw new PalindromeException({ message: "Cannot handle palindrome" });
  }

  return {
     length: input.string?.length,
  };
};

Let’s look at this implementation piece-by-piece. First, the function type Operation<LengthServerInput, LengthServerOutput, HandlerContext> provides the type-safe interface for our business logic. LengthServerInput and LengthServerOutput are the code generated types that correspond to the input and output types for the Length operation in our Smithy model. If we use the wrong type arguments for the Operation, then it will fail type checks against the getLengthHandler function in the entry-point. If we try to access the incorrect properties on the input, then we’ll also see type checker failures. This is one of the core tenets of the Smithy Server Generator for TypeScript: writing a web service should be as strongly typed as writing anything else.

Next, let’s look at the section that validates that the input isn’t a palindrome:

if (input.string != undefined && input.string === reverse(input.string)) {
    throw new PalindromeException({ message: "Cannot handle palindrome" });
}

Although the server SDK can validate the input against Smithy’s constraint traits, there is no constraint trait for rejecting palindromes. Therefore, we must include this validation in our business logic. Our Smithy model includes a PalindromeException definition that includes a message member. This is generated as a standard subclass of Error with a constructor that takes in a message that your operation implementation can throw like any other error. This will be caught and properly rendered as a response by the server SDK.

Finally, there’s the return statement. Since the Smithy model defines LengthOutput as a structure containing an integer member called length, we return an object that has the same structural type here.

Note that this business logic doesn’t have to consider serialization, or the wire format of the request or response, let alone anything else related to HTTP or API Gateway. The unit tests in src/length/length.spec.ts reflect this. They’re the same standard unit tests as you would write against any other TypeScript class. The server SDK lets you write your business logic at a higher level of abstraction, thus simplifying your unit testing and letting your developers focus on their business logic rather than the messy details.

Deploying the sample application

The sample application utilizes the AWS CDK to deploy itself to your AWS account. Explore the CDK definition in server/lib/cdk-stack.ts. An in-depth exploration of the stack is out of the scope for this post, but it looks largely like any other AWS application that deploys TypeScript code to Lambda behind API Gateway.

The key difference is that the cdk stack can rely on a generated OpenAPI definition for the API Gateway resource. This makes sure that your deployed application always matches your Smithy model. Furthermore, it can use the server SDK’s generated types to make sure that every modeled operation has an implementation deployed to Lambda. This means that forgetting to wire up the implementation for a new operation becomes a compile-time failure, rather than a runtime one.

To deploy the sample application from the command line

    1. Open a terminal and navigate to the server directory of your sample application.
    2. Run the following command:
      yarn cdk deploy
    3. The cdk will display a list of security-sensitive resources that will be deployed to your account. These consist mostly of AWS Identity and Access Management (IAM) roles used by your Lambda functions for execution. Enter y to continue deploying the application to your account.
    4. When it has completed, the CDK will print your new application’s endpoint and the CloudFormation stack containing your application to the console. It will look something like the following:
      Outputs:
          StringWizardService.StringWizardApiEndpoint59072E9B
          = https://RANDOMSTRING.execute-api.us-west-2.amazonaws.com/prod/
      	
      Stack ARN:
          arn:aws:cloudformation:us-west-2:YOURACCOUNTID:stack/StringWizardService/SOME-UUID
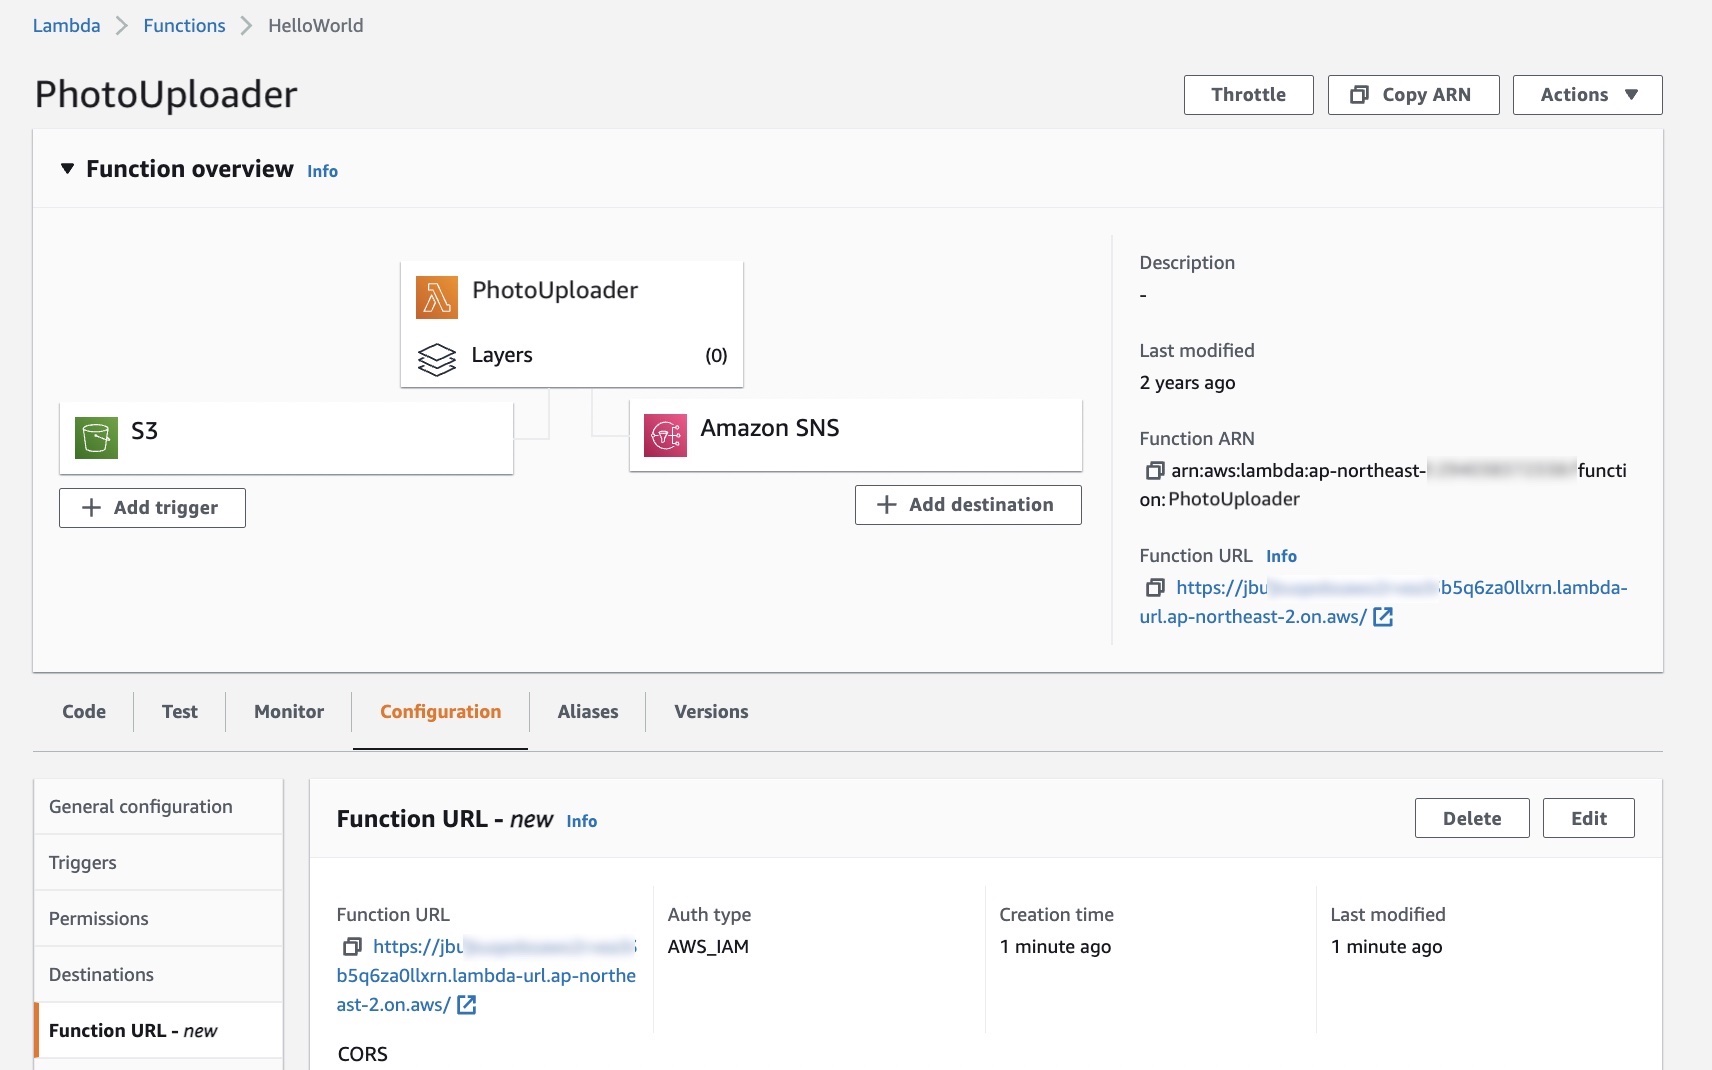
    5. Log on to your AWS account in the AWS Management Console.
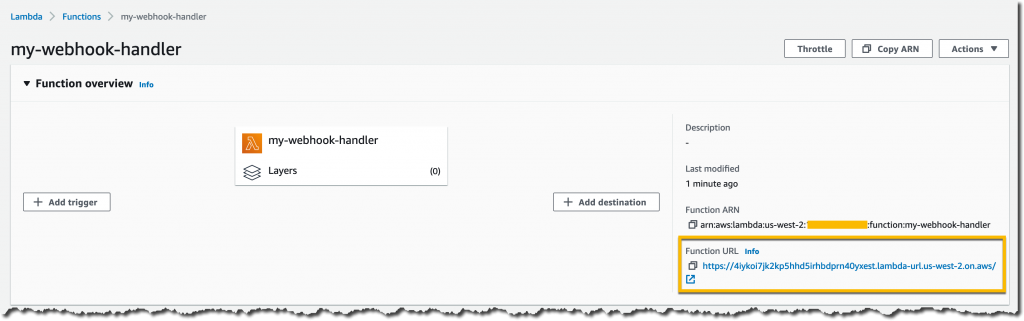
    6. Navigate to the Lambda console. You should see two new functions: one that starts with StringWizardService-EchoFunction, and one that starts with StringWizardService-EchoFunction. These are the implementations of your Smithy service’s operations.
    7. Navigate to the Amazon API Gateway console. You should see a new REST API named StringWizardAPI, with Resources POST /echo and GET /length/{string}, corresponding to your Smithy model.

    Calling the sample application with a generated client

    The last piece of the Smithy puzzle is the strongly-typed generated client generated by the Smithy Client Generator for TypeScript. It’s located in the typescript-client folder, which has a codegen folder that uses SmithyBuild to generate a client in much the same manner as the server.

    The sample application ships with a simple wrapper script for the length operation that uses the generated client to build a rudimentary CLI. Open the typescript-client/bin/length.ts file in your editor. The contents will look like the following:

    #!/usr/bin/env node
    
    import {LengthCommand, StringWizardClient} from "@smithy-demo/string-client";
    
    const client = new StringWizardClient({endpoint: process.argv[2]});
    
    client.send(new LengthCommand({
         string: process.argv[3]
    })).catch((err) => {
         console.log("Failed with error: " + err);
    process.exit(1);
    }).then((res) => {
         process.stderr.write(res.length?.toString() ?? "0");
    });

    If you’ve used the AWS SDK for JavaScript v3, this will look familiar. This is because it’s generated using the Smithy Client Generator for TypeScript!

    From the code, you can see that the CLI takes two positional arguments: the endpoint for the deployed application, and an input string. Let’s give it a spin.

    To call the deployed application using the generated client

    1. Open a terminal and navigate to the typescript-client directory.
    2. Run the following command to build the client:
      yarn build
    3. Using the endpoint output by the CDK in the Deploying the sample application section above, run the following command:
      yarn run str-length https://RANDOMSTRING.execute-api.us-west-2.amazonaws.com/prod/ foo 
    4. You should see an output of 3, the length of foo.
    5. Next, trigger anerror by calling your endpoint with a palindrome by running the following command:
      yarn run str-length https://RANDOMSTRING.execute-api.us-west-2.amazonaws.com/prod/ kayak
    6. You should see the following output:
      Failed with error: PalindromeException: Cannot handle palindrome

    Cleaning up

    To avoid incurring future charges, delete the resources.

    To delete the sample application using the CDK

    1. Open a terminal and navigate to the server directory.
    2. Run the following command:
      yarn cdk destroy StringWizardService
    3. Answer y to the prompt Are you sure you want to delete: StringWizardService (y/n)?
    4. Wait for the CDK to complete the deletion of your CloudFormation stack. You should see the following when it has completed:
      ✅ StringWizardService: destroyed

    Conclusion

    You have now used a Smithy model to define a service, explored how a generated server SDK can simplify your web service development, deployed the service to the AWS Cloud using the AWS CDK, and called the service using a strongly-typed generated client.

    If you aren’t familiar with Smithy, but you want to learn more, then don’t forget to check out the documentation or the introductory video.

    To learn more about the Smithy Server Generator for TypeScript, check out its documentation.

    If you have feature requests, bug reports, feedback of any kind, or would like to contribute, head over to the GitHub repository.

    Adam Thomas

    Adam Thomas is a Senior Software Development engineer on the Smithy team. He has been a web service developer at Amazon for over ten years. Outside of work, Adam is a passionate advocate for staying inside, playing video games, and reading fiction.

Amazon MSK Serverless Now Generally Available–No More Capacity Planning for Your Managed Kafka Clusters

Post Syndicated from Marcia Villalba original https://aws.amazon.com/blogs/aws/amazon-msk-serverless-now-generally-available-no-more-capacity-planning-for-your-managed-kafka-clusters/

Today we are making Amazon MSK Serverless generally available to help you reduce even more the operational overhead of managing an Apache Kafka cluster by offloading the capacity planning and scaling to AWS.

In May 2019, we launched Amazon Managed Streaming for Apache Kafka to help our customers stream data using Apache Kafka. Apache Kafka is an open-source platform that enables customers to capture streaming data like clickstream events, transactions, and IoT events. Apache Kafka is a common solution for decoupling applications that produce streaming data (producers) from those consuming the data (consumers). Amazon MSK makes it easy to ingest and process streaming data in real time with fully managed Apache Kafka clusters.

Amazon MSK reduces the work needed to set up, scale, and manage Apache Kafka in production. With Amazon MSK, you can create a cluster in minutes and start sending data. Apache Kafka runs as a cluster on one or more brokers. Brokers are instances with a given compute and storage capacity distributed in multiple AWS Availability Zones to create high availability. Apache Kafka stores records on topics for a user-defined period of time, partitions those topics, and then replicates these partitions across multiple brokers. Data producers write records to topics, and consumers read records from them.

When creating a new Amazon MSK cluster, you need to decide the number of brokers, the size of the instances, and the storage that each broker has available. The performance of an MSK cluster depends on these parameters. These settings can be easy to provide if you already know the workload. But how will you configure an Amazon MSK cluster for a new workload? Or for an application that has variable or unpredictable data traffic?

Amazon MSK Serverless
Amazon MSK Serverless automatically provisions and manages the required resources to provide on-demand streaming capacity and storage for your applications. It is the perfect solution to get started with a new Apache Kafka workload where you don’t know how much capacity you will need or if your applications produce unpredictable or highly variable throughput and you don’t want to pay for idle capacity. Also, it is great if you want to avoid provisioning, scaling, and managing resource utilization of your clusters.

Amazon MSK Serverless comes with a lot of secure features out of the box, such as private connectivity. This means that the traffic doesn’t leave the AWS backbone, AWS Identity and Access Management (IAM) access control, and encryption of your data at rest and in transit, which keeps it secure.

An Amazon MSK Serverless cluster scales capacity up and down instantly based on the application requirements. When Apache Kafka clusters are scaled horizontally (that is, more brokers are added), you also need to move partitions to these new brokers to make use of the added capacity. With Amazon MSK Serverless, you don’t need to scale brokers or do partition movement.

Each Amazon MSK Serverless cluster provides up to 200 MBps of write-throughput and 400 MBps of read-throughput. It also allocates up to 5 MBps of write-throughput and 10 MBps of read-throughput per partition.

Amazon MSK Serverless pricing is based on throughput. You can learn more on the MSK’s pricing page.

Let’s see it in action
Imagine that you are the architect of a mobile game studio, and you are about to launch a new game. You invested in the game’s marketing, and you expect it will have a lot of new players. Your games send clickstream data to your backend application. The data is analyzed in real time to produce predictions on your players’ behaviors. With these predictions, your games make real-time offers that suit the current player’s behavior, encouraging them to stay in the game longer.

Your games send clickstream data to an Apache Kafka cluster. As you are using an Amazon MSK Serverless cluster, you don’t need to worry about scaling the cluster when the new game launches, as it will adjust its capacity to the throughput.

In the following image, you can see a graph of the day of the launch of the new game. It shows in orange the metric MessagesInPerSec that the cluster is consuming. And you can see that the number of messages per second is increasing first from 100, which is our base number before the launch. Then it increases to 300, 600, and 1,000 messages per second, as our game is getting downloaded and played by more and more players. You can feel confident that the volume of records can keep increasing. Amazon MSK Serverless is capable of ingesting all the records as long as your application throughput stays within the service limits.

Graph of messages in per second to the cluser

How to get started with Amazon MSK Serverless
Creating an Amazon MSK Serverless cluster is very simple, as you don’t need to provide any capacity configuration to the service. You can create a new cluster on the Amazon MSK console page.

Choose the Quick create cluster creation method. This method will provide you with the best-practice settings to create a starter cluster and input a name for your cluster.

Create a cluster

Then, in the General cluster properties, choose the cluster type. Choose the Serverless option to create an Amazon MSK Serverless cluster.

General cluster properties

Finally, it shows all the cluster settings that it will configure by default. You cannot change most of these settings after the cluster is created. If you need different values for these settings, you might need to create the cluster using the Custom create method. If the default settings work for you, then create the cluster.

Cluster settings page

Creating the cluster will take you a few minutes, and after that, you see the Active status on the Cluster summary page.

Cluster information page

Now that you have the cluster, you can start sending and receiving records using an Amazon Elastic Compute Cloud (Amazon EC2) instance. For doing that, the first step is to create a new IAM policy and IAM role. The instances need to authenticate using IAM in order to access the cluster from the instances.

Amazon MSK Serverless integrates with IAM to provide fine-grained access control to your Apache Kafka workloads. You can use IAM policies to grant least privileged access to your Apache Kafka clients.

Create the IAM policy
Create a new IAM policy with the following JSON. This policy will give permissions to connect to the cluster, create a topic, send data, and consume data from the topic.

{
    "Version": "2012-10-17",
    "Statement": [
        {
            "Effect": "Allow",
            "Action": [
                "kafka-cluster:Connect"
            ],
            "Resource": "arn:aws:kafka:<REGION>:<ACCOUNTID>:cluster/msk-serverless-tutorial/cfeffa15-431c-4af4-8725-42636fab9937-s3"
        },
        {
            "Effect": "Allow",
            "Action": [
                "kafka-cluster:DescribeTopic",
                "kafka-cluster:CreateTopic",
                "kafka-cluster:WriteData",
                "kafka-cluster:ReadData"
            ],
            "Resource": "arn:aws:kafka:<REGION>:<ACCOUNTID>:topic/msk-serverless-tutorial/cfeffa15-431c-4af4-8725-42636fab9937-s3/msk-serverless-tutorial"
        },
        {
            "Effect": "Allow",
            "Action": [
                "kafka-cluster:AlterGroup",
                "kafka-cluster:DescribeGroup"
            ],
            "Resource": "arn:aws:kafka:<REGION>:<ACCOUNTID>:group/msk-serverless-tutorial/cfeffa15-431c-4af4-8725-42636fab9937-s3/*"
        }
    ]
}

Make sure that you replace the Region and account ID with your own. Also, you need to replace the cluster, topic, and group ARN. To get these ARNs, you can go to the cluster summary page and get the cluster ARN. The topic ARN and the group ARN are based on the cluster ARN. Here, the cluster and the topic are named msk-serverless-tutorial.

"arn:aws:kafka:<REGION>:<ACCOUNTID>:cluster/msk-serverless-tutorial/cfeffa15-431c-4af4-8725-42636fab9937-s3"
"arn:aws:kafka:<REGION>:<ACCOUNTID>:topic/msk-serverless-tutorial/cfeffa15-431c-4af4-8725-42636fab9937-s3/msk-serverless-tutorial"
"arn:aws:kafka:<REGION>:<ACCOUNTID>:group/msk-serverless-tutorial/cfeffa15-431c-4af4-8725-42636fab9937-s3/*"

Then create a new role with the use case EC2 and attach this policy to the role.

Create a new role

Create a new EC2 instance
Now that you have the cluster and the role, create a new Amazon EC2 instance. Add the instance to the same VPC, subnet, and security group as the cluster. You can find that information on your cluster properties page in the networking settings. Also, when configuring the instance, attach the role that you just created in the previous step.

Cluster networking configuration

When you are ready, launch the instance. You are going to use the same instance to produce and consume messages. To do that, you need to set up Apache Kafka client tools in the instance. You can follow the Amazon MSK developer guide to get your instance ready.

Producing and consuming records
Now that you have everything configured, you can start sending and receiving records using Amazon MSK Serverless. The first thing you need to do is to create a topic. From your EC2 instance, go to the directory where you installed the Apache Kafka tools and export the bootstrap server endpoint.

cd kafka_2.13-3.1.0/bin/
export BS=boot-abc1234.c3.kafka-serverless.us-east-2.amazonaws.com:9098

As you are using Amazon MSK Serverless, there is only one address for this server, and you can find it in the client information on your cluster page.

Viewing client information

Run the following command to create a topic with the name msk-serverless-tutorial.

./kafka-topics.sh --bootstrap-server $BS \
--command-config client.properties \
--create --topic msk-serverless-tutorial --partitions 6

Now you can start sending records. If you want to see the service work under a high throughput, you can use the Apache Kafka producer performance test tool. This tool allows you to send many messages at the same time to the MSK cluster with a defined throughput and specific size. Experiment with this performance test tool, change the number of messages per second and the record size and see how the cluster behaves and adapts its capacity.

./kafka-topics.sh --bootstrap-server $BS \
--command-config client.properties \
--create --topic msk-serverless-tutorial --partitions 6

Finally, if you want to receive the messages, open a new terminal, connect to the same EC2 instance, and use the Apache Kafka consumer tool to receive the messages.

cd kafka_2.13-3.1.0/bin/
export BS=boot-abc1234.c3.kafka-serverless.us-east-2.amazonaws.com:9098
./kafka-console-consumer.sh \
--bootstrap-server $BS \
--consumer.config client.properties \
--topic msk-serverless-tutorial --from-beginning

You can see how the cluster is doing on the monitoring page of the Amazon MSK Serverless cluster.

Cluster metrics page

Availability
Amazon MSK Serverless is available in US East (Ohio), US East (N. Virginia), US West (Oregon), Europe (Frankfurt), Europe (Ireland), Europe (Stockholm), Asia Pacific (Singapore), Asia Pacific (Sydney), and Asia Pacific (Tokyo).
Learn more about this service and its pricing on the Amazon MSK Serverless feature page.

Marcia

New – Storage-Optimized Amazon EC2 Instances (I4i) Powered by Intel Xeon Scalable (Ice Lake) Processors

Post Syndicated from Jeff Barr original https://aws.amazon.com/blogs/aws/new-storage-optimized-amazon-ec2-instances-i4i-powered-by-intel-xeon-scalable-ice-lake-processors/

Over the years we have released multiple generations of storage-optimized Amazon Elastic Compute Cloud (Amazon EC2) instances including the HS1 (2012) , D2 (2015), I2 (2013) , I3 (2017), I3en (2019), D3/D3en (2020), and Im4gn/Is4gen (2021). These instances are used to host high-performance real-time relational databases, distributed file systems, data warehouses, key-value stores, and more.

New I4i Instances
Today I am happy to introduce the new I4i instances, powered by the latest generation Intel Xeon Scalable (Ice Lake) Processors with an all-core turbo frequency of 3.5 GHz.

The instances offer up to 30 TB of NVMe storage using AWS Nitro SSD devices that are custom-built by AWS, and are designed to minimize latency and maximize transactions per second (TPS) on workloads that need very fast access to medium-sized datasets on local storage. This includes transactional databases such as MySQL, Oracle DB, and Microsoft SQL Server, as well as NoSQL databases: MongoDB, Couchbase, Aerospike, Redis, and the like. They are also an ideal fit for workloads that can benefit from very high compute performance per TB of storage such as data analytics and search engines.

Here are the specs:

Instance Name vCPUs
Memory (DDR4) Local NVMe Storage
(AWS Nitro SSD)
Sequential Read Throughput
(128 KB Blocks)
Bandwidth
EBS-Optimized
Network
i4i.large 2 16 GiB 468 GB 350 MB/s Up to 10 Gbps Up to 10 Gbps
i4i.xlarge 4 32 GiB 937 GB 700 MB/s Up to 10 Gbps Up to 10 Gbps
i4i.2xlarge 8 64 GiB 1,875 GB 1,400 MB/s Up to 10 Gbps Up to 12 Gbps
i4i.4xlarge 16 128 GiB 3,750 GB 2,800 MB/s Up to 10 Gbps Up to 25 Gbps
i4i.8xlarge 32 256 GiB 7,500 GB
(2 x 3,750 GB)
5,600 MB/s 10 Gbps 18.75 Gbps
i4i.16xlarge 64 512 GiB 15,000 GB
(4 x 3,750 GB)
11,200 MB/s 20 Gbps 37.5 Gbps
i4i.32xlarge 128 1024 GiB 30,000 GB
(8 x 3,750 GB)
22,400 MB/s 40 Gbps 75 Gbps

In comparison to the Xen-based I3 instances, the Nitro-powered I4i instances give you:

  • Up to 60% lower storage I/O latency, along with up to 75% lower storage I/O latency variability.
  • A new, larger instance size (i4i.32xlarge).
  • Up to 30% better compute price/performance.

The i4i.16xlarge and i4.32xlarge instances give you control over C-states, and the i4i.32xlarge instances support non-uniform memory access (NUMA). All of the instances support AVX-512, and use Intel Total Memory Encryption (TME) to deliver always-on memory encryption.

From Our Customers
AWS customers and AWS service teams have been putting these new instances to the test ahead of today’s launch. Here’s what they had to say:

Redis Enterprises powers mission-critical applications for over 8,000 organizations. According to Yiftach Shoolman (Co-Founder and CTO of Redis):

We are thrilled with the performance we are seeing from the Amazon EC2 I4i instances which use the new low latency AWS Nitro SSDs. Our testing shows I4i instances delivering an astonishing 2.9x higher query throughput than the previous generation I3 instances. We have also tested with various read and write mixes, and observed consistent and linearly scaling performance.

ScyllaDB is a high performance NoSQL database that can take advantage of high performance cloud computing instances.
Avi Kivity (Co-Founder and CTO of ScyllaDB) told us:


When we tested I4i instances, we observed up to 2.7x increase in throughput per vCPU compared to I3 instances for reads. With an even mix of reads and writes, we observed 2.2x higher throughput per vCPU, with a 40% reduction in average latency than I3 instances. We are excited for the incredible performance and value these new instances will enable for our customers going forward.

Amazon QuickSight is a business intelligence service. After testing,
Tracy Daugherty (General Manager, Amazon Quicksight) reported that:

I4i instances have demonstrated superior performance over previous generation I instances, with a 30% improvement across operations. We look forward to using I4i to further elevate performance for our customers.

Available Now

You can launch I4i instances today in the AWS US East (N. Virginia), US East (Ohio), US West (Oregon), and Europe (Ireland) Regions (with more to come) in On-Demand and Spot form. Savings Plans and Reserved Instances are available, as are Dedicated Instances and Dedicated Hosts.

In order to take advantage of the performance benefits of these new instances, be sure to use recent AMIs that include current ENA drivers and support for NVMe 1.4.

To learn more, visit the I4i instance home page.

Jeff;

New AWS Wavelength Zone in Toronto – The First in Canada

Post Syndicated from Danilo Poccia original https://aws.amazon.com/blogs/aws/new-aws-wavelength-zone-in-toronto-the-first-in-canada/

Wireless communication has put us closer to each other. 5G networks increase the reach of what we can achieve to new use cases that need end-to-end low latency. With AWS Wavelength, you can deploy AWS compute and storage services within telecommunications providers’ data centers at the edge of the 5G networks. Your applications can then deliver single-digit millisecond latencies to mobile devices and end users and, at the same time, seamlessly access AWS services in the closest AWS Region.

For example, low latency enables new use cases such as:

  • Delivery of high-resolution and high-fidelity live video streaming.
  • Improved experience for augmented/virtual reality (AR/VR) applications.
  • Running machine learning (ML) inference at the edge for applications in medical diagnostics, retail, and factories.
  • Connected vehicle applications with near real-time connectivity with the cloud to improve driver assistance, autonomous driving, and in-vehicle entertainment experiences.

We opened the first AWS Wavelength Zones in 2020 in the US, and then we expanded to new countries, such as Japan, South Korea, the United Kingdom, and Germany. Today, I am happy to share that, in partnership with Bell Canada, we are expanding in a new country with a Wavelength Zone in Toronto.

What You Can Do with AWS Wavelength
As an example of what is possible with Wavelength, let’s look at food deliveries in Toronto. Most deliveries are made within 2 km, and a significant number are for just one item, such as a cup of coffee. Using a car for these deliveries is slow, expensive, and has a large carbon footprint. A better solution is provided by Tiny Mile: they use small remote-controlled robots to deliver small food orders such as coffees and sandwiches at one-tenth the cost of conventional delivery services.

Tiny Mile robot image.

Their remote staff uses the camera feed from the robots to understand the environment, read signage, and drive the robots. To scale up more efficiently, Tiny Mile can now use Bell’s public Multi-access Edge Computing (MEC) solution, delivered through AWS Wavelength, to process data and analyze the video feed in almost real time to detect obstacles and avoid collisions without manual intervention. Having computation at the edge also reduces the weight and the costs of the robots (they don’t need expensive computers onboard) and increases the amount of cargo they can carry.

Using a Wavelength Zone
I follow the instructions in Get started with AWS Wavelength in the documentation. First, I opt in to use the new Wavelength Zone. In the EC2 console for the Canada (Central) Region, I enable New EC2 Experience in the upper-left corner. In the navigation pane, I choose EC2 Dashboard. In the Account attributes section, I choose Zones. There, I enable the Canada (BELL) Wavelength Zone.

Console screenshot.

Now, I can configure networking to use the Wavelength Zone. I can either create an Amazon Virtual Private Cloud (VPC) or extend an existing VPC to include a subnet in a Wavelength Zone. In this case, I want to use a new VPC. In the VPC console, I choose Your VPCs and then Create VPC. I select the VPC only option to create subnets later. I write a name for the VPC and choose the IPv4 CIDR block that will be used for the private addresses of the resources in this VPC. Then, I complete the creation of the VPC.

Console screenshot.

In the navigation pane, I choose Carrier Gateways and then Create carrier gateway. I write a name and select the VPC I just created. I enable Route subnet traffic to the carrier gateway to automatically route traffic from subnets to the carrier gateway.

Console screenshot.

In the Subnets to route section, I configure a subnet residing in the Canada (BELL) – Toronto Wavelength Zone. For the subnet IPv4 CIDR Block, I use a block within the VPC range. Then, I complete the creation of the carrier gateway.

Console screenshot.

Now that networking is configured, I can deploy the portions of my application that require ultra-low latency in the Wavelength Zone and then connect that back to the rest of the application and the cloud services running in the Canada (Central) Region.

To run an EC2 instance in the Wavelength Zone, I use the AWS Command Line Interface (CLI) run-instances command. In this way, I can pass an option to automatically allocate and associate the Carrier IP address with the network interface of the EC2 instance. Another option is to allocate the carrier address and associate it with the network interface after I create the instance. The Carrier IP address is only valid within the telecommunications provider’s network. The carrier gateway uses NAT to translate the Carrier IP address and send traffic to the internet or to mobile devices.

aws ec2 --region ca-central-1 run-instances
--network-interfaces '[{"DeviceIndex":0, "AssociateCarrierIpAddress": true, "SubnetId": "subnet-0d753f7203c2cfd42"}]'
--image-id ami-01d29fca5bdf8f4b4 --instance-type t3.medium

To discover the IP associated with the EC2 instance in the carrier network, I use the describe-instances command:

aws ec2 --region ca-central-1 describe-instances

In the NetworkInterfaces section of the output, I find the Association and the CarrierIP:

"Association": {
  "CarrierIp": "207.61.170.56",
  "IpOwnerId": "amazon",
  "PublicDnsName": ""
}

Now that the EC2 instance is running in the Wavelength Zone, I can deploy a portion of my application in the EC2 instance so that application traffic can be processed at very low latency without leaving the mobile network.

Architectural diagram.

For my next steps, I look at Deploying your first 5G enabled application with AWS Wavelength and follow the walkthrough for a common Wavelength use case: implementing machine learning inference at the edge.

Availability and Pricing
The new Wavelength Zone in Toronto, Canada, is embedded in Bell Canada’s 5G network and is available today. EC2 instances and other AWS resources in Wavelength Zones have different prices than in the parent Region. See the Wavelength pricing page for more information.

AWS Wavelength is part of AWS for the Edge services that help you deliver data processing, analysis, and storage outside AWS data centers and closer to your endpoints. These capabilities allow you to process and store data close to where it’s generated, enabling low-latency, intelligent, and real-time responsiveness.

Start using AWS Wavelength to deliver ultra-low-latency applications for 5G devices.

Danilo

LGPD workbook for AWS customers managing personally identifiable information in Brazil

Post Syndicated from Rodrigo Fiuza original https://aws.amazon.com/blogs/security/lgpd-workbook-for-aws-customers-managing-personally-identifiable-information-in-brazil/

Portuguese version

AWS is pleased to announce the publication of the Brazil General Data Protection Law Workbook.

The General Data Protection Law (LGPD) in Brazil was first published on 14 August 2018, and started its applicability on 18 August 2020. Companies that manage personally identifiable information (PII) in Brazil as defined by LGPD will have to comply with and attend to the law.

To better help customers prepare and implement controls that focus on LGPD Chapter VII Security and Best Practices, AWS created a workbook based on industry best practices, AWS service offerings, and controls.

Amongst other topics, this workbook covers information security and AWS controls from:

In combination with Brazil General Data Protection Law Workbook, customers can use the detailed Navigating LGPD Compliance on AWS whitepaper.

AWS adheres to a shared responsibility model. Customers will have to observe which services offer privacy features and determine their applicability to their specific compliance requirements. Further information about data privacy at AWS can be found at our Data Privacy Center. Specific information about LGPD and data privacy at AWS in Brazil can be found on our Brazil Data Privacy page.

To learn more about our compliance and security programs, see AWS Compliance Programs. As always, we value your feedback and questions; reach out to the AWS Compliance team through the Contact Us page.

If you have feedback about this post, submit comments in the Comments section below.
Want more AWS Security news? Follow us on Twitter.


Portuguese

Workbook da LGPD para Clientes AWS que gerenciam Informações de Identificação Pessoal no Brasil

A AWS tem o prazer de anunciar a publicação do Workbook Lei Geral de Proteção de Dados do Brasil.

A Lei Geral de Proteção de Dados (LGPD) teve sua primeira publicação em 14 de agosto de 2018 no Brasil e iniciou sua aplicabilidade em 18 de agosto de 2020. Empresas que gerenciam informações pessoais identificáveis (PII) conforme definido na LGPD terão que cumprir e atender às cláusulas da lei.

Para ajudar melhor os clientes a preparar e implementar controles que se concentram no Capítulo VII da LGPD “da Segurança e Boas Práticas”, a AWS criou uma pasta de trabalho com base nas melhores práticas do setor, ofertas de serviços e controles da AWS.

Entre outros tópicos, esta pasta de trabalho aborda a segurança da informação e os controles da AWS de:

Em combinação com o Workbook Lei Geral de Proteção de Dados do Brasil, os clientes podem usar o whitepaper detalhado Navegando na conformidade com a LGPD na AWS.

A AWS adere a um modelo de responsabilidade compartilhada. Clientes terão que observar quais serviços oferecem recursos de privacidade e determinar sua aplicabilidade aos seus requisitos específicos de compliance. Mais informações sobre a privacidade de dados na AWS podem ser encontradas em nosso Centro de Privacidade de Dados. Informações adicionais sobre LGPD e Privacidade de dados na AWS no Brasil podem ser encontradas em nossa página de Privacidade de Dados no Brasil.

Para saber mais sobre nossos programas de conformidade e segurança, consulte Programas de conformidade da AWS. Como sempre, valorizamos seus comentários e perguntas; entre em contato com a equipe de conformidade da AWS por meio da página Fale conosco.

Se você tiver feedback sobre esta postagem, envie comentários na seção Comentários abaixo.

Quer mais notícias sobre segurança da AWS? Siga-nos no Twitter.

Author

Rodrigo Fiuza

Rodrigo is a Security Audit Manager at AWS, based in São Paulo. He leads audits, attestations, certifications, and assessments across Latin America, Caribbean and Europe. Rodrigo has previously worked in risk management, security assurance, and technology audits for the past 12 years.

AWS welcomes new Trans-Atlantic Data Privacy Framework

Post Syndicated from Michael Punke original https://aws.amazon.com/blogs/security/aws-welcomes-new-trans-atlantic-data-privacy-framework/

Amazon Web Services (AWS) welcomes the new Trans-Atlantic Data Privacy Framework (Data Privacy Framework) that was agreed to, in principle, between the European Union (EU) and the United States (US) last month. This announcement demonstrates the common will between the US and EU to strengthen privacy protections in trans-Atlantic data flows, and will supplement the safeguards AWS and other companies already offer today. AWS commits to undertaking certification in accordance with the Data Privacy Framework as it is adopted, and we look forward to our customers and their end users benefiting from the new safeguards.

The Data Privacy Framework, once finalized, will re-establish a mechanism for certified businesses to conduct trans-Atlantic data transfers between the US and EU. According to the announcement, the new Data Privacy Framework will address the concerns raised by the Court of Justice of the European Union (CJEU) when it invalidated the EU-US Privacy Shield in its Schrems II decision in uly 2020. The Data Privacy Framework will adopt new safeguards to ensure that US intelligence activities are limited to what is necessary and proportionate to protect national security, and also create a new redress system to address the complaints of EU citizens.

As one of the architects of the Trusted Cloud Principles (a cloud-industry initiative to help safeguard the interests of organizations and the basic rights of individuals using cloud), AWS fully supports improved rules and regulations that advance privacy and security protections for any organization that wants to use cloud technologies and maintain control of their data.

While organizations using AWS technology have been able to conduct trans-Atlantic data transfers even after Schrems II, the new Data Privacy Framework will ensure further clarity and agility for our customers in their data transfer assessments. This will help our customers unlock value in terms of growth, digital transformation, and global competitive advantage.

Organizations that want to trade with speed and agility to and from the European Economic Area (EEA) need certainty that their goals to innovate and invest in the best technology for growth is supported by international frameworks promoting privacy across borders. Once finalized, the new Data Privacy Framework, coupled with our continued commitment to privacy at AWS, will provide even more simplicity and confidence for customers who choose to transfer data to and from Europe when using AWS services.

More than ever, our collective security requires mutual trust across both sides of the Atlantic and beyond. We therefore look forward to participating in, and remain committed to, the finalization of the Data Privacy Framework. We also support efforts to build broad consensus around the appropriate balance between privacy and security in forums such as the OECD’s workstream on trusted government access to data held by the private sector.

About AWS privacy and security

AWS is committed to protecting customer data. We continue to help customers successfully meet evolving European laws and standards, and achieve the highest levels of security, privacy, and resilience. AWS already offers comprehensive technical, operational, and contractual measures to protect and transfer customer content outside of Europe in compliance with the General Data Protection Regulation (GDPR) and the Schrems II ruling. Customers can also choose to store their content in the European Union by selecting any one or more of our regions in France, Germany, Ireland, Italy, Sweden, and later in 2022, Spain, with the confidence that their data stays in the AWS Region they select. In addition, customers can use an advanced set of access, encryption, and logging features to maintain full control of their content.

Today, AWS customers can also transfer their data outside of the European Economic Area (EEA) by relying on the new Standard Contractual Clauses (SCCs) included in the AWS Data Processing Addendum (DPA), which is supplemented by our strengthened contractual commitments to protect customer data, such as challenging law enforcement requests that conflict with EU law.

We also have a wide variety of tools available to enhance the security of cross-border data transfers for customers with global services. For example, AWS CloudHSM and AWS Key Management Service (AWS KMS) allow customers to encrypt data in transit and at rest, and securely generate and manage control of encryption keys. By building on top of the AWS Nitro System, our answer to confidential computing, which includes the use of specialized hardware and associated firmware to protect customer code and data during processing from outside access, customers can further secure data during processing, and thereby enhance confidentiality and privacy.

AWS has achieved internationally recognized certifications and attestations that demonstrate compliance with rigorous international privacy and security standards, including the Cloud Infrastructure Services in Europe (CISPE) Data Protection Code of Conduct, Cloud Computing Compliance Controls Catalog (C5), ISO27018, and the Esquema National de Securidad (ENS, Spain).

As well as benefitting from these existing measures, our extensive online resources can help customers more easily complete data-transfer assessments and fulfill their GDPR compliance requirements, in accordance with the European Data Protection Board (EDPB) recommendations. This includes regular Information Request Reports showing requests to access data from governments and our responses.

Further information

Our technical paper Navigating Compliance with EU Data Transfer Requirements and AWS’s Privacy Features for AWS Services provide further information to help customers assess the right services for their individual needs.

If you have questions or need more information, visit our EU Data Protection page.

 
If you have feedback about this post, submit comments in the Comments section below. If you have questions about this post, contact AWS Support.

Want more AWS Security news? Follow us on Twitter.

Michael Punke

Michael Punke

Michael Punke is Vice President for Global Public Policy, Amazon Web Services, and lives with his family in Montana. He has more than 25 years of experience in international trade and regulatory issues. Punke served from 2010 to 2017 as Deputy US Trade Representative and US Ambassador to the World Trade Organization (WTO) in Geneva.

Canadian Centre for Cyber Security Assessment Summary report now available in AWS Artifact

Post Syndicated from Rob Samuel original https://aws.amazon.com/blogs/security/canadian-centre-for-cyber-security-assessment-summary-report-now-available-in-aws-artifact/

French version

At Amazon Web Services (AWS), we are committed to providing continued assurance to our customers through assessments, certifications, and attestations that support the adoption of AWS services. We are pleased to announce the availability of the Canadian Centre for Cyber Security (CCCS) assessment summary report for AWS, which you can view and download on demand through AWS Artifact.

The CCCS is Canada’s authoritative source of cyber security expert guidance for the Canadian government, industry, and the general public. Public and commercial sector organizations across Canada rely on CCCS’s rigorous Cloud Service Provider (CSP) IT Security (ITS) assessment in their decision to use CSP services. In addition, CCCS’s ITS assessment process is a mandatory requirement for AWS to provide cloud services to Canadian federal government departments and agencies.

The CCCS Cloud Service Provider Information Technology Security Assessment Process determines if the Government of Canada (GC) ITS requirements for the CCCS Medium Cloud Security Profile (previously referred to as GC’s PROTECTED B/Medium Integrity/Medium Availability [PBMM] profile) are met as described in ITSG-33 (IT Security Risk Management: A Lifecycle Approach, Annex 3 – Security Control Catalogue). As of September, 2021, 120 AWS services in the Canada (Central) Region have been assessed by the CCCS, and meet the requirements for medium cloud security profile. Meeting the medium cloud security profile is required to host workloads that are classified up to and including medium categorization. On a periodic basis, CCCS assesses new or previously unassessed services and re-assesses the AWS services that were previously assessed to verify that they continue to meet the GC’s requirements. CCCS prioritizes the assessment of new AWS services based on their availability in Canada, and customer demand for the AWS services. The full list of AWS services that have been assessed by CCCS is available on our Services in Scope by Compliance Program page.

To learn more about the CCCS assessment or our other compliance and security programs, visit AWS Compliance Programs. If you have questions about this blog post, please start a new thread on the AWS Artifact forum or contact AWS Support.

If you have feedback about this post, submit comments in the Comments section below. Want more AWS Security news? Follow us on Twitter.

Rob Samuel

Rob Samuel

Rob Samuel is a Principal technical leader for AWS Security Assurance. He partners with teams across AWS to translate data protection principles into technical requirements, aligns technical direction and priorities, orchestrates new technical solutions, helps integrate security and privacy solutions into AWS services and features, and addresses cross-cutting security and privacy requirements and expectations. Rob has more than 20 years of experience in the technology industry, and has previously held leadership roles, including Head of Security Assurance for AWS Canada, Chief Information Security Officer (CISO) for the Province of Nova Scotia, various security leadership roles as a public servant, and served as a Communications and Electronics Engineering Officer in the Canadian Armed Forces.

Naranjan Goklani

Naranjan Goklani

Naranjan Goklani is a Security Audit Manager at AWS, based in Toronto (Canada). He leads audits, attestations, certifications, and assessments across North America and Europe. Naranjan has more than 12 years of experience in risk management, security assurance, and performing technology audits. Naranjan previously worked in one of the Big 4 accounting firms and supported clients from the retail, ecommerce, and utilities industries.

Brian Mycroft

Brian Mycroft

Brian Mycroft is a Chief Technologist at AWS, based in Ottawa (Canada), specializing in national security, intelligence, and the Canadian federal government. Brian is the lead architect of the AWS Secure Environment Accelerator (ASEA) and focuses on removing public sector barriers to cloud adoption.

.


Rapport sommaire de l’évaluation du Centre canadien pour la cybersécurité disponible sur AWS Artifact

Par Robert Samuel, Naranjan Goklani et Brian Mycroft
Amazon Web Services (AWS) s’engage à fournir à ses clients une assurance continue à travers des évaluations, des certifications et des attestations qui appuient l’adoption des services proposés par AWS. Nous avons le plaisir d’annoncer la mise à disposition du rapport sommaire de l’évaluation du Centre canadien pour la cybersécurité (CCCS) pour AWS, que vous pouvez dès à présent consulter et télécharger à la demande sur AWS Artifact.

Le CCC est l’autorité canadienne qui met son expertise en matière de cybersécurité au service du gouvernement canadien, du secteur privé et du grand public. Les organisations des secteurs public et privé établies au Canada dépendent de la rigoureuse évaluation de la sécurité des technologies de l’information s’appliquant aux fournisseurs de services infonuagiques conduite par le CCC pour leur décision relative à l’utilisation de ces services infonuagiques. De plus, le processus d’évaluation de la sécurité des technologies de l’information est une étape obligatoire pour permettre à AWS de fournir des services infonuagiques aux agences et aux ministères du gouvernement fédéral canadien.

Le Processus d’évaluation de la sécurité des technologies de l’information s’appliquant aux fournisseurs de services infonuagiques détermine si les exigences en matière de technologie de l’information du Gouvernement du Canada (GC) pour le profil de contrôle de la sécurité infonuagique moyen (précédemment connu sous le nom de Protégé B/Intégrité moyenne/Disponibilité moyenne) sont satisfaites conformément à l’ITSG-33 (Gestion des risques liés à la sécurité des TI : Une méthode axée sur le cycle de vie, Annexe 3 – Catalogue des contrôles de sécurité). En date de septembre 2021, 120 services AWS de la région (centrale) du Canada ont été évalués par le CCC et satisfont aux exigences du profil de sécurité moyen du nuage. Satisfaire les exigences du niveau moyen du nuage est nécessaire pour héberger des applications classées jusqu’à la catégorie moyenne incluse. Le CCC évalue périodiquement les nouveaux services, ou les services qui n’ont pas encore été évalués, et réévalue les services AWS précédemment évalués pour s’assurer qu’ils continuent de satisfaire aux exigences du Gouvernement du Canada. Le CCC priorise l’évaluation des nouveaux services AWS selon leur disponibilité au Canada et en fonction de la demande des clients pour les services AWS. La liste complète des services AWS évalués par le CCC est consultable sur notre page Services AWS concernés par le programme de conformité.

Pour en savoir plus sur l’évaluation du CCC ainsi que sur nos autres programmes de conformité et de sécurité, visitez la page Programmes de conformité AWS. Comme toujours, nous accordons beaucoup de valeur à vos commentaires et à vos questions; vous pouvez communiquer avec l’équipe Conformité AWS via la page Communiquer avec nous.

Si vous avez des commentaires sur cette publication, n’hésitez pas à les partager dans la section Commentaires ci-dessous. Vous souhaitez en savoir plus sur AWS Security? Retrouvez-nous sur Twitter.

Biographies des auteurs :

Rob Samuel : Rob Samuel est responsable technique principal d’AWS Security Assurance. Il collabore avec les équipes AWS pour traduire les principes de protection des données en recommandations techniques, aligne la direction technique et les priorités, met en œuvre les nouvelles solutions techniques, aide à intégrer les solutions de sécurité et de confidentialité aux services et fonctionnalités proposés par AWS et répond aux exigences et aux attentes en matière de confidentialité et de sécurité transversale. Rob a plus de 20 ans d’expérience dans le secteur de la technologie et a déjà occupé des fonctions dirigeantes, comme directeur de l’assurance sécurité pour AWS Canada, responsable de la cybersécurité et des systèmes d’information (RSSI) pour la province de la Nouvelle-Écosse, divers postes à responsabilités en tant que fonctionnaire et a servi dans les Forces armées canadiennes en tant qu’officier du génie électronique et des communications.

Naranjan Goklani : Naranjan Goklani est responsable des audits de sécurité pour AWS, il est basé à Toronto (Canada). Il est responsable des audits, des attestations, des certifications et des évaluations pour l’Amérique du Nord et l’Europe. Naranjan a plus de 12 ans d’expérience dans la gestion des risques, l’assurance de la sécurité et la réalisation d’audits de technologie. Naranjan a exercé dans l’une des quatre plus grandes sociétés de comptabilité et accompagné des clients des industries de la distribution, du commerce en ligne et des services publics.

Brian Mycroft : Brian Mycroft est technologue en chef pour AWS, il est basé à Ottawa (Canada) et se spécialise dans la sécurité nationale, le renseignement et le gouvernement fédéral du Canada. Brian est l’architecte principal de l’AWS Secure Environment Accelerator (ASEA) et s’intéresse principalement à la suppression des barrières à l’adoption du nuage pour le secteur public.

Amazon SageMaker Serverless Inference – Machine Learning Inference without Worrying about Servers

Post Syndicated from Antje Barth original https://aws.amazon.com/blogs/aws/amazon-sagemaker-serverless-inference-machine-learning-inference-without-worrying-about-servers/

In December 2021, we introduced Amazon SageMaker Serverless Inference (in preview) as a new option in Amazon SageMaker to deploy machine learning (ML) models for inference without having to configure or manage the underlying infrastructure. Today, I’m happy to announce that Amazon SageMaker Serverless Inference is now generally available (GA).

Different ML inference use cases pose different requirements on your model hosting infrastructure. If you work on use cases such as ad serving, fraud detection, or personalized product recommendations, you are most likely looking for API-based, online inference with response times as low as a few milliseconds. If you work with large ML models, such as in computer vision (CV) applications, you might require infrastructure that is optimized to run inference on larger payload sizes in minutes. If you want to run predictions on an entire dataset, or larger batches of data, you might want to run an on-demand, one-time batch inference job instead of hosting a model-serving endpoint. And what if you have an application with intermittent traffic patterns, such as a chatbot service or an application to process forms or analyze data from documents? In this case, you might want an online inference option that is able to automatically provision and scale compute capacity based on the volume of inference requests. And during idle time, it should be able to turn off compute capacity completely so that you are not charged.

Amazon SageMaker, our fully managed ML service, offers different model inference options to support all of those use cases:

Amazon SageMaker Serverless Inference in More Detail
In a lot of conversations with ML practitioners, I’ve picked up the ask for a fully managed ML inference option that lets you focus on developing the inference code while managing all things infrastructure for you. SageMaker Serverless Inference now delivers this ease of deployment.

Based on the volume of inference requests your model receives, SageMaker Serverless Inference automatically provisions, scales, and turns off compute capacity. As a result, you pay for only the compute time to run your inference code and the amount of data processed, not for idle time.

You can use SageMaker’s built-in algorithms and ML framework-serving containers to deploy your model to a serverless inference endpoint or choose to bring your own container. If traffic becomes predictable and stable, you can easily update from a serverless inference endpoint to a SageMaker real-time endpoint without the need to make changes to your container image. Using Serverless Inference, you also benefit from SageMaker’s features, including built-in metrics such as invocation count, faults, latency, host metrics, and errors in Amazon CloudWatch.

Since its preview launch, SageMaker Serverless Inference has added support for the SageMaker Python SDK and model registry. SageMaker Python SDK is an open-source library for building and deploying ML models on SageMaker. SageMaker model registry lets you catalog, version, and deploy models to production.

New for the GA launch, SageMaker Serverless Inference has increased the maximum concurrent invocations per endpoint limit to 200 (from 50 during preview), allowing you to use Amazon SageMaker Serverless Inference for high-traffic workloads. Amazon SageMaker Serverless Inference is now available in all the AWS Regions where Amazon SageMaker is available, except for the AWS GovCloud (US) and AWS China Regions.

Several customers have already started enjoying the benefits of SageMaker Serverless Inference:

Bazaarvoice leverages machine learning to moderate user-generated content to enable a seamless shopping experience for our clients in a timely and trustworthy manner. Operating at a global scale over a diverse client base, however, requires a large variety of models, many of which are either infrequently used or need to scale quickly due to significant bursts in content. Amazon SageMaker Serverless Inference provides the best of both worlds: it scales quickly and seamlessly during bursts in content and reduces costs for infrequently used models.” — Lou Kratz, PhD, Principal Research Engineer, Bazaarvoice

Transformers have changed machine learning, and Hugging Face has been driving their adoption across companies, starting with natural language processing and now with audio and computer vision. The new frontier for machine learning teams across the world is to deploy large and powerful models in a cost-effective manner. We tested Amazon SageMaker Serverless Inference and were able to significantly reduce costs for intermittent traffic workloads while abstracting the infrastructure. We’ve enabled Hugging Face models to work out of the box with SageMaker Serverless Inference, helping customers reduce their machine learning costs even further.” — Jeff Boudier, Director of Product, Hugging Face

Now, let’s see how you can get started on SageMaker Serverless Inference.

For this demo, I’ve built a text classifier to turn e-commerce customer reviews, such as “I love this product!” into positive (1), neutral (0), and negative (-1) sentiments. I’ve used the Women’s E-Commerce Clothing Reviews dataset to fine-tune a RoBERTa model from the Hugging Face Transformers library and model hub. I will now show you how to deploy the trained model to an Amazon SageMaker Serverless Inference Endpoint.

Deploy Model to an Amazon SageMaker Serverless Inference Endpoint
You can create, update, describe, and delete a serverless inference endpoint using the SageMaker console, the AWS SDKs, the SageMaker Python SDK, the AWS CLI, or AWS CloudFormation. In this first example, I will use the SageMaker Python SDK as it simplifies the model deployment workflow through its abstractions. You can also use the SageMaker Python SDK to invoke the endpoint by passing the payload in line with the request. I will show you this in a bit.

First, let’s create the endpoint configuration with the desired serverless configuration. You can specify the memory size and maximum number of concurrent invocations. SageMaker Serverless Inference auto-assigns compute resources proportional to the memory you select. If you choose a larger memory size, your container has access to more vCPUs. As a general rule of thumb, the memory size should be at least as large as your model size. The memory sizes you can choose are 1024 MB, 2048 MB, 3072 MB, 4096 MB, 5120 MB, and 6144 MB. For my RoBERTa model, let’s configure a memory size of 5120 MB and a maximum of five concurrent invocations.

import sagemaker
from sagemaker.serverless import ServerlessInferenceConfig

serverless_config = ServerlessInferenceConfig(
	memory_size_in_mb=5120, 
	max_concurrency=5
)

Now let’s deploy the model. You can use the estimator.deploy() method to deploy the model directly from the SageMaker training estimator, together with the serverless inference endpoint configuration. I also provide my custom inference code in this example.


endpoint_name="roberta-womens-clothing-serverless-1"

estimator.deploy(
	endpoint_name = endpoint_name, 
	entry_point="inference.py",
	serverless_inference_config=serverless_config
)

SageMaker Serverless Inference also supports model registry when you use the AWS SDK for Python (Boto3). I will show you how to deploy the model from the model registry later in this post.

Let’s check the serverless inference endpoint settings and deployment status. Go to the SageMaker console and browse to the deployed inference endpoint:

Review Amazon SageMaker Serverless Endpoint configuration in the SageMaker Console

From the SageMaker console, you can also create, update, or delete serverless inference endpoints if needed. In Amazon SageMaker Studio, select the endpoint tab and your serverless inference endpoint to review the endpoint configuration details.

Review Amazon SageMaker Serverless Endpoint configuration in SageMaker Studio

Once the endpoint status shows InService, you can start sending inference requests.

Now, let’s run a few sample predictions. My fine-tuned RoBERTa model expects the inference requests in JSON Lines format with the review text to classify as the input feature. A JSON Lines text file comprises several lines where each individual line is a valid JSON object, delimited by a newline character. This is an ideal format for storing data that is processed one record at a time, such as in model inference. You can learn more about JSON Lines and other common data formats for inference in the Amazon SageMaker Developer Guide. Note that the following code might look different depending on your model’s accepted inference request format.


from sagemaker.predictor import Predictor
from sagemaker.serializers import JSONLinesSerializer
from sagemaker.deserializers import JSONLinesDeserializer

sess = sagemaker.Session(sagemaker_client=sm)

inputs = [
    {"features": ["I love this product!"]},
    {"features": ["OK, but not great."]},
    {"features": ["This is not the right product."]},
]

predictor = Predictor(
    endpoint_name=endpoint_name,
    serializer=JSONLinesSerializer(),
    deserializer=JSONLinesDeserializer(),
    sagemaker_session=sess
)

predicted_classes = predictor.predict(inputs)

for predicted_class in predicted_classes:
    print("Predicted class {} with probability {}".format(predicted_class['predicted_label'], predicted_class['probability']))

The result will look similar to this, classifying the sample reviews into the corresponding sentiment classes.


Predicted class 1 with probability 0.9495596289634705
Predicted class 0 with probability 0.5395089387893677
Predicted class -1 with probability 0.7887083292007446

You can also deploy your model from the model registry to a SageMaker Serverless Inference endpoint. This is currently only supported through the AWS SDK for Python (Boto3). Let me walk you through another quick demo.

Deploy Model from the SageMaker Model Registry
To deploy the model from the model registry using Boto3, let’s first create a model object from the model version by calling the create_model() method. Then, I pass the Amazon Resource Name (ARN) of the model version as part of the containers for the model object.

import boto3
import sagemaker

sm = boto3.client(service_name='sagemaker')
role = sagemaker.get_execution_role()
model_name="roberta-womens-clothing-serverless"

container_list = 
	[{'ModelPackageName': <MODEL_PACKAGE_ARN>}]

create_model_response = sm.create_model(
    ModelName = model_name,
    ExecutionRoleArn = role,
    Containers = container_list
)

Next, I create the serverless inference endpoint. Remember that you can create, update, describe, and delete a serverless inference endpoint using the SageMaker console, the AWS SDKs, the SageMaker Python SDK, the AWS CLI, or AWS CloudFormation. For consistency, I keep using Boto3 in this second example.

Similar to the first example, I start by creating the endpoint configuration with the desired serverless configuration. I specify the memory size of 5120 MB and a maximum number of five concurrent invocations for my endpoint.

endpoint_config_name="roberta-womens-clothing-serverless-ep-config"

create_endpoint_config_response = sm.create_endpoint_config(
    EndpointConfigName = endpoint_config_name,
    ProductionVariants=[{
        'ServerlessConfig':{
            'MemorySizeInMB' : 5120,
            'MaxConcurrency' : 5
        },
        'ModelName':model_name,
        'VariantName':'AllTraffic'}])

Next, I create the SageMaker Serverless Inference endpoint by calling the create_endpoint() method.


endpoint_name="roberta-womens-clothing-serverless-2"

create_endpoint_response = sm.create_endpoint(
    EndpointName=endpoint_name,
    EndpointConfigName=endpoint_config_name)

Once the endpoint status shows InService, you can start sending inference requests. Again, for consistency, I choose to run the sample prediction using Boto3 and the SageMaker runtime client invoke_endpoint() method.

sm_runtime = boto3.client("sagemaker-runtime")
response = sm_runtime.invoke_endpoint(
    EndpointName=endpoint_name,
    ContentType="application/jsonlines",
    Accept="application/jsonlines",
    Body=bytes('{"features": ["I love this product!"]}', 'utf-8')
)

print(response['Body'].read().decode('utf-8'))
{"probability": 0.966135561466217, "predicted_label": 1}

How to Optimize Your Model for SageMaker Serverless Inference
SageMaker Serverless Inference automatically scales the underlying compute resources to process requests. If the endpoint does not receive traffic for a while, it scales down the compute resources. If the endpoint suddenly receives new requests, you might notice that it takes some time for the endpoint to scale up the compute resources to process the requests.

This cold-start time greatly depends on your model size and the start-up time of your container. To optimize cold-start times, you can try to minimize the size of your model, for example, by applying techniques such as knowledge distillation, quantization, or model pruning.

Knowledge distillation uses a larger model (the teacher model) to train smaller models (student models) to solve the same task. Quantization reduces the precision of the numbers representing your model parameters from 32-bit floating-point numbers down to either 16-bit floating-point or 8-bit integers. Model pruning removes redundant model parameters that contribute little to the training process.

Availability and Pricing
Amazon SageMaker Serverless Inference is now available in all the AWS Regions where Amazon SageMaker is available except for the AWS GovCloud (US) and AWS China Regions.

With SageMaker Serverless Inference, you only pay for the compute capacity used to process inference requests, billed by the millisecond, and the amount of data processed. The compute capacity charge also depends on the memory configuration you choose. For detailed pricing information, visit the SageMaker pricing page.

Get Started Today with Amazon SageMaker Serverless Inference
To learn more about Amazon SageMaker Serverless Inference, visit the Amazon SageMaker machine learning inference webpage. Here are SageMaker Serverless Inference example notebooks that will help you get started right away. Give them a try from the SageMaker console, and let us know what you think.

Antje

Amazon Aurora Serverless v2 is Generally Available: Instant Scaling for Demanding Workloads

Post Syndicated from Marcia Villalba original https://aws.amazon.com/blogs/aws/amazon-aurora-serverless-v2-is-generally-available-instant-scaling-for-demanding-workloads/

Today we are very excited to announce that Amazon Aurora Serverless v2 is generally available for both Aurora PostgreSQL and MySQL. Aurora Serverless is an on-demand, auto-scaling configuration for Amazon Aurora that allows your database to scale capacity up or down based on your application’s needs.

Amazon Aurora is a MySQL- and PostgreSQL-compatible relational database built for the cloud. It is fully managed by Amazon Relational Database Service (RDS), which automates time-consuming administrative tasks, such as hardware provisioning, database setup, patches, and backups.

One of the key features of Amazon Aurora is the separation of compute and storage. As a result, they scale independently. Amazon Aurora storage automatically scales as the amount of data in your database increases. For example, you can store lots of data, and if one day you decide to drop most of the data, the storage provisioned adjusts.

How Amazon Aurora works - compute and storage separation
However, many customers said that they need the same flexibility in the compute layer of Amazon Aurora since most database workloads don’t need a constant amount of compute. Workloads can be spiky, infrequent, or have predictable spikes over a period of time.

To serve these kinds of workloads, you need to provision for the peak capacity you expect your database will need. However, this approach is expensive as database workloads rarely run at peak capacity. To provision the right amount of compute, you need to continuously monitor the database capacity consumption and scale up resources if consumption is high. However, this requires expertise and often incurs downtime.

To solve this problem, in 2018, we launched the first version of Amazon Aurora Serverless. Since its launch, thousands of customers have used Amazon Aurora Serverless as a cost-effective option for infrequent, intermittent, and unpredictable workloads.

Today, we are making the next version of Amazon Aurora Serverless generally available, which enables customers to run even the most demanding workload on serverless with instant and nondisruptive scaling, fine-grained capacity adjustments, and additional functionality, including read replicas, Multi-AZ deployments, and Amazon Aurora Global Database.

Aurora Serverless v2 is launching with the latest major versions available on Amazon Aurora. Versions supported: Aurora PostgreSQL-compatible edition with PostgreSQL 13 and Aurora MySQL-compatible edition with MySQL 8.0.

Main features of Aurora Serverless v2
Aurora Serverless v2 enables you to scale your database to hundreds of thousands of transactions per second and cost-effectively manage the most demanding workloads. It scales database capacity in fine-grained increments to closely match the needs of your workload without disrupting connections or transactions. In addition, you pay only for the exact capacity you consume, and you can save up to 90 percent compared to provisioning for peak load.

If you have an existing Amazon Aurora cluster, you can create an Aurora Serverless v2 instance within the same cluster. This way, you’ll have a mixed configuration cluster where both provisioned and Aurora Serverless v2 instances can coexist within the same cluster.

It supports the full breadth of Amazon Aurora features. For example, you can create up to 15 Amazon Aurora read replicas deployed across multiple Availability Zones. Any number of these read replicas can be Aurora Serverless v2 instances and can be used as failover targets for high availability or for scaling read operations.

Similarly, with Global Database, you can assign any of the instances to be Aurora Serverless v2 and only pay for minimum capacity when idling. These instances in secondary Regions can also scale independently to support varying workloads across different Regions. Check out the Amazon Aurora user guide for a comprehensive list of features.

Aurora Serverless compute and storage scaling

How Aurora Serverless v2 scaling works
Aurora Serverless v2 scales instantly and nondisruptively by growing the capacity of the underlying instance in place by adding more CPU and memory resources. This technique allows for the underlying instance to increase and decrease capacity in place without failing over to a new instance for scaling.

For scaling down, Aurora Serverless v2 takes a more conservative approach. It scales down in steps until it reaches the required capacity needed for the workload. Scaling down too quickly can prematurely evict cached pages and decrease the buffer pool, which may affect the performance.

Aurora Serverless capacity is measured in Aurora capacity units (ACUs). Each ACU is a combination of approximately 2 gibibytes (GiB) of memory, corresponding CPU, and networking. With Aurora Serverless v2, your starting capacity can be as small as 0.5 ACU, and the maximum capacity supported is 128 ACU. In addition, it supports fine-grained increments as small as 0.5 ACU which allows your database capacity to closely match the workload needs.

Aurora Serverless v2 scaling in action
To show Aurora Serverless v2 in action, we are going to simulate a flash sale. Imagine that you run an e-commerce site. You run a marketing campaign where customers can purchase items 50 percent off for a limited amount of time. You are expecting a spike in traffic on your site for the duration of the sale.

When you use a traditional database, if you run those marketing campaigns regularly, you need to provision for the peak load you expect. Or, if you run them now and then, you need to reconfigure your database for the expected peak of traffic during the sale. In both cases, you are limited to your assumption of the capacity you need. What happens if you have more sales than you expected? If your database cannot keep up with the demand, it may cause service degradation. Or when your marketing campaign doesn’t produce the sales you expected? You are unnecessarily paying for capacity you don’t need.

For this demo, we use Aurora Serverless v2 as the transactional database. An AWS Lambda function is used to call the database and process orders during the sale event for the e-commerce site. The Lambda function and the database are in the same Amazon Virtual Private Cloud (VPC), and the function connects directly to the database to perform all the operations.

To simulate the traffic of a flash sale, we will use an open-source load testing framework called Artillery. It will allow us to generate varying load by invoking multiple Lambda functions. For example, we can start with a small load and then increase it rapidly to observe how the database capacity adjusts based on the workload. This Artillery load test runs on an Amazon Elastic Compute Cloud (Amazon EC2) instance inside the same VPC.

Architecture diagram
The following Amazon CloudWatch dashboard shows how the database capacity behaves when the order count increases. The dashboard shows the orders placed in blue and the current database capacity in orange.

At the beginning of the sale, the Aurora Serverless v2 database starts with a capacity of 5 ACUs, which was the minimum database capacity configured. For the first few minutes, the orders increase, but the database capacity doesn’t increase right away. The database can handle the load with the starting provisioned capacity.

However, around the time 15:55, the number of orders spikes to 12,000. As a result, the database increases the capacity to 14 ACUs. The database capacity increases in milliseconds, adjusting exactly to the load.

The number of orders placed stays up for some seconds, and then it goes dramatically down by 15:58. However, the database capacity doesn’t adjust exactly to the drop in traffic. Instead, it decreases in steps until it reaches 5 ACUs. The scaling down is done more conservatively to avoid prematurely evicting cached pages and affecting performance. This is done to prevent any unnecessary latency to spiky workloads, and also so the caches and buffer pools are not aggressively purged.

Cloudwatch dashboard

Get started with Aurora Serverless v2 with an existing Amazon Aurora cluster
If you already have an Amazon Aurora cluster and you want to try Aurora Serverless v2, the fastest way to get started is by using mixed configuration clusters that contain both serverless and provisioned instances. Start by adding a new reader into the existing cluster. Configure the reader instance to be of the type Serverless v2.

Adding a serverless reader

Test the new serverless instance with your workload. Once you have confirmation that it works as expected, you can start a failover to the serverless instance, which will take less than 30 seconds to finish. This option provides a minimal downtime experience to get started with Aurora Serverless v2.

Failover to the serverless instance

How to create a new Aurora Serverless v2 database
To get started with Aurora Serverless v2, create a new database from the RDS console. The first step is to pick the engine type: Amazon Aurora. Then, pick which database engine you want it to be compatible with: MySQL or PostgreSQL. Open the filters under Engine version and select the filter Show versions that support Serverless v2. Then, you see that the Available versions dropdown list only shows options that are supported by Aurora Serverless v2.

Engine options
Next, you need to set up the database. Specify credential settings with a username and password for the administrator of the database.

Database settings
Then, configure the instance for the database. You need to select what kind of instance class you want. This allocates the computational, network, and memory capacity for the database instance. Select Serverless.

Then, you need to define the capacity range. Aurora Serverless v2 capacity scales up and down within the minimum and maximum configuration. Here you can specify the minimum and maximum database capacity for your workload. The minimum capacity you can specify is 0.5 ACUs, and the maximum is 128 ACUs. For more information on Aurora Serverless v2 capacity units, see the Instant autoscaling documentation.

Capacity configuration
Next, configure connectivity by creating a new VPC and security group or use the default. Finally, select Create database.

Connectivity configuration

Creating the database takes a couple of minutes. You know your database is ready when the status switches to Available.

Database list

You will find the connection details for the database on the database page. The endpoint and the port, combined with the user name and password for the administrator, are all you need to connect to your new Aurora Serverless v2 database.

Database details page

Available Now!
Aurora Serverless v2 is available now in US East (Ohio), US East (N. Virginia), US West (N. California), US West (Oregon), Asia Pacific (Hong Kong), Asia Pacific (Mumbai), Asia Pacific (Seoul), Asia Pacific (Singapore), Asia Pacific (Sydney), Asia Pacific (Tokyo), Canada (Central), Europe (Frankfurt), Europe (Ireland), Europe (London), Europe (Paris), Europe (Stockholm), and South America (São Paulo).

Visit the Amazon Aurora Serverless v2 page for more information about this launch.

Marcia

Automatically Detect Operational Issues in Lambda Functions with Amazon DevOps Guru for Serverless

Post Syndicated from Marcia Villalba original https://aws.amazon.com/blogs/aws/automatically-detect-operational-issues-in-lambda-functions-with-amazon-devops-guru-for-serverless/

Today we are announcing Amazon DevOps Guru for Serverless, a new capability for Amazon DevOps Guru. It allows developers to improve the operational performance and availability of serverless applications.

AWS pioneered the serverless computing space with the launch of AWS Lambda in 2014. Today, hundreds of thousands of customers are using AWS Lambda. Lambda allows you to configure many parameters for your functions, like memory allocation, provisioned concurrency, and timeouts. For many customers, finding the right balance between all those parameters to optimize the performance and availability of their functions is challenging.

In December 2020, we announced DevOps Guru, a fully managed AIOps (Artificial Intelligence for IT operations) service that automatically detects and alerts customers about application issues and helps them to improve their applications’ availability. Today, we are announcing DevOps Guru for Serverless, a new capability for DevOps Guru, to help developers using Lambda automatically detect anomalous behavior at the function level and use ML-powered recommendations to remediate any issues that were detected.

DevOps Guru for Serverless uses ML to automatically identify and analyze a wide range of performance and availability-related issues for Lambda functions, such as low provisioned concurrency or underutilization of memory. To use this capability, you don’t need to be a serverless or ML expert.

The reactive insights of this capability help you troubleshoot ongoing issues affecting serverless applications efficiently with actionable recommendations that help you identify and fix the root cause in the shortest time possible.

DevOps Guru for Serverless also provides proactive insights that help you identify a wider range of operational anomalies long before your serverless application performance is affected. It also gives you recommendations on how to resolve the root cause of the issues.

When an issue is detected, DevOps Guru for Serverless displays the finding in the DevOps Guru console and sends notifications using Amazon EventBridge or Amazon Simple Notification Service (Amazon SNS). This allows developers to automatically manage and take real-time action on the discovered issues.

DevOps Guru for Serverless Proactive Insights
DevOps Guru for Serverless enables developers to proactively detect application issues before an event that affects the customer occurs. For example, if provision concurrency is set too low for a Lambda function and traffic for this application is growing, DevOps Guru will detect the growing traffic and the application latency degradation and generate a proactive insight showing the issue.

ML algorithms create these insights from operational data and application metrics. An insight provides high-level information, severity, status, and a recommendation for how to solve this issue.

Nowadays, DevOps Guru for Serverless provides proactive insights for Lambda and Amazon DynamoDB. These are the operational issues and the proactive insights available today:

  • Lambda concurrent executions reaching account limit – Triggered when concurrent executions reach an account limit for a continuous period.
  • Lambda Provisioned Concurrency function limit breached – Triggered when the reserved amount of provisioned concurrency is not enough over a period.
  • Lambda timeout high compared to SQS’s visibility timeout – Triggered when the duration of the lambda function exceeds the visibility timeout for the event source Amazon Simple Queue Service (Amazon SQS).
  • ­Lambda­ Provisioned Concurrency usage is lower than expected – Triggered when the utilization of the provisioned concurrency is too low.
  • Account read/write capacity for DynamoDB consumption reaching account limit – Triggered when the account consumed capacity is approaching account-level limits during a period of time.
  • DynamoDB table read/write consumed capacity reaching table limit – Triggered when the writes or reads in a table are reaching the ProvisionedWriteCapacityUnits or ProvisionedReadCapacityUnits limits for the table over a period.
  • DynamoDB table consumed capacity reaching AutoScaling Max parameter limit – Triggered when table consumed capacity is reaching AutoScaling Max parameters limit over a period.
  • DynamoDB read/write consumption lower than expected – Triggered when the value for ProvisionedWriteCapacityUnits or ProvisionedReadCapacityUnits is far from what is being consumed during a period of time.

Get started with DevOps Guru for Serverless
To get started, navigate to the DevOps Guru console to enable the service for your Lambda-based applications, other supported resources, or your entire account.

Configuring DevOps Guru

For this demo, create a new Lambda function with provisioned concurrency of 1. You can do this from the AWS console or programmatically. After you create it, you can check on the function overview page that the provisioned concurrency is set to 1.

Configuring Lambda provisioned concurrency

Add to the Lambda function a CloudWatch Event that triggers the function every minute. You can do that from the AWS console or programmatically. You can follow this tutorial to learn how to do it. Repeat that process five more times. Now the function will get triggered six times every minute from different events.

To trigger the proactive insight, you need to have six concurrent invocations of this Lambda function. To accomplish that, you need to ensure that the duration of each invocation is long enough. For this demo, you can make your function sleep for 30 seconds.

'use strict';

exports.handler = async (event) => {
  
    console.log('Sleep for 30 seconds')
    await new Promise(r => setTimeout(r, 30000));
    console.log('finish sleeping')

    return;
};

This configuration will trigger the proactive insight Lambda Provisioned Concurrency function limit breached for this function. You should see the insight in the console in three hours or less after the issue starts.

How to Check an Insight From the DevOps Guru Console
After a few hours, you can visit your DevOps Guru console, and you can verify that the proactive insight was triggered by exceeding the provisioned concurrency.

List of proactive insights

Select the Ongoing insight to see more details. The insight page opens, and it displays information relevant to the insight, metrics, events, and recommended actions for this issue.

Let’s examine this page in more detail. At the top of the page is the insight overview, with a description of what the insight is about and the severity of the issue. This is a proactive insight, so the user experience is not compromised by this issue. You also learn if the issue is ongoing and when it started. If the issue is not happening anymore, you can learn the end date for that insight. If you select the link for the affected applications, you can confirm all the Lambda functions that are affected by this insight.

Insight description information box

The next information box contains information about the CloudWatch metrics related to the proactive insight. This graph shows the metric ProvisionedConcurrecySpilloverInvocations with the summary of all the invocations in the last hours that the provisioned concurrency spilled.

Information about metrics

Relevant events are the next information box available on the page. These are AWS CloudTrail events that DevOps Guru uses combined with CloudWatch metrics and operational data to identify anomalous behavior that created the insight.

Relevant info about the insight

And finally on the page is the Recommendations information box, where DevOps Guru will output all the generated recommendations to help you address the issue. You can use the recommendations to learn the immediate steps you can take to remediate the issue.

Recommendations for the insights

In this proactive insight, DevOps Guru recommends you tune the provision concurrency of your Lambda function. It tells you to which value to set it, based on the past utilization of your function. You can also find the reasoning on why DevOps Guru recommends this insight.

Pricing and Availability
DevOps Guru for Serverless is offered to customers at no additional charge.

DevOps Guru for Serverless is available in all AWS Regions where DevOps Guru is available, US East (Ohio), US East (N. Virginia), US West (Oregon), Asia Pacific (Singapore), Asia Pacific (Sydney), Asia Pacific (Tokyo), Europe (Frankfurt), Europe (Ireland), and Europe (Stockholm).

Learn more about DevOps Guru for Serverless and register for the hands-on workshop on May 10 to learn more about this new launch.

Marcia

How to protect HMACs inside AWS KMS

Post Syndicated from Jeremy Stieglitz original https://aws.amazon.com/blogs/security/how-to-protect-hmacs-inside-aws-kms/

Today AWS Key Management Service (AWS KMS) is introducing new APIs to generate and verify hash-based message authentication codes (HMACs) using the Federal Information Processing Standard (FIPS) 140-2 validated hardware security modules (HSMs) in AWS KMS. HMACs are a powerful cryptographic building block that incorporate secret key material in a hash function to create a unique, keyed message authentication code.

In this post, you will learn the basics of the HMAC algorithm as a cryptographic building block, including how HMACs are used. In the second part of this post, you will see a few real-world use cases that show an application builder’s perspective on using the AWS KMS HMAC APIs.

HMACs provide a fast way to tokenize or sign data such as web API requests, credit cards, bank routing information, or personally identifiable information (PII).They are commonly used in several internet standards and communication protocols such as JSON Web Tokens (JWT), and are even an important security component for how you sign AWS API requests.

HMAC as a cryptographic building block

You can consider an HMAC, sometimes referred to as a keyed hash, to be a combination function that fuses the following elements:

  • A standard hash function such as SHA-256 to produce a message authentication code (MAC).
  • A secret key that binds this MAC to that key’s unique value.

Combining these two elements creates a unique, authenticated version of the digest of a message. Because the HMAC construction allows interchangeable hash functions as well as different secret key sizes, one of the benefits of HMACs is the easy replaceability of the underlying hash function (in case faster or more secure hash functions are required), as well as the ability to add more security by lengthening the size of the secret key used in the HMAC over time. The AWS KMS HMAC API is launching with support for SHA-224, SHA-256, SHA-384, and SHA-512 algorithms to provide a good balance of key sizes and performance trade-offs in the implementation. For more information about HMAC algorithms supported by AWS KMS, see HMAC keys in AWS KMS in the AWS KMS Developer Guide.

HMACs offer two distinct benefits:

  1. Message integrity: As with all hash functions, the output of an HMAC will result in precisely one unique digest of the message’s content. If there is any change to the data object (for example you modify the purchase price in a contract by just one digit: from “$350,000” to “$950,000”), then the verification of the original digest will fail.
  2. Message authenticity: What distinguishes HMAC from other hash methods is the use of a secret key to provide message authenticity. Only message hashes that were created with the specific secret key material will produce the same HMAC output. This dependence on secret key material ensures that no third party can substitute their own message content and create a valid HMAC without the intended verifier detecting the change.

HMAC in the real world

HMACs have widespread applications and industry adoption because they are fast, high performance, and simple to use. HMACs are particularly popular in the JSON Web Token (JWT) open standard as a means of securing web applications, and have replaced older technologies such as cookies and sessions. In fact, Amazon implements a custom authentication scheme, Signature Version 4 (SigV4), to sign AWS API requests based on a keyed-HMAC. To authenticate a request, you first concatenate selected elements of the request to form a string. You then use your AWS secret key material to calculate the HMAC of that string. Informally, this process is called signing the request, and the output of the HMAC algorithm is informally known as the signature, because it simulates the security properties of a real signature in that it represents your identity and your intent.

Advantages of using HMACs in AWS KMS

AWS KMS HMAC APIs provide several advantages over implementing HMACs in application software because the key material for the HMACs is generated in AWS KMS hardware security modules (HSMs) that are certified under the FIPS 140-2 program and never leave AWS KMS unencrypted. In addition, the HMAC keys in AWS KMS can be managed with the same access control mechanisms and auditing features that AWS KMS provides on all AWS KMS keys. These security controls ensure that any HMAC created in AWS KMS can only ever be verified in AWS KMS using the same KMS key. Lastly, the HMAC keys and the HMAC algorithms that AWS KMS uses conform to industry standards defined in RFC 2104 HMAC: Keyed-Hashing for Message Authentication.

Use HMAC keys in AWS KMS to create JSON Web Tokens

The JSON Web Token (JWT) open standard is a common use of HMAC. The standard defines a portable and secure means to communicate a set of statements, known as claims, between parties. HMAC is useful for applications that need an authorization mechanism, in which claims are validated to determine whether an identity has permission to perform some action. Such an application can only work if a validator can trust the integrity of claims in a JWT. Signing JWTs with an HMAC is one way to assert their integrity. Verifiers with access to an HMAC key can cryptographically assert that the claims and signature of a JWT were produced by an issuer using the same key.

This section will walk you through an example of how you can use HMAC keys from AWS KMS to sign JWTs. The example uses the AWS SDK for Python (Boto3) and implements simple JWT encoding and decoding operations. This example shows the ease with which you can integrate HMAC keys in AWS KMS into your JWT application, even if your application is in another language or uses a more formal JWT library.

Create an HMAC key in AWS KMS

Begin by creating an HMAC key in AWS KMS. You can use the AWS KMS console or call the CreateKey API action. The following example shows creation of a 256-bit HMAC key:

import boto3

kms = boto3.client('kms')

# Use CreateKey API to create a 256-bit key for HMAC
key_id = kms.create_key(
	KeySpec='HMAC_256',
	KeyUsage='GENERATE_VERIFY_MAC'
)['KeyMetadata']['KeyId']

Use the HMAC key to encode a signed JWT

Next, you use the HMAC key to encode a signed JWT. There are three components to a JWT token: the set of claims, header, and signature. The claims are the very application-specific statements to be authenticated. The header describes how the JWT is signed. Lastly, the MAC (signature) is the output of applying the header’s described operation to the message (the combination of the claims and header). All these are packed into a URL-safe string according to the JWT standard.

The following example uses the previously created HMAC key in AWS KMS within the construction of a JWT. The example’s claims simply consist of a small claim and an issuance timestamp. The header contains key ID of the HMAC key and the name of the HMAC algorithm used. Note that HS256 is the JWT convention used to represent HMAC with SHA-256 digest. You can generate the MAC using the new GenerateMac API action in AWS KMS.

import base64
import json
import time

def base64_url_encode(data):
	return base64.b64encode(data, b'-_').rstrip(b'=')

# Payload contains simple claim and an issuance timestamp
payload = json.dumps({
	"does_kms_support_hmac": "yes",
	"iat": int(time.time())
}).encode("utf8")

# Header describes the algorithm and AWS KMS key ID to be used for signing
header = json.dumps({
	"typ": "JWT",
	"alg": "HS256",
	"kid": key_id #This key_id is from the “Create an HMAC key in AWS KMS” #example. The “Verify the signed JWT” example will later #assert that the input header has the same value of the #key_id 
}).encode("utf8")

# Message to sign is of form <header_b64>.<payload_b64>
message = base64_url_encode(header) + b'.' + base64_url_encode(payload)

# Generate MAC using GenerateMac API of AWS KMS
MAC = kms.generate_mac(
	KeyId=key_id, #This key_id is from the “Create an HMAC key in AWS KMS” 
				 #example
	MacAlgorithm='HMAC_SHA_256',
	Message=message
)['Mac']

# Form JWT token of form <header_b64>.<payload_b64>.<mac_b64>
jwt_token = message + b'.' + base64_url_encode(mac)

Verify the signed JWT

Now that you have a signed JWT, you can verify it using the same KMS HMAC key. The example below uses the new VerifyMac API action to validate the MAC (signature) of the JWT. If the MAC is invalid, AWS KMS returns an error response and the AWS SDK throws an exception. If the MAC is valid, the request succeeds and the application can continue to do further processing on the token and its claims.

def base64_url_decode(data):
	return base64.b64decode(data + b'=' * (4 - len(data) % 4), b'-_')

# Parse out encoded header, payload, and MAC from the token
message, mac_b64 = jwt_token.rsplit(b'.', 1)
header_b64, payload_b64 = message.rsplit(b'.', 1)

# Decode header and verify its contents match expectations
header_map = json.loads(base64_url_decode(header_b64).decode("utf8"))
assert header_map == {
	"typ": "JWT",
	"alg": "HS256",
	"kid": key_id #This key_id is from the “Create an HMAC key in AWS KMS” 
				 #example
}

# Verify the MAC using VerifyMac API of AWS KMS. # If the verification fails, this will throw an error.
kms.verify_mac(
	KeyId=key_id, #This key_id is from the “Create an HMAC key in AWS KMS” 
				 #example
	MacAlgorithm='HMAC_SHA_256',
	Message=message,
	Mac=base64_url_decode(mac_b64)
)

# Decode payload for use application-specific validation/processing
payload_map = json.loads(base64_url_decode(payload_b64).decode("utf8"))

Create separate roles to control who has access to generate HMACs and who has access to validate HMACs

It’s often helpful to have separate JWT creators and validators so that you can distinguish between the roles that are allowed to create tokens and the roles that are allowed to verify tokens. HMAC signatures performed outside of AWS-KMS don’t work well for this because you can’t isolate creators and verifiers if they both must have a copy of the same key. However, this is not an issue for HMAC keys in AWS KMS. You can use key policies to separate out who has permission to ask AWS KMS to generate HMACs and who has permission to ask AWS KMS to validate. Each party uses their own unique access keys to access the HMAC key in AWS KMS. Only HSMs in AWS KMS will ever have access to the actual key material. See the following example key policy statements that separate out GenerateMac and VerifyMac permissions:

{
	"Id": "example-jwt-policy",
	"Version": "2012-10-17",
	"Statement": [
		{
			"Sid": "Allow use of the key for creating JWTs",
			"Effect": "Allow",
			"Principal": {
				"AWS": "arn:aws:iam::111122223333:role/JwtProducer"
			},
			"Action": [
				"kms:GenerateMac"
			],
			"Resource": "*"
		},
		{
			"Sid": "Allow use of the key for validating JWTs",
			"Effect": "Allow",
			"Principal": {
				"AWS": "arn:aws:iam::111122223333:role/JwtConsumer"
			},
			"Action": [
				"kms:VerifyMac"
			],
			"Resource": "*"
		}
	]
}

Conclusion

In this post, you learned about the new HMAC APIs in AWS KMS (GenerateMac and VerifyMac). These APIs complement existing AWS KMS cryptographic operations: symmetric key encryption, asymmetric key encryption and signing, and data key creation and key enveloping. You can use HMACs for JWTs, tokenization, URL and API signing, as a key derivation function (KDF), as well as in new designs that we haven’t even thought of yet. To learn more about HMAC functionality and design, see HMAC keys in AWS KMS in the AWS KMS Developer Guide.

If you have feedback about this post, submit comments in the Comments section below. If you have questions about this post, start a new thread on the KMS re:Post or contact AWS Support.
Want more AWS Security news? Follow us on Twitter.

Author

Jeremy Stieglitz

Jeremy is the Principal Product Manager for AWS Key Management Service (KMS) where he drives global product strategy and roadmap for AWS KMS. Jeremy has more than 20 years of experience defining new products and platforms, launching and scaling cryptography solutions, and driving end-to-end product strategies. Jeremy is the author or co-author of 23 patents in network security, user authentication and network automation and control.

Author

Peter Zieske

Peter is a Senior Software Developer on the AWS Key Management Service team, where he works on developing features on the service-side front-end. Outside of work, he enjoys building with LEGO, gaming, and spending time with family.

AWS Week in Review – April 18, 2022

Post Syndicated from Antje Barth original https://aws.amazon.com/blogs/aws/aws-week-in-review-april-18-2022/

This post is part of our Week in Review series. Check back each week for a quick roundup of interesting news and announcements from AWS!

Here we are with another roundup of the most significant AWS launches from the previous week. Among the news, we have a new deployment option for Amazon FSx for NetApp ONTAP, performance and scaling improvements done in AWS Fargate, and an update on the AWS AI & ML Scholarship program.

Last Week’s Launches
Here are some launches that caught my attention last week:

Amazon FSx for NetApp ONTAP introduces a single Availability Zone (AZ) deployment option – Amazon FSx for NetApp ONTAP allows you to launch and run fully managed ONTAP file systems in the cloud. With the new single-AZ deployment option, you can now implement use cases that need storage replicated within an Availability Zone but do not require resiliency across AZs. This could be use cases such as development and test workloads or storing secondary copies of data already stored on-premises or in other AWS Regions. Check out Jeff’s launch blog post to learn more.

Amazon FSx for NetApp ONTAP - Single AZ Deployment

AWS Fargate now delivers faster scaling of applications – AWS Fargate is a serverless compute engine for containers that works with both Amazon Elastic Container Service (Amazon ECS) and Amazon Elastic Kubernetes Service (Amazon EKS). The team has made several improvements over the last year that enable you to scale applications up to 16X faster, making it easier to build and run applications at a larger scale on Fargate. Check out Nathan’s blog post to learn more.

AWS Fargate now delivers faster scaling of applications

AWS AI & ML Scholarship Program opens applications for underrepresented and underserved students – You can now apply for the AWS AI & ML Scholarship Program that will launch this summer. The scholarship program aims to help underserved and underrepresented high school and college students learn foundational ML concepts to prepare them for careers in AI and ML. The program uses AWS DeepRacer Student to teach foundational ML concepts, offer hands-on learning, and track scholarship prerequisites. Check out Anastacia’s blog post for more information and how to apply.

Apply for the AWS AI & ML Scholarship Program through AWS DeepRacer Student

AWS App Runner launches AWS X-Ray support – AWS App Runner is a fully managed service that developers can use to quickly deploy containerized web applications and APIs at scale with little to no infrastructure experience. App Runner now supports tracing as part of its observability suite. You can trace your containerized applications in AWS X-Ray by instrumenting applications with the AWS Distro for OpenTelemetry (ADOT). Check out Yiming’s blog post for more information.

For a full list of AWS announcements, be sure to keep an eye on the What’s New at AWS page.

Other AWS News
Here are additional news and a blog post that caught my attention:

AWS Open-Source News and Updates – My colleague Ricardo Sueiras writes this weekly open-source newsletter in which he highlights new open-source projects, tools, and demos from the AWS Community. Read edition #108 here.

Scheduling Jupyter Notebooks with AWS Orbit Workbench – In this blog post, Olalekan Elesin, Head of Data Platform & Data Architect at HRS Group and AWS Machine Learning Hero, describes how the HRS Group is scheduling Jupyter Notebooks with AWS Orbit Workbench. AWS Orbit Workbench is an open-source framework that provides a single, unified experience for your data, analytics and machine learning projects. Check out Olalekan’s blog post to learn more.

Upcoming AWS Events
Check your calendars and sign up for these AWS events:

AWS SummitThe AWS Summit season is in full swing – The next AWS Summits are taking place in San Francisco (on April 20-21), London (on April 27), Madrid (on May 4-5) and Korea (online, on May 10-11). AWS Global Summits are free events that bring the cloud computing community together to connect, collaborate, and learn about AWS. Summits are held in major cities around the world. Besides in-person summits, we also offer a series of online summits across the regions. Find an AWS Summit near you, and get notified when registration opens in your area.

.NET Enterprise Developer Day EMEA .NET Enterprise Developer Day EMEA 2022 is a free, one-day virtual conference providing enterprise developers with the most relevant information to swiftly and efficiently migrate and modernize their .NET applications and workloads on AWS. It takes place online on April 26. Attendees can also opt-in to attend the free, virtual DeveloperWeek Europe event, taking place April 27-28.

AWS Innovate - Data EditionAWS Innovate – Data Edition Americas AWS Innovate Online Conference – Data Edition is a free virtual event designed to inspire and empower you to make better decisions and innovate faster with your data. You learn about key concepts, business use cases, and best practices from AWS experts in over 30 technical and business sessions. This event takes place on May 11.

That’s all for this week. Check back next Monday for another Week in Review!

Antje

AWS Week in Review – April 11, 2022

Post Syndicated from Channy Yun original https://aws.amazon.com/blogs/aws/aws-week-in-review-april-11-2022/

This post is part of our Week in Review series. Check back each week for a quick round up of interesting news and announcements from AWS!

As spring arrives in the Northern Hemisphere, tulips, sunshine, and cherry blossoms finally appear to be in bloom—surely signs of warmer days to come in North America, Asia, and Europe. I hope you enjoy the spring and, in the Southern Hemisphere, fall season with your family.

Let’s look the second edition of the AWS Week in Review for the month of April!

Last Week’s Launches
Here are some launches that caught my attention last week:

New Amazon EC2 Single Page Instance Launching Console – As Jeff introduced, the Amazon EC2 console introduces the new and improved launch experience—a quicker and easier way to launch an instance. The new design provides a single page layout, allowing you to view all your settings in one location. You no longer need to navigate back and forth between steps to ensure your configuration is correct. The new design also introduces a summary panel that provides an overview and helps navigate the page. Quickly get started by following the simple steps and see the EC2 documentation to learn more.

Unified Settings in the AWS Management Console – New Unified Settings will persist across devices, browsers, and services. It supports settings called default language, Region, visual theme such as either light or dark mode, and favorites bar with either the service icon and full name or only the service icon. You can access Unified Settings by signing in to the AWS Management Console, navigating to the account menu, and selecting Settings in all AWS Regions.

AWS Lambda Function URLs – This is really big news! AWS Lambda Function URLs is a new feature that makes it easier to invoke functions through an HTTPS endpoint as a built-in capability of the AWS Lambda service. You can add Function URLs to new and existing functions easily from the Lambda console. Function URLs are ideal for getting started with building web services on Lambda or for common tasks like building webhooks. To get started quickly and learn more, see Alex’s blog post.

Amazon CloudWatch Metrics Insights is Now Generally Available – As a fast, flexible, SQL-based query engine, Amazon CloudWatch Metrics Insights enables you to identify trends and patterns across millions of operational metrics in real time and helps you use these insights to reduce time to resolution. With Metrics Insights, you can gain better visibility on your infrastructure and large-scale application performance with flexible querying and on-the-fly metric aggregations. To get started, select the All metrics link under Metrics on the left navigation panel of the CloudWatch console and browse to the Query tab. To learn more, see the Metrics Insights documentation.

AWS Amplify Studio’s New File Storage and File Management – This new feature makes it easy to store and serve user-generated content (such as photos and videos) from web or mobile apps. With Amplify Studio, you can easily create an Amazon Simple Storage Service (Amazon S3) bucket, configure file access levels, integrate storage client libraries into your web or mobile app, and manage files in Studio’s drag-and-drop file explorer. Get started by reading Nikhil’s blog post on how to provision Storage directly from your Amplify Studio.

You can either select Upload files or drag and drop files onto your browser

For a full list of AWS announcements, be sure to keep an eye on the What’s New at AWS page.

Other AWS News
Here are some featured news items about open-source and community support at AWS in the last week:

Amazon Athena ACID Transactions Powered by Apache Iceberg – We announced the general availability of Amazon Athena ACID transactions, a new capability that adds insert, update, delete, and time travel operations to Athena’s SQL data manipulation language (DML). Built on the Apache Iceberg table format, Athena ACID transactions are optimized for Amazon S3 storage, support seamless schema evolution, and ensure atomic operations across other services and engines that support the Iceberg table format. To learn more, see Using Amazon Athena Transactions and Using Iceberg Tables in the Athena User Guide.

Amazon OpenSearch Service Now Supports OpenSearch 1.2 – We launched support for OpenSearch 1.0 on Amazon OpenSearch Service in September 2021 and for OpenSearch 1.1 in January 2022. The support included features of OpenSearch 1.2 such as transforms, data streams, notebooks, cross-cluster replication, and improvements to anomaly detection and alerting.

Amazon EKS Now Supports Kubernetes 1.22 – Customers can start taking advantage of the numerous enhancements and new generally available APIs in Kubernetes 1.22. In line with the Kubernetes community support for Kubernetes versions, Amazon EKS is committed to supporting at least four production-ready versions of Kubernetes at any given time. You can learn about how to upgrade your EKS version in our blog posts Amazon EKS now supports Kubernetes 1.22 and Planning Kubernetes Upgrades with Amazon EKS.

The New AWS Community Builders Directory – You can find over 800 AWS Community Builders in the global directory. Community Builders are technical enthusiasts and emerging thought leaders who are passionate about sharing knowledge and connecting with the technical community. You can contact all Community Builders in the directory to engage the AWS Community in your Region. To see created and shared content by them, check them out on dev.to.

Upcoming AWS Events
Check your calendars and sign up for these AWS events:

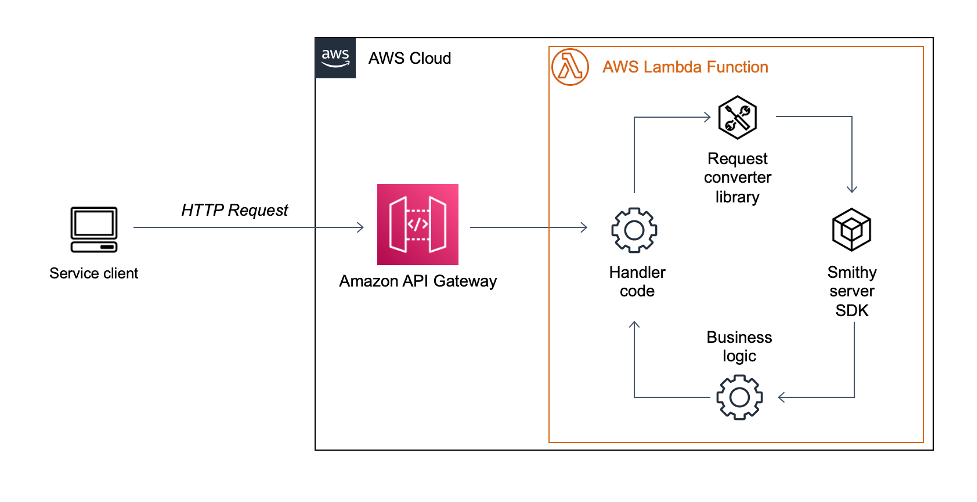
AWS Summits in the Asia-Pacific Are Back – I am happy to announce newly scheduled AWS Summits Online in the Asia-Pacific Regions such as Korea (on May 10–11), ASEAN (on May 18), and Australia & New Zealand (on May 18–19). More in-person summits in May are coming in Madrid (on May 4), Stockholm (on May 11), Berlin (on May 11–12), Tel Aviv (on May 18), and Atlanta (on May 18–19). Find an AWS Summit near you!

AWS Online Tech Talks for April – These talks cover a range of topics and expertise levels and features technical deep dives, demonstrations, customer examples, and live Q&A with AWS experts. Over 20 virtual or on-demand seminars have been scheduled from April 18–29. You can also find archived on-demand videos from previous AWS Online Tech Talks.

AWS Solutions-Focused Immersion Days – This is a series of events that are designed to educate you about AWS products and services and help you develop the skills needed to build, deploy, and operate your infrastructure and applications in the cloud. Hands on labs provide you with an immersive experience in the AWS console. Join us to learn how to build on AWS.

To find more about AWS events and webinars, explore the all AWS Events page.

That’s all for this week. Check back next Monday for another Week in Review!

Channy

Announcing AWS Lambda Function URLs: Built-in HTTPS Endpoints for Single-Function Microservices

Post Syndicated from Alex Casalboni original https://aws.amazon.com/blogs/aws/announcing-aws-lambda-function-urls-built-in-https-endpoints-for-single-function-microservices/

Organizations are adopting microservices architectures to build resilient and scalable applications using AWS Lambda. These applications are composed of multiple serverless functions that implement the business logic. Each function is mapped to API endpoints, methods, and resources using services such as Amazon API Gateway and Application Load Balancer.

But sometimes all you need is a simple way to configure an HTTPS endpoint in front of your function without having to learn, configure, and operate additional services besides Lambda. For example, you might need to implement a webhook handler or a simple form validator that runs within an individual Lambda function.

Today, I’m happy to announce the general availability of Lambda Function URLs, a new feature that lets you add HTTPS endpoints to any Lambda function and optionally configure Cross-Origin Resource Sharing (CORS) headers.

This lets you focus on what matters while we take care of configuring and monitoring a highly available, scalable, and secure HTTPS service.

How Lambda Function URLs Work
Create a new function URL and map it to any function. Each function URL is globally unique and can be associated with a function’s alias or the function’s unqualified ARN, which implicitly invokes the $LATEST version.

For example, if you map a function URL to your $LATEST version, each code update will be available immediately via the function URL. On the other hand, I’d recommend mapping a function URL to an alias, so you can safely deploy new versions, perform some integration tests, and then update the alias when you’re ready. This also lets you implement weighted traffic shifting and safe deployments.

Function URLs are natively supported by the Lambda API, and you can start using it via the AWS Management Console or AWS SDKs, as well as infrastructure as code(IaC) tools such as AWS CloudFormation, AWS SAM, or AWS Cloud Development Kit (AWS CDK).

Lambda Function URLs in Action
You can configure a function URL for a new or an existing function. Let’s see how to implement a new function to handle a webhook.

When creating a new function, I check Enable function URL in Advanced Settings.

Here, I select Auth type: AWS_IAM or NONE. My webhook will use custom authorization logic based on a signature provided in the HTTP headers. Therefore, I’ll choose AuthType None, which means Lambda won’t check for any AWS IAM Sigv4 signatures before invoking my function. Instead, I’ll extract and validate a custom header in my function handler for authorization.

AWS Lambda URLs - Create Function

Please note that when using AuthType None, my function’s resource-based policy must still explicitly allow for public access. Otherwise, unauthenticated requests will be rejected. You can add permissions programmatically using the AddPermission API. In this case, the Lambda console automatically adds the necessary policy for me, as the IAM role I’m using is authorized to call the AddPermission API in my account.

With one click, I can also enable CORS. The default CORS configuration will allow all origins. Then, I’ll add more granular controls after creating the function. In case you’re not familiar with CORS, it’s a header-based security mechanism implemented by browsers to make sure that only certain hosts are allowed to load resources and invoke APIs. If a website is allowed to consume your API, you’ll need to include a few CORS headers that declare which origins, methods, and custom headers are allowed. The new function URLs take care of it for you, so you don’t have to implement all of this in your Lambda handler.

A few seconds later, the function URL is available. I can also easily find and copy it in the Lambda console.

AWS Lambda URLs - Console URL

The function code that handles my webhook in Node.js looks like this:

exports.handler = async (event) => {
    
    // (optional) fetch method and querystring
    const method = event.requestContext.http.method;
    const queryParam = event.queryStringParameters.myCustomParameter;
    console.log(`Received ${method} request with ${queryParam}`)
    
    // retrieve signature and payload
    const webhookSignature = event.headers.SignatureHeader;
    const webhookPayload = JSON.parse(event.body);
    
    try {
        validateSignature(webhookSignature); // throws if invalid signature
        handleEvent(webhookPayload); // throws if processing error
    } catch (error) {
        console.error(error)
        return {
            statusCode: 400,
            body: `Cannot process event: ${error}`,
        }
    }

    return {
        statusCode: 200, // default value
        body: JSON.stringify({
            received: true,
        }),
    };
};

The code is extracting a few parameters from the request headers, query string, and body. If you’re already familiar with the event structure provided by API Gateway or Application Load Balancer, this should look very familiar.

After updating the code, I decide to test the function URL with an HTTP client.

For example, here’s how I’d do it with curl:

$ curl "https://4iykoi7jk2kp5hhd5irhbdprn40yxest.lambda-url.us-west-2.on.aws/?myCustomParameter=squirrel"
    -X POST
    -H "SignatureHeader: XYZ"
    -H "Content-type: application/json"
    -d '{"type": "payment-succeeded"}'

Or with a Python script:

import json
import requests

url = "https://4iykoi7jk2kp5hhd5irhbdprn40yxest.lambda-url.us-west-2.on.aws/"
headers = {'SignatureHeader': 'XYZ', 'Content-type': 'application/json'}
payload = json.dumps({'type': 'payment-succeeded'})
querystring = {'myCustomParameter': 'squirrel'}

r = requests.post(url=url, params=querystring, data=payload, headers=headers)
print(r.json())

Don’t forget to set the request’s Content-type to application/json or text/* in your tests, otherwise, the body will be base64-encoded by default, and you’ll need to decode it in the Lambda handler.

Of course, in this case we’re talking about a webhook, so this function will receive requests directly from the external system that I’m integrating with. I only need to provide them with the public function URL and start receiving events.

For this specific use case, I don’t need any CORS configuration. In other cases where the function URL is called from the browser, I’d need to configure a few more CORS parameters such as Access-Control-Allow-Origin, Access-Control-Allow-Methods, and Access-Control-Expose-Headers. I can easily review and edit these CORS parameters in the Lambda console or in my IaC templates. Here’s what it looks like in the console:

AWS Lambda URLs - CORS

Also, keep in mind that each function URL is unique and mapped to a specific alias or the $LATEST version of your function. This lets you define multiple URLs for the same function. For example, you can define one for testing the $LATEST version during development and one for each stage or alias, such as staging, production, and so on.

Support for Infrastructure as Code (IaC)
You can start configuring Lambda Function URLs directly in your IaC templates today using AWS CloudFormation, AWS SAM, and AWS Cloud Development Kit (AWS CDK).

For example, here’s how to define a Lambda function and its public URL with AWS SAM, including the alias mapping:

WebhookFunction:
    Type: AWS::Serverless::Function
    Properties:
      CodeUri: webhook/
      Handler: index.handler
      Runtime: nodejs14.x
      AutoPublishAlias: live
      FunctionUrlConfig:
        AuthType: NONE
        Cors:
            AllowOrigins:
                - "https://example.com"

If you have existing Lambda functions in your IaC templates, you can define a new function URL with a few lines of code.

Function URL Pricing
Function URLs are included in Lambda’s request and duration pricing. For example, let’s imagine that you deploy a single Lambda function with 128 MB of memory and an average invocation time of 50 ms. The function receives five million requests every month, so the cost will be $1.00 for the requests, and $0.53 for the duration. The grand total is $1.53 per month, in the US East (N. Virginia) Region.

When to use Function URLs vs. Amazon API Gateway
Function URLs are best for use cases where you must implement a single-function microservice with a public endpoint that doesn’t require the advanced functionality of API Gateway, such as request validation, throttling, custom authorizers, custom domain names, usage plans, or caching. For example, when you are implementing webhook handlers, form validators, mobile payment processing, advertisement placement, machine learning inference, and so on. It is also the simplest way to invoke your Lambda functions during research and development without leaving the Lambda console or integrating additional services.

Amazon API Gateway is a fully managed service that makes it easy for you to create, publish, maintain, monitor, and secure APIs at any scale. Use API Gateway to take advantage of capabilities like JWT/custom authorizers, request/response validation and transformation, usage plans, built-in AWS WAF support, and so on.

Generally Available Today
Function URLs are generally available today in all AWS Regions where Lambda is available, except for the AWS China Regions. Support is also available through many AWS Lambda Partners such as Datadog, Lumigo, Pulumi, Serverless Framework, Thundra, and Dynatrace.

I’m looking forward to hearing how you’re using this new functionality to simplify your serverless architectures, especially in single-function use cases where you want to keep things simple and cost-optimized.

Check out the new Lambda Function URLs documentation.

Alex