Zabbix API enables you to collect any and all information from your Zabbix instance by using a multitude of API methods. You can even utilize Zabbix API calls in your HTTP items. For example, this can be used to monitor the number of particular sets of metrics and visualize their growth over time. With named Zabbix API tokens, such use cases are a lot more simple to implement.
Before Zabbix 5.4 we had to perform the user.login API call to obtain the authentication token. Once the user session was closed, we had to relog, obtain the new authentication token and use it in the subsequent API calls.
With the pre-defined named Zabbix API tokens, you don’t have to constantly check if the authentication token needs to be updated. Starting from Zabbix 5.4 you can simply create a new named Zabbix API token with an expiration date and use it in your API calls.
Creating a new named Zabbix API token
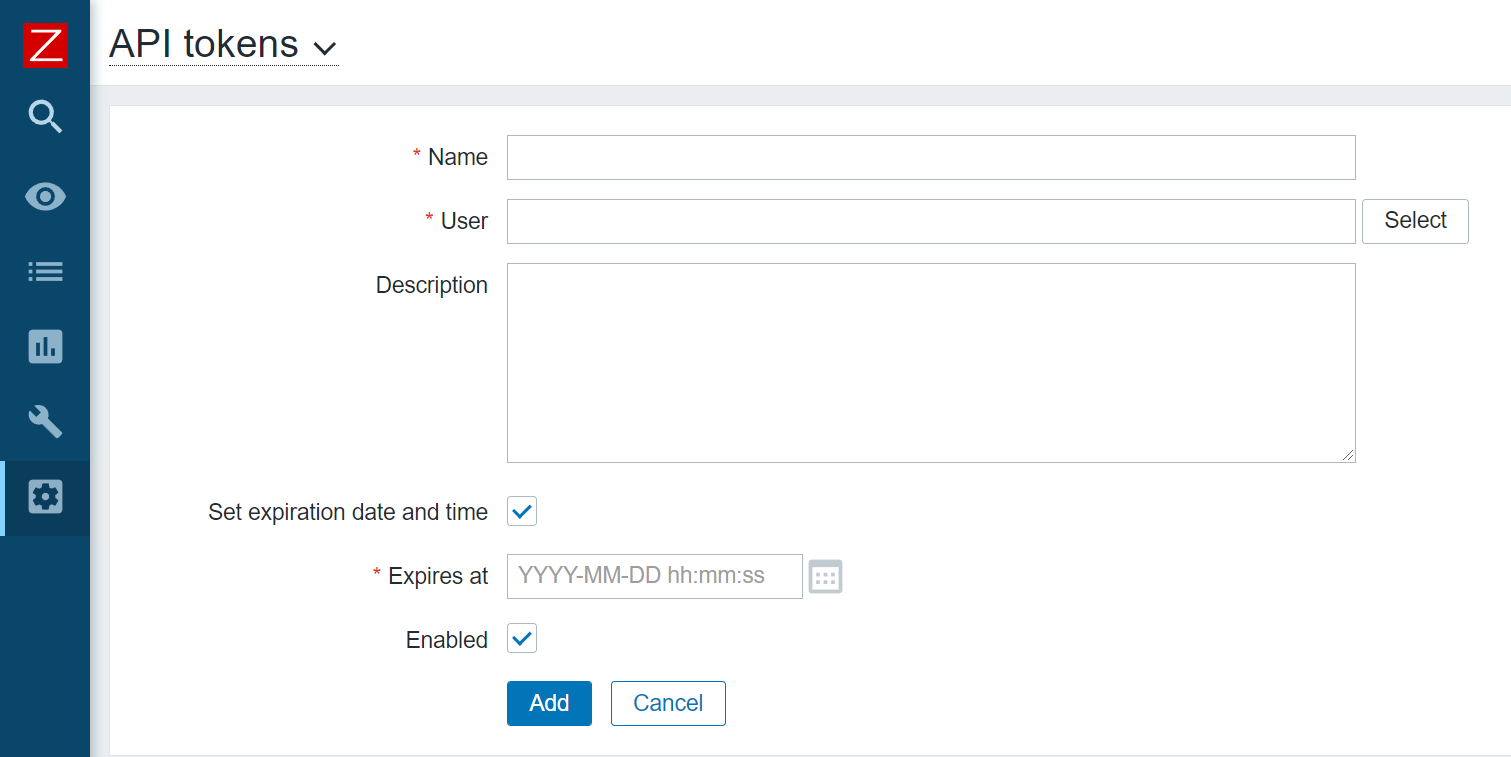
The Zabbix API token creation process is extremely simple. All you have to do is navigate to Administration – General – API tokens and create a new API token. The named API tokens are created for a particular user and can have an optional expiration date and time – otherwise, the tokens are defined without an expiry date.
You can create a named API token in the API tokens section, under Administration – General
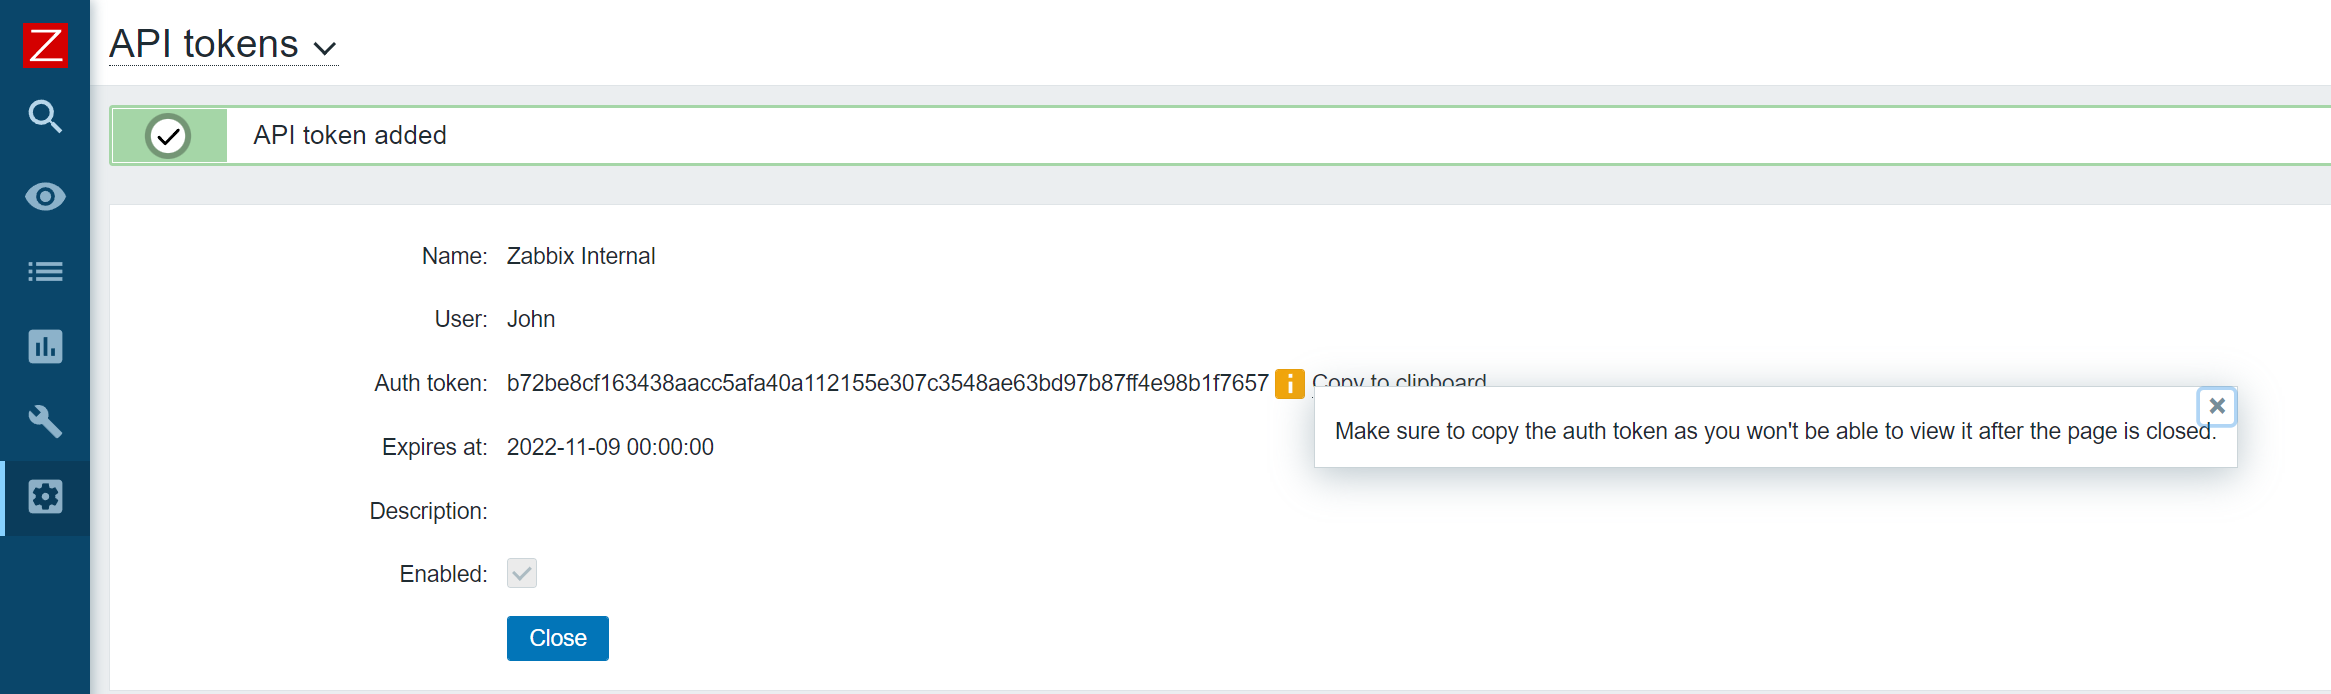
Once the Token has been created, make sure to store it somewhere safe, since you won’t be able to recover it afterward. If the token is lost – you will have to recreate it.
Make sure to store the auth token!
Don’t forget, that when defining a role for the particular API user, we can restrict which API methods this user has access to.
Simplifying API tasks with the named API token
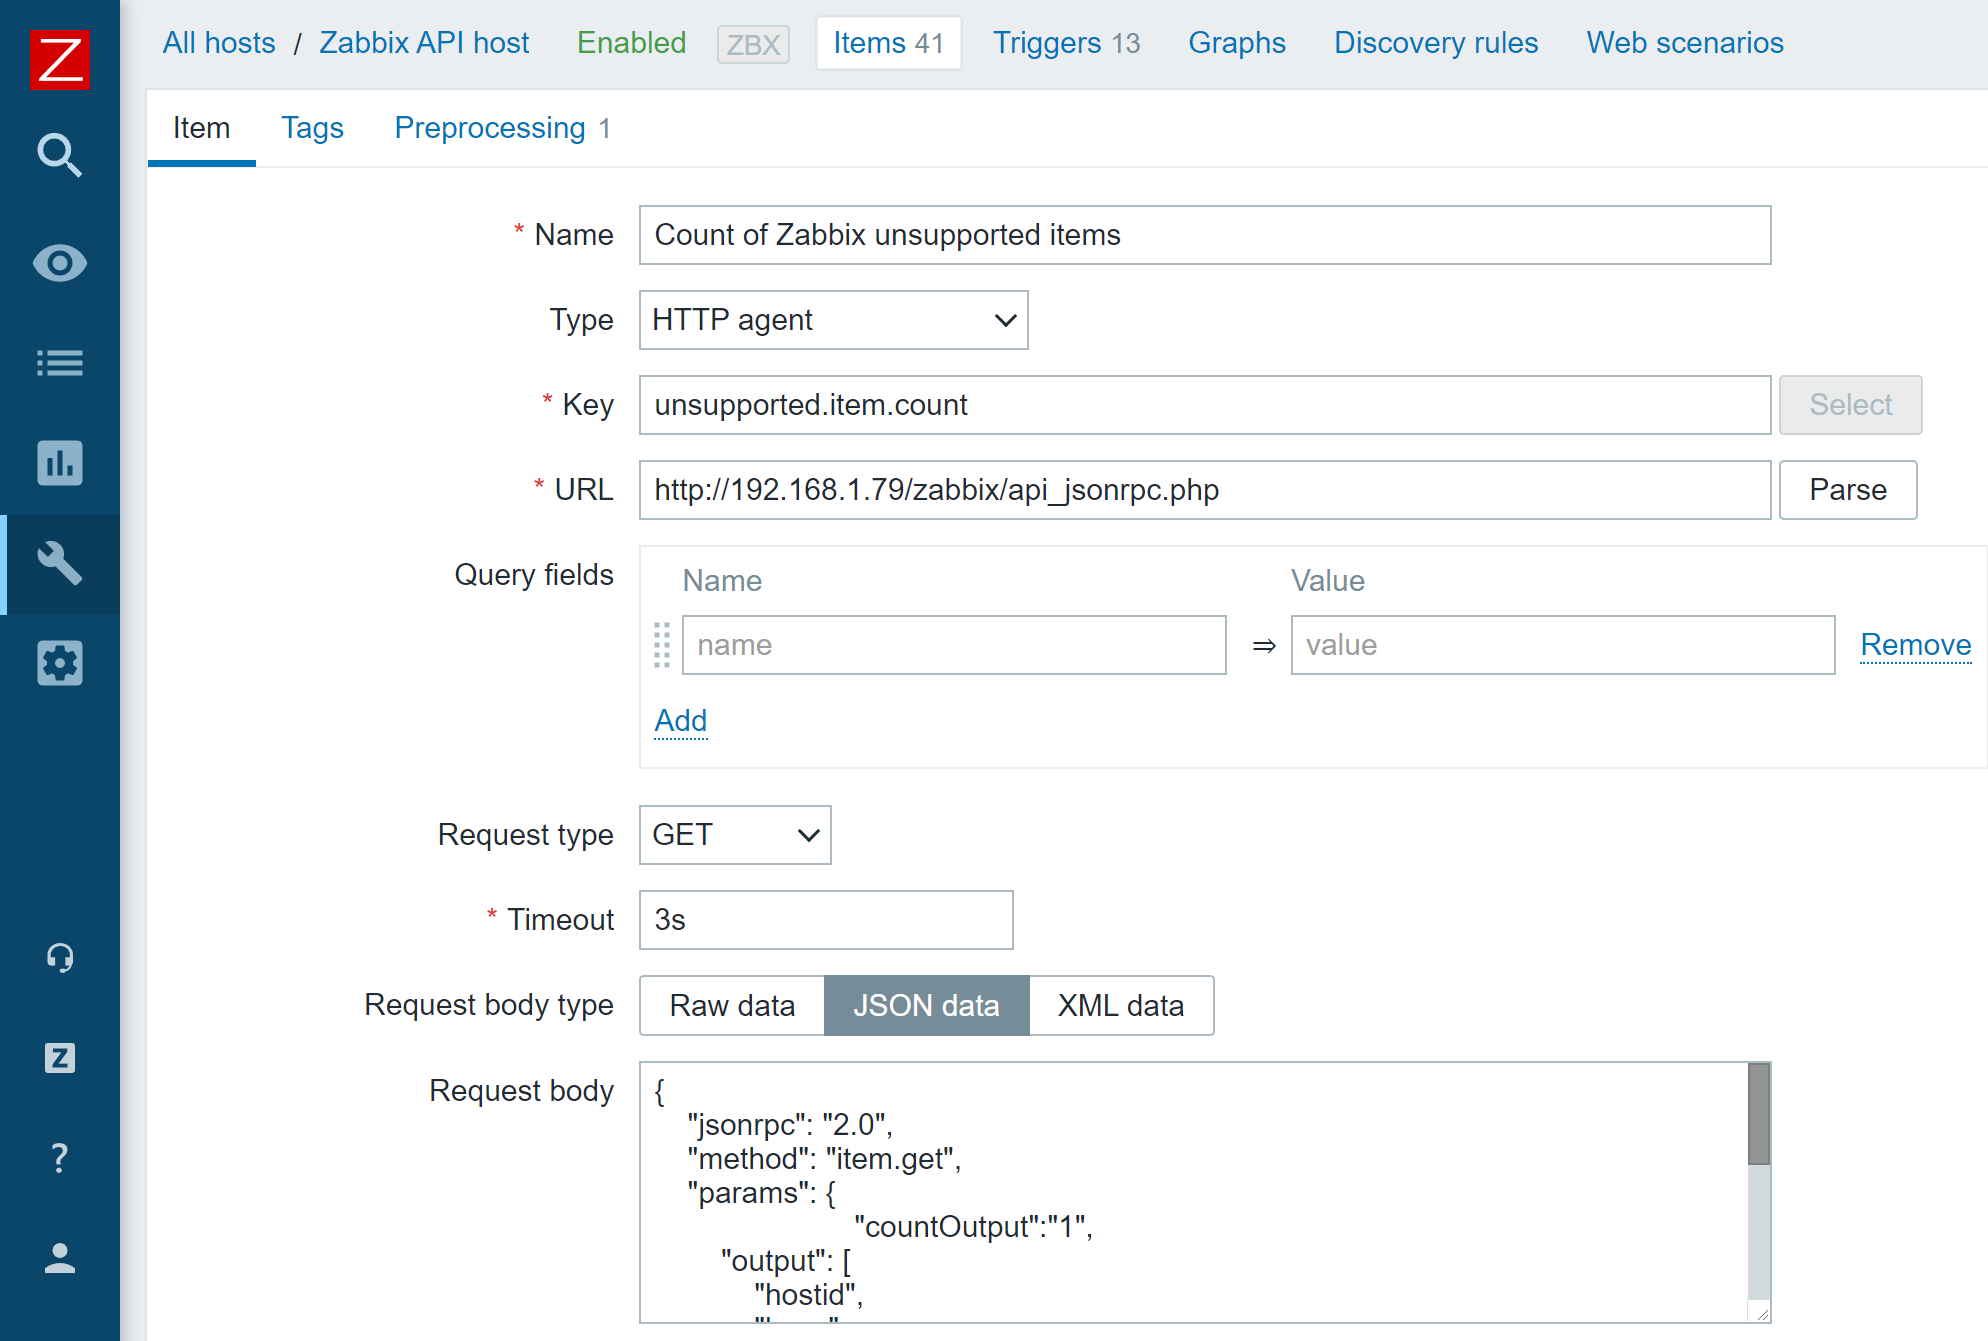
There are many different use cases where you could implement Zabbix API calls to collect some additional information. For this blog post, I will create an HTTP item that uses item.get API call to monitor the number of unsupported items.
To achieve that, I will create an HTTP item on a host (This can be the default Zabbix server host or a host dedicated to collecting metrics via Zabbix API calls) and provide the API call in the request body. Since the named API token now provides a static authentication token until it expires, I can simply use it in my API call without the need to constantly keep it updated.
An HTTP agent item that uses a Zabbix API call in its request body
HTTP item request body, which returns a count of unsupported items
I will also use regular expression preprocessing to obtain the numeric value from the API call result – otherwise, we won’t be able to graph our value or calculate trends for it.
Regular expression preprocessing step to obtain a numeric value from our Zabbix API call result
Utilizing Zabbix API scripts in Actions
In one of our previous blog posts, we covered resolving problems automatically with the event.acknowledge API method. The logic defined in the blog post was quite complex since we needed to keep an eye out for the authentication tokens and use a custom script to keep them up to date. With named Zabbix API tokens, this use case is a lot more simple.
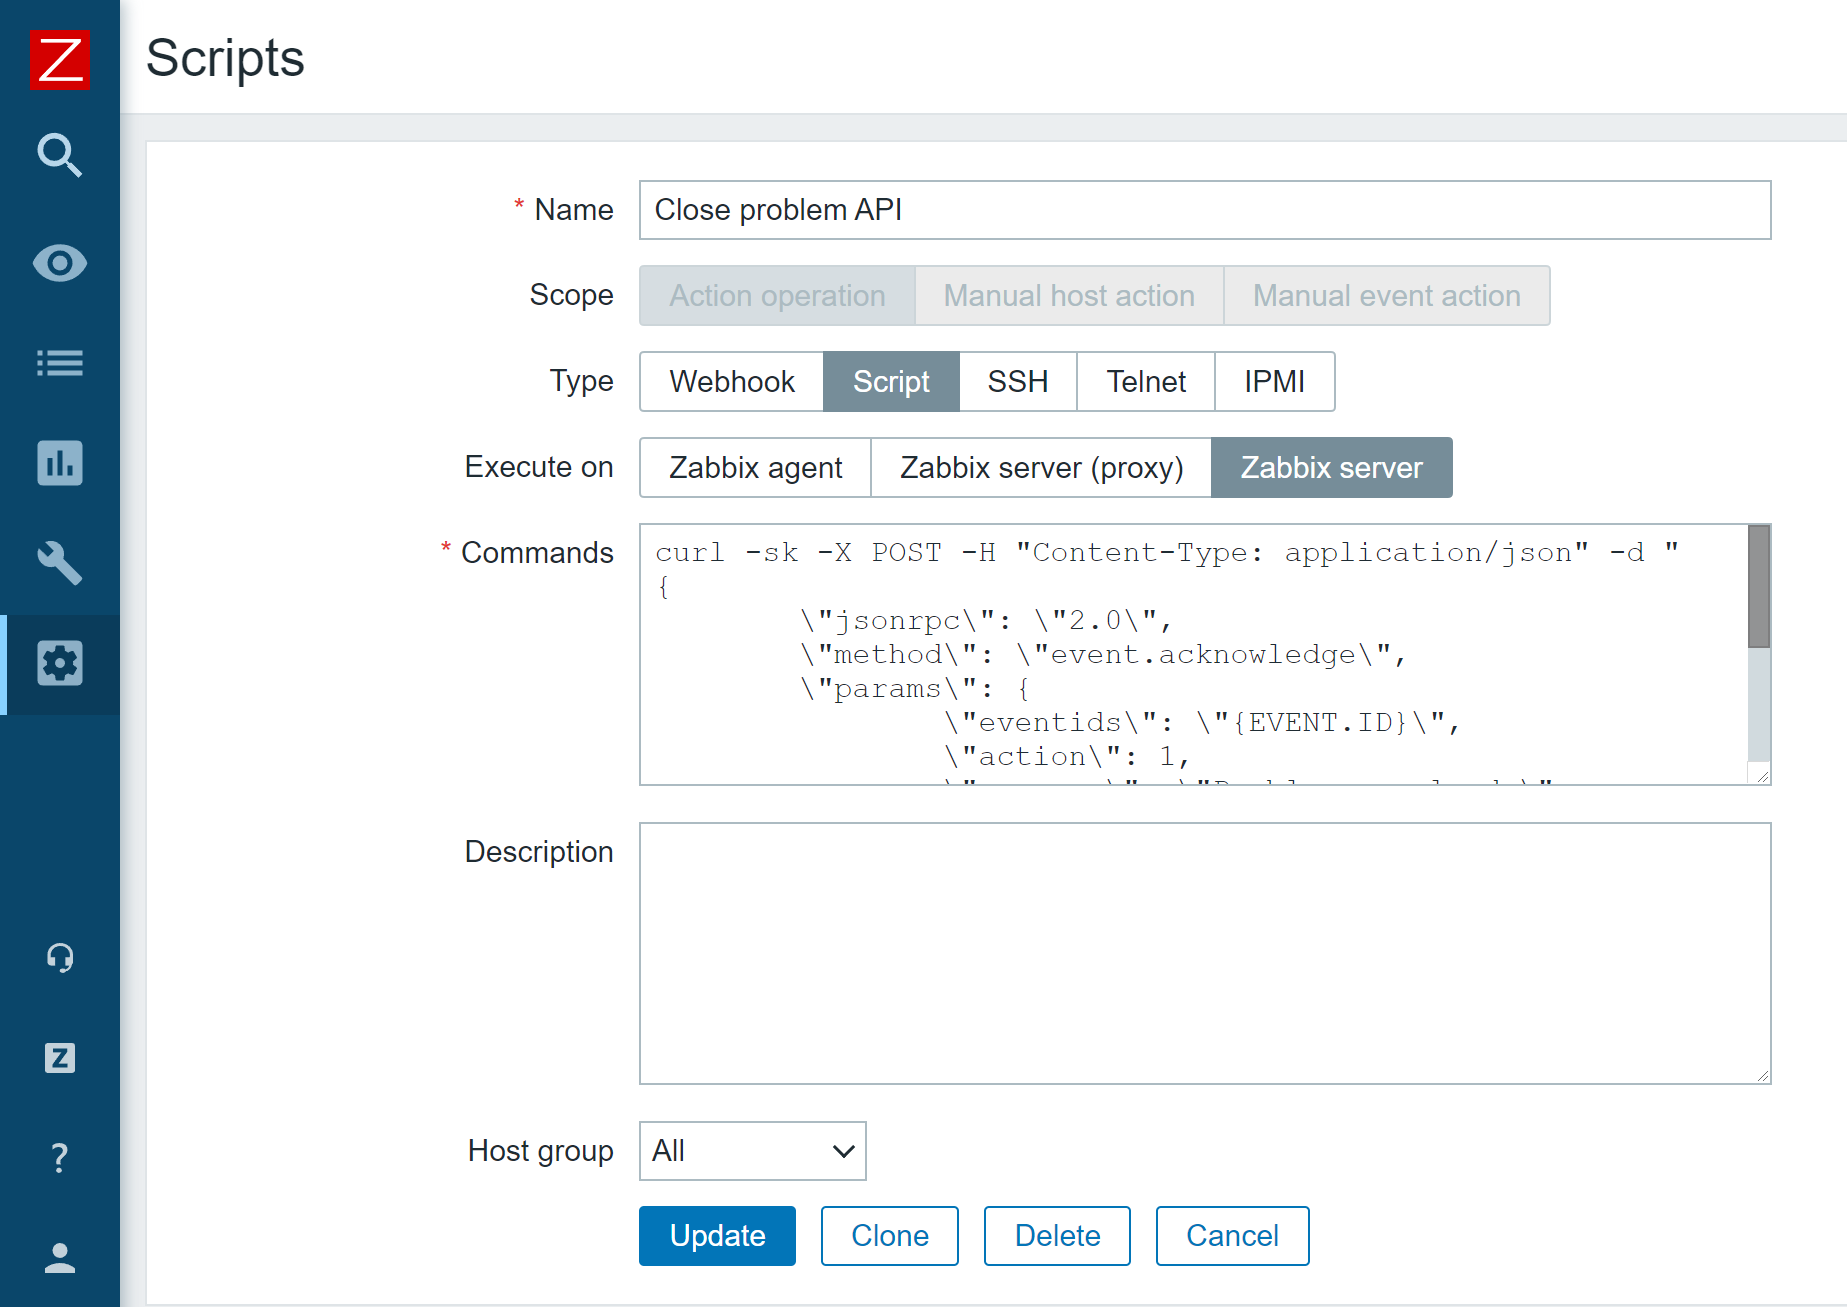
All I have to do is create an Action operation script containing my API call and pass it to an action operation.
Action operation script that invokes Zabbix event.acknowledge API method
curl -sk -X POST -H "Content-Type: application/json" -d "
{
\"jsonrpc\": \"2.0\",
\"method\": \"event.acknowledge\",
\"params\": {
\"eventids\": \"{EVENT.ID}\",
\"action\": 1,
\"message\": \"Problem resolved.\"
},
\"auth\": \"<Place your authentication token here>",
\"id\": 2
}" <Place your Zabbix API endpoint URL here>
Problem remediation script example
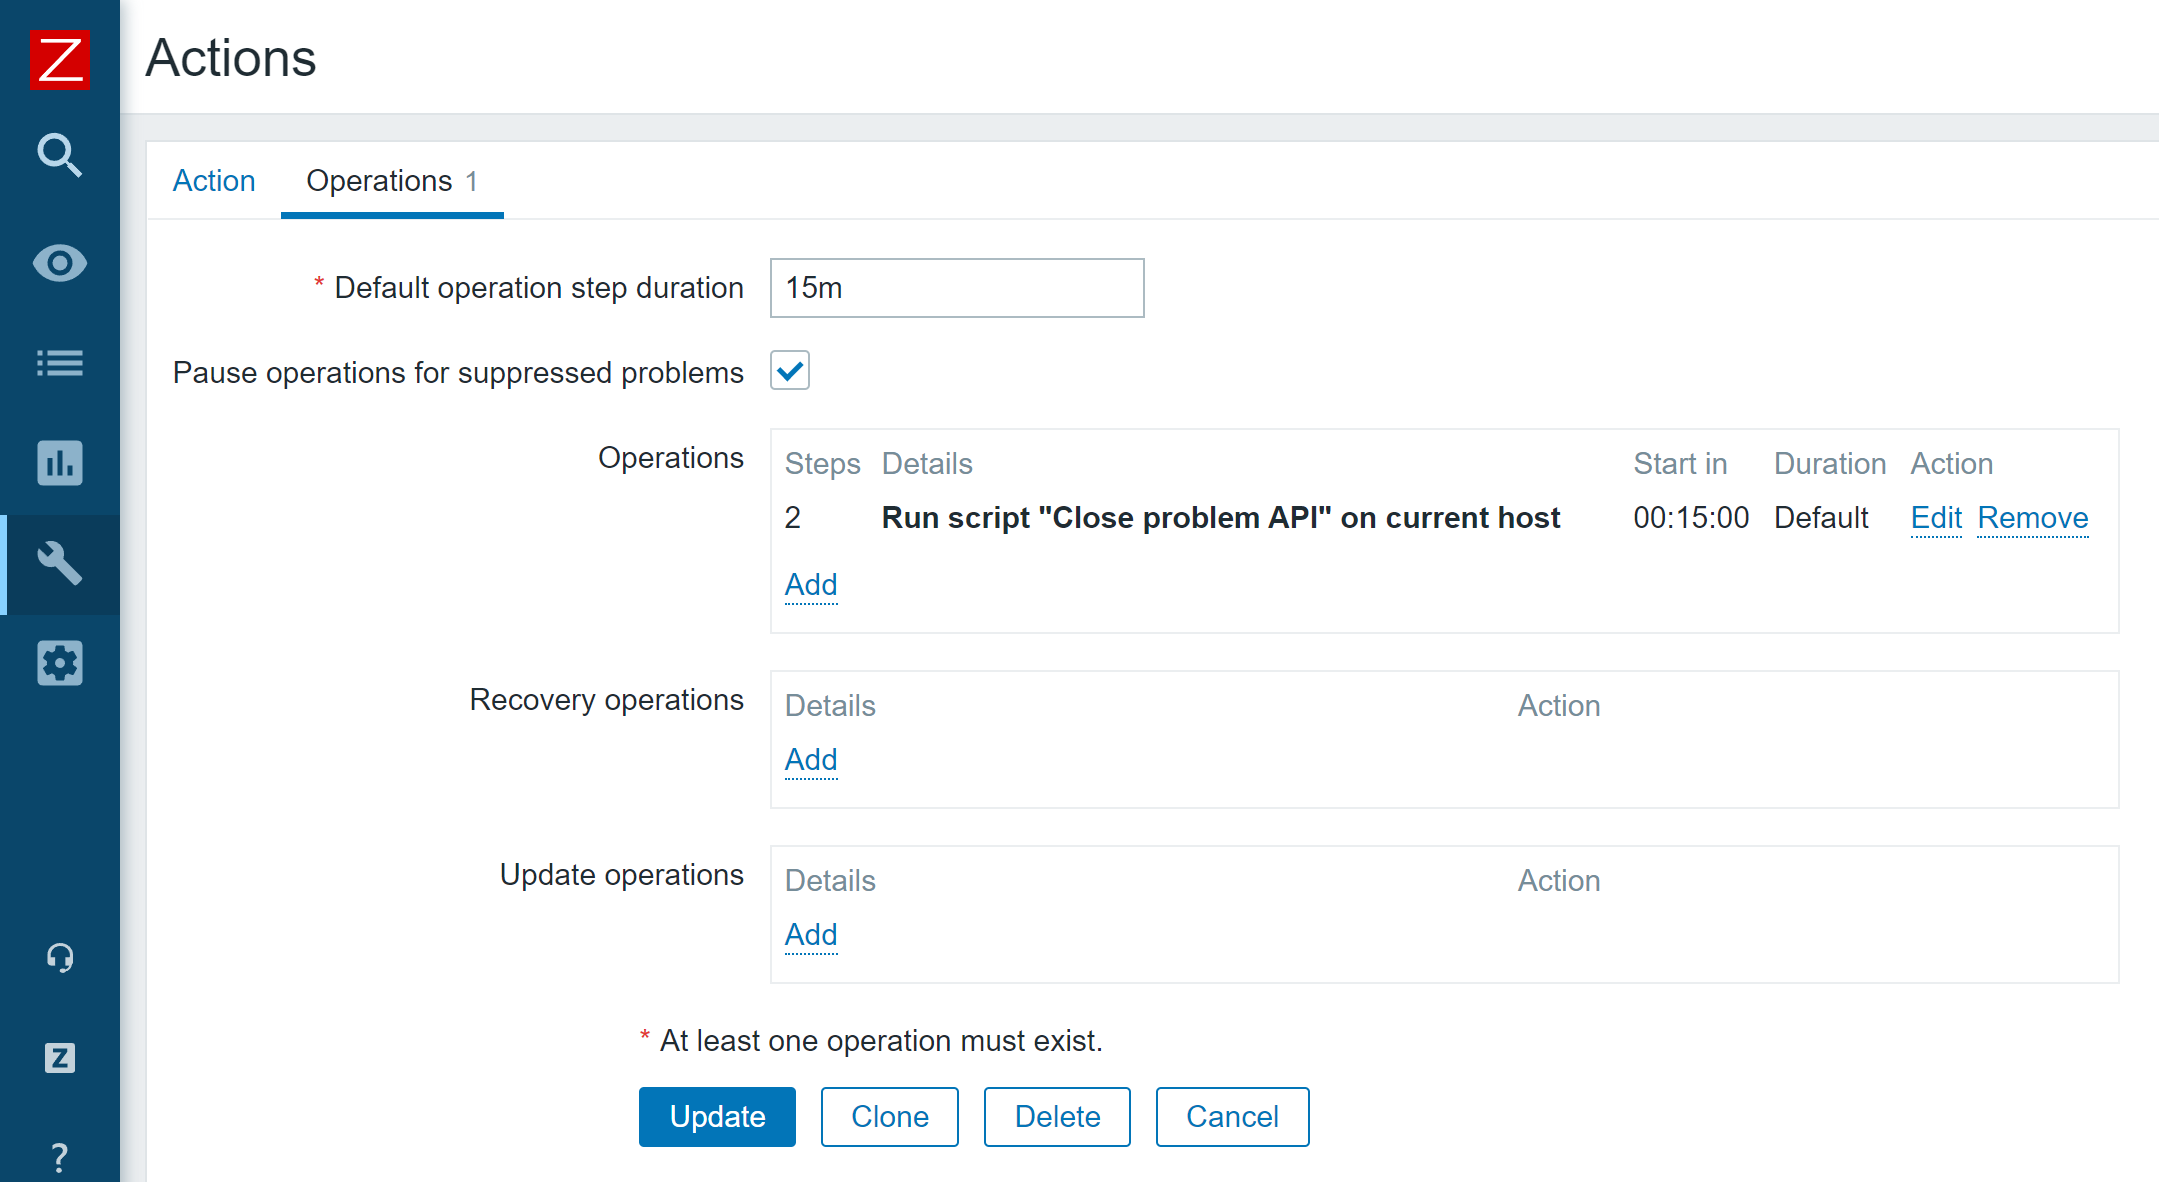
Now my problems will get closed automatically after the time period which I have defined in my action.
Action operation which runs our event.acknowledge Zabbix API script
These are but a few examples that we can now achieve by using API tokens. A lot of information can be obtained and filtered in a unique way via Zabbix API, thus providing you with a granular analysis of your monitored environment. If you have recently upgraded to Zabbix 5.4 or plan to upgrade to Zabbix 6.0 LTS in the future, I would recommend implementing named Zabbix API tokens to simplify your day-to-day workflow and consider the possibilities that this new feature opens up for you.
If you have any questions or if you wish to share your particular use case for data collection or task automation with Zabbix API – feel free to share them in the comments section below!
In our previous post, we discussed how we utilize FieldMask as a solution when designing our APIs so that consumers can request the data they need when fetched via gRPC. In this blog post we will continue to cover how Netflix Studio Engineering uses FieldMask for mutation operations such as update and remove.
Example: Netflix Studio Production
Money Heist (La casa de papel) / Netflix
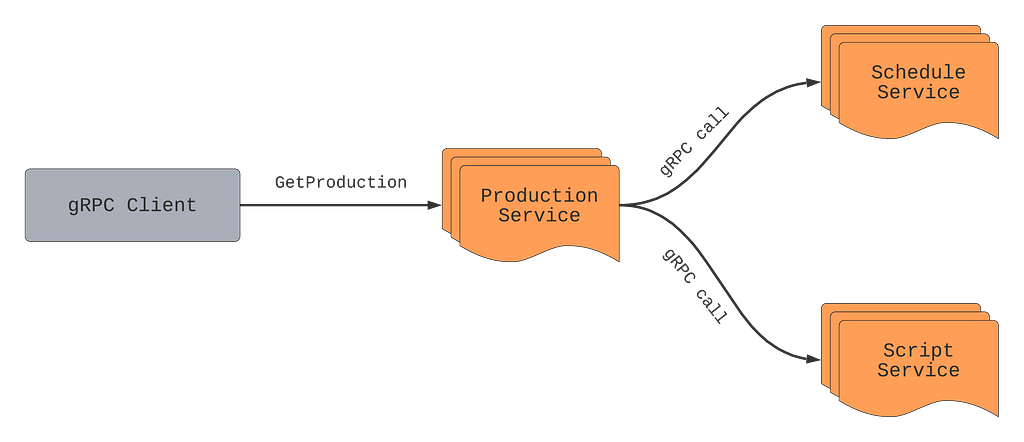
Previously we outlined what a Production is and how the Production Service makes gRPC calls to other microservices such as the Schedule Service and Script Service to retrieve schedules and scripts (aka screenplay) for a particular production such as La Casa De Papel. We can take that model and showcase how we can mutate particular fields on a production.
Mutating Production Details
Let’s say we want to update the format field from LIVE_ACTION to HYBRID as our production has added some animated elements. A naive way for us to solve this is to add an updateProductionFormatRequest method and gRPC endpoint just to update the productionFormat:
This allows us to update the production format for a particular production but what if we then want to update other fields such as titleor even multiple fields such as productionFormat, schedule, etc? Building on top of this we could just implement an update method for every field: one for Production format, another for title and so on:
This can become unmanageable when maintaining our APIs due to the number of fields on the Production. What if we want to update more than one field and do it atomically in a single RPC? Creating additional methods for various combinations of fields will lead to an explosion of mutation APIs. This solution is not scalable.
Instead of trying to create every single combination possible, another solution could be to have an UpdateProduction endpoint that requires all fields from the consumer:
The issue with this solution is two-fold as the consumer must know and provide every single required field in a Production even if they just want to update one field such as the format. The other issue is that since a Production has many fields the request payload can become quite large particularly if the production has schedule or scripts information.
What if, instead of all the fields, we send only the fields we actually want to update, and leave all other fields unset? In our example, we would only set the production format field (and ID to reference the production):
This could work if we never need to remove or blank out any fields. But what if we want to remove the value of the title field? Again, we can introduce one-off methods like RemoveProductionTitle, but as discussed above, this solution does not scale well. What if we want to remove a value of a nested field such as the planned launch date field from the schedule? We would end up adding remove RPCs for every individual nullable sub-field.
Utilizing FieldMask for Mutations
Instead of numerous RPCs or requiring a large payload, we can utilize a FieldMask for all our mutations. The FieldMask will list all of the fields we would like to explicitly update. First, let’s update our proto file to add in the UpdateProductionRequest, which will contain the data we want to update from a production, and a FieldMask of what should be updated:
Now, we can use a FieldMask to make mutations. We can update the format by creating a FieldMask for the format field by using the FieldMaskUtil.fromStringList() utility method which constructs a FieldMask for a list of field paths in a certain type. In this case, we will have one type, but will build upon this example later:
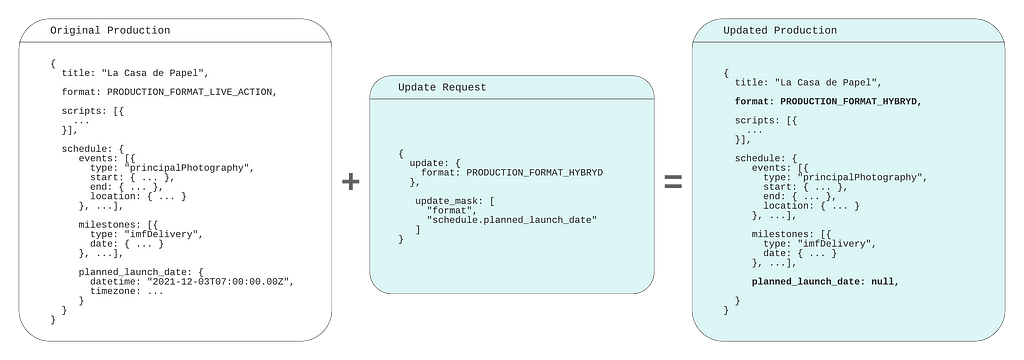
Since our FieldMask only specifies the format field that will be the only field that is updated even if we provide more data in ProductionUpdateOperation. It becomes easier to add or remove more fields to our FieldMask by modifying the paths. Data that is provided in the payload but not added in a path of a FieldMask will not be updated and simply ignored in the operation. But, if we omit a value it will perform a remove mutation on that field. Let’s modify our example above to showcase this and update the format but remove the planned launch date, which is a nested field on the ProductionSchedule as “schedule.planned_launch_date”:
In this example, we are performing both update and remove mutations as we have added “format” and “schedule.planned_launch_date” paths to our FieldMask. When we provide this in our payload these fields will be updated to the new values, but when building our payload we are only providing the format and omitting the schedule.planned_launch_date. Omitting this from the payload but having it defined in our FieldMask will function as a remove mutation:
Empty / Missing Field Mask
When a field mask is unset or has no paths, the update operation applies to all the payload fields. This means the caller must send the whole payload or, as mentioned above, any unset fields will be removed.
This convention has an implication on schema evolution: when a new field is added to the message, all the consumers must start sending its value on the update operation or it will get removed.
Suppose we want to add a new field: production budget. We will extend both the Production message, and ProductionUpdateOperation:
If there is a consumer that doesn’t know about this new field or hasn’t updated client stubs yet, it can accidentally null the budget field out by not sending the FieldMask in the update request.
To avoid this issue, the producer should consider requiring the field mask for all the update operations. Another option would be to implement a versioning protocol: force all callers to send their version numbers and implement custom logic to skip fields not present in the old version.
Bella Ciao
In this blog post series, we have gone over how we use FieldMask at Netflix and how it can be a practical and scalable solution when designing your APIs.
API designers should aim for simplicity, but make their APIs open for extension and evolution. It’s often not easy to keep APIs simple and future-proof. Utilizing FieldMask in APIs helps us achieve both simplicity and flexibility.
In this blog post, we will talk about maintaining and storing the Zabbix API session key in an automated fashion. The blog post builds upon the Close problem automatically via Zabbix API subject and can be used as extra configuration for this particular use-case. The blog post also shares a great example of synthetic monitoring by way of JavaScript preprocessing – how to emulate a scenario in an automated fashion and get alerted in case of any problems.
Prerequisites
First, let us create the Zabbix API user and user macros where we will store our username, password, Zabbix URL and the API session key.
1) Open “Administration” => “Users”. Create a new user ‘api’ with password ‘zabbix’. At the permissions tab set User Type “Zabbix Super Admin”.
2) Go to “Administration” => “General” => “Macros”. Configure base characteristics:
It’s OK to leave {$Z_API_SESSIONID} empty for now.
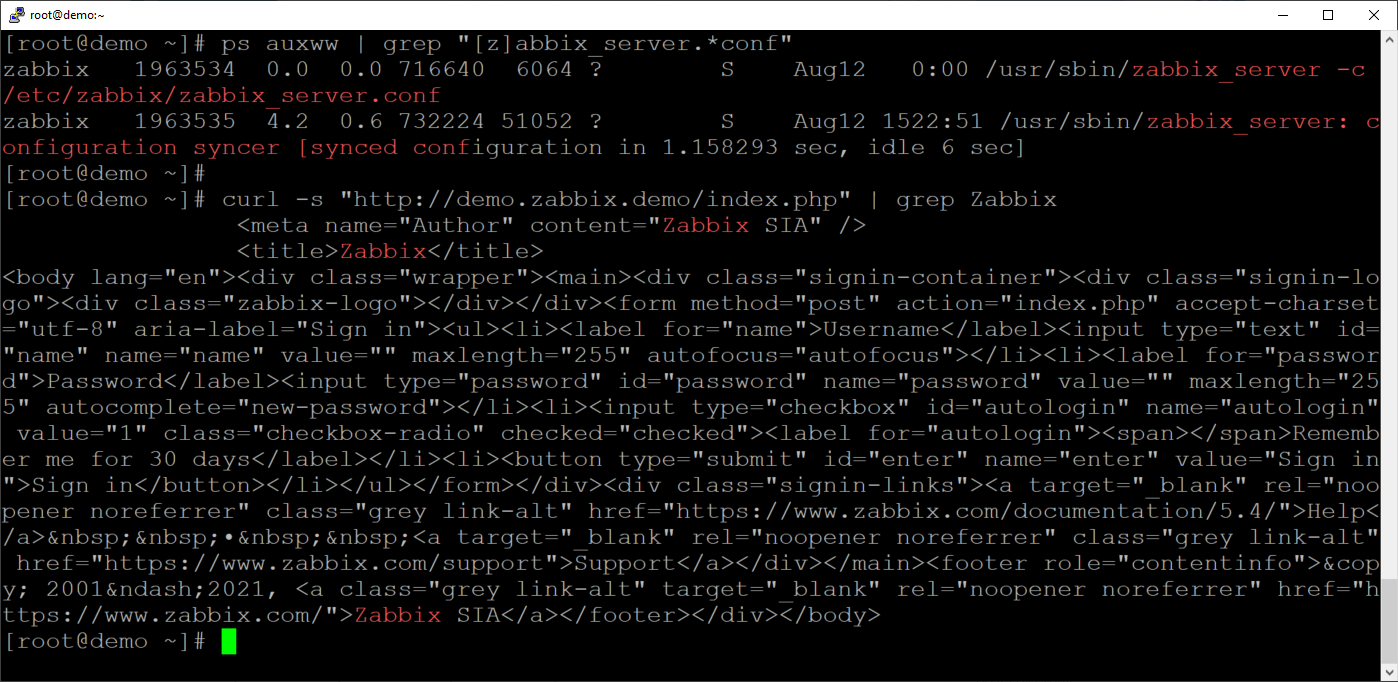
3) Let’s check if the Zabbix backend server can reach the Zabbix frontend server. Make sure that you are logged into the Zabbix backend server by looking up the zabbix_server process:
ps auxww | grep "[z]abbix_server.*conf"
Ensure that we can reach the Zabbix frontend by curling the Zabbix frontend server from the Zabbix backend server:
5) Create a new host with an Agent interface and link the template. The IP address of the host does not matter. The template will use an agentless check to do the monitoring, it will use an “HTTP agent” item.
How it works
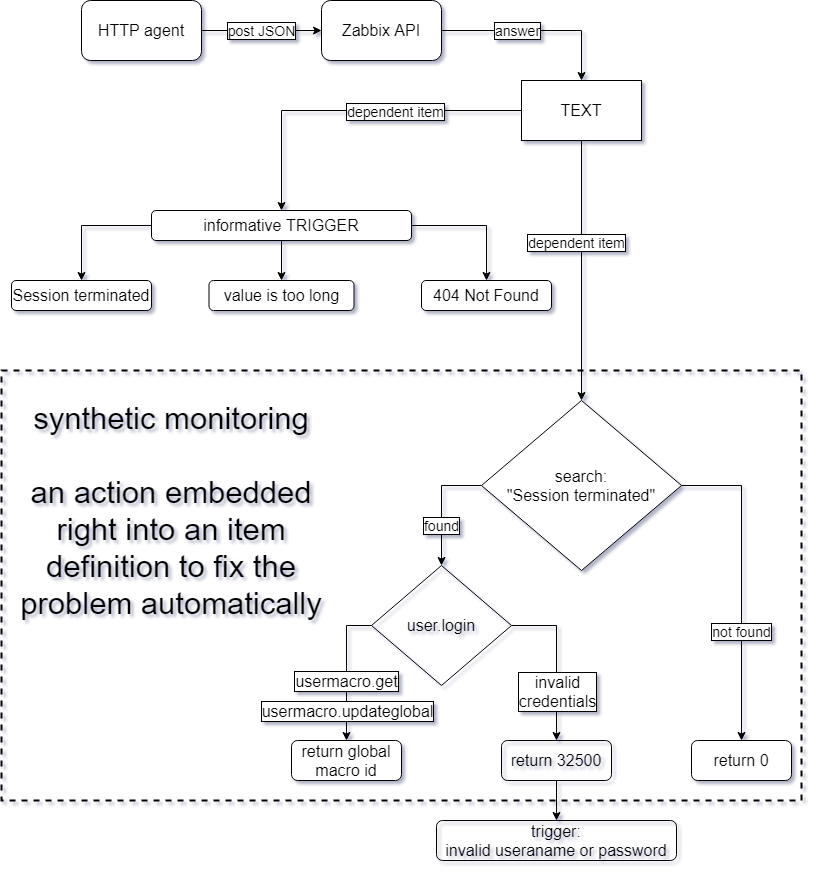
Our goal for today is to figure out a way to keep the Zabbix API authentication token up to date in a user macro. This way we can reuse the macro repeatedly for items, action operations and scripts that require for us to use the Zabbix API. We need to ensure that even if the token changes, the macro gets automatically updated with the new token value! Let’s try and understand each step of the underlying workflow required for us to achieve this goal.
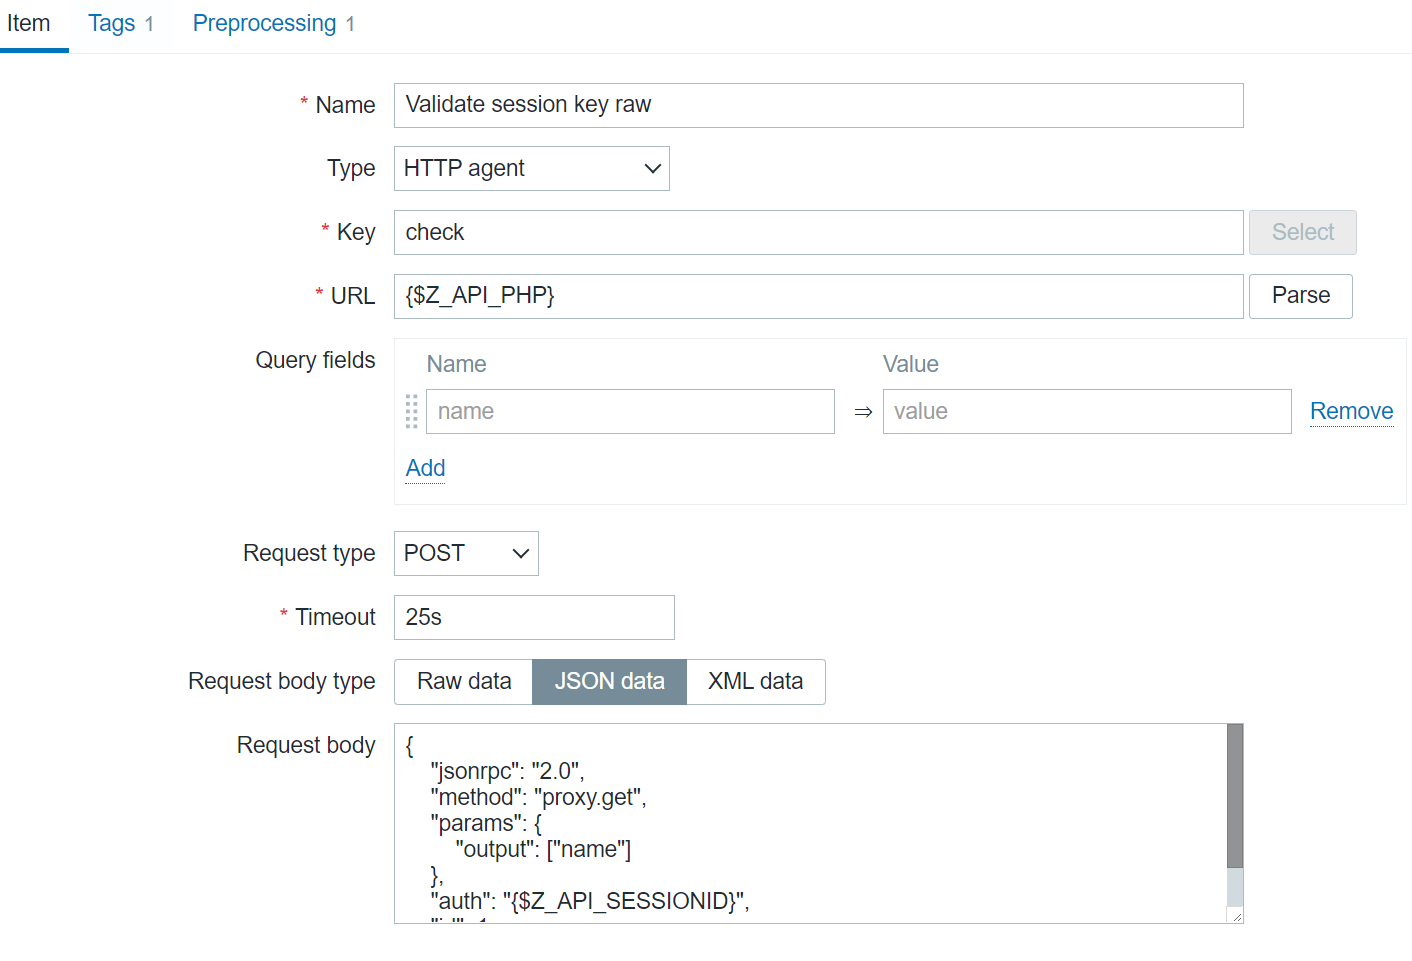
The first component of our workflow is the “Validate session key raw” item. This is an HTTP agent item that performs a POST request with an arbitrary method – proxy.get in this case, but we could have used ANY other method. We simply want to check if an arbitrary Zabbix API call can be executed with the current {$Z_API_SESSIONID} macro value.
The second part of the workflow is the “Repair session key” dependent item. This item utilizes the JavaScript preprocessing step with custom JavaScript code to check the values obtained by the previous item and generate a new authentication token if that is necessary.
The third item – “Status”, is another dependent item that uses regular expression preprocessing steps to check for different error messages or status codes in the value of the “Validate session key raw” item. Most of the triggers defined in this template will react to the values obtained by this item.
Below you can see the full underlying workflow:
Code-wise, the magic is implemented with the following JavaScript code snippet:
if (value.match(/Session terminated/)) {

var req = new CurlHttpRequest();

// Zabbix API
var json_rpc='{$Z_API_PHP}'

// lib curl header
req.AddHeader('Content-Type: application/json');

// First request to get authentication token
var token =  JSON.parse(req.Post(json_rpc,
'{"jsonrpc":"2.0","method":"user.login","params":{"user":"{$Z_API_USER}","password":"{$Z_API_PASSWORD}"},"id":1,"auth":null}'
));

// If authentication was unsuccessful
if ( token.error )
{
// Login name or password is incorrect
return 32500;
}

else {
// Update the macro

// Get the global macro ID
// We cannot plot here a very native Zabbix macro because it will be automatically expanded
// Must use a workaround to distinguish a dollar sign from the actual macro name and merge with '+'
var id = JSON.parse(req.Post(json_rpc,
'{"jsonrpc":"2.0","method":"usermacro.get","params":{"output":["globalmacroid"],"globalmacro":true,"filter":{"macro":"{$'+'Z_API_SESSIONID'+'}"}},"auth":"'+token.result+'","id":1}'
)).result[0].globalmacroid;

// This line contains a keyword '+value+' which will grab exactly the previous value outside this JavaScript snippet
var overwrite = JSON.parse(req.Post(json_rpc,
'{"jsonrpc":"2.0","method":"usermacro.updateglobal","params":{"globalmacroid":"'+id+'","value":"'+token.result+'"},"auth":"'+token.result+'","id":1}'
));

// Return the id (an integer) of the macro, which was updated
return overwrite.result.globalmacroids[0];
}

} else {
return 0;
}
Throughout the JavaScript code, we are extracting a value from one step and using that as an input for the next step.
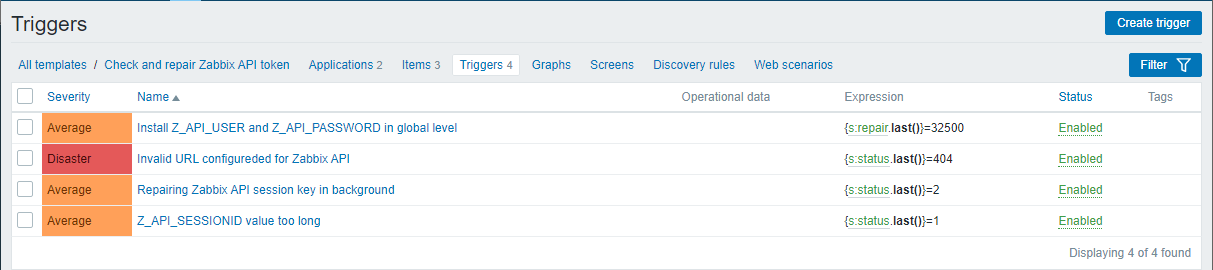
After the data has been collected, the values are analyzed by 4 triggers. 3 out of these 4 triggers prints a misconfiguration problem that requires a human investigation. We also have a “repairing Zabbix API session key in background” title, which is the main trigger that indicates a token has been expired and repair automatically.
And that’s it – now any integration that requires a Zabbix API authentication token can receive the current token value by referencing the user macro that we created in the article. We’ve ensured that the token is always going to stay up to date and in case of any issues, we will receive an alert from Zabbix!
At Netflix, we heavily use gRPC for the purpose of backend to backend communication. When we process a request it is often beneficial to know which fields the caller is interested in and which ones they ignore. Some response fields can be expensive to compute, some fields can require remote calls to other services. Remote calls are never free; they impose extra latency, increase probability of an error, and consume network bandwidth. How can we understand which fields the caller doesn’t need to be supplied in the response, so we can avoid making unnecessary computations and remove calls? With GraphQL this comes out of the box through the use of field selectors. In the JSON:API standard a similar technique is known as Sparse Fieldsets. How can we achieve a similar functionality when designing our gRPC APIs? The solution we use within the Netflix Studio Engineering is protobuf FieldMask.
Money Heist (La casa de papel) / Netflix
Protobuf FieldMask
Protocol Buffers, or simply protobuf, is a data serialization mechanism. By default, gRPC uses protobuf as its IDL (interface definition language) and data serialization protocol.
FieldMask is a protobuf message. There are a number of utilities and conventions on how to use this message when it is present in an RPC request. A FieldMask message contains a single field named paths, which is used to specify fields that should be returned by a read operation or modified by an update operation.
Example: Netflix Studio Production
Money Heist (La casa de papel) / Netflix
Let’s assume there is a Production service that manages Studio Content Productions (in the film and TV industry, the term production refers to the process of making a movie, not the environment to run a software).
GetProduction returns a Production message by its unique ID. A production contains multiple fields such as: title, format, schedule dates, scripts aka screenplay, budgets, episodes, etc, but let’s keep this example simple and focus on filtering out schedule dates and scripts when requesting a production.
Reading Production Details
Let’s say we want to get production information for a particular production such as “La Casa De Papel” using the GetProduction API. While a production has many fields, some of these fields are returned from other services such as schedule from the Schedule service, or scripts from the Script service.
The Production service will make RPCs to Schedule and Script services every time GetProduction is called, even if clients ignore the schedule and scripts fields in the response. As mentioned above, remote calls are not free. If the service knows which fields are important for the caller, it can make an informed decision about making expensive calls, starting resource-heavy computations, and/or calling the database. In this example, if the caller only needs production title and production format, the Production service can avoid making remote calls to Schedule and Script services.
Additionally, requesting a large number of fields can make the response payload massive. This can become an issue for some applications, for example, on mobile devices with limited network bandwidth. In these cases it is a good practice for consumers to request only the fields they need.
Money Heist (La casa de papel) / Netflix
A naïve way of solving these problems can be adding additional request parameters, such as includeSchedule and includeScripts:
This approach requires adding a custom includeXXX field for every expensive response field and doesn’t work well for nested fields. It also increases the complexity of the request, ultimately making maintenance and support more challenging.
Add FieldMask to the Request Message
Instead of creating one-off “include” fields, API designers can add field_mask field to the request message:
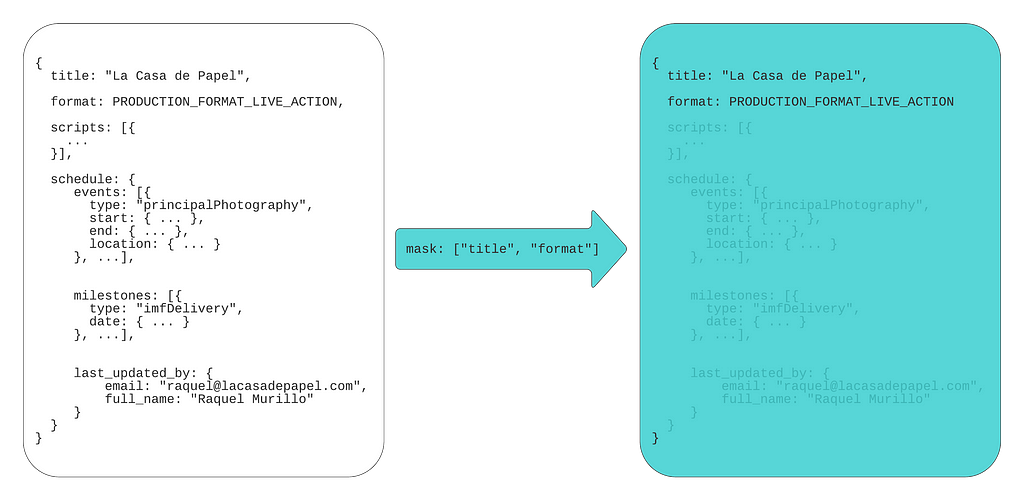
Consumers can set paths for the fields they expect to receive in the response. If a consumer is only interested in production titles and format, they can set a FieldMask with paths “title” and “format”:
Masking fields
Please note, even though code samples in this blog post are written in Java, demonstrated concepts apply to any other language supported by protocol buffers.
If consumers only need a title and an email of the last person who updated the schedule, they can set a different field mask:
By convention, if a FieldMask is not present in the request, all fields should be returned.
Protobuf Field Names vs Field Numbers
You might notice that paths in the FieldMask are specified using field names, whereas on the wire, encoded protocol buffers messages contain only field numbers, not field names. This (alongside some other techniques like ZigZag encoding for signed types) makes protobuf messages space-efficient.
To understand the difference between field numbers and field names, let’s take a detailed look at how protobuf encodes and decodes messages.
Our protobuf message definition (.proto file) contains Production message with five fields. Every field has a type, name, and number.
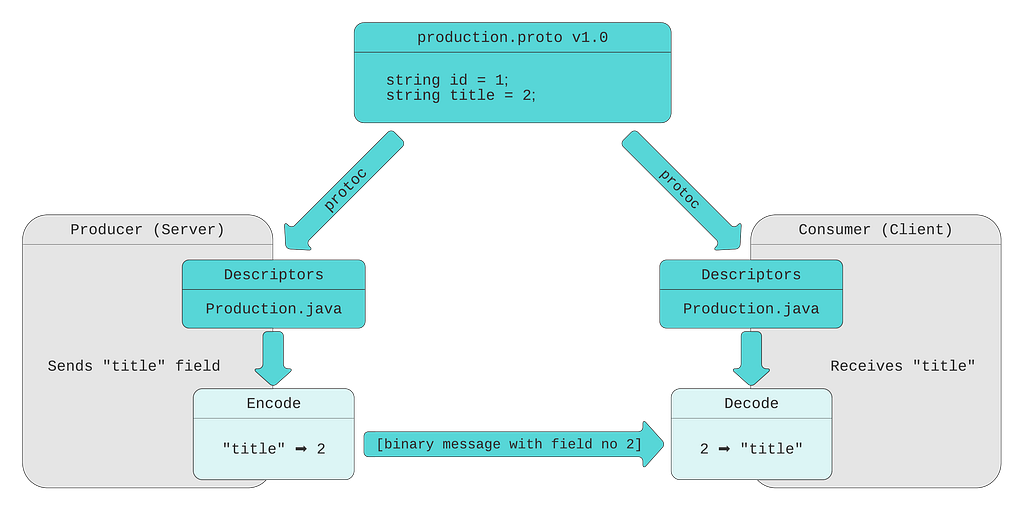
When the protobuf compiler (protoc) compiles this message definition, it creates the code in the language of your choice (Java in our example). This generated code contains classes for defined messages, together with message and field descriptors. Descriptors contain all the information needed to encode and decode a message into its binary format. For example, they contain field numbers, names, types. Message producer uses descriptors to convert a message to its wire format. For efficiency, the binary message contains only field number-value pairs. Field names are not included. When a consumer receives the message, it decodes the byte stream into an object (for example, Java object) by referencing the compiled message definitions.
As mentioned above, FieldMask lists field names, not numbers. Here at Netflix we are using field numbers and convert them to field names using FieldMaskUtil.fromFieldNumbers() utility method. This method utilizes the compiled message definitions to convert field numbers to field names and creates a FieldMask.
However, there is an easy-to-overlook limitation: using FieldMask can limit your ability to rename message fields. Renaming a message field is generally considered a safe operation, because, as described above, the field name is not sent on the wire, it is derived using the field number on the consumer side. With FieldMask, field names are sent in the message payload (in the paths field value) and become significant.
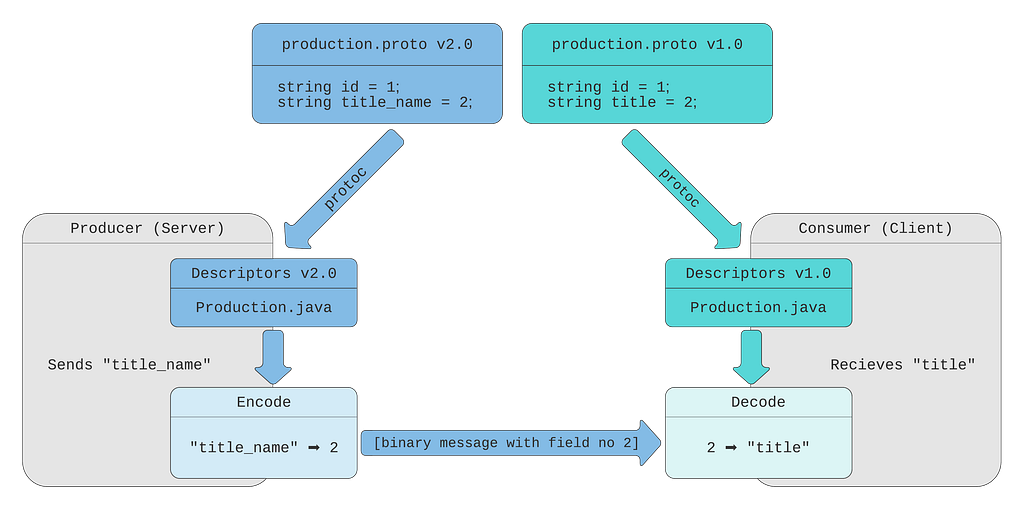
Suppose we want to rename the field title to title_name and publish version 2.0 of our message definition:
In this chart, the producer (server) utilizes new descriptors, with field number 2 named title_name. The binary message sent over the wire contains the field number and its value. The consumer still uses the original descriptors, where the field number 2 is called title. It is still able to decode the message by field number.
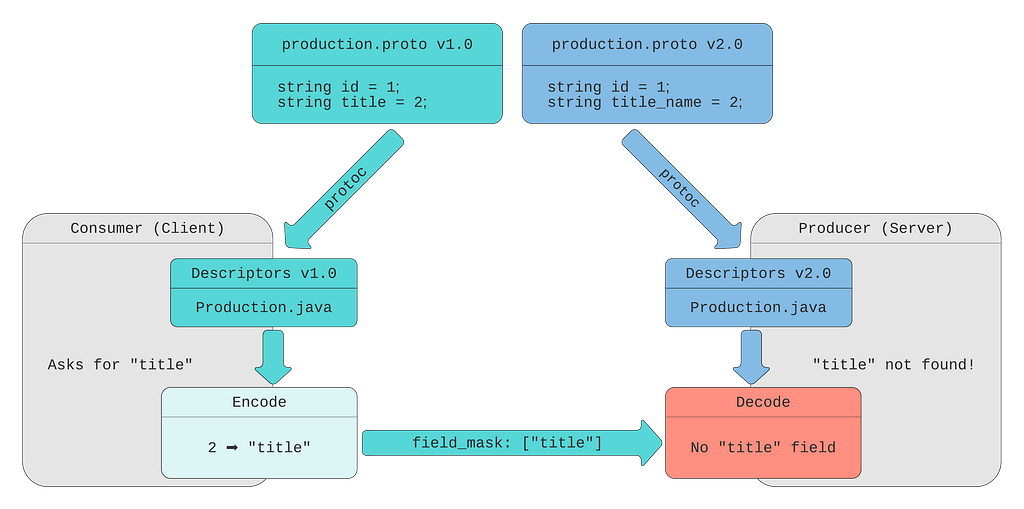
This works well if the consumer doesn’t use FieldMask to request the field. If the consumer makes a call with the “title” path in the FieldMask field, the producer will not be able to find this field. The producer doesn’t have a field named title in its descriptors, so it doesn’t know the consumer asked for field number 2.
As we see, if a field is renamed, the backend should be able to support new and old field names until all the callers migrate to the new field name (backward compatibility issue).
There are multiple ways to deal with this limitation:
Never rename fields when FieldMask is used. This is the simplest solution, but it’s not always possible
Require the backend to support all the old field names. This solves the backward compatibility issue but requires extra code on the backend to keep track of all historical field names
Deprecate old and create a new field instead of renaming. In our example, we would create the title_name field number 6. This option has some advantages over the previous one: it allows the producer to keep using generated descriptors instead of custom converters; also, deprecating a field makes it more prominent on the consumer side
Regardless of the solution, it is important to remember that FieldMask makes field names an integral part of your API contract.
Using FieldMask on the Producer (Server) Side
On the producer (server) side, unnecessary fields can be removed from the response payload using the FieldMaskUtil.merge() method (lines ##8 and 9):
If the server code also needs to know which fields are requested in order to avoid making external calls, database queries or expensive computations, this information can be obtained from the FieldMask paths field:
This code calls the makeExpensiveCallToScheduleServicemethod (line #21) only if the schedule field is requested. Let’s explore this code sample in more detail.
(1) The SCHEDULE_FIELD_NAME constant contains the name of the field. This code sample uses message type Descriptor and FieldDescriptor to lookup field name by field number. The difference between protobuf field names and field numbers is described in the Protobuf Field Names vs Field Numbers section above.
(2) FieldMaskUtil.normalize() returns FieldMask with alphabetically sorted and deduplicated field paths (aka canonical form).
(3) Expression (lines ##14 – 17) that yields the scheduleFieldRequestedvalue takes a stream of FieldMask paths, maps it to a stream of top-level fields, and returns true if top-level fields contain the value of the SCHEDULE_FIELD_NAME constant.
(4) ProductionSchedule is retrieved only if scheduleFieldRequested is true.
If you end up using FieldMask for different messages and fields, consider creating reusable utility helper methods. For example, a method that returns all top-level fields based on FieldMask and FieldDescriptor, a method to return if a field is present in a FieldMask, etc.
Ship Pre-built FieldMasks
Some access patterns can be more common than others. If multiple consumers are interested in the same subset of fields, API producers can ship client libraries with FieldMask pre-built for the most frequently used field combinations.
Providing pre-built field masks simplifies API usage for the most common scenarios and leaves consumers the flexibility to build their own field masks for more specific use-cases.
Limitations
Using FieldMask can limit your ability to rename message fields (described in the Protobuf Field Names vs Field Numbers section)
Repeated fields are only allowed in the last position of a path string. This means you cannot select (mask) individual sub-fields in a message inside a list. This can change in the foreseeable future, as a recently approved Google API Improvement Proposal AIP-161 Field masks includes support for wildcards on repeated fields.
Bella Ciao
Protobuf FieldMask is a simple, yet powerful concept. It can help make APIs more robust and service implementations more efficient.
This blog post covered how and why it is used at Netflix Studio Engineering for APIs that read the data. Part 2 will shed light on using FieldMask for update and remove operations.
Бях решил да не се занимавам с тази случка, но заради това, което стана накрая реших, че си го заслужават.
Взех си няколко дни отпуска и в предпоследния ден в хотела ни нямаше почти хора. Тогава забелязах, че пристигат доста коли, сред които поне четири на Агенция Пътна инфраструктура както и няколко прескъпи джипа. Досетих се, че явно ще имат конференция или семинар или нещо подобно.
Така и се оказа. Напълниха конферентната стая с 80-тина души за 2-3 часа, след което се отправиха към басейна. В началото не бях сигурен кое ме раздразни – че трошаха яко държавна пара за 5-звезден хотел, че изведнъж всичко се напълни на 100% или че дори не си правиха труда да изглеждат, че са на официално събитие.
Бързо обаче размислих и се примирих – можеше да се напълни от други гости, а и все пак първи ден им е и може да имат друга програма за следващите. Дори фактът, че харчат толкова за пет звезден хотел в условията на сериозни скандали за разточителство на агенцията отметнах с това, че бледнее пред милиардите, които са раздали без обосновка, поръчка или дори строеж. А и все пак е форма на бонус към служители на държавна работа, която ако не се вкарат в някаква схема не може да се отрече, че е доста неблагодарна. Всеки офис и организация имат нужда от някаква форма на team-building, особено след последната година и въпреки всички резерви, които имах към тях. Отметнах всичко с ръка.
Гледах да не им обръщам внимание, но не можех да избягам от разговорите им. Явно не им пукаше много кой ги чува. Темите започнаха от злободневни – колко било скъпо в Гърция сега, колко скочили цените, един се жалваше колко малко от хората в агенцията са се ваксинирали, а никой не носел маска никъде в офисите или на конференцията сега.
После минаха на клюки кой какъв страничен бизнес имал, кой шеф успял да си доведе любовницата в хотела и кой не успял, защото я бил уредил в администрацията, а тука били само архитектура. После кой шеф каква кола под 6 цифрени суми не поглеждал и прочие. Общо взето се бяха разделили на три групи: едни дето се правеха на тежкари (предимно мъже, но и две жени), младите, които активно се наслаждаваха на почивката и „лелките и чичковци“, които също се радваха на басейна, но видимо бяха уморени от цялата драма.
Тежкарите изглеждаха доста притеснени през цялото време и все висяха на телефона. Единият много настоя точно до мен да крещи как са посмели да пуснат нещо електронно, като трябвало да си стои затворено в папка в бюрото му. Други двама постоянно дваха инструкции какво да се подписва от тяхно име „все едно са там“. Едната увещаваше, че трябвало да изкарат, че е била на комисия за одобрение на някакъв проект с още двама, които обръщаха коктейли на бара, а служителят в офиса трябвало с подписите на тримата да подпише протокола, защото „всичко сме се разбрали вече, така трябва да мине“. Имаше разговори и за очакваните бонуси и как нищо не можело да се спре, защото „то вече уредено и подписано всичко“.
Всички тези подхвърляния и спорадични изпускания показваха една добре смазана машина, която явно работи дори и от сауната и няма особени притеснения кой какво ще чуе. Общо взето смесица от обикновени хора, които просто искат да си свършат работата предвид ситуацията, в която са поставени от други хора, които раздават стотици милиони с един подпис и не им пука, защото няма кой да ги съди.
Гледах да страня от тях, защото все пак исках да си почина от тези глупости. Не смятах, че което и да е от подвърлянията или гръмогласните заповеди е толкова конкретно, за да си заслужава внимание, а и общата картинка е ясна на всички. Причината обаче да напиша всичко това беше черешката на тортата накрая.
Точно когато освобождавах стаята във фоайето бяха седнали няколко от АПИ и обсъждаха сметките. Напред-назад сновеше служителка на хотела притеснено. Темата беше как трябва да бъде изготвена фактурата и кое как да бъде вписано в касовата бележка. За малкото време, в което чаках собствената си сметка, на три пъти чух вариации на изказване, че хотелът иска да спази закона и трябва да фактурира всичко както е консумирано. От своя страна заобиколилите я държавни служители АПИ отчетливо заплашиха, че ще им изпратят данъчните на проверка и ще „има много неприятни ситуации“, ако не променят сметката.
Всички бяха с много ехидни усмивки, които не се сдържах да снимам. Имам право на това, защото макар някои да бяха по бански, всички бяха формално на работа и обсъждаха неща свързани с разход на бюджетни средства. Скривам лицата им, но с радост ще ги предоставя на отговорната институция, ако някой все има интерес. Скривам и служителката на хотела, защото искрено я съжалих на какъв натиск и заплахи е подложена от държавни служители. Надявам се да не се е поддала, но надали. Така работи АПИ и доста други институции.
ЯЯсно тук е, че е дори да се сменят шапките на тези организации, схемите, връзките и проблемите вътре остават. Разбиването им ще доведе неизменно до масово напускане на хора и криза в конкретната администрация. Т.е. ще стане по-зле преди да стане по-добре. Никой не изглеждаше притеснен от смяната на двама шефове за два месеца, но явно бяха притеснени какво следва.
И ние като данъкоплатци и гласоподаватели сме притеснени какво следва и ключов момент тук е не само каква култура на работа, говорене, поведение и нетърпимост ще бъде наложена на най-високо ниво в управлението, но и да има прокуратура и съд, които да преследват както такива дребни документални измами, така и милиардите подарени на фирми близки до ГЕРБ, ДПС и каквото друг открият. За първото – виждаме някакъв шанс. За прокуратурата ще трябва доста работа и борба.
A couple of months ago, we announced the general availability of Cloudflare Pages: the easiest way to host and collaboratively develop websites on Cloudflare’s global network. It’s been amazing to see over 20,000 incredible sites built by users and hear your feedback. Since then, we’ve released user-requested features like URL redirects, web analytics, and Access integration.
We’ve been listening to your feedback and today we announce two new features: rollbacks and the Pages API. Deployment rollbacks allow you to host production-level code on Pages without needing to stress about broken builds resulting in website downtime. The API empowers you to create custom functionality and better integrate Pages with your development workflows. Now, it’s even easier to use Pages for production hosting.
Rollbacks
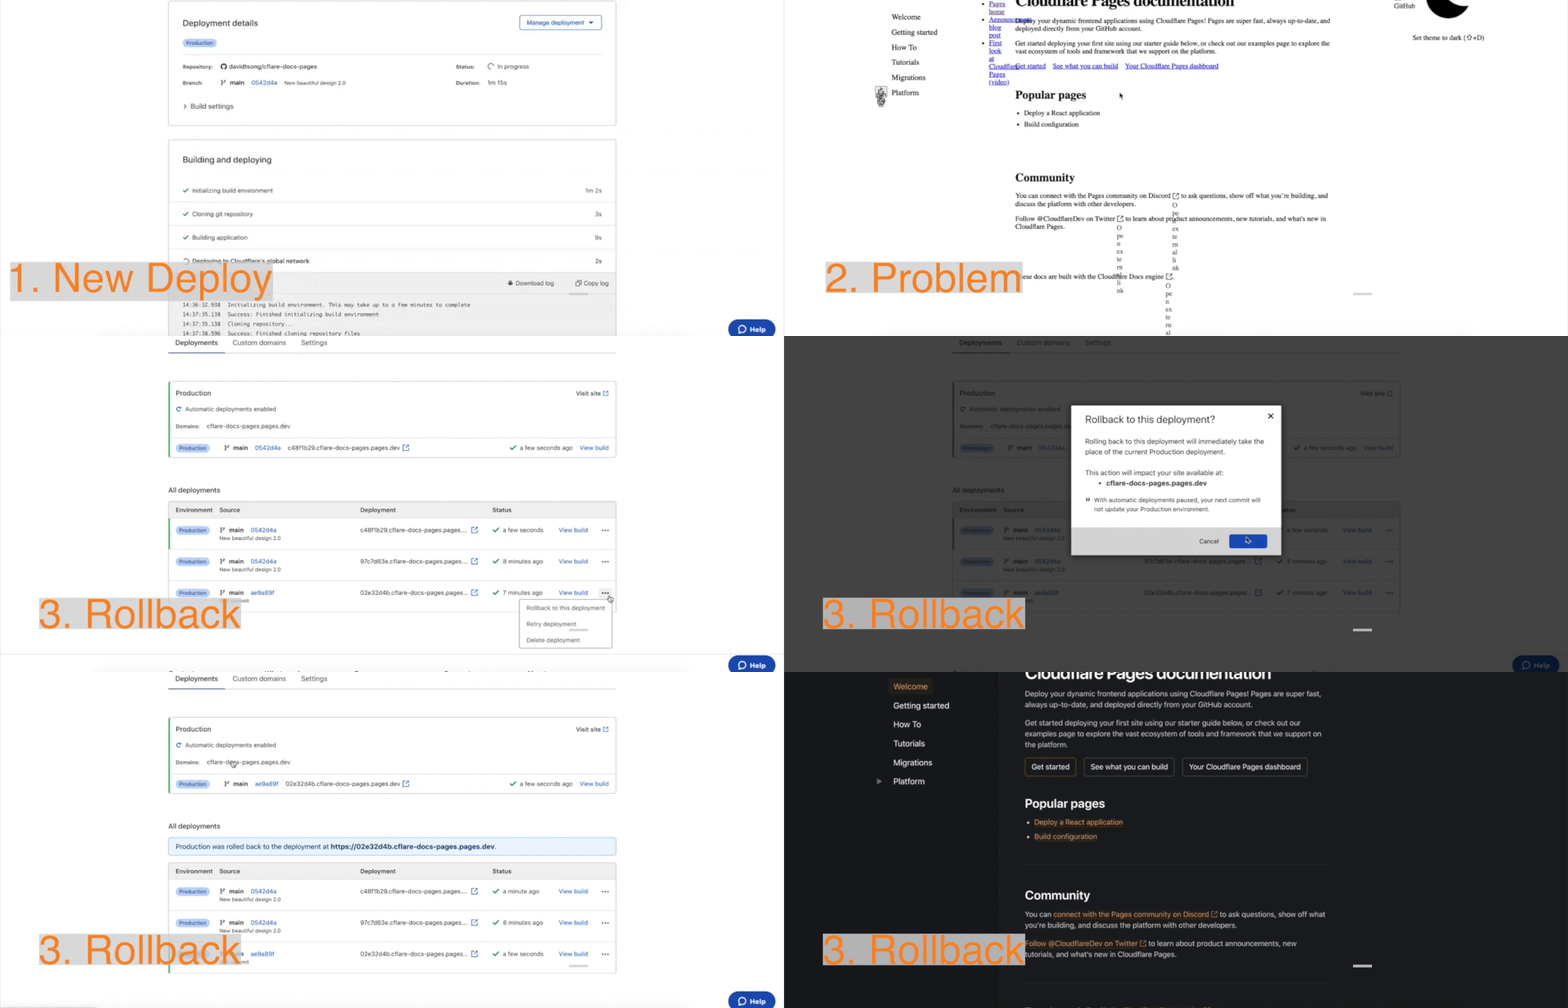
You can now rollback your production website to a previous working deployment with just a click of a button. This is especially useful when you want to quickly undo a new deployment for troubleshooting. Before, developers would have to push another deployment and then wait for the build to finish updating production. Now, you can restore a working version within a few moments by rolling back to a previous working build.
To rollback to a previous build, just click the “Rollback to this deployment” button on either the deployments list menu or on a specific deployment page.
API Access
The Pages API exposes endpoints for you to easily create automations and to integrate Pages within your development workflow. Refer to the API documentation for a full breakdown of the object types and endpoints. To get started, navigate to the Cloudflare API Tokens page and copy your “Global API Key”. Now, you can authenticate and make requests to the API using your email and auth key in the request headers.
For example, here is an API request to get all projects on an account.
Try out an API request with one of your projects by replacing {account_id}, {deployment_id},{email}, and {auth_key}. You can find your account_id in the URL address bar by navigating to the Cloudflare Dashboard. (Ex: 41643ed677c7c7gba4x463c4zdb9563c).
Refer to the API documentation for a full breakdown of the object types and endpoints.
Using the Pages API on Workers
The Pages API is even more powerful and simple to use with workers.new. If you haven’t used Workers before, feel free to go through the getting started guide to learn more. However, you’ll need to have set up a Pages project to follow along. Next, you can copy and paste this template for the new worker. Then, customize the values such as {account_id}, {project_name}, {auth_key}, and {your_email}.
const endpoint = "https://api.cloudflare.com/client/v4/accounts/{account_id}/pages/projects/{project_name}/deployments";
const email = "{your_email}";
addEventListener("scheduled", (event) => {
  event.waitUntil(handleScheduled(event.scheduledTime));
});
async function handleScheduled(request) {
  const init = {
    method: "POST",
    headers: {
      "content-type": "application/json;charset=UTF-8",
      "X-Auth-Email": email,
      "X-Auth-Key": API_KEY,
      //We recommend you store API keys as secrets using the Workers dashboard or using Wrangler as documented here https://developers.cloudflare.com/workers/cli-wrangler/commands#secret
    },
  };
  const response = await fetch(endpoint, init);
  return new Response(200);
}
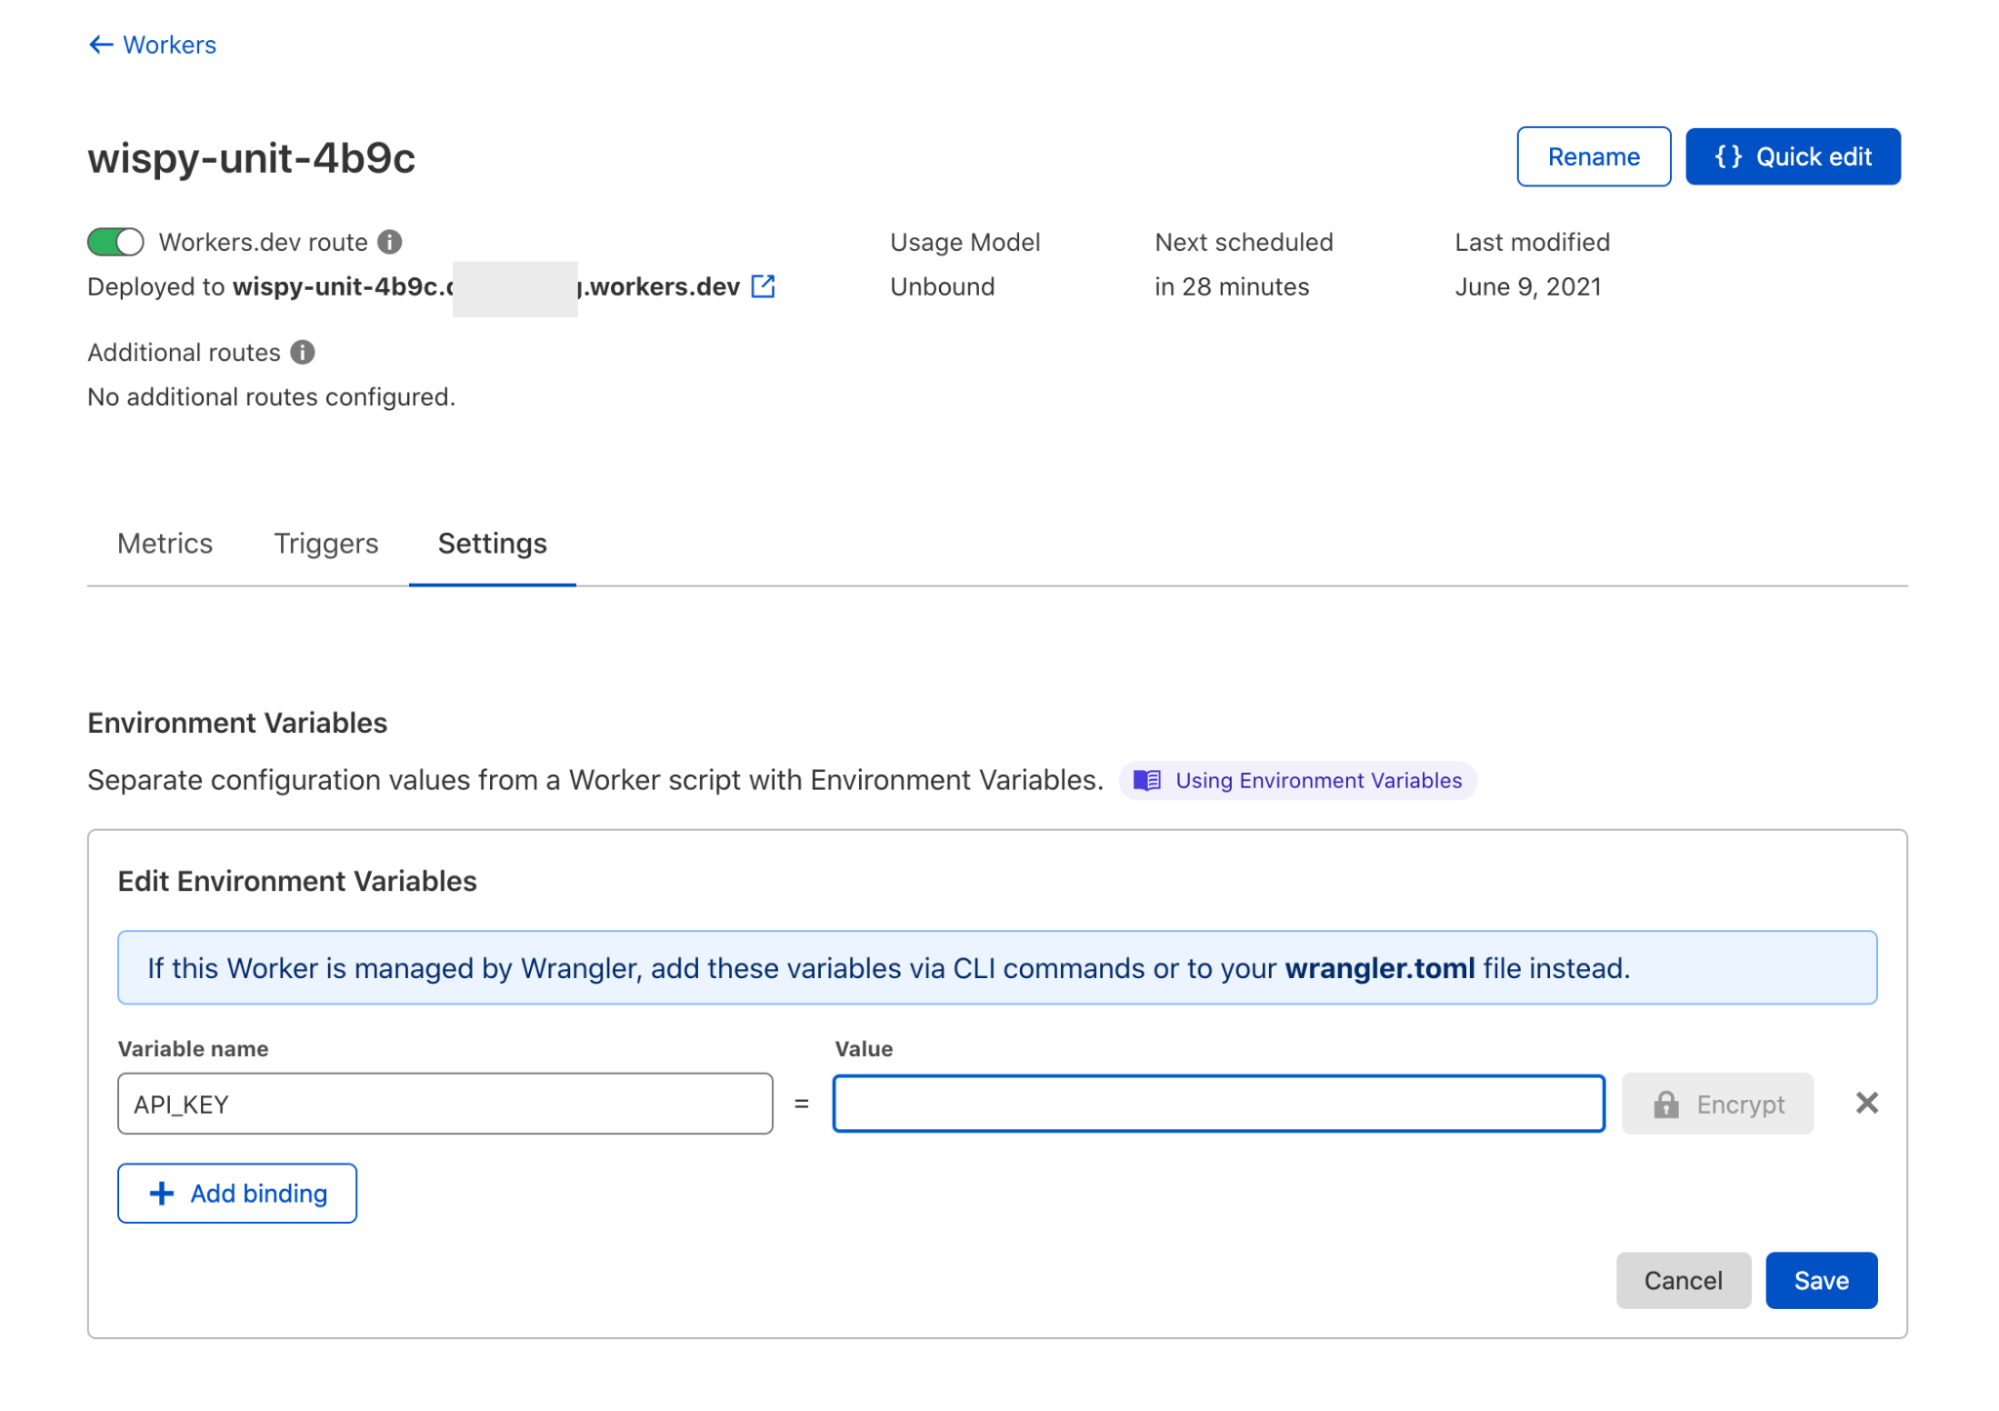
To finish configuring the script, click the back arrow near the top left of the window and click on the settings tab. Then, set an environment variable “API_KEY” with the value of your Cloudflare Global key and click “Encrypt” and then “Save”.
The script just makes a POST request to the deployments’ endpoint to trigger a new build. Click “Quick edit” to go back to the code editor to finish testing the script. You can test out your configuration and make a request by clicking on the “Trigger scheduled event” button in the “Schedule” tab near the tabs saying “HTTP” and “Preview”. You should see a new queued build on your Project through the Pages dashboard. Now, you can click “Save and Deploy” to publish your work. Finally, back to the worker settings page by clicking the back arrow near the top left of the window.
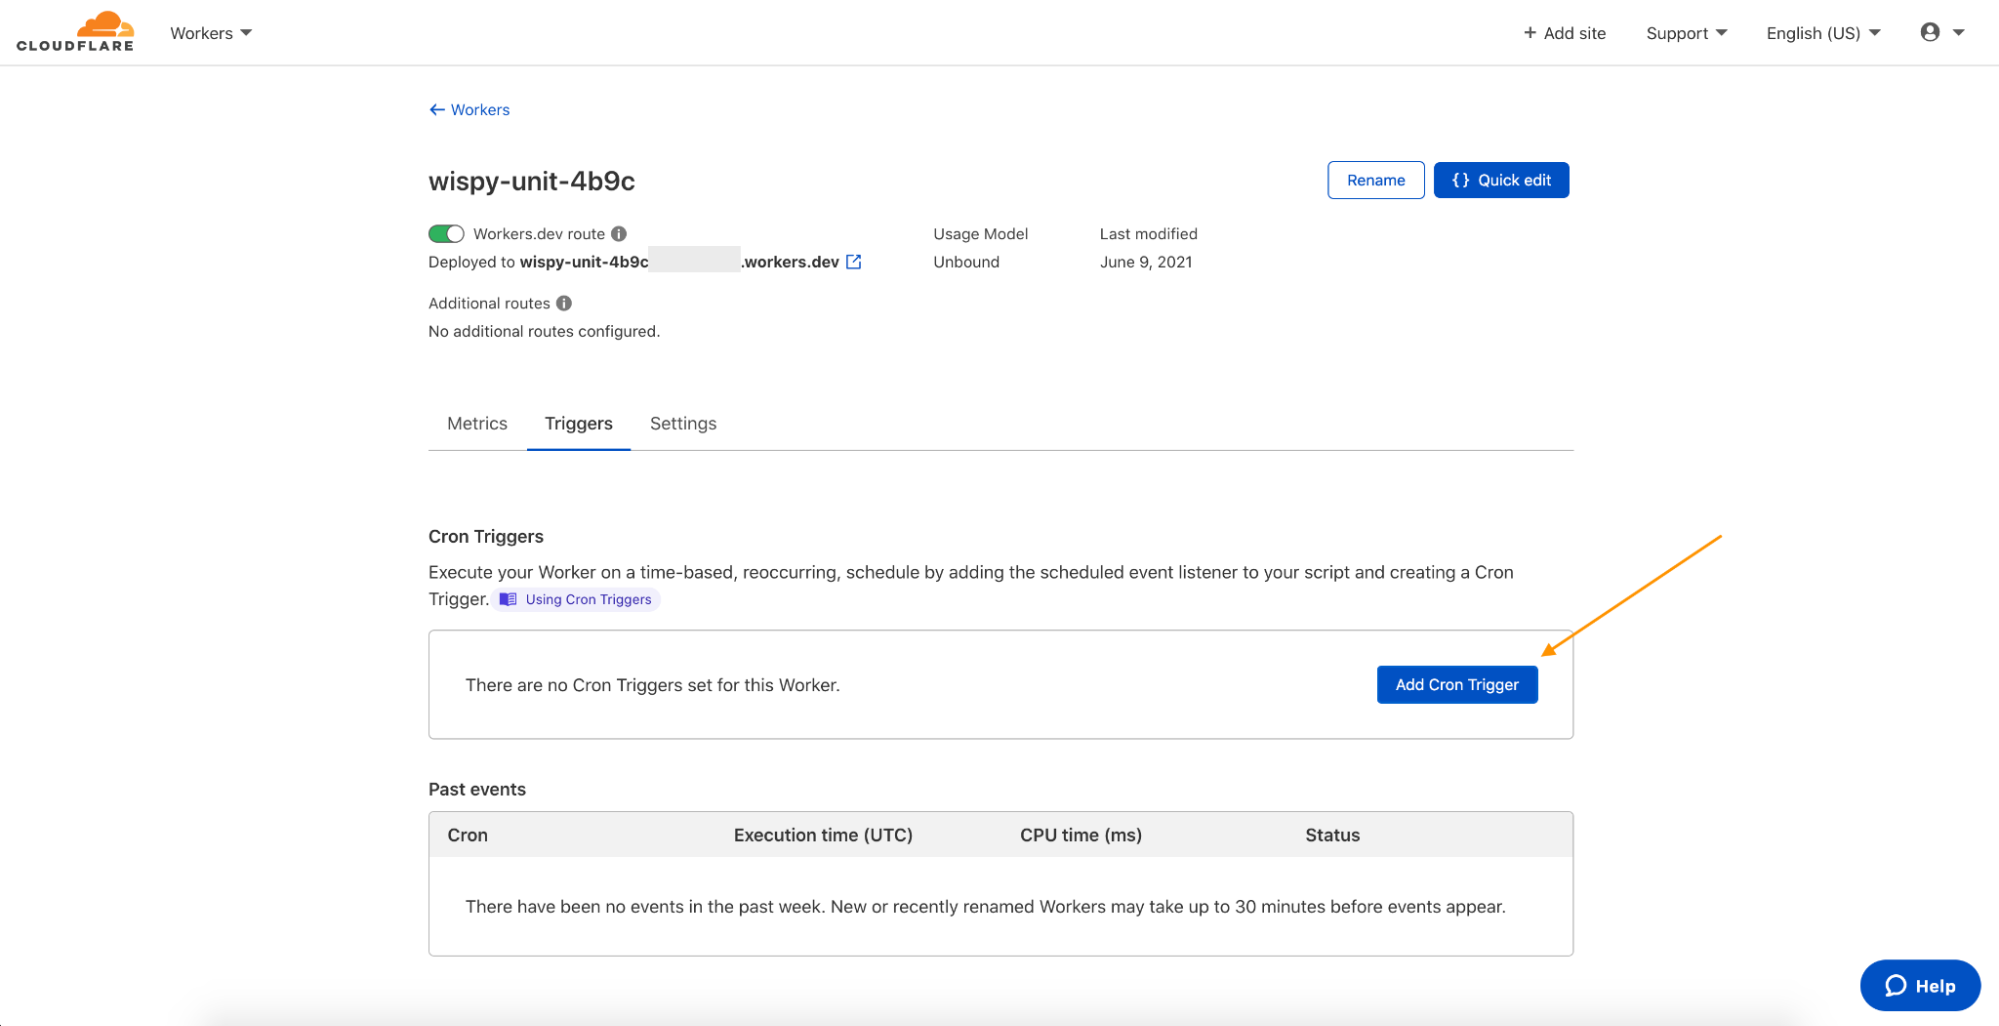
All that’s left to do is set a cron trigger to periodically run this Worker on the “Triggers tab”. Click on “Add Cron Trigger”.
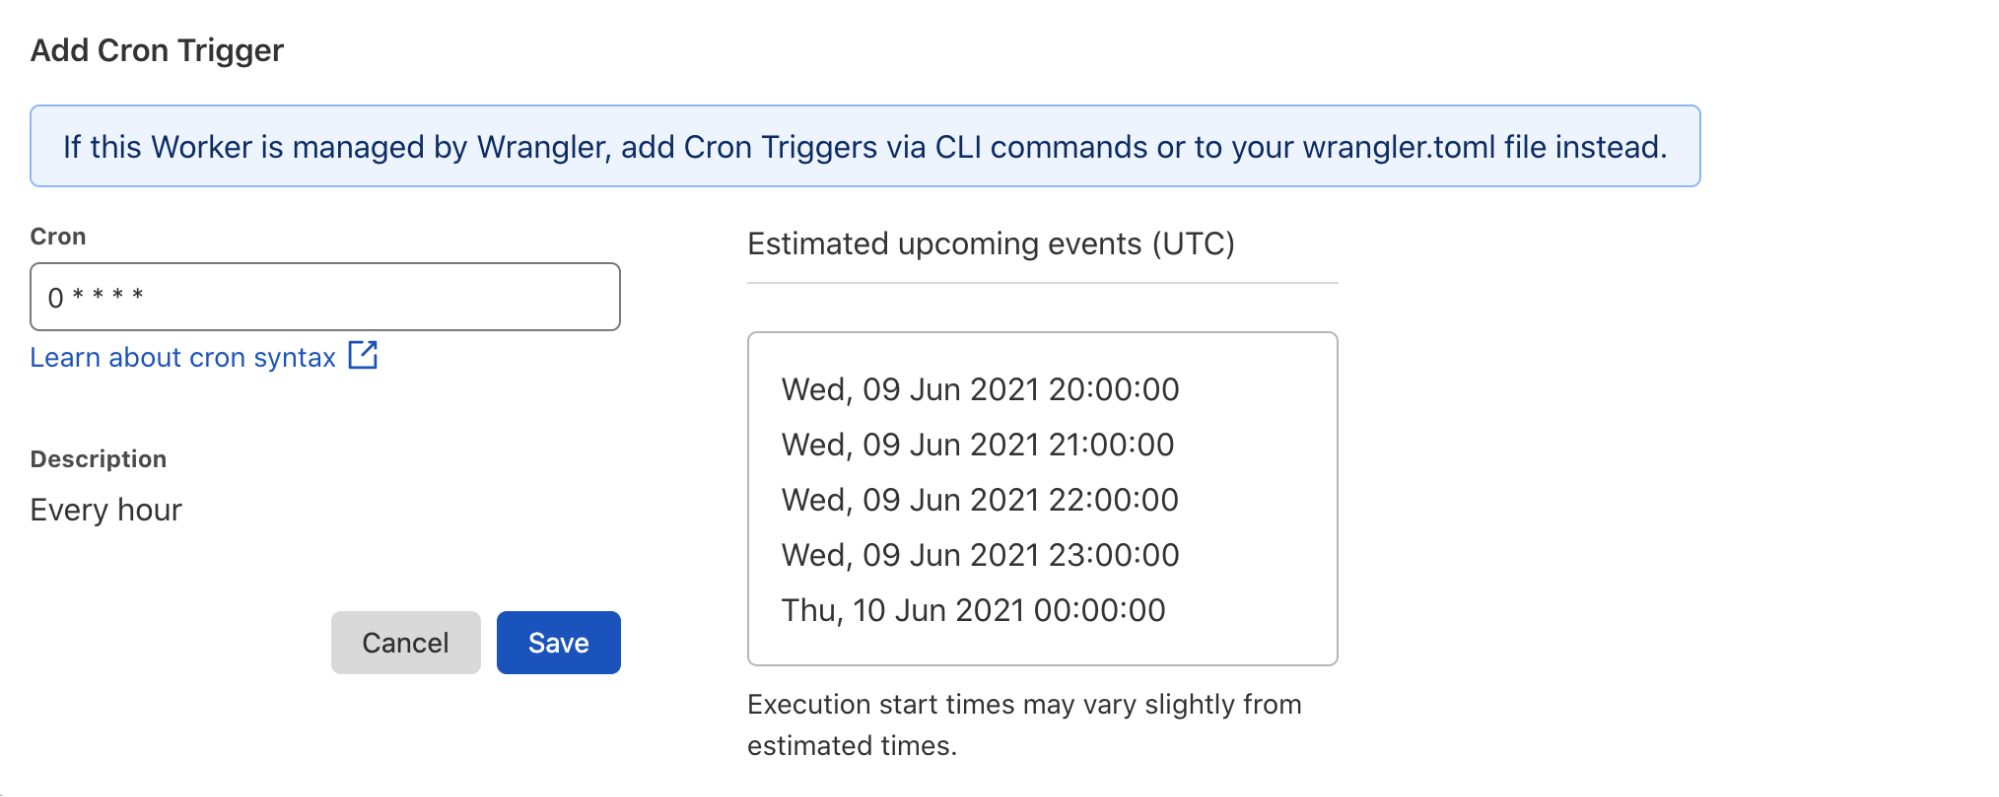
Next, we can input “0 * * * *” to trigger the build every hour.
Finally, click save and your automation using the Pages API will trigger a new build every hour.
2. Deleting old deployments after a week: Pages hosts and serves all project deployments on preview links. Suppose you want to keep your project relatively private and prevent access to old deployments. You can use the API to delete deployments after a month so that they are no longer public online. This is easy to do on Workers using Cron Triggers.
3. Sharing project information: Imagine you are working on a development team using Pages to build our websites. You probably want an easy way to share deployment preview links and build status without having to share Cloudflare accounts. Using the API, you can easily share project information, including deployment status and preview links, and serve this content as HTML from a Cloudflare Worker.
Find the code snippets for all three examples here.
Conclusion
We will continue making the API more powerful with features such as supporting prebuilt deployments in the future. We are excited to see what you build with the API and hope you enjoy using rollbacks. At Cloudflare, we are committed to building the best developer experience on Pages, and we always appreciate hearing your feedback. Come chat with us and share more feedback on the Workers Discord (We have a dedicated #pages-help channel!).
June 5, 2021: We’ve updated Figure 1: User request flow.
Authorizing functionality of an application based on group membership is a best practice. If you’re building APIs with Amazon API Gateway and you need fine-grained access control for your users, you can use Amazon Cognito. Amazon Cognito allows you to use groups to create a collection of users, which is often done to set the permissions for those users. In this post, I show you how to build fine-grained authorization to protect your APIs using Amazon Cognito, API Gateway, and AWS Identity and Access Management (IAM).
As a developer, you’re building a customer-facing application where your users are going to log into your web or mobile application, and as such you will be exposing your APIs through API Gateway with upstream services. The APIs could be deployed on Amazon Elastic Container Service (Amazon ECS), Amazon Elastic Kubernetes Service (Amazon EKS), AWS Lambda, or Elastic Load Balancing where each of these options will forward the request to your Amazon Elastic Compute Cloud (Amazon EC2) instances. Additionally, you can use on-premises services that are connected to your Amazon Web Services (AWS) environment over an AWS VPN or AWS Direct Connect. It’s important to have fine-grained controls for each API endpoint and HTTP method. For instance, the user should be allowed to make a GET request to an endpoint, but should not be allowed to make a POST request to the same endpoint. As a best practice, you should assign users to groups and use group membership to allow or deny access to your API services.
Solution overview
In this blog post, you learn how to use an Amazon Cognito user pool as a user directory and let users authenticate and acquire the JSON Web Token (JWT) to pass to the API Gateway. The JWT is used to identify what group the user belongs to, as mapping a group to an IAM policy will display the access rights the group is granted.
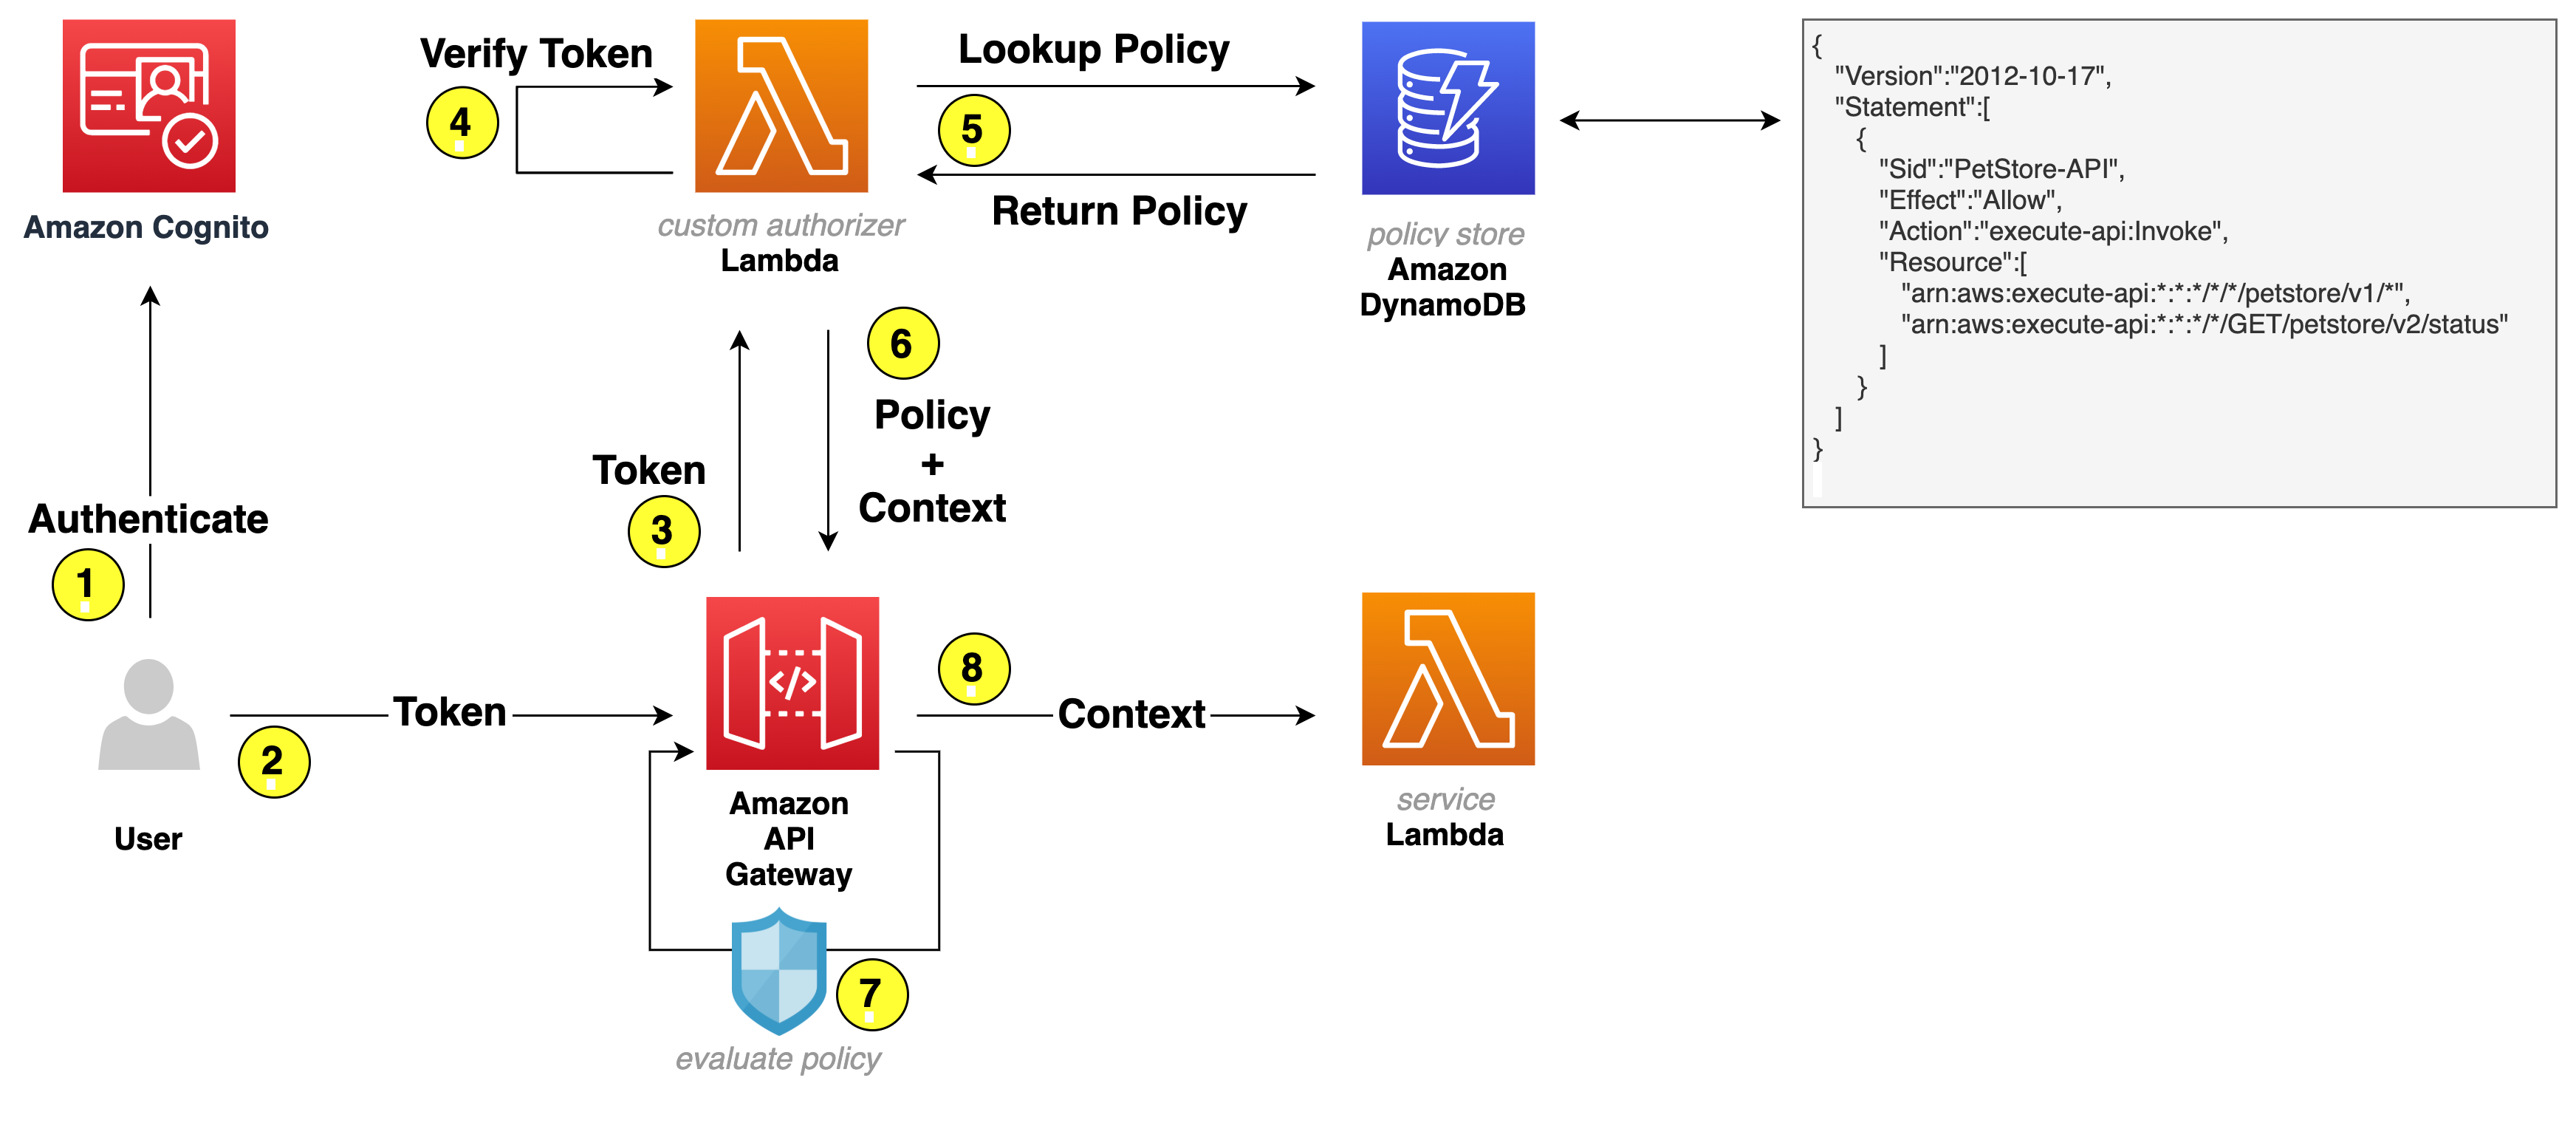
The following figure shows the basic architecture and information flow for user requests.
Figure 1: User request flow
Let’s go through the request flow to understand what happens at each step, as shown in Figure 1:
A user logs in and acquires an Amazon Cognito JWT ID token, access token, and refresh token. To learn more about each token, see using tokens with user pools.
A RestAPI request is made and a bearer token—in this solution, an access token—is passed in the headers.
API Gateway forwards the request to a Lambda authorizer—also known as a custom authorizer.
The Lambda authorizer verifies the Amazon Cognito JWT using the Amazon Cognito public key. On initial Lambda invocation, the public key is downloaded from Amazon Cognito and cached. Subsequent invocations will use the public key from the cache.
The Lambda authorizer looks up the Amazon Cognito group that the user belongs to in the JWT and does a lookup in Amazon DynamoDB to get the policy that’s mapped to the group.
Lambda returns the policy and—optionally—context to API Gateway. The context is a map containing key-value pairs that you can pass to the upstream service. It can be additional information about the user, the service, or anything that provides additional information to the upstream service.
The API Gateway policy engine evaluates the policy.
Note: Lambda isn’t responsible for understanding and evaluating the policy. That responsibility falls on the native capabilities of API Gateway.
The request is forwarded to the service.
Note: To further optimize Lambda authorizer, the authorization policy can be cached or disabled, depending on your needs. By enabling cache, you could improve the performance as the authorization policy will be returned from the cache whenever there is a cache key match. To learn more, see Configure a Lambda authorizer using the API Gateway console.
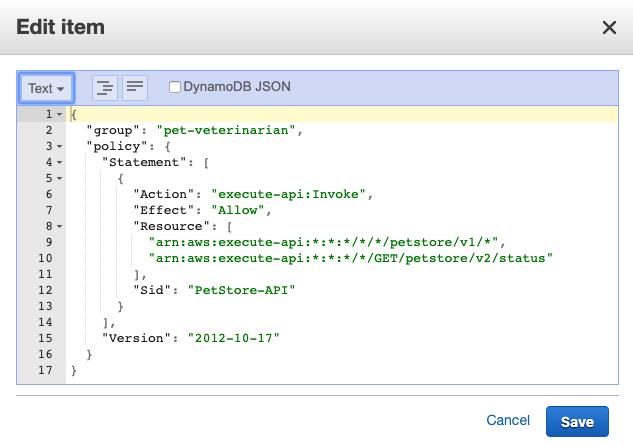
Let’s have a closer look at the following example policy that is stored as part of an item in DynamoDB.
Based on this example policy, the user is allowed to make calls to the petstore API. For version v1, the user can make requests to any verb and any path, which is expressed by an asterisk (*). For v2, the user is only allowed to make a GET request for path /status. To learn more about how the policies work, see Output from an Amazon API Gateway Lambda authorizer.
Getting started
For this solution, you need the following prerequisites:
Let’s review each service, and how those will be used, before creating the resources for this solution.
Amazon Cognito user pool
A user pool is a user directory in Amazon Cognito. With a user pool, your users can log in to your web or mobile app through Amazon Cognito. You use the Amazon Cognito user directory directly, as this sample solution creates an Amazon Cognito user. However, your users can also log in through social IdPs, OpenID Connect (OIDC), and SAML IdPs.
Lambda as backing API service
Initially, you create a Lambda function that serves your APIs. API Gateway forwards all requests to the Lambda function to serve up the requests.
An API Gateway instance and integration with Lambda
Next, you create an API Gateway instance and integrate it with the Lambda function you created. This API Gateway instance serves as an entry point for the upstream service. The following bash command below creates an Amazon Cognito user pool, a Lambda function, and an API Gateway instance. The command then configures proxy integration with Lambda and deploys an API Gateway stage.
Deploy the sample solution
From within the directory where you downloaded the sample code from GitHub, run the following command to generate a random Amazon Cognito user password and create the resources described in the previous section.
 $ bash ./helper.sh cf-create-stack-gen-password
 ...
 Successfully created CloudFormation stack.
When the command is complete, it returns a message confirming successful stack creation.
Validate Amazon Cognito user creation
To validate that an Amazon Cognito user has been created successfully, run the following command to open the Amazon Cognito UI in your browser and then log in with your credentials.
Note: When you run this command, it returns the user name and password that you should use to log in.
 $ bash ./helper.sh open-cognito-ui
  Opening Cognito UI. Please use following credentials to login:
  Username: cognitouser
  Password: xxxxxxxx
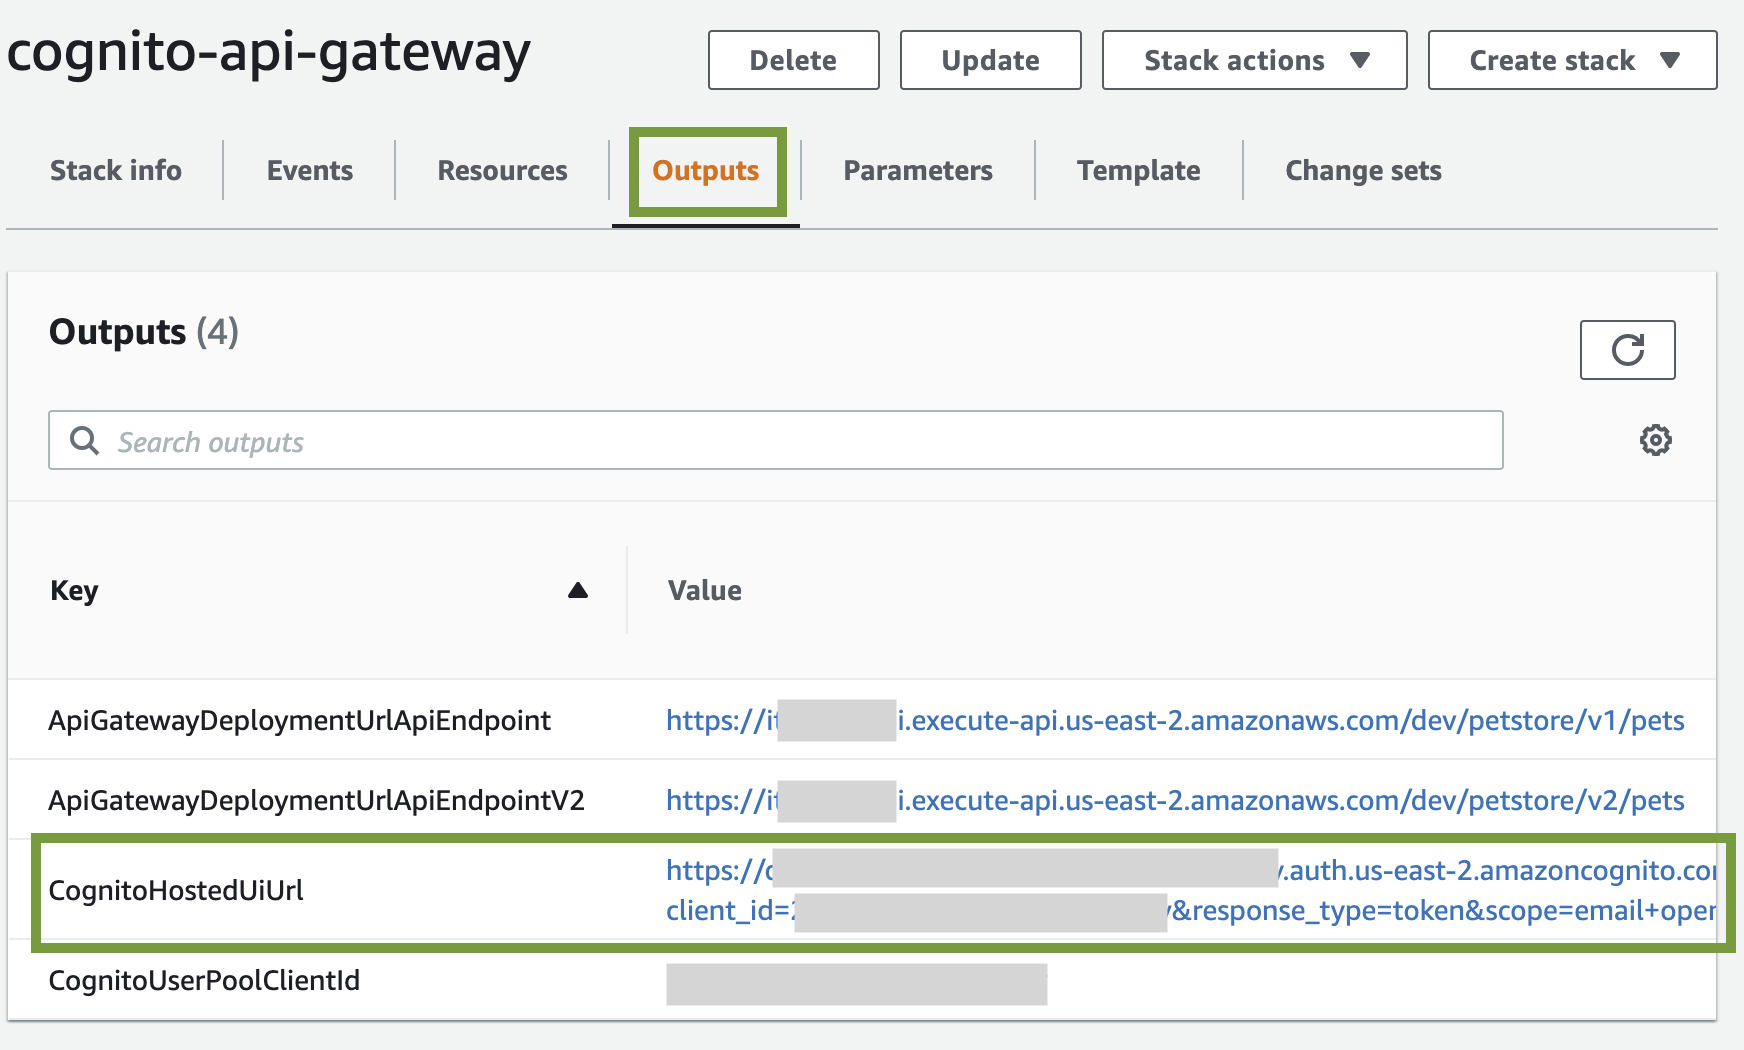
Alternatively, you can open the CloudFormation stack and get the Amazon Cognito hosted UI URL from the stack outputs. The URL is the value assigned to the CognitoHostedUiUrl variable.
Since we haven’t installed a web application that would respond to the redirect request, Amazon Cognito will redirect to localhost, which might look like an error. The key aspect is that after a successful log in, there is a URL similar to the following in the navigation bar of your browser:
Before you protect the API with Amazon Cognito so that only authorized users can access it, let’s verify that the configuration is correct and the API is served by API Gateway. The following command makes a curl request to API Gateway to retrieve data from the API service.
The expected result is that the response will be a list of pets. In this case, the setup is correct: API Gateway is serving the API.
Protect the API
To protect your API, the following is required:
DynamoDB to store the policy that will be evaluated by the API Gateway to make an authorization decision.
A Lambda function to verify the user’s access token and look up the policy in DynamoDB.
Let’s review all the services before creating the resources.
Lambda authorizer
A Lambda authorizer is an API Gateway feature that uses a Lambda function to control access to an API. You use a Lambda authorizer to implement a custom authorization scheme that uses a bearer token authentication strategy. When a client makes a request to one of the API operations, the API Gateway calls the Lambda authorizer. The Lambda authorizer takes the identity of the caller as input and returns an IAM policy as the output. The output is the policy that is returned in DynamoDB and evaluated by the API Gateway. If there is no policy mapped to the caller identity, Lambda will generate a deny policy and request will be denied.
DynamoDB table
DynamoDB is a key-value and document database that delivers single-digit millisecond performance at any scale. This is ideal for this use case to ensure that the Lambda authorizer can quickly process the bearer token, look up the policy, and return it to API Gateway. To learn more, see Control access for invoking an API.
The final step is to create the DynamoDB table for the Lambda authorizer to look up the policy, which is mapped to an Amazon Cognito group.
Figure 3 illustrates an item in DynamoDB. Key attributes are:
Group, which is used to look up the policy.
Policy, which is returned to API Gateway to evaluate the policy.
Figure 3: DynamoDB item
Based on this policy, the user that is part of the Amazon Cognito group pet-veterinarian is allowed to make API requests to endpoints https://<domain>/<api-gateway-stage>/petstore/v1/* and https://<domain>/<api-gateway-stage>/petstore/v2/status for GET requests only.
Update and create resources
Run the following command to update existing resources and create a Lambda authorizer and DynamoDB table.
The request is denied with the message Unauthorized. At this point, the Amazon API Gateway expects a header named Authorization (case sensitive) in the request. If there’s no authorization header, the request is denied before it reaches the lambda authorizer. This is a way to filter out requests that don’t include required information.
Use the following command for the next test. In this test, you pass the required header but the token is invalid because it wasn’t issued by Amazon Cognito but is a simple JWT-format token stored in ./helper.sh. To learn more about how to decode and validate a JWT, see decode and verify an Amazon Cognito JSON token.
$ bash ./helper.sh curl-api-invalid-token
{"Message":"User is not authorized to access this resource"}
This time the message is different. The Lambda authorizer received the request and identified the token as invalid and responded with the message User is not authorized to access this resource.
To make a successful request to the protected API, your code will need to perform the following steps:
Use a user name and password to authenticate against your Amazon Cognito user pool.
Acquire the tokens (id token, access token, and refresh token).
Make an HTTPS (TLS) request to API Gateway and pass the access token in the headers.
Before the request is forwarded to the API service, API Gateway receives the request and passes it to the Lambda authorizer. The authorizer performs the following steps. If any of the steps fail, the request is denied.
Retrieve the public keys from Amazon Cognito.
Cache the public keys so the Lambda authorizer doesn’t have to make additional calls to Amazon Cognito as long as the Lambda execution environment isn’t shut down.
The access token has claims such as Amazon Cognito assigned groups, user name, token use, and others, as shown in the following example (some fields removed).
Finally, let’s programmatically log in to Amazon Cognito UI, acquire a valid access token, and make a request to API Gateway. Run the following command to call the protected API.
This time, you receive a response with data from the API service. Let’s examine the steps that the example code performed:
Lambda authorizer validates the access token.
Lambda authorizer looks up the policy in DynamoDB based on the group name that was retrieved from the access token.
Lambda authorizer passes the IAM policy back to API Gateway.
API Gateway evaluates the IAM policy and the final effect is an allow.
API Gateway forwards the request to Lambda.
Lambda returns the response.
Let’s continue to test our policy from Figure 3. In the policy document, arn:aws:execute-api:*:*:*/*/GET/petstore/v2/status is the only endpoint for version V2, which means requests to endpoint /GET/petstore/v2/pets should be denied. Run the following command to test this.
 $ bash ./helper.sh curl-protected-api-not-allowed-endpoint
{"Message":"User is not authorized to access this resource"}
Note: Now that you understand fine grained access control using Cognito user pool, API Gateway and lambda function, and you have finished testing it out, you can run the following command to clean up all the resources associated with this solution:
In this post, you learned how IAM and Amazon Cognito can be used to provide fine-grained access control for your API behind API Gateway. You can use this approach to transparently apply fine-grained control to your API, without having to modify the code in your API, and create advanced policies by using IAM condition keys.
If you have feedback about this post, submit comments in the Comments section below. If you have questions about this post, start a new thread on the Amazon Cognito forum or contact AWS Support.
Want more AWS Security how-to content, news, and feature announcements? Follow us on Twitter.
In this lab, we will list all devices which are not reachable by a monitoring tool. This is good when we want to improve the overall monitoring experience and decrease the size queue (metrics which has not been arrived at the instance).
Tools required for the job: Access to a database server or a Windows computer with PowerShell
To summarize devices that are not reachable at the moment we can use a database query. Tested and works on 4.0, 5.0, on MySQL and PostgreSQL:
SELECT hosts.host,
       interface.ip,
       interface.dns,
       interface.useip,
       CASE interface.type
           WHEN 1 THEN 'ZBX'
           WHEN 2 THEN 'SNMP'
           WHEN 3 THEN 'IPMI'
           WHEN 4 THEN 'JMX'
       END AS "type",
       hosts.error
FROM hosts
JOIN interface ON interface.hostid=hosts.hostid
WHERE hosts.available=2
  AND interface.main=1
  AND hosts.status=0;
A very similar (but not exactly the same) outcome can be obtained via Windows PowerShell by contacting Zabbix API. Try this snippet:
An analysis of the Cloudflare API availability incident on 2020-11-02
When we review design documents at Cloudflare, we are always on the lookout for Single Points of Failure (SPOFs). Eliminating these is a necessary step in architecting a system you can be confident in. Ironically, when you’re designing a system with built-in redundancy, you spend most of your time thinking about how well it functions when that redundancy is lost.
On November 2, 2020, Cloudflare had an incident that impacted the availability of the API and dashboard for six hours and 33 minutes. During this incident, the success rate for queries to our API periodically dipped as low as 75%, and the dashboard experience was as much as 80 times slower than normal. While Cloudflare’s edge is massively distributed across the world (and kept working without a hitch), Cloudflare’s control plane (API & dashboard) is made up of a large number of microservices that are redundant across two regions. For most services, the databases backing those microservices are only writable in one region at a time.
Each of Cloudflare’s control plane data centers has multiple racks of servers. Each of those racks has two switches that operate as a pair—both are normally active, but either can handle the load if the other fails. Cloudflare survives rack-level failures by spreading the most critical services across racks. Every piece of hardware has two or more power supplies with different power feeds. Every server that stores critical data uses RAID 10 redundant disks or storage systems that replicate data across at least three machines in different racks, or both. Redundancy at each layer is something we review and require. So—how could things go wrong?
In this post we present a timeline of what happened, and how a difficult failure mode known as a Byzantine fault played a role in a cascading series of events.
2020-11-02 14:43 UTC: Partial Switch Failure
At 14:43, a network switch started misbehaving. Alerts began firing about the switch being unreachable to pings. The device was in a partially operating state: network control plane protocols such as LACP and BGP remained operational, while others, such as vPC, were not. The vPC link is used to synchronize ports across multiple switches, so that they appear as one large, aggregated switch to servers connected to them. At the same time, the data plane (or forwarding plane) was not processing and forwarding all the packets received from connected devices.
This failure scenario is completely invisible to the connected nodes, as each server only sees an issue for some of its traffic due to the load-balancing nature of LACP. Had the switch failed fully, all traffic would have failed over to the peer switch, as the connected links would’ve simply gone down, and the ports would’ve dropped out of the forwarding LACP bundles.
Six minutes later, the switch recovered without human intervention. But this odd failure mode led to further problems that lasted long after the switch had returned to normal operation.
2020-11-02 14:44 UTC: etcd Errors begin
The rack with the misbehaving switch included one server in our etcd cluster. We use etcd heavily in our core data centers whenever we need strongly consistent data storage that’s reliable across multiple nodes.
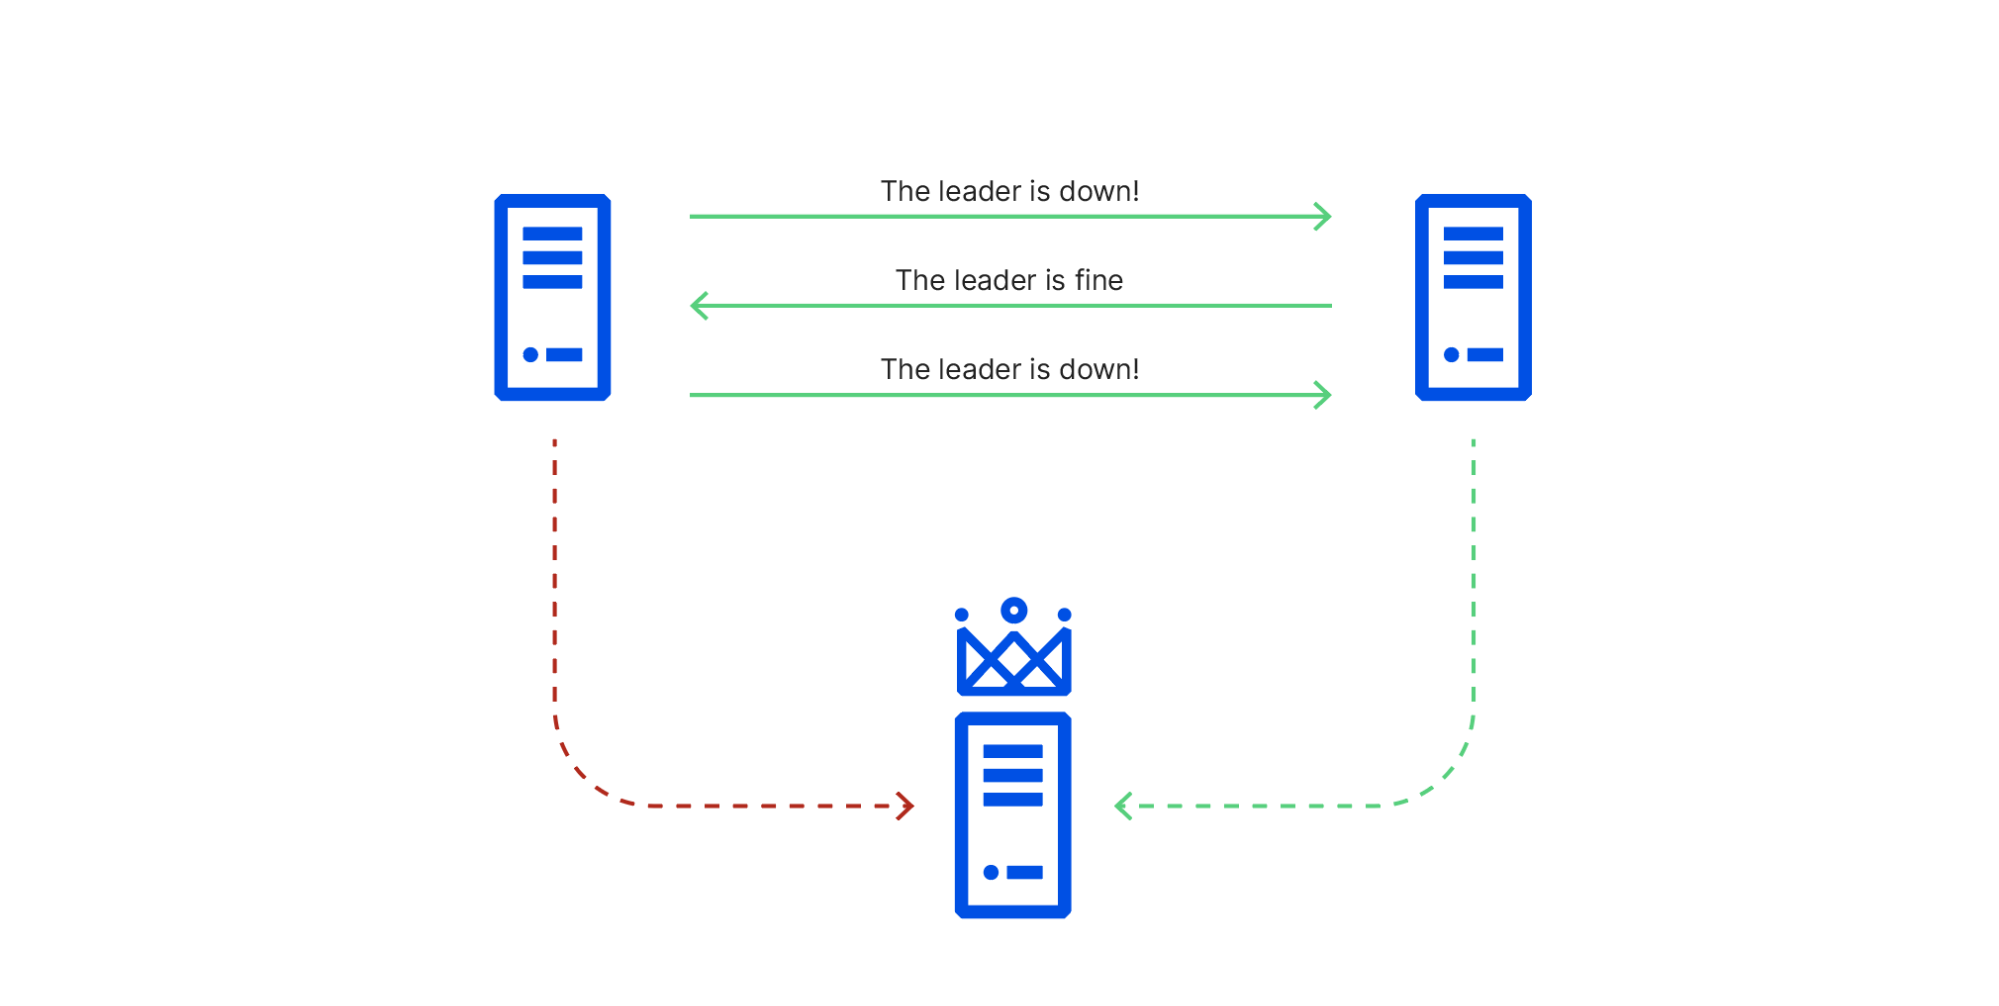
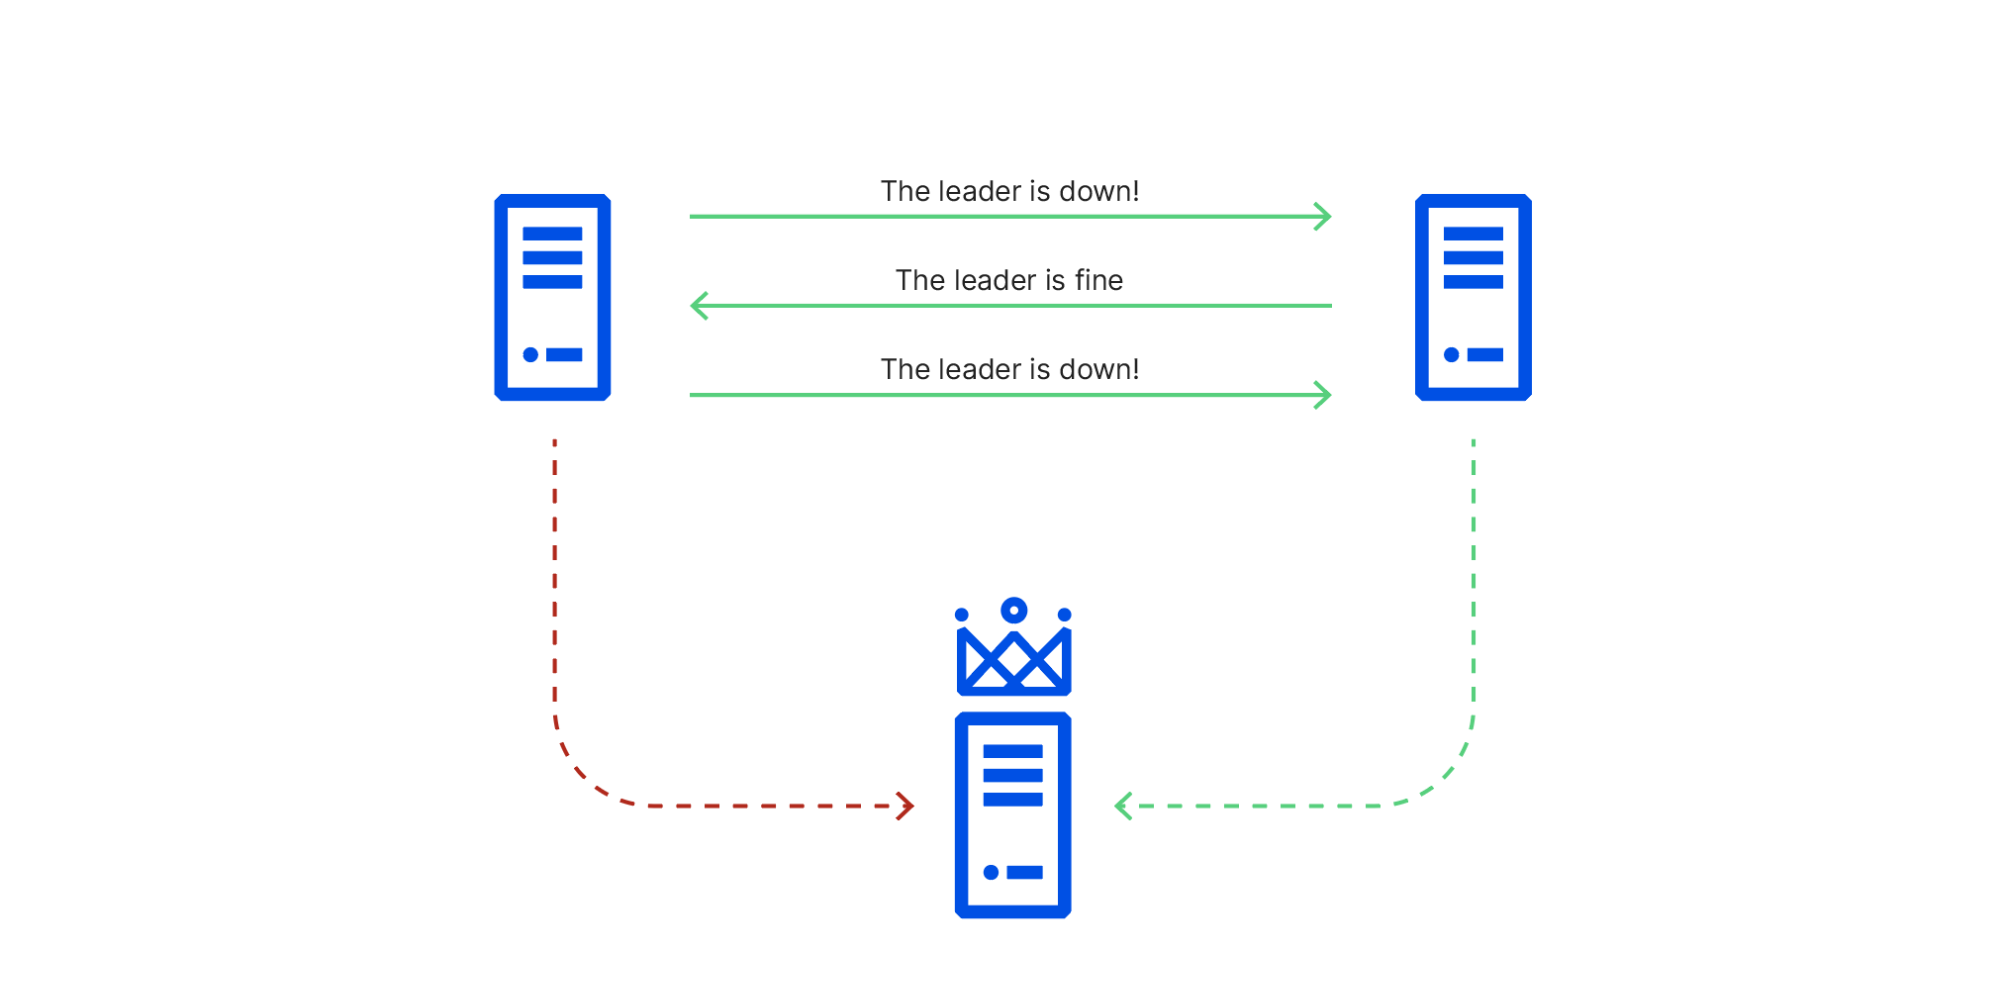
In the event that the cluster leader fails, etcd uses the RAFT protocol to maintain consistency and establish consensus to promote a new leader. In the RAFT protocol, cluster members are assumed to be either available or unavailable, and to provide accurate information or none at all. This works fine when a machine crashes, but is not always able to handle situations where different members of the cluster have conflicting information.
In this particular situation:
Network traffic between node 1 (in the affected rack) and node 3 (the leader) was being sent through the switch in the degraded state,
Network traffic between node 1 and node 2 were going through its working peer, and
Network traffic between node 2 and node 3 was unaffected.
This caused cluster members to have conflicting views of reality, known in distributed systems theory as a Byzantine fault. As a consequence of this conflicting information, node 1 repeatedly initiated leader elections, voting for itself, while node 2 repeatedly voted for node 3, which it could still connect to. This resulted in ties that did not promote a leader node 1 could reach. RAFT leader elections are disruptive, blocking all writes until they’re resolved, so this made the cluster read-only until the faulty switch recovered and node 1 could once again reach node 3.
2020-11-02 14:45 UTC: Database system promotes a new primary database
Cloudflare’s control plane services use relational databases hosted across multiple clusters within a data center. Each cluster is configured for high availability. The cluster setup includes a primary database, a synchronous replica, and one or more asynchronous replicas. This setup allows redundancy within a data center. For cross-datacenter redundancy, a similar high availability secondary cluster is set up and replicated in a geographically dispersed data center for disaster recovery. The cluster management system leverages etcd for cluster member discovery and coordination.
When etcd became read-only, two clusters were unable to communicate that they had a healthy primary database. This triggered the automatic promotion of a synchronous database replica to become the new primary. This process happened automatically and without error or data loss.
There was a defect in our cluster management system that requires a rebuild of all database replicas when a new primary database is promoted. So, although the new primary database was available instantly, the replicas would take considerable time to become available, depending on the size of the database. For one of the clusters, service was restored quickly. Synchronous and asynchronous database replicas were rebuilt and started replicating successfully from primary, and the impact was minimal.
For the other cluster, however, performant operation of that database required a replica to be online. Because this database handles authentication for API calls and dashboard activities, it takes a lot of reads, and one replica was heavily utilized to spare the primary the load. When this failover happened and no replicas were available, the primary was overloaded, as it had to take all of the load. This is when the main impact started.
Reduce Load, Leverage Redundancy
At this point we saw that our primary authentication database was overwhelmed and began shedding load from it. We dialed back the rate at which we push SSL certificates to the edge, send emails, and other features, to give it space to handle the additional load. Unfortunately, because of its size, we knew it would take several hours for a replica to be fully rebuilt.
A silver lining here is that every database cluster in our primary data center also has online replicas in our secondary data center. Those replicas are not part of the local failover process, and were online and available throughout the incident. The process of steering read-queries to those replicas was not yet automated, so we manually diverted API traffic that could leverage those read replicas to the secondary data center. This substantially improved our API availability.
The Dashboard
The Cloudflare dashboard, like most web applications, has the notion of a user session. When user sessions are created (each time a user logs in) we perform some database operations and keep data in a Redis cluster for the duration of that user’s session. Unlike our API calls, our user sessions cannot currently be moved across the ocean without disruption. As we took actions to improve the availability of our API calls, we were unfortunately making the user experience on the dashboard worse.
This is an area of the system that is currently designed to be able to fail over across data centers in the event of a disaster, but has not yet been designed to work in both data centers at the same time. After a first period in which users on the dashboard became increasingly frustrated, we failed the authentication calls fully back to our primary data center, and kept working on our primary database to ensure we could provide the best service levels possible in that degraded state.
2020-11-02 21:20 UTC Database Replica Rebuilt
The instant the first database replica rebuilt, it put itself back into service, and performance resumed to normal levels. We re-ramped all of the services that had been turned down, so all asynchronous processing could catch up, and after a period of monitoring marked the end of the incident.
Redundant Points of Failure
The cascade of failures in this incident was interesting because each system, on its face, had redundancy. Moreover, no system fully failed—each entered a degraded state. That combination meant the chain of events that transpired was considerably harder to model and anticipate. It was frustrating yet reassuring that some of the possible failure modes were already being addressed.
A team was already working on fixing the limitation that requires a database replica rebuild upon promotion. Our user sessions system was inflexible in scenarios where we’d like to steer traffic around, and redesigning that was already in progress.
This incident also led us to revisit the configuration parameters we put in place for things that auto-remediate. In previous years, promoting a database replica to primary took far longer than we liked, so getting that process automated and able to trigger on a minute’s notice was a point of pride. At the same time, for at least one of our databases, the cure may be worse than the disease, and in fact we may not want to invoke the promotion process so quickly. Immediately after this incident we adjusted that configuration accordingly.
Byzantine Fault Tolerance (BFT) is a hot research topic. Solutions have been known since 1982, but have had to choose between a variety of engineering tradeoffs, including security, performance, and algorithmic simplicity. Most general-purpose cluster management systems choose to forgo BFT entirely and use protocols based on PAXOS, or simplifications of PAXOS such as RAFT, that perform better and are easier to understand than BFT consensus protocols. In many cases, a simple protocol that is known to be vulnerable to a rare failure mode is safer than a complex protocol that is difficult to implement correctly or debug.
The first uses of BFT consensus were in safety-critical systems such as aircraft and spacecraft controls. These systems typically have hard real time latency constraints that require tightly coupling consensus with application logic in ways that make these implementations unsuitable for general-purpose services like etcd. Contemporary research on BFT consensus is mostly focused on applications that cross trust boundaries, which need to protect against malicious cluster members as well as malfunctioning cluster members. These designs are more suitable for implementing general-purpose services such as etcd, and we look forward to collaborating with researchers and the open source community to make them suitable for production cluster management.
We are very sorry for the difficulty the outage caused, and are continuing to improve as our systems grow. We’ve since fixed the bug in our cluster management system, and are continuing to tune each of the systems involved in this incident to be more resilient to failures of their dependencies. If you’re interested in helping solve these problems at scale, please visit cloudflare.com/careers.
Today we are talking about a use case when it’s impossible to find a proper way to write a recovery expression for the Zabbix trigger. In other words, we know how to identify problems. But there is no good way to detect when the problem is gone.
This mostly relates to a huge environment, for example:
Got one log file. There are hundreds of patterns inside. We respect all of them. We need them
SNMP trap item (snmptrap.fallback) with different patterns being written inside
In these situations, the trigger is most likely configured to “Event generation mode: Multiple.” This practically means: when a “problematic metric” hits the instance, it will open +1 additional problem.
Goal:
I just need to receive an email about the record, then close the event.
As a workaround (let’s call it a solution here), we can define an action which will:
contact an API endpoint
manually acknowledge the event and close it
The biggest reason why this functionality is possible is that: when an event hits the action, the operation actually knows the event ID of the problem. The macro {EVENT.ID} saves the day.
To solve the problem, we need to install API characteristics at the global level:
NOTE ‘http://127.0.0.1/api_jsonrpc.php’ means the frontend server runs on the same server as systemd:zabbix-server. If it is not the case, we need to plot a front-end address of Zabbix GUI + add ‘api_jsonrpc.php’.
We will have 2 actions. The first one will deliver a notification to email:
After 1 minute, a second action will close the event:
This is a full bash snippet we must put inside. No need to change anything. It works with copy and paste:
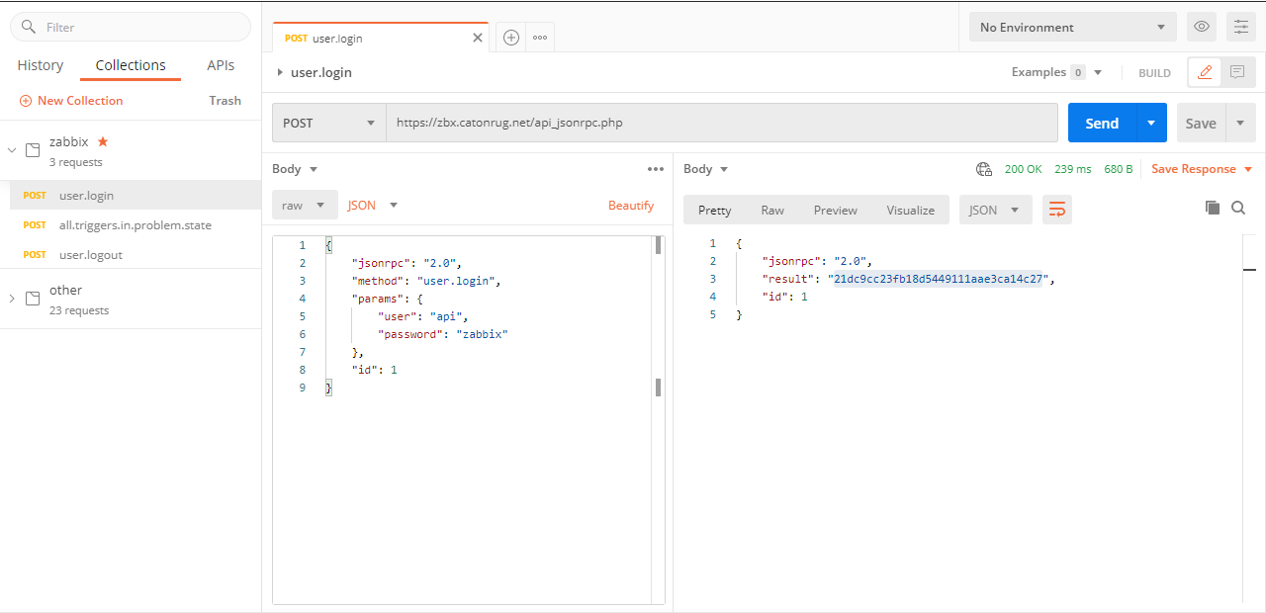
Zabbix API calls can be used through the graphical user interface (GUI), no need to jump to scripting. An application to perform API calls is called Postman.
Benefits:
Available on Windows, Linux, or MAC
Save/synchronize your collection with Google account
Can copy and paste examples from the official documentation page
Let’s go to basic steps on how to perform API calls:
1st step – Grab API method user.login and use a dedicated username and password to obtain and session token:
NOTE We recommend using a dedicated user for API calls. For example, a user called “api”. Make sure the user type has been chosen as “Zabbix Super Admin” so through this user we can access any type of information.
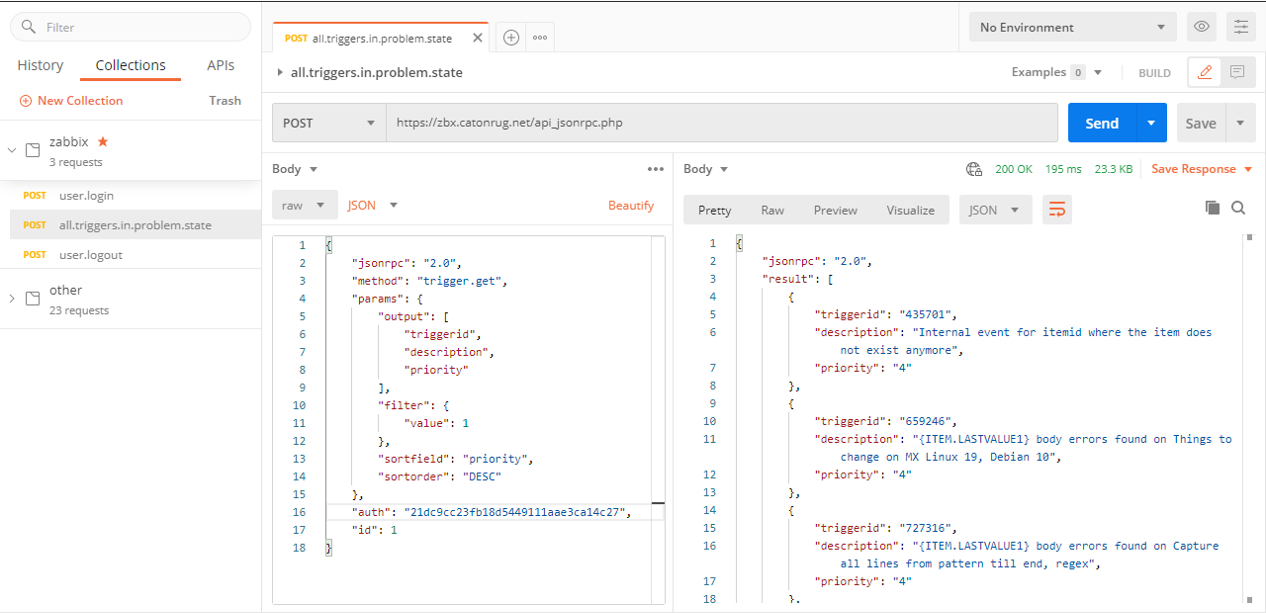
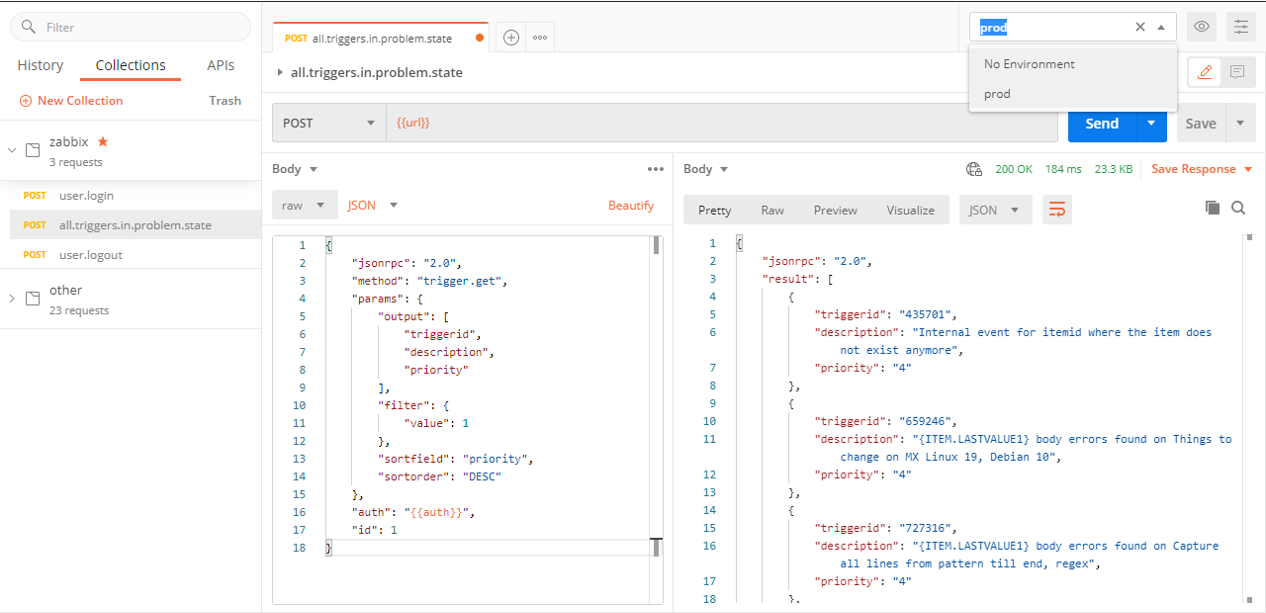
2nd step – Use API method trigger.get to list all triggers in the problem state:
Replace “<session key>” inside the API snippet to make it work. Then click “Send” button. It will list all triggers in the problem state on the right side:
Postman conveniences – Environments
Environments are “a must” if you:
Have a separate test, development, and production Zabbix instance
Plan to migrate Zabbix to next version (4.0 to 5.0) so it’s better to test all API calls beforehand
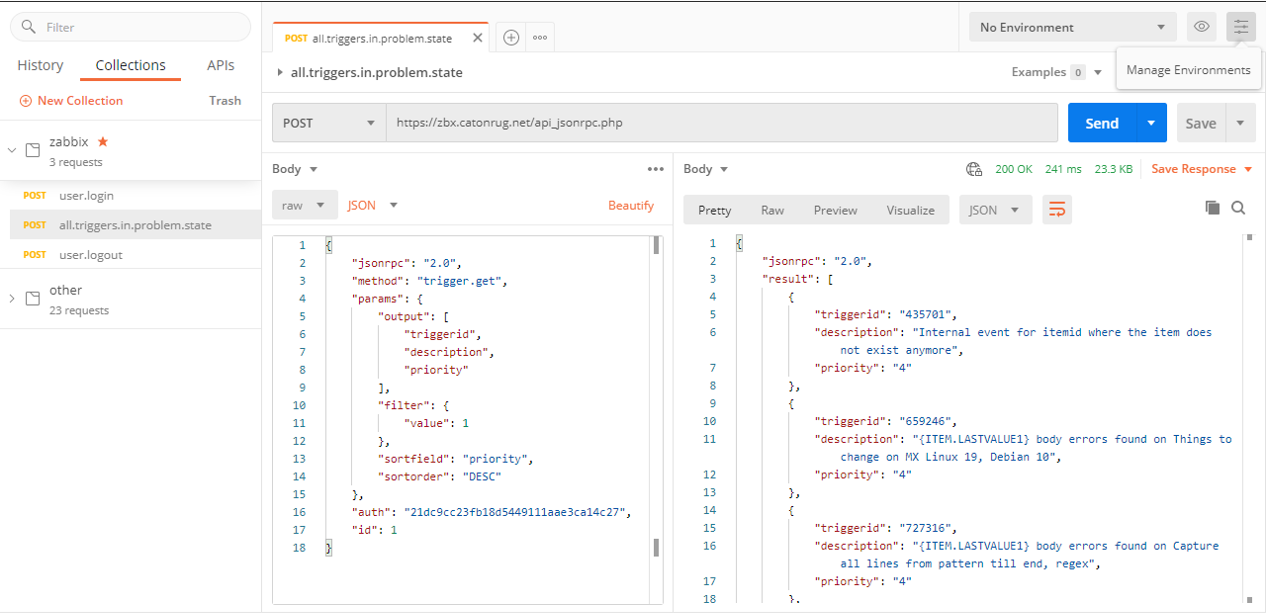
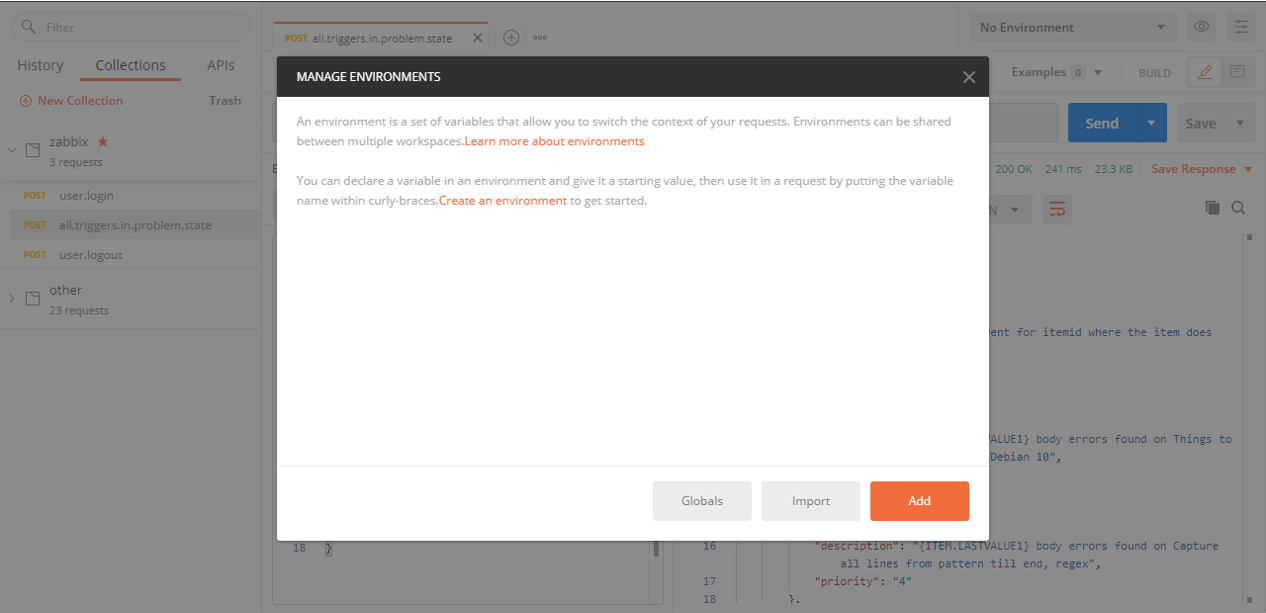
On the top right corner, there is a button Manage Environments. Let’s click it.
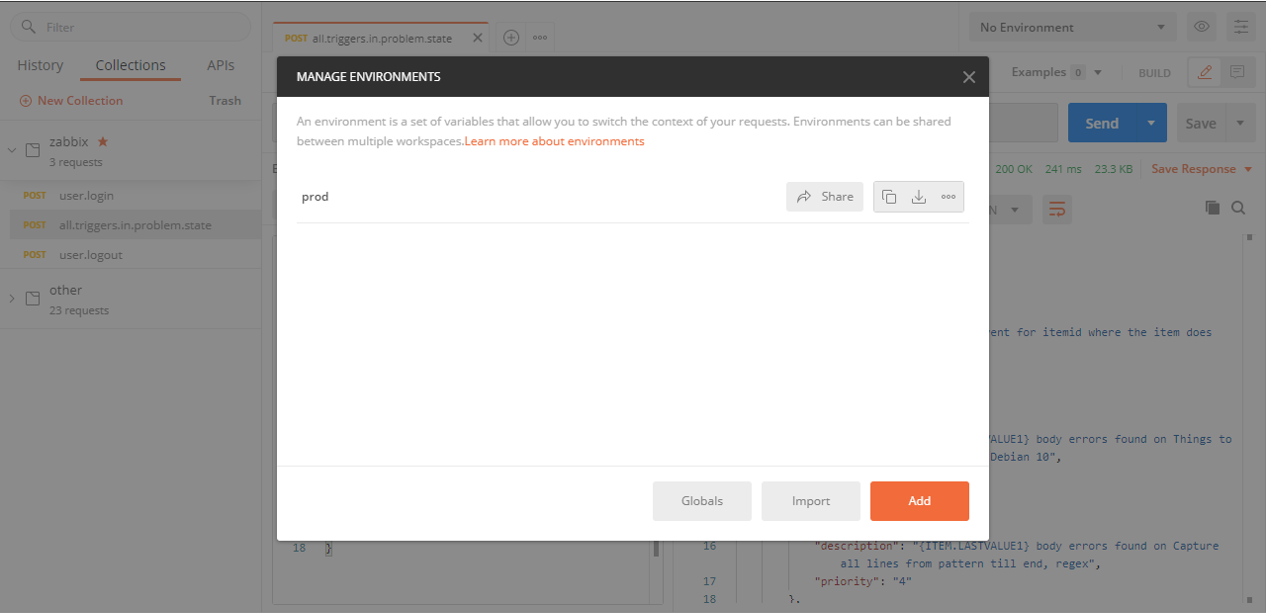
Now Create an environment:
Each environment must consist of url and auth key:
Now we have one definition prod. Can close window with [X]:
In order to work with your new environment, select a newly created profile prod. It’s required to substitute Zabbix API endpoint with {{url}} and plot {{auth}} to serve as a dynamic authorization key:
NOTE Every time we notice an API procedure does not work anymore, all we need to do is to enter Manage environments section and install a new session tokken..
In 2016, we launched the Cloudflare Origin CA, a certificate authority optimized for making it easy to secure the connection between Cloudflare and an origin server. Running our own CA has allowed us to support fast issuance and renewal, simple and effective revocation, and wildcard certificates for our users.
Out of the box, managing TLS certificates and keys within Kubernetes can be challenging and error prone. The secret resources have to be constructed correctly, as components expect secrets with specific fields. Some forms of domain verification require manually rotating secrets to pass. Once you’re successful, don’t forget to renew before the certificate expires!
cert-manager is a project to fill this operational gap, providing Kubernetes resources that manage the lifecycle of a certificate. Today we’re releasing origin-ca-issuer, an extension to cert-manager integrating with Cloudflare Origin CA to easily create and renew certificates for your account’s domains.
Origin CA Integration
Creating an Issuer
After installing cert-manager and origin-ca-issuer, you can create an OriginIssuer resource. This resource creates a binding between cert-manager and the Cloudflare API for an account. Different issuers may be connected to different Cloudflare accounts in the same Kubernetes cluster.
This creates a new OriginIssuer named “prod-issuer” that issues certificates using ECDSA signatures, and the secret “service-key” in the same namespace is used to authenticate to the Cloudflare API.
Signing an Origin CA Certificate
After creating an OriginIssuer, we can now create a Certificate with cert-manager. This defines the domains, including wildcards, that the certificate should be issued for, how long the certificate should be valid, and when cert-manager should renew the certificate.
apiVersion: cert-manager.io/v1
kind: Certificate
metadata:
  name: example-com
  namespace: default
spec:
  # The secret name where cert-manager
  # should store the signed certificate.
  secretName: example-com-tls
  dnsNames:
    - example.com
  # Duration of the certificate.
  duration: 168h
  # Renew a day before the certificate expiration.
  renewBefore: 24h
  # Reference the Origin CA Issuer you created above,
  # which must be in the same namespace.
  issuerRef:
    group: cert-manager.k8s.cloudflare.com
    kind: OriginIssuer
    name: prod-issuer
Once created, cert-manager begins managing the lifecycle of this certificate, including creating the key material, crafting a certificate signature request (CSR), and constructing a certificate request that will be processed by the origin-ca-issuer.
When signed by the Cloudflare API, the certificate will be made available, along with the private key, in the Kubernetes secret specified within the secretName field. You’ll be able to use this certificate on servers proxied behind Cloudflare.
Extra: Ingress Support
If you’re using an Ingress controller, you can use cert-manager’s Ingress support to automatically manage Certificate resources based on your Ingress resource.
apiVersion: networking/v1
kind: Ingress
metadata:
  annotations:
    cert-manager.io/issuer: prod-issuer
    cert-manager.io/issuer-kind: OriginIssuer
    cert-manager.io/issuer-group: cert-manager.k8s.cloudflare.com
  name: example
  namespace: default
spec:
  rules:
    - host: example.com
      http:
        paths:
          - backend:
              serviceName: examplesvc
              servicePort: 80
            path: /
  tls:
    # specifying a host in the TLS section will tell cert-manager
    # what DNS SANs should be on the created certificate.
    - hosts:
        - example.com
      # cert-manager will create this secret
      secretName: example-tls
Building an External cert-manager Issuer
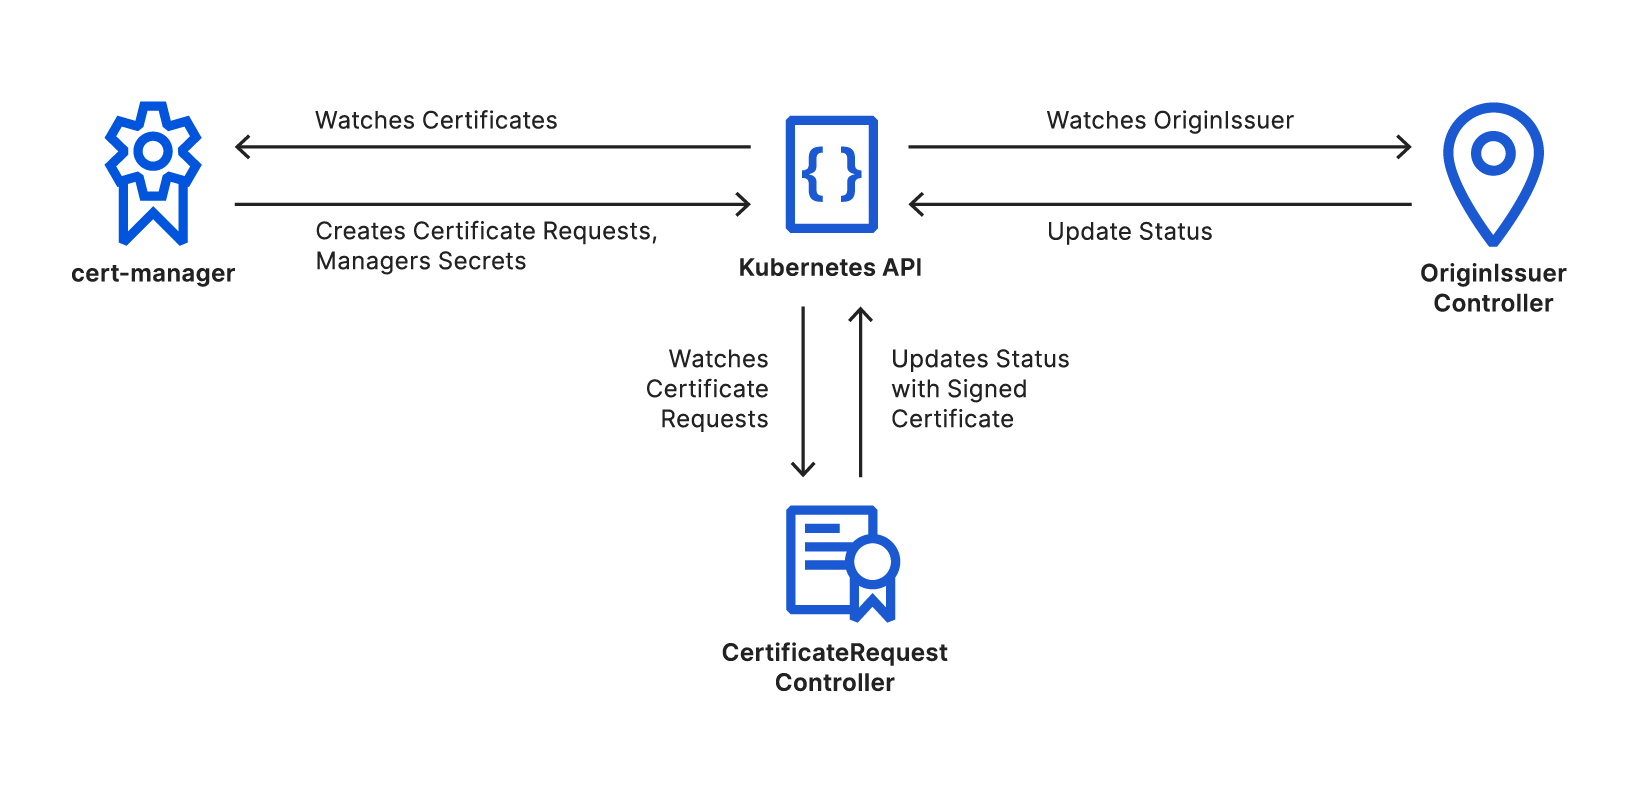
An external cert-manager issuer is a specialized Kubernetes controller. There’s no direct communication between cert-manager and external issuers at all; this means that you can use any existing tools and best practices for developing controllers to develop an external issuer.
We’ve decided to use the excellent controller-runtime project to build origin-ca-issuer, running two reconciliation controllers.
OriginIssuer Controller
The OriginIssuer controller watches for creation and modification of OriginIssuer custom resources. The controllers create a Cloudflare API client using the details and credentials referenced. This client API instance will later be used to sign certificates through the API. The controller will periodically retry to create an API client; once it is successful, it updates the OriginIssuer’s status to be ready.
CertificateRequest Controller
The CertificateRequest controller watches for the creation and modification of cert-manager’s CertificateRequest resources. These resources are created automatically by cert-manager as needed during a certificate’s lifecycle.
The controller looks for Certificate Requests that reference a known OriginIssuer, this reference is copied by cert-manager from the origin Certificate resource, and ignores all resources that do not match. The controller then verifies the OriginIssuer is in the ready state, before transforming the certificate request into an API request using the previously created clients.
On a successful response, the signed certificate is added to the certificate request, and which cert-manager will use to create or update the secret resource. On an unsuccessful request, the controller will periodically retry.
Learn More
Up-to-date documentation and complete installation instructions can be found in our GitHub repository. Feedback and contributions are greatly appreciated. If you’re interested in Kubernetes at Cloudflare, including building controllers like these, we’re hiring.
Since the launch of Cloudflare Stream, our customers have been asking for a programmatic way to add watermarks to their videos. We built the Watermarks API to support a wide range of use cases: from customers who simply want to tell Stream “can you put this watermark image to the top right of my video?” to customers with more detailed asks such as “can you put this watermark image in a way it doesn’t take up more than 10% of the original video and with 20% opacity?” All that and more is now available at no additional cost through the Watermarks API.
What is Cloudflare Stream?
Cloudflare Stream provides out-of-the-box video infrastructure so developers can bring their app ideas to market faster. While building a video streaming app, developers must ask themselves questions like
“Where do we store the videos affordably?”
“How do we encode the videos to support users with varying Internet speeds?”
“How do we maintain our video pipeline in the long term?”
Cloudflare Stream is a single product that handles video encoding, storage, delivery and presentation (with the Stream Player.) Stream lets developers launch their ideas faster while having the confidence the video infrastructure will scale with their app’s growth.
How the Watermark API works
The Watermark API lets you add a watermark to a video at the time of uploading. It consists of two new features to the Stream API:
A new /stream/watermarks endpoint that lets you create watermark profiles and returns a uid, a unique identifier for each watermark profile
Support for a watermark object containing the uid of the watermark profile that can be passed at the time of upload
Step 1: Creating a Watermark Profile
A watermark profile describes the nature of the watermark, including the image to use as a watermark and properties such as its positioning, padding and scale.
In this example, we are going to create a watermark profile that places the Cloudflare logo to the lower left of the video:
In future iterations, we plan to add support for animated watermarks. Additionally, we want to add Watermark support to the Stream Dashboard so you have a UI to manage and add watermarks.
The collective thoughts of the interwebz
Manage Consent
To provide the best experiences, we use technologies like cookies to store and/or access device information. Consenting to these technologies will allow us to process data such as browsing behavior or unique IDs on this site. Not consenting or withdrawing consent, may adversely affect certain features and functions.
Functional
Always active
The technical storage or access is strictly necessary for the legitimate purpose of enabling the use of a specific service explicitly requested by the subscriber or user, or for the sole purpose of carrying out the transmission of a communication over an electronic communications network.
Preferences
The technical storage or access is necessary for the legitimate purpose of storing preferences that are not requested by the subscriber or user.
Statistics
The technical storage or access that is used exclusively for statistical purposes.The technical storage or access that is used exclusively for anonymous statistical purposes. Without a subpoena, voluntary compliance on the part of your Internet Service Provider, or additional records from a third party, information stored or retrieved for this purpose alone cannot usually be used to identify you.
Marketing
The technical storage or access is required to create user profiles to send advertising, or to track the user on a website or across several websites for similar marketing purposes.
 You can create a named API token in the API tokens section, under Administration – General
 Make sure to store the auth token!
 An HTTP agent item that uses a Zabbix API call in its request body
 Action operation script that invokes Zabbix event.acknowledge API method
 Action operation which runs our event.acknowledge Zabbix API script