Security and network administrators can control outbound access from a virtual private cloud (VPC) to specific destinations by using a service like AWS Network Firewall. You can use stateful rule groups to control outbound access to domains for HTTP and HTTPS by default in Network Firewall. In this post, we’ll walk you through how to accomplish this access control for non-HTTP and non-HTTPS traffic, such as SSH (Secure Shell). This solution is extensible to other protocols with static port assignments.
In the example scenario in this post, the network administrator needs to permit outbound SSH access on port 22/tcp to a third-party domain, example.org, from a group of Amazon Elastic Compute Cloud (Amazon EC2) instances that sits inside of a protected VPC that restricts outbound SSH traffic with Network Firewall. Non-HTTP traffic can’t currently be controlled with a domain rule in Network Firewall.
This solution allows administrators to control outbound access to a given domain in a granular way, by resolving the domain name inside of an AWS Lambda function, and updating a Network Firewall rule variable with the results of the DNS query. This solution further restricts specific non-HTTP and non-HTTPS traffic to those allowed domains to only what is explicitly specified by the administrator.
Solution overview
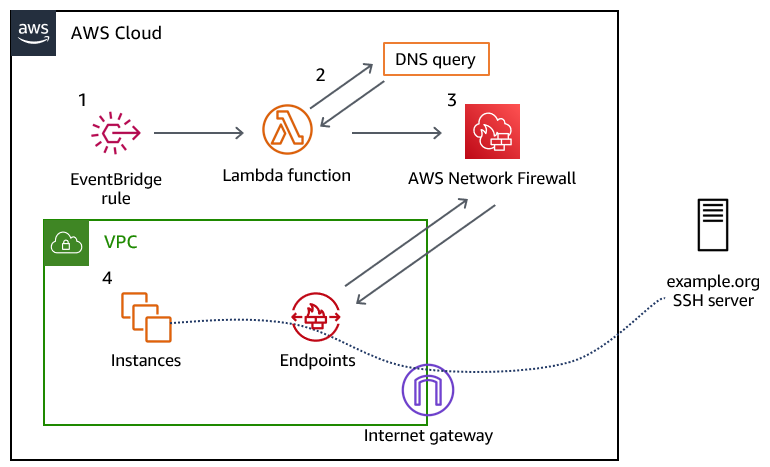
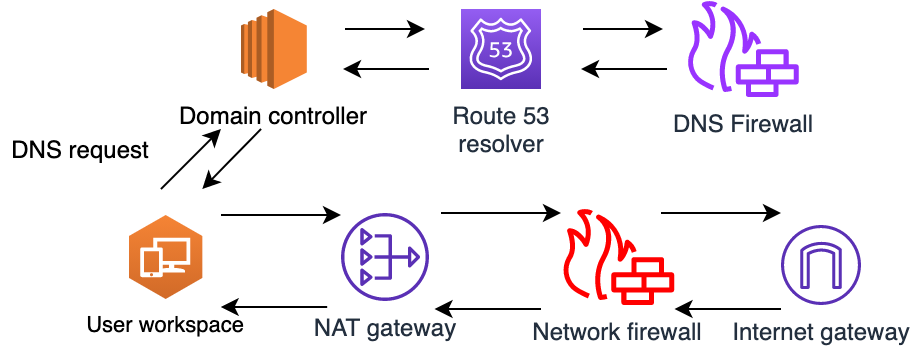
Figure 1 provides an overview of the solution and the resulting traffic flow.
Figure 1: Overview of the solution and the resulting traffic flow
The solution workflow is as follows:
An Amazon EventBridge rule invokes the Lambda function every 10 minutes. You can modify this frequency to meet your needs. You should consider the time-to-live (TTL) record of the DNS record that you are configuring when choosing this interval.
The Lambda function performs the DNS lookup for the provided domain, and updates a variable in an existing Network Firewall rule group. The rule group changes take a few seconds to fully apply to the nodes in your Network Firewall deployment.
The newly created Network Firewall rule group is associated with the Network Firewall policy to control traffic.
Traffic from the instances in your VPC flows through the Network Firewall endpoint, and if allowed, is routed through an internet gateway to the target server.
A DNS domain that you provide, which allows traffic for the protocol and port (or ports) that you plan to allow traffic to. This DNS domain needs to resolve to an IPv4 address or set of addresses; IPv6 is not supported, at this point.
Deploy the solution
We’ve provided a CloudFormation template to deploy this solution, which is located in the GitHub repository that accompanies this blog post.
Choose Stacks > Create Stack > With new resources (standard).
In the Specify template section, choose Upload a template file.
Choose Choose file, navigate to where you saved the CloudFormation template, and upload it. Then choose Next.
Specify a stack name for your CloudFormation stack.
In the Parameters section, for the Domain parameter, specify the name of the domain to which you will control access. The default value is set to example.org; however, note that the actual example.org doesn’t allow SSH traffic.
The remaining parameters have defaults to allow outbound SSH traffic to the specified domain. Adjust the LambdaJobFrequency variable so that it corresponds with the TTL of the DNS record that it will resolve. This allows the Lambda function to keep the IP address of the DNS record up to date, in the event that it changes. After you’ve configured the parameters, choose Next.
Figure 2: CloudFormation stack parameters
On the Configure stack options page, specify any further options needed or keep the default options, and then choose Next.
On the Review page, review the stack and parameters and select the check box to acknowledge that this template will create IAM resources. Choose Create Stack.
Check the stack creation status. Upon successful completion, the status shows CREATE_COMPLETE.
Figure 3: The successful creation of the CloudFormation stack
Test the solution
Before you test the newly created rule, make sure that the Lambda function has been invoked at least once from the EventBridge rule.
To verify the Lambda function results
In the AWS Management Console, navigate to the Lambda function Network-Firewall-Resolver-Function, and on the Monitor tab, choose View logs in CloudWatch.
Figure 4: Navigating to view logs in CloudWatch
Select the most recent log stream.
Verify that that a log line contains the entry StatefulRuleGroup updated successfully.
Figure 5: Examining the CloudWatch logs to verify that the Lambda function ran successfully
Associate the stateful rule group that was created by the stack, Lambda-Managed-Stateful-Rule with the existing Network Firewall policy that is attached to your VPC. To do this:
Navigate to VPC > Network Firewall > Firewall Policies and select your existing firewall policy.
In the Stateful rule groups section, for Actions, choose Add unmanaged stateful rule groups.
Select the check box for Lambda-Managed-Stateful-Rule, and then choose Add stateful rule group.
When the newly provisioned Lambda function runs successfully, it will resolve the IPv4 address for the domain (example.org) and associate the address with the stateful rule variable IP_NET. To validate that this has happened, do the following:
Choose the Lambda-Managed-Stateful-Rule rule group.
Navigate to the rule variable section, and choose IP_NET. If the Lambda function successfully resolved the provided domain name, the variable will contain the IPv4 addresses for the domain you provided, as shown in Figure 6.
Figure 6: Validating the rule variable details
Test the rule by attempting to connect to the domain that you specified in the CloudFormation template. Use an EC2 instance within the VPC that the network firewall rule is associated with, and attempt to establish an SSH connection to the domain that you specified. As shown by the SSH key negotiation in Figure 7, traffic is allowed through the network firewall, as intended.
Figure 7: SSH connectivity to the domain was successful
You can also configure the rule to drop the SSH connection, rather than permit it. To do this:
Choose the Lambda-Managed-Stateful-Rule rule group. In the Rules section, choose Edit Rules.
Modify the rule to take the Drop action, and save the rule group.
As shown by the lack of response from the host in Figure 8, the SSH connection cannot be established anymore.
Figure 8: An SSH connection cannot be established, due to the connection timing out
Cleanup
Follow the steps in this section to remove the resources created by this solution.
To remove the resources
Sign in to your AWS account where you deployed the CloudFormation stack and navigate to the Network Firewall console.
In the Stateful rule groups section, select the check box for Lambda-Managed-Stateful-Rule. For Actions, choose Disassociate from policy.
Figure 9: Disassociating the stateful rule from the existing policy
Navigate to the CloudFormation console, select the stack that you created, and then choose Delete. Upon successful deletion, the resources created by the stack will be deleted.
Conclusion
In this post, we’ve demonstrated how security and network administrators have the ability to permit or restrict non-HTTP and non-HTTPS traffic to a given domain by using Network Firewall. With this solution, administrators can enforce granular port- and protocol-level control to third-party domains. To learn more about rule group configuration in AWS Network Firewall, see Managing your own rule groups in the Developer Guide.
If you have feedback about this post, submit comments in the Comments section below. If you have questions about this post, contact AWS Support. You can also start a new thread on AWS Network Firewall re:Post to get answers from the community.
Want more AWS Security news? Follow us on Twitter.
This blog post shows how to set up an Amazon Elastic Kubernetes Service (Amazon EKS) cluster such that the applications hosted on the cluster can have their outbound internet access restricted to a set of hostnames provided by the Server Name Indication (SNI) in the allow list in the AWS Network Firewall rules. For encrypted web traffic, SNI can be used for blocking access to specific sites in the network firewall. SNI is an extension to TLS that remains unencrypted in the traffic flow and indicates the destination hostname a client is attempting to access over HTTPS.
This post also shows you how to use Network Firewall to collect hostnames of the specific sites that are being accessed by your application. Securing outbound traffic to specific hostnames is called egress filtering. In computer networking, egress filtering is the practice of monitoring and potentially restricting the flow of information outbound from one network to another. Securing outbound traffic is usually done by means of a firewall that blocks packets that fail to meet certain security requirements. One such firewall is AWS Network Firewall, a managed service that you can use to deploy essential network protections for all of your VPCs that you create with Amazon Virtual Private Cloud (Amazon VPC).
Example scenario
You have the option to scan your application traffic by the identifier of the requested SSL certificate, which makes you independent from the relationship of the IP address to the certificate. The certificate could be served from any IP address. Traditional stateful packet filters are not able to follow the changing IP address of the endpoints. Therefore, the host name information that you get from the SNI becomes important in making security decisions. Amazon EKS has gained popularity for running containerized workloads in the AWS Cloud, and you can restrict outbound traffic to only the known hostnames provided by SNI. This post will walk you through the process of setting up the EKS cluster in two different subnets so that your software can use the additional traffic routing in the VPC and traffic filtering through Network Firewall.
Solution architecture
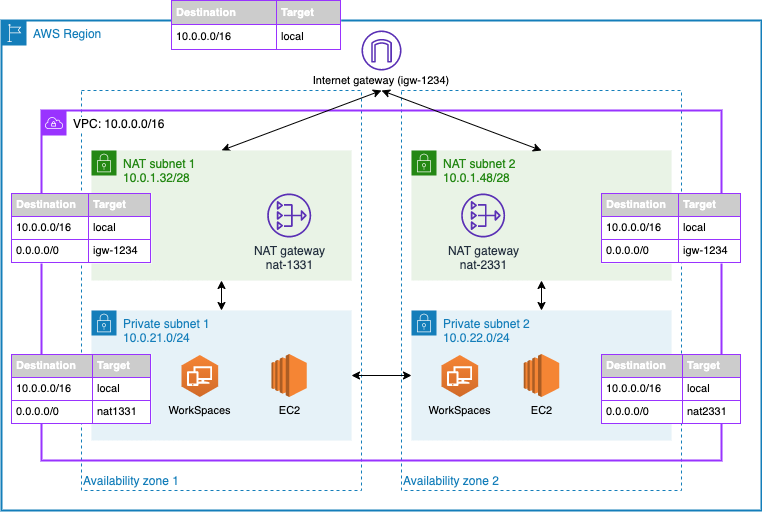
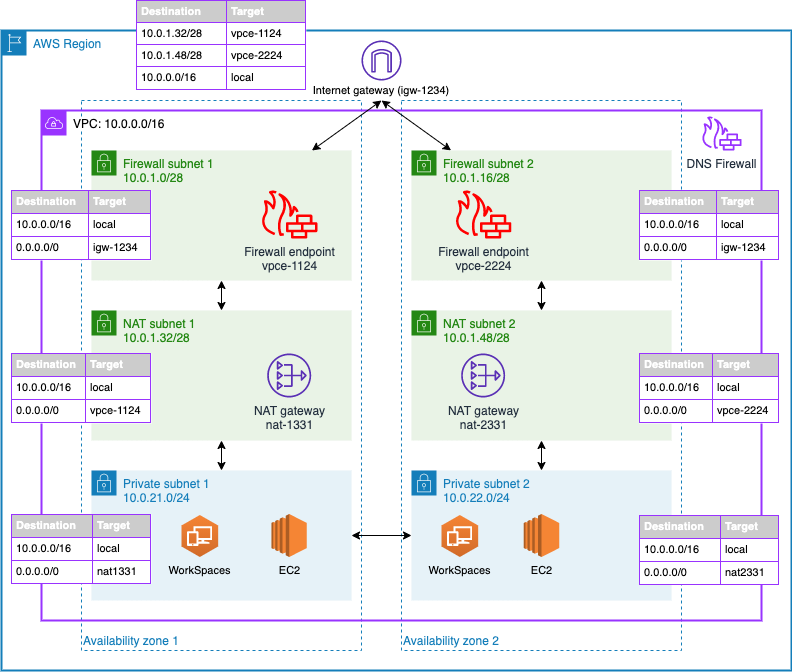
The architecture illustrated in Figure 1 shows a VPC with three subnets in Availability Zone A, and three subnets in Availability Zone B. There are two public subnets where Network Firewall endpoints are deployed, two private subnets where the worker nodes for the EKS cluster are deployed, and two protected subnets where NAT gateways are deployed.
Figure 1: Outbound internet access through Network Firewall from Amazon EKS worker nodes
The workflow in the architecture for outbound access to a third-party service is as follows:
The outbound request originates from the application running in the private subnet (for example, to https://aws.amazon.com) and is passed to the NAT gateway in the protected subnet.
The HTTPS traffic received in the protected subnet is routed to the AWS Network Firewall endpoint in the public subnet.
The network firewall computes the rules, and either accepts or declines the request to pass to the internet gateway.
If the request is passed, the application-requested URL (provided by SNI in the non-encrypted HTTPS header) is allowed in the network firewall, and successfully reaches the third-party server for access.
The VPC settings for this blog post follow the recommendation for using public and private subnets described in Creating a VPC for your Amazon EKS cluster in the Amazon EKS User Guide, but with additional subnets called protected subnets. Instead of placing the NAT gateway in a public subnet, it will be placed in the protected subnet, and the Network Firewall endpoints in the public subnet will filter the egress traffic that flows through the NAT gateway. This design pattern adds further checks and could be a recommendation for your VPC setup.
As suggested in Creating a VPC for your Amazon EKS cluster, using the Public and private subnets option allows you to deploy your worker nodes to private subnets, and allows Kubernetes to deploy load balancers to the public subnets. This arrangement can load-balance traffic to pods that are running on nodes in the private subnets. As shown in Figure 1, the solution uses an additional subnet named the protected subnet, apart from the public and private subnets. The protected subnet is a VPC subnet deployed between the public subnet and private subnet. The outbound internet traffic that is routed through the protected subnet is rerouted to the Network Firewall endpoint hosted within the public subnet. You can use the same strategy mentioned in Creating a VPC for your Amazon EKS cluster to place different AWS resources within private subnets and public subnets. The main difference in this solution is that you place the NAT gateway in a separate protected subnet, between private subnets, and place Network Firewall endpoints in the public subnets to filter traffic in the network firewall. The NAT gateway’s IP address is still preserved, and could still be used for adding to the allow list of third-party entities that need connectivity for the applications running on the EKS worker nodes.
To see a practical example of how the outbound traffic is filtered based on the hosted names provided by SNI, follow the steps in the following Deploy a sample section. You will deploy an AWS CloudFormation template that deploys the solution architecture, consisting of the VPC components, EKS cluster components, and the Network Firewall components. When that’s complete, you can deploy a sample app running on Amazon EKS to test egress traffic filtering through AWS Network Firewall.
Deploy a sample to test the network firewall
Follow the steps in this section to perform a sample app deployment to test the use case of securing outbound traffic through AWS Network Firewall.
Prerequisites
The prerequisite actions required for the sample deployment are as follows:
Make sure you have the AWS CLI installed, and configure access to your AWS account.
Copy the necessary CloudFormation templates and the sample eksctl config files from the blog’s Amazon S3 bucket to your local file system. You can do this by using the following AWS CLI S3 cp command. aws s3 cp s3://awsiammedia/public/sample/803-network-firewall-to-filter-outbound-traffic/config.yaml . aws s3 cp s3://awsiammedia/public/sample/803-network-firewall-to-filter-outbound-traffic/lambda_function.py . aws s3 cp s3://awsiammedia/public/sample/803-network-firewall-to-filter-outbound-traffic/network-firewall-eks-collect-all.yaml . aws s3 cp s3://awsiammedia/public/sample/803-network-firewall-to-filter-outbound-traffic/network-firewall-eks.yaml .
Important: This command will download the S3 bucket contents to the current directory on your terminal, so the “.” (dot) in the command is very important.
Once this is complete, you should be able to see the list of files shown in Figure 2. (The list includes config.yaml, lambda_function.py, network-firewall-eks-collect-all.yaml, and network-firewall-eks.yaml.)
Figure 2: Files downloaded from the S3 bucket
Deploy the VPC architecture with AWS Network Firewall
In this procedure, you’ll deploy the VPC architecture by using a CloudFormation template.
To deploy the VPC architecture (AWS CLI)
Deploy the CloudFormation templatenetwork-firewall-eks.yaml, which you previously downloaded to your local file system from the Amazon S3 bucket.
You can do this through the AWS CLI by using the create-stack command, as follows.
Note: The initially allowed hostnames for egress filtering are passed to the network firewall by using the parameter key NetworkFirewallAllowedWebsites in the CloudFormation stack. In this example, the allowed hostnames are .amazonaws.com, .docker.io, and docker.com.
Make a note of the subnet IDs from the stack outputs of the CloudFormation stack after the status goes to Create_Complete.
Note: For simplicity, the CloudFormation stack name is AWS-Network-Firewall-Multi-AZ, but you can change this name to according to your needs and follow the same naming throughout this post.
To deploy the VPC architecture (console)
In your account, launch the AWS CloudFormation template by choosing the following Launch Stack button. It will take approximately 10 minutes for the CloudFormation stack to complete.
Note: The stack will launch in the N. Virginia (us-east-1) Region. To deploy this solution into other AWS Regions, download the solution’s CloudFormation template, modify it, and deploy it to the selected Region.
Deploy and set up access to the EKS cluster
In this step, you’ll use the eksctl CLI tool to create an EKS cluster.
There are two methods for creating an EKS cluster. Method A uses the eksctl create cluster command without a configuration (config) file. Method B uses a config file.
Note: Before you start, make sure you have the VPC subnet details available from the previous procedure.
Method A: No config file
You can create an EKS cluster without a config file by using the eksctl create cluster command.
From the CLI, enter the following commands. eksctl create cluster \ --vpc-private-subnets=<private-subnet-A>,<private-subnet-B> \ --vpc-public-subnets=<public-subnet-A>,<public-subnet-B>
Make sure that the subnets passed to the --vpc-public-subnets parameter are protected subnets taken from the VPC architecture CloudFormation stack output. You can verify the subnet IDs by looking at step 2 in the To deploy the VPC architecture section.
Method B: With config file
Another way to create an EKS cluster is by using the following config file, with more options with the name (cluster.yaml in this example).
Create a file named cluster.yaml by adding the following contents to it.
Run the following command to create an EKS cluster using the eksctl tool and the cluster.yaml config file. eksctl create cluster -f cluster.yaml
To set up access to the EKS cluster
Before you deploy a sample Kubernetes Pod, make sure you have the kubeconfig file set up for the EKS cluster that you created in step 2 of To deploy an EKS cluster by using the eksctl tool. For more information, see Create a kubeconfig for Amazon EKS. You can use eksctl to do this, as follows.
Now you can test access to a non-allowed website in the AWS Network Firewall stateful rules, using these steps.
First, install the cURL tool on the sample Pod you created previously. cURL is a command-line tool for getting or sending data, including files, using URL syntax. Because cURL uses the libcurl library, it supports every protocol libcurl supports. On the Pod where you have obtained a shell to a running container, run the following command to install cURL. apk install curl
Access a website using cURL. curl -I https://aws.amazon.com
This gives a timeout error similar to the following.
curl -I https://aws.amazon.com
 curl: (28) Operation timed out after 300476 milliseconds with 0 out of 0 bytes received
Navigate to the AWS CloudWatch console and check the alert logs for Network Firewall. You will see a log entry like the following sample, indicating that the access to https://aws.amazon.com was blocked.
The error shown here occurred because the hostname www.amazon.com was not added to the Network Firewall stateful rules allow list.
When you deployed the network firewall in step 1 of the To deploy the VPC architecture procedure, the values provided for the CloudFormation parameter NetworkFirewallAllowedWebsites were just .amazonaws.com, .docker.io, .docker.com and not aws.amazon.com.
Update the Network Firewall stateful rules
In this procedure, you’ll update the Network Firewall stateful rules to allow the aws.amazon.com domain name.
To update the Network Firewall stateful rules (console)
In the AWS CloudFormation console, locate the stack you used to create the network firewall earlier in the To deploy the VPC architecture procedure.
Select the stack you want to update, and choose Update. In the Parameters section, update the stack by adding the hostname aws.amazon.com to the parameter NetworkFirewallAllowedWebsites as a comma-separated value. See Updating stacks directly in the AWS CloudFormation User Guide for more information on stack updates.
To test the outbound access to the aws.amazon.com hostname
Get a shell to a running container in the sample Pod that you deployed earlier, by using the following command. kubectl attach amazon-linux -c alpine -i -t
On the terminal where you got a shell to a running container in the sample Pod, run the following cURL command. curl -I https://aws.amazon.com
The response should be a success HTTP 200 OK message similar to this one. curl -Ik https://aws.amazon.com HTTP/2 200 content-type: text/html;charset=UTF-8 server: Server
If the VPC subnets are organized according to the architecture suggested in this solution, outbound traffic from the EKS cluster can be sent to the network firewall and then filtered based on hostnames provided by SNI.
Collecting hostnames provided by the SNI
In this step, you’ll see how to configure the network firewall to collect all the hostnames provided by SNI that are accessed by an already running application—without blocking any access—by making use of CloudWatch and alert logs.
Select the stack to update, and then choose Update.
Choose Replace current template and upload the template network-firewall-eks-collect-all.yaml. (This template should be available from the files that you downloaded earlier from the S3 bucket in the Prerequisites section.) Choose Next. See Updating stacks directly for more information.
To configure the network firewall (AWS CLI)
Update the CloudFormation stack by using the network-firewall-eks-collect-all.yaml template file that you previously downloaded from the S3 bucket in the Prerequisites section, using the update-stack command as follows. aws cloudformation update-stack --stack-name AWS-Network-Firewall-Multi-AZ \ --template-body file://network-firewall-eks-collect-all.yaml \ --capabilities CAPABILITY_NAMED_IAM
To check the rules in the AWS Management Console
In the AWS Management Console, navigate to the Amazon VPC console and locate the AWS Network Firewall tab.
Select the network firewall that you created earlier, and then select the stateful rule with the name log-all-tls.
The rule group should appear as shown in Figure 4, indicating that the logs are captured and sent to the Alert logs.
Figure 4: Network Firewall rule groups
To test based on stateful rule
On the terminal, get the shell for the running container in the Pod you created earlier. If this Pod is not available, follow the instructions in the To deploy a sample Pod on the EKS clusterprocedure to create a new sample Pod.
Run the cURL command to aws.amazon.com. It should return HTTP 200 OK, as follows. curl -Ik https://aws.amazon.com/ HTTP/2 200 content-type: text/html;charset=UTF-8 server: Server date: ------ ---------- --------------
Navigate to the AWS CloudWatch Logs console and look up the Alert logs log group with the name /AWS-Network-Firewall-Multi-AZ/anfw/alert.
You can see the hostnames provided by SNI within the TLS protocol passing through the network firewall. The CloudWatch Alert logs for allowed hostnames in the SNI looks like the following example.
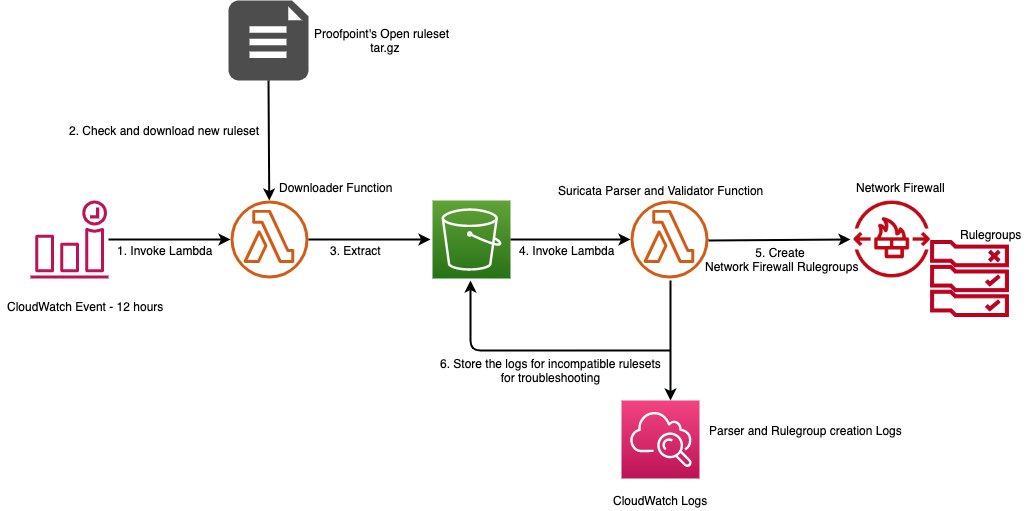
Figure 5: Architecture to collect and capture hostnames by using Network Firewall
Sample Lambda code
The sample Lambda code from Figure 5 is shown following, and is written in Python 3. The sample collects the hostnames that are provided by SNI and captured in Network Firewall. Network Firewall logs the hostnames provided by SNI in the CloudWatch Alert logs. Then, by creating a CloudWatch logs subscription filter, you can send logs to the Lambda function for further processing, for example to invoke SNS notifications.
import json
import gzip
import base64
import boto3
import sys
import traceback
sns_client = boto3.client('sns')
def lambda_handler(event, context):
    try:
        decoded_event = json.loads(gzip.decompress(base64.b64decode(event['awslogs']['data'])))
        body = '''
        {filtermatch}
        '''.format(
            loggroup=decoded_event['logGroup'],
            logstream=decoded_event['logStream'],
            filtermatch=decoded_event['logEvents'][0]['message'],
        )
        # print(body)# uncomment this for debugging
        filterMatch = json.loads(body)
        data = []
        if 'http' in filterMatch['event']:
            data.append(filterMatch['event']['http']['hostname'])
        elif 'tls' in filterMatch['event']:
            data.append(filterMatch['event']['tls']['sni'])
        result = 'Trying to reach ' + 1*' ' + (data[0]) + 1*' ' 'via Network Firewall' + 1*' '  + (filterMatch['firewall_name'])
        # print(result)# uncomment this for debugging
        message = {'HostName': result}
        send_to_sns = sns_client.publish(
            TargetArn='<SNS-topic-ARN>', #Replace with the SNS topic ARN
            Message=json.dumps({'default': json.dumps(message),
                            'sms': json.dumps(message),
                            'email': json.dumps(message)}),
            Subject='Trying to reach the hostname through the Network Firewall',
            MessageStructure='json')
    except Exception as e:
        print('Function failed due to exception.')
        e = sys.exc_info()[0]
        print(e)
        traceback.print_exc()
        Status="Failure"
        Message=("Error occured while executing this. The error is %s" %e)
Clean up
In this step, you’ll clean up the infrastructure that was created as part of this solution.
To delete the Kubernetes workloads
On the terminal, using the kubectl CLI tool, run the following command to delete the sample Pod that you created earlier. kubectl delete pods amazon-linux
Note: Clean up all the Kubernetes workloads running on the EKS cluster. For example, if the Kubernetes service of type LoadBalancer is deployed, and if the EKS cluster where it exists is deleted, the LoadBalancer will not be deleted. The best practice is to clean up all the deployed workloads.
On the terminal, using the eksctl CLI tool, delete the created EKS cluster by using the following command. eksctl delete cluster --name filter-egress-traffic-test
To delete the CloudFormation stack and AWS Network Firewall
Navigate to the AWS CloudFormation console and choose the stack with the name AWS-Network-Firewall-Multi-AZ.
By following the VPC architecture explained in this blog post, you can protect the applications running on an Amazon EKS cluster by filtering the outbound traffic based on the approved hostnames that are provided by SNI in the Network Firewall Allow list.
Additionally, with a simple Lambda function, CloudWatch Logs, and an SNS topic, you can get readable hostnames provided by the SNI. Using these hostnames, you can learn about the traffic pattern for the applications that are running within the EKS cluster, and later create a strict list to allow only the required outbound traffic. To learn more about Network Firewall stateful rules, see Working with stateful rule groups in AWS Network Firewall in the AWS Network Firewall Developer Guide.
If you have feedback about this post, submit comments in the Comments section below. If you have questions about this post, contact AWS Support.
Want more AWS Security news? Follow us on Twitter.
AWS Network Firewall helps make it easier for you to secure virtual networks at scale inside Amazon Web Services (AWS). Without having to worry about availability, scalability, or network performance, you can now deploy Network Firewall with the AWS Firewall Manager service. Firewall Manager allows administrators in your organization to apply network firewalls across accounts. This post will take you through different deployment models and demonstrate with step-by-step instructions how this can be achieved.
Here’s a quick overview of the services used in this blog post:
Amazon Virtual Private Cloud (Amazon VPC) is a logically isolated virtual network. It has inbuilt network security controls and routing between VPC subnets by design. An internet gateway is a horizontally scaled, redundant, and highly available VPC component that allows communication between your VPC and the internet.
AWS Transit Gateway is a service that connects your VPCs to each other, to on-premises networks, to virtual private networks (VPNs), and to the internet through a central hub.
AWS Network Firewall is a service that secures network traffic at the organization and account levels. AWS Network Firewall policies govern the monitoring and protection behavior of these firewalls. The specifics of these policies are defined in rule groups. A rule group consists of rules that define reusable criteria for inspecting and processing network traffic. Network Firewall can support thousands of rules that can be based on a domain, port, protocol, IP address, or pattern matching.
AWS Firewall Manager is a security management service that acts as a central place for you to configure and deploy firewall rules across AWS Regions, accounts, and resources in AWS Organizations. Firewall Manager helps you to ensure that all firewall rules are consistently enforced, even as new accounts and resources are created. Firewall Manager integrates with AWS Network Firewall, Amazon Route 53 Resolver DNS Firewall, AWS WAF, AWS Shield Advanced, and Amazon VPC security groups.
Deployment models overview
When it comes to securing multiple AWS accounts, security teams categorize firewall deployment into centralized or distributed deployment models. Firewall Manager supports Network Firewall deployment in both modes. There are multiple additional deployment models available with Network Firewall. For more information about these models, see the blog post Deployment models for AWS Network Firewall.
Centralized deployment model
Network Firewall can be centrally deployed as an Amazon VPC attachment to a transit gateway that you set up with AWS Transit Gateway. Transit Gateway acts as a network hub and simplifies the connectivity between VPCs as well as on-premises networks. Transit Gateway also provides inter-Region peering capabilities to other transit gateways to establish a global network by using the AWS backbone. In a centralized transit gateway model, Firewall Manager can create one or more firewall endpoints for each Availability Zone within an inspection VPC. Network Firewall deployed in a centralized model covers the following use cases:
Filtering and inspecting traffic within a VPC or in transit between VPCs, also known as east-west traffic.
Filtering and inspecting ingress and egress traffic to and from the internet or on-premises networks, also known as north-south traffic.
Distributed deployment model
With the distributed deployment model, Firewall Manager creates endpoints into each VPC that requires protection. Each VPC is protected individually and VPC traffic isolation is retained. You can either customize the endpoint location by specifying which Availability Zones to create firewall endpoints in, or Firewall Manager can automatically create endpoints in those Availability Zones that have public subnets. Each VPC does not require connectivity to any other VPC or transit gateway. Network Firewall configured in a distributed model addresses the following use cases:
Protect traffic between a workload in a public subnet (for example, an EC2 instance) and the internet. Note that the only recommended workloads that should have a network interface in a public subnet are third-party firewalls, load balancers, and so on.
Protect and filter traffic between an AWS resource (for example Application Load Balancers or Network Load Balancers) in a public subnet and the internet.
Deploying Network Firewall in a centralized model with Firewall Manager
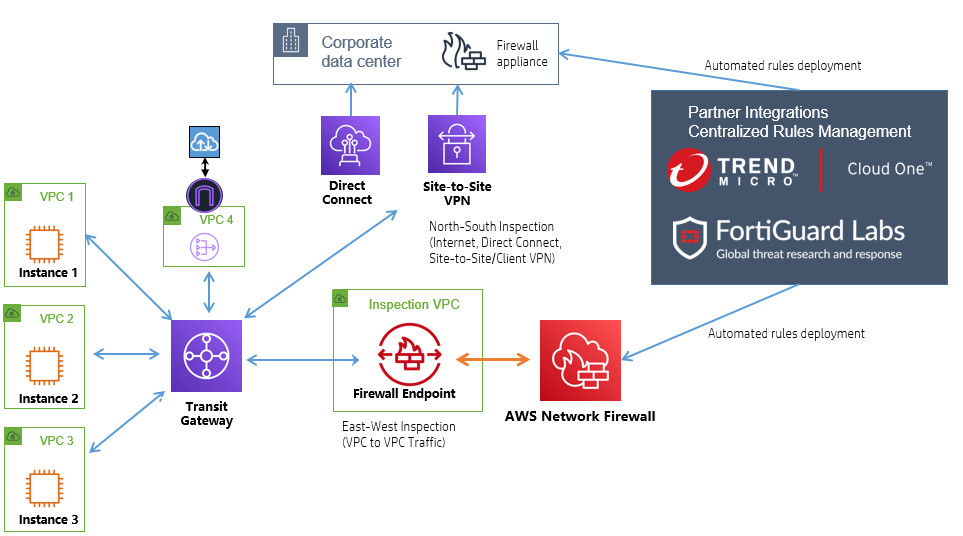
The following steps provide a high-level overview of how to configure Network Firewall with Firewall Manager in a centralized model, as shown in Figure 1.
Create an Inspection VPC in each Firewall Manager member account. Firewall Manager will use these VPCs to create firewalls. Follow the steps to create a VPC.
Create the stateless and stateful rule groups that you want to centrally deploy as an administrator. For more information, see Rule groups in AWS Network Firewall.
Build and deploy Firewall Manager policies for Network Firewall, based on the rule groups you defined previously. Firewall Manager will now create firewalls across these accounts.
Finish deployment by updating the related VPC route tables in the member account, so that traffic gets routed through the firewall for inspection.
Figure 1: Network Firewall centralized deployment model
The following steps provide a detailed description of how to configure Network Firewall with Firewall Manager in a centralized model.
To deploy network firewall policy centrally with Firewall Manager (console)
Sign in to your Firewall Manager delegated administrator account and open the Firewall Manager console under AWS WAF and Shield services.
In the navigation pane, under AWS Firewall Manager, choose Security policies.
On the Filter menu, select the AWS Region where your application is hosted, and choose Create policy. In this example, we choose US East (N. Virginia).
As shown in Figure 2, under Policy details, choose the following:
For AWS services, choose AWS Network Firewall.
For Deployment model, choose Centralized.
Figure 2: Network Firewall Manager policy type and Region for centralized deployment
Choose Next.
Enter a policy name.
In the AWS Network Firewall policy configuration pane, you can choose to configure both stateless and stateful rule groups along with their logging configurations. In this example, we are not creating any rule groups and keep the default configurations, as shown in Figure 3. If you would like to add a rule group, you can create rule groups here and add them to the policy.
For Inspection VPC configuration, select the account and add the VPC ID of the inspection VPC in each of the member accounts that you previously created, as shown in Figure 4. In the centralized model, you can only select one VPC under a specific account as the inspection VPC.
Figure 4: Inspection VPC configuration
For Availability Zones, select the Availability Zones in which you want to create the Network Firewall endpoint(s), as shown in Figure 5. You can select by Availability Zone name or Availability Zone ID. Optionally, if you want to specify the CIDR for each Availability Zone, or specify the subnets for firewall subnets, then you can add the CIDR blocks. If you don’t provide CIDR blocks, Firewall Manager queries your VPCs for available IP addresses to use. If you provide a list of CIDR blocks, Firewall Manager searches for new subnets only in the CIDR blocks that you provide.
Figure 5: Network Firewall endpoint Availability Zones configuration
Choose Next.
For Policy scope, choose VPC, as shown in Figure 6.
For Resource cleanup, choose Automatically remove protections from resources that leave the policy scope. When you select this option, Firewall Manager will automatically remove Firewall Manager managed protections from your resources when a member account or a resource leaves the policy scope. Choose Next.
For Policy tags, you don’t need to add any tags. Choose Next.
Review the security policy, and then choose Create policy.
To route traffic for inspection, you manually update the route configuration in the member accounts. Exactly how you do this depends on your architecture and the traffic that you want to filter. For more information, see Route table configurations for AWS Network Firewall.
Note: In current versions of Firewall Manager, centralized policy only supports one inspection VPC per account. If you want to have multiple inspection VPCs in an account to inspect multiple firewalls, you cannot deploy all of them through Firewall Manager centralized policy. You have to manually deploy to the network firewalls in each inspection VPC.
Deploying Network Firewall in a distributed model with Firewall Manager
The following steps provide a high-level overview of how to configure Network Firewall with Firewall Manager in a distributed model, as shown in Figure 7.
Create a new VPC with a desired tag in each Firewall Manager member account. Firewall Manager uses these VPC tags to create network firewalls in tagged VPCs. Follow these steps to create a VPC.
Create the stateless and stateful rule groups that you want to centrally deploy as an administrator. For more information, see Rule groups in AWS Network Firewall.
Build and deploy Firewall Manager policy for network firewalls into tagged VPCs based on the rule groups that you defined in the previous step.
Finish deployment by updating the related VPC route tables in the member accounts to begin routing traffic through the firewall for inspection.
Figure 7: Network Firewall distributed deployment model
The following steps provide a detailed description how to configure Network Firewall with Firewall Manager in a distributed model.
To deploy Network Firewall policy distributed with Firewall Manager (console)
Create new VPCs in member accounts and tag them. In this example, you launch VPCs in the US East (N. Virginia) Region. Create a new VPC in a member account by using the VPC wizard, as follows.
Choose VPC with a Single Public Subnet. For this example, select a subnet in the us-east-1a Availability Zone.
Add a desired tag to this VPC. For this example, use the key Network Firewall and the value yes. Make note of this tag key and value, because you will need this tag to configure the policy in the Policy scope step.
Sign in to your Firewall Manager delegated administrator account and open the Firewall Manager console under AWS WAF and Shield services.
In the navigation pane, under AWS Firewall Manager, choose Security policies.
On the Filter menu, select the AWS Region where you created VPCs previously and choose Create policy. In this example, you choose US East (N. Virginia).
For AWS services, choose AWS Network Firewall.
For Deployment model, choose Distributed, and then choose Next.
Figure 8: Network Firewall Manager policy type and Region for distributed deployment
Enter a policy name.
On the AWS Network Firewall policy configuration page, you can configure both stateless and stateful rule groups, along with their logging configurations. In this example you are not creating any rule groups, so you choose the default configurations, as shown in Figure 9. If you would like to add a rule group, you can create rule groups here and add them to the policy.
Figure 9: Network Firewall policy configuration
Choose Next.
In the Configure AWS Network Firewall Endpoint section, as shown in Figure 10, you can choose Custom endpoint configuration or Automatic endpoint configuration. In this example, you choose Custom endpoint configuration and select the us-east-1a Availability Zone. Optionally, if you want to specify the CIDR for each Availability Zone or specify the subnets for firewall subnets, then you can add the CIDR blocks. If you don’t provide CIDR blocks, Firewall Manager queries your VPCs for available IP addresses to use. If you provide a list of CIDR blocks, Firewall Manager searches for new subnets only in the CIDR blocks that you provide.
Figure 10: Network Firewall endpoint Availability Zones configuration
Choose Next.
For AWS Network Firewall route configuration, choose the following options, as shown in Figure 11. This will monitor the route configuration using the administrator account, to help ensure that traffic is routed as expected through the network firewalls.
For Route management, choose Monitor.
Under Traffic type, for Internet gateway, choose Add to firewall policy.
Select the checkbox for Allow required cross-AZ traffic, and then choose Next.
Important: Be careful when defining the policy scope. Each policy creates Network Firewall endpoints in all the VPCs and their Availability Zones that are within the policy scope. If you select an inappropriate scope, it could result in the creation of a large number of network firewalls and incur significant charges for AWS Network Firewall.
For Resource cleanup, select the Automatically remove protections from resources that leave the policy scope check box, and then choose Next.
For Policy tags, you don’t need to add any tags. Choose Next.
Review the security policy, and then choose Create policy.
To route traffic for inspection, you need to manually update the route configuration in the member accounts. Exactly how you do this depends on your architecture and the traffic that you want to filter. For more information, see Route table configurations for AWS Network Firewall.
Clean up
To avoid incurring future charges, delete the resources you created for this solution.
To delete Firewall Manager policy (console)
Sign in to your Firewall Manager delegated administrator account and open the Firewall Manager console under AWS WAF and Shield services
In the navigation pane, choose Security policies.
Choose the option next to the policy that you want to delete.
Choose Delete all policy resources, and then choose Delete. If you do not select Delete all policy resources, then only the firewall policy on the administrator account will be deleted, not network firewalls deployed in the other accounts in AWS Organizations.
In this blog post, you learned how you can use either a centralized or a distributed deployment model for Network Firewall, so developers in your organization can build firewall rules, create security policies, and enforce them in a consistent, hierarchical manner across your entire infrastructure. As new applications are created, Firewall Manager makes it easier to bring new applications and resources into a consistent state by enforcing a common set of security rules.
If you have feedback about this post, submit comments in the Comments section below. If you have questions about this post, start a new thread on the AWS Firewall Manager re:Post or contact AWS Support.
Want more AWS Security news? Follow us on Twitter.
In Part 1 of this two-part series, we shared an overview of some of the most important 2021 Amazon Web Services (AWS) Security service and feature launches. In this follow-up, we’ll dive deep into additional launches that are important for security professionals to be aware of and understand across all AWS services. There have already been plenty in the first half of 2022, so we’ll highlight those soon, as well.
AWS Identity
You can use AWS Identity Services to build Zero Trust architectures, help secure your environments with a robust data perimeter, and work toward the security best practice of granting least privilege. In 2021, AWS expanded the identity source options, AWS Region availability, and support for AWS services. There is also added visibility and power in the permission management system. New features offer new integrations, additional policy checks, and secure resource sharing across AWS accounts.
AWS Single Sign-On
For identity management, AWS Single Sign-On (AWS SSO) is where you create, or connect, your workforce identities in AWS once and manage access centrally across your AWS accounts in AWS Organizations. In 2021, AWS SSO announced new integrations for JumpCloud and CyberArk users. This adds to the list of providers that you can use to connect your users and groups, which also includes Microsoft Active Directory Domain Services, Okta Universal Directory, Azure AD, OneLogin, and Ping Identity.
For access management, there have been a range of feature launches with AWS Identity and Access Management (IAM) that have added up to more power and visibility in the permissions management system. Here are some key examples.
IAM made it simpler to relate a user’s IAM role activity to their corporate identity. By setting the new source identity attribute, which persists through role assumption chains and gets logged in AWS CloudTrail, you can find out who is responsible for actions that IAM roles performed.
IAM added support for policy conditions, to help manage permissions for AWS services that access your resources. This important feature launch of service principal conditions helps you to distinguish between API calls being made on your behalf by a service principal, and those being made by a principal inside your account. You can choose to allow or deny the calls depending on your needs. As a security professional, you might find this especially useful in conjunction with the aws:CalledVia condition key, which allows you to scope permissions down to specify that this account principal can only call this API if they are calling it using a particular AWS service that’s acting on their behalf. For example, your account principal can’t generally access a particular Amazon Simple Storage Service (Amazon S3) bucket, but if they are accessing it by using Amazon Athena, they can do so. These conditions can also be used in service control policies (SCPs) to give account principals broader scope across an account, organizational unit, or organization; they need not be added to individual principal policies or resource policies.
Another very handy new IAM feature launch is additional information about the reason for an access denied error message. With this additional information, you can now see which of the relevant access control policies (for example, IAM, resource, SCP, or VPC endpoint) was the cause of the denial. As of now, this new IAM feature is supported by more than 50% of all AWS services in the AWS SDK and AWS Command Line Interface, and a fast-growing number in the AWS Management Console. We will continue to add support for this capability across services, as well as add more features that are designed to make the journey to least privilege simpler.
IAM Access Analyzer also launched the ability to generate fine-grained policies based on analyzing past AWS CloudTrail activity. This feature provides a great new capability for DevOps teams or central security teams to scope down policies to just the permissions needed, making it simpler to implement least privilege permissions. IAM Access Analyzer launched further enhancements to expand policy checks, and the ability to generate a sample least-privilege policy from past activity was expanded beyond the account level to include an analysis of principal behavior within the entire organization by analyzing log activity stored in AWS CloudTrail.
AWS Resource Access Manager
AWS Resource Access Manager (AWS RAM) helps you securely share your resources across unrelated AWS accounts within your organization or organizational units (OUs) in AWS Organizations. Now you can also share your resources with IAM roles and IAM users for supported resource types. This update enables more granular access using managed permissions that you can use to define access to shared resources. In addition to the default managed permission defined for each shareable resource type, you now have more flexibility to choose which permissions to grant to whom for resource types that support additional managed permissions. Additionally, AWS RAM added support for global resource types, enabling you to provision a global resource once, and share that resource across your accounts. A global resource is one that can be used in multiple AWS Regions; the first example of a global resource is found in AWS Cloud WAN, currently in preview as of this publication. AWS RAM helps you more securely share an AWS Cloud WAN core network, which is a managed network containing AWS and on-premises networks. With AWS RAM global resource sharing, you can use the Cloud WAN core network to centrally operate a unified global network across Regions and accounts.
AWS Directory Service
AWS Directory Service for Microsoft Active Directory, also known as AWS Managed Microsoft Active Directory (AD), was updated to automatically provide domain controller and directory utilization metrics in Amazon CloudWatch for new and existing directories. Analyzing these utilization metrics helps you quantify your average and peak load times to identify the need for additional domain controllers. With this, you can define the number of domain controllers to meet your performance, resilience, and cost requirements.
Amazon Cognito
Amazon Cognitoidentity pools (federated identities) was updated to enable you to use attributes from social and corporate identity providers to make access control decisions and simplify permissions management in AWS resources. In Amazon Cognito, you can choose predefined attribute-tag mappings, or you can create custom mappings using the attributes from social and corporate providers’ access and ID tokens, or SAML assertions. You can then reference the tags in an IAM permissions policy to implement attribute-based access control (ABAC) and manage access to your AWS resources. Amazon Cognito also launched a new console experience for user pools and now supports targeted sign out through refresh token revocation.
Governance, control, and logging services
There were a number of important releases in 2021 in the areas of governance, control, and logging services.
This approach provides a powerful new middle ground between the older security models of prevention (which provide developers only an access denied message, and often can’t distinguish between an acceptable and an unacceptable use of the same API) and a detect and react model (when undesired states have already gone live). The Cfn-Guard 2.0 model gives builders the freedom to build with IaC, while allowing central teams to have the ability to reject infrastructure configurations or changes that don’t conform to central policies—and to do so with completely custom error messages that invite dialog between the builder team and the central team, in case the rule is unnuanced and needs to be refined, or if a specific exception needs to be created.
For example, a builder team might be allowed to provision and attach an internet gateway to a VPC, but the team can do this only if the routes to the internet gateway are limited to a certain pre-defined set of CIDR ranges, such as the public addresses of the organization’s branch offices. It’s not possible to write an IAM policy that takes into account the CIDR values of a VPC route table update, but you can write a Cfn-Guard 2.0 rule that allows the creation and use of an internet gateway, but only with a defined and limited set of IP addresses.
AWS Systems Manager Incident Manager
An important launch that security professionals should know about is AWS Systems Manager Incident Manager. Incident Manager provides a number of powerful capabilities for managing incidents of any kind, including operational and availability issues but also security issues. With Incident Manager, you can automatically take action when a critical issue is detected by an Amazon CloudWatch alarm or Amazon EventBridge event. Incident Manager runs pre-configured response plans to engage responders by using SMS and phone calls, can enable chat commands and notifications using AWS Chatbot, and runs automation workflows with AWS Systems Manager Automation runbooks. The Incident Manager console integrates with AWS Systems Manager OpsCenter to help you track incidents and post-incident action items from a central place that also synchronizes with third-party management tools such as Jira Service Desk and ServiceNow. Incident Manager enables cross-account sharing of incidents using AWS RAM, and provides cross-Region replication of incidents to achieve higher availability.
Amazon Simple Storage Service (Amazon S3) is one of the most important services at AWS, and its steady addition of security-related enhancements is always big news. Here are the 2021 highlights.
Access Points aliases
Amazon S3 introduced a new feature, Amazon S3 Access Points aliases. With Amazon S3 Access Points aliases, you can make the access points backwards-compatible with a large amount of existing code that is programmed to interact with S3 buckets rather than access points.
To understand the importance of this launch, we have to go back to 2019 to the launch of Amazon S3 Access Points. Access points are a powerful mechanism for managing S3 bucket access. They provide a great simplification for managing and controlling access to shared datasets in S3 buckets. You can create up to 1,000 access points per Region within each of your AWS accounts. Although bucket access policies remain fully enforced, you can delegate access control from the bucket to its access points, allowing for distributed and granular control. Each access point enforces a customizable policy that can be managed by a particular workgroup, while also avoiding the problem of bucket policies needing to grow beyond their maximum size. Finally, you can also bind an access point to a particular VPC for its lifetime, to prevent access directly from the internet.
With the 2021 launch of Access Points aliases, Amazon S3 now generates a unique DNS name, or alias, for each access point. The Access Points aliases look and acts just like an S3 bucket to existing code. This means that you don’t need to make changes to older code to use Amazon S3 Access Points; just substitute an Access Points aliases wherever you previously used a bucket name. As a security team, it’s important to know that this flexible and powerful administrative feature is backwards-compatible and can be treated as a drop-in replacement in your various code bases that use Amazon S3 but haven’t been updated to use access point APIs. In addition, using Access Points aliases adds a number of powerful security-related controls, such as permanent binding of S3 access to a particular VPC.
S3 Bucket Keys were launched at the end of 2020, another great launch that security professionals should know about, so here is an overview in case you missed it. S3 Bucket Keys are data keys generated by AWS KMS to provide another layer of envelope encryption in which the outer layer (the S3 Bucket Key) is cached by S3 for a short period of time. This extra key layer increases performance and reduces the cost of requests to AWS KMS. It achieves this by decreasing the request traffic from Amazon S3 to AWS KMS from a one-to-one model—one request to AWS KMS for each object written to or read from Amazon S3—to a one-to-many model using the cached S3 Bucket Key. The S3 Bucket Key is never stored persistently in an unencrypted state outside AWS KMS, and so Amazon S3 ultimately must always return to AWS KMS to encrypt and decrypt the S3 Bucket Key, and thus, the data. As a result, you still retain control of the key hierarchy and resulting encrypted data through AWS KMS, and are still able to audit Amazon S3 returning periodically to AWS KMS to refresh the S3 Bucket Keys, as logged in CloudTrail.
Returning to our review of 2021, S3 Bucket Keys gained the ability to use Amazon S3 Inventory and Amazon S3 Batch Operations automatically to migrate objects from the higher cost, slightly lower-performance SSE-KMS model to the lower-cost, higher-performance S3 Bucket Keys model.
To understand this launch, we need to go in time to the origins of Amazon S3, which is one of the oldest services in AWS, created even before IAM was launched in 2011. In those pre-IAM days, a storage system like Amazon S3 needed to have some kind of access control model, so Amazon S3 invented its own: Amazon S3 access control lists (ACLs). Using ACLs, you could add access permissions down to the object level, but only with regard to access by other AWS account principals (the only kind of identity that was available at the time), or public access (read-only or read-write) to an object. And in this model, objects were always owned by the creator of the object, not the bucket owner.
After IAM was introduced, Amazon S3 added the bucket policy feature, a type of resource policy that provides the rich features of IAM, including full support for all IAM principals (users and roles), time-of-day conditions, source IP conditions, ability to require encryption, and more. For many years, Amazon S3 access decisions have been made by combining IAM policy permissions and ACL permissions, which has served customers well. But the object-writer-is-owner issue has often caused friction. The good news for security professionals has been that a deny by either type of access control type overrides an allow by the other, so there were no security issues with this bi-modal approach. The challenge was that it could be administratively difficult to manage both resource policies—which exist at the bucket and access point level—and ownership and ACLs—which exist at the object level. Ownership and ACLs might potentially impact the behavior of only a handful of objects, in a bucket full of millions or billions of objects.
With the features released in 2021, Amazon S3 has removed these points of friction, and now provides the features needed to reduce ownership issues and to make IAM-based policies the only access control system for a specified bucket. The first step came in 2020 with the ability to make object ownership track bucket ownership, regardless of writer. But that feature applied only to newly-written objects. The final step is the 2021 launch we’re highlighting here: the ability to disable at the bucket level the evaluation of all existing ACLs—including ownership and permissions—effectively nullifying all object ACLs. From this point forward, you have the mechanisms you need to govern Amazon S3 access with a combination of S3 bucket policies, S3 access point policies, and (within the same account) IAM principal policies, without worrying about legacy models of ACLs and per-object ownership.
Additional database and storage service features
AWS Backup Vault Lock
AWS Backup added an important new additional layer for backup protection with the availability of AWS Backup Vault Lock. A vault lock feature in AWS is the ability to configure a storage policy such that even the most powerful AWS principals (such as an account or Org root principal) can only delete data if the deletion conforms to the preset data retention policy. Even if the credentials of a powerful administrator are compromised, the data stored in the vault remains safe. Vault lock features are extremely valuable in guarding against a wide range of security and resiliency risks (including accidental deletion), notably in an era when ransomware represents a rising threat to data.
ACM Private CA achieved FedRAMP authorization for six additional AWS Regions in the US.
Additional certificate customization now allows administrators to tailor the contents of certificates for new use cases, such as identity and smart card certificates; or to securely add information to certificates instead of relying only on the information present in the certificate request.
Additional capabilities were added for sharing CAs across accounts by using AWS RAM to help administrators issue fully-customized certificates, or revoke them, from a shared CA.
Integration with Kubernetes provides a more secure certificate authority solution for Kubernetes containers.
Online Certificate Status Protocol (OCSP) provides a fully-managed solution for notifying endpoints that certificates have been revoked, without the need for you to manage or operate infrastructure yourself.
Network and application protection
We saw a lot of enhancements in network and application protection in 2021 that will help you to enforce fine-grained security policies at important network control points across your organization. The services and new capabilities offer flexible solutions for inspecting and filtering traffic to help prevent unauthorized resource access.
AWS WAF
AWS WAF launched AWS WAF Bot Control, which gives you visibility and control over common and pervasive bots that consume excess resources, skew metrics, cause downtime, or perform other undesired activities. The Bot Control managed rule group helps you monitor, block, or rate-limit pervasive bots, such as scrapers, scanners, and crawlers. You can also allow common bots that you consider acceptable, such as status monitors and search engines. AWS WAF also added support for custom responses, managed rule group versioning, in-line regular expressions, and Captcha. The Captcha feature has been popular with customers, removing another small example of “undifferentiated work” for customers.
AWS Shield Advanced
AWS Shield Advanced now automatically protects web applications by blocking application layer (L7) DDoS events with no manual intervention needed by you or the AWS Shield Response Team (SRT). When you protect your resources with AWS Shield Advanced and enable automatic application layer DDoS mitigation, Shield Advanced identifies patterns associated with L7 DDoS events and isolates this anomalous traffic by automatically creating AWS WAF rules in your web access control lists (ACLs).
Amazon CloudFront
In other edge networking news, Amazon CloudFront added support for response headers policies. This means that you can now add cross-origin resource sharing (CORS), security, and custom headers to HTTP responses returned by your CloudFront distributions. You no longer need to configure your origins or use custom Lambda@Edge or CloudFront Functions to insert these headers.
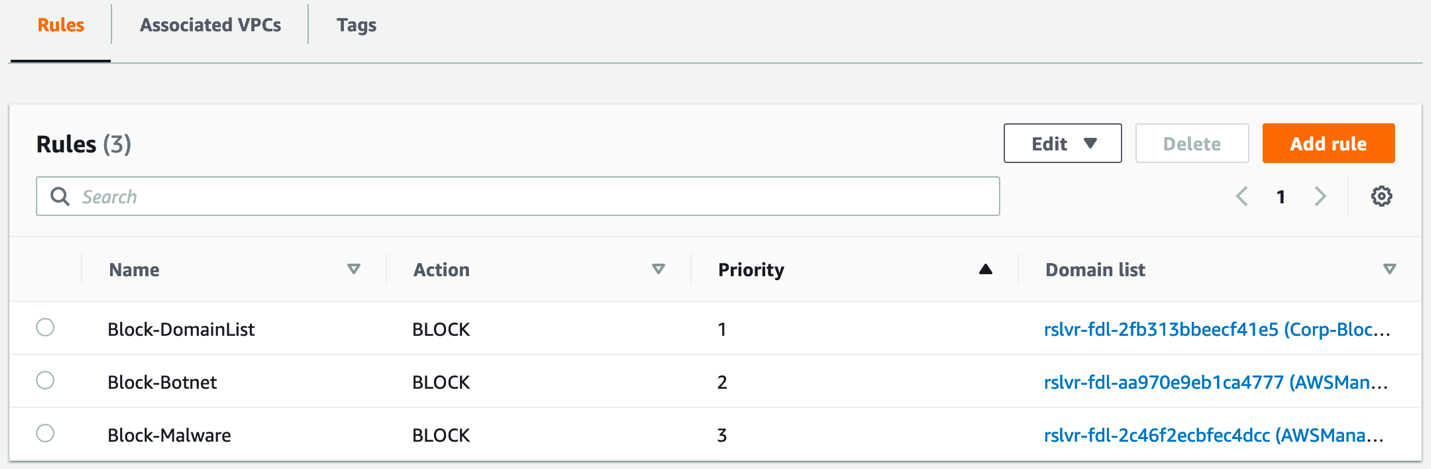
Following Route 53 Resolver’s much-anticipated launch of DNS logging in 2020, the big news for 2021 was the launch of its DNS Firewall capability. Route 53 Resolver DNS Firewall lets you create “blocklists” for domains you don’t want your VPC resources to communicate with, or you can take a stricter, “walled-garden” approach by creating “allowlists” that permit outbound DNS queries only to domains that you specify. You can also create alerts for when outbound DNS queries match certain firewall rules, allowing you to test your rules before deploying for production traffic. Route 53 Resolver DNS Firewall launched with two managed domain lists—malware domains and botnet command and control domains—enabling you to get started quickly with managed protections against common threats. It also integrated with Firewall Manager (see the following section) for easier centralized administration.
AWS Network Firewall and Firewall Manager
Speaking of AWS Network Firewall and Firewall Manager, 2021 was a big year for both. Network Firewall added support for AWS Managed Rules, which are groups of rules based on threat intelligence data, to enable you to stay up to date on the latest security threats without writing and maintaining your own rules. AWS Network Firewall features a flexible rules engine enabling you to define firewall rules that give you fine-grained control over network traffic. As of the launch in late 2021, you can enable managed domain list rules to block HTTP and HTTPS traffic to domains identified as low-reputation, or that are known or suspected to be associated with malware or botnets. Prior to that, another important launch was new configuration options for rule ordering and default drop, making it simpler to write and process rules to monitor your VPC traffic. Also in 2021, Network Firewall announced a major regional expansion following its initial launch in 2020, and a range of compliance achievements and eligibility including HIPAA, PCI DSS, SOC, and ISO.
Elastic Load Balancing now supports forwarding traffic directly from Network Load Balancer (NLB) to Application Load Balancer (ALB). With this important new integration, you can take advantage of many critical NLB features such as support for AWS PrivateLink and exposing static IP addresses for applications that still require ALB.
The AWS Networking team also made Amazon VPC private NAT gateways available in both AWS GovCloud (US) Regions. The expansion into the AWS GovCloud (US) Regions enables US government agencies and contractors to move more sensitive workloads into the cloud by helping them to address certain regulatory and compliance requirements.
Compute
Security professionals should also be aware of some interesting enhancements in AWS compute services that can help improve their organization’s experience in building and operating a secure environment.
Amazon Elastic Compute Cloud (Amazon EC2) launched the Global View on the console to provide visibility to all your resources across Regions. Global View helps you monitor resource counts, notice abnormalities sooner, and find stray resources. A few days into 2022, another simple but extremely useful EC2 launch was the new ability to obtain instance tags from the Instance Metadata Service (IMDS). Many customers run code on Amazon EC2 that needs to introspect about the EC2 tags associated with the instance and then change its behavior depending on the content of the tags. Prior to this launch, you had to associate an EC2 role and call the EC2 API to get this information. That required access to API endpoints, either through a NAT gateway or a VPC endpoint for Amazon EC2. Now, that information can be obtained directly from the IMDS, greatly simplifying a common use case.
Amazon EC2 launched sharing of Amazon Machine Images (AMIs) with AWS Organizations and Organizational Units (OUs). Previously, you could share AMIs only with specific AWS account IDs. To share AMIs within AWS Organizations, you had to explicitly manage sharing of AMIs on an account-by-account basis, as they were added to or removed from AWS Organizations. With this new feature, you no longer have to update your AMI permissions because of organizational changes. AMI sharing is automatically synchronized when organizational changes occur. This feature greatly helps both security professionals and governance teams to centrally manage and govern AMIs as you grow and scale your AWS accounts. As previously noted, this feature was also added to EC2 Image Builder. Finally, Amazon Data Lifecycle Manager, the tool that manages all your EBS volumes and AMIs in a policy-driven way, now supports automatic deprecation of AMIs. As a security professional, you will find this helpful as you can set a timeline on your AMIs so that, if the AMIs haven’t been updated for a specified period of time, they will no longer be considered valid or usable by development teams.
Looking ahead
In 2022, AWS continues to deliver experiences that meet administrators where they govern, developers where they code, and applications where they run. We will continue to summarize important launches in future blog posts. If you’re interested in learning more about AWS services, join us for AWS re:Inforce, the AWS conference focused on cloud security, identity, privacy, and compliance. AWS re:Inforce 2022 will take place July 26–27 in Boston, MA. Registration is now open. Register now with discount code SALxUsxEFCw to get $150 off your full conference pass to AWS re:Inforce. For a limited time only and while supplies last. We look forward to seeing you there!
To stay up to date on the latest product and feature launches and security use cases, be sure to read the What’s New with AWS announcements (or subscribe to the RSS feed) and the AWS Security Blog.
If you have feedback about this post, submit comments in the Comments section below. If you have questions about this post, contact AWS Support.
Want more AWS Security news? Follow us on Twitter.
Protecting your network and computers from security events requires multi-level strategies, and you can use network level traffic filtration as one level of defense. Users need access to the internet for business reasons, but they can inadvertently download malware, which can impact network and data security. This post describes how to use custom Suricata Rules with AWS Network Firewall to add protections that prevent users from downloading malware. You can use your own internal list, or a list from commercial or open-source threat intelligence feeds.
Network Firewall is a managed service that makes it easy to deploy essential network protection for all of your Amazon Virtual Private Cloud (Amazon VPC) Infrastructure. Network Firewall’s flexible rules engine lets you define firewall rules, giving you fine-grained control over network traffic, such as blocking outbound requests to prevent the spread of potential malware.
Features of Network Firewall
This section describes features of Network Firewall that help improve the overall security of your network.
Network Firewall:
Is a managed Amazon Web Services (AWS) service, so you don’t have to build and maintain the infrastructure to host the network firewall.
Integrates with AWS Firewall Manager, which allows you to centrally manage security policies and automatically enforce mandatory security policies across existing and newly created accounts and virtual private clouds (VPCs).
Protects application availability by filtering inbound internet traffic using tools such as access control list (ACL) rules, stateful inspection, protocol detection, and intrusion prevention.
Provides URL, IP address, and domain-based outbound traffic filtering to help you meet compliance requirements, stop potential data leaks, and block communication with known malware hosts.
Gives you control and visibility of VPC-to-VPC traffic to logically separate networks that host sensitive applications or line-of-business resources.
Complements existing network and application security services on AWS by providing control and visibility to layer 3 through 7 network traffic for your entire VPC.
Automating deployment of Network Firewall and management of Network Firewall rules support management at-scale and help in timely response, as Network Firewall is designed to block access to insecure sites before they impact your resources. For the solution in this blog post, you’ll use an AWS CloudFormationtemplate to deploy the network architecture with Network Firewall.
Solution architecture
Figure 1 shows a sample architecture to demonstrate how users are able to download malware files, and how you can prevent this using network firewall rules.
Network Firewall is deployed in a single VPC architecture, where it is placed in line with the traffic to and from the internet.
Figure 1. Network architecture diagram
The network architecture shown in Figure 1 includes three subnets:
A network firewall subnet Hosts the Network Firewall endpoint interface. All outbound traffic from this network goes through the internet gateway.
A public subnet Hosts a NAT gateway. The next hop from the public subnet is the Network Firewall endpoint, where all traffic can be inspected before being forwarded to the internet.
A private network subnet Used to host the client instances. All outbound traffic from this network goes to the NAT gateway endpoint.
In the network architecture shown in Figure 1, only one AZ is shown for simplicity, but best practices recommend deploying infrastructure across multiple AZs
To run the CloudFormation deployment template
To set up the architecture shown in Figure 1, launch the provided CloudFormation deployment template using the Launch stack button in step 2 below. This CloudFormation template:
Sets up VPCs and appropriate subnets as required by the network architecture.
Creates a route table with appropriate routes and attaches it to the appropriate subnet (i.e. private subnet, firewall subnet, public subnet).
Creates a test instance with appropriate security groups.
Deploys Network Firewall with firewall policy.
Creates a Rule Group SampleStatefulRulegroupName with Suricata rules, which is not attached to a firewall policy
To launch the stack, click the Launch Stack button below.
Name the newly created stack (for example, nfw-stack).
The template will also install two sample rules that will be used to protect against accessing two sample malware site URLs, but it will not automatically attach them to a firewall policy
You can see that Network Firewall with firewall policy was deployed as part of the basic CloudFormation deployment. It also created Suricata rules in rule groups, but is not yet attached to the firewall policy.
Note: Unless you attach the rule to the Network Firewall, it will not provide the required protection.
Example: confirming vulnerability
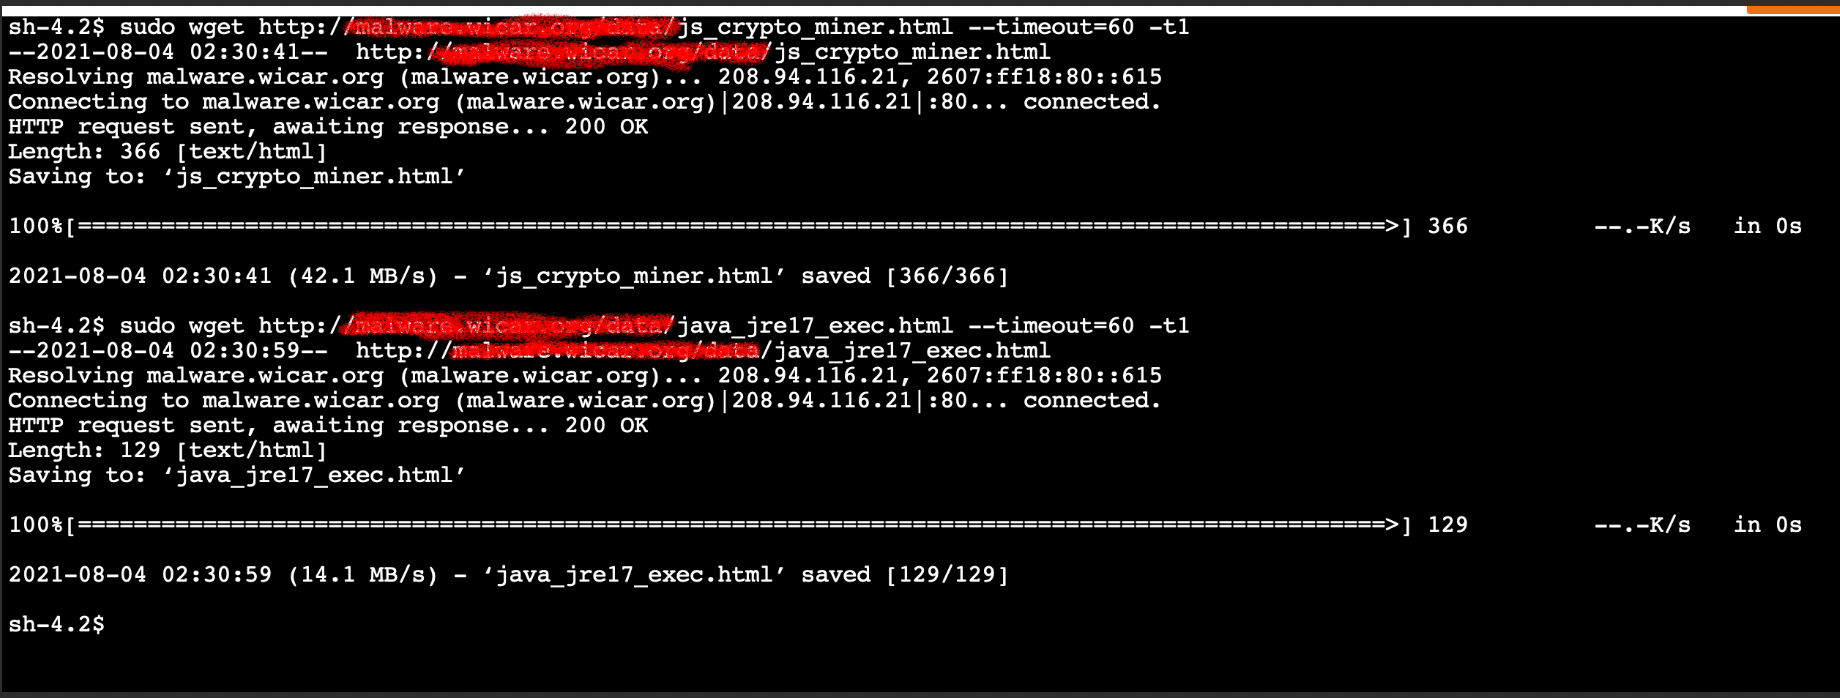
We have identified two sample URLs that contain malware to use for demonstration.
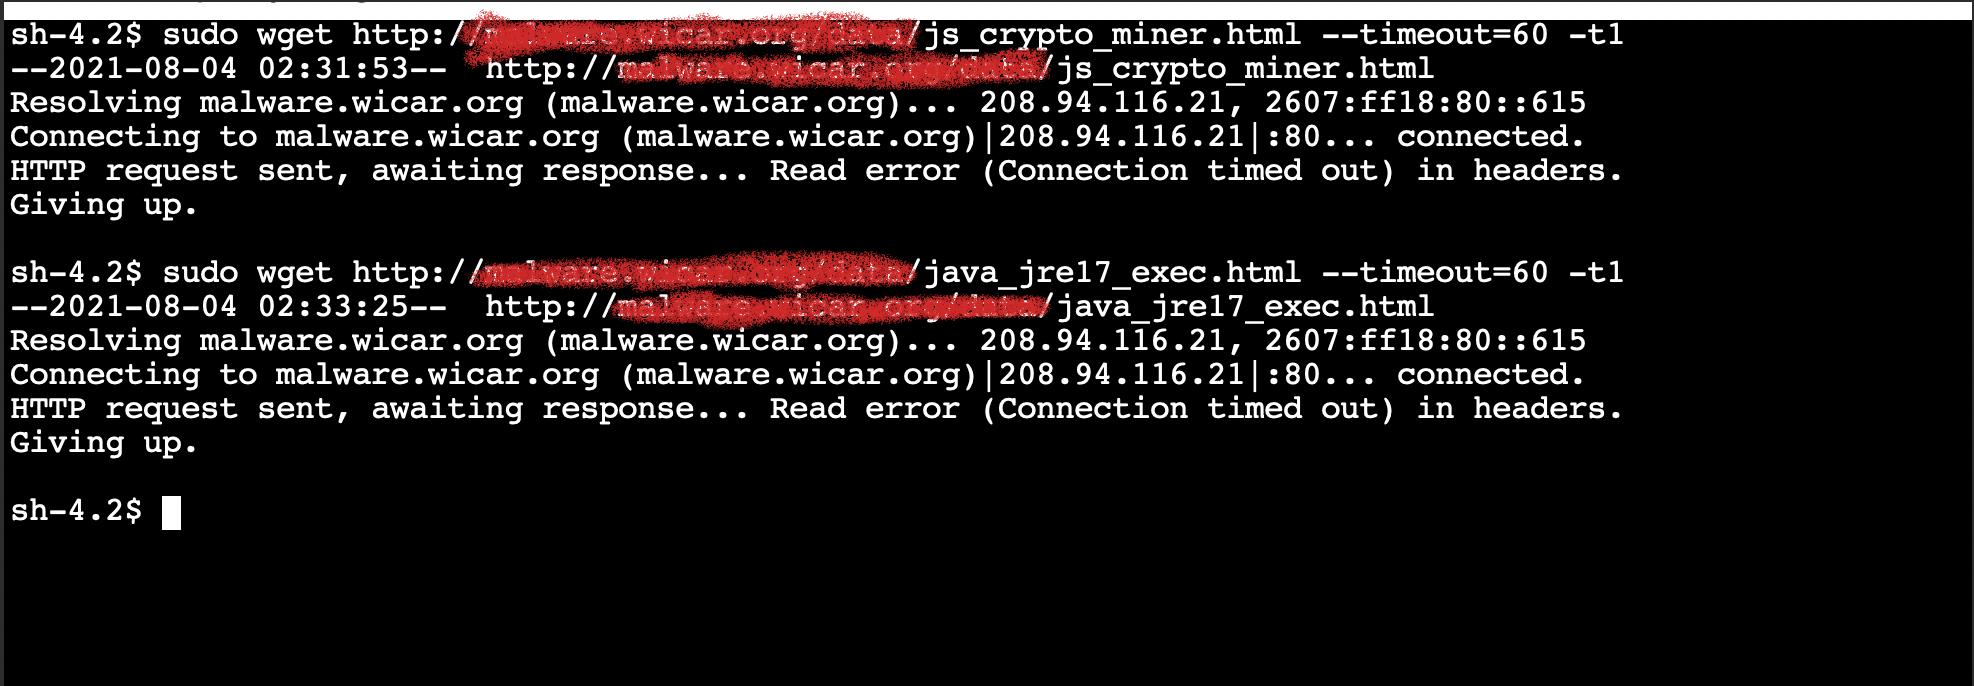
In the example screen shot below, we tested vulnerability by logging into test instance using AWS Session Manager. and at the shell prompt, used wget to access and download a malware file.
Figure 2 that follows is a screenshot of how a user could access and download two different malware files.
Note: Since these URLs contain malware files, we do not recommend users perform this test, but are providing a screenshot as a demonstration. If you wish to actually test ability to download files, use URLs you know are safe for testing.
Figure 2. Insecure URL access
Network Firewall policies
Before the template creates the Network Firewall rule group, it creates a Network Firewall policy and attaches it to the Network Firewall. An AWS Network Firewall firewall policy defines the monitoring and protection behavior for a firewall. The details of the behavior are defined in the rule groups that you add to your policy.
Network Firewall rules
A Network Firewall rule group is a reusable set of criteria for inspecting and handling network traffic. You can add one or more rule groups to a firewall policy as part of policy configuration. The included template does this for you.
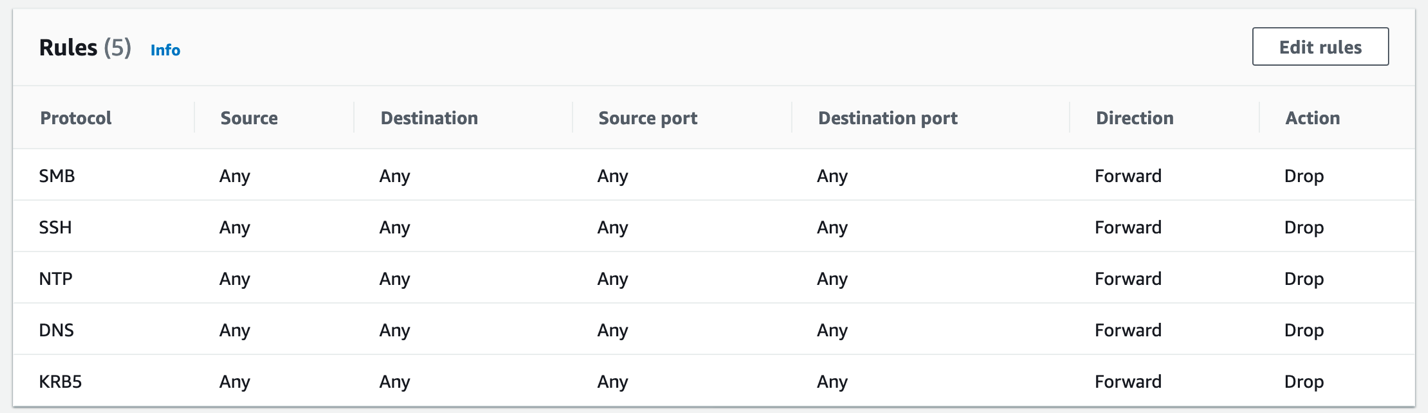
Network Firewall rule groups are either stateless or stateful. Stateless rule groups evaluate packets in isolation, while stateful rule groups evaluate them in the context of their traffic flow. Network Firewall uses a Suricata rules engine to process all stateful rules.
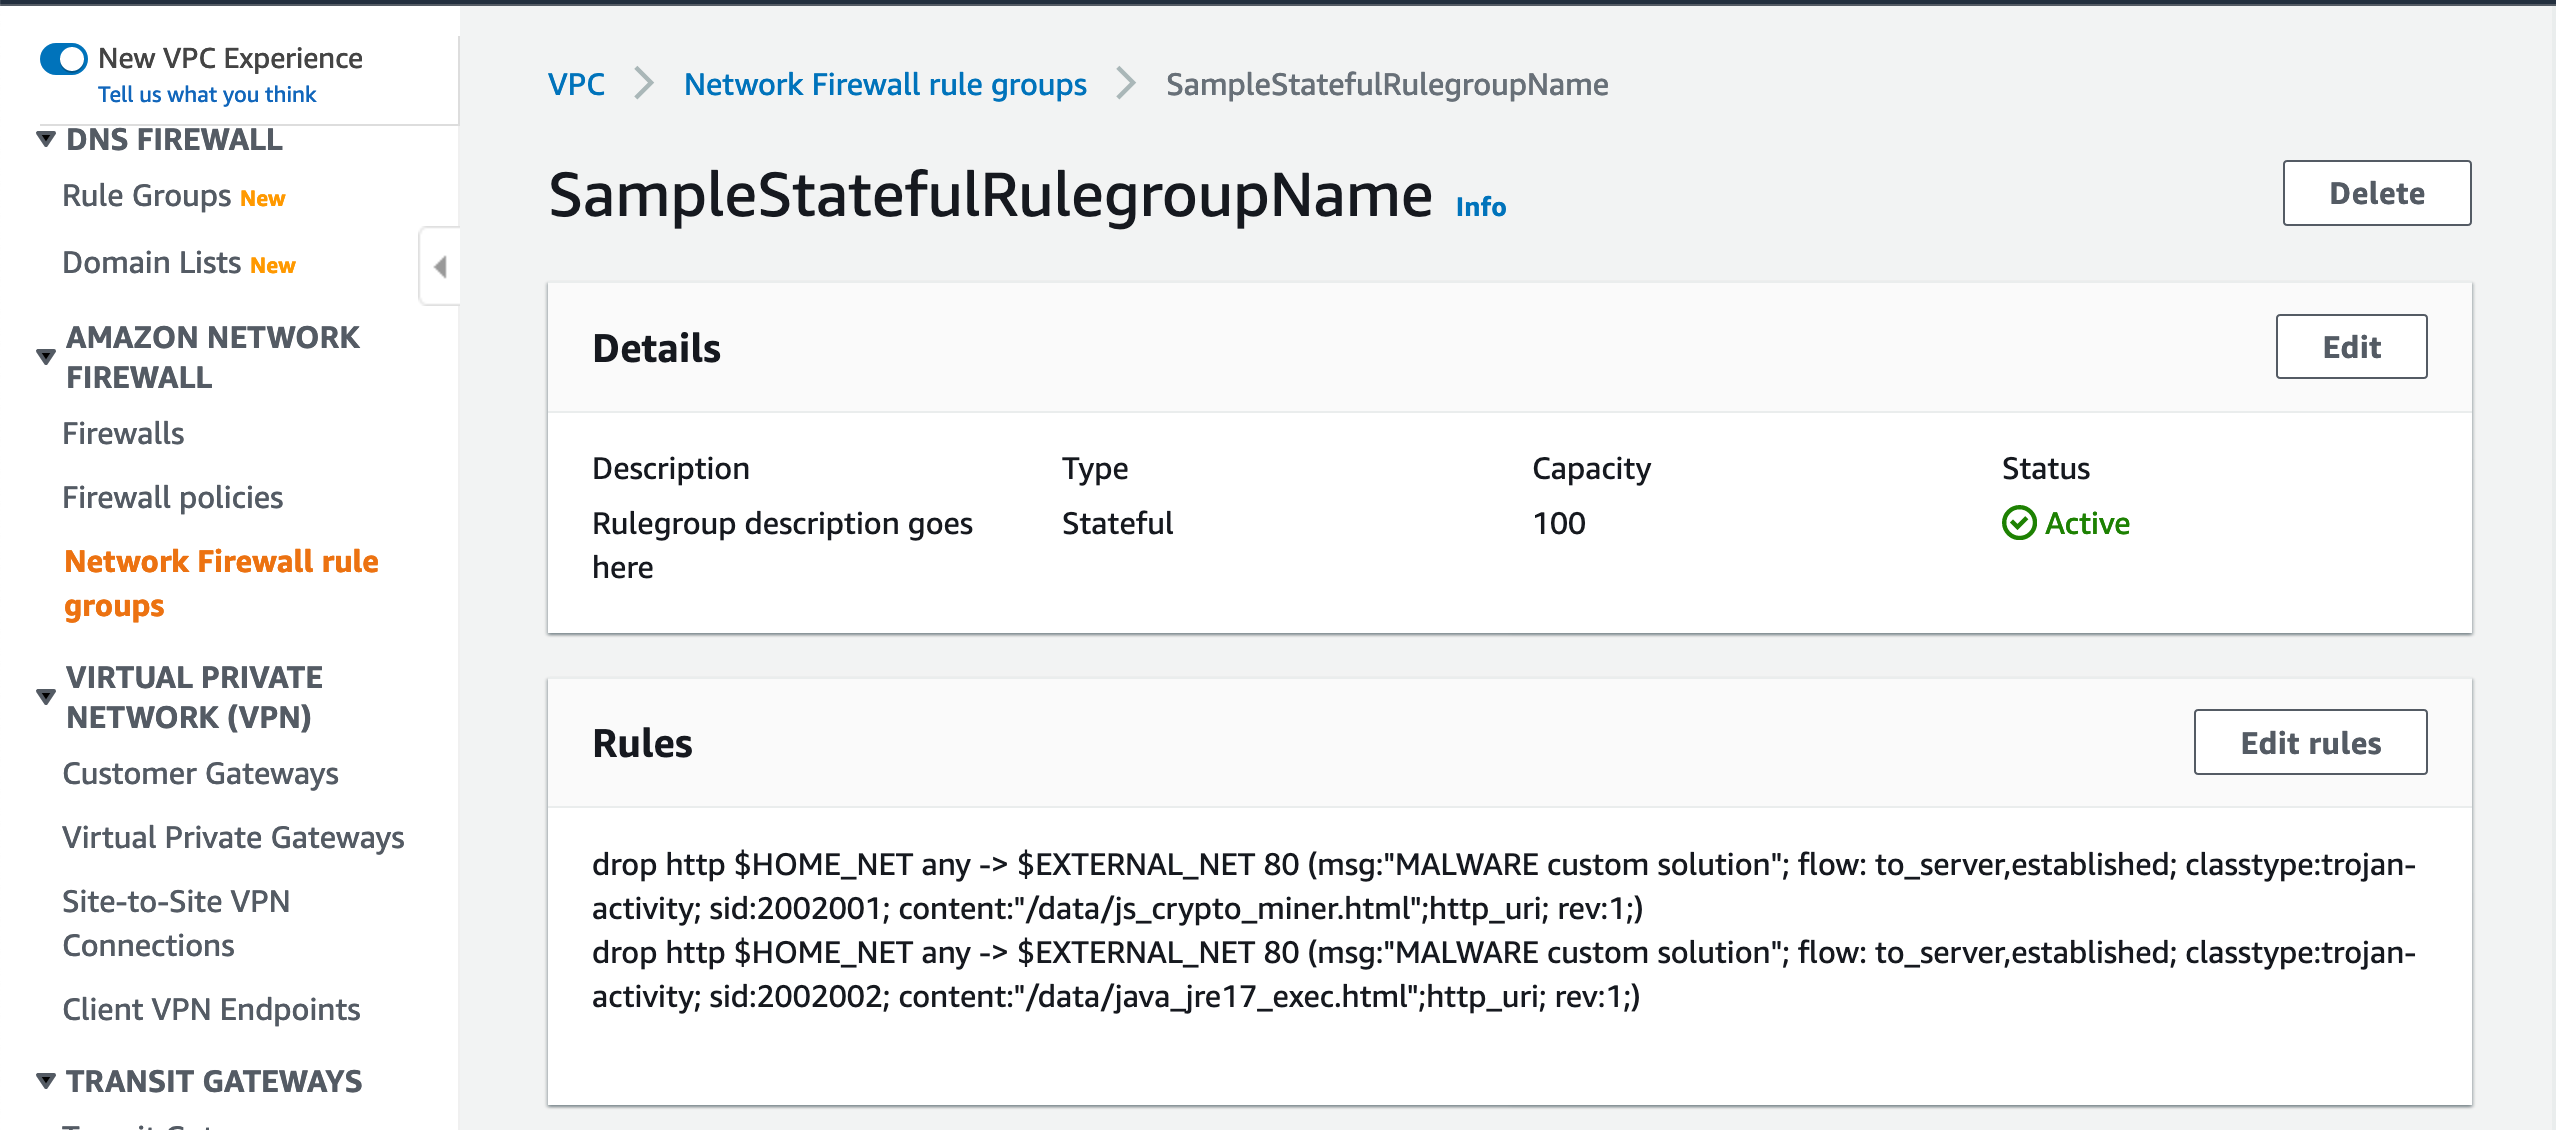
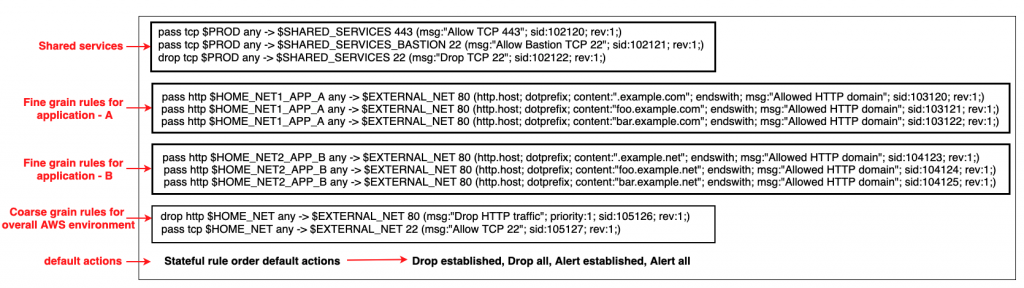
Suricata rules can be used to create a Network Firewall stateful rule to prevent insecure URL access. Figure 3 shows the Suricata rules that the template adds and attaches to the Network Firewall policy in order to block access to the sample malware URLs used in the previous example.
Figure 3. Suricata rules in a Network Firewall rule group
Attach the rule group to the Network Firewall policy
When you launched the CloudFormation template, it automatically created these rules in the rule group. You will now be attaching this rule group to the firewall policy in order to enable the protection. You will need similar rules to block the test URLs that are used for your testing.
Figure 3 shows two Suricata rules that have been configured to block the insecure malware URLs.
To add Suricata rules to Network Firewall
To improve site security and protect against downloading malware, you can add Suricata rules to Network Firewall to secure your site. You’ll do this by:
Creating and attaching a firewall policy to the Network Firewall.
Creating rules as part of rule groups, which are attached to the firewall policy
Testing to verify that access to malware URLs from the instance is blocked.
Let’s review Suricata Rules that are created, which can be attached to Network Firewall.
$HOME_NET anywhere $HOME_NET is a Suricata variable. By default it is set to the CIDR range of the VPC where Network Firewall is deployed and any refers to any source port
$EXTERNAL_NET 80 where $EXTERNAL_NET 80 is a Suricata standard variable that refers to traffic destination, and 80 refers to the destination port
-> is the direction that tells in which direction the signature has to match
Options
msg“MALWARE custom solution” – gives textual information about the signature and the possible alert
flowto_server,established – it is used to match on the direction of the flow and established refers to match on established connections
classtypetrojan-activity – gives information about the classification of rules and alerts
sid:xxxxx gives every signature its own id
content “xxxx” – This keyword is very important and it identifies the pattern that your signature should match.
http_uri is a content modifier that helps you match specifically and only on the request URI
rev:xxx this goes along with sid keyword. It represents the version of the signature
The signatures in the Suricate rule shown in Figure 3 will block traffic that matches the http_uri contents /data/js_crypto_miner.html and /data/java_jre17_exec.html when the traffic is initiated from the VPC to the public network.
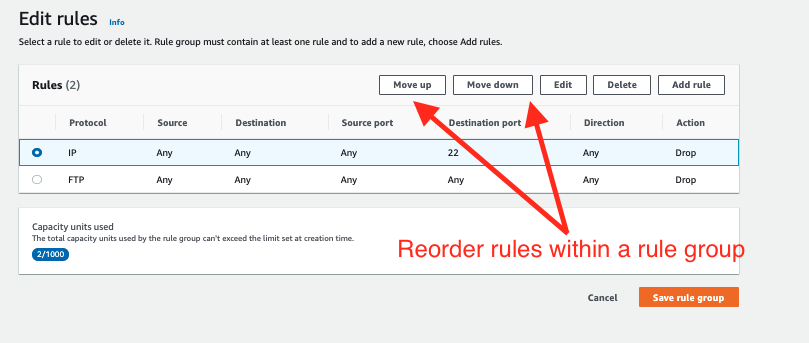
To attach a rule group to an existing Network Firewall
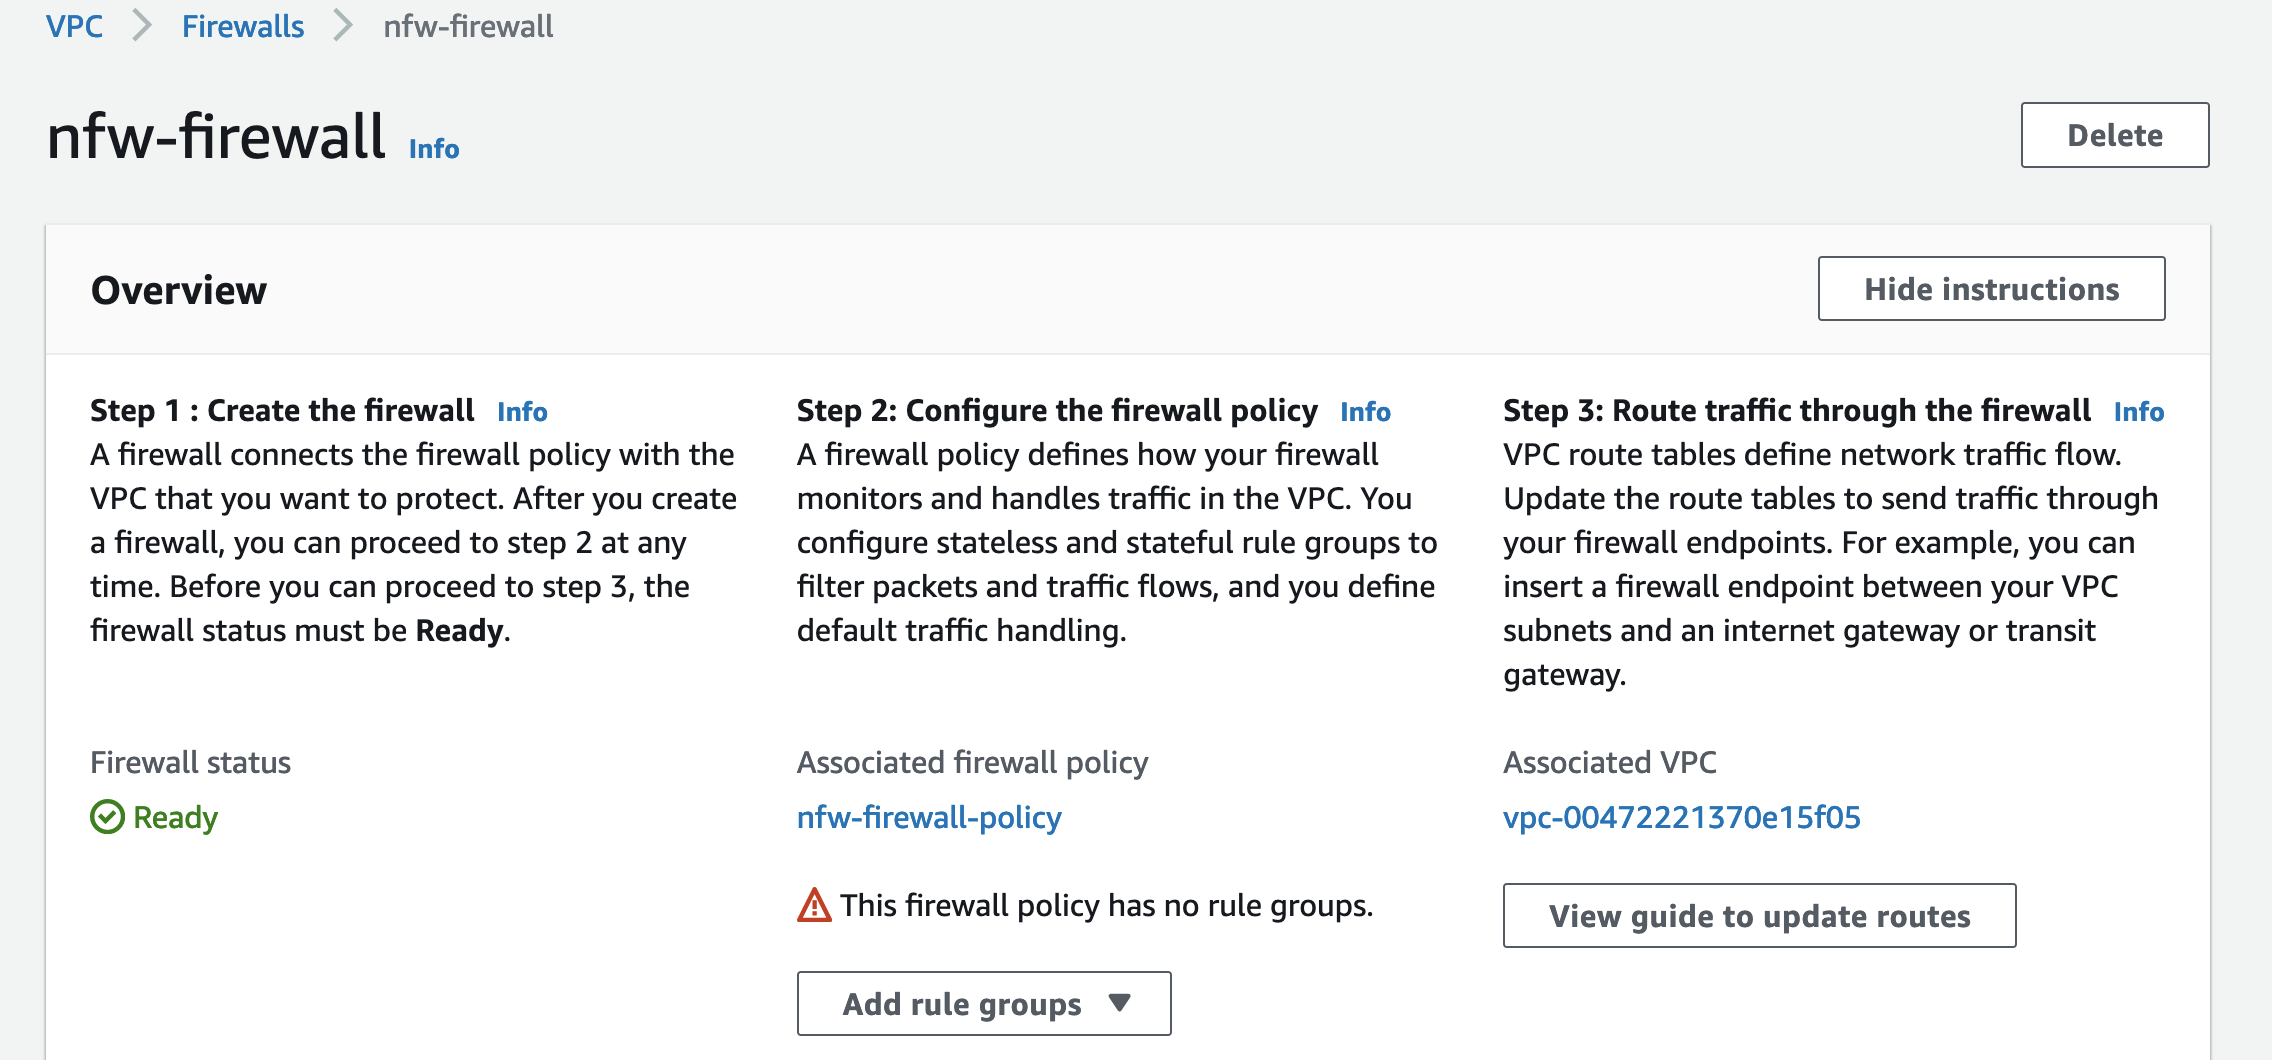
In Figure 4, the Network Firewall has a policy attached. but it does not have a rule group
Figure 4. A policy is attached, but not a rule group
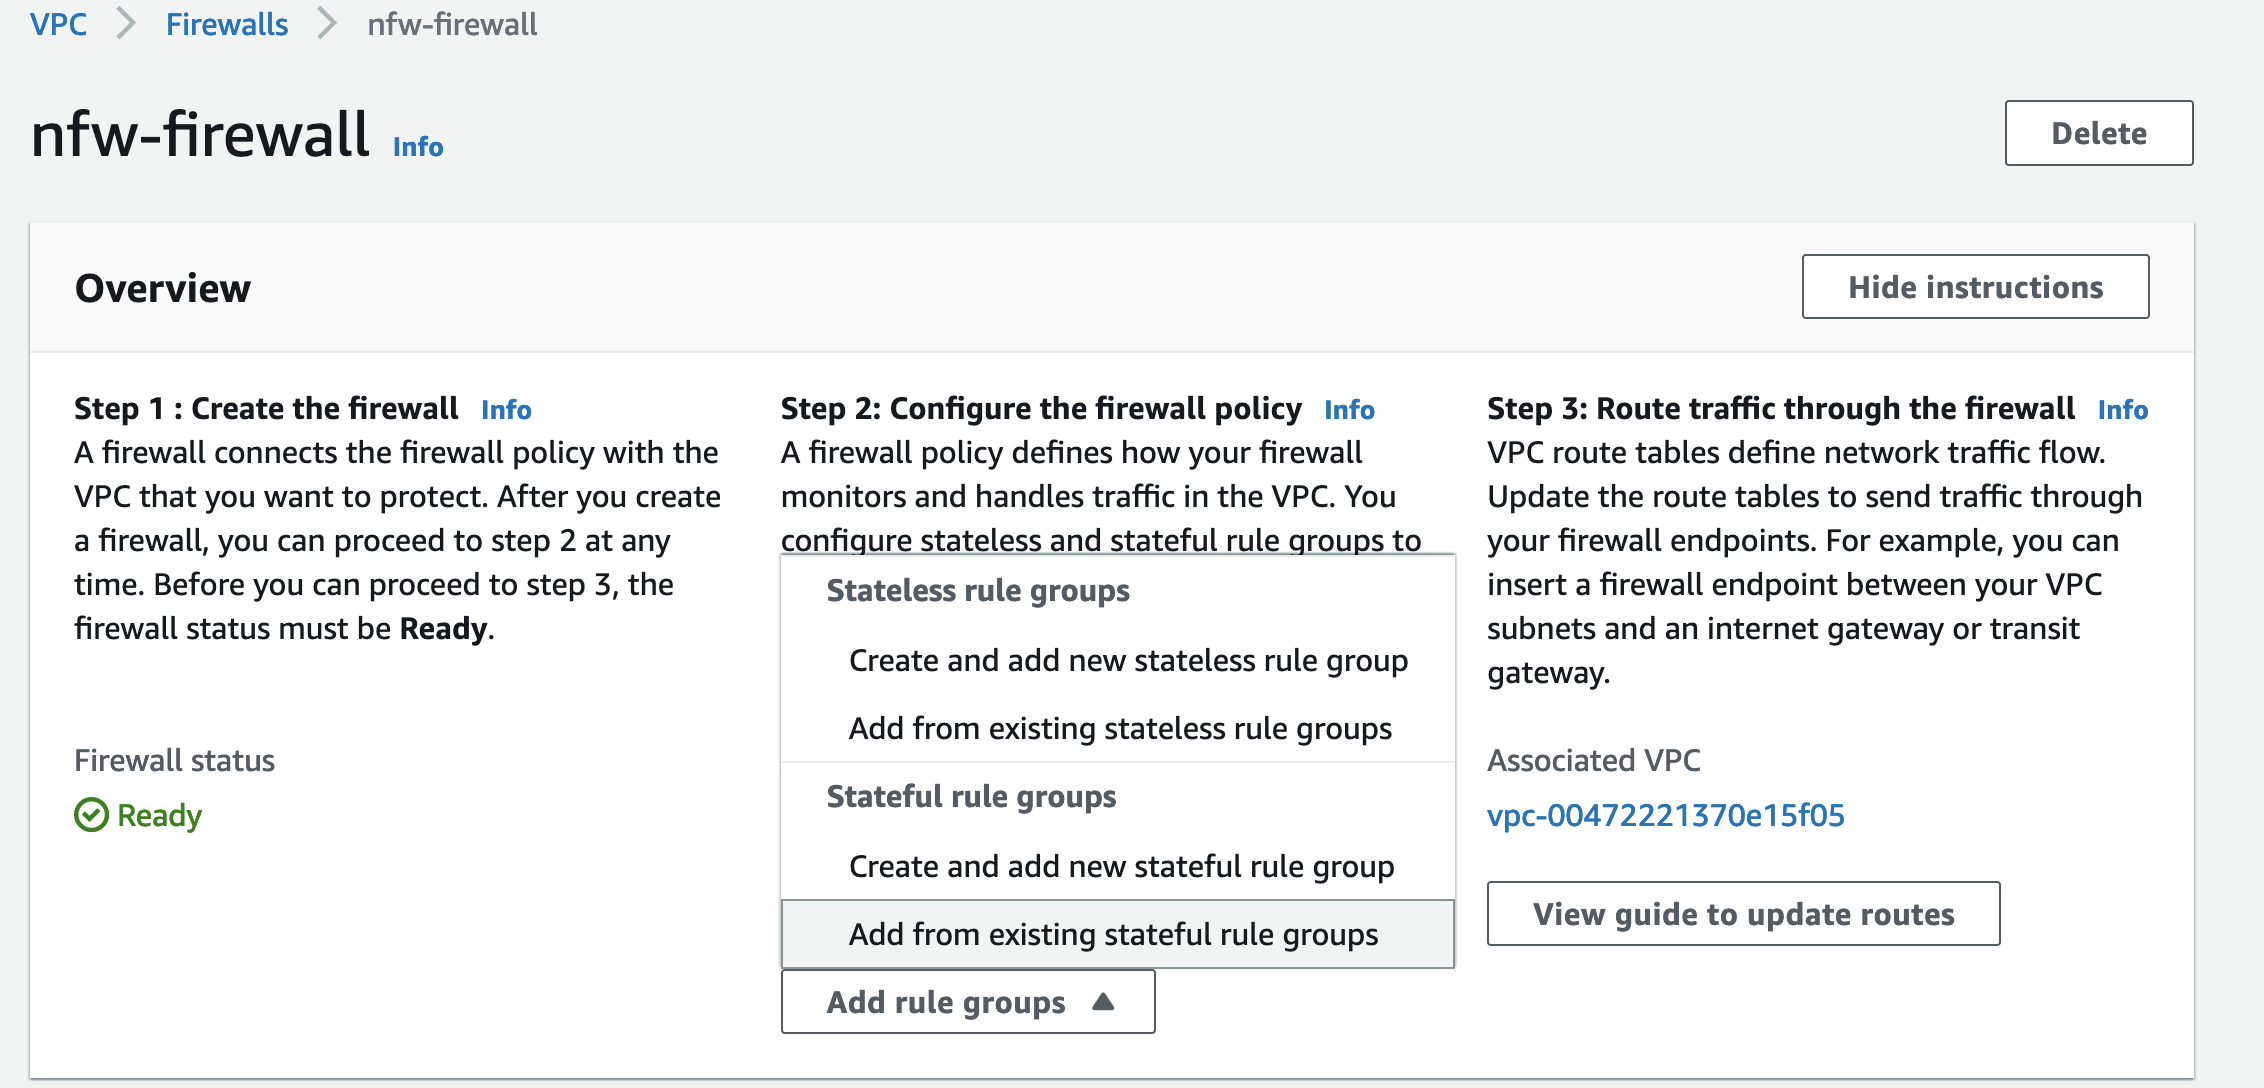
As shown in Figure 5, choose Add rule group to start adding your Suricata rule to the Network Firewall.
Choose Add from existing stateful rule groups to attach an already created Suricata rule group.
Figure 5. Choose Add rule group
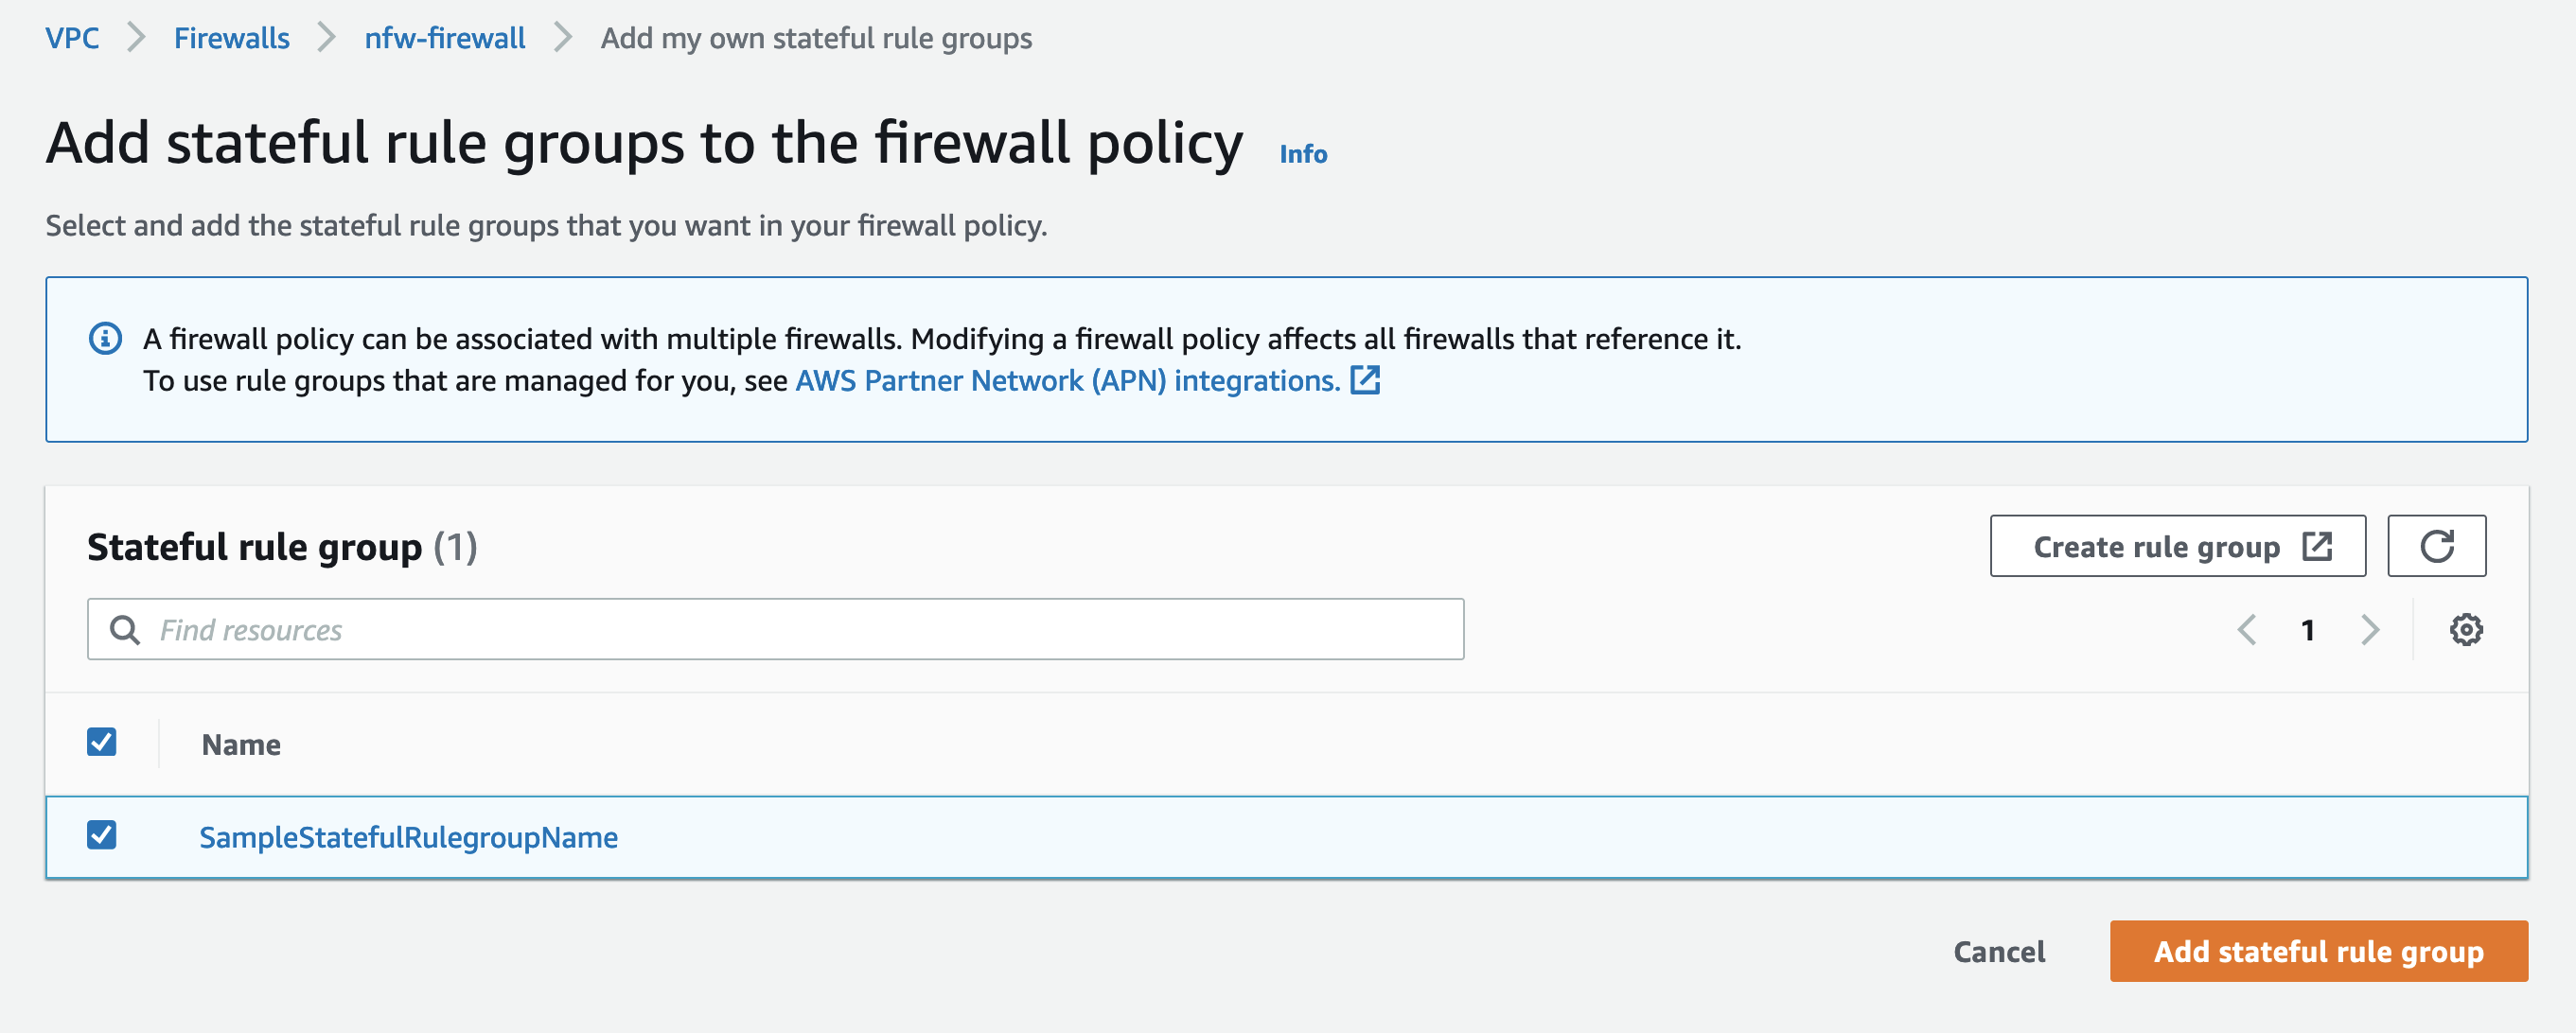
Figure 6 shows the Suriacata rule groups that are already created. SampleStatefulRulegroupName is the rule group created by the CloudFormation template.
Select the rule group and choose Add stateful rule group to finish adding the rule group to Network Firewall.
Figure 6. Review the rule groups that are already created
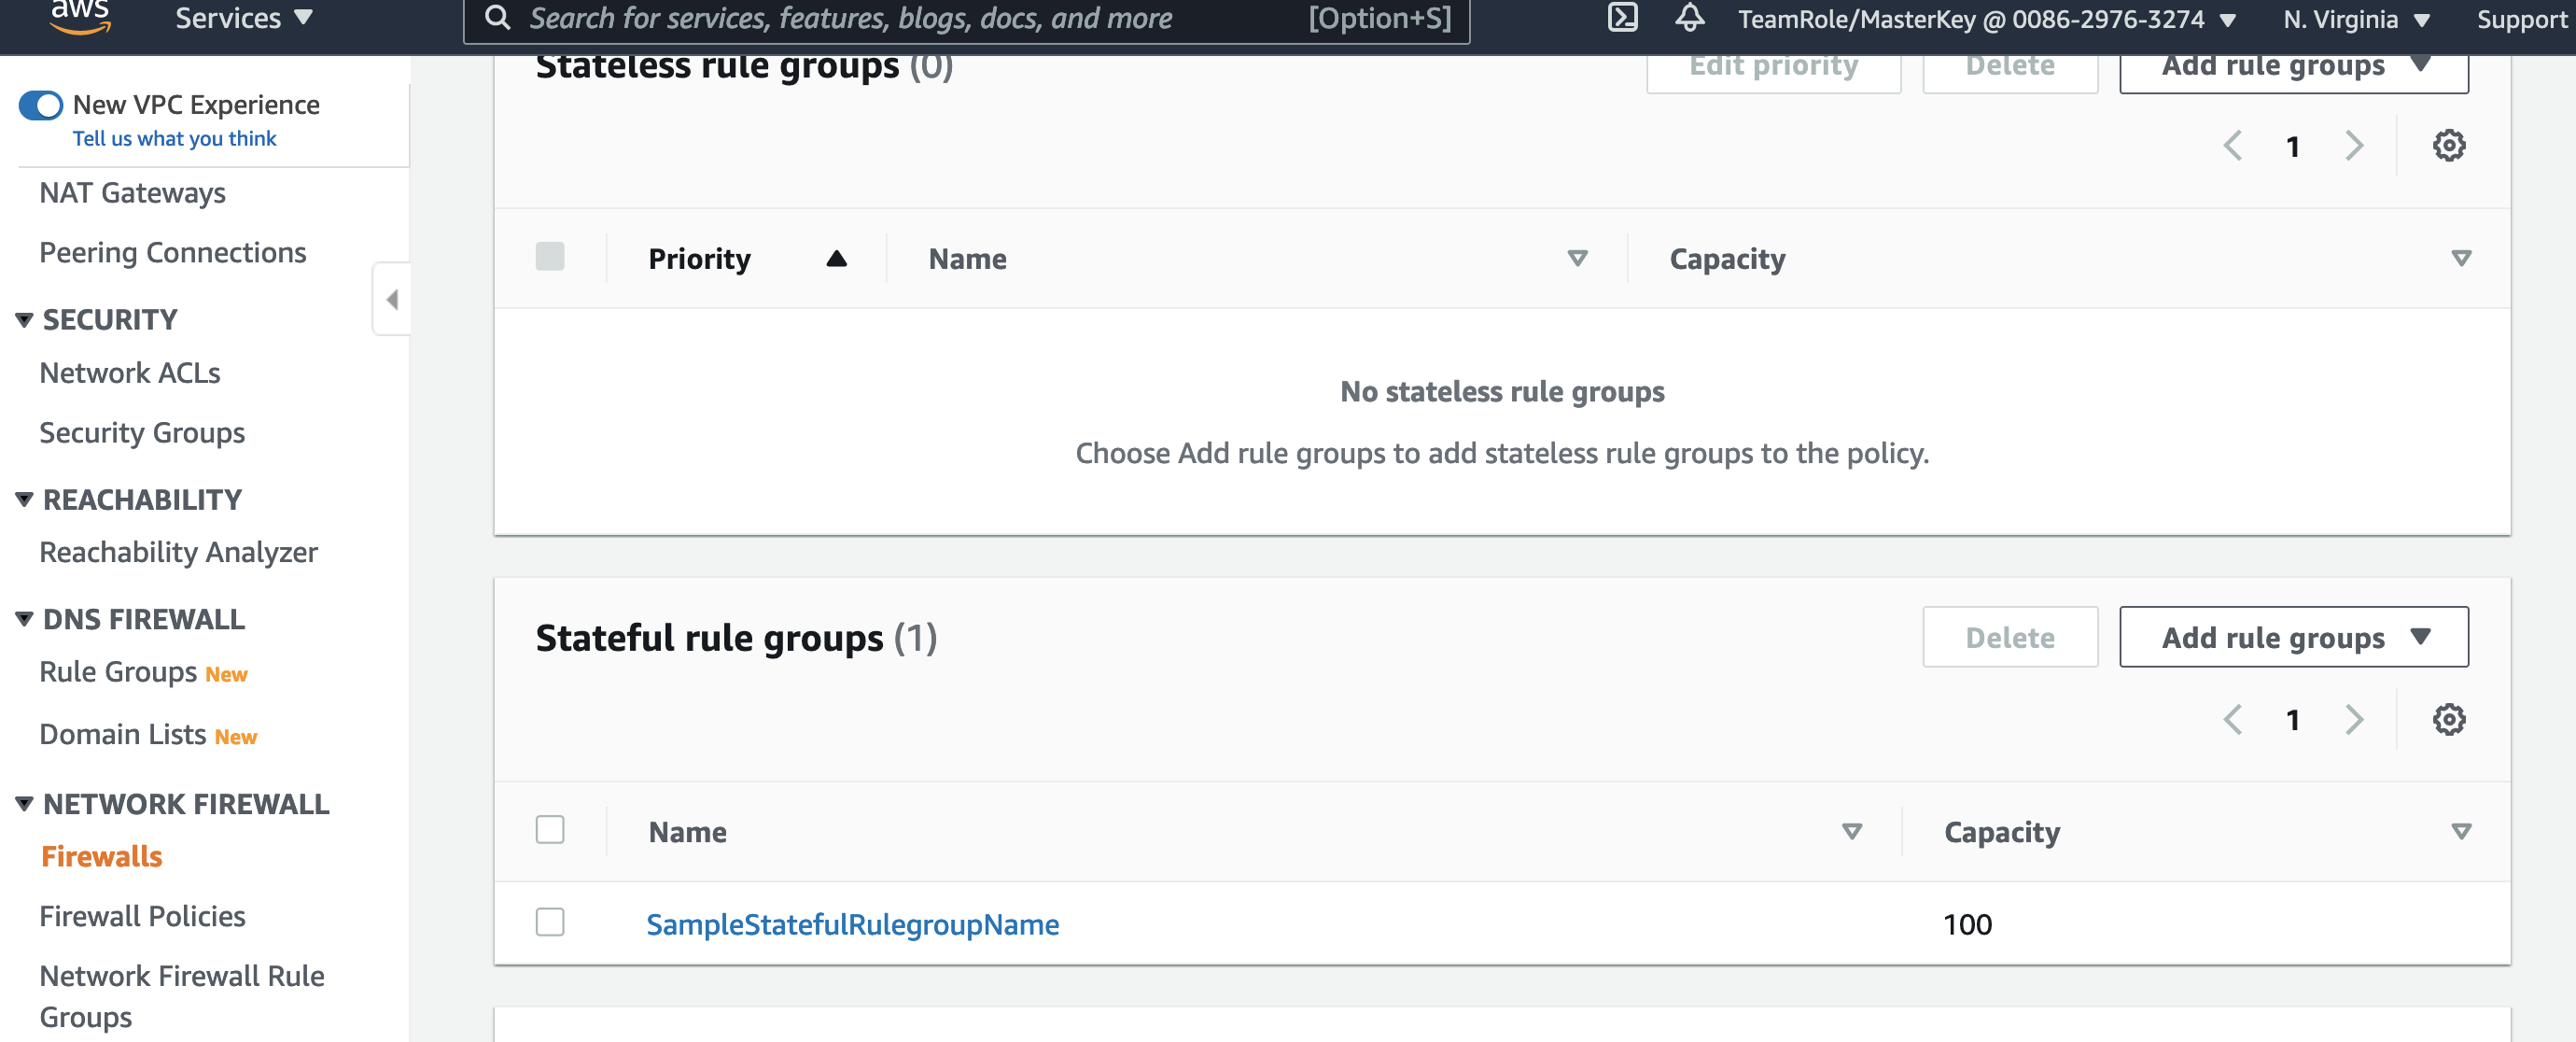
Figure 7 shows that the rule group SampleStatefulRulegroupName is now part of the Stateful rule group section of Network Firewall screen, which completes adding Suricata rules to Network Firewall.
Figure 7. Shows the new rule group is now added
Example: validating the solution
Your Network Firewall is now configured to block malware URLs that are defined in the rulegroup SampleStatefulRulegroupName.
As in the example above where we confirmed vulnerability, Figure 8 shows how to validate that the solution is now protecting your users from accessing malware sites.
Figure 8 shows a user trying to access the same insecure URLs we tested earlier and shows that the URLs are now blocked and the attempted connection times out.
Note: Since these URLs contain malware files, we do not recommend users perform this test, but are providing a screenshot as a demonstration. If you wish to actually test ability to download files, use URLs you know are safe for testing.
Figure 8. Insecure URL access blocked
Validating blocking access helps your security team ensure that users or applications on your network cannot download malware. You can add similar rules for any URLs you identify as insecure. SOC operators are typically not familiar with updating CloudFormation templates, but you can use a deployment pipeline where the data required for the rule is stored in Amazon DynamoDB and use AWS Lambda functions to automate updating rules.
Now that you have an example running, you should implement a complete rule set that meets your requirement from a publicly available malware list such as CISSECURITY MALWARE LIST.
Cleanup
AWS resources created for testing can result in additional costs. Since this environment used a CloudFormation template, you can remove all AWS resources associated with the solution by deleting the CloudFormation stack you named previously (for example, nfw-stack).
Conclusion
This blog describes an approach for preventing users from downloading malware. The solution presented uses AWS Network Firewall to secure your environment by blocking access to the specified malware URLs. The supplied CloudFormation template can be used to automate this protection, and to easily set up a test environment to simulate the scenario.
January 7, 2022: The blog post has been updated to include using Network ACL rules to block potential log4j-related outbound traffic.
January 4, 2022: The blog post has been updated to suggest using WAF rules when correct HTTP Host Header FQDN value is not provided in the request.
December 31, 2021: We made a minor update to the second paragraph in the Amazon Route 53 Resolver DNS Firewall section.
December 29, 2021: A paragraph under the Detect section has been added to provide guidance on validating if log4j exists in an environment.
December 23, 2021: The GuardDuty section has been updated to describe new threat labels added to specific finding to give log4j context.
December 21, 2021: The post includes more info about Route 53 Resolver DNS query logging.
December 20, 2021: The post has been updated to include Amazon Route 53 Resolver DNS Firewall info.
December 17, 2021: The post has been updated to include using Athena to query VPC flow logs.
December 16, 2021: The Respond section of the post has been updated to include IMDSv2 and container mitigation info.
This blog post was first published on December 15, 2021.
Overview
In this post we will provide guidance to help customers who are responding to the recently disclosed log4j vulnerability. This covers what you can do to limit the risk of the vulnerability, how you can try to identify if you are susceptible to the issue, and then what you can do to update your infrastructure with the appropriate patches.
The log4j vulnerability (CVE-2021-44228, CVE-2021-45046) is a critical vulnerability (CVSS 3.1 base score of 10.0) in the ubiquitous logging platform Apache Log4j. This vulnerability allows an attacker to perform a remote code execution on the vulnerable platform. Version 2 of log4j, between versions 2.0-beta-9 and 2.15.0, is affected.
The vulnerability uses the Java Naming and Directory Interface (JNDI) which is used by a Java program to find data, typically through a directory, commonly a LDAP directory in the case of this vulnerability.
Figure 1, below, highlights the log4j JNDI attack flow.
Figure 1. Log4j attack progression. Source: GovCERT.ch, the Computer Emergency Response Team (GovCERT) of the Swiss government
You can use multiple AWS services to help limit your risk/exposure from the log4j vulnerability. You can build a layered control approach, and/or pick and choose the controls identified below to help limit your exposure.
AWSManagedRulesKnownBadInputsRuleSet esp. the Log4JRCE rule which helps inspects the request for the presence of the Log4j vulnerability. Example patterns include ${jndi:ldap://example.com/}.
AWSManagedRulesAnonymousIpList esp. the AnonymousIPList rule which helps inspect IP addresses of sources known to anonymize client information.
AWSManagedRulesCommonRuleSet, esp. the SizeRestrictions_BODY rule to verify that the request body size is at most 8 KB (8,192 bytes).
You should also consider implementing WAF rules that deny access, if the correct HTTP Host Header FQDN value is not provided in the request. This can help reduce the likelihood of scanners that are scanning the internet IP address space from reaching your resources protected by WAF via a request with an incorrect Host Header, like an IP address instead of an FQDN. It’s also possible to use custom Application Load Balancer listener rules to achieve this.
If you’re using AWS WAF Classic, you will need to migrate to AWS WAF or create custom regex match conditions.
You can use Route 53 Resolver DNS Firewall, following AWS Managed Domain Lists, to help proactively protect resources with outbound public DNS resolution. We recommend associating Route 53 Resolver DNS Firewall with a rule configured to block domains on the AWSManagedDomainsMalwareDomainList, which has been updated in all supported AWS regions with domains identified as hosting malware used in conjunction with the log4j vulnerability. AWS will continue to deliver domain updates for Route 53 Resolver DNS Firewall through this list.
Also, you should consider blocking outbound port 53 to prevent the use of external untrusted DNS servers. This helps force all DNS queries through DNS Firewall and ensures DNS traffic is visible for GuardDuty inspection. Using DNS Firewall to block DNS resolution of certain country code top-level domains (ccTLD) that your VPC resources have no legitimate reason to connect out to, may also help. Examples of ccTLDs you may want to block may be included in the known log4j callback domains IOCs.
We also recommend that you enable DNS query logging, which allows you to identify and audit potentially impacted resources within your VPC, by inspecting the DNS logs for the presence of blocked outbound queries due to the log4j vulnerability, or to other known malicious destinations. DNS query logging is also useful in helping identify EC2 instances vulnerable to log4j that are responding to active log4j scans, which may be originating from malicious actors or from legitimate security researchers. In either case, instances responding to these scans potentially have the log4j vulnerability and should be addressed. GreyNoise is monitoring for log4j scans and sharing the callback domains here. Some notable domains customers may want to examine log activity for, but not necessarily block, are: *interact.sh, *leakix.net, *canarytokens.com, *dnslog.cn, *.dnsbin.net, and *cyberwar.nl. It is very likely that instances resolving these domains are vulnerable to log4j.
AWS Network Firewall
Customers can use Suricata-compatible IDS/IPS rules in AWS Network Firewall to deploy network-based detection and protection. While Suricata doesn’t have a protocol detector for LDAP, it is possible to detect these LDAP calls with Suricata. Open-source Suricata rules addressing Log4j are available from corelight, NCC Group, from ET Labs, and from CrowdStrike. These rules can help identify scanning, as well as post exploitation of the log4j vulnerability. Because there is a large amount of benign scanning happening now, we recommend customers focus their time first on potential post-exploitation activities, such as outbound LDAP traffic from their VPC to untrusted internet destinations.
We also recommend customers consider implementing outbound port/protocol enforcement rules that monitor or prevent instances of protocols like LDAP from using non-standard LDAP ports such as 53, 80, 123, and 443. Monitoring or preventing usage of port 1389 outbound may be particularly helpful in identifying systems that have been triggered by internet scanners to make command and control calls outbound. We also recommend that systems without a legitimate business need to initiate network calls out to the internet not be given that ability by default. Outbound network traffic filtering and monitoring is not only very helpful with log4j, but with identifying other classes of vulnerabilities too.
Network Access Control Lists
Customers may be able to use Network Access Control List rules (NACLs) to block some of the known log4j-related outbound ports to help limit further compromise of successfully exploited systems. We recommend customers consider blocking ports 1389, 1388, 1234, 12344, 9999, 8085, 1343 outbound. As NACLs block traffic at the subnet level, careful consideration should be given to ensure any new rules do not block legitimate communications using these outbound ports across internal subnets. Blocking ports 389 and 88 outbound can also be helpful in mitigating log4j, but those ports are commonly used for legitimate applications, especially in a Windows Active Directory environment. See the VPC flow logs section below to get details on how you can validate any ports being considered.
Use IMDSv2
Through the early days of the log4j vulnerability researchers have noted that, once a host has been compromised with the initial JDNI vulnerability, attackers sometimes try to harvest credentials from the host and send those out via some mechanism such as LDAP, HTTP, or DNS lookups. We recommend customers use IAM roles instead of long-term access keys, and not store sensitive information such as credentials in environment variables. Customers can also leverage AWS Secrets Manager to store and automatically rotate database credentials instead of storing long-term database credentials in a host’s environment variables. See prescriptive guidance here and here on how to implement Secrets Manager in your environment.
To help guard against such attacks in AWS when EC2 Roles may be in use — and to help keep all IMDS data private for that matter — customers should consider requiring the use of Instance MetaData Service version 2 (IMDSv2). Since IMDSv2 is enabled by default, you can require its use by disabling IMDSv1 (which is also enabled by default). With IMDSv2, requests are protected by an initial interaction in which the calling process must first obtain a session token with an HTTP PUT, and subsequent requests must contain the token in an HTTP header. This makes it much more difficult for attackers to harvest credentials or any other data from the IMDS. For more information about using IMDSv2, please refer to this blog and documentation. While all recent AWS SDKs and tools support IMDSv2, as with any potentially non-backwards compatible change, test this change on representative systems before deploying it broadly.
Detect
This post has covered how to potentially limit the ability to exploit this vulnerability. Next, we’ll shift our focus to which AWS services can help to detect whether this vulnerability exists in your environment.
Figure 2. Log4j finding in the Inspector console
Amazon Inspector
As shown in Figure 2, the Amazon Inspector team has created coverage for identifying the existence of this vulnerability in your Amazon EC2 instances and Amazon Elastic Container Registry Images (Amazon ECR). With the new Amazon Inspector, scanning is automated and continual. Continual scanning is driven by events such as new software packages, new instances, and new common vulnerability and exposure (CVEs) being published.
For example, once the Inspector team added support for the log4j vulnerability (CVE-2021-44228 & CVE-2021-45046), Inspector immediately began looking for this vulnerability for all supported AWS Systems Manager managed instances where Log4j was installed via OS package managers and where this package was present in Maven-compatible Amazon ECR container images. If this vulnerability is present, findings will begin appearing without any manual action. If you are using Inspector Classic, you will need to ensure you are running an assessment against all of your Amazon EC2 instances. You can follow this documentation to ensure you are creating an assessment target for all of your Amazon EC2 instances. Here are further details on container scanning updates in Amazon ECR private registries.
GuardDuty
In addition to finding the presence of this vulnerability through Inspector, the Amazon GuardDuty team has also begun adding indicators of compromise associated with exploiting the Log4j vulnerability, and will continue to do so. GuardDuty will monitor for attempts to reach known-bad IP addresses or DNS entries, and can also find post-exploit activity through anomaly-based behavioral findings. For example, if an Amazon EC2 instance starts communicating on unusual ports, GuardDuty would detect this activity and create the finding Behavior:EC2/NetworkPortUnusual. This activity is not limited to the NetworkPortUnusual finding, though. GuardDuty has a number of different findings associated with post exploit activity, such as credential compromise, that might be seen in response to a compromised AWS resource. For a list of GuardDuty findings, please refer to this GuardDuty documentation.
To further help you identify and prioritize issues related to CVE-2021-44228 and CVE-2021-45046, the GuardDuty team has added threat labels to the finding detail for the following finding types:
Backdoor:EC2/C&CActivity.B If the IP queried is Log4j-related, then fields of the associated finding will include the following values:
service.additionalInfo.threatListName = Amazon
service.additionalInfo.threatName = Log4j Related
Backdoor:EC2/C&CActivity.B!DNS If the domain name queried is Log4j-related, then the fields of the associated finding will include the following values:
service.additionalInfo.threatListName = Amazon
service.additionalInfo.threatName = Log4j Related
Behavior:EC2/NetworkPortUnusual If the EC2 instance communicated on port 389 or port 1389, then the associated finding severity will be modified to High, and the finding fields will include the following value:
service.additionalInfo.context = Possible Log4j callback
Figure 3. GuardDuty finding with log4j threat labels
Security Hub
Many customers today also use AWS Security Hub with Inspector and GuardDuty to aggregate alerts and enable automatic remediation and response. In the short term, we recommend that you use Security Hub to set up alerting through AWS Chatbot, Amazon Simple Notification Service, or a ticketing system for visibility when Inspector finds this vulnerability in your environment. In the long term, we recommend you use Security Hub to enable automatic remediation and response for security alerts when appropriate. Here are ideas on how to setup automatic remediation and response with Security Hub.
VPC flow logs
Customers can use Athena or CloudWatch Logs Insights queries against their VPC flow logs to help identify VPC resources associated with log4j post exploitation outbound network activity. Version 5 of VPC flow logs is particularly useful, because it includes the “flow-direction” field. We recommend customers start by paying special attention to outbound network calls using destination port 1389 since outbound usage of that port is less common in legitimate applications. Customers should also investigate outbound network calls using destination ports 1388, 1234, 12344, 9999, 8085, 1343, 389, and 88 to untrusted internet destination IP addresses. Free-tier IP reputation services, such as VirusTotal, GreyNoise, NOC.org, and ipinfo.io, can provide helpful insights related to public IP addresses found in the logged activity.
Note: If you have a Microsoft Active Directory environment in the captured VPC flow logs being queried, you might see false positives due to its use of port 389.
Validation with open-source tools
With the evolving nature of the different log4j vulnerabilities, it’s important to validate that upgrades, patches, and mitigations in your environment are indeed working to mitigate potential exploitation of the log4j vulnerability. You can use open-source tools, such as aws_public_ips, to get a list of all your current public IP addresses for an AWS Account, and then actively scan those IPs with log4j-scanusing a DNS Canary Token to get notification of which systems still have the log4j vulnerability and can be exploited. We recommend that you run this scan periodically over the next few weeks to validate that any mitigations are still in place, and no new systems are vulnerable to the log4j issue.
Respond
The first two sections have discussed ways to help prevent potential exploitation attempts, and how to detect the presence of the vulnerability and potential exploitation attempts. In this section, we will focus on steps that you can take to mitigate this vulnerability. As we noted in the overview, the immediate response recommended is to follow this blog and use the tool designed to hotpatch a running JVM using any log4j 2.0+. Steve Schmidt, Chief Information Security Officer for AWS, also discussed this hotpatch.
If you use AWS Systems Manager Patch Manager, and you have critical patches set to install immediately in your patch baseline, your EC2 instances will already have the patch. It is important to note that you’re not done at this point. Next, you will need to update the class path wherever the library is used in your application code, to ensure you are using the most up-to-date version. You can use AWS Patch Manager to patch managed nodes in a hybrid environment. See here for further implementation details.
Container mitigation
To install the hotpatch noted in the overview onto EKS cluster worker nodes AWS has developed an RPM that performs a JVM-level hotpatch which disables JNDI lookups from the log4j2 library. The Apache Log4j2 node agent is an open-source project built by the Kubernetes team at AWS. To learn more about how to install this node agent, please visit the this Github page.
Once identified, ECR container images will need to be updated to use the patched log4j version. Downstream, you will need to ensure that any containers built with a vulnerable ECR container image are updated to use the new image as soon as possible. This can vary depending on the service you are using to deploy these images. For example, if you are using Amazon Elastic Container Service (Amazon ECS), you might want to update the service to force a new deployment, which will pull down the image using the new log4j version. Check the documentation that supports the method you use to deploy containers.
We recommend you vend new application credentials and revoke existing credentials immediately after patching.
Mitigation strategies if you can’t upgrade
In case you either can’t upgrade to a patched version, which disables access to JDNI by default, or if you are still determining your strategy for how you are going to patch your environment, you can mitigate this vulnerability by changing your log4j configuration. To implement this mitigation in releases >=2.10, you will need to remove the JndiLookup class from the classpath: zip -q -d log4j-core-*.jar org/apache/logging/log4j/core/lookup/JndiLookup.class.
For a more comprehensive list about mitigation steps for specific versions, refer to the Apache website.
Conclusion
In this blog post, we outlined key AWS security services that enable you to adopt a layered approach to help protect against, detect, and respond to your risk from the log4j vulnerability. We urge you to continue to monitor our security bulletins; we will continue updating our bulletins with our remediation efforts for our side of the shared-responsibility model.
Given the criticality of this vulnerability, we urge you to pay close attention to the vulnerability, and appropriately prioritize implementing the controls highlighted in this blog.
If you have feedback about this post, submit comments in the Comments section below.
Want more AWS Security news? Follow us on Twitter.
This blog post is Part 2 of Hands-on walkthrough of the AWS Network Firewall flexible rules engine – Part 1. To recap, AWS Network Firewall is a managed service that offers a flexible rules engine that gives you the ability to write firewall rules for granular policy enforcement. In Part 1, we shared how to write a rule and how the rule engine processes rules differently depending on whether you are performing stateless or stateful inspection using the action order method.
In this blog, we focus on how stateful rules are evaluated using a recently added feature—the strict rule order method. This feature gives you the ability to set one or more default actions. We demonstrate how you can use this feature to create or update your rule groups and share scenarios where this feature can be useful.
In addition, after reading this post, you’ll be able to deploy an automated serverless solution that retrieves the latest Suricata-specific rules from the community, such as from Proofpoint’s Emerging Threats OPEN ruleset. By deploying such solutions into your Amazon Web Services (AWS) environment, you can seamlessly enhance your overall security posture as the solutions fetch the latest set of intrusion detection system (IDS) rules from Proofpoint (formerly Emerging Threats) and optionally using them as intrusion prevention system (IPS) thereby keeping the rule groups updated on your Network Firewall. You can select the refresh interval to update these rulesets—the default refresh interval is 6 hours. You can also convert the set of rule groups to intrusion prevention system (IPS) mode. Finally, you have granular visibility of the various categories of rules for your Network Firewall on the AWS Management Console.
How does Network Firewall evaluate your stateful rule group?
There are two ways that Network Firewall can evaluate your stateful rule groups: the action ordering method or the strict ordering method. The settings of your rule groups must match the settings of the firewall policy that they belong to.
With the action order evaluation method for stateless inspection, all individual packets in a flow are evaluated against each rule in the policy. The rules are processed in order based on the priority assigned to them with lowest numbered rules evaluated first. For stateful inspection using the action order evaluation method, the rule engine evaluates based on the order of their action setting with pass rules processed first, then drop, then alert. The engine stops processing rules when it finds a match. The firewall also takes into consideration the order that the rules appear in the rule group, and the priority assigned to the rule, if any. Part 1 provides more details on action order evaluation.
If your firewall policy is set up to use strict ordering, Network Firewall now allows you the option to manually set a strict rule group order for stateful rule groups. Using this optional setting, the rule groups are evaluated in order of priority, starting from the lowest numbered rule, and the rules in each rule group are processed in the order in which they’re defined. You can also select which of the default actions—drop all, drop established, alert all, or alert established—Network Firewall will take when following strict rule ordering.
A customer scenario where strict rule order is beneficial
Configuring rule groups by action order is appropriate for IDS use cases, but can be an obstacle for use cases where you deploy firewalls that follow security best practice, which is to allow only what’s required and deny everything else (default deny). You can’t achieve this best practice by using the default action order behavior. However, with strict order functionality, you can create a firewall policy that allows prioritization of stateful rules, or that can run 5-tuple and Suricata rules simultaneously. Strict rule order allows you to have a block of fine-grain rules with specific actions at the beginning followed by a coarse set of rules with specific actions and finally a default drop action. An example is shown in Figure 1 that follows.
Figure 1: An example snippet of a Network Firewall firewall policy with strict rule order
Figure 1 shows that there are two different default drop actions that you can choose: drop established and drop all. If you choose drop established, Network Firewall drops only the packets that are in established connections. This allows the layer 3 and 4 connection establishment packets that are needed for the upper-layer connections to be established, while dropping the packets for connections that are already established. This allows application-layer pass rules to be written in a default-deny setup without the need to write additional rules to allow the lower-layer handshaking parts of the underlying protocols.
The drop all action drops all packets. In this scenario, you need additional rules to explicitly allow lower-level handshakes for protocols to succeed. Evaluation order for stateful rule groups provides details of how Network Firewall evaluates the different actions. In order to set the additional environment variables that are shown in the snippet, follow the instructions outlined in Examples of stateful rules for Network Firewall and the Suricata rule variables.
An example walkthrough to set up a Network Firewall policy with a stateful rule group with strict rule order and default drop action
In this section, you’ll start by creating a firewall policy with strict rule order. From there, you’ll build on it by adding a stateful rule group with strict rule order and modifying the priority order of the rules within a stateful rule group.
Step 1: Create a firewall policy with strict rule order
You can configure the default actions on policies using strict rule order, which is a property that can only be set at creation time as described below.
Log in to the console and select the AWS Region where you have Network Firewall.
Select VPC service on the search bar.
On the left pane, under the Network Firewall section, select Firewall policies.
Choose Create Firewall policy. In Describe firewall policy, enter an appropriate name and (optional) description. Choose Next.
In the Add rule groups section.
Select the Stateless default actions:
Under Choose how to treat fragmented packets choose one of the options.
Choose one of the actions for stateless default actions.
Under Stateful rule order and default action
Under Rule order choose Strict.
Under Default actions choose the default actions for strict rule order. You can select one drop action and one or both of the alert actions from the list.
Next, add an optional tag (for example, for Key enter Name, and for Value enter Firewall-Policy-Non-Production). Review and choose Create to create the firewall policy.
Step 2: Create a stateful rule group with strict rule order
Log in to the console and select the AWS Region where you have Network Firewall.
Select VPC service on the search bar.
On the left pane, under the Network Firewall section, select Network Firewall rule groups.
In the center pane, select Create Network Firewall rule group on the top right.
In the rule group type, select Stateful rule group.
Enter a name, description, and capacity.
In the stateful rule group options select either 5-tuple or Suricata compatible IPS rules. These allow rule order to be strict.
In the Stateful rule order, choose Strict.
In the Add rule section, add the stateful rules that you require. Detailed instructions on creating a rule can be found at Creating a stateful rule group.
Finally, Select Create stateful rule group.
Step 3: Add the stateful rule group with strict rule order to a Network Firewall policy
Log in to the console and select the AWS Region where you have Network Firewall.
Select VPC service on the search bar.
On the left pane, under the Network Firewall section, select Firewall policies.
Chose the network firewall policy you created in step 1.
In the center pane, in the Stateful rule groups section, select Add rule group.
Select the stateful rule group you created in step 2. Next, choose Add stateful rule group. This is explained in detail in Updating a firewall policy.
Step 4: Modify the priority of existing rules in a stateful rule group
Log in to the console and select the AWS Region where you have Network Firewall.
Select VPC service on the search bar.
On the left pane, under the Network Firewall section, choose Network Firewall rule groups.
Select the rule group that you want to edit the priority of the rules.
Select the Edit rules tab. Select the rule you want to change the priority of and select the Move up and Move down buttons to reorder the rule. This is shown in Figure 2.
Figure 2: Modify the order of the rules within a stateful rule groups
Note:
Rule order can be set to strict order only when network firewall policies or rule groups are created. The rule order can’t be changed to strict order evaluation on existing objects.
You can only associate strict-order rule groups with strict-order policies, and default-order rule groups with default-order policies. If you try to associate an incompatible rule group, you will get a validation exception.
Today, creating domain list-type rule groups using strict order isn’t supported. So, you won’t be able to associate domain lists with strict order policies. However, 5-tuple and Suricata compatible rules are supported.
Automated serverless solution to retrieve Suricata rules
To help simplify and maintain your more advanced Network Firewall rules, let’s look at an automated serverless solution. This solution uses an Amazon CloudWatch Events rule that’s run on a schedule. The rule invokes an AWS Lambda function that fetches the latest Suricata rules from Proofpoint’s Emerging Threats OPEN ruleset and extracts them to an Amazon Simple Storage Service (Amazon S3) bucket. Once the files lands in the S3 bucket another Lambda function is invoked that parses the Suricata rules and creates rule groups that are compatible with Network Firewall. This is shown in Figure 3 that follows. This solution was developed as an AWS Serverless Application Model (AWS SAM) package to make it less complicated to deploy. AWS SAM is an open-source framework that you can use to build serverless applications on AWS. The deployment instructions for this solution can be found in this code repository on GitHub.
Multiple rule groups are created based on the Suricata IDS categories. This solution enables you to selectively change certain rule groups to IPS mode as required by your use case. It achieves this by modifying the default action from alert to drop in the ruleset. The modified stateful rule group can be associated to the active Network Firewall firewall policy. The quota for rule groups might need to be increased to incorporate all categories from Proofpoint’s Emerging Threats OPEN ruleset to meet your security requirements. An example screenshot of various IPS categories of rule groups created by the solution is shown in Figure 4. Setting up rule groups by categories is the preferred way to define an IPS rule, because the underlying signatures have already been grouped and maintained by Proofpoint.
Figure 4: Rule groups created by the solution based on Suricata IPS categories
The solution provides a way to use logs in CloudWatch to troubleshoot the Suricata rulesets that weren’t successfully transformed into Network Firewall rule groups. The final rulesets and discarded rules are stored in an S3 bucket for further analysis. This is shown in Figure 5.
Figure 5: Amazon S3 folder structure for storing final applied and discarded rulesets
Conclusion
AWS Network Firewall lets you inspect traffic at scale in a variety of use cases. AWS handles the heavy lifting of deploying the resources, patch management, and ensuring performance at scale so that your security teams can focus less on operational burdens and more on strategic initiatives. In this post, we covered a sample Network Firewall configuration with strict rule order and default drop. We showed you how the rule engine evaluates stateful rule groups with strict rule order and default drop. We then provided an automated serverless solution from Proofpoint’s Emerging Threats OPEN ruleset that can aid you in establishing a baseline for your rule groups. We hope this post is helpful and we look forward to hearing about how you use these latest features that are being added to Network Firewall.
More of our customers are adopting flexible work-from-home and remote work strategies that use virtual desktop solutions, such as Amazon WorkSpaces and Amazon AppStream 2.0, to deliver their user applications. Securing these workloads benefits from a layered approach, and this post focuses on protecting your users at the network level. Customers can now apply these security measures by using Route 53 Resolver DNS Firewall and AWS Network Firewall, two managed services that provide layered protection for the customer’s virtual private cloud (VPC). This blog post provides recommendations for how you can build network protection for your remote workforce by using DNS Firewall and Network Firewall.
Overview
DNS Firewall helps you block DNS queries that are made for known malicious domains, while allowing DNS queries to trusted domains. DNS Firewall has a simple deployment model that makes it straightforward for you to start protecting your VPCs by using managed domain lists, as well as custom domain lists. With DNS Firewall, you can filter and regulate outbound DNS requests. The service inspects DNS requests that are handled by Route 53 Resolver and applies actions that you define to allow or block requests.
DNS Firewall consists of domain lists and rule groups. Domain lists include custom domain lists that you create and AWS managed domain lists. Rule groups are associated with VPCs and control the response for domain lists that you choose. You can configure rule groups at scale by using AWS Firewall Manager. Rule groups process in priority order and stop processing after a rule is matched.
Network Firewall helps customers protect their VPCs by protecting the workload at the network layer. Network Firewall is an automatically scaling, highly available service that simplifies deployment and management for network administrators. With Network Firewall, you can perform inspection for inbound traffic, outbound traffic, traffic between VPCs, and traffic between VPCs and AWS Direct Connect or AWS VPN traffic. You can deploy stateless rules to allow or deny traffic based on the protocol, source and destination ports, and source and destination IP addresses. Additionally, you can deploy stateful rules that allow or block traffic based on domain lists, standard rule groups, or Suricata compatible intrusion prevention system (IPS) rules.
To configure Network Firewall, you need to create Network Firewall rule groups, a Network Firewall policy, and finally, a network firewall. Rule groups consist of stateless and stateful rule groups. For both types of rule groups, you need to estimate the capacity when you create the rule group. See the Network Firewall Developer Guide to learn how to estimate the capacity that is needed for the stateless and stateful rule engines.
This post shows you how to configure DNS Firewall and Network Firewall to protect your workload. You will learn how to create rules that prevent DNS queries to unapproved DNS servers, and that block resources by protocol, domain, and IP address. For the purposes of this post, we’ll show you how to protect a workload consisting of two Microsoft Active Directory domain controllers, an application server running QuickBooks, and Amazon WorkSpaces to deliver the QuickBooks application to end users, as shown in Figure 1.
Figure 1: An example architecture that includes domain controllers and QuickBooks hosted on EC2 and Amazon WorkSpaces for user virtual desktops
Configure DNS Firewall
DNS Firewall domain lists currently include two managed lists to block malware and botnet command-and-control networks, and you can also bring your own list. Your list can include any domain names that you have found to be malicious and any domains that you don’t want your workloads connecting to.
In the navigation pane, under DNS Firewall, choose Domain lists.
Choose Add domain list to configure a customer-owned domain list.
In the domain list builder dialog box, do the following.
Under Domain list name, enter a name.
In the second dialog box, enter the list of domains you want to allow or block.
Choose Add domain list.
When you create a domain list, you can enter a list of domains you want to block or allow. You also have the option to upload your domains by using a bulk upload. You can use wildcards when you add domains for DNS Firewall. Figure 2 shows an example of a custom domain list that matches the root domain and any subdomain of box.com, dropbox.com, and sharefile.com, to prevent users from using these file sharing platforms.
Figure 2: Domains added to a customer-owned domain list
In the navigation pane, under DNS Firewall, choose Rule group.
Choose Create rule group to apply actions to domain lists.
Enter a rule group name and optional description.
Choose Add rule to add a managed or customer-owned domain list, and do the following.
Enter a rule name and optional description.
Choose Add my own domain list or Add AWS managed domain list.
Select the desired domain list.
Choose an action, and then choose Next.
(Optional) Change the rule priority.
(Optional) Add tags.
Choose Create rule group.
When you create your rule group, you attach rules and set an action and priority for the rule. You can set rule actions to Allow, Block, or Alert. When you set the action to Block, you can return the following responses:
NODATA – Returns no response.
NXDOMAIN – Returns an unknown domain response.
OVERRIDE – Returns a custom CNAME response.
Figure 3 shows rules attached to the DNS firewall.
In the navigation pane, under DNS Firewall, choose Rule group.
Select the desired rule group.
Choose Associated VPCs, and then choose Associate VPC.
Select one or more VPCs, and then choose Associate.
The rule group will filter your DNS requests to Route 53 Resolver. Set your DNS servers forwarders to use your Route 53 Resolver.
To configure logging for your firewall’s activity, navigate to the Route 53 console and select your VPC under the Resolver section. You can configure multiple logging options, if required. You can choose to log to Amazon CloudWatch, Amazon Simple Storage Service (Amazon S3), or Amazon Kinesis Data Firehose. Select the VPC that you want to log queries for and add any tags that you require.
Configure Network Firewall
In this section, you’ll learn how to create Network Firewall rule groups, a firewall policy, and a network firewall.
Configure rule groups
Stateless rule groups are straightforward evaluations of a source and destination IP address, protocol, and port. It’s important to note that stateless rules don’t perform any deep inspection of network traffic.
Stateless rules have three options:
Pass – Pass the packet without further inspection.
Drop – Drop the packet.
Forward – Forward the packet to stateful rule groups.
Stateless rules inspect each packet in isolation in the order of priority and stop processing when a rule has been matched. This example doesn’t use a stateless rule, and simply uses the default firewall action to forward all traffic to stateful rule groups.
Stateful rule groups support deep packet inspection, traffic logging, and more complex rules. Stateful rule groups evaluate traffic based on standard rules, domain rules or Suricata rules. Depending on the type of rule that you use, you can pass, drop, or create alerts on the traffic that is inspected.
In the navigation pane, under AWS Network Firewall, choose Network Firewall rule groups.
Choose Create Network Firewall rule group.
Choose Stateful rule group or Stateless rule group.
Enter the desired settings.
Choose Create stateful rule group.
The example in Figure 4 uses standard rules to block outbound and inbound Server Message Block (SMB), Secure Shell (SSH), Network Time Protocol (NTP), DNS, and Kerberos traffic, which are common protocols used in our example workload. Network Firewall doesn’t inspect traffic between subnets within the same VPC or over VPC peering, so these rules won’t block local traffic. You can add rules with the Pass action to allow traffic to and from trusted networks.
Figure 4: Standard rules created to block unauthorized SMB, SSH, NTP, DNS, and Kerberos traffic
Blocking outbound DNS requests is a common strategy to verify that DNS traffic resolves only from local resolvers, such as your DNS server or the Route 53 Resolver. You can also use these rules to prevent inbound traffic to your VPC-hosted resources, as an additional layer of security beyond security groups. If a security group erroneously allows SMB access to a file server from external sources, Network Firewall will drop this traffic based on these rules.
Even though the DNS Firewall policy described in this blog post will block DNS queries for unauthorized sharing platforms, some users might attempt to bypass this block by modifying the HOSTS file on their Amazon WorkSpace. To counter this risk, you can add a domain rule to your firewall policy to block the box.com, dropbox.com, and sharefile.com domains, as shown in Figure 5.
Figure 5: A domain list rule to block box.com, dropbox.com, and sharefile.com
Configure firewall policy
You can use firewall policies to attach stateless and stateful rule groups to a single policy that is used by one or more network firewalls. Attach your rule groups to this policy and set your preferred default stateless actions. The default stateless actions will apply to any packets that don’t match a stateless rule group within the policy. You can choose separate actions for full packets and fragmented packets, depending on your needs, as shown in Figure 6.
Figure 6: Stateful rule groups attached to a firewall policy
You can choose to forward the traffic to be processed by any stateful rule groups that you have attached to your firewall policy. To bypass any stateful rule groups, you can select the Pass option.
In the navigation pane, under AWS Network Firewall, choose Firewalls.
Choose Create firewall.
Under Firewall details, do the following:
Enter a name for the firewall.
Select the VPC.
Select one or more Availability Zones and subnets, as needed.
Under Associated firewall policy, do the following:
Choose Associate an existing firewall policy.
Select the firewall policy.
(Optional) Add tags.
Choose Create firewall.
Two subnets in separate Availability Zones are used for the network firewall example shown in Figure 7, to provide high availability.
Figure 7: A network firewall configuration that includes multiple subnets
After the firewall is in the ready state, you’ll be able to see the endpoint IDs of the firewall endpoints, as shown in Figure 8. The endpoint IDs are needed when you update VPC route tables.
Figure 8: Firewall endpoint IDs
You can configure alert logs, flow logs, or both to be sent to Amazon S3, CloudWatch log groups, or Kinesis Data Firehose. Administrators configure alert logging to build proactive alerting and flow logging to use in troubleshooting and analysis.
Finalize the setup
After the firewall is created and ready, the last step to complete setup is to update the VPC route tables. Update your routing in the VPC to route traffic through the new network firewall endpoints. Update the public subnets route table to direct traffic to the firewall endpoint in the same Availability Zone. Update the internet gateway route to direct traffic to the firewall endpoints in the matching Availability Zone for public subnets. These routes are shown in Figure 9.
Figure 9: Network diagram of the firewall solution
In this example architecture, Amazon WorkSpaces users are able to connect directly between private subnet 1 and private subnet 2 to access local resources. Security groups and Windows authentication control access from WorkSpaces to EC2-hosted workloads such as Active Directory, file servers, and SQL applications. For example, Microsoft Active Directory domain controllers are added to a security group that allows inbound ports 53, 389, and 445, as shown in Figure 10.
Figure 10: Domain controller security group inbound rules
Traffic from WorkSpaces will first resolve DNS requests by using the Active Directory domain controller. The domain controller uses the local Route 53 Resolver as a DNS forwarder, which DNS Firewall protects. Network traffic then flows from the private subnet to the NAT gateway, through the network firewall to the internet gateway. Response traffic flows back from the internet gateway to the network firewall, then to the NAT gateway, and finally to the user WorkSpace. This workflow is shown in Figure 11.
Figure 11: Traffic flow for allowed traffic
If a user attempts to connect to blocked internet resources, such as box.com, a botnet, or a malware domain, this will result in a NXDOMAIN response from DNS Firewall, and the connection will not proceed any further. This blocked traffic flow is shown in Figure 12.
Figure 12: Traffic flow when blocked by DNS Firewall
If a user attempts to initiate a DNS request to a public DNS server or attempts to access a public file server, this will result in a dropped connection by Network Firewall. The traffic will flow as expected from the user WorkSpace to the NAT gateway and from the NAT gateway to the network firewall, which inspects the traffic. The network firewall then drops the traffic when it matches a rule with the drop or block action, as shown in Figure 13. This configuration helps to ensure that your private resources only use approved DNS servers and internet resources. Network Firewall will block unapproved domains and restricted protocols that use standard rules.
Figure 13: Traffic flow when blocked by Network Firewall
Take extra care to associate a route table with your internet gateway to route private subnet traffic to your firewall endpoints; otherwise, response traffic won’t make it back to your private subnets. Traffic will route from the private subnet up through the NAT gateway in its Availability Zone. The NAT gateway will pass the traffic to the network firewall endpoint in the same Availability Zone, which will process the rules and send allowed traffic to the internet gateway for the VPC. By using this method, you can block outbound network traffic with criteria that are more advanced than what is allowed by network ACLs.
Conclusion
Amazon Route 53 Resolver DNS Firewall and AWS Network Firewall help you protect your VPC workloads by inspecting network traffic and applying deep packet inspection rules to block unwanted traffic. This post focused on implementing Network Firewall in a virtual desktop workload that spans multiple Availability Zones. You’ve seen how to deploy a network firewall and update your VPC route tables. This solution can help increase the security of your workloads in AWS. If you have multiple VPCs to protect, consider enforcing your policies at scale by using AWS Firewall Manager, as outlined in this blog post.
If you have feedback about this post, submit comments in the Comments section below. If you have questions about this post, start a new thread on the AWS Network Firewall forum or contact AWS Support.
Want more AWS Security how-to content, news, and feature announcements? Follow us on Twitter.
You may have requirements to leverage on-premises firewall technology in AWS by using your existing firewall implementation. As you move these workloads to AWS or launch new ones, you may replicate your existing on-premises firewall architecture. In this case, you can run partner appliances such as Palo Alto and Fortinet firewall appliances on Amazon EC2 instances.
Ensure that the firewall and intrusion prevention system (IPS) rules that protect your on-premises data center will also protect your Amazon Virtual Private Cloud (VPC). These rules must be frequently updated to ensure protection against the latest security threats. Many enterprises do not want to manage multiple rulesets across their entire hybrid architecture.
AWS Network Firewall takes the responsibility of this undifferentiated heavy lifting by providing a managed service that runs a fleet of firewall appliances, from patching to security updates. It uses the free and open-source intrusion prevention system (IPS), Suricata, for stateful inspection. Suricata is a network threat detection engine capable of real-time intrusion detection (IDS). It also provides inline intrusion prevention (IPS), network security monitoring (NSM), and offline packet capture processing. Customers can now import their existing IPS rules from their firewall provider software that adheres to the open source Suricata standard. This enables a network security model for your hybrid architecture that minimizes operational overhead while achieving consistent protection.
Overview of AWS services used
The following are AWS services that are used in our solution. These are the fundamental building blocks of a hybrid architecture on AWS.
AWS Network Firewall (ANFW): a stateful, managed, network firewall and intrusion detection and prevention service. You can filter network traffic at your VPC using AWS Network Firewall. AWS Network Firewall pricing is based on the number of firewalls deployed and the amount of traffic inspected. There are no upfront commitments, and you pay only for what you use.
AWS Transit Gateway (TGW): a network transit hub that you use to interconnect your virtual private clouds (VPCs) and on-premises networks. Transit Gateway enables customers to connect thousands of VPCs. You can attach all your hybrid connectivity (VPN and Direct Connect connections) to a single Transit Gateway. This enables you to consolidate and control your organization’s entire AWS routing configuration in one place.
Hybrid architecture with centralized network inspection
The example architecture in Figure 1 depicts the deployment model of a centralized network security architecture. It shows all inbound and outbound traffic flowing through a single VPC for inspection. The centralized inspection architecture incorporates the use of AWS Network Firewall deployed in an inspection VPC. All traffic is routed from other VPCs through AWS Transit Gateway (TGW). The threat intelligence rulesets are managed by a partner integration solution and can be automatically imported into AWS Network Firewall. This will allow you to use the same ruleset that is deployed on-premises. It will reduce inconsistent and manual processes to maintain and update the rules.
Figure 1. Centralized inspection architecture with AWS Network Firewall and imported rules
The partner integration with AWS Network Firewall (ANFW) will work for both a centralized and distributed inspection architecture. The AWS Network Firewall service will house the rulesets, and you only need to deploy a Firewall endpoint in the Availability Zone of your VPC. In the centralized architecture deployment, all traffic originating from the attached VPCs is routed to the TGW. On the TGW route table, all traffic is routed to the inspection VPC attachment ID. The route table associated to the subnet where the TGW ENI is created in the inspection VPC will have a default route via the ANFW endpoint and return traffic from the ANFW endpoint is routed back to the TGW. If your VPC Firewall endpoint is being deployed across multiple Availability Zones (AZ), use the TGW appliance mode to allow traffic flow symmetry. This will ensure that return traffic is processed by the same AZ. For further details on how to set up your network routing, reference the Deployment models for AWS Network Firewall blog post.
If you are already a user of Trend Micro for your threat intelligence, you can leverage this deployment model to standardize your hybrid cloud security. Trend Micro enables you to deploy your AWS managed network infrastructure and pair it with a partner-supported threat intelligence. This focuses on detecting and disrupting malware in your environments. You just need to enable the Sharing capability on Trend Micro Cloud One. For further information, see these detailed instructions.
For existing users of Fortinet that are using their managed IPS rulesets, you can automatically deploy updated IPS rule sets to AWS Network Firewall. This will ensure consistent protection across your applications landscape. For more details on this integration, visit the partner page.
Getting started with AWS Firewall
You can get started with this pattern through the following high-level steps with link to detailed instructions along the way.
Determine your current networking architecture and cross reference it with the different deployment models supported by AWS Network Firewall. You can learn more about your different options in the blog Deployment models for AWS Network Firewall. The deployment model will determine how you set up your route tables and where you will deploy your AWS Network Firewall endpoint.
Visit the AWS Network Firewall Partners page to confirm your provider’s integration with ANFW and follow the integration instructions from the partner’s documentation.
Get started with AWS Network Firewall by visiting the Amazon VPC Console to create or import your firewall rules. You can group them into policies and apply them to the VPCs you want to protect per the developer guide.
You may need to operate a hybrid architecture using the same firewall and IPS rules for both your on-premises and cloud networks. For implementing these rules in the cloud, you can run partner firewall appliances on EC2 instances. This model of operation requires some heavy lifting.
Instead, you can set up AWS Network Firewall quickly, and not worry about deploying and managing any infrastructure. AWS Network Firewall automatically scales with your organizations’ network traffic. AWS provides a flexible rules engine that enables you to define firewall rules to control this traffic. To simplify how organizations determine what rules to define, Fortinet and Trend Micro have made managed rulesets available through AWS Marketplace offerings. These can be deployed to your environment with a few clicks. These partners remove complexity for security teams so they can easily create and maintain rules to take full advantage of the AWS Network Firewall.
The collective thoughts of the interwebz
Manage Consent
To provide the best experiences, we use technologies like cookies to store and/or access device information. Consenting to these technologies will allow us to process data such as browsing behavior or unique IDs on this site. Not consenting or withdrawing consent, may adversely affect certain features and functions.
Functional
Always active
The technical storage or access is strictly necessary for the legitimate purpose of enabling the use of a specific service explicitly requested by the subscriber or user, or for the sole purpose of carrying out the transmission of a communication over an electronic communications network.
Preferences
The technical storage or access is necessary for the legitimate purpose of storing preferences that are not requested by the subscriber or user.
Statistics
The technical storage or access that is used exclusively for statistical purposes.The technical storage or access that is used exclusively for anonymous statistical purposes. Without a subpoena, voluntary compliance on the part of your Internet Service Provider, or additional records from a third party, information stored or retrieved for this purpose alone cannot usually be used to identify you.
Marketing
The technical storage or access is required to create user profiles to send advertising, or to track the user on a website or across several websites for similar marketing purposes.