Hey web developers! We are about to shake things up a bit here at Cloudflare and wanted to give you a heads-up, so that you know what we are doing and where we are going. You might know Cloudflare as one of the best places to come to when you need to protect, speed up, or scale your web application, but increasingly Cloudflare is also becoming the best place to deploy and run your application!
Why deploy your application to Cloudflare? Two simple reasons. First, it removes lots of hassle of managing many separate systems and allows you to develop, deploy, monitor, and tune your application all in one place. Second, by deploying to Cloudflare directly, there is so much more we can do to optimize your application and get it to the hands, ears, or eyes of your users more quickly and smoothly.
So what’s changing? Quite a bit, actually. I’m not going to bore you with rehashing all the details as my most-awesome colleagues have written separate blog posts with all the details, but here is a high level rundown.
Cloudflare Workers + Pages = awesome development platform
Cloudflare Pages and Workers are merging into a single unified development and application hosting platform that offers:
Standards-based JavaScript and WASM runtime that already serves over 10 million requests per second at peak globally.
Access to powerful features like R2 (object storage with an S3-compatible API), low-latency globally replicated KV storage, Queues, D1 database, and many more.
Support for GitOps and CI/CD workflows and preview environments to boost development velocity.
… and so much more.
While mathematically proven to be wrong, we stubbornly believe that 1+1=3, and in this case this translates to Cloudflare Pages + Workers = way more than the sum of the parts. In fact, it’s an awesome foundation for one of a kind development platform that we are thrilled to be building for you.
We started this product convergence journey a few quarters ago, and early on agreed upon not leaving any of the existing applications behind. Instead, we’ll be bringing them over to this new world. Today we are ready to start sharing the incremental results, with so much more to come over the upcoming quarters. Want to know more? My colleague Nevi posted lots of spicy details in her blog post.
Smart Placement for Workers takes us beyond the edge!
Smart placement is, to put it simply, revolutionary for Cloudflare. It enables a new compute paradigm on our platform, unmatched by any other application hosting providers today. Do you have a typical full-stack application built with one of the many popular web frameworks? This feature is for you! And it works with both Workers and Pages!
While previously we always executed all applications at the “edge” of our global network — meaning, as close to the user as possible. With smart placement, we intelligently determine the best location within our network where the compute (your application) should run. We do this by observing your application’s behavior and what other network resources or endpoints the application interacts with. We then transparently spawn your application at an optimal location, usually close to where your data is stored, and route the incoming requests via our network to this location.
Smart placement enables applications to run near to the data these applications need to get stuff done. This is especially powerful for applications that interact with databases, object stores, or other backend endpoints, especially if these are centralized and not globally distributed.
Your user or clients requests still enter our lightning fast network in one of our 285+ datacenters in the world, close to their current location, but instead of spawning the application right there, we route the request to the most optimal datacenter, the one that is near the data or backend system the application talks to.
This doesn’t mean that compute at the edge is not cool anymore! It is! There are still many use-cases where running your application at the edge makes sense, and smart placement will determine this scenario and keep the application at the edge if that’s the right place for it to be. A/B testing, localization, asset serving, and others are use-cases that should almost always happen at the edge.
We continue to deliver on our goal to build the best development environment integrated directly into our lightning fast and globally distributed application platform. We’re launching Wrangler v3, with complete support for local-by-default development workflow. Powered by the open-source Cloudflare Workers JavaScript runtime — workerd, this change reduces development server startup time by 10x and script reload times by 60x — boosting your productivity and keeping you in the flow longer.
In the dashboard, we're introducing an upgraded and far more powerful online editor powered by VSCode – you can now finally edit multiple JavaScript modules in your browser, get an accurate edge preview of your code, friendly error pages, and type checking!
Finally, in both our dashboard editor and Wrangler, we've updated our workerd-customized Chrome DevTools to the latest version, providing even greater debugging and profiling capabilities, wherever you choose to work.
This is just the first wave of improvements to our development tooling space, you’ll see us iterating in this space over the next few quarters, but in the meantime, check out in-depth posts from Adam, Brendan, and Samuel with all the Wrangler v3 details and VSCode and dash editor improvements.
Increased memory, CPU, and application size limits and simplified pricing!
In the age of AI, WASM, and powerful full-stack applications, we’ve noticed that developers are hitting our current resource limits with increased frequency. We want to be a place where these applications thrive and developers are empowered to build bigger and more sophisticated applications. Therefore, within the next week we’ll be increasing application size limits (JavaScript/WASM bundle size) to 10MB (after gzip) and startup latency limit (script compile time) is being increased from 200ms to 400ms.
To further empower developers, we’re thinking about how to unify and simplify our billing model to make our pricing more straightforward, and increase limits such as memory limits by introducing tiers. Stay tuned for more information on these!
With these changes developers can build cooler apps and operate them for less! Cool, right?!?
Pages CI now with a modern build image!
The wait is finally over! Pages now use a modern build image to power the CI and integrated build system. With this improvement you can finally use recent versions of Node.js, pnpm, and many other tools used by developers today.
While delivering this improvement, we made it much easier for us to keep things up to date in the future, but also unlocked new features like build caching!
The updates are available to all new projects by default, while existing projects can opt in to newer defaults. Sounds like your cup of coffee? Read on in this blog post by Greg.
Enough already, let’s get started! …with your framework of choice and C3!
In addition to being a CDN, and place to deploy your Worker applications, Cloudflare is now also becoming the best place to run your full-stack web applications. This includes all full-stack web frameworks like Angular, Astro, Next, Nuxt, Qwik, Remix, Solid, Svelte, Vue, and others.
Our overall mission is to help build a better Internet, and my team’s contribution to this mission is to enable developers, but really just about anyone, to go from an idea to a deployed application in no time.
To enable developers to turn their ideas into deployed applications quickly and without any hassle we’ve built two things.
First, we partnered with many web framework authors to build new or improve existing adapters for all the popular JavaScript web frameworks. These adapters ensure that your application runs on our platform in the most efficient way, while having access to all the capabilities and features of our platform.
These adapters include the highly requested Next.js adapter, that we’ve just overhauled to be production ready and are launching 1.0.0 today! In partnership with the respective teams, we’ve built brand-new adapters for Angular, and Qwik, while improving Astro, Nuxt, Solid, and a few others.
Second, we developed a brand new sassy CLI we call C3 — short for create-cloudflare CLI, a sibling to our existing Wrangler CLI. If you are a developer who lives your life in terminal or local editors like VSCode, then this CLI is your single entry-point to the Cloudflare universe.
Run the C3 command, and we’ll get you started. You pick your framework of choice, we hand the control over to the CLI of the chosen framework as we don’t want to stand in between you and the hard-working framework authors that craft the experience for their framework. A minute or so later once all npm dependencies are installed, you get a URL from us with your application deployed. That’s it. From an idea to a URL that you can share with friends almost instantly! Boom.
The best place for your web applications
So to recap, our first class support for full-stack web frameworks, combined with the low latency and cost-effectiveness of our platform, as well as smart placement that allows the backend of the full-stack web application to run in the optimal location automagically, and all the remaining significant improvements in our developer tooling, makes Cloudflare THE best place to build and host web applications. This is our contribution to our mission to build a better Internet and push the Web forward.
We aspire to be the place people turn to when they want to get business done, or when they just want to be creative, explore ideas and have fun. It’s a long journey, and we’ve got a lot of interesting challenges ahead of us. Your input will be critical in guiding us. We are all thrilled to have the opportunity to be part of it and give it our best shot. You can join this journey too, and get started today:
For over a year now, we’ve been working to improve the Workers local development experience. Our goal has been to improve parity between users' local and production environments. This is important because it provides developers with a fully-controllable and easy-to-debug local testing environment, which leads to increased developer efficiency and confidence.
To start, we integrated Miniflare, a fully-local simulator for Workers, directly into Wrangler, the Workers CLI. This allowed users to develop locally with Wrangler by running wrangler dev --local. Compared to the wrangler dev default, which relied on remote resources, this represented a significant step forward in local development. As good as it was, it couldn’t leverage the actual Workers runtime, which led to some inconsistencies and behavior mismatches.
Last November, we announced the experimental version of Miniflare v3, powered by the newly open-sourced workerd runtime, the same runtime used by Cloudflare Workers. Since then, we’ve continued to improve upon that experience both in terms of accuracy with the real runtime and in cross-platform compatibility.
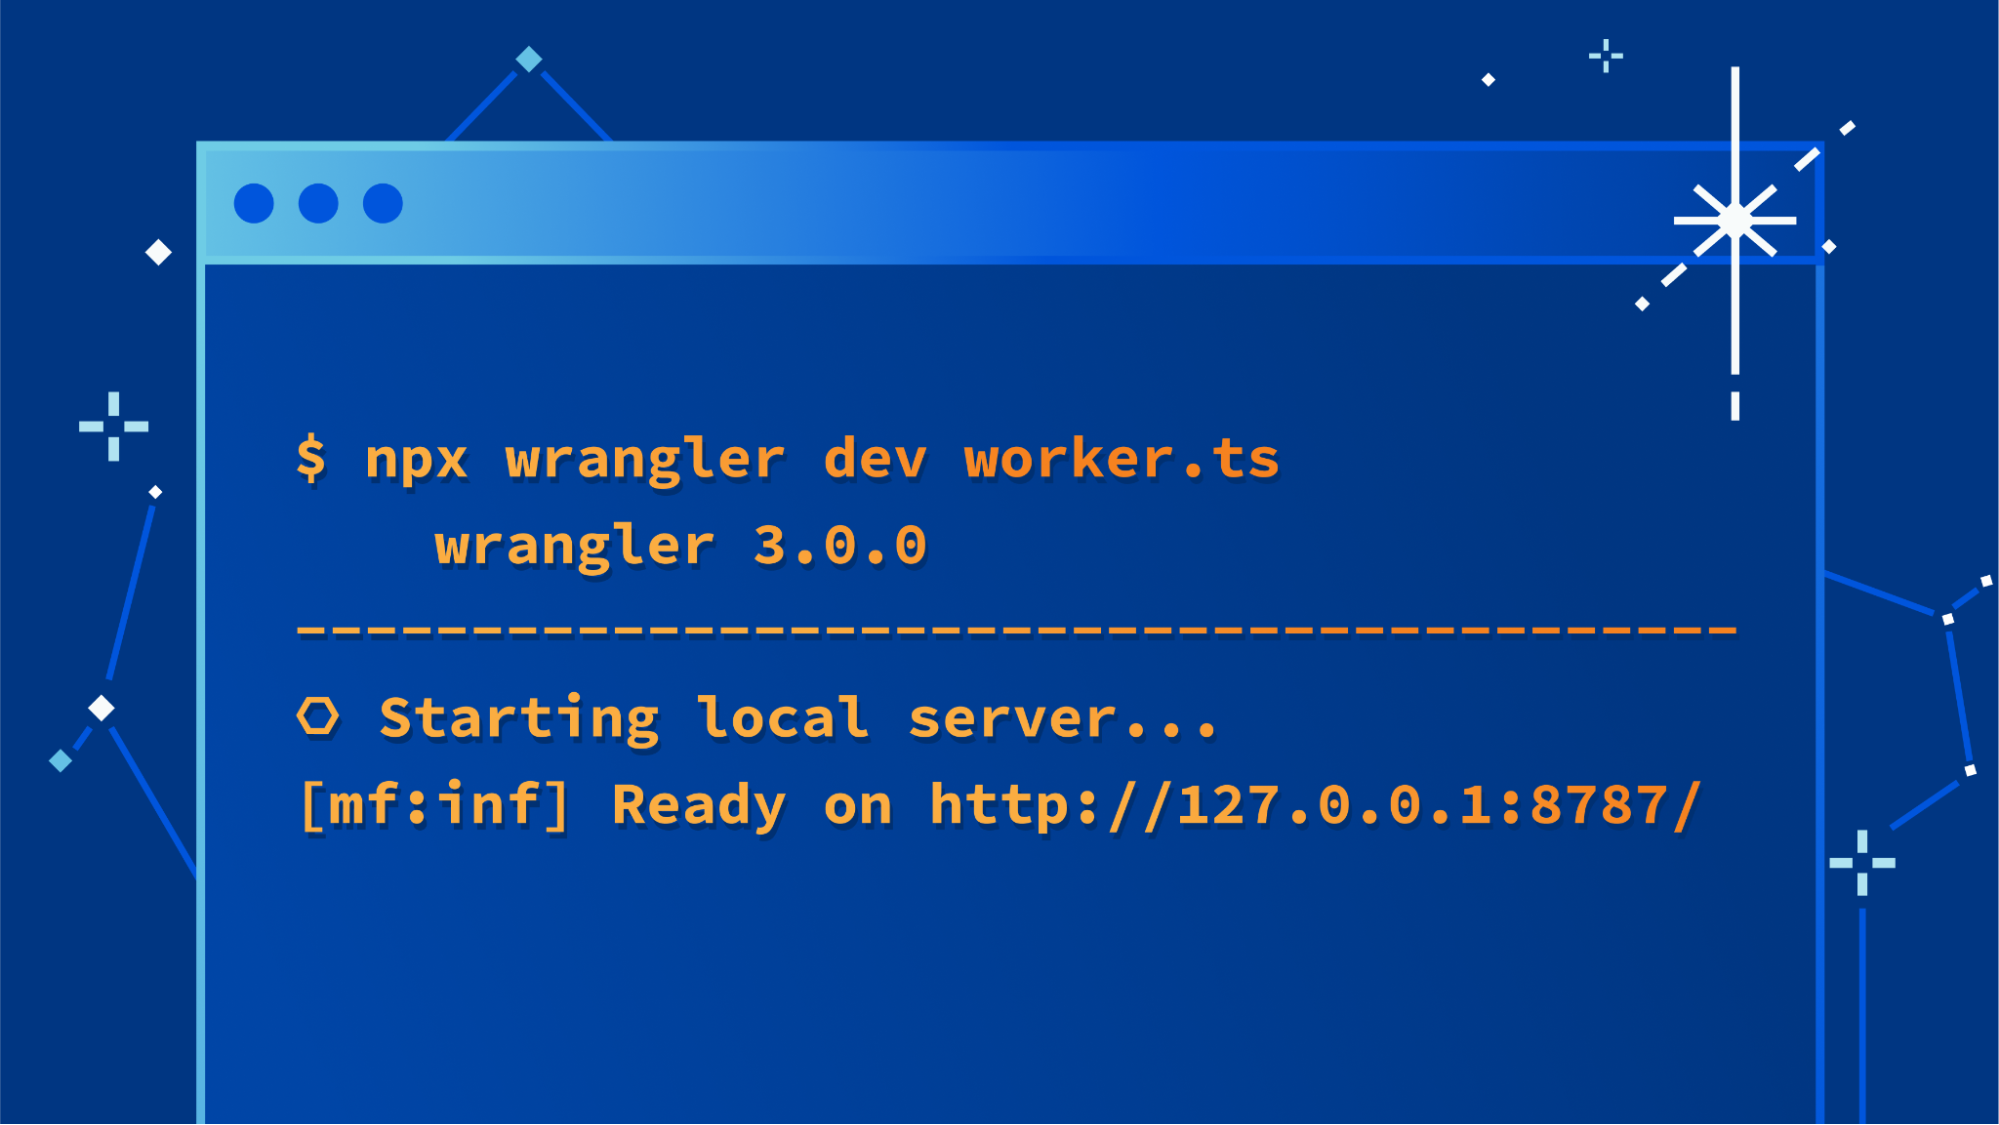
As a result of all this work, we are proud to announce the release of Wrangler v3 – the first version of Wrangler with local-by-default development.
A new default for Wrangler
Starting with Wrangler v3, users running wrangler dev will be leveraging Miniflare v3 to run your Worker locally. This local development environment is effectively as accurate as a production Workers environment, providing an ability for you to test every aspect of your application before deploying. It provides the same runtime and bindings, but has its own simulators for KV, R2, D1, Cache and Queues. Because you’re running everything on your machine, you won’t be billed for operations on KV namespaces or R2 buckets during development, and you can try out paid-features like Durable Objects for free.
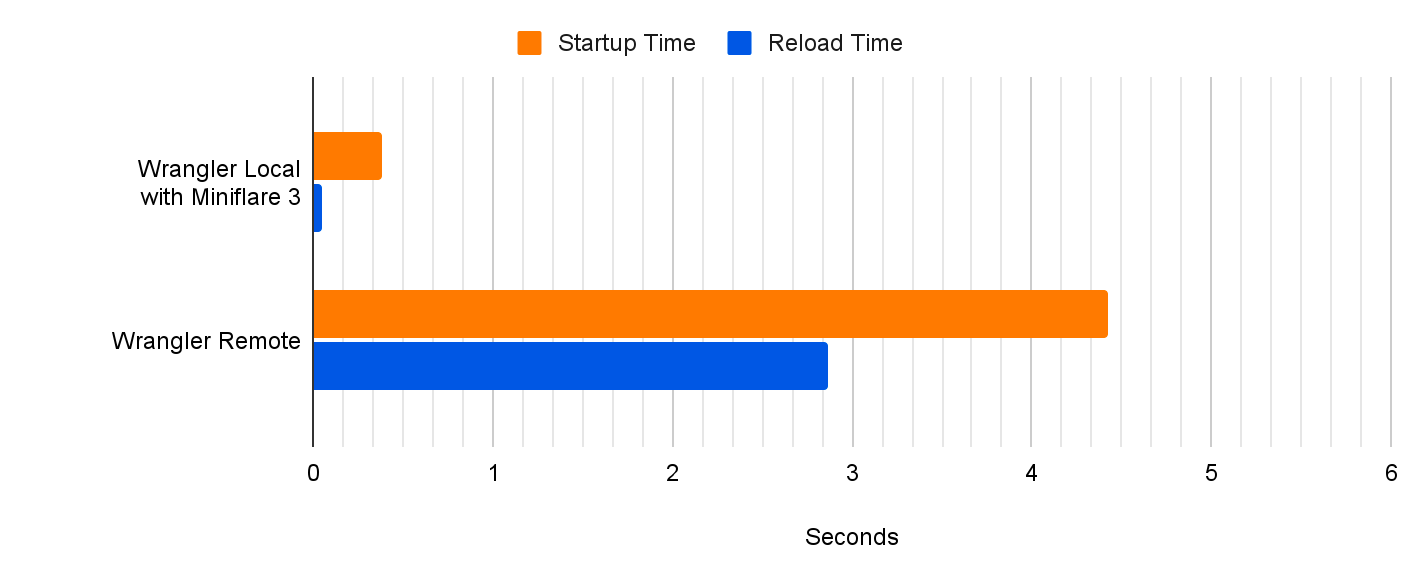
In addition to a more accurate developer experience, you should notice performance differences. Compared to remote mode, we’re seeing a 10x reduction to startup times and 60x reduction to script reload times with the new local-first implementation. This massive reduction in reload times drastically improves developer velocity!
Remote development isn’t going anywhere. We recognise many developers still prefer to test against real data, or want to test Cloudflare services like image resizing that aren’t implemented locally yet. To run wrangler dev on Cloudflare’s network, just like previous versions, use the new --remote flag.
Deprecating Miniflare v2
For users of Miniflare, there are two important pieces of information for those updating from v2 to v3. First, if you’ve been using Miniflare’s CLI directly, you’ll need to switch to wrangler dev. Miniflare v3 no longer includes a CLI. Secondly, if you’re using Miniflare’s API directly, upgrade to miniflare@3 and follow the migration guide.
How we built Miniflare v3
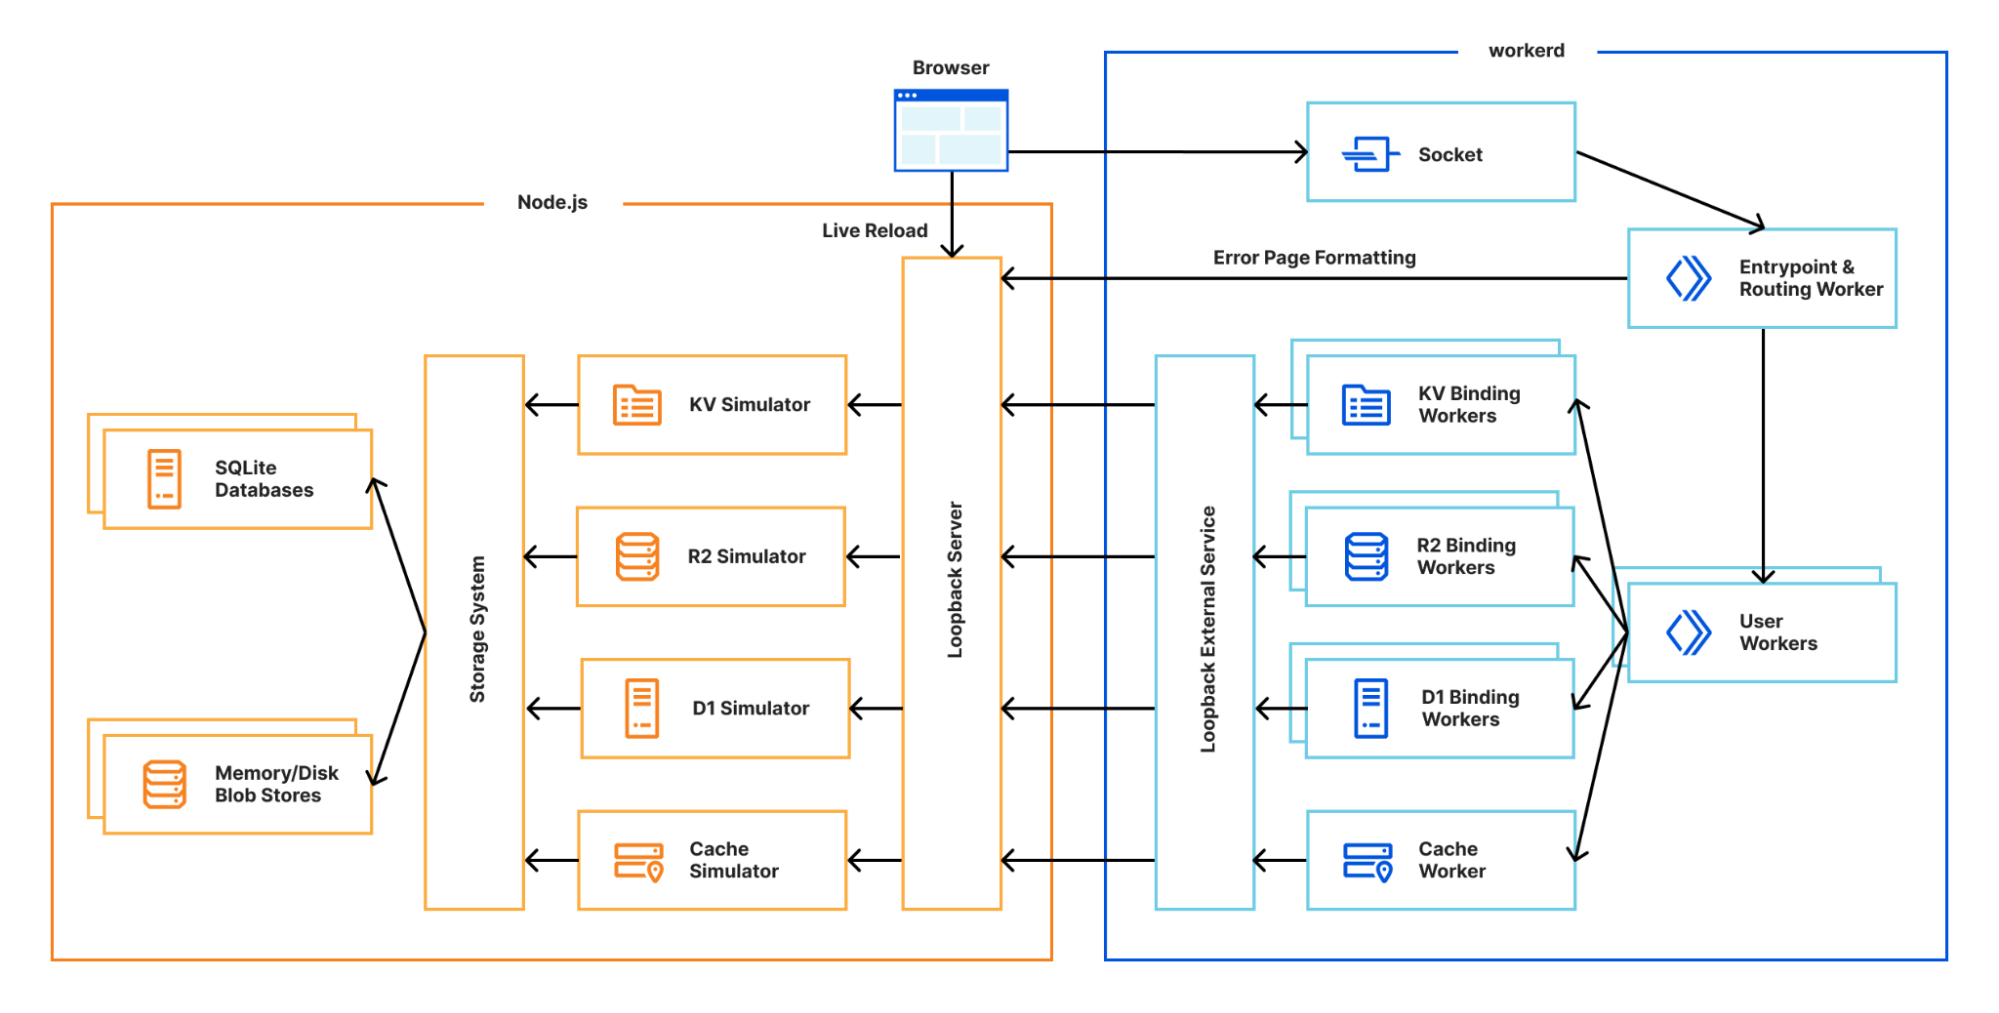
Miniflare v3 is now built using workerd, the open-source Cloudflare Workers runtime. As workerd is a server-first runtime, every configuration defines at least one socket to listen on. Each socket is configured with a service, which can be an external server, disk directory or most importantly for us, a Worker! To start a workerd server running a Worker, create a worker.capnp file as shown below, run npx workerd serve worker.capnp and visit http://localhost:8080 in your browser:
If you’re interested in what else workerd can do, check out the other samples. Whilst workerd provides the runtime and bindings, it doesn’t provide the underlying implementations for the other products in the Developer Platform. This is where Miniflare comes in! It provides simulators for KV, R2, D1, Queues and the Cache API.
Building a flexible storage system
As you can see from the diagram above, most of Miniflare’s job is now providing different interfaces for data storage. In Miniflare v2, we used a custom key-value store to back these, but this had afewlimitations. For Miniflare v3, we’re now using the industry-standard SQLite, with a separate blob store for KV values, R2 objects, and cached responses. Using SQLite gives us much more flexibility in the queries we can run, allowing us to support future unreleased storage solutions. 👀
A separate blob store allows us to provide efficient, ranged, streamed access to data. Blobs have unguessable identifiers, can be deleted, but are otherwise immutable. These properties make it possible to perform atomic updates with the SQLite database. No other operations can interact with the blob until it's committed to SQLite, because the ID is not guessable, and we don't allow listing blobs. For more details on the rationale behind this, check out the original GitHub discussion.
Running unit tests inside Workers
One of Miniflare’s primary goals is to provide a great local testing experience. Miniflare v2 provided custom environments for popular Node.js testing frameworks that allowed you to run your tests inside the Miniflare sandbox. This meant you could import and call any function using Workers runtime APIs in your tests. You weren’t restricted to integration tests that just send and receive HTTP requests. In addition, these environments provide per-test isolated storage, automatically undoing any changes made at the end of each test.
In Miniflare v2, these environments were relatively simple to implement. We’d already reimplemented Workers Runtime APIs in a Node.js environment, and could inject them using Jest and Vitest’s APIs into the global scope.
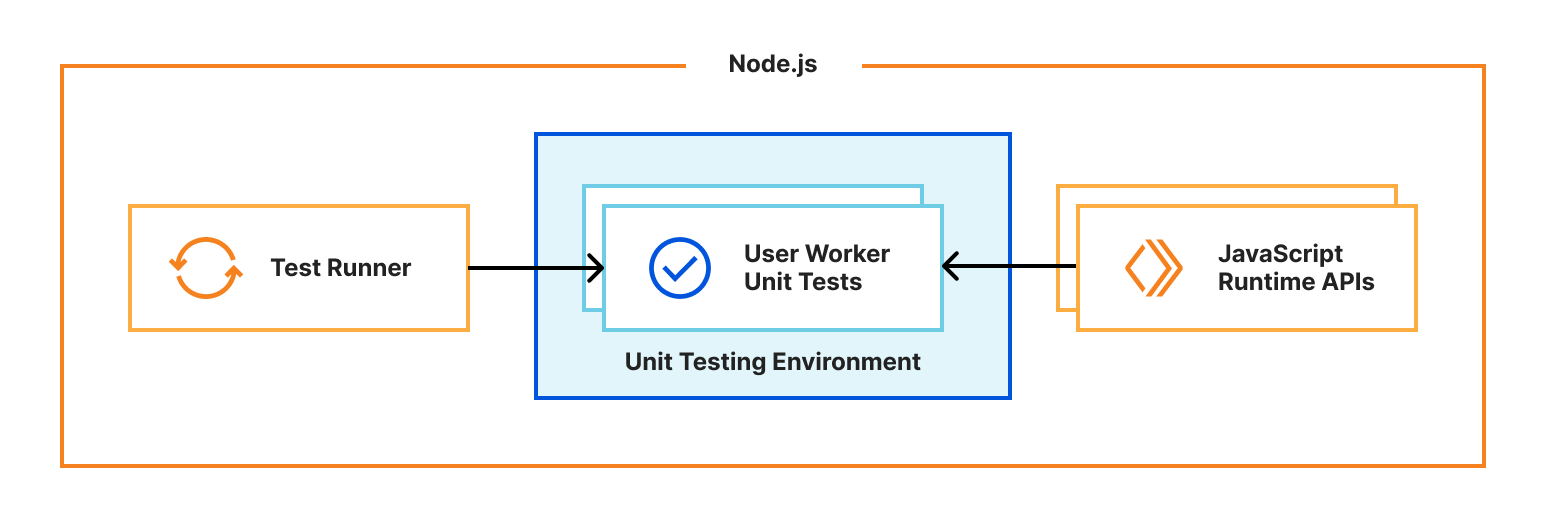
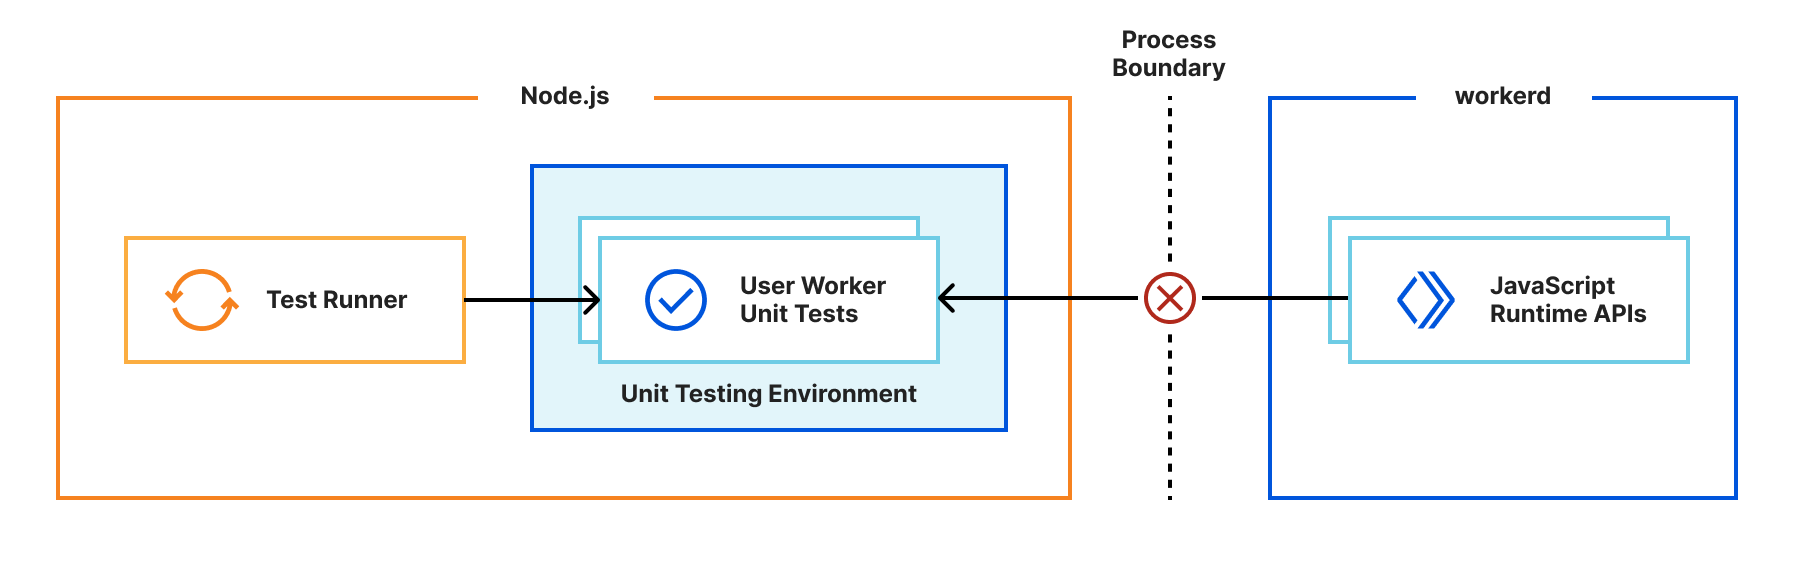
For Miniflare v3, this is much trickier. The runtime APIs are implemented in a separate workerd process, and you can’t reference JavaScript classes across a process boundary. So we needed a new approach…
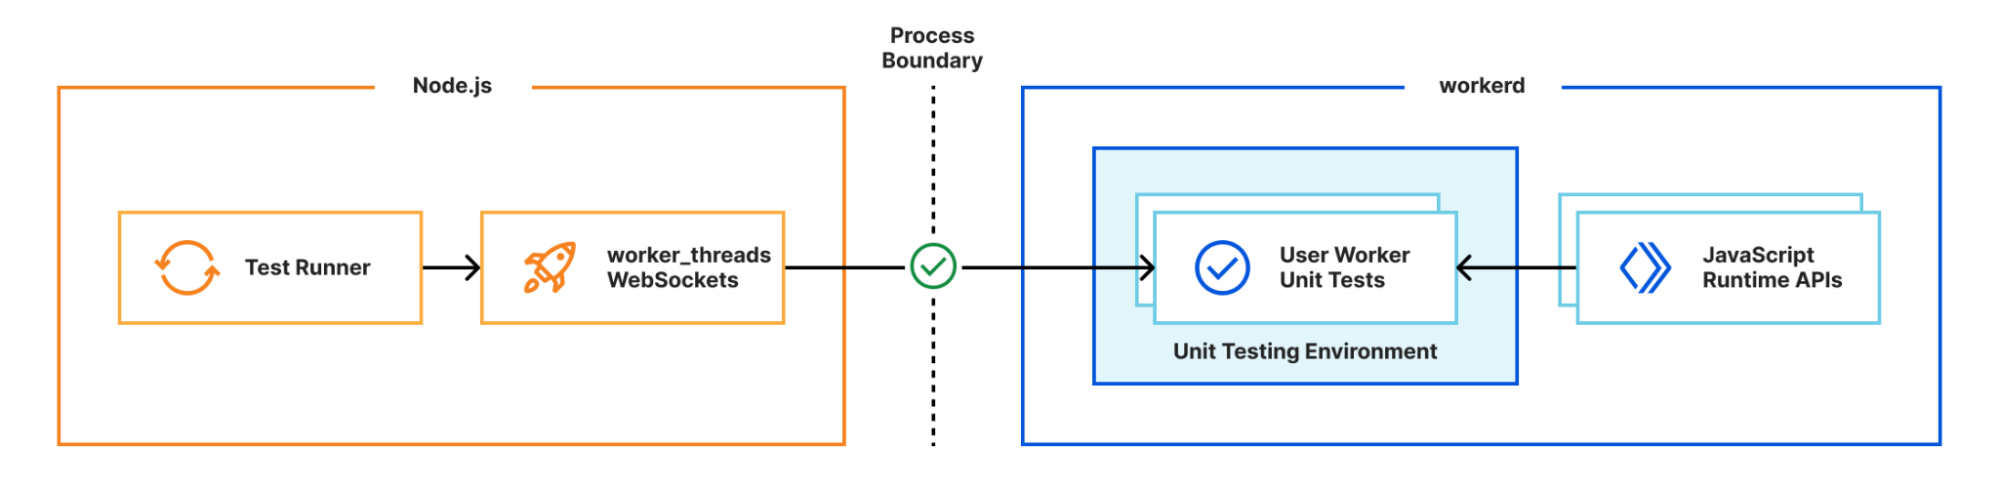
Many test frameworks like Vitest use Node’s built-in worker_threads module for running tests in parallel. This module spawns new operating system threads running Node.js and provides a MessageChannel interface for communicating between them. What if instead of spawning a new OS thread, we spawned a new workerd process, and used WebSockets for communication between the Node.js host process and the workerd “thread”?
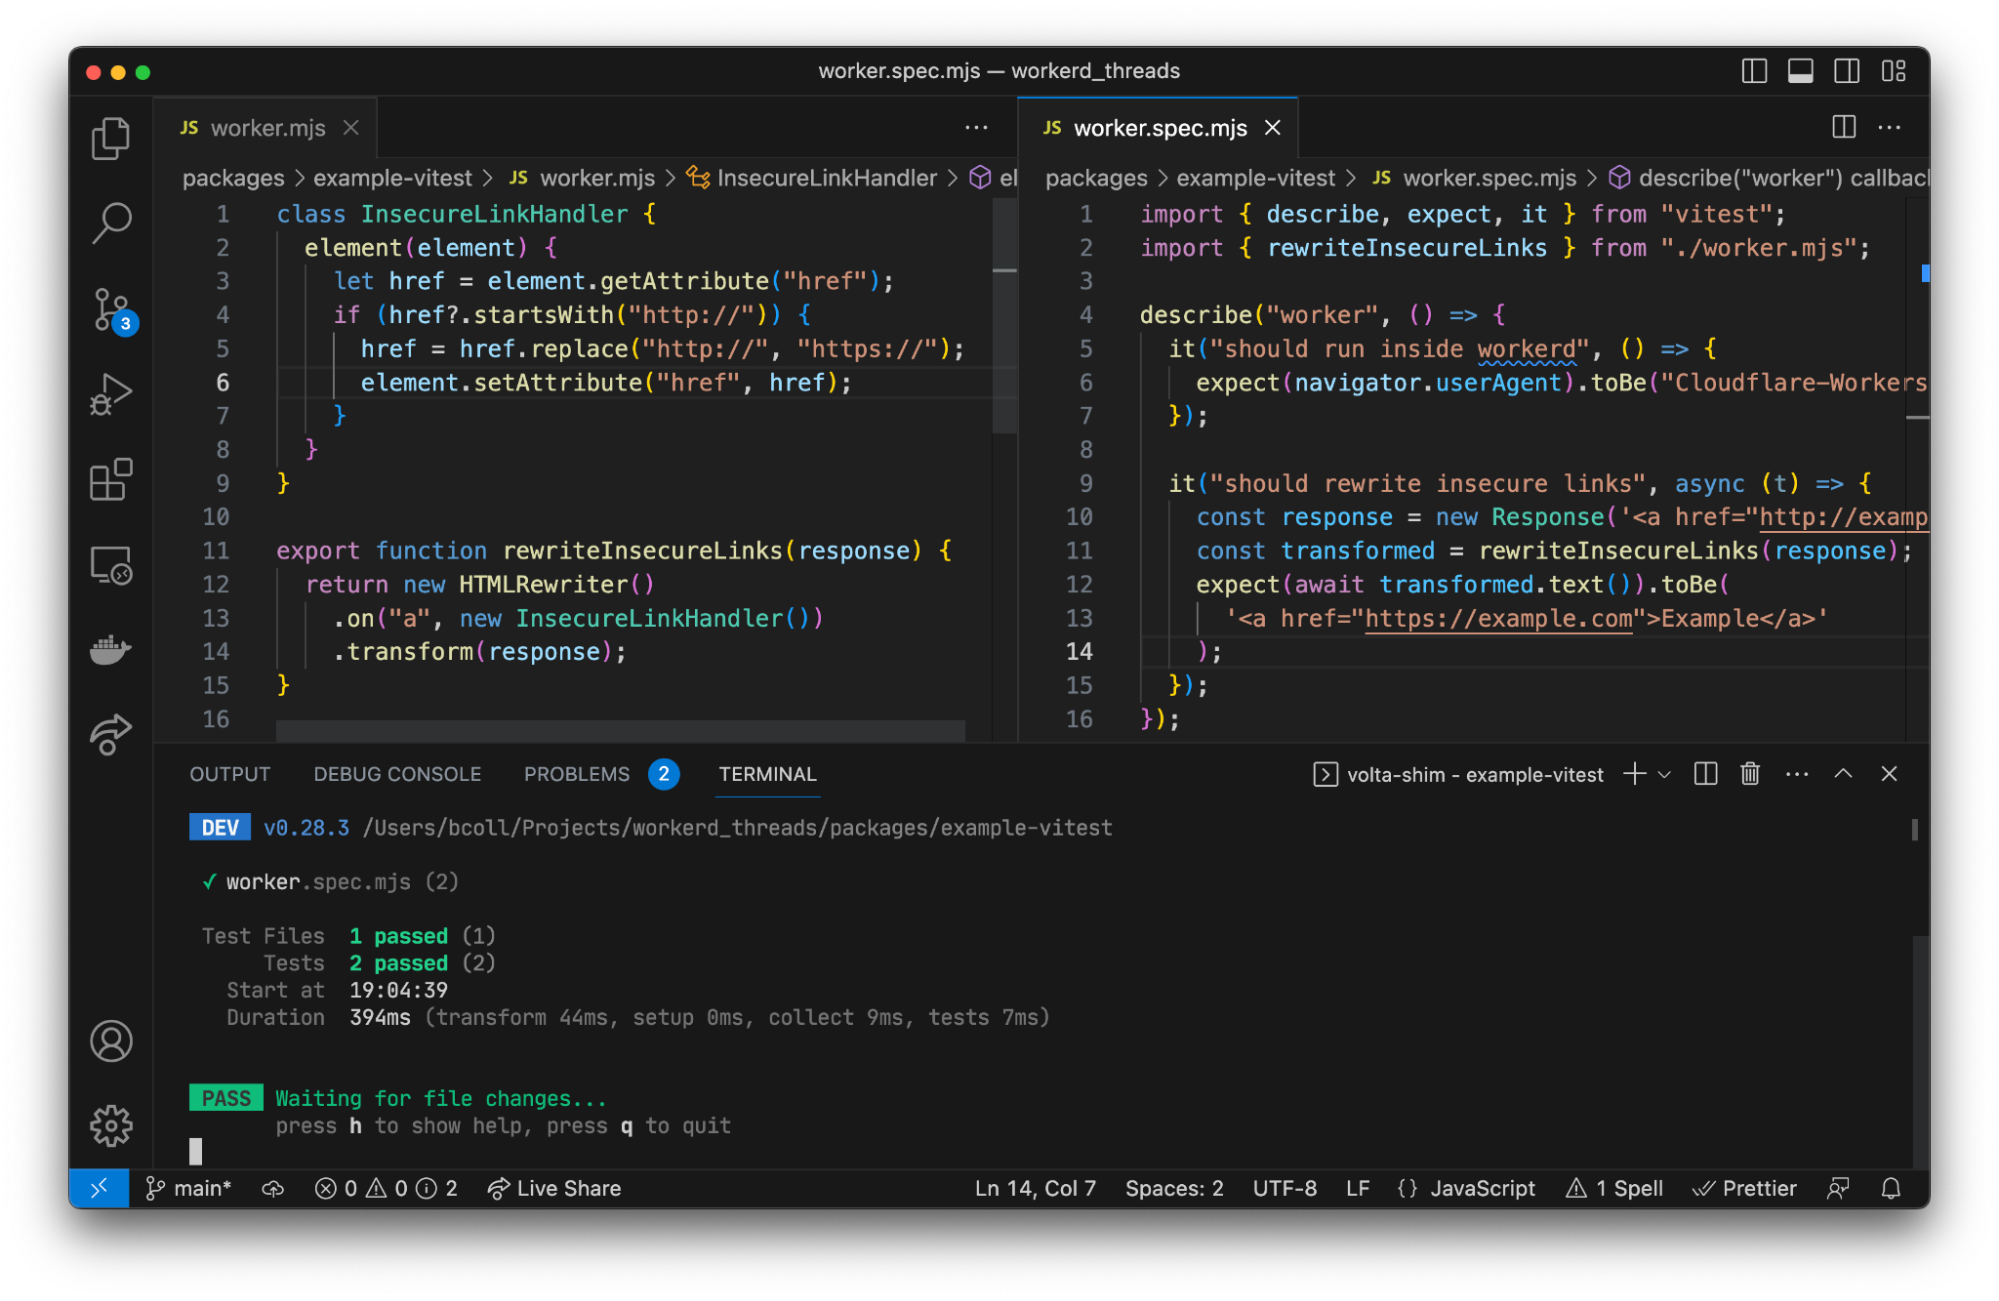
We have a proof of concept using Vitest showing this approach can work in practice. Existing Vitest IDE integrations and the Vitest UI continue to work without any additional work. We aren’t quite ready to release this yet, but will be working on improving it over the next few months. Importantly, the workerd “thread” needs access to Node.js built-in modules, which we recently started rolling out support for.
Running on every platform
We want developers to have this great local testing experience, regardless of which operating system they’re using. Before open-sourcing, the Cloudflare Workers runtime was originally only designed to run on Linux. For Miniflare v3, we needed to add support for macOS and Windows too. macOS and Linux are both Unix-based, making porting between them relatively straightforward. Windows on the other hand is an entirely different beast… 😬
The workerd runtime uses KJ, an alternative C++ base library, which is already cross-platform. We’d also migrated to the Bazel build system in preparation for open-sourcing the runtime, which has good Windows support. When compiling our C++ code for Windows, we use LLVM's MSVC-compatible compiler driver clang-cl, as opposed to using Microsoft’s Visual C++ compiler directly. This enables us to use the "same" compiler frontend on Linux, macOS, and Windows, massively reducing the effort required to compile workerd on Windows. Notably, this provides proper support for #pragma once when using symlinked virtual includes produced by Bazel, __atomic_* functions, a standards-compliant preprocessor, GNU statement expressions used by some KJ macros, and understanding of the .c++ extension by default. After switching out unix API calls for their Windows equivalents using #if _WIN32 preprocessor directives, and fixing a bunch of segmentation faults caused by execution order differences, we were finally able to get workerd running on Windows! No WSL or Docker required! 🎉
Let us know what you think!
Wrangler v3 is now generally available! Upgrade by running npm install --save-dev wrangler@3 in your project. Then run npx wrangler dev to try out the new local development experience powered by Miniflare v3 and the open-source Workers runtime. Let us know what you think in the #wrangler channel on the Cloudflare Developers Discord, and please open a GitHub issue if you hit any unexpected behavior.
One of the best feelings as a developer is seeing your idea come to life. You want to move fast and Cloudflare’s developer platform gives you the tools to take your applications from 0 to 100 within minutes.
One thing that we’ve heard slows developers down is the question: “What databases can be used with Workers?”. Developers stumble when it comes to things like finding the databases that Workers can connect to, the right library or driver that's compatible with Workers and translating boilerplate examples to something that can run on our developer platform.
Today we’re announcing Database Integrations – making it seamless to connect to your database of choice on Workers. To start, we’ve added some of the most popular databases that support HTTP connections: Neon, PlanetScale and Supabase with more (like Prisma, Fauna, MongoDB Atlas) to come!
Focus more on code, less on config
Our serverless SQL database, D1, launched in open alpha last year, and we’re continuing to invest in making it production ready (stay tuned for an exciting update later this week!). We also recognize that there are plenty of flavours of databases, and we want developers to have the freedom to select what’s best for them and pair it with our powerful compute offering.
On our second day of this Developer Week 2023, data is in the spotlight. We’re taking huge strides in making it possible and more performant to connect to databases from Workers (spoiler alert!):
Making it possible and performant is just the start, we also want to make connecting to databases painless. Databases have specific protocols, drivers, APIs and vendor specific features that you need to understand in order to get up and running. With Database Integrations, we want to make this process foolproof.
Whether you’re working on your first project or your hundredth project, you should be able to connect to your database of choice with your eyes closed. With Database Integrations, you can spend less time focusing on configuration and more on doing what you love – building your applications!
What does this experience look like?
Discoverability
If you’re starting a project from scratch or want to connect Workers to an existing database, you want to know “What are my options?”.
Workers supports connections to a wide array of database providers over HTTP. With newly released outbound TCP support, the databases that you can connect to on Workers will only grow!
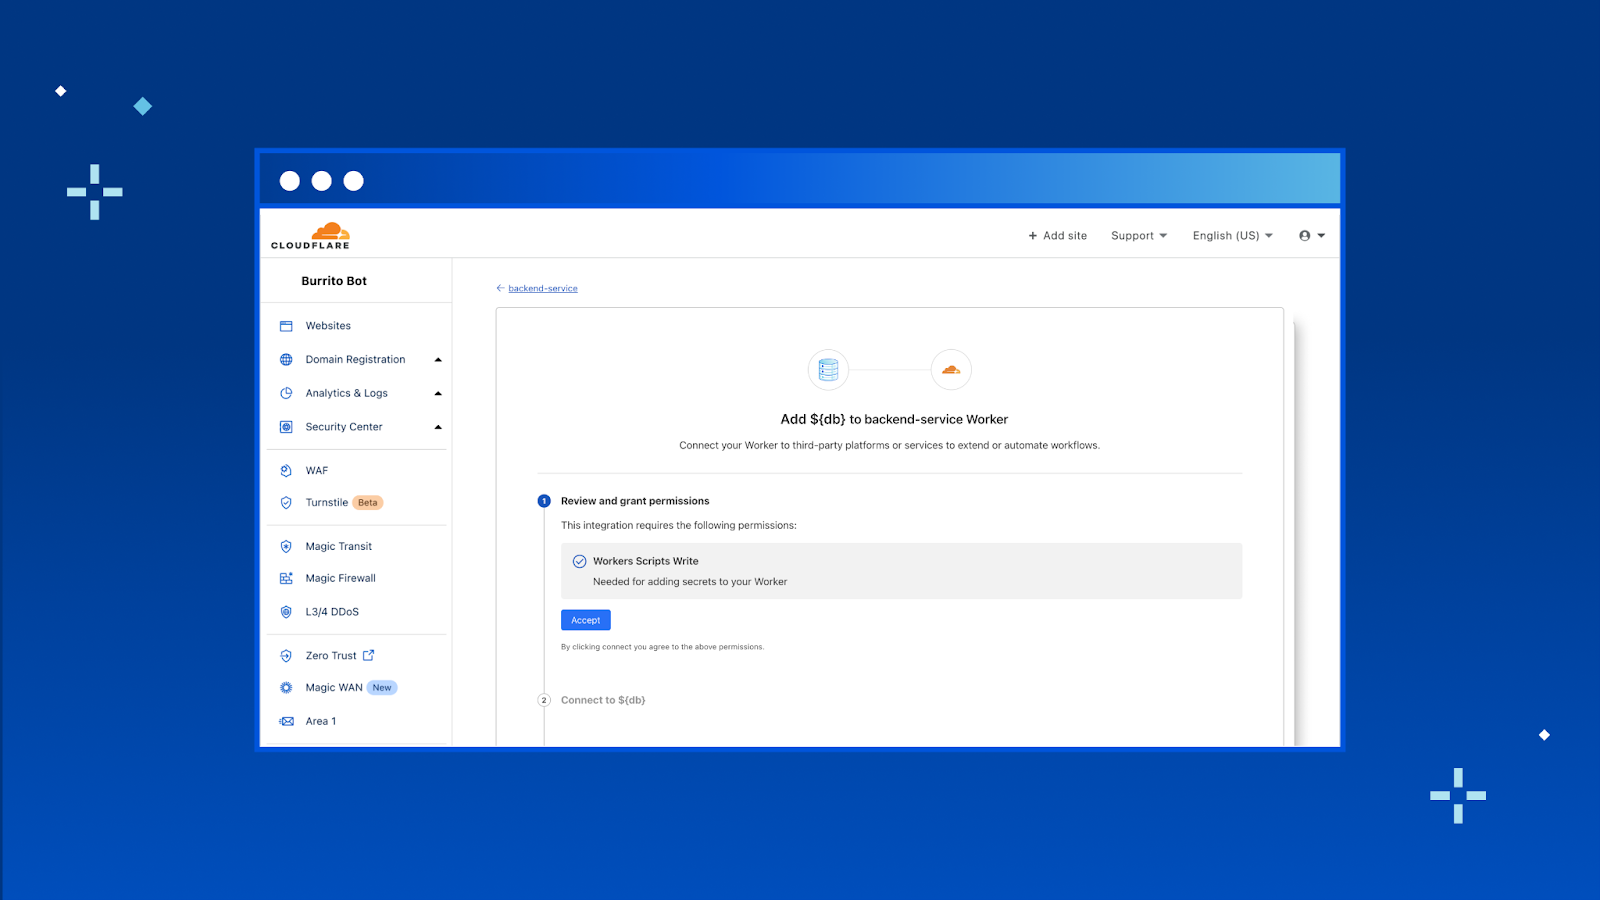
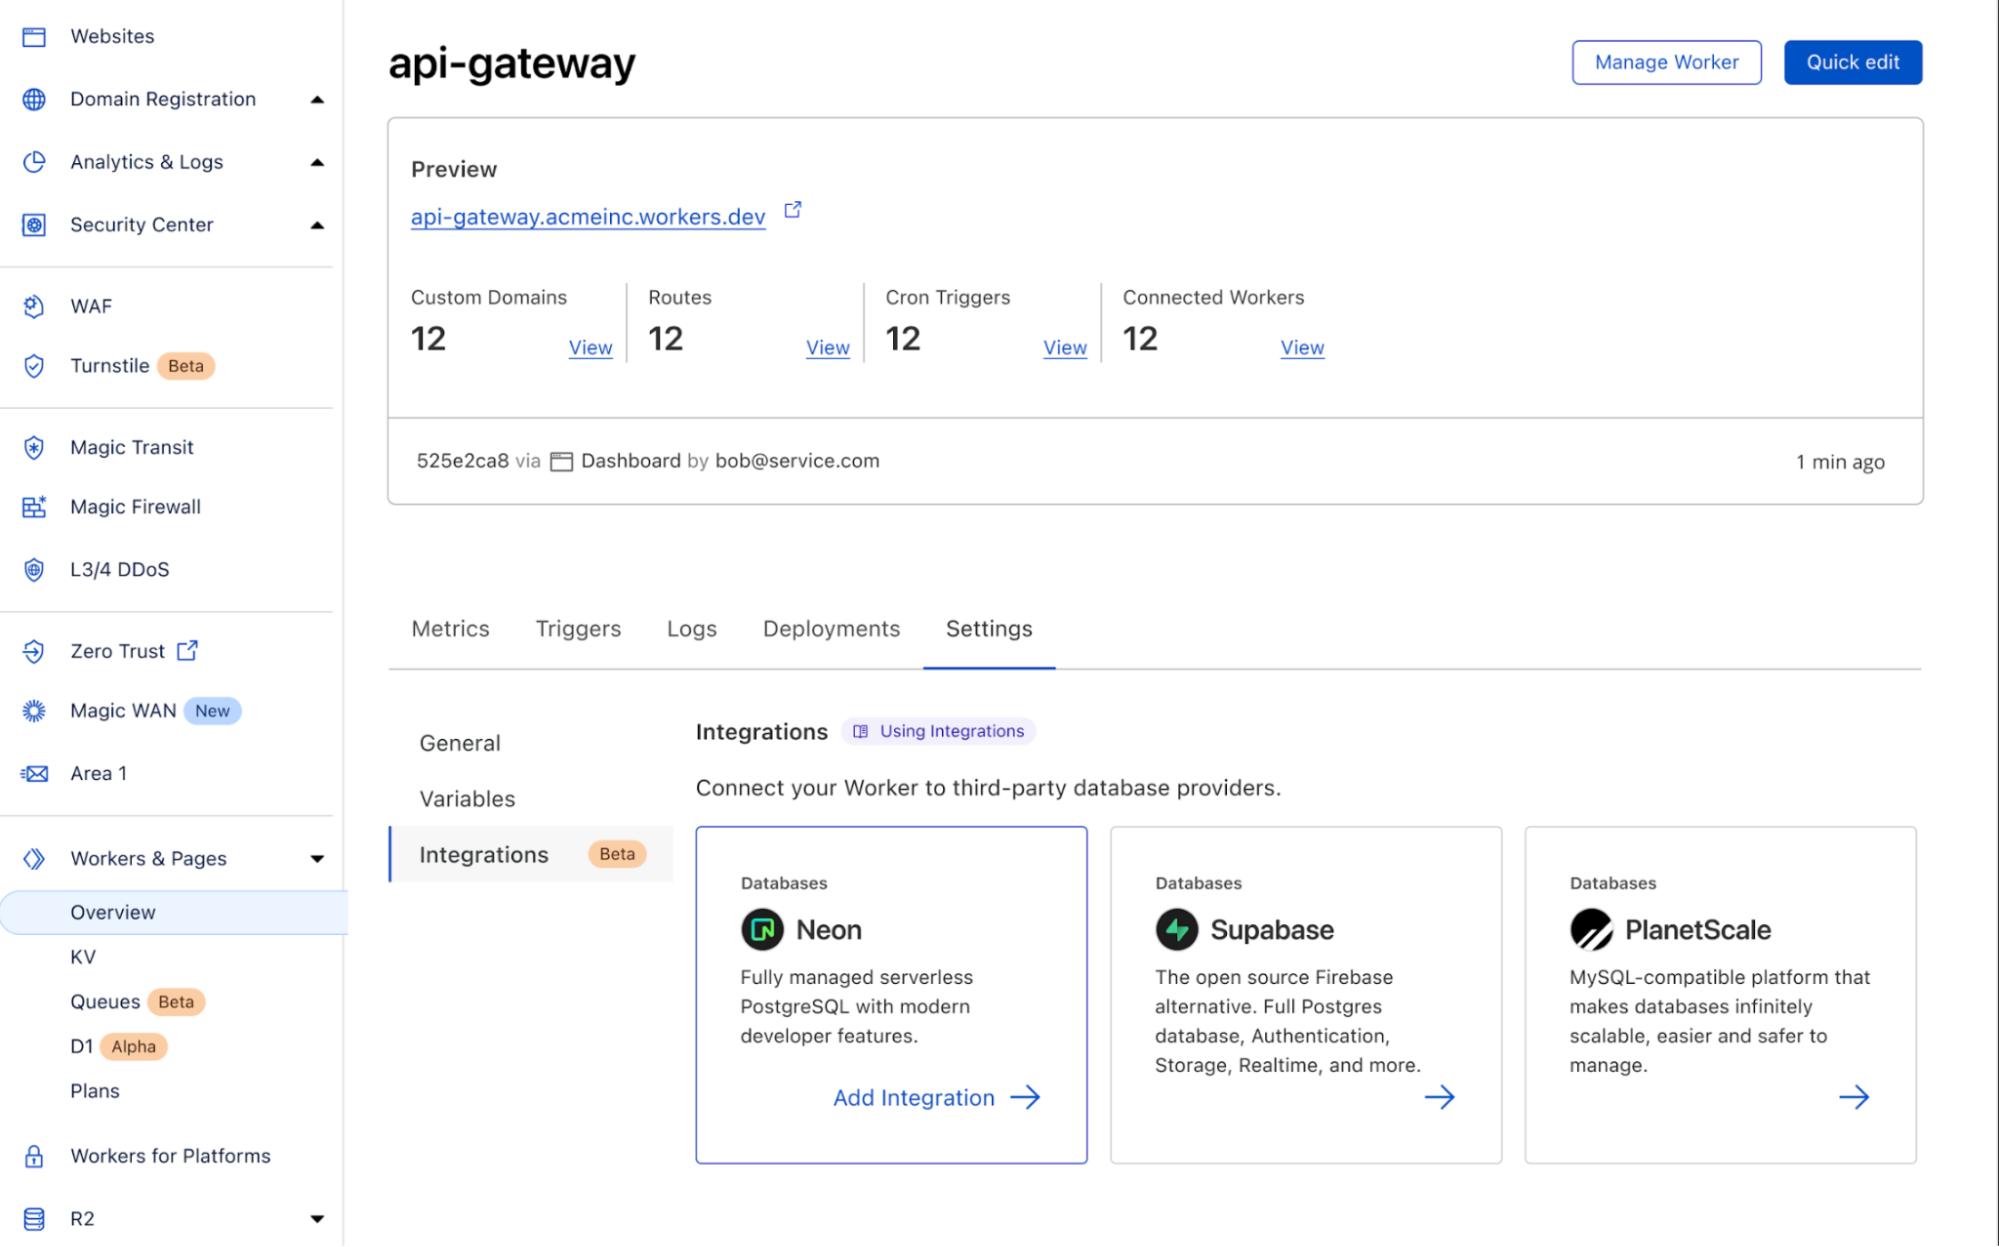
In the new “Integrations” tab, you’ll be able to view all the databases that we support and add the integration to your Worker directly from here. To start, we have support for Neon, PlanetScale and Supabase with many more coming soon.
Authentication
You should never have to copy and paste your database credentials or other parts of the connection string.
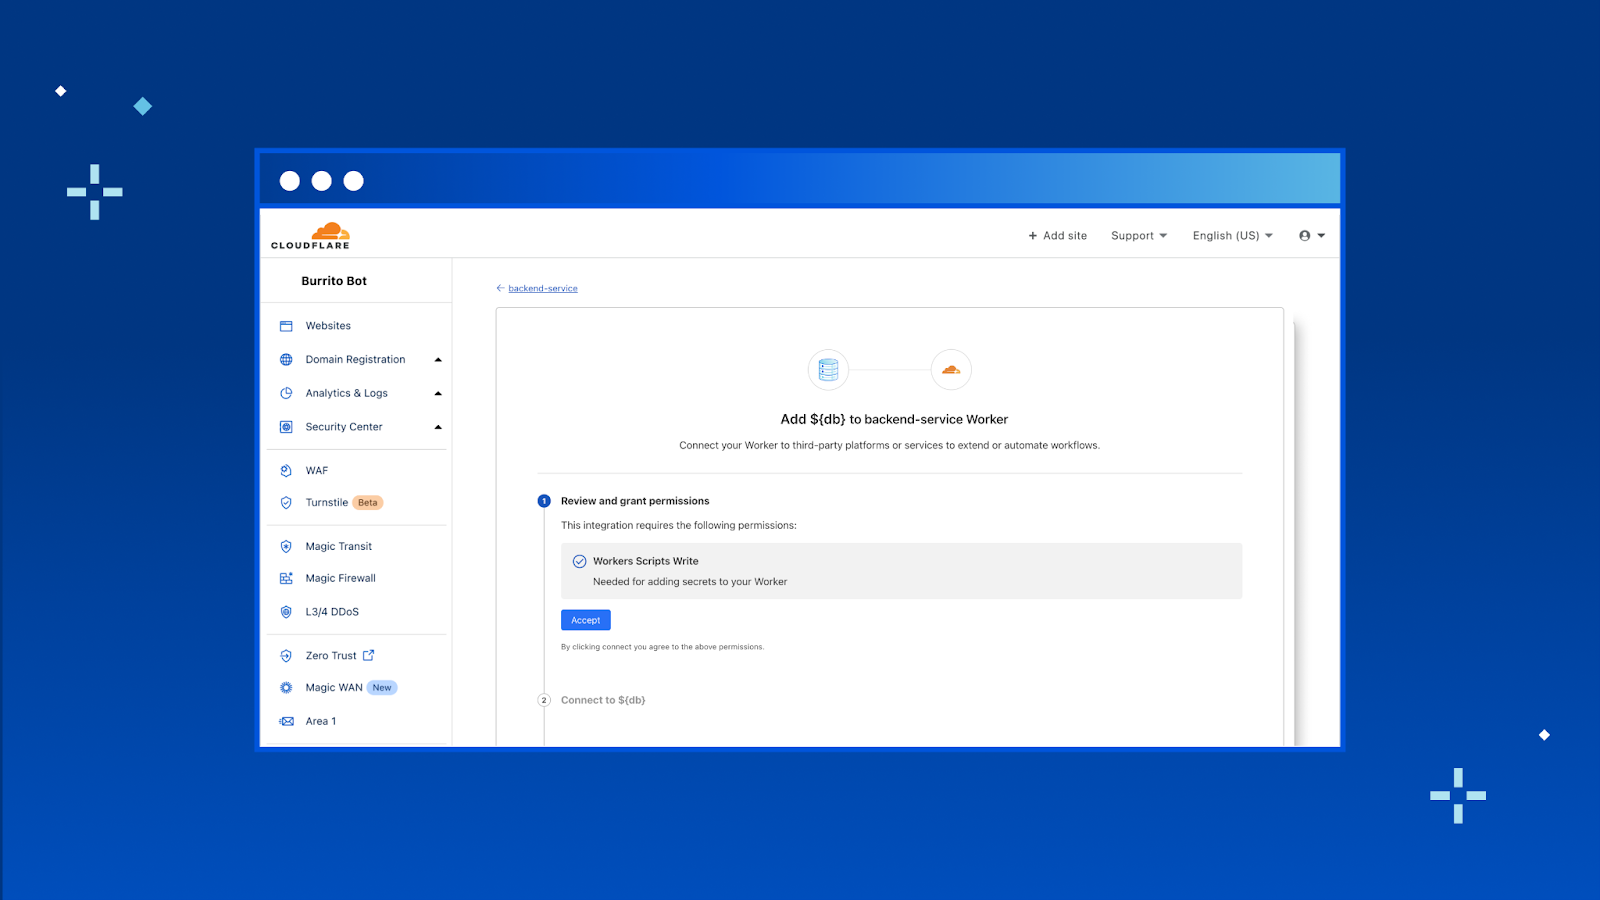
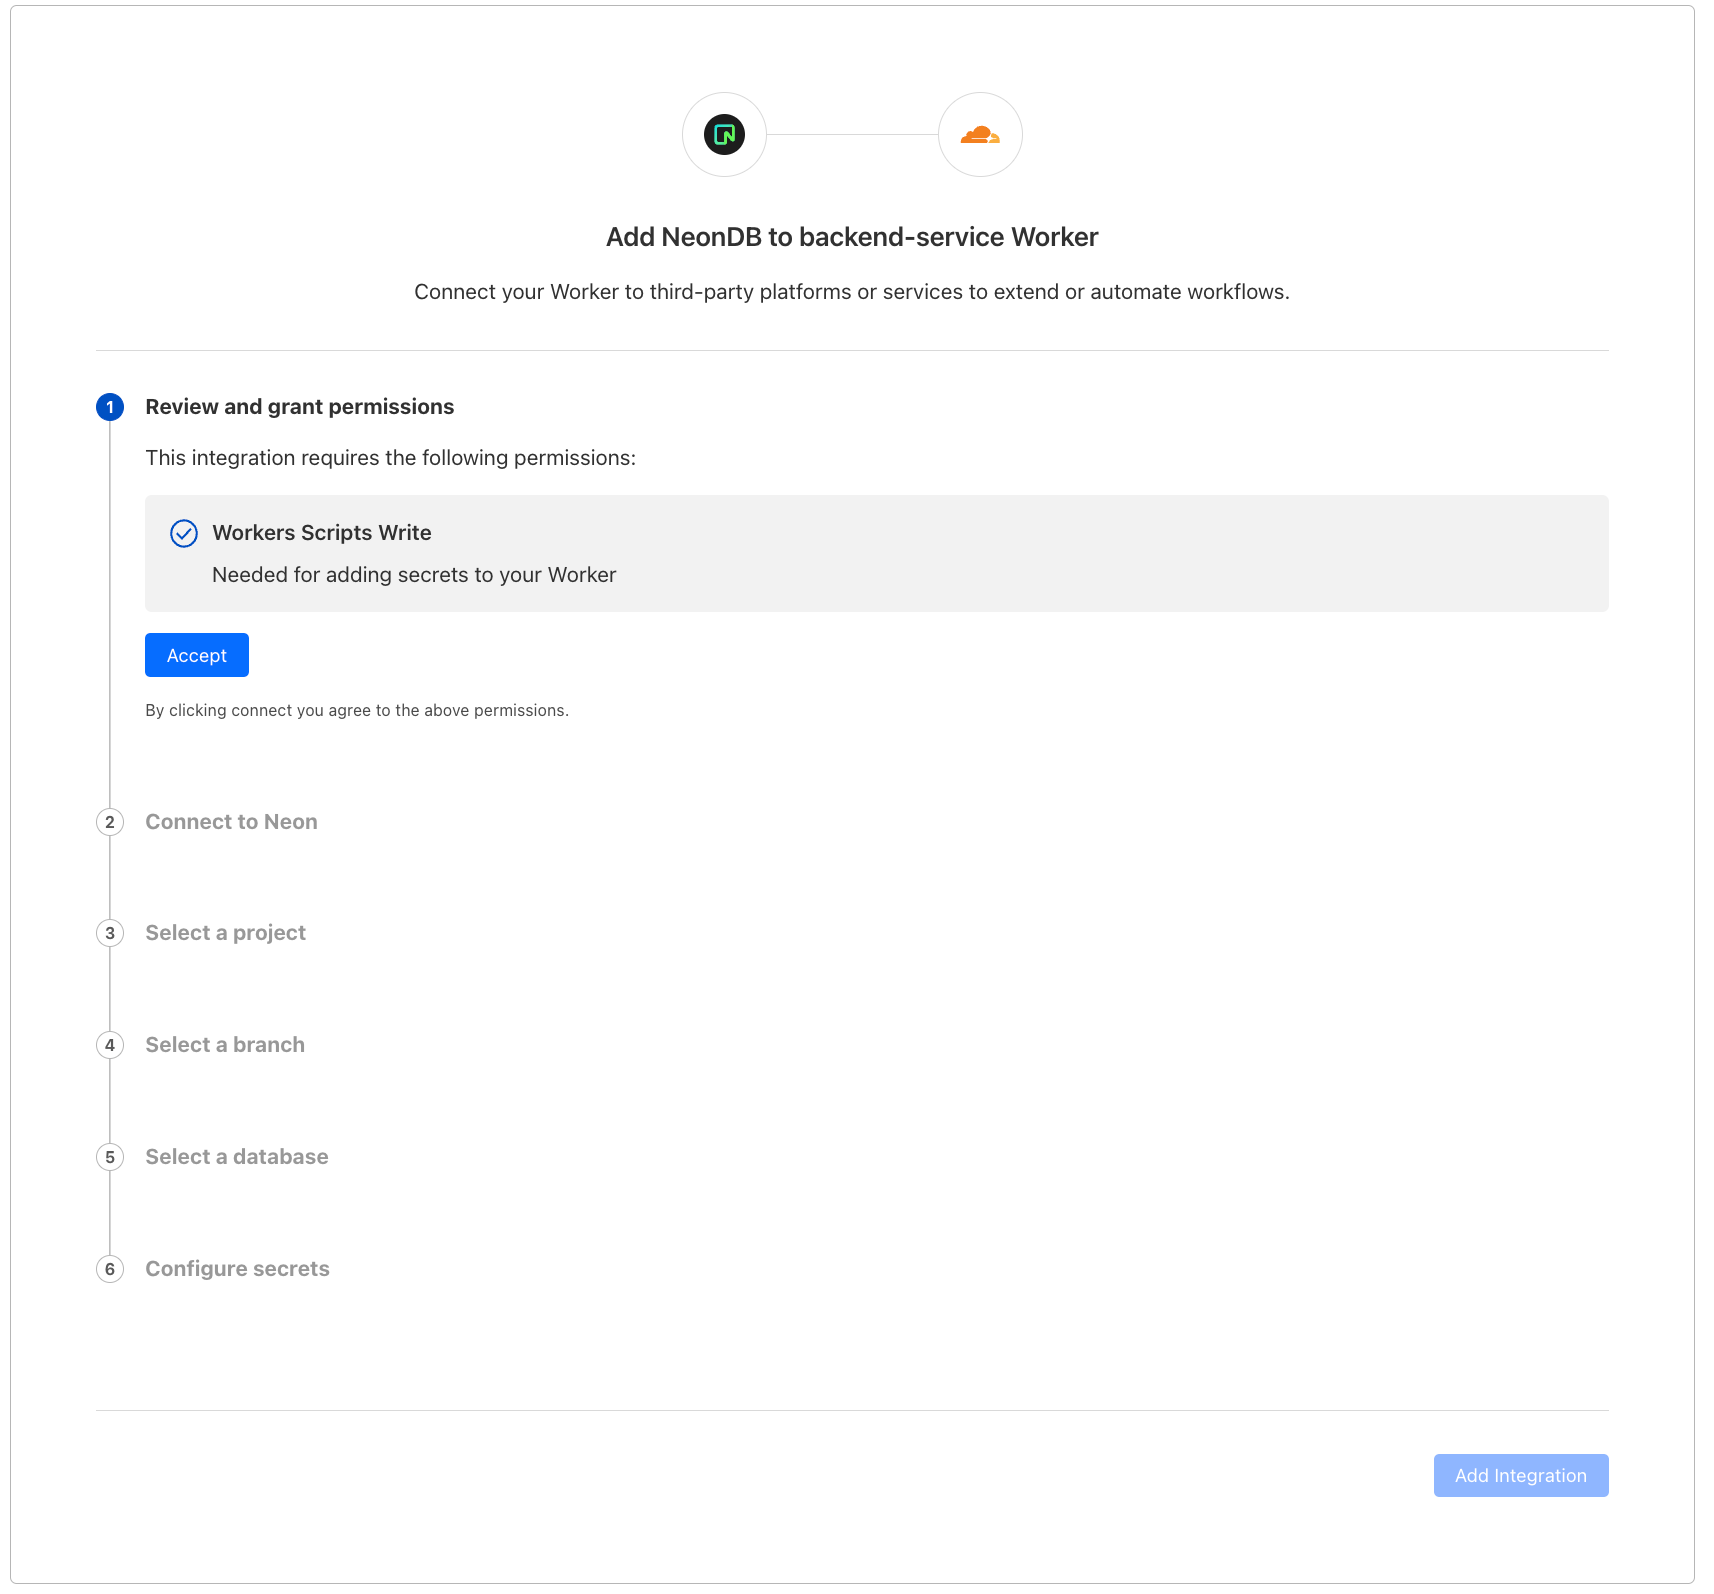
Once you hit “Add Integration” we take you through an OAuth2 flow that automatically gets the right configuration from your database provider and adds them as encrypted environment variables to your Worker.
Once you have credentials set up, check out our documentation for examples on how to get started using the data platform’s client library. What’s more – we have templates coming that will allow you to get started even faster!
That’s it! With database integrations, you can connect your Worker with your database in just a few clicks. Head to your Worker > Settings > Integrations to try it out today.
What’s next?
We’ve only just scratched the surface with Database Integrations and there’s a ton more coming soon!
While we’ll be continuing to add support for more popular data platforms we also know that it's impossible for us to keep up in a moving landscape. We’ve been working on an integrations platform so that any database provider can easily build their own integration with Workers. As a developer, this means that you can start tinkering with the next new database right away on Workers.
Additionally, we’re working on adding wrangler support, so you can create integrations directly from the CLI. We’ll also be adding support for account level environment variables in order for you to share integrations across the Workers in your account.
We’re really excited about the potential here and to see all the new creations from our developers! Be sure to join Cloudflare’s Developer Discord and share your projects. Happy building!
Today, we are excited to announce a new API in Cloudflare Workers for creating outbound TCP sockets, making it possible to connect directly to any TCP-based service from Workers.
Standard protocols including SSH, MQTT, SMTP, FTP, and IRC are all built on top of TCP. Most importantly, nearly all applications need to connect to databases, and most databases speak TCP. And while Cloudflare D1 works seamlessly on Workers, and some hosted database providers allow connections over HTTP or WebSockets, the vast majority of databases, both relational (SQL) and document-oriented (NoSQL), require clients to connect by opening a direct TCP “socket”, an ongoing two-way connection that is used to send queries and receive data. Now, Workers provides an API for this, the first of many steps to come in allowing you to use any database or infrastructure you choose when building full-stack applications on Workers.
Database drivers, the client code used to connect to databases and execute queries, are already using this new API. pg, the most widely used JavaScript database driver for PostgreSQL, works on Cloudflare Workers today, with more database drivers to come.
The TCP Socket API is available today to everyone. Get started by reading the TCP Socket API docs, or connect directly to any PostgreSQL database from your Worker by following this guide.
First — what is a TCP Socket?
TCP (Transmission Control Protocol) is a foundational networking protocol of the Internet. It is the underlying protocol that is used to make HTTP requests (prior to HTTP/3, which uses QUIC), to send email over SMTP, to query databases using database–specific protocols like MySQL, and many other application-layer protocols.
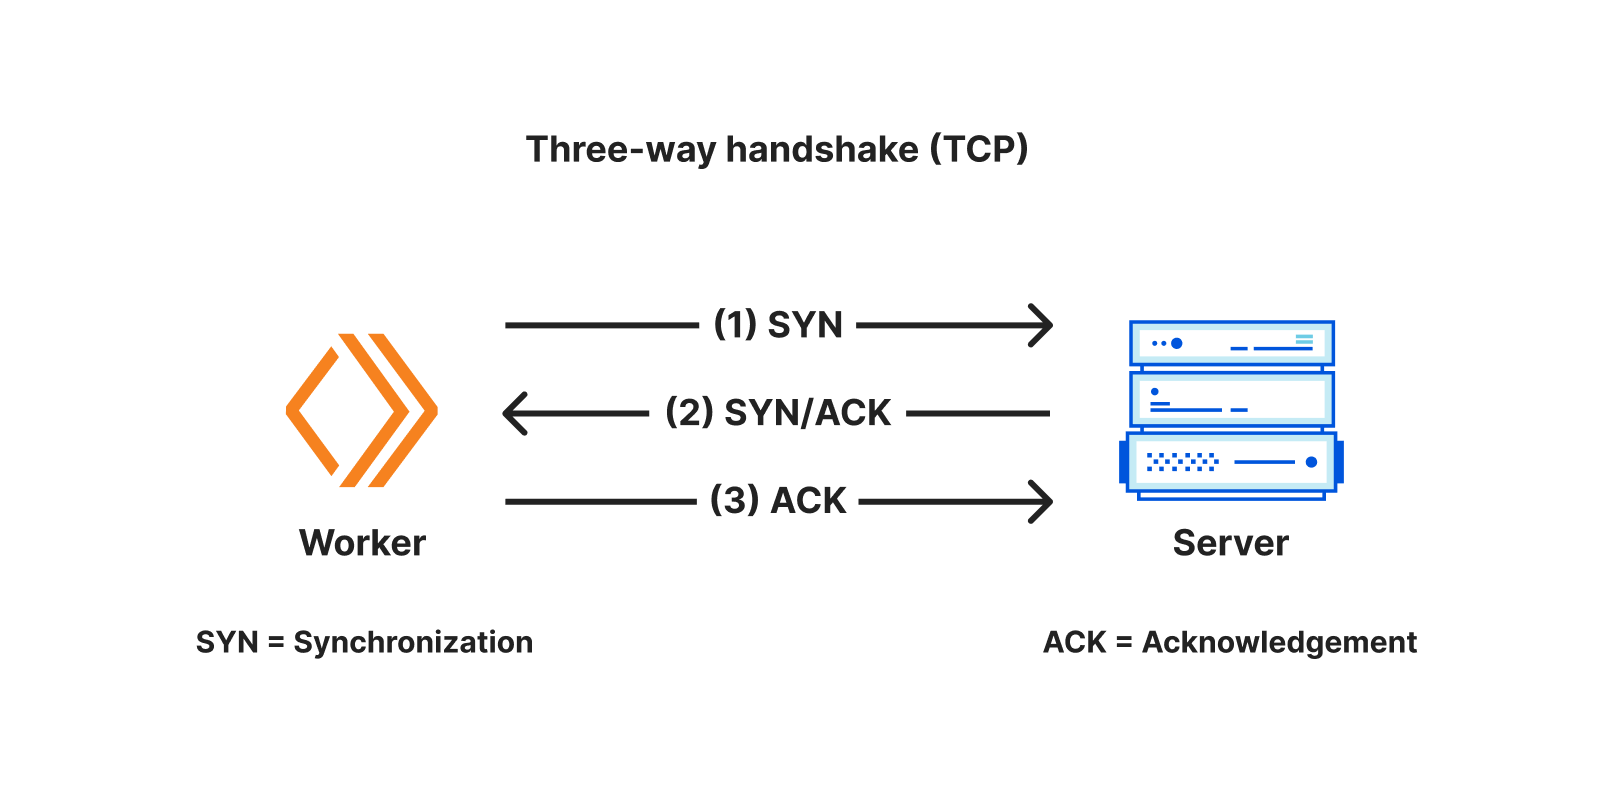
A TCP socket is a programming interface that represents a two-way communication connection between two applications that have both agreed to “speak” over TCP. One application (ex: a Cloudflare Worker) initiates an outbound TCP connection to another (ex: a database server) that is listening for inbound TCP connections. Connections are established by negotiating a three-way handshake, and after the handshake is complete, data can be sent bi-directionally.
A socket is the programming interface for a single TCP connection — it has both a readable and writable “stream” of data, allowing applications to read and write data on an ongoing basis, as long as the connection remains open.
connect() — A simpler socket API
With Workers, we aim to support standard APIs that are supported across browsers and non-browser environments wherever possible, so that as many NPM packages as possible work on Workers without changes, and package authors don’t have to write runtime-specific code. But for TCP sockets, we faced a challenge — there was no clear shared standard across runtimes. Node.js provides the net and tls APIs, but Deno implements a different API — Deno.connect. And web browsers do not provide a raw TCP socket API, though a WICG proposal does exist, and it is different from both Node.js and Deno.
We also considered how a TCP socket API could be designed to maximize performance and ergonomics in a serverless environment. Most networking APIs were designed well before serverless emerged, with the assumption that the developer’s application is also the server, responsible for directly handling configuring TLS options and credentials.
With this backdrop, we reached out to the community, with a focus on maintainers of database drivers, ORMs and other libraries that create outbound TCP connections. Using this feedback, we’ve tried to incorporate the best elements of existing APIs and proposals, and intend to contribute back to future standards, as part of the Web-interoperable Runtimes Community Group (WinterCG).
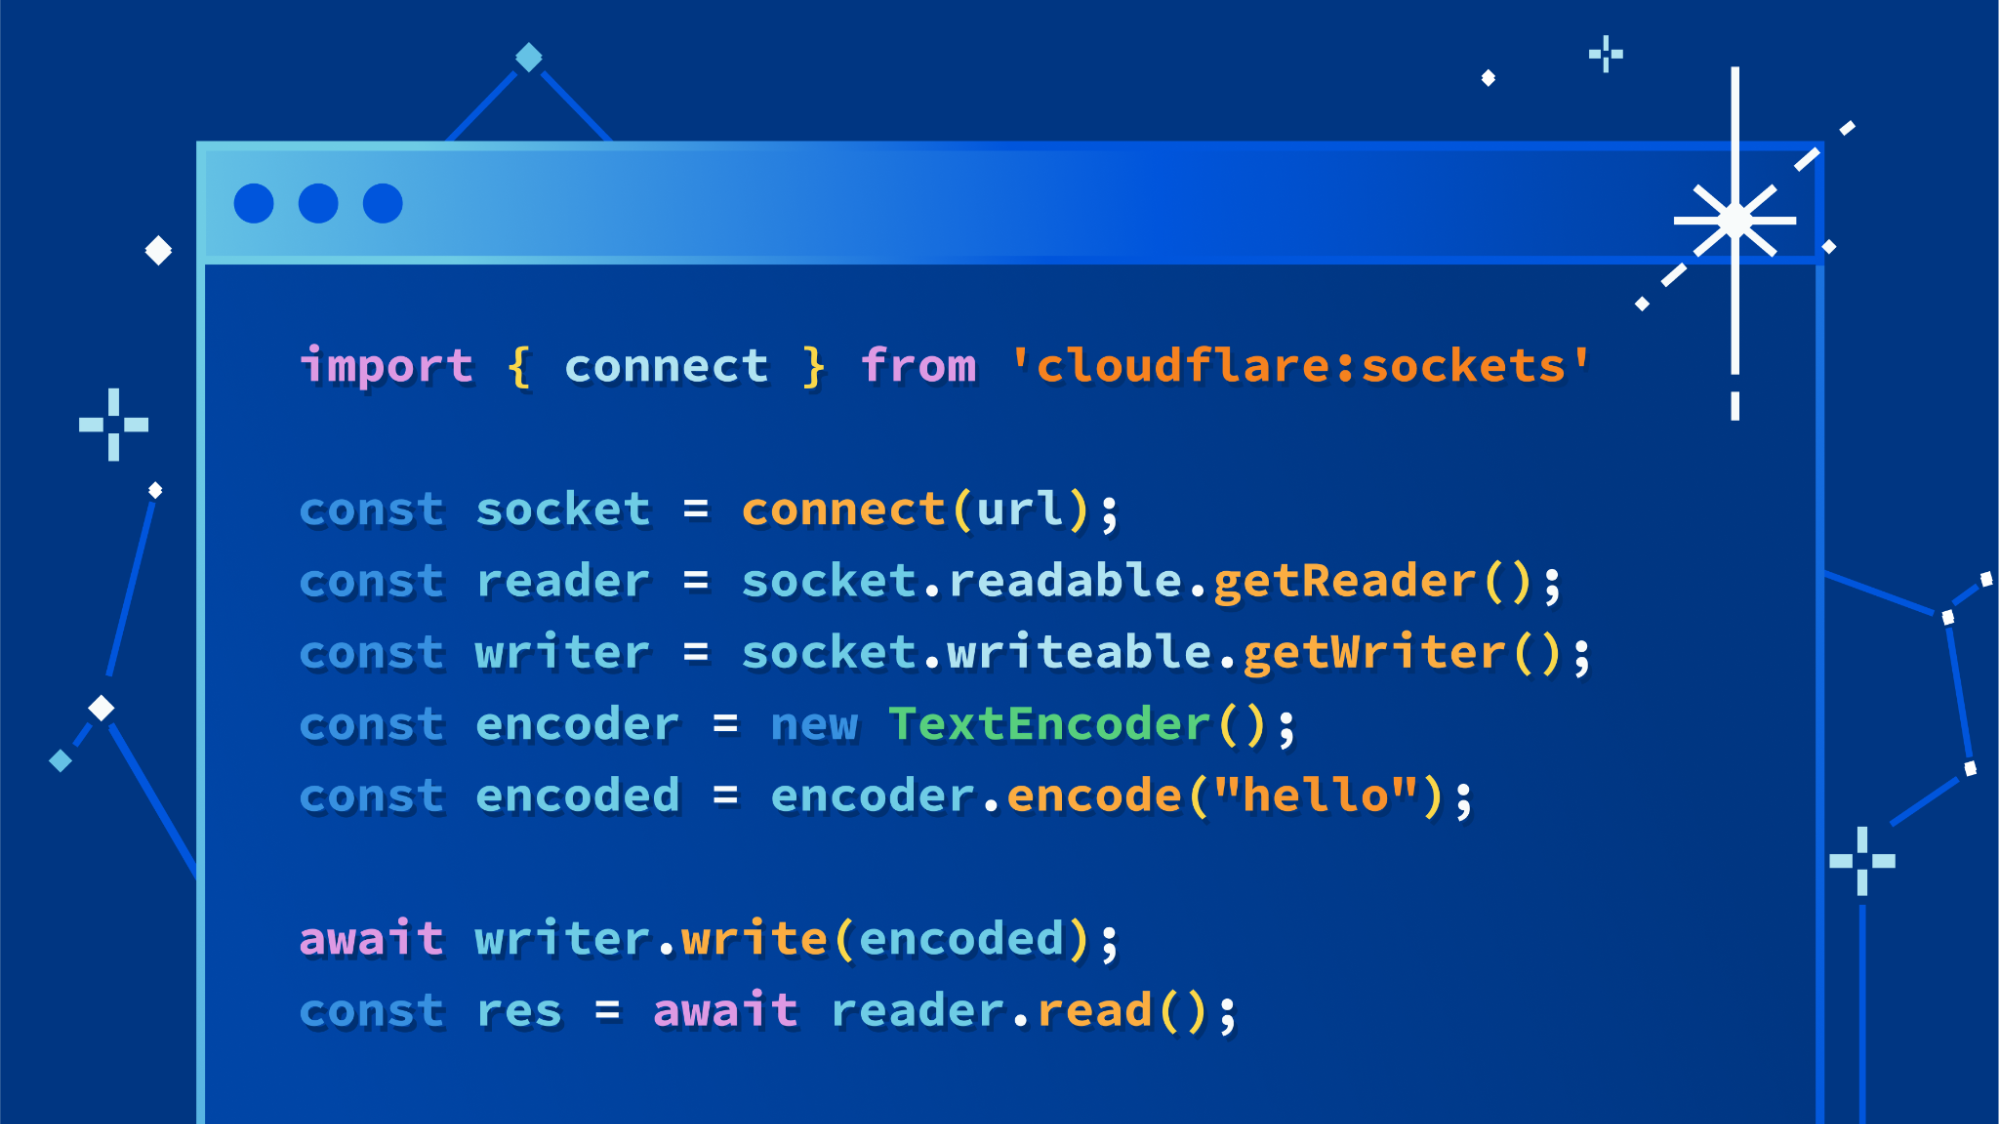
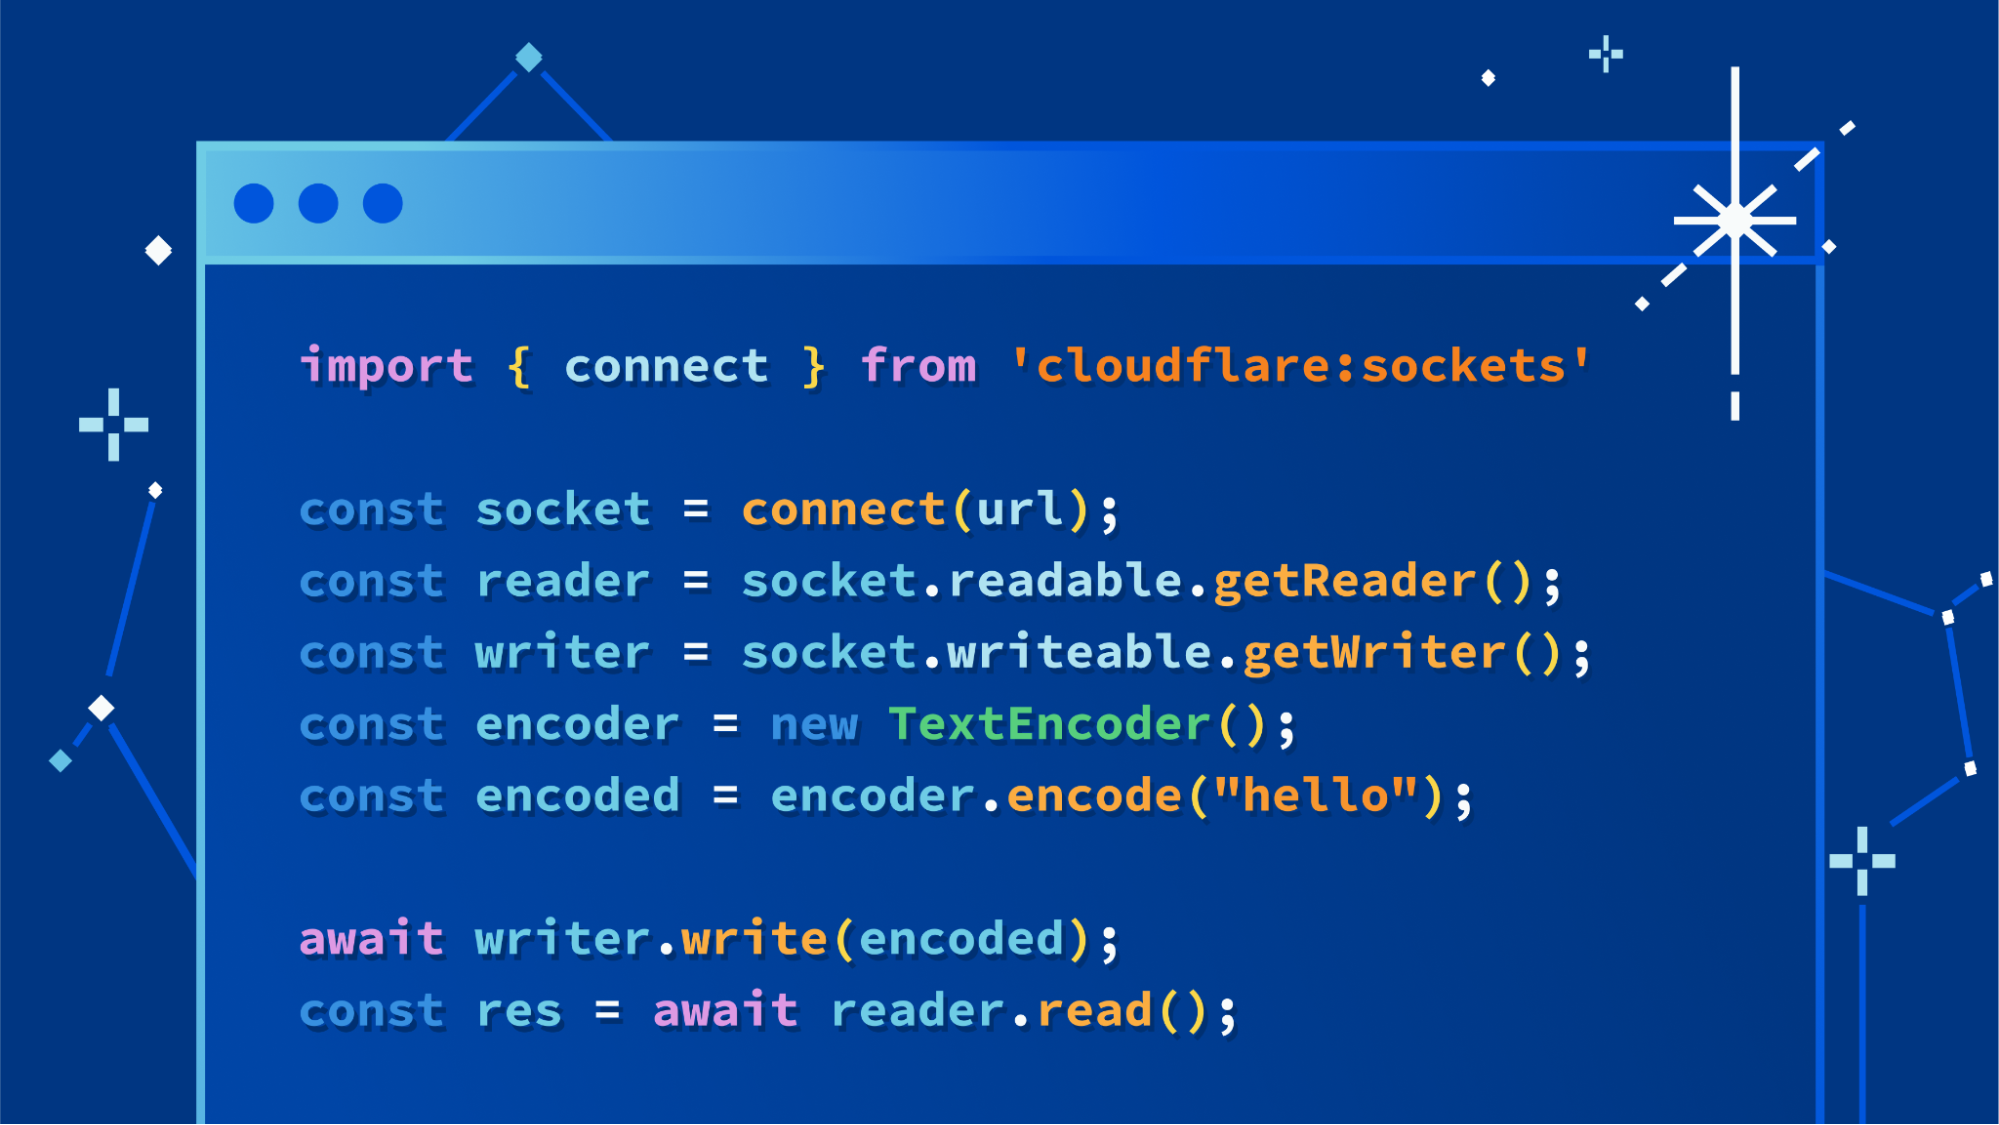
The API we landed on is a simple function, connect(), imported from the new cloudflare:sockets module, that returns an instance of a Socket. Here’s a simple example showing it used to connect to a Gopher server. Gopher was one of the Internet’s early protocols that relied on TCP/IP, and still works today:
Opportunistic TLS (StartTLS), without separate APIs
Opportunistic TLS, a pattern of creating an initial insecure connection, and then upgrading it to a secure one that uses TLS, remains common, particularly with database drivers. In Node.js, you must use the net API to create the initial connection, and then use the tls API to create a new, upgraded connection. In Deno, you pass the original socket to Deno.startTls(), which creates a new, upgraded connection.
Drawing on a previous W3C proposal for a TCP Socket API, we’ve simplified this by providing one API, that allows TLS to be enabled, allowed, or used when creating a socket, and exposes a simple method, startTls(), for upgrading a socket to use TLS.
// Create a new socket without TLS. secureTransport defaults to "off" if not specified.
const socket = connect("address:port", { secureTransport: "off" })

// Create a new socket, then upgrade it to use TLS.
// Once startTls() is called, only the newly created socket can be used.
const socket = connect("address:port", { secureTransport: "starttls" })
const secureSocket = socket.startTls();

// Create a new socket with TLS
const socket = connect("address:port", { secureTransport: "use" })
TLS configuration — a concern of host infrastructure, not application code
Existing APIs for creating TCP sockets treat TLS as a library that you interact with in your application code. The tls.createSecureContext() API from Node.js has a plethora of advanced configuration options that are mostly environment specific. If you use custom certificates when connecting to a particular service, you likely use a different set of credentials and options in production, staging and development. Managing direct file paths to credentials across environments and swapping out .env files in production build steps are common pain points.
Host infrastructure is best positioned to manage this on your behalf, and similar to Workers support for making subrequests using mTLS, TLS configuration and credentials for the socket API will be managed via Wrangler, and a connect() function provided via a capability binding. Currently, custom TLS credentials and configuration are not supported, but are coming soon.
Start writing data immediately, before the TLS handshake finishes
Because the connect() API synchronously returns a new socket, one can start writing to the socket immediately, without waiting for the TCP handshake to first complete. This means that once the handshake completes, data is already available to send immediately, and host platforms can make use of pipelining to optimize performance.
connect() API + DB drivers = Connect directly to databases
Many serverless databases already work on Workers, allowing clients to connect over HTTP or over WebSockets. But most databases don’t “speak” HTTP, including databases hosted on most cloud providers.
Databases each have their own “wire protocol”, and open-source database “drivers” that speak this protocol, sending and receiving data over a TCP socket. Developers rely on these drivers in their own code, as do database ORMs. Our goal is to make sure that you can use the same drivers and ORMs you might use in other runtimes and on other platforms on Workers.
Try it now — connect to PostgreSQL from Workers
We’ve worked with the maintainers of pg, one of the most popular database drivers in the JavaScript ecosystem, used by ORMs including Sequelize and knex.js, to add support for connect().
You can try this right now. First, create a new Worker and install pg:
name = "my-worker"
main = "src/index.ts"
compatibility_date = "2023-05-15"
node_compat = true
In just 20 lines of TypeScript, you can create a connection to a Postgres database, execute a query, return results in the response, and close the connection:
index.ts
import { Client } from "pg";

export interface Env {
  DB: string;
}

export default {
  async fetch(
    request: Request,
    env: Env,
    ctx: ExecutionContext
  ): Promise<Response> {
    const client = new Client(env.DB);
    await client.connect();
    const result = await client.query({
      text: "SELECT * from customers",
    });
    console.log(JSON.stringify(result.rows));
    const resp = Response.json(result.rows);
    // Close the database connection, but don't block returning the response
    ctx.waitUntil(client.end());
    return resp;
  },
};
To test this in local development, use the --experimental-local flag (instead of –local), which uses the open-source Workers runtime, ensuring that what you see locally mirrors behavior in production:
wrangler dev --experimental-local
What’s next for connecting to databases from Workers?
This is only the beginning. We’re aiming for the two popular MySQL drivers, mysql and mysql2, to work on Workers soon, with more to follow. If you work on a database driver or ORM, we’d love to help make your library work on Workers.
If you’ve worked more closely with database scaling and performance, you might have noticed that in the example above, a new connection is created for every request. This is one of the biggest current challenges of connecting to databases from serverless functions, across all platforms. With typical client connection pooling, you maintain a local pool of database connections that remain open. This approach of storing a reference to a connection or connection pool in global scope will not work, and is a poor fit for serverless. Managing individual pools of client connections on a per-isolate basis creates other headaches — when and how should connections be terminated? How can you limit the total number of concurrent connections across many isolates and locations?
Instead, we’re already working on simpler approaches to connection pooling for the most popular databases. We see a path to a future where you don’t have to think about or manage client connection pooling on your own. We’re also working on a brand new approach to making your database reads lightning fast.
What’s next for sockets on Workers?
Supporting outbound TCP connections is only one half of the story — we plan to support inbound TCP and UDP connections, as well as new emerging application protocols based on QUIC, so that you can build applications beyond HTTP with Socket Workers.
Earlier today we also announced Smart Placement, which improves performance by placing any Worker that makes multiple HTTP requests to an origin run as close as possible to reduce round-trip time. We’re working on making this work with Workers that open TCP connections, so that if your Worker connects to a database in Virginia and makes many queries over a TCP connection, each query is lightning fast and comes from the nearest location on Cloudflare’s global network.
We also plan to support custom certificates and other TLS configuration options in the coming months — tell us what is a must-have in order to connect to the services you need to connect to from Workers.
Get started, and share your feedback
The TCP Socket API is available today to everyone. Get started by reading the TCP Socket API docs, or connect directly to any PostgreSQL database from your Worker by following this guide.
We want to hear your feedback, what you’d like to see next, and more about what you’re building. Join the Cloudflare Developers Discord.
Today we’re excited to be launching Cursor – our experimental AI assistant, trained to answer questions about Cloudflare’s Developer Platform. This is just the first step in our journey to help developers build in the fastest way possible using AI, so we wanted to take the opportunity to share our vision for a generative developer experience.
Whenever a new, disruptive technology comes along, it’s not instantly clear what the native way to interact with that technology will be.
However, if you’ve played around with Large Language Models (LLMs) such as ChatGPT, it’s easy to get the feeling that this is something that’s going to change the way we work. The question is: how? While this technology already feels super powerful, today, we’re still in the relatively early days of it.
While Developer Week is all about meeting developers where they are, this is one of the things that’s going to change just that — where developers are, and how they build code. We’re already seeing the beginnings of how the way developers write code is changing, and adapting to them. We wanted to share with you how we’re thinking about it, what’s on the horizon, and some of the large bets to come.
How is AI changing developer experience?
If there’s one big thing we can learn from the exploding success of ChatGPT, it’s the importance of pairing technology with the right interface. GPT-3 — the technology powering ChatGPT has been around for some years now, but the masses didn’t come until ChatGPT made it accessible to the masses.
Since the primary customers of our platform are developers, it’s on us to find the right interfaces to help developers move fast on our platform, and we believe AI can unlock unprecedented developer productivity. And we’re still in the beginning of that journey.
Wave 1: AI generated content
One of the things ChatGPT is exceptionally good at is generating new content and articles. If you’re a bootstrapped developer relations team, the first day playing around with ChatGPT may have felt like you struck the jackpot of productivity. With a simple inquiry, ChatGPT can generate in a few seconds a tutorial that would have otherwise taken hours if not days to write out.
This content still needs to be tested — do the code examples work? Does the order make sense? While it might not get everything right, it’s a massive productivity boost, allowing a small team to multiply their content output.
In terms of developer experience, examples and tutorials are crucial for developers, especially as they start out with a new technology, or seek validation on a path they’re exploring.
However, with AI generated content, it’s always going to be limited to well, how much of it you generated. To compare it to the newspaper, this content is still one size fits all. If as a developer you stray ever so slightly off the beaten path (choose a different framework than the one tutorial suggests, or a different database), you’re still left to put the pieces together, navigating tens of open tabs in order to stitch together your application.
If this content is already being generated by AI, however, why not just go straight to the source, and allow developers to generate their own, personal guides?
Wave 2: Q&A assistants
Since developers love to try out new technologies, it’s no surprise that developers are going to be some of the early adopters for technology such as ChatGPT. Many developers are already starting to build applications alongside their trusted bard, ChatGPT.
Rather than using generated content, why not just go straight to the source, and ask ChatGPT to generate something that’s tailored specifically for you?
There’s one tiny problem: the information is not always up to date. Which is why plugins are going to become a super important way to interact.
But what about someone who’s already on Cloudflare’s docs? Here, you want a native experience where someone can ask questions and receive answers. Similarly, if you have a question, why spend time searching the docs, if you can just ask and receive an answer?
Wave 3: generative experiences
In the examples above, you were still relying on switching back and forth between a dedicated AI interface and the problem at hand. In one tab you’re asking questions, while in another, you’re implementing the answers.
But taking things another step further, what if AI just met you where you were? In terms of developer experience, we’re already starting to see this in the authoring phase. Tools like GitHub Copilot help developers generate boilerplate code and tests, allowing developers to focus on more complex tasks like designing architecture and algorithms.
Sometimes, however, the first iteration AI comes up with might not match what you, the developer had in mind, which is why we’re starting to experiment with a flow-based generative approach, where you can ask AI to generate several versions, and build out your design with the one that matches your expectations the most.
The possibilities are endless, enabling developers to start applications from prompts rather than pre-generated templates.
We’re excited for all the possibilities AI will unlock to make developers more productive than ever, and we’d love to hear from you how AI is changing the way you change applications.
We’re also excited to share our first steps into the realm of AI driven developer experience with the release of our first two ChatGPT plugins, and by welcoming a new member of our team —Cursor, our docs AI assistant.
Our first milestone to AI driven UX: AI Assisted Docs
As the first step towards using AI to streamline our developer experience, we’re excited to introduce a new addition to our documentation to help you get answers as quickly as possible.
How to use Cursor
Here’s a sample exchange with Cursor:
You’ll notice that when you ask a question, it will respond with two pieces of information: a text based response answering your questions, and links to relevant pages in our documentation that can help you go further.
Here’s what happens when we ask “What video formats does Stream support?”.
If you were looking through our examples you may not immediately realize that this specific example uses both Workers and R2.
In its current state, you can think of it as your assistant to help you learn about our products and navigate our documentation in a conversational way. We’re labeling Cursor as experimental because this is the very beginning stages of what we feel like a Cloudflare AI assistant could do to help developers. It is helpful, but not perfect. To deal with its lack of perfection, we took an approach of having it do fewer things better. You’ll find there are many things it isn’t good at today.
How we built Cursor
Under the hood, Cursor is powered by Workers, Durable Objects, OpenAI, and the Cloudflare developer docs. It uses the same backend that we’re using to power our ChatGPT Docs plugin, and you can read about that here.
It uses the “Search-Ask” method, stay tuned for more details on how you can build your own.
A sneak peek into the future
We’re already thinking about the future, we wanted to give you a small preview of what we think this might look like here:
With this type of interface, developers could use a UI to have an AI generate code and developers then link that code together visually. Whether that’s with other code generated by the AI or code they’ve written themselves. We’ll be continuing to explore interfaces that we hope to help you all build more efficiently and can’t wait to get these new interfaces in your hands.
We need your help
Our hope is to quickly update and iterate on how Cursor works as developers around the world use it. As you’re using it to explore our documentation, join us on Discord to let us know your experience.
The Cloudflare Workers' ecosystem now features products and features ranging from compute, hosting, storage, databases, streaming, networking, security, and much more. Over time, we've been trying to inspire others to switch from traditional software architectures, proving and documenting how it's possible to build complex applications that scale globally on top of our stack.
Today, we're excited to welcome Constellation to the Cloudflare stack, enabling developers to run pre-trained machine learning models and inference tasks on Cloudflare's network.
One more building block in our Supercloud
Machine learning and AI have been hot topics lately, but the reality is that we have been using these technologies in our daily lives for years now, even if we do not realize it. Our mobile phones, computers, cars, and home assistants, to name a few examples, all have AI. It's everywhere.
But it isn't a commodity to developers yet, though. They often need to understand the mathematics behind it, the software and tools are dispersed and complex, and the hardware or cloud services to run the frameworks and data are expensive.
Today we're introducing another feature to our stack, allowing everyone to run machine learning models and perform inference on top of Cloudflare Workers.
Introducing Constellation
Constellation allows you to run fast, low-latency inference tasks using pre-trained machine learning models natively with Cloudflare Workers scripts.
Some examples of applications that you can deploy leveraging Constellation are:
Image or audio classification or object detection
Anomaly Detection in Data
Text translation, summarization, or similarity analysis
Natural Language Processing
Sentiment analysis
Speech recognition or text-to-speech
Question answering
Developers can upload any supported model to Constellation. They can train them independently or download pre-trained models from machine learning hubs like HuggingFace or ONNX Zoo.
However, not everyone will want to train models or browse the Internet for models they didn't test yet. For that reason, Cloudflare will also maintain a catalog of verified and ready-to-use models.
We built Constellation with a great developer experience and simple-to-use APIs in mind. Here's an example to get you started.
Image classification application
In this example, we will build an image classification app powered by the Constellation inference API and the SqueezeNet model, a convolutional neural network (CNN) that was pre-trained on more than one million images from the open-source ImageNet database and can classify images into no more than 1,000 categories.
SqueezeNet compares to AlexNet, one of the original CNNs and benchmarks for image classification, by being much faster (~3x) and much smaller (~500x) while still achieving similar levels of accuracy. Its small footprint makes it ideal for running on portable devices with limited resources or custom hardware.
First, let's create a new Constellation project using the ONNX runtime. Wrangler now has functionality for Constellation built-in with the constellation keyword.
As we said above, SqueezeNet classifies images into no more than 1,000 object classes. These classes are actually in the form of a list of synonym rings or synsets. A synset has an id and a label; it derives from Princeton's WordNet database terminology, the same used to label the ImageNet image database.
To translate SqueezeNet's results into human-readable image classes, we need a file that maps the synset ids (what we get from the model) to their corresponding labels.
$ mkdir src; cd src
$ wget https://raw.githubusercontent.com/microsoft/onnxjs-demo/master/src/data/imagenet.ts
And finally, let’s code and deploy our image classification script:
This script reads an image from the request, decodes it into a multidimensional float32 tensor (right now we only decode PNGs, but we can add other formats), feeds it to the SqueezeNet model running in Constellation, gets the results, matches them with the ImageNet classes list, and returns the human-readable tags for the image.
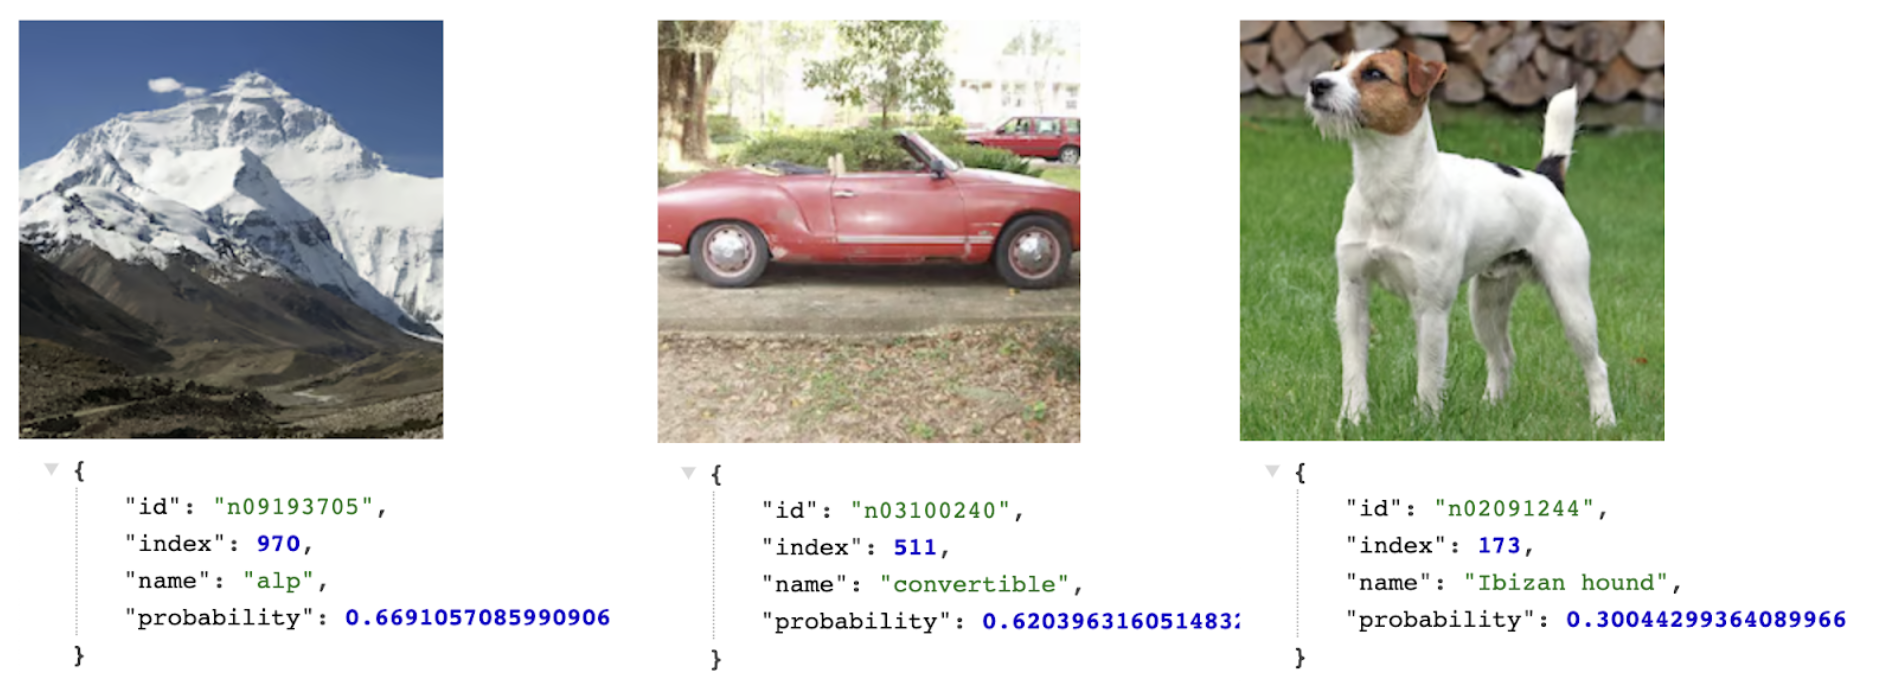
You can see the probabilities in action here. The model is quite sure about the Alp and the Convertible, but the Ibizan hound has a lower probability. Indeed, the dog in the picture is from another breed.
This small app demonstrates how easy and fast you can start using machine learning models and Constellation when building applications on top of Workers. Check the full source code here and deploy it yourself.
Transformers
Transformers were introduced by Google; they are deep-learning models designed to process sequential input data and are commonly used for natural language processing (NLP), like translations, summarizations, or sentiment analysis, and computer vision (CV) tasks, like image classification.
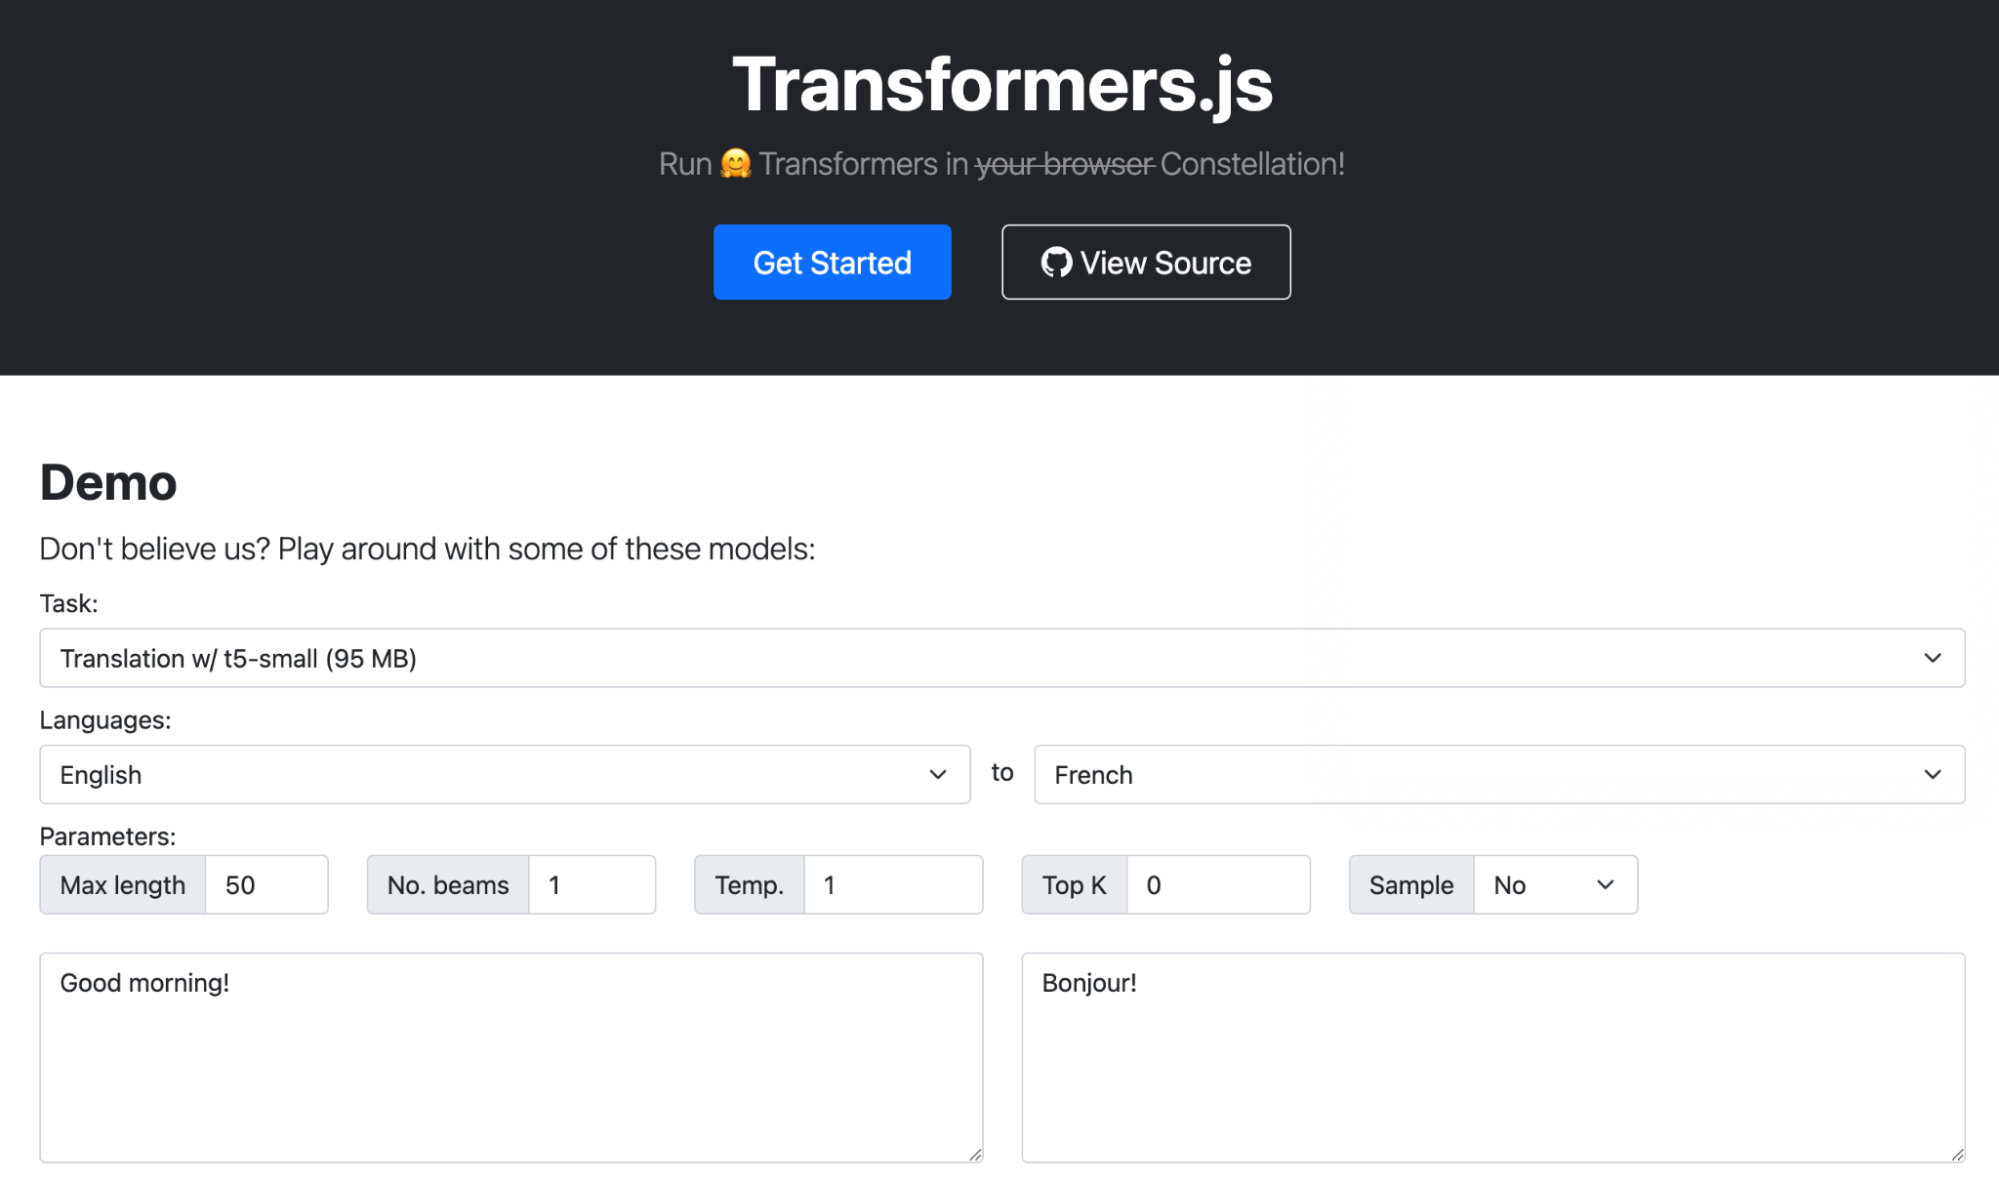
Transformers.js is a popular demo that loads transformer models from HuggingFace and runs them inside your browser using the ONNX Runtime compiled to WebAssembly. We ported this demo to use Constellation APIs instead.
The other interesting element of Constellation is that because it runs natively in Workers, you can orchestrate it with other products and APIs in our stack. You can use KV, R2, D1, Queues, anything, even Email.
Here's an example of a Worker that receives Emails for your domain on Cloudflare using Email Routing, runs Constellation using the t5-small sentiment analysis model, adds a header with the resulting score, and forwards it to the destination address.
import { Tensor, run } from '@cloudflare/constellation';
import * as PostalMime from 'postal-mime';

export interface Env {
    SENTIMENT: any,
}

export default {
  async email(message, env, ctx) {
    const rawEmail = await streamToArrayBuffer(event.raw, event.rawSize);
    const parser = new PostalMime.default();
    const parsedEmail = await parser.parse(rawEmail);

    const input = tokenize(parsedEmail.text)
    const output = await run( env.SENTIMENT, "MODEL-UUID", input);


    var headers = new Headers();
    headers.set("X-Sentiment", idToLabel[output.label]);
    await message.forward("[email protected]", headers);
  }
}
Now you can use Gmail or any email client to apply a rule to your messages based on the 'X-Sentiment' header. For example, you might want to move all the angry emails outside your Inbox to a different folder on arrival.
Start using Constellation
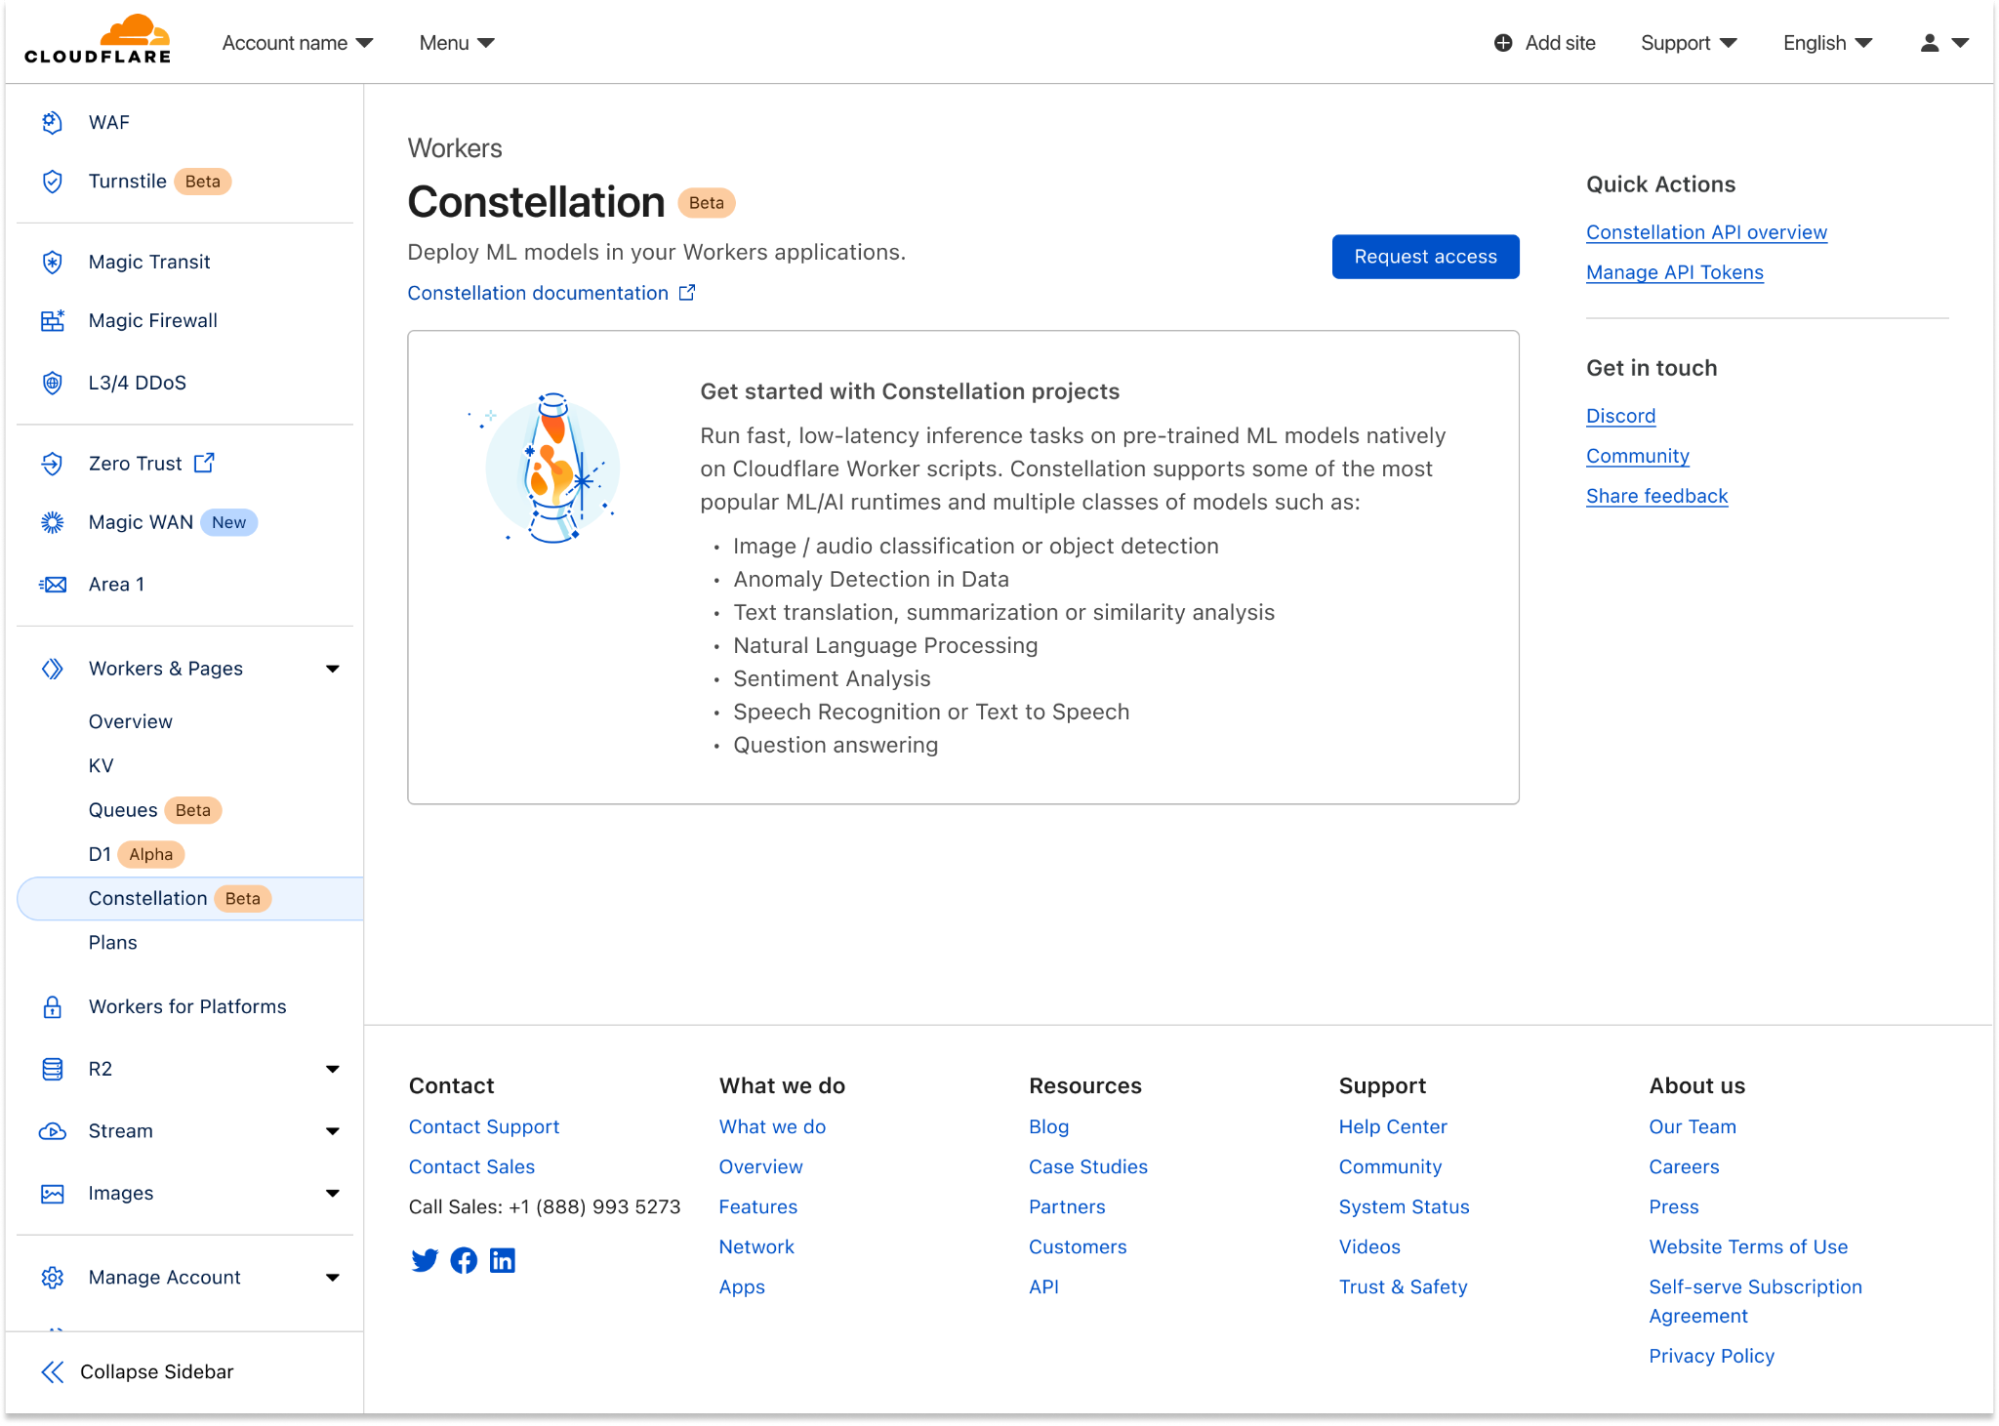
Constellation starts today in private beta. To join the waitlist, please head to the dashboard, click the Workers tab under your account, and click the "Request access" button under the Constellation entry. The team will be onboarding accounts in batches; you'll get an email when your account is enabled.
In the meantime, you can read our Constellation Developer Documentation and learn more about how it works and the APIs. Constellation can be used from Wrangler, our command-line tool for configuring, building, and deploying applications with Cloudflare developer products, or managed directly in the Dashboard UI.
We are eager to learn how you want to use ML/AI with your applications. Constellation will keep improving with higher limits, more supported runtimes, and larger models, but we want to hear from you. Your feedback will certainly influence our roadmap decisions.
One last thing: today, we've been talking about how you can write Workers that use Constellation, but here's an inception fact: Constellation itself was built using the power of WebAssembly, Workers, R2, and our APIs. We'll make sure to write a follow-up blog soon about how we built it; stay tuned.
As usual, you can talk to us on our Developers Discord (join the #constellation channel) or the Community forum; the team will be listening.
When OpenAI launched ChatGPT plugins in alpha we knew that it opened the door for new possibilities for both Cloudflare users and developers building on Cloudflare. After the launch, our team quickly went to work seeing what we could build, and today we’re very excited to share with you two new Cloudflare ChatGPT plugins – the Cloudflare Radar plugin and the Cloudflare Docs plugin.
The Cloudflare Radar plugin allows you to talk to ChatGPT about real-time Internet patterns powered by Cloudflare Radar.
The Cloudflare Docs plugin allows developers to use ChatGPT to help them write and build Cloudflare applications with the most up-to-date information from our documentation. It also serves as an open source example of how to build a ChatGPT plugin with Cloudflare Workers.
Let’s do a deeper dive into how each of these plugins work and how we built them.
Cloudflare Radar ChatGPT plugin
When ChatGPT introduced plugins, one of their use cases was retrieving real-time data from third-party applications and their APIs and letting users ask relevant questions using natural language.
Cloudflare Radar has lots of data about how people use the Internet, a well-documented public API, an OpenAPI specification, and it’s entirely built on top of Workers, which gives us lots of flexibility for improvements and extensibility. We had all the building blocks to create a ChatGPT plugin quickly. So, that's what we did.
We added an OpenAI manifest endpoint which describes what the plugin does, some branding assets, and an enriched OpenAPI schema to tell ChatGPT how to use our data APIs. The longest part of our work was fine-tuning the schema with good descriptions (written in natural language, obviously) and examples of how to query our endpoints.
Amusingly, the descriptions ended up much improved by the need to explain the API endpoints to ChatGPT. An interesting side effect is that this benefits us humans also.
{
    "/api/v1/http/summary/ip_version": {
        "get": {
            "operationId": "get_SummaryIPVersion",
            "parameters": [
                {
                    "description": "Date range from today minus the number of days or weeks specified in this parameter, if not provided always send 14d in this parameter.",
                    "required": true,
                    "schema": {
                        "type": "string",
                        "example": "14d",
                        "enum": ["14d","1d","2d","7d","28d","12w","24w","52w"]
                    },
                    "name": "dateRange",
                    "in": "query"
                }
            ]
        }
    }
Luckily, itty-router-openapi, an easy and compact OpenAPI 3 schema generator and validator for Cloudflare Workers that we built and open-sourced when we launched Radar 2.0, made it really easy for us to add the missing parts.
import { OpenAPIRouter } from '@cloudflare/itty-router-openapi'

const router = OpenAPIRouter({
  aiPlugin: {
    name_for_human: 'Cloudflare Radar API',
    name_for_model: 'cloudflare_radar',
    description_for_human: "Get data insights from Cloudflare's point of view.",
    description_for_model:
      "Plugin for retrieving the data based on Cloudflare Radar's data. Use it whenever a user asks something that might be related to Internet usage, eg. outages, Internet traffic, or Cloudflare Radar's data in particular.",
    contact_email: '[email protected]',
    legal_info_url: 'https://www.cloudflare.com/website-terms/',
    logo_url: 'https://cdn-icons-png.flaticon.com/512/5969/5969044.png',
  },
})
We incorporated our changes into itty-router-openapi, and now it supports the OpenAI manifest and route, and a few other options that make it possible for anyone to build their own ChatGPT plugin on top of Workers too.
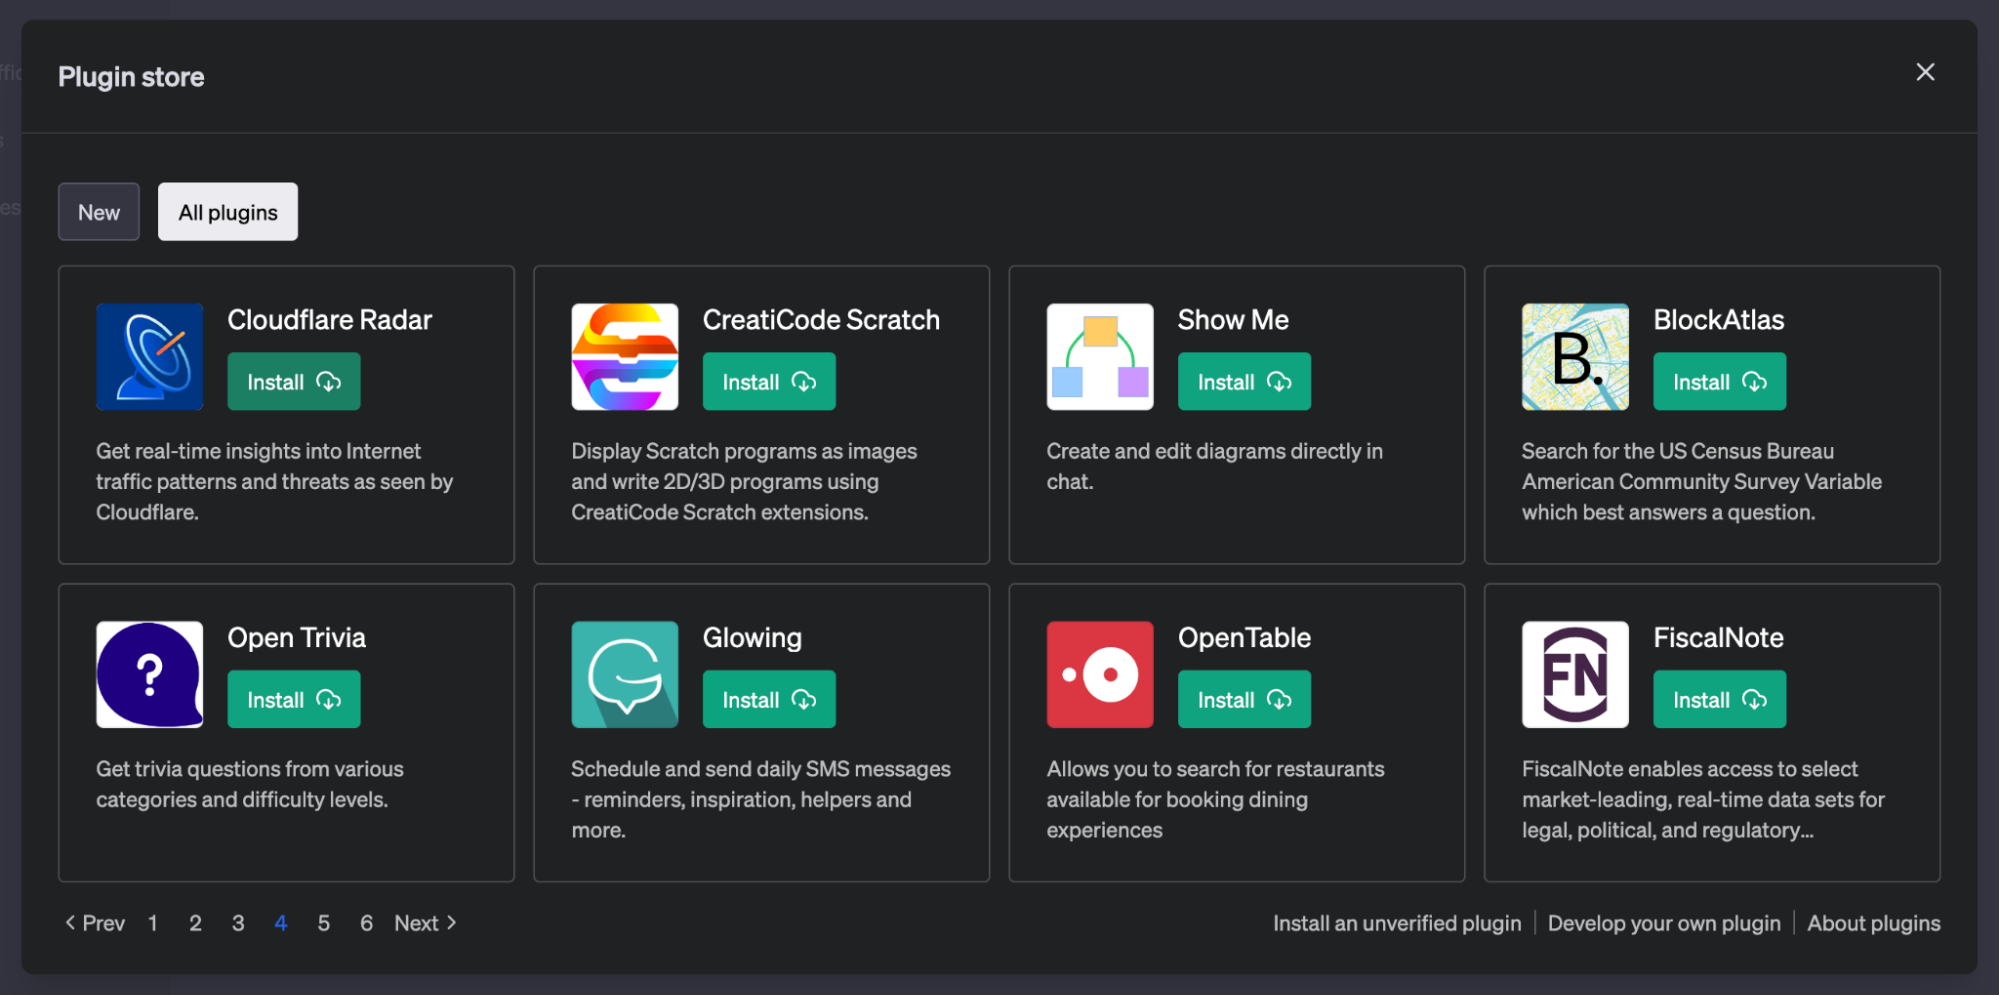
The Cloudflare Radar ChatGPT is available to non-free ChatGPT users or anyone on OpenAI’s plugin's waitlist. To use it, simply open ChatGPT, go to the Plugin store and install Cloudflare Radar.
Once installed, you can talk to it and ask questions about our data using natural language.
When you add plugins to your account, ChatGPT will prioritize using their data based on what the language model understands from the human-readable descriptions found in the manifest and Open API schema. If ChatGPT doesn't think your prompt can benefit from what the plugin provides, then it falls back to its standard capabilities.
Another interesting thing about plugins is that they extend ChatGPT's limited knowledge of the world and events after 2021 and can provide fresh insights based on recent data.
Here are a few examples to get you started:
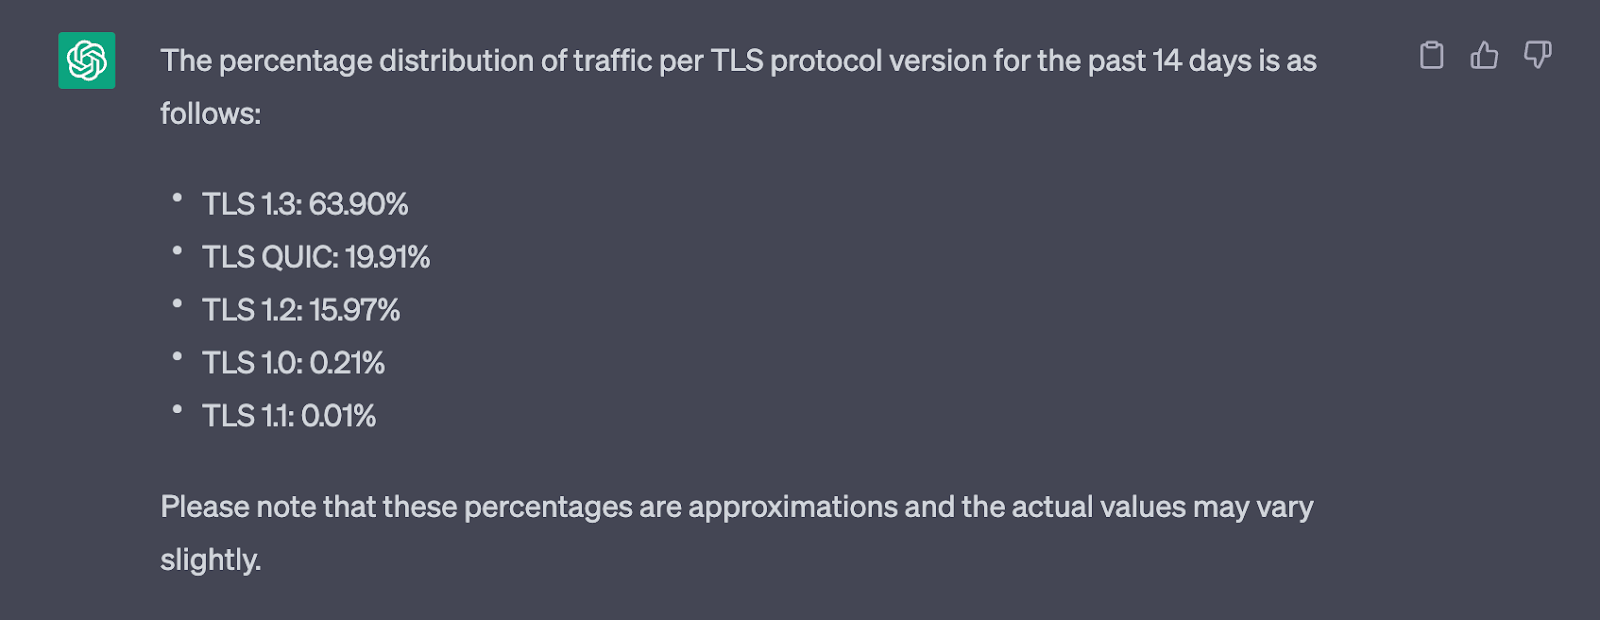
"What is the percentage distribution of traffic per TLS protocol version?"
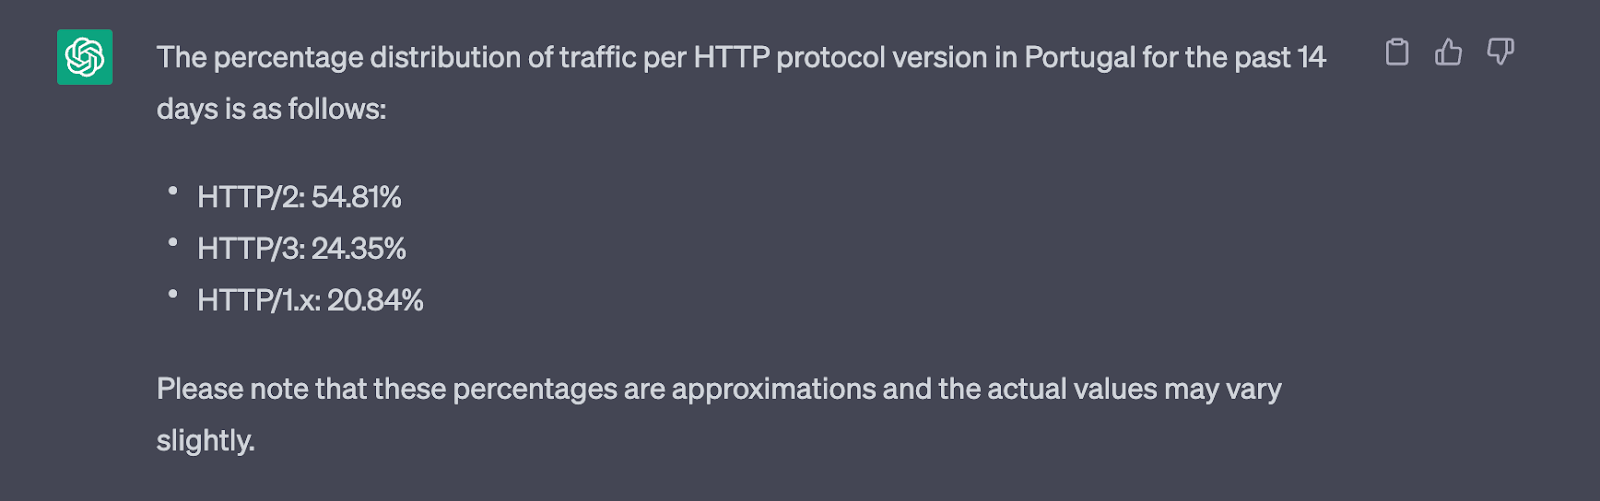
"What's the HTTP protocol version distribution in Portugal?"
Now that ChatGPT has context, you can add some variants, like switching the country and the date range.
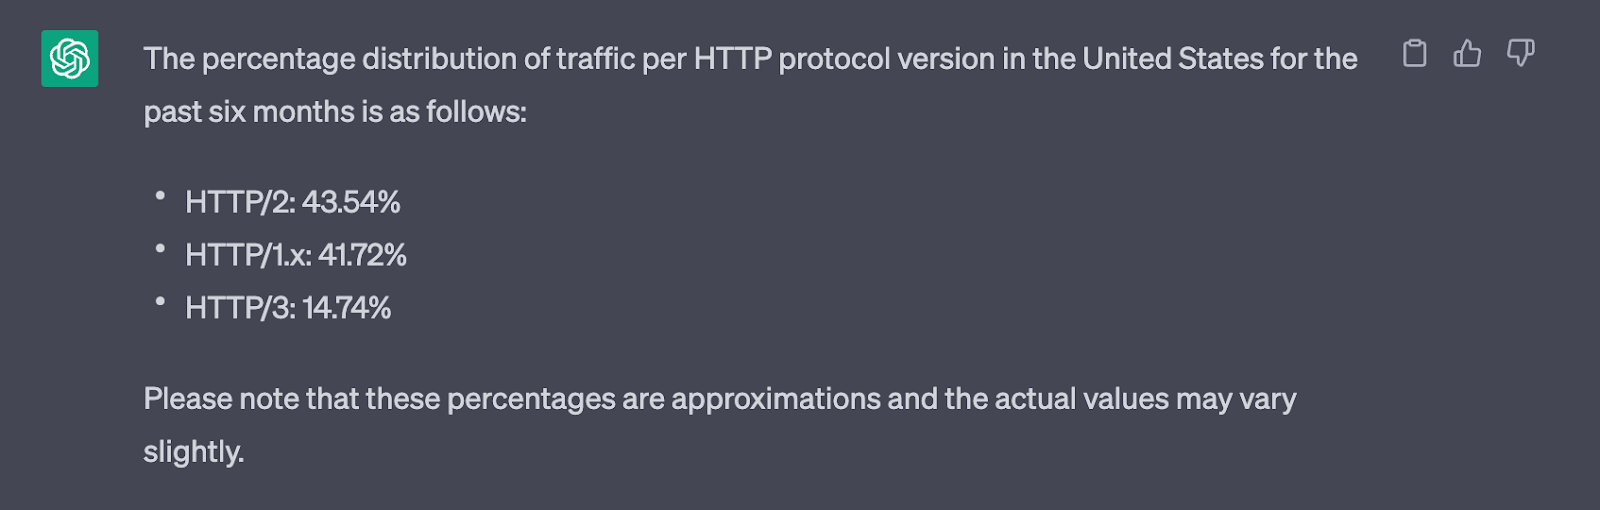
“How about the US in the last six months?”
You can also combine multiple topics (ChatGPT will make multiple API calls behind the scenes and combine the results in the best possible way).
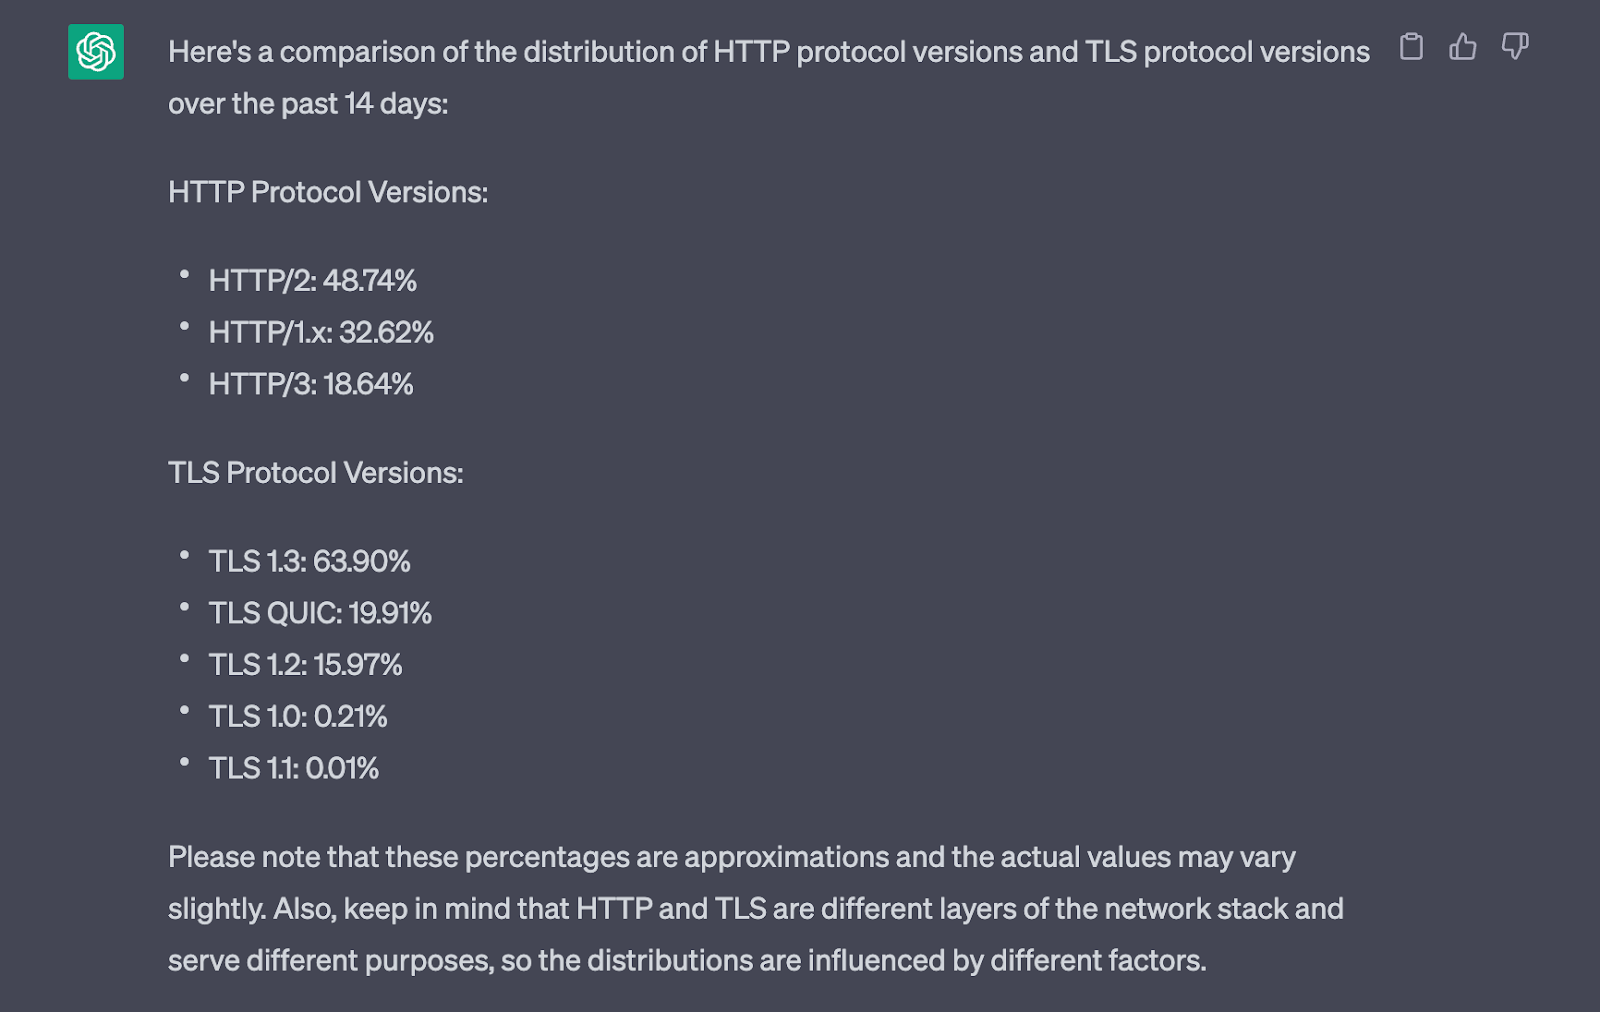
“How do HTTP protocol versions compare with TLS protocol versions?”
Out of ideas? Ask it “What can I ask the Radar plugin?”, or “Give me a random insight”.
Be creative, too; it understands a lot about our data, and we keep improving it. You can also add date or country filters using natural language in your prompts.
Cloudflare Docs ChatGPT plugin
The Cloudflare Docs plugin is a ChatGPT Retrieval Plugin that lets you access the most up-to-date knowledge from our developer documentation using ChatGPT. This means if you’re using ChatGPT to assist you with building on Cloudflare that the answers you’re getting or code that’s being generated will be informed by current best practices and information located within our docs. You can set up and run the Cloudflare Docs ChatGPT Plugin by following the read me in the example repo.
The plugin was built entirely on Workers and uses KV as a vector store. It can also keep its index up-to-date using Cron Triggers, Queues and Durable Objects.
The plugin is a Worker that responds to POST requests from ChatGPT to a /query endpoint. When a query comes in, the Worker converts the query text into an embedding vector via the OpenAI embeddings API and uses this to find, and return, the most relevant document snippets from Cloudflare’s developer documentation.
The way this is achieved is by first converting every document in Cloudflare’s developer documentation on GitHub into embedding vectors (again using OpenAI’s API) and storing them in KV. This storage format allows you to find semantically similar content by doing a similarity search (we use cosine similarity), where two pieces of text that are similar in meaning will result in the two embedding vectors having a high similarity score. Cloudflare’s entire developer documentation compresses to under 5MB when converted to embedding vectors, so fetching these from KV is very quick. We’ve also explored building larger vector stores on Workers, as can be seen in this demo of 1 million vectors stored on Durable Object storage. We’ll be releasing more open source libraries to support these vector store use cases in the near future.
So ChatGPT will query the plugin when it believes the user’s question is related to Cloudflare’s developer tools, and the plugin will return a list of up-to-date information snippets directly from our documentation. ChatGPT can then decide how to use these snippets to best answer the user’s question.
The plugin also includes a “Scheduler” Worker that can periodically refresh the documentation embedding vectors, so that the information is always up-to-date. This is advantageous because ChatGPT’s own knowledge has a cutoff of September 2021 – so it’s not aware of changes in documentation, or new Cloudflare products.
The Scheduler Worker is triggered by a Cron Trigger, on a schedule you can set (eg, hourly), where it will check which content has changed since it last ran via GitHub’s API. It then sends these document paths in messages to a Queue to be processed. Workers will batch process these messages – for each message, the content is fetched from GitHub, and then turned into embedding vectors via OpenAI’s API. A Durable Object is used to coordinate all the Queue processing so that when all the batches have finished processing, the resulting embedding vectors can be combined and stored in KV, ready for querying by the plugin.
This is a great example of how Workers can be used not only for front-facing HTTP APIs, but also for scheduled batch-processing use cases.
Let us know what you think
We are in a time when technology is constantly changing and evolving, so as you experiment with these new plugins please let us know what you think. What do you like? What could be better? Since ChatGPT plugins are in alpha, changes to the plugins user interface or performance (i.e. latency) may occur. If you build your own plugin, we’d love to see it and if it’s open source you can submit a pull request on our example repo. You can always find us hanging out in our developer discord.
Today, we're open-sourcing our ChatGPT Plugin Quickstart repository for Cloudflare Workers, designed to help you build awesome and versatile plugins for ChatGPT with ease. If you don’t already know, ChatGPT is a conversational AI model from OpenAI which has an uncanny ability to take chat input and generate human-like text responses.
With the recent addition of ChatGPT plugins, developers can create custom extensions and integrations to make ChatGPT even more powerful. Developers can now provide custom flows for ChatGPT to integrate into its conversational workflow – for instance, the ability to look up products when asking questions about shopping, or retrieving information from an API in order to have up-to-date data when working through a problem.
That's why we're super excited to contribute to the growth of ChatGPT plugins with our new Quickstart template. Our goal is to make it possible to build and deploy a new ChatGPT plugin to production in minutes, so developers can focus on creating incredible conversational experiences tailored to their specific needs.
How it works
Our Quickstart is designed to work seamlessly with Cloudflare Workers. Under the hood, it uses our command-line tool wrangler to create a new project and deploy it to Workers.
When building a ChatGPT plugin, there are three things you need to consider:
The plugin's metadata, which includes the plugin's name, description, and other info
The plugin's schema, which defines the plugin's input and output
The plugin's behavior, which defines how the plugin responds to user input
To handle all of these parts in a simple, easy-to-understand API, we've created the @cloudflare/itty-router-openapi package, which makes it easy to manage your plugin's metadata, schema, and behavior. This package is included in the ChatGPT Plugin Quickstart, so you can get started right away.
To show how the package works, we'll look at two key files in the ChatGPT Plugin Quickstart: index.js and search.js. The index.js file contains the plugin's metadata and schema, while the search.js file contains the plugin's behavior. Let's take a look at each of these files in more detail.
In index.js, we define the plugin's metadata and schema. The metadata includes the plugin's name, description, and version, while the schema defines the plugin's input and output.
The configuration matches the definition required by OpenAI's plugin manifest, and helps ChatGPT understand what your plugin is, and what purpose it serves.
Here's what the index.js file looks like:
import { OpenAPIRouter } from "@cloudflare/itty-router-openapi";
import { GetSearch } from "./search";

export const router = OpenAPIRouter({
  schema: {
    info: {
      title: 'GitHub Repositories Search API',
      description: 'A plugin that allows the user to search for GitHub repositories using ChatGPT',
      version: 'v0.0.1',
    },
  },
  docs_url: '/',
  aiPlugin: {
    name_for_human: 'GitHub Repositories Search',
    name_for_model: 'github_repositories_search',
    description_for_human: "GitHub Repositories Search plugin for ChatGPT.",
    description_for_model: "GitHub Repositories Search plugin for ChatGPT. You can search for GitHub repositories using this plugin.",
    contact_email: '[email protected]',
    legal_info_url: 'http://www.example.com/legal',
    logo_url: 'https://workers.cloudflare.com/resources/logo/logo.svg',
  },
})

router.get('/search', GetSearch)

// 404 for everything else
router.all('*', () => new Response('Not Found.', { status: 404 }))

export default {
  fetch: router.handle
}
In the search.js file, we define the plugin's behavior. This is where we define how the plugin responds to user input. It also defines the plugin's schema, which ChatGPT uses to validate the plugin's input and output.
Importantly, this doesn't just define the implementation of the code. It also automatically generates an OpenAPI schema that helps ChatGPT understand how your code works — for instance, that it takes a parameter "q", that it is of "String" type, and that it can be described as "The query to search for". With the schema defined, the handle function makes any relevant parameters available as function arguments, to implement the logic of the endpoint as you see fit.
The quickstart smooths out the entire development process, so you can focus on crafting custom behaviors, endpoints, and features for your ChatGPT plugins without getting caught up in the nitty-gritty. If you aren't familiar with API schemas, this also means that you can rely on our schema and manifest generation tools to handle the complicated bits, and focus on the implementation to build your plugin.
Besides making development a breeze, it's worth noting that you're also deploying to Workers, which takes advantage of Cloudflare's vast global network. This means your ChatGPT plugins enjoy low-latency access and top-notch performance, no matter where your users are located. By combining the strengths of Cloudflare Workers with the versatility of ChatGPT plugins, you can create conversational AI tools that are not only powerful and scalable but also cost-effective and globally accessible.
Example
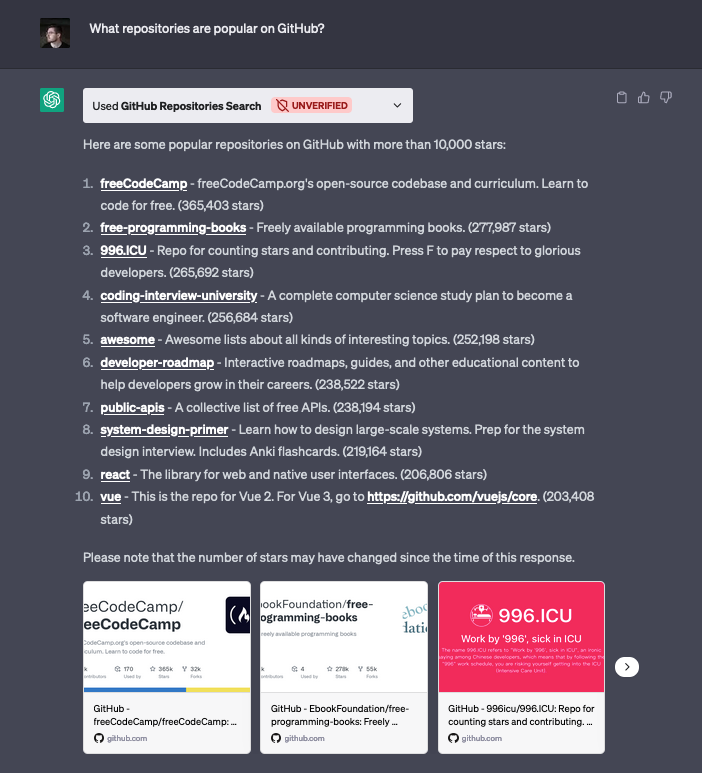
To demonstrate the capabilities of our quickstarts, we've created two example ChatGPT plugins. The first, which we reviewed above, connects ChatGPT with the GitHub Repositories Search API. This plugin enables users to search for repositories by simply entering a search term, returning useful information such as the repository's name, description, star count, and URL.
One intriguing aspect of this example is the property where the plugin could go beyond basic querying. For instance, when asked "What are the most popular JavaScript projects?", ChatGPT was able to intuitively understand the user's intent and craft a new query parameter for querying both by the number of stars (measuring popularity), and the specific programming language (JavaScript) without requiring any explicit prompting. This showcases the power and adaptability of ChatGPT plugins when integrated with external APIs, providing more insightful and context-aware responses.
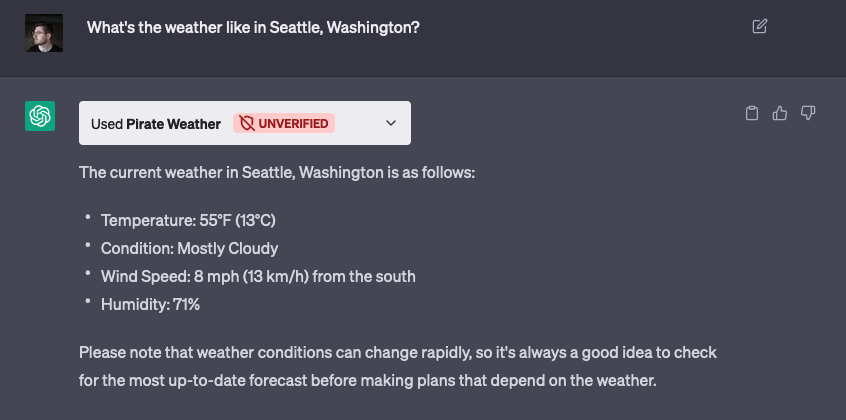
The second plugin uses the Pirate Weather API to retrieve up-to-date weather information. Remarkably, OpenAI is able to translate the request for a specific location (for instance, “Seattle, Washington”) into longitude and latitude values – which the Pirate Weather API uses for lookups – and make the correct API request, without the user needing to do any additional work.
With our ChatGPT Plugin Quickstarts, you can create custom plugins that connect to any API, database, or other data source, giving you the power to create ChatGPT plugins that are as unique and versatile as your imagination. The possibilities are endless, opening up a whole new world of conversational AI experiences tailored to specific domains and use cases.
Get started today
The ChatGPT Plugin Quickstarts don’t just make development a snap—it also offers seamless deployment and scaling thanks to Cloudflare Workers. With the generous free plan provided by Workers, you can deploy your plugin quickly and scale it infinitely as needed.
Our ChatGPT Plugin Quickstarts are all about sparking creativity, speeding up development, and empowering developers to create amazing conversational AI experiences. By leveraging Cloudflare Workers' robust infrastructure and our streamlined tooling, you can easily build, deploy, and scale custom ChatGPT plugins, unlocking a world of endless possibilities for conversational AI applications.
Whether you're crafting a virtual assistant, a customer support bot, a language translator, or any other conversational AI tool, our ChatGPT Plugin Quickstarts are a great place to start. We're excited to provide this Quickstart, and would love to see what you build with it. Join us in our Discord community to share what you're working on!
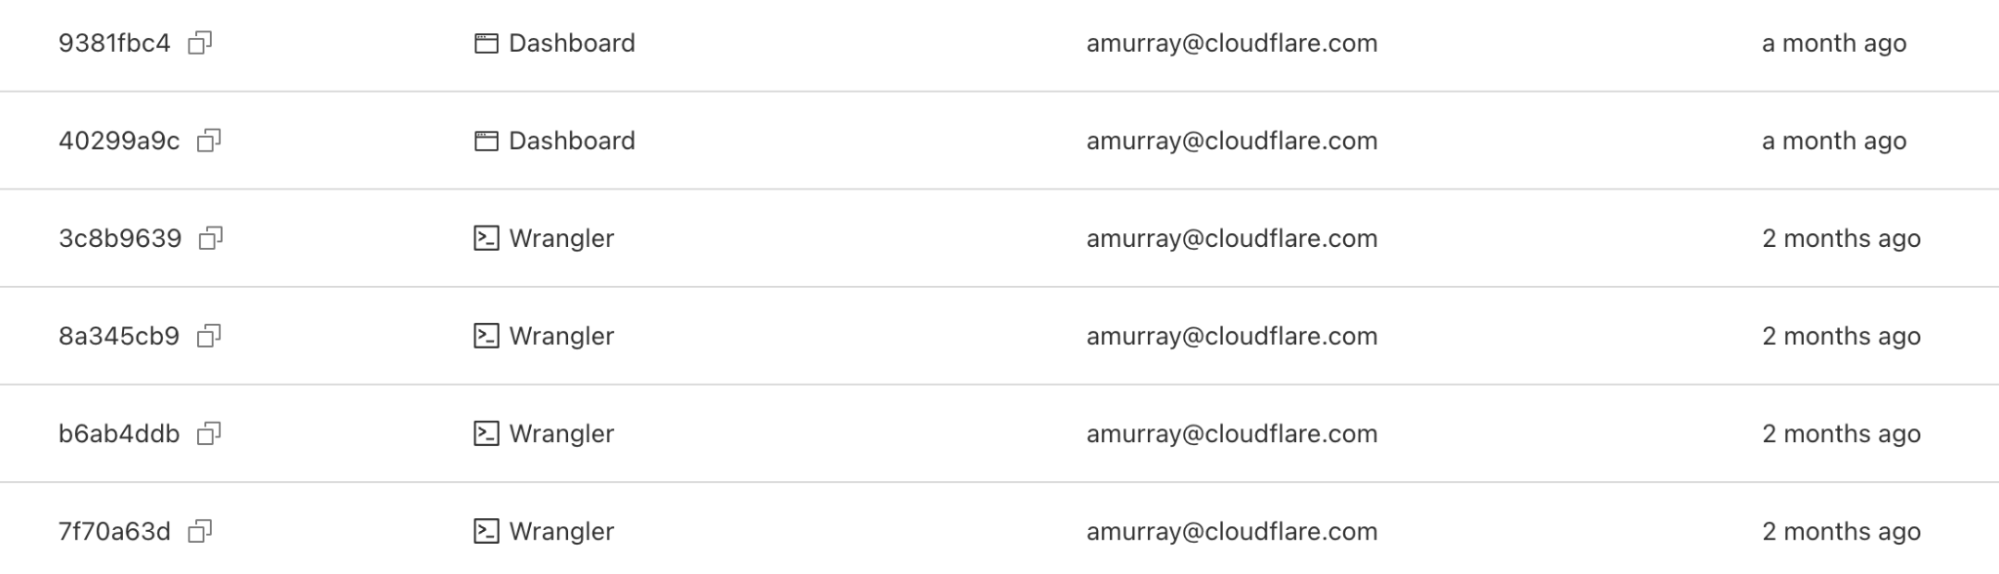
In November, 2022, we introduced deployments for Workers. Deployments are created as you make changes to a Worker. Each one is unique. These let you track changes to your Workers over time, seeing who made the changes, and where they came from.
When we made the announcement, we also said our intention was to build more functionality on top of deployments.
Today, we’re proud to release rollbacks for deployments.
Rollbacks
As nice as it would be to know that every deployment is perfect, it’s not always possible – for various reasons. Rollbacks provide a quick way to deploy past versions of a Worker – providing another layer of confidence when developing and deploying with Workers.
Via the dashboard
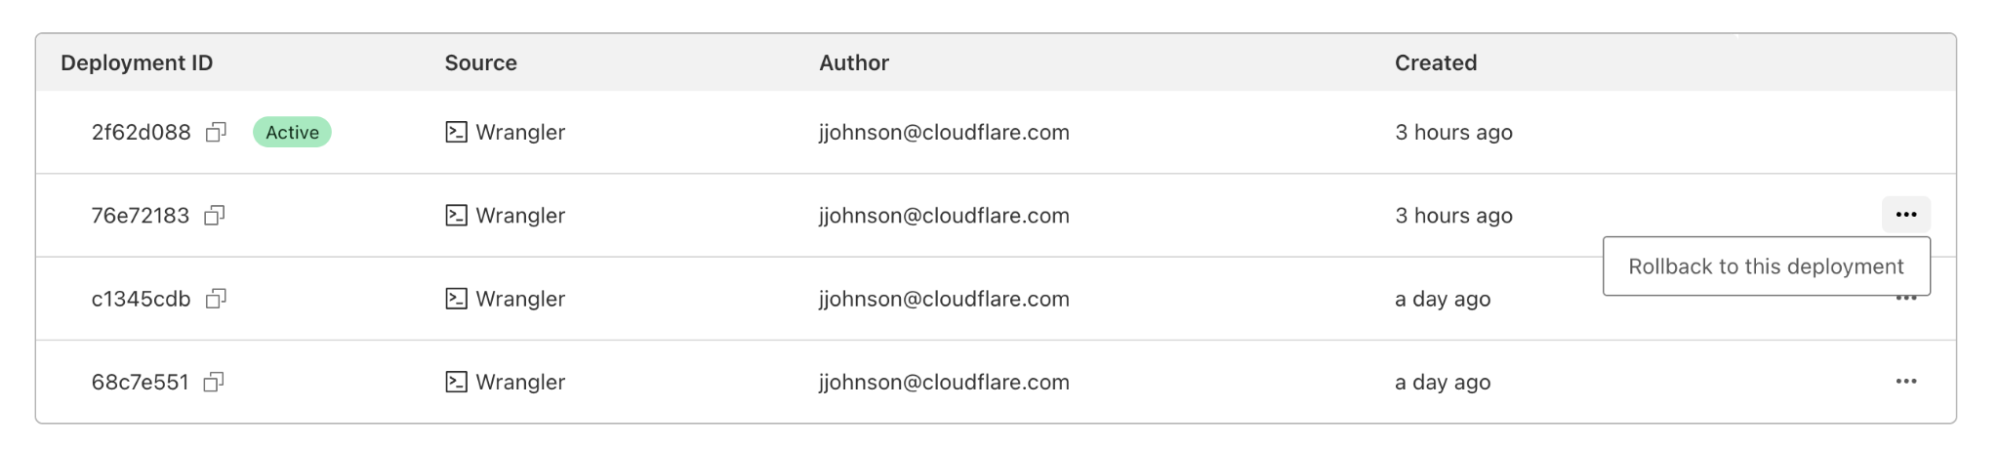
In the dashboard, you can navigate to the Deployments tab. For each deployment that’s not the most recent, you should see a new icon on the far right of the deployment. Hovering over that icon will display the option to rollback to the specified deployment.
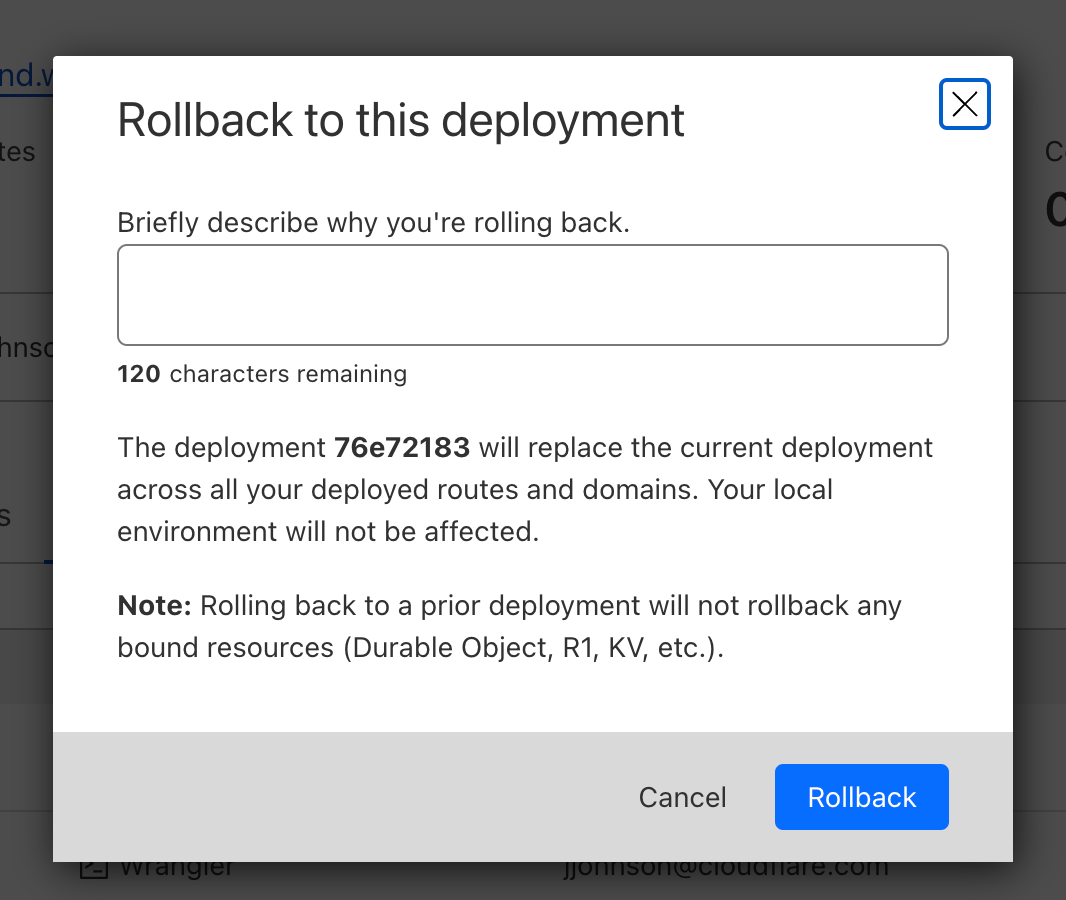
Clicking on that will bring up a confirmation dialog, where you can enter a reason for rollback. This provides another mechanism of record-keeping and helps give more context for why the rollback was necessary.
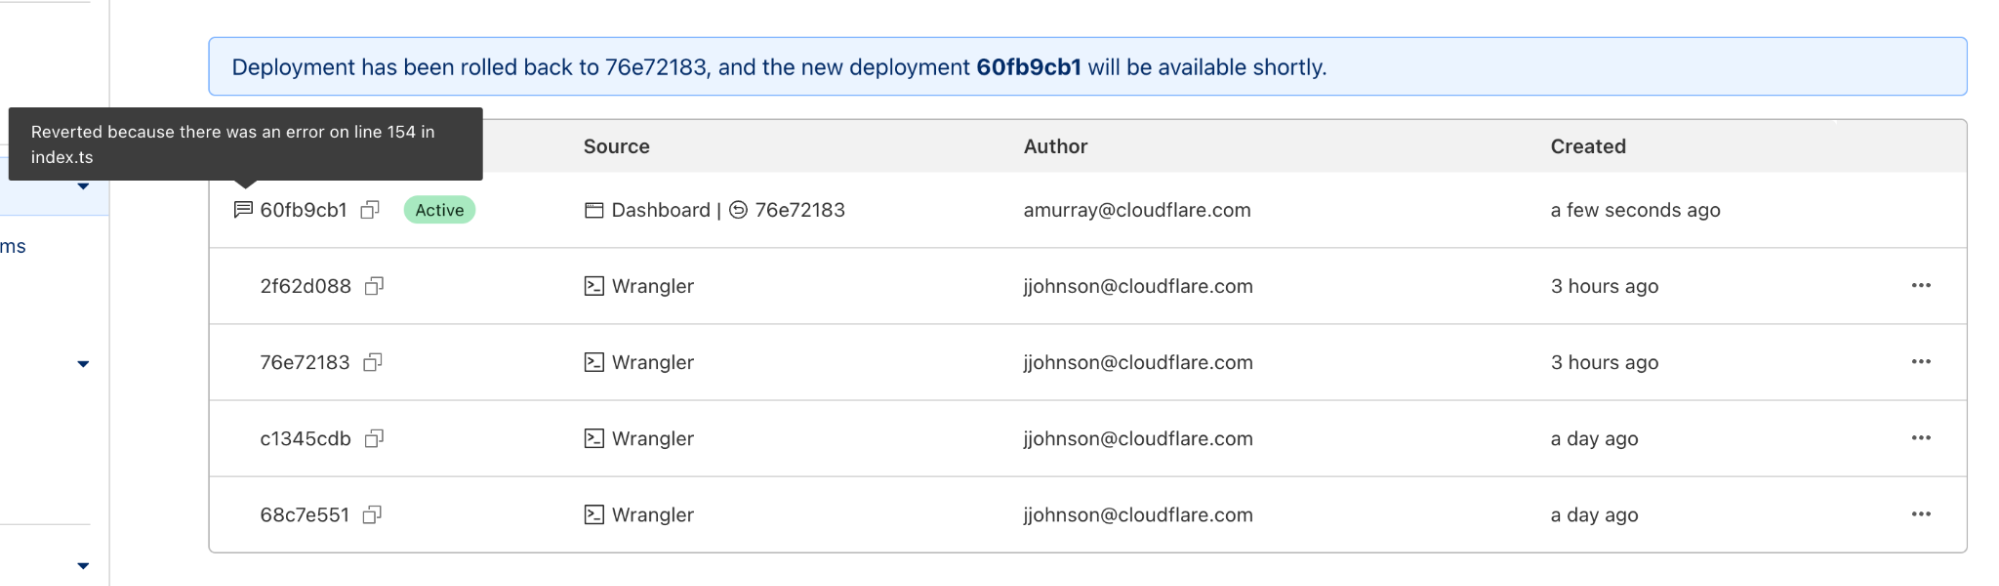
Once you enter a reason and confirm, a new rollback deployment will be created. This deployment has its own ID, but is a duplicate of the one you rolled back to. A message appears with the new deployment ID, as well as an icon showing the rollback message you entered above.
Via Wrangler
With Wrangler version 2.13, rolling back deployments via Wrangler can be done via a new command – wrangler rollback. This command takes an optional ID to rollback to a specific deployment, but can also be run without an ID to rollback to the previous deployment. This provides an even faster way to rollback in a situation where you know that the previous deployment is the one that you want.
Just like the dashboard, when you initiate a rollback you will be prompted to add a rollback reason and to confirm the action.
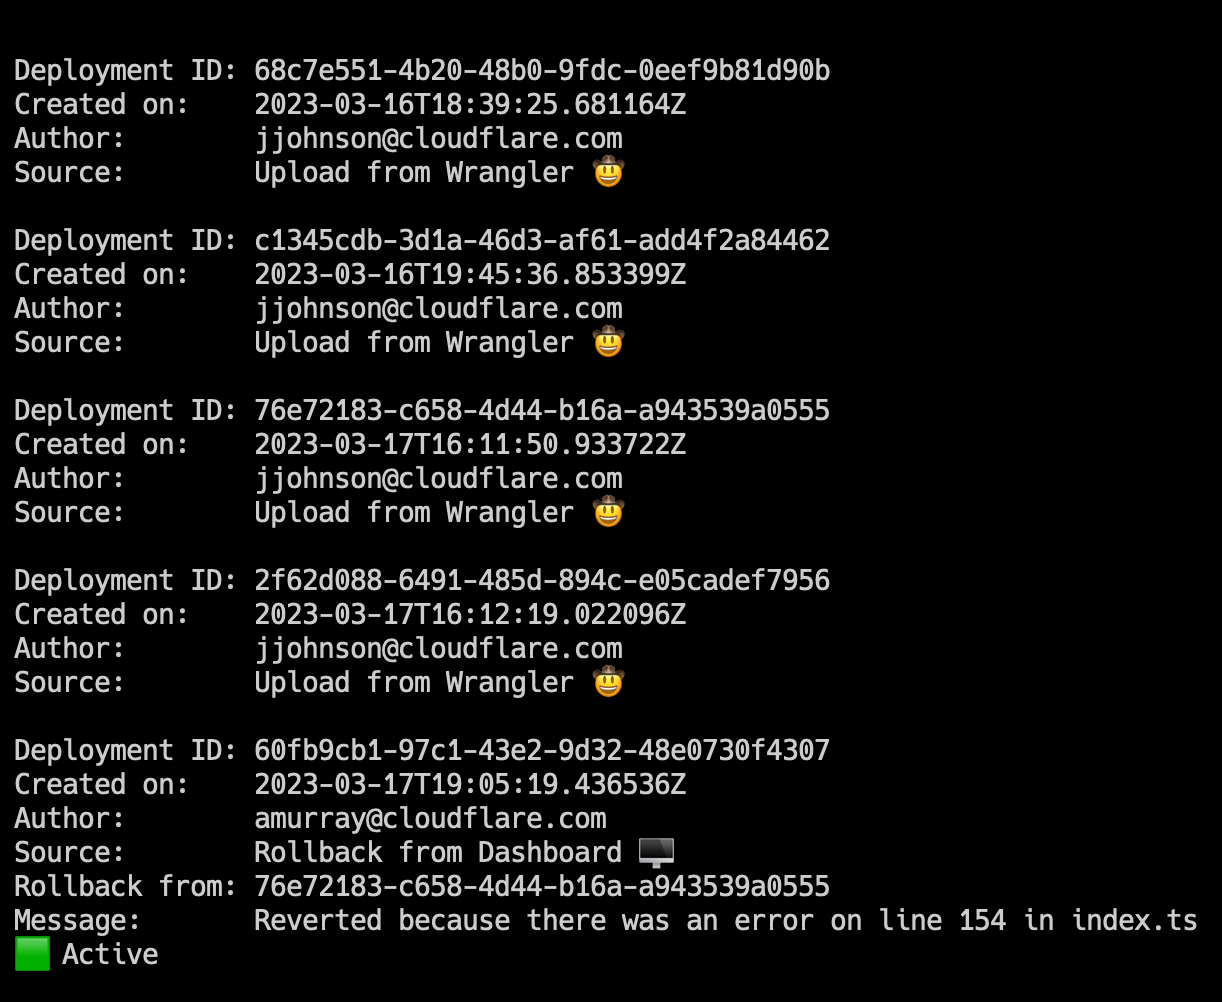
In addition to wrangler rollback we’ve done some refactoring to the wrangler deployments command. Now you can run wrangler deployments list to view up to the last 10 deployments.
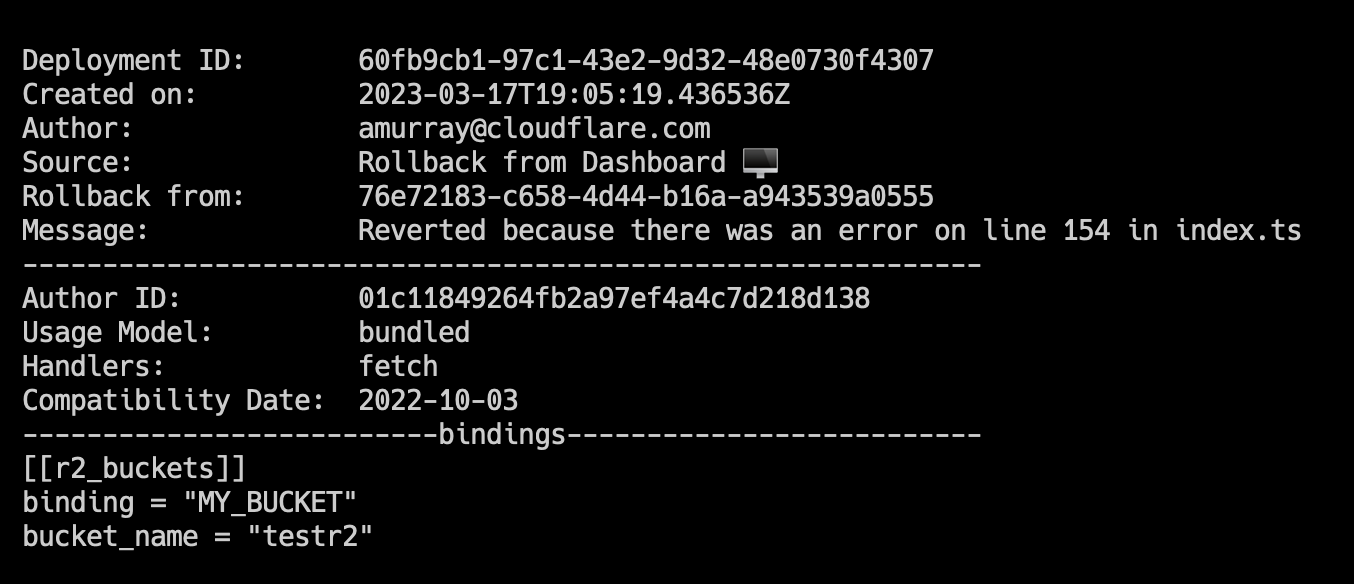
Here, you can see two new annotations: rollback from and message. These match the dashboard experience, and provide more visibility into your deployment history.
To view an individual deployment, you can run wrangler deployments view. This will display the last deployment made, which is the active deployment. If you would like to see a specific deployment, you can run wrangler deployments view [ID].
We’ve updated this command to display more data like: compatibility date, usage model, and bindings. This additional data will help you to quickly visualize changes to Worker or to see more about a specific Worker deployment without having to open your editor and go through source code.
Keep deploying!
We hope this feature provides even more confidence in deploying Workers, and encourages you to try it out! If you leverage the Cloudflare dashboard to manage deployments, you should have access immediately. Wrangler users will need to update to version 2.13 to see the new functionality.
Make sure to check out our updated deployments docs for more information, as well as information on limitations to rollbacks. If you have any feedback, please let us know via this form.
On the Cloudflare Developer Platform, we understand that building any application is a unique experience for every developer. We know that in the developer ecosystem there are a plethora of tools to choose from and as a developer you have preferences and needs. We don’t believe there are “right” or “wrong” tools to use in development and want to ensure a good developer experience no matter your choices. We believe in meeting you where you are.
When Pages Functions moved to Generally Available in November of last year, we knew it was the key that unlocks a variety of use cases – namely full-stack applications! However, we still felt we could do more to provide the flexibility for you to build what you want and how you want.
That’s why today we’re opening the doors to developers who want to build their server side applications with something other than JavaScript. We’re excited to announce WebAssembly support for Pages Functions projects!
WebAssembly (or Wasm) is a low-level assembly-like language that can run with near-native performance. It provides programming languages such as C/C++, C# or Rust with a compilation target, enabling them to run alongside JavaScript. Primarily designed to run on the web (though not exclusively), WebAssembly opens up exciting opportunities for applications to run on the web platform, both on the client and the server, that up until now couldn’t have done so.
With Pages Functions being Workers “under the hood” and Workers having Wasm module support for quite some time, it is only natural that Pages provides a similar experience for our users as well. While not all use cases are a good fit for Wasm, there are many that are. Our goal with adding Wasm support is enabling those use cases and expanding the boundaries of what Functions can build.
Using WebAssembly in Pages Functions
WebAssembly in Pages Functions works very similar to how it does today in Workers — we read wasm files as WebAssembly modules, ready for you to import and use directly from within your Functions. In short, like this:
// functions/api/distance-between.js

import wasmModule from "../../pkg/distance.wasm";

export async function onRequest({ request }) {
  const moduleInstance = await WebAssembly.instantiate(wasmModule);
  const distance = await moduleInstance.exports.distance_between();

  return new Response(distance);
}
Let’s briefly unpack the code snippet above to highlight some things that are important to understand.
import wasmModule from "../../pkg/distance.wasm";
Pages makes no assumptions as to how the binary .wasm files you want to import were compiled. In our example above, distance.wasm can be a file you compiled yourself out of code you wrote, or equally, a file provided in a third-party library’s distribution. The only thing Pages cares about is that distance.wasm is a compiled binary Wasm module file.
Apart from Wasm modules, this work unlocks support for two other module types that you can import within your Functions code: text and binary. These are not standardized modules, but can be very handy if you need to import raw text blobs (such as HTML files) as a string:
// functions/my-function.js
import html from "404.html";

export async function onRequest() {
  return new Response(html,{
    headers: { "Content-Type": "text/html" }
  });
}
or raw data blobs (such as images) as an ArrayBuffer.
// functions/my-function.js
import image from "../hearts.png.bin";

export async function onRequest() {
  return new Response(image,{
    headers: { "Content-Type": "image/png" }
  });
}
The distance between us on the surface of Earth
Let’s take a look at a live example to see it all in action! We’ve built a small demo app that walks you through an example of Functions with WebAssembly end-to-end. You can check out the code of our demo application available on GitHub.
The application computes the distance in kilometers on the surface of Earth between your current location (based on the geo coordinates of the incoming request) and any other point on the globe, each time you click on the globe’s surface.
The code that performs the actual high-performance distance calculation is written in Rust, and is a slight adaptation of the example provided in the Rust cookbook:
fn distance_between(from_latitude_degrees: f64, from_longitude_degrees: f64, to_latitude_degrees: f64, to_longitude_degrees: f64) -> f64 {
    let earth_radius_kilometer = 6371.0_f64;

    let from_latitude = from_latitude_degrees.to_radians();
    let to_latitude = to_latitude_degrees.to_radians();

    let delta_latitude = (from_latitude_degrees - to_latitude_degrees).to_radians();
    let delta_longitude = (from_longitude_degrees - to_longitude_degrees).to_radians();

    let central_angle_inner = (delta_latitude / 2.0).sin().powi(2)
        + from_latitude.cos() * to_latitude.cos() * (delta_longitude / 2.0).sin().powi(2);
    let central_angle = 2.0 * central_angle_inner.sqrt().asin();

    let distance = earth_radius_kilometer * central_angle;

    return distance;
}
We have a Rust playground experiment available here, in case you want to play around with this code snippet in particular.
To use the distance_between() Rust function in Pages Functions, we first compile the code to WebAssembly using wasm-pack:
##
# generate the `pkg` folder which will contain the wasm binary
##
wasm-pack build
Then, we import the generated .wasm artifact from inside our distance-between.js Pages Function. Now, each time you click on the globe surface, a request to /api/distance-between is made, which will trigger the distance_between() function to execute. Once computed, the distance value is returned by our Function, back to the client, which proceeds to display the value to the user.
We want to point out that this application could have been built entirely in JavaScript, however, we equally wanted to show just how simple it is to build it with Rust. The decision to use Rust was motivated by a few factors. First, the tooling ecosystem for building and working with Rust-generated WebAssembly is quite mature, well documented, and easy to get started with. Second, the Rust docs are a fantastic resource if you are new to Rust or to Rust with WebAssembly! If you are looking for a step-by-step tutorial on how to generate and set up a Rust and WebAssembly project, we highly recommend checking out Rust’s official WebAssembly Book.
We hope it gives you a solid starting point in exploring what is possible with Wasm on Pages Functions, and inspires you to create some powerful applications of your own. Head over to our docs to get started today!
Over the coming months, Cloudflare Workers will start to roll out built-in compatibility with Node.js core APIs as part of an effort to support increased compatibility across JavaScript runtimes.
We are happy to announce today that the first of these Node.js APIs – AsyncLocalStorage, EventEmitter, Buffer, assert, and parts of util – are now available for use. These APIs are provided directly by the open-source Cloudflare Workers runtime, with no need to bundle polyfill implementations into your own code.
These new APIs are available today — start using them by enabling the nodejs_compatcompatibility flag in your Workers.
Async Context Tracking with the AsyncLocalStorage API
The AsyncLocalStorage API provides a way to track context across asynchronous operations. It allows you to pass a value through your program, even across multiple layers of asynchronous code, without having to pass a context value between operations.
Consider an example where we want to add debug logging that works through multiple layers of an application, where each log contains the ID of the current request. Without AsyncLocalStorage, it would be necessary to explicitly pass the request ID down through every function call that might invoke the logging function:
function logWithId(id, state) {
  console.log(`${id} - ${state}`);
}

function doSomething(id) {
  // We don't actually use id for anything in this function!
  // It's only here because logWithId needs it.
  logWithId(id, "doing something");
  setTimeout(() => doSomethingElse(id), 10);
}

function doSomethingElse(id) {
  logWithId(id, "doing something else");
}

let idSeq = 0;

export default {
  async fetch(req) {
    const id = idSeq++;
    doSomething(id);
    logWithId(id, 'complete');
    return new Response("ok");
  }
}
While this approach works, it can be cumbersome to coordinate correctly, especially as the complexity of an application grows. Using AsyncLocalStorage this becomes significantly easier by eliminating the need to explicitly pass the context around. Our application functions (doSomething and doSomethingElse in this case) never need to know about the request ID at all while the logWithId function does exactly what we need it to:
import { AsyncLocalStorage } from 'node:async_hooks';

const requestId = new AsyncLocalStorage();

function logWithId(state) {
  console.log(`${requestId.getStore()} - ${state}`);
}

function doSomething() {
  logWithId("doing something");
  setTimeout(() => doSomethingElse(), 10);
}

function doSomethingElse() {
  logWithId("doing something else");
}

let idSeq = 0;

export default {
  async fetch(req) {
    return requestId.run(idSeq++, () => {
      doSomething();
      logWithId('complete');
      return new Response("ok");
    });
  }
}
With the nodejs_compatcompatibility flag enabled, import statements are used to access specific APIs. The Workers implementation of these APIs requires the use of the node: specifier prefix that was introduced recently in Node.js (e.g. node:async_hooks, node:events, etc)
We implement a subset of the AsyncLocalStorage API in order to keep things as simple as possible. Specifically, we’ve chosen not to support the enterWith() and disable() APIs that are found in Node.js implementation simply because they make async context tracking more brittle and error prone.
Conceptually, at any given moment within a worker, there is a current “Asynchronous Context Frame”, which consists of a map of storage cells, each holding a store value for a specific AsyncLocalStorage instance. Calling asyncLocalStorage.run(...) causes a new frame to be created, inheriting the storage cells of the current frame, but using the newly provided store value for the cell associated with asyncLocalStorage.
const als1 = new AsyncLocalStorage();
const als2 = new AsyncLocalStorage();

// Code here runs in the root frame. There are two storage cells,
// one for als1, and one for als2. The store value for each is
// undefined.

als1.run(123, () => {
  // als1.run(...) creates a new frame (1). The store value for als1
  // is set to 123, the store value for als2 is still undefined.
  // This new frame is set to "current".

  als2.run(321, () => {
    // als2.run(...) creates another new frame (2). The store value
    // for als1 is still 123, the store value for als2 is set to 321.
    // This new frame is set to "current".
    console.log(als1.getStore(), als2.getStore());
  });

  // Frame (1) is restored as the current. The store value for als1
  // is still 123, but the store value for als2 is undefined again.
});

// The root frame is restored as the current. The store values for
// both als1 and als2 are both undefined again.
Whenever an asynchronous operation is initiated in JavaScript, for example, creating a new JavaScript promise, scheduling a timer, etc, the current frame is captured and associated with that operation, allowing the store values at the moment the operation was initialized to be propagated and restored as needed.
const als = new AsyncLocalStorage();
const p1 = als.run(123, () => {
  return promise.resolve(1).then(() => console.log(als.getStore());
});

const p2 = promise.resolve(1);
const p3 = als.run(321, () => {
  return p2.then(() => console.log(als.getStore()); // prints 321
});

als.run('ABC', () => setInterval(() => {
  // prints "ABC" to the console once a second…
  setInterval(() => console.log(als.getStore(), 1000);
});

als.run('XYZ', () => queueMicrotask(() => {
  console.log(als.getStore());  // prints "XYZ"
}));
Note that for unhandled promise rejections, the “unhandledrejection” event will automatically propagate the context that is associated with the promise that was rejected. This behavior is different from other types of events emitted by EventTarget implementations, which will propagate whichever frame is current when the event is emitted.
const asyncLocalStorage = new AsyncLocalStorage();

asyncLocalStorage.run(123, () => Promise.reject('boom'));
asyncLocalStorage.run(321, () => Promise.reject('boom2'));

addEventListener('unhandledrejection', (event) => {
  // prints 123 for the first unhandled rejection ('boom'), and
  // 321 for the second unhandled rejection ('boom2')
  console.log(asyncLocalStorage.getStore());
});
Workers can use the AsyncLocalStorage.snapshot() method to create their own objects that capture and propagate the context:
const asyncLocalStorage = new AsyncLocalStorage();

class MyResource {
  #runInAsyncFrame = AsyncLocalStorage.snapshot();

  doSomething(...args) {
    return this.#runInAsyncFrame((...args) => {
      console.log(asyncLocalStorage.getStore());
    }, ...args);
  }
}

const resource1 = asyncLocalStorage.run(123, () => new MyResource());
const resource2 = asyncLocalStorage.run(321, () => new MyResource());

resource1.doSomething();  // prints 123
resource2.doSomething();  // prints 321
There is currently an effort underway to add a new AsyncContext mechanism (inspired by AsyncLocalStorage) to the JavaScript language itself. While it is still early days for the TC-39 proposal, there is good reason to expect it to progress through the committee. Once it does, we look forward to being able to make it available in the Cloudflare Workers platform. We expect our implementation of AsyncLocalStorage to be compatible with this new API.
The proposal for AsyncContext provides an excellent set of examples and description of the motivation of why async context tracking is useful.
Events with EventEmitter
The EventEmitter API is one of the most fundamental Node.js APIs and is critical to supporting many other higher level APIs, including streams, crypto, net, and more. An EventEmitter is an object that emits named events that cause listeners to be called.
The implementation in the Workers runtime fully supports the entire Node.js EventEmitter API including the captureRejections option that allows improved handling of async functions as event handlers:
const emitter = new EventEmitter({ captureRejections: true });
emitter.on('hello', async (...args) => {
  throw new Error('boom');
});
emitter.on('error', (err) => {
  // the async promise rejection is emitted here!
});
The Buffer API in Node.js predates the introduction of the standard TypedArray and DataView APIs in JavaScript by many years and has persisted as one of the most commonly used Node.js APIs for manipulating binary data. Today, every Buffer instance extends from the standard Uint8Array class but adds a range of unique capabilities such as built-in base64 and hex encoding/decoding, byte-order manipulation, and encoding-aware substring searching.
In the Workers implementation of assert, all assertions run in what Node.js calls the “strict assertion mode“, which means that non-strict methods behave like their corresponding strict methods. For instance, deepEqual() will behave like deepStrictEqual().
The promisify and callbackify APIs in Node.js provide a means of bridging between a Promise-based programming model and a callback-based model.
The promisify method allows taking a Node.js-style callback function and converting it into a Promise-returning async function:
import { promisify } from 'node:util';

function foo(args, callback) {
  try {
    callback(null, 1);
  } catch (err) {
    // Errors are emitted to the callback via the first argument.
    callback(err);
  }
}

const promisifiedFoo = promisify(foo);
await promisifiedFoo(args);
Similarly, callbackify converts a Promise-returning async function into a Node.js-style callback function:
import { callbackify } from 'node:util';

async function foo(args) {
  throw new Error('boom');
}

const callbackifiedFoo = callbackify(foo);

callbackifiedFoo(args, (err, value) => {
  if (err) throw err;
});
Together these utilities make it easy to properly handle all of the generally tricky nuances involved with properly bridging between callbacks and promises.
The util.types API provides a reliable and generally more efficient way of checking that values are instances of various built-in types.
import { types } from 'node:util';

types.isAnyArrayBuffer(new ArrayBuffer());  // Returns true
types.isAnyArrayBuffer(new SharedArrayBuffer());  // Returns true
types.isArrayBufferView(new Int8Array());  // true
types.isArrayBufferView(Buffer.from('hello world')); // true
types.isArrayBufferView(new DataView(new ArrayBuffer(16)));  // true
types.isArrayBufferView(new ArrayBuffer());  // false
function foo() {
  types.isArgumentsObject(arguments);  // Returns true
}
types.isAsyncFunction(function foo() {});  // Returns false
types.isAsyncFunction(async function foo() {});  // Returns true
// .. and so on
Please refer to the Node.js documentation for more information on how to use the type check APIs: https://nodejs.org/dist/latest-v19.x/docs/api/util.html#utiltypes. The workers implementation currently does not provide implementations of the util.types.isExternal(), util.types.isProxy(), util.types.isKeyObject(), or util.type.isWebAssemblyCompiledModule() APIs.
What’s next
Keep your eyes open for more Node.js core APIs coming to Cloudflare Workers soon! We currently have implementations of the string decoder, streams and crypto APIs in active development. These will be introduced into the workers runtime incrementally over time and any worker using the nodejs_compat compatibility flag will automatically pick up the new modules as they are added.
In today’s digital world, security is a top priority for businesses. Whether you’re a Fortune 500 company or a startup just taking off, it’s essential to implement security measures in order to protect sensitive information. Security starts inside an organization; it starts with having Zero Trust principles that protect access to resources.
Mutual TLS (mTLS) is useful in a Zero Trust world to secure a wide range of network services and applications: APIs, web applications, microservices, databases and IoT devices. Cloudflare has products that enforce mTLS: API Shield uses it to secure API endpoints and Cloudflare Access uses it to secure applications. Now, with mTLS support for Workers you can use Workers to authenticate to services secured by mTLS directly. mTLS for Workers is now generally available for all Workers customers!
A recap on how TLS works
Before diving into mTLS, let’s first understand what TLS (Transport Layer Security) is. Any website that uses HTTPS, like the one you’re reading this blog on, uses TLS encryption. TLS is used to create private communications on the Internet – it gives users assurance that the website you’re connecting to is legitimate and any information passed to it is encrypted.
TLS is enforced through a TLS handshake where the client and server exchange messages in order to create a secure connection. The handshake consists of several steps outlined below:
The client and server exchange cryptographic keys, the client authenticates the server’s identity and the client and server generate a secret key that’s used to create an encrypted connection.
For most connections over the public Internet TLS is sufficient. If you have a website, for example a landing page, storefront or documentation, you want any user to be able to navigate to it – validating the identity of the client isn’t necessary. But, if you have services that run on a corporate network or private/sensitive applications you may want access to be locked down to only authorized clients.
Enter mTLS
With mTLS, both the client and server present a digital certificate during the TLS handshake to mutually verify each other’s credentials and prove identities. mTLS adds additional steps to the TLS handshake in order to authenticate the client as well as the server.
In comparison to TLS, with mTLS the server also sends a ‘Certificate Request’ message that contains a list of parties that it trusts and it tells the client to respond with its certificate. The mTLS authentication process is outlined below:
mTLS is typically used when a managed list of clients (eg. users, devices) need access to a server. It uses cryptographically signed certificates for authentication, which are harder to spoof than passwords or tokens. Some common use cases include: communications between APIs or microservices, database connections from authorized hosts, and machine-to-machine IoT connections.
Introducing mTLS on Workers
With mTLS support on Workers, your Workers can now communicate with resources that enforce an mTLS connection. mTLS through Workers can be configured in just a few easy steps:
1. Upload a client certificate and private key obtained from your service that enforces mTLS using wrangler
To get per-request granularity, you can configure multiple mTLS certificates if you’re connecting to multiple hosts within the same Worker. There’s a limit of 1,000 certificates that can be uploaded per account. Contact your account team or reach out through the Cloudflare Developer Discord if you need more certificates.
Try it yourself
It’s that easy! For more information and to try it yourself, refer to our developer documentation – client authentication with mTLS.
We love to see what you’re developing on Workers. Join our Discord community and show us what you’re building!
In this blog post we’ll discuss how Cloudflare Workers enabled us to quickly improve the resiliency of a legacy system. In particular, we’ll discuss how we prevented the email notification systems within Cloudflare from outages caused by external vendors.
Email notification services
At Cloudflare, we send email notifications to customers such as billing invoices, password resets, OTP logins and certificate status updates. We rely on external Email Service Providers (ESPs) to deliver these emails to customers.
The following diagram shows how the system looks. Multiple services in our control plane dispatch emails through an external email vendor. They use HTTP Transmission APIs and also SMTP to send messages to the vendor. If dispatching an email fails, they are retried with exponential back-off mechanisms. Even when our ESP has outages, the retry mechanisms in place guarantee that we don’t lose any messages.
Why did we need to improve resilience?
In some cases, it isn’t sufficient to just deliver the email to the customer; it must be delivered on time. For example, OTP login emails are extremely time sensitive; their validity is short-lived such that a delay in sending them is as bad as not sending them at all. If the ESP is down, all emails including the critical ones will be delayed.
Some time ago our ESP suffered an outage; both the HTTP API and SMTP were unavailable and we couldn’t send emails to customers for a few hours. Several thousand emails couldn’t be delivered immediately and were queued. This led to a delay in clearing out the backlogged messages in the retry queue in addition to sending new messages.
Critical emails not being sent is a major incident for us. A major incident impacts our customers, our business, and also our reputation. We take serious measures to prevent it from happening again in the future. Hence improving the resiliency of this system was our top priority.
Our concrete action items to reduce the failure possibilities were to improve availability by onboarding another email vendor and, when ESP has an outage, mitigate downtime by failing over from one vendor to another.
We wanted to achieve the above as quickly as possible so that our customers are not impacted again.
Step 1 – Improve Availability
Introducing a new vendor gives us the option to failover. But before we introduced it we had to consider another key component of email deliverability, which is the email sender reputation. ISPs assign a sending score to any organization that sends emails. The higher the score, the higher the probability that the email sent by the organization reaches your inbox. Similarly the lower the score, the higher the probability it reaches your spam folder.
Adding a new vendor means emails will be delivered from a new IP address. Mailbox providers (such as Gmail or Hotmail) view new IP addresses as suspicious until they achieve a positive sending reputation. A positive sending reputation is determined by answering the question “did the recipient want this email?”. This is calculated differently for different mailbox providers, but the simplest measure would be that the recipient opened it, and perhaps clicked a link within. To build this reputation, it’s recommended to use an IP warm-up strategy. This usually involves increasing e-mail volume slowly over a matter of days and weeks.
Using this new vendor “only” during failovers would increase the probability of emails reaching our customer’s spam folder for the reasons outlined above. To avoid this and establish a positive sending reputation we want to send a constant stream of traffic between the two vendors.
Solution
We came up with a weighted traffic routing module, an algorithm to route emails to the ESPs based on the ratio of weights assigned to them. This is how the algorithm works roughly:
This algorithm solves the problem of maintaining a constant stream of traffic between the two vendors and to failover when outages happen.
Our next big question was “where” to implement this module? How should this be implemented so that we can build, deploy, and test as quickly as possible? Since there are multiple teams involved, how can we make it quicker for all of them? This leads to a perfect segue to our next step.
Step 2 – Mitigate downtime
Let’s discuss a few approaches on where to build this logic. Should this just be a library? Or should it be a service in itself? Or do we have an even better way?
Design 1 – A simple solution
In this proposed solution, we would implement the weighted traffic routing module in a library and import it in every service. The pros of this approach is that there are no major changes to the overall existing architecture. However, it does come with quite a few drawbacks. Firstly, All of the services require a major code change and a considerable amount of development effort would have to be spent on this integration and testing end-to-end. Furthermore, updating libraries can be slow and there is no guarantee that teams would update in a timely manner. This means we may see teams still sending only to the old ESP during an incident, and we have not solved the problem we set out to.
Design 2 – Extract email routing decisions to its own microservice
The first approach is simple and doesn’t disrupt the architecture, but is not a sustainable solution in the long run. This naturally leads to our next design.
In this iteration, the weighted-traffic-routing module is extracted to its own service. This service decides where to route emails. Although it’s better than the previous approach, it is not without its drawbacks.
Firstly, the positives. This approach requires no major code changes in each service. As long as we honor the original ESP contract, team’s should simply need to update the base URL. Furthermore, we achieve the Single Responsibility Principle. When outages happen, the configurations have to be changed only in the weighted-traffic-routing service and this is the only service to be modified. Finally, we have much more control over retry semantics as they are implemented in a single place.
Some of the drawbacks of taking this approach are the time involved in spinning up a new service from scratch – building, testing, and shipping it is not insignificant. Secondly, we are adding an additional network hop; previously the email-notification-services talked directly to the email service providers, now we are proxying it through another service. Furthermore, since all the upstream requests are funneled through this service, it has to be load-balanced and scaled according to the incoming traffic and we need to ensure we service every request.
Design 3 – The Workers way
The final design we considered; Implementing the weighted traffic routing module in a Cloudflare Worker.
There are a lot of positives to doing it this way.
Firstly, minimal code changes are required in each service. In fact, nothing beyond the environment variables need to be updated. As with the previous design, when email vendor outages happen, only the Email Weighted Traffic Router Worker configuration has to be changed. One positive of using a Cloudflare Worker is when an environment variable is changed and deployed, it’s deployed in all of Cloudflare’s network in a few milliseconds. This is a significant advantage for us because it means the failover process takes only a few milliseconds; time-critical emails will reach our customers’ inbox on time, preventing major incidents.
Secondly, As the email traffic increases, we don’t have to care about scaling or load balancing the weighted-traffic-routing module. A Worker automatically takes care of it.
Finally, the operational overhead to building and running this is incredibly low. We don’t have to spend time on spinning up new containers, configuring and deploying them. The majority of the work is just to programme the algorithm that we discussed earlier.
There are still some drawbacks here though.We are still introducing a new service and an additional network hop. However, we can make use of the templates available here to make bootstrapping as efficient as possible.
Building it the Workers way
Weighing the pros and cons of the above approaches, we went with implementing it in a Cloudflare Worker.
The Email Traffic Router Worker sits in between the Cloudflare control plane and the ESPs and proxies requests between them. We stream raw responses from the upstream; the internal service is completely agnostic of multiple ESPs, and how the traffic is routed.
We configure the percentage of traffic we want to send to each vendor using environment variables. Cloudflare Workers provide environment variables which is a convenient way to configure a worker application.
export const ratioBasedRandPicker = (
  ratio: number,
  VENDOR1: string,
  VENDOR2: string,
  generator: () => number = Math.random,
): string => {
  if (isNaN(ratio) || ratio < 0 || ratio > 1) throw new ConfigurationError(`invalid ratio ${ratio}`)
  return generator() < ratio ? VENDOR1 : VENDOR2
}
The Email Weighted Traffic Router Worker generates a random number between 0 (inclusive) and 1 with approximately uniform distribution over the range. When the ratio is set to 1, vendor 1 will be picked always, and similarly when it’s set to 0 vendor 2 will be picked all the time. For any values in between, the vendor is picked based on the weights assigned. Thus, when all the traffic has to be routed to vendor 1 we set the ratio to 1; the random numbers generated are always less than 1, hence vendor 1 will always be selected.
Doing a failover is as simple as updating the vendor1_to_vendor2 environment variable. In general, an environment variable for a Cloudflare Worker can be updated in one of the following ways:
Using Cloudflare Dashboard: All Worker environment variables are available to be configured in the Cloudflare Dashboard. Navigate to Workers -> Settings -> Variables -> Edit Variables and update the value
Using Wrangler (if your Worker is managed by wrangler): edit the environment variable in the wrangler.toml file and execute wrangler publish for the new values to kick in.
Once the variable is updated using one of the above methods, the Email Traffic Router Worker is deployed immediately in all Cloudflare data centers with this value. Hence all our emails will now be routed by the healthy vendor.
Now, we have built and shipped our weighted-traffic-routing logic in a Worker and building it in a Worker really accelerated our process of improving the resiliency.
The module is shipped, now what happens when the ESP is suffering an outage or a degraded performance? Let me conclude with a success story.
When an ESP outage happened
After deploying this Email Traffic Router Worker to production, we saw an outage declared by one of our vendors. We immediately configured our Traffic Router to send all traffic to the healthy vendor. Changing this configuration took about a few seconds, and deploying the change was even faster. Within a few milliseconds all the traffic was routed to the healthy instance, and all the critical emails reached their corresponding inboxes on time!
Looking at some timelines:
18:45 UTC – we get alerted that message delivery is slow/degraded from email provider 1. The other provider is not impacted
18:47 UTC – Teams within Cloudflare confirmed that their message outbound is experiencing delays
18:47 UTC – we decide to failover
18:50 UTC – we configured the Email Traffic Router Worker to dispatch all the traffic to the healthy email provider, deployed the changes
Starting 18:50 we saw a steady decrease in requests to email provider 1 and a steady uptick in the requests to the provider 2 instance.
Here’s our metrics dashboard:
Next steps
Currently, the failover step is manual. Our next step is to automate this process. Once we get notified that one of the vendors is experiencing outages, the Email Traffic Router Worker will failover automatically to the healthy vendor.
Conclusion
To reiterate our goals, we wanted to make our email notification systems resilient by
adding another vendor
having a simple and fast mechanism to failover when vendor outages happen
achieving the above two objectives as quickly as possible to reduce customer impact
Thus our email systems are more reliable, and more resilient to any outages or failures of our email service providers. Cloudflare Worker makes it easy and simple to build and ship a production-ready service in no time; it also makes failovers possible without any code changes or downtime. It’s powerful that multiple services/teams within Cloudflare can rely on one place, the Email Traffic Router Worker, for uninterrupted email delivery.
Building applications on Cloudflare Workers has always been fun. Workers applications have low latency response times by default, and easy developer ergonomics thanks to Wrangler. It’s no surprise that for years now, developers have been going from idea to production with Workers in just a few minutes.
Internally, we’re no different. When a member of our team has a project idea, we often reach for Workers first, and not just for the MVP stage, but in production, too. Workers have been a secret ingredient to Cloudflare’s innovation for some time now, allowing us to build products like Access, Stream and Workers KV. Even better, when we have new ideas and we can use new Cloudflare products to build them, it’s a great way to give feedback on those products.
We’ve discussed this in the past on the Cloudflare blog – in May last year, I wrote how we rebuilt Cloudflare’s developer documentation using many of the tools that had recently been released in the Workers ecosystem: Cloudflare Pages for hosting, and Bulk Redirects for the redirect rules. In November, we released a new version of our API documentation, which again used Pages for hosting, and Pages functions for intelligent caching and transformation of our API schema.
In this blog post, I’m excited to show off some of the new tools in Cloudflare’s developer arsenal, D1 and Queues, to prototype and ship an internal tool for our SEO experts at Cloudflare. We’ve made this project, which we’re calling Prospector, open-source too – check it out in our cloudflare/templates repo on GitHub. Whether you’re a developer looking to understand how to use multiple parts of Cloudflare’s developer stack together, or an SEO specialist who may want to deploy the tool in production, we’ve made it incredibly easy to get up and running.
What we’re building
Prospector is a tool that allows Cloudflare’s SEO experts to monitor our blog and marketing site for specific keywords. When a keyword is matched on a page, Prospector will notify an email address. This allows our SEO experts to stay informed of any changes to our website, and take action accordingly.
Using MailChannels’ integration with Workers, we can quickly and easily send emails from our application using a single API call. This allows us to focus on the core functionality of the application, and not worry about the details of sending emails.
Prospector uses Cloudflare Workers as the user-facing API for the application. It uses D1 to store and retrieve data in real-time, and Queues to handle the fetching of all URLs and the notification process. We’ve also included an intuitive user interface for the application, which is built with HTML, CSS, and JavaScript.
Why we built it
It is widely known in SEO that both internal and external links help Google and other search engines understand what a website is about, which impacts keyword rankings. Not only do these links guide readers to additional helpful information, they also allow web crawlers for search engines to discover and index content on the site.
Acquiring external links is often a time-consuming process and at the discretion of third parties, whereas website owners typically have much more control over internal links. As a result, internal linking is one of the most useful levers available in SEO.
In an ideal world, every piece of content would be fully formed upon publication, replete with helpful internal links throughout the piece. However, this is often not the case. Many times, content is edited after the fact or additional pieces of relevant content come along after initial publication. These situations result in missed opportunities for internal linking.
Like other large organizations, Cloudflare has published thousands of blogs and web pages over the years. We share new content every time a product/technology is introduced and improved. Ultimately, that also means it’s become more challenging to identify opportunities for internal linking in a timely, automated fashion. We needed a tool that would allow us to identify internal linking opportunities as they appear, and speed up the time it takes to identify new internal linking opportunities.
Although we tested several tools that might solve this problem, we found that they were limited in several ways. First, some tools only scanned the first 2,000 characters of a web page. Any opportunities found beyond that limit would not be detected. Next, some tools did not allow us to limit searches to certain areas of the site and resulted in many false positives. Finally, other potential solutions required manual operation, leaving the process at the mercy of human memory.
To solve our problem (and ultimately, improve our SEO), we needed an automated tool that could discover and notify us of new instances of targeted phrases on a specified range of pages.
How it works
Data model
First, let’s explore the data model for Prospector. We have two main tables: notifiers and urls. The notifiers table stores the email address and keyword that we want to monitor. The urls table stores the URL and sitemap that we want to scrape. The notifiers table has a one-to-many relationship with the urls table, meaning that each notifier can have many URLs associated with it.
In addition, we have a sitemaps table that stores the sitemap URLs that we’ve scraped. Many larger websites don’t just have a single sitemap: the Cloudflare blog, for instance, has a primary sitemap that contains four sub-sitemaps. When the application is deployed, a primary sitemap is provided as configuration, and Prospector will parse it to find all of the sub-sitemaps.
Finally, notifier_matches is a table that stores the matches between a notifier and a URL. This allows us to keep track of which URLs have already been matched, and which ones still need to be processed. When a match has been found, the notifier_matches table is updated to reflect that, and “matches” for a keyword are no longer processed. This saves our SEO experts from a crowded inbox, and allows them to focus and act on new matches.
Connecting the pieces with Cloudflare Queues Cloudflare Queues acts as the work queue for Prospector. When a new notifier is added, a new job is created for it and added to the queue. Behind the scenes, Queues will distribute the work across multiple Workers, allowing us to scale the application as needed. When a job is processed, Prospector will scrape the URL and check for matches. If a match is found, Prospector will send an email to the notifier’s email address.
Using the Cron Triggers functionality in Workers, we can schedule the scraping process to run at a regular interval – by default, once a day. This allows us to keep our data up-to-date, and ensures that we’re always notified of any changes to our website. It also allows the end-user to configure when they receive emails in case they want to receive them more or less frequently, or at the beginning of their workday.
The Module Workers syntax for Workers makes accessing the application bindings – the constants available in the application for querying D1, Queues, and other services – incredibly easy. src/index.ts, the entrypoint for the application, looks like this:
With this syntax, we can see where the various events incoming to the application – the fetch event, the queue event, and the scheduled event – are handled. The fetch event is the main entrypoint for the application, and is where we handle all of the API routes. The queue event is where we handle the work that’s been added to the queue, and the scheduled event is where we handle the scheduled scraping process.
Central to the application, of course, is Workers – acting as the API gateway and coordinator. We’ve elected to use the popular open-source framework Hono, an Express-style API for Workers, in Prospector. With Hono, we can quickly map out a REST API in just a few lines of code. Here’s an example of a few API routes and how they’re defined with Hono:
With these bindings, we can define the types for our environment variables, and use them in our application. Here’s an example of the Env type, which defines the environment variables that we use in the application:
Notice the types of the DB and QUEUE bindings – D1Database and Queue, respectively. These types are automatically generated, complete with type signatures for each method inside of the D1 and Queue APIs. This means that we can be sure that we’re using the correct methods, and that we’re passing the correct arguments to them, directly from our text editor – without having to refer to the documentation.
How to use it
One of my favorite things about Workers is that deploying applications is quick and easy. Using `wrangler.toml` and some simple build scripts, we can deploy a fully-functional application in just a few minutes. Prospector is no different. With just a few commands, we can create the necessary D1 database and Queues instance, and deploy the application to our account.
First, you’ll need to clone the repository from our cloudflare/templates repository:
git clone $URL
If you haven’t installed wrangler yet, you can do so by running:
npm install @cloudflare/wrangler -g
With Wrangler installed, you can login to your account by running:
wrangler login
After you’ve done that, you’ll need to create a new D1 database, as well as a Queues instance. You can do this by running the following commands:
Next, you can run the bin/migrate script to create the tables in your database:
bin/migrate
This will create all the needed tables in your database, both in development (locally) and in production. Note that you’ll even see the creation of a honest-to-goodness .sqlite3 file in your project directory – this is the local development database, which you can connect to directly using the same SQLite CLI that you’re used to:
Finally, you can deploy the application to your account:
npm run deploy
With a deployed application, you can visit your Workers URL to see the user interface. From there, you can add new notifiers and URLs, and see the results of your scraping process. When a new keyword match is found, you’ll receive an email with the details of the match instantly:
Conclusion
For some time, there have been a great deal of applications that were hard to build on Workers without relational data or background task tooling. Now, with D1 and Queues, we can build applications that seamlessly integrate between real-time user interfaces, geographically distributed data, background processing, and more, all using the same developer ergonomics and low latency that Workers is known for.
D1 has been crucial for building this application. On larger sites, the number of URLs that need to be scraped can be quite large. If we were to use Workers KV, our key-value store, for storing this data, we would quickly struggle with how to model, retrieve, and update the data needed for this use-case. With D1, we can build relational data models and quickly query just the data we need for each queued processing task.
Using these tools, developers can build internal tools and applications for their companies that are more powerful and more scalable than ever before. With the integration of Cloudflare’s Zero Trust suite, developers can make these applications secure by default, and deploy them to Cloudflare’s global network. This allows developers to build applications that are fast, secure, and reliable, all without having to worry about the underlying infrastructure.
Prospector is a great example of how easy it is to build applications on Cloudflare Workers. With the recent addition of D1 and Queues, we’ve been able to build fully-functional applications that require real-time data and background processing in just a few hours. We’re excited to share the open-source code for Prospector, and we’d love to hear your feedback on the project.
If you have any questions, feel free to reach out to us on Twitter at @cloudflaredev, or join us in the Cloudflare Workers Discord community, which recently hit 20k members and is a great place to ask questions and get help from other developers.
Version 1 of Wrangler (@cloudflare/wrangler on npm) is now deprecated, which means no new features or bug fixes will be published unless they’re critical. Beginning August 2023, no further updates will be provided and the Wrangler v1 GitHub repo will be archived. We strongly recommend you upgrade to version 2 (wrangler on npm) to receive continued support. We have a migration guide to make this process easy!
With that in mind, last year we set out to align our product with our goals. Wrangler was the primary way developers interacted with our platform, but the codebase was difficult to maintain and had spiraled in complexity. Weighing our options, we found that the best way forward was a total rewrite of Wrangler, culminating in the 2.0 release.
For most of our users, deprecation of version 1 will be invisible – they’re already on version 2! If you’re still on version 1, please upgrade – we have a migration guide that details everything you need to do to update to the latest and greatest version. If you encounter any bugs, unexpected behavior, or anything blocking you from upgrading, file an issue! If you’re not using Wrangler, give it a shot! We’re really proud of what we’ve built, and we want your feedback on how we can continue to make it even better.
The Fediverse has been a hot topic of discussion lately, with thousands, if not millions, of new users creating accounts on platforms like Mastodon to either move entirely to “the other side” or experiment and learn about this new social network.
Today we’re introducing Wildebeest, an open-source, easy-to-deploy ActivityPub and Mastodon-compatible server built entirely on top of Cloudflare’s Supercloud. If you want to run your own spot in the Fediverse you can now do it entirely on Cloudflare.
The Fediverse, built on Cloudflare
Today you’re left with two options if you want to join the Mastodon federated network: either you join one of the existing servers (servers are also called communities, and each one has its own infrastructure and rules), or you can run your self-hosted server.
There are a few reasons why you’d want to run your own server:
You want to create a new community and attract other users over a common theme and usage rules.
You don’t want to have to trust third-party servers or abide by their policies and want your server, under your domain, for your personal account.
You want complete control over your data, personal information, and content and visibility over what happens with your instance.
The Mastodon gGmbH non-profit organization provides a server implementation using Ruby, Node.js, PostgreSQL and Redis. Running the official server can be challenging, though. You need to own or rent a server or VPS somewhere; you have to install and configure the software, set up the database and public-facing web server, and configure and protect your network against attacks or abuse. And then you have to maintain all of that and deal with constant updates. It’s a lot of scripting and technical work before you can get it up and running; definitely not something for the less technical enthusiasts.
Wildebeest serves two purposes: you can quickly deploy your Mastodon-compatible server on top of Cloudflare and connect it to the Fediverse in minutes, and you don’t need to worry about maintaining or protecting it from abuse or attacks; Cloudflare will do it for you automatically.
Wildebeest is not a managed service. It’s your instance, data, and code running in our cloud under your Cloudflare account. Furthermore, it’s open-sourced, which means it keeps evolving with more features, and anyone can extend and improve it.
Compatible with the most popular Mastodon web (like Pinafore), desktop, and mobile clients. We also provide a simple read-only web interface to explore the timelines and user profiles.
You can publish, edit, boost, or delete posts, sorry, toots. We support text, images, and (soon) video.
Anyone can follow you; you can follow anyone.
You can search for content.
You can register one or multiple accounts under your instance. Authentication can be email-based on or using any Cloudflare Access compatible IdP, like GitHub or Google.
You can edit your profile information, avatar, and header image.
How we built it
Our implementation is built entirely on top of our products and APIs. Building Wildebeest was another excellent opportunity to showcase our technology stack’s power and versatility and prove how anyone can also use Cloudflare to build larger applications that involve multiple systems and complex requirements.
Here’s a birds-eye diagram of Wildebeest’s architecture:
Let’s get into the details and get technical now.
Cloudflare Pages
At the core, Wildebeest is a Cloudflare Pages project running its code using Pages Functions. Cloudflare Pages provides an excellent foundation for building and deploying your application and serving your bundled assets, Functions gives you full access to the Workers ecosystem, where you can run any code.
Functions has a built-in file-based router. The /functions directory structure, which is uploaded by Wildebeest’s continuous deployment builds, defines your application routes and what files and code will process each HTTP endpoint request. This routing technique is similar to what other frameworks like Next.js use.
Unit testing these endpoints becomes easier too, since we only have to call the handleRequest() function from the testing framework. Check one of our Jest tests, mastodon.spec.ts:
import * as v1_instance from 'wildebeest/functions/api/v1/instance'

describe('Mastodon APIs', () => {
	describe('instance', () => {
		test('return the instance infos v1', async () => {
			const res = await v1_instance.handleRequest(domain, env)
			assert.equal(res.status, 200)
			assertCORS(res)

			const data = await res.json<Data>()
			assert.equal(data.rules.length, 0)
			assert(data.version.includes('Wildebeest'))
		})
       })
})
As with any other regular Worker, Functions also lets you set up bindings to interact with other Cloudflare products and features like KV, R2, D1, Durable Objects, and more. The list keeps growing.
We use Functions to implement a large portion of the official Mastodon API specification, making Wildebeest compatible with the existing ecosystem of other servers and client applications, and also to run our own read-only web frontend under the same project codebase.
Wildebeest’s web frontend uses Qwik, a general-purpose web framework that is optimized for speed, uses modern concepts like the JSX JavaScript syntax extension and supports server-side-rendering (SSR) and static site generation (SSG).
Qwik provides a Cloudflare Pages Adaptor out of the box, so we use that (check our framework guide to know more about how to deploy a Qwik site on Cloudflare Pages). For styling we use the Tailwind CSS framework, which Qwik supports natively.
Our frontend website code and static assets can be found under the /frontend directory. The application is handled by the /functions/[[path]].js dynamic route, which basically catches all the non-API requests, and then invokes Qwik’s own internal router, Qwik City, which takes over everything else after that.
The power and versatility of Pages and Functions routes make it possible to run both the backend APIs and a server-side-rendered dynamic client, effectively a full-stack app, under the same project.
Let’s dig even deeper now, and understand how the server interacts with the other components in our architecture.
D1
Wildebeest uses D1, Cloudflare’s first SQL database for the Workers platform built on top of SQLite, now open to everyone in alpha, to store and query data. Here’s our schema:
The schema will probably change in the future, as we add more features. That’s fine, D1 supports migrations which are great when you need to update your database schema without losing your data. With each new Wildebeest version, we can create a new migration file if it requires database schema changes.
-- Migration number: 0001 	 2023-01-16T13:09:04.033Z

CREATE UNIQUE INDEX unique_actor_following ON actor_following (actor_id, target_actor_id);
D1 exposes a powerful client API that developers can use to manipulate and query data from Worker scripts, or in our case, Pages Functions.
Here’s a simplified example of how we interact with D1 when you start following someone on the Fediverse:
export async function addFollowing(db, actor, target, targetAcct): Promise<UUID> {
	const query = `INSERT OR IGNORE INTO actor_following (id, actor_id, target_actor_id, state, target_actor_acct) VALUES (?, ?, ?, ?, ?)`
	const out = await db
		.prepare(query)
		.bind(id, actor.id.toString(), target.id.toString(), STATE_PENDING, targetAcct)
		.run()
	return id
}
Cloudflare’s culture of dogfooding and building on top of our own products means that we sometimes experience their shortcomings before our users. We did face a few challenges using D1, which is built on SQLite, to store our data. Here are two examples.
ActivityPub uses UUIDs to identify objects and reference them in URIs extensively. These objects need to be stored in the database. Other databases like PostgreSQL provide built-in functions to generate unique identifiers. SQLite and D1 don’t have that, yet, it’s in our roadmap.
Mastodon content has a lot of rich media. We don’t need to reinvent the wheel and build an image pipeline; Cloudflare Images provides APIs to upload, transform, and serve optimized images from our global CDN, so it’s the perfect fit for Wildebeest’s requirements.
Things like posting content images, the profile avatar, or headers, all use the Images APIs. See /backend/src/media/image.ts to understand how we interface with Images.
Cloudflare Images is also available from the dashboard. You can use it to browse or manage your catalog quickly.
Queues
The ActivityPub protocol is chatty by design. Depending on the size of your social graph, there might be a lot of back-and-forth HTTP traffic. We can’t have the clients blocked waiting for hundreds of Fediverse message deliveries every time someone posts something.
We needed a way to work asynchronously and launch background jobs to offload data processing away from the main app and keep the clients snappy. The official Mastodon server has a similar strategy using Sidekiq to do background processing.
Fortunately, we don’t need to worry about any of this complexity either. Cloudflare Queues allows developers to send and receive messages with guaranteed delivery, and offload work from your Workers’ requests, effectively providing you with asynchronous batch job capabilities.
To put it simply, you have a queue topic identifier, which is basically a buffered list that scales automatically, then you have one or more producers that, well, produce structured messages, JSON objects in our case, and put them in the queue (you define their schema), and finally you have one or more consumers that subscribes that queue, receive its messages and process them, at their own speed.
In our case, the main application produces queue jobs whenever any incoming API call requires long, expensive operations. For example, when someone posts, sorry, toots something, we need to broadcast that to their followers’ inboxes, potentially triggering many requests to remote servers. Here we are queueing a job for that, thus freeing the APIs to keep responding:
Similarly, we don’t want to stop the main APIs when remote servers deliver messages to our instance inboxes. Here’s Wildebeest creating asynchronous jobs when it receives messages in the inbox:
And the final piece of the puzzle, our queue consumer runs in a separate Worker, independently from the Pages project. The consumer listens for new messages and processes them sequentially, at its rhythm, freeing everyone else from blocking. When things get busy, the queue grows its buffer. Still, things keep running, and the jobs will eventually get dispatched, freeing the main APIs for the critical stuff: responding to remote servers and clients as quickly as possible.
export default {
async queue(batch, env, ctx) {
for (const message of batch.messages) {
…
switch (message.body.type) {
case MessageType.Inbox: {
await handleInboxMessage(...)
break
}
case MessageType.Deliver: {
await handleDeliverMessage(...)
break
}
}
}
},
}
Caching repetitive operations is yet another strategy for improving performance in complex applications that require data processing. A famous Netscape developer, Phil Karlton, once said: “There are only two hard things in Computer Science: cache invalidation and naming things.”
Cloudflare obviously knows a lot about caching since it’s a core feature of our global CDN. We also provide Workers KV to our customers, a global, low-latency, key-value data store that anyone can use to cache data objects in our data centers and build fast websites and applications.
However, KV achieves its performance by being eventually consistent. While this is fine for many applications and use cases, it’s not ideal for others.
The ActivityPub protocol is highly transactional and can’t afford eventual consistency. Here’s an example: generating complete timelines is expensive, so we cache that operation. However, when you post something, we need to invalidate that cache before we reply to the client. Otherwise, the new post won’t be in the timeline and the client can fail with an error because it doesn’t see it. This actually happened to us with one of the most popular clients.
We needed to get clever. The team discussed a few options. Fortunately, our API catalog has plenty of options. Meet Durable Objects.
Durable Objects are single-instance Workers that provide a transactional storage API. They’re ideal when you need central coordination, strong consistency, and state persistence. You can use Durable Objects in cases like handling the state of multiple WebSocket connections, coordinating and routing messages in a chatroom, or even running a multiplayer game like Doom.
You know where this is going now. Yes, we implemented our key-value caching subsystem for Wildebeest on top of a Durable Object. By taking advantage of the DO’s native transactional storage API, we can have strong guarantees that whenever we create or change a key, the next read will always return the latest version.
The idea is so simple and effective that it took us literally a few lines of code to implement a key-value cache with two primitives: HTTP PUT and GET.
export class WildebeestCache {
async fetch(request: Request) {
if (request.method === 'GET') {
const { pathname } = new URL(request.url)
const key = pathname.slice(1)
const value = await this.storage.get(key)
return new Response(JSON.stringify(value))
}
if (request.method === 'PUT') {
const { key, value } = await request.json()
await this.storage.put(key, value)
return new Response('', { status: 201 })
}
}
}
Strong consistency it is. Lets move to user registration and authentication now.
Zero Trust Access
The official Mastodon server handles user registrations, typically using email, before you can choose your local user name and start using the service. Handling user registration and authentication can be daunting and time-consuming if we were to build it from scratch though.
Furthermore, people don’t want to create new credentials for every new service they want to use and instead want more convenient OAuth-like authorization and authentication methods so that they can reuse their existing Apple, Google, or GitHub accounts.
We wanted to simplify things using Cloudflare’s built-in features. Needless to say, we have a product that handles user onboarding, authentication, and access policies to any application behind Cloudflare; it’s called Zero Trust. So we put Wildebeest behind it.
Zero Trust Access can either do one-time PIN (OTP) authentication using email or single-sign-on (SSO) with many identity providers (examples: Google, Facebook, GitHub, Linkedin), including any generic one supporting SAML 2.0.
When you start using Wildebeest with a client, you don’t need to register at all. Instead, you go straight to log in, which will redirect you to the Access page and handle the authentication according to the policy that you, the owner of your instance, configured.
The policy defines who can authenticate, and how.
When authenticated, Access will redirect you back to Wildebeest. The first time this happens, we will detect that we don’t have information about the user and ask for your Username and Display Name. This will be asked only once and is what will be to create your public Mastodon profile.
Technically, Wildebeest implements the OAuth 2 specification. Zero Trust protects the /oauth/authorize endpoint and issues a valid JWT token in the request headers when the user is authenticated. Wildebeest then reads and verifies the JWT and returns an authorization code in the URL redirect.
Once the client has an authorization code, it can use the /oauth/token endpoint to obtain an API access token. Subsequent API calls inject a bearer token in the Authorization header:
Authorization: Bearer access_token
Deployment and Continuous Integration
We didn’t want to run a managed service for Mastodon as it would somewhat diminish the concepts of federation and data ownership. Also, we recognize that ActivityPub and Mastodon are emerging, fast-paced technologies that will evolve quickly and in ways that are difficult to predict just yet.
For these reasons, we thought the best way to help the ecosystem right now would be to provide an open-source software package that anyone could use, customize, improve, and deploy on top of our cloud. Cloudflare will obviously keep improving Wildebeest and support the community, but we want to give our Fediverse maintainers complete control and ownership of their instances and data.
The remaining question was, how do we distribute the Wildebeest bundle and make it easy to deploy into someone’s account when it requires configuring so many Cloudflare features, and how do we facilitate updating the software over time?
The Deploy with Workers button is a specially crafted link that auto-generates a workflow page where the user gets asked some questions, and Cloudflare handles authorizing GitHub to deploy to Workers, automatically forks the Wildebeest repository into the user’s account, and then configures and deploys the project using a GitHub Actions workflow.
A GitHub Actions workflow is a YAML file that declares what to do in every step. Here’s the Wildebeest workflow (simplified):
This workflow runs automatically every time the main branch changes, so updating the Wildebeest is as easy as synchronizing the upstream official repository with the fork. You don’t even need to use git commands for that; GitHub provides a convenient Sync button in the UI that you can simply click.
What’s more? Updates are incremental and non-destructive. When the GitHub Actions workflow redeploys Wildebeest, we only make the necessary changes to your configuration and nothing else. You don’t lose your data; we don’t need to delete your existing configurations. Here’s how we achieved this:
We use Terraform, a declarative configuration language and tool that interacts with our APIs and can query and configure your Cloudflare features. Here’s the trick, whenever we apply a new configuration, we keep a copy of the Terraform state for Wildebeest in a Cloudflare KV key. When a new deployment is triggered, we get that state from the KV copy, calculate the differences, then change only what’s necessary.
Data loss is not a problem either because, as you read above, D1 supports migrations. If we need to add a new column to a table or a new table, we don’t need to destroy the database and create it again; we just apply the necessary SQL to that change.
Protection, optimization and observability, naturally
Once Wildebeest is up and running, you can protect it from bad traffic and malicious actors. Cloudflare offers you DDoS, WAF, and Bot Management protection out of the box at a click’s distance.
Likewise, you’ll get instant network and content delivery optimizations from our products and analytics on how your Wildebeest instance is performing and being used.
ActivityPub, WebFinger, NodeInfo and Mastodon APIs
Mastodon popularized the Fediverse concept, but many of the underlying technologies used have been around for quite a while. This is one of those rare moments when everything finally comes together to create a working platform that answers an actual use case for Internet users. Let’s quickly go through the protocols that Wildebeest had to implement:
ActivityPub
ActivityPub is a decentralized social networking protocol and has been around as a W3C recommendation since at least 2018. It defines client APIs for creating and manipulating content and server-to-server APIs for content exchange and notifications, also known as federation. ActivityPub uses ActivityStreams, an even older W3C protocol, for its vocabulary.
The concepts of Actors (profiles), messages or Objects (the toots), inbox (where you receive toots from people you follow), and outbox (where you send your toots to the people you follow), to name a few of many other actions and activities, are all defined on the ActivityPub specification.
import type { APObject } from 'wildebeest/backend/src/activitypub/objects'
import type { Actor } from 'wildebeest/backend/src/activitypub/actors'
export async function addObjectInInbox(db, actor, obj) {
	const id = crypto.randomUUID()
	const out = await db
		.prepare('INSERT INTO inbox_objects(id, actor_id, object_id) VALUES(?, ?, ?)')
		.bind(id, actor.id.toString(), obj.id.toString())
		.run()
}
WebFinger
WebFinger is a simple HTTP protocol used to discover information about any entity, like a profile, a server, or a specific feature. It resolves URIs to resource objects.
Mastodon uses WebFinger lookups to discover information about remote users. For example, say you want to interact with @[email protected]. Your local server would request https://example.com/.well-known/webfinger?resource=acct:[email protected] (using the acct scheme) and get something like this:
export async function handleRequest(request, db): Promise<Response> {
	…
	const jsonLink = /* … link to actor */

	const res: WebFingerResponse = {
		subject: `acct:...`,
		aliases: [jsonLink],
		links: [
			{
				rel: 'self',
				type: 'application/activity+json',
				href: jsonLink,
			},
		],
	}
	return new Response(JSON.stringify(res), { headers })
}
Mastodon API
Finally, things like setting your server information, profile information, generating timelines, notifications, and searches, are all Mastodon-specific APIs. The Mastodon open-source project defines a catalog of REST APIs, and you can find all the documentation for them on their website.
Our Mastodon API implementation can be found here (REST endpoints) and here (backend primitives). Here’s an example of Mastodon’s server information /api/v2/instance implemented by Wildebeest:
Wildebeest also implements WebPush for client notifications and NodeInfo for server information.
Other Mastodon-compatible servers had to implement all these protocols too; Wildebeest is one of them. The community is very active in discussing future enhancements; we will keep improving our compatibility and adding support to more features over time, ensuring that Wildebeest plays well with the Fediverse ecosystem of servers and clients emerging.
Get started now
Enough about technology; let’s get you into the Fediverse. We tried to detail all the steps to deploy your server. To start using Wildebeest, head to the public GitHub repository and check our Get Started tutorial.
Most of Wildebeest’s dependencies offer a generous free plan that allows you to try them for personal or hobby projects that aren’t business-critical, however you will need to subscribe an Images plan (the lowest tier should be enough for most needs) and, depending on your server load, Workers Unbound (again, the minimum cost should be plenty for most use cases).
Following our dogfooding mantra, Cloudflare is also officially joining the Fediverse today. You can start following our Mastodon accounts and get the same experience of having regular updates from Cloudflare as you get from us on other social platforms, using your favorite Mastodon apps. These accounts are entirely running on top of a Wildebeest server:
Wildebeest is compatible with most client apps; we are confirmed to work with the official Mastodon Android and iOS apps, Pinafore, Mammoth, and tooot, and looking into others like Ivory. If your favorite isn’t working, please submit an issue here, we’ll do our best to help support it.
Final words
Wildebeest was built entirely on top of our Supercloud stack. It was one of the most complete and complex projects we have created that uses various Cloudflare products and features.
We hope this write-up inspires you to not only try deploying Wildebeest and joining the Fediverse, but also building your next application, however demanding it is, on top of Cloudflare.
Wildebeest is a minimally viable Mastodon-compatible server right now, but we will keep improving it with more features and supporting it over time; after all, we’re using it for our official accounts. It is also open-sourced, meaning you are more than welcome to contribute with pull requests or feedback.
In the meantime, we opened a Wildebeest room on our Developers Discord Server and are keeping an eye open on the GitHub repo issues tab. Feel free to engage with us; the team is eager to know how you use Wildebeest and answer your questions.
PS: The code snippets in this blog were simplified to benefit readability and space (the TypeScript types and error handling code were removed, for example). Please refer to the GitHub repo links for the complete versions.
Developer Week 2022 has come to a close. Over the last week we’ve shared with you 31 posts on what you can build on Cloudflare and our vision and roadmap on where we’re headed. We shared product announcements, customer and partner stories, and provided technical deep dives. In case you missed any of the posts here’s a handy recap.
Our vision of the cloud — a model of cloud computing that promises to make developers highly productive at scaling from one to Internet-scale in the most flexible, efficient, and economical way.
We’ve revamped our API reference documentation to standardize our API content and improve the overall developer experience when using the Cloudflare APIs.
The Segment Edge SDK, built on Workers, helps applications collect and track events from the client, and get access to realtime user state to personalize experiences.
Next
And that’s it for Developer Week 2022. But you can keep the conversation going by joining our Discord Community.
Workers Analytics Engine is a new tool, announced earlier this year, that enables developers and product teams to build time series analytics about anything, with high dimensionality, high cardinality, and effortless scaling. We built Analytics Engine for teams to gain insights into their code running in Workers, provide analytics to end customers, or even build usage based billing.
In this blog post we’re going to tell you about how we use Analytics Engine to build Analytics Engine. We’ve instrumented our own Analytics Engine SQL API using Analytics Engine itself and use this data to find bugs and prioritize new product features. We hope this serves as inspiration for other teams who are looking for ways to instrument their own products and gather feedback.
Why do we need Analytics Engine?
Analytics Engine enables you to generate events (or “data points”) from Workers with just a few lines of code. Using the GraphQL or SQL API, you can query these events and create useful insights about the business or technology stack. For more about how to get started using Analytics Engine, check out our developer docs.
Since we released the Analytics Engine open beta in September, we’ve been adding new features at a rapid clip based on feedback from developers. However, we’ve had two big gaps in our visibility into the product.
First, our engineering team needs to answer classic observability questions, such as: how many requests are we getting, how many of those requests result in errors, what are the nature of these errors, etc. They need to be able to view both aggregated data (like average error rate, or p99 response time) and drill into individual events.
Second, because this is a newly launched product, we are looking for product insights. By instrumenting the SQL API, we can understand the queries our customers write, and the errors they see, which helps us prioritize missing features.
We realized that Analytics Engine would be an amazing tool for both answering our technical observability questions, and also gathering product insight. That’s because we can log an event for every query to our SQL API, and then query for both aggregated performance issues as well as individual errors and queries that our customers run.
In the next section, we’re going to walk you through how we use Analytics Engine to monitor that API.
Adding instrumentation to our SQL API
The Analytics Engine SQL API lets you query events data in the same way you would an ordinary database. For decades, SQL has been the most common language for querying data. We wanted to provide an interface that allows you to immediately start asking questions about your data without having to learn a new query language.
Our SQL API parses user SQL queries, transforms and validates them, and then executes them against backend database servers. We then write information about the query back into Analytics Engine so that we can run our own analytics. Writing data into Analytics Engine from a Cloudflare Worker is very simple and explained in our documentation. We instrument our SQL API in the same way our users do, and this code excerpt shows the data we write into Analytics Engine:
With that data now being stored in Analytics Engine, we can then pull out insights about every field we’re reporting.
Querying for insights
Having our analytics in an SQL database gives you the freedom to write any query you might want. Compared to using something like metrics which are often predefined and purpose specific, you can define any custom dataset desired, and interrogate your data to ask new questions with ease.
We need to support datasets comprising trillions of data points. In order to accomplish this, we have implemented a sampling method called Adaptive Bit Rate (ABR). With ABR, if you have large amounts of data, your queries may be returned sampled events in order to respond in reasonable time. If you have more typical amounts of data, Analytics Engine will query all your data. This allows you to run any query you like and still get responses in a short length of time. Right now, you have to account for sampling in how you make your queries, but we are exploring making it automatic.
Any data visualization tool can be used to visualize your analytics. At Cloudflare, we heavily use Grafana (and you can too!). This is particularly useful for observability use cases.
Observing query response times
One query we pay attention to gives us information about the performance of our backend database clusters:
As you can see, the 99% percentile (corresponding to the 1% most complex queries to execute) sometimes spikes up to about 300ms. But on average our backend responds to queries within 100ms.
This visualization is itself generated from an SQL query:
Customer insights from high-cardinality data
Another use of Analytics Engine is to draw insights out of customer behavior. Our SQL API is particularly well-suited for this, as you can take full advantage of the power of SQL. Thanks to our ABR technology, even expensive queries can be carried out against huge datasets.
We use this ability to help prioritize improvements to Analytics Engine. Our SQL API supports a fairly standard dialect of SQL but isn’t feature-complete yet. If a user tries to do something unsupported in an SQL query, they get back a structured error message. Those error messages are reported into Analytics Engine. We’re able to aggregate the kinds of errors that our customers encounter, which helps inform which features to prioritize next.
The SQL API returns errors in the format of type of error: more details, and so we can take the first portion before the colon to give us the type of error. We group by that, and get a count of how many times that error happened and how many users it affected:
To perform the above query using an ordinary metrics system, we would need to represent each error type with a different metric. Reporting that many metrics from each microservice creates scalability challenges. That problem doesn’t happen with Analytics Engine, because it’s designed to handle high-cardinality data.
Another big advantage of a high-cardinality store like Analytics Engine is that you can dig into specifics. If there’s a large spike in SQL errors, we may want to find which customers are having a problem in order to help them or identify what function they want to use. That’s easy to do with another SQL query:
Inside Cloudflare, we have historically relied on querying our backend database servers for this type of information. Analytics Engine’s SQL API now enables us to open up our technology to our customers, so they can easily gather insights about their services at any scale!
Conclusion and what’s next
The insights we gathered about usage of the SQL API are a super helpful input to our product prioritization decisions. We already added support for substring and position functions which were used in the visualizations above.
Looking at the top SQL errors, we see numerous errors related to selecting columns. These errors are mostly coming from some usability issues related to the Grafana plugin. Adding support for the DESCRIBE function should alleviate this because without this, the Grafana plugin doesn’t understand the table structure. This, as well as other improvements to our Grafana plugin, is on our roadmap.
We also can see that users are trying to query time ranges for older data that no longer exists. This suggests that our customers would appreciate having extended data retention. We’ve recently extended our retention from 31 to 92 days, and we will keep an eye on this to see if we should offer further extension.
We saw lots of errors related to common mistakes or misunderstandings of proper SQL syntax. This indicates that we could provide better examples or error explanations in our documentation to assist users with troubleshooting their queries.
Stay tuned into our developer docs to be informed as we continue to iterate and add more features!
You can start using Workers Analytics Engine Now! Analytics Engine is now in open beta with free 90-day retention. Start using it today or join our Discord community to talk with the team.
The Cloudflare team was so excited to hear how Twilio Segment solved problems they encountered with tracking first-party data and personalization using Cloudflare Workers. We are happy to have guest bloggers Pooya Jaferian and Tasha Alfano from Twilio Segment to share their story.
Introduction
Twilio Segment is a customer data platform that collects, transforms, and activates first-party customer data. Segment helps developers collect user interactions within an application, form a unified customer record, and sync it to hundreds of different marketing, product, analytics, and data warehouse integrations.
There are two “unsolved” problem with app instrumentation today:
Problem #1: Many important events that you want to track happen on the “wild-west” of the client, but collecting those events via the client can lead to low data quality, as events are dropped due to user configurations, browser limitations, and network connectivity issues.
Problem #2: Applications need access to real-time (<50ms) user state to personalize the application experience based on advanced computations and segmentation logic that must be executed on the cloud.
The Segment Edge SDK – built on Cloudflare Workers – solves for both. With Segment Edge SDK, developers can collect high-quality first-party data. Developers can also use Segment Edge SDK to access real-time user profiles and state, to deliver personalized app experiences without managing a ton of infrastructure.
This post goes deep on how and why we built the Segment Edge SDK. We chose the Cloudflare Workers platform as the runtime for our SDK for a few reasons. First, we needed a scalable platform to collect billions of events per day. Workers running with no cold-start made them the right choice. Second, our SDK needed a fast storage solution, and Workers KV fitted our needs perfectly. Third, we wanted our SDK to be easy to use and deploy, and Workers’ ease and speed of deployment was a great fit.
It is important to note that the Segment Edge SDK is in early development stages, and any features mentioned are subject to change.
Serving a JavaScript library 700M+ times per day
analytics.js is our core JavaScript UI SDK that allows web developers to send data to any tool without having to learn, test, or use a new API every time.
Figure 1 illustrates how Segment can be used to collect data on a web application. Developers add Segment’s web SDK, analytics.js, to their websites by including a JavaScript snippet to the HEAD of their web pages. The snippet can immediately collect and buffer events while it also loads the full library asynchronously from the Segment CDN. Developers can then use analytics.js to identify the visitors, e.g., analytics.identify('john'), and track user behavior, e.g., analytics.track('OrderCompleted'). Calling the `analytics.js methods such as identify or track will send data to Segment’s API (api.segment.io). Segment’s platform can then deliver the events to different tools, as well as create a profile for the user (e.g., build a profile for user “John”, associate “Order Completed”, as well as add all future activities of john to the profile).
Analytics.js also stores state in the browser as first-party cookies (e.g., storing an ajs_user_id cookie with the value of john, with cookie scoped at the example.com domain) so that when the user visits the website again, the user identifier stored in the cookie can be used to recognize the user.
Figure 1- How analytics.js loads on a website and tracks events
While analytics.js only tracks first-party data (i.e., the data is collected and used by the website that the user is visiting), certain browser controls incorrectly identify analytics.js as a third-party tracker, because the SDK is loaded from a third-party domain (cdn.segment.com) and the data is going to a third-party domain (api.segment.com). Furthermore, despite using first-party cookies to store user identity, some browsers such as Safari have limited the TTL for non-HTTPOnly cookies to 7-days, making it challenging to maintain state for long periods of time.
To overcome these limitations, we have built a Segment Edge SDK (currently in early development) that can automatically add Segment’s library to a web application, eliminate the use of third-party domains, and maintain user identity using HTTPOnly cookies. In the process of solving the first-party data problem, we realized that the Edge SDK is best positioned to act as a personalization library, given it has access to the user identity on every request (in the form of cookies), and it can resolve such identity to a full-user profile stored in Segment. The user profile information can be used to deliver personalized content to users directly from the Cloudflare Workers platform.
The remaining portions of this post will cover how we solved the above problems. We first explain how the Edge SDK helps with first-party collection. Then we cover how the Segment profiles database becomes available on the Cloudflare Workers platform, and how to use such data to drive personalization.
Segment Edge SDK and first-party data collection
Developers can set up the Edge SDK by creating a Cloudflare Worker sitting in front of their web application (via Routes) and importing the Edge SDK via npm. The Edge SDK will handle requests and automatically injects analytics.js snippets into every webpage. It also configures first-party endpoints to download the SDK assets and send tracking data. The Edge SDK also captures user identity by looking at the Segment events and instructs the browser to store such identity as HTTPOnly cookies.
How the Edge SDK works under the hood to enable first-party data collection
The Edge SDK’s internal router checks the inbound request URL against predefined patterns. If the URL matches a route, the router runs the route’s chain of handlers to process the request, fetch the origin, or modify the response.
Figure 2 demonstrates the routing of incoming requests. The Worker calls segment.handleEvent method with the request object (step 1), then the router matches the request.url and request.method against a set of predefined routes:
GET requests with /seg/assets/* path are proxied to Segment CDN (step 2a)
POST requests with /seg/events/* path are proxied to Segment tracking API (step 2b)
Other requests are proxied to the origin (step 2c) and the HTML responses are enriched with the analytics.js snippet (step 3)
Regardless of the route, the router eventually returns a response to the browser (step 4) containing data from the origin, the response from Segment tracking API, or analytics.js assets. When Edge SDK detects the user identity in an incoming request (more on that later), it sets an HTTPOnly cookie in the response headers to persist the user identity in the browser.
Figure 2- Edge SDK router flow
In the subsequent three sections, we explain how we inject analytics.js, proxy Segment endpoints, and set server-side cookies.
Injecting Segment SDK on requests to origin
For all the incoming requests routed to the origin, the Edge SDK fetches the HTML page and then adds the analytics.js snippet to the <HEAD> tag, embeds the write key, and configures the snippet to download the subsequent javascript bundles from the first-party domain ([first-party host]/seg/assets/*) and sends data to the first-party domain as well ([first-party host]/seg/events/*). This is accomplished using the HTMLRewriter API.
import snippet from "@segment/snippet"; // Existing Segment package that generates snippet

class ElementHandler {
   constructor(host: string, writeKey: string)

   element(element: Element) {
     // generate Segment snippet and configure it with first-party host info
     const snip = snippet.min({
         host: `${this.host}/seg`,
         apiKey: this.writeKey,
       })
     element.append(`<script>${snip}</script>`, { html: true });
   }
 }

export const enrichWithAJS: HandlerFunction = async (
   request,
   response,
   context
 ) => {
   const {
     settings: { writeKey },
   } = context;
   const host = request.headers.get("host") || "";
    return [
     request,
     new HTMLRewriter().on("head",
         new ElementHandler(host, writeKey))
       .transform(response),
     context,
   ];
 };
Proxy SDK bundles and Segment API
The Edge SDK proxies the Segment CDN and API under the first-party domain. For example, when the browser loads a page with the injected analytics.js snippet, the snippet loads the full analytics.js bundle from https://example.com/seg/assets/sdk.js, and the Edge SDK will proxy that request to the Segment CDN:
Similarly, analytics.js collects events and sends them via a POST request to https://example.com/seg/events/[method] and the Edge SDK will proxy such requests to the Segment tracking API:
The Edge SDK also re-writes existing client-side analytics.js cookies as HTTPOnly cookies. When Edge SDK intercepts an identify event e.g., analytics.identify('john'), it extracts the user identity (“john”) and then sets a server-side cookie when sending a response back to the user. Therefore, any subsequent request to the Edge SDK can be associated with “john” using request cookies.
Intercepting the ajs_user_id on the Workers, and using the cookie identifier to associate each request to a user, is quite powerful, and it opens the door for delivering personalized content to users. The next section covers how Edge SDK can drive personalization.
Personalization on the Supercloud
The Edge SDK offers a registerVariation method that can customize how a request to a given route should be fetched from the origin. For example, let’s assume we have three versions of a landing page in the origin: /red, /green, and / (default), and we want to deliver one of the three versions based on the visitor traits. We can use Edge SDK as follows:
   const segment = new Segment(env.SEGMENT_WRITE_KEY);
   segment.registerVariation("/", (profile) => {
     if (profile.red_group) {
       return "/red"
     } else if (profile.green_group)
       return "/green"
     }
   });

   const resp = await segment.handleEvent(request, env);

   return resp
The registerVariation accepts two inputs: the path that displays the personalized content, and a decision function that should return the origin address for the personalized content. The decision function receives a profile object visitor in Segment. In the example, when users visit example.com/(root path), personalized content is delivered by checking if the visitor has a red_group or green_group trait and subsequently requesting the content from either /red or /green path at the origin.
We already explained that Edge SDK knows the identity of the user via ajs_user_id cookie, but we haven’t covered how the Edge SDK has access to the full profile object. The next section explains how the full profile becomes available on the Cloudflare Workers platform.
How does personalization work under the hood?
The Personalization feature of the Edge SDK requires storage of profiles on the Cloudflare Workers platform. A Cloudflare KV should be created for the Worker running the Edge SDK and passed to the Edge SDK during initialization. Edge SDK will store profiles in KV, where keys are the ajs_user_id, and values are the serialized profile object. To move Profiles data from Segment to the KV, the SDK uses two methods:
Profiles data push from Segment to the Cloudflare Workers platform: The Segment product can sync user profiles database with different tools, including pushing the data to a webhook. The Edge SDK automatically exposes a webhook endpoint under the first-party domain (e.g., example.com/seg/profiles-webhook) that Segment can call periodically to sync user profiles. The webhook handler receives incoming sync calls from Segment, and writes profiles to the KV.
Pulling data from Segment by the Edge SDK: If the Edge SDK queries the KV for a user id, and doesn’t find the profile (i.e., data hasn’t synced yet), it requests the user profile from the Segment API, and stores it in the KV.
Figure 3 demonstrates how the personalization flow works. In step 1, the user requests content for the root path ( / ), and the Worker sends the request to the Edge SDK (step 2). The Edge SDK router determines that a variation is registered on the route, therefore, extracts the ajs_user_id from the request cookies, and goes through the full profile extraction (step 3). The SDK first checks the KV for a record with the key of ajs_user_id value and if not found, queries Segment API to fetch the profile, and stores the profile in the KV. Eventually, the profile is extracted and passed into the decision function to decide which path should be served to the user (step 4). The router eventually fetches the variation from the origin (step 5) and returns the response under the / path to the browser (step 6).
Figure 3- Personalization flow
Summary
In this post we covered how the Cloudflare Workers platform can help with tracking first-party data and personalization. We also explained how we built a Segment Edge SDK to enable Segment customers to get those benefits out of the box, without having to create their own DIY solution. The Segment Edge SDK is currently in early development, and we are planning to launch a private pilot and open-source it in the near future.
The collective thoughts of the interwebz
Manage Consent
To provide the best experiences, we use technologies like cookies to store and/or access device information. Consenting to these technologies will allow us to process data such as browsing behavior or unique IDs on this site. Not consenting or withdrawing consent, may adversely affect certain features and functions.
Functional
Always active
The technical storage or access is strictly necessary for the legitimate purpose of enabling the use of a specific service explicitly requested by the subscriber or user, or for the sole purpose of carrying out the transmission of a communication over an electronic communications network.
Preferences
The technical storage or access is necessary for the legitimate purpose of storing preferences that are not requested by the subscriber or user.
Statistics
The technical storage or access that is used exclusively for statistical purposes.The technical storage or access that is used exclusively for anonymous statistical purposes. Without a subpoena, voluntary compliance on the part of your Internet Service Provider, or additional records from a third party, information stored or retrieved for this purpose alone cannot usually be used to identify you.
Marketing
The technical storage or access is required to create user profiles to send advertising, or to track the user on a website or across several websites for similar marketing purposes.