Tag Archives: launch

EC2-Classic is Retiring – Here’s How to Prepare

Post Syndicated from Jeff Barr original https://aws.amazon.com/blogs/aws/ec2-classic-is-retiring-heres-how-to-prepare/

Let’s go back to the summer of 2006 and the launch of EC2. We started out with one instance type (the venerable m1.small), security groups, and the venerable US East (N. Virginia) Region. The EC2-Classic network model was flat, with public IP addresses that were assigned at launch time.
Our initial customers saw the value right away and started to put EC2 to use in many different ways. We hosted web sites, supported the launch of Justin.TV, and helped Animoto to scale to a then-amazing 3400 instances when their Facebook app went viral.

Some of the early enhancements to EC2 focused on networking. For example, we added Elastic IP addresses in early 2008 so that addresses could be long-lived and associated with different instances over time if necessary. After that we added Auto Scaling, Load Balancing, and CloudWatch to help you to build highly scalable applications.

Early customers wanted to connect their EC2 instances to their corporate networks, exercise additional control over IP address ranges, and to construct more sophisticated network topologies. We launched Amazon Virtual Private Cloud in 2009, and in 2013 we made the VPC model essentially transparent with Virtual Private Clouds for Everyone.

Retiring EC2-Classic
EC2-Classic has served us well, but we’re going to give it a gold watch and a well-deserved sendoff! This post will tell you what you need to know, what you need to do, and when you need to do it.

Before I dive in, rest assured that we are going to make this as smooth and as non-disruptive as possible. We are not planning to disrupt any workloads and we are giving you plenty of lead time so that you can plan, test, and perform your migration. In addition to this blog post, we have tools, documentation, and people that are all designed to help.

Timing
We are already notifying the remaining EC2-Classic customers via their account teams, and will soon start to issue notices in the Personal Health Dashboard. Here are the important dates for your calendar:

  • All AWS accounts created after December 4, 2013 are already VPC-only, unless EC2-Classic was enabled as a result of a support request.
  • On October 30, 2021 we will disable EC2-Classic in Regions for AWS accounts that have no active EC2-Classic resources in the Region, as listed below. We will also stop selling 1-year and 3-year Reserved Instances for EC2-Classic.
  • On August 15, 2022 we expect all migrations to be complete, with no remaining EC2-Classic resources present in any AWS account.

Again, we don’t plan to disrupt any workloads and will do our best to help you to meet these dates.

Affected Resources
In order to fully migrate from EC2-Classic to VPC, you need to find, examine, and migrate all of the following resources:

In preparation for your migration, be sure to read Migrate from EC2-Classic to a VPC.

You may need to create (or re-create, if you deleted it) the default VPC for your account. To learn how to do this, read Creating a Default VPC.

In some cases you will be able to modify the existing resources; in others you will need to create new and equivalent resources in a VPC.

Finding EC2-Classic Resources
Use the EC2 Classic Resource Finder script to find all of the EC2-Classic resources in your account. You can run this directly in a single AWS account, or you can use the included multi-account-wrapper to run it against each account of an AWS Organization. The Resource Finder visits each AWS Region, looks for specific resources, and generates a set of CSV files. Here’s the first part of the output from my run:
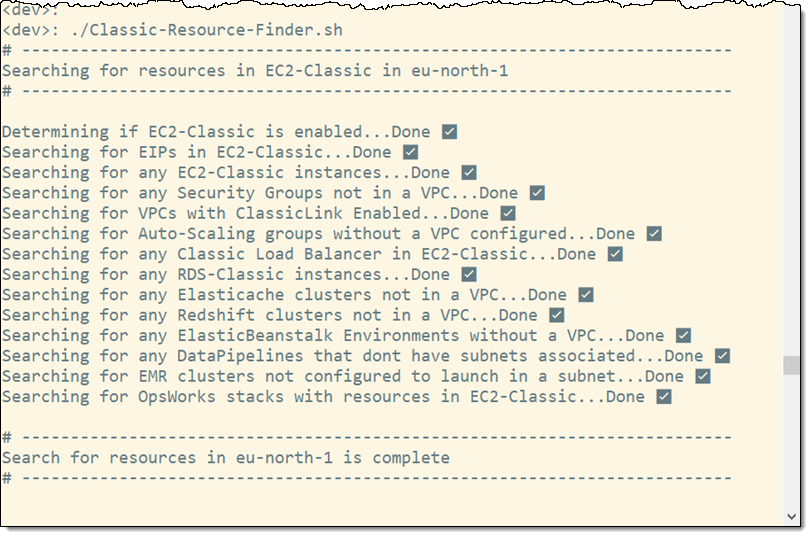
The script takes a few minutes to run. I inspect the list of CSV files to get a sense of how much work I need to do:
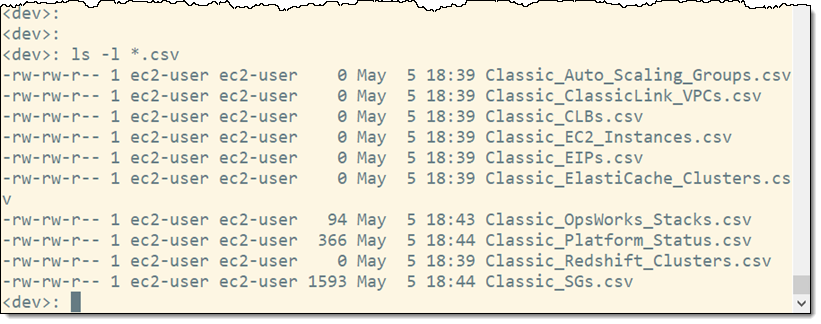
And then I take a look inside to learn more:
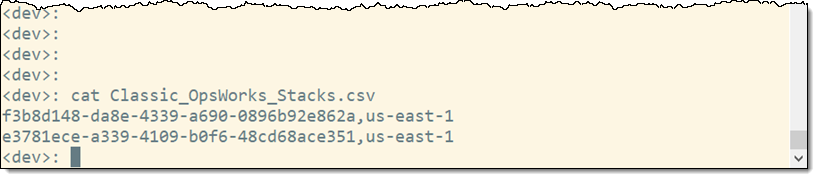
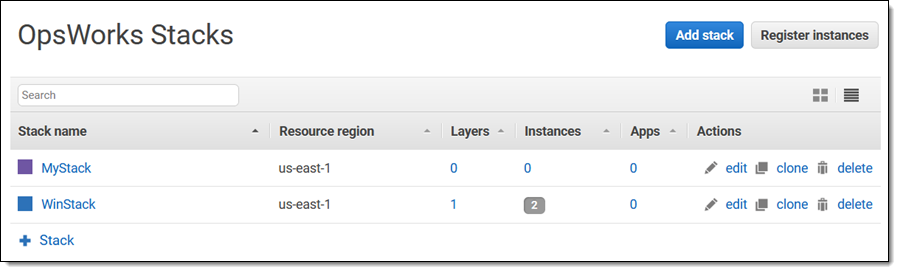
Turns out that I have some stopped OpsWorks Stacks that I can either migrate or delete:
Migration Tools
Here’s an overview of the migration tools that you can use to migrate your AWS resources:

AWS Application Migration Service – Use AWS MGN to migrate your instances and your databases from EC2-Classic to VPC with minimal downtime. This service uses block-level replication and runs on multiple versions of Linux and Windows (read How to Use the New AWS Application Migration Service for Lift-and-Shift Migrations to learn more). The first 90 days of replication are free for each server that you migrate; see the AWS Application Service Pricing page for more information.

Support Automation Workflow – This workflow supports simple, instance-level migration. It converts the source instance to an AMI, creates mirrors of the security groups, and launches new instances in the destination VPC.

After you have migrated all of the resources within a particular region, you can disable EC2-Classic by creating a support case. You can do this if you want to avoid accidentally creating new EC2-Classic resources in the region, but it is definitely not required.

Disabling EC2-Classic in a region is intended to be a one-way door, but you can contact AWS Support if you run it and then find that you need to re-enable EC2-Classic for a region. Be sure to run the Resource Finder that mentioned earlier and make sure that you have not left any resources behind. These resources will continue to run and to accrue charges even after the account status has been changed.

IP Address Migration – If you are migrating an EC2 instance and any Elastic IP addresses associated with the instance, you can use move-address-to-vpc then attach the Elastic IP to the migrated instance. This will allow you to continue to reference the instance by the original DNS name.

Classic Load Balancers – If you plan to migrate a Classic Load Balancer and need to preserve the original DNS names, please contact AWS Support or your AWS account team.

Updating Instance Types
All of the instance types that are available in EC2-Classic are also available in VPC. However, many newer instance types are available only in VPC, and you may want to consider an update as part of your overall migration plan. Here’s a map to get you started:

EC2-Classic VPC
M1, T1 T2
M3 M5
C1, C3 C5
CC2 AWS ParallelCluster
CR1, M2, R3 R4
D2 D3
HS1 D2
I2 I3
G2 G3

Count on Us
My colleagues in AWS Support are ready to help you with your migration to VPC. I am also planning to update this post with additional information and other migration resources as soon as they become available.

— Jeff;
 

Amazon EBS io2 Block Express Volumes with Amazon EC2 R5b Instances Are Now Generally Available

Post Syndicated from Channy Yun original https://aws.amazon.com/blogs/aws/amazon-ebs-io2-block-express-volumes-with-amazon-ec2-r5b-instances-are-now-generally-available/

At AWS re:Invent 2020, we previewed Amazon EBS io2 Block Express volumes, the next-generation server storage architecture that delivers the first SAN built for the cloud. Block Express is designed to meet the requirements of the largest, most I/O-intensive, mission-critical deployments of Microsoft SQL Server, Oracle, SAP HANA, and SAS Analytics on AWS.

Today, I am happy to announce the general availability of Amazon EBS io2 Block Express volumes, with Amazon EC2 R5b instances powered by the AWS Nitro System to provide the best network-attached storage performance available on EC2. The io2 Block Express volumes now also support io2 features such as Multi-Attach and Elastic Volumes.

In the past, customers had to stripe multiple volumes together in order go beyond single-volume performance. Today, io2 volumes can meet the needs of mission-critical performance-intensive applications without striping and the management overhead that comes along with it. With io2 Block Express, customers can get the highest performance block storage in the cloud with four times higher throughput, IOPS, and capacity than io2 volumes with sub-millisecond latency, at no additional cost.

Here is a summary of the use cases and characteristics of the key Solid State Drive (SSD)-backed EBS volumes:

General Purpose SSD Provisioned IOPS SSD
Volume type gp2 gp3 io2 io2 Block Express
Durability 99.8%-99.9% durability 99.999% durability
Use cases General applications, good to start with when you do not fully understand the performance profile yet I/O-intensive applications and databases Business-critical applications and databases that demand highest performance
Volume size 1 GiB – 16 TiB 4 GiB – 16 TiB 4 GiB – 64 TiB
Max IOPS 16,000 64,000 ** 256,000
Max throughput 250 MiB/s * 1,000 MiB/s 1,000 MiB/s ** 4,000 MiB/s

* The throughput limit is between 128 MiB/s and 250 MiB/s, depending on the volume size.
** Maximum IOPS and throughput are guaranteed only on instances built on the Nitro System provisioned with more than 32,000 IOPS.

The new Block Express architecture delivers the highest levels of performance with sub-millisecond latency by communicating with an AWS Nitro System-based instance using the Scalable Reliable Datagrams (SRD) protocol, which is implemented in the Nitro Card dedicated for EBS I/O function on the host hardware of the instance. Block Express also offers modular software and hardware building blocks that can be assembled in many ways, giving you the flexibility to design and deliver improved performance and new features at a faster rate.

Getting Started with io2 Block Express Volumes
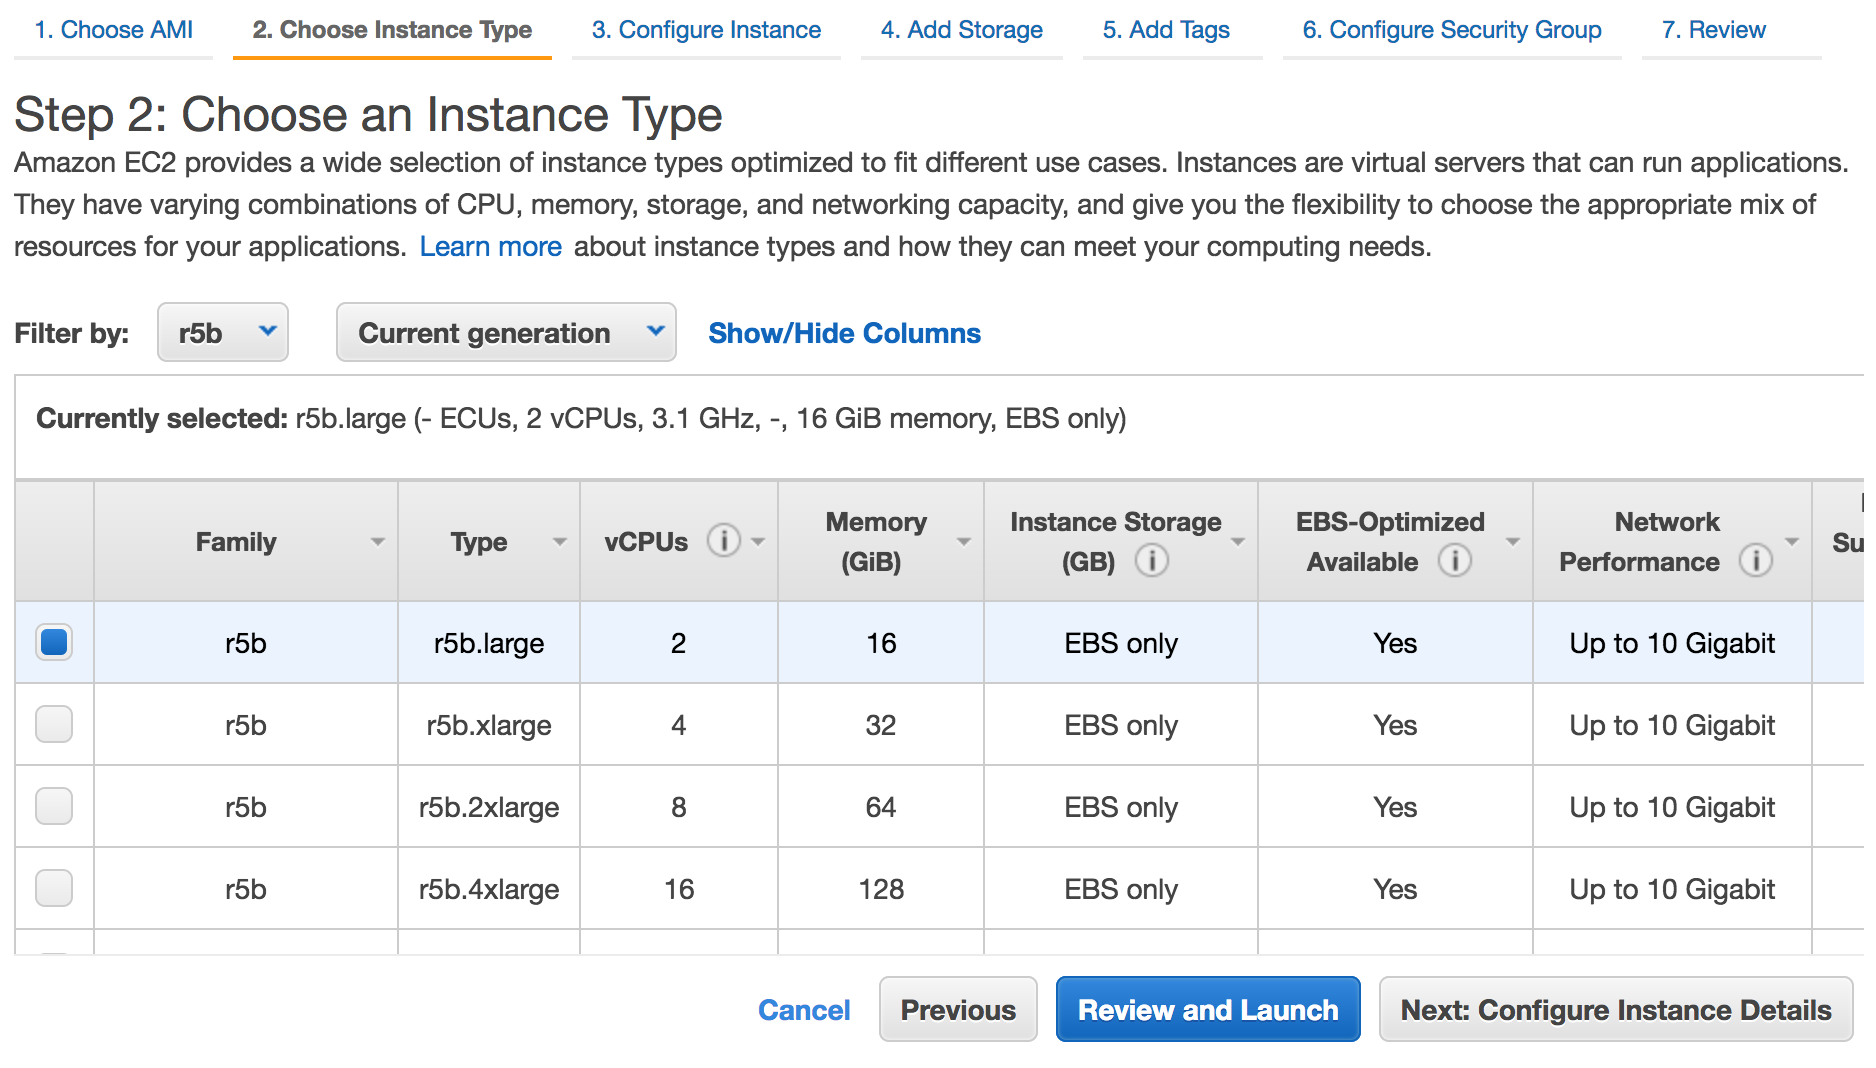
You can now create io2 Block Express volumes in the Amazon EC2 console, AWS Command Line Interface (AWS CLI), or using an SDK with the Amazon EC2 API when you create R5b instances.

After you choose the EC2 R5b instance type, on the Add Storage page, under Volume Type, choose Provisioned IOPS SSD (io2). Your new volumes will be created in the Block Express format.

Things to Know
Here are a couple of things to keep in mind:

  • You can’t modify the size or provisioned IOPS of an io2 Block Express volume.
  • You can’t launch an R5b instance with an encrypted io2 Block Express volume that has a size greater than 16 TiB or IOPS greater than 64,000 from an unencrypted AMI or a shared encrypted AMI. In this case, you must first create an encrypted AMI in your account and then use that AMI to launch the instance.
  • io2 Block Express volumes do not currently support fast snapshot restore. We recommend that you initialize these volumes to ensure that they deliver full performance. For more information, see Initialize Amazon EBS volumes in Amazon EC2 User Guide.

Available Now
The io2 Block Express volumes are available in all AWS Regions where R5b instances are available: US East (Ohio), US East (N. Virginia), US West (Oregon), Asia Pacific (Singapore), Asia Pacific (Tokyo), Europe (Frankfurt), with support for more AWS Regions coming soon. We plan to allow EC2 instances of all types to connect to io2 Block Volumes, and will have updates on this later in the year.

In terms of pricing and billing, io2 volumes and io2 Block Express volumes are billed at the same rate. Usage reports do not distinguish between io2 Block Express volumes and io2 volumes. We recommend that you use tags to help you identify costs associated with io2 Block Express volumes. For more information, see the Amazon EBS pricing page.

To learn more, visit the EBS Provisioned IOPS Volume page and io2 Block Express Volumes in the Amazon EC2 User Guide.

– Channy

Multi-Cloud and Hybrid Threat Protection with Sumo Logic Cloud SIEM Powered by AWS

Post Syndicated from Danilo Poccia original https://aws.amazon.com/blogs/aws/hybrid-threat-protection-with-sumo-logic-cloud-siem-powered-by-aws/

IT security teams need to have a real-time understanding of what’s happening with their infrastructure and applications. They need to be able to find and correlate data in this continuous flood of information to identify unexpected behaviors or patterns that can lead to a security breach.

To simplify and automate this process, many solutions have been implemented over the years. For example:

  • Security information management (SIM) systems collect data such as log files into a central repository for analysis.
  • Security event management (SEM) platforms simplify data inspection and the interpretation of logs or events.

Many years ago these two approaches were merged to address both information analysis and interpretation of events. These security information and event management (SIEM) platforms provide real-time analysis of security alerts generated by applications, network hardware, and domain specific security tools such as firewalls and endpoint protection tools).

Today, I’d like to introduce a solution created by one of our partners: Sumo Logic Cloud SIEM powered by AWS. Sumo Logic Cloud SIEM provides deep security analytics and contextualized threat data across multi-cloud and hybrid environments to reduce the time to detect and respond to threats. You can use this solution to quickly detect and respond to the higher-priority issues, including malicious activities that negatively impact your business or brand. The solution comes with more than 300 out-of-the-box integrations, including key AWS services, and can help reduce time and effort required to conduct compliance audits for regulations such as PCI and HIPAA.

Sumo Logic Cloud SIEM is available in AWS Marketplace and you can use a free trial to evaluate the solution. Before having a look at how this works in practice, let’s see how it’s being used.

Customer Case Study – Medidata
I had the chance to meet a very interesting customer to talk about how they use Sumo Logic Cloud SIEM. Scott Sumner is the VP and CISO at Medidata, a company that is redefining what’s possible in clinical trials. Medidata is processing patient data for clinical trials of the Moderna and Johnson & Johnson COVID-19 vaccines, so you can see why security is a priority for them. With such critical workloads, the company must keep the trust of the people participating in those trials.

Scott told me, “There is an old saying: If you can’t measure it, you can’t manage it.” In fact, when he joined Medidata in 2015, one of the first things Scott did was to implement a SIEM. Medidata has been using Sumo Logic for more than five years now. They appreciate that it’s a cloud-native solution, and that has made it easier for them to follow the evolution of the tool over the years.

“Not having transparency in the environment you process data is not good for security professionals.” Scott wanted his team to be able to respond quickly and, to do so, they needed to be able to look at a single screen that displays all IP calls, network flows, and any relevant information. For example, Medidata has very aggressive checks for security scans and any kind of external access. To do so, they have to look not just at the perimeter, but at the entire environment. Sumo Logic Cloud SIEM allows them to react without breaking anything in their corporate environment, including the resources they have in more than 45 AWS accounts.

“One of the metrics that is floated around by security specialists is that you have up to five hours to respond to a tentative intrusion,” Scott says. “With Sumo Logic Cloud SIEM, we can match that time aggressively, and most of the times we respond within five minutes.” The ability to respond quickly allows Medidata to keep patient trust. This is very important for them, because delaying a clinical trial can affect people’s health.

Medidata security response is managed by a global team through three levels. Level 1 is covered by a partner who is empowered to block simple attacks. For the next level of escalation, Level 2, Medidata has a team in each region. Beyond that there is Level 3: a hardcore team of forensics examiners distributed across the US, Europe, and Asia who deal with more complicated attacks.

Availability is also important to Medidata. In addition to providing the Cloud SIEM functionality, Sumo Logic helps them monitor availability issues, such as web server failover, and very quickly figure out possible problems as they happen. Interestingly, they use Sumo Logic to better understand how applications talk with each other. These different use cases don’t complicate their setup because the security and application teams are segregated and use Sumo Logic as a single platform to share information seamlessly between the two teams when needed.

I asked Scott Sumner if Medidata was affected by the move to remote work in 2020 due to the COVID-19 pandemic. It’s an important topic for them because at that time Medidata was already involved in clinical trials to fight the pandemic. “We were a mobile environment anyway. A significant part of the company was mobile before. So, we were ready and not being impacted much by working remotely. All our tools are remote, and that helped a lot. Not sure we’d done it easily with an on-premises solution.”

Now, let’s see how this solution works in practice.

Setting Up Sumo Logic Cloud SIEM
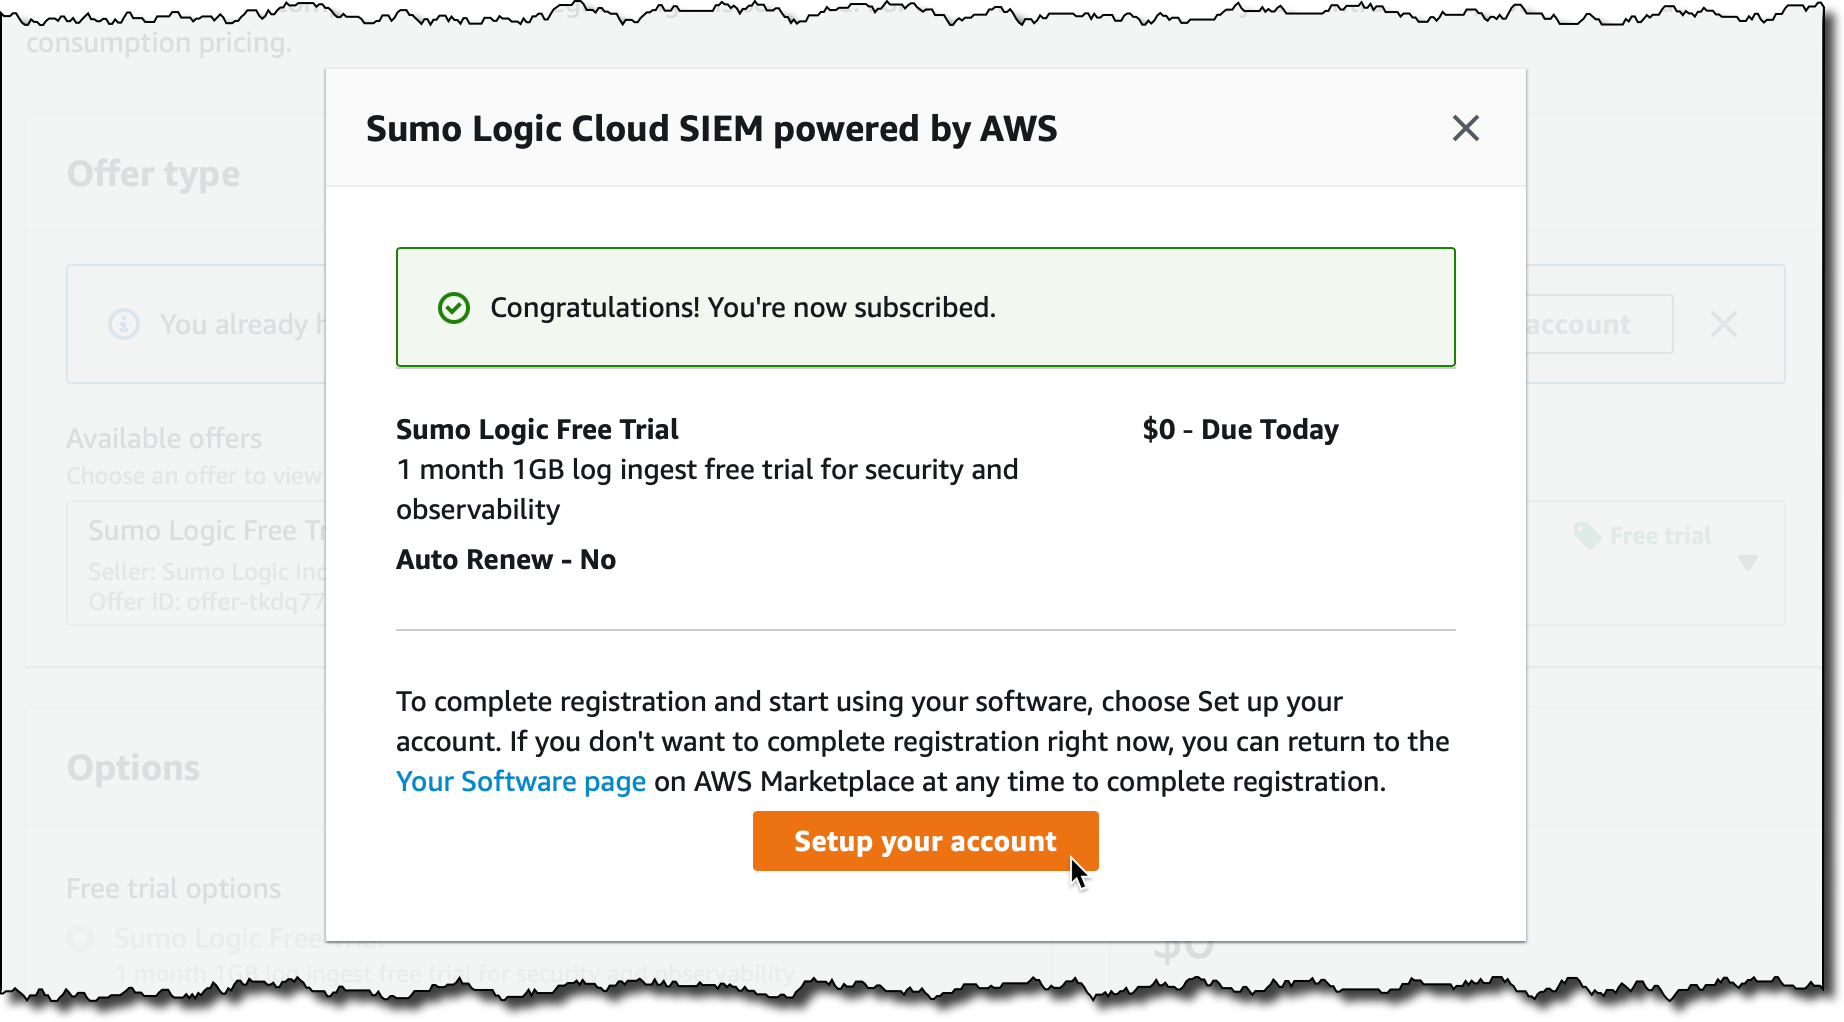
In AWS Marketplace I search for “Sumo Logic Cloud SIEM” and look at the product page. I can either subscribe or start the one-month free trial. The free trial includes 1GB of log ingest for security and observability. There is no automatic conversion to paid offer when the free trials expires. After the free trial I have the option to either buy Sumo Logic Cloud SIEM from AWS Marketplace or remain as a free user. I create and accept the contract and set up my Sumo Logic account.

Console screenshot.

In the setup, I choose the Sumo Logic deployment region to use. The Sumo Logic documentation provides a table that describes the AWS Regions used by each Sumo Logic deployment. I need this information later when I set up the integration between AWS security services and Sumo Logic Cloud SIEM. For now, I select US2, which corresponds to the US West (Oregon) Region in AWS.

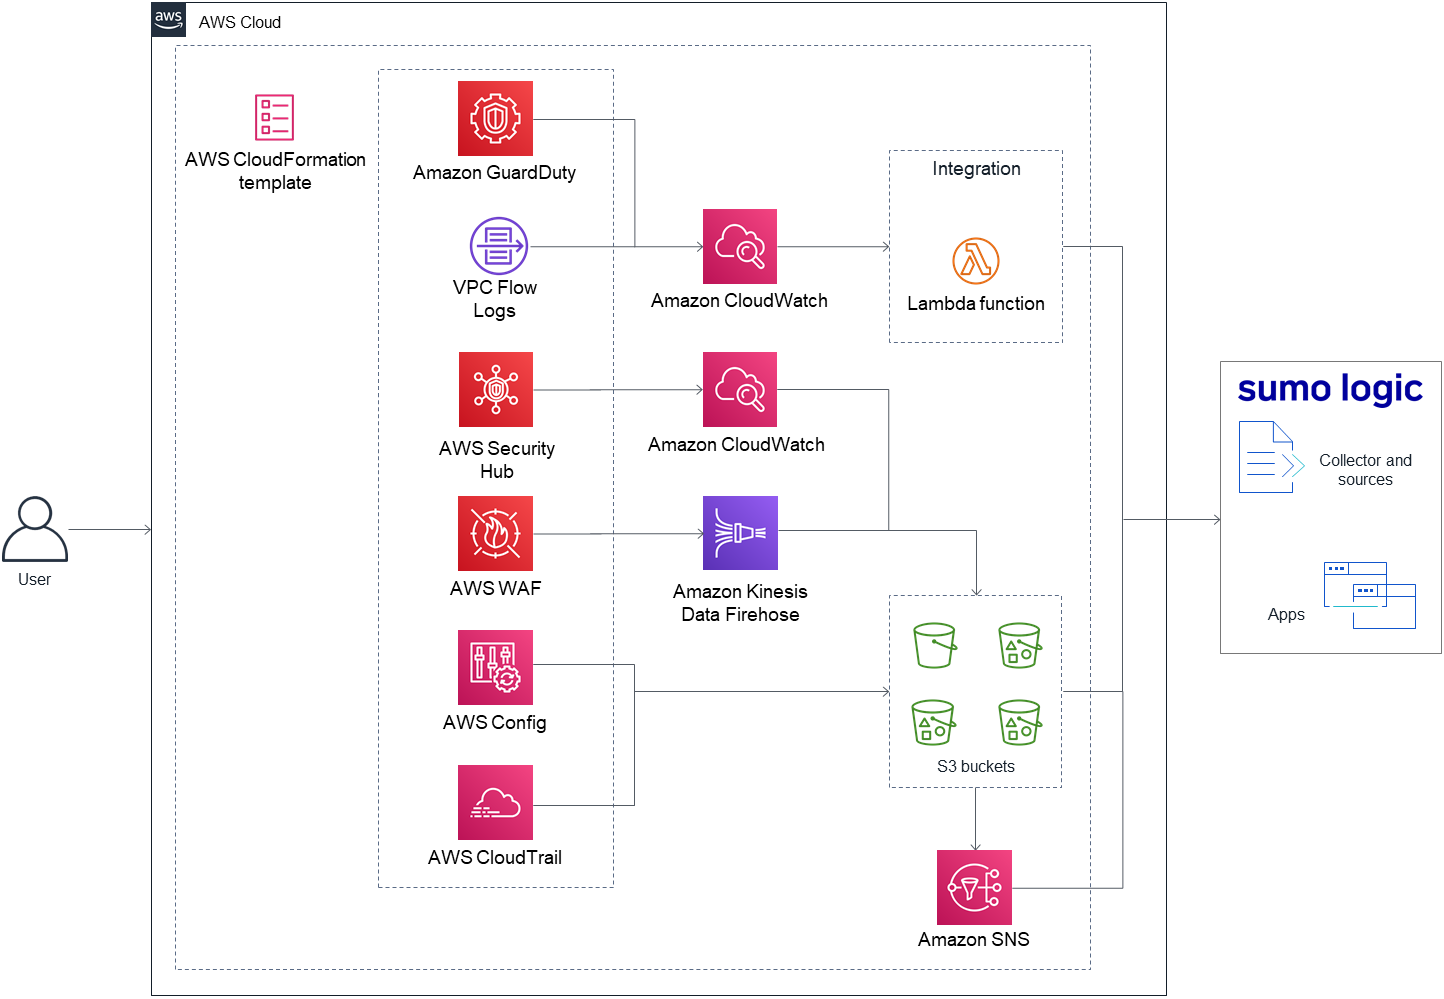
When my Sumo Logic account is ready, I use the Sumo Logic Security Integrations on AWS Quick Start to deploy the required integrations in my AWS account. You’ll find the source files used by this Quick Start in this GitHub repository. I open the deployment guide and follow along.

This architecture diagram shows the environment deployed by this Quick Start:

Architectural diagram.

Following the steps in the deployment guide, I create an access key and access ID in my Sumo Logic account, and write down my organization ID. Then, I launch the Quick Start to deploy the integrations.

The Quick Start uses an AWS CloudFormation template to create a stack. First, I check that I am in the right AWS Region. I use US West (Oregon) because I am using US2 with Sumo Logic. Then, I leave all default values and choose Next. In the parameters, I select US2 as my Sumo Logic deployment region and enter my Sumo Logic access ID, access key, and organization ID.

Console screenshot.

After that, I enable and configure the integrations with AWS security services and tools such as AWS CloudTrail, Amazon GuardDuty, VPC Flow Logs, and AWS Config.

Console screenshot.

If you have a delegate administrator with GuardDuty, you can enabled multiple member accounts as long as they are a part of the same AWS organization. With that, all findings from member accounts are vended to the delegate administrator and then to Sumo Logic Cloud SIEM through the GuardDuty events processor.

In the next step, I leave the stack options to their default values. I review the configuration and acknowledge the additional capabilities required by this stack (such as the creation of IAM resources) and then choose Create stack.

When the stack creation is complete, the integration with Sumo Logic Cloud SIEM is ready. If I had a hybrid architecture, I could connect those resources for a single point of view and analysis of my security events.

Using Sumo Logic Cloud SIEM
To see how the integration with AWS security services works, and how security events are handled by the SIEM, I use the amazon-guardduty-tester open-source scripts to generate security findings.

First, I use the included CloudFormation template to launch an Amazon Elastic Compute Cloud (Amazon EC2) instance in an Amazon Virtual Private Cloud (VPC) private subnet. The stack also includes a bastion host to provide external access. When the stack has been created, I write down the IP addresses of the two instances from the stack output.

Console screenshot.

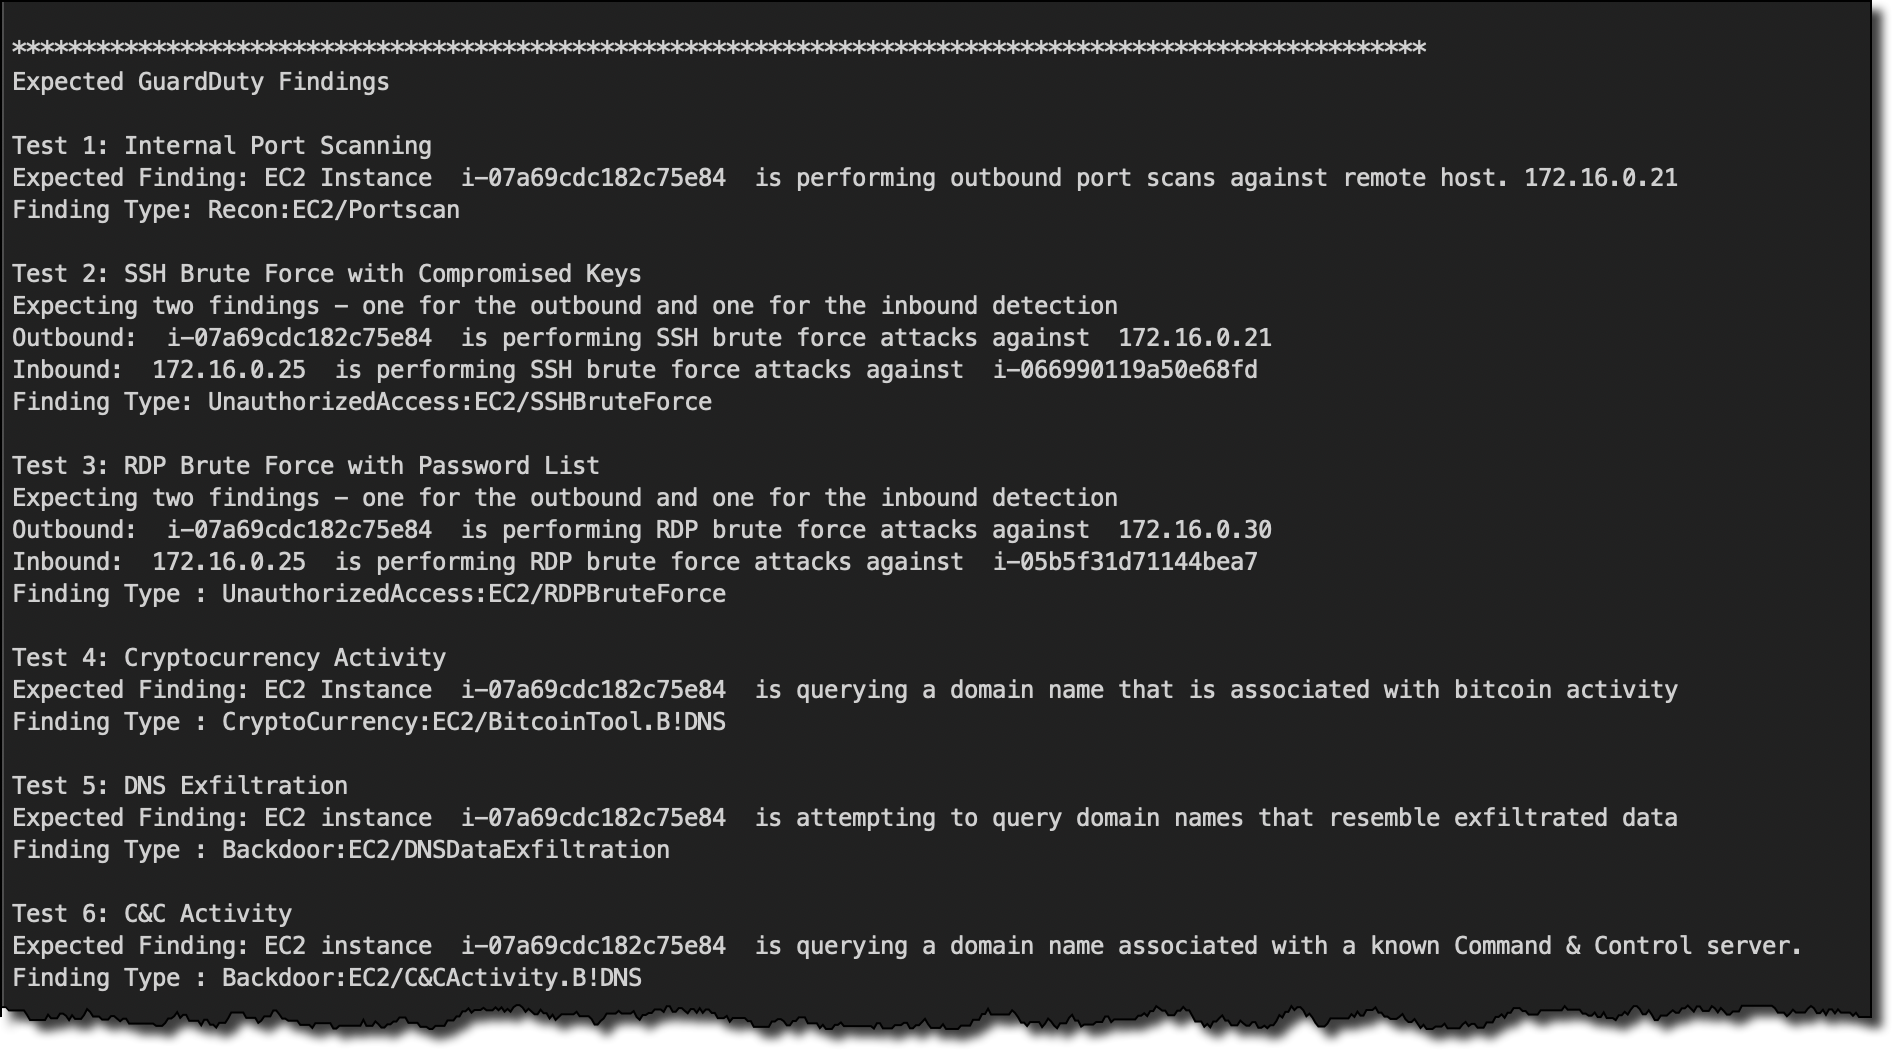
Then, I use SSH to connect to the EC2 instance in the private subnet through the bastion host. There are easy-to-follow instructions in the README file. I use the guardduty_tester.sh script, installed in the instance by CloudFormation, to generate security findings for my AWS account.

$ ./guardduty_tester.sh

SSH screenshot.

GuardDuty processes these findings and the events are sent to Sumo Logic through the integration I just set up. In the Sumo Logic GuardDuty dashboard, I see the threats ready to be analyzed and addressed.

Console screenshot.

Availability and Pricing
Sumo Logic Cloud SIEM powered by AWS is a multi-tenant Software as a Service (SaaS) available in AWS Marketplace that ingests data over HTTPS/TLS 1.2 on the public internet. You can connect data from any AWS Region and from multi-cloud and hybrid architectures for a single point of view of your security events.

Start a free trial of Sumo Logic Cloud SIEM and see how it can help your security team.

Read the Sumo Logic team’s blog post here for more information on the service. 

— Danilo

Amazon Simple Queue Service (SQS) – 15 Years and Still Queueing!

Post Syndicated from Jeff Barr original https://aws.amazon.com/blogs/aws/amazon-sqs-15-years-and-still-queueing/

Time sure does fly! I wrote about the production launch of Amazon Simple Queue Service (SQS) back in 2006, with no inkling that I would still be blogging fifteen years later, or that this service would still be growing rapidly while remaining fundamental to the architecture of so many different types of web-scale applications.

The first beta of SQS was announced with little fanfare in late 2004. Even though we have added many features since that beta, the original description (“a reliable, highly scalable hosted queue for buffering messages between distributed application components”) still applies. Our customers think of SQS as an infinite buffer in the cloud and use SQS queues to implement the connections between the functional parts of their application architecture.

Over the years, we have worked hard to keep the SQS interface simple and easy to use, even though there’s a lot of complexity inside. In order to make SQS scalable, durable, and reliable, messages are stored in a fleet that consists of thousands of servers in each AWS Region. Within a region, we save three copies of each message, taking care to distribute the messages across storage nodes and Availability Zones. In addition to this built-in redundant storage, SQS is self-healing and resilient to host failures & network interruptions. Even though SQS is now 15 years old, we continue to improve our scaling and load management applications so that you can always count on SQS to handle your mission-critical workloads.

SQS runs at an incredible scale. For example:

Amazon Product Fulfillment – During Prime Day 2021, traffic to SQS set a new record, peaking at 47.7 million messages per second.

Rapid7 – Amazon customer Rapid7 makes extensive use of SQS. According to Jeff Myers (Platform Software Architect):

Amazon SQS provides us with a simple to use, highly performant, and highly scalable messaging service without any management headaches. It is a crucial component of our architecture that has allowed us to scale to handle 10s of billions of messages per day.

You can visit the Amazon SQS home page to read about other high-scale use cases from NASA, BMW Group, Capital One, and other AWS customers.

Serverless Office Hours
Be sure to join us today (June 13th) for Serverless Office Hours at Noon PT on Twitch.tv. Rumor has it that there will be cake!

Back in Time
Here’s a quick recap of some of the major SQS milestones:

2006 – Production launch. An unlimited number of queues per account and items per queue, with each item up to 8 KB in length. Pay as you go pricing based on messages sent and data transferred.

2007 – Additional functions including control of the visibility timeout and access to the approximate number of queued messages.

2009 – SQS in Europe, and additional control over queue access via AddPermission and RemovePermission. This launch also marked the debut of what we then called the Access Policy Language, which has evolved into today’s IAM Policies.

2010 – A new free tier (100K requests/month then, since expanded to 1 million requests/month), configurable maximum message length (up to 64 KB), and configurable message retention time.

2011 – Additional CloudWatch Metrics for each SQS queue. Later that year we added batch operations (SendMessageBatch and DeleteMessageBatch), delay queues, and message timers.

2012 – Support for long polling, along with SDK support for request batching and client-side buffering.

2013 – Support for even larger payloads (256 KB) and a 50% price reduction.

2014 – Support for dead letter queues, to accept messages that have become stuck due to a timeout or to a processing error within your code.

2015 – Support for extended payloads (up to 2 GB) using the Extended Client Library.

2016 – Support for FIFO queues with exactly-once processing and deduplication and another price reduction.

2017 – Support for server-side encryption of messages and cost allocation tags.

2018 – Support for Amazon VPC Endpoints using AWS PrivateLink and the ability to invoke Lambda functions.

2019 – Support for Tag-on-Create and X-Ray tracing.

2020 – Support for 1-minute metrics for more fine-grained queue monitoring, a new console experience, and result pagination for the ListQueues and ListDeadLetterSourceQueues functions.

2021 – Tiered pricing so that you save money as your usage grows, and a High Throughput mode for FIFO queues.

Today, SQS remains simple, scalable, cost-effective, and highly reliable.

From the AWS Heroes
We asked some of the AWS Heroes to reflect on the success of SQS and to share some of their success stories. Here’s what we learned:

Eric Hammond (Serverless Hero) uses AWS Lambda Dead Letter Queues. They put alarms on the queues and send internal emails as alerts when problems need to be investigated.

Tom McLaughlin (Serverless Hero) has been using SQS since 2015. He said “My favorite use case is anytime someone wants a queue and I don’t want to manage a queuing platform. Which is always.”

Ken Collins (Serverless Hero) was not entirely sure how long he had been using SQS, and offered a range of 2 to 8 years! He uses it to power the Lambdakiq gem, which implements ActiveJob on SQS & Lambda.

Kyuhyun Byun (Serverless Hero) has been using SQS to power a push system that must sustain massive amounts of traffic, and tells us “Thanks to SQS, I don’t consider building a queuing system anymore.”

Prashanth HN (Serverless Hero) has been using SQS since 2017, and considers himself “late to the party.” He used SQS as part of his first serverless application, and finds that it is ideal for connecting services with differing throughput.

Ben Kehoe (Serverless Hero) told us that “I first saw the power of SQS when a colleague showed me how to retain state in a fleet of EC2 Spot instances by storing the state in SQS when an instance was getting shut down, and having new instances check the queue for state on startup.”

Jeremy Daly (Serverless Hero) started using SQS in 2010 as a lightweight queue that fed a facial recognition process on user-supplied images. Today, he often uses it as a buffer to throttle requests to downstream services that are not yet serverless.

Casey Lee (Container Hero) also started to use SQS in 2010 as a replacement for ActiveMQ between loosely coupled Java services. Casey implements auto scaling based on queue depth, and has found it to be an accurate way to handle the load.

Vlad Ionecsu (Container Hero) began his AWS journey with SQS back in 2014. Vlad found that the API was very easy to understand, and used SQS to power his thesis project.

Sheen Brisals (Serverless Hero) started to use SQS in 2018 while building a proof-of-concept that also used Lambda and S3. Sheen appreciates the ability to adjust the characteristics of each queue to create a good match for the message processing functions, and also makes use of both high and low priority queues.

Gojko Adzic (Serverless Hero) began to use SQS in 2013 as a task dispatch for exporters in MindMup. This online mind-mapping application allows large groups of users to collaborate, and requires strict ordering of updates to each document. Gojko used FIFO queues to allow them to process messages for different documents in parallel, with sequential order within each document.

Sebastian Müller (Serverless Hero) started to use SQS in 2016 by building a notification center for website-builder jimdo.com . The center ensures that customers are kept aware of events (orders, support messages, and contact requests) on a timely basis.

Luca Bianchi (Serverless Hero) first used SQS in 2012. He decoupled a pair of microservices running on AWS Elastic Beanstalk, and also created a fan-out processing system for a gamification platform. Today, his favorite SQS use case stores inference jobs and makes them available to a worker process running on Amazon SageMaker.

Peter Hanssens (Serverless Hero) uses SQS to offload tasks that do not need to be processed immediately. Several years ago, while assisting some data scientists, he created an event-driven batch-processing system that used a Lambda function to check a queue every 5 minutes and fire up EC2 instances to build models, while keeping strict control over the maximum number of running instances.

Serkan Ozal (Serverless Hero) has been using SQS since 2013 or so. He focuses on asynchronous message processing and counts on the ability of SQS to handle a huge number of events. He also makes uses of the message visibility feature so that he can re-process messages if necessary.

Matthieu Napoli (Serverless Hero) has been using SQS for about five years, starting out with EC2, and as a replacement for other queues. As he says, “Paired with Lambda, it gives massive parallelism out of the box without having to think too much about it. Plus the built-in failure handling makes it very robust.”

As you can see, there are a multitude of use cases for SQS.

SQS Resources
If you are not already using SQS, then it is time to get in the queue and get started. Here are some resources to help you find your way:

Happy queueing!

— Jeff;


Prime Day 2021 – Two Chart-Topping Days

Post Syndicated from Jeff Barr original https://aws.amazon.com/blogs/aws/prime-day-2021-two-chart-topping-days/

In what has now become an annual tradition (check out my 2016, 2017, 2019, and 2020 posts for a look back), I am happy to share some of the metrics from this year’s Prime Day and to tell you how AWS helped to make it happen.

This year I bought all sorts of useful goodies including a Toshiba 43 Inch Smart TV that I plan to use as a MagicMirror, some watering cans, and a Dremel Rotary Tool Kit for my workshop.

Powered by AWS
As in years past, AWS played a critical role in making Prime Day a success. A multitude of two-pizza teams worked together to make sure that every part of our infrastructure was scaled, tested, and ready to serve our customers. Here are a few examples:

Amazon EC2 – Our internal measure of compute power is an NI, or a normalized instance. We use this unit to allow us to make meaningful comparisons across different types and sizes of EC2 instances. For Prime Day 2021, we increased our number of NIs by 12.5%. Interestingly enough, due to increased efficiency (more on that in a moment), we actually used about 6,000 fewer physical servers than we did in Cyber Monday 2020.

Graviton2 Instances – Graviton2-powered EC2 instances supported 12 core retail services. This was our first peak event that was supported at scale by the AWS Graviton2 instances, and is a strong indicator that the Arm architecture is well-suited to the data center.

An internal service called Datapath is a key part of the Amazon site. It is highly optimized for our peculiar needs, and supports lookups, queries, and joins across structured blobs of data. After an in-depth evaluation and consideration of all of the alternatives, the team decided to port Datapath to Graviton and to run it on a three-Region cluster composed of over 53,200 C6g instances.

At this scale, the price-performance advantage of the Graviton2 of up to 40% versus the comparable fifth-generation x86-based instances, along with the 20% lower cost, turns into a big win for us and for our customers. As a bonus, the power efficiency of the Graviton2 helps us to achieve our goals for addressing climate change. If you are thinking about moving your workloads to Graviton2, be sure to study our very detailed Getting Started with AWS Graviton2 document, and also consider entering the Graviton Challenge! You can also use Graviton2 database instances on Amazon RDS and Amazon Aurora; read about Key Considerations in Moving to Graviton2 for Amazon RDS and Amazon Aurora Databases to learn more.

Amazon CloudFront – Fast, efficient content delivery is essential when millions of customers are shopping and making purchases. Amazon CloudFront handled a peak load of over 290 million HTTP requests per minute, for a total of over 600 billion HTTP requests during Prime Day.

Amazon Simple Queue Service – The fulfillment process for every order depends on Amazon Simple Queue Service (SQS). This year, traffic set a new record, processing 47.7 million messages per second at the peak.

Amazon Elastic Block Store – In preparation for Prime Day, the team added 159 petabytes of EBS storage. The resulting fleet handled 11.1 trillion requests per day and transferred 614 petabytes per day.

Amazon Aurora – Amazon Fulfillment Technologies (AFT) powers physical fulfillment for purchases made on Amazon. On Prime Day, 3,715 instances of AFT’s PostgreSQL-compatible edition of Amazon Aurora processed 233 billion transactions, stored 1,595 terabytes of data, and transferred 615 terabytes of data

Amazon DynamoDB – DynamoDB powers multiple high-traffic Amazon properties and systems including Alexa, the Amazon.com sites, and all Amazon fulfillment centers. Over the course of the 66-hour Prime Day, these sources made trillions of API calls while maintaining high availability with single-digit millisecond performance, and peaking at 89.2 million requests per second.

Prepare to Scale
As I have detailed in my previous posts, rigorous preparation is key to the success of Prime Day and our other large-scale events. If your are preparing for a similar event of your own, I can heartily recommend AWS Infrastructure Event Management. As part of an IEM engagement, AWS experts will provide you with architectural and operational guidance that will help you to execute your event with confidence.

— Jeff;

Customize and Package Dependencies With Your Apache Spark Applications on Amazon EMR on Amazon EKS

Post Syndicated from Channy Yun original https://aws.amazon.com/blogs/aws/customize-and-package-dependencies-with-your-apache-spark-applications-on-amazon-emr-on-amazon-eks/

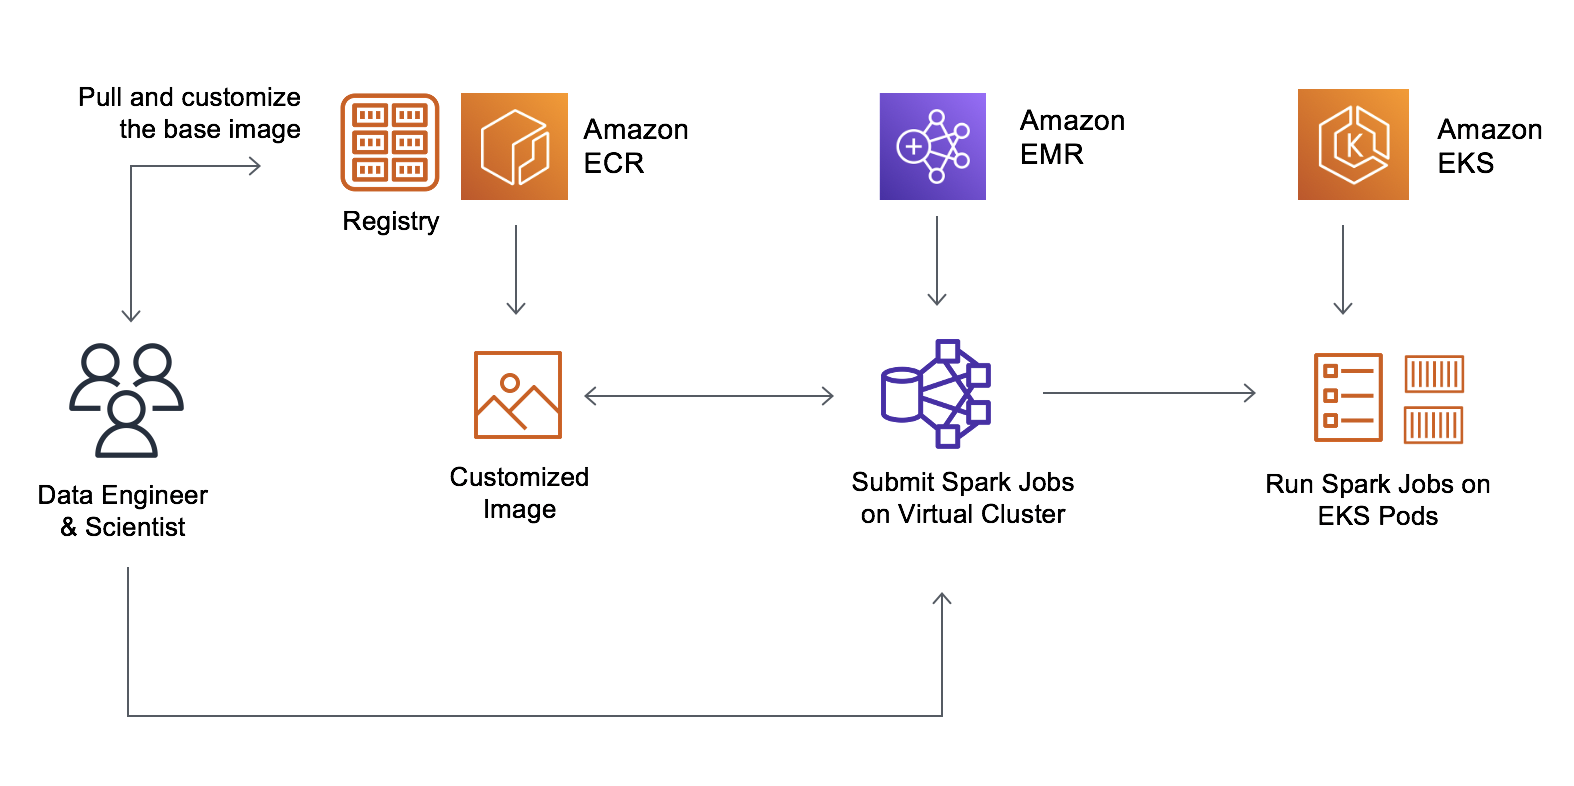
Last AWS re:Invent, we announced the general availability of Amazon EMR on Amazon Elastic Kubernetes Service (Amazon EKS), a new deployment option for Amazon EMR that allows customers to automate the provisioning and management of Apache Spark on Amazon EKS.

With Amazon EMR on EKS, customers can deploy EMR applications on the same Amazon EKS cluster as other types of applications, which allows them to share resources and standardize on a single solution for operating and managing all their applications. Customers running Apache Spark on Kubernetes can migrate to EMR on EKS and take advantage of the performance-optimized runtime, integration with Amazon EMR Studio for interactive jobs, integration with Apache Airflow and AWS Step Functions for running pipelines, and Spark UI for debugging.

When customers submit jobs, EMR automatically packages the application into a container with the big data framework and provides prebuilt connectors for integrating with other AWS services. EMR then deploys the application on the EKS cluster and manages running the jobs, logging, and monitoring. If you currently run Apache Spark workloads and use Amazon EKS for other Kubernetes-based applications, you can use EMR on EKS to consolidate these on the same Amazon EKS cluster to improve resource utilization and simplify infrastructure management.

Developers who run containerized, big data analytical workloads told us they just want to point to an image and run it. Currently, EMR on EKS dynamically adds externally stored application dependencies during job submission.

Today, I am happy to announce customizable image support for Amazon EMR on EKS that allows customers to modify the Docker runtime image that runs their analytics application using Apache Spark on your EKS cluster.

With customizable images, you can create a container that contains both your application and its dependencies, based on the performance-optimized EMR Spark runtime, using your own continuous integration (CI) pipeline. This reduces the time to build the image and helps predicting container launches for a local development or test.

Now, data engineers and platform teams can create a base image, add their corporate standard libraries, and then store it in Amazon Elastic Container Registry (Amazon ECR). Data scientists can customize the image to include their application specific dependencies. The resulting immutable image can be vulnerability scanned, deployed to test and production environments. Developers can now simply point to the customized image and run it on EMR on EKS.

Customizable Runtime Images – Getting Started
To get started with customizable images, use the AWS Command Line Interface (AWS CLI) to perform these steps:

  1. Register your EKS cluster with Amazon EMR.
  2. Download the EMR-provided base images from Amazon ECR and modify the image with your application and libraries.
  3. Publish your customized image to a Docker registry such as Amazon ECR and then submit your job while referencing your image.

You can download one of the following base images. These images contain the Spark runtime that can be used to run batch workloads using the EMR Jobs API. Here is the latest full image list available.

Release Label Spark Hadoop Versions Base Image Tag
emr-5.32.0-latest Spark 2.4.7 + Hadoop 2.10.1 emr-5.32.0-20210129
emr-5.33-latest Spark 2.4.7-amzn-1 + Hadoop 2.10.1-amzn-1 emr-5.33.0-20210323
emr-6.2.0-latest Spark 3.0.1 + Hadoop 3.2.1 emr-6.2.0-20210129
emr-6.3-latest Spark 3.1.1-amzn-0 + Hadoop 3.2.1-amzn-3 emr-6.3.0:latest

These base images are located in an Amazon ECR repository in each AWS Region with an image URI that combines the ECR registry account, AWS Region code, and base image tag in the case of US East (N. Virginia) Region.

755674844232.dkr.ecr.us-east-1.amazonaws.com/spark/emr-5.32.0-20210129

Now, sign in to the Amazon ECR repository and pull the image into your local workspace. If you want to pull an image from a different AWS Region to reduce network latency, choose the different ECR repository that corresponds most closely to where you are pulling the image from US West (Oregon) Region.

$ aws ecr get-login-password --region us-west-2 | docker login --username AWS --password-stdin 895885662937.dkr.ecr.us-west-2.amazonaws.com
$ docker pull 895885662937.dkr.ecr.us-west-2.amazonaws.com/spark/emr-5.32.0-20210129

Create a Dockerfile on your local workspace with the EMR-provided base image and add commands to customize the image. If the application requires custom Java SDK, Python, or R libraries, you can add them to the image directly, just as with other containerized applications.

The following example Docker commands are for a use case in which you want to install useful Python libraries such as Natural Language Processing (NLP) using Spark and Pandas.

FROM 895885662937.dkr.ecr.us-west-2.amazonaws.com/spark/emr-5.32.0-20210129
USER root
### Add customizations here ####
RUN pip3 install pyspark pandas spark-nlp // Install Python NLP Libraries
USER hadoop:hadoop

In another use case, as I mentioned, you can install a different version of Java (for example, Java 11):

FROM 895885662937.dkr.ecr.us-west-2.amazonaws.com/spark/emr-5.32.0-20210129
USER root
### Add customizations here ####
RUN yum install -y java-11-amazon-corretto // Install Java 11 and set home
ENV JAVA_HOME /usr/lib/jvm/java-11-amazon-corretto.x86_64
USER hadoop:hadoop

If you’re changing Java version to 11, then you also need to change Java Virtual Machine (JVM) options for Spark. Provide the following options in applicationConfiguration when you submit jobs. You need these options because Java 11 does not support some Java 8 JVM parameters.

"applicationConfiguration": [ 
  {
    "classification": "spark-defaults",
    "properties": {
        "spark.driver.defaultJavaOptions" : "
		    -XX:OnOutOfMemoryError='kill -9 %p' -XX:MaxHeapFreeRatio=70",
        "spark.executor.defaultJavaOptions" : "
		    -verbose:gc -Xlog:gc*::time -XX:+PrintGCDetails -XX:+PrintGCDateStamps 
			-XX:OnOutOfMemoryError='kill -9 %p' -XX:MaxHeapFreeRatio=70 
			-XX:+IgnoreUnrecognizedVMOptions"
    }
  }
]

To use custom images with EMR on EKS, publish your customized image and submit a Spark workload in Amazon EMR on EKS using the available Spark parameters.

You can submit batch workloads using your customized Spark image. To submit batch workloads using the StartJobRun API or CLI, use the spark.kubernetes.container.image parameter.

$ aws emr-containers start-job-run \
    --virtual-cluster-id <enter-virtual-cluster-id> \
    --name sample-job-name \
    --execution-role-arn <enter-execution-role-arn> \
    --release-label <base-release-label> \ # Base EMR Release Label for the custom image
    --job-driver '{
        "sparkSubmitJobDriver": {
        "entryPoint": "local:///usr/lib/spark/examples/jars/spark-examples.jar",
        "entryPointArguments": ["1000"],
        "sparkSubmitParameters": [ "--class org.apache.spark.examples.SparkPi --conf spark.kubernetes.container.image=123456789012.dkr.ecr.us-west-2.amazonaws.com/emr5.32_custom"
		  ]
      }
  }'

Use the kubectl command to confirm the job is running your custom image.

$ kubectl get pod -n <namespace> | grep "driver" | awk '{print $1}'
Example output: k8dfb78cb-a2cc-4101-8837-f28befbadc92-1618856977200-driver

Get the image for the main container in the Driver pod (Uses jq).

$ kubectl get pod/<driver-pod-name> -n <namespace> -o json | jq '.spec.containers
| .[] | select(.name=="spark-kubernetes-driver") | .image '
Example output: 123456789012.dkr.ecr.us-west-2.amazonaws.com/emr5.32_custom

To view jobs in the Amazon EMR console, under EMR on EKS, choose Virtual clusters. From the list of virtual clusters, select the virtual cluster for which you want to view logs. On the Job runs table, select View logs to view the details of a job run.

Automating Your CI Process and Workflows
You can now customize an EMR-provided base image to include an application to simplify application development and management. With custom images, you can add the dependencies using your existing CI process, which allows you to create a single immutable image that contains the Spark application and all of its dependencies.

You can apply your existing development processes, such as vulnerability scans against your Amazon EMR image. You can also validate for correct file structure and runtime versions using the EMR validation tool, which can be run locally or integrated into your CI workflow.

The APIs for Amazon EMR on EKS are integrated with orchestration services like AWS Step Functions and AWS Managed Workflows for Apache Airflow (MWAA), allowing you to include EMR custom images in your automated workflows.

Now Available
You can now set up customizable images in all AWS Regions where Amazon EMR on EKS is available. There is no additional charge for custom images. To learn more, see the Amazon EMR on EKS Development Guide and a demo video how to build your own images for running Spark jobs on Amazon EMR on EKS.

You can send feedback to the AWS forum for Amazon EMR or through your usual AWS support contacts.

— Channy

Introducing a Public Registry for AWS CloudFormation

Post Syndicated from Steve Roberts original https://aws.amazon.com/blogs/aws/introducing-a-public-registry-for-aws-cloudformation/

AWS CloudFormation and the AWS Cloud Development Kit (CDK) provide scalable and consistent provisioning of AWS resources (for example, compute infrastructure, monitoring tools, databases, and more). We’ve heard from many customers that they’d like to benefit from the same consistency and scalability when provisioning resources from AWS Partner Network (APN) members, third-party vendors, and open-source technologies, regardless of whether they are using CloudFormation templates or have adopted the CDK to define their cloud infrastructure.

I’m pleased to announce a new public registry for CloudFormation, providing a searchable collection of extensions – resource types or modules – published by AWS, APN partners, third parties, and the developer community. The registry makes it easy to discover and provision these extensions in your CloudFormation templates and CDK applications in the same manner you use AWS-provided resources. Using extensions, you no longer need to create and maintain custom provisioning logic for resource types from third-party vendors. And, you are able to use a single infrastructure as code tool, CloudFormation, to provision and manage AWS and third-party resources, further simplifying the infrastructure provisioning process (the CDK uses CloudFormation under the hood).

Launch Partners
We’re excited to be joined by over a dozen APN Partners for the launch of the registry, with more than 35 extensions available for you to use today. Blog posts and announcements from the APN Partners who collaborated on this launch, along with AWS Quick Starts, can be found below (some will be added in the next few days).

Registries and Resource Types
In 2019, CloudFormation launched support for private registries. These enabled registration and use of resource providers (Lambda functions) in your account, including providers from AWS and third-party vendors. After you registered a provider you could use resource types, comprised of custom provisioning logic, from the provider in your CloudFormation templates. Resource types were uploaded by providers to an Amazon Simple Storage Service (Amazon S3) bucket, and you used the types by referencing the relevant S3 URL. The public registry provides consistency in the sourcing of resource types and modules, and you no longer need to use a collection of Amazon Simple Storage Service (Amazon S3) buckets.

Third-party resource types in the public registry also integrate with drift detection. After creating a resource from a third-party resource type, CloudFormation will detect changes to the resource from its template configuration, known as configuration drift, just as it would with AWS resources. You can also use AWS Config to manage compliance for third-party resources consumed from the registry. The resource types are automatically tracked as Configuration items when you have configured AWS Config to record them, and used CloudFormation to create, update, and delete them. Whether the resource types you use are third-party or AWS resources, you can view configuration history for them, in addition to being able to write AWS Config rules to verify configuration best practices.

The public registry also supports Type Configuration, enabling you to configure third-party resource types with API keys and OAuth tokens per account and region. Once set, the configuration is stored securely and can be updated. This also provides a centralized way to configure third-party resource types.

Publishing Extensions to the Public Registry
Extension publishers must be verified as AWS Marketplace sellers, or as GitHub or BitBucket users, and extensions are validated against best practices. To publish extensions (resource types or modules) to the registry, you must first register in an AWS Region, using one of the mentioned account types.

After you’ve registered, you next publish your extension to a private registry in the same Region. Then, you need to test that the extension meets publishing requirements. For a resource type extension, this means it must pass all the contract tests defined for the type. Modules are subject to different requirements, and you can find more details in the documentation. With testing complete, you can publish your extension to the public registry for your Region. See the user guide for detailed information on publishing extensions.

Using Extensions in the Public Registry
I decided to try a couple of extensions related to Kubernetes, contributed by AWS Quick Starts, to make configuration changes to a cluster. Personally, I don’t have a great deal of experience with Kubernetes and its API so this was a great chance to examine how extensions could save me significant time and effort. During the process of writing this post I learned from others that using the Kubernetes API (the usual way to achieve the changes I had in mind) would normally involve effort even for those with more experience.

For this example I needed a Kubernetes cluster, so I followed this tutorial to set one up in Amazon Elastic Kubernetes Service (EKS), using the Managed nodes – Linux node type. With my cluster ready, I want to make two configuration changes.

First, I want to add a new namespace to the cluster. A namespace is a partitioning construct that lets me deploy the same set of resources to different namespaces in the same cluster without conflict thanks to the isolation namespaces provide. Second, I want to set up and use Helm, a package manager for Kubernetes. I’ll use Helm to install the kube-state-metrics package from the Prometheus helm-charts repository for gathering cluster metrics. While I can use CloudFormation to provision clusters and compute resources, previously, to perform these two configuration tasks, I’d have had to switch to the API or various bespoke tool chains. With the registry, and these two extensions, I can now do everything using CloudFormation (and of course, as I mentioned earlier, I could also use the extensions with the CDK, which I’ll show later).

Before using an extension, it needs to be activated in my account. While activation is easy to do for single accounts using the console, as we’ll see in a moment, if I were using AWS Organizations and wanted to activate various third-party extensions across my entire organization, or for a specific organization unit (OU), I could achieve this using Service-Managed StackSets in CloudFormation. Using the resource type AWS::CloudFormation::TypeActivation in a template submitted to a Service-Managed StackSet, I can target an entire Organization, or a particular OU, passing the Amazon Resource Name (ARN) identifying the third-party extension to be activated. Activation of extensions is also very easy to achieve (whether using AWS Organizations or not) using the CDK with just a few lines of code, again making use of the aforementioned TypeActivation resource type.

To activate the extensions, I head to the CloudFormation console and click Public extensions from the navigation bar. This takes me to the Registry:Public extensions home page, where I switch to viewing third party resource type extensions.

Viewing third-party types in the registry

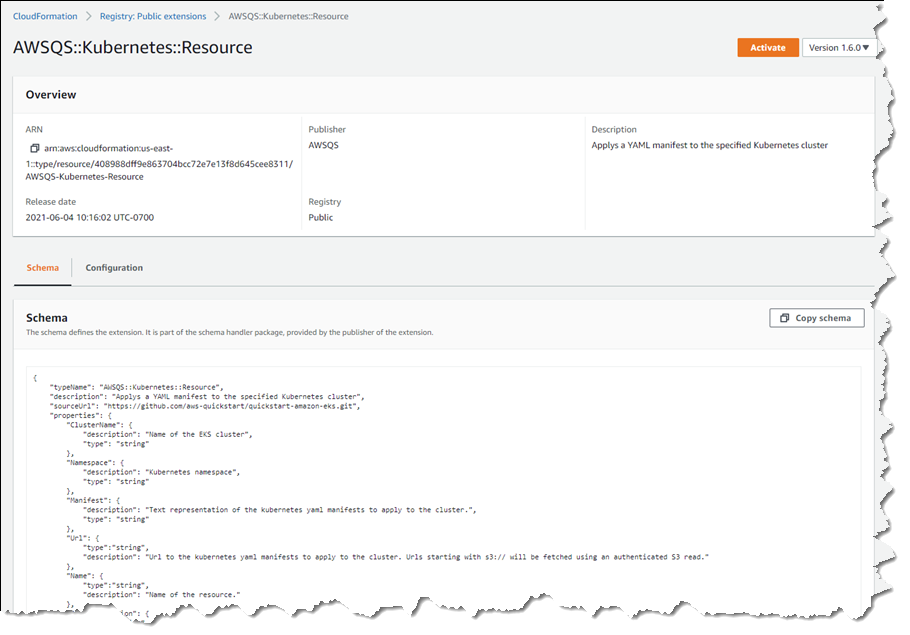
The extensions I want are AWSQS::Kubernetes::Resource and AWSQS::Kubernetes::Helm. The Resource extension is used to apply a manifest describing configuration changes to a cluster. In my case, the manifest requests a namespace be created. Clicking the name of the AWSQS::Kubernetes::Resource extension takes me to a page where I can view schema, configuration details, and versions for the extension.

Viewing details of the Resource extension

What happens if you deactivate an extension you’re using, or an extension is withdrawn by the publisher? If you deactivate an extension a stack depends on, any resources created from that extension won’t be affected, but you’ll be unable to perform further stack operations, such as Read, Update, Delete, and List (these will fail until the extension is re-activated). Publishers must request their extensions be withdrawn from the registry (there is no “delete” API). If the request is granted, customers who activated the extension prior to withdrawal can still perform Create/Read/Update/Delete/List operations, using what is effectively a snapshot of the extension in their account.

Clicking Activate takes me to a page where I need to specify the ARN of an execution role that CloudFormation will assume when it runs the code behind the extension. I create a role following this user guide topic, but the basic trust relationship is below for reference.

{
  "Version": "2012-10-17",
  "Statement": [
    {
      "Effect": "Allow",
      "Principal": {
        "Service": "resources.cloudformation.amazonaws.com"
      },
      "Action": "sts:AssumeRole"
    }
  ]
}

I also add permissions for the resource types I’m using to my execution role. Details on the permissions needed for the types I chose can be found on GitHub, for Helm, and for Kubernetes (note the GitHub examples include the trust relationship too).

When activating an extension, I can elect to use the default name, which is how I will refer to the type in my templates or CDK applications, or I can enter a new name. The name chosen has to be unique within my account, so if I’ve enabled a version of an extension with its default name, and want to enable a different version, I must change the name. Once I’ve filled in the details, and chosen my versioning strategy (extensions use semantic versioning, and I can elect to accept automatic updates for minor version changes, or to “lock” to a specific version) clicking Activate extension completes the process.

Activating an extension from the registry

That completes the process for the first extension, and I follow the same steps for the AWSQS::Kubernetes::Helm extension. Navigating to Activated extensions I can view a list of all my enabled extensions.

Viewing the list of enabled extensions

I have one more set of permissions to update. Resource types make calls to the Kubernetes API on my behalf so I need to update the aws-auth ConfigMap for my cluster to reference the execution role I just used, otherwise the calls made by the resource types I’m using will fail. To do this, I run the command kubectl edit cm aws-auth -n kube-system at a command prompt. In the text editor that opens, I update the ConfigMap with a new group referencing my CfnRegistryExtensionExecRole, shown below (if you’re following along, be sure to change the account ID and role name to match yours).

apiVersion: v1
data:
  mapRoles: |
    - groups:
      - system:bootstrappers
      - system:nodes
      rolearn: arn:aws:iam::111122223333:role/myAmazonEKSNodeRole
      username: system:node:{{EC2PrivateDNSName}}
    - groups:
      - system:masters
      rolearn: arn:aws:iam::111122223333:role/CfnRegistryExtensionExecRole
      username: cfnresourcetypes
kind: ConfigMap
metadata:
  creationTimestamp: "2021-06-04T20:44:24Z"
  name: aws-auth
  namespace: kube-system
  resourceVersion: "6355"
  selfLink: /api/v1/namespaces/kube-system/configmaps/aws-auth
  uid: dc91bfa8-1663-45d0-8954-1e841913b324

Now I’m ready to use the extensions to configure my cluster with a new namespace, Helm, and the kube-state-metrics package. I create a CloudFormation template that uses the extensions, adding parameters for the elements I want to specify when creating a stack: the name of the cluster to update, and the namespace name. The properties for the KubeStateMetrics resource reference the package I want Helm to install.

AWSTemplateFormatVersion: "2010-09-09"
Parameters:
  ClusterName:
    Type: String
  Namespace:
    Type: String
Resources:
  KubeStateMetrics:
    Type: AWSQS::Kubernetes::Helm
    Properties:
      ClusterID: !Ref ClusterName
      Name: kube-state-metrics
      Namespace: !GetAtt KubeNamespace.Name
      Repository: https://prometheus-community.github.io/helm-charts
      Chart: prometheus-community/kube-state-metrics
  KubeNamespace:
    Type: AWSQS::Kubernetes::Resource
    Properties:
      ClusterName: !Ref ClusterName
      Namespace: default
      Manifest: !Sub |
        apiVersion: v1
        kind: Namespace
        metadata:
          name: ${Namespace}
          labels:
            name: ${Namespace}

On the Stacks page of the CloudFormation console, I click Create stack, upload my template, and then give my stack a name and the values for my declared parameters.

Launching a stack with my activated extensions

I click Next to proceed through the rest of the wizard, leaving other settings at their default values, and then Create stack to complete the process.

Once stack creation is complete, I verify my changes using the kubectl command line tool. I first check that the new namespace, newsblog-sample-namespace, is present with the command kubectl get namespaces. I then run the kubectl get all --namespace newsblog-sample-namespace command to verify the kube-state-metrics package is installed.

Verifying the extensions applied by changes

Extensions can also be used with the AWS Cloud Development Kit. To wrap up this exploration of using the new registry, I’ve included an example below of a CDK application snippet in TypeScript that achieves the same effect, using the same extensions, as the YAML template I showed earlier (I could also have written this using any of the languages supported by the CDK – C#, Java, or Python).

import {Stack, Construct, CfnResource} from '@aws-cdk/core';
export class UnoStack extends Stack {
  constructor(scope: Construct, id: string) {
    super(scope, id);
    const clusterName = 'newsblog-cluster';
    const namespace = 'newsblog-sample-namespace';

    const kubeNamespace = new CfnResource(this, 'KubeNamespace', {
      type: 'AWSQS::Kubernetes::Resource',
      properties: {
        ClusterName: clusterName,
        Namespace: 'default',
        Manifest: this.toJsonString({
          apiVersion: 'v1',
          kind: 'Namespace',
          metadata: {
            name: namespace,
            labels: {
              name: namespace,
            }
          },
        }),
      },
    });
    
    new CfnResource(this, 'KubeStateMetrics', {
      type: 'AWSQS::Kubernetes::Helm',
      properties: {
        ClusterID: clusterName,
        Name: 'kube-state-metrics',
        Namespace: kubeNamespace.getAtt('Name').toString(),
        Repository: 'https://prometheus-community.github.io/helm-charts',
        Chart: 'prometheus-community/kube-state-metrics',
      },
    });
  }
};

As mentioned earlier in this post, I don’t have much experience with the Kubernetes API, and Kubernetes in general. However, by making use of the resource types in the public registry, in conjunction with CloudFormation, I was able to easily configure my cluster using a familiar environment, without needing to resort to the API or bespoke tool chains.

Get Started with the CloudFormation Public Registry
Pricing for the public registry is the same as for the existing registry and private resource types. There is no additional charge for using native AWS resource types; for third-party resource types you will incur charges based on the number of handler operations (add, delete, list, etc.) you run per month. For details, see the AWS CloudFormation Pricing page. The new public registry is available today in the US East (N. Virginia, Ohio), US West (Oregon, N. California), Canada (Central), Europe (Ireland, Frankfurt, London, Stockholm, Paris, Milan), Asia Pacific (Hong Kong, Mumbai, Osaka, Singapore, Sydney, Seoul, Tokyo), South America (Sao Paulo), Middle East (Bahrain), and Africa (Cape Town) AWS Regions.

For more information, see the AWS CloudFormation User Guide and User Guide for Extension Development, and start publishing or using extensions today!

— Steve

Heads Up – AWS News Blog RSS Feed Change

Post Syndicated from Jeff Barr original https://aws.amazon.com/blogs/aws/heads-up-aws-news-blog-rss-feed-change/

TL;DR – If you are using the ancient Feedburner feed for this blog, please change to the new one (https://aws.amazon.com/blogs/aws/feed/) ASAP.

Back in the early days of AWS, I paid a visit to the Chicago headquarters of a cool startup called FeedBurner. My friend Matt Shobe demo’ed their new product to me and showed me how “burning” a raw RSS feed could add value to it in various ways. Upon my return to Seattle I promptly burned the RSS feed of the original (TypePad-hosted) version of this blog, and shared that feed for many years.

FeedBurner has served us well over the years, but its time has passed. The company was acquired many years ago and the new owners are now putting the product into maintenance mode.

While the existing feed will continue to work for the foreseeable future, I would like to encourage you to use the one directly generated by this blog instead. Simply update your feed reader to refer to https://aws.amazon.com/blogs/aws/feed/ .

— Jeff;

In the Works – AWS Region in Tel Aviv, Israel

Post Syndicated from Jeff Barr original https://aws.amazon.com/blogs/aws/in-the-works-aws-region-in-tel-aviv-israel/

We launched three AWS Regions (Italy, South Africa, and Japan) in the last 12 months, and are working on regions in Australia, Indonesia, Spain, India, Switzerland, and the United Arab Emirates.

Tel Aviv, Israel in the Works
Today I am happy to announce that the AWS Israel (Tel Aviv) Region is in the works and will open in the first half of 2023. This region will have three Availability Zones and will give AWS customers in Israel the ability to run workloads and store data that must remain in-country.

There are 81 Availability Zones within 25 AWS Regions in operation today, with 21 more Availability Zones and seven announced regions (including this one) underway.

As is always the case with an AWS Region, each of the Availability Zones will be a fully isolated part of the AWS infrastructure. The AZs in this region will be connected together via high-bandwidth, low-latency network connections over dedicated, fully redundant metro fiber. This connectivity supports applications that need synchronous replication between AZs for availability or redundancy. You can take a peek at the AWS Global Infrastructure page to learn more about how we design and build regions and AZs.

AWS in Israel
I first visited Israel in 2013 and have been back several (but definitely not enough) times since then. I have spoken at several AWS Summits and visited many of early customers in the area. Today, AWS has the following resources on the ground in Israel:

Israel is also home to Annapurna Labs, an Amazon.com subsidiary that is responsible for developing much of the innovative hardware that powers AWS.

In addition, the government of Israel announced that it has selected AWS as the primary cloud provider for the Nimbus Project. As part of this project, government ministries and subsidiaries in Israel will use cloud computing to power a digital transformation and to provide new digital services for the citizens of Israel.

Stay Tuned
We’ll announce the opening of the AWS Israel (Tel Aviv) Region in a forthcoming blog post, so be sure to stay tuned!

— Jeff;


Now Open Third Availability Zone in the AWS China (Beijing) Region

Post Syndicated from Jeff Barr original https://aws.amazon.com/blogs/aws/now-open-third-availability-zone-in-the-aws-china-beijing-region/

I made my first trip to China in late 2008. I was able to speak to developers and entrepreneurs and to get a sense of the then-nascent market for cloud computing. With over 900 million Internet users as of 2020 (according to a recent report from China Internet Network Information Center), China now has the largest user base in the world.

A limited preview of the China (Beijing) Region was launched in 2013 and brought to general availability in 2016. A year later the AWS China (Ningxia) Region launched. In order to comply with China’s legal and regulatory requirements, we collaborated with local Chinese partners. These partners have the proper telecom licenses to provide cloud services in Mainland China. Today, developers can deploy cloud-based applications inside of using the same APIs, protocols, services, and operational practices used by our customers in other parts of the world. This commonality has been particularly attractive to multinational companies that can take advantage of their existing AWS experience when they expand their cloud infrastructure into Mainland China.

Third Availability Zone in Beijing
Today I am happy to announce that we are adding a third Availability Zone (AZ) to the China (Beijing) Region operated by Sinnet in order to support the demands of our growing customer base in China. As is the case with all AWS Availability Zones, this one encompasses one or more discrete data centers in separate facilities, each with redundant power, networking, and connectivity. With this launch, both AWS Regions in China offer three AZs and allow customers to build applications that are scalable, fault-tolerant, and highly available.

AWS Customers in the Beijing Region
Many enterprise customers in China are using the China (Beijing) Region to support their digital transformations. For example:

Yantai Shinho was founded in 1992 and now manufactures 13 popular condiments. They now have a presence in over 100 countries and supply products that tens of millions of families enjoy. They are already using the region to support their front-end and big data efforts, and plan to make use of the additional architectural options made possible by the new AZ.

Kingdee International Software Group was founded in 1993 and now provides corporate management and cloud services for more than 6.8 million enterprises and government organizations. They now have over 8,000 employees AND are committed to changing the way that hundreds of millions of people work.

As I noted earlier, our multinational customers are using the AWS Regions in China to expand their global presence. Here are a few examples:

Australian independent software vendor Canva offers its design-on-demand application to 150 million active users in 190 countries. They launched their Chinese products in August 2018, and have since built in into a first-class design platform that includes tens of millions of high-resolution pictures, Chinese fonts, original templates, and more. Chinese users have already created over 50 million designs on the Canva.cn platform.

Swire is a 200 year old business group that spans the aviation, beverage, food, industrial, marine services, and property industries. Their Swire Coca-Cola division has the exclusive right to manufacture, market, and distribute Coca-Cola products in eleven Chinese provinces, the Shanghai Municipality, Hong Kong, Taiwan, and part of the Western United States — a total customer base of 728 million people. Swire Coca-Cola’s systems primarily operate in the China (Beijing) Region and will soon make use of the third AZ.

Finally, startups are using the region to power their fast-growing businesses:

CraiditX applies machine learning technology originally developed for search engines to the financial services industry. Established in 2015, they use behavioral language processing, natural language processing, neural networks, and integrated modeling to build risk management systems.

Founded in 2016, Momenta is a Chinese startup that is building a “brain” for autonomous vehicles. Powered by deep learning and data-driven path planning, they are working on autonomous driving for passenger vehicles and full autonomy for mobile service vehicles, all deployed in the China (Beijing) Region.

81 and 25
This launch raises the global AWS footprint to a total of 81 Availability Zones across 25 geographic regions, with plans to launch 18 additional Availability Zones and six more regions in Australia, India, Indonesia, Spain, Switzerland, and United Arab Emirates (UAE).

–Jeff, with lots of help from Lillian Shao;

PS – The operator and service provider for the AWS China (Beijing) Region is Beijing Sinnet Technology Co., Ltd. The operator and service provider for the AWS China (Ningxia) Region is Ningxia Western Cloud Data Technology Co., Ltd.

Introducing the newest AWS Heroes – June, 2021

Post Syndicated from Ross Barich original https://aws.amazon.com/blogs/aws/introducing-the-newest-aws-heroes-june-2021/

We at AWS continue to be impressed by the passion AWS enthusiasts have for knowledge sharing and supporting peer-to-peer learning in tech communities. A select few of the most influential and active community leaders in the world, who truly go above and beyond to create content and help others build better & faster on AWS, are recognized as AWS Heroes.

Today we are thrilled to introduce the newest AWS Heroes, including the first Heroes based in Perú and Ukraine:

Anahit Pogosova – Tampere, Finland

Data Hero Anahit Pogosova is a Lead Cloud Software Engineer at Solita. She has been architecting and building software solutions with various customers for over a decade. Anahit started working with monolithic on-prem software, but has since moved all the way to the cloud, nowadays focusing mostly on AWS Data and Serverless services. She has been particularly interested in the AWS Kinesis family and how it integrates with AWS Lambda. You can find Anahit speaking at various local and international events, such as AWS meetups, AWS Community Days, ServerlessDays, and Code Mesh. She also writes about AWS on Solita developers’ blog and has been a frequent guest on various podcasts.

Anurag Kale – Gothenburg, Sweden

Data Hero Anurag Kale is a Cloud Consultant at Cybercom Group. He has been using AWS professionally since 2017 and holds the AWS Solutions Architect – Associate certification. He is a co-organizer of the AWS User Group Pune; helping host and organize AWS Community Day Pune 2020 and AWS Community Day India 2020 – Virtual Edition. Anurag’s areas of interest include Amazon DynamoDB, relational databases, serverless data pipelines, data analytics, Infrastructure as Code, and sustainable cloud solutions. He is an active advocate of DynamoDB and Amazon Aurora, and has spoken at various national and international events such as AWS Community Day Nordics 2020 and various AWS Meetups.

Arseny Zinchenko – Kiev, Ukraine

Container Hero Arseny Zinchenko has over 15 years in IT, and currently works as a DevOps Team Lead and Data Security Officer at BetterMe Inc., a leading health & fitness mobile publisher. Since 2011 Arseny has used his blog to share expertise about DevOps, system administration, containerization, and cloud computing. Currently he is focused primary on Amazon Elastic Kubernetes Service (EKS) and security solutions provided by AWS. He is a member of the biggest Ukranian DevOps community, UrkOps, where he helps others to build their best with AWS and containers. where he helps others to build their best with AWS and containers. He also helps implement DevOps methodology in their organizations by using Amazon CloudFormation and AWS managed services like Amazon RDS, Amazon Aurora, and EKS.

Azmi Mengü – Istanbul, Turkey

Community Hero Azmi Mengü is a Sr. Software Engineer on the Infrastructure Team at Armut / HomeRun. He has over 5 years of AWS cloud development experience and has expertise in serverless, containers, data, and storage services. Since 2019, Azmi has been on the organizing committee of the Cloud and Serverless Turkey community. He co-organized and acted as a speaker at over 50 physical and online events during this time. He actively writes blog posts about developing serverless, container, and IaC technologies on AWS. Azmi also co-organized the first-ever ServerlessDays Istanbul in Turkey and AWS Community Day Turkey events.

Carlos Cortez – Lima, Perú

Community Hero Carlos Cortez is the founder and leader of AWS User Group Perú and Founder and CTO of CENNTI, which helps Peruvian companies in their difficult journey to the cloud and the development of Machine Learning solutions. The two biggest AWS events in Perú, AWS Community Day Lima 2019 and AWS UG Perú Conference in 2021, were organized by Carlos. He is the owner of the first AWS Podcast in Latam, “Imperio Cloud” and “Al día con AWS”. He loves to create content for emerging technologies, which is why he created DeepFridays to educate people in Reinforcement Learning.

Chris Miller – Santa Cruz, USA

Machine Learning Hero Chris Miller is an entrepreneur, inventor, and CEO of Cloud Brigade. After winning the 2019 AWS DeepRacer Summit race in Santa Clara, he founded the Santa Cruz DeepRacer Meetup group. Chris has worked with AWS AI/ML product teams with DeepLens and DeepRacer on projects including The Poopinator, and What’s in my Fridge. He prides himself on being a technical founder with experience across a broad range of disciplines, which has led to a lot of crazy projects in competitions and hackathons, such as an automated beer brewery, animatronic ventriloquist dummy, and his team even won a Cardboard Boat Race!

Gert Leenders – Brussels, Belgium

DevTools Hero Gert Leenders started his career as a developer in 2001. Eight years ago, his focus shifted entirely towards AWS. Today, he’s an AWS Cloud Solution Architect helping teams build and deploy cloud-native applications and manage their cloud infrastructure. On his blog, Gert emphasizes hidden gems in AWS developer tools and day-to-day topics for cloud engineers like logging, debugging, error handling and Infrastructure as Code. He also often shares code on GitHub.

Lei Wu – Beijing, China

Machine Learning Hero Lei Wu is head of the machine learning team at FreeWheel. He enjoys sharing technology with others, and he publishes many Chinese language tech blogs at infoQ, covering machine learning, big data, and distributed computing systems. Lei works hard to promote deep learning adoption with AWS services wherever he can, including talks at Spark Summit China, World Artificial Intelligence Conference, AWS Innovate AI/ML edition, and AWS re:Invent where he shared FreeWheel’s best practices on deep learning with Amazon SageMaker.

Hidetoshi Matsui – Hamamatsu, Japan

Serverless Hero Hidetoshi Matsui is a developer at Startup Technology Inc. and a member of the Japan AWS User Group (JAWS-UG). On “builders.flash,” a web magazine for developers run by AWS Japan, the articles he has contributed are among the most viewed pages on the site since 2020. His most impactful achievement is the construction of a distribution site for JAWS-UG’s largest event, JAWS DAYS 2021 re:Connect. He made full use of various AWS services to build a low-latency and scalable distribution system with a serverless architecture and smooth streaming video viewing for nearly 4000 participants.

Philipp Schmid – Nuremberg, Germany

Machine Learning Hero Philipp Schmid is a Machine Learning & Tech Lead at Hugging Face, working to democratize artificial intelligence through open source and open science. He has extensive experience in deep learning, deploying NLP models into production using AWS Lambda, and is an avid advocate of Amazon SageMaker to simplify machine learning, such as “Distributed Training: Train BART/T5 for Summarization using Transformers and Amazon SageMaker.” He loves to share his knowledge on AI and NLP at various meetups such as Data Science on AWS, and on his technical Blog.

Simone Merlini – Milan, Italy

Community Hero Simone Merlini is CEO and CTO at beSharp. In 2012 he co-founded the first AWS User Group in Italy, and he’s currently the organizer of the AWS User Group Milan. He’s also actively involved in the development of Leapp, an open-source project for managing and securing Cloud access in multi-account environments. Simone is also the editor in chief and writer for Proud2beCloud, a blog aimed to share highly specialized AWS knowledge to enable the adoption of cloud technologies.

Virginie Mathivet – Lyon, France

Machine Learning Hero Virginie Mathivet has been leading the DataSquad team at TeamWork since 2017, focused on Data and Artificial Intelligence. Their purpose is to make the most of their clients’ data, via Data Science or Data Engineering / Big Data, mainly on AWS. Virginie regularly participates in conferences and writes books and articles, both for the public (introduction to AI) and for an informed audience (technical subjects). She also campaigns for a better visibility of women in the digital industry and for diversity in the data professions. Her favorite cloud service? Amazon SageMaker of course!

Walid A. Shaari – Dhahran, Saudi Arabia

Container Hero Walid A. Shaari is the community lead for the Dammam Cloud-native AWS User Group, working closely with CNCF ambassadors, K8saraby, and AWS MENA community leaders to enable knowledge sharing, collaboration, and networking. He helped organize the first AWS Community Day – MENA 2020. Walid also maintains GitHub content for Certified Kubernetes Administrators (CKA) and Certified Kubernetes Security Specialists (CKS), and holds several active professional certifications: AWS Certified Associate Solutions Architect, Certified Kubernetes Administrator, Certified Kubernetes Application Developer, Red Hat Certified Architect level IV, and more.


If you’d like to learn more about the new Heroes, or connect with a Hero near you, please visit the AWS Hero website.

— Ross;

Amazon Redshift ML Is Now Generally Available – Use SQL to Create Machine Learning Models and Make Predictions from Your Data

Post Syndicated from Danilo Poccia original https://aws.amazon.com/blogs/aws/amazon-redshift-ml-is-now-generally-available-use-sql-to-create-machine-learning-models-and-make-predictions-from-your-data/

With Amazon Redshift, you can use SQL to query and combine exabytes of structured and semi-structured data across your data warehouse, operational databases, and data lake. Now that AQUA (Advanced Query Accelerator) is generally available, you can improve the performance of your queries by up to 10 times with no additional costs and no code changes. In fact, Amazon Redshift provides up to three times better price/performance than other cloud data warehouses.

But what if you want to go a step further and process this data to train machine learning (ML) models and use these models to generate insights from data in your warehouse? For example, to implement use cases such as forecasting revenue, predicting customer churn, and detecting anomalies? In the past, you would need to export the training data from Amazon Redshift to an Amazon Simple Storage Service (Amazon S3) bucket, and then configure and start a machine learning training process (for example, using Amazon SageMaker). This process required many different skills and usually more than one person to complete. Can we make it easier?

Today, Amazon Redshift ML is generally available to help you create, train, and deploy machine learning models directly from your Amazon Redshift cluster. To create a machine learning model, you use a simple SQL query to specify the data you want to use to train your model, and the output value you want to predict. For example, to create a model that predicts the success rate for your marketing activities, you define your inputs by selecting the columns (in one or more tables) that include customer profiles and results from previous marketing campaigns, and the output column you want to predict. In this example, the output column could be one that shows whether a customer has shown interest in a campaign.

After you run the SQL command to create the model, Redshift ML securely exports the specified data from Amazon Redshift to your S3 bucket and calls Amazon SageMaker Autopilot to prepare the data (pre-processing and feature engineering), select the appropriate pre-built algorithm, and apply the algorithm for model training. You can optionally specify the algorithm to use, for example XGBoost.

Architectural diagram.

Redshift ML handles all of the interactions between Amazon Redshift, S3, and SageMaker, including all the steps involved in training and compilation. When the model has been trained, Redshift ML uses Amazon SageMaker Neo to optimize the model for deployment and makes it available as a SQL function. You can use the SQL function to apply the machine learning model to your data in queries, reports, and dashboards.

Redshift ML now includes many new features that were not available during the preview, including Amazon Virtual Private Cloud (VPC) support. For example:

Architectural diagram.

  • You can also create SQL functions that use existing SageMaker endpoints to make predictions (remote inference). In this case, Redshift ML is batching calls to the endpoint to speed up processing.

Before looking into how to use these new capabilities in practice, let’s see the difference between Redshift ML and similar features in AWS databases and analytics services.

ML Feature Data Training
from SQL
Predictions
using SQL Functions
Amazon Redshift ML

Data warehouse

Federated relational databases

S3 data lake (with Redshift Spectrum)

Yes, using
Amazon SageMaker Autopilot
Yes, a model can be imported and executed inside the Amazon Redshift cluster, or invoked using a SageMaker endpoint.
Amazon Aurora ML Relational database
(compatible with MySQL or PostgreSQL)
No

Yes, using a SageMaker endpoint.

A native integration with Amazon Comprehend for sentiment analysis is also available.

Amazon Athena ML

S3 data lake

Other data sources can be used through Athena Federated Query.

No Yes, using a SageMaker endpoint.

Building a Machine Learning Model with Redshift ML
Let’s build a model that predicts if customers will accept or decline a marketing offer.

To manage the interactions with S3 and SageMaker, Redshift ML needs permissions to access those resources. I create an AWS Identity and Access Management (IAM) role as described in the documentation. I use RedshiftML for the role name. Note that the trust policy of the role allows both Amazon Redshift and SageMaker to assume the role to interact with other AWS services.

From the Amazon Redshift console, I create a cluster. In the cluster permissions, I associate the RedshiftML IAM role. When the cluster is available, I load the same dataset used in this super interesting blog post that my colleague Julien wrote when SageMaker Autopilot was announced.

The file I am using (bank-additional-full.csv) is in CSV format. Each line describes a direct marketing activity with a customer. The last column (y) describes the outcome of the activity (if the customer subscribed to a service that was marketed to them).

Here are the first few lines of the file. The first line contains the headers.

age,job,marital,education,default,housing,loan,contact,month,day_of_week,duration,campaign,pdays,previous,poutcome,emp.var.rate,cons.price.idx,cons.conf.idx,euribor3m,nr.employed,y 56,housemaid,married,basic.4y,no,no,no,telephone,may,mon,261,1,999,0,nonexistent,1.1,93.994,-36.4,4.857,5191.0,no
57,services,married,high.school,unknown,no,no,telephone,may,mon,149,1,999,0,nonexistent,1.1,93.994,-36.4,4.857,5191.0,no
37,services,married,high.school,no,yes,no,telephone,may,mon,226,1,999,0,nonexistent,1.1,93.994,-36.4,4.857,5191.0,no
40,admin.,married,basic.6y,no,no,no,telephone,may,mon,151,1,999,0,nonexistent,1.1,93.994,-36.4,4.857,5191.0,no

I store the file in one of my S3 buckets. The S3 bucket is used to unload data and store SageMaker training artifacts.

Then, using the Amazon Redshift query editor in the console, I create a table to load the data.

CREATE TABLE direct_marketing (
	age DECIMAL NOT NULL, 
	job VARCHAR NOT NULL, 
	marital VARCHAR NOT NULL, 
	education VARCHAR NOT NULL, 
	credit_default VARCHAR NOT NULL, 
	housing VARCHAR NOT NULL, 
	loan VARCHAR NOT NULL, 
	contact VARCHAR NOT NULL, 
	month VARCHAR NOT NULL, 
	day_of_week VARCHAR NOT NULL, 
	duration DECIMAL NOT NULL, 
	campaign DECIMAL NOT NULL, 
	pdays DECIMAL NOT NULL, 
	previous DECIMAL NOT NULL, 
	poutcome VARCHAR NOT NULL, 
	emp_var_rate DECIMAL NOT NULL, 
	cons_price_idx DECIMAL NOT NULL, 
	cons_conf_idx DECIMAL NOT NULL, 
	euribor3m DECIMAL NOT NULL, 
	nr_employed DECIMAL NOT NULL, 
	y BOOLEAN NOT NULL
);

I load the data into the table using the COPY command. I can use the same IAM role I created earlier (RedshiftML) because I am using the same S3 bucket to import and export the data.

COPY direct_marketing 
FROM 's3://my-bucket/direct_marketing/bank-additional-full.csv' 
DELIMITER ',' IGNOREHEADER 1
IAM_ROLE 'arn:aws:iam::123412341234:role/RedshiftML'
REGION 'us-east-1';

Now, I create the model straight form the SQL interface using the new CREATE MODEL statement:

CREATE MODEL direct_marketing
FROM direct_marketing
TARGET y
FUNCTION predict_direct_marketing
IAM_ROLE 'arn:aws:iam::123412341234:role/RedshiftML'
SETTINGS (
  S3_BUCKET 'my-bucket'
);

In this SQL command, I specify the parameters required to create the model:

  • FROM – I select all the rows in the direct_marketing table, but I can replace the name of the table with a nested query (see example below).
  • TARGET – This is the column that I want to predict (in this case, y).
  • FUNCTION – The name of the SQL function to make predictions.
  • IAM_ROLE – The IAM role assumed by Amazon Redshift and SageMaker to create, train, and deploy the model.
  • S3_BUCKET – The S3 bucket where the training data is temporarily stored, and where model artifacts are stored if you choose to retain a copy of them.

Here I am using a simple syntax for the CREATE MODEL statement. For more advanced users, other options are available, such as:

  • MODEL_TYPE – To use a specific model type for training, such as XGBoost or multilayer perceptron (MLP). If I don’t specify this parameter, SageMaker Autopilot selects the appropriate model class to use.
  • PROBLEM_TYPE – To define the type of problem to solve: regression, binary classification, or multiclass classification. If I don’t specify this parameter, the problem type is discovered during training, based on my data.
  • OBJECTIVE – The objective metric used to measure the quality of the model. This metric is optimized during training to provide the best estimate from data. If I don’t specify a metric, the default behavior is to use mean squared error (MSE) for regression, the F1 score for binary classification, and accuracy for multiclass classification. Other available options are F1Macro (to apply F1 scoring to multiclass classification) and area under the curve (AUC). More information on objective metrics is available in the SageMaker documentation.

Depending on the complexity of the model and the amount of data, it can take some time for the model to be available. I use the SHOW MODEL command to see when it is available:

SHOW MODEL direct_marketing

When I execute this command using the query editor in the console, I get the following output:

Console screenshot.

As expected, the model is currently in the TRAINING state.

When I created this model, I selected all the columns in the table as input parameters. I wonder what happens if I create a model that uses fewer input parameters? I am in the cloud and I am not slowed down by limited resources, so I create another model using a subset of the columns in the table:

CREATE MODEL simple_direct_marketing
FROM (
        SELECT age, job, marital, education, housing, contact, month, day_of_week, y
 	  FROM direct_marketing
)
TARGET y
FUNCTION predict_simple_direct_marketing
IAM_ROLE 'arn:aws:iam::123412341234:role/RedshiftML'
SETTINGS (
  S3_BUCKET 'my-bucket'
);

After some time, my first model is ready, and I get this output from SHOW MODEL. The actual output in the console is in multiple pages, I merged the results here to make it easier to follow:

Console screenshot.

From the output, I see that the model has been correctly recognized as BinaryClassification, and F1 has been selected as the objective. The F1 score is a metrics that considers both precision and recall. It returns a value between 1 (perfect precision and recall) and 0 (lowest possible score). The final score for the model (validation:f1) is 0.79. In this table I also find the name of the SQL function (predict_direct_marketing) that has been created for the model, its parameters and their types, and an estimation of the training costs.

When the second model is ready, I compare the F1 scores. The F1 score of the second model is lower (0.66) than the first one. However, with fewer parameters the SQL function is easier to apply to new data. As is often the case with machine learning, I have to find the right balance between complexity and usability.

Using Redshift ML to Make Predictions
Now that the two models are ready, I can make predictions using SQL functions. Using the first model, I check how many false positives (wrong positive predictions) and false negatives (wrong negative predictions) I get when applying the model on the same data used for training:

SELECT predict_direct_marketing, y, COUNT(*)
  FROM (SELECT predict_direct_marketing(
                   age, job, marital, education, credit_default, housing,
                   loan, contact, month, day_of_week, duration, campaign,
                   pdays, previous, poutcome, emp_var_rate, cons_price_idx,
                   cons_conf_idx, euribor3m, nr_employed), y
          FROM direct_marketing)
 GROUP BY predict_direct_marketing, y;

The result of the query shows that the model is better at predicting negative rather than positive outcomes. In fact, even if the number of true negatives is much bigger than true positives, there are much more false positives than false negatives. I added some comments in green and red to the following screenshot to clarify the meaning of the results.

Console screenshot.

Using the second model, I see how many customers might be interested in a marketing campaign. Ideally, I should run this query on new customer data, not the same data I used for training.

SELECT COUNT(*)
  FROM direct_marketing
 WHERE predict_simple_direct_marketing(
           age, job, marital, education, housing,
           contact, month, day_of_week) = true;

Wow, looking at the results, there are more than 7,000 prospects!

Console screenshot.

Availability and Pricing
Redshift ML is available today in the following AWS Regions: US East (Ohio), US East (N Virginia), US West (Oregon), US West (San Francisco), Canada (Central), Europe (Frankfurt), Europe (Ireland), Europe (Paris), Europe (Stockholm), Asia Pacific (Hong Kong) Asia Pacific (Tokyo), Asia Pacific (Singapore), Asia Pacific (Sydney), and South America (São Paulo). For more information, see the AWS Regional Services list.

With Redshift ML, you pay only for what you use. When training a new model, you pay for the Amazon SageMaker Autopilot and S3 resources used by Redshift ML. When making predictions, there is no additional cost for models imported into your Amazon Redshift cluster, as in the example I used in this post.

Redshift ML also allows you to use existing Amazon SageMaker endpoints for inference. In that case, the usual SageMaker pricing for real-time inference applies. Here you can find a few tips on how to control your costs with Redshift ML.

To learn more, you can see this blog post from when Redshift ML was announced in preview and the documentation.

Start getting better insights from your data with Redshift ML.

— Danilo

Getting Started with Amazon ECS Anywhere – Now Generally Available

Post Syndicated from Channy Yun original https://aws.amazon.com/blogs/aws/getting-started-with-amazon-ecs-anywhere-now-generally-available/

Since Amazon Elastic Container Service (Amazon ECS) was launched in 2014, AWS has released other options for running Amazon ECS tasks outside of an AWS Region such as AWS Wavelength, an offering for mobile edge devices or AWS Outposts, a service that extends to customers’ environments using hardware owned and fully managed by AWS.

But some customers have applications that need to run on premises due to regulatory, latency, and data residency requirements or the desire to leverage existing infrastructure investments. In these cases, customers have to install, operate, and manage separate container orchestration software and need to use disparate tooling across their AWS and on-premises environments. Customers asked us for a way to manage their on-premises containers without this added complexity and cost.

Following Jeff’s preannouncement last year, I am happy to announce the general availability of Amazon ECS Anywhere, a new capability in Amazon ECS that enables customers to easily run and manage container-based applications on premises, including virtual machines (VMs), bare metal servers, and other customer-managed infrastructure.

With ECS Anywhere, you can run and manage containers on any customer-managed infrastructure using the same cloud-based, fully managed, and highly scalable container orchestration service you use in AWS today. You no longer need to prepare, run, update, or maintain your own container orchestrators on premises, making it easier to manage your hybrid environment and leverage the cloud for your infrastructure by installing simple agents.

ECS Anywhere provides consistent tooling and APIs for all container-based applications and the same Amazon ECS experience for cluster management, workload scheduling, and monitoring both in the cloud and on customer-managed infrastructure. You can now enjoy the benefits of reduced cost and complexity by running container workloads such as data processing at edge locations on your own hardware maintaining reduced latency, and in the cloud using a single, consistent container orchestrator.

Amazon ECS Anywhere – Getting Started
To get started with ECS Anywhere, register your on-premises servers or VMs (also referred to as External instances) in the ECS cluster. The AWS Systems Manager Agent, Amazon ECS container agent, and Docker must be installed on these external instances. Your external instances require an IAM role that permits them to communicate with AWS APIs. For more information, see Required IAM permissions in the ECS Developer Guide.

To create a cluster for ECS Anywhere, on the Create Cluster page in the ECS console, choose the Networking Only template. This option is for use with either AWS Fargate or external instance capacity. We recommend that you use the AWS Region that is geographically closest to the on-premises servers you want to register.

This creates an empty cluster to register external instances. On the ECS Instances tab, choose Register External Instances to get activation codes and an installation script.

On the Step 1: External instances activation details page, in Activation key duration (in days), enter the number of days the activation key should remain active. The activation key can be used for up to 1,000 activations. In Number of instances, enter the number of external instances you want to register to your cluster. In Instance role, enter the IAM role to associate with your external instances.

Choose Next step to get a registration command.

On the Step 2: Register external instances page, copy the registration command. Run this command on the external instances you want to register to your cluster.

Paste the registration command in your on-premise servers or VMs. Each external instance is then registered as an AWS Systems Manager managed instance, which is then registered to your Amazon ECS clusters.

Both x86_64 and ARM64 CPU architectures are supported. The following is a list of supported operating systems:

  • CentOS 7, CentOS 8
  • RHEL 7
  • Fedora 32, Fedora 33
  • openSUSE Tumbleweed
  • Ubuntu 18, Ubuntu 20
  • Debian 9, Debian 10
  • SUSE Enterprise Server 15

When the ECS agent has started and completed the registration, your external instance will appear on the ECS Instances tab.

You can also add your external instances to the existing cluster. In this case, you can see both Amazon EC2 instances and external instances are prefixed with mi-* together.

Now that the external instances are registered to your cluster, you are ready to create a task definition. Amazon ECS provides the requiresCompatibilities parameter to validate that the task definition is compatible with the the EXTERNAL launch type when creating your service or running your standalone task. The following is an example task definition:

{
	"requiresCompatibilities": [
		"EXTERNAL"
	],
	"containerDefinitions": [{
		"name": "nginx",
		"image": "public.ecr.aws/nginx/nginx:latest",
		"memory": 256,
		"cpu": 256,
		"essential": true,
		"portMappings": [{
			"containerPort": 80,
			"hostPort": 8080,
			"protocol": "tcp"
		}]
	}],
	"networkMode": "bridge",
	"family": "nginx"
}

You can create a task definition in the ECS console. In Task Definition, choose Create new task definition. For Launch type, choose EXTERNAL and then configure the task and container definitions to use external instances.

On the Tasks tab, choose Run new task. On the Run Task page, for Cluster, choose the cluster to run your task definition on. In Number of tasks, enter the number of copies of that task to run with the EXTERNAL launch type.

Or, on the Services tab, choose Create. Configure service lets you specify copies of your task definition to run and maintain in a cluster. To run your task in the registered external instance, for Launch type, choose EXTERNAL. When you choose this launch type, load balancers, tag propagation, and service discovery integration are not supported.

The tasks you run on your external instances must use the bridge, host, or none network modes. The awsvpc network mode isn’t supported. For more information about each network mode, see Choosing a network mode in the Amazon ECS Best Practices Guide.

Now you can run your tasks and associate a mix of EXTERNAL, FARGATE, and EC2 capacity provider types with the same ECS service and specify how you would like your tasks to be split across them.

Things to Know
Here are a couple of things to keep in mind:

Connectivity: In the event of loss of network connectivity between the ECS agent running on the on-premises servers and the ECS control plane in the AWS Region, existing ECS tasks will continue to run as usual. If tasks still have connectivity with other AWS services, they will continue to communicate with them for as long as the task role credentials are active. If a task launched as part of a service crashes or exits on its own, ECS will be unable to replace it until connectivity is restored.

Monitoring: With ECS Anywhere, you can get Amazon CloudWatch metrics for your clusters and services, use the CloudWatch Logs driver (awslogs) to get your containers’ logs, and access the ECS CloudWatch event stream to monitor your clusters’ events.

Networking: ECS external instances are optimized for running applications that generate outbound traffic or process data. If your application requires inbound traffic, such as a web service, you will need to employ a workaround to place these workloads behind a load balancer until the feature is supported natively. For more information, see Networking with ECS Anywhere.

Data Security: To help customers maintain data security, ECS Anywhere only sends back to the AWS Region metadata related to the state of the tasks or the state of the containers (whether they are running or not running, performance counters, and so on). This communication is authenticated and encrypted in transit through Transport Layer Security (TLS).

ECS Anywhere Partners
ECS Anywhere integrates with a variety of ECS Anywhere partners to help customers take advantage of ECS Anywhere and provide additional functionality for the feature. Here are some of the blog posts that our partners wrote to share their experiences and offerings. (I am updating this article with links as they are published.)

Now Available
Amazon ECS Anywhere is now available in all commercial regions except AWS China Regions where ECS is supported. With ECS Anywhere, there are no minimum fees or upfront commitments. You pay per instance hour for each managed ECS Anywhere task. ECS Anywhere free tier includes 2200 instance hours per month for six months per account for all regions. For more information, see the pricing page.

To learn more, see ECS Anywhere in the Amazon ECS Developer Guide. Please send feedback to the AWS forum for Amazon ECS or through your usual AWS Support contacts.

Get started with the Amazon ECS Anywhere today.

– Channy

Update. Watch a cool demo of ECS Anywhere to operate a Raspberry Pi cluster at home office and read its deep-dive blog post.

Introducing Amazon Kinesis Data Analytics Studio – Quickly Interact with Streaming Data Using SQL, Python, or Scala

Post Syndicated from Danilo Poccia original https://aws.amazon.com/blogs/aws/introducing-amazon-kinesis-data-analytics-studio-quickly-interact-with-streaming-data-using-sql-python-or-scala/

The best way to get timely insights and react quickly to new information you receive from your business and your applications is to analyze streaming data. This is data that must usually be processed sequentially and incrementally on a record-by-record basis or over sliding time windows, and can be used for a variety of analytics including correlations, aggregations, filtering, and sampling.

To make it easier to analyze streaming data, today we are pleased to introduce Amazon Kinesis Data Analytics Studio.

Now, from the Amazon Kinesis console you can select a Kinesis data stream and with a single click start a Kinesis Data Analytics Studio notebook powered by Apache Zeppelin and Apache Flink to interactively analyze data in the stream. Similarly, you can select a cluster in the Amazon Managed Streaming for Apache Kafka console to start a notebook to analyze data in Apache Kafka streams. You can also start a notebook from the Kinesis Data Analytics Studio console and connect to custom sources.

Architectural diagram.

In the notebook, you can interact with streaming data and get results in seconds using SQL queries and Python or Scala programs. When you are satisfied with your results, with a few clicks you can promote your code to a production stream processing application that runs reliably at scale with no additional development effort.

For new projects, we recommend that you use the new Kinesis Data Analytics Studio over Kinesis Data Analytics for SQL Applications. Kinesis Data Analytics Studio combines ease of use with advanced analytical capabilities, which makes it possible to build sophisticated stream processing applications in minutes. Let’s see how that works in practice.

Using Kinesis Data Analytics Studio to Analyze Streaming Data
I want to get a better understanding of the data sent by some sensors to a Kinesis data stream.

To simulate the workload, I use this random_data_generator.py Python script. You don’t need to know Python to use Kinesis Data Analytics Studio. In fact, I am going to use SQL in the following steps. Also, you can avoid any coding and use the Amazon Kinesis Data Generator user interface (UI) to send test data to Kinesis Data Streams or Kinesis Data Firehose. I am using a Python script to have finer control over the data that is being sent.

import datetime
import json
import random
import boto3

STREAM_NAME = "my-input-stream"


def get_random_data():
    current_temperature = round(10 + random.random() * 170, 2)
    if current_temperature > 160:
        status = "ERROR"
    elif current_temperature > 140 or random.randrange(1, 100) > 80:
        status = random.choice(["WARNING","ERROR"])
    else:
        status = "OK"
    return {
        'sensor_id': random.randrange(1, 100),
        'current_temperature': current_temperature,
        'status': status,
        'event_time': datetime.datetime.now().isoformat()
    }


def send_data(stream_name, kinesis_client):
    while True:
        data = get_random_data()
        partition_key = str(data["sensor_id"])
        print(data)
        kinesis_client.put_record(
            StreamName=stream_name,
            Data=json.dumps(data),
            PartitionKey=partition_key)


if __name__ == '__main__':
    kinesis_client = boto3.client('kinesis')
    send_data(STREAM_NAME, kinesis_client)

This script sends random records to my Kinesis data stream using JSON syntax. For example:

{'sensor_id': 77, 'current_temperature': 93.11, 'status': 'OK', 'event_time': '2021-05-19T11:20:00.978328'}
{'sensor_id': 47, 'current_temperature': 168.32, 'status': 'ERROR', 'event_time': '2021-05-19T11:20:01.110236'}
{'sensor_id': 9, 'current_temperature': 140.93, 'status': 'WARNING', 'event_time': '2021-05-19T11:20:01.243881'}
{'sensor_id': 27, 'current_temperature': 130.41, 'status': 'OK', 'event_time': '2021-05-19T11:20:01.371191'}

From the Kinesis console, I select a Kinesis data stream (my-input-stream) and choose Process data in real time from the Process drop-down. In this way, the stream is configured as a source for the notebook.

Console screenshot.

Then, in the following dialog box, I create an Apache Flink – Studio notebook.

I enter a name (my-notebook) and a description for the notebook. The AWS Identity and Access Management (IAM) permissions to read from the Kinesis data stream I selected earlier (my-input-stream) are automatically attached to the IAM role assumed by the notebook.

Console screenshot.

I choose Create to open the AWS Glue console and create an empty database. Back in the Kinesis Data Analytics Studio console, I refresh the list and select the new database. It will define the metadata for my sources and destinations. From here, I can also review the default Studio notebook settings. Then, I choose Create Studio notebook.

Console screenshot.

Now that the notebook has been created, I choose Run.

Console screenshot.

When the notebook is running, I choose Open in Apache Zeppelin to get access to the notebook and write code in SQL, Python, or Scala to interact with my streaming data and get insights in real time.

In the notebook, I create a new note and call it Sensors. Then, I create a sensor_data table describing the format of the data in the stream:

%flink.ssql

CREATE TABLE sensor_data (
    sensor_id INTEGER,
    current_temperature DOUBLE,
    status VARCHAR(6),
    event_time TIMESTAMP(3),
    WATERMARK FOR event_time AS event_time - INTERVAL '5' SECOND
)
PARTITIONED BY (sensor_id)
WITH (
    'connector' = 'kinesis',
    'stream' = 'my-input-stream',
    'aws.region' = 'us-east-1',
    'scan.stream.initpos' = 'LATEST',
    'format' = 'json',
    'json.timestamp-format.standard' = 'ISO-8601'
)

The first line in the previous command tells to Apache Zeppelin to provide a stream SQL environment (%flink.ssql) for the Apache Flink interpreter. I can also interact with the streaming data using a batch SQL environment (%flink.bsql), or Python (%flink.pyflink) or Scala (%flink) code.

The first part of the CREATE TABLE statement is familiar to anyone who has used SQL with a database. A table is created to store the sensor data in the stream. The WATERMARK option is used to measure progress in the event time, as described in the Event Time and Watermarks section of the Apache Flink documentation.

The second part of the CREATE TABLE statement describes the connector used to receive data in the table (for example, kinesis or kafka), the name of the stream, the AWS Region, the overall data format of the stream (such as json or csv), and the syntax used for timestamps (in this case, ISO 8601). I can also choose the starting position to process the stream, I am using LATEST to read the most recent data first.

When the table is ready, I find it in the AWS Glue Data Catalog database I selected when I created the notebook:

Console screenshot.

Now I can run SQL queries on the sensor_data table and use sliding or tumbling windows to get a better understanding of what is happening with my sensors.

For an overview of the data in the stream, I start with a simple SELECT to get all the content of the sensor_data table:

%flink.ssql(type=update)

SELECT * FROM sensor_data;

This time the first line of the command has a parameter (type=update) so that the output of the SELECT, which is more than one row, is continuously updated when new data arrives.

On the terminal of my laptop, I start the random_data_generator.py script:

$ python3 random_data_generator.py

At first I see a table that contains the data as it comes. To get a better understanding, I select a bar graph view. Then, I group the results by status to see their average current_temperature, as shown here:

Notebook screenshot.

As expected by the way I am generating these results, I have different average temperatures depending on the status (OK, WARNING, or ERROR). The higher the temperature, the greater the probability that something is not working correctly with my sensors.

I can run the aggregated query explicitly using a SQL syntax. This time, I want the result computed on a sliding window of 1 minute with results updated every 10 seconds. To do so, I am using the HOP function in the GROUP BY section of the SELECT statement. To add the time to the output of the select, I use the HOP_ROWTIME function. For more information, see how group window aggregations work in the Apache Flink documentation.

%flink.ssql(type=update)

SELECT sensor_data.status,
       COUNT(*) AS num,
       AVG(sensor_data.current_temperature) AS avg_current_temperature,
       HOP_ROWTIME(event_time, INTERVAL '10' second, INTERVAL '1' minute) as hop_time
  FROM sensor_data
 GROUP BY HOP(event_time, INTERVAL '10' second, INTERVAL '1' minute), sensor_data.status;

This time, I look at the results in table format:

Notebook screenshot.

To send the result of the query to a destination stream, I create a table and connect the table to the stream. First, I need to give permissions to the notebook to write into the stream.

In the Kinesis Data Analytics Studio console, I select my-notebook. Then, in the Studio notebooks details section, I choose Edit IAM permissions. Here, I can configure the sources and destinations used by the notebook and the IAM role permissions are updated automatically.

Console screenshot.

In the Included destinations in IAM policy section, I choose the destination and select my-output-stream. I save changes and wait for the notebook to be updated. I am now ready to use the destination stream.

In the notebook, I create a sensor_state table connected to my-output-stream.

%flink.ssql

CREATE TABLE sensor_state (
    status VARCHAR(6),
    num INTEGER,
    avg_current_temperature DOUBLE,
    hop_time TIMESTAMP(3)
)
WITH (
'connector' = 'kinesis',
'stream' = 'my-output-stream',
'aws.region' = 'us-east-1',
'scan.stream.initpos' = 'LATEST',
'format' = 'json',
'json.timestamp-format.standard' = 'ISO-8601');

I now use this INSERT INTO statement to continuously insert the result of the select into the sensor_state table.

%flink.ssql(type=update)

INSERT INTO sensor_state
SELECT sensor_data.status,
    COUNT(*) AS num,
    AVG(sensor_data.current_temperature) AS avg_current_temperature,
    HOP_ROWTIME(event_time, INTERVAL '10' second, INTERVAL '1' minute) as hop_time
FROM sensor_data
GROUP BY HOP(event_time, INTERVAL '10' second, INTERVAL '1' minute), sensor_data.status;

The data is also sent to the destination Kinesis data stream (my-output-stream) so that it can be used by other applications. For example, the data in the destination stream can be used to update a real-time dashboard, or to monitor the behavior of my sensors after a software update.

I am satisfied with the result. I want to deploy this query and its output as a Kinesis Analytics application. To do so, I need to provide an S3 location to store the application executable.

In the configuration section of the console, I edit the Deploy as application configuration settings. There, I choose a destination bucket in the same region and save changes.

Console screenshot.

I wait for the notebook to be ready after the update. Then, I create a SensorsApp note in my notebook and copy the statements that I want to execute as part of the application. The tables have already been created, so I just copy the INSERT INTO statement above.

From the menu at the top right of my notebook, I choose Build SensorsApp and export to Amazon S3 and confirm the application name.

Notebook screenshot.

When the export is ready, I choose Deploy SensorsApp as Kinesis Analytics application in the same menu. After that, I fine-tune the configuration of the application. I set parallelism to 1 because I have only one shard in my input Kinesis data stream and not a lot of traffic. Then, I run the application, without having to write any code.

From the Kinesis Data Analytics applications console, I choose Open Apache Flink dashboard to get more information about the execution of my application.

Apache Flink console screenshot.

Availability and Pricing
You can use Amazon Kinesis Data Analytics Studio today in all AWS Regions where Kinesis Data Analytics is generally available. For more information, see the AWS Regional Services List.

In Kinesis Data Analytics Studio, we run the open-source versions of Apache Zeppelin and Apache Flink, and we contribute changes upstream. For example, we have contributed bug fixes for Apache Zeppelin, and we have contributed to AWS connectors for Apache Flink, such as those for Kinesis Data Streams and Kinesis Data Firehose. Also, we are working with the Apache Flink community to contribute availability improvements, including automatic classification of errors at runtime to understand whether errors are in user code or in application infrastructure.

With Kinesis Data Analytics Studio, you pay based on the average number of Kinesis Processing Units (KPU) per hour, including those used by your running notebooks. One KPU comprises 1 vCPU of compute, 4 GB of memory, and associated networking. You also pay for running application storage and durable application storage. For more information, see the Kinesis Data Analytics pricing page.

Start using Kinesis Data Analytics Studio today to get better insights from your streaming data.

— Danilo

AWS Lambda Extensions Are Now Generally Available – Get Started with Your Favorite Operations Tools Today

Post Syndicated from Channy Yun original https://aws.amazon.com/blogs/aws/getting-started-with-using-your-favorite-operational-tools-on-aws-lambda-extensions-are-now-generally-available/

In October 2020, we announced the preview of AWS Lambda extensions, which you can use to easily integrate Lambda functions with your favorite tools for monitoring, observability, security, and governance.

Today, I’m happy to announce the general availability of AWS Lambda Extensions which comes with new performance improvements and an expanded set of partners. As part of the GA release, we have enabled functions to send responses as soon as the function code is complete without waiting for the included extensions to finish. This enables extensions to perform activities like sending telemetry to a preferred destination after the function’s response has been returned. We also welcome extensions from new partners: Imperva, Instana, Sentry, Site24x7, and the AWS Distro for OpenTelemetry.

You can use Lambda extensions for use cases such as capturing diagnostic information before, during, and after function invocation; automatically instrumenting your code without needing code changes; fetching configuration settings or secrets before the function invocation; detecting and alerting on function activity through security agents; and sending telemetry to custom destinations such as Amazon Simple Storage Service (Amazon S3), Amazon Kinesis, Amazon Elasticsearch Service directly and asynchronously from your Lambda functions.

Customers are drawn to the vision of Serverless. The reduced operational responsibility frees them up to focus on their business problems. To help customers monitor, observe, secure, and govern their functions, AWS Lambda provides native integrations for logs and metrics through Amazon CloudWatch, tracing through AWS X-Ray, tracking configuration changes through AWS Config, and recording API calls through AWS CloudTrail In addition, AWS Lambda partners provide tools for application management, API integration, deployment, monitoring, and security.

AWS Lambda extensions provide a simple way to extend the Lambda execution environment, which is where your function code is executed. AWS customers, partners, and the open source community can use the new Lambda Extensions API to build their own extensions, which are companion processes that augment the capabilities of Lambda functions. To learn how to build your own extensions, see the Building Extensions for AWS Lambda – In preview blog post. The post also includes information about changes to the Lambda lifecycle.

How AWS Lambda Extensions Works
AWS Lambda extensions are designed to be the easiest way to plug in the tools you use today without complex installation or configuration management. You can add tools to your functions using Lambda layers or include them in the image for functions deployed as container images.

Lambda extensions use the Extensions API to register for function and execution environment lifecycle events. In response to these events, extensions can start new processes or run logic. Lambda extensions can also use the Runtime Logs API to subscribe to a stream of the same logs that the Lambda service sends to Amazon CloudWatch directly from the Lambda execution environment. Lambda streams the logs to the extension, and the extension can then process, filter, and send the logs to any preferred destination.

Most customers will use Lambda extensions without needing to know about the capabilities of the Extensions API. You can just consume capabilities of an extension by configuring the options in your Lambda functions.

How to Use Lambda Extensions
You can install and manage extensions using the Lambda console, the AWS Command Line Interface (CLI), or infrastructure as code (IaC) services and tools such as AWS CloudFormation, AWS Serverless Application Model (AWS SAM), and Terraform.

To use Lambda extensions to integrate existing tools with your Lambda functions, choose your a Lambda function and on the Configuration tab, choose Monitoring and Operations tools.

On the Extensions page, you can find available extensions from AWS Lambda partners. Choose an extension to view its installation instructions.

AWS Lambda Extensions Partners
At this launch, Lambda extensions integrate with these AWS Lambda partners who have provided the following information to introduce their extensions. (I am updating this article with links as they are published.)

  • AppDynamics provides end-to-end transaction tracing for AWS Lambda. With the AppDynamics extension, it is no longer mandatory for developers to include the AppDynamics tracer as a dependency in their function code, making tracing transactions across hybrid architectures even simpler.
  • Coralogix is a log analytics and cloud security platform that empowers thousands of companies to improve security and accelerate software delivery, allowing you to get deep insights without paying for the noise. Coralogix can now read Lambda function logs and metrics directly, without using CloudWatch or Amazon S3, reducing the latency, and cost of observability.
  • The Datadog extension brings comprehensive, real-time visibility to your serverless applications. Combined with Datadog’s integration with AWS, you get metrics, traces, and logs to help you monitor, detect, and resolve issues at any scale. The Datadog extension makes it easier than ever to get telemetry from your serverless workloads.
  • The Dynatrace extension makes it even easier to bring AWS Lambda metrics and traces into the Dynatrace platform for intelligent observability and automatic root cause detection. Get comprehensive, end-to-end observability with the flip of a switch and no code changes.
  • Epsagon helps you monitor, troubleshoot, and lower the cost of your Lambda functions. Epsagon’s extension reduces the overhead of sending traces to the Epsagon service, with minimal performance impact to your function.
  • HashiCorp Vault allows you to secure, store, and tightly control access to your application’s secrets and sensitive data. With the Vault extension, you can now authenticate and securely retrieve dynamic secrets before your Lambda function is invoked.
  • Honeycomb is a powerful observability tool that helps you debug your entire production app stack. Honeycomb’s extension decreases the overhead, latency, and cost of sending events to the Honeycomb service, while increasing reliability.
  • Instana Enterprise Observability Platform ingests performance metrics, traces requests, and profiles processes to make observability work for the enterprise. The Instana Lambda extension offers modification-free, low latency tracing of Lambda functions backed by their real-time Enterprise Observability Platform.
  • Imperva Serverless Protection protects organizations from vulnerabilities created by misconfigured apps and code-level security risks in serverless computing environments. The Imperva extension enables customers to easily embed additional security in their DevOps processes for serverless applications without requiring any code changes, leading to faster time to market.
  • Lumigo provides a monitoring and observability platform for serverless and microservices applications. The Lumigo extension enables the new Lumigo Lambda Profiler to see a breakdown of function resources, including CPU, memory, and network metrics. Use the extension to receive actionable insights to reduce Lambda runtime duration and cost, fix bottlenecks, and increase efficiency.
  • Check Point CloudGuard provides full lifecycle security for serverless applications. The CloudGuard extension enables Function Self Protection data aggregation as an out-of-process extension, providing detection and alerting on application layer attacks.
  • New Relic enables you to efficiently monitor, troubleshoot, and optimize your Lambda functions. New Relic’s extension allows you send your Lambda service platform logs directly to New Relic’s unified observability platform, allowing you to quickly visualize data with minimal latency and cost.
  • Thundra provides an application debugging, observability and security platform for serverless, container and virtual machine (VM) workloads. The Thundra extension adds asynchronous telemetry reporting functionality to the Thundra agents, getting rid of network latency.
  • Splunk offers an enterprise-grade cloud monitoring solution for real-time full-stack visibility at scale. The Splunk extension provides a simplified runtime-independent interface to collect high-resolution observability data with minimal overhead. Monitor, manage, and optimize the performance and cost of your serverless applications with Splunk Observability solutions.
  • Sentry’s extension enables developers to monitor code health. From error tracking to performance monitoring, developers can see issues more clearly, solve them quicker, and continuously stay informed about the health of their applications, all without making code changes.
  • Site24x7 provides a performance monitoring solution for DevOps and IT operations. The Site24x7 extension enables real-time observability into your Lambda functions. It enables you to monitor critical Lambda metrics and function executions logs and optimize execution time and performance.
  • The Sumo Logic extension enables you to get instant visibility into the health and performance of your mission-critical applications using AWS Lambda. With this extension and Sumo Logic’s continuous intelligence platform, you can now ensure that all your Lambda functions are running as expected by analyzing function, platform, and extension logs to quickly identify and remediate errors and exceptions.

Here are Lambda extensions from AWS services:

  • AWS AppConfig helps you manage, store, and safely deploy application configurations to your hosts at runtime. The AWS AppConfig extension integrates Lambda and AWS AppConfig seamlessly. Lambda functions have simple access to external configuration settings quickly and easily. Developers can now dynamically change their Lambda function’s configuration safely using robust validation features.
  • Amazon CodeGuru Profiler helps developers improve application performance and reduce costs by pinpointing an application’s most expensive line of code. It provides recommendations for improving code to save money. The Lambda integration removes the need to change any code or redeploy packages.
  • Amazon CloudWatch Lambda Insights enables you to efficiently monitor, troubleshoot, and optimize Lambda functions. The Lambda Insights extension simplifies the collection, visualization, and investigation of detailed compute performance metrics, errors, and logs. You can more easily isolate and correlate performance problems to optimize your Lambda environments.
  • AWS Distro for OpenTelemetry is a secure, production-ready, AWS-supported distribution of the OpenTelemetry project. The Lambda extension runs the OpenTelemetry collector and enables functions to send trace data to AWS monitoring services such as AWS X-Ray and to any destination such as Honeycomb and Lightstep that supports OpenTelemetry Protocol (OTLP) using the OTLP exporter.

To get started with Lambda extensions, use the links provided to install these extensions.

Things to Know
Here are a couple of things to keep in mind:

Pricing: Extensions share the same billing model as Lambda functions and you are charged for compute time used in all phases of the Lambda lifecycle. For function invocations, you pay for requests served and the compute time used to run your code and all extensions, together, in 1ms increments. To learn more about billing for extensions, visit the Lambda FAQs page.

Performance: Lambda extensions might impact the performance of your function because they share resources such as CPU, memory, and storage with the function, and because extensions are initialized before function code. For example, if an extension performs compute-intensive operations, you might see your function’s execution duration increase because the extension and your function code share the same CPU resources.

Because Lambda uses allocates proportional CPU power based on the memory setting, you might see increased execution and initialization duration at lower memory settings as more processes compete for the same CPU resources. You can use CloudWatch metrics such as PostRuntimeExecutionDuration to measure the extra time the extension takes after the function execution and MaxMemoryUsed to measure the increase in memory used.

Available Now
The performance improvements announced as part of GA are currently in US East (N. Virginia), Europe (Ireland), and Europe (Milan) Regions. (Update. AWS Lambda Extensions are now generally available in all commercial regions.)

You can also build your own extensions. To learn how to build extensions, see the Lambda Extensions API in the AWS Lambda Developer Guide. You can send feedback through the AWS forum for AWS Lambda or through your usual AWS Support contacts.

— Channy

Update. Watch a quick introductory video and a deep dive playlist about AWS Lambda Extensions for more information.

New – Amazon Elastic Block Store Local Snapshots on AWS Outposts

Post Syndicated from Channy Yun original https://aws.amazon.com/blogs/aws/new-amazon-elastic-block-store-local-snapshots-on-aws-outposts/

Today I am happy to announce that AWS Outposts customers can now make local snapshots of their Amazon Elastic Block Store (EBS) volumes, making it easy to meet data residency and local backup requirements. AWS Outposts is a fully managed service that extends AWS infrastructure, services, APIs, and tools to virtually any datacenter, co-location space, or on-premises facility for a truly consistent hybrid experience. Until now, Amazon EBS snapshots on Outposts were stored by default on Amazon Simple Storage Service (S3) in the AWS Region. If your Outpost is provisioned with Amazon S3 on Outposts, now you have the option to store your snapshots locally on your Outpost.

Customers use AWS Outposts to support applications that need to run on-premises due to low latency, local data processing, or data residency requirements. Customers looking to use AWS services in countries where no AWS Region exists today can opt to run their applications on Outposts. Sometimes data needs to remain in a particular country, state, or municipality for regulatory, contractual, or information security reasons. These customers need the data for snapshots and Amazon Machine Image (AMI) to be stored locally on Outposts to operate their applications. In addition, some of our customers could also see value for workloads that need low latency access to local backups.

EBS Local Snapshots on Outposts is a new capability that enables snapshots and AMI data to be stored locally on Amazon S3 on Outposts. Now you can create and manage EBS Local Snapshots on Outposts through the AWS Management Console, AWS Command Line Interface (CLI), and AWS SDKs. You can also continue to take snapshots of EBS volumes on Outposts, which are stored in S3 in the associated parent Region.

How to Get Started With EBS Local Snapshots on Outposts
To get started, visit the AWS Outposts Management Console to order an Outposts configuration that includes your selected EBS and Amazon S3 storage capacity (EBS snapshots use Amazon S3 on Outposts to store snapshots), or you can add S3 storage to your existing Outposts. EBS Local Snapshots are enabled on Outposts provisioned with Amazon S3 on Outposts.

To create a local EBS snapshot on Outposts, go to the EBS volume console and select the volume you want to create a snapshot from. Click the Actions button, then select Create Snapshot in the dropdown menu.

You can create a snapshot either in the AWS Region or your Outposts when you choose the Snapshot destination. The AWS Region snapshot uses Amazon S3 in the region and the AWS Outposts snapshot uses S3 storage on Outposts for storing the snapshots. Amazon S3 on Outposts is a new storage class, which is designed to durably and redundantly store data on Outposts. Note that due to its scale, Amazon S3 in a region offers higher durability than S3 on Outposts.

You can call CreateSnapshot with the outpost-arn parameter set to the Outposts ARN that uniquely identifies your installation. If data residency is not a concern, you can also get the CreateSnapshot API to create the snapshot in the parent AWS Region by specifying AWS Region as the destination.

$ aws ec2 create-snapshot \
     --volume-id vol-1234567890abcdef0 \
     --outpost-arn arn:aws:outposts:us-east-1:123456789012:outpost/op-1a2b3c \ 
	 --description "local snapshots in outpost"

You can also use commands for the AWS Command Line Interface (CLI) and AWS SDKs e.g. CreateSnapshots, DescribeSnapshot, CopySnapshot, and DeleteSnapshot to manage snapshots on Outposts, and use Amazon Data Lifecycle Manager to automate snapshots management on Outposts. All local snapshots on Outposts are Encrypted by Default (EBD).

You can set IAM policies for data residency of your snapshots. The policy example below will enforce data residency on the Outposts by denying CreateSnapshot(s) calls to create snapshots in the region from outpost volumes.

{
   "Version":"2012-10-17",
   "Statement":[
      {
         "Effect":"Deny",
         "Action":[
            "ec2:CreateSnapshot",
            "ec2:CreateSnapshots"
         ],
         "Resource":"arn:aws:ec2:us-west-2::snapshot/*",
         "Condition":{
            "StringEquals":{
               "ec2:SourceOutpostArn":"arn:aws:outposts:us-west-2:1234567890:outpost/op-1a2b3c"
            },
            "Null":{
               "ec2:OutpostArn":"true"
            }
         }
      },
      {
         "Effect":"Allow",
         "Action":[
            "ec2:CreateSnapshot",
            "ec2:CreateSnapshots"
         ],
         "Resource":"*"
      }
   ]
}

You can audit your own data residency compliance by calling the DescribeSnapshots API that will return the snapshot’s storage location. All creation, update, and copy operations are logged in AWS CloudTrail audit logs.

You can copy AMI snapshots from the AWS Region to your Outposts and register them as AMI to launch your EC2 instances on Outposts.

Also, you can do this via simple AWS Command Line Interface (CLI) commands as follows:

$ aws ec2 copy-snapshot \
     --region us-west-2 \
     --source-region us-west-2 \
     --source-snapshot-id snap-1 \
     --destination-outpost-arn arn:aws:outposts:us-west-2:123456789012:outpost/op-1a2b3c \ 
	 --description "This is my copied snapshot."

Now you can register the snapshot as a local AMI for launching your EC2 instances on your Outposts.

$ aws ec2 register-image \
    --root-device-name /dev/sda1 \
    --block-device-mappings '[ \
       {"DeviceName": "/dev/sda1", "Ebs" :{"VolumeSize":100, "SnapshotId":"snap-1-copy"}}]'

You can also copy your regional AMIs to Outposts using the copy-image command. Specify the ID of the AMI to copy, the source Region, and the ARN of the destination Outpost.

$ aws ec2 copy-image \
       --source-region us-west-2 \
	   --source-image-id ami-1234567890abcdef0  \
	   --name "Local AMI copy"  \
	   --destination-outpost-arn arn:aws:outposts:us-west-2:123456789012:outpost/op-1a2b3c

Copying of local snapshots on Outposts to the parent AWS Region is not supported. In scenarios where data residency is required, you can only create local snapshots or copy snapshots from the parent Region. To ensure your data residency requirements are met on AWS Outposts, I recommend you refer to whitepapers such as AWS Policy Perspectives: Data Residency and Addressing Data Residency Requirements with AWS Outposts, and confirm and work closely with your compliance and security teams.

CloudEndure Migration and Disaster Recovery services, offered by AWS, allow customers to migrate or replicate workloads for recovery purposes into AWS from physical, virtual, or cloud-based sources. Up until now, if customers selected an Outposts device as a migration or recovery target, the snapshot data had to be copied to a public region before being copied back into the Outposts device. This led to increased cutover and recovery times, as well as other data transfer impacts.

With the newly launched availability of EBS Local Snapshots on Outposts, you can migrate, replicate and recover workloads from any sources directly into Outposts, or between Outposts devices, without requiring the EBS snapshot data to go through a public region, leading to lower latencies, greater performance, and reduced costs. Supported use cases related to Outposts for migration and disaster recovery include: from on-premises to Outposts, from public AWS Regions into Outposts, from Outposts into public AWS Regions, and between two Outposts devices. Learn more about CloudEndure Migration and CloudEndure Disaster Recovery.

Available Now
Amazon EBS Local Snapshots on AWS Outposts is available for all Outposts provisioned with S3 on Outposts. To learn more, take a look at the documentation. Please send feedback to the AWS Outposts team, your usual AWS support contacts, or Outposts partners.

Learn all the details about AWS Outposts and get started today.

— Channy

Understanding memory usage in your Java application with Amazon CodeGuru Profiler

Post Syndicated from Fernando Ciciliati original https://aws.amazon.com/blogs/devops/understanding-memory-usage-in-your-java-application-with-amazon-codeguru-profiler/

“Where has all that free memory gone?” This is the question we ask ourselves every time our application emits that dreaded OutOfMemoyError just before it crashes. Amazon CodeGuru Profiler can help you find the answer.

Thanks to its brand-new memory profiling capabilities, troubleshooting and resolving memory issues in Java applications (or almost anything that runs on the JVM) is much easier. AWS launched the CodeGuru Profiler Heap Summary feature at re:Invent 2020. This is the first step in helping us, developers, understand what our software is doing with all that memory it uses.

The Heap Summary view shows a list of Java classes and data types present in the Java Virtual Machine heap, alongside the amount of memory they’re retaining and the number of instances they represent. The following screenshot shows an example of this view.

Amazon CodeGuru Profiler heap summary view example

Figure: Amazon CodeGuru Profiler Heap Summary feature

Because CodeGuru Profiler is a low-overhead, production profiling service designed to be always on, it can capture and represent how memory utilization varies over time, providing helpful visual hints about the object types and the data types that exhibit a growing trend in memory consumption.

In the preceding screenshot, we can see that several lines on the graph are trending upwards:

  • The red top line, horizontal and flat, shows how much memory has been reserved as heap space in the JVM. In this case, we see a heap size of 512 MB, which can usually be configured in the JVM with command line parameters like -Xmx.
  • The second line from the top, blue, represents the total memory in use in the heap, independent of their type.
  • The third, fourth, and fifth lines show how much memory space each specific type has been using historically in the heap. We can easily spot that java.util.LinkedHashMap$Entry and java.lang.UUID display growing trends, whereas byte[] has a flat line and seems stable in memory usage.

Types that exhibit constantly growing trend of memory utilization with time deserve a closer look. Profiler helps you focus your attention on these cases. Associating the information presented by the Profiler with your own knowledge of your application and code base, you can evaluate whether the amount of memory being used for a specific data type can be considered normal, or if it might be a memory leak – the unintentional holding of memory by an application due to the failure in freeing-up unused objects. In our example above, java.util.LinkedHashMap$Entry and java.lang.UUIDare good candidates for investigation.

To make this functionality available to customers, CodeGuru Profiler uses the power of Java Flight Recorder (JFR), which is now openly available with Java 8 (since OpenJDK release 262) and above. The Amazon CodeGuru Profiler agent for Java, which already does an awesome job capturing data about CPU utilization, has been extended to periodically collect memory retention metrics from JFR and submit them for processing and visualization via Amazon CodeGuru Profiler. Thanks to its high stability and low overhead, the Profiler agent can be safely deployed to services in production, because it is exactly there, under real workloads, that really interesting memory issues are most likely to show up.

Summary

For more information about CodeGuru Profiler and other AI-powered services in the Amazon CodeGuru family, see Amazon CodeGuru. If you haven’t tried the CodeGuru Profiler yet, start your 90-day free trial right now and understand why continuous profiling is becoming a must-have in every production environment. For Amazon CodeGuru customers who are already enjoying the benefits of always-on profiling, this new feature is available at no extra cost. Just update your Profiler agent to version 1.1.0 or newer, and enable Heap Summary in your agent configuration.


Happy profiling!

New – AWS Transfer Family support for Amazon Elastic File System

Post Syndicated from Channy Yun original https://aws.amazon.com/blogs/aws/new-aws-transfer-family-support-for-amazon-elastic-file-system/

AWS Transfer Family provides fully managed Secure File Transfer Protocol (SFTP), File Transfer Protocol (FTP) over TLS, and FTP support for Amazon Simple Storage Service (S3), enabling you to seamlessly migrate your file transfer workflows to AWS.

Today I am happy to announce AWS Transfer Family now also supports file transfers to Amazon Elastic File System (EFS) file systems as well as Amazon S3. This feature enables you to easily and securely provide your business partners access to files stored in Amazon EFS file systems. With this launch, you now have the option to store the transferred files in a fully managed file system and reduce your operational burden, while preserving your existing workflows that use SFTP, FTPS, or FTP protocols.

Amazon EFS file systems are accessible within your Amazon Virtual Private Cloud (VPC) and VPC connected environments. With this launch, you can securely enable third parties such as your vendors, partners, or customers to access your files over the supported protocols at scale globally, without needing to manage any infrastructure. When you select Amazon EFS as the data store for your AWS Transfer Family server, the transferred files are readily available to your business-critical applications running on Amazon Elastic Compute Cloud (EC2), as well as to containerized and serverless applications run using AWS services such as Amazon Elastic Container Service (ECS), Amazon Elastic Kubernetes Service (EKS), AWS Fargate, and AWS Lambda.

Using Amazon EFS – Getting Started
To get started in your existing Amazon EFS file system, make sure the POSIX identities you assign for your SFTP/FTPS/FTP users are owners of the files and directories you want to provide access to. You will provide access to that Amazon EFS file system through a resource-based policy. Your role also needs to establish a trust relationship. This trust relationship allows AWS Transfer Family to assume the AWS Identity and Access Management (IAM) role to access your bucket so that it can service your users’ file transfer requests.

You will also need to make sure you have created a mount target for your file system. In the example below, the home directory is owned by userid 1234 and groupid 5678.

$ mkdir home/myname
$ chown 1234:5678 home/myname

When you create a server in the AWS Transfer Family console, select Amazon EFS as your storage service in the Step 4 section Choose a domain.

When the server is enabled and in an online state, you can add users to your server. On the Servers page, select the check box of the server that you want to add a user to and choose Add user.

In the User configuration section, you can specify the username, uid (e.g. 1234), gid (e.g 5678), IAM role, and Amazon EFS file system as user’s home directory. You can optionally specify a directory within the file system which will be the user’s landing directory. You use a service-managed identity type – SSH keys. If you want to use password type, you can use a custom option with AWS Secrets Manager.

Amazon EFS uses POSIX IDs which consist of an operating system user id, group id, and secondary group id to control access to a file system. When setting up your user, you can specify the username, user’s POSIX configuration, and an IAM role to access the EFS file system. To learn more about configuring ownership of sub-directories in EFS, visit the documentation.

Once the users have been configured, you can transfer files using the AWS Transfer Family service by specifying the transfer operation in a client. When your user authenticates successfully using their file transfer client, it will be placed directly within the specified home directory, or root of the specified EFS file system.

$ sftp [email protected]

sftp> cd /fs-23456789/home/myname
sftp> ls -l
-rw-r--r-- 1 3486 1234 5678 Jan 04 14:59 my-file.txt
sftp> put my-newfile.txt
sftp> ls -l
-rw-r--r-- 1 3486 1234 5678 Jan 04 14:59 my-file.txt
-rw-r--r-- 1 1002 1234 5678 Jan 04 15:22 my-newfile.txt

Most of SFTP/FTPS/FTP commands are supported in the new EFS file system. You can refer to a list of available commands for FTP and FTPS clients in the documentation.

Command Amazon S3 Amazon EFS
cd Supported Supported
ls/dir Supported Supported
pwd Supported Supported
put Supported Supported
get Supported Supported including resolving symlinks
rename Supported (only file) Supported (file or folder)
chown Not supported Supported (root only)
chmod Not supported Supported (root only)
chgrp Not supported Supported (root or owner only)
ln -s Not supported Not supported
mkdir Supported Supported
rm Supported Supported
rmdir Supported (non-empty folders only) Supported
chmtime Not Supported Supported

You can use Amazon CloudWatch to track your users’ activity for file creation, update, delete, read operations, and metrics for data uploaded and downloaded using your server. To learn more on how to enable CloudWatch logging, visit the documentation.

Available Now
AWS Transfer Family support for Amazon EFS file systems is available in all AWS Regions where AWS Transfer Family is available. There are no additional AWS Transfer Family charges for using Amazon EFS as the storage backend. With Amazon EFS storage, you pay only for what you use. There is no need to provision storage in advance and there are no minimum commitments or up-front fees.

To learn more, take a look at the FAQs and the documentation. Please send feedback to the AWS forum for AWS Transfer Family or through your usual AWS support contacts.

Learn all the details about AWS Transfer Family to access Amazon EFS file systems and get started today.

— Channy;

Optimizing AWS Lambda cost and performance using AWS Compute Optimizer

Post Syndicated from Chad Schmutzer original https://aws.amazon.com/blogs/compute/optimizing-aws-lambda-cost-and-performance-using-aws-compute-optimizer/

This post is authored by Brooke Chen, Senior Product Manager for AWS Compute Optimizer, Letian Feng, Principal Product Manager for AWS Compute Optimizer, and Chad Schmutzer, Principal Developer Advocate for Amazon EC2

Optimizing compute resources is a critical component of any application architecture. Over-provisioning compute can lead to unnecessary infrastructure costs, while under-provisioning compute can lead to poor application performance.

Launched in December 2019, AWS Compute Optimizer is a recommendation service for optimizing the cost and performance of AWS compute resources. It generates actionable optimization recommendations tailored to your specific workloads. Over the last year, thousands of AWS customers reduced compute costs up to 25% by using Compute Optimizer to help choose the optimal Amazon EC2 instance types for their workloads.

One of the most frequent requests from customers is for AWS Lambda recommendations in Compute Optimizer. Today, we announce that Compute Optimizer now supports memory size recommendations for Lambda functions. This allows you to reduce costs and increase performance for your Lambda-based serverless workloads. To get started, opt in for Compute Optimizer to start finding recommendations.

Overview

With Lambda, there are no servers to manage, it scales automatically, and you only pay for what you use. However, choosing the right memory size settings for a Lambda function is still an important task. Computer Optimizer uses machine-learning based memory recommendations to help with this task.

These recommendations are available through the Compute Optimizer console, AWS CLI, AWS SDK, and the Lambda console. Compute Optimizer continuously monitors Lambda functions, using historical performance metrics to improve recommendations over time. In this blog post, we walk through an example to show how to use this feature.

Using Compute Optimizer for Lambda

This tutorial uses the AWS CLI v2 and the AWS Management Console.

In this tutorial, we setup two compute jobs that run every minute in AWS Region US East (N. Virginia). One job is more CPU intensive than the other. Initial tests show that the invocation times for both jobs typically last for less than 60 seconds. The goal is to either reduce cost without much increase in duration, or reduce the duration in a cost-efficient manner.

Based on these requirements, a serverless solution can help with this task. Amazon EventBridge can schedule the Lambda functions using rules. To ensure that the functions are optimized for cost and performance, you can use the memory recommendation support in Compute Optimizer.

In your AWS account, opt in to Compute Optimizer to start analyzing AWS resources. Ensure you have the appropriate IAM permissions configured – follow these steps for guidance. If you prefer to use the console to opt in, follow these steps. To opt in, enter the following command in a terminal window:

$ aws compute-optimizer update-enrollment-status --status Active

Once you enable Compute Optimizer, it starts to scan for functions that have been invoked for at least 50 times over the trailing 14 days. The next section shows two example scheduled Lambda functions for analysis.

Example Lambda functions

The code for the non-CPU intensive job is below. A Lambda function named lambda-recommendation-test-sleep is created with memory size configured as 1024 MB. An EventBridge rule is created to trigger the function on a recurring 1-minute schedule:

import json
import time

def lambda_handler(event, context):
  time.sleep(30)
  x=[0]*100000000
  return {
    'statusCode': 200,
    'body': json.dumps('Hello World!')
  }

The code for the CPU intensive job is below. A Lambda function named lambda-recommendation-test-busy is created with memory size configured as 128 MB. An EventBridge rule is created to trigger the function on a recurring 1-minute schedule:

import json
import random

def lambda_handler(event, context):
  random.seed(1)
  x=0
  for i in range(0, 20000000):
    x+=random.random()

  return {
    'statusCode': 200,
    'body': json.dumps('Sum:' + str(x))
  }

Understanding the Compute Optimizer recommendations

Compute Optimizer needs a history of at least 50 invocations of a Lambda function over the trailing 14 days to deliver recommendations. Recommendations are created by analyzing function metadata such as memory size, timeout, and runtime, in addition to CloudWatch metrics such as number of invocations, duration, error count, and success rate.

Compute Optimizer will gather the necessary information to provide memory recommendations for Lambda functions, and make them available within 48 hours. Afterwards, these recommendations will be refreshed daily.

These are recent invocations for the non-CPU intensive function:

Recent invocations for the non-CPU intensive function

Function duration is approximately 31.3 seconds with a memory setting of 1024 MB, resulting in a duration cost of about $0.00052 per invocation. Here are the recommendations for this function in the Compute Optimizer console:

Recommendations for this function in the Compute Optimizer console

The function is Not optimized with a reason of Memory over-provisioned. You can also fetch the same recommendation information via the CLI:

$ aws compute-optimizer \
  get-lambda-function-recommendations \
  --function-arns arn:aws:lambda:us-east-1:123456789012:function:lambda-recommendation-test-sleep
{
    "lambdaFunctionRecommendations": [
        {
            "utilizationMetrics": [
                {
                    "name": "Duration",
                    "value": 31333.63587049883,
                    "statistic": "Average"
                },
                {
                    "name": "Duration",
                    "value": 32522.04,
                    "statistic": "Maximum"
                },
                {
                    "name": "Memory",
                    "value": 817.67049838188,
                    "statistic": "Average"
                },
                {
                    "name": "Memory",
                    "value": 819.0,
                    "statistic": "Maximum"
                }
            ],
            "currentMemorySize": 1024,
            "lastRefreshTimestamp": 1608735952.385,
            "numberOfInvocations": 3090,
            "functionArn": "arn:aws:lambda:us-east-1:123456789012:function:lambda-recommendation-test-sleep:$LATEST",
            "memorySizeRecommendationOptions": [
                {
                    "projectedUtilizationMetrics": [
                        {
                            "name": "Duration",
                            "value": 30015.113193697029,
                            "statistic": "LowerBound"
                        },
                        {
                            "name": "Duration",
                            "value": 31515.86878891883,
                            "statistic": "Expected"
                        },
                        {
                            "name": "Duration",
                            "value": 33091.662123300975,
                            "statistic": "UpperBound"
                        }
                    ],
                    "memorySize": 900,
                    "rank": 1
                }
            ],
            "functionVersion": "$LATEST",
            "finding": "NotOptimized",
            "findingReasonCodes": [
                "MemoryOverprovisioned"
            ],
            "lookbackPeriodInDays": 14.0,
            "accountId": "123456789012"
        }
    ]
}

The Compute Optimizer recommendation contains useful information about the function. Most importantly, it has determined that the function is over-provisioned for memory. The attribute findingReasonCodes shows the value MemoryOverprovisioned. In memorySizeRecommendationOptions, Compute Optimizer has found that using a memory size of 900 MB results in an expected invocation duration of approximately 31.5 seconds.

For non-CPU intensive jobs, reducing the memory setting of the function often doesn’t have a negative impact on function duration. The recommendation confirms that you can reduce the memory size from 1024 MB to 900 MB, saving cost without significantly impacting duration. The new duration cost per invocation saves approximately 12%.

The Compute Optimizer console validates these calculations:

Compute Optimizer console validates these calculations

These are recent invocations for the second function which is CPU-intensive:

Recent invocations for the second function which is CPU-intensive

The function duration is about 37.5 seconds with a memory setting of 128 MB, resulting in a duration cost of about $0.000078 per invocation. The recommendations for this function appear in the Compute Optimizer console:

recommendations for this function appear in the Compute Optimizer console

The function is also Not optimized with a reason of Memory under-provisioned. The same recommendation information is available via the CLI:

$ aws compute-optimizer \
  get-lambda-function-recommendations \
  --function-arns arn:aws:lambda:us-east-1:123456789012:function:lambda-recommendation-test-busy
{
    "lambdaFunctionRecommendations": [
        {
            "utilizationMetrics": [
                {
                    "name": "Duration",
                    "value": 36006.85851551957,
                    "statistic": "Average"
                },
                {
                    "name": "Duration",
                    "value": 38540.43,
                    "statistic": "Maximum"
                },
                {
                    "name": "Memory",
                    "value": 53.75978407557355,
                    "statistic": "Average"
                },
                {
                    "name": "Memory",
                    "value": 55.0,
                    "statistic": "Maximum"
                }
            ],
            "currentMemorySize": 128,
            "lastRefreshTimestamp": 1608725151.752,
            "numberOfInvocations": 741,
            "functionArn": "arn:aws:lambda:us-east-1:123456789012:function:lambda-recommendation-test-busy:$LATEST",
            "memorySizeRecommendationOptions": [
                {
                    "projectedUtilizationMetrics": [
                        {
                            "name": "Duration",
                            "value": 27340.37604781184,
                            "statistic": "LowerBound"
                        },
                        {
                            "name": "Duration",
                            "value": 28707.394850202432,
                            "statistic": "Expected"
                        },
                        {
                            "name": "Duration",
                            "value": 30142.764592712556,
                            "statistic": "UpperBound"
                        }
                    ],
                    "memorySize": 160,
                    "rank": 1
                }
            ],
            "functionVersion": "$LATEST",
            "finding": "NotOptimized",
            "findingReasonCodes": [
                "MemoryUnderprovisioned"
            ],
            "lookbackPeriodInDays": 14.0,
            "accountId": "123456789012"
        }
    ]
}

For this function, Compute Optimizer has determined that the function’s memory is under-provisioned. The value of findingReasonCodes is MemoryUnderprovisioned. The recommendation is to increase the memory from 128 MB to 160 MB.

This recommendation may seem counter-intuitive, since the function only uses 55 MB of memory per invocation. However, Lambda allocates CPU and other resources linearly in proportion to the amount of memory configured. This means that increasing the memory allocation to 160 MB also reduces the expected duration to around 28.7 seconds. This is because a CPU-intensive task also benefits from the increased CPU performance that comes with the additional memory.

After applying this recommendation, the new expected duration cost per invocation is approximately $0.000075. This means that for almost no change in duration cost, the job latency is reduced from 37.5 seconds to 28.7 seconds.

The Compute Optimizer console validates these calculations:

Compute Optimizer console validates these calculations

Applying the Compute Optimizer recommendations

To optimize the Lambda functions using Compute Optimizer recommendations, use the following CLI command:

$ aws lambda update-function-configuration \
  --function-name lambda-recommendation-test-sleep \
  --memory-size 900

After invoking the function multiple times, we can see metrics of these invocations in the console. This shows that the function duration has not changed significantly after reducing the memory size from 1024 MB to 900 MB. The Lambda function has been successfully cost-optimized without increasing job duration:

Console shows the metrics from recent invocations

To apply the recommendation to the CPU-intensive function, use the following CLI command:

$ aws lambda update-function-configuration \
  --function-name lambda-recommendation-test-busy \
  --memory-size 160

After invoking the function multiple times, the console shows that the invocation duration is reduced to about 28 seconds. This matches the recommendation’s expected duration. This shows that the function is now performance-optimized without a significant cost increase:

Console shows that the invocation duration is reduced to about 28 seconds

Final notes

A couple of final notes:

  • Not every function will receive a recommendation. Compute optimizer only delivers recommendations when it has high confidence that these recommendations may help reduce cost or reduce execution duration.
  • As with any changes you make to an environment, we strongly advise that you test recommended memory size configurations before applying them into production.

Conclusion

You can now use Compute Optimizer for serverless workloads using Lambda functions. This can help identify the optimal Lambda function configuration options for your workloads. Compute Optimizer supports memory size recommendations for Lambda functions in all AWS Regions where Compute Optimizer is available. These recommendations are available to you at no additional cost. You can get started with Compute Optimizer from the console.

To learn more visit Getting started with AWS Compute Optimizer.


Amazon Location – Add Maps and Location Awareness to Your Applications

Post Syndicated from Jeff Barr original https://aws.amazon.com/blogs/aws/amazon-location-add-maps-and-location-awareness-to-your-applications/

We want to make it easier and more cost-effective for you to add maps, location awareness, and other location-based features to your web and mobile applications. Until now, doing this has been somewhat complex and expensive, and also tied you to the business and programming models of a single provider.

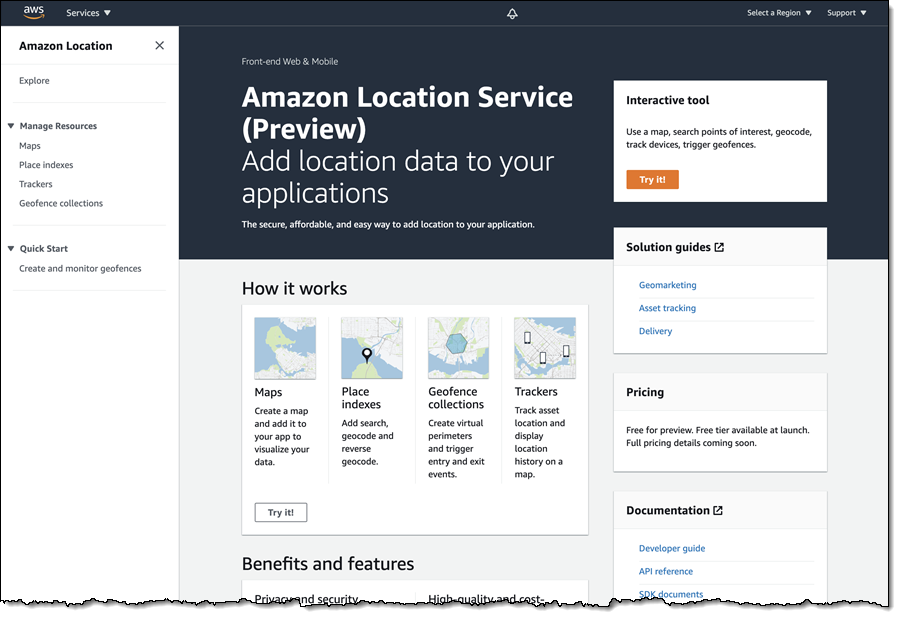
Introducing Amazon Location Service
Today we are making Amazon Location available in preview form and you can start using it today. Priced at a fraction of common alternatives, Amazon Location Service gives you access to maps and location-based services from multiple providers on an economical, pay-as-you-go basis.

You can use Amazon Location Service to build applications that know where they are and respond accordingly. You can display maps, validate addresses, perform geocoding (turn an address into a location), track the movement of packages and devices, and much more. You can easily set up geofences and receive notifications when tracked items enter or leave a geofenced area. You can even overlay your own data on the map while retaining full control.

You can access Amazon Location Service from the AWS Management Console, AWS Command Line Interface (CLI), or via a set of APIs. You can also use existing map libraries such as Mapbox GL and Tangram.

All About Amazon Location
Let’s take a look at the types of resources that Amazon Location Service makes available to you, and then talk about how you can use them in your applications.

Maps – Amazon Location Service lets you create maps that make use of data from our partners. You can choose between maps and map styles provided by Esri and by HERE Technologies, with the potential for more maps & more styles from these and other partners in the future. After you create a map, you can retrieve a tile (at one of up to 16 zoom levels) using the GetMapTile function. You won’t do this directly, but will use Mapbox GL, Tangram, or another library instead.

Place Indexes – You can choose between indexes provided by Esri and HERE. The indexes support the SearchPlaceIndexForPosition function which returns places, such as residential addresses or points of interest (often known as POI) that are closest to the position that you supply, while also performing reverse geocoding to turn the position (a pair of coordinates) into a legible address. Indexes also support the SearchPlaceIndexForText function, which searches for addresses, businesses, and points of interest using free-form text such as an address, a name, a city, or a region.

Trackers –Trackers receive location updates from one or more devices via the BatchUpdateDevicePosition function, and can be queried for the current position (GetDevicePosition) or location history (GetDevicePositionHistory) of a device. Trackers can also be linked to Geofence Collections to implement monitoring of devices as they move in and out of geofences.

Geofence Collections – Each collection contains a list of geofences that define geographic boundaries. Here’s a geofence (created with geojson.io) that outlines a park near me:

Amazon Location in Action
I can use the AWS Management Console to get started with Amazon Location and then move on to the AWS Command Line Interface (CLI) or the APIs if necessary. I open the Amazon Location Service Console, and I can either click Try it! to create a set of starter resources, or I can open up the navigation on the left and create them one-by-one. I’ll go for one-by-one, and click Maps:

Then I click Create map to proceed:

I enter a Name and a Description:

Then I choose the desired map and click Create map:

The map is created and ready to be added to my application right away:

Now I am ready to embed the map in my application, and I have several options including the Amplify JavaScript SDK, the Amplify Android SDK, the Amplify iOS SDK, Tangram, and Mapbox GL (read the Developer Guide to learn more about each option).

Next, I want to track the position of devices so that I can be notified when they enter or exit a given region. I use a GeoJSON editing tool such as geojson.io to create a geofence that is built from polygons, and save (download) the resulting file:

I click Create geofence collection in the left-side navigation, and in Step 1, I add my GeoJSON file, enter a Name and Description, and click Next:

Now I enter a Name and a Description for my tracker, and click Next. It will be linked to the geofence collection that I just created:

The next step is to arrange for the tracker to send events to Amazon EventBridge so that I can monitor them in CloudWatch Logs. I leave the settings as-is, and click Next to proceed:

I review all of my choices, and click Finalize to move ahead:

The resources are created, set up, and ready to go:

I can then write code or use the CLI to update the positions of my devices:

$ aws location batch-update-device-position \
   --tracker-name MyTracker1 \
   --updates "DeviceId=Jeff1,Position=-122.33805,47.62748,SampleTime=2020-11-05T02:59:07+0000"

After I do this a time or two, I can retrieve the position history for the device:

$ aws location get-device-position-history \
  -tracker-name MyTracker1 --device-id Jeff1
------------------------------------------------
|           GetDevicePositionHistory           |
+----------------------------------------------+
||               DevicePositions              ||
|+---------------+----------------------------+|
||  DeviceId     |  Jeff1                     ||
||  ReceivedTime |  2020-11-05T02:59:17.246Z  ||
||  SampleTime   |  2020-11-05T02:59:07Z      ||
|+---------------+----------------------------+|
|||                 Position                 |||
||+------------------------------------------+||
|||  -122.33805                              |||
|||  47.62748                                |||
||+------------------------------------------+||
||               DevicePositions              ||
|+---------------+----------------------------+|
||  DeviceId     |  Jeff1                     ||
||  ReceivedTime |  2020-11-05T03:02:08.002Z  ||
||  SampleTime   |  2020-11-05T03:01:29Z      ||
|+---------------+----------------------------+|
|||                 Position                 |||
||+------------------------------------------+||
|||  -122.43805                              |||
|||  47.52748                                |||
||+------------------------------------------+||

I can write Amazon EventBridge rules that watch for the events, and use them to perform any desired processing. Events are published when a device enters or leaves a geofenced area, and look like this:

{
  "version": "0",
  "id": "7cb6afa8-cbf0-e1d9-e585-fd5169025ee0",
  "detail-type": "Location Geofence Event",
  "source": "aws.geo",
  "account": "123456789012",
  "time": "2020-11-05T02:59:17.246Z",
  "region": "us-east-1",
  "resources": [
    "arn:aws:geo:us-east-1:123456789012:geofence-collection/MyGeoFences1",
    "arn:aws:geo:us-east-1:123456789012:tracker/MyTracker1"
  ],
  "detail": {
        "EventType": "ENTER",
        "GeofenceId": "LakeUnionPark",
        "DeviceId": "Jeff1",
        "SampleTime": "2020-11-05T02:59:07Z",
        "Position": [-122.33805, 47.52748]
  }
}

Finally, I can create and use place indexes so that I can work with geographical objects. I’ll use the CLI for a change of pace. I create the index:

$ aws location create-place-index \
  --index-name MyIndex1 --data-source Here

Then I query it to find the addresses and points of interest near the location:

$ aws location search-place-index-for-position --index-name MyIndex1 \
  --position "[-122.33805,47.62748]" --output json \
  |  jq .Results[].Place.Label
"Terry Ave N, Seattle, WA 98109, United States"
"900 Westlake Ave N, Seattle, WA 98109-3523, United States"
"851 Terry Ave N, Seattle, WA 98109-4348, United States"
"860 Terry Ave N, Seattle, WA 98109-4330, United States"
"Seattle Fireboat Duwamish, 860 Terry Ave N, Seattle, WA 98109-4330, United States"
"824 Terry Ave N, Seattle, WA 98109-4330, United States"
"9th Ave N, Seattle, WA 98109, United States"
...

I can also do a text-based search:

$ aws location search-place-index-for-text --index-name MyIndex1 \
  --text Coffee --bias-position "[-122.33805,47.62748]" \
  --output json | jq .Results[].Place.Label
"Mohai Cafe, 860 Terry Ave N, Seattle, WA 98109, United States"
"Starbucks, 1200 Westlake Ave N, Seattle, WA 98109, United States"
"Metropolitan Deli and Cafe, 903 Dexter Ave N, Seattle, WA 98109, United States"
"Top Pot Doughnuts, 590 Terry Ave N, Seattle, WA 98109, United States"
"Caffe Umbria, 1201 Westlake Ave N, Seattle, WA 98109, United States"
"Starbucks, 515 Westlake Ave N, Seattle, WA 98109, United States"
"Cafe 815 Mercer, 815 9th Ave N, Seattle, WA 98109, United States"
"Victrola Coffee Roasters, 500 Boren Ave N, Seattle, WA 98109, United States"
"Specialty's, 520 Terry Ave N, Seattle, WA 98109, United States"
...

Both of the searches have other options; read the Geocoding, Reverse Geocoding, and Search to learn more.

Things to Know
Amazon Location is launching today as a preview, and you can get started with it right away. During the preview we plan to add an API for routing, and will also do our best to respond to customer feedback and feature requests as they arrive.

Pricing is based on usage, with an initial evaluation period that lasts for three months and lets you make numerous calls to the Amazon Location APIs at no charge. After the evaluation period you pay the prices listed on the Amazon Location Pricing page.

Amazon Location is available in the US East (N. Virginia), US East (Ohio), US West (Oregon), Europe (Ireland), and Asia Pacific (Tokyo) Regions.

— Jeff;