Amazon Web Services (AWS) recently released a new whitepaper, Does data localization cause more problems than it solves?, as part of the AWS Innovating Securely briefing series. The whitepaper draws on research from Emily Wu’s paper Sovereignty and Data Localization, published by Harvard University’s Belfer Center, and describes how countries can realize similar data localization objectives through AWS services without incurring the unintended effects highlighted by Wu.
Wu’s research analyzes the intent of data localization policies, and compares that to the reality of the policies’ effects, concluding that data localization policies are often counterproductive to their intended goals of data security, economic competitiveness, and protecting national values.
The new whitepaper explains how you can use the security capabilities of AWS to take advantage of up-to-date technology and help meet your data localization requirements while maintaining full control over the physical location of where your data is stored.
AWS offers robust privacy and security services and features that let you implement your own controls. AWS uses lessons learned around the globe and applies them at the local level for improved cybersecurity against security events. As an AWS customer, after you pick a geographic location to store your data, the cloud infrastructure provides you greater resiliency and availability than you can achieve by using on-prem infrastructure. When you choose an AWS Region, you maintain full control to determine the physical location of where your data is stored. AWS also provides you with resources through the AWS compliance program, to help you understand the robust controls in place at AWS to maintain security and compliance in the cloud.
An important finding of Wu’s research is that localization constraints can deter innovation and hurt local economies because they limit which services are available, or increase costs because there are a smaller number of service providers to choose from. Wu concludes that data localization can “raise the barriers [to entrepreneurs] for market entry, which suppresses entrepreneurial activity and reduces the ability for an economy to compete globally.” Data localization policies are especially challenging for companies that trade across national borders. International trade used to be the remit of only big corporations. Current data-driven efficiencies in shipping and logistics mean that international trade is open to companies of all sizes. There has been particular growth for small and medium enterprises involved in services trade (of which cross-border data flows are a key element). In a 2016 worldwide survey conducted by McKinsey, 86 percent of tech-based startups had at least one cross-border activity. The same report showed that cross-border data flows added some US$2.8 trillion to world GDP in 2014.
However, the availability of cloud services supports secure and efficient cross-border data flows, which in turn can contribute to national economic competitiveness. Deloitte Consulting’s report, The cloud imperative: Asia Pacific’s unmissable opportunity, estimates that by 2024, the cloud will contribute $260 billion to GDP across eight regional markets, with more benefit possible in the future. The World Trade Organization’s World Trade Report 2018 estimates that digital technologies, which includes advanced cloud services, will account for a 34 percent increase in global trade by 2030.
Wu also cites a link between national data governance policies and a government’s concerns that movement of data outside national borders can diminish their control. However, the technology, storage capacity, and compute power provided by hyperscale cloud service providers like AWS, can empower local entrepreneurs.
AWS continually updates practices to meet the evolving needs and expectations of both customers and regulators. This allows AWS customers to use effective tools for processing data, which can help them meet stringent local standards to protect national values and citizens’ rights.
Wu’s research concludes that “data localization is proving ineffective” for meeting intended national goals, and offers practical alternatives for policymakers to consider. Wu has several recommendations, such as continuing to invest in cybersecurity, supporting industry-led initiatives to develop shared standards and protocols, and promoting international cooperation around privacy and innovation. Despite the continued existence of data localization policies, countries can currently realize similar objectives through cloud services. AWS implements rigorous contractual, technical, and organizational measures to protect the confidentiality, integrity, and availability of customer data, regardless of which AWS Region you select to store their data. As an AWS customer, this means you can take advantage of the economic benefits and the support for innovation provided by cloud computing, while improving your ability to meet your core security and compliance requirements.
With Amazon Cognito, you can quickly add user sign-up, sign-in, and access control to your web and mobile applications. After a user signs in successfully, Cognito generates an identity token for user authorization. The service provides a pre token generation trigger, which you can use to customize identity token claims before token generation. In this blog post, we’ll demonstrate how to perform fine-grained authorization, which provides additional details about an authenticated user by using claims that are added to the identity token. The solution uses a pre token generation trigger to add these claims to the identity token.
Scenario
Imagine a web application that is used by a construction company, where engineers log in to review information related to multiple projects. We’ll look at two different ways of designing the architecture for this scenario: a standard design and a more optimized design.
Standard architecture
A sample standard architecture for such an application is shown in Figure 1, with labels for the various workflow steps:
The user interface is implemented by using ReactJS (a JavaScript library for building user interfaces).
AWS Lambda functions exist to implement business logic.
The AWS Lambda CheckUserAccess function (5) checks whether the user has authorization to call the AWS Lambda functions (4).
The project information is stored in an Amazon DynamoDB database.
Figure 1: Lambda functions that need the user’s projectID call the GetProjectID Lambda function
In this scenario, because the user has access to information from several projects, several backend functions use calls to the CheckUserAccess Lambda function (step 5 in Figure 1) in order to serve the information that was requested. This will result in multiple calls to the function for the same user, which introduces latency into the system.
Optimized architecture
This blog post introduces a new optimized design, shown in Figure 2, which substantially reduces calls to the CheckUserAccess API endpoint:
The user logs in.
Amazon Cognito makes a single call to the PretokenGenerationLambdaFunction-pretokenCognito function.
The PretokenGenerationLambdaFunction-pretokenCognito function queries the Project ID from the DynamoDB table and adds that information to the Identity token.
DynamoDB delivers the query result to the PretokenGenerationLambdaFunction-pretokenCognito function.
This Identity token is passed in the authorization header for making calls to the Amazon API Gateway endpoint.
Information in the identity token claims is used by the Lambda functions that contain business logic, for additional fine-grained authorization. Therefore, the CheckUserAccess function (7) need not be called.
The improved architecture is shown in Figure 2.
Figure 2. Get the projectID and inset it in a custom claim in the Identity token
The benefits of this approach are:
The number of calls to get the Project ID from the DynamoDB table are reduced, which in turn reduces overall latency.
The dependency on the CheckUserAccess Lambda function is removed from the business logic. This reduces coupling in the architecture, as depicted in the diagram.
In the code sample provided in this post, the user interface is run locally from the user’s computer, for simplicity.
Code sample
You can download a zip file that contains the code and the AWS CloudFormation template to implement this solution. The code that we provide to illustrate this solution is described in the following sections.
Prerequisites
Before you deploy this solution, you must first do the following:
The code provided with this post installs the following infrastructure in your AWS account.
Resource
Description
Amazon Cognito user pool
The users, added by the addUserInfo.py script, are added to this pool. The client ID is used to identify the web client that will connect to the user pool. The user pool domain is used by the web client to request authentication of the user.
Policies used for running the Lambda function and connecting to the DynamoDB database.
Lambda function for the pre token generation trigger
A Lambda function to add custom claims to the Identity token.
DynamoDB table with user information
A sample database to store user information that is specific to the application.
Deploy the solution
In this section, we describe how to deploy the infrastructure, save the trigger configuration, add users to the Cognito user pool, and run the web application.
To deploy the solution infrastructure
Download the zip file to your machine. The readme.md file in the addclaimstoidtoken folder includes a table that describes the key files in the code.
Change the directory to addclaimstoidtoken. cd addclaimstoidtoken
Review stackInputs.json. Change the value of the userPoolDomainName parameter to a random unique value of your choice. This example uses pretokendomainname as the Amazon Cognito domain name; you should change it to a unique domain name of your choice.
Deploy the infrastructure by running the following Python script. python3 setup_pretoken.py
After the CloudFormation stack creation is complete, you should see the details of the infrastructure created as depicted in Figure 3.
Figure 3: Details of infrastructure
Now you’re ready to add users to your Amazon Cognito user pool.
To add users to your Cognito user pool
To add users to the Cognito user pool and configure the DynamoDB store, run the Python script from the addclaimstoidtoken directory. python3 add_user_info.py
This script adds one user. It will prompt you to provide a username, email, and password for the user.
Note: Because this is sample code, advanced features of Cognito, like multi-factor authentication, are not enabled. We recommend enabling these features for a production application.
The addUserInfo.py script performs two actions:
Adds the user to the Cognito user pool.
Figure 4: User added to the Cognito user pool
Adds sample data to the DynamoDB table.
Figure 5: Sample data added to the DynamoDB table named UserInfoTable
Now you’re ready to run the application to verify the custom claim addition.
To run the web application
Change the directory to the pre-token-web-app directory and run the following command. cd pre-token-web-app
This directory contains a ReactJS web application that displays details of the identity token. On the terminal, run the following commands to run the ReactJS application. npm install npm start
This should open http://localhost:8081 in your default browser window that shows the Login button.
Figure 6: Browser opens to URL http://localhost:8081
Choose the Login button. After you do so, the Cognito-hosted login screen is displayed. Log in to the website with the user identity you created by using the addUserInfo.py script in step 1 of the To add users to your Cognito user pool procedure.
Figure 7: Input credentials in the Cognito-hosted login screen
When the login is successful, the next screen displays the identity and access tokens in the URL. You can reveal the token details to verify that the custom claim has been added to the token by choosing the Show Token Detail button.
Figure 8: Token details displayed in the browser
What happened behind the scenes?
In this web application, the following steps happened behind the scenes:
When you ran the npm start command on the terminal command line, that ran the react-scripts start command from package.json. The port number (8081) was configured in the pre-token-web-app/.env file. This opened the web application that was defined in app.js in the default browser at the URL http://localhost:8081.
The Login button is configured to navigate to the URL that was defined in the constants.js file. The constants.js file was generated during the running of the setup_pretoken.py script. This URL points to the Cognito-hosted default login user interface.
When you provided the login information (username and password), Amazon Cognito authenticated the user. Before generating the set of tokens (identity token and access token), Cognito first called the pre-token-generation Lambda trigger. This Lambda function has the code to connect to the DynamoDB database. The Lambda function can then access the project information for the user that is stored in the userInfo table. The Lambda function read this project information and added it to the identity token that was delivered to the web application.
After a successful login, Amazon Cognito redirected to the URL that was specified in the App Client Settings section, and added the token to the URL.
The webpage detected the token in the URL and displayed the Show Token Detail button. When you selected the button, the webpage read the token in the URL, decoded the token, and displayed the information in the relevant text boxes.
Notice that the Decoded ID Token box shows the custom claim named projects that displays the projectID that was added by the PretokenGenerationLambdaFunction-pretokenCognito trigger.
How to use the sample code in your application
We recommend that you use this sample code with the following modifications:
The code provided does not implement the API Gateway and Lambda functions that consume the custom claim information. You should implement the necessary Lambda functions and read the custom claim for the event object. This event object is a JSON-formatted object that contains authorization data.
The projectId of the user is available in the token. Therefore, when the token is passed by the Authorization trigger to the back end, this custom claim information can be used to perform actions specific to the project for that user. For example, getting all of that user’s work items that are related to the project.
Because the token is valid for one hour, the information in the custom claim information is available to the user interface during that time.
You can use the AWS Amplify library to simplify the communication between your web application and Amazon Cognito. AWS Amplify can handle the token retention and refresh token mechanism for the web application. This also removes the need for the token to be displayed in the URL.
If you’re using Amazon Cognito to manage your users and authenticate them, using the Amazon Cognito user pool to control access to your API is easier, because you don’t have to write the authentication code in your authorizer.
If you decide to use Lambda authorizers, note the following important information from the topic Steps to create an API Gateway Lambda authorizer: “In production code, you may need to authenticate the user before granting authorization. If so, you can add authentication logic in the Lambda function as well by calling an authentication provider as directed in the documentation for that provider.”
Lambda authorizer is recommended if the final authorization (not just token validity) decision is made based on custom claims.
Conclusion
In this blog post, we demonstrated how to implement fine-grained authorization based on data stored in the back end, by using claims stored in an identity token that is generated by the Amazon Cognito pre token generation trigger. This solution can help you achieve a reduction in latency and improvement in performance.
The latest version of the AWS HITRUST Shared Responsibility Matrix is now available to download. Version 1.2 is based on HITRUST MyCSF version 9.4[r2] and was released by HITRUST on April 20, 2022.
AWS worked with HITRUST to update the Shared Responsibility Matrix and to add new controls based on MyCSF v9.4[r2]. You don’t have to assess these additional controls because AWS already has completed HITRUST assessment using version 9.4 in 2021 . You can deploy your environments on AWS and inherit our HITRUST Common Security Framework (CSF) certification, provided that you use only in-scope services and apply the controls detailed on the HITRUST website.
What this means for our customers
The new AWS HITRUST Shared Responsibility Matrix has been tailored to reflect both the Cross Version ID (CVID) and Baseline Unique ID (BUID) in HITRUST so that you can select the correct control for inheritance even if you’re still using an older version of HITRUST MyCSF for your own assessment.
With the new version, you can also inherit some additional controls based on MyCSF v9.4[r2].
At AWS, we’re committed to helping you achieve and maintain the highest standards of security and compliance. We value your feedback and questions. You can contact the AWS HITRUST team at AWS Compliance Contact Us. If you have feedback about this post, submit comments in the Comments section below.
Want more AWS Security ‘how-to’ content, news, and feature announcements? Follow us on Twitter.
We’re excited to announce that Amazon Web Services (AWS) has successfully achieved ISO 22301:2019 certification without audit findings. ISO 22301:2019 is a rigorous third-party independent assessment of the international standard for Business Continuity Management (BCM). Published by the International Organization for Standardization (ISO), ISO 22301:2019 is designed to help organizations prevent, prepare for, respond to, and recover from unexpected and disruptive events.
EY CertifyPoint, an independent third-party auditor, issued the certificate on June 2, 2022. The covered AWS Regions are included on the ISO 22301:2019 certificate, and the full list of AWS services in scope for ISO 22301:2019 is available on our ISO and CSA STAR Certified webpage. You can view and download the AWS ISO 22301:2019 certificate on demand online and in the AWS Management Console through AWS Artifact.
As always, we value your feedback and questions and are committed to helping you achieve and maintain the highest standard of security and compliance. Feel free to contact our team through AWS Compliance Contact Us. If you have feedback about this post, submit comments in the Comments section below.
Want more AWS Security how-to content, news, and feature announcements? Follow us on Twitter.
Many of our customers use AWS Organizations to manage multiple Amazon Web Services (AWS) accounts. There are many benefits to using multiple accounts in your organization, such as grouping workloads with a common business purpose, complying with regulatory frameworks, and establishing strong isolation barriers between applications based on ownership. Customers are even using distinct accounts for development, testing, and production. As these accounts proliferate, customers need a way to centrally set guardrails and controls.
In this blog post, we will walk you through different techniques that you can use to get more out of AWS Organizations service control policies (SCPs) in a multi-account environment. We focus on policy evaluation logic and how SCPs fit into it, show an overview of SCP inheritance, and describe methods for writing compact SCPs. We cover the following five techniques:
Consider the number of policies per entity
Use policy inheritance
Segment by workload type
Combine policies together
Compact your policies
AWS Organizations provides a mechanism to set distinct logical boundaries by using organizational units (OUs). This is useful when you have similar workloads across different AWS accounts that require common guardrails. SCPs are a type of organization policy that you can use to manage permissions in your organization. SCPs offer central control over the maximum available permissions for all accounts in your organization. SCPs help you make sure that your accounts stay within your organization’s access control guidelines. A key distinction of SCPs is that they are useful to set broad guardrails across your environment. You can think of guardrails as a way to enforce specific governance policies at varying levels of your environment, which we will discuss in this post.
Policy evaluation logic and how SCPs fit in
Before we dig into the details, let’s first look at how SCPs work from an overall policy perspective, along with the evaluation logic. An explicit Deny statement in any policy trumps an Allow statement. Organization SCPs that apply to any AWS account that is part of an organization in AWS Organizations require an Allow statement before proceeding in the policy evaluation flow.
For an in-depth look at how policies are evaluated, see Policy evaluation logic in the documentation.
Now, let’s walk through five recommended techniques that can help you get more out of SCPs.
1. Consider the number of policies per entity
An organization is a collection of AWS accounts that you manage together. You can use OUs to group accounts within an organization and administer them as a single unit. This greatly simplifies the management of your accounts. It’s possible to create multiple OUs within a single organization, and you can create OUs within other OUs, otherwise known as nested OUs. You have the flexibility to attach multiple policies to the root of the organization, to an OU, or to an account. For example, in an organization that has the root, one OU, and one account, attaching five SCPs to each of them would produce a total of 15 SCPs (five SCPs at the root, five SCPs at the OU, and five SCPs on the one account).
The number of SCPs that you can apply is limited, and being close to or at the quota could restrict your ability to add more policies in the future. The current published quotas are as follows:
Maximum number of SCPs attached to the root: 5
Maximum number of SCPs attached to each OU: 5
OU maximum nesting in a root: 5 levels of OUs under a root
Maximum number of SCPs attached to each account: 5
Consider the following sample organization structure to understand how you can apply multiple SCPs at different levels in an organization.
Figure 1: A sample organization showing the maximum number of SCPs applicable at each level (root, OU, account)
2. Use policy inheritance
Policy inheritance refers to the inheritance of policies that are attached to the organization’s root or to an OU. All accounts that are members of the organization root or OU where a policy is attached are affected by that policy, but inheritance works differently for Allow and Deny statements. For a permission to be allowed for a specified account, every SCP from the root through each OU in the direct path to the account, and even attached to the account itself, must allow that permission. In other words, a statement that allows access needs to exist at every level of a hierarchy; it’s not inherited. However, a Deny statement is inherited and evaluated at each level.
At this point, you should start thinking about the policies from a broader controls perspective: Controls that you want to implement on the whole organization should go into your organization’s root-level SCP. Controls should be more granular as you move down the hierarchy in AWS Organizations.
For example, when a Deny policy is attached to the organization’s root, all accounts in the organization are affected by that policy. When you attach a Deny policy to a specific OU, accounts that are directly under that OU or nested OUs under it are affected by that policy. Because you can attach policies to multiple levels in the organization, accounts might have multiple applicable policy documents, as shown in Figure 2.
By default, AWS Organizations attaches an AWS managed SCP named FullAWSAccess to every root and OU when it’s created. This policy allows all services and actions.
Note: Adding an SCP with full AWS access doesn’t give all the principals in an account access to everything. SCPs don’t grant permissions; they are used to filter permissions. Principals still need a policy within the account that grants them access.
Additionally, the policies that are applied to an OU only affect the accounts or the child OUs under it and don’t affect other OUs created under the root. For example, a policy applied to the Sandbox OU doesn’t affect the Workloads OU.
The two tables that follow show examples of the policies that result from inheritance. As discussed previously, if an Allow isn’t present at all levels (root, OU, and account) the account won’t have access to any service. Consider the last example in the Sandbox OU table with a “Deny S3 access” SCP at the root, which limits access to Amazon Simple Storage Service (Amazon S3). Although there is “Allow S3 access” applied to the Sandbox OU and “Full AWS access” at the account level, the resultant policy on account A is “No service access” because there is no policy with an effect of “Allow” in the SCP at the root level.
The following table shows the inheritance of policies in the Sandbox OU.
A key feature of AWS Organizations is the ability to create distinct workload boundaries by using organizational units (OUs). You can think of OUs as a logical boundary where you can directly apply SCPs. You can also nest OUs up to five levels deep and apply different policies at each level. By using OUs, you can segment your workload types and create purpose-driven guardrails to match your security and compliance requirements.
To illustrate this, let’s take an example where there are three distinct workload types divided into three separate OUs: Infrastructure, Sandbox, and Workload, as shown in Figure 3. A best practice would be to tailor your SCPs to each specific OU type. Your security organization wouldn’t want to allow private workloads to be reachable from the internet. However, workloads that serve your external customers would require external network connectivity. To support innovation and experimentation, you can establish a Sandbox OU that has fewer policy restrictions but might limit connectivity back to your corporate data center.
For additional information on how to organize your OUs, see Recommended OUs.
Figure 3: Example organization showing different workloads
4. Combine policies together
Similar to AWS Identity and Access Management (IAM) policies, you can have multiple statements within a service control policy. You can combine statements in a single policy to avoid hitting the quota limit of five policies per account, OU, or root. An AWS full access policy is attached by default when you enable SCPs on an organization. You can combine the full access policy with additional controls and combine statements, as shown in the following example policy. Each SCP that you apply can have a policy size of 5,120 bytes. When combining statements, make sure that the resultant statement doesn’t alter your original intent. You can combine the Action elements in an SCP if the policy has the same values for Effect, Resource, and Condition.
One difference between IAM policies and SCPs is that whitespace counts against the size quota in SCPs. Compacting related actions in a policy can help you shorten the policy. Following are four methods to compact your policy:
Remove whitespace. If you use the AWS Management Console, whitespace is automatically removed. However, if you don’t want to manually update policies by using the console every time, you can incorporate a script that removes the whitespace. (Method four later in this list provides an example of this type of script.)
Use wildcards and prefixes to combine multiple actions. For example, the following policy denies access to disable configuration in AWS Security Hub.
Important: When you combine actions together as in this example, be aware that there could be a potential impact if new actions are released in the future that start with the Disable keyword, because these actions will be covered by the wildcard and denied.
SCPs can be configured to work as either deny lists or allow lists. For additional details on allow lists and deny lists, see Strategies for using SCPs. We recommend that you use deny lists where possible, because they are more flexible and can help simplify your policies, which will result in less maintenance. To expand on this strategy, deny statements support conditions (as shown in the following example), and for specific resources to be specified. For example, when AWS adds a new service, you don’t have to go back and update your policy if you’ve used a deny statement. To support this, AWS Organizations attaches an AWS managed SCP named FullAWSAccess to every root and OU when it’s created. This policy allows all services and actions. Additionally, deny statements coupled with NotAction statements can help you write shorter policies.
Consider the following scenario: Your security organization requires that application teams use specific AWS Regions. The recommended approach is to create a deny list that blocks everything except what is in the NotAction block. Following is an example where the SCP denies any operation outside of specified Regions that your organization has authorized for use.
Note: The list includes AWS global services that cannot be allowlisted based on a Region.
Shorten the Sid value in your policy: The Sid (statement ID) is an optional identifier that you provide for the policy statement. Remove it completely from your policy if it serves no purpose for you. We also have customers who find it effective to maintain a list of SID values and details on corresponding policies in an index file locally.
The following sample Python code can compress a provided policy by removing whitespace and Sid values.
You can export the compressed policy in the file named Compressed_Policy.json or show the output on the terminal by removing # from the following code.
import json
def compress_json(policy):
    statement = policy["Statement"]
    if not isinstance(statement, list):
        statement = [statement]
    for s in statement:
        s.pop("Sid", None)

    # json.dumps removes whitespace around separators in a JSON and converts it to a JSON formatted string.
    # To get the most compact representation, specify separators=(item_separator, key_separator)
    policy_without_whitespace = json.dumps(policy, separators=(',', ':'))

    return policy_without_whitespace

if __name__ == '__main__':
  path = input("Enter the path to policy file like: \n  /Users/swara/Desktop/policy.json or ./policy.json  \n >  ")
  with open(path) as f:
    policy = json.load(f)

original_len = len(str(policy))
mini_policy = compress_json(policy)
#To print the output on the screen
print(mini_policy)
compressed_len = len(str(mini_policy))
print("\n \t original length: {} -> compressed length: {} \n".format(original_len, compressed_len))
#To write output to a file named Compressed_Policy.json
with open("Compressed_Policy.json", "w") as Output_file:
     print(mini_policy, file=Output_file)
Example output on screen:
{"Version":"2012-10-17","Statement":[{"Action":["iam:AttachRolePolicy","iam:DeleteRole","iam:DeleteRolePermissionsBoundary","iam:DeleteRolePolicy","iam:DetachRolePolicy","iam:PutRolePermissionsBoundary","iam:PutRolePolicy","iam:UpdateAssumeRolePolicy","iam:UpdateRole","iam:UpdateRoleDescription"],"Resource":["arn:aws:iam::*:role/role-to-deny"],"Effect":"Deny"}]}

original length: 433 -> compressed length: 364
To download the sample python code and the example policy shown above, download the files compress-policy.py and policy.json.
Conclusion
In this post, we walked you through different techniques that you can use to get more out of service control policies in a multi-account environment. By using these techniques, you can establish a well-considered strategy for how your organization can adopt SCPs in a multi-account environment. You also learned about how SCPs fit into the overall policy landscape for AWS. SCPs are a powerful tool to help customers establish guardrails. As you evaluate your IAM strategy, consider what you’re trying to achieve. If you’re trying to establish broad guardrails for multiple accounts, then we suggest looking at SCPs first.
If you have feedback about this post, submit comments in the Comments section below. If you have questions about this post, contact AWS Support.
Want more AWS Security news? Follow us on Twitter.
Register now with discount code SALUZwmdkJJ to get $150 off your full conference pass to AWS re:Inforce. For a limited time only and while supplies last.
Today we want to tell you about some of the engaging data protection and privacy sessions planned for AWS re:Inforce. AWS re:Inforce is a learning conference where you can learn more about on security, compliance, identity, and privacy. When you attend the event, you have access to hundreds of technical and business sessions, an AWS Partner expo hall, a keynote speech from AWS Security leaders, and more. AWS re:Inforce 2022 will take place in-person in Boston, MA on July 26 and 27. re:Inforce 2022 features content in the following five areas:
Data protection and privacy
Governance, risk, and compliance
Identity and access management
Network and infrastructure security
Threat detection and incident response
This post will highlight of some of the data protection and privacy offerings that you can sign up for, including breakout sessions, chalk talks, builders’ sessions, and workshops. For the full catalog of all tracks, see the AWS re:Inforce session preview.
Breakout sessions
Lecture-style presentations that cover topics at all levels and delivered by AWS experts, builders, customers, and partners. Breakout sessions typically include 10–15 minutes of Q&A at the end.
DPP 101: Building privacy compliance on AWS In this session, learn where technology meets governance with an emphasis on building. With the privacy regulation landscape continuously changing, organizations need innovative technical solutions to help solve privacy compliance challenges. This session covers three unique customer use cases and explores privacy management, technology maturity, and how AWS services can address specific concerns. The studies presented help identify where you are in the privacy journey, provide actions you can take, and illustrate ways you can work towards privacy compliance optimization on AWS.
DPP201: Meta’s secure-by-design approach to supporting AWS applications Meta manages a globally distributed data center infrastructure with a growing number of AWS Cloud applications. With all applications, Meta starts by understanding data security and privacy requirements alongside application use cases. This session covers the secure-by-design approach for AWS applications that helps Meta put automated safeguards before deploying applications. Learn how Meta handles account lifecycle management through provisioning, maintaining, and closing accounts. The session also details Meta’s global monitoring and alerting systems that use AWS technologies such as Amazon GuardDuty, AWS Config, and Amazon Macie to provide monitoring, access-anomaly detection, and vulnerable-configuration detection.
DPP202: Uplifting AWS service API data protection to TLS 1.2+ AWS is constantly raising the bar to ensure customers use the most modern Transport Layer Security (TLS) encryption protocols, which meet regulatory and security standards. In this session, learn how AWS can help you easily identify if you have any applications using older TLS versions. Hear tips and best practices for using AWS CloudTrail Lake to detect the use of outdated TLS protocols, and learn how to update your applications to use only modern versions. Get guidance, including a demo, on building metrics and alarms to help monitor TLS use.
DPP203: Secure code and data in use with AWS confidential compute capabilities At AWS, confidential computing is defined as the use of specialized hardware and associated firmware to protect in-use customer code and data from unauthorized access. In this session, dive into the hardware- and software-based solutions AWS delivers to provide a secure environment for customer organizations. With confidential compute capabilities such as the AWS Nitro System, AWS Nitro Enclaves, and NitroTPM, AWS offers protection for customer code and sensitive data such as personally identifiable information, intellectual property, and financial and healthcare data. Securing data allows for use cases such as multi-party computation, blockchain, machine learning, cryptocurrency, secure wallet applications, and banking transactions.
Builders’ sessions
Small-group sessions led by an AWS expert who guides you as you build the service or product on your own laptop. Use your laptop to experiment and build along with the AWS expert.
DPP251: Disaster recovery and resiliency for AWS data protection services Mitigating unknown risks means planning for any situation. To help achieve this, you must architect for resiliency. Disaster recovery (DR) is an important part of your resiliency strategy and concerns how your workload responds when a disaster strikes. To this end, many organizations are adopting architectures that function across multiple AWS Regions as a DR strategy. In this builders’ session, learn how to implement resiliency with AWS data protection services. Attend this session to gain hands-on experience with the implementation of multi-Region architectures for critical AWS security services.
DPP351: Implement advanced access control mechanisms using AWS KMS Join this builders’ session to learn how to implement access control mechanisms in AWS Key Management Service (AWS KMS) and enforce fine-grained permissions on sensitive data and resources at scale. Define AWS KMS key policies, use attribute-based access control (ABAC), and discover advanced techniques such as grants and encryption context to solve challenges in real-world use cases. This builders’ session is aimed at security engineers, security architects, and anyone responsible for implementing security controls such as segregating duties between encryption key owners, users, and AWS services or delegating access to different principals using different policies.
DPP352: TLS offload and containerized applications with AWS CloudHSM With AWS CloudHSM, you can manage your own encryption keys using FIPS 140-2 Level 3 validated HSMs. This builders’ session covers two common scenarios for CloudHSM: TLS offload using NGINX and OpenSSL Dynamic agent and a containerized application that uses PKCS#11 to perform crypto operations. Learn about scaling containerized applications, discover how metrics and logging can help you improve the observability of your CloudHSM-based applications, and review audit records that you can use to assess compliance requirements.
DPP353: How to implement hybrid public key infrastructure (PKI) on AWS As organizations migrate workloads to AWS, they may be running a combination of on-premises and cloud infrastructure. When certificates are issued to this infrastructure, having a common root of trust to the certificate hierarchy allows for consistency and interoperability of the public key infrastructure (PKI) solution. In this builders’ session, learn how to deploy a PKI that allows such capabilities in a hybrid environment. This solution uses Windows Certificate Authority (CA) and ACM Private CA to distribute and manage x.509 certificates for Active Directory users, domain controllers, network components, mobile, and AWS services, including Amazon API Gateway, Amazon CloudFront, and Elastic Load Balancing.
Chalk talks
Highly interactive sessions with a small audience. Experts lead you through problems and solutions on a digital whiteboard as the discussion unfolds.
DPP231: Protecting healthcare data on AWS Achieving strong privacy protection through technology is key to protecting patient. Privacy protection is fundamental for healthcare compliance and is an ongoing process that demands legal, regulatory, and professional standards are continually met. In this chalk talk, learn about data protection, privacy, and how AWS maintains a standards-based risk management program so that the HIPAA-eligible services can specifically support HIPAA administrative, technical, and physical safeguards. Also consider how organizations can use these services to protect healthcare data on AWS in accordance with the shared responsibility model.
DPP232: Protecting business-critical data with AWS migration and storage services Business-critical applications that were once considered too sensitive to move off premises are now moving to the cloud with an extension of the security perimeter. Join this chalk talk to learn about securely shifting these mature applications to cloud services with the AWS Transfer Family and helping to secure data in Amazon Elastic File System (Amazon EFS), Amazon FSx, and Amazon Elastic Block Storage (Amazon EBS). Also learn about tools for ongoing protection as part of the shared responsibility model.
DPP331: Best practices for cutting AWS KMS costs using Amazon S3 bucket keys Learn how AWS customers are using Amazon S3 bucket keys to cut their AWS Key Management Service (AWS KMS) request costs by up to 99 percent. In this chalk talk, hear about the best practices for exploring your AWS KMS costs, identifying suitable buckets to enable bucket keys, and providing mechanisms to apply bucket key benefits to existing objects.
DPP332: How to securely enable third-party access In this chalk talk, learn about ways you can securely enable third-party access to your AWS account. Learn why you should consider using services such as Amazon GuardDuty, AWS Security Hub, AWS Config, and others to improve auditing, alerting, and access control mechanisms. Hardening an account before permitting external access can help reduce security risk and improve the governance of your resources.
Workshops
Interactive learning sessions where you work in small teams to solve problems using AWS Cloud security services. Come prepared with your laptop and a willingness to learn!
DPP271: Isolating and processing sensitive data with AWS Nitro Enclaves Join this hands-on workshop to learn how to isolate highly sensitive data from your own users, applications, and third-party libraries on your Amazon EC2 instances using AWS Nitro Enclaves. Explore Nitro Enclaves, discuss common use cases, and build and run an enclave. This workshop covers enclave isolation, cryptographic attestation, enclave image files, building a local vsock communication channel, debugging common scenarios, and the enclave lifecycle.
DPP272: Data discovery and classification with Amazon Macie This workshop familiarizes you with Amazon Macie and how to scan and classify data in your Amazon S3 buckets. Work with Macie (data classification) and AWS Security Hub (centralized security view) to view and understand how data in your environment is stored and to understand any changes in Amazon S3 bucket policies that may negatively affect your security posture. Learn how to create a custom data identifier, plus how to create and scope data discovery and classification jobs in Macie.
DPP273: Architecting for privacy on AWS In this workshop, follow a regulatory-agnostic approach to build and configure privacy-preserving architectural patterns on AWS including user consent management, data minimization, and cross-border data flows. Explore various services and tools for preserving privacy and protecting data.
DPP371: Building and operating a certificate authority on AWS In this workshop, learn how to securely set up a complete CA hierarchy using AWS Certificate Manager Private Certificate Authority and create certificates for various use cases. These use cases include internal applications that terminate TLS, code signing, document signing, IoT device authentication, and email authenticity verification. The workshop covers job functions such as CA administrators, application developers, and security administrators and shows you how these personas can follow the principal of least privilege to perform various functions associated with certificate management. Also learn how to monitor your public key infrastructure using AWS Security Hub.
If any of these sessions look interesting to you, consider joining us in Boston by registering for re:Inforce 2022. We look forward to seeing you there!
In this blog post, we will walk you through a scenario and explain when you should use which policy type, and who should own and manage the policy. You will learn when to use the more common policy types: identity-based policies, resource-based policies, permissions boundaries, and AWS Organizations service control policies (SCPs).
Different policy types and when to use them
AWS has different policy types that provide you with powerful flexibility, and it’s important to know how and when to use each policy type. It’s also important for you to understand how to structure your IAM policy ownership to avoid a centralized team from becoming a bottleneck. Explicit policy ownership can allow your teams to move more quickly, while staying within the secure guardrails that are defined centrally.
Service control policies overview
Service control policies (SCPs) are a feature of AWS Organizations. AWS Organizations is a service for grouping and centrally managing the AWS accounts that your business owns. SCPs are policies that specify the maximum permissions for an organization, organizational unit (OU), or an individual account. An SCP can limit permissions for principals in member accounts, including the AWS account root user.
Permissions boundaries are an advanced IAM feature in which you set the maximum permissions that an identity-based policy can grant to an IAM principal. When you set a permissions boundary for a principal, the principal can perform only the actions that are allowed by both its identity-based policies and its permissions boundaries.
A permissions boundary is a type of identity-based policy that doesn’t directly grant access. Instead, like an SCP, a permissions boundary acts as a guardrail for your IAM principals that allows you to set coarse-grained access controls. A permissions boundary is typically used to delegate the creation of IAM principals. Delegation enables other individuals in your accounts to create new IAM principals, but limits the permissions that can be granted to the new IAM principals.
Identity-based policies overview
Identity-based policies are policy documents that you attach to a principal (roles, users, and groups of users) to control what actions a principal can perform, on which resources, and under what conditions. Identity-based policies can be further categorized into AWS managed policies, customer managed policies, and inline policies. AWS managed policies are reusable identity-based policies that are created and managed by AWS. You can use AWS managed policies as a starting point for building your own identity-based policies that are specific to your organization. Customer managed policies are reusable identity-based policies that can be attached to multiple identities. Customer managed policies are useful when you have multiple principals with identical access requirements. Inline policies are identity-based policies that are attached to a single principal. Use inline-policies when you want to create least-privilege permissions that are specific to a particular principal.
You will have many identity-based policies in your AWS account that are used to enable access in scenarios such as human access, application access, machine learning workloads, and deployment pipelines. These policies should be fine-grained. You use these policies to directly apply least privilege permissions to your IAM principals. You should write the policies with permissions for the specific task that the principal needs to accomplish.
Resource-based policies overview
Resource-based policies are policy documents that you attach to a resource such as an S3 bucket. These policies grant the specified principal permission to perform specific actions on that resource and define under what conditions this permission applies. Resource-based policies are inline policies. For a list of AWS services that support resource-based policies, see AWS services that work with IAM.
Resource-based policies are optional for many workloads that don’t span multiple AWS accounts. Fine-grained access within a single AWS account is typically granted with identity-based policies. AWS Key Management Service (AWS KMS)keys and IAM role trust policies are two exceptions, and both of these resources must have a resource-based policy even when the principal and the KMS key or IAM role are in the same account. IAM roles and KMS keys behave this way as an extra layer of protection that requires the owner of the resource (key or role) to explicitly allow or deny principals from using the resource. For other resources that support resource-based policies, here are some use cases where they are most commonly used:
Applying an additional layer of protection for resources that store sensitive data, such as AWS Secrets Manager secrets or an S3 bucket with sensitive data. You can use a resource-based policy to deny access to IAM principals that shouldn’t have access to sensitive data, even if granted access by an identity-based policy. An explicit deny in an IAM policy always overrides an allow.
How to implement different policy types
In this section, we will walk you through an example of a design that includes all four of the policy types explained in this post.
The example that follows shows an application that runs on an Amazon Elastic Compute Cloud (Amazon EC2) instance and needs to read from and write files to an S3 bucket in the same account. The application also reads (but doesn’t write) files from an S3 bucket in a different account. The company in this example, Example Corp, uses a multi-account strategy, and each application has its own AWS account. The architecture of the application is shown in Figure 1.
Figure 1: Sample application architecture that needs to access S3 buckets in two different AWS accounts
There are three teams that participate in this example: the Central Cloud Team, the Application Team, and the Data Lake Team. The Central Cloud Team is responsible for the overall security and governance of the AWS environment across all AWS accounts at Example Corp. The Application Team is responsible for building, deploying, and running their application within the application account (111111111111) that they own and manage. Likewise, the Data Lake Team owns and manages the data lake account (222222222222) that hosts a data lake at Example Corp.
With that background in mind, we will walk you through an implementation for each of the four policy types and include an explanation of which team we recommend own each policy. The policy owner is the team that is responsible for creating and maintaining the policy.
Service control policies
The Central Cloud Team owns the implementation of the security controls that should apply broadly to all of Example Corp’s AWS accounts. At Example Corp, the Central Cloud Team has two security requirements that they want to apply to all accounts in their organization:
All AWS API calls must be encrypted in transit.
Accounts can’t leave the organization on their own.
The Central Cloud Team chooses to implement these security invariants using SCPs and applies the SCPs to the root of the organization. The first statement in Policy 1 denies all requests that are not sent using SSL (TLS). The second statement in Policy 1 prevents an account from leaving the organization.
This is only a subset of the SCP statements that Example Corp uses. Example Corp uses a deny list strategy, and there must also be an accompanying statement with an Effect of Allow at every level of the organization that isn’t shown in the SCP in Policy 1.
Policy 1: SCP attached to AWS Organizations organization root
The Central Cloud Team wants to make sure that they don’t become a bottleneck for the Application Team. They want to allow the Application Team to deploy their own IAM principals and policies for their applications. The Central Cloud Team also wants to make sure that any principals created by the Application Team can only use AWS APIs that the Central Cloud Team has approved.
At Example Corp, the Application Team deploys to their production AWS environment through a continuous integration/continuous deployment (CI/CD) pipeline. The pipeline itself has broad access to create AWS resources needed to run applications, including permissions to create additional IAM roles. The Central Cloud Team implements a control that requires that all IAM roles created by the pipeline must have a permissions boundary attached. This allows the pipeline to create additional IAM roles, but limits the permissions that the newly created roles can have to what is allowed by the permissions boundary. This delegation strikes a balance for the Central Cloud Team. They can avoid becoming a bottleneck to the Application Team by allowing the Application Team to create their own IAM roles and policies, while ensuring that those IAM roles and policies are not overly privileged.
An example of the permissions boundary policy that the Central Cloud Team attaches to IAM roles created by the CI/CD pipeline is shown below. This same permissions boundary policy can be centrally managed and attached to IAM roles created by other pipelines at Example Corp. The policy describes the maximum possible permissions that additional roles created by the Application Team are allowed to have, and it limits those permissions to some Amazon S3 and Amazon Simple Queue Service (Amazon SQS) data access actions. It’s common for a permissions boundary policy to include data access actions when used to delegate role creation. This is because most applications only need permissions to read and write data (for example, writing an object to an S3 bucket or reading a message from an SQS queue) and only sometimes need permission to modify infrastructure (for example, creating an S3 bucket or deleting an SQS queue). As Example Corp adopts additional AWS services, the Central Cloud Team updates this permissions boundary with actions from those services.
Policy 2: Permissions boundary policy attached to IAM roles created by the CI/CD pipeline
In the next section, you will learn how to enforce that this permissions boundary is attached to IAM roles created by your CI/CD pipeline.
Identity-based policies
In this example, teams at Example Corp are only allowed to modify the production AWS environment through their CI/CD pipeline. Write access to the production environment is not allowed otherwise. To support the different personas that need to have access to an application account in Example Corp, three baseline IAM roles with identity-based policies are created in the application accounts:
A role for the CI/CD pipeline to use to deploy application resources.
A read-only role for the Central Cloud Team, with a process for temporary elevated access.
A read-only role for members of the Application Team.
All three of these baseline roles are owned, managed, and deployed by the Central Cloud Team.
The Central Cloud Team is given a default read-only role (CentralCloudTeamReadonlyRole) that allows read access to all resources within the account. This is accomplished by attaching the AWS managed ReadOnlyAccess policy to the Central Cloud Team role. You can use the IAM console to attach the ReadOnlyAccess policy, which grants read-only access to all services. When a member of the team needs to perform an action that is not covered by this policy, they follow a temporary elevated access process to make sure that this access is valid and recorded.
A read-only role is also given to developers in the Application Team (DeveloperReadOnlyRole) for analysis and troubleshooting. At Example Corp, developers are allowed to have read-only access to Amazon EC2, Amazon S3, Amazon SQS, AWS CloudFormation, and Amazon CloudWatch. Your requirements for read-only access might differ. Several AWS services offer their own read-only managed policies, and there is also the previously mentioned AWS managed ReadOnlyAccess policy that grants read only access to all services. To customize read-only access in an identity-based policy, you can use the AWS managed policies as a starting point and limit the actions to the services that your organization uses. The customized identity-based policy for Example Corp’s DeveloperReadOnlyRole role is shown below.
Policy 3: Identity-based policy attached to a developer read-only role to support human access and troubleshooting
The CI/CD pipeline role has broad access to the account to create resources. Access to deploy through the CI/CD pipeline should be tightly controlled and monitored. The CI/CD pipeline is allowed to create new IAM roles for use with the application, but those roles are limited to only the actions allowed by the previously discussed permissions boundary. The roles, policies, and EC2 instance profiles that the pipeline creates should also be restricted to specific role paths. This enables you to enforce that the pipeline can only modify roles and policies or pass roles that it has created. This helps prevent the pipeline, and roles created by the pipeline, from elevating privileges by modifying or passing a more privileged role. Pay careful attention to the role and policy paths in the Resource element of the following CI/CD pipeline role policy (Policy 4). The CI/CD pipeline role policy also provides some example statements that allow the passing and creation of a limited set of service-linked roles (which are created in the path /aws-service-role/). You can add other service-linked roles to these statements as your organization adopts additional AWS services.
Policy 4: Identity-based policy attached to CI/CD pipeline role
In addition to the three baseline roles with identity-based policies in place that you’ve seen so far, there’s one additional IAM role that the Application Team creates using the CI/CD pipeline. This is the role that the application running on the EC2 instance will use to get and put objects from the S3 buckets in Figure 1. Explicit ownership allows the Application Team to create this identity-based policy that fits their needs without having to wait and depend on the Central Cloud Team. Because the CI/CD pipeline can only create roles that have the permissions boundary policy attached, Policy 5 cannot grant more access than the permissions boundary policy allows (Policy 2).
If you compare the identity-based policy attached to the EC2 instance’s role (Policy 5 on left) with the permissions boundary policy described previously (Policy 2 on the right), you can see that the actions allowed by the EC2 instance’s role are also allowed by the permissions boundary policy. Actions must be allowed by both policies for the EC2 instance to perform the s3:GetObject and s3:PutObject actions. Access to create a bucket would be denied even if the role attached to the EC2 instance was given permission to perform the s3:CreateBucket action because the s3:CreateBucket action exceeds the permissions allowed by the permissions boundary.
Policy 5: Identity-based policy bound by permissions boundary and attached to the application’s EC2 instance
The only resource-based policy needed in this example is attached to the bucket in the account external to the application account (DOC-EXAMPLE-BUCKET2 in the data lake account in Figure 1). Both the identity-based policy and resource-based policy must grant access to an action on the S3 bucket for access to be allowed in a cross-account scenario. The bucket policy below only allows the GetObject action to be performed on the bucket, regardless of what permissions the application’s role (ApplicationRole) is granted from its identity-based policy (Policy 5).
This resource-based policy is owned by the Data Lake Team that owns and manages the data lake account (222222222222) and the policy (Policy 6). This allows the Data Lake Team to have complete control over what teams external to their AWS account can access their S3 bucket.
Policy 6: Resource-based policy attached to S3 bucket in external data lake account (222222222222)
No resource-based policy is needed on the S3 bucket in the application account (DOC-EXAMPLE-BUCKET1 in Figure 1). Access for the application is granted to the S3 bucket in the application account by the identity-based policy on its own. Access can be granted by either an identity-based policy or a resource-based policy when access is within the same AWS account.
Putting it all together
Figure 2 shows the architecture and includes the seven different policies and the resources they are attached to. The table that follows summarizes the various IAM policies that are deployed to the Example Corp AWS environment, and specifies what team is responsible for each of the policies.
Figure 2: Sample application architecture with CI/CD pipeline used to deploy infrastructure
The numbered policies in Figure 2 correspond to the policy numbers in the following table.
Policy number
Policy description
Policy type
Policy owner
Attached to
1
Enforce SSL and prevent member accounts from leaving the organization for all principals in the organization
Service control policy (SCP)
Central Cloud Team
Organization root
2
Restrict maximum permissions for roles created by CI/CD pipeline
Permissions boundary
Central Cloud Team
All roles created by the pipeline (ApplicationRole)
3
Scoped read-only policy
Identity-based policy
Central Cloud Team
DeveloperReadOnlyRole IAM role
4
CI/CD pipeline policy
Identity-based policy
Central Cloud Team
CICDPipelineRole IAM role
5
Policy used by running application to read and write to S3 buckets
Identity-based policy
Application Team
ApplicationRole on EC2 instance
6
Bucket policy in data lake account that grants access to a role in application account
Resource-based policy
Data Lake Team
S3 Bucket in data lake account
7
Broad read-only policy
Identity-based policy
Central Cloud Team
CentralCloudTeamReadonlyRole IAM role
Conclusion
In this blog post, you learned about four different policy types: identity-based policies, resource-based policies, service control policies (SCPs), and permissions boundary policies. You saw examples of situations where each policy type is commonly applied. Then, you walked through a real-life example that describes an implementation that uses these policy types.
You can use this blog post as a starting point for developing your organization’s IAM strategy. You might decide that you don’t need all of the policy types explained in this post, and that’s OK. Not every organization needs to use every policy type. You might need to implement policies differently in a production environment than a sandbox environment. The important concepts to take away from this post are the situations where each policy type is applicable, and the importance of explicit policy ownership. We also recommend taking advantage of policy validation in AWS IAM Access Analyzer when writing IAM policies to validate your policies against IAM policy grammar and best practices.
For more information, including the policies described in this solution and the sample application, see the how-and-when-to-use-aws-iam-policy-blog-samples GitHub respository. The repository walks through an example implementation using a CI/CD pipeline with AWS CodePipeline.
It’s critical for your enterprise to understand where sensitive data is stored in your organization and how and why it is shared. The ability to efficiently find data that is shared with entities outside your account and the contents of that data is paramount. You need a process to quickly detect and report which accounts have access to sensitive data. Amazon Macie is an AWS service that can detect many sensitive data types. Macie is a fully managed data security and data privacy service that uses machine learning and pattern matching to discover and help protect your sensitive data in AWS.
AWS Identity and Access Management (IAM)Access Analyzer helps to identify resources in your organization and accounts, such as S3 buckets or IAM roles, that are shared with an external entity. When you enable IAM Access Analyzer, you create an analyzer for your entire organization or your account. The organization or account you choose is known as the zone of trust for the analyzer. The analyzer monitors the supported resources within your zone of trust. This analyzer enables IAM Access Analyzer to detect each instance of a resource shared outside the zone of trust and generates a finding about the resource and the external principals that have access to it.
Currently, you can use IAM Access Analyzer and Macie to detect external access and discover sensitive data as separate processes. You can join the findings from both to best evaluate the risk. The solution in this post integrates IAM Access Analyzer, Macie, and AWS Security Hub to automate the process of correlating findings between the services and presenting them in Security Hub.
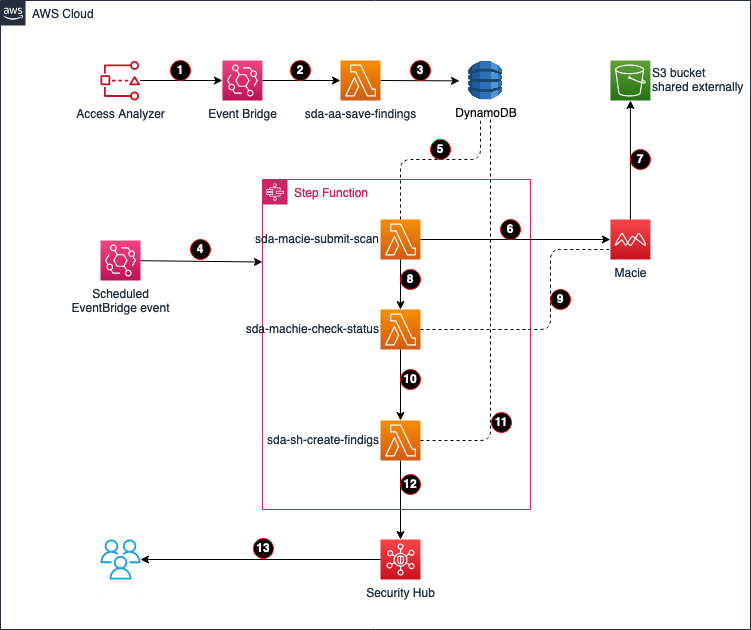
How does the solution work?
First, IAM Access Analyzer discovers S3 buckets that are shared outside the zone of trust. Next, the solution schedules a Macie sensitive data discovery job for each of these buckets to determine if the bucket contains sensitive data. Upon discovery of shared sensitive data in S3, a custom high severity finding is created in Security Hub for review and incident response.
Solution architecture
This solution is based on a serverless architecture, and uses the following services:
IAM Access Analyzer detects shared S3 buckets outside of the zone of trust—the organization or account you choose is known as a zone of trust for the analyzer—and creates the event Access Analyzer Finding in EventBridge.
EventBridge triggers the Lambda function sda-aa-save-findings.
The sda-aa-save-findings function records each finding in DynamoDB.
An EventBridge scheduled event periodically starts a new cycle of the Step Function state machine, which immediately runs the Lambda function sda-macie-submit-scan. The template sets a 15-minute interval, but this is configurable.
The sda-macie-submit-scan function reads the IAM Access Analyzer findings that were created by sda-aa-save-findings from DynamoDB.
sda-macie-submit-scan launches a Macie classification job for each distinct S3 bucket that is related to one or more recent IAM Access Analyzer findings.
Macie performs a sensitive discovery scan on each requested S3 bucket.
The sda-macie-submit-scan function initiates the Lambda function sda-macie-check-status.
sda-macie-check-status periodically checks the status of each Macie classification job, waiting for all the Macie jobs initiated by this solution to complete.
Upon completion of the sda-macie-check-status function, the step function runs the Lambda function sda-sh-create-findings.
sda-sh-create-findings joins the resulting IAM Access Analyzer and Macie datasets for each S3 bucket.
sda-sh-create-findings publishes a finding to Security Hub for each bucket that has both external access and sensitive data.
Note: The Macie scan is skipped if the S3 bucket is tagged to be excluded or if it was recently scanned by Macie. See the Cost considerations section for more information on custom configurations.
Information security can review and act on the findings shown in Security Hub.
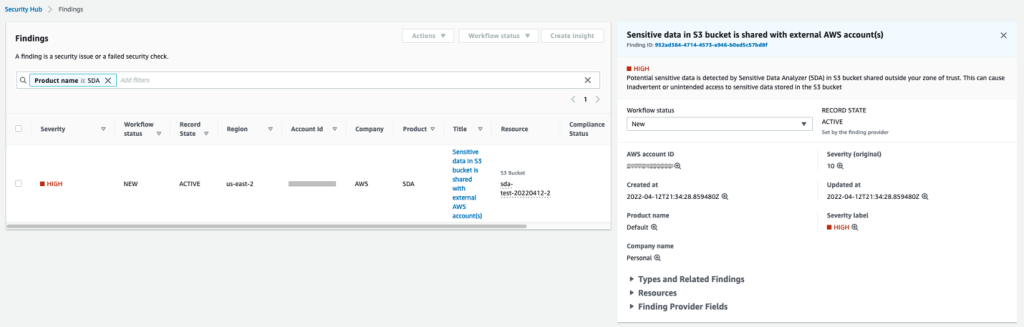
Sample Security Hub output
Figure 2 shows the sample findings that Security Hub will present. Each finding includes:
Severity
Workflow status
Record state
Company
Product
Title
Resource
Figure 2: Sample Security Hub findings
The output to Security Hub will display a severity of HIGH with workflow NEW, because this is the first time the event has been observed. The record state is ACTIVE because the workflow state is NEW. The title explains the reason for the event.
For example, if potentially sensitive data is discovered in a bucket that is shared outside a zone of trust, selecting an event will display the resources involved in the finding so you can investigate. For more information, see the Security Hub User Guide.
Notes:
Detection of public S3 buckets by IAM Access Analyzer will still occur through Security Hub and will be marked as critical severity. This solution does not add to or augment this finding in Security Hub.
If a finding in IAM Access Analyzer is archived, the solution does not update the related finding in Security Hub.
The Application code location, S3 Bucket and S3 Key fields will be pre-filled.
Under Service Activations, modify the activations based on the services you presently have running in your account.
Modify the Logging and Monitoring settings if required.
(Optional) Set an alert email address for errors.
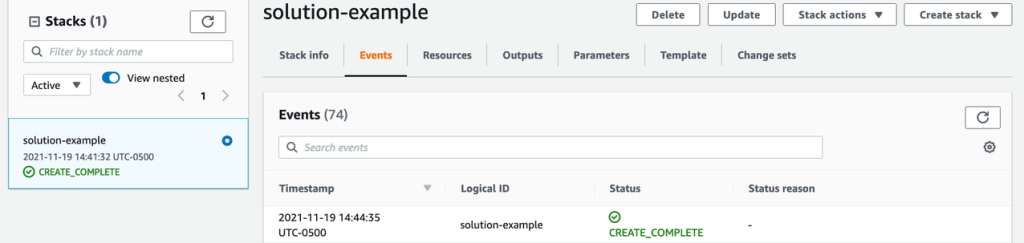
Choose Next, then choose Next again.
Under Capabilities, select the check box.
Choose Create Stack. The solution will begin deploying; watch for the CREATE_COMPLETE message.
Figure 3: Sample CloudFormation deployment status
The solution is now deployed and will start monitoring for sensitive data that is being shared. It will send the findings to Security Hub for your teams to investigate.
Cost considerations
When you scan large S3 buckets with sensitive data, remember that Macie cost is based on the amount of data scanned. For more information on Macie costs, see Amazon Macie pricing.
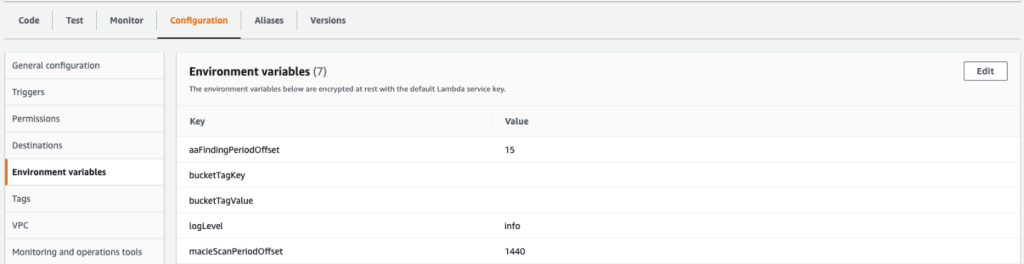
This solution allows the following options, which you can use to help manage costs:
Use environment variables in Lambda to skip specific tagged buckets
Skip recently scanned S3 buckets and reuse prior findings
Figure 4: Screen shot of configurable environment variable
Conclusion
In this post, we discussed how the solution uses Lambda, Step Functions and EventBridge to integrate IAM Access Analyzer with Macie discovery jobs. We reviewed the components of the application, deployed it by using CloudFormation, and reviewed the output a security team would use to take the appropriate actions. We also provided two ways that you can manage the costs associated with the solution.
After you deploy this project, you can modify it to meet your organization’s needs. For example, you can modify the tags to skip specific S3 buckets your organization has already classified to hold sensitive data. Customers who use multiple AWS accounts can designate a centralized Security Hub administrator account to receive the solution alerts from each member account. For more information on this option, see Designating a Security Hub administrator account.
If you have feedback about this post, please submit it in the Comments section below. If you have questions about this post, please start a new thread on the AWS Identity and Access Management forum.
Other resources
For more information on correlating security findings with AWS Security Hub and Amazon EventBridge, refer to this blog post.
Want more AWS Security news? Follow us on Twitter.
Amazon Web Services (AWS) has published an updated version of the AWS Cloud Security Alliance (CSA) Consensus Assessment Initiative Questionnaire (CAIQ). The questionnaire has been completed using the current CSA CAIQ standard, v4.0.2 (06.07.2021 update), and is now available for download.
The CSA is a not-for-profit organization dedicated to “defining and raising awareness of best practices to help ensure a secure cloud computing environment.” For more information, see the Cloud Security Alliance website. A wide range of industry security practitioners, corporations, and associations participate in CSA.
What is CSA CAIQ and how can you use it?
The CSA Consensus Assessments Initiative Questionnaire provides a set of questions that CSA anticipates a cloud consumer or a cloud auditor would ask of a cloud provider. The AWS CSA CAIQ provides the AWS control implementation descriptions for a series of cloud-specific security questions based on the Cloud Controls Matrix (CCM). The AWS CSA CAIQ also reflects the AWS customer responsibilities according to the shared responsibility model, which can help customers comply with the CSA CCM.
At AWS, we’re committed to helping you achieve and maintain the highest standards of security and compliance. We value your feedback and questions. You can contact the AWS HITRUST team at AWS Compliance Contact Us. If you have feedback about this post, submit comments in the Comments section below.
If you have feedback about this post, submit comments in the Comments section below. If you have questions about this post, contact AWS Support.
Want more AWS Security news? Follow us on Twitter.
I’d like to personally invite you to attend the Amazon Web Services (AWS) security conference, AWS re:Inforce 2022, in Boston, MA on July 26–27. This event offers interactive educational content to address your security, compliance, privacy, and identity management needs. Join security experts, customers, leaders, and partners from around the world who are committed to the highest security standards, and learn how to improve your security posture.
As the new Chief Information Security Officer of AWS, my primary job is to help our customers navigate their security journey while keeping the AWS environment safe. AWS re:Inforce offers an opportunity for you to understand how to keep pace with innovation in your business while you stay secure. With recent headlines around security and data privacy, this is your chance to learn the tactical and strategic lessons that will help keep your systems and tools secure, while you build a culture of security in your organization.
AWS re:Inforce 2022 will kick off with my keynote on Tuesday, July 26. I’ll be joined by Steve Schmidt, now the Chief Security Officer (CSO) of Amazon, and Kurt Kufeld, VP of AWS Platform. You’ll hear us talk about the latest innovations in cloud security from AWS and learn what you can do to foster a culture of security in your business. Take a look at the most recent re:Invent presentation, Continuous security improvement: Strategies and tactics, and the latest re:Inforce keynote for examples of the type of content to expect.
For those who are just getting started on AWS, as well as our more tenured customers, AWS re:Inforce offers an opportunity to learn how to prioritize your security investments. By using the Security pillar of the AWS Well-Architected Framework, sessions address how you can build practical and prescriptive measures to protect your data, systems, and assets.
Sessions are offered at all levels and for all backgrounds, from business to technical, and there are learning opportunities in over 300 sessions across five tracks: Data Protection & Privacy; Governance, Risk & Compliance; Identity & Access Management; Network & Infrastructure Security; and Threat Detection & Incident Response. In these sessions, connect with and learn from AWS experts, customers, and partners who will share actionable insights that you can apply in your everyday work. At AWS re:Inforce, the majority of our sessions are interactive, such as workshops, chalk talks, boot camps, and gamified learning, which provides opportunities to hear about and act upon best practices. Sessions will be available from the intermediate (200) through expert (400) levels, so you can grow your skills no matter where you are in your career. Finally, there will be a leadership session for each track, where AWS leaders will share best practices and trends in each of these areas.
At re:Inforce, hear directly from AWS developers and experts, who will cover the latest advancements in AWS security, compliance, privacy, and identity solutions—including actionable insights your business can use right now. Plus, you’ll learn from AWS customers and partners who are using AWS services in innovative ways to protect their data, achieve security at scale, and stay ahead of bad actors in this rapidly evolving security landscape.
A full conference pass is $1,099. However, if you register today with the code ALUMkpxagvkV you’ll receive a $300 discount (while supplies last).
We’re excited to get back to re:Inforce in person; it is emblematic of our commitment to giving customers direct access to the latest security research and trends. We’ll continue to release additional details about the event on our website, and you can get real-time updates by following @AWSSecurityInfo. I look forward to seeing you in Boston, sharing a bit more about my new role as CISO and providing insight into how we prioritize security at AWS.
If you have feedback about this post, submit comments in the Comments section below. If you have questions about this post, contact AWS Support.
Want more AWS Security news? Follow us on Twitter.
Customers often ask for guidance on permissions boundaries in AWS Identity and Access Management (IAM) and when, where, and how to use them. A permissions boundary is an IAM feature that helps your centralized cloud IAM teams to safely empower your application developers to create new IAM roles and policies in Amazon Web Services (AWS). In this blog post, we cover this common use case for permissions boundaries, some best practices to consider, and a few things to avoid.
Background
Developers often need to create new IAM roles and policies for their applications because these applications need permissions to interact with AWS resources. For example, a developer will likely need to create an IAM role with the correct permissions for an Amazon Elastic Compute Cloud (Amazon EC2) instance to report logs and metrics to Amazon CloudWatch. Similarly, a role with accompanying permissions is required for an AWS Glue job to extract, transform, and load data to an Amazon Simple Storage Service (Amazon S3) bucket, or for an AWS Lambda function to perform actions on the data loaded to Amazon S3.
Before the launch of IAM permissions boundaries, central admin teams, such as identity and access management or cloud security teams, were often responsible for creating new roles and policies. But using a centralized team to create and manage all IAM roles and policies creates a bottleneck that doesn’t scale, especially as your organization grows and your centralized team receives an increasing number of requests to create and manage new downstream roles and policies. Imagine having teams of developers deploying or migrating hundreds of applications to the cloud—a centralized team won’t have the necessary context to manually create the permissions for each application themselves.
Because the use case and required permissions can vary significantly between applications and workloads, customers asked for a way to empower their developers to safely create and manage IAM roles and policies, while having security guardrails in place to set maximum permissions. IAM permissions boundaries are designed to provide these guardrails so that even if your developers created the most permissive policy that you can imagine, such broad permissions wouldn’t be functional.
By setting up permissions boundaries, you allow your developers to focus on tasks that add value to your business, while simultaneously freeing your centralized security and IAM teams to work on other critical tasks, such as governance and support. In the following sections, you will learn more about permissions boundaries and how to use them.
Permissions boundaries
A permissions boundary is designed to restrict permissions on IAM principals, such as roles, such that permissions don’t exceed what was originally intended. The permissions boundary uses an AWS or customer managed policy to restrict access, and it’s similar to other IAM policies you’re familiar with because it has resource, action, and effect statements. A permissions boundary alone doesn’t grant access to anything. Rather, it enforces a boundary that can’t be exceeded, even if broader permissions are granted by some other policy attached to the role. Permissions boundaries are a preventative guardrail, rather than something that detects and corrects an issue. To grant permissions, you use resource-based policies (such as S3 bucket policies) or identity-based policies (such as managed or in-line permissions policies).
The predominant use case for permissions boundaries is to limit privileges available to IAM roles created by developers (referred to as delegated administrators in the IAM documentation) who have permissions to create and manage these roles. Consider the example of a developer who creates an IAM role that can access all Amazon S3 buckets and Amazon DynamoDB tables in their accounts. If there are sensitive S3 buckets in these accounts, then these overly broad permissions might present a risk.
To limit access, the central administrator can attach a condition to the developer’s identity policy that helps ensure that the developer can only create a role if the role has a permissions boundary policy attached to it. The permissions boundary, which AWS enforces during authorization, defines the maximum permissions that the IAM role is allowed. The developer can still create IAM roles with permissions that are limited to specific use cases (for example, allowing specific actions on non-sensitive Amazon S3 buckets and DynamoDB tables), but the attached permissions boundary prevents access to sensitive AWS resources even if the developer includes these elevated permissions in the role’s IAM policy. Figure 1 illustrates this use of permissions boundaries.
Figure 1: Implementing permissions boundaries
The central IAM team adds a condition to the developer’s IAM policy that allows the developer to create a role only if a permissions boundary is attached to the role.
The developer creates a role with accompanying permissions to allow access to an application’s Amazon S3 bucket and DynamoDB table. As part of this step, the developer also attaches a permissions boundary that defines the maximum permissions for the role.
Resource access is granted to the application’s resources.
Resource access is denied to the sensitive S3 bucket.
You can use the following policy sample for your developers to allow the creation of roles only if a permissions boundary is attached to them. Make sure to replace <YourAccount_ID> with an appropriate AWS account ID; and the <DevelopersPermissionsBoundary>, with your permissions boundary policy.
Put together, you can use the following permissions policy for your developers to get started with permissions boundaries. This policy allows your developers to create downstream roles with an attached permissions boundary. The policy further denies permissions to detach, delete, or modify the attached permissions boundary policy. Remember, nothing is implicitly allowed in IAM, so you need to allow access permissions for any other actions that your developers require. To learn about allowing access permissions for various scenarios, see Example IAM identity-based policies in the documentation.
You can build on these concepts and apply permissions boundaries to different organizational structures and functional units. In the example shown in Figure 2, the developer can only create IAM roles if a permissions boundary associated to the business function is attached to the IAM roles. In the example, IAM roles in function A can only perform Amazon EC2 actions and Amazon DynamoDB actions, and they don’t have access to the Amazon S3 or Amazon Relational Database Service (Amazon RDS) resources of function B, which serve a different use case. In this way, you can make sure that roles created by your developers don’t exceed permissions outside of their business function requirements.
Figure 2: Implementing permissions boundaries in multiple organizational functions
Best practices
You might consider restricting your developers by directly applying permissions boundaries to them, but this presents the risk of you running out of policy space. Permissions boundaries use a managed IAM policy to restrict access, so permissions boundaries can only be up to 6,144 characters long. You can have up to 10 managed policies and 1 permissions boundary attached to an IAM role. Developers often need larger policy spaces because they perform so many functions. However, the individual roles that developers create—such as a role for an AWS service to access other AWS services, or a role for an application to interact with AWS resources—don’t need those same broad permissions. Therefore, it is generally a best practice to apply permissions boundaries to the IAM roles created by developers, rather than to the developers themselves.
There are better mechanisms to restrict developers, and we recommend that you use IAM identity policies and AWS Organizations service control policies (SCPs) to restrict access. In particular, the Organizations SCPs are a better solution here because they can restrict every principal in the account through one policy, rather than separately restricting individual principals, as permissions boundaries and IAM identity policies are confined to do.
You should also avoid replicating the developer policy space to a permissions boundary for a downstream IAM role. This, too, can cause you to run out of policy space. IAM roles that developers create have specific functions, and the permissions boundary can be tailored to common business functions to preserve policy space. Therefore, you can begin to group your permissions boundaries into categories that fit the scope of similar application functions or use cases (such as system automation and analytics), and allow your developers to choose from multiple options for permissions boundaries, as shown in the following policy sample.
Finally, it is important to understand the differences between the various IAM resources available. The following table lists these IAM resources, their primary use cases and managing entities, and when they apply. Even if your organization uses different titles to refer to the personas in the table, you should have separation of duties defined as part of your security strategy.
IAM resource
Purpose
Owner/maintainer
Applies to
Federated roles and policies
Grant permissions to federated users for experimentation in lower environments
Central team
People represented by users in the enterprise identity provider
IAM workload roles and policies
Grant permissions to resources used by applications, services
Developer
IAM roles representing specific tasks performed by applications
Permissions boundaries
Limit permissions available to workload roles and policies
Central team
Workload roles and policies created by developers
IAM users and policies
Allowed only by exception when there is no alternative that satisfies the use case
Central team plus senior leadership approval
Break-glass access; legacy workloads unable to use IAM roles
Conclusion
This blog post covered how you can use IAM permissions boundaries to allow your developers to create the roles that they need and to define the maximum permissions that can be given to the roles that they create. Remember, you can use AWS Organizations SCPs or deny statements in identity policies for scenarios where permissions boundaries are not appropriate. As your organization grows and you need to create and manage more roles, you can use permissions boundaries and follow AWS best practices to set security guard rails and decentralize role creation and management. Get started using permissions boundaries in IAM.
If you have feedback about this post, submit comments in the Comments section below. If you have questions about this post, contact AWS Support.
Want more AWS Security news? Follow us on Twitter.
This blog post discusses how you can use AWS Key Management Service (AWS KMS) RSA public keys on end clients or devices and encrypt data, then subsequently decrypt data by using private keys that are secured in AWS KMS.
Asymmetric cryptography is a cryptographic system that uses key pairs. Each pair consists of a public key, which can be seen or accessed by anyone, and a private key, which can be accessed only by authorized people. This system has a useful property, which is that anything encrypted with a public key can only be decrypted by the corresponding private key. A popular method for generating key pairs and encrypting data is the RSA algorithm and cryptosystem.
For RSA key pairs, calculating the private key from the public key is seen as computationally infeasible, and therefore RSA key pairs can be used for both authentication and encryption. The features of asymmetric encryption allow separated parties to share information across an untrusted domain, such as the internet, without having to pre-share any other secrets. However, this type of encryption poses an issue of keeping the private key secure, because the private key has the power to decrypt all messages that are transmitted by a large number of end users.
AWS KMS provides simple APIs that you can use to securely generate, store, and manage keys, including RSA key pairs inside hardware security modules (HSMs). Key pairs are generated within FIPS 140-2 validated HSMs that are managed by AWS. You can then use these private keys through APIs to do actions such as decrypt ciphertexts, meaning that plaintext private keys never leave the HSM, which provides assurances of privacy for the private key. Additional APIs allow a customer to retrieve a plaintext copy of the corresponding public key, which allows disconnected or offline uses of RSA public keys.
Limits of asymmetric cryptography
A key drawback to asymmetric cryptography is the fact that you cannot encrypt large pieces of data. When you have a 2048-bit RSA key pair and encrypt something by using the cipher RSAES_OASEP_SHA_256, the largest amount of data that you can encrypt is 190 bytes.
In contrast, symmetric encryption ciphers that use a chained or counter-mode operation don’t have this limit, and they make it possible for you to encrypt data in the tens-of-gigabytes. Symmetric encryption algorithms such as the Advanced Encryption Standard (AES) also benefit from faster data encryption speeds due to smaller key sizes and less complex operations that can be built into hardware.
By combining these two algorithms in a hybrid cryptosystem, you give end clients with a public key the ability to encrypt large pieces of information. A client generates a random 256-bit AES key, which should be from a secure source such as /dev/urandom or a dedicated embedded chip. The client then encrypts its large payload by using a mode of operation such as AES-GCM or AES-CBC by using that 256-bit AES key. Next, the client encrypts that 256-bit AES key by using the RSA public key (see step 5 in Figure 1). End clients then transmit only encrypted data across insecure channels, maintaining privacy of the payload data.
A challenge that customers often face is that they want to use AWS KMS for its security properties, but also want to access their KMS keys from devices that don’t have AWS credentials embedded within them. Without AWS credentials, a device can’t call AWS APIs. This blog post shows how you can use a hybrid cryptosystem where RSA public keys can be downloaded or embedded into devices to overcome this challenge.
Prerequisites and initial considerations
This walkthrough assumes that you have some understanding of RSA ciphers and symmetric encryption schemes such as AES. The walkthrough uses OpenSSL for demonstration of the encryption process, but similar libraries can be used on a client-side device.
When you create a KMS key, you will also generate a key policy that defines access to it. The default key policy allows all users in your account with AWS KMS actions in their IAM policies to access the KMS key. The key policy for a given KMS key is the primary method for determining access.
Important: You will incur charges for the services used in this example. You can find the cost of each service on the corresponding service pricing page. For more information, see AWS KMS Pricing.
Architectural overview
This post contains procedures for completing the following operations, which are also shown in Figure 1:
Create an RSA key pair in AWS KMS.
Download or pre-install the AWS KMS public key to an end-client device.
Generate an AES 256-bit key on an end client.
Encrypt a large payload of data on the end client by using the AES 256-bit key.
Encrypt the AES 256-bit key with the AWS KMS public key.
Transfer the encrypted payload and key.
Decrypt the AES 256-bit key by using AWS KMS.
Decrypt the payload data by using the now-shared AES 256-bit key.
Figure 1: The steps for hybrid encryption
This diagram shows an end client device, an untrusted network such as a cellular network, and the AWS Cloud. An RSA key pair is generated in AWS KMS, and then the public key can either be embedded in the end client, or pulled by the end client through HTTP(S) or other remote means. In all circumstances, only the public key persists on the end client, which means that no secrets are stored on the device.
How you host the public key on your end clients depends on what network access they have. For example, an embedded Internet of Things (IoT) device for mining vehicles might never connect to the internet, but could communicate with a central system through a private 5G network. In this circumstance, you would host this public key within that network for retrieval. For other disconnected IoT devices that can connect to the internet, such as smart-home appliances, you might want to host the public key on a web server at a predefined URL or through an API.
Note: Whenever you vend public keys over an untrusted channel, such as when you vend the public key through an API, you should make sure that the key can be verified in some way to confirm that it hasn’t been tampered with. This is typically done by vending keys over an HTTPS connection, where the integrity of the keys is provided by the X.509 certificate that was used in the TLS connection. The X.509 certificate also verifies an association with the key-pair owner, typically by domain name.
Implement the solution
The following steps can be used as a proof-of-concept to guide you through implementing a hybrid-cryptosystem by using a KMS public key on an example device.
Create keys in AWS KMS
In the first step of this solution, you create an RSA asymmetric key pair in AWS KMS (step 1 in the architectural overview). With AWS KMS, you can create key pairs in a variety of dimensions according to your security requirements or standards. For more information, see Choosing a KMS key type in the AWS KMS documentation.
To create a key pair in AWS KMS, use the CreateKey API. For this example, you will create an RSA key pair with RSA_2048 for the CustomerMasterKeySpec parameter and ENCRYPT_DECRYPT for the KeyUsage parameter in the AWS CLI. This post uses 2048-bit keys, but note that AWS KMS allows larger key sizes. The CLI will return a KeyId value that uniquely identifies the KMS key in your account, which you should take note of.
Note: When a KMS key is created, it will be logged by AWS CloudTrail, a service that monitors and records activity within your account. All API calls to the AWS KMS service are logged in CloudTrail, which you can use to audit access to KMS keys.
To allow your KMS key to be identified by a human-readable string rather than KeyId, you can assign an alias for the KMS key (replace the target-key-id value of <1234abcd-12ab-34cd-56ef-1234567890ab> with your KeyId). This makes it easier to use and manage.
To create a KMS key alias for your key by using the CLI
A benefit of asymmetric encryption is that you can distribute a public key to a large, untrusted network, and the public key can only be used for encryption. Decryption of those messages can only be conducted by the corresponding private key. You can use the AWS KMS Encrypt API to encrypt data with a KMS key pair (specifically the public key). However, because the AWS APIs are authenticated by using a signature, you must have access to AWS credentials to use these APIs, which you might not want to do on untrusted devices. Additionally, in a private 5G network, you might not have the capability to call the AWS KMS API endpoints from the end clients. Instead, you can download the public key from a local source or embed that into the end client at the time of manufacture.
To retrieve a copy of the public key from your AWS KMS key pair, you can use the GetPublicKey API. The following example shows how to use this with the AWS CLI command get-public-key and reference the key alias you set earlier.
To view the public key for your KMS key pair by using the CLI
The return value from this API will contain several elements, including the PublicKey. The returned PublicKey value is the DER-encoded X.509, and because you’re using the AWS CLI, it is base64-encoded for readability purposes. By using the AWS CLI, you can query just the PublicKey return value, base64-decode it, and then save the key to a file on disk, as follows.
To use the AWS CLI to query only the public key, then base64 decode it and output it to a file
In this example, the local machine where you saved the public_key.der file will now represent the end-client device.
Note: If you call this API by using one of the AWS SDKs, such as boto3, then the PublicKey value is not base64-encoded.
Create an AES 256-bit symmetric key on the end client
Although the end client now has a copy of the public key from the associated KMS private key, the public key can’t be used for encrypting data that you plan on transmitting, due to the size limits on data that can be encrypted. Instead, you can use symmetric encryption. Typically, symmetric keys are smaller than asymmetric keys, the ciphers are faster when encrypting data, and the resulting ciphertext is similar in size to the original data.
To generate a symmetric key, you should use a source of random entropy. Some operating systems offer block access to hardware-based sources of random numbers, such as /dev/hwrng. To provide an example process in this blog post, you will use the OpenSSL rand utility, which uses a cryptographically secure pseudo random generator (CSPRNG) seeded by /dev/urandom. In production systems, you might have stronger sources of entropy to rely on, or compliance requirements for random number generation. In hardware-constrained environments, you should take extra care to make sure that sources of entropy are cryptographically secure. The following command uses OpenSSL to create an AES 256-bit (32 bytes) key and base64-encode it, then save it to disk in plaintext as key.b64.
Note: Anyone with access to this file system will have access to this key.
To use the OpenSSL rand command to create a symmetric key and output it to a file
Enter the following command.
openssl rand -base64 32 > key.b64
Encrypt the data to be sent from the end client
Now that you have two different key types on the end client, you can use a hybrid cryptosystem to encrypt a large text file. First, you will generate a sample file to encrypt on your system. By outputting some bytes from /dev/urandom, you can create this file to the size you want. The following command outputs 200 random bytes, base64-encodes the file, and writes that to disk in a file called encrypt.me.
To generate a sample file from random data, which will be encrypted later
Enter the following command.
head -c 200 /dev/urandom | base64 –-wrap=0 > encrypt.me
Next, you will encrypt the newly created file with the AES 256-bit key that you created earlier (which is base64-encoded). By using the OpenSSL command line, you will encrypt the file on disk and create a new file called encrypt.me.enc.
Note: For demonstration purposes, this solution uses OpenSSL to complete the encryption process. However, the command line OpenSSL enc utility doesn’t allow the cipher aes-256-gcm. Galois Counter Mode (GCM) is recommended when encrypting and sending data, because it includes authentication, so that that the ciphertext can’t be tampered with in transit. Instead, for this demonstration, you will use aes-256-cbc, which is not authenticated.
To use the OpenSSL enc command to encrypt your sample file with a symmetric key
So that the data can be decrypted again, you will need to share the same AES 256-bit key with the recipient. To share that with only the person who can use the KMS private key that you created earlier, you can encrypt the symmetric key (key.b64) with the RSA public key that you retrieved earlier (public_key.der).
Again, you will use OpenSSL to see how this works and the required cipher options. When encrypting or decrypting with a KMS RSA key pair, you can use one of two encryption algorithms, either RSAES_OAEP_SHA_1 or RSAES_OAEP_SHA_256. These identify the cipher suites used in encryption that are currently supported by AWS KMS for encryption.
To use the OpenSSL pkeyutl command to encrypt your symmetric key with your local copy of your KMS public key
This command creates a new file on disk called key.b64.enc. This file is the encrypted AES 256-bit key, which can now be transported securely across an insecure network, such as the internet. The last two options in the command define the padding mode used (OAEP) and the length of the message digest (SHA-256), which align with the options available to decrypt when you use the AWS KMS APIs.
Note: You should securely delete both the original payload file (encrypt.me) and the plaintext AES 256-bit key (key.b64) if you want to prevent anyone else from accessing these files. At this point, you will have three files on disk: public_key.der, encrypt.me.enc, and key.b64.enc. If you want to verify the decryption process later in this example, keep these files.
In production, you might never write any of these values to disk. Instead, you can keep all values in memory and only write the encrypted data (ciphertext) to disk, clearing memory after that process has completed.
You can now use the method of your choice to transfer the encrypted files across an unsecured network without compromising the privacy of those files. For smart-home appliance use cases, you can upload the encrypted files in Amazon Simple Storage Service (Amazon S3), a highly durable storage system that can be accessed from the internet, keeping in mind the preventative security practices that AWS recommends. Later, another service can pull these files from S3, and with the correct permissions for the KMS key, can decrypt the files by using the AWS KMS Decrypt API.
Decrypt the files
With access to the decrypt operation for the KMS key and the encrypted files, you can now retrieve the plaintext data file again. To do this, you will replicate the preceding steps, but in reverse. This involves decrypting the AWS 256-bit key by using the AWS KMS API, and then using that result to decrypt the encrypted data. You will need access to the AWS KMS API to complete these actions, because the private key exists in plaintext only within the AWS KMS HSMs.
To decrypt the files
The first step is to decrypt the AWS 256-bit key. You will need to use the AWS CLI to submit the key.b64.enc file to the AWS KMS API, and specify the algorithm you used to encrypt the file (RSAES_OAEP_SHA_256). Use the following command to retrieve the AES 256-bit key in plaintext. Again, you’re using the –query selector to output only the plaintext, and then decode the base64 value.
The final step in decrypting the data is to reverse the CBC encryption process you used in OpenSSL. If another mode of symmetric encryption was used, such as AES-GCM, then you would need to decrypt by using that algorithm and the input AES 256-bit key. Use the following OpenSSL command to retrieve the original plaintext payload.
In this post, you learned how to combine AWS KMS asymmetric key pairs with locally created symmetric keys to encrypt and share data that exceeds 190 bytes, without storing a secret on a client device. By taking advantage of the RSA cryptosystem for offline encryption, you can reduce the exposure of plaintext data or secrets to devices outside of your control, and without having to complete complex key exchanges. By using the steps in this solution, you can more securely share large amounts of data, such as update files or configuration settings. To learn more about the asymmetric keys feature of AWS KMS, refer to the AWS KMS Developer Guide. If you have questions about the asymmetric keys feature, interact with us through AWS re:Post.
If you have feedback about this post, submit comments in the Comments section below. If you have questions about this post, contact AWS Support.
Want more AWS Security news? Follow us on Twitter.
Many Amazon Web Services (AWS) customers choose to use federation with SAML 2.0 in order to use their existing identity provider (IdP) and avoid managing multiple sources of identities. Some customers have previously configured federation by using AWS Identity and Access Management (IAM) with the endpoint signin.aws.amazon.com. Although this endpoint is highly available, it is hosted in a single AWS Region, us-east-1. This blog post provides recommendations that can improve resiliency for customers that use IAM federation, in the unlikely event of disrupted availability of one of the regional endpoints. We will show you how to use multiple SAML sign-in endpoints in your configuration and how to switch between these endpoints for failover.
How to configure federation with multi-Region SAML endpoints
AWS Sign-In allows users to log in into the AWS Management Console. With SAML 2.0 federation, your IdP portal generates a SAML assertion and redirects the client browser to an AWS sign-in endpoint, by default signin.aws.amazon.com/saml. To improve federation resiliency, we recommend that you configure your IdP and AWS federation to support multiple SAML sign-in endpoints, which requires configuration changes for both your IdP and AWS. If you have only one endpoint configured, you won’t be able to log in to AWS by using federation in the unlikely event that the endpoint becomes unavailable.
Let’s take a look at the Region code SAML sign-in endpoints in the AWS General Reference. The table in the documentation shows AWS regional endpoints globally. The format of the endpoint URL is as follows, where <region-code> is the AWS Region of the endpoint: https://<region-code>.signin.aws.amazon.com/saml
All regional endpoints have a region-code value in the DNS name, except for us-east-1. The endpoint for us-east-1 is signin.aws.amazon.com—this endpoint does not contain a Region code and is not a global endpoint. AWS documentation has been updated to reference SAML sign-in endpoints.
In the next two sections of this post, Configure your IdP and Configure IAM roles, I’ll walk through the steps that are required to configure additional resilience for your federation setup.
Important: You must do these steps before an unexpected unavailability of a SAML sign-in endpoint.
Configure your IdP
You will need to configure your IdP and specify which AWS SAML sign-in endpoint to connect to.
To configure your IdP
If you are setting up a new configuration for AWS federation, your IdP will generate a metadata XML configuration file. Keep track of this file, because you will need it when you configure the AWS portion later.
Register the AWS service provider (SP) with your IdP by using a regional SAML sign-in endpoint. If your IdP allows you to import the AWS metadata XML configuration file, you can find these files available for the public,GovCloud, and China Regions.
If you are manually setting the Assertion Consumer Service (ACS) URL, we recommend that you pick the endpoint in the same Region where you have AWS operations.
In SAML 2.0, RelayState is an optional parameter that identifies a specified destination URL that your users will access after signing in. When you set the ACS value, configure the corresponding RelayState to be in the same Region as the ACS. This keeps the Region configurations consistent for both ACS and RelayState. Following is the format of a Region-specific console URL.
https://<region-code>.console.aws.amazon.com/
For more information, refer to your IdP’s documentation on setting up the ACS and RelayState.
Configure IAM roles
Next, you will need to configure IAM roles’ trust policies for all federated human access roles with a list of all the regional AWS Sign-In endpoints that are necessary for federation resiliency. We recommend that your trust policy contains all Regions where you operate. If you operate in only one Region, you can get the same resiliency benefits by configuring an additional endpoint. For example, if you operate only in us-east-1, configure a second endpoint, such as us-west-2. Even if you have no workloads in that Region, you can switch your IdP to us-west-2 for failover. You can log in through AWS federation by using the us-west-2 SAML sign-in endpoint and access your us-east-1 AWS resources.
To configure IAM roles
Log in to the AWS Management Console with credentials to administer IAM. If this is your first time creating the identity provider trust in AWS, follow the steps in Creating IAM SAML identity providers to create the identity providers.
Next, create or update IAM roles for federated access. For each IAM role, update the trust policy that lists the regional SAML sign-in endpoints. Include at least two for increased resiliency.
The following example is a role trust policy that allows the role to be assumed by a SAML provider coming from any of the four US Regions.
When you use a regional SAML sign-in endpoint, the corresponding regional AWS Security Token Service (AWS STS) endpoint is also used when you assume an IAM role. If you are using service control policies (SCP) in AWS Organizations, check that there are no SCPs denying the regional AWS STS service. This will prevent the federated principal from being able to obtain an AWS STS token.
Switch regional SAML sign-in endpoints
In the event that the regional SAML sign-in endpoint your ACS is configured to use becomes unavailable, you can reconfigure your IdP to point to another regional SAML sign-in endpoint. After you’ve configured your IdP and IAM role trust policies as described in the previous two sections, you’re ready to change to a different regional SAML sign-in endpoint. The following high-level steps provide guidance on switching the regional SAML sign-in endpoint.
To switch regional SAML sign-in endpoints
Change the configuration in the IdP to point to a different endpoint by changing the value for the ACS.
Change the configuration for the RelayState value to match the Region of the ACS.
Log in with your federated identity. In the browser, you should see the new ACS URL when you are prompted to choose an IAM role.
Figure 1: New ACS URL
The steps to reconfigure the ACS and RelayState will be different for each IdP. Refer to the vendor’s IdP documentation for more information.
Conclusion
In this post, you learned how to configure multiple regional SAML sign-in endpoints as a best practice to further increase resiliency for federated access into your AWS environment. Check out the updates to the documentation for AWS Sign-In endpoints to help you choose the right configuration for your use case. Additionally, AWS has updated the metadata XML configuration for the public,GovCloud, and China AWS Regions to include all sign-in endpoints.
The simplest way to get started with SAML federation is to use AWS Single Sign-On (AWS SSO). AWS SSO helps manage your permissions across all of your AWS accounts in AWS Organizations.
Your privacy considerations are at the core of our compliance work at Amazon Web Services (AWS), and we are focused on the protection of your content while using AWS services. Our Spring 2022 SOC 2 Type I Privacy report is now available, which provides customers with a third-party attestation of our system and the suitability of the design of our privacy controls. The SOC 2 Privacy Trust Service Criteria (TSC), developed by the American Institute of Certified Public Accountants (AICPA) establishes the criteria for evaluating controls that relate to how personal information is collected, used, retained, disclosed, and disposed of. For more information about our privacy commitments supporting our SOC 2 Type 1 report, see the AWS Customer Agreement.
The scope of the Spring 2022 SOC 2 Type I Privacy report includes information about how we handle the content that you upload to AWS, and how it is protected in all of the services and locations that are in scope for the latest AWS SOC reports. The SOC 2 Type I Privacy report is available to AWS customers through AWS Artifact in the AWS Management Console.
As always, we value your feedback and questions. Feel free to reach out to the compliance team through the Contact Us page. If you have feedback about this post, submit comments in the Comments section below.
Want more AWS Security how-to-content, news, and feature announcements? Follow us on Twitter.
At Amazon Web Services (AWS), we’re committed to providing our customers with continued assurance over the security, availability and confidentiality of the AWS control environment. We’re proud to deliver the Spring 2022 System and Organizational (SOC) 1, 2 and 3 reports, which cover October 1, 2021 to March 31, 2022, to support our AWS customers’ confidence in AWS services.
The Spring 2022 SOC reports now include the Asia Pacific (Jakarta) Region, newly added to scope. The associated infrastructure supporting our in-scope products and services is also updated to reflect new edge locations, AWS Wavelength zones, and AWS Local Zones.
The Spring 2022 SOC reports include an additional 9 new services in scope, for a total of 150 services. See the full list on our Services in Scope by Compliance Program page.
Here are the 9 new services in scope for the Spring 2022 SOC reports:
AWS strives to bring services into scope of our compliance programs to help you meet your architectural and regulatory needs. If there are additional AWS services you would like to see added to the scope of our SOC reports or other compliance programs, reach out to your AWS representatives.
As always, we value your feedback and questions. Feel free to reach out to the team through the Contact Us page. If you have feedback about this post, submit comments in the Comments section below.
Want more AWS Security how-to-content, news, and feature announcements? Follow us on Twitter.
In the AWS Security Profile series, I interview some of the humans who work in Amazon Web Services Security and help keep our customers safe and secure. This interview is with Ely Kahn, principal product manager for AWS Security Hub. Security Hub is a cloud security posture management service that performs security best practice checks, aggregates alerts, and facilitates automated remediation.
How long have you been at AWS and what do you do in your current role?
I’ve been with AWS just over 4 years. I came to AWS through the acquisition of a company I co-founded called Sqrrl, which then became Amazon Detective. Shortly after the acquisition, I moved from the Sqrrl/Detective team and helped launch AWS Security Hub. In my current role, I’m the head of product for Security Hub, which means I lead our product roadmap and our product strategy, and I translate customer requirements into technical specifications.
How did you get started in the world of security?
My career started inside the U.S. federal government, first inside the Department of Homeland Security and, specifically, inside the Transportation Security Administration (TSA). At the time, the TSA had uncovered a vulnerability concerning boarding passes and the terrorist no-fly list. I was tasked with figuring out how to close that vulnerability, and I came up with a new way to embed a digital signature inside the barcode to help ensure the authenticity of the boarding pass. After that, people thought I was a cybersecurity expert, and I began working on a lot of cybersecurity strategy and policy at the Department of Homeland Security and then at the White House.
How do you explain your job to your non-tech friends?
I actually explain it the same way to technical and non-technical friends. I head up a service called Security Hub, which is designed to help you do a couple of different things. It helps you understand your security posture on AWS—what sort of risks you face and the most urgent security issues that you need to address across your AWS accounts. It also gives you the tools to improve your security posture and help you fix as many of those security issues as possible. We do that through three primary functions. First, we aggregate all of your security alerts into a standardized data format that’s available in one place. Second, we do our own automated security checks. We look at all the resources you’ve enabled on AWS and help check that those resources are configured in accordance with best practices that we define, and in alignment with various regulatory frameworks. Third, we help you auto-remediate and auto-respond to as many of those issues as possible.
What are you currently working on that you’re excited about?
Our number one priority with Security Hub is to expand coverage of the automated security checks that we provide. We have almost 200 automated security checks today covering several dozen AWS services. Over the next few years, we plan to expand this to more AWS services, which will add a large number of additional security checks. This is important because customers don’t want to have to write these security checks themselves. They want the one-click capability to turn on the checks—or controls, as we call them in Security Hub—and they should be automatically on in all of your accounts. They should only run if you’re using resources that are actually in-scope for those checks, and they should produce a security score to help you quickly understand the security posture of different accounts and of your organization as a whole.
What would you say is the coolest feature of Security Hub?
The coolest feature is probably the one that gets the least attention. It’s what we call our AWS Security Finding Format (ASFF). The ASFF is really just a data standard—it consists of over 1,000 JSON fields and objects, and it’s how you normalize all of your different security alerts. We’ve integrated 75 different services and partner products. The real advantage of Security Hub is that we automatically take all of those different alerts from all of those different integration partners and normalize them into this standardized data format, so that when you’re searching the findings you have a common set of fields to search against if you’re trying to do correlations. For example, you can imagine a situation where Amazon GuardDuty detects unusual activity in an Amazon Simple Storage Service (Amazon S3) bucket, one of our Security Hub checks detects that the bucket is open, and Amazon Macie determines that the bucket contains sensitive information. It’s much easier to do correlations for situations like this when the alerts from those different tools are in the same format. Similarly, building auto-response, auto-remediation workflows is much easier when all of your alerts are in the same format. One of our biggest customers at AWS called the ASFF the gold standard for how to normalize security alerts, which is something we’re super proud of.
As you mentioned, Security Hub integrates with a lot of other AWS services, like GuardDuty and Macie. How do you work with other service teams?
We work across AWS in a couple of different ways. We build out these integrations with other AWS services to either send or receive findings from those services. So, we receive findings from services like GuardDuty and Macie, and we send our findings to other services like AWS Trusted Advisor to give them the same view of security that we see in Security Hub. In general, we try to make it as simple and as low impact as possible because every service team is extremely busy. Wherever possible, we do the integration work and don’t put the onus of effort on the other service team.
The other way we work with other service teams is to formally define the best practices for that service. We have a security engineering team on Security Hub, and we partner with AWS Professional Services and their security consultants. Together, we have been working through the list of the most popular AWS services using a standard taxonomy of control categories to define security controls and best practices for that service. We then work with product managers and engineers on those service teams to review the controls we’re proposing, get their feedback, and then finally code them up as AWS Config rules before deploying them in Security Hub. We have a very well-honed process now to partner with the service teams to integrate with and define the security controls for each service.
Where do you suggest customers start with Security Hub if they are newer in their cloud journey?
The first step with Security Hub is just to turn it on across all of your accounts and AWS Regions. When you do, you’re likely going to see a lot of alerts. Don’t get overwhelmed with the number of alerts you see. Focus initially on the critical and high-severity alerts and work them as campaigns. Identify the owners for all open critical and high-severity alerts and start tracking burndown on a weekly basis. Coordinate with the leadership in your organization so you can identify which teams are keeping up with the alerts and which ones aren’t.
My favorite is one that I initially discounted: frugality. When I first joined AWS, what came to mind was Jeff Bezos using doors as desks. Although that’s certainly a component of frugality, I’ve found that for me, this principle means that we need to be frugal with each other’s time. There are so many competing demands on everyone’s time, and it’s extremely important in a place like AWS to be mindful of that. Make sure you’ve done your due diligence on something before you broadly ask the question or escalate.
What’s the thing you’re most proud of in your career?
There are two things. First is the acquisition of Sqrrl by AWS. I couldn’t have picked a better landing spot for Sqrrl and the team. I feel really lucky that I joined AWS through this acquisition. I’ve really learned a lot here in a short amount of time.
The other thing I’m especially proud of is to have been selected to do a stint through the White House National Security Council staff as the Department of Homeland Security representative to the Council. I sat in the cybersecurity directorate from 2009–2010 as part of that detail to the White House and got a chance to work in the West Wing and attend meetings in the Situation Room, which was just such a special experience.
If you had to pick an industry outside of security, what would you want to do?
This is pretty similar to security, but I got very close to going into the military. Out of high school, I was being recruited for lacrosse at the U.S. Air Force Academy. I had convinced myself that I wanted to go fly jets. I have the utmost respect for our military community, and I certainly could’ve seen myself taking that path.
If you have feedback about this post, submit comments in the Comments section below. If you have questions about this post, contact AWS Support.
Want more AWS Security news? Follow us on Twitter.
AWS Certificate Manager Private Certificate Authority (ACM PCA) is a highly available, fully managed private certificate authority (CA) service that allows you to create CA hierarchies and issue X.509 certificates from the CAs you create in ACM PCA. You can then use these certificates for scenarios such as encrypting TLS communication channels, cryptographically signing code, authenticating users, and more. But what happens if you decide to change your TLS endpoint or update your code signing entity? How do you revoke a certificate so that others no longer accept it?
In this blog post, we will cover two fully managed certificate revocation status checking mechanisms provided by ACM PCA: the Online Certificate Status Protocol (OCSP) and certificate revocation lists (CRLs). OCSP and CRLs both enable you to manage how you can notify services and clients about ACM PCA–issued certificates that you revoke. We’ll explain how these standard mechanisms work, we’ll highlight appropriate deployment use cases, and we’ll identify the advantages and downsides of each. We won’t cover configuration topics directly, but will provide you with links to that information as we go.
Certificate revocation
An X.509 certificate is a static, cryptographically signed document that represents a user, an endpoint, an IoT device, or a similar end entity. Because certificates provide a mechanism to authenticate these end entities, they are valid for a fixed period of time that you specify in the expiration date attribute when you generate a certificate. The expiration attribute is important, because it validates and regulates an end entity’s identity, and provides a means to schedule the termination of a certificate’s validity. However, there are situations where a certificate might need to be revoked before its scheduled expiration. These scenarios can include a compromised private key, the end of agreement between signed and signing organizations, user or configuration error when issuing certificates, and more. Although you can use certificates in many ways, we will refer to the predominant use case of TLS-based client-server implementations for the remainder of this blog post.
Certificate revocation can be used to identify certificates that are no longer trusted, and CRLs and OCSP are the standard mechanisms used to publish the revocation information. In addition, the special use case of OCSP stapling provides a more efficient mechanism that is supported in TLS 1.2 and later versions.
ACM PCA gives you the flexibility to use either of these mechanisms, or both. More importantly, as an ACM PCA administrator, the mechanism you choose to use is reflected in the certificate, and you must know how you want to manage revocation before you create the certificate. Therefore, you need to understand how the mechanisms work, select your strategy based on its appropriateness to your needs, and then create and deploy your certificates. Let’s look at how each mechanism works, the use cases for each, and issues to be aware of when you select a revocation strategy.
Certificate revocation using CRLs
As the name suggests, a CRL contains a list of revoked certificates. A CRL is cryptographically signed and issued by a CA, and made available for download by clients (for example, web browsers for TLS) through a CRL distribution point (CDP) such as a web server or a Lightweight Directory Access Point (LDAP) endpoint.
A CRL contains the revocation date and the serial number of revoked certificates. It also includes extensions, which specify whether the CA administrator temporarily suspended or irreversibly revoked the certificate. The CRL is signed and timestamped by the CA and can be verified by using the public key of the CA and the cryptographic algorithm included in the certificate. Clients download the CRL by using the address provided in the CDP extension and trust a certificate by verifying the signature, expiration date, and revocation status in the CRL.
CRLs provide an easy way to verify certificate validity. They can be cached and reused, which makes them resilient to network disruptions, and are an excellent choice for a server that is getting requests from many clients for the same CA. All major web browsers, OpenSSL, and other major TLS implementations support the CRL method of validating certificates.
However, the size of CRLs can lead to inefficiency for clients that are validating server identities. An example is the scenario of browsing multiple websites and downloading a CRL for each site that is visited. CRLs can also grow large over time as you revoke more certificates. Consider the World Wide Web and the number of invalidations that take place daily, which makes CRLs an inefficient choice for small-memory devices (for example, mobile, IoT, and similar devices). In addition, CRLs are not suited for real-time use cases. CRLs are downloaded periodically, a value that can be hours, days, or weeks, and cached for memory management. Many default TLS implementations, such as Mozilla, Chrome, Windows OS, and similar, cache CRLs for 24 hours, leaving a window of up to a day where an endpoint might incorrectly trust a revoked certificate. Cached CRLs also open opportunities for non-trusted sites to establish secure connections until the server refreshes the list, leading to security risks such as data breaches and identity theft.
Implementing CRLs by using ACM PCA
ACM PCA supports CRLs and stores them in an Amazon Simple Storage Service (Amazon S3) bucket for high availability and durability. You can refer to this blog post for an overview of how to securely create and store your CRLs for ACM PCA. Figure 1 shows how CRLs are implemented by using ACM PCA.
Figure 1: Certificate validation with a CRL
The workflow in Figure 1 is as follows:
On certificate revocation, ACM PCA updates the Amazon S3 CRL bucket with a new CRL.
Note: An update to the CRL may take up to 30 minutes after a certificate is revoked.
The client requests a TLS connection and receives the server’s certificate.
The client retrieves the current CRL file from the Amazon S3 bucket and validates it.
The refresh interval is the period between when an administrator revokes a certificate and when all parties consider that certificate revoked. The length of the refresh interval can depend on how quickly new information is published and how long clients cache revocation information to improve performance.
When you revoke a certificate, ACM PCA publishes a new CRL. ACM PCA waits 5 minutes after a RevokeCertificate API call before publishing a new CRL. This process exists to accommodate multiple revocation requests in a short time frame. An update to the CRL can take up to 30 minutes to propagate. If the CRL update fails, ACM PCA makes further attempts every 15 minutes.
CRLs also have a validity period, which you define as part of the CRL configuration by using ExpirationInDays. ACM PCA uses the value in the ExpirationInDays parameter to calculate the nextUpdate field in the CRL (the day and time when ACM PCA will publish the next CRL). If there are no changes to the CRL, the CRL is refreshed at half the interval of the next update. Clients may cache CRLs while they are still valid, so not all clients will have the updated CRL with the newly revoked certificates until the previous published CRL has expired.
Certificate revocation using OCSP
OCSP removes the burden of downloading the CRL from the client. With OCSP, clients provide the serial number and obtain the certificate status for a single certificate from an OCSP Responder. The OCSP Responder can be the CA or an endpoint managed by the CA. The certificate that is returned to the client contains an authorityInfoAccess extension, which provides an accessMethod (for example, OCSP), and identifies the OCSP Responder by a URL (for example, http://example-responder:<port>) in the accessLocation. You can also specify the OCSP Responder location manually in the CA profile. The certificate status response that is returned by the OCSP Responder can be good, revoked, or unknown, and is signed by using a process similar to the CRL for protection against forgery.
OCSP status checks are conducted in real time and are a good choice for time-sensitive devices, as well as mobile and IoT devices with limited memory.
However, the certificate status needs to be checked against the OCSP Responder for every connection, therefore requiring an extra hop. This can overwhelm the responder endpoint that needs to be designed for high availability, low latency, and protection against network and system failures. We will cover how ACM PCA addresses these availability and latency concerns in the next section.
Another thing to be mindful of is that the OCSP protocol implements OCSP status checks over unencrypted HTTP that poses privacy risks. When a client requests a certificate status, the CA receives information regarding the endpoint that is being connected to (for example, domain, IP address, and related information), which can easily be intercepted by a middle party. We will address how OCSP stapling can be used to address these privacy concerns in the OCSP stapling section.
Implementing OCSP by using ACM PCA
ACM PCA provides a highly available, fully managed OCSP solution to notify endpoints that certificates have been revoked. The OCSP implementation uses AWS managed OCSP responders and a globally available Amazon CloudFront distribution that caches OCSP responses closer to you, so you don’t need to set up and operate any infrastructure by yourself. You can enable OCSP on new or existing CAs using the ACM PCA console, the API, the AWS Command Line Interface (AWS CLI), or through AWS CloudFormation. Figure 2 shows how OCSP is implemented on ACM PCA.
Note: OCSP Responders, and the CloudFront distribution that caches the OCSP response for client requests, are managed by AWS.
Figure 2: Certificate validation with OCSP
The workflow in Figure 2 is as follows:
On certificate revocation, the ACM PCA updates the OCSP Responder, which generates the OCSP response.
The client requests a TLS connection and receives the server’s certificate.
The client sends a query to the OCSP endpoint on CloudFront.
Note: If the response is still valid in the CloudFront cache, it will be served to the client from the cache.
If the response is invalid or missing in the CloudFront cache, the request is forwarded to the OCSP Responder.
The OCSP Responder sends the OCSP response to the CloudFront cache.
CloudFront caches the OCSP response and returns it to the client.
The ACM PCA OCSP Responder generates an OCSP response that gets cached by CloudFront for 60 minutes. When a certificate is revoked, ACM PCA updates the OCSP Responder to generate a new OCSP response. During the caching interval, clients continue to receive responses from the CloudFront cache. As with CRLs, clients may also cache OCSP responses, which means that not all clients will have the updated OCSP response for the newly revoked certificate until the previously published (client-cached) OCSP response has expired. Another thing to be mindful of is that while the response is cached, a compromised certificate can be used to spoof a client.
Certificate revocation using OCSP stapling
With both CRLs and OCSP, the client is responsible for validating the certificate status. OCSP stapling addresses the client validation overhead and privacy concerns that we mentioned earlier by having the server obtain status checks for certificates that the server holds, directly from the CA. These status checks are periodic (based on a user-defined value), and the responses are stored on the web server. During TLS connection establishment, the server staples the certificate status in the response that is sent to the client. This improves connection establishment speed by combining requests and reduces the number of requests that are sent to the OCSP endpoint. Because clients are no longer directly connecting to OCSP Responders or the CAs, the privacy risks that we mentioned earlier are also mitigated.
Implementing OCSP stapling by using ACM PCA
OCSP stapling is supported by ACM PCA. You simply use the OCSP Certificate Status Response passthrough to add the stapling extension in the TLS response that is sent from the server to the client. Figure 3 shows how OCSP stapling works with ACM PCA.
Figure 3: Certificate validation with OCSP stapling
The workflow in Figure 3 is as follows:
On certificate revocation, the ACM PCA updates the OCSP Responder, which generates the OCSP response.
The client requests a TLS connection and receives the server’s certificate.
In the case of server’s cache miss, the server will query the OCSP endpoint on CloudFront.
Note: If the response is still valid in the CloudFront cache, it will be returned to the server from the cache.
If the response is invalid or missing in the CloudFront cache, the request is forwarded to the OCSP Responder.
The OCSP Responder sends the OCSP response to the CloudFront cache.
CloudFront caches the OCSP response and returns it to the server, which also caches the response.
The server staples the certificate status in its TLS connection response (for TLS 1.2 and later versions).
OCSP stapling is supported with TLS 1.2 and later versions.
Selecting the correct path with OCSP and CRLs
All certificate revocation offerings from AWS run on a highly available, distributed, and performance-optimized infrastructure. We strongly recommend that you enable a certificate validation and revocation strategy in your environment that best reflects your use case. You can opt to use CRLs, OCSP, or both. Without a revocation and validation process in place, you risk unauthorized access. We recommend that you review your business requirements and evaluate the risk profile of access with an invalid certificate versus the availability requirements for your application.
In the following sections, we’ll provide some recommendations on when to select which certificate validation and revocation strategy. We’ll cover client-server TLS communication, and also provide recommendations for mutual TLS (mTLS) authentication scenarios.
Recommended scenarios for OCSP stapling and OCSP Must-Staple
If your organization requires support for TLS 1.2 and later versions, you should use OCSP stapling. If you want to reduce the application availability risk for a client that is configured to fail the TLS connection establishment when it is unable to validate the certificate, you should consider using the OCSP Must-Staple extension.
OCSP stapling
If your organization requires support for TLS 1.2 and later versions, you should use OCSP stapling. With OCSP stapling, you reduce your client’s load and connectivity requirements, which helps if your network connectivity is unpredictable. For example, if your application client is a mobile device, you should anticipate network failures, low bandwidth, limited processing capacity, and impatient users. In this scenario, you will likely benefit the most from a system that relies on OCSP stapling.
Although the majority of web browsers support OCSP stapling, not all servers support it. OCSP stapling is, therefore, typically implemented together with CRLs that provide an alternate validation mechanism or as a passthrough for when the OCSP response fails or is invalid.
OCSP Must-Staple
If you want to rely on OCSP alone and avoid implementing CRLs, you can use the OCSP Must-Staple certificate extension, which tells the connecting client to expect a stapled response. You can then use OCSP Must-Staple as a flag for your client to fail the connection if the client does not receive a valid OCSP response during connection establishment.
Recommended scenarios for CRLs, OCSP (without stapling), and combinational strategies
If your application needs to support legacy, now deprecated protocols such as TLS 1.0 or 1.1, or if your server doesn’t support OCSP stapling, you could use a CRL, OCSP, or both together. To determine which option is best, you should consider your sensitivity to CA availability, recently revoked certificates, the processing capacity of your application client, and network latency.
CRLs
If your application needs to be available independent of your CA connectivity, you should consider using a CRL. CRLs are much larger files that, from a practical standpoint, require much longer cache times to be of use, but they will be present and available for verification on your system regardless of the status of your network connection. In addition, the lookup time of a certificate within a CRL is local and therefore shorter than a network round trip to an OCSP Responder, because there are no network connection or DNS lookup times.
OCSP (without stapling)
If you are sensitive to the processing capacity of your application client, you should use OCSP. The size of an OCSP message is much smaller compared to a CRL, which allows you to configure shorter caching times that are better suited for your risk profile. To optimize your OCSP and OCSP stapling process, you should review your DNS configuration because it plays a significant role in the amount of time your application will take to receive a response.
For example, if you’re building an application that will be hosted on infrastructure that doesn’t support OCSP stapling, you will benefit from clients making an OCSP request and caching it for a short period. In this scenario, your application client will make a single OCSP request during its connection setup, cache the response, and reuse the certificate state for the duration of its application session.
Combining CRLs and OCSP
You can also choose to implement both CRLs and OCSP for your certificate revocation and validation needs. For example, if your application needs to support legacy TLS protocols while providing resiliency to network failures, you can implement both CRLs and OCSP. When you use CRLs and OCSP together, you verify certificates primarily by using OCSP; however, in case your client is unable to reach the OCSP endpoint, you can fail over to an alternative validation method (for example, CRL). This approach of combining CRLs and OCSP gives you all the benefits of OCSP mentioned earlier, while providing a backup mechanism for failure scenarios such as an unreachable OCSP Responder, invalid response from the OCSP Responder, and similar. However, while this approach adds resilience to your application, it will add management overhead because you will need to set up CRL-based and OCSP-based revocation separately. Also, remember that clients with reduced computing power or poor network connectivity might struggle as they attempt to download and process the CRL.
Recommendations for mTLS authentication scenarios
You should consider network latency and revocation propagation delays when optimizing your server infrastructure for mTLS authentication. In a typical scenario, server certificate changes are infrequent, so caching an OCSP response or CRL on your client and an OCSP-stapled response on a server will improve performance. For mTLS, you can revoke a client certificate at any time; therefore, cached responses could introduce the risk of invalid access. You should consider designing your system such that a copy of a CRL for client certificates is maintained on the server and refreshed based on your business needs. For example, you can use S3 ETags to determine whether an object has changed, and flush the server’s cache in response.
Conclusion
This blog post covered two certificate revocation methods, OCSP and CRLs, that are available on ACM PCA. Remember, when you deploy CA hierarchies for public key infrastructure (PKI), it’s important to define how to handle certificate revocation. The certificate revocation information must be included in the certificate when it is issued, so the choice to enable either CRL or OCSP, or both, has to happen before the certificate is issued. It’s also important to have highly available CRL and OCSP endpoints for certificate lifecycle management. ACM PCA provides a highly available, fully managed CA service that you can use to meet your certificate revocation and validation requirements. Get started using ACM PCA.
If you have feedback about this post, submit comments in the Comments section below. If you have questions about this post, contact AWS Support.
Want more AWS Security news? Follow us on Twitter.
This blog post outlines how to use your existing Microsoft Active Directory (AD) to reliably authenticate access to your Amazon Web Services (AWS) accounts, infrastructure running on AWS, and third-party applications. The architecture we describe is designed to be highly available and extends access to your existing AD to AWS, enabling your users to use their existing credentials to access authorized AWS resources and applications.
Many customers rely on AD as their single source of truth for IT identity management. HR automation processes are often already in place to automatically add, update, and remove employee access within an organization’s AD as staffing changes occur. Using a single source of truth as the basis for all authentication and authorization, both on-premises and in the cloud, makes it easier to manage access across multiple applications and services, because you are creating, managing, and revoking access from a single location. For example, if someone leaves your organization, you can revoke access for all applications and services (including AWS accounts) from one location. Additionally, this reduces risks associated with stranded or forgotten credentials, or users needing to remember multiple different sets of credentials.
Microsoft Active Directory (AD) is deployed on Microsoft Windows Server servers called domain controllers, which replicate the contents of the directory between the domain controllers that are hosting the AD domain. Multiple domain controllers are deployed within a domain to improve the availability and performance of the directory. The AD infrastructure should be designed to provide sufficiently high levels of availability and performance, because it governs access to your organization’s IT resources. This typically requires the placement of at least one domain controller in every customer hosting location, because the lack of availability of your identity store is likely to cause authentication and authorization failures, which in turn prevent access to resources.
These design principles align with the Security Pillar of the AWS Well-Architected Framework, which is focused on implementing a strong identity foundation. The Security Pillar guidance states that you should centralize identity management and aim to eliminate reliance on long-term static credentials. By using your existing AD, you can benefit from centralized identity management and your existing group-based permissions for access to your AWS accounts. Applications that are running on domain-joined servers can use their AD service account credentials when they access other domain-joined resources, which removes the need for those credentials to be stored in application configuration files. As your AWS usage grows, it is important to give serious consideration to effective identity management, both for access to AWS and AWS resources, and for your instances that are running on AWS.
By extending your existing Active Directory to AWS, you can continue to use your existing Active Directory user credentials and group policies to manage your Microsoft Windows Server servers, whether those servers are running on-premises or on AWS, and extend these capabilities to authenticate and authorize access to the AWS Management Console and third-party applications.
This post covers networking requirements and connectivity setup to enable network connectivity to your on-premises AD; the approach to extending your AD to AWS; integrating AWS Single Sign-On with your AD; and joining Amazon Elastic Compute Cloud (Amazon EC2) instances to AD. As part of the setup, you will add additional domain controllers running on Amazon EC2 instances to your existing AD, for availability and latency reasons. You will also build a resource forest to enable your existing AD identities to access AD-integrated AWS services and resources. This enables you to have a highly available single identity source as the source of truth for your user authentication.
Networking prerequisites to extend your Active Directory to AWS
To enable Active Directory–related network communication, network connectivity needs to be established between your on-premises network and your AWS environment. You need to ensure there is connectivity between the on-premises network that is hosting your existing domain controllers and the Amazon Virtual Private Cloud (Amazon VPC) VPC that will host your AD infrastructure on AWS. Typically, hybrid network connectivity is configured within a network account within your organization, where the multiple AWS accounts within your organization are managed by using AWS Organizations. This network account effectively sits between your on-premises network and the resources, including the AD infrastructure, that are deployed in AWS.
You can provide connectivity between your on-premises network and your network account by using AWS Site-to-Site VPN or AWS Direct Connect connections. For an overview of the options to connect your on-premises network to AWS, refer to Amazon Virtual Private Cloud Connectivity Options. The necessary routing and firewall rules need to be configured to allow connectivity between these subnets and the on-premises network that is hosting your existing domain controllers. AWS recommends that you have highly resilient, fault-tolerant connectivity with dynamic routing between your on-premises network and your AWS network. You can achieve high resiliency through the use of redundant AWS Direct Connect connections, or, for less critical workloads, a VPN connection might offer sufficient resilience.
We recommend AWS Transit Gateway to provide connectivity between your AWS accounts. A transit gateway will be in your network account and then shared with your other AWS accounts that have VPCs that require access to on-premises networks or other VPCs. This enables a hub and spoke network architecture, which is used to provide connectivity both between your VPCs as needed and between your VPCs and your on-premises network. You will create a VPC, which we will refer to within this blog as the endpoint VPC, with subnets across two Availability Zones, within the network account. This endpoint VPC will be used later by Amazon Route 53 outbound endpoints for DNS resolution of AD-hosted DNS zones. Other documentation might refer to this endpoint VPC by alternative names, such as outbound VPC or egress VPC.
Your AD infrastructure that is running on AWS is typically deployed within a shared services account, sometimes referred to as an operations account. Within this shared services account, you will create a shared services VPC with at least two subnets within different Availability Zones to host your domain controller infrastructure on AWS. Your domain controller availability is increased when your architecture is configured to use multiple Availability Zones. You will attach this shared services VPC to the transit gateway that is shared from your network account. This VPC attachment provides connectivity between this VPC and your on-premises network through the transit gateway and network account. You will need to configure the subnet route table(s) and transit gateway route table(s) appropriately to provide IP connectivity between the shared services VPC and your on-premises network.
The sample architecture shown in Figure 1 illustrates the use of a transit gateway with two AWS Direct Connect connections to provide resilient connectivity between an on-premises network, the network account, and a VPC within the shared services account.
Figure 1: Foundational network connectivity between on-premises and AWS VPCs
Active Directory relies heavily on Domain Name System (DNS) services and typically hosts its own DNS services on domain controllers. To establish name resolution of your AD-hosted DNS domains from within your VPCs, you should use Route 53 Resolver with outbound resolver endpoints and forwarding rules. Forwarding rules specify the domain name queries to forward from your VPCs to DNS servers that are authoritative for your AD DNS names. The queries will be forwarded through the outbound endpoints. The outbound endpoints will be configured in the network account on the endpoint VPC, and use the previously configured network connectivity to communicate with your existing DNS servers. You will configure your existing DNS servers as targets in the forwarding rules. Configuring Route 53 Resolver with the appropriate forwarding rules will help to enable seamless DNS resolution between your on-premises and AWS hosted resources. You need to share the Route 53 Resolver rules with your organization so that they can be used by your other AWS accounts. These shared rules are then associated with your VPCs, which need to be able to resolve names within AD-hosted DNS domains. Refer to the AWS Hybrid DNS with Active Directory technical guide for detailed step-by-step configuration guidance.
Figure 2 shows a sample flow of a DNS query from an Amazon Elastic Compute Cloud (Amazon EC2) instance through Route 53 Resolver and an outbound interface when resolving an on-premises domain name that matches a forwarding rule. In this example, the domain controllers are also the DNS servers, but splitting the DNS and AD servers is also fully supported.
Figure 2: Flow of a DNS query matching a forwarding rule through a Route 53 outbound endpoint
The flow is as follows:
An Amazon EC2 instance sends a DNS request for an internal name, such as ad.example.com, to the Route 53 Resolver address within the VPC.
Route 53 matches this query against a forwarding rule and directs the query through the configured outbound interface.
The query is sent from the outbound interface towards the target IP address, configured in the forwarding rule, of a server that is authoritative for the domain name.
This target DNS server receives the query and responds.
To extend your existing AD to AWS, domain controllers on Amazon EC2 instances are required, because AWS Managed Microsoft AD does not support being added to an existing forest. An AWS Managed Microsoft AD resource forest is required to enable integration with AWS services that offer AD integration. This is discussed in more detail in the following sections.
Extend your on-premises AD to AWS
Your first step is to build additional AD domain controllers for your existing AD domain(s) on Amazon EC2 instances that are running Microsoft Windows Server. You would then manage these domain controllers along with your existing domain controllers. By running additional domain controllers within AWS, you remove dependencies on network links and improve reliability and performance of your directory for infrastructure that is running within AWS. Communication between the domain controllers and other domain-joined resources within AWS is designed to remain within the AWS Region. AWS recommends that a minimum of two domain controllers, spread across multiple Availability Zones for resilience, are deployed. You should deploy the domain controllers into the subnets within the shared services VPC.
Depending on your capacity planning considerations and availability goals, you may choose to deploy more than two domain controllers. The number of users, servers, and applications that access your directory will influence the required number of domain controllers. Security considerations, including the required TCP/IP ports, and management options are discussed in the blog post Securely extend and access on-premises Active Directory domain controllers in AWS.
These new domain controllers will be in a new AD site, which includes all your VPC CIDR blocks within your chosen AWS Region. In Active Directory, a site represents a group of IP subnets that are connected with fast and highly reliable network connectivity. Site information is used to locate domain controllers closest to the client, to reduce latency and unnecessary network traffic. AWS recommends that your VPCs within an AWS Region belong to the same new Active Directory site, consisting only of your IP ranges within the chosen AWS Region, and that consistent site names are used in all AD forests that are connected by trusts. Further details are available in the section Designing Active Directory sites and services topology in Active Directory Domain Services on AWS and in Designing the Site Topology.
Update targets in Route 53 Resolver rules
After you have deployed AD-integrated DNS servers to these domain controllers and opened the required TCP/IP ports on the associated security groups, you can update the targets in your Route 53 Resolver forwarding rules to use the IP addresses of these servers. This will improve performance and reliability of DNS resolution, by removing the need for DNS resolution traffic to flow between AWS and on-premises infrastructure.
Figure 3 shows Amazon EC2 instances that are configured as AD domain controllers within a shared services VPC. After they are configured, these domain controllers will replicate with the on-premises domain controllers, using the connectivity that is provided through the transit gateway.
Figure 3: On-premises AD extended to AWS by deploying additional domain controllers
Build a resource forest for AWS hosted infrastructure and applications
When you select and launch this directory type, it is created as a highly available pair of domain controllers that are connected to your virtual private cloud (VPC). The domain controllers run in different Availability Zones in your choice of AWS Region. Host monitoring and recovery, data replication, snapshots, and software updates are automatically configured and managed for you. AWS Managed Microsoft AD is available in Standard and Enterprise Editions.
The AWS Managed Microsoft AD will be shared with your accounts within your organization to enable your other AWS accounts to access this directory and benefit from the features and services outlined previously.
With correct AD site configuration in both forests, communication between the AWS Managed Microsoft AD domain controllers and other domain-joined resources within AWS, and your existing domain’s domain controllers, remains within the chosen AWS Region. This is designed to keep your data within AWS in the country of your chosen AWS Region, to help to address possible data residency concerns.
An example of this architecture is depicted in Figure 4.
Figure 4: AWS Managed Microsoft AD resource forest with trust to on-premises AD
Manage access to your AWS accounts
AWS Single Sign-On (AWS SSO) enables you to centrally manage access across your AWS organization. You can choose to manage access just to your AWS accounts, or to your cloud applications as well. You can create user identities directly in AWS SSO, access your existing identifies by connecting AWS SSO to your existing Active Directory domain, or you can federate them from your Active Directory Federation Services (AD FS) or a standards-based identity provider, such as Okta Universal Directory or Azure AD. Your workforce users get a user portal to access all of their assigned AWS accounts or cloud applications. AWS SSO can be flexibly configured to run alongside or replace AWS account access management through AWS Identity and Access Management (IAM).
Identity federation is a system of trust between two parties for the purpose of authenticating third parties, such as users, and conveying information that is needed to authorize their access to resources. In this system, an identity provider (IdP) is responsible for user authentication, and a service provider (SP), such as a service or an application, controls access to resources. AWS SSO automates the setup of the identity federation that is used to provide authorized users access to your AWS accounts. AWS SSO is acting as an IdP when AWS SSO is connected to your AD and used to give access to your AWS accounts.
Although you can create users and groups directly within AWS SSO, a best practice is to use your existing identity single source of truth to simplify user and permission management. Connecting AWS SSO through to your Active Directory, which has been extended to AWS, will allow authentication of users for access to your AWS accounts to take place entirely within the AWS Region. This practice is designed to reduce dependencies on hybrid networking and resources located on-premises or in other hosting locations.
You should enforce secure access to the user portal, AWS SSO integrated apps, and the AWS CLI by enabling multi-factor authentication (MFA). AWS SSO MFA supports various MFA types, including client-side authenticator apps, security keys, and built-in authenticators. Using MFA is recommended as part of configuring strong sign-in mechanisms.
Connect AWS SSO to your Active Directory
You can connect AWS SSO to your Active Directory on AWS by using AD Connector, or through an AWS Managed Microsoft AD. Using AD Connector is often the primary mechanism considered by customers, but given the lack of support for multi-domain environments as used in this post, this blog post recommends using AWS Managed Microsoft AD.
When you use AWS Managed Microsoft AD with AWS SSO, AWS SSO requires two-way trusts to be in place between this AWS Managed Microsoft AD forest and any other forest that contains the user identities that will authenticate through AWS SSO.
Before AWS SSO supported delegated administration, AWS SSO had to be configured within the management account of your AWS organization, and required the connected AWS Managed Microsoft AD directory to also be within your organization’s management account.
With the announcement of AWS SSO delegated administration support, AWS SSO and the connected AWS Managed Microsoft AD can be configured in an account other than your management account. This post recommends using your shared services account as the AWS SSO delegated administration account. Doing so will enable AWS SSO to use the AWS Managed Microsoft AD that you configured within the shared services account in the preceding Build a resource forest for AWS hosted infrastructure and applications section.
This follows the AWS guidance to avoid deploying workloads to the organization’s management account and to limit access to the management account. Using a delegated administration account for AWS SSO reduces the need for regular access to the management account.
From within your management account, your shared services account needs to be registered as the AWS SSO delegated administration account. You can then configure and manage AWS SSO from within your shared services account. The AWS SSO delegated administration account can manage permissions across your organization, apart from assigning permissions to access the management account. Assignment of permissions to access the management account through AWS SSO needs to be configured from within the management account itself.
Permission sets are a way to define permissions centrally in AWS SSO so that they can be applied to all your AWS accounts. After you have created your permission sets, you will assign them to your Active Directory groups to grant access to the respective AWS accounts, using the defined permission set persona. Your users will then use the AWS SSO user portal to authenticate with their AD credentials and can choose which of the assigned AWS accounts and personas they wish to access. Users can configure AWS CLI to use AWS SSO to access the roles they have been assigned.
Figure 5 shows the complete architecture covered in this blog post. The diagram includes AWS SSO within the shared services account connected to the AWS Managed Microsoft AD that is used to provide access to the forests that contain your user identities.
Figure 5: Complete AD architecture with trusts and AWS SSO using AD as the identity source
Access domain-joined infrastructure resources
By joining your Windows Server servers to your Active Directory resource domain, you can centralize the management of your servers by using native Microsoft tooling. Joining your Amazon EC2 Windows instances to your domain enables you to continue using existing tools, such as group policies, to manage your server estate both on-premises and in AWS.
VPCs with workloads that need to be domain joined, to access on-premises networks, or to access other VPCs will need appropriate network connectivity and DNS configuration in place. You can enable network connectivity between workload VPCs and the shared services VPC and other on-premises networks by attaching your VPCs to the transit gateway shared from the networking account. You can enable DNS resolution of your AD domains by attaching the Route 53 Resolver rules, shared from the networking account, to your workload VPCs.
Join instances to your AD domain
Amazon EC2 Windows instances can be manually or seamlessly joined to your resource domain. Manually joining an instance involves the same steps that you would follow on-premises. Seamlessly joining instances requires the AWS Systems Manager agent, which is installed by default in AWS provided Windows AMIs, on the Amazon EC2 instance and an attached instance profile with sufficient permissions. This instance profile should include the AmazonSSMManagedInstanceCore and AmazonSSMDirectoryServiceAccess policies.
In order to join the domain, either manually or seamlessly, the Amazon EC2 instance must be able to resolve the DNS name for your AD domain. This DNS resolution was enabled by the attachment of the correctly configured shared Route 53 Resolver rules to the workload VPCs. Seamlessly joining instances to the domain also requires that your shared services account AWS Managed Microsoft AD directory be shared with the workload account that contains the Amazon EC2 instances.
After your instances are joined to the domain, applications running on the servers will be able to access other domain-joined resources, if authorized by AD, through the connectivity that is provided by the transit gateway attachment on the workload VPC.
Applications that need to access AWS resources that are not domain joined, such as objects in Amazon Simple Storage Service (Amazon S3), should make use of temporary credentials associated with the attached instance profile to access AWS resources. By using these IAM temporary credentials, you can avoid using static long-term credentials. When an application requires access to credentials or other secrets, and cannot use AD or IAM temporary credentials, such as for database logins or for third-party API tokens, use a service designed to handle management of secrets, such as AWS Secrets Manager. See the AWS Well-Architected Security Pillar Identity Management documentation for further guidance.
Figure 6 shows Active Directory access through the transit gateway. The Route 53 forwarding rules, which are shared from the shared services account, are associated with the workload VPCs to enable DNS resolution of Active Directory–integrated DNS domains. Not shown in the diagram is the sharing of the AWS Managed Microsoft AD for the resource forest with the workload accounts.
Figure 6: Flow of AD network traffic through the transit gateway within the network account
Access applications and third-party services
You might have existing applications that rely on Active Directory or LDAP for user authentication. When you extend your Active Directory environment to AWS, these existing applications can be deployed to your AWS environment, and they will be able to authenticate the users of the application against your AD.
You might already be using a third-party identity provider, such as Azure AD or Okta, to provide your users with access to AWS services such as AWS Client VPN or to third-party business applications such as those on the AWS SSO Cloud applications page. These third-party identity providers will typically offer an agent to replicate or synchronize necessary user information from your Active Directory to their service, in order to offer federated authentication for your users. Using these agents to replicate from your existing Active Directory means that you are still using your Active Directory as the single source of truth. To ensure reliable authentication, you should follow the vendor’s recommendations for the high-availability setup of their agent.
Figure 7 shows the steps that occur when you use AWS SSO to provide identity federation to a web application.
Figure 7: Example flow for identify federation that uses AWS SSO
Conclusion
This post highlights the importance of implementing a cloud authentication and authorization architecture that addresses the variety of requirements for an organization’s AWS Cloud environment. In addition to console access, this post highlights the importance of considering how you will:
Perform authentication to AWS based Windows and Linux instances
Integrate AWS services that need Windows-based authentication capabilities
Integrate authentication for internal user applications
Provide a single identity source as the source of truth for all AWS user authentication
Enable MFA for user authentication
The proposed approach provides a highly available Active Directory (AD) infrastructure, running on AWS and integrated with your existing AD, which addresses these considerations. The approach helps you to attain reduced latencies and higher levels of availability by removing dependencies on on-premises resources, other hosting locations, and external network links. This design stores the identity information that is contained within your existing AD in your chosen AWS Region and country, across multiple Availability Zones, which can also help you meet your data residency requirements.
If you have feedback about this post, submit comments in the Comments section below. If you have questions about this post, contact AWS Support.
Want more AWS Security news? Follow us on Twitter.
Recently, AWS launched the ability to delegate administration of AWS Single Sign-On (AWS SSO) in your AWS Organizations organization to a member account (an account other than the management account). This post will show you a practical approach to using this new feature. For the documentation for this feature, see Delegated administration in the AWS Single Sign-On User Guide.
With AWS Organizations, your enterprise organization can manage your accounts more securely and at scale. One of the benefits of Organizations is that it integrates with many other AWS services, so you can centrally manage accounts and how the services in those accounts can be used.
AWS SSO is where you can create, or connect, your workforce identities in AWS just once, and then manage access centrally across your AWS organization. You can create user identities directly in AWS SSO, or you can bring them from your Microsoft Active Directory or a standards-based identity provider, such as Okta Universal Directory or Azure AD. With AWS SSO, you get a unified administration experience to define, customize, and assign fine-grained access.
By default, the management account in an AWS organization has the power and authority to manage member accounts in the organization. Because of these additional permissions, it is important to exercise least privilege and tightly control access to the management account. AWS recommends that enterprises create one or more accounts specifically designated for security of the organization, with proper controls and access management policies in place. AWS provides a method in which many services can be administered for the organization from a member account; this is usually referred to as a delegated administrator account. These accounts can reside in a security organizational unit (OU), where administrators can enforce organizational policies. Figure 1 is an example of a recommended set of OUs in Organizations.
Figure 1: Recommended AWS Organizations OUs
Many AWS services support this delegated administrator model, including Amazon GuardDuty, AWS Security Hub, and Amazon Macie. For an up-to-date complete list, see AWS services that you can use with AWS Organizations. AWS SSO is now the most recent addition to the list of services in which you can delegate administration of your users, groups, and permissions, including third-party applications, to a member account of your organization.
How to configure a delegated administrator account
In this scenario, your enterprise AnyCompany has an organization consisting of a management account, an account for managing security, as well as a few member accounts. You have enabled AWS SSO in the organization, but you want to enable the security team to manage permissions for accounts and roles in the organization. AnyCompany doesn’t want you to give the security team access to the management account, and they also want to make sure the security team can’t delete the AWS SSO configuration or manage access to that account, so you decide to delegate the administration of AWS SSO to the security account.
Note: There are a few things to consider when making this change, which you should review before you enable delegated administration. These items are covered in the console during the process, and are described in the section Considerations when delegating AWS SSO administration in this post.
To delegate AWS SSO administration to a security account
In the AWS SSO console, navigate to the Region in which AWS SSO is enabled.
Choose Settings on the left navigation pane, and then choose the Management tab on the right side.
Under Delegated administrator, choose Register account, as shown in Figure 2.
Figure 2: The Register account button in AWS SSO
Consider the implications of designating a delegated administrator account (as described in the section Considerations when delegating AWS SSO administration). Select the account you want to be able to manage AWS SSO, and then choose Register account, as shown in Figure 3.
Figure 3: Choosing a delegated administrator account in AWS SSO
You should see a success message to indicate that the AWS SSO delegated administrator account is now setup.
To remove delegated AWS SSO administration from an account
In the AWS SSO console, navigate to the Region in which AWS SSO is enabled.
Choose Settings on the left navigation pane, and then choose the Management tab on the right side.
Under Delegated administrator, select Deregister account, as shown in Figure 4.
Figure 4: The Deregister account button in AWS SSO
Consider the implications of removing a delegated administrator account (as described in the section Considerations when delegating AWS SSO administration), then enter the account name that is currently administering AWS SSO, and choose Deregister account, as shown in Figure 5.
Figure 5: Considerations of deregistering a delegated administrator in AWS SSO
There are a few considerations you should keep in mind when you delegate AWS SSO administration. The first consideration is that the delegated administrator account will not be able to perform the following actions:
Delete the AWS SSO configuration.
Delegate (to other accounts) administration of AWS SSO.
Manage user or group access to the management account.
Manage permission sets that are provisioned (have a user or group assigned) in the organization management account.
For examples of those last two actions, consider the following scenarios:
In the first scenario, you are managing AWS SSO from the delegated administrator account. You would like to give your colleague Saanvi access to all the accounts in the organization, including the management account. This action would not be allowed, since the delegated administrator account cannot manage access to the management account. You would need to log in to the management account (with a user or role that has proper permissions) to provision that access.
In a second scenario, you would like to change the permissions Paulo has in the management account by modifying the policy attached to a ManagementAccountAdmin permission set, which Paulo currently has access to. In this scenario, you would also have to do this from inside the management account, since the delegated administrator account does not have permissions to modify the permission set, because it is provisioned to a user in the management account.
With those caveats in mind, users with proper access in the delegated administrator account will be able to control permissions and assignments for users and groups throughout the AWS organization. For more information about limiting that control, see Allow a user to administer AWS SSO for specific accounts in the AWS Single Sign-On User Guide.
Deregistering an AWS SSO delegated administrator account will not affect any permissions or assignments in AWS SSO, but it will remove the ability for users in the delegated account to manage AWS SSO from that account.
Additional considerations if you use Microsoft Active Directory
There are additional considerations for you to keep in mind if you use Microsoft Active Directory (AD) as an identity provider, specifically if you use AWS SSO configurable AD sync, and which AWS account the directory resides in. In order to use AWS SSO delegated administration when the identity source is set to Active Directory, AWS SSO configurable AD sync must be enabled for the directory. Your organization’s administrators must synchronize Active Directory users and groups you want to grant access to into an AWS SSO identity store. When you enable AWS SSO configurable AD sync, a new feature that launched in April, Active Directory administrators can choose which users and groups get synced into AWS SSO, similar to how other external identity providers work today when using the System for Cross-domain Identity Management (SCIM) v2.0 protocol. This way, AWS SSO knows about users and groups even before they are granted access to specific accounts or roles, and AWS SSO administrators don’t have to manually search for them.
Another thing to consider when delegating AWS SSO administration when using AD as an identity source is where your directory resides, that is which AWS account owns the directory. If you decide to change the AWS SSO identity source from any other source to Active Directory, or change it from Active Directory to any other source, then the directory must reside in (be owned by) the account that the change is being performed in. For example, if you are currently signed in to the management account, you can only change the identity source to or from directories that reside in (are owned by) the management account. For more information, see Manage your identity source in the AWS Single Sign-On User Guide.
Best practices for managing AWS SSO with delegated administration
AWS recommends the following best practices when using delegated administration for AWS SSO:
Maintain separate permission sets for use in the organization management account (versus the rest of the accounts). This way, permissions can be kept separate and managed from within the management account without causing confusion among the delegated administrators.
When granting access to the organization management account, grant the access to groups (and permission sets) specifically for access in that account. This helps enable the principal of least privilege for this important account, and helps ensure that AWS SSO delegated administrators are able to manage the rest of the organization as efficiently as possible (by reducing the number of users, groups, and permission sets that are off limits to them).
If you plan on using one of the AWS Directory Services for Microsoft Active Directory (AWS Managed Microsoft AD or AD Connector) as your AWS SSO identity source, locate the directory and the AWS SSO delegated administrator account in the same AWS account.
Conclusion
In this post, you learned about a helpful new feature of AWS SSO, the ability to delegate administration of your users and permissions to a member account of your organization. AWS recommends as a best practice that the management account of an AWS organization be secured by a least privilege access model, in which as few people as possible have access to the account. You can enable delegated administration for supported AWS services, including AWS SSO, as a useful tool to help your organization minimize access to the management account by moving that control into an AWS account designated specifically for security or identity services. We encourage you to consider AWS SSO delegated administration for administrating access in AWS. To learn more about the new feature, see Delegated administration in the AWS Single Sign-On User Guide.
If you have feedback about this post, submit comments in the Comments section below. If you have questions about this post, start a new thread on the AWS IAM forum or contact AWS Support.
Want more AWS Security how-to content, news, and feature announcements? Follow us on Twitter.
For your sensitive data on AWS, you should implement security controls, including identity and access management, infrastructure security, and data protection. Amazon Web Services (AWS) recommends that you set up multiple accounts as your workloads grow to isolate applications and data that have specific security requirements. AWS tools can help you establish a data perimeter between your multiple accounts, while blocking unintended access from outside of your organization. Data perimeters on AWS span many different features and capabilities. Based on your security requirements, you should decide which capabilities are appropriate for your organization. In this first blog post on data perimeters, I discuss which AWS Identity and Access Management (IAM) features and capabilities you can use to establish a data perimeter on AWS. Subsequent posts will provide implementation guidance and IAM policy examples for establishing your identity, resource, and network data perimeters.
A data perimeter is a set of preventive guardrails that help ensure that only your trusted identities are accessing trusted resources from expected networks. These terms are defined as follows:
Trusted identities – Principals (IAM roles or users) within your AWS accounts, or AWS services that are acting on your behalf
Trusted resources – Resources that are owned by your AWS accounts, or by AWS services that are acting on your behalf
Expected networks – Your on-premises data centers and virtual private clouds (VPCs), or networks of AWS services that are acting on your behalf
Data perimeter guardrails
You typically implement data perimeter guardrails as coarse-grained controls that apply across a broad set of AWS accounts and resources. When you implement a data perimeter, consider the following six primary control objectives.
Data perimeter
Control objective
Identity
Only trusted identities can access my resources.
Only trusted identities are allowed from my network.
Resource
My identities can access only trusted resources.
Only trusted resources can be accessed from my network.
Network
My identities can access resources only from expected networks.
My resources can only be accessed from expected networks.
Note that the controls in the preceding table are coarse in nature and are meant to serve as always-on boundaries. You can think of data perimeters as creating a firm boundary around your data to prevent unintended access patterns. Although data perimeters can prevent broad unintended access, you still need to make fine-grained access control decisions. Establishing a data perimeter does not diminish the need to continuously fine-tune permissions by using tools such as IAM Access Analyzer as part of your journey to least privilege.
To implement the preceding control objectives on AWS, use three primary capabilities:
Service control policies (SCPs) – AWS Organizations policies that you can use to establish the maximum available permissions for your principals (IAM roles or users) within your organization. SCPs help you ensure that your accounts stay within your organization’s access control guidelines. In the context of data perimeters, you use SCPs so that your identities can access only trusted resources from expected networks.
VPC endpoint policies – Policies that you attach to VPC endpoints to control which principals, actions, and resources can be accessed by using a VPC endpoint. In the context of data perimeters, use VPC endpoint policies to specify that your network can be used only by trusted identities to access only trusted resources. For a list of services that support VPC endpoints and VPC endpoint policies, see AWS services that integrate with AWS PrivateLink.
Let’s expand the previous table to include the corresponding policies you would use to implement the controls for each of the control objectives.
Data perimeter
Control objective
Implemented by using
Identity
Only trusted identities can access my resources.
Resource-based policies
Only trusted identities are allowed from my network.
VPC endpoint policies
Resource
My identities can access only trusted resources.
SCPs
Only trusted resources can be accessed from my network.
VPC endpoint policies
Network
My identities can access resources only from expected networks.
SCPs
My resources can only be accessed from expected networks.
Resource-based policies
As you can see in the preceding table, the correct policy for each control objective depends on which resource you are trying to secure. Resource-based policies, which are applied to resources such as Amazon S3 buckets, can be used to filter access based on the calling principal and the network from which they are making a call. VPC endpoint policies are used to inspect the principal that is making the API call and the resource they are trying to access. And SCPs are used to restrict your identities from accessing resources outside your control or from outside your network. Note that SCPs apply only to your principals within your AWS organization, whereas resource policies can be used to limit access to all principals.
The last components are the specific IAM controls or condition keys that enforce the control objective. For effective data perimeter controls, use the following primary IAM condition keys, including the new resource owner condition keys:
aws:PrincipalOrgID – Use this condition key to restrict access to trusted identities, your principals (roles or users) that belong to your organization. In the context of a data perimeter, you will use this condition key with your resource-based policies and VPC endpoint policies.
aws:ResourceOrgID – Use this condition key to restrict access to resources that belong to your AWS organization. To establish a data perimeter, you will use this condition key within SCPs and VPC endpoint policies.
aws:SourceIp, aws:SourceVpc, aws:SourceVpce – Use these condition keys to restrict access to expected network locations, such as your corporate network or your VPCs. In the context of a data perimeter, you will use these keys within identity and resource-based policies.
We can now complete the table that we’ve been developing throughout this post.
Data perimeter
Control objective
Implemented by using
Primary IAM capability
Identity
Only trusted identities can access my resources.
Resource-based policies
aws:PrincipalOrgID aws:PrincipalIsAWSService
Only trusted identities are allowed from my network.
VPC endpoint policies
aws:PrincipalOrgID
Resource
My identities can access only trusted resources.
SCPs
aws:ResourceOrgID
Only trusted resources can be accessed from my network.
VPC endpoint policies
aws:ResourceOrgID
Network
My identities can access resources only from expected networks.
For the identity data perimeter, the primary condition key is aws:PrincipalOrgID, which you can use in resource-based policies and VPC endpoint policies so that only your identities are allowed access. Use aws:PrincipalIsAWSService to allow AWS services to access your resources by using their own identities—for example, AWS CloudTrail can use this access to write data to your bucket.
For the resource data perimeter, the primary condition key is aws:ResourceOrgID, which you can use in an SCP policy or VPC endpoint policy to allow your identities and network to access only the resources that belong to your AWS organization.
In this blog post, you learned the foundational elements that are needed to implement an identity, resource, and network data perimeter on AWS, including the primary IAM capabilities that are used to implement each of the control objectives. Stay tuned to the follow-up posts in this series, which will provide prescriptive guidance on establishing your identity, resource, and network data perimeters.
Following are additional resources that will help you further explore the data perimeter topic, including a whitepaper and a hands-on-workshop. We have also curated several blog posts related to the key IAM capabilities discussed in this post.
If you have any questions, comments, or concerns, contact AWS Support or start a new thread on the IAM forum. If you have feedback about this post, submit comments in the Comments section below.
Want more AWS Security news? Follow us on Twitter.
The collective thoughts of the interwebz
Manage Consent
To provide the best experiences, we use technologies like cookies to store and/or access device information. Consenting to these technologies will allow us to process data such as browsing behavior or unique IDs on this site. Not consenting or withdrawing consent, may adversely affect certain features and functions.
Functional
Always active
The technical storage or access is strictly necessary for the legitimate purpose of enabling the use of a specific service explicitly requested by the subscriber or user, or for the sole purpose of carrying out the transmission of a communication over an electronic communications network.
Preferences
The technical storage or access is necessary for the legitimate purpose of storing preferences that are not requested by the subscriber or user.
Statistics
The technical storage or access that is used exclusively for statistical purposes.The technical storage or access that is used exclusively for anonymous statistical purposes. Without a subpoena, voluntary compliance on the part of your Internet Service Provider, or additional records from a third party, information stored or retrieved for this purpose alone cannot usually be used to identify you.
Marketing
The technical storage or access is required to create user profiles to send advertising, or to track the user on a website or across several websites for similar marketing purposes.