Amazon Inspector is a vulnerability management and application security service that helps improve the security of your workloads. It automatically scans applications for vulnerabilities and provides you with a detailed list of security findings, prioritized by their severity level, as well as remediation instructions. In this blog post, we’ll introduce new features from Amazon Inspector that can help you improve the security posture of your AWS Lambda functions.
At re:Invent 2022, Amazon Inspector announced the ability to perform automated security scans of the application package dependencies and associated layers in your Lambda functions. This adds to the existing ability to scan Amazon Elastic Compute Cloud (Amazon EC2) instances and container images in the Amazon Elastic Container Registry (Amazon ECR). The list of operating systems and programming languages that are supported for scanning is available in the Amazon Inspector documentation. On February 28, 2023, Amazon Inspector also announced a new feature, in public preview, to scan your application code in Lambda functions for vulnerabilities. This new feature uses the Detector Library from Amazon CodeGuru to scan your Lambda code. For more details on how the service scans your code, see the Amazon Inspector documentation.
Security is the top priority at AWS. For Lambda, our serverless compute offering, we released a whitepaper that goes into more detail about the security underpinnings of the service. It is important to highlight some differences in the model between infrastructure services such as Amazon EC2 and serverless options such as Lambda. Given the serverless nature of Lambda, besides the infrastructure, AWS also manages the Firecracker microVM software patches, the execution environment, and runtimes. Meanwhile, customers are responsible for using AWS Identity and Access Management (IAM) to create roles and permissions for their Lambda functions and for securing their code that is used with Lambda.
Activate Amazon Inspector
Let’s go over the steps for activating Amazon Inspector.
First, if you’re an existing Amazon Inspector customer, you can enable the new Lambda features from the Amazon Inspector console.
To enable Lambda scanning from the Amazon Inspector console
In the left navigation pane, expand the Settings section, and choose Account Management.
On the Accounts tab, choose Activate, and then select one of two options:
Lambda standard scanning — With this option enabled, Amazon Inspector only scans for package dependencies in your Lambda functions and associated layers.
Lambda standard scanning and Lambda code scanning — With this option enabled, Amazon Inspector scans for package dependencies and also scans your proprietary application code in Lambda for code vulnerabilities. The code scanning feature is only available in certain AWS Regions.
If you’re a new Amazon Inspector customer, we encourage you to try the service by enabling the 15-day free trial, which includes both Lambda function standard scanning and, if available in your Region, code scanning. Figure 1 shows how the Account Management section of the Amazon Inspector console will look, after you enable both features for Lambda. You also have the ability to exclude Lambda functions from being scanned by using AWS tags, as explained in the Amazon Inspector documentation.
Note: The Export CSV button in Figure 1 will be displayed only when you are logged in as the designated Inspector delegated administrator in the Region.
Figure 1: Amazon Inspector account management area
Let’s see these features in action.
To view security findings in the console
In the Amazon Inspector console, on the Findings menu, choose By Lambda function to display the security scan results that were performed on Lambda functions.
You won’t see Lambda functions in the findings if there are no potential vulnerabilities detected by Amazon Inspector. Amazon Inspector discovers eligible Lambda functions in near real time when it is deployed to Lambda and automatically scans the function code and dependencies. For more details on how Lambda functions are scanned, see the Amazon Inspector documentation.
Package vulnerability findings examples
As an example, we will walk through a simple Node.js 12 application. Figure 2 shows a sample Lambda function for which Amazon Inspector generated findings.
Figure 2: Lambda function finding summary
Amazon Inspector found three findings marked with a severity rating of High or Medium, shown in Figure 3. Amazon Inspector detects software vulnerabilities in Lambda functions and categorizes them as type Package Vulnerability (a vulnerable package in Lambda functions or associated layers) or Code Vulnerability (code vulnerabilities in custom code written by a developer – this does not include third-party dependencies, because these are covered under package vulnerabilities). The three findings in Figure 3 are of type Package Vulnerability, and when you choose the Common Vulnerabilities and Exposures (CVE) title, you can find more details about the vulnerability and its status
Figure 3: Amazon Inspector findings for a sample Lambda function
Each Lambda function can have up to five layers (at the time of this writing). A layer is a .zip file archive that can contain additional code or data. Amazon Inspector will also scan the functions’ available layers, and the findings from these scans will be available on the Layers tab, as shown in Figure 4.
Figure 4: Amazon Inspector findings for Lambda Layers
Amazon Inspector sources the data for its vulnerability intelligence database from more than 50 data feeds to generate its CVE findings. Let’s dive deeper into one finding from the sample application—for instance, the CVE-2021-43138-async package shown in Figure 5. The description of the CVE gives a high-level overview of the vulnerability, along with a CVE score to determine the severity.
Figure 5: CVE-2021-43138 finding details
The Amazon Inspector score assigned to the vulnerability will be affected by details such as whether an exploit is available. Amazon Inspector also uses the network reachability of the function as one of its score parameters. This helps you triage your findings appropriately to focus on the functions that could be most vulnerable.
Amazon Inspector will also provide you with remediation instructions for the vulnerable package, if available. In Figure 6, the recommendation to address this particular finding is to upgrade the async package to 3.2.2 to mitigate the vulnerability.
Figure 6: Remediation instructions for the sample application finding
Code vulnerability findings examples
Now let’s look at the new code scanning feature of Amazon Inspector. With this release, Amazon Inspector reviews the security and quality of the code written in your Lambda functions. To do this, the service uses the Amazon CodeGuru Detector Library, which has trained data across millions of code reviews, to generate findings. Amazon Inspector scans the Lambda function code to detect security flaws like cross-site scripting, injection flaws, data leaks, log injection, OS command injections, and other risk categories in the OWASP Top 10 and CWE Top 25. When you enable code scanning, you can focus on building your application while also following current security recommendations. At the time of this writing, Amazon Inspector supports scanning Java, Node.js, Python, and Go Lambda runtimes. For a full list of supported programming language runtimes, see the Amazon Inspector documentation.
As a demonstration of the Amazon Inspector code scanning feature, let’s take the simple Python Lambda function shown following, which accidentally overrides the Lambda reserved environment variables and also has an open-to-all socket connection.
Overriding reserved environment variables might lead to unexpected behavior or failure of the Lambda function. You can learn more about this vulnerability by reviewing the Detector Library documentation. Similarly, a socket connection without an IP address opens the connection to all entities, allowing the function code to potentially access public IPv4 addresses from within the code. There can be external dependencies in your code, which might reuse the insecure socket connection. To learn more about insecure socket binds, see the Detector Library documentation.
As shown in Figure 7, Amazon Inspector automatically detects these vulnerabilities and tags them as Code Vulnerability, which indicates that the vulnerability is in the code of the function, and not in one of the code-dependent libraries. You can see more details for these new finding types under the By Lambda function section of the Amazon Inspector console. You can filter the results based on the function name to see the active vulnerabilities. For this particular function, Amazon Inspector found two vulnerabilities.
Figure 7: Code Vulnerability sample findings
Similar to other finding types, Amazon Inspector tagged the vulnerability based on its severity level, which can help you to triage findings. Let’s focus on the High severity vulnerability in Figure 8 to learn how you can remediate the issue. Selecting the finding reveals additional details, like the name of the detector, the vulnerability location, and remediation details.
Figure 8: Code Vulnerability finding details
Now let’s see how you can remediate these vulnerabilities according to the suggested remediation. The code is attempting to change the function handler. AWS recommends that you don’t try to override reserved Lambda environment variables, because this can lead to unexpected results. For this case, we recommend that you delete line 8 from the sample code shown here and instead update the Lambda function handler name by using the runtime settings configuration in the Lambda console, as shown in Figure 9.
To change the Lambda function handler
In the Lambda console, search for and then select your Lambda function.
Scroll down to the Runtime settings area and choose Edit.
Under Edit runtime settings, update the handler name, and then choose Save.
Figure 9: Lambda function runtime settings
To address the second finding, we also updated the function by passing an IP address when binding to a socket, according to the recommendations that were included in the finding. Amazon Inspector will automatically detect the changes that are made to fix the issues, and change the status of the finding to closed, as shown in Figure 10. By changing the findings filter to Show all, you can see active and closed findings.
Figure 10: Findings summary after remediation
You can create more complex workflows by using the Amazon Inspector integration with Amazon EventBridge to manually or automatically respond to findings by creating various playbooks to respond to unique events. These findings will also be routed to AWS Security Hub for a centralized view of your Amazon Inspector findings in your AWS accounts and Regions.
Pricing
Pricing for Lambda standard scanning is available on the Amazon Inspector pricing page. During the public preview, the code scanning feature will be available at no additional cost.
Conclusion
In this blog post, we introduced two new Amazon Inspector features that scan your Lambda function application package dependencies, as well as your application code, for security vulnerabilities. With these new features, you can strengthen your security posture by scanning for code security vulnerabilities such as injection flaws, data leaks, and unsanitized input, according to current AWS security recommendations. We encourage you to test Lambda function scanning in your own environment by enabling the free trial for Amazon Inspector and following the steps in the Amazon Inspector documentation.
With Amazon Cognitouser pools, you can configure third-party SAML identity providers (IdPs) so that users can log in by using the IdP credentials. The Amazon Cognito user pool manages the federation and handling of tokens returned by a configured SAML IdP. It uses the public certificate of the SAML IdP to verify the signature in the SAML assertion returned by the IdP. Public certificates have an expiry date, and an expired public certificate will result in a SAML user federation failing because it can no longer be used for signature verification. To avoid user authentication failures, you must monitor and rotate SAML public certificates before expiration.
You can configure SAML IdPs in an Amazon Cognito user pool by using a SAML metadata document or a URL that points to the metadata document. If you use the SAML metadata document option, you must manually upload the SAML metadata. If you use the URL option, Amazon Cognito downloads the metadata from the URL and automatically configures the SAML IdP. In either scenario, if you don’t rotate the SAML certificate before expiration, users can’t log in using that SAML IdP.
In this blog post, I will show you how to monitor SAML certificates that are about to expire or already expired in an Amazon Cognito user pool by using an AWS Lambda function initiated by an Amazon EventBridge rule.
Solution overview
In this section, you will learn how to configure a Lambda function that checks the validity period of the SAML IdP certificates in an Amazon Cognito user pool, logs the findings to AWS Security Hub, and sends out an Amazon Simple Notification Service (Amazon SNS) notification with the list of certificates that are about to expire or have already expired. This Lambda function is invoked by an EventBridge rule that uses a rate or cron expression and runs on a defined schedule. For example, if the rate expression is defined as 1 day, the EventBridge rule initiates the Lambda function once each day. Figure 1 shows an overview of this process.
Figure 1: Lambda function initiated by EventBridge rule
As shown in Figure 1, this process involves the following steps:
Gets the list of SAML IdPs and corresponding X509 certificates.
Verifies if the X509 certificates are about to expire or already expired based on the dates in the certificate.
Based on the results of step 2, the Lambda function logs the findings in AWS Security Hub. Each finding shows the SAML certificate that is about to expire or is already expired.
Based on the results of step 2, the Lambda function publishes a notification to the Amazon SNS topic with the certificate expiration details. For example, if CERT_EXPIRY_DAYS=60, the details of SAML certificates that are going to expire within 60 days or are already expired are published in the SNS notification.
Amazon SNS sends messages to the subscribers of the topic, such as an email address.
Prerequisites
For this setup, you will need to have the following in place:
In this section, we will walk you through how to deploy the Lambda function and configure an EventBridge rule that invokes the Lambda function.
Step 1: Create the Node.js Lambda package
Open a command line terminal or shell.
Create a folder named saml-certificate-expiration-monitoring.
Install the fast-xml-parser module by running the following command:
cd saml-certificate-expiration-monitoring
npm install fast-xml-parser
Create a file named index.js and paste the following content in the file.
const AWS = require('aws-sdk');
const { X509Certificate } = require('crypto');
const { XMLParser} = require("fast-xml-parser");
const https = require('https');

exports.handler = async function(event, context, callback) {

    const cognitoUPID = process.env.COGNITO_UPID;
    const expiryDays = process.env.CERT_EXPIRY_DAYS;
    const snsTopic = process.env.SNS_TOPIC_ARN;
    const postToSh = process.env.ENABLE_SH_MONITORING; //Enable security hub monitoring
    var securityhub = new AWS.SecurityHub({apiVersion: '2018-10-26'});

    var shParams = {
      Findings: []
    };

    AWS.config.apiVersions = {
      cognitoidentityserviceprovider: '2016-04-18',
    };

    // Initialize CognitoIdentityServiceProvider.
    const cognitoidentityserviceprovider = new AWS.CognitoIdentityServiceProvider();

    let listProvidersParams = {
      UserPoolId: cognitoUPID /* required */
    };

    let hasNext = true;
    const providerNames = [];

    while (hasNext) {
      const listProvidersResp = await cognitoidentityserviceprovider.listIdentityProviders(listProvidersParams).promise();
      listProvidersResp['Providers'].forEach(function(provider) {
            if(provider.ProviderType == 'SAML') {
              providerNames.push(provider.ProviderName);
            }
        });

      listProvidersParams.NextToken = listProvidersResp.NextToken;
      hasNext = !!listProvidersResp.NextToken; //Keep iterating if there are more pages
    }

    let describeIdentityProviderParams = {
      UserPoolId: cognitoUPID /* required */
    };

    //Initialize the options for fast-xml-parser
    //Parse KeyDescriptor as an array
    const alwaysArray = [
      "EntityDescriptor.IDPSSODescriptor.KeyDescriptor"
    ];
    const options = {
      removeNSPrefix: true,
      isArray: (name, jpath, isLeafNode, isAttribute) => {
        if( alwaysArray.indexOf(jpath) !== -1) return true;
      },
      ignoreDeclaration: true
    };
    const parser = new XMLParser(options);

    let certExpMessage = '';
    const today = new Date();

    if(providerNames.length == 0) {
      console.log("There are no SAML providers in this Cognito user pool. ID : " + cognitoUPID);
    }

    for (let provider of providerNames) {
      describeIdentityProviderParams.ProviderName = provider;
      const descProviderResp = await cognitoidentityserviceprovider.describeIdentityProvider(describeIdentityProviderParams).promise();
      let xml = '';
      //Read SAML metadata from Cognito if the file is available. Else, read the SAML metadata from URL
      if('MetadataFile' in descProviderResp.IdentityProvider.ProviderDetails) {
        xml = descProviderResp.IdentityProvider.ProviderDetails.MetadataFile;
      } else {
        let metadata_promise = getMetadata(descProviderResp.IdentityProvider.ProviderDetails.MetadataURL);
		    xml = await metadata_promise;
      }
      let jObj = parser.parse(xml);
      if('EntityDescriptor' in jObj) {
        //SAML metadata can have multiple certificates for signature verification.
        for (let cert of jObj['EntityDescriptor']['IDPSSODescriptor']['KeyDescriptor']) {
          let certificate = '-----BEGIN CERTIFICATE-----\n'
          + cert['KeyInfo']['X509Data']['X509Certificate']
          + '\n-----END CERTIFICATE-----';
          let x509cert = new X509Certificate(certificate);
          console.log("------ Provider : " + provider + "-------");
          console.log("Cert Expiry: " + x509cert.validTo);
          const diffTime = Math.abs(new Date(x509cert.validTo) - today);
          const diffDays = Math.ceil(diffTime / (1000 * 60 * 60 * 24));
          console.log("Days Remaining: " + diffDays);
          if(diffDays <= expiryDays) {

            certExpMessage += 'Provider name: ' + provider + ' SAML certificate (serialnumber : '+ x509cert.serialNumber + ') expiring in ' + diffDays + ' days \n';

            if(postToSh === 'true') {
              //Log finding for security hub
              logFindingToSh(context, shParams,
              'Provider name: ' + provider + ' SAML certificate is expiring in ' + diffDays + ' days. Please contact the Identity provider to rotate the certificate.',
              x509cert.fingerprint, cognitoUPID, provider);
            }
          }
        }
      }
    }
    //Send a SNS message if a certificate is about to expire or already expired
    if(certExpMessage) {
      console.log("SAML certificates expiring within next " + expiryDays + " days :\n");
      console.log(certExpMessage);
      certExpMessage = "SAML certificates expiring within next " + expiryDays + " days :\n" + certExpMessage;
      // Create publish parameters
      let snsParams = {
        Message: certExpMessage, /* required */
        TopicArn: snsTopic
      };
      // Create promise and SNS service object
      let publishTextPromise = await new AWS.SNS({apiVersion: '2010-03-31'}).publish(snsParams).promise();
      console.log(publishTextPromise);

      if(postToSh === 'true') {
        console.log("Posting the finding to SecurityHub");
        let shPromise = await securityhub.batchImportFindings(shParams).promise();
        console.log("shPromise : " + JSON.stringify(shPromise));
      }

    } else {
      console.log("No certificates are expiring within " + expiryDays + " days");
    }
};

function getMetadata(url) {
	return new Promise((resolve, reject) => {
		https.get(url, (response) => {
			let chunks_of_data = [];

			response.on('data', (fragments) => {
				chunks_of_data.push(fragments);
			});

			response.on('end', () => {
				let response_body = Buffer.concat(chunks_of_data);
				resolve(response_body.toString());
			});

			response.on('error', (error) => {
				reject(error);
			});
		});
	});
}

function logFindingToSh(context, shParams, remediationMsg, certFp, cognitoUPID, provider) {
  const accountID = context.invokedFunctionArn.split(':')[4];
  const region = process.env.AWS_REGION;
  const sh_product_arn = `arn:aws:securityhub:${region}:${accountID}:product/${accountID}/default`;
  const today = new Date().toISOString();

  shParams.Findings.push(
        {
      SchemaVersion: "2018-10-08",
      AwsAccountId: `${accountID}`, /* required */
      CreatedAt: `${today}`, /* required */
      UpdatedAt: `${today}`,
      Title: 'SAML Certificate expiration',
      Description: 'SAML certificate expiry', /* required */
      GeneratorId: `${context.invokedFunctionArn}`, /* required */
      Id: `${cognitoUPID}:${provider}:${certFp}`, /* required */
      ProductArn: `${sh_product_arn}`, /* required */
      Severity: {
          Original: '89.0',
          Label: 'HIGH'
      },
      Types: [
                "Software and Configuration Checks/AWS Config Analysis"
      ],
      Compliance: {Status: 'WARNING'},
      Resources: [ /* required */
        {
          Id: `${cognitoUPID}`, /* required */
          Type: 'AWSCognitoUserPool', /* required */
          Region: `${region}`,
          Details : {
            Other: {
                       "IdPIdentifier" : `${provider}`
            }
          }
        }
      ],
      Remediation: {
                Recommendation: {
                    Text: `${remediationMsg}`,
                    Url: `https://console.aws.amazon.com/cognito/v2/idp/user-pools/${cognitoUPID}/sign-in/identity-providers/details/${provider}`
                }
      }
    }
  );
}
To create the deployment package for a .zip file archive, you can use a built-in .zip file archive utility or other third-party zip file utility. If you are using Linux or Mac OS, run the following command.
zip -r saml-certificate-expiration-monitoring.zip .
Step 2: Create an Amazon SNS topic
Create a standard Amazon SNS topic named saml-certificate-expiration-monitoring-topic for the Lambda function to use to send out notifications, as described in Creating an Amazon SNS topic.
Copy the Amazon Resource Name (ARN) for Amazon SNS. Later in this post, you will use this ARN in the AWS Identity and Access Management (IAM) policy and Lambda environment variable configuration.
After you create the Amazon SNS topic, create email subscribers to this topic.
Step 3: Configure the IAM role and policies and deploy the Lambda function
In the IAM documentation, review the section Creating policies on the JSON tab. Then, using those instructions, use the following template to create an IAM policy named lambda-saml-certificate-expiration-monitoring-function-policy for the Lambda role to use. Replace <REGION> with your Region, <AWS-ACCT-NUMBER> with your AWS account ID, <SNS-ARN> with the Amazon SNS ARN from Step 2: Create an Amazon SNS topic, and <USER_POOL_ID> with your Amazon Cognito user pool ID that you want to monitor.
After the policy is created, create a role for the Lambda function to use the policy, by following the instructions in Creating a role to delegate permissions to an AWS service. Choose Lambda as the service to assume the role and attach the policy lambda-saml-certificate-expiration-monitoring-function-policy that you created in step 1 of this section. Specify a role named lambda-saml-certificate-expiration-monitoring-function-role, and then create the role.
If you make code changes after uploading, deploy the Lambda function.
Step 4: Create an EventBridge rule
Follow the instructions in creating an Amazon EventBridge rule that runs on a schedule to create a rule named saml-certificate-expiration-monitoring-rule. You can use a rate expression of 24 hours to initiate the event. This rule will invoke the Lambda function once per day.
Create an environment variable called CERT_EXPIRY_DAYS. This specifies how much lead time, in days, you want to have before the certificate expiration notification is sent.
Create an environment variable called COGNITO_UPID. This identifies the Amazon Cognito user pool ID that needs to be monitored.
Create an environment variable called ENABLE_SH_MONITORING and set it to true or false. If you set it to true, the Lambda function will log the findings in AWS Security Hub.
Configure a test event for the Lambda function by using the default template and name it TC1, as shown in Figure 2.
Figure 2: Create a Lambda test case
Run the TC1 test case to test the Lambda function. To make sure that the Lambda function ran successfully, check the Amazon CloudWatchlogs. You should see the console log messages from the Lambda function. If ENABLE_SH_MONITORING is set to true in the Lambda environment variables, you will see a list of findings in AWS Security Hub for certificates with an expiry of less than or equal to the value of the CERT_EXPIRY_DAYS environment variable. Also, an email will be sent to each subscriber of the Amazon SNS topic.
Cleanup
To avoid future charges, delete the following resources used in this post (if you don’t need them) and disable AWS Security Hub.
Lambda function
EventBridge rule
CloudWatch logs associated with the Lambda function
Amazon SNS topic
IAM role and policy that you created for the Lambda function
Conclusion
An Amazon Cognito user pool with hundreds of SAML IdPs can be challenging to monitor. If a SAML IdP certificate expires, users can’t log in using that SAML IdP. This post provides the steps to monitor your SAML IdP certificates and send an alert to Amazon Cognito user pool administrators when a certificate is about to expire so that you can proactively work with your SAML IdP administrator to rotate the certificate. Now that you’ve learned the benefits of monitoring your IdP certificates for expiration, I recommend that you implement these, or similar, controls to make sure that you’re notified of these events before they occur.
If you have feedback about this post, submit comments in the Comments section below. If you have questions about this post, start a new thread on the Amazon Cognito re:Post or contact AWS Support.
Want more AWS Security news? Follow us on Twitter.
This is a guest post co-written with Jonatan Selsing and Moses Arthur from Novo Nordisk.
This is the second post of a three-part series detailing how Novo Nordisk, a large pharmaceutical enterprise, partnered with AWS Professional Services to build a scalable and secure data and analytics platform. The first post of this series describes the overall architecture and how Novo Nordisk built a decentralized data mesh architecture, including Amazon Athena as the data query engine. The third post will show how end-users can consume data from their tool of choice, without compromising data governance. This will include how to configure Okta, AWS Lake Formation, and a business intelligence tool to enable SAML-based federated use of Athena for an enterprise BI activity.
When building a scalable data architecture on AWS, giving autonomy and ownership to the data domains are crucial for the success of the platform. By providing the right mix of freedom and control to those people with the business domain knowledge, your business can maximize value from the data as quickly and effectively as possible. The challenge facing organizations, however, is how to provide the right balance between freedom and control. At the same time, data is a strategic asset that needs to be protected with the highest degree of rigor. How can organizations strike the right balance between freedom and control?
In this post, you will learn how to build decentralized governance with Lake Formation and AWS Identity and Access Management (IAM) using attribute-based access control (ABAC). We discuss some of the patterns we use, including Amazon Cognito identity pool federation using ABAC in permission policies, and Okta-based SAML federation with ABAC enforcement on role trust policies.
Solution overview
In the first post of this series, we explained how Novo Nordisk and AWS Professional Services built a modern data architecture based on data mesh tenets. This architecture enables data governance on distributed data domains, using an end-to-end solution to create data products and providing federated data access control. This post dives into three elements of the solution:
How IAM roles and Lake Formation are used to manage data access across data domains
How data access control is enforced at scale, using a group membership mapping with an ABAC pattern
How the system maintains state across the different layers, so that the ecosystem of trust is configured appropriately
From the end-user perspective, the objective of the mechanisms described in this post is to enable simplified data access from the different analytics services adopted by Novo Nordisk, such as those provided by software as a service (SaaS) vendors like Databricks, or self-hosted ones such as JupyterHub. At the same time, the platform must guarantee that any change in a dataset is immediately reflected at the service user interface. The following figure illustrates at a high level the expected behavior.
Following the layer nomenclature established in the first post, the services are created and managed in the consumption layer. The domain accounts are created and managed in the data management layer. Because changes can occur from both layers, continuous communication in both directions is required. The state information is kept in the virtualization layer along with the communication protocols. Additionally, at sign-in time, the services need information about data resources required to provide data access abstraction.
Managing data access
The data access control in this architecture is designed around the core principle that all access is encapsulated in isolated IAM role sessions. The layer pattern that we described in the first post ensures that the creation and curation of the IAM role policies involved can be delegated to the different data management ecosystems. Each data management platform integrated can use their own data access mechanisms, with the unique requirement that the data is accessed via specific IAM roles.
To illustrate the potential mechanisms that can be used by data management solutions, we show two examples of data access permission mechanisms used by two different data management solutions. Both systems utilize the same trust policies as described in the following sections, but have a completely different permission space.
Example 1: Identity-based ABAC policies
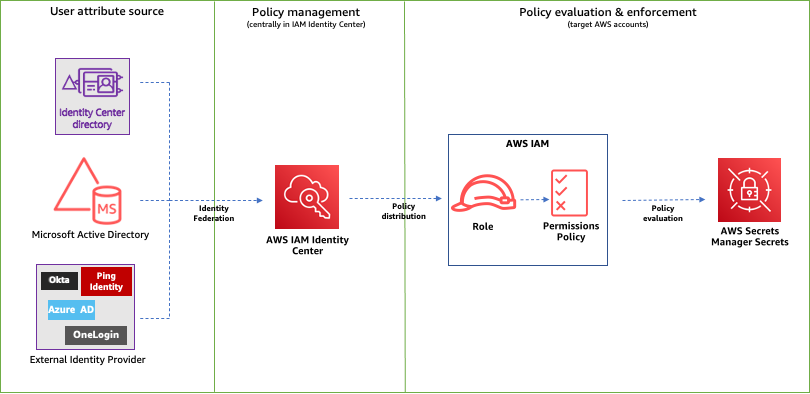
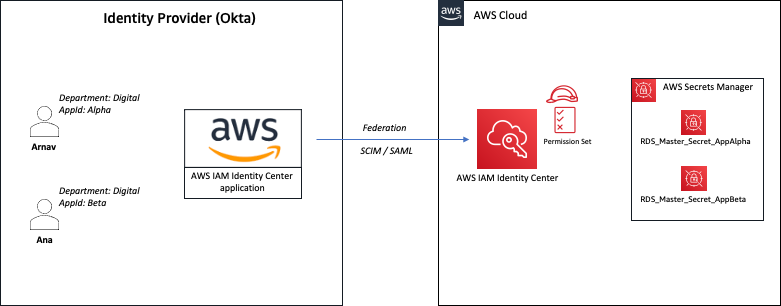
The first mechanism we discuss is an ABAC role that provides access to a home-like data storage area, where users can share within their departments and with the wider organization in a structure that mimics the organizational structure. Here, we don’t utilize the group names, but instead forward user attributes from the corporate Active Directory directly into the permission policy through claim overrides. We do this by having the corporate Active Directory as the identity provider (IdP) for the Amazon Cognito user pool and mapping the relevant IdP attributes to user pool attributes. Then, in the Amazon Cognito identity pool, we map the user pool attributes to session tags to use them for access control. Custom overrides can be included in the claim mapping, through the use of a pre token generation Lambda trigger. This way, claims from AD can be mapped to Amazon Cognito user pool attributes and then ultimately used in the Amazon Cognito identity pool to control IAM role permissions. The following is an example of an IAM policy with sessions tags:
This role is then embedded in the analytics layer (together with the data domain roles) and assumed on behalf of the user. This enables users to mix and match between data domains—as well as utilizing private and public data paths that aren’t necessarily tied to any data domain. For more examples of how ABAC can be used with permission policies, refer to How to scale your authorization needs by using attribute-based access control with S3.
Example 2: Lake Formation name-based access controls
In the data management solution named Novo Nordisk Enterprise Datahub (NNEDH), which we introduced in the first post, we use Lake Formation to enable standardized data access. The NNEDH datasets are registered in the Lake Formation Data Catalog as databases and tables, and permissions are granted using the named resource method. The following screenshot shows an example of these permissions.
In this approach, data access governance is delegated to Lake Formation. Every data domain in NNEDH has isolated permissions synthesized by NNEDH as the central governance management layer. This is a similar pattern to what is adopted for other domain-oriented data management solutions. Refer to Use an event-driven architecture to build a data mesh on AWS for an example of tag-based access control in Lake Formation.
These patterns don’t exclude implementations of peer-to-peer type data sharing mechanisms, such as those that can be achieved using AWS Resource Access Manager (AWS RAM), where a single IAM role session can have permissions that span across accounts.
Delegating role access to the consumption later
The following figure illustrates the data access workflow from an external service.
The workflow steps are as follows:
A user authenticates on an IdP used by the analytics tool that they are trying to access. A wide range of analytics tools are supported by Novo Nordisk platform, such as Databricks and JupyterHub, and the IdP can be either SAML or OIDC type depending on the capabilities of the third-party tool. In this example, an Okta SAML application is used to sign into a third-party analytics tool, and an IAM SAML IdP is configured in the data domain AWS account to federate with the external IdP. The third post of this series describes how to set up an Okta SAML application for IAM role federation on Athena.
The SAML assertion obtained during the sign-in process is used to request temporary security credentials of an IAM role through the AssumeRole operation. In this example, the SAML assertion is used onAssumeRoleWithSAMLoperation. For OpenID Connect-compatible IdPs, the operationAssumeRoleWithWebIdentitymust be used with the JWT. The SAML attributes in the assertion or the claims in the token can be generated at sign-in time, to ensure that the group memberships are forwarded, for the ABAC policy pattern described in the following sections.
The analytics tool, such as Databricks or JupyterHub, abstracts the usage of the IAM role session credentials in the tool itself, and data can be accessed directly according to the permissions of the IAM role assumed. This pattern is similar in nature to IAM passthrough as implemented by Databricks, but in Novo Nordisk it’s extended across all analytics services. In this example, the analytics tool accesses the data lake on Amazon Simple Storage Service (Amazon S3) through Athena queries.
As the data mesh pattern expands across domains covering more downstream services, we need a mechanism to keep IdPs and IAM role trusts continuously updated. We come back to this part later in the post, but first we explain how role access is managed at scale.
Attribute-based trust policies
In previous sections, we emphasized that this architecture relies on IAM roles for data access control. Each data management platform can implement its own data access control method using IAM roles, such as identity-based policies or Lake Formation access control. For data consumption, it’s crucial that these IAM roles are only assumable by users that are part of Active Directory groups with the appropriate entitlements to use the role. To implement this at scale, the IAM role’s trust policy uses ABAC.
When a user authenticates on the external IdP of the consumption layer, we add in the access token a claim derived from their Active Directory groups. This claim is propagated by theAssumeRoleoperation into the trust policy of the IAM role, where it is compared with the expected Active Directory group. Only users that belong to the expected groups can assume the role. This mechanism is illustrated in the following figure.
Translating group membership to attributes
To enforce the group membership entitlement at the role assumption level, we need a way to compare the required group membership with the group memberships that a user comes with in their IAM role session. To achieve this, we use a form of ABAC, where we have a way to represent the sum of context-relevant group memberships in a single attribute. A single IAM role session tag value is limited to 256 characters. The corresponding limit for SAML assertions is 100,000 characters, so for systems where a very large number of either roles or group-type mappings are required, SAML can support a wider range of configurations.
In our case, we have opted for a compression algorithm that takes a group name and compresses it to a 4-character string hash. This means that, together with a group-separation character, we can fit 51 groups in a single attribute. This gets pushed down to approximately 20 groups for OIDC type role assumption due to the PackedPolicySize, but is higher for a SAML-based flow. This has shown to be sufficient for our case. There is a risk that two different groups could hash to the same character combination; however, we have checked that there are no collisions in the existing groups. To mitigate this risk going forward, we have introduced guardrails in multiples places. First, before adding new groups entitlements in the virtualization layer, we check if there’s a hash collision with any existing group. When a duplicated group is attempted to be added, our service team is notified and we can react accordingly. But as stated earlier, there is a low probability of clashes, so the flexibility this provides outweighs the overhead associated with managing clashes (we have not had any yet). We additionally enforce this at SAML assertion creation time as well, to ensure that there are no duplicated groups in the users group list, and in cases of duplication, we remove both entirely. This means malicious actors can at most limit the access of other users, but not gain unauthorized access.
Enforcing audit functionality across sessions
As mentioned in the first post, on top of governance, there are strict requirements around auditability of data accesses. This means that for all data access requests, it must be possible to trace the specific user across services and retain this information. We achieve this by setting (and enforcing) a source identity for all role sessions and make sure to propagate enterprise identity to this attribute. We use a combination of Okta inline hooks and SAML session tags to achieve this. This means that the AWS CloudTrail logs for an IAM role session have the following information:
On the IAM role level, we can enforce the required attribute configuration with the following example trust policy. This is an example for a SAML-based app. We support the same patterns through OpenID Connect IdPs.
We now go through the elements of an IAM role trust policy, based on the following example:
ThePrincipalstatement should point to the list of apps that are served through the consumption layer. These can be Azure app registrations, Okta apps, or Amazon Cognito app clients. This means that SAML assertions (in the case of SAML-based flows) minted from these applications can be used to run the operationAssumeRoleWithSamlif the remaining elements are also satisfied.
TheActionstatement includes the required permissions for theAssumeRolecall to succeed, including adding the contextual information to the role session.
In the first condition, the audience of the assertion needs to be targeting AWS.
In the second condition, there are twoStringLikerequirements:
A requirement on the source identity as the naming convention to follow at Novo Nordisk (users must come with enterprise identity, following our audit requirements).
Theaws:RequestTag/GroupHashneeds to bexxxx, which represents the hashed group name mentioned in the upper section.
Lastly, we enforce that sessions can’t be started without setting the source identity.
This policy enforces that all calls are from recognized services, include auditability, have the right target, and enforces that the user has the right group memberships.
Building a central overview of governance and trust
In this section, we discuss how Novo Nordisk keeps track of the relevant group-role relations and maps these at sign-in time.
Entitlements
In Novo Nordisk, all accesses are based on Active Directory group memberships. There is no user-based access. Because this pattern is so central, we have extended this access philosophy into our data accesses. As mentioned earlier, at sign-in time, the hooks need to be able to know which roles to assume for a given user, given this user’s group membership. We have modeled this data in Amazon DynamoDB, where just-in-time provisioning ensures that only the required user group memberships are available. By building our application around the use of groups, and by having the group propagation done by the application code, we avoid having to make a more general Active Directory integration, which would, for a company the size of Novo Nordisk, severely impact the application, simply due to the volume of users and groups.
The DynamoDB entitlement table contains all relevant information for all roles and services, including role ARNs and IdP ARNs. This means that when users log in to their analytics services, the sign-in hook can construct the required information for the Roles SAML attribute.
When new data domains are added to the data management layer, the data management layer needs to communicate both the role information and the group name that gives access to the role.
Single sign-on hub for analytics services
When scaling this permission model and data management pattern to a large enterprise such as Novo Nordisk, we ended up creating a large number of IAM roles distributed across different accounts. Then, a solution is required to map and provide access for end-users to the required IAM role. To simplify user access to multiple data sources and analytics tools, Novo Nordisk developed a single sign-on hub for analytics services. From the end-user perspective, this is a web interface that glues together different offerings in a unified system, making it a one-stop tool for data and analytics needs. When signing in to each of the analytical offerings, the authenticated sessions are forwarded, so users never have to reauthenticate.
Common for all the services supported in the consumption layer is that we can run a piece of application code at sign-in time, allowing sign-in time permissions to be calculated. The hooks that achieve this functionality can, for instance, be run by Okta inline hooks. This means that each of the target analytics services can have custom code to translate relevant contextual information or provide other types of automations for the role forwarding.
The sign-in flow is demonstrated in the following figure.
The workflow steps are as follows:
A user accesses an analytical service such as Databricks in the Novo Nordisk analytics hub.
The service uses Okta as the SAML-based IdP.
Okta invokes an AWS Lambda-based SAML assertion inline hook.
The hook uses the entitlement database, converting application-relevant group memberships into role entitlements.
Relevant contextual information is returned from the entitlement database.
The Lambda-based hook adds new SAML attributes to the SAML assertion, including the hashed group memberships and other contextual information such as source identity.
A modified SAML assertion is used to sign users in to the analytical service.
The user can now use the analytical tool with active IAM role sessions.
Synchronizing role trust
The preceding section gives an overview of how federation works in this solution. Now we can go through how we ensure that all participating AWS environments and accounts are in sync with the latest configuration.
From the end-user perspective, the synchronization mechanism must ensure that every analytics service instantiated can access the data domains assigned to the groups that the user belongs to. Also, changes in data domains—such as granting data access to an Active Directory group—must be effective immediately to every analytics service.
Two event-based mechanisms are used to maintain all the layers synchronized, as detailed in this section.
Synchronize data access control on the data management layer with changes to services in the consumption layer
As describe in the previous section, the IAM roles used for data access are created and managed by the data management layer. These IAM roles have a trust policy providing federated access to the external IdPs used by the analytics tools of the consumption layer. It implies that for every new analytical service created with a different IDP, the IAM roles used for data access on data domains must be updated to trust this new IdP.
Using NNEDH as an example of a data management solution, the synchronization mechanism is demonstrated in the following figure.
Taking as an example a scenario where a new analytics service is created, the steps in this workflow are as follows:
A user with access to the administration console of the consumption layer instantiates a new analytics service, such as JupyterHub.
A job running on AWS Fargate creates the resources needed for this new analytics service, such as an Amazon Elastic Compute Cloud (Amazon EC2) instance for JupyterHub, and the IdP required, such as a new SAML IdP.
When the IdP is created in the previous step, an event is added in an Amazon Simple Notification Service (Amazon SNS) topic with its details, such as name and SAML metadata.
In the NNEDH control plane, a Lambda job is triggered by new events on this SNS topic. This job creates the IAM IdP, if needed, and updates the trust policy of the required IAM roles in all the AWS accounts used as data domains, adding the trust on the IdP used by the new analytics service.
In this architecture, all the update steps are event-triggered and scalable. This means that users of new analytics services can access their datasets almost instantaneously when they are created. In the same way, when a service is removed, the federation to the IdP is automatically removed if not used by other services.
Propagate changes on data domains to analytics services
Changes to data domains, such as the creation of a new S3 bucket used as a dataset, or adding or removing data access to a group, must be reflected immediately on analytics services of the consumption layer. To accomplish it, a mechanism is used to synchronize the entitlement database with the relevant changes made in NNEDH. This flow is demonstrated in the following figure.
Taking as an example a scenario where access to a specific dataset is granted to a new group, the steps in this workflow are as follows:
Using the NNEDH admin console, a data owner approves a dataset sharing request that grants access on a dataset to an Active Directory group.
In the AWS account of the related data domain, the dataset components such as the S3 bucket and Lake Formation are updated to provide data access to the new group. The cross-account data sharing in Lake Formation uses AWS RAM.
An event is added in an SNS topic with the current details about this dataset, such as the location of the S3 bucket and the groups that currently have access to it.
In the virtualization layer, the updated information from the data management layer is used to update the entitlement database in DynamoDB.
These steps make sure that changes on data domains are automatically and immediately reflected on the entitlement database, which is used to provide data access to all the analytics services of the consumption layer.
Limitations
Many of these patterns rely on the analytical tool to support a clever use of IAM roles. When this is not the case, the platform teams themselves need to develop custom functionality at the host level to ensure that role accesses are correctly controlled. This, for example, includes writing custom authenticators for JupyterHub.
Conclusion
This post shows an approach to building a scalable and secure data and analytics platform. It showcases some of the mechanisms used at Novo Nordisk and how to strike the right balance between freedom and control. The architecture laid out in the first post in this series enables layer independence, and exposes some extremely useful primitives for data access and governance. We make heavy use of contextual attributes to modulate role permissions at the session level, which provide just-in-time permissions. These permissions are propagated at a scale, across data domains. The upside is that a lot of the complexity related to managing data access permission can be delegated to the relevant business groups, while enabling the end-user consumers of data to think as little as possible about data accesses and focus on providing value for the business use cases. In the case of Novo Nordisk, they can provide better outcomes for patients and acceleration innovation.
The next post in this series describes how end-users can consume data from their analytics tool of choice, aligned with the data access controls detailed in this post.
About the Authors
Jonatan Selsing is former research scientist with a PhD in astrophysics that has turned to the cloud. He is currently the Lead Cloud Engineer at Novo Nordisk, where he enables data and analytics workloads at scale. With an emphasis on reducing the total cost of ownership of cloud-based workloads, while giving full benefit of the advantages of cloud, he designs, builds, and maintains solutions that enable research for future medicines.
Hassen Riahi is a Sr. Data Architect at AWS Professional Services. He holds a PhD in Mathematics & Computer Science on large-scale data management. He works with AWS customers on building data-driven solutions.
Alessandro Fior is a Sr. Data Architect at AWS Professional Services. He is passionate about designing and building modern and scalable data platforms that accelerate companies to extract value from their data.
Moses Arthur comes from a mathematics and computational research background and holds a PhD in Computational Intelligence specialized in Graph Mining. He is currently a Cloud Product Engineer at Novo Nordisk, building GxP-compliant enterprise data lakes and analytics platforms for Novo Nordisk global factories producing digitalized medical products.
Anwar Rizal is a Senior Machine Learning consultant based in Paris. He works with AWS customers to develop data and AI solutions to sustainably grow their business.
Kumari Ramar is an Agile certified and PMP certified Senior Engagement Manager at AWS Professional Services. She delivers data and AI/ML solutions that speed up cross-system analytics and machine learning models, which enable enterprises to make data-driven decisions and drive new innovations.
In the AWS Security Profile series, I interview some of the humans who work in AWS Security and help keep our customers safe and secure. In this profile, I interviewed Tatyana Yatskevich, Principal Solutions Architect for AWS Identity.
How long have you been at AWS and what do you do in your current role?
I’ve been at AWS for about five and a half years now. I’ve had several different roles, but I’m currently part of the Identity Solutions team, which is a team of solutions architects who are embedded into the Identity and Control Service. Our team focuses on staying current with customer use cases and emerging problems in the identity space so that we can facilitate the development of new capabilities and prescriptive guidance from AWS.
To keep up with the demand in certain industries, we work with some enterprise customers that operate large cloud environments on AWS. Knowing what these customers need to do to achieve their business outcomes while operating under stringent regulatory compliance requirements helps us provide valuable input into our service and feature development process and support customers in their cloud journey in the most efficient manner.
How did you get started in security?
At the beginning of my career, I mostly just happened to work on security-related projects. I performed security and vulnerability assessments, facilitated remediation work, and managed traditional on-premises security solutions such as web proxies, firewalls, and VPNs. Through these projects, I developed an interest in the security field because of its wide reach and impact, and because it presents a lot of opportunities for growth and problem solving as new challenges arise almost daily. My roles at AWS have been a logical continuation of my security-focused career. Here, I’ve mostly been motivated by empowering security teams to become business enablers, rather than being perceived as blockers to innovation and agility.
How do you explain your job to non-technical friends and family?
I usually give an example of a service or feature that most of us interact with on a regular basis, such as a banking application. I explain that it takes a lot of engineering work to build that application from the ground up and deliver on the user experience and security. That engineering work involves the use of many different technologies that support the user sign-in process, or storage of your personal information like your social security or credit card numbers. My job is to help companies that provide these services implement the proper security controls so that your personal information is used in accordance with local laws and isn’t disclosed for unauthorized use.
In your opinion, what’s one of the coolest things happening in identity right now?
I think it’s the increased role of identity, authentication, and authorization controls in the overall security model of newly built applications. It spans from helping to ensure secure workforce mobility now that providing access to business applications from anywhere is critical to business competitiveness, to keeping Internet of Things (IoT) infrastructure protected and operated in accordance with zero trust. The realization of the power and the increasing usage of identity-specific controls to manage access to digital assets is the coolest trend in identity right now.
What are you currently working on that you’re excited about?
One of the areas that I’m highly invested in is data perimeters. A data perimeter is a set of capabilities that help customers keep their data within their organizational boundary and mitigate the risks of data exfiltration or unintended access to data. We have customers in a wide variety of industries, such as the financial sector, telecom, media and entertainment, and public sector. There are compliance and regulatory requirements that they operate under. A lot of those requirements emphasize controls that guard sensitive data from unauthorized access and prevent movement of that data to places outside of company’s control.
To help customers meet these requirements in a scalable way, we continuously invest in the development of new capabilities. I talk to some of our largest enterprise customers on a regular basis to understand their challenges in this area, and I work with service teams to introduce new capabilities to meet new requirements. I also lead efforts to extend customer-facing guidance and solutions so that customers can design and implement data perimeters on their own. And I present at AWS events to reach more customers, with the most recent being our presentation with Goldman Sachs at re:Invent 2022.
Tell me about that presentation.
I co-presented a chalk talk with Shubham Shukla, Vice President of Cloud Enablement at Goldman Sachs, called Establishing a Data Perimeter on AWS. The session gave an overview of data perimeter capabilities and showcased Goldman Sachs’ experience implementing data perimeter controls at scale in their multi-account AWS environment. What’s cool about that session, I think, is that it’s always good to present about AWS best practices and our view of how certain things should be done, but it’s extra powerful when we include a customer. This is especially true when a large enterprise customer such as Goldman Sachs shares their experience and talks about how they do certain things in practice, like mapping specific requirements to the actual implementation and talking through lessons learned and their perspective on the problem and solution. A lot of our customers are interested in learning from other customers how to build and operate enterprise security controls at scale. We did a similar presentation with Vanguard at re:Inforce 2022, and I look forward to future opportunities to showcase the awesome work being done by our customers.
What is your favorite Amazon Leadership Principle and why?
Customer Obsession. For me, the core of it is building deeper, longer lasting relationships with our customers and taking their learnings back to our business to work backwards from the actual customer needs. Building better products, helping customers meet their business goals, and having wide-reaching impact is what makes me so excited to come to work every day.
What’s the thing you’re most proud of in your career?
As part of my former role as a security consultant in the AWS Professional Services organization, I led security-related projects to either help customers migrate their workloads to AWS or perform security assessments of their existing AWS environment. Part of that role involved developing mechanisms to better engage with customers on security-related topics and help them develop their own security strategy for running workloads on AWS. That work sometimes involved challenging conversations with customers. I would explain the value of the technology that AWS provides and help customers figure out how to implement AWS services to meet both their business and security needs. I took learnings from these conversations and developed some internal assets that helped newer AWS security consultants conduct those conversations more effectively, and I mentored them throughout the process.
If you had to pick an industry outside of security, what would you want to do?
I would be in the travel industry. I absolutely love visiting new places and exploring nature. I love learning the history and culture of different regions, and trying out different cuisines. It’s something that helps me learn more about myself through new experiences and ultimately be a happier person.
If you have feedback about this post, submit comments in the Comments section below. If you have questions about this post, contact AWS Support.
Want more AWS Security news? Follow us on Twitter.
Amazon Web Services (AWS) is pleased to announce that we have achieved an AAA rating from Pinakes. The scope of this qualification covers 166 services in 25 global AWS Regions.
The Spanish banking association Centro de Cooperación Interbancaria (CCI) developed Pinakes, a rating framework intended to manage and monitor the cybersecurity controls of service providers that Spanish financial entities depend on. The requirements arise from the European Banking Authority guidelines (EBA/GL/2019/02).
Pinakes evaluates the cybersecurity levels of service providers through 1,315 requirements across 4 categories (confidentiality, integrity, availability of information, and general) and 14 domains:
Information security management program
Facility security
Third-party management
Normative compliance
Network controls
Access control
Incident management
Encryption
Secure development
Monitoring
Malware protection
Resilience
Systems operation
Staff safety
Each requirement is associated to a rating level (A+, A, B, C, D), ranging from the highest A+ (provider has implemented the most diligent measures and controls for cybersecurity management) to the lowest D (minimum security requirements are met).
An independent third-party auditor has verified the implementation status for each section. As a result, AWS has been qualified with A ratings for Confidentiality, Integrity and Availability, getting an overall rating of AAA.
Our Spanish financial customers can refer to the AWS Pinakes rating to confirm that the AWS control environment is appropriately designed and implemented. By receiving an AAA, AWS demonstrates our commitment to meet the heightened security expectations for cloud service providers set by the CCI. The full evaluation report will be published on AWS Artifact upon request. Pinakes participants who are AWS customers can contact their AWS account manager to request access to it.
As always, we value your feedback and questions. Reach out to the AWS Compliance team through the Contact Us page. To learn more about our other compliance and security programs, see AWS Compliance Programs.
If you have feedback about this post, please submit them in the Comments section below.
Want more AWS Security news? Follow us on Twitter.
Many of our customers use Amazon Cognito user pools to add authentication, authorization, and user management capabilities to their web and mobile applications. You can enable the built-in advanced security in Amazon Cognito to detect and block the use of credentials that have been compromised elsewhere, and to detect unusual sign-in activity and then prompt users for additional verification or block sign-ins. Additionally, you can associate an AWS WAF web access control list (web ACL) with your user pool to allow or block requests to Amazon Cognito user pools, based on security rules.
In this post, we’ll show how you can use AWS WAF with Amazon Cognito user pools and provide a sample set of rate-based rules and advanced AWS WAF rule groups. We’ll also show you how to test and tune the rules to help protect your user pools from common threats.
Rate-based rules for Amazon Cognito user pool endpoints
The following are endpoints exposed publicly by an Amazon Cognito user pool that you can protect with AWS WAF:
Public API operations — These generate a request to Cognito API actions that are either unauthenticated or authenticated with a session string or access token, but not with AWS credentials.
A good way to protect these endpoints is to deploy rate-based AWS WAF rules. These rules will detect and block requests with high rates that could indicate an attempt to exceed your Amazon Cognito API request rate quotas and that could subsequently impact requests from legitimate users.
When you apply rate limits, it helps to group Amazon Cognito API actions into four action categories. You can set specific rate limits per action category giving you traffic visibility for each category.
User Creation — This category includes operations that create new users in Cognito. Setting a rate limit for this category provides visibility for traffic of these operations and threats such as fake users being created in Cognito, which drives up your Monthly Active User (MAU) costs for Cognito.
Sign-in — This category includes operations to initiate a sign-in operation. Setting a rate limit for this category can provide visibility into the abuse of these operations. This could indicate high frequency, automated attempts to guess user credentials, sometimes referred to as credential stuffing.
Account Recovery — This category includes operations to recover accounts, including “forgot password” flows. Setting a rate limit for this category can provide visibility into the abuse of these operations, malicious activity can include: sending fake reset attempts, which might result in emails and SMS messages being sent to users.
Default — This is a catch-all rate limit that applies to an operation that is not in one of the prior categories. Setting a default rate limit can provide visibility and mitigation from request flooding attacks.
Table 1 below shows selected Hosted UI endpoint paths (the equivalent of individual API actions) and the recommended rate-based rule limit category for each.
Additionally, the rate-based rules we provide in this post include the following:
Two IP sets that represent allow lists for IPv4 and IPv6. You can add IPs that represent your trusted source IP addresses to these IP sets so that other AWS WAF rules don’t apply to requests that originate from these IP addresses.
Two IP sets that represent deny lists for IPv4 and IPv6. Add IPs to these IP sets that you want to block in all cases, regardless of the result of other rules.
An AWS managed IP reputation rule group: The AWS managed IP reputation list rule group contains rules that are based on Amazon internal threat intelligence, to identify IP addresses typically associated with bots or other threats. You can limit requests that match rules in this rule group to a specific rate limit.
Deploy rate-based rules
You can deploy the rate-based rules described in the previous section by using the AWS CloudFormation template that we provide here.
To deploy rate-based rules using the template
(Optional but recommended) If you want to enable AWS WAF logging and resources to analyze request rates, create an Amazon Simple Storage Service (Amazon S3) bucket in the same AWS Region as your Amazon Cognito user pool, with a bucket name starting with the prefix aws-waf-logs-. If you previously created an S3 bucket for AWS WAF logs, you can choose to reuse it, or you can create a new bucket to store AWS WAF logs for Amazon Cognito.
Choose the following Launch Stack button to launch a CloudFormation stack in your account.
Note: The stack will launch in the N. Virginia (us-east-1) Region. To deploy this solution into other AWS Regions, download the solution’s CloudFormation template and deploy it to the selected Region.
This template creates the following resources in your AWS account:
A rule group for the rate-based rules, according to the limits shown in Tables 1 and 2.
Four IP sets for an allow list and deny list for IPv4 and IPv6 addresses.
A web ACL that includes the rule group that is created, IP set based rules, and the AWS managed IP reputation rule group.
(Optional) The template enables AWS WAF logging for the web ACL to an S3 bucket that you specify.
(Optional) The template creates resources to help you analyze AWS WAF logs in S3 to calculate peak request rates that you can use to set rate limits for the rate-based rules.
Set the template parameters as needed. The following table shows the default values for the parameters. We recommend that you deploy the template with the default values and with TestMode set to Yes so that all rules are set to Count. This allows all requests but emits Amazon CloudWatch metrics and AWS WAF log events for each rule that matches. You can then follow the guidance in the next section to analyze the logs and tune the rate limits to match the traffic patterns to your user pool. When you are satisfied with the unique rate limits for each parameter, you can update the stack and set TestMode to No to start blocking requests that exceed the rate limits.
The rate limits for AWS WAF rate-based rules are configured as the number of requests per 5-minute period per unique source IP. The value of the rate limit can be between 100 and 2,000,000,000 (2 billion).
Table 3: Default values for template parameters
Parameter name
Description
Default value
Allowed values
Request rate limits by action category
UserCreationRateLimit
Rate limit applied to User Creation actions
2000
100–2,000,000,000
SignInRateLimit
Rate limit applied to Sign-in actions
4000
100–2,000,000,000
AccountRecoveryRateLimit
Rate limit applied to Account Recovery actions
1000
100–2,000,000,000
IPReputationRateLimit
Rate limit applied to requests that match the AWS Managed IP reputation list
1000
100–2,000,000,000
DefaultRateLimit
Default rate limit applied to actions that are not in any of the prior categories
6000
100–2,000,000,000
Test mode
TestMode
Set to Yes to test rules by overriding rule actions to Count. Set to No to apply the default actions for rules after you’ve tested the impact of these rules.
Yes
Yes or No
AWS WAF logging and rate analysis
EnableWAFLogsAndRateAnalysis
Set to Yes to enable logging for the AWS WAF web ACL to an S3 bucket and create resources for request rate analysis. Set to No to disable AWS WAF logging and skip creating resources for rate analysis. If No, the rest of the parameter values in this section are ignored. If Yes, choose values for the rest of the parameters in this section.
Yes
Yes or No
WAFLogsS3Bucket
The name of an existing S3 bucket where AWS WAF logs are delivered. The bucket name must start with aws-waf-logs- and can end with any suffix. Only used if the parameter EnableWAFLogsAndRateAnalysis is set to Yes.
None
Name of an existing S3 bucket that starts with the prefix aws-waf-logs-
DatabaseName
The name of the AWS Glue database to create, which will contain the request rate analysis tables created by this template. (Important: The name cannot contain hyphens.) Only used if the parameter EnableWAFLogsAndRateAnalysis is set to Yes.
rate_analysis
WorkgroupName
The name of the Amazon Athena workgroup to create for rate analysis. Only used if the parameter EnableWAFLogsAndRateAnalysis is set to Yes.
rate_analysis
WAFLogsTableName
The name of the AWS Glue table for AWS WAF logs. Only used if the parameter EnableWAFLogsAndRateAnalysis is set to Yes.
waf_logs
WAFLogsProjectionStartDate
The earliest date to analyze AWS WAF logs, in the format YYYY/MM/DD (example: 2023/02/28). Only used if the parameter EnableWAFLogsAndRateAnalysis is set to Yes.
None
Set this to the current date, in the format YYYY/MM/DD
Wait for the CloudFormation template to be created successfully.
Go to the AWS WAF console and choose the web ACL created by the template. It will have a name ending with CognitoWebACL.
Choose the Associated AWS resources tab, and then choose Add AWS resource.
For Resource type, choose Amazon Cognito user pool, and then select the Amazon Cognito user pools that you want to protect with this web ACL.
Choose Add.
Now that your user pool is being protected by the rate-based rules in the web ACL you created, you can proceed to tune the rate-based rule limits by analyzing AWS WAF logs.
Tune AWS WAF rate-based rule limits
As described in the previous section, the rate-based rules give you the ability to set separate rate limit values for each category of Amazon Cognito API actions.
Although the CloudFormation template has default starting values for these rate limits, it is important that you tune these values to match the traffic patterns for your user pool. To begin the tuning process, deploy the template with default values for all parameters, including Yes for TestMode. This overrides all rule actions to Count, allowing all requests but emitting CloudWatch metrics and AWS WAF log events for each rule that matches.
After you collect AWS WAF logs for a period of time (this period can vary depending on your traffic, from a couple of hours to a couple of days), you can analyze them, as shown in the next section, to get peak request rates to tune the rate limits to match observed traffic patterns for your user pool.
Query AWS WAF logs to calculate peak request rates by request type
You can calculate peak request rates by analyzing information that is present in AWS WAF logs. One way to analyze these is to send AWS WAF logs to S3 and to analyze the logs by using SQL queries in Amazon Athena. If you deploy the template in this post with default values, it creates the resources you need to analyze AWS WAF logs in S3 to calculate peak requests rates by request type.
If you are instead ingesting AWS WAF logs into your security information and event management (SIEM) system or a different analytics environment, you can create equivalent queries by using the query language for your SIEM or analytics environment to get similar results.
To access and edit the queries built by the CloudFormation template for use
Open the Athena console and switch to the Athena workgroup that was created by the template (the default name is rate_analysis).
On the Saved queries tab, choose the query named Peak request rate per 5-minute period by source IP and request category. The following SQL query will be loaded into the edit panel.
-- Gets the top 5 source IPs sending the most requests in a 5-minute period per request category
‐‐ NOTE: change the start and end timestamps to match the duration of interest
SELECT request_category, from_unixtime(time_bin*60*5) AS date_time, client_ip, request_count FROM (
  SELECT *, row_number() OVER (PARTITION BY request_category ORDER BY request_count DESC, time_bin DESC) AS row_num FROM (
    SELECT
      CASE
        WHEN ip_reputation_labels.name IN (
          'awswaf:managed:aws:amazon-ip-list:AWSManagedIPReputationList',
          'awswaf:managed:aws:amazon-ip-list:AWSManagedReconnaissanceList',
          'awswaf:managed:aws:amazon-ip-list:AWSManagedIPDDoSList'
        ) THEN 'IPReputation'
        WHEN target.value IN (
          'AWSCognitoIdentityProviderService.InitiateAuth',
          'AWSCognitoIdentityProviderService.RespondToAuthChallenge'
        ) THEN 'SignIn'
        WHEN target.value IN (
          'AWSCognitoIdentityProviderService.ResendConfirmationCode',
          'AWSCognitoIdentityProviderService.SignUp',
          'AWSCognitoIdentityProviderService.ConfirmSignUp'
        ) THEN 'UserCreation'
        WHEN target.value IN (
          'AWSCognitoIdentityProviderService.ForgotPassword',
          'AWSCognitoIdentityProviderService.ConfirmForgotPassword'
        ) THEN 'AccountRecovery'
        WHEN httprequest.uri IN (
          '/login',
          '/oauth2/authorize'
        ) THEN 'SignIn'
        WHEN httprequest.uri IN (
          '/signup',
          '/confirmUser',
          '/resendcode'
        ) THEN 'UserCreation'
        WHEN  httprequest.uri IN (
          '/forgotPassword',
          '/confirmForgotPassword'
        ) THEN 'AccountRecovery'
        ELSE 'Default'
      END AS request_category,
      httprequest.clientip AS client_ip,
      FLOOR("timestamp"/(1000*60*5)) AS time_bin,
      COUNT(*) AS request_count
    FROM waf_logs
      LEFT OUTER JOIN UNNEST(FILTER(httprequest.headers, h -> h.name = 'x-amz-target')) AS t(target) ON TRUE
      LEFT OUTER JOIN UNNEST(FILTER(labels, l -> l.name like 'awswaf:managed:aws:amazon-ip-list:%')) AS t(ip_reputation_labels) ON TRUE
    WHERE
      from_unixtime("timestamp"/1000) BETWEEN TIMESTAMP '2022-01-01 00:00:00' AND TIMESTAMP '2023-01-01 00:00:00'
    GROUP BY 1, 2, 3
    ORDER BY 1, 4 DESC
  )
) WHERE row_num <= 5 ORDER BY request_category ASC, row_num ASC
Scroll down to Line 48 in the Query Editor and edit the timestamps to match the start and end time of the time window of interest.
Run the query to calculate the top 5 peak request rates per 5-minute period by source IP and by action category.
The results show the action category, source IP, time, and count of requests. You can use the request count to tune the rate limits for each action category.
The lowest rate limit you can set for AWS WAF rate-based rules is 100 requests per 5-minute period. If your query results show that the peak request count is less than 100, set the rate limit as 100 or higher.
After you have tuned the rate limits, you can apply the changes to your web ACL by updating the CloudFormation stack.
To update the CloudFormation stack
On the CloudFormation console, choose the stack you created earlier.
Choose Update. For Prepare template, choose Use current template, and then choose Next.
Update the values of the parameters with rate limits to match the tuned values from your analysis.
You can choose to enable blocking of requests by setting TestMode to No. This will set the action to Block for the rate-based rules in the web ACL and start blocking traffic that exceeds the rate limits you have chosen.
Choose Next and then Next again to update the stack.
Now the rate-based rules are updated with your tuned limits, and requests will be blocked if you set TestMode to No.
Protect endpoints with user interaction
Now that we’ve covered the bases with rate-based rules, we’ll show you some more advanced AWS WAF rules that further help protect your user pool. We’ll explore two sample scenarios in detail, and provide AWS WAF rules for each. You can use the rules provided as a guideline to build others that can help with similar use cases.
Rules to verify human activity
The first scenario is protecting endpoints where users have interaction with the page. This will be a browser-based interaction, and a human is expected to be behind the keyboard. This scenario applies to the Hosted UI endpoints such as /login, /signup, and /forgotPassword, where a CAPTCHA can be rendered on the user’s browser for the user to solve. Let’s take the login (sign-in) endpoint as an example, and imagine you want to make sure that only actual human users are attempting to sign in and you want to block bots that might try to guess passwords.
To illustrate how to protect this endpoint with AWS WAF, we’re sharing a sample rule, shown in Figure 1. In this rule, you can take input from prior rules like the Amazon IP reputation list or the Anonymous IP list (which are configured to Count requests and add labels) and combine that with a CAPTCHA action. The logic of the rule says that if the request matches the reputation rules (and has received the corresponding labels) and is going to the /login endpoint, then the AWS WAF action should be to respond with a CAPTCHA challenge. This will present a challenge that increases the confidence that a human is performing the action, and it also adds a custom label so you can efficiently identify and have metrics on how many requests were matched by this rule. The rule is provided in the CloudFormation template and is in JSON format, because it has advanced logic that cannot be displayed by the console. Learn more about labels and CAPTCHA actions in the AWS WAF documentation.
Figure 1: Login sample rule flow
Note that the rate-based rules you created in the previous section are evaluated before the advanced rules. The rate-based rules will block requests to the /login endpoint that exceed the rate limit you have configured, while this advanced rule will match requests that are below the rate limit but match the other conditions in the rule.
Rules for specific activity
The second scenario explores activity on specific application clients within the user pool. You can spot this activity by monitoring the logs provided by AWS WAF, or other traffic logs like Application Load Balancer (ALB) logs. The application client information is provided in the call to the service.
In the Amazon Cognito user pool in this scenario, we have different application clients and they’re constrained by geography. For example, for one of the application clients, requests are expected to come from the United States at or below a certain rate. We can create a rule that combines the rate and geographical criteria to block requests that don’t meet the conditions defined.
The flow of this rule is shown in Figure 2. The logic of the rule will evaluate the application client information provided in the request and the geographic information identified by the service, and apply the selected rate limit. If blocked, the rule will provide a custom response code by using HTTP code 429 Too Many Requests, which can help the sender understand the reason for the block. For requests that you make with the Amazon Cognito API, you could also customize the response body of a request that receives a Block response. Adding a custom response helps provide the sender context and adjust the rate or information that is sent.
Figure 2: AppClientId sample rule flow
AWS WAF can detect geo location with Region accuracy and add specific labels for the location. These can then be used in other rule evaluations. This rule is also provided as a sample in the CloudFormation template.
Advanced protections
To build on the rules we’ve shared so far, you can consider using some of the other intelligent threat mitigation rules that are available as managed rules—namely, bot control for common or targeted bots. These rules offer advanced capabilities to detect bots in sensitive endpoints where automation or non-browser user agents are not expected or allowed. If you receive machine traffic to the endpoint, these rules will result in false positives that would need to be tuned. For more information, see Options for intelligent threat mitigation.
The sample rule flow in Figure 3 shows an example for our Hosted UI, which builds on the first rule we built for specific activity and adds signals coming from the Bot Control common bots managed rule, in this case the non-browser-user-agent label.
Figure 3: Login sample rule with advanced protections
Adding the bot detection label will also add accuracy to the evaluation, because AWS WAF will consider multiple different sources of information when analyzing the request. This can also block attacks that come from a small set of IPs or easily recognizable bots.
We’ve shared this rule in the CloudFormation template sample. The rule requires you to add AWS WAF Bot Control (ABC) before the custom rule evaluation. ABC has additional costs associated with it and should only be used for specific use cases. For more information on ABC and how to enable it, see this blog post.
After adding these protections, we have a complete set of rules for our Hosted UI–specific needs; consider that your traffic and needs might be different. Figure 4 shows you what the rule priority looks like. All rules except the last are included in the provided CloudFormation template. Managed rule evaluations need to have higher priority and be in Count mode; this way, a matching request can get labels that can be evaluated further down the priority list by using the custom rules that were created. For more information, see How labeling works.
Figure 4: Summary of the rules discussed in this post
Conclusion
In this post, we examined the different protections provided by the integration between AWS WAF and Amazon Cognito. This integration makes it simpler for you to view and monitor the activity in the different Amazon Cognito endpoints and APIs, while also adding rate-based rules and IP reputation evaluations. For more specific use cases and advanced protections, we provided sample custom rules that use labels, as well as an advanced rule that uses bot control for common bots. You can use these advanced rules as examples to create similar rules that apply to your use cases.
If you have feedback about this post, submit comments in the Comments section below. If you have questions about this post, start a new thread on the re:Post with tag AWS WAF or contact AWS Support.
Want more AWS Security news? Follow us on Twitter.
Have you ever wanted to initiate change in an Amazon Web Services (AWS) account after you update a GitHub repository, or deploy updates in an AWS application after you merge a commit, without the use of AWS Identity and Access Management (IAM) user access keys? If you configure an OpenID Connect (OIDC) identity provider (IdP) inside an AWS account, you can use IAM roles and short-term credentials, which removes the need for IAM user access keys.
In this blog post, we will walk you through the steps needed to configure a specific GitHub repo to assume an individual role in an AWS account to preform changes. You will learn how to create an OIDC-trusted connection that is scoped to an individual GitHub repository, and how to map the repository to an IAM role in your account. You will create the OIDC connection, IAM role, and trust relationship two ways: with the AWS Management Console and with the AWS Command Line Interface (AWS CLI).
This post focuses on creating an IAM OIDC identity provider for GitHub and demonstrates how to authorize access into an AWS account from a specific branch and repository. You can use OIDC IdPs for workflows that support the OpenID Connect standard, such as Google or Salesforce.
Prerequisites
To follow along with this blog post, you should have the following prerequisites in place:
GitHub is an external provider that is independent from AWS. To use GitHub as an OIDC IdP, you will need to complete four steps to access AWS resources from your GitHub repository. Then, for the fifth and final step, you will use AWS CloudTrail to audit the role that you created and used in steps 1–4.
Create an OIDC provider in your AWS account. This is a trust relationship that allows GitHub to authenticate and be authorized to perform actions in your account.
Create an IAM role in your account. You will then scope the IAM role’s trust relationship to the intended parts of your GitHub organization, repository, and branch for GitHub to assume and perform specific actions.
Assign a minimum level of permissions to the role.
Create a GitHub Actions workflow file in your repository that can invoke actions in your account.
Audit the role’s use with Amazon CloudTrail logs.
Step 1: Create an OIDC provider in your account
The first step in this process is to create an OIDC provider which you will use in the trust policy for the IAM role used in this action.
(Optional) For Add tags, you can add key–value pairs to help you identify and organize your IdPs. To learn more about tagging IAM OIDC IdPs, see Tagging OpenID Connect (OIDC) IdPs.
Verify the information that you entered. Your console should match the screenshot in Figure 1. After verification, choose Add provider.
Note: Each provider is a one-to-one relationship to an external IdP. If you want to add more IdPs to your account, you can repeat this process.
Figure 1: Steps to configure the identity provider
Once you are taken back to the Identity providers page, you will see your new IdP as shown in Figure 2. Select your provider to view its properties, and make note of the Amazon Resource Name (ARN). You will use the ARN later in this post. The ARN will look similar to the following:
You can add GitHub as an IdP in your account with a single AWS CLI command. The following code will perform the previous steps outlined for the console, with the same results. For the value —thumbprint-list, you will use the GitHub OIDC thumbprint 938fd4d98bab03faadb97b34396831e3780aea1.
aws iam create-open-id-connect-provider --url
"https://token.actions.GitHubusercontent.com" --thumbprint-list
"6938fd4d98bab03faadb97b34396831e3780aea1" --client-id-list
'sts.amazonaws.com'
Both of the preceding methods will add an IdP in your account. You can view the provider on the Identity providers page in the IAM console.
Step 2: Create an IAM role and scope the trust policy
You can create an IAM role with either the IAM console or the AWS CLI. If you choose to create the IAM role with the AWS CLI, you will scope the Trust Relationship Policy before you create the role.
In the IAM console, on the Identity providers screen, choose the Assign role button for the newly created IdP.
Figure 3: Assign a role to the identity provider
In the Assign role for box, choose Create a new role, and then choose Next, as shown in the following figure.
Figure 4: Create a role from the Identity provider page
The Create role page presents you with a few options. Web identity is already selected as the trusted entity, and the Identity provider field is populated with your IdP. In the Audience list, select sts.amazonaws.com, and then choose Next.
On the Permissions page, choose Next. For this demo, you won’t add permissions to the role.
(Optional) On the Tags page, add tags to this new role, and then choose Next: Review.
On the Create role page, add a role name. For this demo, enter GitHubAction-AssumeRoleWithAction. Optionally add a description.
To create the role, choose Create role.
Next, you’ll scope the IAM role’s trust policy to a single GitHub organization, repository, and branch.
To scope the trust policy (IAM console)
In the IAM console, open the newly created role and choose Edit trust relationship.
On the Edit trust policy page, modify the trust policy to allow your unique GitHub organization, repository, and branch to assume the role. This example trusts the GitHub organization <aws-samples>, the repository named <EXAMPLEREPO>, and the branch named <ExampleBranch>. Update the Federated ARN with the GitHub IdP ARN that you copied previously.
In the AWS CLI, use the example trust policy shown above for the console. This policy is designed to limit access to a defined GitHub organization, repository, and branch.
Create and save a JSON file with the example policy to your local computer with the file name trustpolicyforGitHubOIDC.json.
Run the following command to create the role.
aws iam create-role --role-name GitHubAction-AssumeRoleWithAction --assume-role-policy-document file://C:\policies\trustpolicyforGitHubOIDC.json
Step 3: Assign a minimum level of permissions to the role
For this example, you won’t add permissions to the IAM role, but will assume the role and call STS GetCallerIdentity to demonstrate a GitHub action that assumes the AWS role.
If you’re interested in performing additional actions in your account, you can add permissions to the role you created, GitHubAction-AssumeRoleWithAction. Common actions for workflows include calling AWS Lambda functions or pushing files to an Amazon Simple Storage Service (Amazon S3) bucket. For more information about using IAM to apply permissions, see Policies and permissions in IAM.
Step 4: Create a GitHub action to invoke the AWS CLI
GitHub actions are defined as methods that you can use to automate, customize, and run your software development workflows in GitHub. The GitHub action that you create will authenticate into your account as the role that was created in Step 2: Create the IAM role and scope the trust policy.
To create a GitHub action to invoke the AWS CLI:
Create a basic workflow file, such as main.yml, in the .github/workflows directory of your repository. This sample workflow will assume the GitHubAction-AssumeRoleWithAction role, to perform the action aws sts get-caller-identity. Your repository can have multiple workflows, each performing different sets of tasks. After GitHub is authenticated to the role with the workflow, you can use AWS CLI commands in your account.
Paste the following example workflow into the file.
# This is a basic workflow to help you get started with Actions
name:Connect to an AWS role from a GitHub repository

# Controls when the action will run. Invokes the workflow on push events but only for the main branch
on:
  push:
    branches: [ main ]
  pull_request:
    branches: [ main ]

env:

  AWS_REGION : <"us-east-1"> #Change to reflect your Region

# Permission can be added at job level or workflow level
permissions:
      id-token: write   # This is required for requesting the JWT
      contents: read    # This is required for actions/checkout
jobs:
  AssumeRoleAndCallIdentity:
    runs-on: ubuntu-latest
    steps:
      - name: Git clone the repository
        uses: actions/checkout@v3
      - name: configure aws credentials
        uses: aws-actions/[email protected]
        with:
          role-to-assume: <arn:aws:iam::111122223333:role/GitHubAction-AssumeRoleWithAction> #change to reflect your IAM role’s ARN
          role-session-name: GitHub_to_AWS_via_FederatedOIDC
          aws-region: ${{ env.AWS_REGION }}
      # Hello from AWS: WhoAmI
      - name: Sts GetCallerIdentity
        run: |
          aws sts get-caller-identity
Modify the workflow to reflect your AWS account information:
AWS_REGION: Enter the AWS Region for your AWS resources.
role-to-assume: Replace the ARN with the ARN of the AWS GitHubAction role that you created previously.
In the example workflow, if there is a push or pull on the repository’s “main” branch, the action that you just created will be invoked.
Figure 5 shows the workflow steps in which GitHub does the following:
Authenticates to the IAM role with the OIDC IdP in the Region that was defined in the workflow file in the step configure aws credentials.
Calls aws sts get-caller-identity in the step Hello from AWS. WhoAmI… Run AWS CLI sts GetCallerIdentity.
Figure 5: Results of GitHub action
Step 5: Audit the role usage: Query CloudTrail logs
The final step is to view the AWS CloudTrail logs in your account to audit the use of this role.
To view the event logs for the GitHub action:
In the AWS Management Console, open CloudTrail and choose Event History.
In the Lookup attributes list, choose Event source.
In the search bar, enter sts.amazonaws.com.
Figure 6: Find event history in CloudTrail
You should see the GetCallerIdentity and AssumeRoleWithWebIdentity events, as shown in Figure 6. The GetCallerIdentity event is the Hello from AWS. step in the GitHub workflow file. This event shows the workflow as it calls aws sts get-caller-identity. The AssumeRoleWithWebIdentity event shows GitHub authenticating and assuming your IAM role GitHubAction-AssumeRoleWithAction.
You can also view one event at a time.
To view the AWS CLI GetCallerIdentity event:
In the Lookup attributes list, choose User name.
In the search bar, enter the role-session-name, defined in the workflow file in your repository. This is not the IAM role name, because this role-session-name is defined in line 30 of the workflow example. In the workflow example for this blog post, the role-session-name is GitHub_to_AWS_via_FederatedOIDC.
You can now see the first event in the CloudTrail history.
Figure 7: View the get caller identity in CloudTrail
To view the AssumeRoleWithWebIdentity event
In the Lookup attributes list, choose User name.
In the search bar, enter the GitHub organization, repository, and branch that is defined in the IAM role’s trust policy. In the example outlined earlier, the user name is repo:aws-samples/EXAMPLE:ref:refs/heads/main.
You can now see the individual event in the CloudTrail history.
Figure 8: View the assume role call in CloudTrail
Conclusion
When you use IAM roles with OIDC identity providers, you have a trusted way to provide access to your AWS resources. GitHub and other OIDC providers can generate temporary security credentials to update resources and infrastructure inside your accounts.
In this post, you learned how to use the federated access to assume a role inside AWS directly from a workflow action file in a GitHub repository. With this new IdP in place, you can begin to delete AWS access keys from your IAM users and use short-term credentials.
After you read this post, we recommend that you follow the AWS Well Architected Security Pillar IAM directive to use programmatic access to AWS services using temporary and limited-privilege credentials. If you deploy IAM federated roles instead of AWS user access keys, you follow this guideline and issue tokens by the AWS Security Token Service. If you have feedback on this post, leave a comment below and let us know how you would like to see OIDC workflows expanded to help your IAM needs.
If you have feedback about this post, submit comments in the Comments section below. If you have questions about this post, contact AWS Support.
Want more AWS Security news? Follow us on Twitter.
For the permissions already in place, one of IAM Access Analyzer’s capabilities is that it helps you identify resources in your AWS Organizations organization and AWS accounts that are shared with an external entity.
For each external entity that has access to a resource in your account, IAM Access Analyzer generates a finding. Findings display information about the resource and the policy statement that generated the finding, with details such as the list of actions in the policy granting access, level of access, and conditions that allow the access. You can review the findings to determine if the access is intended or unintended.
As your use of AWS services grows and the number of accounts in your organization increases, the number of findings that you have might also increase. To help reduce noise and allow you to focus on unintended access findings, you can filter findings and create archive rules for intended access.
This blog post provides step-by-step guidance on how to get started with IAM Access Analyzer findings by using different filtering techniques that can help you filter approved use cases that result in access findings. For example, you might see a finding generated for an S3 bucket that hosts images for your website and thus allows public access, as approved by your organization, apply a filter so that you can concentrate on unintended access. IAM Access Analyzer offers a wide range of filters; for a complete list, see the IAM documentation.
In this post, we also share example archive rules for approved use cases that result in access findings. Archive rules automatically archive new findings that meet the criteria you define when you create the rule. You can also apply archive rules retroactively to archive existing findings that meet the archive rule criteria. Finally, we have included an example implementation of archive rules using an AWS CloudFormation template.
IAM Access Analyzer findings overview
To get started, create an analyzer for your entire organization or your account. The organization or account that you choose is known as the zone of trust for the analyzer. The zone of trust determines the type of access that IAM Access Analyzer considers to be trusted. IAM Access Analyzer continuously monitors to identify resource policies, access control lists, and other access controls that grant public or cross-account access from outside the zone of trust, and generates findings. For this blog post, we’ll demonstrate an organization as the zone of trust, showcasing findings from a large-scale, multi-account AWS deployment.
Prerequisites
This blog post assumes that you have the following in place:
IAM Access Analyzer is enabled in your organization or account in the AWS Regions where you operate. For more details on how to enable IAM Access Analyzer, see Enabling IAM Access Analyzer.
Access to the AWS Organizations management account or to a member account in the organization with delegated administrator access for creating and updating IAM Access Analyzer resources.
How to filter the findings
To start filtering your findings and create archive rules, you should complete the following steps:
Review public access findings
Filter by removing permissions errors
Filter for known identity providers
Filter cross-account access from trusted external accounts
We’ll walk you through each step.
1. Review public access findings
Some AWS resources allow public access on the resource by means of a resource-based policy—for example, an Amazon Simple Storage Service (Amazon S3) bucket policy that has the “Principal:*” permission added to its bucket policy. For resources such as Amazon Elastic Block Store (Amazon EBS) snapshots, you can share these by using a flag on the resource permission. IAM Access Analyzer looks for such sharing and reports it in the findings.
From the global report, you can generate a list of resources that allow public access by using the Public access: true query in the IAM console.
If the access is intended, you can archive the findings by creating an archive rule using the AWS Management Console, AWS CLI, or API. When you archive a security finding, IAM Access Analyzer removes it from the Active findings list and changes its status to Archived. For instructions on how to automatically archive expected findings, see How to automatically archive expected IAM Access Analyzer findings.
Example: Known S3 bucket that hosts public website images
If you have resources for which public access is expected, such as an S3 bucket that hosts images for your website, you can add an archive rule with Resource criteria equal to the bucket name, as shown in Figure 1.
Figure 1: Create IAM Access Analyzer archive rule using the console
Is the public access unintended?
If the finding results from policies that were misconfigured to allow unintended public access, you can constrain the access by using AWS global condition context keys or a specific IAM principal ARN. The findings show the account and resource that contain the policy.
For example, if the finding shows a misconfigured S3 bucket, the following policy shows how you can modify the S3 bucket policy to only allow IAM principals from your organization to access the bucket by using the PrincipalOrgID condition key. Replace <DOC-EXAMPLE-BUCKET> with the name of your S3 bucket, and <ORGANIZATION_ID> with your organization ID.
Before you further investigate the IAM Access Analyzer findings, you should make sure that IAM Access Analyzer has enough permissions to access the resources in your accounts to be able to provide the analysis.
IAM Access Analyzer uses an AWS service-linked role to call other AWS services on your behalf. When IAM Access Analyzer analyzes a resource, it reads resource metadata, such as a resource-based policy, access control lists, and other access controls that grant public or cross-account access. If the policies don’t allow an IAM Access Analyzer role to read the resource metadata, it generates an Access Denied error finding, as shown in Figure 2.
Figure 2: IAM Access Analyzer access denied error example
To view these error findings from the IAM Access Analyzer console, filter the findings by using the Error: Access Denied property.
Resolution
To resolve the access issue, make sure that the IAM Access Analyzer service-linked role is not denied access. Review the resource-based policy attached to the resource that IAM Access Analyzer isn’t able to access. For a list of services that support resource-based policies, see the IAM documentation.
For example, if the analyzer can’t access an AWS Key Management Service (AWS KMS) key because of an explicit deny, add an exception for the IAM Access Analyzer service-linked role to the policy statement, similar to the following. Make sure that you change the <ACCOUNT_ID> to your account id.
With SAML 2.0 or Open ID Connect (OIDC)—which are open federation standards that many identity providers (IdPs) use—users can log in to the console or call the AWS API operations without you having to create an IAM user for everyone in your organization.
To set up federation, you must perform a one-time configuration so that your organization’s IdP and your account trust each other. To configure this trust, you must register AWS as a service provider (SP) with the IdP of your organization and set up metadata and key exchange.
The role or roles that you create in IAM define what the federated users from your organization are allowed to use on AWS. When you create the trust policy for the role, you specify the SAML or OIDC provider as the Principal. To only allow users that match certain attributes to access the role, you can scope the trust policy with a Condition.
Example 1: Federation with Okta
Let’s walk through an example that uses Okta as the IdP. Although access to a trusted IdP is intended, IAM Access Analyzer creates a finding for an IAM role that has trust policy granting access to a SAML provider because the trust policy allows access outside of the known zone of trust for the analyzer. You will see findings created for the IAM role granting access to Okta using the IAM trust policy, as shown in Figure 3.
Figure 3: IAM Access Analyzer identity provider finding example
Resolution
Setting access through SAML providers is a privileged operation, so we recommend that you analyze each finding to decide if an exception is acceptable. If you approve of the SAML-provided access setup, you can implement an archive rule to archive such findings with conditions for federation used in combination with your SAML provider. The filter for the Federated User rule depends on the name that you gave to the SAML IdP in your federation setup. For example, if your SAML IdP name is Okta, the rule should have a filter for arn:aws:iam::<ACCOUNT_ID>:saml-provider/Okta, where <ACCOUNT_ID> is your account number, as shown in Figure 4.
Figure 4: Archive rule example for using an IdP-related finding
Note: To include additional values for a multi-account setup, use the Add another value filter.
Example 2: IAM Identity Center
With AWS IAM Identity Center (successor to AWS Single Sign-On), you can manage sign-in security for your workforce. IAM Identity Center provides a central place to define your permission sets, assign them to your users and groups, and give your users a portal where they can access their assigned accounts.
With IAM Identity Center, you manage access to accounts by creating and assigning permission sets. These are IAM role templates that define (among other things) which policies to include in a role. When you create a permission set in IAM Identity Center and associate it to an account, IAM Identity Center creates a role in that account with a trust policy that allows a federated IdP as a principal — in this case, IAM Identity Center.
IAM Access Analyzer generates a finding for this setup because the allowed access is outside of the known zone of trust for the analyzer, as shown in Figure 5.
Figure 5: IAM Access Analyzer finding example for IAM Identity Center
To filter this finding, you need to implement an archive rule.
Resolution
You can implement an archive rule with conditions for federation used in combination with IAM Identity Center as the SAML provider. The roles created by IAM Identity Center in member accounts use a reserved path on AWS: arn:aws:iam::<ACCOUNT_ID>:role/aws-reserved/sso.amazonaws.com/. Hence, you can create an archive rule with a filter that contains :saml-provider/AWSSSO in the Federated User name and aws-reserved/sso.amazonaws.com/ in the Resource, as shown in Figure 6.
Figure 6: Archive rule example for IAM Identity Center generated findings
4. Filter cross-account access findings from trusted external accounts
We recommend that you identify and document accounts and principals that should be allowed access outside of the zone of trust for IAM Access Analyzer.
When a resource-based policy attached to a resource allows cross-account access from outside the zone of trust, IAM Access Analyzer generates cross-account access findings.
Is the cross-account access intended?
When you review cross-account access findings, you need to determine whether the access is intended or not. For example, you might have access provided to your auditor’s account or a partner account for visibility and monitoring of your AWS applications.
For trusted external accounts, you can create an archive rule that includes the AWS account in the criteria for the rule. Figure 7 shows an example of how to create the archive rule for a trusted external account (EXTERNAL_ACCOUNT_ID). In your own rule, replace EXTERNAL_ACCOUNT_ID with the trusted account id.
Figure 7: Archive rule example for trusted account findings
Is the cross-account access unintended?
After you have archived the intended access findings, you can start analyzing the findings initiated from unintended access. When you confirm that the findings show unintended access, you should take steps to remove the access by altering or deleting the policy or access control that granted access. You can expand the solution outlined in the blog post Automate resolution for IAM Access Analyzer cross-account access findings on IAM roles by adding an explicit deny statement.
You can also use AWS CloudTrail to track API calls that could have changed access configuration on your AWS resources.
Deploy IAM Access Analyzer and archive rules with a CloudFormation template
In this section, we demonstrate a sample CloudFormation template that creates an IAM access analyzer and archive rules for findings that are created for identified intended access to resources.
Important: When you create an archive rule using the AWS console, the existing findings and new findings that match criteria mentioned in the rules will be archived. However, archive rules created through CloudFormation or the AWS CLI will only archive the new findings that meet the criteria defined. You need to perform the access-analyzer:ApplyArchiveRule API after you create the archive rule to archive existing findings as well.
The sample CloudFormation template takes the following values as inputs and creates archive rules for findings that are created for identified intended access to resources shared outside of your zone of trust for the specified analyzer:
Analyzer name
Zone of trust
Known public S3 buckets, if you have any (for example, a bucket that hosts public website images).
Note: We use S3 buckets as an example. You can edit the rule to include resource types that are supported by IAM Access Analyzer, if public access is intended.
Trusted accounts — AWS accounts that don’t belong to your organization, but you trust them to have access to resources in your organization
SAML provider — The SAML provider approved to have access to your resources
Note: If you don’t use federation, you can remove the rule SAMLFederatedUsers.
AWSTemplateFormatVersion: 2010-09-09
Description: >+
  Sample CloudFormation template creates archive rules for findings
  created for resources shared outside of your zone of trust for specified
  analyzer.

Metadata:
  AWS::CloudFormation::Interface:
    ParameterGroups:
      - Label:
          default: Define Configuration
        Parameters:
          - AccessAnalyzerName
          - ZoneOfTrust
          - KnownPublicS3Buckets
          - TrustedAccounts
          - SAMLProvider
Parameters:
  AccessAnalyzerName:
    Description: Provide name of the analyzer you would like to create archive rules for.
    Type: String
  ZoneOfTrust:
    Description: Select the zone of trust of AccessAnalyzer
    AllowedValues:
      - ACCOUNT
      - ORGANIZATION
    Type: String
  KnownPublicS3Buckets:
    Description: List of comma-separated known S3 bucket arns, that should allow
      public access Example -
      arn:aws:s3:::DOC-EXAMPLE-BUCKET,arn:aws:s3:::DOC-EXAMPLE-BUCKET2
    Type: CommaDelimitedList
  TrustedAccounts:
    Description: List of comma-separated account IDs, that do not belong to your
      organization but you trust them to have access to resources in your
      organization. [Example - Your auditor’s AWS account]
    Type: List<Number>
  TrustedFederationPrincipals:
    Description: List of comma-separated trusted federated principals that are able
      to assume roles in your accounts. [Example -
      arn:aws:iam::012345678901:saml-provider/Okta,
      arn:aws:iam::1111222233334444:saml-provider/Okta]
    Type: CommaDelimitedList
Resources:
  AccessAnalyzer:
    Type: AWS::AccessAnalyzer::Analyzer
    Properties:
      AnalyzerName: ${AccessAnalyzerName}-${AWS::Region}
      Type: ZoneOfTrust
      ArchiveRules:
        - RuleName: ArchivePublicS3BucketsAccess
          Filter:
            - Property: resource
              Eq: KnownPublicS3Buckets
        - RuleName: AccountAccessNecessaryForBusinessProcesses
          Filter:
            - Property: principal.AWS
              Eq: TrustedAccounts
            - Property: isPublic
              Eq:
                - "false"
        - RuleName: SAMLFederatedUsers
          Filter:
            - Property: principal.Federated
              Eq: TrustedFederationPrincipals
To download this sample template, download the file IAMAccessAnalyzer.yaml from Amazon S3.
Conclusion
In this blog post, you learned how to start with IAM Access Analyzer findings, filter them based on the level of access given outside of your zone of trust, and create archive rules for intended access findings. By using different filtering techniques to remediate intended access findings, you can concentrate on unintended access.
A full conference pass is $1,099. Register today with the code secure150off to receive a limited time $150 discount, while supplies last.
AWS re:Inforce is fast approaching, and this post can help you plan your agenda. AWS re:Inforce is a security learning conference where you can gain skills and confidence in cloud security, compliance, identity, and privacy. As a re:Inforce attendee, you have access to hundreds of technical and non-technical sessions, an Expo featuring AWS experts and security partners with AWS Security Competencies, and keynote and leadership sessions featuring Security leadership. AWS re:Inforce 2023 will take place in-person in Anaheim, CA, on June 13 and 14. re:Inforce 2023 features content in the following six areas:
Data Protection
Governance, Risk, and Compliance
Identity and Access Management
Network and Infrastructure Security
Threat Detection and Incident Response
Application Security
The data protection track will showcase services and tools that you can use to help achieve your data protection goals in an efficient, cost-effective, and repeatable manner. You will hear from AWS customers and partners about how they protect data in transit, at rest, and in use. Learn how experts approach data management, key management, cryptography, data security, data privacy, and encryption. This post will highlight of some of the data protection offerings that you can add to your agenda. To learn about sessions from across the content tracks, see the AWS re:Inforce catalog preview.
“re:Inforce is a great opportunity for us to hear directly from our customers, understand their unique needs, and use customer input to define solutions that protect sensitive data. We also use this opportunity to deliver content focused on the latest security research and trends, and I am looking forward to seeing you all there. Security is everyone’s job, and at AWS, it is job zero.” — Ritesh Desai, General Manager, AWS Secrets Manager
Breakout sessions, chalk talks, and lightning talks
DAP301: Moody’s database secrets management at scale with AWS Secrets Manager Many organizations must rotate database passwords across fleets of on-premises and cloud databases to meet various regulatory standards and enforce security best practices. One-time solutions such as scripts and runbooks for password rotation can be cumbersome. Moody’s sought a custom solution that satisfies the goal of managing database passwords using well-established DevSecOps processes. In this session, Moody’s discusses how they successfully used AWS Secrets Manager and AWS Lambda, along with open-source CI/CD system Jenkins, to implement database password lifecycle management across their fleet of databases spanning nonproduction and production environments.
DAP401: Security design of the AWS Nitro System The AWS Nitro System is the underlying platform for all modern Amazon EC2 instances. In this session, learn about the inner workings of the Nitro System and discover how it is used to help secure your most sensitive workloads. Explore the unique design of the Nitro System’s purpose-built hardware and software components and how they operate together. Dive into specific elements of the Nitro System design, including eliminating the possibility of operator access and providing a hardware root of trust and cryptographic system integrity protections. Learn important aspects of the Amazon EC2 tenant isolation model that provide strong mitigation against potential side-channel issues.
DAP322: Integrating AWS Private CA with SPIRE and Ottr at Coinbase Coinbase is a secure online platform for buying, selling, transferring, and storing cryptocurrency. This lightning talk provides an overview of how Coinbase uses AWS services, including AWS Private CA, AWS Secrets Manager, and Amazon RDS, to build out a Zero Trust architecture with SPIRE for service-to-service authentication. Learn how short-lived certificates are issued safely at scale for X.509 client authentication (i.e., Amazon MSK) with Ottr.
DAP331: AWS Private CA: Building better resilience and revocation techniques In this chalk talk, explore the concept of PKI resiliency and certificate revocation for AWS Private CA, and discover the reasons behind multi-Region resilient private PKI. Dive deep into different revocation methods like certificate revocation list (CRL) and Online Certificate Status Protocol (OCSP) and compare their advantages and limitations. Leave this talk with the ability to better design resiliency and revocations.
DAP231: Securing your application data with AWS storage services Critical applications that enterprises have relied on for years were designed for the database block storage and unstructured file storage prevalent on premises. Now, organizations are growing with cloud services and want to bring their security best practices along. This chalk talk explores the features for securing application data using Amazon FSx, Amazon Elastic File System (Amazon EFS), and Amazon Elastic Block Store (Amazon EBS). Learn about the fundamentals of securing your data, including encryption, access control, monitoring, and backup and recovery. Dive into use cases for different types of workloads, such as databases, analytics, and content management systems.
Hands-on sessions (builders’ sessions and workshops)
DAP353: Privacy-enhancing data collaboration with AWS Clean Rooms Organizations increasingly want to protect sensitive information and reduce or eliminate raw data sharing. To help companies meet these requirements, AWS has built AWS Clean Rooms. This service allows organizations to query their collective data without needing to expose the underlying datasets. In this builders’ session, get hands-on with AWS Clean Rooms preventative and detective privacy-enhancing controls to mitigate the risk of exposing sensitive data.
DAP371: Post-quantum crypto with AWS KMS TLS endpoints, SDKs, and libraries This hands-on workshop demonstrates post-quantum cryptographic algorithms and compares their performance and size to classical ones. Learn how to use AWS Key Management Service (AWS KMS) with the AWS SDK for Java to establish a quantum-safe tunnel to transfer the most critical digital secrets and protect them from a theoretical computer targeting these communications in the future. Find out how the tunnels use classical and quantum-resistant key exchanges to offer the best of both worlds, and discover the performance implications.
DAP271: Data protection risk assessment for AWS workloads Join this workshop to learn how to simplify the process of selecting the right tools to mitigate your data protection risks while reducing costs. Follow the data protection lifecycle by conducting a risk assessment, selecting the effective controls to mitigate those risks, deploying and configuring AWS services to implement those controls, and performing continuous monitoring for audits. Leave knowing how to apply the right controls to mitigate your business risks using AWS advanced services for encryption, permissions, and multi-party processing.
If these sessions look interesting to you, join us in California by registering for re:Inforce 2023. We look forward to seeing you there!
If you have feedback about this post, submit comments in the Comments section below. If you have questions about this post, contact AWS Support.
Want more AWS Security news? Follow us on Twitter.
A full conference pass is $1,099. Register today with the code secure150off to receive a limited time $150 discount, while supplies last.
AWS re:Inforce is a security learning conference where you can gain skills and confidence in cloud security, compliance, identity, and privacy. As a re:Inforce attendee, you have access to hundreds of technical and non-technical sessions, an Expo featuring AWS experts and security partners with AWS Security Competencies, and keynote and leadership sessions featuring Security leadership. AWS re:Inforce 2023 will take place in-person in Anaheim, CA, on June 13 and 14.
In these sessions, you’ll hear directly from AWS leaders and get hands-on with the tools that help you ship securely. You’ll hear how organization and culture help security accelerate your business, and you’ll dive deep into the technology that helps you more swiftly get features to customers. You might even find some new tools that make it simpler to empower your builders to move quickly and ship securely.
Breakout sessions, chalk talks, and lightning talks
APS221: From code to insight: Amazon Inspector & AWS Lambda in action In this lightning talk, see a demo of Amazon Inspector support for AWS Lambda. Inspect a Java application running on Lambda for security vulnerabilities using Amazon Inspector for an automated and continual vulnerability assessment. In addition, explore how Amazon Inspector can help you identify package and code vulnerabilities in your serverless applications.
APS302: From IDE to code review, increasing quality and security Attend this session to discover how to improve the quality and security of your code early in the development cycle. Explore how you can integrate Amazon Code Whisperer, Amazon CodeGuru reviewer, and Amazon Inspector into your development workflow, which can help you identify potential issues and automate your code review process.
APS201: How AWS and MongoDB raise the security bar with distributed ownership In this session, explore how AWS and MongoDB have approached creating their Security Guardians and Security Champions programs. Learn practical advice on scoping, piloting, measuring, scaling, and managing a program with the goal of accelerating development with a high security bar, and discover tips on how to bridge the gap between your security and development teams. Learn how a guardians or champions program can improve security outside of your dev teams for your company as a whole when applied broadly across your organization.
APS202: AppSec tooling & culture tips from AWS & Toyota Motor North America In this session, AWS and Toyota Motor North America (TMNA) share how they scale AppSec tooling and culture across enterprise organizations. Discover practical advice and lessons learned from the AWS approach to threat modeling across hundreds of service teams. In addition, gain insight on how TMNA has embedded security engineers into business units working on everything from mainframes to serverless. Learn ways to support teams at varying levels of maturity, the importance of differentiating between risks and vulnerabilities, and how to balance the use of cloud-native, third-party, and open-source tools at scale.
APS331: Shift security left with the AWS integrated builder experience As organizations start building their applications on AWS, they use a wide range of highly capable builder services that address specific parts of the development and management of these applications. The AWS integrated builder experience (IBEX) brings those separate pieces together to create innovative solutions for both customers and AWS Partners building on AWS. In this chalk talk, discover how you can use IBEX to shift security left by designing applications with security best practices built in and by unlocking agile software to help prevent security issues and bottlenecks.
Hands-on sessions (builders’ sessions and workshops)
APS271: Threat modeling for builders Attend this facilitated workshop to get hands-on experience creating a threat model for a workload. Learn some of the background and reasoning behind threat modeling, and explore tools and techniques for modeling systems, identifying threats, and selecting mitigations. In addition, explore the process for creating a system model and corresponding threat model for a serverless workload. Learn how AWS performs threat modeling internally, and discover the principles to effectively perform threat modeling on your own workloads.
APS371: Integrating open-source security tools with the AWS code services AWS, open-source, and partner tooling works together to accelerate your software development lifecycle. In this workshop, learn how to use Automated Security Helper (ASH), a source-application security tool, to quickly integrate various security testing tools into your software build and deployment flows. AWS experts guide you through the process of security testing locally on your machines and within the AWS CodeCommit, AWS CodeBuild, and AWS CodePipeline services. In addition, discover how to identify potential security issues in your applications through static analysis, software composition analysis, and infrastructure-as-code testing.
APS352: Practical shift left for builders Providing early feedback in the development lifecycle maximizes developer productivity and enables engineering teams to deliver quality products. In this builders’ session, learn how to use AWS Developer Tools to empower developers to make good security decisions early in the development cycle. Tools such as Amazon CodeGuru, Amazon CodeWhisperer, and Amazon DevOps Guru can provide continuous real-time feedback upon each code commit into a source repository and supplement this with ML capabilities integrated into the code review stage.
APS351: Secure software factory on AWS through the DoD DevSecOps lens Modern information systems within regulated environments are driven by the need to develop software with security at the forefront. Increasingly, organizations are adopting DevSecOps and secure software factory patterns to improve the security of their software delivery lifecycle. In this builder’s session, we will explore the options available on AWS to create a secure software factory aligned with the DoD Enterprise DevSecOps initiative. We will focus on the security of the software supply chain as we deploy code from source to an Amazon Elastic Kubernetes Service (EKS) environment.
If these sessions look interesting to you, join us in California by registering for re:Inforce 2023. We look forward to seeing you there!
If you have feedback about this post, submit comments in the Comments section below. If you have questions about this post, contact AWS Support.
Want more AWS Security news? Follow us on Twitter.
At Amazon Web Services (AWS), we move fast and continually iterate to meet the evolving needs of our customers. We design services that can help our customers meet even the most stringent security and compliance requirements. Additionally, our service teams work closely with our AWS Security Guardians program to coordinate security efforts and to maintain a high quality bar. We also have internal compliance teams that continually monitor security control requirements from all over the world and engage with external auditors to achieve third-party validation of our services against these requirements.
In this post, I’ll cover some key strategies and best practices that we use to scale security and compliance while maintaining a culture of innovation.
Security as the foundation
At AWS, security is our top priority. Although compliance might be challenging, treating security as an integral part of everything we do at AWS makes it possible for us to adhere to a broad range of compliance programs, to document our compliance, and to successfully demonstrate our compliance status to our auditors and customers.
Over time, as the auditors get deeper into what we’re doing, we can also help improve and refine their approach, as well. This increases the depth and quality of the reports that we provide directly to our customers.
The challenge of scaling securely
Many customers struggle with balancing security, compliance, and production. These customers have applications that they want to quickly make available to their own customer base. They might need to audit these applications. The traditional process can include writing the application, putting it into production, and then having the audit team take a look to make sure it meets compliance standards. This approach can cause issues, because retroactively adding compliance requirements can result in rework and churn for the development team.
Enforcing compliance requirements in this way doesn’t scale and eventually causes more complexity and friction between teams. So how do you scale quickly and securely?
Speak their language
The first way to earn trust with development teams is to speak their language. It’s critical to use terms and references that developers use, and to know what tools they are using to develop, deploy, and secure code. It’s not efficient or realistic to ask the engineering teams to do the translation of diverse (and often vague) compliance requirements into engineering specs. The compliance teams must do the hard work of translating what is required into what specifically must be done, using language that engineers are familiar with.
Another strategy to scale is to embed compliance requirements into the way developers do their daily work. It’s important that compliance teams enable developers to do their work just as they normally do, without compliance needing to intervene. If you’re successful at that strategy—and the compliant path becomes the simplest and most natural path—then that approach can lead to a very scalable compliance program that fosters understanding between teams and increased collaboration. This approach has helped break down the barriers between the developer and audit/compliance organizations.
Treat auditors and regulators as partners
I believe that you should treat auditors and regulators as true business partners. An independent auditor or regulator understands how a wide range of customers will use the security assurance artifacts that you are producing, and therefore will have valuable insights into how your reports can best be used. I think people can fall into the trap of treating regulators as adversaries. The best approach is to communicate openly with regulators, helping them understand your business and the value you bring to your customers, and getting them ramped up on your technology and processes.
At AWS, we help auditors and regulators get ramped up in various ways. For example, we have the Digital Audit Symposium, which contains presentations on how we control and operate particular services in terms of security and compliance. We also offer the Cloud Audit Academy, a learning path that provides both cloud-agnostic and AWS-specific training to help existing and prospective auditing, risk, and compliance professionals understand how to audit regulated cloud workloads. We’ve learned that being a partner with auditors and regulators is key in scaling compliance.
Conclusion
Having security as a foundation is essential to driving and scaling compliance efforts. Speaking the language of developers helps them continue to work without disruption, and makes the simple path the compliant path. Although some barriers still exist, especially for organizations in highly regulated industries such as financial services and healthcare, treating auditors like partners is a positive strategic shift in perspective. The more proactive you are in helping them accomplish what they need, the faster you will realize the value they bring to your business.
If you have feedback about this post, submit comments in the Comments section below. If you have questions about this post, contact AWS Support.
Want more AWS Security news? Follow us on Twitter.
In the AWS Security Profile — Cryptography Edition series, we interview Amazon Web Services (AWS) thought leaders who help keep our customers safe and secure. This interview features Panos Kampanakis, Principal Security Engineer, AWS Cryptography. Panos shares thoughts on data protection, cloud security, post-quantum cryptography, and more.
What do you do in your current role and how long have you been at AWS?
I have been with AWS for two years. I started as a Technical Program Manager in AWS Cryptography, where I led some AWS Cryptography projects related to cryptographic libraries and FIPS, but I’m currently working as a Principal Security Engineer on a team that focuses on applied cryptography, research, and cryptographic software. I also participate in standardization efforts in the security space, especially in cryptographic applications. It’s a very active space that can consume as much time as you have to offer.
How did you get started in the data protection/ cryptography space? What about it piqued your interest?
I always found cybersecurity fascinating. The idea of proactively focusing on security and enabling engineers to protect their assets against malicious activity was exciting. After working in organizations that deal with network security, application security, vulnerability management, and security information sharing, I found myself going back to what I did in graduate school: applied cryptography.
Cryptography is a constantly evolving, fundamental area of security that requires breadth of technical knowledge and understanding of mathematics. It provides a challenging environment for those that like to constantly learn. Cryptography is so critical to the security and privacy of data and assets that it is top of mind for the private and public sector worldwide.
How do you explain your job to your non-tech friends?
I usually tell them that my work focuses on protecting digital assets, information, and the internet from malicious actors. With cybersecurity incidents constantly in the news, it’s an easy picture to paint. Some of my non-technical friends still joke that I work as a security guard!
What makes cryptography exciting to you?
Cryptography is fundamental to security. It’s critical for the protection of data and many other secure information use cases. It combines deep mathematical topics, data information, practical performance challenges that threaten deployments at scale, compliance with various requirements, and subtle potential security issues. It’s certainly a challenging space that keeps evolving. Post-quantum or privacy preserving cryptography are examples of areas that have gained a lot of attention recently and have been consistently growing.
Given the consistent evolution of security in general, this is an important and impactful space where you can work on challenging topics. Additionally, working in cryptography, you are surrounded by intelligent people who you can learn from.
AWS has invested in the migration to post-quantum cryptography by contributing to post-quantum key agreement and post-quantum signature schemes to protect the confidentiality, integrity, and authenticity of customer data. What should customers do to prepare for post-quantum cryptography?
There are a few things that customers can do while waiting for the ratification of the new quantum-safe algorithms and their deployment. For example, you can inventory the use of asymmetric cryptography in your applications and software. Admittedly, this is not a simple task, but with proper subject matter expertise and instrumentation where necessary, you can identify where you’re using quantum-vulnerable algorithms in order to prioritize the uses. AWS is doing this exercise to have a prioritized plan for the upcoming migration.
You can also study and experiment with the potential impact of these new algorithms in critical use cases. There have been many studies on transport protocols like TLS, virtual private networks (VPNs), Secure Shell (SSH), and QUIC, but organizations might have unique uses that haven’t been accounted for yet. For example, a firm that specializes in document signing might require efficient signature methods with small size constraints, so deploying Dilithium, NIST’s preferred quantum-safe signature, could come at a cost. Evaluating its impact and performance implications would be important. If you write your own crypto software, you can also strive for algorithm agility, which would allow you to swap in new algorithms when they become available.
More importantly, you should push your vendors, your hardware suppliers, the software and open-source community, and cloud providers to adjust and enable their solutions to become quantum-safe in the near future.
What’s been the most dramatic change you’ve seen in the data protection and post-quantum cryptography landscape?
The transition from typical cryptographic algorithms to ones that can operate on encrypted data is an important shift in the last decade. This is a field that’s still seeing great development. It’s interesting how the power of data has brought forward a whole new area of being able to operate on encrypted information so that we can benefit from the analytics. For more information on the work that AWS is doing in this space, see Cryptographic Computing.
In terms of post-quantum cryptography, it’s exciting to see how an important potential risk brought a community from academia, industry, and research together to collaborate and bring new schemes to life. It’s also interesting how existing cryptography has reached optimal efficiency levels that the new cryptographic primitives sometimes cannot meet, which pushes the industry to reconsider some of our uses. Sometimes the industry might overestimate the potential impact of quantum computing to technology, but I don’t believe we should disregard the effect of heavier algorithms on performance, our carbon footprint, energy consumption, and cost. We ought to aim for efficient solutions that don’t undermine security.
Where do you see post-quantum cryptography heading in the future?
Post-quantum cryptography has received a lot of attention, and a transition is about to start ramping up after we have ratified algorithms. Although it’s sometimes considered a Herculian effort, some use cases can transition smoothly.
AWS and other industry peers and researchers have already evaluated some post-quantum migration strategies. With proper prioritization and focus, we can address some of the most important applications and gradually transition the rest. There might be some applications that will have no clear path to a post-quantum future, but most will. At AWS, we are committed to making the transitions necessary to protect our customer data against future threats.
What are you currently working on that you look forward to sharing with customers’?
I’m currently focused on bringing post-quantum algorithms to our customers’ cryptographic use cases. I’m looking into the challenges that this upcoming migration will bring and participating in standards and industry collaborations that will hopefully enable a simpler transition for everyone.
I also engage on various topics with our cryptographic libraries teams (for example, AWS-LC and s2n-tls). We build these libraries with security and performance in mind, and they are used in software across AWS.
Additionally, I work with some AWS service teams to help enable compliance with various cryptographic requirements and regulations.
Is there something you wish customers would ask you about more often?
I wish customers asked more often about provable security and how to integrate such solutions in their software. This is a fascinating field that can prevent serious issues where cryptography can go wrong. It’s a complicated topic. I would like for customers to become more aware of the importance of provable security especially in open-source software before adopting it in their solutions. Using provably secure software that is designed for performance and compliance with crypto requirements is beneficial to everyone.
I also wish customers asked more about why AWS made certain choices when deploying new mechanisms. In areas of active research, it’s often simpler to experimentally build a proof-of-concept of a new mechanism and test and prove its performance in a controlled benchmark scenario. On the other hand, it’s usually not trivial to deploy new solutions at scale (especially given the size and technological breadth of AWS), to help ensure backwards compatibility, commit to supporting these solutions in the long run, and make sure they’re suitable for various uses. I wish I had more opportunities to go over with customers the effort that goes into vetting and deploying new mechanisms at scale.
You have frequently contributed to cybersecurity publications, what is your favorite recent article and why?
I used to play basketball when I was younger, but I no longer have time. I spend most of my time with my family and little toddlers who have infinite amounts of energy. When I find an opportunity, I like reading books and short stories or watching quality films.
If you have feedback about this post, submit comments in the Comments section below. If you have questions about this post, contact AWS Support.
Want more AWS Security news? Follow us on Twitter.
In the AWS Security Profile series, I interview some of the humans who work in Amazon Web ServicesSecurity and help keep our customers safe and secure. This interview is with Ryan Dsouza, Principal Solutions Architect for industrial internet of things (IIoT) security.
How long have you been at AWS and what do you do in your current role?
I’ve been with AWS for over five years and have held several positions working with customers, AWS Partner Network partners, and standards organizations on IoT and IIoT solutions. Currently, I’m a Principal Solutions Architect for IIoT security. In this role, I’m the global technical leader and subject matter expert for operational technology (OT) and IIoT security, which means that I lead our OT/IIoT strategy and roadmap, translate customer requirements into technical solutions, and work with industry standards such as ISA/IEC 62443 to support IIoT and cloud technologies. I also work with our strategic OT/IIoT security partners to design and build integrations and solutions on AWS. And I work with some of our strategic customers to help them plan, assess, and manage the risk that comes from OT/IT convergence and to design, build, and operate more secure, scalable, and innovative IIoT solutions by using AWS capabilities to deliver measurable business outcomes.
How did you get started in the world of OT and IIoT security?
I’ve been working with OT for more than 25 years and with IIoT, for the last 10 years. I’ve led digital transformation initiatives for numerous world-class organizations including Accenture, Siemens, General Electric, IBM, and AECOM, serving customers on their digital transformation initiatives across a wide range of industry verticals such as manufacturing, buildings, utilities, smart cities, and more.
Throughout my career, I witnessed devices across critical infrastructure sectors, such as water, manufacturing, electricity, transportation, oil and gas, and buildings, getting digitized and connected to the internet. I quickly realized that this trend of connected assets and digitization will continue to grow and could outstrip the supply of cybersecurity professionals. Each customer that embraces the digital world faces cybersecurity challenges. At AWS, I work with customers to understand these challenges and provide prescriptive and practical guidance on how to secure their OT environments and IIoT solutions to help ensure safe and secure digital transformation.
What makes OT security different from information technology (IT) security?
OT and IT security are two distinct areas of security that are designed to protect different types of systems and assets. OT security is concerned with the protection of industrial control systems and other related operational technology, such as supervisory control and data acquisition (SCADA) systems, which are used to control and monitor physical processes in critical infrastructure industries such as manufacturing, energy, transportation, buildings, and utilities. The main focus of OT security is on the availability, integrity, safety, and reliability of these systems, as well as protection of the physical equipment that is being controlled. OT cybersecurity supports the safe operation of critical infrastructure. IT security, on the other hand, is concerned with the protection of computer systems, networks, and data from cyberthreats such as hacking, malware, and phishing attempts. The main focus of IT security is on the confidentiality, integrity, and availability of information and systems.
As a result of OT/IT convergence, IIoT, and the industrial digital transformation, our customers now must secure an increasing attack surface and overlapping IT and OT environments. They realize that it is business critical to secure OT/IIoT systems to avoid security events that could cause unplanned downtime and pose a safety risk. I refer to this as “securing cyber-physical systems and enabling safe and secure industrial digital transformation.”
How do you explain your job to your non-tech friends?
I explain that OT is used in buildings, manufacturing, utilities, transportation, and more, and when these systems connect to the internet, they’re exposed to risks. The risks are the same as those faced by IoT devices in our own homes and workplaces—but with greater consequences if compromised because these systems deal with critical infrastructure that our society relies on. I often share the Colonial Pipeline example and explain that I help AWS customers understand the risks and the consequences from a compromise, and design cybersecurity solutions to protect these critical infrastructure assets.
What are you currently working on that you’re excited about?
Our customers use lots of security tools from lots of different vendors. Security is a team sport, and I’m really excited to be working with customers, APN partners, and AWS service teams to build security features and product integrations that make it simpler for customers to monitor and secure OT, IIoT, and the cloud. For example, I’m working with our APN security partners to build integrations with AWS Security Hub and Amazon Security Lake, bring zero trust security solutions to OT environments, and improve security at the industrial edge.
Another project that I’m super excited about is bringing OT/IIoT security solutions to our critical infrastructure customers, including small and mid-sized organizations, by simplifying the deployment, management, procurement, and payment process so that customers can get more value from these AWS security solutions faster.
Another area of focus for me is tracking the fast-evolving critical infrastructure cybersecurity regulations, how they impact our customers, and the role that AWS can play to make it simpler for customers to align with these new security and compliance requirements.
Just like how the cloud transformed IT, I think the cloud will continue to revolutionize OT, and I’m super excited and energized to work with customers and APN partners to move OT and IIoT applications to the cloud and build nearly anything they can imagine faster and more cost-effectively on AWS.
What are the biggest challenges in securing critical infrastructure systems?
With critical infrastructure, the biggest challenge is legacy OT systems that may not have been designed with cybersecurity in mind and that use older operating systems and software, which can be difficult to upgrade and patch. These systems were designed to operate in an air-gapped environment, but there is a growing trend to connect them in new ways to IT systems. As IT and OT converge to support expanding business needs, air-gapped devices and perimeter security are no longer sufficient to address and defend against modern threats such as ransomware, data exfiltration, denial of service, and cryptocurrency mining. As OT and IT converge and OT becomes more cloud connected, the biggest challenge is to secure critical infrastructure that uses legacy and aging industrial control systems (ICS) and OT technology. We are seeing a trend to keep ICS/OT systems connected, but in smarter and more secure ways by using network segmentation, edge gateways, and the hybrid cloud so that if a problem occurs, you can still run the most important systems in an isolated and disconnected mode. For example, if your corporate systems are compromised with ransomware, you can disconnect your critical infrastructure systems from the external world and continue the most critical operations. There is a growing need to design innovative and highly distributed solution patterns to keep critical information and hybrid systems safe and secure. This is an area of focus for me at AWS.
What else can enterprises do to manage OT/IT convergence and protect themselves from these security risks?
I’ve done multiple presentations, blog posts, and whitepapers on this topic, and even if the solutions sound simple, they can be challenging to implement in industrial environments. I recommend reading the blog posts Managing Organization Transformation for Successful OT/IT Convergence and Assessing OT and IIoT cybersecurity risk, and implementing the Ten security golden rules for IIoT solutions. AWS offers lots of prescriptive guidance and solutions to help enterprises more safely and securely manage OT/IT convergence and mitigate risk with proper planning and implementation across the various aspects of business—people, processes, and technology. I encourage customers to start by focusing on the security fundamentals of securing identities, assessing their risk from OT/IT convergence, and improving their visibility into devices on the network and across the converged OT and IT environment. I also recommend using standards such as ISA/IEC 62443, which are comprehensive, consensus-based, and form a strong basis for securing critical infrastructure systems.
What skills do professionals need to be successful in critical infrastructure security?
Critical infrastructure security sounds harder than it really is. When I train people, I break it down into bite-sized pieces that are simple to understand and implement. There is some mystery around cybersecurity, but it’s just a lot of small parts. You must learn what all the parts are, what the acronyms are, and how they fit together to form cyber-physical systems. When I describe it in a real-world application, most people pick it up quickly.
Curiosity and a desire to continue learning are important characteristics to have, because cybersecurity is a fast-evolving technology field. Empathy is also important because to secure a system, you must have empathy for the people behind the work and why their goals and needs are important. For example, in the OT world, you have operations folks who just want the thing to work. If an alarm is going off on their computer screen and they must react by clicking a button, they don’t want their screen to lock them out so they can’t click that button, because this could cause the plant to have big problems. So, you need to design a solution that matches user access controls with roles and responsibilities so that a plant operator can take corrective actions in an emergency situation.
Another example is patching critical OT systems that have vulnerabilities. This may not be possible due to the risk of causing unplanned downtime, and it could pose a safety risk or result in additional time and cost for recertification due to compliance requirements. You must have empathy for the people in this situation and their needs, and then, as a security professional, design around that so they can still have those things but in a more secure way. For example, you might need to create mechanisms to identify, network isolate, or replace legacy devices that aren’t capable of receiving updates. If you are detail-oriented and have strong curiosity and empathy, you can succeed in the field of critical infrastructure cybersecurity.
I have two favorite leadership principles: Learn and be Curious; and one that I initially discounted, Frugality. I believe that the best way to predict the future is to invent it, which is why I’m never done learning and seeking new ways to solve problems.
My view on the Frugality leadership principle is that we need to be frugal with each other’s time. There are so many competing demands on everyone’s time, and it’s important in a place like AWS to be mindful of that. Make sure you’ve done your due diligence on something before you broadly ask the question or escalate. Being frugal in my view is about being self-sufficient, learning to use self-service tools, and working with limited time or resources to deliver results.
I wake up every morning with the conviction that the world is always changing, and that, to succeed, I have to change faster by learning new skills and being frugal with time and resources.
What’s the thing you’re most proud of in your career?
I’m really proud of working with critical infrastructure customers across a diverse range of industries over the last 25 years and supporting their digital transformation initiatives. In the early part of my career, I was a design and commissioning engineer of industrial automation systems. In this role, I had the opportunity to design and commission new industrial plants and get them into operation, which was extremely fulfilling. I feel fortunate to have joined a company like AWS that takes cybersecurity seriously in developing its products and cloud services, and I’m proud to bring real-world experience in the design and security of cyber-physical systems to our critical infrastructure customers.
If you had to pick an industry outside of engineering, what would you want to do?
Growing up in India in a family of engineers and doctors, there were only two options: engineer or doctor. Both professions have the ability to change the world. Because my mother and brother worked at Siemens, I pursued a career in engineering. If I had to pick an industry outside of engineering, it would have been in the medical field.
If you have feedback about this post, submit comments in the Comments section below. If you have questions about this post, contact AWS Support.
Want more AWS Security news? Follow us on Twitter.
With AWS Secrets Manager, you can securely store, manage, retrieve, and rotate the secrets required for your applications and services running on AWS. A secret can be a password, API key, OAuth token, or other type of credential used for authentication purposes. You can control access to secrets in Secrets Manager by using AWS Identity and Access Management (IAM) permission policies. In this blog post, I will show you how to use principles of attribute-based access control (ABAC) to define dynamic IAM permission policies in AWS IAM Identity Center (successor to AWS Single Sign-On) by using user attributes from an external identity provider (IdP) and resource tags in Secrets Manager.
What is ABAC and why use it?
Attribute-based access control (ABAC) is an authorization strategy that defines permissions based on attributes or characteristics of the user, the data, or the environment, such as the department, business unit, or other factors that could affect the authorization outcome. In the AWS Cloud, these attributes are called tags. By assigning user attributes as principal tags, you can simplify the process of creating fine-grained permissions on AWS.
With ABAC, you can use attributes to build more dynamic policies that provide access based on matching attribute conditions. ABAC rules are evaluated dynamically at runtime, which means that the users’ access to applications and data and the type of allowed operations automatically change based on the contextual factors in the policy. For example, if a user changes department, access is automatically adjusted without the need to update permissions or request new roles. You can use ABAC in conjunction with role-based access control (RBAC) to combine the ease of policy administration with flexible policy specification and dynamic decision-making capability to enforce least privilege.
AWS IAM Identity Center (successor to AWS Single Sign-On) expands the capabilities of IAM to provide a central place that brings together the administration of users and their access to AWS accounts and cloud applications. With IAM Identity Center, you can define user permissions and manage access to accounts and applications in your AWS Organizations organization centrally. You can also create ABAC permission policies in a central place. ABAC will work with attributes from a supported identity source in IAM Identity Center. For a list of supported external IdPs for identity synchronization through the System for Cross-domain Identity Management (SCIM) and Security Assertion Markup Language (SAML) 2.0, see Supported identity providers.
The following are key benefits of using ABAC with IAM Identity Center and Secrets Manager:
Fewer permission sets — With ABAC, multiple users who use the same IAM Identity Center permission set and the same IAM role can still get unique permissions, because permissions are now based on user attributes. Administrators can author IAM policies that grant users access only to secrets that have matching attributes. This helps reduce the number of distinct permissions that you need to create and manage in IAM Identity Center and, in turn, reduces your permission management complexity.
Teams can change and grow quickly — When you create new secrets, you can apply the appropriate tags, which will automatically grant access without requiring you to update the permission policies.
Use employee attributes from your corporate directory to define access — You can use existing employee attributes from a supported identity source configured in IAM Identity Center to make access control decisions on AWS.
Figure 1 shows a framework to control access to Secrets Manager secrets using IAM Identity Center and ABAC principles.
Figure 1: ABAC framework to control access to secrets using IAM Identity Center
The following is a brief introduction to the basic components of the framework:
User attribute source or identity source — This is where your users and groups are administered. You can configure a supported identity source with IAM Identity Center. You can then define and manage supported user attributes in the identity source.
Policy management — You can create and maintain policy definitions (permission sets) centrally in IAM Identity Center. You can assign access to a user or group to one or more accounts in IAM Identity Center with these permission sets. You can then use attributes defined in your identity source to build ABAC policies for managing access to secrets.
Policy evaluation — When you assign a permission set, IAM Identity Center creates corresponding IAM Identity Center-controlled IAM roles in each account, and attaches the policies specified in the permission set to those roles. IAM Identity Center manages the role, and allows the authorized users that you’ve defined to assume the role. When users try to access a secret, IAM dynamically evaluates ABAC policies on the target account to determine access based on the attributes assigned to the user and resource tags assigned to that secret.
How to configure ABAC with IAM Identity Center
To configure ABAC with IAM Identity Center, you need to complete the following high-level steps. I will walk you through these steps in detail later in this post.
Identify and set up identities that are created and managed in the identity source with user attributes, such as project, team, AppID or department.
In IAM Identity Center, enable Attributes for access control and configure select attributes (such as department) to use for access control. For a list of supported attributes, see Supported external identity provider attributes.
If you are using an external IdP and choose to use custom attributes from your IdP for access controls, configure your IdP to send the attributes through SAML assertions to IAM Identity Center.
Assign appropriate tags to secrets in Secrets Manager.
Create permission sets based on attributes added to identities and resource tags.
Define guardrails to enforce access using ABAC.
ABAC enforcement and governance
Because an ABAC authorization model is based on tags, you must have a tagging strategy for your resources. To help prevent unintended access, you need to make sure that tagging is enforced and that a governance model is in place to protect the tags from unauthorized updates. By using service control policies (SCPs) and AWS Organizations tag policies, you can enforce tagging and tag governance on resources.
When you implement ABAC for your secrets, consider the following guidance for establishing a tagging strategy:
During secret creation, secrets must have an ABAC tag applied (tag-on-create).
During secret creation, the provided ABAC tag key must be the same case as the principal’s ABAC tag key.
After secret creation, the ABAC tag cannot be modified or deleted.
Only authorized principals can do tagging operations on secrets.
You enforce the permissions that give access to secrets through tags.
For more information on tag strategy, enforcement, and governance, see the following resources:
In this post, I will walk you through the steps to enable the IdP that is supported by IAM Identity Center.
Figure 2: Sample solution implementation
In the sample architecture shown in Figure 2, Arnav and Ana are users who each have the attributes department and AppID. These attributes are created and updated in the external directory—Okta in this case. The attribute department is automatically synchronized between IAM Identity Center and Okta using SCIM. The attribute AppID is a custom attribute configured on Okta, and is passed to AWS as a SAML assertion. Both users are configured to use the same IAM Identity Center permission set that allows them to retrieve the value of secrets stored in Secrets Manager. However, access is granted based on the tags associated with the secret and the attributes assigned to the user.
For example, user Arnav can only retrieve the value of the RDS_Master_Secret_AppAlpha secret. Although both users work in the same department, Arnav can’t retrieve the value of the RDS_Master_Secret_AppBeta secret in this sample architecture.
Prerequisites
Before you implement the solution in this blog post, make sure that you have the following prerequisites in place:
You have IAM Identity Center enabled for your organization and connected to an external IdP using SAML 2.0 identity federation.
You have IAM Identity Center configured for automatic provisioning with an external IdP using the SCIM v2.0 standard. SCIM keeps your IAM Identity Center identities in sync with identities from the external IdP.
Solution implementation
In this section, you will learn how to enable access to Secrets Manager using ABAC by completing the following steps:
Configure ABAC in IAM Identity Center
Define custom attributes in Okta
Update configuration for the IAM Identity Center application on Okta
Make sure that required tags are assigned to secrets in Secrets Manager
Create and assign a permission set with an ABAC policy in IAM Identity Center
Define guardrails to enforce access using ABAC
Step 1: Configure ABAC in IAM Identity Center
The first step is to set up attributes for your ABAC configuration in IAM Identity Center. This is where you will be mapping the attribute coming from your identity source to an attribute that IAM Identity Center passes as a session tag. The Key represents the name that you are giving to the attribute for use in the permission set policies. You need to specify the exact name in the policies that you author for access control. For the example in this post, you will create a new attribute with Key of department and Value of ${path:enterprise.department}. For supported external IdP attributes, see Attribute mappings.
To configure ABAC in IAM Identity Center (console)
Open the IAM Identity Center console.
In the Settings menu, enable Attributes for access control.
Choose the Attributes for access control tab, select Add attribute, and then enter the Key and Value details as follows.
The sample architecture in this post uses a custom attribute (AppID) on an external IdP for access control. In this step, you will create a custom attribute in Okta.
To define custom attributes in Okta (console)
Open the Okta console.
Navigate to Directory and then select Profile Editor.
On the Profile Editor page, choose Okta User (default).
Select Add Attribute and create a new custom attribute with the following parameters.
For Data type, enter string
For Display name, enter AppID
For Variable name, enter user.AppID
For Attribute length, select Less Than from the dropdown and enter a value.
For User permission, enter Read Only
Navigate to Directory, select People, choose in-scope users, and enter a value for Department and AppID attributes. The following shows these values for the users in our example.
Step 3: Update SAML configuration for IAM Identity Center application on Okta
Automatic provisioning (through the SCIM v2.0 standard) of user and group information from Okta into IAM Identity Center supports a set of defined attributes. A custom attribute that you create on Okta won’t be automatically synchronized to IAM Identity Center through SCIM. You can, however, define the attribute in the SAML configuration so that it is inserted into the SAML assertions.
To update the SAML configuration in Okta (console)
Open the Okta console and navigate to Applications.
On the Applications page, select the app that you defined for IAM Identity Center.
Under the Sign On tab, choose Edit.
Under SAML 2.0, expand the Attributes (Optional) section, and add an attribute statement with the following values, as shown in Figure 3:
Figure 3: Sample SAML configuration with custom attributes
To check that the newly added attribute is reflected in the SAML assertion, choose Preview SAML, review the information, and then choose Save.
Step 4: Make sure that required tags are assigned to secrets in Secrets Manager
The next step is to make sure that the required tags are assigned to secrets in Secrets Manager. You will review the required tags from the Secrets Manager console.
To verify required tags on secrets (console)
Open the Secrets Manager console in the target AWS account and then choose Secrets.
Verify that the required tags are assigned to the secrets in scope for this solution, as shown in Figure 4. In our example, the tags are as follows:
Key: department
Value: Digital
Key: AppID
Value: Alpha or Beta
Figure 4: Sample secret configuration with required tags
Step 5a: Create a permission set in IAM Identity Center using ABAC policy
In this step, you will create a new permission set that allows access to secrets based on the principal attributes and resource tags.
When you enable ABAC and specify attributes, IAM Identity Center passes the attribute value of the authenticated user to AWS Security Token Service (AWS STS) as session tags when an IAM role is assumed. You can use access control attributes in your permission sets by using the aws:PrincipalTag condition key to create access control rules.
To create a permission set (console)
Open the IAM Identity Center console and navigate to Multi-account permissions.
Choose Permission sets, and then select Create permission set.
On the Specify policies and permissions boundary page, choose Inline policy.
For Inline policy, paste the following sample policy document and then choose Next. This policy allows users to retrieve the value of only those secrets that have resource tags that match the required user attributes (department and AppID in our example).
Configure the session duration, and optionally provide a description and tags for the permission set.
Review and create the permission set.
Step 5b: Assign permission set to users in IAM Identity Center
Now that you have created a permission set with ABAC policy, complete the configuration by assigning the permission set to users to grant them access to secrets in one or more accounts in your organization.
To assign a permission set (console)
Open the IAM Identity Center console and navigate to Multi-account permissions.
Choose AWS accounts and select one or more accounts to which you want to assign access.
Choose Assign users or groups.
On the Assign users and groups page, select the users, groups, or both to which you want to assign access. For this example, I select both Arnav and Ana.
On the Assign permission sets page, select the permission set that you created in the previous section.
Review your changes, as shown in Figure 5, and then select Submit.
Figure 5: Sample permission set assignment
Step 6: Define guardrails to enforce access using ABAC
To govern access to secrets to your workforce users only through ABAC and to help prevent unauthorized access, you can define guardrails. In this section, I will show you some sample service control policies (SCPs) that you can use in your organization.
Note: Before you use these sample SCPs, you should carefully review, customize, and test them for your unique requirements. For additional instructions on how to attach an SCP, see Attaching and detaching service control policies.
Guardrail 1 – Enforce ABAC to access secrets
The following sample SCP requires the use of ABAC to access secrets in Secrets Manager. In this example, users and secrets must have matching values for the attributes department and AppID. Access is denied if those attributes don’t exist or if they don’t have matching values. Also, this example SCP allows only the admin role to access secrets without matching tags. Replace <arn:aws:iam::*:role/secrets-manager-admin-role> with your own information.
The following sample SCP denies the creation of new secrets that don’t have the required tag key-value pairs. In this example, the SCP denies creation of a new secret if it doesn’t include department and AppID tag keys. It also denies access if the tag department doesn’t have the value Digital and the tag AppID doesn’t have either Alpha or Beta assigned to it. Also, this example SCP allows only the admin role to create secrets without matching tags. Replace <arn:aws:iam::*:role/secrets-manager-admin-role> with your own information.
The following sample SCP denies the ability to delete the tags used for ABAC. In this example, only the admin role can delete the tags department and AppID after they are attached to a secret. Replace <arn:aws:iam::*:role/secrets-manager-admin-role> with your own information.
Guardrail 4 – Restrict modification of ABAC tags
The following sample SCP denies the ability to modify required tags for ABAC after they are attached to a secret. In this example, only the admin role can modify the tags department and AppID after they are attached to a secret. Replace <arn:aws:iam::*:role/secrets-manager-admin-role> with your own information.
In this section, you will test the solution by retrieving a secret using the Secrets Manager console. Your attempt to retrieve the secret value will be successful only when the required resource and principal tags exist, and have matching values (AppID and department in our example).
Test scenario 1: Retrieve and view the value of an authorized secret
In this test, you will verify whether you can successfully retrieve the value of a secret that belongs to your application.
To test the scenario
Sign in to IAM Identity Center and log in with your external IdP user. For this example, I log in as Arnav.
On the IAM Identity Center dashboard, select the target account.
From the list of available roles that the user has access to, choose the role that you created in Step 5a and select Management console, as shown in Figure 6. For this example, I select the SecretsManagerABACTest permission set.
Figure 6: Sample IAM Identity Center dashboard
Open the Secrets Manager console and select a secret that belongs to your application. For this example, I select RDS_Master_Secret_AppAlpha.
Because the AppID and department tags exist on both the secret and the user, the ABAC policy allowed the user to describe the secret, as shown in Figure 7.
Figure 7: Sample secret that was described successfully
In the Secret value section, select Retrieve secret value.
Because the value of the resource tags, AppID and department, matches the value of the corresponding user attributes (in other words, the principal tags), the ABAC policy allows the user to retrieve the secret value, as shown in Figure 8.
Figure 8: Sample secret value that was retrieved successfully
Test scenario 2: Retrieve and view the value of an unauthorized secret
In this test, you will verify whether you can retrieve the value of a secret that belongs to a different application.
Open the Secrets Manager console and select a secret that belongs to a different application. For this example, I select RDS_Master_Secret_AppBeta.
Because the value of the resource tag AppID doesn’t match the value of the corresponding user attribute (principal tag), the ABAC policy denies access to describe the secret, as shown in Figure 9.
Figure 9: Sample error when describing an unauthorized secret
Conclusion
In this post, you learned how to implement an ABAC strategy using attributes and to build dynamic policies that can simplify access management to Secrets Manager using IAM Identity Center configured with an external IdP. You also learned how to govern resource tags used for ABAC and establish guardrails to enforce access to secrets using ABAC. To learn more about ABAC and Secrets Manager, see Attribute-Based Access Control (ABAC) for AWS and the Secrets Manager documentation.
If you have feedback about this blog post, submit comments in the Comments section below. If you have questions about this blog post, start a new thread on AWS Secrets Manager re:Post.
Want more AWS Security news? Follow us on Twitter.
This blog post shows you how to use AWS CloudTrail Lake capabilities to investigate CloudTrail activity across AWS Organizations in response to a security incident scenario. We will walk you through two security-related scenarios while we investigate CloudTrail activity. The method described in this post will help you with the investigation process, allowing you to gain comprehensive understanding of the incident and its implications. CloudTrail Lake is a managed audit and security lake that allows you to aggregate, immutably store, and query your activity logs for auditing, security investigation, and operational troubleshooting.
Prerequisites
You must have the following AWS services enabled before you start the investigation.
CloudTrail Lake — To learn how to enable this service and use sample queries, see the blog post Announcing AWS CloudTrail Lake – a managed audit and security Lake. When you create a new event data store at the organization level, you will need to enable CloudTrail Lake for all of the accounts in the organization. We advise that you include not only management events but also data events.
When you use CloudTrail Lake with AWS Organizations, you can designate an account within the organization to be the CloudTrail Lake delegated administrator. This provides a convenient way to perform queries from a designated AWS security account—for example, you can avoid granting access to your AWS management account.
Amazon GuardDuty — This is a threat detection service that continuously monitors your AWS accounts and workloads for malicious activity and delivers detailed security findings for visibility and remediation. To learn about the benefits of the service and how to get started, see Amazon GuardDuty.
Incident scenario 1: AWS access keys compromised
In the first scenario, you have observed activity within your AWS account from an unauthorized party. This example covers a situation where a threat actor has obtained and misused one of your AWS access keys that was exposed publicly by mistake. This investigation starts after Amazon GuardDuty generates an IAM finding identifying that the malicious activity came from the exposed AWS access key. Following the Incident Response Playbook Compromised IAM Credentials, focusing on step 12 in the playbook ([DETECTION AND ANALYSIS] Review CloudTrail Logs), you will use CloudTrail Lake capabilities to investigate the activity that was performed with this key. To do so, you will use the following nine query examples that we provide for this first scenario.
Query 1.1: Activity performed by access key during a specific time window
The first query is aimed at obtaining the specific activity that was performed by this key, either successfully or not, during the time the malicious activity took place. You can use the GuardDuty finding details “EventFirstSeen” and “EventLastSeen” to define the time window of the query. Also, and for further queries, you want to fetch artifacts that could be considered possible indicators of compromise (IoC) related to this security incident, such as IP addresses.
SELECT eventSource,eventName,sourceIPAddress,eventTime,errorCode FROM 1994bee2-d4a0-460e-8c07-1b5ee04765d8 WHERE userIdentity.accessKeyId = 'AKIAIOSFODNN7EXAMPLE' AND eventTime > '2022-03-15 13:10:00' AND eventTime < '2022-03-16 00:00:00' order by eventTime;
The results of the query are as follows:
Figure 1: Sample query 1.1 and results in the AWS Management Console
The results demonstrate that the activity performed by the access key tried to unsuccessfully list Amazon Simple Storage Services (Amazon S3) buckets and CloudTrail trails. You can also see specific write activity related to AWS Identity and Access Management (IAM) that was denied, and afterwards there was activity possibly related to reconnaissance tactics in IAM to finally be able to assume a role, which indicates a possible attempt to perform an escalation of privileges. You can observe only one source IP from which this activity was performed.
Query 1.2: Confirm which IAM role was assumed by the threat actor during a specific time window
As you observed from the previous query results, the threat actor was able to assume an IAM role. In this query, you would like to confirm which IAM role was assumed during the security incident.
Query 1.2
SELECT requestParameters,responseElements FROM 1994bee2-d4a0-460e-8c07-1b5ee04765d8 WHERE eventName = 'AssumeRole' AND eventTime > '2022-03-15 13:10:00' AND eventTime < '2022-03-16 00:00:00' AND userIdentity.accessKeyId = 'AKIAIOSFODNN7EXAMPLE'
The results of the query are as follows:
Figure 2: Sample query 1.2 and results in the console
The results show that an IAM role named “Alice” was assumed in a second account. For future queries, keep the temporary access key from the responseElements result to obtain activity performed by this role session.
Query 1.3: Activity performed from an IP address in an expanded time window search
Investigating the incident only from the time of discovery may result in overlooking signs or indicators of potential past incidents that were not detected related to this threat actor. For this reason, you want to expand the investigation window time, which might result in expanding the search back weeks, months, or even years, depending on factors such as the nature and severity of the incident, available resources, and so on. In this example, for balance and urgency, the window of time searched is expanded to a month. You want to also review whether there is past activity related to this account by the IP you previously observed.
Query 1.3
The results of the query are as follows:
SELECT eventSource,eventName,sourceIPAddress,eventTime,errorCode FROM 1994bee2-d4a0-460e-8c07-1b5ee04765d8 WHERE sourceIPAddress = '192.0.2.76' AND useridentity.accountid = '555555555555 AND eventTime > '2022-02-15 13:10:00' AND eventTime < '2022-03-15 13:10:00' order by eventTime;
Figure 3: Sample query 1.3 and results in the console
As you can observe from the results, there is no activity coming from this IP address in this account in the previous month.
Query 1.4: Activity performed from an IP address in any other account in your organization during a specific time window
Before you start investigating what activity was performed by the role assumed in the second account, and considering that this malicious activity now involves cross-account access, you will want to review whether any other account in your organization has activity related to the specific IP address observed. You will need to expand the window of time to an entire month in order to see if previous activity was performed before this incident from this source IP, and you will need to exclude activity coming from the first account.
Query 1.4
SELECT useridentity.accountid,eventTime FROM 1994bee2-d4a0-460e-8c07-1b5ee04765d8 WHERE sourceIPAddress = '192.0.2.76' AND eventTime > '2022-02-15 13:10:00' AND eventTime < '2022-03-16 00:00:00' AND useridentity.accountid != '555555555555'GROUP by useridentity.accountid
The results of the query are as follows:
Figure 4: Sample query 1.4 and results in the console
As you can observe from the results, there is activity only in the second account where the role was assumed. You can also confirm that there was no activity performed in other accounts in the previous month from this IP address.
Query 1.5: Count activity performed by an IAM role during a specific time period
For the next query example, you want to count and group activity based on the API actions that were performed in each service by the role assumed. This query helps you quantify and understand the impact of the possible unauthorized activity that might have happened in this second account.
Query 1.5
 SELECT count (*) as NumberEvents, eventSource, eventName
 FROM 1994bee2-d4a0-460e-8c07-1b5ee04765d8 WHERE eventTime > '2022-03-15 13:10:00' AND eventTime < '2022-03-16 00:00:00' AND useridentity.type = 'AssumedRole' AND useridentity.sessioncontext.sessionissuer.arn = 'arn:aws:iam::111122223333:role/Alice'
 GROUP by eventSource, eventName
 order by NumberEvents desc;
The results of the query are as follows:
Figure 5: Sample query 1.5 and results in the console
You observe that the activity is consistent with what was shown in the first account, and the threat actor seems to be targeting trails, S3 buckets, and IAM activity related to possible further escalation of privileges.
Query 1.6: Confirm successful activity performed by an IAM role during a specific time window
Following the example in query 1.1, you will fetch the information related to activity that was successful or denied. This helps you confirm modifications that took place in the environment, or the creation of new resources. For this example, you will also want to obtain the event ID in case you need to dig further into one specific API call. You will then filter out activity done by any other session by using the temporary access key obtained from query 1.2.
Query 1.6
SELECT eventSource, eventName, eventTime, eventID, errorCode FROM 1994bee2-d4a0-460e-8c07-1b5ee04765d8 WHERE eventTime > '2022-03-15 13:10:00' AND eventTime < '2022-03-16 00:00:00' AND useridentity.type = 'AssumedRole' AND useridentity.sessioncontext.sessionissuer.arn = 'arn:aws:iam::111122223333:role/Alice' AND userIdentity.accessKeyId = 'ASIAZNYXHMZ37EXAMPLE '
The results of the query are as follows:
Figure 6: Sample query 1.6 and results in the console
You can observe that the threat actor was again not able to perform activity upon the trails, S3 buckets, or IAM roles. But as you can see, the threat actor was able to perform specific IAM activity, which led to the creation of a new IAM user, policy attachment, and access key.
Query 1.7: Obtain new access key ID created
By making use of the event ID from the CreateAccesskey event displayed in the previous query, you can obtain the access key ID so that you can further dig into what activity was performed by it.
Query 1.7
SELECT responseElements FROM 1994bee2-d4a0-460e-8c07-1b5ee04765d8 WHERE eventID = 'bd29bab7-1153-4510-9e7f-9ff9bba4bd9a'
The results of the query are as follows:
Figure 7: Sample query 1.7 and results in the console
Query 1.8: Obtain successful API activity that was performed by the access key during a specific time window
Following previous examples, you will count and group the API activity that was successfully performed by this access key ID. This time, you will exclude denied activity in order to understand the activity that actually took place.
Query 1.8
 SELECT count (*) as NumberEvents, eventSource, eventName
 FROM 1994bee2-d4a0-460e-8c07-1b5ee04765d8 WHERE eventTime > '2022-03-15 13:10:00' AND eventTime < '2022-03-16 00:00:00' AND
 userIdentity.accessKeyId = 'AKIAI44QH8DHBEXAMPLE' AND errorcode IS NULL
 GROUP by eventSource, eventName
 order by NumberEvents desc;
The results of the query are as follows:
Figure 8: Sample query 1.8 and results in the console
You can observe that this time, the threat actor was able to perform specific activities targeting your trails and buckets due to privilege escalation. In these results, you observe that a trail was successfully stopped, and S3 objects were downloaded and deleted.
You can also see bucket deletion activity. At first glance, this might indicate activity related to a data exfiltration scenario in the case where the bucket was not properly secured, and possible future ransom demands could be made if proper preventive controls and measures to recover the data were not in place. For more details on this scenario, see this AWS Security blog post.
Query 1.9: Obtain bucket and object names affected during a specific time window
After you obtain the activities on the S3 buckets by using sample query 1.8, you can use the following query to show what objects this activity was related to, and from which buckets. You can expand the query to exclude denied activity.
Query 1.9
SELECT element_at(requestParameters, 'bucketName') as BucketName, element_at(requestParameters, 'key') as ObjectName, eventName FROM 1994bee2-d4a0-460e-8c07-1b5ee04765d8 WHERE (eventName = 'GetObject' OR eventName = 'DeleteObject') AND eventTime > '2022-03-15 13:10:00' AND eventTime < '2022-03-16 00:00:00' AND userIdentity.accessKeyId = 'AKIAI44QH8DHBEXAMPLE' AND errorcode IS NULL
The results of the query are as follows:
Figure 9: Sample query 1.9 and results in the console
As you can observe, the unauthorized user was able to first obtain and exfiltrate S3 objects, and then delete them afterwards.
Summary of incident scenario 1
This scenario describes a security incident involving a publicly exposed AWS access key that is exploited by a threat actor. Here is a summary of the steps taken to investigate this incident by using CloudTrail Lake capabilities:
Investigated AWS activity that was performed by the compromised access key
Observed possible adversary tactics and techniques that were used by the threat actor
Collected artifacts that could be potential indicators of compromise (IoC), such as IP addresses
Confirmed role assumption by the threat actor in a second account
Expanded the time window of your investigation and the scope to your entire organization in AWS Organizations; and searched for any activity that might have taken place originating from the IP address related to the unauthorized activity
Investigated AWS activity that was performed by the role assumed in the second account
Identified new resources that were created by the threat actor, and malicious activity performed by the actor
Confirmed the modifications caused by the threat actor and their impact in your environment
Incident scenario 2: AWS IAM Identity Center user credentials compromised
In this second scenario, you start your investigation from a GuardDuty finding stating that an Amazon Elastic Compute Cloud (Amazon EC2) instance is querying an IP address that is associated with cryptocurrency-related activity. There are several sources of logs that you might want to explore when you conduct this investigation, including network, operation system, or application logs, among others. In this example, you will use CloudTrail Lake capabilities to investigate API activity logged in CloudTrail for this security event. To understand what exactly happened and when, you start by querying information from the resource involved, in this case an EC2 instance, and then continue digging into the AWS IAM Identity Center (successor to AWS Single Sign-On) credentials that were used to launch that EC2 instance, to finally confirm what other actions were performed.
Query 2.1: Confirm who has launched the EC2 instance involved in the cryptocurrency-related activity
You can begin by looking at the finding CryptoCurrency:EC2/BitcoinTool.B to get more information related to this event, for example when (timestamp), where (AWS account and AWS Region), and also which resource (EC2 instance ID) was involved with the security incident and when it was launched. With this information, you can perform the first query for this scenario, which will confirm what type of user credentials were used to launch the instance involved.
Query 2.1
 SELECT userIdentity.principalid, eventName, eventTime, recipientAccountId, awsRegion FROM 467f2e52-84b9-4d41-8049-bc8f8fad35dd
 WHERE responseElements IS NOT NULL AND
 element_at(responseElements, 'instancesSet') like '%"instanceId":"i-053a7e6164c0f0473"%' AND
 eventTime > '2022-09-13 12:45:59' AND eventName='RunInstances'
The results of the query are as follows:
Figure 10: Sample query 2.1 and results in the console
The results demonstrate that the IAM Identity Center user as principal ID AROASVPO5CIEXAMPLE:[email protected] was used to launch the EC2 instance that was involved in the incident.
Query 2.2: Confirm in which AWS accounts the IAM Identity Center user has federated and authenticated
You want to confirm which AWS accounts this specific IAM Identity Center user has federated and authenticated with, and also which IAM role was assumed. This is important information to make sure that the security event happened only within the affected AWS account. The window of time for this query is based on the maximum value for the permission sets’ session duration in IAM Identity Center.
Query 2.2
SELECT element_at(serviceEventDetails, 'account_id') as AccountID, element_at(serviceEventDetails, 'role_name') as SSORole, eventID, eventTime FROM 467f2e52-84b9-4d41-8049-bc8f8fad35dd WHERE eventSource = 'sso.amazonaws.com' AND eventName = 'Federate' AND userIdentity.username = '[email protected]' AND eventTime > '2022-09-13 00:00:00' AND eventTime < '2022-09-14 00:00:00'
The results of the query are as follows:
Figure 11: Sample query 2.2 and results in the console
The results show that only one AWS account has been accessed during the time of the incident, and only one AWS role named AdministratorAccess has been used.
Query 2.3: Count and group activity based on API actions that were performed by the user in each AWS service
You now know exactly where the user has gained access, so next you can count and group the activity based on the API actions that were performed in each AWS service. This information helps you confirm the types of activity that were performed.
Query 2.3
 SELECT eventSource, eventName, COUNT(*) AS apiCount
 FROM 467f2e52-84b9-4d41-8049-bc8f8fad35dd
 WHERE userIdentity.principalId = 'AROASVPO5CIEXAMPLE:[email protected]'
 AND eventTime > '2022-09-13 00:00:00' AND eventTime < '2022-09-14 00:00:00'
 GROUP BY eventSource, eventName ORDER BY apiCount DESC
The results of the query are as follows:
Figure 12: Sample query 2.3 and results in the console
You can see that the list of APIs includes the read activities Get, Describe, and List. This activity is commonly associated with the discovery stage, when the unauthorized user is gathering information to determine credential permissions.
Query 2.4: Obtain mutable activity based on API actions performed by the user in each AWS service
To get a better understanding of the mutable actions performed by the user, you can add a new condition to hide the read-only actions by setting the readOnly parameter to false. You will want to focus on mutable actions to know whether there were new AWS resources created or if existing AWS resources were deleted or modified. Also, you can add the possible error code from the response element to the query, which will tell you if the actions were denied.
Query 2.4
 SELECT eventSource, eventName, eventTime, eventID, errorCode
 FROM 467f2e52-84b9-4d41-8049-bc8f8fad35dd
 WHERE userIdentity.principalId = 'AROASVPO5CIEXAMPLE:[email protected]'
 AND readOnly = false
 AND eventTime > '2022-09-13 00:00:00' AND eventTime < '2022-09-14 00:00:00'
The results of the query are as follows:
Figure 13: Sample query 2.4 and results in the console
You can confirm that some actions, like EC2 RunInstances, EC2 CreateImage, SSM StartSession, IAM CreateUser, and IAM PutRolePolicy were allowed. And in contrast, IAM CreateAccessKey, IAM CreateRole, IAM AttachRolePolicy, and GuardDuty DeleteDetector were denied. The IAM-related denied actions are commonly associated with persistence tactics, where an unauthorized user may try to maintain access to the environment. The GuardDuty denied action is commonly associated with defense evasion tactics, where the unauthorized user is trying to cover their tracks and avoid detection.
Query 2.5: Obtain more information about API action EC2 RunInstances
You can focus first on the API action EC2 RunInstances to understand how many EC2 instances were created by the same user. This information will confirm which other EC2 instances were involved in the security event.
Query 2.5
 SELECT awsRegion, recipientAccountId, eventID, element_at(responseElements, 'instancesSet') as instances
 FROM 467f2e52-84b9-4d41-8049-bc8f8fad35dd
 WHERE userIdentity.principalId = 'AROASVPO5CIEXAMPLE:[email protected]'
 AND eventName='RunInstances'
 AND eventTime > '2022-09-13 00:00:00' AND eventTime < '2022-09-14 00:00:00'
The results of the query are as follows:
Figure 14: Sample query 2.5 and results in the console
You can confirm that the API was called twice, and if you expand the column InstanceSet in the response element, you will see the exact number of EC2 instances that were launched. Also, you can find that these EC2 instances were launched with an IAM instance profile called ec2-role-ssm-core. By checking in the IAM console, you can confirm that the IAM role associated has only the AWS managed policy AmazonSSMManagedInstanceCore attached, which enables AWS Systems Manager core functionality.
Query 2.6: Get the list of denied API actions performed by the user for each AWS service
Now, you can filter more to focus only on those denied API actions by performing the following query. This is important because it can help you to identify what kind of malicious event was attempted.
Query 2.6
 SELECT recipientAccountId, awsRegion, eventSource, eventName, eventID, eventTime
 FROM 467f2e52-84b9-4d41-8049-bc8f8fad35dd
 WHERE userIdentity.principalId = 'AROASVPO5CIEXAMPLE:[email protected]'
 AND errorCode = 'AccessDenied'
 AND eventTime > '2022-09-13 00:00:00' AND eventTime < '2022-09-14 00:00:00'
The results of the query are as follows:
Figure 15: Sample query 2.6 and results in the console
You can see that the user has tried to stop GuardDuty by calling DeleteDetector, and has also performed actions within IAM that you should examine more closely to know if new unwanted access to the environment was created.
Query 2.7: Obtain more information about API action IAM CreateUserAccessKeys
With the previous query, you confirmed that more actions were denied within IAM. You can now focus on the failed attempt to create IAM user access keys that could have been used to gain persistent and programmatic access to the AWS account. With the following query, you can make sure that the actions were denied and determine the reason why.
Query 2.7
 SELECT recipientAccountId, awsRegion, eventID, eventTime, errorCode, errorMessage
 FROM 467f2e52-84b9-4d41-8049-bc8f8fad35dd
 WHERE userIdentity.principalId = 'AROASVPO5CIEXAMPLE:[email protected]'
 AND eventName='CreateAccessKey'
 AND eventTime > '2022-09-13 00:00:00' AND eventTime < '2022-09-14 00:00:00'
The results of the query are as follows:
Figure 16: Sample query 2.7 and results in the console
If you copy the errorMessage element from the response, you can confirm that the action was denied by a service control policy, as shown in the following example.
"errorMessage":"User: arn:aws:sts::111122223333:assumed-role/AWSReservedSSO_AdministratorAccess_f53d10b0f8a756ac/[email protected] is not authorized to perform: iam:CreateAccessKey on resource: user production-user with an explicit deny in a service control policy"
Query 2.8: Obtain more information about API IAM CreateUser
From the query error message in query 2.7, you can confirm the name of the IAM user that was used. Now you can check the allowed API action IAM CreateUser that you observed before to see if the IAM users match. This helps you confirm that there were no other IAM users involved in the security event.
Query 2.8
 SELECT recipientAccountId, awsRegion, eventID, eventTime, element_at(responseElements, 'user') as userInfo
 FROM 467f2e52-84b9-4d41-8049-bc8f8fad35dd
 WHERE userIdentity.principalId = 'AROASVPO5CIEXAMPLE:[email protected]'
 AND eventName='CreateUser'
 AND eventTime > '2022-09-13 00:00:00' AND eventTime < '2022-09-14 00:00:00'
The results of the query are as follows:
Figure 17: Sample query 2.8 and results in the console
Based on this output, you can confirm that the IAM user is indeed the same. This user was created successfully but was denied the creation of access keys, confirming the failed attempt to get new persistent and programmatic credentials.
Query 2.9: Get more information about the IAM role creation attempt
Now you can figure out what happened with the IAM CreateRole denied action. With the following query, you can see the full error message for the denied action.
Query 2.9
 SELECT recipientAccountId, awsRegion, eventID, eventTime, errorCode, errorMessage
 FROM 467f2e52-84b9-4d41-8049-bc8f8fad35dd
 WHERE userIdentity.principalId = 'AROASVPO5CIEXAMPLE:[email protected]'
 AND eventName='CreateRole'
 AND eventTime > '2022-09-13 00:00:00' AND eventTime < '2022-09-14 00:00:00'
The results of the query are as follows:
Figure 18: Sample query 2.9 and results in the console
If you copy the output of this query, you will see that the role was denied by a service control policy, as shown in the following example:
"errorMessage":"User: arn:aws:sts::111122223333:assumed-role/AWSReservedSSO_AdministratorAccess_f53d10b0f8a756ac/[email protected] is not authorized to perform: iam:CreateRole on resource: arn:aws:iam::111122223333:role/production-ec2-role with an explicit deny in a service control policy"
Query 2.10: Get more information about IAM role policy changes
With the previous query, you confirmed that the unauthorized user failed to create a new IAM role to replace the existing EC2 instance profile in an attempt to grant more permissions. And with another of the previous queries, you confirmed that the IAM API action AttachRolePolicy was also denied, in another attempt for the same goal, but this time trying to attach a new AWS managed policy directly. However, with this new query, you can confirm that the unauthorized user successfully applied an inline policy to the EC2 role associated with the existing EC2 instance profile, with full admin access.
Query 2.10
SELECT recipientAccountId, eventID, eventTime, element_at(requestParameters, 'roleName') as roleName, element_at(requestParameters, 'policyDocument') as policyDocument FROM 467f2e52-84b9-4d41-8049-bc8f8fad35dd WHERE userIdentity.principalId = 'AROASVPO5CIEXAMPLE:[email protected]' AND eventName = 'PutRolePolicy' AND eventTime > '2022-09-13 00:00:00' AND eventTime < '2022-09-14 00:00:00'
The results of the query are as follows:
Figure 19: Sample query 2.10 and results in the console
Summary of incident scenario 2
This second scenario describes a security incident that involves an IAM Identity Center user that has been compromised. To investigate this incident by using CloudTrail Lake capabilities, you did the following:
Started the investigation by looking at metadata from the GuardDuty EC2 finding
Confirmed the AWS credentials that were used for the creation of that resource
Looked at whether the IAM Identity Center user credentials were used to access other AWS accounts
Did further investigation on the AWS APIs that were called by the IAM Identity Center user
Obtained the list of denied actions, confirming the unauthorized user’s attempt to get persistent access and cover their tracks
Obtained the list of EC2 resources that were successfully created in this security event
Conclusion
In this post, we’ve shown you how to use AWS CloudTrail Lake capabilities to investigate CloudTrail activity in response to security incidents across your organization. We also provided sample queries for two security incident scenarios. You now know how to use the capabilities of CloudTrail Lake to assist you and your security teams during the investigation process in a security incident. Additionally, you can find some of the sample queries related to this post and other topics in the following GitHub repository, and additional examples in the sample queries tab in the CloudTrail console. To learn more, see Working with CloudTrail Lake in the CloudTrail User Guide.
Regarding pricing for CloudTrail Lake, you pay for ingestion and storage together, where the billing is based on the amount of uncompressed data ingested. If you’re a new customer, you can try AWS CloudTrail Lake for a 30-day free trial or when you reach the free usage limits of 5GB of data. For more information, see see AWS CloudTrail pricing.
Finally, in combination with the investigation techniques shown in this post, we also recommend that you explore the use of Amazon Detective, an AWS managed and dedicated service that simplifies the investigative process and helps security teams conduct faster and more effective investigations. With the Amazon Detective prebuilt data aggregations, summaries, and context, you can quickly analyze and determine the nature and extent of possible security issues.
If you have feedback about this post, submit comments in the Comments section below. If you have questions about this post, contact AWS Support.
Want more AWS Security news? Follow us on Twitter.
In the AWS Security Profile series, I interview some of the humans who work in Amazon Web Services Security and help keep our customers safe and secure. In this profile, I interviewed Matt Luttrell, Principal Solutions Architect for AWS Identity.
How long have you been at AWS and what do you do in your current role?
I’ve been at AWS around five years and have worked in a variety of roles from Professional Services consulting as an application architect to a solutions architect. In my current role, I work on the Identity Solutions team, which is a group of solutions architects who are embedded directly in the Identity and Control Services team. We have both internal-facing and external-facing functions. Internally, we work with product managers, drive concepts like data perimeters, and generally act as the voice of the customer to our product teams. Externally, we have conversations with customers, present at events, and so on.
How did you get started in security?
My background is in software development. I’ve always had a side interest in security and have always worked for very security-conscious companies. Early in my career, I became CISSP certified and that’s what got me kickstarted in security-specific domains and conversations. At AWS, being involved in security isn’t an optional thing. So, even before I joined the Identity Solutions team, I spent a lot of time working on identity and AWS Identity and Access Management (IAM) in particular, as well as AWS IAM Access Analyzer, while working with security-conscious customers in the financial services industry. As I got involved in that, I was able to dive deep in the security elements of AWS, but I’ve always had a background in security.
How do you explain your job to non-technical friends and family?
I typically tell them that I work in the cloud computing division at Amazon and that my job title is Solutions Architect. Naturally, the next question is, “what does a solutions architect do? I’ve never heard of that.” I explain that I work with customers to figure out how to put the building blocks together that we offer them. We offer a bunch of different services and features, and my job is to teach customers how they all work and interact with each other.
What are you currently working on that you’re excited about?
One of the things our team is working on is data perimeters. Our customers will see continued guidance on data perimeters. We’ve done a lot of work in this space—workshops and presentations at some of our big conferences, as well as blog posts and example repositories.
I’m also putting together some videos that go in depth on IAM policy evaluation and offer prescriptive guidance on writing IAM policies.
In your opinion, what’s one of the coolest things happening in identity right now?
I might be biased here, but I think there’s been a shift in the security industry at large from network-based perimeters in the traditional on-premises world to identity-based perimeters in the cloud. This is where the concept of data perimeters comes into play. Because your resources and identities are distributed, you can no longer look at your server and touch your server that’s sitting right next to you. This really puts an extra emphasis on your authentication and authorization controls, as well as the need for visibility into those controls. I think there’s a lot of innovation happening in the identity world because of this increased focus on identity perimeters. You’re hearing about concepts in this area like zero trust, data perimeters, and general identity awareness in all levels of the application and infrastructure stacks. You have services like IAM Access Analyzer to help give you that visibility into your AWS environment and what your identities are doing in terms of who can access what. I think we’ll continue to see growth in these areas because workloads are not becoming less distributed over time.
Tell me about something fun that you’ve done recently at AWS.
Roberto Migli and I presented a 400-level workshop at re:Invent 2022 on IAM policy evaluation, AWS Identity and Access Management (IAM) policy evaluation in action. This workshop introduced a new mental model for thinking about policy evaluation and walked attendees through a number of different policy evaluation scenarios. The idea behind the workshop is that we introduce a scenario and have the attendee try to figure out what the result of the evaluation would be. It spends some extra time comparing how the evaluation of resource-based policies differs from that of identity-based policies. I hope attendees walked away with a better understanding of how policy evaluations work at a deeper level and how they can write better, more secure IAM policies. We presented practical advice on how to structure different types of IAM policies and the different tradeoffs when writing a policy one way compared to another. I hope the mental model we introduced helps customers better reason about how policies will evaluate when they write them in their environment.
What is your favorite Amazon Leadership Principle and why?
This is an easy one. For me, it’s definitely Learn and Be Curious. Something I try to do is put myself in uncomfortable situations because I feel that when I’m uncomfortable, I’m learning and growing because it means I don’t know something. I find comfortable situations boring at times, so I’m always trying to dig in and learn how things work. This can sometimes be distracting, too, because there’s so much to learn and understand in the identity world.
What’s the thing you’re most proud of in your career?
There’s no particular project that I can point to and say, “this is what I’m most proud of.” I’m proud to be a part of the team I’m on now. For my team, Customer Obsession is more than just a slogan. We really advocate on behalf of the customer, listen to the voice of the customer, and push back on features that might not be the best thing for the customer. I think it’s awesome that I get to work for a company that really does advocate on behalf of the customer, and that my voice is heard when I’m trying to be that advocate. That aspect of working at AWS and with my team is what I’m most proud of.
I’m also proud of the mentoring and teaching that I get to do within AWS and within my role specifically. It’s really fulfilling to watch somebody grow and realize that career growth is not a zero-sum game—just because someone else succeeds does not mean that I have to fail.
If you had to pick an industry outside of security, what would you want to do?
I’d probably choose to be a ski instructor. I’m a big fan of skiing, but I don’t get to ski very often because of where I live. I love being out on the mountains, skiing, and teaching. I’m looking for any excuse to spend my days in the mountains.
If you have feedback about this post, submit comments in the Comments section below. If you have questions about this post, contact AWS Support.
Want more AWS Security news? Follow us on Twitter.
Navigating data protection laws around the world is no simple task. Today, I’m pleased to announce that AWS is expanding the scope of the AWS Data Processing Addendum (Global AWS DPA) so that it applies globally whenever customers use AWS services to process personal data, regardless of which data protection laws apply to that processing. AWS is proud to be the first major cloud provider to adopt this global approach to help you meet your compliance needs for data protection.
The Global AWS DPA is designed to help you satisfy requirements under data protection laws worldwide, without having to create separate country-specific data processing agreements for every location where you use AWS services. By introducing this global, one-stop addendum, we are simplifying contracting procedures and helping to reduce the time that you spend assessing contractual data privacy requirements on a country-by-country basis.
If you have signed a copy of the previous AWS General Data Protection Regulation (GDPR) DPA, then you do not need to take any action and can continue to rely on that addendum to satisfy data processing requirements. AWS is always innovating to help you meet your compliance obligations wherever you operate. We’re confident that this expanded Global AWS DPA will help you on your journey. If you have questions or need more information, see Data Protection & Privacy at AWS and GDPR Center.
If you have feedback about this post, submit comments in the Comments section below. If you have questions about this post, contact AWS Support.
Want more AWS Security news? Follow us on Twitter.
To respond to emerging threats, you will often need to sort through large datasets rapidly to prioritize security findings. Amazon Detective recently released two new features to help you do this. New visualizations in Detective show the connections between entities related to multiple Amazon GuardDuty findings, and a new export data feature helps you use the data from Detective in your other tools and automated workflows.
In this post, we’ll show you how you can use these new features to help reduce the time it takes to assess, investigate, and prioritize a security incident.
If GuardDuty detects potential malicious activity, such as anomalous behavior, credential exfiltration, or command and control (C2) infrastructure communication, it generates detailed security incidents called findings.
Depending on the severity and complexity of the GuardDuty finding, the resolution might require deep investigation. Consider an example that involves cryptocurrency mining. If you frequently see a cryptocurrency finding on your EC2 instances, you might have a recurring malware issue that has enabled a backdoor. If a threat actor is attempting to compromise your AWS environment, they typically perform a sequence of actions that lead to multiple findings and unusual behavior. When security findings are investigated in isolation, it can lead to a misinterpretation of their significance and difficulty in finding the root cause. When you need more context around a finding, Detective can help.
Detective automatically collects log data and events from sources like CloudTrail logs, Amazon VPC Flow Logs, GuardDuty findings, and Amazon EKS audit logs and maintains up to a year of aggregated data for analysis. Detective uses machine learning to create a behavioral graph for these data sources that helps show how security issues have evolved. It highlights what AWS resources might be compromised and flags unusual activity like new API calls, new user agents, and new AWS Regions.
The search capabilities work across AWS workloads, providing the information required to show the potential impact of an incident. Detective helps you answer questions like: How did this security incident happen? What AWS resources were affected? How can we prevent this from happening again?
Finding groups help connect the dots of an incident
You can use finding groups, a recent feature of Detective, to help with your investigations. A finding group is a collection of entities related to a single potential security incident that should be investigated together. An entity can be an AWS resource like an EC2 instance, IAM role, or GuardDuty finding, but it can also be an IP address or user agent. For a full list of entities collected, see Searching for a finding or entity in the Detective User Guide.
Grouping these entities together helps provide context and a more complete understanding of the threat landscape. This makes it simpler for you to identify relationships between different events and to assess the overall impact of a potential threat.
In the cryptocurrency mining example described previously, finding groups could show the relationship between the cryptocurrency mining finding and a C2 finding so that you know the two are related and the AWS resources affected. To learn more about working with Detective finding groups, see How to improve security incident investigations using Amazon Detective finding groups.
Figure 1 shows the finding groups overview page on the Detective console, with a list of finding groups filtered by status. The dashboard also shows the severity, title, observed tactics, accounts, entities, and the total number of findings for each finding group. For more information about the attributes of finding groups, see Analyzing finding groups.
Figure 1: Finding groups overview
To see details about the finding group, select the title of the finding group to access the details page, which includes Details, Visualization, Involved entities, and Involved findings. On this panel, you can view entities and findings included in a finding group and interact with them. The information presented is the same in the Visualization panel, the Involved entities panel, and the Involved findings panel. The different views allow you to view the information in the way that is helpful for you. Figure 2 shows an example of the Details and Visualization for a specific finding group.
Figure 2: Details and Visualization
Note: Finding groups with over 100 nodes (findings and entities) do not include a graph visualization.
Visualizations to show you the situation
The new visualizations in Detective provide three layouts that display the same information from finding groups, but allow you to choose and arrange the different entities so that you can focus on the highest priority finding or resources.
To determine what each visual element represents, choose the Legend in the bottom left corner of the panel. You can change the placement of findings in the Visualization panel by selecting a different layout from the Select layout dropdown menu. Figure 2 in the preceding section shows the Force-directed layout, where the positioning of entities and findings presents an even distribution of links with minimal overlap, while maintaining consistent distance between items.
Figure 3 shows the Visualization panel with the Circle layout, where nodes are displayed in a circular layout. You can use the Legend to understand the different categories of Findings, Compute, Network, Identity, Storage, or Other.
Figure 3: Visualization panel with Circle layout and Legend
Figure 4 shows the Visualization panel with the Grid layout, where nodes are divided into four different columns: evidence, identity entities, GuardDuty findings, and other entities (compute, network, and storage).
Figure 4: Visualization panel with Grid layout
In the Visualization panel, you can select one or more (using ctrl/cmd+click) nodes. Selected nodes are listed next to the graph, and you can select each node’s title for more information. Selecting an entity’s title opens a new page that displays detailed information about that entity, whereas selecting a finding or evidence expands the right sidebar to show details on the selected finding or evidence.
You can rearrange chosen entities and findings as needed to help improve your understanding of their connections. This can help speed up your assessment of findings. Figure 5 shows the Visualization panel with four nodes selected and the sidebar displaying information relevant to the selected finding.
Figure 5: Visualization panel with evidence selected
Finding groups and visualizations provide an overview of the entities and resources related to a security activity. Presenting the information in this way highlights the interconnections between various activities. This means that you no longer have to use multiple tools or query different services to collect information or investigate entities and resources. This can help you reduce triage and scoping times and make your investigations faster and more comprehensive.
Increased flexibility for investigation with simpler data access
To expand the scope of your investigation or confirm if a security incident has taken place, you might want to combine data from Detective with your own tools or different services. This is where export data comes into play.
Detective has several Summary page panels that you can use as a starting point for your investigations because they highlight potentially suspicious activity. The panels include roles and users with the most API call volume, EC2 instances with the most traffic volume, and EKS clusters with the most Kubernetes pods created.
With export data, you can now export these panels as common-separated values (CSV) files and import the data into other AWS services or third-party applications, or manipulate the data with spreadsheet programs.
Export from the Detective console Summary screen
In the Detective console, on the Summary page, you will see an Export option on several summary panes. This is enabled and available for anyone with access to Detective. Figure 6 shows summary information for the roles and users with the most API call volume.
Figure 6: Detective console Summary screen
Choose Export to download a CSV file containing the data for the summary information. The file is downloaded to your browser’s default download folder on your local device. When you view the data, it will look something like the spreadsheet in Figure 7:
Figure 7: Example CSV data export from Detective console Summary
Export from the Detective console Search screen
You can also export data using the Search capability of Detective. After you apply specific filters to search for findings or entities based on your use case, an Export button appears at the top of the search results in Detective. Figure 8 shows an example of filtering for a particular CIDR range. Choose Export to download the CSV file containing the filtered data.
Figure 8: Detective search results filtering for a CIDR range
Conclusion
In this blog post, you learned how to use the two new features of Detective to visualize findings and export data. By using these new features, you and your teams can investigate an incident in the way that best fits your workflow. New visualizations show the entities involved in an issue and surface nuanced connections that can be difficult to find when you’re faced with line after line of log data. The new data export feature makes it simpler to integrate the insights discovered in Detective with the tools and automations that your team is already using.
These features are automatically enabled for both existing and new customers in AWS Regions that support Detective. There is no additional charge for finding groups. If you don’t currently use Detective, you can start a free 30-day trial. For more information on finding groups, see Analyzing finding groups in the Amazon Detective User Guide.
AWS Network Firewall is a managed service that provides a convenient way to deploy essential network protections for your virtual private clouds (VPCs). In this blog, we are going to cover how to leverage the TLS inspection configuration with AWS Network Firewall and perform Deep Packet Inspection for encrypted traffic. We shall also discuss key considerations and possible architectures.
Today, the majority of internet traffic is SSL/TLS encrypted to maintain privacy and secure communications between applications. Deep packet inspection (DPI) refers to the method of examining the full content of data packets as they traverse a network perimeter firewall. However, the lack of visibility into encrypted traffic presents a challenge to organizations that do not have the resources to decrypt and inspect network traffic. TLS encryption can hide malware, conceal data theft, or mask data leakage of sensitive information such as credit card numbers or passwords. Additionally, TLS decryption is compute-intensive and cryptographic standards are constantly evolving. Organizations that want to decrypt and inspect network traffic typically use a combination of hardware and software solutions from multiple vendors, which adds operational complexity and implementation challenges around capacity planning, scaling issues, and latency concerns. This forces some organizations to make adverse decisions to reduce the complexity of inspecting their network traffic such as blocking access to popular websites to mitigate performance problems.
There are multiple options you can use to perform DPI for encrypted traffic in your AWS environment, based on the use case. These include using AWS WAF or implementing third-party security appliances (next generation firewalls). The addition of new services like Gateway Load Balancer gives you more flexibility in designing your firewall architectures and the ability to perform DPI on AWS.
With this release, Network Firewall also becomes an option to support Deep Packet Inspection on encrypted payloads.
Considerations for deep packet inspection
The following are some key factors to consider when you enable TLS decryption functionality on Network Firewall.
DPI and performance. DPI is processor-intensive, because it not only looks into individual packets, but it also looks into traffic flows (a flow is a collection of related packets). This is combined with the fact that inspection needs to be done in real time with minimal impact to latency. Also, because many firewalls perform other advanced functions (for example, stateful packet inspection, NAT, virtual private network (VPN), and malware threat prevention), adding DPI increases the complexity of the entire system and impacts performance. However, because Network Firewall is an AWS managed service, the bandwidth performance of 100 gigabits per second (Gbps) per firewall endpoint is not impacted, even after you enable TLS inspection configuration. Single digit millisecond latency is expected at initial connection due to the TCP and TLS handshake before data can flow to the firewall. We recommend that you conduct your own testing for the rule sets to verify that the service meets your performance expectations.
DPI and encryption. Encryption has particularly been a challenge to DPI. Effective decisions can’t be made if the contents of the packets aren’t known. As more applications and websites use encryption, it is important that you implement the right TLS decryption technique. With Network Firewall, you can chose which traffic to decrypt by using your available certificates in AWS Certificate Manager (ACM). You can then apply the TLS configurations across the stateful rule groups, thereby authorizing Network Firewall to act as a go-between. For more information on how AWS Network Firewall handles privacy, please read the Network Firewall documentation.
AWS Network Firewall deployment architectures
There are three main architecture patterns for Network Firewall deployments. You can refer to the Deployment models for AWS Network Firewall blog post, which provides details on these, as well as key considerations. The three main models are as follows:
Distributed deployment model — Network Firewall is deployed into each individual VPC.
Centralized deployment model — Network Firewall is deployed into a centralized VPC for East-West (VPC-to-VPC) or North-South (inbound and outbound from internet, on-premises) traffic. We refer to this VPC as the inspection VPC throughout this blog post.
Combined deployment model — Network Firewall is deployed into a centralized inspection VPC for East-West (VPC-to-VPC) and a subset of North-South (on-premises, egress) traffic. Internet ingress is distributed to VPCs that require dedicated inbound access from the internet, and Network Firewall is deployed accordingly.
Each of these architectures is still valid for TLS inspection functionality. Today, AWS Network Firewall supports TLS inspection only for the ingress (inbound) traffic coming into the VPC.
In this section, we will highlight a deployment architecture with AWS Network Firewall and the process for deep packet inspection.
AWS Network Firewall – prior to TLS inspection configuration
Below figure 1 shows how Network Firewall performs inspection when the TLS inspection feature isn’t enabled. The workflow is as follows:
The ingress traffic enters the VPC. Ingress routing enables the internet traffic to be inspected by AWS Network Firewall.
The traffic from the firewall endpoint to the Network Firewall:
Network Firewall inspects the packet first through a stateless engine. Network Firewall makes a drop/pass decision by applying the rules that are present in the stateless engine.
If there is no match on the set of stateless rules present, the traffic is then forwarded to the stateful engine. Again, a drop/pass decision is made by applying the set of stateful rules.
If the decision is to pass traffic, then the firewall endpoint present in the firewall subnet sends the traffic to the customer subnet through the routes present in the VPC subnet route table.
AWS Network Firewall — after TLS inspection configuration
After you enable the TLS inspection capability in Network Firewall, the traffic flow changes slightly, as shown in Figure 2. Because the ingress data you want to inspect is encrypted, it first needs to be decrypted before it is sent to the firewall stateful engine.
In Figure 2, you can see the ingress traffic flow, which has the following steps:
The ingress traffic enters the VPC. Ingress routing enables the internet traffic to be inspected by AWS Network Firewall.
The traffic from the firewall endpoint to the Network Firewall:
Network Firewall inspects the packet first through a stateless engine. Network Firewall makes a drop/pass decision by applying the rules present in the stateless engine.
If there is no match on the set of stateless rules present, the traffic is then forwarded to the stateful engine. However, before the traffic passes to the stateful engine, if there is no match and the traffic is in the scope of the TLS encryption configuration, the traffic is forwarded for the decrypt operation.
After decryption, the traffic is then forwarded to the firewall stateful engine for inspection. Again, Network Firewall makes a drop/pass decision by applying the set of stateful rules.
If the decision is to pass traffic, then the firewall endpoint present in the firewall subnet sends the traffic to the customer subnet through the routes present in the VPC subnet route table.
Note: Customers must trust this certificate for the TLS inspection configuration to function properly.
Let’s look at how to implement TLS inspection when you create a new network firewall in AWS Network Firewall. A TLS inspection configuration contains one or more references to a valid AWS Certificate Manager (ACM) SSL/TLS certificate that Network Firewall uses to decrypt ingress (inbound) traffic. Network Firewall supports a variety of certificate types supported in addition to wildcard certificates. You can optionally define a scope (5-tuple based) to decrypt traffic by source and destination IP or port. To follow this procedure, you must have at least one valid certificate type supported by Network Firewall in ACM that’s accessible by your AWS account.
To create a TLS inspection configuration (console)
In the navigation pane, under Network Firewall, choose TLS inspection configurations.
Choose Create TLS inspection configuration.
Figure 3: TLS inspection configuration for AWS Network Firewall
On the Associate SSL/TLS certificates page, in the search box, select the ACM certificate to use in the TLS inspection configuration, and then choose Add certificate. You can use as many as 10 certificates for a single configuration.
Figure 4: SSL/TLS certificate as part of Network Firewall inspection configuration
Choose Next to go to the TLS inspection configuration’s Describe TLS inspection configuration page.
For Name, enter a name to identify this TLS inspection configuration, and optionally enter a description for the TLS inspection configuration.
Choose Next to go to the TLS inspection configuration’s Define scope page.
Figure 5: Description for Network Firewall inspection configuration
Note that you can’t change the name after you create the TLS inspection configuration.
In the Scope configuration pane, you can optionally define one or more 5-tuple scopes for the domains that you want Network Firewall to decrypt. Network Firewall uses the corresponding SSL/TLS certificates in your TLS inspection configuration to decrypt the SSL/TLS traffic that matches the scope criteria.
Figure 6: Define scope for Network Firewall to decrypt
For Protocol, choose the protocol to decrypt and inspect for. Network Firewall currently supports only TCP.
For Source, choose the source IP addresses and ranges to decrypt and inspect for. You can inspect for either Custom IP addresses or Any IPv4 address. (IPv6 is currently not supported.)
For Source port, choose the source ports and source port ranges to decrypt and inspect for. You can inspect for either Custom port ranges or Any port.
For Destination, choose the destination IP addresses and ranges to decrypt and inspect for. You can inspect for either Custom IP addresses or Any IPv4 address.
For Destination port, choose the destination ports and destination port ranges to decrypt and inspect for. You can inspect for either Custom port ranges or Any port.
After you’ve set the scope criteria, choose Add scope configuration, and then choose Next.
On the next page, Select encryption options, determine whether you want to use the AWS managed key or customize encryption settings (advanced). Here we use the default key that AWS owns and manages on your behalf, choose Next.
Figure 7: Select the encryption options
On the Add tags page, choose Next. Tags are optional but are recommended as a best practice. Tags help you organize and manage your AWS resources. For more information about tagging your resources, see Tagging AWS Network Firewall resources.
On the Review and confirm page, check the TLS inspection configuration settings. Choose Create TLS inspection configuration. Your TLS inspection configuration is now ready for use.
Figure 8: Validate the TLS inspection configuration
Update an existing network firewall with TLS inspection configuration
There are two methods that you can use modify an existing firewall configuration for TLS inspection, depending on your scenario.
Scenario 1: Add TLS inspection to an existing network firewall. In this scenario, you only need to consider the scope that TLS inspection applies to. After you have followed steps 1 through 12 outlined in the procedure in this post, and created the TLS inspection configuration, ingress (inbound) traffic will be decrypted and then sent to the stateful engine for inspection that uses your existing firewall policies.
Scenario 2: Modify an existing firewall with TLS inspection configured. In this scenario, where TLS configuration has already been added and you just need to modify the configuration, you can use the following steps. Note that you can’t change the name of a TLS inspection configuration after creation, but you can change other details.
AWS Network Firewall lets you inspect traffic at scale in a variety of use cases. In this blog post, we looked into the recently launched TLS inspection configuration for ingress inspection architectures and discussed considerations for enabling this feature. We showed how you can enable and update the TLS inspection feature on Network Firewall. To learn more about the TLS inspection feature, check out the AWS Network Firewall Developer Guide. We hope this post is helpful and look forward to hearing about how you use the latest feature.
If you have feedback about this post, submit comments in the Comments section below. If you have questions about this post, contact AWS Support.
Want more AWS Security news? Follow us on Twitter.
Effective security incident response depends on adequate logging, as described in the AWS Security Incident Response Guide. If you have the proper logs and the ability to query them, you can respond more rapidly and effectively to security events. If a security event occurs, you can use various log sources to validate what occurred and understand the scope. Then, you can use the results of your analysis to take remediation actions. To learn more about logging best practices, see Configure service and application logging and Analyze logs, findings, and metrics centrally.
In this blog post, we will show you how to achieve an effective strategy for logging for security incident response. We will share logging options across the typical cloud application stack, log analysis options, and sample queries. AWS offers managed services, such as Amazon GuardDuty for threat detection and Amazon Detective for incident analysis. If you want to collect additional logs or perform custom analysis, then you should consider the options described in this blog post.
Selection of logs
To select the appropriate logs for security incident response, you should start with the common cloud application stack, which consists of the components and layers of your application deployed on AWS. For each component, we will describe the logging sources that you have. For each log source, we will describe why you should log it for security incident response, how to enable the logs, and what your log storage options are.
To select the logs for security incident response, first consider the following questions:
What are your compliance and regulatory requirements for logging?
Note: Make sure that you comply with the log retention requirements of compliance standards relevant to your organization, as well as your organization’s incident response strategy.
What AWS services do you commonly use?
What AWS services have access to or contain sensitive data?
What threats are most relevant to you?
Note: Performing a threat model of your cloud architectures can help you answer this question. For more information, see How to approach threat modelling.
Considering these questions can help you develop requirements for logging that will guide your selection of the following log sources.
AWS account logs
An AWS account is the first, fundamental component of an application deployed on AWS. The account is a container for your AWS resources. You create and manage your AWS resources in this account, and the account provides administrative capabilities for access and billing.
AWS CloudTrail
Within an account, each action performed is an API call. From a console sign-in to the deployment of each resource in an AWS CloudFormation stack, events are generated to provide transparency on what has occurred in the account. With AWS CloudTrail, you can log, continuously monitor, and retain account activity related to actions across supported AWS services. CloudTrail provides the event history of your account activity, including actions taken through the AWS Management Console, AWS SDKs, command line tools, and other AWS services. CloudTrail logs API calls as three types of events:
Management events(also known as control plane operations) show management operations that are performed on resources in your account. This includes actions like creating an Amazon Simple Storage Service (Amazon S3) bucket and setting up logging.
Data events(also known as data plane operations) show the resource operations performed on or within resources in your account. These operations are often high-volume activities, such as Amazon S3 object-level API activity (for example, GetObject, DeleteObject, and PutObject API operations) and AWS Lambda function invocation activity.
Insights events capture unusual API call rate or error rate activity in your account. You must enable these events on a trail in order to capture them, and they are logged to a different folder prefix in the destination S3 bucket for your trail. Insights events provide you with information such as the type of event, the incident time period, the associated API, the error code, and statistics to help you understand and respond effectively to unusual activity.
For security investigations, CloudTrail provides context on the creation, modification, and deletion of AWS resources. Therefore, CloudTrail is one of your most important log sources for security incident response in an AWS environment. You have three primary ways to set up CloudTrail:
CloudTrail Event history — CloudTrail is enabled by default with 90-day retention of management events that you can retrieve through the CloudTrail Event history facility using the console, AWS Command line Interface (AWS CLI), or AWS SDK. You don’t need to take any action to get started using the Event history feature.
CloudTrail trail — For longer retention and visibility of data events, you need to create a CloudTrail trail and associate it with an S3 bucket and optionally with an Amazon CloudWatch log group. If you use AWS Organizations, you can create an organization trail that will log events for each account in the organization. By default, trails are multi-Region, so you don’t need to enable CloudTrail logs in each AWS Region.
AWS CloudTrail Lake — You can create a CloudTrail lake, which retains CloudTrail logs for up to seven years and provides a SQL-based querying facility. You don’t need to have a trail configured in your account to use CloudTrail Lake.
Amazon Security Lake — You can use Security Lake to ingest CloudTrail events, which include management and data events. You can further analyze these events with Amazon QuickSight or another other third-party security information and event management (SIEM) tool.
AWS Config
Creating and modifying resources is an integral part of your account use. Tracking resource configuration changes made by calling the AWS API helps you review changes throughout the resource lifecycle. AWS Config provides a detailed view of the configuration of AWS resources in your account, examines the resource configurations periodically, and tracks configuration changes that were not initiated by the API. This includes how the resources are related to one another and how they were configured in the past so that you can see how configurations and relationships change over time.
You should enable AWS Config in each Region where you have resources deployed, and you should configure an S3 bucket to receive configuration history and configuration snapshot files, which contain details on the resources that AWS Config records. You can then review configuration compliance and analyze activities performed before, during, and after an event using the configuration history in S3. You should centralize AWS Config resource tracking across multiple accounts in the same organization by setting up an aggregator. You can use AWS Control Tower to automate the setup.
During a security investigation, you might want to understand how a resource configuration has changed over time. For example, you might want to investigate the changes to an S3 bucket policy before and after a security event that involves an S3 bucket. AWS Config provides a configuration history for resources that can help you track activities performed during a security event.
Operating system and application logs
To record interactions with applications, you must capture operating system (OS) and application logs, especially custom logs generated by the application development framework. OS and local application logs are relevant for security events that involve an Amazon Elastic Compute Cloud (Amazon EC2) instance. These instances could be standalone, in an auto scaling group behind a load balancer, or compute workloads for Amazon Elastic Container Service (Amazon ECS) or an Amazon Elastic Kubernetes Service (Amazon EKS) cluster. OS logs track privileged use, processes, login events, access to directory services, and file system activity on a server. To analyze a potential compromise to an EC2 instance, you will want to review the security event logs for Windows OS and the system logs for Linux-based OS.
With the unified CloudWatch agent, you can collect metrics and logs from EC2 instances and on-premises servers. The CloudWatch agent aggregates log data into CloudWatch logs, which can then be exported to Amazon S3 for long-term retention and analyzed with a SIEM tool of your choice or Amazon Athena, as shown in Figure 1.
Figure 1: Aggregate OS and application logs using CloudWatch Logs
Database logs
With SQL databases, you can log transactions to help track modifications to the databases, such as additions or deletions. After an engine or system failure, you will need transaction logs to restore a database to a consistent state. Transaction logs are designed to be secure, and they require additional processing to access valuable information. It’s important that you understand data interactions during a security investigation, especially if your databases hold personally identifiable information (PII), financial and payments information, or other information subject to regulatory controls.
The goal of logging network activity is to gain insight into the communications that traverse your network. You might need this data for a variety of reasons, such as network troubleshooting or for use in a forensic investigation of suspected malware activity within your network.
In the AWS Cloud, you can log network activity by creating a proxy that logs network traffic or by using Traffic Mirroring to send a copy of network traffic to a logging server. You can adopt cloud-native approaches to capture this type of data using Amazon Route 53 DNS query logs and Amazon VPC Flow Logs.
There are also a variety of third-party networking solutions available like Palo Alto Networks and Fortinet, so you can continue to use the network logging mechanisms that you might have used in an on-premises environment.
Route 53 DNS query logs
You can configure Amazon Route 53 to log Domain Name System (DNS) queries. These logs are categorized into two groups:
Public DNS query logging
Resolver query logging
Logging public DNS queries against domains that you have hosted in Route 53 provides query information, such as the domain or subdomain requested, date and time stamp of the request, DNS record type, Route 53 edge location that responded, and response code.
You can configure VPC Flow Logs for a VPC in your account to capture traffic that enters and moves around your VPC network, without the addition of instances or products. From these logs, you can review information, such as source and destination IP, ports, timestamps, protocol, account ID, and whether the traffic was accepted or rejected. For a complete list of the fields available for flow log records, see Available fields. You can create a flow log for a VPC, a subnet, or a network interface. If you create a flow log for a subnet or VPC, IP traffic going to and from each network interface in that subnet or VPC will be logged. For more details on VPC Flow Logs, see Logging IP traffic using VPC Flow Logs.
You can forward flow logs to Amazon CloudWatch Logs to create CloudWatch alarms based on metric filters. You can also forward flow logs to an S3 bucket for long-term retention and further analysis. Figure 2 demonstrates these configurations.
Figure 2: Sending VPC Flow logs to CloudWatch Logs and S3
Access logs
To identify access patterns for accessible endpoints, especially public endpoints, you should use access logs. Access logs capture detailed information about requests sent to your load balancer. Each log contains information such as the time the request was received, the client’s IP address, latencies, request paths, and server responses. With services built in layers behind a load balancer, unless you track the X-Forwarded-For request header, the requestor’s context is lost. Access logs help bridge that gap during investigations and analysis.
Amazon S3 server access logs
Access logs are critical to track object level access when using S3 buckets to store confidential or sensitive data. You can also turn on CloudTrail to capture S3 data events. You can store access logs in S3 buckets for long-term storage for compliance purposes and to run analyses during and after an event.
Load balancing logs
Elastic Load Balancing provides access logs that capture detailed information about requests sent to load balancers. Each log contains information such as the time the request was received, the client’s IP address, latencies, request paths, and server responses. You can use this log to analyze traffic patterns and to troubleshoot issues.
Access logs is an optional feature of Elastic Load Balancing that is turned off by default. To enable access logs for load balancers, see Access logs for your Application Load Balancer.
If you implement your own reverse proxy for load balancing needs, make sure that you capture the reverse proxy access logs. You can use the unified CloudWatch agent to forward the logs to CloudWatch. As with OS logs, you can export CloudWatch logs to an S3 bucket for long-term retention and analysis.
If you use an Amazon CloudFront distribution as the public endpoint for end users with load balancers as the custom origin, then load balancing access logs will represent the CloudFront distribution as the requestor, rather than the actual end user. If this information doesn’t add value to your incident handling process, then you can use CloudFront access logs as the log source that provides end user request details.
CloudFront access logs
You should enable standard logs, also known as access logs, when using CloudFront. Specify an S3 bucket where you want CloudFront to save the files.
CloudFront access logs are delivered on a best-effort basis. For information about requests made to a distribution in real time, use real-time logs that are delivered within seconds of receiving the requests. You should use real-time logs to monitor, analyze, and take action based on content delivery performance. For more details on the fields available from these logs, see the CloudFront standard log file format.
AWS WAF logs
When associated with a supported resource like a CloudFront distribution, Amazon API Gateway REST API, Application Load Balancer, AWS AppSync GraphQL API, Amazon Cognito user pool, or AWS App Runner, AWS WAF can help you monitor HTTP and HTTPS requests that are forwarded to the resource. You should configure web access control lists (ACLs) to gain fine-grained control over the requests, and enable logging for such ACLs to get detailed information about traffic that is analyzed by AWS WAF. Log information includes time of the request being received by AWS WAF from the AWS resource, details about the request, and the AWS WAF rules that the request matched. You can use this log information to monitor access patterns of public endpoints and configure rules to inspect requests in detail. For more information about AWS WAF logging, see Logging web ACL traffic.
Serverless logs
Serverless computing has become increasingly popular in the cloud-computing space. It provides on-demand compute power in a relatively short burst, meaning that cloud-based instances don’t need to be provisioned and kept around, idle, when there are no tasks to be completed. Although more and more compute tasks are being moved to serverless solutions, the need to log has not changed, but how the logs are generated has. In a serverless environment, security investigations not only benefit from logs that demonstrate the interactions and changes made by the code deployed, but that also document changes to the deployed code itself and access permissions of the Lambda execution role that is granting privileged access.
AWS Lambda
The logging of Lambda functions involves two components: how the function itself is operating, and what is happening inside the function (what your code is actually doing).
The logging of a Lambda function itself occurs through data events captured by CloudTrail. As noted earlier in this post, you must configure data events on a trail created in CloudTrail. During configuration, you will need to specify the function from which logs will be captured by your trail, and the destination S3 bucket where they will be stored. These logs contain details on the invocation of the function and help identify the IAM principals that called the Invoke API for Lambda.
AWS Lambda automatically monitors Lambda functions on your behalf and sends logs to CloudWatch. Your Lambda function comes with a CloudWatch Logs log group and a log stream for each instance of your function. The Lambda runtime environment sends details about each invocation to the log stream, and relays logs and other output from your function’s code. For more details on how to monitor Lambda functions, see Accessing Amazon CloudWatch logs for AWS Lambda.
Log analysis
For incident response, you need to be able to analyze and query your logs to validate what occurred and to understand the scope.
To begin, you can aggregate logs from various sources in S3 buckets for long-term storage, and you can integrate that data with query tools for further investigation. Logs can be exported and either parsed through directly, or ingested by another tool to help with the analysis. The following are some options that you can use to query these logs:
Amazon Athena — You can directly query CloudTrail events stored in S3 with Athena using SQL commands, specifying the LOCATION of the log files. You would generally use this approach if you have advanced queries to run, and you don’t have a SIEM. To set up Athena to query logs, you can use this open-source solution from AWS.
Amazon OpenSearch Service — OpenSearch is a distributed search and log analytics suite. Because it’s open source, it can ingest logs from more than just AWS log sources. To set this up, you can use this open-source SIEM solution from AWS.
CloudTrail Event History — Either from the console, or programmatically, you can query CloudTrail management events from the last 90-day period. This is ideal for when you have simple queries to make within the last 90 days, and you don’t need stored logs or more complex queries.
AWS CloudTrail Lake — Either from the console, or programmatically, you can query stored events in your configured CloudTrail Lake from the time of its configuration, up until the maximum storage duration of 2,557 days (7 years) from the time that you make your query. This approach allows for SQL-based queries, and it is ideal for when you need to make more complex queries against events, but don’t require the additional features of a SIEM solution.
Parse through raw JSON using CLI — This is achieved programmatically and parsed through terminal commands. It’s more a legacy method of parsing through logs. You might choose to use this approach for analysis if another service or solution isn’t feasible (for example, if you can’t use the service due to your corporate security policy).
Third-party SIEM — A third-party SIEM might be ideal if you already have a SIEM solution on AWS or elsewhere, and you don’t need a duplicated solution elsewhere. Typically, SIEM solutions will import logs from an S3 bucket and process and index events for analysis. To learn more about SIEM options, see the SIEM solutions in the AWS Marketplace, or the AWS Security Competency Partners for a partner local to you with threat detection and incident response (TDIR) expertise.
Sample queries
In this section, we provide samples of SQL queries. Both Athena and CloudTrail Lake accept SQL queries, but the following samples have been tested for use in Athena only. This is because some samples are for VPC Flow Logs, which you can’t query from CloudTrail Lake. To query CloudTrail logs in Athena, you must first create a table definition that points to the location of your logs stored in S3. You can do this from the CloudTrail Events console by using a hyperlinked suggestion, or from the Athena console directly. Alternatively, for Athena, you can use the AWS Security Analytics Bootstrap.
For each of these queries, you might need to modify some of the fields, such as the time frame that you are investigating, the IAM entity involved, and the account and Region in scope. For example, you might want to modify the time frame based on the current time and when you believe the security event began. This often involves expanding the time frame after running additional queries and learning more about the scope and timeline.
By using partitions for tables, you can restrict the amount of data scanned by each Athena query, helping to improve performance and reduce cost. For example, you can partition your CloudTrail Athena table manually or by using partition projection. You can include the partition column (for example, the timestamp) in your queries to limit the amount of data scanned.
Unauthorized attempts
When a security event occurs, you might want to review API calls that were attempted but failed due to the IAM principal not having access to perform the action on that resource. To discover this activity, run the following query (be sure to modify the time window first):
SELECT *
FROM cloudtrail
WHERE errorcode IN ('Client.UnauthorizedOperation','Client.InvalidPermission.NotFound','Client.OperationNotPermitted','AccessDenied')
AND useridentity.arn LIKE '%iam%'
AND eventtime >= '2023-01-01T00:00:00Z'
AND eventtime < '2023-03-01T00:00:00Z'
ORDER BY eventtime desc
This sample query can help you identify whether certain IAM principals have a significant amount of unauthorized API calls, which can indicate that an IAM principal is compromised.
Rejected TCP connections
During a security event, the unauthorized user that is interacting with the resources in your account is probably trying to establish persistence through the network layer. To get a list of rejected TCP connections and extract from it the day that these events occurred, run the following query:
SELECT day_of_week(date) AS
day,date,interface_id,srcaddr,action,protocol
FROM vpc_flow_logs
WHERE action = 'REJECT' AND protocol = 6
LIMIT 100;
Connections over older TLS versions
You might want to see how many calls to AWS APIs were made using older versions of the TLS protocol, as part of a forensic follow-up or a discovery job after a risk analysis. You can get this data by querying CloudTrail logs.
SELECT eventSource
COUNT(*) AS numOutdatedTlsCalls FROM cloudtrail WHERE tlsDetails.tlsVersion IN ('TLSv1', 'TLSv1.1') AND eventTime > '2023-01-01 00:00:00' GROUP BY eventSource ORDER BY numOutdatedTlsCalls DESC
Filter connections from an IP
With an IP address that you’d like to investigate, as a part of your forensic analysis, you might want to see the connections made to resources in a VPC. You can obtain this information by querying VPC Flow Logs. As with the server access logs, if you’re using Athena, you will first need to create a new table.
SELECT day_of_week(date) AS
day, date, srcaddr, dstaddr, action, protocol
FROM vpc_flow_logs
WHERE day >= '2023/01/01' AND day < '2023/03/01' AND srcaddr LIKE '172.50.%'
ORDER BY day DESC
LIMIT 100
Investigate user actions
If you have identified a user who has been compromised, or that you suspect has been compromised, you might want to know the API calls that they made over a specific time period. Understanding the activity of a user can help you understand the scope of impact during an incident, as well as the reach of user permissions when you design your access management strategy.
SELECT eventID, eventName, eventSource, eventTime, userIdentity.arn
AS user
FROM cloudtrail
WHERE userIdentity.arn = '%<username>%' AND eventTime > '2022-12-05 00:00:00' AND eventTime < '2022-12-08 00:00:00'
Conclusion
It is essential that you capture logs from various layers within your application architecture, so that you can effectively respond to a security event at various layers of the application stack. If a security event occurs, logs can help provide a clear picture of what happened and the scope of the affected resources. This post helps you build a logging strategy for security incident response by understanding what logs you want to analyze, where you want to store those logs, and how you will analyze them.
Want more AWS Security news? Follow us on Twitter.
The collective thoughts of the interwebz
Manage Consent
To provide the best experiences, we use technologies like cookies to store and/or access device information. Consenting to these technologies will allow us to process data such as browsing behavior or unique IDs on this site. Not consenting or withdrawing consent, may adversely affect certain features and functions.
Functional
Always active
The technical storage or access is strictly necessary for the legitimate purpose of enabling the use of a specific service explicitly requested by the subscriber or user, or for the sole purpose of carrying out the transmission of a communication over an electronic communications network.
Preferences
The technical storage or access is necessary for the legitimate purpose of storing preferences that are not requested by the subscriber or user.
Statistics
The technical storage or access that is used exclusively for statistical purposes.The technical storage or access that is used exclusively for anonymous statistical purposes. Without a subpoena, voluntary compliance on the part of your Internet Service Provider, or additional records from a third party, information stored or retrieved for this purpose alone cannot usually be used to identify you.
Marketing
The technical storage or access is required to create user profiles to send advertising, or to track the user on a website or across several websites for similar marketing purposes.


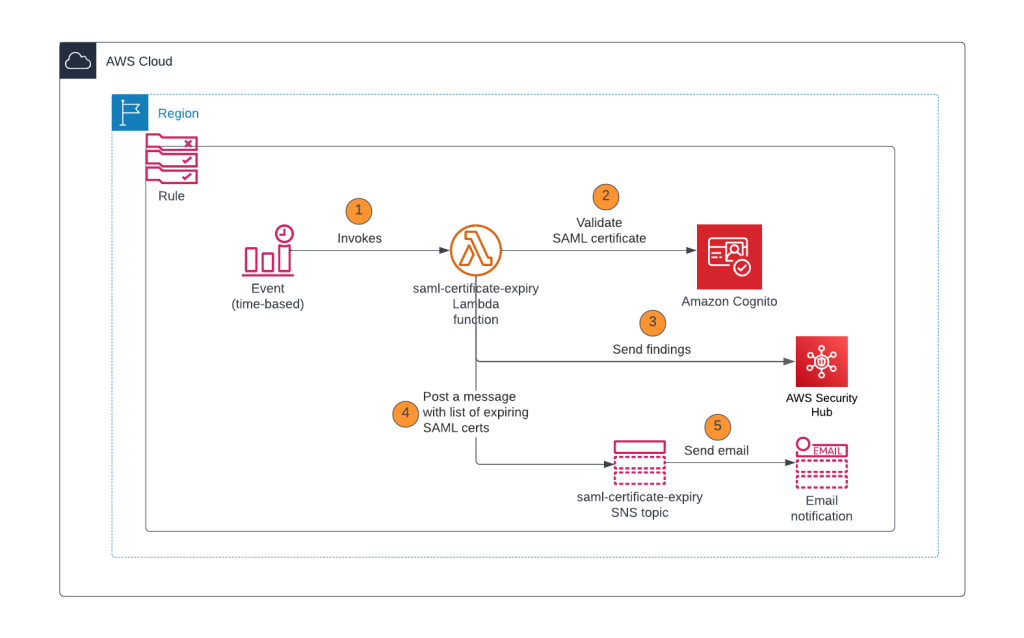

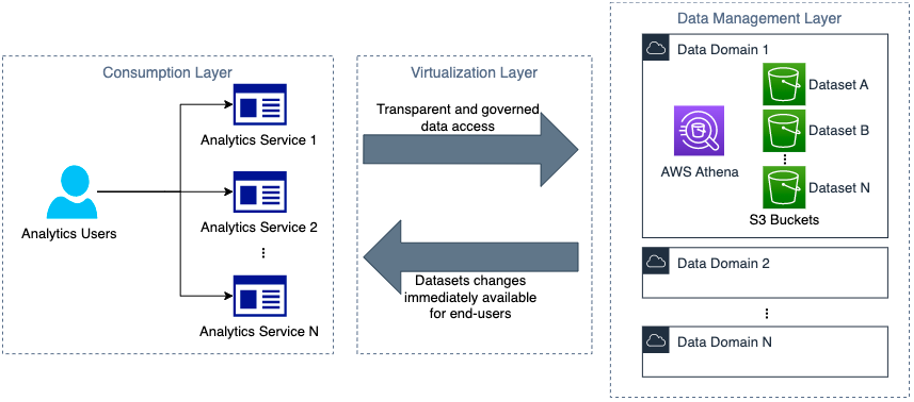
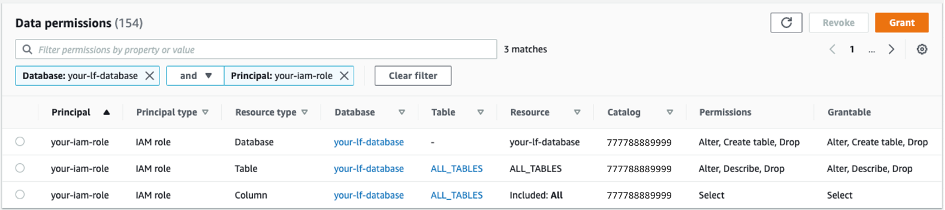

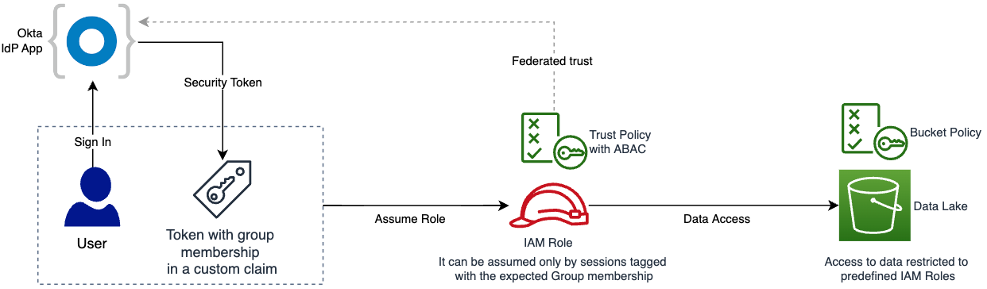
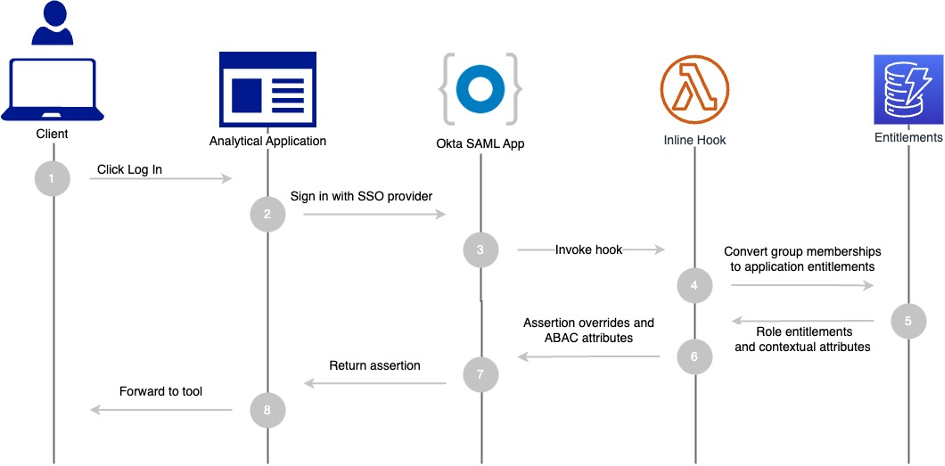
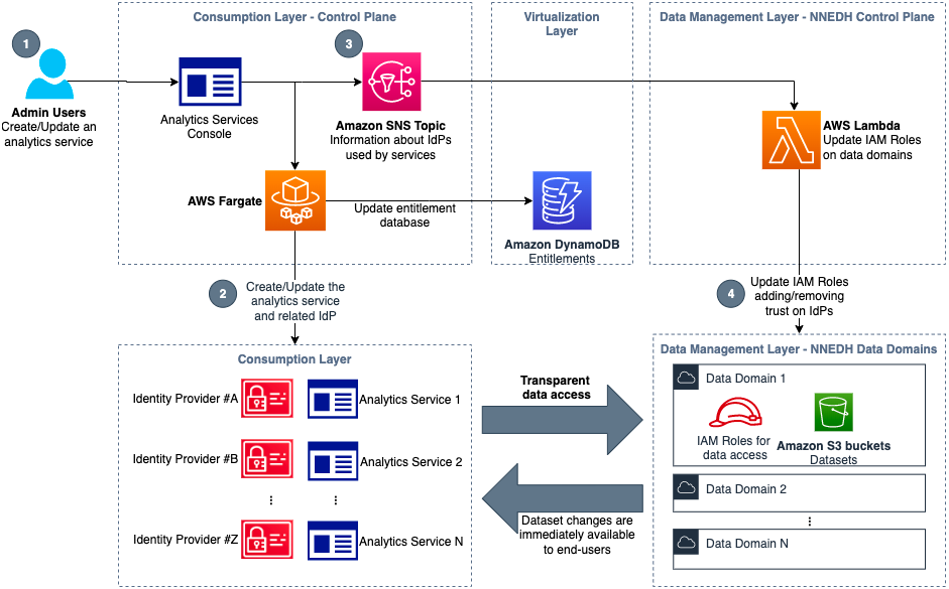
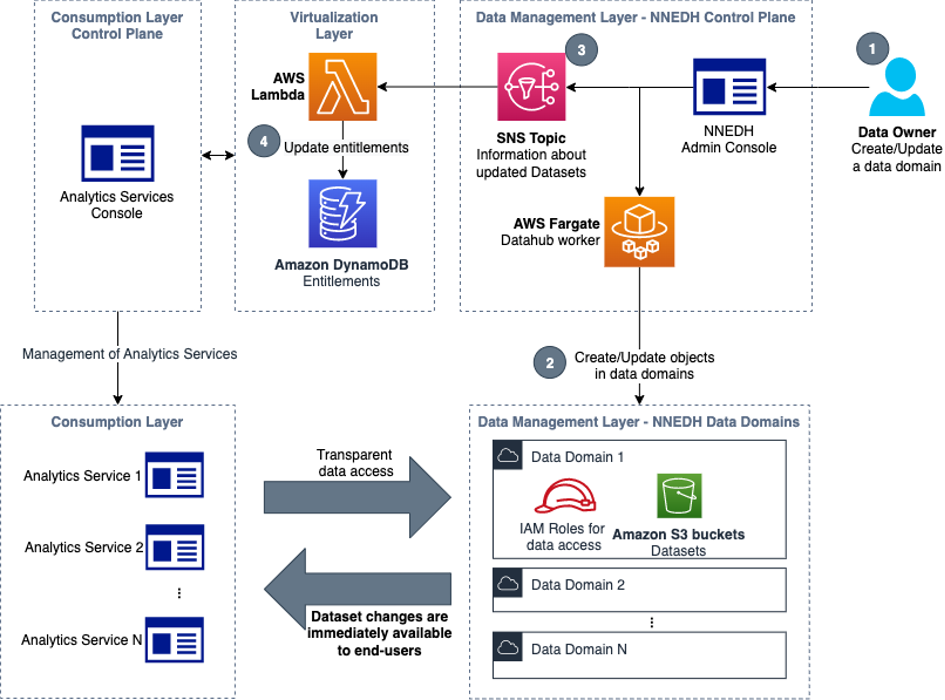
 Jonatan Selsing is former research scientist with a PhD in astrophysics that has turned to the cloud. He is currently the Lead Cloud Engineer at Novo Nordisk, where he enables data and analytics workloads at scale. With an emphasis on reducing the total cost of ownership of cloud-based workloads, while giving full benefit of the advantages of cloud, he designs, builds, and maintains solutions that enable research for future medicines.
 Hassen Riahi is a Sr. Data Architect at AWS Professional Services. He holds a PhD in Mathematics & Computer Science on large-scale data management. He works with AWS customers on building data-driven solutions.
 Alessandro Fior is a Sr. Data Architect at AWS Professional Services. He is passionate about designing and building modern and scalable data platforms that accelerate companies to extract value from their data.