Schedule notebook runs in Amazon SageMaker Unified Studio

Post Syndicated from Shivani Mehendarge original https://aws.amazon.com/blogs/big-data/schedule-notebook-runs-in-amazon-sagemaker-unified-studio/

If you build notebooks for recurring tasks such as daily customer analysis, weekly report generation, or data quality checks in Amazon SageMaker Unified Studio, you’ve likely wanted to run them automatically on a schedule. Until now, there wasn’t a native way to do this. Teams had to manage orchestration separately, even though the interactive notebook experience was already in place. Now, notebook scheduling is available, so you can configure your production workloads to run automatically with minimal manual intervention.

In this post, we walk you through the new scheduling and orchestrating capabilities for notebooks in Amazon SageMaker Unified Studio. You will learn how to:

  • Trigger on-demand background runs, such as a model re-training job, without waiting at your desk.
  • Create recurring schedules for tasks such as nightly data freshness checks or weekly business reviews.
  • Parameterize notebooks so a single template can generate reports across different AWS Regions or customer segments.
  • Orchestrate multi-notebook workflows where one notebook’s output feeds into the next. For example, an extract, transform, and load (ETL) pipeline followed by a summary dashboard refresh.
  • Debug failed runs with AI-assisted troubleshooting.

Sample use case overview

In this walkthrough, you will take on the role of a logistics analyst who monitors shipping performance across carriers. The notebook loads shipping data from the ShippingLogs.csv dataset, identifies late deliveries, and generates a performance summary. You want to run this notebook every morning without manual intervention, reuse it across different carriers, and know when something goes wrong.

You will start by running a notebook in the background and viewing the results. Next, you will create a recurring schedule for daily runs, then parameterize the notebook to generate reports for different carriers. You will also orchestrate the notebook in a multi-step workflow and debug a failed run using AI-assisted troubleshooting.

Prerequisites

Before you begin, you need:

  • An Amazon SageMaker Unified Studio project with Notebooks enabled. See Set up IAM-based domains for permission requirements.
  • A sample dataset. We use the ShippingLogs.csv dataset, which contains shipping data including estimated and actual delivery times, carriers, and origins. You can download it from the Workshop Studio (the file is named ShippingLogs.csv on the linked page).

Setting up the notebook

Start by creating a new notebook in your SageMaker Unified Studio project. If you haven’t already, upload the ShippingLogs.csv file under the Shared tab in the Files panel.

SageMaker Unified Studio Notebook Files panel showing the Shared tab with the ShippingLogs.csv dataset uploaded

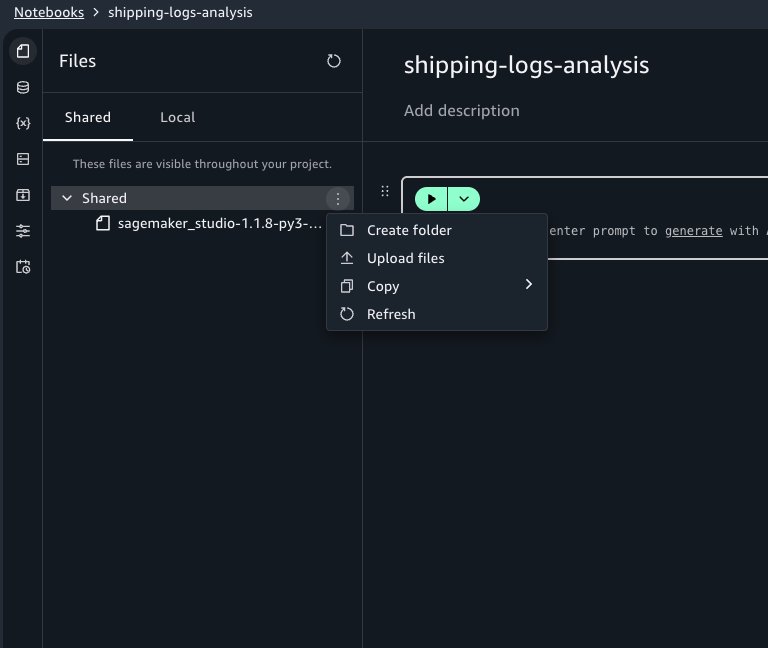
In the first cell, we load and explore the dataset. To reference the file in code, select the file in the Shared tab and copy the Amazon Simple Storage Service (Amazon S3) URI shown in the file details. Alternatively, you can reference it with this code:

import pandas as pd
from sagemaker_studio import Project

# Initialize the project
proj = Project()

# Get the S3 root path
s3_root = proj.s3.root

df = pd.read_csv(s3_root + '/ShippingLogs.csv')
df.head()

The dataset contains columns including Carrier, ActualShippingDays, ExpectedShippingDays, ShippingOrigin, ShippingPriority, and OnTimeDelivery. Add a second cell to analyze shipping performance for a single carrier:

import matplotlib.pyplot as plt

carrier_data = df[df['Carrier'] == 'GlobalFreight']
# Flag late deliveries
carrier_data['is_late'] = carrier_data['ActualShippingDays'] > carrier_data['ExpectedShippingDays']
late_pct = carrier_data['is_late'].mean() * 100
# Visualize actual vs expected shipping days
plt.figure(figsize=(12, 4))
plt.hist(carrier_data['ActualShippingDays'] - carrier_data['ExpectedShippingDays'], bins=20, edgecolor='black')
plt.axvline(x=0, color='red', linestyle='--', label='On time')
plt.title(f'Shipping Delay Distribution - GlobalFreight ({late_pct:.1f}% late)')
plt.xlabel('Days Over Expected')
plt.ylabel('Number of Shipments')
plt.legend()
plt.show()

With the notebook working interactively, you’re ready to automate it.

Running a notebook asynchronously

To trigger an asynchronous run, open your notebook. In the notebook header, choose the menu on the Run all button, and then choose Run in background.

Notebook header with the Run all menu expanded, showing the Run in background option

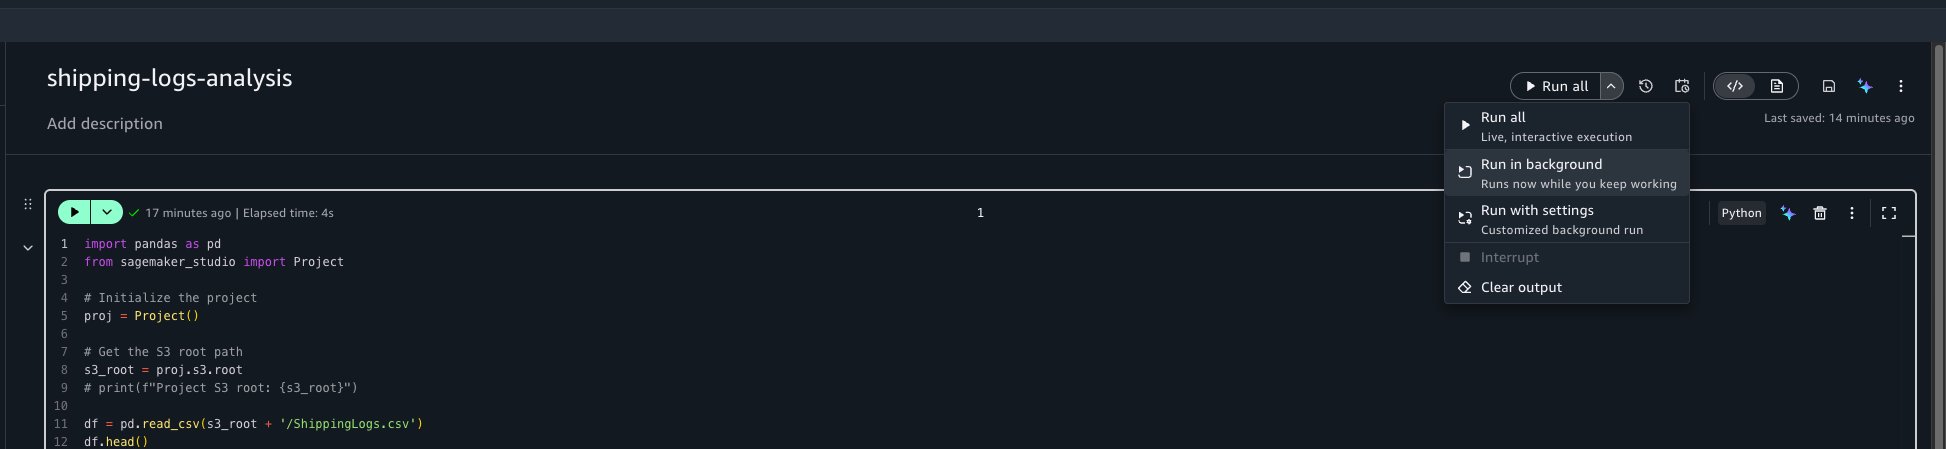
This captures a snapshot of the notebook in its current state and starts a run on a separate dedicated compute. You can continue working on other tasks or close the browser entirely. Your interactive session isn’t affected.

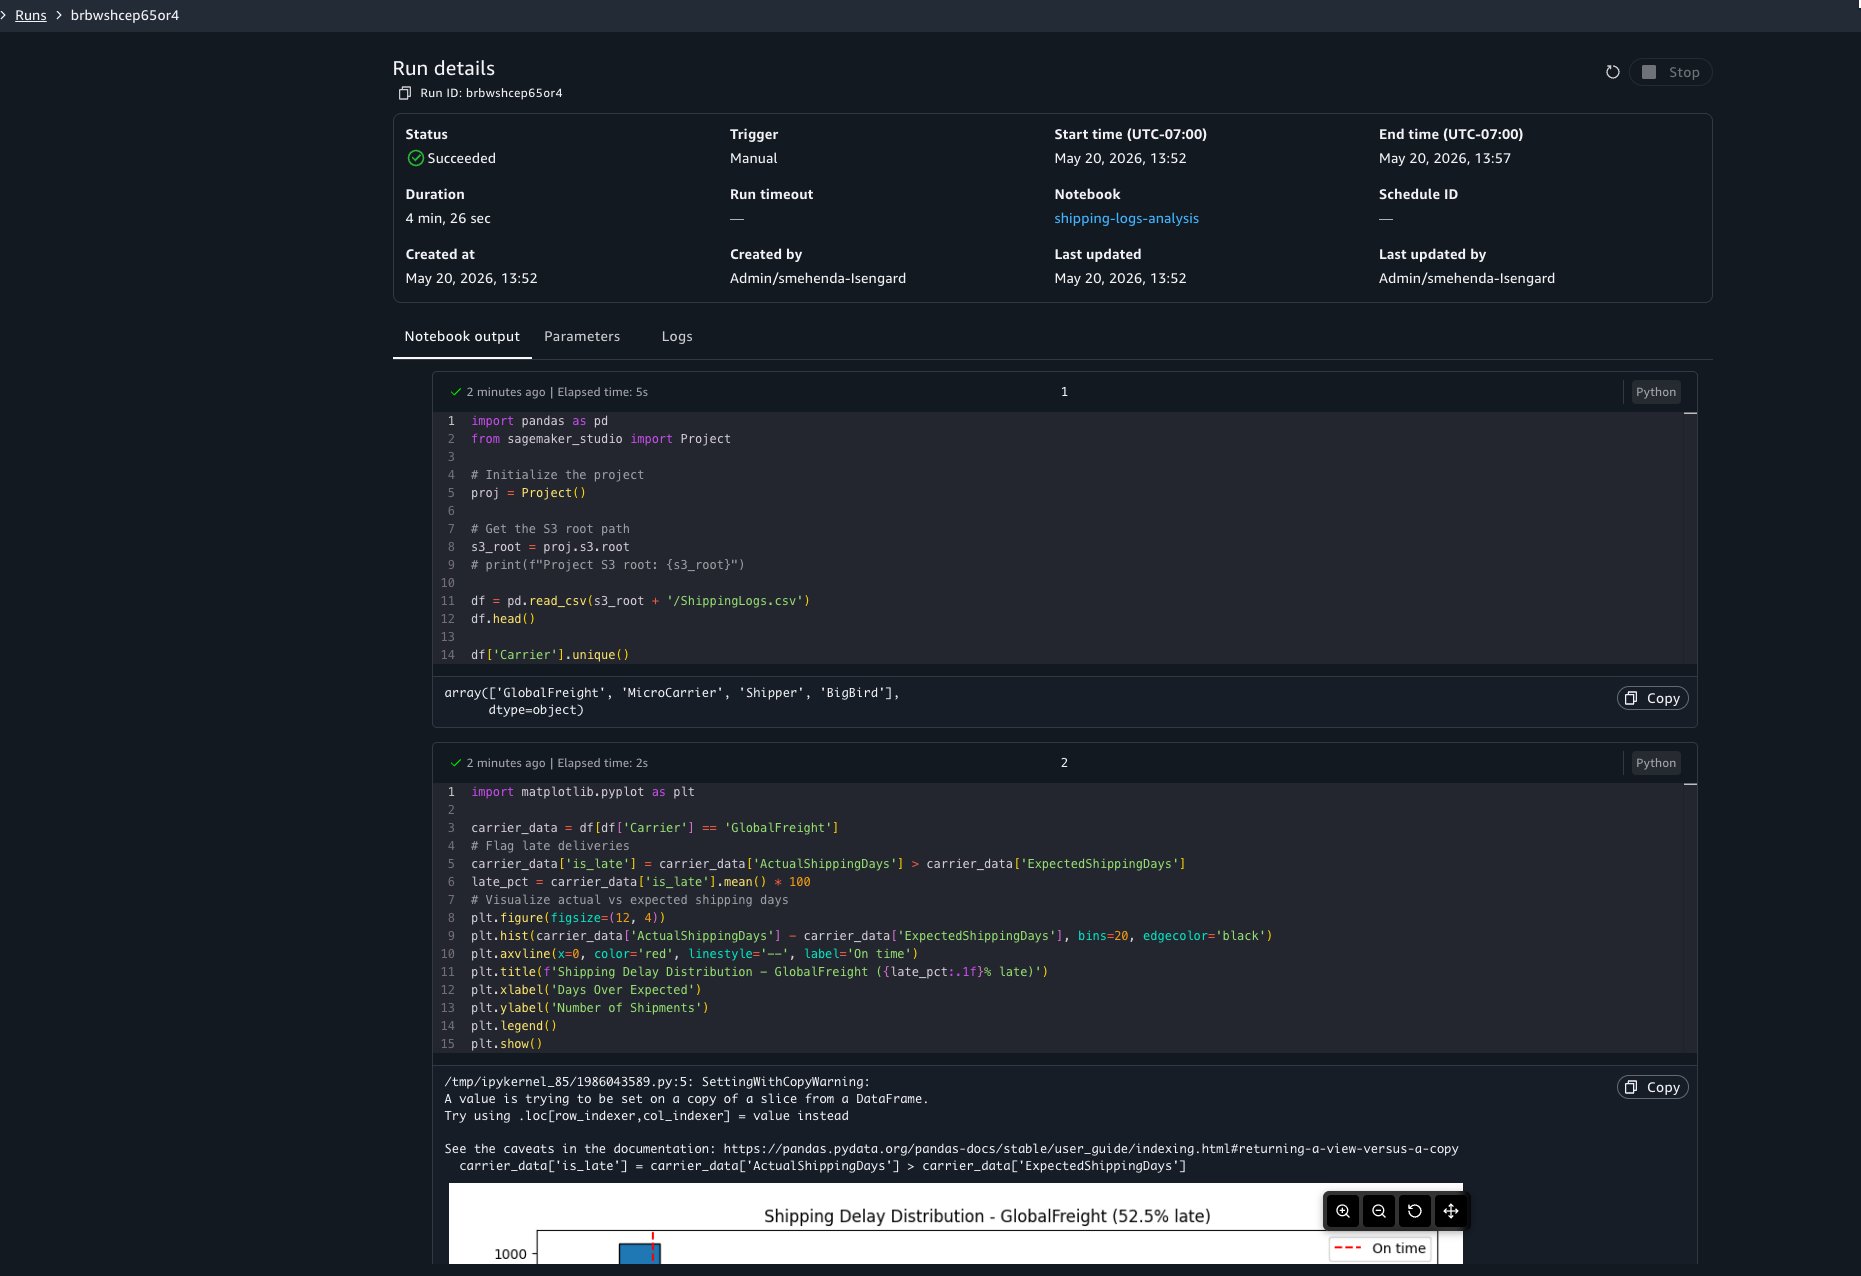
You will see a notification at the bottom of your screen confirming that the run started. To check the status of your run, choose View Run in the notification. This opens a view showing every background and scheduled run with its status, duration, and a link to view the full output.

Run history view showing background and scheduled runs with status, duration, and output links

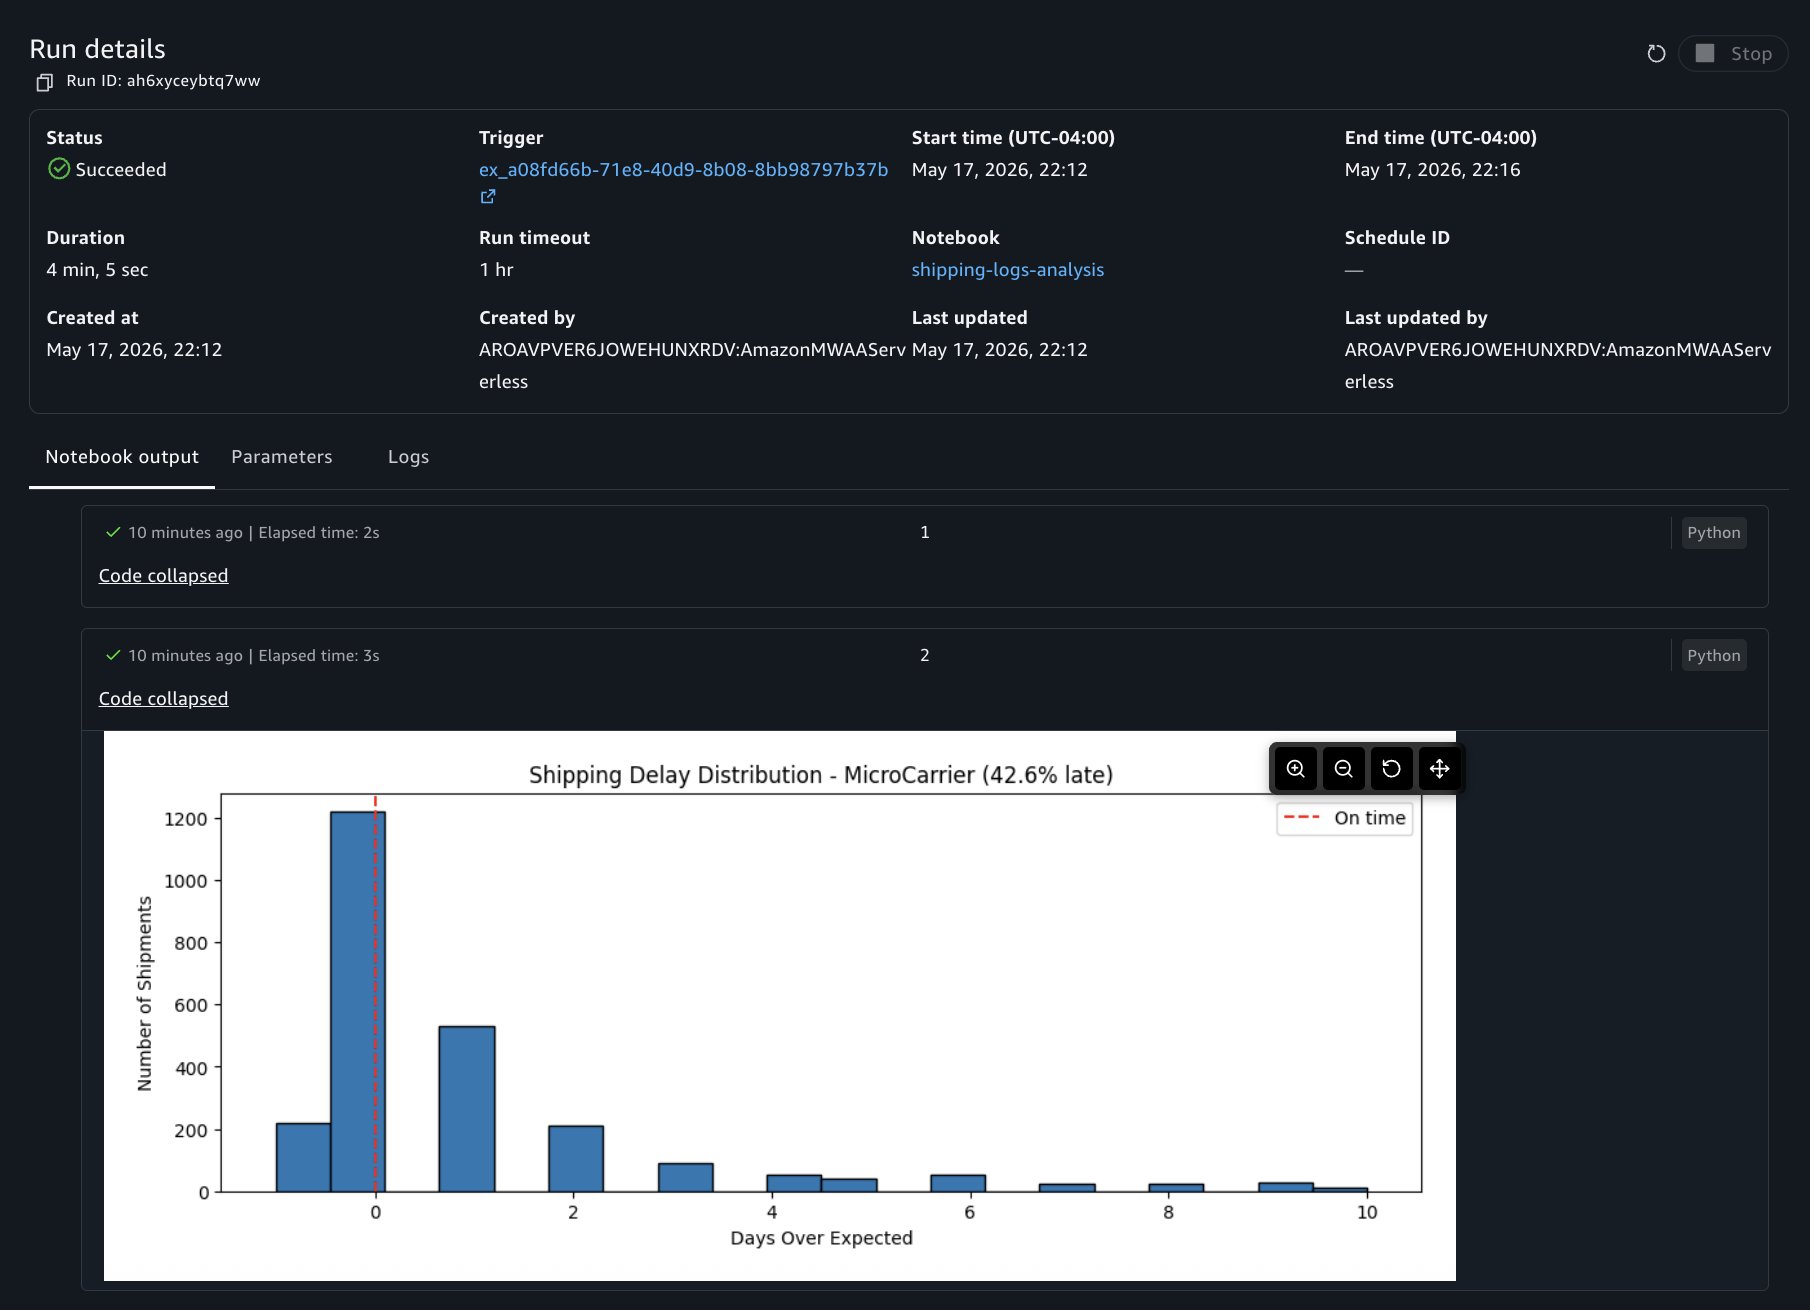
You can choose to view the run details at any point to view results as cells run. The run details include three tabs:

  • Output: The notebook in read-only mode with cell results rendered, including dataframe outputs, visualizations, and print statements.
  • Parameters: The parameter values used for this run.
  • Logs: Run logs for debugging.

Run details view showing the Output, Parameters, and Logs tabs with rendered cell output

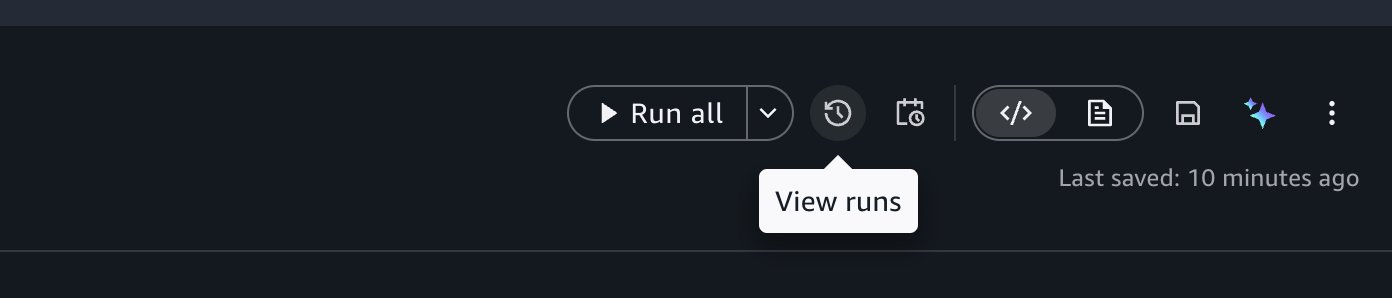
You can also access past runs by selecting the View Runs option in the notebook header.

Notebook header with the View Runs option highlighted

Stopping an in-progress run

If you need to cancel a run, open the run, and choose Stop. The run terminates, and its status updates to reflect the cancellation.

Run detail view with the Stop button selected to terminate an in-progress run

What to know about background runs

Compute: Each background run uses its own dedicated compute, separate from your interactive session. Your interactive work isn’t interrupted.

Packages: The packages that you install through the notebook’s package manager will be available in your background runs. When you use !pip install in code cells, the asynchronous run installs those packages as well.

Local files: Background runs can’t access files stored locally in your notebook environment. Reference data from your project’s shared storage (Amazon S3) or connected data sources instead.

Startup time: Expect a few minutes of startup time while compute is provisioned and your environment is prepared.

Creating a recurring schedule

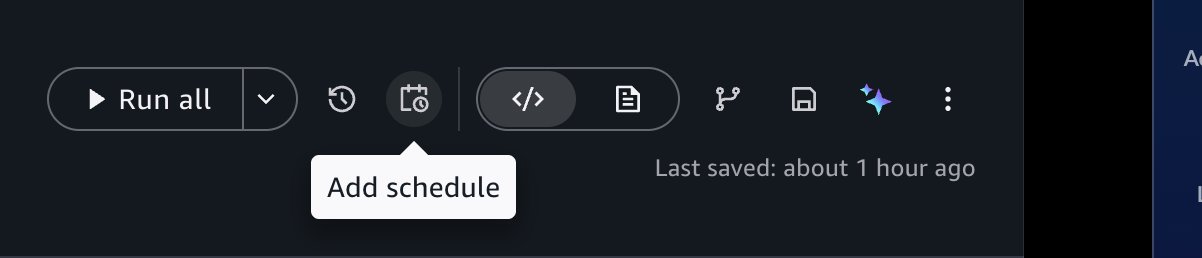
Now that you’ve confirmed asynchronous runs work correctly, you can automate the notebook on a schedule. Choose the schedule icon in the notebook header to open the schedule creation form.

Schedule creation form opened from the notebook header schedule icon

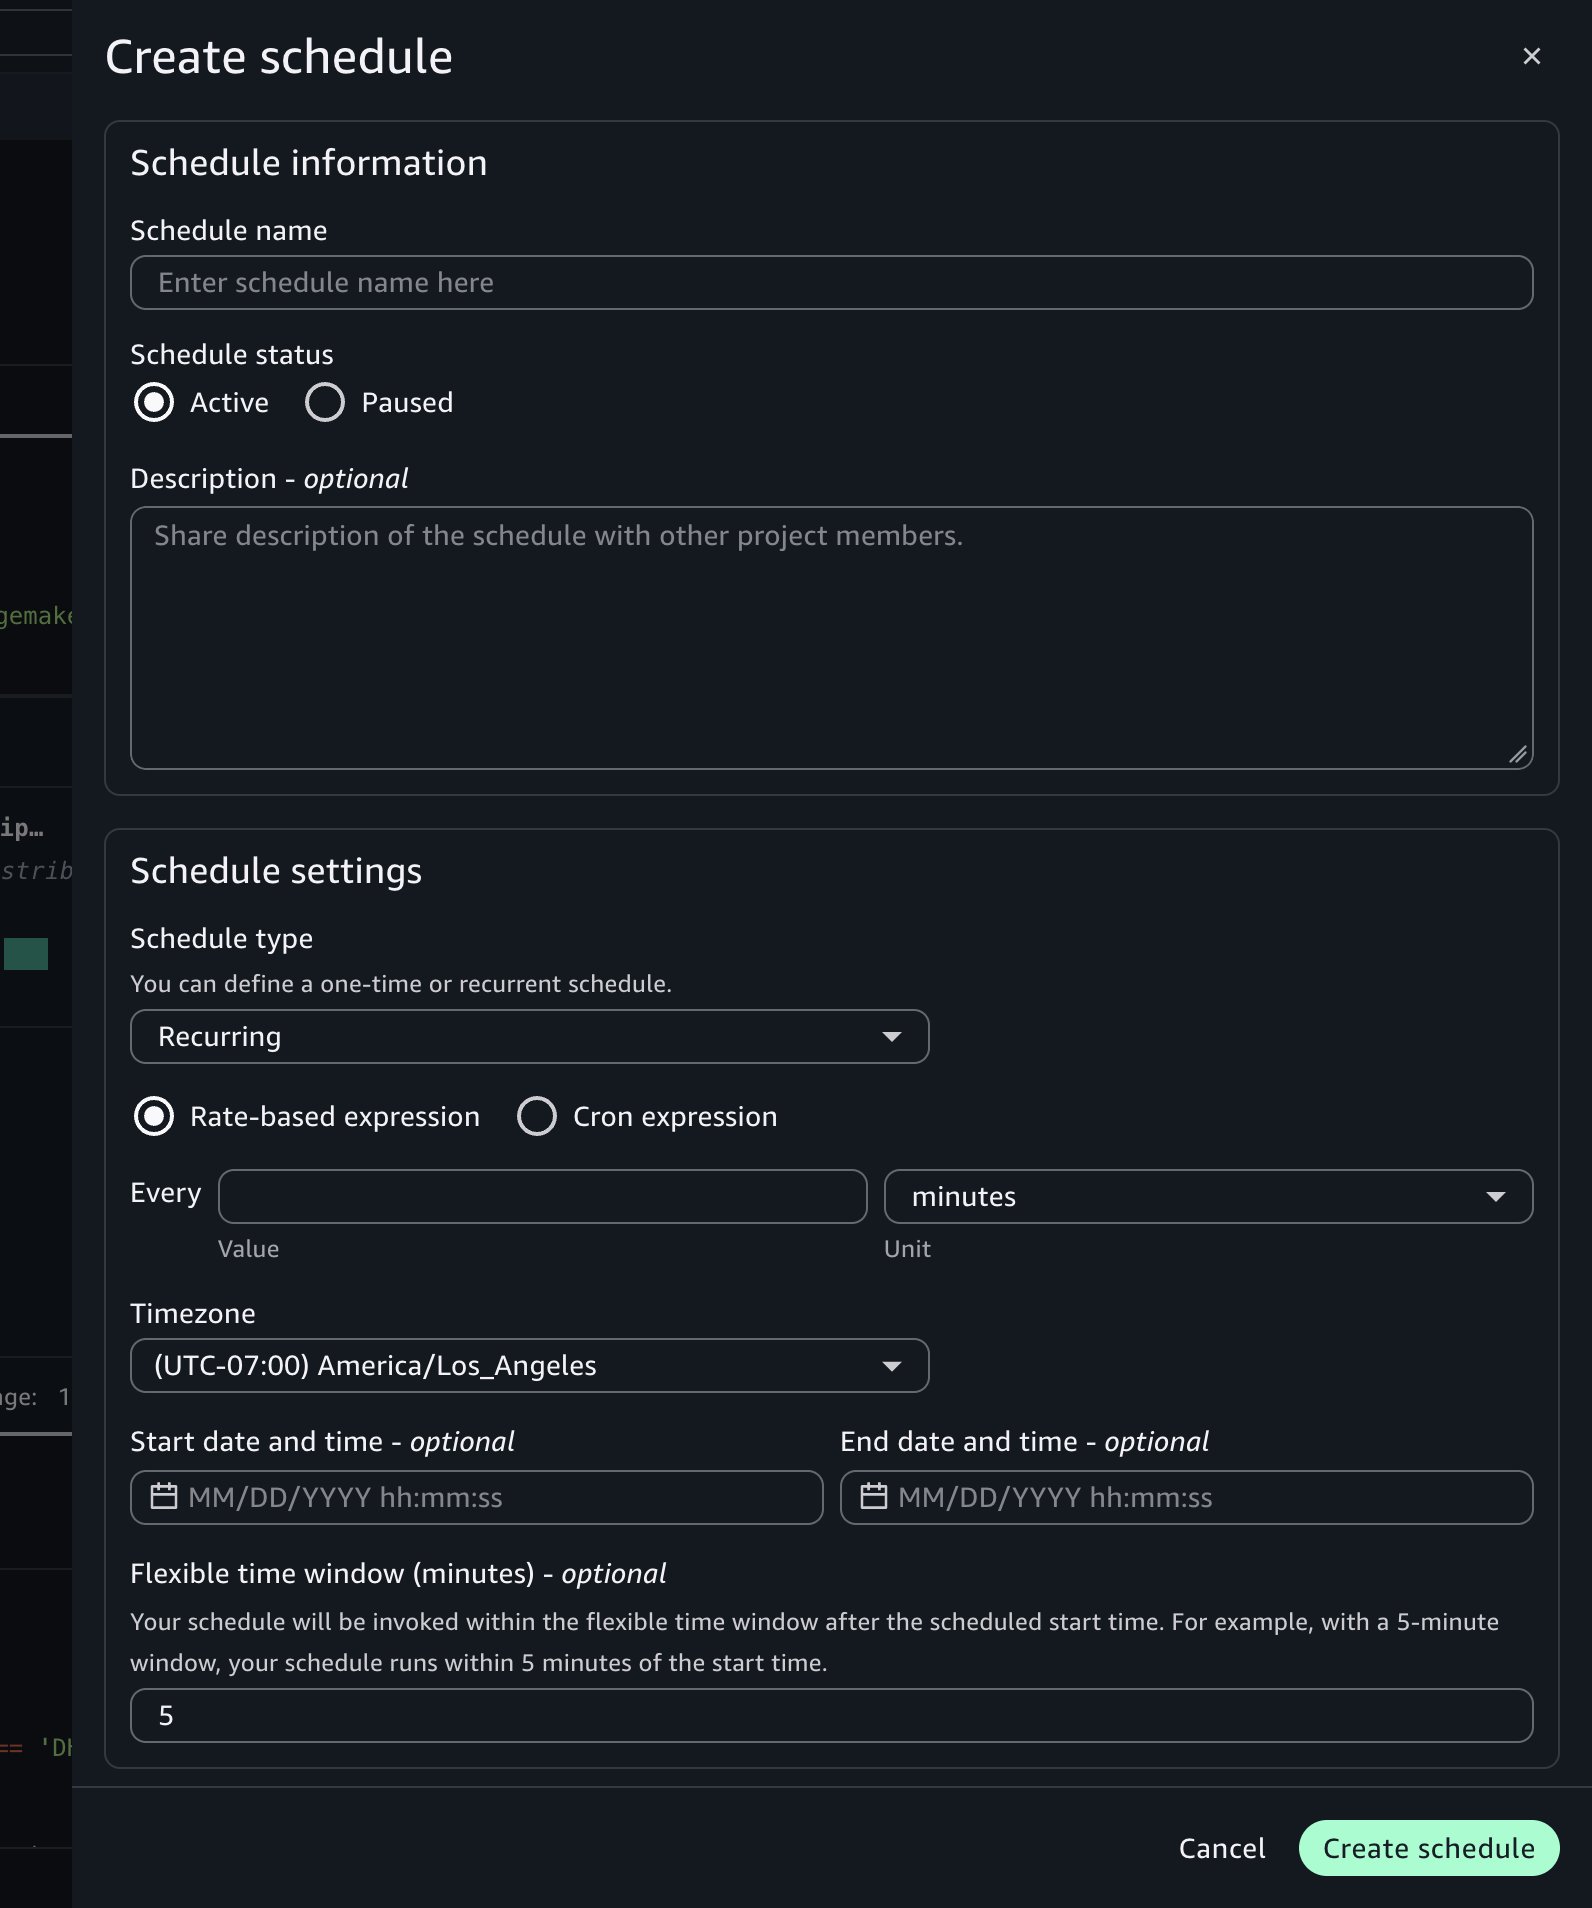
Configure the following settings:

  • Schedule name: Enter a descriptive name, such as Daily Shipping Report.
  • Schedule type: Choose Recurring for repeated runs or One-time for a single future run.
  • Frequency: Define how often the notebook runs using a rate (for example, every one day) or a cron expression. Set the time zone and the start and end dates for the schedule. For example, set the schedule to run every day at 7:00 AM UTC starting tomorrow.
  • Flexible time window (optional): The number of minutes after the scheduled start time within which the run can be invoked. For example, with a 5-minute window, the notebook runs within 5 minutes of the start time.
  • Advanced settings:
    • Compute Instance: Keep the current settings or override with a different instance type for the asynchronous run to use.
    • Timeout: Set a maximum run duration to help prevent notebooks from running indefinitely. If left blank, it defaults to 60 minutes.

Choose Create.

Configured schedule form with name, recurring type, daily frequency, and advanced settings populated

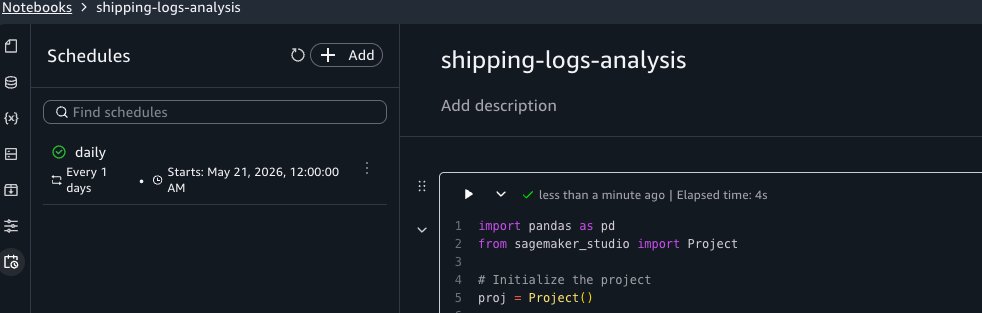
The schedule appears in the Schedules tab of the activity panel. SageMaker Unified Studio creates an Amazon EventBridge Scheduler schedule for each schedule you configure.

Schedules tab in the activity panel listing the newly created Daily Shipping Report schedule

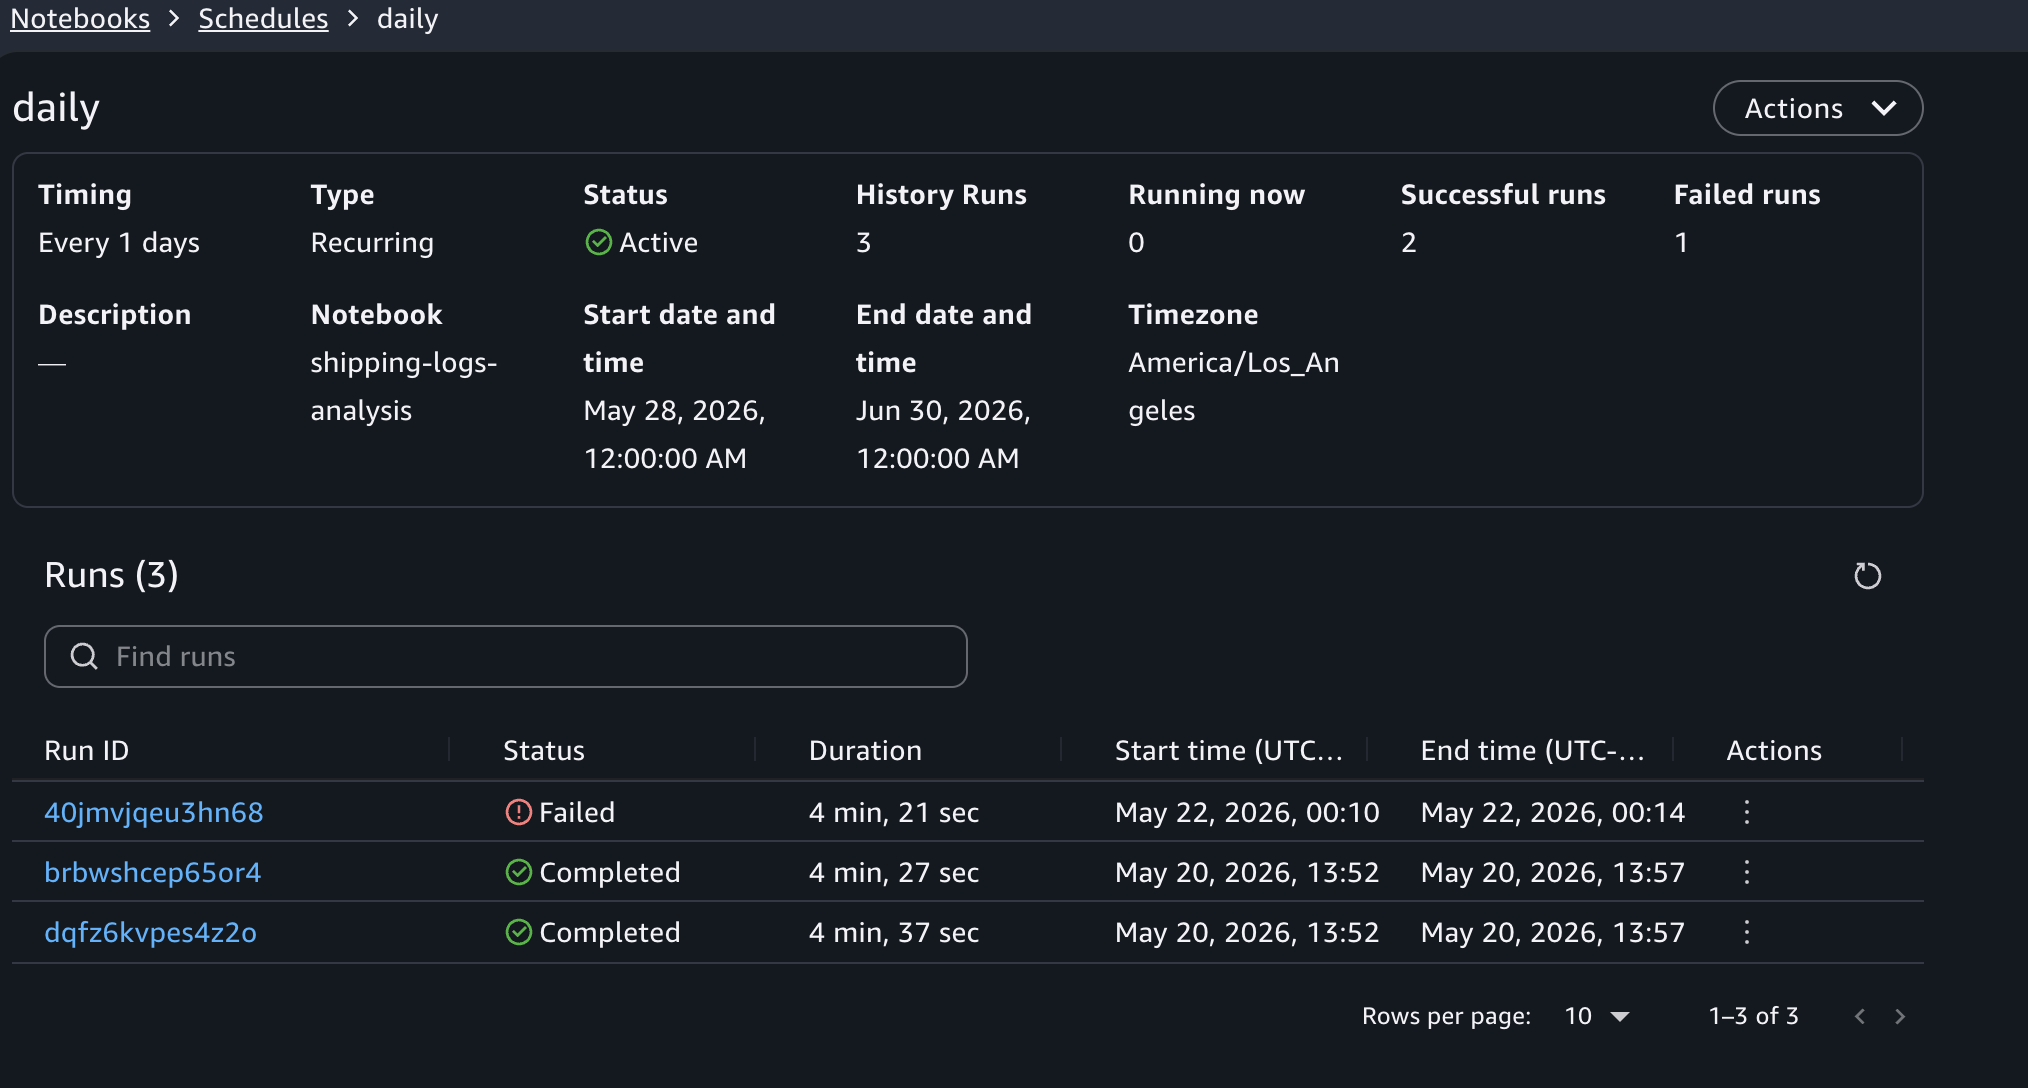
Viewing schedule run history

To view past runs for a schedule, choose the schedule name in the Schedules activity panel. This opens the schedule details view, where you can see the list of runs triggered by that schedule, the duration of each run, and a link to open the notebook output for an individual run.

Schedule details view showing the list of past runs with status, duration, and output links

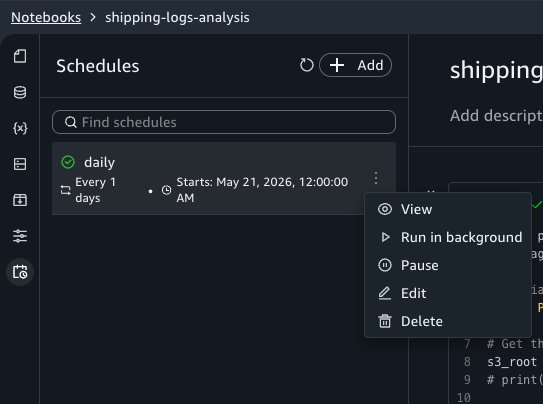
Editing and deleting schedules

To modify a schedule, choose Edit next to it in the Schedules panel. You can change the frequency, instance type, timeout, and other configuration fields. To pause or resume a schedule, choose Pause or Resume from the same menu. To remove a schedule, choose Delete from that menu. Deleting a schedule stops future runs but preserves historical run outputs in Amazon S3 for auditing purposes.

Schedules panel with the Edit, Pause, Resume, and Delete options for a schedule

Parameterizing notebooks

With parameters, you can reuse a single notebook across different inputs without duplicating code. For example, you can run the same shipping performance report for each carrier by passing a different carrier name to each run.
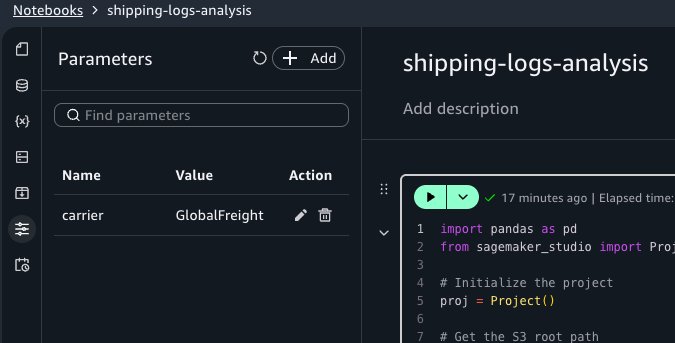
Defining parameters

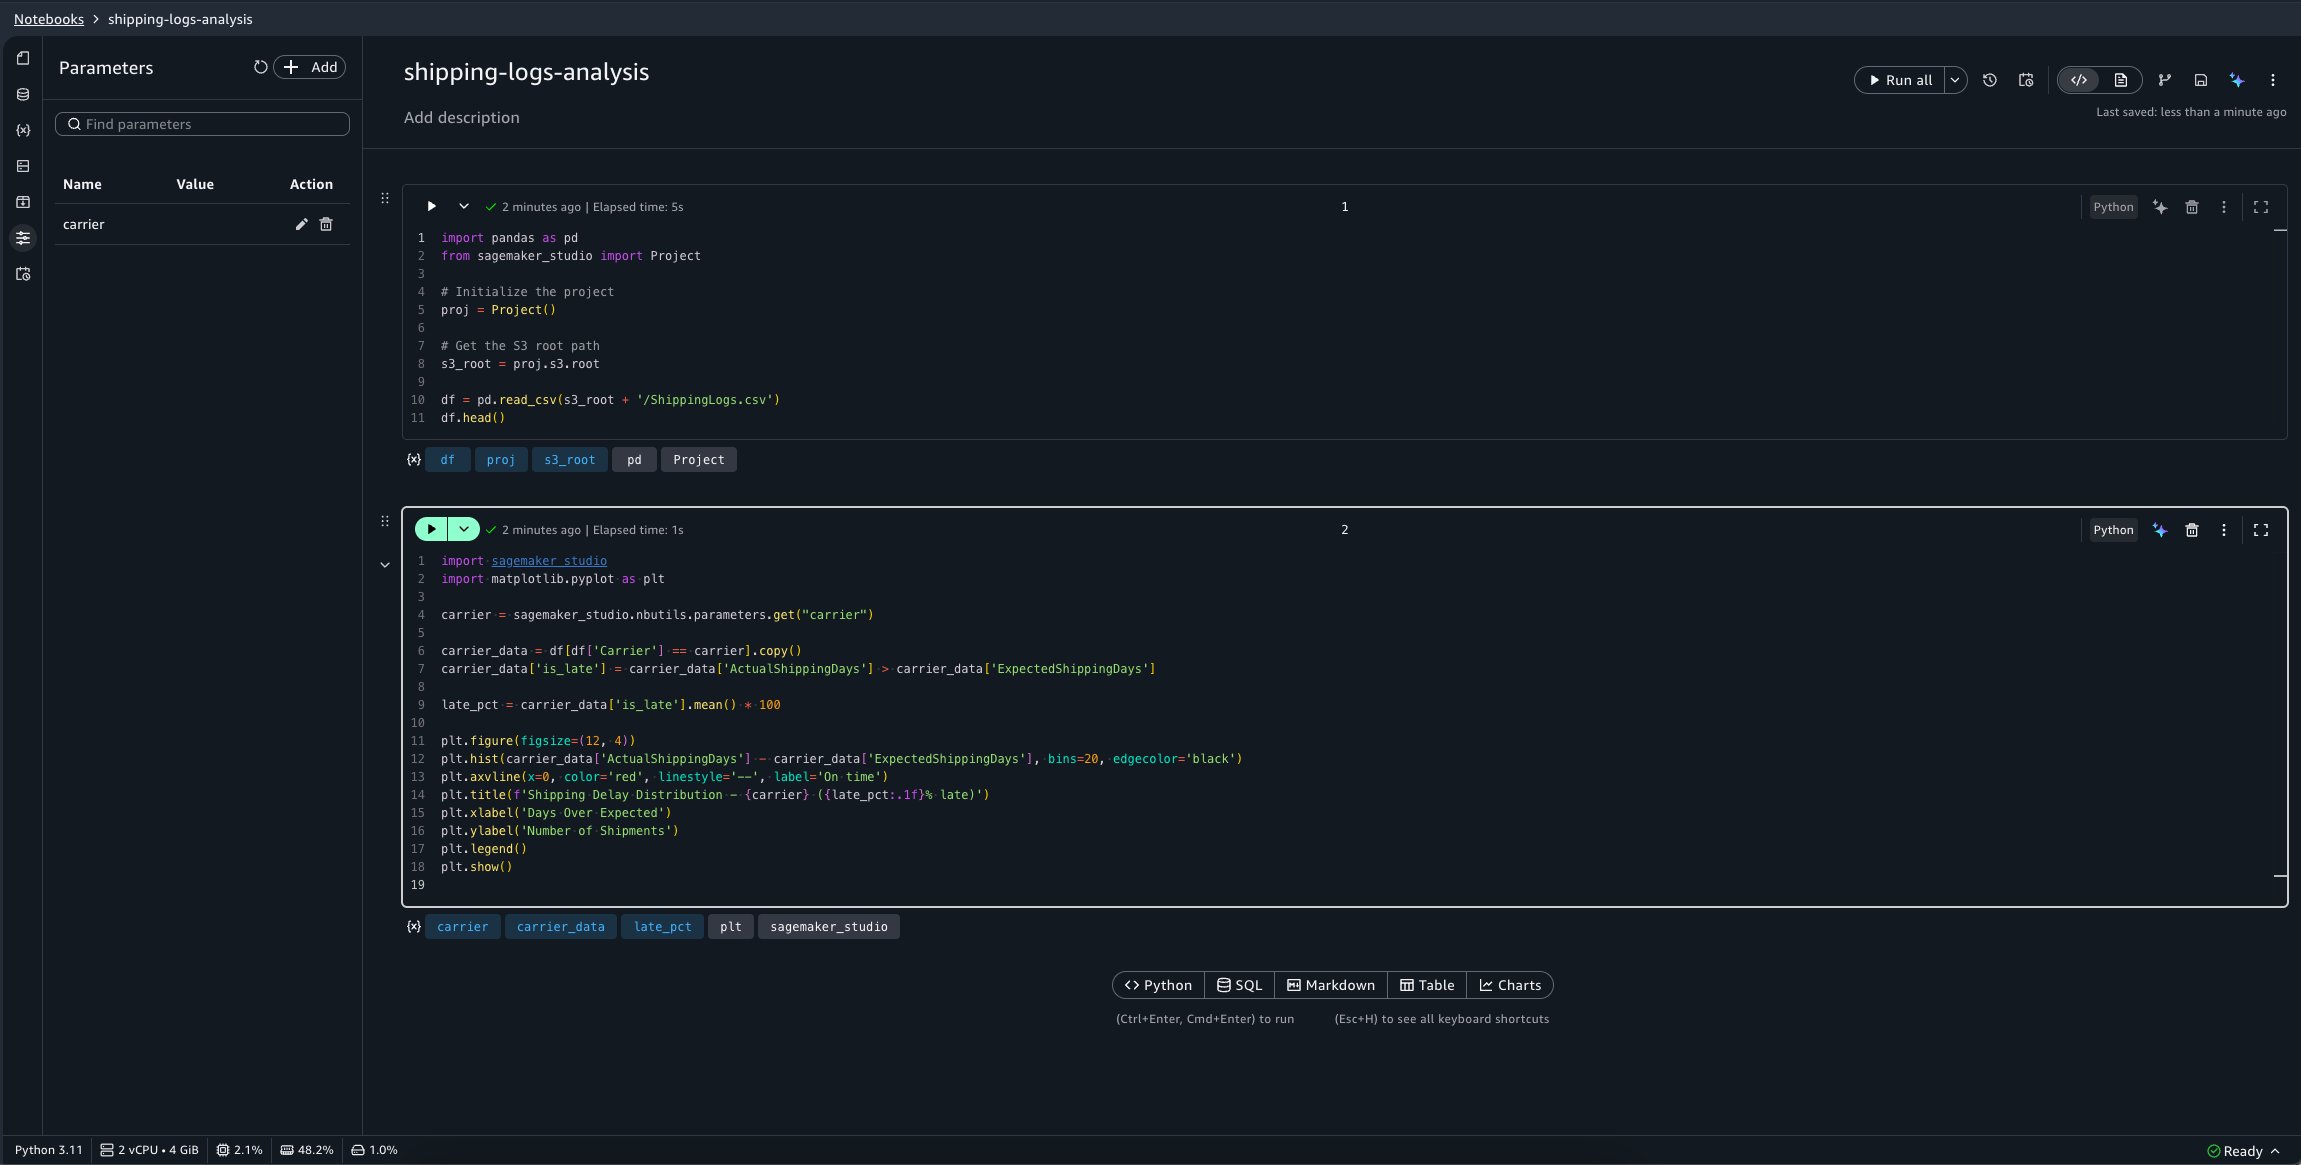
Open the Parameters activity panel and choose Add. Set the parameter name to carrier and the default value to GlobalFreight.

Parameters activity panel with the carrier parameter and GlobalFreight default value configured

Using parameters in code

In your notebook, replace the second cell with the following code. This retrieves the carrier parameter value using the SageMaker Unified Studio Python SDK instead of the hardcoded value:

import sagemaker_studio
import matplotlib.pyplot as plt

carrier = sagemaker_studio.nbutils.parameters.get("carrier")

carrier_data = df[df['Carrier'] == carrier].copy()
carrier_data['is_late'] = carrier_data['ActualShippingDays'] > carrier_data['ExpectedShippingDays']
late_pct = carrier_data['is_late'].mean() * 100

plt.figure(figsize=(12, 4))
plt.hist(carrier_data['ActualShippingDays'] - carrier_data['ExpectedShippingDays'], bins=20, edgecolor='black')
plt.axvline(x=0, color='red', linestyle='--', label='On time')
plt.title(f'Shipping Delay Distribution - {carrier} ({late_pct:.1f}% late)')
plt.xlabel('Days Over Expected')
plt.ylabel('Number of Shipments')
plt.legend()
plt.show()

Creating schedules with different parameter values

Now create three schedules for the same notebook, each targeting a different carrier:

  • “daily-shipping-gf” with carrier = GlobalFreight.
  • “daily-shipping-mc” with carrier = MicroCarrier.
  • “daily-shipping-shipper” with carrier = Shipper.

When you view a historical run, a separate Parameters tab in the run output displays the parameter values that were active for that run.

You can also override parameter values when triggering an on-demand background run. Choose the menu on the Run all button, then choose Run with settings. You can keep the defaults or provide custom values for that run.

Orchestrating with Workflows

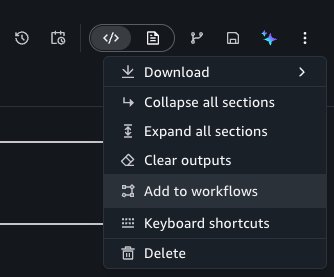
To combine notebooks into a multi-step pipeline, such as running a data calculation notebook before the shipping log notebook, you can use the Notebook Operator in the Workflows tool to orchestrate them.

To do this, choose the Add to workflows button under the options menu of the notebook header.

Notebook header options menu with the Add to workflows button highlighted

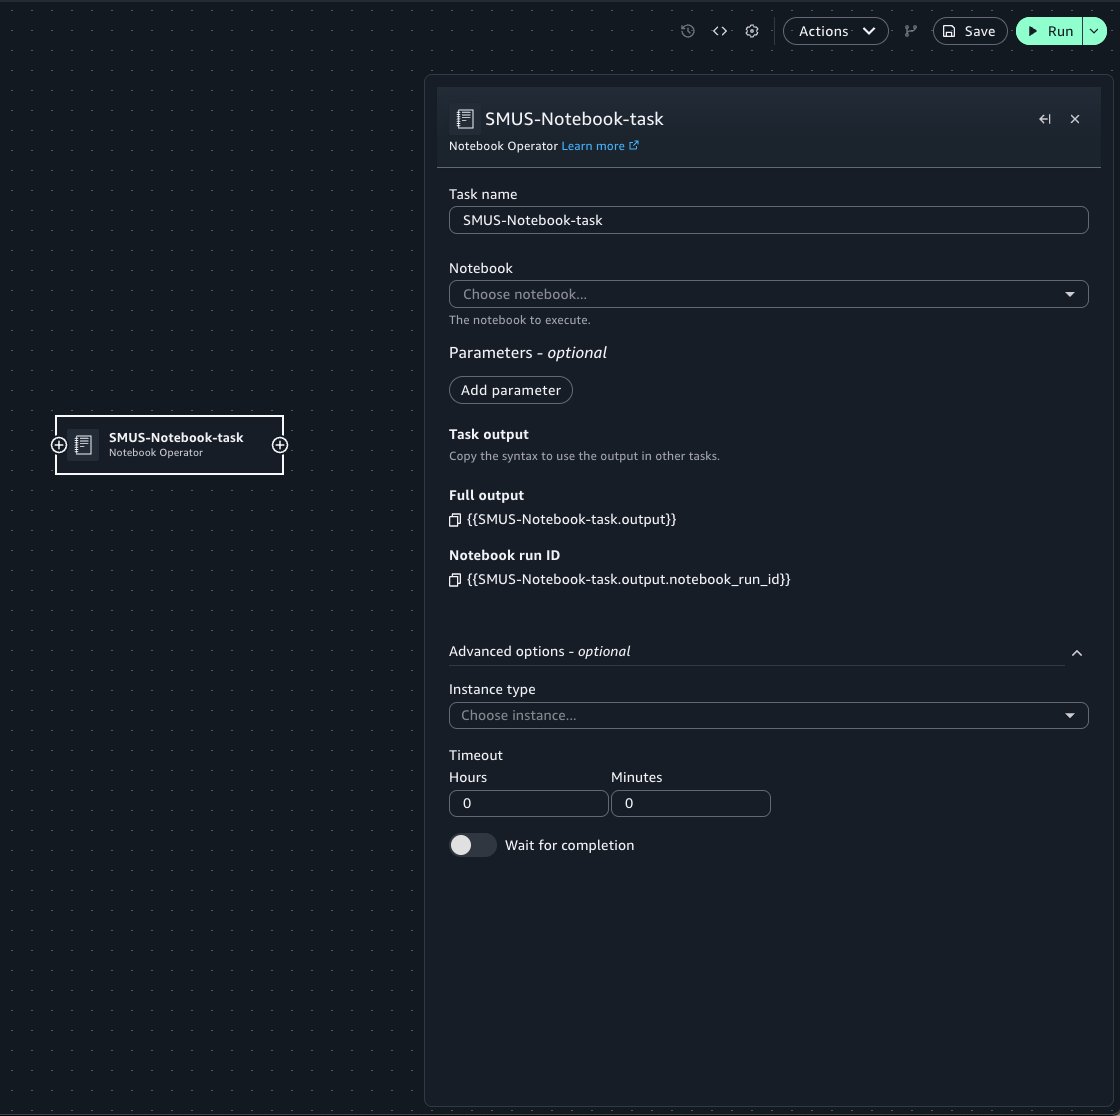
This takes you to the Workflows tool, adding a new Notebook Operator task with prefilled properties from your notebook. When configuring the Operator task:

  • Select the target notebook from the notebook menu.
  • Use the Parameters widget to pass notebook parameters into the run of the notebook.
  • Specify optional arguments such as the compute instance and timeout configuration for the run.

Workflows canvas with a Notebook Operator task configured with notebook, parameters, and compute settings

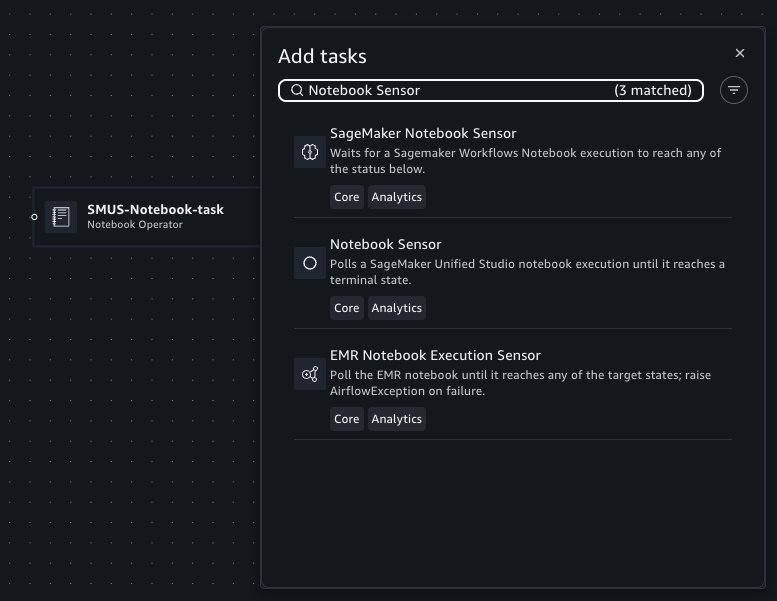
Workflows also supports polling for the status of a notebook run for a particular notebook using Notebook Sensor. In Workflows, you can add a new Sensor task by hovering on the edge of the existing Operator task, where a plus (+) button is displayed.

Workflows canvas showing the plus button on the edge of an Operator task for adding a Sensor

You can then search for and add the Notebook Sensor to the canvas.

Task picker dialog with Notebook Sensor selected for adding to the workflow canvas

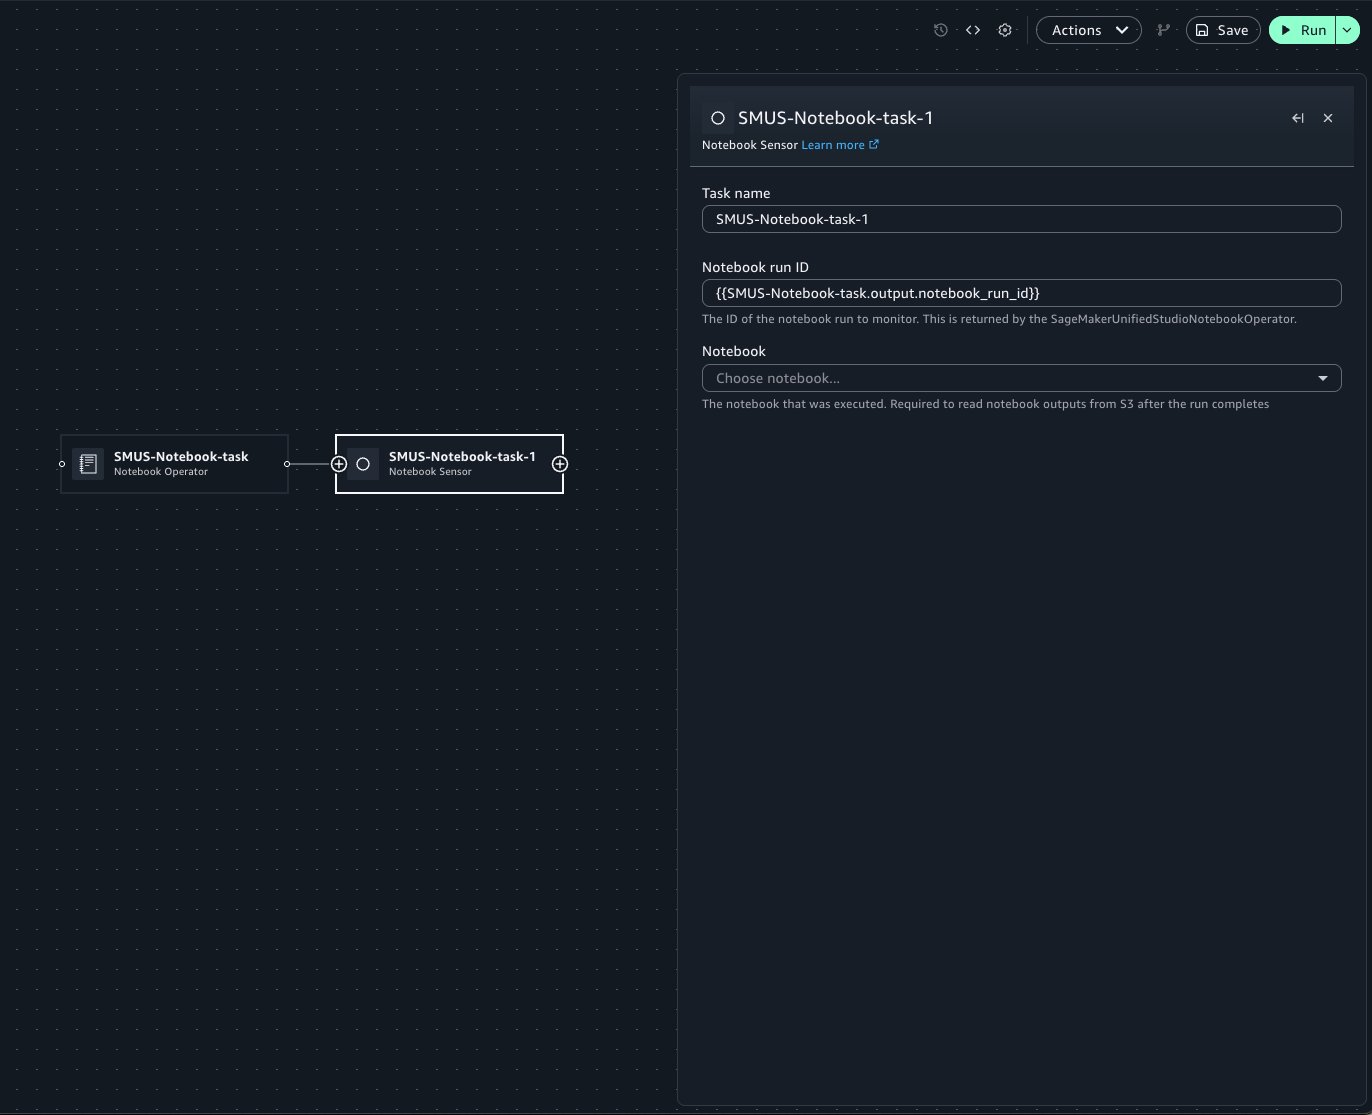
When configuring the Sensor task, specify the notebook run ID within the text field. The Operator’s form field contains Jinja templating to retrieve the notebook run. If the Sensor is used within the same workflow as the Operator, this template can be copied to use within a Sensor to poll the notebook run. Select the target notebook from the notebook menu.

Notebook Sensor configuration panel with the notebook run ID field populated using Jinja templating

Within Workflows, you can configure notebook runs to emit outputs and use those outputs as inputs for subsequent notebook runs.

Building off of the previous shipping log notebook example, we will pass the carrier parameter from an upstream notebook’s output. Your shipping-logs-analysis notebook should be already set up.

Because the notebook depends on the carrier parameter, you can specify it in the Parameters panel.

Parameters panel for the shipping-logs-analysis Operator with the carrier parameter dependency configured

Now, define a second notebook, calculate-best-carrier, which performs a calculation to determine our best carrier to use for shipping:

import pandas as pd
from sagemaker_studio import Project

# Initialize the project
proj = Project()

# Get the S3 root path
s3_root = proj.s3.root

df = pd.read_csv(s3_root + '/ShippingLogs.csv')
df.head()

carrier_stats = df.groupby('Carrier').agg(
    total=('OrderID', 'count'),
    late=('OnTimeDelivery', lambda x: (x == 'Late').sum())
).reset_index()
carrier_stats['late_pct'] = carrier_stats['late'] / carrier_stats['total'] * 100

best = carrier_stats.sort_values('late_pct', ascending=True).iloc[0]
best_carrier = best['Carrier']

print("Late % by carrier:")
print(carrier_stats.to_string(index=False))
print(f"\nBest carrier: {best_carrier} ({best['late_pct']:.1f}% late)")

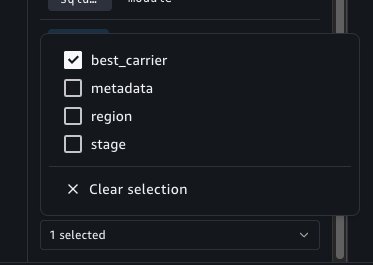
To configure the calculate-best-carrier notebook’s outputs, you can choose the Variables panel. A new selector is available at the bottom of this panel which allows you to select variables to mark as outputs.

Variables panel with the selector at the bottom for marking notebook variables as outputs

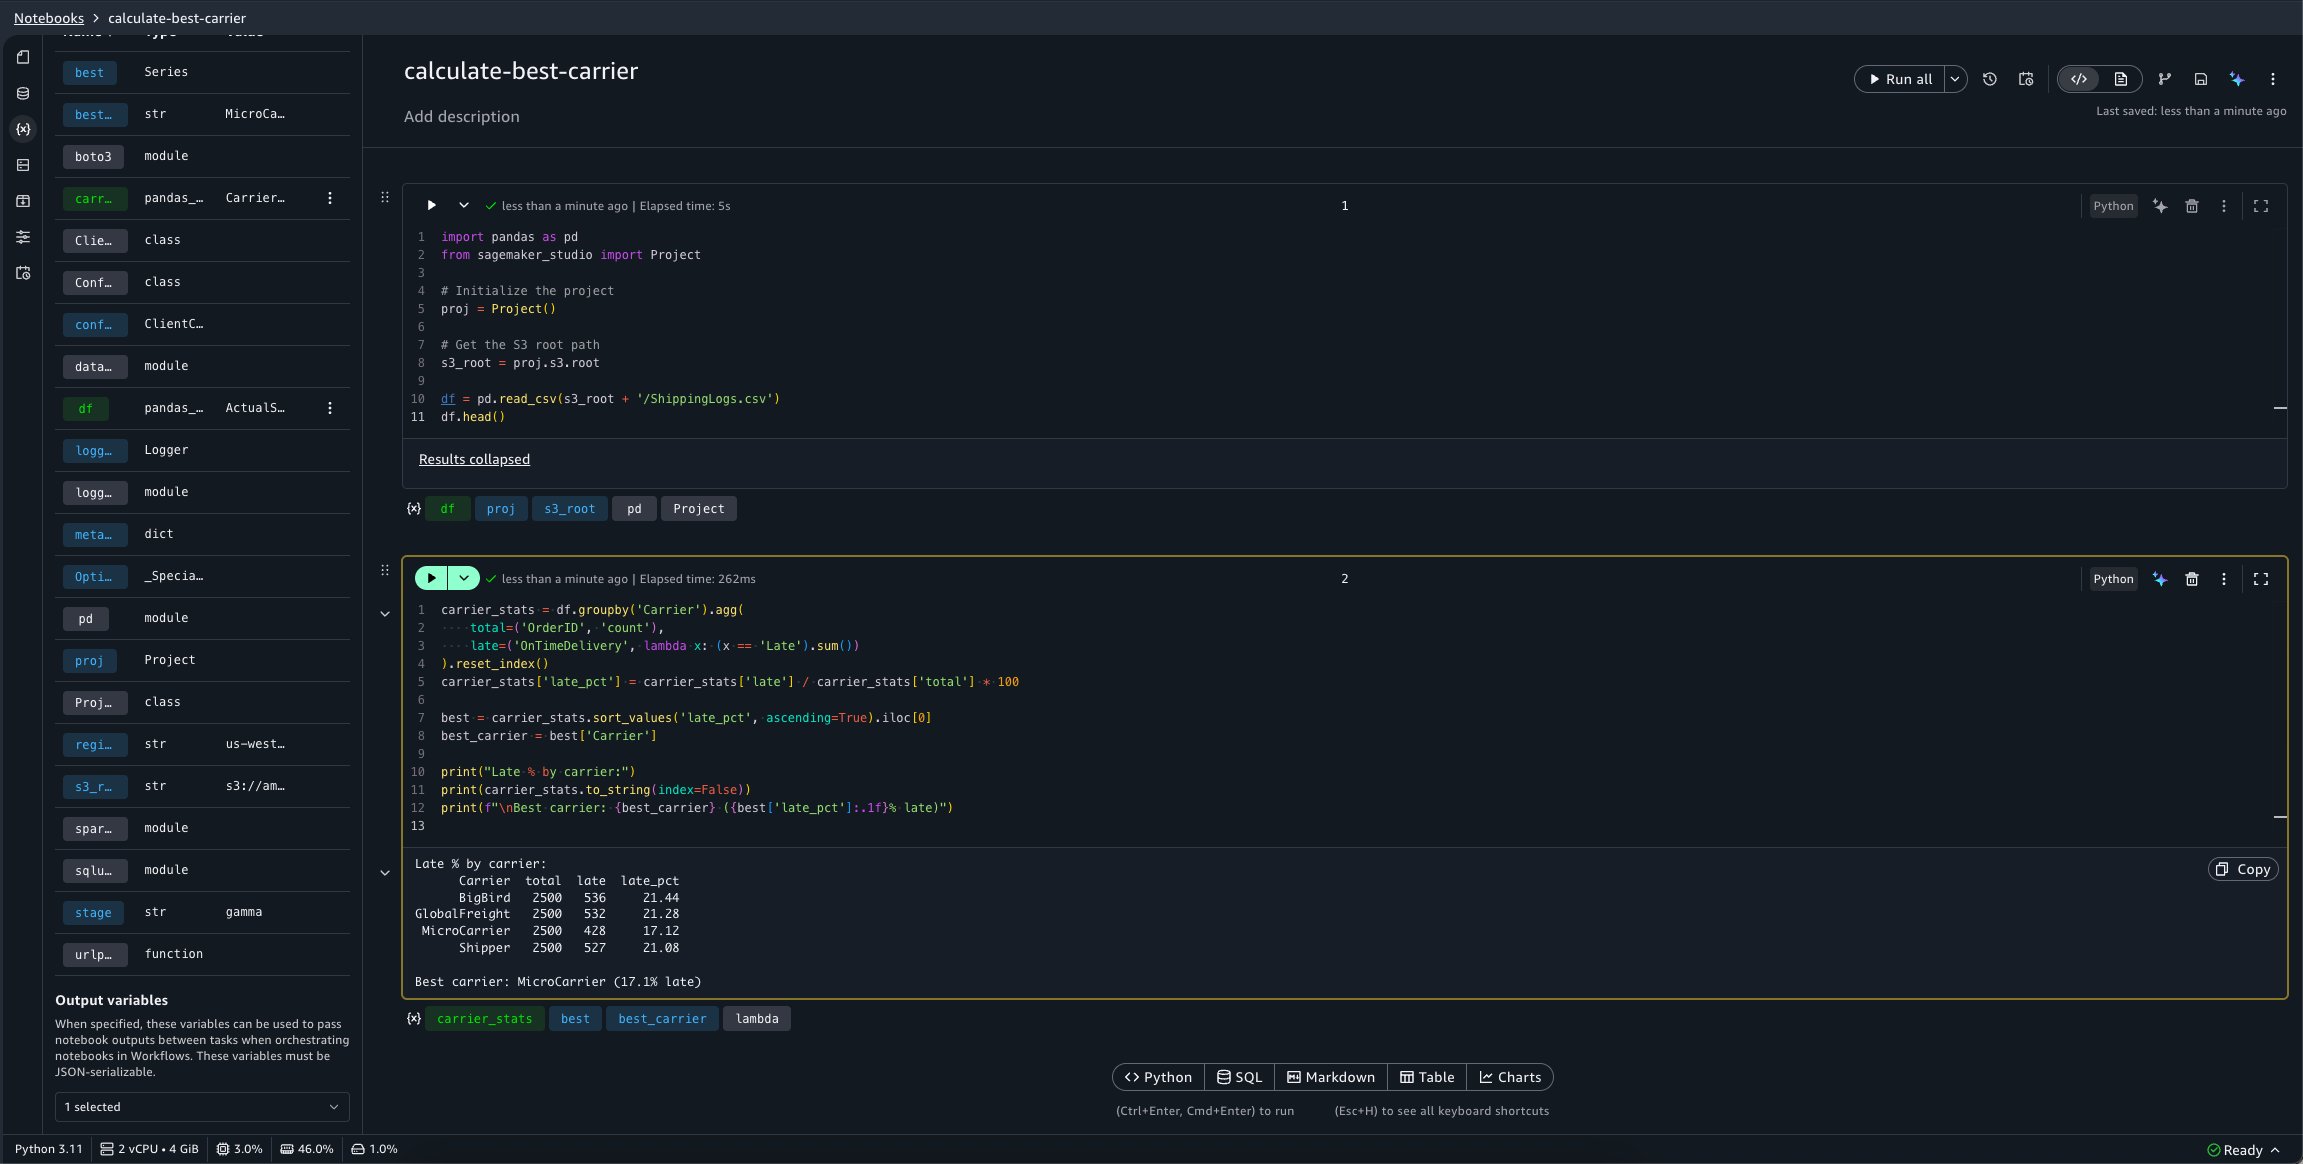
We want this notebook to emit the best_carrier variable.

Variables panel showing best_carrier marked as an output variable for the calculate-best-carrier notebook

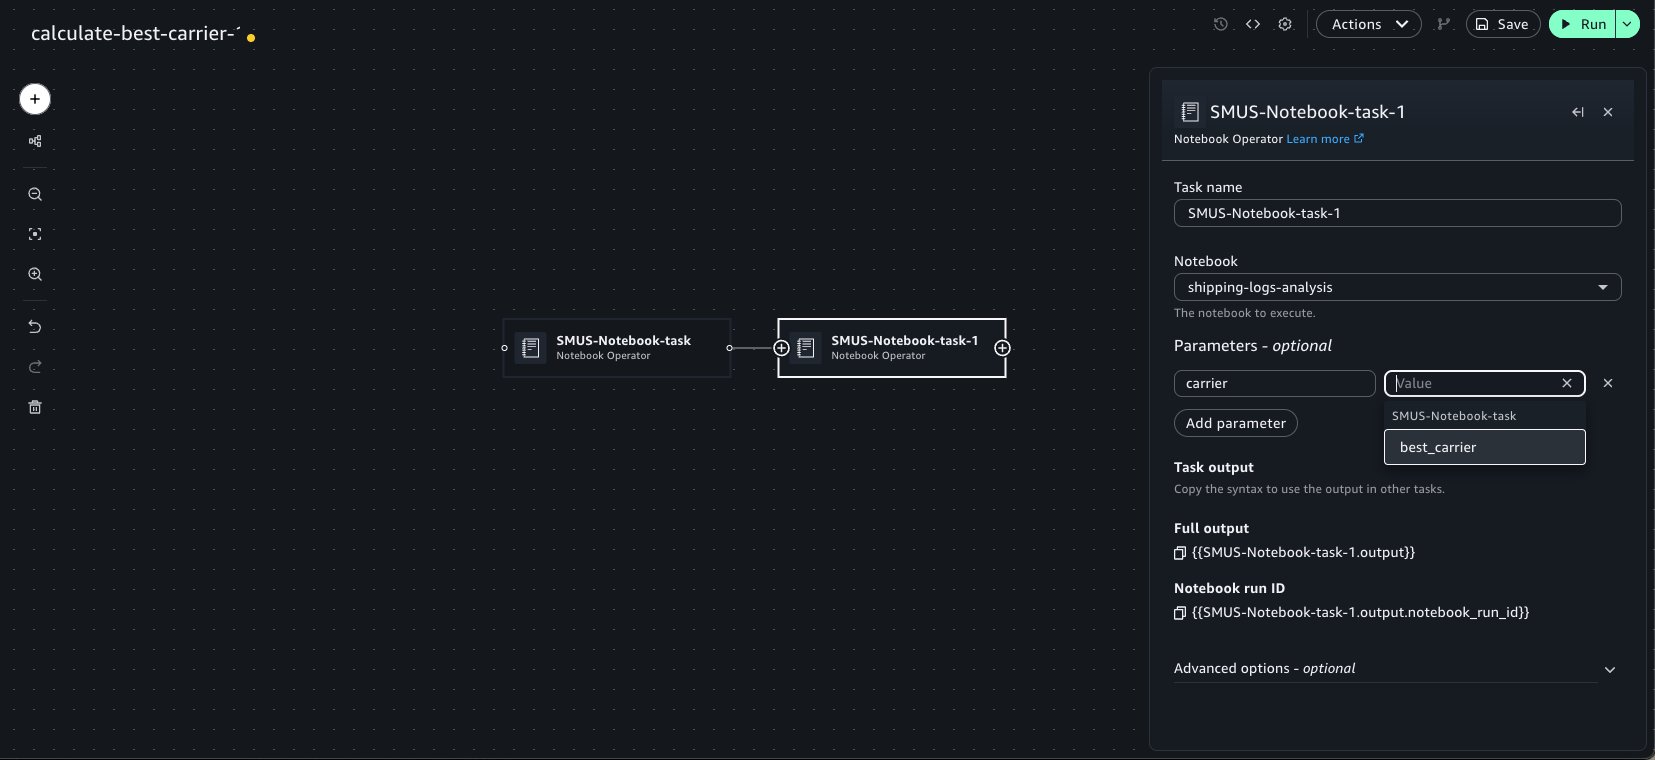
Now, use the Add to workflows button as previously demonstrated to quickly add this notebook within a workflow. Chain a second Notebook Operator that points to our shipping-logs-analysis notebook. Because we specified a parameter dependency on carrier for this notebook, it’s available as an option in the Parameters widget menu.

Parameters widget menu of a Notebook Operator showing carrier as a configurable parameter dependency

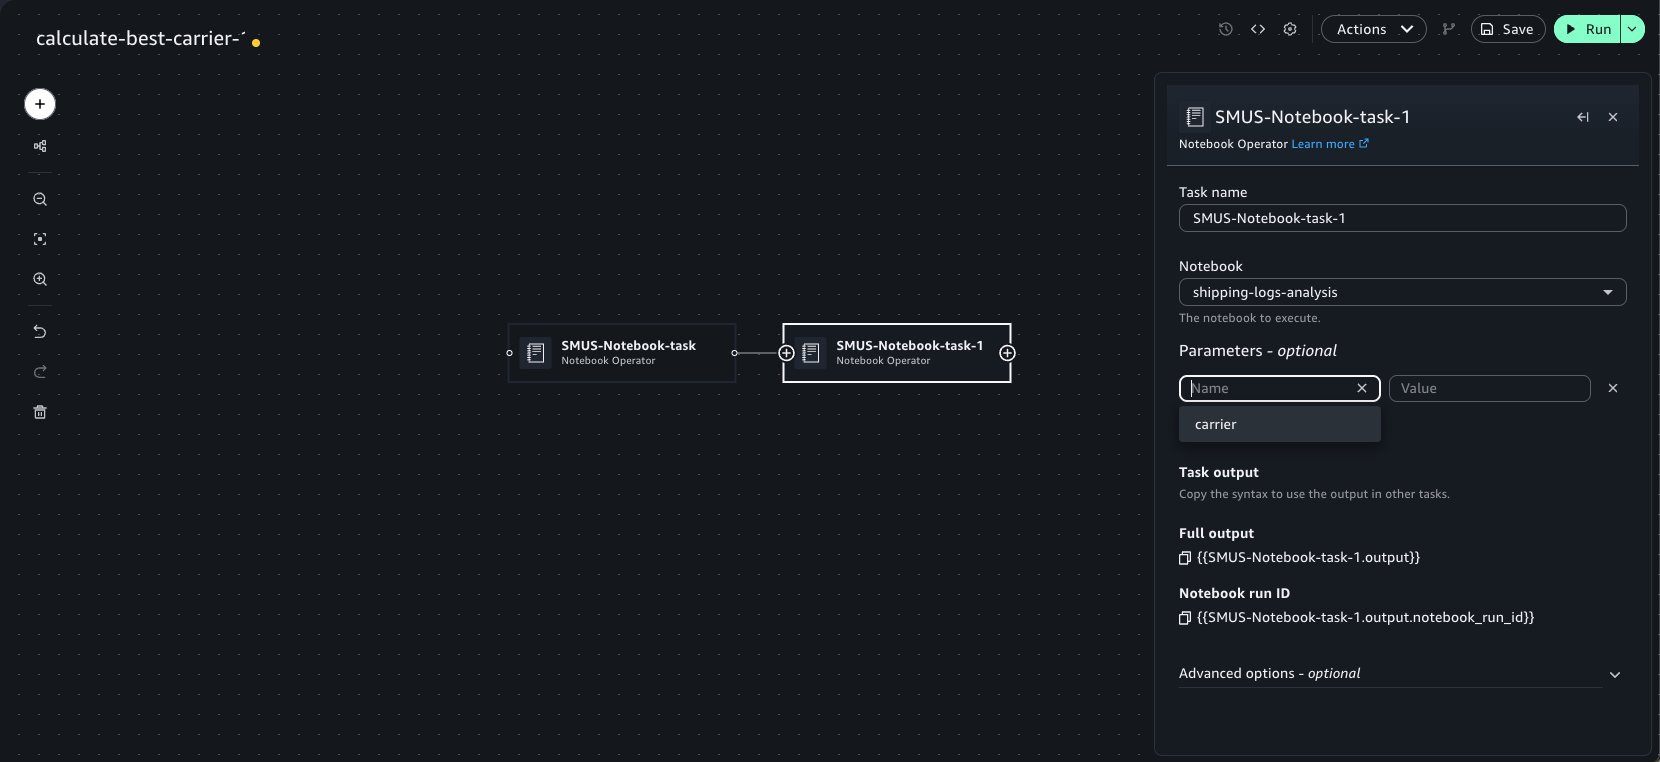
When they’re chained, the notebook tasks detect the outputs set in upstream notebook runs. These outputs can be selected as keys within the Parameters widget of the Operator to pass into the run. This can be done recursively for an arbitrary number of Operator tasks. We can select the emitted best_carrier output from the calculate-best-carrier notebook.

Parameters widget displaying best_carrier as a selectable upstream output to pass into the next Operator

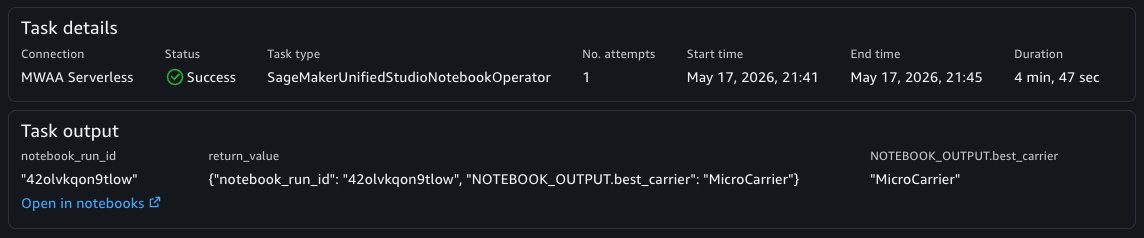
You can now choose the Save button on the top left of the visual canvas and the Run button to start the workflow. When the workflow is completed, the specified notebook outputs are available in the Task Output panel and the notebook run result can be viewed in the Notebooks tool.

Task Output panel showing the emitted notebook outputs after a successful workflow run

Notebook run result rendered in the Notebooks tool after the chained workflow completes

In a similar manner, the Notebook Sensor will also emit the notebook outputs from a particular notebook’s run which can be used within other tasks. This is useful when you want to retrieve outputs from a notebook run in another workflow.

Debugging a failed run with AI assistance

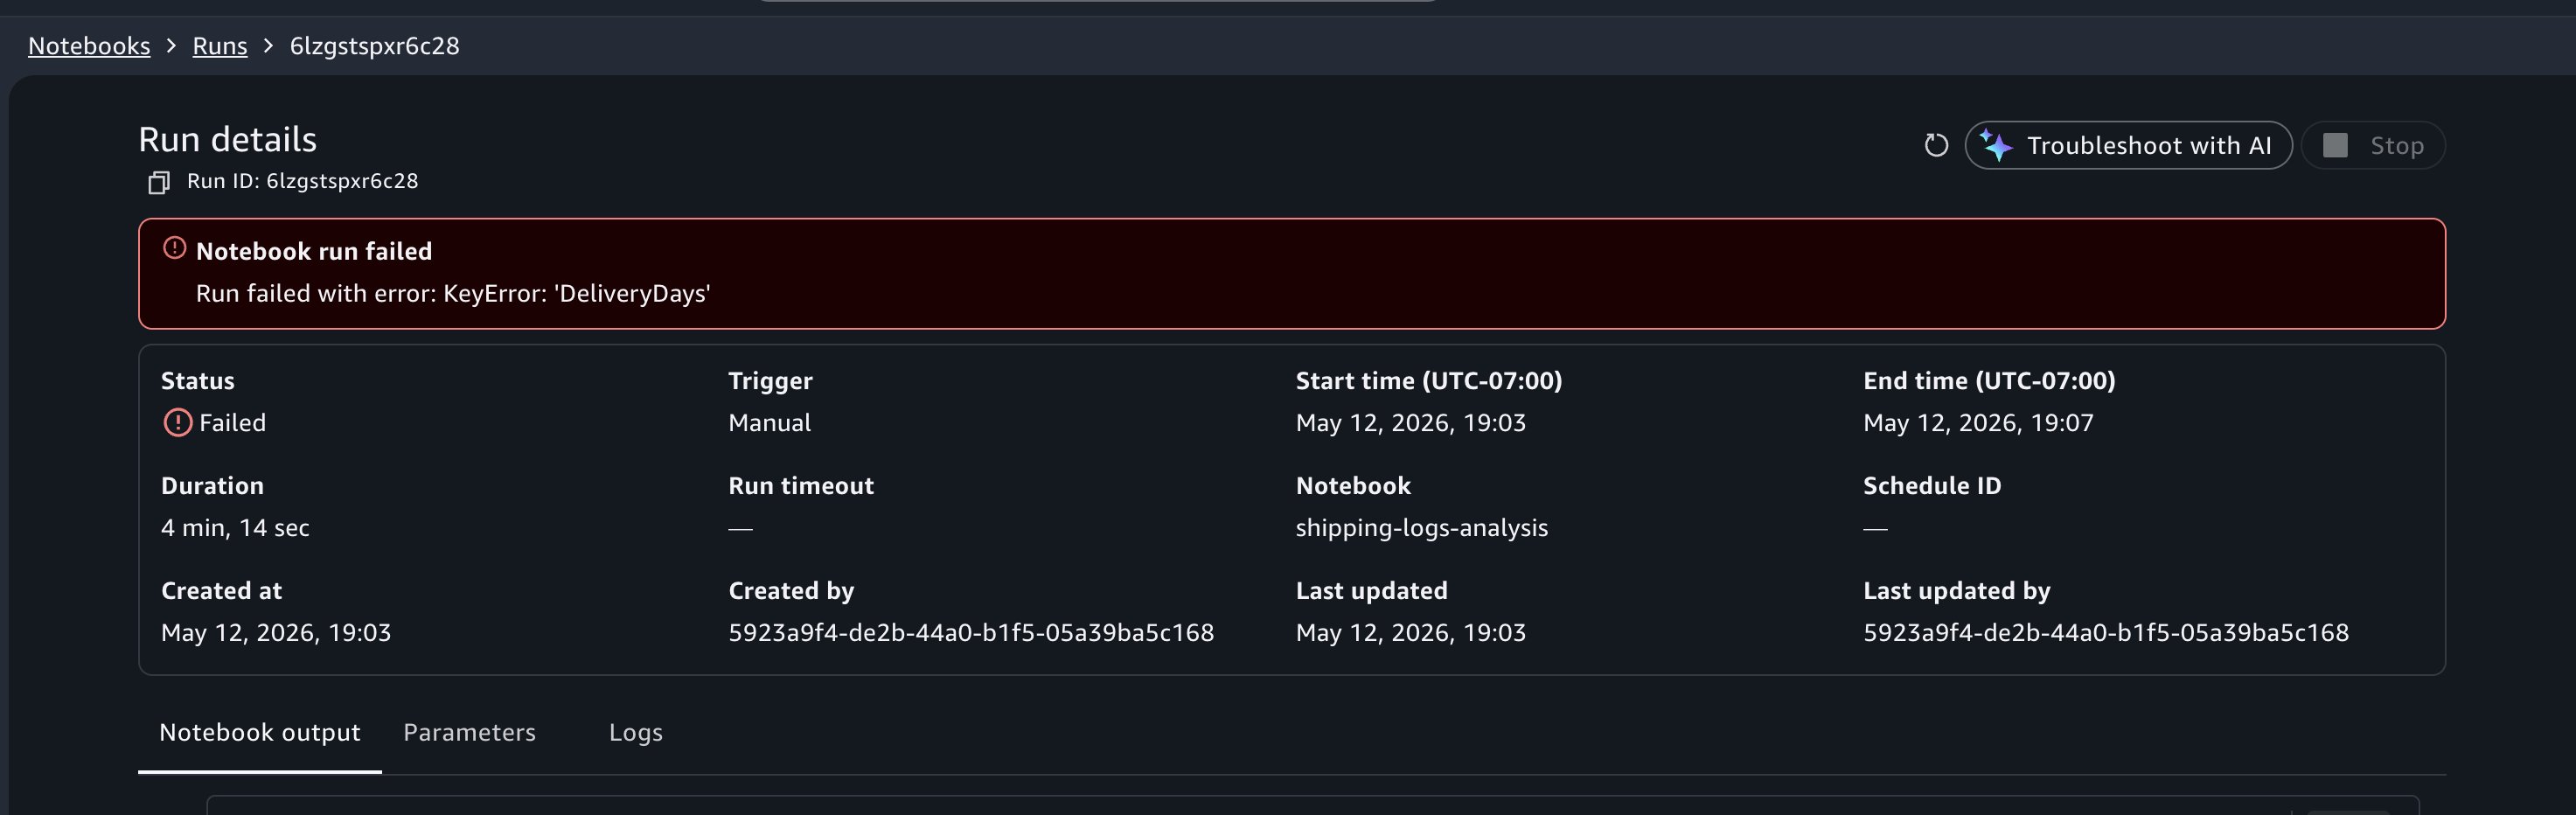
When viewing your past runs, you notice that a run from earlier today has a Failed status. Choose the failed run to open the notebook output in read-only mode.

In this example, suppose you incorrectly referred to column name ActualShippingDays as DeliveryDays. The run would fail with a KeyError: 'DeliveryDays' in the cell that computes late deliveries.

At the top of the failed run output, choose Troubleshoot with AI. Choosing the Troubleshoot with AI button lands you in the notebook with the Agent chat panel open.

Failed run output with the Troubleshoot with AI button highlighted at the top of the page

The data agent analyzes the cell outputs, identifies the cell that errored, explains the root cause, and suggests a fix. In this case, it identifies that the column DeliveryDays doesn’t exist in the dataframe and suggests updating the code reference. You can review the change, then verify the fix by choosing Run in background from the Run all menu to trigger a test run before the next scheduled run.

Note: You can also use the Data Agent to create schedules and start notebook runs using natural language, without having to navigate.

Cleaning up

To avoid incurring future charges, delete the resources that you created in this walkthrough:

  • Delete any schedules that you created from the Schedules panel in your notebook.
  • Delete test notebooks if you don’t need them.
  • Navigate to the Workflows page and delete any workflows that you created during this walkthrough.
  • Your project’s Amazon S3 storage retains historical run outputs until you manually remove them.

Conclusion

In this post, we showed how to run notebooks in the background in Amazon SageMaker Unified Studio using background runs, schedules, parameterization, workflow orchestration, and AI-assisted debugging. Using a shipping logistics dataset, we demonstrated how a single notebook can be parameterized to generate performance reports for different carriers on independent schedules, all without duplicating code or managing extensive infrastructure.

To get started, open a notebook in your SageMaker Unified Studio project, choose the menu on the Run all button in the notebook header, and choose Run in background. For more advanced use cases, explore workflows in Amazon SageMaker Unified Studio to build multi-step data pipelines, or review the Amazon SageMaker Unified Studio User Guide for additional configuration options.

Learn more:

If you have feedback or questions, reach out on AWS re:Post for Amazon SageMaker Unified Studio.


About the authors

Shivani Mehendarge

Shivani Mehendarge

Shivani is a Software Development Engineer at Amazon Web Services, where she builds scalable infrastructure that helps data teams run and automate their workloads in Amazon SageMaker Unified Studio. She is passionate about solving complex distributed systems challenges and building reliable cloud services.

Regan Perk

Regan Perk

Regan is a Senior Software Development Engineer on the Amazon SageMaker Unified Studio team. She designs, implements, and maintains features that enable customers to manage schedules and workflows in SageMaker Unified Studio.

Qazi Ashikin

Qazi Ashikin

Qazi is a Software Development Engineer at Amazon Web Services, where he works on developing features that allow customers to orchestrate workflows and schedules in SageMaker Unified Studio. He also works on AWS Glue Studio, where he builds agentic systems and maintains services that enable data analytics.

Align your architecture backlog with Tech Roadmap Prioritization (TRP)

Post Syndicated from John Walker original https://aws.amazon.com/blogs/architecture/align-your-architecture-backlog-with-tech-roadmap-prioritization-trp/

What do the organizations that succeed at digital transformation have in common? They align business and technical stakeholders around a shared plan before writing a single line of code. Yet research from McKinsey shows that 70 percent of transformations fail. Stakeholder misalignment and the inability to scale initiatives beyond initial pilots are patterns we see repeatedly across these failures. Before you architect your workloads, your team must agree on which ones deserve focus first.

In this post, we show you how to run a one-hour prioritization session with your stakeholders, plot competing initiatives on a shared matrix by cost and impact and turn the result into an actionable architecture backlog – using a framework called Tech Roadmap Prioritization (TRP).

The architect’s challenge

You’re facilitating alignment between five competing initiatives, but your organization only has capacity to execute two. Who decides? Without structure, decisions default to political influence or recency bias. High-value work stalls while low-impact projects consume resources.

Consider this scenario: your organization has competing initiatives such as a new product launch, application modernization, sales expansion, and security upgrades. Business and technical leaders each hold different priorities, share no view of tradeoffs, and have no shared way to decide what gets done first.

Developers work story backlogs. Support teams work ticket queues. As an architect, your backlog is the set of prioritized initiatives your organization needs to execute, and TRP is how you build it with your stakeholders.

The TRP framework

In approximately one hour, you bring business and technical owners into the same room and build a shared roadmap together. At every stage of your cloud journey, you face competing workloads that require your team’s attention. TRP gives you a repeatable way to decide which ones come first. You produce a single visual artifact: a modified prioritization matrix adapted for architecture roadmapping that plots your initiatives by cost and complexity against business impact.

The initiatives that you surface in TRP feed directly into the AWS Cloud Adoption Framework (AWS CAF) Envision phase, where you can connect business goals to enabling technologies and evaluate initiatives across the CAF’s six perspectives. TRP gives you the starting artifact and AWS CAF gives you the structured analysis that follows.

Why a visual roadmap?

You track your technology initiatives across spreadsheets, slide decks, and hallway conversations. Your business leaders frame urgency in revenue terms. Your technical leaders frame it in risk terms. No single artifact exists where both can view every initiative, its relative priority, and the reasoning behind it. TRP produces that artifact. One hour, one room, one artifact. You plot each initiative on a matrix where position alone communicates priority, and the conversation shifts from “my initiative matters more” to “where does this land relative to everything else?”

The TRP matrix

Tech Roadmap Prioritization matrix plotting initiatives by cost on the x-axis and business impact on the y-axis, with bubble size showing strategic importance and color showing Modernize, Optimize, or Monetize strategy

You represent each initiative as a numbered bubble. The numbers are identifiers, not a priority ranking. Priority is determined by position on the matrix, which you read using five visual cues:

  • X-axis position: Cost and complexity of the initiative (low to high).
  • Y-axis position: Potential benefits and business impact (low to high).
  • Bubble size: Strategic importance to the organization (small = low, large = high).
  • Bubble color: Strategy type based on the Modernize, Optimize, Monetize (MOM) framework. Healthy cloud architectures balance all three: yellow = Modernize (improve what exists), blue = Optimize (reduce cost or increase efficiency), green = Monetize (generate new revenue).
  • Position on the matrix: Where a bubble lands reveals its priority. Upper-left = strategic quick wins (high impact, low cost). Upper-right = strategic transformations (high impact, high cost). Lower-left = tactical quick wins. Lower-right = questionable initiatives that should wait.

What each position tells you to do

After you plot your initiatives, position on the matrix tells you more than priority. It tells you what kind of work comes next.

Upper-left: Strategic quick wins. High impact, low cost. You execute these now. Assign an owner, set a delivery date, and get moving. These build momentum and demonstrate early value to your stakeholders.

Upper-right: Strategic transformations. High impact, high cost. Look at a large blue bubble here, like initiative 1 (Migration to SaaS) in the sample. This delivers high value but carries significant risk. You don’t commit resources to this on day one. You de-risk it first. Run a proof of concept. Schedule workshops to close skill gaps. Identify the complexity drivers and investment requirements, then remove them before you scale. Your job as the facilitator is to define the path from “we want this” to “we’re ready to build this.” For initiatives requiring skills your organization lacks, engage AWS Partners to de-risk and accelerate the work.

Lower-left: Tactical quick wins. Low impact, low cost. Delegate or batch these small wins together. They won’t move the needle on their own, but they clear the backlog and free up attention for the strategic work above.

Lower-right: Questionable initiatives. Low impact, high cost. You park these. They stay visible on the matrix so stakeholders know they haven’t been forgotten, but you don’t invest in them until the business case changes. If someone pushes for one of these, you point to the matrix and ask what moves off the board to make room.

Your architecture decisions start here. Each quadrant demands a different response, and the matrix gives you the shared language to explain why.

Look at initiative 2 in the sample, Cost Optimization. It sits in the upper-left as a large yellow bubble: high impact, low cost, high strategic importance, optimization strategy. That is your first move. Initiative 1 (Migration to SaaS) ranks second: high impact but high cost, meaning you de-risk it before committing. You read every initiative the same way, and the full priority order emerges from the diagram itself.

Now that you know how to read the matrix, here’s how to run the session that creates it.

How to run a one-hour roadmap session

You are the facilitator, not a participant, not a decision-maker. The decisions belong to the business and technical owners in the room. Your role is to keep the group moving, protect the scope, and ensure every voice is heard. TRP isn’t a substitute for capacity planning, project sequencing, or backlog management – those follow TRP and are handled by project management, product owners, and technical owners. What TRP produces is the shared prioritization artifact that informs all of those downstream functions.

You’re answering four questions per initiative, relative to one another. That is the entire scope. Keep the group focused on relative positioning, not detailed analysis. Target 60 minutes. For larger groups, budget 90. The hour works when you protect the scope.

1. Get the right people in the room

Invite people who can make decisions and commit resources. Bring your CTO, VP of Engineering, product leaders, and line-of-business owners. If you don’t have access to those people, find the person who does. That’s your sponsor up your chain of command. Seat business owners and technical owners at the same table. Whether your organization has dedicated roles for each or one person wears multiple hats, the key is getting the people who understand the business priorities and the people who understand the technical complexity into the same conversation.

2. Bring the set of initiatives

Gather your list of competing initiatives before the session. Aim for 5–15. Too few and the exercise feels trivial, too many and you won’t finish in an hour. Pull from your existing project proposals, strategic plans, customer requests, and technical debt backlog. Write a name and a one-sentence description for each one that everyone in the room can understand.

3. Ask the four questions

Walk through each initiative and ask four questions:

  1. How big is it? Skip detailed estimates. Size it relative to the others. Is this a quarter-long effort or a multi-year program? Is it cost, complexity, or something your team has never attempted? Plot it on the x-axis accordingly.
  2. How important is it? Determine where it sits in your organization’s strategic priorities. Does it directly impact initiatives from the board or company owners? Does it enable new technical capabilities? Identify who sponsors it and why. Set the bubble size based on the answer.
  3. How much impact will it have? Name the business outcome it drives: revenue growth, cost reduction, risk mitigation, or customer retention. Place it on the y-axis based on the group’s assessment.
  4. Does it modernize, optimize, or monetize? Assign the bubble color and check your portfolio balance. If every initiative targets optimization, you may be missing growth opportunities. If everything targets monetization, technical debt may be piling up.

Keep these questions high-level on purpose. TRP is qualitative by design. You’re calibrating relative priority, not producing detailed estimates. Focus on alignment, not solutioning. Save the how for after the group agrees on the what and the why.

4. Dos and don’ts

The following patterns are drawn from facilitation observations across TRP sessions run with AWS customers since its creation. They’re specific to what goes wrong (and right) in this particular conversation.

Do:

  • Establish your role at the start. Open with: “I’m here as a facilitator. My job is to help you reach a shared view – the decisions are yours.” This prevents the group from deferring to you and keeps accountability where it belongs.
  • Surface the “someone else’s problem” initiatives. Each team knows what matters to them but assumes another team owns the overlap. TRP puts both sides in the same room and forces them to name where their work ends and the other’s begins.
  • Break the “everything is number one” cluster. Teams that struggle to prioritize will plot every initiative in the same spot. When you see clustering, force relative comparison: no two initiatives can occupy the same position on the matrix.
  • Watch for portfolio imbalance. If every initiative maps to a single color, name it. An all-blue portfolio means no one is investing in growth. A healthy roadmap balances modernization, optimization, and monetization.
  • Redirect from “what it is” to “what it does.” Teams describe initiatives as technologies: “migrate our database,” “upgrade our instances.” Redirect to the business outcome. You can’t plot an initiative on the matrix until the group agrees on what it accomplishes.

Don’t:

  • Let the group solution. The most common failure mode in TRP is the group diving into architecture details mid-session. The moment someone says “well, for initiative 3 we’d need to refactor the data layer,” pull them back: “We’re deciding what matters, not how to build it. Let’s place it on the matrix first.”
  • Skip preparation. The second most common failure: walking in without a pre-populated list of initiatives. You will spend the hour defining them instead of prioritizing them. Even a rough list of five initiatives with one-sentence descriptions is enough to start.
  • Ignore missing data. If nobody can estimate cost or impact for an initiative, flag it. That gap tells you something: you can’t prioritize what you can’t size. These are the initiatives that need a discovery conversation before they can be placed.

5. Close with next steps

Assign the number one priority a point person and set specific dates for next steps. Repeat for each initiative in priority order. Every initiative on the matrix should leave the session with an owner and a next action, even if that action is “revisit in Q3.”

After the session

Treat the matrix as a living document, not an annual artifact. A formal review cadence of at least once per year is a floor, not a target. The real question is: what triggers an out-of-cycle review? Based on patterns across TRP engagements, the answer is any of the following:

  • A major strategic shift – new leadership, a market pivot, an acquisition.
  • A failed or stalled initiative that changes the cost or complexity picture.
  • A significant budget change that reorders what’s feasible.
  • A new initiative that clearly belongs in the upper-left quadrant and displaces existing priorities.
  • A completed initiative that frees capacity and opens room to pull forward work from the upper-right.

When any of these occur, call a TRP session. The matrix is the mechanism for keeping your architecture decisions aligned with a business that doesn’t stand still.

As your prioritized initiatives break down into epics and themes, use the matrix to drive your architecture decision-making throughout the year. Share it with executives, delivery teams, and partners. Before TRP, you justified priorities in meetings and emails that nobody could find later. After TRP, you have a single artifact that documents what was decided, why, and in what order.

Conclusion

Since its creation, TRP has been run with AWS customers of all sizes across industries. That volume is the source of the practitioner patterns in this post, not just a credibility number. Customers consistently surface 4–7 initiatives they hadn’t previously articulated or prioritized as a group. That finding alone is worth one hour of your time.

For example, Zinnia, a leading insurance technology company that processes over 55 percent of digital annuity sales in the U.S., used TRP to prioritize the most critical workloads in their migration to AWS. By identifying their core order entry platform, AnnuityNet, as the highest-impact initiative, they focused resources there first before tackling their data warehouse and commission systems. Within 16 months, Zinnia completed the migration and now processes over 55 percent of digital annuity sales in the U.S. on AWS infrastructure.

The biggest risk in architecture isn’t the technology. It’s that your team isn’t on the same page. TRP gives you a repeatable way to fix that in one hour. Gather your stakeholders, bring your initiatives, ask the four questions, and walk out with a shared roadmap. If you want facilitation support, reach out to your AWS account team. For deeper guidance on the workloads you prioritize, explore the AWS Architecture Center.


About the authors

Enforcing the First AS in BGP AS_PATHs

Post Syndicated from Bryton Herdes original https://blog.cloudflare.com/enforce-first-as-bgp/

Some recent route hijacks reported by Spamhaus captured our attention. In many of these hijack attempts, an apparent bad actor took advantage of unused autonomous system numbers, or ASNs. Notably in these hijacks, the actor appears to be creating fake AS_PATHs toward destinations, misdirecting traffic down an unexpected path. 

By creating forged AS_PATHs, the hijacker is attempting to lead traffic somewhere it isn’t normally meant to go while also trying to conceal their identity. A hijacker could strip enough information away from a network path that they could pretend to be the origin of a Border Gateway Protocol (BGP) prefix themselves. Attackers can use this hijacked route to intercept traffic and for other nefarious purposes.

There is a simple solution for these cases: basic verification that a BGP peer autonomous system (AS) always includes their network as the “First AS” in an advertised route. To get a sense of how well these safeguards are implemented, we stress-tested several major networks and researched their BGP implementations. Read on to see what we learned.

Examining route hijacks involving forged paths

The idea that an actor is creating fake AS_PATHs is supported when we take a closer look at implausible AS relationships in the path. For example, let’s examine one of the hijacks reported by Spamhaus, involving a prefix belonging to Orange S.A., the French telecom company. Using the monocle tool, we can easily find a BGP UPDATE message related to the hijack:

➜  ~ monocle search --start-ts 2026-04-13T00:20:00Z --end-ts 2026-04-13T00:23:59Z --prefix 90.98.0.0/15 --collector rrc26 --json
{
  "aggr_asn": null,
  "aggr_ip": null,
  "as_path": "48237 1299 199524 270118 17072 41128",
  "atomic": false,
  "collector": "rrc26",
  "communities": null,
  "local_pref": 0,
  "med": 0,
  "next_hop": "185.1.8.3",
  "origin": "IGP",
  "peer_asn": 48237,
  "peer_ip": "185.1.8.3",
  "prefix": "90.98.0.0/15",
  "timestamp": 1776039612.0,
  "type": "ANNOUNCE"
}

We know AS1299 (Arelion) is a Tier 1 network, meaning every AS on the right-hand side in the path is describing an upstream (customer-to-provider) relationship. This implies that AS17072 is a transit provider for AS41128, AS270118 for AS17072, and AS199524 for AS270118. If we take a closer look at these networks:

  • AS41128 is an unused ASN belonging to Orange France

  • AS17072 is an ISP primarily based in Mexico

  • AS270118 is a hosting provider based in Mexico

  • AS199524 is Gcore, a provider with a global peering presence

The order of the ASes in the message above would suggest that an unused Orange France AS is buying transit from Mexican ISPs, which is then upstreamed to Gcore and Tier 1 providers – which would be quite odd.

In another instance, a reported hijack for prefixes 47.1.0.0/16 and 47.2.0.0/16 from origin AS36429 even included Cloudflare’s main ASN, 13335, in the AS_PATH, “199524 270118 17072 13335 36429”. We can view examples of these BGP UPDATEs in the MRT Explorer from Cloudflare Radar:


We can authoritatively confirm that we (Cloudflare, AS13335) have no adjacency with the now-unused AS36429 owned by Charter. This means this was a forged path by the hijacker that included Cloudflare’s ASN as one of the fake upstream networks in advertisements propagated toward Gcore (AS199524). Further, Spamhaus correctly pointed out that all the hijack routes led to a network behind Gcore peering in Chicago, never actually traversing the Mexican ISPs or Cloudflare’s network in the forwarding path.

Because of this, we can reasonably conclude these paths are forged up until the leftmost common AS, which in this case is AS199524, as the rest of the path seems implausible. We believe what is happening here is the result of a specific strategy by the hijacker, involving the following steps:

  1. Originate BGP announcements for “parked” prefixes

  2. Forge the AS_PATH completely, without including the hijacker’s own local ASN

  3. Advertise these routes to Gcore, AS199524

In these hijacks it appears Gcore (AS199524) skips the verification and enforcement of the First AS matching the expected customer’s ASN. (We’ll look at why it might skip those steps later in this post.) As a result, the forged path is accepted and the hijacked prefixes are propagated to upstream providers and peers.

While Autonomous System Provider Authorization (ASPA) will help invalidate these forged paths, attackers may bypass it by only including an RPKI-ROV-valid origin AS, or a legitimate ASPA upstream AS. To stop these specific hijacks, we must rely on a different protection mechanism already built into BGP: First AS checking and enforcement.

The importance of First AS checking

Routing traffic across the Internet is a bit like shipping a package. When the package is shipped, a log is kept of every courier that handles it. In BGP, this is called the AS_PATH (Autonomous System Path) and it tracks each network in the path of that route.

The AS_PATH attribute in BGP is used for path selection. This selection algorithm determines which route to a destination traverses the best list of hops, where “best” is defined by multiple variables. It is also used for loop prevention, where networks can decide not to accept paths that have already traversed their own network. Aside from keeping a record of the networks a BGP UPDATE, and therefore route, will traverse, the AS_PATH can also be examined by operator-configured routing policies to route around or purposely through a given AS – for example to avoid BGP anomalies having unexpected impact.

BGP was built on trust, and the AS_PATH can be easily manipulated – whether for seemingly legitimate reasons such as AS prepending to move traffic around, or nefarious reasons such as shortening it to artificially attract traffic or perform origin attacks.

Let’s look at how these two types of malicious BGP manipulations are carried out. 

Example 1: Forged origin attacks

  • AS64506 cryptographically signs their routes with an RPKI ROA (Route Origin Authorization) record, to prevent route origin hijacks.

  • AS64506 also creates an ASPA object, specifying only AS64503 as a valid provider

  • AS64505 manipulates their AS_PATH to strip AS64505 and originate with AS64506

  • AS64502 does not enforce the First AS


The route appears RPKI-ROV valid and is the shortest path, effectively hijacking traffic with the route. AS64506 has done everything correctly by specifying a valid ROA for a prefix advertisement, and has even configured an ASPA object consisting of their sole provider AS64503.

Unfortunately, the hijacker running AS64505 is still able to attract traffic meant for AS64506. Even if AS64501, the customer, and AS64502, their provider, run ASPA validation, they will not find an invalid path, because there is no valley in the path “64502 64506”. In other words, AS64505 by way of not even including their own ASN in the AS_PATH is able to pretend they are AS64506 with no intermediate AS hop.

The correct way of preventing this hijack with existing tools is to enforce the First AS in the AS_PATH. Once enforcing this rule, AS64502 would properly drop the route from AS64505.

Example 2: Shortening the AS_PATH to attract traffic

  • AS64506 has two transit providers: AS64503 and AS64505.

  • AS64505 bills their customer AS64506 based on traffic usage ratios.

  • AS64505 strips itself from the path, and their peer AS64504 does not enforce the First AS.


The BGP path selection algorithm now chooses the route via AS64504 as the best path from AS64501. AS64506 pays both of their providers, AS64503 and AS64505, to deliver traffic from the Internet. However, now AS64505 provides a shorter BGP path from far-end sources, meaning AS64505 will process all the traffic toward AS64506 and be paid for doing so, and AS64503 will not be paid at all.

These BGP vulnerabilities can be solved very simply by enforcing the First AS to match the peer AS in a received AS_PATH.

When an operator configures a BGP neighbor, they must set the remote AS of the network they are interconnecting with. If the First AS in the AS_PATH does not match this value, then the path has been manipulated. The First AS enforcement procedure is outlined in Section 6.3 of RFC 4271 very clearly as:

“If the UPDATE message is received from an external peer, the local

system MAY check whether the leftmost (with respect to the position

of octets in the protocol message) AS in the AS_PATH attribute is

equal to the autonomous system number of the peer that sent the

message. If the check determines this is not the case, the Error

Subcode MUST be set to Malformed AS_PATH.”

RFC 7606 later revises how error-handling should be implemented by vendors, suggesting that routes containing malformed AS_PATHs should be dropped via treat-as-withdraw method. This allows routers to drop specific prefixes with malformed attributes without disrupting the entire BGP session.

The current ASPA draft clearly calls out the importance of First AS enforcement, stating that ASPA cannot handle paths where sufficient AS_PATH information is lacking due to malformed announcements. Enforcing First AS in AS_PATHs is a must for Internet routing security.

Measurement by breaking the First AS rule on purpose

Instead of sticking to theoretical failure cases and past public incidents about violations of the First AS rule, we wanted to measure for ourselves how widely these AS_PATH violations could be accepted on the Internet. To do so, we set up BGP announcements to neighbors where we purposely violated the rule ourselves. Here is what we did:

  1. Allocated two IP prefixes, one for IPv4 and one for IPv6, to advertise to Tier 1 External BGP (EBGP) neighbors 

  2. Purposely prepended the test prefix advertisements to Tier 1 neighbors with a Cloudflare-owned, non-13335 ASN (AS402542) in front of 13335

For example, we advertised the prefixes to AS1299 from our normal BGP session in Geneva. Our local AS is AS13335, but we include AS402542 clearly as the First AS in the AS_PATH.

[email protected]> show configuration policy-options policy-statement 4-TELIA-ACCEPT-EXPORT term ADV-FIRST-AS-PROBE-CR-1695522
from {
    community ANYCAST-ROUTE;
    prefix-list fl_first_as_prober;
    route-type internal;
}
then {
    origin igp;
    as-path-prepend 402542;
    next-hop self;
    accept;
}

[email protected]> show route advertising-protocol bgp <redacted_1299_ip> 162.159.82.0/24 detail | grep "AS path: "
     AS path: 402542 [13335] I

With this configuration, our expectation is that: 

  1. Networks that do enforce-first-as will quietly drop the route via RFC 7606 withdrawal method 

  2. Networks that do not enforce-first-as will accept the route and install it for forwarding toward our test prefixes

Either result will be visible in BGP public route views. It was initially our goal to implement a continuous announcement of prefixes toward all peers that would purposely violate the First AS rule in announcements, and give everyone a tool to check which ISPs validate First AS and those which do not. However, we found there are still networks that have not implemented the guidance published in RFC 7606 when receiving malformed BGP AS_PATHs, and would reset BGP sessions instead of a treat-as-withdraw behavior. This meant we could not safely implement a continuous set of announcements that violate the First AS rule without impacting real traffic to Cloudflare, which we obviously can’t do.

But we can take a closer look at the networks whose policies make the biggest impact: Tier 1 networks. These networks make up the backbone of the Internet and have the largest AS customer cones of anyone, meaning hijacks or malformed paths by these peers have the broadest significance. Let’s start by examining the normal propagation of an anycast prefix, 1.1.1.0/24, across the Tier 1 networks.


The propagation of 1.1.1.0/24 looks how you would expect – it is directly reachable by every Tier 1 network that Cloudflare has a direct adjacency with currently.

Now, let’s compare that with our purposely malformed announcement of the prefix 162.159.82.0/24: 


Note: AS5511 (Orange S.A.) is not pictured above due to its limited presence in public route views, but it was a part of our testing and measurements.

The prefix is propagated very differently from 1.1.1.0/24 – far fewer Tier 1 networks are accepting the announcement directly from Cloudflare (in this case from AS13335 with AS402542 prepended). Based on the criteria of our test mentioned earlier, these are the results we found.

Tier 1 networks that are enforcing First AS rule (by dropping the invalid announcements): 

  • AS174 (Cogent)

  • AS1299 (Arelion)

  • AS3257 (GTT)

  • AS3491 (PCCW)

  • AS5511 (Orange S.A.)

  • AS6453 (Tata)

  • AS7018 (AT&T)

Tier 1 networks that are not enforcing the First AS rule (by accepting and installing the prefixes): 

  • AS701 (Verizon)

  • AS2914 (NTT)

  • AS3356 (Lumen/Colt/Cirion)

  • AS6461 (Zayo)

  • AS6762 (Sparkle)

  • AS6830 (Liberty Global)

  • AS12956 (Telefonica)

With our testing, we uncovered a troubling reality: Half of the Tier 1 networks are vulnerable to hijacks that violate the First AS rule.

While we only tested Tier 1 networks in this measurement study, there’s no doubt there are many non-Tier 1 networks that also break the First AS rule.

We noted that the majority of the Tier 1 networks failing the First AS violation test are running Juniper Networks routers, identified by the peers’ MAC addresses.

This highlights that the default behavior of vendors defines how secure a network is “out of the box” against First AS violation-based attacks. Let’s go over some of the BGP implementations and their defaults to have a better understanding of who is protected by default, and who isn’t.

BGP implementations and default behaviors

The chart below lists major routing/networking vendors and their BGP policies. Here, “Yes” means the BGP implementation by default enforces First AS, which is good. “No” means the BGP implementation is vulnerable by default. 

BGP implementation

First AS enforced by default

Documentation

Cisco IOS/XE/XR

Yes 

bgp enforce-first-as

Junos OS / Junos OS Evolved

No

enforce-first-as

Arista EOS

Yes

bgp enforce-first-as

Nokia SR OS

No

enforce-first-as

Huawei

Yes

check-first-as

Extreme SLX-OS

No

enforce-first-as

RouterOS

No

Configuration not available

BIRD

No

enforce first as

OpenBGPD

Yes

enforce neighbor-as

FRR

Yes (since October 2023 patch)

bgp enforce-first-as

The lack of default enforcement from some vendors may stem from the only valid use case where the First AS should not be enforced on External BGP (EBGP) sessions: Internet Exchange (IX) route servers.

A route server is responsible for transparently (without appending its AS to the AS_PATH) distributing routes between peers on the fabric. This ensures peers do not have to configure new BGP sessions every time a network joins the fabric – instead they can peer with just the route server.

In reality, most production networks have far more sessions with neighbors who are not transparent IX route servers than neighbors who are. It makes much more sense to configure “no enforce-first-as” on a handful of route-server sessions than to manually enable “enforce-first-as” on every single peer in your network.

While a “safe by default” approach is best for protecting against First AS violations, it is generally a steep hill to climb trying to convince vendors to change longstanding defaults. Vendors would also need to introduce a method of doing this gracefully, so as to not impact the IX route server BGP sessions that require “no enforce-first-as” settings to successfully receive routes.

Safer Internet routing with your help: enforce the First AS

Attackers will purposely malform AS_PATHs to slide around BGP security mechanisms. Even RPKI-based ASPA path validation will not be able to protect us from forged-origin hijacks where the path has been totally stripped of everything but the origin AS, leaving nothing for ASPA to invalidate. 

The good news is we already have a mitigation for these cases: we can verify the First AS matches BGP peer AS and always enforce it. Refer to the corresponding “Documentation” column in the above table we have provided. It should be safe to enforce First AS on any External BGP (EBGP) session besides those facing an IX route server neighbor.

If you are a network operator, please enforce First AS on your routers today to protect your network and the wider Internet.

If your router vendor or choice of BGP implementation has a default of enforcing First AS, you’re already safe and should be rejecting any First AS violations.

By working together, we can make the Internet safer from these kinds of hijacks.

A Day in the Life of an MDR Analyst: Inside the Modern SOC

Post Syndicated from Emma Burdett original https://www.rapid7.com/blog/post/it-day-in-the-life-mdr-analyst-inside-the-modern-soc

What actually happens inside a SOC when an incident unfolds? Most teams see the alerts and the outcomes, but the decision-making in between is often less visible.

At the Rapid7 2026 Global Cybersecurity Summit, the signature session Inside the Modern SOC: Who Carries You Through an Incident takes a different approach. Rather than focusing on tools or dashboards, it follows a real-world incident from the perspective of the people responsible for investigating and containing it.

The session walks through how modern MDR teams operate under pressure, drawing on real experience across cloud, identity, and on-prem environments. Led by Karl Lankford, Senior Director, Sales Engineering, Rapid7, the discussion brings in perspectives from across the SOC, including incident response and detection, to show how teams work together when it matters most.

Structured around a full incident lifecycle, the walkthrough begins with the initial signal and moves through triage and investigation, following the decisions that shape the outcome. The focus is not on theory but on how incidents are handled in practice, from background and context through to the final result.

What stands out is how much of the process depends on judgment. Alerts are only the starting point. From there, analysts are working to understand context, assess risk, and decide what matters most in the moment. This includes identifying compromised identities, understanding how attackers move across environments, and coordinating response across multiple systems.

The session also highlights how quickly these decisions need to be made. As shown in the high-level timeline, attackers can move from initial access to broader compromise across cloud and on-prem systems in a matter of minutes, which leaves little room for hesitation or uncertainty.

Throughout the walkthrough, the focus stays on what carries organizations through an incident. Detection plays a role, but outcomes are shaped by coordination, tradeoffs, and the ability to act with clarity under pressure. The session also explores how visibility across environments, combined with human-led response, helps teams connect signals and act before impact occurs.

For practitioners, SOC leaders, and teams evaluating MDR, this session offers a grounded view of how modern incident response works under real conditions. It shows what happens between the alert and the outcome, and why that gap is where the real value lies. Watch the full session to follow the investigation step by step and see how MDR teams carry organizations through real incidents.

Building highly available Oracle databases with Amazon FSx for NetApp ONTAP

Post Syndicated from Vignyanand Penumatcha original https://aws.amazon.com/blogs/architecture/building-highly-available-oracle-databases-with-amazon-fsx-for-netapp-ontap/

Oracle databases power mission-critical enterprise applications, making their continuous availability essential for business operations. Traditional Oracle high availability (HA) solutions require complex clustering software, expensive shared storage arrays, and specialized database administration teams. These conventional approaches often introduce single points of failure while demanding significant operational overhead.

Modern cloud architectures offer a transformative approach that combines Amazon FSx for NetApp ONTAP (FSxN) with Amazon EC2 Auto Scaling groups, automated AMI creation, AWS Lambda-driven orchestration, and AWS Systems Manager Parameter Store (SSM Parameter). This solution removes traditional Oracle HA complexities while delivering enterprise-grade availability, automated recovery, and makes sure new instances launch with the latest Oracle configuration.

This post shows how to build a highly available Oracle database architecture using FSxN shared storage, Auto Scaling groups with dynamic AMI updates, and serverless orchestration to help reduce recovery times with current configurations.

Solution overview

The solution uses multiple AWS services working together to create a comprehensive high availability architecture. FSxN Multi-AZ provides persistent shared storage spanning availability zones for Oracle database files, software, and configurations, so that data remains accessible when EC2 instances are replaced. Auto Scaling groups deliver automated instance lifecycle management with the latest AMI configurations, so failed instances are quickly replaced with identical configurations that can immediately access the existing Oracle database files on FSxN. AWS Backup creates AMIs that capture the latest Oracle host configurations including patches and settings, preserving the complete server state for consistent deployments. AWS Lambda extracts the AMI ID from backup recovery points and updates the SSM Parameter, orchestrating the entire configuration management workflow. Systems Manager Parameter Store stores the current AMI ID for Auto Scaling group launch templates, so new instances always launch with the most recent configuration and can immediately connect to the Oracle database on shared storage.

The following diagram shows the complete architecture with all AWS services and their interactions:

AWS architecture diagram showing Oracle Database disaster recovery across two Availability Zones using FSx for ONTAP synchronous replication, AWS Backup automation with EventBridge and Lambda, and Auto Scaling group with SSM Parameter Store for AMI management.

Key benefits include:

  • Recovery Time Objective (RTO): Can help achieve 2–5 minutes with latest Oracle configuration
  • Recovery Point Objective (RPO): Near-zero through synchronous Multi-AZ replication
  • Configuration consistency: New instances launch with identical Oracle host setup
  • Automated AMI management: Scheduled AMI creation with Parameter Store updates

Walkthrough

This walkthrough demonstrates implementing Oracle HA using Amazon FSx for NetApp ONTAP shared storage, AWS Backup-driven AMI creation, Lambda orchestration, and Auto Scaling groups with Parameter Store integration for configuration consistency and automated failover.

Prerequisites

For this walkthrough, you should have the following prerequisites:

  • An AWS account with appropriate permissions for Amazon FSx, Auto Scaling, EC2, Lambda, and Systems Manager
  • A VPC with subnets in at least two Availability Zones
  • Oracle database software

Keep in mind that customers are responsible for their own Oracle licensing compliance.

  • An EC2 instance with Oracle database installed and configured
  • AWS Identity and Access Management (IAM) roles for AMI creation and cross-service communication
  • Basic knowledge of Oracle database administration and AWS automation

Assumptions

This post is a conceptual illustration of the architecture. Your specific implementation will vary based on your VPC layout, Oracle version, storage requirements, and organizational security policies.

We assume the reader is familiar with:

  • Creating and configuring Amazon FSx for NetApp ONTAP file systems through the AWS console
  • iSCSI concepts including initiators, targets, and multipath I/O
  • Oracle database startup and shutdown procedures
  • AWS Backup, Lambda, and Auto Scaling group fundamentals

For detailed step-by-step instructions on specific AWS services, refer to the additional resources section.

Step 1: Create an Amazon FSx for NetApp ONTAP file system

FSxN Multi-AZ provides the persistent shared storage foundation for this architecture. Unlike Amazon Elastic Block Store (Amazon EBS) volumes, which are bound to a single AZ, FSxN Multi-AZ replicates data synchronously across two AZs with automatic failover. This means that when an EC2 instance is replaced (whether in the same AZ or a different one), the new instance can immediately access the existing Oracle database files without restoring from backup.

To create the file system, navigate to the Amazon FSx console and select Amazon FSx for NetApp ONTAP as the file system type.

The critical configuration choice is selecting Multi-AZ deployment, which places an active file server in one AZ and a standby in another.

Amazon FSx console showing oracle-fsxn-multi-az file system configuration with ONTAP Multi-AZ 1 deployment, 1024 GiB SSD storage, 512 MB/s throughput, spanning us-east-1a preferred and us-east-1b standby subnets.

FSxN console showing Multi-AZ deployment type selection with preferred and standby subnets in separate availability zones.

After the file system is created, you need to set up a Storage Virtual Machine (SVM), which acts as a logical storage container providing data access to your Oracle instances. The SVM creation is done from the FSx console under your file system’s details.With the SVM in place, the next step is configuring iSCSI access. FSxN exposes iSCSI endpoints—these are IP addresses (one per AZ) that your EC2 instances use to connect to the storage over the iSCSI protocol. You can find these endpoint addresses in the FSx console under your SVM’s Endpoints tab.

Amazon FSx Storage Virtual Machine configuration page showing oracle-svm with Created lifecycle state, NFS, iSCSI, and management endpoints for Oracle Database storage connectivity.

SVM Endpoints tab showing iSCSI endpoint IP addresses for each availability zone. These addresses are used in the EC2 instance’s iSCSI discovery configuration.

The iSCSI setup involves creating iGroups (which define which EC2 instances can access the storage) and LUNs (logical storage units mapped to those groups) through the NetApp ONTAP CLI. On the EC2 side, you configure the iSCSI initiator to discover and connect to the FSxN endpoints, then mount the resulting block devices. Using multipath I/O with both endpoints makes sure that Oracle data remains accessible even during an AZ failover. For detailed iSCSI configuration steps, see mounting iSCSI LUNs on Linux clients.

A dedicated security group is required for FSxN access. At minimum, the security group must allow inbound traffic on ports 111 (NFS portmapper), 635 (NFS mountd), 2049 (NFS), 3260 (iSCSI), 4045–4046 (NFS lock), 443 (HTTPS for management), and 22 (SSH for ONTAP CLI). Restrict the source to only your Oracle EC2 instances’ security group.

Step 2: Set up AWS Backup for EC2 instance protection

AWS Backup captures the complete state of your Oracle EC2 instance. The key design choice here is using tag-based resource selection rather than specifying instance IDs directly. Because Auto Scaling groups replace instances (and generate new instance IDs), tag-based selection makes sure that any new instance with the correct tags are automatically included in the backup plan.Configure a backup plan with a frequency appropriate for your environment and set the resource assignment to select EC2 instances matching your application tag (for example, ‘Application: Oracle’).

AWS Backup console showing blog-test backup plan with hourly backup rule targeting Oracle EC2 instances identified by the Application:oracle-db tag.

AWS Backup resource assignment configured with tag-based selection. Any EC2 instances tagged with the application tag are automatically included in the backup plan.

Step 3: Configure Lambda for AMI management

When AWS Backup completes an EC2 backup, it creates an AMI as the recovery point. An Amazon EventBridge rule detects this completion event and triggers a Lambda function. The function extracts the AMI ID from the backup recovery point, updates the SSM Parameter Store parameter with the new AMI ID, and cleans up older AMIs to control storage costs.

AWS Lambda function configuration for oracle-backup-handler showing Python 3.11 runtime, EventBridge trigger, and description indicating it processes AWS Backup completion events and updates AMI in SSM.

Lambda function overview showing the EventBridge trigger, Python 3.11 runtime, and function description indicating its role in processing backup completions and updating AMI references in SSM.

This event-driven approach means the latest AMI is available without manual intervention. The Lambda function needs IAM permissions for EC2 (to manage AMIs), SSM (to update the parameter), and Backup (to read recovery point metadata).

Amazon EventBridge rule oracle-backup-completion configured to trigger the oracle-backup-handler Lambda function when AWS Backup completes an EC2 backup job, with event pattern filtering for COMPLETED state.

EventBridge rule configured to match AWS Backup job completion events for EC2 resources, with the Lambda function as the target.

Step 4: Configure the Systems Manager Parameter Store

The SSM Parameter Store holds the current AMI ID that the Auto Scaling group’s launch template references. The parameter is created with the aws:ec2:image data type, which enables the launch template’s resolve:ssm: functionality, a feature that allows the launch template to dynamically resolve the AMI ID at instance launch time without requiring a template version update.

AWS Systems Manager Parameter Store showing /oracle/ec2/ami-id parameter with AMI value ami-0a705a7d5523c555, version 857, last modified by the oracle-backup-lambda-role on April 25, 2026.

SSM Parameter Store showing the /oracle/ec2/ami-id parameter with aws:ec2:image data type. The “Last modified user” confirms the Lambda function is automatically updating this parameter after each backup cycle.

When Lambda updates this parameter after each backup cycle, the next instance launched by the Auto Scaling group will automatically use the latest AMI. This removes the operational burden of manually updating launch template versions.

Step 5: Set up an Auto Scaling Group with dynamic AMI

The launch template references the SSM parameter using the resolve:ssm: prefix for the AMI ID field. This is the mechanism that ties the entire automation pipeline together. The mechanism backups trigger AMI creation, AMI IDs flow into Parameter Store, and the launch template resolves the latest AMI at launch time.

EC2 Launch Template oracle-db-launch-template version 75 showing AMI ID resolved from SSM parameter resolve:ssm:/oracle/ec2/ami-id with r7i.large instance type for Oracle Database deployment.

Launch template AMI configuration showing the ‘resolve:ssm:’ prefix, which dynamically retrieves the latest AMI ID from Parameter Store at instance launch time.

The Auto Scaling group is configured with minimum, maximum, and desired capacity all set to 1. This is not traditional auto-scaling, it’s a self-healing pattern. The sole purpose is to detect when the Oracle instance becomes unhealthy and automatically launch a replacement. The health check grace period should be set to at least 300 seconds (5 minutes) to allow Oracle sufficient time to start before health checks begin evaluating the new instance.

The launch template also includes a User Data script that runs on each new instance. This script configures the iSCSI initiator, discovers and connects to the FSxN endpoints, mounts the Oracle data volumes, and starts the Oracle database through a systemd service. This automation makes sure that a replacement instance is fully operational without manual intervention.

EC2 Auto Scaling group oracle-db-asg configuration showing desired capacity of 1, scaling limits 1-1, r7i.large instance type, oracle-db-launch-template with Latest version, spanning two availability zone subnets.

Auto Scaling group configured with min=max=desired=1 across two availability zones, providing self-healing capability.

Test the complete workflow

To validate the architecture, simulate an instance failure by terminating the current Oracle EC2 instance.

The expected sequence is:

  1. The Auto Scaling group detects the instance is unhealthy (within approximately 30 seconds)
  2. A new instance launches from the latest AMI resolved from Parameter Store (approximately 2 minutes)
  3. The User Data script connects to FSxN using iSCSI and starts Oracle (approximately 2–3 minutes)
  4. The Oracle database is available and accepting connections (total elapsed: approximately 5 minutes)

Auto Scaling group Activity History showing the self-healing sequence — the unhealthy instance is terminated, and a replacement is launched automatically within seconds.

The new instance automatically inherits the application tags from the Auto Scaling group, which means AWS Backup includes it in the next backup cycle without manual configuration.

Cleaning up

To avoid incurring future charges, delete the resources:

  • Delete Lambda functions and EventBridge rules
  • Remove Parameters from Systems Manager Parameter Store
  • Delete AWS Backup plans and backup vault
  • Deregister created AMIs
  • Terminate Auto Scaling group instances
  • Delete the Amazon FSx for NetApp ONTAP file system

Conclusion

This architecture facilitates Oracle high availability with configuration consistency by combining FSxN persistent shared storage with automated AMI management and AWS Backup protection. The Lambda-driven AMI management from backup recovery points and Parameter Store integration helps make sure that replacement instances launched by Auto Scaling groups always use the latest Oracle host configuration and can immediately connect to the existing Oracle database files stored on FSxN. Replacements occur only when health checks fail. Organizations can target high availability while maintaining configuration consistency across instance replacements. The automated AMI management alleviates configuration drift and makes sure that disaster recovery scenarios restore Oracle instances with identical host-level configurations that can immediately access the persistent Oracle database on shared storage. Healthy instances continue running unchanged, with replacements occurring only, when necessary, because of health check failures.Next steps include implementing cross-Region AMI replication, adding AMI validation testing, and developing custom health checks that verify both Oracle database and host configuration consistency.

Additional resources

Amazon OpenSearch Service: Mechanisms to secure your domain

Post Syndicated from Imtiaz Sayed original https://aws.amazon.com/blogs/big-data/amazon-opensearch-service-mechanisms-to-secure-your-domain/

Imagine you’re building a product search feature for your website or storing customer records in Amazon OpenSearch Service to power full-text search. The moment that real user data enters your domain, security becomes essential.

Whether your workload is a public-facing website search, an internal application querying sensitive data, or a pipeline handling personally identifiable information (PII), the questions you face are the same:

  • Who should be allowed to connect to my domain?
  • How do I authenticate users and services?
  • How do I make sure that even authenticated users only see data they are entitled to see?
  • How do I satisfy regulatory requirements such as HIPAA, PCI DSS, or SOC 2?

This post offers an overview of the security mechanisms available for Amazon OpenSearch Service, spanning authentication and authorization, encryption, and network access controls. You learn how to implement fine-grained access control, manage AWS Identity and Access Management (IAM) roles, and secure data both in transit and at rest for both public and virtual private cloud (VPC) access domains.

Scope: This post covers security for Amazon OpenSearch Service managed clusters only. It doesn’t cover Amazon OpenSearch Serverless, which uses a different security model. For serverless security, see Amazon OpenSearch Serverless security in the AWS documentation.

To begin, let’s look at the security layers in Amazon OpenSearch Service.

Amazon OpenSearch Service security layers

Amazon OpenSearch Service has multi-layer security. The following diagram illustrates the multi-layer security in Amazon OpenSearch Service.

Diagram showing the three security layers of Amazon OpenSearch Service: Network, Domain access policy, and Fine-grained access control

Figure 1: Multi-layer security.

The three main layers of security are network, domain access policy, and fine-grained access control.

Network – The first security layer is the network, which determines whether requests reach an OpenSearch Service domain. If you choose Public access when you create a domain, requests from any internet-connected client can reach the domain endpoint. If you choose VPC access, clients must connect to the Amazon Virtual Private Cloud (Amazon VPC) (and the associated security groups must permit it) for a request to reach the endpoint.

Domain access policy – The second security layer is the domain access policy. After a request reaches a domain endpoint, the resource-based access policy allows or denies the request access to a given URI. The access policy accepts or rejects requests at the edge of the domain, before they reach data or indexes in OpenSearch itself.

Fine-grained access control – The third and final security layer is fine-grained access control. After a resource-based access policy allows a request to reach a domain endpoint, fine-grained access control evaluates the user credentials and either authenticates the user or denies the request. If fine-grained access control authenticates the user, it fetches all OpenSearch internal roles mapped to that user and uses the full set of permissions to determine how to handle the request.

With fine-grained access control, you can control access to your data in Amazon OpenSearch Service. For example, depending on who makes the request, you might want to hide certain fields in your documents or exclude certain documents altogether. With fine-grained access control, you can:

  • Define role-based access control to determine who can perform which actions on which indexes, documents, and fields.
  • Define security at the index, document, and field level to allow access to only required data.

Fine-grained access control requires OpenSearch or Elasticsearch 6.7 or later. It also requires HTTPS for all traffic to the domain, encryption of data at rest, and node-to-node encryption. Depending on how you configure the advanced features of fine-grained access control, more processing of your requests might require compute and memory resources on individual data nodes. After you turn on fine-grained access control, you can’t turn it off. For more details, see Fine-grained access control in Amazon OpenSearch Service in the AWS documentation.

To learn more about security features in an OpenSearch Service domain, let’s start by configuring a new public access domain. We discuss a VPC access domain later in the post.

Public access domain

With a public access domain, you can configure an OpenSearch Service domain so that the domain endpoint is accessible from the internet.

The AWS console for Amazon OpenSearch Service provides a guided wizard that you can use to configure and reconfigure your provisioned Amazon OpenSearch Service domains. Follow the Tutorial: Configure a domain with the internal user database and HTTP basic authentication in the AWS documentation to configure a domain with basic authentication and validate fine-grained access control.

Let’s review some important configuration attributes for a public access domain.

Network:

Public access. To simplify the network access configurations, you can use Public access, but for production workloads, we recommend VPC access.

With the domain in public access, you have several options to secure access. While you can use a resource-based access policy to restrict access to specific IAM principals or IP addresses, the recommended approach is to turn on fine-grained access control (FGAC) and use it as the primary mechanism for securing your domain. With FGAC turned on, you can set an open access policy (allowing all traffic to reach the domain) and let FGAC handle authentication and authorization at the index, document, and field level.

When using IAM-based authentication with FGAC, you should map IAM roles to backend roles in OpenSearch. You can use backend roles to assign permissions to groups of users based on their IAM role, rather than managing individual user mappings. This is especially important because if your IAM federation or authentication mechanism changes, the backend role mappings make sure of consistent access control within OpenSearch.

Amazon OpenSearch Service network configuration screen with Public access selected

Figure 2: Use public access domain.

Fine-grained access control: Fine-grained access control provides numerous features to help you keep your data secure, such as document-level security, field-level security, read-only users, and OpenSearch Dashboards/Kibana tenants. Fine-grained access control requires a primary user, which is the administrator identity we discuss through the rest of this post.

The primary user is the administrator identity for your OpenSearch domain. This user can set up additional users in Amazon OpenSearch Service, assign roles to them, and assign permissions for those roles. You can choose username and password authentication for the primary user or use an IAM identity. You use these credentials to log in to OpenSearch Dashboards. Following the best practices on choosing your primary user, you should move to an IAM primary user for production workloads.

Fine-grained access control can be applied regardless of how you log in. You can follow your organization’s suggested authentication mechanism and apply fine-grained access control on top of it.

FGAC provides security at multiple levels to meet your security needs:

  • Index-level security – Controls who can create, search, read, write, update, or delete within specific indexes.
  • Document-level security – Restricts which documents within an index a user can see, using OpenSearch query filters (for example, only show documents where department: “sales”).
  • Field-level security – Controls which fields within documents are visible (include or exclude specific fields).
  • Field masking – Anonymizes sensitive field data (for example, hash a release_date or SSN field) rather than hiding it entirely.

Fine-grained access control supports several authentication mechanisms, including HTTP basic authentication using an internal user database, Amazon Cognito for web-based Dashboards access, SAML for enterprise identity provider integration, JSON Web Tokens (JWT) for token-based authentication, and AWS Identity and Access Management with SigV4 signing for IAM users and roles.

Encryption:

Amazon OpenSearch Service encrypts data both in transit and at rest. When you turn on fine-grained access control, encryption is required—the corresponding settings are automatically turned on and can’t be changed. These include Transport Layer Security (TLS 1.2 or later) for requests to the domain and for traffic between nodes in the domain, and encryption of data at rest through AWS Key Management Service (AWS KMS).

For encryption at rest, OpenSearch Service supports three key types: AWS owned keys, AWS managed keys, and customer managed keys. While AWS owned keys provide a quick-start option with no additional configuration, customer managed keys are the recommended best practice. Customer managed keys give you full control over the encryption key lifecycle, including key rotation policies, granular access control through key policies, and the ability to audit key usage through AWS CloudTrail. To use a customer managed key, create a symmetric encryption key in AWS KMS and select it when configuring your domain’s encryption settings.

For a basic public access domain with FGAC, all traffic reaches the domain freely (no VPC restriction), and an open access policy is used so no SigV4 signing is needed. FGAC then takes over, authenticating users through the internal user database (username/password) and enforcing role-based permissions at the index, document, and field level.

The public access configuration we discussed is useful for development and testing, but for production workloads, a best practices deployment combines VPC access, IAM-based authentication, and fine-grained access control. This approach layers all three security mechanisms—network isolation, identity verification, and granular permissions—to protect your domain end to end.

VPC access domain

Placing your OpenSearch Service domain inside a VPC restricts network-level access to resources within the VPC or connected networks. Traffic between your applications and the OpenSearch endpoint doesn’t traverse the public internet, and you can use security groups to further limit which entities can communicate with the domain. OpenSearch Service places a VPC endpoint (VPCe) using AWS PrivateLink into one, two, or three subnets of your VPC depending on your Availability Zone configuration. For high availability (HA), turn on multiple Availability Zones with each subnet in a different zone within the same AWS Region. For more details, see Launching your Amazon OpenSearch Service domains within a VPC.

For this best practices deployment, we use an IAM primary user with Amazon Cognito authentication for OpenSearch Dashboards and for fine-grained access control. We configure a primary IAM role and a limited IAM role, associate them with users in Amazon Cognito through a user pool and identity pool, and then use fine-grained access control to manage permissions. The primary user can then sign in to OpenSearch Dashboards, create backend roles, map the limited user to a restricted role, and enforce granular access at the index, document, and field level. For more details, see Tutorial: Configure a domain with an IAM master user and Amazon Cognito authentication in the AWS documentation.

The following high-level steps detail what’s needed to configure a VPC access domain with Amazon Cognito users. These steps use the Amazon Cognito user pool for authentication. The same basic process works for any Cognito authentication provider that lets you assign different IAM roles to different users.

  • Create an Amazon Cognito user pool.
  • Add users in the user pool for the primary user and a limited-access user.
  • Create an Amazon Cognito identity pool.
  • Update the IAM role for the primary user to allow access to OpenSearch Dashboards.
  • Create an IAM role for the limited user.
  • Create the domain.

You can follow Creating and managing Amazon OpenSearch Service domains in the AWS documentation to provision a domain. The following sections describe some important attributes for the domain.

Network:

VPC access. Public access isn’t recommended for production workloads. We recommend that you use VPC access for all production workloads. Pick the VPC, subnets, and security group that you have created for the OpenSearch domain.

Amazon OpenSearch Service network configuration screen with VPC access selected and VPC, subnet, and security group fields populated

Figure 4: Use VPC access.

Fine-grained access control:

Turn on fine-grained access control with OS[MasterUserRole] as the primary user. You can follow steps in Tutorial: Configure a domain with an IAM master user and Amazon Cognito authentication to create OS[MasterUserRole].

Amazon OpenSearch Service fine-grained access control configuration with an IAM ARN selected as the primary user

Figure 5: Turn on fine-grained access control with an IAM role.

Fine-grained access control provides numerous features to help you keep your data secure, such as document-level security, field-level security, read-only users, and OpenSearch Dashboards/Kibana tenants. Fine-grained access control requires a primary user.

The primary user is the administrator identity for your OpenSearch domain. This user can set up additional users in Amazon OpenSearch Service, assign roles to them, and assign permissions for those roles. You can choose username and password authentication for the primary user or use an IAM identity. You use these credentials to log in to OpenSearch Dashboards. Following the best practices on choosing your primary user, you should choose an IAM primary user for production workloads.

Fine-grained access control can be applied regardless of how you log in. You can follow your organization’s suggested authentication mechanism and apply fine-grained access control on top of it.

Amazon Cognito authentication:

To turn on Amazon Cognito authentication, select Enable Amazon Cognito authentication and choose the Amazon Cognito user pool and Amazon Cognito identity pool for your OpenSearch Dashboards.

Amazon OpenSearch Service authentication configuration with Amazon Cognito enabled and a user pool and identity pool selected

Figure 6: Turn on Amazon Cognito authentication.

Access policy:

The access policy controls whether a request is accepted or rejected when it reaches the Amazon OpenSearch Service domain. You can configure a domain-level access policy to allow access to your Amazon OpenSearch Service domain.

Amazon OpenSearch Service domain access policy editor showing a JSON policy granting access to the configured IAM principals

Figure 7: Configure domain-level access to the domain.

Encryption:

Amazon OpenSearch Service encrypts data both in transit and at rest. When you turn on fine-grained access control, encryption is required—the corresponding settings are automatically turned on and can’t be changed. These include Transport Layer Security (TLS 1.2 or later) for requests to the domain and for traffic between nodes in the domain, and encryption of data at rest through AWS KMS.

For encryption at rest, OpenSearch Service supports three key types: AWS owned keys, AWS managed keys, and customer managed keys. While AWS owned keys provide a quick-start option with no additional configuration, customer managed keys are the recommended best practice. Customer managed keys give you full control over the encryption key lifecycle, including key rotation policies, granular access control through key policies, and the ability to audit key usage through AWS CloudTrail. To use a customer managed key, create a symmetric encryption key in AWS KMS and select it when configuring your domain’s encryption settings.

With these configurations, you can configure your Amazon OpenSearch domain and OpenSearch Service Dashboards so that they’re accessible only within the chosen VPC. For your production scenario, you can follow your organization’s approved mechanism to access the resources in a VPC. You can access OpenSearch Service Dashboards with a primary user to create a limited-access role and map it to the IAM role with limited access to validate fine-grained access control.

Conclusion

In this post, we looked at the important security configurations for a public and a VPC-based Amazon OpenSearch domain. You can examine more settings for fine-grained access control in the OpenSearch Dashboards Security section.

If you have feedback about this post, submit comments in the Comments section. If you have questions about this post, start a new thread on the Amazon OpenSearch Service forum or contact AWS Support.


About the author

Imtiaz (Taz) Sayed

Imtiaz (Taz) Sayed

Imtiaz (Taz) Sayed is the WW Tech Leader for Analytics at AWS. He enjoys engaging with the community on all things data and analytics. He can be reached through LinkedIn.

Narendra Gupta

Narendra Gupta

Narendra is a Specialist Solutions Architect at AWS, helping customers on their cloud journey with a focus on AWS analytics services. Outside of work, Narendra enjoys learning new technologies, watching movies, and visiting new places.

Akhilesh Dube

Akhilesh Dube

Akhilesh is a Senior Analytics Solutions Architect at AWS. He possesses more than two decades of expertise in working with databases and analytics products. His primary role involves collaborating with enterprise clients to design robust data analytics solutions while offering comprehensive technical guidance on a wide range of AWS Analytics and AI/ML services.

Nishchai JM

Nishchai JM

Nishchai is an Analytics and GenAI Specialist Solutions Architect at Amazon Web services. He specializes in building larger scale distributed applications and help customer to modernize their workload on Cloud. He thinks Data is new oil and spends most of his time in deriving insights out of the Data.

[$] Open-source security is not a solo activity

Post Syndicated from jzb original https://lwn.net/Articles/1075741/

Over time, many open-source maintainers face the same problem: they
lack the time to do all of the work that their project needs, and no
one else is stepping up to provide adequate help. Maintainers, though,
are often reluctant to throw in the towel. The result is suboptimal
all around; the maintainer is stressed out, project quality suffers,
and users face security risks that they may not be fully aware of. At
the 2026 Open
Source Summit North America
, Robin Bender Ginn spoke about this
problem, when it might be time for maintainers to pass the torch, and
the responsibilities of users.

Support your young people with our AI literacy resources

Post Syndicated from Jenni Hutchings original https://www.raspberrypi.org/blog/ai-education-resources-ai-awareness-day/

At the Raspberry Pi Foundation, we believe that alongside learning to code, a crucial part of computing education is building AI literacy skills. Amidst the rapid pace of development and the growing impact of AI tools, it is increasingly important for educators everywhere to feel equipped to address the topic of AI with their learners, to help young people understand their world, be responsible users of AI technologies, and prepare to become the future creators of these technologies. 

We work at the leading edge of AI education, combining research and industry expertise with practical classroom experience to define what AI means for computing education, and how to best support teachers and learners to understand these technologies. 

Whether you are a teacher, a Code Club mentor, or a parent, we have a wide range of free resources to help you teach your young people about AI, and learn more about it yourself.

Explore our teaching resources

We offer a variety of teaching materials to help you bring AI into your setting. You do not need to be a professional educator or have a background in computer science to use these resources, and we provide everything you need to guide your learners with confidence.

Experience AI is our free AI literacy programme, developed in collaboration with Google DeepMind. Through ready-to-use classroom resources, including lesson plans, presentations, and hands-on activities, the programme helps educators all over the world teach their learners about how AI works, as well as its wider social and ethical implications. You and your learners will investigate AI tools, explore real-world uses of AI, and engage with critical issues such as bias, fairness, and transparency, helping learners to understand AI and use it responsibly. The lessons currently available are designed for learners aged 11–14, and we are releasing resources for other age groups this year.

To help bring Experience AI to more educators and learners around the world, we work with a global network of partner organisations, who help us provide tailored and translated resources and offer localised, high-quality training and support for educators in their regions. Experience AI resources are currently available in 19 languages, and have already been downloaded in more than 180 countries. In recognition of its impact, in 2025 Experience AI was named a laureate of the UNESCO King Hamad Bin Isa Al-Khalifa Prize for the Use of ICT in Education.

“[Experience AI] has definitely changed my outlook on AI. I went from knowing nothing about it to understanding how it works, why it acts in certain ways, and how to actually create my own AI models and what data I would need for that. I would 100% recommend others who don’t know much about AI to try it out.” – Student, Arthur Mellows Village College, UK

If you are looking to introduce school-aged young people to AI with short, beginner-friendly coding  and digital making projects, take a look at our collection of Code Club projects about AI and machine learning. These projects are a great way to spark curiosity and investigate how AI and machine learning works.

In the projects, learners get hands-on with a range of AI tools and platforms, and explore different applications of AI, such as image recognition, voice recognition, and (for learners aged 13 and over) generative AI. For example, in Doodle detector, learners use Machine Learning for Kids with Scratch to create a machine learning application that can identify what they have drawn. 

The projects feature clear step-by-step instructions, and many include video tutorials, to help learners work at their own pace and in a style that suits them. We also provide mentor guidance to help you prepare.

An illustration of an image classification application correctly identifying a drawing of an apple.
Learners can explore topics such as image classification through our collection of Code Club projects about AI and machine learning

For resources to support older learners to build their understanding of AI, head to Ada Computer Science. Ada Computer Science is our free online platform for computer science students and teachers, developed in partnership with the University of Cambridge. It provides comprehensive resources for learners aged 14–19 across the breadth of computer science, including detailed learning materials about AI and machine learning. The materials include helpful definitions, clear explanations, and carefully designed self-marking questions to support young people’s learning.

Learners aged 14–19 can build their knowledge of AI and machine learning on our Ada Computer Science platform

Explore our learning and training opportunities for educators

To help you build your knowledge around AI technologies and grow your confidence to teach your young people about this important topic, we offer a range of learning resources and professional development opportunities, all for free. They are open to everyone, so we invite you to dive into any that interest you.

For flexible, self-paced learning options, take a look at the following free online courses, which cover a range of topics within AI:

  • Introducing AI: Investigate how AI systems work and how to evaluate them, and explore the benefits, risks, and ethical issues related to them. This course is made up of 2 modules, and takes around 2–4 hours to complete.
  • AI literacy for teachers and school leaders: Learn how to support your students and staff to understand, use, and critically assess AI technologies. This course takes around 1–2 hours to complete. 
  • Machine learning and AI: Discover machine learning and how it works, and train your own AI models using free online tools. This course is made up of 4 modules, and takes around 4–8 hours to complete.
Learn more about AI through our free online courses for educators

You might also be interested in Hello World, our free magazine and podcast for educators teaching computing and AI. Each magazine is packed with resources, discussions, news, and ideas, and you can subscribe to receive each issue as soon as it is released. The next issue, coming in July, will focus on critical thinking in the age of AI. You can download our previous issues to explore articles about a variety of topics within AI too. What’s more, you can continue your learning with the Hello World podcast, which accompanies the magazine and features discussions with educators and researchers from around the world. Visit the podcast page to discover previous episodes exploring vibe coding and programming education, AI education around the world, and more.

Hello World Issue 29 - Safety & security
Hello World Issue 29 – Safety & security

To learn about research-informed teaching strategies to help you as you explore AI with your learners, you can read these short Pedagogy Quick Reads:

  • Anthropomorphism: Explore how to help learners avoid thinking of AI systems as human-like, to support their understanding.
  • Computational Thinking 2.0: Consider how computational thinking is evolving and how to help learners develop the computational thinking skills they need to understand modern digital systems involving AI.
  • Feedback literacy: Explore how feedback literacy can help teachers and learners interact effectively with feedback generated by AI tools.
A Pedagogy Quick Read entitled ‘The effects of anthropomorphisation on students’ mental models of AI’.

For more insights from computing education research, you can join our monthly online research seminars. Our 2026 research seminar series focuses on teaching about AI across the curriculum, delving into research on teaching and learning about AI from disciplines beyond computer science, including the arts, sciences, and humanities. Our next seminar takes place on 16 June, and you can catch up on previous seminars from our current series here. You can also explore our archive of recordings from previous seminar series, with themes including teaching about AI and data science, teaching programming (with or without AI), and more.

Bring AI into your classroom today

All of these resources and learning opportunities are available to anyone interested in educating young people about AI, anywhere in the world. We hope they help you gain understanding, confidence, and inspiration to guide your young learners to engage with AI safely and responsibly, and to learn valuable skills that will help them navigate their world.

“Let the students explore, advance, and grow. And who knows — maybe one of our students will go on to become a mentor or leader in this field someday.” – Ana Judith Zavaleta, computer science teacher, Mexico, speaking about Experience AI

If you are in the UK, you can also use these resources to get involved with the first-ever AI Awareness Day, a new nationwide campaign designed to build AI literacy across UK schools, which is taking place on 4 June.

The post Support your young people with our AI literacy resources appeared first on Raspberry Pi Foundation.

[$] BPF in the agentic era

Post Syndicated from daroc original https://lwn.net/Articles/1075067/

Alexei Starovoitov gave “less of a presentation, more of a scream of
realization
” at the BPF track of the 2026

Linux Storage, Filesystem,
Memory-Management, and BPF Summit
. He shared a set of ideas for how BPF could
change to avoid being swept away by the sea-change in programming represented by modern
large language models (LLMs) and the coding agents based on them.
In a follow-up session, the discussion covered
more problems with how coding agents use tools like bpftrace, and the current deluge of
patches in need of review in the BPF subsystem.

Tridgell: rsync and outrage

Post Syndicated from jzb original https://lwn.net/Articles/1076040/

Andrew Tridgell has written a blog
post
responding to complaints that he has begun using LLM tools in
his work maintaining rsync:

Like many developers of open source packages I’ve been hit by a
flood of security reports lately in my role as the rsync
maintainer. Many of those reports are AI generated (not all though,
there are some notable ones with very careful and high quality manual
analysis).

As this flood started to get more intense I realised I needed to
raise the defences on rsync a lot — we needed much more thorough test
suites, code coverage analysis, CI testing on a lot more platforms,
deliberate and thorough scanning for possible security issues (so I
find at least some of them before other people!) and the addition of a
whole lot of defence-in-depth hardening techniques.

[…] Now to the future, because we’re not done yet by a long
shot. The security reports keep rolling in. I’m working on a bunch of
CVEs right now. Luckily I’ve been joined by some other very good
developers with great systems development skills and security
knowledge. Some of these people came to my attention partly because of
all the rage happening at the moment, so I get some rage storm clouds
have silver linings. Watch out for some credits for some great new
rsync developers in the next release.

Security updates for Wednesday

Post Syndicated from jzb original https://lwn.net/Articles/1076117/

Security updates have been issued by Debian (php-twig), Fedora (hplip, python-wsgidav, roundcubemail, and xorg-x11-server), Oracle (compat-openssl10, httpd:2.4, and kernel), Red Hat (osbuild-composer), SUSE (busybox, cloudflared, cockpit, cups, ffmpeg-4, gnutls, google-osconfig-agent, helm, hplip, kernel, kubelogin, libjxl, libsoup, libunbound8, LibVNCServer-devel, mapserver, nvidia-open-driver-G06-signed, nvidia-open-driver-G07-signed, openssh, python-idna, qemu, rqlite, shadowsocks-v2ray-plugin, ucode-intel, unbound, vim, vorbis-tools, and xorg-x11-server), and Ubuntu (age, dovecot, editorconfig-core, gobgp, libapache-mod-jk, libcommons-lang-java, libcommons-lang3-java, libeconf, linux, linux-aws, linux-aws-6.8, linux-aws-fips, linux-azure, linux-fips,
linux-gcp, linux-gcp-6.8, linux-gcp-fips, linux-gke, linux-gkeop,
linux-hwe-6.8, linux-ibm, linux-ibm-6.8, linux-nvidia, linux-nvidia-6.8,
linux-nvidia-lowlatency, linux-nvidia-tegra, linux-oracle,
linux-oracle-6.8, linux-raspi, linux-raspi-realtime, linux-realtime,
linux-realtime-6.8, linux, linux-aws, linux-azure, linux-azure-6.17, linux-hwe-6.17,
linux-nvidia-6.17, linux-oem-6.17, linux-oracle, linux-oracle-6.17,
linux-raspi, linux-realtime, linux-realtime-6.17, linux, linux-aws, linux-gcp, linux-ibm, linux-nvidia, linux-oracle,
linux-raspi, linux-realtime, linux-aws-6.17, linux-gcp, linux-gcp-6.17, luanti, mysql-8.0, mysql-8.4, node-tar-fs, and unbound).

Ася Демирева: Нашите съвършени тела

Post Syndicated from Ина Иванова original https://www.toest.bg/asya-demireva-nashite-suvursheni-tela/

Ася Демирева: Нашите съвършени тела

Вече почти две десетилетия Ася Демирева е сертифицирана и обичана консултантка по кърмене (IBCLC), което неусетно я е превърнало в гуру в една доста нишова сфера.

Това е най-хубавата работа, по-добра дори от дегустатор на сладолед.

Често жените идват при нея с новопокълнало чувство за вина или боязън, че нямат майчински инстинкт: не се справих, не ми се получава да кърмя, а искам.

Телата ни са съвършени, а ние, с нашите мозъци и незрелите си разбирания, им пречим да си свършат работата. Ние сме програмирани да знаем кое е правилно, но на съвременните поколения е вменено, че за да направим нещо добре, трябва да бъдем научени. Не виждаме живота в абсолютния му, природен покой. Моята прабаба, която е била неграмотна, е знаела какво е пермакултурен дизайн, без разбира се, да го нарича така. Но е знаела къде коя култура да посади и че на тази почва след две години ще се чувства добре друго растение, защото вече е обогатена от предишните с конкретни вещества. Ние обаче сме загубили това знание, което се е предавало от поколение на поколение. Загубили сме и вкоренения си инстинкт да отглеждаме други хора. Само преди около 150 години хората са виждали всичко – съвкупяването на животните, раждането. Вместо да се радваме на живота, ние никога не сме посрещали живот. Затова не знаем какво да правим. Хората преди нас са имали имплантирани модели за грижа, биологични модели, които при това са визуализирани стотици пъти. Днес пречим на телата си да действат свободно, спънати от недоверие и противоречива информация.

Ася Демирева е наясно със сблъсъка на младите майки с общия информационен шум, с непомерните изисквания за правилност, които обществото налага. Затова и напоследък в мрежата се появяват групи за споделяне – на майките, които не се справят, които се чувстват уплашени или просто искат да говорят за трудностите и „тегавините“ в този етап от живота си.

Мисията на Ася е не просто да говори за ползите от кърменето – ползи и за майката, и за бебето, но и да подпомогне процеса на засукване, обяснявайки рефлекторната му природа и разчитайки на инстинктите, заложени в телата ни. Тя е и сред създателките на възглавницата „Матеа“, която облекчава позицията на майките и осигурява комфорт при кърмене.

Стотици пъти съм присъствала на момента, в който един човек засуква от майка си и как тази жена емоционално го преживява, как цялото ѝ тяло се разтреперва, много често тя се разплаква. Аз имам късмета да съм свидетел на този първи контакт.

Първата детска мечта на Ася Демирева е да учи медицина; майка ѝ обаче я убеждава, че трудно би се справила емоционално с подобна професия. И така, Ася завършва Френската гимназия в Бургас и след това журналистика в Софийския университет. Това са точно годините на приватизацията и начеваща политическа журналистика и тя осъзнава, че ще завърши, без да иска да работи това. Създава семейство и през 2006 г. се обучава за консултантка по кърмене. Малко по-късно, вече майка на едно дете, започва да работи за сп. „Моето дете“. И понеже житейското колело се върти неумолимо, но и с подобаващ усет за историческа ирония, по времето, по което се развежда, Ася става главен редактор на списанието.

Когато години по-късно заради работата си следва за лекарски асистент и изучава обща медицина, установява, че майка ѝ е била права и трудно би оцеляла в болница.

Ако бях станала лекар, щях да работя предимно с болни бебета. Сега работя със здрави и много щастливи родители, после те си тръгват с нахранени и доволно заспиващи бебета.

Разбира се, истината е, че понякога родителите се изплашени и напрегнати, друг път идват на консултация в комплект с две баби.

Преди години обяснявах на бабите със страхопочитание и желание да насоча начина им на мислене в различна посока, но сега, от „пиедестала“ на двайсетгодишния ми опит, говоря по-авторитетно, а и с повече разбиране. Истината е, че бабите, които вече консултирам, са първите ползвателки на форума „БГ мама“.

Хората, ангажирани с медицински професии, често са изправени пред необходимостта да се сблъскват с различни начини на мислене, методи за справяне със стреса, а и с възприемане на биологичните ни параметри. Когато става въпрос за деца обаче, цялото ни общество сякаш се държи нелогично.

Живеем в кански парадокс – считаме, че на четири месеца бебето ни трябва да заспива самостоятелно, което е смешно, но на осем години вземаме детето за ръка от ръката на учителката. То не знае как да се прибере до вкъщи, откъде се купува хлябът и че той струва пари. А във все още съществуващите племенни култури това е възрастта, в която момчетата получават оръжие – собствено копие например. Те вече имат правото да убият животно и да приготвят храна. Тоест могат да се защитят и да се нахранят.

Ася всъщност помага на младите родители да не страхуват. Но и да си припомнят, че човек заспива в абсолютна безопасност. А за бебетата това е в прегръдката на друг човек.

Ние знаем за зоната за терморегулация при майката – тя се намира около гърдите. Когато бебето е хладно, тази зона се затопля, и обратното – ако кожата на майката фиксира, че има нужда от охлаждане, го прави. Това е велик способ за регулация. Майката е първата инстанция в адаптацията на този нов човек в новия за него свят. Имаме всички механизми да го посрещнем извън тялото си. Затова „кожа в кожа“ е и метафора – точно така започва животът.

За хора като Ася Демирева, които работят с наука, но виждат началата на живия живот, границата между биологично и трансцедентно е проницаема. Тя познава механизмите на телесното, а работата ѝ изисква и да го обясни на майките.

Ние създаваме тела от тялото си, храним ги от себе си, трансформирайки нашата храна в нещо жизненоважно за оцеляването на бебетата – всъщност ние имаме божествени функции.

Дългогодишната ѝ практика с бебета я е убедила, че дори новороденото не е табула раза, не е бяло платно, върху което се пише отначало.

Но за този живот, в това тяло, всяко конкретно бебе започва да се учи сега. И нашата работа като родители е първо да го приведем във физическата норма за конкретното общество – без значение дали ще е високотехнологично, или не, дали ще е бедно дете в богата държава, или обратното.

А това е невъзможно без майката да се събере и да се задейства спрямо собствените си представи за правилно. Иначе,

всяка жена има собствено дъно на тема майчинство, което копае системно,

твърди Ася и се надява все повече жени да избират подкрепата на психолог, за да се справят.

Всяка майка има своите страхове и форми на несигурност, но преди години сякаш беше по-просто. Днес имаме свръхсоциален елемент на социалните мрежи.

В момента количеството на информацията е ужасяващо. А вече съществува и понятието mommy shaming, което отразява съвсем реалния процес не просто на засрамване, а на тотално отричане: ако не правиш нещата по съответния начин, каква майка си изобщо?! Поредната стигма у нас пък е свързана с възрастта, на която кърменето трябва да престане. Само преди десетилетие общуването между майките е било по-скоро обмяна на опит, сочат наблюденията на Ася Демирева. От друга страна, тя смята, че социалните мрежи и миниобществата, които те поддържат, имат голямо и качествено значение за съвременния родител.

Самата тя е възпитана от майка, която е фиксирала модела, че ако едно решение е взето след претегляне на плюсове и минуси, значи то е правилно. Към онзи момент и онези обстоятелства то е било най-доброто. Тоест „не връщаме времето и не се самообвиняваме“. Това се оказва нейната лична работеща стратегия по отношение на майчинството, а Ася има две деца и със сигурност е преминала през обичайните изпитания. С първото си дете излиза ежедневно навън, защото по това време има паник атаки:

Най-големият ми страх беше, че мога да получа инфаркт и да минат часове, преди някой да дойде и да спаси бебето ми. Така че започнах да тренирам екстравертността си. Виждах се непрекъснато с жени с бебета. Винаги съм чела много и обичам да препредавам информация, затова се чувствах изключително добре да разказвам всичко, което съм научила. Всъщност съм тренирала за консултант.

Ася Демирева е различна по рождение – с вродена липса на кост, т.нар. малък пищял, фибулата. Затова десният ѝ крак е по-къс.

Това е източникът на всичките ми детски травми и върху него работя все още с психолога си. Но то е и в основата на избора ми на професия, която е свързана с оказване на помощ.

Ася е израснала по времето на социализма, когато в детските болници децата са оставяни сами. Да, дори и четиригодишните. Но е имала късмета майка ѝ да бъде до нея само защото е била медицинска сестра.

Това не ме спаси от манипулации без упойки и без нива на физическа болка, които не са окей за малко дете. Някъде там у мен се роди убедеността, че нито едно дете повече не бива да преживее това. Аз исках да стана лекар, за да спася децата.

Глобално Ася смята, че разбиранията ѝ са доста стереотипни. Тя уважава йерархията, приема, че обществото ни вменява роли и ролевите модели трябва да бъдат спазвани. И че малкият човек трябва да постигне конкретни нива, за да бъде равен на големите. Но не може да се съгласи да се отнасяме с малките деца като с незначителни.

У нас малките са нищожни. А това не е вярно. Ние имаме нужда от техния подход, от тяхното любопитство и интерес към всичко и ако си позволим да бъдем като тях, ще живеем в по-добро общество. Вместо това ние ги омаловажаваме.


Хората, които тихо и кротко променят средата, формират общности и задават посоки, в които има смисъл да тръгнем заедно. Тук ви срещаме с тях. Това са „Тези хора“.

Тоест разговаряме – епизод 10

Post Syndicated from Владислав Севов original https://www.toest.bg/toest-razgovaryame-epizod-10/

Тоест разговаряме – епизод 10

В навечерието на един от най-хубавите български празници – 24 май, Деня на българската просвета и култура – разговорът ни със Зорница Христова естествено тръгна от литературата, но много бързо стигна до паметта, езика, детството, общественото доверие и въпроса какво всъщност остава след думите. Коментирахме, че формалното празнично говорене за езика понякога рискува да се превърне в ритуал без съдържание, а в същото време именно словото някога е било истинско „оръжие“, променяло общества и съдби.

Говорихме за книгите и четенето като възможност за бавно размишление в свят на непрекъснат шум, за липсващата критика, за маркетинга, който често подменя разговора за литература, за нуждата някой все пак да пази пространствата за смисъл…

Зорница разказа и за рубриката си „По буквите“, в която книгите не стоят една до друга като заглавия в каталог, а разговарят помежду си – през паметта, през настоящето, през личния опит на читателя. За Зорница литературата не е самотен предмет, а жива среда, в която различни светове непрекъснато си общуват.

Особено място в разговора ни зае детската литература като едно от най-трудните и най-важни изкуства. Говорихме за свободата през играта, за правото на детето да чува сложни думи, да се страхува, да си въобразява, да мисли различно. И за онези книги, които остават като емоционална памет за цял живот.

Накрая стигнахме и до езика като удоволствие, а не като назидание, и до онова усещане, че думите имат значение не когато ги пазим под стъклен похлупак, а когато успяват да провокират размисли и да създават близост и доверие.

Гледайте целия разговор в нашия YouTube канал:

Може да го чуете и като аудиозапис в SoundCloud:


На живо зададох на Зорница въпроси от публиката, но нямаше как да обхванем всички. Затова я помолих да отговори тук на още един ваш въпрос:

Как намирате баланса между комерсиалния успех на едно издателство и поддържането на безкомпромисен литературен стандарт?

Ха-ха-ха, този въпрос е много мило зададен! Можеше да бъде: „Кое е по-лошо: да правите книги, от които Ви е срам, или да правите книги, които не се продават?“ Така зададен, въпросът е лесен. Но все пак искам и да се продават, разбира се – продажбите ти показват, че книгата е била нужна.

Така и си задавам въпроса: От какви книги има нужда? И защо? Много от нашите научнопопулярни книги – „Витоша“, книгите от поредицата „Философски закуски“, „Книга за смъртта“, „Един ден в музея“, „Бедността. Пътеводител за деца“, „Сладоледена реторика“ – са издадени по тази причина. Смятам, че има нужда от тях. Това са и тиражите, които свършват първи.

Други излизат просто защото страшно много ми харесват, без дълбок пазарен замисъл. Не може всичко да е по схема. Нали литературата трябва да изненадва, да доставя удоволствие, да „отваря приказка“ с разни части от теб, които иначе не са особено разговорливи. Понякога сред тези книги, издадени „защото така“, дадено заглавие се разграбва за миг.

Не е ли по-сладко хубавата книга сама да си пробие път, отколкото да правиш книги според проправените вече пътеки? За мен поне е. „Когато искам да мълча“ е бестселър не само у нас, но и в Италия. А смятах, че я правим за двайсетина наши приятели…

Преди срещата ви помолихме да отговорите на кратката ни анкета. Ето и резултатите от нея:

Книгата е най-добрият офлайн режим за ума.


Зорница Христова е писателка, преводачка, редакторка и издателка. Тя е съоснователка на „Точица“ – издателство, специализирано в съвременни детски книги с висок литературен и визуален стандарт. Авторка е на книги за деца и възрастни. Работи активно и като преводачка от английски език. Сред преведените от нея автори са Джулиан Барнс, Джон Ървинг, Тони Джуд, Джумпа Лахири, Джеръм К. Джеръм, Том Улф, Йосиф Бродски и много други. В текстовете и публичните си изяви често защитава ролята на преводача като съавтор и литературен посредник.

Зорница Христова е и дългогодишна литературна журналистка и есеистка. В „Тоест“ води рубриката „По буквите“ – пренесената от Марин Бодаков легендарна колонка „Ходене по буквите“ във вестник „Култура“, която по-късно Зорница продължи в негова памет. В своите текстове тя съчетава литературна критика, културен анализ и личен есеистичен подход, като особено внимание отделя на паметта, превода, детската литература и връзката между книгите и обществената среда.


Така протече десетият епизод на „Тоест разговаряме“, който беше и последният в рамките на инициативата, подкрепена от Институт „Отворено общество – София“ и проекта Media Resilience на Европейския съюз. Искрено се надяваме, че тези разговори са ви били интересни и полезни. Ако искате да ги продължим, подкрепете ни! 


В десетте епизода на „Тоест разговаряме“ всеки месец ви срещахме с автори, които познавате добре от анализите или от рубриките им в „Тоест“, но този път ги видяхте и чухте в по-личен и непосредствен формат. Във видеоразговорите, предавани на живо, активно участие имахте и вие, нашата публика – със своите въпроси, коментари и включване в тематичната анкета. Водещ на поредицата беше Владислав Севов, дългогодишен телевизионен журналист и съосновател на „Тоест“.

Тоест разговаряме – епизод 10

„Тоест разговаряме“ е поредица от 10 епизода, подкрепена от Институт „Отворено общество – София“ и съфинансирана от Европейския съюз в рамките на проекта Media Resilience. Изразените възгледи и мнения са само и изцяло на техните автори и не отразяват непременно възгледите и мненията на Европейския съюз, на Европейската изпълнителна агенция за образование и култура (EACEA) или на Институт „Отворено общество – София“ (ИООС). Нито Европейският съюз, нито EACEA, нито ИООС могат да бъдат държани отговорни за тях.

The collective thoughts of the interwebz