All posts by Channy Yun (윤석찬)

Amazon Redshift introduces AWS Graviton-based RG instances with an integrated data lake query engine

Post Syndicated from Channy Yun (윤석찬) original https://aws.amazon.com/blogs/aws/amazon-redshift-introduces-aws-graviton-based-rg-instances-with-an-integrated-data-lake-query-engine/

Since 2013, Amazon Redshift has given the full power of a data warehouse in the cloud, at a fraction of the on-premises cost. Every architectural generation—from dense compute to Amazon RA3 instances, from provisioned to Amazon Redshift Serverless—has made each query cheaper, faster, and more efficient than the last.

For over a decade, as data volumes have grown and analytics requirements have evolved, organizations increasingly leverage both data warehouse tables for structured, frequently-accessed data and data lakes for cost-effective storage of diverse datasets. Add AI agents to the mix and they query your data warehouse at a scale that dwarfs typical human usage, leading to spiraling operational costs.

Amazon Redshift has doubled down on its core strengths to meet the demands of any workload — whether driven by humans or AI agents. For example, in March 2026, Amazon Redshift improved the performance of business intelligence (BI) dashboards and ETL workloads by speeding up new queries by up to 7 times. This significantly improves the response times of low-latency SQL queries, such as those used in near-real-time analytics applications, BI dashboards, ETL pipelines, and autonomous, goal-seeking AI agents.

Today, we’re announcing Amazon Redshift RG instances, a new instance family powered by AWS Graviton. RG instances deliver better performance, running data warehouse workloads up to 2.2x as fast as RA3 instances at 30% lower price per vCPU. Their integrated data lake query engine lets you run SQL analytics across your data warehouse and data lake from a single engine with performance up to 2.4x as fast as RA3 for Apache Iceberg and up to 1.5x as fast as RA3 for Apache Parquet. This blend of speed, cost efficiency, and an integrated data lake query engine makes Redshift RG instances well-suited to handle the high query volumes and low-latency requirements of today’s analytics and agentic AI workloads.

You can compare new RG instances and current RA3 instances:

Current RA3 Instance Recommended RG instance vCPU Memory (GB) Primary Use Case
ra3.xlplus rg.xlarge 4 32 Small cluster departmental analytics
ra3.4xlarge rg.4xlarge 12 → 16 (1.33:1) 96 GB → 128 GB (1.33:1) Standard production workloads, medium data volumes

This approach reduces total analytics costs for customers running combined data warehouse and data lake workloads, while simplifying operations through a single system for querying both warehouse tables and Amazon Simple Storage Service (Amazon S3) data lakes. We recommend using the AWS Pricing Calculator with your specific workload patterns to estimate savings.

Getting started with Amazon Redshift RG instances
You can launch new clusters or migrate existing clusters through the AWS Management Console, AWS Command Line Interface (AWS CLI), or AWS API. The integrated data lake query engine is enabled by default.

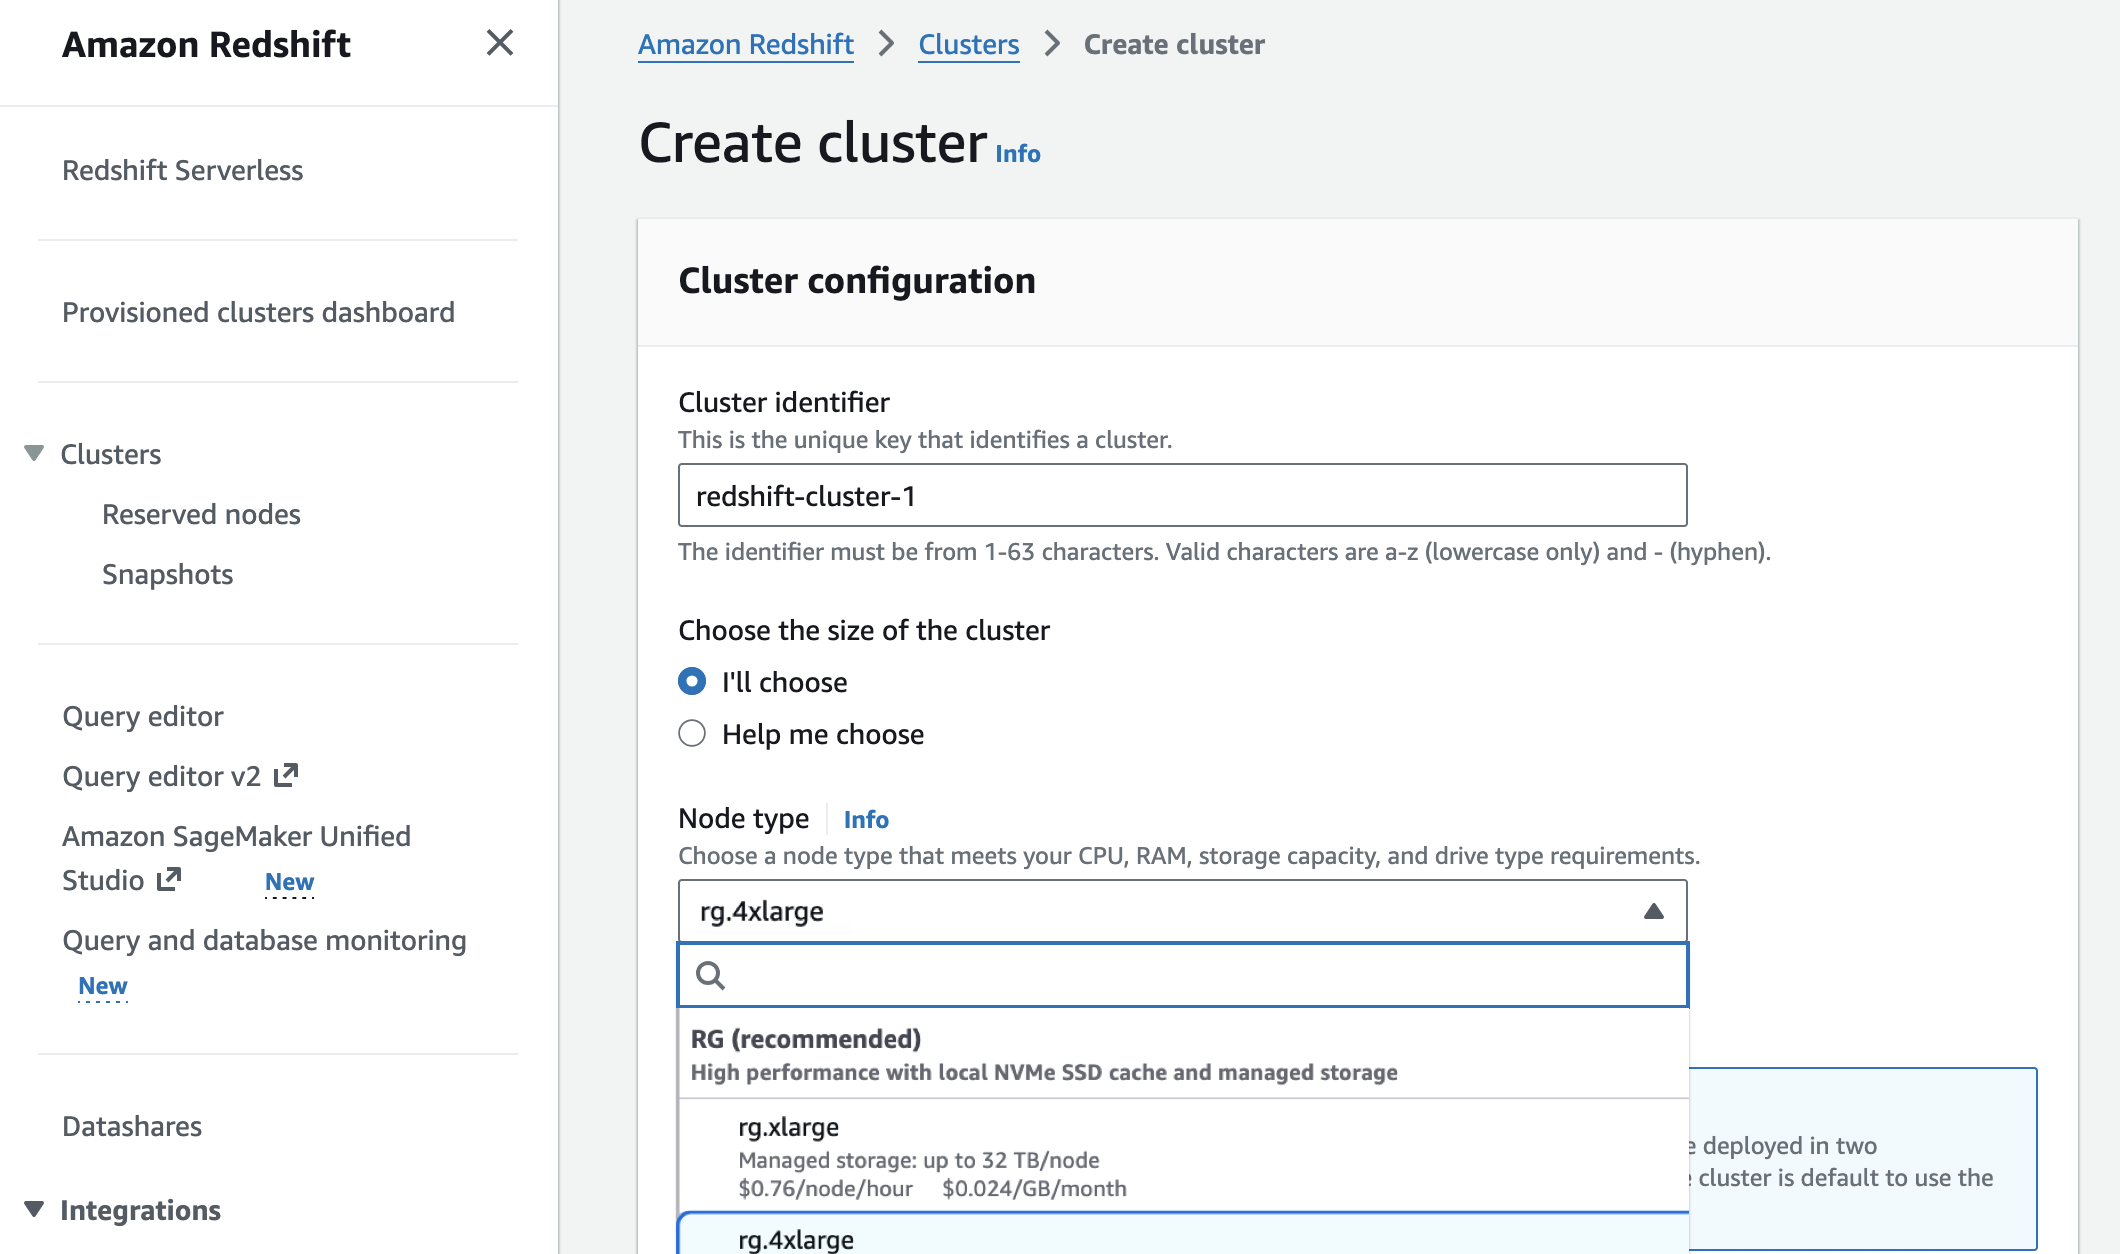
In the Amazon Redshift console, you can choose new RG instances when you create a cluster.

You can migrate previous-generation instances to RG instances with optimal paths based on your cluster configuration to estimate costs, validate compatibility, and automate execution.

  • Elastic Resize—in-place migration with 10-15 minutes downtime for compatible configurations
  • Snapshot and Restore—create a RG cluster from an RA3 snapshot. This is best for customers who want to make configuration changes during the migration

Your external tables, schemas, and query syntax—including existing Spectrum queries—remain unchanged. There is no need to recreate external tables or modify application code. To learn more, visit the Redshift Management Guide.

Amazon Redshift now executes data lake queries on cluster nodes—the same compute that processes data warehouse workloads. As a result, Amazon Redshift Spectrum is no longer required. Data lake queries stay within your VPC boundary, use existing IAM roles, and incur zero per-terabyte scanning charges. This removes the $5/TB Spectrum scanning fees that previously added to total Redshift costs.

Now available
Amazon Redshift RG instances are now available in the following AWS Regions: US East (N. Virginia, Ohio), US West (N. California, Oregon), Asia Pacific (Hong Kong, Hyderabad, Jakarta, Malaysia, Melbourne, Mumbai, Osaka, Seoul, Singapore, Sydney, Taiwan, Tokyo), Canada (Central), Europe (Frankfurt, Ireland, Milan, London, Paris, Spain, Stockholm), Middle East (UAE), and South America (São Paulo). For Regional availability and a future roadmap, visit the AWS Capabilities by Region. For Redshift Provisioned, you can select On-Demand Instances with hourly billing and no commitments or choose Reserved Instances for cost savings. To learn more, visit the Amazon Redshift Pricing page.

Give RG instances a try in the Redshift console and send feedback to AWS re:Post for Amazon Redshift or through your usual AWS Support contacts.

Channy

AWS Weekly Roundup: Amazon Bedrock AgentCore payments, Agent Toolkit for AWS, and more (May 11, 2026)

Post Syndicated from Channy Yun (윤석찬) original https://aws.amazon.com/blogs/aws/aws-weekly-roundup-amazon-bedrock-agentcore-payments-agent-toolkit-for-aws-and-more-may-11-2026/

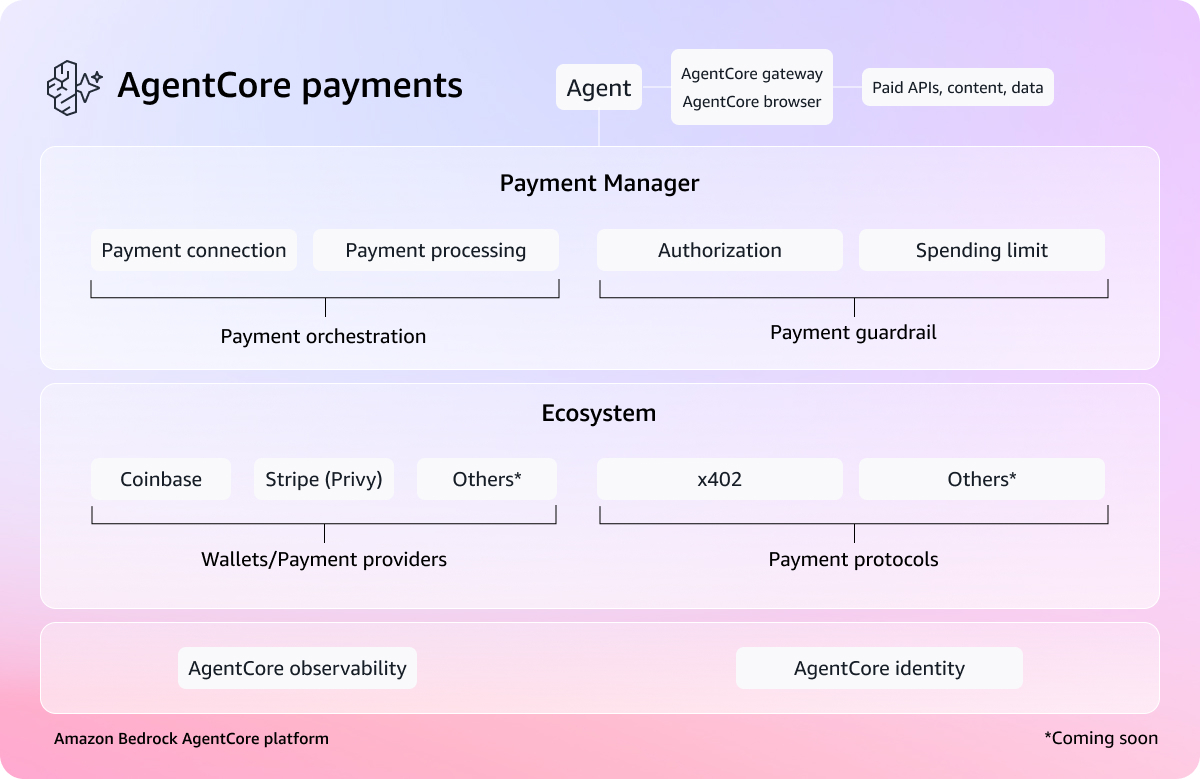
My most exciting news of last week: Amazon Bedrock AgentCore previewed the first managed payment capabilities enabling AI agents to autonomously access and pay for APIs, MCP servers, web content, and other agents. Built in partnership with Coinbase and Stripe, it removes the undifferentiated heavy lifting of building customized systems for billing, credential management, and compliance.

You can connect a Coinbase CDP wallet or Stripe Privy wallet as a payment connection, set session-level spending limits, and your agent transacts autonomously during execution. What excites me most is what AgentCore payments can unlock—like a research agent that can pay for real-time market data on the fly, or a coding agent calling paid APIs mid-task.

To learn more, visit the blog post, dive deeper using the documentation, and get started with the AgentCore CLI.

Last week’s launches
Here are last week’s launches that caught my attention:

  • Agent Toolkit for AWS – A production-ready suite of tools and guidance, available at no additional charge, that helps AI coding agents build on AWS with fewer errors, lower token costs, and enterprise-grade security controls. The Agent Toolkit for AWS is the successor to the MCP servers, plugins, and skills available on AWS Labs. To get started, visit the quick start guide or browse the available skills and plugins on GitHub.
  • AWS MCP Server GA – You can use a managed remote Model Context Protocol (MCP) server that gives AI agents and coding assistants secure, authenticated access to all AWS services through a small, fixed set of tools. It is part of the Agent Toolkit for AWS. To learn more, visit Seb Stormacq’s blog post.
  • Amazon WorkSpaces for AI agents (Preview) – You can use AI agents to securely access and operate desktop applications through managed WorkSpaces environments. This capability allows organizations to automate everyday workflows at scale while maintaining full enterprise-grade governance and compliance. To learn more, visit Micah Walter’s blog post.
  • Amazon EC2 M8idn/M8idb and R8idn/R8idb instances – These instances are powered by custom sixth-generation Intel Xeon Scalable processors available only on AWS and the latest sixth-generation AWS Nitro cards. These instances deliver up to 43% better compute performance per vCPU compared to previous-generation instances. M8idn/R8idn instances offer up to 600 Gbps network bandwidth, and M8idb/R8idb instances deliver up to 300 Gbps EBS bandwidth.

For a full list of AWS announcements, be sure to keep an eye on the What’s New with AWS page.

Additional updates
Here are some additional news items that you might find interesting:

  • Valkey turns two – Valkey stands as proof that open, community-driven technology innovates faster, scales further, and delivers more value than any single-vendor model. Valkey has surpassed 100 million Docker pulls (up 17x year over year) and attracted more than 225 contributors who have submitted over 1,500 pull requests, roughly double the development pace of Redis over the same period. You can also use the latest Valkey 9.0 in Amazon ElastiCache.
  • Query billion-scale vectors with SQL – You can learn how to query Amazon S3 Vectors from Amazon Aurora PostgreSQL-Compatible Edition using standard SQL, and how to combine vector similarity results with relational filters in a single query, for example, finding the most semantically similar products and then filtering by price, stock status, or tenant in one SQL statement.
  • Building an end-to-end agentic SRE using AWS DevOps Agent – Learn how to configure DevOps Agent Spaces that define an investigation scope, integrating seamlessly with Amazon CloudWatch, Splunk, GitHub, and Slack. You can also learn how to trigger automated investigations via webhooks, generate mitigation plans, and hand off agent-ready specs to coding agents like Kiro for implementation.

For a full list of AWS blog posts, be sure to keep an eye on the AWS Blogs page.

Learn more about AWS, browse and join upcoming AWS-led in-person and virtual events, startup events, and developer-focused events as well as AWS Summits and AWS Community Days. Join the AWS Builder Center to connect with builders, share solutions, and access content that supports your development.

That’s all for this week. Check back next Monday for another Weekly Roundup!

Channy

Introducing Anthropic’s Claude Opus 4.7 model in Amazon Bedrock

Post Syndicated from Channy Yun (윤석찬) original https://aws.amazon.com/blogs/aws/introducing-anthropics-claude-opus-4-7-model-in-amazon-bedrock/

Today, we’re announcing Claude Opus 4.7 in Amazon Bedrock, Anthropic’s most intelligent Opus model for advancing performance across coding, long-running agents, and professional work.

Claude Opus 4.7 is powered by Amazon Bedrock’s next generation inference engine, delivering enterprise-grade infrastructure for production workloads. Bedrock’s new inference engine has brand-new scheduling and scaling logic which dynamically allocates capacity to requests, improving availability particularly for steady-state workloads while making room for rapidly scaling services. It provides zero operator access—meaning customer prompts and responses are never visible to Anthropic or AWS operators—keeping sensitive data private.

According to Anthropic, Claude Opus 4.7 model provides improvements across the workflows that teams run in production such as agentic coding, knowledge work, visual understanding,long-running tasks. Opus 4.7 works better through ambiguity, is more thorough in its problem solving, and follows instructions more precisely.

  • Agentic coding: The model extends Opus 4.6’s lead in agentic coding, with stronger performance on long-horizon autonomy, systems engineering, and complex code reasoning tasks. According to Anthropic, the model records high-performance scores with 64.3% on SWE-bench Pro, 87.6% on SWE-bench Verified, and 69.4% on Terminal-Bench 2.0.
  • Knowledge work: The model advances professional knowledge work, with stronger performance on document creation, financial analysis, and multi-step research workflows. The model reasons through underspecified requests, making sensible assumptions and stating them clearly, and self-verifies its output to improve quality on the first step. According to Anthropic, the model reaches 64.4% on Finance Agent v1.1.
  • Long-running tasks: The model stays on track over longer horizons, with stronger performance over its full 1M token context window as it reasons through ambiguity and self-verifies its output.
  • Vision: the model adds high-resolution image support, improving accuracy on charts, dense documents, and screen UIs where fine detail matters.

The model is an upgrade from Opus 4.6 but may require prompting changes and harness tweaks to get the most out of the model. To learn more, visit Anthropic’s prompting guide.

Claude Opus 4.7 model in action
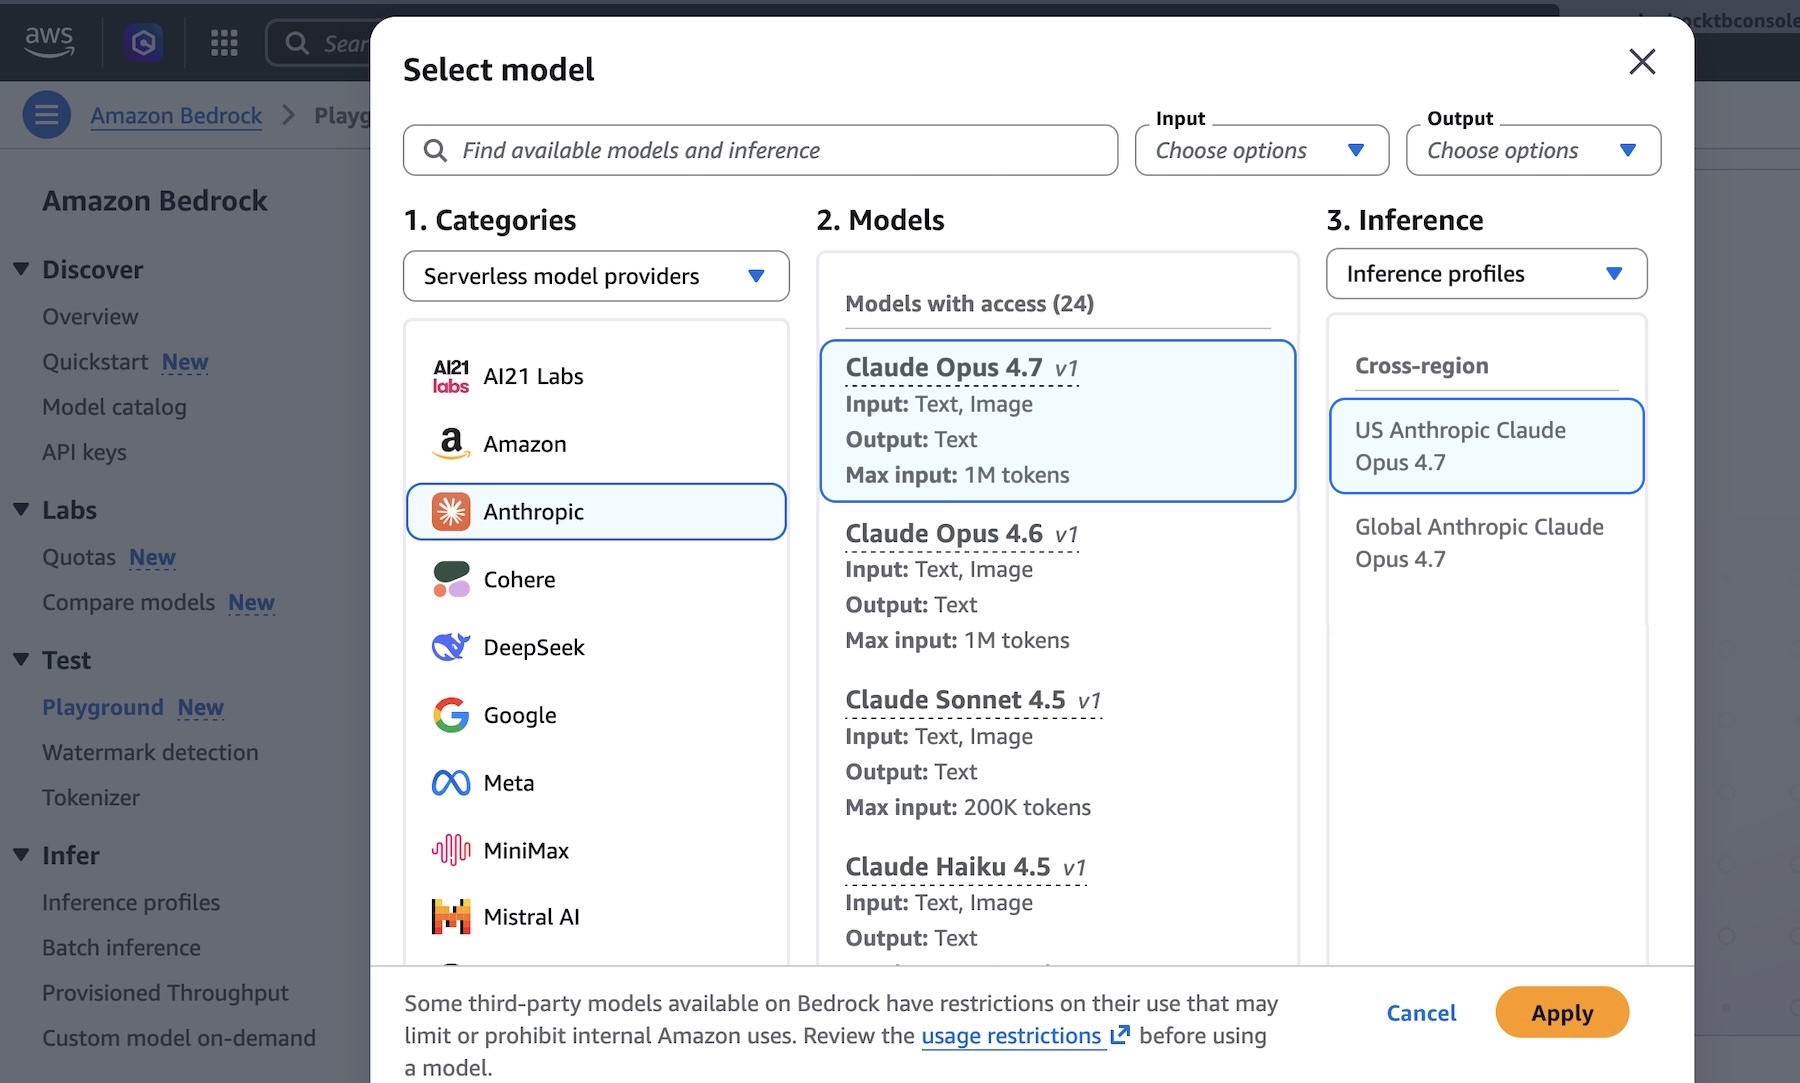
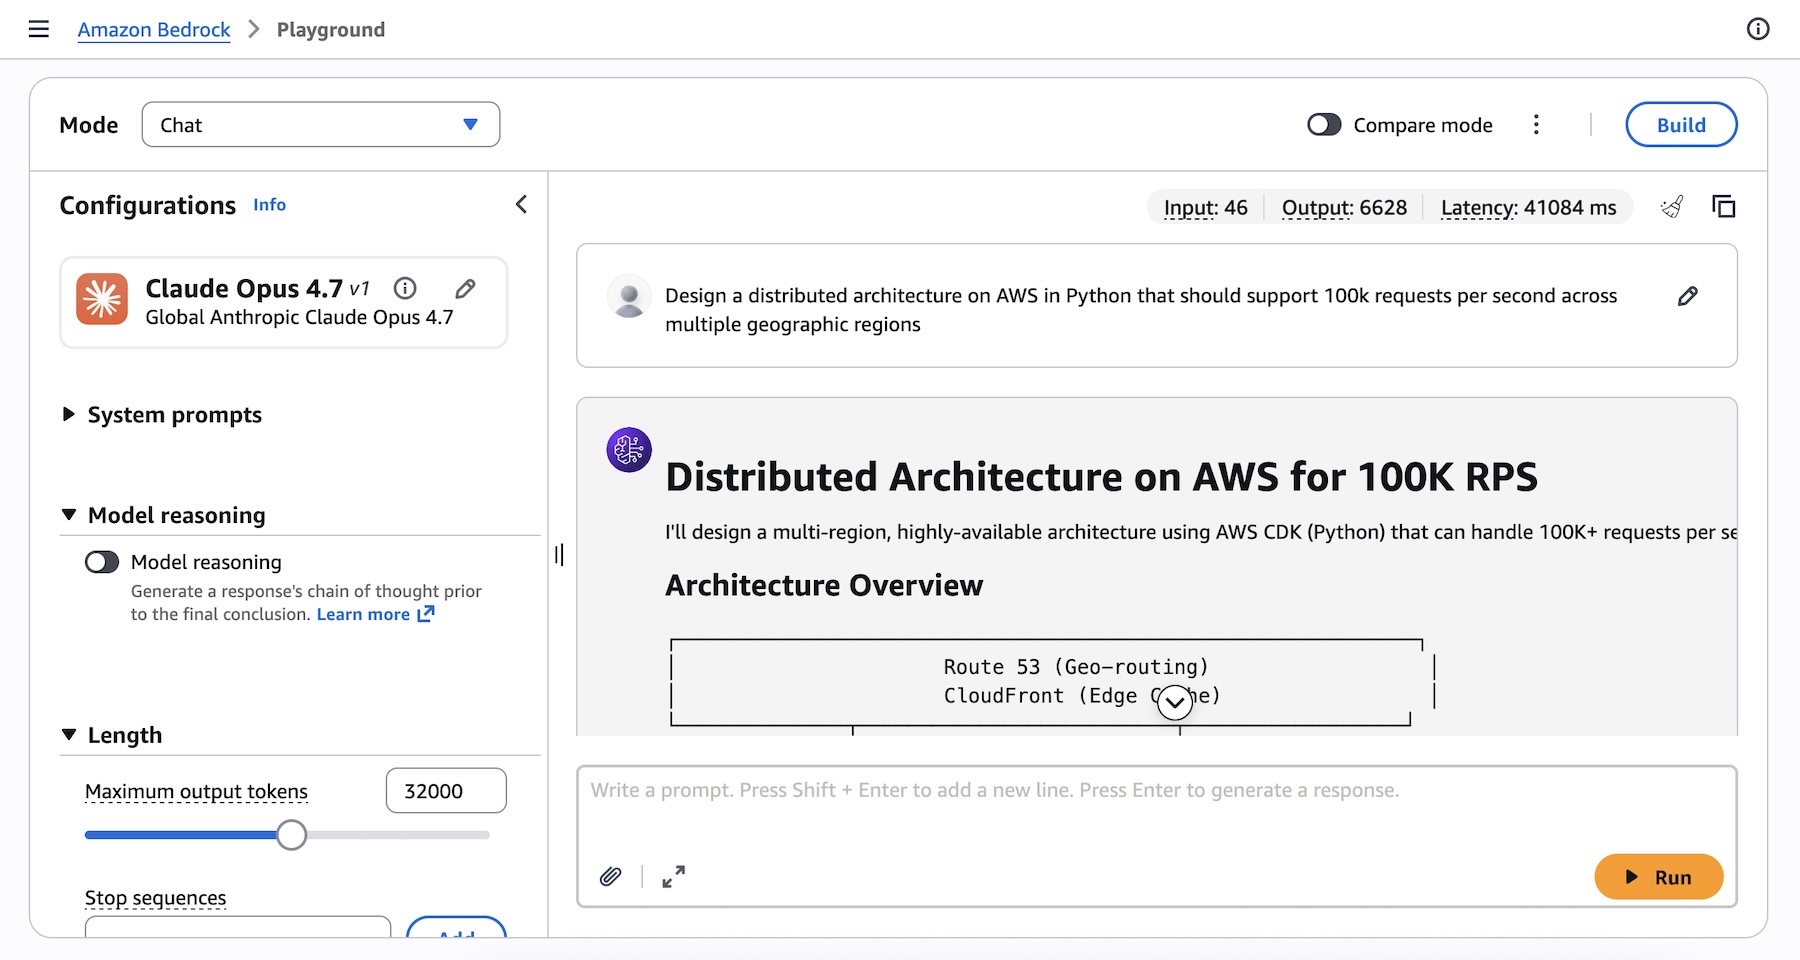
You can get started with Claude Opus 4.7 model in Amazon Bedrock console. Choose Playground under Test menu and choose Claude Opus 4.7 when you select model. Now, you can test your complex coding prompt with the model.

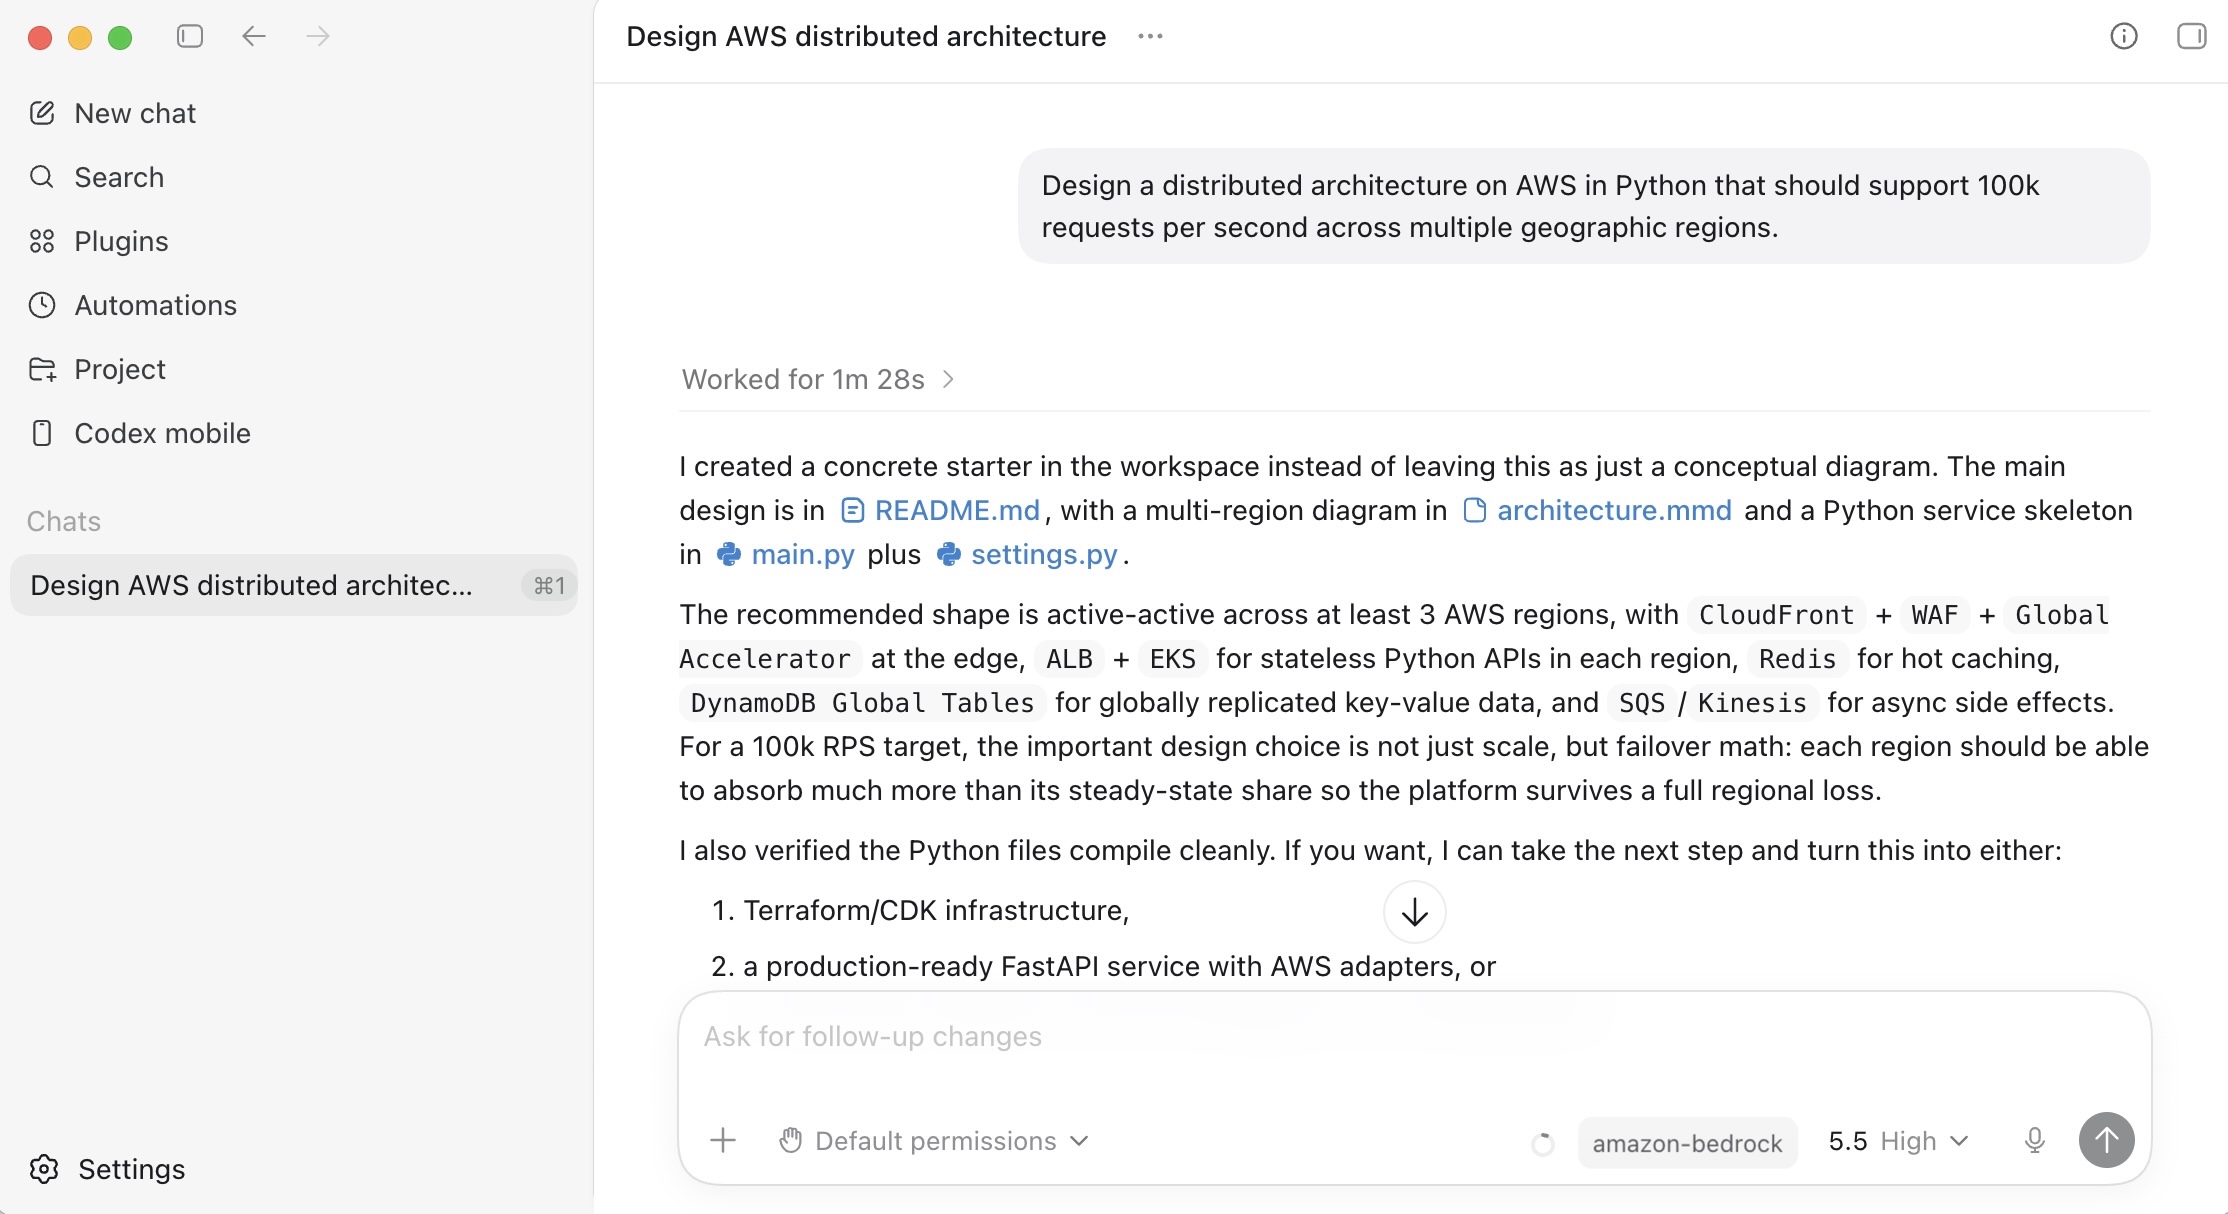
I run the following prompt example about technical architecture decision:
Design a distributed architecture on AWS in Python that should support 100k requests per second across multiple geographic regions.

You can also access the model programmatically using the Anthropic Messages API to call the bedrock-runtime through Anthropic SDK or bedrock-mantle endpoints, or keep using the Invoke and Converse API on bedrock-runtime through the AWS Command Line Interface (AWS CLI) and AWS SDK.

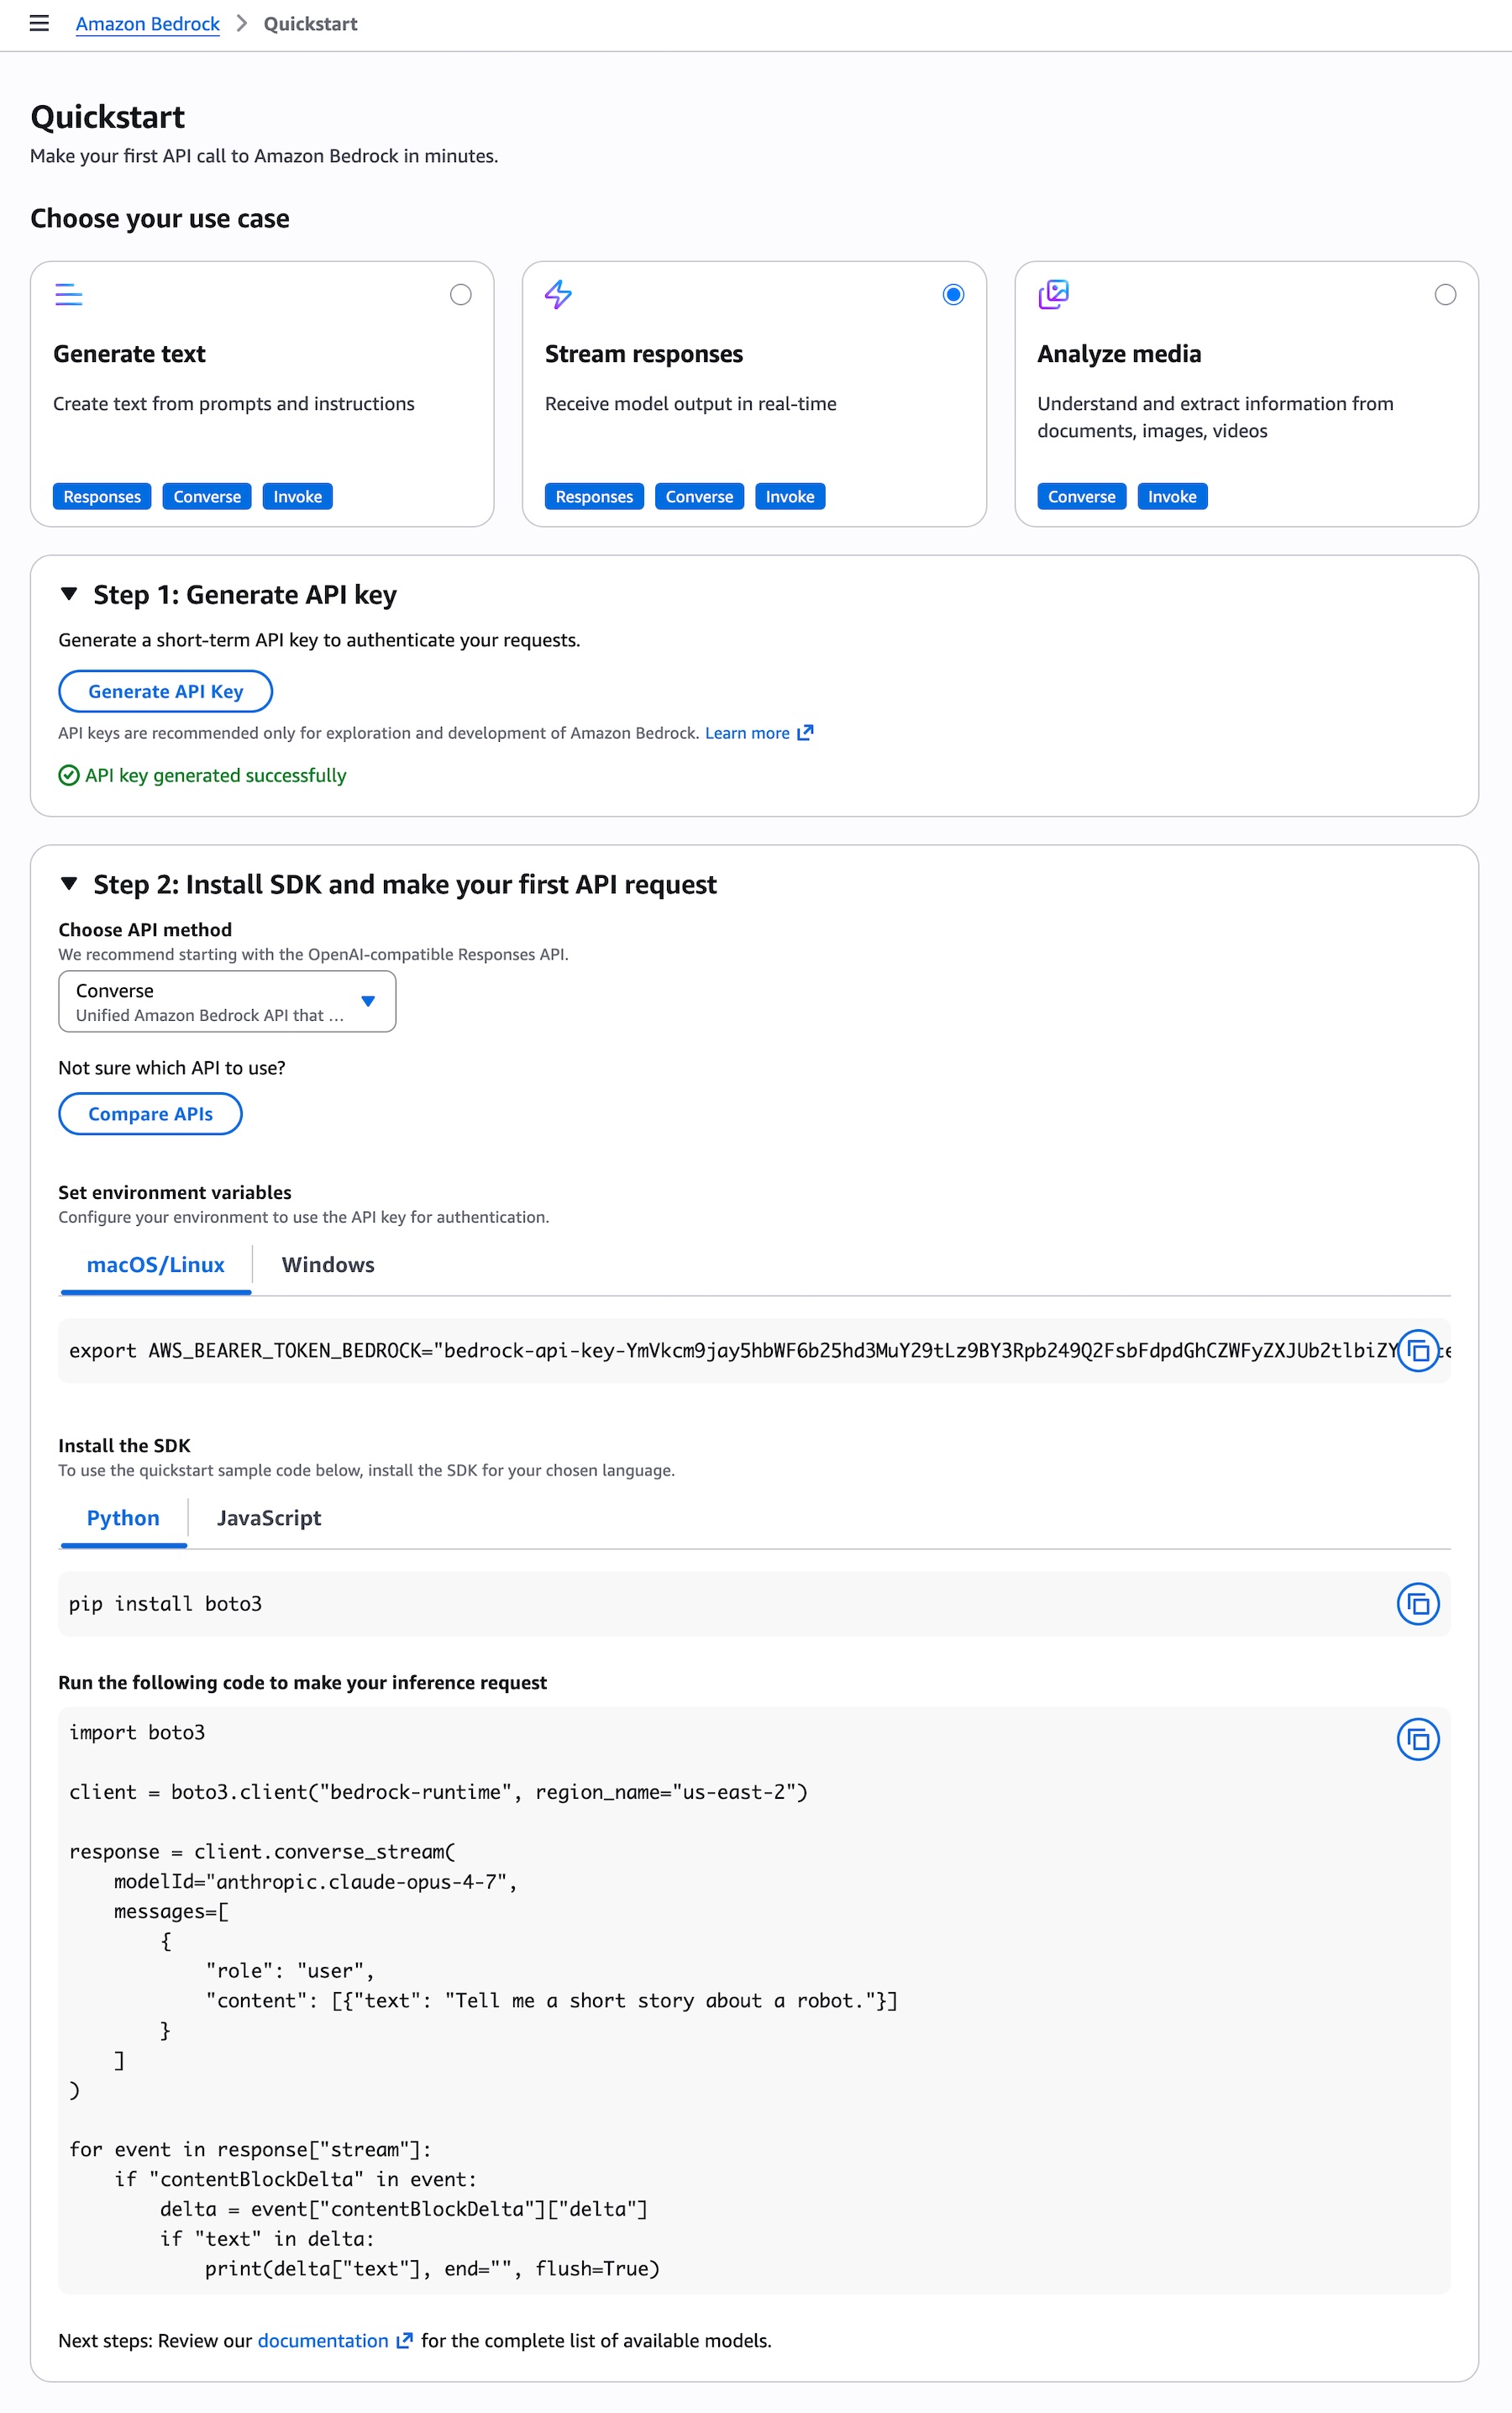
To get started with making your first API call to Amazon Bedrock in minutes, choose Quickstart in the left navigation pane in the console. After choosing your use case, you can generate a short term API key to authenticate your requests as testing purpose.

When you choose the API method such as the OpenAI-compatible Responses API, you can get sample codes to run your prompt to make your inference request using the model.


To invoke the model through the Anthropic Claude Messages API, you can proceed as follows using anthropic[bedrock] SDK package for a streamlined experience:

from anthropic import AnthropicBedrockMantle
# Initialize the Bedrock Mantle client (uses SigV4 auth automatically)
mantle_client = AnthropicBedrockMantle(aws_region=REGION)
# Create a message using the Messages API
message = mantle_client.messages.create(
    model="anthropic.claude-opus-4-7",
    max_tokens=2048,
    messages=[ 
	    {"role": "user", "content": "Design a distributed architecture on AWS in Python that should support 100k requests per second across multiple geographic regions"}
    ]
)
print(message.content[0].text)

You can also run the following command to invoke the model directly to bedrock-runtime endpoint using the AWS CLI and the Invoke API:

aws bedrock-runtime invoke-model \ 
 --model-id anthropic.claude-opus-4-7 \ 
 --region us-east-1 \ 
 --body '{"messages": [{"role": "user", "content": "Design a distributed architecture on AWS in Python that should support 100k requests per second across multiple geographic regions."}], "max_tokens": 512, "temperature": 0.5, "top_p": 0.9}' \ 
 --cli-binary-format raw-in-base64-out \ 
invoke-model-output.txt

For more intelligent reasoning capability, you can use Adaptive thinking with Claude Opus 4.7, which lets Claude dynamically allocate thinking token budgets based on the complexity of each request.

To learn more, visit the Anthropic Claude Messages API and check out code examples for multiple use cases and a variety of programming languages.

Things to know
Let me share some important technical details that I think you’ll find useful.

  • Choosing APIs: You can choose from a variety of Bedrock APIs for model inference, as well as the Anthropic Messages API. The Bedrock-native Converse API supports multi-turn conversations and Guardrails integration. The Invoke API provides direct model invocation and lowest-level control.
  • Scaling and capacity: Bedrock’s new inference engine is designed to rapidly provision and serve capacity across many different models. When accepting requests, we prioritize keeping steady state workloads running, and ramp usage and capacity rapidly in response to changes in demand. During periods of high demand, requests are queued, rather than rejected. Up to 10,000 requests per minute (RPM) per account per Region are available immediately, with more available upon request.

Now available
Anthropic’s Claude Opus 4.7 model is available today in the US East (N. Virginia), Asia Pacific (Tokyo), Europe (Ireland), and Europe (Stockholm) Regions; check the full list of Regions for future updates. To learn more, visit the Claude by Anthropic in Amazon Bedrock page and the Amazon Bedrock pricing page.

Give Anthropic’s Claude Opus 4.7 a try in the Amazon Bedrock console today and send feedback to AWS re:Post for Amazon Bedrock or through your usual AWS Support contacts.

Channy

AWS Weekly Roundup: AWS DevOps Agent & Security Agent GA, Product Lifecycle updates, and more (April 6, 2026)

Post Syndicated from Channy Yun (윤석찬) original https://aws.amazon.com/blogs/aws/aws-weekly-roundup-aws-devops-agent-security-agent-ga-product-lifecycle-updates-and-more-april-6-2026/

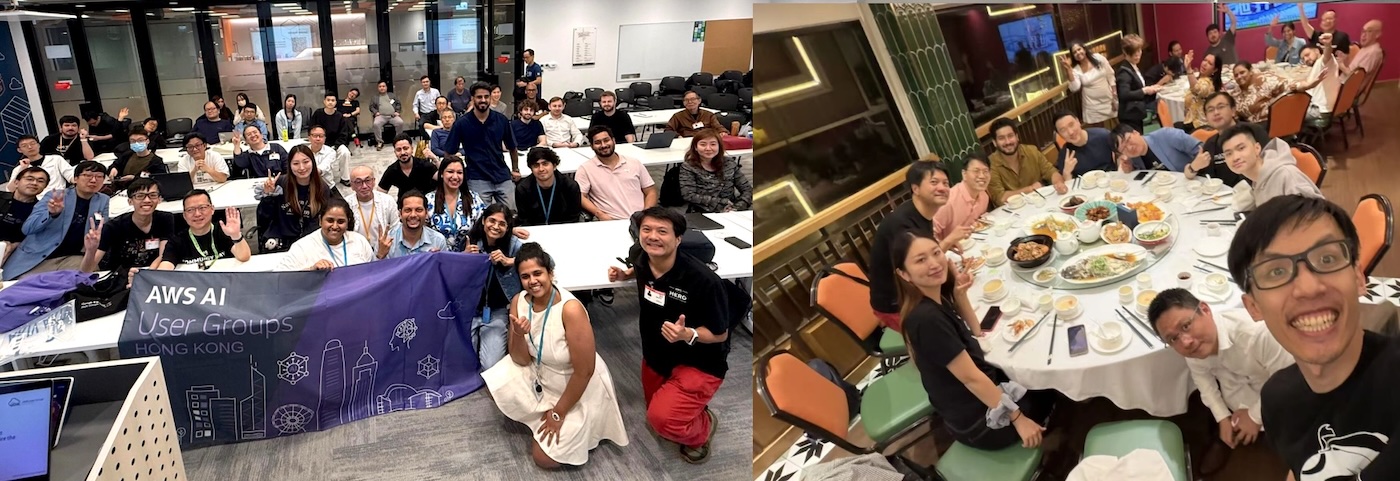
Last week, I visited AWS Hong Kong User Group with my team. Hong Kong has a small but strong community, and their energy and passion are high. They recently started a new AI user group, and we hope more people will join. I was able to strengthen my bond with the community through great food and conversation.

This week, I”ll first take a closer look at some of the key launches.

AWS DevOps Agent and Security Agent GA
At the last re:Invent, we introduced the concept of frontier agents that work autonomously across multiple steps to achieve outcomes, operating continuously until the job is done. The first two—AWS DevOps Agent and AWS Security Agent—are now generally available after the preview.
AWS DevOps Agent helps you run cloud operations—investigating incidents, reducing time to resolution, and preventing issues before they happen. Customers like United Airlines, Western Governors University, and T-Mobile are already using DevOps Agent to accelerate incident response and simplify operations at scale. At WGU, resolution time dropped from hours to minutes, and in preview customers report up to 75% lower MTTR and 3 to 5 times faster resolution. Learn more in Sébastien’s preview blog post and GA announcement.

AWS Security Agent brings continuous, context-aware penetration testing into the development lifecycle. This agent operates like a human penetration tester. Customers including LG CNS, HENNGE, and Wayspring are seeing strong results. At LG CNS, teams estimate over 50% faster testing and ~30% lower costs, along with significantly fewer false positives. Learn more in Esra’s preview blog post and GA announcement.

Both are designed to work across AWS cloud, multicloud, and on-prem environments. You can have an always-available teammate that can handle the heavy lifting, so you can focus on what matters most.

AWS Service Availability Updates
When the availability of an AWS service or feature changes, we provide customers guidance in AWS Product Lifecycle Changes on available alternatives and support for migration so that disruptions to your operations are minimized. The following lifecycle changes were updated on March 31, 2026.

We understand that changes in availability can impact your operations. For specific guidance, consult the relevant service documentation or contact AWS Support.

Last week’s launches
Here are last week’s launches that caught my attention:

For a full list of AWS announcements, be sure to keep an eye on the What’s New with AWS page.

Additional updates
Here are some additional news items that you might find interesting:

For a full list of AWS blog posts, be sure to keep an eye on the AWS Blogs page.

Learn more about AWS, browse and join upcoming AWS led in-person and virtual events, startup events, and developer-focused events as well as AWS Summits and AWS Community Days. Join the AWS Builder Center to connect with builders, share solutions, and access content that supports your development.

That’s all for this week. Check back next Monday for another Weekly Roundup!

Channy

Amazon Bedrock Guardrails supports cross-account safeguards with centralized control and management

Post Syndicated from Channy Yun (윤석찬) original https://aws.amazon.com/blogs/aws/amazon-bedrock-guardrails-supports-cross-account-safeguards-with-centralized-control-and-management/

Today, we’re announcing the general availability of cross-account safeguards in Amazon Bedrock Guardrails, a new capability that enables centralized enforcement and management of safety controls across multiple AWS accounts within an organization.

With this new capability, you can specify a guardrail in a new Amazon Bedrock policy within the management account of your organization that automatically enforces configured safeguards across all member entities for every model invocation with Amazon Bedrock. This organization-wide implementation supports uniform protection across all accounts and generative AI applications with centralized control and management. This capability also offers flexibility to apply account-level and application-specific controls depending on use case requirements in addition to organizational safeguards.

  • Organization-level enforcements apply a single guardrail from your organization’s management account to all entities within the organization through policy settings. This guardrail automatically enforces filters across all member entities, including organizational units (OUs) and individual accounts, for all Amazon Bedrock model invocations.
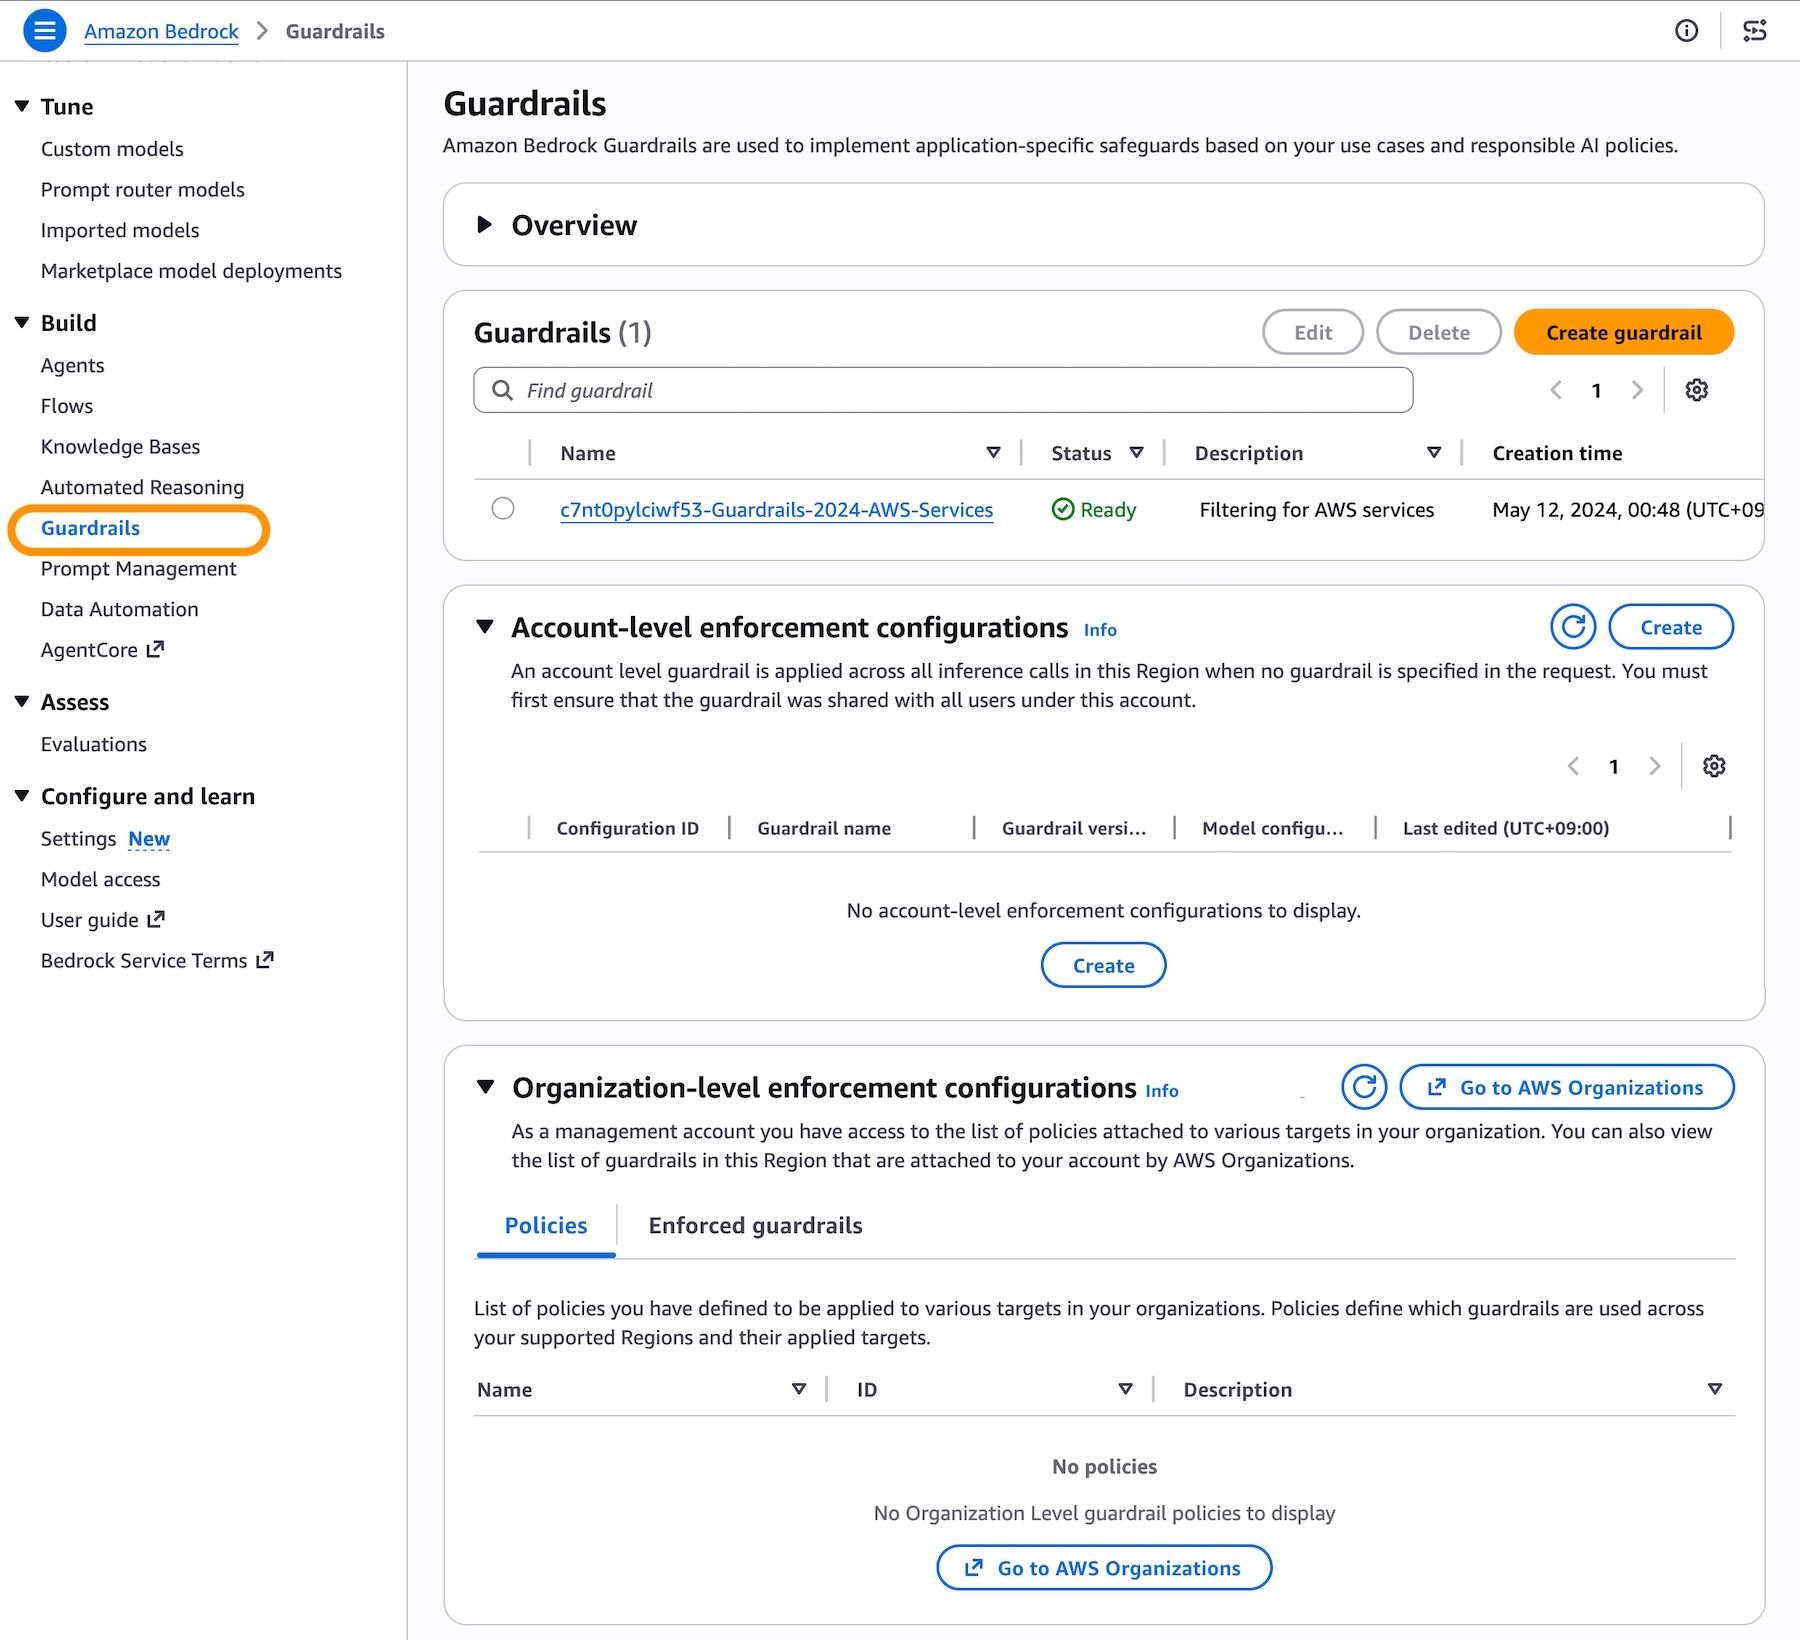
  • Account-level enforcement enables automatic enforcement of configured safeguards across all Amazon Bedrock model invocations in your AWS account. The configured safeguards in the account-level guardrail apply to all inference API calls.

You can now establish and centrally manage dependable, comprehensive protection through a single, unified approach. This supports consistent adherence to corporate responsible AI requirements while significantly reducing the administrative burden of monitoring individual accounts and applications. Your security team no longer needs to oversee and verify configurations or compliance for each account independently.

Getting started with centralized enforcement in Amazon Bedrock Guardrails
You can get started with account-level and organization-level enforcement configuration in the Amazon Bedrock Guardrails console. Before the enforcement configuration, you need to create a guardrail with a particular version to support the guardrail configuration remains immutable and cannot be modified by member accounts and complete prerequisites for using the new capability such as resource-based policies for guardrails.

To enable account-level enforcement, choose Create in the section of Account-level enforcement configurations.

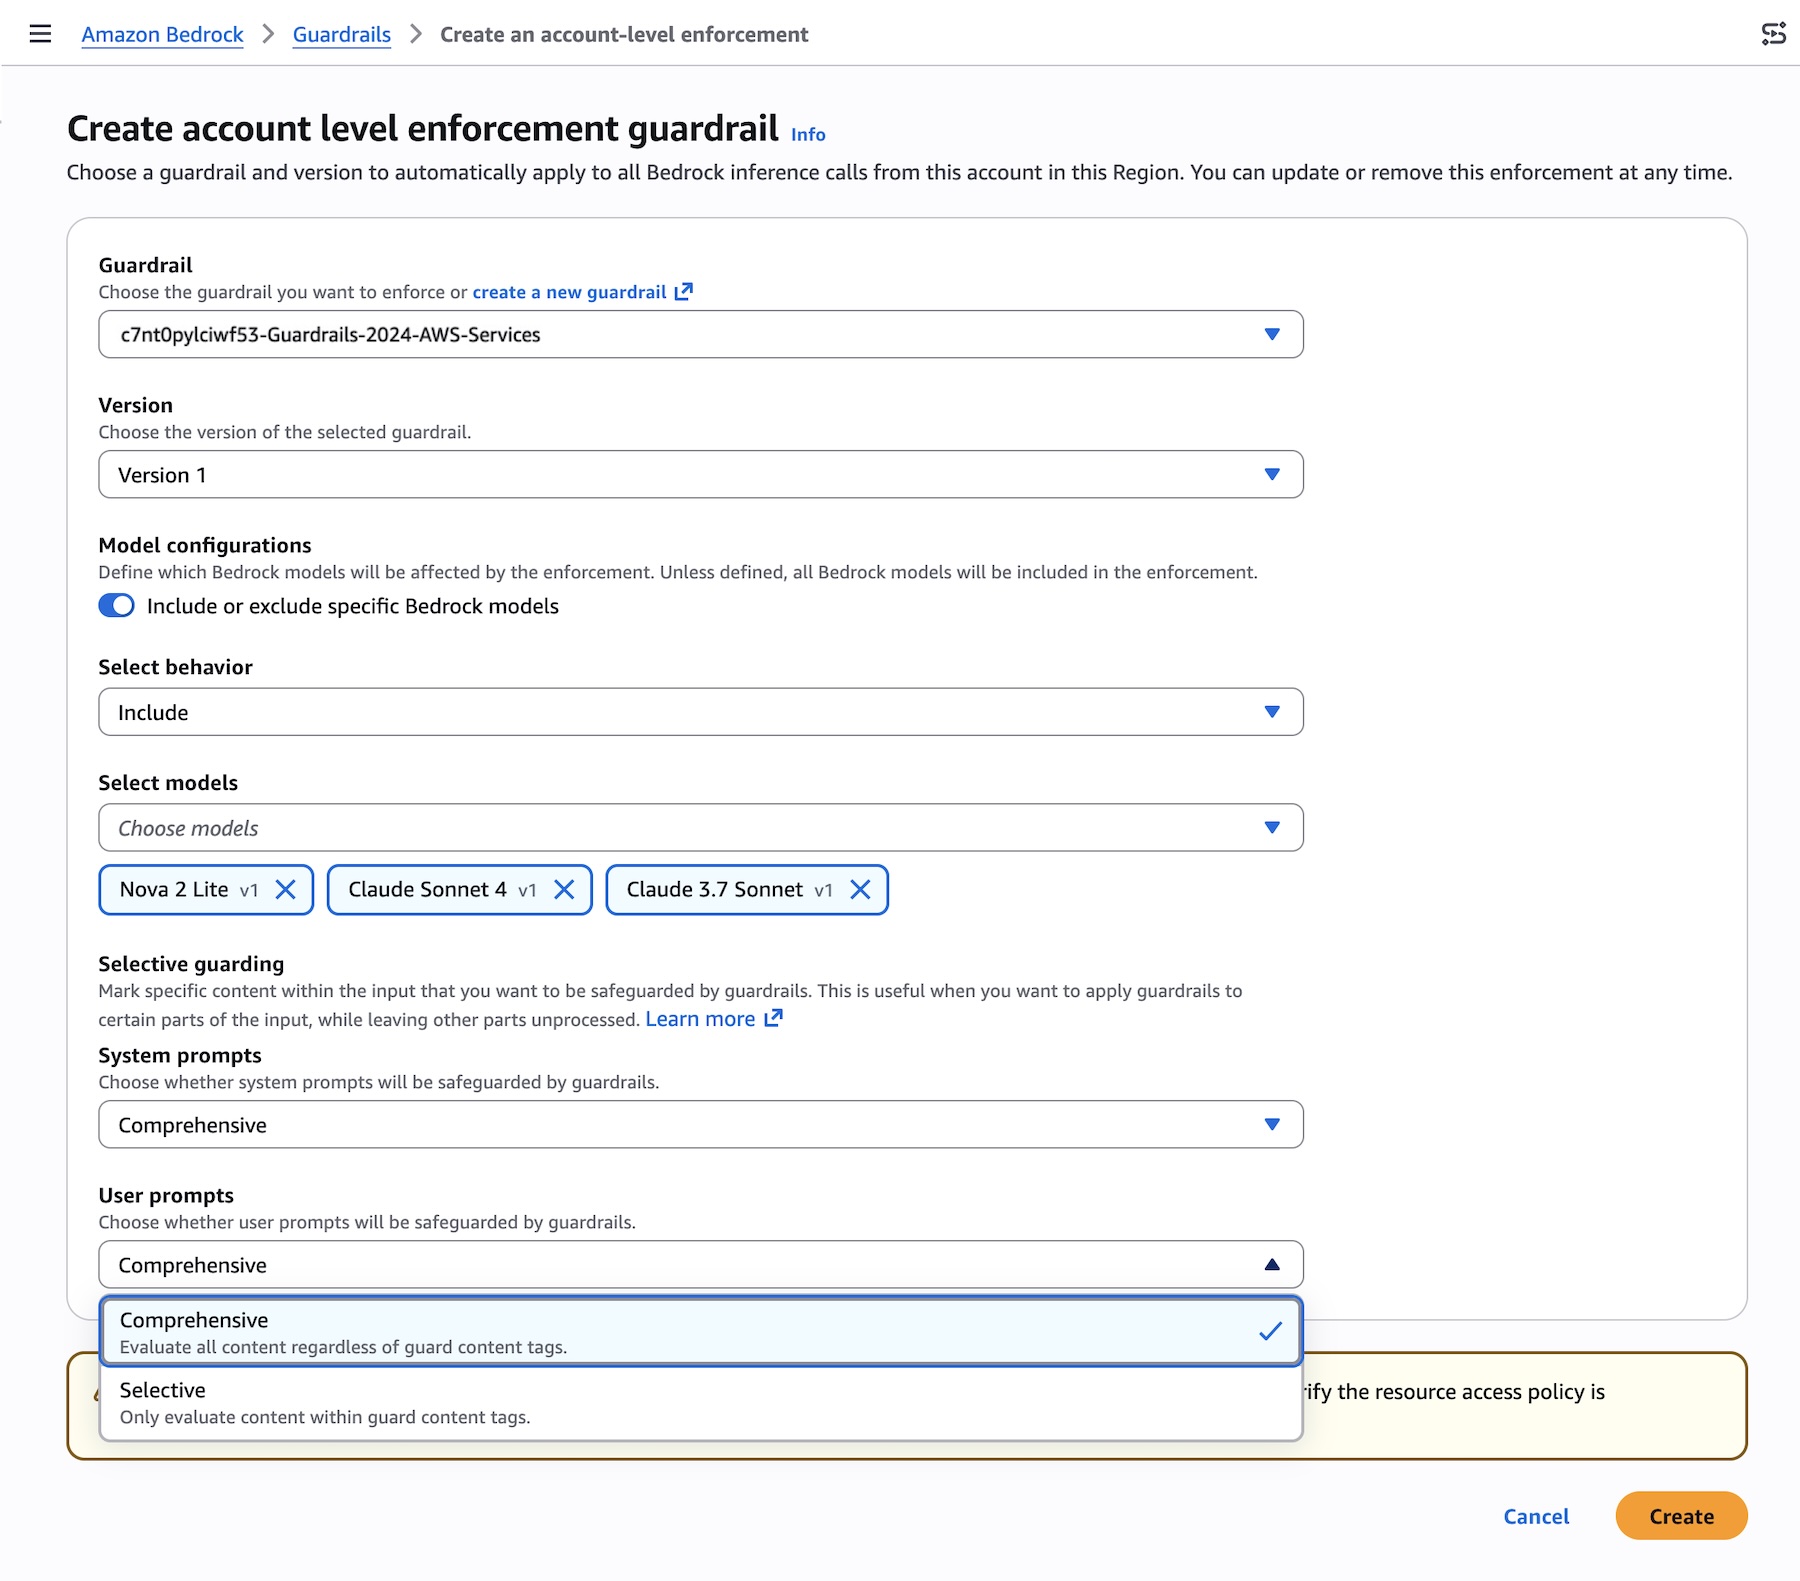
You can choose the guardrail and version to automatically apply to all Bedrock inference calls from this account in this Region. With general availability, we introduce the new feature defining which models will be affected by the enforcement with either Include or Exclude behavior.

You can also configure selective content guarding controls for system prompts and user prompts with either Comprehensive or Selective.

  • Use Comprehensive when you want to enforce guardrails on everything, regardless of what the caller tags. This is the safer default when you don’t want to rely on callers to correctly identify sensitive content.
  • Use Selective when you trust callers to tag the right content and want to reduce unnecessary guardrail processing. This is useful when callers handle a mix of pre-validated and user-generated content, and only need guardrails applied to specific portions.

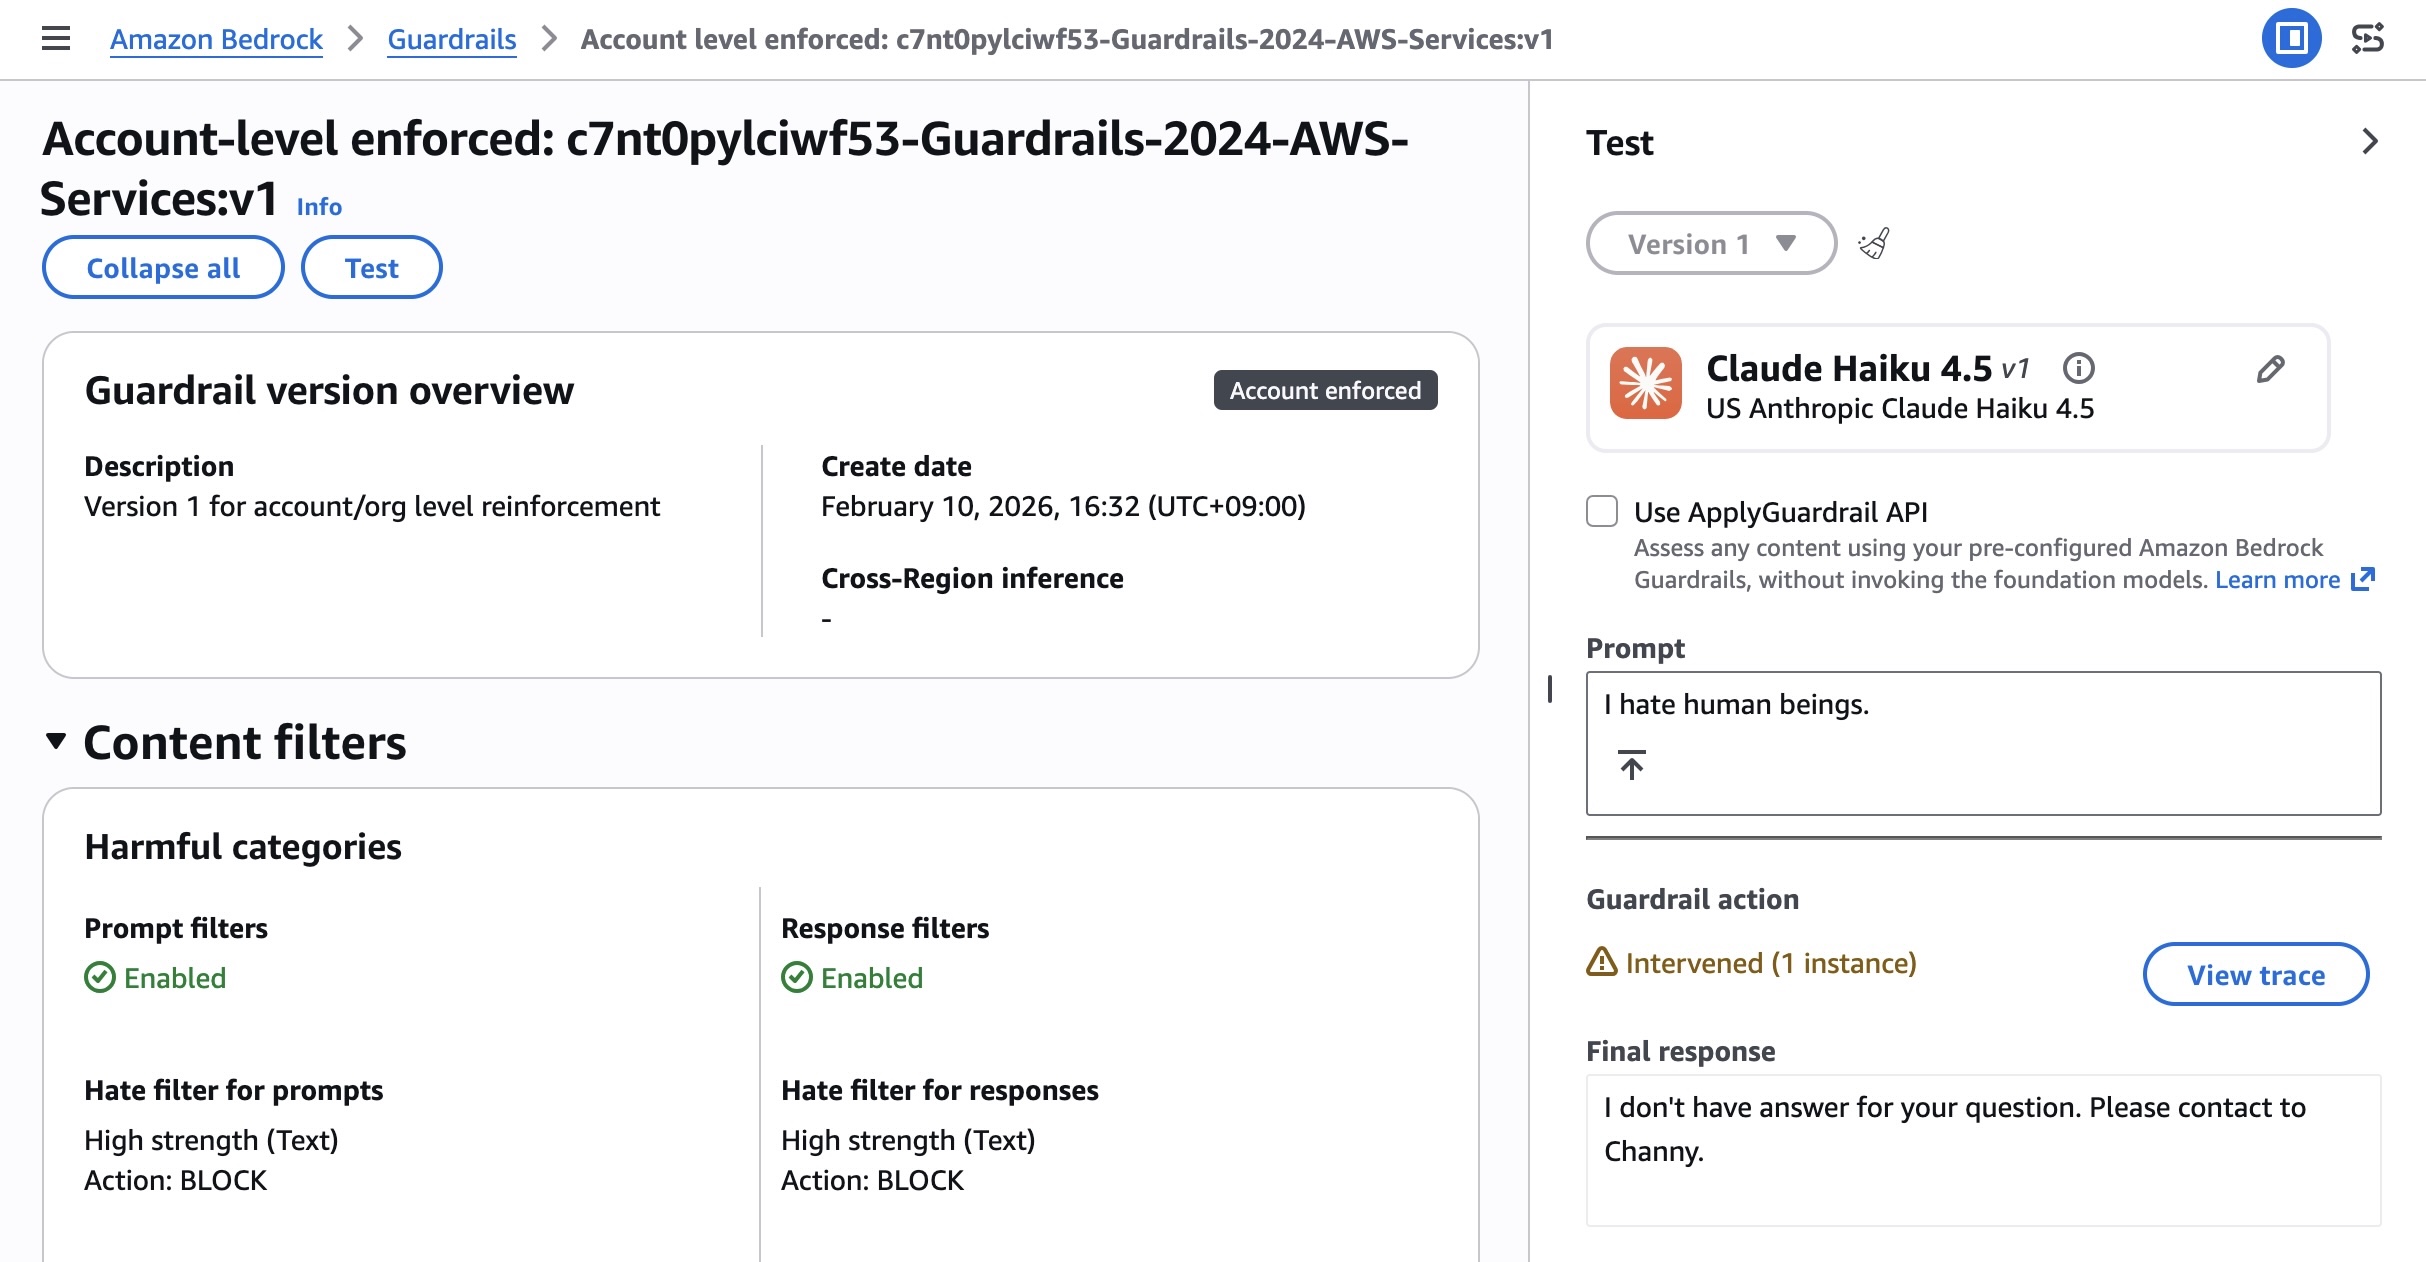
After creating the enforcement, you can test and verify enforcement using a role in your account. The account-enforced guardrail should automatically apply to both prompts and outputs.

Check the response for guardrail assessment information. The guardrail response will include enforced guardrail information. You can also test by making a Bedrock inference call using InvokeModel, InvokeModelWithResponseStream, Converse, or ConverseStream APIs.

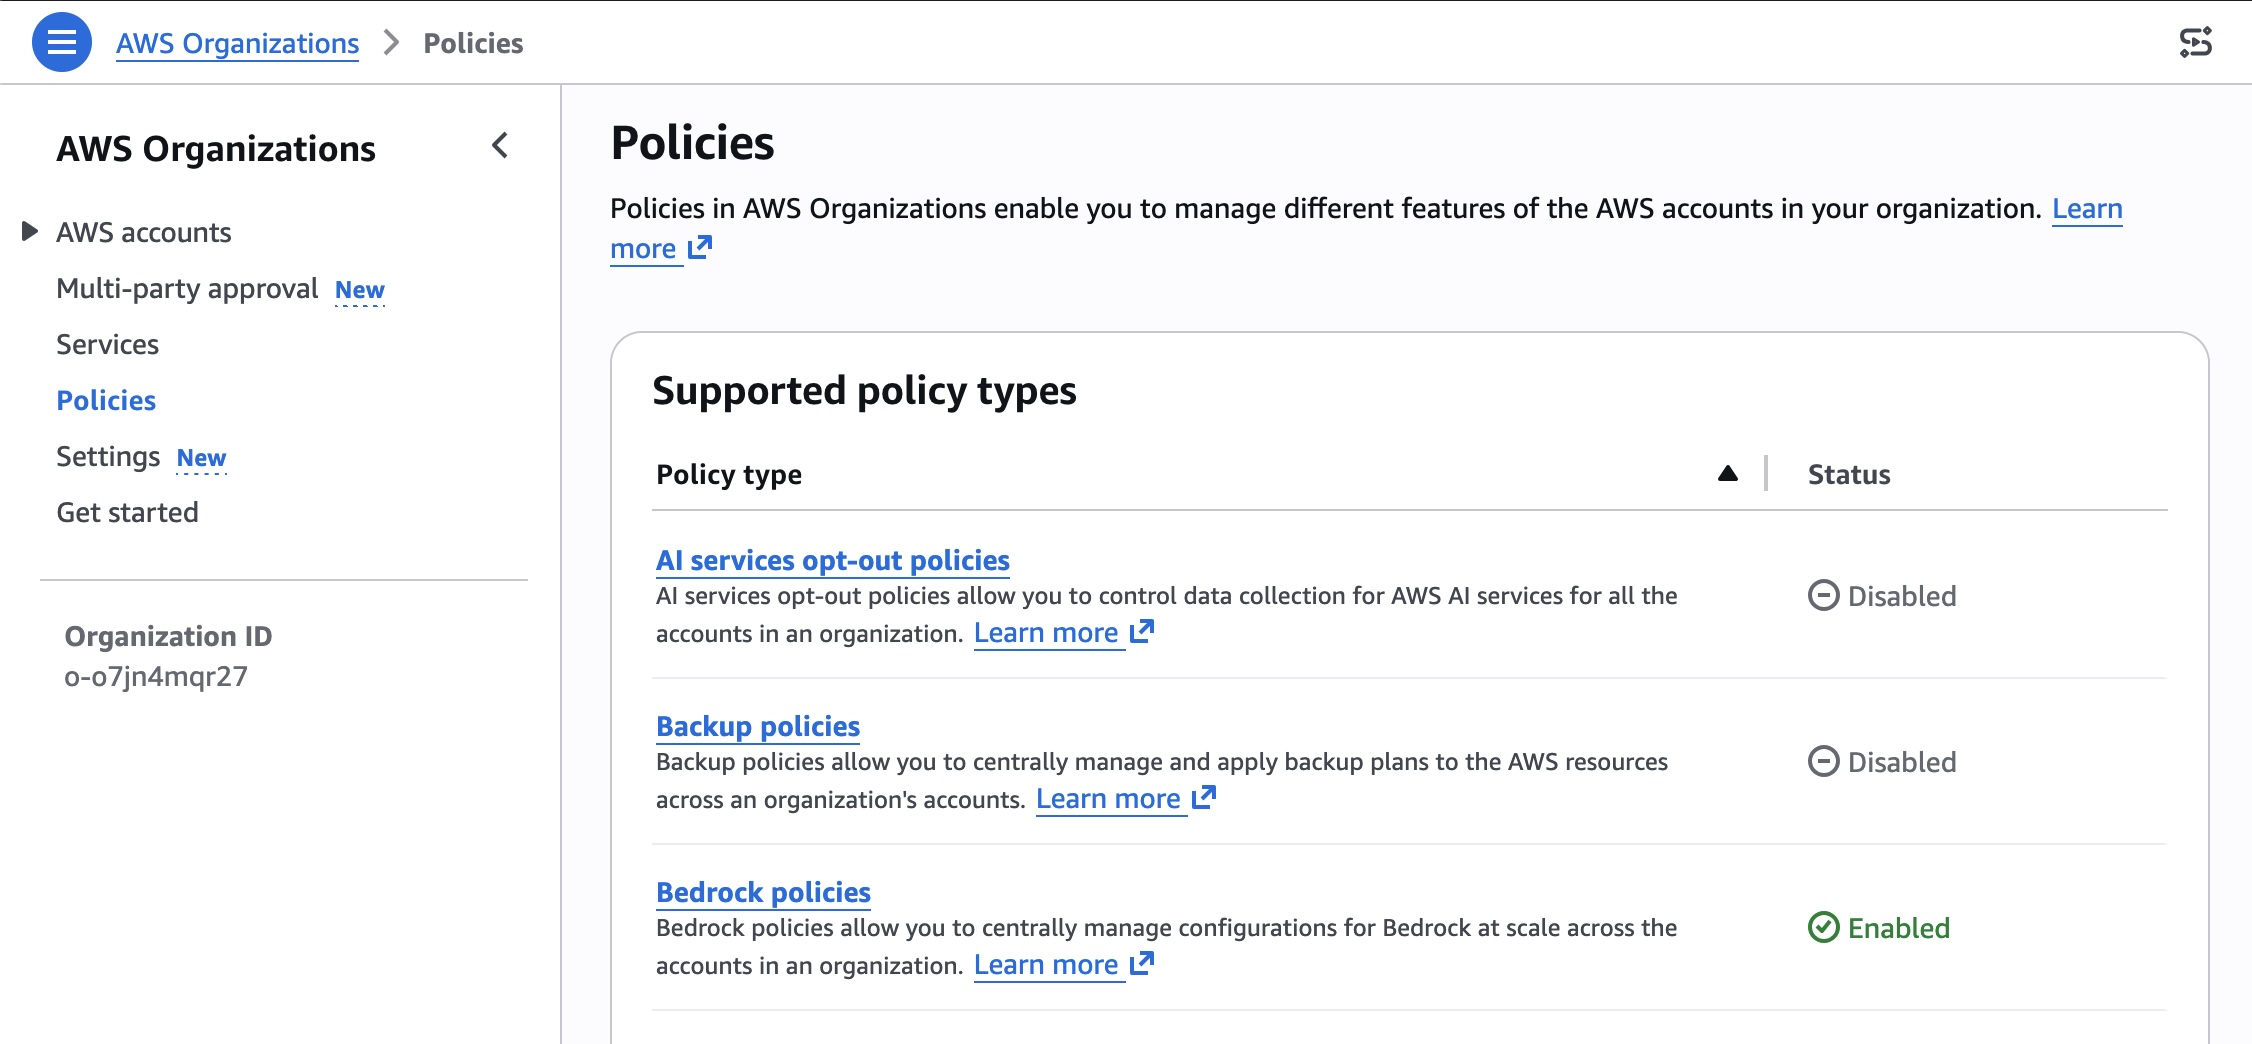
To enable organization-level enforcement, go to AWS Organizations console and choose Policies menu. You can enable the Bedrock policies in the console.

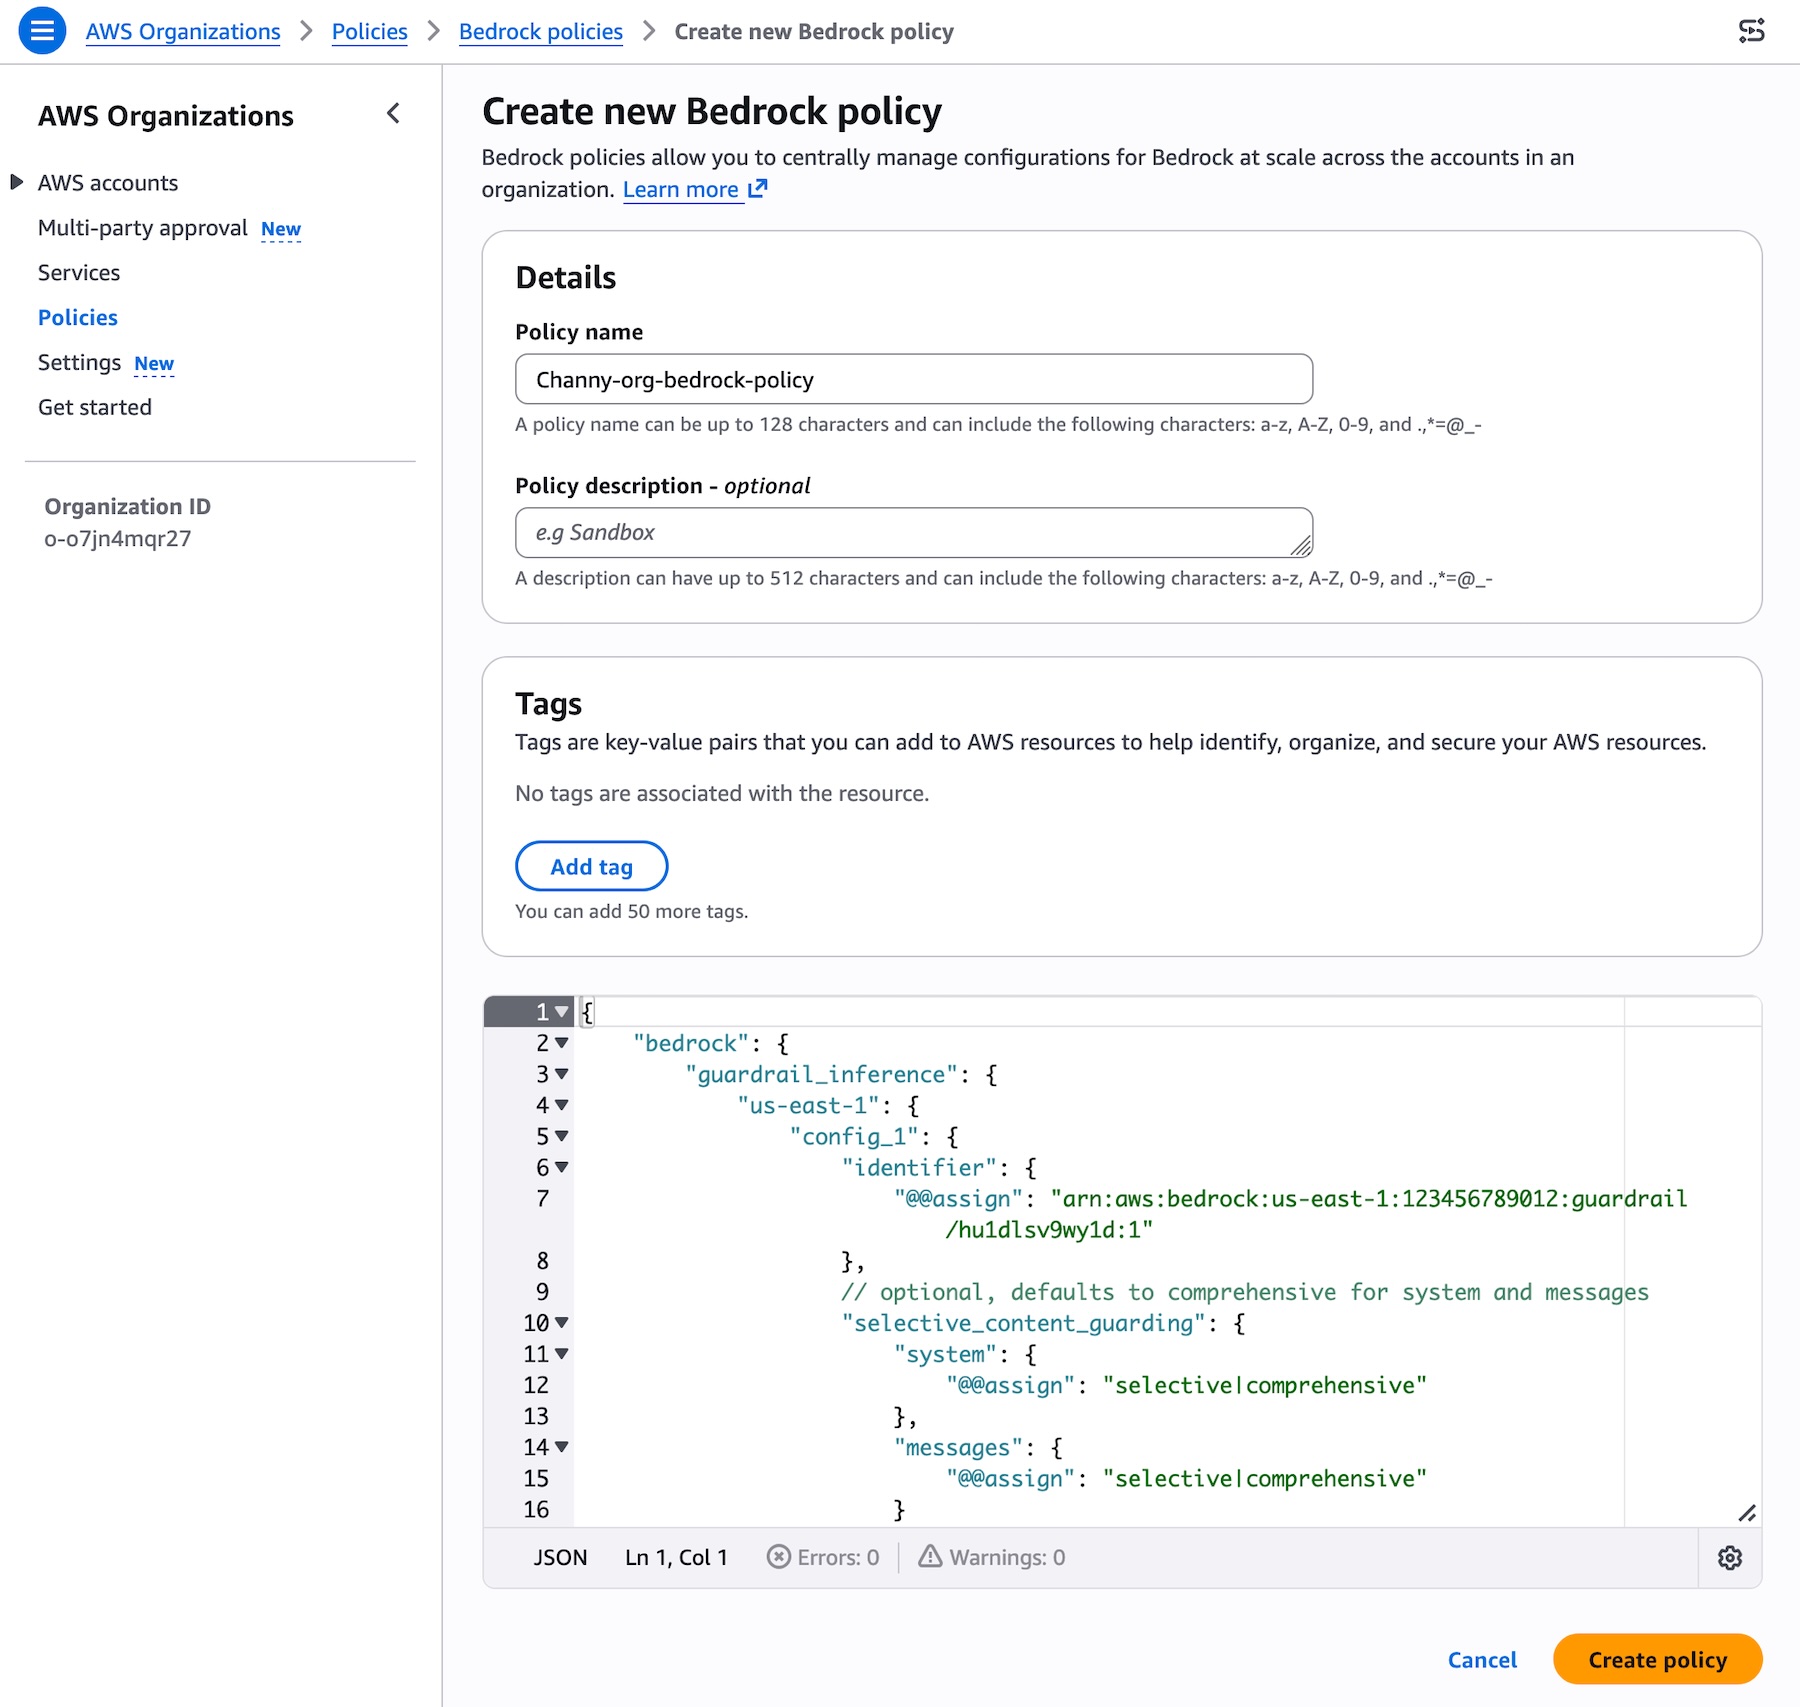
You can create a Bedrock policy that specifies your guardrail and attach it to your target accounts or OUs. Choose Bedrock policies enabled and Create policy. Specify your guardrail ARN and version and configure the input tags setting for in the AWS Organizations. To learn more, visit Amazon Bedrock policies in AWS Organizations and Amazon Bedrock policy syntax and examples.

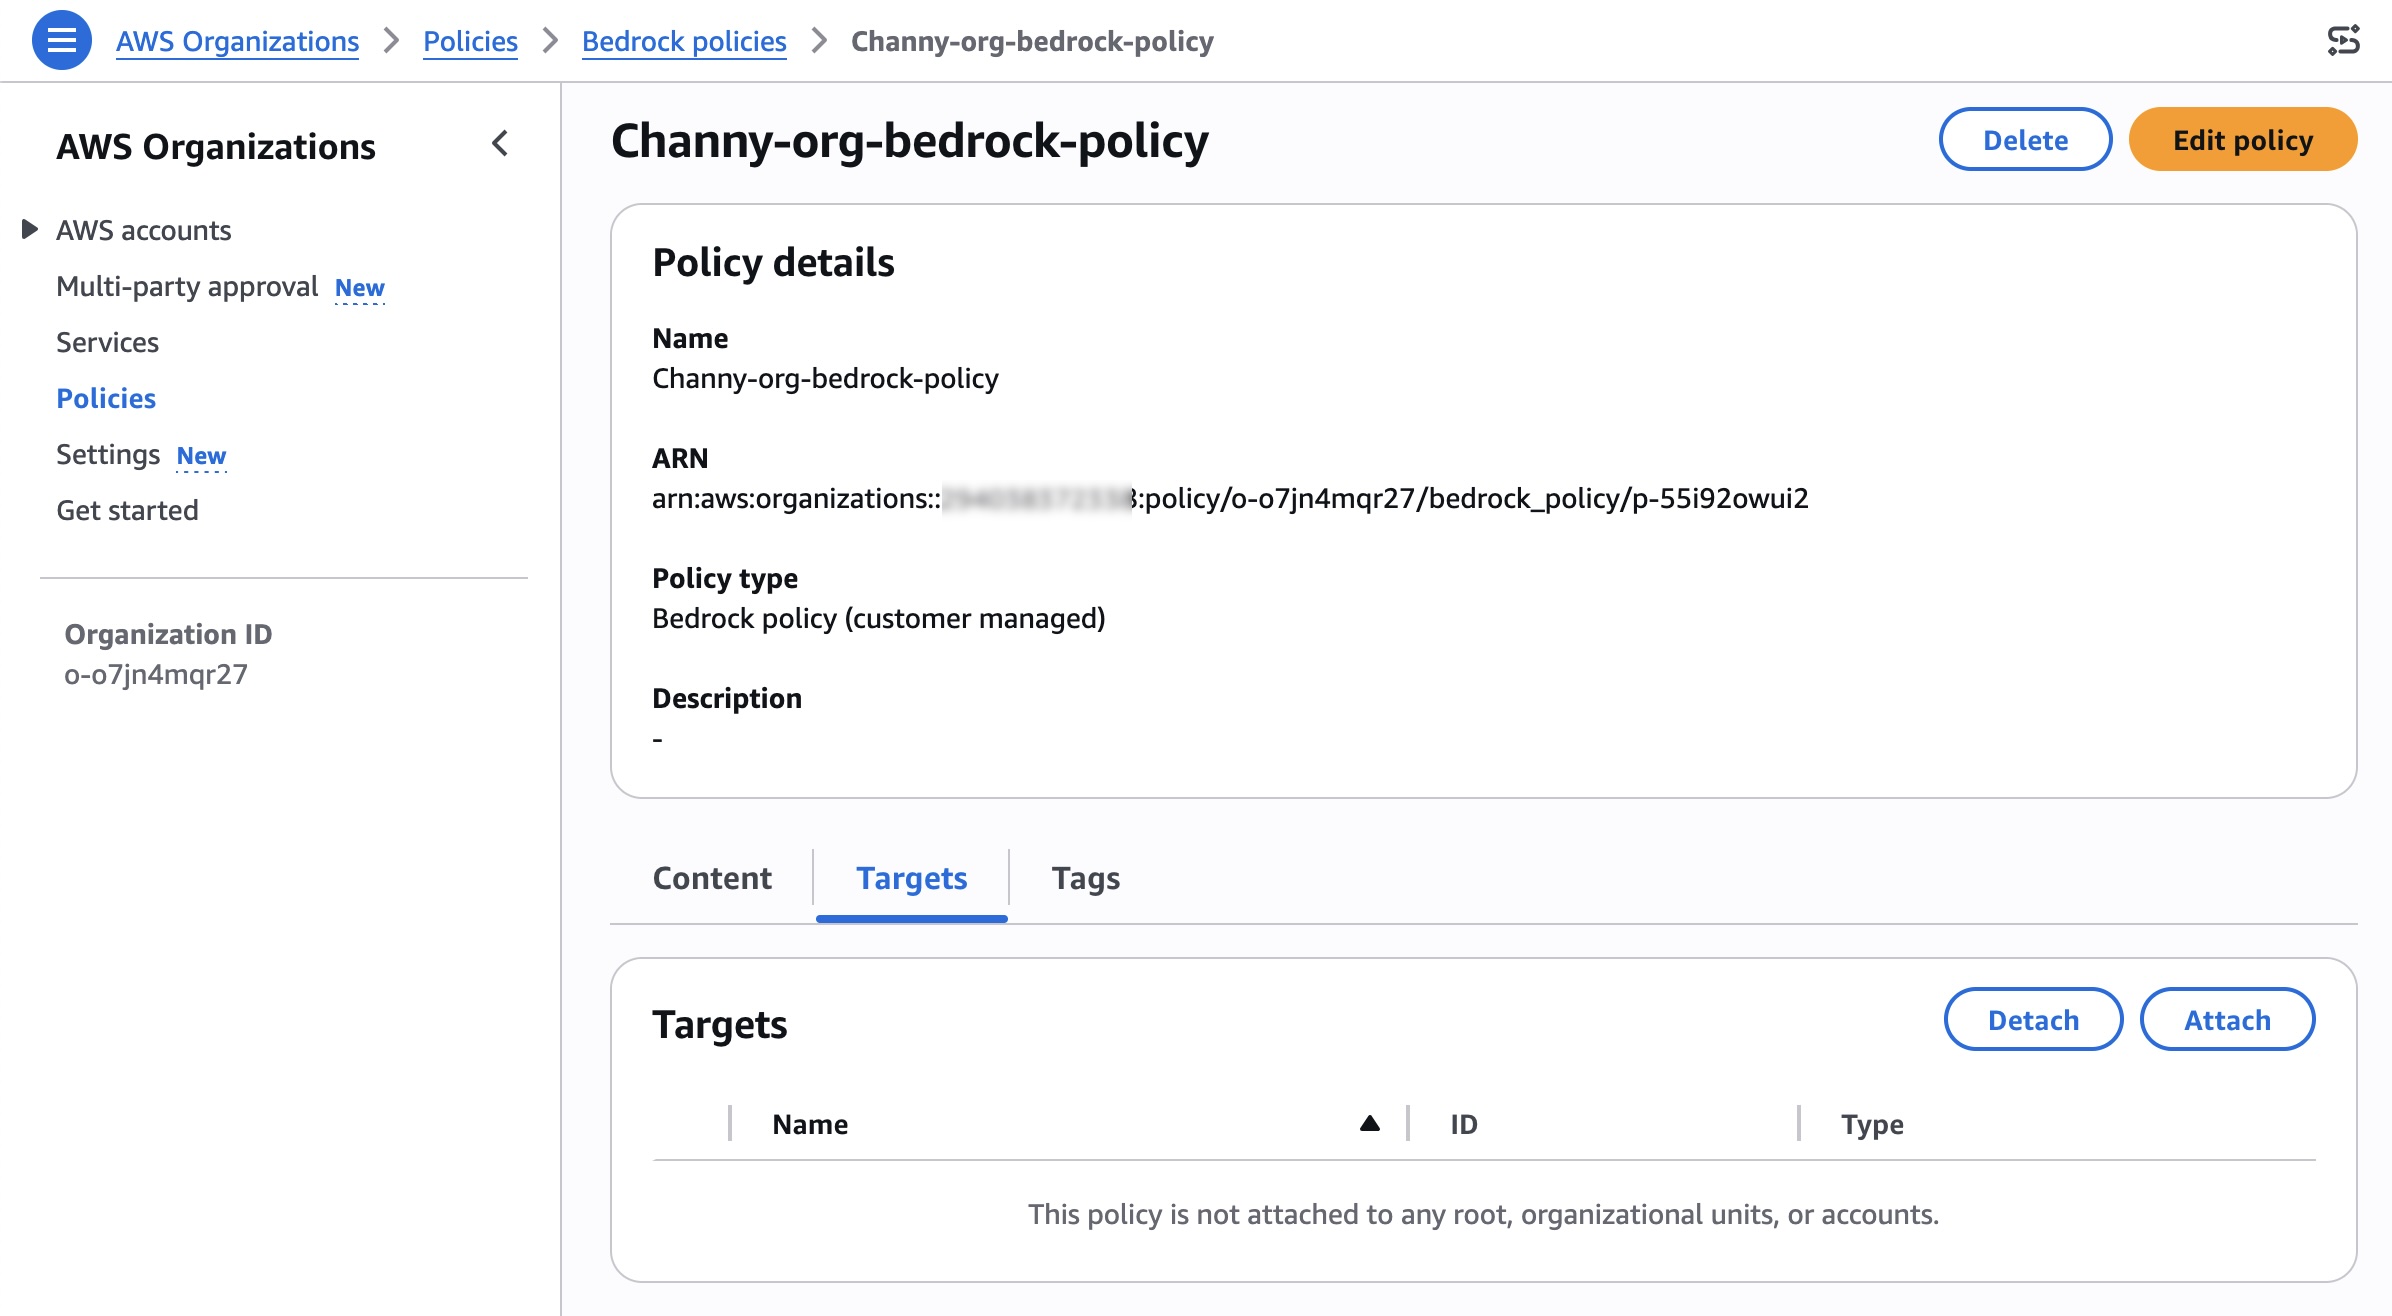
After creating the policy, you can attach the policy to your desired organizational units, accounts, root in the Targets tab.

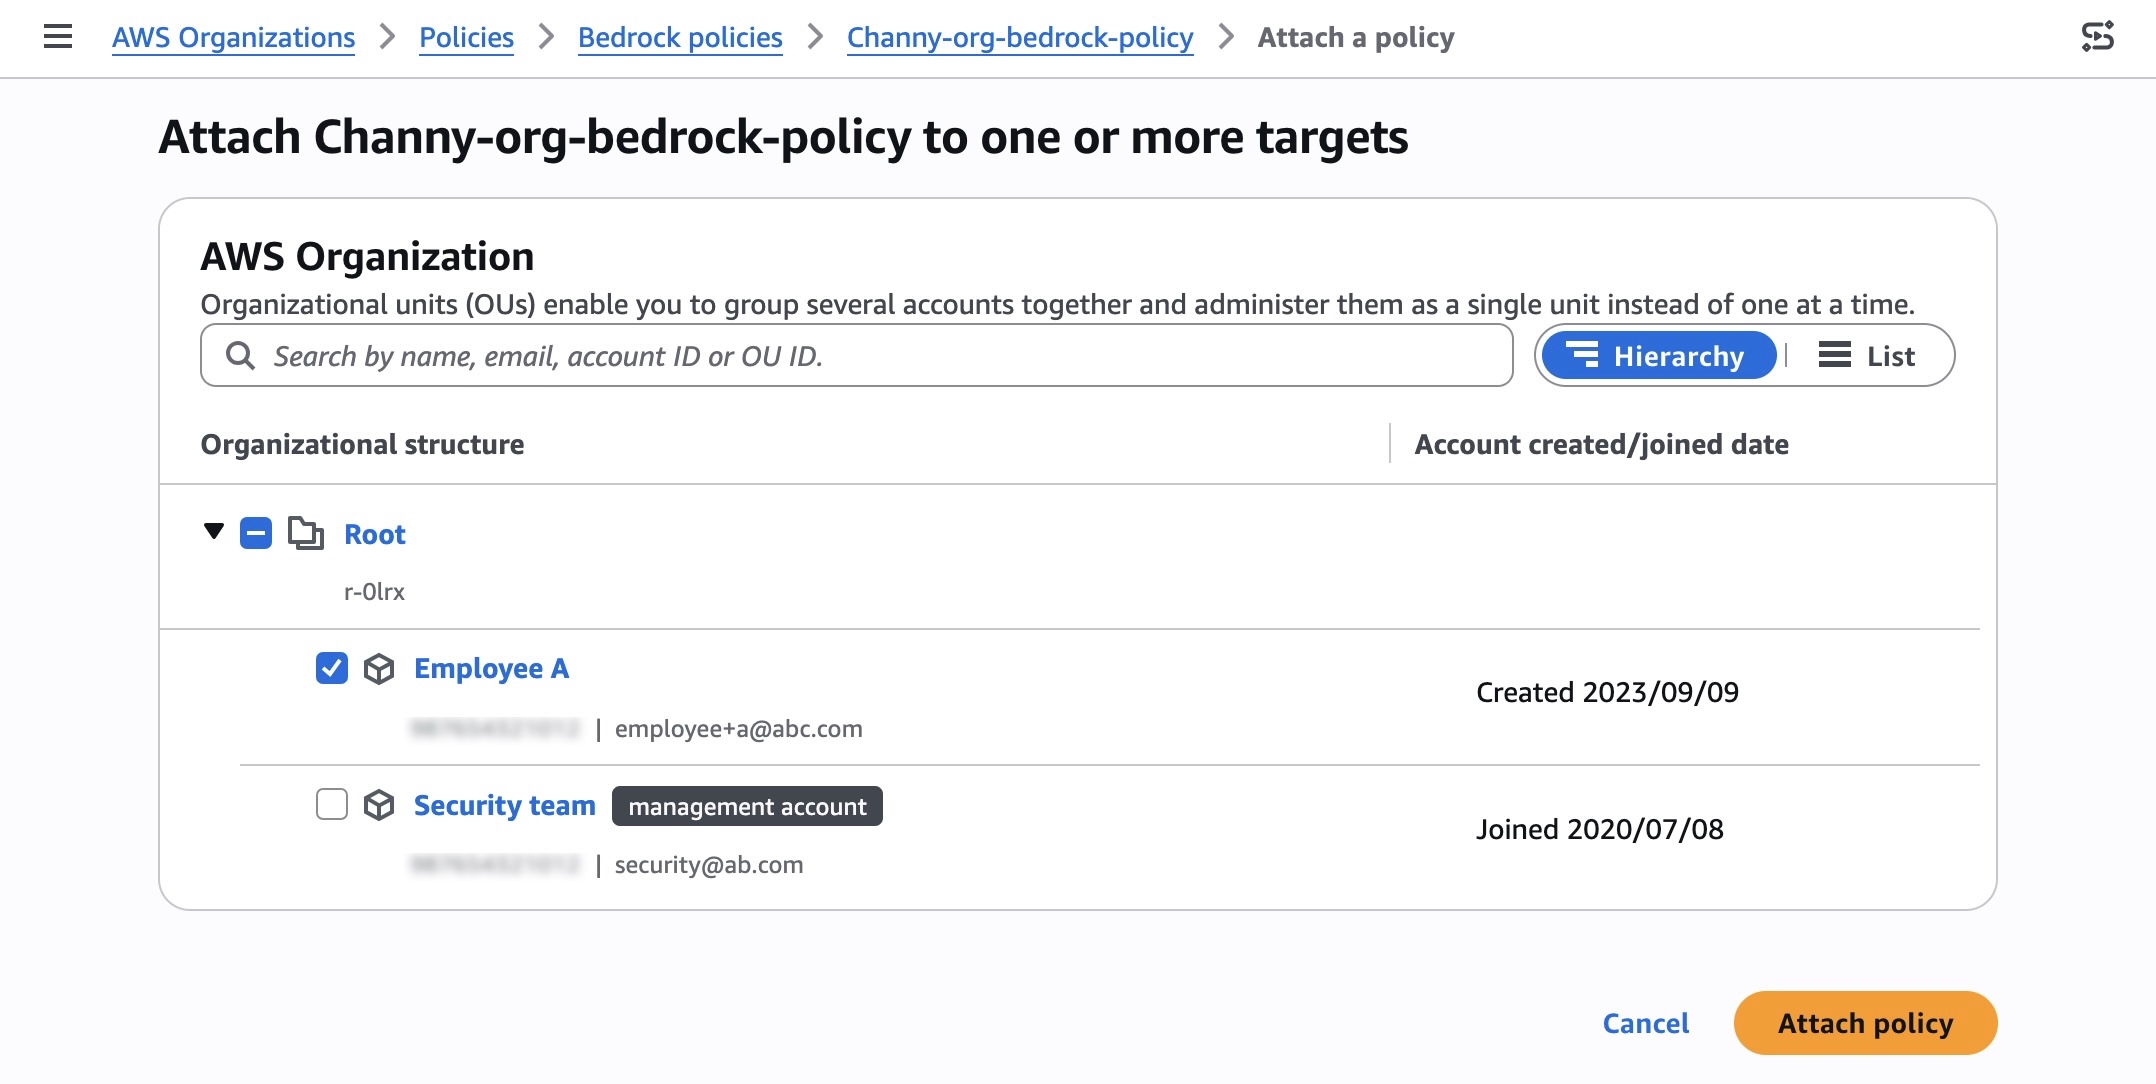
Search and select your organization root, OUs, or individual accounts to attach your policy, and choose Attach policy.

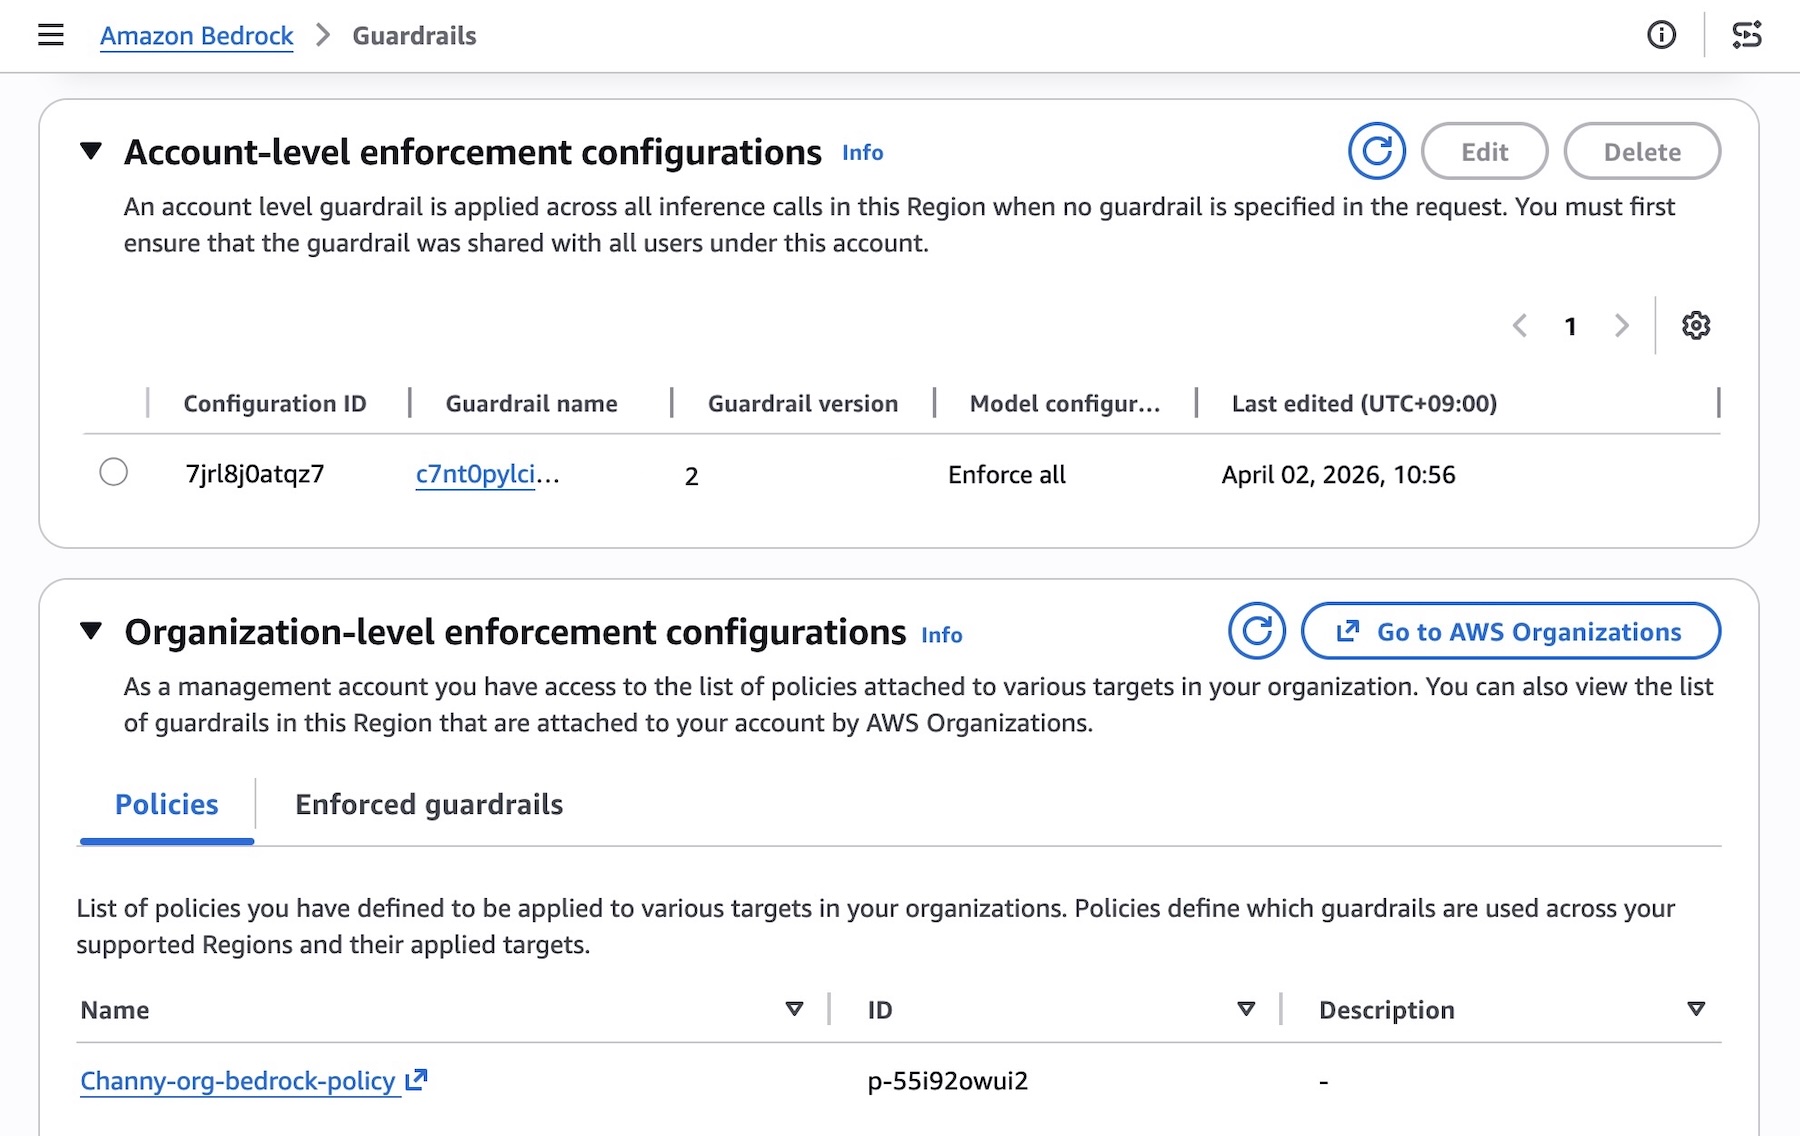
You can test that the guardrail is being enforced on member accounts and verify which guardrail is enforced. From a member account attached, you should see the organization enforced guardrail under the section Organization-level enforcement configurations.

The underlying safeguards within the specified guardrail are then automatically enforced for every model inference request across all member entities, ensuring consistent safety controls. To accommodate varying requirements of individual teams or applications, you can attach different policies with associated guardrails to different member entities through your organization.

Things to know
Here are key considerations to know about GA features:

  • You can now choose to include or exclude specific models in Bedrock for inference, enabling centralized enforcement on model invocation calls. You can also choose to safeguard partial or complete system prompts and input prompts. To learn more, visit Apply cross-account safeguards with Amazon Bedrock Guardrails enforcement.
  • Ensure you are specifying the accurate guardrail Amazon Resource Names (ARN) in the policy. Specifying an incorrect or invalid ARN will result in policy violations, non-enforcement of safeguards, and the inability to use the models in Amazon Bedrock for inference. To learn more, visit Best practices for using Amazon Bedrock policies.
  • Automated Reasoning checks are not supported with this capability.

Now available
Cross-account safeguards in Amazon Bedrock Guardrails is generally available today in the all AWS commercial and GovCloud Regions where Bedrock Guardrails is available. For Regional availability and a future roadmap, visit the AWS Capabilities by Region. Charges apply to each enforced guardrail according to its configured safeguards. For detailed pricing information on individual safeguards, visit Amazon Bedrock Pricing page.

Give this capability a try in the Amazon Bedrock console and send feedback to AWS re:Post for Amazon Bedrock Guardrails or through your usual AWS Support contacts.

Channy

Customize your AWS Management Console experience with visual settings including account color, region and service visibility

Post Syndicated from Channy Yun (윤석찬) original https://aws.amazon.com/blogs/aws/customize-your-aws-management-console-experience-with-visual-settings-including-account-color-region-and-service-visibility/

In August 2025, we introduced AWS User Experience Customization (UXC) capability to tailor user interfaces (UIs) to meet your specific needs and complete your tasks efficiently. With this capability, your account administrator can customize some UI component of AWS Management Console, such as assigning a color to an AWS account for easier identification.

Today, we’re announcing additional customization capability in UXC that enables selective display of relevant AWS Regions and services for your team members. By hiding unused Regions and services, you can reduce cognitive load and eliminate unnecessary clicks and scrolling, helping you focus better and work faster. With this launch, we offer the ability to customize account color, Region, and service visibility together.

Categorize account by color
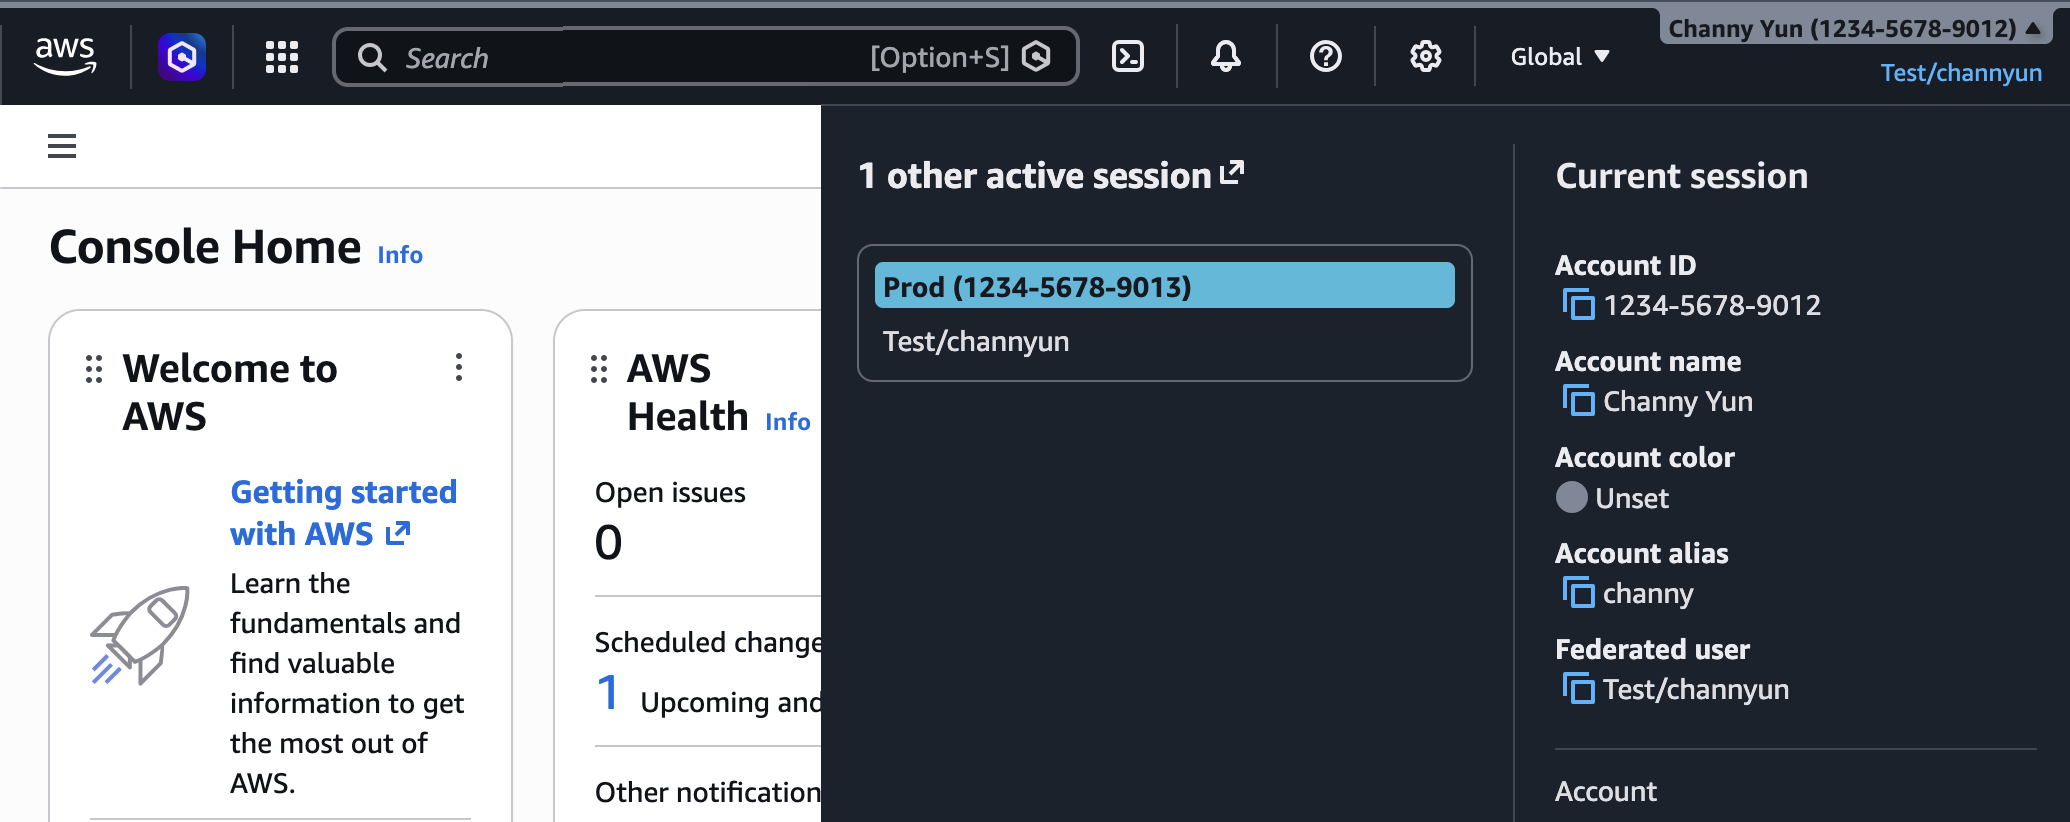
You can set a color for your accounts to visually distinguish between them. To get started, sign in to the AWS Management Console and choose your account name on the navigation bar. Your account color isn’t set yet. To set the color, choose Account.

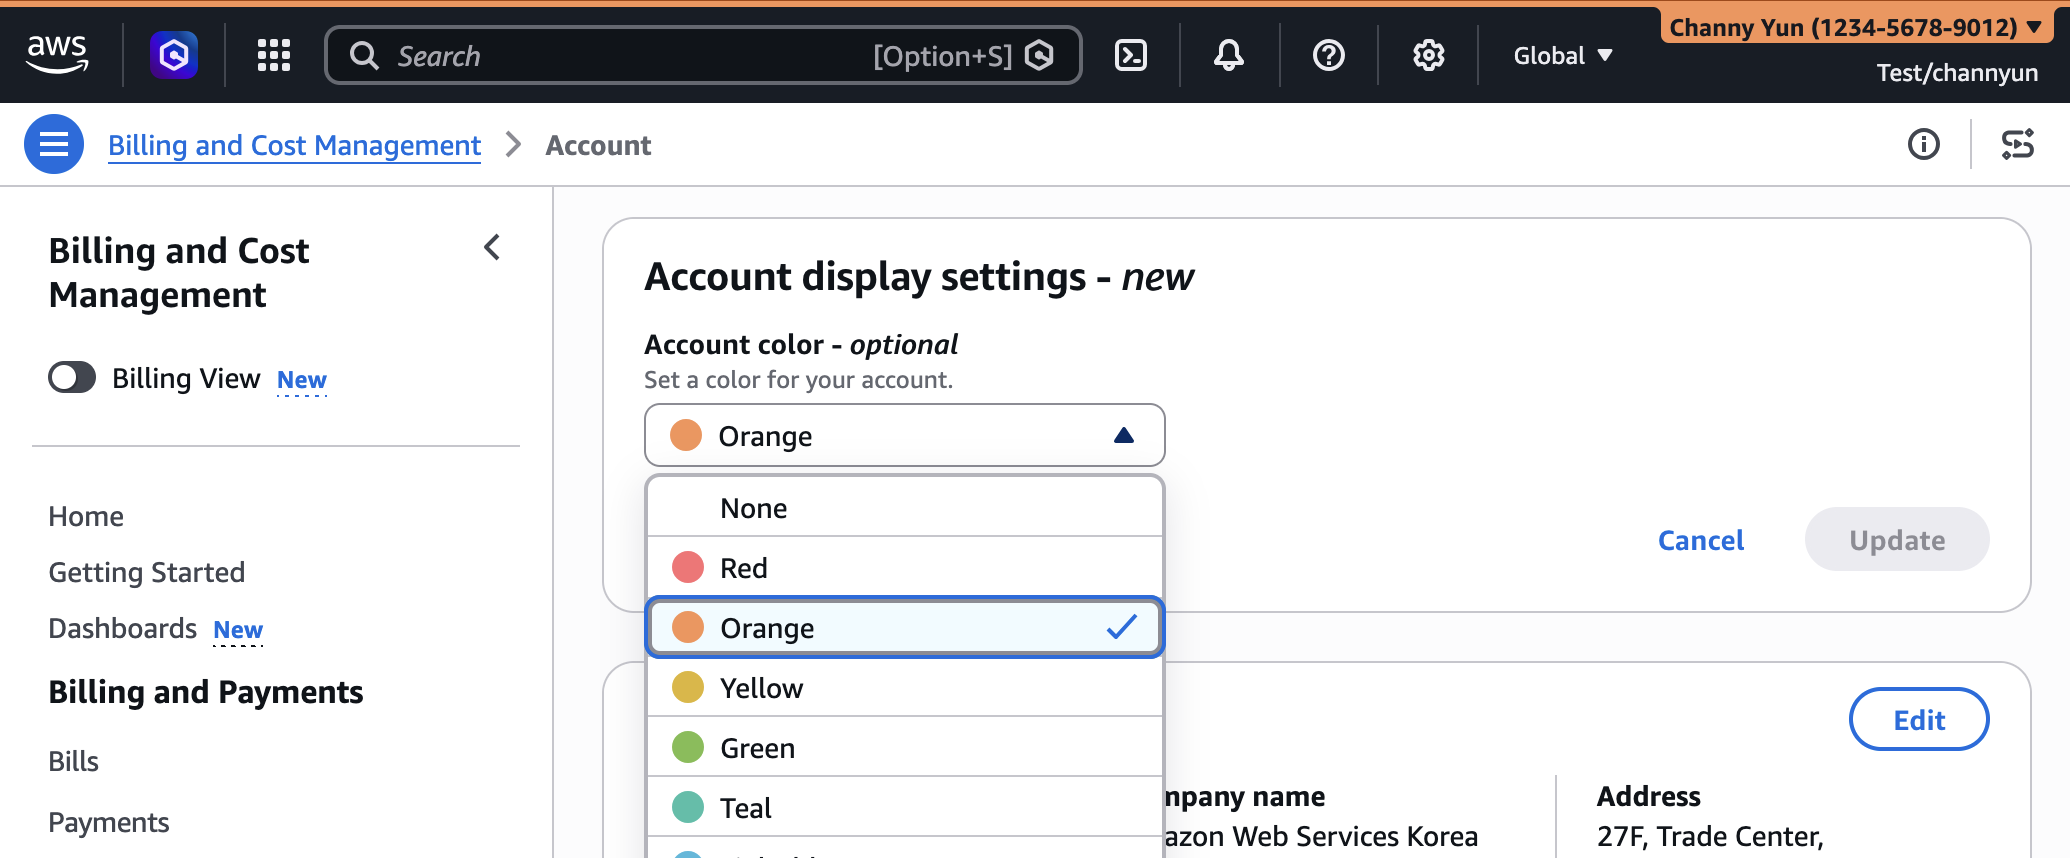
In the Account display settings, select your preferred account color and choose Update. You can see the chosen color in the navigation bar.

By changing the account color, you can clearly distinguish the account’s purpose. For example, you can use orange for development accounts, light blue for test accounts, and red for production accounts.

Customize Regions and services visibility
You can control which AWS Regions appear in the Region selector or which AWS services appear in the console navigation. In other words, you can set to show only the Regions and services that are relevant to your account.

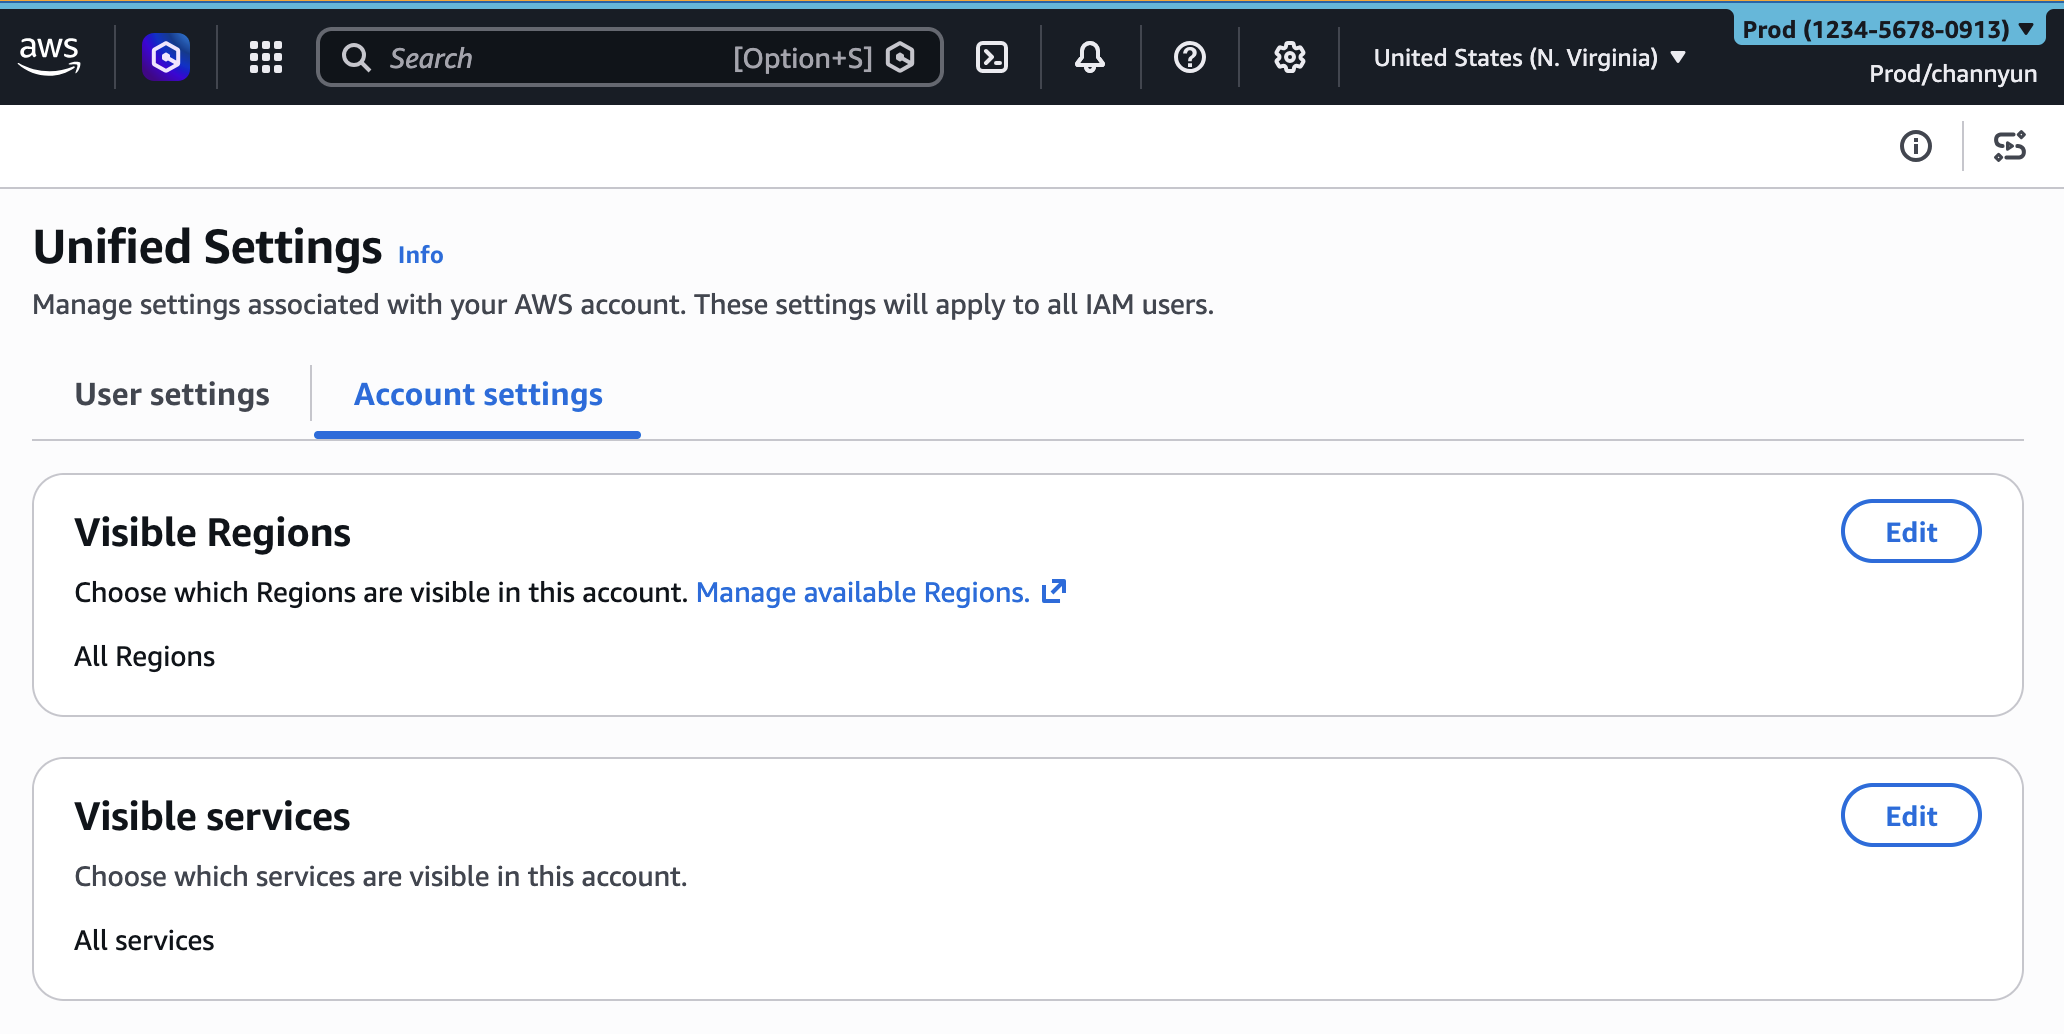
To get started, choose the gear icon on the navigation bar and choose See all user settings. If you are in an administrator role, you can see a new Account settings tab in the unified settings. If you have not configured a setting, all Regions and services are visible.

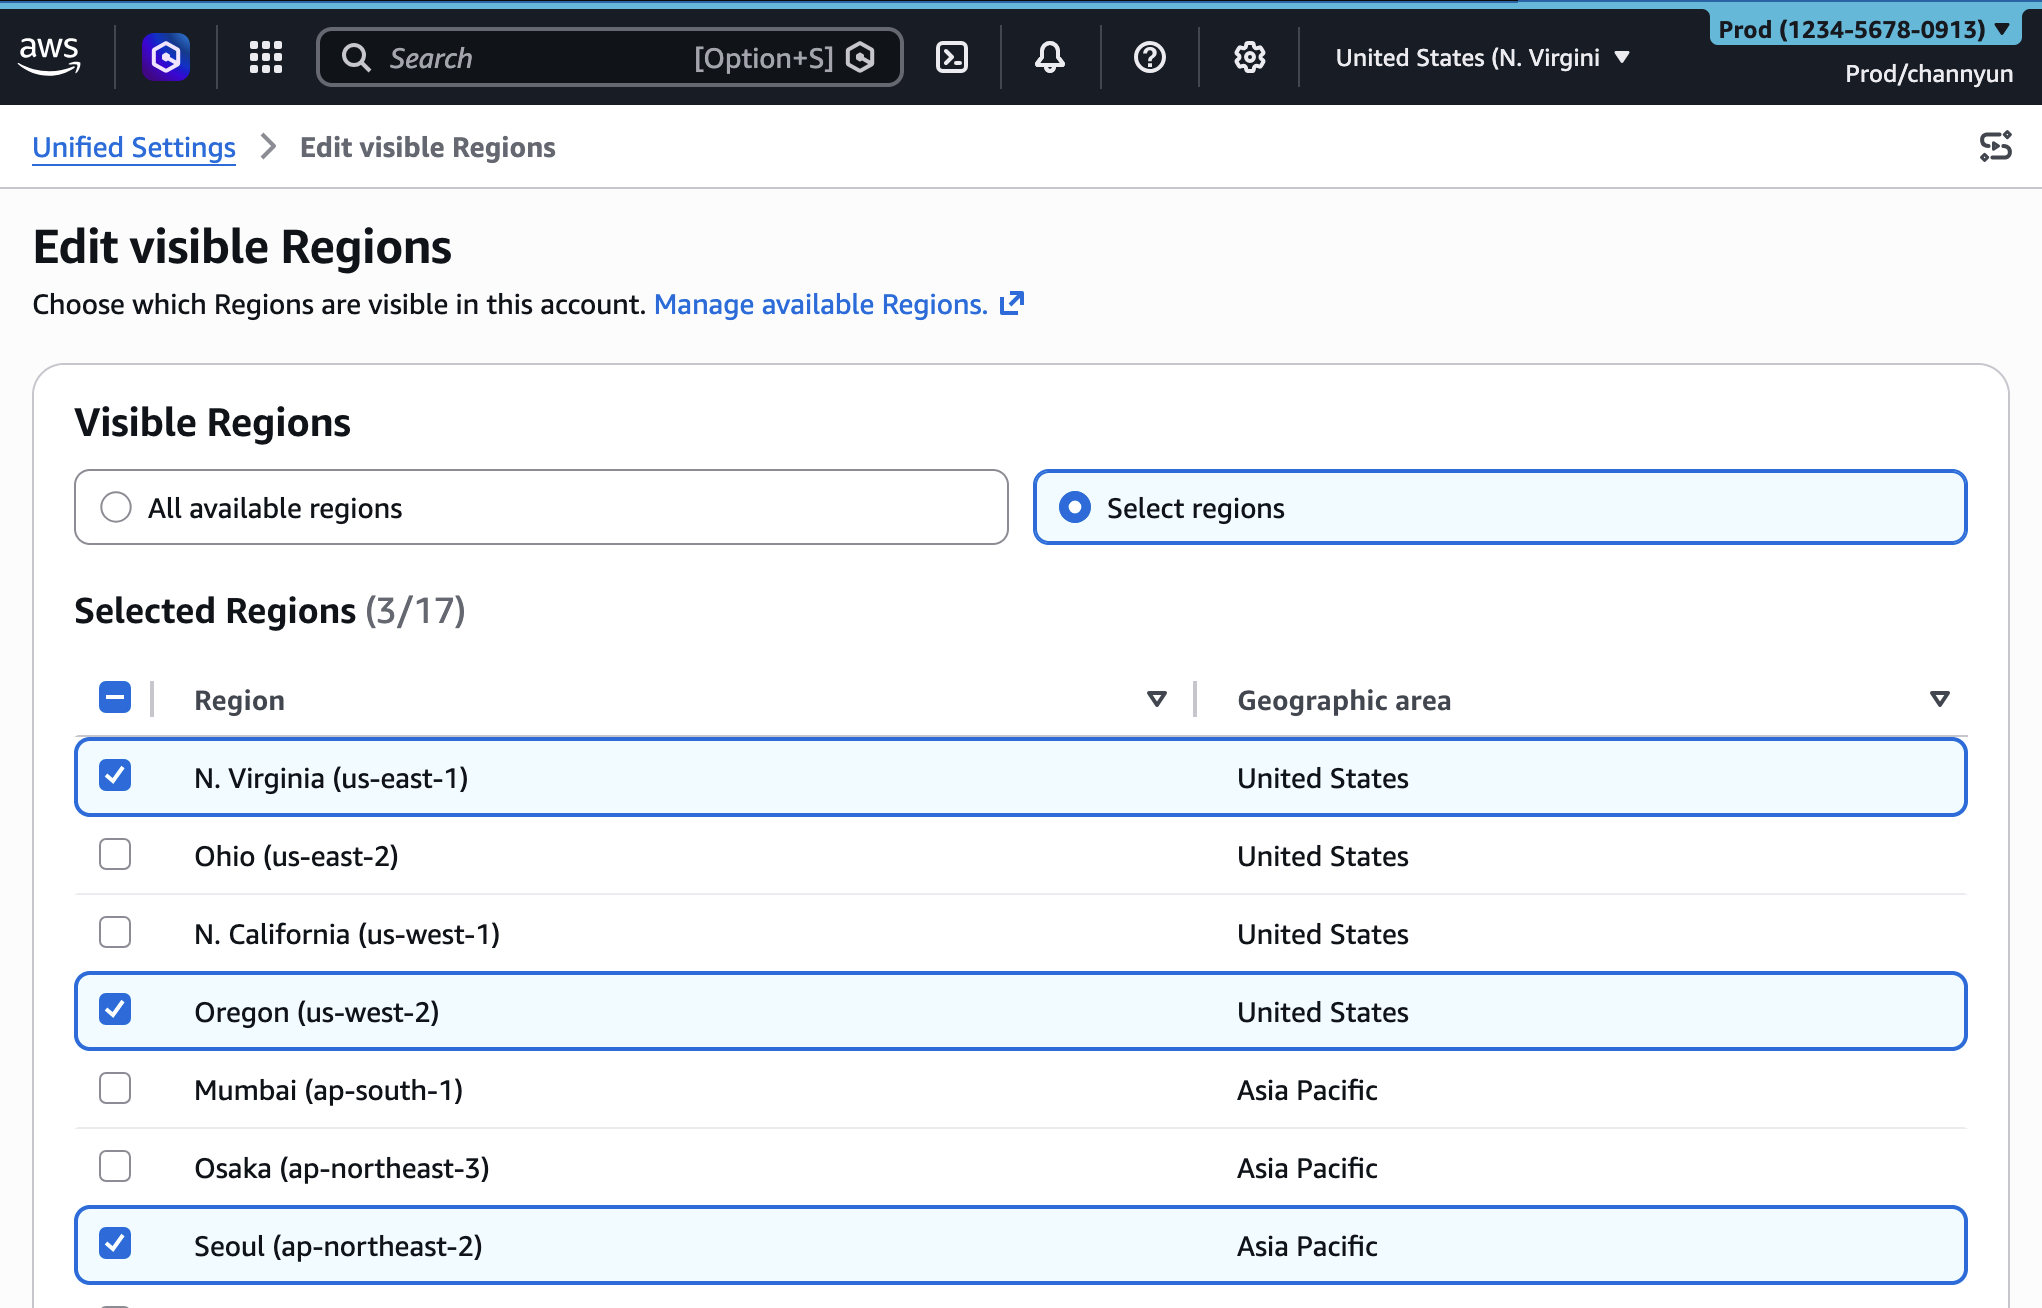
To set visible Regions, choose Edit in the Visible Regions section. Select your visible Regions to All available Regions or Select Regions and configure your list. Choose Save changes.

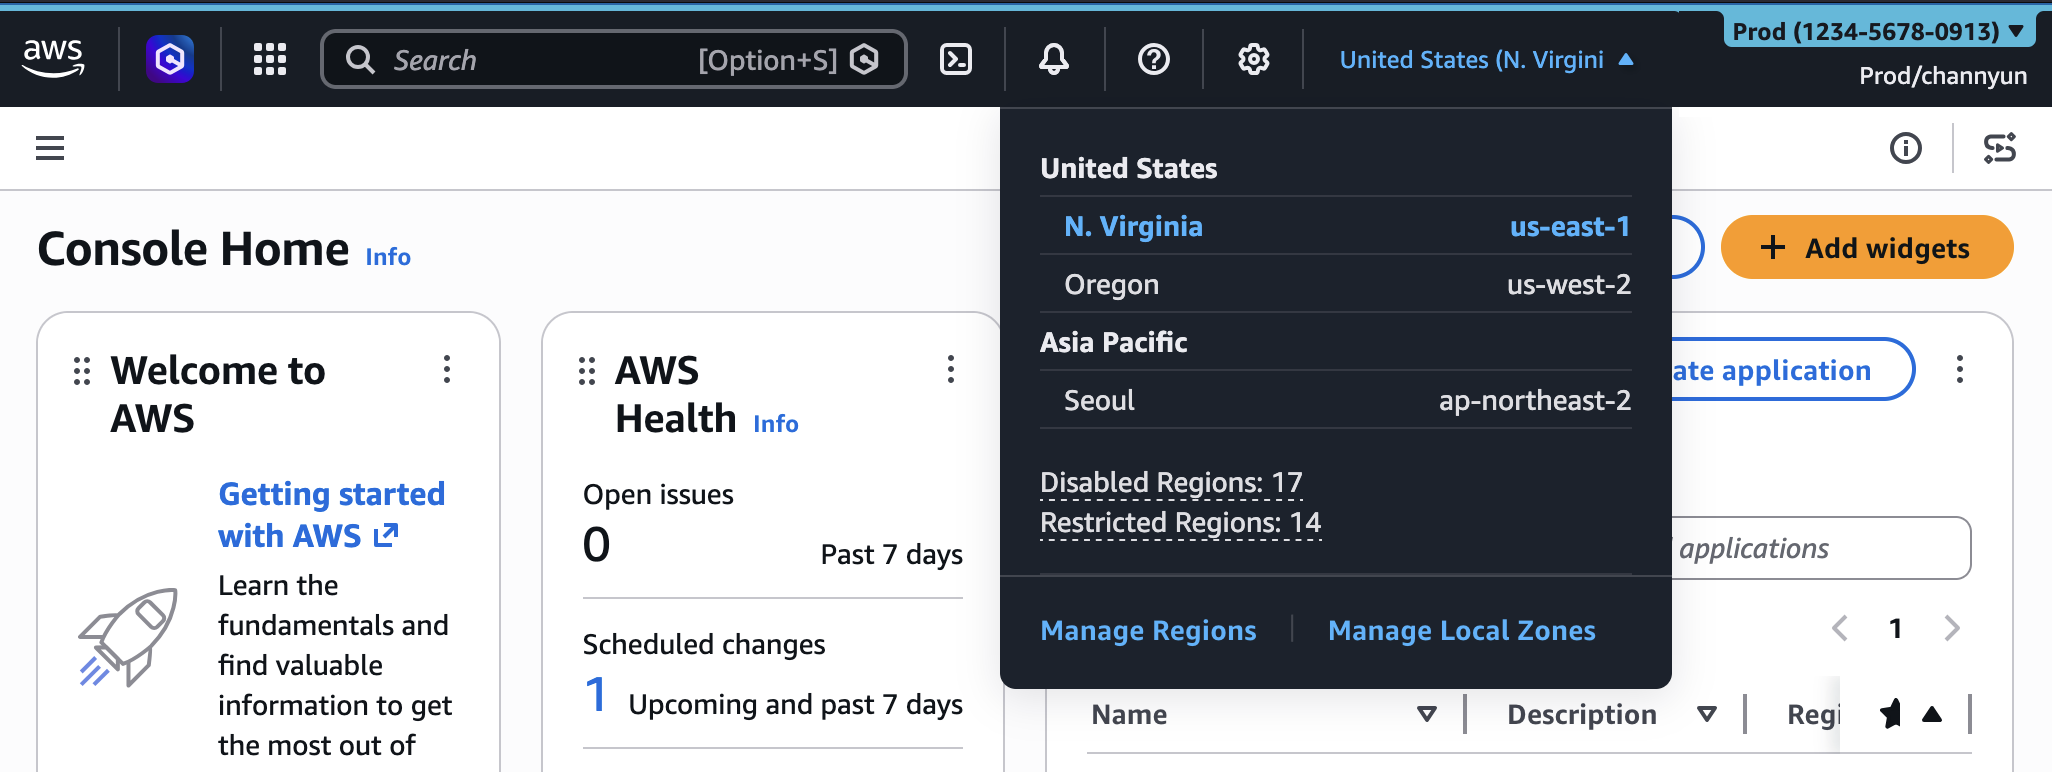
After configuring visible Region setting, you will find only selected Regions in the Regions selector on the navigation bar in the console.

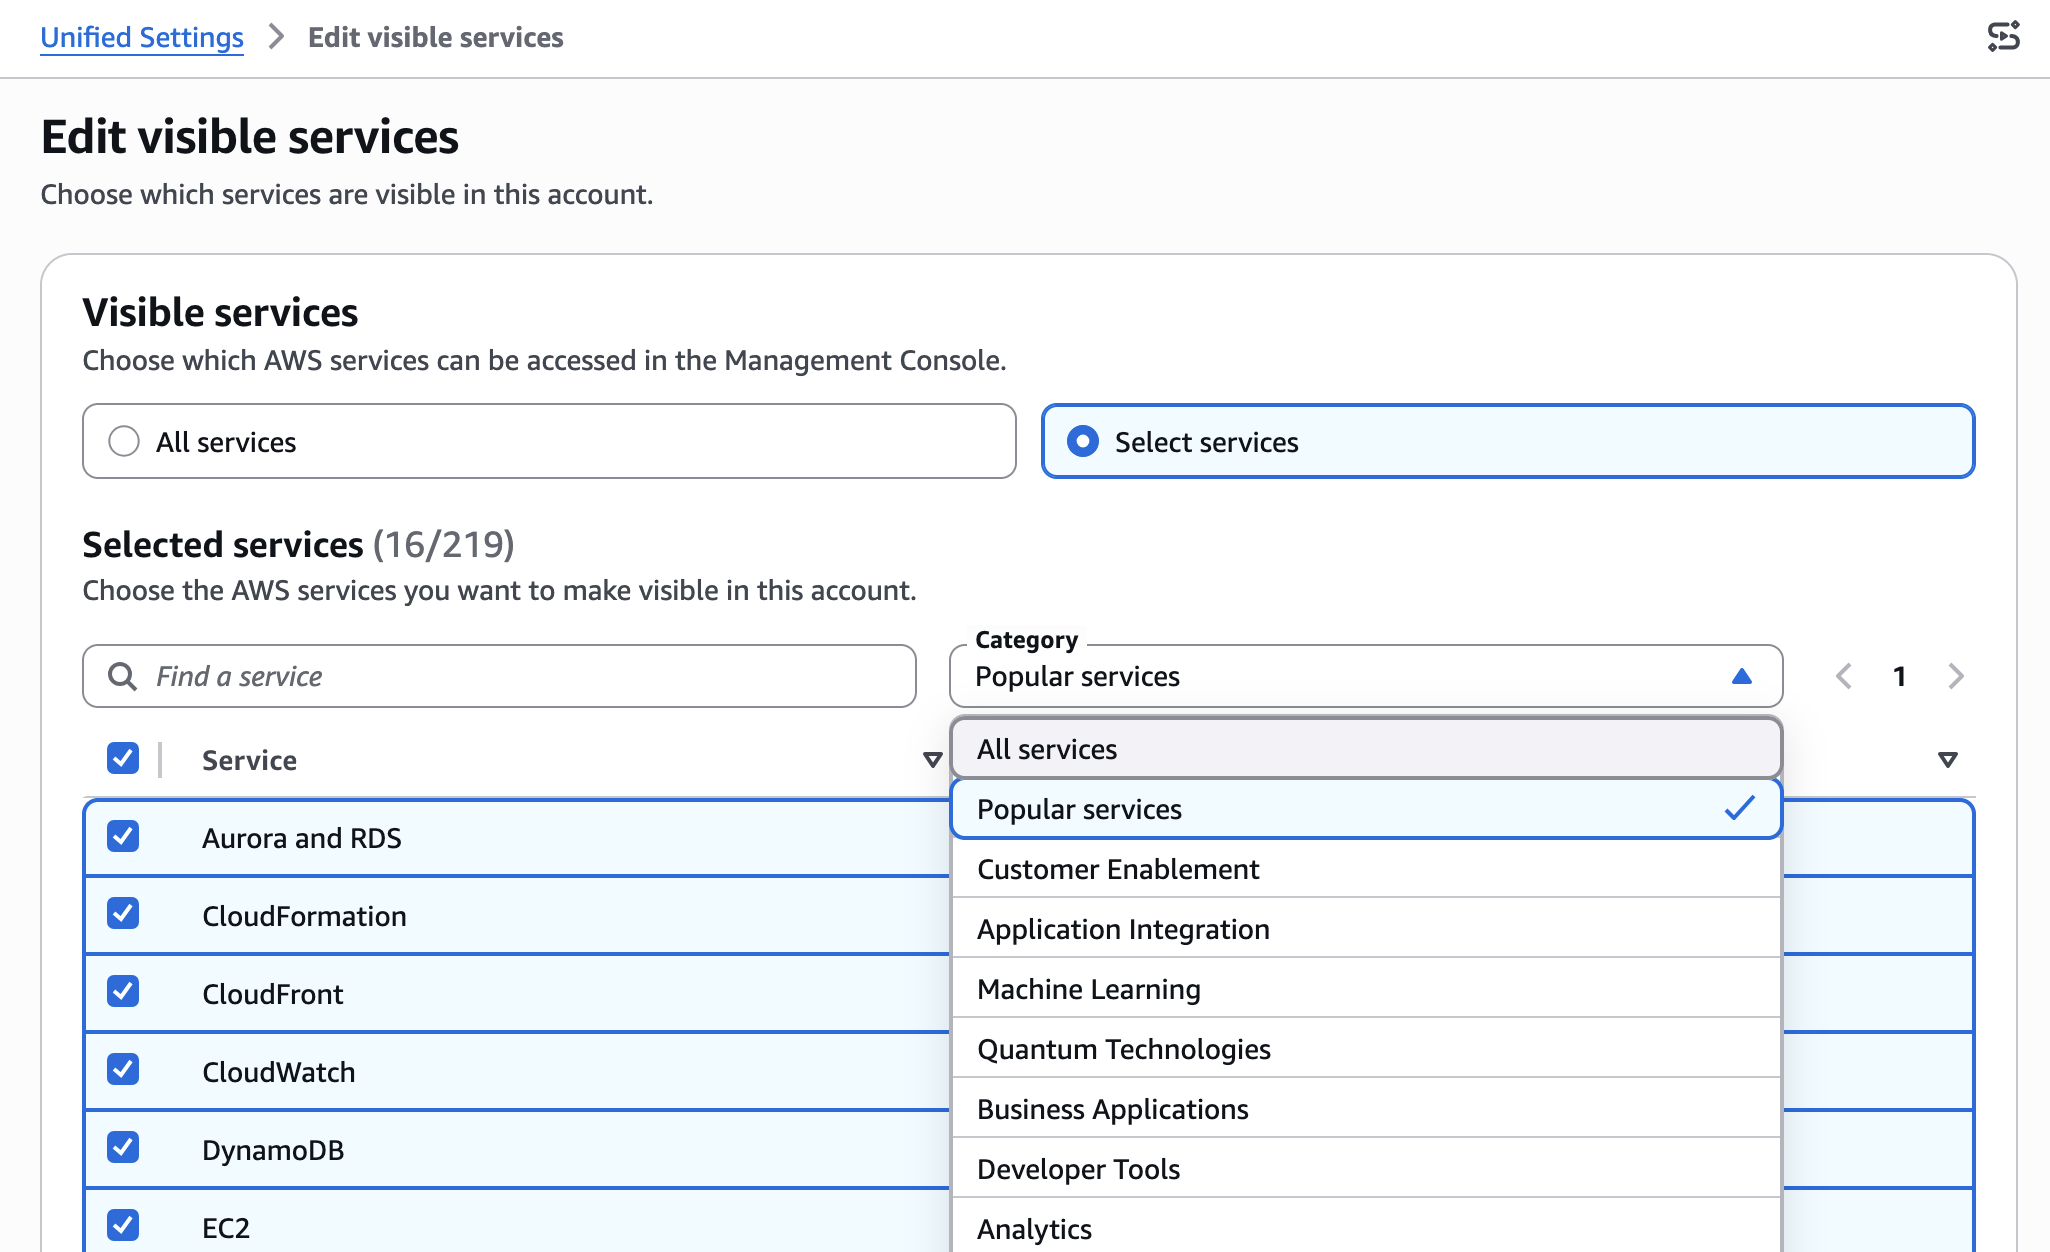
You can also set visible services in the same way. Search or select services from the category. I used the Popular services category to select my favorites. When you finish selection, choose Save changes.

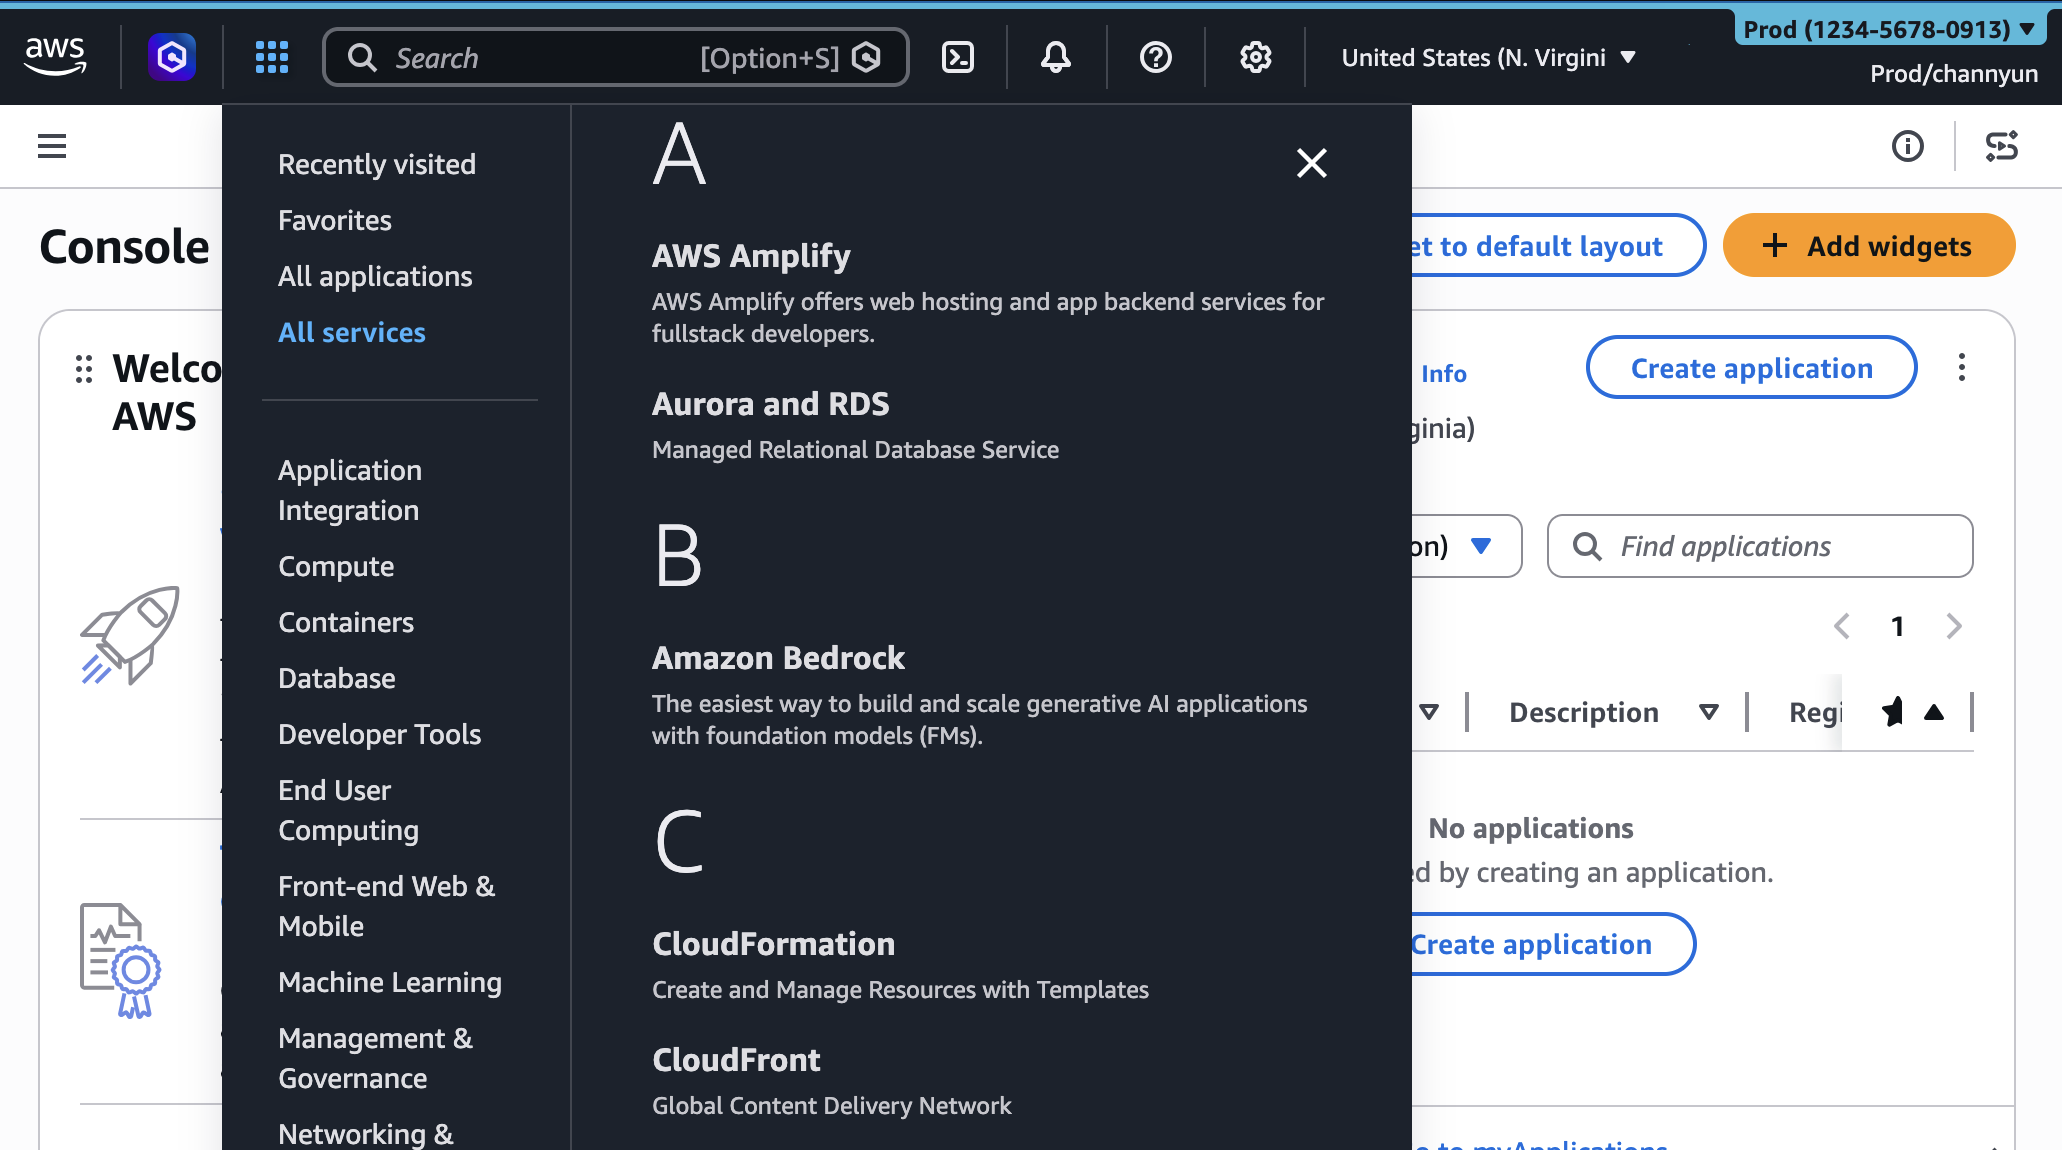
After configuring visible services setting, you will find only selected services in the All services menu on the navigation bar.

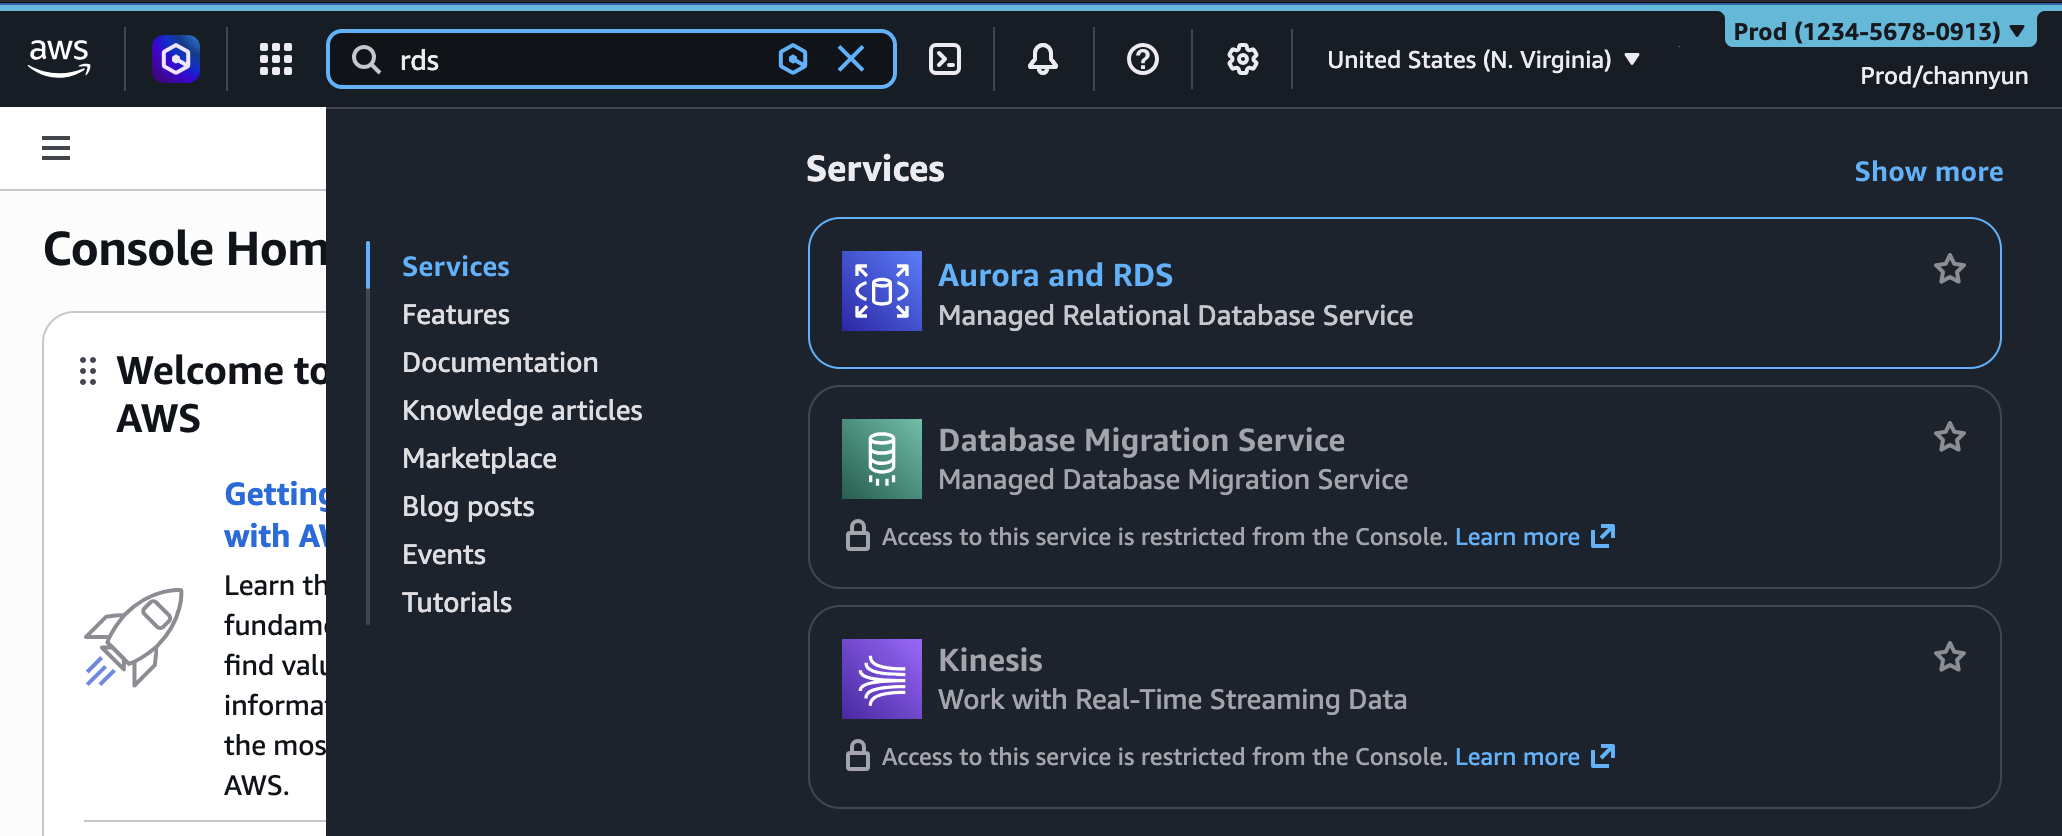
When you search the service name in the search bar, you can only choose selected services.

The Regions and services visibility settings control only the appearance of services and Regions in the console. They don’t restrict access through the AWS Command Line Interface (AWS CLI), AWS SDKs, AWS APIs, or Amazon Q Developer.

You can also manage these account customization settings programmatically with new visibleServices and visibleRegions parameters. For example, you can use AWS CloudFormation sample template:

AWSTemplateFormatVersion: "2010-09-09"
Description: Customize AWS Console appearance for this account

Resources:
  AccountCustomization:
    Type: AWS::UXC::AccountCustomization
    Properties:
      AccountColor: red
      VisibleServices:
        - s3
        - ec2
        - lambda
      VisibleRegions:
        - us-east-1
        - us-west-2

And you can deploy your Cloudformation template.

$ aws cloudformation deploy \
  --template-file account-customization.yaml \
  --stack-name my-account-customization

To learn more, visit the AWS User Experience Customization API Reference and AWS CloudFormation template reference.

Give it a try in the AWS Management Console today and provide feedback by selecting the Feedback link at the bottom of the console, posting to the AWS re:Post forum for the AWS Management Console, or reaching out to your AWS Support contacts.

Channy

Announcing Amazon Aurora PostgreSQL serverless database creation in seconds

Post Syndicated from Channy Yun (윤석찬) original https://aws.amazon.com/blogs/aws/announcing-amazon-aurora-postgresql-serverless-database-creation-in-seconds/

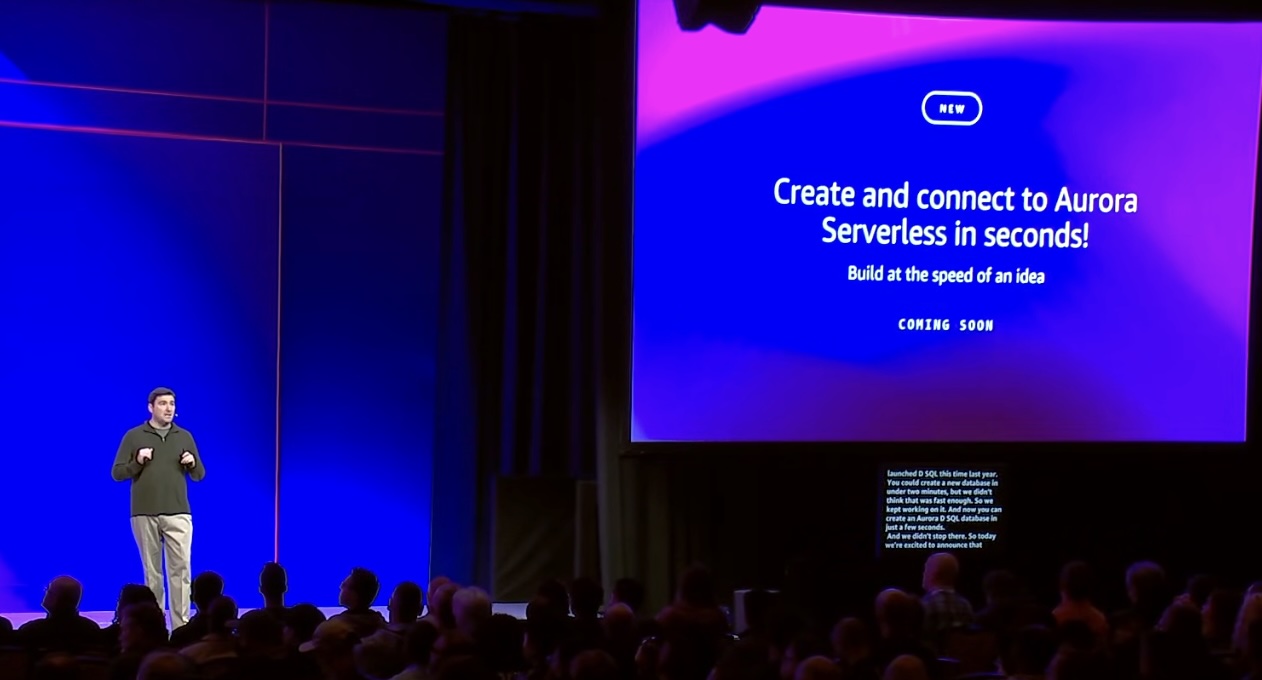
At re:Invent 2025, Colin Lazier, vice president of databases at AWS, emphasized the importance of building at the speed of an idea—enabling rapid progress from concept to running application. Customers can already create production-ready Amazon DynamoDB tables and Amazon Aurora DSQL databases in seconds. He previewed creating an Amazon Aurora serverless database with the same speed, and customers have since requested quick access and speed to this capability.

Today, we’re announcing the general availability of a new express configuration for Amazon Aurora PostgreSQL, a streamlined database creation experience with preconfigured defaults designed to help you get started in seconds.

With only two clicks, you can have an Aurora PostgreSQL serverless database ready to use in seconds. You have the flexibility to modify certain settings during and after database creation in the new configuration. For example, you can change the capacity range for the serverless instance at the time of create or add read replicas, modify parameter groups after the database is created. Aurora clusters with express configuration are created without an Amazon Virtual Private Cloud (Amazon VPC) network and include an internet access gateway for secure connections from your favorite development tools – no VPN, or AWS Direct Connect required. Express configuration also sets up AWS Identity and Access Management (IAM) authentication for your administrator user by default, enabling passwordless database authentication from the beginning without additional configuration.

After it’s created, you have access to features available for Aurora PostgreSQL serverless, such as deploying additional read replicas for high availability and automated failover capabilities. This launch also introduces a new internet access gateway routing layer for Aurora. Your new serverless instance comes enabled by default with this feature, which allows your applications to connect securely from anywhere in the world through the internet using the PostgreSQL wire protocol from a wide range of developer tools. This gateway is distributed across multiple Availability Zones, offering the same level of high availability as your Aurora cluster.

Creating and connecting to Aurora in seconds means fundamentally rethinking how you get started. We launched multiple capabilities that work together to help you onboard and run your application with Aurora. Aurora is now available on AWS Free Tier, which you gain hands-on experience with Aurora at no upfront cost. After it’s created, you can directly query an Aurora database in AWS CloudShell or using programming languages and developer tools through a new internet accessible routing component for Aurora. With integrations such as v0 by Vercel, you can use natural language to start building your application with the features and benefits of Aurora.

Create an Aurora PostgreSQL serverless database in seconds
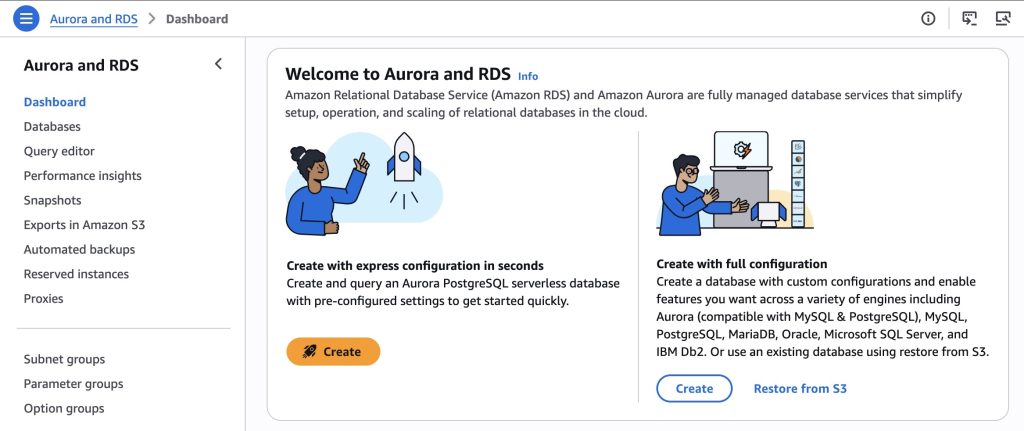
To get started, go to the Aurora and RDS console and in the navigation pane, choose Dashboard. Then, choose Create with a rocket icon.

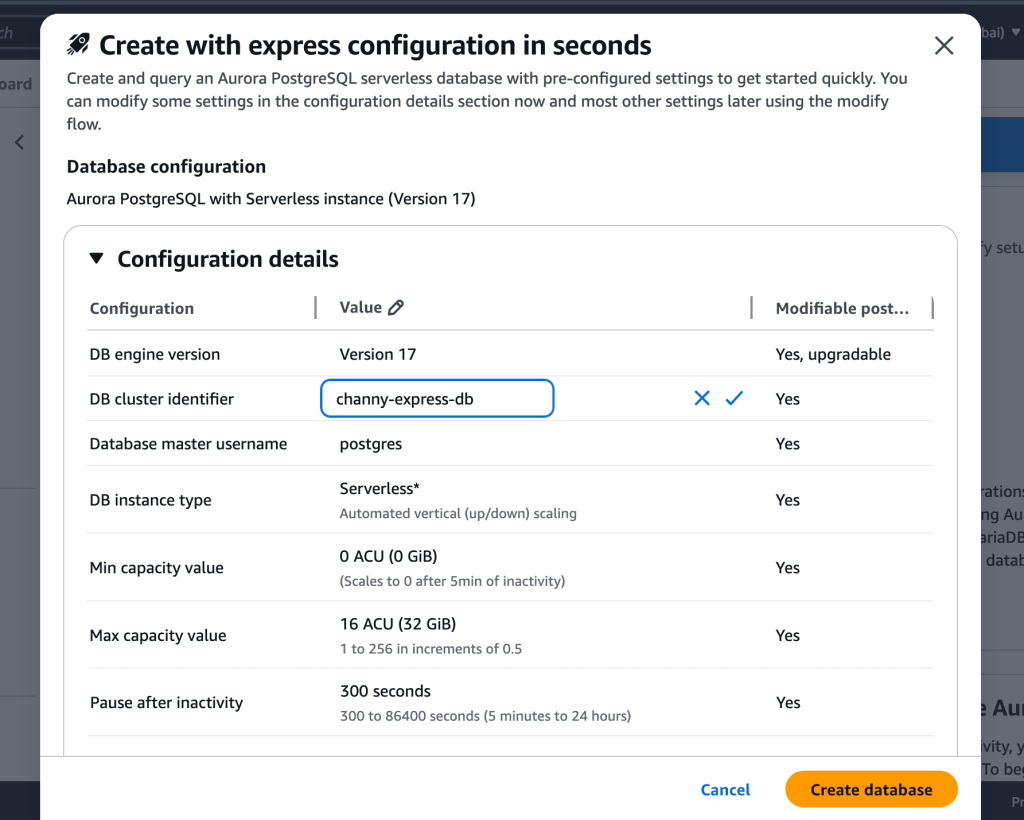
Review pre-configured settings in the Create with express configuration dialog box. You can modify the DB cluster identifier or the capacity range as needed. Choose Create database.

You can also use the AWS Command Line Interface (AWS CLI) or AWS SDKs with the parameter --express-configuration to create both a cluster and an instance within the cluster with a single API call which makes it ready for running queries in seconds.To learn more, visit Creating an Aurora PostgreSQL DB cluster with express configuration.

Here is a CLI command to create the cluster:

$ aws rds create-db-cluster --db-cluster-identifier channy-express-db \
    --engine aurora-postgresql \
    –with-express-configuration

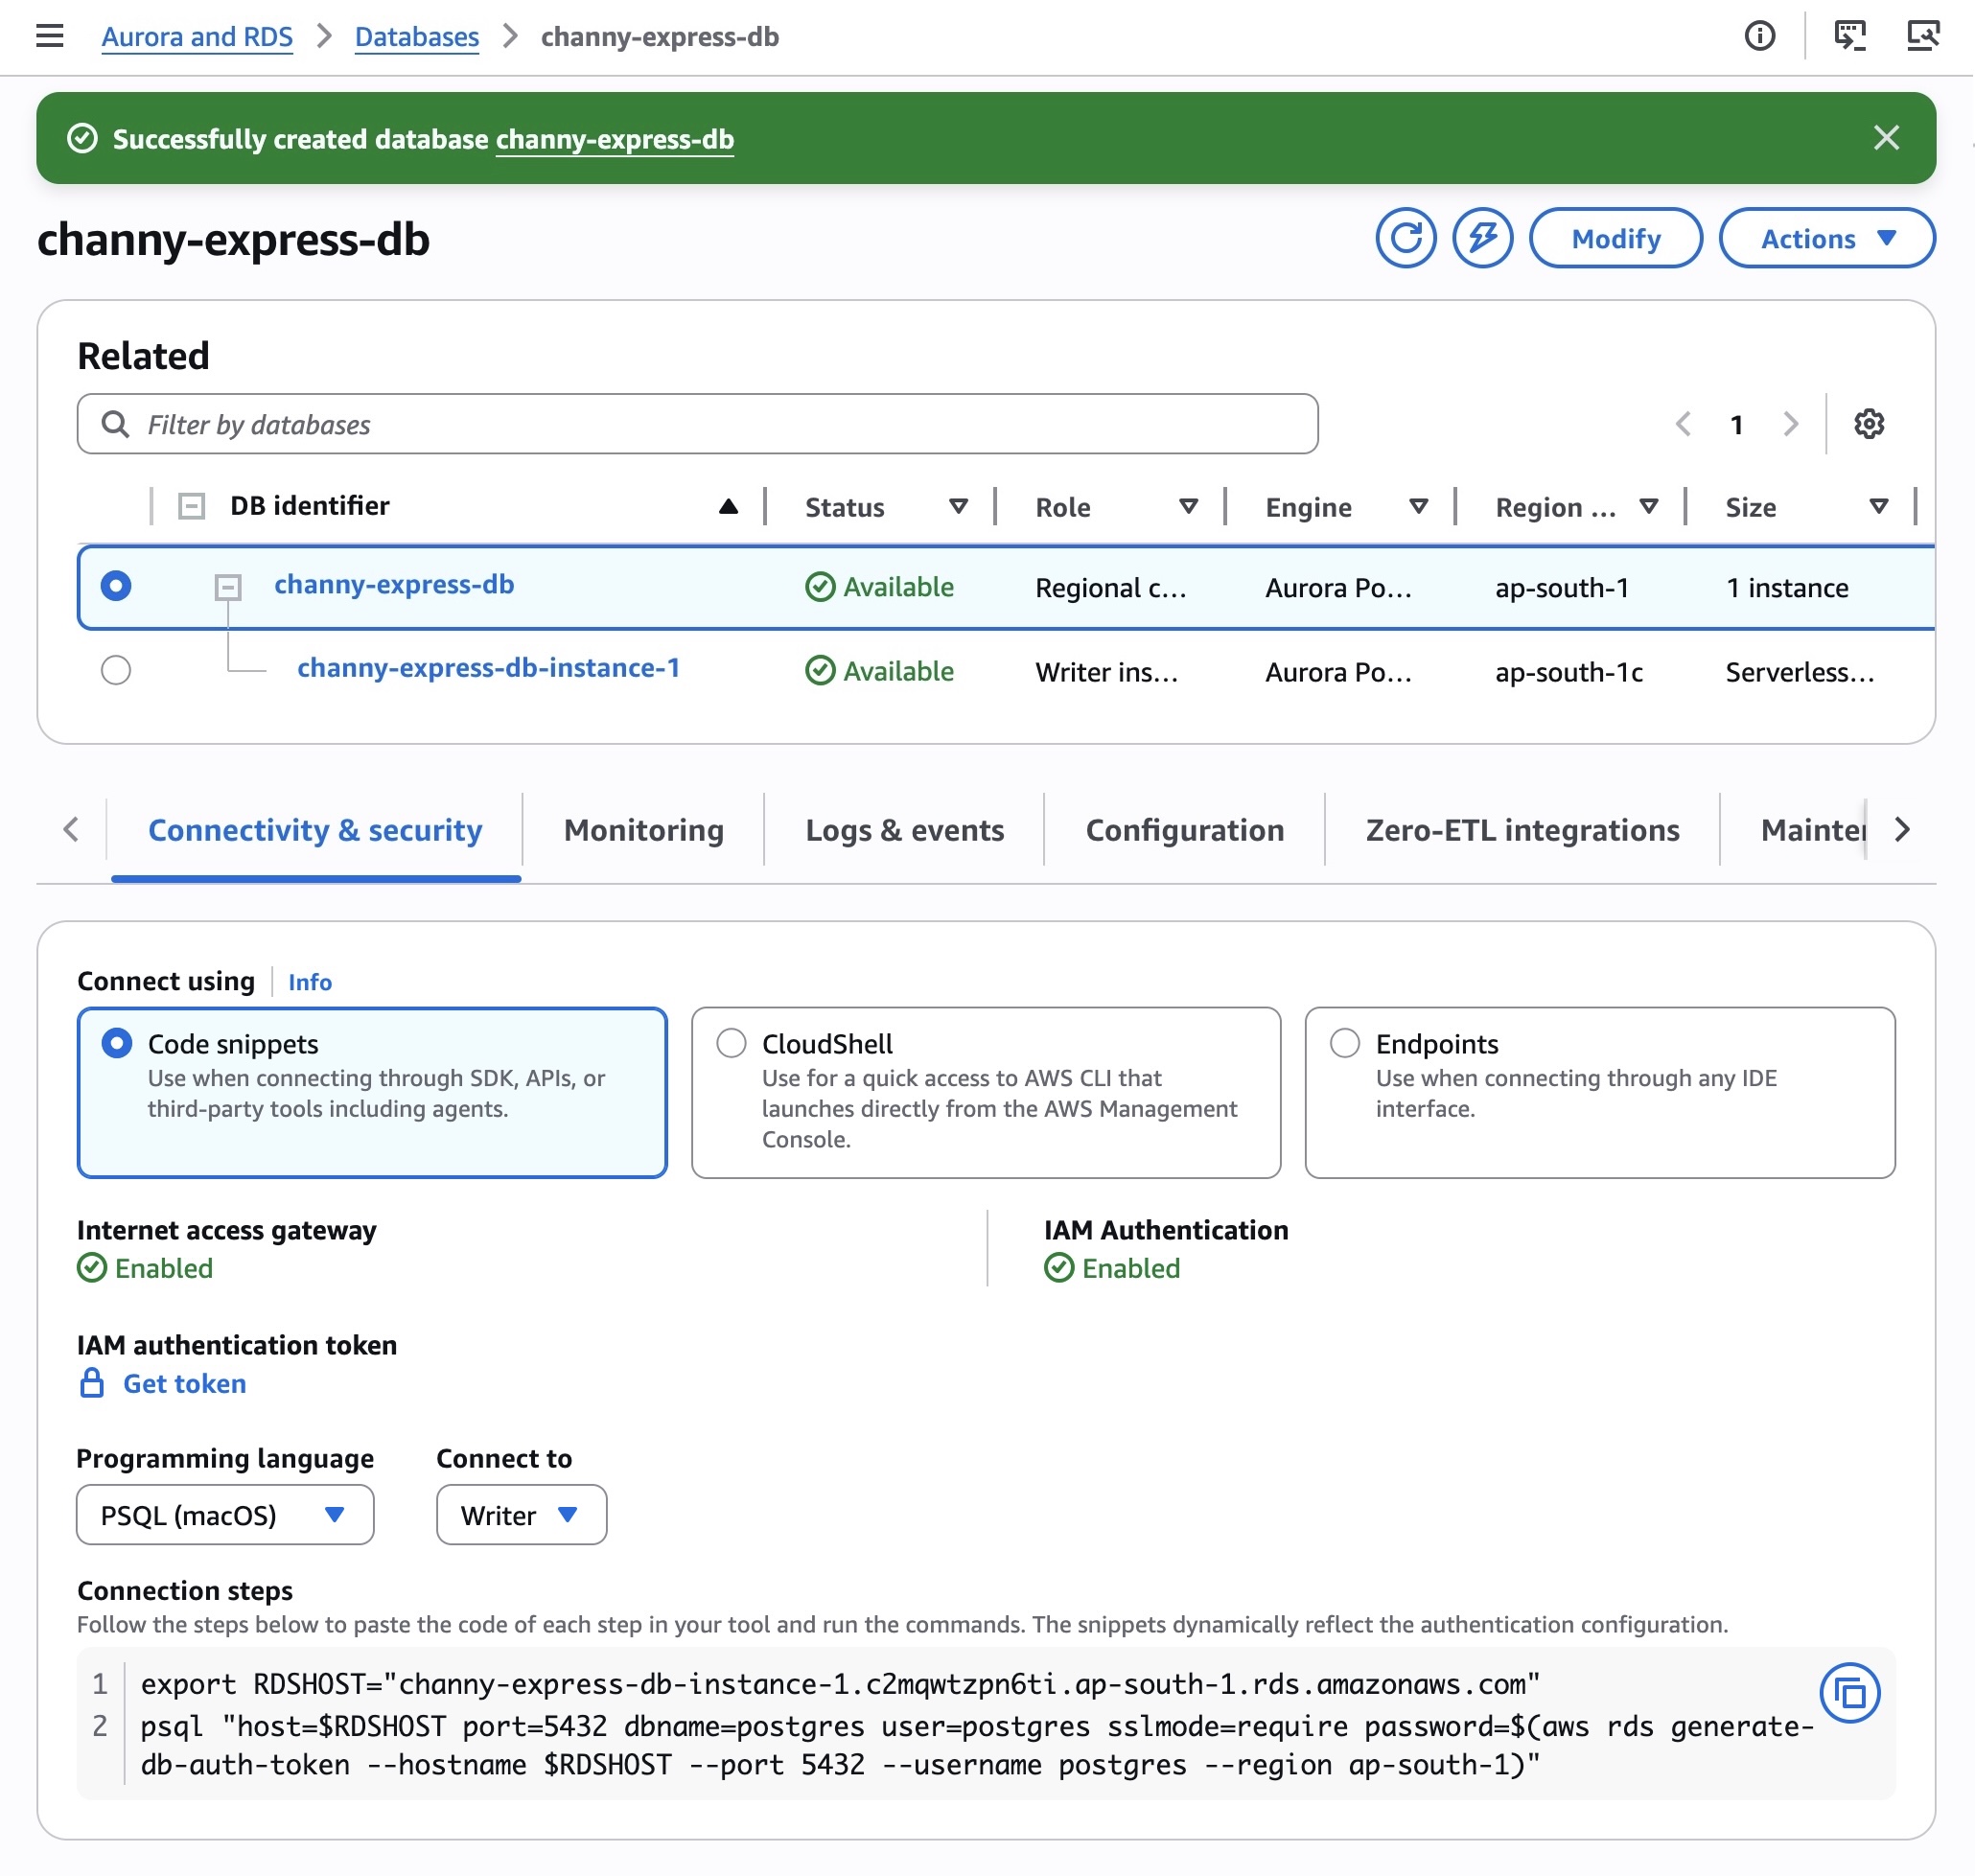
Your Aurora PostgreSQL serverless database should be ready in seconds. A success banner confirms the creation, and the database status changes to Available.

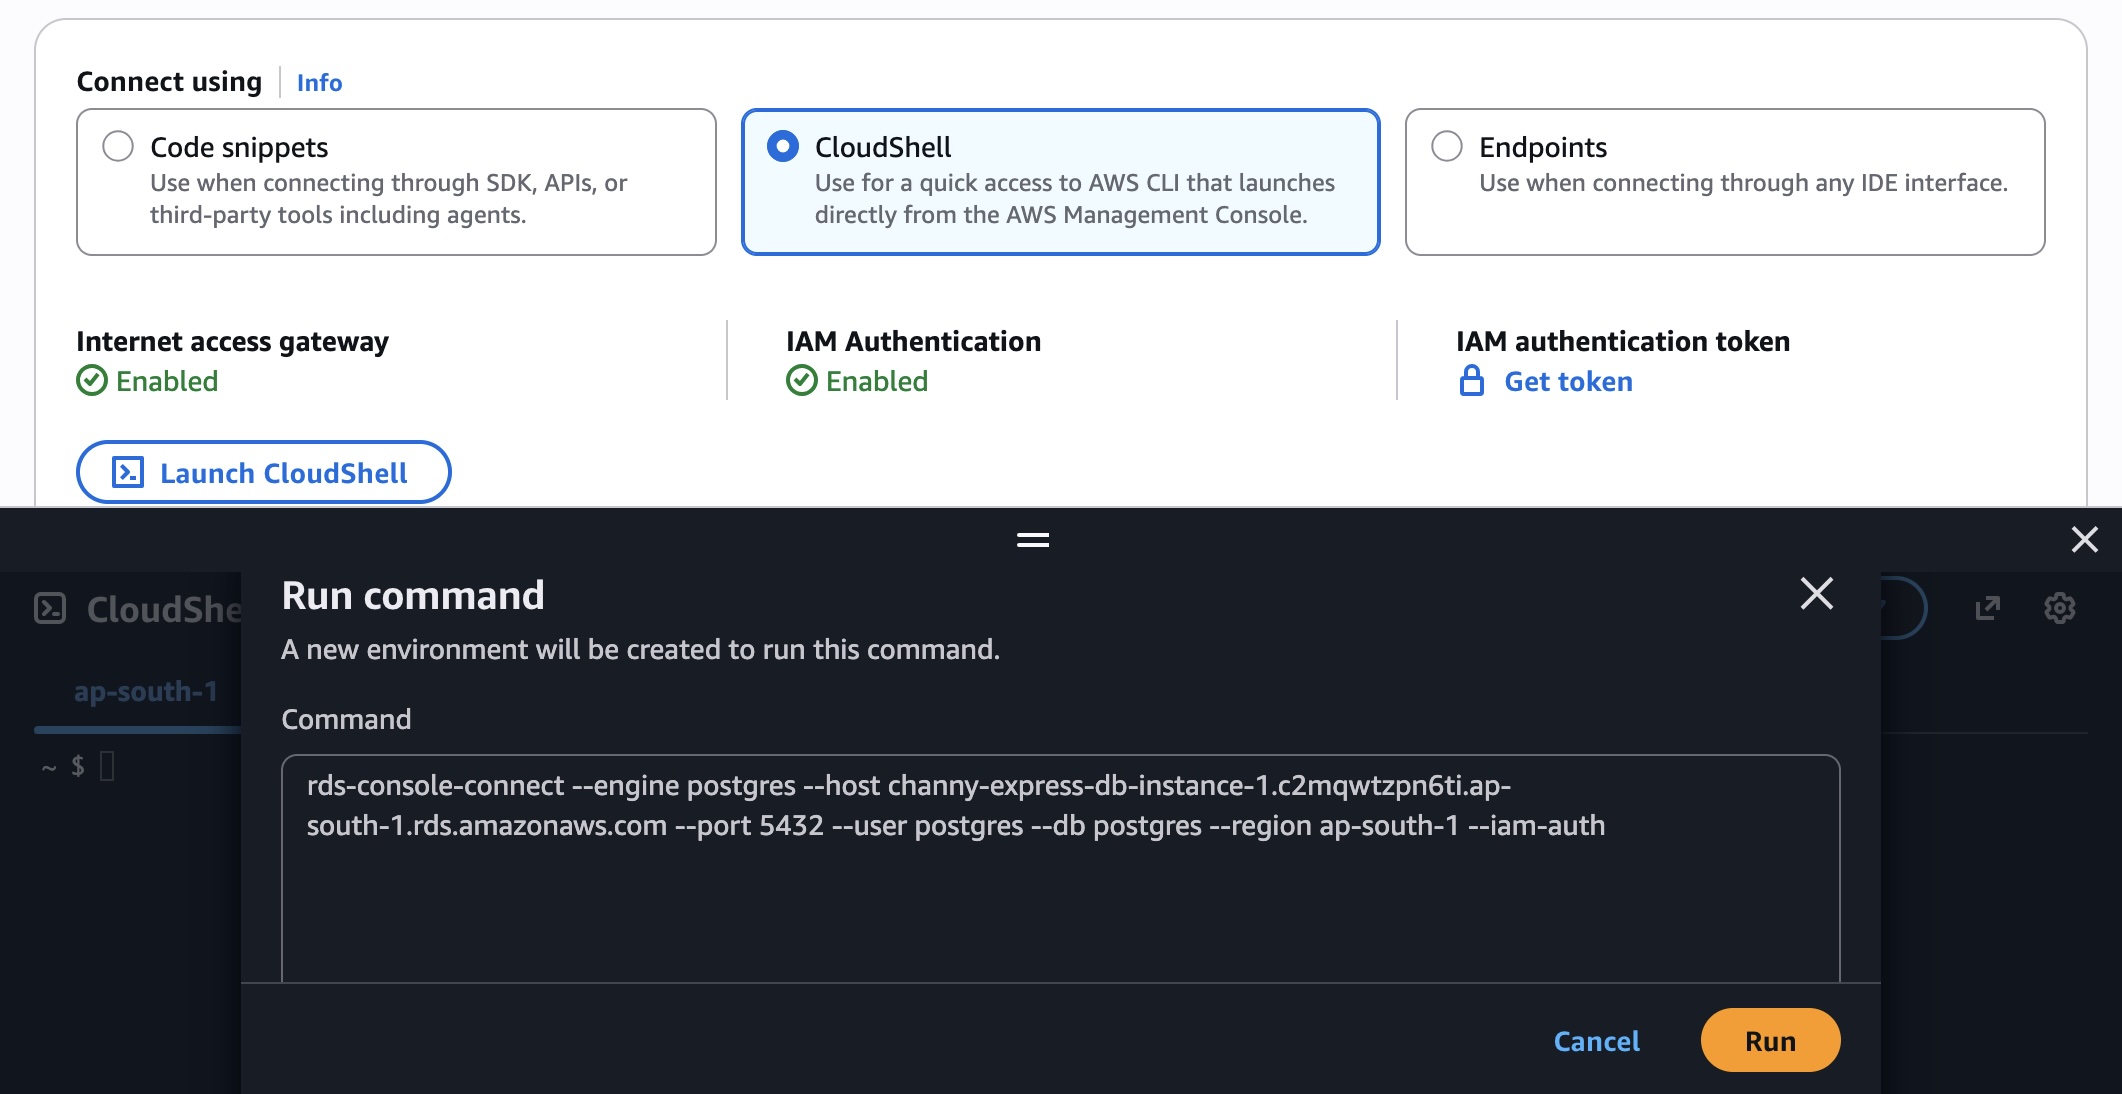
After your database is ready, go to the Connectivity & security tab to access three connection options. When connecting through SDKs, APIs, or third-party tools including agents, choose Code snippets. You can choose various programming languages such as .NET, Golang, JDBC, Node.js, PHP, PSQL, Python, and TypeScript. You can paste the code from each step into your tool and run the commands.

For example, the following Python code is dynamically generated to reflect the authentication configuration:

import psycopg2
import boto3

auth_token = boto3.client('rds', region_name='ap-south-1').generate_db_auth_token(DBHostname='channy-express-db-instance-1.abcdef.ap-south-1.rds.amazonaws.com', Port=5432, DBUsername='postgres', Region='ap-south-1')

conn = None
try:
    conn = psycopg2.connect(
        host='channy-express-db-instance-1.abcdef.ap-south-1.rds.amazonaws.com',
        port=5432,
        database='postgres',
        user='postgres',
        password=auth_token,
        sslmode='require'
    )
    cur = conn.cursor()
    cur.execute('SELECT version();')
    print(cur.fetchone()[0])
    cur.close()
except Exception as e:
    print(f"Database error: {e}")
    raise
finally:
    if conn:
        conn.close()

const { Client } = require('pg');
const AWS = require('aws-sdk');
AWS.config.update({ region: 'ap-south-1' });

async function main() {
  let password = '';
  const signer = new AWS.RDS.Signer({ region: 'ap-south-1', hostname: 'channy-express-db-instance-1.abcdef.ap-south-1.rds.amazonaws.com', port: 5432, username: 'postgres' });
  password = signer.getAuthToken({});

  const client = new Client({
    host: 'channy-express-db-instance-1.abcdef.ap-south-1.rds.amazonaws.com',
    port: 5432,
    database: 'postgres',
    user: 'postgres',
    password,
    ssl: { rejectUnauthorized: false }
  });

  try {
    await client.connect();
    const res = await client.query('SELECT version()');
    console.log(res.rows[0].version);
  } catch (error) {
    console.error('Database error:', error);
    throw error;
  } finally {
    await client.end();
  }
}
main().catch(console.error);

Choose CloudShell for quick access to the AWS CLI which launches directly from the console. When you choose Launch CloudShell, you can see the command is pre-populated with relevant information to connect to your specific cluster. After connecting to the shell, you should see the psql login and the postgres => prompt to run SQL commands.

You can also choose Endpoints to use tools that only support username and password credentials, such as pgAdmin. When you choose Get token, you use an AWS Identity and Access Management (IAM) authentication token generated by the utility in the password field. The token is generated for the master username that you set up at the time of creating the database. The token is valid for 15 minutes at a time. If the tool you’re using terminates the connection, you will need to generate the token again.

Building your application faster with Aurora databases
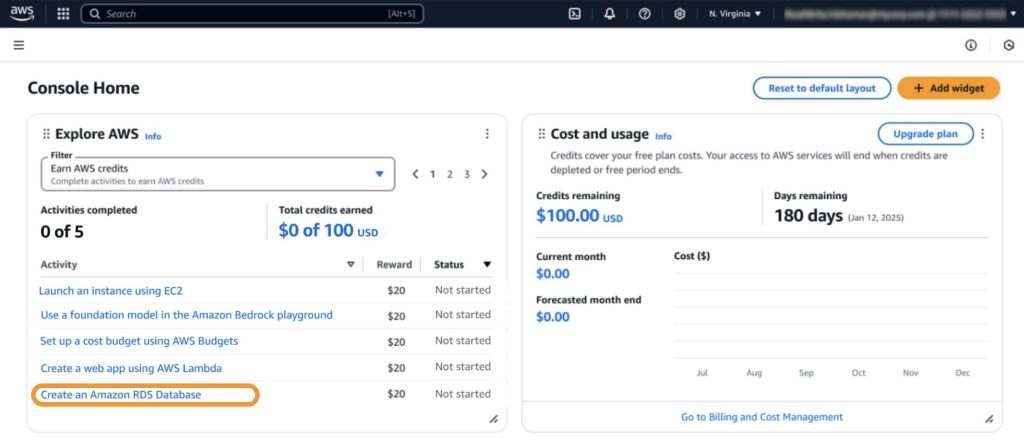
At re:Invent 2025, we announced enhancements to the AWS Free Tier program, offering up to $200 in AWS credits that can be used across AWS services. You’ll receive $100 in AWS credits upon sign-up and can earn an additional $100 in credits by using services such as Amazon Relational Database Service (Amazon RDS), AWS Lambda, and Amazon Bedrock. In addition, Amazon Aurora is now available across a broad set of eligible Free Tier database services.

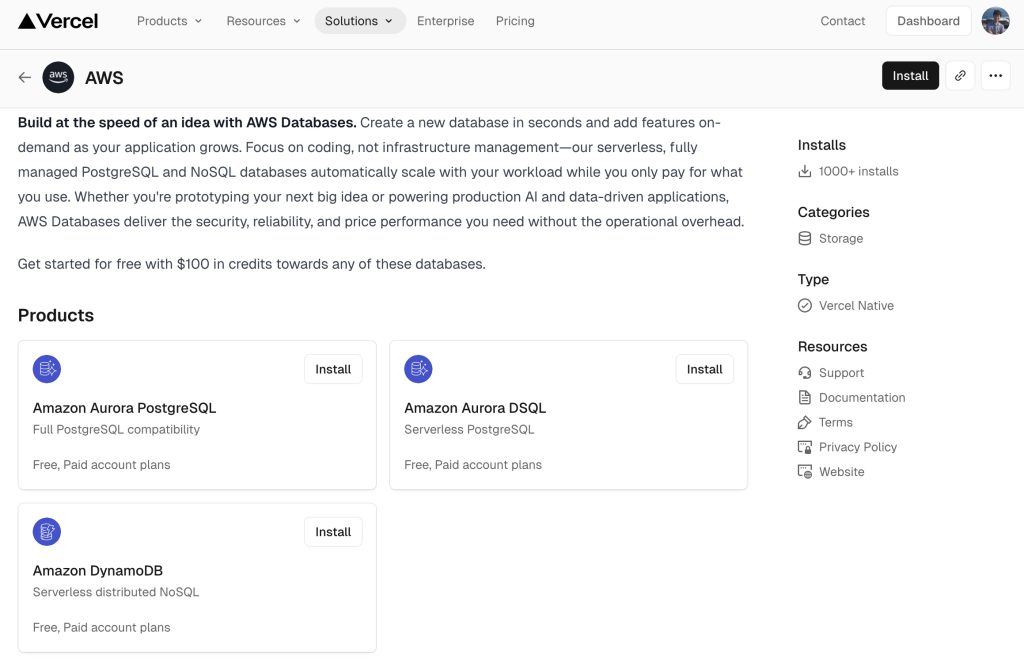
Developers are embracing platforms such as Vercel, where natural language is all it takes to build production-ready applications. We announced integrations with Vercel Marketplace to create and connect to an AWS database directly from Vercel in seconds and v0 by Vercel, an AI-powered tool that transforms your ideas into production-ready, full-stack web applications in minutes. It includes Aurora PostgreSQL, Aurora DSQL, and DynamoDB databases. You can also connect your existing databases created through express configuration with Vercel. To learn more, visit AWS for Vercel.

Like Vercel, we’re bringing our databases seamlessly into their experiences and are integrating directly with widely adopted frameworks, AI assistant coding tools, environments, and developer tools, all to unlock your ability to build at the speed of an idea.

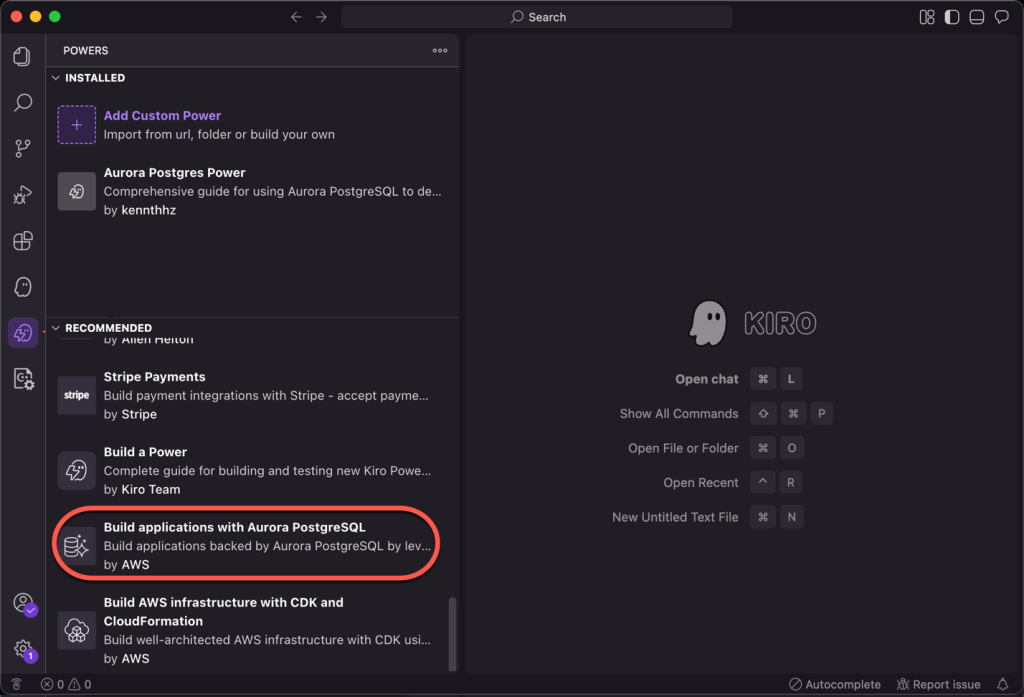
We introduced Aurora PostgreSQL integration with Kiro powers, which developers can use to build Aurora PostgreSQL backed applications faster with AI agent-assisted development through Kiro. You can use Kiro power for Aurora PostgreSQL within Kiro IDE and from the Kiro powers webpage for one-click installation. To learn more about this Kiro Power, read Introducing Amazon Aurora powers for Kiro and Amazon Aurora Postgres MCP Server.

Now available
You can create an Aurora PostgreSQL serverless database in seconds today in all AWS commercial Regions. For Regional availability and a future roadmap, visit the AWS Capabilities by Region.

You pay only for capacity consumed based on Aurora Capacity Units (ACUs) billed per second from zero capacity, which automatically starts up, shuts down, and scales capacity up or down based on your application’s needs. To learn more, visit the Amazon Aurora Pricing page.

Give it a try in the Aurora and RDS console and send feedback to AWS re:Post for Aurora PostgreSQL or through your usual AWS Support contacts.

Channy

20 years in the AWS Cloud – how time flies!

Post Syndicated from Channy Yun (윤석찬) original https://aws.amazon.com/blogs/aws/20-years-in-the-aws-cloud-how-time-flies/

AWS has reached its 20th anniversary! With a steady pace of innovation, AWS has grown to offer over 240 comprehensive cloud services and continues to launch thousands of new features annually for millions of customers. During this time, over 4,700 posts have been published on this blog—more than double the number since Jeff Barr wrote the 10th anniversary post.

AWS changed my life
Reflecting on what I was doing 20 years ago, I met Jeff in Seoul on March 13, 2006, when he came as the keynote speaker for the Korea NGWeb conference. At that time, Amazon was one of the first pioneers to initiate an API economy, introducing ecommerce API services. After the keynote speech, he returned home that evening, and I believe he wrote the Amazon S3 launch blog post on the flight back to the United States.

That short meeting with him brought significant changes to my life. He became my role model as a blogger, and I began building API-based services in my company and opening them to third-party developers. When I was a PhD student while taking a break from work, I realized that for individual researchers like me, AWS Cloud services are powerful tools for conducting large-scale research projects. After returning to work, my company became one of the first AWS customers in Korea in 2014. Countless developers—myself included—have embraced cloud computing and actively used its capabilities to accomplish what was previously impossible.

Over the past decade, the technology landscape has transformed dramatically. Deep learning emerged as a breakthrough in AI, evolving through generative AI based on large language models (LLMs) to today’s agentic AI technology. Jeff wrote, “When looking into the future, you need to be able to distinguish between flashy distractions and genuine trends, while remaining flexible enough to pivot if yesterday’s niche becomes today’s mainstream technology.” This principle guides how AWS approaches innovation—we start by listening to what customers truly need. The real trend isn’t pursuing every emerging technology, but rather reimagining solutions that address customers’ most critical challenges.

20 years of AWS
For the first 10 years, Jeff selected his favorite AWS launches and blog posts. Amazon S3, Amazon EC2 (2006), Amazon Relational Database Service, Amazon Virtual Private Cloud (2009), Amazon DynamoDB, Amazon Redshift (2012), Amazon WorkSpaces, Amazon Kinesis (2013), AWS Lambda (2014), and AWS IoT (2015).

While I also hate to play favorites, I want to choose some of my favorite AWS blog posts of the past decade.

  • Deploying containers easily (2014) – Amazon Elastic Container Service makes it straightforward for you to run any number of containers across a managed cluster of Amazon EC2 instances using powerful APIs and other tools. In 2017, we launched Amazon Elastic Kubernetes Service as a fully managed Kubernetes service and AWS Fargate as a serverless deployment option.
  • High availability database at global scale (2017) – Amazon Aurora is a modern relational database service offering performance and high availability at scale. In 2018, we launched Amazon Aurora Serverless v1, and this serverless database evolved to Amazon Aurora Serverless v2 to scale down to zero. In 2025, we also launched Amazon Aurora DSQL is the fastest serverless distributed SQL database for always available applications.
  • Machine learning (ML) at your fingertips (2017) – Amazon SageMaker is a fully managed end-to-end ML service that data scientists, developers, and ML experts can use to quickly build, train, and host machine learning models at scale. In 2024, we launched the next generation of Amazon SageMaker, a unified platform for data, analytics, and AI and introduced Amazon SageMaker AI to focus specifically on building, training, and deploying AI and ML models at scale.
  • Best price performance for cloud workloads (2018) – We launched Amazon EC2 A1 instances powered by the first generation of Arm-based AWS Graviton Processors designed to deliver the best price performance for your cloud workloads. Last year, we previewed EC2 M9g instances powered by AWS Graviton5 processors. Over 90,000 AWS customers have reaped the benefits of Graviton supporting popular AWS services such as Amazon ECS and Amazon EKS, AWS Lambda, Amazon RDS, Amazon ElastiCache, Amazon EMR, and Amazon OpenSearch Service.
  • Run AWS Cloud in your data center (2019) – AWS Outposts is a family of fully managed services delivering AWS infrastructure and services to virtually any on-premises or edge location for a truly consistent hybrid experience. Now, AWS Outposts is available in a variety of form factors, from 1U and 2U Outposts servers to 42U Outposts racks, and multiple rack deployments. Customers such as DISH, Fanduel, Morningstar, Philips, and others use Outposts in workloads requiring low latency access to on-premises systems, local data processing, data residency, and application migration with local system interdependencies.
  • Best price performance for ML workloads (2019) – We launched Amazon EC2 Inf1 instances powered by the first generation of AWS Inferentia chips designed to provide fast, low-latency inferencing. In 2022, we launched Amazon EC2 Trn1 instances powered by the first generation of AWS Trainium chips optimized for high performance AI training. Last year, we launched Amazon EC2 Trn3 UltraServers powered by Trainium3 to deliver the best token economics for next-generation generative AI applications. Customers such as Anthropic, Decart, poolside, Databricks, Ricoh, Karakuri, SplashMusic, and others are realizing performance and cost benefits of Trainium-based instances and UltraServers.
  • Build your generative AI apps on AWS (2023) – Amazon Bedrock is a fully managed service that offers a choice of industry leading AI models along with a broad set of capabilities that you need to build generative AI applications, simplifying development with security, privacy, and responsible AI. Last year, we introduced Amazon Bedrock AgentCore, an agentic platform for building, deploying, and operating effective agents securely at scale. Now, more than 100,000 customers worldwide choose Amazon Bedrock to deliver personalized experiences, automate complex workflows, and uncover actionable insights.
  • Your AI coding companion (2023) – We launched Amazon CodeWhisperer as the industry’s first cloud-based AI coding assistant service. The service delivered code generation from comments, open-source code reference tracking, and vulnerability scanning capabilities. In 2024, we rebranded the service to Amazon Q Developer and expanded its features to include a chat-based assistant in the console, project-based code generation, and code transformation tools. In 2025, this service evolved into Kiro, a new agentic AI development tool that brings structure to AI coding through spec-driven development, taking projects from prototype to production. Recently, Kiro previewed an autonomous agent, a frontier agent that works independently on development tasks, maintaining context and learning from every interaction.
  • Broaden your AI model choices (2024) – We launched Amazon Titan models further increasing cost-effective AI model choice for text and multimodal needs in Amazon Bedrock. At AWS re:Invent 2024, we announced Amazon Nova models that delivers frontier intelligence and industry leading price performance. Now Amazon Nova has a portfolio of AI offerings—including Amazon Nova models, Amazon Nova Forge, a new service to build your own frontier models; and Amazon Nova Act, a new service to build agents that automate browser-based UI workflows powered by a custom Amazon Nova 2 Lite model.

Build with AI: Your path forward
A decade ago, AWS responded to the emergence of deep learning by launching the broadest and deepest ML services, such as Amazon SageMaker, democratizing AI for a wide range of customers—from individual developers and startups to large enterprises—regardless of their technical expertise.

AI technology has advanced significantly, but building and deploying AI models and applications still remains complex for many developers and organizations. AWS offers the broadest selection of AI models through Amazon Bedrock, including leading providers such as Anthropic and OpenAI. By using our model training and inference infrastructure and responsible AI both practical and scalable, you can accelerate trusted AI innovation while maintaining control of your data and costs—all built on our global infrastructure’s operational excellence.

Reinvent your idea, keep on learning, build confidently with AI you can trust, and share your successes with us! New AWS customers receive up to $200 in credits to try AWS AI for free. If you’re a student, start building with Kiro for free using 1,000 credits per month for one year.

Channy

Introducing account regional namespaces for Amazon S3 general purpose buckets

Post Syndicated from Channy Yun (윤석찬) original https://aws.amazon.com/blogs/aws/introducing-account-regional-namespaces-for-amazon-s3-general-purpose-buckets/

Today, we’re announcing a new feature of Amazon Simple Storage Service (Amazon S3) you can use to create general purpose buckets in your own account regional namespace simplifying bucket creation and management as your data storage needs grow in size and scope. You can create general purpose bucket names across multiple AWS Regions with assurance that your desired bucket names will always be available for you to use.

With this feature, you can predictably name and create general purpose buckets in your own account regional namespace by appending your account’s unique suffix in your requested bucket name. For example, I can create the bucket mybucket-123456789012-us-east-1-an in my account regional namespace. mybucket is the bucket name prefix that I specified, then I add my account regional suffix to the requested bucket name: -123456789012-us-east-1-an. If another account tries to create buckets using my account’s suffix, their requests will be automatically rejected.

Your security teams can use AWS Identity and Access Management (AWS IAM) policies and AWS Organizations service control policies to enforce that your employees only create buckets in their account regional namespace using the new s3:x-amz-bucket-namespace condition key, helping teams adopt the account regional namespace across your organization.

Create your S3 bucket with account regional namespace in action
To get started, choose Create bucket in the Amazon S3 console. To create your bucket in your account regional namespace, choose Account regional namespace. If you choose this option, you can create your bucket with any name that is unique to your account and region.

This configuration supports all of the same features as general purpose buckets in the global namespace. The only difference is that only your account can use bucket names with your account’s suffix. The bucket name prefix and the account regional suffix combined must be between 3 and 63 characters long.

Using the AWS Command Line Interface (AWS CLI), you can create a bucket with account regional namespace by specifying the x-amz-bucket-namespace:account-regional request header and providing a compatible bucket name.

$ aws s3api create-bucket --bucket mybucket-123456789012-us-east-1-an \
   --bucket-namespace account-regional \
   --region us-east-1

You can use the AWS SDK for Python (Boto3) to create a bucket with account regional namespace using CreateBucket API request.

import boto3

class AccountRegionalBucketCreator:
    """Creates S3 buckets using account-regional namespace feature."""
    
    ACCOUNT_REGIONAL_SUFFIX = "-an"
    
    def __init__(self, s3_client, sts_client):
        self.s3_client = s3_client
        self.sts_client = sts_client
    
    def create_account_regional_bucket(self, prefix):
        """
        Creates an account-regional S3 bucket with the specified prefix.
        Resolves caller AWS account ID using the STS GetCallerIdentity API.
        Format: ---an
        """
        account_id = self.sts_client.get_caller_identity()['Account']
        region = self.s3_client.meta.region_name
        bucket_name = self._generate_account_regional_bucket_name(
            prefix, account_id, region
        )
        
        params = {
            "Bucket": bucket_name,
            "BucketNamespace": "account-regional"
        }
        if region != "us-east-1":
            params["CreateBucketConfiguration"] = {
                "LocationConstraint": region
            }
        
        return self.s3_client.create_bucket(**params)
    
    def _generate_account_regional_bucket_name(self, prefix, account_id, region):
        return f"{prefix}-{account_id}-{region}{self.ACCOUNT_REGIONAL_SUFFIX}"


if __name__ == '__main__':
    s3_client = boto3.client('s3')
    sts_client = boto3.client('sts')
    
    creator = AccountRegionalBucketCreator(s3_client, sts_client)
    response = creator.create_account_regional_bucket('test-python-sdk')
    
    print(f"Bucket created: {response}")

You can update your infrastructure as code (IaC) tools, such as AWS CloudFormation, to simplify creating buckets in your account regional namespace. AWS CloudFormation offers the pseudo parameters, AWS::AccountId and AWS::Region, making it easy to build CloudFormation templates that create account regional namespace buckets.

The following example demonstrates how you can update your existing CloudFormation templates to start creating buckets in your account regional namespace:

BucketName: !Sub "amzn-s3-demo-bucket-${AWS::AccountId}-${AWS::Region}-an"
BucketNamespace: "account-regional"

Alternatively, you can also use the BucketNamePrefix property to update your CloudFormation template. By using the BucketNamePrefix, you can provide only the customer defined portion of the bucket name and then it automatically adds the account regional namespace suffix based on the requesting AWS account and Region specified.

BucketNamePrefix: 'amzn-s3-demo-bucket'
BucketNamespace: "account-regional"

Using these options, you can build a custom CloudFormation template to easily create general purpose buckets in your account regional namespace.

Things to know
You can’t rename your existing global buckets to bucket names with account regional namespace, but you can create new general purpose buckets in your account regional namespace. Also, the account regional namespace is only supported for general purpose buckets. S3 table buckets and vector buckets already exist in an account-level namespace and S3 directory buckets exist in a zonal namespace.

To learn more, visit Namespaces for general purpose buckets in the Amazon S3 User Guide.

Now available
Creating general purpose buckets in your account regional namespace in Amazon S3 is now available in 37 AWS Regions including the AWS China and AWS GovCloud (US) Regions. You can create general purpose buckets in your account regional namespace at no additional cost.

Give it a try in the Amazon S3 console today and send feedback to AWS re:Post for Amazon S3 or through your usual AWS Support contacts.

Channy

Introducing OpenClaw on Amazon Lightsail to run your autonomous private AI agents

Post Syndicated from Channy Yun (윤석찬) original https://aws.amazon.com/blogs/aws/introducing-openclaw-on-amazon-lightsail-to-run-your-autonomous-private-ai-agents/

Today, we’re announcing the general availability of OpenClaw on Amazon Lightsail to launch OpenClaw instance, pairing your browser, enabling AI capabilities, and optionally connecting messaging channels. Your Lightsail OpenClaw instance is pre-configured with Amazon Bedrock as the default AI model provider. Once you complete setup, you can start chatting with your AI assistant immediately — no additional configuration required.

OpenClaw is an open-source self-hosted autonomous private AI agent that acts as a personal digital assistant by running directly on your computer. You can AI agents on OpenClaw through your browser to connect to messaging apps like WhatsApp, Discord, or Telegram to perform tasks such as managing emails, browsing the web, and organizing files, rather than just answering questions.

AWS customers have asked if they can run OpenClaw on AWS. Some of them blogged about running OpenClaw on Amazon EC2 instances. As someone who has experienced installing OpenClaw directly on my home device, I learned that this is not easy and that there are many security considerations.

So, let me introduce how to launch a pre-configured OpenClaw instance on Amazon Lightsail more easily and run it securely.

OpenClaw on Amazon Lightsail in action
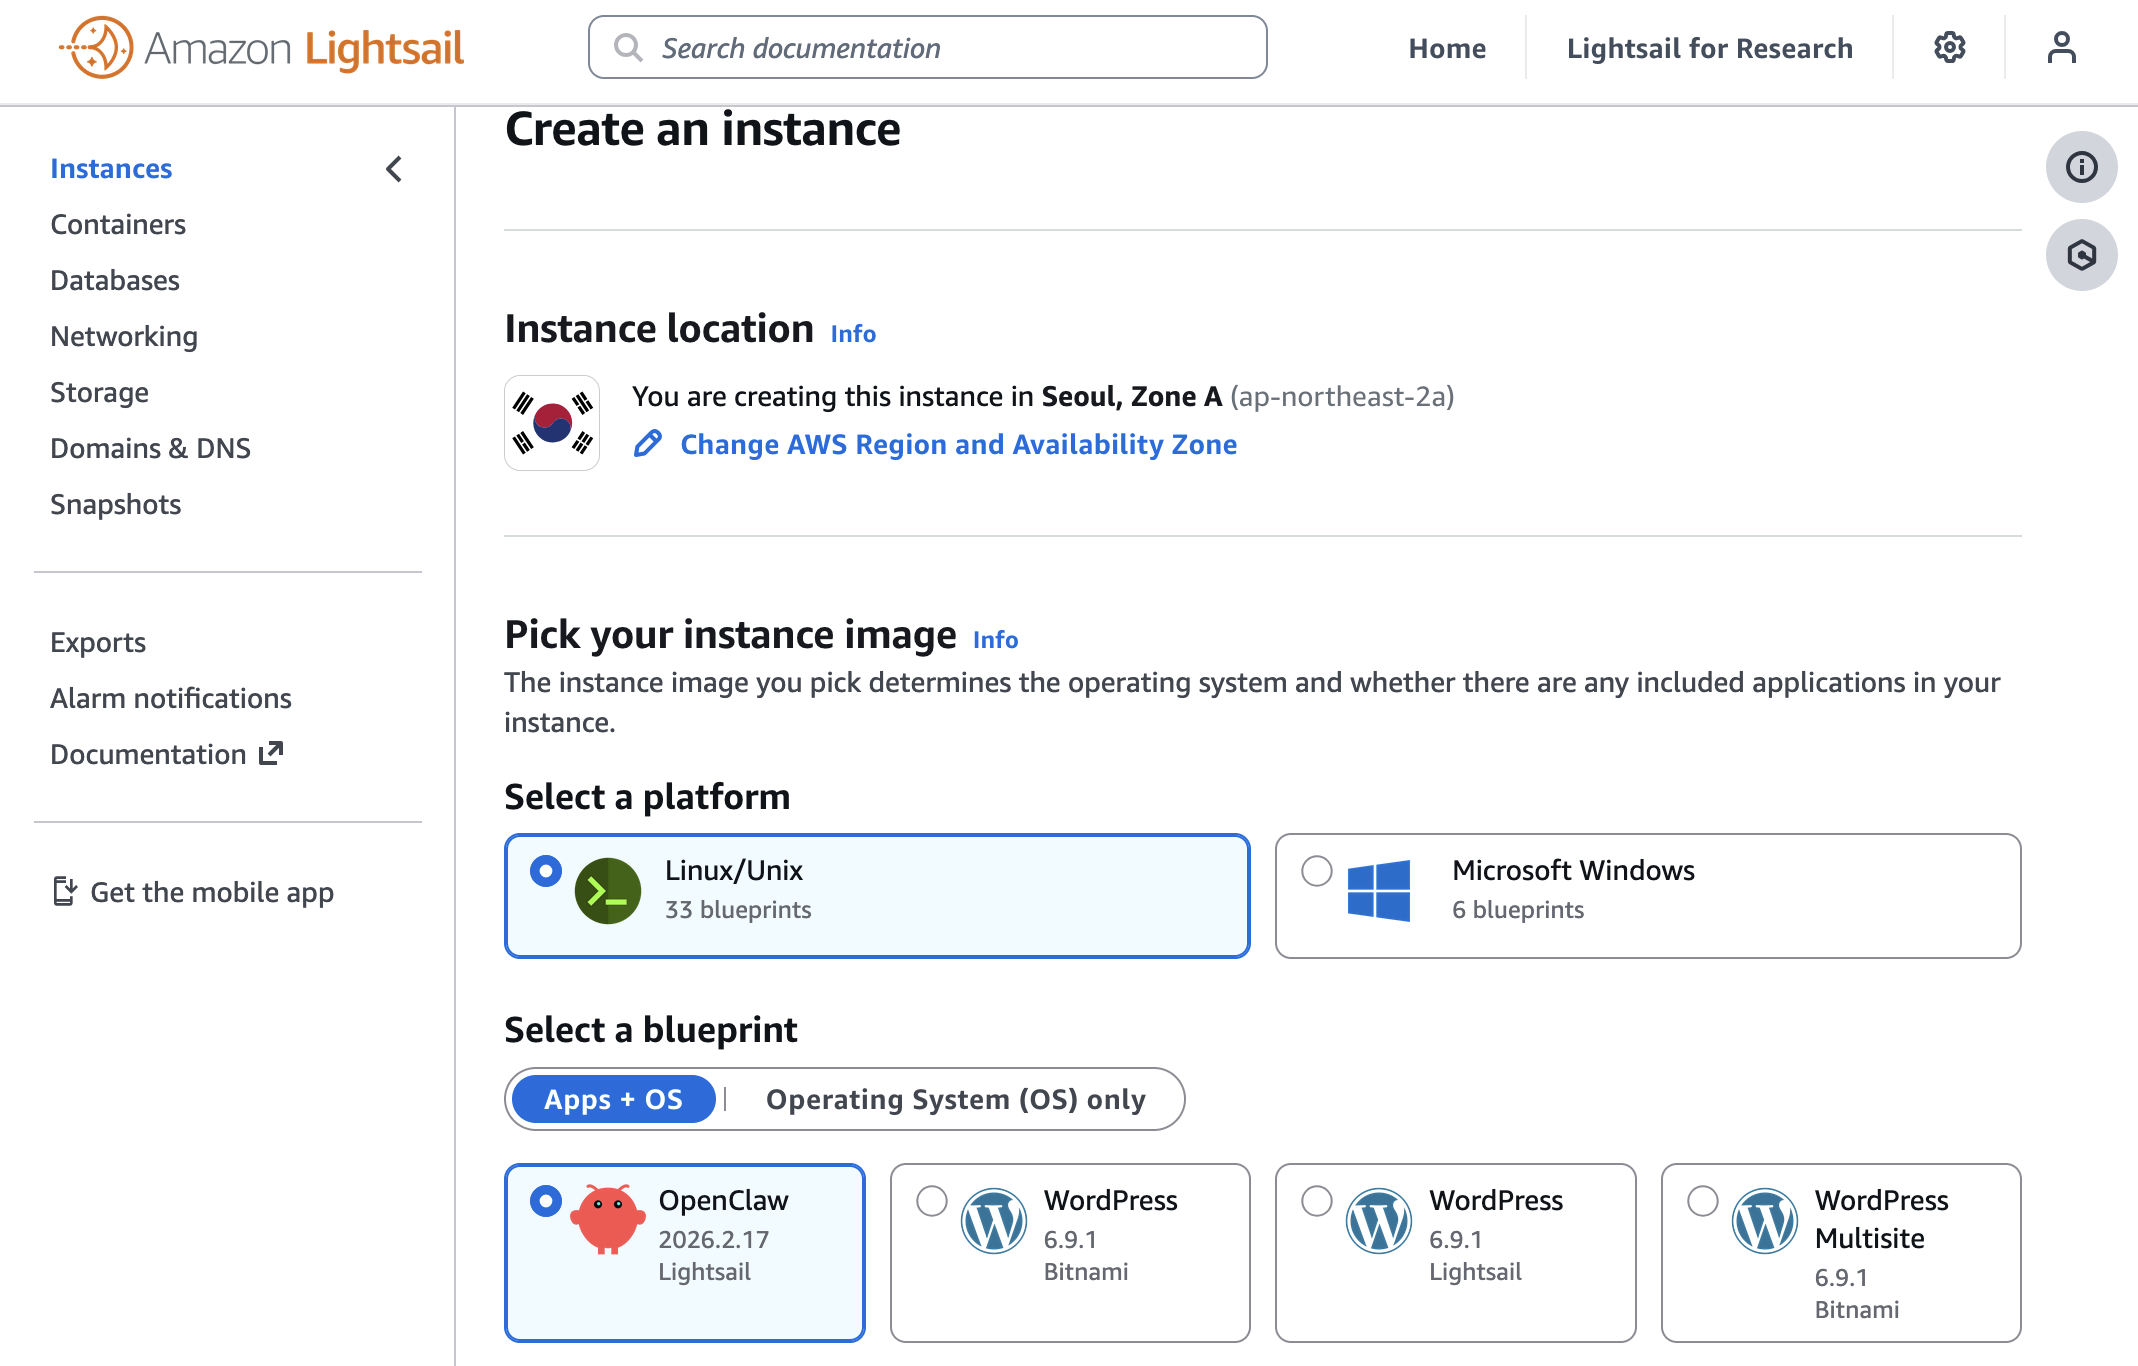
To get started, go to the Amazon Lightsail console and choose Create instance on the Instances section. After choosing your preferred AWS Region and Availability Zone, Linux/Unix platform to run your instance, choose OpenClaw under Select a blueprint.

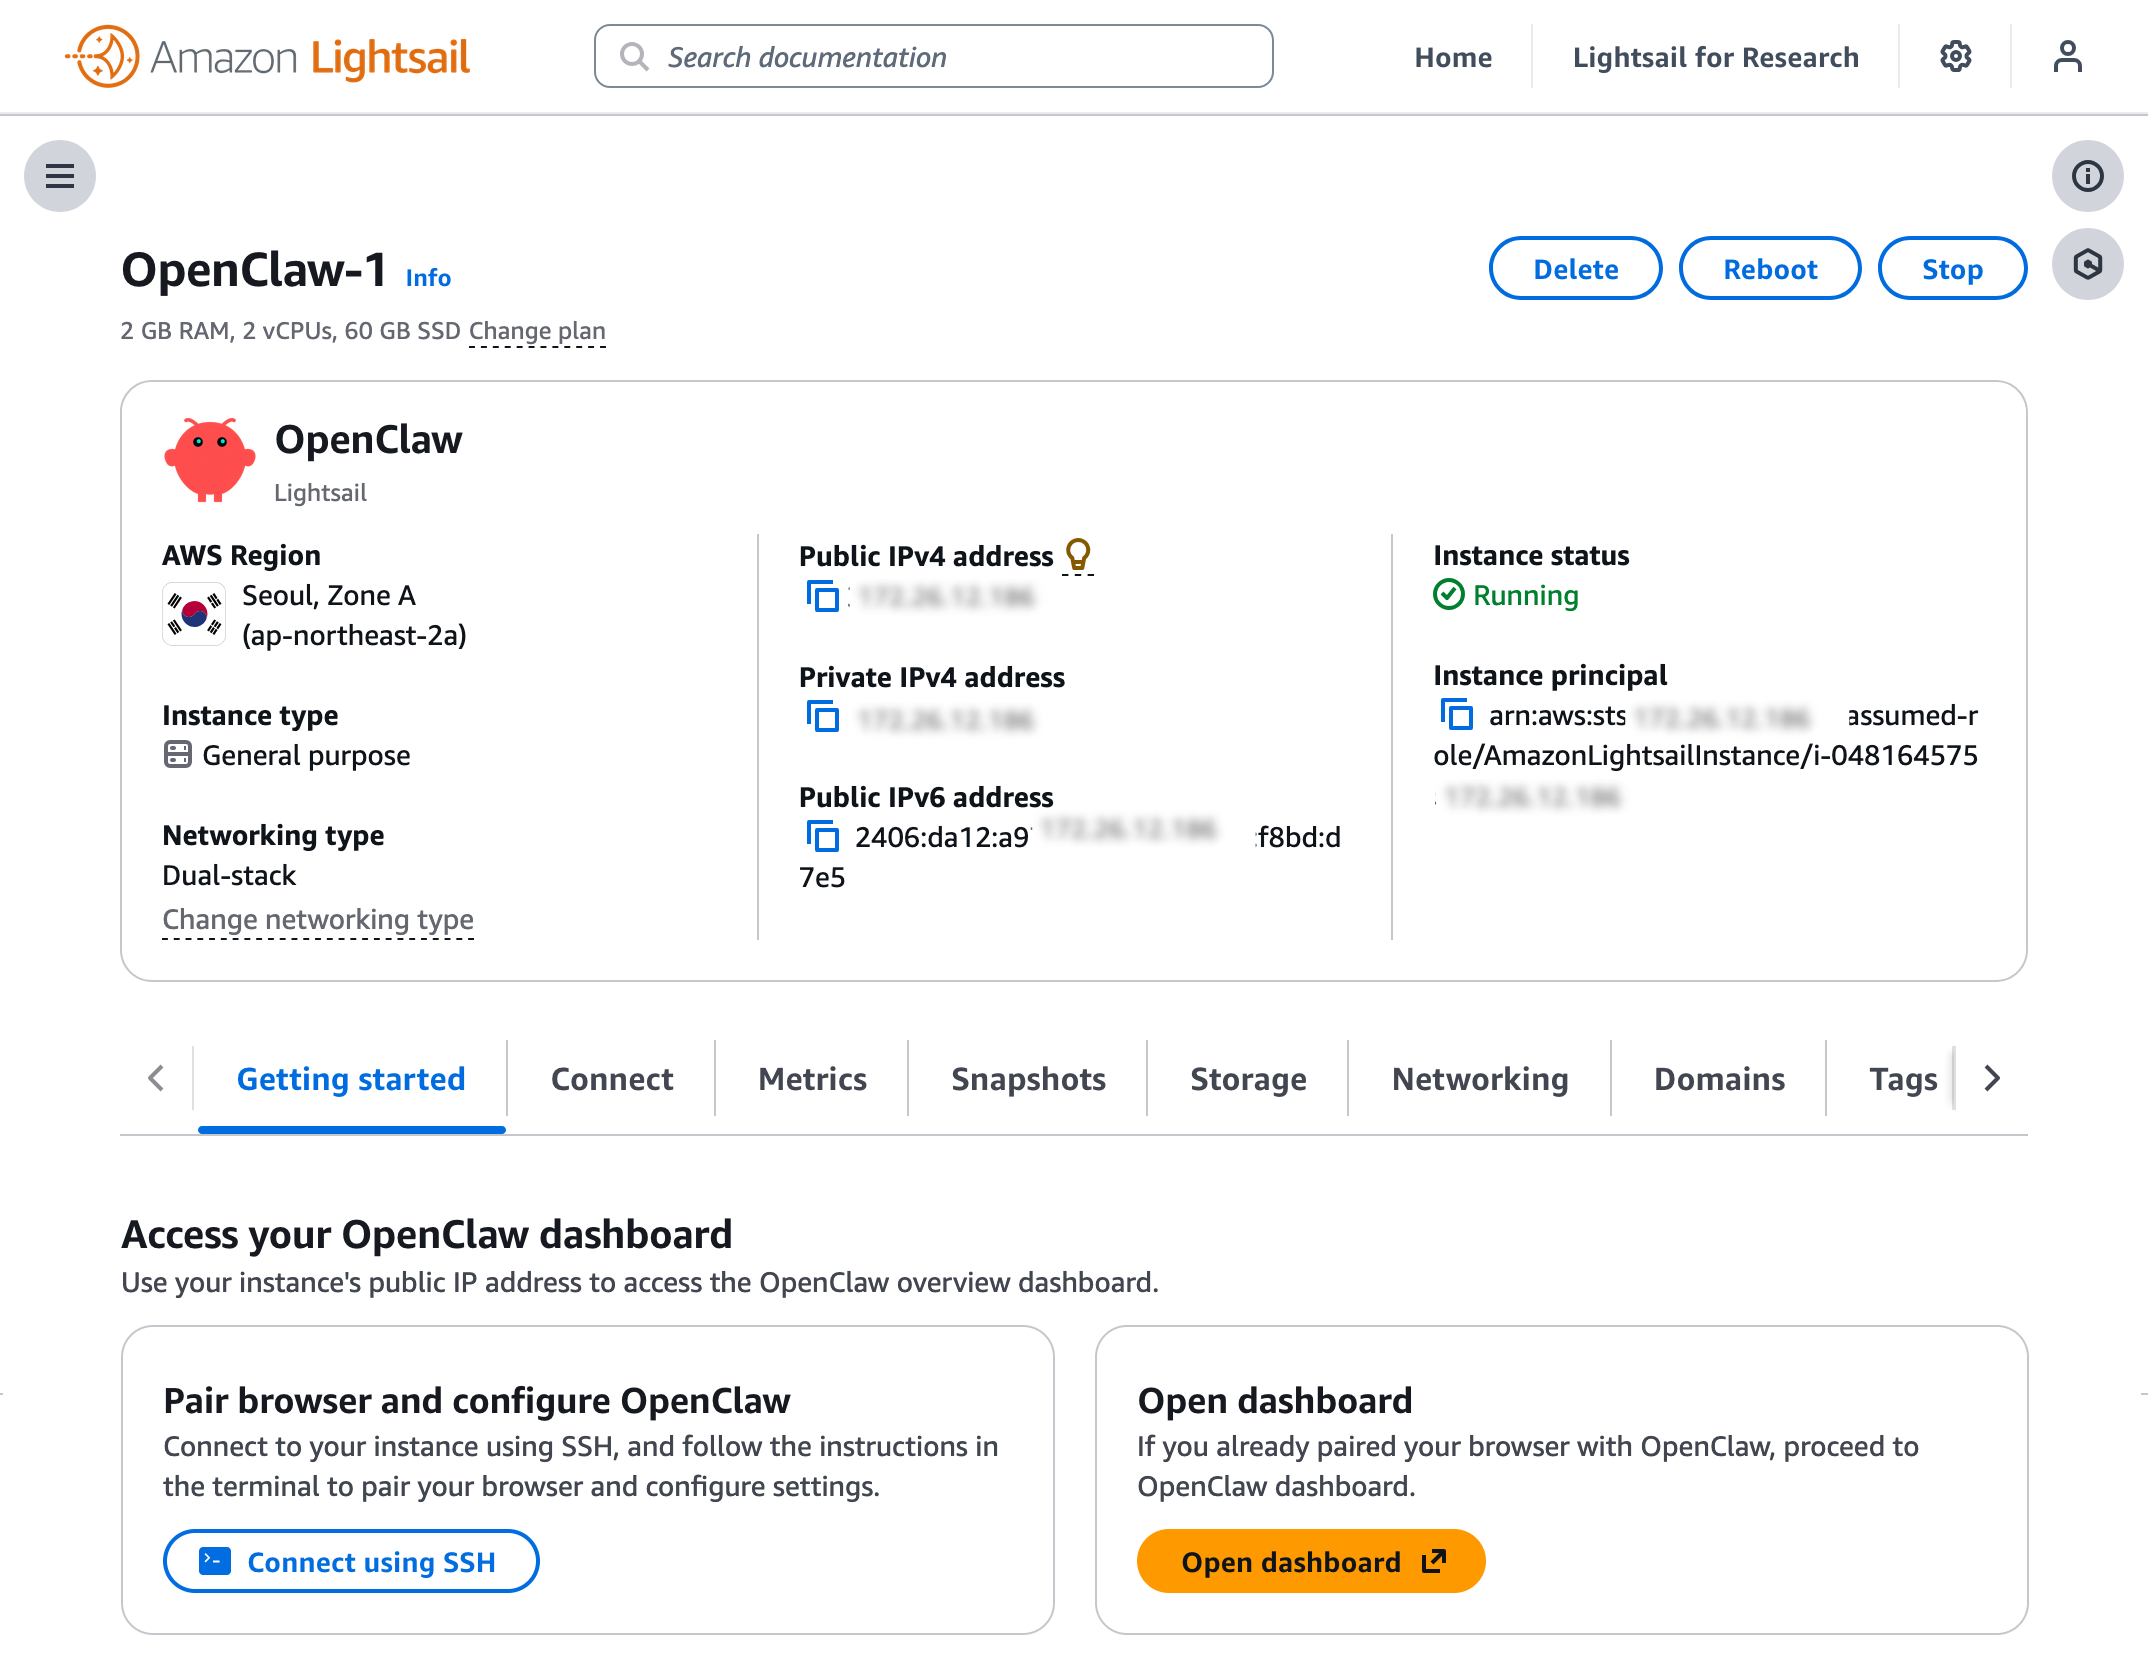
You can choose your instance plan (4 GB memory plan is recommended for optimal performance) and enter a name for your instance. Finally choose Create instance. Your instance will be in a Running state in a few minutes.

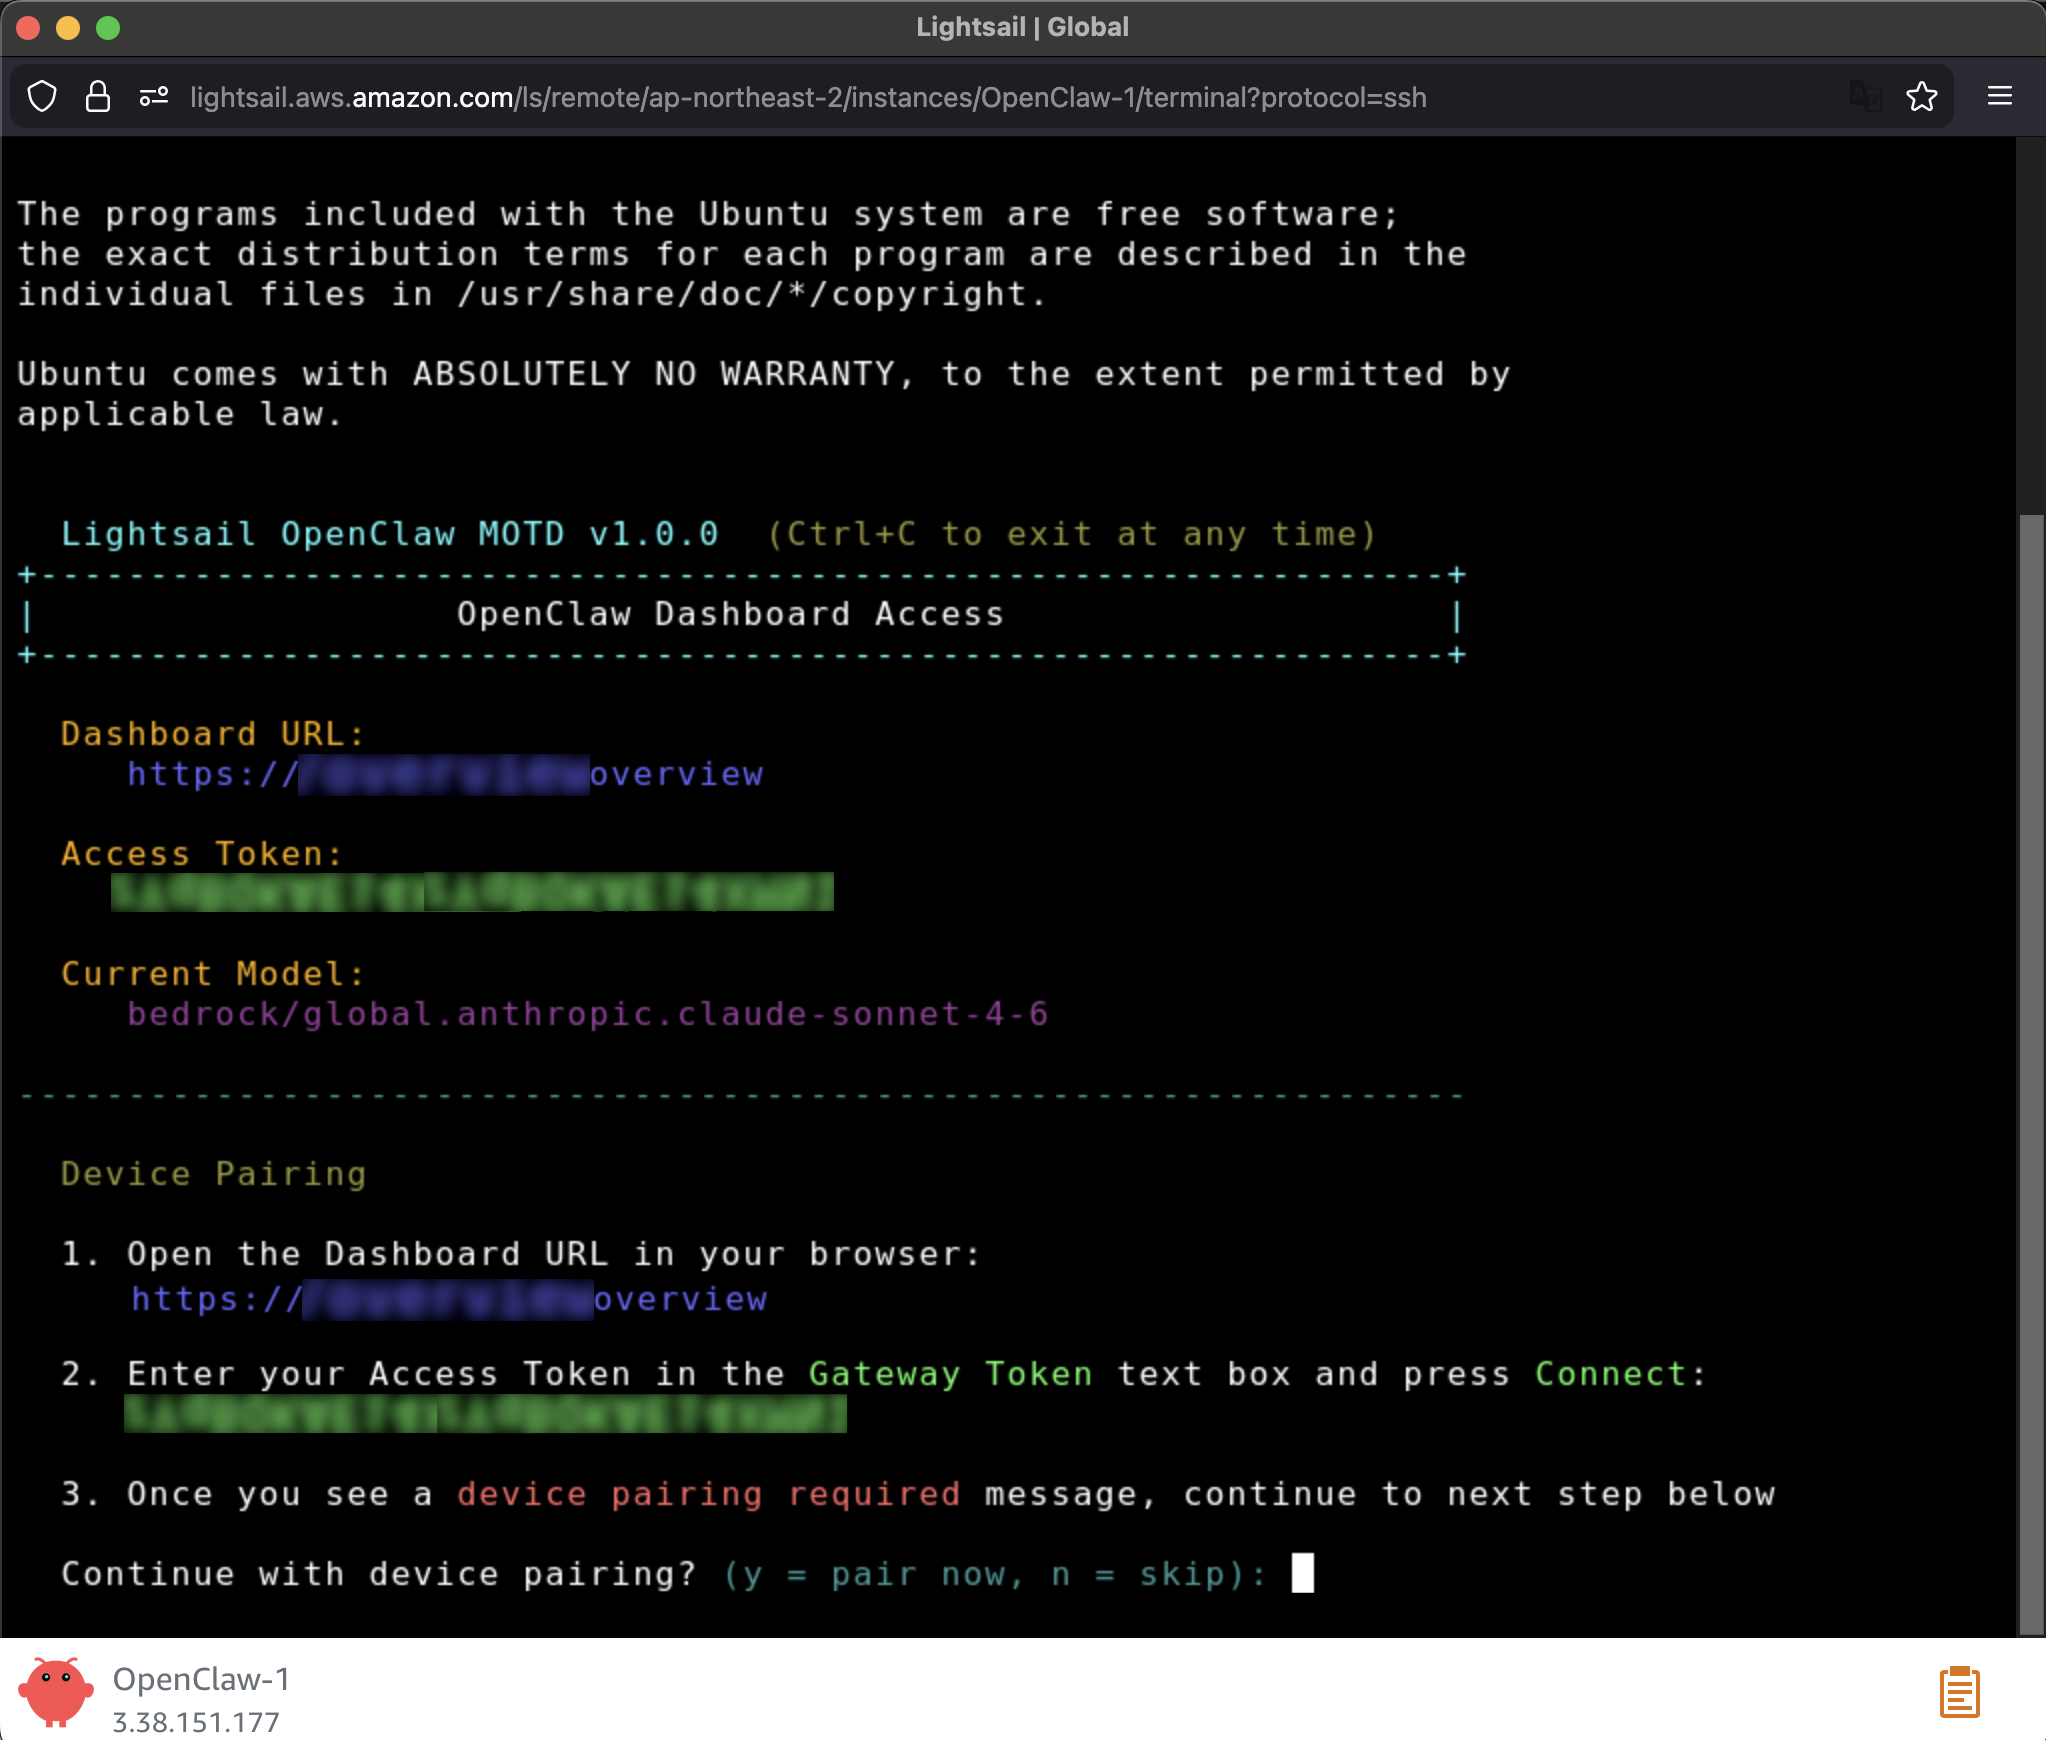
Before you can use the OpenClaw dashboard, you should pair your browser with OpenClaw. This creates a secure connection between your browser session and OpenClaw. To pair your browser with OpenClaw, choose Connect using SSH in the Getting started tab.

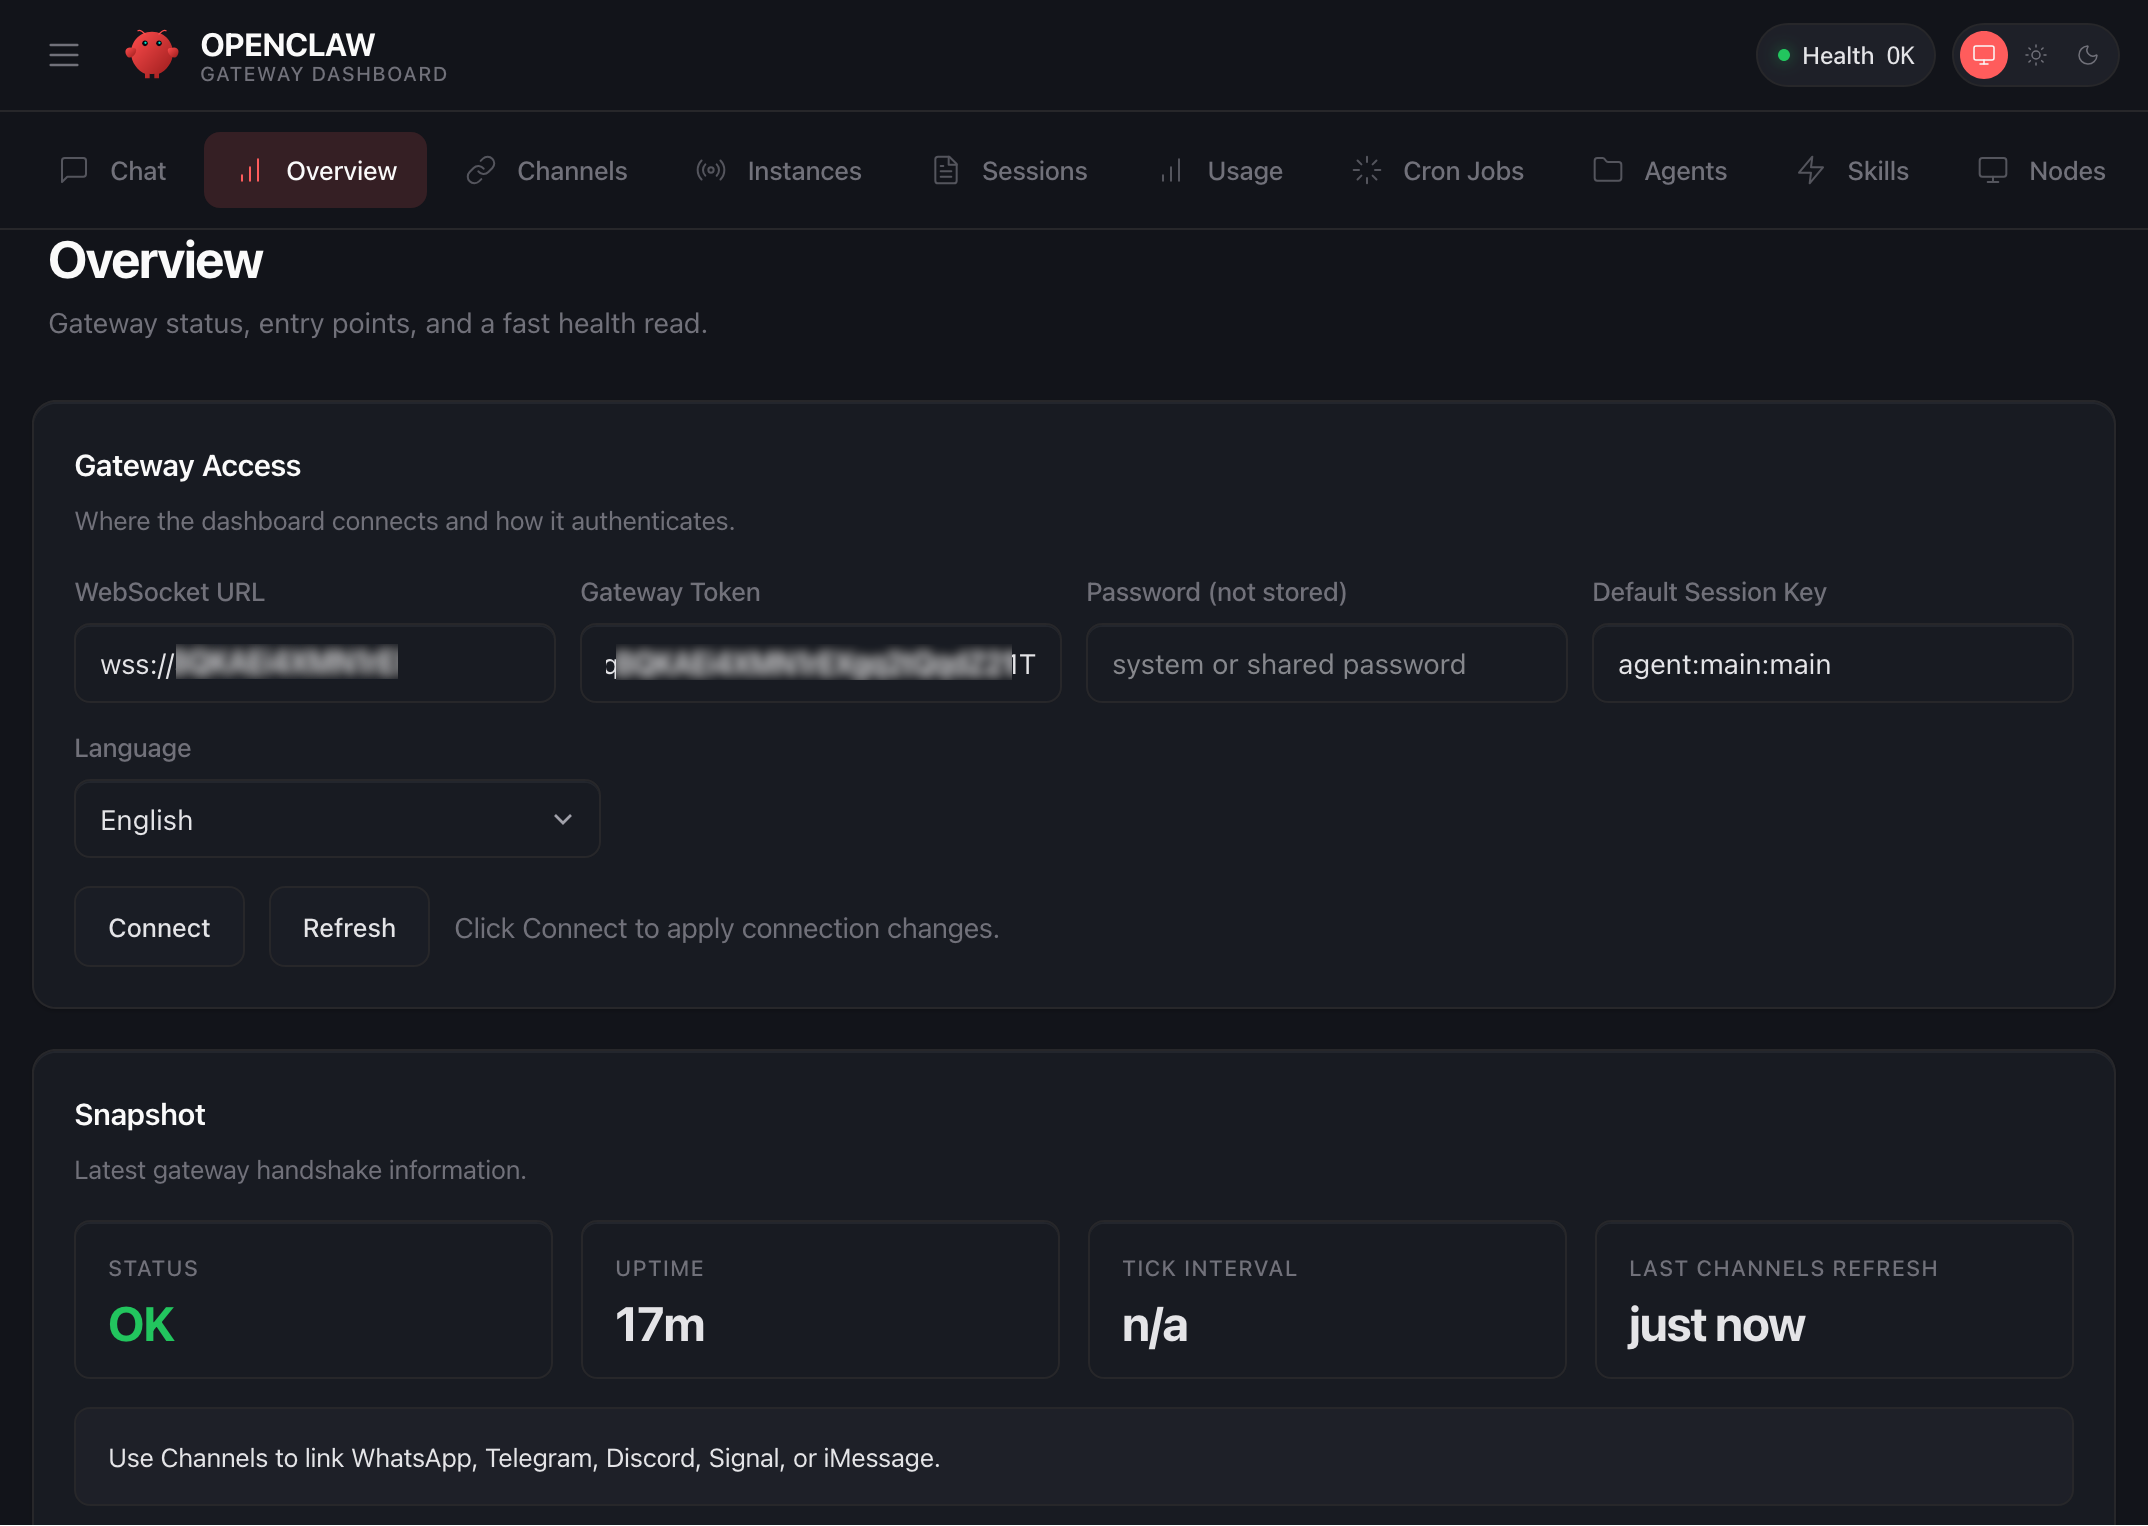
When a browser-based SSH terminal opens, you can see the dashboard URL, security credentials displayed in the welcome message. Copy them and open the dashboard in a new browser tab. In the OpenClaw dashboard, you can paste the copied access token into the Gateway Token field in the OpenClaw dashboard.

When prompted, press y to continue and a to approve with device pairing in the SSH terminal. When pairing is complete, you can see the OK status in the OpenClaw dashboard and your browser is now connected to your OpenClaw instance.

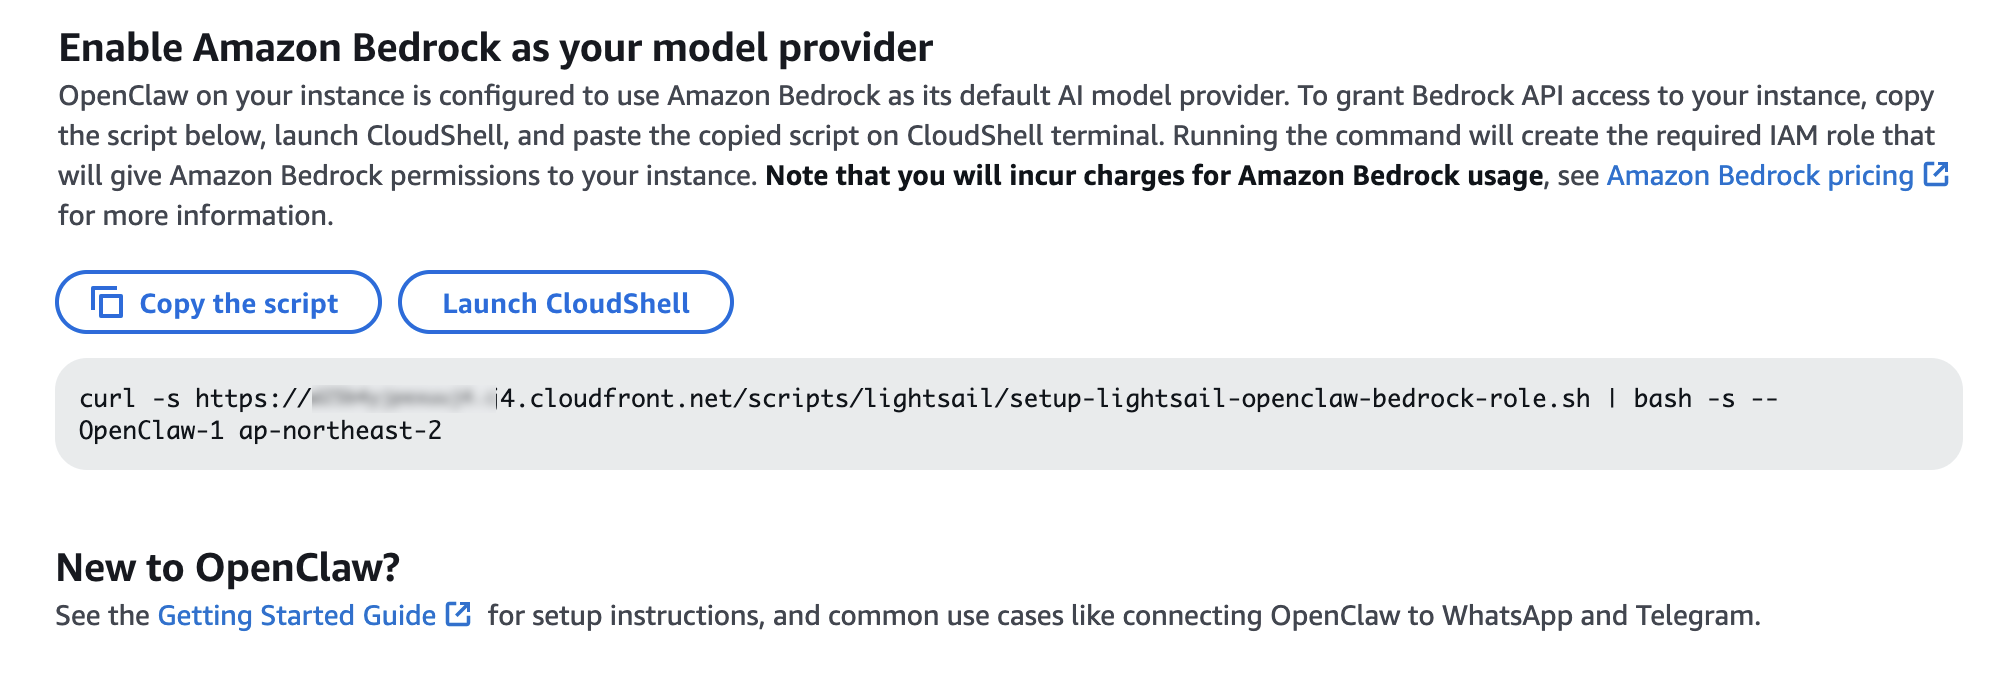
Your OpenClaw instance on Lightsail is configured to use Amazon Bedrock to power its AI assistant. To enable Bedrock API access, copy the script in the Getting started tab and run copied script into the AWS CloudShell terminal.

Once the script is complete, go to Chat in the OpenClaw dashboard to start using your AI assistant!

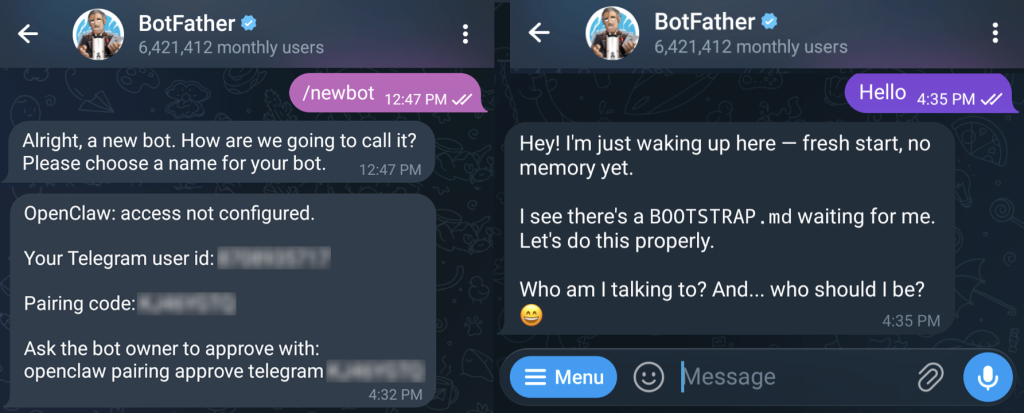
You can set up OpenClaw to work with messaging apps like Telegram and WhatsApp for interacting with your AI assistant directly from your phone or messaging client. To learn more, visit Get started with OpenClaw on Lightsail in the Amazon Lightsail User Guide.

Things to know
Here are key considerations to know about this feature:

  • Permission — You can customize AWS IAM permissions granted to your OpenClaw instance. The setup script creates an IAM role with a policy that grants access to Amazon Bedrock. You can customize this policy at any time. But, you should be careful when modifying permissions because it may prevent OpenClaw from generating AI responses. To learn more, visit AWS IAM policies in the AWS documentation
  • Cost — You pay for the instance plan you selected on an on-demand hourly rate only for what you use. Every message sent to and received from the OpenClaw assistant is processed through Amazon Bedrock using a token-based pricing model. If you select a third-party model distributed through AWS Marketplace such as Anthropic Claude or Cohere, there may be additional software fees on top of the per-token cost.
  • Security — Running a personal AI agent on OpenClaw is powerful, but it may cause security threat if you are careless. I recommend to hide your OpenClaw gateway never to expose it to open internet. The gateway auth token is your password, so rotate it often and store it in your envirnment file not hardcoded in config file. To learn more about security tips, visit Security on OpenClaw gateway.

Now available
OpenClaw on Amazon Lightsail is now available in all AWS commercial Regions where Amazon Lightsail is available. For Regional availability and a future roadmap, visit the AWS Capabilities by Region.

Give a try in the Lightsail console and send feedback to AWS re:Post for Amazon Lightsail or through your usual AWS support contacts.

Channy

AWS Security Hub Extended offers full-stack enterprise security with curated partner solutions

Post Syndicated from Channy Yun (윤석찬) original https://aws.amazon.com/blogs/aws/aws-security-hub-extended-offers-full-stack-enterprise-security-with-curated-partner-solutions/

At re:Invent 2025, we introduced a completely re-imagined AWS Security Hub that unifies AWS security services, including Amazon GuardDuty and Amazon Inspector into a single experience. This unified experience automatically and continuously analyzes security findings in combination to help you prioritize and respond to your critical security risks.

Today, we’re announcing AWS Security Hub Extended, a plan of Security Hub that simplifies how you procure, deploy, and integrate a full-stack enterprise security solution across endpoint, identity, email, network, data, browser, cloud, AI, and security operations. With the Extended plan, you can expand your security portfolio beyond AWS to help protect your enterprise estate through a curated selection of AWS Partner solutions, including 7AI, Britive, CrowdStrike, Cyera, Island, Noma, Okta, Oligo, Opti, Proofpoint, SailPoint, Splunk, a Cisco company, Upwind, and Zscaler.

With AWS as the seller of record, you benefit from pre-negotiated pay-as-you-go pricing, a single bill, and no long-term commitments. You can also get unified security operations experience within Security Hub and unified Level 1 support for AWS Enterprise Support customers. You told us that managing multiple procurement cycles and vendor negotiations was creating unnecessary complexity, costing you time and resources. In response, we’ve curated these partner offerings for you to establish more comprehensive protection across your entire technology stack through a single, simplified experience.

Security findings from all participating solutions are emitted in the Open Cybersecurity Schema Framework (OCSF) schema and automatically aggregated in AWS Security Hub. With the Extended plan, you can combine AWS and partner security solutions to quickly identify and respond to risks that span boundaries.

The Security Hub Extended plan in action
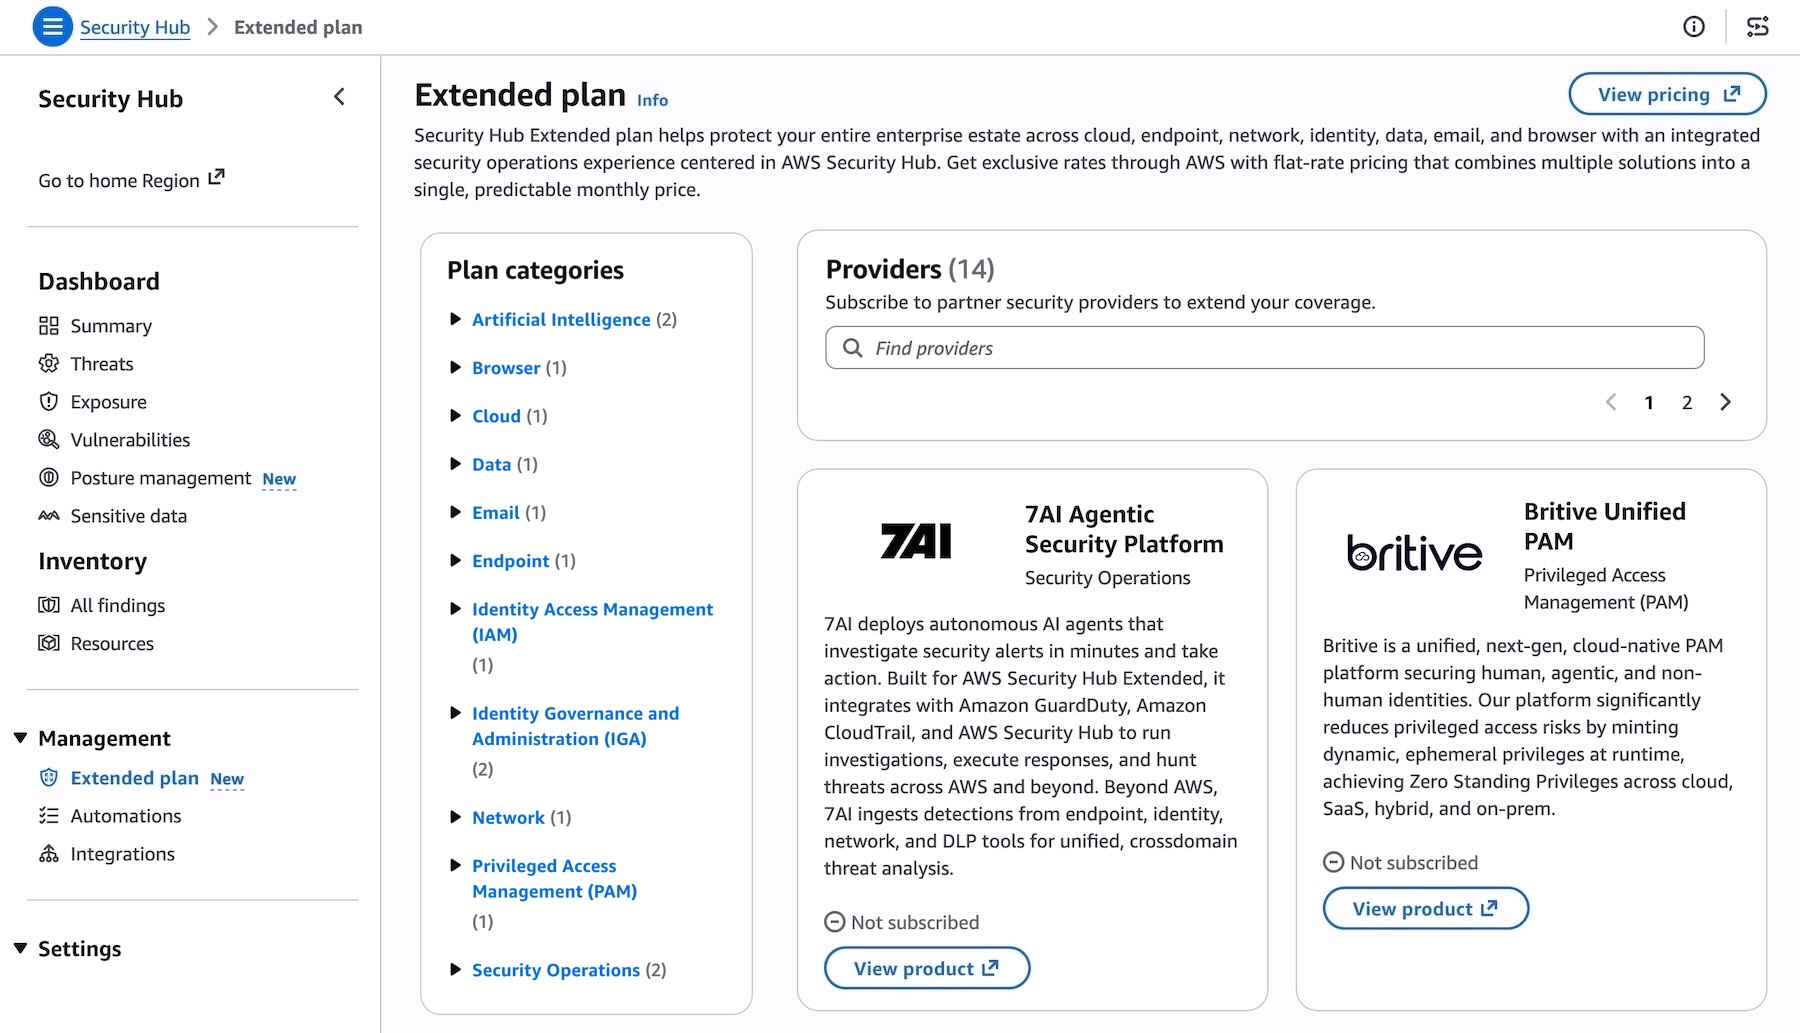
You can access the partner solutions directly within the Security Hub console by selecting Extended plan under the Management menu. From there, you can review and deploy any combination of curated and partner offerings.

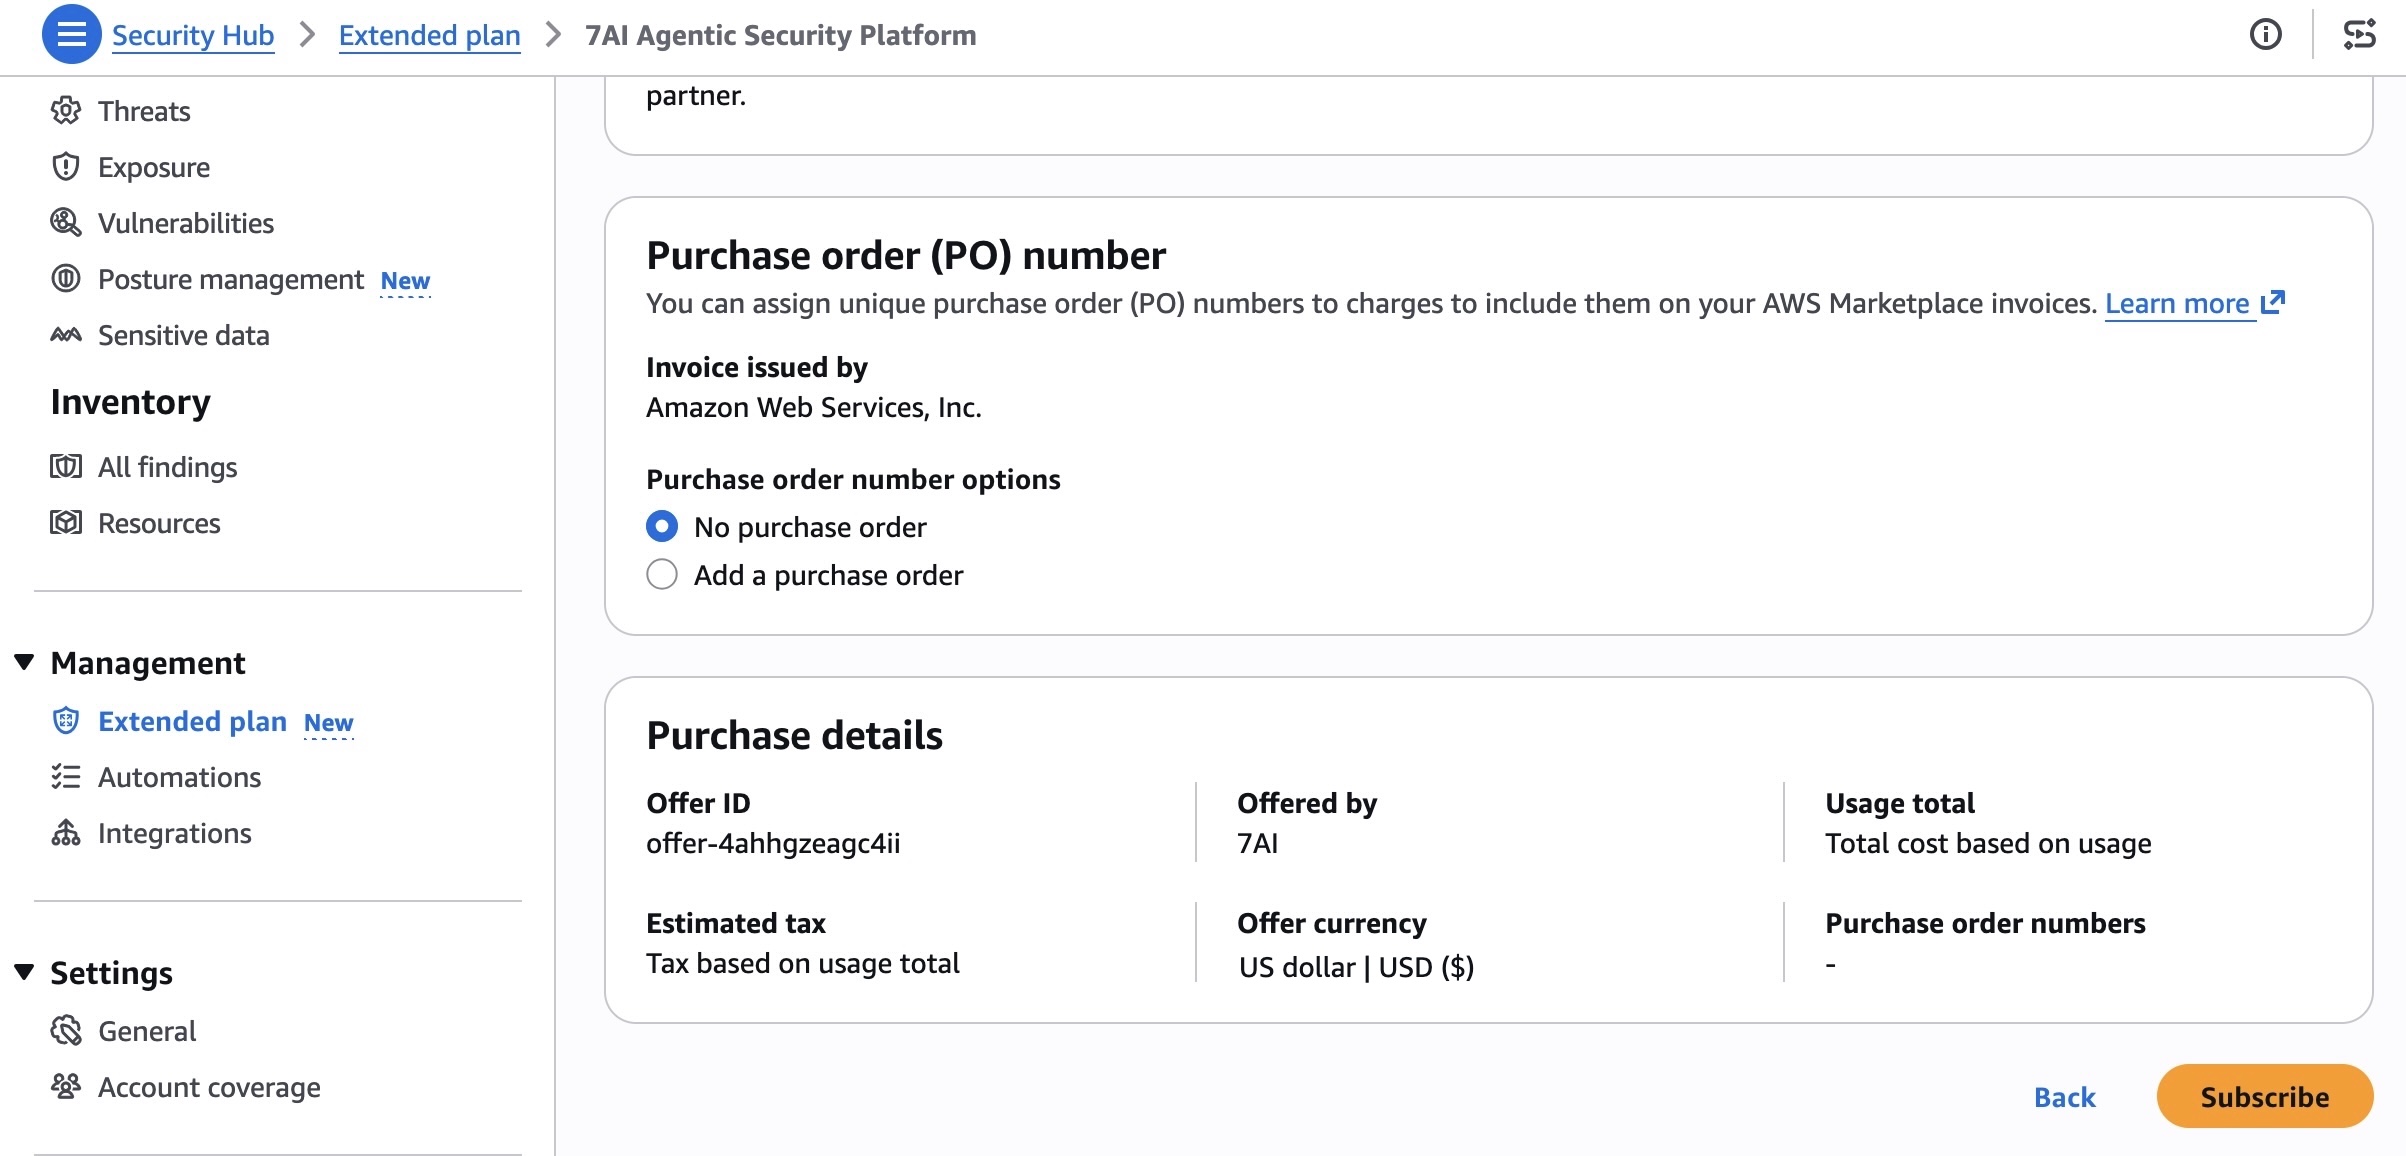
You can review details of each partner offering directly in the Security Hub console and subscribe. When you subscribe, you’ll be directed to an automated on-boarding experience from each partner. Once onboarded, consumption-based metering is automatic and you are billed monthly as part of your Security Hub bill.

Security findings from all solutions are automatically consolidated in AWS Security Hub. This gives you immediate and direct access to all security findings in normalized OCSF schema.

To learn more about how to enhance your security posture with these integrations for AWS Security Hub, visit the AWS Security Hub User Guide.

Now available
The AWS Security Hub Extended plan is now generally available in all AWS commercial Regions where Security Hub is available. You can use flexible pay-as-you-go or flat-rate pricing—no upfront investments or long-term commitments required. For more information about pricing, visit the AWS Security Hub pricing page.

Give it a try today in the Security Hub console and send feedback to AWS re:Post for Security Hub or through your usual AWS Support contacts.

Channy

AWS Weekly Roundup: Claude Sonnet 4.6 in Amazon Bedrock, Kiro in GovCloud Regions, new Agent Plugins, and more (February 23, 2026)

Post Syndicated from Channy Yun (윤석찬) original https://aws.amazon.com/blogs/aws/aws-weekly-roundup-claude-sonnet-4-6-in-amazon-bedrock-kiro-in-govcloud-regions-new-agent-plugins-and-more-february-23-2026/

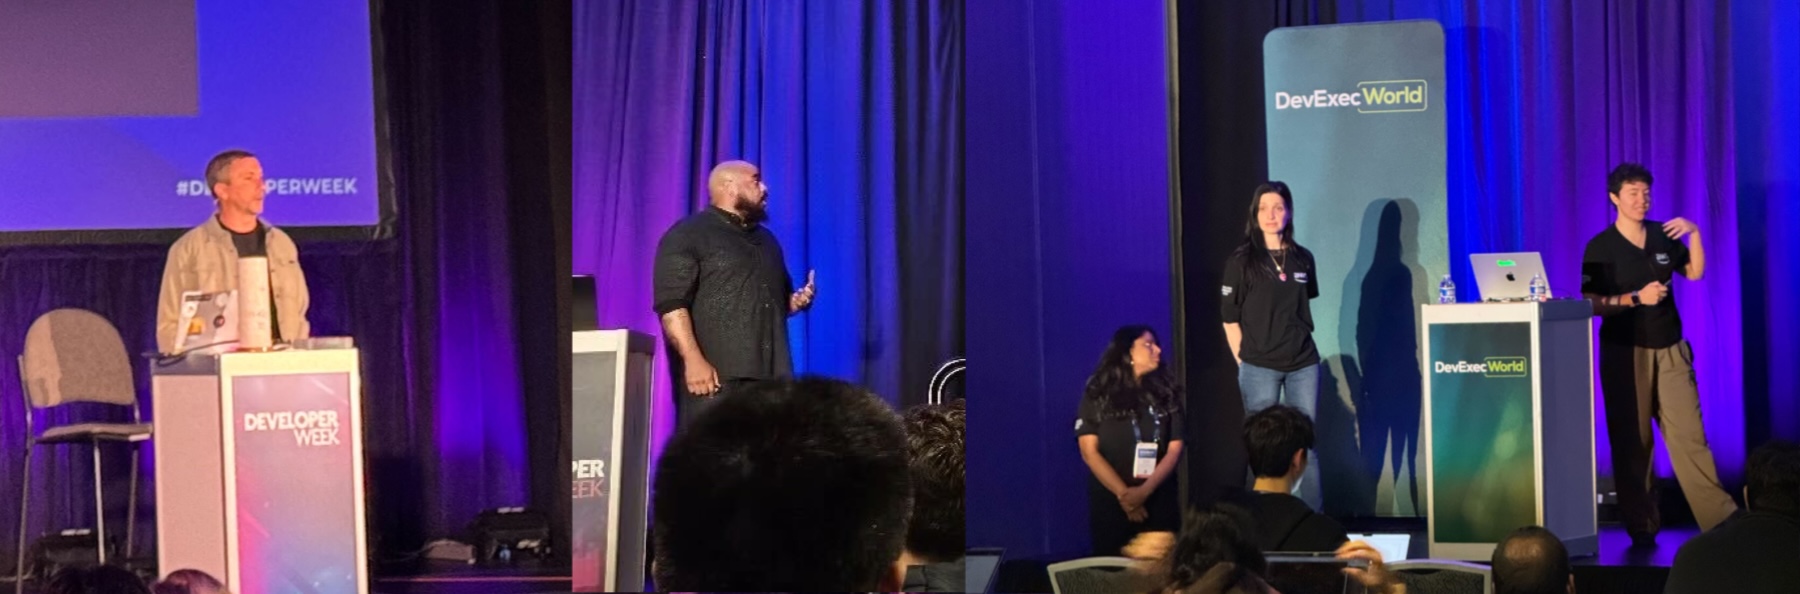
Last week, my team met many developers at Developer Week in San Jose. My colleague, Vinicius Senger delivered a great keynote about renascent software—a new way of building and evolving applications where humans and AI collaborate as co-developers using Kiro. Other colleagues spoke about building and deploying production-ready AI agents. Everyone stayed to ask and hear the questions related to agent memory, multi-agent patterns, meta-tooling and hooks. It was interesting how many developers were actually building agents.

We are continuing to meet developers and hear their feedback at third-party developer conferences. You can meet us at the dev/nexus, the largest and longest-running Java ecosystem conference on March 4-6 in Atlanta. My colleague, James Ward will speak about building AI Agents with Spring and MCP, and Vinicius Senger and Jonathan Vogel will speak about 10 tools and tips to upgrade your Java code with AI. I’ll keep sharing places for you to connect with us.

Last week’s launches
Here are some of the other announcements from last week:

  • Claude Sonnet 4.6 model in Amazon Bedrock – You can now use Claude Sonnet 4.6 which offers frontier performance across coding, agents, and professional work at scale. Claude Sonnet 4.6 approaches Opus 4.6 intelligence at a lower cost. It enables faster, high-quality task completion, making it ideal for high-volume coding and knowledge work use cases.
  • Amazon EC2 Hpc8a instances powered by 5th Gen AMD EPYC processors – You can use new Hpc8a instances delivering up to 40% higher performance, increased memory bandwidth, and 300 Gbps Elastic Fabric Adapter networking. You can accelerate compute-intensive simulations, engineering workloads, and tightly coupled HPC applications.
  • Amazon SageMaker Inference for custom Amazon Nova models – You can now configure the instance types, auto-scaling policies, and concurrency settings for custom Nova model deployments with Amazon SageMaker Inference to best meet your needs.
  • Nested virtualization on virtual Amazon EC2 instances – You can create nested virtual machines by running KVM or Hyper-V on virtual EC2 instances. You can leverage this capability for use cases such as running emulators for mobile applications, simulating in-vehicle hardware for automobiles, and running Windows Subsystem for Linux on Windows workstations.
  • Server-Side Encryption by default in Amazon Aurora – Amazon Aurora further strengthens your security posture by automatically applying server-side encryption by default to all new databases clusters using AWS-owned keys. This encryption is fully managed, transparent to users, and with no cost or performance impact.
  • Kiro in AWS GovCloud (US) Regions – You can use Kiro for the development teams behind government missions. Developers in regulated environments can now leverage Kiro’s agentic AI tool with the rigorous security controls required.

For a full list of AWS announcements, be sure to keep an eye on the What’s New with AWS page.

Additional updates
Here are some additional news items that you might find interesting:

  • Introducing Agent Plugins for AWS – You can see how new open-source Agent Plugins for AWS extend coding agents with skills for deploying applications to AWS. Using the deploy-on-aws plugin, you can generate architecture recommendations, cost estimates, and infrastructure-as-code directly from your coding agent.
  • A chat with Byron Cook on automated reasoning and trust in AI systems – You can hear how to verify AI systems doing the right thing using automated reasoning when they generate code or manage critical decisions. Byron Cook’s team has spent a decade proving correctness in AWS and apply those techniques to agentic systems.
  • Best practices for deploying AWS DevOps Agent in production – You can read best practices for setting up DevOps Agent Spaces that balance investigation capability with operational efficiency. According to Swami Sivasubramanian, AWS DevOps Agent, a frontier agent that resolves and proactively prevents incidents, has handled thousands of escalations, with an estimated root cause identification rate of over 86% within Amazon.

From AWS community
Here are my personal favorite posts from AWS community:

Join the AWS Builder Center to connect with community, share knowledge, and access content that supports your development.

Upcoming AWS events
Check your calendar and sign up for upcoming AWS events:

  • AWS Summits – Join AWS Summits in 2026, free in-person events where you can explore emerging cloud and AI technologies, learn best practices, and network with industry peers and experts. Upcoming Summits include Paris (April 1), London (April 22), and Bengaluru (April 23–24).
  • Amazon Nova AI Hackathon – Join developers worldwide to build innovative generative AI solutions using frontier foundation models and compete for $40,000 in prizes across five categories including agentic AI, multimodal understanding, UI automation, and voice experiences during this six-week challenge from February 2nd to March 16th, 2026.
  • AWS Community Days – Community-led conferences where content is planned, sourced, and delivered by community leaders, featuring technical discussions, workshops, and hands-on labs. Upcoming events include Ahmedabad (February 28), JAWS Days in Tokyo (March 7), Chennai (March 7), Slovakia (March 11), and Pune (March 21).

Browse here for upcoming AWS led in-person and virtual events, startup events, and developer-focused events.

That’s all for this week. Check back next Monday for another Weekly Roundup!

Channy

Amazon EC2 Hpc8a Instances powered by 5th Gen AMD EPYC processors are now available

Post Syndicated from Channy Yun (윤석찬) original https://aws.amazon.com/blogs/aws/amazon-ec2-hpc8a-instances-powered-by-5th-gen-amd-epyc-processors-are-now-available/

Today, we’re announcing the general availability of Amazon Elastic Compute Cloud (Amazon EC2) Hpc8a instances, a new high performance computing (HPC) optimized instance type powered by latest 5th Generation AMD EPYC processors with a maximum frequency of up to 4.5 GHz. These instances are ideal for compute-intensive tightly coupled HPC workloads, including computational fluid dynamics, simulations for faster design iterations, high-resolution weather modeling within tight operational windows, and complex crash simulations that require rapid time-to-results.

The new Hpc8a instances deliver up to 40% higher performance, 42% greater memory bandwidth, and up to 25% better price-performance compared to previous generation Hpc7a instances. Customers benefit from the high core density, memory bandwidth, and low-latency networking that helped them scale efficiently and reduce job completion times for their compute-intensive simulation workloads.

Hpc8a instances
Hpc8a instances are available with 192 cores, 768 GiB memory, and 300 Gbps Elastic Fabric Adapter (EFA) networking to run applications requiring high levels of inter node communications at scale.

Instance Name Physical Cores Memory (Gib) EFA Network Bandwidth (Gbps) Network Bandwidth (Gbps) Attached Storage
Hpc8a.96xlarge 192 768 Up to 300 75 EBS Only

Hpc8a instances are available in a single 96xlarge size with a 1:4 core-to-memory ratio. You will have the capability to right size based on HPC workload requirements by customizing the number of cores needed at launch instances. These instances also use sixth-generation AWS Nitro cards, which offload CPU virtualization, storage, and networking functions to dedicated hardware and software, enhancing performance and security for your workloads.

You can use Hpc8a instances with AWS ParallelCluster and AWS Parallel Computing Service (AWS PCS) to simplify workload submission and cluster creation and Amazon FSx for Lustre for sub-millisecond latencies and up to hundreds of gigabytes per second of throughput for storage. To achieve the best performance for HPC workloads, these instances have Simultaneous Multithreading (SMT) disabled.

Now available
Amazon EC2 Hpc8a instances are now available in US East (Ohio) and Europe (Stockholm) AWS Regions. For Regional availability and a future roadmap, search the instance type in the CloudFormation resources tab of AWS Capabilities by Region.

You can purchase these instances as On-Demand Instances and Savings Plan. To learn more, visit the Amazon EC2 Pricing page.

Give Hpc8a instances a try in the Amazon EC2 console. To learn more, visit the Amazon EC2 Hpc8a instances page and send feedback to AWS re:Post for EC2 or through your usual AWS Support contacts.

Channy

Announcing Amazon SageMaker Inference for custom Amazon Nova models

Post Syndicated from Channy Yun (윤석찬) original https://aws.amazon.com/blogs/aws/announcing-amazon-sagemaker-inference-for-custom-amazon-nova-models/

Since we launched Amazon Nova customization in Amazon SageMaker AI at AWS NY Summit 2025, customers have been asking for the same capabilities with Amazon Nova as they do when they customize open weights models in Amazon SageMaker Inference. They also wanted have more control and flexibility in custom model inference over instance types, auto-scaling policies, context length, and concurrency settings that production workloads demand.

Today, we’re announcing the general availability of custom Nova model support in Amazon SageMaker Inference, a production-grade, configurable, and cost-efficient managed inference service to deploy and scale full-rank customized Nova models. You can now experience an end-to-end customization journey to train Nova Micro, Nova Lite, and Nova 2 Lite models with reasoning capabilities using Amazon SageMaker Training Jobs or Amazon HyperPod and seamlessly deploy them with managed inference infrastructure of Amazon SageMaker AI.

With Amazon SageMaker Inference for custom Nova models, you can reduce inference cost through optimized GPU utilization using Amazon Elastic Compute Cloud (Amazon EC2) G5 and G6 instances over P5 instances, auto-scaling based on 5-minute usage patterns, and configurable inference parameters. This feature enables deployment of customized Nova models with continued pre-training, supervised fine-tuning, or reinforcement fine-tuning for your use cases. You can also set advanced configurations about context length, concurrency, and batch size for optimizing the latency-cost-accuracy tradeoff for your specific workloads.

Let’s see how to deploy customized Nova models on SageMaker AI real-time endpoints, configure inference parameters, and invoke your models for testing.

Deploy custom Nova models in SageMaker Inference
At AWS re:Invent 2025, we introduced new serverless customization in Amazon SageMaker AI for popular AI models including Nova models. With a few clicks, you can seamlessly select a model and customization technique, and handle model evaluation and deployment. If you already have a trained custom Nova model artifact, you can deploy the models on SageMaker Inference through the SageMaker Studio or SageMaker AI SDK.

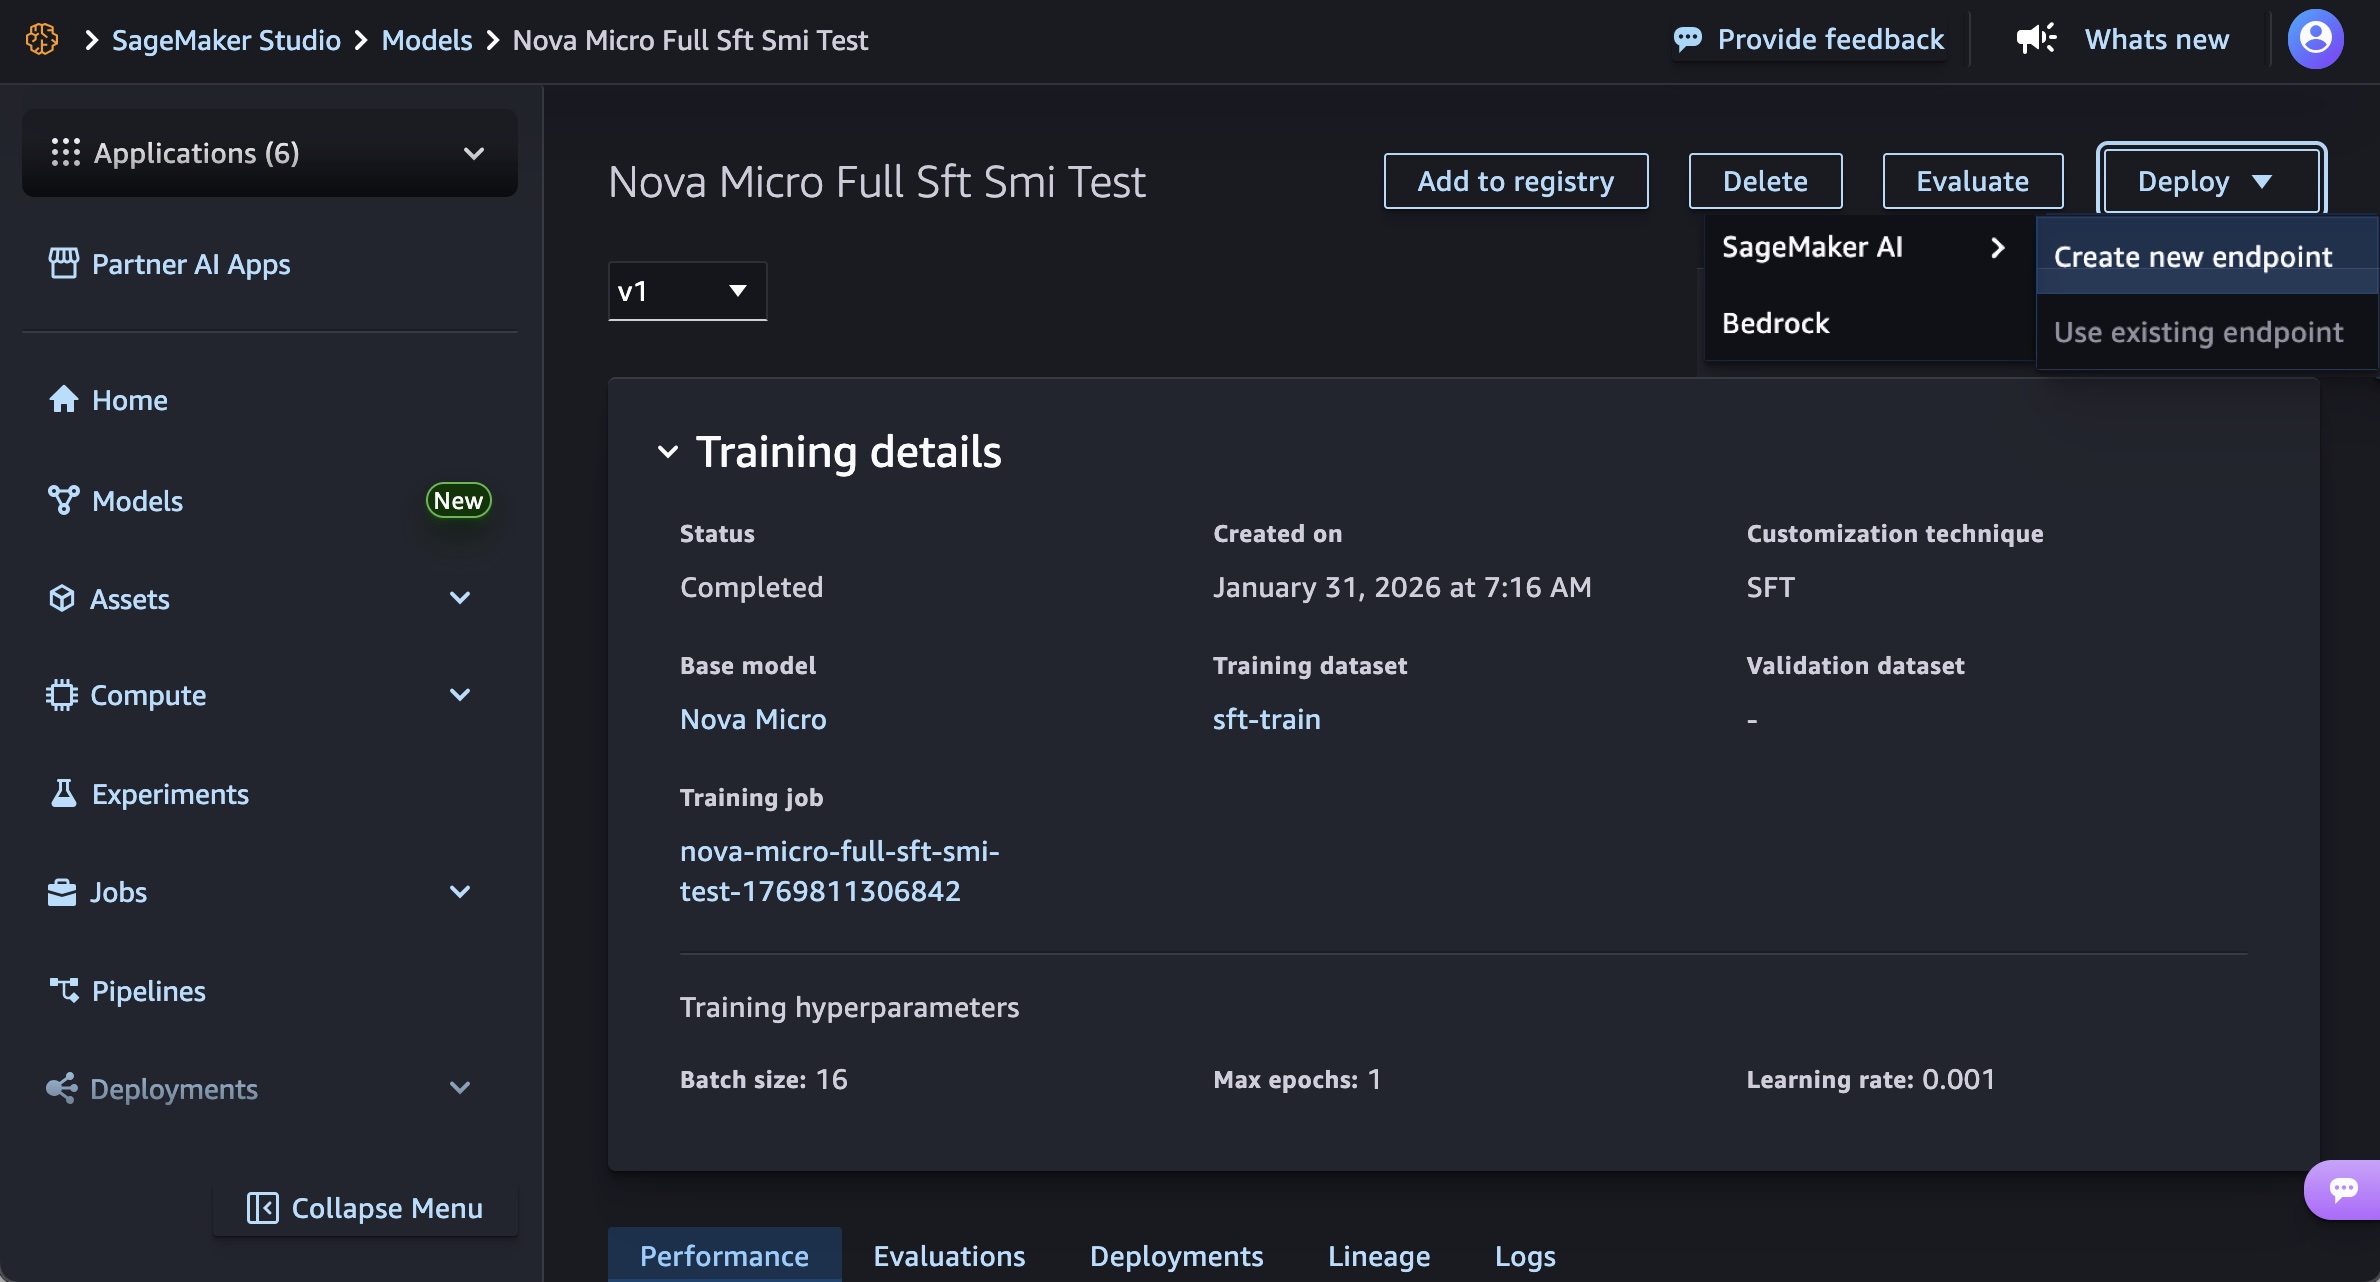
In the SageMaker Studio, choose a trained Nova model in Models in your models in the Models menu. You can deploy the model by choosing Deploy button, SageMaker AI and Create new endpoint.

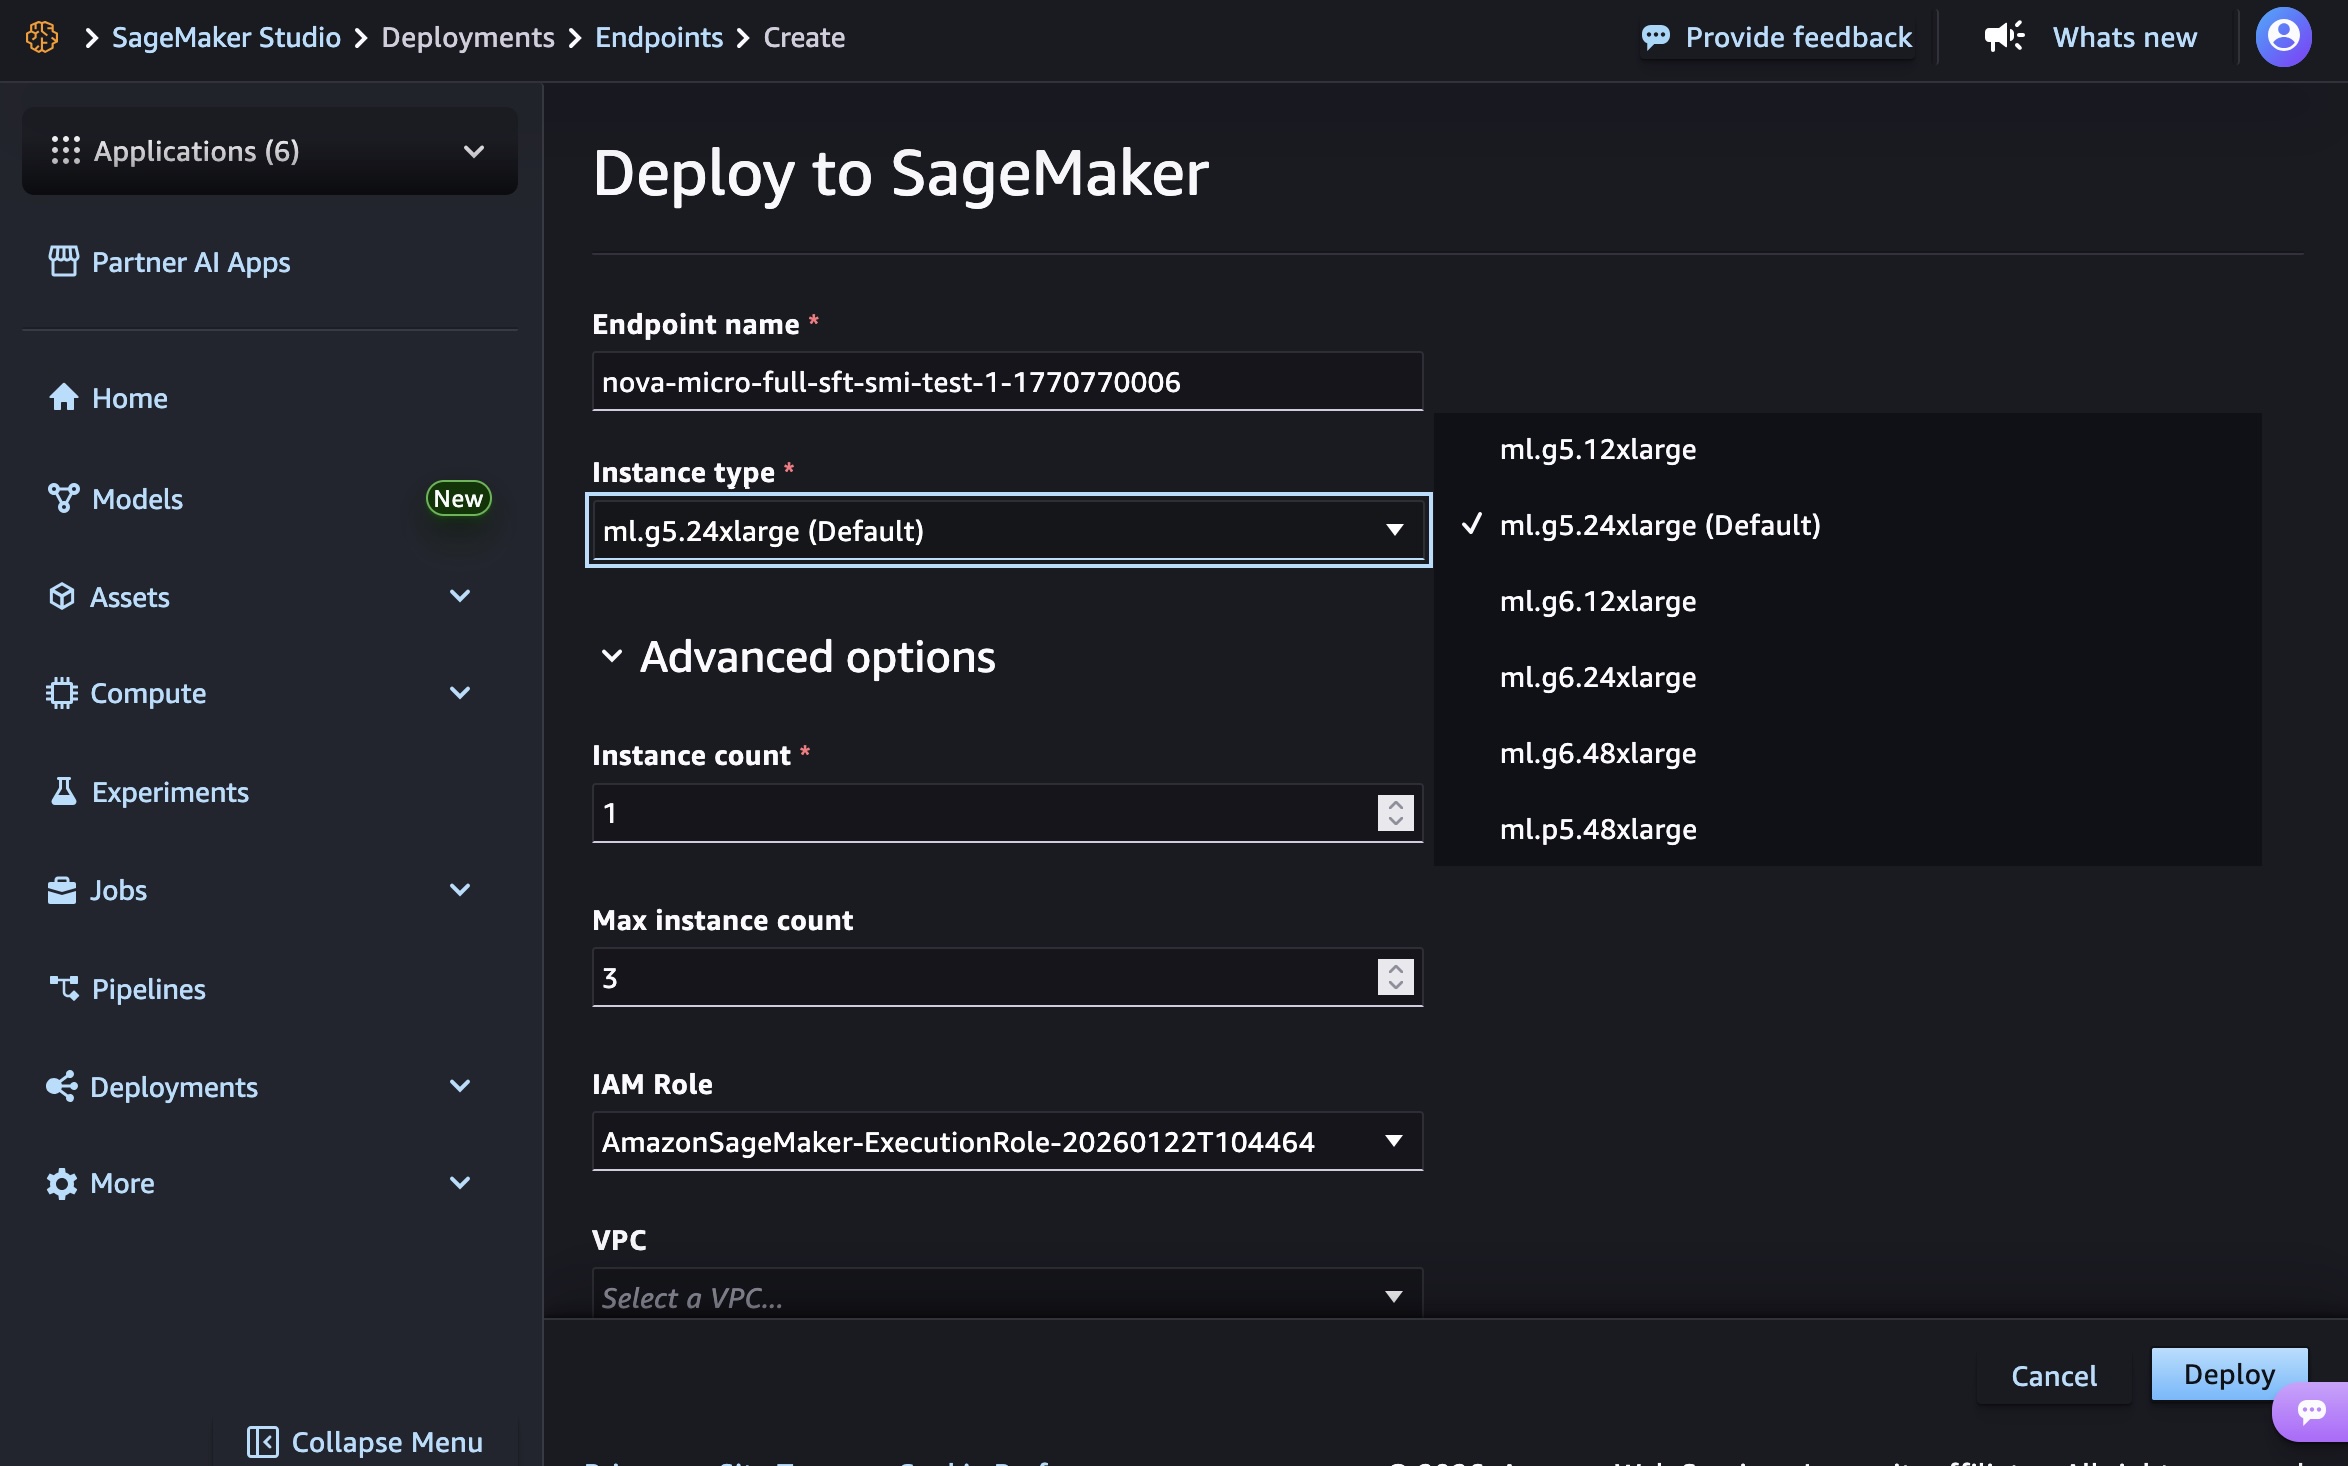
Choose the endpoint name, instance type, and advanced options such as instance count, max instance count, permission and networking, and Deploy button. At GA launch, you can use g5.12xlarge, g5.24xlarge, g5.48xlarge, g6.12xlarge, g6.24xlarge, g6.48xlarge, and p5.48xlarge instance types for the Nova Micro model, g5.24xlarge, g5.48xlarge, g6.24xlarge, g6.48xlarge, and p5.48xlarge for the Nova Lite model, and p5.48xlarge for the Nova 2 Lite model.

Creating your endpoint requires time to provision the infrastructure, download your model artifacts, and initialize the inference container.

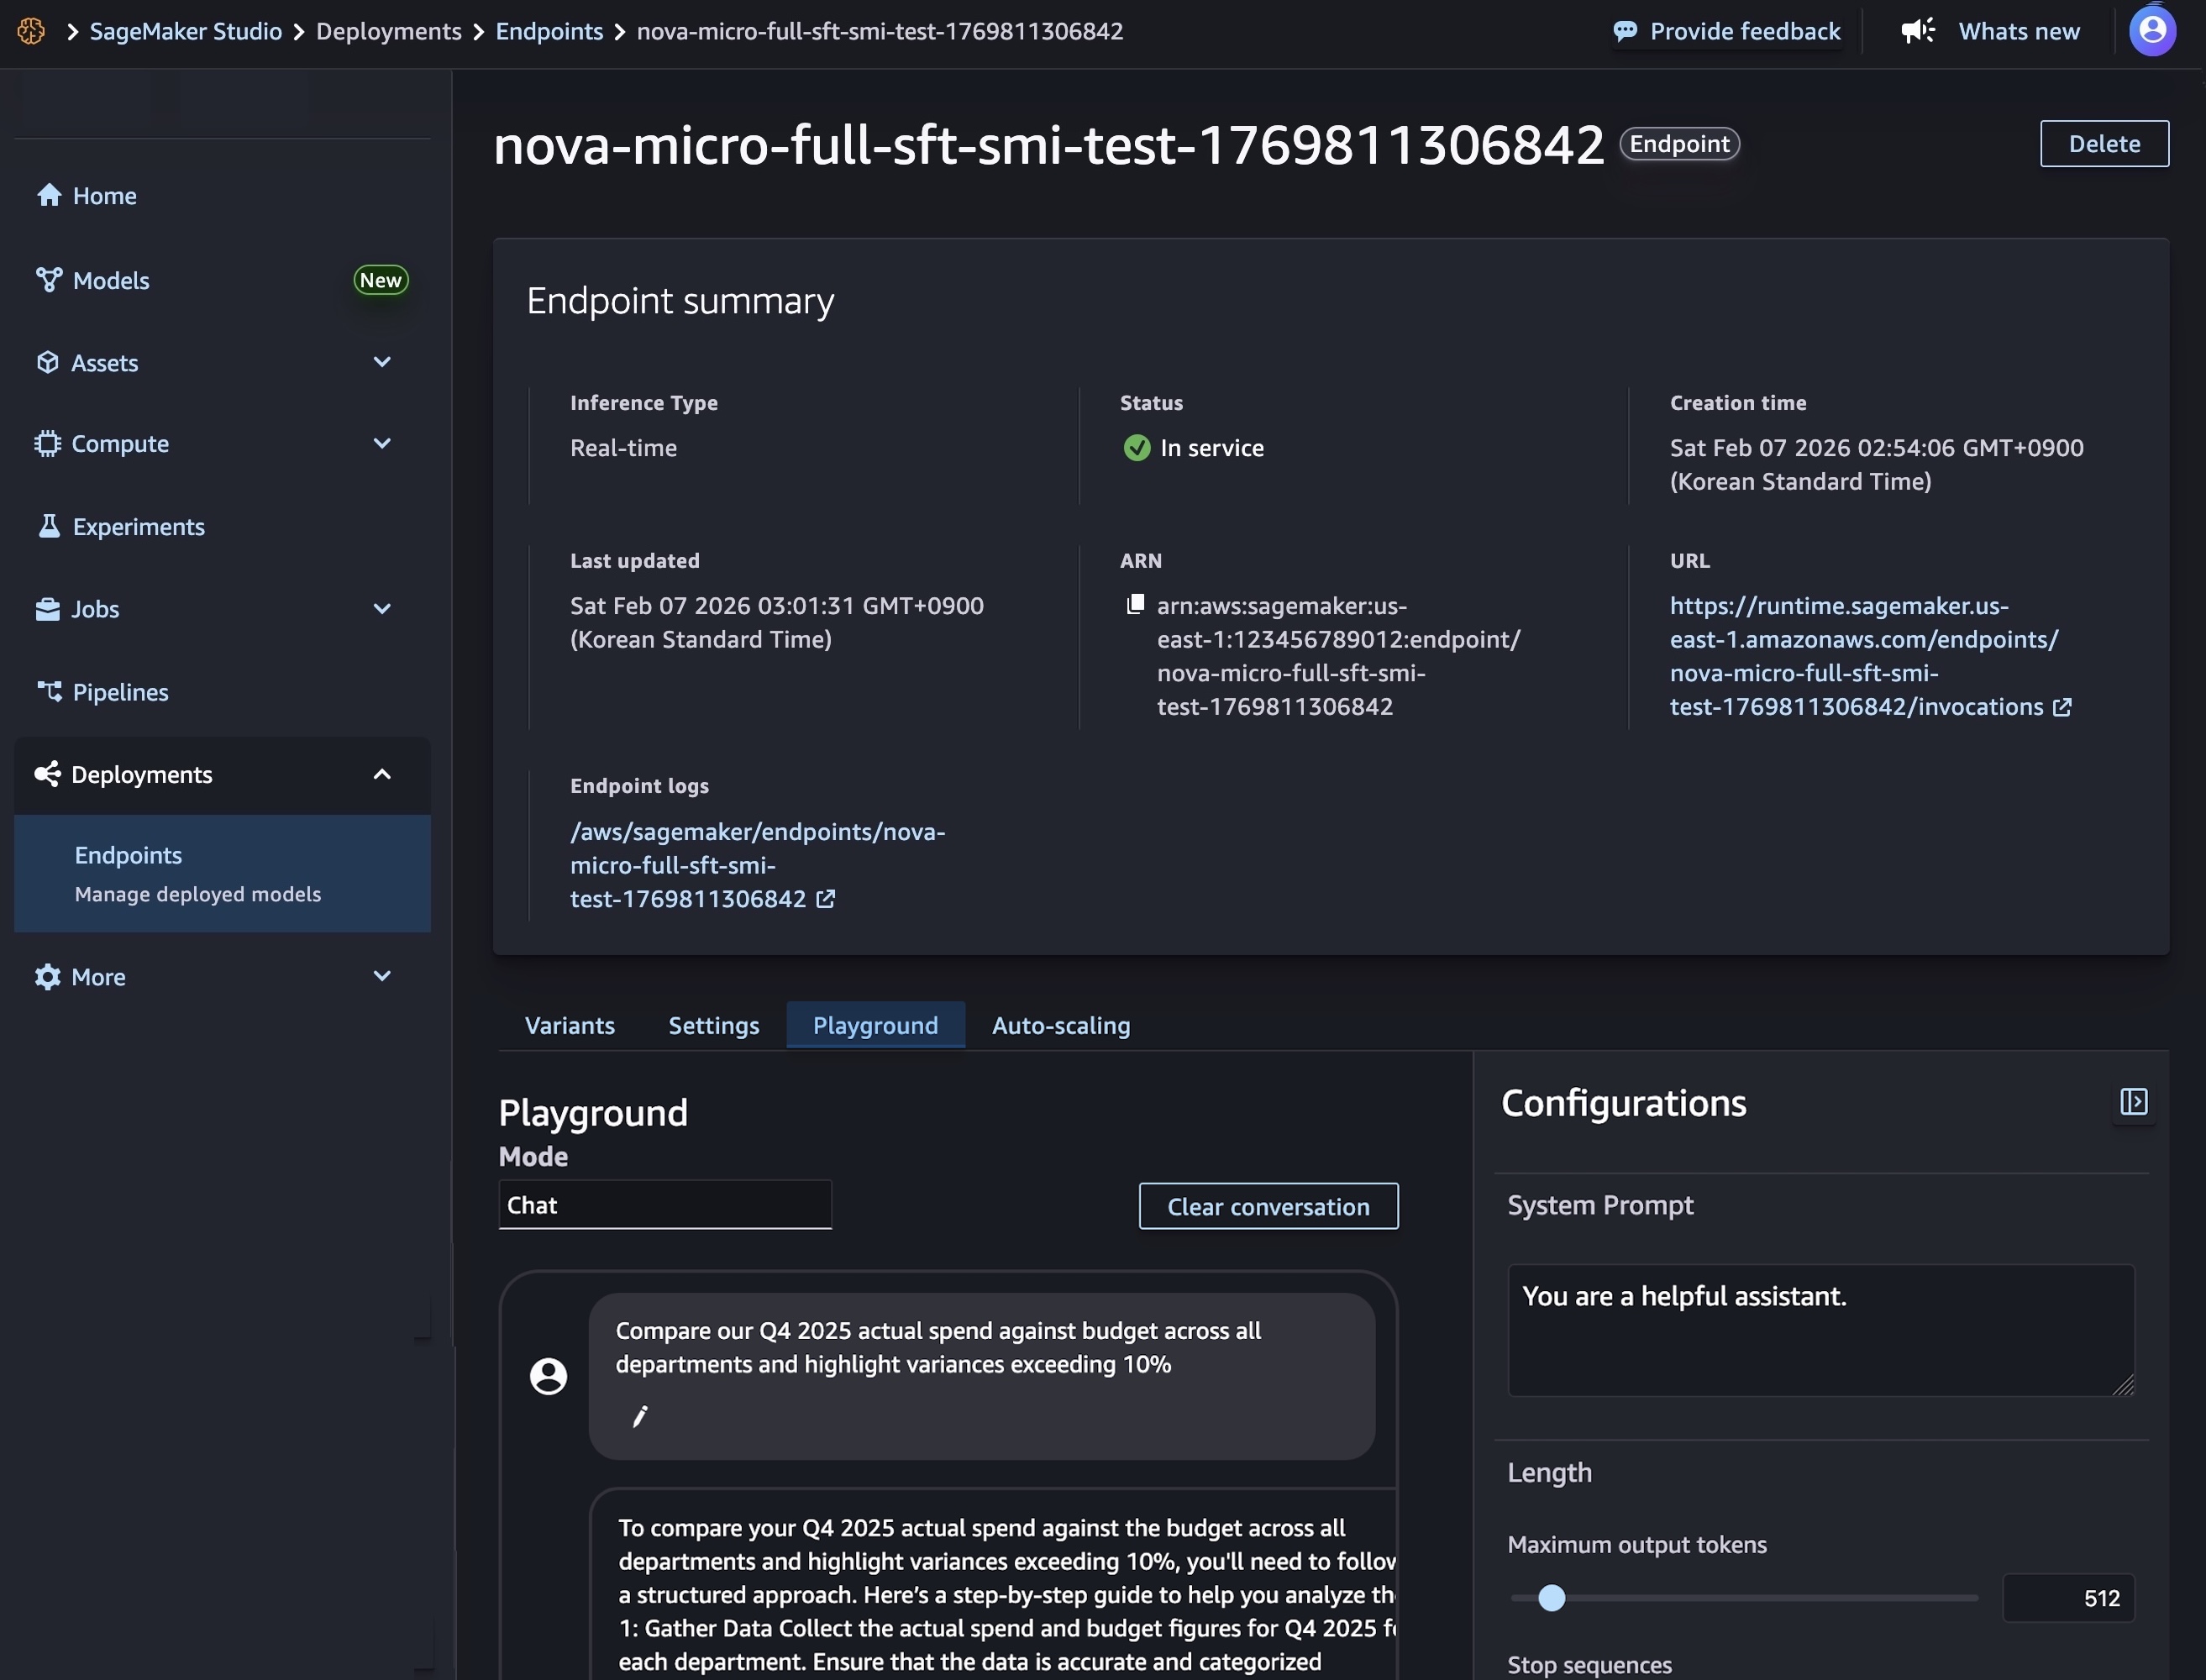
After model deployment completes and the endpoint status shows InService, you can perform real-time inference using the new endpoint. To test the model, choose the Playground tab and input your prompt in the Chat mode.

You can also use the SageMaker AI SDK to create two resources: a SageMaker AI model object that references your Nova model artifacts, and an endpoint configuration that defines how the model will be deployed.

The following code creates a SageMaker AI model that references your Nova model artifacts:

# Create a SageMaker AI model
    model_response = sagemaker.create_model(
        ModelName= 'Nova-micro-ml-g5-12xlarge',
        PrimaryContainer={
            'Image': '123456789012.dkr.ecr.us-east-1.amazonaws.com/nova-inference-repo:v1.0.0',
            'ModelDataSource': {
                'S3DataSource': {
                   'S3Uri': 's3://your-bucket-name/path/to/model/artifacts/',
                   'S3DataType': 'S3Prefix',
                   'CompressionType': 'None'
                }
            },
            # Model Parameters
            'Environment': {
                'CONTEXT_LENGTH': 8000,
                'CONCURRENCY': 16,
                'DEFAULT_TEMPERATURE': 0.0,
                'DEFAULT_TOP_P': 1.0
            }
        },
        ExecutionRoleArn=SAGEMAKER_EXECUTION_ROLE_ARN,
        EnableNetworkIsolation=True
    )
    print("Model created successfully!")

Next, create an endpoint configuration that defines your deployment infrastructure and deploy your Nova model by creating a SageMaker AI real-time endpoint. This endpoint will host your model and provide a secure HTTPS endpoint for making inference requests.

# Create Endpoint Configuration
    production_variant = {
        'VariantName': 'primary',
        'ModelName': 'Nova-micro-ml-g5-12xlarge',
        'InitialInstanceCount': 1,
        'InstanceType': 'ml.g5.12xlarge',
    }
    
    config_response = sagemaker.create_endpoint_config(
        EndpointConfigName= 'Nova-micro-ml-g5-12xlarge-Config',
        ProductionVariants= production_variant
    )
    print("Endpoint configuration created successfully!")
    
# Deploy your Noval model
    endpoint_response = sagemaker.create_endpoint(
        EndpointName= 'Nova-micro-ml-g5-12xlarge-endpoint',
        EndpointConfigName= 'Nova-micro-ml-g5-12xlarge-Config'
    )
    print("Endpoint creation initiated successfully!")

After the endpoint is created, you can send inference requests to generate predictions from your custom Nova model. Amazon SageMaker AI supports synchronous endpoints for real-time with streaming/non-streaming modes and asynchronous endpoints for batch processing.

For example, the following code creates streaming completion format for text generation:

# Streaming chat request with comprehensive parameters
streaming_request = {
"messages": [
        {"role": "user", "content": "Compare our Q4 2025 actual spend against budget across all departments and highlight variances exceeding 10%"}
    ],
    "max_tokens": 512,
    "stream": True,
    "temperature": 0.7,
    "top_p": 0.95,
    "top_k": 40,
    "logprobs": True,
    "top_logprobs": 2,
    "reasoning_effort": "low",  # Options: "low", "high"
    "stream_options": {"include_usage": True}
}

invoke_nova_endpoint(streaming_request)

def invoke_nova_endpoint(request_body):
"""
    Invoke Nova endpoint with automatic streaming detection.
    
    Args:
        request_body (dict): Request payload containing prompt and parameters
    
    Returns:
        dict: Response from the model (for non-streaming requests)
        None: For streaming requests (prints output directly)
    """
    body = json.dumps(request_body)
    is_streaming = request_body.get("stream", False)
    
    try:
        print(f"Invoking endpoint ({'streaming' if is_streaming else 'non-streaming'})...")
        
        if is_streaming:
            response = runtime_client.invoke_endpoint_with_response_stream(
                EndpointName=ENDPOINT_NAME,
                ContentType='application/json',
                Body=body
            )
            
            event_stream = response['Body']
            for event in event_stream:
                if 'PayloadPart' in event:
                    chunk = event['PayloadPart']
                    if 'Bytes' in chunk:
                        data = chunk['Bytes'].decode()
                        print("Chunk:", data)
        else:
            # Non-streaming inference
            response = runtime_client.invoke_endpoint(
                EndpointName=ENDPOINT_NAME,
                ContentType='application/json',
                Accept='application/json',
                Body=body
            )
            
            response_body = response['Body'].read().decode('utf-8')
            result = json.loads(response_body)
            print("✅ Response received successfully")
            return result
    
    except ClientError as e:
        error_code = e.response['Error']['Code']
        error_message = e.response['Error']['Message']
        print(f"❌ AWS Error: {error_code} - {error_message}")
    except Exception as e:
        print(f"❌ Unexpected error: {str(e)}")

To use full code examples, visit Customizing Amazon Nova models on Amazon SageMaker AI. To learn more about best practices on deploying and managing models, visit Best Practices for SageMaker AI.

Now available
Amazon SageMaker Inference for custom Nova models is available today in US East (N. Virginia) and US West (Oregon) AWS Regions. For Regional availability and a future roadmap, visit the AWS Capabilities by Region.

The feature supports Nova Micro, Nova Lite, and Nova 2 Lite models with reasoning capabilities, running on EC2 G5, G6, and P5 instances with auto-scaling support. You pay only for the compute instances you use, with per-hour billing and no minimum commitments. For more information, visit Amazon SageMaker AI Pricing page.

Give it a try in Amazon SageMaker AI console and send feedback to AWS re:Post for SageMaker or through your usual AWS Support contacts.

Channy

Amazon EC2 C8id, M8id, and R8id instances with up to 22.8 TB local NVMe storage are generally available

Post Syndicated from Channy Yun (윤석찬) original https://aws.amazon.com/blogs/aws/amazon-ec2-c8id-m8id-and-r8id-instances-with-up-to-22-8-tb-local-nvme-storage-are-generally-available/

Last year, we launched the Amazon Elastic Compute Cloud (Amazon EC2) C8i instances, M8i instances, and R8i instances powered by custom Intel Xeon 6 processors available only on AWS with sustained all-core 3.9 GHz turbo frequency. They deliver the highest performance and fastest memory bandwidth among comparable Intel processors in the cloud.

Today we’re announcing new Amazon EC2 C8id, M8id, and R8id instances backed by up to 22.8TB of NVMe-based SSD block-level instance storage physically connected to the host server. These instances offer 3 times more vCPUs, memory and local storage compared to previous sixth-generation instances.

These instances deliver up to 43% higher compute performance and 3.3 times more memory bandwidth compared to previous sixth-generation instances. They also deliver up to 46% higher performance for I/O intensive database workloads, and up to 30% faster query results for I/O intensive real-time data analytics compared to previous sixth generation instances.

  • C8id instances are ideal for compute-intensive workloads, including those that need access to high-speed, low-latency local storage like video encoding, image manipulation, and other forms of media processing.
  • M8id instances are best for workloads that require a balance of compute and memory resources along with high-speed, low-latency local block storage, including data logging, media processing, and medium-sized data stores.
  • R8id instances are designed for memory-intensive workloads such as large-scale SQL and NoSQL databases, in-memory databases, large-scale data analytics, and AI inference.

C8id, M8id, and R8id instances now scale up to 96xlarge (versus 32xlarge sizes in the sixth generation) with up to 384 vCPUs, 3TiB of memory, and 22.8TB of local storage that make it easier to scale up applications and drive greater efficiencies. These instances also offer two bare metal sizes (metal-48xl and metal-96xl), allowing you to right size your instances and deploy your most performance sensitive workloads that benefit from direct access to physical resources.

The instances are available in 11 sizes per family, as well as two bare metal configurations each:

Instance Name vCPUs Memory (GiB) (C/M/R) Local NVMe storage (GB) Network bandwidth (Gbps) EBS bandwidth (Gbps)
large 2 4/8/16* 1 x 118 Up to 12.5 Up to 10
xlarge 4 8/16/32* 1 x 237 Up to 12.5 Up to 10
2xlarge 8 16/32/64* 1 x 474 Up to 15 Up to 10
4xlarge 16 32/64/128* 1 x 950 Up to 15 Up to 10
8xlarge 32 64/128/256* 1 x 1,900 15 10
12xlarge 48 96/192/384* 1 x 2,850 22.5 15
16xlarge 64 128/256/512* 1 x 3,800 30 20
24xlarge 96 192/384/768* 2 x 2,850 40 30
32xlarge 128 256/512/1024* 2 x 3,800 50 40
48xlarge 192 384/768/1536* 3 x 3,800 75 60
96xlarge 384 768/1536/3072* 6 x 3,800 100 80
metal-48xl 192 384/768/1536* 3 x 3,800 75 60
metal-96xl 384 768/1536/3072* 6 x 3,800 100 80

*Memory values are for C8id/M8id/R8id respectively.

These instances support the Instance Bandwidth Configuration (IBC) feature like other eighth-generation instance types, offering flexibility to allocate resources between network and Amazon Elastic Block Store (Amazon EBS) bandwidth. You can scale network or EBS bandwidth by 25%, allocating resources optimally for each workload. These instances also use sixth-generation AWS Nitro cards offloading CPU virtualization, storage, and networking functions to dedicated hardware and software, enhancing performance and security for your workloads.

You can use any Amazon Machine Images (AMIs) that include drivers for the Elastic Network Adapter (ENA) and NVMe to fully utilize the performance and capabilities. All current generation AWS Windows and Linux AMIs come with the AWS NVMe driver installed by default. If you use an AMI that does not have the AWS NVMe driver, you can manually install AWS NVMe drivers.

As I noted in my previous blog post, here are a couple of things to remind you about the local NVMe storage on these instances:

  • You don’t have to specify a block device mapping in your AMI or during the instance launch; the local storage will show up as one or more devices (/dev/nvme[0-26]n1 on Linux) after the guest operating system has booted.
  • Each local NVMe device is hardware encrypted using the XTS-AES-256 block cipher and a unique key. Each key is destroyed when the instance is stopped or terminated.
  • Local NVMe devices have the same lifetime as the instance they are attached to and do not persist after the instance has been stopped or terminated.

To learn more, visit Amazon EBS volumes and NVMe in the Amazon EBS User Guide.

Now available
Amazon EC2 C8id, M8id and R8id instances are available in US East (N. Virginia), US East (Ohio), and US West (Oregon) AWS Regions. R8id instances are additionally available in Europe (Frankfurt) Region. For Regional availability and a future roadmap, search the instance type in the CloudFormation resources tab of AWS Capabilities by Region.

You can purchase these instances as On-Demand Instances, Savings Plans, and Spot Instances. These instances are also available as Dedicated Instances and Dedicated Hosts. To learn more, visit the Amazon EC2 Pricing page.

Give C8id, M8id, and R8id instances a try in the Amazon EC2 console. To learn more, visit the EC2 C8i instances, M8i instances, and R8i instances page and send feedback to AWS re:Post for EC2 or through your usual AWS Support contacts.

Channy

AWS IAM Identity Center now supports multi-Region replication for AWS account access and application use

Post Syndicated from Channy Yun (윤석찬) original https://aws.amazon.com/blogs/aws/aws-iam-identity-center-now-supports-multi-region-replication-for-aws-account-access-and-application-use/

Today, we’re announcing the general availability of AWS IAM Identity Center multi-Region support to enable AWS account access and managed application use in additional AWS Regions.

With this feature, you can replicate your workforce identities, permission sets, and other metadata in your organization instance of IAM Identity Center connected to an external identity provider (IdP), such as Microsoft Entra ID and Okta, from its current primary Region to additional Regions for improved resiliency of AWS account access.

You can also deploy AWS managed applications in your preferred Regions, close to application users and datasets for improved user experience or to meet data residency requirements. Your applications deployed in additional Regions access replicated workforce identities locally for optimal performance and reliability.

When you replicate your workforce identities to an additional Region, your workforce gets an active AWS access portal endpoint in that Region. This means that in the unlikely event of an IAM Identity Center service disruption in its primary Region, your workforce can still access their AWS accounts through the AWS access portal in an additional Region using already provisioned permissions. You can continue to manage IAM Identity Center configurations from the primary Region, maintaining centralized control.

Enable IAM Identity Center in multiple Regions
To get started, you should confirm that the AWS managed applications you’re currently using support customer managed AWS Key Management Service (AWS KMS) key enabled in AWS Identity Center. When we introduced this feature in October 2025, Seb recommended using multi-Region AWS KMS keys unless your company policies restrict you to single-Region keys. Multi-Region keys provide consistent key material across Regions while maintaining independent key infrastructure in each Region.

Before replicating IAM Identity Center to an additional Region, you must first replicate the customer managed AWS KMS key to that Region and configure the replica key with the permissions required for IAM Identity Center operations. For instructions on creating multi-Region replica keys, refer to Create multi-Region replica keys in the AWS KMS Developer Guide.

Go to the IAM Identity Center console in the primary Region, for example, US East (N. Virginia), choose Settings in the left-navigation pane, and select the Management tab. Confirm that your configured encryption key is a multi-Region customer managed AWS KMS key. To add more Regions, choose Add Region.

You can choose additional Regions to replicate the IAM Identity Center in a list of the available Regions. When choosing an additional Region, consider your intended use cases, for example, data compliance or user experience.

If you want to run AWS managed applications that access datasets limited to a specific Region for compliance reasons, choose the Region where the datasets reside. If you plan to use the additional Region to deploy AWS applications, verify that the required applications support your chosen Region and deployment in additional Regions.

Choose Add Region. This starts the initial replication whose duration depends on the size of your Identity Center instance.

After the replication is completed, your users can access their AWS accounts and applications in this new Region. When you choose View ACS URLs, you can view SAML information, such as an Assertion Consumer Service (ACS) URL, about the primary and additional Regions.

How your workforce can use an additional Region
AWS Identity Center supports SAML single sign-on with external IdPs, such as Microsoft Entra ID and Okta. Upon authentication in the IdP, the user is redirected to the AWS access portal. To enable the user to be redirected to the AWS access portal in the newly added Region, you need to add the additional Region’s ACS URL to the IdP configuration.

The following screenshots show you how to do this in the Okta admin console:

Then, you can create a bookmark application in your identity provider for users to discover the additional Region. This bookmark app functions like a browser bookmark and contains only the URL to the AWS access portal in the additional Region.

You can also deploy AWS managed applications in additional Regions using your existing deployment workflows. Your users can access applications or accounts using the existing access methods, such as the AWS access portal, an application link, or through the AWS Command Line Interface (AWS CLI).

To learn more about which AWS managed applications support deployment in additional Regions, visit the IAM Identity Center User Guide.

Things to know
Here are key considerations to know about this feature:

  • Consideration – To take advantage of this feature at launch, you must be using an organization instance of IAM Identity Center connected to an external IdP. Also, the primary and additional Regions must be enabled by default in an AWS account. Account instances of IAM Identity Center, and the other two identity sources (Microsoft Active Directory and IAM Identity Center directory) are presently not supported.
  • Operation – The primary Region remains the central place for managing workforce identities, account access permissions, external IdP, and other configurations. You can use the IAM Identity Center console in additional Regions with a limited feature set. Most operations are read-only, except for application management and user session revocation.
  • Monitoring – All workforce actions are emitted in AWS CloudTrail in the Region where the action was performed. This feature enhances account access continuity. You can set up break-glass access for privileged users to access AWS if the external IdP has a service disruption.

Now available
AWS IAM Identity Center multi-Region support is now available in the 17 enabled-by-default commercial AWS Regions. For Regional availability and a future roadmap, visit the AWS Capabilities by Region. You can use this feature at no additional cost. Standard AWS KMS charges apply for storing and using customer managed keys.

Give it a try in the AWS Identity Center console. To learn more, visit the IAM Identity Center User Guide and send feedback to AWS re:Post for Identity Center or through your usual AWS Support contacts.

Channy

Announcing Amazon EC2 G7e instances accelerated by NVIDIA RTX PRO 6000 Blackwell Server Edition GPUs

Post Syndicated from Channy Yun (윤석찬) original https://aws.amazon.com/blogs/aws/announcing-amazon-ec2-g7e-instances-accelerated-by-nvidia-rtx-pro-6000-blackwell-server-edition-gpus/

Today, we’re announcing the general availability of Amazon Elastic Compute Cloud (Amazon EC2) G7e instances that deliver cost-effective performance for generative AI inference workloads and the highest performance for graphics workloads.

G7e instances are accelerated by the NVIDIA RTX PRO 6000 Blackwell Server Edition GPUs and are well suited for a broad range of GPU-enabled workloads including spatial computing and scientific computing workloads. G7e instances deliver up to 2.3 times inference performance compared to G6e instances.

Improvements made compared to predecessors:

  • NVIDIA RTX PRO 6000 Blackwell GPUs — NVIDIA RTX PRO 6000 Blackwell Server Edition GPUs offer two times the GPU memory and 1.85 times the GPU memory bandwidth compared to G6e instances. By using the higher GPU memory offered by G7e instances, you can run medium-sized models of up to 70B parameters with FP8 precision on a single GPU.
  • NVIDIA GPUDirect P2P — For models that are too large to fit into the memory of a single GPU, you can split the model or computations across multiple GPUs. G7e instances reduce the latency of your multi-GPU workloads with support for NVIDIA GPUDirect P2P, which enables direct communication between GPUs over PCIe interconnect. These instances offer the lowest peer to peer latency for GPUs on the same PCIe switch. Additionally, G7e instances offer up to four times the inter-GPU bandwidth compared to L40s GPUs featured in G6e instances, boosting the performance of multi-GPU workloads. These improvements mean you can run inference for larger models across multiple GPUs offering up to 768 GB of GPU memory in a single node.
  • Networking — G7e instances offer four times the networking bandwidth compared to G6e instances, which means you can use the instance for small-scale multi-node workloads. Additionally, multi-GPU G7e instances support NVIDIA GPUDirect Remote Direct Memory Access (RDMA) with Elastic Fabric Adapter (EFA), which reduces the latency of remote GPU-to-GPU communication for multi-node workloads. These instance sizes also support NVIDIA GPUDirectStorage with Amazon FSx for Lustre, which increases throughput by up to 1.2 Tbps to the instances compared to G6e instances, which means you can quickly load your models.

EC2 G7e specifications
G7e instances feature up to 8 NVIDIA RTX PRO 6000 Blackwell Server Edition GPUs with up to 768 GB of total GPU memory (96 GB of memory per GPU) and Intel Emerald Rapids processors. They also support up to 192 vCPUs, up to 1,600 Gbps of network bandwidth, up to 2,048 GiB of system memory, and up to 15.2 TB of local NVMe SSD storage.

Here are the specs:

Instance name
 GPUs GPU memory (GB) vCPUs Memory (GiB) Storage (TB) EBS bandwidth (Gbps) Network bandwidth (Gbps)
g7e.2xlarge 1 96 8 64 1.9 x 1 Up to 5 50
g7e.4xlarge 1 96 16 128 1.9 x 1 8 50
g7e.8xlarge 1 96 32 256 1.9 x 1 16 100
g7e.12xlarge 2 192 48 512 3.8 x 1 25 400
g7e.24xlarge 4 384 96 1024 3.8 x 2 50 800
g7e.48xlarge 8 768 192 2048 3.8 x 4 100 1600

To get started with G7e instances, you can use the AWS Deep Learning AMIs (DLAMI) for your machine learning (ML) workloads. To run instances, you can use AWS Management Console, AWS Command Line Interface (AWS CLI) or AWS SDKs. For a managed experience, you can use G7e instances with Amazon Elastic Container Service (Amazon ECS), Amazon Elastic Kubernetes Service (Amazon EKS). Support for Amazon SageMaker AI is also coming soon.

Now available
Amazon EC2 G7e instances are available today in the US East (N. Virginia) and US East (Ohio) AWS Regions. For Regional availability and a future roadmap, search the instance type in the CloudFormation resources tab of AWS Capabilities by Region.

The instances can be purchased as On-Demand Instances, Savings Plan, and Spot Instances. G7e instances are also available in Dedicated Instances and Dedicated Hosts. To learn more, visit the Amazon EC2 Pricing page.

Give G7e instances a try in the Amazon EC2 console. To learn more, visit the Amazon EC2 G7e instances page and send feedback to AWS re:Post for EC2 or through your usual AWS Support contacts.

Channy

Amazon EC2 X8i instances powered by custom Intel Xeon 6 processors are generally available for memory-intensive workloads

Post Syndicated from Channy Yun (윤석찬) original https://aws.amazon.com/blogs/aws/amazon-ec2-x8i-instances-powered-by-custom-intel-xeon-6-processors-are-generally-available-for-memory-intensive-workloads/

Since a preview launch at AWS re:Invent 2025, we’re announcing the general availability of new memory-optimized Amazon Elastic Compute Cloud (Amazon EC2) X8i instances. These instances are powered by custom Intel Xeon 6 processors with a sustained all-core turbo frequency of 3.9 GHz, available only on AWS. These SAP certified instances deliver the highest performance and fastest memory bandwidth among comparable Intel processors in the cloud.

X8i instances are ideal for memory-intensive workloads including in-memory databases such as SAP HANA, traditional large-scale databases, data analytics, and electronic design automation (EDA), which require high compute performance and a large memory footprint.

These instances provide 1.5 times more memory capacity (up to 6 TB), and 3.4 times more memory bandwidth compared to previous generation X2i instances. These instances offer up to 43% higher performance compared to X2i instances, with higher gains on some of the real-world workloads. They deliver up to 50% higher SAP Application Performance Standard (SAPS) performance, up to 47% faster PostgreSQL performance, up to 88% faster Memcached performance, and up to 46% faster AI inference performance.

During the preview, customers like RISE with SAP utilized up to 6 TB of memory capacity with 50% higher compute performance compared to X2i instances. This enabled faster transaction processing and improved query response times for SAP HANA workloads. Orion reduced the number of active cores on X8i instances compared to X2idn instances while maintaining performance thresholds, cutting SQL Server licensing costs by 50%.

X8i instances
X8i instances are available in 14 sizes including three larger instance sizes (48xlarge, 64xlarge, and 96xlarge), so you can choose the right size for your application to scale up, and two bare metal sizes (metal-48xl and metal-96xl) to deploy workloads that benefit from direct access to physical resources. X8i instances feature up to 100 Gbps of network bandwidth with support for the Elastic Fabric Adapter (EFA) and up to 80 Gbps of throughput to Amazon Elastic Block Store (Amazon EBS).

Here are the specs for X8i instances:

Instance name vCPUs Memory
(GiB)
Network bandwidth (Gbps) EBS bandwidth (Gbps)
x8i.large 2 32 Up to 12.5 Up to 10
x8i.xlarge 4 64 Up to 12.5 Up to 10
x8i.2xlarge 8 128 Up to 15 Up to 10
x8i.4xlarge 16 256 Up to 15 Up to 10
x8i.8xlarge 32 512 15 10
x8i.12xlarge 48 768 22.5 15
x8i.16xlarge 64 1,024 30 20
x8i.24xlarge 96 1,536 40 30
x8i.32xlarge 128 2,048 50 40
x8i.48xlarge 192 3,072 75 60
x8i.64xlarge 256 4,096 80 70
x8i.96xlarge 384 6,144 100 80
x8i.metal-48xl 192 3,072 75 60
x8i.metal-96xl 384 6,144 100 80

X8i instances support the instance bandwidth configuration (IBC) feature like other eighth-generation instance types, offering flexibility to allocate resources between network and EBS bandwidth. You can scale network or EBS bandwidth by up to 25%, improving database performance, query processing speeds, and logging efficiency. These instances also use sixth-generation AWS Nitro cards, which offload CPU virtualization, storage, and networking functions to dedicated hardware and software, enhancing performance and security for your workloads.

Now available
Amazon EC2 X8i instances are now available in US East (N. Virginia), US East (Ohio), US West (Oregon), and Europe (Frankfurt) AWS Regions. For Regional availability and a future roadmap, search the instance type in the CloudFormation resources tab of AWS Capabilities by Region.

You can purchase these instances as On-Demand Instances, Savings Plan, and Spot Instances. To learn more, visit the Amazon EC2 Pricing page.

Give X8i instances a try in the Amazon EC2 console. To learn more, visit the Amazon EC2 X8i instances page and send feedback to AWS re:Post for EC2 or through your usual AWS Support contacts.

Channy

New serverless customization in Amazon SageMaker AI accelerates model fine-tuning

Post Syndicated from Channy Yun (윤석찬) original https://aws.amazon.com/blogs/aws/new-serverless-customization-in-amazon-sagemaker-ai-accelerates-model-fine-tuning/

Today, I’m happy to announce new serverless customization in Amazon SageMaker AI for popular AI models, such as Amazon Nova, DeepSeek, GPT-OSS, Llama, and Qwen. The new customization capability provides an easy-to-use interface for the latest fine-tuning techniques like reinforcement learning, so you can accelerate the AI model customization process from months to days.

With a few clicks, you can seamlessly select a model and customization technique, and handle model evaluation and deployment—all entirely serverless so you can focus on model tuning rather than managing infrastructure. When you choose serverless customization, SageMaker AI automatically selects and provisions the appropriate compute resources based on the model and data size.

Getting started with serverless model customization
You can get started customizing models in Amazon SageMaker Studio. Choose Models in the left navigation pane and check out your favorite AI models to be customized.

Customize with UI
You can customize AI models in a only few clicks. In the Customize model dropdown list for a specific model such as Meta Llama 3.1 8B Instruct, choose Customize with UI.

You can select a customization technique used to adapt the base model to your use case. SageMaker AI supports Supervised Fine-Tuning and the latest model customization techniques including Direct Preference Optimization, Reinforcement Learning from Verifiable Rewards (RLVR), and Reinforcement Learning from AI Feedback (RLAIF). Each technique optimizes models in different ways, with selection influenced by factors such as dataset size and quality, available computational resources, task at hand, desired accuracy levels, and deployment constraints.

Upload or select a training dataset to match the format required by the customization technique selected. Use the values of batch size, learning rate, and number of epochs recommended by the technique selected. You can configure advanced settings such as hyperparameters, a newly introduced serverless MLflow application for experiment tracking, and network and storage volume encryption. Choose Submit to get started on your model training job.

After your training job is complete, you can see the models you created in the My Models tab. Choose View details in one of your models.

By choosing Continue customization, you can continue to customize your model by adjusting hyperparameters or training with different techniques. By choosing Evaluate, you can evaluate your customized model to see how it performs compared to the base model.

When you complete both jobs, you can choose either the SageMaker or Bedrock in the Deploy dropdown list to deploy your model.

You can choose Amazon Bedrock for serverless inference. Choose Bedrock and the model name to deploy the model into Amazon Bedrock. To find your deployed models, choose Imported models in the Bedrock console.

You can also deploy your model to a SageMaker AI inference endpoint if you want to control your deployment resources such as an instance type and instance count. After the SageMaker AI deployment is In service, you can use this endpoint to perform inference. In the Playground tab, you can test your customized model with a single prompt or chat mode.

With the serverless MLflow capability, you can automatically log all critical experiment metrics without modifying code and access rich visualizations for further analysis.

Customize with code
When you choose customizing with code, you can see a sample notebook to fine-tune or deploy AI models. If you want to edit the sample notebook, open it in JupyterLab. Alternatively, you can deploy the model immediately by choosing Deploy.

You can choose the Amazon Bedrock or SageMaker AI endpoint by selecting the deployment resources either from Amazon SageMaker Inference or Amazon SageMaker Hyperpod.

When you choose Deploy on the bottom right of the page, it will be redirected back to the model detail page. After the SageMaker AI deployment is in service, you can use this endpoint to perform inference.

Okay, you’ve seen how to streamline the model customization in the SageMaker AI. You can now choose your favorite way. To learn more, visit the Amazon SageMaker AI Developer Guide.

Now available
New serverless AI model customization in Amazon SageMaker AI is now available in US East (N. Virginia), US West (Oregon), Asia Pacific (Tokyo), and Europe (Ireland) Regions. You only pay for the tokens processed during training and inference. To learn more details, visit Amazon SageMaker AI pricing page.

Give it a try in Amazon SageMaker Studio and send feedback to AWS re:Post for SageMaker or through your usual AWS Support contacts.

Channy

Introducing checkpointless and elastic training on Amazon SageMaker HyperPod

Post Syndicated from Channy Yun (윤석찬) original https://aws.amazon.com/blogs/aws/introducing-checkpointless-and-elastic-training-on-amazon-sagemaker-hyperpod/

Today, we’re announcing two new AI model training features within Amazon SageMaker HyperPod: checkpointless training, an approach that mitigates the need for traditional checkpoint-based recovery by enabling peer-to-peer state recovery, and elastic training, enabling AI workloads to automatically scale based on resource availability.

  • Checkpointless training – Checkpointless training eliminates disruptive checkpoint-restart cycles, maintaining forward training momentum despite failures, reducing recovery time from hours to minutes. Accelerate your AI model development, reclaim days from development timelines, and confidently scale training workflows to thousands of AI accelerators.
  • Elastic training  – Elastic training maximizes cluster utilization as training workloads automatically expand to use idle capacity as it becomes available, and contract to yield resources as higher-priority workloads like inference volumes peak. Save hours of engineering time per week spent reconfiguring training jobs based on compute availability.

Rather than spending time managing training infrastructure, these new training techniques mean that your team can concentrate entirely on enhancing model performance, ultimately getting your AI models to market faster. By eliminating the traditional checkpoint dependencies and fully utilizing available capacity, you can significantly reduce model training completion times.

Checkpointless training: How it works
Traditional checkpoint-based recovery has these sequential job stages: 1) job termination and restart, 2) process discovery and network setup, 3) checkpoint retrieval, 4) data loader initialization, and 5) training loop resumption. When failures occur, each stage can become a bottleneck and training recovery can take up to an hour on self-managed training clusters. The entire cluster must wait for every single stage to complete before training can resume. This can lead to the entire training cluster sitting idle during recovery operations, which increases costs and extends the time to market.

Checkpointless training removes this bottleneck entirely by maintaining continuous model state preservation across the training cluster. When failures occur, the system instantly recovers by using healthy peers, avoiding the need for a checkpoint-based recovery that requires restarting the entire job. As a result, checkpointless training enables fault recovery in minutes.

Checkpointless training is designed for incremental adoption and built on four core components that work together: 1) collective communications initialization optimizations, 2) memory-mapped data loading that enables caching, 3) in-process recovery, and 4) checkpointless peer-to-peer state replication. These components are orchestrated through the HyperPod training operator that is used to launch the job. Each component optimizes a specific step in the recovery process, and together they enable automatic detection and recovery of infrastructure faults in minutes with zero manual intervention, even with thousands of AI accelerators. You can progressively enable each of these features as your training scales.

The latest Amazon Nova models were trained using this technology on tens of thousands of accelerators. Additionally, based on internal studies on cluster sizes ranging between 16 GPUs to over 2,000 GPUs, checkpointless training showcased significant improvements in recovery times, reducing downtime by over 80% compared to traditional checkpoint-based recovery.

To learn more, visit HyperPod Checkpointless Training in the Amazon SageMaker AI Developer Guide.

Elastic training: How it works
On clusters that run different types of modern AI workloads, accelerator availability can change continuously throughout the day as short-duration training runs complete, inference spikes occur and subside, or resources free up from completed experiments. Despite this dynamic availability of AI accelerators, traditional training workloads remain locked into their initial compute allocation, unable to take advantage of idle accelerators without manual intervention. This rigidity leaves valuable GPU capacity unused and prevents organizations from maximizing their infrastructure investment.

Elastic training transforms how training workloads interact with cluster resources. Training jobs can automatically scale up to utilize available accelerators and gracefully contract when resources are needed elsewhere, all while maintaining training quality.

Workload elasticity is enabled through the HyperPod training operator that orchestrates scaling decisions through integration with the Kubernetes control plane and resource scheduler. It continuously monitors cluster state through three primary channels: pod lifecycle events, node availability changes, and resource scheduler priority signals. This comprehensive monitoring enables near-instantaneous detection of scaling opportunities, whether from newly available resources or requests from higher-priority workloads.

The scaling mechanism relies on adding and removing data parallel replicas. When additional compute resources become available, new data parallel replicas join the training job, accelerating throughput. Conversely, during scale-down events (for example, when a higher-priority workload requests resources), the system scales down by removing replicas rather than terminating the entire job, allowing training to continue at reduced capacity.

Across different scales, the system preserves the global batch size and adapts learning rates, preventing model convergence from being adversely impacted. This enables workloads to dynamically scale up or down to utilize available AI accelerators without any manual intervention.

You can start elastic training through the HyperPod recipes for publicly available foundation models (FMs) including Llama and GPT-OSS. Additionally, you can modify your PyTorch training scripts to add elastic event handlers, which enable the job to dynamically scale.

To learn more, visit the HyperPod Elastic Training in the Amazon SageMaker AI Developer Guide. To get started, find the HyperPod recipes available in the AWS GitHub repository.

Now available
Both features are available in all the Regions in which Amazon SageMaker HyperPod is available. You can use these training techniques without additional cost. To learn more, visit the SageMaker HyperPod product page and SageMaker AI pricing page.

Give it a try and send feedback to AWS re:Post for SageMaker or through your usual AWS Support contacts.

Channy