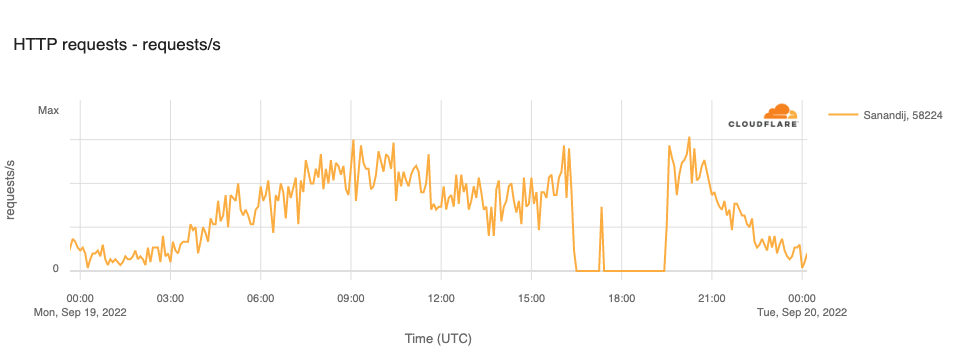
Published reports indicate that the growing protests have resulted in at least eight deaths. Iran has a history of restricting Internet connectivity in response to protests, taking such steps in May 2022, February 2021, and November 2019. They have taken a similar approach to the current protests, including disrupting Internet connectivity, blocking social media platforms, and blocking DNS. The impact of these actions, as seen through Cloudflare’s data, are reviewed below.
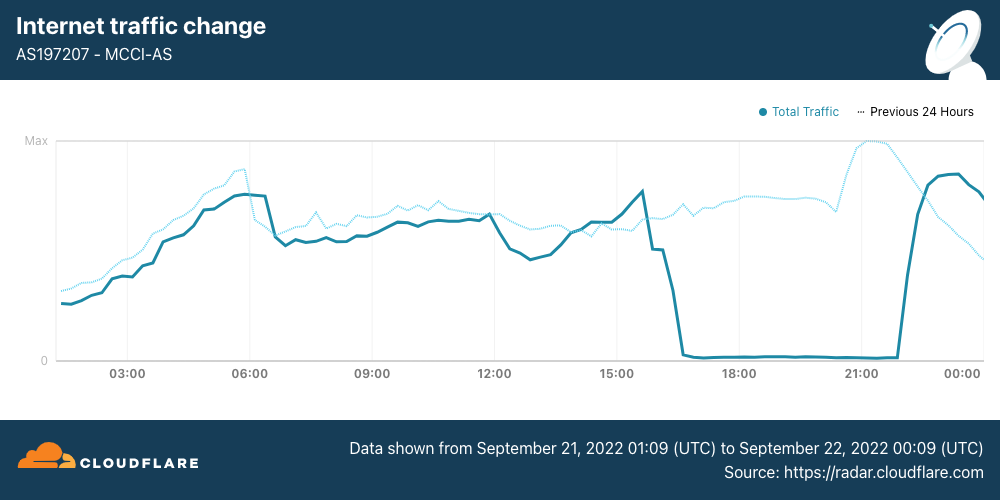
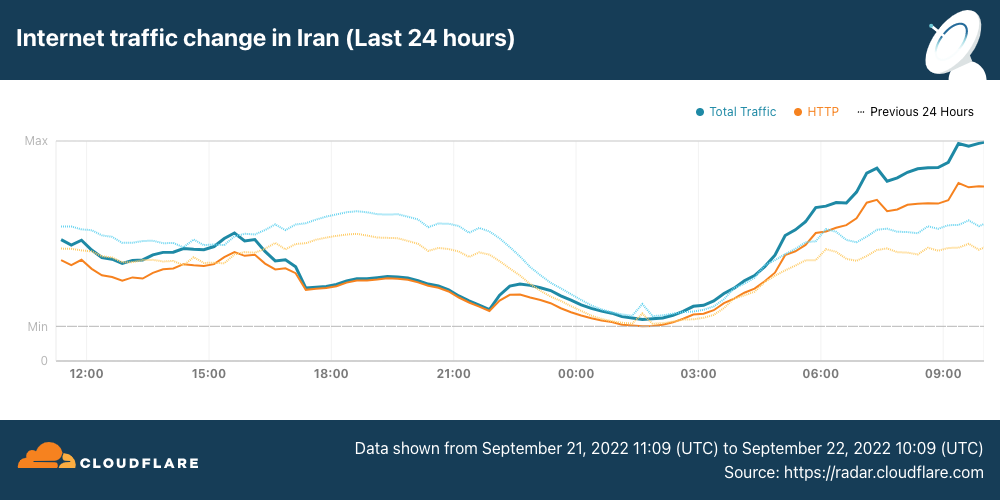
On September 21, Internet disruptions started to become more widespread, with mobile networks effectively shut down nationwide. (Iran is a heavily mobile-centric country, with Cloudflare Radar reporting that 85% of requests are made from mobile devices.) Internet traffic from Iran Mobile Communications Company (AS197207) started to decline around 1530 UTC, and remained near zero until it started to recover at 2200 UTC, returning to “normal” levels by the end of the day.
Internet traffic from RighTel (AS57218) began to decline around 1630 UTC. After an outage lasting more than 12 hours, traffic returned at 0510 UTC.
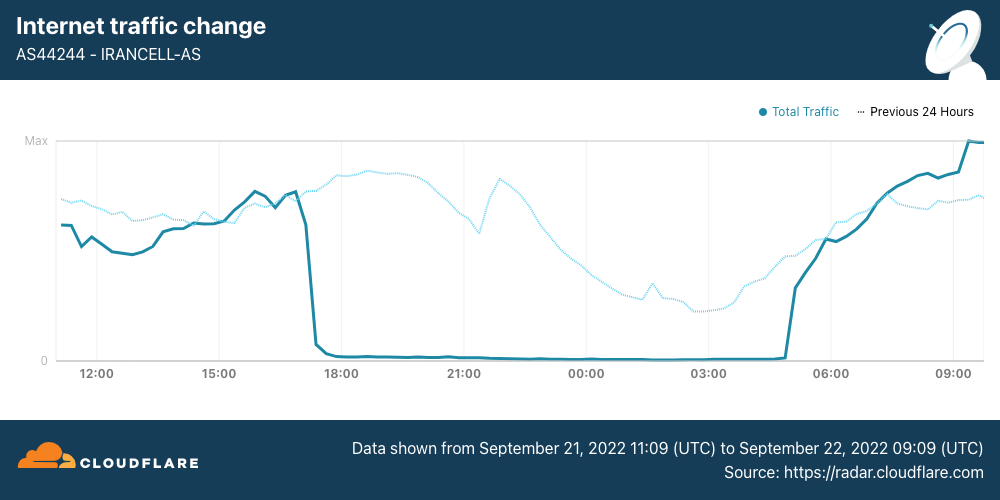
Internet traffic from MTN Irancell (AS44244) began to drop just before 1700 UTC. After a 12-hour outage, traffic began recovering at 0450 UTC.
The impact of these disruptions is also visible when looking at traffic at both a regional and national level. In Tehran Province, HTTP request volume declined by approximately 70% around 1600 UTC, and continued to drop for the next several hours before seeing a slight recovery at 2200 UTC, likely related to the recovery also seen at that time on AS197207.
Similarly, Internet traffic volumes across the whole country began to decline just after 1600 UTC, falling approximately 40%. Nominal recovery at 2200 UTC is visible in this view as well, again likely from the increase in traffic from AS197207. More aggressive traffic growth is visible starting around 0500 UTC, after the remaining two mobile network providers came back online.
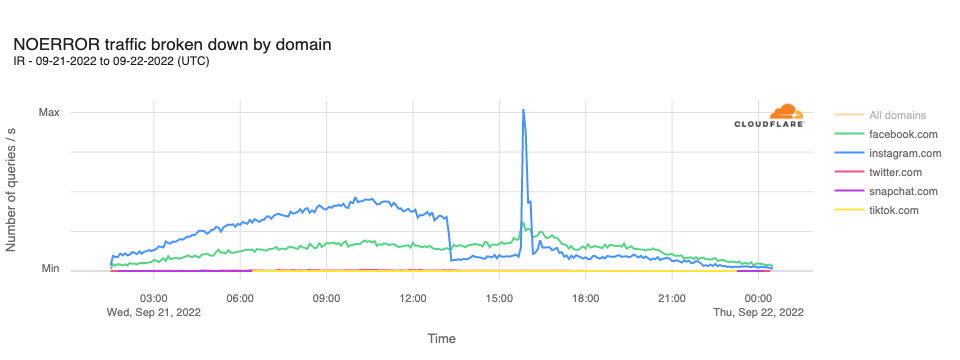
In analyzing DNS requests to Cloudflare’s resolver for domains associated with leading social media platforms, we observe that requests for instagram.com hostnames drop sharply at 1310 UTC, remaining lower for the rest of the day, except for a significant unexplained spike in requests between 1540 and 1610 UTC. Request volumes for hostnames associated with other leading social media platforms did not appear to be similarly affected.
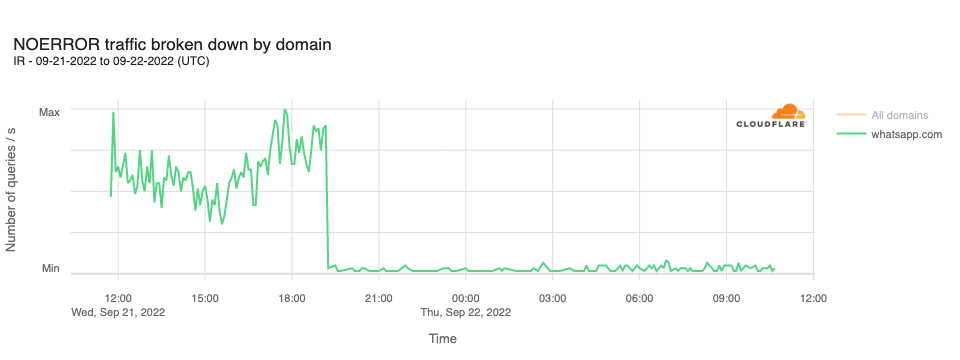
In addition, it was reported that access to WhatsApp had also been blocked in Iran. This can be seen in resolution requests to Cloudflare’s resolver for whatsapp.com hostnames. The graph below shows a sharp decline in query traffic at 1910 UTC, dropping to near zero.
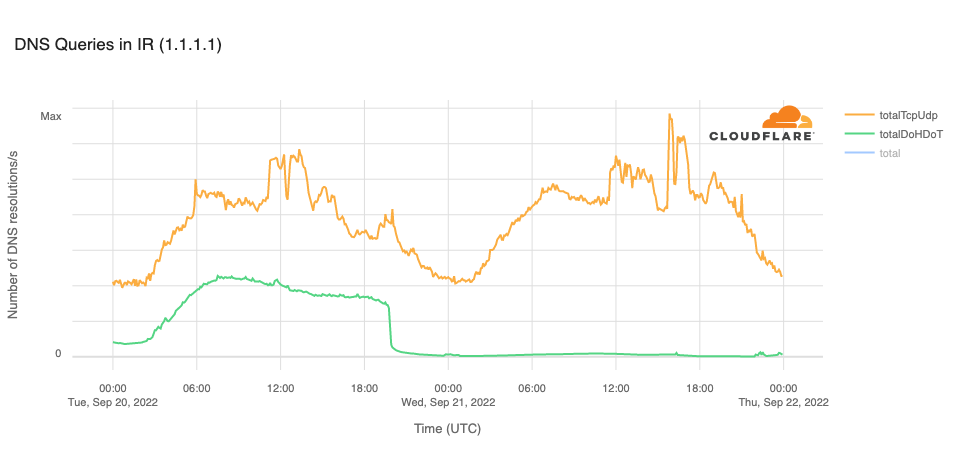
The Open Observatory for Network Interference (OONI), an organization that measures Internet censorship, reported in a Tweet that the cloudflare-dns.com domain name, used for DNS-over-HTTPS (DoH) and DNS-over-TLS (DoT) connections to Cloudflare’s DNS resolver, was blocked in Iran on September 20. This is clearly evident in the graph below, with resolution volume over DoH and DoT dropping to zero at 1940 UTC. The OONI tweet also noted that the 1.1.1.1 IP address “remains blocked on most networks.” The trend line for resolution over TCP or UDP (on port 53) in the graph below suggests that the IP address is not universally blocked, as there are still resolution requests reaching Cloudflare.
Interested parties can use Cloudflare Radar to monitor the impact of such government-directed Internet disruptions, and can follow @CloudflareRadar on Twitter for updates on Internet disruptions as they occur.
В рамките на предходна кампания публикувах списък с бюрократични пречки, за чието отпадане ще работя. Ето ревизирана версия, с прогреса, който постигнахме за седем месеца:
1. Удостоверенията – голяма част от обикалянето по гишета е събирането на удостоверения и бележки за данни, които администрацията има за вас. Тя е длъжна да ги събира по електронен път, служебно, но се оправдава, че не го прави, защото „нашият закон е специален“ и „нямаме техническа възможност“. Подготвихме и приехме на Министерски съвет изменения в Закона за електронното управление, което приравнява служебните справки на предоставено удостоверение, като по този начин елиминираме оправданието с „нашия специален закон“. На първия ден на Народното събрание този закон ще бъде внесен.
2. Печатите – Имахме готов законопроект, който дадох на работна група, която създадох. Стигнахме до извода, че за да е трайна и системна реформата, трябва изцяло нов закон, който да урежда работата с документи и печати, като по този закон вече се работи. Никой няма да има право да ви върне, защото на нещо някъде липсва печат.
3. „Тук не е информация“ – отношението към гражданите, че те трябва сами да си знаят всички бюрократични процедури, трябва да спре. Закон забраняващ „тук не е информация“ е комично да има, но може да има ясни правила за „дизайн на услугите“ както в дигиталната, така и във физическата среда, които да правят омразния надпис „Тук не е информация“ излишен. В края на мандата изготвихме проект на изменение на наредба, с която се въвежда забрана за надписи с отрицание, вкл. „Тук не е информация“. В следващ кабинет ще има време да мине обществено обсъждане и да бъде приета.
4. „Това не може по електронен път, елате на място“ – по закон всичко трябва да може да се прави по електронен път. Докато бях министър, получих редица сигнали за такива откази и ги разпределих на отговорните за контрола, които да съставят актове на нарушаващите администрации.
5. Разпечатването на платежни – дори електронизирани към момента услуги изисква прикачване на платежно (макар нормативната уредба, създавана с мое участие преди години, да го забранява). В рамките на мандата присъединихме много нови институции към системата за електронни плащания, което да елиминира тези проблеми, а заедно с МФ инструктирахме администрациите да позволят плащане и с чуждестранни карти и иновативни платежни услуги, така че онлайн плащанията да се все по-достъпни.
6. Сканираните PDF-и – всички документи се създават в електронен вид. След това, заради аналоговото мислене в администрацията, се разпечатват, подписват, подпечатват и сканират. Това ги прави (почти) невъзможни за търсене и индексиране. Отпадането на печатите ще реши и този проблем. В МЕУ сканирани документи нямаше.
7. Трудовата книжка – по-предното редовно правителство предложи смяна на дизайна на трудовата книжка. Крайно време е този документ да отпадне. Създадох работна група, която предостави пълен анализ на данните от трудовата книжка и нормативните актове, в които те са уредени и предложения за пълна електронизация.
8. Медицинския картон – единният (електронен) здравен запис, до който има всеки лекар при нужда, трябва да замени парцалите, които разнасяме по лекари (или които сме загубили много отдавна). МЗ, в сътрудничество с МЕУ и Информационно обслужване, въведе изцяло електронна рецепта, която е важна стъпка към пълнотата на здравния запис, а аз изисках от НЗОК да спазят закона, като предоставят данните си на Министерсетво на здравеопазването.
9. Подписване с електронен подпис – Java вече (почти) не е проблем, но електронните подписи са неудобни. Затова стартирахме приоритетно проекта за електронна идентификация, който ще е готов в началото на следващата година, и чрез който ще могат да се заявяват услуги без електронен подпис (след като минат и измененията в Закона за електронното управление, които подготвихме)
10. Хартиените ваучери за храна – тези ваучери са полезни, но администрирането им е ужасно бюрократично – по-големите вериги строят отделни складове за хартиените ваучери, напр. Подготвихме електронизирането им с наредба, като нужните изменения в Закона за корпоративното подоходно облагане ще ги внесем в първия ден народното събрание.
Бюрокрацията пречи на гражданите, на бизнеса и на администрацията. Нейното отпадане е трудно, защото „винаги така сме го правили“, но задължително. Ще продължим започнатото по всички тези теми.
We announced the Data Localization Suite in 2020, when requirements for data localization were already important in the European Union. Since then, we’ve witnessed a growing trend toward localization globally. We are thrilled to expand our coverage to these countries in Asia Pacific, allowing more customers to use Cloudflare by giving them precise control over which parts of the Cloudflare network are able to perform advanced functions like WAF or Bot Management that require inspecting traffic.
Regional Services, a recap
In 2020, we introduced (Regional Services), a new way for customers to use Cloudflare. With Regional Services, customers can limit which data centers actually decrypt and inspect traffic. This helps because certain customers are affected by regulations on where they are allowed to service traffic. Others have agreements with their customers as part of contracts specifying exactly where traffic is allowed to be decrypted and inspected.
As one German bank told us: “We can look at the rules and regulations and debate them all we want. As long as you promise me that no machine outside the European Union will see a decrypted bank account number belonging to one of my customers, we’re happy to use Cloudflare in any capacity”.
Under normal operation, Cloudflare uses its entire network to perform all functions. This is what most customers want: leverage all of Cloudflare’s data centers so that you always service traffic to eyeballs as quickly as possible. Increasingly, we are seeing customers that wish to strictly limit which data centers service their traffic. With Regional Services, customers can use Cloudflare’s network but limit which data centers perform the actual decryption. Products that require decryption, such as WAF, Bot Management and Workers will only be applied within those data centers.
How does Regional Services work?
You might be asking yourself: how does that even work? Doesn’t Cloudflare operate an anycast network? Cloudflare was built from the bottom up to leverage anycast, a routing protocol. All of Cloudflare’s data centers advertise the same IP addresses through Border Gateway Protocol. Whichever data center is closest to you from a network point of view is the one that you’ll hit.
This is great for two reasons. The first is that the closer the data center to you, the faster the reply. The second great benefit is that this comes in very handy when dealing with large DDoS attacks. Volumetric DDoS attacks throw a lot of bogus traffic at you, which overwhelms network capacity. Cloudflare’s anycast network is great at taking on these attacks because they get distributed across the entire network.
Anycast doesn’t respect regional borders, it doesn’t even know about them. Which is why out of the box, Cloudflare can’t guarantee that traffic inside a country will also be serviced there. Although typically you’ll hit a data center inside your country, it’s very possible that your Internet Service Provider will send traffic to a network that might route it to a different country.
Regional Services solves that: when turned on, each data center becomes aware of which region it is operating in. If a user from a country hits a data center that doesn’t match the region that the customer has selected, we simply forward the raw TCP stream in encrypted form. Once it reaches a data center inside the right region, we decrypt and apply all Layer 7 products. This covers products such as CDN, WAF, Bot Management and Workers.
Let’s take an example. A user is in Kerala, India and their Internet Service Provider has determined that the fastest path to one of our data centers is to Colombo, Sri Lanka. In this example, a customer may have selected India as the sole region within which traffic should be serviced. The Colombo data center sees that this traffic is meant for the India region. It does not decrypt, but instead forwards it to the closest data center inside India. There, we decrypt and products such as WAF and Workers are applied as if the traffic had hit the data center directly.
Bringing Regional Services to Asia
Historically, we’ve seen most interest in Regional Services in geographic regions such as the European Union and the Americas. Over the past few years, however, we are seeing a lot of interest from Asia Pacific. Based on customer feedback and analysis on regulations we quickly concluded there were three key regions we needed to support: India, Japan and Australia. We’re proud to say that all three are now generally available for use today.
But we’re not done yet! We realize there are many more customers that require localization to their particular region. We’re looking to add many more in the near future and are working hard to make it easier to support more of them. If you have a region in mind, we’d love to hear it!
India, Japan and Australia are all live today! If you’re interested in using the Data Localization Suite, contact your account team!
Public hosting systems for free software have come and gone over the years
but one of them, Sourceware, has been
supporting the development of most of the GNU toolchain for nearly
25 years.
Recently, an application was made to bring
Sourceware under the umbrella of the Software Freedom Conservancy (SFC), at least for
fundraising purposes. It turns out that there is a separate initiative,
developed in secret until now, with a different vision for the future of
Sourceware. The 2022 GNU
Tools Cauldron was the site of an intense discussion on how this
important community resource should be managed in the coming years.
AWS Identity and Access Management (IAM) is changing an aspect of how role trust policy evaluation behaves when a role assumes itself. Previously, roles implicitly trusted themselves from a role trust policy perspective if they had identity-based permissions to assume themselves. After receiving and considering feedback from customers on this topic, AWS is changing role assumption behavior to always require self-referential role trust policy grants. This change improves consistency and visibility with regard to role behavior and privileges. This change allows customers to create and understand role assumption permissions in a single place (the role trust policy) rather than two places (the role trust policy and the role identity policy). It increases the simplicity of role trust permission management: “What you see [in the trust policy] is what you get.”
Therefore, beginning today, for any role that has not used the identity-based behavior since June 30, 2022, a role trust policy must explicitly grant permission to all principals, including the role itself, that need to assume it under the specified conditions. Removal of the role’s implicit self-trust improves consistency and increases visibility into role assumption behavior.
Most AWS customers will not be impacted by the change at all. Only a tiny percentage (approximately 0.0001%) of all roles are involved. Customers whose roles have recently used the previous implicit trust behavior are being notified, beginning today, about those roles, and may continue to use this behavior with those roles until February 15, 2023, to allow time for making the necessary updates to code or configuration. Or, if these customers are confident that the change will not impact them, they can opt out immediately by substituting in new roles, as discussed later in this post.
The first part of this post briefly explains the change in behavior. The middle sections answer practical questions like: “why is this happening?,” “how might this change impact me?,” “which usage scenarios are likely to be impacted?,” and “what should I do next?” The usage scenario section is important because it shows that, based on our analysis, the self-assuming role behavior exhibited by code or human users is very likely to be unnecessary and counterproductive. Finally, for security professionals interested in better understanding the reasons for the old behavior, the rationale for the change, as well as its possible implications, the last section reviews a number of core IAM concepts and digs in to additional details.
What is changing?
Until today, an IAM role implicitly trusted itself. Consider the following role trust policy attached to the role named RoleA in AWS account 123456789012.
This role trust policy grants role assumption access to the role named RoleB in the same account. However, if the corresponding identity-based policy for RoleA grants the sts:AssumeRole action with respect to itself, then RoleA could also assume itself. Therefore, there were actually two roles that could assume RoleA: the explicitly permissioned RoleB, and RoleA, which implicitly trusted itself as a byproduct of the IAM ownership model (explained in detail in the final section). Note that the identity-based permission that RoleA must have to assume itself is not required in the case of RoleB, and indeed an identity-based policy associated with RoleB that references other roles is not sufficient to allow RoleB to assume them. The resource-based permission granted by RoleA’s trust policy is both necessary and sufficient to allow RoleB to assume RoleA.
Although earlier we summarized this behavior as “implicit self-trust,” the key point here is that the ability of Role A to assume itself is not actually implicit behavior. The role’s self-referential permission had to be explicit in one place or the other (or both): either in the role’s identity-based policy (perhaps based on broad wildcard permissions), or its trust policy. But unlike the case with other principals and role trust, an IAM administrator would have to look in two different policies to determine whether a role could assume itself.
As of today, for any new role, or any role that has not recently assumed itself while relying on the old behavior, IAM administrators must modify the previously shown role trust policy as follows to allow RoleA to assume itself, regardless of the privileges granted by its identity-based policy:
This change makes role trust behavior clearer and more consistent to understand and manage, whether directly by humans or as embodied in code.
How might this change impact me?
As previously noted, most customers will not be impacted by the change at all. For those customers who do use the prior implicit trust grant behavior, AWS will work with you to eliminate your usage prior to February 15, 2023. Here are more details for the two cases of customers who have not used the behavior, and those who have.
If you haven’t used the implicit trust behavior since June 30, 2022
Beginning today, if you have not used the old behavior for a given role at any time since June 30, 2022, you will now experience the new behavior. Those existing roles, as well as any new roles, will need an explicit reference in their own trust policy in order to assume themselves. If you have roles that are used only very occasionally, such as once per quarter for a seldom-run batch process, you should identify those roles and if necessary either remove the dependency on the old behavior or update their role trust policies to include the role itself prior to their next usage (see the second sample policy above for an example).
If you have used the implicit trust behavior since June 30, 2022
If you have a role that has used the implicit trust behavior since June 30, 2022, then you will continue to be able to do so with that role until February 15, 2023. AWS will provide you with notice referencing those roles beginning today through your AWS Health Dashboard and will also send an email with the relevant information to the account owner and security contact. We are allowing time for you to make any necessary changes to your existing processes, code, or configurations to prepare for removal of the implicit trust behavior. If you can’t change your processes or code, you can continue to use the behavior by making a configuration change—namely, by updating the relevant role trust policies to reference the role itself. On the other hand, you can opt out of the old behavior at any time by creating a new role with a different Amazon Resource Name (ARN) with the desired identity-based and trust-policy-based permissions and substituting it for any older role that was identified as using the implicit trust behavior. (The new role will not be allow-listed, because the allow list is based on role ARNs.) You can also modify an existing allow-listed role’s trust policy to explicitly deny access to itself. See the “What should I do next?” section for more information.
Notifications and retirement
As we previously noted, starting today, accounts with existing roles that use the implicit self-assume role assumption behavior will be notified of this change by email and through their AWS Health Dashboard. Those roles have been allow-listed, and so for now their behavior will continue as before. After February 15, 2023, the old behavior will be retired for all roles and all accounts. IAM Documentation has been updated to make clear the new behavior.
After the old behavior is retired from the allow-listed roles and accounts, role sessions that make self-referential role assumption calls will fail with an Access Denied error unless the role’s trust policy explicitly grants the permission directly through a role ARN. Another option is to grant permission indirectly through an ARN to the root principal in the trust policy that acts as a delegation of privilege management, after which permission grants in identity-based policies determine access, similar to the typical cross-account case.
Which usage scenarios are likely to be impacted?
Users often attach an IAM role to an Amazon Elastic Compute Cloud (Amazon EC2) instance, an Amazon Elastic Container Service (Amazon ECS) task, or AWS Lambda function. Attaching a role to one of these runtime environments enables workloads to use short-term session credentials based on that role. For example, when an EC2 instance is launched, AWS automatically creates a role session and assigns it to the instance. An AWS best practice is for the workload to use these credentials to issue AWS API calls without explicitly requesting short-term credentials through sts:AssumeRole calls.
However, examples and code snippets commonly available on internet forums and community knowledge sharing sites might incorrectly suggest that workloads need to call sts:AssumeRole to establish short-term sessions credentials for operation within those environments.
We analyzed AWS Security Token Service (AWS STS) service metadata about role self-assumption in order to understand the use cases and possible impact of the change. What the data shows is that in almost all cases this behavior is occurring due to unnecessarily reassuming the role in an Amazon EC2, Amazon ECS, Amazon Elastic Kubernetes Services (EKS), or Lambda runtime environment already provided by the environment. There are two exceptions, discussed at the end of this section under the headings, “self-assumption with a scoped-down policy” and “assuming a target compute role during development.”
There are many variations on this theme, but overall, most role self-assumption occurs in scenarios where the person or code is unnecessarily reassuming the role that the code was already running as. Although this practice and code style can still work with a configuration change (by adding an explicit self-reference to the role trust policy), the better practice will almost always be to remove this unnecessary behavior or code from your AWS environment going forward. By removing this unnecessary behavior, you save CPU, memory, and network resources.
Common mistakes when using Amazon EKS
Some users of the Amazon EKS service (or possibly their shell scripts) use the command line interface (CLI) command aws eks get-token to obtain an authentication token for use in managing a Kubernetes cluster. The command takes as an optional parameter a role ARN. That parameter allows a user to assume another role other than the one they are currently using before they call get-token. However, the CLI cannot call that API without already having an IAM identity. Some users might believe that they need to specify the role ARN of the role they are already using. We have updated the Amazon EKS documentation to make clear that this is not necessary.
Common mistakes when using AWS Lambda
Another example is the use of an sts:AssumeRole API call from a Lambda function. The function is already running in a preassigned role provided by user configuration within the Lambda service, or else it couldn’t successfully call any authenticated API action, including sts:AssumeRole. However, some Lambda functions call sts:AssumeRole with the target role being the very same role that the Lambda function has already been provided as part of its configuration. This call is unnecessary.
AWS Software Development Kits (SDKs) all have support for running in AWS Lambda environments and automatically using the credentials provided in that environment. We have updated the Lambda documentation to make clear that such STS calls are unnecessary.
Common mistakes when using Amazon ECS
Customers can associate an IAM role with an Amazon ECS task to give the task AWS credentials to interact with other AWS resources.
We detected ECS tasks that call sts:AssumeRole on the same role that was provided to the ECS task. Amazon ECS makes the role’s credentials available inside the compute resources of the ECS task, whether on Amazon EC2 or AWS Fargate, and these credentials can be used to access AWS services or resources as the IAM role associated with the ECS talk, without being called through sts:AssumeRole. AWS handles renewing the credentials available on ECS tasks before the credentials expire. AWS STS role assumption calls are unnecessary, because they simply create a new set of the same temporary role session credentials.
AWS SDKs all have support for running in Amazon ECS environments and automatically using the credentials provided in that ECS environment. We have updated the Amazon ECS documentation to make clear that calling sts:AssumeRole for an ECS task is unnecessary.
Common mistakes when using Amazon EC2
Users can configure an Amazon EC2 instance to contain an instance profile. This instance profile defines the IAM role that Amazon EC2 assigns the compute instance when it is launched and begins to run. The role attached to the EC2 instance enables your code to send signed requests to AWS services. Without this attached role, your code would not be able to access your AWS resources (nor would it be able to call sts:AssumeRole). The Amazon EC2 service handles renewing these temporary role session credentials that are assigned to the instance before they expire.
We have observed that workloads running on EC2 instances call sts:AssumeRole to assume the same role that is already associated with the EC2 instance and use the resulting role-session for communication with AWS services. These role assumption calls are unnecessary, because they simply create a new set of the same temporary role session credentials.
AWS SDKs all have support for running in Amazon EC2 environments and automatically using the credentials provided in that EC2 environment. We have updated the Amazon EC2 documentation to make clear that calling sts:AssumeRole for an EC2 instance with a role assigned is unnecessary.
For information on creating an IAM role, attaching that role to an EC2 instance, and launching an instance with an attached role, see “IAM roles for Amazon EC2” in the Amazon EC2 User Guide.
Other common mistakes
If your use case does not use any of these AWS execution environments, you might still experience an impact from this change. We recommend that you examine the roles in your account and identify scenarios where your code (or human use through the AWS CLI) results in a role assuming itself. We provide Amazon Athena and AWS CloudTrail Lake queries later in this post to help you locate instances where a role assumed itself. For each instance, you can evaluate whether a role assuming itself is the right operation for your needs.
Self-assumption with a scoped-down policy
The first pattern we have observed that is not a mistake is the use of self-assumption combined with a scoped-down policy. Some systems use this approach to provide different privileges for different use cases, all using the same underlying role. Customers who choose to continue with this approach can do so by adding the role to its own trust policy. While the use of scoped-down policies and the associated least-privilege approach to permissions is a good idea, we recommend that customers switch to using a second generic role and assume that role along with the scoped-down policy rather than using role self-assumption. This approach provides more clarity in CloudTrail about what is happening, and limits the possible iterations of role assumption to one round, since the second role should not be able to assume the first. Another possible approach in some cases is to limit subsequent assumptions is by using an IAM condition in the role trust policy that is no longer satisfied after the first role assumption. For example, for Lambda functions, this would be done by a condition checking for the presence of the “lambda:SourceFunctionArn” property; for EC2, by checking for presence of “ec2:SourceInstanceARN.”
Assuming an expected target compute role during development
Another possible reason for role self-assumption may result from a development practice in which developers attempt to normalize the roles that their code is running in between scenarios in which role credentials are not automatically provided by the environment, and scenarios where they are. For example, imagine a developer is working on code that she expects to run as a Lambda function, but during development is using her laptop to do some initial testing of the code. In order to provide the same execution role as is expected later in product, the developer might configure the role trust policy to allow assumption by a principal readily available on the laptop (an IAM Identity Center role, for example), and then assume the expected Lambda function execution role when the code is initializing. The same approach could be used on a build and test server. Later, when the code is deployed to Lambda, the actual role is already available and in use, but the code need not be modified in order to provide the same post-role-assumption behavior that existing outside of Lambda: the unmodified code can automatically assume what is in this case the same role, and proceed. While this approach is not illogical, as with the scope-down policy case we recommend that customers configure distinct roles for assumption both in development and test environments as well as later production environments. Again, this approach provides more clarity in CloudTrail about what is happening, and limits the possible iterations of role assumption to one round, since the second role should not be able to assume the first.
What should I do next?
If you receive an email or AWS Health Dashboard notification for an account, we recommend that you review your existing role trust policies and corresponding code. For those roles, you should remove the dependency on the old behavior, or if you can’t, update those role trust policies with an explicit self-referential permission grant. After the grace period expires on February 15, 2023, you will no longer be able to use the implicit self-referential permission grant behavior.
If you currently use the old behavior and need to continue to do so for a short period of time in the context of existing infrastructure as code or other automated processes that create new roles, you can do so by adding the role’s ARN to its own trust policy. We strongly encourage you to treat this as a temporary stop-gap measure, because in almost all cases it should not be necessary for a role to be able to assume itself, and the correct solution is to change the code that results in the unnecessary self-assumption. If for some reason that self-service solution is not sufficient, you can reach out to AWS Support to seek an accommodation of your use case for new roles or accounts.
If you make any necessary code or configuration changes and want to remove roles that are currently allow-listed, you can also ask AWS Support to remove those roles from the allow list so that their behavior follows the new model. Or, as previously noted, you can opt out of the old behavior at any time by creating a new role with a different ARN that has the desired identity-based and trust-policy–based permissions and substituting it for the allow-listed role. Another stop-gap type of option is to add an explicit deny that references the role to its own trust policy.
If you would like to understand better the history of your usage of role self-assumption in a given account or organization, you can follow these instructions on querying CloudTrail data with Athena and then use the following Athena query against your account or organization CloudTrail data, as stored in Amazon Simple Storage Services (Amazon S3). The results of the query can help you understand the scenarios and conditions and code involved. Depending on the size of your CloudTrail logs, you may need to follow the partitioning instructions to query subsets of your CloudTrail logs sequentially. If this query yields no results, the role self-assumption scenario described in this blog post has never occurred within the analyzed CloudTrail dataset.
SELECT eventid, eventtime, userIdentity.sessioncontext.sessionissuer.arn as RoleARN, split_part(userIdentity.principalId, ':', 2) as RoleSessionName from cloudtrail_logs t CROSS JOIN UNNEST(t.resources) unnested (resources_entry) where eventSource = 'sts.amazonaws.com' and eventName = 'AssumeRole' and userIdentity.type = 'AssumedRole' and errorcode IS NULL and substr(userIdentity.sessioncontext.sessionissuer.arn,12) = substr(unnested.resources_entry.ARN,12)
As another option, you can follow these instructions to set up CloudTrail Lake to perform a similar analysis. CloudTrail Lake allows richer, faster queries without the need to partition the data. As of September 20, 2022, CloudTrail Lake now supports import of CloudTrail logs from Amazon S3. This allows you to perform a historical analysis even if you haven’t previously enabled CloudTrail Lake. If this query yields no results, the scenario described in this blog post has never occurred within the analyzed CloudTrail dataset.
SELECT eventid, eventtime, userIdentity.sessioncontext.sessionissuer.arn as RoleARN, userIdentity.principalId as RoleIdColonRoleSessionName from $EDS_ID where eventSource = 'sts.amazonaws.com' and eventName = 'AssumeRole' and userIdentity.type = 'AssumedRole' and errorcode IS NULL and userIdentity.sessioncontext.sessionissuer.arn = element_at(resources,1).arn
Understanding the change: more details
To better understand the background of this change, we need to review the IAM basics of identity-based policies and resource-based policies, and then explain some subtleties and exceptions. You can find additional overview material in the IAM documentation.
The structure of each IAM policy follows the same basic model: one or more statements with an effect (allow or deny), along with principals, actions, resources, and conditions. Although the identity-based and resource-based policies share the same basic syntax and semantics, the former is associated with a principal, the latter with a resource. The main difference between the two is that identity-based policies do not specify the principal, because that information is supplied implicitly by associating the policy with a given principal. On the other hand, resource policies do not specify an arbitrary resource, because at least the primary identifier of the resource (for example, the bucket identifier of an S3 bucket) is supplied implicitly by associating the policy with that resource. Note that an IAM role is the only kind of AWS object that is both a principal and a resource.
In most cases, access to a resource within the same AWS account can be granted by either an identity-based policy or a resource-based policy. Consider an Amazon S3 example. An identity-based policy attached to an IAM principal that allows the s3:GetObject action does not require an equivalent grant in the S3 bucket resource policy. Conversely, an s3:GetObject permission grant in a bucket’s resource policy is all that is needed to allow a principal in the same account to call the API with respect to that bucket; an equivalent identity-based permission is not required. Either the identity-based policy or the resource-based policy can grant the necessary permission. For more information, see IAM policy types: How and when to use them.
However, in order to more tightly govern access to certain security-sensitive resources, such as AWS Key Management Service (AWS KMS) keys and IAM roles, those resource policies need to grant access to the IAM principal explicitly, even within the same AWS account. A role trust policy is the resource policy associated with a role that specifies which IAM principals can assume the role by using one of the sts:AssumeRole* API calls. For example, in order for RoleB to assume RoleA in the same account, whether or not RoleB’s identity-based policy explicitly allows it to assume RoleA, RoleA’s role trust policy must grant access to RoleB. Within the same account, an identity-based permission by itself is not sufficient to allow assumption of a role. On the other hand, a resource-based permission—a grant of access in the role trust policy—is sufficient. (Note that it’s possible to construct a kind of hybrid permission to a role by using both its resource policy and other identity-based policies. In that case, the role trust policy grants permission to the root principal ARN; after that, the identity-based policy of a principal in that account would need to explicitly grant permission to assume that role. This is analogous to the typical cross-account role trust scenario.)
Until now, there has been a nonintuitive exception to these rules for situations where a role assumes itself. Since a role is both a principal (potentially with an identity-based policy) and a resource (with a resource-based policy), it is in the unique position of being both a subject and an object within the IAM system, as well as being an object owned by itself rather than its containing account. Due to this ownership model, roles with identity-based permission to assume themselves implicitly trusted themselves as resources, and vice versa. That is to say, roles that had the privilege as principals to assume themselves implicitly trusted themselves as resources, without an explicit self-referential Allow in the role trust policy. Conversely, a grant of permission in the role trust policy was sufficient regardless of whether there was a grant in the same role’s identity-based policy. Thus, in the self-assumption case, roles behaved like most other resources in the same account: only a single permission was required to allow role self-assumption, either on the identity side or the resource side of their dual-sided nature. Because of a role’s implicit trust of itself as a resource, the role’s trust policy—which might otherwise limit assumption of the role with properties such as actions and conditions—was not applied, unless it contained an explicit deny of itself.
The following example is a role trust policy attached to the role named RoleA in account 123456789012. It grants explicit access only to the role named RoleB.
Assuming that the corresponding identity-based policy for RoleA granted the sts:AssumeRole action with regard to RoleA, this role trust policy provided that there were two roles that could assume RoleA: RoleB (explicitly referenced in the trust policy) and RoleA (assuming it was explicitly referenced in its identity policy). RoleB could assume RoleA only if it had the principal tag project:BlueSkyProject because of the trust policy condition. (The sts:TagSession permission is needed here in case tags need to be added by the caller as parted of the RoleAssumption call.) RoleA, on the other hand, did not need to meet that condition because it relied on a different explicit permission—the one granted in the identity-based policy. RoleA would have needed the principal tag project:BlueSkyProject to meet the trust policy condition if and only if it was relying on the trust policy to gain access through the sts:AssumeRole action; that is, in the case where its identity-based policy did not provide the needed privilege.
As we previously noted, after considering feedback from customers on this topic, AWS has decided that requiring self-referential role trust policy grants even in the case where the identity-based policy also grants access is the better approach to delivering consistency and visibility with regard to role behavior and privileges. Therefore, as of today, role assumption behavior requires an explicit self-referential permission in the role trust policy, and the actions and conditions within that policy must also be satisfied, regardless of the permissions expressed in the role’s identity-based policy. (If permissions in the identity-based policy are present, they must also be satisfied.)
Requiring self-reference in the trust policy makes role trust policy evaluation consistent regardless of which role is seeking to assume the role. Improved consistency makes role permissions easier to understand and manage, whether through human inspection or security tooling. This change also eliminates the possibility of continuing the lifetime of an otherwise temporary credential without explicit, trackable grants of permission in trust policies. It also means that trust policy constraints and conditions are enforced consistently, regardless of which principal is assuming the role. Finally, as previously noted, this change allows customers to create and understand role assumption permissions in a single place (the role trust policy) rather than two places (the role trust policy and the role identity policy). It increases the simplicity of role trust permission management: “what you see [in the trust policy] is what you get.”
Continuing with the preceding example, if you need to allow a role to assume itself, you now must update the role trust policy to explicitly allow both RoleB and RoleA. The RoleA trust policy now looks like the following:
Without this new principal grant, the role can no longer assume itself. The trust policy conditions are also applied, even if the role still has unconditioned access to itself in its identity-based policy.
Conclusion
In this blog post we’ve reviewed the old and new behavior of role assumption in the case where a role seeks to assume itself. We’ve seen that, according to our analysis of service metadata, the vast majority of role self-assumption behavior that relies solely on identity-based privileges is totally unnecessary, because the code (or human) who calls sts:AssumeRole is already, without realizing it, using the role’s credentials to call the AWS STS API. Eliminating that mistake will improve performance and decrease resource consumption. We’ve also explained in more depth the reasons for the old behavior and the reasons for making the change, and provided Athena and CloudTrail Lake queries that you can use to examine past or (in the case of allow-listed roles) current self-assumption behavior in your own environments. You can reach out to AWS Support or your customer account team if you need help in this effort.
If you currently use the old behavior and need to continue to do so, your primary option is to create an explicit allow for the role in its own trust policy. If that option doesn’t work due to operational constraints, you can reach out to AWS Support to seek an accommodation of your use case for new roles or new accounts. You can also ask AWS Support to remove roles from the allow-list if you want their behavior to follow the new model.
If you have feedback about this post, submit comments in the Comments section below. If you have questions about this post, start a new IAM-tagged discussion on AWS re:Post or contact AWS Support.
AWS would like to thank several customers and partners who highlighted this behavior as something they found surprising and unhelpful, and asked us to consider making this change. We would also like to thank independent security researcher Ryan Gerstenkorn who engaged with AWS on this topic and worked with us prior to this update.
Want more AWS Security news? Follow us on Twitter.
Version 43 of the GNOME desktop environment has been released; see the release notes for details.
This latest GNOME release comes with improvements across the board,
ranging from a new quick settings menu, a redesigned Files app, and
hardware security integration. GNOME 43 continues the trend of
GNOME apps migrating from GTK 3 to GTK 4, and includes many other
smaller enhancements.
As we get closer to closing out 2022, the talk in the market continues to swirl around extended detection and response (XDR) solutions. What are they? What are the benefits? Should my team adopt XDR, and if yes, how do we evaluate vendors to determine the best approach?
While there continue to be many different definitions of XDR in the market, the common themes around this technology consistently are:
Tightly integrated security products delivering common threat prevention, detection, and incident response capabilities
Out-of-the-box operational efficiencies that require minimal customization
High-quality detection content with limited tuning required
Advanced analytics that can correlate alerts from multiple sources into incidents
Simply put, XDR is an evolution of the security ecosystem in order to provide elevated and stronger security for resource-constrained security teams.
XDR for 2023
Why is XDR the preferred cybersecurity solution? With an ever-expanding attack surface and diverse and complex threats, security operations centers (SOCs) need more visibility and stronger threat coverage across their environment – without creating additional pockets of siloed data from point solutions.
A 2022 study of security leaders found that the average security team is now managing 76 different tools – with sprawl driven by a need to keep pace with cloud adoption and remote working requirements. Because of the exponential growth of tools, security teams are spending more than half their time manually producing reports, pulling in data from multiple siloed tools. An XDR solution offers significant operational efficiency benefits by centralizing all that data to form a cohesive picture of your environment.
Is XDR the right move for your organization?
When planning your security for the next year, consider what outcomes you want to achieve in 2023.
Security product and vendor consolidation
To combat increasing complexity, security and risk leaders are looking for effective ways to consolidate their security stack – without compromising the ability to detect threats across a growing attack surface. In fact, 75% of security professionals are pursuing a vendor consolidation strategy today, up from just 29% two years ago. An XDR approach can be an effective path for minimizing the number of tools your SOC needs to manage while still bringing together critical telemetry to power detection and response. For this reason, many teams are prioritizing XDR in 2023 to spearhead their consolidation movement. It’s predicted that by year-end 2027, XDR will be used by up to 40% of end-user organizations to reduce the number of security vendors they have in place.
As you explore prioritizing XDR in 2023, it’s important to remember that all XDR is not created equal. A hybrid XDR approach may enable you to select top products across categories but will still require significant deployment, configuration, and ongoing management to bring these products together (not to mention multiple vendor relationships and expenses to tackle). A native XDR approach delivers a more inclusive suite of capabilities from a single vendor. For resource-constrained teams, a native approach may be superior to hybrid as there is likely to be less work on behalf of the customer. A native XDR does much of the consolidation work for you, while a hybrid XDR helpsyou consolidate.
Improved security operations efficiency and productivity
“Efficiency” is a big promise of XDR, but this can look different for many teams. How do you measure efficiency today? What areas are currently inefficient and could be made faster or easier? Understanding this baseline and where your team is losing time today will help you know what to prioritize when you pursue an XDR strategy in 2023.
A strong XDR replaces existing tools and processes with alternative, more efficient working methods. Example processes to evaluate as you explore XDR:
Data ingestion: As your organization grows, you want to be sure your XDR can grow with it. Cloud-native XDR platforms will be especially strong in this category, as they will have the elastic foundation necessary to keep pace with your environment. Consider also how you’ll add new event sources over time. This can be a critical area to improve efficiency.
Dashboards and reporting: Is your team equipped to create and manage custom queries, reports, and dashboards? Creating and distributing reports can be extremely time-consuming – especially for newer analysts. If your team doesn’t have the time for constant dashboard creation, consider XDR approaches that offer prebuilt content and more intuitive experiences that will satisfy these use cases.
Detections: With a constant evolution of threat actors and behaviors, it’s important to evaluate if your team has the time to bring together the necessary threat intelligence and detection rule creation to stay ahead of emergent threats. Effective XDR can greatly reduce or potentially eliminate the need for your team to manually create and manage detection rules by offering built-in detection libraries. It’s important to understand the breadth and fidelity of the detections library offered by your vendor and ensure that this content addresses the needs of your organization.
Automation: Finding the right balance for your SOC between technology and human expertise will allow analysts to apply their skills and training in critical areas without having to maintain repetitive and mundane tasks additionally. Because different XDR solutions offer different instances of automation, prioritize workflows that will provide the most benefit to your team. Some example use cases would be connecting processes across your IT and security teams, automating incident response to common threats, or reducing any manual or repetitive tasks.
Accelerated investigations and response
While XDR solutions claim to host a variety of features that can accelerate your investigation and response process, it’s important to understand how your team currently functions. Start by identifying your mean time to respond (MTTR) at present, then what your goal MTTR is for the future. Once you lay that out, look back at how analysts currently investigate and respond to attacks and note any skill or knowledge gaps, so you can understand what capabilities will best assist your team. XDR aims to paint a fuller picture of attacker behavior, so security teams can better analyze and respond to it.
Some examples of questions that can build out the use cases you require to meet your target ROI for next year.
During an investigation, where is your team spending the majority of their time?
What established processes are currently in place for threat response?
How adaptable is your team when faced with new and unknown threat techniques?
Do you have established playbooks for specific threats? Does your team know what to do when these fire?
Again, having a baseline of where your organization is today will help you define more realistic goals and requirements going forward. When evaluating XDR products, dig into how they will shorten the window for attackers to succeed and drive a more effective response for your team. For a resource-constrained team, you may especially want to consider how an XDR approach can:
Reduce the amount of noise that your team needs to triage and ensure analysts zero in on top priority threats
Shorten the time for effective investigation by providing relevant events, evidence, and intelligence around a specific attack
Provide effective playbooks that maximize autonomy for analysts, enabling them to respond to threats confidently without the need to escalate or do excessive investigation
Deliver one-click automation that analysts can leverage to accelerate a response after they have accessed the situation
Unlock the potential of XDR with Rapid7
If you and your team prioritize XDR in 2023, we’d love to help. Rapid7’s native XDR approach unlocks advanced threat detection and accelerated response for resource-constrained teams. With 360-degree attack surface coverage, teams have a sophisticated view across both the internal – and external – threat landscape. Rapid7 Threat Intelligence and Detection Engineering curate an always up-to-date library of threat detections – vetted in the field by our MDR SOC experts to ensure high-fidelity, actionable alerts. And with recommended response playbooks and pre-built workflows, your team will always be ready to respond to threats quickly and confidently.
It’s hard to imagine a world without computer chips. They are at the heart of the devices that we use to work and play every day. Currently, Amazon Web Services (AWS) is offering customers the next generation of computer chip, with lower cost, higher performance, and a reduced carbon footprint.
This edition of Let’s Architect! focuses on custom computer chips, accelerators, and technologies developed by AWS, such as AWS Nitro System, custom-designed Arm-based AWS Graviton processors that support data-intensive workloads, as well as AWS Trainium, and AWS Inferentia chips optimized for machine learning training and inference.
In this post, we discuss these new AWS technologies, their main characteristics, and how to take advantage of them in your architecture.
As Deep Learning models become increasingly large and complex, the training cost for these models increases, as well as the inference time for serving.
With AWS Inferentia, machine learning practitioners can deploy complex neural-network models that are built and trained on popular frameworks, such as Tensorflow, PyTorch, and MXNet on AWS Inferentia-based Amazon EC2 Inf1 instances.
This video introduces you to the main concepts of AWS Inferentia, a service designed to reduce both cost and latency for inference. To speed up inference, AWS Inferentia: selects and shares a model across multiple chips, places pieces inside the on-chip cache, then streams the data via pipeline for low-latency predictions.
AWS Lambda is a serverless, event-driven compute service that enables code to run from virtually any type of application or backend service, without provisioning or managing servers. Lambda uses a high-availability compute infrastructure and performs all of the administration of the compute resources, including server- and operating-system maintenance, capacity-provisioning, and automatic scaling and logging.
AWS Graviton processors are designed to deliver the best price and performance for cloud workloads. AWS Graviton3 processors are the latest in the AWS Graviton processor family and provide up to: 25% increased compute performance, two-times higher floating-point performance, and two-times faster cryptographic workload performance compared with AWS Graviton2 processors. This means you can migrate AWS Lambda functions to Graviton in minutes, plus get as much as 19% improved performance at approximately 20% lower cost (compared with x86).
Comparison between x86 and Arm/Graviton2 results for the AWS Lambda function computing prime numbers (click to enlarge)
The AWS Nitro System is a collection of building-block technologies that includes AWS-built hardware offload and security components. It is powering the next generation of Amazon EC2 instances, with a broadening selection of compute, storage, memory, and networking options.
In this session, dive deep into the Nitro System, reviewing its design and architecture, exploring new innovations to the Nitro platform, and understanding how it allows for fasting innovation and increased security while reducing costs.
Traditionally, hypervisors protect the physical hardware and bios; virtualize the CPU, storage, networking; and provide a rich set of management capabilities. With the AWS Nitro System, AWS breaks apart those functions and offloads them to dedicated hardware and software.
AWS Nitro System separates functions and offloads them to dedicated hardware and software, in place of a traditional hypervisor
In this re:Invent 2021 session, we learn about the benefits Amazon’s ecommerce Datapath platform has realized with AWS Graviton.
With a range of 25%-40% performance gains across 53,000 Amazon EC2 instances worldwide for Prime Day 2021, the Datapath team is lowering their internal costs with AWS Graviton’s improved price performance. Explore the software updates that were required to achieve this and the testing approach used to optimize and validate the deployments. Finally, learn about the Datapath team’s migration approach that was used for their production deployment.
AWS Graviton2: core components
See you next time!
Thanks for exploring custom computer chips, accelerators, and technologies developed by AWS. Join us in a couple of weeks when we talk more about architectures and the daily challenges faced while working with distributed systems.
Amazon QuickSight Q uses machine learning (ML) and natural language technology to empower you to ask business questions about your data and get answers instantly. You can simply enter your questions (for example, “What is the year-over-year sales trend?”) and get the answer in seconds in the form of a QuickSight visual.
Some business questions can’t be answered through existing business intelligence (BI) dashboards. It can take days or weeks for the BI team to accommodate these needs and refine their solution. Because Q doesn’t depend on prebuilt dashboards or reports to answer questions, it removes the need for BI teams to create or update dashboards every time a new business question arises. You can ask questions and receive answers in the form of visuals in seconds directly from within QuickSight or from web applications and portals. Q empowers every business user to self-serve and get insights faster, regardless of their background or skillset.
In this post, we walk you through the steps to configure Q using an Olympic Games public dataset and demonstrate how an end-user can ask simple questions directly from Q in an interactive manner and receive answers in seconds.
You can interactively play with the Olympic dashboard and Q search bar in the following interactive demo.
Solution overview
We use Olympic games public datasets to configure a Q topic and discuss tips and tricks on how to make further configurations on the topic that enable Q to provide prompt answers using ML-powered, natural language query (NLQ) capabilities that empower you to ask questions about data using everyday business language.
The video from Data Con LA provides a high-level demonstration of the capabilities covered in this post.
We use multiple publicly available datasets from Kaggle. The datasets have historical information about athletes, including name, ID, age, weight, country, and medals.
We use the 2020 Olympic datasets and historical data. We also use the datasets Introduction of Women Olympic Sport and Women of Olympic Games to determine the participation of women athletes in Olympics and discover trends. The QuickSight datasets created using these public data files are added to a Q topic, as shown in the following screenshot. We provide details on creating QuickSight datasets later in this post.
Prerequisites
To follow along with the solution presented in this post, you must have access to the following:
The public datasets in Kaggle can’t be directly utilized to create a Q topic. We have already cleansed the raw data and have provided the cleansed datasets in the GitHub repo. If you are interested in learning more about data cleansing, we discussed three different data cleansing methods at the end of this post.
To create your resources, complete the following steps:
Create an S3 bucket called olympicsdata.
Create a folder for each data file, as shown in the following screenshot.
Upload the data files from the GitHub repo into their respective folders.
The template creates an Athena database and tables, as shown in the following screenshot.
The template also creates the QuickSight data source athena-olympics and datasets.
Create datasets in QuickSight
To build the Q topic, we need to combine the datasets, because each table contains only partial data. Joining these tables helps answer questions across all the features of the 2020 Olympics.
We create the Olympics 2021 dataset by joining the tables Medals_athletes_2021, Athletes_full_2021, Coach_full_2021, and Tech_official_2021.
The following screenshot shows the joins for our complete dataset.
Medals_athletes_2021 is the main table, with the following join conditions:
Left outer join athletes_full_2021 on athlete_name, discipline_code, and country_code
Left outer join coach_full_2021 on country, discipline, and event
Left outer join tech_official_2021 on discipline
Finally, we have the following datasets that we use for our Q topic:
Olympics 2021 Details
Medals 2021
Olympics History (created using the Olympics table)
Introduction of Women Olympics Sports
Women in the Olympic Movement
Create a Q topic
Topics are collections of one or more datasets that represent a subject area that your business users can ask questions about. In QuickSight, you can create and manage topics on the Topics page. When you create a topic, your business users can ask questions about it in the Q search bar.
When you create topics in Q, you can add multiple datasets to them and then configure all the fields in the datasets to make them natural language-friendly. This enables Q to provide your business users with the correct visualizations and answers to their questions.
The following are data modeling best practices for Q topics:
Reduce the number of datasets by consolidating the data. Any given question can only hit one data set, so only include multiple datasets if they are related enough to be part of the same topic, but distinct enough that you can ask a question against them independently.
For naming conventions, provide a meaningful name or alias (synonym) of a field to allow the end-user to easily query it.
If a field appears in different datasets, make sure that this field has the same name across different datasets.
Validate data consistency. For example, the total value of a metric that aggregates from different datasets should be consistent.
For fields that don’t request on-the-fly calculations, for example, metrics with distributive functions (sum, max, min, and so on), push down the calculation into a data warehouse.
For fields that request on-the-fly calculations, create the calculated field in the QuickSight dataset or Q topic. If other topics or dashboards might reuse the same field, create it in the datasets.
To create a topic, complete the following steps:
On the QuickSight console, choose Topics in the navigation pane.
Choose New topic.
For Topic name, enter a name.
For Description, enter a description.
Choose Save.
On the Add data to topic page that opens, choose Datasets, and then select the datasets that we created in the previous section.
Choose Add data to create the topic.
Enhance the topic
In this section, we discuss various ways that you can enhance the topic.
Add calculated fields to a topic dataset
You can add new fields to a dataset in a topic by creating calculated fields.
For example, we have the column Age in our Olympics dataset. We can create a calculated field to group age into different ranges using the ifelse function. This calculated field can help us ask a question like “How many athletes for each age group?”
Choose Add calculated field.
In the calculation editor, enter the following syntax:
ifelse(
Age<=20, '0-20',
Age>20 and Age <=40, '21-40',
Age>40 and Age<=60, '41-60',
'60+'
)
Name the calculated field Age Groups.
Choose Save.
The calculated field is added to the list of fields in the topic.
Add filters to a topic dataset
Let’s say lot of analysis is expected on the dataset for the summer season. We can add a filter to allow for easy selection of this value. Furthermore, if we want to allow analysis against data for the summer season only, we can choose to always apply this filter or apply it as the default choice, but allow users to ask questions about other seasons as well.
Choose Add filter.
For Name, enter Summer.
Choose the Women in the Olympic Movement dataset.
Choose the Olympics Season field.
Choose Custom filter list for Filter type and set the rule as include.
Enter Summer under Values.
Choose Apply always, unless a question results in an explicit filter from the dataset.
Choose Save.
The filter is added to the list of fields in the topic.
Add named entities to a topic dataset
We can define named entities if we need to show users a combination of fields. For example, when someone asks for player details, it makes sense to show them player name, age, country, sport, and medal. We can make this happen by defining a named entity.
Choose Add named entity.
Choose the Olympics dataset.
Enter Player Profile for Name.
Enter Information of Player for Description.
Choose Add field.
Choose Player Name from the list.
Choose Add field again and add the fields Age, Countries, Sport, and Medal. The fields listed are the order they appear in answers. To move a field, choose the six dots next to the name and drag and drop the field to the order that you want.
Choose Save.
The named entity is added to the list of fields in the topic.
Make Q topics natural language-friendly
To help Q interpret your data and better answer your readers’ questions, provide as much information about your datasets and their associated fields as possible.
To make the topic more natural language-friendly, use the following procedures.
Rename fields
You can make your field names more user-friendly in your topics by renaming them and adding descriptions.
Q uses field names to understand the fields and link them to terms in your readers’ questions. When your field names are user-friendly, it’s easier for Q to draw links between the data and a reader’s question. These friendly names are also presented to readers as part of the answer to their question to provide additional context.
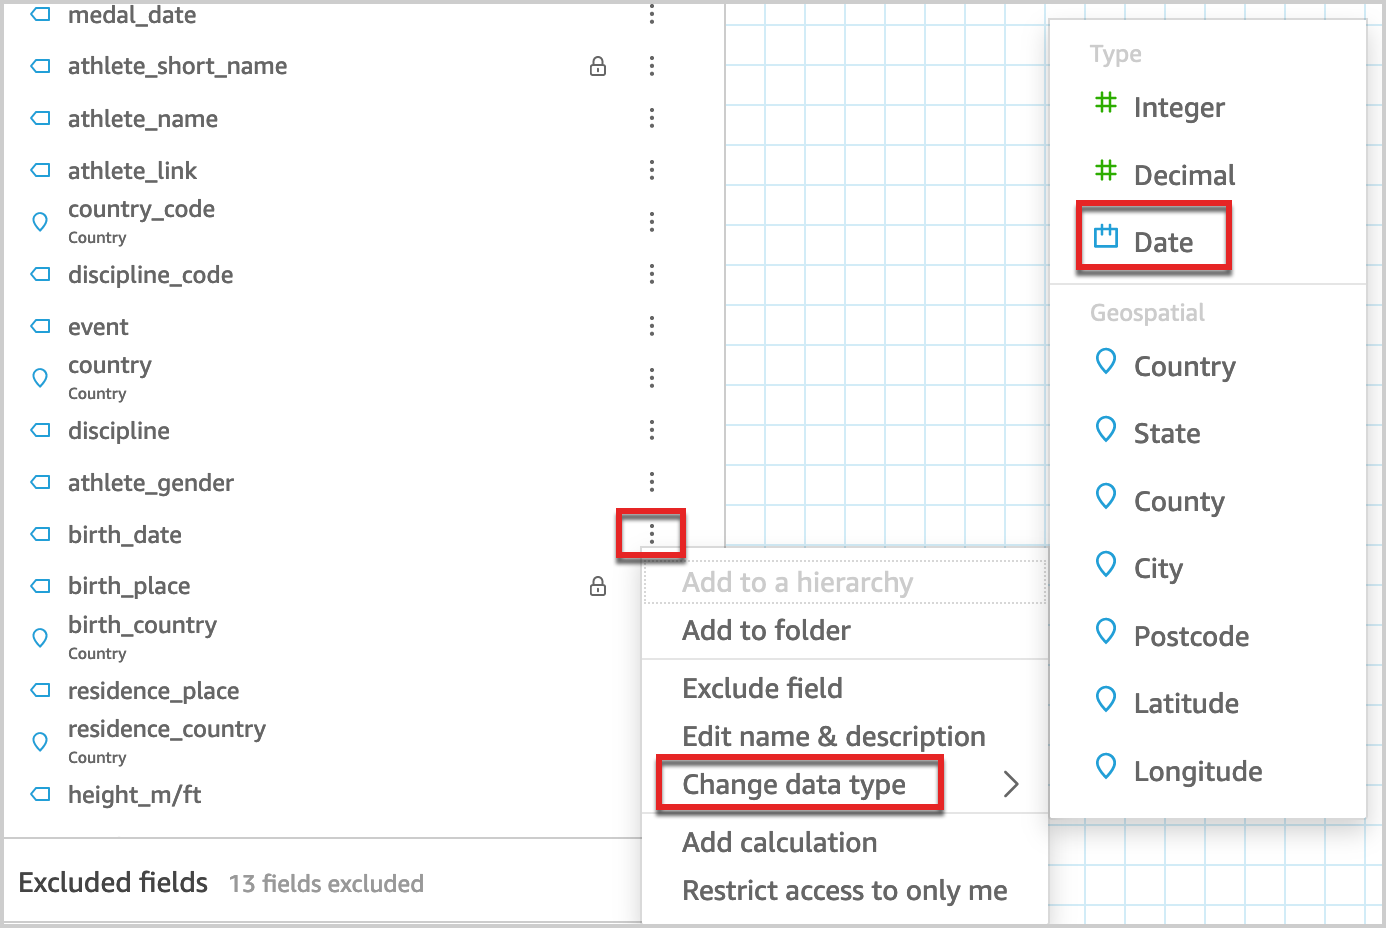
Let’s rename the birth date field from the athlete dataset as Athlete Birth Date. Because we have multiple birth date fields in the topics for coach, athlete, and tech roles, renaming the athletes’ birth date field helps Q easily link to the data field when we ask questions regarding athletes’ birth dates.
On the Fields page, choose the down arrow at far right of the Birth Date field to expand it.
Choose the pencil icon next to the field name.
Rename the field to Athlete Birth Date.
Add synonyms to fields in a topic
Even if you update your field names to be user-friendly and provide a description for them, your readers might still use different names to refer to them. For example, a player name field might be referred to as player, players, or sportsman in your reader’s questions.
To help Q make sense of these terms and map them to the correct fields, you can add one or more synonyms to your fields. Doing this improves Q’s accuracy.
On the Fields page, under Synonyms, choose the pencil icon for Player Name.
Enter player and sportsman as synonyms.
Add synonyms to field values
Like we did for field names, we can add synonyms for category values as well.
Choose the Gender field’s row to expand it.
Choose Configure value synonyms, then choose Add.
Choose the pencil icon next to the F value.
Add the synonym Female.
Repeat these steps to add the synonym Male for M.
Choose Done.
Assign field roles
Every field in your dataset is either a dimension or a measure. Knowing whether a field is a dimension or a measure determines what operations Q can and can’t perform on a field.
For example, setting the field Age as a dimension means that Q doesn’t try to aggregate it as it does measures.
On the Fields page, expand the Age field.
For Role, choose Dimension.
Set field aggregations
Setting field aggregations tells Q which function should or shouldn’t be used when those fields are aggregated across multiple rows. You can set a default aggregation for a field, and specify aggregations that aren’t allowed.
A default aggregation is the aggregation that’s applied when there’s no explicit aggregation function mentioned or identified in a reader’s question. For example, let’s ask Q “Show total number of events.” In this case, Q uses the field Total Events, which has a default aggregation of Sum, to answer the question.
On the Fields page, expand the Total Events field.
For Default aggregation, choose Sum.
For Not allowed aggregation, choose Average.
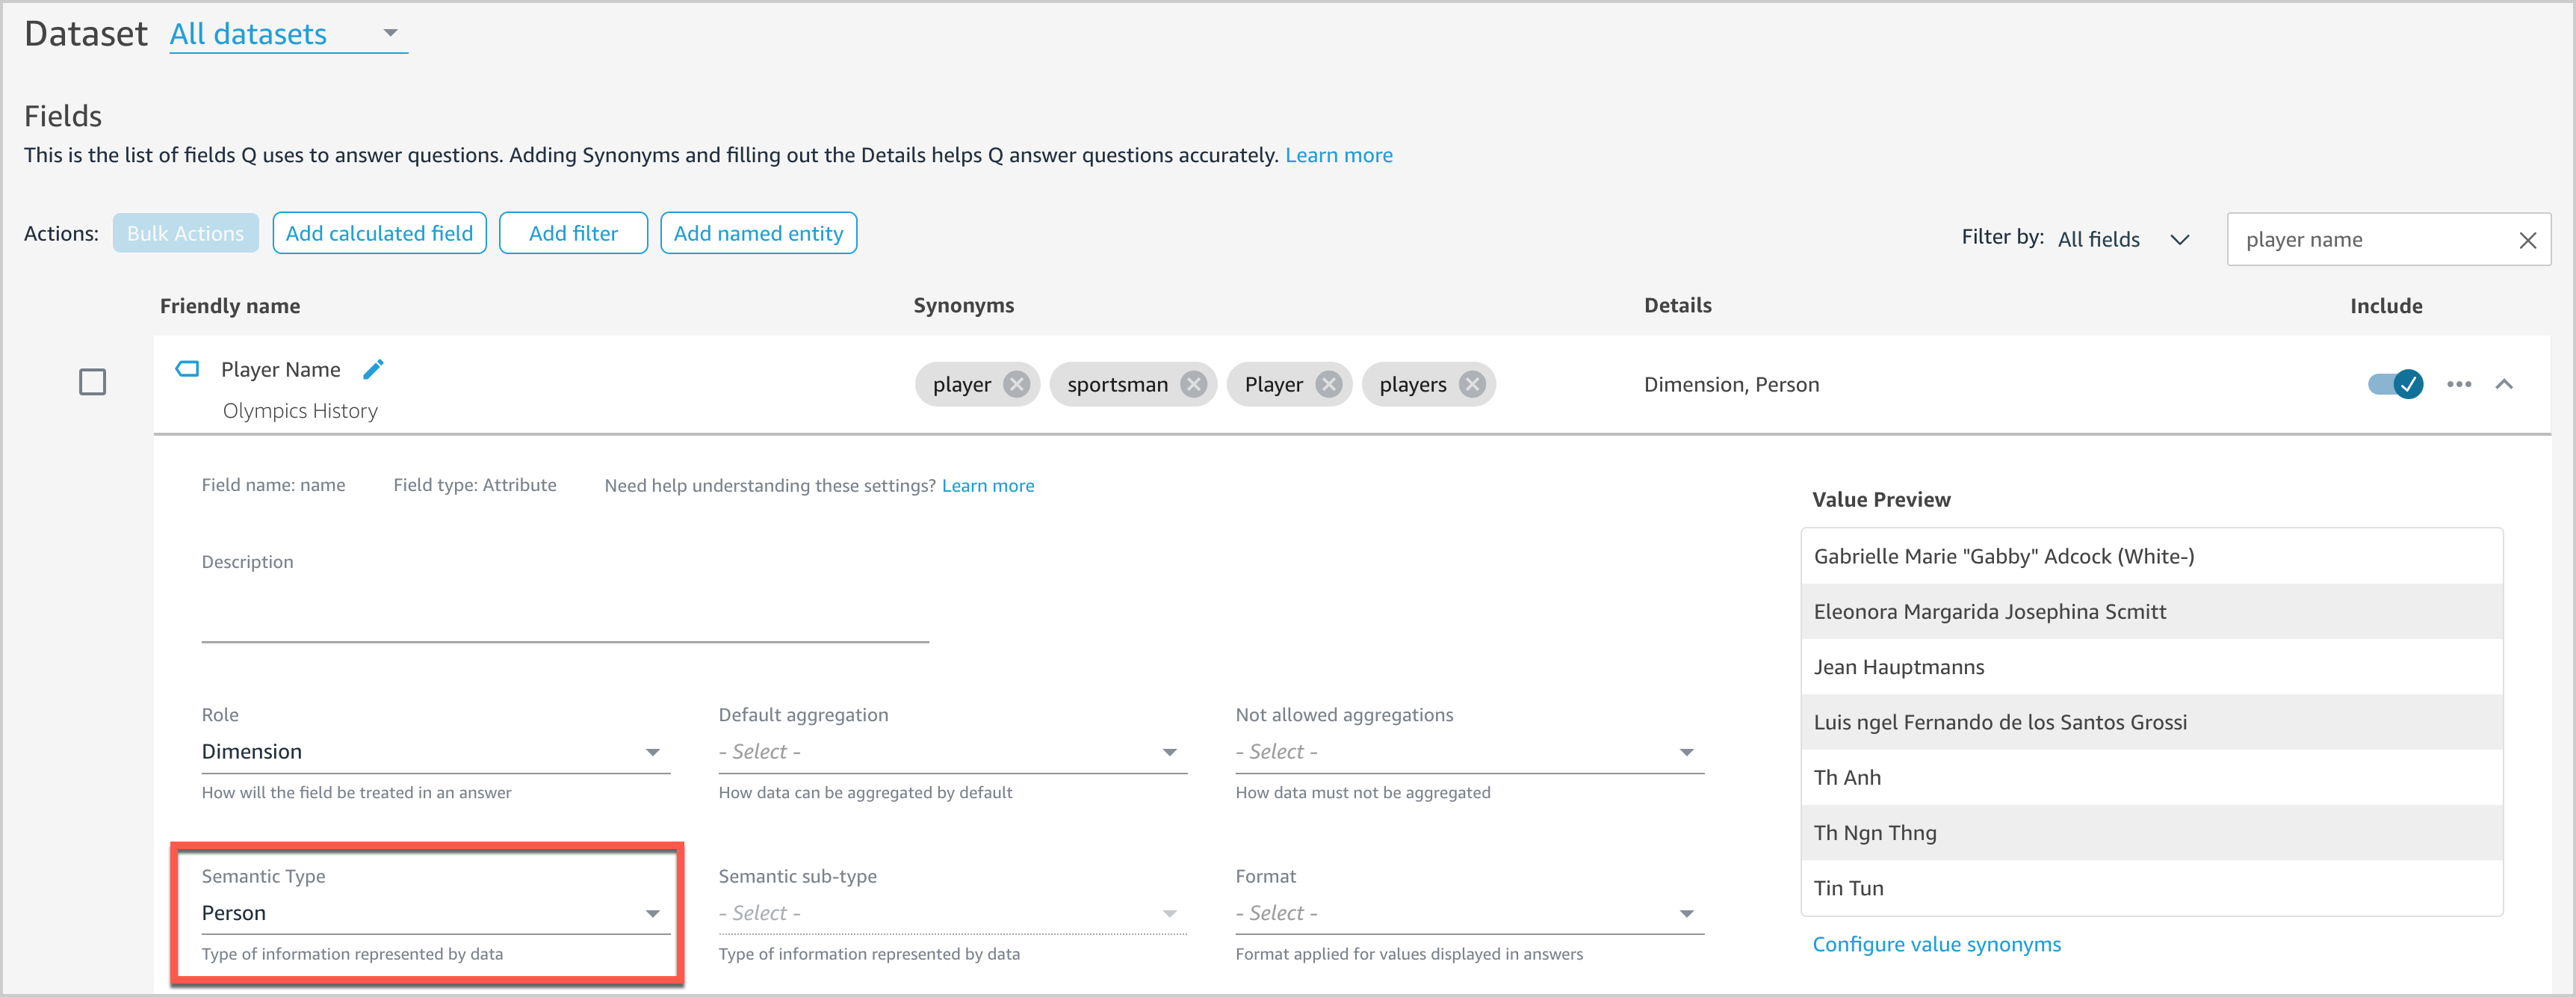
Specify field semantic types
Providing more details on the field context will help Q answer more natural language questions. For example, users might ask “Who won the most medals?” We haven’t set any semantic information for any fields in our dataset yet, so Q doesn’t know what fields to associate with “who.” Let’s see how we can enable Q to tackle this question.
On the Fields page, expand the Player Name field.
For Semantic Type, choose Person.
This enables Q to surface Player Name as an option when answering “who”-based questions.
Exclude unused or unnecessary fields
Fields from all included datasets are displayed by default. However, we have a few fields like Short name of Country, URL Coach Full 2021, and URL Tech Official 2021 that we don’t need in our topic. We can exclude unnecessary fields from the topic to prevent them from showing up in results by choosing the slider next to each field.
Ask questions with Q
After we create and configure our topic, we can now interact with Q by entering questions in the Q search bar.
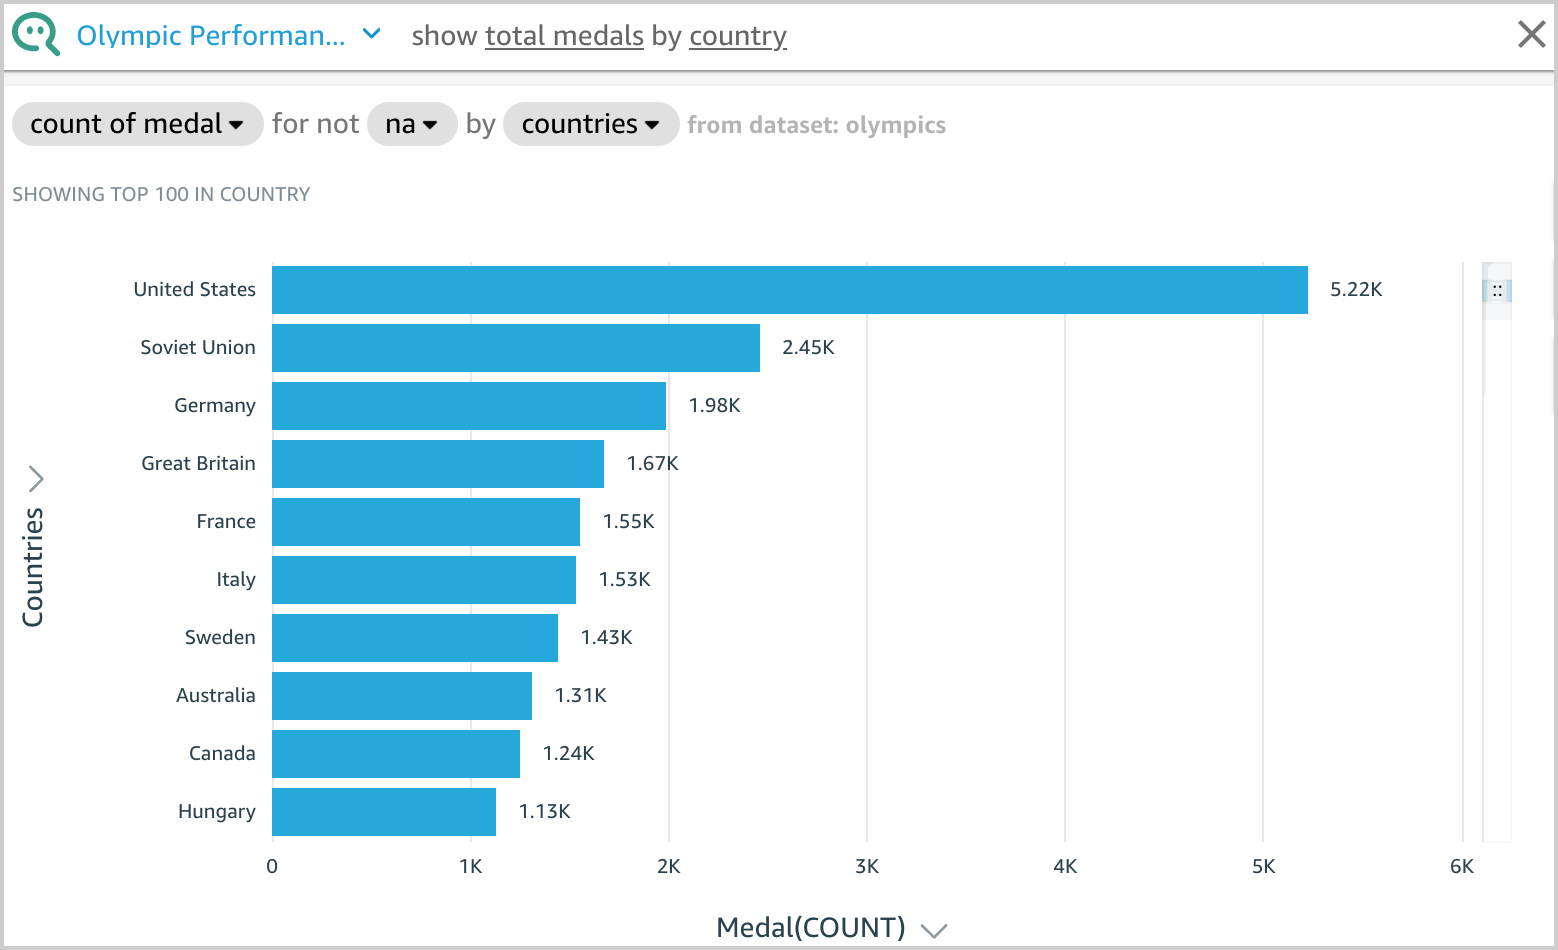
For example, let’s enter show total medals by country. Q presents an answer to your question as a visual.
You can see how Q interpreted your question in the description at the visual’s upper left. Here you can see the fields, aggregations, topic filters, and datasets used to answer the question. The topic filter na is applied on the Medal attribute, which excludes na values from the aggregation. For more information on topic filters, see Adding filters to a topic dataset.
Q displays the results using the visual type best suited to convey the information. However, Q also gives you the flexibility to view results in other visual types by choosing the Visual icon.
Another example, let’s enter who is the oldest player in basketball. Q presents an answer to your question as a visual.
In this post, we showed you how to configure Q using an Olympic games public dataset and so end-users can ask simple questions directly from Q in an interactive manner and receive answers in seconds. If you have any feedback or questions, please leave them in the comments section.
Appendix 1: Types of questions supported by Q
Let’s look at samples of each question type that Q can answer using the topic created earlier in this post.
Try the following questions or your own questions and continue enhancing the topic to improve accuracy of responses.
Question Type
Example
Dimensional Group Bys
show total medals by country
Dimensional Filters (Include)
show total medals for united states
Date Group Bys
show yearly trend of women participants
Multi Metrics
number of women events compared to total events
KPI-Based Period over Periods (PoPs)
how many women participants in 2018 over 2016
Relative Date Filters
show total medals for united states in the last 5 years
Time Range Filters
list of women sports introduced since 2016
Top/Bottom Filter
show me the top 3 player with gold medal
Sort Order
show top 3 countries with maximum medals
Aggregate Metrics Filter
show teams that won more than 50 medals
List Questions
list the women sports by year in which they are introduced
OR filters
Show player who got gold or silver medal
Percent of Total
Percentage of players by country
Where Questions
where are the most number of medals
When Questions
when women volleyball introduced into olympic games
Who Questions
who is the oldest player in basketball
Exclude Questions
show countries with highest medals excluding united states
Appendix 2: Data cleansing
In this section, we provide three options for data cleansing: SQL, DataBrew, and Python.
Option 1: SQL
For our first option, we discuss how to create Athena tables on the downloaded Excel or CSV files and then perform the data cleansing using SQL. This option is suitable for those who use Athena tables as a data source for QuickSight datasets and are comfortable using SQL.
The SQL queries to create Athena tables are available in the GitHub repo. In these queries, we perform data cleansing by renaming, changing the data type of some columns, as well as removing the duplicates of rows. Proper naming conventions and accurate data types help Q efficiently link the questions to the data fields and provide accurate answers.
Use the following sample DDL query to create an Athena table for women_introduction_to_olympics:
CREATE EXTERNAL TABLE women_introduction_to_olympics(
year string,
sport string)
ROW FORMAT DELIMITED
FIELDS TERMINATED BY ','
STORED AS INPUTFORMAT
'org.apache.hadoop.mapred.TextInputFormat'
OUTPUTFORMAT
'org.apache.hadoop.hive.ql.io.HiveIgnoreKeyTextOutputFormat'
LOCATION
's3://<<s3 bucket name>>/womeninolympics/introduction_of_women_olympic_sports'
TBLPROPERTIES (
'has_encrypted_data'='false')
In our data files, there are few columns that are common across more than one dataset that have different column names. For example, gender is available as gender or sex, country is available as country or team or team/noc, and person names have a role prefix in one dataset but not in other datasets. We rename such columns using SQL to maintain consistent column names.
Additionally, we need to change other demographic columns like age, height, and weight to the INT data type, so that they don’t get imported as String.
The following columns from the data files have been transformed using SQL.
Team NOC Age (String) Height (String) Weight (String)
country country_code Age (Integer) Height (Integer) Weight (Integer)
Option 2: DataBrew
In this section, we discuss a data cleansing option using DataBrew. DataBrew is a visual data preparation tool that makes it easy to clean and prepare data with no prior coding knowledge. You can directly load the results into an S3 bucket or load the data by uploading an Excel or CSV file.
For our example, we walk you through the steps to implement data cleansing on the medals_athletes_2021 dataset. You can follow the same process to perform any necessary data cleaning on other datasets as well.
Create a new dataset in DataBrew using medals_athletes.csv and then create a DataBrew project and implement the following recipes to cleanse the data in the medals_athletes_2021 dataset.
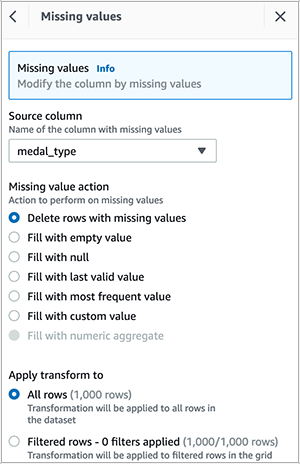
Delete empty rows in the athlete_name column.
Delete empty rows in the medal_type column.
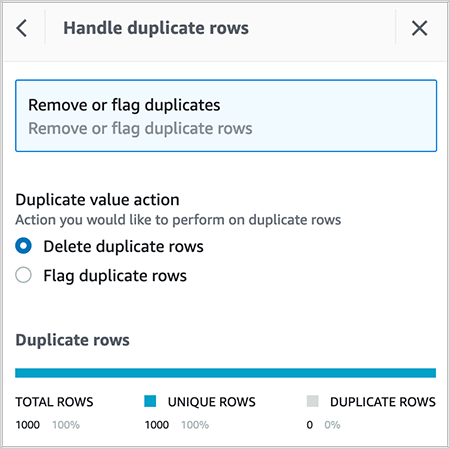
Delete duplicate rows in the dataset.
Rename discipline to Sport.
Delete the column discipline_code.
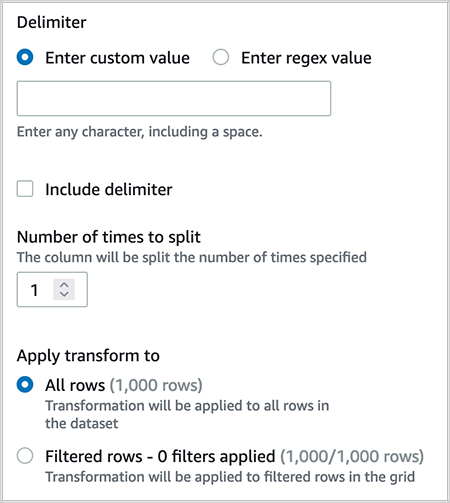
Split the column medal_type on a single delimiter.
Delete the column medal_type_2, which was created as a result of step 6.
Rename medal_type_1 to medal_type.
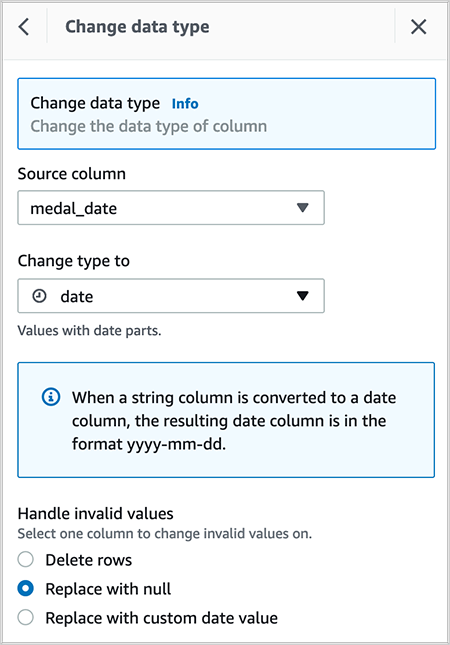
Change the data type of column medal_date from timestamp to date.
After you create the recipe, publish it and create a job to output the results in your desired destination. You can create QuickSight SPICE datasets by importing the cleaned CSV file.
Option 3: Python
In this section, we discuss data cleansing using NumPy and Pandas of Python on the medals_athletes_2021 dataset. You can follow the same process to perform any necessary data cleansing on other datasets as well. The sample Python code is available on GitHub. This option is suitable for someone who is comfortable processing the data using Python.
Delete the column discipline_code:
olympic.drop(columns='discipline_code')
Rename the column discipline to sport:
olympic.rename(columns={'discipline': 'sport'})
You can create QuickSight SPICE datasets by importing the cleansed CSV.
Appendix 3: Data cleansing and modeling in the QuickSight data preparation layer
In this section, we discuss one more method of data cleansing that you can perform from the QuickSight data preparation layer, in addition to the methods discussed previously. Using SQL, DataBrew, or Python have advantages because you can prepare and clean the data outside QuickSight so other AWS services can use the cleansed results. Additionally, you can automate the scripts. However, Q authors have to learn other tools and programming languages to take advantage of these options.
Cleansing data in the QuickSight dataset preparation stage allows non-technical Q authors to build the application end to end in QuickSight with a codeless method.
The QuickSight dataset stores any data preparation done on the data, so that the prepared data can be reused in multiple analyses and topics.
We have provided a few examples for data cleansing in the QuickSight data preparation layer.
Change a field name
Let’s change the name data field from Athletes_full_2021 to athlete_name.
In the data preview pane, choose the edit icon on the field that you want to change.
For Name, enter a new name.
Choose Apply.
Change a field data type
You can change the data type of any field from the data source in the QuickSight data preparation layer using the following procedure.
In the data preview pane, choose the edit icon on the field you want to change (for example, birth_date).
Choose Change data type and choose Date.
This converts the string field to a date field.
Appendix 4: Information about the tables
The following table illustrates the scope of each table in the dataset.
Information on participation of women in Olympic sports
About the authors
Ying Wang is a Manager of Software Development Engineer. She has 12 years experience in data analytics and data science. In her data architect life, she helped customer on enterprise data architecture solutions to scale their data analytics in the cloud. Currently, she helps customer to unlock the power of Data with QuickSight from engineering/product by delivering new features.
Ginni Malik is a Data & ML Engineer with AWS Professional Services. She assists customers by architecting enterprise level data lake solutions to scale their data analytics in the cloud. She is a travel enthusiast and likes to run half-marathons.
Niharika Katnapally is a QuickSight Business Intelligence Engineer with AWS Professional Services. She assists customers by developing QuickSight dashboards to help them gain insights into their data and make data driven business decisions.
Many AWS customers use Amazon Elastic Kubernetes Service (Amazon EKS) in order to take advantage of Kubernetes without the burden of managing the Kubernetes control plane. With Kubernetes, you can centrally manage your workloads and offer administrators a multi-tenant environment where they can create, update, scale, and secure workloads using a single API. Kubernetes also allows you to improve resource utilization, reduce cost, and simplify infrastructure management to support different application deployments. This model is beneficial for those running Apache Spark workloads, for several reasons. For example, it allows you to have multiple Spark environments running concurrently with different configurations and dependencies that are segregated from each other through Kubernetes multi-tenancy features. In addition, the same cluster can be used for various workloads like machine learning (ML), host applications, data streaming and thereby reducing operational overhead of managing multiple clusters.
AWS offers Amazon EMR on EKS, a managed service that enables you to run your Apache Spark workloads on Amazon EKS. This service uses the Amazon EMR runtime for Apache Spark, which increases the performance of your Spark jobs so that they run faster and cost less. When you run Spark jobs on EMR on EKS and not on self-managed Apache Spark on Kubernetes, you can take advantage of automated provisioning, scaling, faster runtimes, and the development and debugging tools that Amazon EMR provides
In this post, we show how to configure and run EMR on EKS in a multi-tenant EKS cluster that can used by your various teams. We tackle multi-tenancy through four topics: network, resource management, cost management, and security.
Concepts
Throughout this post, we use terminology that is either specific to EMR on EKS, Spark, or Kubernetes:
Multi-tenancy – Multi-tenancy in Kubernetes can come in three forms: hard multi-tenancy, soft multi-tenancy and sole multi-tenancy. Hard multi-tenancy means each business unit or group of applications gets a dedicated Kubernetes; there is no sharing of the control plane. This model is out of scope for this post. Soft multi-tenancy is where pods might share the same underlying compute resource (node) and are logically separated using Kubernetes constructs through namespaces, resource quotas, or network policies. A second way to achieve multi-tenancy in Kubernetes is to assign pods to specific nodes that are pre-provisioned and allocated to a specific team. In this case, we talk about sole multi-tenancy. Unless your security posture requires you to use hard or sole multi-tenancy, you would want to consider using soft multi-tenancy for the following reasons:
Soft multi-tenancy avoids underutilization of resources and waste of compute resources.
There is a limited number of managed node groups that can be used by Amazon EKS, so for large deployments, this limit can quickly become a limiting factor.
In sole multi-tenancy there is high chance of ghost nodes with no pods scheduled on them due to misconfiguration as we force pods into dedicated nodes with label, taints and tolerance and anti-affinity rules.
Namespace – Namespaces are core in Kubernetes and a pillar to implement soft multi-tenancy. With namespaces, you can divide the cluster into logical partitions. These partitions are then referenced in quotas, network policies, service accounts, and other constructs that help isolate environments in Kubernetes.
Virtual cluster – An EMR virtual cluster is mapped to a Kubernetes namespace that Amazon EMR is registered with. Amazon EMR uses virtual clusters to run jobs and host endpoints. Multiple virtual clusters can be backed by the same physical cluster. However, each virtual cluster maps to one namespace on an EKS cluster. Virtual clusters don’t create any active resources that contribute to your bill or require lifecycle management outside the service.
Pod template – In EMR on EKS, you can provide a pod template to control pod placement, or define a sidecar container. This pod template can be defined for executor pods and driver pods, and stored in an Amazon Simple Storage Service (Amazon S3) bucket. The S3 locations are then submitted as part of the applicationConfiguration object that is part of configurationOverrides, as defined in the EMR on EKS job submission API.
Security considerations
In this section, we address security from different angles. We first discuss how to protect IAM role that is used for running the job. Then address how to protect secrets use in jobs and finally we discuss how you can protect data while it is processed by Spark.
IAM role protection
A job submitted to EMR on EKS needs an AWS Identity and Access Management (IAM) execution role to interact with AWS resources, for example with Amazon S3 to get data, with Amazon CloudWatch Logs to publish logs, or use an encryption key in AWS Key Management Service (AWS KMS). It’s a best practice in AWS to apply least privilege for IAM roles. In Amazon EKS, this is achieved through IRSA (IAM Role for Service Accounts). This mechanism allows a pod to assume an IAM role at the pod level and not at the node level, while using short-term credentials that are provided through the EKS OIDC.
IRSA creates a trust relationship between the EKS OIDC provider and the IAM role. This method allows only pods with a service account (annotated with an IAM role ARN) to assume a role that has a trust policy with the EKS OIDC provider. However, this isn’t enough, because it would allow any pod with a service account within the EKS cluster that is annotated with a role ARN to assume the execution role. This must be further scoped down using conditions on the role trust policy. This condition allows the assume role to happen only if the calling service account is the one used for running a job associated with the virtual cluster. The following code shows the structure of the condition to add to the trust policy:
The command will the add the service account that will be used by the spark client, Jupyter Enterprise Gateway, Spark kernel, driver or executor. The service accounts name have the following structure emr-containers-sa-*-*-<AWS_ACCOUNT_ID>-<BASE36_ENCODED_ROLE_NAME>.
In addition to the role segregation offered by IRSA, we recommend blocking access to instance metadata because a pod can still inherit the rights of the instance profile assigned to the worker node. For more information about how you can block access to metadata, refer to Restrict access to the instance profile assigned to the worker node.
Secret protection
Sometime a Spark job needs to consume data stored in a database or from APIs. Most of the time, these are protected with a password or access key. The most common way to pass these secrets is through environment variables. However, in a multi-tenant environment, this means any user with access to the Kubernetes API can potentially access the secrets in the environment variables if this access isn’t scoped well to the namespaces the user has access to.
To overcome this challenge, we recommend using a Secrets store like AWS Secrets Manager that can be mounted through the Secret Store CSI Driver. The benefit of using Secrets Manager is the ability to use IRSA and allow only the role assumed by the pod access to the given secret, thereby improving your security posture. You can refer to the best practices guide for sample code showing the use of Secrets Manager with EMR on EKS.
Spark data encryption
When a Spark application is running, the driver and executors produce intermediate data. This data is written to the node local storage. Anyone who is able to exec into the pods would be able to read this data. Spark supports encryption of this data, and it can be enabled by passing --conf spark.io.encryption.enabled=true. Because this configuration adds performance penalty, we recommend enabling data encryption only for workloads that store and access highly sensitive data and in untrusted environments.
Network considerations
In this section we discuss how to manage networking within the cluster as well as outside the cluster. We first address how Spark handle cross executors and driver communication and how to secure it. Then we discuss how to restrict network traffic between pods in the EKS cluster and allow only traffic destined to EMR on EKS. Last, we discuss how to restrict traffic of executors and driver pods to external AWS service traffic using security groups.
Network encryption
The communication between the driver and executor uses RPC protocol and is not encrypted. Starting with Spark 3 in the Kubernetes backed cluster, Spark offers a mechanism to encrypt communication using AES encryption.
The driver generates a key and shares it with executors through the environment variable. Because the key is shared through the environment variable, potentially any user with access to the Kubernetes API (kubectl) can read the key. We recommend securing access so that only authorized users can have access to the EMR virtual cluster. In addition, you should set up Kubernetes role-based access control in such a way that the pod spec in the namespace where the EMR virtual cluster runs is granted to only a few selected service accounts. This method of passing secrets through the environment variable would change in the future with a proposal to use Kubernetes secrets.
To enable encryption, RPC authentication must also be enabled in your Spark configuration. To enable encryption in-transit in Spark, you should use the following parameters in your Spark config:
Note that these are the minimal parameters to set; refer to Encryption from the complete list of parameters.
Additionally, applying encryption in Spark has a negative impact on processing speed. You should only apply it when there is a compliance or regulation need.
Securing Network traffic within the cluster
In Kubernetes, by default pods can communicate over the network across different namespaces in the same cluster. This behavior is not always desirable in a multi-tenant environment. In some instances, for example in regulated industries, to be compliant you want to enforce strict control over the network and send and receive traffic only from the namespace that you’re interacting with. For EMR on EKS, it would be the namespace associated to the EMR virtual cluster. Kubernetes offers constructs that allow you to implement network policies and define fine-grained control over the pod-to-pod communication. These policies are implemented by the CNI plugin; in Amazon EKS, the default plugin would be the VPC CNI. A policy is defined as follows and is applied with kubectl:
In Amazon EKS, when you deploy pods on Amazon Elastic Compute Cloud (Amazon EC2) instances, all the pods use the security group associated with the node. This can be an issue if your pods (executor pods) are accessing a data source (namely a database) that allows traffic based on the source security group. Database servers often restrict network access only from where they are expecting it. In the case of a multi-tenant EKS cluster, this means pods from other teams that shouldn’t have access to the database servers, would be able to send traffic to it.
To overcome this challenge, you can use security groups for pods. This feature allows you to assign a specific security group to your pods, thereby controlling the network traffic to your database server or data source. You can also refer to the best practices guide for a reference implementation.
Cost management and chargeback
In a multi-tenant environment, cost management is a critical subject. You have multiple users from various business units, and you need to be able to precisely chargeback the cost of the compute resource they have used. At the beginning of the post, we introduced three models of multi-tenancy in Amazon EKS: hard multi-tenancy, soft multi-tenancy, and sole multi-tenancy. Hard multi-tenancy is out of scope because the cost tracking is trivial; all the resources are dedicated to the team using the cluster, which is not the case for sole multi-tenancy and soft multi-tenancy. In the next sections, we discuss these two methods to track the cost for each of model.
Soft multi-tenancy
In a soft multi-tenant environment, you can perform chargeback to your data engineering teams based on the resources they consumed and not the nodes allocated. In this method, you use the namespaces associated with the EMR virtual cluster to track how much resources were used for processing jobs. The following diagram illustrates an example.
Diagram -1 Soft multi-tenancy
Tracking resources based on the namespace isn’t an easy task because jobs are transient in nature and fluctuate in their duration. However, there are partner tools available that allow you to keep track of the resources used, such as Kubecost, CloudZero, Vantage, and many others. For instructions on using Kubecost on Amazon EKS, refer to this blog post on cost monitoring for EKS customers.
Sole multi-tenancy
For sole multi-tenancy, the chargeback is done at the instance (node) level. Each member on your team uses a specific set of nodes that are dedicated to it. These nodes aren’t always running, and are spun up using the Kubernetes auto scaling mechanism. The following diagram illustrates an example.
Diagram -2 Sole tenancy
With sole multi-tenancy, you use a cost allocation tag, which is an AWS mechanism that allows you to track how much each resource has consumed. Although the method of sole multi-tenancy isn’t efficient in terms of resource utilization, it provides a simplified strategy for chargebacks. With the cost allocation tag, you can chargeback a team based on all the resources they used, like Amazon S3, Amazon DynamoDB, and other AWS resources. The chargeback mechanism based on the cost allocation tag can be augmented using the recently launched AWS Billing Conductor, which allows you to issue bills internally for your team.
Resource management
In this section, we discuss considerations regarding resource management in multi-tenant clusters. We briefly discuss topics like sharing resources graciously, setting guard rails on resource consumption, techniques for ensuring resources for time sensitive and/or critical jobs, meeting quick resource scaling requirements and finally cost optimization practices with node selectors.
Sharing resources
In a multi-tenant environment, the goal is to share resources like compute and memory for better resource utilization. However, this requires careful capacity management and resource allocation to make sure each tenant gets their fair share. In Kubernetes, resource allocation is controlled and enforced by using ResourceQuota and LimitRange. ResourceQuota limits resources on the namespace level, and LimitRange allows you to make sure that all the containers are submitted with a resource requirement and a limit. In this section, we demonstrate how a data engineer or Kubernetes administrator can set up ResourceQuota as a LimitRange configuration.
The administrator creates one ResourceQuota per namespace that provides constraints for aggregate resource consumption:
For LimitRange, the administrator can review the following sample configuration. We recommend using default and defaultRequest to enforce the limit and request field on containers. Lastly, from a data engineer perspective while submitting the EMR on EKS jobs, you need to make sure the Spark parameters of resource requirements are within the range of the defined LimitRange. For example, in the following configuration, the request for spark.executor.cores=7 will fail because the max limit for CPU is 6 per container:
Diagram – 3 Illustrates an example of resource allocation with priority.
As all the EMR virtual clusters share the same EKS computing platform with limited resources, there will be scenarios in which you need to prioritize jobs in a sensitive timeline. In this case, high-priority jobs can utilize the resources and finish the job, whereas low-priority jobs that are running gets stopped and any new pods must wait in the queue. EMR on EKS can achieve this with the help of pod templates, where you specify a priority class for the given job.
When a pod priority is enabled, the Kubernetes scheduler orders pending pods by their priority and places them in the scheduling queue. As a result, the higher-priority pod may be scheduled sooner than pods with lower priority if its scheduling requirements are met. If this pod can’t be scheduled, the scheduler continues and tries to schedule other lower-priority pods.
The preemptionPolicy field on the PriorityClass defaults to PreemptLowerPriority, and the pods of that PriorityClass can preempt lower-priority pods. If preemptionPolicy is set to Never, pods of that PriorityClass are non-preempting. In other words, they can’t preempt any other pods. When lower-priority pods are preempted, the victim pods get a grace period to finish their work and exit. If the pod doesn’t exit within that grace period, that pod is stopped by the Kubernetes scheduler. Therefore, there is usually a time gap between the point when the scheduler preempts victim pods and the time that a higher-priority pod is scheduled. If you want to minimize this gap, you can set a deletion grace period of lower-priority pods to zero or a small number. You can do this by setting the terminationGracePeriodSeconds option in the victim Pod YAML.
See the following code samples for priority class:
One of the key considerations while templatizing the driver pods, especially for low-priority jobs, is to avoid the same low-priority class for both driver and executor. This will save the driver pods from getting evicted and lose the progress of all its executors in a resource congestion scenario. In this low-priority job example, we have used a high-priority class for driver pod templates and low-priority classes only for executor templates. This way, we can ensure the driver pods are safe during the eviction process of low-priority jobs. In this case, only executors will be evicted, and the driver can bring back the evicted executor pods as the resource becomes freed. See the following code:
apiVersion: v1
kind: Pod
spec:
  priorityClassName: "high-priority"
  nodeSelector:
    eks.amazonaws.com/capacityType: ON_DEMAND
  containers:
  - name: spark-kubernetes-driver # This will be interpreted as Spark driver container

apiVersion: v1
kind: Pod
spec:
  priorityClassName: "low-priority"
  nodeSelector:
    eks.amazonaws.com/capacityType: SPOT
  containers:
  - name: spark-kubernetes-executors # This will be interpreted as Spark executor container
Overprovisioning with priority
Diagram – 4 Illustrates an example of overprovisioning with priority.
As pods wait in a pending state due to resource availability, additional capacity can be added to the cluster with Amazon EKS auto scaling. The time it takes to scale the cluster by adding new nodes for deployment has to be considered for time-sensitive jobs. Overprovisioning is an option to mitigate the auto scaling delay using temporary pods with negative priority. These pods occupy space in the cluster. When pods with high priority are unschedulable, the temporary pods are preempted to make the room. This causes the auto scaler to scale out new nodes due to overprovisioning. Be aware that this is a trade-off because it adds higher cost while minimizing scheduling latency. For more information about overprovisioning best practices, refer to Overprovisioning.
Node selectors
EKS clusters can span multiple Availability Zones in a VPC. A Spark application whose driver and executor pods are distributed across multiple Availability Zones can incur inter- Availability Zone data transfer costs. To minimize or eliminate the data transfer cost, you should configure the job to run on a specific Availability Zone or even specific node type with the help of node labels. Amazon EKS places a set of default labels to identify capacity type (On-Demand or Spot Instance), Availability Zone, instance type, and more. In addition, we can use custom labels to meet workload-specific node affinity.
EMR on EKS allows you to choose specific nodes in two ways:
In the driver and executor level using pod templates.
When using pod templates, we recommend using on demand instances for driver pods. You can also consider including spot instances for executor pods for workloads that are tolerant of occasional periods when the target capacity is not completely available. Leveraging spot instances allow you to save cost for jobs that are not critical and can be terminated. Please refer Define a NodeSelector in PodTemplates.
Conclusion
In this post, we provided guidance on how to design and deploy EMR on EKS in a multi-tenant EKS environment through different lenses: network, security, cost management, and resource management. For any deployment, we recommend the following:
Use IRSA with a condition scoped on the EMR on EKS service account
Use a secret manager to store credentials and the Secret Store CSI Driver to access them in your Spark application
Use ResourceQuota and LimitRange to specify the resources that each of your data engineering teams can use and avoid compute resource abuse and starvation
Implement a network policy to segregate network traffic between pods
Lastly, if you are considering migrating your spark workload to EMR on EKS you can further learn about design patterns to manage Apache Spark workload in EMR on EKS in this blog and about migrating your EMR transient cluster to EMR on EKS in this blog.
About the Authors
Lotfi Mouhib is a Senior Solutions Architect working for the Public Sector team with Amazon Web Services. He helps public sector customers across EMEA realize their ideas, build new services, and innovate for citizens. In his spare time, Lotfi enjoys cycling and running.
Ajeeb Peter is a Senior Solutions Architect with Amazon Web Services based in Charlotte, North Carolina, where he guides global financial services customers to build highly secure, scalable, reliable, and cost-efficient applications on the cloud. He brings over 20 years of technology experience on Software Development, Architecture and Analytics from industries like finance and telecom.
Every new technology comes with a learning curve specific to your organization. First you learn the basics, then you accelerate. Rapid7’s offerings are no different.
As a Senior Information Security Engineer at Brooks, I have firsthand experience with this process. I oversaw the implementation of Rapid7’s security orchestration, automation, and response (SOAR) product, InsightConnect, within my organization. We went from zero to 20+ workflows in just one year. Here are some reflections and advice about setting up a SOAR program, through the lens of my story about that successful and innovative year.
Workflow 1: Let Rapid7 hold your hand
In a previous blog regarding our initial deployment of InsightConnect, I shared key advice about how to set up a SOAR tool and get the program started. Looking back on that successful process, I believe that you should start with a goal that’s manageable – and delivers immediate value to help prove and cement the value of the initiative. For example, a phishing-related workflow is a great place to start. But there are other options as well, depending on your organization’s needs. Consider the following questions:
What pain point within your organization presents an immediate need?
What processes do you already want or need to try to automate?
Consider your team’s key technologies as well, but as you think through these questions, approach the solution in a technology-agnostic way. Instead, focus on the process, which can usually be applied to multiple technologies, and the corresponding desired outcome.
After that, you’ll want to work with your security analysts (assuming you’re not the security analyst!) to determine their pain points as well. What are the most common alerts they get? Where do they spend the most time? Or my favorite question to ask, “What requires the most browser tabs?” Your immediate focus should be how to make their job easier and more efficient.
From there, lean heavily on Rapid7’s product resources and services, and especially existing workflows that you can find in the Rapid7 Extensions Library – this will cut your work in half.
Workflows 2 to 5: Integrate with Slack and Teams
Once you’ve gone live with your first workflow, continue to look to the Rapid7 Extensions Library for workflows you can download and adapt to your needs. Some of the best examples of that use Slack or Microsoft Teams as the primary interface – you can find them easily by searching for workflows by category. And when you find an appropriate workflow, don’t get caught up on the specific technologies in the workflow. Again, focus on the process that you’re automating – after all, blocking an IP on one firewall is essentially the same as blocking an IP on another firewall, as it’s just a matter of swapping the integration plugin.
A major reason I advise starting with Slack and Teams-related workflows is that they’re the most numerous in the library and are valuable to most organizations. But this is the point where buy-in from key stakeholders across your organization becomes essential. Work with whoever runs your Teams or enterprise Slack account to input the appropriate API keys – they’re an extended part of your security automation team.
From there, look into workflows for incident response and enrichment – again, in the extensions library. Searching Virustotal or forcing a password reset or revoking Office 365 access can be very useful areas of automation, since you likely conduct those processes a lot. They can take a lot of time because they often rely on other teams when integration and automations aren’t already in place. Since time is of the essence in a phishing-related compromise, they’re super impactful.
One reason response and enrichment workflows are so useful for Workflows 2 to 5 is that it helps you understand that SOAR is not just about full automation. In fact, it’s about supporting human decision-making. So many security decisions require human insight and experience to make the right decision. What SOAR can do is to automatically collect the necessary context, tee up the decision to the security analyst, and then broadly automate the execution of those decisions.
Workflows 6 to 10: Hone in on your analysts’ pain points
At this point, it’s going to become easier for you and your team to build and implement your own, more heavily customized workflows. You’ll understand things like decisions trees, loops, and markdown cards – essential tools to take your security automation workflows to the next level. You’ll then be prepared to start customizing more workflows specifically catered to the needs of your organization and your analysts. Start here:
Find out what your analysts’ top 5 alerts are. They’ll likely be something along the lines of DNS, EDR, Firewalls, or email-related alerts.
Return to the Rapid7 workflow library to find existing workflows you can adopt and customize to address those alert categories.
Expect to commit a couple of hours here and there over a couple of weeks to perfect each workflow to fit your organization. This may sound like a lot, but I promise – the lift isn’t too hard. The Rapid7 extensions library and tool does alot of lifting for you!
Workflows 10 to 20: Take your workflows to the next level
Once you’ve implemented roughly 10 workflows, you’re ready to start honing in on specific pain points that likely require a bit more and customization – for example, ad-hoc actions for investigations like revoking active Office 365 sessions, searching for and deleting specific emails, or automatically blocking likely malicious URLs based on threat intelligence feeds you’re subscribed to.
The more you create, the more comfortable you’ll be creating workflows from scratch. In my experience, by the time you get to 20 workflows, you should expect that you or a team member could get a typical workflow designed and shipped in 1 to 2 weeks, assuming they spend 4 to 8 hours a week on it. Check out two of my team’s prized custom workflows:
However, that’s not to say that you can’t still make existing workflows your own. It’s to your benefit to keep up with the latest developments in Rapid7’s marketplace. I check the marketplace every few weeks and subscribe to the newsletter for new workflows or plugins. I’ve also learned to use the plugin API to make custom API calls for plugins Rapid7 doesn’t yet have!
In my next blog, I’ll take a deeper dive into the why and how of high-value security automation workflows. I’ll also give you some insights into the benefits we’ve seen at Brooks thanks to our SOAR program.
Konstantin Ryabitsev has announced
the availability of rendered
documentation from linux-next on kernel.org. This will be useful for
anybody wanting to see what the documentation for the next kernel release
will look like.
Following today’s announcement of General Availability of Cloudflare R2 object storage, we’re excited to announce that customers can also store and retrieve their logs on R2.
Cloudflare’s Logging and Analytics products provide vital insights into customers’ applications. Though we have a breadth of capabilities, logs in particular play a pivotal role in understanding what occurs at a granular level; we produce detailed logs containing metadata generated by Cloudflare products via events flowing through our network, and they are depended upon to illustrate or investigate anything (and everything) from the general performance or health of applications to closely examining security incidents.
Until today, we have only provided customers with the ability to export logs to 3rd-party destinations – to both store and perform analysis. However, with Log Storage on R2 we are able to offer customers a cost-effective solution to store event logs for any of our products.
The cost conundrum
We’ve unpacked the commercial impact in a previous blog post, but to recap, the cost of storage can vary broadly depending on the volume of requests Internet properties receive. On top of that – and specifically pertaining to logs – there’s usually more expensive fees to access that data whenever the need arises. This can be incredibly problematic, especially when customers are having to balance their budget with the need to access their logs – whether it’s to mitigate a potential catastrophe or just out of curiosity.
With R2, not only do we not charge customers egress costs, but we also provide the opportunity to make further operational savings by centralizing storage and retrieval. Though, most of all, we just want to make it easy and convenient for customers to access their logs via our Retrieval API – all you need to do is provide a time range!
Logs on R2: get started!
Why would you want to store your logs on Cloudflare R2? First, R2 is S3 API compatible, so your existing tooling will continue to work as is. Second, not only is R2 cost-effective for storage, we also do not charge any egress fees if you want to get your logs out of Cloudflare to be ingested into your own systems. You can store logs for any Cloudflare product, and you can also store what you need for as long as you need; retention is completely within your control.
Storing Logs on R2
To create Logpush jobs pushing to R2, you can use either the dashboard or Cloudflare API. Using the dashboard, you can create a job and select R2 as the destination during configuration:
To use the Cloudflare API to create the job, do something like:
Now that you have critical logging infrastructure on Cloudflare, you probably want to be able to monitor the health of these Logpush jobs as well as get relevant alerts when something needs your attention.
Looking forward
While we have a vision to build out log analysis and forensics capabilities on top of R2 – and a roadmap to get us there – we’d still love to hear your thoughts on any improvements we can make, particularly to our retrieval options.
Get setup on R2 to start pushing logs today! If your current plan doesn’t include Logpush, storing logs on R2 is another great reason to upgrade!
To provide the best experiences, we use technologies like cookies to store and/or access device information. Consenting to these technologies will allow us to process data such as browsing behavior or unique IDs on this site. Not consenting or withdrawing consent, may adversely affect certain features and functions.
Functional
Always active
The technical storage or access is strictly necessary for the legitimate purpose of enabling the use of a specific service explicitly requested by the subscriber or user, or for the sole purpose of carrying out the transmission of a communication over an electronic communications network.
Preferences
The technical storage or access is necessary for the legitimate purpose of storing preferences that are not requested by the subscriber or user.
Statistics
The technical storage or access that is used exclusively for statistical purposes.The technical storage or access that is used exclusively for anonymous statistical purposes. Without a subpoena, voluntary compliance on the part of your Internet Service Provider, or additional records from a third party, information stored or retrieved for this purpose alone cannot usually be used to identify you.
Marketing
The technical storage or access is required to create user profiles to send advertising, or to track the user on a website or across several websites for similar marketing purposes.