Amazon Kinesis Data Streams On-Demand – Stream Data at Scale Without Managing Capacity

Post Syndicated from Marcia Villalba original https://aws.amazon.com/blogs/aws/amazon-kinesis-data-streams-on-demand-stream-data-at-scale-without-managing-capacity/

Today we are launching Amazon Kinesis Data Streams On-demand, a new capacity mode. This capacity mode eliminates capacity provisioning and management for streaming workloads.

Kinesis Data Streams is a fully-managed, serverless service for real-time processing of streamed data at a massive scale. Kinesis Data Streams can take any amount of data, from any number of sources, and scale up and down as needed. Creating a new data stream is easy, since we announced Kinesis Data Streams in November 2013. To get started, you only need to specify the number of shards with which you must provision your stream.

Shards are the way to define capacity in Kinesis Data Streams. Each shard can ingest 1 MB/s and 1,000 records/second and egress up to 2 MB/s. You can add or remove shards of the stream using Kinesis Data Streams APIs to adjust the stream capacity according to the throughout needs of their workloads. This lets you make sure that producer and consumer applications don’t experience any throttling.

As customers adopt data streaming broadly, workloads with data traffic that can increase by millions of events in a few minutes are becoming more common. For these volatile traffic patterns, customers carefully plan capacity, monitor throughput, and in some cases develop processes that automatically change the Kinesis Data Streams stream capacity.

Kinesis Data Streams On-Demand Mode
That is why today we are announcing Kinesis Data Streams On-demand. This new capacity mode eliminates the need for provisioning and managing the capacity for streaming data. Using Kinesis Data Streams On-demand automatically scales the capacity in response to varying data traffic. Customers are charged per gigabyte of data written, read, and stored in the stream, in a pay-per-throughput fashion.

Data streams in the on-demand mode have the same high durability, high availability, low latency, security, and deep AWS integrations that Kinesis Data Streams already provides. Moreover, there are no new APIs to write or read data. All existing Kinesis Data Streams integrations work in the on-demand mode.

Kinesis Data Streams uses the partition key to distribute data across shards. That is why when using Kinesis Data Streams On-demand, you still must specify a partition key for each record to write data into a data stream, as you do today in Kinesis Data Streams using the provisioned mode. In Kinesis Data Streams On-demand, the data stream automatically adapts to handle uneven data distribution patterns. But you must be careful that no partition key exceeds a shard’s limits. If this happens, then you will receive write throttles, and then you can retry these requests.

When a new data stream is created using Kinesis Data Streams On-demand, it gets created with the default capacity of 4 MB/s and 4,000 records per second for writes. Kinesis Data Streams On-demand can automatically scale up to 200 MB/s and 200,000 records per second for writes.

Kinesis Data Streams On-demand accommodates up to double its previous peak write throughput observed in the last 30 days. As your data stream’s write throughput hits a new peak, Kinesis Data Streams automatically scales the stream’s capacity.

For example, if your data stream has a write throughput that varies between 10 MB/s and 40 MB/s, Kinesis Data Streams will make sure that you can easily burst to double the peak—80 MB/s. And, if later on that same data stream reaches a new peak of 50 MB/s, then Kinesis Data Streams will make sure that there is enough capacity to ingest 100 MB/s. However, write throttling can occur if your traffic grows more than double the previous peak in less than 15 minutes.

When to Use Kinesis Data Streams On-demand
On-demand mode is great for customers that have an unknown or variable workload, or who simply don’t want to deal with capacity management. On-demand mode works best for workloads that have even partition key distribution. For example, you run a mobile game that has variable traffic through the week or day, as customers play mostly on nights or weekends. Or, you run a streaming platform that hosts live shows, and you see a sudden increase in demand depending on the guests you have.

In addition, you can switch between on-demand and provision mode twice a day. For example, you run an e-commerce site with predictable traffic. But, starting next month, there will be many marketing campaigns launched globally. You don’t know the impact that those will have on the site traffic. Switch your Kinesis Data Streams to on-demand mode, and now you can enjoy the automated capacity planning and management for your data streams.

Get Started with Kinesis Data Streams On-demand
Create a new data stream with Kinesis Data Streams On-demand from the AWS console, AWS SDKs, AWS Command Line Interface (CLI), and AWS CloudFormation.

To create one from the console, visit the Kinesis console and Create data stream. When selecting the capacity mode, select On-demand.

Creating a data stream

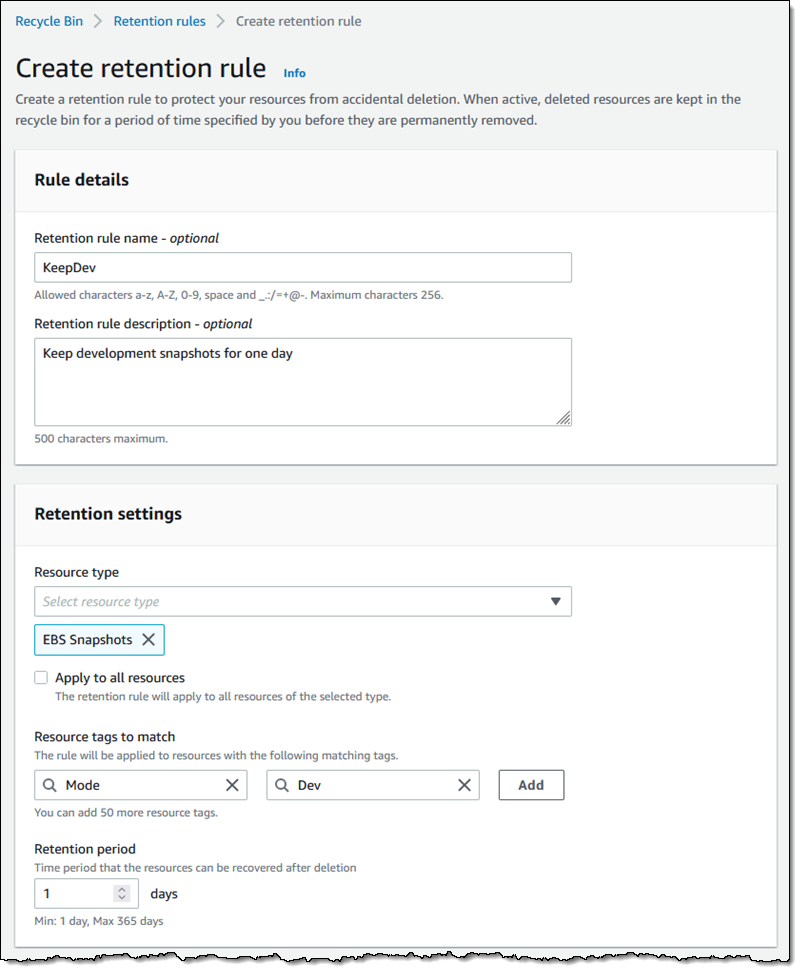
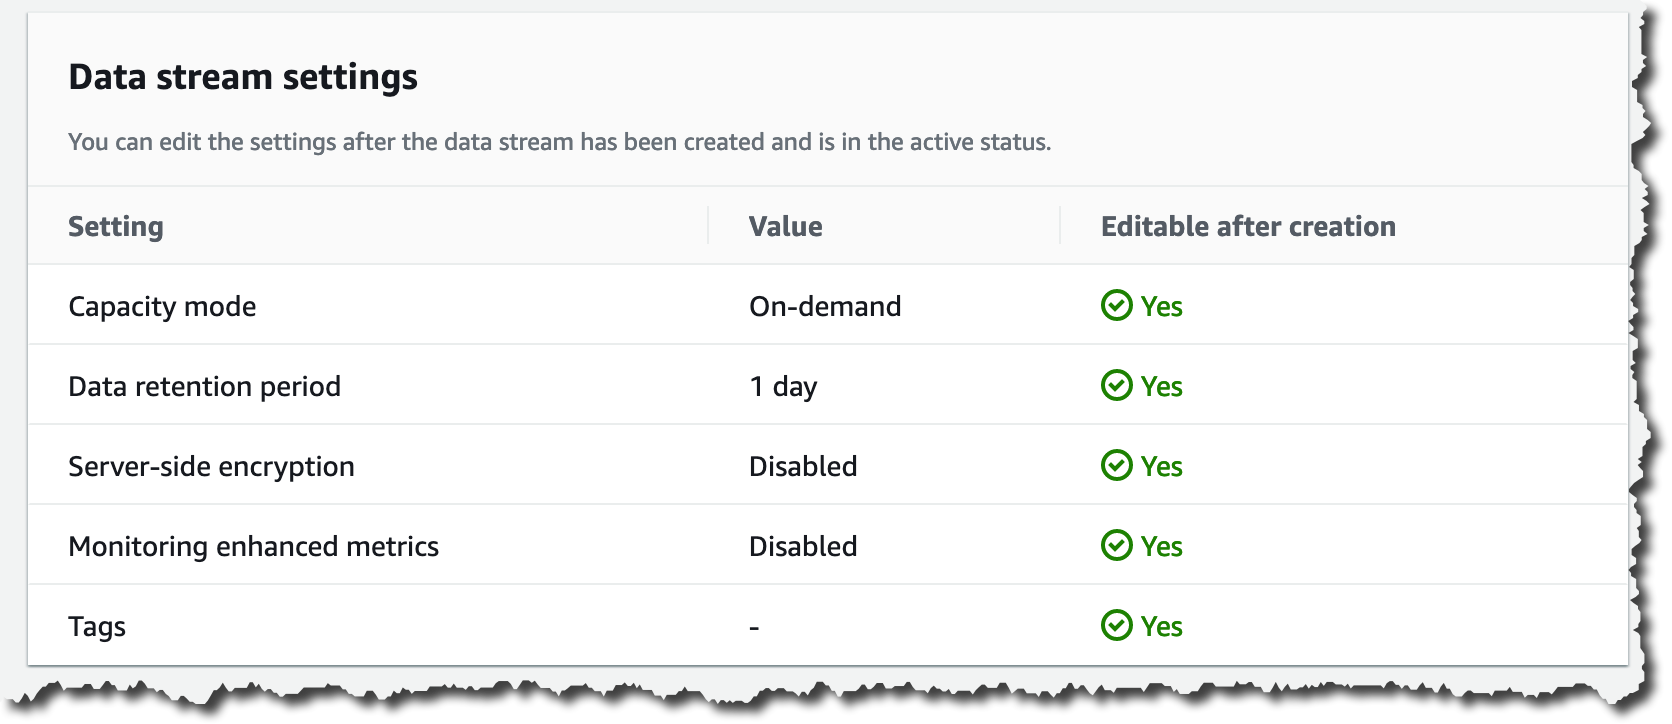
At the end of the page, all of the settings for the new data stream are presented. These settings can be changed after the data stream has been created.

Data stream settings

Let’s See This in Action!
For this demo, I want to show you how the new Kinesis Data Streams capability works. This situation is best described if you at look at the following Amazon CloudWatch graphs. The green line represents the bytes ingested successfully into the stream, and the red line shows the percentage of traffic that is throttled.

First, we will start with a stream provisioned with five shards. For the first three minutes, we are sending a load of 4 MB/s. You can see that the stream can handle the load.

At the time stamp 21:19, we increase the load to 12 MB/s. Now the stream cannot handle the load, and the throttles start (the red line starts climbing up to 60 percent of request being throttled).

Increase the load on a provisioned stream

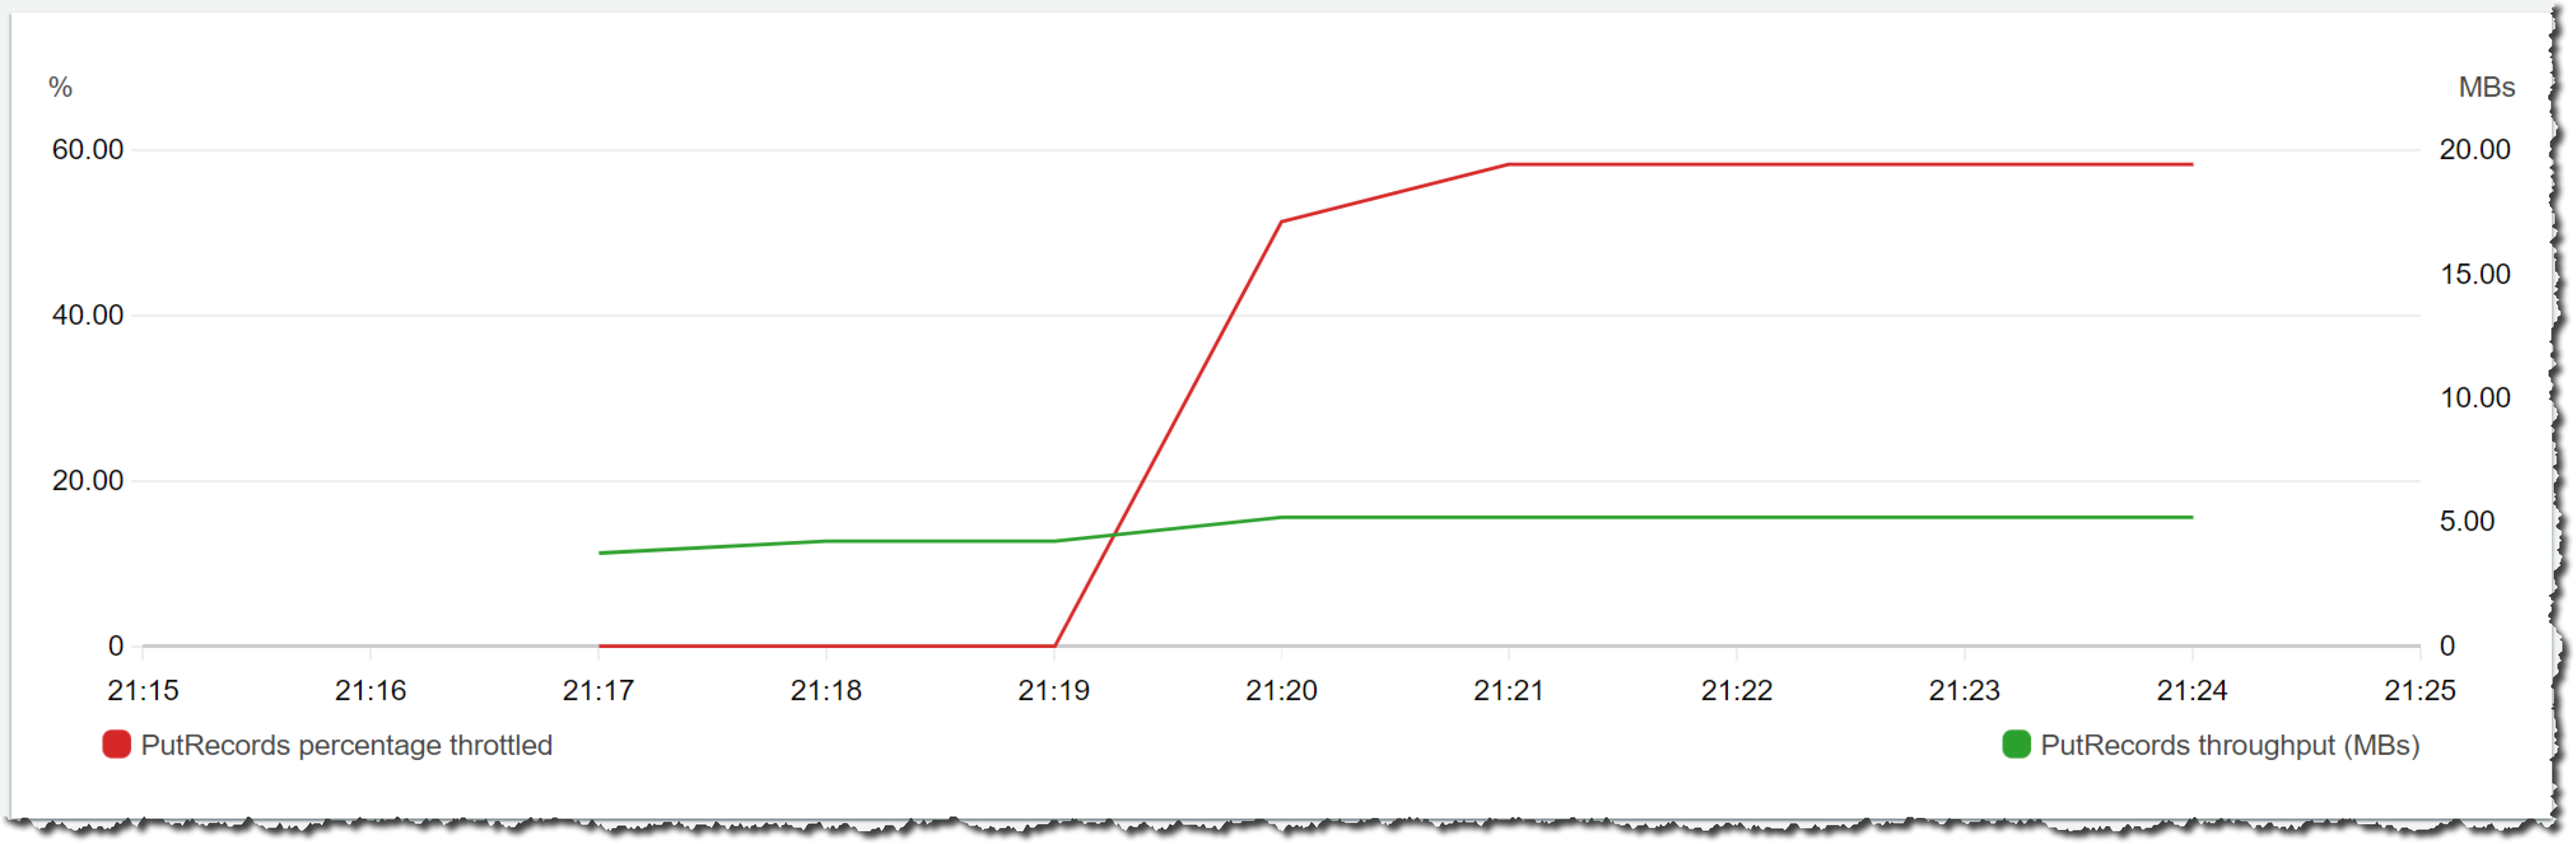
At the time stamp 21:23, we change the stream capacity from provisioned to on-demand. You can do that on-the-fly without affecting the stream. See that it takes a very short time for the stream to handle the load when converting from one capacity mode to the other.

In a few minutes (time stamp 21:24) the throttles start to drop as the stream starts scaling up. The stream capacity doubles to 10 shards first (time stamp 21:26), and the stream keeps scaling up until each shard has a load of less than 0.5 MB/s. In this way, if the stream suddenly receives double the amount of load, then it has the capacity ready to handle it.

Change to on-demand mode

At the time stamp 21:26, the load in the stream is increased to 18 MB/s. You can see the green line climbing to 350,000 records – there are no throttles, and the stream ends this demo with 40 open shards. This means that if suddenly the stream receives a load of 40 MB/s, then it could handle it with no problem.

Increase the load

Available Now!
The Amazon Kinesis Data Streams On-demand is available globally in all commercial Regions.

You can learn more about the capacity modes in the Amazon Kinesis Data Streams Developer Guide.

Marcia

Introducing Amazon Redshift Serverless – Run Analytics At Any Scale Without Having to Manage Data Warehouse Infrastructure

Post Syndicated from Danilo Poccia original https://aws.amazon.com/blogs/aws/introducing-amazon-redshift-serverless-run-analytics-at-any-scale-without-having-to-manage-infrastructure/

We’re seeing the use of data analytics expanding among new audiences within organizations, for example with users like developers and line of business analysts who don’t have the expertise or the time to manage a traditional data warehouse. Also, some customers have variable workloads with unpredictable spikes, and it can be very difficult for them to constantly manage capacity.

With Amazon Redshift, you use SQL to analyze structured and semi-structured data across data warehouses, operational databases, and data lakes. Today, I am happy to introduce the public preview of Amazon Redshift Serverless, a new capability that makes it super easy to run analytics in the cloud with high performance at any scale. Just load your data and start querying. There is no need to set up and manage clusters. You pay for the duration in seconds when your data warehouse is in use, for example, while you are querying or loading data. There is no charge when your data warehouse is idle.

Amazon Redshift Serverless automatically provisions the right compute resources for you to get started. As your demand evolves with more concurrent users and new workloads, your data warehouse scales seamlessly and automatically to adapt to the changes. You can optionally specify the base data warehouse size to have additional control on cost and application-specific SLAs.

With the new serverless option, you can continue to query data in other AWS data stores, such as Amazon Simple Storage Service (Amazon S3) data lakes and Amazon Aurora and Amazon Relational Database Service (RDS) databases.

Amazon Redshift Serverless is ideal when it is difficult to predict compute needs such as variable workloads, periodic workloads with idle time, and steady-state workloads with spikes. This approach is also a good fit for ad-hoc analytics needs that need to get started quickly and for test and development environments.

Let’s see how this works in practice.

Using Amazon Redshift Serverless
I go to the Amazon Redshift console and choose the new serverless option. The first time, I set up the serverless endpoint and configure networking and security.

I confirm the default settings that use all subnets in my default Amazon Virtual Private Cloud (VPC) and its default security group. Data is always encrypted, and I use the default AWS-owned key. Optionally, I can customize all settings. I can associate now or later the AWS Identity and Access Management (IAM) roles to give permissions to access other AWS resources, for example, to be able to load data from an S3 bucket. The configuration of the serverless endpoint will be shared by all my serverless data warehouses in the same AWS account and Region.

Console screenshot.

To query data, I use Amazon Redshift Query Editor V2, a new free web-based tool that we made available a few months back. The query editor provides quick access to a few sample datasets to make it easy to learn Amazon Redshift’s SQL capabilities: TPC-H, TPC-DS, and tickit, a dataset containing information on ticket sales for events.

For a quick test, I use the tickit sample dataset so I don’t need to load any data. I prepare a query to get the list of tickets sold per date, sorted to see the dates with more sales first:

SELECT caldate, sum(qtysold) as sumsold
FROM   tickit.sales, tickit.date
WHERE  sales.dateid = date.dateid 
GROUP BY caldate
ORDER BY sumsold DESC;

By using the web-based query editor, I don’t need to configure a SQL client or set up the network permissions to reach the serverless endpoint. Instead, I just write my SQL query and run it.

Console screenshot.

I am a visual person. I enable the Chart option on the right of the result table and select a bar chart.

Console screenshot.

Satisfied with the clarity of the chart, I export it as an image file. In this way, I can quickly share it or include it in a report.

Bar chart

Amazon Redshift Serverless supports all rich SQL functionality of Amazon Redshift such as semi-structured data support. I can use any JDBC/ODBC-compliant tool or the Amazon Redshift Data API to query my data. To migrate data, I can take a snapshot of an Amazon Redshift provisioned cluster and restore it as serverless. Then, I just need to update my SQL applications to use the new serverless endpoint.

Availability and Pricing
Amazon Redshift Serverless is available in public preview in the following AWS Regions: US East (N. Virginia), US West (N. California, Oregon), Europe (Frankfurt, Ireland), Asia Pacific (Tokyo).

With Amazon Redshift Serverless, you pay separately for the compute and storage you use. Compute capacity is measured in Redshift Processing Units (RPUs), and you pay for the workloads in RPU-hours with per-second billing. For storage, you pay for data stored in Amazon Redshift-managed storage and storage used for snapshots, similar to what you’d pay with a provisioned cluster using RA3 instances.

To control your costs, you can specify usage limits and define actions that Amazon Redshift automatically takes if those limits are reached. You can specify usage limits in RPU-hours and associated with a daily, weekly, or monthly duration. Setting higher usage limits can improve the overall throughput of the system, especially for workloads that need to handle high concurrency while maintaining consistently high performance.

Compute resources automatically shutdown behind the scenes when there is no activity and resume when you are loading data, or there are queries coming in. When accessing your S3 data lake via the new serverless endpoint, you do not pay for Amazon Redshift Spectrum separately. You have a unified serverless experience and pay for data lake queries also in RPU-seconds. For more information, see the Amazon Redshift pricing page.

The serverless end point is configured at the AWS account level. If you have multiple teams or projects and want to manage costs separately, you can use separate AWS accounts. You can share data between your provisioned clusters and serverless endpoint and between serverless endpoints across accounts.

To help you get practice, we provide you upfront with $500 in AWS credits to try the Amazon Redshift Serverless public preview. You get the credits when you first create a database with Amazon Redshift Serverless. These credits are used to cover your costs for compute, storage, and snapshot usage of Amazon Redshift Serverless only.

Start using Amazon Redshift Serverless today to run and scale analytics without having to provision and manage data warehouse clusters.

Danilo

Announcing Amazon EMR Serverless (Preview): Run big data applications without managing servers

Post Syndicated from Damon Cortesi original https://aws.amazon.com/blogs/big-data/announcing-amazon-emr-serverless-preview-run-big-data-applications-without-managing-servers/

Today we’re happy to announce Amazon EMR Serverless, a new option in Amazon EMR that makes it easy and cost-effective for data engineers and analysts to run petabyte-scale data analytics in the cloud. With EMR Serverless, you can run applications built using open-source frameworks such as Apache Spark, Hive, and Presto, without having to configure, manage, optimize, or secure clusters. EMR Serverless automatically provisions and scales the compute and memory resources required by your applications, and you only pay for the resources that your applications use.

In this post, we discuss the benefits of EMR Serverless, walk you through the core concepts of EMR Serverless and how you can use it, and show you a quick demo.

Overview of EMR Serverless

Tens of thousands of customers use Amazon EMR, a managed service for running open-source analytics frameworks such as Apache Spark, Hive, and Presto, for large-scale data analytics applications. With Amazon EMR, you can provision clusters of any size in minutes. Amazon EMR automatically installs and configures the frameworks you choose, and provides a performance-optimized runtime that is compatible with and over twice as fast as standard open-source.

Amazon EMR customers have full control over cluster configuration. The ability to customize clusters allows you to optimize for cost and performance based on workload requirements. For example, you can use Amazon Elastic Compute Cloud (Amazon EC2) memory optimized instances to run SQL workloads with low latency, or use the EC2 Graviton2-based instances to improve performance. You can also use EC2 Spot Instances, which are integrated in Amazon EMR so that you can take advantage of unused EC2 capacity in the AWS Cloud to obtain instances at up to a 90% discount compared to On-Demand prices. If you run your applications on Kubernetes, you can use Amazon EMR on Amazon EKS to run your Amazon EMR analytics applications on Amazon Elastic Kubernetes Service (Amazon EKS) clusters.

However, tuning clusters for optimal cost and performance requires engineers to have deep knowledge of the underlying analytics frameworks. Furthermore, the specific compute and memory resources needed to optimally run applications depend on various factors, such as the schedule and complexity of data processing jobs and the volume of data being processed. When these characteristics change over time, you need to reevaluate and reconfigure clusters. In addition, administrators have to secure and monitor the clusters to ensure that they’re compliant with corporate security policies, and adjust security settings each time the cluster is reconfigured. Many customers don’t need this level of customization and control, and want a simpler way to process data using open-source frameworks on the Amazon EMR performance-optimized runtime.

With this in mind, we built EMR Serverless. With EMR Serverless, you can get all the benefits of running Amazon EMR, but with a serverless environment. We had the following goals in mind when we built EMR Serverless:

  • Provide a simpler experience – EMR Serverless is simple to use because you don’t have to configure, optimize, operate, or secure clusters. You don’t have to worry about instance types or cluster sizes, or about applying OS patches. You simply specify the framework and version that you want to use for your application, and submit your data processing jobs. You still get all the benefits that you expect out of Amazon EMR—open-source compatibility, open-source version currency, and performance-optimized runtime—but without the need to manage clusters.
  • No need to guess cluster sizes – EMR Serverless eliminates the need to right-size clusters for varying jobs and data sizes. With EMR Serverless, you create an application using an open-source framework version, and submit jobs to the application. EMR Serverless automatically adds and removes workers at different stages of processing your job. As a result, you don’t have to reconfigure when data volumes change, and you only pay for what your jobs require. You can control costs by specifying the minimum and maximum number of concurrent workers, and the VCPU and memory per worker.
  • Retain Amazon EMR’s performance-optimized runtime and open-source currency – EMR Serverless includes the Amazon EMR performance-optimized runtime for Apache Spark, Hive, and Presto. The Amazon EMR runtime is API-compatible and over twice as fast as standard open-source, so your jobs run faster and incur less compute costs.
  • Seamless integration with EMR Studio – EMR Serverless includes EMR Studio, which provides fully managed serverless Jupyter Notebooks and familiar open-source tools such as Spark UI and Tez UI to help you develop, visualize, and debug your applications.
  • Automatic and fine-grained scaling – EMR Serverless automatically scales up workers at each stage of processing your job and scales them down when they’re not required. You’re charged for aggregate vCPU, memory, and storage resources used from the time a worker starts running until it stops, rounded up to the nearest second with a 1-minute minimum. For example, your job may require 10 workers for the first 10 minutes of processing the job, and 50 workers for the next 5 minutes. With fine-grained automatic scaling, you only incur cost for 10 workers for 10 minutes and 50 workers for 5 minutes. As a result, you don’t have to pay for underutilized resources.
  • Resilience to Availability Zone failures – EMR Serverless is a Regional service. When you submit jobs to an EMR Serverless application, it can run in any Availability Zone in the Region. A job is run in a single Availability Zone to avoid performance implications of network traffic across Availability Zones. In case an Availability Zone is impaired, a job submitted to your EMR Serverless application is automatically run in a different (healthy) Availability Zone. When using resources in a private VPC, EMR Serverless recommends you specify the private VPC configuration for multiple Availability Zones so that EMR Serverless can automatically select a healthy Availability Zone.
  • Enable shared applications – When you submit jobs to an EMR Serverless application, you can specify the AWS Identity and Access Management (IAM) role that must be used by the job to access AWS resources such as Amazon Simple Storage Service (Amazon S3) objects. As a result, different IAM principals can run jobs on a single EMR Serverless application, and each job can only access the AWS resources that the IAM principal is allowed to access. This enables you to set up scenarios where a single application with a pre-initialized pool of workers is made available to multiple tenants wherein each tenant can submit jobs using a different IAM role but use the common pool of pre-initialized workers to immediately process requests.
  • Enable interactive applications – Interactive applications that allow data scientists and analysts to run interactive SQL queries for data exploration require a fast response time to user requests. For such interactive applications, EMR Serverless allows you to pre-initialize a pool of workers. You can start your EMR Serverless application and pre-initialize the pool of workers as soon as a user starts the application, and stop the application to stop workers when no interactive users are active. If processing user requests requires more workers than what have been pre-initialized, EMR Serverless automatically adds more workers up to the maximum concurrent limits that you specify. Therefore, by controlling the number of workers to pre-initialize and the maximum concurrent workers, you can optimize user experience and cost for your interactive applications.
  • Make it easy to switch from one deployment model to another – The same Amazon EMR releases are provided for applications using EMR clusters, Amazon EMR on EKS, and EMR Serverless. When you build an application using an Amazon EMR release (for example a Spark job using Amazon EMR release 6.4), you can choose to run it on an EMR cluster, Amazon EMR on EKS, or EMR Serverless without having to rewrite the application. This allows you to build applications for a given framework version, and retain the flexibility to change the deployment model based on future operational needs.

Core concepts

In this section, we discuss the core concepts in EMR Serverless: applications, jobs, workers, and pre-initialized workers.

Application

With EMR Serverless, you can create one or more applications that use open-source analytics frameworks. To create an application, you specify the open-source framework that you want to use (for example, Apache Spark or Apache Hive), the Amazon EMR release for the open-source framework version (for example, Amazon EMR release 6.4, which corresponds to Apache Spark 3.1.2), and a name for your application. After you create an application, you can submit data processing jobs or interactive requests to your application.

The following are a few examples where you may want to create multiple applications:

  • To use different open-source frameworks (for example, Hive or Spark)
  • To use different versions of open-source frameworks for different use cases (for example, use a newer version of Spark for a new application without having to upgrade older applications)
  • To perform A/B testing when upgrading from one version to another (for example, migrating from Spark 2.4 to Spark 3.1)
  • To maintain separate logical environments for test and production scenarios
  • To provide separate logical environments for different teams with independent cost controls and usage tracking
  • To logically separate different line-of-business applications (for example, finance vs. marketing)

Job

A job is a request submitted to an EMR Serverless application that is asynchronously run and tracked through completion. You can run multiple jobs concurrently in an application.

Workers

An EMR Serverless application internally uses workers to run your jobs. By default, each application uses workers with 4 VCPU, 30 memory, and 20 GB of local storage per worker. You have the ability to customize this configuration.

Pre-initialized workers

EMR Serverless provides an optional feature to pre-initialize workers when your application starts up, so that the workers are ready to process requests immediately when a job is submitted to the application. Pre-initialized workers allow you to maintain a warm pool of workers for the application so that it can provide a sub-second response to start processing requests.

Common usage patterns applied to EMR Serverless

Now let’s examine some common usage scenarios and how EMR Serverless provides you a simple solution.

Pattern #1: Data pipelines

Data pipelines are the backbone of your analytics workloads. A common pattern with data pipelines is to start a cluster, run a job, and stop the cluster when the job is complete. Because data is separated from compute, the inputs and outputs for each job are persisted separately from the cluster (for example, in Amazon S3). These steps are frequently automated using workflow orchestration applications such as Apache Airflow. You can also use AWS services such as AWS Step Functions and AWS Managed Workflows for Apache Airflow (Amazon MWAA) to create such workflows.

Although automating these steps isn’t complex, data engineers have to spend time determining the appropriate EC2 instance and cluster size. They have to determine the Availability Zone where the cluster is run, and handle failover. They have to test their applications when adopting OS updates. When data sizes change over time, they have to resize clusters, or use features like Amazon EMR managed scaling that automatically resize clusters. EMR Serverless provides a simpler solution by eliminating the need for you to handle these scenarios. You simply choose the open-source framework and version for your application, and submit jobs. You don’t have to worry about instance selection, cluster sizes, cluster startup, cluster resize, stopping nodes, Availability Zone failover, or OS updates.

Pattern #2: Shared clusters

Another common pattern is for teams to use a shared long-running cluster to run multiple jobs. In this case, engineers implement queues in Apache YARN for different workloads on a common cluster, and set up rules to automatically scale the cluster up or down based on overall workload. With Amazon EMR on EC2 clusters, you can use Amazon EMR managed scaling, a feature that automatically scales clusters up or down depending on the workload. With EMR Serverless, workers are assigned to each job when required, so your jobs get the resources they need. Moreover, because you only pay for the workers that your jobs require, you don’t incur cost for over-provisioned resources. Finally, because each job can specify the IAM role that should be used to access AWS resources when running the job, you don’t have to set up complex configurations to manage queues and permissions.

Pattern #3: Interactive workloads

A third pattern of use is when teams keep a cluster of instances available to support interactive analysis. In this case, the cluster is set up and initialized with applications that wait for interactive user requests. Applications are pre-initialized so that they can immediately start processing user requests and provide an interactive user experience. EMR Serverless enables this scenario without requiring you to manage clusters. You can specify the number of workers that you want to pre-initialize when you start an EMR Serverless application. Subsequently, when users submit requests, the pre-initialized workers can be used to immediately process user requests. If processing the user requests requires more workers than what you have chosen to pre-initialize, EMR Serverless automatically adds more workers (up to the maximum concurrent limit that you specify). When the requests are processed, EMR Serverless automatically reverts back to maintaining the pre-initialized workers that you specified. You can control when the pre-initialized workers start by controlling when to start and stop your EMR Serverless application. For example, you can start your application when users begin interactive analysis and turn it off when there are no user requests and the application remains idle.

Demo

Conclusion

In this post, we discussed the core concepts and common usage patterns of EMR Serverless, and showed you a quick demo. EMR Serverless is in Preview, in which you can run workloads using Spark 3.1.2 and Hive 2.0 using the API, AWS Command Line Interface (AWS CLI), and SDK. Sign up for now, and for more information, see EMR Serverless documentation.


About the Authors

Damon Cortesi is a Principal Developer Advocate with Amazon Web Services.

Mehul Y. Shah is the GM for Amazon EMR.

Abhishek Sinha is a Principal Product Manager at Amazon Web Services.

Active Exploitation of Apache HTTP Server CVE-2021-40438

Post Syndicated from Caitlin Condon original https://blog.rapid7.com/2021/11/30/active-exploitation-of-apache-http-server-cve-2021-40438/

Active Exploitation of Apache HTTP Server CVE-2021-40438

On September 16, 2021, Apache released version 2.4.49 of HTTP Server, which included a fix for CVE-2021-40438, a critical server-side request forgery (SSRF) vulnerability affecting Apache HTTP Server 2.4.48 and earlier versions. The vulnerability resides in mod_proxy and allows remote, unauthenticated attackers to force vulnerable HTTP servers to forward requests to arbitrary servers — giving them the ability to obtain or tamper with resources that would potentially otherwise be unavailable to them.

Since other vendors bundle HTTP Server in their products, we expect to see a continued trickle of downstream advisories as third-party software producers update their dependencies. Cisco, for example, has more than 20 products they are investigating as potentially affected by CVE-2021-40438, including a number of network infrastructure solutions and security boundary devices. To be exploitable, CVE-2021-40438 requires that mod_proxy be enabled. It carries a CVSSv3 score of 9.0.

Several sources have confirmed that they have seen exploit attempts of CVE-2021-40438 in the wild. As of November 30, 2021, there is no evidence yet of widespread attacks, but given httpd’s prevalence and typical exposure levels (and the fact that it’s commonly bundled across a wide ecosystem of products), it’s likely exploitation will continue — and potentially increase. Rapid7 and the community have analysis of this vulnerability in AttackerKB.

Affected versions

According to Apache’s advisory, all Apache HTTP Server versions up to 2.4.48 are vulnerable if mod_proxy is in use. CVE-2021-40438 is patched in Apache HTTP Server 2.4.49 and later.

Rapid7 Labs has observed over 4 million potentially vulnerable instances of Apache httpd 2.x:

Active Exploitation of Apache HTTP Server CVE-2021-40438

Mitigation guidance

Apache HTTP Server versions 2.4.49 and 2.4.50 included other severe vulnerabilities that are known to be exploited in the wild, so Apache httpd customers should upgrade to the latest version (2.4.51 at time of writing) instead of upgrading incrementally.

We advise paying close attention particularly to firewall or other security boundary product advisories and prioritizing updates for those solutions. NVD’s entry for CVE-2021-40438 includes several downstream vendor advisories.

Rapid7 customers

InsightVM and Nexpose customers can assess their exposure to CVE-2021-40438 with both authenticated and unauthenticated vulnerability checks.

NEVER MISS A BLOG

Get the latest stories, expertise, and news about security today.

AWS Lake Formation – General Availability of Cell-Level Security and Governed Tables with Automatic Compaction

Post Syndicated from Danilo Poccia original https://aws.amazon.com/blogs/aws/aws-lake-formation-general-availability-of-cell-level-security-and-governed-tables-with-automatic-compaction/

A data lake can help you break down data silos and combine different types of analytics into a centralized repository. You can store all of your structured and unstructured data in this repository. However, setting up and managing data lakes involve a lot of manual, complicated, and time-consuming tasks. AWS Lake Formation makes it easy to set up a secure data lake in days instead of weeks or months.

Today, I am excited to share the general availability of some new features that simplify even further loading data, optimizing storage, and managing access to a data lake:

  • Governed Tables – A new type of Amazon Simple Storage Service (Amazon S3) tables that makes it simple and reliable to ingest and manage data at any scale. Governed tables support ACID transactions that let multiple users concurrently and reliably insert and delete data across multiple governed tables. ACID transactions also let you run queries that return consistent and up-to-date data. In case of errors in your extract, transform, and load (ETL) processes, or during an update, changes are not committed and will not be visible.
  • Storage Optimization with Automatic Compaction for governed tables – When this option is enabled, Lake Formation automatically compacts small S3 objects in your governed tables into larger objects to optimize access via analytics engines, such as Amazon Athena and Amazon Redshift Spectrum. By using automatic compaction, you don’t have to implement custom ETL jobs that read, merge, and compress data into new files, and then replace the original files.
  • Granular Access Control with Row and Cell-Level Security – You can control access to specific rows and columns in query results and within AWS Glue ETL jobs based on the identity of who is performing the action. In this way, you don’t have to create (and keep updated) subsets of your data for different roles and legislations. This works for both governed and traditional S3 tables.

Using Governed Tables, ACID Transactions, and Automatic Compaction
In the Lake Formation console, I can enable governed data access and management at table creation. Automatic compaction is enabled by default, and it can be disabled using the AWS Command Line Interface (CLI) or AWS SDKs.

Console screenshot.

Governed tables have a manifest that tracks the S3 objects that are part of the table’s data. I can use the UpdateTableObjects API to keep the manifest updated when adding new objects to the table, and I can call it using the AWS CLI and SDKs. This API is implicitly used by the AWS Glue ETL library.

Moreover, I have access to new Lake Formation APIs to start, commit, or cancel a transaction. I can use these APIs to wrap data loading, data transformation, and output consistent and up-to-date data.

Using Row and Cell-Level Security
There are many use cases where, for a table, you want to restrict access to specific columns, rows, or a combination that depends on the role of the user accessing the data. For example, a company with offices in the US, Germany, and France can create a filter for analysts based in the European Union (EU) to limit access to EU-based customers.

Console screenshot.

The filter can enforce that some columns, such as date of birth (dob) and phone, are not accessible to those analysts. Moreover, access to individual rows can be filtered by using filter expressions. You can configure row filter expressions with a SQL-compatible syntax based on the open-source PartiQL language. In this case, only rows with country equal to Germany or France (country='DE' OR country='FR') are visible.

Console screenshot.

Availability and Pricing
These new features are available today in the following AWS Regions: US East (N. Virginia), US West (Oregon), Europe (Ireland), US East (Ohio), and Asia Pacific (Tokyo).

When querying governed tables, or tables secured with row and cell-level security, you pay by the amount of data scanned (with a 10MB minimum). When using governed tables, transaction metadata is charged by the number of S3 objects tracked, and you pay for the number of transaction requests. Automatic compaction is charged based on the data processed. For more information, see the AWS Lake Formation pricing page.

While implementing these features, we introduced a new Lake Formation Storage API that is integrated with tools such as AWS Glue, Amazon Athena, Amazon Redshift Spectrum, and Amazon QuickSight. You can use this storage API directly in your applications to query tables with a SQL-like syntax (joins are not supported) and get the benefits of governed tables and cell-level security.

See the detailed blog series published during the preview to learn more:

Effective data lakes using AWS Lake Formation

Take advantage of these new features to simplify the creation and management of your data lake.

Danilo

5 DevOps tips to speed up your developer workflow

Post Syndicated from Damian Brady original https://github.blog/2021-11-30-5-devops-tips-to-speed-up-your-developer-workflow/

TL;DR: From learning YAML to scripting with Bash, here are a few simple tips for developers who want to speed up their workflows.

From CI/CD to containerization management and server provisioning, DevOps gets a lot of buzz in tech today. You could even say that it’s a buzz … word.

As a developer, you might be part of a DevOps team, but you’re focused on building great software, not necessarily provisioning servers and managing containers.

Even still, a lot of what developers, DevOps engineers, and IT teams handle in today’s software development life cycle is focused on tools, testing, automations, and server orchestration. And, that’s even more true if you’re a team of one or engaging in a big open source project.

Here are five DevOps tips for any developer looking to work smarter and faster.

Tip #1: A little YAML can make frontend work easier

Initially released in 2001, YAML has become one of the defacto languages for a lot of declarative automation—and it’s commonly used in DevOps and development work for an array of frontend configurations, automations, and more.

YAML, which stands for Yet Another Markup Language, is a superset of JSON and is notable for being a human readable language. That means it focuses less on characters, like brackets, braces, and quotes ({}, [], “).

Here’s why this matters: Learning YAML (or even stepping up your YAML skills) makes it easier to store configurations for your own applications, like your settings in an easy-to-write and easy-to-read language.

For this reason, you’re likely to come across YAML files anywhere from enterprise development workflows to open source projects—and yes, you’ll see plenty of YAML files on GitHub (it powers a product we’re pretty fond of: GitHub Actions, but more on this later).

Whether you can apply YAML directly to your day-to-day dev workflows or leverage different tools that use YAML, there are some pretty big benefits to getting started with this language—or stepping up your YAML skills.

Looking to learn more about YAML? Try the Learn YAML in Y Minutes guide.

Tip #2: A few DevOps tools to keep you moving fast

Let’s clear up one thing first: “DevOps tools” is an umbrella term that covers everything from cloud platforms, server orchestration tools, code management, version control, and dozens of other things.

So when we talk about “DevOps tools,” we’re really talking about technologies that make it easier to write, test, host, and release software, as well as reduce any worries around unexpected failures.

Here are three “DevOps tools” that can speed up your workflows and let you focus on building great software.

Git

You’re on the GitHub Blog, so we’re pretty sure you’re familiar with Git as a version control system and distributed source code management tool. It’s a mainstay of developers and a popular DevOps tool.

Here’s why: Git makes version control easy and gives teams a straightforward way to collaborate, experiment with different branches, and merge new features into the main software branch.

Learn how Git works >

Cloud-hosted integrated development environments (IDE)

I know, I know, saying cloud-hosted integrated development environments, or cloud IDEs, out loud is a bit of a mouthful (thank you, marketing). But these platforms are something you should start exploring immediately, if you haven’t already.

Here’s why: Cloud IDEs are fully hosted developer environments that let you write, run, and debug code—and they make spinning up new, preconfigured environments fast. Do you need proof? We launched our own cloud IDE called Codespaces earlier this year and started using it internally to build GitHub. It used to take us up to 45 minutes to spin up new developer environments—now it takes 10 seconds :mindblown:.

Cloud IDEs give you a super simple way to quickly spin up new, pre-configured development environments (and disposable development environments). Also, since they’re hosted in the cloud, you don’t need to worry about how powerful the computer you’re coding on is (friendly shout out here goes to the intrepid folks who have started coding on tablets).

Picture this: Your laptop fries itself (which has happened to me once or twice). You might have versions of npm, tools for connecting to your cloud provider, and any number of other configurations that you just lost. If you use a cloud IDE, you can spin up an environment in the cloud with all of your configurations, and that’s a magical thing to see.

Learn how cloud IDEs work >

Containers

If you don’t want to use a cloud IDE, dev containers are something you can use locally or in the cloud. Containers have exploded in popularity over the past decade for their utility in microservices architectures, CI/CD, and cloud-native application development, among other things. By nature, containers are lightweight and efficient making it easy to build, test, stage, and deploy software.

Learning the basics of containerization can be really handy—especially when it comes to testing your code in a lightweight environment that imitates your production environment. If you need to upgrade a library or try using an application on the next version of Node, you can do that really easily with containers before you hit production.

This can be especially useful for ”shifting left,” which is an important DevOps strategy. Catching issues or problems before you ever hit production can save a lot of headaches. If you can find those issues while you’re writing the code, that’s even better. Any problems will eventually mean more work, so the earlier you can catch them the better. After all, catching a problem before you get to the compiling stage can save you a headache or two.

Learn how containers work >

Tip #3: Automated testing and continuous integration (CI) to stay one step ahead

In any conversation around DevOps, you’ll probably hear about automated testing and continuous integration (CI). Yet while automated testing is typically part of a good CI development practice, it’s not strictly a requirement (but it should be … or at least part of your continuous delivery phase).

Most teams have some basic unit testing as part of their CI process, but stop short of testing for security vulnerabilities, automated UI testing, integration testing, etc.

Even still, these are two things that can help you step up your workflows by: (A) making sure your code works with the main branch; and (B) catching things like security vulnerabilities and other problems, so you can lessen your DevOps team’s workload.

Here’s how:

Using GitHub Actions to run automated tests

From ordering pizza to triggering an alarm, there’s a lot you can do with GitHub Actions. It all comes down to workflow automations.When it comes to setting up automated tests with GitHub Actions, you can either build your own action or leverage pre-built actions in the GitHub Marketplace.

[Learn how to build your own GitHub Actions workflow automations.]> Pro tip: Using Actions workflows that run on pull requests is a great way to check for security vulnerabilities, problems in your code, or anything else before you merge to the main branch. Doing this means you’re one step ahead and helps keep your main branch clean.

[Want to learn more about GitHub Actions? Check out our guide.]You can also configure your workflows to deploy to ephemeral testing environments. This means you can run your tests and deploy your changes to an environment where you can test your application. You can even configure your workflow to automatically tear these testing environments down after you’re finished.

All this means you’re testing things as much as possible before it’s time to go to production.

Using GitHub Actions to create CI pipelines

CI, or continuous integration, is the process of automatically integrating code from multiple people for a given project. A good CI practice means you can work faster, make sure your code compiles correctly, merge code changes more efficiently, and be sure your code plays nice with everyone else’s work.

The most powerful CI workflows are the ones that test all of the things you care about every single time you push your code to the server.

If you’re working on GitHub, GitHub Actions can do this for you, too. There are plenty of pre-built CI workflows in the GitHub Marketplace (and you can always build your own), but there are a few things to keep in mind when you start incorporating CI into your development flow. These include:

  • Run the necessary tests: Think about what build, integration, and testing automations you ideally need. You’ll want to consider things that may have gone wrong with releases in the past, and see if you can add a test for that in your CI.
  • Balance the time it takes to test your code with how fast you’re pushing new code: Let’s say you have teams pushing new code every five minutes (hypothetically), but the tests you’re running take 10 minutes to execute … that’s not great. It’s always best to balance what you’re checking and when with how long it takes, which might mean trimming your ideal list of tests down to a more realistic number, at least for your CI builds.

Get a tutorial on creating a CI pipeline with GitHub Actions >

Tip #4: Server orchestration tips for flexibility and speed

If you’re building a cloud-native application (or really even just using a few different servers, VMs, containers, or hosting services), you’re probably dealing with a few environments. Being able to make sure your application and infrastructure play well together means you can rely a little less on an operations team trying to get your software to run on existing infrastructure at the last minute.

That’s where server orchestration comes in. Server orchestration—or infrastructure orchestration—is often the job of IT and DevOps teams and includes configuring, managing, provisioning, and coordinating systems, applications, and core infrastructure needed to run software.

Pro tip: There’s a suite of tools that allow you to define and update the infrastructure you need to use.

A big advantage of infrastructure automation is improved scalability—and defined environments means it’s easier to tear down and rebuild an environment when something goes wrong (instead of starting from scratch, but we’ve all been there).

There’s another big advantage: If you want to test something, you don’t have to worry about asking the operations team to go and set up a server for you. You can instead do that as part of a workflow. You don’t have to worry about manually provisioning hardware or system requirements.

How to get started: Don’t try to replace everything in your environment with automated infrastructure automation. Instead, look for a part that might be easy to automate and start there—then the next piece and the next piece after that.

And definitely never start in production. Instead, begin with your testing environment. Once that works, move to your staging environment (and if that works, you can trust it’s good for production).

Tip #5: Repeatable tasks? Try scripting them with Bash or PowerShell

Picture this: You have a bunch of repeatable tasks that you’re executing on a local basis, and you’re spending way too much time working through them every week. There’s a better—and more efficient—way to handle this. How? Scripting with either Bash or PowerShell.

Bash has deep roots in the Unix world, and it’s a mainstay of IT and DevOps teams, and more than a few developers too. PowerShell is comparatively newer. Designed by Microsoft and launched in 2006, PowerShell replaced the command shell and earlier scripting languages for task automation and configuration management in Windows environments.

Today, both Bash and PowerShell are cross-platform (though most people with a Windows background will use PowerShell, and most people familiar with Linux or macOS will use Bash out of habit).

Pro tip: Bash and PowerShell have different ways of working. Where PowerShell works with objects, Bash passes information around as strings. Even still, whatever you choose is largely up to personal preference.

One of the more useful things I’ve done with Bash and PowerShell, for example, is building a script that pulls down the latest version of the code, creates a new branch, switches to that branch, pushes a draft pull request up to GitHub, and then opens VSCode (sub in your editor of choice here) in that branch.

It’s a series of small steps to make your life much easier. It’s something you might do once or twice a week, and if you can script that—it gives you more time to focus on what matters: writing great code.

The bottom line

There’s a big difference between an IT pro, a DevOps engineer, and a developer. But in today’s world of software development, a lot of core DevOps practices are becoming everyone’s job. Plus, any developer that can learn a few DevOps tricks can have an easier time working independently (and more efficiently at that), and continue to focus on what matters most: building great software. That’s something we can all get behind.

Additional resources

Join the Preview – Amazon EC2 C7g Instances Powered by New AWS Graviton3 Processors

Post Syndicated from Jeff Barr original https://aws.amazon.com/blogs/aws/join-the-preview-amazon-ec2-c7g-instances-powered-by-new-aws-graviton3-processors/

We announced the first generation AWS-designed Graviton processor in late 2018, and followed it up with the second generation Graviton2 a year later. Today, AWS customers make use of twelve different Graviton2-powered instances including the new X2gd instances that are designed for memory-intensive workloads. All Graviton processors include dedicated cores & caches for each vCPU, along with additional security features courtesy of AWS Nitro System; the Graviton2 processors add support for always-on memory encryption.

C7g in the Works
I am thrilled to tell you about our upcoming C7g instances. Powered by new Graviton3 processors, these instances are going to be a great match for your compute-intensive workloads: HPC, batch processing, electronic design automation (EDA), media encoding, scientific modeling, ad serving, distributed analytics, and CPU-based machine learning inferencing.

While we are still optimizing these instances, it is clear that the Graviton3 is going to deliver amazing performance. In comparison to the Graviton2, the Graviton3 will deliver up to 25% more compute performance and up to twice as much floating point & cryptographic performance. On the machine learning side, Graviton3 includes support for bfloat16 data and will be able to deliver up to 3x better performance.

Graviton3 processors also include a new pointer authentication feature that is designed to improve security. Before return addresses are pushed on to the stack, they are first signed with a secret key and additional context information, including the current value of the stack pointer. When the signed addresses are popped off the stack, they are validated before being used. An exception is raised if the address is not valid, thereby blocking attacks that work by overwriting the stack contents with the address of harmful code. We are working with operating system and compiler developers to add additional support for this feature, so please get in touch if this is of interest to you.

C7g instances will be available in multiple sizes (including bare metal), and are the first in the cloud industry to be equipped with DDR5 memory. In addition to drawing less power, this memory delivers 50% higher bandwidth than the DDR4 memory used in the current generation of EC2 instances.

On the network side, C7g instances will offer up to 30 Gbps of network bandwidth and Elastic Fabric Adapter (EFA) support.

Join the Preview
We are now running a preview of the C7g instances so that you can be among the first to experience all of this power. Sign up now, take an instance for a spin, and let me know what you think!

Jeff;

How do we develop AI education in schools? A panel discussion

Post Syndicated from Sue Sentance original https://www.raspberrypi.org/blog/ai-education-schools-panel-uk-policy/

AI is a broad and rapidly developing field of technology. Our goal is to make sure all young people have the skills, knowledge, and confidence to use and create AI systems. So what should AI education in schools look like?

To hear a range of insights into this, we organised a panel discussion as part of our seminar series on AI and data science education, which we co-host with The Alan Turing Institute. Here our panel chair Tabitha Goldstaub, Co-founder of CogX and Chair of the UK government’s AI Council, summarises the event. You can also watch the recording below.

As part of the Raspberry Pi Foundation’s monthly AI education seminar series, I was delighted to chair a special panel session to broaden the range of perspectives on the subject. The members of the panel were:

  • Chris Philp, UK Minister for Tech and the Digital Economy
  • Philip Colligan, CEO of the Raspberry Pi Foundation 
  • Danielle Belgrave, Research Scientist, DeepMind
  • Caitlin Glover, A level student, Sandon School, Chelmsford
  • Alice Ashby, student, University of Brighton

The session explored the UK government’s commitment in the recently published UK National AI Strategy stating that “the [UK] government will continue to ensure programmes that engage children with AI concepts are accessible and reach the widest demographic.” We discussed what it will take to make this a reality, and how we will ensure young people have a seat at the table.

Two teenage girls do coding during a computer science lesson.

Why AI education for young people?

It was clear that the Minister felt it is very important for young people to understand AI. He said, “The government takes the view that AI is going to be one of the foundation stones of our future prosperity and our future growth. It’s an enabling technology that’s going to have almost universal applicability across our entire economy, and that is why it’s so important that the United Kingdom leads the world in this area. Young people are the country’s future, so nothing is complete without them being at the heart of it.”

A teacher watches two female learners code in Code Club session in the classroom.

Our panelist Caitlin Glover, an A level student at Sandon School, reiterated this from her perspective as a young person. She told us that her passion for AI started initially because she wanted to help neurodiverse young people like herself. Her idea was to start a company that would build AI-powered products to help neurodiverse students.

What careers will AI education lead to?

A theme of the Foundation’s seminar series so far has been how learning about AI early may impact young people’s career choices. Our panelist Alice Ashby, who studies Computer Science and AI at Brighton University, told us about her own process of deciding on her course of study. She pointed to the fact that terms such as machine learning, natural language processing, self-driving cars, chatbots, and many others are currently all under the umbrella of artificial intelligence, but they’re all very different. Alice thinks it’s hard for young people to know whether it’s the right decision to study something that’s still so ambiguous.

A young person codes at a Raspberry Pi computer.

When I asked Alice what gave her the courage to take a leap of faith with her university course, she said, “I didn’t know it was the right move for me, honestly. I took a gamble, I knew I wanted to be in computer science, but I wanted to spice it up.” The AI ecosystem is very lucky that people like Alice choose to enter the field even without being taught what precisely it comprises.

We also heard from Danielle Belgrave, a Research Scientist at DeepMind with a remarkable career in AI for healthcare. Danielle explained that she was lucky to have had a Mathematics teacher who encouraged her to work in statistics for healthcare. She said she wanted to ensure she could use her technical skills and her love for math to make an impact on society, and to really help make the world a better place. Danielle works with biologists, mathematicians, philosophers, and ethicists as well as with data scientists and AI researchers at DeepMind. One possibility she suggested for improving young people’s understanding of what roles are available was industry mentorship. Linking people who work in the field of AI with school students was an idea that Caitlin was eager to confirm as very useful for young people her age.

We need investment in AI education in school

The AI Council’s Roadmap stresses how important it is to not only teach the skills needed to foster a pool of people who are able to research and build AI, but also to ensure that every child leaves school with the necessary AI and data literacy to be able to become engaged, informed, and empowered users of the technology. During the panel, the Minister, Chris Philp, spoke about the fact that people don’t have to be technical experts to come up with brilliant ideas, and that we need more people to be able to think creatively and have the confidence to adopt AI, and that this starts in schools. 

A class of primary school students do coding at laptops.

Caitlin is a perfect example of a young person who has been inspired about AI while in school. But sadly, among young people and especially girls, she’s in the minority by choosing to take computer science, which meant she had the chance to hear about AI in the classroom. But even for young people who choose computer science in school, at the moment AI isn’t in the national Computing curriculum or part of GCSE computer science, so much of their learning currently takes place outside of the classroom. Caitlin added that she had had to go out of her way to find information about AI; the majority of her peers are not even aware of opportunities that may be out there. She suggested that we ensure AI is taught across all subjects, so that every learner sees how it can make their favourite subject even more magical and thinks “AI’s cool!”.

A primary school boy codes at a laptop with the help of an educator.

Philip Colligan, the CEO here at the Foundation, also described how AI could be integrated into existing subjects including maths, geography, biology, and citizenship classes. Danielle thoroughly agreed and made the very good point that teaching this way across the school would help prepare young people for the world of work in AI, where cross-disciplinary science is so important. She reminded us that AI is not one single discipline. Instead, many different skill sets are needed, including engineering new AI systems, integrating AI systems into products, researching problems to be addressed through AI, or investigating AI’s societal impacts and how humans interact with AI systems.

On hearing about this multitude of different skills, our discussion turned to the teachers who are responsible for imparting this knowledge, and to the challenges they face. 

The challenge of AI education for teachers

When we shifted the focus of the discussion to teachers, Philip said: “If we really want to equip every young person with the knowledge and skills to thrive in a world that shaped by these technologies, then we have to find ways to evolve the curriculum and support teachers to develop the skills and confidence to teach that curriculum.”

Teenage students and a teacher do coding during a computer science lesson.

I asked the Minister what he thought needed to happen to ensure we achieved data and AI literacy for all young people. He said, “We need to work across government, but also across business and society more widely as well.” He went on to explain how important it was that the Department for Education (DfE) gets the support to make the changes needed, and that he and the Office for AI were ready to help.

Philip explained that the Raspberry Pi Foundation is one of the organisations in the consortium running the National Centre for Computing Education (NCCE), which is funded by the DfE in England. Through the NCCE, the Foundation has already supported thousands of teachers to develop their subject knowledge and pedagogy around computer science.

A recent study recognises that the investment made by the DfE in England is the most comprehensive effort globally to implement the computing curriculum, so we are starting from a good base. But Philip made it clear that now we need to expand this investment to cover AI.

Young people engaging with AI out of school

Philip described how brilliant it is to witness young people who choose to get creative with new technologies. As an example, he shared that the Foundation is seeing more and more young people employ machine learning in the European Astro Pi Challenge, where participants run experiments using Raspberry Pi computers on board the International Space Station. 

Three teenage boys do coding at a shared computer during a computer science lesson.

Philip also explained that, in the Foundation’s non-formal CoderDojo club network and its Coolest Projects tech showcase events, young people build their dream AI products supported by volunteers and mentors. Among these have been autonomous recycling robots and AI anti-collision alarms for bicycles. Like Caitlin with her company idea, this shows that young people are ready and eager to engage and create with AI.

We closed out the panel by going back to a point raised by Mhairi Aitken, who presented at the Foundation’s research seminar in September. Mhairi, an Alan Turing Institute ethics fellow, argues that children don’t just need to learn about AI, but that they should actually shape the direction of AI. All our panelists agreed on this point, and we discussed what it would take for young people to have a seat at the table.

A Black boy uses a Raspberry Pi computer at school.

Alice advised that we start by looking at our existing systems for engaging young people, such as Youth Parliament, student unions, and school groups. She also suggested adding young people to the AI Council, which I’m going to look into right away! Caitlin agreed and added that it would be great to make these forums virtual, so that young people from all over the country could participate.

The panel session was full of insight and felt very positive. Although the challenge of ensuring we have a data- and AI-literate generation of young people is tough, it’s clear that if we include them in finding the solution, we are in for a bright future. 

What’s next for AI education at the Raspberry Pi Foundation?

In the coming months, our goal at the Foundation is to increase our understanding of the concepts underlying AI education and how to teach them in an age-appropriate way. To that end, we will start to conduct a series of small AI education research projects, which will involve gathering the perspectives of a variety of stakeholders, including young people. We’ll make more information available on our research pages soon.

In the meantime, you can sign up for our upcoming research seminars on AI and data science education, and peruse the collection of related resources we’ve put together.

The post How do we develop AI education in schools? A panel discussion appeared first on Raspberry Pi.

Simple Things That Are Actually Hard: User Authentication

Post Syndicated from Bozho original https://techblog.bozho.net/simple-things-that-are-actually-hard-user-authentication/

You build a system. User authentication is the component that is always there, regardless of the functionality of the system. And by now it should be simple to implement it – just “drag” some ready-to-use authentication module, or configure it with some basic options (e.g. Spring Security), and you’re done.

Well, no. It’s the most obvious thing and yet it’s extremely complicated to get right. It’s not just login form -> check username/password -> set cookie. It has a lot of other things to think about:

  • Cookie security – how to make it so that a cookie doesn’t leak or can’t be forged. Should you even have a cookie, or use some stateless approach like JWT, use SameSite lax or strict?
  • Bind cookie to IP and logout user if IP changes?
  • Password requirements – minimum length, special characters? UI to help with selecting a password?
  • Storing passwords in the database – bcrypt, scrypt, PBKDF2, SHA with multiple iterations?
  • Allow storing in the browser? Generally “yes”, but some applications deliberately hash it before sending it, so that it can’t be stored automatically
  • Email vs username – do you need a username at all? Should change of email be allowed?
  • Rate-limiting authentication attempts – how many failed logins should block the account, for how long, should admins get notifications or at least logs for locked accounts? Is the limit per IP, per account, a combination of those?
  • Captcha – do you need captcha at all, which one, and after how many attempts? Is Re-Captcha an option?
  • Password reset – password reset token database table or expiring links with HMAC? Rate-limit password reset?
  • SSO – should your service should support LDAP/ActiveDirectory authentication (probably yes), should it support SAML 2.0 or OpenID Connect, and if yes, which ones? Or all of them? Should it ONLY support SSO, rather than internal authentication?
  • 2FA – TOTP or other? Implement the whole 2FA flow, including enable/disable and use or backup codes; add option to not ask for 2FA for a particular device for a period of time>
  • Login by link – should the option to send a one-time login link be email be supported?
  • XSS protection – make sure no XSS vulnerabilities exist especially on the login page (but not only, as XSS can steal cookies)
  • Dedicated authentication log – keep a history of all logins, with time, IP, user agent
  • Force logout – is the ability to logout a logged-in device needed, how to implement it, e.g. with stateless tokens it’s not trivial.
  • Keeping a mobile device logged in – what should be stored client-side? (certainly not the password)
  • Working behind proxy – if the client IP matters (it does), make sure the X-Forwarded-For header is parsed
  • Capture login timezone for user and store it in the session to adjust times in the UI?
  • TLS Mutual authentication – if we need to support hardware token authentication with private key, we should enable TLS mutual. What should be in the truststore, does the web server support per-page mutual TLS or should we use a subdomain?

And that’s for the most obvious feature that every application has. No wonder it has been implemented incorrectly many, many times. The IT world is complex and nothing is simple. Sending email isn’t simple, authentication isn’t simple, logging isn’t simple. Working with strings and dates isn’t simple, sanitizing input and output isn’t simple.

We have done a poor job in building the frameworks and tools to help us with all those things. We can’t really ignore them, we have to think about them actively and take conscious, informed decisions.

The post Simple Things That Are Actually Hard: User Authentication appeared first on Bozho's tech blog.

Intel Is Maintaining Legacy Technology for Security Research

Post Syndicated from Bruce Schneier original https://www.schneier.com/blog/archives/2021/11/intel-is-maintaining-legacy-technology-for-security-research.html

Interesting:

Intel’s issue reflects a wider concern: Legacy technology can introduce cybersecurity weaknesses. Tech makers constantly improve their products to take advantage of speed and power increases, but customers don’t always upgrade at the same pace. This creates a long tail of old products that remain in widespread use, vulnerable to attacks.

Intel’s answer to this conundrum was to create a warehouse and laboratory in Costa Rica, where the company already had a research-and-development lab, to store the breadth of its technology and make the devices available for remote testing. After planning began in mid-2018, the Long-Term Retention Lab was up and running in the second half of 2019.

The warehouse stores around 3,000 pieces of hardware and software, going back about a decade. Intel plans to expand next year, nearly doubling the space to 27,000 square feet from 14,000, allowing the facility to house 6,000 pieces of computer equipment.

Intel engineers can request a specific machine in a configuration of their choice. It is then assembled by a technician and accessible through cloud services. The lab runs 24 hours a day, seven days a week, typically with about 25 engineers working any given shift.

Slashdot thread.

New – Use Amazon S3 Event Notifications with Amazon EventBridge

Post Syndicated from Jeff Barr original https://aws.amazon.com/blogs/aws/new-use-amazon-s3-event-notifications-with-amazon-eventbridge/

We launched Amazon EventBridge in mid-2019 to make it easy for you to build powerful, event-driven applications at any scale. Since that launch, we have added several important features including a Schema Registry, the power to Archive and Replay Events, support for Cross-Region Event Bus Targets, and API Destinations to allow you to send events to any HTTP API. With support for a very long list of destinations and the ability to do pattern matching, filtering, and routing of events, EventBridge is an incredibly powerful and flexible architectural component.

S3 Event Notifications
Today we are making it even easier for you to use EventBridge to build applications that react quickly and efficiently to changes in your S3 objects. This is a new, “directly wired” model that is faster, more reliable, and more developer-friendly than ever. You no longer need to make additional copies of your objects or write specialized, single-purpose code to process events.

At this point you might be thinking that you already had the ability to react to changes in your S3 objects, and wondering what’s going on here. Back in 2014 we launched S3 Event Notifications to SNS Topics, SQS Queues, and Lambda functions. This was (and still is) a very powerful feature, but using it at enterprise-scale can require coordination between otherwise-independent teams and applications that share an interest in the same objects and events. Also, EventBridge can already extract S3 API calls from CloudTrail logs and use them to do pattern matching & filtering. Again, very powerful and great for many kinds of apps (with a focus on auditing & logging), but we always want to do even better.

Net-net, you can now configure S3 Event Notifications to directly deliver to EventBridge! This new model gives you several benefits including:

Advanced Filtering – You can filter on many additional metadata fields, including object size, key name, and time range. This is more efficient than using Lambda functions that need to make calls back to S3 to get additional metadata in order to make decisions on the proper course of action. S3 only publishes events that match a rule, so you save money by only paying for events that are of interest to you.

Multiple Destinations – You can route the same event notification to your choice of 18 AWS services including Step Functions, Kinesis Firehose, Kinesis Data Streams, and HTTP targets via API Destinations. This is a lot easier than creating your own fan-out mechanism, and will also help you to deal with those enterprise-scale situations where independent teams want to do their own event processing.

Fast, Reliable Invocation – Patterns are matched (and targets are invoked) quickly and directly. Because S3 provides at-least-once delivery of events to EventBridge, your applications will be more reliable.

You can also take advantage of other EventBridge features, including the ability to archive and then replay events. This allows you to reprocess events in case of an error or if you add a new target to an event bus.

Getting Started
I can get started in minutes. I start by enabling EventBridge notifications on one of my S3 buckets (jbarr-public in this case). I open the S3 Console, find my bucket, open the Properties tab, scroll down to Event notifications, and click Edit:

I select On, click Save changes, and I’m ready to roll:

Now I use the EventBridge Console to create a rule. I start, as usual, by entering a name and a description:

Then I define a pattern that matches the bucket and the events of interest:

One pattern can match one or more buckets and one or more events; the following events are supported:
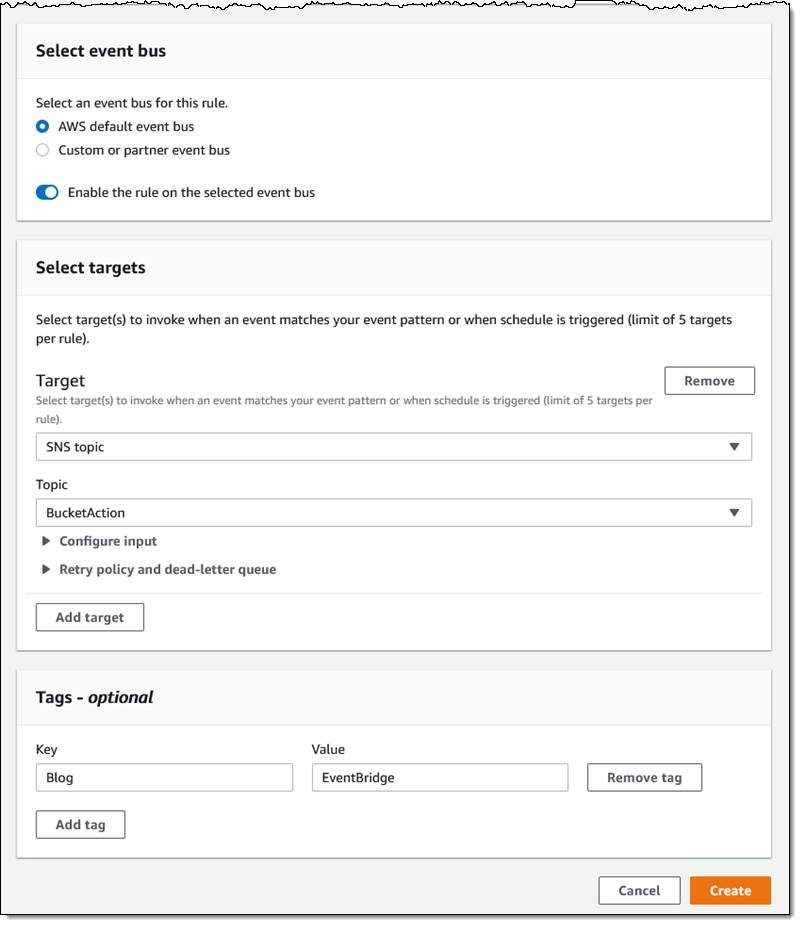
  • Object Created
  • Object Deleted
  • Object Restore Initiated
  • Object Restore Completed
  • Object Restore Expired
  • Object Tags Added
  • Object Tags Deleted
  • Object ACL Updated
  • Object Storage Class Changed
  • Object Access Tier Changed

Then I choose the default event bus, and set the target to an SNS topic (BucketAction) which publishes the messages to my Amazon email address:

I click Create, and I am all set. To test it out, I simply upload some files to my bucket and await the messages:

The message contains all of the interesting and relevant information about the event, and (after some unquoting and formatting), looks like this:

{
    "version": "0",
    "id": "2d4eba74-fd51-3966-4bfa-b013c9da8ff1",
    "detail-type": "Object Created",
    "source": "aws.s3",
    "account": "348414629041",
    "time": "2021-11-13T00:00:59Z",
    "region": "us-east-1",
    "resources": [
        "arn:aws:s3:::jbarr-public"
    ],
    "detail": {
        "version": "0",
        "bucket": {
            "name": "jbarr-public"
        },
        "object": {
            "key": "eb_create_rule_mid_1.png",
            "size": 99797,
            "etag": "7a72374e1238761aca7778318b363232",
            "version-id": "a7diKodKIlW3mHIvhGvVphz5N_ZcL3RG",
            "sequencer": "00618F003B7286F496"
        },
        "request-id": "4Z2S00BKW2P1AQK8",
        "requester": "348414629041",
        "source-ip-address": "72.21.198.68",
        "reason": "PutObject"
    }

My initial event pattern was very simple, and matched only the bucket name. I can use content-based filtering to write more complex and more interesting patterns. For example, I could use numeric matching to set up a pattern that matches events for objects that are smaller than 1 megabyte:

{
    "source": [
        "aws.s3"
    ],
    "detail-type": [
        "Object Created",
        "Object Deleted",
        "Object Tags Added",
        "Object Tags Deleted"
    ],

    "detail": {
        "bucket": {
            "name": [
                "jbarr-public"
            ]
        },
        "object" : {
            "size": [{"numeric" :["<=", 1048576 ] }]
        }
    }
}

Or, I could use prefix matching to set up a pattern that looks for objects uploaded to a “subfolder” (which doesn’t really exist) of a bucket:

"object": {
  "key" : [{"prefix" : "uploads/"}]
  }]
}

You can use all of this in conjunction with all of the existing EventBridge features, including Archive/Replay. You can also access the CloudWatch metrics for each of your rules:

Available Now
This feature is available now and you can start using it today in all commercial AWS Regions. You pay $1 for every 1 million events that match a rule; check out the EventBridge Pricing page for more information.

Jeff;

New – Amazon EBS Snapshots Archive

Post Syndicated from Sébastien Stormacq original https://aws.amazon.com/blogs/aws/new-amazon-ebs-snapshots-archive/

I am pleased to announce the availability of Amazon EBS Snapshots Archive, a new storage tier for the long-term retention of Amazon Elastic Block Store (EBS) snapshots of your EBS volumes.

In a nutshell, EBS is an easy-to-use high-performance block storage service for your Amazon Elastic Compute Cloud (Amazon EC2) instances. An EBS volume mounted to your EC2 instances lets you boot an operating system and store data for your most performance-demanding workloads. You may use EBS snapshots to create point-in-time copies of your volume data. The first snapshot of a volume contains all of the data written into that volume. Subsequent snapshots are incremental. Snapshots are stored on Amazon Simple Storage Service (Amazon S3), and they may be shared between AWS accounts and AWS Regions.

The ability to take frequent snapshots and easily restore volumes makes EBS snapshots an obvious choice for your data management strategy, alongside other backup options. The incremental nature of snapshots makes them cost-effective for daily and weekly backups that need immediate restores. However, you were telling us that business compliance and regulatory needs have meant that you needed to retain EBS snapshots for longer periods of time (months or years). For example, snapshots taken at the end of a project, or snapshots for test and development preserved for future project releases. The vast majority of these snapshots are taken and never read. For these snapshots, you are looking to lower your storage costs. Today, to benefit from lower storage costs, you may have written complex scripts involving temporary EC2 instances to restore snapshots, mount the corresponding volumes, and transfer the data to lower-cost storage tiers, such as Amazon Glacier.

EBS Snapshots Archive provides a low-cost storage tier to archive full, point-in-time copies of EBS Snapshots that you must retain for 90 days or more for regulatory and compliance reasons, or for future project releases. Now, you can easily archive and manage EBS Snapshots, thereby eliminating the need for custom scripts and third-party tools to manage these snapshots. This lets you move your rarely accessed snapshots to EBS Snapshots Archive to achieve up to 75% lower storage costs, and avoid licensing costs for third-party tools. Furthermore, you can retrieve an archived snapshot within 24-72 hours, and, once restored, use the snapshot to recover an EBS volume.

As per usual, let me show you how it works.

How to Get Started
I have a snapshot available in the US East (N. Virginia) Region, and I want to archive this snapshot for compliance reasons. I open the AWS Management Console, navigate to EC2, then to Snapshots. I select the snapshot I want to archive, and select the Actions menu. I select the Archive snapshot menu option.

EBS Snapshot Archive - create snapshot

I carefully read the confirmation message :-), and I select Archive snapshot.

EBS Snapshot Archive - create snapshot - confirmation

I may monitor the progress of the archive operation with the new Storage Tier tab at the bottom of the screen. After some time, depending on the size of the snapshot, the Tiering status becomes ✅ Archival completed.

EBS Snapshot Archive - create snapshot - archival completedArchived snapshots stay visible in the console. The new Storage tier column indicates the tier used for storage (Standard or Archive).

How do I Restore a Volume?
Restoring a volume from EBS Snapshots Archive is a two-step process. First, I retrieve the snapshot from EBS Snapshots Archive to its original snapshot ID, using RestoreSnapshotTier API call or the management console. It takes between 24-72 hours to retrieve the snapshot from the archive, depending on the snapshot size. Once retrieved, the snapshot appears as a regular snapshot on my account. At this stage, I hydrate the retrieved snapshot into an EBS volume using the default snapshot restore or Fast Snapshot Restore (FSR) for expedited restores, just like usual.

A CloudWatch event is generated when the snapshot is restored. You may listen to this event to avoid pulling the status with the API.

A CreateVolume API call on an archived snapshot will fail. You must restore a snapshot from archive before you use it to create a volume.

Using the AWS Management Console, I select the snapshot that I want to restore, I select the Actions menu, and then I select the Restore snapshot from archive menu option.

EBS Snapshot Archive - create snapshot - restore archive

I have the choice to restore the snapshot permanently, or just temporarily. At the end of the temporary duration, the standard tier snapshot is deleted, and only the archive is preserved.

EBS Snapshot Archive - create snapshot - restore archive - confirmation

After a while, depending on the snapshot size, the archive is restored to standard storage and may be used to recreate a volume, just like usual. I may monitor the progress of the retrieval and the lifetime for temporarily restored archives in the new Storage tier tab in the bottom half of the screen. Temporary restored snapshots may be kept for up to 180 days.

Pricing and Availability
EBS Snapshots Archive is available for you today in 17 AWS Regions. At the time of launch, it is not available in the two Regions in China, Asia Pacific (Seoul), Asia Pacific (Osaka), Canada (Central), and South America (São Paulo).

As per usual, you pay as-you-go, with no minimum or fixed fees. There are two metrics that influence EBS Snapshots Archive billing: data storage and data retrieval. We charge you $0.0125 per GB-month of stored data and $0.03 per GB retrieved. You are charged for a 90-day period at minimum. This means that if you delete a snapshot archive or permanently restore it less than 90 days after creation, then we charge for the full 90-day period. The EBS pricing page has the details.

Go ahead and start to configure your long term storage for EBS snaphots today.

— seb

New – AWS Control Tower Account Factory for Terraform

Post Syndicated from Danilo Poccia original https://aws.amazon.com/blogs/aws/new-aws-control-tower-account-factory-for-terraform/

AWS Control Tower makes it easier to set up and manage a secure, multi-account AWS environment. AWS Control Tower uses AWS Organizations to create what is called a landing zone, bringing ongoing account management and governance based on our experience working with thousands of customers.

If you use AWS CloudFormation to manage your infrastructure as code, you can customize your AWS Control Tower landing zone using Customizations for AWS Control Tower, a solution that helps you deploy custom templates and policies to individual accounts and organizational units (OUs) within your organization.

But what if you use Terraform to manage your AWS infrastructure?

Today, I am happy to share the availability of AWS Control Tower Account Factory for Terraform (AFT), a new Terraform module maintained by the AWS Control Tower team that allows you to provision and customize AWS accounts through Terraform using a deployment pipeline. The source code for the development pipeline can be stored in AWS CodeCommit, GitHub, GitHub Enterprise, or BitBucket. With AFT, you can automate the creation of fully functional accounts that have access to all the resources they need to be productive. The module works with Terraform open source, Terraform Enterprise, and Terraform Cloud.

Architectural diagram.

Let’s see how this works in practice.

Using AWS Control Tower Account Factory for Terraform
First, I create a main.tf file that uses the AWS Control Tower Account Factory for Terraform (AFT) module:

module "aft" {
  source = "[email protected]:aws-ia/terraform-aws-control_tower_account_factory.git"

  # Required Parameters
  ct_management_account_id    = "123412341234"
  log_archive_account_id      = "234523452345"
  audit_account_id            = "345634563456"
  aft_management_account_id   = "456745674567"
  ct_home_region              = "us-east-1"
  tf_backend_secondary_region = "us-west-2"

  # Optional Parameters
  terraform_distribution = "oss"
  vcs_provider           = "codecommit"

  # Optional Feature Flags
  aft_feature_delete_default_vpcs_enabled = false
  aft_feature_cloudtrail_data_events      = false
  aft_feature_enterprise_support          = false
}

The first six parameters are required. As a prerequisite, I need to pass the ID of four AWS accounts in my AWS organization:

  • ct_management_account_id – AWS Control Tower management account
  • log_archive_account_id – Log Archive account
  • audit_account_id – Audit account
  • aft_management_account_id – AFT management account

Then, I have to pass two AWS Regions:

  • ct_home_region – The Region from which this module will be executed. This must be the same Region where AWS Control Tower is deployed.
  • tf_backend_secondary_region – The backend primary Region is the same as the AFT Region. This parameter defines the secondary Region to replicate to. AFT creates a backend for state tracking for its own state. It is also used for Terraform when using the open-source version.

The other parameters are optional and are set to their default value in the previous main.tf file:

  • terraform_distribution – To select between Terraform open source (default), Enterprise, or Cloud
  • vcs_provider – To choose the version control system to use between AWS CodeCommit (default), GitHub, GitHub Enterprise, or BitBucket.

These feature flags are disabled by default and can be omitted unless you want to enable them:

  • aft_feature_delete_default_vpcs_enabled – To automatically delete the default VPC for new accounts.
  • aft_feature_cloudtrail_data_events – To enable AWS CloudTrail data events for new accounts. Be aware that this option, usually required for compliance in highly regulated environments, can have an impact on your costs.
  • aft_feature_enterprise_support – To automatically enroll new accounts with Enterprise Support (if you have an Enterprise Support Plan).

First, I initialize the project and download the plugins:

terraform init

Then, I use AWS Single Sign-On to log in with the AWS Control Tower management account and start the deployment:

terraform apply

I confirm with a yes and, after some time, the deployment is complete.

Now, I use AWS SSO again to log in with the AFT management account. In the AWS CodeCommit console, I find four repositories that I can use to customize the accounts created with AFT.

Console screenshot.

These repositories are used by pipelines managed by AWS CodePipeline to automate the account creation:

  • xaft-account-request – This is where I place requests for accounts provisioned and managed by AFT.
  • aft-global-customizations – I can use this repository to customize all provisioned accounts with customer-defined resources. The resources can be created through Terraform or through Python.
  • aft-account-customizations – Here, I can customize provisioned accounts depending on the value of the account_customizations_name parameter in the aft-account-request repository. In this way, I can create different sets of customizations depending on the role the account will be used for.
  • aft-account-provisioning-customizations – This repository uses AWS Step Functions to customize the provisioning process for new accounts and simplify the integration with additional environments. State machines can use AWS Lambda functions, Amazon Elastic Container Service (Amazon ECS) or AWS Fargate tasks, custom activities hosted either on AWS or on-premises, or Amazon Simple Notification Service (SNS) and Amazon Simple Queue Service (SQS) to communicate with external applications.

Currently, these four repositories are all empty. To start, I use the code in the sources/aft-customizations-repos folder in the GitHub repo of the AFT Terraform module.

Using the example in the aft-account-request repository, I prepare a template to create a couple of AWS accounts. One of the two accounts is for a software developer.

To help software developers be productive quickly, I create a specific account customization. In the template, I set the parameter account_customizations_name equal to developer-customization.

Then, in the aft-account-customizations repository, I create a developer-customization folder where I put a Terraform template to automatically create an AWS Cloud9 EC2-based development environment for new accounts of that type. Optionally, I can extend that with my Python code, for example, to invoke internal or external APIs. Using this approach, all new accounts for software developers will have their development environment ready as they go through the delivery pipeline.

I push the changes to the main branch (first for the aft-account-customizations repository, then for the aft-account-request). This triggers the execution of the pipeline. After a few minutes, the two new accounts are ready to be used.

You can customize accounts created by AFT based on your unique requirements. For example, you can provide each account with its own specific security setup (such as IAM roles or security groups) and storage (for example, pre-configured Amazon Simple Storage Service (Amazon S3) buckets).

Availability and Pricing
AWS Control Tower Account Factory for Terraform (AFT) works in any Region where AWS Control Tower is available. There are no additional costs when using AFT. You pay for the services used by the solution. For example, when you set up AWS Control Tower, you will begin to incur costs for AWS services configured to set up your landing zone and mandatory guardrails.

When building this solution, we worked together with HashiCorp. Armon Dadgar, HashiCorp Co-Founder and CTO, told us: “Managing cloud environments with hundreds or thousands of users can be a complex and time-consuming process. Using a software delivery pipeline integrating Terraform and AWS Control Tower makes it easier to achieve consistent governance and compliance requirements across all accounts.”

The pipeline provides an account creation process that monitors when account provisioning is complete and then triggers additional Terraform modules to enhance the account with further customizations. You can configure the pipeline to use your own custom Terraform modules or pick from pre-published Terraform modules for common products and configurations.

Simplify and standardize AWS account creation using AWS Control Tower Account Factory for Terraform.

Danilo

New – Recycle Bin for EBS Snapshots

Post Syndicated from Jeff Barr original https://aws.amazon.com/blogs/aws/new-recycle-bin-for-ebs-snapshots/

It is easy to create EBS Snapshots, and just as easy to either delete them manually or to use the Data Lifecycle Manager to delete them automatically in accord with your organization’s retention model. Sometimes, as it turns out, it is a bit too easy to delete snapshots, and a well-intended cleanup effort or a wayward script can sometimes go a bit overboard!

New Recycle Bin
In order to give you more control over the deletion process, we are launching a Recycle Bin for EBS Snapshots. As you will see in a moment, you can now set up rules to retain deleted snapshots so that you can recover them after an accidental deletion. You can think of this as a two-level model, where individual AWS users are responsible for the initial deletion, and then a designated “Recycle Bin Administrator” (as specified by an IAM role) manages retention and recovery.

Rules can apply to all snapshots, or to snapshots that include a specified set of tag/value pairs. Each rule specifies a retention period (between one day and one year), after which the snapshot is permanently deleted.

Let’s Recycle!
I open the Recycle Bin Console, select the region of interest, and click Create retention rule to begin:

I call my first rule KeepAll, and set it to retain all deleted EBS snapshots for 4 days:

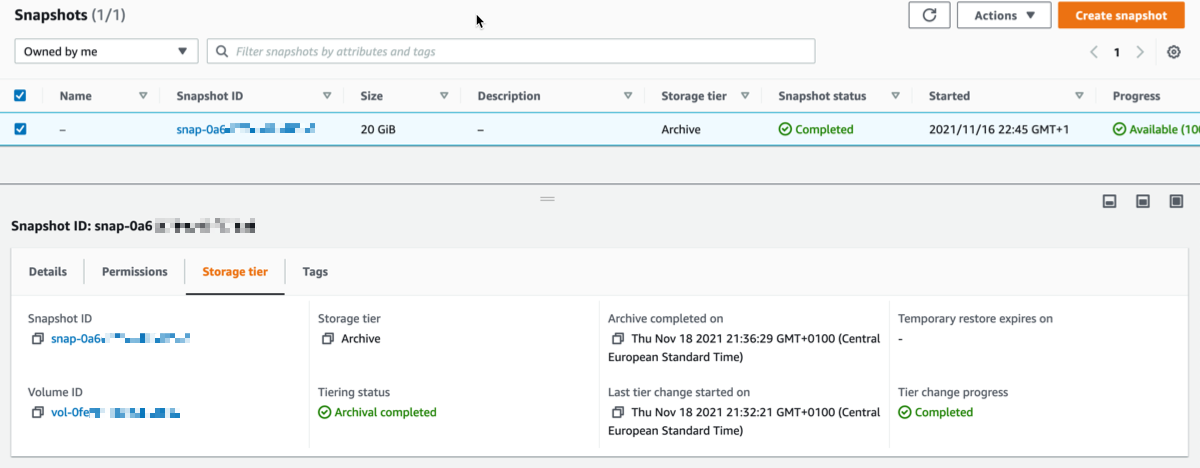
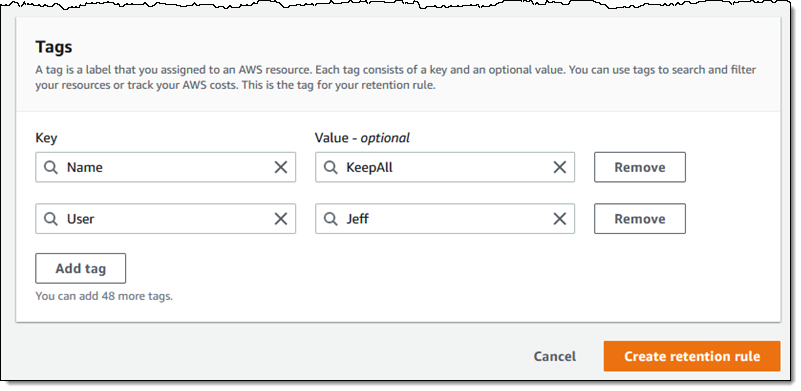
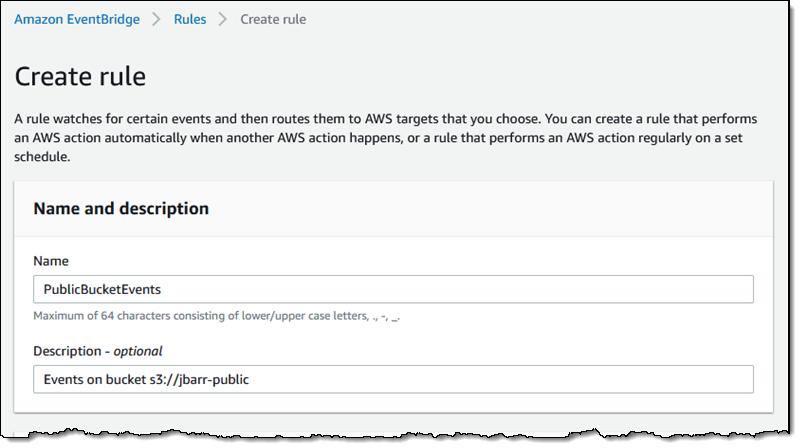
I add a tag (User) to the rule, and click Create retention rule:

Because Apply to all resources is checked, this is a general rule that applies when there are no applicable rules that specify one or more tags.

Then I create a second rule (KeepDev) that retains snapshots tagged with a Mode of Dev for just one day:

If two different tag-based rules match the same resource, then the one with the longer retention period applies.

Here are my retention rules:

Here are my EBS snapshots. As you can see, the first three are tagged with a Mode of Dev:

In an effort to save several cents per month, I impulsively delete them all:

And they are gone:

Later in the day, a member of my developer team messages me in a panic and lets me know that they desperately need the latest snapshot of the development server’s code. I open the Recycle Bin and I locate the snapshot (DevServer_2021_10_6):

I select the snapshot and click Recover:

Then I confirm my intent:

And the snapshot is available once again:

As has always been the case, Fast Snapshot Restore is disabled when a snapshot is deleted. With this launch, it will remain disabled when a snapshot is restored.

All of this functionality (creating rules, listing resources in the Recycle Bin, and restoring them) is also available from the CLI and via the Recycle Bin APIs.

Things to Know
Here are a couple of things to know about the new Recycle Bin:

IAM Support – As I mentioned earlier, you can use AWS Identity and Access Management (IAM) to grant access to this feature, and should consider creating an empowered user known as the Recycle Bin Administrator.

Rule Changes – You can make changes to your retention rules at any time, but be aware that the rules are evaluated (and the retention period is set) when you delete a snapshot. Changing a rule after an item has been deleted will not alter the retention period for the item.

Pricing – Resources that are in the Recycle Bin are charged the usual price, but be aware that creating rules with long retention periods could increase your AWS bill. On a related note, be sure that keeping deleted snapshots around does not violate your organization’s data retention policies. There is no charge for deleting or recovering a resource.

In the Bin – Resources in the Recycle Bin are immutable. If a resource is recovered, all of its existing metadata (tags and so forth) is also recovered intact.

Recycling  – We will do our best to recycle all of the zeroes and all of the ones once when a resource in your Recycle Bin reaches the end of its retention period!

Jeff;

Introducing Karpenter – An Open-Source High-Performance Kubernetes Cluster Autoscaler

Post Syndicated from Channy Yun original https://aws.amazon.com/blogs/aws/introducing-karpenter-an-open-source-high-performance-kubernetes-cluster-autoscaler/

Today we are announcing that Karpenter is ready for production. Karpenter is an open-source, flexible, high-performance Kubernetes cluster autoscaler built with AWS. It helps improve your application availability and cluster efficiency by rapidly launching right-sized compute resources in response to changing application load. Karpenter also provides just-in-time compute resources to meet your application’s needs and will soon automatically optimize a cluster’s compute resource footprint to reduce costs and improve performance.

Before Karpenter, Kubernetes users needed to dynamically adjust the compute capacity of their clusters to support applications using Amazon EC2 Auto Scaling groups and the Kubernetes Cluster Autoscaler. Nearly half of Kubernetes customers on AWS report that configuring cluster auto scaling using the Kubernetes Cluster Autoscaler is challenging and restrictive.

When Karpenter is installed in your cluster, Karpenter observes the aggregate resource requests of unscheduled pods and makes decisions to launch new nodes and terminate them to reduce scheduling latencies and infrastructure costs. Karpenter does this by observing events within the Kubernetes cluster and then sending commands to the underlying cloud provider’s compute service, such as Amazon EC2.

Karpenter is an open-source project licensed under the Apache License 2.0. It is designed to work with any Kubernetes cluster running in any environment, including all major cloud providers and on-premises environments. We welcome contributions to build additional cloud providers or to improve core project functionality. If you find a bug, have a suggestion, or have something to contribute, please engage with us on GitHub.

Getting Started with Karpenter on AWS
To get started with Karpenter in any Kubernetes cluster, ensure there is some compute capacity available, and install it using the Helm charts provided in the public repository. Karpenter also requires permissions to provision compute resources on the provider of your choice.

Once installed in your cluster, the default Karpenter provisioner will observe incoming Kubernetes pods, which cannot be scheduled due to insufficient compute resources in the cluster and automatically launch new resources to meet their scheduling and resource requirements.

I want to show a quick start using Karpenter in an Amazon EKS cluster based on Getting Started with Karpenter on AWS. It requires the installation of AWS Command Line Interface (AWS CLI), kubectl, eksctl, and Helm (the package manager for Kubernetes). After setting up these tools, create a cluster with eksctl. This example configuration file specifies a basic cluster with one initial node.

cat <<EOF > cluster.yaml
---
apiVersion: eksctl.io/v1alpha5
kind: ClusterConfig
metadata:
  name: eks-karpenter-demo
  region: us-east-1
  version: "1.20"
managedNodeGroups:
  - instanceType: m5.large
    amiFamily: AmazonLinux2
    name: eks-kapenter-demo-ng
    desiredCapacity: 1
    minSize: 1
    maxSize: 5
EOF
$ eksctl create cluster -f cluster.yaml

Karpenter itself can run anywhere, including on self-managed node groups, managed node groups, or AWS Fargate. Karpenter will provision EC2 instances in your account.

Next, you need to create necessary AWS Identity and Access Management (IAM) resources using the AWS CloudFormation template and IAM Roles for Service Accounts (IRSA) for the Karpenter controller to get permissions like launching instances following the documentation. You also need to install the Helm chart to deploy Karpenter to your cluster.

$ helm repo add karpenter https://charts.karpenter.sh
$ helm repo update
$ helm upgrade --install --skip-crds karpenter karpenter/karpenter --namespace karpenter \
  --create-namespace --set serviceAccount.create=false --version 0.5.0 \
  --set controller.clusterName=eks-karpenter-demo
  --set controller.clusterEndpoint=$(aws eks describe-cluster --name eks-karpenter-demo --query "cluster.endpoint" --output json) \
  --wait # for the defaulting webhook to install before creating a Provisioner

Karpenter provisioners are a Kubernetes resource that enables you to configure the behavior of Karpenter in your cluster. When you create a default provisioner, without further customization besides what is needed for Karpenter to provision compute resources in your cluster, Karpenter automatically discovers node properties such as instance types, zones, architectures, operating systems, and purchase types of instances. You don’t need to define these spec:requirements if there is no explicit business requirement.

cat <<EOF | kubectl apply -f -
apiVersion: karpenter.sh/v1alpha5
kind: Provisioner
metadata:
name: default
spec:
#Requirements that constrain the parameters of provisioned nodes. 
#Operators { In, NotIn } are supported to enable including or excluding values
  requirements:
    - key: node.k8s.aws/instance-type #If not included, all instance types are considered
      operator: In
      values: ["m5.large", "m5.2xlarge"]
    - key: "topology.kubernetes.io/zone" #If not included, all zones are considered
      operator: In
      values: ["us-east-1a", "us-east-1b"]
    - key: "kubernetes.io/arch" #If not included, all architectures are considered
      values: ["arm64", "amd64"]
    - key: " karpenter.sh/capacity-type" #If not included, the webhook for the AWS cloud provider will default to on-demand
      operator: In
      values: ["spot", "on-demand"]
  provider:
    instanceProfile: KarpenterNodeInstanceProfile-eks-karpenter-demo
  ttlSecondsAfterEmpty: 30  
EOF

The ttlSecondsAfterEmpty value configures Karpenter to terminate empty nodes. If this value is disabled, nodes will never scale down due to low utilization. To learn more, see Provisioner custom resource definitions (CRDs) on the Karpenter site.

Karpenter is now active and ready to begin provisioning nodes in your cluster. Create some pods using a deployment, and watch Karpenter provision nodes in response.

$ kubectl create deployment --name inflate \
          --image=public.ecr.aws/eks-distro/kubernetes/pause:3.2

Let’s scale the deployment and check out the logs of the Karpenter controller.

$ kubectl scale deployment inflate --replicas 10
$ kubectl logs -f -n karpenter $(kubectl get pods -n karpenter -l karpenter=controller -o name)
2021-11-23T04:46:11.280Z        INFO    controller.allocation.provisioner/default       Starting provisioning loop      {"commit": "abc12345"}
2021-11-23T04:46:11.280Z        INFO    controller.allocation.provisioner/default       Waiting to batch additional pods        {"commit": "abc123456"}
2021-11-23T04:46:12.452Z        INFO    controller.allocation.provisioner/default       Found 9 provisionable pods      {"commit": "abc12345"}
2021-11-23T04:46:13.689Z        INFO    controller.allocation.provisioner/default       Computed packing for 10 pod(s) with instance type option(s) [m5.large]  {"commit": " abc123456"}
2021-11-23T04:46:16.228Z        INFO    controller.allocation.provisioner/default       Launched instance: i-01234abcdef, type: m5.large, zone: us-east-1a, hostname: ip-192-168-0-0.ec2.internal    {"commit": "abc12345"}
2021-11-23T04:46:16.265Z        INFO    controller.allocation.provisioner/default       Bound 9 pod(s) to node ip-192-168-0-0.ec2.internal  {"commit": "abc12345"}
2021-11-23T04:46:16.265Z        INFO    controller.allocation.provisioner/default       Watching for pod events {"commit": "abc12345"}

The provisioner’s controller listens for Pods changes, which launched a new instance and bound the provisionable Pods into the new nodes.

Now, delete the deployment. After 30 seconds (ttlSecondsAfterEmpty = 30), Karpenter should terminate the empty nodes.

$ kubectl delete deployment inflate
$ kubectl logs -f -n karpenter $(kubectl get pods -n karpenter -l karpenter=controller -o name)
2021-11-23T04:46:18.953Z        INFO    controller.allocation.provisioner/default       Watching for pod events {"commit": "abc12345"}
2021-11-23T04:49:05.805Z        INFO    controller.Node Added TTL to empty node ip-192-168-0-0.ec2.internal {"commit": "abc12345"}
2021-11-23T04:49:35.823Z        INFO    controller.Node Triggering termination after 30s for empty node ip-192-168-0-0.ec2.internal {"commit": "abc12345"}
2021-11-23T04:49:35.849Z        INFO    controller.Termination  Cordoned node ip-192-168-116-109.ec2.internal   {"commit": "abc12345"}
2021-11-23T04:49:36.521Z        INFO    controller.Termination  Deleted node ip-192-168-0-0.ec2.internal    {"commit": "abc12345"}

If you delete a node with kubectl, Karpenter will gracefully cordon, drain, and shut down the corresponding instance. Under the hood, Karpenter adds a finalizer to the node object, which blocks deletion until all pods are drained, and the instance is terminated.

Things to Know
Here are a couple of things to keep in mind about Kapenter features:

Accelerated Computing: Karpenter works with all kinds of Kubernetes applications, but it performs particularly well for use cases that require rapid provisioning and deprovisioning large numbers of diverse compute resources quickly. For example, this includes batch jobs to train machine learning models, run simulations, or perform complex financial calculations. You can leverage custom resources of nvidia.com/gpu, amd.com/gpu, and aws.amazon.com/neuron for use cases that require accelerated EC2 instances.

Provisioners Compatibility: Kapenter provisioners are designed to work alongside static capacity management solutions like Amazon EKS managed node groups and EC2 Auto Scaling groups. You may choose to manage the entirety of your capacity using provisioners, a mixed model with both dynamic and statically managed capacity, or a fully static approach. We recommend not using Kubernetes Cluster Autoscaler at the same time as Karpenter because both systems scale up nodes in response to unschedulable pods. If configured together, both systems will race to launch or terminate instances for these pods.

Join our Karpenter Community
Karpenter’s community is open to everyone. Give it a try, and join our working group meeting, or follow our roadmap for future releases that interest you. As I said, we welcome any contributions such as bug reports, new features, corrections, or additional documentation.

To learn more about Karpenter, see the documentation and demo video from AWS Container Day.

Channy

New – AWS Marketplace for Containers Anywhere to Deploy Your Kubernetes Cluster in Any Environment

Post Syndicated from Channy Yun original https://aws.amazon.com/blogs/aws/new-aws-marketplace-for-containers-anywhere-to-deploy-your-kubernetes-cluster-in-any-environment/

More than 300,000 customers use AWS Marketplace today to find, subscribe to, and deploy third-party software packaged as Amazon Machine Images (AMIs), software-as-a-service (SaaS), and containers. Customers can find and subscribe containerized third-party applications from AWS Marketplace and deploy them in Amazon Elastic Container Service (Amazon ECS) and Amazon Elastic Kubernetes Service (Amazon EKS).

Many customers that run Kubernetes applications on AWS want to deploy them on-premises due to constraints, such as latency and data governance requirements. Also, once they have deployed the Kubernetes application, they need additional tools to govern the application through license tracking, billing, and upgrades.

Today, we announce AWS Marketplace for Containers Anywhere, a set of capabilities that allows AWS customers to find, subscribe to, and deploy third-party Kubernetes applications from AWS Marketplace on any Kubernetes cluster in any environment. This capability makes the AWS Marketplace more useful for customers who run containerized workloads.

With this launch, you can deploy third party Kubernetes applications to on-premises environments using Amazon EKS Anywhere or any customer self-managed Kubernetes cluster in on-premises environments or in Amazon Elastic Compute Cloud (Amazon EC2), enabling you to use a single catalog to find container images regardless of where they eventually plan to deploy.

With AWS Marketplace for Containers Anywhere, you can get the same benefits as any other products in AWS Marketplace, including consolidated billing, flexible payment options, and lower pricing for long-term contracts. You can find vetted, security-scanned, third-party Kubernetes applications, manage upgrades with a few clicks, and track all licenses and bills. You can migrate applications between any environment without purchasing duplicate licenses. After you have subscribed to an application using this feature, you can migrate your Kubernetes applications to AWS by deploying the independent software vendor (ISV) provided Helm charts onto their Kubernetes clusters on AWS without changing their licenses.

Getting Started with AWS Marketplace for Containers Anywhere
You can get started by visiting AWS Marketplace. Easily search in Delivery methods in all products, then filter Helm Chart in the catalog to find Kubernetes-based applications that they can deploy on AWS and on premises.

If you chose to subscribe to your favorite product, you would select Continue to Subscribe.

Once you accept the seller’s end user license agreement (EULA), select Create Contract and Continue to Configuration.

You can configure the software deployment using the dropdowns. Once Fulfillment option and Software Version are selected, choose Continue to Launch.

To deploy on Amazon EKS, you have the option to deploy the application on a new EKS cluster or copy and paste commands into existing clusters. You can also deploy into self-managed Kubernetes in EC2 by clicking on the self-managed Kubernetes option in the supported services.

To deploy on-premises or in EC2, you can select EKS Anywhere and then take an additional step to request a license token on the AWS Marketplace launch page. You will then use commands provided by AWS Marketplace to download container images, Helm charts from the AWS Marketplace Elastic Container Registry (ECR), the service account creation, and the token to apply IAM Roles for Service Accounts on your EKS cluster.

To upgrade or renew your existing software licenses, you can go to the AWS Marketplace website for a self-service upgrade or renewal experience. You can also negotiate a private offer directly with ISVs to upgrade and renew the application. After you subscribe to the new offer, the license is automatically updated in AWS License Manager. You can view all the licenses you have purchased from AWS Marketplace using AWS License Manager, including the application capabilities you’re entitled to and the expiration date.

Launch Partners of AWS Marketplace for Containers Anywhere
Here is the list of our launch partners to support an on-premises deployment option. Try them out today!

  • D2iQ delivers the leading independent platform for enterprise-grade Kubernetes implementations at scale and across environments, including cloud, hybrid, edge, and air-gapped.
  • HAProxy Technologies offers widely used software load balancers to deliver websites and applications with the utmost performance, observability, and security at any scale and in any environment.
  • Isovalent builds open-source software and enterprise solutions such as Cilium and eBPF solving networking, security, and observability needs for modern cloud-native infrastructure.
  • JFrog‘s “liquid software” mission is to power the world’s software updates through the seamless, secure flow of binaries from developers to the edge.
  • Kasten by Veeam provides Kasten K10, a data management platform purpose-built for Kubernetes, an easy-to-use, scalable, and secure system for backup and recovery, disaster recovery, and application mobility.
  • Nirmata, the creator of Kyverno, provides open source and enterprise solutions for policy-based security and automation of production Kubernetes workloads and clusters.
  • Palo Alto Networks, the global cybersecurity leader, is shaping the cloud-centric future with technology that is transforming the way people and organizations operate.
  • Prosimo‘s SaaS combines cloud networking, performance, security, AI powered observability and cost management to reduce enterprise cloud deployment complexity and risk.
  • Solodev is an enterprise CMS and digital ecosystem for building custom cloud apps, from content to crypto. Get access to DevOps, training, and 24/7 support—powered by AWS.
  • Trilio, a leader in cloud-native data protection for Kubernetes, OpenStack, and Red Hat Virtualization environments, offers solutions for backup and recovery, migration, and application mobility.

If you are interested in offering your Kubernetes application on AWS Marketplace, register and modify your product to integrate with AWS License Manager APIs using the provided AWS SDK. Integrating with AWS License Manager will allow the application to check licenses procured through AWS Marketplace.

Next, you would create a new container product on AWS Marketplace with a contract offer by submitting details of the listing, including the product information, license options, and pricing. The details would be reviewed, approved, and published by AWS Marketplace Technical Account Managers. You would then submit the new container image to AWS Marketplace ECR and add it to a newly created container product through the self-service Marketplace Management Portal. All container images are scanned for Common Vulnerabilities and Exposures (CVEs).

Finally, the product listing and container images would be published and accessible by customers on AWS Marketplace’s customer website. To learn more details about creating container products on AWS Marketplace, visit Getting started as a seller and Container-based products in the AWS documentation.

Available Now
The feature of AWS Marketplace for Containers Anywhere is available now in all Regions that support AWS Marketplace. You can start using the feature directly from the product of launch partners.

Give it a try, and please send us feedback either in the AWS forum for AWS Marketplace or through your usual AWS support contacts.

Channy

Announcing AWS Data Exchange for APIs: Find, Subscribe to, and Use Third-party APIs with Consistent Authentication

Post Syndicated from Alex Casalboni original https://aws.amazon.com/blogs/aws/data-exchange-for-apis-find-subscribe-use-third-party-apis-consistent-authentication/

Data is at the center of many processes and products, whether it’s a large-scale dataset used to train machine learning models, a relational database, or an API-based integration. AWS Data Exchange lets you discover, subscribe to, and use hundreds of file-based datasets via Amazon Simple Storage Service (Amazon S3) offered by third parties such as Reuters, Foursquare, Change Healthcare, Vortexa, IMDb, and many more. Additionally, AWS Data Exchange for Amazon Redshift makes it even easier to ingest third-party data in your Amazon Redshift data warehouse, without any manual processing or transformation.

However, in many cases your data projects require more than static datasets because you need frequent and synchronous retrieval of small amounts of information – for example, you might need to fetch a stock price every hour. Data APIs let you answer specific questions quickly and without having to build ad-hoc data pipelines to ingest, process, and analyze bulk datasets. But each API provider has its own ease of use, SDK, documentation, and authentication mechanisms, which makes this harder than it needs to be.

Today, I’m happy to announce the general availability of AWS Data Exchange for APIs, a new capability that lets you find, subscribe to, and use third-party APIs with a consistent access using AWS SDKs, as well as consistent AWS-native authentication and governance. This simplifies the lives of developers and IT administrators who have to integrate and secure the access to multiple third-party APIs.

Now you can make RESTful or GraphQL API calls directly to AWS Data Exchange and receive synchronous responses that contain the information you need, using the AWS SDK in the programming language of your choice. We take care of integrating with the API provider, implementing proper authentication, managing the API subscription, and ensuring charges appear on your AWS bill. You can manage API access centrally with AWS Identity and Access Management (IAM).

As a data provider, you make your API discoverable by millions of AWS customers by listing it in the AWS Data Exchange catalog using an OpenAPI specification and fronting it with an Amazon API Gateway endpoint.

AWS Data Exchange for APIs in Action
First, I look for an API product in the AWS Data Exchange catalog, review its subscription terms, support information, and auto-renewal. Each API product might include multiple public or private subscription offers and periods.

I select Subscribe and a couple of minutes later I’m successfully subscribed.

Within the API product, I select an entitled data set and its latest revision.

Each API revision contains one or more API assets that correspond to a specific API endpoint and a unique Asset ARN.

AWS Data Exchange takes care of invoking API endpoints with the correct authentication.

All I need to do is check the Integration notes, which include instructions and code snippets based on the AWS Command Line Interface (CLI).

Of course, I could implement the very same API call with my favorite programming language using one of the AWS SDKs.

For example, here’s how I’d implement a simple wrapper function in Python:

import json
import urllib
import boto3

adx = boto3.client('dataexchange')

def get_api_response(path, method="GET", querystring={}, headers={}, body={}):
    return adx.send_api_asset(
        DataSetId="4b3fbabc31171662851531b8576a3411",
        RevisionId="e8e78e921af12c76499edc40f92e3082",
        AssetId="557d858c317efdfb5b6c9a2860ec4a03",
        Method=method,
        Path=path,
        QueryStringParameters=urllib.urlencode(querystring),
        RequestHeaders=urllib.urlencode(headers),
        Body=json.dumps(body),
    )

Please note that there are no hard-coded credentials in the code above because all the authorization happens via AWS Identity and Access Management (IAM).

And that’s how you make your first API call via AWS Data Exchange for APIs.

Available Today
AWS Data Exchange for APIs is generally available in all AWS Regions where AWS Data Exchange is available. We’re looking forward to helping you simplify and centralize the management and governance of third-party APIs while we take care of the undifferentiated heavy lifting for you.

Today you can start integrating third-party APIs such as Infutor, Variety Business Intelligence, IMDb, PeopleDataLabs, Neustar, Experian, Foursquare, PredictHQ, WeatherTrends International, and many more.

If you’re a developer, check out the new AWS Data Exchange for APIs documentation to learn more about subscribing and using APIs. If you’re an API provider, check out the new publishing documentation to learn more about publishing new APIs on the AWS Data Exchange catalog.

Alex

The collective thoughts of the interwebz