Post Syndicated from original https://xkcd.com/2791/
.")
Post Syndicated from original https://xkcd.com/2791/
Post Syndicated from original https://lwn.net/Articles/935083/
The 6.4-rc7 kernel prepatch is out for
testing. “Nothing particular stands out in the rc this week,
”
unless you count the mptcp selftest changes that are about making the tests
work on stable kernels too.
Post Syndicated from Sam Marsh original http://blog.cloudflare.com/welcome-to-speed-week-2023/


What we consider ‘fast’ is changing. In just over a century we’ve cut the time taken to travel to the other side of the world from 28 days to 17 hours. We developed a vaccine for a virus causing a global pandemic in just one year – 10% of the typical time. AI has reduced the time taken to complete software development tasks by 55%. As a society, we are driven by metrics – and the need to beat what existed before.
At Cloudflare we don't focus on metrics of days gone by. We’re not aiming for “faster horses”. Instead we are driven by questions such as “What does it actually look like for users?”, “How is this actually speeding up the Internet?”, and “How does this make the customer faster?”.
This innovation week we are helping users measure what matters. We will cover a range of topics including how we are fastest at Zero Trust, have the fastest network and a deep dive on cache purge and why global purge latency mightn’t be the gold star it's made out to be. We’ll also cover why Time to First Byte is generally a bad measurement. And what you should care about instead.
Woven amongst these topics are a number of great new products and features that genuinely make you and your customers faster. From API acceleration and end-to-end Brotli 11 compression, to reducing page load times by 30% with one-click. Plus a brand new home for application performance.
This week we will help you measure what matters. We’ll help you gain insight into your performance, from Zero Trust and API’s to websites and applications. And finally we’ll help you get faster. Quickly.
We are proving we are the fastest at what we do. And we are making it as easy as possible for our users to attain those numbers.
Welcome to Speed Week.
You don't have to go far in the real world to find examples of highly-touted metrics that likely don't capture what you really care about.
If you read the announcements each year you’d be forgiven for believing smartphones have devolved into cameras with apps and an antenna. With each new model announced the press releases reference megapixel improvements between the previous and latest model.
The number of megapixels alone does not guarantee better image quality. Factors such as sensor size, lens quality, image processing algorithms, and low-light performance also play significant roles in determining the overall camera performance. This has been a widely accepted view for over a decade now, so why do companies keep pushing it as a metric – and why do users feel it's important?
Similarly, marketing collateral from Internet Service Providers would have you believe that “bandwidth is king”.
However it has been categorically proven that bandwidth is not the sole indicator of speed. Just two months ago we published a blog on “Making home Internet faster has little to do with speed”, concluding “While bandwidth plays a part, the latency of the connection – the real Internet “speed” – is more important”. The post references a recent paper by two researchers from MIT which supports this point, showing the point of diminishing returns is around 20Mbps for when more bandwidth doesn't mean a webpage loads much faster.
Again, the advertised, and generally accepted comparison metric amongst consumers, is incorrect. More bandwidth does not equal faster Internet speeds.
Simply put – are you really measuring what matters to you when reviewing your product choices and vendors? Or on reflection have your choices been influenced by dogma for far too long?
Similarly to the smartphone and ISP industries, we at Cloudflare operate in industries where users often compare us against competitors using metrics that likely don't measure what matters to them.
Large enterprises use software to selectively shift traffic between Content Delivery Networks (CDNs) based on the lowest possible Time to First Byte (TTFB) score per region. This means if Cloudflare suddenly were to cut its TTFB in half in Africa, for example, we could see a huge influx of traffic in this region from these enterprise customers – likely not doing anything to improve the actual visitor experience of a website.
TTFB is often used as a measure of how quickly a web server responds to a request and common web testing services report it. The faster it is the better the web server (in theory). We have known for years, however, that TTFB is not on its own a fair reflection of real world performance.
Receiving the first byte isn't sufficient to determine a good end user experience as most pages have additional render blocking resources that get loaded after the initial document request. TTFB does not take into account multiplexing benefits of HTTP/2 and HTTP/3 which allow browsers to load files in parallel. It also doesn't account for features like Early Hints, Zaraz, Rocket Loader, HTTP/2 and soon HTTP/3 Prioritization which eliminate render blocking.
As Sitespect wrote last year, “TTFB is a measure of how fast a web server is able to respond to a request, and how long it takes for that request to traverse various layers of networking to reach a user’s browser. It is a measure of speed for delivery of content, but it is not a measurement for how long end-users are effectively waiting before they can start interacting with your website. TTFB completely ignores everything that happens after that network layer: loading, downloading of resources, rendering, etc. In other words, TTFB is not a user-centric measurement, it’s a networking measurement.”.
At Cloudflare we are all-in on Real User Monitoring (RUM) as the future of website performance. We’re investing heavily in it – both from an observation point of view and from an optimization one also. This week we will be releasing a series of new products aimed at helping users understand the actual experience of their end users (i.e. website visitors), and provide suggestions on how to improve it.
For those unfamiliar with RUM, we typically optimize websites for three main metrics – known as the “Core Web Vitals”. This is a set of key metrics which are believed to be the best and most accurate representation of a poorly performing website vs a well performing one. These key metrics are Largest Contentful Paint, First Input Delay and Cumulative Layout Shift.
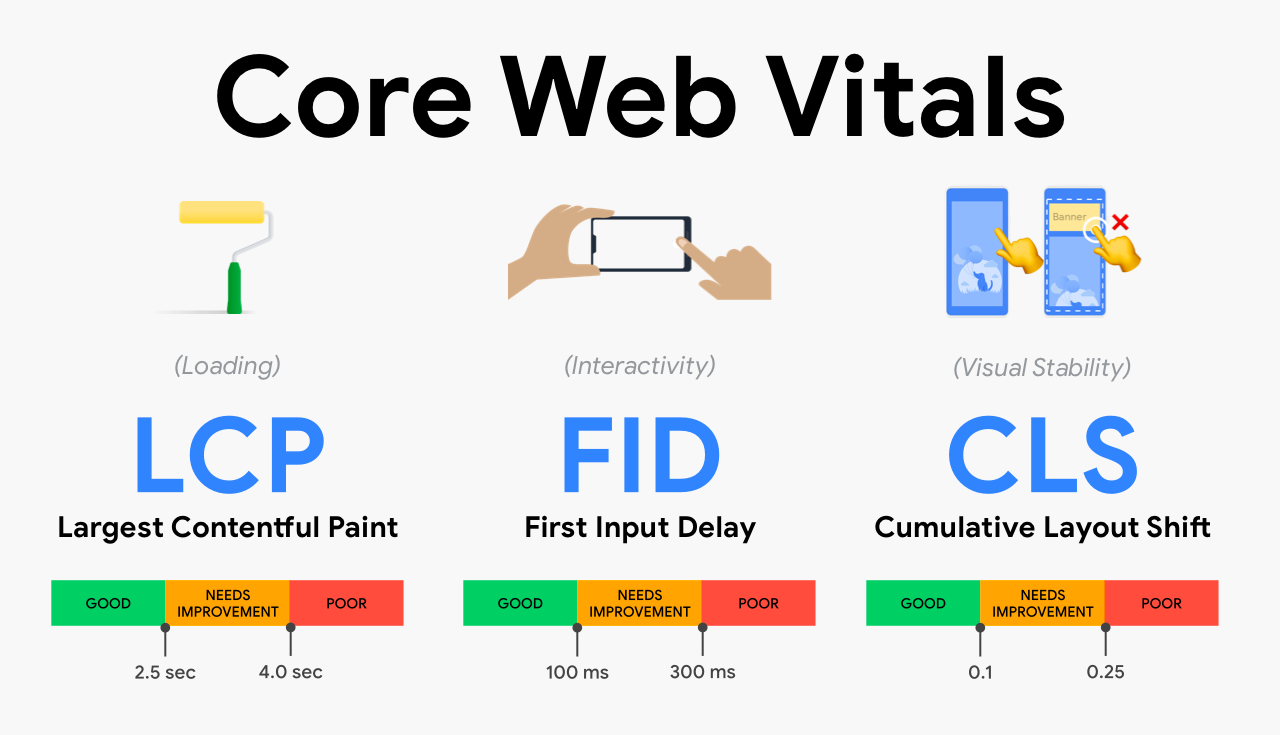
LCP measures loading performance; typically how long it takes to load the largest image or text block visible in the browser. FID measures interactivity. For example, the time between when a user clicks or taps on a button to when the browser responds and starts doing something. Finally, CLS measures visual stability. A good, or bad example of CLS is when you go to a website on your mobile phone, tap on a link and the page moves at the last second meaning you tap something you didn't want to. That would be a lower CLS score as its poor user experience.
Looking at these metrics gives us a good idea of how the end user is truly experiencing your website (RUM) vs. how quickly the nearest Cloudflare data center begins to return data (TTFB).
The other benefit of Real User Monitoring is it includes the speed advantage of new protocols and features designed to improve the customer experience. For example, Time to First Byte is a single connection between the client and the nearest Cloudflare server. This is nothing like how a web browser connects to a website, which uses multiplexing to fetch multiple files at the same time in parallel. There are also products like Early Hints which are designed to take advantage of the “server think time” to send instructions to the browser to begin loading readily-available resources while the server finishes compiling the full response.
In Speed Week we will be going deep into why TTFB is a bad metric to care about for websites and web applications, why RUM is the future, and a blog post on the latest Core Web Vital – “Interaction to Next Paint” (INP), and what it means to you as a business.
We will also be unveiling a brand-new product which will be the new home of application performance on Cloudflare. The new product will augment synthetic tests from various global locations with real user monitoring data to give administrators the best possible understanding of how their website is performing in the real world. This product will be available for all plan levels.
It's no secret that Cloudflare is fast.
However it might not be obvious to the everyday reader just how fast we are, and in just how many areas. Fastest compute. Fastest DNS. Fastest network. Fastest Zero Trust Network Access (ZTNA). Fastest Secure Web Gateway (SWG). Fastest object storage. And we’re finding areas we are not empirically the fastest and looking to prove we are number one.
We’re also finding ways to migrate customers from legacy providers and applications to Cloudflare as fast as possible. These legacy vendors have locked in companies using confusing terminology and esoteric features, trapping them on sub-par products and making them too afraid to move away. We’re helping those customers escape. Super Slurper helps customers move away from S3, Turpentine helps migrate legacy VCL setups to Cloudflare, and our Descaler program helps to migrate customers from Zscaler to Cloudflare in a matter of hours. We are building tools and products to help those customers who want to move to the fastest network but are locked in.
In Speed Week we’ll cover the latest on these programs and how we are relentlessly pushing to make the migration process as quick and easy as possible for customers who want to move to Cloudflare and put their business on the fastest network around.
Generally when you hear of performance improvements it's typically through the lens making websites faster. But speed comes in many forms. Take Zero Trust as an example.
Measuring Zero Trust performance matters because it impacts your employees' experience and their ability to get their job done. Whether it’s accessing services through access control products, connecting out to the public Internet through a Secure Web Gateway, or securing risky external sites through Remote Browser Isolation, all of these experiences need to be frictionless. But what if your company's Secure Web Gateway is in London and you are in Johannesburg? This can mean a painful, slow, and frustrating employee experience whilst they wait for traffic to be sent to and from London. Slack becomes slow. Zoom becomes slow. Employees become frustrated.
The bigger concern, however, is not knowing of these performance issues. For example, if each of your employees are physically located in an office and the connection to critical business systems like Salesforce or Workday worsens, the likelihood is it will become evident quickly. But what about in a remote workforce with employees globally distributed? As a business, you need the ability to understand how your employees are experiencing critical business systems and identify any connection and performance issues they may be experiencing to ensure they get addressed quickly. In Speed Week we’ll unveil our latest Zero Trust offering which will give CIOs and businesses incredible insight into the performance experience of their workforce.
Speed Week will show Cloudflare is the fastest Zero Trust provider. Our analysis will provide updated benchmark comparisons and include additional competitors to show how we outperform everyone to give employees the fastest Zero Trust experience.
Another area we will shine a spotlight on this week is cache purge. When you think of CDNs it's common to look at them as a large distributed cache. Visitor-requested files are retrieved from an origin and stored on globally distributed CDN servers. This allows visitors to download the file in the quickest possible time by retrieving it from their nearest Cloudflare data center rather than having to traverse the Internet to and from the origin. TTFB will measure the time taken to receive a single file from the nearest location. RUM will measure the time it takes to receive multiple files, cached and uncached, and put them together into the webpage requested. But what about when the file changes on origin?
In the scenario where a business is hosting a pricebook as a downloadable file on its website, it is very important to understand how long it takes to remove old copies from Cloudflare cache to ensure customers don't see incorrect prices. This is where measuring cache purge times becomes important. The time taken to remove the invalidated file (old file) from every server in every data center in the CDN is known as the ‘global purge time’. In Speed Week we will explain how we have built our new cache purge architecture to be lightning-fast and what the performance numbers are as a result (spoiler: they are insanely fast).
These are just a few examples of what we have in store for the week. We also have blogs on AI, API acceleration, developer platform, networking, protocols, compression, streaming, UI optimization and more.
At Cloudflare we put performance at the heart of everything we do.
Make sure to follow the Cloudflare blog and social media accounts for all of the week's news, and join us on Cloudflare TV each day for a live discussion of the day's announcements.
Welcome to Speed Week.
Post Syndicated from Talks at Google original https://www.youtube.com/watch?v=7izkGKB0rCM
Post Syndicated from Bryan Young original https://www.servethehome.com/horaco-8-port-2-5gbe-and-1-port-10gbe-sub-100-switch-review/
We review the Horaco 8-port 2.5GbE and 1-port 10GbE switch, one of the lowest power and cheapest on the market to see if it is worth it
The post Horaco 8-port 2.5GbE and 1-port 10GbE Sub $100 Switch Review appeared first on ServeTheHome.
Post Syndicated from Bozho original https://blog.bozho.net/blog/4106
През 2015 г. електронното управление е доникъде. Е-услуги имат общо взето само НАП (такива, които се ползват, имам предвид), а служебното събиране на данни между администтациите, предвидено още от 2009 г. в закона почти не се случва.
Министерство на транспорта е възложило изграждане на система за обмен на данни между системи и регистри (RegiX). Но тя не е заработила на практика и няма изглед да заработи, защото администрациите отказват да го ползват – бил „незаконен“. Дори в случаите, в които някой се престраши, най-важните първични администратори – ГРАО и МВР изискват сключване на тристранни споразумения и масово отказват достъп по своя преценка.
Тогава правим две изменения, които да отключат процеса – в Закона за електронното управление забраняваме допълнителните споразумения, а в наредбата към него уреждаме използването на системата за обмен на данни като един от възможните начини за служебно събиране на данни.
Оттогава служебният обмен расте всеки месец и на гражданите се спестяват някои „разходки“. Но докато вече всичко по обмена на данни е ясно и макар администрациите да го ползват, те продължават да искат удостоверения и бележки, защото казват „в нашия закон пише, че трябва да съберем тези данни от заявителя“.
Затова в следващите седмици ще гласуваме следващата стъпка – приравняване на служебната справка на предоставени от заявителя удостоверения, така че дори в някой закон и наредба да пише „представя удостоверение“, това да не е пречка пред спестяването на административната тежест. Не само това, а въвеждаме удостоверяване на тези справки с електронен печат, за да няма оправдания „аз как да знам, че тези електронни данни са истински“.
Даволът е в детайлите – и техническите, и нормативните, и организационно-човешките. И една от причините да съм в парламента е, че такива детайли там има всяка седмица, а за да има електронно управление по сектори, понякога зависи от две алинеи и даже от две думи.
Материалът Служебен обмен на данни в електронното управление е публикуван за пръв път на БЛОГодаря.
Post Syndicated from Matt Granger original https://www.youtube.com/watch?v=SE1o1-p-xUI
Post Syndicated from Explosm.net original https://explosm.net/comics/baby-hitler
New Cyanide and Happiness Comic
Post Syndicated from Oglaf! -- Comics. Often dirty. original https://www.oglaf.com/brain-teaser/


Post Syndicated from Patrick Kennedy original https://www.servethehome.com/sth-weekly-newsletter-you-want-to-subscribe-in-q2-2023/
Subscribe to our weekly newsletter to stay up to date on the latest reviews and coverage from STH delivered each weekend to your inbox
The post STH Weekly Newsletter You Want to Subscribe in Q2 2023 appeared first on ServeTheHome.
Post Syndicated from Techmoan original https://www.youtube.com/watch?v=tFFMoWSjxcI
Post Syndicated from Йовко Ламбрев original https://www.toest.bg/sedmitsata-12-17-june/

Според теорията на преговорите една от най-устойчивите сделки е тази, при която всички са малко недоволни. Парадокс на нашата действителност е, че най-често недоволството е в повече. Навсякъде.
Та с много изначално недоволство и последвали престъргвания и поскърцвания новото българско правителство избута първата си седмица. И повече от очевидно е, че никой не възнамерява да му остави 100 дни комфорт. Бесовете и сенките в българската политика не са се укротили, даже напротив. Особено озверяха след този ход, който очевидно обърка доста планове. Едно със сигурност е ясно – разместването на пластовете ще е придружено с още трусове. И жертви… В този ред на размисли първата седмица на кабинета „Денков“ се оказа последната на Иван Гешев като главен прокурор.
За тези и други важни теми от изминалата седмица прочетете в анализа на Емилия Милчева, озаглавен „Залезът на българските божества“.
Но докато сме на темата с бесовете, да не пропуснем нещо важно. В българския обществен живот винаги е имало субекти, които тровят ежедневието и се захранват с внимание, създавайки скандали. Напоследък в тази токсична роля е „Възраждане“, чиито активисти през седмицата се опитаха да спретнат шумно „аутодафе“ на филм в София и Пловдив. С хомофобски аргументи. И с фашистки подход.
С риск да захраним тази формация с още малко внимание, повече от наложителни са институционални мерки срещу нея. Отговорност на медиите, особено националните, е да поспестят безкритично отворените микрофони, които така щедро ѝ предоставят. Различната гледна точка невинаги заслужава внимание. И сме длъжни да я заглушим и да ѝ се противопоставим фронтално, ако пропагандира омраза. Нека не се заблуждаваме, че късопишещите ще водят някакви площадни битки в София – тяхната борба е за съзнанията на хората в периферията.
Това беше само началото. Там, където горят книги, по-късно ще горят и хора.
Хайнрих Хайне
На темата с разцвета и институционализирането на хомофобията, а и на антиевропейската пропаганда в най-общ план в България е посветен и материалът на Светла Енчева „Еврото ли ще е следващият „джендър“?
И като заговорихме за отговорността на националните медии, ето какво е написал във Facebook профила си дългогодишният водещ по БНР Петър Волгин на 1 февруари т.г., в Деня за почит към жертвите на комунизма: „Достатъчно е да погледаш само десетина минути някой нахален и неумен богаташ като Хампарцумян, за да разбереш защо е трябвало да има Народен съд.“
По повод тези думи 102-годишна жена е завела гражданско дело срещу журналиста за нанесени неимуществени вреди, изразяващи се в „душевни болки и страдания“, съобщава Клуб Z. Столетницата е загубила съпруга си по време на т.нар. Народен съд през 1944 г., когато той и всички първенци от селото им „са били убити и хвърлени в масов гроб без съд, без присъда и без каквото и да е деяние от тях, освен че са изпълнили дълга си да се явят на повикватeлна в армията“. Две години по-късно той е обявен за „безследно изчезнал“. Тя остава сама с двегодишния им син. Животът на двамата по време на комунистическия режим е тежък, на сина ѝ не е позволено да учи в университет, семейството е считано за „врагове на народа“ и е следено от Държавна сигурност.
Когато дойдоха промените, се надявах, че ще има някаква справедливост за жертвите на комунизма. И ако не извинение от палачите и техните наследници, то поне признание от обществото, че това, което ни е било причинено, е несправедливо, нечовешко и жестоко. За съжаление, в обществото са налице противоположни мнения, като все по-гласовити стават някои граждани, които не само че не признават престъпния характер на комунистическия режим, но дори го и възхваляват.
„Във времена, в които бъдещето на демокрацията в България изглежда объркано и все по-обвързано със съдебната система, има едно място, където правораздаването се пресича с архитектурата, при това буквално“, пише Анета Василева в новата си статия за „Тоест“, която е посветена на състоянието на затворите и условията, в които живеят лишените от свобода. Един прелюбопитен материал за властта на пространството и как пространствата всъщност формират хората. Не го пропускайте!
Сред любимите ми рубрики в „Тоест“ е „Научни новини“, водена от Михаил Ангелов. А тазседмичната му статия е една от най-интересните в поредицата. В нея ще прочетете как с помощта на вирус и генна модификация може да се постигне контрол над популацията на бездомните котки, какво сънуват гълъбите, как с нови технологии се осигурява възможност за успешна сърдечна трансплантация дори от донор, чието кръвообращение е спряло, и как т.нар. изкуствен интелект помага за усъвършенстване на някои от базовите изчислителни задачи.
Завършваме седмицата с хубава книга. В рубриката „По буквите“ Зорница Христова реши да ни изненада с българския превод на стихосбирката на Ю Дзиен „Давам име на една врана“. Да оставим настрани факта, че рядко до четящите българи достига китайска литература, а още по-малко поезия. Още по-ценното е, че имаме възможност да прочетем един съвременен китайски поет, пишещ по актуалните теми от ежедневието, извън географските дистанции. Както казва Зорница,
не бива да гледаме на поезията на Ю Дзиен като на реалистична поезия, тоест като описваща реалността. Тя е по-скоро хипнотизирана от пълнокръвието на света, от изобилието на случващото се в него и описва именно този свой захлас.
Приятно четене!
Post Syndicated from Explosm.net original https://explosm.net/comics/hitlers-dad
New Cyanide and Happiness Comic
Post Syndicated from Bruce Schneier original https://www.schneier.com/blog/archives/2023/06/friday-squid-blogging-squid-can-edit-their-rna.html
This is just crazy:
Scientists don’t yet know for sure why octopuses, and other shell-less cephalopods including squid and cuttlefish, are such prolific editors. Researchers are debating whether this form of genetic editing gave cephalopods an evolutionary leg (or tentacle) up or whether the editing is just a sometimes useful accident. Scientists are also probing what consequences the RNA alterations may have under various conditions.
I sometimes think that cephalopods are aliens that crash-landed on this planet eons ago.
Another article.
As usual, you can also use this squid post to talk about the security stories in the news that I haven’t covered.
Read my blog posting guidelines here.
Post Syndicated from Alan David Foster original https://blog.rapid7.com/2023/06/16/metasploit-weekly-wrap-up-15/

In honor of Metasploit’s 20th anniversary, Rapid7 is launching special edition t-shirts – and we’re inviting members of our community to have a hand in its creation. The contest winner will have their design featured on the shirts, which will then be available to pick up at Black Hat 2023.
We will be accepting submissions from now through June 30! Contest details, design guidelines, and submission instructions here
Authors: Aaron Meese and Jamie Hill-Daniel
Type: Auxiliary
Pull request: #17670 contributed by ajmeese7
AttackerKB reference: CVE-2019-16328
Description: Adds a new rpyc_rce module to exploit CVE-2019-16328 and achieve remote command execution as the vulnerable server’s service user.
Authors: Malayke and h00die
Type: Auxiliary
Pull request: #18075 contributed by h00die
Description: This PR adds a version scanner for Apache RocketMQ.
Authors: Justin Fatuch Apt4hax, Robert Bronstein, and Steve Campbell
Type: Exploit
Pull request: #18077 contributed by sdcampbell
AttackerKB reference: CVE-2022-40022
Description: This adds an exploit for Symmetricom SyncServer appliances (S100-S300 series) vulnerable to an unauthenticated command injection in the hostname parameter in a request to the /controller/ping.php endpoint. The command injection vulnerability is patched in the S650 v2.2. Requesting the endpoint will result in a redirect to the login page; however, the command will still be executed, resulting in RCE as the root user.
Authors: IHTeam and h00die-gr3y
Type: Exploit
Pull request: #18063 contributed by h00die-gr3y
AttackerKB reference: CVE-2020-28188
Description: This adds an exploit for TerraMaster NAS devices running TOS 4.2.06 or prior. The logic in include/makecvs.php permits shell metacharacters through the Event parameter in a GET request, permitting the upload of a webshell without authentication. Through this, an attacker can achieve remote code execution as the user running the TOS web interface.
Authors: h00die-gr3y and n0tme
Type: Exploit
Pull request: #18070 contributed by h00die-gr3y
AttackerKB reference: CVE-2021-45841
Description: This exploits a series of vulnerabilities including session crafting and command injection in TerraMaster NAS versions 4.2.15 and below to achieve unauthenticated RCE as the root user.
Authors: 0xf4n9x, Octagon Networks, and h00die-gr3y
Type: Exploit
Pull request: #18086 contributed by h00die-gr3y
AttackerKB reference: CVE-2022-24989
Description: This exploits an administrative password leak and command injection vulnerability on TerraMaster devices running TerraMaster Operating System (TOS) versions 4.2.29 and below to achieve unauthenticated RCE as the root user.
Author: sf
Type: Exploit
Pull request: #18016 contributed by sfewer-r7
AttackerKB reference: CVE-2023-28771
Description: This adds an exploit for CVE-2023-28771 which is a remote, unauthenticated OS command injection in IKE service of several Zyxel devices. Successful exploitation results in remote command execution as the root user.
Authors: 14m3ta7k, 4ra1n, and Grant Willcox
Type: Exploit
Pull request: #17946 contributed by gwillcox-r7
AttackerKB reference: CVE-2023-21839
Description: This adds an exploit for CVE-2023-21839 which is an unauthenticated RCE in Oracle Weblogic. Successful exploitation results in remote code execution as the oracle user.
Author: Spencer McIntyre
Type: Payload
Pull request: #18084
Description: Fetch and execute a x86 payload from an HTTP server. These modules were developed live on stream. Fetch based payloads offer a shorter path from command injection to a Metasploit session
Authors: Daniel López Jiménez (attl4s) and Simone Salucci (saim1z)
Type: Post
Pull request: #18022 contributed by attl4s
Description: This adds the post/windows/manage/make_token module which is capable of creating new tokens from known credentials and then setting them in a running instance of Meterpreter, which can allow that session to access resources it might not have previously been able to access.
include_dirs array when using the MinGW library to compile payloads.php/reverse_php.setg SessionTLVLogging true support to no longer truncate useful values such as payload UUIDs, file paths, executed commands etc.multi/manage/shell_to_meterpreter to not break when win_transfer=VBS was set.stdapi_sys_process_memory_free command. This incorrectly handled memory, leading to a double free condition, which would crash Meterpreter. This has since been fixed.auxiliary/admin/kerberos/keytab EXPORT action will now consistently order exported entries.route or ipconfig commands.ifconfig has a gateway name as a mac address separated by dots.test/services module to more consistently pass. This module is useful for developers contributing enhancements or new functionality to Meterpreter and other payloads. It is available after running loadpath test/modules.You can always find more documentation on our docsite at docs.metasploit.com.
As always, you can update to the latest Metasploit Framework with msfupdate
and you can get more details on the changes since the last blog post from
GitHub:
If you are a git user, you can clone the Metasploit Framework repo (master branch) for the latest.
To install fresh without using git, you can use the open-source-only Nightly Installers or the
binary installers (which also include the commercial edition).
Post Syndicated from original https://lwn.net/Articles/934961/
The registration for this year’s Linux Plumbers Conference (LPC) is now open. It will be held November 13-15 in Richmond, Virginia in the US.
The attend page has all of the details. Meanwhile, some of the calls for proposals are still open, though the microconferences CFP is closed; this year’s proposed microconference topics are listed here. Those who want to attend should note:
“As usual we expect to sell our rather quickly so don’t delay your registration for too long!
”
Post Syndicated from original https://lwn.net/Articles/934692/
The bcachefs filesystem, and the
process for getting it upstream, were the topics
of a session led remotely by
Kent Overstreet, creator of bcachefs, at the
2023 Linux Storage, Filesystem,
Memory-Management and BPF Summit. He has also discussed bcachefs in
previous editions of the summit, first
in 2018 and at last year’s event;
in both of those cases, the question of getting bcachefs merged
into the mainline kernel came up, but that merge has not happened yet.
This time
around, though, Overstreet seemed
closer than ever to being ready to actually start that process.
Post Syndicated from Bruce Schneier original https://www.schneier.com/blog/archives/2023/06/security-and-human-behavior-shb-2023.html
I’m just back from the sixteenth Workshop on Security and Human Behavior, hosted by Alessandro Acquisti at Carnegie Mellon University in Pittsburgh.
SHB is a small, annual, invitational workshop of people studying various aspects of the human side of security, organized each year by Alessandro Acquisti, Ross Anderson, and myself. The fifty or so attendees include psychologists, economists, computer security researchers, criminologists, sociologists, political scientists, designers, lawyers, philosophers, anthropologists, geographers, neuroscientists, business school professors, and a smattering of others. It’s not just an interdisciplinary event; most of the people here are individually interdisciplinary.
Our goal is always to maximize discussion and interaction. We do that by putting everyone on panels, and limiting talks to six to eight minutes, with the rest of the time for open discussion. Short talks limit presenters’ ability to get into the boring details of their work, and the interdisciplinary audience discourages jargon.
For the past decade and a half, this workshop has been the most intellectually stimulating two days of my professional year. It influences my thinking in different and sometimes surprising ways 00 and has resulted in some unexpected collaborations.
And that’s what’s valuable. One of the most important outcomes of the event is new collaborations. Over the years, we have seen new interdisciplinary research between people who met at the workshop, and ideas and methodologies move from one field into another based on connections made at the workshop. This is why some of us have been coming back every year for over a decade.
This year’s schedule is here. This page lists the participants and includes links to some of their work. As he does every year, Ross Anderson is live blogging the talks. We are back 100% in person after two years of fully remote and one year of hybrid.
Here are my posts on the first, second, third, fourth, fifth, sixth, seventh, eighth, ninth, tenth, eleventh, twelfth, thirteenth, fourteenth, and fifteenth SHB workshops. Follow those links to find summaries, papers, and occasionally audio/video recordings of the sessions. Ross also maintains a good webpage of psychology and security resources.
It’s actually hard to believe that the workshop has been going on for this long, and that it’s still vibrant. We rotate between organizers, so next year is my turn in Cambridge (the Massachusetts one).
Post Syndicated from Marcia Villalba original https://aws.amazon.com/blogs/aws/how-godaddy-implemented-a-multi-region-event-driven-platform-at-scale/
GoDaddy, a leading global provider of domain registration and web hosting services, has served over 84 million domains and 22 million customers since its establishment in 1997. Among its various internal systems, the Customer Signal Platform provides tooling to capture, analyze, and act on customer and product data to drive better business outcomes. With this platform, GoDaddy can track user visits and interactions on its website and use meaningful event data to improve its customer experience and overall business performance.
Nowadays, the Customer Signal Platform processes 400 million events every day. As GoDaddy expands its integrations, it aims to increase this number to 2 billion events per day in the near future.
When building the Customer Signal Platform, GoDaddy had three main requirements for the system architecture:
Amazon EventBridge Event Bus
After evaluating many options against their requirements, GoDaddy decided to implement the customer signal platform using Amazon EventBridge Event Bus. EventBridge Event Bus is a serverless event bus that helps you receive, filter, transform, route, and deliver events. Because EventBridge is serverless, it requires minimal configuration to get started and scales automatically—GoDaddy’s first two requirements were checked.
To comply with the third requirement, the solution needed to provide business continuity and ensure that no event is lost from the moment the client produces it until it gets to the platform to be analyzed. EventBridge Event Bus comes with many features that helped GoDaddy build their application with this requirement in mind.
The main feature that GoDaddy took advantage of was global endpoints. EventBridge global endpoints provide a reliable and simple way to improve the business continuity of event-driven applications. This new feature, added in 2022, allows customers to build a multi-Region event-driven application.
EventBridge Global Endpoints
Global endpoints allow you to configure a managed DNS endpoint in EventBridge, to which your applications will send events. Then you need to configure two custom event buses in two distinct AWS Regions. One is the primary Region, and the other is the failover, or secondary Region. The failover of events is decided based on the health indicated by an Amazon Route 53 health check. When the health check is healthy, the events are routed from the global endpoint to the custom event bus in the primary Region. And if the health check is unhealthy, then the global endpoint will send the events to the event bus in the secondary Region.

The simplest configuration for global endpoints is the active/archive configuration. This configuration provides business continuity and simplicity at the same time. The active/archive configuration defines two different Regions. The primary Region is where the application is deployed and all the business processes are happening. The archive Region is where only a custom bus is deployed and all the events are archived.
In addition, there is a bidirectional replication rule between the buses in separate Regions. In the normal case, when there are no errors, whenever an event arrives at the custom bus in the primary Region, the event is automatically replicated to the archive custom bus in the secondary Region.
In the case of failover, the global endpoint redirects the events to the secondary Region, where they get archived for processing at another time.

GoDaddy Implementation of Global Endpoints
GoDaddy was looking for a solution that minimized their operations load while still providing business continuity, and that is why they adopted global endpoints and the active/archive configuration. In this way, they could have the event processing logic in their primary Region and have a secondary Region in case of any issues.
In their configuration, events are archived in the secondary Region for 30 days, after which the events expire. In the case of a failover, because they don’t need to process the events in real time, they collect them in the archive. If the issue is resolved within 24 hours, the retention period for the replication rule, the events are sent automatically to the primary Region. If the issue is solved in more than 24 hours the events need to be replayed to the primary Region.
The following image shows what their current solution looks like. They are working with two Regions. US West (Oregon) is their primary Region and is the location of the data lake, which is the primary consumer of the events. US East (N. Virginia) is the secondary Region. Events are being produced in different clients; from the clients, they are sent to Amazon API Gateway. GoDaddy deployed two API Gateways in their two Regions. The events are sent to the API Gateway with the smallest latency from the client. To do that, they use latency-based routing provided by Amazon Route 53. Then events are sent to an AWS Lambda function that validates the events and forwards them to the EventBridge global endpoint at the DNS level.

The global endpoint is configured with the active/archive setup, and the failover is configured to be triggered via a Route 53 health check that monitors an Amazon CloudWatch alarm. That alarm observes the IngestionToInvocationStartLatency metric in the primary Region.
IngestionToInvocationStartLatency is a service-level metric that exposes the time to process events from the point at which they are ingested by EventBridge to the point the first invocation of a target in the configured rules is made. This metric is measured across all the rules in your bus and provides an indication of the health of the EventBridge service. Any extended periods of high latency over 30 seconds indicate a service disruption.
When the system is in the normal state, the events are forwarded from the global endpoint to the custom ingress event bus in the primary Region. That custom event bus has replication enabled; this means that all the events that arrive at the bus get replicated automatically in the secondary Region custom ingress event bus.
All the events received by the ingress event bus are sent to the enrichment function. This function performs basic validation and authentication, and it enriches the event data to make sure that all the events from different clients are standard.
From there, the events are forwarded to the data platform event bus to be sent to the different consumer targets. The main target is their data lake solution, which analyzes all the events.
What Was the Impact?
For GoDaddy, business continuity is important, and their customer signals are not getting lost due to any issue with their platform. This makes them confident that they can expand their customer signal platforms from 400 million events per day to 2 billion events per day without introducing any additional operations overhead.
Now, they can confidently process hundreds of millions of events per day to their system, and they can keep on growing. The following image shows the number of events ingested by global endpoints in a normal day.

While GoDaddy’s use of the active/archive pattern enables them to ensure they never lose any events, they’re already starting to see certain use cases where they want to minimize any delays in processing their events, even when service disruptions occur. Because they’re already replicating their events to a secondary Region, they can deploy their most critical consumers to both Regions and enable an active/active configuration for their mission-critical systems. Active/active configuration allows you to process parallel events in both the primary and secondary Regions, simplifying the processing of events even during disruptions and enabling business continuity.
The vision when building the Customer Signal Platform was to align with GoDaddy’s high bar for reliability, scalability, and maintainability and, at the same time, keep the platform self-service so that developers can focus on business needs. This led GoDaddy to choose Amazon EventBridge global endpoints and serverless technologies to build this solution.
GoDaddy Customer Signal Platform is an excellent example of what serverless technologies enable. By leveraging the cloud to handle as much of the undifferentiated heavy lifting as possible, GoDaddy has reduced the operational complexity of setting up an event bus for a multi-Region strategy, implemented failover mechanisms in the case of Regional distruptions, and ensured that events are not lost by enabling replication. Global endpoints active/archive configuration improves the availability of customer applications with the least amount of configuration changes.
If you want to get started with EventBridge global endpoints, you can check out this talk on event-driven applications. For a working demo on how to use EventBridge global endpoints for failover events, check out this Serverless Land repository.
— Marcia
Post Syndicated from Екип на Биволъ original https://bivol.bg/bobi-vilata-prolesha.html

Новоизбраният и.ф. главен прокурор Борислав Сарафов е бил следовател по шумно дело за тежко хулиганство, изтезания и изнудване срещу бизнесмен от Божурище, който обаче се измъква с условна присъда. Години…