Intel posts a new “Xe” graphics driver

Post Syndicated from original https://lwn.net/Articles/918469/

Intel’s graphical processors have been well supported in the mainline for
years, but it seems that the i915 driver may be approaching the end of its
development life. Matthew Brost has just posted a new
driver called “Xe”
that looks to be (eventually) a replacement for
i915:

The intention of this new driver is to have a fresh base to work
from that is unencumbered by older platforms, whilst also taking
the opportunity to rearchitect our driver to increase sharing
across the drm subsystem, both leveraging and allowing us to
contribute more towards other shared components like TTM and
drm/scheduler.

Unlock the power of EC2 Graviton with GitLab CI/CD and EKS Runners

Post Syndicated from Michael Fischer original https://aws.amazon.com/blogs/devops/unlock-the-power-of-ec2-graviton-with-gitlab-ci-cd-and-eks-runners/

Many AWS customers are using GitLab for their DevOps needs, including source control, and continuous integration and continuous delivery (CI/CD). Many of our customers are using GitLab SaaS (the hosted edition), while others are using GitLab Self-managed to meet their security and compliance requirements.

Customers can easily add runners to their GitLab instance to perform various CI/CD jobs. These jobs include compiling source code, building software packages or container images, performing unit and integration testing, etc.—even all the way to production deployment. For the SaaS edition, GitLab offers hosted runners, and customers can provide their own runners as well. Customers who run GitLab Self-managed must provide their own runners.

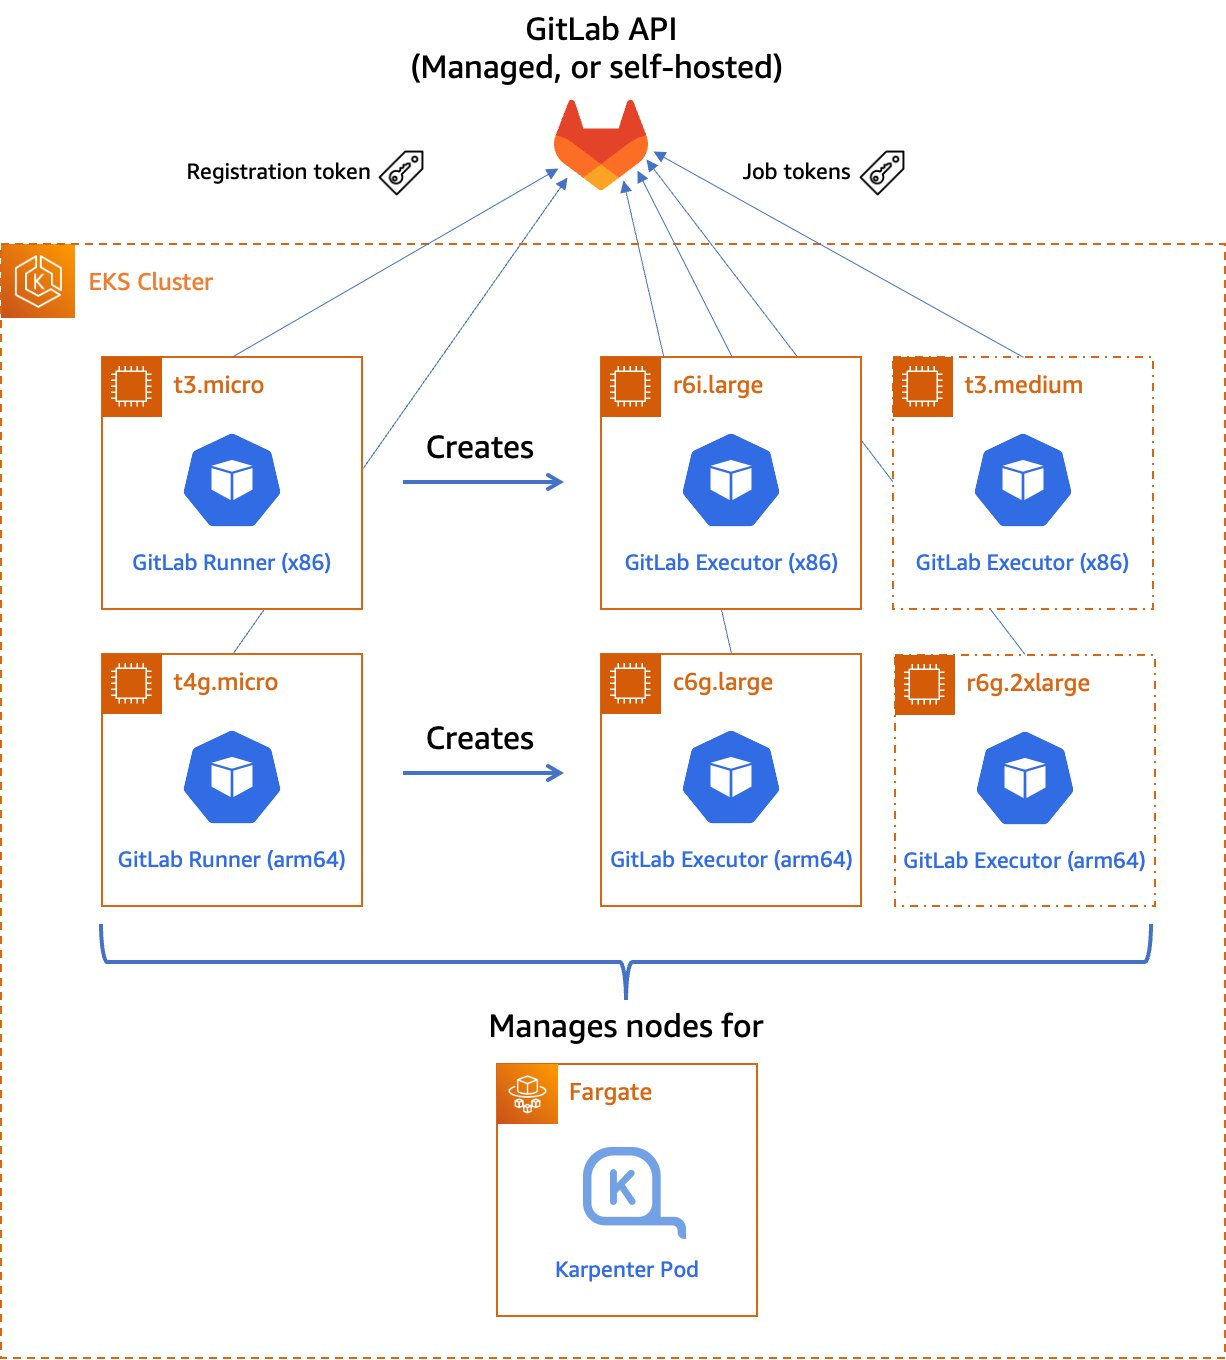
In this post, we’ll discuss how customers can maximize their CI/CD capabilities by managing their GitLab runner and executor fleet with Amazon Elastic Kubernetes Service (Amazon EKS). We’ll leverage both x86 and Graviton runners, allowing customers for the first time to build and test their applications both on x86 and on AWS Graviton, our most powerful, cost-effective, and sustainable instance family. In keeping with AWS’s philosophy of “pay only for what you use,” we’ll keep our Amazon Elastic Compute Cloud (Amazon EC2) instances as small as possible, and launch ephemeral runners on Spot instances. We’ll demonstrate building and testing a simple demo application on both architectures. Finally, we’ll build and deliver a multi-architecture container image that can run on Amazon EC2 instances or AWS Fargate, both on x86 and Graviton.

Figure 1. Managed GitLab runner architecture overview

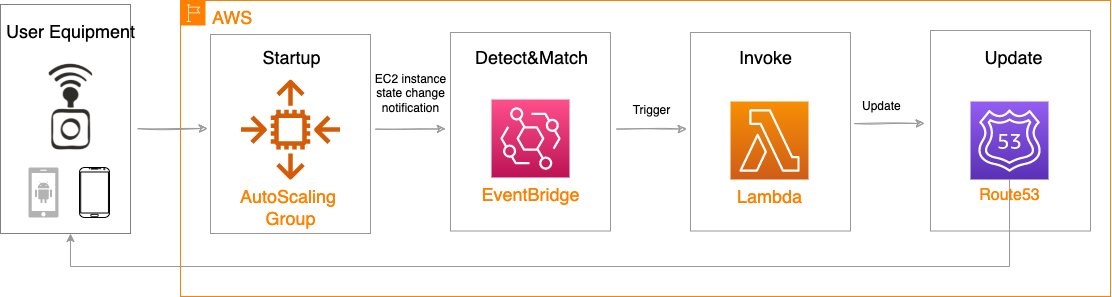
Figure 1.  Managed GitLab runner architecture overview.

Let’s go through the components:

Runners

A runner is an application to which GitLab sends jobs that are defined in a CI/CD pipeline. The runner receives jobs from GitLab and executes them—either by itself, or by passing it to an executor (we’ll visit the executor in the next section).

In our design, we’ll be using a pair of self-hosted runners. One runner will accept jobs for the x86 CPU architecture, and the other will accept jobs for the arm64 (Graviton) CPU architecture. To help us route our jobs to the proper runner, we’ll apply some tags to each runner indicating the architecture for which it will be responsible. We’ll tag the x86 runner with x86, x86-64, and amd64, thereby reflecting the most common nicknames for the architecture, and we’ll tag the arm64 runner with arm64.

Currently, these runners must always be running so that they can receive jobs as they are created. Our runners only require a small amount of memory and CPU, so that we can run them on small EC2 instances to minimize cost. These include t4g.micro for Graviton builds, or t3.micro or t3a.micro for x86 builds.

To save money on these runners, consider purchasing a Savings Plan or Reserved Instances for them. Savings Plans and Reserved Instances can save you up to 72% over on-demand pricing, and there’s no minimum spend required to use them.

Kubernetes executors

In GitLab CI/CD, the executor’s job is to perform the actual build. The runner can create hundreds or thousands of executors as needed to meet current demand, subject to the concurrency limits that you specify. Executors are created only when needed, and they are ephemeral: once a job has finished running on an executor, the runner will terminate it.

In our design, we’ll use the Kubernetes executor that’s built into the GitLab runner. The Kubernetes executor simply schedules a new pod to run each job. Once the job completes, the pod terminates, thereby freeing the node to run other jobs.

The Kubernetes executor is highly customizable. We’ll configure each runner with a nodeSelector that makes sure that the jobs are scheduled only onto nodes that are running the specified CPU architecture. Other possible customizations include CPU and memory reservations, node and pod tolerations, service accounts, volume mounts, and much more.

Scaling worker nodes

For most customers, CI/CD jobs aren’t likely to be running all of the time. To save cost, we only want to run worker nodes when there’s a job to run.

To make this happen, we’ll turn to Karpenter. Karpenter provisions EC2 instances as soon as needed to fit newly-scheduled pods. If a new executor pod is scheduled, and there isn’t a qualified instance with enough capacity remaining on it, then Karpenter will quickly and automatically launch a new instance to fit the pod. Karpenter will also periodically scan the cluster and terminate idle nodes, thereby saving on costs. Karpenter can terminate a vacant node in as little as 30 seconds.

Karpenter can launch either Amazon EC2 on-demand or Spot instances depending on your needs. With Spot instances, you can save up to 90% over on-demand instance prices. Since CI/CD jobs often aren’t time-sensitive, Spot instances can be an excellent choice for GitLab execution pods. Karpenter will even automatically find the best Spot instance type to speed up the time it takes to launch an instance and minimize the likelihood of job interruption.

Deploying our solution

To deploy our solution, we’ll write a small application using the AWS Cloud Development Kit (AWS CDK) and the EKS Blueprints library. AWS CDK is an open-source software development framework to define your cloud application resources using familiar programming languages. EKS Blueprints is a library designed to make it simple to deploy complex Kubernetes resources to an Amazon EKS cluster with minimum coding.

The high-level infrastructure code – which can be found in our GitLab repo – is very simple. I’ve included comments to explain how it works.

// All CDK applications start with a new cdk.App object.
const app = new cdk.App();

// Create a new EKS cluster at v1.23. Run all non-DaemonSet pods in the 
// `kube-system` (coredns, etc.) and `karpenter` namespaces in Fargate
// so that we don't have to maintain EC2 instances for them.
const clusterProvider = new blueprints.GenericClusterProvider({
  version: KubernetesVersion.V1_23,
  fargateProfiles: {
    main: {
      selectors: [
        { namespace: 'kube-system' },
        { namespace: 'karpenter' },
      ]
    }
  },
  clusterLogging: [
    ClusterLoggingTypes.API,
    ClusterLoggingTypes.AUDIT,
    ClusterLoggingTypes.AUTHENTICATOR,
    ClusterLoggingTypes.CONTROLLER_MANAGER,
    ClusterLoggingTypes.SCHEDULER
  ]
});

// EKS Blueprints uses a Builder pattern.
blueprints.EksBlueprint.builder()
  .clusterProvider(clusterProvider) // start with the Cluster Provider
  .addOns(
    // Use the EKS add-ons that manage coredns and the VPC CNI plugin
    new blueprints.addons.CoreDnsAddOn('v1.8.7-eksbuild.3'),
    new blueprints.addons.VpcCniAddOn('v1.12.0-eksbuild.1'),
    // Install Karpenter
    new blueprints.addons.KarpenterAddOn({
      provisionerSpecs: {
        // Karpenter examines scheduled pods for the following labels
        // in their `nodeSelector` or `nodeAffinity` rules and routes
        // the pods to the node with the best fit, provisioning a new
        // node if necessary to meet the requirements.
        //
        // Allow either amd64 or arm64 nodes to be provisioned 
        'kubernetes.io/arch': ['amd64', 'arm64'],
        // Allow either Spot or On-Demand nodes to be provisioned
        'karpenter.sh/capacity-type': ['spot', 'on-demand']
      },
      // Launch instances in the VPC private subnets
      subnetTags: {
        Name: 'gitlab-runner-eks-demo/gitlab-runner-eks-demo-vpc/PrivateSubnet*'
      },
      // Apply security groups that match the following tags to the launched instances
      securityGroupTags: {
        'kubernetes.io/cluster/gitlab-runner-eks-demo': 'owned'      
      }
    }),
    // Create a pair of a new GitLab runner deployments, one running on
    // arm64 (Graviton) instance, the other on an x86_64 instance.
    // We'll show the definition of the GitLabRunner class below.
    new GitLabRunner({
      arch: CpuArch.ARM_64,
      // If you're using an on-premise GitLab installation, you'll want
      // to change the URL below.
      gitlabUrl: 'https://gitlab.com',
      // Kubernetes Secret containing the runner registration token
      // (discussed later)
      secretName: 'gitlab-runner-secret'
    }),
    new GitLabRunner({
      arch: CpuArch.X86_64,
      gitlabUrl: 'https://gitlab.com',
      secretName: 'gitlab-runner-secret'
    }),
  )
  .build(app, 
         // Stack name
         'gitlab-runner-eks-demo');
The GitLabRunner class is a HelmAddOn subclass that takes a few parameters from the top-level application:
// The location and name of the GitLab Runner Helm chart
const CHART_REPO = 'https://charts.gitlab.io';
const HELM_CHART = 'gitlab-runner';

// The default namespace for the runner
const DEFAULT_NAMESPACE = 'gitlab';

// The default Helm chart version
const DEFAULT_VERSION = '0.40.1';

export enum CpuArch {
    ARM_64 = 'arm64',
    X86_64 = 'amd64'
}

// Configuration parameters
interface GitLabRunnerProps {
    // The CPU architecture of the node on which the runner pod will reside
    arch: CpuArch
    // The GitLab API URL 
    gitlabUrl: string
    // Kubernetes Secret containing the runner registration token (discussed later)
    secretName: string
    // Optional tags for the runner. These will be added to the default list 
    // corresponding to the runner's CPU architecture.
    tags?: string[]
    // Optional Kubernetes namespace in which the runner will be installed
    namespace?: string
    // Optional Helm chart version
    chartVersion?: string
}

export class GitLabRunner extends HelmAddOn {
    private arch: CpuArch;
    private gitlabUrl: string;
    private secretName: string;
    private tags: string[] = [];

    constructor(props: GitLabRunnerProps) {
        // Invoke the superclass (HelmAddOn) constructor
        super({
            name: `gitlab-runner-${props.arch}`,
            chart: HELM_CHART,
            repository: CHART_REPO,
            namespace: props.namespace || DEFAULT_NAMESPACE,
            version: props.chartVersion || DEFAULT_VERSION,
            release: `gitlab-runner-${props.arch}`,
        });

        this.arch = props.arch;
        this.gitlabUrl = props.gitlabUrl;
        this.secretName = props.secretName;

        // Set default runner tags
        switch (this.arch) {
            case CpuArch.X86_64:
                this.tags.push('amd64', 'x86', 'x86-64', 'x86_64');
                break;
            case CpuArch.ARM_64:
                this.tags.push('arm64');
                break;
        }
        this.tags.push(...props.tags || []); // Add any custom tags
    };

    // `deploy` method required by the abstract class definition. Our implementation
    // simply installs a Helm chart to the cluster with the proper values.
    deploy(clusterInfo: ClusterInfo): void | Promise<Construct> {
        const chart = this.addHelmChart(clusterInfo, this.getValues(), true);
        return Promise.resolve(chart);
    }

    // Returns the values for the GitLab Runner Helm chart
    private getValues(): Values {
        return {
            gitlabUrl: this.gitlabUrl,
            runners: {
                config: this.runnerConfig(), // runner config.toml file, from below
                name: `demo-runner-${this.arch}`, // name as seen in GitLab UI
                tags: uniq(this.tags).join(','),
                secret: this.secretName, // see below
            },
            // Labels to constrain the nodes where this runner can be placed
            nodeSelector: {
                'kubernetes.io/arch': this.arch,
                'karpenter.sh/capacity-type': 'on-demand'
            },
            // Default pod label
            podLabels: {
                'gitlab-role': 'manager'
            },
            // Create all the necessary RBAC resources including the ServiceAccount
            rbac: {
                create: true
            },
            // Required resources (memory/CPU) for the runner pod. The runner
            // is fairly lightweight as it's a self-contained Golang app.
            resources: {
                requests: {
                    memory: '128Mi',
                    cpu: '256m'
                }
            }
        };
    }

    // This string contains the runner's `config.toml` file including the
    // Kubernetes executor's configuration. Note the nodeSelector constraints 
    // (including the use of Spot capacity and the CPU architecture).
    private runnerConfig(): string {
        return `
  [[runners]]
    [runners.kubernetes]
      namespace = "{{.Release.Namespace}}"
      image = "ubuntu:16.04"
    [runners.kubernetes.node_selector]
      "kubernetes.io/arch" = "${this.arch}"
      "kubernetes.io/os" = "linux"
      "karpenter.sh/capacity-type" = "spot"
    [runners.kubernetes.pod_labels]
      gitlab-role = "runner"
      `.trim();
    }
}

For security reasons, we store the GitLab registration token in a Kubernetes Secret – never in our source code. For additional security, we recommend encrypting Secrets using an AWS Key Management Service (AWS KMS) key that you supply by specifying the encryption configuration when you create your Amazon EKS cluster. It’s a good practice to restrict access to this Secret via Kubernetes RBAC rules.

To create the Secret, run the following command:

# These two values must match the parameters supplied to the GitLabRunner constructor
NAMESPACE=gitlab
SECRET_NAME=gitlab-runner-secret
# The value of the registration token.
TOKEN=GRxxxxxxxxxxxxxxxxxxxxxx

kubectl -n $NAMESPACE create secret generic $SECRET_NAME \
        --from-literal="runner-registration-token=$TOKEN" \
        --from-literal="runner-token="

Building a multi-architecture container image

Now that we’ve launched our GitLab runners and configured the executors, we can build and test a simple multi-architecture container image. If the tests pass, we can then upload it to our project’s GitLab container registry. Our application will be pretty simple: we’ll create a web server in Go that simply prints out “Hello World” and prints out the current architecture.

Find the source code of our sample app in our GitLab repo.

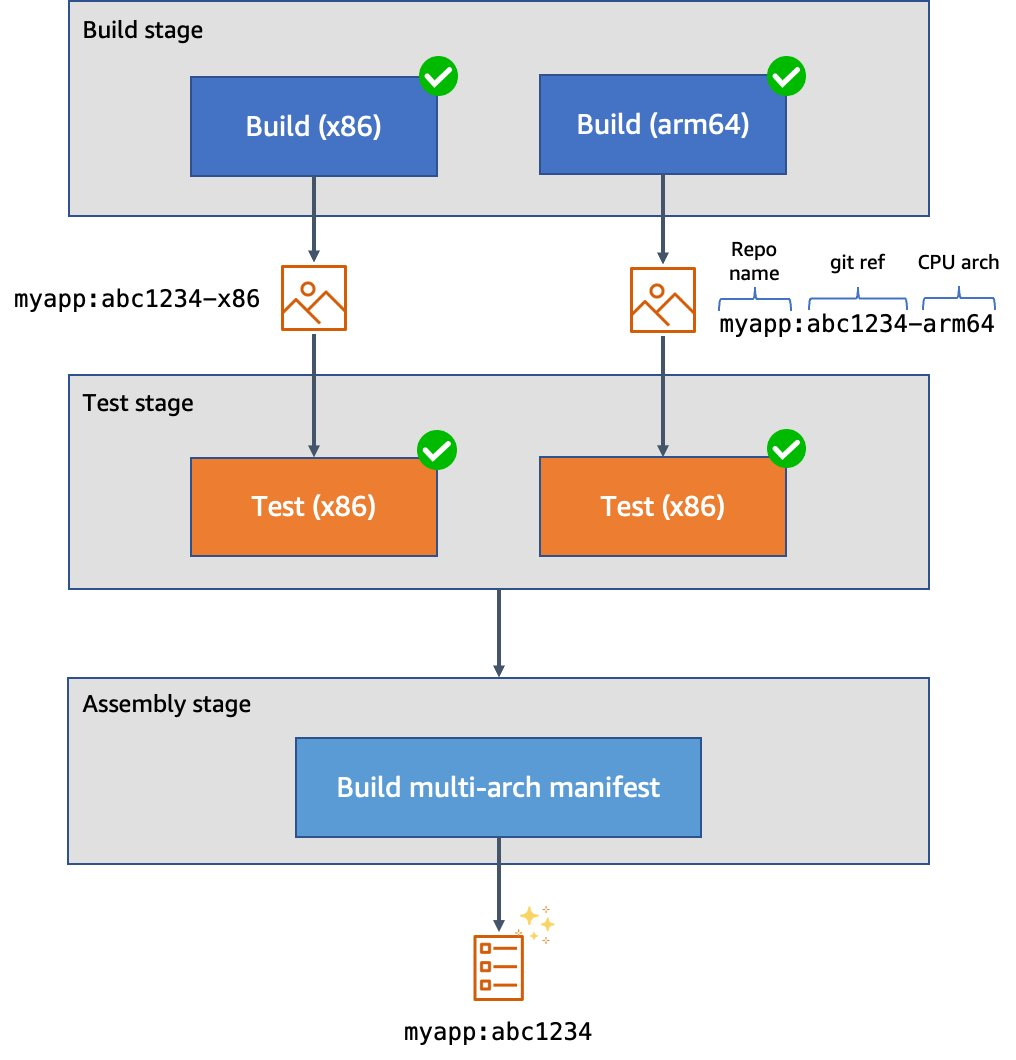
In GitLab, the CI/CD configuration lives in the .gitlab-ci.yml file at the root of the source repository. In this file, we declare a list of ordered build stages, and then we declare the specific jobs associated with each stage.

Our stages are:

  1. The build stage, in which we compile our code, produce our architecture-specific images, and upload these images to the GitLab container registry. These uploaded images are tagged with a suffix indicating the architecture on which they were built. This job uses a matrix variable to run it in parallel against two different runners – one for each supported architecture. Furthermore, rather than using docker build to produce our images, we use Kaniko to build them. This lets us build our images in an unprivileged container environment and improve the security posture considerably.
  2. The test stage, in which we test the code. As with the build stage, we use a matrix variable to run the tests in parallel in separate pods on each supported architecture.

The assembly stage, in which we create a multi-architecture image manifest from the two architecture-specific images. Then, we push the manifest into the image registry so that we can refer to it in future deployments.

Figure 2. Example CI/CD pipeline for multi-architecture images

Figure 2. Example CI/CD pipeline for multi-architecture images.

Here’s what our top-level configuration looks like:

variables:
  # These are used by the runner to configure the Kubernetes executor, and define
  # the values of spec.containers[].resources.limits.{memory,cpu} for the Pod(s).
  KUBERNETES_MEMORY_REQUEST: 1Gi
  KUBERNETES_CPU_REQUEST: 1

# List of stages for jobs, and their order of execution  
stages:    
  - build
  - test
  - create-multiarch-manifest
Here’s what our build stage job looks like. Note the matrix of variables which are set in BUILD_ARCH as the two jobs are run in parallel:
build-job:
  stage: build
  parallel:
    matrix:              # This job is run twice, once on amd64 (x86), once on arm64
    - BUILD_ARCH: amd64
    - BUILD_ARCH: arm64
  tags: [$BUILD_ARCH]    # Associate the job with the appropriate runner
  image:
    name: gcr.io/kaniko-project/executor:debug
    entrypoint: [""]
  script:
    - mkdir -p /kaniko/.docker
    # Configure authentication data for Kaniko so it can push to the
    # GitLab container registry
    - echo "{\"auths\":{\"${CI_REGISTRY}\":{\"auth\":\"$(printf "%s:%s" "${CI_REGISTRY_USER}" "${CI_REGISTRY_PASSWORD}" | base64 | tr -d '\n')\"}}}" > /kaniko/.docker/config.json
    # Build the image and push to the registry. In this stage, we append the build
    # architecture as a tag suffix.
    - >-
      /kaniko/executor
      --context "${CI_PROJECT_DIR}"
      --dockerfile "${CI_PROJECT_DIR}/Dockerfile"
      --destination "${CI_REGISTRY_IMAGE}:${CI_COMMIT_SHORT_SHA}-${BUILD_ARCH}"

Here’s what our test stage job looks like. This time we use the image that we just produced. Our source code is copied into the application container. Then, we can run make test-api to execute the server test suite.

build-job:
  stage: build
  parallel:
    matrix:              # This job is run twice, once on amd64 (x86), once on arm64
    - BUILD_ARCH: amd64
    - BUILD_ARCH: arm64
  tags: [$BUILD_ARCH]    # Associate the job with the appropriate runner
  image:
    # Use the image we just built
    name: "${CI_REGISTRY_IMAGE}:${CI_COMMIT_SHORT_SHA}-${BUILD_ARCH}"
  script:
    - make test-container

Finally, here’s what our assembly stage looks like. We use Podman to build the multi-architecture manifest and push it into the image registry. Traditionally we might have used docker buildx to do this, but using Podman lets us do this work in an unprivileged container for additional security.

create-manifest-job:
  stage: create-multiarch-manifest
  tags: [arm64] 
  image: public.ecr.aws/docker/library/fedora:36
  script:
    - yum -y install podman
    - echo "${CI_REGISTRY_PASSWORD}" | podman login -u "${CI_REGISTRY_USER}" --password-stdin "${CI_REGISTRY}"
    - COMPOSITE_IMAGE=${CI_REGISTRY_IMAGE}:${CI_COMMIT_SHORT_SHA}
    - podman manifest create ${COMPOSITE_IMAGE}
    - >-
      for arch in arm64 amd64; do
        podman manifest add ${COMPOSITE_IMAGE} docker://${COMPOSITE_IMAGE}-${arch};
      done
    - podman manifest inspect ${COMPOSITE_IMAGE}
    # The composite image manifest omits the architecture from the tag suffix.
    - podman manifest push ${COMPOSITE_IMAGE} docker://${COMPOSITE_IMAGE}

Trying it out

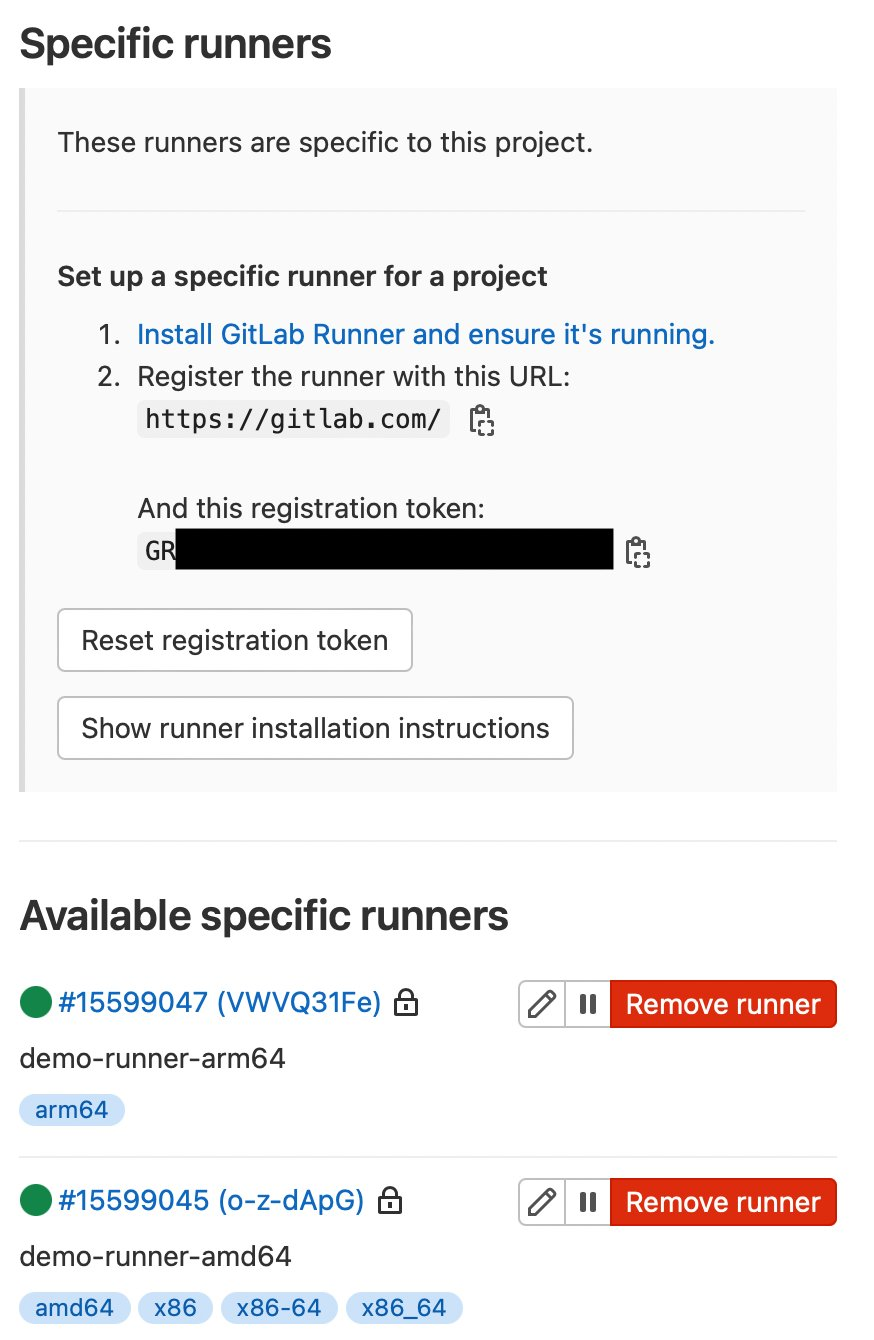
I’ve created a public test GitLab project containing the sample source code, and attached the runners to the project. We can see them at Settings > CI/CD > Runners:

Figure 3. GitLab runner configurations

Figure 3. GitLab runner configurations.

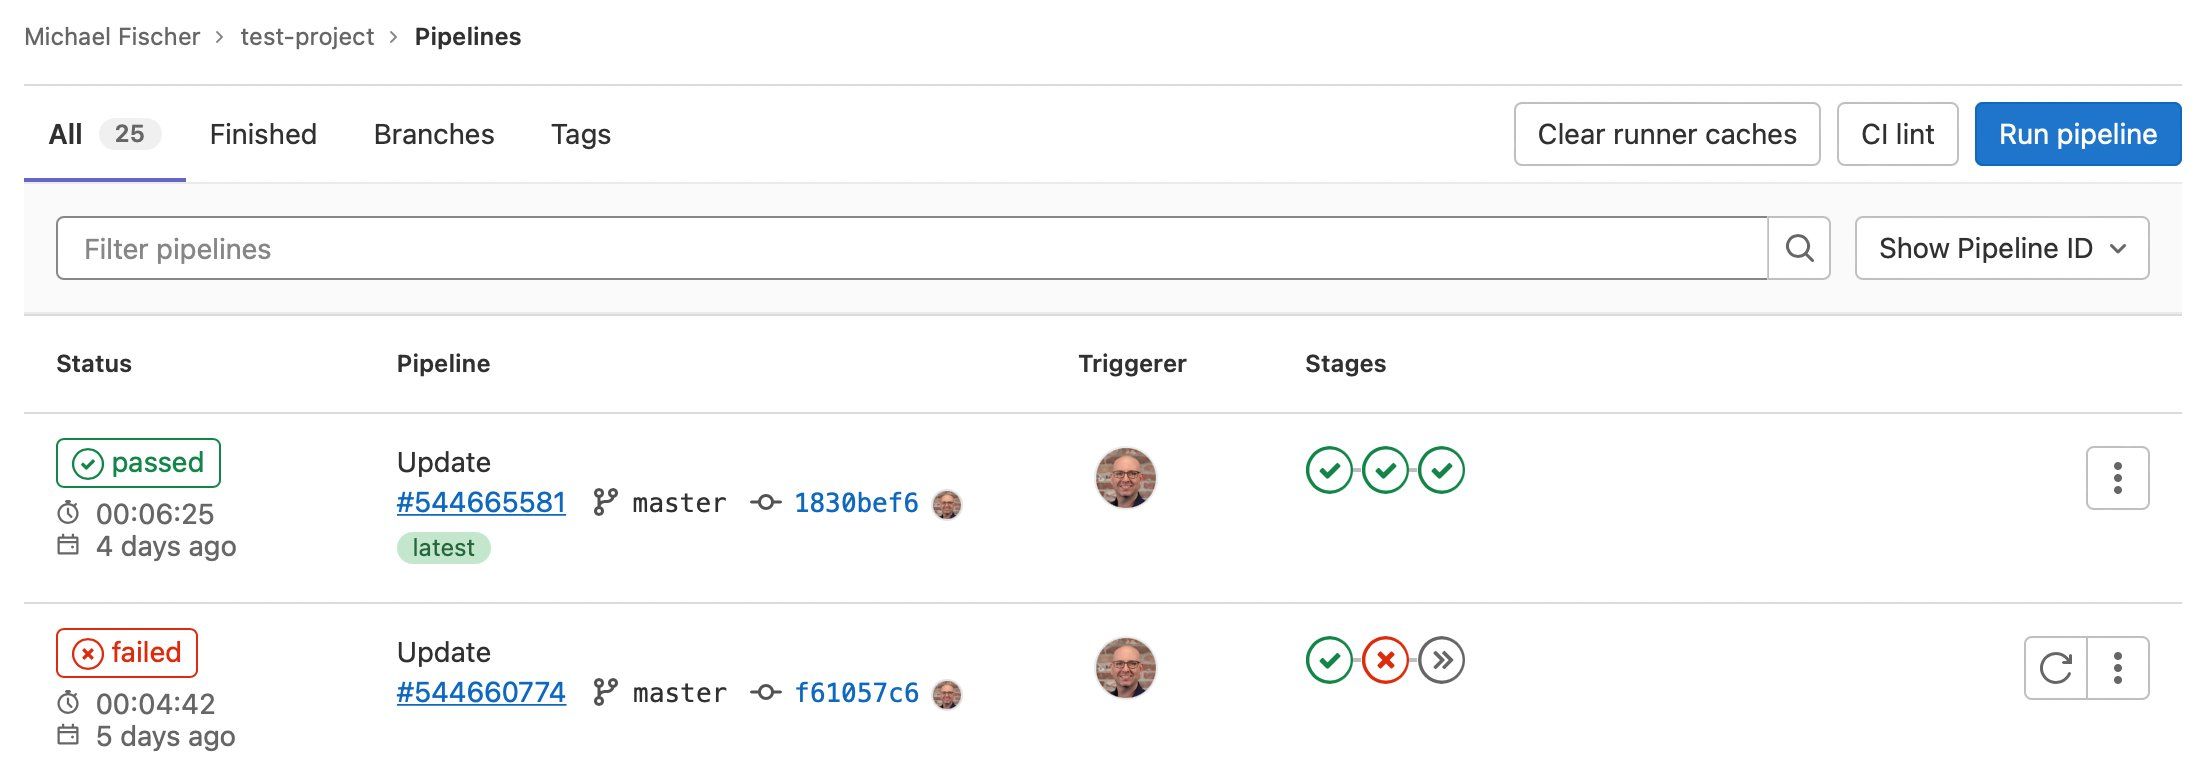
Here we can also see some pipeline executions, where some have succeeded, and others have failed.

Figure 4. GitLab sample pipeline executions

Figure 4. GitLab sample pipeline executions.

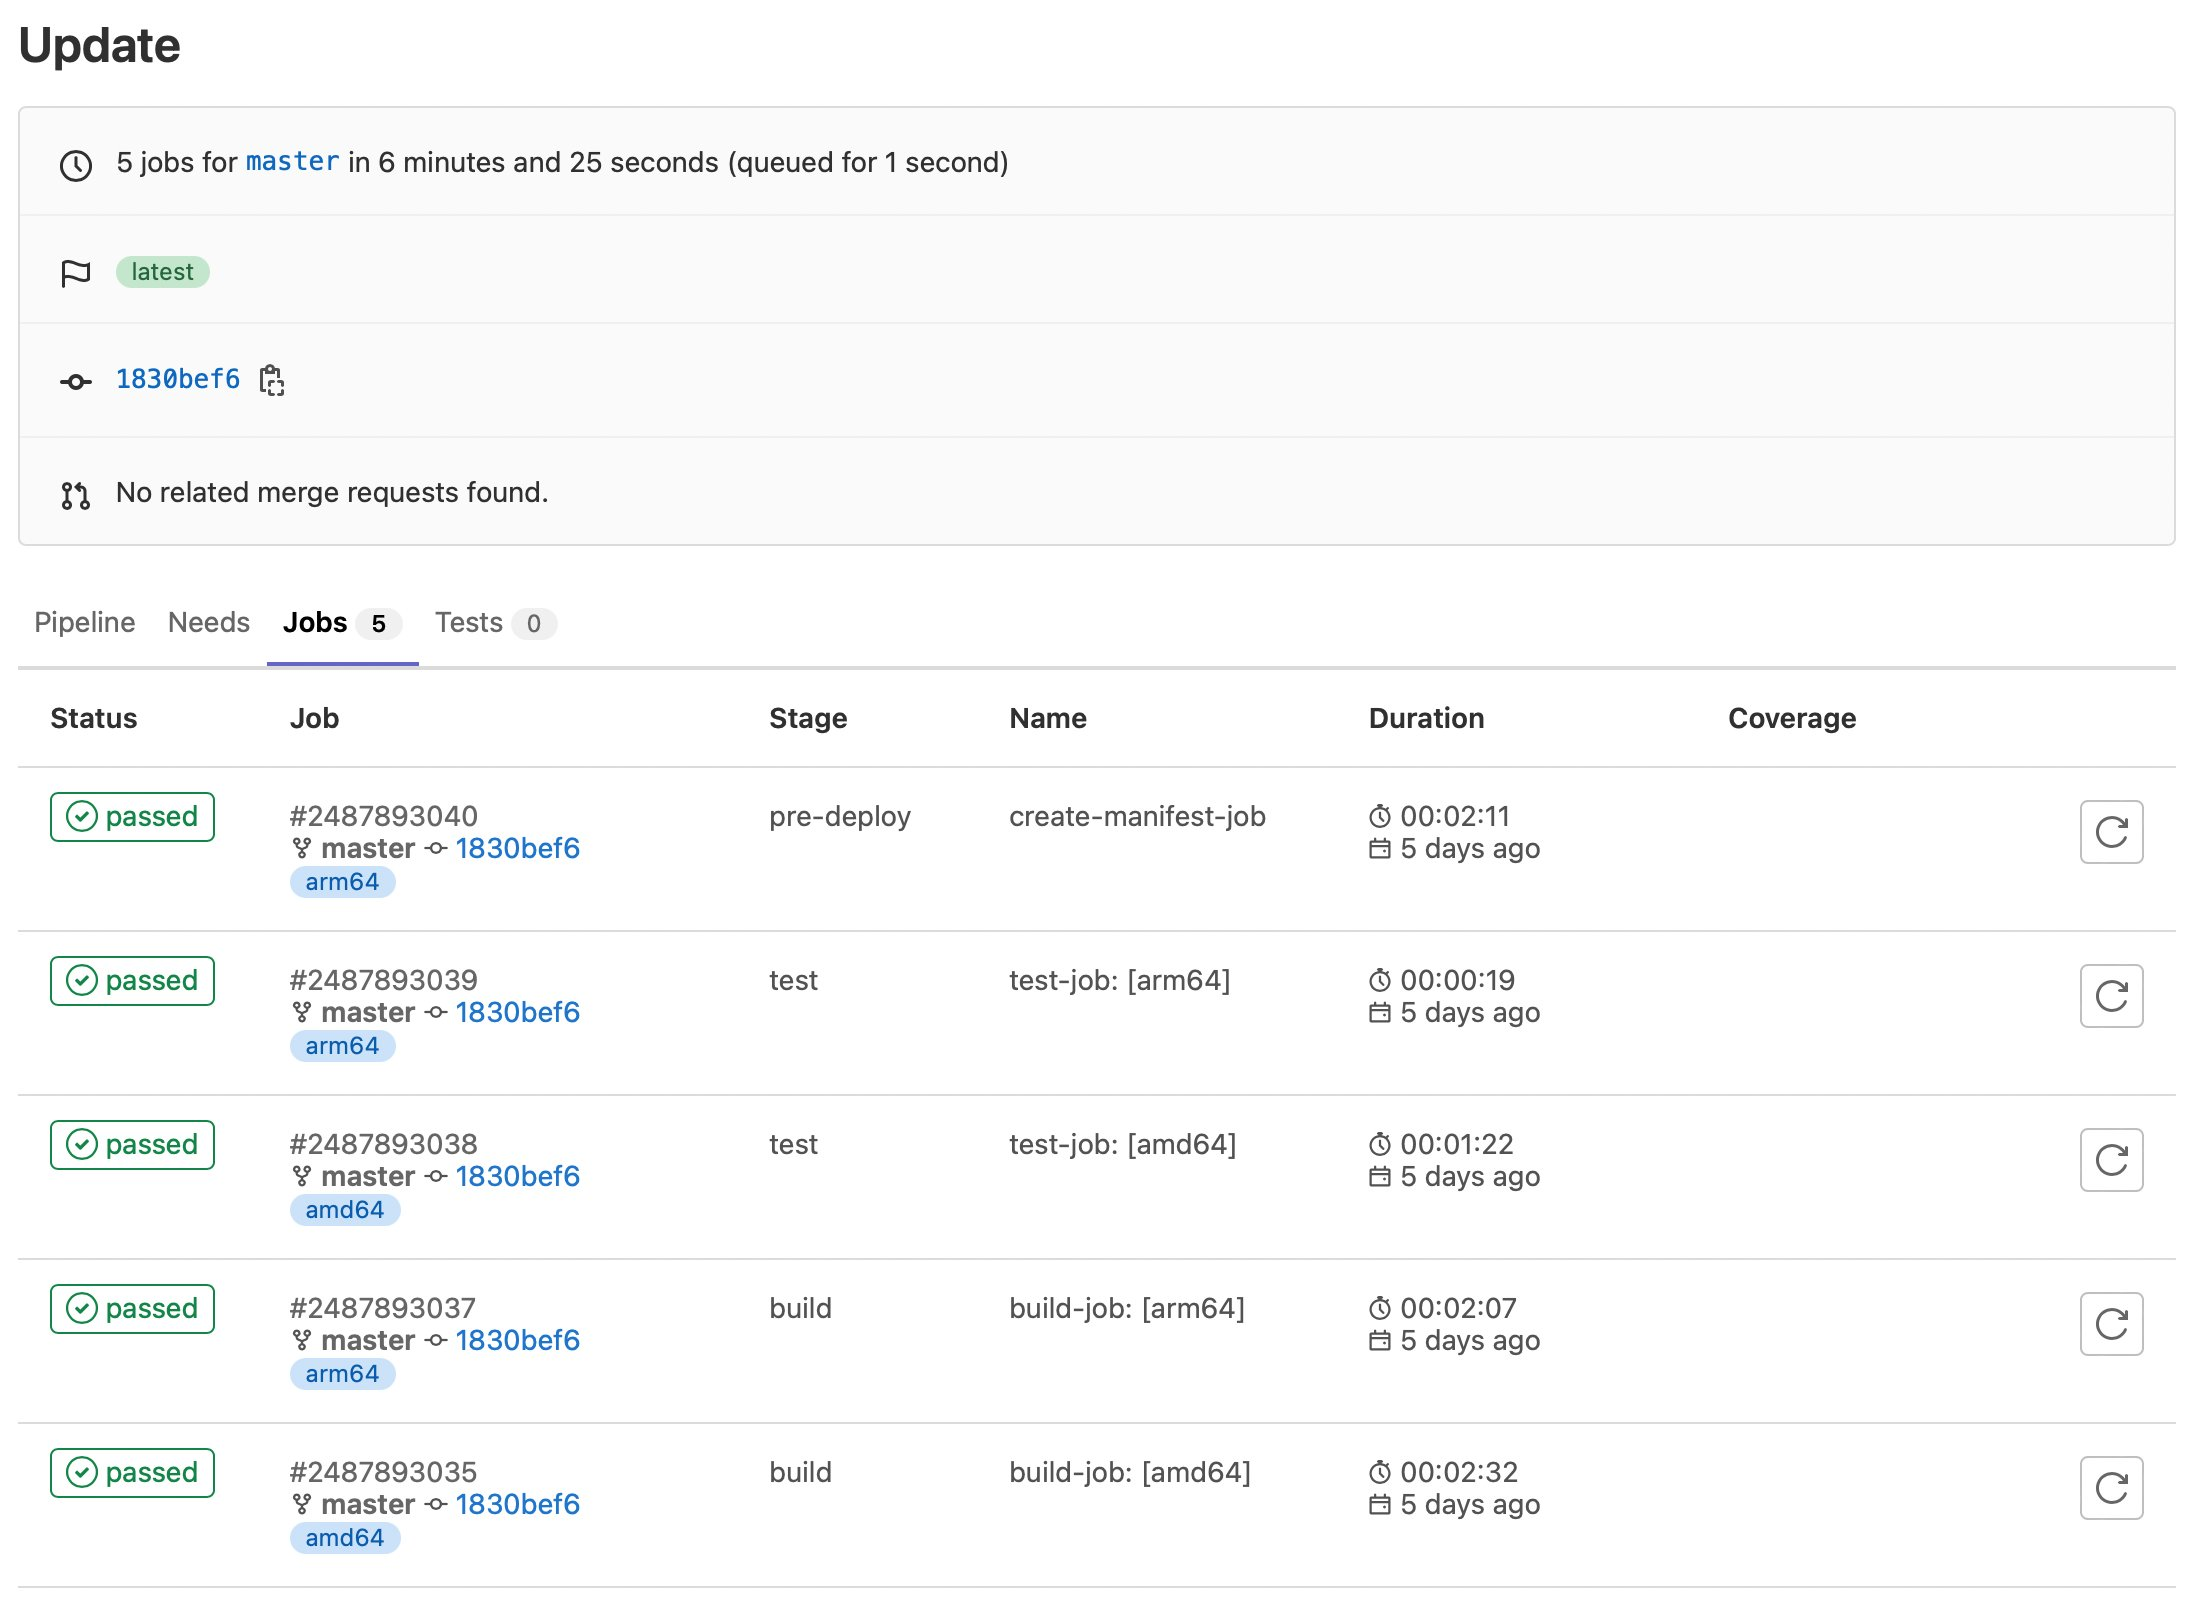
We can also see the specific jobs associated with a pipeline execution:

Figure 5. GitLab sample job executions

Figure 5. GitLab sample job executions.

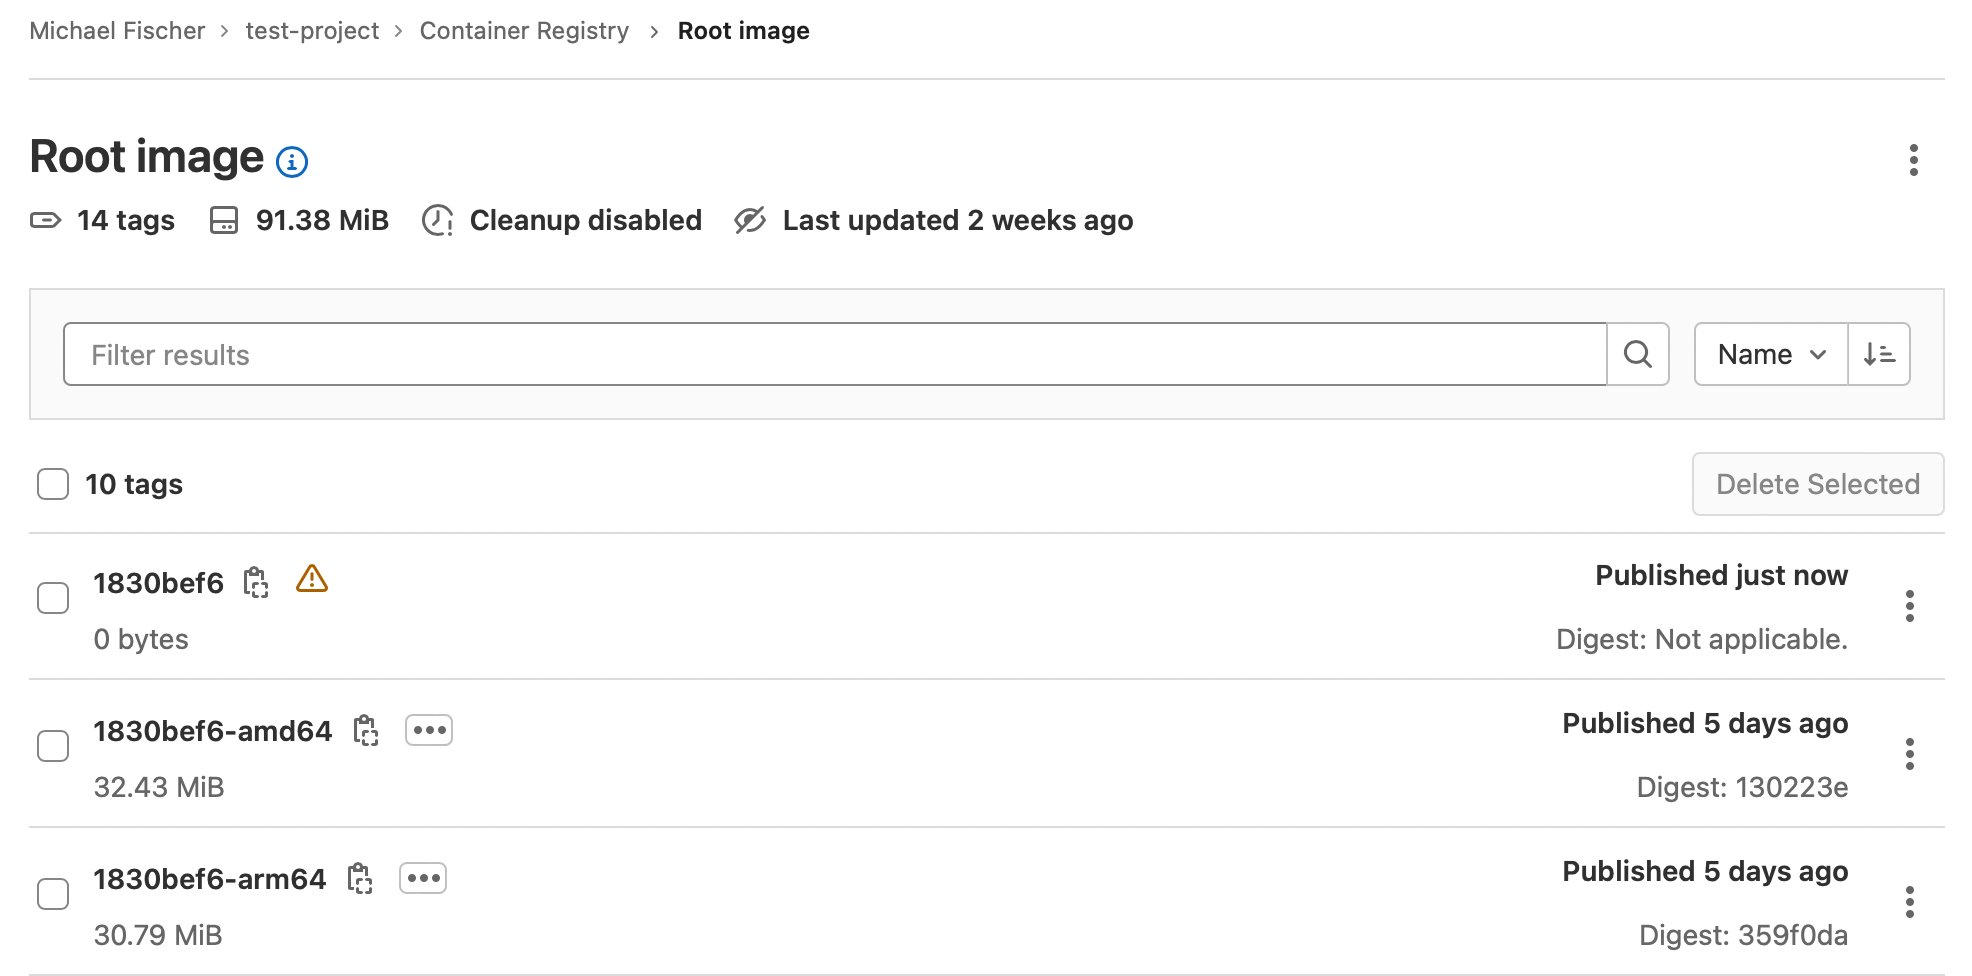
Finally, here are our container images:

Figure 5. GitLab sample job executions

Figure 6. GitLab sample container registry.

Conclusion

In this post, we’ve illustrated how you can quickly and easily construct multi-architecture container images with GitLab, Amazon EKS, Karpenter, and Amazon EC2, using both x86 and Graviton instance families. We indexed on using as many managed services as possible, maximizing security, and minimizing complexity and TCO. We dove deep on multiple facets of the process, and discussed how to save up to 90% of the solution’s cost by using Spot instances for CI/CD executions.

Find the sample code, including everything shown here today, in our GitLab repository.

Building multi-architecture images will unlock the value and performance of running your applications on AWS Graviton and give you increased flexibility over compute choice. We encourage you to get started today.

About the author:

Michael Fischer

Michael Fischer is a Principal Specialist Solutions Architect at Amazon Web Services. He focuses on helping customers build more cost-effectively and sustainably with AWS Graviton. Michael has an extensive background in systems programming, monitoring, and observability. His hobbies include world travel, diving, and playing the drums.

Multi-branch pipeline management and infrastructure deployment using AWS CDK Pipelines

Post Syndicated from Iris Kraja original https://aws.amazon.com/blogs/devops/multi-branch-pipeline-management-and-infrastructure-deployment-using-aws-cdk-pipelines/

This post describes how to use the AWS CDK Pipelines module to follow a Gitflow development model using AWS Cloud Development Kit (AWS CDK). Software development teams often follow a strict branching strategy during a solutions development lifecycle. Newly-created branches commonly need their own isolated copy of infrastructure resources to develop new features.

CDK Pipelines is a construct library module for continuous delivery of AWS CDK applications. CDK Pipelines are self-updating: if you add application stages or stacks, then the pipeline automatically reconfigures itself to deploy those new stages and/or stacks.

The following solution creates a new AWS CDK Pipeline within a development account for every new branch created in the source repository (AWS CodeCommit). When a branch is deleted, the pipeline and all related resources are also destroyed from the account. This GitFlow model for infrastructure provisioning allows developers to work independently from each other, concurrently, even in the same stack of the application.

Solution overview

The following diagram provides an overview of the solution. There is one default pipeline responsible for deploying resources to the different application environments (e.g., Development, Pre-Prod, and Prod). The code is stored in CodeCommit. When new changes are pushed to the default CodeCommit repository branch, AWS CodePipeline runs the default pipeline. When the default pipeline is deployed, it creates two AWS Lambda functions.

These two Lambda functions are invoked by CodeCommit CloudWatch events when a new branch in the repository is created or deleted. The Create Lambda function uses the boto3 CodeBuild module to create an AWS CodeBuild project that builds the pipeline for the feature branch. This feature pipeline consists of a build stage and an optional update pipeline stage for itself. The Destroy Lambda function creates another CodeBuild project which cleans all of the feature branch’s resources and the feature pipeline.

Figure 1. Architecture diagram.

Figure 1. Architecture diagram.

Prerequisites

Before beginning this walkthrough, you should have the following prerequisites:

  • An AWS account
  • AWS CDK installed
  • Python3 installed
  • Jq (JSON processor) installed
  • Basic understanding of continuous integration/continuous development (CI/CD) Pipelines

Initial setup

Download the repository from GitHub:

# Command to clone the repository
git clone https://github.com/aws-samples/multi-branch-cdk-pipelines.git
cd multi-branch-cdk-pipelines

Create a new CodeCommit repository in the AWS Account and region where you want to deploy the pipeline and upload the source code from above to this repository. In the config.ini file, change the repository_name and region variables accordingly.

Make sure that you set up a fresh Python environment. Install the dependencies:

pip install -r requirements.txt

Run the initial-deploy.sh script to bootstrap the development and production environments and to deploy the default pipeline. You’ll be asked to provide the following parameters: (1) Development account ID, (2) Development account AWS profile name, (3) Production account ID, and (4) Production account AWS profile name.

sh ./initial-deploy.sh --dev_account_id <YOUR DEV ACCOUNT ID> --
dev_profile_name <YOUR DEV PROFILE NAME> --prod_account_id <YOUR PRODUCTION
ACCOUNT ID> --prod_profile_name <YOUR PRODUCTION PROFILE NAME>

Default pipeline

In the CI/CD pipeline, we set up an if condition to deploy the default branch resources only if the current branch is the default one. The default branch is retrieved programmatically from the CodeCommit repository. We deploy an Amazon Simple Storage Service (Amazon S3) Bucket and two Lambda functions. The bucket is responsible for storing the feature branches’ CodeBuild artifacts. The first Lambda function is triggered when a new branch is created in CodeCommit. The second one is triggered when a branch is deleted.

if branch == default_branch:
    
...

    # Artifact bucket for feature AWS CodeBuild projects
    artifact_bucket = Bucket(
        self,
        'BranchArtifacts',
        encryption=BucketEncryption.KMS_MANAGED,
        removal_policy=RemovalPolicy.DESTROY,
        auto_delete_objects=True
    )
...
    # AWS Lambda function triggered upon branch creation
    create_branch_func = aws_lambda.Function(
        self,
        'LambdaTriggerCreateBranch',
        runtime=aws_lambda.Runtime.PYTHON_3_8,
        function_name='LambdaTriggerCreateBranch',
        handler='create_branch.handler',
        code=aws_lambda.Code.from_asset(path.join(this_dir, 'code')),
        environment={
            "ACCOUNT_ID": dev_account_id,
            "CODE_BUILD_ROLE_ARN": iam_stack.code_build_role.role_arn,
            "ARTIFACT_BUCKET": artifact_bucket.bucket_name,
            "CODEBUILD_NAME_PREFIX": codebuild_prefix
        },
        role=iam_stack.create_branch_role)


    # AWS Lambda function triggered upon branch deletion
    destroy_branch_func = aws_lambda.Function(
        self,
        'LambdaTriggerDestroyBranch',
        runtime=aws_lambda.Runtime.PYTHON_3_8,
        function_name='LambdaTriggerDestroyBranch',
        handler='destroy_branch.handler',
        role=iam_stack.delete_branch_role,
        environment={
            "ACCOUNT_ID": dev_account_id,
            "CODE_BUILD_ROLE_ARN": iam_stack.code_build_role.role_arn,
            "ARTIFACT_BUCKET": artifact_bucket.bucket_name,
            "CODEBUILD_NAME_PREFIX": codebuild_prefix,
            "DEV_STAGE_NAME": f'{dev_stage_name}-{dev_stage.main_stack_name}'
        },
        code=aws_lambda.Code.from_asset(path.join(this_dir,
                                                  'code')))

Then, the CodeCommit repository is configured to trigger these Lambda functions based on two events:

(1) Reference created

# Configure AWS CodeCommit to trigger the Lambda function when a new branch is created
repo.on_reference_created(
    'BranchCreateTrigger',
    description="AWS CodeCommit reference created event.",
    target=aws_events_targets.LambdaFunction(create_branch_func))

(2) Reference deleted

# Configure AWS CodeCommit to trigger the Lambda function when a branch is deleted
repo.on_reference_deleted(
    'BranchDeleteTrigger',
    description="AWS CodeCommit reference deleted event.",
    target=aws_events_targets.LambdaFunction(destroy_branch_func))

Lambda functions

The two Lambda functions build and destroy application environments mapped to each feature branch. An Amazon CloudWatch event triggers the LambdaTriggerCreateBranch function whenever a new branch is created. The CodeBuild client from boto3 creates the build phase and deploys the feature pipeline.

Create function

The create function deploys a feature pipeline which consists of a build stage and an optional update pipeline stage for itself. The pipeline downloads the feature branch code from the CodeCommit repository, initiates the Build and Test action using CodeBuild, and securely saves the built artifact on the S3 bucket.

The Lambda function handler code is as follows:

def handler(event, context):
    """Lambda function handler"""
    logger.info(event)

    reference_type = event['detail']['referenceType']

    try:
        if reference_type == 'branch':
            branch = event['detail']['referenceName']
            repo_name = event['detail']['repositoryName']

            client.create_project(
                name=f'{codebuild_name_prefix}-{branch}-create',
                description="Build project to deploy branch pipeline",
                source={
                    'type': 'CODECOMMIT',
                    'location': f'https://git-codecommit.{region}.amazonaws.com/v1/repos/{repo_name}',
                    'buildspec': generate_build_spec(branch)
                },
                sourceVersion=f'refs/heads/{branch}',
                artifacts={
                    'type': 'S3',
                    'location': artifact_bucket_name,
                    'path': f'{branch}',
                    'packaging': 'NONE',
                    'artifactIdentifier': 'BranchBuildArtifact'
                },
                environment={
                    'type': 'LINUX_CONTAINER',
                    'image': 'aws/codebuild/standard:4.0',
                    'computeType': 'BUILD_GENERAL1_SMALL'
                },
                serviceRole=role_arn
            )

            client.start_build(
                projectName=f'CodeBuild-{branch}-create'
            )
    except Exception as e:
        logger.error(e)

Create branch CodeBuild project’s buildspec.yaml content:

version: 0.2
env:
  variables:
    BRANCH: {branch}
    DEV_ACCOUNT_ID: {account_id}
    PROD_ACCOUNT_ID: {account_id}
    REGION: {region}
phases:
  pre_build:
    commands:
      - npm install -g aws-cdk && pip install -r requirements.txt
  build:
    commands:
      - cdk synth
      - cdk deploy --require-approval=never
artifacts:
  files:
    - '**/*'

Destroy function

The second Lambda function is responsible for the destruction of a feature branch’s resources. Upon the deletion of a feature branch, an Amazon CloudWatch event triggers this Lambda function. The function creates a CodeBuild Project which destroys the feature pipeline and all of the associated resources created by that pipeline. The source property of the CodeBuild Project is the feature branch’s source code saved as an artifact in Amazon S3.

The Lambda function handler code is as follows:

def handler(event, context):
    logger.info(event)
    reference_type = event['detail']['referenceType']

    try:
        if reference_type == 'branch':
            branch = event['detail']['referenceName']
            client.create_project(
                name=f'{codebuild_name_prefix}-{branch}-destroy',
                description="Build project to destroy branch resources",
                source={
                    'type': 'S3',
                    'location': f'{artifact_bucket_name}/{branch}/CodeBuild-{branch}-create/',
                    'buildspec': generate_build_spec(branch)
                },
                artifacts={
                    'type': 'NO_ARTIFACTS'
                },
                environment={
                    'type': 'LINUX_CONTAINER',
                    'image': 'aws/codebuild/standard:4.0',
                    'computeType': 'BUILD_GENERAL1_SMALL'
                },
                serviceRole=role_arn
            )

            client.start_build(
                projectName=f'CodeBuild-{branch}-destroy'
            )

            client.delete_project(
                name=f'CodeBuild-{branch}-destroy'
            )

            client.delete_project(
                name=f'CodeBuild-{branch}-create'
            )
    except Exception as e:
        logger.error(e)

Destroy the branch CodeBuild project’s buildspec.yaml content:

version: 0.2
env:
  variables:
    BRANCH: {branch}
    DEV_ACCOUNT_ID: {account_id}
    PROD_ACCOUNT_ID: {account_id}
    REGION: {region}
phases:
  pre_build:
    commands:
      - npm install -g aws-cdk && pip install -r requirements.txt
  build:
    commands:
      - cdk destroy cdk-pipelines-multi-branch-{branch} --force
      - aws cloudformation delete-stack --stack-name {dev_stage_name}-{branch}
      - aws s3 rm s3://{artifact_bucket_name}/{branch} --recursive

Create a feature branch

On your machine’s local copy of the repository, create a new feature branch using the following git commands. Replace user-feature-123 with a unique name for your feature branch. Note that this feature branch name must comply with the CodePipeline naming restrictions, as it will be used to name a unique pipeline later in this walkthrough.

# Create the feature branch
git checkout -b user-feature-123
git push origin user-feature-123

The first Lambda function will deploy the CodeBuild project, which then deploys the feature pipeline. This can take a few minutes. You can log in to the AWS Console and see the CodeBuild project running under CodeBuild.

Figure 2. AWS Console - CodeBuild projects.

Figure 2. AWS Console – CodeBuild projects.

After the build is successfully finished, you can see the deployed feature pipeline under CodePipelines.

Figure 3. AWS Console - CodePipeline pipelines.

Figure 3. AWS Console – CodePipeline pipelines.

The Lambda S3 trigger project from AWS CDK Samples is used as the infrastructure resources to demonstrate this solution. The content is placed inside the src directory and is deployed by the pipeline. When visiting the Lambda console page, you can see two functions: one by the default pipeline and one by our feature pipeline.

Figure 4. AWS Console - Lambda functions.

Figure 4. AWS Console – Lambda functions.

Destroy a feature branch

There are two common ways for removing feature branches. The first one is related to a pull request, also known as a “PR”. This occurs when merging a feature branch back into the default branch. Once it’s merged, the feature branch will be automatically closed. The second way is to delete the feature branch explicitly by running the following git commands:

# delete branch local
git branch -d user-feature-123

# delete branch remote
git push origin --delete user-feature-123

The CodeBuild project responsible for destroying the feature resources is now triggered. You can see the project’s logs while the resources are being destroyed in CodeBuild, under Build history.

Figure 5. AWS Console - CodeBuild projects.

Figure 5. AWS Console – CodeBuild projects.

Cleaning up

To avoid incurring future charges, log into the AWS console of the different accounts you used, go to the AWS CloudFormation console of the Region(s) where you chose to deploy, and select and click Delete on the main and branch stacks.

Conclusion

This post showed how you can work with an event-driven strategy and AWS CDK to implement a multi-branch pipeline flow using AWS CDK Pipelines. The described solutions leverage Lambda and CodeBuild to provide a dynamic orchestration of resources for multiple branches and pipelines.
For more information on CDK Pipelines and all the ways it can be used, see the CDK Pipelines reference documentation.

About the authors:

Iris Kraja

Iris is a Cloud Application Architect at AWS Professional Services based in New York City. She is passionate about helping customers design and build modern AWS cloud native solutions, with a keen interest in serverless technology, event-driven architectures and DevOps.  Outside of work, she enjoys hiking and spending as much time as possible in nature.

Jan Bauer

Jan is a Cloud Application Architect at AWS Professional Services. His interests are serverless computing, machine learning, and everything that involves cloud computing.

Rolando Santamaria Maso

Rolando is a senior cloud application development consultant at AWS Professional Services, based in Germany. He helps customers migrate and modernize workloads in the AWS Cloud, with a special focus on modern application architectures and development best practices, but he also creates IaC using AWS CDK. Outside work, he maintains open-source projects and enjoys spending time with family and friends.

Caroline Gluck

Caroline is an AWS Cloud application architect based in New York City, where she helps customers design and build cloud native data science applications. Caroline is a builder at heart, with a passion for serverless architecture and machine learning. In her spare time, she enjoys traveling, cooking, and spending time with family and friends.

Hallmark Channel: Securing the Season

Post Syndicated from Aaron Wells original https://blog.rapid7.com/2022/12/22/hallmark-channel-securing-the-season/

How Crown Media protects its crown jewel

Hallmark Channel: Securing the Season

It’s that time of year again…chestnuts roasting on an open-fire, kids making wish-lists, and company holiday parties where you can showcase your most outlandish ugly sweater. It’s also the time of year we all get a little bit less cynical and take in a cheesy holiday movie or two. Enter Crown Media Family Networks and its holiday hitmaker, Hallmark Channel.

Hallmark Channel—and its streaming counterparts like Hallmark Movies Now—are unique in the entertainment world. The company provides year-round programming and has many fans the world over, but the end-of-the-year holiday season is when its content really pops off. Holiday-season die-hards show up for cheesily-wistful-yet-earnest films that have become a cottage industry and an annual jingle-bell juggernaut.

In 2021, Hallmark Channel finished as the number one network among “women 18 and above”, which led to $147.8 million in revenue generated from holiday programming alone. It’s safe to assume the company doesn’t want intellectual property (IP) theft cutting into those kinds of returns.

Cloud-based content delivery

Here’s a scary-sounding sentence for those wary of vulnerabilities: Hallmark Channel’s entire content library is managed in the cloud. Cloud has obvious advantages for any organization, like quick-scaling and not having to build on-prem systems from the ground up. However, it can also increase risk to intellectual property:

  • High-risk resources open to the public internet: If a particular cloud instance becomes accessible by anyone on the internet, revenue-generating IP may be compromised.
  • Increased complexity: IP can be spread across multiple clouds in multiple locations. This makes identity management critical—who has access? Why do they need access? Where are they located?
  • Delayed remediation: So the risk has been identified. But, how old is the data on which the remediation workflow is based? 6 hours? 12 hours? More? This significantly detracts from the efficiency of the remediation.

Action!

Holidays are a particularly busy time for threat actors. So, how do media companies like Hallmark Channel (or any organization) protect their intellectual property?  

  • Create a cybersecurity IP legal and strategic framework: According to the American Bar Association, film and TV studios should avoid single-event approaches to IP theft and create a framework that prioritizes strategic management of risk in the long term. Treating the risk of IP theft as systemic will yield benefits like faster mean time to detect (MTTD) and mean time to respond (MTTR).  
  • Address supply chain issues: Creating big-budget Hollywood content can involve hundreds of vendors and partnerships. Obviously, not everything can be taken in-house. Therefore it’s critical that a company like Hallmark Channel creates a process whereby each outside vendor’s IT and security is thoroughly vetted prior to engagement of services.
  • Implement a disaster recovery solution: Modern cloud playout to streaming services must continue uninterrupted, so media organizations must build redundancy into their content delivery systems. A disaster recovery solution that protects data, enables rapid restore, and offers failover capability is critical.
  • Keep clouds confidential: When the people that need to approve a cut of an in-progress TV show or film are scattered all over the world, a digital copy is uploaded onto what is essentially a public-facing cloud so they can access it, just like digital collaboration in any number of other industries. For holiday event films driving ratings and subscriber numbers however, that sort of collaboration can leave highly valuable content open to vulnerabilities and theft. Solutions like InsightCloudSec by Rapid7 can help to lock down identity and access management (IAM) protocols, as well as manage risk with real-time context across infrastructure, orchestration, workload, and data tiers.  

Making film and TV projects is a painstaking, long, and laborious process. All of the hard work by hundreds of people that goes into each project can be devalued by attackers in the blink of an eye. So to all cybersecurity professionals who are also major fans of holiday films and TV shows, let’s take up the call: Protect the IP!

You can read the previous entry in this blog series here.

AWS CIRT announces the release of five publicly available workshops

Post Syndicated from Steve de Vera original https://aws.amazon.com/blogs/security/aws-cirt-announces-the-release-of-five-publicly-available-workshops/

Greetings from the AWS Customer Incident Response Team (CIRT)! AWS CIRT is dedicated to supporting customers during active security events on the customer side of the AWS Shared Responsibility Model.

Over the past year, AWS CIRT has responded to hundreds of such security events, including the unauthorized use of AWS Identity and Access Management (IAM) credentials, ransomware and data deletion in an AWS account, and billing increases due to the creation of unauthorized resources to mine cryptocurrency.

We are excited to release five workshops that simulate these security events to help you learn the tools and procedures that AWS CIRT uses on a daily basis to detect, investigate, and respond to such security events. The workshops cover AWS services and tools, such as Amazon GuardDuty, Amazon CloudTrail, Amazon CloudWatch, Amazon Athena, and AWS WAF, as well as some open source tools written and published by AWS CIRT.

To access the workshops, you just need an AWS account, an internet connection, and the desire to learn more about incident response in the AWS Cloud! Choose the following links to access the workshops.

Unauthorized IAM Credential Use – Security Event Simulation and Detection

During this workshop, you will simulate the unauthorized use of IAM credentials by using a script invoked within AWS CloudShell. The script will perform reconnaissance and privilege escalation activities that have been commonly seen by AWS CIRT and that are typically performed during similar events of this nature. You will also learn some tools and processes that AWS CIRT uses, and how to use these tools to find evidence of unauthorized activity by using IAM credentials.

Ransomware on S3 – Security Event Simulation and Detection

During this workshop, you will use an AWS CloudFormation template to replicate an environment with multiple IAM users and five Amazon Simple Storage Service (Amazon S3) buckets. AWS CloudShell will then run a bash script that simulates data exfiltration and data deletion events that replicate a ransomware-based security event. You will also learn the tools and processes that AWS CIRT uses to respond to similar events, and how to use these tools to find evidence of unauthorized S3 bucket and object deletions.

Cryptominer Based Security Events – Simulation and Detection

During this workshop, you will simulate a cryptomining security event by using a CloudFormation template to initialize three Amazon Elastic Compute Cloud (Amazon EC2) instances. These EC2 instances will mimic cryptomining activity by performing DNS requests to known cryptomining domains. You will also learn the tools and processes that AWS CIRT uses to respond to similar events, and how to use these tools to find evidence of unauthorized creation of EC2 instances and communication with known cryptomining domains.

SSRF on IMDSv1 – Simulation and Detection

During this workshop, you will simulate the unauthorized use of a web application that is hosted on an EC2 instance configured to use Instance Metadata Service Version 1 (IMDSv1) and vulnerable to server side request forgery (SSRF). You will learn how web application vulnerabilities, such as SSRF, can be used to obtain credentials from an EC2 instance. You will also learn the tools and processes that AWS CIRT uses to respond to this type of access, and how to use these tools to find evidence of the unauthorized use of EC2 instance credentials through web application vulnerabilities such as SSRF.

AWS CIRT Toolkit For Automating Incident Response Preparedness

During this workshop, you will install and experiment with some common tools and utilities that AWS CIRT uses on a daily basis to detect security misconfigurations, respond to active events, and assist customers with protecting their infrastructure.

If you have feedback about this post, submit comments in the Comments section below. If you have questions about this post, contact AWS Support.

Want more AWS Security news? Follow us on Twitter.

Author

Steve de Vera

Steve is the Incident Response Watch Lead for the US Pacific region of the AWS CIRT. He is passionate about American-style BBQ and is a certified competition BBQ judge. He has a dog named Brisket.

[$] Not coalescing around None-aware

Post Syndicated from original https://lwn.net/Articles/918058/

The wish for a “None-aware” operator (or operators) is
longstanding within the Python community. While there is fairly
widespread
interest in more easily handling situations where a value needs to be
tested for being None before being further processed, there is
much less agreement on how to “spell” such an operator (or construct) and
on whether the language truly needs it. But the idea never seems to go
away, with long discussions erupting every year or two—and no resolution
really in sight.

AWS Specialist Insights Team uses Amazon QuickSight to provide operational insights across the AWS Worldwide Specialist Organization

Post Syndicated from David Adamson original https://aws.amazon.com/blogs/big-data/aws-specialist-insights-team-uses-amazon-quicksight-to-provide-operational-insights-across-the-aws-worldwide-specialist-organization/

The AWS Worldwide Specialist Organization (WWSO) is a team of go-to-market experts that support strategic services, customer segments, and verticals at AWS. Working together, the Specialist Insights Team (SIT) and the Finance, Analytics, Science, and Technology team (FAST) support WWSO in acquiring, securing, and delivering information and business insights at scale by working with the broader AWS community (Sales, Business Units, Finance) enabling data-driven decisions to be made.

SIT is made up of analysts who bring deep knowledge of the business intelligence (BI) stack to support the WWSO business. Some analysts work across multiple areas, whereas others are deeply knowledgeable in their specific verticals, but all are technically proficient in BI tools and methodologies. The team’s ability to combine technical and operational knowledge, in partnership with domain experts within WWSO, helps us build a common, standard data platform that can be used throughout AWS.

Untapped potential in data availability

One of the ongoing challenges for the team was how to turn the 2.1 PB of data inside the data lake into actionable business intelligence that can drive actions and verifiable outcomes. The resources needed to translate the data, analyze it, and succinctly articulate what the data shows had been a blocker of our ability to be agile and responsive to our customers.

After reviewing several vendor products and evaluating the pros and cons of each, Amazon QuickSight was chosen to replace our existing legacy BI solution. It not only satisfied all of the criteria necessary to provide actionable insights across WWSO business but allows us to scale securely across tens of thousands of users at AWS.

In this post, we discuss what influenced the decision to implement QuickSight, and will detail some of the benefits our team has seen since implementation.

Legacy tool deprecation

The legacy BI solution presented a number of challenges, starting with scaling, complex governance, and siloed reporting. This resulted in poor performance, cumbersome development processes, multiple versions of truth, and high costs. Ultimately, the legacy BI solution had significant barriers to widespread adoption, including long time to insights, lack of trust, low innovation, and return-on-investment (ROI) justification.

After the decision was made to deprecate the previous BI tool our team had been using to provide reports and insights to the organization, the team began to make preparations for the impending switch. We met with analysts across the specialist organization to gather feedback on what they’d like to see in the next iteration of reporting capabilities. Based on that feedback, and with guidance from our leadership teams, the following criteria needed to be met in our next BI tool:

  • Accessible insights – To ensure users with varying levels of technical aptitude could understand the information, the insights format needed to be easy to understand.
  • Speed – With millions of records, processing speed needed to be lightning fast, and we also didn’t want to invest a lot of time in technical implementation or user education training.
  • Cost – Being a frugal company, we needed to ensure that our BI solution would not only do what we needed it to do but that it wouldn’t blow up our budget.
  • Security – Built-in row-level security, and a custom solution developed internally, had the ability to give access to thousands of users across AWS.

Among other considerations that ultimately influenced the decision to use QuickSight was that it’s a fully managed service, which meant no need to maintain a separate server or manage any upgrades. Because our team handles sensitive data, security was also top of mind. QuickSight passed that test as well; we were able to implement fine-grained security measures and saw no trade-off in performance.

A simple, speedy, single source of truth

With such a wide variety of teams needing access to the data and insights our team provides, our BI solution needed to be user-friendly and intuitive without the need for extensive training or convoluted instructions. With millions of records used to generate insights on sales pipelines, revenue, headcount, etc., queries could become quite complex. To meet our first top priority for accessible insights, we were looking for a combination of easy-to-operate and easy-to-understand visualizations.

Once our QuickSight implementation was complete, near-real-time, actionable insights with informative visuals were just a few clicks away. We were impressed by how simple it was to get at-a-glance insights that told data-driven stories about the key performance indicators that were most important to our stakeholder community. For business-critical metrics, we’re able to set up alerts that trigger emails to owners when certain thresholds are met, providing peace of mind that nothing important will slip through the cracks.

With the goal of migrating 400+ dashboards from the legacy BI solution over to QuickSight successfully, there were three critical components that we had to get right. Not only did we need to have the right technology, we also needed to set up the right processes while also keeping change management—from a people perspective—top of mind.

This migration project provided us with an opportunity to standardize our data, ensuring that we have a uniform source of truth that enables efficiency, as well as governed access and self-service across the company. In the spirit of working smarter (not harder), we kickstarted the migration in parallel with the data standardization project.

We started by establishing clear organization goals for alignment and a solid plan from start to finish. Next steps were to focus on row-level security design and evolution to ensure that we can provide governance and security at scale. To ensure success, we first piloted migrating 35+ dashboards and 500+ users. We then established a core technical team whose focus was to be experts at QuickSight and migrate another 400+ dashboards, 4,000+ users, and 60,0000+ impressions. The technical team also trained other members of the team to bring everyone along on the change management journey. We were able to complete the migration in 18 months across thousands of users.

With the base in place, we shifted focus to move from foundational business metrics to machine learning (ML) based insights and outcomes to help drive data-driven actions.

The following screenshot shows an example of what one of our QuickSight dashboards looks like, though the numbers do not reflect real values; this is test data.

With speed being next on our list of key criteria, we were delighted to learn more about how QuickSight works. SPICE, an acronym for Super-fast, Parallel, In-memory Calculation Engine, is the robust engine that QuickSight uses to rapidly perform advanced calculations and serve data. The query runtimes and dashboard development speed were both appreciably faster in comparison to other data visualization tools we had used, where we’d need to wait for it to process every time we added a new calculation or a new field to the visual. The dashboard load times were also noticeably faster than the load times from our previous BI tool; most load in under 5 seconds, compared to several minutes with the previous BI tool.

Another benefit of having chosen QuickSight is that there has been a significant reduction in the number of disagreements over data definitions or questions about discrepancies between reports. With standardized SPICE datasets built in QuickSight, we can now offer data as a service to the organization, creating a single source of truth for our insights shared across the organization. This saved the organization hours of time investigating unanswered questions, enabling us to be more agile and responsive, which makes us better able to serve our customers.

Dashboards are just the beginning

We’re very happy with QuickSight’s performance and scalability, and we are very excited to improve and expand on the solid reporting foundation we’ve begun to build. Having driven adoption from 50 percent to 83 percent, as well as seeing a 215 percent growth in views and a 157 percent growth in users since migrating to QuickSight, it’s clear we made the right choice.

We were intrigued by a recent post by Amy Laresch and Kellie Burton, AWS Analytics sales team uses QuickSight Q to save hours creating monthly business reviews. Based on what we learned from that post, we also plan to test out and eventually implement Amazon QuickSight Q, a ML powered natural language capability that gives anyone in the organization the ability to ask business questions in natural language and receive accurate answers with relevant visualizations. We’re also considering integrations with Amazon SageMaker and Amazon Honeycode-built apps for write back.

To learn more, visit Amazon QuickSight.


About the Authors

David Adamson is the head of WWSO Insights. He is leading the team on the journey to a data driven organization that delivers insightful, actionable data products to WWSO and shared in partnership with the broader AWS organization. In his spare time, he likes to travel across the world and can be found in his back garden, weather permitting exploring and photography the night sky.

Yash Agrawal is an Analytics Lead at Amazon Web Services. Yash’s role is to define the analytics roadmap, develop standardized global dashboards & deliver insightful analytics solutions for stakeholders across AWS.

Addis Crooks-Jones is a Sr. Manager of Business Intelligence Engineering at Amazon Web Services Finance, Analytics and Science Team (FAST). She is responsible for partnering with business leaders in the World Wide Specialist Organization to build a culture of data  to support strategic initiatives. The technology solutions developed are used globally to drive decision making across AWS. When not thinking about new plans involving data, she like to be on adventures big and small involving food, art and all the fun people in her life.

Graham Gilvar is an Analytics Lead at Amazon Web Services. He builds and maintains centralized QuickSight dashboards, which enable stakeholders across all WWSO services to interlock and make data driven decisions. In his free time, he enjoys walking his dog, golfing, bowling, and playing hockey.

Shilpa Koogegowda is the Sales Ops Analyst at Amazon Web Services and has been part of the WWSO Insights team for the last two years. Her role involves building standardized metrics, dashboards and data products to provide data and insights to the customers.

Enabling load-balancing of non-HTTP(s) traffic on AWS Wavelength

Post Syndicated from Sheila Busser original https://aws.amazon.com/blogs/compute/enabling-load-balancing-of-non-https-traffic-on-aws-wavelength/

This blog post is written by Jack Chen, Telco Solutions Architect, and Robert Belson, Developer Advocate.

AWS Wavelength embeds AWS compute and storage services within 5G networks, providing mobile edge computing infrastructure for developing, deploying, and scaling ultra-low-latency applications. AWS recently introduced support for Application Load Balancer (ALB) in AWS Wavelength zones. Although ALB addresses Layer-7 load balancing use cases, some low latency applications that get deployed in AWS Wavelength Zones rely on UDP-based protocols, such as QUIC, WebRTC, and SRT, which can’t be load-balanced by Layer-7 Load Balancers. In this post, we’ll review popular load-balancing patterns on AWS Wavelength, including a proposed architecture demonstrating how DNS-based load balancing can address customer requirements for load-balancing non-HTTP(s) traffic across multiple Amazon Elastic Compute Cloud (Amazon EC2) instances. This solution also builds a foundation for automatic scale-up and scale-down capabilities for workloads running in an AWS Wavelength Zone.

Load balancing use cases in AWS Wavelength

In the AWS Regions, customers looking to deploy highly-available edge applications often consider Amazon Elastic Load Balancing (Amazon ELB) as an approach to automatically distribute incoming application traffic across multiple targets in one or more Availability Zones (AZs). However, at the time of this publication, AWS-managed Network Load Balancer (NLB) isn’t supported in AWS Wavelength Zones and ALB is being rolled out to all AWS Wavelength Zones globally. As a result, this post will seek to document general architectural guidance for load balancing solutions on AWS Wavelength.

As one of the most prominent AWS Wavelength use cases, highly-immersive video streaming over UDP using protocols such as WebRTC at scale often require a load balancing solution to accommodate surges in traffic, either due to live events or general customer access patterns. These use cases, relying on Layer-4 traffic, can’t be load-balanced from a Layer-7 ALB. Instead, Layer-4 load balancing is needed.

To date, two infrastructure deployments involving Layer-4 load balancers are most often seen:

  • Amazon EC2-based deployments: Often the environment of choice for earlier-stage enterprises and ISVs, a fleet of EC2 instances will leverage a load balancer for high-throughput use cases, such as video streaming, data analytics, or Industrial IoT (IIoT) applications
  • Amazon EKS deployments: Customers looking to optimize performance and cost efficiency of their infrastructure can leverage containerized deployments at the edge to manage their AWS Wavelength Zone applications. In turn, external load balancers could be configured to point to exposed services via NodePort objects. Furthermore, a more popular choice might be to leverage the AWS Load Balancer Controller to provision an ALB when you create a Kubernetes Ingress.

Regardless of deployment type, the following design constraints must be considered:

  • Target registration: For load balancing solutions not managed by AWS, seamless solutions to load balancer target registration must be managed by the customer. As one potential solution, visit a recent HAProxyConf presentation, Practical Advice for Load Balancing at the Network Edge.
  • Edge Discovery: Although DNS records can be populated into Amazon Route 53 for each carrier-facing endpoint, DNS won’t deterministically route mobile clients to the most optimal mobile endpoint. When available, edge discovery services are required to most effectively route mobile clients to the lowest latency endpoint.
  • Cross-zone load balancing: Given the hub-and-spoke design of AWS Wavelength, customer-managed load balancers should proxy traffic only to that AWS Wavelength Zone.

Solution overview – Amazon EC2

In this solution, we’ll present a solution for a highly-available load balancing solution in a single AWS Wavelength Zone for an Amazon EC2-based deployment. In a separate post, we’ll cover the needed configurations for the AWS Load Balancer Controller in AWS Wavelength for Amazon Elastic Kubernetes Service (Amazon EKS) clusters.

The proposed solution introduces DNS-based load balancing, a technique to abstract away the complexity of intelligent load-balancing software and allow your Domain Name System (DNS) resolvers to distribute traffic (equally, or in a weighted distribution) to your set of endpoints.

Our solution leverages the weighted routing policy in Route 53 to resolve inbound DNS queries to multiple EC2 instances running within an AWS Wavelength zone. As EC2 instances for a given workload get deployed in an AWS Wavelength zone, Carrier IP addresses can be assigned to the network interfaces at launch.

Through this solution, Carrier IP addresses attached to AWS Wavelength instances are automatically added as DNS records for the customer-provided public hosted zone.

To determine how Route 53 responds to queries, given an arbitrary number of records of a public hosted zone, Route53 offers numerous routing policies:

Simple routing policy – In the event that you must route traffic to a single resource in an AWS Wavelength Zone, simple routing can be used. A single record can contain multiple IP addresses, but Route 53 returns the values in a random order to the client.

Weighted routing policy – To route traffic more deterministically using a set of proportions that you specify, this policy can be selected. For example, if you would like Carrier IP A to receive 50% of the traffic and Carrier IP B to receive 50% of the traffic, we’ll create two individual A records (one for each Carrier IP) with a weight of 50 and 50, respectively. Learn more about Route 53 routing policies by visiting the Route 53 Developer Guide.

The proposed solution leverages weighted routing policy in Route 53 DNS to route traffic to multiple EC2 instances running within an AWS Wavelength zone.

Reference architecture

The following diagram illustrates the load-balancing component of the solution, where EC2 instances in an AWS Wavelength zone are assigned Carrier IP addresses. A weighted DNS record for a host (e.g., www.example.com) is updated with Carrier IP addresses.

DNS-based load balancing

When a device makes a DNS query, it will be returned to one of the Carrier IP addresses associated with the given domain name. With a large number of devices, we expect a fair distribution of load across all EC2 instances in the resource pool. Given the highly ephemeral mobile edge environments, it’s likely that Carrier IPs could frequently be allocated to accommodate a workload and released shortly thereafter. However, this unpredictable behavior could yield stale DNS records, resulting in a “blackhole” – routes to endpoints that no longer exist.

Time-To-Live (TTL) is a DNS attribute that specifies the amount of time, in seconds, that you want DNS recursive resolvers to cache information about this record.

In our example, we should set to 30 seconds to force DNS resolvers to retrieve the latest records from the authoritative nameservers and minimize stale DNS responses. However, a lower TTL has a direct impact on cost, as a result of increased number of calls from recursive resolvers to Route53 to constantly retrieve the latest records.

The core components of the solution are as follows:

Alongside the services above in the AWS Wavelength Zone, the following services are also leveraged in the AWS Region:

  • AWS Lambda – a serverless event-driven function that makes API calls to the Route 53 service to update DNS records.
  • Amazon EventBridge– a serverless event bus that reacts to EC2 instance lifecycle events and invokes the Lambda function to make DNS updates.
  • Route 53– cloud DNS service with a domain record pointing to AWS Wavelength-hosted resources.

In this post, we intentionally leave the specific load balancing software solution up to the customer. Customers can leverage various popular load balancers available on the AWS Marketplace, such as HAProxy and NGINX. To focus our solution on the auto-registration of DNS records to create functional load balancing, this solution is designed to support stateless workloads only. To support stateful workloads, sticky sessions – a process in which routes requests to the same target in a target group – must be configured by the underlying load balancer solution and are outside of the scope of what DNS can provide natively.

Automation overview

Using the aforementioned components, we can implement the following workflow automation:

Event-driven Auto Scaling Workflow

Amazon CloudWatch alarm can trigger the Auto Scaling group Scale out or Scale in event by adding or removing EC2 instances. Eventbridge will detect the EC2 instance state change event and invoke the Lambda function. This function will update the DNS record in Route53 by either adding (scale out) or deleting (scale in) a weighted A record associated with the EC2 instance changing state.

Configuration of the automatic auto scaling policy is out of the scope of this post. There are many auto scaling triggers that you can consider using, based on predefined and custom metrics such as memory utilization. For the demo purposes, we will be leveraging manual auto scaling.

In addition to the core components that were already described, our solution also utilizes AWS Identity and Access Management (IAM) policies and CloudWatch. Both services are key components to building AWS Well-Architected solutions on AWS. We also use AWS Systems Manager Parameter Store to keep track of user input parameters. The deployment of the solution is automated via AWS CloudFormation templates. The Lambda function provided should be uploaded to an AWS Simple Storage Service (Amazon S3) bucket.

Amazon Virtual Private Cloud (Amazon VPC), subnets, Carrier Gateway, and Route Tables are foundational building blocks for AWS-based networking infrastructure. In our deployment, we are creating a new VPC, one subnet in an AWS Wavelength zone of your choice, a Carrier Gateway, and updating the route table for this subnet to point the default route to the Carrier Gateway.

Wavelength VPC architecture.

Deployment prerequisites

The following are prerequisites to deploy the described solution in your account:

  • Access to an AWS Wavelength zone. If your account is not allow-listed to use AWS Wavelength zones, then opt-in to AWS Wavelength zones here.
  • Public DNS Hosted Zone hosted in Route 53. You must have access to a registered public domain to deploy this solution. The zone for this domain should be hosted in the same account where you plan to deploy AWS Wavelength workloads.
    If you don’t have a public domain, then you can register a new one. Note that there will be a service charge for the domain registration.
  • Amazon S3 bucket. For the Lambda function that updates DNS records in Route 53, store the source code as a .zip file in an Amazon S3 bucket.
  • Amazon EC2 Key pair. You can use an existing Key pair for the deployment. If you don’t have a KeyPair in the region where you plan to deploy this solution, then create one by following these instructions.
  • 4G or 5G-connected device. Although the infrastructure can be deployed independent of the underlying connected devices, testing the connectivity will require a mobile device on one of the Wavelength partner’s networks. View the complete list of Telecommunications providers and Wavelength Zone locations to learn more.

Conclusion

In this post, we demonstrated how to implement DNS-based load balancing for workloads running in an AWS Wavelength zone. We deployed the solution that used the EventBridge Rule and the Lambda function to update DNS records hosted by Route53. If you want to learn more about AWS Wavelength, subscribe to AWS Compute Blog channel here.

Amazon Sunsets Cloud Drive

Post Syndicated from Stephanie Doyle original https://www.backblaze.com/blog/amazon-sunsets-cloud-drive/

Another one bites the dust. Amazon announced they’re putting Amazon Cloud Drive in the rearview to focus on Amazon Photos in a phased deprecation through December 2023. Today, we’ll dig into what this means for folks with data on Amazon Cloud Drive, especially those with files other than photos and videos.

Dear Amazon Drive User

When Amazon dropped the news, they explained the phased approach they would take to deprecating Amazon Drive. They’re not totally eliminating Drive—yet. Here’s what they’ve done so far, and what they plan to do moving forward:

  • October 31, 2022: Amazon removed the Drive app from iOS and Android app stores. The app doesn’t get bug fixes and security updates anymore.
  • January 31, 2023: Uploading to the Amazon Drive website will be cut off. You will have read-only access to your files.
  • December 31, 2023: Amazon Drive will no longer be supported and access to files will be cut off. Every file stored on Amazon Drive, except photo or video files, needs a new home. Users can access photo and video files on Amazon Photos.

Now, users face two options for what to do with files stored on Amazon Drive:

  1. Follow instructions to download Amazon Photos for iOS and Android devices. And, use the Amazon Drive website to download and store all other files locally or with another service.
  2. Transfer your entire library of photos, videos, and other data to another service.

Looking for an Amazon Cloud Drive Alternative?

Shameless plug: If you used Amazon Cloud Drive to store anything other than photos and you need a new place to keep your data, give Backblaze B2 Cloud Storage a try. The first 10GB are free, and our storage is priced at a flat rate of $5/TB/month ($0.005/GB/month) after that. And if you’re a business customer, we also offer the choice of capacity-based pricing with Backblaze B2 Reserve.

A Quick History of Amazon Cloud Drive

In 2014, Amazon offered free, unlimited photo storage on Amazon Cloud Drive as a loyalty perk for Prime members. The following year, they rolled out a subscription-based offering to store other types of files in addition to photos—video, documents, etc.—on Cloud Drive.

Then, in 2017, they capped the free tier at 5GB. This was just one of many in a string of cloud storage providers ending a free offering and forcing users to pay or move.

All Amazon account holders—regardless of whether they paid for Prime or not—got 5GB for photos and other file types free of charge. If you wanted or needed more storage than that, you had to sign up for the subscription-based offering starting at $11.99 per year for 100GB of storage, and prices went up from there.

You might consider this the beginning of the end for Amazon Cloud Drive.

Why Say Goodbye?

When tech companies deprecate a feature—as Amazon has done with Drive—it’s for any number of reasons:

  1. To combine one feature with another.
  2. To rectify naming inconsistencies.
  3. When a newer version makes supporting the older one impossible or impractical.
  4. To avoid flaws in a necessary feature.
  5. When a better alternative replaced the feature.
  6. To simplify the system as a whole.

Amazon’s reason for deprecating Drive? To provide a dedicated solution for photos and videos. The company stated, “We are taking the opportunity to more fully focus our efforts on Amazon Photos to provide customers a dedicated solution for photos and video storage.” Unfortunately, that leaves folks who store anything else high and dry.

Where Do We Go From Here?

The bottom line: Amazon Drive customers must park emails, documents, spreadsheets, PDFs, and text files somewhere else. If you’re an Amazon Drive customer looking to move your files out before you lose access, we invite you to try Backblaze B2. The first 10GB is on us.

How to Get Started with Backblaze B2

  1. If you’re not a customer, first sign up for B2 Cloud Storage.
  2. If you’re already a customer, enable B2 Cloud Storage in your “My Settings” tab. You can follow our Quick Start Guide for more detailed instructions.
  3. Download your data from Amazon Drive.
  4. Upload your data to Backblaze B2. Many customers choose to do so directly through the web interface, while others prefer to use integrated transfer solutions like Cyberduck, which is free and open-source, or Panic’s Transmit for Macs.
  5. Sit back and relax knowing your data is safely stored in the Backblaze B2 Storage Cloud.

The post Amazon Sunsets Cloud Drive appeared first on Backblaze Blog | Cloud Storage & Cloud Backup.

Impact of Infrastructure failures on shard in Amazon OpenSearch Service

Post Syndicated from Bukhtawar Khan original https://aws.amazon.com/blogs/big-data/impact-of-infrastructure-failures-on-shard-in-amazon-opensearch-service/

Amazon OpenSearch Service is a managed service that makes it easy to secure, deploy, and operate OpenSearch and legacy Elasticsearch clusters at scale in the AWS Cloud. Amazon OpenSearch Service provisions all the resources for your cluster, launches it, and automatically detects and replaces failed nodes, reducing the overhead of self-managed infrastructures. The service makes it easy for you to perform interactive log analytics, real-time application monitoring, website searches, and more by offering the latest versions of OpenSearch, support for 19 versions of Elasticsearch (1.5 to 7.10 versions), and visualization capabilities powered by OpenSearch Dashboards and Kibana (1.5 to 7.10 versions).

In the latest service software release, we’ve updated the shard allocation logic to be load-aware so that when shards are redistributed in case of any node failures, the service disallows surviving nodes from getting overloaded by shards previously hosted on the failed node. This is especially important for Multi-AZ domains to provide consistent and predictable cluster performance.

If you would like more background on shard allocation logic in general, please see Demystifying Elasticsearch shard allocation.

The challenge

An Amazon OpenSearch Service domain is said to be “balanced” when the number of nodes are equally distributed across configured Availability Zones, and the total number of shards are distributed equally across all the available nodes without concentration of shards of any one index on any one node. Also, OpenSearch has a property called “Zone Awareness” that, when enabled, ensures that the primary shard and its corresponding replica are allocated in different Availability Zones. If you have more than one copy of data, having multiple Availability Zones provides better fault tolerance and availability. In the event, the domain is scaled out or scaled in or during the failure of node(s), OpenSearch automatically redistributes the shards between available nodes while obeying the allocation rules based on zone awareness.

While the shard-balancing process ensures that shards are evenly distributed across Availability Zones, in some cases, if there is an unexpected failure in a single zone, shards will get reallocated to the surviving nodes. This might result in the surviving nodes getting overwhelmed, impacting cluster stability.

For instance, if one node in a three-node cluster goes down, OpenSearch redistributes the unassigned shards, as shown in the following diagram. Here “P“ represents a primary shard copy, whereas “R“ represents a replica shard copy.

This behavior of the domain can be explained in two parts – during failure and during recovery.

During failure

A domain deployed across multiple Availability Zones can encounter multiple types of failures during its lifecycle.

Complete zone failure

A cluster may lose a single Availability Zone due to a variety of reasons and also all the nodes in that zone. Today, the service tries to place the lost nodes in the remaining healthy Availability Zones. The service also tries to re-create the lost shards in the remaining nodes while still following the allocation rules. This can result in some unintended consequences.

  • When the shards of the impacted zone are getting reallocated to healthy zones, they trigger shard recoveries that can increase the latencies as it consumes additional CPU cycles and network bandwidth.
  • For an n-AZ, n-copy setup, (n>1), the surviving n-1 Availability Zones are allocated with the nth shard copy, which can be undesirable as it can cause skewness in shard distribution, which can also result in unbalanced traffic across nodes. These nodes can get overloaded, leading to further failures.

Partial zone failure

In the event of a partial zone failure or when the domain loses only some of the nodes in an Availability Zone, Amazon OpenSearch Service tries to replace the failed nodes as quickly as possible. However, in case it takes too long to replace the nodes, OpenSearch tries to allocate the unassigned shards of that zone into the surviving nodes in the Availability Zone. If the service cannot replace the nodes in the impacted Availability Zone, it may allocate them in the other configured Availability Zone, which may further skew the distribution of shards both across and within the zone. This again has unintended consequences.

  • If the nodes on the domain do not have enough storage space to accommodate the additional shards, the domain can be write-blocked, impacting indexing operation.
  • Due to the skewed distribution of shards, the domain may also experience skewed traffic across the nodes, which can further increase the latencies or timeouts for read and write operations.

Recovery

Today, in order to maintain the desired node count of the domain, Amazon OpenSearch Service launches data nodes in the remaining healthy Availability Zones, similar to the scenarios described in the failure section above. In order to ensure proper node distribution across all the Availability Zones after such an incident, manual intervention was needed by AWS.

What’s changing

To improve the overall failure handling and minimizing the impact of failure on the domain health and performance, Amazon OpenSearch Service is performing the following changes:

  • Forced Zone Awareness: OpenSearch has a preexisting shard balancing configuration called forced awareness that is used to set the Availability Zones to which shards need to be allocated. For example, if you have an awareness attribute called zone and configure nodes in zone1 and zone2, you can use forced awareness to prevent OpenSearch from allocating replicas if only one zone is available:
cluster.routing.allocation.awareness.attributes: zone
cluster.routing.allocation.awareness.force.zone.values: zone1,zone2

With this example configuration, if you start two nodes with node.attr.zone set to zone1 and create an index with five shards and one replica, OpenSearch creates the index and allocates the five primary shards but no replicas. Replicas are only allocated once nodes with node.attr.zone set to zone2 are available.

Amazon OpenSearch Service will use the forced awareness configuration on Multi-AZ domains to ensure that shards are only allocated according to the rules of zone awareness. This would prevent the sudden increase in load on the nodes of the healthy Availability Zones.

  • Load-Aware Shard Allocation: Amazon OpenSearch Service will take into consideration factors like the provisioned capacity, actual capacity, and total shard copies to calculate if any node is overloaded with more shards based on expected average shards per node. It would prevent shard assignment when any node has allocated a shard count that goes beyond this limit.

Note that any unassigned primary copy would still be allowed on the overloaded node to prevent the cluster from any imminent data loss.

Similarly, to address the manual recovery issue (as described in the Recovery section above), Amazon OpenSearch Service is also making changes to its internal scaling component. With the newer changes in place, Amazon OpenSearch Service will not launch nodes in the remaining Availability Zones even when it goes through the previously described failure scenario.

Visualizing the current and new behavior

For example, an Amazon OpenSearch Service domain is configured with 3-AZ, 6 data nodes, 12 primary shards, and 24 replica shards. The domain is provisioned across AZ-1, AZ-2, and AZ-3, with two nodes in each of the zones.

Current shard allocation:
Total number of shards: 12 Primary + 24 Replica = 36 shards
Number of Availability Zones: 3
Number of shards per zone (zone awareness is true): 36/3 = 12
Number of nodes per Availability Zone: 2
Number of shards per node: 12/2 = 6

The following diagram provides a visual representation of the domain setup. The circles denote the count of shards allocated to the node. Amazon OpenSearch Service will allocate six shards per node.

During a partial zone failure, where one node in AZ-3 fails, the failed node is assigned to the remaining zone, and the shards in the zone are redistributed based on the available nodes. After the changes described above, the cluster will not create a new node or redistribute shards after the failure of the node.


In the diagram above, with the loss of one node in AZ-3, Amazon OpenSearch Service would try to launch the replacement capacity in the same zone. However, due to some outage, the zone might be impaired and would fail to launch the replacement. In such an event, the service tries to launch deficit capacity in another healthy zone, which might lead to zone imbalance across Availability Zones. Shards on the impacted zone get stuffed on the surviving node in the same zone. However, with the new behavior, the service would try to attempt launching capacity in the same zone but would avoid launching deficit capacity in other zones to avoid imbalance. The shard allocator would also ensure that the surviving nodes don’t get overloaded.


Similarly, in case all the nodes in AZ-3 are lost, or the AZ-3 becomes impaired, Amazon OpenSearch Service brings up the lost nodes in the remaining Availability Zone and also redistributes the shards on the nodes. However, after the new changes, Amazon OpenSearch Service will neither allocate nodes to the remaining zone or it will try to re-allocate lost shards to the remaining zone. Amazon OpenSearch Service will wait for the Recovery to happen and for the domain to return to the original configuration after recovery.

If your domain is not provisioned with enough capacity to withstand the loss of an Availability Zone, you may experience a drop in throughput for your domain. It is therefore strongly recommended to follow the best practices while sizing your domain, which means having enough resources provisioned to withstand the loss of a single Availability Zone failure.


Currently, once the domain recovers, the service requires manual intervention to balance capacity across Availability Zones, which also involves shard movements. However, with the new behaviour, there is no intervention needed during the recovery process because the capacity returns in the impacted zone and the shards are also automatically allocated to the recovered nodes. This ensures that there are no competing priorities on the remaining resources.

What you can expect

After you update your Amazon OpenSearch Service domain to the latest service software release, the domains that have been configured with best practices will have more predictable performance even after losing one or many data nodes in an Availability Zone. There will be reduced cases of shard overallocation in a node. It is a good practice to provision sufficient capacity to be able to tolerate a single zone failure

You might at times see a domain turning yellow during such unexpected failures since we won’t assign replica shards to overloaded nodes. However, this does not mean that there will be data loss in a well-configured domain. We will still make sure that all primaries are assigned during the outages. There is an automated recovery in place, which will take care of balancing the nodes in the domain and ensuring that the replicas are assigned once the failure recovers.

Update the service software of your Amazon OpenSearch Service domain to get these new changes applied to your domain. More details on the service software update process are in the Amazon OpenSearch Service documentation.

Conclusion

In this post we saw how Amazon OpenSearch Service recently improved the logic to distribute nodes and shards across Availability Zones during zonal outages.

This change will help the service to ensure more consistent and predictable performance during node or zonal failures. Domains won’t see any increased latencies or write blocks during processing writes and reads, which used to surface earlier at times due to over-allocation of shards on nodes.


About the authors

Bukhtawar Khan is a Senior Software Engineer working on Amazon OpenSearch Service. He is interested in distributed and autonomous systems. He is an active contributor to OpenSearch.

Anshu Agarwal is a Senior Software Engineer working on AWS OpenSearch at Amazon Web Services. She is passionate about solving problems related to building scalable and highly reliable systems.

Shourya Dutta Biswas is a Software Engineer working on AWS OpenSearch at Amazon Web Services. He is passionate about building highly resilient distributed systems.

Rishab Nahata is a Software Engineer working on OpenSearch at Amazon Web Services. He is fascinated about solving problems in distributed systems. He is active contributor to OpenSearch.

Ranjith Ramachandra is an Engineering Manager working on Amazon OpenSearch Service at Amazon Web Services.

Jon Handler is a Senior Principal Solutions Architect, specializing in AWS search technologies – Amazon CloudSearch, and Amazon OpenSearch Service. Based in Palo Alto, he helps a broad range of customers get their search and log analytics workloads deployed right and functioning well.

Cloud Security and Compliance Best Practices: Highlights From The CSA Cloud Controls Matrix

Post Syndicated from Rapid7 original https://blog.rapid7.com/2022/12/22/cloud-security-and-compliance-best-practices-highlights-from-the-csa-cloud-controls-matrix/

Cloud Security and Compliance Best Practices: Highlights From The CSA Cloud Controls Matrix

In a recent blog post, we highlighted the release of an InsightCloudSec compliance pack, that helps organizations establish and adhere to AWS Foundational Security Best Practices. While that’s a great pack for those who have standardized on AWS and are looking for a trusted set of controls to harden their environment, we know that’s not always the case.

In fact, depending on what report you read, the percentage of organizations that have adopted multiple cloud platforms has soared and continues to rise exponentially. According to Gartner, by 2026 more than 90% of enterprises will extend their capabilities to multi-cloud environments, up from 76% in 2020.

It can be a time- and labor-intensive process to establish and enforce compliance standards across single cloud environments, but this becomes especially challenging in multi-cloud environments. First, the number of required checks and guardrails are multiplied, and second, because each platform is unique,  proper hygiene and security measures aren’t consistent across the various clouds. The general approaches and philosophies are fairly similar, but the way controls are implemented and the way policies are written can be significantly different.

For this post, we’ll dive into one of the most commonly-used cloud security standards for large, multi-cloud environments: the CSA Cloud Controls Matrix (CCM).

What is the CSA Cloud Controls Matrix?

In the unlikely event you’re unfamiliar, Cloud Security Alliance (CSA) is a non-profit organization dedicated to defining and raising awareness of best practices to help ensure a secure cloud computing environment. CSA brings together a community of cloud security experts, industry practitioners, associations, governments, and its corporate and individual members to offer cloud security-specific research, education, certification, events and products.

The Cloud Controls Matrix is a comprehensive cybersecurity control framework for cloud computing developed and maintained by CSA. It is widely-used as a systematic assessment of a cloud implementation and provides guidance on which security controls should be implemented within the cloud supply chain. The controls framework is aligned to the CSA Security Guidance for Cloud Computing and is considered a de-facto standard for cloud security assurance and compliance.

Five CSA CCM Principles and Why They’re Important

The CCM consists of many controls and best practices, which means we can’t cover them all in a single blog post. That said, we’ve outlined 5 major principles that logically group the various controls and why they’re important to implement in your cloud environment. Of course, the CCM provides a comprehensive set of specific and actionable directions that, when adopted, simplify the process of adhering to these principles—and many others.

Ensure consistent and proper management of audit logs
Audit logs record the occurrence of an event along with supporting metadata about the event, including the time at which it occurred, the responsible user or service, and the impacted entity or entities. By reviewing audit logs, security teams can investigate breaches and ensure compliance with regulatory requirements. Within CCM, there are a variety of controls focused on ensuring that you’ve got a process in place to collect, retain and analyze logs as well as limiting access and the ability to edit or delete such logs to only those who need it.

Ensure consistent data encryption and proper key management
Ensuring that data is properly encrypted, both at rest and in transit, is a critical step to protect your organization and customer data from unauthorized access. There are a variety of controls within the CCM that are centered around ensuring that data encryption is used consistently and that encryption keys are maintained properly—including regular rotation of keys as applicable.

Effectively manage IAM permissions and abide by Least Privilege Access (LPA)
In modern cloud environments, every user and resource is assigned a unique identity and a set of access permissions and privileges. This can be a challenge to keep track of, especially at scale, which can result in improper access, either from internal users or external malicious actors. To combat this, the CCM provides guidance around establishing processes and mechanisms to manage, track and enforce permissions across the organization. Further, the framework suggests employing the Least Privilege Access (LPA) principle to ensure users only have access to the systems and data that they absolutely need.

Establish and follow a process for managing vulnerabilities
There are a number of controls focused on establishing, implementing and evaluating processes, procedures and technical measures for detecting and remediating vulnerabilities. The CCM has dedicated controls for application vulnerabilities, external library vulnerabilities and host-level vulnerabilities. It is important to regularly scan your cloud environments for known vulnerabilities, and evaluate the processes and methodologies you use to do so, as well.

Define a process to proactively roll back changes to a previous state of good
In traditional, on-premises environments, patching and fixing existing resources is the proper course of action when an error or security concern is discovered. Conversely, when things go awry in cloud environments, remediation steps typically involve reverting back to a previous state of good. To this end, the CCM guides organizations to proactively establish and implement a process  that allows them to easily roll back changes to a previously known good state—whether manually or via automation.

How InsightCloudSec Helps Implement and Enforce CCM

InsightCloudSec allows security teams to establish and continuously measure compliance against organizational policies, whether they’re based on common industry frameworks or customized to specific business needs. This is accomplished through the use of compliance packs.

A compliance pack within InsightCloudSec is a set of checks that can be used to continuously assess your cloud environments for compliance with a given regulatory framework or industry best practices. The platform comes out-of-the-box with 30+ compliance packs, and also offers the ability to build custom compliance packs that are completely tailored to your business’ specific needs.

Whenever a non-compliant resource is created, or when a change is made to an existing resource’s configuration or permissions, InsightCloudSec will detect it within minutes. If you so choose, you can make use of the platform’s native, no-code automation to remediate the issue—either via deletion or by adjusting the configuration and/or permissions—without any human intervention.

If you’re interested in learning more about how InsightCloudSec can help implement and enforce security and compliance standards across your organization, be sure to check out a free demo!

James Alaniz and Ryan Blanchard contributed to this article.

Ryabitsev: Sending a kernel patch with b4 (part 1)

Post Syndicated from original https://lwn.net/Articles/918381/

Konstantin Ryabitsev has put up a
blog entry
showing how to use b4 to submit kernel patches
without (directly) using email.

While b4 started out as a way for maintainers to retrieve patches
from mailing lists, it also has contributor-oriented
features. Starting with version 0.10 b4 can:

  • create and manage patch series and cover letters
  • track and auto-reroll series revisions
  • display range-diffs between revisions
  • apply trailers received from reviewers and maintainers
  • submit patches without needing a valid SMTP gateway

Second Prototype Advances ALP (openSUSE News)

Post Syndicated from original https://lwn.net/Articles/918380/

The openSUSE News site covers
some highlights
from the second prototype
release
of the upcoming SUSE “ALP” distribution.

The mountainous prototype has the big addition of Full Disk
Encryption. ALP extended this Full Disk Encryption to bare metal
servers and the use of a Trusted Platform Module will open the
doors to leverage unattended booting while keeping systems
encrypted and secured. ALP is intended to run on both private and
public clouds that require encryption features.

The collective thoughts of the interwebz