Tag Archives: Amazon Aurora

Address Modernization Tradeoffs with Lake House Architecture

Post Syndicated from Sukhomoy Basak original https://aws.amazon.com/blogs/architecture/address-modernization-tradeoffs-with-lake-house-architecture/

Many organizations are modernizing their applications to reduce costs and become more efficient. They must adapt to modern application requirements that provide 24×7 global access. The ability to scale up or down quickly to meet demand and process a large volume of data is critical. This is challenging while maintaining strict performance and availability. For many companies, modernization includes decomposing a monolith application into a set of independently developed, deployed, and managed microservices. The decoupled nature of a microservices environment allows each service to evolve agilely and independently. While there are many benefits for moving to a microservices-based architecture, there can be some tradeoffs. As your application monolith evolves into independent microservices, you must consider the implications to your data architecture.

In this blog post we will provide example use cases, and show how Lake House Architecture on AWS can streamline your microservices architecture. A Lake house architecture embraces the decentralized nature of microservices by facilitating data movement. These transfers can be between data stores, from data stores to data lake, and from data lake to data stores (Figure 1).

Figure 1. Integrating data lake, data warehouse, and all purpose-built stores into a coherent whole

Figure 1. Integrating data lake, data warehouse, and all purpose-built stores into a coherent whole

Health and wellness application challenges

Our fictitious health and wellness customer has an application architecture comprised of several microservices backed by purpose-built data stores. User profiles, assessments, surveys, fitness plans, health preferences, and insurance claims are maintained in an Amazon Aurora MySQL-Compatible relational database. The event service monitors the number of steps walked, sleep pattern, pulse rate, and other behavioral data in Amazon DynamoDB, a NoSQL database (Figure 2).

Figure 2. Microservices architecture for health and wellness company

Figure 2. Microservices architecture for health and wellness company

With this microservices architecture, it’s common to have data spread across various data stores. This is because each microservice uses a purpose-built data store suited to its usage patterns and performance requirements. While this provides agility, it also presents challenges to deriving needed insights.

Here are four challenges that different users might face:

  1. As a health practitioner, how do I efficiently combine the data from multiple data stores to give personalized recommendations that improve patient outcomes?
  2. As a sales and marketing professional, how do I get a 360 view of my customer, when data lives in multiple data stores? Profile and fitness data are in a relational data store, but important behavioral and clickstream data are in NoSQL data stores. It’s hard for me to run targeted marketing campaigns, which can lead to revenue loss.
  3. As a product owner, how do I optimize healthcare costs when designing wellbeing programs for patients?
  4. As a health coach, how do I find patients and help them with their wellness goals?

Our remaining subsections highlight AWS Lake House Architecture capabilities and features that allow data movement and the integration of purpose-built data stores.

1. Patient care use case

In this scenario, a health practitioner is interested in historical patient data to estimate the likelihood of a future outcome. To get the necessary insights and identify patterns, the health practitioner needs event data from Amazon DynamoDB and patient profile data from Aurora MySQL-Compatible. Our health practitioner will use Amazon Athena to run an ad-hoc analysis across these data stores.

Amazon Athena provides an interactive query service for both structured and unstructured data. The federated query functionality in Amazon Athena helps with running SQL queries across data stored in relational, NoSQL, and custom data sources. Amazon Athena uses Lambda-based data source connectors to run federated queries. Figure 3 illustrates the federated query architecture.

Figure 3. Amazon Athena federated query

Figure 3. Amazon Athena federated query

The patient care team could use an Amazon Athena federated query to find out if a patient needs urgent care. It is able to detect anomalies in the combined datasets from claims processing, device data, and electronic health record (HER) as show in Figure 4.

Figure 4. Federated query result by combining data from claim, device, and EHR stores

Figure 4. Federated query result by combining data from claim, device, and EHR stores

Healthcare data from various sources, including EHRs and genetic data, helps improve personalized care. Machine learning (ML) is able to harness big data and perform predictive analytics. This creates opportunities for researchers to develop personalized treatments for various diseases, including cancer and depression.

To achieve this, you must move all the related data into a centralized repository such as an Amazon S3 data lake. For specific use cases, you also must move the data between the purpose-built data stores. Finally, you must build an ML solution that can predict the outcome. Amazon Redshift ML, combined with its federated query processing capabilities enables data analysts and database developers to create a platform to detect patterns (Figure 5). With this platform, health practitioners are able to make more accurate, data-driven decisions.

Figure 5. Amazon Redshift federated query with Amazon Redshift ML

Figure 5. Amazon Redshift federated query with Amazon Redshift ML

2. Sales and marketing use case

To run marketing campaigns, the sales and marketing team must search customer data from a relational database, with event data in a non-relational data store. We will move the data from Aurora MySQL-Compatible and Amazon DynamoDB to Amazon Elasticsearch Service (ES) to meet this requirement.

AWS Database Migration Service (DMS) helps move the change data from Aurora MySQL-Compatible to Amazon ES using Change Data Capture (CDC). AWS Lambda could be used to move the change data from DynamoDB streams to Amazon ES, as shown in Figure 6.

Figure 6. Moving and combining data from Aurora MySQL-Compatible and Amazon DynamoDB to Amazon Elasticsearch Service

Figure 6. Moving and combining data from Aurora MySQL-Compatible and Amazon DynamoDB to Amazon Elasticsearch Service

The sales and marketing team can now run targeted marketing campaigns by querying data from Amazon Elasticsearch Service, see Figure 7. They can improve sales operations by visualizing data with Amazon QuickSight.

Figure 7. Personalized search experience for ad-tech marketing team

Figure 7. Personalized search experience for ad-tech marketing team

3. Healthcare product owner use case

In this scenario, the product owner must define the care delivery value chain. They must develop process maps for patient activity and estimate the cost of patient care. They must analyze these datasets by building business intelligence (BI) reporting and dashboards with a tool like Amazon QuickSight. Amazon Redshift, a cloud scale data warehousing platform, is a good choice for this. Figure 8 illustrates this pattern.

Figure 8. Moving data from Amazon Aurora and Amazon DynamoDB to Amazon Redshift

Figure 8. Moving data from Amazon Aurora and Amazon DynamoDB to Amazon Redshift

The product owners can use integrated business intelligence reports with Amazon Redshift to analyze their data. This way they can make more accurate and appropriate decisions, see Figure 9.

Figure 9. Business intelligence for patient care processes

Figure 9. Business intelligence for patient care processes

4. Health coach use case

In this scenario, the health coach must find a patient based on certain criteria. They would then send personalized communication to connect with the patient to ensure they are following the proposed health plan. This proactive approach contributes to a positive patient outcome. It can also reduce healthcare costs incurred by insurance companies.

To be able to search patient records with multiple data points, it is important to move data from Amazon DynamoDB to Amazon ES. This also will provide a fast and personalized search experience. The health coaches can be notified and will have the information they need to provide guidance to their patients. Figure 10 illustrates this pattern.

Figure 10. Moving Data from Amazon DynamoDB to Amazon ES

Figure 10. Moving Data from Amazon DynamoDB to Amazon ES

The health coaches can use Elasticsearch to search users based on specific criteria. This helps them with counseling and other health plans, as shown in Figure 11.

Figure 11. Simplified personalized search using patient device data

Figure 11. Simplified personalized search using patient device data

Summary

In this post, we highlight how Lake House Architecture on AWS helps with the challenges and tradeoffs of modernization. A Lake House architecture on AWS can help streamline the movement of data between the microservices data stores. This offers new capabilities for various analytics use cases.

For further reading on architectural patterns, and walkthroughs for building Lake House Architecture, see the following resources:

Perform Chaos Testing on your Amazon Aurora Cluster

Post Syndicated from Anthony Pasquariello original https://aws.amazon.com/blogs/architecture/perform-chaos-testing-on-your-amazon-aurora-cluster/

“Everything fails all the time” Werner Vogels, AWS CTO

In 2010, Netflix introduced a tool called “Chaos Monkey”, that was used for introducing faults in a production environment. Chaos Monkey led to the birth of Chaos engineering where teams test their live applications by purposefully injecting faults. Observations are then used to take corrective action and increase resiliency of applications.

In this blog, you will learn about the fault injection capabilities available in Amazon Aurora for simulating various database faults.

Chaos Experiments

Chaos experiments consist of:

  • Understanding the application baseline: The application’s steady-state behavior
  • Designing an experiment: Ask “What can go wrong?” to identify failure scenarios
  • Run the experiment: Introduce faults in the application environment
  • Observe and correct: Redesign apps or infrastructure for fault tolerance

Chaos experiments require fault simulation across distributed components of the application. Amazon Aurora provides a set of fault simulation capabilities that may be used by teams to exercise chaos experiments against their applications.

Amazon Aurora fault injection

Amazon Aurora is a fully managed database service that is compatible with MySQL and PostgreSQL. Aurora is highly fault tolerant due to its six-way replicated storage architecture. In order to test the resiliency of an application built with Aurora, developers can leverage the native fault injection features to design chaos experiments. The outcome of the experiments gives a better understanding of the blast radius, depth of monitoring required, and the need to evaluate event response playbooks.

In this section, we will describe the various fault injection scenarios that you can use for designing your own experiments. We’ll show you how to conduct the experiment and use the results. This will make your application more resilient and prepared for an actual event.

Note that availability of the fault injection feature is dependent on the version of MySQL and PostgreSQL.

Figure 1. Fault injection overview

Figure 1. Fault injection overview

1. Testing an instance crash

An Aurora cluster can have one primary and up to 15 read replicas. If the primary instance fails, one of the replicas becomes the primary. Applications must be designed to recover from these instance failures as soon as possible to have minimal impact on the end-user experience.

The instance crash fault injection simulates failure of the instance/dispatcher/node in the Aurora database cluster. Fault injection may be carried out on the primary or replicas by running the API against the target instance.

Example: Aurora PostgreSQL for instance crash simulation

The query following will simulate a database instance crash:

SELECT aurora_inject_crash ('instance' );

Since this is a simulation, it does not lead to a failover to the replica. As an alternative to using this API, you can carry out an actual failover by using the AWS Management Console or AWS CLI.

The team should observe the change in the application’s behavior to understand the impact of the instance failure. Take corrective actions to reduce the impact of such failures on the application.

A long recovery time on the application would require the team to reduce the Domain Name Service (DNS) time-to-live (TTL) for the DB connections. As a general best practice, the Aurora Database cluster should have at least one replica.

2. Testing the replica failure

Aurora manages asynchronous replication between cluster nodes within a cluster. The typical replication lag is under 100 milliseconds. Network slowness or issues on the nodes may lead to an increase in replication lag between writer and replica nodes.

The replica failure fault injection allows you to simulate replication failure across one or more replicas. Note that this type of fault injection applies only to a DB cluster that has at least one read replica.

Replica failure manifests itself as stale data read by the application that is connecting to the replicas. The specific functional impact on the application depends on the sensitivity to the freshness of data. Note that this fault injection mechanism does not apply to the native replication supported mechanisms in PostgreSQL and MySQL databases.

Example: Aurora PostgreSQL for replica failure

The statement following will simulate 100% failure of replica named ‘my-replica’ for 20 seconds.

SELECT aurora_inject_replica_failure(100, 20, ‘my-replica’)

The team must observe the behavior of the application from the data sensitivity perspective. If the observed lag is unacceptable, the team must evaluate corrective actions such as vertical scaling of database instances and query optimization. As a best practice, the team should monitor the replication lag and take proactive actions to address it.

3. Testing the disk failure

Aurora’s storage volume consists of six copies of data across three Availability Zones (refer the diagram preceding). Aurora has an inherent ability to repair itself for failures in the storage components. This high reliability is achieved by way of a quorum model. Reads require only 3/6 nodes and writes require 4/6 nodes to be available. However, there may still be transient impact on application depending on how widespread the issue.

The disk failure injection capability allows you to simulate failures of storage nodes and partial failure of disks. The severity of failure can be set as a percentage value. The simulation continues only for the specified amount of time. There is no impact on the actual data on the storage nodes and the disk.

Example: Aurora PostgreSQL for disk failure simulation

You may get the number of disks (for index) on your cluster using the query:

SELECT disks FROM aurora_show_volume_status()

The query following will simulate 75% failure on disk with index 15. The simulation will end in 20 seconds.

SELECT aurora_inject_disk_failure(75, 15, true, 20)

Applications may experience temporary failures due to this fault injection and should be able to gracefully recover from it. If the recovery time is higher than a threshold, or the application has a complete failure, the team can redesign their application.

4. Disk congestion fault

Disk congestion usually happens because of heavy I/O traffic against the storage devices. The impact may range from degraded application performance, to complete application failures.

Aurora provides the capability to simulate disk congestion without synthetic SQL load against the database. With this fault injection mechanism, you can gain a better understanding of the performance characteristics of the application under heavy I/O spikes.

Example: Aurora PostgreSQL for disk congestion simulation

You may get the number of disks (for index) on your cluster using the query:

SELECT disks FROM aurora_show_volume_status()

The query following will simulate a 100% disk failure for 20 seconds. The failure will be simulated on disk with index 15. Simulated delay will be between 30 and 40 milliseconds.

SELECT aurora_inject_disk_congestion(100, 15, true, 20, 30, 40)

If the observed behavior is unacceptable, then the team must carefully consider the load characteristics of their application. Depending on the observations, corrective action may include query optimization, indexing, vertical scaling of the database instances, and adding more replicas.

Conclusion

A chaos experiment involves injecting a fault in a production environment and then observing the application behavior. The outcome of the experiment helps the team identify application weaknesses and evaluate event response processes. Amazon Aurora natively provides fault-injection capabilities that can be used by teams to conduct chaos experiments for database failure scenarios. Aurora can be used for simulating instance failure, replication failure, disk failures, and disk congestion. Try out these capabilities in Aurora to make your applications more robust and resilient from database failures.

Implement tenant isolation for Amazon S3 and Aurora PostgreSQL by using ABAC

Post Syndicated from Ashutosh Upadhyay original https://aws.amazon.com/blogs/security/implement-tenant-isolation-for-amazon-s3-and-aurora-postgresql-by-using-abac/

In software as a service (SaaS) systems, which are designed to be used by multiple customers, isolating tenant data is a fundamental responsibility for SaaS providers. The practice of isolation of data in a multi-tenant application platform is called tenant isolation. In this post, we describe an approach you can use to achieve tenant isolation in Amazon Simple Storage Service (Amazon S3) and Amazon Aurora PostgreSQL-Compatible Edition databases by implementing attribute-based access control (ABAC). You can also adapt the same approach to achieve tenant isolation in other AWS services.

ABAC in Amazon Web Services (AWS), which uses tags to store attributes, offers advantages over the traditional role-based access control (RBAC) model. You can use fewer permissions policies, update your access control more efficiently as you grow, and last but not least, apply granular permissions for various AWS services. These granular permissions help you to implement an effective and coherent tenant isolation strategy for your customers and clients. Using the ABAC model helps you scale your permissions and simplify the management of granular policies. The ABAC model reduces the time and effort it takes to maintain policies that allow access to only the required resources.

The solution we present here uses the pool model of data partitioning. The pool model helps you avoid the higher costs of duplicated resources for each tenant and the specialized infrastructure code required to set up and maintain those copies.

Solution overview

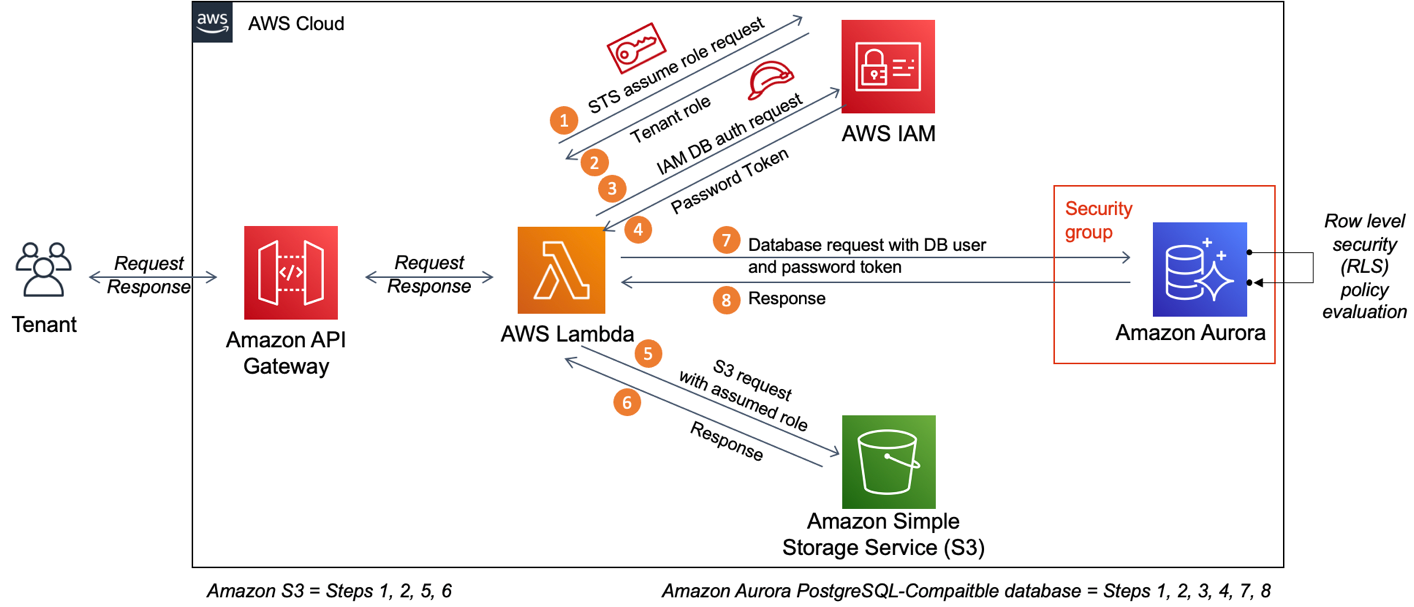
In a typical customer environment where this solution is implemented, the tenant request for access might land at Amazon API Gateway, together with the tenant identifier, which in turn calls an AWS Lambda function. The Lambda function is envisaged to be operating with a basic Lambda execution role. This Lambda role should also have permissions to assume the tenant roles. As the request progresses, the Lambda function assumes the tenant role and makes the necessary calls to Amazon S3 or to an Aurora PostgreSQL-Compatible database. This solution helps you to achieve tenant isolation for objects stored in Amazon S3 and data elements stored in an Aurora PostgreSQL-Compatible database cluster.

Figure 1 shows the tenant isolation architecture for both Amazon S3 and Amazon Aurora PostgreSQL-Compatible databases.

Figure 1: Tenant isolation architecture diagram

Figure 1: Tenant isolation architecture diagram

As shown in the numbered diagram steps, the workflow for Amazon S3 tenant isolation is as follows:

  1. AWS Lambda sends an AWS Security Token Service (AWS STS) assume role request to AWS Identity and Access Management (IAM).
  2. IAM validates the request and returns the tenant role.
  3. Lambda sends a request to Amazon S3 with the assumed role.
  4. Amazon S3 sends the response back to Lambda.

The diagram also shows the workflow steps for tenant isolation for Aurora PostgreSQL-Compatible databases, as follows:

  1. Lambda sends an STS assume role request to IAM.
  2. IAM validates the request and returns the tenant role.
  3. Lambda sends a request to IAM for database authorization.
  4. IAM validates the request and returns the database password token.
  5. Lambda sends a request to the Aurora PostgreSQL-Compatible database with the database user and password token.
  6. Aurora PostgreSQL-Compatible database returns the response to Lambda.

Prerequisites

For this walkthrough, you should have the following prerequisites:

  1. An AWS account for your workload.
  2. An Amazon S3 bucket.
  3. An Aurora PostgreSQL-Compatible cluster with a database created.

    Note: Make sure to note down the default master database user and password, and make sure that you can connect to the database from your desktop or from another server (for example, from Amazon Elastic Compute Cloud (Amazon EC2) instances).

  4. A security group and inbound rules that are set up to allow an inbound PostgreSQL TCP connection (Port 5432) from Lambda functions. This solution uses regular non-VPC Lambda functions, and therefore the security group of the Aurora PostgreSQL-Compatible database cluster should allow an inbound PostgreSQL TCP connection (Port 5432) from anywhere (0.0.0.0/0).

Make sure that you’ve completed the prerequisites before proceeding with the next steps.

Deploy the solution

The following sections describe how to create the IAM roles, IAM policies, and Lambda functions that are required for the solution. These steps also include guidelines on the changes that you’ll need to make to the prerequisite components Amazon S3 and the Aurora PostgreSQL-Compatible database cluster.

Step 1: Create the IAM policies

In this step, you create two IAM policies with the required permissions for Amazon S3 and the Aurora PostgreSQL database.

To create the IAM policies

  1. Open the AWS Management Console.
  2. Choose IAM, choose Policies, and then choose Create policy.
  3. Use the following JSON policy document to create the policy. Replace the placeholder <111122223333> with the bucket name from your account.
    {
        "Version": "2012-10-17",
        "Statement": [
            {
                "Effect": "Allow",
                "Action": [
                    "s3:Get*",
                    "s3:List*"
                ],
                "Resource": "arn:aws:s3:::sts-ti-demo-<111122223333>/${aws:PrincipalTag/s3_home}/*"
            }
        ]
    }
    

  4. Save the policy with the name sts-ti-demo-s3-access-policy.

    Figure 2: Create the IAM policy for Amazon S3 (sts-ti-demo-s3-access-policy)

    Figure 2: Create the IAM policy for Amazon S3 (sts-ti-demo-s3-access-policy)

  5. Open the AWS Management Console.
  6. Choose IAM, choose Policies, and then choose Create policy.
  7. Use the following JSON policy document to create a second policy. This policy grants an IAM role permission to connect to an Aurora PostgreSQL-Compatible database through a database user that is IAM authenticated. Replace the placeholders with the appropriate Region, account number, and cluster resource ID of the Aurora PostgreSQL-Compatible database cluster, respectively.
{
    "Version": "2012-10-17",
    "Statement": [
        {
            "Effect": "Allow",
            "Action": [
                "rds-db:connect"
            ],
            "Resource": [
                "arn:aws:rds-db:<us-west-2>:<111122223333>:dbuser:<cluster- ZTISAAAABBBBCCCCDDDDEEEEL4>/${aws:PrincipalTag/dbuser}"
            ]
        }
    ]
}
  • Save the policy with the name sts-ti-demo-dbuser-policy.

    Figure 3: Create the IAM policy for Aurora PostgreSQL database (sts-ti-demo-dbuser-policy)

    Figure 3: Create the IAM policy for Aurora PostgreSQL database (sts-ti-demo-dbuser-policy)

Note: Make sure that you use the cluster resource ID for the clustered database. However, if you intend to adapt this solution for your Aurora PostgreSQL-Compatible non-clustered database, you should use the instance resource ID instead.

Step 2: Create the IAM roles

In this step, you create two IAM roles for the two different tenants, and also apply the necessary permissions and tags.

To create the IAM roles

  1. In the IAM console, choose Roles, and then choose Create role.
  2. On the Trusted entities page, choose the EC2 service as the trusted entity.
  3. On the Permissions policies page, select sts-ti-demo-s3-access-policy and sts-ti-demo-dbuser-policy.
  4. On the Tags page, add two tags with the following keys and values.

    Tag key Tag value
    s3_home tenant1_home
    dbuser tenant1_dbuser
  5. On the Review screen, name the role assumeRole-tenant1, and then choose Save.
  6. In the IAM console, choose Roles, and then choose Create role.
  7. On the Trusted entities page, choose the EC2 service as the trusted entity.
  8. On the Permissions policies page, select sts-ti-demo-s3-access-policy and sts-ti-demo-dbuser-policy.
  9. On the Tags page, add two tags with the following keys and values.

    Tag key Tag value
    s3_home tenant2_home
    dbuser tenant2_dbuser
  10. On the Review screen, name the role assumeRole-tenant2, and then choose Save.

Step 3: Create and apply the IAM policies for the tenants

In this step, you create a policy and a role for the Lambda functions. You also create two separate tenant roles, and establish a trust relationship with the role that you created for the Lambda functions.

To create and apply the IAM policies for tenant1

  1. In the IAM console, choose Policies, and then choose Create policy.
  2. Use the following JSON policy document to create the policy. Replace the placeholder <111122223333> with your AWS account number.
    {
        "Version": "2012-10-17",
        "Statement": [
            {
                "Sid": "VisualEditor0",
                "Effect": "Allow",
                "Action": "sts:AssumeRole",
                "Resource": [
                    "arn:aws:iam::<111122223333>:role/assumeRole-tenant1",
                    "arn:aws:iam::<111122223333>:role/assumeRole-tenant2"
                ]
            }
        ]
    }
    

  3. Save the policy with the name sts-ti-demo-assumerole-policy.
  4. In the IAM console, choose Roles, and then choose Create role.
  5. On the Trusted entities page, select the Lambda service as the trusted entity.
  6. On the Permissions policies page, select sts-ti-demo-assumerole-policy and AWSLambdaBasicExecutionRole.
  7. On the review screen, name the role sts-ti-demo-lambda-role, and then choose Save.
  8. In the IAM console, go to Roles, and enter assumeRole-tenant1 in the search box.
  9. Select the assumeRole-tenant1 role and go to the Trust relationship tab.
  10. Choose Edit the trust relationship, and replace the existing value with the following JSON document. Replace the placeholder <111122223333> with your AWS account number, and choose Update trust policy to save the policy.
    {
      "Version": "2012-10-17",
      "Statement": [
        {
          "Effect": "Allow",
          "Principal": {
            "AWS": "arn:aws:iam::<111122223333>:role/sts-ti-demo-lambda-role"
          },
          "Action": "sts:AssumeRole"
        }
      ]
    }
    

To verify that the policies are applied correctly for tenant1

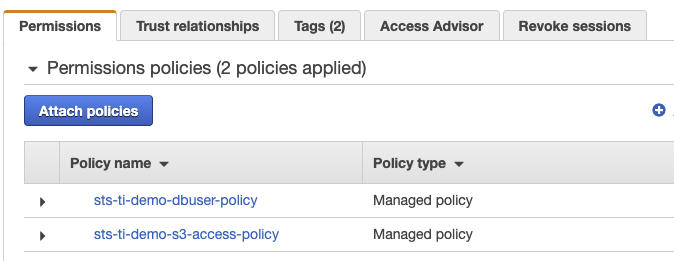
In the IAM console, go to Roles, and enter assumeRole-tenant1 in the search box. Select the assumeRole-tenant1 role and on the Permissions tab, verify that sts-ti-demo-dbuser-policy and sts-ti-demo-s3-access-policy appear in the list of policies, as shown in Figure 4.

Figure 4: The assumeRole-tenant1 Permissions tab

Figure 4: The assumeRole-tenant1 Permissions tab

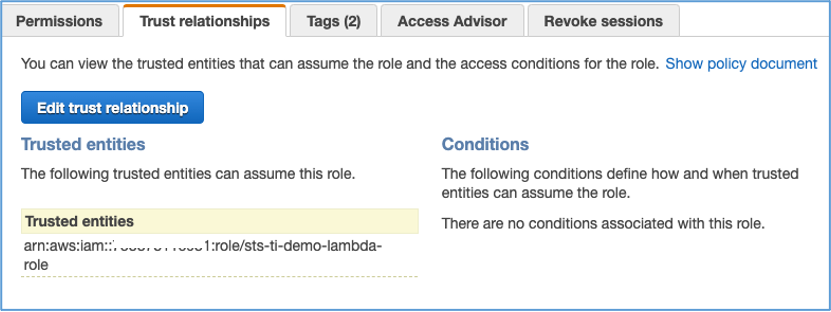
On the Trust relationships tab, verify that sts-ti-demo-lambda-role appears under Trusted entities, as shown in Figure 5.

Figure 5: The assumeRole-tenant1 Trust relationships tab

Figure 5: The assumeRole-tenant1 Trust relationships tab

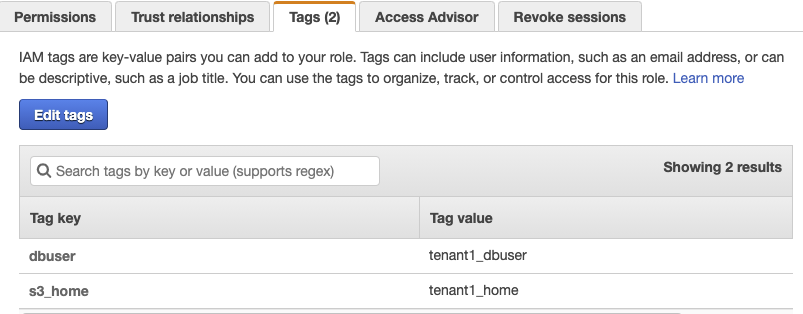
On the Tags tab, verify that the following tags appear, as shown in Figure 6.

Tag key Tag value
dbuser tenant1_dbuser
s3_home tenant1_home


Figure 6: The assumeRole-tenant1 Tags tab

Figure 6: The assumeRole-tenant1 Tags tab

To create and apply the IAM policies for tenant2

  1. In the IAM console, go to Roles, and enter assumeRole-tenant2 in the search box.
  2. Select the assumeRole-tenant2 role and go to the Trust relationship tab.
  3. Edit the trust relationship, replacing the existing value with the following JSON document. Replace the placeholder <111122223333> with your AWS account number.
    {
      "Version": "2012-10-17",
      "Statement": [
        {
          "Effect": "Allow",
          "Principal": {
            "AWS": "arn:aws:iam::<111122223333>:role/sts-ti-demo-lambda-role"
          },
          "Action": "sts:AssumeRole"
        }
      ]
    }
    

  4. Choose Update trust policy to save the policy.

To verify that the policies are applied correctly for tenant2

In the IAM console, go to Roles, and enter assumeRole-tenant2 in the search box. Select the assumeRole-tenant2 role and on the Permissions tab, verify that sts-ti-demo-dbuser-policy and sts-ti-demo-s3-access-policy appear in the list of policies, you did for tenant1. On the Trust relationships tab, verify that sts-ti-demo-lambda-role appears under Trusted entities.

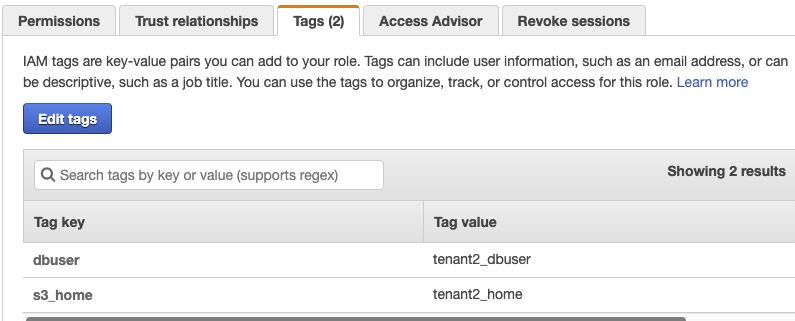
On the Tags tab, verify that the following tags appear, as shown in Figure 7.

Tag key Tag value
dbuser tenant2_dbuser
s3_home tenant2_home
Figure 7: The assumeRole-tenant2 Tags tab

Figure 7: The assumeRole-tenant2 Tags tab

Step 4: Set up an Amazon S3 bucket

Next, you’ll set up an S3 bucket that you’ll use as part of this solution. You can either create a new S3 bucket or re-purpose an existing one. The following steps show you how to create two user homes (that is, S3 prefixes, which are also known as folders) in the S3 bucket.

  1. In the AWS Management Console, go to Amazon S3 and select the S3 bucket you want to use.
  2. Create two prefixes (folders) with the names tenant1_home and tenant2_home.
  3. Place two test objects with the names tenant.info-tenant1_home and tenant.info-tenant2_home in the prefixes that you just created, respectively.

Step 5: Set up test objects in Aurora PostgreSQL-Compatible database

In this step, you create a table in Aurora PostgreSQL-Compatible Edition, insert tenant metadata, create a row level security (RLS) policy, create tenant users, and grant permission for testing purposes.

To set up Aurora PostgreSQL-Compatible

  1. Connect to Aurora PostgreSQL-Compatible through a client of your choice, using the master database user and password that you obtained at the time of cluster creation.
  2. Run the following commands to create a table for testing purposes and to insert a couple of testing records.
    CREATE TABLE tenant_metadata (
        tenant_id VARCHAR(30) PRIMARY KEY,
        email     VARCHAR(50) UNIQUE,
        status    VARCHAR(10) CHECK (status IN ('active', 'suspended', 'disabled')),
        tier      VARCHAR(10) CHECK (tier IN ('gold', 'silver', 'bronze')));
    
    INSERT INTO tenant_metadata (tenant_id, email, status, tier) 
    VALUES ('tenant1_dbuser','[email protected]','active','gold');
    INSERT INTO tenant_metadata (tenant_id, email, status, tier) 
    VALUES ('tenant2_dbuser','[email protected]','suspended','silver');
    ALTER TABLE tenant_metadata ENABLE ROW LEVEL SECURITY;
    

  3. Run the following command to query the newly created database table.
    SELECT * FROM tenant_metadata;
    

    Figure 8: The tenant_metadata table content

    Figure 8: The tenant_metadata table content

  4. Run the following command to create the row level security policy.
    CREATE POLICY tenant_isolation_policy ON tenant_metadata
    USING (tenant_id = current_user);
    

  5. Run the following commands to establish two tenant users and grant them the necessary permissions.
    CREATE USER tenant1_dbuser WITH LOGIN;
    CREATE USER tenant2_dbuser WITH LOGIN;
    GRANT rds_iam TO tenant1_dbuser;
    GRANT rds_iam TO tenant2_dbuser;
    
    GRANT select, insert, update, delete ON tenant_metadata to tenant1_dbuser, tenant2_dbuser;
    

  6. Run the following commands to verify the newly created tenant users.
    SELECT usename AS role_name,
      CASE
         WHEN usesuper AND usecreatedb THEN
           CAST('superuser, create database' AS pg_catalog.text)
         WHEN usesuper THEN
            CAST('superuser' AS pg_catalog.text)
         WHEN usecreatedb THEN
            CAST('create database' AS pg_catalog.text)
         ELSE
            CAST('' AS pg_catalog.text)
      END role_attributes
    FROM pg_catalog.pg_user
    WHERE usename LIKE (‘tenant%’)
    ORDER BY role_name desc;
    

    Figure 9: Verify the newly created tenant users output

    Figure 9: Verify the newly created tenant users output

Step 6: Set up the AWS Lambda functions

Next, you’ll create two Lambda functions for Amazon S3 and Aurora PostgreSQL-Compatible. You also need to create a Lambda layer for the Python package PG8000.

To set up the Lambda function for Amazon S3

  1. Navigate to the Lambda console, and choose Create function.
  2. Choose Author from scratch. For Function name, enter sts-ti-demo-s3-lambda.
  3. For Runtime, choose Python 3.7.
  4. Change the default execution role to Use an existing role, and then select sts-ti-demo-lambda-role from the drop-down list.
  5. Keep Advanced settings as the default value, and then choose Create function.
  6. Copy the following Python code into the lambda_function.py file that is created in your Lambda function.
    import json
    import os
    import time 
    
    def lambda_handler(event, context):
        import boto3
        bucket_name     =   os.environ['s3_bucket_name']
    
        try:
            login_tenant_id =   event['login_tenant_id']
            data_tenant_id  =   event['s3_tenant_home']
        except:
            return {
                'statusCode': 400,
                'body': 'Error in reading parameters'
            }
    
        prefix_of_role  =   'assumeRole'
        file_name       =   'tenant.info' + '-' + data_tenant_id
    
        # create an STS client object that represents a live connection to the STS service
        sts_client = boto3.client('sts')
        account_of_role = sts_client.get_caller_identity()['Account']
        role_to_assume  =   'arn:aws:iam::' + account_of_role + ':role/' + prefix_of_role + '-' + login_tenant_id
    
        # Call the assume_role method of the STSConnection object and pass the role
        # ARN and a role session name.
        RoleSessionName = 'AssumeRoleSession' + str(time.time()).split(".")[0] + str(time.time()).split(".")[1]
        try:
            assumed_role_object = sts_client.assume_role(
                RoleArn         = role_to_assume, 
                RoleSessionName = RoleSessionName, 
                DurationSeconds = 900) #15 minutes
    
        except:
            return {
                'statusCode': 400,
                'body': 'Error in assuming the role ' + role_to_assume + ' in account ' + account_of_role
            }
    
        # From the response that contains the assumed role, get the temporary 
        # credentials that can be used to make subsequent API calls
        credentials=assumed_role_object['Credentials']
        
        # Use the temporary credentials that AssumeRole returns to make a connection to Amazon S3  
        s3_resource=boto3.resource(
            's3',
            aws_access_key_id=credentials['AccessKeyId'],
            aws_secret_access_key=credentials['SecretAccessKey'],
            aws_session_token=credentials['SessionToken']
        )
    
        try:
            obj = s3_resource.Object(bucket_name, data_tenant_id + "/" + file_name)
            return {
                'statusCode': 200,
                'body': obj.get()['Body'].read()
            }
        except:
            return {
                'statusCode': 400,
                'body': 'error in reading s3://' + bucket_name + '/' + data_tenant_id + '/' + file_name
            }
    

  7. Under Basic settings, edit Timeout to increase the timeout to 29 seconds.
  8. Edit Environment variables to add a key called s3_bucket_name, with the value set to the name of your S3 bucket.
  9. Configure a new test event with the following JSON document, and save it as testEvent.
    {
      "login_tenant_id": "tenant1",
      "s3_tenant_home": "tenant1_home"
    }
    

  10. Choose Test to test the Lambda function with the newly created test event testEvent. You should see status code 200, and the body of the results should contain the data for tenant1.

    Figure 10: The result of running the sts-ti-demo-s3-lambda function

    Figure 10: The result of running the sts-ti-demo-s3-lambda function

Next, create another Lambda function for Aurora PostgreSQL-Compatible. To do this, you first need to create a new Lambda layer.

To set up the Lambda layer

  1. Use the following commands to create a .zip file for Python package pg8000.

    Note: This example is created by using an Amazon EC2 instance running the Amazon Linux 2 Amazon Machine Image (AMI). If you’re using another version of Linux or don’t have the Python 3 or pip3 packages installed, install them by using the following commands.

    sudo yum update -y 
    sudo yum install python3 
    sudo pip3 install pg8000 -t build/python/lib/python3.8/site-packages/ 
    cd build 
    sudo zip -r pg8000.zip python/
    

  2. Download the pg8000.zip file you just created to your local desktop machine or into an S3 bucket location.
  3. Navigate to the Lambda console, choose Layers, and then choose Create layer.
  4. For Name, enter pgdb, and then upload pg8000.zip from your local desktop machine or from the S3 bucket location.

    Note: For more details, see the AWS documentation for creating and sharing Lambda layers.

  5. For Compatible runtimes, choose python3.6, python3.7, and python3.8, and then choose Create.

To set up the Lambda function with the newly created Lambda layer

  1. In the Lambda console, choose Function, and then choose Create function.
  2. Choose Author from scratch. For Function name, enter sts-ti-demo-pgdb-lambda.
  3. For Runtime, choose Python 3.7.
  4. Change the default execution role to Use an existing role, and then select sts-ti-demo-lambda-role from the drop-down list.
  5. Keep Advanced settings as the default value, and then choose Create function.
  6. Choose Layers, and then choose Add a layer.
  7. Choose Custom layer, select pgdb with Version 1 from the drop-down list, and then choose Add.
  8. Copy the following Python code into the lambda_function.py file that was created in your Lambda function.
    import boto3
    import pg8000
    import os
    import time
    import ssl
    
    connection = None
    assumed_role_object = None
    rds_client = None
    
    def assume_role(event):
        global assumed_role_object
        try:
            RolePrefix  = os.environ.get("RolePrefix")
            LoginTenant = event['login_tenant_id']
        
            # create an STS client object that represents a live connection to the STS service
            sts_client      = boto3.client('sts')
            # Prepare input parameters
            role_to_assume  = 'arn:aws:iam::' + sts_client.get_caller_identity()['Account'] + ':role/' + RolePrefix + '-' + LoginTenant
            RoleSessionName = 'AssumeRoleSession' + str(time.time()).split(".")[0] + str(time.time()).split(".")[1]
        
            # Call the assume_role method of the STSConnection object and pass the role ARN and a role session name.
            assumed_role_object = sts_client.assume_role(
                RoleArn         =   role_to_assume, 
                RoleSessionName =   RoleSessionName,
                DurationSeconds =   900) #15 minutes 
            
            return assumed_role_object['Credentials']
        except Exception as e:
            print({'Role assumption failed!': {'role': role_to_assume, 'Exception': 'Failed due to :{0}'.format(str(e))}})
            return None
    
    def get_connection(event):
        global rds_client
        creds = assume_role(event)
    
        try:
            # create an RDS client using assumed credentials
            rds_client = boto3.client('rds',
                aws_access_key_id       = creds['AccessKeyId'],
                aws_secret_access_key   = creds['SecretAccessKey'],
                aws_session_token       = creds['SessionToken'])
    
            # Read the environment variables and event parameters
            DBEndPoint   = os.environ.get('DBEndPoint')
            DatabaseName = os.environ.get('DatabaseName')
            DBUserName   = event['dbuser']
    
            # Generates an auth token used to connect to a database with IAM credentials.
            pwd = rds_client.generate_db_auth_token(
                DBHostname=DBEndPoint, Port=5432, DBUsername=DBUserName, Region='us-west-2'
            )
    
            ssl_context             = ssl.SSLContext()
            ssl_context.verify_mode = ssl.CERT_REQUIRED
            ssl_context.load_verify_locations('rds-ca-2019-root.pem')
    
            # create a database connection
            conn = pg8000.connect(
                host        =   DBEndPoint,
                user        =   DBUserName,
                database    =   DatabaseName,
                password    =   pwd,
                ssl_context =   ssl_context)
            
            return conn
        except Exception as e:
            print ({'Database connection failed!': {'Exception': "Failed due to :{0}".format(str(e))}})
            return None
    
    def execute_sql(connection, query):
        try:
            cursor = connection.cursor()
            cursor.execute(query)
            columns = [str(desc[0]) for desc in cursor.description]
            results = []
            for res in cursor:
                results.append(dict(zip(columns, res)))
            cursor.close()
            retry = False
            return results    
        except Exception as e:
            print ({'Execute SQL failed!': {'Exception': "Failed due to :{0}".format(str(e))}})
            return None
    
    
    def lambda_handler(event, context):
        global connection
        try:
            connection = get_connection(event)
            if connection is None:
                return {'statusCode': 400, "body": "Error in database connection!"}
    
            response = {'statusCode':200, 'body': {
                'db & user': execute_sql(connection, 'SELECT CURRENT_DATABASE(), CURRENT_USER'), \
                'data from tenant_metadata': execute_sql(connection, 'SELECT * FROM tenant_metadata')}}
            return response
        except Exception as e:
            try:
                connection.close()
            except Exception as e:
                connection = None
            return {'statusCode': 400, 'statusDesc': 'Error!', 'body': 'Unhandled error in Lambda Handler.'}
    

  9. Add a certificate file called rds-ca-2019-root.pem into the Lambda project root by downloading it from https://s3.amazonaws.com/rds-downloads/rds-ca-2019-root.pem.
  10. Under Basic settings, edit Timeout to increase the timeout to 29 seconds.
  11. Edit Environment variables to add the following keys and values.

    Key Value
    DBEndPoint Enter the database cluster endpoint URL
    DatabaseName Enter the database name
    RolePrefix assumeRole
    Figure 11: Example of environment variables display

    Figure 11: Example of environment variables display

  12. Configure a new test event with the following JSON document, and save it as testEvent.
    {
      "login_tenant_id": "tenant1",
      "dbuser": "tenant1_dbuser"
    }
    

  13. Choose Test to test the Lambda function with the newly created test event testEvent. You should see status code 200, and the body of the results should contain the data for tenant1.

    Figure 12: The result of running the sts-ti-demo-pgdb-lambda function

    Figure 12: The result of running the sts-ti-demo-pgdb-lambda function

Step 7: Perform negative testing of tenant isolation

You already performed positive tests of tenant isolation during the Lambda function creation steps. However, it’s also important to perform some negative tests to verify the robustness of the tenant isolation controls.

To perform negative tests of tenant isolation

  1. In the Lambda console, navigate to the sts-ti-demo-s3-lambda function. Update the test event to the following, to mimic a scenario where tenant1 attempts to access other tenants’ objects.
    {
      "login_tenant_id": "tenant1",
      "s3_tenant_home": "tenant2_home"
    }
    

  2. Choose Test to test the Lambda function with the updated test event. You should see status code 400, and the body of the results should contain an error message.

    Figure 13: The results of running the sts-ti-demo-s3-lambda function (negative test)

    Figure 13: The results of running the sts-ti-demo-s3-lambda function (negative test)

  3. Navigate to the sts-ti-demo-pgdb-lambda function and update the test event to the following, to mimic a scenario where tenant1 attempts to access other tenants’ data elements.
    {
      "login_tenant_id": "tenant1",
      "dbuser": "tenant2_dbuser"
    }
    

  4. Choose Test to test the Lambda function with the updated test event. You should see status code 400, and the body of the results should contain an error message.

    Figure 14: The results of running the sts-ti-demo-pgdb-lambda function (negative test)

    Figure 14: The results of running the sts-ti-demo-pgdb-lambda function (negative test)

Cleaning up

To de-clutter your environment, remove the roles, policies, Lambda functions, Lambda layers, Amazon S3 prefixes, database users, and the database table that you created as part of this exercise. You can choose to delete the S3 bucket, as well as the Aurora PostgreSQL-Compatible database cluster that we mentioned in the Prerequisites section, to avoid incurring future charges.

Update the security group of the Aurora PostgreSQL-Compatible database cluster to remove the inbound rule that you added to allow a PostgreSQL TCP connection (Port 5432) from anywhere (0.0.0.0/0).

Conclusion

By taking advantage of attribute-based access control (ABAC) in IAM, you can more efficiently implement tenant isolation in SaaS applications. The solution we presented here helps to achieve tenant isolation in Amazon S3 and Aurora PostgreSQL-Compatible databases by using ABAC with the pool model of data partitioning.

If you run into any issues, you can use Amazon CloudWatch and AWS CloudTrail to troubleshoot. If you have feedback about this post, submit comments in the Comments section below.

To learn more, see these AWS Blog and AWS Support articles:

Want more AWS Security how-to content, news, and feature announcements? Follow us on Twitter.

Author

Ashutosh Upadhyay

Ashutosh works as a Senior Security, Risk, and Compliance Consultant in AWS Professional Services (GFS) and is based in Singapore. Ashutosh started off his career as a developer, and for the past many years has been working in the Security, Risk, and Compliance field. Ashutosh loves to spend his free time learning and playing with new technologies.

Author

Chirantan Saha

Chirantan works as a DevOps Engineer in AWS Professional Services (GFS) and is based in Singapore. Chirantan has 20 years of development and DevOps experience working for large banking, financial services, and insurance organizations. Outside of work, Chirantan enjoys traveling, spending time with family, and helping his children with their science projects.

Field Notes: How to Set Up Your Cross-Account and Cross-Region Database for Amazon Aurora

Post Syndicated from Ashutosh Pateriya original https://aws.amazon.com/blogs/architecture/field-notes-how-to-set-up-your-cross-account-and-cross-region-database-for-amazon-aurora/

This post was co-written by Ashutosh Pateriya, Solution Architect at AWS and Nirmal Tomar, Principal Consultant at Infosys Technologies Ltd. 

Various organizations have stringent regulatory compliance obligations or business requirements that require an effective cross-account and cross-region database setup. We recommend to establish a Disaster Recovery (DR) environment in different AWS accounts and Regions for a system design that can handle AWS Region failures.

Account-level separation is important for isolating production environments from other environments, that is, development, test, UAT and DR environments. These are defined by external compliance requirements, such as PCI-DSS or HIPAA. Cross-account replication helps an organization recover data from a replicated account, when the primary AWS account is compromised, and access to the account is lost. Using multiple Regions gives you greater control over the recovery time, if there is a hard dependency failure on a Regional AWS service.

You can use Amazon Aurora Global Database to replicate your RDS database across Regions, within the same AWS Account. In this blog, we show how to build a custom solution for Cross-Account, Cross-Region database replication with configurable Recovery Time Objective (RTO)/ Recovery Point Objective (RPO).

Solution Overview

a custom solution for Cross-Account, Cross-Region database replication with configurable Recovery Time

Figure 1 – Architecture of a Cross-Account, Cross-Region database replication with configurable Recovery Time Objective (RTO)/ Recovery Point Objective (RPO)

Step 1: Automated Amazon Aurora snapshots cannot be shared with other AWS accounts. Hence, create a manual version of the snapshot for the same.

Step 2: Amazon Aurora cannot be restored from the snapshot created in different AWS Regions. To overcome this, you must copy the snapshot in the target AWS Region after AWS KMS encryption.

Step 3: Share the DB cluster snapshot with the target account, in order to restore the cluster.

Step 4: Restore Aurora Cluster from the shared snapshot.

Step 5: Restore the required Aurora Instances.

Step 6: Swap the cluster and instance names, to make it accessible from the previous Reader/Writer endpoint.

Step 7: Perform a sanity test and shut down the old cluster.

Prerequisites

  • Two AWS accounts with permission to spin up required resources.
  • A running Aurora instance in the source AWS account.

Walkthrough

The solution outlined is custom built, and automated using AWS Step functions, AWS Lambda, Amazon Simple Notification Service (SNS), AWS Key Management Service (KMS), AWS Cloud​Formation Templates, Amazon Aurora and AWS Identity and Access Management IAM by following these four steps:

  1. Launch a one-time set up of the AWS KMS in the AWS source account to share the key with destination account. This key will be used by the destination account to restore the Aurora cluster from a KMS encrypted snapshot.
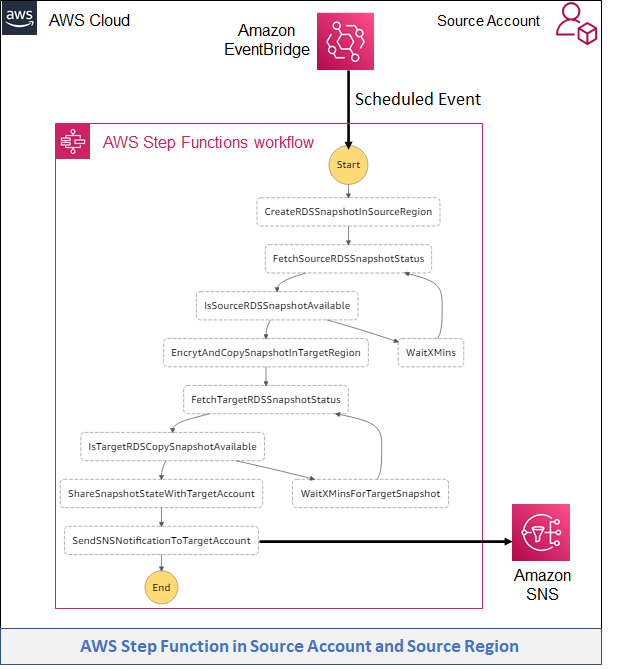
  2. Set up the step function workflow in the AWS source account and source Region. On a scheduled interval, this workflow creates a snapshot in the source account and source Region. Copy it to the target Region and push a notification to the SNS topic and setup a Lambda function as a target for the SNS topic. Refer to the documentation to learn more about Using Lambda with Amazon SNS.
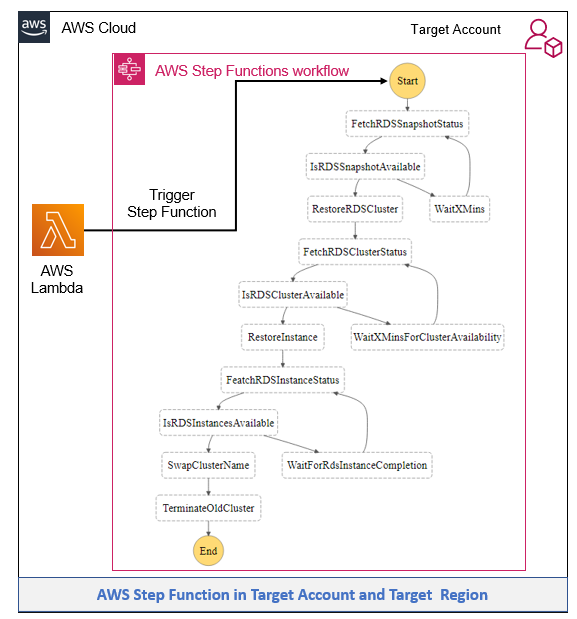
  3. Set up the step function workflow in the AWS target account and in the target Region. This workflow is initiated from the previous workflow after sharing the snapshot. It restores the Aurora cluster from the shared snapshot in the target account and in the target Region.
  4. Provide access to the Lambda function in the target account and target Region. Set it up to listen to the SNS topic in the source account and source Region.
AWS Step Function in Source Account and Source Region

Figure 2 – Architecture showing AWS Step Function in Source Account and Source Region

We can implement a Lambda function with different supported programming languages. For this solution, we selected Python to implement various Lambda functions used in both step function workflows.

Note: We are using us-west-2 as the source Region and us-west-1 as the target Region for this demo. You can choose Regions as per your design need.

Part 1: One Time AWS KMS key setup in the Source Account and Target Region for cross-account access of the Encrypted Snapshot

We can share a Customer Master Key (CMK) across multiple AWS accounts using different ways, such as  using AWS CloudFormation templates, CLI, and AWS console.

Following are one-time steps that allow you to create an AWS KMS key in the source AWS account. You can then provide cross-account usage access of the same key to the destination account for restoring the Aurora cluster. You can achieve this with the AWS Console and AWS CloudFormation Template.

Note: Several AWS services being used do not fall under the AWS Free Tier. To avoid extra charges, make sure to delete resources once the demo is completed.

Using the AWS Console

You can set up cross-account AWS KMS keys using the AWS Console. For more information on the setup, refer to the guide: Allowing users in other accounts to use a CMK.

Using the AWS CloudFormation Template

You can set up cross account AWS KMS keys using CloudFormation templates by following these steps:

  • Launch the template:

Launch with CLoudFormatation Console button

  • Use the source account and destination AWS Region.
  • Type the appropriate stack name and destination account number and select Create stack.

Create Stack screenshot

  • Click on the Resources tab to confirm if the KMS key and its alias name have been created.

Resources screenshot

Part 2: Snapshot creation and sharing Target Account in Target Region using the Step Function workflow

Now, we schedule the AWS Step Function workflow with single/multiple times in a day/week/month using Amazon EventBridge or Amazon CloudWatch Events per Recovery Time Objective (RTO)/ Recovery Point Objective (RPO).

This workflow first creates a snapshot in the AWS source account and source Region> The snapshot copies it in target Region after KMS encryption, shares the snapshot with the target account and sends a notification to SNS Topic.  A Lambda function is subscribed to the topic in the target account.


Diagram showing AWS Step Function in Source Account and Source Region

Figure 3 – Architecture showing the AWS Step Functions Workflow

The Import Lambda functions involved in this workflow:

a.     CreateRDSSnapshotInSourceRegion:  This Lambda function creates a snapshot in the source Account and Region for an existing Aurora cluster.

b.     FetchSourceRDSSnapshotStatus: This Lambda function fetches the snapshot status and waits for its availability before moving to the next step.

c.     EncrytAndCopySnapshotInTargetRegion: This Lambda function copies the source snapshot in the target AWS Region after encryption with AWS KMS keys.

d.     FetchTargetRDSSnapshotStatus: This Lambda function fetch the snapshot status in the target Region and will wait to move to the next step once snapshot status changed to available.

e.     ShareSnapshotStateWithTargetAccount: This Lambda function shares the snapshot with the target account and target Region.

f.      SendSNSNotificationToTargetAccount:  This option sends the notification to the SNS topic. An AWS Lambda function is subscribed to this topic for the destination AWS Account.

Using the following AWS CloudFormation Template, we set up the required services/workflow in the source account and source Region:

a.     Launch the template in the source account and source Region:

Launch with CLoudFormatation Console button

Specify stack details screenshot

b.     Fill out the preceding form with the following details and select next.

Stack name:  Stack Name which you want to create.

DestinationAccountNumber: Destination AWS Account number where you want to restore the Aurora  cluster.

KMSKey: KMS key ARN number setup in previous steps.

ScheduleExpression: Schedule a cron expression when you want to run this workflow. Sample expressions are available in this guide, Schedule expressions using rate or cron.

SourceDBClusterIdentifier: The identifier of the DB cluster, for which a snapshot is created. It must match the identifier of an existing DBCluster. This parameter isn’t case-sensitive.

SourceDBSnapshotName: Snapshot name which we will use in this flow.

TargetAWSRegion: Destination AWS Account Region where you want to restore the Aurora cluster.

Permissions screenshot

c.     Select IAM role to launch this template per best practices.

Capabilities and transforms screenshot

d.     Acknowledge to create various resources including IAM roles/policies and select Create Stack.

Part 3: Workflow to Restore the Aurora Cluster in the AWS Target Account and Target Region

Once AWS Lambda receives a cross-account sns notification for the shared snapshot, this workflow begins:

  • The Lambda function starts the AWS Step Function workflow in an asynchronous mode.
  • The workflow checks for the snapshot availability and starts restoring the Aurora cluster based on the configured engine, version, and other parameters.
  • Depending on the availability of the cluster, it adds instances based on a predefined configuration.
  • Once the instances are available, it swaps cluster names so that the updated database is available at the same reader and writer endpoints.
  • Once the databases are restored, the old Aurora cluster is shut down.

Note:

a)       The database is restored in the default VPC, Availability Zone, and option group, with the default cluster version and option group. If you want to restore with the specific configurations, you can edit the restore cluster function with details available in the same section.

b)      Database credentials will be the same as source account. If you want to override credential or change the authentication mechanism, you can edit the restore cluster function with details available in the same section.

Trigger Step Function graphic

Figure 4 – Architecture showing the AWS Step Functions Workflow

Import Lambda functions involved in this workflow:

a)     FetchRDSSnapshotStatus: This Lambda function fetches the snapshot status and moves to RestoreCluster functionality once the snapshot is available.

b)    RestoreRDSCluster: This Lambda function restores the cluster from the shared snapshot with the mandatory attribute only.

–     You can edit the Lambda function as described following to add specific parameters like specific VPC, Subnets, AvailabilityZones, DBSubnetGroupName, Autoscaling for reader capacity, DBClusterParameterGroupName, BacktrackWindow and many more.

c)     RestoreInstance: This Lambda function creates an instance for the restored cluster.

d)    SwapClusterName: This Lambda function swaps the cluster name, so that the updated database is available at previous endpoints. Then the cluster url is swapped.

e)     TerminateOldCluster: This Lambda function will shut down the previous cluster.

Using the following AWS CloudFormation Template, we can set up the required services/workflow in the target account and target Region:

a)     Launch the template in target account and target Region:

Launch with CLoudFormatation Console button

Specify stack details screenshot

b)     Fill out the preceding form with the following details and click the next button.

Stack name: Stack name which you want to create.

Engine: The database engine to be used for the new DB cluster, such as aurora-mysql. It must be compatible with the engine of the source.

DBInstanceClass: The compute and memory capacity of the Amazon RDS DB instance, for example, db.t3.medium.

Not all DB instance classes are available in all AWS Regions, or for all database engines. For the full list of DB instance classes, and availability for your engine, see DB Instance Class in the Amazon RDS User Guide.

ExistingDBClusterIdentifier: Name of the existing DB cluster. In the final step, if the old cluster is available with this name, it will be deleted and a new cluster will be available with this name, so the reader/writer endpoint will not change. This parameter isn’t case-sensitive. It must contain from 1 to 63 letters, numbers, or hyphens. The first character must be a letter. DBClusterIdentifier can’t end with a hyphen or contain two consecutive hyphens.

TempDBClusterIdentifier: Temporary name of the DB cluster created from the DB snapshot or DB cluster snapshot. In the final step, this cluster name will be swapped with the original cluster and the previous cluster will be deleted. This parameter isn’t case-sensitive. Must contain from 1 to 63 letters, numbers, or hyphens. The first character must be a letter. DBClusterIdentifier can’t end with a hyphen or contain two consecutive hyphens.

ExistingDBInstanceIdentifier: Name of the existing DB instance identifier. In the final step, if an previous instance is available with this name, it will be deleted and a new instance will be available with this name. This parameter is stored as a lowercase string. Must contain from 1 to 63 letters, numbers, or hyphens. The first character must be a letter, can’t end with a hyphen or contain two consecutive hyphens.

TempDBInstanceIdentifier: Temporary name of the existing DB instance. In the final step, if a previous instance is available with this name, it will be deleted and a new instance will be available. This parameter is stored as a lowercase string. Must contain from 1 to 63 letters, numbers, or hyphens. The first character must be a letter, can’t end with a hyphen or contain two consecutive hyphens.

Permissions2 screenshot


c)     Select IAM role to launch this template as per best practices and select Next.

Capabilities and transforms screenshot 2


d)     Acknowledge to create various resources including IAM roles/policies and select Create Stack.

After launching the CloudFormation steps, all resources like IAM roles, step function workflow and Lambda functions will be set up in the target account.

Part 4: Cross Account Role for Lambda Invocation to restore the Aurora Cluster

In this step, we  provide access to Lambda function setup in the target account and target Region to listen to the SNS topic setup in the source account and source Region. An SNS notification is initiated by the first workflow after the snapshot sharing steps. The Lambda function initiates a workflow to restore the Aurora cluster in the target account and target Region.

Using the following code , we can configure a Lambda function in the target account to listen to the sns topic created in the source account and Region. More details are available in this Tutorial: Using AWS Lambda with Amazon Simple Notification Service.

a)     Configure the SNS topic in source account to allow Subscriptions for target account by using the following AWS CLI command in the source account.

aws sns add-permission \
  --label lambda-access --aws-account-id <<targetAccountID>> \
  --topic-arn <<snsTopicinSourceAccount>> \
  --action-name Subscribe ListSubscriptionsByTopic

Replace << targetAccountID >> with target AWS account number and <<snsTopicinSourceAccount>> with sns topic created as an output of part 2 CloudFormation template in the source account.

b)     Configure the InvokeStepFunction Lambda function in target account to allow invocation from the SNS topic in source account by using following AWS CLI command in the target account. This policy allows the specific SNS topic in the source account to invoke the Lambda function.

aws lambda add-permission \
  --function-name InvokeStepFunction \
  --source-arn <<snsTopicinSourceAccount>> \
  --statement-id sns-x-account \
  --action "lambda:InvokeFunction" \
   --principal sns.amazonaws.com

Replace <<snsTopicinSourceAccount>> with sns topic created as an output of part 2 CloudFormation template.

c)     Subscribe the Lambda function in the target account to the SNS topic in the source account by using the following AWS CLI command in the target account.

aws sns subscribe \
  --topic-arn <<snsTopicinSourceAccount>> \
   --protocol "lambda" \
  --notification-endpoint << InvokeStepFunctionArninTargetAccount>>

Initiate the CLI command in the source Region as sns topic is created there. Replace <<snsTopicinSourceAccount>> with sns topic created as an output of part 2 CloudFormation template execution and << InvokeStepFunctionArninTargetAccount >>with InvokeStepFunction Lambda in the target account created as an output of part 3 CloudFormation template launch.

Security Consideration:

1.     We can share the snapshots with different accounts using public and private mode.

  • Public mode permits all AWS accounts to restore a DB instance from the shared snapshot.
  • Private mode permits only AWS accounts that you specify to restore a DB instance from the shared snapshot. We recommend sharing the snapshot with the destination account in private mode, as we are using the same in our solution.

Snapshot permissions screenshot

2.     Sharing a manual DB cluster snapshot (whether encrypted or unencrypted) enables authorized AWS accounts to directly restore a DB cluster from the snapshot. This is instead of taking a copy and restoring from that. We recommend sharing an encrypted snapshot with the destination account, as we are using the same in our solution.

Cleaning up

Delete the resources to avoid future incurring charges.

Conclusion

In this blog, you learned how to replicate databases across the Region and across different accounts. This helps in designing your DR environment and fulfilling compliance requirements. This solution can be customized for any RDS-based databases or Aurora Serverless, and you can achieve the desired level of RTO and RPO.

Reference:

Field Notes provides hands-on technical guidance from AWS Solutions Architects, consultants, and technical account managers, based on their experiences in the field solving real-world business problems for customers.


Nirmal Tomar

Nirmal is a principal consultant with Infosys, assisting vertical industries on application migration and modernization to the public cloud. He is the part of the Infosys Cloud CoE team and leads various initiatives with AWS. Nirmal has a keen interest in industry and cloud trends, and in working with hyperscaler to build differentiated offerings. Nirmal also specializes in cloud native development, managed containerization solutions, data analytics, data lakes, IoT, AI, and machine learning solutions.

Automate Amazon ES synonym file updates

Post Syndicated from Ashwini Rudra original https://aws.amazon.com/blogs/big-data/automate-amazon-es-synonym-file-updates/

Search engines provide the means to retrieve relevant content from a collection of content. However, this can be challenging if certain exact words aren’t entered. You need to find the right item from a catalog of products, or the correct provider from a list of service providers, for example. The most common method of specifying your query is through a text box. If you enter the wrong terms, you won’t match the right items, and won’t get the best results.

Synonyms enable better search results by matching words that all match to a single indexable term. In Amazon Elasticsearch Service (Amazon ES), you can provide synonyms for keywords that your application’s users may look for. For example, your website may provide medical practitioner searches, and your users may search for “child’s doctor” instead of “pediatrician.” Mapping the two words together enables either search term to match documents that contain the term “pediatrician.” You can achieve similar search results by using synonym files. Amazon ES custom packages allow you to upload synonym files that define the synonyms in your catalog. One best practice is to manage the synonyms in Amazon Relational Database Service (Amazon RDS). You then need to deploy the synonyms to your Amazon ES domain. You can do this with AWS Lambda and Amazon Simple Storage Service (Amazon S3).

In this post, we discuss an approach using Amazon Aurora and Lambda functions to automate updating synonym files for improved search results.

Overview of solution

Amazon ES is a fully managed service that makes it easy to deploy, secure, and run Elasticsearch cost-effectively and at scale. You can build, monitor, and troubleshoot your applications using the tools you love, at the scale you need. The service supports open-source Elasticsearch API operations, managed Kibana, integration with Logstash, and many AWS services with built-in alerting and SQL querying.

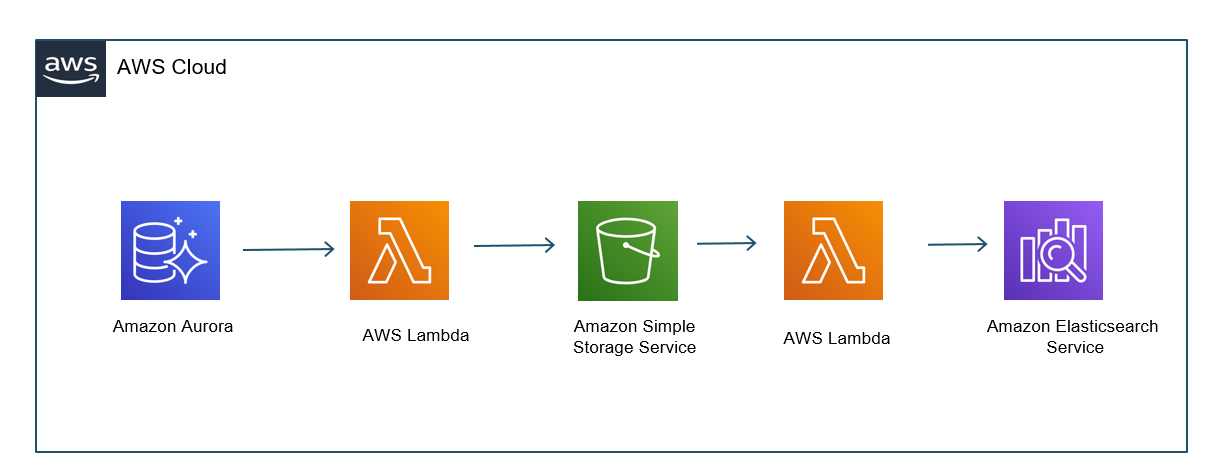
The following diagram shows the solution architecture. One Lambda function pushes files to Amazon S3, and another function distributes the updates to Amazon ES.

Walkthrough overview

For search engineers, the synonym file’s content is usually stored within a database or in a data lake. You may have data in tabular format in Amazon RDS (in this case, we use Amazon Aurora MySQL). When updates to the synonym data table occur, the change triggers a Lambda function that pushes data to Amazon S3. The S3 event triggers a second function, which pushes the synonym file from Amazon S3 to Amazon ES. This architecture automates the entire synonym file update process.

To achieve this architecture, we complete the following high-level steps:

  1. Create a stored procedure to trigger the Lambda function.
  2. Write a Lambda function to verify data changes and push them to Amazon S3.
  3. Write a Lambda function to update the synonym file in Amazon ES.
  4. Test the data flow.

We discuss each step in detail in the next sections.

Prerequisites

Make sure you complete the following prerequisites:

  1. Configure an Amazon ES domain. We use a domain running Elasticsearch version 7.9 for this architecture.
  2. Set up an Aurora MySQL database. For more information, see Configuring your Amazon Aurora DB cluster.

Create a stored procedure to trigger a Lambda function

You can invoke a Lambda function from an Aurora MySQL database cluster using a native function or a stored procedure.

The following script creates an example synonym data table:

CREATE TABLE SynonymsTable (
SynID int NOT NULL AUTO_INCREMENT,
Base_Term varchar(255),
Synonym_1 varchar(255),
Synonym_2 varchar(255),
PRIMARY KEY (SynID)
)

You can now populate the table with sample data. To generate sample data in your table, run the following script:

INSERT INTO SynonymsTable(Base_Term, Synonym_1, Synonym_2)
VALUES ( 'danish', 'croissant', 'pastry')

Create a Lambda function

You can use two different methods to send data from Aurora to Amazon S3: a Lambda function or SELECT INTO OUTFILE S3.

To demonstrate the ease of setting up integration between multiple AWS services, we use a Lambda function that is called every time a change occurs that must be tracked in the database table. This function passes the data to Amazon S3. First create an S3 bucket where you store the synonym file using the Lambda function.

When you create your function, make sure you give the right permissions using an AWS Identity and Access Management (IAM) role for the S3 bucket. These permissions are for the Lambda execution role and S3 bucket where you store the synonyms.txt file. By default, Lambda creates an execution role with minimal permissions when you create a function on the Lambda console. The following is the Python code to create the synonyms.txt file in S3:

import boto3
import json
import botocore
from botocore.exceptions import ClientError

s3_resource = boto3.resource('s3')

filename = 'synonyms.txt'
BucketName = '<<provide your bucket name>>
local_file = '/tmp/test.txt'

def lambda_handler(event, context):
    S3_data = (("%s,%s,%s \n") %(event['Base_Term'], event['Synonym_1'], event['Synonym_2']))
    # open  a file and append new line
    try:
        obj=s3_resource.Bucket(BucketName).download_file(local_file,filename)
    except ClientError as e:
        if e.response['Error']['Code'] == "404":
            # create a new file if file does not exits 
            s3_resource.meta.client.put_object(Body=S3_data, Bucket= BucketName,Key=filename)
        else:
            # append file
            raise
    with open('/tmp/test.txt', 'a') as fd:
        fd.write(S3_data)
        
    s3_resource.meta.client.upload_file('/tmp/test.txt', BucketName, filename)

Note the Amazon Resource Name (ARN) of this Lambda function to use in a later step.

Give Aurora permissions to invoke a Lambda function

To give Aurora permissions to invoke your function, you must attach an IAM role with the appropriate permissions to the cluster. For more information, see Invoking a Lambda function from an Amazon Aurora DB cluster.

When you’re finished, the Aurora database has access to invoke a Lambda function.

Create a stored procedure and a trigger in Aurora

To create a new stored procedure, return to MySQL Workbench. Change the ARN in the following code to your Lambda function’s ARN before running the procedure:

DROP PROCEDURE IF EXISTS Syn_TO_S3;
DELIMITER ;;
CREATE PROCEDURE Syn_TO_S3 (IN SysID INT,IN Base_Term varchar(255),IN Synonym_1 varchar(255),IN Synonym_2 varchar(255)) LANGUAGE SQL
BEGIN
   CALL mysql.lambda_async('<<Lambda-Funtion-ARN>>,
    CONCAT('{ "SysID ": "', SysID,
    '", "Base_Term" : "', Base_Term,
    '", "Synonym_1" : "', Synonym_1,
    '", "Synonym_2" : "', Synonym_2,'"}')
    );
END
;;
DELIMITER

When this stored procedure is called, it invokes the Lambda function you created.

Create a trigger TR_SynonymTable_CDC on the table SynonymTable. When a new record is inserted, this trigger calls the Syn_TO_S3 stored procedure. See the following code:

DROP TRIGGER IF EXISTS TR_Synonym_CDC;
 
DELIMITER ;;
CREATE TRIGGER TR_Synonym_CDC
  AFTER INSERT ON SynonymsTable
  FOR EACH ROW
BEGIN
  SELECT  NEW.SynID, NEW.Base_Term, New.Synonym_1, New.Synonym_2 
  INTO @SynID, @Base_Term, @Synonym_1, @Synonym_2;
  CALL  Syn_TO_S3(@SynID, @Base_Term, @Synonym_1, @Synonym_2);
END
;;
DELIMITER ;

If a new row is inserted in SynonymsTable, the Lambda function that is mentioned in the stored procedure is invoked.

Verify that data is being sent from the function to Amazon S3 successfully. You may have to insert a few records, depending on the size of your data, before new records appear in Amazon S3.

Update synonyms in Amazon ES when a new synonym file becomes available

Amazon ES lets you upload custom dictionary files (for example, stopwords and synonyms) for use with your cluster. The generic term for these types of files is packages. Before you can associate a package with your domain, you must upload it to an S3 bucket. For instructions on uploading a synonym file for the first time and associating it to an Amazon ES domain, see Uploading packages to Amazon S3 and Importing and Associating packages.

To update the synonyms (package) when a new version of the synonym file becomes available, we complete the following steps:

  1. Create a Lambda function to update the existing package.
  2. Set up an S3 event notification to trigger the function.

Create a Lambda function to update the existing package

We use a Python-based Lambda function that uses the Boto3 AWS SDK for updating the Elasticsearch package. For more information about how to create a Python-based Lambda function, see Building Lambda functions with Python. You need the following information before we start coding for the function:

  • The S3 bucket ARN where the new synonym file is written
  • The Amazon ES domain name (available on the Amazon ES console)

  • The package ID of the Elasticsearch package we’re updating (available on the Amazon ES console)

You can use the following code for the Lambda function:

import logging
import boto3
import os

# Elasticsearch client
client = boto3.client('es')
# set up logging
logger = logging.getLogger('boto3')
logger.setLevel(logging.INFO)
# fetch from Environment Variable
package_id = os.environ['PACKAGE_ID']
es_domain_nm = os.environ['ES_DOMAIN_NAME']

def lambda_handler(event, context):
    s3_bucket = event["Records"][0]["s3"]["bucket"]["name"]
    s3_key = event["Records"][0]["s3"]["object"]["key"]
    logger.info("bucket: {}, key: {}".format(s3_bucket, s3_key))
    # update package with the new Synonym file.
    up_response = client.update_package(
        PackageID=package_id,
        PackageSource={
            'S3BucketName': s3_bucket,
            'S3Key': s3_key
        },
        CommitMessage='New Version: ' + s3_key
    )
    logger.info('Response from Update_Package: {}'.format(up_response))
    # check if the package update is completed
    finished = False
    while finished == False:
        # describe the package by ID
        desc_response = client.describe_packages(
            Filters=[{
                    'Name': 'PackageID',
                    'Value': [package_id]
                }],
            MaxResults=1
        )
        status = desc_response['PackageDetailsList'][0]['PackageStatus']
        logger.info('Package Status: {}'.format(status))
        # check if the Package status is back to available or not.
        if status == 'AVAILABLE':
            finished = True
            logger.info('Package status is now Available. Exiting loop.')
        else:
            finished = False
    logger.info('Package: {} update is now Complete. Proceed to Associating to ES Domain'.format(package_id))
    # once the package update is completed, re-associate with the ES domain
    # so that the new version is applied to the nodes.
    ap_response = client.associate_package(
        PackageID=package_id,
        DomainName=es_domain_nm
    )
    logger.info('Response from Associate_Package: {}'.format(ap_response))
    return {
        'statusCode': 200,
        'body': 'Custom Package Updated.'
    }

The preceding code requires environment variables to be set to the appropriate values and the IAM execution role assigned to the Lambda function.

Set up an S3 event notification to trigger the Lambda function

Now we set up event notification (all object create events) for the S3 bucket in which the updated synonym file is uploaded. For more information about how to set up S3 event notifications with Lambda, see Using AWS Lambda with Amazon S3.

Test the solution

To test our solution, let’s consider an Elasticsearch index (es-blog-index-01) that consists of the following documents:

  • tennis shoe
  • hightop
  • croissant
  • ice cream

A synonym file is already associated with the Amazon ES domain via Amazon ES custom packages and the index (es-blog-index-01) has the synonym file in the settings (analyzer, filter, mappings). For more information about how to associate a file to an Amazon ES domain and use it with the index settings, see Importing and associating packages and Using custom packages with Elasticsearch. The synonym file contains the following data:

danish, croissant, pastry

Test 1: Search with a word present in the synonym file

For our first search, we use a word that is present in the synonym file. The following screenshot shows that searching for “danish” brings up the document croissant based on a synonym match.

Test 2: Search with a synonym not present in the synonym file

Next, we search using a synonym that’s not in the synonym file. In the following screenshot, our search for “gelato” yields no result. The word “gelato” doesn’t match with the document ice cream because no synonym mapping is present for it.

In the next test, we add synonyms for “ice cream” and perform the search again.

Test 3: Add synonyms for “ice cream” and redo the search

To add the synonyms, let’s insert a new record into our database. We can use the following SQL statement:

INSERT INTO SynonymsTable(Base_Term, Synonym_1, Synonym_2)
VALUES ('frozen custard', 'gelato', 'ice cream')

When we search with the word “gelato” again, we get the ice cream document.

This confirms that the synonym addition is applied to the Amazon ES index.

Clean up resources

To avoid ongoing charges to your AWS account, remove the resources you created:

  1. Delete the Amazon ES domain.
  2. Delete the RDS DB instance.
  3. Delete the S3 bucket.
  4. Delete the Lambda functions.

Conclusion

In this post, we implemented a solution using Aurora, Lambda, Amazon S3, and Amazon ES that enables you to update synonyms automatically in Amazon ES. This provides central management for synonyms and ensures your users can obtain accurate search results when synonyms are changed in your source database.


About the Authors

Ashwini Rudra is a Solutions Architect at AWS. He has more than 10 years of experience architecting Windows workloads in on-premises and cloud environments. He is also an AI/ML enthusiast. He helps AWS customers, namely major sports leagues, define their cloud-first digital innovation strategy.


Arnab Ghosh is a Solutions Architect for AWS in North America helping enterprise customers build resilient and cost-efficient architectures. He has over 13 years of experience in architecting, designing, and developing enterprise applications solving complex business problems.


Jennifer Ng is an AWS Solutions Architect working with enterprise customers to understand their business requirements and provide solutions that align with their objectives. Her background is in enterprise architecture and web infrastructure, where she has held various implementation and architect roles in the financial services industry.

Disaster Recovery (DR) Architecture on AWS, Part IV: Multi-site Active/Active

Post Syndicated from Seth Eliot original https://aws.amazon.com/blogs/architecture/disaster-recovery-dr-architecture-on-aws-part-iv-multi-site-active-active/

In my first blog post of this series, I introduced you to four strategies for disaster recovery (DR). My subsequent posts shared details on the backup and restore, pilot light, and warm standby active/passive strategies.

In this post, you’ll learn how to implement an active/active strategy to run your workload and serve requests in two or more distinct sites. Like other DR strategies, this enables your workload to remain available despite disaster events such as natural disasters, technical failures, or human actions.

DR strategies: Multi-site active/active

As we know from our now familiar DR strategies diagram (Figure 1), the multi-site active/active strategy will give you the lowest RTO (recovery time objective) and RPO (recovery point objective). However, this must be weighed against the potential cost and complexity of operating active stacks in multiple sites.

DR strategies

Figure 1. DR strategies

Implementing multi-site active/active

The architecture in Figure 2 shows you how to use AWS Regions as your active sites, creating a multi-Region active/active architecture. Only two Regions are shown, which is common, but more may be used. Each Region hosts a highly available, multi-Availability Zone (AZ) workload stack. In each Region, data is replicated live between the data stores and also backed up. This protects against disasters that include data deletion or corruption, since the data backup can be restored to the last known good state.

Multi-site active/active DR strategy

Figure 2. Multi-site active/active DR strategy

Traffic routing

Each regional stack serves production traffic. How you implement traffic routing determines which Region will receive a given request. Figure 2 shows Amazon Route 53, a highly available and scalable cloud Domain Name System (DNS), used for routing. Route 53 offers multiple routing policies. For example, the geolocation or latency routing policies are good choices for active/active deployments. For geolocation routing, you configure which Region a request goes to based on the origin location of the request. For latency routing, AWS automatically sends requests to the Region that provides the shortest round-trip time.
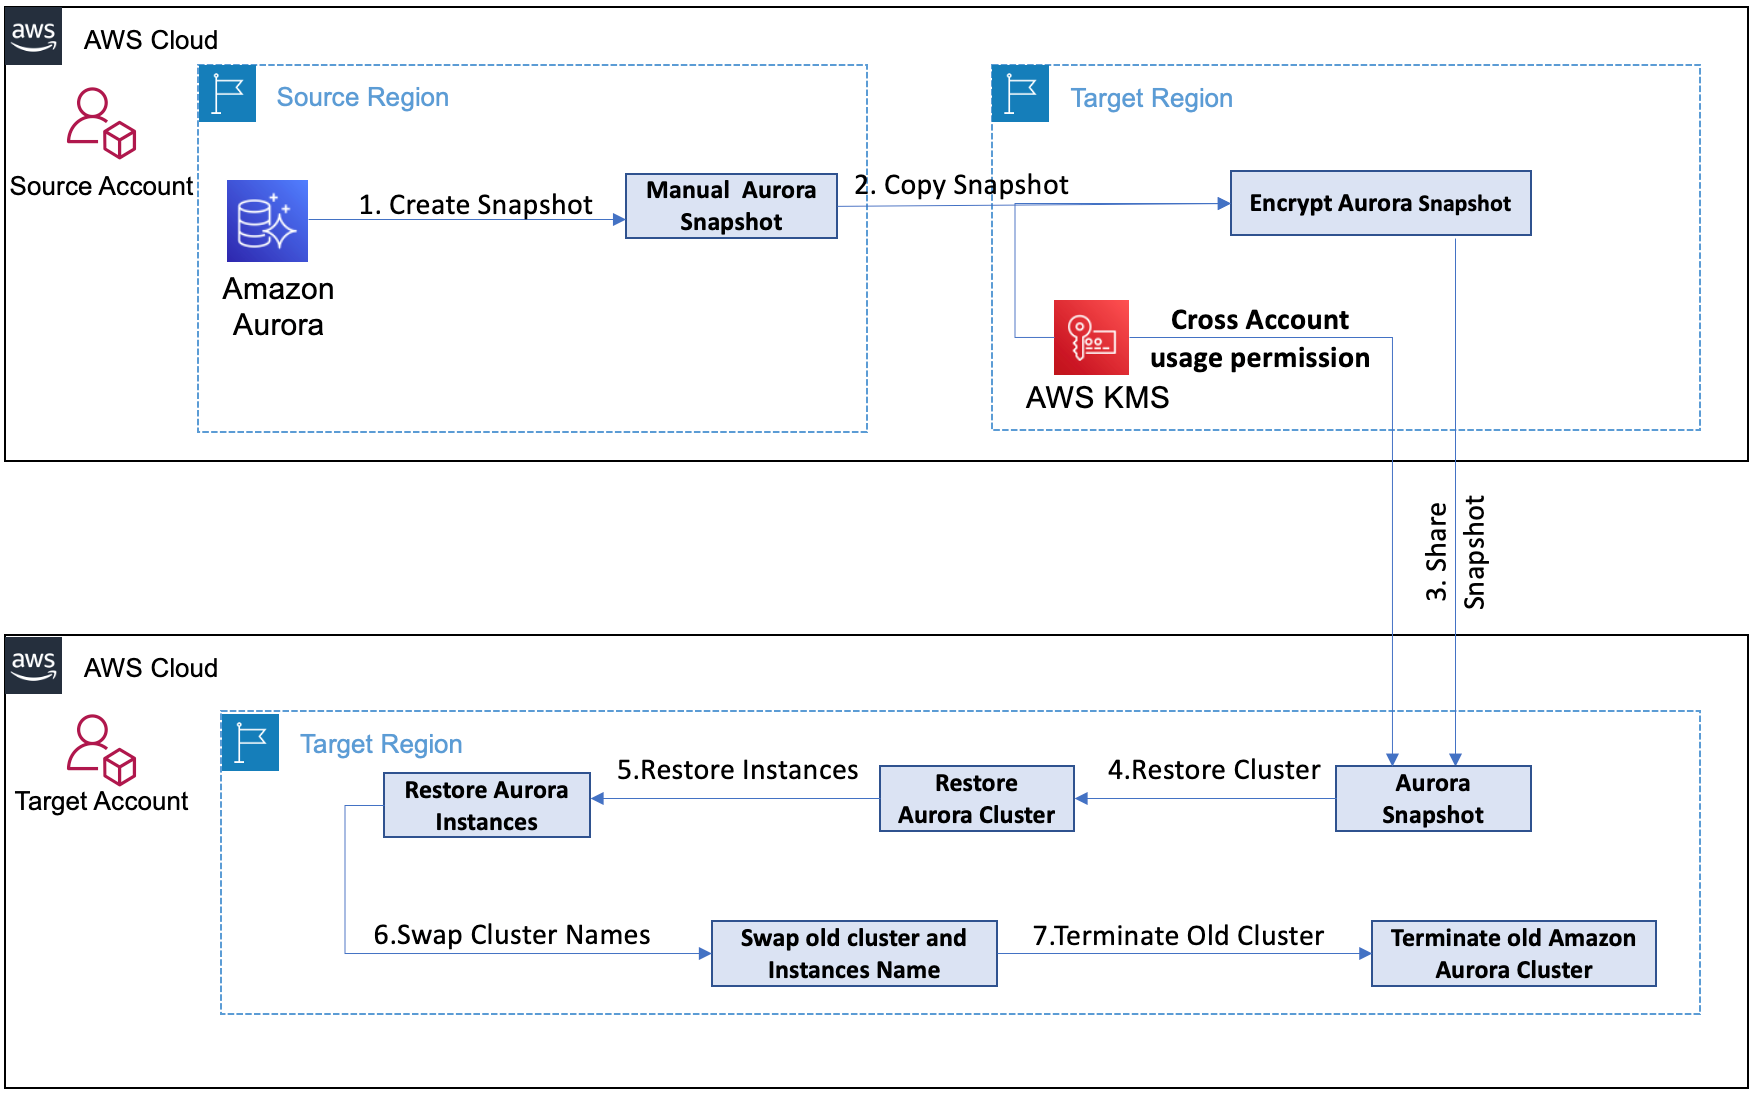
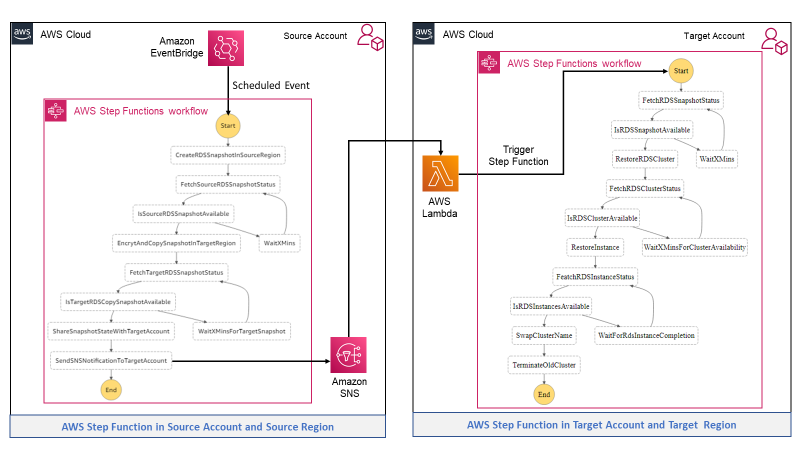
Your data governance strategy helps inform which routing policy to use. Geolocation routing lets you distribute requests in a deterministic way. This allows you to keep data for certain users within a specific Region, or you can control where write operations are routed to prevent contention. If optimizing for performance is your top priority, then latency routing is a good choice.

Read/write patterns

Read local/write local pattern

The Region to which a request is routed is called the “local Region” for that request. To maintain low latencies and reduce the potential for network error, serve all read and write requests from the local Region of your multi-Region active/active architecture.

I use Amazon DynamoDB for the example architecture in Figure 2. DynamoDB global tables replicate a table to multiple Regions. Writes to the table in any Region are replicated to other Regions within a second. This makes it a good choice when using the read local/write local pattern. However, there is the possibility of write contention if updates are made to the same item in different Regions at about the same time. To help ensure eventual consistency, DynamoDB global tables use a last writer wins reconciliation between concurrent updates. In this case, the data written by the first writer is lost. If your application cannot handle this and you require strong consistency, use another write pattern to avoid write contention.

Read local/write global pattern

With a write global pattern, you choose a Region to be the global write Region and only accept writes in that Region. DynamoDB global tables are still an excellent choice for replicating data globally; however, you must ensure that locally received write requests are re-directed to the global write Region.

Amazon Aurora is another good choice. When deployed as an Aurora global database, a primary cluster is deployed to your global write Region, and read-only instances (Aurora Replicas) are deployed to other AWS Regions. Data is replicated to these read-only instances with typical latency of under a second. Aurora global database write forwarding (available using Aurora MySQL-Compatible Edition) allows Aurora Replicas in the secondary cluster to forward write operations to the primary cluster in the global write Region. This way, you can treat the read-only replicas in all your Regions as if they were read/write capable. Using write forwarding, the request travels over the AWS network and not the public internet, reducing latency.

Amazon ElastiCache for Redis also can replicate data across Regions. For example, to store session data, you write to your global write Region and use Global Datastore to ensure that this data is available to be read from other Regions.

Read local/write partitioned pattern

For write-heavy workloads with users located around the world, your application may not be suited to incur the round trip to the global write Region with every write. Consider using a write partitioned pattern to mitigate this. With this pattern, each item or record is assigned a home Region. This can be done based on the Region it was first written to. Or it can be based on a partition key in the record (such as user ID) by pre-assigning a home Region for each value of this key. As shown in Figure 3, records for this user are assigned to the left AWS Region as their home Region. The goal is to try to map records to a home Region close to where most write requests will originate.

Read local/write partitioned pattern for multi-site active/active DR strategy

Figure 3. Read local/write partitioned pattern for multi-site active/active DR strategy

When the user in Figure 3 travels away from home, they will read local, but writes will be routed back to their home Region. Usually writes will not incur long round trips as they are expected to typically come from near the home Region. Since writes are accepted in all Regions (for records homed to that respective Region), DynamoDB global tables, which accept writes in all Regions, are a good choice here also.

Failover

With a multi-Region active/active strategy, if your workload cannot operate in a Region, failover will route traffic away from the impacted Region to healthy Region(s). You can accomplish this with Route 53 by updating the DNS records. Make sure you set TTL (time to live) on these records low enough so that DNS resolvers will reflect your changes quickly enough to meet your RTO targets. Alternatively, you can use AWS Global Accelerator for routing and failover. It does not rely on DNS. Global Accelerator gives you two static IP addresses. You then configure which Regions user traffic goes to based on traffic dials and weights you set.

If you’re using a write global pattern and the impacted Region is the global write Region, then a new Region needs to be promoted to be the new global write Region. If you’re using a write partitioned pattern, your workload must repartition so that the records homed in the impacted Region are assigned to one of the remaining Regions. Using write local, all Regions can accept writes. With no changes needed to the data storage layer, this pattern can have the fastest (near zero) RTO.

Conclusion

Consider the multi-site active/active strategy for your workload if you need DR with the quickest recovery time (lowest RTO) and least data loss (lowest RPO). Implementing it across Regions (multi-Region) is a good option if you are looking for the most separation and complete independence of your sites, or if you need to provide low latency access to the workload from users in globally diverse locations.

Also consider the trade-offs. Implementing and operating this strategy, particularly using multi-Region, can be more complicated and more expensive, than other DR strategies. When implementing multi-Region active/active in AWS, you have access to resources to choose the routing policy and the read/write pattern that is right for your workload.

Related information

Accelerating Amazon Redshift federated query to Amazon Aurora MySQL with AWS CloudFormation

Post Syndicated from BP Yau original https://aws.amazon.com/blogs/big-data/accelerating-amazon-redshift-federated-query-to-amazon-aurora-mysql-with-aws-cloudformation/

Amazon Redshift federated query allows you to combine data from one or more Amazon Relational Database Service (Amazon RDS) for MySQL and Amazon Aurora MySQL databases with data already in Amazon Redshift. You can also combine such data with data in an Amazon Simple Storage Service (Amazon S3) data lake.

This post shows you how to set up Aurora MySQL and Amazon Redshift with a TPC-DS dataset so you can take advantage of Amazon Redshift federated query using AWS CloudFormation. You can use the environment you set up in this post to experiment with various use cases in the post Announcing Amazon Redshift federated querying to Amazon Aurora MySQL and Amazon RDS for MySQL.

Benefits of using CloudFormation templates

The standard workflow for setting up Amazon Redshift federated query involves six steps. For more information, see Querying data with federated queries in Amazon Redshift. With a CloudFormation template, you can condense these manual procedures into a few steps listed in a text file. The declarative code in the file captures the intended state of the resources that you want to create and allows you to automate the setup of AWS resources to support Amazon Redshift federated query. You can further enhance this template to become the single source of truth for your infrastructure.

A CloudFormation template acts as an accelerator. It helps you automate the deployment of technology and infrastructure in a safe and repeatable manner across multiple Regions and accounts with the least amount of effort and time.

Architecture overview

The following diagram illustrates the solution architecture.

The following diagram illustrates the solution architecture.

The CloudFormation template provisions the following components in the architecture:

  • VPC
  • Subnets
  • Route tables
  • Internet gateway
  • Amazon Linux bastion host
  • Secrets
  • Aurora for MySQL cluster with TPC-DS dataset preloaded
  • Amazon Redshift cluster with TPC-DS dataset preloaded
  • Amazon Redshift IAM role with required permissions

Prerequisites

Before you create your resources in AWS CloudFormation, you must complete the following prerequisites:

Setting up resources with AWS CloudFormation

This post provides a CloudFormation template as a general guide. You can review and customize it to suit your needs. Some of the resources that this stack deploys incur costs when in use.

To create your resources, complete the following steps:

  1. Sign in to the console.
  2. Choose the us-east-1 Region in which to create the stack.
  3. Choose Launch Stack:
  4. Choose Next.

This automatically launches AWS CloudFormation in your AWS account with a template. It prompts you to sign in as needed. You can view the CloudFormation template from within the console.

  1. For Stack name, enter a stack name.
  2. For Session, leave as the default.
  3. For ec2KeyPair, choose the key pair you created earlier.
  4. Choose Next.

This automatically launches AWS CloudFormation in your AWS account with a template.

  1. On the next screen, choose Next.
  2. Review the details on the final screen and select I acknowledge that AWS CloudFormation might create IAM resources.
  3. Choose Create.

Stack creation can take up to 45 minutes.

  1. After the stack creation is complete, on the Outputs tab of the stack, record the value of the key for the following components, which you use in a later step:
  • AuroraClusterEndpoint
  • AuroraSecretArn
  • RedshiftClusterEndpoint
  • RedshiftClusterRoleArn

As of this writing, this feature is in public preview. You can create a snapshot of your Amazon Redshift cluster created by the stack and restore the snapshot as a new cluster in the sql_preview maintenance track with the same configuration.

You can create a snapshot of your Amazon Redshift cluster created by the stack and restore the snapshot as a new cluster

You’re now ready to log in to both the Aurora MySQL and Amazon Redshift cluster and run some basic commands to test them.

Logging in to the clusters using the Amazon Linux bastion host

The following steps assume that you use a computer with an SSH client to connect to the bastion host. For more information about connecting using various clients, see Connect to your Linux instance.

  1. Move the private key of the EC2 key pair (that you saved previously) to a location on your SSH client, where you are connecting to the Amazon Linux bastion host.
  2. Change the permission of the private key using the following code, so that it’s not publicly viewable:
    chmod 400 <private key file name; for example, bastion-key.pem>

  1. On the Amazon EC2 console, choose Instances.
  2. Choose the Amazon Linux bastion host that the CloudFormation stack created.
  3. Choose Connect.
  4. Copy the value for SSHCommand.
  5. On the SSH client, change the directory to the location where you saved the EC2 private key, and enter the SSHCommand value.
  6. On the console, open the AWS Secrets Manager dashboard.
  7. Choose the secret secretAuroraMasterUser-*.
  8. Choose Retrieve secret value.
  9. Record the password under Secret key/value, which you use to log in to the Aurora MySQL cluster.
  10. Choose the secret SecretRedshiftMasterUser.
  11. Choose Retrieve secret value.
  12. Record the password under Secret key/value, which you use to log in to the Amazon Redshift cluster.
  13. Log in to both Aurora MySQL using the MySQL Command-Line Client and Amazon Redshift using query editor.

The CloudFormation template has already set up MySQL Command-Line Client binaries on the Amazon Linux bastion host.

  1. On the Amazon Redshift console, choose Editor.
  2. Choose Query editor.
  3. For Connection, choose Create new connection.
  4. For Cluster, choose the Amazon Redshift cluster.
  5. For Database name, enter your database.
  6. Enter the database user and password recorded earlier.
  7. Choose Connect to database.

Choose Connect to database.

  1. Enter the following SQL command:
    select "table" from svv_table_info where schema='public';

You should see 25 tables as the output.

You should see 25 tables as the output.

  1. Launch a command prompt session of the bastion host and enter the following code (substitute <AuroraClusterEndpoint> with the value from the AWS CloudFormation output):
    mysql --host=<AuroraClusterEndpoint> --user=awsuser --password=<database user password recorded earlier>

  1. Enter the following SQL command:
    use tpc;
    show tables;
    

You should see the following eight tables as the output:

mysql> use tpc;
Reading table information for completion of table and column names
You can turn off this feature to get a quicker startup with -A

Database changed
mysql> show tables;
+------------------------+
| Tables_in_tpc          |
+------------------------+
| customer               |
| customer_address       |
| household_demographics |
| income_band            |
| item                   |
| promotion              |
| web_page               |
| web_sales              |
+------------------------+
8 rows in set (0.01 sec)

Completing federated query setup

The final step is to create an external schema to connect to the Aurora MySQL instance. The following example code creates an external schema statement that you need to run on your Amazon Redshift cluster to complete this step:

CREATE EXTERNAL SCHEMA IF NOT EXISTS mysqlfq 
FROM MYSQL 
DATABASE 'tpc' 
URI '<AuroraClusterEndpoint>' 
PORT 3306 
IAM_ROLE '<IAMRole>' 
SECRET_ARN '<SecretARN>'

Use the following parameters:

  • URI – The AuroraClusterEndpoint value from the CloudFormation stack outputs. The value is in the format <stackname>-cluster.<randomcharacter>.us-east-1.rds.amazonaws.com.
  • IAM_Role – The RedshiftClusterRoleArn value from the CloudFormation stack outputs. The value is in the format arn:aws:iam::<accountnumber>:role/<stackname>-RedshiftClusterRole-<randomcharacter>.
  • Secret_ARN – The AuroraSecretArn value from the CloudFormation stack outputs. The value is in the format arn:aws:secretsmanager:us-east-1:<accountnumber>: secret:secretAuroraMasterUser-<randomcharacter>. 

Federated query test

Now that you have set up federated query, you can start testing the feature using the TPC-DS dataset that was preloaded into both Aurora MySQL and Amazon Redshift.

For example, the following query aggregates the total net sales by product category and class from the web_sales fact table and date and item dimension tables. Tables web_sales and date are stored in Amazon Redshift, and the item table is stored in Aurora MySQL:

select
    sum(ws_net_paid
    ) as total_sum, i_category, i_class, 0 as g_category, 0 as g_class  
from
    web_sales ,date_dim d1 ,mysqlfq.item 
where
    d1.d_month_seq between 1205 
    and 1205+11 
    and d1.d_date_sk = ws_sold_date_sk 
    and i_item_sk = ws_item_sk 
group
    by i_category,i_class ; 

You can continue to experiment with the dataset and explore the three main use cases in the post [exact name of post title with embedded link].

Cleaning up

When you’re finished, delete the CloudFormation stack, because some of the AWS resources in this walkthrough incur a cost if you continue to use them. Complete the following steps:

  1. On the AWS CloudFormation console, choose Stacks.
  2. Choose the stack you launched in this walkthrough. The stack must be currently running.
  3. In the stack details pane, choose Delete.
  4. Choose Delete stack.

Summary

This post showed you how to automate the creation of an Aurora MySQL and Amazon Redshift cluster preloaded with the TPC-DS dataset, the prerequisites for the new Amazon Redshift federated query feature using AWS CloudFormation, and a single manual step to complete the setup. It also provided an example federated query using the TPC-DS dataset, which you can use to accelerate your learning and adoption of the new feature. You can continue to modify the CloudFormation templates from this post to support your business needs.

If you have any questions or suggestions, please leave a comment.


About the Authors

BP Yau is an Analytics Specialist Solutions Architect at AWS. His role is to help customers architect big data solutions to process data at scale. Before AWS, he helped Amazon.com Supply Chain Optimization Technologies migrate its Oracle data warehouse to Amazon Redshift and build its next generation big data analytics platform using AWS technologies.

 

Srikanth Sopirala is a Sr. Specialist Solutions Architect, Analytics at AWS. He is passionate about helping customers build scalable data and analytics solutions in the cloud.



Zhouyi Yang is a Software Development Engineer for Amazon Redshift Query Processing team. He’s passionate about gaining new knowledge about large databases and has worked on SQL language features such as federated query and IAM role privilege control. In his spare time, he enjoys swimming, tennis, and reading.



Entong Shen is a Senior Software Development Engineer for Amazon Redshift. He has been working on MPP databases for over 8 years and has focused on query optimization, statistics, and SQL language features such as stored procedures and federated query. In his spare time, he enjoys listening to music of all genres and working in his succulent garden.
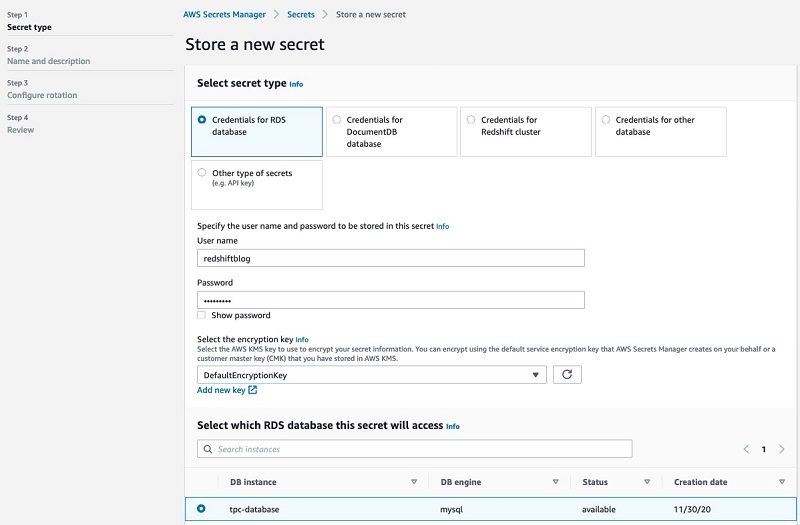
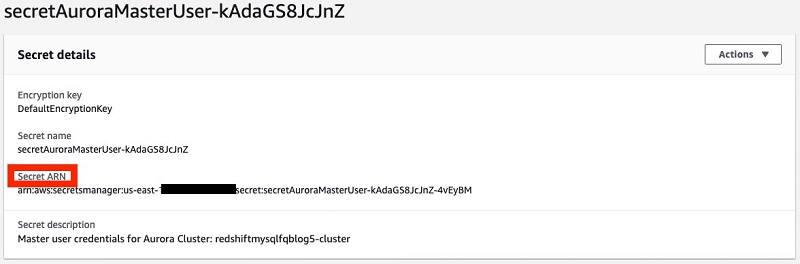
 

Announcing Amazon Redshift federated querying to Amazon Aurora MySQL and Amazon RDS for MySQL

Post Syndicated from BP Yau original https://aws.amazon.com/blogs/big-data/announcing-amazon-redshift-federated-querying-to-amazon-aurora-mysql-and-amazon-rds-for-mysql/

Since we launched Amazon Redshift as a cloud data warehouse service more than seven years ago, tens of thousands of customers have built analytics workloads using it. We’re always listening to your feedback and, in April 2020, we announced general availability for federated querying to Amazon Aurora PostgreSQL and Amazon Relational Database Service (Amazon RDS) for PostgreSQL to enable you to query data across your operational databases, your data warehouse, and your data lake to gain faster and deeper insights not possible otherwise.

Today, we’re launching a new feature of Amazon Redshift federated query to Amazon Aurora MySQL and Amazon RDS for MySQL to help you expand your operational databases in the MySQL family. With this lake house architecture expansion to support more operational data stores, you can query and combine data more easily in real time and store data in open file formats in your Amazon Simple Storage Service (Amazon S3) data lake. Your data can then be more available to other analytics and machine learning (ML) tools, rather than siloed in disparate data stores.

In this post, we share information about how to get started with this new federated query feature to MySQL.

Prerequisites

To try this new feature, create a new Amazon Redshift cluster in a sql_preview maintenance track and Aurora MySQL instance and load sample TPC data into both data stores. To make sure both Aurora MySQL DB instances can accept connections from the Amazon Redshift cluster, you should make sure that both your Amazon Redshift cluster and Aurora MySQL instances are in the same Amazon Virtual Private Cloud (Amazon VPC) and subnet group. This way, you can add the security group for the Amazon Redshift cluster to the inbound rules of the security group for the Aurora MySQL DB instance.

If your Amazon Redshift cluster and Aurora MySQL instances are in the different VPC, you can set up VPC peering or other networking to allow Amazon Redshift to make connections to your Aurora MySQL instances. For more information about VPC networking, see Working with a DB instance in a VPC.

Configuring AWS Secrets Manager for remote database credentials

Amazon Redshift needs database credentials to issue a federated query to a MySQL database. AWS Secrets Manager provides a centralized service to manage secrets and can be used to store your MySQL database credentials. Because Amazon Redshift retrieves and uses these credentials, they are transient, not stored in any generated code, and discarded after the query runs.

Storing credentials in Secrets Manager takes only a few minutes. To store a new secret, complete the following steps:

  1. On the Secrets Manager console, choose Secrets.
  2. Choose Store a new secret.
  3. For Select secret type, select Credentials for RDS database.
  4. For User name, enter a name.
  5. For Password, enter a password.
  6. For Select the encryption key, choose DefaultEncryptionkey.
  7. For Select which RDS database this secret will access, choose your database.

Storing credentials in Secrets Manager takes only a few minutes.

  1. Optionally, copy programmatic code for accessing your secret using your preferred programming languages (which is not needed for this post).
  2. Choose Next.

After you create the secret, you can retrieve the secret ARN by choosing the secret on the Secrets Manager console. The secret ARN is needed in the subsequent step.

After you create the secret, you can retrieve the secret ARN by choosing the secret on the Secrets Manager console.

Setting up IAM role

You can now pull everything together by embedding the secret ARN into an AWS Identity and Access Management (IAM) policy, naming the policy, and attaching it to an IAM role. See the following code:

{
    "Version": "2012-10-17",
    "Statement": [
        {
            "Sid": "AccessSecret",
            "Effect": "Allow",
            "Action": [
                "secretsmanager:GetResourcePolicy",
                "secretsmanager:GetSecretValue",
                "secretsmanager:DescribeSecret",
                "secretsmanager:ListSecretVersionIds"
            ],
            "Resource": "<SecretARN>"
        },
        {
            "Sid": "VisualEditor1",
            "Effect": "Allow",
            "Action": [
                "secretsmanager:GetRandomPassword",
                "secretsmanager:ListSecrets"
            ],
            "Resource": "*"
        }
    ]
}

Finally, attach the same IAM role to your Amazon Redshift cluster.

  1. On the Amazon Redshift console, choose Clusters.
  2. Choose your cluster.
  3. On the Actions drop-down menu, choose Manage IAM roles.

Finally, attach the same IAM role to your Amazon Redshift cluster.

  1. Choose and add the IAM role you just created.

Setting up external schema

The final step is to create an external schema to connect to your Aurora MySQL instance. The following example code creates the external schema statement that you need to run on your Amazon Redshift cluster to complete this step:

CREATE EXTERNAL SCHEMA IF NOT EXISTS mysqlfq 
FROM MYSQL 
DATABASE 'tpc' 
URI '<AuroraClusterEndpoint>' 
PORT 3306 
IAM_ROLE '<IAMRole>' 
SECRET_ARN '<SecretARN>'

Use the following parameters:

  • URI – Aurora MySQL cluster endpoint
  • IAM_Role – IAM role created from the previous step
  • Secret_ARN – Secret ARN

After you set up the external schema, you’re ready to run some queries to test different use cases.

Querying live operational data

You can now query real-time operational data in your Aurora MySQL instance from Amazon Redshift. Note that isolation level is read committed for MySQL. See the following code:

dev=# select top 10 ws_order_number from mysqlfq.web_sales;
 ws_order_number 
-----------------
        93628990
       157020207
         4338647
        41395871
        58468186
       171095867
        12514566
        74946143
         3418243
        67054239
(10 rows)

Querying mysqlfq.web_sales in Amazon Redshift routes the request to MySQL tpc database and web_sales table. If you examine the query plan, you can see the query runs at the MySQL instance as shown by the step Remote MySQL Seq Scan:

dev=# explain select top 10 ws_order_number from mysqlfq.web_sales;
                                          QUERY PLAN                                           
-----------------------------------------------------------------------------------------------
 XN Limit  (cost=0.00..0.20 rows=10 width=8)
   ->  XN MySQL Query Scan web_sales  (cost=0.00..6869.28 rows=343464 width=8)
         ->  Remote MySQL Seq Scan mysqlfq.web_sales  (cost=0.00..3434.64 rows=343464 width=8)
(3 rows)

Simplifying ELT and ETL

You can also extract operational data directly from your Aurora MySQL instance and load it into Amazon Redshift. See the following code:

dev=# create table staging_customer as select c_customer_id from mysqlfq.customer where c_customer_id not in (select c_customer_id from customer);
SELECT
dev=# select count(*) from staging_customer;
 count  
--------
 350000
(1 row)

The preceding code uses CTAS to create and load incremental data from your operational MySQL instance into a staging table in Amazon Redshift. You can then perform transformation and merge operations from the staging table to the target table. For more information, see Updating and inserting new data.

Combining operational data with data from your data warehouse and data lake

You can combine live operational data from your Aurora MySQL instance with data from your Amazon Redshift data warehouse and S3 data lake by creating a late binding view.

To access your S3 data lake historical data via Amazon Redshift Spectrum, create an external table:

create external schema mysqlspectrum
from data catalog
database 'spectrumdb'
iam_role '<IAMRole>'
create external database if not exists;
 
create external table mysqlspectrum.customer 
stored as parquet 
location 's3://<yourS3bucket>/customer/'
as select * from customer where c_customer_sk <= 100000;

You can then run queries on the view to gain insight on data across the three sources:

drop view vwCustomer;
create view vwCustomer as
select c_customer_sk, 'redshift' as source from public.customer where c_customer_sk > 100000
union all
select c_customer_sk, 'mysql' as source from mysqlfq.customer
union all
select c_customer_sk, 's3' as source from mysqlspectrum.customer
with no schema binding;

select * from vwCustomer where c_customer_sk in (1, 149712,29033279);

You should the following three records as output:

dev=# select * from vwCustomer where c_customer_sk in (1, 149712,29033279);
 c_customer_sk |  source  
---------------+----------
      29033279 | mysql
             1 | s3
        149712 | redshift
(3 rows)

If you examine the query plan, you can see that the predicates are pushed down to your MySQL instance to run:

dev=# explain select * from vwCustomer where c_customer_sk in (1,149712,29033279);
                                                                            QUERY PLAN                                                                            
------------------------------------------------------------------------------------------------------------------------------------------------------------------
 XN Subquery Scan vwcustomer  (cost=0.00..48398.40 rows=6988 width=36)
   ->  XN Append  (cost=0.00..48328.52 rows=6988 width=4)
         ->  XN Subquery Scan "*SELECT* 1"  (cost=0.00..40000.03 rows=3 width=4)
               ->  XN Seq Scan on customer  (cost=0.00..40000.00 rows=3 width=4)
                     Filter: (((c_customer_sk = 1) OR (c_customer_sk = 149712) OR (c_customer_sk = 29033279)) AND (c_customer_sk > 100000))
         ->  XN Subquery Scan "*SELECT* 2"  (cost=0.00..6548.63 rows=5492 width=4)
               ->  XN MySQL Query Scan customer  (cost=0.00..6493.71 rows=5492 width=4)
                     ->  Remote MySQL Seq Scan mysqlfq.customer  (cost=0.00..6438.79 rows=5492 width=4)
                           Filter: ((c_customer_sk = 1) OR (c_customer_sk = 149712) OR (c_customer_sk = 29033279))
         ->  XN Subquery Scan "*SELECT* 3"  (cost=0.00..1779.86 rows=1493 width=4)
               ->  XN S3 Query Scan customer  (cost=0.00..1764.93 rows=1493 width=4)
                     ->  S3 Seq Scan mysqlspectrum.customer location:"s3://<yourS3bucket>/customer" format:PARQUET  (cost=0.00..1750.00 rows=1493 width=4)
                           Filter: ((c_customer_sk = 1) OR (c_customer_sk = 149712) OR (c_customer_sk = 29033279))
(13 rows)

Available Now

Amazon Redshift federated querying to Aurora MySQL and Amazon RDS for MySQL is now available for public preview with Amazon Redshift release version 1.0.21591 or later. Refer to the AWS Region Table for Amazon Redshift availability and to check the version of your clusters.


About the Authors

BP Yau is an Analytics Specialist Solutions Architect at AWS. His role is to help customers architect big data solutions to process data at scale. Before AWS, he helped Amazon.com Supply Chain Optimization Technologies migrate its Oracle data warehouse to Amazon Redshift and build its next-generation big data analytics platform using AWS technologies.


Zhouyi Yang is a Software Development Engineer for the Amazon Redshift Query Processing team. He’s passionate about gaining new knowledge about large databases and has worked on SQL language features such as federated query and IAM role privilege control. In his spare time, he enjoys swimming, tennis, and reading.


Entong Shen is a Senior Software Development Engineer for Amazon Redshift. He has been working on MPP databases for over 8 years and has focused on query optimization, statistics, and SQL language features such as stored procedures and federated query. In his spare time, he enjoys listening to music of all genres and working in his succulent garden.

Bringing machine learning to more builders through databases and analytics services

Post Syndicated from Swami Sivasubramanian original https://aws.amazon.com/blogs/big-data/bringing-machine-learning-to-more-builders-through-databases-and-analytics-services/

Machine learning (ML) is becoming more mainstream, but even with the increasing adoption, it’s still in its infancy. For ML to have the broad impact that we think it can have, it has to get easier to do and easier to apply. We launched Amazon SageMaker in 2017 to remove the challenges from each stage of the ML process, making it radically easier and faster for everyday developers and data scientists to build, train, and deploy ML models. SageMaker has made ML model building and scaling more accessible to more people, but there’s a large group of database developers, data analysts, and business analysts who work with databases and data lakes where much of the data used for ML resides. These users still find it too difficult and involved to extract meaningful insights from that data using ML.

This group is typically proficient in SQL but not Python, and must rely on data scientists to build the models needed to add intelligence to applications or derive predictive insights from data. And even when you have the model in hand, there’s a long and involved process to prepare and move data to use the model. The result is that ML isn’t being used as much as it can be.

To meet the needs of this large and growing group of builders, we’re integrating ML into AWS databases, analytics, and business intelligence (BI) services.

AWS customers generate, process, and collect more data than ever to better understand their business landscape, market, and customers. And you don’t just use one type of data store for all your needs. You typically use several types of databases, data warehouses, and data lakes, to fit your use case. Because all these use cases could benefit from ML, we’re adding ML capabilities to our purpose-built databases and analytics services so that database developers, data analysts, and business analysts can train models on their data or add inference results right from their database, without having to export and process their data or write large amounts of ETL code.

Machine Learning for database developers

At re:Invent last year, we announced ML integrated inside Amazon Aurora for developers working with relational databases. Previously, adding ML using data from Aurora to an application was a very complicated process. First, a data scientist had to build and train a model, then write the code to read data from the database. Next, you had to prepare the data so it can be used by the ML model. Then, you called an ML service to run the model, reformat the output for your application, and finally load it into the application.

Now, with a simple SQL query in Aurora, you can add ML to an enterprise application. When you run an ML query in Aurora using SQL, it can directly access a wide variety of ML models from Amazon SageMaker and Amazon Comprehend. The integration between Aurora and each AWS ML service is optimized, delivering up to 100 times better throughput when compared to moving data between Aurora and SageMaker or Amazon Comprehend without this integration. Because the ML model is deployed separately from the database and the application, each can scale up or scale out independently of the other.

In addition to making ML available in relational databases, combining ML with certain types of non-relational database models can also lead to better predictions. For example, database developers use Amazon Neptune, a purpose-built, high-performance graph database, to store complex relationships between data in a graph data model. You can query these graphs for insights and patterns and apply the results to implement capabilities such as product recommendations or fraud detection.

However, human intuition and analyzing individual queries is not enough to discover the full breadth of insights available from large graphs. ML can help, but as was the case with relational databases it requires you to do a significant amount of heavy lifting upfront to prepare the graph data and then select the best ML model to run against that data. The entire process can take weeks.

To help with this, today we announced the general availability of Amazon Neptune ML to provide database developers access to ML purpose-built for graph data. This integration is powered by SageMaker and uses the Deep Graph Library (DGL), a framework for applying deep learning to graph data. It does the hard work of selecting the graph data needed for ML training, automatically choosing the best model for the selected data, exposing ML capabilities via simple graph queries, and providing templates to allow you to customize ML models for advanced scenarios. The following diagram illustrates this workflow.

And because the DGL is purpose-built to run deep learning on graph data, you can improve accuracy of most predictions by over 50% compared to that of traditional ML techniques.

Machine Learning for data analysts

At re:Invent last year, we announced ML integrated inside Amazon Athena for data analysts. With this integration, you can access more than a dozen built-in ML models or use your own models in SageMaker directly from ad-hoc queries in Athena. As a result, you can easily run ad-hoc queries in Athena that use ML to forecast sales, detect suspicious logins, or sort users into customer cohorts.

Similarly, data analysts also want to apply ML to the data in their Amazon Redshift data warehouse. Tens of thousands of customers use Amazon Redshift to process exabytes of data per day. These Amazon Redshift users want to run ML on their data in Amazon Redshift without having to write a single line of Python. Today we announced the preview of Amazon Redshift ML to do just that.

Amazon Redshift now enables you to run ML algorithms on Amazon Redshift data without manually selecting, building, or training an ML model. Amazon Redshift ML works with Amazon SageMaker Autopilot, a service that automatically trains and tunes the best ML models for classification or regression based on your data while allowing full control and visibility.

When you run an ML query in Amazon Redshift, the selected data is securely exported from Amazon Redshift to Amazon Simple Storage Service (Amazon S3). SageMaker Autopilot then performs data cleaning and preprocessing of the training data, automatically creates a model, and applies the best model. All the interactions between Amazon Redshift, Amazon S3, and SageMaker are abstracted away and automatically occur. When the model is trained, it becomes available as a SQL function for you to use. The following diagram illustrates this workflow.

Rackspace Technology – a leading end-to-end multicloud technology services company, and Slalom –  a modern consulting firm focused on strategy, technology, and business transformation are both users of Redshift ML in preview.

Nihar Gupta, General Manager for Data Solutions at Rackspace Technology says “At Rackspace Technology, we help companies elevate their AI/ML operationsthe seamless integration with Amazon SageMaker will empower data analysts to use data in new ways, and provide even more insight back to the wider organization.”

And Marcus Bearden, Practice Director at Slalom shared “We hear from our customers that they want to have the skills and tools to get more insight from their data, and Amazon Redshift is a popular cloud data warehouse that many of our customers depend on to power their analytics, the new Amazon Redshift ML feature will make it easier for SQL users to get new types of insight from their data with machine learning, without learning new skills.”

Machine Learning for business analysts

To bring ML to business analysts, we launched new ML capabilities in Amazon QuickSight earlier this year called ML Insights. ML Insights uses SageMaker Autopilot to enable business analysts to perform ML inference on their data and visualize it in BI dashboards with just a few clicks. You can get results for different use cases that require ML, such as anomaly detection to uncover hidden insights by continuously analyzing billions of data points, to do forecasting, to predict growth, and other business trends. In addition, QuickSight can also give you an automatically generated summary in plain language (a capability we call auto-narratives), which interprets and describes what the data in your dashboard means. See the following screenshot for an example.

Customers like Expedia Group, Tata Consultancy Services, and Ricoh Company are already benefiting from ML out of the box with QuickSight. These human-readable narratives enable you to quickly interpret the data in a shared dashboard and focus on the insights that matter most.

In addition, customers have also been interested in asking questions of their business data in plain language and receiving answers in near-real time. Although some BI tools and vendors have attempted to solve this challenge with Natural Language Query (NLQ), the existing approaches require that you first spend months in advance preparing and building a model on a pre-defined set of data, and even then, you still have no way of asking ad hoc questions when those questions require a new calculation that wasn’t pre-defined in the data model. For example, the question “What is our year-over-year growth rate?” requires that “growth rate” be pre-defined as a calculation in the model. With today’s BI tools, you need to work with your BI teams to create and update the model to account for any new calculation or data, which can take days or weeks of effort.

Last week, we announced Amazon QuickSight Q. ‘Q’ gives business analysts the ability to ask any question of all their data and receive an accurate answer in seconds. To ask a question, you simply type it into the QuickSight Q search bar using natural language and business terminology that you’re familiar with. Q uses ML (natural language processing, schema understanding, and semantic parsing for SQL code generation) to automatically generate a data model that understands the meaning of and relationships between business data, so you can get answers to your business questions without waiting weeks for a data model to be built. Because Q eliminates the need to build a data model, you’re also not limited to asking only a specific set of questions. See the following screenshot for an example.

Best Western Hotels & Resorts is a privately-held hotel brand with a global network of approximately 4,700 hotels in over 100 countries and territories worldwide. “With Amazon QuickSight Q, we look forward to enabling our business partners to self-serve their ad hoc questions while reducing the operational overhead on our team for ad hoc requests,” said Joseph Landucci, Senior Manager of Database and Enterprise Analytics at Best Western Hotels & Resorts. “This will allow our partners to get answers to their critical business questions quickly by simply typing and searching their questions in plain language.”

Summary

For ML to have a broad impact, we believe it has to get easier to do and easier to apply. Database developers, data analysts, and business analysts who work with databases and data lakes have found it too difficult and involved to extract meaningful insights from their data using ML. To meet the needs of this large and growing group of builders, we’ve added ML capabilities to our purpose-built databases and analytics services so that database developers, data analysts, and business analysts can all use ML more easily without the need to be an ML expert. These capabilities put ML in the hands of every data professional so that they can get the most value from their data.


About the Authors

Swami Sivasubramanian is Vice President at AWS in charge of all Amazon AI and Machine Learning services. His team’s mission is “to put machine learning capabilities in the hands on every developer and data scientist.” Swami and the AWS AI and ML organization work on all aspects of machine learning, from ML frameworks (Tensorflow, Apache MXNet and PyTorch) and infrastructure, to Amazon SageMaker (an end-to-end service for building, training and deploying ML models in the cloud and at the edge), and finally AI services (Transcribe, Translate, Personalize, Forecast, Rekognition, Textract, Lex, Comprehend, Kendra, etc.) that make it easier for app developers to incorporate ML into their apps with no ML experience required.

Previously, Swami managed AWS’s NoSQL and big data services. He managed the engineering, product management, and operations for AWS database services that are the foundational building blocks for AWS: DynamoDB, Amazon ElastiCache (in-memory engines), Amazon QuickSight, and a few other big data services in the works. Swami has been awarded more than 250 patents, authored 40 referred scientific papers and journals, and participates in several academic circles and conferences.


Herain Oberoi leads Product Marketing for AWS’s Databases, Analytics, BI, and Blockchain services. His team is responsible for helping customers learn about, adopt, and successfully use AWS services. Prior to AWS, he held various product management and marketing leadership roles at Microsoft and a successful startup that was later acquired by BEA Systems. When he’s not working, he enjoys spending time with his family, gardening, and exercising.


Dream11: Scaling a Fantasy Sports Platform with 5M Daily Active Users

Post Syndicated from Annik Stahl original https://aws.amazon.com/blogs/architecture/scaling-fantasy-sports-platform/

Founded in 2008, Dream11 is India’s leading sports-tech startup with a growing base of more than 45 million users playing multiple sports such as fantasy cricket, football, kabaddi, and basketball.

Dream11 uses Amazon Aurora with Amazon ElastiCache to serve 1 million concurrent users within 50ms response time, serving at an average 3 million requests per minute (rpm), which can surge to 3X in a 30-second time span. In this video, we’ll be shedding some light on our architecture, along with our battle plan to handle transactions without locking. We’ll also talk about the features of Aurora and ElastiCache that helped Dream11 to handle 5 million daily active users with 4X growth YoY.

For more content like this, subscribe to our YouTube channels This is My Architecture, This is My Code, and This is My Model, or visit the This is My Architecture on AWS, which has search functionality and the ability to filter by industry, language, and service.