Tag Archives: Amazon EventBridge

Improved failure recovery for Amazon EventBridge

Post Syndicated from Chris Munns original https://aws.amazon.com/blogs/compute/improved-failure-recovery-for-amazon-eventbridge/

Today we’re announcing two new capabilities for Amazon EventBridgedead letter queues and custom retry policies. Both of these give you greater flexibility in how to handle any failures in the processing of events with EventBridge. You can easily enable them on a per target basis and configure them uniquely for each.

Dead letter queues (DLQs) are a common capability in queuing and messaging systems that allow you to handle failures in event or message receiving systems. They provide a way for failed events or messages to be captured and sent to another system, which can store them for future processing. With DLQs, you can have greater resiliency and improved recovery from any failure that happens.

You can also now configure a custom retry policy that can be set on your event bus targets. Today, there are two attributes that can control how events are retried: maximum number of retries and maximum event age. With these two settings, you could send events to a DLQ sooner and reduce the retries attempted.

For example, this could allow you to recover more quickly if an event bus target is overwhelmed by the number of events received, causing throttling to occur. The events are placed in a DLQ and then processed later.

Failures in event processing

Currently, EventBridge can fail to deliver an event to a target in certain scenarios. Events that fail to be delivered to a target due to client-side errors are dropped immediately. Examples of this are when EventBridge does not have permission to a target AWS service or if the target no longer exists. This can happen if the target resource is misconfigured or is deleted by the resource owner.

For service-side issues, EventBridge retries delivery of events for up to 24 hours. This can happen if the target service is unavailable or the target resource is not provisioned to handle the incoming event traffic and the target service is throttling the requests.

EventBridge failures

EventBridge failures

Previously, when all attempts to deliver an event to the target were exhausted, EventBridge published a CloudWatch metric indicating a failed target invocation. However, this provides no visibility into which events failed to be delivered and there was no way to recover the event that failed.

Dead letter queues

EventBridge’s DLQs are made possible today with Amazon Simple Queue Service (SQS) standard queues. With SQS, you get all of the benefits of a fully serverless queuing service: no servers to manage, automatic scalability, pay for what you consume, and high availability and security built in. You can configure the DLQs for your EventBridge bus and pay nothing until it is used, if and when a target experiences an issue. This makes it a great practice to follow and standardize on, and provides you with a safety net that’s active only when needed.

Optionally, you could later configure an AWS Lambda function to consume from that DLQ. The function is only invoked when messages exist in the queue, allowing you to maintain a serverless stack to recover from a potential failure.

DLQ configured per target

DLQ configured per target

With DLQ configured, the queue receives the event that failed in the message with important metadata that you can use to troubleshoot the issue. This can include: Error Code, Error Message, Exhausted Retry Condition, Retry Attempts, Rule ARN, and the Target ARN.

You can use this data to more easily troubleshoot what went wrong with the original delivery attempt and take action to resolve or prevent such failures in the future. You could also use the information such as Exhausted Retry Condition and Retry Attempts to further tweak your custom retry policy.

You can configure a DLQ when creating or updating rules via the AWS Management Console and AWS Command Line Interface (AWS CLI). You can also use infrastructure as code (IaC) tools such as AWS CloudFormation.

In the console, select the queue to be used for your DLQ configuration from the drop-down as shown here:

DLQ configuration

DLQ configuration

When configured via API, AWS CLI, or IaC tools, you must specify the ARN of the queue:

arn:aws:sqs:us-east-1:123456789012:orders-bus-shipping-service-dlq

When you configure a DLQ, the target SQS queue requires a resource-based policy that grants EventBridge access. One is created and applied automatically via the console when you create or update an EventBridge rule with a DLQ that exists in your own account.

For any queues created in other accounts, or via API, AWS CLI, or IaC tools, you must add a policy that allows SQS’s SendMessage permission to the EventBridge rule ARN, as shown below:

{
  "Sid": "Dead-letter queue permissions",
  "Effect": "Allow",
  "Principal": {
     "Service": "events.amazonaws.com"
  },
  "Action": "sqs:SendMessage",
  "Resource": "arn:aws:sqs:us-east-1:123456789012:orders-bus-shipping-service-dlq",
  "Condition": {
    "ArnEquals": {
      "aws:SourceArn": "arn:aws:events:us-east-1:123456789012:rule/MyTestRule"
    }
  }
}

You can read more about setting permissions for DLQ the documentation for “Granting permissions to the dead-letter queue”.

Once configured, you can monitor CloudWatch metrics for the DLQ queue. This shows both the successful delivery of messages via the InvocationsSentToDLQ metric, in addition to any failures via the InvocationsFailedToBeSentToDLQ. Note that these metrics do not exist if your queue is not considered “active”.

Retry policies

By default, EventBridge retries delivery of an event to a target so long as it does not receive a client-side error as described earlier. Retries occur with a back-off, for up to 185 attempts or for up to 24 hours, after which the event is dropped or sent to a DLQ, if configured. Due to the jitter of the back-off and retry process you may reach the 24-hour limit before reaching 185 retries.

For many workloads, this provides an acceptable way to handle momentary service issues or throttling that might occur. For some however, this model of back-off and retry can cause increased and on-going traffic to an already overloaded target system.

For example, consider an Amazon API Gateway target that has a resource constrained backend service behind it.

Constrained target service

Constrained target service

Under a consistently high load, the bus could end up generating too many API requests, tripping the API Gateway’s throttling configuration. This would cause API Gateway to respond with throttling errors back to EventBridge.

Throttled API reply

Throttled API reply

You may decide that allowing the failed events to retry for 24 hours puts too much load into this system and it may not properly recover from the load. This could lead to potential data loss unless a DLQ was configured.

Added DLQ

Added DLQ

With a DLQ, you could choose to process these events later, once the overwhelmed target service has recovered.

DLQ drained back to API

DLQ drained back to API

Or the events in question may no longer have the same value as they did previously. This can occur in systems where data loss is tolerated but the timeliness of data processing matters. In these situations, the DLQ would have less value and dropping the message is acceptable.

For either of these situations, configuring the maximum number of retries or the maximum age of the event could be useful.

Now with retry policies, you can configure per target the following two attributes:

  • MaximumEventAgeInSeconds: between 60 and 86400 seconds (86400, or 24 hours the default)
  • MaximumRetryAttempts: between 0 and 185 (185 is the default)

When either condition is met, the event fails. It’s then either dropped, which generates an increase to the FailedInvocations CloudWatch metric, or sent to a configured DLQ.

You can configure retry policy attributes when creating or updating rules via the AWS Management Console and AWS Command Line Interface (AWS CLI). You can also use infrastructure as code (IaC) tools such as AWS CloudFormation.

Retry policy

Retry policy

There is no additional cost for configuring either of these new capabilities. You only pay for the usage of the SQS standard queue configured as the dead letter queue during a failure and any application that handles the failed events. SQS pricing can be found here.

Conclusion

With dead letter queues and custom retry policies, you have improved handling and control over failure in distributed systems built with EventBridge. With DLQs you can capture failed events and then process them later, potentially saving yourself from data loss. With custom retry policies, you gain the improved ability to control the number of retries and for how long they can be retried.

I encourage you to explore how both of these new capabilities can help make your applications more resilient to failures, and to standardize on using them both in your infrastructure.

For more serverless learning resources, visit https://serverlessland.com.

Building resilient serverless patterns by combining messaging services

Post Syndicated from James Beswick original https://aws.amazon.com/blogs/compute/building-resilient-no-code-serverless-patterns-by-combining-messaging-services/

In “Choosing between messaging services for serverless applications”, I explain the features and differences between the core AWS messaging services. Amazon SQS, Amazon SNS, and Amazon EventBridge provide queues, publish/subscribe, and event bus functionality for your applications. Individually, these are robust, scalable services that are fundamental building blocks of serverless architectures.

However, you can also combine these services to solve specific challenges in distributed architectures. By doing this, you can use specific features of each service to build sophisticated patterns with little code. These combinations can make your applications more resilient and scalable, and reduce the amount of custom logic and architecture in your workload.

In this blog post, I highlight several important patterns for serverless developers. I also show how you use and deploy these integrations with the AWS Serverless Application Model (AWS SAM).

Examples in this post refer to code that can be downloaded from this GitHub repo. The README.md file explains how to deploy and run each example.

SNS to SQS: Adding resilience and throttling to message throughput

SNS has a robust retry policy that results in up to 100,010 delivery attempts over 23 days. If a downstream service is unavailable, it may be overwhelmed by retries when it comes back online. You can solve this issue by adding an SQS queue.

Adding an SQS queue between the SNS topic and its subscriber has two benefits. First, it adds resilience to message delivery, since the messages are durably stored in a queue. Second, it throttles the rate of messages to the consumer, helping smooth out traffic bursts caused by the service catching up with missed messages.

To build this in an AWS SAM template, you first define the two resources, and the SNS subscription:

  MySqsQueue:
    Type: AWS::SQS::Queue

  MySnsTopic:
    Type: AWS::SNS::Topic
    Properties:
      Subscription:
        - Protocol: sqs
          Endpoint: !GetAtt MySqsQueue.Arn

Finally, you provide permission to the SNS topic to publish to the queue, using the AWS::SQS::QueuePolicy resource:

  SnsToSqsPolicy:
    Type: AWS::SQS::QueuePolicy
    Properties:
      PolicyDocument:
        Version: "2012-10-17"
        Statement:
          - Sid: "Allow SNS publish to SQS"
            Effect: Allow
            Principal: "*"
            Resource: !GetAtt MySqsQueue.Arn
            Action: SQS:SendMessage
            Condition:
              ArnEquals:
                aws:SourceArn: !Ref MySnsTopic
      Queues:
        - Ref: MySqsQueue

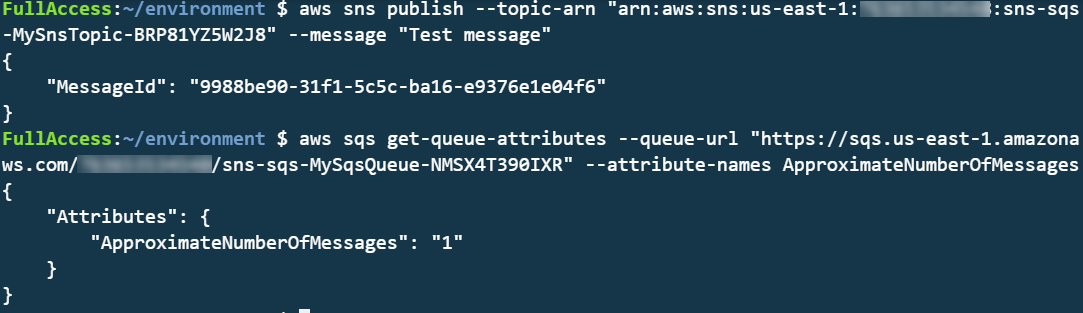
To test this, you can publish a message to the SNS topic and then inspect the SQS queue length using the AWS CLI:

aws sns publish --topic-arn "arn:aws:sns:us-east-1:123456789012:sns-sqs-MySnsTopic-ABC123ABC" --message "Test message"
aws sqs get-queue-attributes --queue-url "https://sqs.us-east-1.amazonaws.com/123456789012/sns-sqs-MySqsQueue- ABC123ABC " --attribute-names ApproximateNumberOfMessages

This results in the following output:

CLI output

Another usage of this pattern is when you want to filter messages in architectures using an SQS queue. By placing the SNS topic in front of the queue, you can use the message filtering capabilities of SNS. This ensures that only the messages you need are published to the queue. To use message filtering in AWS SAM, use the AWS:SNS:Subcription resource:

  QueueSubcription:
    Type: 'AWS::SNS::Subscription'
    Properties:
      TopicArn: !Ref MySnsTopic
      Endpoint: !GetAtt MySqsQueue.Arn
      Protocol: sqs
      FilterPolicy:
        type:
        - orders
        - payments 
      RawMessageDelivery: 'true'

EventBridge to SNS: combining features of both services

Both SNS and EventBridge have different characteristics in terms of targets, and integration with broader features. This table compares the major differences between the two services:

Amazon SNS Amazon EventBridge
Number of targets 10 million (soft) 5
Limits 100,000 topics. 12,500,000 subscriptions per topic. 100 event buses. 300 rules per event bus.
Input transformation No Yes – see details.
Message filtering Yes – see details. Yes, including IP address matching – see details.
Format Raw or JSON JSON
Receive events from AWS CloudTrail No Yes
Targets HTTP(S), SMS, SNS Mobile Push, Email/Email-JSON, SQS, Lambda functions 15 targets including AWS LambdaAmazon SQSAmazon SNSAWS Step FunctionsAmazon Kinesis Data StreamsAmazon Kinesis Data Firehose.
SaaS integration No Yes – see integration partners.
Schema Registry integration No Yes – see details.
Dead-letter queues supported Yes No
Public visibility Can create public topics Cannot create public buses
Cross-Region You can subscribe your AWS Lambda functions to an Amazon SNS topic in any Region. Targets must be same Region. You can publish across Region to another event bus.

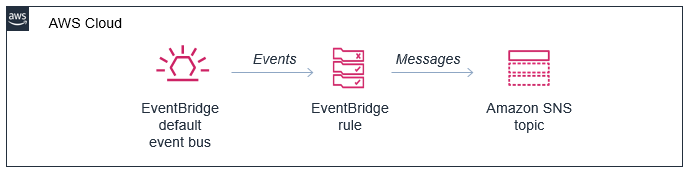
In this pattern, you configure an SNS topic as a target of an EventBridge rule:

SNS topic as a target for an EventBridge rule

In the AWS SAM template, you declare the resources in the preceding diagram as follows:

Resources:
  MySnsTopic:
    Type: AWS::SNS::Topic

  EventRule: 
    Type: AWS::Events::Rule
    Properties: 
      Description: "EventRule"
      EventPattern: 
        account: 
          - !Sub '${AWS::AccountId}'
        source:
          - "demo.cli"
      Targets: 
        - Arn: !Ref MySnsTopic
          Id: "SNStopic"

The default bus already exists in every AWS account, so there is no need to declare it. For the event bus to publish matching events to the SNS topic, you define permissions using the AWS::SNS::TopicPolicy resource:

  EventBridgeToToSnsPolicy:
    Type: AWS::SNS::TopicPolicy
    Properties: 
      PolicyDocument:
        Statement:
        - Effect: Allow
          Principal:
            Service: events.amazonaws.com
          Action: sns:Publish
          Resource: !Ref MySnsTopic
      Topics: 
        - !Ref MySnsTopic       

EventBridge has a limit of five targets per rule. In cases where you must send events to hundreds or thousands of targets, publishing to SNS first and then subscribing those targets to the topic works around this limit. Both services have different targets, and this pattern allows you to deliver EventBridge events to SMS, HTTP(s), email and SNS mobile push.

You can transform and filter the message using these services, often without needing an AWS Lambda function. SNS does not support input transformation but you can do this in an EventBridge rule. Message filtering is possible in both services but EventBridge provides richer content filtering capabilities.

AWS CloudTrail can log and monitor activity across services in your AWS account. It can be a useful source for events, allowing you to respond dynamically to objects in Amazon S3 or react to changes in your environment, for example. This natively integrates with EventBridge, allowing you to ingest events at scale from dozens of services.

Using EventBridge enables you to source events from outside your AWS account, offering integrations with a list of software as a service (SaaS) providers. This capability allows you to receive events from your accounts with SaaS providers like Zendesk, PagerDuty, and Auth0. These events are delivered to a partner event bus in your account, and can then be filtered and routed to an SNS topic.

Additionally, this pattern allows you to deliver events to Lambda functions in other AWS accounts and in other AWS Regions. You can invoke Lambda from SNS topics in other Regions and accounts. It’s also possible to make SNS topics publicly read-only, making them extensible endpoints that other third parties can consume from. SNS has comprehensive access control, which you can incorporate into this pattern.

Cross-account publishing

EventBridge to SQS: Building fault-tolerant microservices

EventBridge can route events to targets such as microservices. In the case of downstream failures, the service retries events for up to 24 hours. For workloads where you need a longer period of time to store and retry messages, you can deliver the events to an SQS queue in each microservice. This durably stores those events until the downstream service recovers. Additionally, this pattern protects the microservice from large bursts of traffic by throttling the delivery of messages.

Fault-tolerant microservices architecture

The resources declared in the AWS SAM template are similar to the previous examples, but it uses the AWS::SQS::QueuePolicy resource to grant the appropriate permission to EventBridge:

  EventBridgeToToSqsPolicy:
    Type: AWS::SQS::QueuePolicy
    Properties:
      PolicyDocument:
        Statement:
        - Effect: Allow
          Principal:
            Service: events.amazonaws.com
          Action: SQS:SendMessage
          Resource:  !GetAtt MySqsQueue.Arn
      Queues:
        - Ref: MySqsQueue

Conclusion

You can combine these services in your architectures to implement patterns that solve complex challenges, often with little code required. This blog post shows three examples that implement message throttling and queueing, integrating SNS and EventBridge, and building fault tolerant microservices.

To learn more building decoupled architectures, see this Learning Path series on EventBridge. For more serverless learning resources, visit https://serverlessland.com.

Choosing between messaging services for serverless applications

Post Syndicated from James Beswick original https://aws.amazon.com/blogs/compute/choosing-between-messaging-services-for-serverless-applications/

Most serverless application architectures use a combination of different AWS services, microservices, and AWS Lambda functions. Messaging services are important in allowing distributed applications to communicate with each other, and are fundamental to most production serverless workloads.

Messaging services can improve the resilience, availability, and scalability of applications, when used appropriately. They can also enable your applications to communicate beyond your workload or even the AWS Cloud, and provide extensibility for future service features and versions.

In this blog post, I compare the primary messaging services offered by AWS and how you can use these in your serverless application architectures. I also show how you use and deploy these integrations with the AWS Serverless Application Model (AWS SAM).

Examples in this post refer to code that can be downloaded from this GitHub repository. The README.md file explains how to deploy and run each example.

Overview

Three of the most useful messaging patterns for serverless developers are queues, publish/subscribe, and event buses. In AWS, these are provided by Amazon SQS, Amazon SNS, and Amazon EventBridge respectively. All of these services are fully managed and highly available, so there is no infrastructure to manage. All three integrate with Lambda, allowing you to publish messages via the AWS SDK and invoke functions as targets. Each of these services has an important role to play in serverless architectures.

SNS enables you to send messages reliably between parts of your infrastructure. It uses a robust retry mechanism for when downstream targets are unavailable. When the delivery policy is exhausted, it can optionally send those messages to a dead-letter queue for further processing. SNS uses topics to logically separate messages into channels, and your Lambda functions interact with these topics.

SQS provides queues for your serverless applications. You can use a queue to send, store, and receive messages between different services in your workload. Queues are an important mechanism for providing fault tolerance in distributed systems, and help decouple different parts of your application. SQS scales elastically, and there is no limit to the number of messages per queue. The service durably persists messages until they are processed by a downstream consumer.

EventBridge is a serverless event bus service, simplifying routing events between AWS services, software as a service (SaaS) providers, and your own applications. It logically separates routing using event buses, and you implement the routing logic using rules. You can filter and transform incoming messages at the service level, and route events to multiple targets, including Lambda functions.

Integrating an SQS queue with AWS SAM

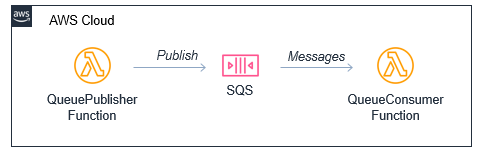
The first example shows an AWS SAM template defining a serverless application with two Lambda functions and an SQS queue:

Producer-consumer example

You can declare an SQS queue in an AWS SAM template with the AWS::SQS::Queue resource:

  MySqsQueue:
    Type: AWS::SQS::Queue

To publish to the queue, the publisher function must have permission to send messages. Using an AWS SAM policy template, you can apply policy that enables send messaging to one specific queue:

      Policies:
        - SQSSendMessagePolicy:
            QueueName: !GetAtt MySqsQueue.QueueName

The AWS SAM template passes the queue name into the Lambda function as an environment variable. The function uses the sendMessage method of the AWS.SQS class to publish the message:

const AWS = require('aws-sdk')
AWS.config.region = process.env.AWS_REGION 
const sqs = new AWS.SQS({apiVersion: '2012-11-05'})

// The Lambda handler
exports.handler = async (event) => {
  // Params object for SQS
  const params = {
    MessageBody: `Message at ${Date()}`,
    QueueUrl: process.env.SQSqueueName
  }
  
  // Send to SQS
  const result = await sqs.sendMessage(params).promise()
  console.log(result)
}

When the SQS queue receives the message, it publishes to the consuming Lambda function. To configure this integration in AWS SAM, the consumer function is granted the SQSPollerPolicy policy. The function’s event source is set to receive messages from the queue in batches of 10:

  QueueConsumerFunction:
    Type: AWS::Serverless::Function 
    Properties:
      CodeUri: code/
      Handler: consumer.handler
      Runtime: nodejs12.x
      Timeout: 3
      MemorySize: 128
      Policies:  
        - SQSPollerPolicy:
            QueueName: !GetAtt MySqsQueue.QueueName
      Events:
        MySQSEvent:
          Type: SQS
          Properties:
            Queue: !GetAtt MySqsQueue.Arn
            BatchSize: 10

The payload for the consumer function is the message from SQS. This is an array of messages up to the batch size, containing a body attribute with the publishing function’s MessageBody. You can see this in the CloudWatch log for the function:

CloudWatch log result

Integrating an SNS topic with AWS SAM

The second example shows an AWS SAM template defining a serverless application with three Lambda functions and an SNS topic:

SNS fanout to Lambda functions

You declare an SNS topic and the subscribing Lambda functions with the AWS::SNS:Topic resource:

  MySnsTopic:
    Type: AWS::SNS::Topic
    Properties:
      Subscription:
        - Protocol: lambda
          Endpoint: !GetAtt TopicConsumerFunction1.Arn    
        - Protocol: lambda
          Endpoint: !GetAtt TopicConsumerFunction2.Arn

You provide the SNS service with permission to invoke the Lambda functions but defining an AWS::Lambda::Permission for each:

  TopicConsumerFunction1Permission:
    Type: 'AWS::Lambda::Permission'
    Properties:
      Action: 'lambda:InvokeFunction'
      FunctionName: !Ref TopicConsumerFunction1
      Principal: sns.amazonaws.com

The SNSPublishMessagePolicy policy template grants permission to the publishing function to send messages to the topic. In the function, the publish method of the AWS.SNS class handles publishing:

const AWS = require('aws-sdk')
AWS.config.region = process.env.AWS_REGION 
const sns = new AWS.SNS({apiVersion: '2012-11-05'})

// The Lambda handler
exports.handler = async (event) => {
  // Params object for SNS
  const params = {
    Message: `Message at ${Date()}`,
    Subject: 'New message from publisher',
    TopicArn: process.env.SNStopic
  }
  
  // Send to SQS
  const result = await sns.publish(params).promise()
  console.log(result)
}

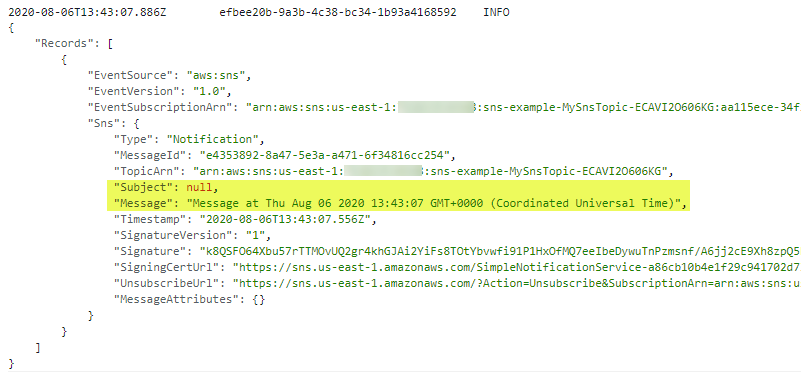
The payload for the consumer functions is the message from SNS. This is an array of messages, containing subject and message attributes from the publishing function. You can see this in the CloudWatch log for the function:

CloudWatch log result

Differences between SQS and SNS configurations

SQS queues and SNS topics offer different functionality, though both can publish to downstream Lambda functions.

An SQS message is stored on the queue for up to 14 days until it is successfully processed by a subscriber. SNS does not retain messages so if there are no subscribers for a topic, the message is discarded.

SNS topics may broadcast to multiple targets. This behavior is called fan-out. It can be used to parallelize work across Lambda functions or send messages to multiple environments (such as test or development). An SNS topic can have up to 12,500,000 subscribers, providing highly scalable fan-out capabilities. The targets may include HTTP/S endpoints, SMS text messaging, SNS mobile push, email, SQS, and Lambda functions.

In AWS SAM templates, you can retrieve properties such as ARNs and names of queues and topics, using the following intrinsic functions:

Amazon SQS Amazon SNS
Channel type Queue Topic
Get ARN !GetAtt MySqsQueue.Arn !Ref MySnsTopic
Get name !GetAtt MySqsQueue.QueueName !GetAtt MySnsTopic.TopicName

Integrating with EventBridge in AWS SAM

The third example shows the AWS SAM template defining a serverless application with two Lambda functions and an EventBridge rule:

EventBridge integration with AWS SAM

The default event bus already exists in every AWS account. You declare a rule that filters events in the event bus using the AWS::Events::Rule resource:

  EventRule: 
    Type: AWS::Events::Rule
    Properties: 
      Description: "EventRule"
      EventPattern: 
        source: 
          - "demo.event"
        detail: 
          state: 
            - "new"
      State: "ENABLED"
      Targets: 
        - Arn: !GetAtt EventConsumerFunction.Arn
          Id: "ConsumerTarget"

The rule describes an event pattern specifying matching JSON attributes. Events that match this pattern are routed to the list of targets. You provide the EventBridge service with permission to invoke the Lambda functions in the target list:

  PermissionForEventsToInvokeLambda: 
    Type: AWS::Lambda::Permission
    Properties: 
      FunctionName: 
        Ref: "EventConsumerFunction"
      Action: "lambda:InvokeFunction"
      Principal: "events.amazonaws.com"
      SourceArn: !GetAtt EventRule.Arn

The AWS SAM template uses an IAM policy statement to grant permission to the publishing function to put events on the event bus:

  EventPublisherFunction:
    Type: AWS::Serverless::Function
    Properties:
      CodeUri: code/
      Handler: publisher.handler
      Timeout: 3
      Runtime: nodejs12.x
      Policies:
        - Statement:
          - Effect: Allow
            Resource: '*'
            Action:
              - events:PutEvents      

The publishing function then uses the putEvents method of the AWS.EventBridge class, which returns after the events have been durably stored in EventBridge:

const AWS = require('aws-sdk')
AWS.config.update({region: 'us-east-1'})
const eventbridge = new AWS.EventBridge()

exports.handler = async (event) => {
  const params = {
    Entries: [ 
      {
        Detail: JSON.stringify({
          "message": "Hello from publisher",
          "state": "new"
        }),
        DetailType: 'Message',
        EventBusName: 'default',
        Source: 'demo.event',
        Time: new Date 
      }
    ]
  }
  const result = await eventbridge.putEvents(params).promise()
  console.log(result)
}

The payload for the consumer function is the message from EventBridge. This is an array of messages, containing subject and message attributes from the publishing function. You can see this in the CloudWatch log for the function:

CloudWatch log result

Comparing SNS with EventBridge

SNS and EventBridge have many similarities. Both can be used to decouple publishers and subscribers, filter messages or events, and provide fan-in or fan-out capabilities. However, there are differences in the list of targets and features for each service, and your choice of service depends on the needs of your use-case.

EventBridge offers two newer capabilities that are not available in SNS. The first is software as a service (SaaS) integration. This enables you to authorize supported SaaS providers to send events directly from their EventBridge event bus to partner event buses in your account. This replaces the need for polling or webhook configuration, and creates a highly scalable way to ingest SaaS events directly into your AWS account.

The second feature is the Schema Registry, which makes it easier to discover and manage OpenAPI schemas for events. EventBridge can infer schemas based on events routed through an event bus by using schema discovery. This can be used to generate code bindings directly to your IDE for type-safe languages like Python, Java, and TypeScript. This can help accelerate development by automating the generation of classes and code directly from events.

This table compares the major features of both services:

Amazon SNS Amazon EventBridge
Number of targets 10 million (soft) 5
Availability SLA 99.9% 99.99%
Limits 100,000 topics. 12,500,000 subscriptions per topic. 100 event buses. 300 rules per event bus.
Publish throughput Varies by Region. Soft limits. Varies by Region. Soft limits.
Input transformation No Yes – see details.
Message filtering Yes – see details. Yes, including IP address matching – see details.
Message size maximum 256 KB 256 KB
Billing Per 64 KB
Format Raw or JSON JSON
Receive events from AWS CloudTrail No Yes
Targets HTTP(S), SMS, SNS Mobile Push, Email/Email-JSON, SQS, Lambda functions. 15 targets including AWS LambdaAmazon SQSAmazon SNSAWS Step FunctionsAmazon Kinesis Data StreamsAmazon Kinesis Data Firehose.
SaaS integration No Yes – see integrations.
Schema Registry integration No Yes – see details.
Dead-letter queues supported Yes No
FIFO ordering available No No
Public visibility Can create public topics Cannot create public buses
Pricing $0.50/million requests + variable delivery cost + data transfer out cost. SMS varies. $1.00/million events. Free for AWS events. No charge for delivery.
Billable request size 1 request = 64 KB 1 event = 64 KB
AWS Free Tier eligible Yes No
Cross-Region You can subscribe your AWS Lambda functions to an Amazon SNS topic in any Region. Targets must be in the same Region. You can publish across Regions to another event bus.
Retry policy
  • For SQS/Lambda, exponential backoff over 23 days.
  • For SMTP, SMS and Mobile push, exponential backoff over 6 hours.
At-least-once event delivery to targets, including retry with exponential backoff for up to 24 hours.

Conclusion

Messaging is an important part of serverless applications and AWS services provide queues, publish/subscribe, and event routing capabilities. This post reviews the main features of SNS, SQS, and EventBridge and how they provide different capabilities for your workloads.

I show three example applications that publish and consume events from the three services. I walk through AWS SAM syntax for deploying these resources in your applications. Finally, I compare differences between the services.

To learn more building decoupled architectures, see this Learning Path series on EventBridge. For more serverless learning resources, visit https://serverlessland.com.

Automatically updating AWS WAF Rule in real time using Amazon EventBridge

Post Syndicated from Adam Cerini original https://aws.amazon.com/blogs/security/automatically-updating-aws-waf-rule-in-real-time-using-amazon-eventbridge/

In this post, I demonstrate a method for collecting and sharing threat intelligence between Amazon Web Services (AWS) accounts by using AWS WAF, Amazon Kinesis Data Analytics, and Amazon EventBridge. AWS WAF helps protect against common web exploits and gives you control over which traffic can reach your application.

Attempted exploitation blocked by AWS WAF provides a data source on potential attackers that can be shared proactively across AWS accounts. This solution can be an effective way to block traffic known to be malicious across accounts and public endpoints. AWS WAF managed rules provide an easy way to mitigate and record the details of common web exploit attempts. This solution will use the Admin protection managed rule for demonstration purposes.

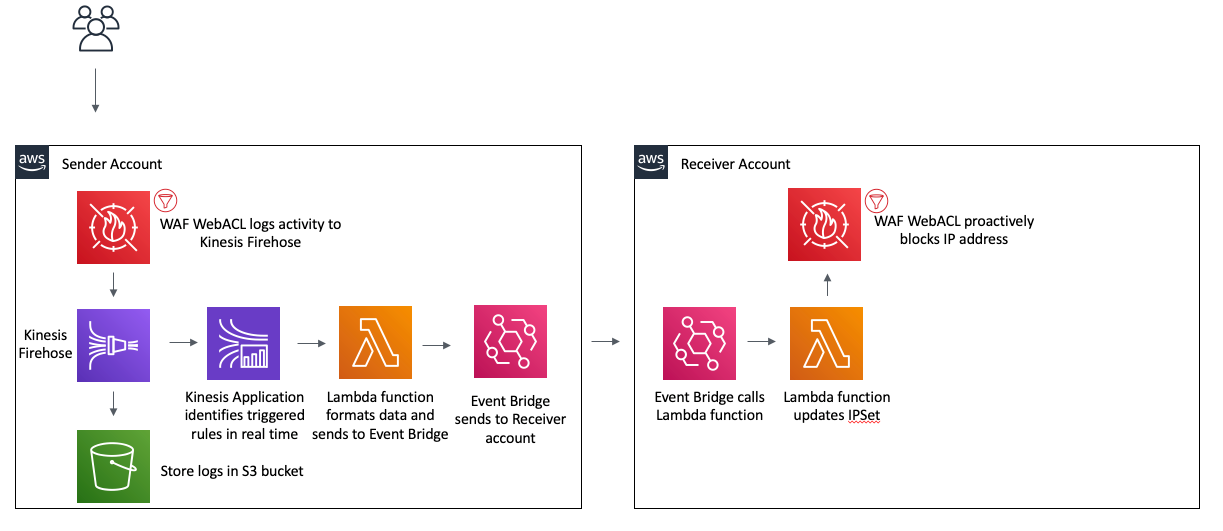
In this post you will see references to the Sender account and the Receiver account. There is only one receiver in this example, but the receiving process can be duplicated multiple times across multiple accounts. This post walks through how to set up the solution. You’ll notice there is also an AWS CloudFormation template that makes it easy to test the solution in your own AWS account. The diagram in figure 1 illustrates how this architecture fits together at a high level.
 

Figure 1: Architecture diagram showing the activity flow of traffic blocked on the Sender AWS WAF

Figure 1: Architecture diagram showing the activity flow of traffic blocked on the Sender AWS WAF

Prerequisites

You should know how to do the following tasks:

Extracting threat intelligence

AWS WAF logs using a Kinesis Data Firehose delivery stream. This allows you to not only log to a destination S3 bucket, but also act on the stream in real time using a Kinesis Data Analytics Application. The following SQL code demonstrates how to extract any unique IP addresses that have been blocked by AWS WAF. While this example returns all blocked IPs, more complex SQL could be used for a more granular result. The full list of log fields is included in the documentation.


CREATE OR REPLACE STREAM "wafstream" (
 "clientIp" VARCHAR(16),
 "action" VARCHAR(8),
 "time_stamp" TIMESTAMP
 );

CREATE OR REPLACE PUMP "WAFPUMP" as
INSERT INTO "wafstream" (
"clientIp",
"action",
"time_stamp"
) 

Select STREAM DISTINCT "clientIp", "action", FLOOR(WAF_001.ROWTIME TO MINUTE) as "time_stamp"
FROM "WAF_001"
WHERE "action" = 'BLOCK';

Proactively blocking unwanted traffic

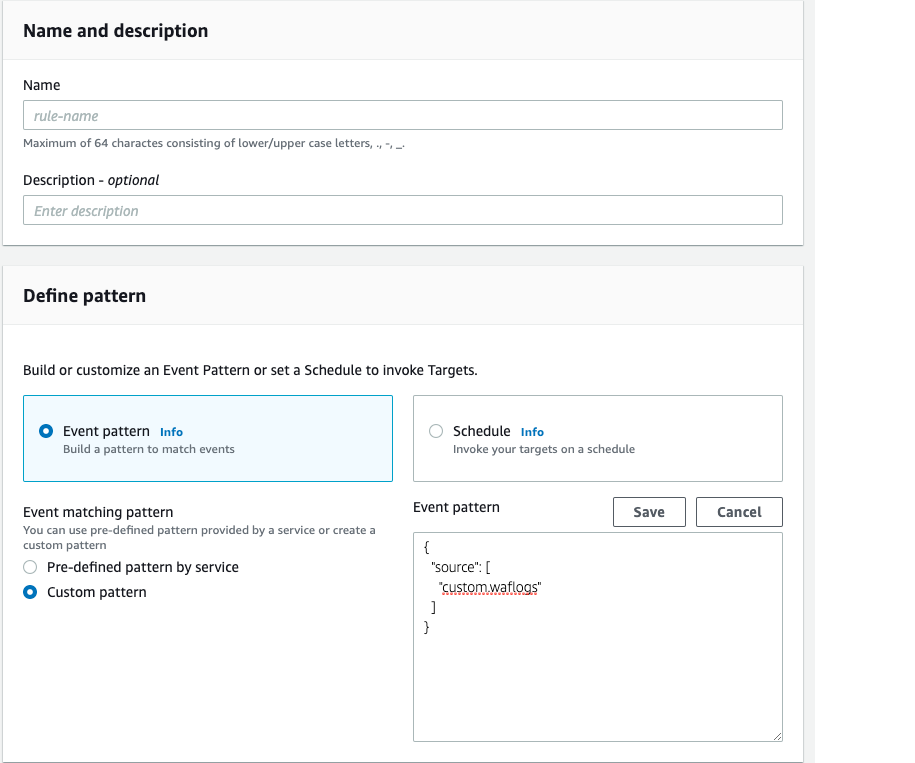
After extracting the IP addresses involved in the abnormal traffic, you will want to proactively block those IPs on your other web facing resources. You can accomplish this in a scalable way using Amazon EventBridge. After the Kinesis Application extracts the IP address, it will use an AWS Lambda function to call PutEvents on an EventBridge event bus. This process will create the event pattern, which is used to determine when to trigger an event bus rule. This example uses a simple pattern, which acts on any event with a source of “custom.waflogs” as shown in Figure 2. A more complex pattern could be used to for finer grain control of when a rule triggers.
 

Figure 2: EventBridge Rule creation

Figure 2: EventBridge Rule creation

Once the event reaches the event bus, the rule will forward the event to an event bus in “Receiver” account, where a second rule will trigger to call a Lambda function to update a WAF IPSet. A Web ACL rule is used to block all traffic sourcing from an IP address contained in the IPSet.

Test the solution by using AWS CloudFormation

Now that you’ve walked through the design of this solution, you can follow these instructions to test it in your own AWS account by using CloudFormation stacks.

To deploy using CloudFormation

  1. Launch the stack to provision resources in the Receiver account.
  2. Provide the account ID of the Sender account. This will correctly configure the permissions for the EventBridge event bus.
  3. Wait for the stack to complete, and then capture the event bus ARN from the output tab.

    This stack creates the following resources:

    • An AWS WAF v2 web ACL
    • An IPSet which will be used to contain the IP addresses to block
    • An AWS WAF rule that will block IP addresses contained in the IPSet
    • A Lambda function to update the IPSet
    • An IAM policy and execution role for the Lambda function
    • An event bus
    • An event bus rule that will trigger the Lambda function
  4. Switch to the Sender account. This should be the account you used in step 2 of this procedure.
  5. Provide the ARN of the event bus that was captured in step 3. This stack will provision the following resources in your account:
    • A virtual private cloud (VPC) with public and private subnets
    • Route tables for the VPC resources
    • An Application Load Balancer (ALB) with a fixed response rule
    • A security group that allows ingress traffic on port 80 to the ALB
    • A web ACL with the AWS Managed Rule for Admin Protection enabled
    • An S3 bucket for AWS WAF logs
    • A Kinesis Data Firehose delivery stream
    • A Kinesis Data Analytics application
    • An EventBridge event bus
    • An event bus rule
    • A Lambda function to send information to the Receiver account event bus
    • A custom CloudFormation resource which enables WAF logging and starts the Kinesis Application
    • An IAM policy and execution role that allows a Lamba function to put events into the event bus
    • An IAM policy and role to allow the custom CloudFormation resource to enable WAF logging and start the Kinesis Application
    • An IAM policy and role that allows the Kinesis Firehose to put logs into S3
    • An IAM policy that allows the WAF Web ACL to put records into the Firehose
    • An IAM policy and role that allows the Kinesis Application to invoke a Lambda function and log to CloudWatch
    • An IAM policy and role that allows the “Sender” account to put events in the “Receiver” event bus

After the CloudFormation stack completes, you should test your environment. To test the solution, check the output tab for the DNS name of the Application Load Balancer and run the following command:

curl ALBDNSname/admin

You should be able to check the Receiver account’s AWS WAF IPSet named WAFBlockIPset and find your IP.

Conclusion

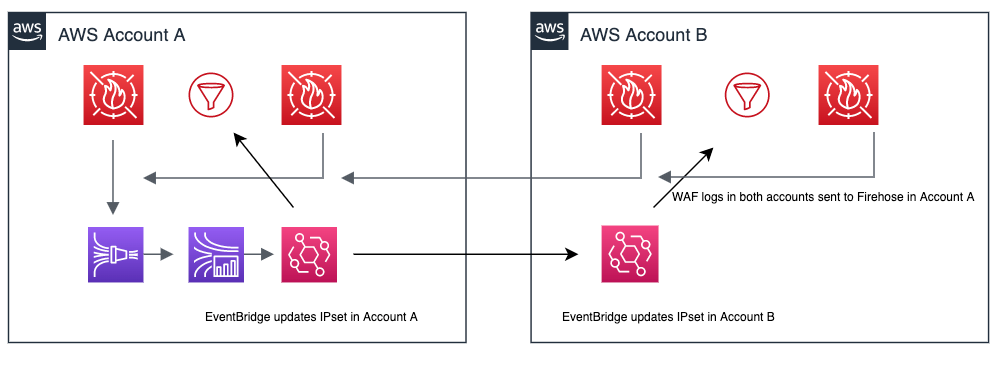
This example is intentionally simple to clearly demonstrate how each component works. You can take these principles and apply them to your own environment. Layering the Amazon managed rules with your own custom rules is the best way to get started with AWS WAF. This example shows how you can use automation to update your WAF rules without needing to rely on humans. A more complete solution would source log data from each Web ACL and update an active IP Set in each account to protect all resources. As seen in Figure 3, a more complete implementation would send all logs in a region to a centralized Kinesis Firehose to be processed by the Kinesis Analytics Application, EventBridge would be used to update a local IPset as well as forward the event to other accounts event buses for processing.
 

Figure 3: Updating across accounts

Figure 3: Updating across accounts

You can also add additional targets to the event bus to do things such as send to a Simple Notification Service topic for notifications, or run additional automation. To learn more about AWS WAF web ACLs, visit the AWS WAF Developer Guide. Using Amazon EventBridge opens up the possibility to send events to partner integrations. Customers or APN Partners like PagerDuty or Zendesk can enrich this solution by taking actions such as automatically opening a ticket or starting an incident. To learn more about the power of Amazon EventBridge, see the EventBridge User Guide.

If you have feedback about this post, submit comments in the Comments section below. If you have questions about this post, start a new thread on the AWS WAF forum or contact AWS Support.

Want more AWS Security how-to content, news, and feature announcements? Follow us on Twitter.

Author

Adam Cerini

Adam is a Senior Solutions Architect with Amazon Web Services. He focuses on helping Public Sector customers architect scalable, secure, and cost effective systems. Adam holds 5 AWS certifications including AWS Certified Solutions Architect – Professional and AWS Certified Security – Specialist.

Building Salesforce integrations with Amazon EventBridge and Amazon AppFlow

Post Syndicated from James Beswick original https://aws.amazon.com/blogs/compute/building-salesforce-integrations-with-amazon-eventbridge/

This post is courtesy of Den Delimarsky, Senior Product Manager, and Vinay Kondapi, Senior Product Manager.

The integration between Amazon EventBridge and Amazon AppFlow enables customers to receive and react to events from Salesforce in their event-driven applications. In this blog post, I show you how to set up the integration, and route Salesforce events to an AWS Lambda function for processing.

Amazon AppFlow is a fully managed integration service that enables you to securely transfer data between software as a service (SaaS) applications like Salesforce, Marketo, Slack, and ServiceNow, and AWS services like Amazon S3 and Amazon Redshift.

EventBridge SaaS integrations make it easier for customers to receive events from over 30 different SaaS providers. Salesforce is a popular SaaS provider among AWS customers, so it has been one of the most anticipated event sources for EventBridge. Customers want to build rich applications that can react to events that track campaigns, contracts, opportunities, and order changes.

The ability to receive these events allows you to build workflows where you can start a variety of processes. For example, you could notify a broad range of subscribers about the changes, or enrich the data with information from another service. Or you could route the event to an order delivery system.

Previously, to connect Salesforce to your application, you must write custom API polling code that routes events either directly to an application or to an event bus. With the Salesforce integration with EventBridge and Amazon AppFlow, the integration is built in minutes directly through the AWS Management Console, with no code required.

The solution outlined in this blog post is structured as follows:

Architecture overview

Setting up the event source

To set up the event source:

  1. Open the Amazon AppFlow console, and create a new flow. Choose Create flow button on the service landing page. Give your flow a unique name, and choose Next.Specify flow details
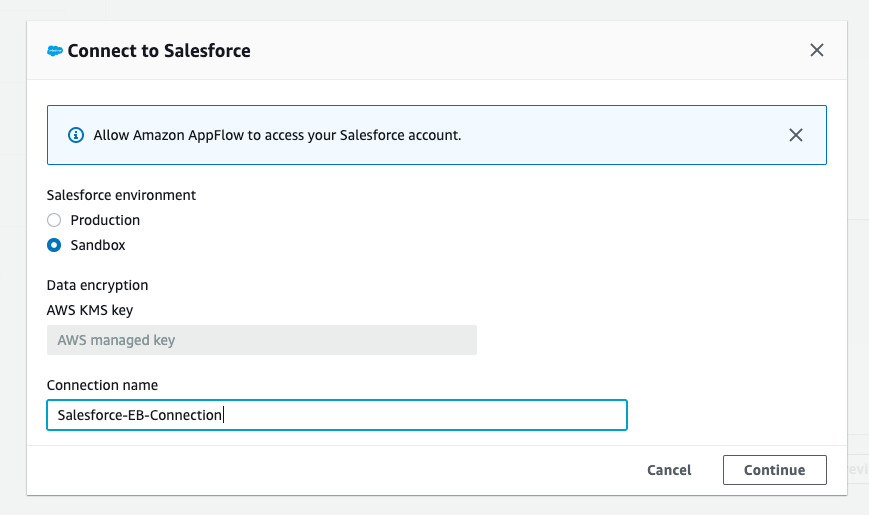
  2. In the Source name list, select Salesforce, and then choose Connect. Select the Salesforce environment you are using, and provide a unique connection name.Connect to Salesforce
  3. Choose Continue. When prompted, provide your Salesforce credentials. These are the credentials that are associated with the specific Salesforce environment selected in the previous step.
  4. Select Salesforce events from the list of available options for the flow, and choose the event that you want to route to EventBridge. This ensures that Amazon AppFlow can route specific events that are coming from Salesforce to an EventBridge event bus.Source details
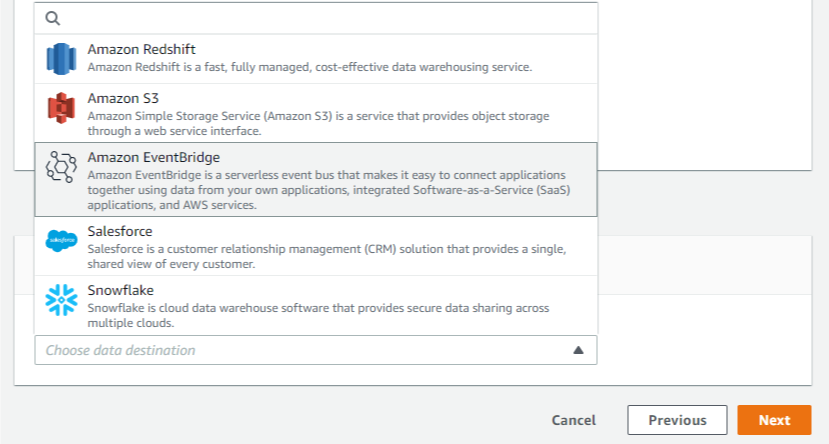
  5. With the source set up, you can now specify the destination. In the Destination name list, select EventBridge.Destination name

To send Salesforce events to EventBridge, Amazon AppFlow creates a new partner event source that is associated with a partner event bus.

To create a partner event source:

  1. Select an existing partner event source, or create a new one by choosing the list of partner event sources.Destination details
  2. When creating a new event source, you can optionally customize the name, to make it easier for you to identify it later.Generate partner event source
  3. Choose an Amazon S3 bucket for large events. For events that are larger than 256 KB, Amazon AppFlow sends a URL for the S3 object to the event bus instead of the event payload.Large event handling
  4. Define a flow trigger, which determines when the flow is started. Because we are tracking events, we want to react to those as they come in. Using the default Run flow on event enables this scenario as changes occur in Salesforce.Flow trigger

With Amazon AppFlow, you can also configure data field mapping, validation rules, and filters. These enable you to enrich and modify event data before it is sent to the event bus.

Once you create the flow, you must activate the event source that you created. To complete this step:

  1. Open the EventBridge console.
  2. Associate a partner event source with an event bus by following the link in the Amazon AppFlow integration dialog box, or navigating directly to the partner event sources view. You can see a partner event source with a Pending state.Partner event source
  3. Select the event source and choose Associate with event bus.
  4. Confirm the settings and choose on Associate.Associate with an event bus
  5. Return to the Amazon AppFlow console, and open the flow you were creating. Choose Activate flow.Activate flow

Your integration is now complete, and EventBridge can start receiving Salesforce events from the configured flow.

Routing Salesforce events to Lambda function

The associated partner event bus receives all events of the configured type from the connected Salesforce accounts. Now your application can react to these events with the help of rules in EventBridge. Rules allow you to set conditions for event routing that determine what targets receive event payloads. You can learn more about this functionality in the EventBridge documentation.

To create a new rule:

  1. Go to the rules view in the EventBridge console, and choose Create rule.EventBridge Rules
  2. Provide a unique name and an optional description for your rule.
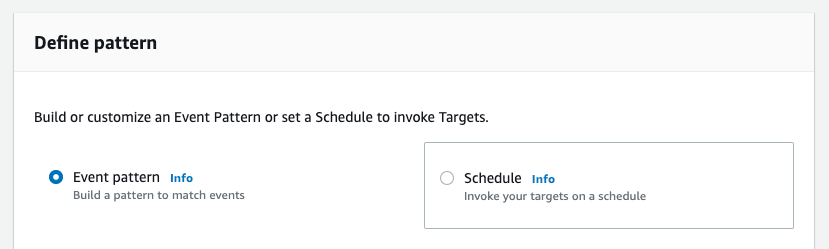
  3. Select the Event pattern option in the Define pattern section. With event pattern configuration, you can define parts of the event payload that EventBridge must look at to determine where to route the event.Define pattern
    For this exercise, start by capturing every Salesforce event that goes through the partner event bus. The only events routed through this bus are from the partner event source. In this case, it is Amazon AppFlow connected to Salesforce.
  4. Set the event matching pattern to Pre-defined pattern by service, with the service provider being All Events. The default setting allows you to receive all events that are coming through the partner event bus.Event matching pattern
  5. Select the event bus that the rule should be associated with. Choose Custom or partner event bus and select the event bus that you associated with the Amazon AppFlow event source. Every rule in EventBridge is associated with an event bus.Select event bus

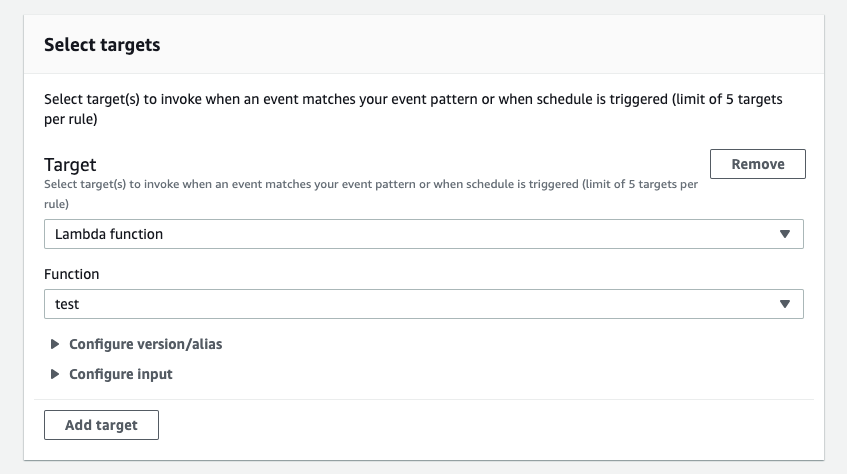
When rules are triggered, the event can be routed to other AWS services. Additionally, every rule can have up to five different AWS targets. You can read more about available targets in the EventBridge documentation. For this blog post, we use an AWS Lambda function as a target for Salesforce events received from Amazon AppFlow.

To configure targets for your rule:

  1. From the list of targets, select Lambda function, and select an existing function. If you do not yet have a function available, you can create one in the AWS Lambda console.Select targets
  2. Choose Create. You have now completed the rule setup.

Now, Salesforce events that match the configured type are routed directly to a Lambda function in your account.

Testing the integration

To test the integration:

  1. Open the Lambda view in the AWS Management Console.
  2. Choose the function that is handling the events from EventBridge.
  3. In the Function code section, update the code to:
    exports.handler = async (event) => {
        console.log(event);
        const response = {
            statusCode: 200,
            body: JSON.stringify('Hello from Lambda!'),
        };
        return response;
    };
    

    Function code

  4. Choose Save.
  5. Open your Salesforce instance, and take an action that is associated with the event you configured earlier. For example, you could update a contract or create an order.
  6. Go back to your function in AWS Management Console, and choose the Monitoring tab.Lambda function monitoring tab
  7. Scroll to CloudWatch Logs Insights section.CloudWatch Logs Insights
  8. Choose the latest log stream. Make sure that the timestamp approximately matches the time when you triggered the action in Salesforce.
  9. Choose the log stream.
  10. Observe log events that contain Salesforce event data.

You have completed your first Salesforce integration with EventBridge and Amazon AppFlow. You are now able to build decoupled and highly scalable applications that integrate with Salesforce.

Conclusion

Building decoupled and scalable cross-service applications is more relevant than ever with requirements for high availability, consistency, and reliability. This blog post demonstrates a solution that connects Salesforce to an event-driven application that uses EventBridge and Amazon AppFlow to route events. The application uses events from Salesforce as a starting point for a custom processing workflow in a Lambda function.

To learn more about EventBridge, visit the EventBridge documentation or EventBridge Learning Path.

To learn more about Amazon AppFlow, visit the Amazon AppFlow documentation.

Building storage-first serverless applications with HTTP APIs service integrations

Post Syndicated from Eric Johnson original https://aws.amazon.com/blogs/compute/building-storage-first-applications-with-http-apis-service-integrations/

Over the last year, I have been talking about “storage first” serverless patterns. With these patterns, data is stored persistently before any business logic is applied. The advantage of this pattern is increased application resiliency. By persisting the data before processing, the original data is still available, if or when errors occur.

Common pattern for serverless API backend

Common pattern for serverless API backend

Using Amazon API Gateway as a proxy to an AWS Lambda function is a common pattern in serverless applications. The Lambda function handles the business logic and communicates with other AWS or third-party services to route, modify, or store the processed data. One option is to place the data in an Amazon Simple Queue Service (SQS) queue for processing downstream. In this pattern, the developer is responsible for handling errors and retry logic within the Lambda function code.

The storage first pattern flips this around. It uses native error handling with retry logic or dead-letter queues (DLQ) at the SQS layer before any code is run. By directly integrating API Gateway to SQS, developers can increase application reliability while reducing lines of code.

Storage first pattern for serverless API backend

Storage first pattern for serverless API backend

Previously, direct integrations require REST APIs with transformation templates written in Velocity Template Language (VTL). However, developers tell us they would like to integrate directly with services in a simpler way without using VTL. As a result, HTTP APIs now offers the ability to directly integrate with five AWS services without needing a transformation template or code layer.

The first five service integrations

This release of HTTP APIs direct integrations includes Amazon EventBridge, Amazon Kinesis Data Streams, Simple Queue Service (SQS), AWS System Manager’s AppConfig, and AWS Step Functions. With these new integrations, customers can create APIs and webhooks for their business logic hosted in these AWS services. They can also take advantage of HTTP APIs features like authorizers, throttling, and enhanced observability for securing and monitoring these applications.

Amazon EventBridge

HTTP APIs service integration with Amazon EventBridge

HTTP APIs service integration with Amazon EventBridge

The HTTP APIs direct integration for EventBridge uses the PutEvents API to enable client applications to place events on an EventBridge bus. Once the events are on the bus, EventBridge routes the event to specific targets based upon EventBridge filtering rules.

This integration is a storage first pattern because data is written to the bus before any routing or logic is applied. If the downstream target service has issues, then EventBridge implements a retry strategy with incremental back-off for up to 24 hours. Additionally, the integration helps developers reduce code by filtering events at the bus. It routes to downstream targets without the need for a Lambda function as a transport layer.
Use this direct integration when:

  • Different tasks are required based upon incoming event details
  • Only data ingestion is required
  • Payload size is less than 256 kb
  • Expected requests per second are less than the Region quotas.

Amazon Kinesis Data Streams

HTTP APIs service integration with Amazon Kinesis Data Streams

HTTP APIs service integration with Amazon Kinesis Data Streams

The HTTP APIs direct integration for Kinesis Data Streams offers the PutRecord integration action, enabling client applications to place events on a Kinesis data stream. Kinesis Data Streams are designed to handle up to 1,000 writes per second per shard, with payloads up to 1 mb in size. Developers can increase throughput by increasing the number of shards in the data stream. You can route the incoming data to targets like an Amazon S3 bucket as part of a data lake or a Kinesis data analytics application for real-time analytics.

This integration is a storage first option because data is stored on the stream for up to seven days until it is processed and routed elsewhere. When processing stream events with a Lambda function, errors are handled at the Lambda layer through a configurable error handling strategy.

Use this direct integration when:

  • Ingesting large amounts of data
  • Ingesting large payload sizes
  • Order is important
  • Routing the same data to multiple targets

Amazon SQS

HTTP APIs service integration with Amazon SQS

HTTP APIs service integration with Amazon SQS

The HTTP APIs direct integration for Amazon SQS offers the SendMessage, ReceiveMessage, DeleteMessage, and PurgeQueue integration actions. This integration differs from the EventBridge and Kinesis integrations in that data flows both ways. Events can be created, read, and deleted from the SQS queue via REST calls through the HTTP API endpoint. Additionally, a full purge of the queue can be managed using the PurgeQueue action.

This pattern is a storage first pattern because the data remains on the queue for four days by default (configurable to 14 days), unless it is processed and removed. When the Lambda service polls the queue, the messages that are returned are hidden in the queue for a set amount of time. Once the calling service has processed these messages, it uses the DeleteMessage API to remove the messages permanently.

When triggering a Lambda function with an SQS queue, the Lambda service manages this process internally. However, HTTP APIs direct integration with SQS enables developers to move this process to client applications without the need for a Lambda function as a transport layer.

Use this direct integration when:

  • Data must be received as well as sent to the service
  • Downstream services need reduced concurrency
  • The queue requires custom management
  • Order is important (FIFO queues)

AWS AppConfig

HTTP APIs service integration with AWS Systems Manager AppConfig

HTTP APIs service integration with AWS Systems Manager AppConfig

The HTTP APIs direct integration for AWS AppConfig offers the GetConfiguration integration action and allows applications to check for application configuration updates. By exposing the systems parameter API through an HTTP APIs endpoint, developers can automate configuration changes for their applications. While this integration is not considered a storage first integration, it does enable direct communication from external services to AppConfig without the need for a Lambda function as a transport layer.

Use this direct integration when:

  • Access to AWS AppConfig is required.
  • Managing application configurations.

AWS Step Functions

HTTP APIs service integration with AWS Step Functions

HTTP APIs service integration with AWS Step Functions

The HTTP APIs direct integration for Step Functions offers the StartExecution and StopExecution integration actions. These actions allow for programmatic control of a Step Functions state machine via an API. When starting a Step Functions workflow, JSON data is passed in the request and mapped to the state machine. Error messages are also mapped to the state machine when stopping the execution.

This pattern provides a storage first integration because Step Functions maintains a persistent state during the life of the orchestrated workflow. Step Functions also supports service integrations that allow the workflows to send and receive data without needing a Lambda function as a transport layer.

Use this direct integration when:

  • Orchestrating multiple actions.
  • Order of action is required.

Building HTTP APIs direct integrations

HTTP APIs service integrations can be built using the AWS CLI, AWS SAM, or through the API Gateway console. The console walks through contextual choices to help you understand what is required for each integration. Each of the integrations also includes an Advanced section to provide additional information for the integration.

Creating an HTTP APIs service integration

Creating an HTTP APIs service integration

Once you build an integration, you can export it as an OpenAPI template that can be used with infrastructure as code (IaC) tools like AWS SAM. The exported template can also include the API Gateway extensions that define the specific integration information.

Exporting the HTTP APIs configuration to OpenAPI

Exporting the HTTP APIs configuration to OpenAPI

OpenAPI template

An example of a direct integration from HTTP APIs to SQS is located in the Sessions With SAM repository. This example includes the following architecture:

AWS SAM template resource architecture

AWS SAM template resource architecture

The AWS SAM template creates the HTTP APIs, SQS queue, Lambda function, and both Identity and Access Management (IAM) roles required. This is all generated in 58 lines of code and looks like this:

AWSTemplateFormatVersion: '2010-09-09'
Transform: AWS::Serverless-2016-10-31
Description: HTTP API direct integrations

Resources:
  MyQueue:
    Type: AWS::SQS::Queue
    
  MyHttpApi:
    Type: AWS::Serverless::HttpApi
    Properties:
      DefinitionBody:
        'Fn::Transform':
          Name: 'AWS::Include'
          Parameters:
            Location: './api.yaml'
          
  MyHttpApiRole:
    Type: "AWS::IAM::Role"
    Properties:
      AssumeRolePolicyDocument:
        Version: "2012-10-17"
        Statement:
          - Effect: "Allow"
            Principal:
              Service: "apigateway.amazonaws.com"
            Action: 
              - "sts:AssumeRole"
      Policies:
        - PolicyName: ApiDirectWriteToSQS
          PolicyDocument:
            Version: '2012-10-17'
            Statement:
              Action:
              - sqs:SendMessage
              Effect: Allow
              Resource:
                - !GetAtt MyQueue.Arn
                
  MyTriggeredLambda:
    Type: AWS::Serverless::Function
    Properties:
      CodeUri: src/
      Handler: app.lambdaHandler
      Runtime: nodejs12.x
      Policies:
        - SQSPollerPolicy:
            QueueName: !GetAtt MyQueue.QueueName
      Events:
        SQSTrigger:
          Type: SQS
          Properties:
            Queue: !GetAtt MyQueue.Arn

Outputs:
  ApiEndpoint:
    Description: "HTTP API endpoint URL"
    Value: !Sub "https://${MyHttpApi}.execute-api.${AWS::Region}.amazonaws.com"

The OpenAPI template handles the route definitions for the HTTP API configuration and configures the service integration. The template looks like this:

openapi: "3.0.1"
info:
  title: "my-sqs-api"
paths:
  /:
    post:
      responses:
        default:
          description: "Default response for POST /"
      x-amazon-apigateway-integration:
        integrationSubtype: "SQS-SendMessage"
        credentials:
          Fn::GetAtt: [MyHttpApiRole, Arn]
        requestParameters:
          MessageBody: "$request.body.MessageBody"
          QueueUrl:
            Ref: MyQueue
        payloadFormatVersion: "1.0"
        type: "aws_proxy”
        connectionType: "INTERNET"
x-amazon-apigateway-importexport-version: "1.0"

Because the OpenAPI template is included in the AWS SAM template via a transform, the API Gateway integration can reference the roles and services created within the AWS SAM template.

Conclusion

This post covers the concept of storage first integration patterns and how the new HTTP APIs direct integrations can help. I cover the five current integrations and possible use cases for each. Additionally, I demonstrate how to use AWS SAM to build and manage the integrated applications using infrastructure as code.

Using the storage first pattern with direct integrations can help developers build serverless applications that are more durable with fewer lines of code. A Lambda function is no longer required to transport data from the API endpoint to the desired service. Instead, use Lambda function invocations for differentiating business logic.

To learn more join us for the HTTP API service integrations session of Sessions With SAM! 

#ServerlessForEveryone

Using serverless backends to iterate quickly on web apps – part 2

Post Syndicated from James Beswick original https://aws.amazon.com/blogs/compute/using-serverless-backends-to-iterate-quickly-on-web-apps-part-2/

This series is about building flexible solutions that can adapt as user requirements change. One of the challenges of building modern web applications is that requirements can change quickly. This is especially true for new applications that are finding their product-market fit. Many development teams start building a product with one set of requirements, and quickly find they must build a product with different features.

For both start-ups and enterprises, it’s often important to find a development methodology and architecture that allows flexibility. This is the surest way to keep up with feature requests in evolving products and innovate to delight your end-users. In this post, I show how to build sophisticated workflows using minimal custom code.

Part 1 introduces the Happy Path application that allows park visitors to share maps and photos with other users. In that post, I explain the functionality, how to deploy the application, and walk through the backend architecture.

The Happy Path application accepts photo uploads from users’ smartphones. The application architecture must support 100,000 monthly active users. These binary uploads are typically 3–9 MB in size and must be resized and optimized for efficient distribution.

Using a serverless approach, you can develop a robust low-code solution that can scale to handle millions of images. Additionally, the solution shown here is designed to handle complex changes that are introduced in subsequent versions of the software. The code and instructions for this application are available in the GitHub repo.

Architecture overview

After installing the backend in the previous post, the architecture looks like this:

In this design, the API, storage, and notification layers exist as one application, and the business logic layer is a separate application. These two applications are deployed using AWS Serverless Application Model (AWS SAM) templates. This architecture uses Amazon EventBridge to pass events between the two applications.

In the business logic layer:

  1. The workflow starts when events are received from EventBridge. Each time a new object is uploaded by an end-user, the PUT event in the Amazon S3 Upload bucket triggers this process.
  2. After the workflow is completed successfully, processed images are stored in the Distribution bucket. Related metadata for the object is also stored in the application’s Amazon DynamoDB table.

By separating the architecture into two independent applications, you can replace the business logic layer as needed. Providing that the workflow accepts incoming events and then stores processed images in the S3 bucket and DynamoDB table, the workflow logic becomes interchangeable. Using the pattern, this workflow can be upgraded to handle new functionality.

Introducing AWS Step Functions for workflow management

One of the challenges in building distributed applications is coordinating components. These systems are composed of separate services, which makes orchestrating workflows more difficult than working with a single monolithic application. As business logic grows more complex, if you attempt to manage this in custom code, it can become quickly convoluted. This is especially true if it handles retries and error handling logic, and it can be hard to test and maintain.

AWS Step Functions is designed to coordinate and manage these workflows in distributed serverless applications. To do this, you create state machine diagrams using Amazon States Language (ASL). Step Functions renders a visualization of your state machine, which makes it simpler to see the flow of data from one service to another.

Each state machine consists of a series of steps. Each step takes an input and produces an output. Using ASL, you define how this data progresses through the state machine. The flow from step to step is called a transition. All state machines transition from a Start state towards an End state.

The Step Functions service manages the state of individual executions. The service also supports versioning, which makes it easier to modify state machines in production systems. Executions continue to use the version of a state machine when they were started, so it’s possible to have active executions on multiple versions.

For developers using VS Code, the AWS Toolkit extension provides support for writing state machines using ASL. It also renders visualizations of those workflows. Combined with AWS Serverless Application Model (AWS SAM) templates, this provides a powerful way to deploy and maintain applications based on Step Functions. I refer to this IDE and AWS SAM in this walkthrough.

Version 1: Image resizing

The Happy Path application uses Step Functions to manage the image-processing part of the backend. The first version of this workflow resizes the uploaded image.

To see this workflow:

  1. In VS Code, open the workflows/statemachines folder in the Explorer panel.
  2. Choose the v1.asl.sjon file.v1 state machine
  3. Choose the Render graph option in the CodeLens. This opens the workflow visualization.CodeLens - Render graph

In this basic workflow, the state machine starts at the Resizer step, then progresses to the Publish step before ending:

  • In the top-level attributes in the definition, StartsAt sets the Resizer step as the first action.
  • The Resizer step is defined as a task with an ARN of a Lambda function. The Next attribute determines that the Publish step is next.
  • In the Publish step, this task defines a Lambda function using an ARN reference. It sets the input payload as the entire JSON payload. This step is set as the End of the workflow.

Deploying the Step Functions workflow

To deploy the state machine:

  1. In the terminal window, change directory to the workflows/templates/v1 folder in the repo.
  2. Execute these commands to build and deploy the AWS SAM template:
    sam build
    sam deploy –guided
  3. The deploy process prompts you for several parameters. Enter happy-path-workflow-v1 as the Stack Name. The other values are the outputs from the backend deployment process, detailed in the repo’s README. Enter these to complete the deployment.
  4. SAM deployment output

Testing and inspecting the deployed workflow

Now the workflow is deployed, you perform an integration test directly from the frontend application.

To test the deployed v1 workflow:

  1. Open the frontend application at https://localhost:8080 in your browser.
  2. Select a park location, choose Show Details, and then choose Upload images.
  3. Select an image from the sample photo dataset.
  4. After a few seconds, you see a pop-up message confirming that the image has been added:Upload confirmation message
  5. Select the same park location again, and the information window now shows the uploaded image:Happy Path - park with image data

To see how the workflow processed this image:

  1. Navigate to the Steps Functions console.
  2. Here you see the v1StateMachine with one execution in the Succeeded column.Successful execution view
  3. Choose the state machine to display more information about the start and end time.State machine detail
  4. Select the execution ID in the Executions panel to open details of this single instance of the workflow.

This view shows important information that’s useful for understanding and debugging an execution. Under Input, you see the event passed into Step Functions by EventBridge:

Event detail from EventBridge

This contains detail about the S3 object event, such as the bucket name and key, together with the placeId, which identifies the location on the map. Under Output, you see the final result from the state machine, shows a successful StatusCode (200) and other metadata:

Event output from the state machine

Using AWS SAM to define and deploy Step Functions state machines

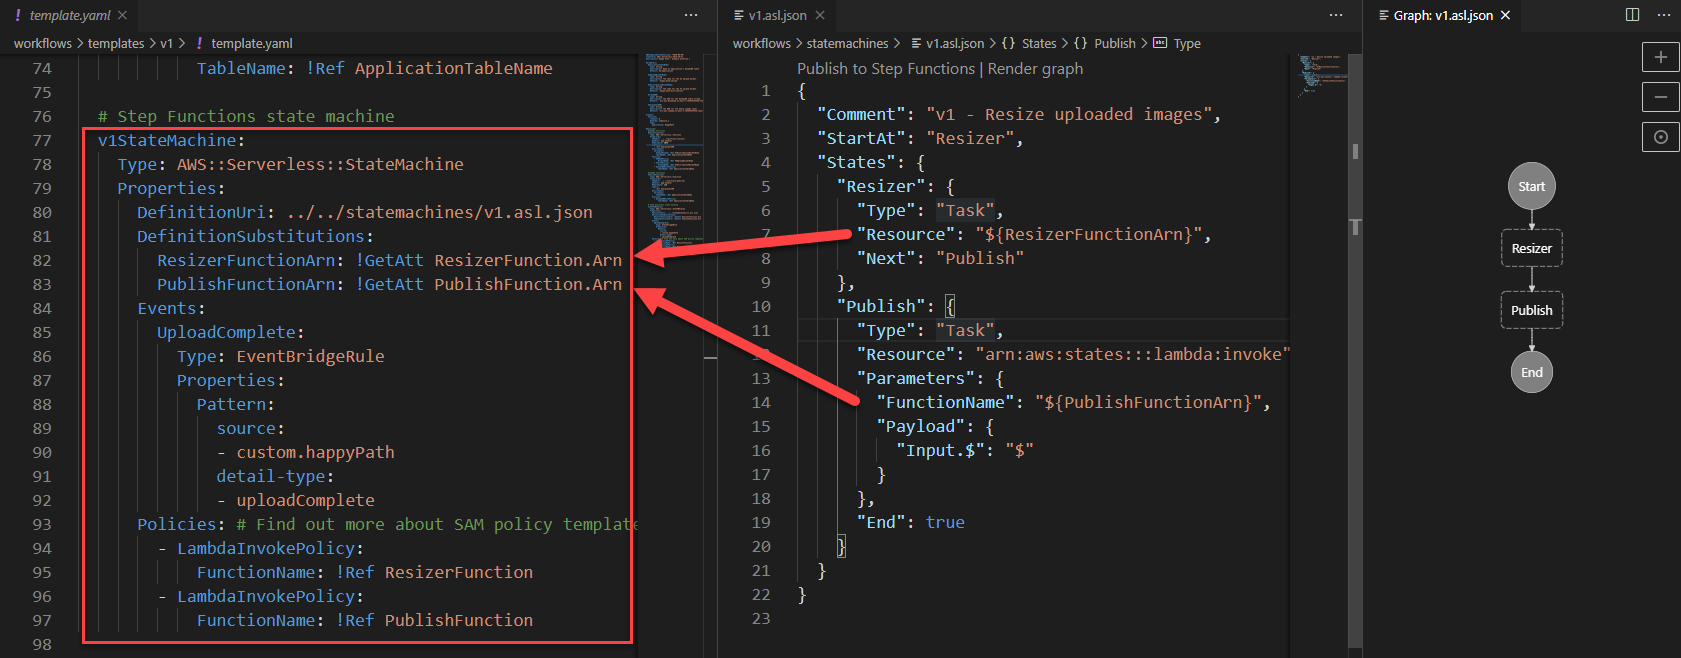
The AWS SAM template defines both the state machine, the trigger for executions, and the permissions needed for Step Functions to execute. The AWS SAM resource for a Step Functions definition is AWS::Serverless::StateMachine.

Definition permissions in state machines

In this example:

  • DefinitionUri refers to an external ASL definition, instead of embedding the JSON in the AWS SAM template directly.
  • DefinitionSubstitutions allow you to use tokens in the ASL definition that refer to resources created in the AWS SAM template. For example, the token ${ResizerFunctionArn} refers to the ARN of the resizer Lambda function.
  • Events define how the state machine is invoked. Here it defines an EventBridge rule. If an event matches this source and detail-type, it triggers an execution.
  • Policies: the Step Functions service must have permission to invoke the services that perform tasks in the state machine. AWS SAM policy templates provide a convenient shorthand for common execution policies, such as invoking a Lambda function.

This workflow application is separate from the main backend template. As more functionality is added to the workflow, you deploy the subsequent AWS SAM templates in the same way.

Conclusion

Using AWS SAM, you can specify serverless resources, configure permissions, and define substitutions for the ASL template. You can deploy a standalone Step Functions-based application using the AWS SAM CLI, separately from other parts of your application. This makes it easier to decouple and maintain larger applications. You can visualize these workflows directly in the VS Code IDE in addition to the AWS Management Console.

In part 3, I show how to build progressively more complex workflows and how to deploy these in-place without affecting the other parts of the application.

To learn more about building serverless web applications, see the Ask Around Me series.