This whitepaper is intended for customers that are looking to store and process controlled goods information in the AWS Cloud, and is particularly useful for leadership, security, risk, and compliance teams that need to understand CGP requirements and guidance.
The whitepaper summarizes CGP requirements and guidance related to the protection of controlled goods information, and gives CGP-regulated customers information they can use to commence their due diligence and assess how to implement the appropriate programs for their use of AWS Cloud services.
This document is our first that is specific to Canadian regulatory requirements and joins other guides related to specific regulatory regimes around the world. As the regulatory environment continues to evolve, we’ll provide further updates on the AWS Security Blog and the AWS Compliance page. You can find more information on cloud-related regulatory compliance at the AWS Compliance Center. You can also reach out to your AWS account manager for help finding the resources you need.
If you have feedback about this blog post, submit comments in the Comments section below. You can also start a new thread on re:Post to get answers from the community.
Want more AWS Security news? Follow us on Twitter.
Monday means it’s time for another Week in Review post, so, without further ado, let’s dive right in!
Last Week’s Launches Here’s some launch announcements from last week you may have missed.
AWS Directory Service for Microsoft Active Directory is now available on Windows Server 2019, and all new directories will run on this server platform. Those of you with existing directories can choose to update with either a few clicks on the AWS Managed Microsoft AD console, or you can update programmatically using an API. With either approach, you can update at a time convenient to you and your organization between now and March 2023. After March 2023, directories will be updated automatically.
AWS Activate is a program that offers free tools, resources, and the opportunity to apply for credits to smaller early stage businesses and also more advanced digital businesses, helping them get started quickly on AWS. The program is now open to any self-identified startup.
Amazon QuickSight users who employ row-level security (RLS) to control access to restricted datasets will be interested in a new feature that enables you to ask questions against topics in these datasets. User-based rules control the answers received to questions and any auto-complete suggestions provided when the questions are being framed. This ensures that users only ever receive answer data that they are granted permission to access.
Other AWS News This interesting blog post focus on the startup Pieces Technologies, who are putting predictive artificial intelligence (AI) and machine learning (ML) tools to work on AWS to predict and offer clinical insights on patient outcomes such as such as projected discharge dates, anticipated clinical and non-clinical barriers to discharge, and risk of readmission. To help healthcare teams work more efficiently, the insights are provided in natural language and seek to optimize overall clarity of a patient’s clinical issues.
As usual, there’s another AWS open-source and updates newsletter. The newsletter is published weekly to bring you up to date on the latest news on open-source projects, posts, and events.
Upcoming Events Speaking of upcoming events, the following are some you may be interested in joining, especially if you work with .NET:
Looking to modernize .NET workloads using Windows containers on AWS? There’s a free webinar, with follow-along lab, in just a couple of days on October 20. You can find more details and register here.
My .NET colleagues are also hosting another webinar on November 2 related to building modern .NET applications on AWS. If you’re curious about the hosting and development capabilities of AWS for .NET applications, this is a webinar you should definitely check out. You’ll find further information and registration here.
And finally, a reminder that reserved seating for sessions at AWS re:Invent 2022 is now open. We’re now just 6 weeks away from the event! There are lots of great sessions for your attention, but those of particular interest to me are the ones related to .NET, and at this year’s event we have seven breakouts, three chalk talks, and a workshop for you. You can find all the details using the .NET filter in the session catalog (the sessions all start with the prefix XNT, by the way).
That’s all for this week. Check back next Monday for another AWS Week in Review!
Customers tell us they want to have stronger performance and lower costs for their data analytics applications and workloads. Customers also want to use AWS as a platform that hosts managed versions of their favorite open-source projects, which will frequently adopt the latest features from the open-source communities. With Amazon Athena engine version 3, we continue to increase performance, provide new features and now deliver better currency with the Trino and Presto projects.
Athena is an interactive query service that makes it easy to analyze data in Amazon Simple Storage Service (Amazon S3) using standard SQL. Athena is serverless, so there is no infrastructure to manage, and you pay only for the queries that you run. Customers such as Orca Security, the Agentless Cloud Security Platform, are already realizing the benefits of using Athena engine version 3 with the Apache Iceberg.
“At Orca Security, we are excited about the launch of Athena engine version 3,” says Arie Teter, VP R&D at Orca Security. “With Athena engine version 3, we will be able to query our massive petabyte-scale data lake more efficiently and at a lower cost. We are especially excited about being able to leverage all the latest Trino features with Athena’s new engine in order to deliver our customers the best-of-breed, ML-driven anomaly detection solution.”
In this post, we discuss benefits of Athena engine version 3, performance benchmark results for different table formats and information about upgrading to engine version 3.
New features, more often
One of the most exciting aspects of engine version 3 is its new continuous integration approach to open source software management that will improve currency with the Trino and PrestoDB projects. This approach enables Athena to deliver increased performance and new features at an even faster pace.
At AWS, we are committed to bringing the value of open source to our customers and providing contributions to open source communities. The Athena development team is actively contributing bug fixes and security, scalability, performance, and feature enhancements back to these open-source code bases, so anyone using Trino, PrestoDB and Apache Iceberg can benefit from the team’s contributions. For more information on AWS’s commitment to the open-source community, refer to Open source at AWS.
Athena engine version 3 incorporates over 50 new SQL functions, and 30 new features from the open-source Trino project. For example, Athena engine version 3 supports T-Digest functions that can be used to approximate rank-based statistics with high accuracy, new Geospatial functions to run optimized Geospatial queries, and new query syntaxes such as MATCH_RECOGNIZE for identifying data patterns in applications such as fraud detection and sensor data analysis.
Athena engine version 3 also gives you more AWS-specific features. For example, we have worked closely with the AWS Glue data catalog team to improve Athena’s metadata retrieval time, which we explain in the section “Faster query planning with AWS Glue Data Catalog” below.
For more information about what’s new in Athena engine version 3, refer to the Athena engine version 3 Improvements and new features.
Faster runtime, lower cost
Last year, we shared benchmark testing on Athena engine version 2 using TPC-DS benchmark queries at 3 TB scale and observed that query performance improved by three times and cost decreased by 70% as a result of reduced scanned data. These improvements have been a combination of enhancements developed by Athena and AWS engineering teams as well as contributions from the PrestoDB and Trino open-source communities.
The new engine version 3 will allow Athena to continue delivering performance improvements at a rapid pace. We performed benchmark testing on engine version 3 using TPC-DS benchmark queries at 3 TB scale, and observed 20% query performance improvement when compared to the latest release of engine version 2. Athena engine version 3 includes performance improvement across operators, clauses, and decoders: such as performance improvement of joins involving comparisons with the <,<=, >,>= operators, queries that contains JOIN, UNION, UNNEST, GROUP BY clauses, queries using IN predicate with a short list of constant. Athena engine version 3 also provides query execution improvements that reduce the amount of data scanned which gives you additional performance gains. With Athena, you are charged based on the amount of data scanned by each query, so this also translates to lower costs. For more information, refer to Amazon Athena pricing.
Faster query planning with AWS Glue Data Catalog
Athena engine version 3 provides better integration with AWS Glue Data Catalog to improve query planning performance by up to ten times. Query planning is the process of listing instructions the query engine will follow in order to run a query. During query planning, Athena uses AWS Glue API to retrieve various information such as table and partition metadata, and column statistics. As the number of tables increases, the number of calls to the Glue API for metadata also increase which results in additional query latency. In engine version 3, we reduced this Glue API overhead thus brought down the overall query planning time. For smaller datasets and datasets with large number of tables, you can see the total runtime has been reduced significantly because the query planning time is a higher percentage of the total run time.
Figure 1 below charts the top 10 queries from the TPC-DS benchmark with the most performance improvement from engine version 2 to engine version 3 based on the Amazon CloudWatch metric for total runtime. Each query involves joining multiple tables with complex predicates.
Faster query runtime with Apache Iceberg integration
Athena engine version 3 provides better integration with the Apache Iceberg table format. Features such as Iceberg’s hidden partitioning now augment Athena optimizations such as partition pruning and dynamic filtering to reduce data scanned and improve query performance in Athena engine v3. You do not need to maintain partition columns or even understand the physical table layout to load data to table and achieve good query performance.
We performed TPC-DS benchmark testing by loading data into the Apache Iceberg table format, with hidden partitions configured, and compared the performance between Athena engine version 2 and 3. Figure 2 below is a chart of the top 10 query improvements, which all include complex predicates. The top query, query 52, has five WHERE predicates and two GROUP BY operations. Compared to engine version 2, the query runs thirteen times faster with sixteen times less data scanned on engine version 3.
Upgrading to Athena engine version 3
To use Athena engine version 3, you can create a new workgroup, or configure an existing workgroup, and select the recommended Athena engine version 3. Any Athena workgroup can upgrade from engine version 2 to engine version 3 without interruption in your ability to submit queries. For more information and instructions for changing your Athena engine version, refer to Changing Athena engine versions.
Athena engine version 3 includes additional improvements to support ANSI SQL compliance. This results in some changes to syntax, data processing, and timestamps that may cause errors when running the same queries in the new engine version. For information about error messages, causes, and suggested solutions, refer to Athena engine version 3 Limitations, Breaking changes, Data processing changes, and Timestamp changes.
To make sure that your Athena engine version upgrade goes smoothly, we recommend the following practices to facilitate your upgrade process. After you have confirmed your query behavior works as you expect, you can safely upgrade your existing Athena workgroups.
Test in pre-production to validate and qualify your queries against Athena engine version 3 by creating a test workgroup or upgrading an existing pre-production environment. For example, you can create a new test workgroup running engine version 3 to run integration tests from your pre-production or staging environment, and monitor for failures or performance regressions. For information about CloudWatch metrics and dimensions published by Athena, refer to Monitoring Athena queries with CloudWatch metrics.
Upgrade each query based on metrics to test your queries against an Athena engine version 3 workgroup. For example, you can create a new workgroup with engine version 3 alongside your existing engine version 2 workgroup. You can send a small percentage of queries to the engine version 3 workgroup, monitor for failures or performance regressions, then increase the number of queries if they’re successful and performant. Repeat until all your queries have been migrated to Athena engine version 3.
With our simplified automatic engine upgrade process, you can configure existing workgroups to be automatically upgraded to engine version 3 without requiring manual review or intervention. The upgrade behavior is as follows:
If Query engine version is set to Automatic, your workgroup will remain on engine version 2 pending the automatic upgrade, and Athena will choose when to upgrade the workgroup to engine version 3. Before upgrading a workgroup, we perform a set of validation tests to confirm that its queries perform correctly and efficiently on engine version 3. Because our validation is performed on a best effort basis, we recommend you perform your own validation testing to ensure all queries run as expected.
If Query engine version is set to Manual, you will have the ability to select your version. The default choice is set to engine version 3, with the ability to toggle to engine version 2.
Conclusion
This post discussed Athena engine version 3 benefits, performance benchmark results, and how you can start using engine version 3 today with minimal work required. You can get started with Athena engine version 3 by using the Athena Console, the AWS CLI, or the AWS SDK. To learn more about Athena, refer to the Amazon Athena User Guide.
Thanks for reading this post! If you have questions on Athena engine version 3, don’t hesitate to leave a comment in the comments section.
About the authors
Blayze Stefaniak is a Senior Solutions Architect for the Technical Strategist Program supporting Executive Customer Programs in AWS Marketing. He has experience working across industries including healthcare, automotive, and public sector. He is passionate about breaking down complex situations into something practical and actionable. In his spare time, you can find Blayze listening to Star Wars audiobooks, trying to make his dogs laugh, and probably talking on mute.
Daniel Chen is a Senior Product Manager at Amazon Web Services (AWS) Athena. He has experience in Banking and Capital Market of financial service industry and works closely with enterprise customers building data lakes and analytical applications on the AWS platform. In his spare time, he loves playing tennis and ping pong.
Theo Tolv is a Senior Big Data Architect in the Athena team. He’s worked with small and big data for most of his career and often hangs out on Stack Overflow answering questions about Athena.
Jack Ye is a software engineer of the Athena Data Lake and Storage team. He is an Apache Iceberg Committer and PMC member.
Deep learning (DL) models have been increasing in size and complexity over the last few years, pushing the time to train from days to weeks. Training large language models the size of GPT-3 can take months, leading to an exponential growth in training cost. To reduce model training times and enable machine learning (ML) practitioners to iterate fast, AWS has been innovating across chips, servers, and data center connectivity.
At AWS re:Invent 2021, we announced the preview of Amazon EC2 Trn1 instances powered by AWS Trainium chips. AWS Trainium is optimized for high-performance deep learning training and is the second-generation ML chip built by AWS, following AWS Inferentia.
Today, I’m excited to announce that Amazon EC2 Trn1 instances are now generally available! These instances are well-suited for large-scale distributed training of complex DL models across a broad set of applications, such as natural language processing, image recognition, and more.
Compared to Amazon EC2 P4d instances, Trn1 instances deliver 1.4x the teraFLOPS for BF16 data types, 2.5x more teraFLOPS for TF32 data types, 5x the teraFLOPS for FP32 data types, 4x inter-node network bandwidth, and up to 50 percent cost-to-train savings. Trn1 instances can be deployed in EC2 UltraClusters that serve as powerful supercomputers to rapidly train complex deep learning models. I’ll share more details on EC2 UltraClusters later in this blog post.
New Trn1 Instance Highlights Trn1 instances are available today in two sizes and are powered by up to 16 AWS Trainium chips with 128 vCPUs. They provide high-performance networking and storage to support efficient data and model parallelism, popular strategies for distributed training.
Trn1 instances offer up to 512 GB of high-bandwidth memory, deliver up to 3.4 petaFLOPS of TF32/FP16/BF16 compute power, and feature an ultra-high-speed NeuronLink interconnect between chips. NeuronLink helps avoid communication bottlenecks when scaling workloads across multiple Trainium chips.
Trn1 instances are also the first EC2 instances to enable up to 800 Gbps of Elastic Fabric Adapter (EFA) network bandwidth for high-throughput network communication. This second generation EFA delivers lower latency and up to 2x more network bandwidth compared to the previous generation. Trn1 instances also come with up to 8 TB of local NVMe SSD storage for ultra-fast access to large datasets.
The following table lists the sizes and specs of Trn1 instances in detail.
Instance Name
vCPUs
AWS Trainium Chips
Accelerator Memory
NeuronLink
Instance Memory
Instance Networking
Local Instance Storage
trn1.2xlarge
8
1
32 GB
N/A
32 GB
Up to 12.5 Gbps
1x 500 GB NVMe
trn1.32xlarge
128
16
512 GB
Supported
512 GB
800 Gbps
4x 2 TB NVMe
Trn1 EC2 UltraClusters For large-scale model training, Trn1 instances integrate with Amazon FSx for Lustre high-performance storage and are deployed in EC2 UltraClusters. EC2 UltraClusters are hyperscale clusters interconnected with a non-blocking petabit-scale network. This gives you on-demand access to a supercomputer to cut model training time for large and complex models from months to weeks or even days.
AWS Trainium Innovation AWS Trainium chips include specific scalar, vector, and tensor engines that are purpose-built for deep learning algorithms. This ensures higher chip utilization as compared to other architectures, resulting in higher performance.
Here is a short summary of additional hardware innovations:
Data Types: AWS Trainium supports a wide range of data types, including FP32, TF32, BF16, FP16, and UINT8, so you can choose the most suitable data type for your workloads. It also supports a new, configurable FP8 (cFP8) data type, which is especially relevant for large models because it reduces the memory footprint and I/O requirements of the model.
Hardware-Optimized Stochastic Rounding: Stochastic rounding achieves close to FP32-level accuracy with faster BF16-level performance when you enable auto-casting from FP32 to BF16 data types. Stochastic rounding is a different way of rounding floating-point numbers, which is more suitable for machine learning workloads versus the commonly used Round Nearest Even rounding. By setting the environment variable NEURON_RT_STOCHASTIC_ROUNDING_EN=1 to use stochastic rounding, you can train a model up to 30 percent faster.
Custom Operators, Dynamic Tensor Shapes: AWS Trainium also supports custom operators written in C++ and dynamic tensor shapes. Dynamic tensor shapes are key for models with unknown input tensor sizes, such as models processing text.
AWS Trainium shares the same AWS Neuron SDK as AWS Inferentia, making it easy for everyone who is already using AWS Inferentia to get started with AWS Trainium.
For model training, the Neuron SDK consists of a compiler, framework extensions, a runtime library, and developer tools. The Neuron plugin natively integrates with popular ML frameworks, such as PyTorch and TensorFlow.
The AWS Neuron SDK supports just-in-time (JIT) compilation, in addition to ahead-of-time (AOT) compilation, to speed up model compilation, and Eager Debug Mode, for a step-by-step execution.
To compile and run your model on AWS Trainium, you need to change only a few lines of code in your training script. You don’t need to tweak your model or think about data type conversion.
Get Started with Trn1 Instances In this example, I train a PyTorch model on an EC2 Trn1 instance using the available PyTorch Neuron packages. PyTorch Neuron is based on the PyTorch XLA software package and enables conversion of PyTorch operations to AWS Trainium instructions.
Each AWS Trainium chip includes two NeuronCore accelerators, which are the main neural network compute units. With only a few changes to your training code, you can train your PyTorch model on AWS Trainium NeuronCores.
SSH into the Trn1 instance and activate a Python virtual environment that includes the PyTorch Neuron packages. If you’re using a Neuron-provided AMI, you can activate the preinstalled environment by running the following command:
source aws_neuron_venv_pytorch_p36/bin/activate
Before you can run your training script, you need to make a few modifications. On Trn1 instances, the default XLA device should be mapped to a NeuronCore.
Let’s start by adding the PyTorch XLA imports to your training script:
import torch, torch_xla
import torch_xla.core.xla_model as xm
Then, place your model and tensors onto an XLA device:
When the model is moved to the XLA device (NeuronCore), subsequent operations on the model are recorded for later execution. This is XLA’s lazy execution which is different from PyTorch’s eager execution. Within the training loop, you have to mark the graph to be optimized and run on the XLA device using xm.mark_step(). Without this mark, XLA cannot determine where the graph ends.
...
for data, target in train_loader:
	output = model(data)
	loss = loss_fn(output, target)
	loss.backward()
	optimizer.step()
	xm.mark_step()
...
You can now run your training script using torchrun <my_training_script>.py.
When running the training script, you can configure the number of NeuronCores to use for training by using torchrun –nproc_per_node.
For example, to run a multi-worker data parallel model training on all 32 NeuronCores in one trn1.32xlarge instance, run torchrun --nproc_per_node=32 <my_training_script>.py.
Data parallel is a strategy for distributed training that allows you to replicate your script across multiple workers, with each worker processing a portion of the training dataset. The workers then share their result with each other.
For more details on supported ML frameworks, model types, and how to prepare your model training script for large-scale distributed training across trn1.32xlarge instances, have a look at the AWS Neuron SDK documentation.
Profiling Tools Let’s have a quick look at useful tools to keep track of your ML experiments and profile Trn1 instance resource consumption. Neuron integrates with TensorBoard to track and visualize your model training metrics.
On the Trn1 instance, you can use the neuron-ls command to describe the number of Neuron devices present in the system, along with the associated NeuronCore count, memory, connectivity/topology, PCI device information, and the Python process that currently has ownership of the NeuronCores:
Similarly, you can use the neuron-top command to see a high-level view of the Neuron environment. This shows the utilization of each of the NeuronCores, any models that are currently loaded onto one or more NeuronCores, process IDs for any processes that are using the Neuron runtime, and basic system statistics relating to vCPU and memory usage.
Available Now You can launch Trn1 instances today in the AWS US East (N. Virginia) and US West (Oregon) Regions as On-Demand, Reserved, and Spot Instances or as part of a Savings Plan. As usual with Amazon EC2, you pay only for what you use. For more information, see Amazon EC2 pricing.
I had an amazing start to the week last week as I was speaking at the AWS Community Day NL. This event had 500 attendees and over 70 speakers, and Dr. Werner Vogels, Amazon CTO, delivered the keynote. AWS Community Days are community-led conferences organized by local communities, with a variety of workshops and sessions. I recommend checking your region for any of these events.
Last Week’s Launches Here are some launches that got my attention during the previous week.
Amazon S3 Object Lambdanow supports using your own code to change the results of HEAD and LIST requests, besides GET (which we launched last year). This feature now enables more capabilities for what you can do with S3 Object Lambda. Danilo made a Twitter thread with lots of use cases for this new launch.
Amazon SageMaker Clarifynow can provide near real-time explanations for ML predictions. SageMaker Clarify is a service that provides explainability by ML models individual predictions. These explanations are important for developers to get visibility into their training data and models to identify potential bias.
AWS Storage Gatewaynow supports 15 TiB tapes. It increased the maximum supported virtual tape size on Tape Gateway from 5 TiB to 15 TiB, so you can store more data on a single virtual tape, and you can reduce the number of tapes you need to manage.
AWS Config now supports 15 new resource types, including AWS DataSync, Amazon GuardDuty, Amazon Simple Email Service (Amazon SES), AWS AppSync, AWS Cloud Map, Amazon EC2, and AWS AppConfig. With this launch, you can use AWS Config to monitor configuration data for the supported resource types in your AWS account, and you can see how the configuration changes.
Other AWS News Some other updates and news that you may have missed:
This week an article about how AWS is leading a pilot project to turn the Greek island of Naxos into a smart island caught my attention. The project introduces smart solutions for mobility, primary healthcare, and the transport of goods. The solution has been built based on four pillars that were important for the island: sustainability, telehealth, leisure, and digital skills. Check out the whole article to learn what they are doing.
Podcast Charlas Técnicas de AWS – If you understand Spanish, this podcast is for you. Podcast Charlas Técnicas is one of the official AWS podcasts in Spanish, and every other week there is a new episode. The podcast is meant for builders, and it shares stories about how customers implemented and learned AWS services, how to architect applications, and how to use new services. You can listen to all the episodes directly from your favorite podcast app or at AWS Podcasts en español.
AWS open-source news and updates – This is a newsletter curated by my colleague Ricardo to bring you the latest open-source projects, posts, events, and more.
Upcoming AWS Events Check your calendars and sign up for these AWS events:
AWS re:Invent reserved seating opens on October 11. If you are planning to attend, book a spot in advance for your favorite sessions. AWS re:Invent is our biggest conference of the year, it happens in Las Vegas from November 28 to December 2, and registrations are open. Many writers of this blog have sessions at re:Invent, and you can search the event agenda using our names.
I started the post talking about AWS Community Days, and there is one in Warsaw, Poland, on October 14. If you are around Warsaw during this week, you can first check out the AWS Pop-up Hub in Warsaw that runs October 10-14 and then join for the Community Day.
On October 20, there is a virtual event for modernizing .NET workloads with Windows containers on AWS,You can register for free.
That’s all for this week. Check back next Monday for another Week in Review!
We continue to listen to our customers, regulators, and stakeholders to understand their needs regarding audit, assurance, certification, and attestation programs at Amazon Web Services (AWS). We are pleased to announce that Spring 2022 SOC 1, SOC 2, and SOC 3 reports are now available in Spanish. These translated reports will help drive greater engagement and alignment with customer and regulatory requirements across Latin America and Spain.
The English language version of the reports contains the independent opinion issued by the auditors and control test results. Stakeholders should use the English version as a complement to the Spanish version.
Translated SOC reports in Spanish are available through AWS Artifact. Translated SOC reports in Spanish will be published twice a year, in alignment with the Fall and Spring reporting cycles.
We value your feedback and questions—feel free to reach out to our team or give feedback about this post through the Contact Us page.
If you have feedback about this post, submit comments in the Comments section below. Want more AWS Security news? Follow us on Twitter.
Español
Los informes SOC de Primavera de 2022 ahora están disponibles en español
Seguimos escuchando a nuestros clientes, reguladores y partes interesadas para comprender sus necesidades en relación con los programas de auditoría, garantía, certificación y atestación en Amazon Web Services (AWS). Nos complace anunciar que los informes SOC 1, SOC 2 y SOC 3 de AWS de otoño de 2021 ya están disponibles en español. Estos informes traducidos ayudarán a impulsar un mayor compromiso y alineación con los requisitos regulatorios y de los clientes en las regiones de América Latina y España.
La versión en inglés de los informes debe tenerse en cuenta en relación con la opinión independiente emitida por los auditores y los resultados de las pruebas de control, como complemento de las versiones en español.
Los informes SOC traducidos en español están disponibles en AWS Artifact. Los informes SOC traducidos en español se publicarán dos veces al año según los ciclos de informes de otoño y primavera.
Valoramos sus comentarios y preguntas; no dude en ponerse en contacto con nuestro equipo o enviarnos sus comentarios sobre esta publicación a través de nuestra página Contáctenos.
Si tienes comentarios sobre esta publicación, envíalos en la sección Comentarios a continuación. ¿Desea obtener más noticias sobre seguridad de AWS? Síguenos en Twitter.
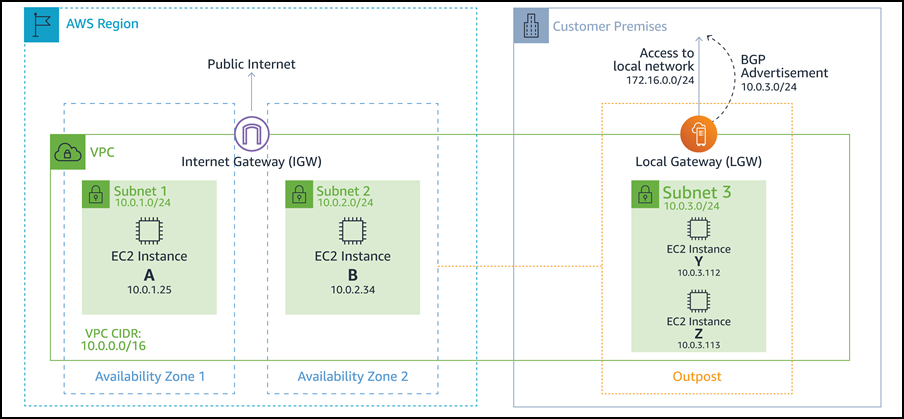
In late 2019 I told you about the AWS Local Zone in Los Angeles, California. In that post I described Local Zones as a new type of AWS infrastructure deployment that brings select AWS services very close to a particular geographic area. A year after that launch, I announced our plans to add 3 more Local Zones in 2020, and 12 more in 2021. Right now, we are working to bring Local Zones to 33 cities in 27 countries including 6 in Latin America.
Applications hosted in a Local Zone benefit from very low (single-digit millisecond) latency access to EC2 instances and other AWS services. Local Zones also give AWS customers additional choices regarding data residency, giving them the ability to store and process sensitive data (often financial or personal in nature) in-country.
Going Global Today I am happy to announce the launch of Local Zones in Taipei (Taiwan) and Delhi (India). Like the existing Local Zones in the US, you start by enabling them in the AWS Management Console:
Local Zones in Action AWS customers are working to put Local Zones to use. Here are a few use cases:
AdvaHealth Solutions – This digital health care & life sciences company supports radiology, oncology, ophthalmology and other medical imaging applications with AdvaPACS, a cloud-native image archive. The new Local Zones will allow them to deliver diagnostic image data with low latency in order to improve the point-of-care experience for patients and health care providers across Asia, and will also support expansion into new markets.
M2P Fintech specializes in building financial infrastructure and is an API infrastructure platform for Banking, Lending and Payments products. More than 600 Fintechs, 100 Banks & 100 Financial Institutions across MENA and APAC regions rely on M2P’s platform to power their own branded products including category leaders across ride-hailing, food delivery, and credit cards. M2P uses Local Zones instead of bearing the burden of setting up their own data centers and to meet local requirements for data processing and storage.
NaranjaX – This financial services company is the primary credit card issuer in Argentina. They are engaged in a digital transformation with the target of delivering an improved financial solution to their commercial customers, and believe that using Local Zones will give these customers a strategic advantage.
Pluto XR is the developer of the PlutoSphere OS that enables gamers, developers and operators to live stream XR applications to any XR device. In order to deliver a high quality streaming experience, they run their application as close to their end users as possible. The new Local Zones will allow them to serve millions of users in new metro areas
Riot Games is an American video game developer, publisher and entertainment company based in Los Angeles, California. Their games deliver an optimal player experience through ultra low latency for their MOBA (Multiplayer Online Battle Arena) League of Legends and their first-person tactical shooter VALORANT. By deploying their games into Local Zones, Riot is able to serve players at low latency without the need for operating on-premises compute.
Zenga Media is one of the largest media-tech companies in India. They provide live streaming and over-the-top distribution of entertainment content to millions of users globally, while using cloud-based video editing and sharing to process content destined for TV shows, sports broadcasts, news, and movies. They will use Local Zones to provide local connectivity to their editors and customers, thereby speeding processing and delivering a superior video streaming experience to customers.
Local Zones Resources Here are a few resources to help you learn more about designing, building, and using Local Zones:
I am always interested in hearing about how our customers are making use of Local Zones. Leave me a comment or track me down online and let me know what you are working on!
In June 2022 AWS announced a preview of Amazon Connect Cases, a feature of Amazon Connect that simplifies these customer interactions and reduces the average handle times of issues.
Today I am excited to announce the general availability of Amazon Connect Cases. Cases, a feature of Amazon Connect, makes it easy for your contact center agents to create, collaborate on, and quickly resolve customer issues that require several customer conversations and follow-up tasks, and they can focus on solving the customer issue, no matter how simple or how complex. Agents have relevant case details (such as date and time opened, issue summary, or customer information) in a single unified view, and they can focus on solving the customer issue.
Getting started with Cases takes only a few clicks because it is built into Amazon Connect. With Cases, you automatically create cases or find existing cases, saving agents time searching and entering data manually. Cases accelerates resolution times, improves efficiency, and reduces errors to help increase customer satisfaction.
Litigation Practice Group is a provider of legal support for debt relief. Litigation’s Director of Business Intelligence, Alex Miles, spoke about how they have experienced Cases. He said:
“Amazon Connect not only addresses many of the technological limitations we were facing but brings with it a suite of modern solutions for all our business needs. One of those needs is case management to handle operating activities, including payments, document control, and legal cases. Amazon Connect Cases seamlessly integrates with our existing contact center workflows. Our agents and legal teams now have full performance visibility and spend less time on manual tasks, creating more time to find solutions to enhance the customer journey.”
Cases provides built-in case management capabilities, eliminating the need for contact centers to build custom solutions or integrate with third-party products to handle complex customer issues. For every issue, Cases enables agents to view case history and activity all in one place, automatically capture case data from interactive voice response (IVR) or chats (via Amazon Lex), and track follow-up work with Tasks.
View case history and activity all in one place – Agents view the details of the customer issue (including calls, tasks, and chats associated with the case) all in one place within the unified Amazon Connect agent application. The timeline view shows agents a case at a glance, removing the need for agents to go back and forth between applications.
View case history and activity in one place
Automatically capture case data from interactive voice response (IVR)or chats – With this feature you can automatically create and update cases by using information gathered in a customer’s self-service IVR or chatbot interaction. When agent assistance is required, the contact will then be routed to an available agent with the relevant case attached, resulting in improved average handle time and first-contact resolution.
Automatically capture case data from your IVR and chatbots
Take action with task management – This feature is Cases working together with Amazon Connect Tasks to help you reduce resolution time and improve efficiency. Tasks, which tracks the work that must be done to resolve the customer’s issue, ensures that a case is captured and includes prior and pending actions needed to resolve the issue. This makes it easier for agents to create, prioritize, and monitor work assigned to other agents or teams. Here I’d also like to highlight how all this results in great collaboration between agents and ultimately, teams.
Take action with task management
Get started in a few clicks! Turn on Cases and configure permissions, fields, and templates, all within Amazon Connect. No third-party tools or integrations are required.
Get Started
General Availability Amazon Connect Cases is generally available in US East (N. Virginia), and US West (Oregon).
A new week and a new month just started. Curious which were the most significant AWS news from the previous seven days? I got you covered with this post.
Last Week’s Launches Here are the launches that got my attention last week:
Amazon Data Lifecycle Manager – You can now automatically archive Amazon EBS snapshots to save up to 75 percent on storage costs for those EBS snapshots that you intend to retain for more than 90 days and rarely access.
AWS App Runner – You can now build and run web applications and APIs from source code using the new Node.js 16 managed runtime.
Bottlerocket – The Linux-based operating system purpose-built to run container workloads is now supported by Amazon Inspector. Amazon Inspector can now recommend an update of Bottlerocket if it finds a vulnerability.
AWS Budgets – Use a simplified 1-click workflow for common budgeting scenarios with step-by-step tutorials on how to use each template.
Amazon Connect – Now provides an updated flow designer UI that makes it easier and faster to build personalized and automated end-customer experiences, as well as a queue dashboard to view and compare real-time queue performance through time series graphs.
Amazon WorkSpaces – You can now provision Ubuntu desktops and use virtual desktops for new categories of workloads, such as for your developers, engineers, and data scientists.
Building a GraphQL API with Java and AWS Lambda – This blog shows different options for resolving GraphQL queries using serverless technologies on AWS.
For AWS open-source news and updates, here’s the latest newsletter curated by Ricardo to bring you the most recent updates on open-source projects, posts, events, and more.
Upcoming AWS Events As usual, there are many opportunities to meet:
AWS Summits– Connect, collaborate, and learn about AWS at these free in-person events: Bogotá (October 4), and Singapore (October 6).
Artificial intelligence (AI) is all around us. AI sends certain emails to our spam folders. It powers autocorrect, which helps us fix typos when we text. And now we can use it to solve business problems.
In business, data-driven insights have become increasingly valuable. These insights are often discovered with the help of machine learning (ML), a subset of AI and the foundation of complex AI systems. And ML technology has come a long way. Today, you don’t need to be a data scientist or computer engineer to gain insights. With the help of no-code ML tools such as Amazon SageMaker Canvas, you can now achieve effective business outcomes using ML without writing a single line of code. You can better understand patterns, trends, and what’s likely to happen in the future. And that means making better business decisions!
Today, I’m happy to announce that AWS and Coursera are launching the new hands-on course Practical Decision Making using No-Code ML on AWS. This five-hour course is designed to demystify AI/ML and give anyone with a spreadsheet the ability to solve real-life business problems.
Course Highlights Over the course of three lessons, you will learn how to address your business problem using ML, how to build and understand an ML model without any code, and how to use ML to extract value to make better decisions. Each lesson walks you through real-life business scenarios and hands-on exercises using Amazon SageMaker Canvas, a visual, no-code ML tool.
Lesson 1 – How To Address Your Business Problem Using ML In the first lesson, you will learn how to address your business problem using ML without knowing data science. You will be able to describe the four stages of analytics and discuss the high-level concepts of AI/ML.
This lesson will also introduce you to automated machine learning (AutoML) and how AutoML can help you generate insights based on common business use cases. You will then practice forming business questions around the most common machine learning problem types.
For example, imagine you are a business analyst at a ticketing company. You manage ticket sales for large venues—concerts, sporting events, and so on. Let’s assume you want to predict cash flow. A question to solve with ML could be: “How can you better forecast ticket sales?” This is an example of time series forecasting. You will also explore numeric and category ML problems throughout the course. They will help you answer business questions such as “What’s the likely annual revenue for a customer?” and “Will this customer buy another ticket in the next three months?”.
Next, you will learn about the iterative process of asking questions for machine learning to make the questions more explicit and explore how to pick the highest value problems to work on.
The first lesson wraps up with a deep dive on how time influences your data across forecasting and nonforecasting business problems and how to set up your data for each ML problem type.
Lesson 2 – Build and Understand an ML Model Without Any Code In the second lesson, you learn how to build and understand an ML model without any code using Amazon SageMaker Canvas. You will focus on a customer churn example with synthetically generated data from a cellular services company. The problem question is, “Which customers are most likely to cancel their service next month?”
You will learn how to import data and start exploring it. This lesson will explain how to select the right configuration, pick the target column, and show you how to prepare your data for ML.
SageMaker Canvas also recently introduced new visualizations for exploratory data analysis (EDA), including scatter plots, bar charts, and box plots. These visualizations help you analyze the relationships between features in your data sets and comprehend your data better.
After a final data validation, you can preview the model. This shows you right away how accurate the model might be and, on average, which features or columns have the greatest relative impact on model predictions. Once you are done preparing and validating the data, you can go ahead and build the model.
Next, you will learn how to evaluate the performance of the model. You will be able to describe the difference between training data and test data splits and how they are used to derive the model’s accuracy score. The lesson also discusses additional performance metrics and how you can apply domain knowledge to decide if the model is performing well. Once you understand how to evaluate the performance metrics, you have the foundation for making better business decisions.
The second lesson wraps up with some common gotchas to watch out for and shows how to iterate on the model to keep improving performance. You will be able to describe the concept of data leakage as a result of memorization versus generalization and additional model flaws to avoid. You will also learn how to iterate on questions, included features, and sample sizes to keep increasing model performance.
Lesson 3 – Extract Value From ML In the third lesson, you learn how to extract value from ML to make better decisions. You will be able to generate and read predictions, including predictions on a single row of a spreadsheet, called a single prediction, and predictions on the entire spreadsheet, called batch prediction. You will be able to understand what is impacting predictions and play with different scenarios.
Next, you will learn how to share insights and predictions with others. You will learn how to take visuals from the product, such as feature importance charts or scoring diagrams, and share the insights through presentations or business reports.
The third lesson wraps up with how to collaborate with the data science team or a team member with machine learning expertise. When you build your model using SageMaker Canvas, you can choose either a Quick build or a Standard build. The Quick build usually takes 2–15 minutes and limits the input dataset to a maximum of 50,000 rows. The Standard build usually takes 2–4 hours and generally has a higher accuracy. SageMaker Canvas makes it easy to share a standard build model. In the process, you can reveal the model’s behind-the-scenes complexity down to the code level.
Once you have the trained model open, you can click on the Share button. This creates a link that can be opened in SageMaker Studio, an integrated development environment used by data science teams.
In SageMaker Studio, you can see the transformations to the input data set and detailed information about scoring and artifacts, like the model object. You can also see the Python notebooks for data exploration and feature engineering.
Hands-On Exercises This course includes seven hands-on labs to put your learning into practice. You will have the opportunity to use no-code ML with SageMaker Canvas to solve real-world challenges based on publicly available datasets.
The labs focus on different business problems across industries, including retail, financial services, manufacturing, healthcare, and life sciences, as well as transport and logistics.
You will have the opportunity to work on customer churn predictions, housing price predictions, sales forecasting, loan predictions, diabetic patient readmission prediction, machine failure predictions, and supply chain delivery on-time predictions.
Register Today Practical Decision Making using No-Code ML on AWS is a five-hour course for business analysts and anyone who wants to learn how to solve real-life business problems using no-code ML.
I am pleased to announce today the availability of Amazon File Cache, a new high-speed cache service on AWS designed for processing file data stored in disparate locations—including on premises. File Cache accelerates and simplifies your most demanding cloud bursting and hybrid workflows by giving your applications access to files using a fast and familiar POSIX interface, no matter if the original files live on premises on any file system that can be accessed through NFS v3 or on Amazon Simple Storage Service (Amazon S3).
Imagine you have a large data set on on-premises storage infrastructure, and your end-of-month reporting typically takes two to three days to run. You want to move that occasional workload to the cloud to run it on larger machines with more CPU and memory to reduce the processing time. But you’re not ready to move the data set to the cloud yet.
Imagine another scenario where you have access to a large data set on Amazon Simple Storage Service (Amazon S3), spread across multiple Regions. Your application that wants to exploit this data set is coded for traditional (POSIX) file system access and uses command line tools like awk, sed, pipes, and so on. Your application requires file access with sub-millisecond latencies. You cannot update the source code to use the S3 API.
File Cache helps to address these use cases and many others, think about management and transformation of video files, AI/ML data sets, and so on. File Cache creates a file system–based cache in front of either NFS v3 file systems or S3 buckets in one or more Regions. It transparently loads file content and metadata (such as the file name, size, and permissions) from the origin and presents it to your applications as a traditional file system. File Cache automatically releases the less recently used cached files to ensure the most active files are available in the cache for your applications.
You can link up to eight NFS file systems or eight S3 buckets to a cache, and they will be exposed as a unified set of files and directories. You can access the cache from a variety of AWS compute services, such as virtual machines or containers. The connection between File Cache and your on-premises infrastructure uses your existing network connection, based on AWS Direct Connect and/or Site-to-Site VPN.
When using File Cache, your applications benefit from consistent, sub-millisecond latencies, up to hundreds of GB/s of throughput, and up to millions of operations per second. Just like with other storage services, such as Amazon Elastic Block Store (Amazon EBS), the performance depends on the size of the cache. The cache size can be expanded to petabyte scale, with a minimum size of 1.2 TiB.
Let’s See How It Works To show you how it works, I create a file cache on top of two existing Amazon FSx for OpenZFS file systems. In a real-world scenario, it is likely you will create caches on top of on-premises file systems. I choose FSx for OpenZFS for the demo because I don’t have an on-premises data center at hand (I should maybe invest in seb-west-1). Both demo OpenZFS file systems are accessible from a private subnet in my AWS account. Finally, I access the cache from an EC2 Linux instance.
I open my browser and navigate to the AWS Management Console. I search for “Amazon FSx” in the console search bar and click on Caches in the left navigation menu. Alternatively, I go directly to the File Cache section of the console. To get started, I select Create cache.
I enter a Cache name for my cache (AWSNewsBlog for this demo) and a Cache storage capacity. The storage capacity is expressed in tebibytes. The minimum value is 1.2 TiB or increments of 2.4 TiB. Notice that the Throughput capacity increases as you choose large cache sizes.
I check and accept the default values provided for Networking and Encryption. For networking, I might select a VPC, subnet, and security group to associate with my cache network interface. It is recommended to deploy the cache in the same subnet as your compute service to minimize the latency when accessing files. For encryption, I might use an AWS KMS-managed key (the default) or select my own.
Then, I create Data Repository Association. This is the link between the cache and a data source. A data source might be an NFS file system or an S3 bucket or prefix. I might create up to eight data repository associations for one cache. All Data Repository Associations for a cache have the same type: they are all NFS v3 or all S3. If you need both, you can create two caches.
In this demo, I choose to link two OpenZFS file systems on my AWS account. You can link to any NFS v3 servers, including the ones you already have on premises. Cache path allows you to choose where the source file system will be mounted in the cache. The Data repository path is the URL to your NFS v3 or S3 data repository. The format is nfs://hostname/path or s3://bucketname/path.
The DNS server IP addresses allows File Cache to resolve the DNS name of your NFS server. This is useful when DNS resolution is private, like in my example. When you are associating NFS v3 servers deployed in a VPC, and when using the AWS-provided DNS server, the DNS server IP address of your VPC is the VPC Range + two. In my example, my VPC CIDR range is 172.31.0.0, hence the DNS server IP address is 172.31.0.2.
Do not forget to click on the Add button! Otherwise, your input is ignored. You can repeat the operation to add more data repositories.
Once I have entered my two data repositories, I select Next, and I review my choices. When I am ready, I select Create cache.
After a few minutes, the cache status becomes Available.
The last part is to mount the cache on the machine where my workload is deployed. File Cache uses Lustre behind the scene. I have to install the Lustre client for Linux first, as explained in our documentation. Once done, I select the Attach button on the console to receive the instructions to download and install the Lustre client and to mount the cache file system. To do so, I connect to an EC2 instance running in the same VPC. Then I type:
sudo mount -t lustre -o relatime,flock file_cache_dns_name@tcp:/mountname /mnt
This command mounts my cache with two options:
relatime – Maintains atime (inode access times) data, but not for each time that a file is accessed. With this option enabled, atime data is written to disk only if the file has been modified since the atime data was last updated (mtime) or if the file was last accessed more than a certain amount of time ago (one day by default). relatime is required for automatic cache eviction to work properly.
flock – Enables file locking for your cache. If you don’t want file locking enabled, use the mount command without flock.
Once mounted, processes running on my EC2 instance can access files in the cache as usual. As I defined at cache creation time, the first ZFS file system is available inside the cache at /dataset1, and the second ZFS file system is available as /dataset2.
Second, File Cache provides two options for importing data from your data repositories to the cache: lazy load and preload. Lazy load imports data on demand if it’s not already cached, and preload imports data at user request before you start your workload. Lazy loading is the default. It makes sense for most workloads since it allows your workload to start without waiting for metadata and data to be imported to the cache. Pre loading is helpful when your access pattern is sensitive to first-byte latencies.
Pricing and Availability There are no upfront or fixed-price costs when using File Cache. You are billed for the provisioned cache storage capacity and metadata storage capacity. The pricing page has the details. In addition to File Cache itself, you pay for S3 request costs, AWS Direct Connect charges, and the usual data transfer charges for inter-AZ, inter-Region, and internet egress traffic between File Cache and the data sources.
File Cache is available in US East (Ohio), US East (N. Virginia), US West (Oregon), Asia Pacific (Singapore), Asia Pacific (Sydney), Asia Pacific (Tokyo), Canada (Central), Europe (Frankfurt), Europe (Ireland), and Europe (London).
At AWS, we love to give our customers choices: the choice of infrastructure to deploy your workloads, to store your most important data, or the operating systems for your virtual desktops.
Many of you choose Amazon Workspaces to provision and distribute virtual desktops securely and at scale to your workforce. Our customers choose Workspaces when choosing a solution to enable secure remote workers or when they want to quickly provision desktop for contractors, just to name two use cases. When using Workspaces, you’ve had the choice between two operating systems: Microsoft Windows or Amazon Linux.
Starting today, you can also provision Ubuntu desktops for your developers, engineers, or data scientists. This allows virtual desktop users to have more choices and to embrace new categories of workloads. It also gives virtual desktop administrators a consistent experience whether you are managing Windows or Linux-based desktops for your workforce. You can now have one process and set of tools to manage the majority of your desktop operating systems.
According to the HackerEarth 2020 Developer Survey, Ubuntu is the most widely used operating system among professional developers (66 percent Ubuntu, 61 percent Windows, and 57 percent macOS). Many developers or DevOps engineers have a battery of scripts, tools, or libraries well tested on their Ubuntu desktops or laptops. Providing Ubuntu desktop on Workspaces gives developers and engineers a familiar and compatible environment allowing them to work from anywhere, with access to a wealth of open-source tools and libraries in cutting-edge fields like data science, AI/ML, cloud, and IoT. All Ubuntu WorkSpaces benefit from Ubuntu Pro, which includes support for expanded security patching for 10 years.
Having Ubuntu on Amazon Workspaces is important for you, but also for us, AWS, and for Canonical, the publisher of Ubuntu.
“ We’ve brought Ubuntu Desktop to WorkSpaces so developers can streamline the design, coding, pipelines, and deployment of Ubuntu-based workloads, whether instances or containers, all within the AWS environment,” said Alex Gallagher, VP Cloud for Canonical. “ Also, Ubuntu virtual desktops on WorkSpaces enable IT organizations to quickly and easily provision high-performance Ubuntu Desktop instances, delivered as a fully managed AWS service. In the face of constant and increasing pressure to support the security and productivity needs of hybrid workers, that’s a win for IT organizations and their end users.”
Why a Virtual Desktop for Developers And Engineers? There are several benefits to providing virtual cloud desktops to your technical workforce.
First, the security: all your files are securely stored on cloud-based volumes within the security perimeter of your AWS account. Application assets such as source code or design documents are not locally stored on end-user machines, and no data is at risk in case of a laptop being lost or stolen.
Second, the ease of provisioning at scale. Providing new desktops, including with the latest generation of hardware, is a matter of minutes. Onboarding new team members or contractors is accelerated, and can even be automated.
Third, the reduction in costs by paying on demand, either monthly or hourly, just for the time the resources are used.
Fourth, end-users may access their desktop from anywhere. They can work with the same desktop from on premises, from home, or when traveling.
And fifth, virtual desktop administrators now have a common administration experience across Windows and two distributions of Linux (Ubuntu and Amazon Linux).
How to Get Started For IT administrators, provisioning Ubuntu desktops is no different than provisioning Windows or Amazon Linux desktops. You may choose the hardware bundle, with various sizes of CPUs and memory, depending on the end-user needs. Workspaces are bound to an Active Directory. You may use your on-premises AD or a fully managed directory service in the cloud.
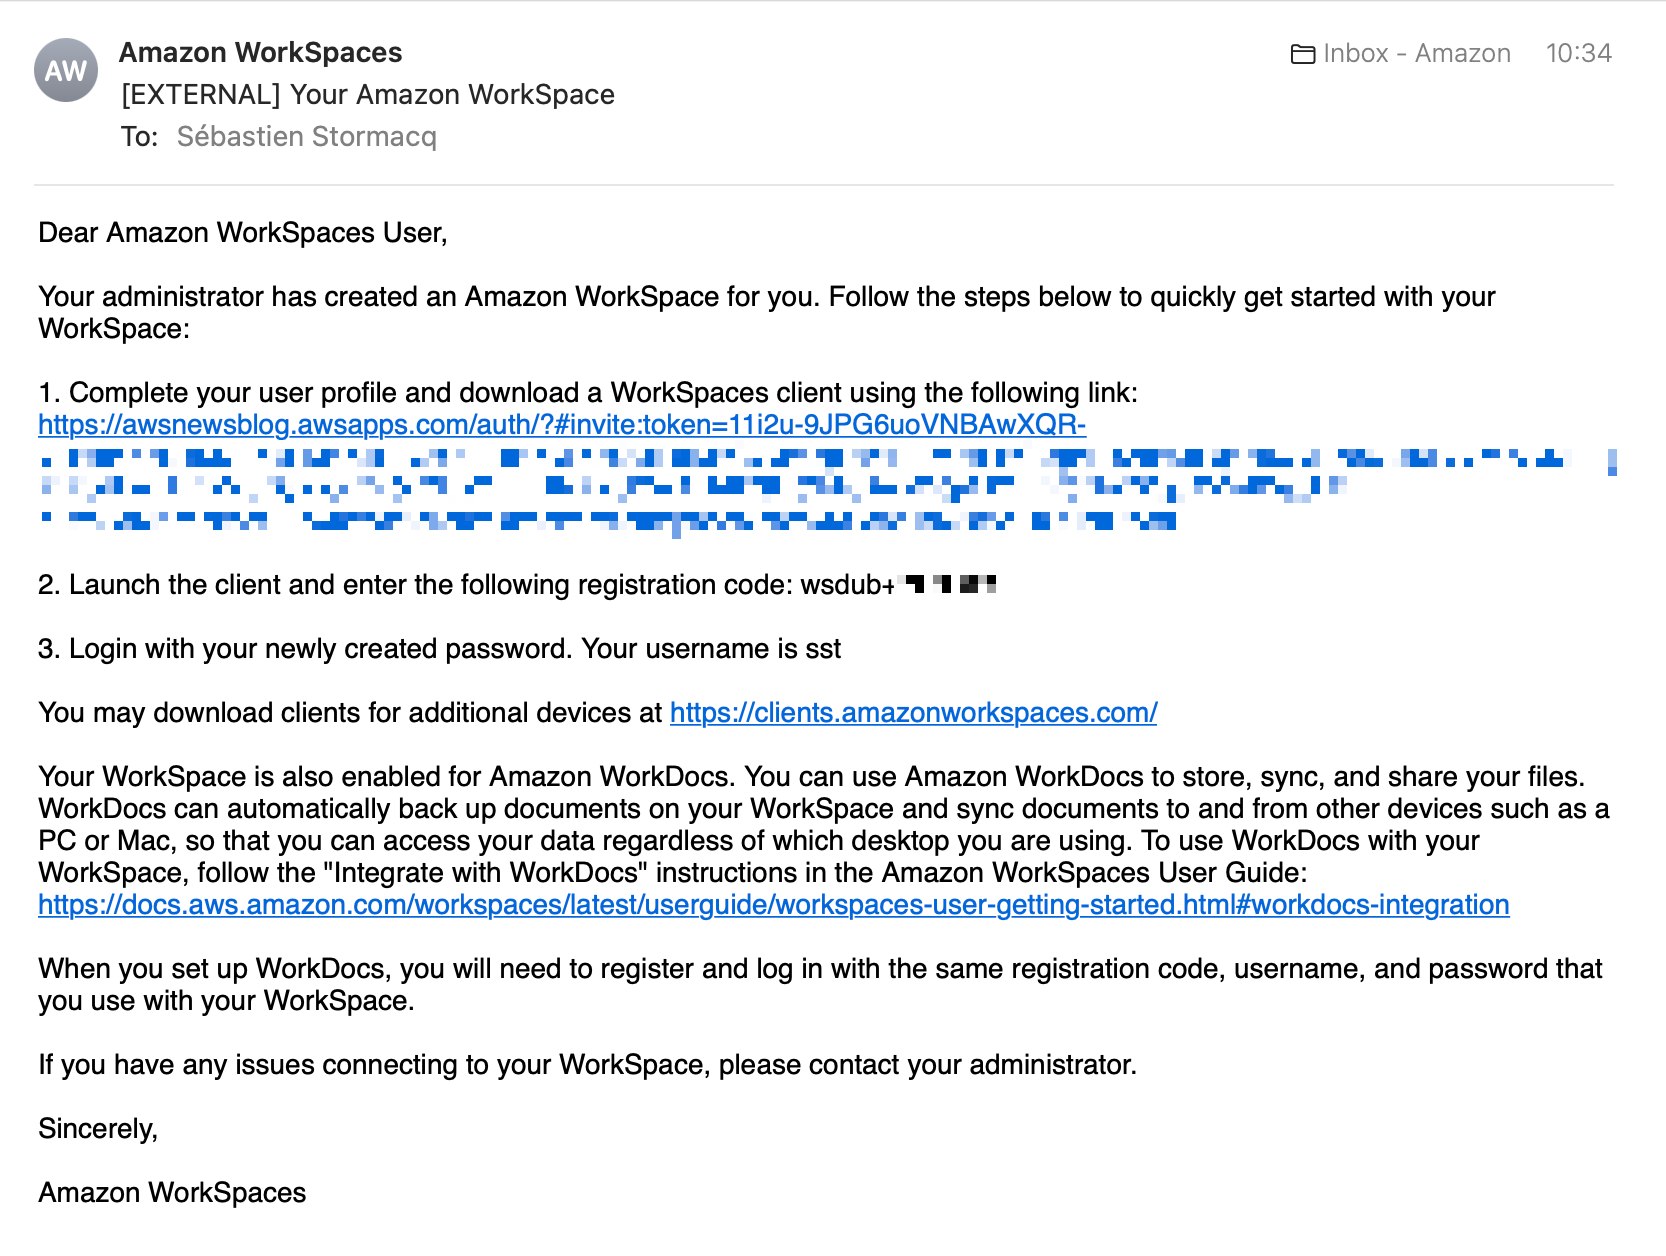
For this blog post, I choose to show you the end-user experience instead. As a developer or engineer, once my desktop is provisioned, I receive an email like this one:
For this demo, I am using the Windows Workspaces client. After downloading and installing it, I enter the registration code I received by email.
A few seconds later, I have access to my Ubuntu desktop.
Imagine I later travel to a family member’s place, and I have to access my work desktop. I can borrow a web browser and reconnect from the web client. Not surprisingly, I find my desktop in the exact state I left it—even the mouse pointer is in the same place. When closing a session, I am confident that I did not leave any confidential files behind me. All my files, messages, and applications are securely stored within my company AWS account.
Things You Need To Know The service team is actively listening to your feedback and building new capabilities into Workspaces.
For this launch, we chose to use version 22.04 LTS (Jammy Jellyfish). Canonical has optimized the base image for cloud development use cases. We have preinstalled AWS CLI and SDK.
You may select from a selection of Value, Standard, Performance, Power, or Power Pro bundles. These bundles provide you with computer sizes starting at 1 vCPU and 2 GB RAM, up to 8 vCPU and 32 GB RAM.
There are two features of Workspaces that are not present today for the launch of Ubuntu Workspaces. They will be added in the very near future. First, you may connect today using the Windows or web-based Workspaces clients. Linux and macOS clients will be supported as a quick follow-up to this launch. Second, the GPU-based Graphics.g4dn, and GraphicsPro.g4dn bundles will be available in the coming weeks.
Availability and Pricing Ubuntu Workspaces are available in all AWS Regions where Workspaces is available, except a Region in China: China (Ningxia). Again, we’re working hard to add support for China (Ningxia) as a quick follow-up after launch.
Workspace pricing is either per month, for users that primarily use Workspaces as their main desktop, or per hour for those in your workforce making occasional use of the workspace. Ubuntu Workspace prices start at $23 per month and per desktop or $0.19 per hour. Our pricing page has the details.
Today we announce the general availability of AWS IoT FleetWise, a fully managed AWS service that makes it easier to collect, transform, and transfer vehicle data to the cloud. Last AWS re:Invent 2021, we previewed AWS IoT FleetWise, heard customer feedback, and improved features for various use cases of near-real-time vehicle data processing.
With AWS IoT FleetWise, automakers, fleet operators, and automotive suppliers can take the complex variability out of collecting data from vehicle fleets at scale. You can access standardized fleet-wide vehicle data and avoid developing custom data collection systems, or you can integrate AWS IoT FleetWise to enhance your existing systems. AWS IoT FleetWise enables intelligent data collection that sends the exact data you need from the vehicle to the cloud. You can use the data to analyze vehicle fleet health to more quickly identify potential maintenance issues or make in-vehicle infotainment systems smarter. Furthermore, you can use it to train machine learning (ML) models that improve autonomous driving and advanced driver assistance systems (ADAS).
For example, electric vehicle (EV) battery temperature is a critical metric that should be continuously analyzed for the entire vehicle fleet. In order to avoid costly continuous data ingestion, you may want to optimize the data collection by setting a threshold on EV battery temperature. The results of this analysis would be provided to the automaker’s quality engineering department, enabling fast assessment of the criticality and possible root causes of any issues identified at certain temperatures. Based on the root cause analysis, the automaker can then take short-term actions to support the driver affected by the issue, as well as midterm actions to improve vehicle quality.
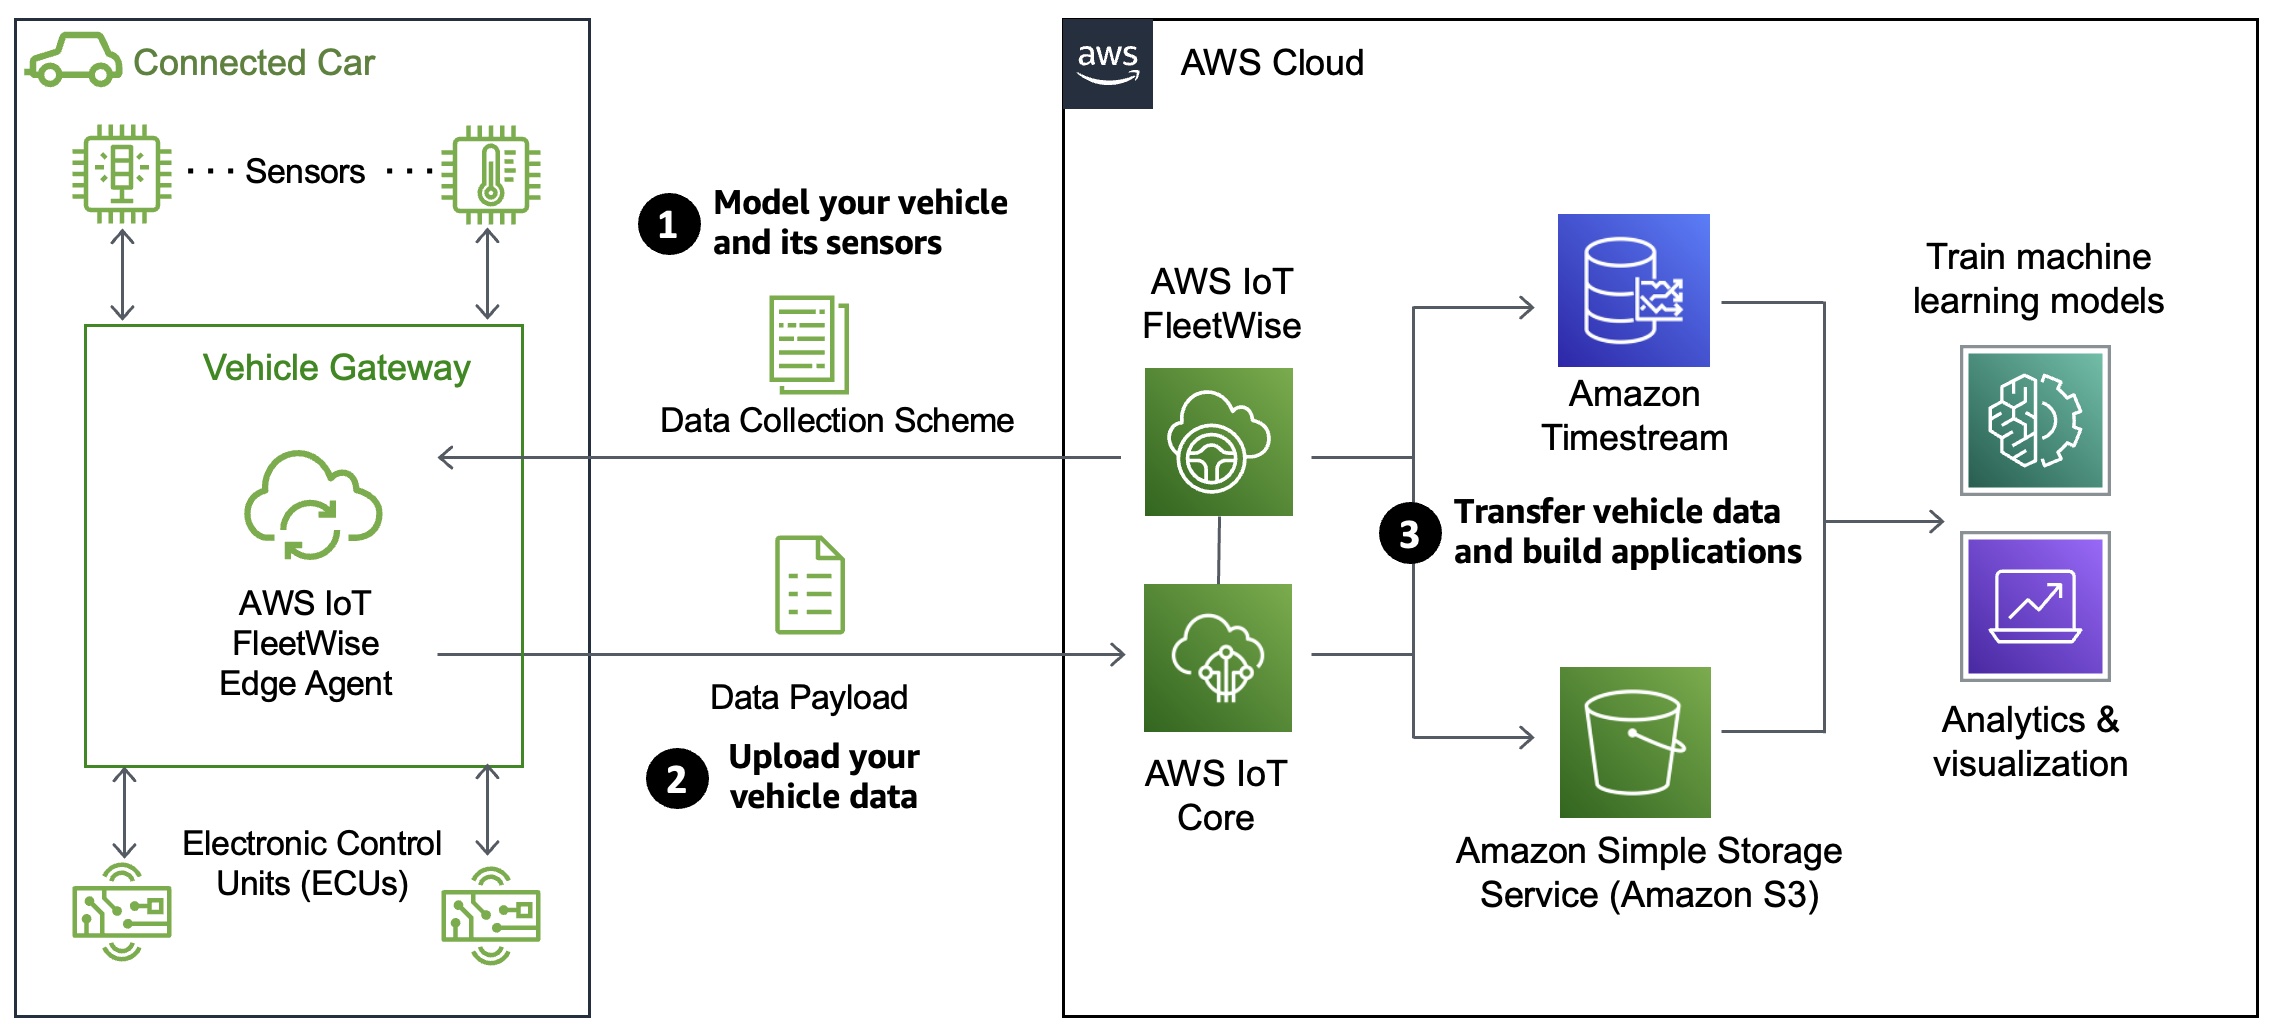
How AWS IoT FleetWise Works AWS IoT FleetWise provides a vehicle modeling framework that you can use to model your vehicle and its sensors and actuators in the cloud. To enable secure communication between your vehicle and the cloud, AWS IoT FleetWise also provides the AWS IoT FleetWise Edge Agent application that you can use to download and install in-vehicle electronic control units (ECUs) such as the gateway, in-vehicle infotainment controller, etc. You define data collection schemes in the cloud and deploy them to your vehicle.
The AWS IoT FleetWise Edge Agent running in your vehicle uses data collection schemes to control what data to collect and when to transfer it to the cloud. Data collected and ingested through AWS IoT FleetWise Edge Agent software goes directly into your Amazon Timestream table or Amazon Simple Storage Service (Amazon S3) repositories via AWS IoT Core.
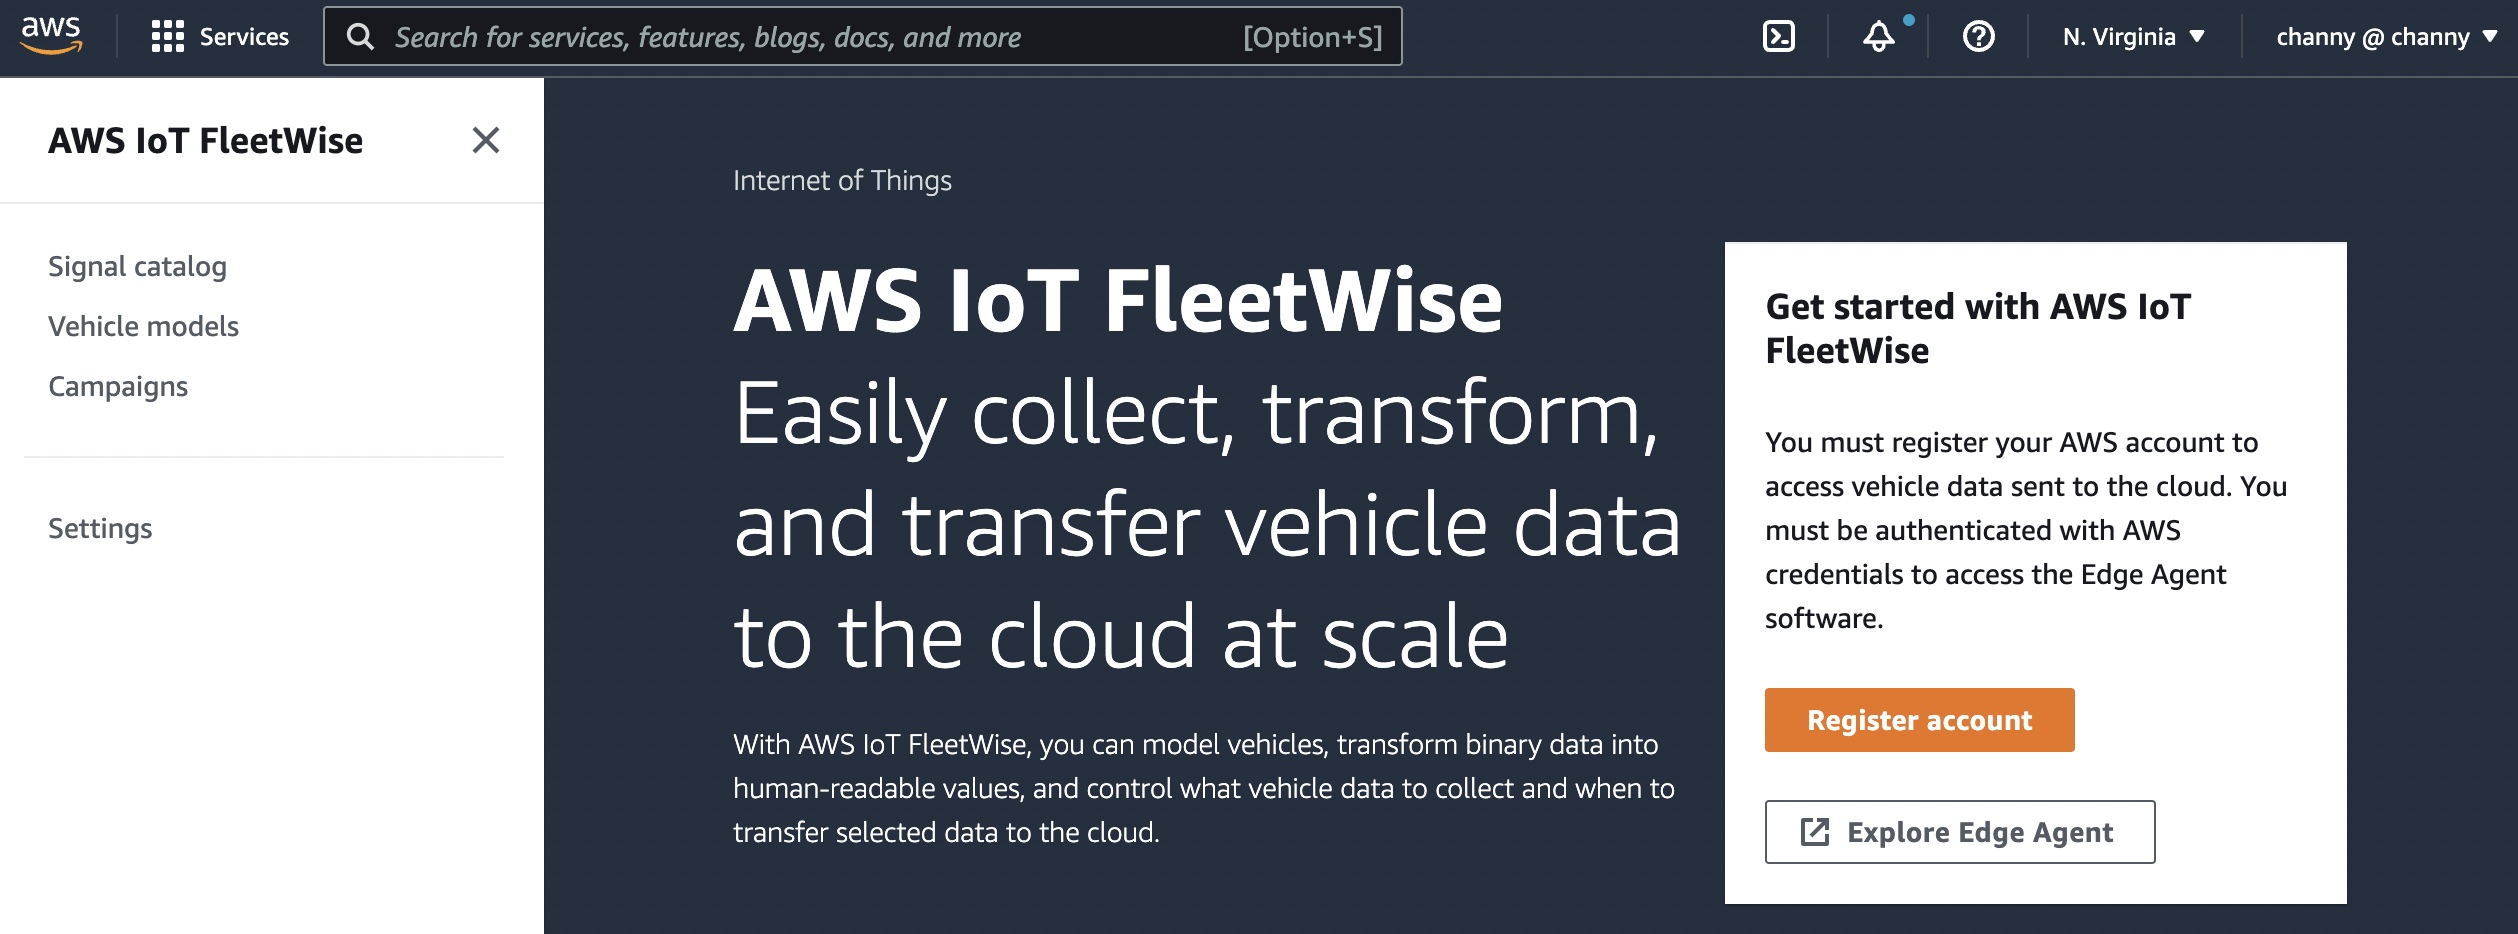
AWS IoT FleetWise Features To get started with AWS IoT FleetWise, you can register your account and configure the settings via the AWS console. AWS IoT FleetWise automatically registers your AWS account, IAM role, and Amazon Timestream resources.
The Edge Agent software is a C++ application distributed as source code and is available on GitHub to collect, decode, normalize, cache, and ingest vehicle data to AWS. It supports multiple deployment options, such as vehicle gateways, infotainment systems, telematics control units (TCUs), or aftermarket devices. When vehicles are connected to the cloud, the Edge Agent continually receives data collection schemes and collects, decodes, normalizes and ingests the transformed vehicle data to AWS.
Let’s see the benefits and features of AWS IoT FleetWise:
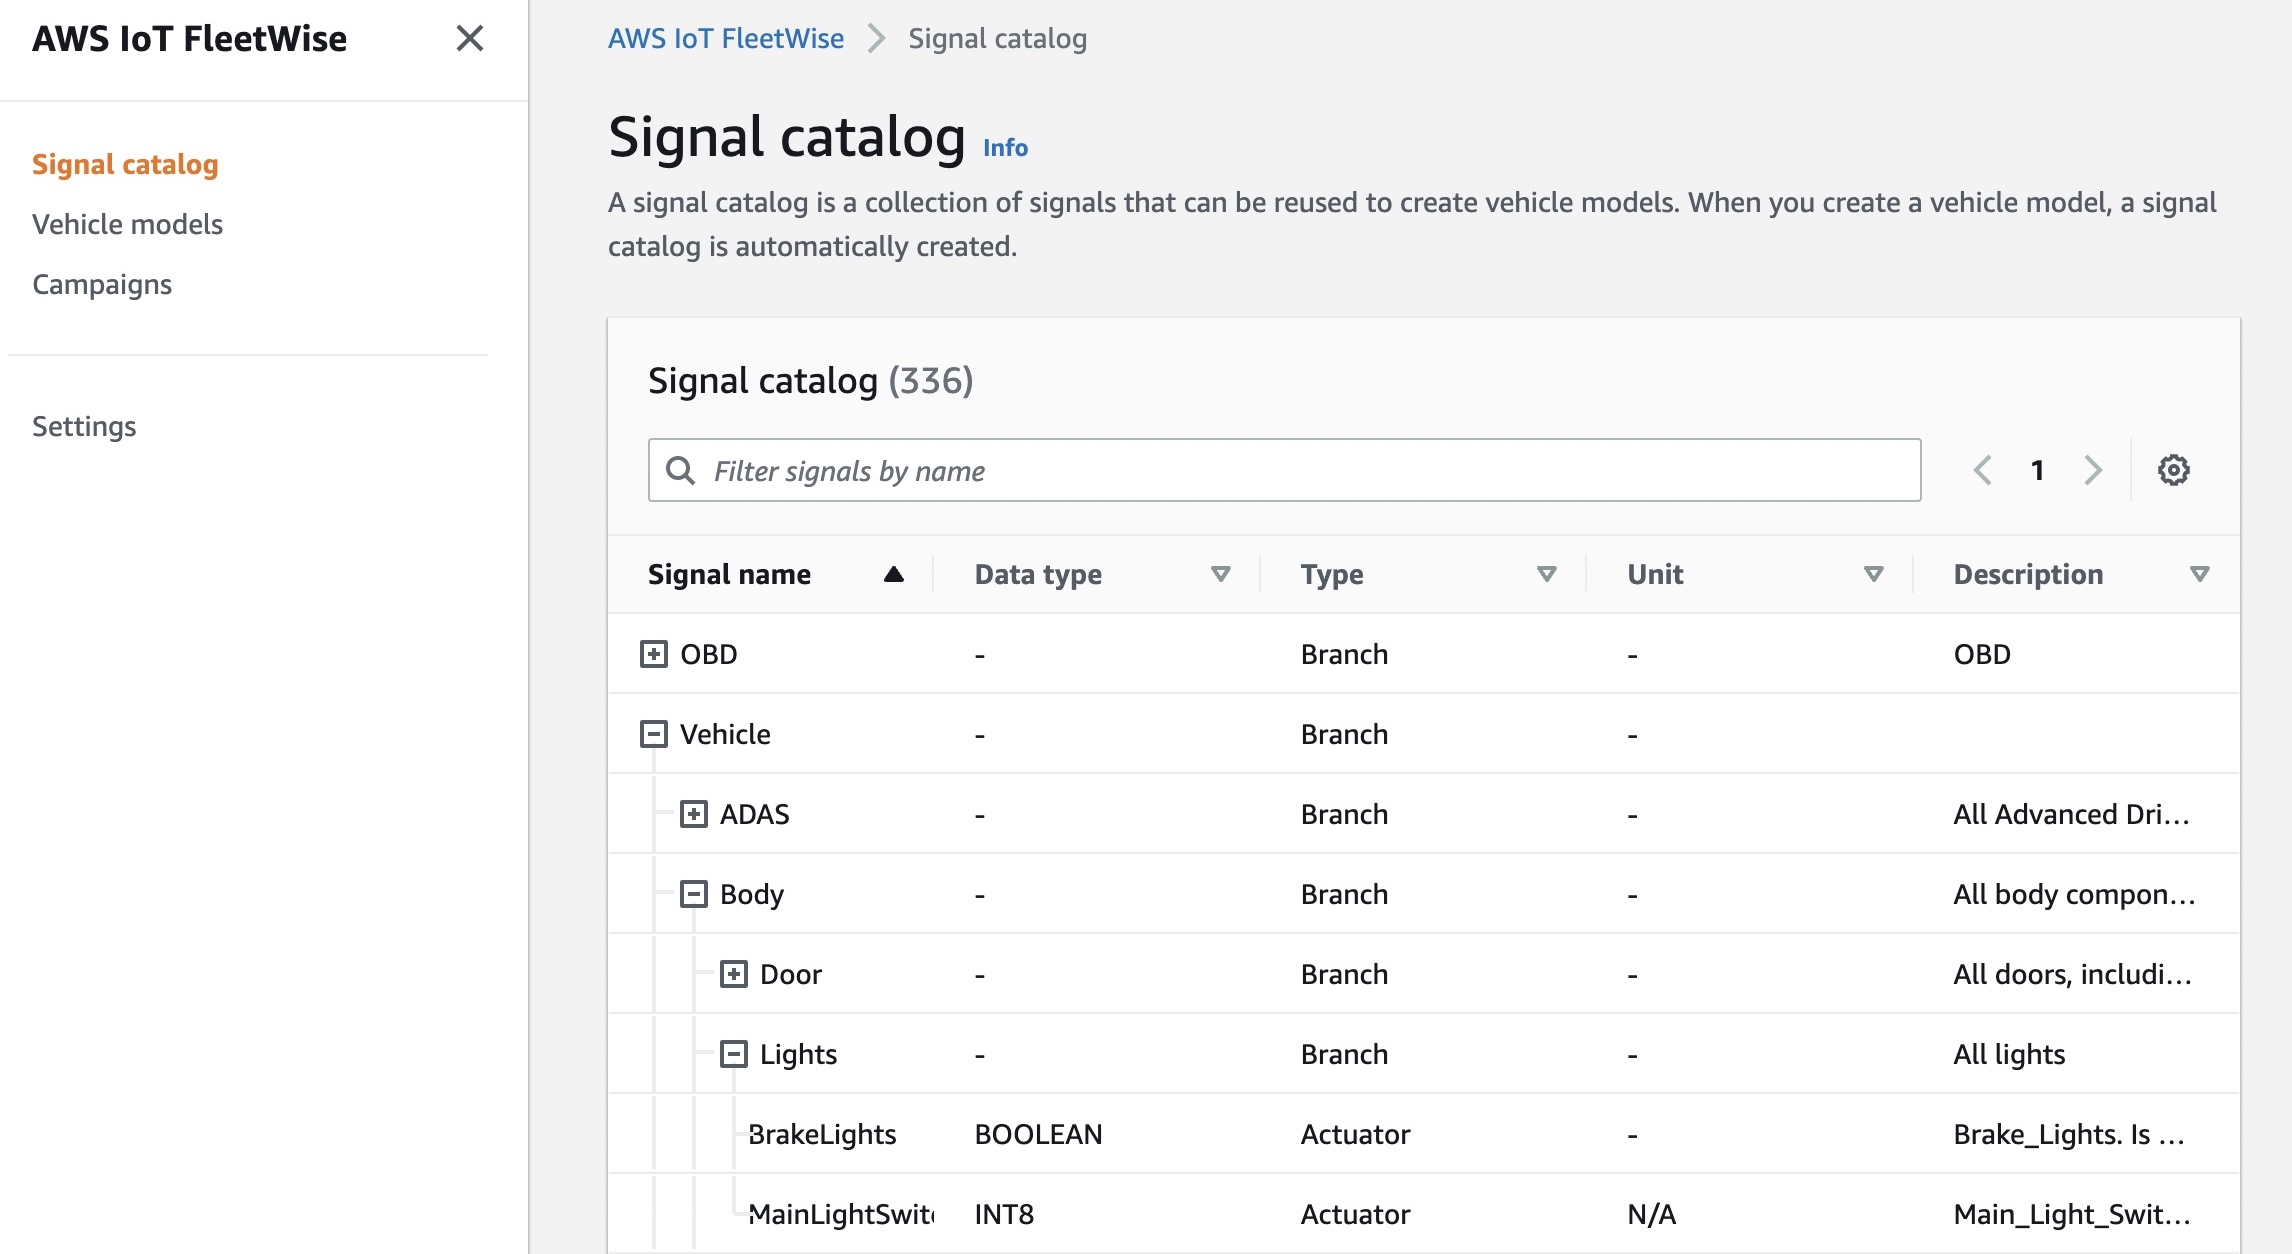
Signal catalog A signal catalog contains a collection of vehicle signals. Signals are fundamental structures that you define to contain vehicle data and its metadata. A signal can be a sensor and its status, an attribute as static information of the manufacturer, a branch to represent a nested structure such as Vehicle.Powertrain.combustionEngine expression, or an actuator such as the state of a vehicle device. For example, you can create a sensor to receive in-vehicle temperature values and store its metadata, including a sensor name, a data type, and a unit.
Signals in a signal catalog can be used to model vehicles that use different protocols and data formats. For example, there are two cars made by different automakers: one uses the Controller Area Network (CAN) to transmit the in-vehicle temperature data and the other uses On-board Diagnostic (OBD) protocol.
You can define a sensor in the signal catalog to receive in-vehicle temperature values. This sensor can be used to represent the thermocouples in both cars, irrespective of how this temperature data is available within the vehicle networks. For more information, see Create and manage signal catalogs in the AWS documentation.
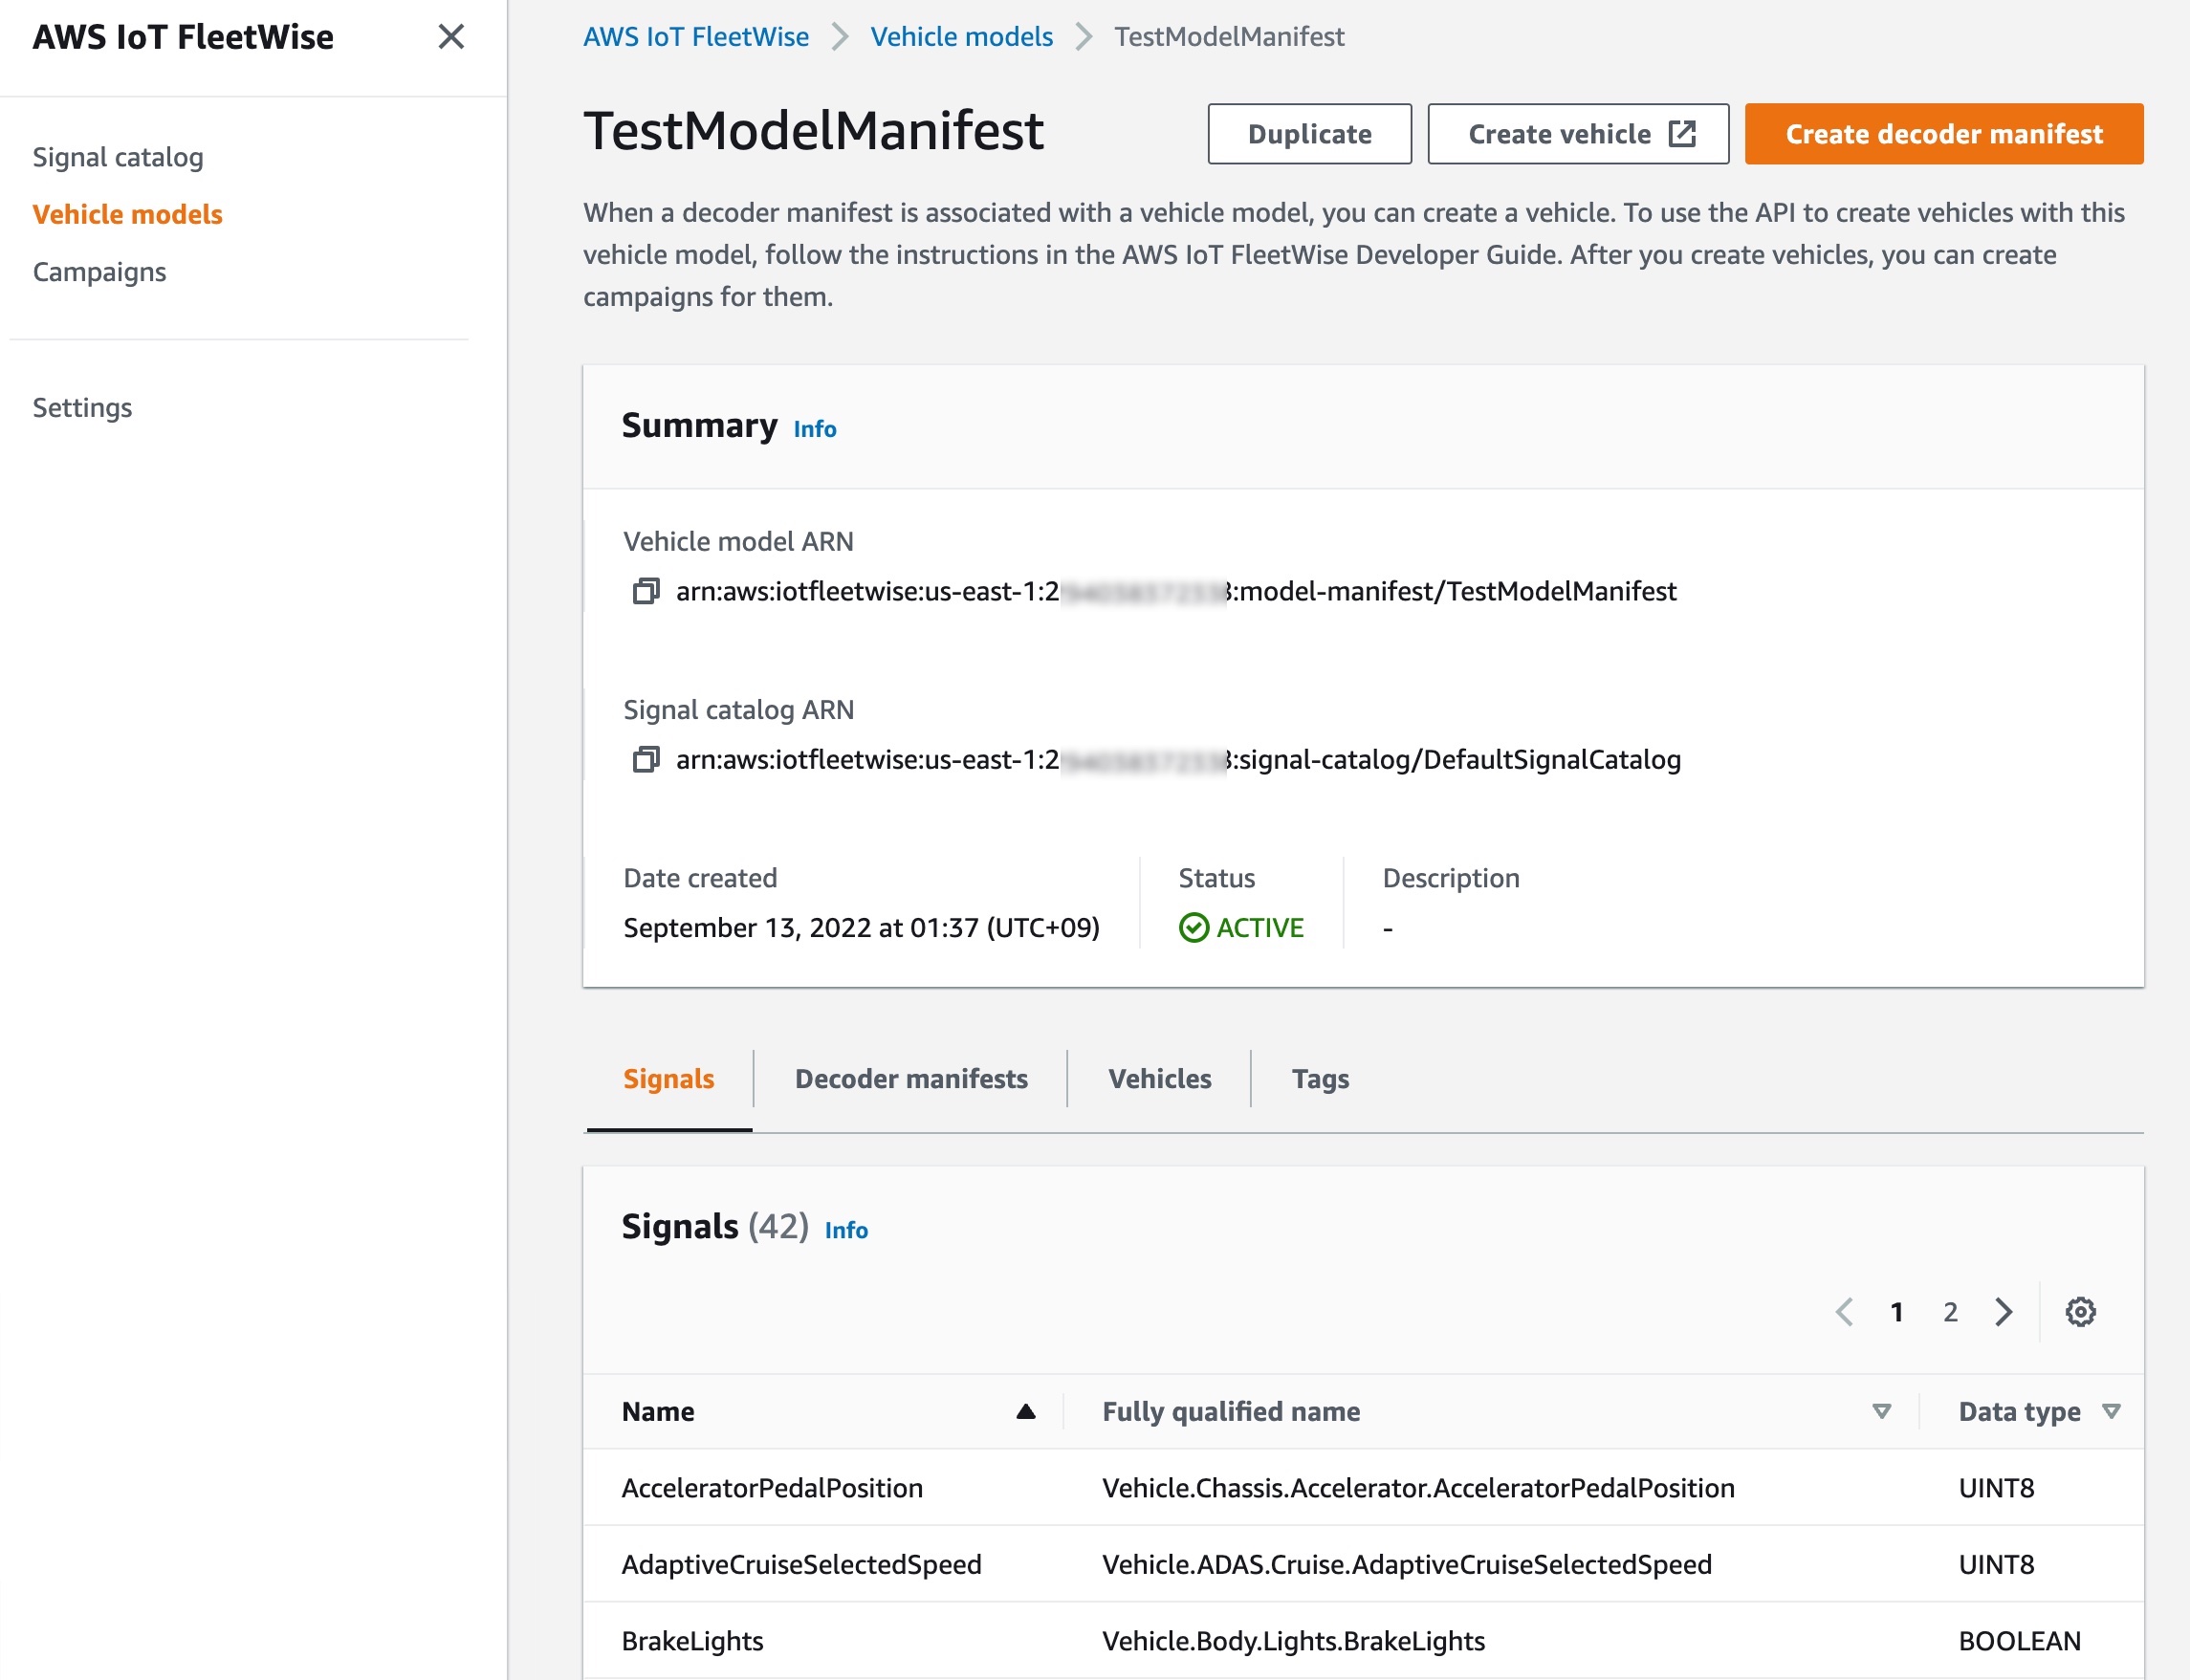
Vehicle models Vehicle models are virtual declarative representations that standardize the format of your vehicles and define relationships between signals in the vehicles. Vehicle models enforce consistent information across multiple vehicles of the same type so that you can quickly configure and create a vehicle fleet. In each vehicle model, you can add signals, including attributes, branches (signal hierarchies), sensors, and actuators.
You can define condition-based schemes to control what data to collect, such as data in-vehicle temperature values that are greater than 40 degrees. You can also define time-based schemes to control how often to collect data. For more information, see Create and manage vehicle models in the AWS documentation.
When a decoder manifest is associated with a vehicle model, you can create a vehicle. Each vehicle corresponds to an AWS IoT thing. You can use an existing AWS IoT thing to create a vehicle or set AWS IoT FleetWise to automatically create an AWS IoT thing for your vehicle. For more information, see Provision vehicles in the AWS documentation. After you create vehicles, you can create campaigns for them.
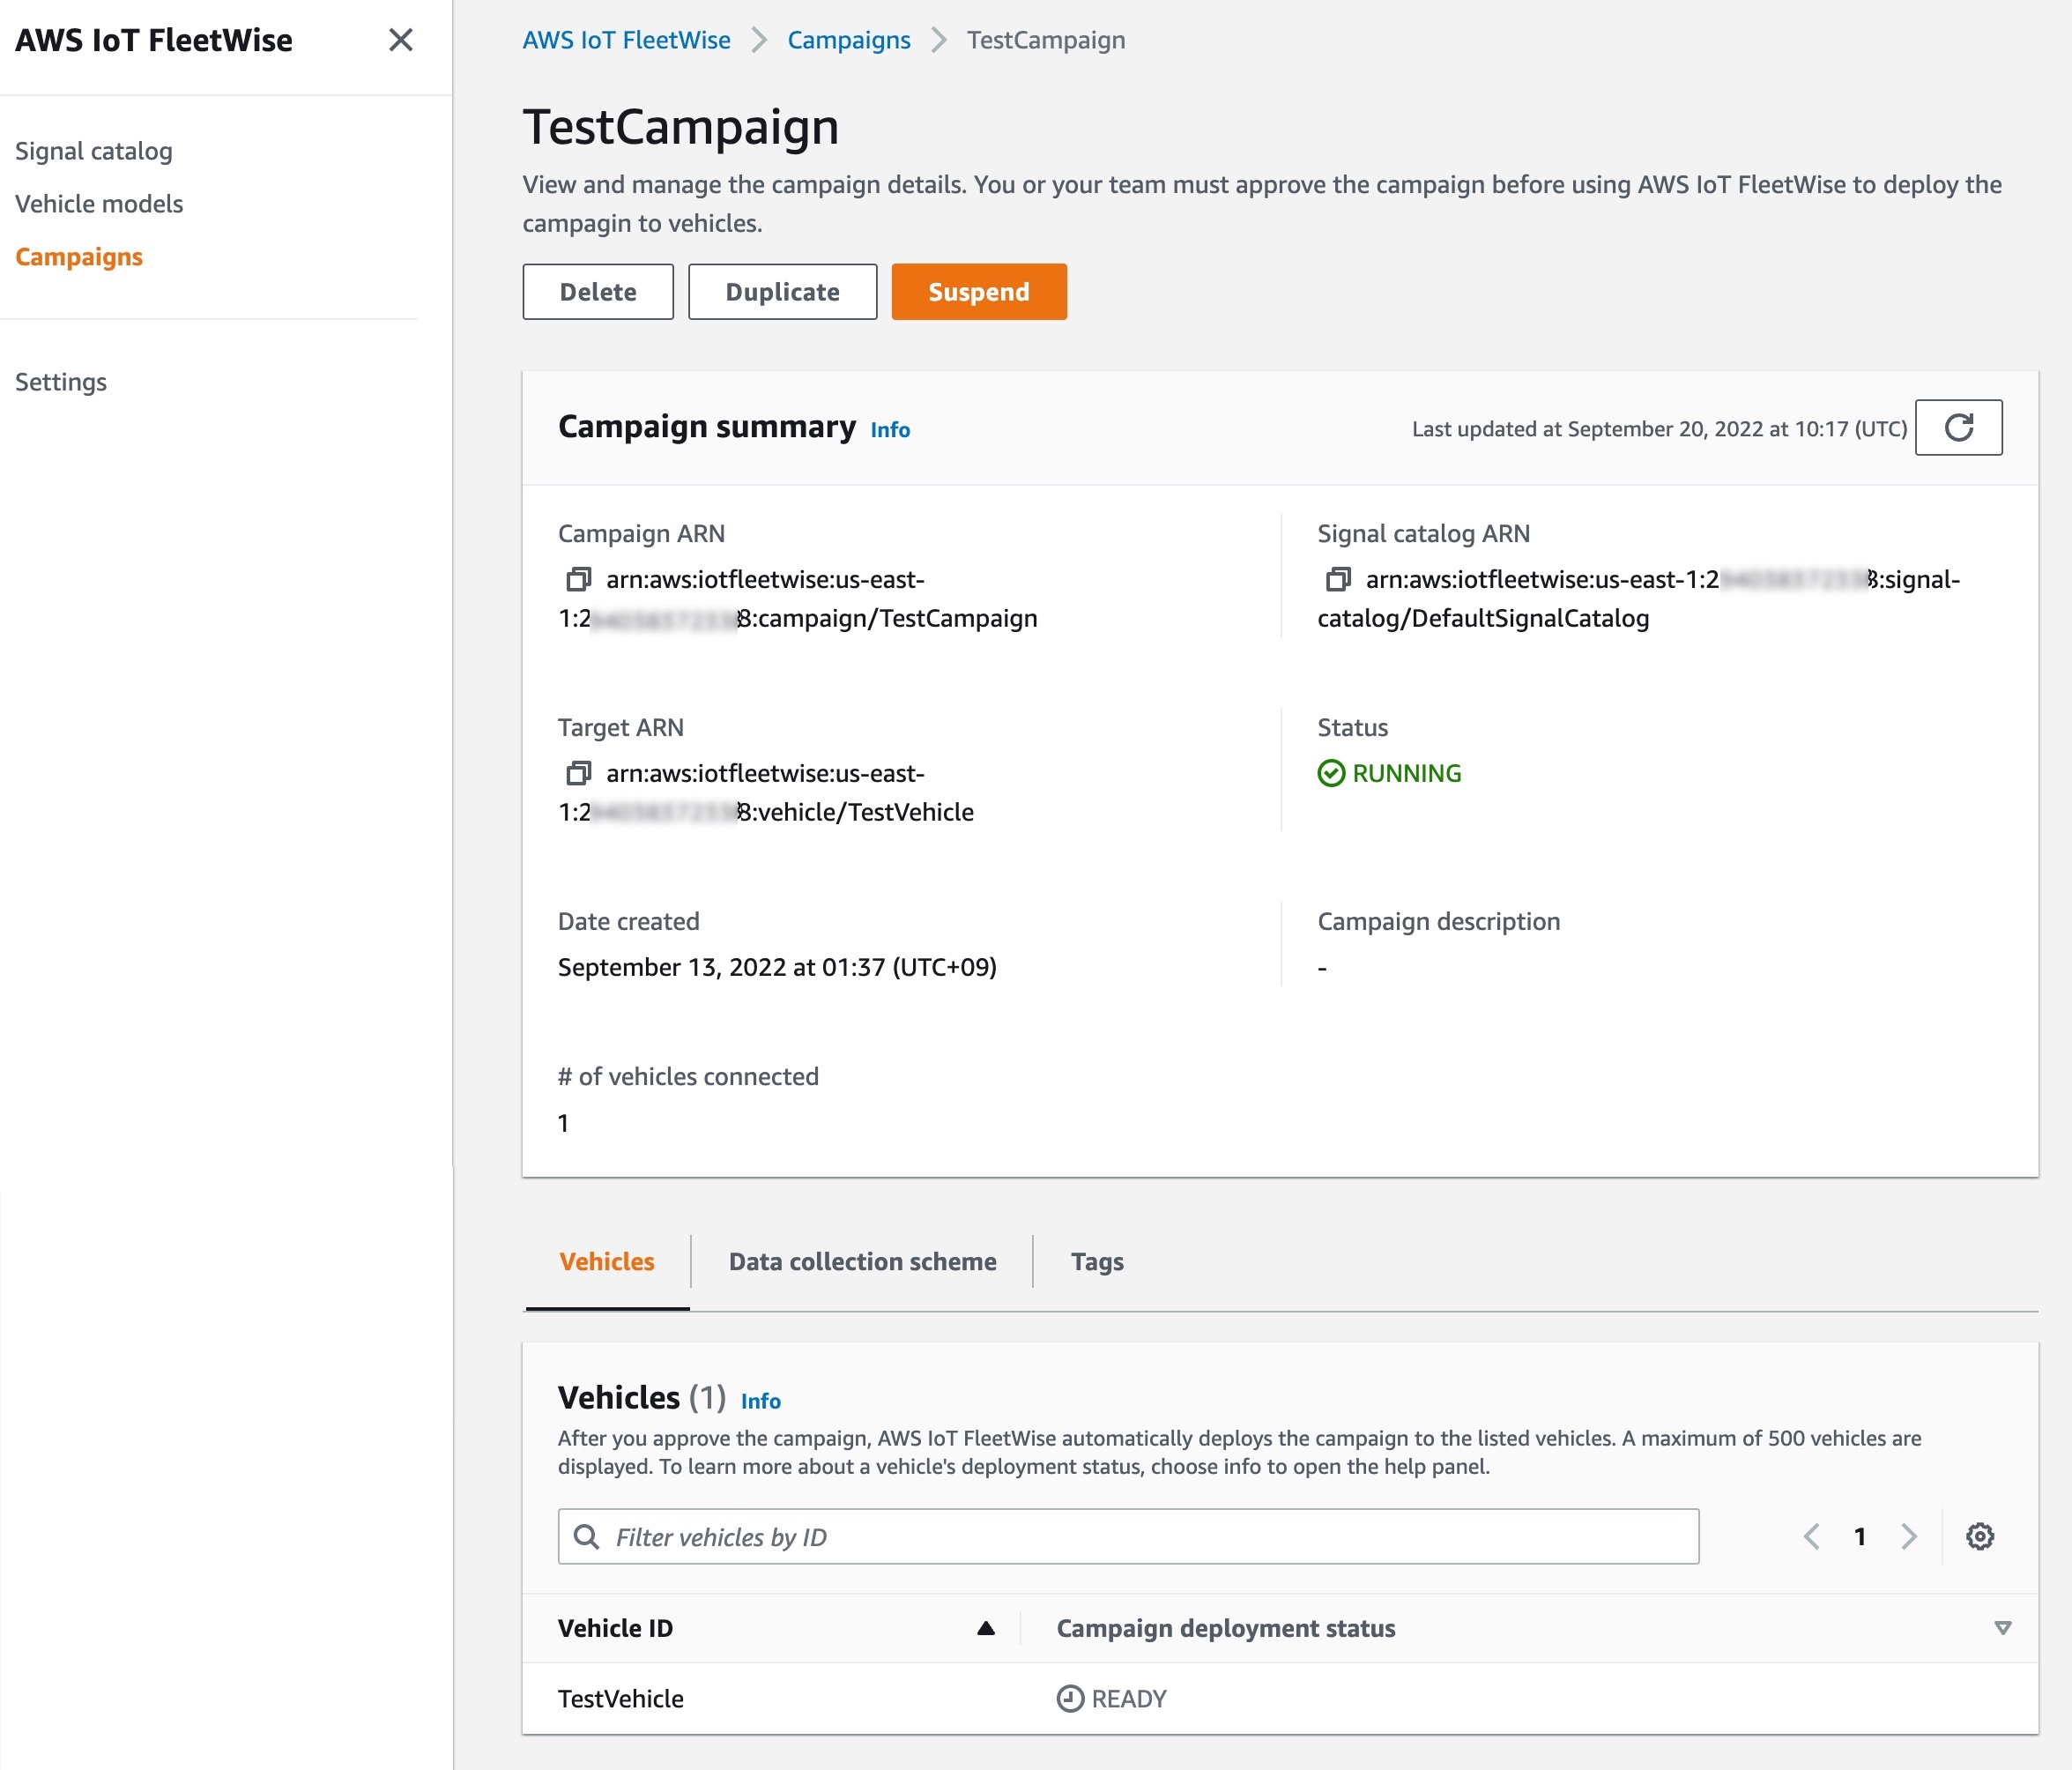
Campaigns A campaign gives the AWS IoT FleetWise Edge Agent instructions on how to select, collect, and transfer data to the cloud. You can make a campaign with vehicle attributes that you added when creating vehicles, and a data collection scheme. You can manually define the data collection scheme either condition-based logical expressions such as $variable.myVehicle.InVehicleTemperature > 40.0, or time-based data collection in milliseconds such as from 10000 – 60000 milliseconds. To learn more, see Create a campaign in the AWS documentation.
After you create and approve the campaign, AWS IoT FleetWise automatically deploys the campaign to the listed vehicles. The AWS IoT FleetWise Edge Agent software doesn’t start collecting data until a running campaign is deployed to the vehicle. If you want to pause collecting data from vehicles connected to the campaign, on the Campaign summary page, choose Suspend. To resume collecting data from vehicles connected to the campaign, choose Resume.
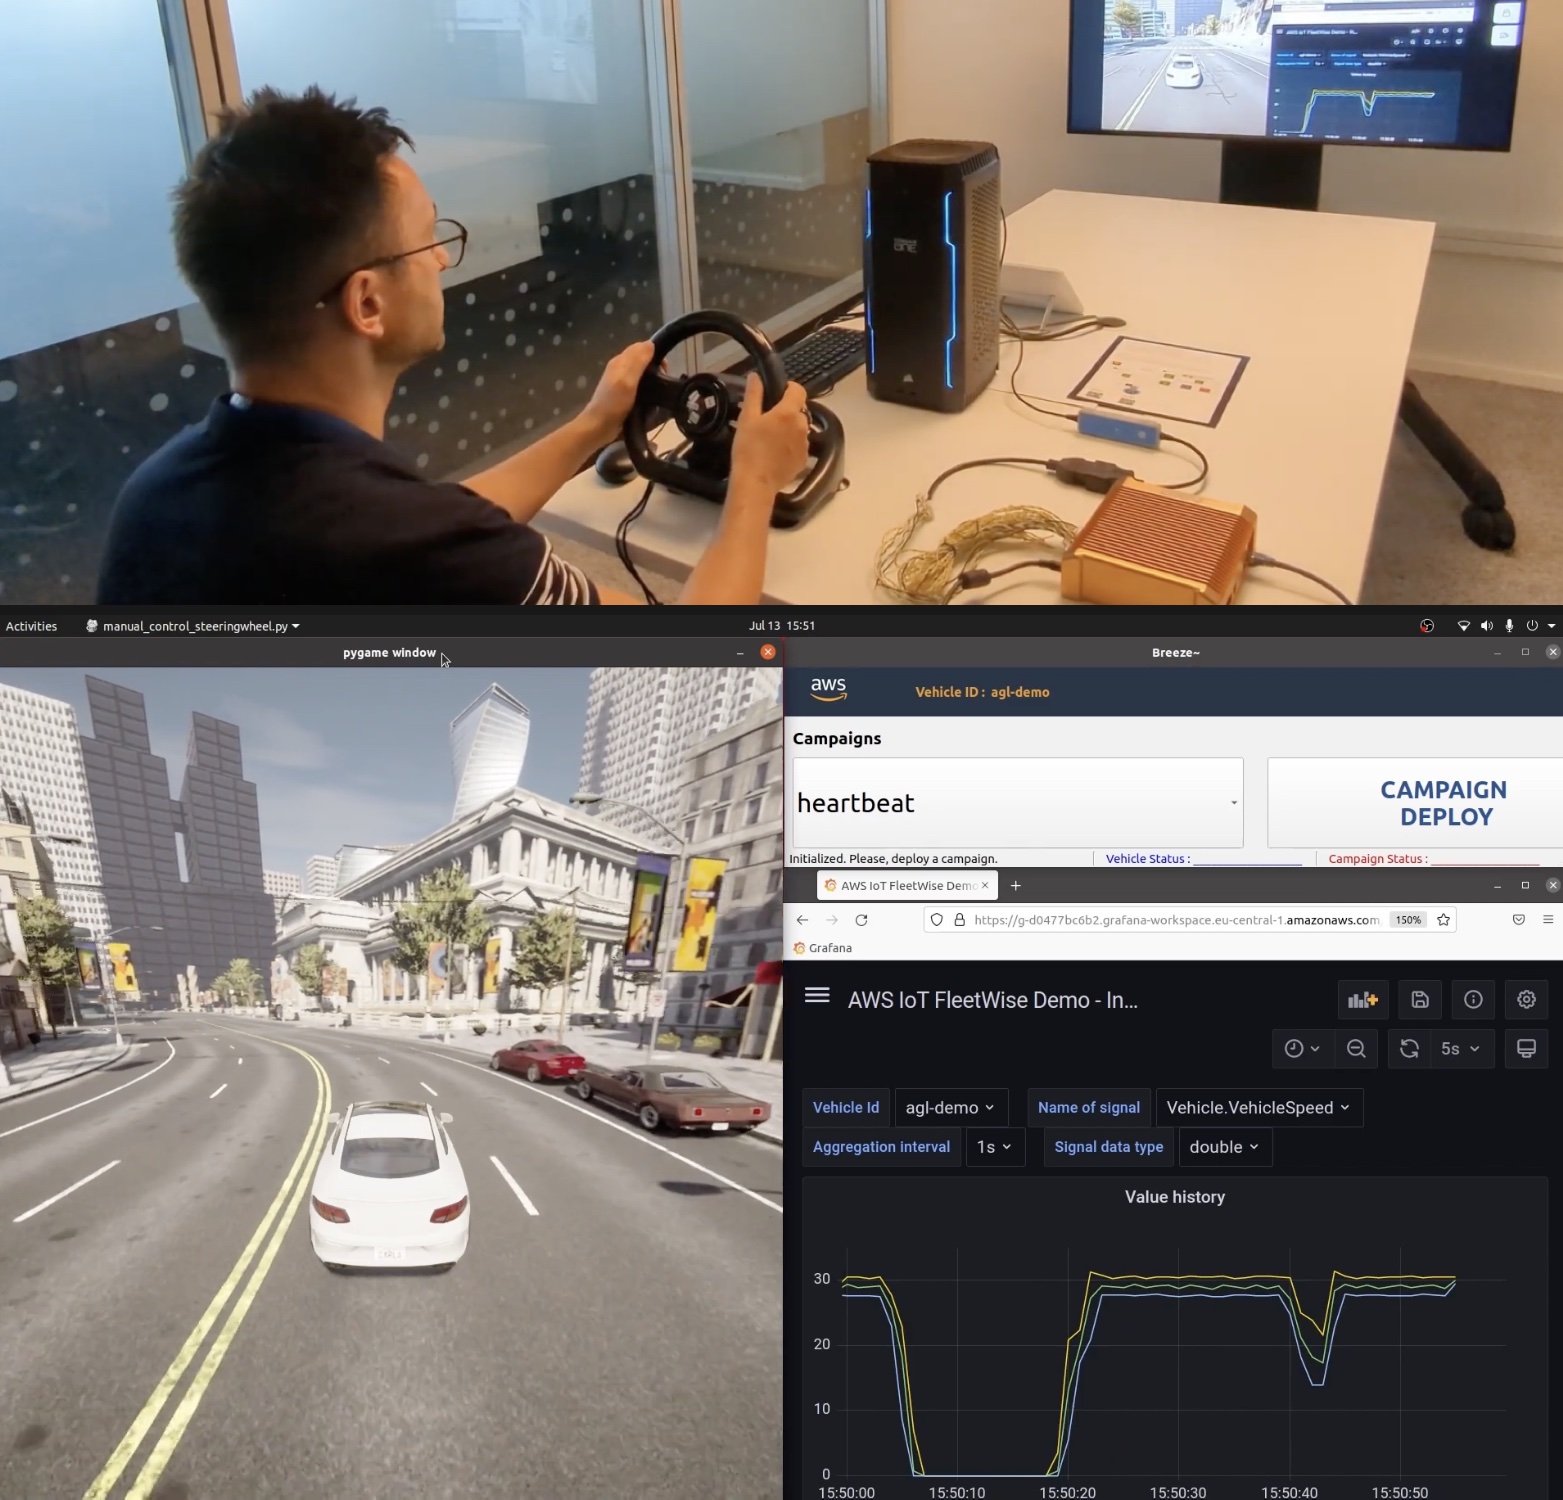
Demo – Visualizing Vehicle Data Here is a demo that aims to show how AWS IoT FleetWise can make it easy to collect vehicle data and use it to build visualizing applications. In this demo, you can simulate two kinds of vehicles, an NXP GoldBox powered by an Automotive Grade Linux distribution that runs the AWS IoT FleetWise agent as an AWS IoT Greengrass component or a completely virtual vehicle implemented as an AWS Graviton ARM-based Amazon EC2 instance. To learn more, see the getting started guide and source code in the GitHub repository.
The vehicle in CARLA Simulator can self-drive or be driven with a game steering wheel connected to your desktop. You can watch a live demo video.
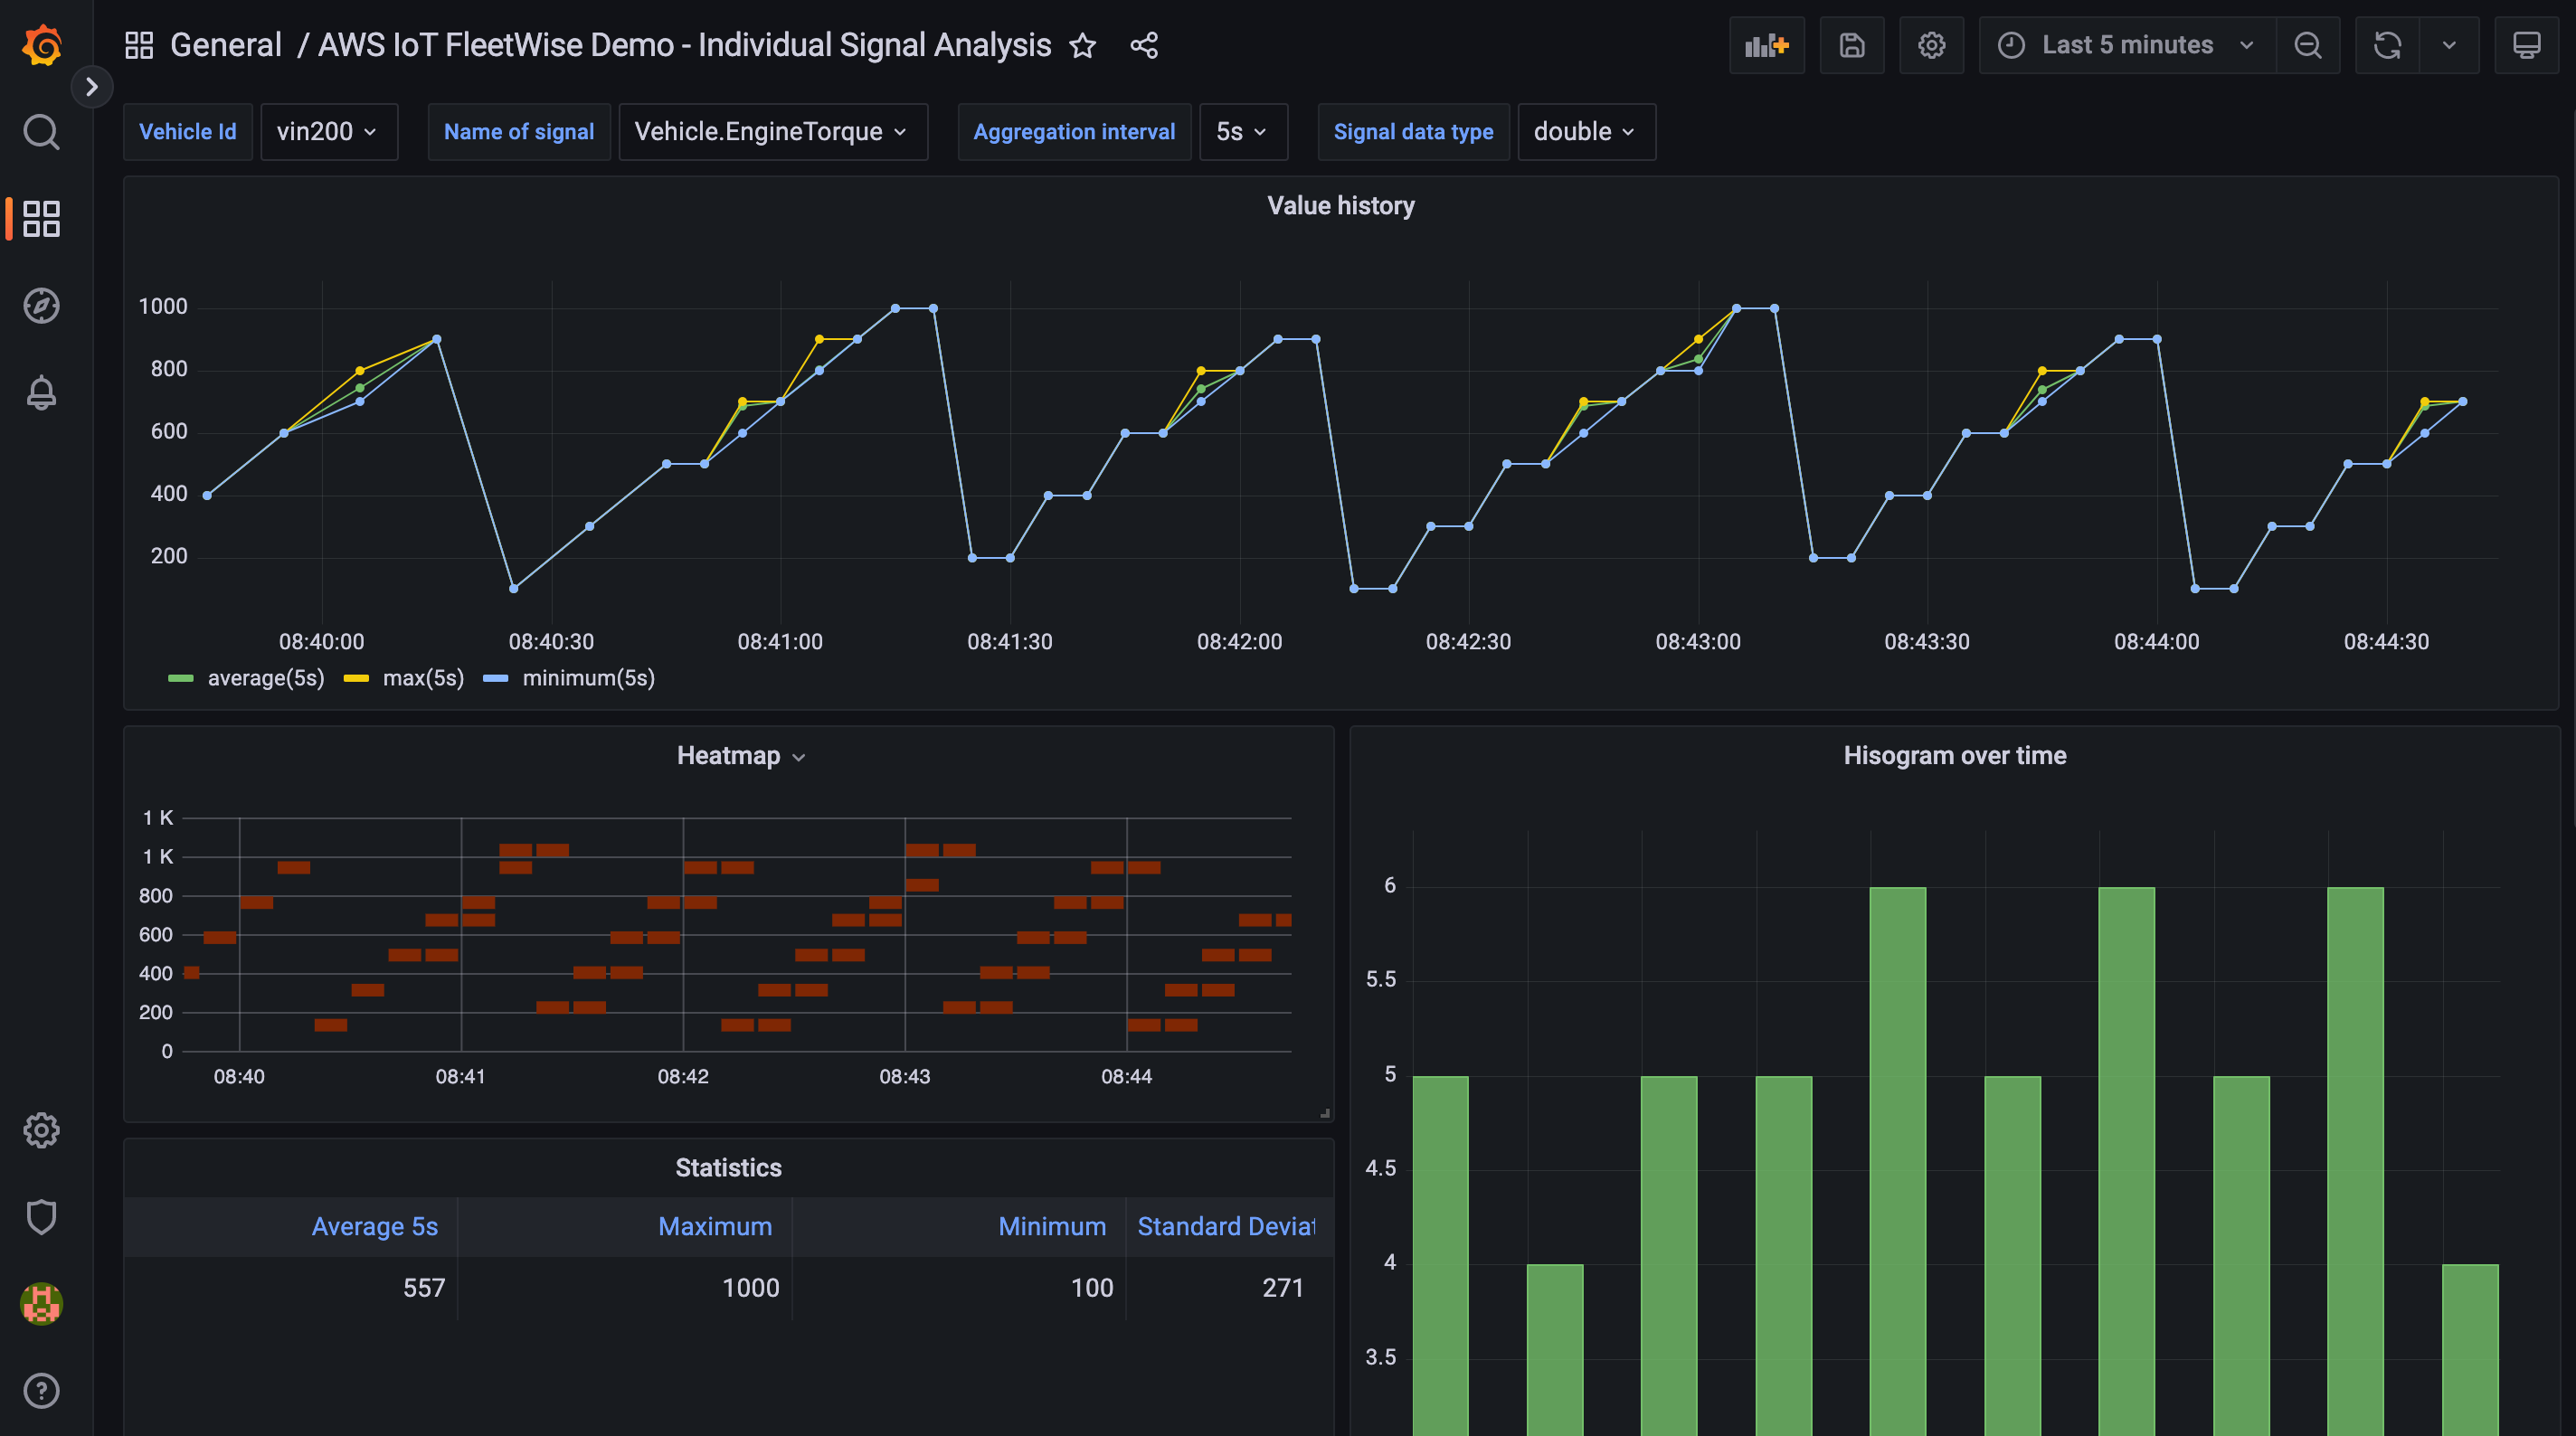
Data is collected by AWS IoT FleetWise and stored in the Amazon Timestream table, and visualized on a Grafana Dashboard.
Customer and Partner Voices During the preview period, we heard lots of feedback from our customers and partners in automotive industry such as automakers, fleet operators, and automotive suppliers.
For example, Hyundai Motor Group (HMG) is a global vehicle manufacturer that offers consumers a technology-rich lineup of cars, sport utility vehicles, and electrified vehicles. HMG has used AWS services, such as using Amazon SageMaker, to reduce its ML model training time for autonomous driving models.
Hae Young Kwon, vice president and head of the infotainment development group at HMG, said:
“As a leading global vehicle manufacturer, we have come to appreciate the breadth and depth of AWS services to help create new connected vehicle capabilities. With more data available from our expanding global fleet of connected cars, we look forward to leveraging AWS IoT FleetWise to discover how we can build more personalized ownership experiences for our customers.”
LG CNS is a global IT service provider and AWS Premier Consulting Partner that is transforming smart transportation services by building an advanced transportation system that is convenient and safe by maximizing the operational efficiency of multiple modes of transport, including buses, subways, taxis, railways, and airplanes.
Jae Seung Lee, vice president at LG CNS, said:
“At LG CNS, we are committed to advancing the technology that is powering the future of transportation. By using AWS IoT FleetWise, we are creating a new data platform that allows us to ingest, analyze, and simulate vehicle conditions in real-time. With these advanced insights, our customers can gain a better understanding of their vehicles and, as a result, improve decision-making about their fleets.”
Bridgestone is a global leader in tires and rubber building on its expertise to provide solutions for safe and sustainable mobility. Bridgestone has worked with AWS for several years to develop a system that delivers insights derived from the interaction between a tire and a vehicle using advanced machine learning capabilities on Amazon SageMaker.
Brian Goldstine, president of mobility solutions and fleet management at Bridgestone Americas Inc. said:
“Bridgestone has been working with AWS to transform the digital services we provide to our automotive manufacturer, fleet, and retail customers. We look forward to exploring how AWS IoT FleetWise will make it easier for our customers to collect detailed tire data, which can provide new insights for their products and applications.”
Yusuke Kawasaki, director at Renesas Electronics Corporation, said:
“The volume of connected vehicle data is forecast to increase dramatically over the next few years, driven by new and evolving customer expectations. As a result, Renesas is focused on addressing the needs of automotive engineers facing increasing system complexity. Incorporating AWS IoT FleetWise into our vehicle gateway solution will enable our customers to enjoy our market-ready approach for large-scale data collection and accelerate their cloud development strategy. We look forward to further collaborating with AWS to provide a better and simpler development environment for our customers.”
By working with AWS IoT FleetWise Partners, you can take advantage of solutions to streamline your IoT projects, reduce the risk of your efforts, and accelerate time to value. To learn more how AWS accelerates the automotive industry’s digital transformation, see AWS for Automotive.
Now Available AWS IoT FleetWise is now generally available in the US East (N. Virginia) and Europe (Frankfurt) Regions. You pay for the vehicles you have created and messages per vehicle per month. Additional services used alongside AWS IoT FleetWise, such as AWS IoT Core and Amazon Timestream, are billed separately. For more detail, see the AWS IoT FleetWise pricing page.
It looks like my travel schedule is coupled with this Week In Review series of blog posts. This week, I am traveling to Fort-de-France in the French Caribbean islands to meet our customers and partners. I enjoy the travel time when I am offline. It gives me the opportunity to reflect on the past or plan for the future.
Last Week’s Launches Here are some of the launches that caught my eye last week:
Amazon SageMaker Autopilot – has added a new Ensemble training mode powered by AutoGluon that is 8X faster than the current Hyper parameter Optimization Mode and supports a wide range of algorithms, including LightGBM, CatBoost, XGBoost, Random Forest, Extra Trees, linear models, and neural networks based on PyTorch and FastAI.
Amazon Corretto 19 – Corretto is a no-cost, multiplatform, production-ready distribution of OpenJDK. Corretto is distributed by Amazon under an open source license. This version supports the latest OpenJDK feature release and is available on Linux, Windows, and macOS. You can download Corretto 19 from our downloads page.
Amazon CloudWatch Evidently – Evidently is a fully-managed service that makes it easier to introduce experiments and launches in your application code. Evidently adds support for Client Side Evaluations (CSE) for AWS Lambda, powered by AWS AppConfig. Evidently CSE allows application developers to generate feature evaluations in single-digit milliseconds from within their own Lambda functions. Check the client-side evaluation documentation to learn more.
Amazon S3on AWS Outposts – S3 on Outposts now supports object versioning. Versioning helps you to locally preserve, retrieve, and restore each version of every object stored in your buckets. Versioning objects makes it easier to recover from both unintended user actions and application failures.
Amazon Polly – Amazon Polly is a service that turns text into lifelike speech. This week, we announced the general availability of Hiujin, Amazon Polly’s first Cantonese-speaking neural text-to-speech (NTTS) voice. With this launch, the Amazon Polly portfolio now includes 96 voices across 34 languages and language variants.
X in Y – We launched existing AWS services in additional Regions:
Other AWS News Introducing the Smart City Competency program – The AWS Smart City Competency provides best-in-class partner recommendations to our customers and the broader market. With the AWS Smart City Competency, you can quickly and confidently identify AWS Partners to help you address Smart City focused challenges.
An update to IAM role trust policy behavior – This is potentially a breaking change. AWS Identity and Access Management (IAM) is changing an aspect of how role trust policy evaluation behaves when a role assumes itself. Previously, roles implicitly trusted themselves. AWS is changing role assumption behavior to always require self-referential role trust policy grants. This change improves consistency and visibility with regard to role behavior and privileges. This blog post shares the details and explains how to evaluate if your roles are impacted by this change and what to modify. According to our data, only 0.0001 percent of roles are impacted. We notified by email the account owners.
Upcoming AWS Events Check your calendar and sign up for an AWS event in your Region and language:
AWS re:Invent – Learn the latest from AWS and get energized by the community present in Las Vegas, Nevada. Registrations are open for re:Invent 2022 which will be held from Monday, November 28 to Friday, December 2.
AWS Summits – Come together to connect, collaborate, and learn about AWS. Registration is open for the following in-person AWS Summits: Bogotá (October 4), and Singapore (October 6).
Natural Language Processing (NLP) Summit – The AWS NLP Summit 2022 will host over 25 sessions focusing on the latest trends, hottest research, and innovative applications leveraging NLP capabilities on AWS. It is happening at our UK headquarters in London, October 5–6, and you can register now.
AWS Innovate for every app – This regional online conference is designed to inspire and educate executives and IT professionals about AWS. It offers dozens of technical sessions in eight languages (English, Spanish, French, German, Italian, Japanese, Korean, and Indonesian). Register today: Americas, September 28; Europe, Middle-East, and Africa, October 6; Asia Pacific & Japan, October 20.
AWS Fest – This third-party event will feature AWS influencers, community heroes, industry leaders, and AWS customers, all sharing AWS optimization secrets (this week on Wednesday, September). You can register for AWS Fest here.
Stay Informed That is my selection for this week! To better keep up with all of this news, please check out the following resources:
AWS on Air – Join us every Friday on Twitch, Twitter, and LinkedIn.
The Official AWS Podcast – Listen each week for updates on the latest AWS news and deep dives into exciting use cases. There are also official AWS podcasts in your local languages. Check the ones in Spanish, French, Italian, and German.
AWS Identity and Access Management (IAM) is changing an aspect of how role trust policy evaluation behaves when a role assumes itself. Previously, roles implicitly trusted themselves from a role trust policy perspective if they had identity-based permissions to assume themselves. After receiving and considering feedback from customers on this topic, AWS is changing role assumption behavior to always require self-referential role trust policy grants. This change improves consistency and visibility with regard to role behavior and privileges. This change allows customers to create and understand role assumption permissions in a single place (the role trust policy) rather than two places (the role trust policy and the role identity policy). It increases the simplicity of role trust permission management: “What you see [in the trust policy] is what you get.”
Therefore, beginning today, for any role that has not used the identity-based behavior since June 30, 2022, a role trust policy must explicitly grant permission to all principals, including the role itself, that need to assume it under the specified conditions. Removal of the role’s implicit self-trust improves consistency and increases visibility into role assumption behavior.
Most AWS customers will not be impacted by the change at all. Only a tiny percentage (approximately 0.0001%) of all roles are involved. Customers whose roles have recently used the previous implicit trust behavior are being notified, beginning today, about those roles, and may continue to use this behavior with those roles until February 15, 2023, to allow time for making the necessary updates to code or configuration. Or, if these customers are confident that the change will not impact them, they can opt out immediately by substituting in new roles, as discussed later in this post.
The first part of this post briefly explains the change in behavior. The middle sections answer practical questions like: “why is this happening?,” “how might this change impact me?,” “which usage scenarios are likely to be impacted?,” and “what should I do next?” The usage scenario section is important because it shows that, based on our analysis, the self-assuming role behavior exhibited by code or human users is very likely to be unnecessary and counterproductive. Finally, for security professionals interested in better understanding the reasons for the old behavior, the rationale for the change, as well as its possible implications, the last section reviews a number of core IAM concepts and digs in to additional details.
What is changing?
Until today, an IAM role implicitly trusted itself. Consider the following role trust policy attached to the role named RoleA in AWS account 123456789012.
This role trust policy grants role assumption access to the role named RoleB in the same account. However, if the corresponding identity-based policy for RoleA grants the sts:AssumeRole action with respect to itself, then RoleA could also assume itself. Therefore, there were actually two roles that could assume RoleA: the explicitly permissioned RoleB, and RoleA, which implicitly trusted itself as a byproduct of the IAM ownership model (explained in detail in the final section). Note that the identity-based permission that RoleA must have to assume itself is not required in the case of RoleB, and indeed an identity-based policy associated with RoleB that references other roles is not sufficient to allow RoleB to assume them. The resource-based permission granted by RoleA’s trust policy is both necessary and sufficient to allow RoleB to assume RoleA.
Although earlier we summarized this behavior as “implicit self-trust,” the key point here is that the ability of Role A to assume itself is not actually implicit behavior. The role’s self-referential permission had to be explicit in one place or the other (or both): either in the role’s identity-based policy (perhaps based on broad wildcard permissions), or its trust policy. But unlike the case with other principals and role trust, an IAM administrator would have to look in two different policies to determine whether a role could assume itself.
As of today, for any new role, or any role that has not recently assumed itself while relying on the old behavior, IAM administrators must modify the previously shown role trust policy as follows to allow RoleA to assume itself, regardless of the privileges granted by its identity-based policy:
This change makes role trust behavior clearer and more consistent to understand and manage, whether directly by humans or as embodied in code.
How might this change impact me?
As previously noted, most customers will not be impacted by the change at all. For those customers who do use the prior implicit trust grant behavior, AWS will work with you to eliminate your usage prior to February 15, 2023. Here are more details for the two cases of customers who have not used the behavior, and those who have.
If you haven’t used the implicit trust behavior since June 30, 2022
Beginning today, if you have not used the old behavior for a given role at any time since June 30, 2022, you will now experience the new behavior. Those existing roles, as well as any new roles, will need an explicit reference in their own trust policy in order to assume themselves. If you have roles that are used only very occasionally, such as once per quarter for a seldom-run batch process, you should identify those roles and if necessary either remove the dependency on the old behavior or update their role trust policies to include the role itself prior to their next usage (see the second sample policy above for an example).
If you have used the implicit trust behavior since June 30, 2022
If you have a role that has used the implicit trust behavior since June 30, 2022, then you will continue to be able to do so with that role until February 15, 2023. AWS will provide you with notice referencing those roles beginning today through your AWS Health Dashboard and will also send an email with the relevant information to the account owner and security contact. We are allowing time for you to make any necessary changes to your existing processes, code, or configurations to prepare for removal of the implicit trust behavior. If you can’t change your processes or code, you can continue to use the behavior by making a configuration change—namely, by updating the relevant role trust policies to reference the role itself. On the other hand, you can opt out of the old behavior at any time by creating a new role with a different Amazon Resource Name (ARN) with the desired identity-based and trust-policy-based permissions and substituting it for any older role that was identified as using the implicit trust behavior. (The new role will not be allow-listed, because the allow list is based on role ARNs.) You can also modify an existing allow-listed role’s trust policy to explicitly deny access to itself. See the “What should I do next?” section for more information.
Notifications and retirement
As we previously noted, starting today, accounts with existing roles that use the implicit self-assume role assumption behavior will be notified of this change by email and through their AWS Health Dashboard. Those roles have been allow-listed, and so for now their behavior will continue as before. After February 15, 2023, the old behavior will be retired for all roles and all accounts. IAM Documentation has been updated to make clear the new behavior.
After the old behavior is retired from the allow-listed roles and accounts, role sessions that make self-referential role assumption calls will fail with an Access Denied error unless the role’s trust policy explicitly grants the permission directly through a role ARN. Another option is to grant permission indirectly through an ARN to the root principal in the trust policy that acts as a delegation of privilege management, after which permission grants in identity-based policies determine access, similar to the typical cross-account case.
Which usage scenarios are likely to be impacted?
Users often attach an IAM role to an Amazon Elastic Compute Cloud (Amazon EC2) instance, an Amazon Elastic Container Service (Amazon ECS) task, or AWS Lambda function. Attaching a role to one of these runtime environments enables workloads to use short-term session credentials based on that role. For example, when an EC2 instance is launched, AWS automatically creates a role session and assigns it to the instance. An AWS best practice is for the workload to use these credentials to issue AWS API calls without explicitly requesting short-term credentials through sts:AssumeRole calls.
However, examples and code snippets commonly available on internet forums and community knowledge sharing sites might incorrectly suggest that workloads need to call sts:AssumeRole to establish short-term sessions credentials for operation within those environments.
We analyzed AWS Security Token Service (AWS STS) service metadata about role self-assumption in order to understand the use cases and possible impact of the change. What the data shows is that in almost all cases this behavior is occurring due to unnecessarily reassuming the role in an Amazon EC2, Amazon ECS, Amazon Elastic Kubernetes Services (EKS), or Lambda runtime environment already provided by the environment. There are two exceptions, discussed at the end of this section under the headings, “self-assumption with a scoped-down policy” and “assuming a target compute role during development.”
There are many variations on this theme, but overall, most role self-assumption occurs in scenarios where the person or code is unnecessarily reassuming the role that the code was already running as. Although this practice and code style can still work with a configuration change (by adding an explicit self-reference to the role trust policy), the better practice will almost always be to remove this unnecessary behavior or code from your AWS environment going forward. By removing this unnecessary behavior, you save CPU, memory, and network resources.
Common mistakes when using Amazon EKS
Some users of the Amazon EKS service (or possibly their shell scripts) use the command line interface (CLI) command aws eks get-token to obtain an authentication token for use in managing a Kubernetes cluster. The command takes as an optional parameter a role ARN. That parameter allows a user to assume another role other than the one they are currently using before they call get-token. However, the CLI cannot call that API without already having an IAM identity. Some users might believe that they need to specify the role ARN of the role they are already using. We have updated the Amazon EKS documentation to make clear that this is not necessary.
Common mistakes when using AWS Lambda
Another example is the use of an sts:AssumeRole API call from a Lambda function. The function is already running in a preassigned role provided by user configuration within the Lambda service, or else it couldn’t successfully call any authenticated API action, including sts:AssumeRole. However, some Lambda functions call sts:AssumeRole with the target role being the very same role that the Lambda function has already been provided as part of its configuration. This call is unnecessary.
AWS Software Development Kits (SDKs) all have support for running in AWS Lambda environments and automatically using the credentials provided in that environment. We have updated the Lambda documentation to make clear that such STS calls are unnecessary.
Common mistakes when using Amazon ECS
Customers can associate an IAM role with an Amazon ECS task to give the task AWS credentials to interact with other AWS resources.
We detected ECS tasks that call sts:AssumeRole on the same role that was provided to the ECS task. Amazon ECS makes the role’s credentials available inside the compute resources of the ECS task, whether on Amazon EC2 or AWS Fargate, and these credentials can be used to access AWS services or resources as the IAM role associated with the ECS talk, without being called through sts:AssumeRole. AWS handles renewing the credentials available on ECS tasks before the credentials expire. AWS STS role assumption calls are unnecessary, because they simply create a new set of the same temporary role session credentials.
AWS SDKs all have support for running in Amazon ECS environments and automatically using the credentials provided in that ECS environment. We have updated the Amazon ECS documentation to make clear that calling sts:AssumeRole for an ECS task is unnecessary.
Common mistakes when using Amazon EC2
Users can configure an Amazon EC2 instance to contain an instance profile. This instance profile defines the IAM role that Amazon EC2 assigns the compute instance when it is launched and begins to run. The role attached to the EC2 instance enables your code to send signed requests to AWS services. Without this attached role, your code would not be able to access your AWS resources (nor would it be able to call sts:AssumeRole). The Amazon EC2 service handles renewing these temporary role session credentials that are assigned to the instance before they expire.
We have observed that workloads running on EC2 instances call sts:AssumeRole to assume the same role that is already associated with the EC2 instance and use the resulting role-session for communication with AWS services. These role assumption calls are unnecessary, because they simply create a new set of the same temporary role session credentials.
AWS SDKs all have support for running in Amazon EC2 environments and automatically using the credentials provided in that EC2 environment. We have updated the Amazon EC2 documentation to make clear that calling sts:AssumeRole for an EC2 instance with a role assigned is unnecessary.
For information on creating an IAM role, attaching that role to an EC2 instance, and launching an instance with an attached role, see “IAM roles for Amazon EC2” in the Amazon EC2 User Guide.
Other common mistakes
If your use case does not use any of these AWS execution environments, you might still experience an impact from this change. We recommend that you examine the roles in your account and identify scenarios where your code (or human use through the AWS CLI) results in a role assuming itself. We provide Amazon Athena and AWS CloudTrail Lake queries later in this post to help you locate instances where a role assumed itself. For each instance, you can evaluate whether a role assuming itself is the right operation for your needs.
Self-assumption with a scoped-down policy
The first pattern we have observed that is not a mistake is the use of self-assumption combined with a scoped-down policy. Some systems use this approach to provide different privileges for different use cases, all using the same underlying role. Customers who choose to continue with this approach can do so by adding the role to its own trust policy. While the use of scoped-down policies and the associated least-privilege approach to permissions is a good idea, we recommend that customers switch to using a second generic role and assume that role along with the scoped-down policy rather than using role self-assumption. This approach provides more clarity in CloudTrail about what is happening, and limits the possible iterations of role assumption to one round, since the second role should not be able to assume the first. Another possible approach in some cases is to limit subsequent assumptions is by using an IAM condition in the role trust policy that is no longer satisfied after the first role assumption. For example, for Lambda functions, this would be done by a condition checking for the presence of the “lambda:SourceFunctionArn” property; for EC2, by checking for presence of “ec2:SourceInstanceARN.”
Assuming an expected target compute role during development
Another possible reason for role self-assumption may result from a development practice in which developers attempt to normalize the roles that their code is running in between scenarios in which role credentials are not automatically provided by the environment, and scenarios where they are. For example, imagine a developer is working on code that she expects to run as a Lambda function, but during development is using her laptop to do some initial testing of the code. In order to provide the same execution role as is expected later in product, the developer might configure the role trust policy to allow assumption by a principal readily available on the laptop (an IAM Identity Center role, for example), and then assume the expected Lambda function execution role when the code is initializing. The same approach could be used on a build and test server. Later, when the code is deployed to Lambda, the actual role is already available and in use, but the code need not be modified in order to provide the same post-role-assumption behavior that existing outside of Lambda: the unmodified code can automatically assume what is in this case the same role, and proceed. While this approach is not illogical, as with the scope-down policy case we recommend that customers configure distinct roles for assumption both in development and test environments as well as later production environments. Again, this approach provides more clarity in CloudTrail about what is happening, and limits the possible iterations of role assumption to one round, since the second role should not be able to assume the first.
What should I do next?
If you receive an email or AWS Health Dashboard notification for an account, we recommend that you review your existing role trust policies and corresponding code. For those roles, you should remove the dependency on the old behavior, or if you can’t, update those role trust policies with an explicit self-referential permission grant. After the grace period expires on February 15, 2023, you will no longer be able to use the implicit self-referential permission grant behavior.
If you currently use the old behavior and need to continue to do so for a short period of time in the context of existing infrastructure as code or other automated processes that create new roles, you can do so by adding the role’s ARN to its own trust policy. We strongly encourage you to treat this as a temporary stop-gap measure, because in almost all cases it should not be necessary for a role to be able to assume itself, and the correct solution is to change the code that results in the unnecessary self-assumption. If for some reason that self-service solution is not sufficient, you can reach out to AWS Support to seek an accommodation of your use case for new roles or accounts.
If you make any necessary code or configuration changes and want to remove roles that are currently allow-listed, you can also ask AWS Support to remove those roles from the allow list so that their behavior follows the new model. Or, as previously noted, you can opt out of the old behavior at any time by creating a new role with a different ARN that has the desired identity-based and trust-policy–based permissions and substituting it for the allow-listed role. Another stop-gap type of option is to add an explicit deny that references the role to its own trust policy.
If you would like to understand better the history of your usage of role self-assumption in a given account or organization, you can follow these instructions on querying CloudTrail data with Athena and then use the following Athena query against your account or organization CloudTrail data, as stored in Amazon Simple Storage Services (Amazon S3). The results of the query can help you understand the scenarios and conditions and code involved. Depending on the size of your CloudTrail logs, you may need to follow the partitioning instructions to query subsets of your CloudTrail logs sequentially. If this query yields no results, the role self-assumption scenario described in this blog post has never occurred within the analyzed CloudTrail dataset.
SELECT eventid, eventtime, userIdentity.sessioncontext.sessionissuer.arn as RoleARN, split_part(userIdentity.principalId, ':', 2) as RoleSessionName from cloudtrail_logs t CROSS JOIN UNNEST(t.resources) unnested (resources_entry) where eventSource = 'sts.amazonaws.com' and eventName = 'AssumeRole' and userIdentity.type = 'AssumedRole' and errorcode IS NULL and substr(userIdentity.sessioncontext.sessionissuer.arn,12) = substr(unnested.resources_entry.ARN,12)
As another option, you can follow these instructions to set up CloudTrail Lake to perform a similar analysis. CloudTrail Lake allows richer, faster queries without the need to partition the data. As of September 20, 2022, CloudTrail Lake now supports import of CloudTrail logs from Amazon S3. This allows you to perform a historical analysis even if you haven’t previously enabled CloudTrail Lake. If this query yields no results, the scenario described in this blog post has never occurred within the analyzed CloudTrail dataset.
SELECT eventid, eventtime, userIdentity.sessioncontext.sessionissuer.arn as RoleARN, userIdentity.principalId as RoleIdColonRoleSessionName from $EDS_ID where eventSource = 'sts.amazonaws.com' and eventName = 'AssumeRole' and userIdentity.type = 'AssumedRole' and errorcode IS NULL and userIdentity.sessioncontext.sessionissuer.arn = element_at(resources,1).arn
Understanding the change: more details
To better understand the background of this change, we need to review the IAM basics of identity-based policies and resource-based policies, and then explain some subtleties and exceptions. You can find additional overview material in the IAM documentation.
The structure of each IAM policy follows the same basic model: one or more statements with an effect (allow or deny), along with principals, actions, resources, and conditions. Although the identity-based and resource-based policies share the same basic syntax and semantics, the former is associated with a principal, the latter with a resource. The main difference between the two is that identity-based policies do not specify the principal, because that information is supplied implicitly by associating the policy with a given principal. On the other hand, resource policies do not specify an arbitrary resource, because at least the primary identifier of the resource (for example, the bucket identifier of an S3 bucket) is supplied implicitly by associating the policy with that resource. Note that an IAM role is the only kind of AWS object that is both a principal and a resource.
In most cases, access to a resource within the same AWS account can be granted by either an identity-based policy or a resource-based policy. Consider an Amazon S3 example. An identity-based policy attached to an IAM principal that allows the s3:GetObject action does not require an equivalent grant in the S3 bucket resource policy. Conversely, an s3:GetObject permission grant in a bucket’s resource policy is all that is needed to allow a principal in the same account to call the API with respect to that bucket; an equivalent identity-based permission is not required. Either the identity-based policy or the resource-based policy can grant the necessary permission. For more information, see IAM policy types: How and when to use them.
However, in order to more tightly govern access to certain security-sensitive resources, such as AWS Key Management Service (AWS KMS) keys and IAM roles, those resource policies need to grant access to the IAM principal explicitly, even within the same AWS account. A role trust policy is the resource policy associated with a role that specifies which IAM principals can assume the role by using one of the sts:AssumeRole* API calls. For example, in order for RoleB to assume RoleA in the same account, whether or not RoleB’s identity-based policy explicitly allows it to assume RoleA, RoleA’s role trust policy must grant access to RoleB. Within the same account, an identity-based permission by itself is not sufficient to allow assumption of a role. On the other hand, a resource-based permission—a grant of access in the role trust policy—is sufficient. (Note that it’s possible to construct a kind of hybrid permission to a role by using both its resource policy and other identity-based policies. In that case, the role trust policy grants permission to the root principal ARN; after that, the identity-based policy of a principal in that account would need to explicitly grant permission to assume that role. This is analogous to the typical cross-account role trust scenario.)
Until now, there has been a nonintuitive exception to these rules for situations where a role assumes itself. Since a role is both a principal (potentially with an identity-based policy) and a resource (with a resource-based policy), it is in the unique position of being both a subject and an object within the IAM system, as well as being an object owned by itself rather than its containing account. Due to this ownership model, roles with identity-based permission to assume themselves implicitly trusted themselves as resources, and vice versa. That is to say, roles that had the privilege as principals to assume themselves implicitly trusted themselves as resources, without an explicit self-referential Allow in the role trust policy. Conversely, a grant of permission in the role trust policy was sufficient regardless of whether there was a grant in the same role’s identity-based policy. Thus, in the self-assumption case, roles behaved like most other resources in the same account: only a single permission was required to allow role self-assumption, either on the identity side or the resource side of their dual-sided nature. Because of a role’s implicit trust of itself as a resource, the role’s trust policy—which might otherwise limit assumption of the role with properties such as actions and conditions—was not applied, unless it contained an explicit deny of itself.
The following example is a role trust policy attached to the role named RoleA in account 123456789012. It grants explicit access only to the role named RoleB.
Assuming that the corresponding identity-based policy for RoleA granted the sts:AssumeRole action with regard to RoleA, this role trust policy provided that there were two roles that could assume RoleA: RoleB (explicitly referenced in the trust policy) and RoleA (assuming it was explicitly referenced in its identity policy). RoleB could assume RoleA only if it had the principal tag project:BlueSkyProject because of the trust policy condition. (The sts:TagSession permission is needed here in case tags need to be added by the caller as parted of the RoleAssumption call.) RoleA, on the other hand, did not need to meet that condition because it relied on a different explicit permission—the one granted in the identity-based policy. RoleA would have needed the principal tag project:BlueSkyProject to meet the trust policy condition if and only if it was relying on the trust policy to gain access through the sts:AssumeRole action; that is, in the case where its identity-based policy did not provide the needed privilege.
As we previously noted, after considering feedback from customers on this topic, AWS has decided that requiring self-referential role trust policy grants even in the case where the identity-based policy also grants access is the better approach to delivering consistency and visibility with regard to role behavior and privileges. Therefore, as of today, role assumption behavior requires an explicit self-referential permission in the role trust policy, and the actions and conditions within that policy must also be satisfied, regardless of the permissions expressed in the role’s identity-based policy. (If permissions in the identity-based policy are present, they must also be satisfied.)
Requiring self-reference in the trust policy makes role trust policy evaluation consistent regardless of which role is seeking to assume the role. Improved consistency makes role permissions easier to understand and manage, whether through human inspection or security tooling. This change also eliminates the possibility of continuing the lifetime of an otherwise temporary credential without explicit, trackable grants of permission in trust policies. It also means that trust policy constraints and conditions are enforced consistently, regardless of which principal is assuming the role. Finally, as previously noted, this change allows customers to create and understand role assumption permissions in a single place (the role trust policy) rather than two places (the role trust policy and the role identity policy). It increases the simplicity of role trust permission management: “what you see [in the trust policy] is what you get.”
Continuing with the preceding example, if you need to allow a role to assume itself, you now must update the role trust policy to explicitly allow both RoleB and RoleA. The RoleA trust policy now looks like the following:
Without this new principal grant, the role can no longer assume itself. The trust policy conditions are also applied, even if the role still has unconditioned access to itself in its identity-based policy.
Conclusion
In this blog post we’ve reviewed the old and new behavior of role assumption in the case where a role seeks to assume itself. We’ve seen that, according to our analysis of service metadata, the vast majority of role self-assumption behavior that relies solely on identity-based privileges is totally unnecessary, because the code (or human) who calls sts:AssumeRole is already, without realizing it, using the role’s credentials to call the AWS STS API. Eliminating that mistake will improve performance and decrease resource consumption. We’ve also explained in more depth the reasons for the old behavior and the reasons for making the change, and provided Athena and CloudTrail Lake queries that you can use to examine past or (in the case of allow-listed roles) current self-assumption behavior in your own environments. You can reach out to AWS Support or your customer account team if you need help in this effort.
If you currently use the old behavior and need to continue to do so, your primary option is to create an explicit allow for the role in its own trust policy. If that option doesn’t work due to operational constraints, you can reach out to AWS Support to seek an accommodation of your use case for new roles or new accounts. You can also ask AWS Support to remove roles from the allow-list if you want their behavior to follow the new model.
If you have feedback about this post, submit comments in the Comments section below. If you have questions about this post, start a new IAM-tagged discussion on AWS re:Post or contact AWS Support.
AWS would like to thank several customers and partners who highlighted this behavior as something they found surprising and unhelpful, and asked us to consider making this change. We would also like to thank independent security researcher Ryan Gerstenkorn who engaged with AWS on this topic and worked with us prior to this update.
Want more AWS Security news? Follow us on Twitter.
Earning and maintaining customer trust is an ongoing commitment at Amazon Web Services (AWS). Our customers’ security requirements drive the scope and portfolio of the compliance reports, attestations, and certifications we pursue. We’re excited to announce that AWS has achieved authorization under the Information System Security Management and Assessment Program (ISMAP) program, effective from April 1, 2022 to March 31, 2023. The authorization scope covers a total of 145 AWS services (an increase of 22 services over the previous authorization) across 22 AWS Regions, including the Asia Pacific (Tokyo) Region and the Asia Pacific (Osaka) Region. This is the second time AWS has undergone an assessment since ISMAP was first published by the ISMAP steering committee in March 2020.
ISMAP is a Japanese government program for assessing the security of public cloud services. The purpose of ISMAP is to provide a common set of security standards for cloud service providers (CSPs) to comply with as a baseline requirement for government procurement. ISMAP introduces security requirements for cloud domains, practices, and procedures that CSPs must implement. CSPs must engage with an ISMAP-approved third-party assessor to assess compliance with the ISMAP security requirements in order to apply as an ISMAP-registered CSP. The ISMAP program will evaluate the security of each CSP and register those that satisfy the Japanese government’s security requirements. Upon successful ISMAP registration of CSPs, government procurement departments and agencies can accelerate their engagement with the registered CSPs and contribute to the smooth introduction of cloud services in government information systems.
The achievement of this authorization demonstrates the proactive approach AWS has taken to help customers meet compliance requirements set by the Japanese government and to deliver secure AWS services to our customers. Service providers and customers of AWS can use the ISMAP authorization of AWS services to support their own ISMAP authorization programs. The full list of 145 ISMAP-authorized AWS services is available on the AWS Services in Scope by Compliance Program webpage, and you can also use the ISMAP Customer Package on AWS Artifact. You can confirm the AWS ISMAP authorization status and find detailed scope information on the ISMAP Portal.
As always, we are committed to bringing new services and Regions into the scope of our ISMAP program, based on your business needs. If you have any questions, don’t hesitate to contact your AWS Account Manager.
If you have feedback about this post, submit comments in the Comments section below. Want more AWS Security how-to content, news, and feature announcements? Follow us on Twitter.
Amazon EKS is a managed Kubernetes service that makes it easy for you to run Kubernetes on AWS and on premises. AWS Outposts is a family of fully managed solutions delivering AWS infrastructure and services to virtually any on-premises or edge location for a truly consistent hybrid experience.
To fully understand the benefits of local clusters for Amazon EKS on Outposts, I need to first share a bit of background.
Some customers use Outposts to deploy Kubernetes cluster nodes and pods close to the rest of their on-premises infrastructure. This allows their applications to benefit from low latency access to on-premises services and data while managing the cluster and the lifecycle of the nodes using the same AWS API, CLI, or AWS console as they do for their cloud-based clusters.
Until today, when you deployed Kubernetes applications on Outposts, you typically started by creating an Amazon EKS cluster in the AWS cloud. Then you deployed the cluster nodes on your Outposts machines. In this hybrid cluster scenario, the Kubernetes control plane runs in the parent Region of your Outposts, and the nodes are running on your on-premises Outposts. The Amazon EKS service communicates through the network with the nodes running on the Outposts machine.
But, remember: everything fails all the time. Customers told us the main challenge they have in this scenario is to manage site disconnections. This is something we cannot control, especially when you deploy Outposts on rough edges: areas with poor or intermittent network connections. When the on-premises facility is temporarily disconnected from the internet, the Amazon EKS control plane running in the cloud is unable to communicate with the nodes and the pods. Although the nodes and pods work perfectly and continue to serve the application on the on-premises local network, Kubernetes may consider them unhealthy and schedule them for replacement when the connection is reestablished (see pod eviction in Kubernetes documentation). This may lead to application downtimes when connectivity is restored.
To simplify this, we are giving you the ability to host your entire Amazon EKS cluster on Outposts. In this configuration, both the Kubernetes control plane and your worker nodes run locally on premises on your Outposts machine. That way, your cluster continues to operate even in the event of a temporary drop in your service link connection. You can perform cluster operations such as creating, updating, and scaling applications during network disconnects to the cloud.
Local clusters are identical to Amazon EKS in the cloud and automatically deploy the latest security patches to make it easy for you to maintain an up-to-date, secure cluster. You can use the same tooling you use with Amazon EKS in the cloud and the AWS Management Console for a single interface for your clusters running on Outposts and in AWS Cloud.
Let’s See It In Action Let’s see how we can use this new capability. For this demo, I will deploy the Kubernetes control plane on Amazon Elastic Compute Cloud (Amazon EC2) instances running on premises on an Outposts rack.
I use an Outposts rack already configured. If you want to learn how to get started with Outposts, you can read the steps on the Get Started with AWS Outposts page.
This demo has two parts. First, I create the cluster. Second, I connect to the cluster and create nodes.
Creating Cluster Before deploying the Amazon EKS local cluster on Outposts, I make sure I created an IAM cluster role and attached the AmazonEKSLocalOutpostClusterPolicy managed policy. This IAM cluster role will be used in cluster creation.
Then, I switch to the Amazon EKS dashboard, and I select Add Cluster, then Create.
On the following page, I chose the location of the Kubernetes control plane: the AWS Cloud or AWS Outposts. I select AWS Outposts and specify the Outposts ID.
The Kubernetes control plane on Outposts is deployed on three EC2 instances for high availability. That’s why I see three Replicas. Then, I choose the instance type according to the number of worker nodes needed for workloads. For example, to handle 0–20 worker nodes, it is recommended to use m5d.large EC2 instances.
On the same page, I specify configuration values for the Kubernetes cluster, such as its Name, Kubernetes version, and the Cluster service role that I created earlier.
On the next page, I configure the networking options. Since Outposts is an extension of an AWS Region, I need to use the VPC and Subnets used by Outposts to enable communication between Kubernetes control plane and worker nodes. For Security Groups, Amazon EKS creates a security group for local clusters that enables communication between my cluster and my VPC. I can also define additional security groups according to my application requirements.
As we run the Kubernetes control plane inside Outposts, the Cluster endpoint access can only be accessed privately. This means I can only access the Kubernetes cluster through machines that are deployed in the same VPC or over the local network via the Outposts local gateway with Direct VPC Routing.
On the next page, I define logging. Logging is disabled by default, and I may enable it as needed. For more details about logging, you can read the Amazon EKS control plane logging documentation.
The last screen allows me to review all configuration options. When I’m satisfied with the configuration, I select Create to create the cluster.
The cluster creation takes a few minutes. To check the cluster creation status, I can use the console or the terminal with the following command:
The Status section tells me when the cluster is created and active.
In addition to using the AWS Management Console, I can also create a local cluster using the AWS CLI. Here is the command snippet to create a local cluster with the AWS CLI:
Connecting to the Cluster The endpoint access for a local cluster is private; therefore, I can access it from a local gateway with Direct VPC Routing or from machines that are in the same VPC. To find out how to use local gateways with Outposts, you can follow the information on the Working with local gateways page. For this demo, I use an EC2 instance as a bastion host, and I manage the Kubernetes cluster using kubectl command.
The first thing I do is edit Security Groups to open traffic access from the bastion host. I go to the detail page of the Kubernetes cluster and select the Networking tab. Then I select the link in Cluster security group.
Then, I add inbound rules, and I provide access for the bastion host by specifying its IP address.
Once I’ve allowed the access, I create kubeconfig in the bastion host by running the command:
Finally, I use kubectl to interact with the Kubernetes API server, just like usual.
$ kubectl get nodes -o wide
NAME STATUS ROLES AGE VERSION INTERNAL-IP EXTERNAL-IP OS-IMAGE KERNEL-VERSION CONTAINER-RUNTIME
ip-10-X-Y-Z.us-west-2.compute.internal NotReady control-plane,master 10h v1.21.13 10.X.Y.Z <none> Bottlerocket OS 1.8.0 (aws-k8s-1.21) 5.10.118 containerd://1.6.6+bottlerocket
ip-10-X-Y-Z.us-west-2.compute.internal NotReady control-plane,master 10h v1.21.13 10.X.Y.Z <none> Bottlerocket OS 1.8.0 (aws-k8s-1.21) 5.10.118 containerd://1.6.6+bottlerocket
ip-10-X-Y-Z.us-west-2.compute.internal NotReady control-plane,master 9h v1.21.13 10.X.Y.Z <none> Bottlerocket OS 1.8.0 (aws-k8s-1.21) 5.10.118 containerd://1.6.6+bottlerocket
Kubernetes local clusters running on AWS Outposts run on three EC2 instances. We see on the output above that the status of three worker nodes is NotReady. This is because they are used by the control plane exclusively, and we cannot use them to schedule pods.
From this stage, you can deploy self-managed node groups using the Amazon EKS local cluster.
Pricing and Availability Amazon EKS local clusters are charged at the same price as traditional EKS clusters. It starts at $0.10/hour. The EC2 instances required to deploy the Kubernetes control plane and nodes on Outposts are included in the price of the Outposts. As usual, the pricing page has the details.
Amazon EKS local clusters are available in all AWS Regions where Outposts is available.
Amazon Simple Notification Service (Amazon SNS) now supports message signatures based on Secure Hash Algorithm 256 (SHA256) hashing. Amazon SNS signs the messages that are delivered from your Amazon SNS topic so that subscribed HTTP endpoints can verify the authenticity of the messages. In this blog post, we will show you how to enable message signatures based on SHA256 for your Amazon SNS topics.
About message signing verification
To verify the authenticity of a message sent to your HTTP endpoint by Amazon SNS, you can verify the message signature. There are two cases where we recommend verifying the authenticity of the message. The first is when Amazon SNS sends a message to an HTTP endpoint that you subscribed to a topic. The second is when Amazon SNS sends a confirmation message to your HTTP endpoint after the Subscribe or the Unsubscribe API actions. For more information, see Verifying the signatures of Amazon SNS messages in the Amazon SNS Developer Guide.
Amazon SNS now supports two message signature versions:
Signature version 1 – Amazon SNS creates the signature based on the SHA1 hash of the message.
Signature version 2 – Amazon SNS creates the signature based on the SHA256 hash of the message.
Amazon SNS adds the SignatureVersion property to the JSON payload of messages delivered to HTTP endpoints, as shown in the following code snippet. For more information on the JSON payload format, see Parsing message formats in the Amazon SNS Developer Guide.
What to consider before you enable message signatures based on SHA256 for your Amazon SNS topic
As an Amazon SNS topic owner, before you enable SHA256 support for your topic, we recommend communicating with the owners of the HTTP endpoints that are subscribed to your topic. They might need to update their message signature verification logic to accommodate the new signature version. If the endpoint owners are using the AWS SDK feature for verifying the Amazon SNS message signatures, they need to make sure that they are using one of the following versions of the AWS SDK: Java 1.12.285, JavaScript 0.3.5, Ruby 1.54.0, PHP 1.8.0 or .NET 3.7.3.96.
How to enable message signatures based on SHA256 for your Amazon SNS topic
Amazon SNS topic owners can now enable message signatures based on SHA256 hashing. In this post, you learned how to choose the hashing algorithm, either SHA256 or SHA1, for your SNS topic. For more information, see Verifying the signatures of Amazon SNS messages in the Amazon SNS Developer Guide, and SetTopicAttributes in the Amazon SNS API Reference.
For more serverless learning resources, visit Serverless Land.
If you have feedback about this post, submit comments in the Comments section below. If you have questions about this post, contact AWS Support.
Want more AWS Security how-to content, news, and feature announcements? Follow us on Twitter.
The AWS HITRUST Compliance Team is excited to announce that 154 Amazon Web Services (AWS) services are certified for the Health Information Trust Alliance (HITRUST) Common Security Framework (CSF) v9.6 for the 2022 cycle.
These 154 AWS services were audited by a third-party assessor and certified under the HITRUST CSF. The full list is now available on the AWS Services in Scope by Compliance Program page. As an AWS customer, you can view and download our HITRUST CSF certification at any time through AWS Artifact.
AWS HITRUST CSF certification is available for customer inheritance
As an AWS customer, you can deploy business solutions into the AWS Cloud environment and inherit the AWS HITRUST CSF certification, provided that your organization uses only in-scope services, and you properly apply the controls that your organization is responsible for as detailed in the HITRUST Shared Responsibility and Inheritance Program.
With 154 AWS services receiving HITRUST certification, as an AWS customer you can tailor your security control baselines to a variety of factors—including, but not limited to, your regulatory requirements and your organization type. The HITRUST CSF is widely adopted by leading organizations in a variety of industries as part of their approach to security and privacy. For more information, see the HITRUST website.
As always, we value your feedback and questions and are committed to helping you achieve and maintain the highest standard of security and compliance. Feel free to contact the team through AWS Compliance Contact Us. If you have feedback about this post, please submit comments in the Comments section below.
Want more AWS Security how-to content, news, and feature announcements? Follow us on Twitter.
Today, we announced direct VPC routing for AWS Outposts rack. This enables you to connect Outposts racks and on-premises networks using simplified IP address management. Direct VPC routing automatically advertises Amazon Virtual Private Cloud (Amazon VPC) subnet CIDR addresses to on-premises networks. This enables you to use the private IP addresses of resources in your VPC when communicating with your on-premises network. Furthermore, you can enable direct VPC routing using a self-serve process without needing to contact AWS.
If you’re unfamiliar, AWS Outposts rack, a part of the Outposts family, is a fully-managed service that offers the same AWS infrastructure, AWS services, APIs, and tools to virtually any on-premises datacenter or co-location space for a consistent hybrid experience. They’re ideal for workloads that require low-latency access to on-premises systems, local data processing, data residency, and migration of applications with local system interdependencies. Once installed, your Outposts rack becomes an extension of your VPC, and it’s managed using the same APIs, tools, and management controls that you already use in the cloud.
With direct VPC routing, you now have two options to configure and connect your Outposts rack to your on-premises networks. Previously, to configure network routing between an on-premises network and an Outposts rack, you needed to use Customer-owned IP addresses (CoIP). During an Outposts rack installation, this involved providing a separate IP address range/CIDR from your on-premises network for AWS to create an address pool, which is known as a CoIP pool. When an Amazon Elastic Compute Cloud (Amazon EC2) instance on your Outposts rack needed to communicate with your on-premises network, Outposts rack would perform a 1:1 network address translation (NAT) from the VPC private IP address to a CoIP address in the CoIP pool. Using CoIP means that you must manage both VPC and CoIP address pools, without overlap, and configure route propagation between the two sets of addresses. When adding a subnet to a VPC, you also needed to follow several steps to update route propagation between your networks to recognize the new subnet addresses.
Managing IP address ranges for AWS cloud and onsite resources, as well as dealing with CoIP ranges on Outposts rack, can be an operational burden. Although the option to use CoIP is still available and will continue to be fully supported, the new direct VPC routing option simplifies your IP address management. Automatic advertisement of CIDR addresses for subnets, including new subnets added in the future, between the VPC and your Outposts rack, removes the need for you to reconfigure IP addresses. This also keeps route propagation up-to-date, thereby saving you time and effort. Furthermore, as mentioned earlier, you can enable all of this with a self-serve option.
Enabling Direct VPC Routing You can select either CoIP or direct VPC routing approaches and utilize a new self-service API, CreateLocalGatewayRouteTable, to configure direct VPC routing for both new and existing Outposts racks. This eliminates the need to contact AWS to enable the configuration. To enable direct VPC routing, simply set the mode property in the CreateLocalGatewayRouteTable API’s request parameters to the value direct-vpc-routing. If you’re already using CoIP, then you must delete and recreate the route table that’s propagating traffic between the Outposts rack and your on-premises network.
The following example diagram, taken from the user guide, illustrates the setup for an Outposts rack running several Amazon EC2 instances and connected to an on-premises network, with automatic address advertisement. Note that private IP address ranges are utilized across the Outposts rack resources and the on-premises network.
Get started with Direct VPC Routing today The option to enable direct VPC routing is available now for both new and existing Outposts racks. As mentioned earlier, the option to use CoIP will continue to be supported, but now you can choose between direct VPC routing and CoIP based on your on-premises networking needs. Direct VPC routing is available in all AWS Regions where Outposts rack is supported.
To provide the best experiences, we use technologies like cookies to store and/or access device information. Consenting to these technologies will allow us to process data such as browsing behavior or unique IDs on this site. Not consenting or withdrawing consent, may adversely affect certain features and functions.
Functional
Always active
The technical storage or access is strictly necessary for the legitimate purpose of enabling the use of a specific service explicitly requested by the subscriber or user, or for the sole purpose of carrying out the transmission of a communication over an electronic communications network.
Preferences
The technical storage or access is necessary for the legitimate purpose of storing preferences that are not requested by the subscriber or user.
Statistics
The technical storage or access that is used exclusively for statistical purposes.The technical storage or access that is used exclusively for anonymous statistical purposes. Without a subpoena, voluntary compliance on the part of your Internet Service Provider, or additional records from a third party, information stored or retrieved for this purpose alone cannot usually be used to identify you.
Marketing
The technical storage or access is required to create user profiles to send advertising, or to track the user on a website or across several websites for similar marketing purposes.


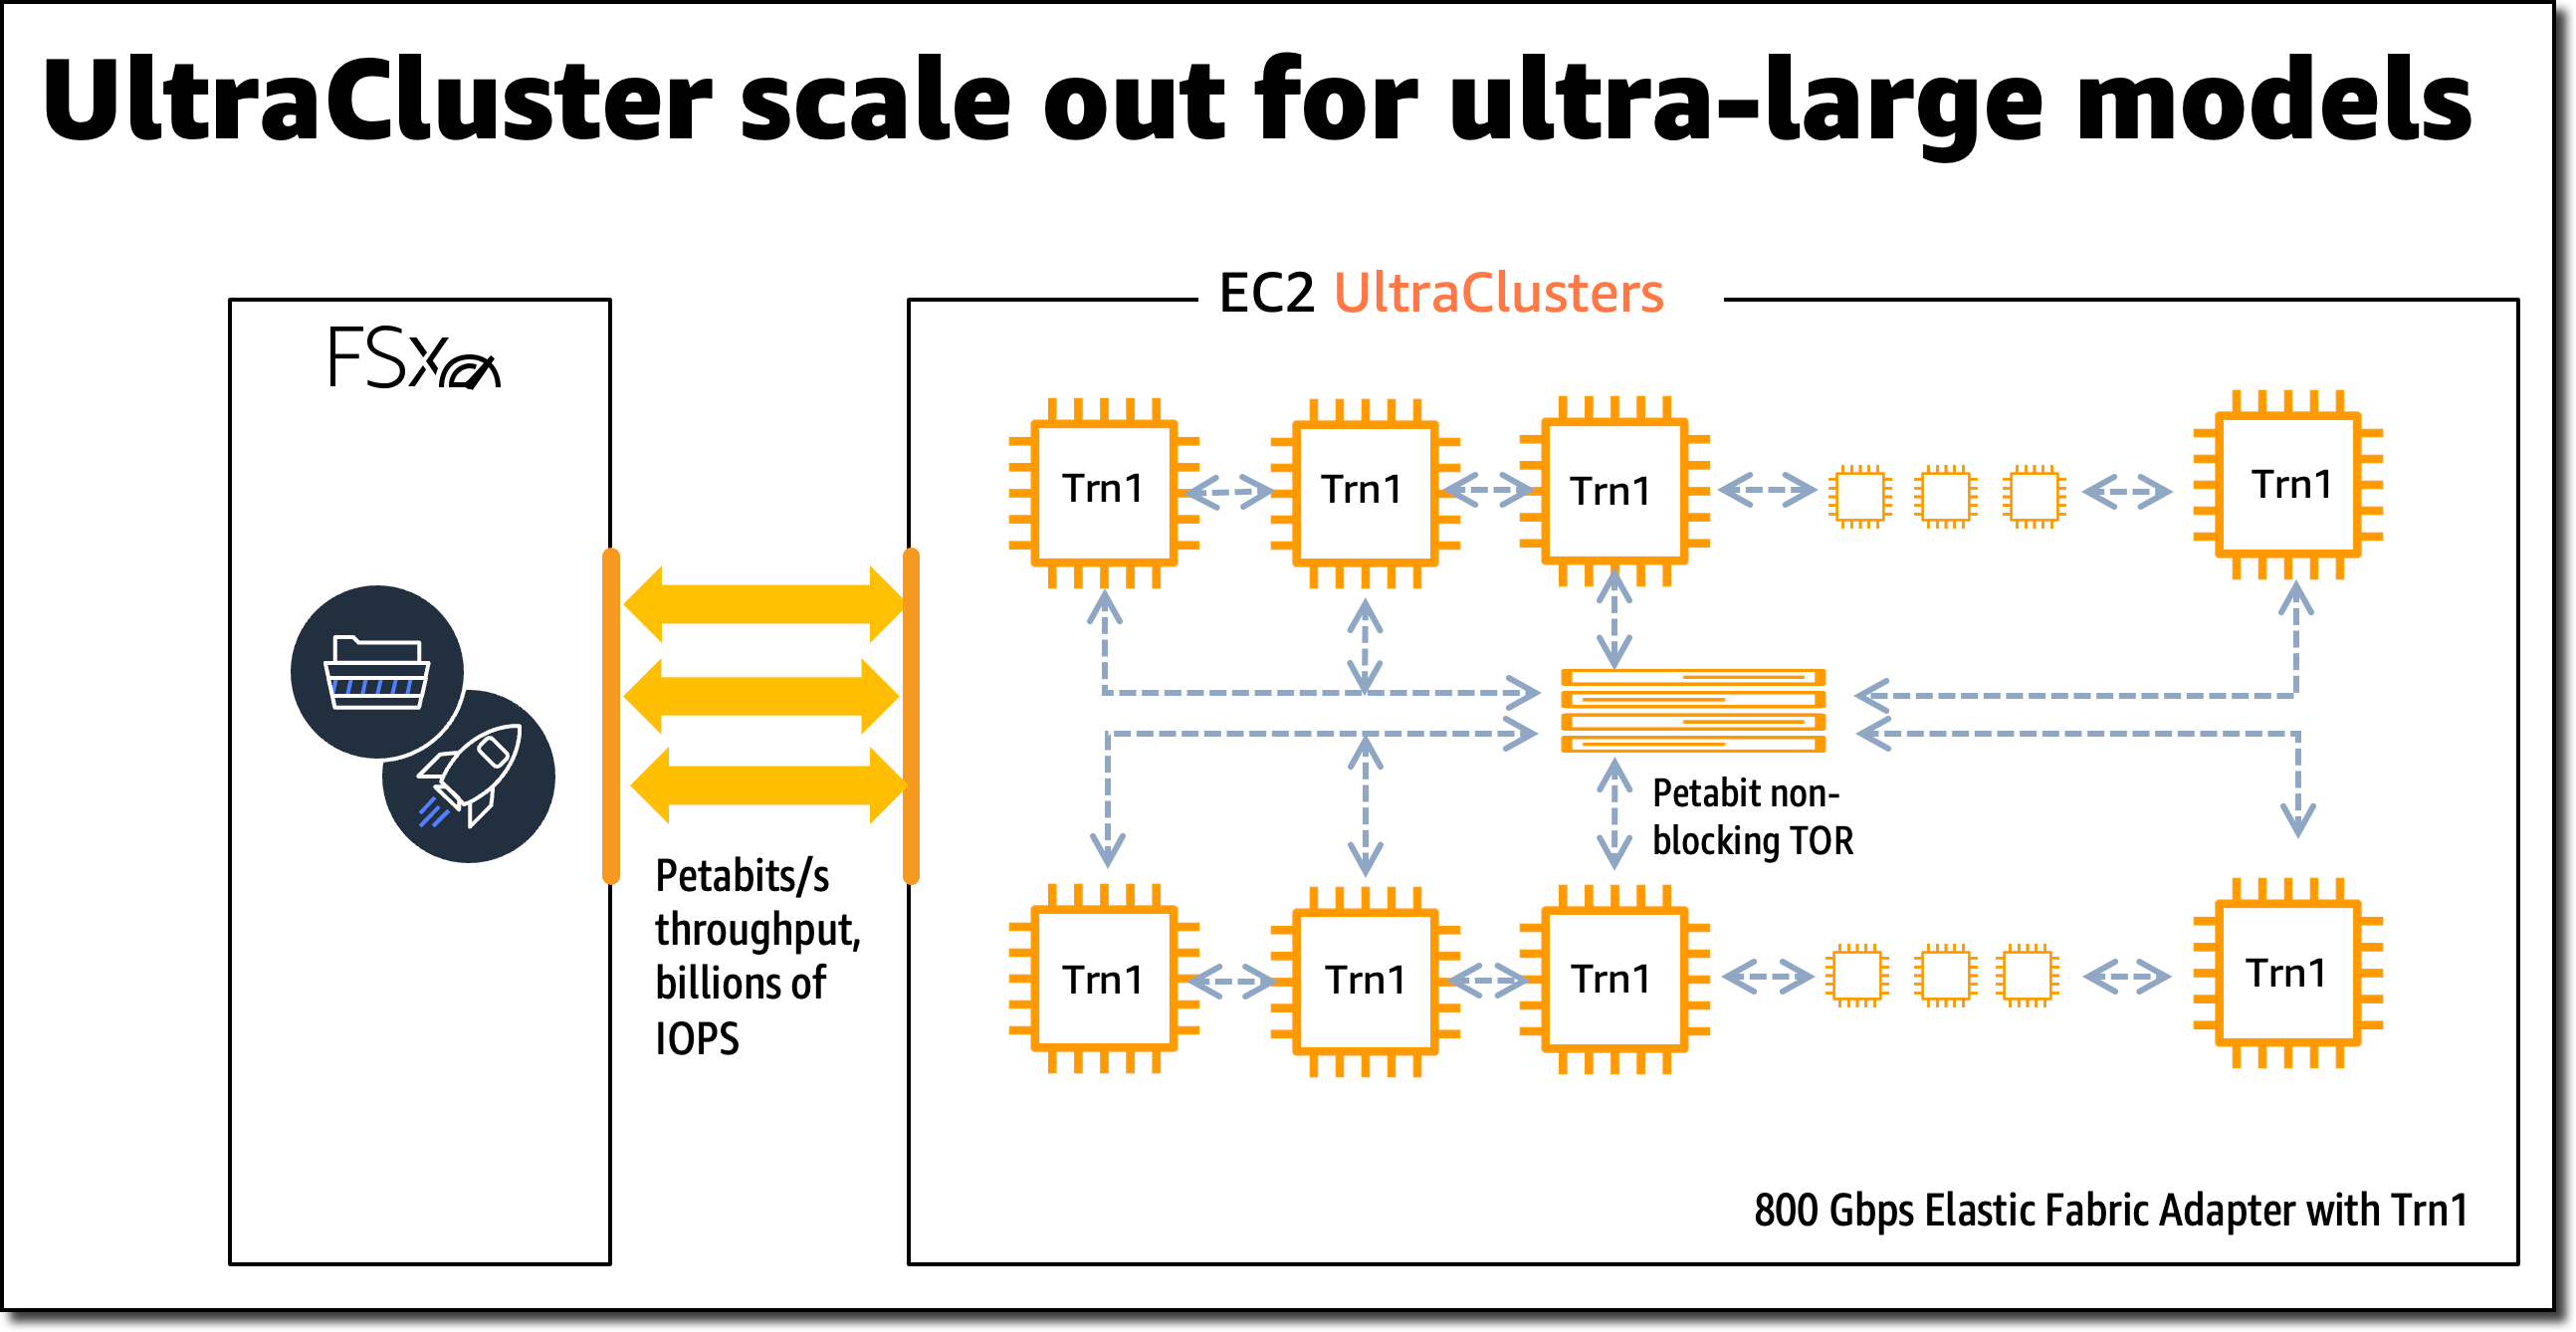
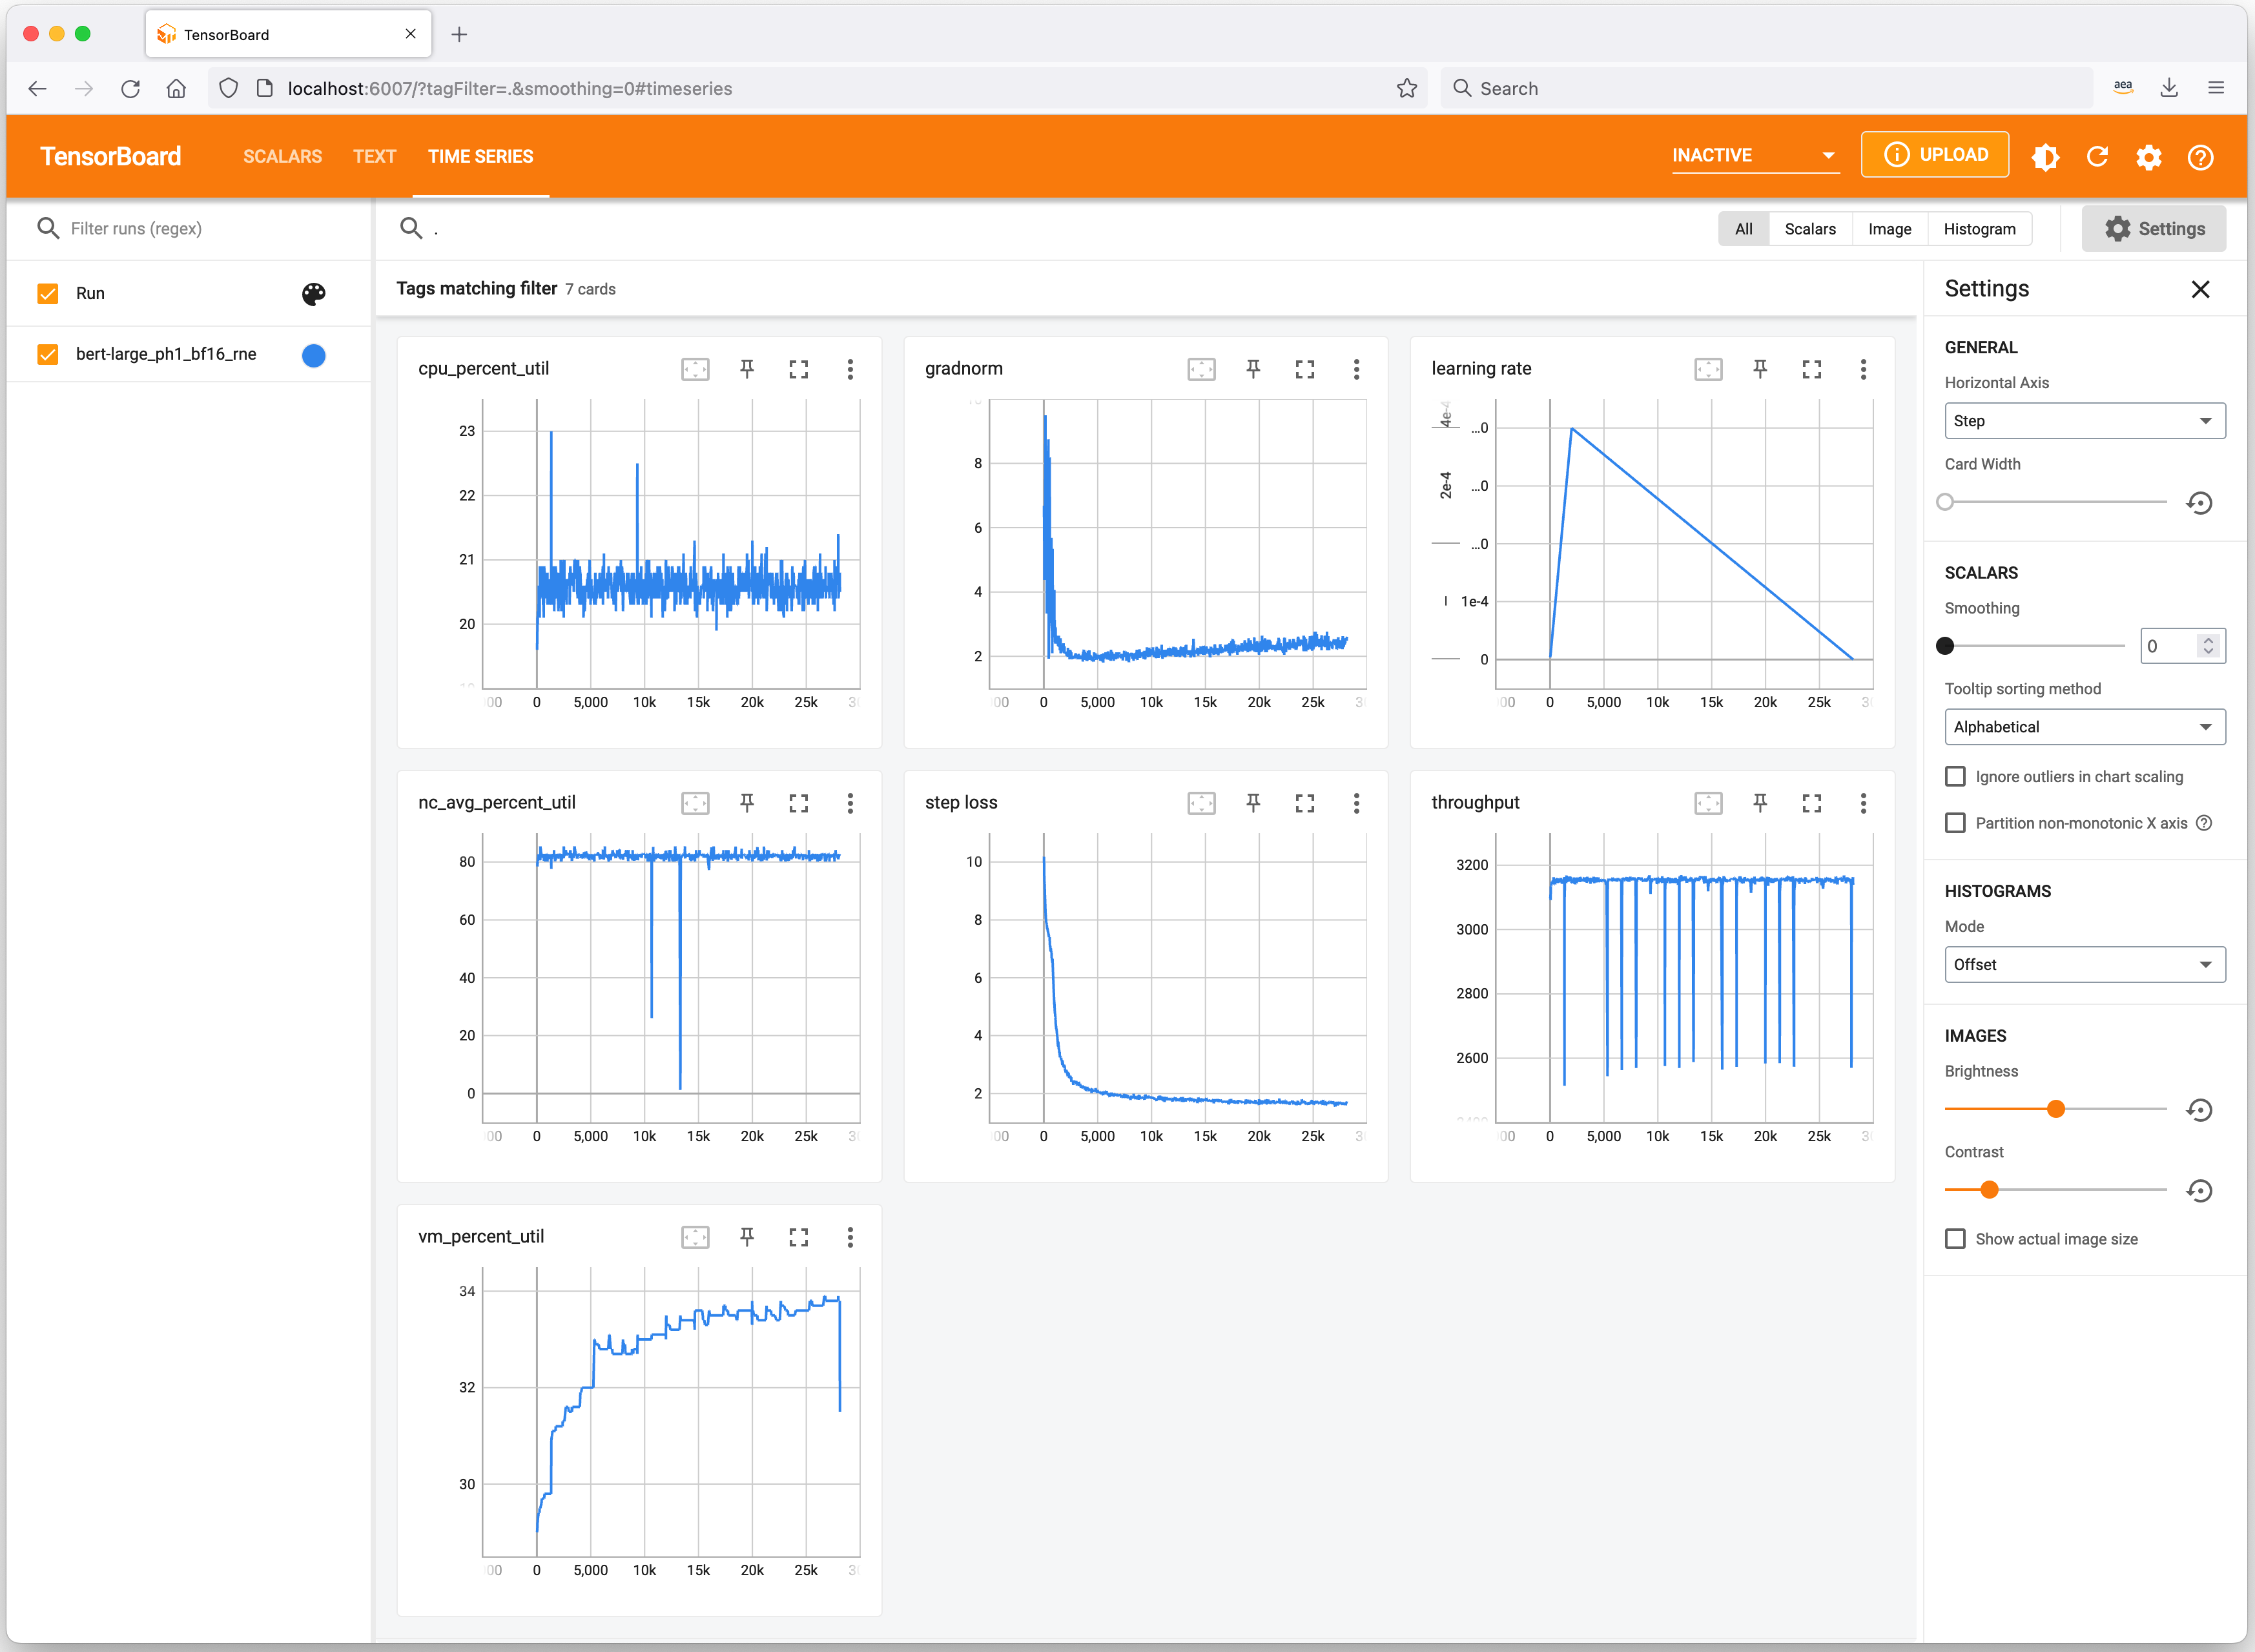
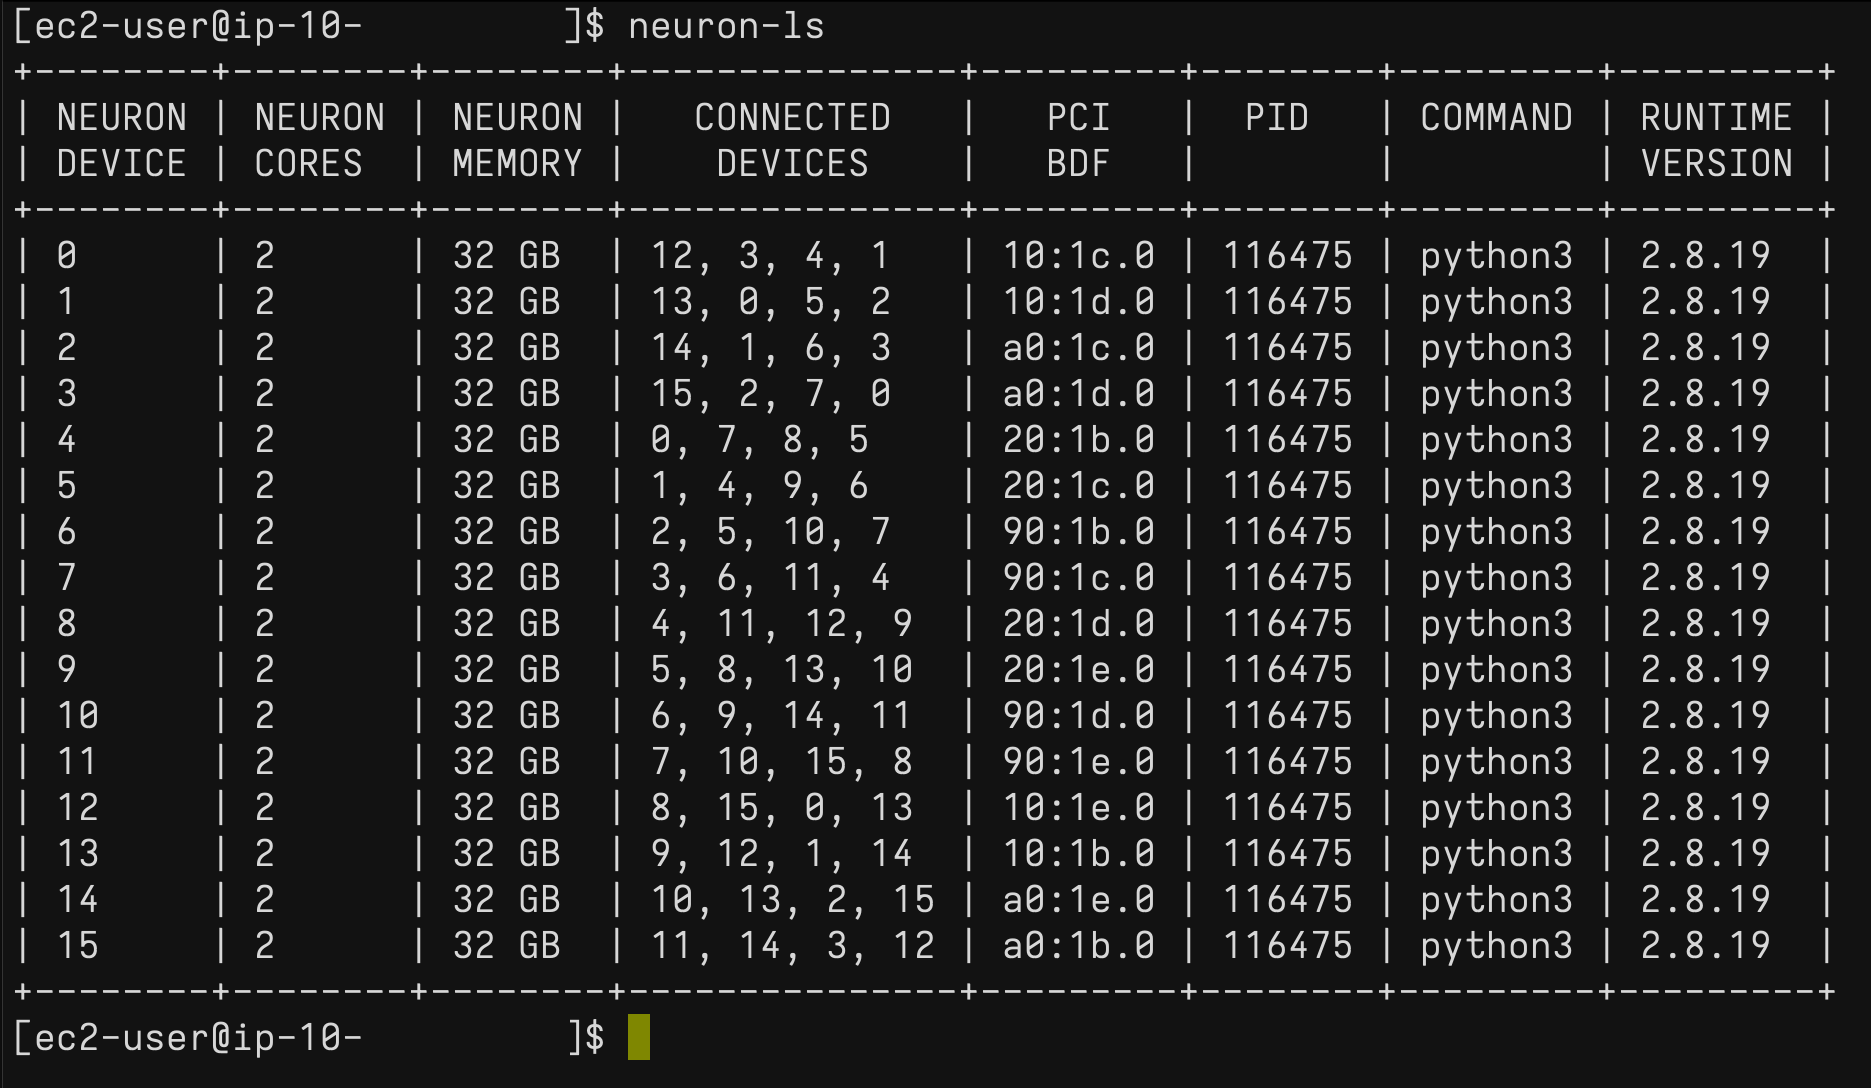


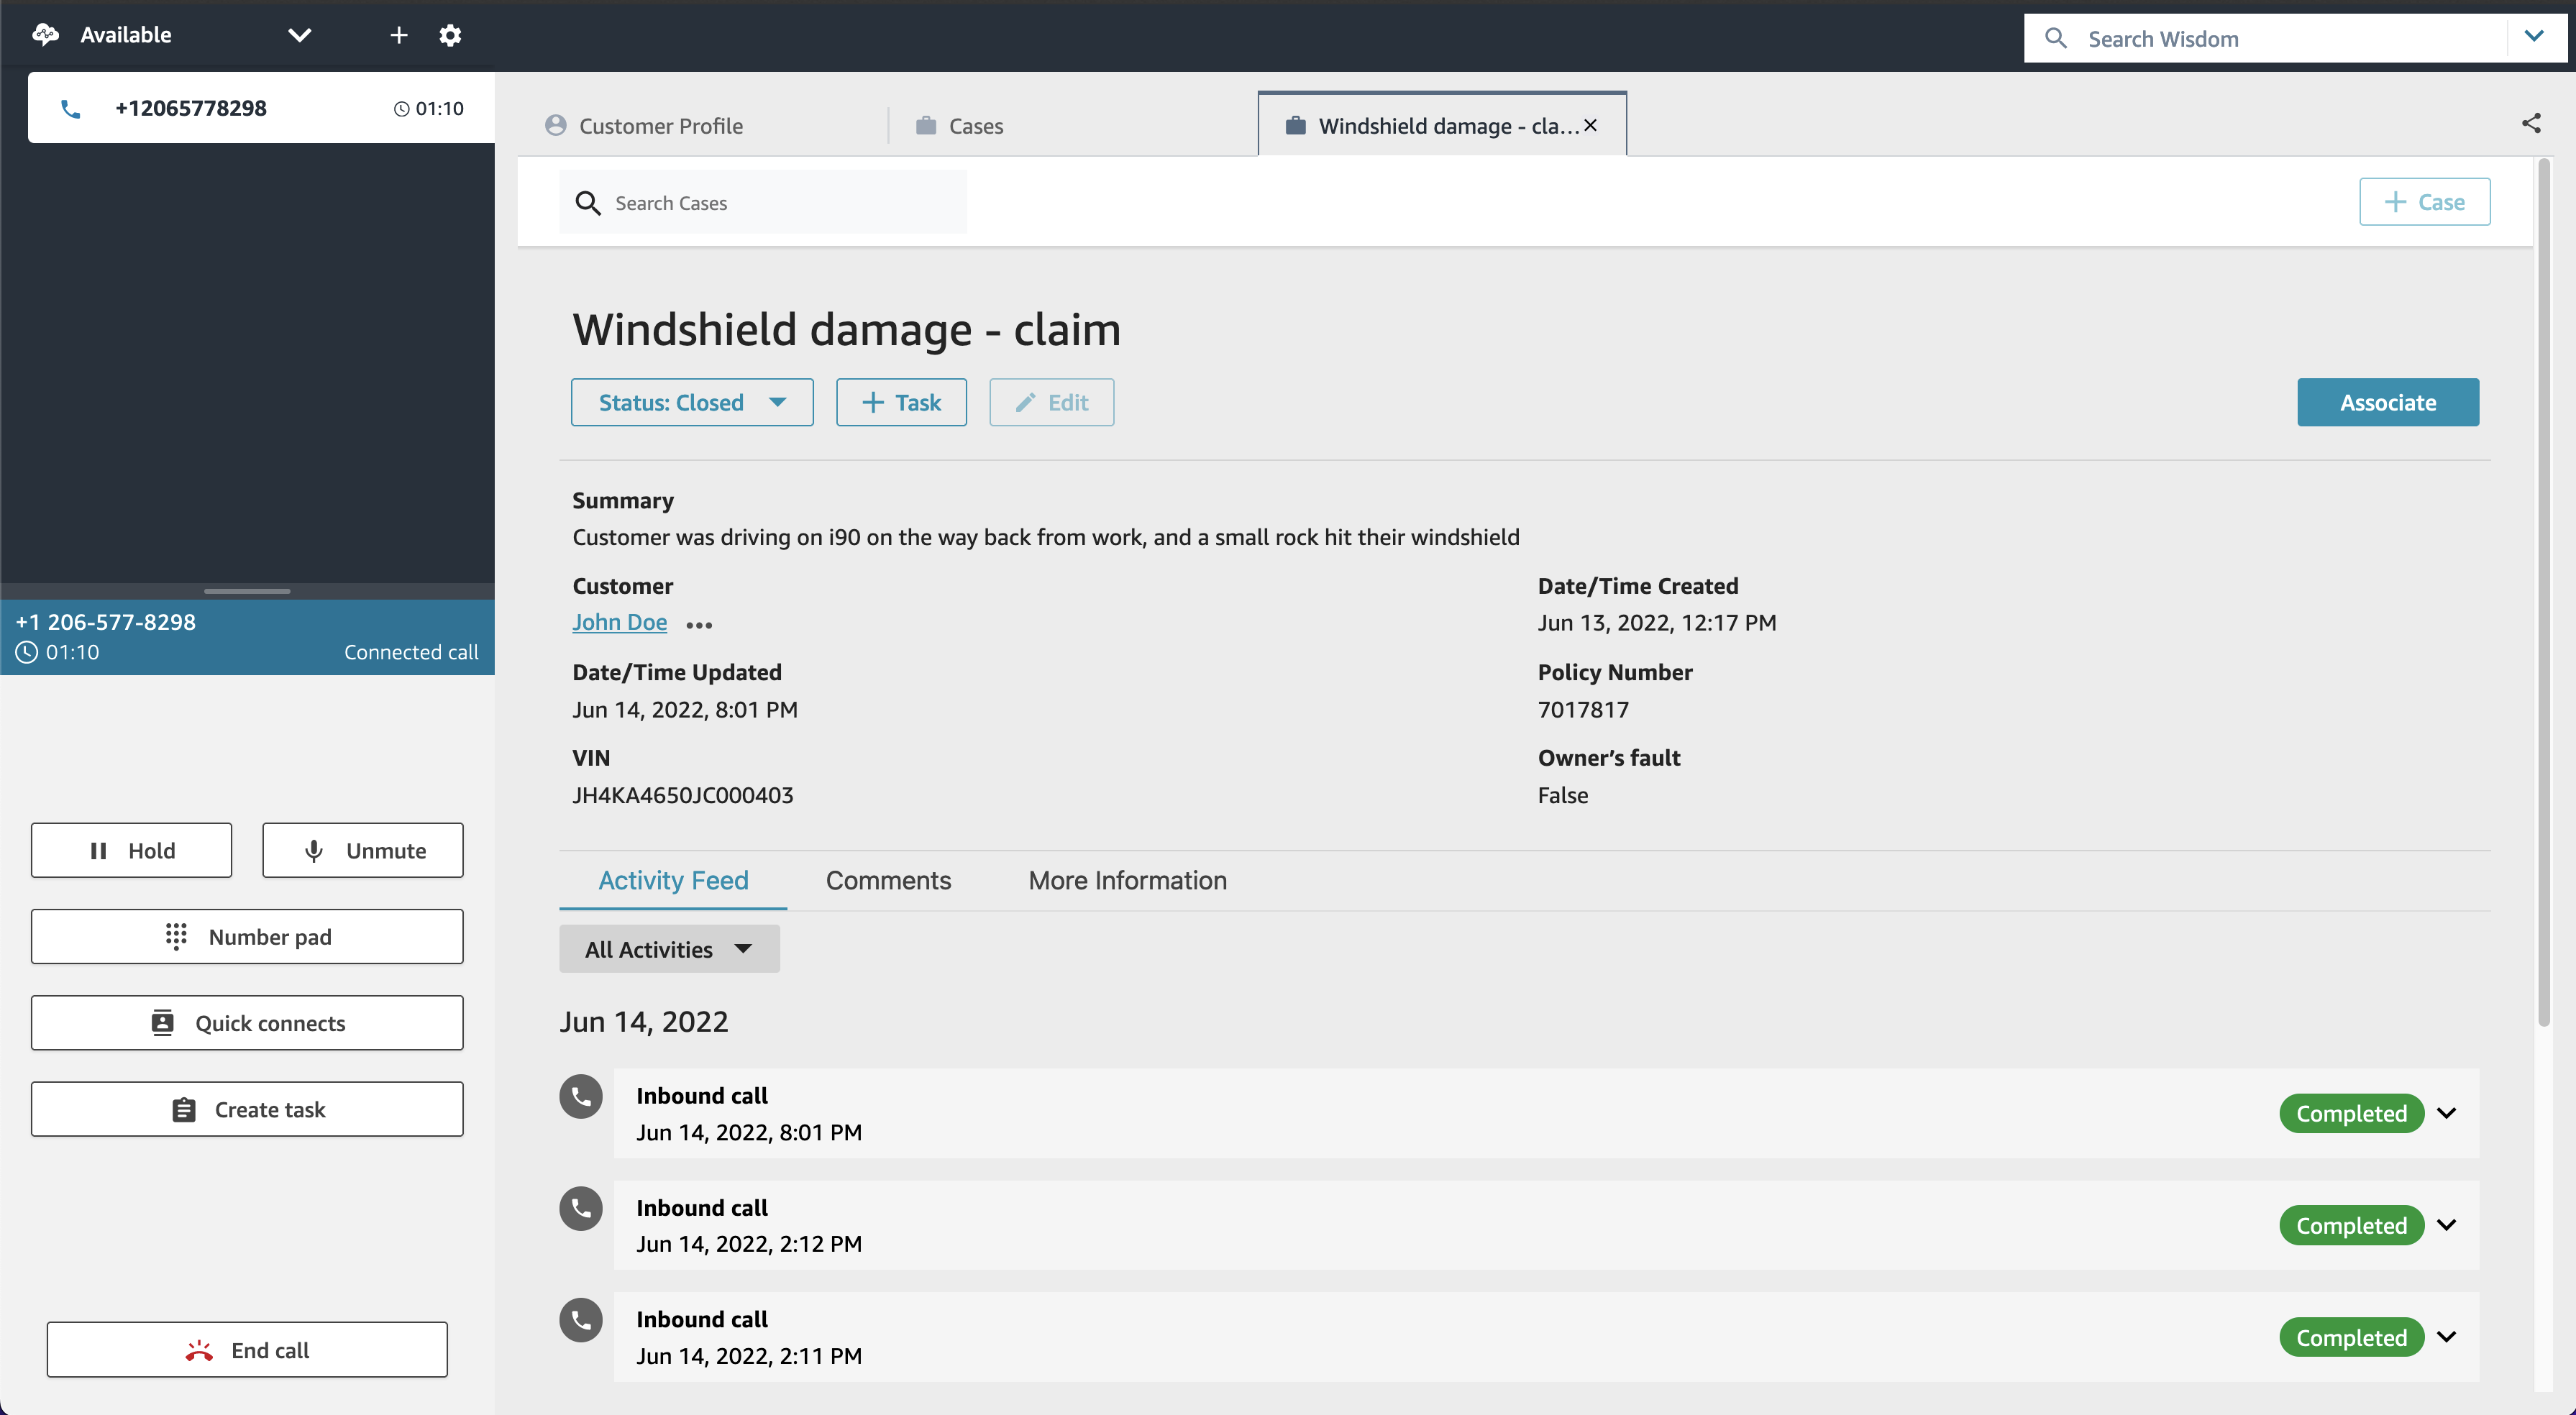
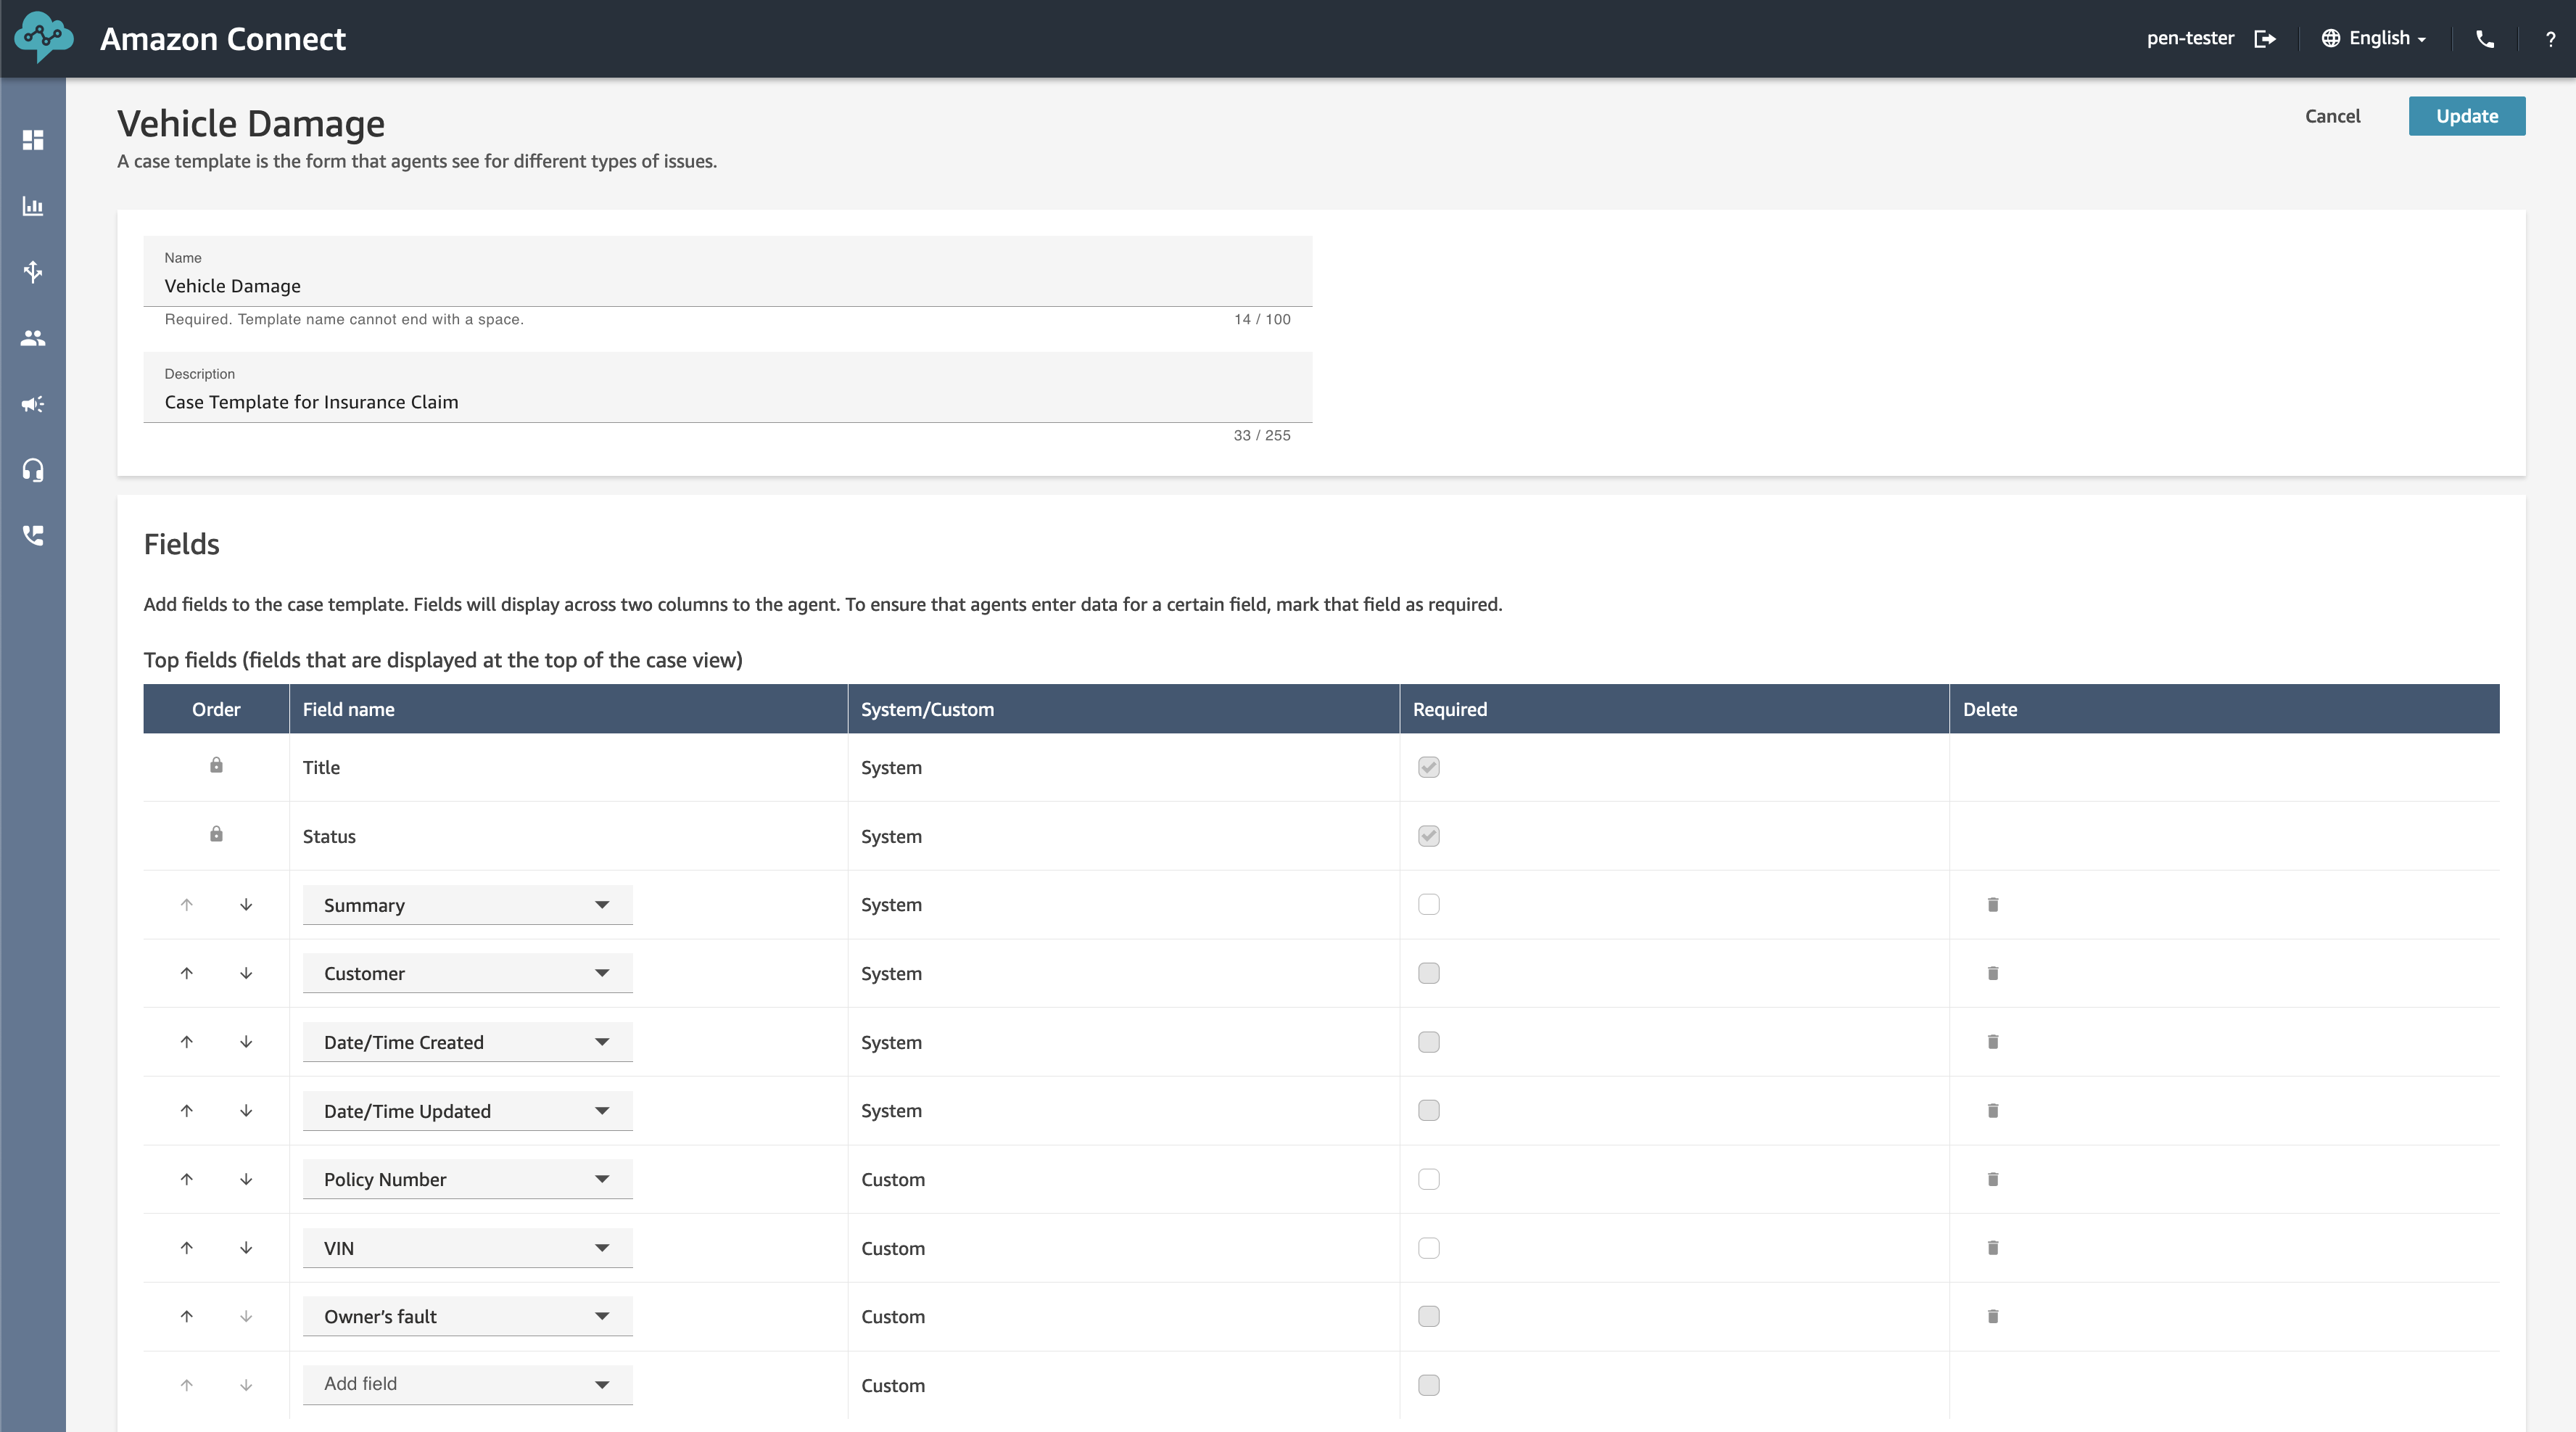
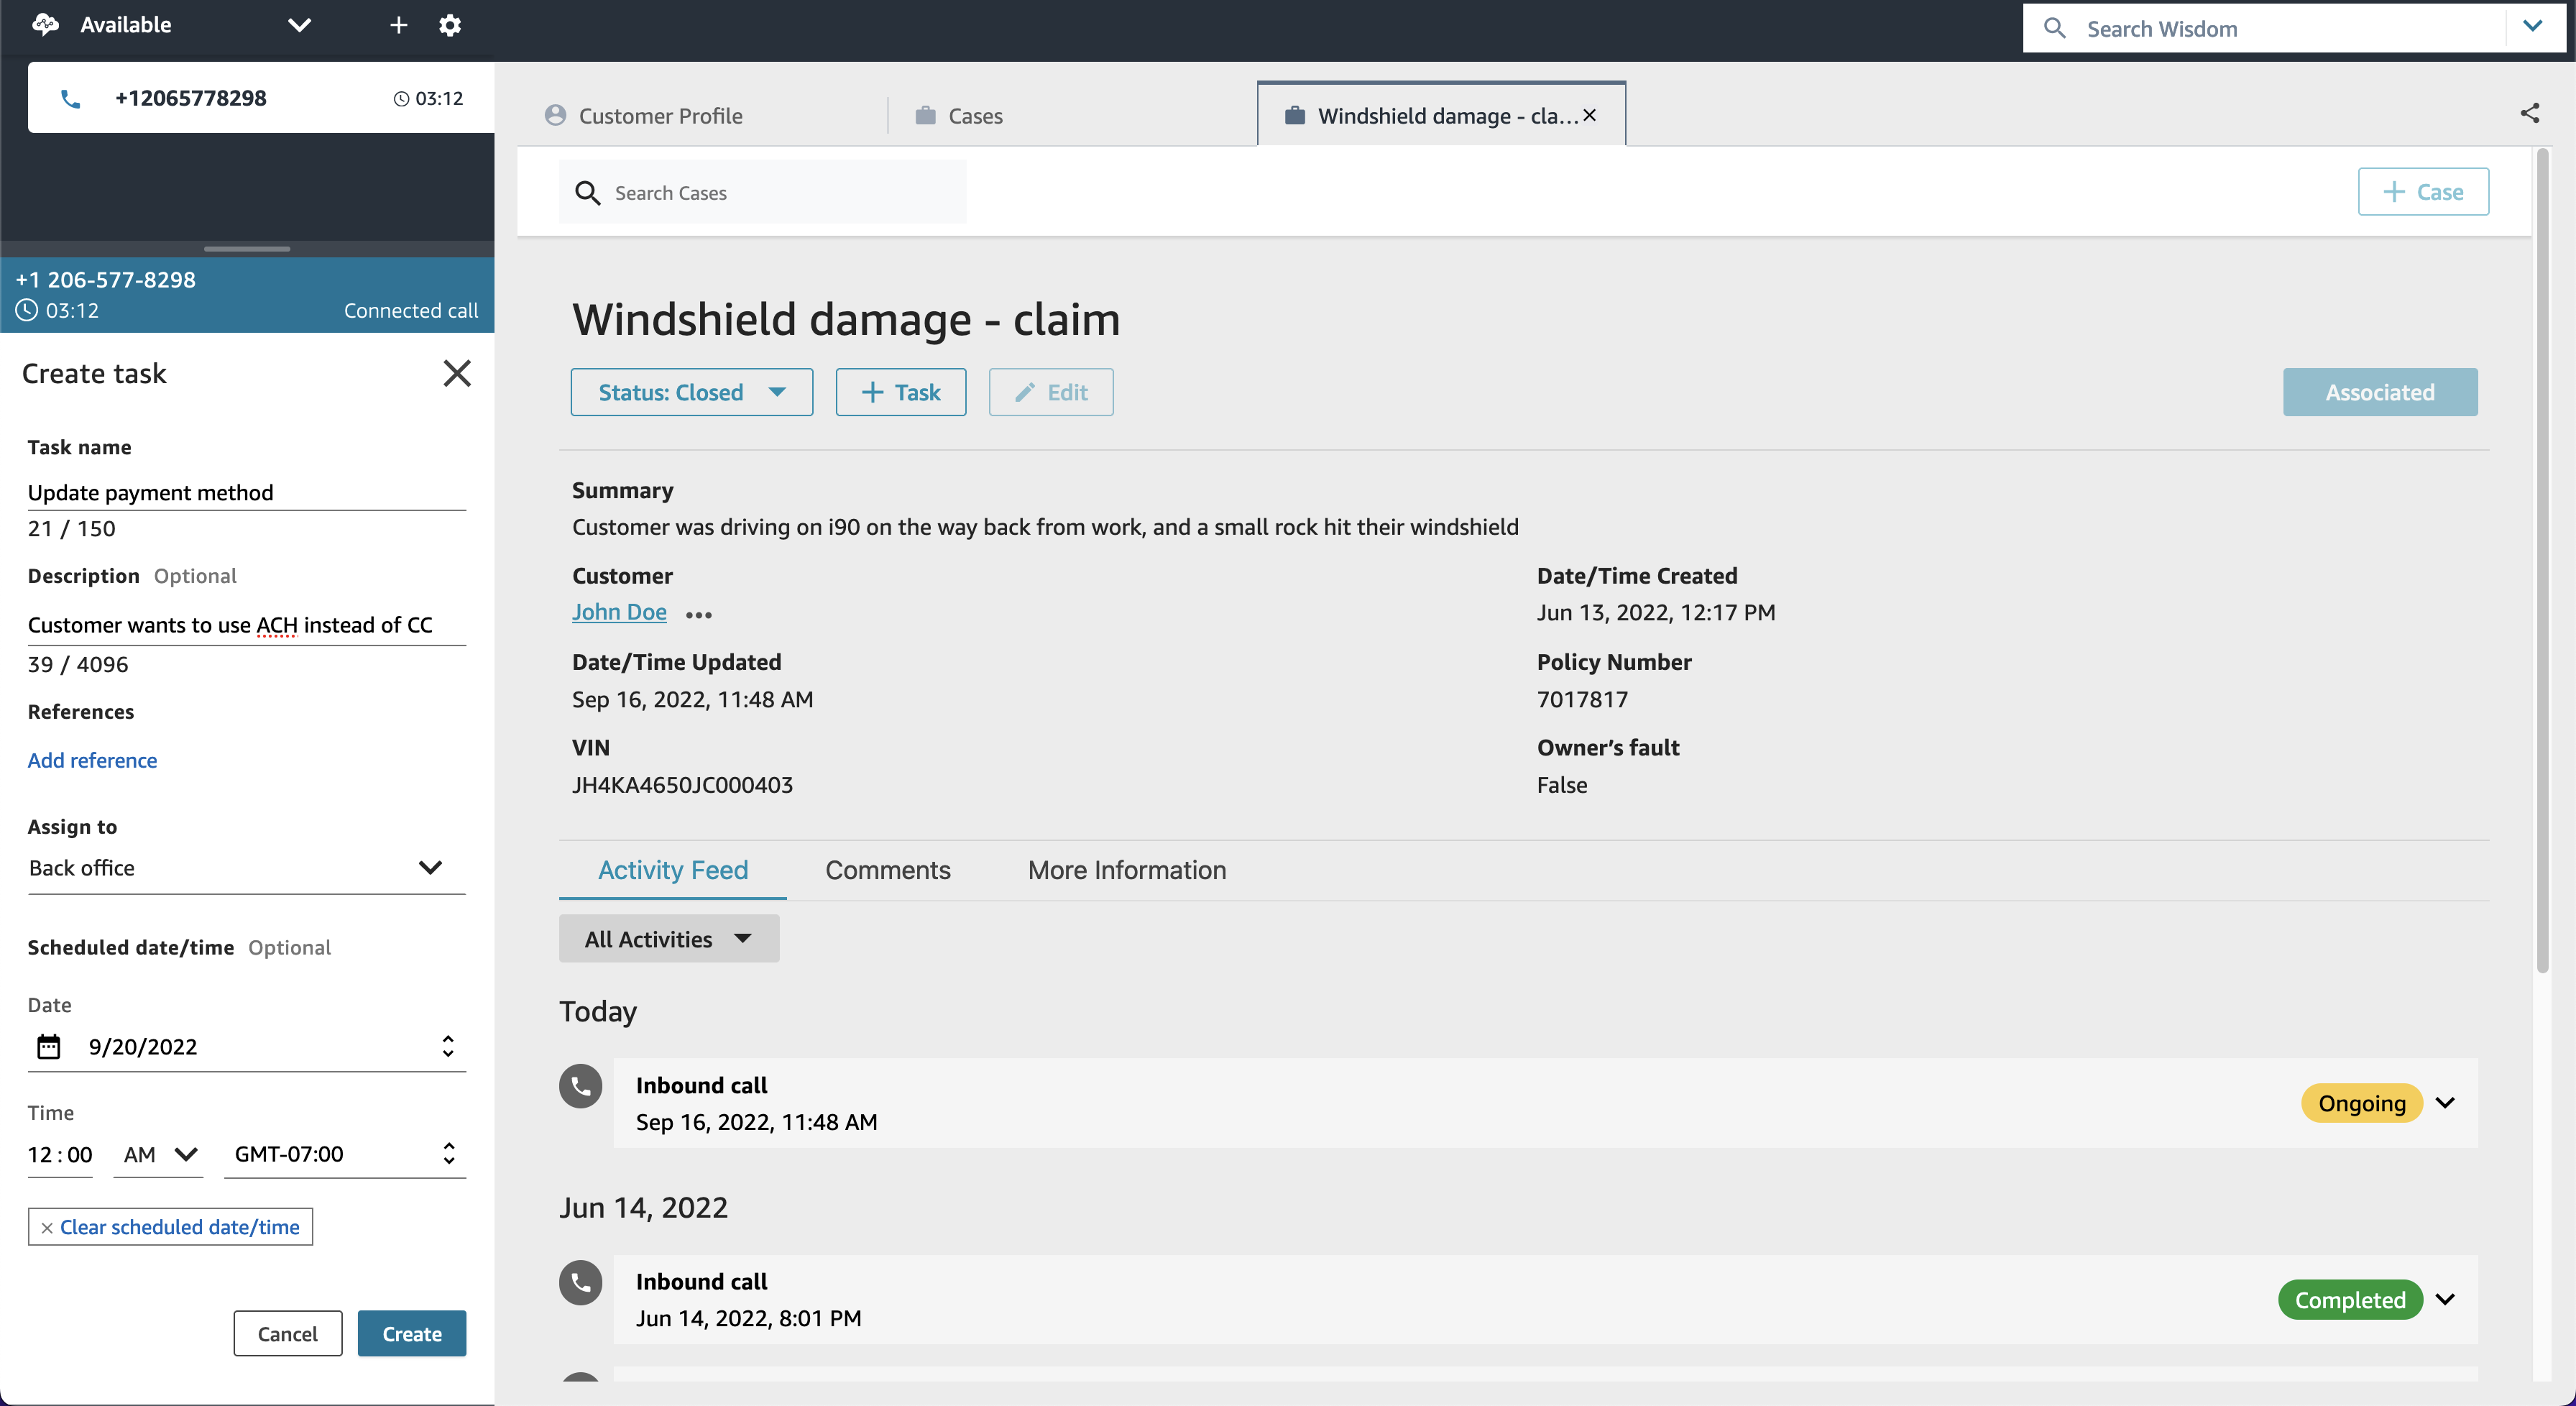

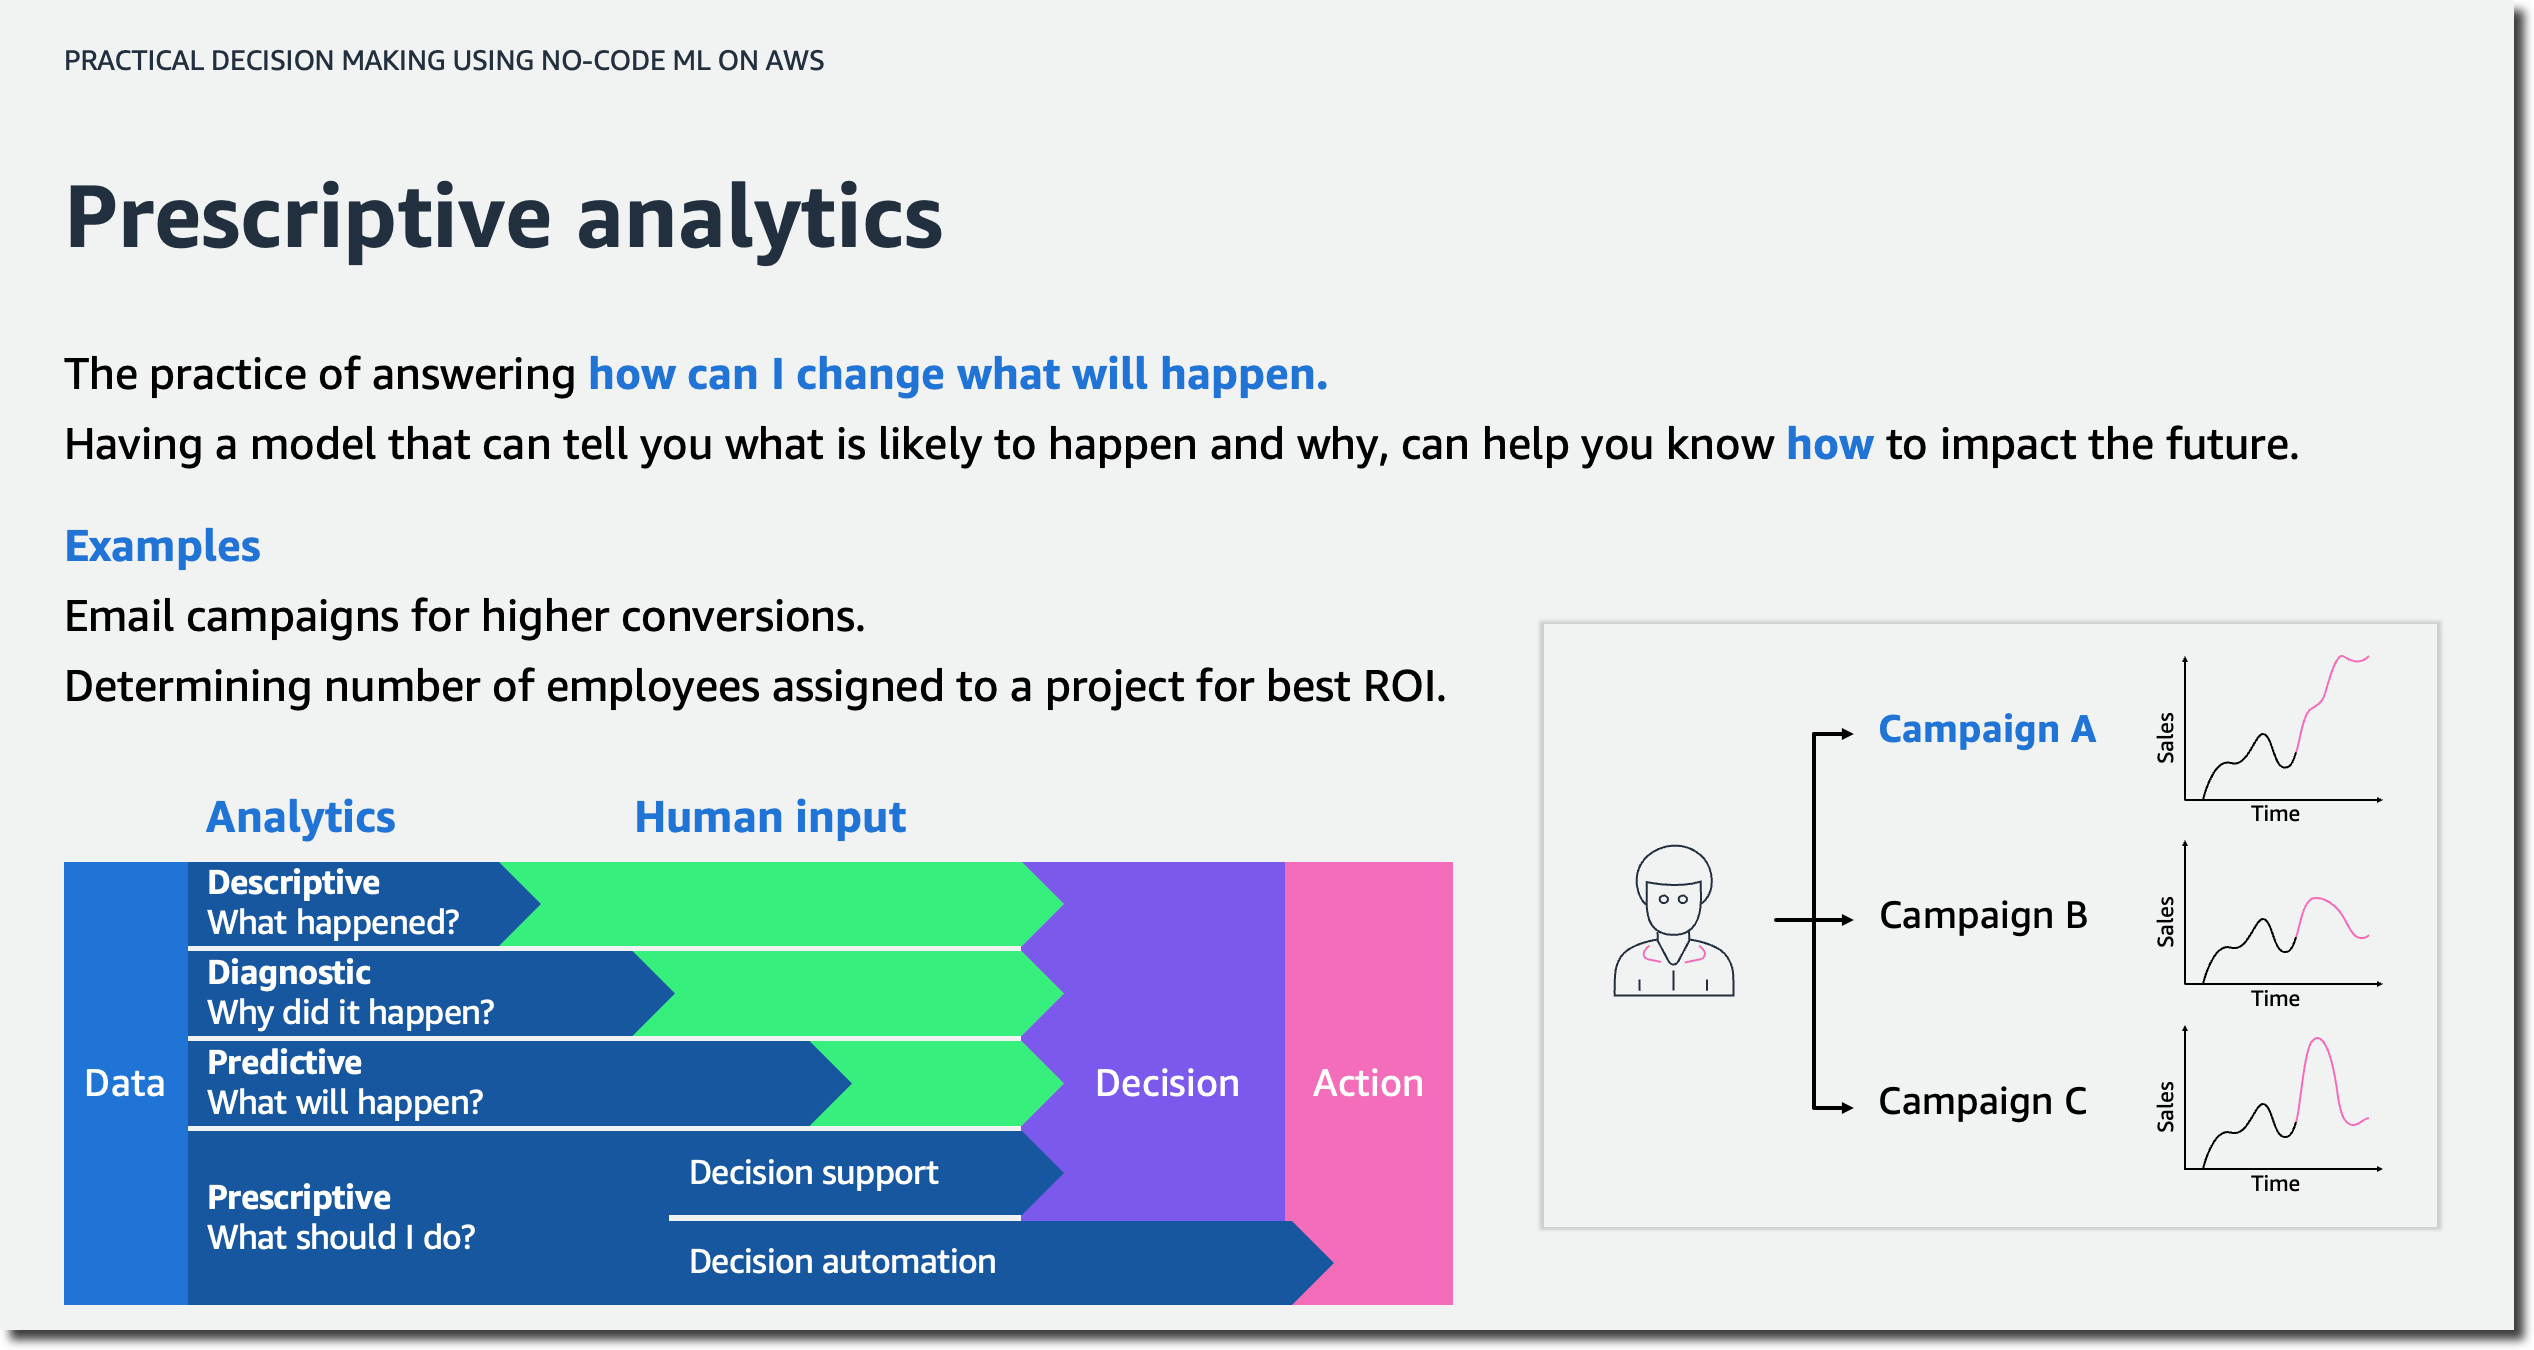
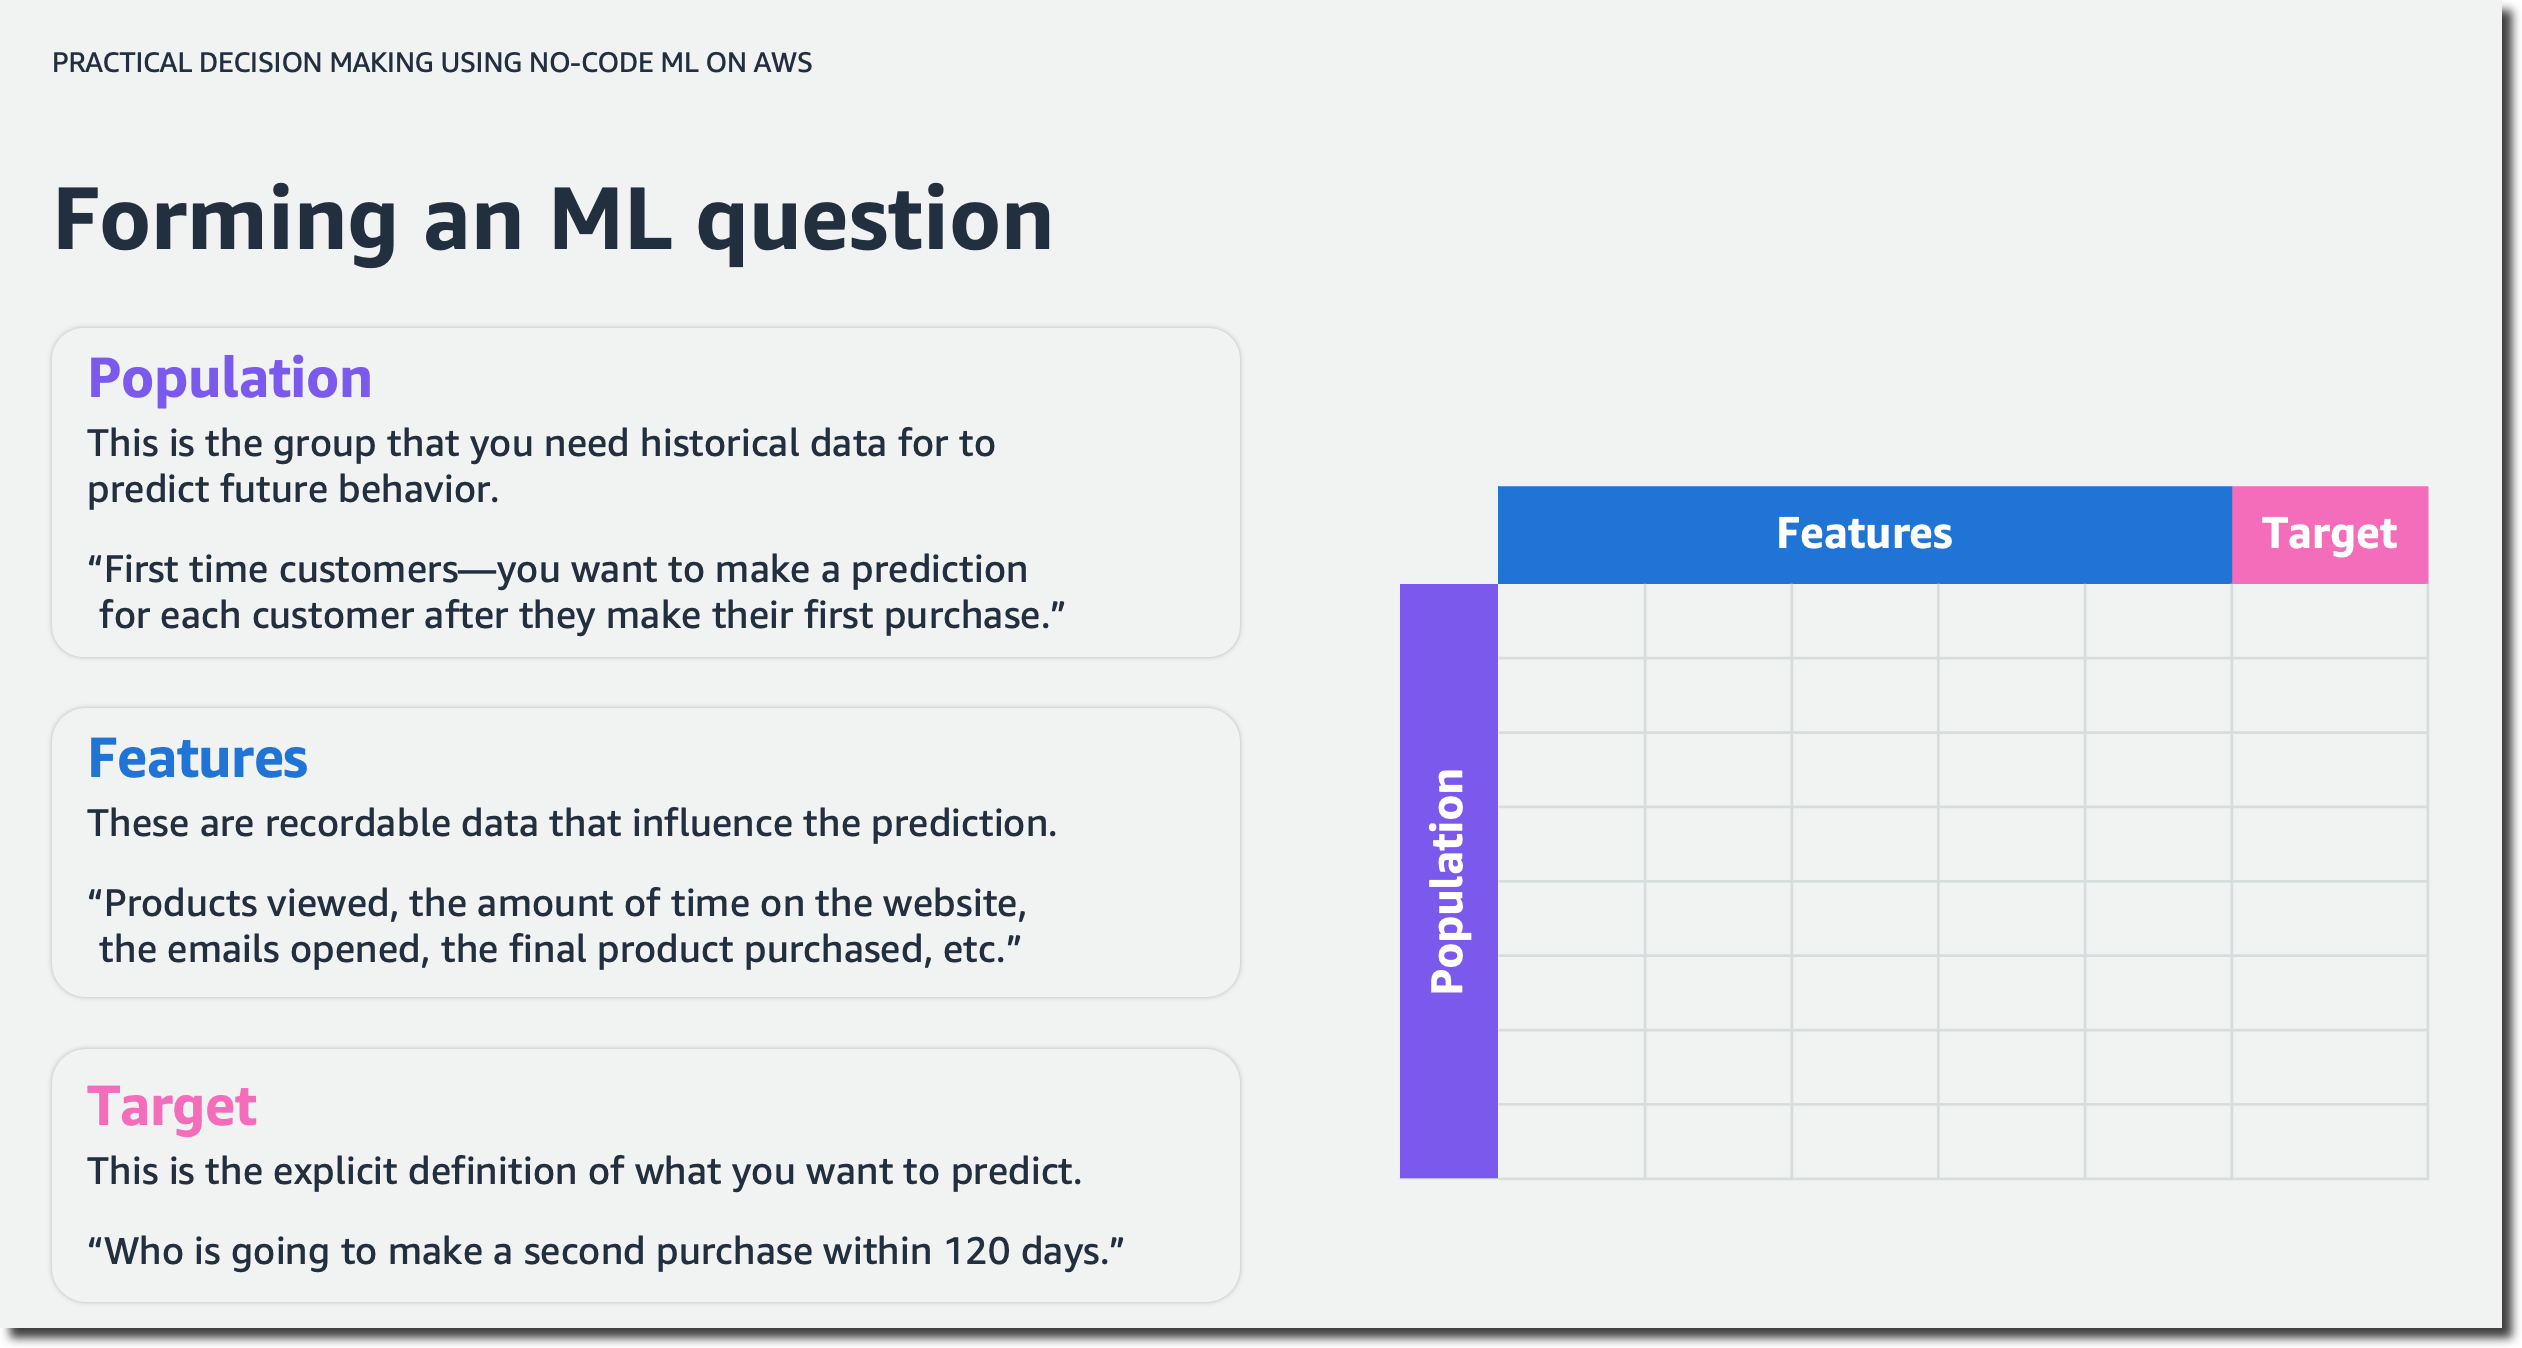

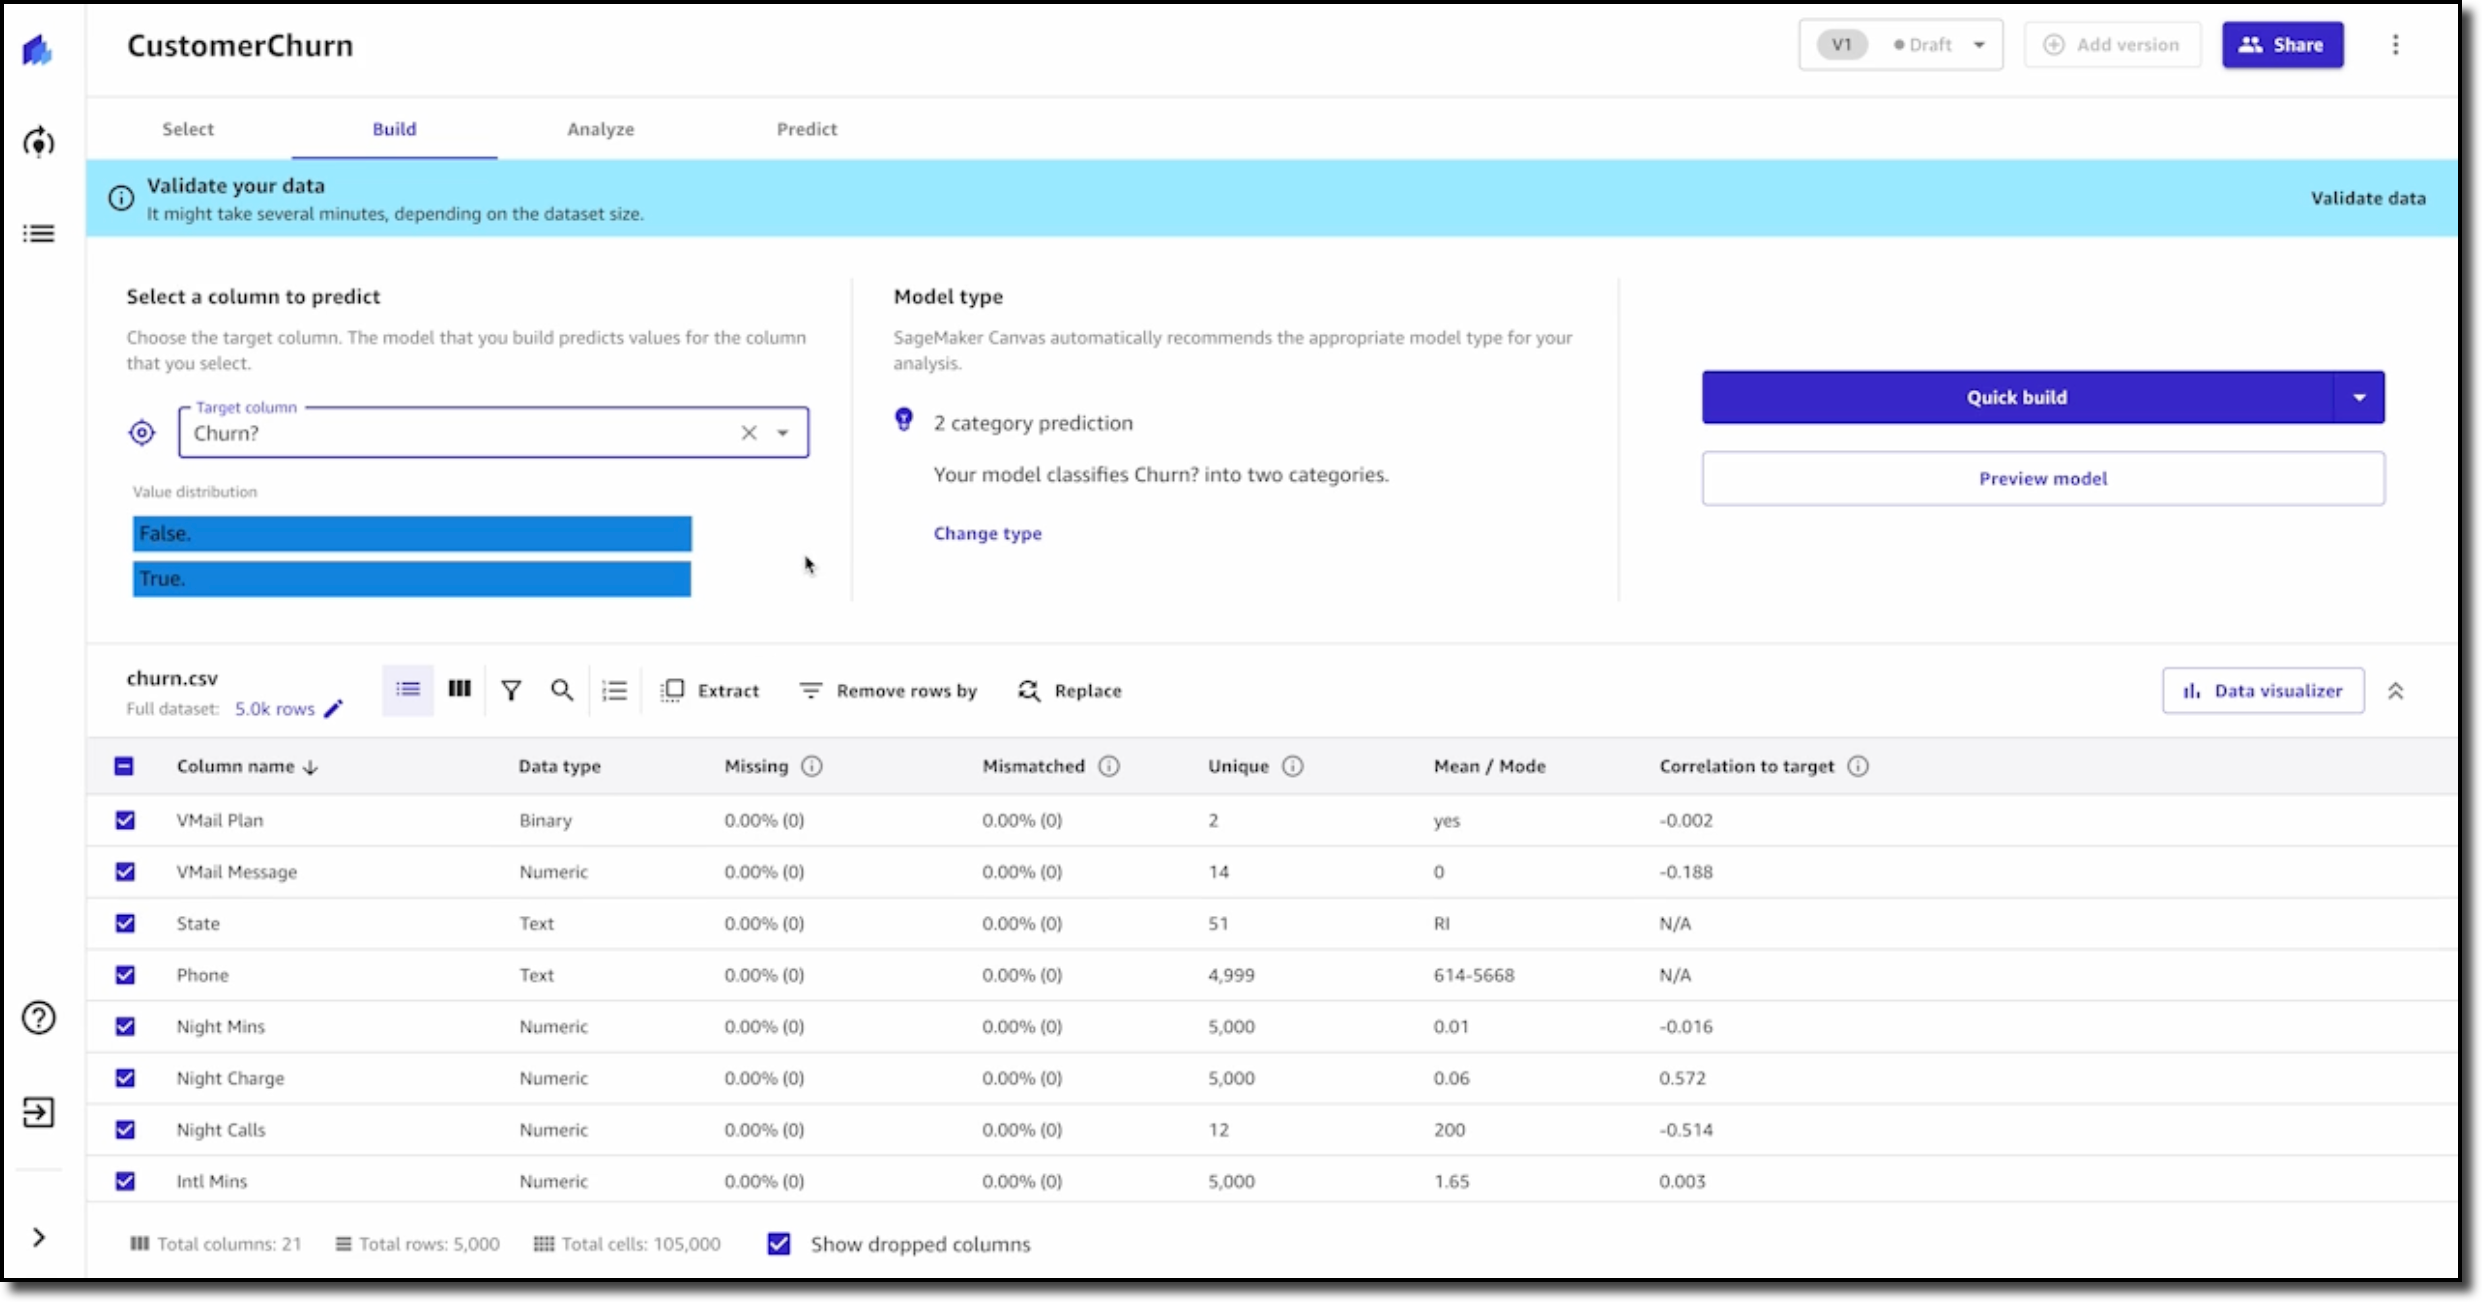
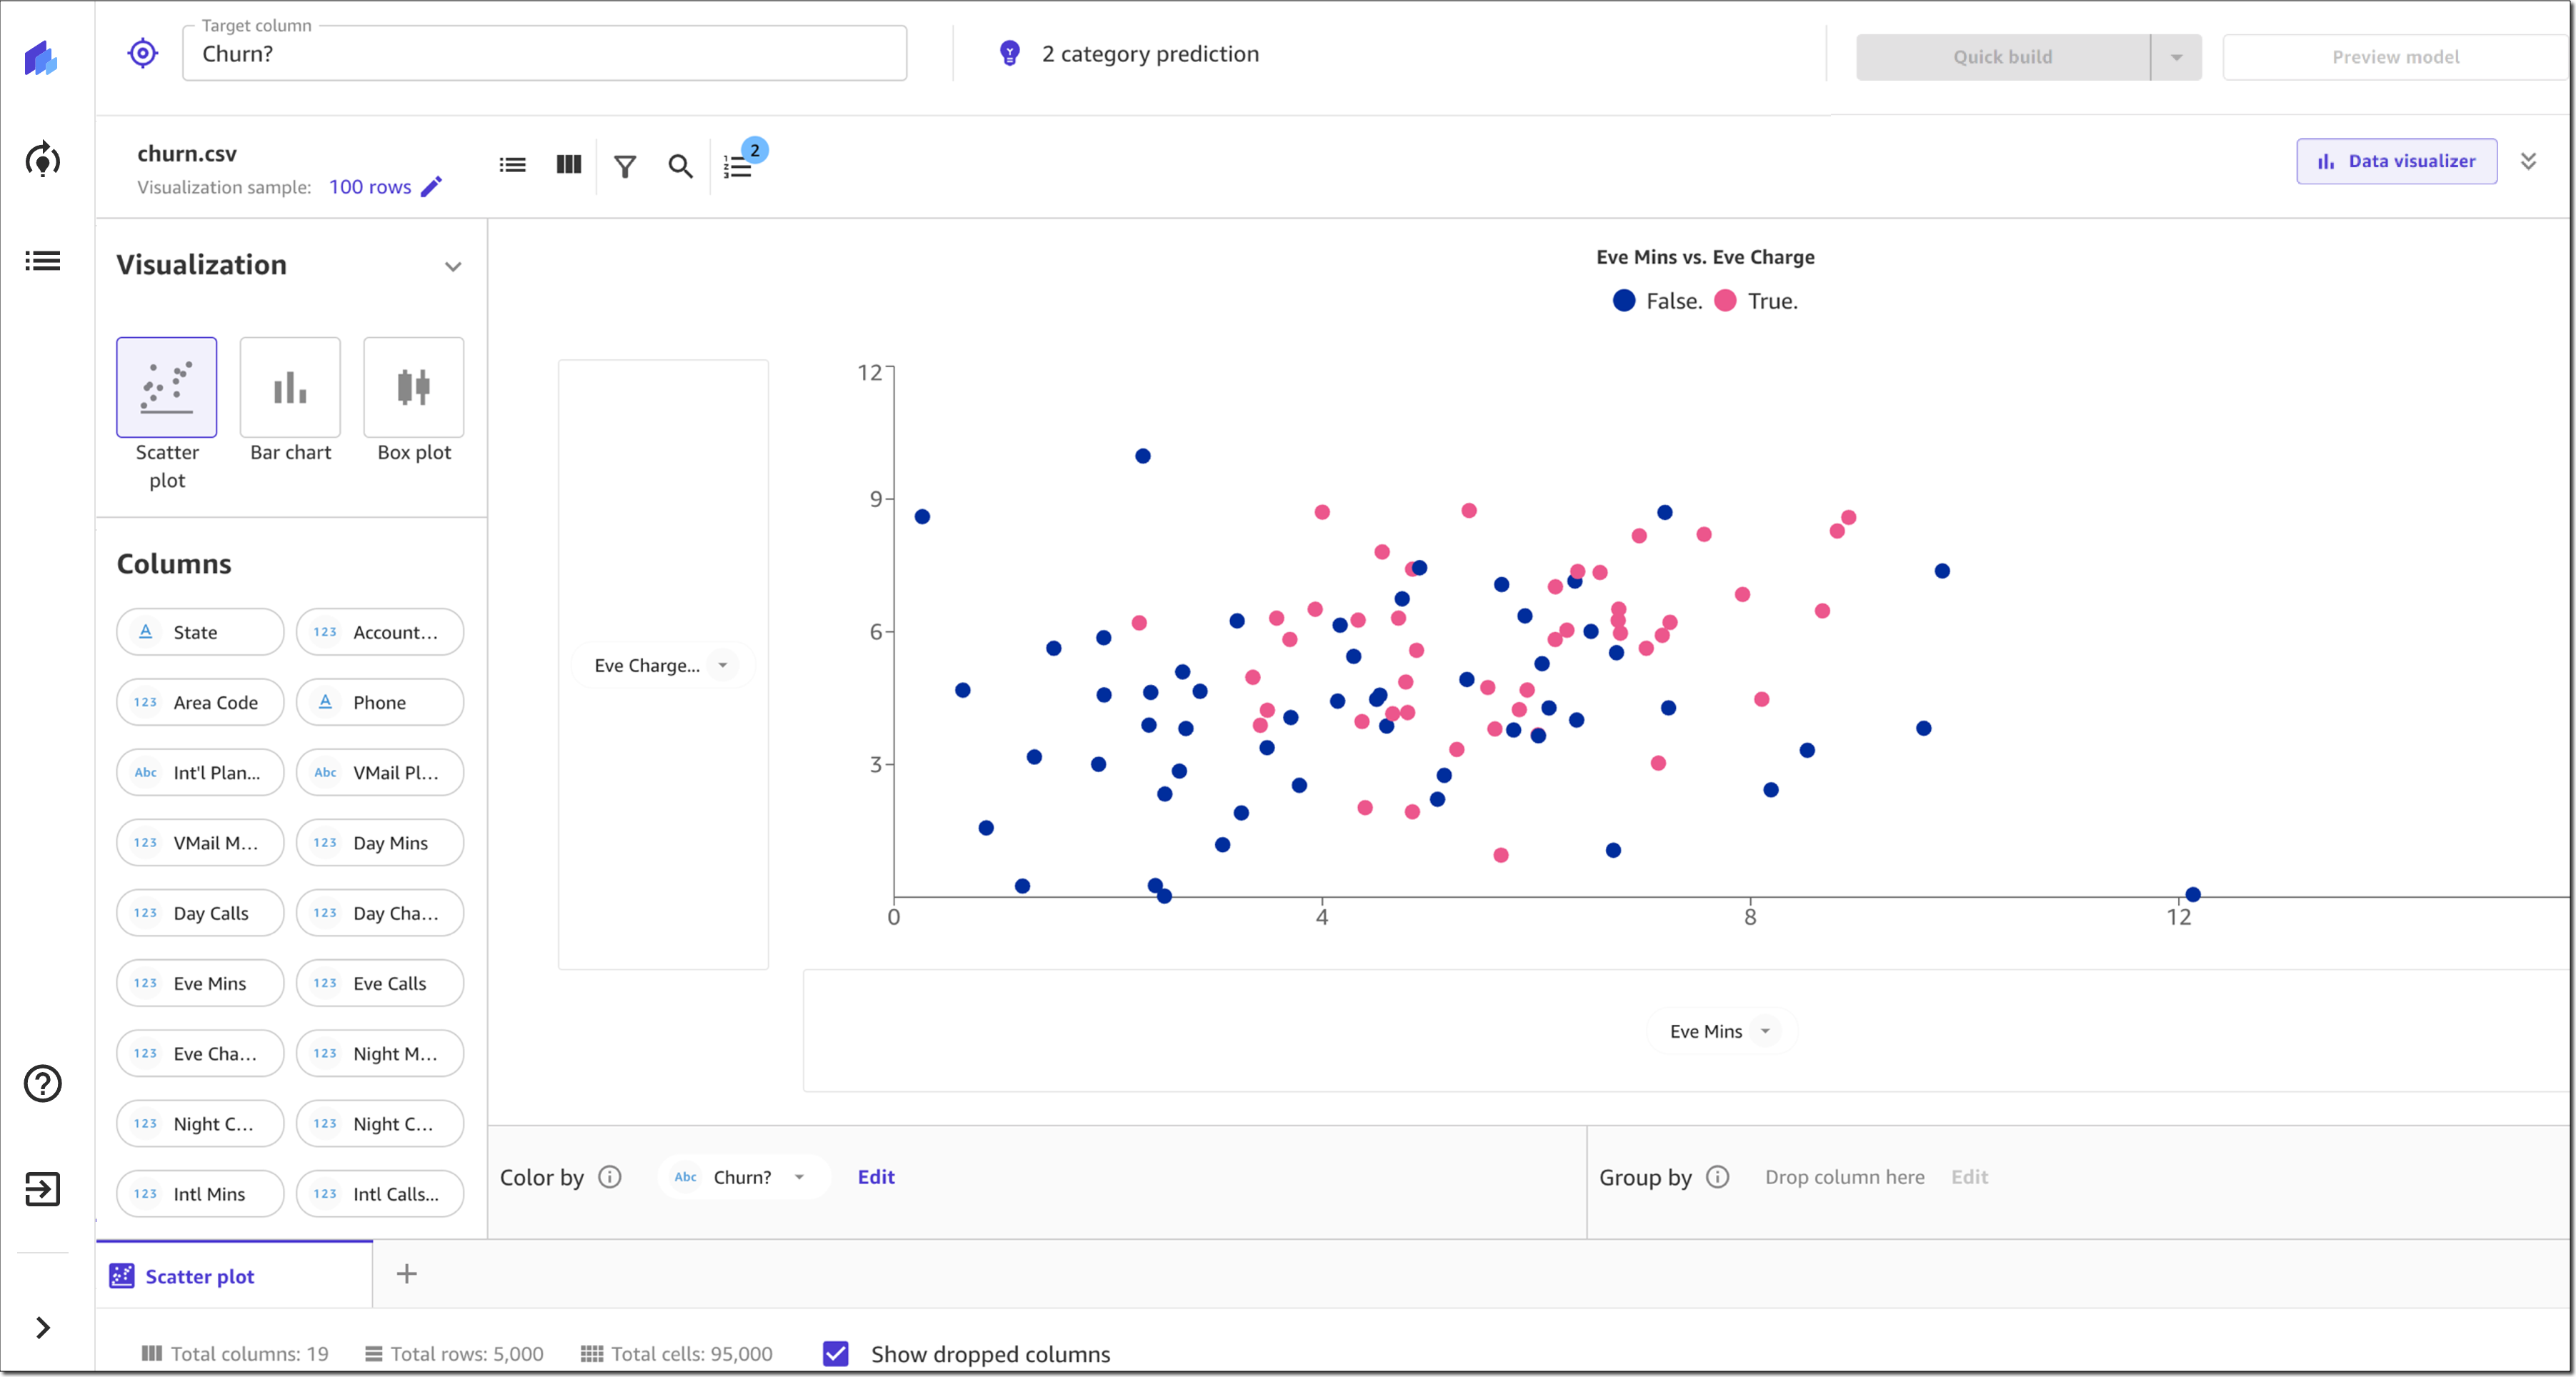
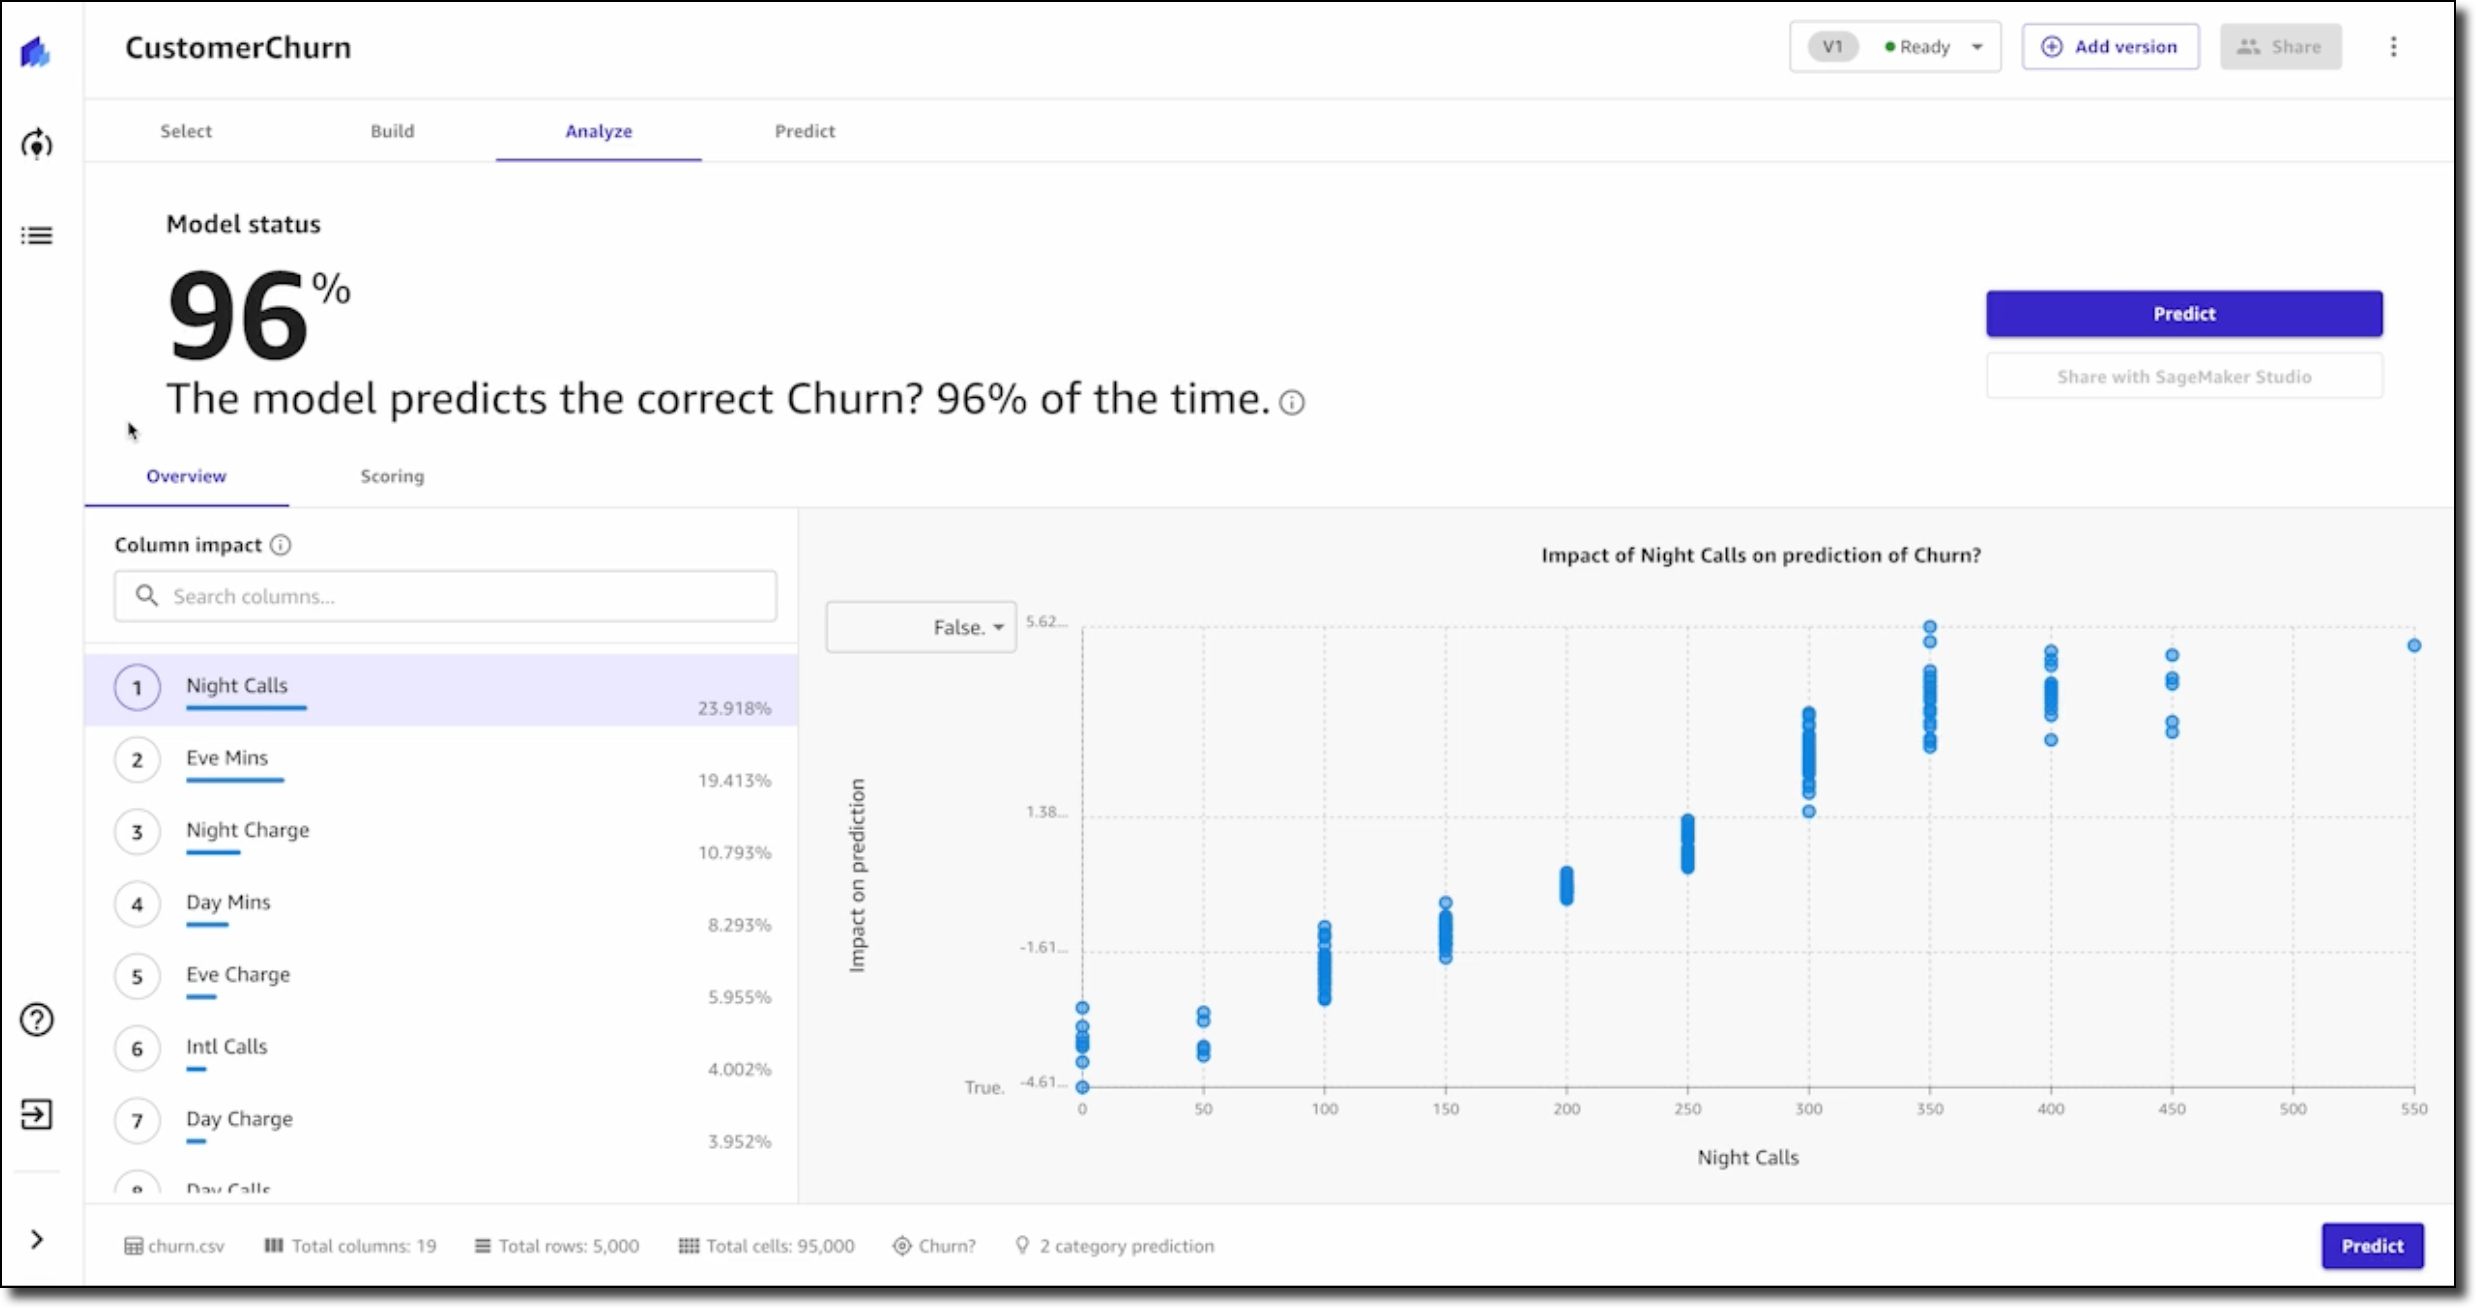


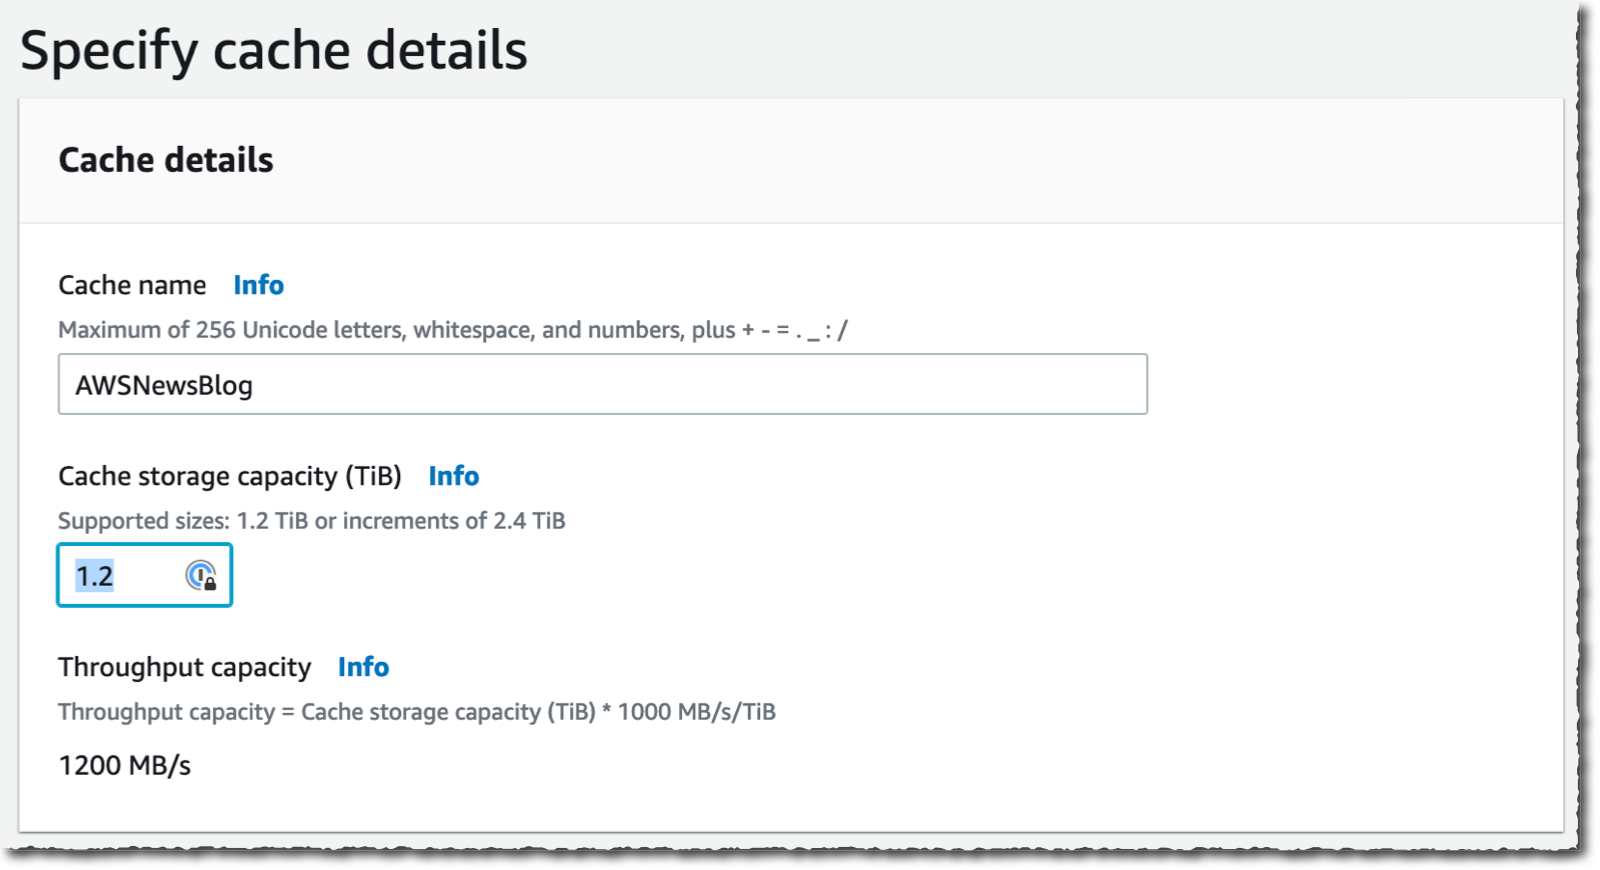
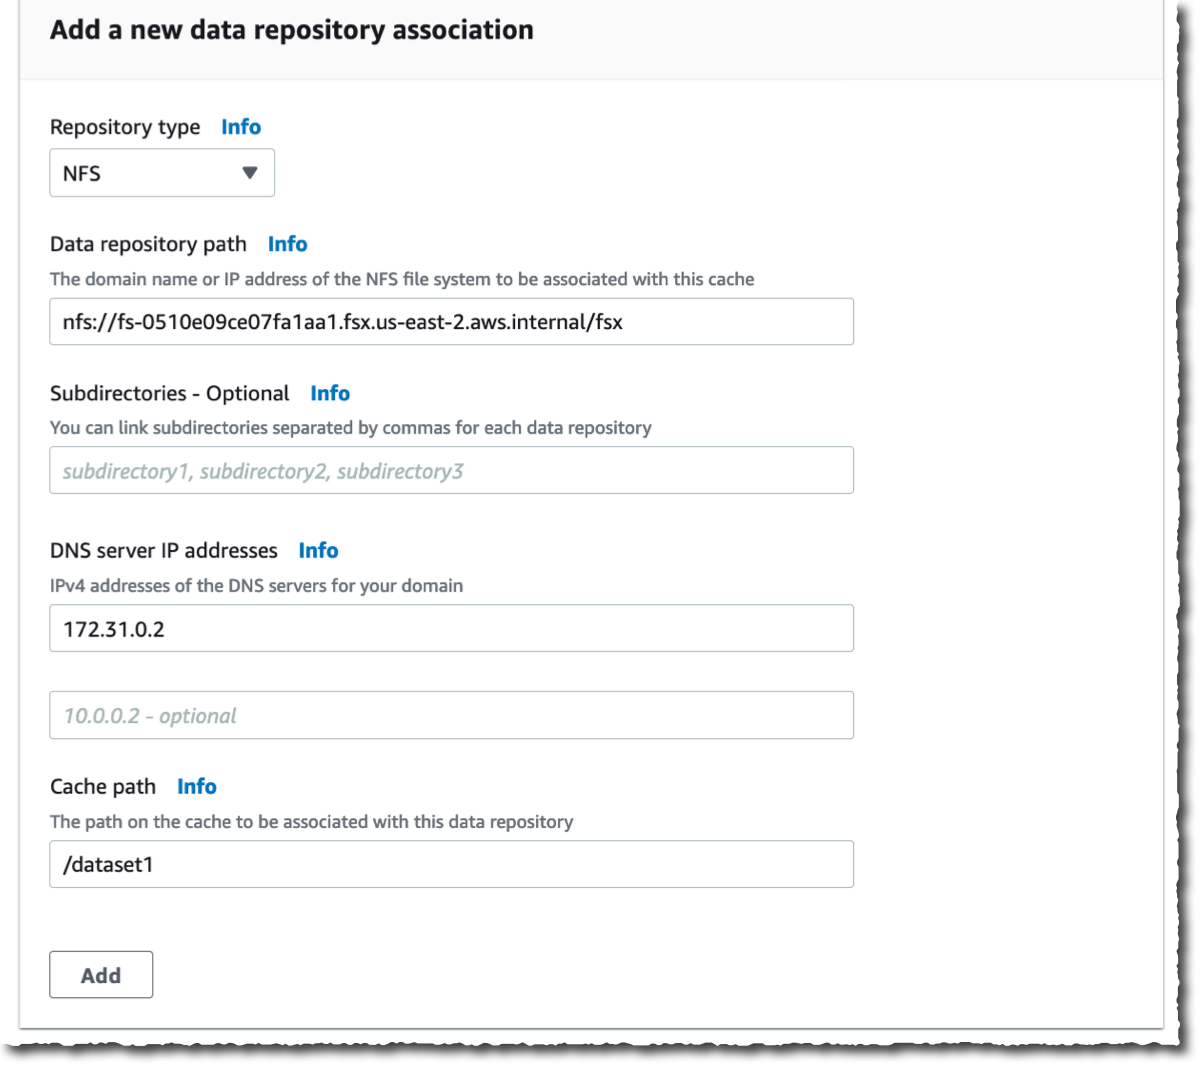


 Available.