A group of Swiss researchers have published an impressive security analysis of Threema.
We provide an extensive cryptographic analysis of Threema, a Swiss-based encrypted messaging application with more than 10 million users and 7000 corporate customers. We present seven different attacks against the protocol in three different threat models. As one example, we present a cross-protocol attack which breaks authentication in Threema and which exploits the lack of proper key separation between different sub-protocols. As another, we demonstrate a compression-based side-channel attack that recovers users’ long-term private keys through observation of the size of Threema encrypted back-ups. We discuss remediations for our attacks and draw three wider lessons for developers of secure protocols.
Threema has more than 10 million users, which include the Swiss government, the Swiss army, German Chancellor Olaf Scholz, and other politicians in that country. Threema developers advertise it as a more secure alternative to Meta’s WhatsApp messenger. It’s among the top Android apps for a fee-based category in Switzerland, Germany, Austria, Canada, and Australia. The app uses a custom-designed encryption protocol in contravention of established cryptographic norms.
The company is performing the usual denials and deflections:
In a web post, Threema officials said the vulnerabilities applied to an old protocol that’s no longer in use. It also said the researchers were overselling their findings.
“While some of the findings presented in the paper may be interesting from a theoretical standpoint, none of them ever had any considerable real-world impact,” the post stated. “Most assume extensive and unrealistic prerequisites that would have far greater consequences than the respective finding itself.”
Left out of the statement is that the protocol the researchers analyzed is old because they disclosed the vulnerabilities to Threema, and Threema updated it.
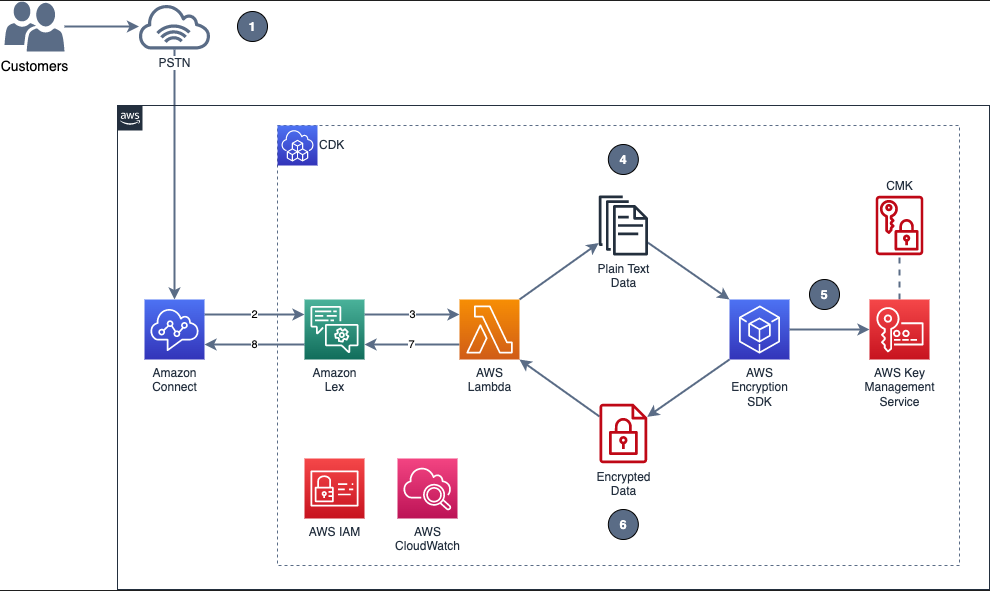
In the telecommunications industry, sensitive authentication and user data are typically received through mobile voice and keypads, and companies are responsible for protecting the data obtained through these channels. The increasing use of voice-driven interactive voice response (IVR) has resulted in a need to provide solutions that can protect user data that is gathered from mobile voice inputs. In this blog post, you’ll see how to protect a caller’s sensitive voice data that was captured through Amazon Lex by using data encryption implemented through AWS Lambda functions. The solution described in this post helps you to protect customer data received through voice channels from inadvertent or unknown access. The solution also includes decryption capabilities, which give an authorized administrator or operator the ability to decrypt user data from a Lambda console.
Solution overview
To demonstrate the IVR solution described in this post, a caller speaks two sensitive pieces of data—credit card number and zip code—from an Amazon Connect contact flow. The spoken values are encrypted and returned to the contact flow to be stored in contact attributes. The encrypted ciphertext is retained as a contact attribute for decryption purposes. Amazon CloudWatch Logs is enabled in the contact flow, but only the encrypted values are logged in log streams.
In the newly created Amazon Connect instance, under the Overview section, find the access URL with the format https://<aliasname>.awsapps.com/connect/login
Make note of the access URL, which you will use later to log in to the Amazon Connect Dashboard.
From the Routing menu on the left side, choose Contact flows to show the list of contact flows.
Choose Create Contact flow.
Choose the arrow to the right of the Save button and choose Import flow (beta). This imports the contact flow that you previously downloaded in the procedure To clone or download the solution.
The contact flow already has the Amazon Lex bot configured.
Figure 5: Select Import flow (beta)
In the upper right corner of the contact flow, choose Save, and then choose OK to save the changes.
Choose Publish to make the contact flow ready for use during the validation steps.
(Optional) Claim a phone number (if none is available), using the following steps:
In the Connect Dashboard, on the navigation menu, choose Channels, and then choose Phone numbers.
On the right side of the page, choose Claim a number.
Select the DID(Direct Inward Dialing) tab. Use the drop-down arrow to choose your country/region. When numbers are returned, choose one.
Write down the phone number. You call it later in this post.
(Optional) On the Edit Phone number page, in the Description box, you can type a note if desired.
To assign the contact flow to your claimed phone number, for Contact flow / IVR, choose the drop-down arrow, and then choose Secure_Lex_Input.
Choose Save.
Figure 6: Under Contact flow / IVR, select the imported contact flow
Dial the test phone number to go through the voice prompt flow.
When prompted, speak a 16-digit credit card number (you have a maximum of two retries), then speak a 5-digit zip code (also a maximum of two retries).
After you complete your test call, review the log streams in Amazon CloudWatch Logs to confirm that the digits that you entered are now encrypted and stored as a contact attribute. The two entered values zipcode and creditcard are stored in contact attributes. Both are encrypted.
Figure 7: Sample log showing encrypted values for zipcode and creditcard
Log in to your Amazon Connect Dashboard as a Supervisor. The URL is provided after the connect instance has been created. In the navigation menu, choose Contact search.
Figure 8: Choose Contact search to look for the call information
Locate your inbound call on the Contact search list. Note that it can take up to 60 seconds for data to appear in the Contact search list.
Select the Contact ID for your call.
Figure 9: The Contact search showing the contact details for your test call
Copy the encrypted values for creditcard and zipcode and make note of them; you will use these values in the next procedure.
Figure 10: Contact attributes stored in a contact flow are registered as part of the contact details
Use the Search bar to look for the dev-encryption-core-DecryptFn Lambda function, and then select the name link to open it.
Under folder encryption-master, open the test folder. Under the tab \events, locate the file decrypt.json.
Use the following steps to create a sample test event in the console by using the contents from decrypt.json. For more details, see Testing Lambda functions in the console.
Use the encrypted values saved in the Validate a solution procedure and replace the ones in the recently created test event.
Figure 11: Replace the creditcard or zipCode values with the ones from the Contact Search page
Choose Test. The output from the test shows the values decrypted by the Lambda function. This is shown in Figure 12under the Execution result tab.
Figure 12: Result from the decryption operation
Note: Make sure that only the appropriate authorized administrator or operator, application, or AWS service is able to invoke the decryption Lambda function.
You have now successfully implemented the solution by encrypting and decrypting the voice input of your test call, which you collected through Amazon Lex.
Cleanup
To avoid incurring future charges, follow these steps to clean up the deployed resources that you created when implementing this solution.
To delete the Amazon Connect instance
In the Amazon Connect console, under Instance alias, select the name of the Amazon Connect instance, and choose Delete.
When prompted, type the name of the instance, and then choose Delete.
To delete the Amazon Lex bot
In the Amazon Lex console, choose the bot that you created in the To configure the Amazon Lex bot procedure.
Choose Delete, and then choose Continue.
To delete the AWS CloudFormation stack
In the AWS CloudFormation console, on the Stacks page, select the stack you created in the procedure To create AWS resources needed for encryption and decryption.
In the stack details pane, choose Delete.
Choose Delete stack when prompted. This deletes the Amazon S3 bucket, IAM roles and AWS Lambda functions you created for testing. This will also schedule a deletion date on the AWS KMS key.
Conclusion
In this post, you learned how an Amazon Connect contact flow can collect voice inputs from a caller by using Amazon Lex, and how you can encrypt these inputs by using your own AWS KMS key. This solution can help improve the security of voice input that is collected through Amazon Connect. For cost information, see the Amazon Connect pricing page.
For more information, see the blog post Creating a secure IVR solution with Amazon Connect and the topic Encrypt customer input (using OpenSSL) in the Amazon Connect Administrator Guide. As previously mentioned, the increasing use of voice-driven IVR has resulted in a need to provide solutions that can protect user data gathered from mobile voice inputs.
If you need help with setting up this solution, you can get assistance from AWS Professional Services. You can also seek assistance from Amazon Connect partners available worldwide.
If you have feedback about this post, submit comments in the Comments section below. If you have questions about this post, contact AWS Support.
Want more AWS Security news? Follow us on Twitter.
This is a really interesting paper that discusses what the authors call the Decoupling Principle:
The idea is simple, yet previously not clearly articulated: to ensure privacy, information should be divided architecturally and institutionally such that each entity has only the information they need to perform their relevant function. Architectural decoupling entails splitting functionality for different fundamental actions in a system, such as decoupling authentication (proving who is allowed to use the network) from connectivity (establishing session state for communicating). Institutional decoupling entails splitting what information remains between non-colluding entities, such as distinct companies or network operators, or between a user and network peers. This decoupling makes service providers individually breach-proof, as they each have little or no sensitive data that can be lost to hackers. Put simply, the Decoupling Principle suggests always separating who you are from what you do.
This is an actual CAPTCHA I was shown when trying to log into PayPal.
As an actual human and not a bot, I had no idea how to answer. Is this a joke? (Seems not.) Is it a Magritte-like existential question? (It’s not a bicycle. It’s a drawing of a bicycle. Actually, it’s a photograph of a drawing of a bicycle. No, it’s really a computer image of a photograph of a drawing of a bicycle.) Am I overthinking this? (Definitely.) I stared at the screen, paralyzed, for way too long.
It’s probably the best CAPTCHA I have ever encountered; a computer would have just answered.
(In the end, I treated the drawing as a real bicycle and selected the appropriate squares…and it seemed to like that.)
Not all users are having problems receiving SMS authentication codes, and those who rely on an authenticator app or physical authentication token to secure their Twitter account may not have reason to test the mechanism. But users have been self-reporting issues on Twitter since the weekend, and WIRED confirmed that on at least some accounts, authentication texts are hours delayed or not coming at all. The meltdown comes less than two weeks after Twitter laid off about half of its workers, roughly 3,700 people. Since then, engineers, operations specialists, IT staff, and security teams have been stretched thin attempting to adapt Twitter’s offerings and build new features per new owner Elon Musk’s agenda.
A researcher contacted Information Security Media Group on condition of anonymity to reveal that texting “STOP” to the Twitter verification service results in the service turning off SMS two-factor authentication.
“Your phone has been removed and SMS 2FA has been disabled from all accounts,” is the automated response.
The vulnerability, which ISMG verified, allows a hacker to spoof the registered phone number to disable two-factor authentication. That potentially exposes accounts to a password reset attack or account takeover through password stuffing.
CISA is now pushing phishing-resistant multifactor authentication.
Roger Grimes has an excellent post reminding everyone that “phishing-resistant” is not “phishing proof,” and that everyone needs to stop pretending otherwise. His list of different attacks is particularly useful.
Here’s a phishing campaign that uses a man-in-the-middle attack to defeat multi-factor authentication:
Microsoft observed a campaign that inserted an attacker-controlled proxy site between the account users and the work server they attempted to log into. When the user entered a password into the proxy site, the proxy site sent it to the real server and then relayed the real server’s response back to the user. Once the authentication was completed, the threat actor stole the session cookie the legitimate site sent, so the user doesn’t need to be reauthenticated at every new page visited. The campaign began with a phishing email with an HTML attachment leading to the proxy server.
Since the broad launch of our multi-factor authentication (MFA) security key program, customers have been enthusiastic about the program and how they will use it to improve their organizations’ security posture. Given the level of interest, we’re expanding eligibility for the program to allow more US-based AWS account root users and payer accounts to take advantage of the offer. Previously, eligibility required that US-based root users and payer accounts spend a minimum of $100 per month over the past 3 months. Now, we are expanding eligibility to US-based root users and payer accounts who have spent a minimum of $300 over the past 3 months. If you are a US-based customer who meets the expanded eligibility requirements, we encourage you to place an order for your free security key. As a reminder, you can use the following steps to order your free key.
To order your free security key
Confirm your eligibility at the ordering portal. You will be prompted to sign in if you haven’t already. Sign in with your AWS account root user or payer account credentials.
Choose your free security key from the available options.
Provide your email address for order confirmation and your shipping address.
Place your order.
MFA as a core security best practice is one of the key messages emphasized at the recent AWS re:Inforce conference. Using MFA is one of the simplest ways for anyone, personally or professionally, to help improve their security online. For example, if credentials become compromised on GitHub, users have an extra layer of protection if MFA is enabled. Or, if your login details are compromised for your bank account, MFA acts a second factor to protect your account.
If you’re not eligible for a free security key at this time, but would still like a security key, check out our MFA recommendations. These are available for purchase from many sellers, including Amazon. For more information about the MFA program, see our Free MFA Security Key page.
If you have feedback about this post, submit comments in the Comments section below. If you have questions about this post, contact AWS Support.
Want more AWS Security news? Follow us on Twitter.
AWS Identity and Access Management (IAM) has now made it easier for you to use IAM roles for your workloads that are running outside of AWS, with the release of IAM Roles Anywhere. This feature extends the capabilities of IAM roles to workloads outside of AWS. You can use IAM Roles Anywhere to provide a secure way for on-premises servers, containers, or applications to obtain temporary AWS credentials and remove the need for creating and managing long-term AWS credentials.
In this post, I will briefly discuss how IAM Roles Anywhere works. I’ll mention some of the common use cases for IAM Roles Anywhere. And finally, I’ll walk you through an example scenario to demonstrate how the implementation works.
Background
To enable your applications to access AWS services and resources, you need to provide the application with valid AWS credentials for making AWS API requests. For workloads running on AWS, you do this by associating an IAM role with Amazon Elastic Compute Cloud (Amazon EC2), Amazon Elastic Container Service (Amazon ECS), Amazon Elastic Kubernetes Service (Amazon EKS), or AWS Lambda resources, depending on the compute platform hosting your application. This is secure and convenient, because you don’t have to distribute and manage AWS credentials for applications running on AWS. Instead, the IAM role supplies temporary credentials that applications can use when they make AWS API calls.
IAM Roles Anywhere enables you to use IAM roles for your applications outside of AWS to access AWS APIs securely, the same way that you use IAM roles for workloads on AWS. With IAM Roles Anywhere, you can deliver short-term credentials to your on-premises servers, containers, or other compute platforms. When you use IAM Roles Anywhere to vend short-term credentials you can remove the need for long-term AWS access keys and secrets, which can help improve security, and remove the operational overhead of managing and rotating the long-term credentials. You can also use IAM Roles Anywhere to provide a consistent experience for managing credentials across hybrid workloads.
In this post, I assume that you have a foundational knowledge of IAM, so I won’t go into the details here about IAM roles. For more information on IAM roles, see the IAM documentation.
How does IAM Roles Anywhere work?
IAM Roles Anywhere relies on public key infrastructure (PKI) to establish trust between your AWS account and certificate authority (CA) that issues certificates to your on-premises workloads. Your workloads outside of AWS use IAM Roles Anywhere to exchange X.509 certificates for temporary AWS credentials. The certificates are issued by a CA that you register as a trust anchor (root of trust) in IAM Roles Anywhere. The CA can be part of your existing PKI system, or can be a CA that you created with AWS Certificate Manager Private Certificate Authority (ACM PCA).
Your application makes an authentication request to IAM Roles Anywhere, sending along its public key (encoded in a certificate) and a signature signed by the corresponding private key. Your application also specifies the role to assume in the request. When IAM Roles Anywhere receives the request, it first validates the signature with the public key, then it validates that the certificate was issued by a trust anchor previously configured in the account. For more details, see the signature validation documentation.
After both validations succeed, your application is now authenticated and IAM Roles Anywhere will create a new role session for the role specified in the request by calling AWS Security Token Service (AWS STS). The effective permissions for this role session are the intersection of the target role’s identity-based policies and the session policies, if specified, in the profile you create in IAM Roles Anywhere. Like any other IAM role session, it is also subject to other policy types that you might have in place, such as permissions boundaries and service control policies (SCPs).
There are typically three main tasks, performed by different personas, that are involved in setting up and using IAM Roles Anywhere:
Initial configuration of IAM Roles Anywhere – This task involves creating a trust anchor, configuring the trust policy of the role that IAM Roles Anywhere is going to assume, and defining the role profile. These activities are performed by the AWS account administrator and can be limited by IAM policies.
Provisioning of certificates to workloads outside AWS – This task involves ensuring that the X.509 certificate, signed by the CA, is installed and available on the server, container, or application outside of AWS that needs to authenticate. This is performed in your on-premises environment by an infrastructure admin or provisioning actor, typically by using existing automation and configuration management tools.
Using IAM Roles Anywhere – This task involves configuring the credential provider chain to use the IAM Roles Anywhere credential helper tool to exchange the certificate for session credentials. This is typically performed by the developer of the application that interacts with AWS APIs.
I’ll go into the details of each task when I walk through the example scenario later in this post.
Common use cases for IAM Roles Anywhere
You can use IAM Roles Anywhere for any workload running in your data center, or in other cloud providers, that requires credentials to access AWS APIs. Here are some of the use cases we think will be interesting to customers based on the conversations and patterns we have seen:
Send security findings from on-premises sources to AWS Security Hub
Enable hybrid workloads to access AWS services over the course of phased migrations
Example scenario and walkthrough
To demonstrate how IAM Roles Anywhere works in action, let’s walk through a simple scenario where you want to call S3 APIs to upload some data from a server in your data center.
Prerequisites
Before you set up IAM Roles Anywhere, you need to have the following requirements in place:
The certificate bundle of your own CA, or an active ACM PCA CA in the same AWS Region as IAM Roles Anywhere
An end-entity certificate and associated private key available on the on-premises server
Administrator permissions for IAM roles and IAM Roles Anywhere
Setup
Here I demonstrate how to perform the setup process by using the IAM Roles Anywhere console. Alternatively, you can use the AWS API or Command Line Interface (CLI) to perform these actions. There are three main activities here:
Create a trust anchor
Create and configure a role that trusts IAM Roles Anywhere
Under Trust anchors, choose Create a trust anchor.
On the Create a trust anchor page, enter a name for your trust anchor and select the existing AWS Certificate Manager Private CA from the list. Alternatively, if you want to use your own external CA, choose External certificate bundle and provide the certificate bundle.
Figure 1: Create a trust anchor in IAM Roles Anywhere
To create and configure a role that trusts IAM Roles Anywhere
Using the AWS Command Line Interface (AWS CLI), you are going to create an IAM role with appropriate permissions that you want your on-premises server to assume after authenticating to IAM Roles Anywhere. Save the following trust policy as rolesanywhere-trust-policy.json on your computer.
Save the following identity-based policy as onpremsrv-permissions-policy.json. This grants the role permissions to write objects into the specified S3 bucket.
You can optionally use condition statements based on the attributes extracted from the X.509 certificate to further restrict the trust policy to control the on-premises resources that can obtain credentials from IAM Roles Anywhere. IAM Roles Anywhere sets the SourceIdentity value to the CN of the subject (onpremsrv01 in my example). It also sets individual session tags (PrincipalTag/) with the derived attributes from the certificate. So, you can use the principal tags in the Condition clause in the trust policy as additional authorization constraints.
For example, the Subject for the certificate I use in this post is as follows.
Subject: … O = Example Corp., OU = SecOps, CN = onpremsrv01
So, I can add condition statements like the following into the trust policy (rolesanywhere-trust-policy.json):
On the Create a profile page, enter a name for the profile.
For Roles, select the role that you created in the previous step (ExampleS3WriteRole).
5. Optionally, you can define session policies to further scope down the sessions delivered by IAM Roles Anywhere. This is particularly useful when you configure the profile with multiple roles and want to restrict permissions across all the roles. You can add the desired session polices as managed policies or inline policy. Here, for demonstration purpose, I add an inline policy to only allow requests coming from my specified IP address.
Figure 2: Create a profile in IAM Roles Anywhere
At this point, IAM Roles Anywhere setup is complete and you can start using it.
Use IAM Roles Anywhere
IAM Roles Anywhere provides a credential helper tool that can be used with the process credentials functionality that all current AWS SDKs support. This simplifies the signing process for the applications. See the IAM Roles Anywhere documentation to learn how to get the credential helper tool.
To test the functionality first, run the credential helper tool (aws_signing_helper) manually from the on-premises server, as follows.
Figure 3: Running the credential helper tool manually
You should successfully receive session credentials from IAM Roles Anywhere, similar to the example in Figure 3. Once you’ve confirmed that the setup works, update or create the ~/.aws/config file and add the signing helper as a credential_process. This will enable unattended access for the on-premises server. To learn more about the AWS CLI configuration file, see Configuration and credential file settings.
To verify that the config works as expected, call the aws sts get-caller-identity AWS CLI command and confirm that the assumed role is what you configured in IAM Roles Anywhere. You should also see that the role session name contains the Serial Number of the certificate that was used to authenticate (cc:c3:…:85:37 in this example). Finally, you should be able to copy a file to the S3 bucket, as shown in Figure 4.
Figure 4: Verify the assumed role
Audit
As with other AWS services, AWS CloudTrail captures API calls for IAM Roles Anywhere. Let’s look at the corresponding CloudTrail log entries for the activities we performed earlier.
The first log entry I’m interested in is CreateSession, when the on-premises server called IAM Roles Anywhere through the credential helper tool and received session credentials back.
You can see that the cert, along with other parameters, is sent to IAM Roles Anywhere and a role session along with temporary credentials is sent back to the server.
The next log entry we want to look at is the one for the s3:PutObject call we made from our on-premises server.
In addition to the CloudTrail logs, there are several metrics and events available for you to use for monitoring purposes. To learn more, see Monitoring IAM Roles Anywhere.
Additional notes
You can disable the trust anchor in IAM Roles Anywhere to immediately stop new sessions being issued to your resources outside of AWS. Certificate revocation is supported through the use of imported certificate revocation lists (CRLs). You can upload a CRL that is generated from your CA, and certificates used for authentication will be checked for their revocation status. IAM Roles Anywhere does not support callbacks to CRL Distribution Points (CDPs) or Online Certificate Status Protocol (OCSP) endpoints.
Another consideration, not specific to IAM Roles Anywhere, is to ensure that you have securely stored the private keys on your server with appropriate file system permissions.
Conclusion
In this post, I discussed how the new IAM Roles Anywhere service helps you enable workloads outside of AWS to interact with AWS APIs securely and conveniently. When you extend the capabilities of IAM roles to your servers, containers, or applications running outside of AWS you can remove the need for long-term AWS credentials, which means no more distribution, storing, and rotation overheads.
I mentioned some of the common use cases for IAM Roles Anywhere. You also learned about the setup process and how to use IAM Roles Anywhere to obtain short-term credentials.
If you have any questions, you can start a new thread on AWS re:Post or reach out to AWS Support.
Thought experiment story of someone who lost everything in a house fire, and now can’t log into anything:
But to get into my cloud, I need my password and 2FA. And even if I could convince the cloud provider to bypass that and let me in, the backup is secured with a password which is stored in—you guessed it—my Password Manager.
I am in cyclic dependency hell. To get my passwords, I need my 2FA. To get my 2FA, I need my passwords.
It’s a one-in-a-million story, and one that’s hard to take into account in system design.
This is where we reach the limits of the “Code Is Law” movement.
In the boring analogue world—I am pretty sure that I’d be able to convince a human that I am who I say I am. And, thus, get access to my accounts. I may have to go to court to force a company to give me access back, but it is possible.
But when things are secured by an unassailable algorithm—I am out of luck. No amount of pleading will let me without the correct credentials. The company which provides my password manager simply doesn’t have access to my passwords. There is no-one to convince. Code is law.
Of course, if I can wangle my way past security, an evil-doer could also do so.
So which is the bigger risk?
An impersonator who convinces a service provider that they are me?
A malicious insider who works for a service provider?
Me permanently losing access to all of my identifiers?
I don’t know the answer to that.
Those risks are in the order of most common to least common, but that doesn’t necessarily mean that they are in risk order. They probably are, but then we’re left with no good way to handle someone who has lost all their digital credentials—computer, phone, backup, hardware token, wallet with ID cards—in a catastrophic house fire.
I want to remind readers that this isn’t a true story. It didn’t actually happen. It’s a thought experiment.
I’d like to personally invite you to attend the Amazon Web Services (AWS) security conference, AWS re:Inforce 2022, in Boston, MA on July 26–27. This event offers interactive educational content to address your security, compliance, privacy, and identity management needs. Join security experts, customers, leaders, and partners from around the world who are committed to the highest security standards, and learn how to improve your security posture.
As the new Chief Information Security Officer of AWS, my primary job is to help our customers navigate their security journey while keeping the AWS environment safe. AWS re:Inforce offers an opportunity for you to understand how to keep pace with innovation in your business while you stay secure. With recent headlines around security and data privacy, this is your chance to learn the tactical and strategic lessons that will help keep your systems and tools secure, while you build a culture of security in your organization.
AWS re:Inforce 2022 will kick off with my keynote on Tuesday, July 26. I’ll be joined by Steve Schmidt, now the Chief Security Officer (CSO) of Amazon, and Kurt Kufeld, VP of AWS Platform. You’ll hear us talk about the latest innovations in cloud security from AWS and learn what you can do to foster a culture of security in your business. Take a look at the most recent re:Invent presentation, Continuous security improvement: Strategies and tactics, and the latest re:Inforce keynote for examples of the type of content to expect.
For those who are just getting started on AWS, as well as our more tenured customers, AWS re:Inforce offers an opportunity to learn how to prioritize your security investments. By using the Security pillar of the AWS Well-Architected Framework, sessions address how you can build practical and prescriptive measures to protect your data, systems, and assets.
Sessions are offered at all levels and for all backgrounds, from business to technical, and there are learning opportunities in over 300 sessions across five tracks: Data Protection & Privacy; Governance, Risk & Compliance; Identity & Access Management; Network & Infrastructure Security; and Threat Detection & Incident Response. In these sessions, connect with and learn from AWS experts, customers, and partners who will share actionable insights that you can apply in your everyday work. At AWS re:Inforce, the majority of our sessions are interactive, such as workshops, chalk talks, boot camps, and gamified learning, which provides opportunities to hear about and act upon best practices. Sessions will be available from the intermediate (200) through expert (400) levels, so you can grow your skills no matter where you are in your career. Finally, there will be a leadership session for each track, where AWS leaders will share best practices and trends in each of these areas.
At re:Inforce, hear directly from AWS developers and experts, who will cover the latest advancements in AWS security, compliance, privacy, and identity solutions—including actionable insights your business can use right now. Plus, you’ll learn from AWS customers and partners who are using AWS services in innovative ways to protect their data, achieve security at scale, and stay ahead of bad actors in this rapidly evolving security landscape.
A full conference pass is $1,099. However, if you register today with the code ALUMkpxagvkV you’ll receive a $300 discount (while supplies last).
We’re excited to get back to re:Inforce in person; it is emblematic of our commitment to giving customers direct access to the latest security research and trends. We’ll continue to release additional details about the event on our website, and you can get real-time updates by following @AWSSecurityInfo. I look forward to seeing you in Boston, sharing a bit more about my new role as CISO and providing insight into how we prioritize security at AWS.
If you have feedback about this post, submit comments in the Comments section below. If you have questions about this post, contact AWS Support.
Want more AWS Security news? Follow us on Twitter.
This blog post outlines how to use your existing Microsoft Active Directory (AD) to reliably authenticate access to your Amazon Web Services (AWS) accounts, infrastructure running on AWS, and third-party applications. The architecture we describe is designed to be highly available and extends access to your existing AD to AWS, enabling your users to use their existing credentials to access authorized AWS resources and applications.
Many customers rely on AD as their single source of truth for IT identity management. HR automation processes are often already in place to automatically add, update, and remove employee access within an organization’s AD as staffing changes occur. Using a single source of truth as the basis for all authentication and authorization, both on-premises and in the cloud, makes it easier to manage access across multiple applications and services, because you are creating, managing, and revoking access from a single location. For example, if someone leaves your organization, you can revoke access for all applications and services (including AWS accounts) from one location. Additionally, this reduces risks associated with stranded or forgotten credentials, or users needing to remember multiple different sets of credentials.
Microsoft Active Directory (AD) is deployed on Microsoft Windows Server servers called domain controllers, which replicate the contents of the directory between the domain controllers that are hosting the AD domain. Multiple domain controllers are deployed within a domain to improve the availability and performance of the directory. The AD infrastructure should be designed to provide sufficiently high levels of availability and performance, because it governs access to your organization’s IT resources. This typically requires the placement of at least one domain controller in every customer hosting location, because the lack of availability of your identity store is likely to cause authentication and authorization failures, which in turn prevent access to resources.
These design principles align with the Security Pillar of the AWS Well-Architected Framework, which is focused on implementing a strong identity foundation. The Security Pillar guidance states that you should centralize identity management and aim to eliminate reliance on long-term static credentials. By using your existing AD, you can benefit from centralized identity management and your existing group-based permissions for access to your AWS accounts. Applications that are running on domain-joined servers can use their AD service account credentials when they access other domain-joined resources, which removes the need for those credentials to be stored in application configuration files. As your AWS usage grows, it is important to give serious consideration to effective identity management, both for access to AWS and AWS resources, and for your instances that are running on AWS.
By extending your existing Active Directory to AWS, you can continue to use your existing Active Directory user credentials and group policies to manage your Microsoft Windows Server servers, whether those servers are running on-premises or on AWS, and extend these capabilities to authenticate and authorize access to the AWS Management Console and third-party applications.
This post covers networking requirements and connectivity setup to enable network connectivity to your on-premises AD; the approach to extending your AD to AWS; integrating AWS Single Sign-On with your AD; and joining Amazon Elastic Compute Cloud (Amazon EC2) instances to AD. As part of the setup, you will add additional domain controllers running on Amazon EC2 instances to your existing AD, for availability and latency reasons. You will also build a resource forest to enable your existing AD identities to access AD-integrated AWS services and resources. This enables you to have a highly available single identity source as the source of truth for your user authentication.
Networking prerequisites to extend your Active Directory to AWS
To enable Active Directory–related network communication, network connectivity needs to be established between your on-premises network and your AWS environment. You need to ensure there is connectivity between the on-premises network that is hosting your existing domain controllers and the Amazon Virtual Private Cloud (Amazon VPC) VPC that will host your AD infrastructure on AWS. Typically, hybrid network connectivity is configured within a network account within your organization, where the multiple AWS accounts within your organization are managed by using AWS Organizations. This network account effectively sits between your on-premises network and the resources, including the AD infrastructure, that are deployed in AWS.
You can provide connectivity between your on-premises network and your network account by using AWS Site-to-Site VPN or AWS Direct Connect connections. For an overview of the options to connect your on-premises network to AWS, refer to Amazon Virtual Private Cloud Connectivity Options. The necessary routing and firewall rules need to be configured to allow connectivity between these subnets and the on-premises network that is hosting your existing domain controllers. AWS recommends that you have highly resilient, fault-tolerant connectivity with dynamic routing between your on-premises network and your AWS network. You can achieve high resiliency through the use of redundant AWS Direct Connect connections, or, for less critical workloads, a VPN connection might offer sufficient resilience.
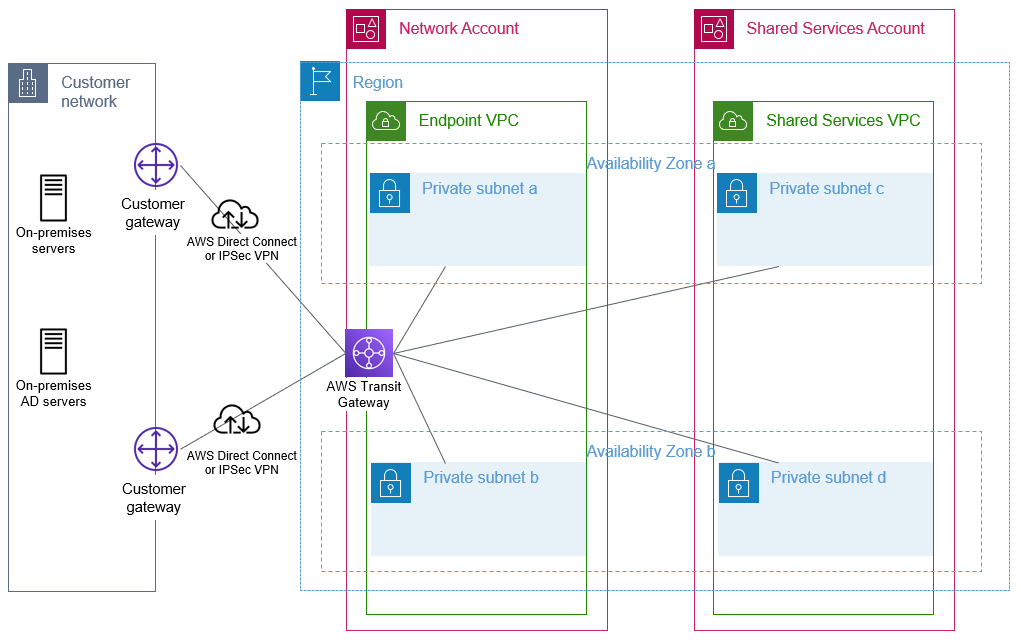
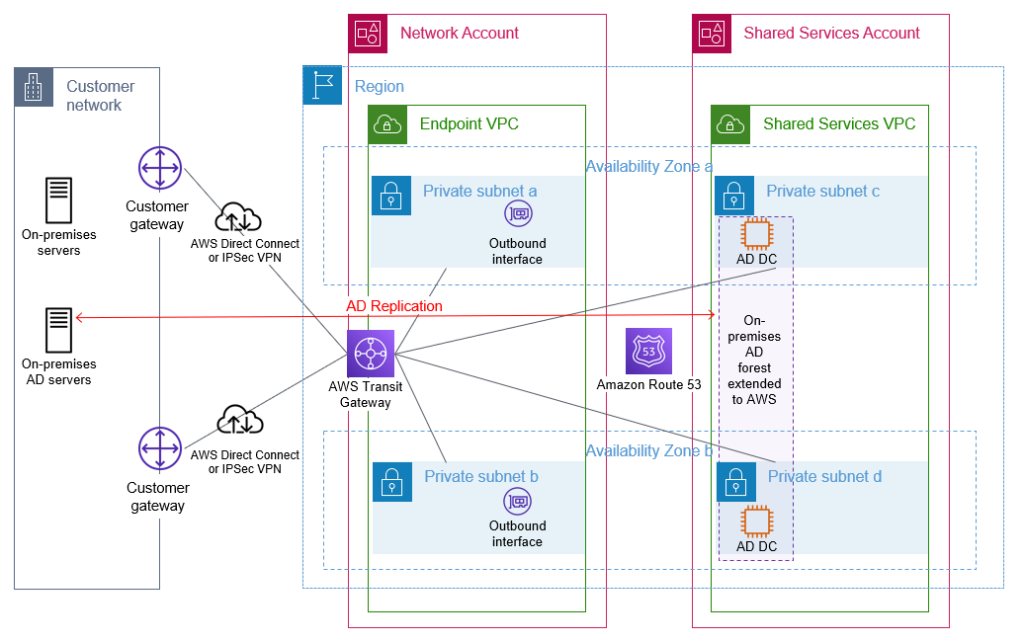
We recommend AWS Transit Gateway to provide connectivity between your AWS accounts. A transit gateway will be in your network account and then shared with your other AWS accounts that have VPCs that require access to on-premises networks or other VPCs. This enables a hub and spoke network architecture, which is used to provide connectivity both between your VPCs as needed and between your VPCs and your on-premises network. You will create a VPC, which we will refer to within this blog as the endpoint VPC, with subnets across two Availability Zones, within the network account. This endpoint VPC will be used later by Amazon Route 53 outbound endpoints for DNS resolution of AD-hosted DNS zones. Other documentation might refer to this endpoint VPC by alternative names, such as outbound VPC or egress VPC.
Your AD infrastructure that is running on AWS is typically deployed within a shared services account, sometimes referred to as an operations account. Within this shared services account, you will create a shared services VPC with at least two subnets within different Availability Zones to host your domain controller infrastructure on AWS. Your domain controller availability is increased when your architecture is configured to use multiple Availability Zones. You will attach this shared services VPC to the transit gateway that is shared from your network account. This VPC attachment provides connectivity between this VPC and your on-premises network through the transit gateway and network account. You will need to configure the subnet route table(s) and transit gateway route table(s) appropriately to provide IP connectivity between the shared services VPC and your on-premises network.
The sample architecture shown in Figure 1 illustrates the use of a transit gateway with two AWS Direct Connect connections to provide resilient connectivity between an on-premises network, the network account, and a VPC within the shared services account.
Figure 1: Foundational network connectivity between on-premises and AWS VPCs
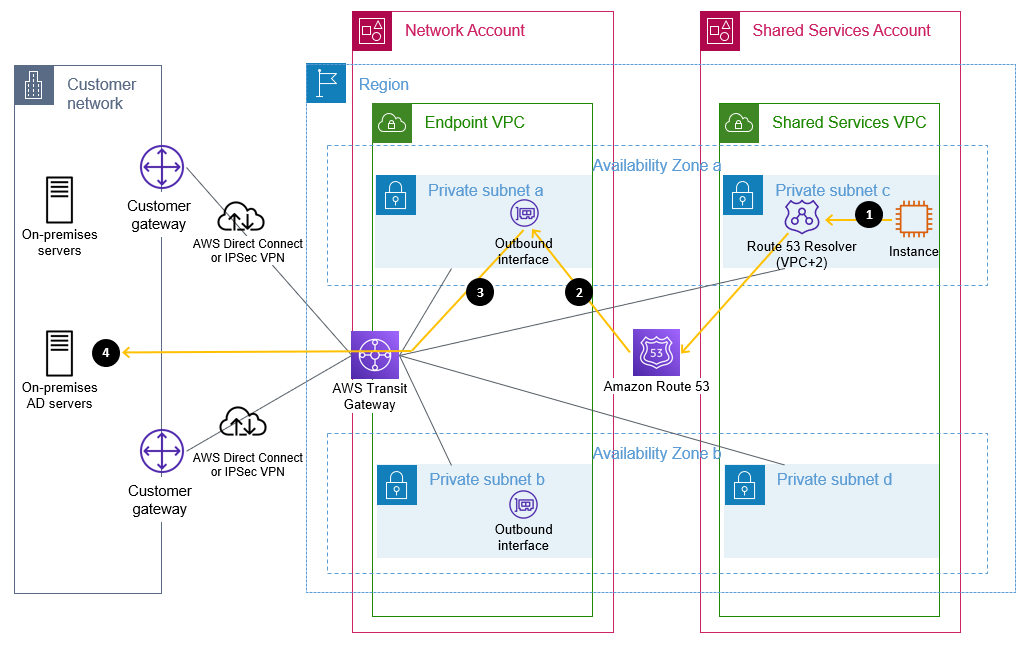
Active Directory relies heavily on Domain Name System (DNS) services and typically hosts its own DNS services on domain controllers. To establish name resolution of your AD-hosted DNS domains from within your VPCs, you should use Route 53 Resolver with outbound resolver endpoints and forwarding rules. Forwarding rules specify the domain name queries to forward from your VPCs to DNS servers that are authoritative for your AD DNS names. The queries will be forwarded through the outbound endpoints. The outbound endpoints will be configured in the network account on the endpoint VPC, and use the previously configured network connectivity to communicate with your existing DNS servers. You will configure your existing DNS servers as targets in the forwarding rules. Configuring Route 53 Resolver with the appropriate forwarding rules will help to enable seamless DNS resolution between your on-premises and AWS hosted resources. You need to share the Route 53 Resolver rules with your organization so that they can be used by your other AWS accounts. These shared rules are then associated with your VPCs, which need to be able to resolve names within AD-hosted DNS domains. Refer to the AWS Hybrid DNS with Active Directory technical guide for detailed step-by-step configuration guidance.
Figure 2 shows a sample flow of a DNS query from an Amazon Elastic Compute Cloud (Amazon EC2) instance through Route 53 Resolver and an outbound interface when resolving an on-premises domain name that matches a forwarding rule. In this example, the domain controllers are also the DNS servers, but splitting the DNS and AD servers is also fully supported.
Figure 2: Flow of a DNS query matching a forwarding rule through a Route 53 outbound endpoint
The flow is as follows:
An Amazon EC2 instance sends a DNS request for an internal name, such as ad.example.com, to the Route 53 Resolver address within the VPC.
Route 53 matches this query against a forwarding rule and directs the query through the configured outbound interface.
The query is sent from the outbound interface towards the target IP address, configured in the forwarding rule, of a server that is authoritative for the domain name.
This target DNS server receives the query and responds.
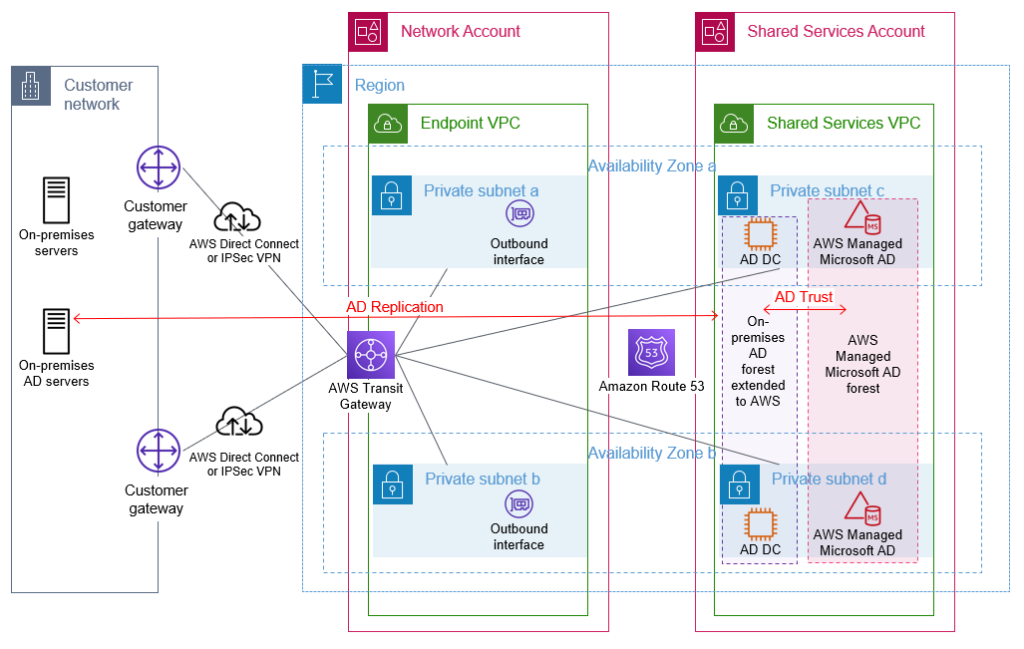
To extend your existing AD to AWS, domain controllers on Amazon EC2 instances are required, because AWS Managed Microsoft AD does not support being added to an existing forest. An AWS Managed Microsoft AD resource forest is required to enable integration with AWS services that offer AD integration. This is discussed in more detail in the following sections.
Extend your on-premises AD to AWS
Your first step is to build additional AD domain controllers for your existing AD domain(s) on Amazon EC2 instances that are running Microsoft Windows Server. You would then manage these domain controllers along with your existing domain controllers. By running additional domain controllers within AWS, you remove dependencies on network links and improve reliability and performance of your directory for infrastructure that is running within AWS. Communication between the domain controllers and other domain-joined resources within AWS is designed to remain within the AWS Region. AWS recommends that a minimum of two domain controllers, spread across multiple Availability Zones for resilience, are deployed. You should deploy the domain controllers into the subnets within the shared services VPC.
Depending on your capacity planning considerations and availability goals, you may choose to deploy more than two domain controllers. The number of users, servers, and applications that access your directory will influence the required number of domain controllers. Security considerations, including the required TCP/IP ports, and management options are discussed in the blog post Securely extend and access on-premises Active Directory domain controllers in AWS.
These new domain controllers will be in a new AD site, which includes all your VPC CIDR blocks within your chosen AWS Region. In Active Directory, a site represents a group of IP subnets that are connected with fast and highly reliable network connectivity. Site information is used to locate domain controllers closest to the client, to reduce latency and unnecessary network traffic. AWS recommends that your VPCs within an AWS Region belong to the same new Active Directory site, consisting only of your IP ranges within the chosen AWS Region, and that consistent site names are used in all AD forests that are connected by trusts. Further details are available in the section Designing Active Directory sites and services topology in Active Directory Domain Services on AWS and in Designing the Site Topology.
Update targets in Route 53 Resolver rules
After you have deployed AD-integrated DNS servers to these domain controllers and opened the required TCP/IP ports on the associated security groups, you can update the targets in your Route 53 Resolver forwarding rules to use the IP addresses of these servers. This will improve performance and reliability of DNS resolution, by removing the need for DNS resolution traffic to flow between AWS and on-premises infrastructure.
Figure 3 shows Amazon EC2 instances that are configured as AD domain controllers within a shared services VPC. After they are configured, these domain controllers will replicate with the on-premises domain controllers, using the connectivity that is provided through the transit gateway.
Figure 3: On-premises AD extended to AWS by deploying additional domain controllers
Build a resource forest for AWS hosted infrastructure and applications
When you select and launch this directory type, it is created as a highly available pair of domain controllers that are connected to your virtual private cloud (VPC). The domain controllers run in different Availability Zones in your choice of AWS Region. Host monitoring and recovery, data replication, snapshots, and software updates are automatically configured and managed for you. AWS Managed Microsoft AD is available in Standard and Enterprise Editions.
The AWS Managed Microsoft AD will be shared with your accounts within your organization to enable your other AWS accounts to access this directory and benefit from the features and services outlined previously.
With correct AD site configuration in both forests, communication between the AWS Managed Microsoft AD domain controllers and other domain-joined resources within AWS, and your existing domain’s domain controllers, remains within the chosen AWS Region. This is designed to keep your data within AWS in the country of your chosen AWS Region, to help to address possible data residency concerns.
An example of this architecture is depicted in Figure 4.
Figure 4: AWS Managed Microsoft AD resource forest with trust to on-premises AD
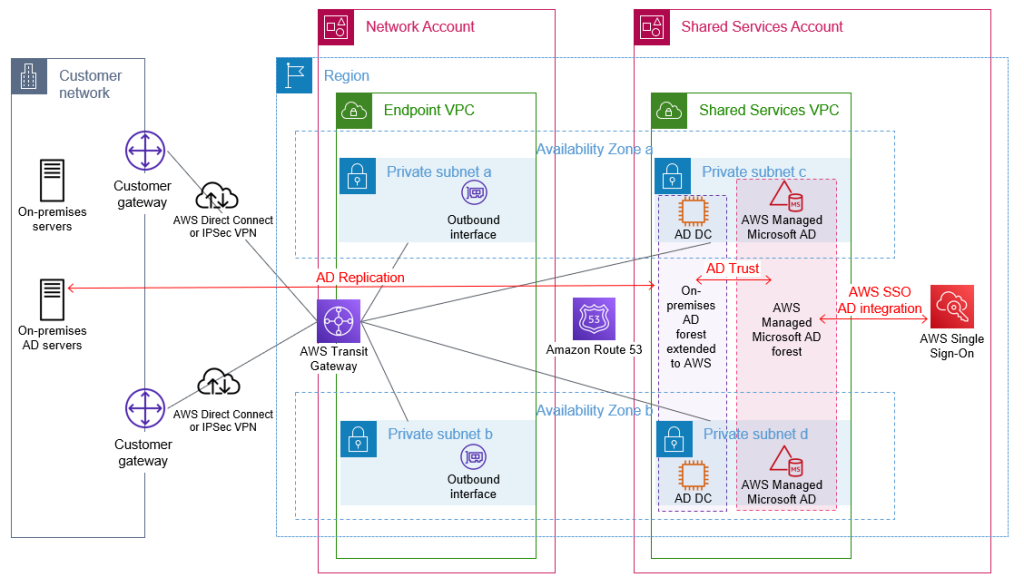
Manage access to your AWS accounts
AWS Single Sign-On (AWS SSO) enables you to centrally manage access across your AWS organization. You can choose to manage access just to your AWS accounts, or to your cloud applications as well. You can create user identities directly in AWS SSO, access your existing identifies by connecting AWS SSO to your existing Active Directory domain, or you can federate them from your Active Directory Federation Services (AD FS) or a standards-based identity provider, such as Okta Universal Directory or Azure AD. Your workforce users get a user portal to access all of their assigned AWS accounts or cloud applications. AWS SSO can be flexibly configured to run alongside or replace AWS account access management through AWS Identity and Access Management (IAM).
Identity federation is a system of trust between two parties for the purpose of authenticating third parties, such as users, and conveying information that is needed to authorize their access to resources. In this system, an identity provider (IdP) is responsible for user authentication, and a service provider (SP), such as a service or an application, controls access to resources. AWS SSO automates the setup of the identity federation that is used to provide authorized users access to your AWS accounts. AWS SSO is acting as an IdP when AWS SSO is connected to your AD and used to give access to your AWS accounts.
Although you can create users and groups directly within AWS SSO, a best practice is to use your existing identity single source of truth to simplify user and permission management. Connecting AWS SSO through to your Active Directory, which has been extended to AWS, will allow authentication of users for access to your AWS accounts to take place entirely within the AWS Region. This practice is designed to reduce dependencies on hybrid networking and resources located on-premises or in other hosting locations.
You should enforce secure access to the user portal, AWS SSO integrated apps, and the AWS CLI by enabling multi-factor authentication (MFA). AWS SSO MFA supports various MFA types, including client-side authenticator apps, security keys, and built-in authenticators. Using MFA is recommended as part of configuring strong sign-in mechanisms.
Connect AWS SSO to your Active Directory
You can connect AWS SSO to your Active Directory on AWS by using AD Connector, or through an AWS Managed Microsoft AD. Using AD Connector is often the primary mechanism considered by customers, but given the lack of support for multi-domain environments as used in this post, this blog post recommends using AWS Managed Microsoft AD.
When you use AWS Managed Microsoft AD with AWS SSO, AWS SSO requires two-way trusts to be in place between this AWS Managed Microsoft AD forest and any other forest that contains the user identities that will authenticate through AWS SSO.
Before AWS SSO supported delegated administration, AWS SSO had to be configured within the management account of your AWS organization, and required the connected AWS Managed Microsoft AD directory to also be within your organization’s management account.
With the announcement of AWS SSO delegated administration support, AWS SSO and the connected AWS Managed Microsoft AD can be configured in an account other than your management account. This post recommends using your shared services account as the AWS SSO delegated administration account. Doing so will enable AWS SSO to use the AWS Managed Microsoft AD that you configured within the shared services account in the preceding Build a resource forest for AWS hosted infrastructure and applications section.
This follows the AWS guidance to avoid deploying workloads to the organization’s management account and to limit access to the management account. Using a delegated administration account for AWS SSO reduces the need for regular access to the management account.
From within your management account, your shared services account needs to be registered as the AWS SSO delegated administration account. You can then configure and manage AWS SSO from within your shared services account. The AWS SSO delegated administration account can manage permissions across your organization, apart from assigning permissions to access the management account. Assignment of permissions to access the management account through AWS SSO needs to be configured from within the management account itself.
Permission sets are a way to define permissions centrally in AWS SSO so that they can be applied to all your AWS accounts. After you have created your permission sets, you will assign them to your Active Directory groups to grant access to the respective AWS accounts, using the defined permission set persona. Your users will then use the AWS SSO user portal to authenticate with their AD credentials and can choose which of the assigned AWS accounts and personas they wish to access. Users can configure AWS CLI to use AWS SSO to access the roles they have been assigned.
Figure 5 shows the complete architecture covered in this blog post. The diagram includes AWS SSO within the shared services account connected to the AWS Managed Microsoft AD that is used to provide access to the forests that contain your user identities.
Figure 5: Complete AD architecture with trusts and AWS SSO using AD as the identity source
Access domain-joined infrastructure resources
By joining your Windows Server servers to your Active Directory resource domain, you can centralize the management of your servers by using native Microsoft tooling. Joining your Amazon EC2 Windows instances to your domain enables you to continue using existing tools, such as group policies, to manage your server estate both on-premises and in AWS.
VPCs with workloads that need to be domain joined, to access on-premises networks, or to access other VPCs will need appropriate network connectivity and DNS configuration in place. You can enable network connectivity between workload VPCs and the shared services VPC and other on-premises networks by attaching your VPCs to the transit gateway shared from the networking account. You can enable DNS resolution of your AD domains by attaching the Route 53 Resolver rules, shared from the networking account, to your workload VPCs.
Join instances to your AD domain
Amazon EC2 Windows instances can be manually or seamlessly joined to your resource domain. Manually joining an instance involves the same steps that you would follow on-premises. Seamlessly joining instances requires the AWS Systems Manager agent, which is installed by default in AWS provided Windows AMIs, on the Amazon EC2 instance and an attached instance profile with sufficient permissions. This instance profile should include the AmazonSSMManagedInstanceCore and AmazonSSMDirectoryServiceAccess policies.
In order to join the domain, either manually or seamlessly, the Amazon EC2 instance must be able to resolve the DNS name for your AD domain. This DNS resolution was enabled by the attachment of the correctly configured shared Route 53 Resolver rules to the workload VPCs. Seamlessly joining instances to the domain also requires that your shared services account AWS Managed Microsoft AD directory be shared with the workload account that contains the Amazon EC2 instances.
After your instances are joined to the domain, applications running on the servers will be able to access other domain-joined resources, if authorized by AD, through the connectivity that is provided by the transit gateway attachment on the workload VPC.
Applications that need to access AWS resources that are not domain joined, such as objects in Amazon Simple Storage Service (Amazon S3), should make use of temporary credentials associated with the attached instance profile to access AWS resources. By using these IAM temporary credentials, you can avoid using static long-term credentials. When an application requires access to credentials or other secrets, and cannot use AD or IAM temporary credentials, such as for database logins or for third-party API tokens, use a service designed to handle management of secrets, such as AWS Secrets Manager. See the AWS Well-Architected Security Pillar Identity Management documentation for further guidance.
Figure 6 shows Active Directory access through the transit gateway. The Route 53 forwarding rules, which are shared from the shared services account, are associated with the workload VPCs to enable DNS resolution of Active Directory–integrated DNS domains. Not shown in the diagram is the sharing of the AWS Managed Microsoft AD for the resource forest with the workload accounts.
Figure 6: Flow of AD network traffic through the transit gateway within the network account
Access applications and third-party services
You might have existing applications that rely on Active Directory or LDAP for user authentication. When you extend your Active Directory environment to AWS, these existing applications can be deployed to your AWS environment, and they will be able to authenticate the users of the application against your AD.
You might already be using a third-party identity provider, such as Azure AD or Okta, to provide your users with access to AWS services such as AWS Client VPN or to third-party business applications such as those on the AWS SSO Cloud applications page. These third-party identity providers will typically offer an agent to replicate or synchronize necessary user information from your Active Directory to their service, in order to offer federated authentication for your users. Using these agents to replicate from your existing Active Directory means that you are still using your Active Directory as the single source of truth. To ensure reliable authentication, you should follow the vendor’s recommendations for the high-availability setup of their agent.
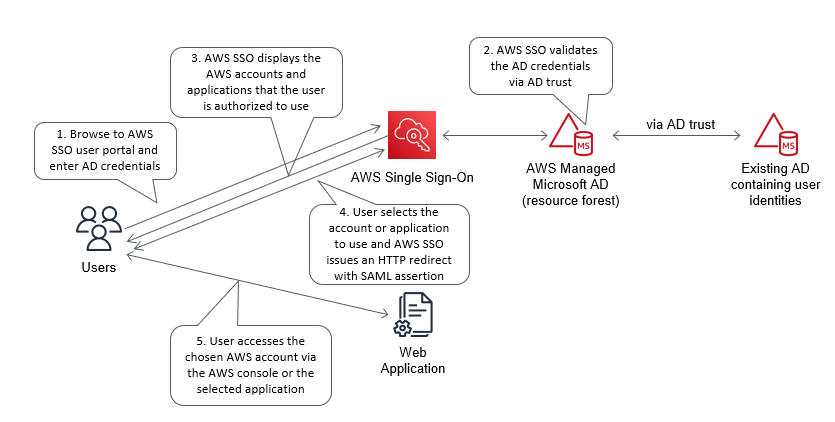
Figure 7 shows the steps that occur when you use AWS SSO to provide identity federation to a web application.
Figure 7: Example flow for identify federation that uses AWS SSO
Conclusion
This post highlights the importance of implementing a cloud authentication and authorization architecture that addresses the variety of requirements for an organization’s AWS Cloud environment. In addition to console access, this post highlights the importance of considering how you will:
Perform authentication to AWS based Windows and Linux instances
Integrate AWS services that need Windows-based authentication capabilities
Integrate authentication for internal user applications
Provide a single identity source as the source of truth for all AWS user authentication
Enable MFA for user authentication
The proposed approach provides a highly available Active Directory (AD) infrastructure, running on AWS and integrated with your existing AD, which addresses these considerations. The approach helps you to attain reduced latencies and higher levels of availability by removing dependencies on on-premises resources, other hosting locations, and external network links. This design stores the identity information that is contained within your existing AD in your chosen AWS Region and country, across multiple Availability Zones, which can also help you meet your data residency requirements.
If you have feedback about this post, submit comments in the Comments section below. If you have questions about this post, contact AWS Support.
Want more AWS Security news? Follow us on Twitter.
“Authentication is hard. Hard to debug, hard to test, hard to get right.” – Me
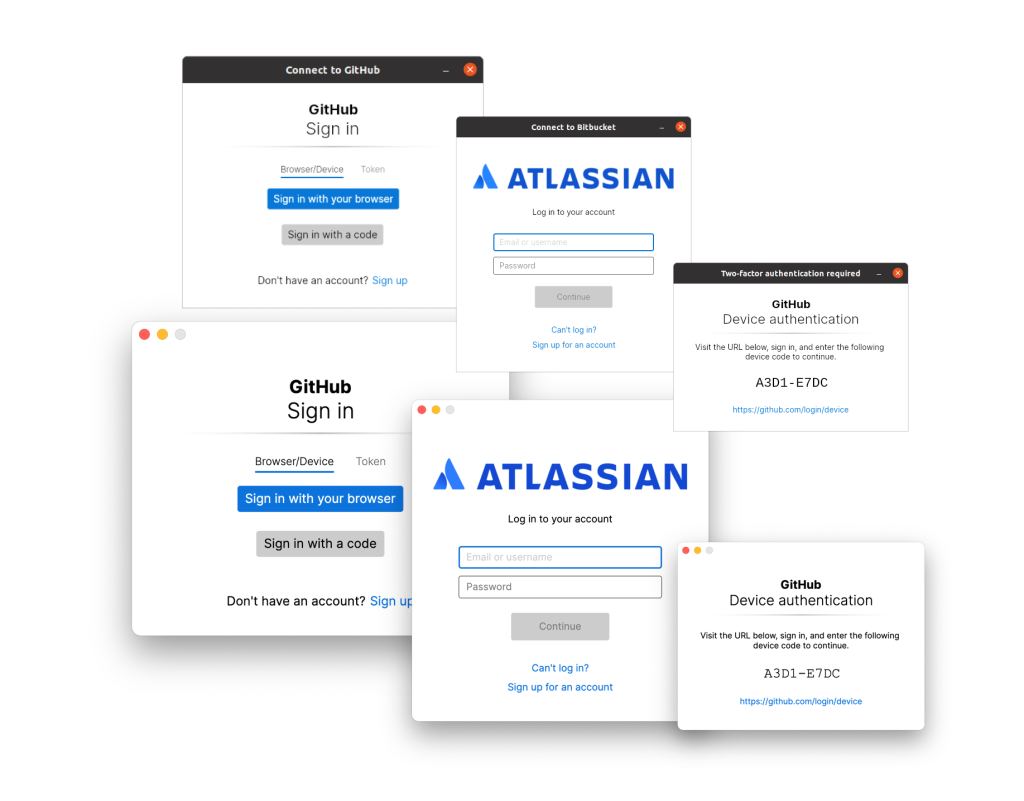
These words were true when I wrote them back in July 2020, and they’re still true today. The goal of Git Credential Manager (GCM) is to make the task of authenticating to your remote Git repositories easy and secure, no matter where your code is stored or how you choose to work. In short, GCM wants to be Git’s universal authentication experience.
In my last blog post, I talked about the risk of proliferating “universal standards” and how introducing Git Credential Manager Core (GCM Core) would mean yet another credential helper in the wild. I’m therefore pleased to say that we’ve managed to successfully replace both GCM for Windows and GCM for Mac and Linux with the new GCM! The source code of the older projects has been archived, and they are no longer shipped with distributions like Git for Windows!
In order to celebrate and reflect this successful unification, we decided to drop the “Core” moniker from the project’s name to become simply Git Credential Manager or GCM for short.
We felt being homed under github.com/microsoft or github.com/github didn’t quite represent the ethos of GCM as an open, universal and agnostic project. All existing issues and pull requests were migrated, and we continue to welcome everyone to contribute to the project.
Interacting with HTTP remotes without the help of a credential helper like GCM is becoming more difficult with the removal of username/password authentication at GitHub and Bitbucket. Using GCM makes it easy, and with exciting developments such as using GitHub Mobile for two-factor authentication and OAuth device code flow support, we are making authentication more seamless.
Hello, Linux!
In the quest to become a universal solution for Git authentication, we’ve worked hard on getting GCM to work well on various Linux distributions, with a primary focus on Debian-based distributions.
Today we have Debian packages available to download from our GitHub releases page, as well as tarballs for other distributions (64-bit Intel only). Being built on the .NET platform means there should be a reduced effort to build and run anywhere the .NET runtime runs. Over time, we hope to expand our support matrix of distributions and CPU architectures (by adding ARM64 support, for example).
Due to the broad and varied nature of Linux distributions, it’s important that GCM offers many different credential storage options. In addition to GPG encrypted files, we added support for the Secret Service API via libsecret (also see the GNOME Keyring), which provides a similar experience to what we provide today in GCM on Windows and macOS.
Windows Subsystem for Linux
In addition to Linux distributions, we also have special support for using GCM with Windows Subsystem for Linux (WSL). Using GCM with WSL means that all your WSL installations can share Git credentials with each other and the Windows host, enabling you to easily mix and match your development environments.
You can read more about using GCM inside of your WSL installations here.
Hello, GitLab
Being universal doesn’t just mean we want to run in more places, but also that we can help more users with whatever Git hosting service they choose to use. We are very lucky to have such an engaged community that is constantly working to make GCM better for everyone.
On that note, I am thrilled to share that through a community contribution, GCM now has support for GitLab. Welcome to the family!
Look Ma, no terminals!
We love the terminal and so does GCM. However, we know that not everyone feels comfortable typing in commands and responding to prompts via the keyboard. Also, many popular tools and IDEs that offer Git integration do so by shelling out to the git executable, which means GCM may be called upon to perform authentication from a GUI app where there is no terminal(!)
GCM has always offered full graphical authentication prompts on Windows, but thanks to our adoption of the Avalonia project that provides a cross-platform .NET XAML framework, we can now present graphical prompts on macOS and Linux.
GCM continues to support terminal prompts as a first-class option for all prompts. We detect environments where there is no GUI (such as when connected over SSH without display forwarding) and instead present the equivalent text-based prompts. You can also manually disable the GUI prompts if you wish.
Securing the software supply chain
Keeping your source code secure is a critical step in maintaining trust in software, whether that be keeping commercially sensitive source code away from prying eyes or protecting against malicious actors making changes in both closed and open source projects that underpin much of the modern world.
In 2020, an extensive cyberattack was exposed that impacted parts of the US federal government as well as several major software companies. The US president’s recent executive order in response to this cyberattack brings into focus the importance of mechanisms such as multi-factor authentication, conditional access policies, and generally securing the software supply chain.
Store ALL the credentials
Git Credential Manager creates and stores credentials to access Git repositories on a host of platforms. We hold in the highest regard the need to keep your credentials and access secure. That’s why we always keep your credentials stored using industry standard encryption and storage APIs.
In addition to these existing mechanisms, we also support several alternatives across supported platforms, giving you the choice of how and where you wish to store your generated credentials (such as GPG-encrypted credential files).
GCM can now also use Git’s git-credential-cache helper that is commonly built and available in many Git distributions. This is a great option for cloud shells or ephemeral environments when you don’t want to persist credentials permanently to disk but still want to avoid a prompt for every git fetch or git push.
Modern windows authentication (experimental)
Another way to keep your credentials safe at rest is with hardware-level support through technologies like the Trusted Platform Module (TPM) or Secure Enclave. Additionally, enterprises wishing to make sure your device or credentials have not been compromised may want to enforce conditional access policies.
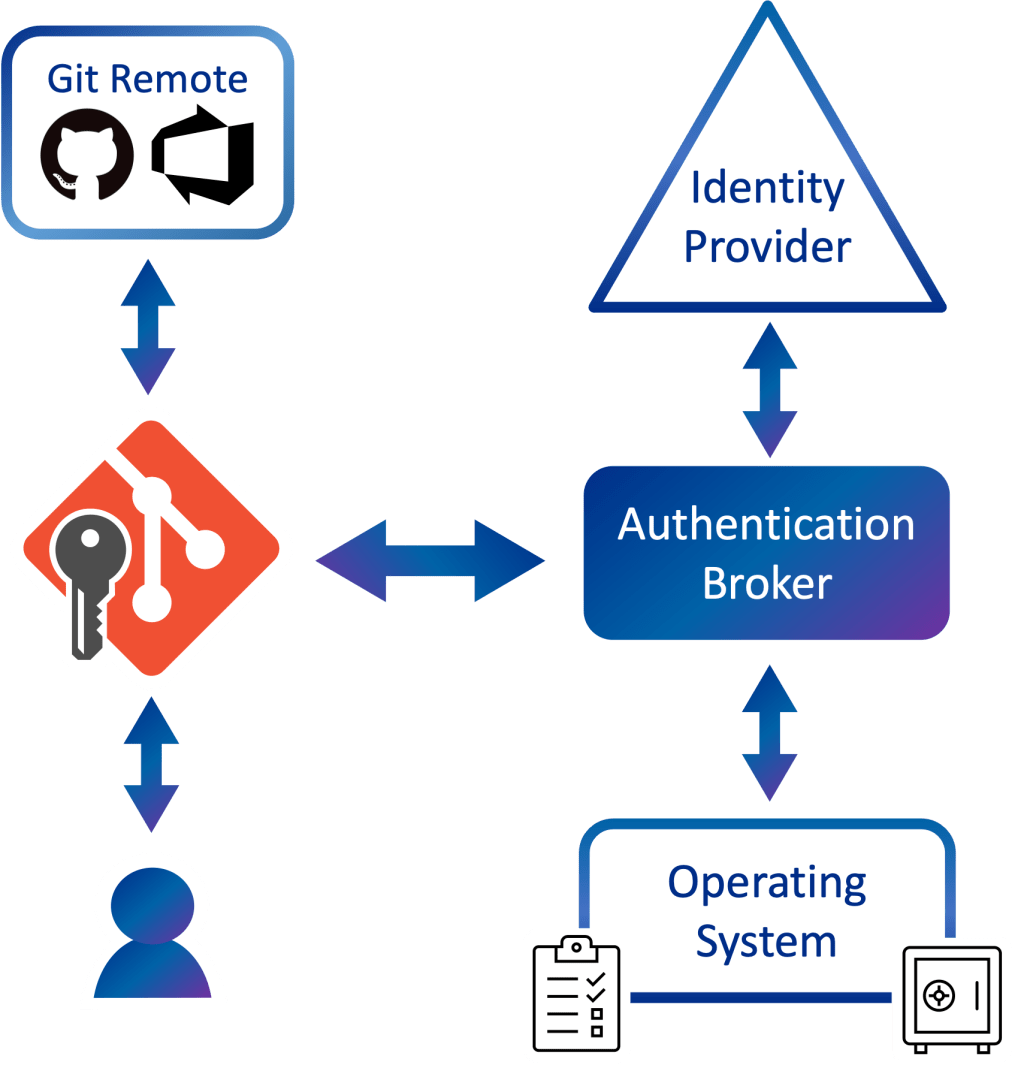
Integrating with these kinds of security modules or enforcing policies can be tricky and is platform-dependent. It’s often easier for applications to hand over responsibility for the credential acquisition, storage, and policy
enforcement to an authentication broker.
An authentication broker performs credential negotiation on behalf of an app, simplifying many of these problems, and often comes with the added benefit of deeper integration with operating system features such as biometrics.
I’m happy to announce that GCM has gained experimental support for brokered authentication (Windows-only at the moment)!
On Windows, the authentication broker is a component that was first introduced in Windows 10 and is known as the Web Account Manager (WAM). WAM enables apps like GCM to support modern authentication experiences such as Windows Hello and will apply conditional access policies set by your work or school.
Please note that support for the Windows broker is currently experimental and limited to authentication of Microsoft work and school accounts against Azure DevOps.
Click here to read more about GCM and WAM, including how to opt-in and current known issues.
Even more improvements
GCM has been a hive of activity in the past 18 months, with too many new features and improvements to talk about in detail! Here’s a quick rundown of additional updates since our July 2020 post:
While we’ve made a great deal of progress toward our universal experience goal, we’re not slowing down anytime soon; we’re still full steam ahead with GCM!
Our focus for the next period will be on iterating and improving our authentication broker support, providing stronger protection of credentials, and looking to increase performance and compatibility with more environments and uses.
In the 2021 edition of the OWASP top 10 list, Broken Authentication was changed to Identification and Authentication Failures. This term bundles in a number of existing items like cryptography failures, session fixation, default login credentials, and brute-forcing access. Additionally, this vulnerability slid down the top 10 list from number 2 to number 7.
To be sure, security practitioners have made progress in recent years in mitigating authentication vulnerabilities. We should consider ourselves fortunate that most employees are no longer using default usernames and passwords, generic admin, or admin as credentials — many of these issues have been resolved with the availability of frameworks that help standardize against these types of vulnerabilities. Security teams have also started to feel the effects of maintaining multi-factor authentication (MFA) accounts across the multitudes of applications we use in our day-to-day lives. This, too, has helped contribute to this category going down in the OWASP top 10 list.
But that doesn’t mean security pros should take their eyes off the ball when it comes to identification and authentication failures. Let’s take a look at the issues that still remain in mitigating this family of threats.
The challenges with identification and authentication
Nearly every application and technology solution that we use in our lives has some sort of login associated with it. In your home, think about the WiFi routers you connect to — and the many devices and appliances that can now access that network.
Your workplace likely also has a wide variety of devices that reside on the network. Most of these devices have some form of login that allows them to make configuration changes. In addition, these devices almost always come with generic usernames and passwords that allow users to log into them for the first time.
Unfortunately, these credentials appear in every user guide and are publicly well-known. Vendors routinely use the same generic credentials across multiple different product types, which can compound the problem. Even if you change the password upon configuration of the device, the username is still known, and the password can be brute-forced with a variety of different testing tools.
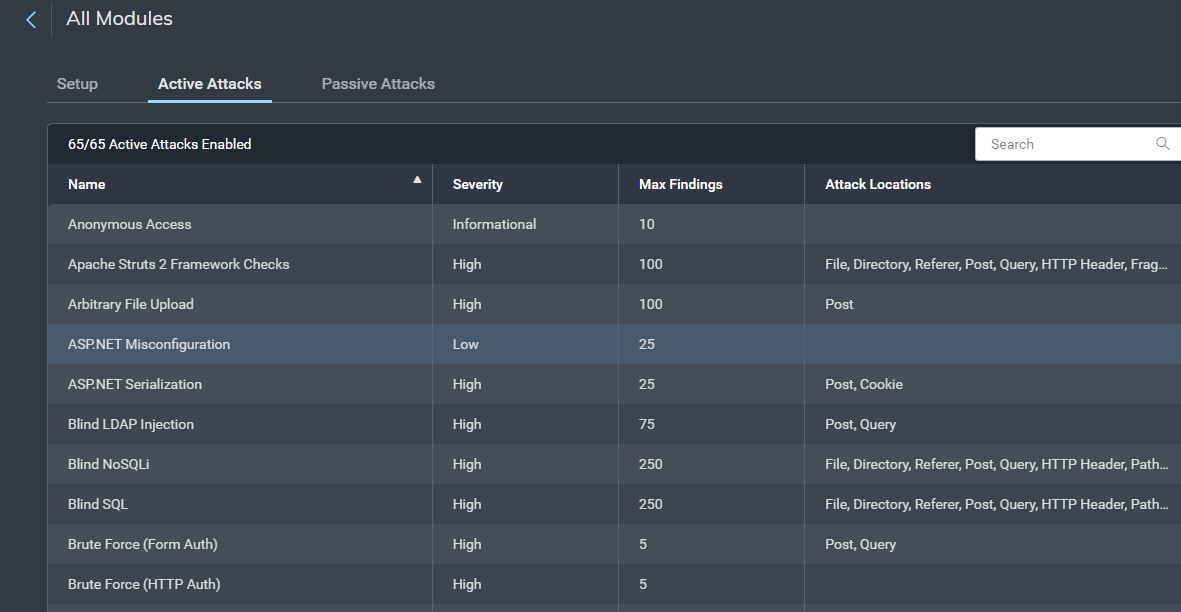
Testing identification and authentication with InsightAppSec
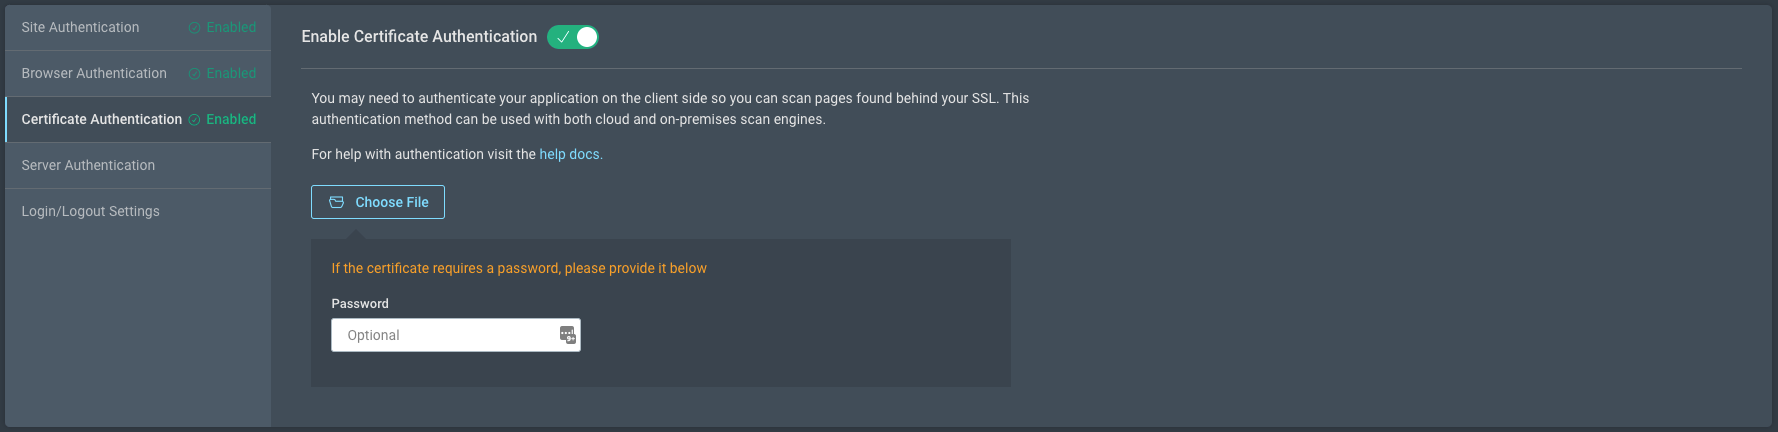
InsightAppSec, Rapid7’s dynamic application security testing (DAST) solution, offers a single solution with an ability to detect and identify these risks across your environment. It allows you to test your applications and devices for identification and authentication failures throughout the enterprise.
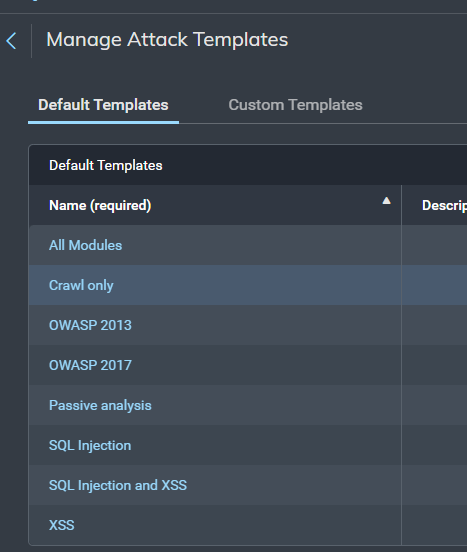
InsightAppSec contains 101 different attack modules, with thousands of payloads to help identify vulnerabilities in your environment. You can utilize the default attack templates within the solution or build your own from scratch.
InsightAppSec also lets you prioritize these risks within the platform and gives you the information you need to provide details and context to the teams responsible for remediation. The platform gives detailed recommendations for how developers can fix vulnerabilities. Users can also replay the attacks in real time against the application and validate that common issues, such as using generic credentials to log in, have been resolved with the Rapid7 Chrome Plugin.
Final thought
As organizations continue to protect their applications from identification and authentication issues, there will be added mechanisms for authentication in place for protection. As a part of any good application security program, these applications will still be to be scanned and tested. Having a scanning solution in place to be able to authenticate appropriately through these security protections is essential for organizations to address their identity- and access-related vulnerabilities.
Check out our previous OWASP Top 10 Deep Dives on:
Roger Grimes on why multifactor authentication isn’t a panacea:
The first time I heard of this issue was from a Midwest CEO. His organization had been hit by ransomware to the tune of $10M. Operationally, they were still recovering nearly a year later. And, embarrassingly, it was his most trusted VP who let the attackers in. It turns out that the VP had approved over 10 different push-based messages for logins that he was not involved in. When the VP was asked why he approved logins for logins he was not actually doing, his response was, “They (IT) told me that I needed to click on Approve when the message appeared!”
And there you have it in a nutshell. The VP did not understand the importance (“the WHY”) of why it was so important to ONLY approve logins that they were participating in. Perhaps they were told this. But there is a good chance that IT, when implementinthe new push-based MFA, instructed them as to what they needed to do to successfully log in, but failed to mention what they needed to do when they were not logging in if the same message arrived. Most likely, IT assumed that anyone would naturally understand that it also meant not approving unexpected, unexplained logins. Did the end user get trained as to what to do when an unexpected login arrived? Were they told to click on “Deny” and to contact IT Help Desk to report the active intrusion?
Or was the person told the correct instructions for both approving and denying and it just did not take? We all have busy lives. We all have too much to do. Perhaps the importance of the last part of the instructions just did not sink in. We can think we hear and not really hear. We can hear and still not care.
Zero Trust rules by default block attempts to reach a resource. To obtain access, users need to prove they should be allowed to connect using signals like their identity, their device health, and other factors.
However, some workflows need a second opinion. Starting today, you can add new policies in Cloudflare Access that grant temporary access to specific users based on approvals for a set of predefined administrators. You can decide that some applications need second-party approval in addition to other Zero Trust signals. We’re excited to give your team another layer of Zero Trust control for any application — whether it’s a popular SaaS tool or you host it yourself.
Why temporary authentication?
Configuring appropriate user access is a challenge. Most companies start granting employee-specific application access based on username or email. This requires manual provisioning and deprovisioning when an employee joins or leaves.
When this becomes unwieldy, security teams generally use identity provider groups to set access levels by employee role. Which allows better provisioning and deprovisioning, but again starts to get clunky when application access requirements do not conform around roles. If a specific support rep needs access, then they need to be added to an existing group (for example, engineering) or a new group needs to be created (for example, specfic_support_reps). Even if that new team member only needed temporary access, it is unlikely they were ever removed from the identity group they were added to. This leads to overprovisioned and unnecessary groups in your identity provider.
In most cases, there are two sets of application users — those that access every day to do their jobs and those that need specific access periodically. We wanted to make it possible to give these periodic users temporary access to applications. Additionally, some services are so sensitive that every user should only have temporary access, for example in the case of production database access.
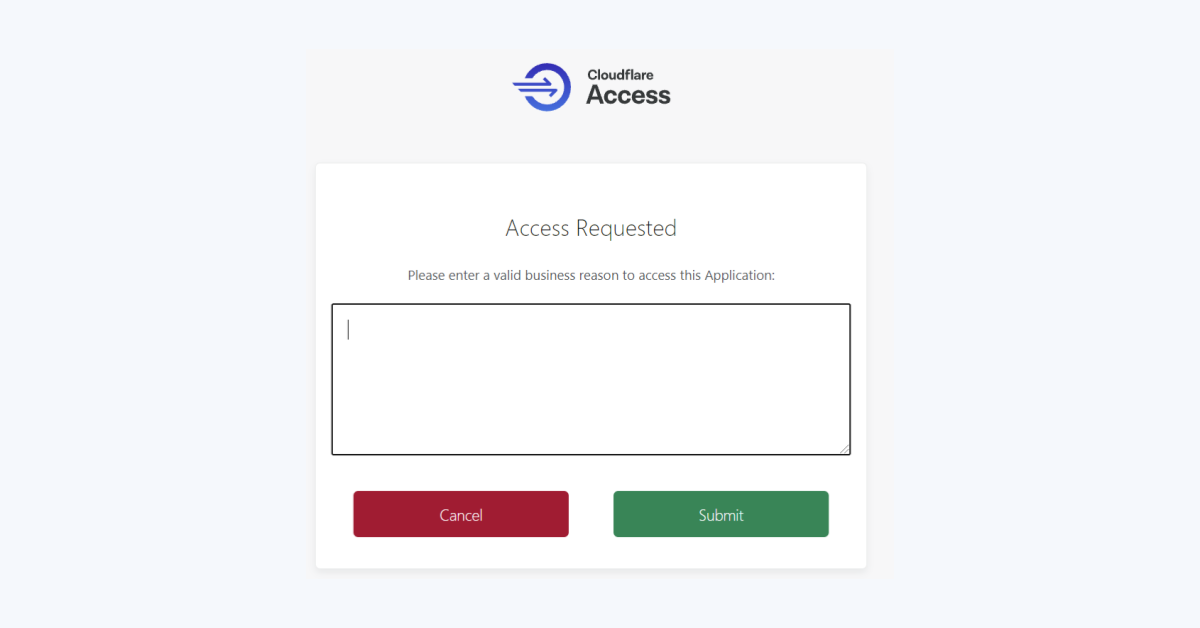
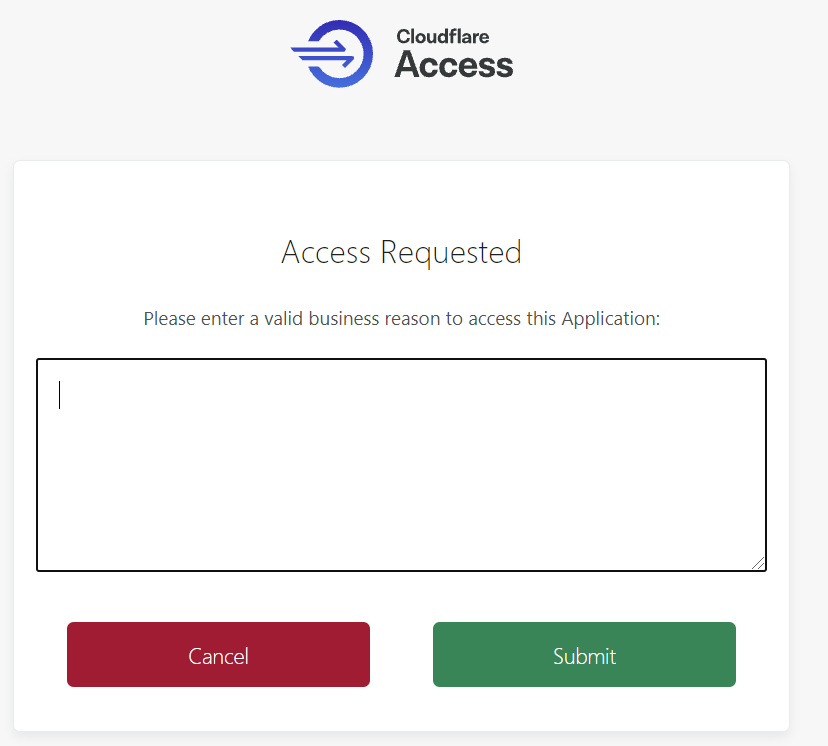
Starting with Purpose Justification
Cloudflare Access starts solving this problem by allowing security administrators to collect a business reason for accessing a specific application. This provides an audit trail and a prompt to remind users that they should only connect to the resource with a good reason. However, the feature does actively stop a user from accessing something.
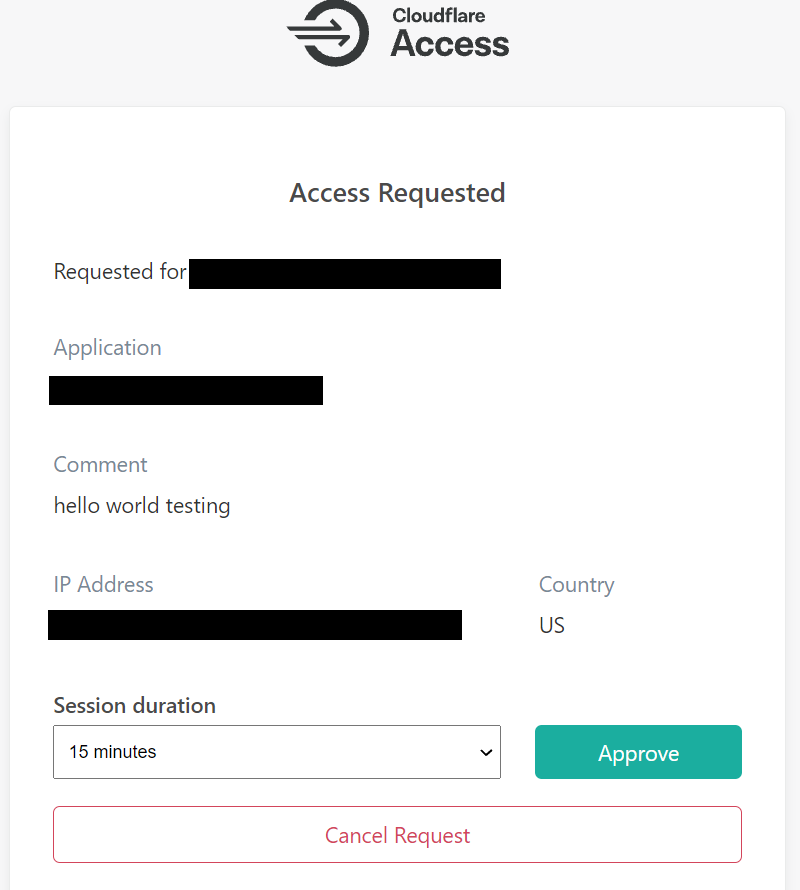
Added control with Temporary Authentication
As part of this release, we have extended Purpose Justification with Temporary Access to introduce scoped permissions and second approval requirements. Now a user’s Purpose Justification, along with location and IP address, will be sent to a preconfigured list of approvers who can then either approve or deny a user’s access request, or grant access for a set amount of time.
This allows security teams to avoid over-provisioning sensitive applications without also creating bottlenecks on a few key individuals in their organization with access to sensitive tools. Better yet, all of these requests and approvals are logged for regulatory and investigative purposes.
When the user’s session expires, they need to repeat the process if they need access again. If you have a group of users who should always be allowed to reach a resource, without second approval, you can define groups that are allowed to skip this step.
Purpose Justification and Temporary Access were both built using Cloudflare Workers. This means both user access requests and administrator access reviews are rendered from the closest data center to the user. You could request access to an application from an approver across the world with virtually no latency.
Workers also allowed us to be very flexible when Temporary Authentication is required. As an example, the same user who normally has persistent access to an application can be required to request access when connecting from a personal device or when visiting a high-risk country.
How to get started
To get started with Temporary Authentication in Cloudflare Access, go to the Teams Dashboard and create an Access application. Within the Application’s Zero Trust policy, you can configure when you want to allow for temporary authentication with human approval. For more detailed information, you can refer to our developer docs.
At Rapid7, we know the most powerful tools in your security portfolio are the ones that help you understand your risks quickly. With our new automated login for InsightAppSec, you can access and scan even the most complex, modern applications quickly and easily. That means you’ll spend less time worrying about whether your scans are authenticating and more time assessing and responding to vulnerabilities.
In the world before automated login — we’ll call these the dark ages — security professionals needed to write scripts and rely on macros to navigate more complex applications with their many layers of authentication. This has always been a time-consuming process that takes resources away from the work of identifying and remediating vulnerabilities.
InsightAppSec with automated authentication analyzes and identifies the login pages, enters the credentials, and logs in to the app automatically. Then, it provides you with a confidence score so you’re sure it’s been logged in successfully. Fewer confusing steps, fewer macros — just more understanding of risk from the restricted parts of your web applications.
A look inside
So, what’s different? Well, for starters, the look and feel of the scan will be intuitive and easy to use. We’ve taken great pains to maximize your efficiency at every turn so when you start a new application scan and select authentication, automated authentication will be the default.
We’ve also improved secondary navigation to include new, more logical groupings, making settings easier to find.
The process couldn’t be easier. Simply choose the application you wish to scan from the InsightAppSec All Apps page, open Scan Config, and select Automated Authentication from the Authentication’s page. Enter your credentials once, and you’re good to save for later or start the scan now.
Moving to automated login is more than just a single new feature — it opens the door to more innovations. Automated login uses a new architecture that allows InsightAppSec to interact with web apps in the same way a user and their browser would behave. This is critical as applications become more complex, which in turn presents new challenges to automating certain processes. Automated login is just the first feature we’re rolling out based on this new, more innovative architecture.
As web applications become more complex, the solutions you employ to secure them should become more powerful. Automated authentication provides your security team with the ability to efficiently and accurately scan even the most complex applications quickly and in an intuitive way right out of the box. It flattens the learning curve for setting up and running scans, giving any member of your security team the ability to run scans and identify vulnerabilities.
We are including automated login through InsightAppSec for existing and new customers right away. If you want to learn more, click here for more resources.
Abstract: A master face is a face image that passes face-based identity-authentication for a large portion of the population. These faces can be used to impersonate, with a high probability of success, any user, without having access to any user-information. We optimize these faces, by using an evolutionary algorithm in the latent embedding space of the StyleGAN face generator. Multiple evolutionary strategies are compared, and we propose a novel approach that employs a neural network in order to direct the search in the direction of promising samples, without adding fitness evaluations. The results we present demonstrate that it is possible to obtain a high coverage of the population (over 40%) with less than 10 master faces, for three leading deep face recognition systems.
Sonja Drummer describes (with photographs) two medieval security techniques. The first is a for authentication: a document has been cut in half with an irregular pattern, so that the two halves can be brought together to prove authenticity. The second is for integrity: hashed lines written above and below a block of text ensure that no one can add additional text at a later date.
The collective thoughts of the interwebz
Manage Consent
To provide the best experiences, we use technologies like cookies to store and/or access device information. Consenting to these technologies will allow us to process data such as browsing behavior or unique IDs on this site. Not consenting or withdrawing consent, may adversely affect certain features and functions.
Functional
Always active
The technical storage or access is strictly necessary for the legitimate purpose of enabling the use of a specific service explicitly requested by the subscriber or user, or for the sole purpose of carrying out the transmission of a communication over an electronic communications network.
Preferences
The technical storage or access is necessary for the legitimate purpose of storing preferences that are not requested by the subscriber or user.
Statistics
The technical storage or access that is used exclusively for statistical purposes.The technical storage or access that is used exclusively for anonymous statistical purposes. Without a subpoena, voluntary compliance on the part of your Internet Service Provider, or additional records from a third party, information stored or retrieved for this purpose alone cannot usually be used to identify you.
Marketing
The technical storage or access is required to create user profiles to send advertising, or to track the user on a website or across several websites for similar marketing purposes.