Wow, May already! Here in the Pacific Northwest, spring is in full bloom and nature has emerged completely from her winter slumbers. It feels that way here at AWS, too, with a burst of new releases and updates and our in-person summits and other events now in full flow. Two weeks ago, we had the San Francisco summit; last week, we held the London summit and also our .NET Enterprise Developer Day virtual event in EMEA. This week we have the Madrid summit, with more summits and events to come in the weeks ahead. Be sure to check the events section at the end of this post for a summary and registration links.
Last week’s launches Here are some of the launches and updates last week that caught my eye:
If you’re looking to reduce or eliminate the operational overhead of managing your Apache Kafka clusters, then the general availability of Amazon Managed Streaming for Apache Kafka (MSK) Serverless will be of interest. Starting with the original release of Amazon MSK in 2019, the work needed to set up, scale, and manage Apache Kafka has been reduced, requiring just minutes to create a cluster. With Amazon MSK Serverless, the provisioning, scaling, and management of the required resources is automated, eliminating the undifferentiated heavy-lift. As my colleague Marcia notes in her blog post, Amazon MSK Serverless is a perfect solution when getting started with a new Apache Kafka workload where you don’t know how much capacity you will need or your applications produce unpredictable or highly variable throughput and you don’t want to pay for idle capacity.
Another week, another set of Amazon Elastic Compute Cloud (Amazon EC2) instances! This time around, it’s new storage-optimized I4i instances based on the latest generation Intel Xeon Scalable (Ice Lake) Processors. These new instances are ideal for workloads that need minimal latency, and fast access to data held on local storage. Examples of these workloads include transactional databases such as MySQL, Oracle DB, and Microsoft SQL Server, as well as NoSQL databases including MongoDB, Couchbase, Aerospike, and Redis. Additionally, workloads that benefit from very high compute performance per TB of storage (for example, data analytics and search engines) are also an ideal target for these instance types, which offer up to 30 TB of AWS Nitro SSD storage.
Deploying AWS compute and storage services within telecommunications providers’ data centers, at the edge of the 5G networks, opens up interesting new possibilities for applications requiring end-to-end low latency (for example, delivery of high-resolution and high-fidelity live video streaming, and improved augmented/virtual reality (AR/VR) experiences). The first AWS Wavelength deployments started in the US in 2020, and have expanded to additional countries since. This week we announced the opening of the first Canadian AWS Wavelength zone, in Toronto.
Other AWS News Some other launches and news items you may have missed:
The addition of IPv6 support enables customers to simplify their networking stack. The increase in address space offered by IPv6 removes the need to manage overlapping address spaces in your Amazon Virtual Private Cloud (VPC)s. IPv6 addressing can be enabled on both new and existing RDS instances.
Customers in the Asia Pacific (Sydney) and Asia Pacific (Singapore) Regions now have the option to use Multi-AZ deployments to provide enhanced availability and durability for Amazon RDS DB instances, offering one primary and two readable standby database instances spanning three Availability Zones (AZs). These deployments benefit from up to 2x faster transaction commit latency, and automated fail overs, typically under 35 seconds.
Applications using RDS Data API can now elect to receive SQL results as a simplified JSON string, making it easier to deserialize results to an object. Previously, the API returned a JSON string as an array of data type and value pairs, which required developers to write custom code to parse the response and extract the values, so as to translate the JSON string into an object. Applications that use the API to receive the previous JSON format are still supported and will continue to work unchanged.
Applications using Amazon Interactive Video Service (IVS), offering low-latency interactive video experiences, can now add a livestream chat feature, complete with built-in moderation, to help foster community participation in livestreams using Q&A discussions. The new chat support provides chat room resource management and a messaging API for sending, receiving, and moderating chat messages.
Amazon Polly now offers a new Neural Text-to-Speech (TTS) voice, Vitória, for Brazilian Portuguese. The original Vitória voice, dating back to 2016, used standard technology. The new voice offers a more natural-sounding rhythm, intonation, and sound articulation. In addition to Vitória, Polly also offers a second Brazilian Portuguese neural voice, Camila.
Finally, if you’re a .NET developer who’s modernizing .NET Framework applications to run in the cloud, then the announcement that the open-source CoreWCF project has reached its 1.0 release milestone may be of interest. AWS is a major contributor to the project, a port of Windows Communication Foundation (WCF), to run on modern cross-platform .NET versions (.NET Core 3.1, or .NET 5 or higher). This project benefits all .NET developers working on WCF applications, not just those on AWS. You can read more about the project in my blog post from last year, where I spoke with one of the contributing AWS developers. Congratulations to all concerned on reaching the 1.0 milestone!
Upcoming AWS Events As I mentioned earlier, the AWS Summits are in full flow, with some some virtual and in-person events in the very near future you may want to check out:
I’m also happy to share that I’ll be joining the AWS on Air crew at AWS Summit Washington, DC. This in-person event is coming up May 23–25. Be sure to tune in to the livestream for all the latest news from the event, and if you’re there in person feel free to come say hi!
Registration is also now open for re:MARS, our conference for topics related to machine learning, automation, robotics, and space. The conference will be in-person in Las Vegas, June 21–24.
That’s all the news I have room for this week — check back next Monday for another week in review!
Blazor can run your client-side C# code directly in the browser, using WebAssembly. It is a .NET running on WebAssembly, and you can reuse code and libraries from the server-side parts of your application.
Overview of solution
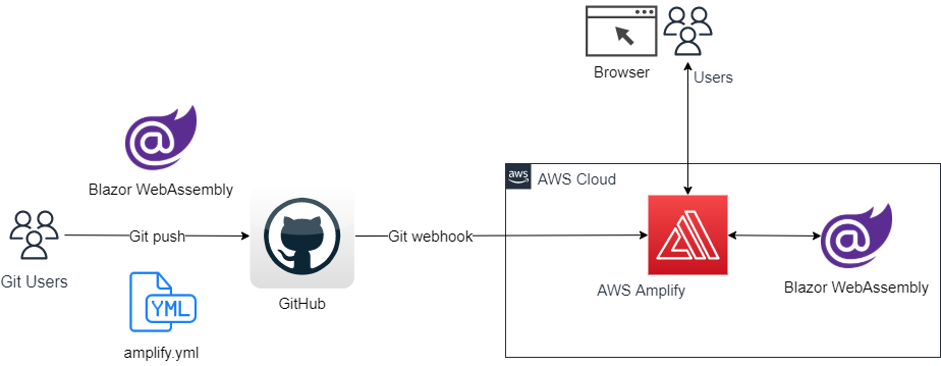
In this post, you will deploy a Blazor WebAssembly Application from git repository to AWS Amplify. We will use .NET 6. to create a Blazor WebAssembly on local machine using AWS Command Line Interface (AWS CLI), use GitHub as a git repository, and deploy the application to Amplify.
Follow this post on: Windows 10, Windows 11/Ubuntu 20.04 LTS/macOS 10.15 “Catalina”, macOS 11.0 “Big Sur”, or macOS 12.0 “Monterey”.
Walkthrough
We will walk through the following steps:
Create Blazor WebAssembly application on our local machine using AWS CLI
Test /run the application locally
Create a new repository on Github
Create a local repository
Setup Amplify
Test /run the application on AWS
Prerequisites
For this walkthrough, you should have the following prerequisites:
Let’s start creating a Blazor WebAssembly application on our local machine using CLI:
Open the command line interface
Create a directory for your application running the following command:
mkdir BlazorWebApp
Change to the application directory running the following command:
cd BlazorWebApp
Create the Blazor WebAssembly Application running the following command:
dotnet new blazorwasm
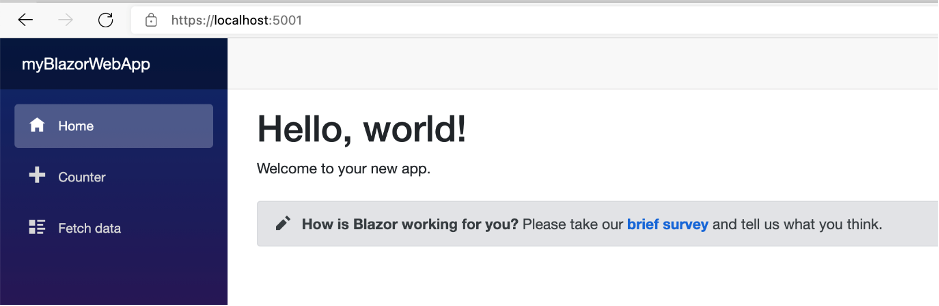
Run the application:
dotnet run
Copy the URL after “Now listening on:”, and paste it on your browser. Example: http://localhost:5152 (port might be different in your CLI)
After testing your application, go back to the terminal and press <ctrl> + c to stop the application.
Create a gitignore for your project running the following command:
dotnet new gitignore
Create a file called “amplify.yml” in the root directory of your application. The name must be exactly “amplify.yml”. This file contains the commands to build your application used by AWS CodeBuild.
Copy and paste the following code to the file amplify.yml.
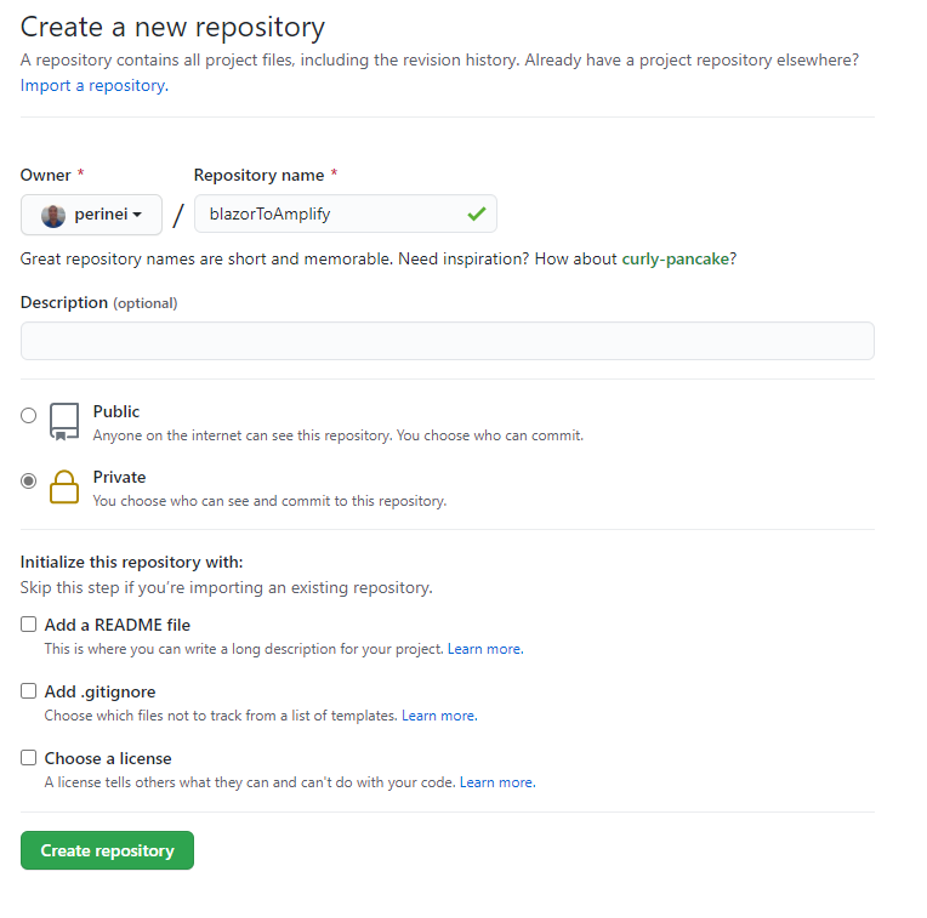
Log in to the Github website and create a new repository:
Type a name for your repository, choose private, and add a read.me file as shown in the following screenshot:
Create a local repository for your application:
On the root folder of your application enter the following commands. Make sure that you have configured git CLI with email and user
git add --all
 git commit -m “first commit”
 git branch -M main
 git remote add origin https://github.com/perinei/blazorToAmplify.git
 (replace red text with your repo)
 for ssh authentication use:
 git remote add origin [email protected]: perinei/blazorToAmplify.git
 git push -u origin main
Setup Amplify:
Log in to the AWS account
Go to AWS Amplify Service
On the left panel, choose All apps
Select New app as per the following screen
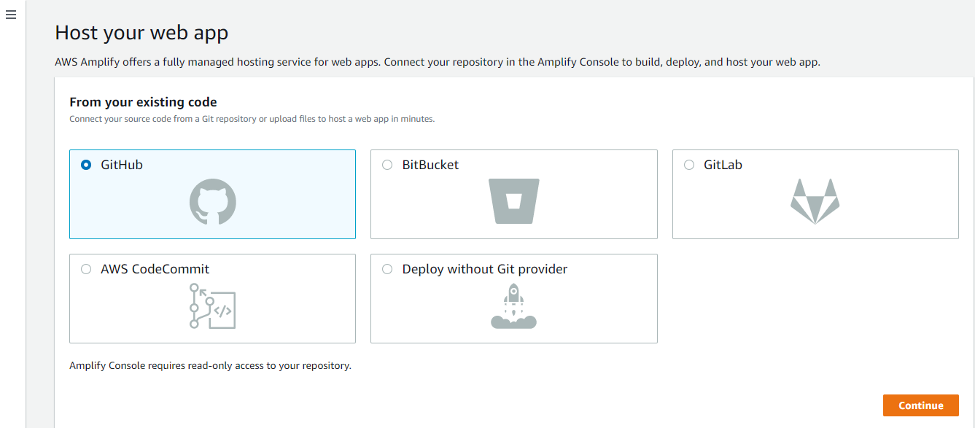
Select Host Web App from the dropdown list
Choose Github
Select Continue. If you are still logged in on your Github account, then the page will automatically authenticate you, otherwise select the Authenticate Button
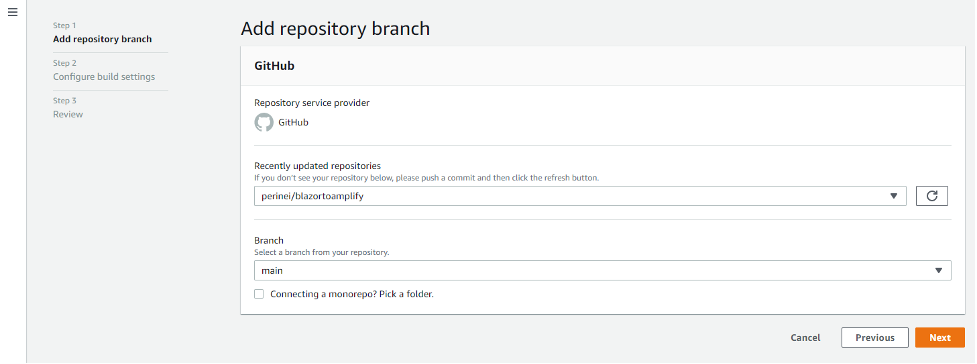
Choose your repository: in my case, perinei/bazortoamplify
Branch: main
Select next
Give your app a name
amplify.yml will be automatically detected and will be used to build the application on AWS
Select Next to review the configuration
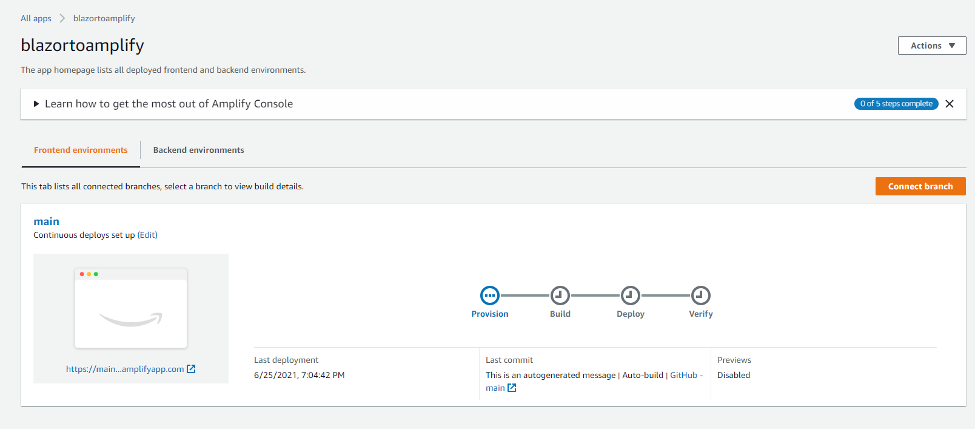
Select Save and Deploy
Amplify will provision, build, deploy, and verify the application
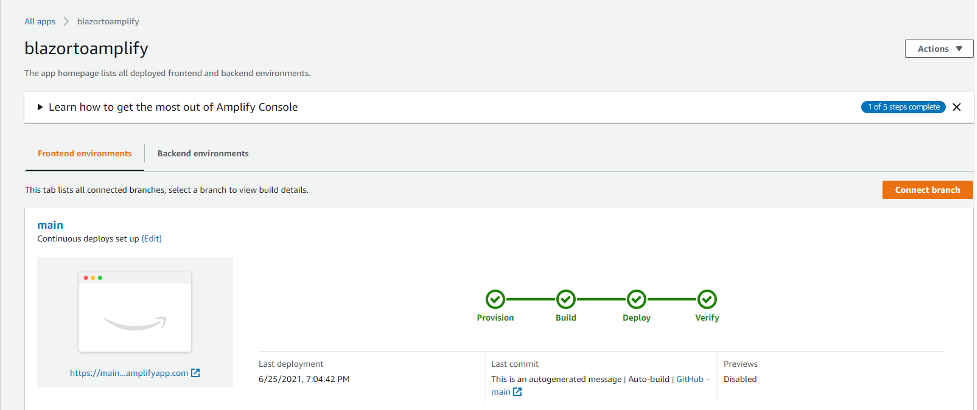
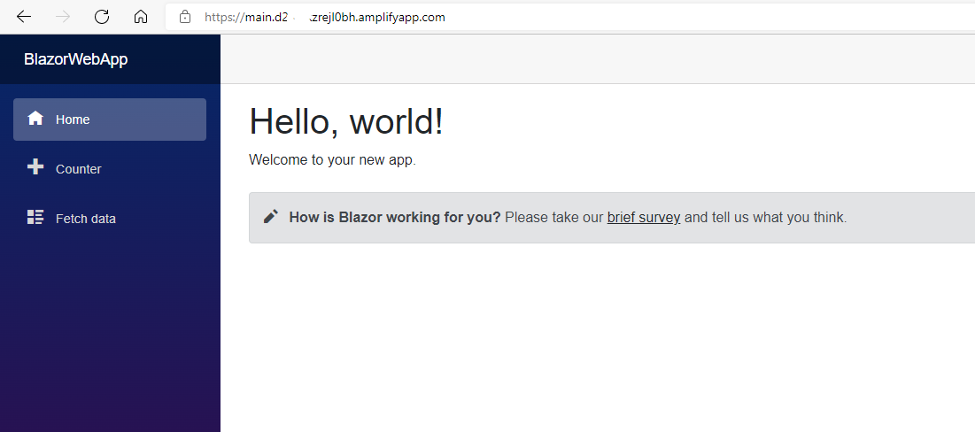
When the process is complete, select the URL of your application and test the application.
Congratulations! Your Blazor WebAssembly is running on Amplify.
Cleaning up
To avoid incurring future charges, delete the resources. On Amplify, choose your app name on the left panel, select action, and then delete app.
Conclusion
Congratulations, you deployed your first Blazor Webassembly Application to AWS Amplify.
In this blog post you learned how to easily build a full CI/CD pipeline for a Blazor WebAssembly using the AWS amplify. It was only necessary to specify the repository and the commands build the application on the file amplify.yml that should be include on the root folder of repository. You can also easily add a custom domain to your application. Visit Set up custom domains on AWS Amplify Hosting
AWS can help you to migrate .NET applications to the Cloud. Visit .NET on AWS.
The .NET on AWS YouTube playlist is the place to get the latest .NET on AWS videos, including AWS re:Invent sessions.
We’re excited to share that we’ve coordinated our recent .NET and .NET Core agent releases with the brand new .NET 6.0 release from Microsoft.
What is tCell?
Since the founding of tCell by Rapid7, our web application and API protection solution, we’ve prided ourselves on providing both breadth and depth of coverage. We recognize the importance of shifting left in the software development lifecycle (SDLC), and we also see the equal importance of shifting right. This is why Rapid7 approaches application security from a holistic perspective that’s inclusive of testing, monitoring, and protecting to prevent the exploitation of web applications and APIs across the SDLC.
In addition to coverage throughout the SDLC, we recognize modern applications require modern AppSec solutions to meet them where they are. This is why our solution offers flexible deployment options including our App-Server agents, Web-Server agents, proxy agents, and CDN agents. So whether you’re securing a traditional application written in Java, you’re a Windows shop, or you’re deploying applications with a Kubernetes architecture, we’ve got you covered.
Sounds great… but what’s new?
Today, Microsoft announced the release of .NET 6, a significant release with an expected lifetime of 3 years and a slew of new features. Today, tCell also announced support for .NET 6. This is in line with a promise to our customers to support modern languages and frameworks, as soon as possible.
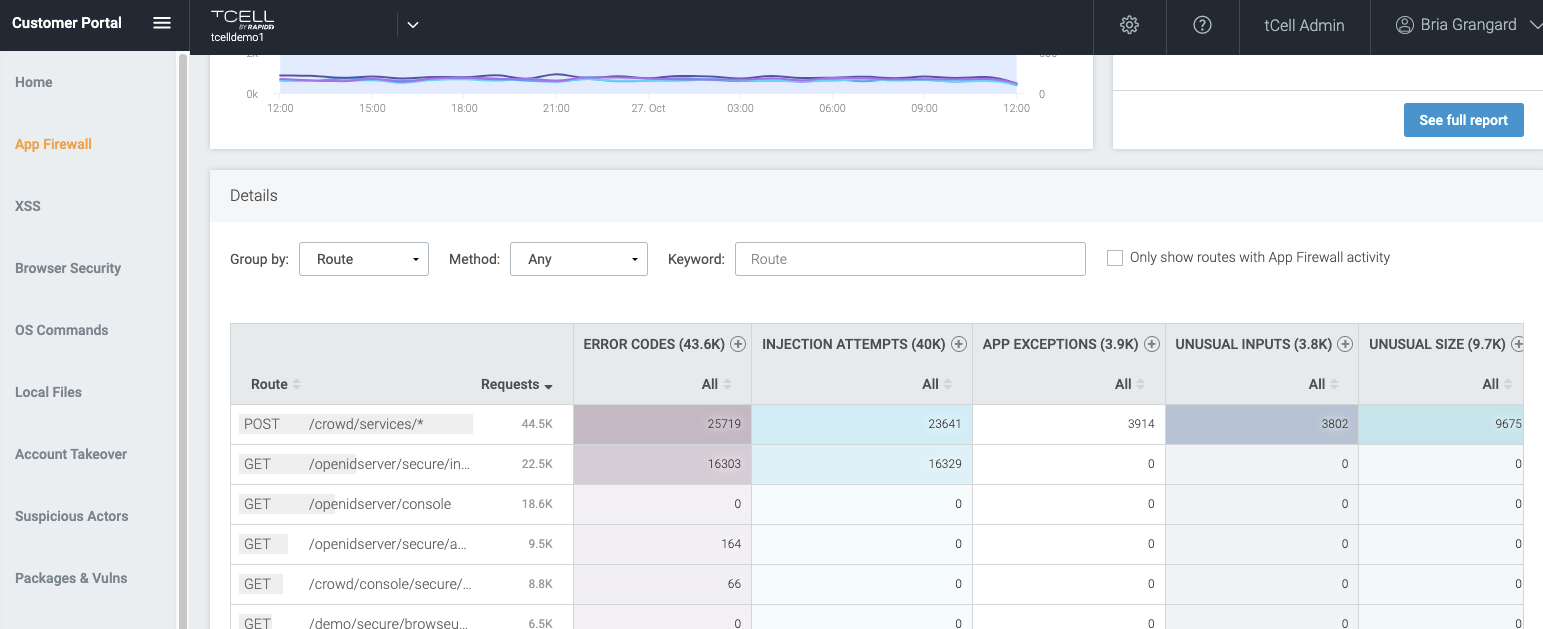
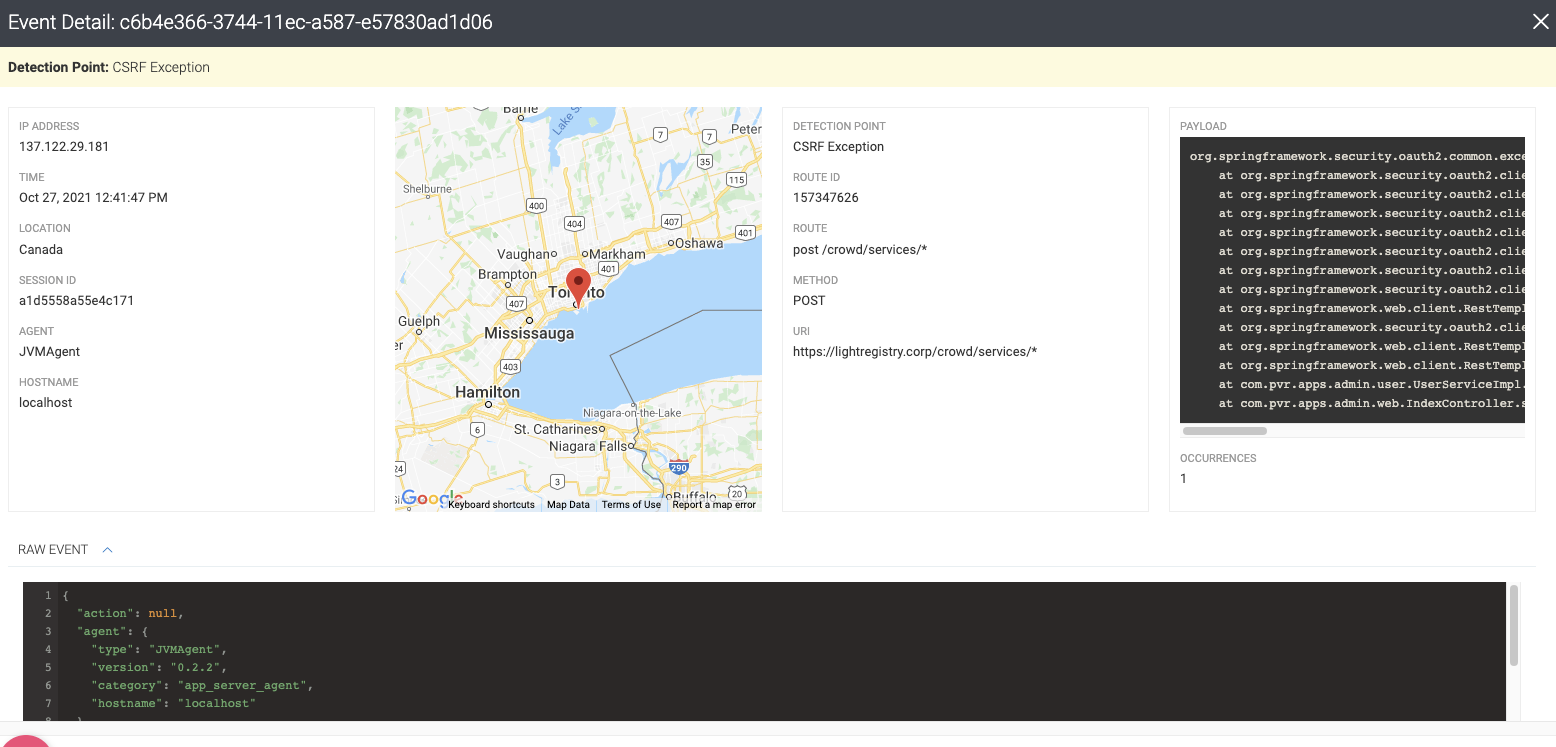
With this new tCell release, customers leveraging .NET or .NET Core frameworks will continue to be supported with our native .NET and .NET Core agents. Additionally, we’ve added functionality for new and existing tCell customers. For those customers who are leveraging tCell’s .NET or .NET Core agents 2.2+, they will now have full visibility into their API endpoints. What’s this mean? tCell will automatically enumerate your application’s API endpoints and show you attack attempts, attack types, and any app exceptions.
This is helpful because it provides visibility into key API endpoints, what attacks were attempted, and what attacks were successful, automatically reducing the number of high alerts our customers receive. From here, customers can drill down for more context on the attack attempts and view detailed stack trace information.
So, tell me more!
In addition to the real-time monitoring and detection for your web applications and APIs, tCell provides a robust set of use cases that it helps solve when leveraging either our .NET or .NET Core agents. Here are just a few examples:
Want visibility into your dev teams’ third-party packages and their associated vulnerabilities? Check out our runtime software composition analysis (SCA) feature, which will highlight any vulnerable third party code.
Want to make sure no one gets access to your user accounts? Attackers will often use a stolen list of credentials to login to an app and mimic real user behavior. With tCell’s Account Takeover capabilities, we monitor for these auth events and can take action on blocking anyone that is deemed a threat. We can also share a list of compromised users your team can follow up on.
Want to ensure your apps only load specific content? tCell makes it seamless and easy to enable Content Security Policies to enforce what content is loaded on your site and ensure a safe and happy user experience.
… And so much more, from specific actor detection to prevention of unauthorized executions of OS commands and app-level attacks.
We’re proud of our continued investment in helping customers secure their applications and APIs. Curious to learn more? Feel free to reach out to get a demo of tCell or try it out yourself!
Microservices commonly communicate with JSON over HTTP/1.1. These technologies are ubiquitous and human-readable, but they aren’t optimized for communication between dozens or hundreds of microservices.
Next-generation Web technologies, including gRPC and HTTP/2, significantly improve communication speed and efficiency between microservices. AWS offers the most compelling experience for builders implementing microservices. Moreover, the addition of HTTP/2 and gRPC support in Application Load Balancer (ALB) provides an end-to-end solution for next-generation microservices. ALBs can inspect and route gRPC calls, enabling features like health checks, access logs, and gRPC-specific metrics.
This post demonstrates .NET microservices communicating with gRPC via Application Load Balancers. The microservices run on AWS Graviton2 instances, utilizing a custom-built 64-bit Arm processor to deliver up to 40% better price/performance than x86.
Architecture Overview
Modern Tacos is a new restaurant offering delivery. Customers place orders via mobile app, then they receive real-time status updates as their order is prepared and delivered.
The tutorial includes two microservices: “Submit Order” and “Track Order”. The Submit Order service receives orders from the app, then it calls the Track Order service to initiate order tracking. The Track Order service provides streaming updates to the app as the order is prepared and delivered.
Each microservice is deployed in an Amazon EC2 Auto Scaling group. Each group is behind an ALB that routes gRPC traffic to instances in the group.
This architecture is simplified to focus on ALB and gRPC functionality. Microservices are often deployed in containers for elastic scaling, improved reliability, and efficient resource utilization. ALB, gRPC, and .NET all work equally effectively in these architectures.
Comparing gRPC and JSON for microservices
Microservices typically communicate by sending JSON data over HTTP. As a text-based format, JSON is readable, flexible, and widely compatible. However, JSON also has significant weaknesses as a data interchange format. JSON’s flexibility makes enforcing a strict API specification difficult — clients can send arbitrary or invalid data, so developers must write rigorous data validation code. Additionally, performance can suffer at scale due to JSON’s relatively high bandwidth and parsing requirements. These factors also impact performance in constrained environments, such as smartphones and IoT devices. gRPC addresses all of these issues.
gRPC is an open-source framework designed to efficiently connect services. Instead of JSON, gRPC sends messages via a compact binary format called Protocol Buffers, or protobuf. Although protobuf messages are not human-readable, they utilize less network bandwidth and are faster to encode and decode. Operating at scale, these small differences multiply to a significant performance gain.
gRPC APIs define a strict contract that is automatically enforced for all messages. Based on this contract, gRPC implementations generate client and server code libraries in multiple programming languages. This allows developers to use higher-level constructs to call services, rather than programming against “raw” HTTP requests.
gRPC also benefits from being built on HTTP/2, a major revision of the HTTP protocol. In addition to the foundational performance and efficiency improvements from HTTP/2, gRPC utilizes the new protocol to support bi-directional streaming data. Implementing real-time streaming prior to gRPC typically required a completely separate protocol (such as WebSockets) that might not be supported by every client.
Instead of working with JSON, dynamic objects, or strings, C# developers calling a gRPC service use a strongly-typed client, automatically generated from the protobuf specification. This obviates much of the boilerplate validation required by JSON APIs, and it enables developers to use rich data structures. Additionally, the generated code enables full IntelliSense support in Visual Studio.
For example, the “Submit Order” microservice executes this code in order to call the “Track Order” microservice:
using var channel = GrpcChannel.ForAddress("https://track-order.example.com");

var trackOrderClient = new TrackOrder.Protos.TrackOrder.TrackOrderClient(channel);

var reply = await trackOrderClient.StartTrackingOrderAsync(new TrackOrder.Protos.Order
{
    DeliverTo = "Address",
    LastUpdated = Timestamp.FromDateTime(DateTime.UtcNow),
    OrderId = order.OrderId,
    PlacedOn = order.PlacedOn,
    Status = TrackOrder.Protos.OrderStatus.Placed
});
This code calls the StartTrackingOrderAsync method on the Track Order client, which looks just like a local method call. The method intakes a data structure that supports rich data types like DateTime and enumerations, instead of the loosely-typed JSON. The methods and data structures are defined by the Track Order service’s protobuf specification, and the .NET gRPC tools automatically generate the client and data structure classes without requiring any developer effort.
Configuring ALB for gRPC
To make gRPC calls to targets behind an ALB, create a load balancer target group and select gRPC as the protocol version. You can do this through the AWS Management Console, AWS Command Line Interface (CLI), AWS CloudFormation, or AWS Cloud Development Kit (CDK).
This CDK code creates a gRPC target group:
var targetGroup = new ApplicationTargetGroup(this, "TargetGroup", new ApplicationTargetGroupProps
{
    Protocol = ApplicationProtocol.HTTPS,
    ProtocolVersion = ApplicationProtocolVersion.GRPC,
    Vpc = vpc,
    Targets = new IApplicationLoadBalancerTarget {...}
});
gRPC requests work with target groups utilizing HTTP/2, but the gRPC protocol enables additional features including health checks, request count metrics, access logs that differentiate gRPC requests, and gRPC-specific response headers. gRPC also works with native ALB features like stickiness, multiple load balancing algorithms, and TLS termination.
Deploy the Tutorial
The sample provisions AWS resources via the AWS Cloud Development Kit (CDK). The CDK code is provided in C# so that .NET developers can use a familiar language.
Open a terminal (such as Bash) or a PowerShell prompt.
Configure the environment variables needed by the CDK. In the sample commands below, replace AWS_ACCOUNT_ID with your numeric AWS account ID. Replace AWS_REGION with the name of the region where you will deploy the sample, such as us-east-1 or us-west-2.
If you’re using a *nix shell such as Bash, run these commands:
Throughout this tutorial, replace RED TEXT with the appropriate value.
Save the directory path where you cloned the GitHub repository. In the sample commands below, replace EXAMPLE_DIRECTORY with this path.
In your terminal or PowerShell, run these commands:
cd EXAMPLE_DIRECTORY/src/ModernTacoShop/Common/cdk
cdk bootstrap --context domain-name=PARENT_DOMAIN_NAME
cdk deploy --context domain-name=PARENT_DOMAIN_NAME
The CDK output includes the name of the S3 bucket that will store deployment packages. Save the name of this bucket. In the sample commands below, replace SHARED_BUCKET_NAME with this name.
Deploy the Track Order microservice
Compile the Track Order microservice for the Arm microarchitecture utilized by AWS Graviton2 processors. The TrackOrder.csproj file includes a target that automatically packages the compiled microservice into a ZIP file. You will upload this ZIP file to S3 for use by CodeDeploy. Next, you will utilize the CDK to deploy the microservice’s AWS infrastructure, and then install the microservice on the EC2 instance via CodeDeploy.
The CDK stack deploys these resources:
An Amazon EC2 Auto Scaling group.
An Application Load Balancer (ALB) using gRPC, targeting the Auto Scaling group and configured with microservice health checks.
A subdomain for the microservice, targeting the ALB.
A DynamoDB table used by the microservice.
CodeDeploy infrastructure to deploy the microservice to the Auto Scaling group.
The Submit Order ALB routes the gRPC call to an instance.
The Submit Order instance stores order data.
The Submit Order instance calls the Track Order service via gRPC.
The Track Order ALB routes the gRPC call to an instance.
The Track Order instance stores tracking data.
The app calls the Track Order service, which streams the order’s location during delivery.
Test the microservices
Once the CodeDeploy deployments have completed, test both microservices.
First, check the load balancers’ status. Go to Target Groups in the AWS Management Console, which will list one target group for each microservice. Click each target group, then click “Targets” in the lower details pane. Every EC2 instance in the target group should have a “healthy” status.
If a service is healthy, it will return an empty JSON object.
Run the mobile app
You will run a pre-compiled version of the app on AWS Device Farm, which lets you test on a real device without managing any infrastructure. Alternatively, compile your own version via the AndroidApp.FrontEnd project within the solution located at EXAMPLE_DIRECTORY/src/ModernTacoShop/AndroidApp/AndroidApp.sln.
Go to Device Farm in the AWS Management Console. Under “Mobile device testing projects”, click “Create a new project”. Enter “ModernTacoShop” as the project name, and click “Create Project”. In the ModernTacoShop project, click the “Remote access” tab, then click “Start a new session”. Under “Choose a device”, select the Google Pixel 3a running OS version 10, and click “Confirm and start session”.
Once the session begins, click “Upload” in the “Install applications” section. Unzip and upload the APK file located at EXAMPLE_DIRECTORY/src/ModernTacoShop/AndroidApp/com.example.modern_tacos.grpc_tacos.apk.zip, or upload an APK that you created.
Once the app has uploaded, drag up from the bottom of the device screen in order to reach the “All apps” screen. Click the ModernTacos app to launch it.
Once the app launches, enter the parent domain name in the “Domain Name” field. Click the “+” and “-“ buttons next to each type of taco in order to create your order, then click “Submit Order”. The order status will initially display as “Preparing”, and will switch to “InTransit” after about 30 seconds. The Track Order service will stream a random route to the app, updating with new position data every 5 seconds. After approximately 2 minutes, the order status will change to “Delivered” and the streaming updates will stop.
Once you’ve run a successful test, click “Stop session” in the console.
Cleaning up
To avoid incurring charges, use the cdk destroy command to delete the stacks in the reverse order that you deployed them.
In addition to deleting the stacks, you must delete the Route 53 hosted zone and the Device Farm project.
Conclusion
This post demonstrated multiple next-generation technologies for microservices, including end-to-end HTTP/2 and gRPC communication over Application Load Balancer, AWS Graviton2 processors, and .NET 5. These technologies enable builders to create microservices applications with new levels of performance and efficiency.
Matt Cline
Matt Cline is a Solutions Architect at Amazon Web Services, supporting customers in his home city of Pittsburgh PA. With a background as a full-stack developer and architect, Matt is passionate about helping customers deliver top-quality applications on AWS. Outside of work, Matt builds (and occasionally finishes) scale models and enjoys running a tabletop role-playing game for his friends.
Ulili Nhaga
Ulili Nhaga is a Cloud Application Architect at Amazon Web Services in San Diego, California. He helps customers modernize, architect, and build highly scalable cloud-native applications on AWS. Outside of work, Ulili loves playing soccer, cycling, Brazilian BBQ, and enjoying time on the beach.
AWS Elastic Beanstalk takes care of undifferentiated heavy lifting for customers by regularly providing new platform versions to update all Linux-based and Windows Server-based platforms. In addition to the updates to existing software components and support for new features and configuration options incorporated into the Elastic Beanstalk managed Amazon Machine Images (AMI), you may need to install third-party packages, or apply additional controls in order to meet industry or internal security criteria; for example, the Defense Information Systems Agency’s (DISA) Security Technical Implementation Guides (STIG).
In this blog post you will learn how to automate the process of customizing Elastic Beanstalk managed AMIs using EC2 Image Builder and apply the medium and low severity STIG settings to Windows instances whenever new platform versions are released.
You can extend the solution in this blog post to go beyond system hardening. EC2 Image Builder allows you to execute scripts that define the custom configuration for an image, known as Components. There are over 20 Amazon managed Components that you can use. You can also create your own, and even share with others.
These services are discussed in this blog post:
EC2 Image Builder simplifies the building, testing, and deployment of virtual machine and container images.
Amazon EventBridge is a serverless event bus that simplifies the process of building event-driven architectures.
AWS Lambda lets you run code without provisioning or managing servers.
Docker Desktop to create the container image used to publish the Lambda function
All of the code necessary to deploy the solution is available on the . The repository details the solution’s codebase, and the “Deploying the Solution” section walks through the deployment process. Let’s start with a walkthrough of the solution’s design.
Overview of solution
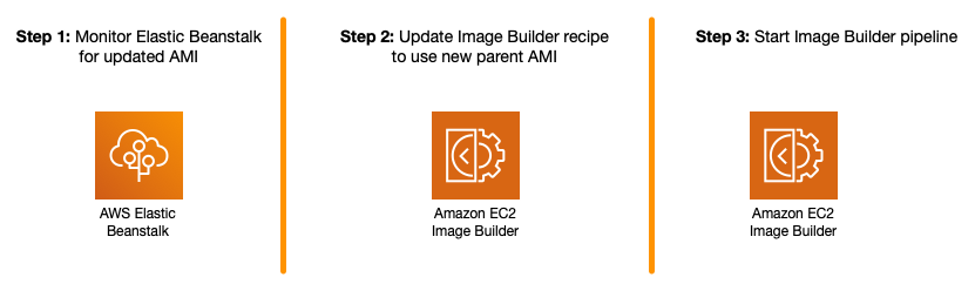
The solution automates the following three steps.
Figure 1 – Steps being automated
The Image Builder Pipeline takes care of launching an EC2 instance using the Elastic Beanstalk managed AMI, hardens the image using EC2 Image Builder’s STIG Medium Component, and outputs a new AMI that can be used by application teams to create their Elastic Beanstalk Environments.
Figure 2 – EC2 Image Builder Pipeline Steps
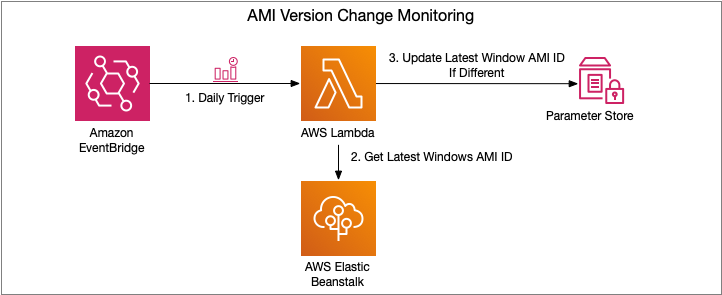
To automate Step 1, an Amazon EventBridge rule is used to trigger an AWS Lambda function to get the latest AMI ID for the Elastic Beanstalk platform used, and ensures that the Parameter Store parameter is kept up to date.
Figure 3 – AMI Version Change Monitoring Flow
Steps 2 and 3 are trigged upon change to the Parameter Store parameter. An EventBridge rule is created to trigger a Lambda function, which manages the creation of a new EC2 Image Builder Recipe, updates the EC2 Image Builder Pipeline to use this new recipe, and starts a new instance of an EC2 Image Builder Pipeline.
If you would also like to store the ID of the newly created AMI, see the Tracking the latest server images in Amazon EC2 Image Builder pipelines blog post on how to use Parameter Store for this purpose. This will enable you to notify teams that a new AMI is available for consumption.
Let’s dive a bit deeper into each of these pieces and how to deploy the solution.
Walkthrough
The following are the high-level steps we will be walking through in the rest of this post.
Invoke the AMI version monitoring AWS Lambda function. The EventBridge rule is configured for a daily trigger and for the purposes of this blog post, we do not want to wait that long prior to seeing the pipeline in action.
View the details of the resultant image after the Image Builder Pipeline completes
Deploying the Solution
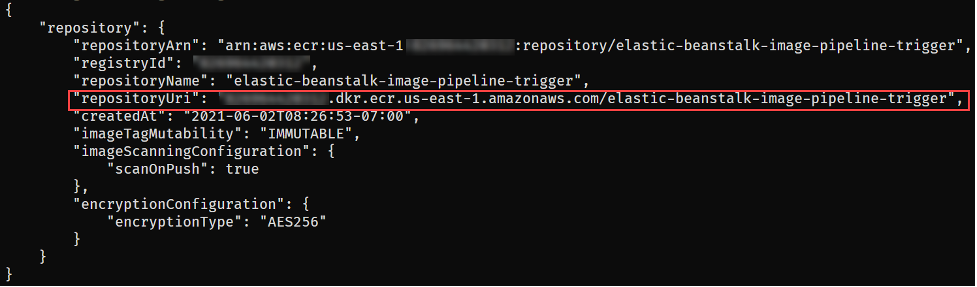
The first step to deploying the solution is to create the Elastic Container Registry Repository that will be used to upload the image artifacts created. You can do so using the following AWS CLI or AWS Tools for PowerShell command:
This will return output similar to the following. Take note of the repositoryUri as you will be using that in an upcoming step.
Figure 5 – ECR repository creation output
With the repository configured, you are ready to get the solution. Either download or clone the project’s aws-samples/elastic-beanstalk-image-pipeline-trigger GitHub repository to a local directory. Once you have the project downloaded, you can compile it using the following command from the project’s src/BeanstalkImageBuilderPipeline directory.
Now that the project is compiled, you are ready to create the container image by executing the following SAM CLI command.
sam build --template-file ./serverless.template
Figure 7 – SAM build command output
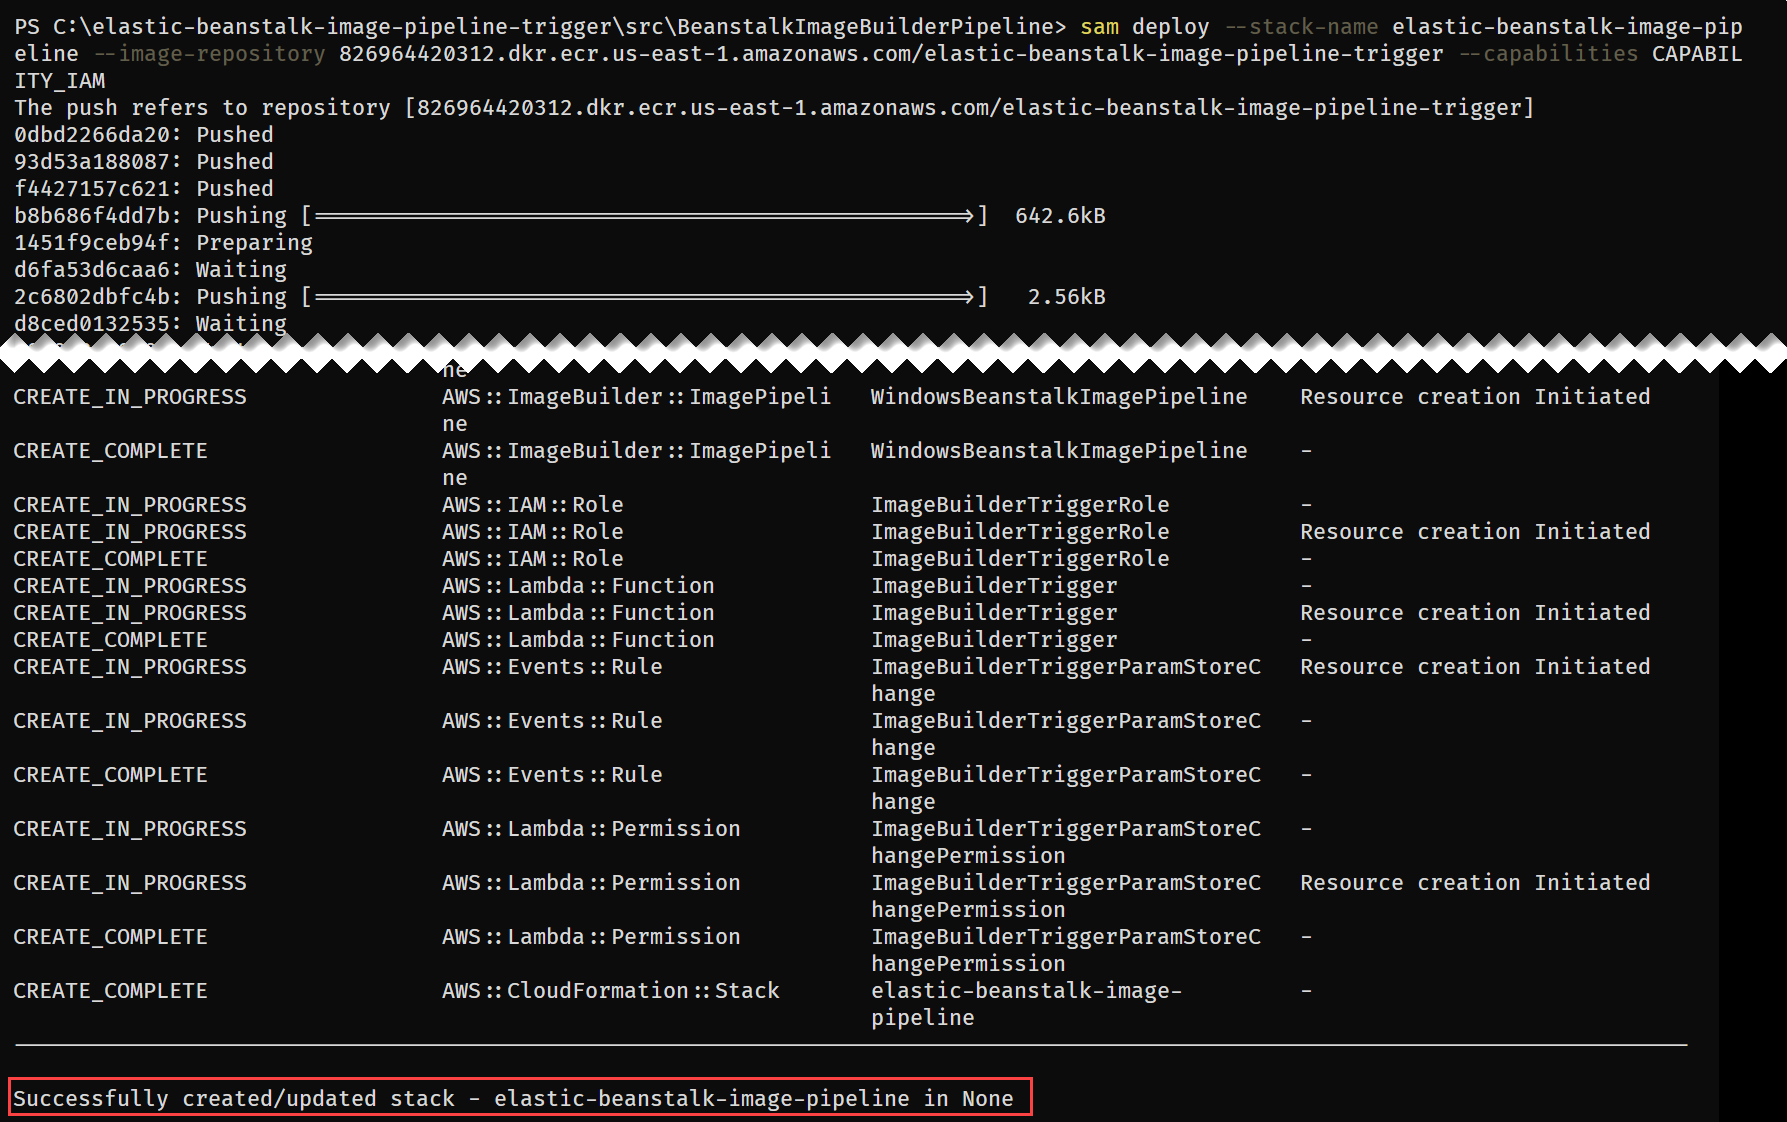
Next up deploy the SAM template with the following command, replacing REPOSITORY_URL with the URL of the ECR repository created earlier:
sam deploy --stack-name elastic-beanstalk-image-pipeline --image-repository <REPOSITORY_URL> --capabilities CAPABILITY_IAM --region us-east-1
The SAM CLI will both push the container image and create the CloudFormation Stack, deploying all resources needed for this solution. The deployment output will look similar to:
Figure 8 – SAM deploy command output
With the CloudFormation Stack completed, you are ready to move onto starting the pipeline to create a custom Windows AMI with the medium DISA STIG applied.
Invoke AMI ID Monitoring Lambda
Let’s start by invoking the Lambda function, depicted in Figure 3, responsible for ensuring that the latest Elastic Beanstalk managed AMI ID is stored in Parameter Store.
The Lambda’s CloudWatch log group contains the BeanstalkManagedAmiMonitor function’s output. For example, below you can see that the SSM parameter is being updated with the new AMI ID.
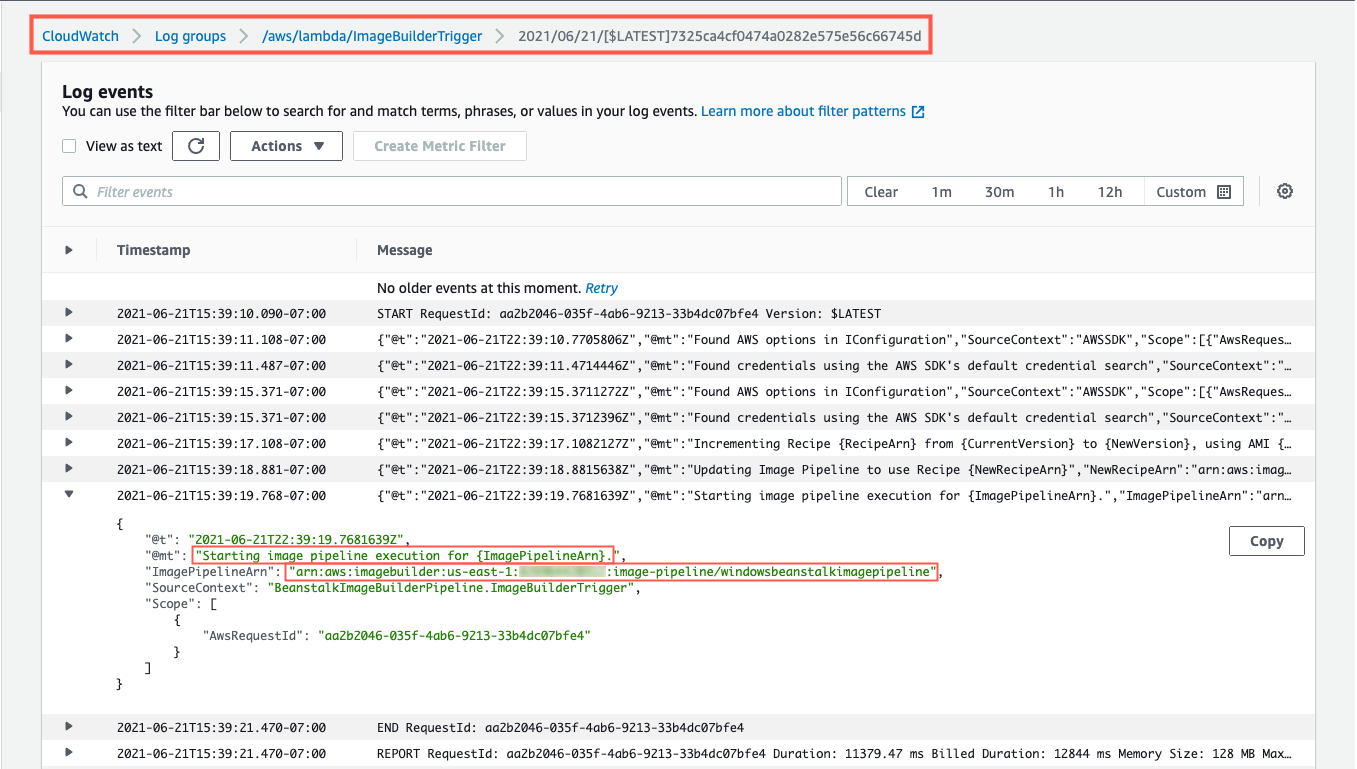
After this Lambda function updates the Parameter Store parameter with the latest AMI ID, the EC2 Image Builder recipe will be updated to use this AMI ID as the parent image, and the Image Builder pipeline will be started. You can see evidence of this by going to the ImageBuilderTrigger Lambda function’s CloudWatch log group. Below you can see a log entry with the message “Starting image pipeline execution…”.
Figure 11 – ImageBuilderTrigger Lambda’s log
To keep track of the status of the image creation, navigate to the EC2 Image Builder console, and select the 1.0.1 version of the demo-beanstalk-image.
Figure 12 – EC2 Image Builder images list
This will display the details for that build. Keep an eye on the status. While the image is being create, you will see the status as “Building”. Applying the latest Windows updates and DISA STIG can take about an hour.
Figure 13 – EC2 Image Builder image build version details
Once the AMI has been created, the status will change to “Available”. Click on the version column’s link to see the details of that version.
Figure 14 – EC2 Image Builder image build version details
You can use the AMI ID listed when creating an Elastic Beanstalk application. When using the create new environment wizard, you can modify the capacity settings to specify this custom AMI ID. The automation is configured to run on a daily basis. Only for the purposes of this post, did we have to invoke the Lambda function directly.
Cleaning up
To avoid incurring future charges, delete the resources using the following commands, replacing the AWS_ACCOUNT_NUMBER placeholder with appropriate value.
In this post, you learned how to leverage EC2 Image Builder, Lambda, and EventBridge to automate the creation of a Windows AMI with the medium DISA STIGs applied that can be used for Elastic Beanstalk environments. Don’t stop there though, you can apply these same techniques whenever you need to base recipes on AMIs that the image origin is not available in EC2 Image Builder.
Carlos Santos is a Microsoft Specialist Solutions Architect with Amazon Web Services (AWS). In his role, Carlos helps customers through their cloud journey, leveraging his experience with application architecture, and distributed system design.
With .NET providing first-class support for ARM architecture, running .NET applications on an AWS Graviton processor provides you with more choices to help optimize performance and cost. We have already written about .NET 5 with Graviton benchmarks; in this post, we explore how C#/.NET developers can take advantages of Graviton processors and obtain this performance at scale with Amazon Elastic Container Service (Amazon ECS).
In addition, we take advantage of infrastructure as code (IaC) by using the AWS Cloud Development Kit (AWS CDK) to define the infrastructure .
The AWS CDK is an open-source development framework to define cloud applications in code. It includes constructs for Amazon ECS resources, which allows you to deploy fully containerized applications to AWS.
Architecture overview
Our target architecture for our .NET application running in AWS is a load balanced ECS cluster, as shown in the following diagram.
Figure: Show load balanced Amazon ECS Cluster running .NET application
We need to provision many components in this architecture, but this is where the AWS CDK comes in. AWS CDK is an open source-software development framework to define cloud resources using familiar programming languages. You can use it for the following:
A multi-stage .NET application container build
Create an Amazon Elastic Container Registry (Amazon ECR) repository and push the Docker image to it
Use IaC written in .NET to provision the preceding architecture
The following diagram illustrates how we use these services.
Figure: Show Application and Infrastructure code written in .NET
This repository contains two .NET projects, the web application, and the IaC application using the AWS CDK.
The unit of deployment in the AWS CDK is called a stack. All AWS resources defined within the scope of a stack, either directly or indirectly, are provisioned as a single unit.
The stack for this project is located within /cdk/src/Cdk/CdkStack.cs. When we read the C# code, we can see how it aligns with the architecture diagram at the beginning of this post.
First, we create a virtual private cloud (VPC) and assign a maximum of two Availability Zones:
var vpc = new Vpc(this, "DotNetGravitonVpc", new VpcProps { MaxAzs = 2 });
Next, we define the cluster and assign it to the VPC:
var cluster = new Cluster(this, "DotNetGravitonCluster", new ClusterProp { Vpc = vpc });
The Graviton instance type (c6g.4xlarge) is defined in the cluster capacity options:
cluster.AddCapacity("DefaultAutoScalingGroupCapacity",
    new AddCapacityOptions
    {
        InstanceType = new InstanceType("c6g.4xlarge"),
        MachineImage = EcsOptimizedImage.AmazonLinux2(AmiHardwareType.ARM)
    });
Finally, ApplicationLoadBalancedEC2Service is defined, along with a reference to the application source code:
new ApplicationLoadBalancedEc2Service(this, "Service",
    new ApplicationLoadBalancedEc2ServiceProps
    {
        Cluster = cluster,
        MemoryLimitMiB = 8192,
        DesiredCount = 2,
        TaskImageOptions = new ApplicationLoadBalancedTaskImageOptions
        {
            Image = ContainerImage.FromAsset(Path.Combine(Directory.GetCurrentDirectory(), @"../app")),
        }
    });
With about 30 lines of AWS CDK code written in C#, we achieve the following:
Build and package a .NET application within a Docker image
Push the Docker image to Amazon Elastic Container Registry (Amazon ECR)
Create a VPC with two Availability Zones
Create a cluster with a Graviton c6g.4xlarge instance type that pulls the Docker image from Amazon ECR
The AWS CDK has several useful helpers, such as the FromAsset function:
The ContainerImage.FromAsset function instructs the AWS CDK to build the Docker image from a Dockerfile, automatically create an Amazon ECR repository, and upload the image to the repository.
For more information about the ContainerImage class, see ContainerImage.
Build and deploy the project with the AWS CDK Toolkit
The AWS CDK Toolkit, the CLI command cdk, is the primary tool for interaction with AWS CDK apps. It runs the app, interrogates the application model you defined, and produces and deploys the AWS CloudFormation templates generated by the AWS CDK.
If an AWS CDK stack being deployed uses assets such as Docker images, the environment needs to be bootstrapped. Use the cdk bootstrap command from the /cdk directory:
cdk bootstrap
Now you can deploy the stack into the AWS account with the deploy command:
cdk deploy
The AWS CDK Toolkit synthesizes fresh CloudFormation templates locally before deploying anything. The first time this runs, it has a changeset that reflects all the infrastructure defined within the stack and prompts you for confirmation before running.
When the deployment is complete, the load balancer DNS is in the Outputs section.
Figure: Show stack outputs
You can navigate to the load balancer address via a browser.
Figure: Show browser navigating to .NET application
Tracking the drift
Typically drift is a change that happens outside of the Infrastructure as Code, for example, code updates to the .NET application.
To support changes, the AWS CDK Toolkit queries the AWS account for the last deployed CloudFormation template for the stack and compares it with the locally generated template. Preview the changes with the following code:
cdk diff
If a simple text change within the application’s home page HTML is made (app/webapp/Pages/Index.cshtml), a difference is detected within the assets, but not all the infrastructure as per the first deploy.
Figure: Show cdk diff output
Running cdk deploy again now rebuilds the Docker image, uploads it to Amazon ECR, and refreshes the containers within the ECS cluster.
cdk deploy
Figure: Show browser navigating to updated .NET application
Clean up
Remove the resources created in this post with the following code:
cdk destroy
Conclusion
Using the AWS CDK to provision infrastructure in .NET provides rigor, clarity, and reliability in a language familiar to .NET developers. For more information, see Infrastructure as Code.
This post demonstrates the low barrier to entry for .NET developers wanting to apply modern application development practices while taking advantage of the price performance of ARM-based processors such as Graviton.
To learn more about building and deploying .NET applications on AWS visit our .NET Developer Center.
About the author
Matt Laver is a Solutions Architect at AWS working with SMB customers in the UK. He is passionate about DevOps and loves helping customers find simple solutions to difficult problems.
This post was authored by Kirk Davis, Developer Advocate for App Modernization
In 2019, AWS announced new Amazon EC2 instance types powered by the AWS Graviton2 processor. The AWS Graviton2 processor is based on the ARM64 architecture leveraging 64-bit ARM Neoverse N1 cores. Since 2019, AWS has launched many new EC2 instances built on Graviton2, including general-purpose (M6g), compute-optimized (C6g), memory-optimized (R6g), and general-purpose burstable (T4g) types. These Graviton2 based instances provide up to 40% better price performance over their comparable generation x86-64 instances. These instance types use the same naming convention as other types, but with a “g” appended to the family. For example, a t4g.large, or a c6g.2xlarge. Many customers are already running workloads on these Graviton2 instances, including .NET Core applications. Note that I refer to these 64-bit processors as “x86” for this blog post.
Organizations like AnandTech have done in-depth benchmarking of Graviton2 against x86-architecture EC2 instances and found that Graviton2 has a significant performance and cost advantage. Comparing similar instance families, the Graviton2 instances are about 20% less expensive per hour than Intel x86 instances with up to 40% better performance. With .NET 5 officially released in November, I thought it would be interesting to see what advantages Graviton2 has for .NET 5 web applications as a follow-up to the .NET 5 on AWS blog AWS published earlier. Follow along this blog to learn how I ran the benchmarking tests, the applications I chose to benchmark, and to see the results.
Overview
I decided to run some straight-forward .NET 5 benchmarks that tested ASP.NET Core under load for both x86-based and Graviton2 instances. ASP.NET Core runs application code in thread-pool threads, so it takes advantage of multiple cores to handle multiple requests concurrently. One thing to keep in mind is that x86-based EC2 instance types use simultaneous multi-threading, and a vCPU maps to a logical core. However, for Graviton2 instances a vCPU maps to a physical core. So, for these benchmarks, I used x86 and ARM64 instance types with 4 x vCPUs: m5.xlarge instance types, which have four logical (two physical) x86 cores, and m6g.xlarge instances, which have four physical ARM cores. I wanted to compare the latency and requests/second performance for different scenarios, and then compare the performance adjusted for the instances’ cost per hour. I used the per-hour pricing from the us-east-2 (Ohio) Region:
m5.xlarge
m6g.xlarge
Cost
$0.192
$0.154
vCPU
4
4
RAM
16
16
Benchmarks and testing framework
I used the open-source Crank software to run the benchmarks and gather results. Crank abstracts away many of the messy details in running benchmarks and delivers consistent results. From the GitHub page:
“Crank is the benchmarking infrastructure used by the .NET team to run benchmarks including (but not limited to) scenarios from the TechEmpower Web Framework Benchmarks.”
Crank uses a controller (crank-controller), which communicates to one or more agents (crank-agent). The agents download, compile, and run the code, then report the results back to the controller. In this case, I used three agents: one each on the instances to be tested, and one on a test-runner instance (an m5.xlarge) that ran bombardier, a common load-testing tool that is already integrated into Crank. You can also choose wrk2, or other tools if you prefer (Crank’s readme files provide examples for both). I ran all the instances in the same Availability Zone (AZ) to minimize any other sources of latency. The setup looked like this:
Note: In order to use Crank’s agent with the .NET 5 release version, I made minor changes to its Startup.cs class. These changes forced Crank to pull down the correct .NET 5 SDK version, and fixed an issue where it wasn’t appending the correct build parameters for arm64 when compiling code on the m6g.xlarge instance. It’s possible the Microsoft.Crank.Agent project has been updated since I used it. I also updated all projects to .NET 5.
Benchmark tests
Since many of the .NET Core workloads customers are running in AWS are ASP.NET Core websites or APIs, I focused only these types of applications. I selected the Mvc project from the ASP.NET Benchmarks GitHub repository. The controller in this project defines an “Entry” class, and then creates and returns them as List<Entry> (which gets serialized to JSON by ASP.NET Core). For the source code for these methods, please refer to the preceding GitHub links. In the project, the Crank configuration YAML file defines three scenarios (note that I used these scenarios but swapped out wrk for bombardier).
MvcJsonOutput60k: calls JsonController’s JsonNk() method for 60,000 bytes
MvcJsonOutput2M: calls JsonController’s JsonNk() method for 221 bytes
Additionally, I created another ASP.NET Core Web API application based on the boilerplate ASP.NET Web API project and added EF Core. I did this because many ASP.NET Core applications use Entity Framework Core (EF Core), and do more computationally expensive work than only serializing JSON. To isolate the performance of the two instances, I used the in-memory provider for EF Core, and populated a DbSet with weather summaries at startup. I modified the WeatherForecastController to encrypt each WeatherForecast’s Summary property using .NET’s RSACryptoServiceProvider class, and then added another controller that queries forecasts from the DbSet, and serializes them to strings. For that method, I added an asynchronous delay (using Task.Delay) to simulate querying a relational database. To run the tests, I created a Crank configuration YAML file that defines three scenarios:
AsyncParallelJson100: returns 100 forecasts from EF Core serialized to string using Text.Json
AsyncParallelJson500: returns 500 forecasts from EF Core serialized to string using Text.Json
ParallelEncryptWeather100: encrypts summaries for 100 forecasts and returns the forecasts as IEnumerable<WeatherForecast>
This application uses the 5.0.0 version of the Microsoft.EntityFrameworkCore and Microsoft.EntityFrameworkCore.InMemory NuGet packages. The following is the source code for the two methods I used in the tests:
JsonSerializeController’s Get method:
[HttpGet]
public async Task<IEnumerable<string>> Get(int count = 100)
{
    List<WeatherForecast> forecasts;
    List<string> jsons = new List<string>();

    using (var context = new WeatherContext())
    {
        forecasts = context.WeatherForecasts.Take(count).ToList();
    }
    await Task.Delay(5);
    Parallel.ForEach(forecasts, x => jsons.Add(JsonSerializer.Serialize(x)));

    return jsons;
}
WeatherForecastController’s Get method:
[HttpGet]
public IEnumerable<WeatherForecast> Get(int count = 100)
{
    List<WeatherForecast> forecasts;

    using (var context = new WeatherContext())
    {
        forecasts = context.WeatherForecasts.Take(count).ToList();
    }
    UnicodeEncoding ByteConverter = new UnicodeEncoding();

    using (RSACryptoServiceProvider RSA = new RSACryptoServiceProvider())
    {
        Parallel.ForEach(forecasts, x => x.EncryptedSummary = RSAEncrypt(ByteConverter.GetBytes(x.Summary), RSA.ExportParameters(false), false));
    }
    return forecasts;
}
Note:The RSAEncrypt method was copied from the sample code in the RSACryptoServiceProvider’s docs.
Setting up the instances
For running the benchmarks, I selected the Amazon Machine Image (AMI) for Ubuntu Server 20.04 LTS, and chose “64-bit (x86)” for the m5.xlarge and “64-bit (Arm)” for the m6g.xlarge. I gave them both 20GB of Amazon Elastic Block Store (EBS) storage, and chose a security group with port 22 open to my home IP address, so that I could SSH into them. While it’s possible to install and use .NET 5 on Amazon Linux 2 (AL2), that’s not currently a supported Linux distribution for .NET 5 on ARM, and I wanted the same distribution for both x86 and ARM64. For details on launching Graviton2 instances from the AWS Management Console, please refer to the .NET 5 on AWS blog post from November 10, 2020.
Ubuntu 20.04 is a supported release for installing .NET 5 using apt-get, but ARM architectures are not yet supported. So instead – and to use the same method on both instances – I manually installed the .NET 5 SDK using the following commands, specifying the architecture-appropriate download link for the binaries*. Instructions for manually installing are also available at the prior “installing .NET 5” link.
Then, I used SCP to upload the source code for my benchmarking solution to the instances, and SSH’d onto both, using two tabs in the new Windows Terminal.
I used Crank to perform two runs of each of the six benchmarks on each of the two instances and took the average of the two runs for each. There was minimal variation between runs. For each test, I charted the latency in microseconds (μs), with the bars for MvcJsonOutput2M and ParallelEncryptWeather100 scaled by plotting μs/100, and bars for AsyncParallelJson100 and AsyncParallelJson500 scaled with μs/10. For latency, shorter bars are better.
I also charted the performance in requests/second, and the overall value as performance/dollar, where the performance is the requests/second, and dollars is the cost/hour of the given instance type. In order to have the bars legible on the same chart, some values were scaled as shown below the chart (the same scaling was applied to all values for a given benchmark). For both raw performance and performance/price, longer bars are better.
Note that I didn’t do any specific optimization for ARM64 or x86.
Summary of results
The Graviton2 instance had lower latency across the board for the tests I ran, with the m6g.xlarge (Graviton2) instance having up to 24.7% lower latency (for MvcJsonOutput2M) than the m5.xlarge (x86-64). It’s notable that in general, the more work the test method was doing, the bigger the advantage of Graviton2.
The results were broadly similar for requests/second, with Graviton2 delivering up to 31.6% better performance (for MvcJsonOutput2M). For the most computationally-expensive test – ParallelEncryptWeather100 – the Graviton2 instance churned out 16.6% more requests per second. And all of this is without considering the price difference. Also, not reflected in the charts is that the x86 instance had twice as many bad requests (average of 16) as the Graviton2 instance (average of 8) for the ParallelEncryptWeather100 test. ParallelEncryptWeather100 was the only test where there were any bad responses across all the tests.
When scaling the performance for the hourly price of each instance type, the differences are starker. The Graviton2 offers up to 64% more requests/second per hourly cost of the instance (for MvcJsonOutput2M). Even on the test with the least advantage (MvcJsonNet2k), the Graviton2 provided 30.8% better performance/cost, where performance is requests/second. These types of results can translate into significant savings for even modestly sized workloads.
Charts
In the preceding chart, the mean latency is shown in micro-seconds (μs), with the values for some tests divided by either 10 or 100 in order to make all the bars visible in the chart. The Graviton2 instance had 24.7% lower latency for the MvcJsonOutput2M test, and had lower latency across all the tests.
This second chart shows how the m6g.xlarge Graviton2 instance handled more requests for every test. The bars represent the raw requests/second for each test. For the MvcJsonOutput2M test, which serializes two megabytes to JSON, it handled 31.6% more requests per second, and was faster for every test I ran.
This third chart uses the same performance values as the preceding one, but the m5.xlarge values are divided by its hourly cost ($0.192 in the Ohio Region), and the m6g.xlarge bars are divided by $0.154 (also for the Ohio Region). The Graviton2 instance handled 64% more requests per dollar for the MvcJsonOutput2M test, and provides much better performance per dollar across all the tests.
Conclusion
If you’re adopting .NET 5 for your applications, you have a variety of choices for deploying them in AWS. You can run them in containers in Amazon Elastic Container Service (ECS) or Amazon Elastic Kubernetes Service (EKS) with or without AWS Fargate, you can deploy them as serverless functions in AWS Lambda, or deploy them onto EC2 using either x86-based or Graviton2-based instances.
For running scalable web applications built on ASP.NET Core 5.0, the new Graviton2 instance families offer significant performance advantages, and even more compelling performance/price advantages of up to 64% over the equivalent Intel x86 instance families without making any code changes. Coupled with the ARM64 performance improvements in .NET 5, moving from .NET Core 3.1 on x86 to .NET 5 on Graviton2 promises significant cost savings. It also allows developers to code and locally test on their x86-based development machines (or even new ARM-based macOS laptops), and to use their existing deployment mechanisms. If your application is still based on .NET Framework, consider using the AWS Porting Assistant for .NET to begin porting to .NET Core.
As companies implement DevOps practices, standardizing the deployment of continuous integration and continuous deployment (CI/CD) pipelines is increasingly important. Your developer team may not have the ability or time to create your own CI/CD pipelines and processes from scratch for each new project. Additionally, creating a standardized DevOps process can help your entire company ensure that all development teams are following security and governance best practices.
Another challenge that large enterprise and small organization IT departments deal with is managing their software portfolio. This becomes even harder in agile scenarios working with mobile and web applications where you need to not only provision the cloud resources for hosting the application, but also have a proper DevOps process in place.
Having a standardized portfolio of products for your development teams enables you to provision the infrastructure resources needed to create development environments, and helps reduce the operation overhead and accelerate the overall development process.
This post shows you how to provide your end-users a catalog of resources with all the functionality a development team needs to check in code and run it in a highly scalable load balanced cloud compute environment.
We use AWS Service Catalog to provision a cloud-based AWS Cloud9 IDE, a CI/CD pipeline using AWS CodePipeline, and the AWS Elastic Beanstalk compute service to run the website. AWS Service Catalog allows organizations to keep control of the services and products that can be provisioned across the organization’s AWS account, and there’s an effective software delivery process in place by using CodePipeline to orchestrate the application deployment. The following diagram illustrates this architecture.
Continue through the stack launch screens using the defaults and choosing Next.
Select the acknowledgements in the Capabilities box on the third screen.
When the stack is complete, a top-level CloudFormation stack with the default name SC-RA-Beanstalk-Portfolio, which contains five nested stacks, has created the AWS Service Catalog products with the services the development team needs to implement a CI/CD pipeline and host the web application. This AWS Service Catalog reference architecture provisions the AWS Service Catalog products needed to set up the DevOps pipeline and the application environment.
When the portfolio has been created, you have completed the administrator setup. As an end-user (any roles you added to the LinkedRole1 or LinkedRole2 parameters), you can access the portfolio section on the AWS Service Catalog console and review the product list, which now includes the AWS Cloud9 IDE, Elastic Beanstalk application, and CodePipeline project that we will use for continuous delivery.
On the AWS Service Catalog administrator section, inside the Elastic Beanstalk reference architecture portfolio, we can add and remove groups, roles, and users by choosing Add groups, roles, users on the Group, roles, and users tab. This lets us enable developers or other users to deploy the products from this portfolio.
Solution overview
The rest of this post walks you through how to provision the resources you need for CI/CD and web application deployment. You complete the following steps:
Deploy the CI/CD pipeline.
Provision the AWS Cloud9 IDE.
Create the Elastic Beanstalk environment.
Deploying the CI/CD pipeline
The first product you need is the CI/CD pipeline, which manages the code and deployment process.
Sign in to the AWS Service Catalog console in the same Region where you launched the CloudFormation stack earlier.
On the Products list page, locate the CodePipeline product you created earlier.
Choose Launch product.
You now provision the CI/CI pipeline. For this post, we use some name examples for the pipeline name, Elastic Beanstalk application name, and code repository, which you can of course modify.
Enter a name for the provisioned Codepipeline product.
Select the Windows version and click Next.
For the application and repository name, enter dotnetapp.
Leave all other settings at their default and click Next.
Choose Launch to start the provisioning of the CodePipeline product.
When you’re finished, the provisioned pipeline should appear on the Provisioned products list.
Copy the CloneUrlHttp output to use in a later step.
You now have the CI/CD pipeline ready, with the code repository and the continuous integration service that compiles the code, runs tests, and generates the software bundle stored in Amazon Simple Storage Service (Amazon S3) ready to be deployed. The following diagram illustrates this architecture.
When the Elastic Beanstalk environment is provisioned, the deploy stage takes care of deploying the bundle application stored in Amazon S3, so the DevOps pipeline takes care of the full software delivery as shown in the earlier architecture diagram.
The Region we use should support the WINDOWS_SERVER_2019_CONTAINER build image that AWS CodeBuild uses. You can modify the environment type or create a custom one by editing the CloudFormation template used for the CodePipeline for Windows.
Provisioning the AWS Cloud9 IDE
To show the full lifecycle of the deployment of a web application with Elastic Beanstalk, we use a .NET web application, but this reference architecture also supports Linux. To provision an AWS Cloud9 environment, complete the following steps:
From the AWS Service Catalog product list, choose the AWS Cloud9 IDE.
Click Launch product.
Enter a name for the provisioned Cloud9 product and click Next.
Enter an EnvironmentName and select the InstanceType.
Set LinkedRepoPath to /dotnetapp.
For LinkedRepoCloneUrl, enter the CloneUrlHttp from the previous step.
Leave the default parameters for tagOptions and Notifications, and click Launch.
Now we download a sample ASP.NET MVC application in the AWS Cloud9 IDE, move it under the folder we specified in the previous step, and push the code.
Open the IDE with the Cloud9Url link from AWS Service Catalog output.
Get the sample .NET web application and move it under the dotnetapp. See the following code:
Now that we have committed the application to the code repository, it’s time to review the DevOps pipeline.
On the CodePipeline console, choose Pipelines.
You should see the pipeline ElasticBeanstalk-ProductPipeline-dotnetapp running.
Wait until the three pipeline stages are complete, this may take several minutes.
The code commitment and web application build stages are successful, but the code deployment stage fails because we haven’t provisioned the Elastic Beanstalk environment yet.
If you want to deploy your own sample or custom ASP.NET web application, CodeBuild requires the build specification file buildspec-build-dotnet.yml for the .NET Framework, which is located under the elasticbeanstalk/codepipeline folder in the GitHub repo. See the following example code:
Finally, it’s time to provision the hosting system, an Elastic Beanstalk Windows-based environment, where the .NET sample web application runs. For this, we follow the same approach from the previous steps and provision the Elastic Beanstalk AWS Service Catalog product.
On the AWS Service Catalog console, on the Product list page, choose the Elastic Beanstalk application product.
Choose Launch product.
Enter an environment name and click Next.
Enter the application name.
Enter the S3Bucket and S3SourceBundle that were generated (you can retrieve them from the Amazon S3 console).
Set the SolutionStackName to 64bit Windows Server Core 2019 v2.5.8 running IIS 10.0. Follow this link for up to date platform names.
Launch the product.
To verify that you followed the steps correctly, review that the provisioned products are all available (AWS Cloud9 IDE, Elastic Beanstalk CodePipeline project, and Elastic Beanstalk application) and the recently created Elastic Beanstalk environment is healthy.
As in the previous step, if you’re planning to deploy your own sample or custom ASP.NET web application, AWS CodeDeploy requires the deploy specification file buildspec-deploy-dotnet.yml for the .NET Framework, which should be located under the codepipeline folder in the GitHub repo. See the following code:
version: 0.2
phases:
  pre_build:
    commands:
      - echo application deploy started on `date`
      - ls -l
      - ls -l obj/Release/Package
      - aws s3 cp ./obj/Release/Package/SampleWebApplication.zip s3://$ARTIFACT_BUCKET/$EB_APPLICATION_NAME-$CODEBUILD_BUILD_NUMBER.zip
  build:
    commands:
      - echo Pushing package to Elastic Beanstalk...
      - aws elasticbeanstalk create-application-version --application-name $EB_APPLICATION_NAME --version-label v$CODEBUILD_BUILD_NUMBER --description "Auto deployed from CodeCommit build $CODEBUILD_BUILD_NUMBER" --source-bundle S3Bucket="$ARTIFACT_BUCKET",S3Key="$EB_APPLICATION_NAME-$CODEBUILD_BUILD_NUMBER.zip"
      - aws elasticbeanstalk update-environment --environment-name "EB-ENV-$EB_APPLICATION_NAME" --version-label v$CODEBUILD_BUILD_NUMBER
The same codepipeline folder contains some build and deploy specification files besides the .NET ones, which you could use if you prefer to use a different framework like Python to deploy a web application with Elastic Beanstalk.
To complete the application deployment, go to the application pipeline and release the change, which triggers the pipeline with the application environment now ready.
When you create the environment through the AWS Service Catalog, you can access the provisioned Elastic Beanstalk environment.
In the Events section, locate the LoadBalancerURL, which is the public endpoint that we use to access the website.
In our preferred browser, we can check that the website has been successfully deployed.
Cleaning up
When you’re finished, you should complete the following steps to delete the resources you provisioned to avoid incurring further charges and keep the account free of unused resources.
The CodePipeline product creates an S3 bucket which you must empty from the S3 console.
On the AWS Service Catalog console, end the provisioned resources from the Provisioned products list.
As administrator, in the CloudFormation console, delete the stack SC-RA-Beanstalk-Portfolio.
Conclusions
This post has shown you how to deploy a standardized DevOps pipeline which was then used to manage and deploy a sample .NET application on Elastic Beanstalk using the Service Catalog Elastic Beanstalk reference architecture. AWS Service Catalog is the ideal service for administrators who need to centrally provision and manage the AWS services needed with a consistent governance model. Deploying web applications to Elastic Beanstalk is very simple for developers and provides built in scalability, patch maintenance, and self-healing for your applications.
The post includes the information and references on how to extend the solution with other programming languages and operating systems supported by Elastic Beanstalk.
The collective thoughts of the interwebz
Manage Consent
To provide the best experiences, we use technologies like cookies to store and/or access device information. Consenting to these technologies will allow us to process data such as browsing behavior or unique IDs on this site. Not consenting or withdrawing consent, may adversely affect certain features and functions.
Functional
Always active
The technical storage or access is strictly necessary for the legitimate purpose of enabling the use of a specific service explicitly requested by the subscriber or user, or for the sole purpose of carrying out the transmission of a communication over an electronic communications network.
Preferences
The technical storage or access is necessary for the legitimate purpose of storing preferences that are not requested by the subscriber or user.
Statistics
The technical storage or access that is used exclusively for statistical purposes.The technical storage or access that is used exclusively for anonymous statistical purposes. Without a subpoena, voluntary compliance on the part of your Internet Service Provider, or additional records from a third party, information stored or retrieved for this purpose alone cannot usually be used to identify you.
Marketing
The technical storage or access is required to create user profiles to send advertising, or to track the user on a website or across several websites for similar marketing purposes.