Tag Archives: Security Blog

How to detect suspicious activity in your AWS account by using private decoy resources

Post Syndicated from Maitreya Ranganath original https://aws.amazon.com/blogs/security/how-to-detect-suspicious-activity-in-your-aws-account-by-using-private-decoy-resources/

As customers mature their security posture on Amazon Web Services (AWS), they are adopting multiple ways to detect suspicious behavior and notify response teams or workflows to take action. One example is using Amazon GuardDuty to monitor AWS accounts and workloads for malicious activity and deliver detailed security findings for visibility and remediation. Another tactic is to deploy decoys, also called honeypots, as an effective way to detect suspicious behavior.

In this blog post, we’ll show how you can create low-cost private decoy AWS resources in your AWS accounts and configure them to generate alerts when they are accessed. These decoy resources appear legitimate but don’t contain any useful or sensitive data and typically are not accessed in the normal course of business by your users and systems. Any attempt to access them is a clear signal of suspicious activity that should be investigated. You can use data sources like AWS CloudTrail, services like Amazon Detective, and your own security incident and event monitoring (SIEM) systems to investigate the activity further. This post is aimed at experienced AWS users and security professionals.

Detecting suspicious activity

Imagine that an unauthorized user has obtained credentials for your account. This could also be an insider, malicious or careless, using their valid credentials inappropriately. The unauthorized user might use these credentials to invoke AWS API calls to list resources in your account. As the next step, they might try to access resources that are commonly used to store sensitive data—such as objects in Amazon Simple Storage Service (Amazon S3) buckets, secrets in AWS Secrets Manager, or items in Amazon DynamoDB. They might also try to elevate their privileges by assuming other Identity and Access Management (IAM) roles in your account. In your role as a security professional, your task is to detect this suspicious behaviour and take actions in response. One approach is to learn the baseline of activities of the IAM users and roles in your account and flag any deviations from the learned baseline—this is the approach taken by GuardDuty when it generates findings such as Discovery:IAMUser/AnomalousBehavior.

This post focuses on another approach of creating private decoy resources in your account that are intended to look legitimate, but don’t have any useful or sensitive data and are not exposed publicly. These decoys are designed to alert you about suspicious activities that could indicate AWS credentials exposure or account compromise. You can use the decoys in conjunction with other techniques, such as creating deception environments and public and private honeypots to better detect suspicious activity in your accounts and applications.

The Fidelity-Isolation-Cost trilemma

In an ACM Queue article titled Lamboozling Attackers: A New Generation of Deception, Kelly Shortridge and Ryan Petrich introduced the Fidelity-Isolation-Cost (FIC) trilemma that “captures the most important dimensions of designing deception systems: fidelity, isolation, and cost.” Using their definition of the FIC trilemma, we see that decoy AWS resources can be well suited to designing deception systems:

  • Fidelity – Because the decoys are actual AWS resources, they behave like other legitimate resources and have high fidelity. For example, a decoy S3 bucket behaves exactly like any other S3 bucket, with the only exception being that the object data it contains is dummy and not useful. However, the unauthorized user only discovers this fact after downloading the object data and generating an automated alert to your security team.
  • Isolation – You can simply isolate the decoy AWS resources from other resources in the same account. For example, an S3 bucket is inherently isolated from other S3 buckets in the same account. An unauthorized user that can read the decoy S3 bucket does not, by doing so, get the ability to access or impact the availability of other resources in the account. The credentials obtained by the unauthorized user might have permissions to actions on other services, but the presence of the decoy S3 bucket doesn’t add to those permissions in any way.
  • Cost – You can keep the cost of deception low by choosing AWS resources that have no cost or low cost to deploy, are deployed by means of automation, and require no further operation or maintenance effort. For example, an S3 bucket with several files that are a few MB in size costs a fraction of a US cent per month for storage. The API request cost should be zero, because the bucket is designed never to be accessed in the normal course of business. Choosing similar zero or low-cost resources can make it cost-effective and feasible to create such decoy resources in multiple accounts, including in Production accounts, where it’s especially important to detect suspicious activity.

Examples of private decoy AWS resources

The following table shows examples of private decoy AWS resources that are high-fidelity, high-isolation, low-cost and are suitable to be deployed in an account that has sensitive data or applications. The table also lists the CloudTrail event fields that provide the source and name for accesses to each resource. You can use these CloudTrail events to create corresponding Amazon EventBridge rules that will generate alerts and notifications.

Private decoy resource CloudTrail event source CloudTrail event names Considerations
S3 bucket and S3 objects with dummy data s3.amazonaws.com GetObject
HeadObject
Ensure that the S3 objects do not contain any sensitive data.

S3 data events must be enabled in CloudTrail for the decoy S3 bucket

IAM role that should never be assumed sts.amazonaws.com AssumeRole Ensure that the IAM policies attached to this role allow access only to decoy resources and no other data or resources.

Ensure that the IAM role’s trust policy only trusts principals in the same account to assume the role.

Secrets Manager secret (See Note at end of table) kms.amazonaws.com Decrypt Ensure that the secret value does not contain any sensitive data.
AWS Systems Manager Parameter Store parameter (See Note at end of table) kms.amazonaws.com Decrypt Ensure that the parameter value does not contain any sensitive data.
DynamoDB table that contains items with dummy data dynamodb.amazonaws.com BatchExecuteStatement
BatchGetItem
BatchWriteItem
DeleteItem
ExecuteStatement
ExecuteTransaction
GetItem
PutItem
Query
Scan
TransactGetItems
TransactWriteItems
UpdateItem
Ensure that the item does not have any sensitive data.

DynamoDB data events must be enabled in CloudTrail for the decoy DynamoDB table.

Note: When CloudTrail Management API events are sent to EventBridge, read-only events such as Get*, List*, and Describe* are filtered out and not processed. In order to get findings for secrets and Systems Manager parameters that are being accessed, you need to alert on GetSecretValue and GetParameter API calls. Since these are not processed by EventBridge, you can instead use the fact that secrets and secure string parameters are encrypted by using AWS Key Management Service (AWS KMS), and match on the corresponding AWS KMS Decrypt API calls. This means that successful calls from an unauthorized user to GetSecretValue and GetParameter are able to be matched and alerted on.

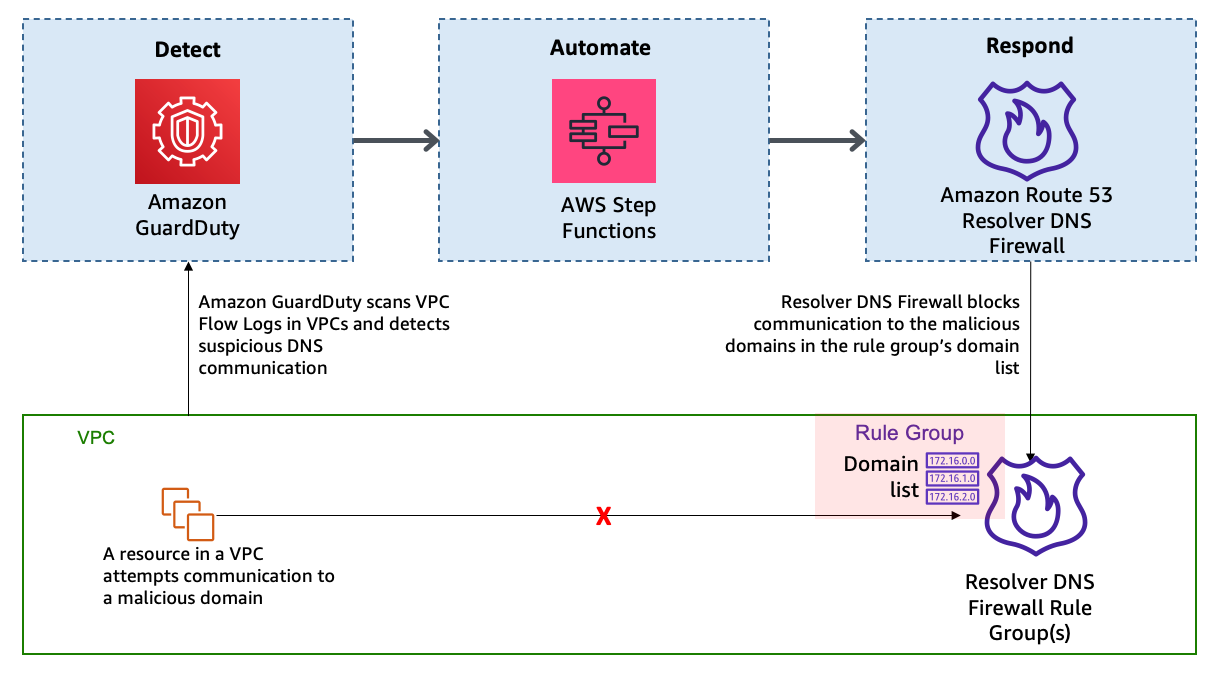
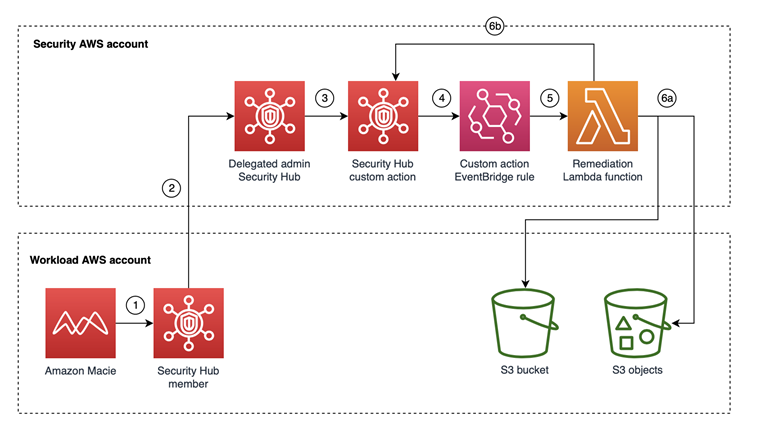
Notifications from matching EventBridge rules can be sent to an AWS Lambda function that generates custom findings in Security Hub. These findings can then be sent to downstream systems that you might have configured in your environment, such as your SIEM system or an automated response workflow in your Security Orchestration, Automation, and Response system. Figure 1 shows this workflow.

Figure 1: Accesses to decoy resources automatically create custom Security Hub findings

Figure 1: Accesses to decoy resources automatically create custom Security Hub findings

Deploy the private decoy resources

We’ve provided an AWS CloudFormation template that you can use to deploy the solution. The template creates the following private decoy AWS resources in your account:

  • DynamoDB table
  • IAM role
  • S3 bucket with a decoy S3 object
  • Systems Manager SecureString parameter
  • Secrets Manager secret

In addition, the CloudFormation template deploys the following resources in your account to detect accesses to the decoys and send custom findings to Security Hub:

  • A CloudTrail data events trail that includes only data events from the decoy S3 bucket and DynamoDB table
  • Six EventBridge rules to match specific CloudTrail API events
  • Two Lambda functions with corresponding IAM roles:
    • The WriteData Lambda function is a CloudFormation custom resource that is used to create the decoy S3 object and the Systems Manager SecureString parameter
    • The Data Lambda function is a target for the EventBridge rules, and it sends custom findings to Security Hub when the decoy resources are accessed

Prerequisites

The prerequisites to deploying the solution are as follows:

  • Security Hub must be enabled in the AWS Regions where the private decoys will be deployed, in order to receive custom findings.
  • You must have created a CloudTrail trail to log management events for the AWS account in the Region where you deploy the private decoys. This trail can be created locally in the account or can be an organization trail. Ensure that you have enabled both read and write events, and enabled all AWS KMS events in the trail (this is the default configuration).

Deploy the solution

After you have the prerequisites set up, you can launch the CloudFormation template to deploy the private decoys.

To launch the template

  1. Choose the following Launch Stack button to launch a CloudFormation stack in your account.

    Launch Stack

    Note: The stack will launch in the N. Virginia (us-east-1) Region. To deploy this solution into other AWS Regions, download the solution’s CloudFormation template, modify it, and deploy it to the selected Region. In order to get maximum coverage for detecting suspicious activity, we recommend that you deploy the solution into your key production accounts and Regions.

  2. On the Specify stack details page, enter the stack name, then choose Next.

    The CloudFormation template will use the stack name as part of the naming of the resources that are created. We recommend that you use your organization’s existing naming conventions for stack names, and not make reference to decoy resources, because this could alert any unauthorized user to the real purpose of the resources they’re attempting to access.

    Figure 2: Specify stack details

    Figure 2: Specify stack details

  3. Configure any tags or other organization-specific stack options you need, or accept the default settings, and then choose Next.
  4. Review the CloudFormation settings and select the box acknowledging that AWS CloudFormation might create IAM resources with custom names, and then choose Create stack.
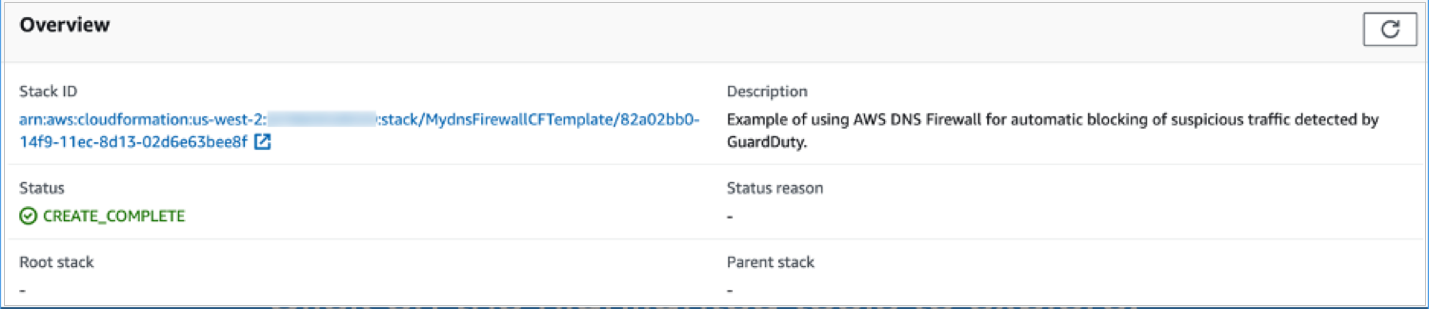
  5. After the stack has completed deployment, the CloudFormation stack output will show the Amazon Resource Names (ARNs) of the decoy resources that were created.
    Figure 3: CloudFormation stack outputs

    Figure 3: CloudFormation stack outputs

Estimated costs

This solution has been designed to keep costs as low as possible, by using services that have no associated costs (such as IAM roles or any parameters stored in Systems Manager Parameter Store), and keeping the use of paid for services (such as S3 and DynamoDB) to a minimum.

Deploying the solution as outlined in this blog post should result in a cost of less than $1 per month for a single account deployment, however please refer to the AWS Pricing Calculator where you can create a pricing estimate based on your deployment using the most up-to-date pricing information.

Test the alerts

In normal circumstances, after you configure the decoys, there will be no attempted access to these resources, and no findings will be sent to Security Hub in your account. To test that the configuration is working as expected, you can issue the following commands from a device that has programmatic access to your account where the private decoy resources have been deployed. To run each command, replace the bracketed, italicized text with your own information. You can find the details for each of the resources in the outputs section of the CloudFormation stack after it has been deployed successfully.

S3 object access

  • aws s3 cp s3://<bucket_name/object_name> /tmp
  • aws s3 cp s3://<bucket_name/object_name> s3://<any_existing_bucket>

IAM role assumption

  • aws sts assume-role –role-arn <role_name> –role-session-name BlogTestRole

Secrets Manager access

  • aws secretsmanager get-secret-value –secret-id <secret_name>

Parameter Store access

  • aws ssm get-parameters –names <ssm_parameter> –with-decryption

    DynamoDB table scan

  • aws dynamodb scan –table-name <table_name>

An example of what these test-generated findings looks like is shown in Figure 4.

Figure 4: Security Hub findings

Figure 4: Security Hub findings

Considerations

Consider the following as you deploy decoy AWS resources:

  • You should consider decoy AWS resources as enhancements to your foundational security controls. Your foundational controls should include these measures:
    • Help prevent the compromise of AWS credentials and limit the privileges of credentials by implementing strong identity management and permissions management.
    • Identify and investigate alerts generated by decoy resources by implementing detective controls.
    • Implement incident response mechanisms to respond to and mitigate the potential impact of security incidents, such as a decoy AWS resource being accessed.
  • You should ensure that your monitoring services and tools are configured to query the configuration of resources and not the data stored in resources. Otherwise, you might get a large volume of false positives because every time a resource is accessed, a custom finding is created in Security Hub. For example, consider a service like Security Hub Security Standards checks, or a cloud security posture management (CSPM) tool that monitors your S3 buckets by describing the properties of all buckets in your account. Such tools will find the decoy S3 bucket and will interrogate its configuration by making calls such as GetBucketPolicy and GetBucketLogging. However, as long as these tools don’t try to read data in the bucket through calls such as GetObject, the EventBridge rules that are configured as described in this post won’t generate a finding.
  • As a specific example of the previous point, ensure that you don’t run a sensitive data discovery job in Amazon Macie on the decoy S3 bucket, to avoid false alerts. You can configure Amazon Macie to monitor the metadata of your S3 buckets, because those actions won’t generate alerts.
  • The solution generates custom findings in Security Hub only for successful accesses of Secrets Manager secrets and Systems Manager parameters. However, both successful and unsuccessful accesses of S3 objects and DynamoDB items, and IAM role assumption, will generate custom findings in Security Hub.

Conclusion

In this post, we discussed the advantages of using private decoy AWS resources to detect suspicious activities within your account and how these decoys can complement your existing security solutions. You learned how to create private decoys, set up alerting, and ingest (and test) these alerts as custom findings into Security Hub for central visibility across your AWS environment. The solution deployment included a set of common resources as private decoys; however, the necessary code and templates can be found in our GitHub repository, and you can extend and customize these to add other resources that you want to include in your accounts.

If you would also like to learn about using CloudTrail as another method of detecting unexpected behavior within your accounts, see the blog post Using CloudTrail to identify unexpected behaviors in individual workloads for more information.

If you have feedback about this post, submit comments in the Comments section below. If you have questions about this post, contact AWS Support.

Want more AWS Security news? Follow us on Twitter.

Author

Maitreya Ranganath

Maitreya is an AWS Security Solutions Architect. He enjoys helping customers solve security and compliance challenges and architect scalable and cost-effective solutions on AWS.

Mark Keating

Mark Keating

Mark is an AWS Security Solutions Architect based out of the U.K. who works with Global Healthcare & Life Sciences and Automotive customers to solve their security and compliance challenges and help them reduce risk. He has over 20 years of experience working with technology, within in operations, solution, and enterprise architecture roles.

AWS CyberVadis report now available for due diligence on third-party suppliers

Post Syndicated from Andreas Terwellen original https://aws.amazon.com/blogs/security/aws-cybervadis-report-now-available-for-due-diligence-on-third-party-suppliers/

At Amazon Web Services (AWS), we’re continuously expanding our compliance programs to provide you with more tools and resources to perform effective due diligence on AWS. We’re excited to announce the availability of the AWS CyberVadis report to help you reduce the burden of performing due diligence on your third-party suppliers.

With the increase in adoption of cloud products and services across multiple sectors and industries, AWS is a critical component of customers’ third-party environments. Regulated customers, such as those in the financial services sector, are held to high standards by regulators and auditors when it comes to exercising effective due diligence on third parties.

Many customers use third-party cyber risk management (TPCRM) services such as CyberVadis to better manage risks from their evolving third-party environments and to drive operational efficiencies. To help with such efforts, AWS has completed the CyberVadis assessment of its security posture. CyberVadis security analysts perform the assessment and validate the results annually.

CyberVadis is a comprehensive third-party risk assessment process that combines the speed and scalability of automation with the certainty of analyst validation. The CyberVadis cybersecurity rating methodology assesses the maturity of a company’s information security management system (ISMS) through its policies, implementation measures, and results.

CyberVadis integrates responses from AWS with analytics and risk models to provide an in-depth view of the AWS security posture. The CyberVadis methodology maps to major international compliance standards, including the following:

Customers can download the AWS CyberVadis report at no additional cost. For details on how to access the report, see our AWS CyberVadis report page.

As always, we value your feedback and questions. Reach out to the AWS Compliance team through the Contact Us page. If you have feedback about this post, submit comments in the Comments section below. To learn more about our other compliance and security programs, see AWS Compliance Programs.

Want more AWS Security news? Follow us on Twitter.

Andreas Terwellen

Andreas Terwellen

Andreas is a senior manager in security audit assurance at AWS, based in Frankfurt, Germany. His team is responsible for third-party and customer audits, attestations, certifications, and assessments across Europe. Previously, he was a CISO in a DAX-listed telecommunications company in Germany. He also worked for different consulting companies managing large teams and programs across multiple industries and sectors.

Manuel Mazarredo

Manuel Mazarredo

Manuel is a security audit program manager at AWS based in Amsterdam, the Netherlands. Manuel leads security audits, attestations, and certification programs across Europe, and is responsible for the BeNeLux area. For the past 18 years, he has worked in information systems audits, ethical hacking, project management, quality assurance, and vendor management across a variety of industries.

How to use customer managed policies in AWS IAM Identity Center for advanced use cases

Post Syndicated from Ron Cully original https://aws.amazon.com/blogs/security/how-to-use-customer-managed-policies-in-aws-single-sign-on-for-advanced-use-cases/

Are you looking for a simpler way to manage permissions across all your AWS accounts? Perhaps you federate your identity provider (IdP) to each account and divide permissions and authorization between cloud and identity teams, but want a simpler administrative model. Maybe you use AWS IAM Identity Center (successor to AWS Single Sign-On) but are running out of room in your permission set policies; or need a way to keep the role models you have while tailoring the policies in each account to reference their specific resources. Or perhaps you are considering IAM Identity Center as an alternative to per-account federation, but need a way to reuse the customer managed policies that you have already created. Great news! Now you can use customer managed policies (CMPs) and permissions boundaries (PBs) to help with these more advanced situations.

In this blog post, we explain how you can use CMPS and PBs with IAM Identity Center to address these considerations. We describe how IAM Identity Center works, how these types of policies work with IAM Identity Center, and how to best use CMPs and PBs with IAM Identity Center. We also show you how to configure and use CMPs in your IAM Identity Center deployment.

IAM Identity Center background

With IAM Identity Center, you can centrally manage access to multiple AWS accounts and business applications, while providing your workplace users a single sign-on experience with your choice of identity system. Rather than manage identity in each account individually, IAM Identity Center provides one place to connect an existing IdP, Microsoft Active Directory Domain Services (AD DS), or workforce users that you create directly in AWS. Because IAM Identity Center integrates with AWS Organizations, it also provides a central place to define your roles, assign them to your users and groups, and give your users a portal where they can access their assigned accounts.

With AWS Identity Center, you manage access to accounts by creating and assigning permission sets. These are AWS Identity and Access Management (IAM) role templates that define (among other things) which policies to include in a role. If you’re just getting started, you can attach AWS managed policies to the permission set. These policies, created by AWS service teams, enable you to get started without having to learn how to author IAM policies in JSON.

For more advanced cases, where you are unable to express policies sufficiently using inline policies, you can create a custom policy in the permission set. When you assign a permission set to users or groups in a specified account, IAM Identity Center creates a role from the template and then controls single sign-on access to the role. During role creation, IAM Identity Center attaches any specified AWS managed policies, and adds any custom policy to the role as an inline policy. These custom policies must be within the 10,240 character IAM quota of inline policies.

IAM provides two other types of custom policies that increase flexibility when managing access in AWS accounts. Customer managed policies (CMPs) are standalone policies that you create and can attach to roles in your AWS accounts to grant or deny access to AWS resources. Permissions boundaries (PBs) provide an advanced feature that specifies the maximum permissions that a role can have. For both CMPs and PBs, you create the custom policy in your account and then attach it to roles. IAM Identity Center now supports attaching both of these to permission sets so you can handle cases where AWS Managed Policies and inline policies may not be enough.

How CMPs and PBs work with IAM Identity Center

Although you can create IAM users to manage access to AWS accounts and resources, AWS recommends that you use roles instead of IAM users for this purpose. Roles act as an identity (sometimes called an IAM principal), and you assign permissions (identity-based policies) to the role. If you use the AWS Management Console or the AWS Command Line Interface to assume a role, you get the permissions of the role that you assumed. With its simpler way to maintain your users and groups in one AWS location and its ability to centrally manage and assign roles, AWS recommends that you use IAM Identity Center to manage access to your AWS accounts.

With this new IAM Identity Center release, you have the option to specify the names of CMPs and one PB in your permission set (role definition). Doing so modifies how IAM Identity Center provisions roles into accounts. When you assign a user or group to a permission set, IAM Identity Center checks the target account to verify that all specified CMPs and the PB are present. If they are all present, IAM Identity Center creates the role in the account and attaches the specified policies. If any of the specified CMPs or the PB are missing, IAM Identity Center fails the role creation.

This all sounds simple enough, but there are important implications to consider.

If you modify the permission set, IAM Identity Center updates the corresponding roles in all accounts to which you assigned the permission set. What is different when using CMPs and PBs is that IAM Identity Center is uninvolved in the creation or maintenance of the CMPs or PBs. It’s your responsibility to make sure that the CMPs and PBs are created and managed in all of the accounts to which you assign permission sets that use the CMPs and PBs. This means that you must be careful in how you name, create, and maintain these policies in your accounts, to avoid unintended consequences. For example, if you do not apply changes to CMPs consistently across all your accounts, the behavior of an IAM Identity Center created role will vary between accounts.

What CMPs do for you

By using CMPs with permission sets, you gain four main benefits:

  1. If you federate to your accounts directly and have CMPs already, you can reuse your CMPs with permission sets in IAM Identity Center. We describe exceptions later in this post.
  2. If you are running out of space in your permission set inline policies, you can add permission sets to increase the aggregate size of your policies.
  3. Policies often need to refer to account-specific resources by Amazon Resource Name (ARN). Designing an inline policy that does this correctly across all your accounts can be challenging and, in some cases, may not be possible. By specifying a CMP in a permission set, you can tailor the CMPs in each of your accounts to reference the resources of the account. When IAM Identity Center creates the role and attaches the CMPs of the account, the policies used by the IAM Identity Center–generated role are now specific to the account. We highlight this example later in this post.
  4. You get the benefit of a central location to define your roles, which gives you visibility of all the policies that are in use across the accounts where you assigned permission sets. This enables you to have a list of CMP and PB names that you should monitor for change across your accounts. This helps you ensure that you are maintaining your policies correctly.

Considerations and best practices

Start simple, avoid complex – If you’re just starting out, try using AWS managed policies first. With managed policies, you don’t need to know JSON policy to get started. If you need more advanced policies, start by creating identity-based inline custom policies in the permission set. These policies are provisioned as inline policies, and they will be identical in all your accounts. If you need larger policies or more advanced capabilities, use CMPs as your next option. In most cases, you can accomplish what you need with inline and customer managed policies. When you can’t achieve your objective using CMPs, use PBs. For information about intended use cases for PBs, see the blog post When and where to use IAM permissions boundaries.

Permissions boundaries don’t constrain IAM Identity Center admins who create permission sets – IAM Identity Center administrators (your staff) that you authorize to create permission sets can create inline policies and attach CMPs and PBs to permission sets, without restrictions. Permissions boundary policies set the maximum permissions of a role and the maximum permissions that the role can grant within an account through IAM only. For example, PBs can set the maximum permissions of a role that uses IAM to create other roles for use by code or services. However, a PB doesn’t set maximum permissions of the IAM Identity Center permission set creator. What does that mean? Suppose you created an IAM Identity Center Admin permission set that has a PB attached, and you assigned it to John Doe. John Doe can then sign in to IAM Identity Center and modify permission sets with any policy, regardless of what you put in the PB. The PB doesn’t restrict the policies that John Doe can put into a permission set.

In short, use PBs only for roles that need to create IAM roles for use by code or services. Don’t use PBs for permission sets that authorize IAM Identity Center admins who create permission sets.

Create and use a policy naming plan – IAM Identity Center doesn’t consider the content of a named policy that you attach to a permission set. If you assign a permission set in multiple accounts, make sure that all referenced policies have the same intent. Failure to do this will result in unexpected and inconsistent role behavior between different accounts. Imagine a CMP named “S3” that grants S3 read access in account A, and another CMP named “S3” that grants S3 administrative permissions over all S3 buckets in account B. A permission set that attaches the S3 policy and is assigned in accounts A and B will be confusing at best, because the level access is quite different in each of the accounts. It’s better to have more specific names, such as “S3Reader” and “S3Admin,” for your policies and ensure they are identical except for the account-specific resource ARNs.

Use automation to provision policies in accounts – Using tools such as AWS CloudFormation stacksets, or other infrastructure-as-code tools, can help ensure that naming and policies are consistent across your accounts. It also helps reduce the potential for administrators to modify policies in undesirable ways.

Policies must match the capabilities of IAM Identity Center – Although IAM Identity Center supports most IAM semantics, there are exceptions:

  1. If you use an identity provider as your identity source, IAM Identity Center passes only PrincipalTag attributes that come through SAML assertions to IAM. IAM Identity Center doesn’t process or forward other SAML assertions to IAM. If you have CMPs or PBs that rely on other information from SAML assertions, they won’t work. For example, IAM Identity Center doesn’t provide multi-factor authentication (MFA) context keys or SourceIdentity.
  2. Resource policies that reference role names or tags as part of trust policies don’t work with IAM Identity Center. You can use resource policies that use attribute-based access control (ABAC). IAM Identity Center role names are not static, and you can’t tag the roles that IAM Identity Center creates from its permission sets.

How to use CMPs with permission sets

Now that you understand permission sets and how they work with CMPs and PBs, let’s take a look at how you can configure a permission set to use CMPs.

In this example, we show you how to use one or more permission sets that attach a CMP that enables Amazon CloudWatch operations to the log group of specified accounts. Specifically, the AllowCloudWatch_permission set attaches a CMP named AllowCloudWatchForOperations. When we assign the permission set in two separate accounts, the assigned users can perform CloudWatch operations against the log groups of the assigned account only. Because the CloudWatch operations policies are in CMPs rather than inline policies, the log groups can be account specific, and you can reuse the CMPs in other permission sets if you want to have CloudWatch operations available through multiple permission sets.

Note: For this blog post, we demonstrate using CMPs by utilizing the IAM Management Console to create policies and assignments. We recommend that after you learn how to do this, you create your policies through automation for production environments. For example, use AWS CloudFormation. The intent of this example is to demonstrate how you can have a policy in two separate accounts that refer to different resources; something that is harder to accomplish using inline policies. The use case itself is not that advanced, but the use of CMPs to have different resources referenced in each account is a more advanced idea. We kept this simple to make it easier to focus on the feature than the use case.

Prerequisites

In this example, we assume that you know how to use the AWS Management Console, create accounts, navigate between accounts, and create customer managed policies. You also need administrative privileges to enable IAM Identity Center and to create policies in your accounts.

Before you begin, enable IAM Identity Center in your AWS Organizations management account in an AWS Region of your choice. You need to create at least two accounts within your AWS Organization. In this example, the account names are member-account and member-account-1. After you set up the accounts, you can optionally configure IAM Identity Center for administration in a delegated member account.

Configure an IAM Identity Center permission set to use a CMP

Follow these four procedures to use a CMP with a permission set:

  1. Create CMPs with consistent names in your target accounts
  2. Create a permission set that references the CMP that you created
  3. Assign groups or users to the permission set in accounts where you created CMPs
  4. Test your assignments

Step 1: Create CMPs with consistent names in your target accounts

In this step, you create a customer managed policy named AllowCloudWatchForOperations in two member accounts. The policy allows your cloud operations users to access a predefined CloudWatch log group in the account.

To create CMPs in your target accounts

  1. Sign into AWS.

    Note: You can sign in to IAM Identity Center if you have existing permission sets that enable you to create policies in member accounts. Alternatively, you can sign in using IAM federation or as an IAM user that has access to roles that enable you to navigate to other accounts where you can create policies. Your sign-in should also give you access to a role that can administer IAM Identity Center permission sets.

  2. Navigate to an AWS Organizations member account.

    Note: If you signed in through IAM Identity Center, use the user portal page to navigate to the account and role. If you signed in by using IAM federation or as an IAM user, choose your sign-in name that is displayed in the upper right corner of the AWS Management Console and then choose switch role, as shown in Figure 1.

    Figure 1: Switch role for IAM user or IAM federation

    Figure 1: Switch role for IAM user or IAM federation

  3. Open the IAM console.
  4. In the navigation pane, choose Policies.
  5. In the upper right of the page, choose Create policy.
  6. On the Create Policy page, choose the JSON tab.
  7. Paste the following policy into the JSON text box. Replace <account-id> with the ID of the account in which the policy is created.

    Tip: To copy your account number, choose your sign-in name that is displayed in the upper right corner of the AWS Management Console, and then choose the copy icon next to the account ID, as shown in Figure 2.

    Figure 2: Copy account number

    Figure 2: Copy account number

    {
        "Version": "2012-10-17",
        "Statement": [
            {
                "Action": [
                    "logs:CreateLogStream",
                    "logs:DescribeLogStreams",
                    "logs:PutLogEvents",
                    "logs:GetLogEvents"
                ],
                "Effect": "Allow",
                "Resource": "arn:aws:logs:us-east-1:<account-id>:log-group:OperationsLogGroup:*"
            },
            {
                "Action": [
                    "logs:DescribeLogGroups"
                ],
                "Effect": "Allow",
                "Resource": "arn:aws:logs:us-east-1:<account-id>:log-group::log-stream:*"
            }
        ]
    }

  8. Choose Next:Tags, and then choose Next:Review.
  9. On the Create Policy/Review Policy page, in the Name field, enter AllowCloudWatchForOperations. This is the name that you will use when you attach the CMP to the permission set in the next procedure (Step 2).
  10. Repeat steps 1 through 7 in at least one other member account. Be sure to replace the <account-id> element in the policy with the account ID of each account where you create the policy. The only difference between the policies in each account is the <account-id> in the policy.

Step 2: Create a permission set that references the CMP that you created

At this point, you have at least two member accounts containing the same policy with the same policy name. However, the ResourceARN in each policy refers to log groups that belong to the respective accounts. In this step, you create a permission set and attach the policy to the permission set. Importantly, you attach only the name of the policy to the permission set. The actual attachment of the policy to the role that IAM Identity Center creates, happens when you assign the permission set to a user or group in Step 3.

To create a permission set that references the CMP

  1. Sign in to the Organizations management account or the IAM Identity Center delegated administration account.
  2. Open the IAM Identity Center console.
  3. In the navigation pane, choose Permission Sets.
  4. On the Select Permission set type screen, select Custom permission Set and choose Next.
    Figure 3: Select custom permission set

    Figure 3: Select custom permission set

  5. On the Specify policies and permissions boundary page, expand the Customer managed policies option, and choose Attach policies.
    Figure 4: Specify policies and permissions boundary

    Figure 4: Specify policies and permissions boundary

  6. For Policy names, enter the name of the policy. This name must match the name of the policy that you created in Step 1. In our example, the name is AllowCloudWatchForOperations. Choose Next.
  7. On the Permission set details page, enter a name for your permission set. In this example, use AllowCloudWatch_PermissionSet. You can alspecify additional details for your permission sets, such as session duration and relay state (these are a link to a specific AWS Management Console page of your choice).
    Figure 5: Permission set details

    Figure 5: Permission set details

  8. Choose Next, and then choose Create.

Step 3: Assign groups or users to the permission set in accounts where you created your CMPs

In the preceding steps, you created a customer managed policy in two or more member accounts, and a permission set with the customer managed policy attached. In this step, you assign users to the permission set in your accounts.

To assign groups or users to the permission set

  1. Sign in to the Organizations management account or the IAM Identity Center delegated administration account.
  2. Open the IAM Identity Center console.
  3. In the navigation pane, choose AWS accounts.
    Figure 6: AWS account

    Figure 6: AWS account

  4. For testing purposes, in the AWS Organization section, select all the accounts where you created the customer managed policy. This means that any users or groups that you assign during the process will have access to the AllowCloudWatch_PermissionSet role in each account. Then, on the top right, choose Assign users or groups.
  5. Choose the Users or Groups tab and then select the users or groups that you want to assign to the permission set. You can select multiple users and multiple groups in this step. For this example, we recommend that you select a single user for which you have credentials, so that you can sign in as that user to test the setup later. After selecting the users or groups that you want to assign, choose Next.
    Figure 7: Assign users and groups to AWS accounts

    Figure 7: Assign users and groups to AWS accounts

  6. Select the permission set that you created in Step 2 and choose Next.
  7. Review the users and groups that you are assigning and choose Submit.
  8. You will see a message that IAM Identity Center is configuring the accounts. In this step, IAM Identity Center creates roles in each of the accounts that you selected. It does this for each account, so it looks in the account for the CMP that you specified in the permission set. If the name of the CMP that you specified in the permission set matches the name that you provided when creating the CMP, IAM Identity Center creates a role from the permission set. If the names don’t match or if the CMP isn’t present in the account to which you assigned the permission set, you see an error message associated with that account. After successful submission, you will see the following message: We reprovisioned your AWS accounts successfully and applied the updated permission set to the accounts.

Step 4: Test your assignments

Congratulations! You have successfully created CMPs in multiple AWS accounts, created a permission set and attached the CMPs by name, and assigned the permission set to users and groups in the accounts. Now it’s time to test the results.

To test your assignments

  1. Go to the IAM Identity Center console.
  2. Navigate to the Settings page.
  3. Copy the user portal URL, and then paste the user portal URL into your browser.
  4. At the sign-in prompt, sign in as one of the users that you assigned to the permission set.
  5. The IAM Identity Center user portal shows the accounts and roles that you can access. In the example shown in Figure 8, the user has access to the AllowCloudWatch_PermissionSet created in two accounts.
    Figure 8: User portal

    Figure 8: User portal

    If you choose AllowCloudWatch_PermissionSet in the member-account, you will have access to the CloudWatch log group in the member-account account. If you choose the role in member-account-1, you will have access to CloudWatch Log group in member-account-1.

  6. Test the access by choosing Management Console for the AllowCloudWatch_PermissionSet in the member-account.
  7. Open the CloudWatch console.
  8. In the navigation pane, choose Log groups. You should be able to access log groups, as shown in Figure 9.
    Figure 9: CloudWatch log groups

    Figure 9: CloudWatch log groups

  9. Open the IAM console. You shouldn’t have permissions to see the details on this console, as shown in figure 10. This is because AllowCloudWatch_PermissionSet only provided CloudWatch log access.
    Figure 10: Blocked access to the IAM console

    Figure 10: Blocked access to the IAM console

  10. Return to the IAM Identity Center user portal.
  11. Repeat steps 4 through 8 using member-account-1.

Answers to key questions

What happens if I delete a CMP or PB that is attached to a role that IAM Identity Center created?
IAM prevents you from deleting policies that are attached to IAM roles.

How can I delete a CMP or PB that is attached to a role that IAM Identity Center created?
Remove the CMP or PB reference from all your permission sets. Then re-provision the roles in your accounts. This detaches the CMP or PB from IAM Identity Center–created roles. If the policies are unused by other IAM roles in your account or by IAM users, you can delete the policy.

What happens if I modify a CMP or PB that is attached to an IAM Identity Center provisioned role?
The IAM Identity Center role picks up the policy change the next time that someone assumes the role.

Conclusion

In this post, you learned how IAM Identity Center works with customer managed policies and permissions boundaries that you create in your AWS accounts. You learned different ways that this capability can help you, and some of the key considerations and best practices to succeed in your deployments. That includes the principle of starting simple and avoiding unnecessarily complex configurations. Remember these four principles:

  1. In most cases, you can accomplish everything you need by starting with custom (inline) policies.
  2. Use customer managed policies for more advanced cases.
  3. Use permissions boundary policies only when necessary.
  4. Use CloudFormation to manage your customer managed policies and permissions boundaries rather than having administrators deploy them manually in accounts.

To learn more about this capability, see the IAM Identity Center User Guide. If you have feedback about this post, submit comments in the Comments section below. If you have questions about this post, start a new thread on the AWS IAM re:Post or contact AWS Support.

Want more AWS Security news? Follow us on Twitter.

Ron Cully

Ron s a Principal Product Manager at AWS where he leads feature and roadmap planning for workforce identity products at AWS. Ron has over 20 years of industry experience in product and program management of networking and directory related products. He is passionate about delivering secure, reliable solutions that help make it easier for customers to migrate directory aware applications and workloads to the cloud.

Nitin Kulkarni

Nitin Kulkarni

Nitin is a Solutions Architect on the AWS Identity Solutions team. He helps customers build secure and scalable solutions on the AWS platform. He also enjoys hiking, baseball and linguistics.

AWS launches AWS Wickr ATAK Plugin

Post Syndicated from Anne Grahn original https://aws.amazon.com/blogs/security/aws-launches-aws-wickr-atak-plugin/

AWS is excited to announce the launch of the AWS Wickr ATAK Plugin, which makes it easier for ATAK users to maintain secure communications.

The Android Team Awareness Kit (ATAK)—also known as Android Tactical Assault Kit (ATAK) for military use—is a smartphone geospatial infrastructure and situational awareness application. It provides mapping, messaging, and geofencing capabilities to enable safe collaboration over geography.

ATAK users, referred to as operators, can view the location of other operators and potential hazards—a major advantage over relying on hand-held radio transmissions. While ATAK was initially designed for use in combat zones, the technology has been adapted to fit the missions of local, state, and federal agencies.

ATAK is currently in use by over 40,000 US Department of Defense (DoD) users—including the Air Force, Army, Special Operations, and National Guard—along with the Department of Justice (DOJ), the Department of Homeland Security (DHS), and 32,000 nonfederal users.

Using AWS Wickr with ATAK

AWS Wickr is a secure collaboration service that provides enterprises and government agencies with advanced security and administrative controls to help them meet security and compliance requirements. The AWS Wickr service is now in preview.

With AWS Wickr, communication mechanisms such as one-to-one and group messaging, audio and video calling, screen sharing, and file sharing are protected with 256-bit end-to-end encryption (E2EE). Encryption takes place locally, on the endpoint. Every message, call, and file is encrypted with a new random key, and no one but the intended recipients can decrypt them. Flexible administrative features enable organizations to deploy at scale, and facilitate information governance.

AWS Wickr supports many agencies that use ATAK. However, until now, ATAK operators have had to leave the ATAK application in order to use AWS Wickr, which creates operational risk.

AWS Wickr ATAK Plugin

AWS Wickr has developed a plugin that enhances ATAK with secure communications features. ATAK operators are provided with a Wickr Enterprise or Wickr Pro account, so they can use AWS Wickr within ATAK for secure messaging, calling, and file transfer. This helps reduce interruptions, and the complexity of configuration with ATAK chat features.

Use cases

The AWS Wickr ATAK Plugin has multiple use cases.

Military

The military uses ATAK for blue force tracking to locate team members, red force tracking to locate enemies, terrain and weather analysis, and to visually communicate their movements to friendly forces.

The AWS Wickr ATAK Plugin enhances the ability of military personnel to maintain the situational awareness ATAK provides, while quickly receiving and reacting to Wickr communications. Ephemeral messaging options allow unit leaders to send mission plans, GPS points of interest, and set burn-on-read and expiration timers. Information can be deleted from the device, while being retained on the AWS Wickr service to help meet compliance requirements, and facilitate the creation of after-action reports.

Law enforcement

ATAK is a powerful tool for team tracking and mission planning that promotes a safer and better response to critical law enforcement and public-safety events.

The AWS Wickr ATAK Plugin adds to the capabilities of ATAK by supporting secure communications between tactical, negotiation, and investigative teams.

First responders

ATAK aids in search-and-rescue and multi-jurisdictional natural disaster responses, such as hurricane relief efforts.

The AWS Wickr ATAK Plugin provides secure, uninterrupted communication between all levels of first responders to help them get oriented quickly, and support complex coordination needs.

Getting started

AWS customers can sign up to use AWS Wickr at no cost during the preview period. For more information about the AWS Wickr ATAK Plugin, email [email protected], and visit the AWS Wickr web page.

If you have feedback about this blog post, let us know in the Comments section below.

Want more AWS Security news? Follow us on Twitter.

Anne Grahn

Anne Grahn

Anne is a Senior Worldwide Security GTM Specialist at AWS based in Chicago. She has more than a decade of experience in the security industry, and has a strong focus on privacy risk management. She maintains a Certified Information Systems Security Professional (CISSP) certification.

Randy Brumfield

Randy Brumfield

Randy leads technology business for new initiatives and the Cloud Support Engineering team at Wickr, an AWS Company. Prior to Wickr (and AWS), Randy spent close to two and a half decades in Silicon Valley across several start-ups, networking companies, and system integrators in various corporate development, product management, and operations roles. Randy currently resides in San Jose, California.

How to incorporate ACM PCA into your existing Windows Active Directory Certificate Services

Post Syndicated from Geoff Sweet original https://aws.amazon.com/blogs/security/how-to-incorporate-acm-pca-into-your-existing-windows-active-directory-certificate-services/

Using certificates to authenticate and encrypt data is vital to any enterprise security. For example, companies rely on certificates to provide TLS encryption for web applications so that client data is protected. However, not all certificates need to be issued from a publicly trusted certificate authority (CA). A privately trusted CA can be leveraged to issue certificates to help protect data in transit on resources such as load-balancers and also device authentication for endpoints and IoT devices. Many organizations already have that privately trusted CA running in their Microsoft Active Directory architecture via Active Directory Certificate Services (ADCS).

This post outlines how you can use Microsoft’s Windows 2019 ADCS to sign an AWS Certificate Manager (ACM) Private Certificate Authority (Private CA) instance, extending your existing ADCS system into your AWS environment. This will allow you to issue certificates via ACM for resources like Application Load Balancer that are trusted by your Active Directory members. The ACM PCA documentation talks about how to use an external CA to sign the ACM PCA certificate. However, it leaves the details of the external CA outside of the documentation scope.

Why use ACM PCA?

AWS Certificate Manager Private Certificate Authority (ACM Private CA or ACM PCA) is a private CA service that extends ACM certificate management capabilities to both public and private certificates. ACM PCA provides a highly available private CA service without the upfront investment and ongoing maintenance costs of operating your own private CA. ACM PCA allows developers to be more agile by providing them with APIs to create and deploy private certificates programmatically. You also have the flexibility to create private certificates for applications that require custom certificate lifetimes or resource names.

Why use ACM PCA with Windows Active Directory?

Many enterprises already use Active Directory to manage their IT resources. Whether it is on-premises or built into your AWS accounts, Active Directory’s built-in CA can be extended by ACM PCA. Using your ADCS to sign an ACM PCA means that members of your Active Directory automatically trust certificates issued by that ACM PCA. Keep in mind that these are still private certificates, and they are intended to be used just like certificates from ADCS itself. They will not be trusted by unmanaged devices, because these are not signed by a publicly trusted external CA. Therefore, systems like Mac and Linux may require that you manually deploy the ADCS certificate chain in order to trust certificates issued by your new ACM PCA.

This means it is more efficient for you to rapidly deploy certificates to your endpoint workstations for authentication. Or you can protect internal-only workloads with certificates that are constrained to your internal domain namespace. These tasks can be done conveniently through AWS APIs and the AWS SDK.

Solution overview

In the following sections, we will configure Microsoft ADCS to be able to sign a subordinate CA, deploy and sign ACM PCA, and then test the solution using a private website that is protected by a TLS certificate issued from the ACM PCA.

Configure Microsoft ADCS

Microsoft ADCS is normally deployed as part of your Windows Active Directory architecture. It can be extended to do multiple different types of certificate signing depending on your environment’s needs. Each of these different types of certificates is defined by a template that you must enable and configure. Each template contains configuration information about how Microsoft ADCS will issue the certificate type. You can copy and configure templates differently depending on your environment’s requirements. The specifics of each type of template is outside the scope of this blog post.

To configure ADCS to sign subordinate CAs

  1. On the CA server that will be signing the private CA certificate, open the Certification Authority Microsoft Management Console (MMC).
  2. In the left-side tree view, expand the name of the server.
  3. Open the context (right-click) menu for Certificate Templates and choose Manage.
    Figure 1: Navigating to the Manage option for the certificate templates

    Figure 1: Navigating to the Manage option for the certificate templates

    This opens the Certificate Template Console, which is populated with the list of optional templates.

  4. Scroll down, open the context (right-click) menu for Subordinate Certification Authority, and choose Duplicate Template, as shown in Figure 2. This will create a duplicate of the template that you can alter for your needs, while leaving the original template unaltered for future use. Selecting Duplicate Template immediately opens the configuration for the new template.
    Figure 2: Select Duplicate Template to create a copy of the Subordinate Certification Authority template

    Figure 2: Select Duplicate Template to create a copy of the Subordinate Certification Authority template

To configure and use the new template

  1. On the new template configuration page, choose the General tab, and change the template display name to something that uniquely identifies it. The example in this post uses the name Subordinate Certification Authority – Private CA.
  2. Select the check box for Publish certificate in Active Directory, and then choose OK. The new template appears in the list of available templates. Close the Certificate Templates Console.
  3. Return to the Certification Authority MMC. Open the context (right-click) menu for Certificate Templates again, but this time choose New -> Certificate Template to Issue.
    Figure 3: Issue the new Certificate Template you created for subordinate Cas

    Figure 3: Issue the new Certificate Template you created for subordinate Cas

  4. In the dialog box that appears, choose the new template you created in Step 1 of this procedure, and then choose OK.

That’s all that’s needed! Your CA is now ready to issue certificates for subordinate CAs in your public key infrastructure. Open a browser from either the ADCS CA server itself or through a network connection to the ADCS CA server, and use the following URL to access the certificate server’s certificate signing interface.

http://<hostname-of-your-ca-with-domain>/certsrv/certrqxt.asp

Now you can see that in the Certificate Templates list, you can choose the Subordinate Certification Authority template that you created, as shown in Figure 4.

Figure 4: The interface to sign certificates on your CA now shows the new certificate template you created

Figure 4: The interface to sign certificates on your CA now shows the new certificate template you created

Deploy and sign the ACM Private CA’s certificate

In this step, you will deploy the ACM PCA, which is the first step to create a subordinate CA to deploy in your AWS account. The process of deploying the ACM PCA is well documented, so this post will not go into depth about the deployment itself. Instead, this procedure focuses on the steps for taking the certificate signing request (CSR) and signing it against the ADCS, and then covers the additional steps to convert the certificates that ADCS produces into the certificate format that ACM PCA expects.

After the ACM PCA is initially deployed, it needs to have a certificate signed to authenticate it. ACM PCA offers two options for signing the new instance’s certificate. You can choose to sign either through another ACM PCA instance, or via an external CA. Since you are using ADCS in this walkthrough, you will use the process of an external CA. The ACM PCA deployment is now at a point where it needs its CSR signed by Microsoft ADCS. You should see that it is ready in the AWS Management Console for ACM PCA.

To deploy and sign the ACM PCA’s certificate

  1. When the ACM PCA is ready, in the ACM PCA console, begin the Install subordinate CA certificate process by choosing External private CA for the CA type.
    Figure 5: Options for signing the new instance’s certificate

    Figure 5: Options for signing the new instance’s certificate

  2. You will then be provided the certificate signing request (CSR) for the ACM PCA. Copy and paste the CSR content into the ADCS CA signing URL you visited earlier on the CA server. Then choose Next. The next page is where you will paste in the new signed certificate and certchain in a later step.
  3. From the ADCS CA URL, be sure that the new Subordinate Certification Authority template is selected, and then choose Submit. The new certificate will be issued to you. The ADCS issuing page provides two different formats for the certificate, either as Distinguished Encoding Rules (DER) or base64-encoded.
  4. Copy the base64-encoded files for both the certificate and the certchain to your local computer. The certificate is already in Privacy Enhanced Mail (PEM) format, and its contents can be pasted into the ACM PCA certificate input in the console. However, you must convert the certchain into the format required by the ACM PCA by following these steps:
    1. To convert the format of the certchain, use the openssl tool from the command line. The process of installing the openssl tool is outside the scope of this blog post. Refer to the OpenSSL site documentation for installation options for your operating system.
    2. Use the following command to convert the certchain file from Public Key Cryptographic Standards #7 (PKCS7) to PEM.

      openssl pkcs7 -print_certs -in certnew.p7b -out certchain.pem

    3. Using a text editor, open the certchain.pem file and copy the last certificate block from the file, starting with —–BEGIN CERTIFICATE—– and ending with —–END CERTIFICATE—–. You will notice that the file begins with the signed certificate and includes subject= and issuer= statements. ACM PCA only accepts the content that is the certificate chain.
  5. Return to the ACM PCA console page from Step 1, and paste the text the you just copied into the input area provided for the certificate chain. After this step is complete, the private CA is now signed by your corporate PKI.

Test the solution

Now that the ACM PCA is online, one of the things it can do is issue certificates via ACM that are trusted by your corporate Active Directory joined clients. These certificates can be used in services such as Application Load Balancers to provide TLS protected endpoints that are unique to your organization and trusted only by your internal clients.

From a client joined to our test Active Directory, Internet Explorer shows that it trusts the TLS certificate issued by AWS Certificate Manager and used on the Application Load Balancer for a private site.

Figure 6: Internet Explorer showing that it trusts the TLS certificate

Figure 6: Internet Explorer showing that it trusts the TLS certificate

For this demo, we created a test web server that is hosting an example webpage. The web server is behind an AWS Application Load Balancer. The TLS certificate attached to the Application Load Balancer is issued from the new ACM PCA.

Conclusion

Organizations that have Microsoft Active Directory deployed can use Active Directory’s Certificate Services to issue certificates for private resources. This blog post shows how you can extend that certificate trust to AWS Certificate Manager Private CA. This provides a way for your developers to issue private certificates automatically, which are trusted by your Active Directory domain-joined clients or clients that have the ADCS certificate chain installed.

For more information on hybrid public key infrastructure (PKI) on AWS, refer to these blog posts:

For more information on certificates for Mac and Linux, refer to the following resources:

 
If you have feedback about this post, submit comments in the Comments section below. If you have questions about this post, contact AWS Support.

Want more AWS Security news? Follow us on Twitter.

Geoff Sweet

Geoff Sweet

Geoff has been in industry for over 20 years, and began his career in Electrical Engineering. Starting in IT during the dot-com boom, he has held a variety of diverse roles, such as systems architect, network architect, and, for the past several years, security architect. Geoff specializes in infrastructure security.

AWS co-announces release of the Open Cybersecurity Schema Framework (OCSF) project

Post Syndicated from Mark Ryland original https://aws.amazon.com/blogs/security/aws-co-announces-release-of-the-open-cybersecurity-schema-framework-ocsf-project/

In today’s fast-changing security environment, security professionals must continuously monitor, detect, respond to, and mitigate new and existing security issues. To do so, security teams must be able to analyze security-relevant telemetry and log data by using multiple tools, technologies, and vendors. The complex and heterogeneous nature of this task drives up costs and may slow down detection and response times. Our mission is to innovate on behalf of our customers so they can more quickly analyze and protect their environment when the need arises.

With that goal in mind, alongside a number of partner organizations, we’re pleased to announce the release of the Open Cybersecurity Schema Framework (OCSF) project, which includes an open specification for the normalization of security telemetry across a wide range of security products and services, as well as open-source tools that support and accelerate the use of the OCSF schema. As a co-founder of the OCSF effort, we’ve helped create the specifications and tools that are available to all industry vendors, partners, customers, and practitioners. Joining us in this announcement is an array of key security vendors, beginning with Splunk, the co-founder with AWS of the OCSF project, and also including Broadcom, Salesforce, Rapid7, Tanium, Cloudflare, Palo Alto Networks, DTEX, CrowdStrike, IBM Security, JupiterOne, Zscaler, Sumo Logic, IronNet, Securonix, and Trend Micro. Going forward, anyone can participate in the evolution of the specification and tooling at https://github.com/ocsf.

Our customers have told us that interoperability and data normalization between security products is a challenge for them. Security teams have to correlate and unify data across multiple products from different vendors in a range of proprietary formats; that work has a growing cost associated with it. Instead of focusing primarily on detecting and responding to events, security teams spend time normalizing this data as a prerequisite to understanding and response. We believe that use of the OCSF schema will make it easier for security teams to ingest and correlate security log data from different sources, allowing for greater detection accuracy and faster response to security events. We see value in contributing our engineering efforts and also projects, tools, training, and guidelines to help standardize security telemetry across the industry. These efforts benefit our customers and the broader security community.

Although we as an industry can’t directly control the behavior of threat actors, we can improve our collective defenses by making it easier for security teams to do their jobs more efficiently. At AWS, we are excited to see the industry come together to use the OCSF project to make it easier for security professionals to focus on the things that are important to their business: identifying and responding to events, then using that data to proactively improve their security posture.

To learn more about the OCSF project, visit https://github.com/ocsf.

Want more AWS Security news? Follow us on Twitter.

Mark Ryland

Mark Ryland

Mark is the director of the Office of the CISO for AWS. He has over 30 years of experience in the technology industry and has served in leadership roles in cybersecurity, software engineering, distributed systems, technology standardization and public policy. Previously, he served as the Director of Solution Architecture and Professional Services for the AWS World Public Sector team.

Spring 2022 PCI DSS report available with seven services added to compliance scope

Post Syndicated from Michael Oyeniya original https://aws.amazon.com/blogs/security/spring-2022-pci-dss-report-available-with-seven-services-added-to-compliance-scope/

We’re continuing to expand the scope of our assurance programs at Amazon Web Services (AWS) and are pleased to announce that seven new services have been added to the scope of our Payment Card Industry Data Security Standard (PCI DSS) certification. This provides our customers with more options to process and store their payment card data and architect their cardholder data environment (CDE) securely in AWS.

You can see the full list of services on our Services in Scope by Compliance program page. The seven new services are:

We were evaluated by Coalfire, a third-party Qualified Security Assessor (QSA). Customers can access the Attestation of Compliance (AOC) report demonstrating AWS’ PCI compliance status through AWS Artifact.

To learn more about our PCI program and other compliance and security programs, see the AWS Compliance Programs page. As always, we value your feedback and questions; reach out to the AWS Compliance team through the Contact Us page.

 
If you have feedback about this post, submit comments in the Comments section below. If you have questions about this post, contact AWS Support.

Want more AWS Security news? Follow us on Twitter.

Author

Michael Oyeniya

Michael is a Compliance Program Manager at AWS on the Global Audits team, managing the PCI compliance program. He holds a Master’s degree in management and has over 18 years of experience in information technology security risk and control.

Spring 2022 PCI 3DS report now available

Post Syndicated from Michael Oyeniya original https://aws.amazon.com/blogs/security/spring-2022-pci-3ds-report-now-available/

We are excited to announce that Amazon Web Services (AWS) has released the latest 2022 Payment Card Industry 3-D Secure (PCI 3DS) attestation to support our customers in the financial services sector. Although AWS doesn’t perform 3DS functions directly, the AWS PCI 3DS attestation of compliance can help customers to attain their own PCI 3DS compliance for their services running on AWS.

All AWS Regions in scope for PCI DSS were included in the 3DS attestation. AWS was assessed by Coalfire, an independent Qualified Security Assessor (QSA).

AWS compliance reports, including this latest PCI 3DS attestation, are available on demand through AWS Artifact. The 3DS package available in AWS Artifact includes the 3DS Attestation of Compliance (AOC) and Shared Responsibility Guide. To learn more about our PCI program and other compliance and security programs, visit the AWS Compliance Programs page.

We value your feedback and questions. If you have feedback about this post, or want to reach out to our team, submit comments through the Contact Us page.

Want more AWS Security news? Follow us on Twitter.

Author

Michael Oyeniya

Michael is a Compliance Program Manager at AWS on the Global Audits team, managing the PCI compliance program. He holds a Master’s degree in management and has over 18 years of experience in information technology security risk and control.

Welcoming the AWS Customer Incident Response Team

Post Syndicated from Kyle Dickinson original https://aws.amazon.com/blogs/security/welcoming-the-aws-customer-incident-response-team/

Well, hello there! Thanks for reading our inaugural blog post.

Who are we, you ask? We are the AWS Customer Incident Response Team (CIRT). The AWS CIRT is a specialized 24/7 global Amazon Web Services (AWS) team that provides support to customers during active security events on the customer side of the AWS Shared Responsibility Model. The team is made up of AWS Global Services Consultants and Solutions Architects with experience in incident response.

When the AWS CIRT supports you, you will receive assistance with triage and recovery for an active security event on AWS. We will assist in root cause analysis through the use of AWS service logs and provide you with recommendations for recovery. We will also provide security tips and best practices to help you avoid security events in the future.

AWS CIRT is thrilled to talk with you in this new medium! This is AWS after all; getting customer feedback and taking steps to make your experience better is our number one goal. The AWS CIRT has heard from customers that they are challenged with 24/7 security event prevention, detection, analysis, and response to security events. You’ve told us that you are seeking the right AWS skill sets, knowledge, and best practices to address your security response needs in the case of an active security event. AWS CIRT wants to share our knowledge with you so that you can excel in preventing and detecting security events in the cloud.

Figure 1 shows the two different sides of the shared responsibility model, in which AWS is responsible for security OF the cloud, while customers are responsible for security IN the cloud.

Figure 1: The Customer/AWS Shared Responsibility Model

Figure 1: The Customer/AWS Shared Responsibility Model

In addition to this blog post, we’ve been working overtime on our favorite social media platform, AWS Twitch. In December 2021, we developed five episodes to share with you some of the most common causes of security events. We received so much positive customer feedback that we decided to create a bi-weekly series! You can find all episodes of The Safe Room on AWS Twitch.

We mentioned earlier that our number one goal is to help you. We’ve heard from you, and understand that many of you do not have the tools or playbooks necessary to operate your AWS workloads securely. We are pleased to announce that we have developed open-source tools to support your security needs:

Stay tuned to this blog. More tools are coming soon!

We’ve told you who we are and what we do—now, how do you contact us? All AWS Customers can engage the AWS CIRT through an AWS support case. Yes, that is correct. We support all AWS customers! For those customers that do have an account team, you can start an escalation to the AWS CIRT with the account team. However, we will always require that you open an AWS support case.

Thanks again for stopping by and giving us your eyeballs for a few minutes. Please stay tuned to this blog, because this is where we will comment on security trends and interesting stuff we find in the security world, as well as make new open source tools public.

Cloud safe, everyone!

 
If you have feedback about this post, submit comments in the Comments section below. If you have questions about this post, contact AWS Support.

Want more AWS Security news? Follow us on Twitter.

Kyle Dickinson

Kyle Dickinson

Kyle is a TDIR Senior Security Consultant with the AWS Customer Incident Response Team, a team who supports AWS Customers during active security events. Kyle also hosts The Safe Room on the AWS Twitch Channel to share information on being more secure on AWS.

Scale your workforce access management with AWS IAM Identity Center (previously known as AWS SSO)

Post Syndicated from Ron Cully original https://aws.amazon.com/blogs/security/scale-your-workforce-access-management-with-aws-iam-identity-center-previously-known-as-aws-sso/

AWS Single Sign-On (AWS SSO) is now AWS IAM Identity Center. Amazon Web Services (AWS) is changing the name to highlight the service’s foundation in AWS Identity and Access Management (IAM), to better reflect its full set of capabilities, and to reinforce its recommended role as the central place to manage access across AWS accounts and applications. Although the technical capabilities of the service haven’t changed with this announcement, we want to take the opportunity to walk through some of the important features that drive our recommendation to consider IAM Identity Center your front door into AWS.

If you’ve worked with AWS accounts, chances are that you’ve worked with IAM. This is the service that handles authentication and authorization requests for anyone who wants to do anything in AWS. It’s a powerful engine, processing half a billion API calls per second globally, and it has underpinned and secured the growth of AWS customers since 2011. IAM provides authentication on a granular basis—by resource, within each AWS account. Although this gives you unsurpassed ability to tailor permissions, it also requires that you establish permissions on an account-by-account basis for credentials (IAM users) that are also defined on an account-by-account basis.

As AWS customers increasingly adopted a multi-account strategy for their environments, in December 2017 we launched AWS Single Sign-On (AWS SSO)—a service built on top of IAM to simplify access management across AWS accounts. In the years since, customer adoption of multi-account AWS environments continued to increase the need for centralized access control and distributed access management. AWS SSO evolved accordingly, adding integrations with new identity providers, AWS services, and applications; features for the consistent management of permissions at scale; multiple compliance certifications; and availability in most AWS Regions. The variety of use cases supported by AWS SSO, now known as AWS IAM Identity Center, makes it our recommended way to manage AWS access for workforce users.

IAM Identity Center, just like AWS SSO before it, is offered at no extra charge. You can follow along with our walkthrough in your own console by choosing Getting started on the console main page. If you don’t have the service enabled, you will be prompted to choose Enable IAM Identity Center, as shown in Figure 1.

Figure 1: IAM Identity Center Getting Started page

Figure 1: IAM Identity Center Getting Started page

Freedom to choose your identity source

Once you’re in the IAM Identity Center console, you can choose your preferred identity source for use across AWS, as shown in Figure 2. If you already have a workforce directory, you can continue to use it by connecting, or federating, it. You can connect to the major cloud identity providers, including Okta, Ping Identity, Azure AD, JumpCloud, CyberArk, and OneLogin, as well as Microsoft Active Directory Domain Services. If you don’t have or don’t want to use a workforce directory, you have the option to create users in Identity Center. Whichever source you decide to use, you connect or create it in one place for use in multiple accounts and AWS or SAML 2.0 applications.

Figure 2 Choosing and connecting your identity source

Figure 2 Choosing and connecting your identity source

Management of fine-grained permissions at scale

As noted before, IAM Identity Center builds on the per-account capabilities of IAM. The difference is that in IAM Identity Center, you can define and assign access across multiple AWS accounts. For example, permission sets create IAM roles and apply IAM policies in multiple AWS accounts, helping to scale the access of your users securely and consistently.

You can use predefined permission sets based on AWS managed policies, or custom permission sets, where you can still start with AWS managed policies but then tailor them to your needs.

Recently, we added the ability to use IAM customer managed policies (CMPs) and permissions boundary policies as part of Identity Center permission sets, as shown in Figure 3. This helps you improve your security posture by creating larger and finer-grained policies for least privilege access and by tailoring them to reference the resources of the account to which they are applied. By using CMPs, you can maintain the consistency of your policies, because CMP changes apply automatically to the permission sets and roles that use the CMP. You can govern your CMPs and permissions boundaries centrally, and auditors can find, monitor, and review them in one place. If you already have existing CMPs for roles you manage in IAM, you can reuse them without the need to create, review, and approve new inline policies.

Figure 3: Specify permission sets in IAM Identity Center

Figure 3: Specify permission sets in IAM Identity Center

By default, users and permission sets in IAM Identity Center are administered by the management account in an organization in AWS Organizations. This management account has the power and authority to manage member accounts in the organization as well. Because of the power of this account, it is important to exercise least privilege and tightly control access to it. If you are managing a complex organization supporting multiple operations or business units, IAM Identity Center allows you to delegate a member account that can administer user permissions, reducing the need to access the AWS Organizations management account for daily administrative work.

One place for application assignments

If your workforce uses Identity Center enabled applications, such as Amazon Managed Grafana, Amazon SageMaker Studio, or AWS Systems Manager Change Manager, you can assign access to them centrally, through IAM Identity Center, and your users can have a single sign-on experience.

If you do not have a separate cloud identity provider, you have the option to use IAM Identity Center as a single place to manage user assignments to SAML 2.0-based cloud applications, such as top-tier customer relationship management (CRM) applications, document collaboration tools, and productivity suites. Figure 4 shows this option.

Figure 4: Assign users to applications in IAM Identity Center

Figure 4: Assign users to applications in IAM Identity Center

Conclusion

IAM Identity Center (the successor to AWS Single Sign-On) is where you centrally create or connect your workforce users once, and manage their access to multiple AWS accounts and applications. It’s our recommended front door into AWS, because it gives you the freedom to choose your preferred identity source for use across AWS, helps you strengthen your security posture with consistent permissions across AWS accounts and applications, and provides a convenient experience for your users. Its new name highlights the service’s foundation in IAM, while also reflecting its expanded capabilities and recommended role.

Learn more about IAM Identity Center. If you have questions about this post, start a new thread on the IAM Identity Center forum page.

Want more AWS Security news? Follow us on Twitter.

Ron Cully

Ron is a Principal Product Manager at AWS where he leads feature and roadmap planning for workforce identity products at AWS. Ron has over 20 years of industry experience in product and program management of networking and directory related products. He is passionate about delivering secure, reliable solutions that help make it easier for customers to migrate directory aware applications and workloads to the cloud.

Enable post-quantum key exchange in QUIC with the s2n-quic library

Post Syndicated from Panos Kampanakis original https://aws.amazon.com/blogs/security/enable-post-quantum-key-exchange-in-quic-with-the-s2n-quic-library/

At Amazon Web Services (AWS) we prioritize security, performance, and strong encryption in our cloud services. In order to be prepared for quantum computer advancements, we’ve been investigating the use of quantum-safe algorithms for key exchange in the TLS protocol. In this blog post, we’ll first bring you up to speed on what we’ve been doing on the TLS front. Then, we’ll focus on the QUIC transport protocol and show how you can enable and experiment with the newly released post-quantum (PQ) key exchange by using our s2n-quic library. The s2n-quic library is an open-source implementation of the QUIC protocol.

Why use PQ-hybrid key establishment in s2n-quic?

A large-scale quantum computer could break the current public key cryptography that is used to establish keys for secure communication connections. Although a large-scale quantum computer isn’t available today, traffic that is recorded now could be decrypted by one in the future. With such concerns in mind, the recent US Congress Quantum Computing Cybersecurity Preparedness Act and the White House National Security Memorandum set a goal of a timely and equitable transition of cryptographic systems to quantum-resistant cryptography.

At AWS, we are working to prepare for this future. Recently, AWS Key Management Service (AWS KMS), AWS Certificate Manager (ACM) and AWS Secrets Manager TLS endpoints started supporting post-quantum hybrid (PQ-hybrid) key establishment in TLS connections with three of the post-quantum key encapsulation mechanisms (KEMs) in the NIST Post-Quantum Cryptography (PQC) Project. The three post-quantum KEMs are Kyber (NIST’s Round 3 KEM selection), BIKE and SIKE (NIST’s Round 4 KEM candidates). All three of these AWS services’ support of post-quantum KEMs raises the security bar when making API requests to their endpoints over TLS.

PQ-hybrid key establishment in TLS is a feature that introduces post-quantum KEMs used in conjunction with classical Elliptic Curve Diffie-Hellman (ECDH) key exchange. The client and server still do an ECDH key exchange. Additionally, the server encapsulates a post-quantum shared secret to the client’s post-quantum KEM public key, which is advertised in the ClientHello message. This strategy combines the high assurance of a classical key exchange with the security of the proposed post-quantum key exchanges, to ensure that the handshakes are protected as long as the ECDH or the post-quantum shared secret cannot be broken.

After decapsulating the secret, the client and server have an ECDH and a post-quantum shared secret, which they concatenate and use to derive the symmetric keys that are used in the Authenticated Encryption with Additional Data (AEAD) cipher in TLS. These symmetric keys used by the AEAD cipher for data encryption will be secure against a quantum computer, which means that the TLS communication is secure against a quantum computer. The AWS implementation of TLS is s2n-tls, a streamlined open source implementation of TLS. The s2n-tls implementation already supports PQ-hybrid key exchange with ECDH and three NIST PQC Project KEMs (Kyber, BIKE, and SIKE) for TLS 1.2 and 1.3. The use of KEMs for TLS 1.2 is described in the draft-campagna-tls-bike-sike-hybrid IETF draft, and the use of KEMs for TLS 1.3 is described in the draft-ietf-tls-hybrid-design IETF draft.

Note: The Kyber, BIKE, and SIKE implementations follow the algorithm specifications described in NIST PQ Project Round 3, which are expected to be updated as standardization proceeds.

How PQ-hybrid key exchange works in s2n-quic

AWS recently announced s2n-quic, an open-source Rust implementation of the QUIC protocol. QUIC is an encrypted transport protocol that is designed for performance and is the foundation of HTTP/3. For tunnel establishment, QUIC uses TLS 1.3 carried over QUIC transport. To alleviate the harvest-now-decrypt-later concerns for customers that use s2n-quic, in the next section we show you how to enable PQ-hybrid key establishment in s2n-quic. AWS services and software that use s2n-quic will automatically inherit the ability to support quantum-safe key exchanges in the future when post-quantum algorithms are standardized and are officially supported in s2n-quic.

The s2n-quic implementation is written in the Rust programming language. It can use either s2n-tls (the TLS library for AWS) or rustls (the TLS library in Rust) to perform the TLS handshake. If you build s2n-quic with s2n-tls, then s2n-quic inherits the post-quantum support that is offered in s2n-tls. In turn, s2n-tls is built over other crypto libraries such as the AWS libcrypto (AWS-LC) or alternatively OpenSSL crypto library (libcrypto). AWS-LC is a general-purpose cryptographic library that is maintained by AWS, which will incorporate standardized post-quantum algorithms. Therefore, building s2n-tls with AWS-LC will provide s2n-tls with the post-quantum cryptographic algorithms for use in s2n-quic.

Such a model allows for AWS services and software that use s2n-quic to automatically inherit the standardized post-quantum options as they are implemented in s2n-tls and its underlying crypto libraries. There will be no need to tweak s2n-quic to support post-quantum TLS 1.3 handshakes. The whole stack of protocol implementations is architected in an agile manner without duplication of work.

In the following section, we show you how to run an experimental PQ build of s2n-quic that supports PQ-hybrid key exchange.

Test PQ-hybrid key establishment in s2n-quic

The public s2n-quic GitHub repository includes an example that demonstrates how to build the library with PQ-hybrid key exchange support, along with a server and client to test. The PQ-hybrid key exchange feature test requires CMake in Linux or macOS. The experiments below were run in an Amazon Linux 2 instance with rustc, Cargo, Clang, and CMake installed. Connections that you establish with this experimental build of s2n-quic will support PQ-hybrid key exchange.

To test PQ-hybrid key establishment

  1. Clone s2n-quic by using the following commands:

    git clone https://github.com/aws/s2n-quic
    cd s2n-quic

  2. Run the example post-quantum s2n-quic client and server in the post-quantum directory to confirm that they negotiate a PQ-hybrid key by using the following commands:

    cd examples/post-quantum
    cargo run –bin pq_server
    cargo run –bin pq_client

    Note: Although these examples with the PQ-hybrid feature experimental build of s2n-quic are self-contained, if you want to manually change and build s2n-quic and s2n-tls to enable PQ-hybrid key exchange, you have to update the default_tls13 policy in s2n-tls to point to security_policy_pq_tls_1_0_2021_05_26 in tls/s2n_security_policies.c. Then you rebuild s2n-tls and override the location that s2n-quic links to by setting the S2N_TLS_DIR, S2N_TLS_LIB_DIR, and S2N_TLS_INCLUDE_DIR environment variables at build time.

  3. To confirm the PQ-hybrid key establishment, you capture the QUIC negotiation by using the following tcpdump command:

    sudo tcpdump -i lo port 4433 -w test.pcap

  4. Open the capture by using a packet capture visualization application. First you look at the ClientHello message, as shown in the capture in Figure 1 taken from Wireshark.
    Figure 1: pq_client ClientHello in QUIC

    Figure 1: pq_client ClientHello in QUIC

    In the QUIC CRYPTO frame, you can see the TLS 1.3 cipher suites, and that the TLS version is 1.3 while the supported key exchange groups are classical ECDH (with identifiers 0x0017, 0x0018, 0x001d) and 0x2f39, 0x2f3a, 0x2f37…. 0x2f1f. The 0x2f… groups are the agreed upon identifiers (not standardized yet) for PQ-hybrid key exchange. You also see the PQ-hybrid X25519+Kyber512 (with identifier 12089 or 0x2f39) key share that is offered by the client. That key share includes 32 bytes for the Curve25519 ephemeral ECDH client public key, 800 bytes for the ephemeral Kyber512 public key, and 4 bytes for the identifier and the key share length.

    Note: The post-quantum KEMs implementations at the time of this writing follow the NIST Round 3 Kyber, BIKE, and SIKE specifications. We expect these specifications to change as the NIST PQC Project proceeds with standardization. Post-quantum support in s2n-tls and s2n-quic will be experimental until NIST has selected and published standardized algorithms and identifiers. Pushing the change to the main branch now would mean that s2n-quic clients would be sending a PQ-hybrid key share that won’t be used until the servers on the internet start supporting it. The actual algorithms and their identifiers will still be integrated in future releases of s2n-tls and AWS-LC. Therefore, s2n-quic will still be able to negotiate the NIST and IETF standardized options. Meanwhile, we will continue to experiment with post-quantum QUIC and its potential challenges.

  5. Next, take a look at the server-negotiated keys in the ServerHello message, as shown in Figure 2.
    Figure 2: pq_server ServerHello in QUIC

    Figure 2: pq_server ServerHello in QUIC

You can again see the TLS 1.3 cipher suite, the TLS version being 1.3, and the picked PQ-hybrid X25519+Kyber512 key share. The key share includes 4 bytes for the identifier and the key share length, 32 bytes for the Curve25519 ephemeral ECDH server public key, and 768 bytes for the Kyber512 ciphertext that encapsulates a post-quantum shared secret to the client’s ephemeral Kyber512 public key (included in its ClientHello message).

The rest of the handshake completes successfully by deriving symmetric keys from the X25519 and Kyber512 post-quantum shared secrets (as defined in the draft-ietf-tls-hybrid-design IETF draft) and encrypting the rest of the messages with Advanced Encryption Standard with Galois/Counter Mode (AES-GCM) by using these symmetric keys over QUIC.

Benchmark

Now you can benchmark the post-quantum QUIC client and server by using netbench, a transport protocol benchmarking tool that is available in the s2n-quic repository.

To benchmark the post-quantum QUIC client and server

  1. Go in the netbench directory and build it with the correct flags for the experimental post-quantum QUIC examples, by using the following commands:

    cd s2n-quic/netbench
    RUSTFLAGS=”–cfg s2n_quic_unstable –cfg s2n_quic_enable_pq_tls” cargo build –release

  2. Generate the netbench scenario by using the following commands:

    ./target/release/netbench-scenarios –request_response.connections 10000 –request_response.request_size 1 –request_response.response_size 1

    In this example, you’re trying to create 10,000 sequential QUIC connections. The scenario opens a connection, sends a single byte, receives a single byte, closes it, and repeats 10,000 times.

  3. Run the server by using the following command:

    ./target/release/netbench-driver-s2n-quic-server target/netbench/request_response.json

  4. Run the client by using the following command:

    SERVER_0=localhost:4433 ./target/release/netbench-driver-s2n-quic-client target/netbench/request_response.json

    The drivers read the request_response.json to run the scenario. Then the driver is wrapped in a collector that outputs statistics to another JSON file. At the end of all of the 10,000 runs, the cli feature is used to generate the report.

Figure 3 shows the performance results for X25519, X25519+Kyber512, X25519+BIKE-1, and X25519+SIKEp434 key exchange. All connections used an ECDSA P256 server certificate for authentication.

Figure 3: PQ-hybrid key exchange impact on QUIC connection rates

Figure 3: PQ-hybrid key exchange impact on QUIC connection rates

The x-axis is time in seconds. The y-axis is the number of times send is called—which, for 1 byte per connection, practically means that the diagram shows the connection establishment rate (per second). The absolute performance numbers in these benchmarks are not important, because the results could change based on the netbench scenario parameters. The performance difference between PQ-hybrid key exchange algorithms is what this graph is highlighting.

You can see that the classical X25519 achieves higher connection rates, because it is the most efficient option (that offers no post-quantum protection). The performance of Kyber is competitive and achieves 8% fewer connections per second when used with X25519 in a PQ-hybrid key exchange. BIKE-1 is relatively efficient, but adds some extra latency and introduces two frames for the ClientHello, which leads to 37% fewer connections per second. SIKEp434, although it offers much smaller public keys and ciphertexts, is orders of magnitude slower, which means it offers 95% fewer connections per second. These results match previous results we have shared before and other research works, where the most efficient signature algorithms ended up with higher connection rates and lower connection failure probabilities due to overload.

Conclusion

In this post, we showed how you can use s2n-quic in conjunction with s2n-tls to enable QUIC connections to negotiate encryption keys in a quantum-resistant manner. If you’re interested in learning more about s2n-quic, join us at AWS re:Inforce in July for the breakout session entitled NIS304: Using s2n-quic: Bringing QUIC, the secure transport protocol, to AWS.

As always, if you’re interested in using or contributing to s2n-quic, the source code and documentation are publicly available under the terms of the Apache Software License 2.0 from our s2n-quic GitHub repository. If you package or distribute s2n-quic or s2n-tls, or use it as part of a large multi-user service, you might be eligible for pre-notification of security issues. Contact [email protected] for more information. If you discover a potential security issue in s2n-quic or s2n-tls, we ask that you notify AWS Security by using our vulnerability reporting page.

If you have feedback about this post, submit comments in the Comments section below. If you have questions about this post, contact AWS Support.

Want more AWS Security news? Follow us on Twitter.

Panos Kampanakis

Panos Kampanakis

Panos has extensive experience with cyber security, applied cryptography, security automation, and vulnerability management. In his professional career, he has trained and presented on various security topics at technical events for numerous years. He has co-authored cybersecurity publications and participated in various security standards bodies to provide common interoperable protocols and languages for security information sharing, cryptography, and PKI. Currently, he works with engineers and industry standards partners to provide cryptographically secure tools, protocols, and standards.

Cameron Bytheway

Cameron Bytheway

Cameron is a Software Development Engineer at AWS, based in Salt Lake City, Utah. He leads and contributes to the s2n libraries of AWS, and enjoys using testing, fuzzing, simulations, and statical analysis to improve correctness of programs.

Use AWS Chatbot in Slack to remediate security findings from AWS Security Hub

Post Syndicated from Vikas Purohit original https://aws.amazon.com/blogs/security/use-aws-chatbot-in-slack-to-remediate-security-findings-from-aws-security-hub/

You can use AWS Chatbot and its integration with Slack and Amazon Chime to receive and remediate security findings from AWS Security Hub. To learn about how to configure AWS Chatbot to send findings from Security Hub to Slack, see the blog post Enabling AWS Security Hub integration with AWS Chatbot.

In this blog post, you’ll learn how to extend the solution so you can use AWS Chatbot to remediate the findings in your Slack channel. You’ll receive the findings from Security Hub and then run AWS CLI commands from your Slack channel to remediate the reported security findings.

AWS Chatbot works by acting as a subscriber to an Amazon Simple Notification Service (Amazon SNS) topic that can receive notifications from either Amazon CloudWatch or Amazon EventBridge, and have them delivered to the configured Slack channels or Amazon Chime chat rooms. You can apply standard AWS Identity and Access Management (IAM) permissions to the Slack channel or Amazon Chime chatroom, and you can also associate some channel guardrails to provide granular control on what commands can be run from the channel. For example, you may want to allow running commands that would allow getting more details on findings reported from Security Hub, and remediating and archiving those findings, but use channel guardrails to prevent anyone from disabling Security Hub. Another example is that you might want to allow the channel members to query AWS CloudTrail logs in order to get more details on findings, but you use channel guardrails to prevent them from disabling AWS CloudTrail or changing the destination Amazon Simple Storage Services (Amazon S3) bucket.

Overview of ChatOps and ChatSecOps concepts

ChatOps, also known as Chat Operations, refers to using chatbots, tools, and clients to communicate, notify, assign, and launch operational tasks and issues. You can use your existing Slack channels and Amazon Chime chatrooms to receive alerts and notifications about operational issues or tasks, and you can also respond to those incidents or tasks in real time from the same chat room. SecOps is a philosophy of encouraging collaboration between the ITOps and Security teams of an organization. ChatSecOps, also known as Chat Security Operations, uses the ChatOps technology to enable customers to put SecOps in practice.

ChatSecOps facilitates this collaboration by allowing security-related notifications to be delivered to common chat rooms used by SecOps teams, providing visibility on the issues and actions that are taken to investigate and remediate the reported issues. SecOps teams can share threat analysis reports, compliance finding reports, and information on security vulnerabilities in these channels and work closely with DevOps teams to perform further analysis, investigation, and remediation of the issues and findings. This helps to ensure visibility and collaboration across the SecOps and DevOps teams and promotes the philosophy of DevSecOps.

Prerequisites

To get started, you’ll need the following prerequisites:

Set up Slack permissions

You need to grant permissions to the users in Slack channels, which you can do in one of the following ways:

  • Associate a channel IAM role with AWS Chatbot. This method provides similar permissions to all the members of the Slack channel. A channel IAM role is more useful if all your channel members require the same set of permissions. The channel IAM role can also be used to restrict the permissions provided by the user IAM role.
  • Define user roles. User roles require channel members to choose their own roles. This allows different users in your channel to have different sets of permissions. User roles are also useful when you don’t want new channel members to perform actions as soon as they join the channel.

For detailed instructions about setting up AWS Chatbot and defining permissions, see Getting started with AWS Chatbot. For more information about setting boundaries on the permissions that can be allowed by the channel and user IAM roles, see Channel guardrails.

Integrate the Slack channel with AWS Chatbot

After you set up the Slack channel with required permissions, you integrate the ChatOps for AWS app with your channel by using the following steps.

To integrate the Slack channel with AWS Chatbot

  1. Log in to Slack by using either the Slack app or web browser.
  2. In the Slack sidebar, from the Channels section, choose the channel name.
  3. In the right pane, choose the channel name to open the channel configuration window.
  4. Choose the Integrations tab, then choose Add an App.
  5. In the search bar, enter AWS Chatbot. In the search results list, choose the Add button for AWS Chatbot.
  6. On the Integrations tab, under Apps, you should see ChatOps for AWS, as shown in Figure 1.
    Figure 1: Integrate the ChatOps for AWS app with your Slack channel

    Figure 1: Integrate the ChatOps for AWS app with your Slack channel

The step-by-step process for integrating a Slack channel with AWS Chatbot is described in more detail in the blog post Enabling AWS Security Hub integration with AWS Chatbot.

Now you’re ready to start running the commands. Note that you need to add @aws before writing any commands. For more information , see Running AWS CLI commands from Slack channels.

Use case: Amazon S3 Block Public Access enabled at the account level

The Amazon S3 Block Public Access feature provides settings for access points, buckets, and accounts to help you manage public access to Amazon S3 resources. With S3 Block Public Access, account administrators and bucket owners can set up centralized controls to limit public access to your S3 resources. These controls are enforced regardless of how the resources are created.

Amazon GuardDuty tracks and reports S3 Block Public Access feature configurations at the account level, as well as the bucket level. These findings are automatically sent to Security Hub.

For the purpose of this walkthrough, consider the following use case: your organization has compliance requirements to disable public access to all the S3 buckets at the account level. You do not want to allow individual bucket owners to configure this access policy. You get a notification that the S3 Block Public Access feature is disabled at the account level for a specific account. This walkthrough shows how you can run AWS CLI commands from the Slack channel to investigate and remediate this issue.

To remediate finding for Amazon S3 Block Public Access from the Slack channel

  1. You receive a Security Hub notification that Amazon S3 Block Public Access was disabled for an account in your designated Slack channel.
    Figure 2: Notification received from Security Hub in Slack channel

    Figure 2: Notification received from Security Hub in Slack channel

    This notification indicates that S3 Block Public Access was disabled for a specific account.

    Note: Your Slack channel members require permissions to investigate and remediate the findings received in the Slack channel. As described earlier, you can grant permissions using a channel IAM role or a user IAM role. You should follow the principal of least privilege access when granting access and use IAM Access Analyzer to review the permissions that are granted through the channel or user IAM role.

  2. Before you take any action, you need to find the current S3 Block Public Access configuration for the account. To do this, run the following AWS CLI command from the Slack channel, replacing <your_account_id> with the AWS account ID you are investigating.

    @aws s3control get-public-access-block –account-id <your_account_id>

  3. Review the response in the Slack channel.
    Figure 3: AWS CLI command output in Slack channel indicating that S3 Block Public Access is disabled

    Figure 3: AWS CLI command output in Slack channel indicating that S3 Block Public Access is disabled

    You see that the output in Figure 3 shows that all the parameters of PublicAccessBlockConfiguration are set to false, which indicates that the Block Public Access feature is disabled at the account level.

  4. To remediate this issue, run the following AWS CLI command in your Slack channel, replacing <your_account_id> with the AWS account ID you are investigating.

    @aws s3control put-public-access-block –account-id <your_account_id> –public-access-block-configuration {“RestrictPublicBuckets”: true,
    “BlockPublicPolicy”: true,
    “BlockPublicAcls”: true,
    “IgnorePublicAcls”: true

  5. In the response from AWS Chatbot, look for Result was null to verify that the command was run without any errors.
    Figure 4: AWS CLI command run from Slack channel to enable S3 Block Public Access

    Figure 4: AWS CLI command run from Slack channel to enable S3 Block Public Access

  6. To check the current status of the configuration, and to validate whether the issue has been resolved, again run the following AWS CLI command from the Slack channel, replacing <your_account_id> with the AWS account ID you are investigating:

    @aws s3control get-public-access-block –account-id <your_account_id>

  7. In the response, you see that all the parameters of PublicAccessBlockConfiguration are set to false, which indicates that the Block Public Access feature is enabled at the account level.
    Figure 5: AWS CLI command output in Slack channel indicating S3 Block Public Access is enabled

    Figure 5: AWS CLI command output in Slack channel indicating S3 Block Public Access is enabled

Another example use case is that you get a security finding notifying you about unencrypted Amazon Elastic Block Store (Amazon EBS) volumes. You can remediate the finding by running AWS CLI commands to encrypt the volume. In addition to interacting with AWS services by running standard AWS CLI commands in the Slack channel, you can further extend this capability to run operating system (OS)-level commands by using AWS Systems Manager runbooks, using the same mechanism described in this post. For more information, see AWS Systems Manager Runbooks in the AWS Chatbot Administrator Guide.

Conclusion

In this blog post, you learned how to run AWS CLI commands from Slack channels to remediate your security findings. This allows you to receive alerts and notifications from Security Hub and other security services such as Amazon GuardDuty, then investigate and remediate the issues from a single platform. You can integrate AWS Chatbot with your security operation team’s Slack channel or Amazon Chime chatroom, and manage your security operations in a more collaborative, transparent, and automated manner.

If you have any questions about this post, let us know in the Comments section below. For more information about AWS Chatbot, see the AWS Chatbot Administrator Guide.

Want more AWS Security news? Follow us on Twitter.

Vikas Purohit

Vikas Purohit

Vikas works as a Partner Solution Architect with AISPL, India. He is passionate about helping customers and partners in their cloud journeys. He is particularly passionate in Cloud Security, hybrid networking and migrations.

AWS re:Inforce 2022: Network & Infrastructure Security track preview

Post Syndicated from Satinder Khasriya original https://aws.amazon.com/blogs/security/aws-reinforce-2022-network-infrastructure-security-track-preview/

Register now with discount code SALvWQHU2Km to get $150 off your full conference pass to AWS re:Inforce. For a limited time only and while supplies last.

Today we’re going to highlight just some of the network and infrastructure security focused sessions planned for AWS re:Inforce. AWS re:Inforce 2022 will take place in-person in Boston, MA July 26-27. AWS re:Inforce is a learning conference focused on security, compliance, identity, and privacy. When you attend the event, you have access to hundreds of technical and business sessions, demos of the latest technology, an AWS Partner expo hall, a keynote speech from AWS Security leaders, and more. re:Inforce 2022 organizes content across multiple themed tracks: identity and access management; threat detection and incident response; governance, risk, and compliance; networking and infrastructure security; and data protection and privacy. This post describes some of the Breakout sessions, Chalk Talk sessions, Builders’ sessions, and Workshops that are planned for the Network & Infrastructure Security track. For information on the other re:Inforce tracks, see our previous re:Inforce blog posts.

Breakout sessions

These are lecture-style presentations that cover topics at all levels and delivered by AWS experts, builders, customers, and partners. Breakout sessions typically include 10–15 minutes of Q&A at the end.

NIS201: An overview of AWS firewall services and where to use them

In this session, review the firewall services that can be used on AWS, including OS firewalls (Windows and Linux), security group, NACLs, AWS Network Firewall and AWS WAF. This session covers a quick description of each service and where to use it and then offer strategies to help you get the most out of these services.

NIS306: Automating patch management and compliance using AWS

In this session, learn how you can use AWS to automate one of the most common operational challenges that often emerge on the journey to the cloud: patch management and compliance. AWS gives you visibility and control of your infrastructure using AWS Systems Manager. See firsthand how-to setup and configure an automated, multi-account and multi-region patching operation using Amazon CloudWatch Events, AWS Lambda, and AWS Systems Manager.

NIS307: AWS Internet access at scale: Designing a cloud-native internet edge

Today’s on-premises infrastructure typically has a single internet gateway that is sized to handle all corporate traffic. With AWS, infrastructure as code allows you to deploy in different internet access patterns, including distributed DMZs. Automated queries mean you can identify your infrastructure with an API query and ubiquitous instrumentation, allowing precise anomaly detection. In this session, learn about AWS native security tools like Amazon API Gateway, AWS WAF, ELB, Application Load Balancer, and AWS Network Firewall. These options can help you simplify internet service delivery and improve your agility.

NIS308: Deploying AWS Network Firewall at scale: athenahealth’s journey

When the Log4j vulnerability became known in December 2021, athenahealth made the decision to increase their cloud security posture by adding AWS Network Firewall to over 100 accounts and 230 VPCs. Join this session to learn about their initial deployment of a distributed architecture and how they were able to reduce their costs by approximately two-thirds by moving to a centralized model. The session also covers firewall policy creation, optimization, and management at scale. The session is aimed at architects and leaders focused on network and perimeter security that are interested in deploying AWS Network Firewall.

Builders’ sessions

These are small-group sessions led by an AWS expert who guides you as you build the service or product on your own laptop. Use your laptop to experiment and build along with the AWS expert.

NIS251: Building security defenses for edge computing devices

Once devices run applications at the edge and are interacting with various AWS services, establishing a compliant and secure computing environment is necessary. It’s also necessary to monitor for unexpected behaviors, such as a device running malicious code or mining cryptocurrency. This builders’ session walks you through how to build security mechanisms to detect unexpected behaviors and take automated corrective actions for edge devices at scale using AWS IoT Device Defender and AWS IoT Greengrass.

NIS252: Analyze your network using Amazon VPC Network Access Analyzer

In this builders’ session, review how the new Amazon VPC Network Access Analyzer helps you identify network configurations that can lead to unintended network access. Learn ways that you can improve your security posture while still allowing you and your organization to be agile and flexible.

Chalk Talk sessions

These are highly interactive sessions with a small audience. Experts lead you through problems and solutions on a digital whiteboard as the discussion unfolds.

NIS332: Implementing traffic inspection capabilities at scale on AWS

Join this chalk talk to learn about a broad range of security offerings to integrate firewall services into your network, including AWS WAF, AWS Network Firewall, and third-party security products. Learn how to choose network architectures for these firewalling options to help protect inbound traffic to your internet-facing applications. Also learn best practices for applying security controls to various traffic flows, such as internet egress, east-west, and internet ingress.

NIS334: Building Zero Trust from the inside out

What is a protect surface and how can it simplify achieving Zero Trust outcomes on AWS? In this chalk talk, discover how to layer security controls on foundational services, such as Amazon EC2, Amazon EKS, and Amazon S3, to achieve Zero Trust. Starting with these foundational services, learn about AWS services and partner offerings to add security layer by layer. Learn how you can satisfy common Zero Trust use cases on AWS, including user, device, and system authentication and authorization.

Workshops

These are interactive learning sessions where you work in small teams to solve problems using AWS Cloud security services. Come prepared with your laptop and a willingness to learn!

NIS372: Build a DDoS-resilient perimeter and enable automatic protection at scale

In this workshop, learn how to build a DDoS-resilient perimeter and how to use services like AWS Shield, AWS WAF, AWS Firewall Manager, and Amazon CloudFront to architect for DDoS resiliency and maintain robust operational capabilities that allow rapid detection and engagement during high-severity events. Learn how to detect and filter out malicious web requests, reduce attack surface, and protect web-facing workloads at scale with maximum automation and visibility.

NIS373: Open-source security appliances with ELB Gateway Load Balancer

ELB Gateway Load Balancer (GWLB) can help you deploy and scale security appliances on AWS. This workshop focuses on integrating GWLB with an open-source thread detection engine from Suricata. Learn about the mechanics of GWLB, build rules for GeoIP blocking, and write scripts for enhanced malware detection. The architecture relies on AWS Transit Gateway for centralized inspection; automate it using a GitOps CI/CD approach.

NIS375: Segmentation and security inspection for global networks with AWS Cloud WAN

In this workshop, learn how to build and design connectivity for global networks using native AWS services. The workshop includes a discussion of security concepts such as segmentation, centralized network security controls, and creating a balance between self-service and governance at scale. Understand new services like AWS Cloud WAN and AWS Direct Connect SiteLink, as well as how they interact with existing services like AWS Transit Gateway, AWS Network Firewall, and SD-WAN. Use cases covered include federated networking models for large enterprises, using AWS as a WAN, SD-WAN at scale, and building extranets for partner connectivity.

NIS374: Strengthen your web application defenses with AWS WAF

In this workshop, use AWS WAF to build an effective set of controls around your web application and perform monitoring and analysis of traffic that is analyzed by your web ACL. Learn to use AWS WAF to mitigate common attack vectors against web applications such as SQL injection and cross-site scripting. Additionally, learn how to use AWS WAF for advanced protections such as bot mitigation and JSON inspection. Also find out how to use AWS WAF logging, query logs with Amazon Athena, and near-real-time dashboards to analyze requests inspected by AWS WAF.

If any of the above sessions look interesting, consider joining us by registering for AWS re:Inforce 2022. We look forward to seeing you in Boston!

If you have feedback about this post, submit comments in the Comments section below.

Want more AWS Security how-to content, news, and feature announcements? Follow us on Twitter.

Author

Satinder Khasriya

Satinder leads the product marketing strategy and implementation for AWS Network and Application protection services. Prior to AWS, Satinder spent the last decade leading product marketing for various network security solutions across across several technologies, including network firewall, intrusion prevention, and threat intelligence. Satinder lives in Austin, Texas and enjoys spending time with his family and traveling.

Automatically block suspicious DNS activity with Amazon GuardDuty and Route 53 Resolver DNS Firewall

Post Syndicated from Akshay Karanth original https://aws.amazon.com/blogs/security/automatically-block-suspicious-dns-activity-with-amazon-guardduty-and-route-53-resolver-dns-firewall/

In this blog post, we’ll show you how to use Amazon Route 53 Resolver DNS Firewall to automatically respond to suspicious DNS queries that are detected by Amazon GuardDuty within your Amazon Web Services (AWS) environment.

The Security Pillar of the AWS Well-Architected Framework includes incident response, stating that your organization should implement mechanisms to automatically respond to and mitigate the potential impact of security issues. Automating incident response helps you scale your capabilities, rapidly reduce the scope of compromised resources, and reduce repetitive work by security teams.

Use cases for Route 53 Resolver DNS Firewall

Route 53 Resolver DNS Firewall is a managed firewall that you can use to block DNS queries that are made for known malicious domains and to allow queries for trusted domains. It provides more granular control over the DNS querying behavior of resources within your VPCs.

Let’s discuss two use cases for Route 53 Resolver DNS Firewall:

Use of allow lists – If you have stricter security requirements around network security controls and want to deny all outbound DNS queries for domains that don’t match those on your lists of approved domains (known as allow lists), you can create such rules. This is called a walled garden approach to DNS security. These allow lists only include the domains for which resources within your Amazon Virtual Private Cloud (Amazon VPC) are allowed to make DNS queries through Amazon-provided DNS. This helps to ensure that the DNS queries containing the domains that your organization doesn’t trust are blocked.

Use of deny lists – If your organization prefers to allow all outbound DNS lookups within your accounts by default and only requires the ability to block DNS queries for known malicious domains, you can use DNS Firewall to create deny lists, which include all the malicious domain names that your organization is aware of. DNS Firewall also provides AWS Managed Rules, giving you to the ability to configure protections against known DNS threats like command-and-control (C&C) bots. You can also add block lists from open-source third-party threat intelligence sources.

A few important points about the use of allow and deny lists:

  1. Broader use of allow lists is more effective at blocking a greater number of malicious DNS queries than a short deny list. For example, if your workloads only need access to .com domains, then allowing only .com will block many malicious domains that might be specific to certain countries. View a list of country code top-level domains (ccTLDs).
  2. If you use allow lists, you need to make sure that you keep up with the domains that your applications need to communicate with. Likewise, if you use deny lists, you need to keep up with updates to the lists.
  3. Allow lists and deny lists are not mutually exclusive models and can be used together. For example, let’s say that you have an allow list that only allows .com domains (with the intention of blocking several ccTLDs by default). You can also use the built-in AWS Managed Rules deny list to block known malicious .com domains for an additional layer of security.

Solution overview

Refer to the DNS Firewall documentation to familiarize yourself with its constructs and understand how it works. The automation example we provide in this blog post is focused on providing blocks or alerts for DNS queries with suspicious domain names. For example, consider the scenario where an Amazon Elastic Compute Cloud (Amazon EC2) instance queries a domain name that is associated with a known command-and-control server. As shown in Figure 1, when GuardDuty detects communication with the malicious domain, it initiates a series of steps. First, AWS Step Functions orchestrates the remediation response through a defined workflow, then DNS Firewall adds the suspicious domain to deny list or alert list, and finally GuardDuty notifies the security operators of the attempted communication.

Figure 1: High-level solution overview

Figure 1: High-level solution overview

In this solution, the detection of threats by GuardDuty triggers the automated remediation procedure documented in this post. GuardDuty informs you of the status of your AWS environment by producing security findings. Each GuardDuty finding has an assigned severity level and value that reflects the potential risk that the finding could have to your network as determined by our security engineers. The value of the severity can fall anywhere within the 0.1 to 8.9 range, with higher values indicating greater security risk. To help you determine a response to a potential security issue that is highlighted by a finding, GuardDuty breaks down this range into High, Medium, and Low severity levels. We have seen that many of the DNS-based GuardDuty findings fall into the category of High severity, and many times these findings are strongly indicative of potential compromise (for example, pre ransomware activity).

In this blog post, we specifically focus on the following types of GuardDuty findings:

  • Backdoor:EC2/C&CActivity.B!DNS
  • Impact:EC2/MaliciousDomainRequest.Reputation
  • Trojan:EC2/DNSDataExfiltration

We’ve configured DNS Firewall to block only events with High severity by sending only those domains to the deny list. DNS Firewall sends the rest of the domains to an alert list.

This solution uses Step Functions and AWS Lambda so that incident response steps run in the correct order. Step Functions also provides retry and error-handling logic. Lambda functions interact with networking services to block traffic, and with databases to store data about blocked domain lists and AWS Security Hub finding Amazon Resource Names (ARNs).

How it works

Figure 2 shows the automated remediation workflow in detail.
 

Figure 2: Detailed workflow diagram

Figure 2: Detailed workflow diagram

The solution is implemented as follows:

  1. GuardDuty detects communication attempts that include a suspicious domain. GuardDuty generates a finding, in JSON format, that includes details such as the EC2 instance ID involved (if applicable), account information, type of finding, domain, and other details. Following is a sample finding (some fields removed for brevity).
    {
      "schemaVersion": "2.0",
      "accountId": "123456789012",
      "id": " 1234567890abcdef0",
      "type": "Backdoor:EC2/C&CActivity.B!DNS",
      "service": {
        "serviceName": "guardduty",
        "action": {
          "actionType": "DNS_REQUEST",
         "dnsRequestAction": {
    "domain": "guarddutyc2activityb.com",
    "protocol": "UDP",
    "blocked": false
          }
        }
      }
    }
    

  2. Security Hub ingests the finding generated by GuardDuty and consolidates it with findings from other AWS security services. Security Hub also publishes the contents of the finding to the default bus in Amazon EventBridge. Following is a snippet from a sample event published to EventBridge.
    { 
      "id": "12345abc-ca56-771b-cd1b-710550598e37", 
      "detail-type": "Security Hub Findings - Imported", 
      "source": "aws.securityhub", 
      "account": "123456789012", 
      "time": "2021-01-05T01:20:33Z", 
      "region": "us-east-1", 
      "detail": { 
        "findings": [ 
            { "ProductArn": "arn:aws:securityhub:us-east-1::product/aws/guardduty", 
            "Types": ["Software and Configuration Checks/Backdoor:EC2.C&CActivity.B!DNS"], 
            "LastObservedAt": "2021-01-05T01:15:01.549Z", 
            "ProductFields": 
                {"aws/guardduty/service/action/dnsRequestAction/blocked": "false",
                "aws/guardduty/service/action/dnsRequestAction/domain": "guarddutyc2activityb.com"} 
                }
                ]}}
    

  3. EventBridge has a rule with an event pattern that matches GuardDuty events that contain the malicious domain name. When an event matching the pattern is published on the default bus, EventBridge routes that event to the designated target, in this case a Step Functions state machine. Following is a snippet of AWS CloudFormation code that defines the EventBridge rule.
    # EventBridge Event Rule - For Security Hub event published to EventBridge:
      SecurityHubtoFirewallStateMachineEvent:
        Type: "AWS::Events::Rule"
        Properties:
          Description: "Security Hub - GuardDuty findings with DNS Domain"
          EventPattern:
            source:
            - aws.securityhub
            detail:
              findings:
                ProductFields:
                  aws/guardduty/service/action/dnsRequestAction/blocked:
                    - "exists": true
          State: "ENABLED"
          Targets:
            -
              Arn: !GetAtt SecurityHubtoDnsFirewallStateMachine.Arn
              RoleArn: !GetAtt SecurityHubtoFirewallStateMachineEventRole.Arn
              Id: "GuardDutyEvent-StepFunctions-Trigger"
    

  4. The Step Functions state machine ingests the details of the Security Hub finding published in EventBridge and orchestrates the remediation response through a defined workflow. Figure 3 shows the state machine workflow.
     
    Figure 3: AWS Step Functions state machine workflow

    Figure 3: AWS Step Functions state machine workflow

  5. The first two steps in the state machine, getDomainFromDynamo and isDomainInDynamo, invoke the Lambda function CheckDomainInDynamoLambdaFunction that checks whether the flagged domain is already in the Amazon DynamoDB table. If the domain already exists in DynamoDB, then the workflow continues to check whether the domain is also in the domain list and adds it accordingly. If the domain is not in DynamoDB, then the workflow considers it a new addition and adds the domain to both domain lists, as well as the DynamoDB table.
  6. The next three steps in the state machine—getDomainFromDomainList, isDomainInDomainList, and addDomainToDnsFirewallDomainList—invoke a second Lambda function that checks and updates the DNS Firewall domain lists with the domain name. Figure 4 shows an example of the DNS Firewall rules and associated domain list.
     
    Figure 4: Sample rules in a DNS Firewall rule group

    Figure 4: Sample rules in a DNS Firewall rule group

    Figure 5 shows the domain lists.
     

    Figure 5: Domain lists

    Figure 5: Domain lists

    The next step in the state machine, updateDynamoDB, invokes a third Lambda function that updates the DynamoDB table with the domain that was just added to the domain list. Figure 6 shows an example domain entry that gets stored inside the DynamoDB table.
     

    Figure 6: DynamoDB table entry

    Figure 6: DynamoDB table entry

  7. The notifySuccess step of the state machine uses an Amazon Simple Notification Service (Amazon SNS) topic to send out a message that the automatic block or alert happened.
  8. If there was a failure in any of the previous steps, then the state machine runs the notifyFailure step. The state machine publishes a message on the SNS topic that the automated remediation workflow has failed to complete, and that manual intervention might be required.

Solution deployment and testing

To set up this solution, you’ll do the following steps:

  1. Verify prerequisites in your AWS account.
  2. Deploy the CloudFormation template.
  3. Create a test Security Hub event.
  4. Confirm the entry in the DNS Firewall rule group domain list.
  5. Confirm the SNS notification.
  6. Apply the rule group to your VPC by using DNS Firewall.

Step 1: Verify prerequisites in your AWS account

The sample solution we provide in this blog post requires that you activate both GuardDuty and Security Hub in your AWS account. If either of these services is not activated in your account, do the following:

Step 2: Deploy the CloudFormation template

For this next step, make sure that you deploy the template within the AWS account and the AWS Region where you want to monitor GuardDuty findings and block suspicious DNS activity. Depending on your architecture, you can deploy the solution one time centrally in a security account or deploy it repeatedly across multiple accounts.

To deploy the template

  1. Choose the Launch Stack button to launch a CloudFormation stack in your account:
    Select the Launch Stack button to launch the template

    Note: The stack will launch in the N. Virginia (us-east-1) Region. It takes approximately 15 minutes for the CloudFormation stack to complete. To deploy this solution into other AWS Regions, download the solution’s CloudFormation template and deploy it to the selected Region. Network Firewall isn’t currently available in all Regions. For more information about where it’s available, see the list of service endpoints.

  2. In the AWS CloudFormation console, select the Select Template form, and then choose Next.
  3. On the Specify Details page, provide the following input parameters. You can modify the default values to customize the solution for your environment.
    • AdminEmail – The email address to receive notifications. This must be a valid email address. There is no default value.
    • DnsFireWallAlertDomainListName – The name of the domain list for DNS Firewall that consists of domains that will be only alerted and not blocked. The default value is DemoAlertDomainListAutoUpdated.
    • DnsFireWallBlockDomainListName – The name of the domain list for DNS Firewall that consists of domains that will be blocked. The default value is DemoBlockedDomainListAutoUpdated.
    • DnsFirewallBlockAction – You can select NODATA or NXDOMAIN. NODATA implies that there is no response available if a DNS query from the VPC matches a domain in the block domain list. NXDOMAIN implies that the response is an error message, which indicates that a domain doesn’t exist. The default value is NODATA.

    Figure 7 shows an example of the values entered in the Parameters screen.

    Figure 7: Sample CloudFormation stack parameters

    Figure 7: Sample CloudFormation stack parameters

  4. After you’ve entered values for all of the input parameters, choose Next.
  5. On the Options page, keep the defaults, and then choose Next.
  6. On the Review page, in the Capabilities section, select the check box next to I acknowledge that AWS CloudFormation might create IAM resources. Then choose Create. Figure 8 shows what the CloudFormation capabilities acknowledgement prompt looks like.
     
    Figure 8: AWS CloudFormation capabilities acknowledgement

    Figure 8: AWS CloudFormation capabilities acknowledgement

While the stack is being created, check the email inbox that corresponds to the value that you gave for the AdminEmail address parameter. Look for an email message with the subject “AWS Notification – Subscription Confirmation.” Choose the link to confirm the subscription to the SNS topic.

After the Status field for the CloudFormation stack changes to CREATE_COMPLETE, as shown in Figure 9, the solution is implemented and is ready for testing.
 

Figure 9: CloudFormation stack completed deployment

Figure 9: CloudFormation stack completed deployment

Step 3: Create a test Security Hub event

After the CloudFormation stack has completed deployment, you can test the functionality by creating a test event in the same format as would be published by Security Hub.

To create a test run of the solution

  1. In the AWS Management Console, choose Services, choose CloudFormation, and then for Stack, choose the stack name that you provided in Step 2: Deploy the CloudFormation template.
  2. In the Resources tab for the stack, look for the SecurityHubDnsFirewallStateMachine entry. It should appear as shown in Figure 10.
     
    Figure 10: CloudFormation stack resources

    Figure 10: CloudFormation stack resources

  3. Choose the link in the entry. You’ll be redirected to the Step Functions console, with the state machine already open. Choose Start execution.
     
    Figure 11: AWS Step Functions state machine

    Figure 11: AWS Step Functions state machine

  4. To facilitate testing, we’ve provided a test event file. On the Start execution page, in the Input section, paste the C&CActivity.B!DNS finding sample as shown in Figure 12.
     
    Figure 12: Sample input for the Step Functions state machine execution

    Figure 12: Sample input for the Step Functions state machine execution

  5. Note the domain name guarddutyc2activityb.com for the remote host identified in the GuardDuty finding in the test event on line 57 of the sample. The solution should block or alert traffic from that domain name in the following steps.
  6. Choose Start execution to begin the processing of the test event.
  7. You can now track the state machine processing of the test event. The processing should complete within a few seconds. You can select different steps in the visual Graph inspector to view input and output data. Figure 13 shows the input to the addDomainToDnsFirewallDomainList step that launches a Lambda function that interacts with DNS Firewall.
     
    Figure 13: Step Functions state machine step details

    Figure 13: Step Functions state machine step details

Step 4: Confirm the entry in the DNS Firewall rule group

Now that a test event was processed by the state machine, you can check whether the DNS Firewall rule group would block traffic to the domain name identified in the GuardDuty finding.

To validate entries in the DNS Firewall rule group

  1. In the AWS Management Console, choose Services, and then choose VPC. In the DNS Firewall section in the left navigation bar, choose DNS Firewall rule groups.
  2. Choose the demoDnsFirewallRuleGroup rule group created by the solution, and you’ll be able to see the rules as shown in Figure 14.
     
    Figure 14: Select the DNS Firewall rule

    Figure 14: Select the DNS Firewall rule

  3. Choose the domain list associated with the BLOCK rule. Confirm that the rules blocking the traffic from the source and to the domain that you specified in the test event were created. The domain list should look similar to what is shown in Figure 15.
     
    Figure 15: Verify that the domain was added to the blocked domain list

    Figure 15: Verify that the domain was added to the blocked domain list

Step 5: Confirm the SNS notification

In this step, you’ll view the SNS notification that was sent to the email address you set up.

To confirm the SNS notification

  • Review the email inbox for the value that you provided for the AdminEmail parameter and look for a message with the subject line “AWS Notification Message.” The contents of the message from SNS should be similar to the following.
    {"Blocked":"true","Input":{"ResponseMetadata":{"RequestId":"HOLOAAENUS3MN9B0DS6CO8BF4BVV4KQNSO5AEMVJF66Q9ASUAAJG","HTTPStatusCode":200,"HTTPHeaders":{"server":"Server","date":"Wed, 17 Nov 2021 08:20:38 GMT","content-type":"application/x-amz-json-1.0","content-length":"2","connection":"keep-alive","x-amzn-requestid":"HOLOAAENUS3MN9B0DS6CO8BF4BVV4KQNSO5AEMVJF66Q9ASUAAJG","x-amz-crc32":"2745614147"},"RetryAttempts":0}}}
    

Step 6: Apply the rule group to your VPC by using DNS Firewall

As part of the CloudFormation template deployment, two test VPCs have been created for you, to demonstrate that you can assign a single DNS Firewall rule group to multiple VPCs. You can also associate this rule group to your existing VPC of interest. To learn how to do this task, see Managing associations between your VPC and Route 53 Resolver DNS Firewall rule group. For visibility into DNS queries and for debugging purposes, the template creates log groups that accumulate DNS Resolver query logs.

After you’ve successfully tested the given sample that emulates C&CActivity.B!DNS, you can repeat steps 3 to 6 for the MaliciousDomainRequest.Reputation finding sample and the DNSDataExfiltration finding sample.

These samples are supplied for your convenience, and you will see the blocking action in a matter of minutes. Alternatively, you can use other ways to test, which might need about an hour for blocking action to happen. To initiate DNS C&C activity, you can make a DNS request from your instance (using dig for Linux or nslookup for Windows) against the test domain guarddutyc2activityb.com. Alternatively, you can use GuardDuty Tester, which generates DNS C&C activity and DNS exfiltration unauthorized events.

To take this solution one step further, you can implement automatic aging out of the domains that get added to the domain list. One way to do this is to use the Time to Live feature in DynamoDB and keep repopulating the domain list from DynamoDB at regular intervals of time. The benefit of this is that if the malicious nature of a domain in the domain list changes over time, the list will be kept up to date during this age out and repopulation process.

Considerations

There are a few considerations that you should keep in mind regarding DNS Firewall:

  • DNS Firewall and AWS Network Firewall work together for improved domain-filtering capability across HTTP(S) traffic. A domain list that you configure in Network Firewall should reflect the domain list configured in DNS Firewall.
  • DNS Firewall filters based on the domain name. It doesn’t translate that domain name to an IP address to be blocked.
  • It’s a best practice to block outbound traffic to port 53 with network access control lists (network ACLs) or Network Firewall so that GuardDuty can monitor DNS queries.
  • DNS Firewall filters DNS queries to the Amazon Route 53 Resolver (also known as AmazonProvidedDNS or VPC .2 Resolver) in the VPC. So for traffic leaving the VPC, we recommend that you use DNS Firewall along with Network Firewall, which you can use to secure traffic that isn’t headed to Amazon Route 53 Resolver. Network Firewall can also block domain names that exist in network traffic leaving the Amazon VPC, such as in HTTP HOST headers, TLS Server Name Indication (SNI) fields, and so on.
  • You can use Network Firewall to block external encrypted DNS services so that these services can’t be used to circumvent your DNS Firewall policies.

Conclusion

In this blog post, you learned how to automatically block malicious domains by using Route 53 Resolver DNS Firewall and GuardDuty. You can use this sample solution to automatically block communication to suspicious hosts discovered by GuardDuty, and you can apply those blocks across all configured DNS Firewall firewalls within your account.

All of the code for this solution is available on GitHub. Feel free to play around with the code; we hope it helps you learn more about automated security remediation. You can adjust the code to better fit your unique environment or extend the code with additional steps.

If you have comments about this blog post, submit them in the Comments section below. If you have questions about using this solution, start a thread in the Route 53 Resolver forum or GuardDuty forums, or contact AWS Support.

Want more AWS Security how-to content, news, and feature announcements? Follow us on Twitter.

Author

Akshay Karanth

Akshay is a senior solutions architect at AWS. He helps digital native businesses learn, build, and grow in the AWS Cloud. Before AWS, he worked at companies such as Juniper Networks and Microsoft in various customer facing roles across networking and security domains. When not at work, Akshay enjoys hiking up a hard trail or cooking a fulfilling meal with his family.

Author

Rohit Aswani

Rohit is a specialist solutions architect focussed on Networking at AWS, where he helps customers build and design scalable, highly-available, secure, resilient, and cost-effective networks. He holds an MS in telecommunication systems management from Northeastern University, specializing in computer networking.

Contributor

Special thanks to Fabrice Dall’ara who made significant contributions to this post.

A pathway to the cloud: Analysis of the Reserve Bank of New Zealand’s Guidance on Cyber Resilience

Post Syndicated from Julian Busic original https://aws.amazon.com/blogs/security/a-pathway-to-the-cloud-analysis-of-the-reserve-bank-of-new-zealands-guidance-on-cyber-resilience/

The Reserve Bank of New Zealand’s (RBNZ’s) Guidance on Cyber Resilience (referred to as “Guidance” in this post) acknowledges the benefits of RBNZ-regulated financial services companies in New Zealand (NZ) moving to the cloud, as long as this transition is managed prudently—in other words, as long as entities understand the risks involved and manage them appropriately. In this blog post, I analyze the RBNZ’s thinking as it developed the Guidance, and how the Guidance creates opportunities for NZ financial services customers to accelerate migration of workloads—including critical systems—to the Amazon Web Services (AWS) Cloud.

On page 14 of its Guidance, the RBNZ writes that “[i]f used prudently, third-party services may reduce an entity’s cyber risk, especially for those entities that lack cyber expertise.” This open regulatory stance towards the cloud enables our NZ financial services customers to consider a cloud first strategy for both new and existing systems, including critical workloads. Customers must, however, manage the transition to the cloud prudently, working closely with both their cloud service provider and their regulators.

This blog post is aimed at boards, management, and technology decision-makers, for whom understanding regulatory thinking is a useful input when developing an enterprise cloud strategy.

Operational technology staff and risk practitioners seeking detailed guidance on how AWS helps you align with the RBNZ’s Guidance can download our New Zealand Financial Services whitepaper from our public website and the AWS Reserve Bank of New Zealand Guidance on Cyber Resilience (RBNZ-GCR) Workbook from AWS Artifact, a self-service portal for you to access AWS compliance reports.

Overview and applicability

The RBNZ’s Guidance sets out the RBNZ’s expectations for management of cyber resilience. It’s aimed at all registered banks, licensed non-bank deposit takers, licensed insurers, and designated financial market infrastructures that are regulated by the RBNZ. The Guidance makes a series of non-binding recommendations across four domains—Governance, Capability Building, Information Sharing, and Third-Party Management.

Each section of the Guidance has a short preamble, summarizing the RBNZ’s expectations for effective risk management in each domain and providing insights into why the RBNZ is making specific recommendations.

The Guidance can be tailored to an entity’s individual needs, technology choices, and risk appetite. Boards, management, and technology decision-makers should familiarize themselves with the RBNZ’s Guidance, ascertain how closely their own organization aligns to it, and work to remediate any identified gaps.

Why non-binding guidance and not an enforceable standard?

The RBNZ gives several reasons (see RBNZ Summary of submissions, paragraphs 9-16) for choosing to publish non-binding recommendations rather than legally binding requirements. The RBNZ declares an intent to monitor adoption of its recommendations by industry, and indicates that future policy settings might include developing legally binding standards for cyber resilience. In this respect, the RBNZ’s approach is similar to that of the Australian Prudential Regulation Authority (APRA), which first issued non-binding guidance on management of IT security risk in 2013, before moving to a legally binding standard in 2019.

The RBNZ gives the following reasons for choosing guidance over a standard:

  • The RBNZ’s policy stance of being moderately active in respect to cyber resilience
  • A previous light-touch approach regarding cyber resilience
  • Providing sufficient time for industry to adjust to new policy settings, given the wide range of maturity within financial services organizations in New Zealand
  • The gap between New Zealand’s and other jurisdictions’ cyber readiness
  • The RBNZ’s current ability to effectively monitor and ensure compliance

The RBNZ indicates that it will “work together with the industry to operationalise the finalised Guidance” (RBNZ Summary of submissions, paragraph 10) and that it is “looking to strengthen [its] cyber resilience expertise in [its] financial stability function” although this will “take time to achieve” (RBNZ Summary of submissions, paragraph 9).

RBNZ-regulated entities should already be self-assessing against the Guidance and working to address gaps as a matter of priority. This is not just because the Guidance could become a legally binding standard in the next 3–5 years, but because the RBNZ has created a practical and flexible framework for the management of cyber risk, which will greatly enhance the NZ financial sector’s resilience to cyber incidents. Non–RBNZ-regulated entities looking for a benchmark to measure themselves against can also use the RBNZ’s Guidance to assess and improve the effectiveness of their own control environments.

Comparing rules-based frameworks and principles-based frameworks

There are two main ways that regulators communicate their risk management expectations to their regulated entities. These are a rules-based approach (sometimes called a compliance-based approach) and a principles-based approach. The RBNZ’s Guidance takes a principles-based approach towards the management of cyber risk.

With a rules-based approach, the regulator takes responsibility for identifying risks and lays out explicit and granular controls that regulated entities are required to implement. A rules-based approach is highly prescriptive, meaning that regulated entities can adopt a checklist approach in meeting their regulators’ requirements. This approach, although it gives certainty to regulated entities regarding the controls they are expected to adopt, can have disadvantages for regulators:

  • Creating and maintaining detailed technical rules can be challenging, given the pace at which technology and the threat environment evolve.
  • Regulators have a diverse population of regulated entities, so a rules-based approach can be inflexible or have blind spots.
  • A rules-based approach doesn’t encourage entities to actively identify and manage their own unique set of risks.

By contrast, a principles-based approach describes a set of desired regulatory or risk-management outcomes, but it isn’t prescriptive in how regulated entities achieve these goals. Regulators act in a vendor- and technology-neutral manner, and regulated entities are expected to interpret regulatory requirements or guidance in the context of their individual business models, technology choices, threat environments, and risk appetites.

Under a principles-based approach, an entity must be able to demonstrate to its regulators’ satisfaction that it both understands the current and emerging risks it faces, and that it is managing these risks appropriately. For example, the principle that entities “[…] should develop and maintain a programme for continuing cyber resilience training for staff at all levels” (Guidance, section A3.3 page 6) gives clear direction, but leaves it up to the entity to decide on the approach to take, and how the entity will demonstrate to the RBNZ that this principle is being met.

A principles-based approach avoids the issues with the rules-based approach that I outlined previously—this approach is significantly longer-lived than a rules-based approach, it moves responsibility for effective risk identification and management from the regulator to the entity (which better understands its own risk profile and appetite), and the framework can be applied to a regulated entity population that varies in size, nature, and complexity.

Freedom to innovate under a principles-based approach

The RBNZ says that its Guidance should be employed in a manner “[…] proportionate to the size, structure and operational environment of an entity, as well as the nature, scope, complexity and risk profile of its products and services” (Guidance, page 2).

You can therefore meet the RBNZ’s Guidance in many different ways, as long as you can demonstrate to the RBNZ that your organization understands the risks it is facing and is managing them appropriately. A principles-based approach creates opportunities for innovation, because there are many different ways to meet a set of regulatory principles.

If you are an NZ financial services customer who also operates in Australia, you might note that the RBNZ’s approach aligns to that of the principal financial services regulator in Australia—the Australian Prudential Regulation Authority (APRA). APRA also takes a principles-based approach to its prudential framework, “avoiding excessive prescription where possible to allow for the diversity of practice according to the size, business activity, and sophistication of the institutions being supervised” (APRA’s objectives, Chapter 1).

A cautious green light to the cloud for New Zealand financial services

“If used prudently, third-party services may reduce an entity’s cyber risk, especially for those entities that lack cyber expertise” (Guidance, page 14).

In my view, this statement represents a (cautious) green light for financial services customers in NZ who wish to migrate systems to the AWS Cloud, although as the RBNZ makes clear, you “should be fully aware of the cyber risk associated with third parties and act appropriately to mitigate that risk” (Guidance, page 14). The RBNZ also requests that for critical functions, entities “[…] should inform the Reserve Bank about their outsourcing of critical functions to cloud service providers early in their decision-making process” (Guidance, Section D8.1, page 17).

The RBNZ defines a critical function as “[a]ny activity, function, process, or service, the loss of which (for even a short period of time) would materially affect the continued operation of an entity, the market it serves and the broader financial system, and/or materially affect the data integrity, reputation of an entity and confidence in the financial system” (Guidance, page 19).

Although the RBNZ doesn’t elaborate further on why it requests early notification about outsourcing of critical functions to the cloud, it’s likely that early engagement is requested so that the RBNZ has the opportunity to provide early feedback on any areas of potential concern, before the initiative is significantly progressed and a large amount of resources are committed.

Migration of higher-risk workloads to the cloud will naturally attract higher levels of regulatory scrutiny, but this doesn’t change the RBNZ’s open regulatory stance on cloud security. This stance is further emphasized by the RBNZ’s comment that “If managed prudently, migrating to the cloud presents a number of benefits including geographically dispersed infrastructures, agility to scale more quickly, improved automation, sufficient redundancy, and reduced initial investment costs for individual financial institutions” (Guidance, page 15).

Building innovative, secure, and highly resilient solutions on AWS, and using the high levels of visibility that you have into your environments that are running on AWS, can help you demonstrate to your regulators how you are identifying and managing your cyber resilience risks in line with the RBNZ’s Guidance.

A note on regulatory myths

In conversations with customers, I occasionally encounter “regulatory myths,” such as “certain types of workloads are prohibited in the cloud,” or “my regulator won’t allow me to use multi-region architectures.”

To date, the RBNZ has not made specific recommendations or set specific requirements regarding technology solutions. This includes, but is not limited to, choice of vendors or technology platforms, prescription of particular architectures, or the types of workload that may or may not be migrated to the cloud. Remember, the RBNZ’s Guidance is a principles-based framework, and is vendor-, technology-, and solution-neutral.

We have many examples of financial services companies all over the world successfully running critical workloads in the AWS Cloud, but regulatory myths and misunderstandings can inhibit our customers’ ability to “think big” when developing their cloud strategies. If you believe that you must implement specific technical patterns to meet regulatory expectations, we encourage you to contact the RBNZ to discuss any aspects of the Guidance that require clarification. We also encourage you to contact your AWS account team, who can arrange support from internal AWS risk and regulatory specialists, particularly if critical systems are proposed for migration to AWS.

Conclusion

The RBNZ’s Guidance on Cyber Resilience is an important first step for financial services regulation of cybersecurity in NZ. The Guidance can be considered cloud friendly because it acknowledges that prudent use of third parties (such as AWS) can reduce cyber risk, especially for entities that lack cyber expertise, and outlines several benefits of the cloud over traditional on-premises infrastructure, including resilience and redundancy, ability to scale, and reduced initial investment costs.

The principles-based nature of the RBNZ’s Guidance creates opportunities for you to develop innovative solutions in the AWS Cloud, because there are many different ways to meet the principles contained in the RBNZ’s Guidance. The key consideration is that you demonstrate to your regulators that you both understand the cyber risks you face in moving to the AWS Cloud, and manage them appropriately.

The launch of the AWS Asia Pacific (Auckland) Region in 2024, our wide range of products and services, and the visibility that you have into the AWS control environment (through AWS Artifact) and your own environment (through services like Amazon GuardDuty and AWS Security Hub) can all help you demonstrate to the RBNZ that you are managing cyber risk in accordance with the RBNZ’s expectations.

Next steps

Boards, executives, and technology decision-makers should familiarize themselves with the RBNZ’s Guidance, and if they aren’t already doing so, conduct a self-assessment and initiate a body of work to address identified gaps.

In view of the RBNZ’s cautious green light for prudent migration to the cloud—including for critical systems—NZ financial services customers should review their existing cloud strategies and identify areas where they can both broaden and accelerate their cloud journeys. The AWS Cloud Adoption Framework (AWS CAF) offers guidance and best practices to help organizations develop an efficient and effective plan for their cloud adoption journey. The AWS C-suite Guide to Shared Responsibility for Cloud Security and Data Safe Cloud eBook inform boards and senior management about both the benefits and risks of operating in the cloud.

Operational technology staff and risk practitioners can download our New Zealand Financial Service whitepaper from our public website and the AWS Reserve Bank of New Zealand Guidance on Cyber Resilience (RBNZ-GCR) Workbook from AWS Artifact. The RBNZ-GCR is particularly useful for operational IT staff and risk practitioners because it provides prescriptive guidance on which controls to implement on your side of the shared responsibility model and which AWS controls you inherit from the service.

Finally, contact your AWS representative to discuss how the AWS Partner Network, AWS solution architects, AWS Professional Services teams, and AWS Training and Certification can assist with your cloud adoption journey. If you don’t have an AWS representative, contact us at https://aws.amazon.com/contact-us.

 
If you have feedback about this post, submit comments in the Comments section below. If you have questions about this post, contact AWS Support.

Want more AWS Security news? Follow us on Twitter.

Author

Julian Busic

Julian is a Security Solutions Architect with a focus on regulatory engagement. He works with our customers, their regulators, and AWS teams to help customers raise the bar on secure cloud adoption and usage. Julian has over 15 years of experience working in risk and technology across the financial services industry in Australia and New Zealand.

Use Security Hub custom actions to remediate S3 resources based on Macie discovery results

Post Syndicated from Jonathan Nguyen original https://aws.amazon.com/blogs/security/use-security-hub-custom-actions-to-remediate-s3-resources-based-on-macie-discovery-results/

The amount of data available to be collected, stored and processed within an organization’s AWS environment can grow rapidly and exponentially. This increases the operational complexity and the need to identify and protect sensitive data. If your security teams need to review and remediate security risks manually, it would either take a large team or the actions might not be timely. There is also a chance that with manual operation, a step could be missed or the incorrect action could be taken. As a result, your security teams will need an automated and scalable way to support these operations efficiently.

Amazon Macie is a fully managed data security and data privacy service that uses machine learning and pattern matching to discover and protect your sensitive data in AWS. Macie generates findings for sensitive data in an S3 object or a potential issue with the security or privacy of an S3 bucket. AWS Security Hub allows you to gain a centralized view into the security posture across your AWS environment by aggregating security findings from various AWS services and partner products, including Amazon Macie. Security Hub also includes the custom actions feature, which you can use to create actions for response and remediation to selected findings within the Security Hub console in an efficient and consistent manner.

It is important for your security teams to create effective and standardized mechanisms for taking action against Macie findings to ensure that data remains secure. By using Security Hub custom actions, you can have predefined actions for the security team to take against Macie findings without having to manually find and remediate the resources.

This blog post provides you with an example solution for responding to Macie sensitive data findings and policy findings in Security Hub by using custom actions. I will walk through the components of the solution, as well as opportunities where resources can be customized for your specific use case.

Prerequisites

You must have AWS Security Hub and Amazon Macie enabled in the AWS account where you are deploying this solution.

Solution overview

In this solution, you’ll use a combination of Security Hub custom actions, Amazon EventBridge, and AWS Lambda to take action on Macie findings in Security Hub. You will be working with the findings within the same AWS account where you deployed the solution.

Macie generates two categories of findings relating to different resources, which will require different remediation actions.

  1. Policy finding is a detailed report of a potential policy violation or issue with the security or privacy of an Amazon Simple Storage Service (Amazon S3) bucket.
  2. Sensitive data finding is a detailed report of sensitive data in an S3 object.

A full list of Macie finding types can be found in the Macie User guide.

For the two Macie finding categories, there is an associated Security Hub custom action:

  1. Custom action for sensitive data finding (S3 object) – When the security team selects this custom action, the action invokes a Lambda function that will take the following steps on the S3 object in the Macie finding:
    1. Tag the object with the Security Hub finding ID
    2. Encrypt the S3 object with a different customer-managed KMS key
    3. Update the Security Hub finding workflow status to RESOLVED
  2. Custom action for policy finding (S3 bucket). When you select this this custom action, it invokes a Lambda function that will take the following steps on the S3 bucket in the Macie finding:
    1. Tag the object with the Security Hub finding ID
    2. Update the S3 bucket configuration to:
      • Enable default encryption
      • Enable public access block
    3. Update the Security Hub finding workflow status to RESOLVED

The solution is configured to take action within the AWS account where the finding and corresponding resource is generated. In order to enable cross-account remediation, you will need to deploy an additional IAM role for the automation to assume and provision a KMS key to use for encryption.

Note: The custom actions in this solution are meant to be examples of actions to take against Macie policy and sensitive data findings. These actions will be different depending on your use-case and environment. You will also need to review and update the associated Lambda function execution role IAM policies accordingly.

Solution architecture

Figure 1: Resources deployed in the Security AWS account taking action on resources identified in the Workload AWS account

Figure 1: Resources deployed in the Security AWS account taking action on resources identified in the Workload AWS account

Figure 1 shows the architecture for the solution. The workflow is as follows:

  1. A Macie job runs and creates findings, which are sent to Security Hub in the same AWS account as the Macie finding.
  2. The delegated administrator Security Hub account combines findings across all member Security Hub accounts, including Macie findings.
  3. The security team reviews the Macie findings in the Security Hub delegated administrator account and determines to take remediation actions for a finding by selecting the finding and then selecting the appropriate Security Hub custom action.
  4. The Security Hub custom action sends the finding to the EventBridge rule, which is linked to the Lambda function.
  5. The EventBridge rule invokes the Lambda function to take action against the resources from the Macie finding.
  6. The Lambda function will:
    1. Take action for the S3 resource
    2. Mark the Macie finding as resolved in the delegated administrator Security Hub account

The solution is currently intended to work in a single Region. In order to enable this solution across Regions, you will need to change the Remediation Lambda function code for any regional resources used for remediation actions (i.e. AWS Key Management Service).

Deploy the solution

You can deploy the solution through either the AWS Management Console or the AWS Cloud Development Kit (AWS CDK).

To deploy the solution by using the AWS Management Console

  • In your security tooling account, launch the AWS CloudFormation template by choosing the following Launch Stack button. It will take approximately 10 minutes for the CloudFormation stack to complete.
    Select this image to open a link that starts building the CloudFormation stack

    Note: The stack will launch in the N. Virginia (us-east-1) Region. To deploy this solution into other AWS Regions, download the solution’s CloudFormation template, modify it, and deploy it to the selected Region.

  • (OPTIONAL) If you want to enable cross-account remediation, launch the following AWS CloudFormation template in the AWS account where you want to be able to take remediation actions. You can also use AWS CloudFormation StackSets if deploying to multiple AWS accounts.
    Select this image to open a link that starts building the CloudFormation stack

To deploy the solution by using AWS CDK

You can find the latest code in our GitHub repository, where you can also contribute to the sample code. The following commands show how to deploy the solution by using the AWS CDK. First, the CDK initializes your environment and uploads the AWS Lambda assets to Amazon S3. Then, you can deploy the solution to your account. Make sure to replace <AWS_ACCOUNT> with the account number, and replace <REGION> with the AWS Region that you want the solution deployed to.

  1. Run the following commands in your terminal while authenticated in the security tooling AWS account:

    cdk bootstrap aws://<Security_Tooling_AWS_ACCOUNT>/<REGION>

    cdk deploy MacieRemediationStack

  2. (OPTIONAL) If you want to enable cross-account remediation, Run the following commands in your terminal while authenticated to member AWS account:

    cdk bootstrap aws://<Member_AWS_ACCOUNT>/<REGION>

    cdk deploy MacieRemediationIAMStack –parameters solutionaccount=<Security_Tooling_AWS_ACCOUNT>

Solution walkthrough and validation

Now that you’ve successfully deployed the solution, you can see things in action. You have two options for testing the workflow on your own:

  1. Use a sample event, generated by a Macie finding in Security Hub, and invoke the Lambda function that is tied to the Security Hub custom action.

    Note: If using sample events, you can replace the values for the resources with real resources. Otherwise, you will not be able to see the Lambda function successfully take action because the resource in your sample event may not exist.

  2. Generate demo Macie findings in Security Hub by using this sample data for Amazon Macie.

I have existing findings for Macie generated in my AWS account, and in the procedures in this section, I’ll walk through taking action against these.

Note: If you set up Macie and Security Hub in a delegated administrator and member model that ingests findings from other AWS accounts, the IAM remediation roles for the S3 bucket and S3 objects must be deployed in the member accounts.

Review deployed resources in the AWS console

Before taking action on your sample findings, review the deployed resources that you’ll use.

To review deployed resources

  1. In the AWS account console where the automation was deployed, go to Security Hub, choose Settings, and then choose Custom actions. You should see two custom actions:
    • Macie Policy Finding
      • arn:aws:securityhub:<region>:<account-id>:action/custom/MacieS3BucketPolicy
    • Macie Data Finding
      • arn:aws:securityhub:<region>:<account-id>:action/custom/MacieSensitiveData
        Figure 2: Custom actions in Security Hub

        Figure 2: Custom actions in Security Hub

  2. Navigate to the EventBridge console and then choose Rules. You should see four rules:
    • Disabled – These are disabled by default during deployment
      • Autoremediate_Macie_Policy_Finding
      • Autoremediate_Macie_Sensitive_Data_Finding
        Figure 3: Disabled EventBridge rules for autoremediation of Macie findings in Security Hub

        Figure 3: Disabled EventBridge rules for autoremediation of Macie findings in Security Hub

    • Enabled – These are enabled by default during deployment:
      • Custom_Action_Macie_Policy_Finding
      • Custom_Action_Macie_Sensitive_Data_Finding
        Figure 4: Enabled EventBridge rules tied to the Security Hub custom actions

        Figure 4: Enabled EventBridge rules tied to the Security Hub custom actions

    In the enabled EventBridge rules, you should see the corresponding Security Hub custom action Amazon Resource Names (ARNs) in the rule event pattern.

    Figure 5: Enabled EventBridge rule event pattern for the Security Hub custom action

    Figure 5: Enabled EventBridge rule event pattern for the Security Hub custom action

Take action on an Amazon Macie object or policy finding

Each Security Hub custom action invokes a corresponding Lambda function that is configured as a target in the EventBridge rule. The Lambda function parses the information in the Macie finding from Security Hub to take action.

Each Security Hub custom action is specific to either an S3 object or an S3 bucket. If you attempt a custom action meant for an S3 object against a Macie policy finding, this will successfully initiate the custom action, but the Lambda function that is invoked will be unsuccessful.

If the Macie finding is specific to an S3 object, the title will display “The S3 object …,” whereas if the Macie finding is for a policy finding, the title will display information for an S3 bucket.

To take action on findings

  1. In the AWS account console where the automation was deployed, navigate to AWS Security Hub, and then choose Findings.
  2. Filter the findings by setting Product Name to Macie.
    Figure 6: Filter for Macie findings in Security Hub

    Figure 6: Filter for Macie findings in Security Hub

  3. Select the checkbox for either a Macie policy finding or a sensitive data finding; this will select a custom action. After you select the action, there is no confirmation step, and the action will invoke the Lambda function.
    Figure 7: Validate Custom Action has sent the finding to Amazon CloudWatch Events (EventBridge rule)

    Figure 7: Validate Custom Action has sent the finding to Amazon CloudWatch Events (EventBridge rule)

Review and validate the Security Hub custom action on target resources

In order to validate or troubleshoot the solution, you need to review whether the Lambda function was able to take action against the resources in the Security Hub finding for Macie.

To validate or troubleshoot the custom action

  1. For validation of sensitive data finding remediation, review S3 object configuration:
    1. Navigate to the Amazon S3 console.
    2. Choose the S3 object in the Macie finding.
    3. Choose the Properties tab and review the following fields:
      • Tags should be set to SH_Finding_ID.
      • AWS KMS key ARN should be set to the KMS key with the alias `macie_key`
        1. Click on the KMS key ARN and validate the key’s alias is the key deployed in the solution
  2. For validation of policy finding remediation, review the S3 bucket configuration:
    1. Navigate to the Amazon S3 console.
    2. Choose the S3 bucket in the Macie finding.
    3. Choose the Properties tab and review the following fields:
      • Tags should be set to SH_Finding_ID.
      • Default Encryption should be set to Enabled.
    4. Choose the Permissions tab and review the following fields:
      • Block public access should be set to On.
  3. For troubleshooting, you can review the CloudWatch logs for the Lambda function:
    1. Navigate to the CloudWatch console.
    2. Choose /aws/lambda/Remediate_Macie_S3_Bucket.
    3. Choose the most recent log stream and review the logs to see what actions were taken on the resources.

Next steps and customization

The solution in this post has a custom action for an S3 object and an S3 bucket, and is meant to serve as a template. You could modify the Lambda functions associated with the custom actions to take different or additional actions that are specific to your environment and data classification.

Additionally, I walked through specific Security Hub custom actions for Macie policy (bucket) or sensitive data (objects) findings. If you have defined actions to take for both, you could consolidate the custom actions and invoke a Lambda function that parses information from the Security Hub Macie finding to determine if it is a policy or sensitive data finding.

The two disabled EventBridge rules deployed as part of the solution are examples that can be leveraged for auto-remediation. After you use Security Hub’s custom actions to remediate findings, your security team could start to see a trend where you always want to take specific actions and enable the EventBridge rules to take action without requiring your security team to select a custom action in Security Hub in the AWS console.

  • Autoremediate_Macie_Policy_Finding
  • Autoremediate_Macie_Sensitive_Data_Finding

Conclusion

In this post, you deployed a solution to allow your security team to take automated actions against a Macie sensitive data and policy finding from Security Hub by using custom actions in the AWS console. We walked through what the solution does and how the solution can be customized to your use case.

If you have feedback about this post, submit comments in the Comments section below. If you have any questions about this post, start a thread on the AWS Security Hub forum or Amazon Macie forum.

Want more AWS Security news? Follow us on Twitter.

Jonathan Nguyen

Jonathan Nguyen

Jonathan is a Shared Delivery Team Senior Security Consultant at AWS. His background is in AWS Security with a focus on threat detection and incident response. Today, he helps enterprise customers develop a comprehensive security strategy and deploy security solutions at scale, and he trains customers on AWS Security best practices.

AWS achieves TISAX certification (Information with Very High Protection Needs (AL3)

Post Syndicated from Janice Leung original https://aws.amazon.com/blogs/security/aws-achieves-tisax-certification-information-with-very-high-protection-needs-al3/

We’re excited to announce the completion of the Trusted Information Security Assessment Exchange (TISAX) certification on June 30, 2022 for 19 AWS Regions. These Regions achieved the Information with Very High Protection Needs (AL3) label for the control domains Information Handling and Data Protection. This alignment with TISAX requirements demonstrates our continued commitment to adhere to the heightened expectations for cloud service providers. AWS automotive customers can run their applications in the AWS Cloud certified Regions in confidence.

The following 19 Regions are currently TISAX certified:

  • US East (Ohio)
  • US East (Northern Virginia)
  • US West (Oregon)
  • Africa (Cape Town)
  • Asia Pacific (Hong Kong)
  • Asia Pacific (Mumbai)
  • Asia Pacific (Osaka)
  • Asia Pacific (Korea)
  • Asia Pacific (Singapore)
  • Asia Pacific (Sydney)
  • Asia Pacific (Tokyo)
  • Canada (Central)
  • Europe (Frankfurt)
  • Europe (Ireland)
  • Europe (London)
  • Europe (Milan)
  • Europe (Paris)
  • Europe (Stockholm)
  • South America (Sao Paulo)

TISAX is a European automotive industry-standard information security assessment (ISA) catalog based on key aspects of information security, such as data protection and connection to third parties.

AWS was evaluated and certified by independent third-party auditors on June 30, 2022. The Certificate of Compliance demonstrating the AWS compliance status is available on the European Network Exchange (ENX) Portal (the scope ID and assessment ID are SM22TH and AYA2D4-1, respectively) and through AWS Artifact. AWS Artifact is a self-service portal for on-demand access to AWS compliance reports. Sign in to AWS Artifact in the AWS Management Console, or learn more at Getting Started with AWS Artifact.

For up-to-date information, including when additional Regions are added, see the AWS Compliance Program, and choose TISAX.

AWS strives to continuously bring services into scope of its compliance programs to help you meet your architectural and regulatory needs. Please reach out to your AWS account team if you have questions or feedback about TISAX compliance.

To learn more about our compliance and security programs, see AWS Compliance Programs. As always, we value your feedback and questions; reach out to the AWS Compliance team through the Contact Us page.

If you have feedback about this post, submit comments in the Comments section below.

Want more AWS Security how-to content, news, and feature announcements? Follow us on Twitter.

Author

Janice Leung

Janice is a security audit program manager at AWS, based in New York. She leads security audits across Europe and has previously worked in security assurance and technology risk management in the financial industry for 10 years.

AWS achieves HDS certification to three additional Regions

Post Syndicated from Janice Leung original https://aws.amazon.com/blogs/security/aws-achieves-hds-certification-to-three-additional-regions/

We’re excited to announce that three additional AWS Regions—Asia Pacific (Korea), Europe (London), and Europe (Stockholm)—have been granted the Health Data Hosting (Hébergeur de Données de Santé, HDS) certification. This alignment with the HDS requirements demonstrates our continued commitment to adhere to the heightened expectations for cloud service providers. AWS customers who handle personal health data can be hosted in the AWS Cloud certified Regions with confidence.

The following 16 Regions are now in scope of this certification:

  • US East (Ohio)
  • US East (Northern Virginia)
  • US West (Northern California)
  • US West (Oregon)
  • Asia Pacific (Mumbai)
  • Asia Pacific (Korea)
  • Asia Pacific (Singapore)
  • Asia Pacific (Sydney)
  • Asia Pacific (Tokyo)
  • Canada (Central)
  • Europe (Frankfurt)
  • Europe (Ireland)
  • Europe (London)
  • Europe (Paris)
  • Europe (Stockholm)
  • South America (Sao Paulo)

Introduced by the French governmental agency for health, Agence Française de la Santé Numérique (ASIP Santé), HDS certification aims to strengthen the security and protection of personal health data. Achieving this certification demonstrates that AWS provides a framework for technical and governance measures to secure and protect personal health data, governed by French law.

AWS was evaluated and certified by independent third-party auditors on June 30, 2022. The Certificate of Compliance demonstrating the AWS compliance status is available on the Agence du Numérique en Santé (ANS) website and through AWS Artifact. AWS Artifact is a self-service portal for on-demand access to AWS compliance reports. Sign in to AWS Artifact in the AWS Management Console, or learn more at Getting Started with AWS Artifact.

For up-to-date information, including when additional Regions are added, see the AWS Compliance Program, and choose HDS.

AWS strives to continuously bring services into scope of its compliance programs to help you meet your architectural and regulatory needs. Please reach out to your AWS account team if you have questions or feedback about HDS compliance.

To learn more about our compliance and security programs, see AWS Compliance Programs. As always, we value your feedback and questions; reach out to the AWS Compliance team through the Contact Us page.

If you have feedback about this post, submit comments in the Comments section below.

Want more AWS Security how-to content, news, and feature announcements? Follow us on Twitter.

Author

Janice Leung

Janice is a security audit program manager at AWS, based in New York. She leads security audits across Europe and has previously worked in security assurance and technology risk management in the financial industry for 10 years.

A sneak peek at the governance, risk, and compliance sessions for AWS re:Inforce 2022

Post Syndicated from Greg Eppel original https://aws.amazon.com/blogs/security/a-sneak-peek-at-the-governance-risk-and-compliance-sessions-for-aws-reinforce-2022/

Register now with discount code SALUZwmdkJJ to get $150 off your full conference pass to AWS re:Inforce. For a limited time only and while supplies last.

Today we want to tell you about some of the exciting governance, risk, and compliance sessions planned for AWS re:Inforce 2022. AWS re:Inforce is a conference where you can learn more about security, compliance, identity, and privacy. When you attend the event, you have access to hundreds of technical and business sessions, an AWS Partner expo hall, a keynote speech from AWS Security leaders, and more. AWS re:Inforce 2022 will take place in person in Boston, MA on July 26 and 27. AWS re:Inforce 2022 features content in the following five areas:

  • Data protection and privacy
  • Governance, risk, and compliance
  • Identity and access management
  • Network and infrastructure security
  • Threat detection and incident response

This post will highlight of some of the governance, risk, and compliance offerings that you can sign up for, including breakout sessions, chalk talks, builders’ sessions, and workshops. For the full catalog of all tracks, see the AWS re:Inforce session preview.

Breakout sessions

These are lecture-style presentations that cover topics at all levels and are delivered by AWS experts, builders, customers, and partners. Breakout sessions typically include 10–15 minutes of Q&A at the end.

GRC201: Learn best practices for auditing AWS with Cloud Audit Academy
Do you want to know how to audit in the cloud? Today, control framework language is catered toward on-premises environments, and security IT auditing techniques have not been reshaped for the cloud. The AWS Cloud–specific Cloud Audit Academy provides auditors with the education and tools to audit for security on AWS using a risk-based approach. In this session, experience a condensed sample domain from a four-day Cloud Audit Academy workshop.

GRC203: Panel discussion: Continuous compliance and auditing on AWS
In this session, an AWS leader speaks with senior executives from enterprise customer and AWS Partner organizations as they share their paths to success with compliance and auditing on AWS. Join this session to hear how they have used AWS Cloud Operations to help make compliance and auditing more efficient and improve business outcomes. Also hear how AWS Partners are supporting customer organizations as they automate compliance and move to the cloud.

GRC205: Crawl, walk, run: Accelerating security maturity
Where are you on your cloud security journey? Where do you want to end up? What are your next steps? In this step-by-step roadmap, we provide a comprehensive overview of the AWS security journey based on lessons learned with other organizations. Learn where you are, how to take the next step and how to improve your cloud security program. In this session, we will leverage cloud-native tools like AWS Control Tower, AWS Config, and AWS Security Hub to demonstrate how knowing your current state of security can drive more effective and efficient story telling of your posture.

GRC302: Using AWS security services to build our cloud operations foundation
Organizations new to the cloud need to quickly understand what foundational security capabilities should be considered as a baseline. In this session, learn how AWS security services can help you improve your cloud security posture. Learn how to incorporate security into your AWS architecture based on the AWS Cloud Operations model, which will help you implement governance, manage risk, and achieve compliance while proactively discovering opportunities for improvement.

GRC331: Automating security and compliance with OSCAL
Documentation exports can be very time consuming. In this session, learn how the National Institute of Science and Technology is developing the Open Security Controls Assessment Language (OSCAL) to provide common translation between XML, JSON, and YAML formats. OSCAL also provides a common means to identify and version shared resources, and standardize the expression of assessment artifacts. Learn how AWS is working to implement OSCAL for our security documentation exports so that you can save time when creating and maintaining ATO packages.

Builders’ sessions

These are small-group sessions led by an AWS expert who guides you as you build the service or product on your own laptop. Use your laptop to experiment and build along with the AWS expert.

GRC351: Implementing compliance as code on AWS
To manage compliance at the speed and scale the cloud requires, organizations need to implement automation and have an effective mechanism to manage it. In this builders’ session, learn how to implement compliance as code (CaC). CaC shares many of the same benefits as infrastructure as code: speed, automation, peer review, and auditability. Learn about defining controls with AWS Config rules, customizing those controls, using remediation actions, packaging and deploying with AWS Config conformance packs, and validating using a CI/CD pipeline.

GRC352: Deploying repeatable, secure, and compliant Amazon EKS clusters
In this builders’ session, learn how to deploy, manage, and scale containerized applications that run Kubernetes on AWS with AWS Service Catalog. Walk through how to deploy the Kubernetes control plane into a virtual private cloud (VPC), connect worker nodes to the cluster, and configure a bastion host for cluster administrative operations. Using AWS CloudFormation registry resource types, learn how to declare Kubernetes manifests or Helm charts to deploy and manage your Kubernetes applications. With AWS Service Catalog, you can empower your teams to deploy securely configured Amazon Elastic Kubernetes Service (Amazon EKS) clusters in multiple accounts and Regions.

GRC354: Building remediation workflows to simplify compliance
Automation and simplification are key to managing compliance at scale. Remediation is one of the key elements of simplifying and managing risk. In this builders’ session, walk through how to build a remediation workflow using AWS Config and AWS Systems Manager Automation. Then, explore how the workflow can be deployed at scale and monitored with AWS Security Hub to oversee your entire organization.

GRC355: Build a Security Posture Leaderboard using AWS Security Hub
This builders’ session introduces you to the possibilities of creating a robust and comprehensive leaderboard using AWS Security Hub findings to improve security and compliance visibility in your organization. Learn how to design and support various use cases, such as combining security and compliance data into a single, centralized dashboard that allows you to make more informed decisions; correlating Security Hub findings with operational data for deeper insights; building a security and compliance scorecard across various dimensions to share across different stakeholders; and supporting a decentralized organization structure with centralized or shared security function.

Chalk talks

These are highly interactive sessions with a small audience. Experts lead you through problems and solutions on a digital whiteboard as the discussion unfolds.

GRC233: Critical infrastructure: Supply chain and compliance impacts
In this chalk talk, learn how you can benefit from cloud-based solutions that build in security from the beginning. Review technical details around cybersecurity best practices for OT systems in adherence with government partnership with public and private industries. Dive deep into use cases and best practices for using AWS security services to help improve cybersecurity specifically for water utilities. Hear about opportunities to receive AWS cybersecurity training designed to teach you the skills necessary to support cloud adoption.

GRC304: Scaling the possible: Digitizing the audit experience
Do you want to increase the speed and scale of your audits? As companies expand to new industries and environments, so too does the scale of regulatory compliance. AWS undergoes over 500 audits in a year. In this session, hear from AWS experts as they digitize and automate the regulator/auditor experience. Walk through pre-audit educational training, self-service of control evidence and walkthrough information, live chatting with an audit control owner, and virtual data center tours. This session discusses how innovation and digitization allows companies to build trust with regulators and auditors while reducing the level of effort for internal audit teams and compliance executives.

GRC334: Shared responsibility deep dive at the service level
Auditors and regulators often need assistance understanding which configuration settings and security responsibilities are in the company’s control. Depending on the service, the AWS shared responsibility model can vary, which can affect the process for meeting compliance goals. Join AWS subject-matter experts in this chalk talk for an in-depth discussion on the next wave of compliance activation for AWS customers. Explore the configurable security decisions that users have for each service and how you can map to AWS best practices and security controls.

GRC431: Building purpose-driven and data-rich GRC solutions
Are you getting everything you need out of your data? Or do you not have enough information to make data-driven security decisions? Many organizations trying to modernize and innovate using data often struggle with finding the right data security solutions to build data-driven applications. In this chalk talk, explore how you can use Amazon Virtual Private Cloud (Amazon VPC), AWS Identity and Access Management (IAM), AWS Key Management Service (AWS KMS), AWS Systems Manager, AWS Single Sign-On (AWS SSO), and AWS Config to drive valuable insights to make more informed decisions. Hear about best practices and lessons learned to help you on your journey to garner purpose-filled information.

Workshops

These are interactive learning sessions where you work in small teams to solve problems using AWS Cloud security services. Come prepared with your laptop and a willingness to learn!

GRC272: Executive Security Simulation
The Executive Security Simulation takes senior security management and IT/business executive teams through an experiential exercise that illuminates key decision points for a successful and secure cloud journey. During this team-based, game-like competitive simulation, participants leverage an industry case study to make strategic security, risk, and compliance time-based decisions and investments. Participants experience the impact of these investments and decisions on the critical aspects of their secure cloud adoption. Join this workshop to understand the major success factors to lead security, risk, and compliance in the cloud, and learn applicable decision and investment approaches to specific secure cloud adoption journeys.

GRC371: Automate your compliance and evidence collection with AWS
Automation and simplification are key to managing compliance at scale. Remediation is one of the key elements of simplifying and managing risk. In this workshop, we will walk through building a remediation workflow using AWS Config and AWS Systems Manager and show how it can be deployed at scale and then monitored with Security Hub across the entire organization. In this workshop, you will learn how you can set up a continuous collection process that not only establishes controls to help meet the requirements of compliance but also automates the process of collecting evidence to avoid the time-consuming manual effort to prepare for audits.

GRC372: How to implement governance on AWS with ServiceNow
Many AWS customers use IT service management (ITSM) solutions such as ServiceNow to implement governance and compliance and manage security incidents. In this workshop, learn how to use AWS services such as AWS Service Catalog, AWS Config, AWS Systems Manager, and AWS Security Hub on the ServiceNow service portal. Learn how AWS services align to service management standards by integrating AWS capabilities through ITSM process integration with ServiceNow. Design and implement a curated provisioning strategy, along with incident management and resource transparency/compliance, by using the AWS Service Management Connector for ServiceNow.

GRC471: Building guardrails to meet your custom control requirements
In this session, you will experience the process of identifying, designing, and implementing security configurations, as well as detective and preventive guardrails, to meet custom control requirements. You will use a pre-built environment, read a customer scenario to identify specific control needs, and then learn how to design and implement the custom controls.

If any of these sessions look interesting to you, consider joining us in Boston by registering for re:Inforce 2022. We look forward to seeing you there!

Greg Eppel

Greg is the Tech Leader for Cloud Operations and is responsible for the global direction of an internal community of hundreds of AWS experts who are focused on the operational capabilities of AWS. Prior to joining AWS in 2016, he was the CTO of a company that provided SaaS solutions to the sports, media, and entertainment industry. He is a Canadian originally from Vancouver, and he currently resides in the DC metro area with his family.

Author

Alexis Robinson

Alexis is the Head of the US Government Security and Compliance Program for AWS. For over 10 years, she has served federal government clients by advising them on security best practices and conducting cyber and financial assessments. She currently supports the security of the AWS internal environment, including cloud services applicable to AWS US East/West and AWS GovCloud (US) Regions.