AWS Secrets Manager is a service that helps you manage, retrieve, and rotate database credentials, application credentials, OAuth tokens, API keys, and other secrets throughout their lifecycles. You can use Secrets Manager to help remove hard-coded credentials in application source code. Storing the credentials in Secrets Manager helps avoid unintended or inadvertent access by anyone who can inspect your application’s source code, configuration, or components. You can replace hard-coded credentials with a runtime call to the Secrets Manager service to retrieve credentials dynamically when you need them.
In this blog post, we introduce a new Secrets Manager API call, BatchGetSecretValue, and walk you through how you can use it to retrieve multiple Secretes Manager secrets.
New API — BatchGetSecretValue
Previously, if you had an application that used Secrets Manager and needed to retrieve multiple secrets, you had to write custom code to first identify the list of needed secrets by making a ListSecrets call, and then call GetSecretValue on each individual secret. Now, you don’t need to run ListSecrets and loop. The new BatchGetSecretValue API reduces code complexity when retrieving secrets, reduces latency by running bulk retrievals, and reduces the risk of reaching Secrets Manager service quotas.
Security considerations
Though you can use this feature to retrieve multiple secrets in one API call, the access controls for Secrets Manager secrets remain unchanged. This means AWS Identity and Access Management (IAM) principals need the same permissions as if they were to retrieve each of the secrets individually. If secrets are retrieved using filters, principals must have both permissions for list-secrets and get-secret-value on secrets that are applicable. This helps protect secret metadata from inadvertently being exposed. Resource policies on secrets serve as another access control mechanism, and AWS principals must be explicitly granted permissions to access individual secrets if they’re accessing secrets from a different AWS account (see Cross-account access for more information). Later in this post, we provide some examples of how you can restrict permissions of this API call through an IAM policy or a resource policy.
Solution overview
In the following sections, you will configure an AWS Lambda function to use the BatchGetSecretValue API to retrieve multiple secrets at once. You also will implement attribute based access control (ABAC) for Secrets Manager secrets, and demonstrate the access control mechanisms of Secrets Manager. In following along with this example, you will incur costs for the Secrets Manager secrets that you create, and the Lambda function invocations that are made. See the Secrets Manager Pricing and Lambda Pricing pages for more details.
Prerequisites
To follow along with this walk-through, you need:
Five resources that require an application secret to interact with, such as databases or a third-party API key.
Create an IAM role to be used as a Lambda execution role.
Create a Lambda function.
Step 1: Create secrets
First, create multiple secrets with the same resource tag key-value pair using the AWS CLI. The resource tag will be used for ABAC. These secrets might look different depending on the resources that you decide to use in your environment. You can also manually create these secrets in the Secrets Manager console if you prefer.
Run the following commands in the AWS CLI, replacing the secret-string values with the credentials of the resources that you will be accessing:
aws secretsmanager create-secret --name MyTestSecret1 --description "My first test secret created with the CLI for resource 1." --secret-string "{\"user\":\"username\",\"password\":\"EXAMPLE-PASSWORD-1\"}" --tags "[{\"Key\":\"app\",\"Value\":\"app1\"},{\"Key\":\"environment\",\"Value\":\"production\"}]"
aws secretsmanager create-secret --name MyTestSecret2 --description "My second test secret created with the CLI for resource 2." --secret-string "{\"user\":\"username\",\"password\":\"EXAMPLE-PASSWORD-2\"}" --tags "[{\"Key\":\"app\",\"Value\":\"app1\"},{\"Key\":\"environment\",\"Value\":\"production\"}]"
aws secretsmanager create-secret --name MyTestSecret3 --description "My third test secret created with the CLI for resource 3." --secret-string "{\"user\":\"username\",\"password\":\"EXAMPLE-PASSWORD-3\"}" --tags "[{\"Key\":\"app\",\"Value\":\"app1\"},{\"Key\":\"environment\",\"Value\":\"production\"}]"
aws secretsmanager create-secret --name MyTestSecret4 --description "My fourth test secret created with the CLI for resource 4." --secret-string "{\"user\":\"username\",\"password\":\"EXAMPLE-PASSWORD-4 \"}" --tags "[{\"Key\":\"app\",\"Value\":\"app1\"},{\"Key\":\"environment\",\"Value\":\"production\"}]"
aws secretsmanager create-secret --name MyTestSecret5 --description "My fifth test secret created with the CLI for resource 5." --secret-string "{\"user\":\"username\",\"password\":\"EXAMPLE-PASSWORD-5\"}" --tags "[{\"Key\":\"app\",\"Value\":\"app1\"},{\"Key\":\"environment\",\"Value\":\"production\"}]"
Next, create a secret with a different resource tag value for the app key, but the same environment key-value pair. This will allow you to demonstrate that the BatchGetSecretValue call will fail when an IAM principal doesn’t have permissions to retrieve and list the secrets in a given filter.
Create a secret with a different tag, replacing the secret-string values with credentials of the resources that you will be accessing.
aws secretsmanager create-secret --name MyTestSecret6 --description "My test secret created with the CLI." --secret-string "{\"user\":\"username\",\"password\":\"EXAMPLE-PASSWORD-6\"}" --tags "[{\"Key\":\"app\",\"Value\":\"app2\"},{\"Key\":\"environment\",\"Value\":\"production\"}]"
Step 2: Create an execution role for your Lambda function
In this example, create a Lambda execution role that only has permissions to retrieve secrets that are tagged with the app:app1 resource tag.
Select change default execution role and attach the execution role you just created.
Choose Create Function.
Figure 1: create a Lambda function to access secrets
In the Code tab, copy and paste the following code:
import json
import boto3
from botocore.exceptions import ClientError
import urllib.request
import json

session = boto3.session.Session()
# Create a Secrets Manager client
client = session.client(
        service_name='secretsmanager'
    )


def lambda_handler(event, context):

     application_secrets = client.batch_get_secret_value(Filters =[
        {
        'Key':'tag-key',
        'Values':[event["TagKey"]]
        },
        {
        'Key':'tag-value',
        'Values':[event["TagValue"]]
        }
        ])


    ### RESOURCE 1 CONNECTION ###
    try:
        print("TESTING CONNECTION TO RESOURCE 1")
        resource_1_secret = application_secrets["SecretValues"][0]
        ## IMPLEMENT RESOURCE CONNECTION HERE

        print("SUCCESFULLY CONNECTED TO RESOURCE 1")

    except Exception as e:
        print("Failed to connect to resource 1")
        return e

    ### RESOURCE 2 CONNECTION ###
    try:
        print("TESTING CONNECTION TO RESOURCE 2")
        resource_2_secret = application_secrets["SecretValues"][1]
        ## IMPLEMENT RESOURCE CONNECTION HERE

        print("SUCCESFULLY CONNECTED TO RESOURCE 2")

    except Exception as e:
        print("Failed to connect to resource 2",)
        return e


    ### RESOURCE 3 CONNECTION ###
    try:
        print("TESTING CONNECTION TO RESOURCE 3")
        resource_3_secret = application_secrets["SecretValues"][2]
        ## IMPLEMENT RESOURCE CONNECTION HERE

        print("SUCCESFULLY CONNECTED TO DB 3")

    except Exception as e:
        print("Failed to connect to resource 3")
        return e

    ### RESOURCE 4 CONNECTION ###
    try:
        print("TESTING CONNECTION TO RESOURCE 4")
        resource_4_secret = application_secrets["SecretValues"][3]
        ## IMPLEMENT RESOURCE CONNECTION HERE

        print("SUCCESFULLY CONNECTED TO RESOURCE 4")

    except Exception as e:
        print("Failed to connect to resource 4")
        return e

    ### RESOURCE 5 CONNECTION ###
    try:
        print("TESTING ACCESS TO RESOURCE 5")
        resource_5_secret = application_secrets["SecretValues"][4]
        ## IMPLEMENT RESOURCE CONNECTION HERE

        print("SUCCESFULLY CONNECTED TO RESOURCE 5")

    except Exception as e:
        print("Failed to connect to resource 5")
        return e

    return {
        'statusCode': 200,
        'body': json.dumps('Successfully Completed all Connections!')
    }
You need to configure connections to the resources that you’re using for this example. The code in this example doesn’t create database or resource connections to prioritize flexibility for readers. Add code to connect to your resources after the “## IMPLEMENT RESOURCE CONNECTION HERE” comments.
Choose Deploy.
Step 4: Configure the test event to initiate your Lambda function
Above the code source, choose Test and then Configure test event.
In the Event JSON, replace the JSON with the following:
{
"TagKey": "app",
“TagValue”:”app1”
}
Enter a Name for your event.
Choose Save.
Step 5: Invoke the Lambda function
Invoke the Lambda by choosing Test.
Step 6: Review the function output
Review the response and function logs to see the new feature in action. Your function logs should show successful connections to the five resources that you specified earlier, as shown in Figure 2.
Figure 2: Review the function output
Step 7: Test a different input to validate IAM controls
In the Event JSON window, replace the JSON with the following:
You should now see an error message from Secrets Manager in the logs similar to the following:
User: arn:aws:iam::123456789012:user/JohnDoe is not authorized to perform:
secretsmanager:GetSecretValue because no resource-based policy allows the secretsmanager:GetSecretValue action
As you can see, you were able to retrieve the appropriate secrets based on the resource tag. You will also note that when the Lambda function tried to retrieve secrets for a resource tag that it didn’t have access to, Secrets Manager denied the request.
How to restrict use of BatchGetSecretValue for certain IAM principals
When dealing with sensitive resources such as secrets, it’s recommended that you adhere to the principle of least privilege. Service control policies, IAM policies, and resource policies can help you do this. Below, we discuss three policies that illustrate this:
Policy 1: IAM ABAC policy for Secrets Manager
This policy denies requests to get a secret if the principal doesn’t share the same project tag as the secret that the principal is trying to retrieve. Note that the effectiveness of this policy is dependent on correctly applied resource tags and principal tags. If you want to take a deeper dive into ABAC with Secrets Manager, see Scale your authorization needs for Secrets Manager using ABAC with IAM Identity Center.
Policy 3: Restrict actions to specified principals
Finally, let’s take a look at an example resource policy from our data perimeters policy examples. This resource policy restricts Secrets Manager actions to the principals that are in the organization that this secret is a part of, except for AWS service accounts.
In this blog post, we introduced the BatchGetSecretValue API, which you can use to improve operational excellence, performance efficiency, and reduce costs when using Secrets Manager. We looked at how you can use the API call in a Lambda function to retrieve multiple secrets that have the same resource tag and showed an example of an IAM policy to restrict access to this API.
iam:PassRole is an AWS Identity and Access Management (IAM) permission that allows an IAM principal to delegate orpass permissions to an AWS service by configuring a resource such as an Amazon Elastic Compute Cloud (Amazon EC2) instance or AWS Lambda function with an IAM role. The service then uses that role to interact with other AWS resources in your accounts. Typically, workloads, applications, or services run with different permissions than the developer who creates them, and iam:PassRole is the mechanism in AWS to specify which IAM roles can be passed to AWS services, and by whom.
In this blog post, we’ll dive deep into iam:PassRole, explain how it works and what’s required to use it, and cover some best practices for how to use it effectively.
A typical example of using iam:PassRole is a developer passing a role’s Amazon Resource Name (ARN) as a parameter in the Lambda CreateFunction API call. After the developer makes the call, the service verifies whether the developer is authorized to do so, as seen in Figure 1.
Figure 1: Developer passing a role to a Lambda function during creation
The following command shows the parameters the developer needs to pass during the CreateFunction API call. Notice that the role ARN is a parameter, but there is no passrole parameter.
The API call will create the Lambda function only if the developer has the iam:PassRole permission as well as the CreateFunction API permissions. If the developer is lacking either of these, the request will be denied.
Now that the permissions have been checked and the Function resource has been created, the Lambda service principal will assume the role you passed whenever your function is invoked and use the role to make requests to other AWS services in your account.
Understanding IAM PassRole
When we say that iam:PassRole is a permission, we mean specifically that it is not an API call; it is an IAM action that can be specified within an IAM policy. The iam:PassRole permission is checked whenever a resource is created with an IAM service role or is updated with a new IAM service role.
Here is an example IAM policy that allows a principal to pass a role named lambda_role.
The roles that can be passed are specified in the Resource element of the IAM policy. It is possible to list multiple IAM roles, and it is possible to use a wildcard (*) to match roles that begins with the pattern you specify. Use a wildcard as the last characters only when you’re matching a role pattern, to help prevent over-entitlement.
Note: We recommend that you avoid using resource ”*” with the iam:PassRole action in most cases, because this could grant someone the permission to pass any role, opening the possibility of unintended privilege escalation.
The iam:PassRole action can only grant permissions when used in an identity-based policy attached to an IAM role or user, and it is governed by all relevant AWS policy types, such as service control policies (SCPs) and VPC endpoint policies.
When a principal attempts to pass a role to an AWS service, there are three prerequisites that must be met to allow the service to use that role:
The principal that attempts to pass the role must have the iam:PassRole permission in an identity-based policy with the role desired to be passed in the Resource field, all IAM conditions met, and no implicit or explicit denies in other policies such as SCPs, VPC endpoint policies, session policies, or permissions boundaries.
The role that is being passed is configured via the trust policy to trust the service principal of the service you’re trying to pass it to. For example, the role that you pass to Amazon EC2 has to trust the Amazon EC2 service principal, ec2.amazonaws.com.
To learn more about role trust policies, see this blog post. In certain scenarios, the resource may end up being created or modified even if a passed IAM role doesn’t trust the required service principal, but the AWS service won’t be able to use the role to perform actions.
The role being passed and the principal passing the role must both be in the same AWS account.
Best practices for using iam:PassRole
In this section, you will learn strategies to use when working with iam:PassRole within your AWS account.
Place iam:PassRole in its own policy statements
As we demonstrated earlier, the iam:PassRole policy action takes an IAM role for a resource. If you specify a wildcard as a resource in a policy granting iam:PassRole permission, it means that the principals to whom this policy applies will be able to pass any role in that account, allowing them to potentially escalate their privilege beyond what you intended.
To be able to specify the Resource value and be more granular in comparison to other permissions you might be granting in the same policy, we recommend that you keep the iam:PassRole action in its own policy statement, as indicated by the following example.
Use IAM paths or naming conventions to organize IAM roles within your AWS accounts
You can use IAM paths or a naming convention to grant a principal access to pass IAM roles using wildcards (*) in a portion of the role ARN. This reduces the need to update IAM policies whenever new roles are created.
In your AWS account, you might have IAM roles that are used for different reasons, for example roles that are used for your applications, and roles that are used by your security team. In most circumstances, you would not want your developers to associate a security team’s role to the resources they are creating, but you still want to allow them to create and pass business application roles.
You may want to give developers the ability to create roles for their applications, as long as they are safely governed. You can do this by verifying that those roles have permissions boundaries attached to them, and that they are created in a specific IAM role path. You can then allow developers to pass only the roles in that path. To learn more about using permissions boundaries, see our Example Permissions Boundaries GitHub repo.
In the following example policy, access is granted to pass only the roles that are in the /application_role/ path.
You can also protect specific IAM paths by using an SCP.
In the following example, the SCP prevents your principals from passing a role unless they have a tag of “team” with a value of “security” when the role they are trying to pass is in the IAM path /security_app_roles/.
Similarly, you can craft a policy to only allow a specific naming convention or IAM path to pass a role in a specific path. For example, the following SCP shows how to prevent a role outside of the IAM path security_response_team from passing a role in the IAM path security_app_roles.
iam:PassRole does not support using the iam:ResourceTag or aws:ResourceTag condition keys to specify which roles can be passed. However, the IAM policy language supports using variables as part of the Resource element in an IAM policy.
The following IAM policy example uses the aws:PrincipalTag condition key as a variable in the Resource element. That allows this policy to construct the IAM path based on the values of the caller’s IAM tags or Session tags.
If there was no value set for the AllowedRolePath tag, the resource would not match any role ARN, and no iam:PassRole permissions would be granted.
Pass different IAM roles for different use cases, and for each AWS service
As a best practice, use a single IAM role for each use case, and avoid situations where the same role is used by multiple AWS services.
We recommend that you also use different IAM roles for different workloads in your AWS accounts, even if those workloads are built on the same AWS service. This will allow you to grant only the permissions necessary to your workloads and make it possible to adhere to the principle of least privilege.
iam:PassedToService allows you to specify what service a role may be passed to. iam:AssociatedResourceArn allows you to specify what resource ARNs a role may be associated with.
As mentioned previously, we typically recommend that customers use an IAM role with only one AWS service wherever possible. This is best accomplished by listing a single AWS service in a role’s trust policy, reducing the need to use the iam:PassedToService condition key in the calling principal’s identity-based policy. In circumstances where you have an IAM role that can be assumed by more than one AWS service, you can use iam:PassedToService to specify which service the role can be passed to. For example, the following policy allows ExampleRole to be passed only to the Amazon EC2 service.
When you use iam:AssociatedResourceArn, it’s important to understand that ARN formats typically do not change, but each AWS resource will have a unique ARN. Some AWS resources have non-predictable components, such as EC2 instance IDs in their ARN. This means that when you’re using iam:AssociatedResourceArn, if an AWS resource is ever deleted and a new resource created, you might need to modify the IAM policy with a new resource ARN to allow a role to be associated with it.
Most organizations prefer to limit who can delete and modify resources in their AWS accounts, rather than limit what resource a role can be associated with. An example of this would be limiting which principals can modify a Lambda function, rather than limiting which function a role can be associated with, because in order to pass a role to Lambda, the principals would need permissions to update the function itself.
Using iam:PassRole with service-linked roles
If you’re dealing with a service that uses service-linked roles (SLRs), most of the time you don’t need the iam:PassRole permission. This is because in most cases such services will create and manage the SLR on your behalf, so that you don’t pass a role as part of a service configuration, and therefore, the iam:PassRole permission check is not performed.
Some AWS services allow you to create multiple SLRs and pass them when you create or modify resources by using those services. In this case, you need the iam:PassRole permission on service-linked roles, just the same as you do with a service role.
For example, Amazon EC2 Auto Scaling allows you to create multiple SLRs with specific suffixes and then pass a role ARN in the request as part of the ec2:CreateAutoScalingGroup API action. For the Auto Scaling group to be successfully created, you need permissions to perform both the ec2:CreateAutoScalingGroup and iam:PassRole actions.
SLRs are created in the /aws-service-role/ path. To help confirm that principals in your AWS account are only passing service-linked roles that they are allowed to pass, we recommend using suffixes and IAM policies to separate SLRs owned by different teams.
For example, the following policy allows only SLRs with the _BlueTeamSuffix to be passed.
You could attach this policy to the role used by the blue team to allow them to pass SLRs they’ve created for their use case and that have their specific suffix.
AWS CloudTrail logging
Because iam:PassRole is not an API call, there is no entry in AWS CloudTrail for it. To identify what role was passed to an AWS service, you must check the CloudTrail trail for events that created or modified the relevant AWS service’s resource.
In Figure 2, you can see the CloudTrail log created after a developer used the Lambda CreateFunction API call with the role ARN noted in the role field.
Figure 2: CloudTrail log of a CreateFunction API call
PassRole and VPC endpoints
Earlier, we mentioned that iam:PassRole is subject to VPC endpoint policies. If a request that requires the iam:PassRole permission is made over a VPC endpoint with a custom VPC endpoint policy configured, iam:PassRole should be allowed through the Action element of that VPC endpoint policy, or the request will be denied.
Conclusion
In this post, you learned about iam:PassRole, how you use it to interact with AWS services and resources, and the three prerequisites to successfully pass a role to a service. You now also know best practices for using iam:PassRole in your AWS accounts. To learn more, see the documentation on granting a user permissions to pass a role to an AWS service.
In pursuit of a more efficient and customer-centric support system, organizations are deploying cutting-edge generative AI applications. These applications are designed to excel in four critical areas: multi-lingual support, sentiment analysis, personally identifiable information (PII) detection, and conversational search capabilities. Customers worldwide can now engage with the applications in their preferred language, and the applications can gauge their emotional state, mask sensitive personal information, and provide context-aware responses. This holistic approach not only enhances the customer experience but also offers efficiency gains, ensures data privacy compliance, and drives customer retention and sales growth.
Generative AI applications are poised to transform the customer support landscape, offering versatile solutions that integrate seamlessly with organizations’ operations. By combining the power of multi-lingual support, sentiment analysis, PII detection, and conversational search, these applications promise to be a game-changer. They empower organizations to deliver personalized, efficient, and secure support services while ultimately driving customer satisfaction, cost savings, data privacy compliance, and revenue growth.
Amazon Bedrock and foundation models like Anthropic Claude are poised to enable a new wave of AI adoption by powering more natural conversational experiences. However, a key challenge that has emerged is tailoring these general purpose models to generate valuable and accurate responses based on extensive, domain-specific datasets. This is where the Retrieval Augmented Generation (RAG) technique plays a crucial role.
RAG allows you to retrieve relevant data from databases or document repositories to provide helpful context to large language models (LLMs). This additional context helps the models generate more specific, high-quality responses tuned to your domain.
Multi-lingual support – The solution uses the ability of LLMs like Anthropic Claude to understand and respond to queries in multiple languages without any additional training needed. This provides true multi-lingual capabilities out of the box, unlike traditional machine learning (ML) systems that need training data in each language.
Sentiment analysis – This solution enables you to detect positive, negative, or neutral sentiment in text inputs like customer reviews, social media posts, or surveys. LLMs can provide explanations for the inferred sentiment, describing which parts of the text contributed to a positive or negative classification. This explainability helps build trust in the model’s predictions. Potential use cases could include analyzing product reviews to identify pain points or opportunities, monitoring social media for brand sentiment, or gathering feedback from customer surveys.
PII detection and redaction – The Claude LLM can be accurately prompted to identify various types of PII like names, addresses, Social Security numbers, and credit card numbers and replace it with placeholders or generic values while maintaining readability of the surrounding text. This enables compliance with regulations like GDPR and prevents sensitive customer data from being exposed. This also helps automate the labor-intensive process of PII redaction and reduces risk of exposed customer data across various use cases, such as the following:
Processing customer support tickets and automatically redacting any PII before routing to agents.
Scanning internal company documents and emails to flag any accidental exposure of customer PII.
Anonymizing datasets containing PII before using the data for analytics or ML, or sharing the data with third parties.
Through careful prompt engineering, you can accomplish the aforementioned use cases with a single LLM. The key is crafting prompt templates that clearly articulate the desired task to the model. Prompting allows us to tap into the vast knowledge already present within the LLM for advanced natural language processing (NLP) tasks, while tailoring its capabilities to our particular needs. Well-designed prompts unlock the power and potential of the model.
With the vector database capabilities of Amazon OpenSearch Serverless, you can store vector embeddings of documents, allowing ultra-fast, semantic (rather than keyword) similarity searches to find the most relevant passages to augment prompts.
Read on to learn how to build your own RAG solution using an OpenSearch Serverless vector database and Amazon Bedrock.
Solution overview
The following architecture diagram provides a scalable and fully managed RAG-based workflow for a wide range of generative AI applications, such as language translation, sentiment analysis, PII data detection and redaction, and conversational AI. This pre-built solution operates in two distinct stages. The initial stage involves generating vector embeddings from unstructured documents and saving these embeddings within an OpenSearch Serverless vectorized database index. In the second stage, user queries are forwarded to the Amazon Bedrock Claude model along with the vectorized context to deliver more precise and relevant responses.
In the following sections, we discuss the two core functions of the architecture in more detail:
Index domain data
Query an LLM with enhanced context
Index domain data
In this section, we discuss the details of the data indexing phase.
Generate embeddings with Amazon Titan
We used Amazon Titan embeddings model to generate vector embeddings. With 1,536 dimensions, the embeddings model captures semantic nuances in meaning and relationships. Embeddings are available via the Amazon Bedrock serverless experience; you can access it using a single API and without managing any infrastructure. The following code illustrates generating embeddings using a Boto3 client.
import boto3
bedrock_client = boto3.client('bedrock-runtime')

## Generate embeddings with Amazon Titan Embeddings model
response = bedrock_client.invoke_model(
            body = json.dumps({"inputText": 'Hello World'}),
            modelId = 'amazon.titan-embed-text-v1',
            accept = 'application/json',
            contentType = 'application/json'
)
result = json.loads(response['body'].read())
embeddings = result.get('embedding')
print(f'Embeddings -> {embeddings}')
Store embeddings in an OpenSearch Serverless vector collection
OpenSearch Serverless offers a vector engine to store embeddings. As your indexing and querying needs fluctuate based on workload, OpenSearch Serverless automatically scales up and down based on demand. You no longer have to predict capacity or manage infrastructure sizing.
With OpenSearch Serverless, you don’t provision clusters. Instead, you define capacity in the form of Opensearch Capacity Units (OCUs). OpenSearch Serverless will scale up to the maximum number of OCUs defined. You’re charged for a minimum of 4 OCUs, which can be shared across multiple collections sharing the same AWS Key Management Service (AWS KMS) key.
The following screenshot illustrates how to configure capacity limits on the OpenSearch Serverless console.
Query an LLM with domain data
In this section, we discuss the details of the querying phase.
Generate query embeddings
When a user queries for data, we first generate an embedding of the query with Amazon Titan embeddings. OpenSearch Serverless vector collections employ an Approximate Nearest Neighbors (A-NN) algorithm to find document embeddings closest to the query embeddings. The A-NN algorithm uses cosine similarity to measure the closeness between the embedded user query and the indexed data. OpenSearch Serverless then returns the documents whose embeddings have the smallest distance, and therefore the highest similarity, to the user’s query embedding. The following code illustrates our vector search query:
OpenSearch Serverless finds relevant documents for a given query by matching embedded vectors. We enhance the prompt with this context and then query the LLM. In this example, we use the AWS SDK for Python (Boto3) to invoke models on Amazon Bedrock. The AWS SDK provides the following APIs to interact with foundational models on Amazon Bedrock:
The solution provides some sample data for indexing, as shown in the following screenshot. You can also index custom text. Initial indexing of documents may take some time because OpenSearch Serverless has to create a new vector index and then index documents. Subsequent requests are faster. To delete the vector index and start over, choose Reset.
The following screenshot illustrates how you can query your domain data in multiple languages after it’s indexed. You could also try out sentiment analysis or PII data detection and redaction on custom text. The response is streamed over Amazon API Gateway WebSockets.
Clean up
To clean up your resources, delete the following AWS CloudFormation stacks via the AWS CloudFormation console:
LlmsWithServerlessRagStack
ApiGwLlmsLambda
Conclusion
In this post, we provided an end-to-end serverless solution for RAG-based generative AI applications. This not only offers you a cost-effective option, particularly in the face of GPU cost and hardware availability challenges, but also simplifies the development process and reduces operational costs.
Stay up to date with the latest advancements in generative AI and start building on AWS. If you’re seeking assistance on how to begin, check out the Generative AI Innovation Center.
About the authors
Fraser Sequeira is a Startups Solutions Architect with AWS based in Mumbai, India. In his role at AWS, Fraser works closely with startups to design and build cloud-native solutions on AWS, with a focus on analytics and streaming workloads. With over 10 years of experience in cloud computing, Fraser has deep expertise in big data, real-time analytics, and building event-driven architecture on AWS. He enjoys staying on top of the latest technology innovations from AWS and sharing his learnings with customers. He spends his free time tinkering with new open source technologies.
Kenneth Walsh is a New York-based Sr. Solutions Architect whose focus is AWS Marketplace. Kenneth is passionate about cloud computing and loves being a trusted advisor for his customers. When he’s not working with customers on their journey to the cloud, he enjoys cooking, audiobooks, movies, and spending time with his family and dog.
Max Winter is a Principal Solutions Architect for AWS Financial Services clients. He works with ISV customers to design solutions that allow them to leverage the power of AWS services to automate and optimize their business. In his free time, he loves hiking and biking with his family, music and theater, digital photography, 3D modeling, and imparting a love of science and reading to his two nearly-teenagers.
Manjula Nagineni is a Senior Solutions Architect with AWS based in New York. She works with major financial service institutions, architecting and modernizing their large-scale applications while adopting AWS Cloud services. She is passionate about designing big data workloads cloud-natively. She has over 20 years of IT experience in software development, analytics, and architecture across multiple domains such as finance, retail, and telecom.
Recently, AWS launched a new feature that allows deployment of account instances of AWS IAM Identity Center . With this launch, you can now have two types of IAM Identity Center instances: organization instances and account instances. An organization instance is the IAM Identity Center instance that’s enabled in the management account of your organization created with AWS Organizations. This instance is used to manage access to AWS accounts and applications across your entire organization. Organization instances are the best practice when deploying IAM Identity Center. Many customers have requested a way to enable AWS applications using test or sandbox identities. The new account instances are intended to support sand-boxed deployments of AWS managed applications such as Amazon CodeCatalyst and are only usable from within the account and AWS Region in which they were created. They can exist in a standalone account or in a member account within AWS Organizations.
In this blog post, we show you when to use each instance type, how to control the deployment of account instances, and how you can monitor, manage, and audit these instances at scale using the enhanced IAM Identity Center APIs.
IAM Identity Center instance types
IAM Identity Center now offers two deployment types, the traditional organization instance and an account instance, shown in Figure 1. In this section, we show you the differences between the two.
Figure 1: IAM Identity Center instance types
Organization instance of IAM Identity Center
An organization instance of IAM Identity Center is the fully featured version that’s available with AWS Organizations. This type of instance helps you securely create or connect your workforce identities and manage their access centrally across AWS accounts and applications in your organization. The recommended use of an organization instance of Identity Center is for workforce authentication and authorization on AWS for organizations of any size and type.
Using the organization instance of IAM Identity Center, your identity center administrator can create and manage user identities in the Identity Center directory, or connect your existing identity source, including Microsoft Active Directory, Okta, Ping Identity, JumpCloud, Google Workspace, and Azure Active Directory (Entra ID). There is only one organization instance of IAM Identity Center at the organization level. If you have enabled IAM Identity Center before November 15, 2023, you have an organization instance.
Account instances of IAM Identity Center
Account instances of IAM Identity Center provide a subset of the features of the organization instance. Specifically, account instances support user and group assignments initially only to Amazon CodeCatalyst. They are bound to a single AWS account, and you can deploy them in either member accounts of an organization or in standalone AWS accounts. You can only deploy one account instance per AWS account regardless of Region.
You can use account instances of IAM Identity Center to provide access to supported Identity Center enabled application if the application is in the same account and Region.
When should I use account instances of IAM Identity Center?
Account instances are intended for use in specific situations where organization instances are unavailable or impractical, including:
You want to run a temporary trial of a supported AWS managed application to determine if it suits your business needs. See Additional Considerations.
You are unable to deploy IAM Identity Center across your organization, but still want to experiment with one or more AWS managed applications. See Additional Considerations.
You have an organization instance of IAM Identity Center, but you want to deploy a supported AWS managed application to an isolated set of users that are distinct from those in your organization instance.
Additional considerations
When working with multiple instances of IAM Identity Center, you want to keep a number of things in mind:
Each instance of IAM Identity Center is separate and distinct from other Identity Center instances. That is, users and assignments are managed separately in each instance without a means to keep them in sync.
Migration between instances isn’t possible. This means that migrating an application between instances requires setting up that application from scratch in the new instance.
Account instances have the same considerations when changing your identity source as an organization instance. In general, you want to set up with the right identity source before adding assignments.
Automating assigning users to applications through the IAM Identity Center public APIs also requires using the applications APIs to ensure that those users and groups have the right permissions within the application. For example, if you assign groups to CodeCatalyst using Identity Center, you still have to assign the groups to the CodeCatalyst space from the Amazon CodeCatalyst page in the AWS Management Console. See the Setting up a space that supports identity federation documentation.
By default, account instances require newly added users to register a multi-factor authentication (MFA) device when they first sign in. This can be altered in the AWS Management Console for Identity Center for a specific instance.
Controlling IAM Identity Center instance deployments
If you’ve enabled IAM Identity Center prior to November 15, 2023 then account instance creation is off by default. If you want to allow account instance creation, you must enable this feature from the Identity Center console in your organization’s management account. This includes scenarios where you’re using IAM Identity Center centrally and want to allow deployment and management of account instances. See Enable account instances in the AWS Management Console documentation.
If you enable IAM Identity Center after November 15, 2023 or if you haven’t enabled Identity Center at all, you can control the creation of account instances of Identity Center through a service control policy (SCP). We recommend applying the following sample policy to restrict the use of account instances to all but a select set of AWS accounts. The sample SCP that follows will help you deny creation of account instances of Identity Center to accounts in the organization unless the account ID matches the one you specified in the policy. Replace <ALLOWED-ACCOUNT_ID> with the ID of the account that is allowed to create account instances of Identity Center:
If your organization has an existing log ingestion pipeline solution to collect logs and generate reports through AWS CloudTrail, then IAM Identity Center supported CloudTrail operations will automatically be present in your pipeline, including additional account instances of IAM Identity Center actions such as sso:CreateInstance.
To create a monitoring solution for IAM Identity Center events in your organization, you should set up monitoring through AWS CloudTrail. CloudTrail is a service that records events from AWS services to facilitate monitoring activity from those services in your accounts. You can create a CloudTrail trail that captures events across all accounts and all Regions in your organization and persists them to Amazon Simple Storage Service (Amazon S3).
After creating a trail for your organization, you can use it in several ways. You can send events to Amazon CloudWatch Logs and set up monitoring and alarms for Identity Center events, which enables immediate notification of supported IAM Identity Center CloudTrail operations. With multiple instances of Identity Center deployed within your organization, you can also enable notification of instance activity, including new instance creation, deletion, application registration, user authentication, or other supported actions.
The following is an example of a simple query that shows you a list of the Identity Center instances created and deleted, the account where they were created, and the user that created them. Replace <Event_data_store_ID> with your store ID.
SELECT
    userIdentity.arn AS userARN, eventName, userIdentity.accountId
FROM
    <Event_data_store_ID>
WHERE
    userIdentity.arn IS NOT NULL
    AND eventName = 'DeleteInstance'
    OR eventName = 'CreateInstance'
You can save your query result to an S3 bucket and download a copy of the results in CSV format. To learn more, follow the steps in Download your CloudTrail Lake saved query results. Figure 2 shows the CloudTrail Lake query results.
Figure 2: AWS CloudTrail Lake query results
If you want to automate the sourcing, aggregation, normalization, and data management of security data across your organization using the Open Cyber Security Framework (OCSF) standard, you will benefit from using Amazon Security Lake. This service helps make your organization’s security data broadly accessible to your preferred security analytics solutions to power use cases such like threat detection, investigation, and incident response. Learn more in What is Amazon Security Lake?
Instance management and discovery within an organization
You can create account instances of IAM Identity Center in a standalone account or in an account that belongs to your organization. Creation can happen from an API call (CreateInstance) from the Identity Center console in a member account or from the setup experience of a supported AWS managed application. Learn more about Supported AWS managed applications.
If you decide to apply the DenyCreateAccountInstances SCP shown earlier to accounts in your organization, you will no longer be able to create account instances of IAM Identity Center in those accounts. However, you should also consider that when you invite a standalone AWS account to join your organization, the account might have an existing account instance of Identity Center.
To identify existing instances, who’s using them, and what they’re using them for, you can audit your organization to search for new instances. The following script shows how to discover all IAM Identity Center instances in your organization and export a .csv summary to an S3 bucket. This script is designed to run on the account where Identity Center was enabled. Click here to see instructions on how to use this script.
. . .
. . .
accounts_and_instances_dict={}
duplicated_users ={}

main_session = boto3.session.Session()
sso_admin_client = main_session.client('sso-admin')
identity_store_client = main_session.client('identitystore')
organizations_client = main_session.client('organizations')
s3_client = boto3.client('s3')
logger = logging.getLogger()
logger.setLevel(logging.INFO)

#create function to list all Identity Center instances in your organization
def lambda_handler(event, context):
    application_assignment = []
    user_dict={}

    current_account = os.environ['CurrentAccountId']

    logger.info("Current account %s", current_account)

    paginator = organizations_client.get_paginator('list_accounts')
    page_iterator = paginator.paginate()
    for page in page_iterator:
        for account in page['Accounts']:
            get_credentials(account['Id'],current_account)
            #get all instances per account - returns dictionary of instance id and instances ARN per account
            accounts_and_instances_dict = get_accounts_and_instances(account['Id'], current_account)

def get_accounts_and_instances(account_id, current_account):
    global accounts_and_instances_dict

    instance_paginator = sso_admin_client.get_paginator('list_instances')
    instance_page_iterator = instance_paginator.paginate()
    for page in instance_page_iterator:
        for instance in page['Instances']:
            #send back all instances and identity centers
            if account_id == current_account:
                accounts_and_instances_dict = {current_account:[instance['IdentityStoreId'],instance['InstanceArn']]}
            elif instance['OwnerAccountId'] != current_account:
                accounts_and_instances_dict[account_id]= ([instance['IdentityStoreId'],instance['InstanceArn']])
    return accounts_and_instances_dict
  . . .
  . . .
  . . .
The following table shows the resulting IAM Identity Center instance summary report with all of the accounts in your organization and their corresponding Identity Center instances.
AccountId
IdentityCenterInstance
111122223333
d-111122223333
111122224444
d-111122223333
111122221111
d-111111111111
Duplicate user detection across multiple instances
A consideration of having multiple IAM Identity Center instances is the possibility of having the same person existing in two or more instances. In this situation, each instance creates a unique identifier for the same person and the identifier associates application-related data to the user. Create a user management process for incoming and outgoing users that is similar to the process you use at the organization level. For example, if a user leaves your organization, you need to revoke access in all Identity Center instances where that user exists.
The code that follows can be added to the previous script to help detect where duplicates might exist so you can take appropriate action. If you find a lot of duplication across account instances, you should consider adopting an organization instance to reduce your management overhead.
...
#determine if the member in IdentityStore have duplicate
def get_users(identityStoreId, user_dict):
    global duplicated_users
    paginator = identity_store_client.get_paginator('list_users')
    page_iterator = paginator.paginate(IdentityStoreId=identityStoreId)
    for page in page_iterator:
        for user in page['Users']:
            if ( 'Emails' not in user ):
                print("user has no email")
            else:
                for email in user['Emails']:
                    if email['Value'] not in user_dict:
                        user_dict[email['Value']] = identityStoreId
                    else:
                        print("Duplicate user found " + user['UserName'])
                        user_dict[email['Value']] = user_dict[email['Value']] + "," + identityStoreId
                        duplicated_users[email['Value']] = user_dict[email['Value']]
    return user_dict
...
The following table shows the resulting report with duplicated users in your organization and their corresponding IAM identity Center instances.
The full script for all of the above use cases is available in the multiple-instance-management-iam-identity-center GitHub repository. The repository includes instructions to deploy the script using AWS Lambda within the management account. After deployment, you can invoke the Lambda function to get .csv files of every IAM Identity center instance in your organization, the applications assigned to each instance, and the users that have access to those applications. With this function, you also get a report of users that exist in more than one local instance.
Conclusion
In this post, you learned the differences between an IAM Identity Center organization instance and an account instance, considerations for when to use an account instance, and how to use Identity Center APIs to automate discovery of Identity Center account instances in your organization.
If you have feedback about this post, submit comments in the Comments section below. If you have questions about this post, start a new thread on AWS IAM Identity Center re:Post or contact AWS Support.
Want more AWS Security news? Follow us on Twitter.
Welcome to the fifth post in the Establishing a data perimeter on AWS series. Throughout this series, we’ve discussed how a set of preventative guardrails can create an always-on boundary to help ensure that your trusted identities are accessing your trusted resources over expected networks. In a previous post, we emphasized the importance of preventing access from unexpected locations, even for authorized users. For example, you wouldn’t expect non-public corporate data to be accessed from outside the corporate network. In this post, we demonstrate how to use preventative controls to help ensure that your resources are deployed within your Amazon Virtual Private Cloud (Amazon VPC), so that you can effectively enforce the network perimeter controls. We also explore detective controls you can use to detect the lack of adherence to this requirement.
Let’s begin with a quick refresher on the fundamental concept of data perimeters using Figure 1 as a reference. Customers generally prefer establishing a high-level perimeter to help prevent untrusted entities from coming in and data from going out. The perimeter defines what access customers expect within their AWS environment. It refers to the access patterns among your identities, resources, and networks that should always be blocked. Using those three elements, an assertion can be made to define your perimeter’s goal: access can only be allowed if the identity is trusted, the resource is trusted, and the network is expected. If any of these conditions are false, then the access inside the perimeter is unintended and should be denied. The perimeter is composed of controls implemented on your identities, resources, and networks to maintain that the necessary conditions are true.
Figure 1: A high-level depiction of defining a perimeter around your AWS resources to prevent interaction with unintended IAM principals, unintended resources, and unexpected networks
Now, let’s consider a scenario to understand the problem statement this post is trying to solve. Assume a setup like the one in Figure 2, where an application needs to access an Amazon Simple Storage Service (Amazon S3) bucket using its temporary AWS Identity and Access Management (IAM) credentials over an Amazon S3 VPC endpoint.
Figure 2: Scenario of a simple app using its temporary credential to access an S3 bucket
From our previous posts in this series, we’ve learned that we can use the following set of capabilities to build a network perimeter to achieve our control objectives for this sample scenario.
Control objective
Implemented using
Applicable IAM capability
My identities can access resources only from expected networks. For example, in Figure 2, my application’s temporary credential can only access my S3 bucket when my application is within my expected network space.
Service control policies (SCP)
aws:SourceIp aws:SourceVpc aws:SourceVpce
My resources can only be accessed from expected networks. For example, in Figure 2, my S3 bucket can only be accessed from my expected network space.
Resource-based policies
aws:SourceIp aws:SourceVpc aws:SourceVpce
But there are certain AWS services that allow for different network deployment models, such as providing the choice of associating the service resources with either an AWS managed VPC or a customer managed VPC. For example, an AWS Lambda function always runs inside a VPC owned by the Lambda service (AWS managed VPC) and by default isn’t connected to VPCs in your account (customer managed VPC). For more information, see Connecting Lambda functions to your VPC.
This means that if your application code was deployed as a Lambda function that isn’t connected to your VPC, then the function cannot access your resources with standard network perimeter controls enforced. Let’s understand this situation better using Figure 3, where a Lambda function isn’t configured to connect to the customer VPC. This function cannot access your S3 bucket over the internet because of how the recommended data perimeter in the preceding table has been defined, that is, to only allow your bucket to be accessible from a known network segment (the customer VPC and IP CIDR range) and only allow the IAM role associated with the Lambda function to allow accessing the bucket from known networks. The function also cannot access your S3 bucket through your S3 VPC endpoint because the function isn’t associated with the customer VPC. Lastly, unless other compensating controls are in place, this function might be able to access untrusted resources as your standard data perimeter controls enforced with the VPC endpoint policies won’t be in effect, which might not meet your company’s security requirements.
Figure 3: Lambda function configured to be associated with AWS managed VPC
This means that for the Lambda function to conform to your data perimeter, it must be associated with your network segment (customer VPC) as shown in Figure 4.
Figure 4: Lambda function configured to be associated with the customer managed VPC
To make sure that your Lambda functions are deployed into your networks so that they can access your resources under the purview of data perimeter controls, it’s preferable to have a way to automatically prevent deployment or configuration errors. Additionally, if you have a large deployment of Lambda functions across hundreds or even thousands of accounts, you want an efficient way to enforce conformance of these functions to your data perimeter.
To solve for this problem and make sure that an application team or a developer cannot create a function that’s not associated with your VPC, you can use the lambda:VpcIds or lambda:SubnetIds IAM condition keys (for more information, see Using IAM condition keys for VPC settings). These keys allow you to create and update functions only when VPC settings are satisfied.
In the following SCP example, an IAM principal that is subject to the following SCP policy will only be able to create or update a Lambda function if the function is associated with a VPC (customer VPC). When the customer VPC isn’t specified, the lambda:VpcIds condition key has no value—it is null—and thus this policy will deny creating or updating the function. For more information about how the Null condition operator functions, see Condition operator to check existence of condition keys.
AWS services such as AWS Glue and Amazon SageMaker have similar feature behavior and provide similar condition keys. For example, the glue:VpcIds condition key allows you to govern the creation of AWS Glue jobs only in your VPC. For further details and an example policy, see Control policies that control settings using condition keys.
The AWS Well-Architected Framework recommends applying a defense in-depth approach with multiple security controls (see Security Pillar). This is why in addition to the preventative controls discussed in the form of condition keys in this post, you should also consider using AWS native fully managed governance tools to help you manage your environment’s deployed resources and their conformance to your data perimeter (see Management and Governance on AWS).
In this post, we discussed how you can enforce that specific AWS services resources can only be created such that they adhere to your data perimeter. We used a sample scenario to dive into AWS Lambda and its network deployment options. We then used IAM condition keys as preventative controls to enforce predictable creation of Lambda functions conforming with our security standard. We also discussed additional AWS services that have similar behavior when the same concepts apply. Finally, we briefly discussed some AWS provided managed rules and security checks that you can use as supplementary detective controls to ensure that your preventative controls are in effect as expected.
Additional resources
The following are some additional resources that you can use to further explore data perimeters.
Amazon Redshift is a fully managed, petabyte-scale data warehouse service in the cloud. With Amazon Redshift, you can analyze all your data to derive holistic insights about your business and your customers.
Amazon Redshift now supports custom URLs or custom domain names for your data warehouse. You might want to use a custom domain name or CNAME (Canonical Name) for the following reasons:
A custom domain name is straightforward to recall and use.
Routing connections is less disruptive. The connections from the client are pointed to the DNS record and not the server name. This lets you easily route connections to new clusters in failover or disaster recovery scenarios.
You can now obfuscate your server names with a friendly custom domain name.
It helps you avoid application code or connectivity changes in case the underlying data warehouse is migrated to a different Region or the endpoint is changed.
In this post, we discuss how you can modify your data warehouse to use custom domain names and how to connect to a data warehouse that has been configured with a custom URL.
Pre-requisites
To get started, you need a registered domain name. You can use Amazon Route 53 or a third-party domain registrar to register a domain.
You also need a validated Secure Sockets Layer (SSL) certificate for your custom endpoints. This is to verify ownership of the domain name and secure communication. You can use AWS Certificate Manager (ACM) to provision, manage, and deploy public SSL/TLS certificates. You need to use verify-full mode, which ensures that the connections are encrypted and verifies that the hostname of the server matches the hostname in the certificate.
Lastly, you need to attach the necessary permissions to the AWS Identity and Access Management (IAM) role that’s assigned to the relevant users and groups that will manage your Redshift data warehouse. These vary depending on if you’re using Amazon Redshift provisioned or Amazon Redshift Serverless. The permissions needed for the required actions are listed in the following table.
Action
IAM Permission
Redshift Provisioned
Redshift Serverless
Create custom domain for datawarehouse
redshift:CreateCustomDomainAssociation
acm:DescribeCertificate
redshiftServerless:CreateCustomDomainAssociation
acm:DescribeCertificate
Renaming cluster that has custom domain name
acm:DescribeCertificate
Not needed
Changing certificate for association
redshift:ModifyCustomDomainAssociation
acm:DescribeCertificate
redshiftServerless:UpdateCustomDomainAssociation
acm:DescribeCertificate
Deleting custom domain
redshift:DeleteCustomDomainAssociation
redshiftServerless:DeleteCustomDomainAssociation
Connecting to the data warehouse using custom domain name
redshift:DescribeCustomDomainAssociations
Not needed
The following screenshot shows an example of creating an IAM policy on the IAM console.
Creating DNS CNAME entry for custom domain name
The custom domain name typically includes the root domain and a subdomain, like mycluster.mycompany.com. You can either register a new root domain or use an existing one. For more information about registering a new domain with Route 53, refer to Registering a new domain.
After you set that up, you can add a DNS record that points your custom CNAME to the Redshift endpoint. You can find the data warehouse endpoint on the Amazon Redshift console on the cluster detail page.
The following screenshot illustrates locating a provisioned endpoint.
The following screenshot illustrates locating a serverless endpoint.
Now that you have created the CNAME entry, you can request a certificate from ACM. Complete the following steps:
Open the ACM console and choose Request a certificate.
For Fully qualified domain name, enter your custom domain name.
Choose Request.
Confirm that the request is validated by the owner of the domain by checking the status of the certificate.
The status should be Issued.
Now that you have created the CNAME record and certificate, you can create the custom domain URL for your Redshift cluster using the Amazon Redshift console.
Creating custom domain for a provisioned instance
To create a custom domain for a provisioned instance, complete the following steps:
On the Amazon Redshift console, navigate to your provisioned instance detail page.
On the Actions menu, choose Create custom domain name.
For Custom domain name, enter the CNAME record for your Redshift provisioned cluster.
For ACM certificate, choose the appropriate certificate.
Choose Create.
You should now have a custom domain name associated to your provisioned data warehouse. The custom domain name and custom domain certificate ARN values should now be populated with your entries.
Note that sslmode=verify-full will only work for the new custom endpoint. You can’t use this mode with the default endpoint; you can connect to the default endpoint by using other SSL modes like sslmode=verify-ca.
Create a custom domain for a serverless instance
To create a custom domain for a serverless instance, complete the following steps:
On the Amazon Redshift console, navigate to your serverless instance detail page.
On the Actions menu, choose Create custom domain name.
For Custom domain name, enter the CNAME record for your Redshift Serverless workgroup.
For ACM certificate, choose the appropriate certificate.
Choose Create.
You should now have a custom domain name associated to your serverless workgroup. The custom domain name and custom domain certificate ARN values should now be populated with your entries.
Note that, as with a provisioned instance, sslmode=verify-full will only work for the new custom endpoint. You can’t use this mode with the default endpoint; you can connect to the default endpoint by using other SSL modes like sslmode=verify-ca.
Connect using custom domain name
You can now connect to your cluster using the custom domain name. The JDBC URL would be similar to jdbc:redshift://prefix.rootdomain.com:5439/dev?sslmode=verify-full, where prefix.rootdomain.com is your custom domain name and dev is the default database. Use your preferred editor to connect to this URL using your user name and password.
Update the certificate association for your provisioned custom domain
To update the certificate association using the Amazon Redshift console, navigate to your provisioned cluster details page and on the Actions menu, choose Edit custom domain name. Update the domain name and ACM certificate, then choose Save changes.
To change the cluster’s ACM certificate associated to the custom domain using the AWS Command Line Interface (AWS CLI), use the following command:
Update the certificate for your serverless custom domain
To update the certificate using the Amazon Redshift console, navigate to your serverless workgroup details page and on the Actions menu, choose Edit custom domain name. Update the domain name and ACM certificate, then choose Save changes.
To change the serverless workgroup’s ACM certificate associated to the custom domain using the AWS CLI, use the following command:
To delete your custom domain, navigate to the provisioned cluster details page. On the Actions menu, choose Delete custom domain name. Enter delete to confirm, then choose Delete.
To delete your custom domain, navigate to the serverless workgroup details page. On the Actions menu, choose Delete custom domain name. Enter delete to confirm, then choose Delete.
In this post, we discussed the benefits of using custom domain names for your Redshift data warehouse and the steps needed to associate a custom domain name with the Redshift endpoint. For more information, refer to Using a custom domain name for client connections.
About the Authors
Raghu Kuppala is an Analytics Specialist Solutions Architect experienced working in the databases, data warehousing, and analytics space. Outside of work, he enjoys trying different cuisines and spending time with his family and friends.
Sam Selvan is a Principal Analytics Solution Architect with Amazon Web Services.
Yanzhu Ji is a Product Manager in the Amazon Redshift team. She has experience in product vision and strategy in industry-leading data products and platforms. She has outstanding skill in building substantial software products using web development, system design, database, and distributed programming techniques. In her personal life, Yanzhu likes painting, photography, and playing tennis.
Nikhitha Loyapally is a Senior Software Development Engineer for Amazon Redshift.
AWS Security Hub provides a comprehensive view of your security posture in Amazon Web Services (AWS) and helps you check your environment against security standards and best practices. In this post, I show you a solution to export Security Hub findings to a .csv file weekly and send an email notification to download the file from Amazon Simple Storage Service (Amazon S3). By using this solution, you can share the report with others without providing access to your AWS account. You can also use it to generate assessment reports and prioritize and build a remediation roadmap.
Cloud security processes can differ from traditional on-premises security in that security is often decentralized in the cloud. With traditional on-premises security operations, security alerts are typically routed to centralized security teams operating out of security operations centers (SOCs). With cloud security operations, it’s often the application builders or DevOps engineers who are best situated to triage, investigate, and remediate security alerts.
This solution uses the Security Hub API, AWS Lambda, Amazon S3, and Amazon Simple Notification Service (Amazon SNS). Findings are aggregated into a .csv file to help identify common security issues that might require remediation action.
Solution overview
This solution assumes that Security Hub is enabled in your AWS account. If it isn’t enabled, set up the service so that you can start seeing a comprehensive view of security findings across your AWS accounts.
How the solution works
An Amazon EventBridge time-based event invokes a Lambda function for processing.
The Lambda function gets finding results from the Security Hub API and writes them into a .csv file.
The API uploads the file into Amazon S3 and generates a presigned URL with a 24-hour duration, or the duration of the temporary credential used in Lambda, whichever ends first.
Amazon SNS sends an email notification to the address provided during deployment. This email address can be updated afterwards through the Amazon SNS console.
The email includes a link to download the file.
Figure 1: Solution overview, deployed through AWS CloudFormation
An Amazon SNS topic named SecurityHubRecurringFullReport and an email subscription to the topic.
Figure 2: SNS topic created by the solution
The email address that subscribes to the topic is captured through a CloudFormation template input parameter. The subscriber is notified by email to confirm the subscription. After confirmation, the subscription to the SNS topic is created. Additional subscriptions can be added as needed to include additional emails or distribution lists.
Figure 3: SNS email subscription
The SendSecurityHubFullReportEmail Lambda function queries the Security Hub API to get findings into a .csv file that’s written to Amazon S3. A pre-authenticated link to the file is generated and sends the email message to the SNS topic described above.
Figure 4: Lambda function created by the solution
An IAM role for the Lambda function to be able to create logs in CloudWatch, get findings from Security Hub, publish messages to SNS, and put objects into an S3 bucket.
Figure 5: Permissions policy for the Lambda function
An EventBridge rule that runs on a schedule named SecurityHubFullReportEmailSchedule used to invoke the Lambda function that generates the findings report. The default schedule is every Monday at 8:00 AM UTC. This schedule can be overwritten by using a CloudFormation input parameter. Learn more about creating cron expressions.
Figure 6: Example of the EventBridge schedule created by the solution
Copy the template to an S3 bucket within your target AWS account and Region. Copy the object URL for the CloudFormation template .json file.
On the AWS Management Console, go to the CloudFormation console. Choose Create Stack and select With new resources.
Figure 7: Create stack with new resources
Under Specify template, in the Amazon S3 URL textbox, enter the S3 object URL for the .json file that you uploaded in step 1.
Figure 8: Specify S3 URL for CloudFormation template
Choose Next. On the next page, do the following:
Stack name: Enter a name for the stack.
Email address: Enter the email address of the subscriber to the Security Hub findings email.
RecurringScheduleCron: Enter the cron expression for scheduling the Security Hub findings email. The default is every Monday at 8:00 AM UTC. Learn more about creating cron expressions.
SecurityHubRegion: Enter the Region where Security Hub is aggregating the findings.
Figure 9: Enter stack name and parameters
Choose Next.
Keep all defaults in the screens that follow and choose Next.
Check the box I acknowledge that AWS CloudFormation might create IAM resources, and then choose Create stack.
Test the solution
You can send a test email after the deployment is complete. To do this, open the Lambda console and locate the SendSecurityHubFullReportEmail Lambda function. Perform a manual invocation with an event payload to receive an email within a few minutes. You can repeat this procedure as many times as you want.
Conclusion
In this post I’ve shown you an approach for rapidly building a solution for sending weekly findings report of the security posture of your AWS account as evaluated by Security Hub. This solution helps you to be diligent in reviewing outstanding findings and to remediate findings in a timely way based on their severity. You can extend the solution in many ways, including:
Send a file to an email-enabled ticketing service, such as ServiceNow or another security information and event management (SIEM) that you use.
Add links to internal wikis for workflows such as organizational exceptions to vulnerabilities or other internal processes.
Extend the solution by modifying the filters, email content, and delivery frequency.
If you have feedback about this post, submit comments in the Comments section below. If you have any questions about this post, start a thread on the AWS Security Hub re:Post forum.
Want more AWS Security news? Follow us on Twitter.
Amazon DynamoDB is a fully managed, serverless, key-value NoSQL database designed to run high-performance applications at any scale. DynamoDB offers built-in security, continuous backups, automated multi-Region replication, in-memory caching, and data import and export tools. The scalability and flexible data schema of DynamoDB make it well-suited for a variety of use cases. These include internet-scale web and mobile applications, low-latency metadata stores, high-traffic retail websites, Internet of Things (IoT) and time series data, online gaming, and more.
Data stored in DynamoDB is the basis for valuable business intelligence (BI) insights. To make this data accessible to data analysts and other consumers, you can use Amazon Athena. Athena is a serverless, interactive service that allows you to query data from a variety of sources in heterogeneous formats, with no provisioning effort. Athena accesses data stored in DynamoDB via the open source Amazon Athena DynamoDB connector. Table metadata, such as column names and data types, is stored using the AWS Glue Data Catalog.
Finally, to visualize BI insights, you can use Amazon QuickSight, a cloud-powered business analytics service. QuickSight makes it straightforward for organizations to build visualizations, perform ad hoc analysis, and quickly get business insights from their data, anytime, on any device. Its generative BI capabilities enable you to ask questions about your data using natural language, without having to write SQL queries or learn a BI tool.
This post shows how you can use the Athena DynamoDB connector to easily query data in DynamoDB with SQL and visualize insights in QuickSight.
Solution overview
The following diagram illustrates the solution architecture.
The Athena DynamoDB connector runs in a pre-built, serverless AWS Lambda function. You don’t need to write any code.
AWS Glue provides supplemental metadata from the DynamoDB table. In particular, an AWS Glue crawler is run to infer and store the DynamoDB table format, schema, and associated properties in the Glue Data Catalog.
The Athena editor is used to test the connector and perform analysis via SQL queries.
QuickSight uses the Athena connector to visualize BI insights from DynamoDB.
The Athena DynamoDB connector comprises a pre-built, serverless Lambda function provided by AWS that communicates with DynamoDB so you can query your tables with SQL using Athena. The connector is available in the AWS Serverless Application Repository, and is used to create the Athena data source for later use in data analysis and visualization. To set up the connector, complete the following steps:
On the Athena console, choose Data sources in the navigation pane.
Choose Create data source.
In the search bar, search for and choose Amazon DynamoDB.
Choose Next.
Under Data source details, enter a name. Note that this name should be unique and will be referenced in your SQL statements when you query your Athena data source.
Under Connection details, choose Create Lambda function.
This will take you to the Lambda applications page on the Lambda console. Do not close the Athena data source creation tab; you will return to it in a later step.
Scroll down to Application settings and enter a value for the following parameters (leave the other parameters as default):
SpillBucket – Specifies the Amazon Simple Storage Service (Amazon S3) bucket name for storing data that exceeds Lambda function response size limits. To create an S3 bucket, refer to Creating a bucket.
AthenaCatalogName – A lowercase name for the Lambda function to be created.
Select the acknowledgement check box and choose Deploy.
Wait for deployment to complete before moving to the next step.
Return to the Athena data source creation tab.
Under Connection details, choose the refresh icon and choose the Lambda function you created.
Choose Next.
Review and choose Create data source.
Provide supplemental metadata via AWS Glue
The Athena connector already comes with a built-in inference capability to discover the schema and table properties of your data source. However, this capability is limited. To accurately discover the metadata of your DynamoDB table and centralize schema management as your data evolves over time, the connector integrates with AWS Glue.
To achieve this, an AWS Glue crawler is run to automatically determine the format, schema, and associated properties of the raw data stored in your DynamoDB table, writing the resulting metadata to a Glue database. Glue databases contain tables, which hold metadata from different data stores, independent from the actual location of the data. The Athena connector then references the Glue table and retrieves the corresponding DynamoDB metadata to enable queries.
Create the AWS Glue database
Complete the following steps to create the Glue database:
On the AWS Glue console, under Data Catalog in the navigation pane, choose Databases.
Choose Add database (you can also edit an existing database if you already have one).
For Name, enter a database name.
For Location, enter the string literal dynamo-db-flag. This keyword indicates that the database contains tables that the connector can use for supplemental metadata.
Choose Create database.
Following security best practices, it is also recommended that you enable encryption at rest for your Data Catalog. For details, refer to Encrypting your Data Catalog.
Create the AWS Glue crawler
Complete the following steps to create and run the Glue crawler:
On the AWS Glue console, under Data Catalog in the navigation pane, choose Crawlers.
Choose Create crawler.
Enter a crawler name and choose Next.
For Data sources, choose Add a data source.
On the Data source drop-down menu, choose DynamoDB. For Table name, enter the name of your DynamoDB table (string literal).
Choose Add a DynamoDB data source.
Choose Next.
For IAM Role, choose Create new IAM role.
Enter a role name and choose Create. This will automatically create an IAM role that trusts AWS Glue and has permissions to access the crawler targets.
Choose Next.
For Target database, choose the database previously created.
Choose Next.
Review and choose Create crawler.
On the newly created crawler page, choose Run crawler.
Crawler runtimes depend on your DynamoDB table size and properties. You can find crawler run details under Crawler runs.
Validate the output metadata
When your crawler run status shows as Completed, follow the below steps to validate the output metadata:
On the AWS Glue console, choose Tables in the navigation pane. Here, you can confirm a new table has been added to the database as a result of the crawler run.
Navigate to the newly created table and take a look at the Schema tab. This tab shows the column names, data types, and other parameters inferred from your DynamoDB table.
If needed, edit the schema by choosing Edit schema.
Choose Advanced properties.
Under Table properties, verify the crawler automatically created and set the classification key to dynamodb. This indicates to the Athena connector that the table can be used for supplemental metadata.
Optionally, add the following properties to correctly catalog and reference DynamoDB data in AWS Glue and Athena queries. This is due to capital letters not being permitted in AWS Glue table and column names, but being permitted in DynamoDB table and attribute names.
If your DynamoDB table name contains any capital letters, choose Actions and Edit Table and add an extra table property as follows:
Key: sourceTable
Value: YourDynamoDBTableName
If your DynamoDB table has attributes that contain any capital letters, add an extra table property as follows:
After the Athena DynamoDB connector is deployed and the AWS Glue table is populated with supplemental metadata, the DynamoDB table is ready for analysis. The example in this post uses the Athena editor to make SQL queries to the ProductCatalog table. For further options to interact with Athena, see Accessing Athena.
Complete the following steps to test the connector:
If this is your first time visiting the Athena console in your current AWS Region, complete the following steps. This is a prerequisite before you can run Athena queries. See Getting Started for more details.
Choose Query editor in the navigation pane to open the editor.
Navigate to Settings and choose Manage to set up a query result location in Amazon S3.
Under Data, select the data source and database you created (you may need to choose the refresh icon for them to sync up with Athena).
Tables belonging to the selected database appear under Tables. You can choose a table name for Athena to show the table column list and data types.
Test the connector by pulling data from your table via a SELECT statement. When you run Athena queries, you can reference Athena data sources, databases, and tables as <datasource_name>.<database>.<table_name>. Retrieved records are shown under Results.
For this post, we run a SELECT statement to validate the process. You can refer to the SQL reference for Athena to build more complex queries and analyses.
Visualize in QuickSight
QuickSight allows for building modern interactive dashboards, paginated reports, embedded analytics, and natural language queries through a unified BI solution. In this step, we use QuickSight to generate visual insights from the DynamoDB table by connecting to the Athena data source previously created.
Allow QuickSight to access to resources
Complete the following steps to grant QuickSight access to resources:
On the QuickSight console, choose the profile icon and choose Manage QuickSight.
In the navigation pane, choose Security & Permissions.
Under QuickSight access to AWS services, choose Manage.
QuickSight may ask you to switch to the Region in which users and groups in your account are managed. To change the current Region, navigate to the profile icon on the QuickSight console and choose the Region you want to switch to.
For IAM Role, choose Use QuickSight-managed role (default).
Subsequent instructions assume that the default QuickSight-managed role is being used. If this is not the case, make sure to update the existing role to the same effect.
Under Allow access and autodiscovery for these resources, select IAM and Amazon S3.
For Amazon S3, choose Select S3 buckets.
Choose the spill bucket you specified in earlier when deploying the Lambda function for the connector and the bucket you specified as the Athena query result location in Amazon S3.
For both buckets, select Write permission for Athena Workgroup.
Choose Amazon Athena.
In the pop-up window, choose Next.
Choose Lambda and choose the Amazon Resource Name (ARN) of the Lambda function previously used for the Athena data source connector.
Choose Finish.
Choose Save.
Create the Athena dataset
To create the Athena dataset, complete the following steps:
On the QuickSight console, choose the user profile and switch to the Region you deployed the Athena data source to.
Return to the QuickSight home page.
In the navigation pane, choose Datasets.
Choose New dataset.
For Create a Dataset, select Athena.
For Data source name, enter a name and choose Validate connection.
When the connection shows as Validated, choose Create data source.
Under Catalog, Database, and Tables, select the Athena data source, AWS Glue database, and AWS Glue table previously created.
Choose Select.
On the Finish dataset creation page, select Import to SPICE for quicker analytics.
Once the DynamoDB data is available in QuickSight via the Athena DynamoDB connector, it is ready to be visualized. The QuickSight analysis in the below example shows a vertical stacked bar chart with the average price per product category for the ProductCatalog sample dataset. In addition, it shows a donut chart with the proportion of products by product category, and a tree map containing the count of bicycles per bicycle type.
If you use data imported to SPICE in a QuickSight analysis, the dataset will only be available after the import is complete. For further details, see Using SPICE data in an analysis.
If you no longer need the Athena data source to create other datasets, delete the data source.
Summary
This post demonstrated how you can use the Athena DynamoDB connector to query data in DynamoDB with SQL and build visualizations in QuickSight.
Learn more about the Athena DynamoDB connector in the Amazon Athena User Guide. Discover more available data source connectors to query and visualize a variety of data sources without setting up or managing any infrastructure while only paying for the queries you run.
Antonio Samaniego Jurado is a Solutions Architect at Amazon Web Services. With a strong passion for modern technology, Antonio helps customers build state-of-the-art applications on AWS. A creator at heart, he loves community-driven learning and sharing of best practices across the AWS service portfolio to make the best of customers cloud journey.
Pascal Vogel is a Solutions Architect at Amazon Web Services. Pascal helps startups and enterprises build cloud-native solutions. As a cloud enthusiast, Pascal loves learning new technologies and connecting with like-minded customers who want to make a difference in their cloud journey.
Amazon Redshift is a cloud data warehousing service that provides high-performance analytical processing based on a massively parallel processing (MPP) architecture. Building and maintaining data pipelines is a common challenge for all enterprises. Managing the SQL files, integrating cross-team work, incorporating all software engineering principles, and importing external utilities can be a time-consuming task that requires complex design and lots of preparation.
dbt (DataBuildTool) offers this mechanism by introducing a well-structured framework for data analysis, transformation and orchestration. It also applies general software engineering principles like integrating with git repositories, setting up DRYer code, adding functional test cases, and including external libraries. This mechanism allows developers to focus on preparing the SQL files per the business logic, and the rest is taken care of by dbt.
How does the dbt framework work with Amazon Redshift?
dbt has an Amazon Redshift adapter module named dbt-redshift that enables it to connect and work with Amazon Redshift. All the connection profiles are configured within the dbt profiles.yml file. In an optimal environment, we store the credentials in AWS Secrets Manager and retrieve them.
The following code shows the contents of profile.yml:
The following diagram illustrates the key components of the dbt framework:
The primary components are as follows:
Models – These are written as a SELECT statement and saved as a .sql file. All the transformation queries can be written here which can be materialized as a table or view. The table refresh can be full or incremental based on the configuration. For more information, refer SQL models.
Snapshots – These implements type-2 slowly changing dimensions (SCDs) over mutable source tables. These SCDs identify how a row in a table changes over time.
Seeds – These are CSV files in your dbt project (typically in your seeds directory), which dbt can load into your data warehouse using the dbt seed command.
Tests – These are assertions you make about your models and other resources in your dbt project (such as sources, seeds, and snapshots). When you run dbt test, dbt will tell you if each test in your project passes or fails.
Macros – These are pieces of code that can be reused multiple times. They are analogous to “functions” in other programming languages, and are extremely useful if you find yourself repeating code across multiple models.
These components are stored as .sql files and are run by dbt CLI commands. During the run, dbt creates a Directed Acyclic Graph (DAG) based on the internal reference between the dbt components. It uses the DAG to orchestrate the run sequence accordingly.
Multiple profiles can be created within the profiles.yml file, which dbt can use to target different Redshift environments while running. For more information, refer to Redshift set up.
Solution overview
The following diagram illustrates our solution architecture.
The workflow contains the following steps:
The open source dbt-redshift connector is used to create our dbt project including all the necessary models, snapshots, tests, macros and profiles.
A Docker image is created and pushed to the ECR repository.
The Docker image is run by Fargate as an ECS task triggered via AWS Step Functions. All the Amazon Redshift credentials are stored in Secrets Manager, which is then used by the ECS task to connect with Amazon Redshift.
During the run, dbt converts all the models, snapshots, tests and macros to Amazon Redshift compliant SQL statements and it orchestrates the run based on the internal data lineage graph maintained. These SQL commands are run directly on the Redshift cluster and therefore the workload is pushed to Amazon Redshift directly.
When the run is complete, dbt will create a set of HTML and JSON files to host the dbt documentation, which describes the data catalog, compiled SQL statements, data lineage graph, and more.
Prerequisites
You should have the following prerequisites:
A good understanding of the dbt principles and implementation steps.
An AWS account with user role permission to access the AWS services used in this solution.
Security groups for Fargate to access the Redshift cluster and Secrets Manager from Amazon ECS.
A Redshift cluster. For creation instructions, refer to Create a cluster.
A Secrets Manager secret containing all the credentials for connecting to Amazon Redshift. This includes the host, port, database name, user name, and password. For more information, refer to Create an AWS Secrets Manager database secret.
We are using dbt CLI so all commands are run in the command line. Therefore, install pip if not already installed. Refer to installation for more information.
To create a dbt project, complete the following steps:
Initialize a dbt project using the dbt init <project_name> command, which creates all the template folders automatically.
Add all the required DBT artifacts. Refer to the dbt-redshift-etlpattern repo which includes a reference dbt project. For more information about building projects, refer to About dbt projects.
In the reference project, we have implemented the following features:
SCD type 1 using incremental models
SCD type 2 using snapshots
Seed look-up files
Macros for adding reusable code in the project
Tests for analyzing inbound data
The Python script is prepared to fetch the credentials required from Secrets Manager for accessing Amazon Redshift. Refer to the export_redshift_connection.py file.
Prepare the run_dbt.sh script to run the dbt pipeline sequentially. This script is placed in the root folder of the dbt project as shown in sample repo.
-- Import the dependent external libraries
dbt deps --profiles-dir . --project-dir .

-- Create tables based on the seed files
dbt seed --profiles-dir . --project-dir .

-- Run all the model files
dbt run --profiles-dir . --project-dir .

-- Run all the snapshot files
dbt snapshot --profiles-dir . --project-dir .

-- Run all inbuilt and custom test cases prepared
dbt test --profiles-dir . --project-dir .

-- Generate dbt documentation files
dbt docs generate --profiles-dir . --project-dir .

--Copying dbt outputs to s3 bucket - for hosting
aws s3 cp --recursive --exclude="*" --include="*.json" --include="*.html" dbt/target/ s3://<bucketName>/REDSHIFT_POC/
Create a Docker file in the parent directory of the dbt project folder. This step builds the image of the dbt project to be pushed to the ECR repository.
FROM python:3

ADD dbt_src /dbt_src

RUN pip install -U pip

# Install DBT libraries
RUN pip install --no-cache-dir dbt-core

RUN pip install --no-cache-dir dbt-redshift

RUN pip install --no-cache-dir boto3

RUN pip install --no-cache-dir awscli

WORKDIR /dbt_src

RUN chmod -R 755 .

ENTRYPOINT [ "/bin/sh", "-c" ]

CMD ["./run_dbt.sh"]
Upload the image to Amazon ECR and run it as an ECS task
To push the image to the ECR repository, complete the following steps:
Retrieve an authentication token and authenticate your Docker client to your registry:
Build your Docker image using the following command:
docker build -t <image tag> .
After the build is complete, tag your image so you can push it to the repository:
docker tag <image tag>:latest <repository_name>:latest
Run the following command to push the image to your newly created AWS repository:
docker push <repository_name>/<image tag>:latest
On the Amazon ECS console, create a cluster with Fargate as an infrastructure option.
Provide your VPC and subnets as required.
After you create the cluster, create an ECS task and assign the created dbt image as the task definition family.
In the networking section, choose your VPC, subnets, and security group to connect with Amazon Redshift, Amazon S3 and Secrets Manager.
This task will trigger the run_dbt.sh pipeline script and run all the dbt commands sequentially. When the script is complete, we can see the results in Amazon Redshift and the documentation files pushed to Amazon S3.
This post covered the basic implementation of using dbt with Amazon Redshift in a cost-efficient way by using Fargate in Amazon ECS. We described the key infrastructure and configuration set-up with a sample project. This architecture can help you take advantage of the benefits of having a dbt framework to manage your data warehouse platform in Amazon Redshift.
For more information about dbt macros and models for Amazon Redshift internal operation and maintenance, refer to the following GitHub repo. In subsequent post, we’ll explore the traditional extract, transform, and load (ETL) patterns that you can implement using the dbt framework in Amazon Redshift. Test this solution in your account and provide feedback or suggestions in the comments.
About the Authors
Seshadri Senthamaraikannan is a data architect with AWS professional services team based in London, UK. He is well experienced and specialised in Data Analytics and works with customers focusing on building innovative and scalable solutions in AWS Cloud to meet their business goals. In his spare time, he enjoys spending time with his family and play sports.
Mohamed Hamdy is a Senior Big Data Architect with AWS Professional Services based in London, UK. He has over 15 years of experience architecting, leading, and building data warehouses and big data platforms. He helps customers develop big data and analytics solutions to accelerate their business outcomes through their cloud adoption journey. Outside of work, Mohamed likes travelling, running, swimming and playing squash.
Early-feedback loops exist to provide developers with ongoing feedback through automated checks. This enables developers to take early remedial action while increasing the efficiency of the code review process and, in turn, their productivity.
Early-feedback loops help provide confidence to reviewers that fundamental security and compliance requirements were validated before review. As part of this process, common expectations of code standards and quality can be established, while shifting governance mechanisms to the left.
In this post, we will show you how to use AWS developer tools to implement a shift-left approach to security that empowers your developers with early feedback loops within their development practices. You will use AWS CodeCommit to securely host Git repositories, AWS CodePipeline to automate continuous delivery pipelines, AWS CodeBuild to build and test code, and Amazon CodeGuru Reviewer to detect potential code defects.
Why the shift-left approach is important
Developers today are an integral part of organizations, building and maintaining the most critical customer-facing applications. Developers must have the knowledge, tools, and processes in place to help them identify potential security issues before they release a product to production.
This is why the shift-left approach is important. Shift left is the process of checking for vulnerabilities and issues in the earlier stages of software development. By following the shift-left process (which should be part of a wider application security review and threat modelling process), software teams can help prevent undetected security issues when they build an application. The modern DevSecOps workflow continues to shift left towards the developer and their practices with the aim to achieve the following:
Drive accountability among developers for the security of their code
Empower development teams to remediate issues up front and at their own pace
Improve risk management by enabling early visibility of potential security issues through early feedback loops
You can use AWS developer tools to help provide this continual early feedback for developers upon each commit of code.
Solution prerequisites
To follow along with this solution, make sure that you have the following prerequisites in place:
Make sure that you have a general working knowledge of the listed services and DevOps practices.
Solution overview
The following diagram illustrates the architecture of the solution.
Figure 1: Solution overview
We will show you how to set up a continuous integration and continuous delivery (CI/CD) pipeline by using AWS developer tools—CodeCommit, CodePipeline, CodeBuild, and CodeGuru—that you will integrate with the code repository to detect code security vulnerabilities. As shown in Figure 1, the solution has the following steps:
The developer commits the new branch into the code repository.
The developer creates a pull request to the main branch.
CodeGuru Reviewer uses program analysis and machine learning to help detect potential defects in your Java and Python code, and provides recommendations to improve the code. CodeGuru Reviewer helps detect security vulnerabilities, secrets, resource leaks, concurrency issues, incorrect input validation, and deviation from best practices for using AWS APIs and SDKs.
You can configure the CodeBuild deployment with third-party tools, such as Bandit for Python to help detect security issues in your Python code.
CodeGuru Reviewer or CodeBuild writes back the findings of the code scans to the pull request to provide a single common place for developers to review the findings that are relevant to their specific code updates.
The following table presents some other tools that you can integrate into the early-feedback toolchain, depending on the type of code or artefacts that you are evaluating:
When you deploy the solution in your AWS account, you can review how Bandit for Python has been built into the deployment pipeline by using AWS CodeBuild with a configured buildspec file, as shown in Figure 2. You can implement the other tools in the table by using a similar approach.
Figure 2: Bandit configured in CodeBuild
Walkthrough
To deploy the solution, you will complete the following steps:
The first step is to deploy the required resources into your AWS environment by using CloudFormation.
To deploy the solution
Choose the following Launch Stack button to deploy the solution’s CloudFormation template:
The solution deploys in the AWS US East (N. Virginia) Region (us-east-1) by default because each service listed in the Prerequisites section is available in this Region. To deploy the solution in a different Region, use the Region selector in the console navigation bar and make sure that the services required for this walkthrough are supported in your newly selected Region. For service availability by Region, see AWS Services by Region.
On the Quick Create Stack screen, do the following:
Leave the provided parameter defaults in place.
Scroll to the bottom, and in the Capabilities section, select I acknowledge that AWS CloudFormation might create IAM resources with custom names.
Choose Create Stack.
When the CloudFormation template has completed, open the AWS Cloud9 console.
In the Environments table, for the provisioned shift-left-blog-cloud9-ide environment, choose Open, as shown in Figure 3.
Figure 3: Cloud9 environments
The provisioned Cloud9 environment opens in a new tab. Wait for Cloud9 to initialize the two sample code repositories: shift-left-sample-app-java and shift-left-sample-app-python, as shown in Figure 4. For this post, you will work only with the Python sample repository shift-left-sample-app-python, but the procedures we outline will also work for the Java repository.
Figure 4: Cloud9 IDE
Associate CodeGuru Reviewer with a code repository
The next step is to associate the Python code repository with CodeGuru Reviewer. After you associate the repository, CodeGuru Reviewer analyzes and comments on issues that it finds when you create a pull request.
To associate CodeGuru Reviewer with a repository
Open the CodeGuru console, and in the left navigation pane, under Reviewer, choose Repositories.
In the Repositories section, choose Associate repository and run analysis.
In the Associate repository section, do the following:
For Select source provider, select AWS CodeCommit.
For Repository location,select shift-left-sample-app-python.
In the Run a repository analysis section, do the following, as shown in Figure 5:
For Source branch, select main.
For Code review name – optional, enter a name.
For Tags – optional, leave the default settings.
Choose Associate repository and run analysis.
Figure 5: CodeGuru repository configuration
CodeGuru initiates the Full repository analysis and the status is Pending, as shown in Figure 6. The full analysis takes about 5 minutes to complete. Wait for the status to change from Pending to Completed.
Figure 6: CodeGuru full analysis pending
Create a pull request
The next step is to create a new branch and to push sample code to the repository by creating a pull request so that the code scan can be initiated by CodeGuru Reviewer and the CodeBuild job.
To create a new branch
In the Cloud9 IDE, locate the terminal and create a new branch by running the following commands.
cd ~/environment/shift-left-sample-app-python
git checkout -b python-test
Confirm that you are working from the new branch, which will be highlighted in the Cloud9 IDE terminal, as shown in Figure 7.
git branch -v
Figure 7: Cloud9 IDE terminal
To create a new file and push it to the code repository
Create a new file called sample.py.
touch sample.py
Copy the following sample code, paste it into the sample.py file, and save the changes, as shown in Figure 8.
import requests

data = requests.get("https://www.example.org/", verify = False)
print(data.status_code)
Figure 8: Cloud9 IDE noncompliant code
Commit the changes to the repository.
git status
git add -A
git commit -m "shift left blog python sample app update"
Note: if you receive a message to set your name and email address, you can ignore it because Git will automatically set these for you, and the Git commit will complete successfully.
Push the changes to the code repository, as shown in Figure 9.
git push origin python-test
Figure 9: Git push
To create a new pull request
Open the CodeCommit console and select the code repository called shift-left-sample-app-python.
From the Branches dropdown, select the new branch that you created and pushed, as shown in Figure 10.
Figure 10: CodeCommit branch selection
In your new branch, select the file sample.py, confirm that the file has the changes that you made, and then choose Create pull request, as shown in Figure 11.
Figure 11: CodeCommit pull request
A notification appears stating that the new code updates can be merged.
In the Source dropdown, choose the new branch python-test. In the Destination dropdown, choose the main branch where you intend to merge your code changes when the pull request is closed.
To have CodeCommit run a comparison between the main branch and your new branch python-test, choose Compare. To see the differences between the two branches, choose the Changes tab at the bottom of the page. CodeCommit also assesses whether the two branches can be merged automatically when the pull request is closed.
When you’re satisfied with the comparison results for the pull request, enter a Title and an optional Description, and then choose Create pull request. Your pull request appears in the list of pull requests for the CodeCommit repository, as shown in Figure 12.
Figure 12: Pull request
The creation of this pull request has automatically started two separate code scans. The first is a CodeGuru incremental code review and the second uses CodeBuild, which utilizes Bandit to perform a security code scan of the Python code.
Review code scan results and resolve detected security vulnerabilities
The next step is to review the code scan results to identify security vulnerabilities and the recommendations on how to fix them.
To review the code scan results
Open the CodeGuru console, and in the left navigation pane, under Reviewer, select Code reviews.
On the Incremental code reviews tab, make sure that you see a new code review item created for the preceding pull request.
Figure 13: CodeGuru Code review
After a few minutes, when CodeGuru completes the incremental analysis, choose the code review to review the CodeGuru recommendations on the pull request. Figure 14 shows the CodeGuru recommendations for our example.
Figure 14: CodeGuru recommendations
Open the CodeBuild console and select the CodeBuild job called shift-left-blog-pr-Python. In our example, this job should be in a Failed state.
Open the CodeBuild run, and under the Build history tab, select the CodeBuild job, which is in Failed state. Under the Build Logs tab, scroll down until you see the following errors in the logs. Note that the severity of the finding is High, which is why the CodeBuild job failed. You can review the Bandit scanning options in the Bandit documentation.
Test results:
>> Issue: [B501:request_with_no_cert_validation] Call to requests with verify=False disabling SSL certificate checks, security issue.
   Severity: High   Confidence: High
   CWE: CWE-295 (https://cwe.mitre.org/data/definitions/295.html)
   More Info: https://bandit.readthedocs.io/en/1.7.5/plugins/b501_request_with_no_cert_validation.html
   Location: sample.py:3:7

2
3   data = requests.get("https://www.example.org/", verify = False)
4   print(data.status_code)
Navigate to the CodeCommit console, and on the Activity tab of the pull request, review the CodeGuru recommendations. You can also review the results of the CodeBuild jobs that Bandit performed, as shown in Figure 15.
Figure 15: CodeGuru recommendations and CodeBuild logs
This demonstrates how developers can directly link the relevant information relating to security code scans with their code development and associated pull requests, hence shifting to the left the required security awareness for developers.
To resolve the detected security vulnerabilities
In the Cloud9 IDE, navigate to the file sample.py in the Python sample repository, as shown in Figure 16.
Figure 16: Cloud9 IDE sample.py
Copy the following code and paste it in the sample.py file, overwriting the existing code. Save the update.
import requests

data = requests.get("https://www.example.org", timeout=5)
print(data.status_code)
Commit the changes by running the following commands.
git status
git add -A
git commit -m "shift left python sample.py resolve security errors"
git push origin python-test
Open the CodeCommit console and choose the Activity tab on the pull request that you created earlier. You will see a banner indicating that the pull request was updated. You will also see new comments indicating that new code scans using CodeGuru and CodeBuild were initiated for the new pull request update.
In the CodeGuru console, on the Incremental code reviews page, check that a new code scan has begun. When the scans are finished, review the results in the CodeGuru console and the CodeBuild build logs, as described previously. The previously detected security vulnerability should now be resolved.
In the CodeCommit console, on the Activity tab, under Activity history, review the comments to verify that each of the code scans has a status of Passing, as shown in Figure 17.
Figure 17: CodeCommit activity history
Now that the security issue has been resolved, merge the pull request into the main branch of the code repository. Choose Merge, and under Merge strategy, select Fast Forward merge.
AWS account clean-up
Clean up the resources created by this solution to avoid incurring future charges.
To clean up your account
Start by deleting the CloudFormation stacks for the Java and Python sample applications that you deployed. In the CloudFormation console, in the Stacks section, select one of these stacks and choose Delete; then select the other stack and choose Delete.
Figure 18: Delete repository stack
To initiate deletion of the Cloud9 CloudFormation stack, select it and choose Delete.
Open the Amazon S3 console, and in the search box, enter shift-left to search for the S3 bucket that CodePipeline used.
Figure 19: Select CodePipeline S3 bucket
Select the S3 bucket, select all of the object folders in the bucket, and choose Delete
Figure 20: Select CodePipeline S3 objects
To confirm deletion of the objects, in the section Permanently delete objects?, enter permanently delete, and then choose Delete objects. A banner message that states Successfully deleted objects appears at the top confirming the object deletion.
Navigate back to the CloudFormation console, select the stack named shift-left-blog, and choose Delete.
Conclusion
In this blog post, we showed you how to implement a solution that enables early feedback on code development through status comments in the CodeCommit pull request activity tab by using Amazon CodeGuru Reviewer and CodeBuild to perform automated code security scans on the creation of a code repository pull request.
We configured CodeBuild with Bandit for Python to demonstrate how you can integrate third-party or open-source tools into the development cycle. You can use this approach to integrate other tools into the workflow.
Shifting security left early in the development cycle can help you identify potential security issues earlier and empower teams to remediate issues earlier, helping to prevent the need to refactor code towards the end of a build.
This solution provides a simple method that you can use to view and understand potential security issues with your newly developed code and thus enhances your awareness of the security requirements within your organization.
It’s simple to get started. Sign up for an AWS account, deploy the provided CloudFormation template through the Launch Stack button, commit your code, and start scanning for vulnerabilities.
If you have feedback about this post, submit comments in the Comments section below. If you have questions about this post, start a new thread on AWS re:Post or contact AWS Support.
Want more AWS Security news? Follow us on Twitter.
In today’s data-driven world, organizations face unprecedented challenges in managing and extracting valuable insights from their ever-expanding data ecosystems. As the number of data assets and users grow, the traditional approaches to data management and governance are no longer sufficient. Customers are now building more advanced architectures to decentralize permissions management to allow for individual groups of users to build and manage their own data products, without being slowed down by a central governance team. One of the core features of AWS Lake Formation is the delegation of permissions on a subset of resources such as databases, tables, and columns in AWS Glue Data Catalog to data stewards, empowering them make decisions regarding who should get access to their resources and helping you decentralize the permissions management of your data lakes. Lake Formation has added a new capability that further allows data stewards to create and manage their own Lake Formation tags (LF-tags). Lake Formation tag-based access control (LF-TBAC) is an authorization strategy that defines permissions based on attributes. In Lake Formation, these attributes are called LF-Tags. LF-TBAC is the recommended method to use to grant Lake Formation permissions when there is a large number of Data Catalog resources. LF-TBAC is more scalable than the named resource method and requires less permission management overhead.
In this post, we go through the process of delegating the LF-tag creation, management, and granting of permissions to a data steward.
Lake Formation serves as the foundation for these advanced architectures by simplifying security management and governance for users at scale across AWS analytics. Lake Formation is designed to address these challenges by providing secure sharing between AWS accounts and tag-based access control to be able scale permissions. By assigning tags to data assets based on their characteristics and properties, organizations can implement access control policies tailored to specific data attributes. This ensures that only authorized individuals or teams can access and work with the data relevant to their domain. For example, it allows customers to tag data assets as “Confidential” and grant access to that LF-Tag to only those users who should have access to confidential data. Tag-based access control not only enhances data security and privacy, but also promotes efficient collaboration and knowledge sharing.
The need for producer autonomy and decentralized tag creation and delegation in data governance is paramount, regardless of the architecture chosen, whether it be a single account, hub and spoke, or data mesh with central governance. Relying solely on centralized tag creation and governance can create bottlenecks, hinder agility, and stifle innovation. By granting producers and data stewards the autonomy to create and manage tags relevant to their specific domains, organizations can foster a sense of ownership and accountability among producer teams. This decentralized approach allows you to adapt and respond quickly to changing requirements. This methodology helps organizations strike a balance between central governance and producer ownership, leading to improved governance, enhanced data quality, and data democratization.
Lake Formation announced the tag delegation feature to address this. With this feature, a Lake Formation admin can now provide permission to AWS Identity and Access Management (IAM) users and roles to create tags, associate them, and manage the tag expressions.
Solution overview
In this post, we examine an example organization that has a central data lake that is being used by multiple groups. We have two personas: the Lake Formation administrator LFAdmin, who manages the data lake and onboards different groups, and the data steward LFDataSteward-Sales, who owns and manages resources for the Sales group within the organization. The goal is to grant permission to the data steward to be able to use LF-Tags to perform permission grants for the resources that they own. In addition, the organization has a set of common LF-Tags called Confidentiality and Department, which the data steward will be able to use.
The following diagram illustrates the workflow to implement the solution.
The following are the high-level steps:
Grant permissions to create LF-Tags to a user who is not a Lake Formation administrator (the LFDataSteward-Sales IAM role).
Grant permissions to associate an organization’s common LF-Tags to the LFDataSteward-Sales role.
Create new LF-Tags using the LFDataSteward-Sales role.
Associate the new and common LF-Tags to resources using the LFDataSteward-Sales role.
Grant permissions to other users using the LFDataSteward-Sales role.
Prerequisites
For this walkthrough, you should have the following:
An AWS account.
Knowledge of using Lake Formation and enabling Lake Formation to manage permissions to a set of tables.
An IAM role that is a Lake Formation administrator. For this post, we name ours LFAdmin.
Two LF-Tags created by the LFAdmin:
Key Confidentiality with values PII and Public.
Key Department with values Sales and Marketing.
An IAM role that is a data steward within an organization. For this post, we name ours LFDataSteward-Sales.
The data steward should have ‘Super’ access to at least one database. In this post, the data steward has access to three databases: sales-ml-data, sales-processed-data, and sales-raw-data.
An IAM role to serve as a user that the data steward will grant permissions to using LF-Tags. For this post, we name ours LFAnalysts-MLScientist.
Grant permission to the data steward to be able to create LF-Tags
Complete the following steps to grant LFDataSteward-Sales the ability to create LF-Tags:
As the LFAdmin role, open the Lake Formation console.
In the navigation pane, choose LF-Tags and permissions under Permissions.
Under LF-Tags, because you are logged in as LFAdmin, you can see all the tags that have been created within the account. You can see the Confidentiality LF-Tag as well as the Department LF-Tag and the possible values for each tag.
On the LF-Tag creators tab, choose Add LF-Tag creators.
For IAM users and roles, enter the LFDataSteward-Sales IAM role.
For Permission, select Create LF-Tag.
If you want this data steward to be able to grant Create LF-Tag permissions to other users, select Create LF-Tag under Grantable permission.
Choose Add.
The LFDataSteward-Sales IAM role now has permissions to create their own LF-Tags.
Grant permission to the data steward to use common LF-Tags
We now want to give permission to the data steward to tag using the Confidentiality and Department tags. Complete the following steps:
As the LFAdmin role, open the Lake Formation console.
In the navigation pane, choose LF-Tags and permissions under Permissions.
On the LF-Tag permissions tab, choose Grant permissions.
Select LF-Tag key-value permission for Permission type.
The LF-Tag permission option grants the ability to modify or drop an LF-Tag, which doesn’t apply in this use case.
Select IAM users and roles and enter the LFDataSteward-Sales IAM role.
Provide the Confidentiality LF-Tag and all its values, and the Department LF-Tag with only the Sales value.
Select Describe, Associate, and Grant with LF-Tag expression under Permissions.
Choose Grant permissions.
This gave the LFDataSteward-Sales role the ability to tag resources using the Confidentiality tag and all its values as well as the Department tag with only the Sales value.
Create new LF-Tags using the data steward role
This step demonstrates how the LFDataSteward-Sales role can now create their own LF-Tags.
As the LFDataSteward-Sales role, open the Lake Formation console.
In the navigation pane, choose LF-Tags and permissions under Permissions.
The LF-Tags section only shows the Confidentiality tag and Department tag with only the Sales value. As the data steward, we want to create our own LF-Tags to make permissioning easier.
Choose Add LF-Tag.
For Key, enter Sales-Subgroups.
For Values¸ enter DataScientists, DataEngineers, and MachineLearningEngineers.
Choose Add LF-Tag.
As the LF-Tag creator, the data steward has full permissions on the tags that they created. You will be able to see all the tags that the data steward has access to.
Associate LF-Tags to resources as the data steward
We now associate resources to the LF-Tags that we just created so that Machine Learning Engineers can have access to the sales-ml-data resource.
As the LFDataSteward-Sales role, open the Lake Formation console.
In the navigation pane, choose Databases.
Select sales-ml-data and on the Actions menu, choose Edit LF-Tags.
Add the following LF-Tags and values:
Key Sales-Subgroups with value MachineLearningEngineers.
Key Department with value analytics.
Key Confidentiality with value Public.
Choose Save.
Grant permissions using LF-Tags as the data steward
To grant permissions using LF-Tags, complete the following steps:
As the LFDataSteward-Sales role, open the Lake Formation console.
In the navigation pane, choose Data lake permissions under Permissions.
Choose Grant.
Select IAM users and roles and enter the IAM principal to grant permission to (for this example, the Sales-MLScientist role).
In the LF-Tags or catalog resources section, select Resources matched by LF-Tags.
Enter the following tag expressions:
For the Department LF-Tag, set the Sales value.
For the Sales-Subgroups LF-Tag, set the MachineLearningEngineers value.
For the Confidentiality LF-Tag, set the Public value.
Because this is a machine learning (ML) and data science user, we want to give full permissions so that they can manage databases and create tables.
For Database permissions, select Super, and for Table permissions, select Super.
Choose Grant.
We now see the permissions granted to the LF-Tag expression.
Verify permissions granted to the user
To verify permissions using Amazon Athena, navigate to the Athena console as the Sales-MLScientist role. We can observe that the Sales-MLScientist role now has access to the sales-ml-data database and all the tables. In this case, there is only one table, sales-report.
Clean up
To clean up your resources, delete the following:
IAM roles that you may have created for the purposes of this post
Any LF-Tags that you created
Conclusion
In this post, we discussed the benefits of decentralized tag management and how the new Lake Formation feature helps implement this. By granting permission to producer teams’ data stewards to manage tags, organizations empower them to use their domain knowledge and capture the nuances of their data effectively. Furthermore, granting permission to data stewards enables them to take ownership of the tagging process, ensuring accuracy and relevance.
The post illustrated the various steps involved in decentralized Lake Formation tag management, such as granting permission to data stewards to create LF-Tags and use common LF-Tags. We also demonstrated how the data steward can create their own LF-Tags, associate the tags to resources, and grant permissions using tags.
Ramkumar Nottath is a Principal Solutions Architect at AWS focusing on Analytics services. He enjoys working with various customers to help them build scalable, reliable big data and analytics solutions. His interests extend to various technologies such as analytics, data warehousing, streaming, data governance, and machine learning. He loves spending time with his family and friends.
Mert Hocanin is a Principal Big Data Architect at AWS within the AWS Lake Formation Product team. He has been with Amazon for over 10 years, and enjoys helping customers build their data lakes with a focus on governance on a wide variety of services. When he isn’t helping customers build data lakes, he spends his time with his family and traveling.
In this era of big data, organizations worldwide are constantly searching for innovative ways to extract value and insights from their vast datasets. Apache Spark offers the scalability and speed needed to process large amounts of data efficiently.
Amazon EMR is the industry-leading cloud big data solution for petabyte-scale data processing, interactive analytics, and machine learning (ML) using open source frameworks such as Apache Spark, Apache Hive, and Presto. Amazon EMR is the best place to run Apache Spark. You can quickly and effortlessly create managed Spark clusters from the AWS Management Console, AWS Command Line Interface (AWS CLI), or Amazon EMR API. You can also use additional Amazon EMR features, including fast Amazon Simple Storage Service (Amazon S3) connectivity using the Amazon EMR File System (EMRFS), integration with the Amazon EC2 Spot market and the AWS Glue Data Catalog, and EMR Managed Scaling to add or remove instances from your cluster. Amazon EMR Studio is an integrated development environment (IDE) that makes it straightforward for data scientists and data engineers to develop, visualize, and debug data engineering and data science applications written in R, Python, Scala, and PySpark. EMR Studio provides fully managed Jupyter notebooks, and tools like Spark UI and YARN Timeline Service to simplify debugging.
To unlock the potential hidden within the data troves, it’s essential to go beyond traditional analytics. Enter generative AI, a cutting-edge technology that combines ML with creativity to generate human-like text, art, and even code. Amazon Bedrock is the most straightforward way to build and scale generative AI applications with foundation models (FMs). Amazon Bedrock is a fully managed service that makes FMs from Amazon and leading AI companies available through an API, so you can quickly experiment with a variety of FMs in the playground, and use a single API for inference regardless of the models you choose, giving you the flexibility to use FMs from different providers and keep up to date with the latest model versions with minimal code changes.
In this post, we explore how you can supercharge your data analytics with generative AI using Amazon EMR, Amazon Bedrock, and the pyspark-ai library. The pyspark-ai library is an English SDK for Apache Spark. It takes instructions in English language and compiles them into PySpark objects like DataFrames. This makes it straightforward to work with Spark, allowing you to focus on extracting value from your data.
Solution overview
The following diagram illustrates the architecture for using generative AI with Amazon EMR and Amazon Bedrock.
EMR Studio is a web-based IDE for fully managed Jupyter notebooks that run on EMR clusters. We interact with EMR Studio Workspaces connected to a running EMR cluster and run the notebook provided as part of this post. We use the New York City Taxi data to garner insights into various taxi rides taken by users. We ask the questions in natural language on top of the data loaded in Spark DataFrame. The pyspark-ai library then uses the Amazon Titan Text FM from Amazon Bedrock to create a SQL query based on the natural language question. The pyspark-ai library takes the SQL query, runs it using Spark SQL, and provides results back to the user.
In this solution, you can create and configure the required resources in your AWS account with an AWS CloudFormation template. The template creates the AWS Glue database and tables, S3 bucket, VPC, and other AWS Identity and Access Management (IAM) resources that are used in the solution.
The template is designed to demonstrate how to use EMR Studio with the pyspark-ai package and Amazon Bedrock, and is not intended for production use without modification. Additionally, the template uses the us-east-1 Region and may not work in other Regions without modification. The template creates resources that incur costs while they are in use. Follow the cleanup steps at the end of this post to delete the resources and avoid unnecessary charges.
Prerequisites
Before you launch the CloudFormation stack, ensure you have the following:
An AWS account that provides access to AWS services
An IAM user with an access key and secret key to configure the AWS CLI, and permissions to create an IAM role, IAM policies, and stacks in AWS CloudFormation
The Titan Text G1 – Express model is currently in preview, so you need to have preview access to use it as part of this post
Create resources with AWS CloudFormation
The CloudFormation creates the following AWS resources:
A VPC stack with private and public subnets to use with EMR Studio, route tables, and NAT gateway.
An EMR cluster with Python 3.9 installed. We are using a bootstrap action to install Python 3.9 and other relevant packages like pyspark-ai and Amazon Bedrock dependencies. (For more information, refer to the bootstrap script.)
An S3 bucket for the EMR Studio Workspace and notebook storage.
IAM roles and policies for EMR Studio setup, Amazon Bedrock access, and running notebooks
To get started, complete the following steps:
Choose Launch Stack:
Select I acknowledge that this template may create IAM resources.
The CloudFormation stack takes approximately 20–30 minutes to complete. You can monitor its progress on the AWS CloudFormation console. When its status reads CREATE_COMPLETE, your AWS account will have the resources necessary to implement this solution.
Create EMR Studio
Now you can create an EMR Studio and Workspace to work with the notebook code. Complete the following steps:
On the EMR Studio console, choose Create Studio.
Enter the Studio Name as GenAI-EMR-Studio and provide a description.
In the Networking and security section, specify the following:
For VPC, choose the VPC you created as part of the CloudFormation stack that you deployed. Get the VPC ID using the CloudFormation outputs for the VPCID key.
For Subnets, choose all four subnets.
For Security and access, select Custom security group.
For Cluster/endpoint security group, choose EMRSparkAI-Cluster-Endpoint-SG.
For Workspace security group, choose EMRSparkAI-Workspace-SG.
In the Studio service role section, specify the following:
For Authentication, select AWS Identity and Access Management (IAM).
For AWS IAM service role, choose EMRSparkAI-StudioServiceRole.
In the Workspace storage section, browse and choose the S3 bucket for storage starting with emr-sparkai-<account-id>.
Choose Create Studio.
When the EMR Studio is created, choose the link under Studio Access URL to access the Studio.
When you’re in the Studio, choose Create workspace.
Add emr-genai as the name for the Workspace and choose Create workspace.
When the Workspace is created, choose its name to launch the Workspace (make sure you’ve disabled any pop-up blockers).
Big data analytics using Apache Spark with Amazon EMR and generative AI
Now that we have completed the required setup, we can start performing big data analytics using Apache Spark with Amazon EMR and generative AI.
As a first step, we load a notebook that has the required code and examples to work with the use case. We use NY Taxi dataset, which contains details about taxi rides.
Download the notebook file NYTaxi.ipynb and upload it to your Workspace by choosing the upload icon.
After the notebook is imported, open the notebook and choose PySpark as the kernel.
PySpark AI by default uses OpenAI’s ChatGPT4.0 as the LLM model, but you can also plug in models from Amazon Bedrock, Amazon SageMaker JumpStart, and other third-party models. For this post, we show how to integrate the Amazon Bedrock Titan model for SQL query generation and run it with Apache Spark in Amazon EMR.
To get started with the notebook, you need to associate the Workspace to a compute layer. To do so, choose the Compute icon in the navigation pane and choose the EMR cluster created by the CloudFormation stack.
Configure the Python parameters to use the updated Python 3.9 package with Amazon EMR:
from pyspark_ai import SparkAI
from pyspark.sql import SparkSession
from langchain.chat_models import ChatOpenAI
from langchain.llms.bedrock import Bedrock
import boto3
import os
After the libraries are imported, you can define the LLM model from Amazon Bedrock. In this case, we use amazon.titan-text-express-v1. You need to enter the Region and Amazon Bedrock endpoint URL based on your preview access for the Titan Text G1 – Express model.
Connect Spark AI to the Amazon Bedrock LLM model for SQL query generation based on questions in natural language:
#Connecting Spark AI to the Bedrock Titan LLM
spark_ai = SparkAI(llm = llm, verbose=False)
spark_ai.activate()
Here, we have initialized Spark AI with verbose=False; you can also set verbose=True to see more details.
Now you can read the NYC Taxi data in a Spark DataFrame and use the power of generative AI in Spark.
For example, you can ask the count of the number of records in the dataset:
taxi_records.ai.transform("count the number of records in this dataset").show()
We get the following response:
> Entering new AgentExecutor chain...
Thought: I need to count the number of records in the table.
Action: query_validation
Action Input: SELECT count(*) FROM spark_ai_temp_view_ee3325
Observation: OK
Thought: I now know the final answer.
Final Answer: SELECT count(*) FROM spark_ai_temp_view_ee3325
> Finished chain.
+----------+
| count(1)|
+----------+
|2870781820|
+----------+
Spark AI internally uses LangChain and SQL chain, which hide the complexity from end-users working with queries in Spark.
The notebook has a few more example scenarios to explore the power of generative AI with Apache Spark and Amazon EMR.
Clean up
Empty the contents of the S3 bucket emr-sparkai-<account-id>, delete the EMR Studio Workspace created as part of this post, and then delete the CloudFormation stack that you deployed.
Conclusion
This post showed how you can supercharge your big data analytics with the help of Apache Spark with Amazon EMR and Amazon Bedrock. The PySpark AI package allows you to derive meaningful insights from your data. It helps reduce development and analysis time, reducing time to write manual queries and allowing you to focus on your business use case.
About the Authors
Saurabh Bhutyani is a Principal Analytics Specialist Solutions Architect at AWS. He is passionate about new technologies. He joined AWS in 2019 and works with customers to provide architectural guidance for running generative AI use cases, scalable analytics solutions and data mesh architectures using AWS services like Amazon Bedrock, Amazon SageMaker, Amazon EMR, Amazon Athena, AWS Glue, AWS Lake Formation, and Amazon DataZone.
Harsh Vardhan is an AWS Senior Solutions Architect, specializing in analytics. He has over 8 years of experience working in the field of big data and data science. He is passionate about helping customers adopt best practices and discover insights from their data.
Organizations are increasingly embracing a shift-left approach when it comes to security, actively integrating security considerations into their software development lifecycle (SDLC). This shift aligns seamlessly with modern software development practices such as DevSecOps and continuous integration and continuous deployment (CI/CD), making it a vital strategy in today’s rapidly evolving software development landscape. At its core, shift left promotes a security-as-code culture, where security becomes an integral part of the entire application lifecycle, starting from the initial design phase and extending all the way through to deployment. This proactive approach to security involves seamlessly integrating security measures into the CI/CD pipeline, enabling automated security testing and checks at every stage of development. Consequently, it accelerates the process of identifying and remediating security issues.
By identifying security vulnerabilities early in the development process, you can promptly address them, leading to significant reductions in the time and effort required for mitigation. Amazon Web Services (AWS) encourages this shift-left mindset, providing services that enable a seamless integration of security into your DevOps processes, fostering a more robust, secure, and efficient system. In this blog post we share how you can use Amazon CodeWhisperer, Amazon CodeGuru, and Amazon Inspector to automate and enhance code security.
CodeWhisperer is a versatile, artificial intelligence (AI)-powered code generation service that delivers real-time code recommendations. This innovative service plays a pivotal role in the shift-left strategy by automating the integration of crucial security best practices during the early stages of code development. CodeWhisperer is equipped to generate code in Python, Java, and JavaScript, effectively mitigating vulnerabilities outlined in the OWASP (Open Web Application Security Project) Top 10. It uses cryptographic libraries aligned with industry best practices, promoting robust security measures. Additionally, as you develop your code, CodeWhisperer scans for potential security vulnerabilities, offering actionable suggestions for remediation. This is achieved through generative AI, which creates code alternatives to replace identified vulnerable sections, enhancing the overall security posture of your applications.
Next, you can perform further vulnerability scanning of code repositories and supported integrated development environments (IDEs) with Amazon CodeGuru Security. CodeGuru Security is a static application security tool that uses machine learning to detect security policy violations and vulnerabilities. It provides recommendations for addressing security risks and generates metrics so you can track the security health of your applications. Examples of security vulnerabilities it can detect include resource leaks, hardcoded credentials, and cross-site scripting.
Finally, you can use Amazon Inspector to address vulnerabilities in workloads that are deployed. Amazon Inspector is a vulnerability management service that continually scans AWS workloads for software vulnerabilities and unintended network exposure. Amazon Inspector calculates a highly contextualized risk score for each finding by correlating common vulnerabilities and exposures (CVE) information with factors such as network access and exploitability. This score is used to prioritize the most critical vulnerabilities to improve remediation response efficiency. When started, it automatically discovers Amazon Elastic Compute Cloud (Amazon EC2) instances, container images residing in Amazon Elastic Container Registry (Amazon ECR), and AWS Lambda functions, at scale, and immediately starts assessing them for known vulnerabilities.
Figure 1: An architecture workflow of a developer’s code workflow
Amazon CodeWhisperer
CodeWhisperer is powered by a large language model (LLM) trained on billions of lines of code, including code owned by Amazon and open-source code. This makes it a highly effective AI coding companion that can generate real-time code suggestions in your IDE to help you quickly build secure software with prompts in natural language. CodeWhisperer can be used with four IDEs including AWS Toolkit for JetBrains, AWS Toolkit for Visual Studio Code, AWS Lambda, and AWS Cloud9.
As you use CodeWhisperer it filters out code suggestions that include toxic phrases (profanity, hate speech, and so on) and suggestions that contain commonly known code structures that indicate bias. These filters help CodeWhisperer generate more inclusive and ethical code suggestions by proactively avoiding known problematic content. The goal is to make AI assistance more beneficial and safer for all developers.
CodeWhisperer can also scan your code to highlight and define security issues in real time. For example, using Python and JetBrains, if you write code that would write unencrypted AWS credentials to a log — a bad security practice — CodeWhisperer will raise an alert. Security scans operate at the project level, analyzing files within a user’s local project or workspace and then truncating them to create a payload for transmission to the server side.
Figure 2: CodeWhisperer performing a security scan in Visual Studio Code
Furthermore, the CodeWhisperer reference tracker detects whether a code suggestion might be similar to particular CodeWhisperer open source training data. The reference tracker can flag such suggestions with a repository URL and project license information or optionally filter them out. Using CodeWhisperer, you improve productivity while embracing the shift-left approach by implementing automated security best practices at one of the principal layers—code development.
CodeGuru Security
Amazon CodeGuru Security significantly bolsters code security by harnessing the power of machine learning to proactively pinpoint security policy violations and vulnerabilities. This intelligent tool conducts a thorough scan of your codebase and offers actionable recommendations to address identified issues. This approach verifies that potential security concerns are corrected early in the development lifecycle, contributing to an overall more robust application security posture.
CodeGuru Security relies on a set of security and code quality detectors crafted to identify security risks and policy violations. These detectors empower developers to spot and resolve potential issues efficiently.
CodeGuru Security allows manual scanning of existing code and automating integration with popular code repositories like GitHub and GitLab. It establishes an automated security check pipeline through either AWS CodePipeline or Bitbucket Pipeline. Moreover, CodeGuru Security integrates with Amazon Inspector Lambda code scanning, enabling automated code scans for your Lambda functions.
Notably, CodeGuru Security doesn’t just uncover security vulnerabilities; it also offers insights to optimize code efficiency. It identifies areas where code improvements can be made, enhancing both security and performance aspects within your applications.
Initiating CodeGuru Security is a straightforward process, accessible through the AWS Management Console, AWS Command Line Interface (AWS CLI), AWS SDKs, and multiple integrations. This allows you to run code scans, review recommendations, and implement necessary updates, fostering a continuous improvement cycle that bolsters the security stance of your applications.
Use Amazon CodeGuru to scan code directly and in a pipeline
Use the following steps to create a scan in CodeGuru to scan code directly and to integrate CodeGuru with AWS CodePipeline.
Note: You must provide sample code to scan.
Scan code directly
Open the AWS Management Console using your organization management account and go to Amazon CodeGuru.
In the navigation pane, select Security and then select Scans.
Choose Create new scan to start your manual code scan.
Figure 3: Scans overview
On the Create Scan page:
Choose Choose file to upload your code.
Note: The file must be in .zip format and cannot exceed 5 GB.
Enter a unique name to identify your scan.
Choose Create scan.
Figure 4: Create scan
After you create the scan, the configured scan will automatically appear in the Scans table, where you see the Scan name, Status, Open findings, Date of last scan, and Revision number (you review these findings later in the Findings section of this post).
Figure 5: Scan update
Automated scan using AWS CodePipeline integration
Still in the CodeGuru console, in the navigation pane under Security, select Integrations. On the Integrations page, select Integration with AWS CodePipeline. This will allow you to have an automated security scan inside your CI/CD pipeline.
Figure 6: CodeGuru integrations
Next, choose Open template in CloudFormation to create a CodeBuild project to allow discovery of your repositories and run security scans.
Figure 7: CodeGuru and CodePipeline integration
The CloudFormation template is already entered. Select the acknowledge box, and then choose Create stack.
Figure 8: CloudFormation quick create stack
If you already have a pipeline integration, go to Step 2 and select CodePipeline console. If this is your first time using CodePipeline, this blog post explains how to integrate it with AWS CI/CD services.
Figure 9: Integrate with AWS CodePipeline
Choose Edit.
Figure 10: CodePipeline with CodeGuru integration
Choose Add stage.
Figure 11: Add Stage in CodePipeline
On the Edit action page:
Enter a stage name.
For the stage you just created, choose Add action group.
For Action provider, select CodeBuild.
For Input artifacts, select SourceArtifact.
For Project name, select CodeGuruSecurity.
Choose Done, and then choose Save.
Figure 12: Add action group
Test CodeGuru Security
You have now created a security check stage for your CI/CD pipeline. To test the pipeline, choose Release change.
Figure 13: CodePipeline with successful security scan
If your code was successfully scanned, you will see Succeeded in the Most recent execution column for your pipeline.
Figure 14: CodePipeline dashboard with successful security scan
Findings
To analyze the findings of your scan, select Findings under Security, and you will see the findings for the scans whether manually done or through integrations. Each finding will show the vulnerability, the scan it belongs to, the severity level, the status of an open case or closed case, the age, and the time of detection.
Figure 15: Findings inside CodeGuru security
Dashboard
To view a summary of the insights and findings from your scan, select Dashboard, under Security, and you will see high level summary of your findings overview and a vulnerability fix overview.
Figure 16:Findings inside CodeGuru dashboard
Amazon Inspector
Your journey with the shift-left model extends beyond code deployment. After scanning your code repositories and using tools like CodeWhisperer and CodeGuru Security to proactively reduce security risks before code commits to a repository, your code might still encounter potential vulnerabilities after being deployed to production. For instance, faulty software updates can introduce risks to your application. Continuous vigilance and monitoring after deployment are crucial.
This is where Amazon Inspector offers ongoing assessment throughout your resource lifecycle, automatically rescanning resources in response to changes. Amazon Inspector seamlessly complements the shift-left model by identifying vulnerabilities as your workload operates in a production environment.
Amazon Inspector continuously scans various components, including Amazon EC2, Lambda functions, and container workloads, seeking out software vulnerabilities and inadvertent network exposure. Its user-friendly features include enablement in a few clicks, continuous and automated scanning, and robust support for multi-account environments through AWS Organizations. After activation, it autonomously identifies workloads and presents real-time coverage details, consolidating findings across accounts and resources.
Distinguishing itself from traditional security scanning software, Amazon Inspector has minimal impact on your fleet’s performance. When vulnerabilities or open network paths are uncovered, it generates detailed findings, including comprehensive information about the vulnerability, the affected resource, and recommended remediation. When you address a finding appropriately, Amazon Inspector autonomously detects the remediation and closes the finding.
The findings you receive are prioritized according to a contextualized Inspector risk score, facilitating prompt analysis and allowing for automated remediation.
Additionally, Amazon Inspector provides robust management APIs for comprehensive programmatic access to the Amazon Inspector service and resources. You can also access detailed findings through Amazon EventBridge and seamlessly integrate them into AWS Security Hub for a comprehensive security overview.
Scan workloads with Amazon Inspector
Use the following examples to learn how to use Amazon Inspector to scan AWS workloads.
Open the Amazon Inspector console in your AWS Organizations management account. In the navigation pane, select Activate Inspector.
Under Delegated administrator, enter the account number for your desired account to grant it all the permissions required to manage Amazon Inspector for your organization. Consider using your Security Tooling account as delegated administrator for Amazon Inspector. Choose Delegate. Then, in the confirmation window, choose Delegate again. When you select a delegated administrator, Amazon Inspector is activated for that account. Now, choose Activate Inspector to activate the service in your management account.
Figure 17: Set the delegated administrator account ID for Amazon Inspector
You will see a green success message near the top of your browser window and the Amazon Inspector dashboard, showing a summary of data from the accounts.
Figure 18: Amazon Inspector dashboard after activation
Explore Amazon Inspector
From the Amazon Inspector console in your delegated administrator account, in the navigation pane, select Account management. Because you’re signed in as the delegated administrator, you can enable and disable Amazon Inspector in the other accounts that are part of your organization. You can also automatically enable Amazon Inspector for new member accounts.
In the navigation pane, select Findings. Using the contextualized Amazon Inspector risk score, these findings are sorted into several severity ratings.
The contextualized Amazon Inspector risk score is calculated by correlating CVE information with findings such as network access and exploitability.
This score is used to derive severity of a finding and prioritize the most critical findings to improve remediation response efficiency.
Figure 20: Findings in Amazon Inspector sorted by severity (default)
When you enable Amazon Inspector, it automatically discovers all of your Amazon EC2 and Amazon ECR resources. It scans these workloads to detect vulnerabilities that pose risks to the security of your compute workloads. After the initial scan, Amazon Inspector continues to monitor your environment. It automatically scans new resources and re-scans existing resources when changes are detected. As vulnerabilities are remediated or resources are removed from service, Amazon Inspector automatically updates the associated security findings.
In order to successfully scan EC2 instances, Amazon Inspector requires inventory collected by AWS Systems Manager and the Systems Manager agent. This is installed by default on many EC2 instances. If you find some instances aren’t being scanned by Amazon Inspector, this might be because they aren’t being managed by Systems Manager.
Select a findings title to see the associated report.
Each finding provides a description, severity rating, information about the affected resource, and additional details such as resource tags and how to remediate the reported vulnerability.
Amazon Inspector stores active findings until they are closed by remediation. Findings that are closed are displayed for 30 days.
Integrate CodeGuru Security with Amazon Inspector to scan Lambda functions
Amazon Inspector and CodeGuru Security work harmoniously together. CodeGuru Security is available through Amazon Inspector Lambda code scanning. After activating Lambda code scanning, you can configure automated code scans to be performed on your Lambda functions.
Use the following steps to configure Amazon CodeGuru Security with Amazon Inspector Lambda code scanning to evaluate Lambda functions.
Open the Amazon Inspector console and select Account management from the navigation pane.
Select the AWS account you want to activate Lambda code scanning in.
Figure 22: Activating AWS Lambda code scanning from the Amazon Inspector Account management console
Choose Activate and select AWS Lambda code scanning.
With Lambda code scanning activated, security findings for your Lambda function code will appear in the All findings section of Amazon Inspector.
Amazon Inspector plays a crucial role in maintaining the highest security standards for your resources. Whether you’re installing a new package on an EC2 instance, applying a software patch, or when a new CVE affecting a specific resource is disclosed, Amazon Inspector can assist with quick identification and remediation.
Conclusion
Incorporating security at every stage of the software development lifecycle is paramount and requires that security be a consideration from the outset. Shifting left enables security teams to reduce overall application security risks.
Using these AWS services — Amazon CodeWhisperer, Amazon CodeGuru and Amazon Inspector — not only aids in early risk identification and mitigation, it empowers your development and security teams, leading to more efficient and secure business outcomes.
The rapid growth of data has empowered organizations to develop better products, more personalized services, and deliver transformational outcomes for their customers. As organizations use Amazon Web Services (AWS) to modernize their data capabilities, they can sometimes find themselves with data spread across several AWS accounts, each aligned to distinct use cases and business units. This can present a challenge for security professionals, who need not only a mechanism to identify sensitive data types—such as protected health information (PHI), payment card industry (PCI), and personally identifiable information (PII), or organizational intellectual property—stored on AWS, but also the ability to automatically act upon these findings through custom logic that supports organizational policies and regulatory requirements.
In this blog post, we present a solution that provides you with visibility into sensitive data residing across a fleet of AWS accounts through a ChatOps-style notification mechanism using Microsoft Teams, which also provides contextual information needed to conduct security investigations. This solution also incorporates a decision logic mechanism to automatically quarantine sensitive data assets while they’re pending review, which can be tailored to meet unique organizational, industry, or regulatory environment requirements.
Prerequisites
Before you proceed, ensure that you have the following within your environment:
Access to a set of AWS accounts that have been joined to an organization with all features enabled.
A designated security tooling account within AWS Organizations that’s dedicated to operating security services, monitoring AWS accounts, and automating security alerting and response, and whose access is restricted through AWS Identity and Access Management (IAM) to security professionals.
Permissions to create the resources listed below using CloudFormation.
A Microsoft Teams account with permissions to add apps and webhooks in your desired team and channel.
Assumptions
Things to know about the solution in this blog post:
This solution assumes that you’ve set up your AWS accounts for IAM authentication, and the notifications presented to you in Microsoft Teams will reflect an IAM user authentication experience. If you’re using AWS IAM Identity Center with federated authentication, additional customization of this solution might be required.
Solution overview
The solution architecture and overall workflow are detailed in Figure 1 that follows.
Figure 1: Solution overview
Upon discovering sensitive data in member accounts, this solution selectively quarantines objects based on their finding severity and public status. This logic can be customized to evaluate additional details such as the finding type or number of sensitive data occurrences detected. The ability to adjust this workflow logic can provide a custom-tailored solution to meet a variety of industry use cases, helping you adhere to industry-specific security regulations and frameworks.
Figure 1 provides an overview of the components used in this solution, and for illustrative purposes we step through them here.
Automated scanning of buckets
Macie supports various scope options for sensitive data discovery jobs, including the use of bucket tags to determine in-scope buckets for scanning. Setting up automated scanning includes the use of an AWS Organizations tag policy to verify that the S3 buckets deployed in your chosen OUs conform to tagging requirements, an AWS Config job to automatically check that tags have been applied correctly, an Amazon EventBridge rule and bus to receive compliance events from a fleet of member accounts, and an AWS Lambda function to notify administrators of compliance change events.
An AWS Organizations tag policy verifies that the S3 buckets created in the in-scope AWS accounts have a tag structure that facilitates automated scanning and identification of the bucket owner. Specific tags enforced with this tag policy include RequireMacieScan : True|False and BucketOwner : <variable>. The tag policy is enforced at the OU level.
A custom AWS Config rule evaluates whether these tags have been applied to all in-scope S3 buckets, and marks resources as compliant or not compliant.
After every evaluation of S3 bucket tag compliance, AWS Config will send compliance events to an EventBridge event bus in the same AWS member account.
An EventBridge rule is used to send compliance messages from member accounts to a centralized security account, which is used for operational administration of the solution.
An EventBridge rule in the centralized security account is used to send all tag compliance events to a Lambda serverless function, which is used for notification.
The tag compliance notification function receives the tag compliance events from EventBridge, parses the information, and posts it to a Microsoft Teams webhook. This provides you with details such as the affected bucket, compliance status, and bucket owner, along with a link to investigate the compliance event in AWS Config.
Detecting sensitive data
Macie is a key component of this solution and facilitates sensitive data discovery across a fleet of AWS accounts based on the RequireMacieScan tag value configured at the time of bucket creation. Setting up sensitive data detection includes using Macie for sensitive data discovery, an EventBridge rule and bus to receive these finding events from the Macie delegated administrator account, an AWS Step Functions state machine to process these findings, and a Lambda function to notify administrators of new findings.
Macie is used to detect sensitive data in member account S3 buckets with job definitions based on bucket tags, and central reporting of findings through a Macie delegated administrator account (that is, the central security account).
When new findings are detected, Macie will send finding events to an EventBridge event bus in the security account.
An EventBridge rule is used to send all finding events to AWS Step Functions, which runs custom business logic to evaluate each finding and determine the next action to take on the affected object.
In the default configuration, for findings that are of low or medium severity and in objects that are not publicly accessible, Step Functions sends finding event information to a Lambda serverless function, which is used for notification. You can alter this event processing logic in Step Functions to change which finding types initiate an automated quarantine of the object.
The Macie finding notification function receives the finding events from Step Functions, parses this information, and posts it to a Microsoft Teams webhook. This presents you with details such as the affected bucket and AWS account, finding ID and severity, public status, and bucket owner, along with a link to investigate the finding in Macie.
Automated quarantine
As outlined in the previous section, this solution uses event processing decision logic in Step Functions to determine whether to quarantine a sensitive object in place. Setting up automated quarantine includes a Step Functions state machine for Macie finding processing logic, an Amazon DynamoDB table to track items moved to quarantine, a Lambda function to notify administrators of quarantine, and an Amazon API Gateway and second Step Functions state machine to facilitate remediation or removal of objects from quarantine.
In the default configuration for findings that are of high severity, or in objects that are publicly accessible, Step Functions adds the affected object’s metadata to an Amazon DynamoDB table, which is used to track quarantine and remediation status at scale.
Step Functions then quarantines the affected object, moving it to an automatically configured and secured prefix in the same S3 bucket while the finding is being investigated. Only select personnel (that is, cybersecurity) has access to the object.
Step Functions then sends finding event information to a Lambda serverless function, which is used for notification.
The Macie quarantine notification function receives the finding events from Step Functions, parses this information, and posts it to a Microsoft Teams webhook. This presents you with similar details to the Macie finding notification function, but also notes the object has been moved to quarantine, and provides a one-click option to release the object from quarantine.
In the Microsoft Teams channel, which should only be accessible to qualified security professionals, DLP administrators select the option to release the object from quarantine. This invokes a REST API deployed on API Gateway.
API Gateway invokes a release object workflow in Step Functions, which begins to process releasing the affected object from quarantine.
Step Functions inspects the affected object ID received through API Gateway, and first retrieves details about this object from DynamoDB. Upon receiving these details, the object is removed from the quarantine tracking database.
Step Functions then moves the affected object to its original location in Amazon S3, thereby making the object accessible again under the original bucket policy and IAM permissions.
Organization structure
As mentioned in the prerequisites, the solution uses a set of AWS accounts that have been joined to an organization, which is shown in Figure 2. While the logical structure of your AWS Organizations deployment can differ from what’s shown, for illustration purposes, we’re looking for sensitive data in the Development and Production AWS accounts, and the examples shown throughout the remainder of this blog post reflect that.
Figure 2: Organization structure
Deploy the solution
The overall deployment process of this solution has been decomposed into three AWS CloudFormation templates to be deployed to your management, security, and member accounts as CloudFormation stacks and StackSets, respectively. Performing the deployment in this manner not only verifies that the solution is extended to other member accounts created after the initial solution deployment, but also serves as an illustrative aid of the components deployed in each portion of the solution. An overview of the deployment process is as follows:
Set up of Microsoft Teams webhooks to receive information from this solution.
Deployment of a CloudFormation stack to the management account to configure the tag policy for this solution.
Deployment of a CloudFormation stack set to member accounts to enable monitoring of S3 bucket tags and forwarding of tag compliance events to the security account.
Deployment of a CloudFormation stack to the security account to configure the remainder of the solution that will facilitate sensitive data discovery, finding event processing, administrator notification, and release from quarantine functionality.
Remaining manual configuration of quarantine remediation API authorization, enabling Macie, and specifying a Macie results location.
Set up Microsoft Teams
Before deploying the solution, you must create two incoming webhooks in a Microsoft Teams channel of your choice. Due to the sensitivity of the event information provided and the ability to release objects from quarantine, we recommend that this channel only be accessible to information security professionals. In addition, we recommend creating two distinct webhooks to distinguish tag compliance events from finding events and have named the webhooks in the examples S3-Tag-Compliance-Notification and Macie-Finding-Notification, respectively. A complete walkthrough of creating an incoming webhook is out of scope for this blog post, but you can access Microsoft’s documentation on creating incoming webhooks for an overview. After the webhooks have been created, save the URLs, to use in the solution deployment process.
Configure the management account
The first step of the deployment process is to deploy a CloudFormation stack in your management account that creates an AWS Organizations tag policy and applies it to the OUs of your choice. Before performing this step, note the two OU IDs you will apply the policy to, as these will be captured as input parameters for the CloudFormation stack.
Choose the following Launch Stack button to open the CloudFormation console pre-loaded with the template for this step:
Note: The stack will launch in the N. Virginia (us-east-1) Region. To deploy this solution into other AWS Regions, change your regional selection in the CloudFormation console, and deploy it to the selected Region.
For Stack name, enter ConfigureManagementAccount.
For First AWS Organizations Unit ID, enter your first OU ID.
For Second AWS Organizations Unit ID, enter your second OU ID.
Choose Next.
Figure 3: Management account stack details
After you’ve entered all details, launch the stack and wait until the stack has reached CREATE_COMPLETE status before proceeding. The deployment process will take 1–2 minutes.
Configure the member accounts
The next step of the deployment process is to deploy a CloudFormation Stack, which will initiate a StackSet deployment from your management account that’s scoped to the OUs of your choice. This stack set will enable AWS Config along with an AWS Config rule to evaluate Amazon S3 tag compliance and will deploy an EventBridge rule to send compliance events from AWS Config in your member accounts to a centralized event bus in your security account. If AWS Config has previously been enabled, select True for the AWS Config Status parameter to help prevent an overwrite of your existing settings. Prior to performing this setup, note the two AWS Organizations OU IDs you will deploy the stack set to. You will also be prompted to enter the AWS account ID and Region of your security account.
Choose the following Launch Stack button to open the CloudFormation console pre-loaded with the template for this step:
Note: The stack will launch in the N. Virginia (us-east-1) Region. To deploy this solution into other AWS Regions, change your regional selection in the CloudFormation console, and deploy it to the selected Region.
For Stack name, enter DeployToMemberAccounts.
For First AWS Organizations Unit ID, enter your first OU ID.
For Second AWS Organizations Unit ID, enter your second OU ID.
For Deployment Region, enter the Region you want to deploy the Stack set to.
For AWS Config Status, accept the default value of false if you have not previously enabled AWS Config in your accounts.
For Support all resource types, accept the default value of false.
For Include global resource types, accept the default value of false.
For List of resource types if not all supported, accept the default value of AWS::S3::Bucket.
For Configuration delivery channel name, accept the default value of <Generated>.
For Snapshot delivery frequency, accept the default value of 1 hour.
For Security account ID, enter your security account ID.
For Security account region, select the Region of your security account.
Choose Next.
Figure 4: Member account Stack details
After you’ve entered all details, launch the stack and wait until the stack has reached CREATE_COMPLETE status before proceeding. The deployment process will take 3–5 minutes.
Configure the security account
The next step of the deployment process involves deploying a CloudFormation stack in your security account that creates all the resources needed for at-scale sensitive data detection, automated quarantine, and security professional notification and response. This stack configures the following:
Two rules in EventBridge for routing tag compliance and Macie finding events.
Two Step Functions state machines whose logic will be used for automated object quarantine and release.
Three Lambda functions for tag compliance, Macie findings, and quarantine notification.
A DynamoDB table for quarantine status tracking.
An API Gateway REST endpoint to facilitate the release of objects from quarantine.
Before performing this setup, note your AWS Organizations ID and two Microsoft Teams webhook URLs previously configured.
Choose the following Launch Stack button to open the CloudFormation console pre-loaded with the template for this step:
Note: The stack will launch in the N. Virginia (us-east-1) Region. To deploy this solution into other AWS Regions, change your regional selection in the CloudFormation console, and deploy it to the selected Region.
For Stack name, enter ConfigureSecurityAccount.
For AWS Org ID, enter your AWS Organizations ID.
For Webhook URI for S3 tag compliance notifications, enter the first webhook URL you created in Microsoft Teams.
For Webhook URI for Macie finding and quarantine notifications, enter the second webhook URL you created in Microsoft Teams.
Choose Next.
Figure 5: Security account stack details
After you’ve entered all details, launch the stack and wait until the stack has reached CREATE_COMPLETE status before proceeding. The deployment process will take 3–5 minutes.
Remaining configuration
While most of the solution is deployed automatically using CloudFormation, there are a few items that you must configure manually.
Configure Lambda API key environment variable
When the CloudFormation stack was deployed to the security account, CloudFormation created a new REST API for security professionals to release objects from quarantine. This API was configured with an API key to be used for authorization, and you must retrieve the value of this API key and set it as an environment variable in your MacieQuarantineNotification function, which also deployed in the security account. To retrieve the value of this API key, navigate to the REST API created in the security account, select API Keys, and retrieve the value of APIKey1. Next, navigate to the MacieQuarantineNotification function in the Lambda console, and set the ReleaseObjectApiKey environment variable to the value of your API key.
Enable Macie
Next, you must enable Macie to facilitate sensitive data discovery in selected accounts in your organization, and this process begins with the selection of a delegated administrator account (that is, the security account), followed by onboarding the member accounts you want to test with. See Integrating and configuring an organization in Amazon Macie for detailed instructions on enabling Macie in your organization.
Configure the Macie results bucket and KMS key
Macie creates an analysis record for each Amazon S3 object that it analyzes. This includes objects where Macie has detected sensitive data as well as objects where sensitive data was not detected or that Macie could not analyze. The CloudFormation stack deployed in the security account created an S3 bucket and KMS key for this, and they are noted as MacieResultsS3BucketName and MacieResultsKmsKeyAlias in the CloudFormation stack output. Use these resources to configure the Macie results bucket and KMS key in the security account according to Storing and retaining sensitive data discovery results with Amazon Macie. Customization of the S3 bucket policy or KMS key policy has already been done for you as part of the ConfigureSecurityAccount CloudFormation template deployed earlier.
Validate the solution
With the solution fully deployed, you now need to deploy an S3 bucket with sample data to test the solution and review the findings.
Create a member account S3 bucket
In any of the member accounts onboarded into this solution as part of the Configure the member accounts step, deploy a new S3 bucket and the KMS key used to encrypt the bucket using the CloudFormation template that follows. Before performing this step, note the InvestigateMacieFindingsRole, StepFunctionsProcessFindingsRole, and StepFunctionsReleaseObjectRole outputs from the CloudFormation template deployed to the security account, as these will be captured as input parameters for the CloudFormation stack.
Choose the following Launch Stack button to open the CloudFormation console pre-loaded with the template for this step:
Note: The stack will launch in the N. Virginia (us-east-1) Region. To deploy this solution into other AWS Regions, change your regional selection in the CloudFormation console, and deploy it to the selected Region.
For Stack name, enter DeployS3BucketKmsKey.
For IAM Role used by Step Functions to process Macie findings, enter the ARN that was provided to you as the StepFunctionsProcessFindingsRole output from the Configure security account step.
For IAM Role used by Step Functions to release objects from quarantine, enter the ARN that was provided to you as the StepFunctionsReleaseObjectRole outputfrom the Configure security account step.
For IAM Role used by security professionals to investigate Macie findings, enter the ARN that was provided to you as the InvestigateMacieFindingsRole output from the Configure security account step.
For Department name of the bucket owner, enter any department or team name you want to designate as having ownership responsibility over the S3 bucket.
Choose Next.
Figure 6: Deploy S3 bucket and KMS key stack details
After you’ve entered all details, launch the stack and wait until the stack has reached CREATE_COMPLETE status before proceeding. The deployment process will take 3–5 minutes.
Monitor S3 bucket tag compliance
Shortly after the deployment of the new S3 bucket, you should see a message in your Microsoft Teams channel notifying you of the tag compliance status of the new bucket. This AWS Config rule is evaluated automatically any time an S3 resource event takes place, and the tag compliance event is sent to the centralized security account for notification purposes. While the notification shown in Figure 7 depicts a compliant S3 bucket, a bucket deployed without the required tags will be marked as NON_COMPLIANT, and security professionals can check the AWS Config compliance status directly in the AWS console for the member account.
Figure 7: S3 tag compliance notification
Upload sample data
Download this .zip file of sample data and upload the expanded files into the newly created S3 bucket. The sample files include fictitious PII, including credit card information and social security numbers, and so will invoke various Macie findings.
Note: All data in this blog post has been artificially created by AWS for demonstration purposes and has not been collected from any individual person. Similarly, such data does not, nor is it intended, to relate back to any individual person.
Configure a Macie discovery job
Configure a sensitive data discovery job in the Amazon Macie delegated administrator account (that is, the security account) according to Creating a sensitive data discovery job. When creating the job, specify tag-based bucket criteria instructing Macie to scan any bucket with a tag key of RequireMacieScan and a tag value of True. This instructs Macie to scan buckets matching this criterion across the accounts that have been onboarded into Macie.
Figure 8: Macie bucket criteria
On the discovery options page, specify a one-time job with a sampling depth of 100 percent. Further refine the job scope by adding the quarantine prefix to the exclusion criteria of the sensitive data discovery job.
Figure 9: Macie scan scope
Select the AWS_CREDENTIALS, CREDIT_CARD_NUMBER, CREDIT_CARD_SECURITY_CODE, and DATE_OF_BIRTH managed data identifiers and proceed to the review screen. On the review screen, ensure that the bucket name you created is listed under bucket matches, and launch the discovery job.
Note: This solution also works with the Automated Sensitive Data Discovery feature in Amazon Macie. I recommend you investigate this feature further for broad visibility into where sensitive data might reside within your Amazon S3 data estate. Regardless of the method you choose, you will be able to integrate the appropriate notification and quarantine solution.
Review and investigate findings
After a few minutes, the discovery job will complete and soon you should see four messages in your Microsoft teams channel notifying you of the finding events created by Macie. One of these findings will be marked as medium severity, while the other three will be marked as high.
Review the medium severity finding, and recall the flow of event information from the solution overview section. Macie scanned a bucket in the member account and presented this finding in the Macie delegated administrator account. Macie then sent this finding event to EventBridge, which initiated a workflow run in Step Functions. Step Functions invoked customer-specified logic to evaluate the finding and determined that because the object isn’t publicly accessible, and because the finding isn’t high severity, it should only notify security professionals rather than quarantine the object in question. Several key pieces of information necessary for investigation are presented to the security team, along with a link to directly investigate the finding in the AWS console of the central security account.
Figure 10: Macie medium severity finding notification
Now review the high severity finding. The flow of event information in this scenario is identical to the medium severity finding, but in this case, Step Functions quarantined the object because the severity is high. The security team is again presented with an option to use the console to investigate further. The process to investigate this finding is a bit different due to the object being moved to a quarantine prefix. If security professionals want to view the original object in its entirety, they would assume the InvestigateMacieFindingsRole in the security account, which has cross-account access to the S3 bucket quarantine prefix in the in-scope member accounts. S3 buckets deployed in member accounts using the CloudFormation template listed above will have a special bucket policy that denies access to the quarantine prefix for any role other than the InvestigateMacieFindingsRole, StepFunctionsProcessFindingsRole, and StepFunctionsReleaseObjectRole. This makes sure that objects are truly quarantined and inaccessible while being investigated by security professionals.
Figure 11: Macie high severity finding notification
Unlike the previous example, the security team is also notified that an affected object was moved to quarantine, and is presented with a separate option to release the object from quarantine. Choosing Release Object from Quarantine runs an HTTP POST to the REST API transparently in the background, and the API responds with a SUCCEEDED or FAILED message indicating the result of the operation.
Figure 12: Release object from quarantine
The state machine uses decision logic based on the affected object’s public status and the severity of the finding. Customers deploying this solution can choose to alter this logic or add additional customization by altering the Step Functions state machine definition either directly in the CloudFormation template or through the Step Functions Workflow Studio low-code interface available in the Step Functions console. For reference, the full event schema used by Macie can be found in the Eventbridge event schema for Macie findings.
The logic of the Step Functions state machine used to process Macie finding events follows and is shown in Figure 13.
An EventBridge rule invokes the Step Functions state machine as Macie findings are received.
Step Functions parses Macie event data to determine the finding severity.
If the finding is high severity or determined to be public, the affected object is then added to the quarantine tracking database in DynamoDB.
After adding the object to quarantine tracking, the object is copied into the quarantine prefix within its S3 bucket.
After being copied, the object is deleted from its original S3 location.
After the object is deleted, the MacieQuarantineNotification function is invoked to alert you of the finding and quarantine status.
If the finding is not high severity and not determined to be public, the MacieFindingNotification function is invoked to alert you of the finding.
Figure 13: Process Macie findings workflow
Solution cleanup
To remove the solution and avoid incurring additional charges for the AWS resources used in this solution, perform the following steps.
Open the Macie console in your security account. Under Settings, choose Accounts. Select the checkboxes next to the member accounts onboarded previously, select the Actions dropdown, and select Disassociate Account. When that has completed, select the same accounts again, and choose Delete.
Open the Macie console in your management account. Click on Get started, and remove your security account as the Macie delegated administrator.
Open the Macie console in your security account, choose Settings, then choose Disable Macie.
Open the S3 console in your security account. Remove all objects from the Macie results S3 bucket.
Open the CloudFormation console in your security account. Select the ConfigureSecurityAccount stack and choose Delete.
Open the Macie console in your member accounts. Under Settings, choose Disable Macie.
Open the Amazon S3 console in your member accounts. Remove all sample data objects from the S3 bucket.
Open the CloudFormation console in your member accounts. Select the DeployS3BucketKmsKey stack and choose Delete.
Open the CloudFormation console in your management account. Select the DeployToMemberAccounts stack and choose Delete.
Still in the CloudFormation console in your management account, select the ConfigureManagementAccount stack and choose Delete.
Summary
In this blog post, we demonstrated a solution to process—and act upon—sensitive data discovery findings surfaced by Macie through the incorporation of decision logic implemented in Step Functions. This logic provides granularity on quarantine decisions and extensibility you can use to customize automated finding response to suit your business and regulatory needs.
In addition, we demonstrated a mechanism to notify you of finding event information as it’s discovered, while providing you with the contextual details necessary for investigative purposes. Additional customization of the information presented in Microsoft Teams can be accomplished through parsing of the event payload. You can also customize the Lambda functions to interface with Slack, as demonstrated in this sample solution for Macie.
Finally, we demonstrated a solution that can operate at-scale, and will automatically be deployed to new member accounts in your organization. By using an in-place quarantine strategy instead of one that is centralized, you can more easily manage this solution across potentially hundreds of AWS accounts and thousands of S3 buckets. By incorporating a global tracking database in DynamoDB, this solution can also be enhanced through a visual dashboard depicting quarantine insights.
Managing data within an organization is complex. Handling data from outside the organization adds even more complexity. As the organization receives data from multiple external vendors, it often arrives in different formats, typically Excel or CSV files, with each vendor using their own unique data layout and structure. In this blog post, we’ll explore a solution that streamlines this process by leveraging the capabilities of AWS Glue DataBrew.
DataBrew is an excellent tool for data quality and preprocessing. You can use its built-in transformations, recipes, as well as integrations with the AWS Glue Data Catalog and Amazon Simple Storage Service (Amazon S3) to preprocess the data in your landing zone, clean it up, and send it downstream for analytical processing.
In this post, we demonstrate the following:
Extracting non-transactional metadata from the top rows of a file and merging it with transactional data
Combining multi-line rows into single-line rows
Extracting unique identifiers from within strings or text
Solution overview
For this use case, imagine you’re a data analyst working at your organization. The sales leadership have requested a consolidated view of the net sales they are making from each of the organization’s suppliers. Unfortunately, this information is not available in a database. The sales data comes from each supplier in layouts like the following example.
However, with hundreds of resellers, manually extracting the information at the top is not feasible. Your goal is to clean up and flatten the data into the following output layout.
To achieve this, you can use pre-built transformations in DataBrew to quickly get the data in the layout you want.
Prerequisites
For this walkthrough, you should have the following prerequisites:
The first thing we need to do is upload the input dataset to Amazon S3. Create an S3 bucket for the project and create a folder to upload the raw input data. The output data will be stored in another folder in a later step.
Next, we need to connect DataBrew to our CSV file. We create what we call a dataset, which is an artifact that points to whatever data source we will be using. Navigate to “Datasets” on the left hand menu.
Ensure the Column header values field is set to Add default header. The input CSV has an irregular format, so the first row will not have the needed column values.
Create a project
To create a new project, complete the following steps:
On the DataBrew console, choose Projects in the navigation pane.
Choose Create project.
For Project name, enter FoodMartSales-AllUpProject.
For Attached recipe, choose Create new recipe.
For Recipe name, enter FoodMartSales-AllUpProject-recipe.
For Select a dataset, select My datasets.
Select the FoodMartSales-AllUp dataset.
Under Permissions, for Role name, choose the IAM role you created as a prerequisite or create a new role.
Choose Create project.
After the project is opened, an interactive session is created where you can author transformations on a sample of the data.
Extract non-transactional metadata from within the contents of the file and merge it with transactional data
In this section, we consider data that has metadata on the first few rows of the file, followed by transactional data. We walk through how to extract data relevant to the whole file from the top of the document and combine it with the transactional data into one flat table.
Extract metadata from the header and remove invalid rows
Complete the following steps to extract metadata from the header:
Choose Conditions and then choose IF.
For Matching conditions, choose Match all conditions.
For Source, choose Value of and Column_1.
For Logical condition, choose Is exactly.
For Enter a value, choose Enter custom value and enter RESELLER NAME.
For Flag result value as, choose Custom value.
For Value if true, choose Select source column and set Value of to Column_2.
For Value if false, choose Enter custom value and enter INVALID.
Choose Apply.
Your dataset should now look like the following screenshot, with the Reseller Name value extracted to a column by itself.
Next, you remove invalid rows and fill the rows with the Reseller Name value.
Choose Clean and then choose Custom values.
For Source column, choose ResellerName.
For Specify values to remove, choose Custom value.
For Values to remove, choose Invalid.
For Apply transform to, choose All rows.
Choose Apply.
Choose Missing and then choose Fill with most frequent value.
For Source column, choose FirstTransactionDate.
For Missing value action, choose Fill with most frequent value.
For Apply transform to, choose All rows.
Choose Apply.
Your dataset should now look like the following screenshot, with the Reseller Name value extracted to a column by itself.
Repeat the same steps in this section for the rest of the metadata, including Reseller Email Address, Reseller ID, and First Transaction Date.
Promote column headers and clean up data
To promote column headers, complete the following steps:
Reorder the columns to put the metadata columns to the left of the dataset by choosing Column, Move column, and Start of the table.
Rename the columns with the appropriate names.
Now you can clean up some columns and rows.
Delete unnecessary columns, such as Column_7.
You can also delete invalid rows by filtering out records that don’t have a transaction date value.
Choose the ABC icon on the menu of the Transaction_Date column and choose date.
For Handle invalid values, select Delete rows, then choose Apply.
The dataset should now have the metadata extracted and the column headers promoted.
Combine multi-line rows into single-line rows
The next issue to address is transactions pertaining to the same row that are split across multiple lines. In the following steps, we extract the needed data from the rows and merge it into single-line transactions. For this example specifically, the Reseller Margin data is split across two lines.
Complete the following steps to get the Reseller Margin value on the same line as the corresponding transaction. First, we identify the Reseller Margin rows and store them in a temporary column.
Choose Conditions and then choose IF.
For Matching conditions, choose Match all conditions.
For Source, choose Value of and Transaction_ID.
For Logical condition, choose Contains.
For Enter a value, choose Enter custom value and enter Reseller Margin.
For Flag result value as, choose Custom value.
For Value if true, choose Select source column set Value of to TransactionAmount.
For Value if false, choose Enter custom value and enter Invalid.
For Destination column, choose ResellerMargin_Temp.
Choose Apply.
Next, you shift the Reseller Margin value up one row.
Choose Functions and then choose NEXT.
For Source column, choose ResellerMargin_Temp.
For Number of rows, enter 1.
For Destination column, choose ResellerMargin.
For Apply transform to, choose All rows.
Choose Apply.
Next, delete the invalid rows.
Choose Missing and then choose Remove missing rows.
For Source column, choose TransactionDate.
For Missing value action, choose Delete rows with missing values.
For Apply transform to, choose All rows.
Choose Apply.
Your dataset should now look like the following screenshot, with the Reseller Margin value extracted to a column by itself.
With the data structured properly, we can move on to mining the cleaned data.
Extract unique identifiers from within strings and text
Many types of data contain important information stored as unstructured text in a cell. In this section, we look at how to extract this data. Within the sample dataset, the BankTransferText column has valuable information around our resellers’ registered bank account numbers as well as the currency of the transaction, namely IBAN, SWIFT Code, and Currency.
Complete the following steps to extract IBAN, SWIFT code, and Currency into separate columns. First, you extract the IBAN number from the text using a regular expression (regex).
Choose Extract and then choose Custom value or pattern.
For Create column options, choose Extract values.
For Source column, choose BankTransferText.
For Extract options, choose Custom value or pattern.
For Values to extract, enter [a-zA-Z][a-zA-Z][0-9]{2}[A-Z0-9]{1,30}.
For Destination column, choose IBAN.
For Apply transform to, choose All rows.
Choose Apply.
Extract the SWIFT code from the text using a regex following the same steps used to extract the IBAN number, but using the following regex instead: (?!^)(SWIFT Code: )([A-Z]{2}[A-Z0-9]+).
Next, remove the SWIFT Code: label from the extracted text.
Choose Remove and then choose Custom values.
For Source column, choose SWIFT Code.
For Specify values to remove, choose Custom value.
For Apply transform to, choose All rows.
Extract the currency from the text using a regex following the same steps used to extract the IBAN number, but using the following regex instead: (?!^)(Currency: )([A-Z]{3}).
Remove the Currency: label from the extracted text following the same steps used to remove the SWIFT Code: label.
You can clean up by deleting any unnecessary columns.
Choose Column and then choose Delete.
For Source columns, choose BankTransferText.
Choose Apply.
Repeat for any remaining columns.
Your dataset should now look like the following screenshot, with IBAN, SWIFT Code, and Currency extracted to separate columns.
Write the transformed data to Amazon S3
With all the steps captured in the recipe, the last step is to write the transformed data to Amazon S3.
On the DataBrew console, choose Run job.
For Job name, enter FoodMartSalesToDataLake.
For Output to, choose Amazon S3.
For File type, choose CSV.
For Delimiter, choose Comma (,).
For Compression, choose None.
For S3 bucket owners’ account, select Current AWS account.
For S3 location, enter s3://{name of S3 bucket}/clean/.
For Role name, choose the IAM role created as a prerequisite or create a new role.
Choose Create and run job.
Go to the Jobs tab and wait for the job to complete.
Navigate to the job output folder on the Amazon S3 console.
Download the CSV file and view the transformed output.
Your dataset should look similar to the following screenshot.
Clean up
To optimize cost, make sure to clean up the resources deployed for this project by completing the following steps:
Delete every DataBrew project along with their linked recipes.
Delete all the DataBrew datasets.
Delete the contents in your S3 bucket.
Delete the S3 bucket.
Conclusion
The reality of exchanging data with suppliers is that we can’t always control the shape of the input data. With DataBrew, we can use a list of pre-built transformations and repeatable steps to transform incoming data into a desired layout and extract relevant data and insights from Excel or CSV files. Start using DataBrew today and transform 3 rd party files into structured datasets ready for consumption by your business.
About the Author
Ismail Makhlouf is a Senior Specialist Solutions Architect for Data Analytics at AWS. Ismail focuses on architecting solutions for organizations across their end-to-end data analytics estate, including batch and real-time streaming, big data, data warehousing, and data lake workloads. He primarily works with direct-to-consumer platform companies in the ecommerce, FinTech, PropTech, and HealthTech space to achieve their business objectives with well-architected data platforms.
November 14, 2023: We’ve updated this post to use IAM Identity Center and follow updated IAM best practices.
In this post, we discuss the concept of folders in Amazon Simple Storage Service (Amazon S3) and how to use policies to restrict access to these folders. The idea is that by properly managing permissions, you can allow federated users to have full access to their respective folders and no access to the rest of the folders.
Overview
Imagine you have a team of developers named Adele, Bob, and David. Each of them has a dedicated folder in a shared S3 bucket, and they should only have access to their respective folders. These users are authenticated through AWS IAM Identity Center (successor to AWS Single Sign-On).
In this post, you’ll focus on David. You’ll walk through the process of setting up these permissions for David using IAM Identity Center and Amazon S3. Before you get started, let’s first discuss what is meant by folders in Amazon S3, because it’s not as straightforward as it might seem. To learn how to create a policy with folder-level permissions, you’ll walk through a scenario similar to what many people have done on existing files shares, where every IAM Identity Center user has access to only their own home folder. With folder-level permissions, you can granularly control who has access to which objects in a specific bucket.
You’ll be shown a policy that grants IAM Identity Center users access to the same Amazon S3 bucket so that they can use the AWS Management Console to store their information. The policy allows users in the company to upload or download files from their department’s folder, but not to access any other department’s folder in the bucket.
After the policy is explained, you’ll see how to create an individual policy for each IAM Identity Center user.
Throughout the rest of this post, you will use a policy, which will be associated with an IAM Identity Center user named David. Also, you must have already created an S3 bucket.
Note: S3 buckets have a global namespace and you must change the bucket name to a unique name.
For this blog post, you will need an S3 bucket with the following structure (the example bucket name for the rest of the blog is “my-new-company-123456789”):
Figure 1: Screenshot of the root of the my-new-company-123456789 bucket
Your S3 bucket structure should have two folders, home and confidential, with a file root-file.txt in the main bucket directory. Inside confidential you will have no items or folders. Inside home there should be three sub-folders: Adele, Bob, and David.
Figure 2: Screenshot of the home/ directory of the my-new-company-123456789 bucket
A brief lesson about Amazon S3 objects
Before explaining the policy, it’s important to review how Amazon S3 objects are named. This brief description isn’t comprehensive, but will help you understand how the policy works. If you already know about Amazon S3 objects and prefixes, skip ahead to Creating David in Identity Center.
Amazon S3 stores data in a flat structure; you create a bucket, and the bucket stores objects. S3 doesn’t have a hierarchy of sub-buckets or folders; however, tools like the console can emulate a folder hierarchy to present folders in a bucket by using the names of objects (also known as keys). When you create a folder in S3, S3 creates a 0-byte object with a key that references the folder name that you provided. For example, if you create a folder named photos in your bucket, the S3 console creates a 0-byte object with the key photos/. The console creates this object to support the idea of folders. The S3 console treats all objects that have a forward slash (/) character as the last (trailing) character in the key name as a folder (for example, examplekeyname/)
To give you an example, for an object that’s named home/common/shared.txt, the console will show the shared.txt file in the common folder in the home folder. The names of these folders (such as home/ or home/common/) are called prefixes, and prefixes like these are what you use to specify David’s department folder in his policy. By the way, the slash (/) in a prefix like home/ isn’t a reserved character — you could name an object (using the Amazon S3 API) with prefixes such as home:common:shared.txt or home-common-shared.txt. However, the convention is to use a slash as the delimiter, and the Amazon S3 console (but not S3 itself) treats the slash as a special character for showing objects in folders. For more information on organizing objects in the S3 console using folders, see Organizing objects in the Amazon S3 console by using folders.
Creating David in Identity Center
IAM Identity Center helps you securely create or connect your workforce identities and manage their access centrally across AWS accounts and applications. Identity Center is the recommended approach for workforce authentication and authorization on AWS for organizations of any size and type. Using Identity Center, you can create and manage user identities in AWS, or connect your existing identity source, including Microsoft Active Directory, Okta, Ping Identity, JumpCloud, Google Workspace, and Azure Active Directory (Azure AD). For further reading on IAM Identity Center, see the Identity Center getting started page.
Begin by setting up David as an IAM Identity Center user. To start, open the AWS Management Console and go to IAM Identity Center and create a user.
Note: The following steps are for Identity Center without System for Cross-domain Identity Management (SCIM) turned on, the add user option won’t be available if SCIM is turned on.
From the left pane of the Identity Center console, select Users, and then choose Add user.
Figure 3: Screenshot of IAM Identity Center Users page.
Enter David as the Username, enter an email address that you have access to as you will need this later to confirm your user, and then enter a First name, Last name, and Display name.
Leave the rest as default and choose Add user.
Select Users from the left navigation pane and verify you’ve created the user David.
Figure 4: Screenshot of adding users to group in Identity Center.
Now that you’re verified the user David has been created, use the left pane to navigate to Permission sets, then choose Create permission set.
Figure 5: Screenshot of permission sets in Identity Center.
Select Custom permission set as your Permission set type, then choose Next.
Figure 6: Screenshot of permission set types in Identity Center.
David’s policy
This is David’s complete policy, which will be associated with an IAM Identity Center federated user named David by using the console. This policy grants David full console access to only his folder (/home/David) and no one else’s. While you could grant each user access to their own bucket, keep in mind that an AWS account can have up to 100 buckets by default. By creating home folders and granting the appropriate permissions, you can instead allow thousands of users to share a single bucket.
Now, copy and paste the preceding IAM Policy into the inline policy editor. In this case, you use the JSON editor. For information on creating policies, see Creating IAM policies.
Figure 7: Screenshot of the inline policy inside the permissions set in Identity Center.
Give your permission set a name and a description, then leave the rest at the default settings and choose Next.
Verify that you modify the policies to have the bucket name you created earlier.
After your permission set has been created, navigate to AWS accounts on the left navigation pane, then select Assign users or groups.
Figure 8: Screenshot of the AWS accounts in Identity Center.
Select the user David and choose Next.
Figure 9: Screenshot of the AWS accounts in Identity Center.
Select the permission set you created earlier, choose Next, leave the rest at the default settings and choose Submit.
Figure 10: Screenshot of the permission sets in Identity Center.
You’ve now created and attached the permissions required for David to view his S3 bucket folder, but not to view the objects in other users’ folders. You can verify this by signing in as David through the AWS access portal.
Figure 11: Screenshot of the settings summary in Identity Center.
Navigate to the dashboard in IAM Identity Center and go to the Settings summary, then choose the AWS access portal URL.
Figure 12: Screenshot of David signing into the console via the Identity Center dashboard URL.
Sign in as the user David with the one-time password you received earlier when creating David.
Figure 13: Second screenshot of David signing into the console through the Identity Center dashboard URL.
Open the Amazon S3 console.
Search for the bucket you created earlier.
Figure 14: Screenshot of my-new-company-123456789 bucket in the AWS console.
Navigate to David’s folder and verify that you have read and write access to the folder. If you navigate to other users’ folders, you’ll find that you don’t have access to the objects inside their folders.
David’s policy consists of four blocks; let’s look at each individually.
Before you begin identifying the specific folders David can have access to, you must give him two permissions that are required for Amazon S3 console access: ListAllMyBuckets and GetBucketLocation.
The ListAllMyBuckets action grants David permission to list all the buckets in the AWS account, which is required for navigating to buckets in the Amazon S3 console (and as an aside, you currently can’t selectively filter out certain buckets, so users must have permission to list all buckets for console access). The console also does a GetBucketLocation call when users initially navigate to the Amazon S3 console, which is why David also requires permission for that action. Without these two actions, David will get an access denied error in the console.
Block 2: Allow listing objects in root and home folders
Although David should have access to only his home folder, he requires additional permissions so that he can navigate to his folder in the Amazon S3 console. David needs permission to list objects at the root level of the my-new-company-123456789 bucket and to the home/ folder. The following policy grants these permissions to David:
Without the ListBucket permission, David can’t navigate to his folder because he won’t have permissions to view the contents of the root and home folders. When David tries to use the console to view the contents of the my-new-company-123456789 bucket, the console will return an access denied error. Although this policy grants David permission to list all objects in the root and home folders, he won’t be able to view the contents of any files or folders except his own (you specify these permissions in the next block).
This block includes conditions, which let you limit under what conditions a request to AWS is valid. In this case, David can list objects in the my-new-company-123456789 bucket only when he requests objects without a prefix (objects at the root level) and objects with the home/ prefix (objects in the home folder). If David tries to navigate to other folders, such as confidential/, David is denied access. Additionally, David needs permissions to list prefix home/David to be able to use the search functionality of the console instead of scrolling down the list of users’ folders.
To set these root and home folder permissions, I used two conditions: s3:prefix and s3:delimiter. The s3:prefix condition specifies the folders that David has ListBucket permissions for. For example, David can list the following files and folders in the my-new-company-123456789 bucket:
But David cannot list files or subfolders in the confidential/, home/Adele, or home/Bob folders.
Although the s3:delimiter condition isn’t required for console access, it’s still a good practice to include it in case David makes requests by using the API. As previously noted, the delimiter is a character—such as a slash (/)—that identifies the folder that an object is in. The delimiter is useful when you want to list objects as if they were in a file system. For example, let’s assume the my-new-company-123456789 bucket stored thousands of objects. If David includes the delimiter in his requests, he can limit the number of returned objects to just the names of files and subfolders in the folder he specified. Without the delimiter, in addition to every file in the folder he specified, David would get a list of all files in any subfolders.
Block 3: Allow listing objects in David’s folder
In addition to the root and home folders, David requires access to all objects in the home/David/ folder and any subfolders that he might create. Here’s a policy that allows this:
In the condition above, you use a StringLike expression in combination with the asterisk (*) to represent an object in David’s folder, where the asterisk acts as a wildcard. That way, David can list files and folders in his folder (home/David/). You couldn’t include this condition in the previous block (AllowRootAndHomeListingOfCompanyBucket) because it used the StringEquals expression, which would interpret the asterisk (*) as an asterisk, not as a wildcard.
In the next section, the AllowAllS3ActionsInUserFolder block, you’ll see that the Resource element specifies my-new-company/home/David/*, which looks like the condition that I specified in this section. You might think that you can similarly use the Resource element to specify David’s folder in this block. However, the ListBucket action is a bucket-level operation, meaning the Resource element for the ListBucket action applies only to bucket names and doesn’t take folder names into account. So, to limit actions at the object level (files and folders), you must use conditions.
Block 4: Allow all Amazon S3 actions in David’s folder
Finally, you specify David’s actions (such as read, write, and delete permissions) and limit them to just his home folder, as shown in the following policy:
For the Action element, you specified s3:*, which means David has permission to do all Amazon S3 actions. In the Resource element, you specified David’s folder with an asterisk (*) (a wildcard) so that David can perform actions on the folder and inside the folder. For example, David has permission to change his folder’s storage class. David also has permission to upload files, delete files, and create subfolders in his folder (perform actions in the folder).
An easier way to manage policies with policy variables
In David’s folder-level policy you specified David’s home folder. If you wanted a similar policy for users like Bob and Adele, you’d have to create separate policies that specify their home folders. Instead of creating individual policies for each IAM Identity Center user, you can use policy variables and create a single policy that applies to multiple users (a group policy). Policy variables act as placeholders. When you make a request to a service in AWS, the placeholder is replaced by a value from the request when the policy is evaluated.
For example, you can use the previous policy and replace David’s user name with a variable that uses the requester’s user name through attributes and PrincipalTag as shown in the following policy (copy this policy to use in the procedure that follows):
To implement this policy with variables, begin by opening the IAM Identity Center console using the main AWS admin account (ensuring you’re not signed in as David).
Select Settings on the left-hand side, then select the Attributes for access control tab.
Figure 15: Screenshot of Settings inside Identity Center.
Create a new attribute for access control, entering userName as the Key and ${path:userName} as the Value, then choose Save changes. This will add a session tag to your Identity Center user and allow you to use that tag in an IAM policy.
Figure 16: Screenshot of managing attributes inside Identity Center settings.
To edit David’s permissions, go back to the IAM Identity Center console and select Permission sets.
Figure 17: Screenshot of permission sets inside Identity Center with Davids-Permissions selected.
Select David’s permission set that you created previously.
Select Inline policy and then choose Edit to update David’s policy by replacing it with the modified policy that you copied at the beginning of this section, which will resolve to David’s username.
Figure 18: Screenshot of David’s policy inside his permission set inside Identity Center.
You can validate that this is set up correctly by signing in to David’s user through the Identity Center dashboard as you did before and verifying you have access to the David folder and not the Bob or Adele folder.
Figure 19: Screenshot of David’s S3 folder with access to a .jpg file inside.
Whenever a user makes a request to AWS, the variable is replaced by the user name of whoever made the request. For example, when David makes a request, ${aws:PrincipalTag/userName} resolves to David; when Adele makes the request, ${aws:PrincipalTag/userName} resolves to Adele.
It’s important to note that, if this is the route you use to grant access, you must control and limit who can set this username tag on an IAM principal. Anyone who can set this tag can effectively read/write to any of these bucket prefixes. It’s important that you limit access and protect the bucket prefixes and who can set the tags. For more information, see What is ABAC for AWS, and the Attribute-based access control User Guide.
Conclusion
By using Amazon S3 folders, you can follow the principle of least privilege and verify that the right users have access to what they need, and only to what they need.
See the following example policy that only allows API access to the buckets, and only allows for adding, deleting, restoring, and listing objects inside the folders:
Amazon Redshift is a fast, fully managed cloud data warehouse that makes it straightforward and cost-effective to analyze all your data at petabyte scale, using standard SQL and your existing business intelligence (BI) tools. Today, tens of thousands of customers run business-critical workloads on Amazon Redshift.
Amazon Redshift Serverless makes it effortless to run and scale analytics workloads without having to manage any data warehouse infrastructure.
Redshift Serverless automatically provisions and intelligently scales data warehouse capacity to deliver fast performance for even the most demanding and unpredictable workloads, and you pay only for what you use.
This is ideal when it’s difficult to predict compute needs such as variable workloads, periodic workloads with idle time, and steady-state workloads with spikes. As your demand evolves with new workloads and more concurrent users, Redshift Serverless automatically provisions the right compute resources, and your data warehouse scales seamlessly and automatically.
Amazon Redshift data sharing allows you to securely share live, transactionally consistent data in one Redshift data warehouse with another Redshift data warehouse (provisioned or serverless) across accounts and Regions without needing to copy, replicate, or move data from one data warehouse to another.
Amazon Redshift data sharing enables you to evolve your Amazon Redshift deployment architectures into a hub-and-spoke or data mesh model to better meet performance SLAs, provide workload isolation, perform cross-group analytics, and onboard new use cases, all without the complexity of data movement and data copies.
In this post, we show how Wallapop adopted Redshift Serverless and data sharing to modernize their data warehouse architecture.
Wallapop’s initial data architecture platform
Wallapop is a Spanish ecommerce marketplace company focused on second-hand items, founded in 2013. Every day, they receive around 300,000 new items from buyers to be added to their catalog. The marketplace can be accessed via mobile app or website.
The average monthly traffic is around 15 million active users. Since its creation in 2013, it has reached more than 40 million downloads and more than 700 million products have been listed.
Amazon Redshift plays a central role in their data platform on AWS for ingestion, ETL (extract, transform, and load), machine learning (ML), and consumption workloads that run their insight consumption to drive decision-making.
The initial architecture is composed of one main Redshift provisioned cluster that handled all the workloads, as illustrated in the following diagram. Their cluster was deployed with 8 nodes ra3.4xlarge and concurrency scaling enabled.
Wallapop had three main areas to improve in their initial data architecture platform:
Workload isolation challenges with growing data volumes and new workloads running in parallel
Administrative burden on data engineering teams to manage the concurrent workloads, especially at peak times
Cost-performance ratio while scaling during peak periods
The areas of improvement mainly focused on performance of data consumption workloads along with the BI and analytics consumption tool, where high query concurrency was impacting the final analytics preparation and its insights consumption.
Solution overview
To improve their data platform architecture, Wallapop designed and built a new distributed approach with Amazon Redshift with the support of AWS.
Their cluster size of the provisioned data warehouse didn’t change. What changed was lowering the usage concurrency scaling to 1 hour, which is in the Free Tier usage for every 24 hours of using the main cluster. The following diagram illustrates the target architecture.
Solution details
The new data platform architecture combines Redshift Serverless and provisioned data warehouses with Amazon Redshift data sharing, helping Wallapop improve their overall Amazon Redshift experience with improved ease of use, performance, and optimized costs.
Redshift Serverless measures data warehouse capacity in Redshift Processing Units (RPUs). RPUs are resources used to handle workloads. You can adjust the base capacity setting from 8 RPUs to 512 RPUs in units of 8 (8, 16, 24, and so on).
The new architecture uses a Redshift provisioned cluster with RA3 nodes to run their constant and write workloads (data ingestion and transformation jobs). For cost-efficiency, Wallapop is also benefiting from Redshift reserved instances to optimize on costs for these known, predictable, and steady workloads. This cluster acts as the producer cluster in their distributed architecture using data sharing, meaning the data is ingested into the storage layer of Amazon Redshift—Redshift Managed Storage (RMS).
For the consumption part of the data platform architecture, the data is shared with different Redshift Serverless endpoints to meet the needs for different consumption workloads.
Data sharing provides workloads isolation. With this architecture, Wallapop achieves better workload isolation and ensures that only the right data is shared with the different consumption applications. Additionally, this approach avoids data duplication in their consumer part, which optimizes costs and allows better governance processes, because they only have to manage a single version of the data warehouse data instead of different copies or versions of it.
Redshift Serverless is used as a consumer part of the data platform architecture to meet those predictable and unpredictable, non-steady, and often demanding analytics workloads, such as their CI/CD jobs and BI and analytics consumption workloads coming from their data visualization application. Redshift Serverless also helps them achieve better workload isolation due to its managed auto scaling feature that makes sure performance is consistently good for these unpredictable workloads, even at peak times. It also provides a better user experience for the Wallapop data platform team, thanks to the autonomics capabilities that Redshift Serverless provides.
The new solution combining Redshift Serverless and data sharing allowed Wallapop to achieve better performance, cost, and ease of use.
Eduard Lopez, Wallapop Data Engineering Manager, shared the improved experience of analytics users: “Our analyst users are telling us that now ‘Looker flies.’ Insights consumption went up as a result of it without increasing costs.”
Evaluation of outcome
Wallapop started this re-architecture effort by first testing the isolation of their BI consumption workload with Amazon Redshift data sharing and Redshift Serverless with the support of AWS. The workload was tested using different base RPU configurations to measure the base capacity and resources in Redshift Serverless. Base RPU ranges for Redshift Serverless range from 8–512. Wallapop tested their BI workload with two configurations: 32 base RPU and 64 base RPU, after enabling data sharing from their Redshift provisioned cluster to ensure the serverless endpoints have access to the necessary datasets.
Based on the results measured 1 week before testing, the main area for improvement was the queries that took longer than 10 seconds to complete (52%), represented by the yellow, orange, and red areas of the following chart, as well as the long-running queries represented by the red area (over 600 seconds, 9%).
The first test of this workload with Redshift Serverless using a 64 base RPU configuration immediately showed performance improvement results: the queries running longer than 10 seconds were reduced by 38% and the long-running queries (over 120 seconds) were almost completely eliminated.
Javier Carbajo, Wallapop Data Engineer, says, “Providing a service without downtime or loading times that are too long was one of our main requirements since we couldn’t have analysts or stakeholders without being able to consult the data.”
Following the first set of results, Wallapop also tested with a Redshift Serverless configuration using 32 base RPU to compare the results and select the configuration that could offer them the best price-performance for this workload. With this configuration, the results were similar to the previously test run on Redshift Serverless with 64 base RPU (still showing significant performance improvement from the original results). Based on the tests, this configuration was selected for the new architecture.
Gergely Kajtár, Wallapop Data Engineer, says, “We noticed a significant increase in the daily workflows’ stability after the change to the new Redshift architecture.”
Following this first workload, Wallapop has continued expanding their Amazon Redshift distributed architecture with CI/CD workloads running on a separated Redshift Serverless endpoint using data sharing with their Redshift provisioned (RA3) cluster.
“With the new Redshift architecture, we have noticed remarkable improvements both in speed and stability. That has translated into an increase of 2 times in analytical queries, not only by analysts and data scientists but from other roles as well such as marketing, engineering, C-level, etc. That proves that investing in a scalable architecture like Redshift Serverless has a direct consequence on accelerating the adoption of data as decision-making driver in the organization.”
– Nicolás Herrero, Wallapop Director of Data & Analytics.
Conclusion
In this post, we showed you how this platform can help Wallapop to scale in the future by adding new consumers when new needs or applications require to access data.
If you’re new to Amazon Redshift, you can explore demos, other customer stories, and the latest features at Amazon Redshift. If you’re already using Amazon Redshift, reach out to your AWS account team for support, and learn more about what’s new with Amazon Redshift.
About the Authors
Eduard Lopez is the Data Engineer Manager at Wallapop. He is a software engineer with over 6 years of experience in data engineering, machine learning, and data science.
Daniel Martinez is a Solutions Architect in Iberia Digital Native Businesses (DNB), part of the worldwide commercial sales organization (WWCS) at AWS.
Jordi Montoliu is a Sr. Redshift Specialist in EMEA, part of the worldwide specialist organization (WWSO) at AWS.
Ziad Wali is an Acceleration Lab Solutions Architect at Amazon Web Services. He has over 10 years of experience in databases and data warehousing, where he enjoys building reliable, scalable, and efficient solutions. Outside of work, he enjoys sports and spending time in nature.
Semir Naffati is a Sr. Redshift Specialist Solutions Architect in EMEA, part of the worldwide specialist organization (WWSO) at AWS.
With Amazon Cognito user pools, you can add user sign-up and sign-in features and control access to your web and mobile applications. You can enable your users who already have accounts with other identity providers (IdPs) to skip the sign-up step and sign in to your application by using an existing account through SAML 2.0 or OpenID Connect (OIDC). In this blog post, you will learn how to extend the authorization code grant between Cognito and an external OIDC IdP with private key JSON Web Token (JWT) client authentication.
For OIDC, Cognito uses the OAuth 2.0 authorization code grant flow as defined by the IETF in RFC 6749 Section 1.3.1. This flow can be broken down into two steps: user authentication and token request. When a user needs to authenticate through an external IdP, the Cognito user pool forwards the user to the IdP’s login endpoint. After successful authentication, the IdP sends back a response that includes an authorization code, which concludes the authentication step. The Cognito user pool now uses this code, together with a client secret for client authentication, to retrieve a JWT from the IdP. The JWT consists of an access token and an identity token. Cognito ingests that JWT, creates or updates the user in the user pool, and returns a JWT it has created for the client’s session, to the client. You can find a more detailed description of this flow in the Amazon Cognito documentation.
Although this flow sufficiently secures the requests between Cognito and the IdP for most customers, those in the public sector, healthcare, and finance sometimes need to integrate with IdPs that enforce additional security measures as part of their security requirements. In the past, this has come up in conversations at AWS when our customers needed to integrate Cognito with, for example, the HelseID (healthcare sector, Norway), login.gov (public sector, USA), or GOV.UK One Login (public sector, UK) IdPs. Customers who are using Okta, PingFederate, or similar IdPs and want additional security measures as part of their internal security requirements, might also find adding further security requirements desirable as part of their own policies.
The most common additional requirement is to replace the client secret with an assertion that consists of a private key JWT as a means of client authentication during token requests. This method is defined through a combination of RFC 7521 and RFC 7523. Instead of a symmetric key (the client secret), this method uses an asymmetric key-pair to sign a JWT with a private key. The IdP can then verify the token request by validating the signature of that JWT using the corresponding public key. This helps to eliminate the exposure of the client secret with every request, thereby reducing the risk of request forgery, depending on the quality of the key material that was used and how access to the private key is secured. Additionally, the JWT has an expiry time, which further constrains the risk of replay attacks to a narrow time window.
A Cognito user pool does not natively support private key JWT client authentication when integrating with an external IdP. However, you can still integrate Cognito user pools with IdPs that support or require private key JWT authentication by using Amazon API Gateway and AWS Lambda.
This blog post presents a high-level overview of how you can implement this solution. To learn more about the underlying code, how to configure the included services, and what the detailed request flow looks like, check out the Deploy a demo section later in this post. Keep in mind that this solution does not cover the request flow between your own application and a Cognito user pool, but only the communication between Cognito and the IdP.
Solution overview
Following the technical implementation details of the previously mentioned RFCs, the required request flow between a Cognito user pool and the external OIDC IdP can be broken down into four simplified steps, shown in Figure 1.
Figure 1: Simplified UML diagram of the target implementation for using a private key JWT during the authorization code grant
In this example, we’re using the Cognito user pool hosted UI—because it already provides OAuth 2.0-aligned IdP integration—and extending it with the private key JWT. Figure 1 illustrates the following steps:
The hosted UI forwards the user client to the /authorize endpoint of the external OIDC IdP with an HTTP GET request.
After the user successfully logs into the IdP, the IdP‘s response includes an authorization code.
The hosted UI sends this code in an HTTP POST request to the IdP’s /token endpoint. By default, the hosted UI also adds a client secret for client authentication. To align with the private key JWT authentication method, you need to replace the client secret with a client assertion and specify the client assertion type, as highlighted in the diagram and further described later.
The IdP validates the client assertion by using a pre-shared public key.
The IdP issues the user’s JWT, which Cognito ingests to create or update the user in the user pool.
As mentioned earlier, token requests between a Cognito user pool and an external IdP do not natively support the required client assertion. However, you can redirect the token requests to, for example, an Amazon API Gateway, which invokes a Lambda function to extend the request with the new parameters. Because you need to sign the client assertion with a private key, you also need a secure location to store this key. For this, you can use AWS Secrets Manager, which helps you to secure the key from unauthorized use. With the required flow and additional services in mind, you can create the following architecture.
Figure 2: Architecture diagram with Amazon API Gateway and Lambda to process token requests between Cognito and the OIDC identity provider
Let’s have a closer look at the individual components and the request flow that are shown in Figure 2.
When adding an OIDC IdP to a Cognito user pool, you configure endpoints for Authorization, UserInfo, Jwks_uri, and Token. Because the private key is required only for the token request flow, you can configure resources to redirect and process requests, as follows (the step numbers correspond to the step numbering in Figure 2):
Configure the endpoints for Authorization, UserInfo, and Jwks_Uri with the ones from the IdP.
Create an API Gateway with a dedicated route for token requests (for example, /token) and add it as the Token endpoint in the IdP configuration in Cognito.
Modify the original body and make the token request, including the original parameters for grant_type, code, and client_id, with added client_assertion_type and the client_assertion. (The following example HTTP request has line breaks and placeholders in angle brackets for better readability.)
Note that there is no client secret needed in this request. Instead, you add a client assertion type as urn:ietf:params:oauth:client-assertion-type:jwt-bearer, and the client assertion with the signed JWT.
If the request is successful, the IdP’s response includes a JWT with the access token and identity token. On returning the response via the Lambda function, Cognito ingests the JWT and creates or updates the user in the user pool. It then responds to the original authorize request of the user client by sending its own authorization code, which can be exchanged for a Cognito issued JWT in your own application.
Deploy a demo
To deploy an example of this solution, see our GitHub repository. You will find the prerequisites and deployment steps there, as well as additional in-depth information.
Additional considerations
To further optimize this solution, you should consider checking the event details in the Lambda function before fully processing the requests. This way, you can, for example, check that all required parameters are present and valid. One option to do that, is to define a client secret when you create the IdP integration for the user pool. When Cognito sends the token request, it adds the client secret in the encoded body, so you can retrieve it and validate its value. If the validation fails, requests can be dropped early to improve exception handling and to prevent invalid requests from causing unnecessary function charges.
By redirecting the IdP token endpoint in the Cognito user pool’s external OIDC IdP configuration to a route in an API Gateway, you can use Lambda functions to customize the request flow between Cognito and the IdP. In the example in this post, we showed how to change the client authentication mechanism during the token request from a client secret to a client assertion with a signed JWT (private key JWT). You can also apply the same proxy-like approach to customize the request flow even further—for example, by adding a Proof Key for Code Exchange (PKCE), for which you can find an example in the aws-samples GitHub repository.
This post is cowritten with Preshen Goobiah and Johan Olivier from Capitec.
Apache Spark is a widely-used open source distributed processing system renowned for handling large-scale data workloads. It finds frequent application among Spark developers working with Amazon EMR, Amazon SageMaker, AWS Glue and custom Spark applications.
Amazon Redshift offers seamless integration with Apache Spark, allowing you to easily access your Redshift data on both Amazon Redshift provisioned clusters and Amazon Redshift Serverless. This integration expands the possibilities for AWS analytics and machine learning (ML) solutions, making the data warehouse accessible to a broader range of applications.
With the Amazon Redshift integration for Apache Spark, you can quickly get started and effortlessly develop Spark applications using popular languages like Java, Scala, Python, SQL, and R. Your applications can seamlessly read from and write to your Amazon Redshift data warehouse while maintaining optimal performance and transactional consistency. Additionally, you’ll benefit from performance improvements through pushdown optimizations, further enhancing the efficiency of your operations.
Capitec, South Africa’s biggest retail bank with over 21 million retail banking clients, aims to provide simple, affordable and accessible financial services in order to help South Africans bank better so that they can live better. In this post, we discuss the successful integration of the open source Amazon Redshift connector by Capitec’s shared services Feature Platform team. As a result of utilizing the Amazon Redshift integration for Apache Spark, developer productivity increased by a factor of 10, feature generation pipelines were streamlined, and data duplication reduced to zero.
The business opportunity
There are 19 predictive models in scope for utilizing 93 features built with AWS Glue across Capitec’s Retail Credit divisions. Feature records are enriched with facts and dimensions stored in Amazon Redshift. Apache PySpark was selected to create features because it offers a fast, decentralized, and scalable mechanism to wrangle data from diverse sources.
These production features play a crucial role in enabling real-time fixed-term loan applications, credit card applications, batch monthly credit behavior monitoring, and batch daily salary identification within the business.
The data sourcing problem
To ensure the reliability of PySpark data pipelines, it’s essential to have consistent record-level data from both dimensional and fact tables stored in the Enterprise Data Warehouse (EDW). These tables are then joined with tables from the Enterprise Data Lake (EDL) at runtime.
During feature development, data engineers require a seamless interface to the EDW. This interface allows them to access and integrate the necessary data from the EDW into the data pipelines, enabling efficient development and testing of features.
Previous solution process
In the previous solution, product team data engineers spent 30 minutes per run to manually expose Redshift data to Spark. The steps included the following:
Catalog data in the AWS Glue Data Catalog via the AWS SDK for Pandas using sampling.
This approach posed issues for large datasets, required recurring maintenance from the platform team, and was complex to automate.
Current solution overview
Capitec was able to resolve these problems with the Amazon Redshift integration for Apache Spark within feature generation pipelines. The architecture is defined in the following diagram.
The workflow includes the following steps:
Internal libraries are installed into the AWS Glue PySpark job via AWS CodeArtifact.
The Spark query is translated to an Amazon Redshift optimized query and submitted to the EDW. This is accomplished by the Amazon Redshift integration for Apache Spark.
The EDW dataset from the S3 bucket is loaded into Spark executors via the Amazon Redshift integration for Apache Spark.
The EDL dataset is loaded into Spark executors via the AWS Glue Data Catalog.
These components work together to ensure that data engineers and production data pipelines have the necessary tools to implement the Amazon Redshift integration for Apache Spark, run queries, and facilitate the unloading of data from Amazon Redshift to the EDL.
Using the Amazon Redshift integration for Apache Spark in AWS Glue 4.0
In this section, we demonstrate the utility of the Amazon Redshift integration for Apache Spark by enriching a loan application table residing in the S3 data lake with client information from the Redshift data warehouse in PySpark.
The dimclient table in Amazon Redshift contains the following columns:
ClientKey – INT8
ClientAltKey – VARCHAR50
PartyIdentifierNumber – VARCHAR20
ClientCreateDate – DATE
IsCancelled – INT2
RowIsCurrent – INT2
The loanapplication table in the AWS Glue Data Catalog contains the following columns:
RecordID – BIGINT
LogDate – TIMESTAMP
PartyIdentifierNumber – STRING
The Redshift table is read via the Amazon Redshift integration for Apache Spark and cached. See the following code:
Loan application records are read in from the S3 data lake and enriched with the dimclient table on Amazon Redshift information:
import pyspark.sql.functions as F
from awsglue.context import GlueContext
from pyspark import SparkContext

glue_ctx = GlueContext(SparkContext.getOrCreate())

push_down_predicate = (
    f"meta_extract_start_utc_ms between "
    f"'2023-07-12"
    f" 18:00:00.000000' and "
    f"'2023-07-13 06:00:00.000000'"
)

database_name="loan_application_system"
table_name="dbo_view_loan_applications"
catalog_id = # Glue Data Catalog

# Selecting only the following columns
initial_select_cols=[
            "RecordID",
            "LogDate",
            "PartyIdentifierNumber"
        ]

d_controller = (glue_ctx.create_dynamic_frame.from_catalog(catalog_id=catalog_id,
                                            database=database_name,
                                            table_name=table_name,
                                            push_down_predicate=push_down_predicate)
                .toDF()
                .select(*initial_select_cols)
                .withColumn("LogDate", F.date_format("LogDate", "yyyy-MM-dd").cast("string"))
                .dropDuplicates())

# Left Join on PartyIdentifierNumber and enriching the loan application record
d_controller_enriched = d_controller.join(d_client, on=["PartyIdentifierNumber"], how="left").cache()
As a result, the loan application record (from the S3 data lake) is enriched with the ClientCreateDate column (from Amazon Redshift).
How the Amazon Redshift integration for Apache Spark solves the data sourcing problem
The Amazon Redshift integration for Apache Spark effectively addresses the data sourcing problem through the following mechanisms:
Just-in-time reading – The Amazon Redshift integration for Apache Spark connector reads Redshift tables in a just-in-time manner, ensuring the consistency of data and schema. This is particularly valuable for Type 2 slowly changing dimension (SCD) and timespan accumulating snapshot facts. By combining these Redshift tables with the source system AWS Glue Data Catalog tables from the EDL within production PySpark pipelines, the connector enables seamless integration of data from multiple sources while maintaining data integrity.
Optimized Redshift queries – The Amazon Redshift integration for Apache Spark plays a crucial role in converting the Spark query plan into an optimized Redshift query. This conversion process simplifies the development experience for the product team by adhering to the data locality principle. The optimized queries use the capabilities and performance optimizations of Amazon Redshift, ensuring efficient data retrieval and processing from Amazon Redshift for the PySpark pipelines. This helps streamline the development process while enhancing the overall performance of the data sourcing operations.
Gaining the best performance
The Amazon Redshift integration for Apache Spark automatically applies predicate and query pushdown to optimize performance. You can gain performance improvements by using the default Parquet format used for unloading with this integration.
The adoption of the integration yielded several significant benefits for the team:
Enhanced developer productivity – The PySpark interface provided by the integration boosted developer productivity by a factor of 10, enabling smoother interaction with Amazon Redshift.
Elimination of data duplication – Duplicate and AWS Glue cataloged Redshift tables in the data lake were eliminated, resulting in a more streamlined data environment.
Reduced EDW load – The integration facilitated selective data unloading, minimizing the load on the EDW by extracting only the necessary data.
By using the Amazon Redshift integration for Apache Spark, Capitec has paved the way for improved data processing, increased productivity, and a more efficient feature engineering ecosystem.
Conclusion
In this post, we discussed how the Capitec team successfully implemented the Apache Spark Amazon Redshift integration for Apache Spark to simplify their feature computation workflows. They emphasized the importance of utilizing decentralized and modular PySpark data pipelines for creating predictive model features.
Currently, the Amazon Redshift integration for Apache Spark is utilized by 7 production data pipelines and 20 development pipelines, showcasing its effectiveness within Capitec’s environment.
Moving forward, the shared services Feature Platform team at Capitec plans to expand the adoption of the Amazon Redshift integration for Apache Spark in different business areas, aiming to further enhance data processing capabilities and promote efficient feature engineering practices.
For additional information on using the Amazon Redshift integration for Apache Spark, refer to the following resources:
Preshen Goobiah is the Lead Machine Learning Engineer for the Feature Platform at Capitec. He is focused on designing and building Feature Store components for enterprise use. In his spare time, he enjoys reading and traveling.
Johan Olivier is a Senior Machine Learning Engineer for Capitec’s Model Platform. He is an entrepreneur and problem-solving enthusiast. He enjoys music and socializing in his spare time.
Sudipta Bagchi is a Senior Specialist Solutions Architect at Amazon Web Services. He has over 12 years of experience in data and analytics, and helps customers design and build scalable and high-performant analytics solutions. Outside of work, he loves running, traveling, and playing cricket. Connect with him on LinkedIn.
Syed Humair is a Senior Analytics Specialist Solutions Architect at Amazon Web Services (AWS). He has over 17 years of experience in enterprise architecture focusing on Data and AI/ML, helping AWS customers globally to address their business and technical requirements. You can connect with him on LinkedIn.
Vuyisa Maswana is a Senior Solutions Architect at AWS, based in Cape Town. Vuyisa has a strong focus on helping customers build technical solutions to solve business problems. He has supported Capitec in their AWS journey since 2019.
Building a data platform involves various approaches, each with its unique blend of complexities and solutions. A modern data platform entails maintaining data across multiple layers, targeting diverse platform capabilities like high performance, ease of development, cost-effectiveness, and DataOps features such as CI/CD, lineage, and unit testing. In this post, we delve into a case study for a retail use case, exploring how the Data Build Tool (dbt) was used effectively within an AWS environment to build a high-performing, efficient, and modern data platform.
dbt is an open-source command line tool that enables data analysts and engineers to transform data in their warehouses more effectively. It does this by helping teams handle the T in ETL (extract, transform, and load) processes. It allows users to write data transformation code, run it, and test the output, all within the framework it provides. dbt enables you to write SQL select statements, and then it manages turning these select statements into tables or views in Amazon Redshift.
Use case
The Enterprise Data Analytics group of a large jewelry retailer embarked on their cloud journey with AWS in 2021. As part of their cloud modernization initiative, they sought to migrate and modernize their legacy data platform. The aim was to bolster their analytical capabilities and improve data accessibility while ensuring a quick time to market and high data quality, all with low total cost of ownership (TCO) and no need for additional tools or licenses.
dbt emerged as the perfect choice for this transformation within their existing AWS environment. This popular open-source tool for data warehouse transformations won out over other ETL tools for several reasons. dbt’s SQL-based framework made it straightforward to learn and allowed the existing development team to scale up quickly. The tool also offered desirable out-of-the-box features like data lineage, documentation, and unit testing. A crucial advantage of dbt over stored procedures was the separation of code from data—unlike stored procedures, dbt doesn’t store the code in the database itself. This separation further simplifies data management and enhances the system’s overall performance.
Let’s explore the architecture and learn how to build this use case using AWS Cloud services.
Solution overview
The following architecture demonstrates the data pipeline built on dbt to manage the Redshift data warehouse ETL process.
Figure 1 : Modern data platform using AWS Data Services and dbt
This architecture consists of the following key services and tools:
Amazon Redshift was utilized as the data warehouse for the data platform, storing and processing vast amounts of structured and semi-structured data
Amazon QuickSight served as the business intelligence (BI) tool, allowing the business team to create analytical reports and dashboards for various business insights
AWS Database Migration Service (AWS DMS) was employed to perform change data capture (CDC) replication from various source transactional databases
AWS Glue was put to work, loading files from the SFTP location to the Amazon Simple Storage Service (Amazon S3) landing bucket and subsequently to the Redshift landing schema
AWS Lambda functioned as a client program, calling third-party APIs and loading the data into Redshift tables
AWS Fargate, a serverless container management service, was used to deploy the consumer application for source queues and topics
dbt, an open-source tool, was employed to write SQL-based data pipelines for data stored in Amazon Redshift, facilitating complex transformations and enhancing data modeling capabilities
Let’s take a closer look at each component and how they interact in the overall architecture to transform raw data into insightful information.
Data sources
As part of this data platform, we are ingesting data from diverse and varied data sources, including:
Transactional databases – These are active databases that store real-time data from various applications. The data typically encompasses all transactions and operations that the business engages in.
Queues and topics – Queues and topics come from various integration applications that generate data in real time. They represent an instantaneous stream of information that can be used for real-time analytics and decision-making.
Third-party APIs – These provide analytics and survey data related to ecommerce websites. This could include details like traffic metrics, user behavior, conversion rates, customer feedback, and more.
Flat files – Other systems supply data in the form of flat files of different formats. These files, stored in an SFTP location, might contain records, reports, logs, or other kinds of raw data that can be further processed and analyzed.
Data ingestion
Data from various sources are grouped into two major categories: real-time ingestion and batch ingestion.
Real-time ingestion uses the following services:
AWS DMS– AWS DMS is used to create CDC replication pipelines from OLTP (Online Transaction Processing) databases. The data is loaded into Amazon Redshift in near-real time to ensure that the most recent information is available for analysis. You can also use Amazon Aurora zero-ETL integration with Amazon Redshift to ingest data directly from OLTP databases to Amazon Redshift.
Fargate–Fargate is used to deploy Java consumer applications that ingest data from source topics and queues in real time. This real-time data consumption can help the business make immediate and data-informed decisions. You can also use Amazon Redshift Streaming Ingestion to ingest data from streaming engines like Amazon Kinesis Data Streams or Amazon Managed Streaming for Apache Kafka (Amazon MSK) into Amazon Redshift.
Batch ingestion uses the following services:
Lambda – Lambda is used as a client for calling third-party APIs and loading the resultant data into Redshift tables. This process has been scheduled to run daily, ensuring a consistent batch of fresh data for analysis.
AWS Glue – AWS Glue is used to load files into Amazon Redshift through the S3 data lake. You can also use features like auto-copy from Amazon S3 (feature under preview) to ingest data from Amazon S3 to Amazon Redshift. However, the focus of this post is more on data processing within Amazon Redshift, rather than on the data loading process. Data ingestion, whether real time or batch, forms the basis of any effective data analysis, enabling organizations to gather information from diverse sources and use it for insightful decision-making.
Data warehousing using Amazon Redshift
In Amazon Redshift, we’ve established three schemas, each serving as a different layer in the data architecture:
Landing layer – This is where all data ingested by our services initially lands. It’s raw, unprocessed data straight from the source.
Certified dataset (CDS) layer – This is the next stage, where data from the landing layer undergoes cleaning, normalization, and aggregation. The cleansed and processed data is stored in this certified dataset schema. It serves as a reliable, organized source for downstream data analysis.
User-friendly data mart (UFDM) layer – This final layer uses data from the CDS layer to create data mart tables. These are specifically tailored to support BI reports and dashboards as per the business requirements. The goal of this layer is to present the data in a way that is most useful and accessible for end-users.
This layered approach to data management allows for efficient and organized data processing, leading to more accurate and meaningful insights.
Data pipeline
dbt, an open-source tool, can be installed in the AWS environment and set up to work with Amazon MWAA. We store our code in an S3 bucket and orchestrate it using Airflow’s Directed Acyclic Graphs (DAGs). This setup facilitates our data transformation processes in Amazon Redshift after the data is ingested into the landing schema.
To maintain modularity and handle specific domains, we create individual dbt projects. The nature of the data reporting—real-time or batch—affects how we define our dbt materialization. For real-time reporting, we define materialization as a view, loading data into the landing schema using AWS DMS from database updates or from topic or queue consumers. For batch pipelines, we define materialization as a table, allowing data to be loaded from various types of sources.
In some instances, we have had to build data pipelines that extend from the source system all the way to the UFDM layer. This can be accomplished using Airflow DAGs, which we discuss further in the next section.
To wrap up, it’s worth mentioning that we deploy a dbt webpage using a Lambda function and enable a URL for this function. This webpage serves as a hub for documentation and data lineage, further bolstering the transparency and understanding of our data processes.
ETL job orchestration
In our data pipeline, we follow these steps for job orchestration:
Establish a new Amazon MWAA environment. This environment serves as the central hub for orchestrating our data pipelines.
Install dbt in the new Airflow environment by adding the following dependency to your requirements.txt:
Develop DAGs with specific tasks that call upon dbt commands to carry out the necessary transformations. This step involves structuring our workflows in a way that captures dependencies among tasks and ensures that tasks run in the correct order. The following code shows how to define the tasks in the DAG:
#imports..
...

#Define the begin_exec tasks
start = DummyOperator(
    task_id='begin_exec',
    dag=dag
)

#Define 'verify_dbt_install' task to check if dbt was installed properly
verify = BashOperator(
    task_id='verify_dbt_install',
    dag=dag,
    bash_command='''
        echo "checking dbt version....";
        /usr/local/airflow/.local/bin/dbt --version;
        if [ $? -gt 0 ]; then
            pip install dbt-redshift>=1.3.0;
        else
            echo "dbt already installed";
        fi
        python --version;
        echo "listing dbt...";
        rm -r /tmp/dbt_project_home;
        cp -R /usr/local/airflow/dags/dbt_project_home /tmp;
        ls /tmp/dbt_project_home/<your_dbt_project_name>;
    '''
)

#Define ‘landing_to_cds_task’ task to copy from landing schema to cds schema
landing_to_cds_task = BashOperator(
    task_id='landing_to_cds_task',
    dag = dag,
    bash_command='''
        /usr/local/airflow/.local/bin/dbt run --project-dir /tmp/dbt_project_home/<your_dbt_project_name> --profiles-dir /tmp/dbt_project_home/ --select <model_folder_name>.*;
    '''
)

...
#Define data quality check task to test a package, generate docs and copy the docs to required S3 location
data_quality_check = BashOperator(
    task_id='data_quality_check',
    dag=dag,
    bash_command='''
   	  /usr/local/airflow/.local/bin/dbt test –-select your_package.*
        /usr/local/airflow/.local/bin/dbt docs generate --project-dir /tmp/dbt_project_home/<your_project_name> --profiles-dir /tmp/dbt_project_home/;
        aws s3 cp /tmp/dbt_project_home/<your_project_name>/target/ s3://<your_S3_bucket_name>/airflow_home/dags/dbt_project_home/<your_project_name>/target --recursive;
    '''
)
Create DAGs that solely focus on dbt transformation. These DAGs handle the transformation process within our data pipelines, harnessing the power of dbt to convert raw data into valuable insights.
#This is how we define the flow
start >> verify >> landing_to_cds_task >> cds_to_ufdm_task >> data_quality_check >> end_exec
The following image shows how this workflow would be seen on the Airflow UI .
Create DAGs with AWS Glue for ingestion. These DAGs use AWS Glue for data ingestion tasks. AWS Glue is a fully managed ETL service that makes it easy to prepare and load data for analysis. We create DAGs that orchestrate AWS Glue jobs for extracting data from various sources, transforming it, and loading it into our data warehouse.
      #Create boto3 client for Glue
      glue_client = boto3.client('glue', region_name='us-east-1')

      #Define callback function to start the Glue job using boto3 client
      def run_glue_ingestion_job():
   glue_client.start_job_run(JobName='glue_ingestion_job')

#Define the task for glue job for ingestion
   glue_job_step = PythonOperator(
       task_id=’glue_task_for_source_to_landing’,
       python_callable=run_glue_ingestion_job
   )
#This is how we define the flow
start >> verify >> glue_task_for_source_to_landing >> landing_to_cds_task >> cds_to_ufdm_task >> data_quality_check >> end_exec
The following image shows how this workflow would be seen on the Airflow UI.
Create DAGs with Lambda for ingestion. Lambda lets us run code without provisioning or managing servers. These DAGs use Lambda functions to call third-party APIs and load data into our Redshift tables, which can be scheduled to run at certain intervals or in response to specific events.
#Create boto3 client for Lambda
lambda_client = boto3.client('lambda')

#Define callback function to invoke the lambda function using boto3 client
def run_lambda_ingestion_job():
   Lambda_client.invoke(FunctionName='<funtion_arn>')
)

#Define the task for glue job for ingestion
glue_job_step = PythonOperator(
   task_id=’lambda_task_for_api_to_landing’,
   python_callable=run_lambda_ingestion_job
)
The following image shows how this workflow would be seen on the Airflow UI.
We now have a comprehensive, well-orchestrated process that uses a variety of AWS services to handle different stages of our data pipeline, from ingestion to transformation.
Conclusion
The combination of AWS services and the dbt open-source project provides a powerful, flexible, and scalable solution for building modern data platforms. It’s a perfect blend of manageability and functionality, with its easy-to-use, SQL-based framework and features like data quality checks, configurable load types, and detailed documentation and lineage. Its principles of “code separate from data” and reusability make it a convenient and efficient tool for a wide range of users. This practical use case of building a data platform for a retail organization demonstrates the immense potential of AWS and dbt for transforming data management and analytics, paving the way for faster insights and informed business decisions.
Prantik Gachhayat is an Enterprise Architect at Infosys having experience in various technology fields and business domains. He has a proven track record helping large enterprises modernize digital platforms and delivering complex transformation programs. Prantik specializes in architecting modern data and analytics platforms in AWS. Prantik loves exploring new tech trends and enjoys cooking.
Ashutosh Dubey is a Senior Partner Solutions Architect and Global Tech leader at Amazon Web Services based out of New Jersey, USA. He has extensive experience specializing in the Data and Analytics and AIML field including generative AI, contributed to the community by writing various tech contents, and has helped Fortune 500 companies in their cloud journey to AWS.
The collective thoughts of the interwebz
Manage Consent
To provide the best experiences, we use technologies like cookies to store and/or access device information. Consenting to these technologies will allow us to process data such as browsing behavior or unique IDs on this site. Not consenting or withdrawing consent, may adversely affect certain features and functions.
Functional
Always active
The technical storage or access is strictly necessary for the legitimate purpose of enabling the use of a specific service explicitly requested by the subscriber or user, or for the sole purpose of carrying out the transmission of a communication over an electronic communications network.
Preferences
The technical storage or access is necessary for the legitimate purpose of storing preferences that are not requested by the subscriber or user.
Statistics
The technical storage or access that is used exclusively for statistical purposes.The technical storage or access that is used exclusively for anonymous statistical purposes. Without a subpoena, voluntary compliance on the part of your Internet Service Provider, or additional records from a third party, information stored or retrieved for this purpose alone cannot usually be used to identify you.
Marketing
The technical storage or access is required to create user profiles to send advertising, or to track the user on a website or across several websites for similar marketing purposes.


 Fraser Sequeira is a Startups Solutions Architect with AWS based in Mumbai, India. In his role at AWS, Fraser works closely with startups to design and build cloud-native solutions on AWS, with a focus on analytics and streaming workloads. With over 10 years of experience in cloud computing, Fraser has deep expertise in big data, real-time analytics, and building event-driven architecture on AWS. He enjoys staying on top of the latest technology innovations from AWS and sharing his learnings with customers. He spends his free time tinkering with new open source technologies.
 Kenneth Walsh is a New York-based Sr. Solutions Architect whose focus is AWS Marketplace. Kenneth is passionate about cloud computing and loves being a trusted advisor for his customers. When he’s not working with customers on their journey to the cloud, he enjoys cooking, audiobooks, movies, and spending time with his family and dog.
 Max Winter is a Principal Solutions Architect for AWS Financial Services clients. He works with ISV customers to design solutions that allow them to leverage the power of AWS services to automate and optimize their business. In his free time, he loves hiking and biking with his family, music and theater, digital photography, 3D modeling, and imparting a love of science and reading to his two nearly-teenagers.
 Manjula Nagineni is a Senior Solutions Architect with AWS based in New York. She works with major financial service institutions, architecting and modernizing their large-scale applications while adopting AWS Cloud services. She is passionate about designing big data workloads cloud-natively. She has over 20 years of IT experience in software development, analytics, and architecture across multiple domains such as finance, retail, and telecom.


 Raghu Kuppala is an Analytics Specialist Solutions Architect experienced working in the databases, data warehousing, and analytics space. Outside of work, he enjoys trying different cuisines and spending time with his family and friends.
 Yanzhu Ji is a Product Manager in the Amazon Redshift team. She has experience in product vision and strategy in industry-leading data products and platforms. She has outstanding skill in building substantial software products using web development, system design, database, and distributed programming techniques. In her personal life, Yanzhu likes painting, photography, and playing tennis.
 Nikhitha Loyapally is a Senior Software Development Engineer for Amazon Redshift.
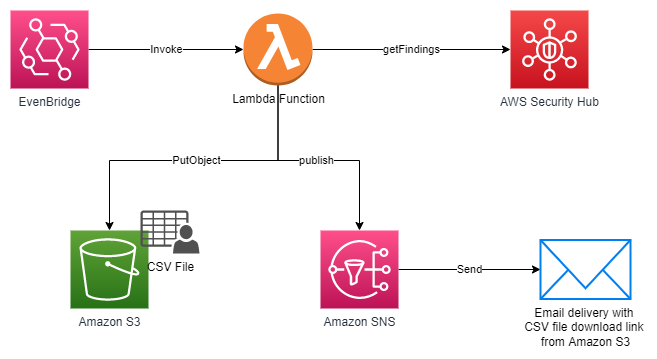


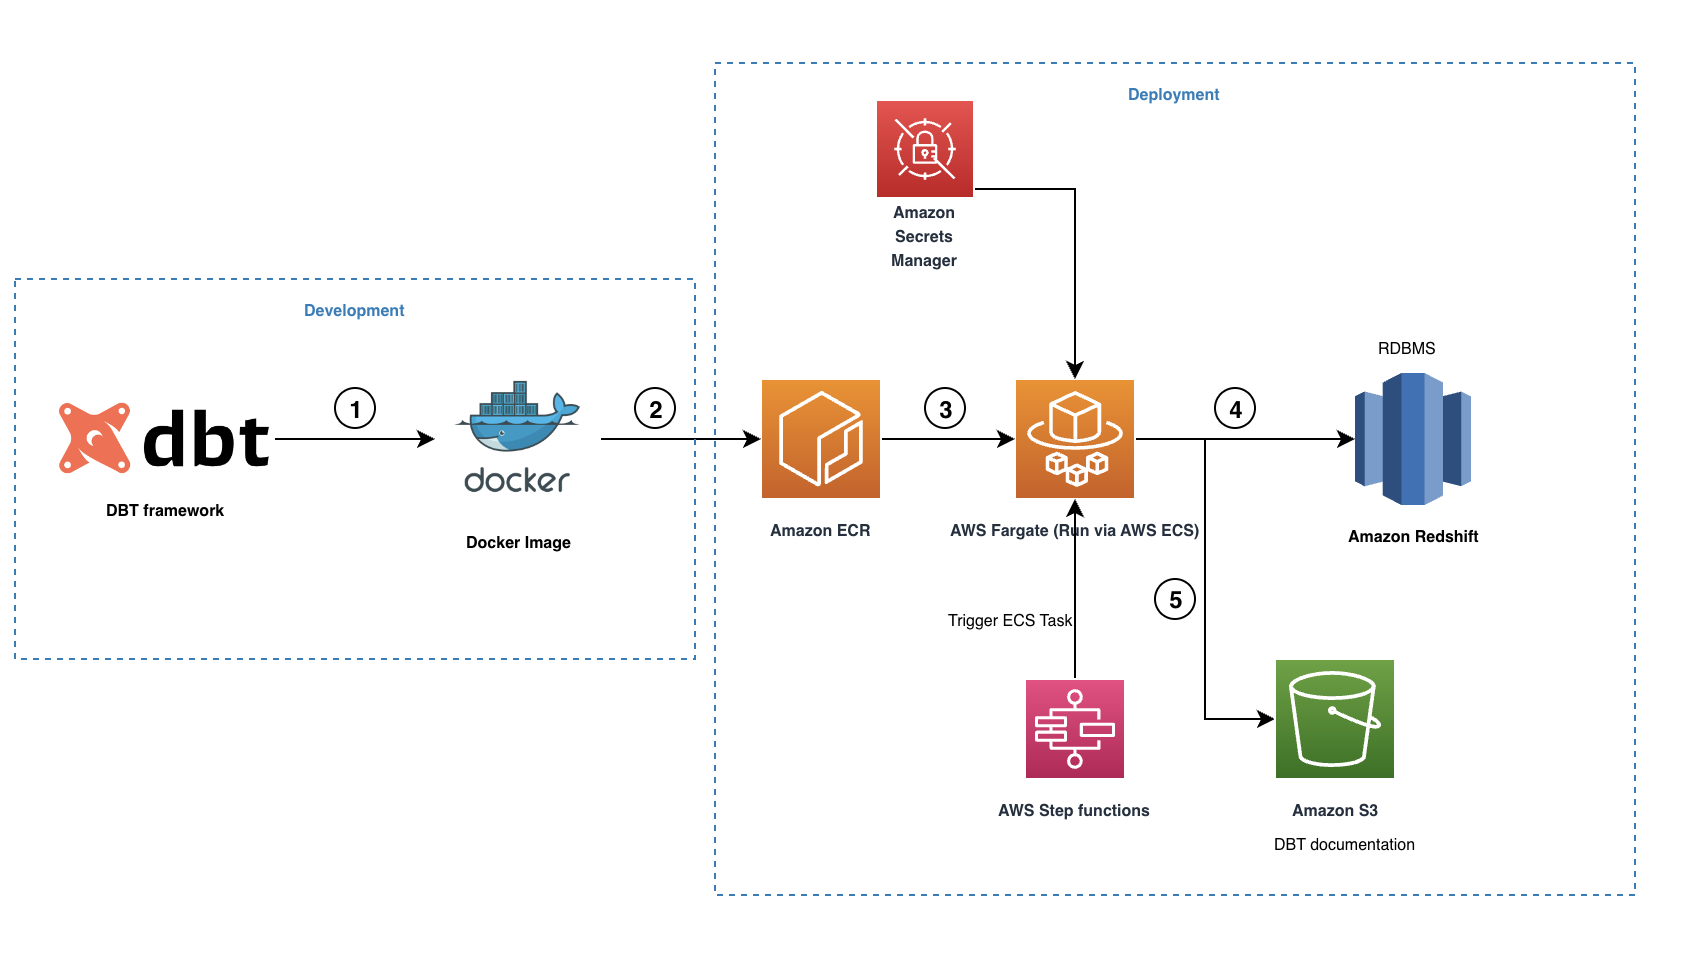
 Seshadri Senthamaraikannan is a data architect with AWS professional services team based in London, UK. He is well experienced and specialised in Data Analytics and works with customers focusing on building innovative and scalable solutions in AWS Cloud to meet their business goals. In his spare time, he enjoys spending time with his family and play sports.
 Mohamed Hamdy is a Senior Big Data Architect with AWS Professional Services based in London, UK. He has over 15 years of experience architecting, leading, and building data warehouses and big data platforms. He helps customers develop big data and analytics solutions to accelerate their business outcomes through their cloud adoption journey. Outside of work, Mohamed likes travelling, running, swimming and playing squash.
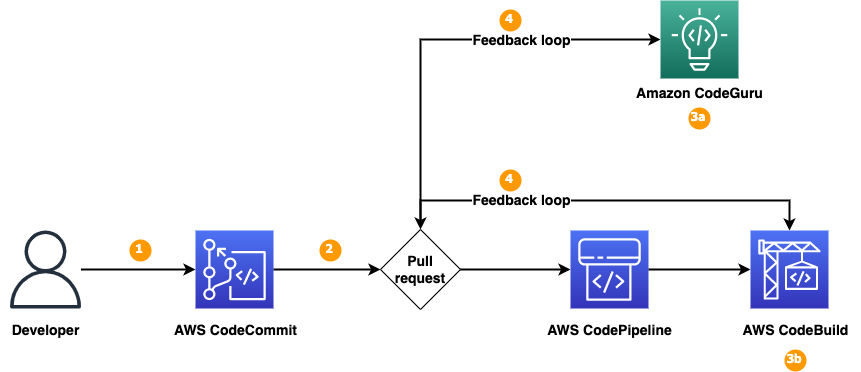


 Ramkumar Nottath is a Principal Solutions Architect at AWS focusing on Analytics services. He enjoys working with various customers to help them build scalable, reliable big data and analytics solutions. His interests extend to various technologies such as analytics, data warehousing, streaming, data governance, and machine learning. He loves spending time with his family and friends.
 Mert Hocanin is a Principal Big Data Architect at AWS within the AWS Lake Formation Product team. He has been with Amazon for over 10 years, and enjoys helping customers build their data lakes with a focus on governance on a wide variety of services. When he isn’t helping customers build data lakes, he spends his time with his family and traveling.
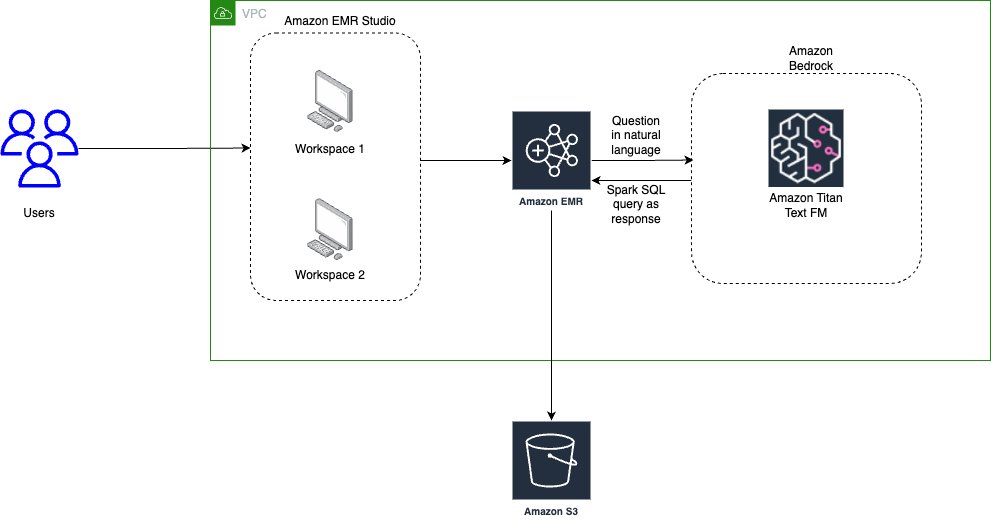


 Saurabh Bhutyani is a Principal Analytics Specialist Solutions Architect at AWS. He is passionate about new technologies. He joined AWS in 2019 and works with customers to provide architectural guidance for running generative AI use cases, scalable analytics solutions and data mesh architectures using AWS services like Amazon Bedrock, Amazon SageMaker, Amazon EMR, Amazon Athena, AWS Glue, AWS Lake Formation, and Amazon DataZone.
 Harsh Vardhan is an AWS Senior Solutions Architect, specializing in analytics. He has over 8 years of experience working in the field of big data and data science. He is passionate about helping customers adopt best practices and discover insights from their data.
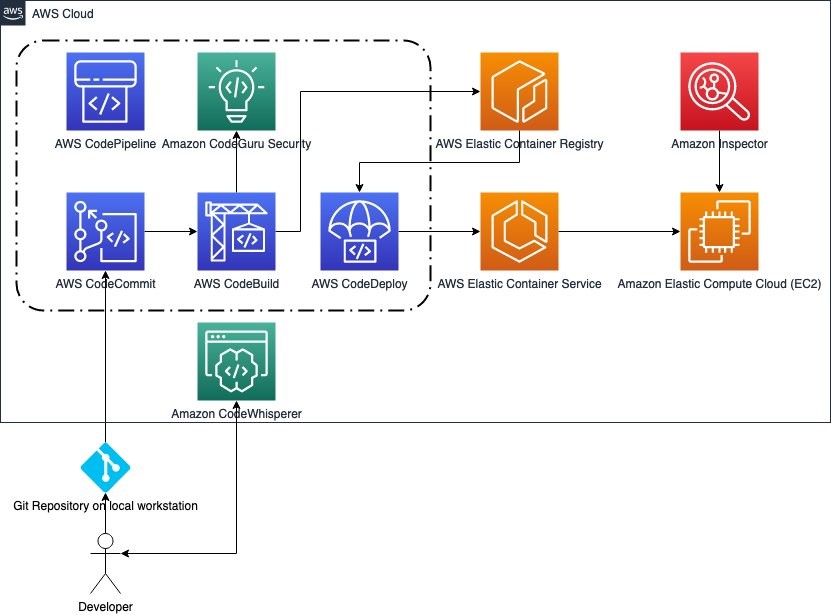


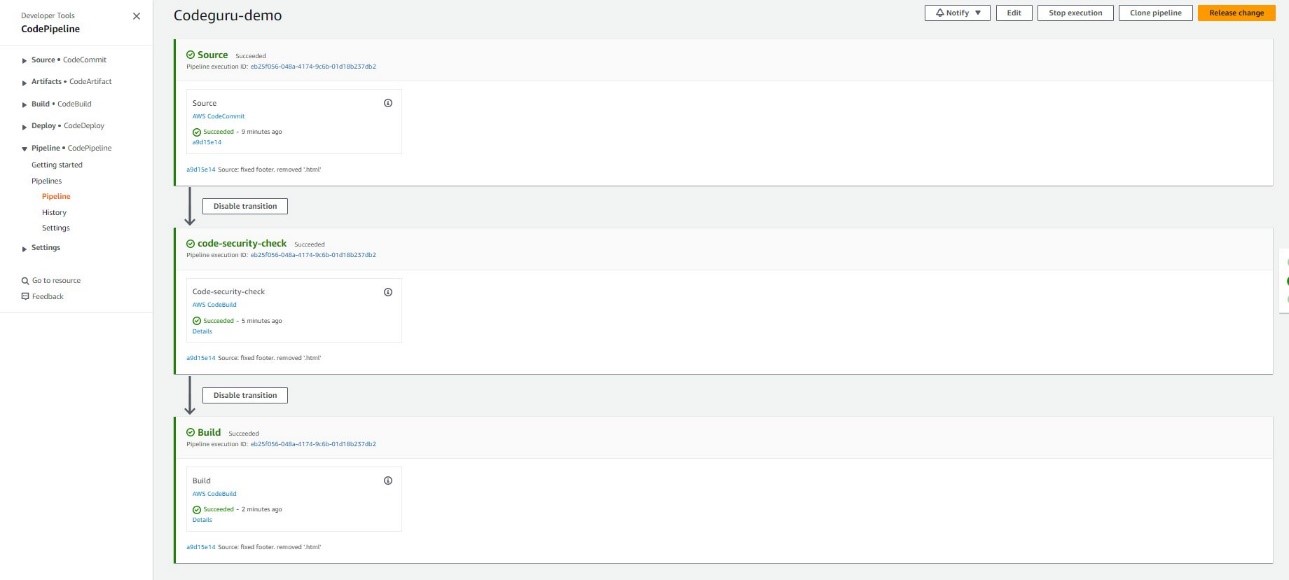
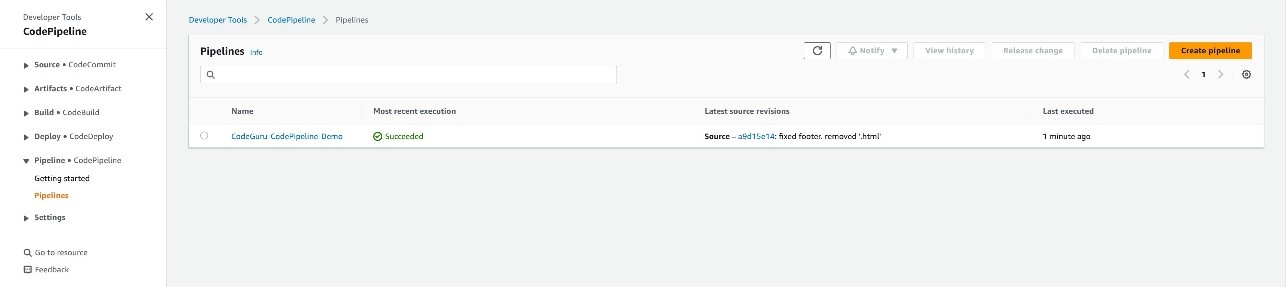
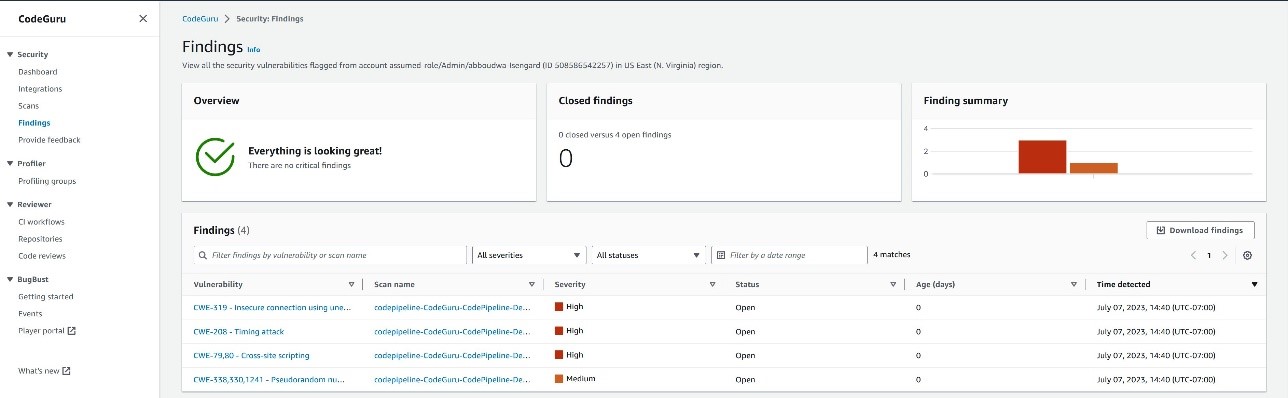
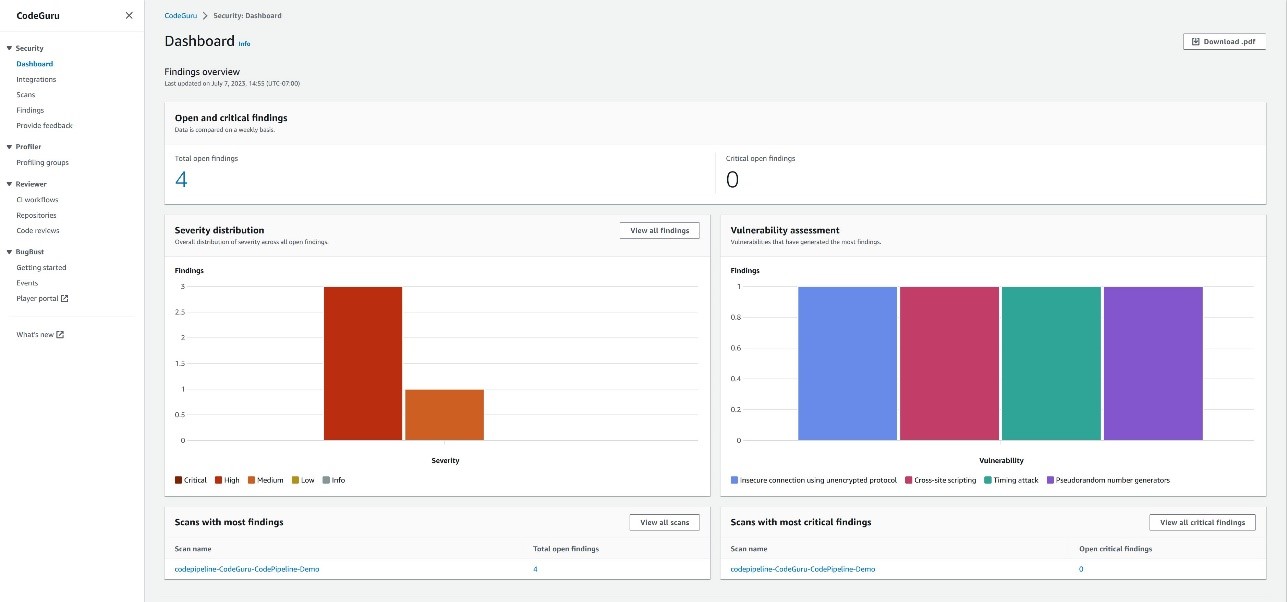


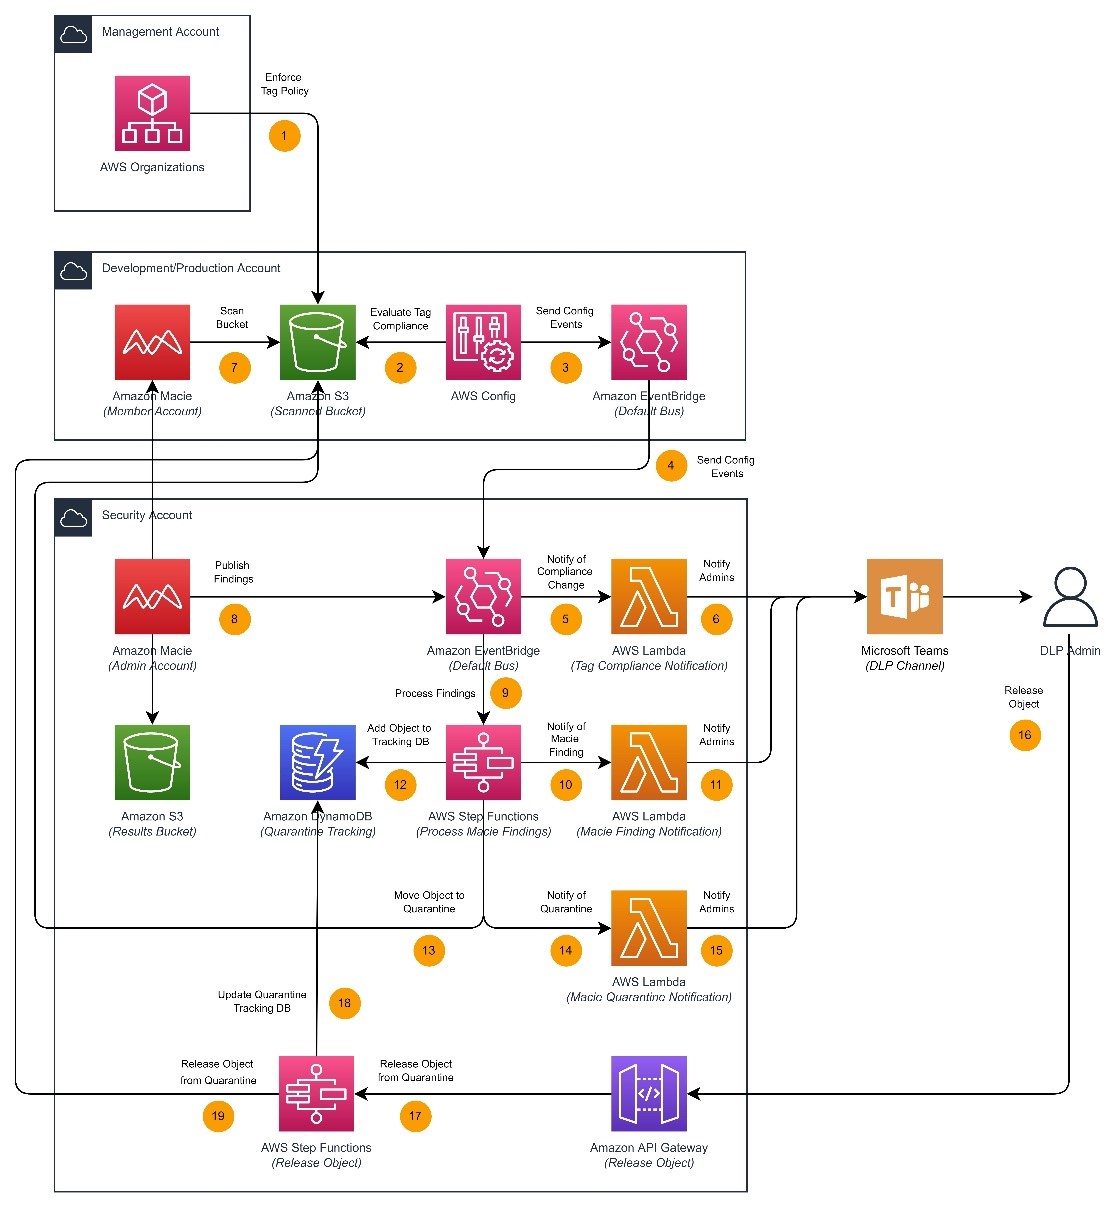
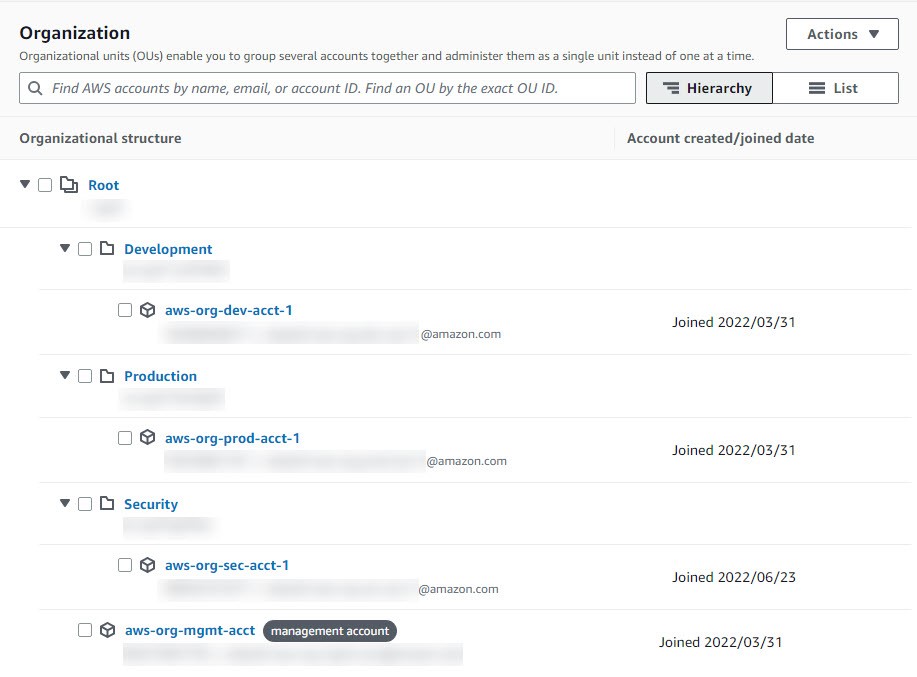


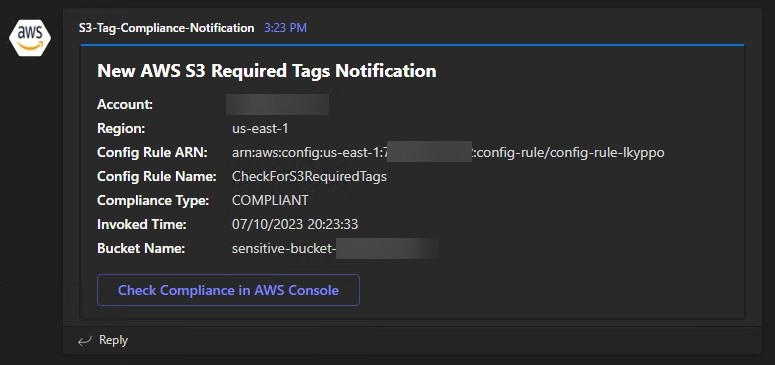
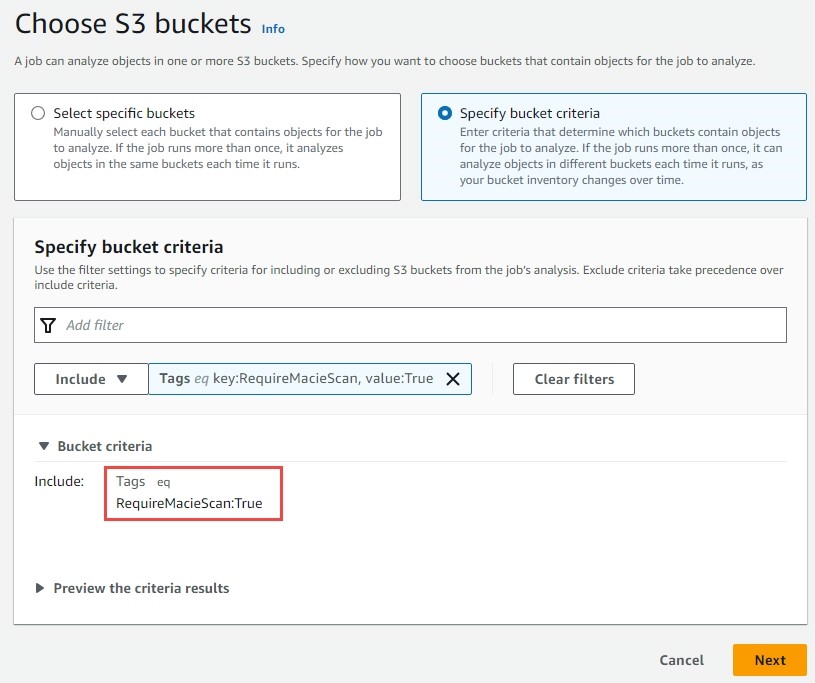
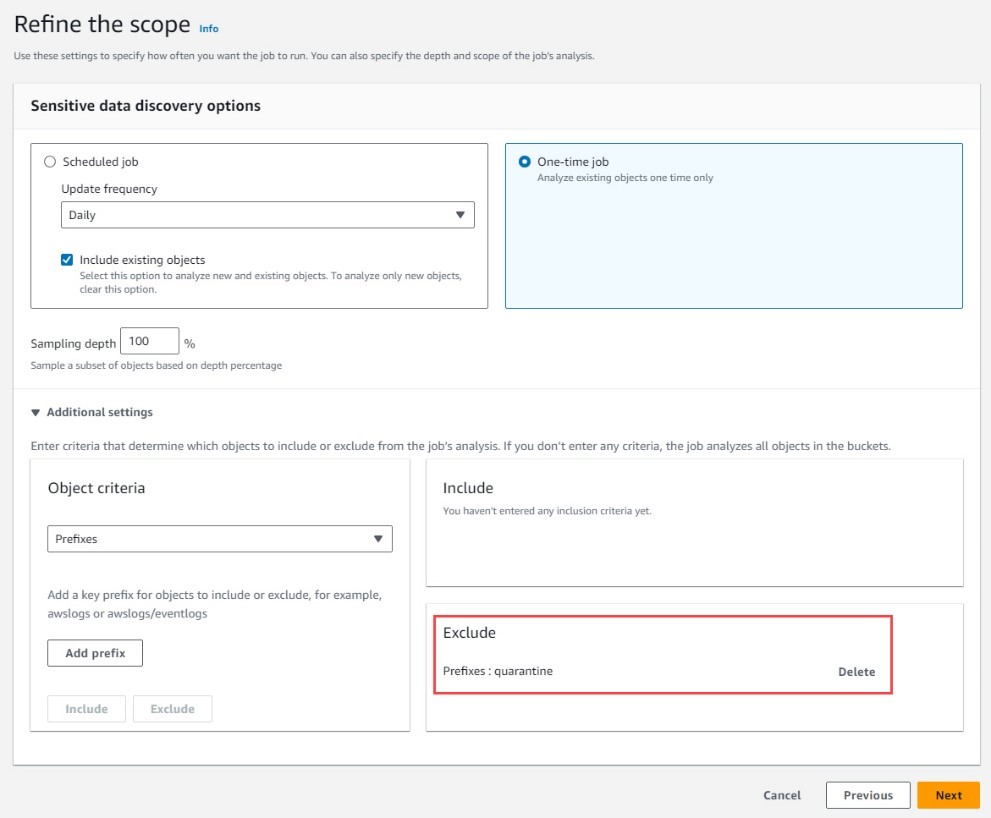
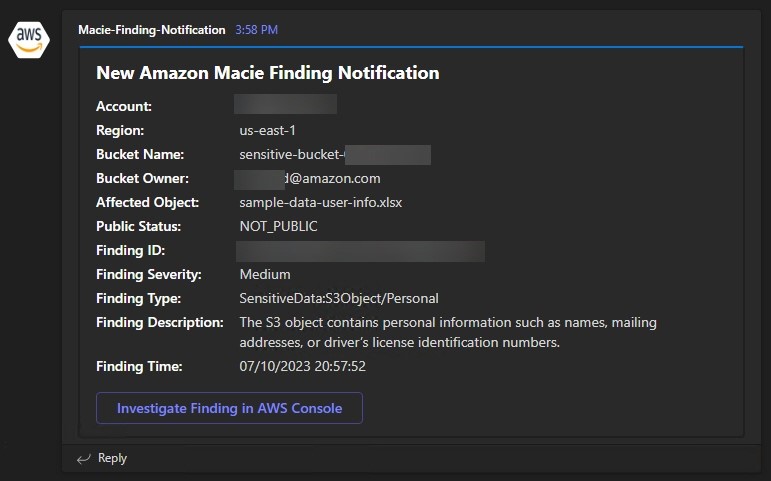
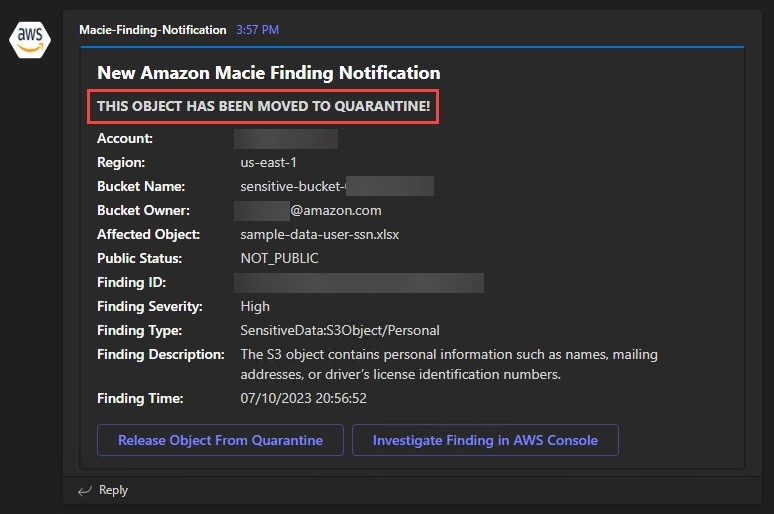
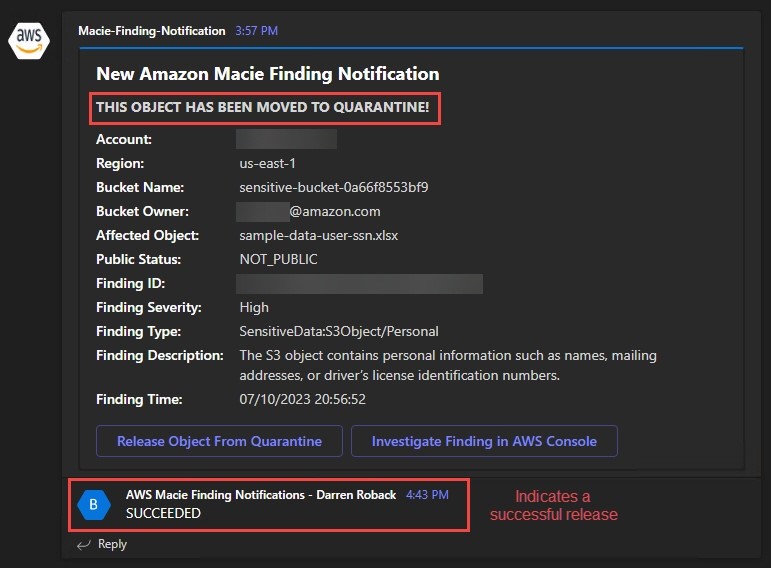


 Ismail Makhlouf is a Senior Specialist Solutions Architect for Data Analytics at AWS. Ismail focuses on architecting solutions for organizations across their end-to-end data analytics estate, including batch and real-time streaming, big data, data warehousing, and data lake workloads. He primarily works with direct-to-consumer platform companies in the ecommerce, FinTech, PropTech, and HealthTech space to achieve their business objectives with well-architected data platforms.
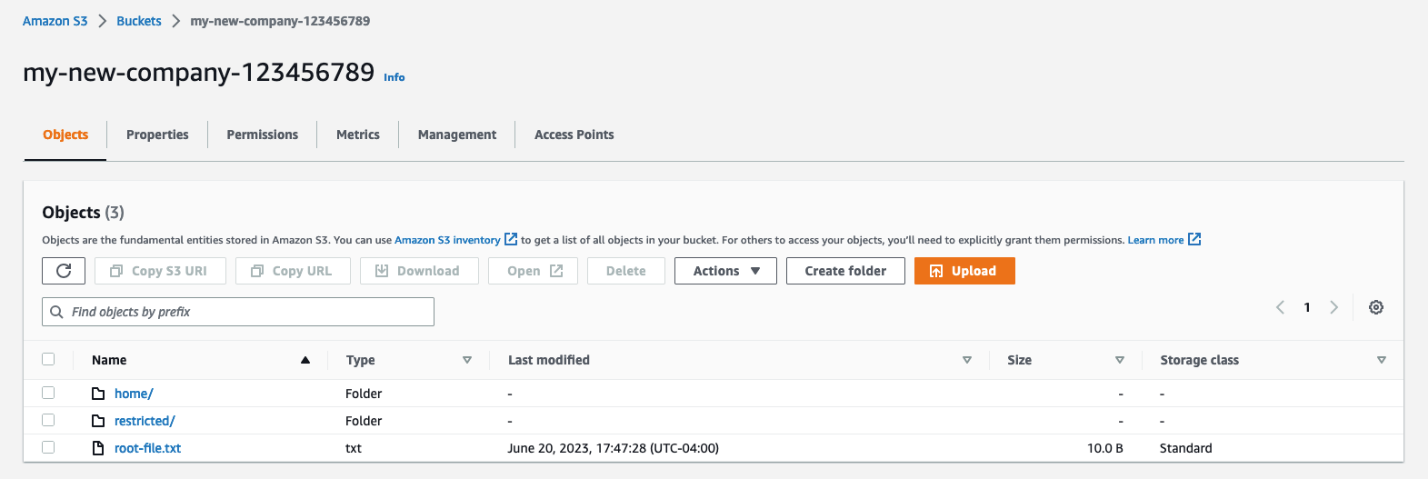


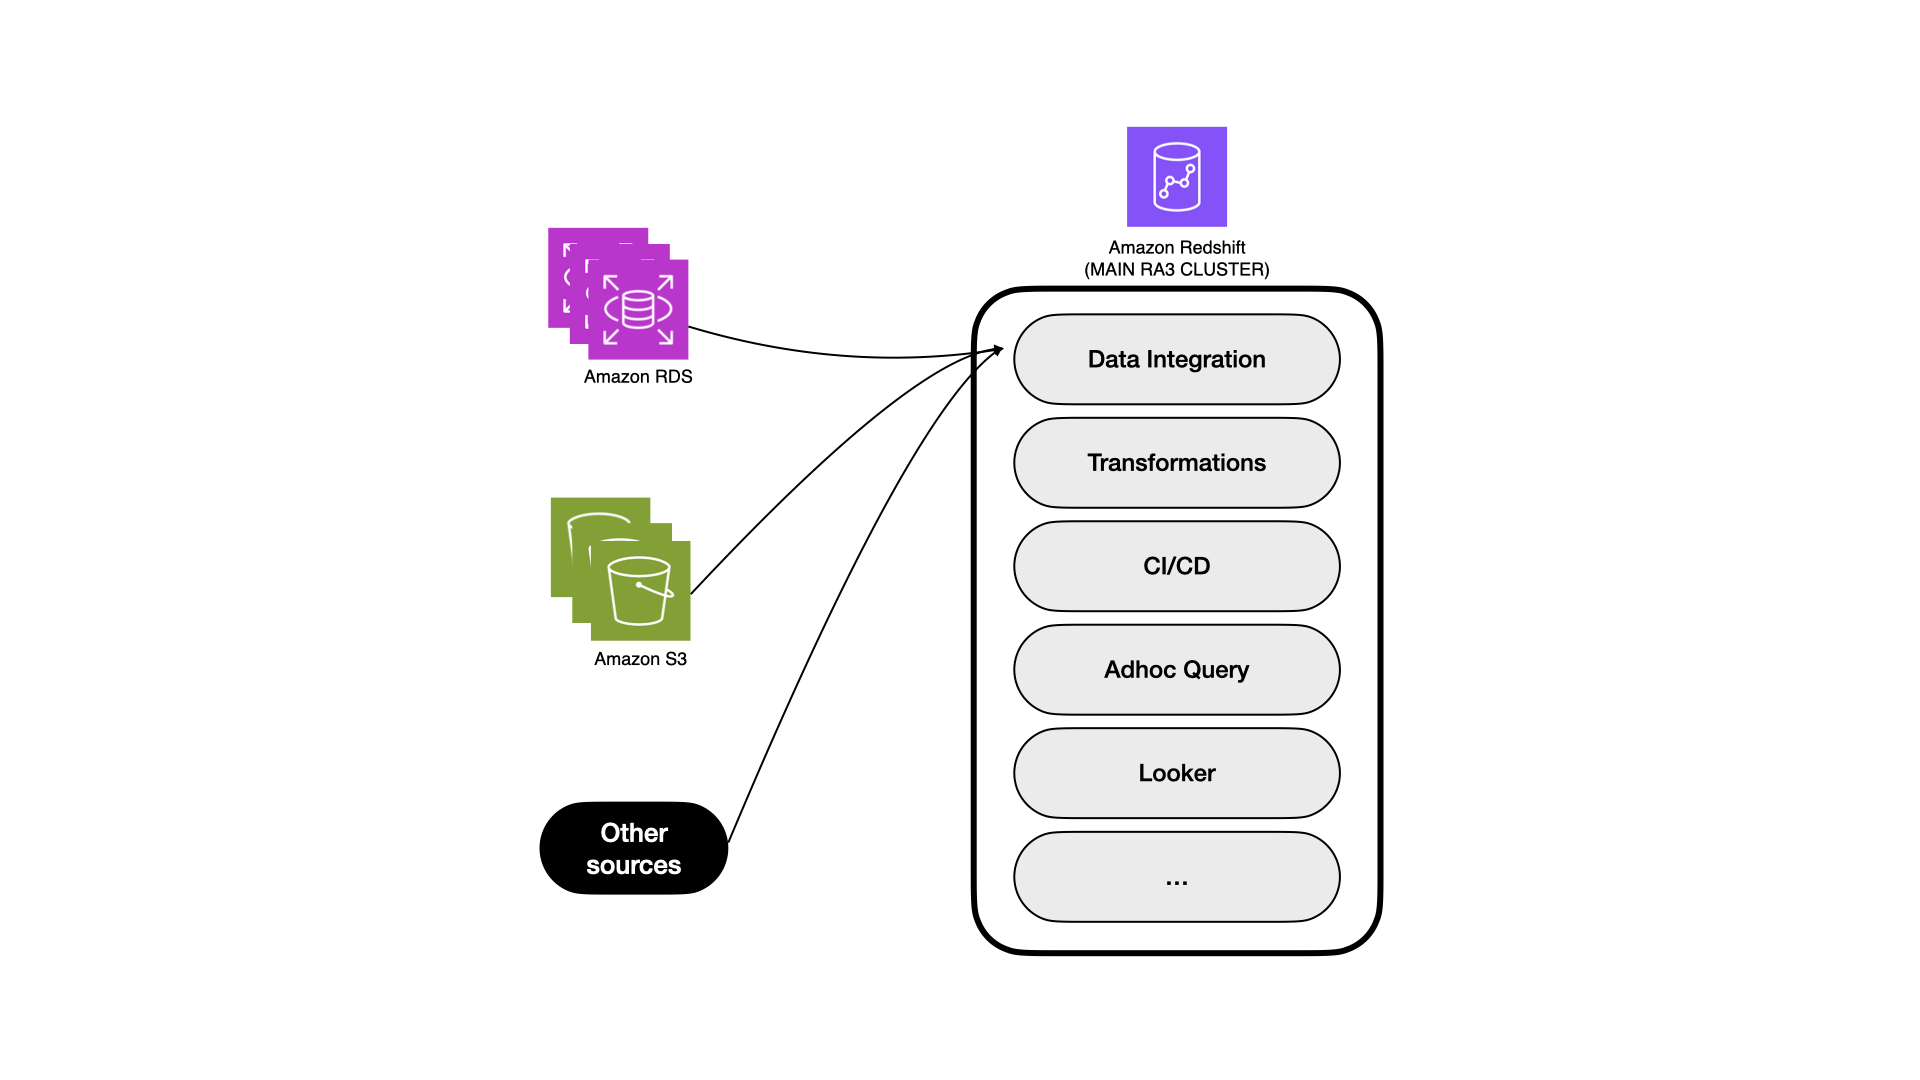

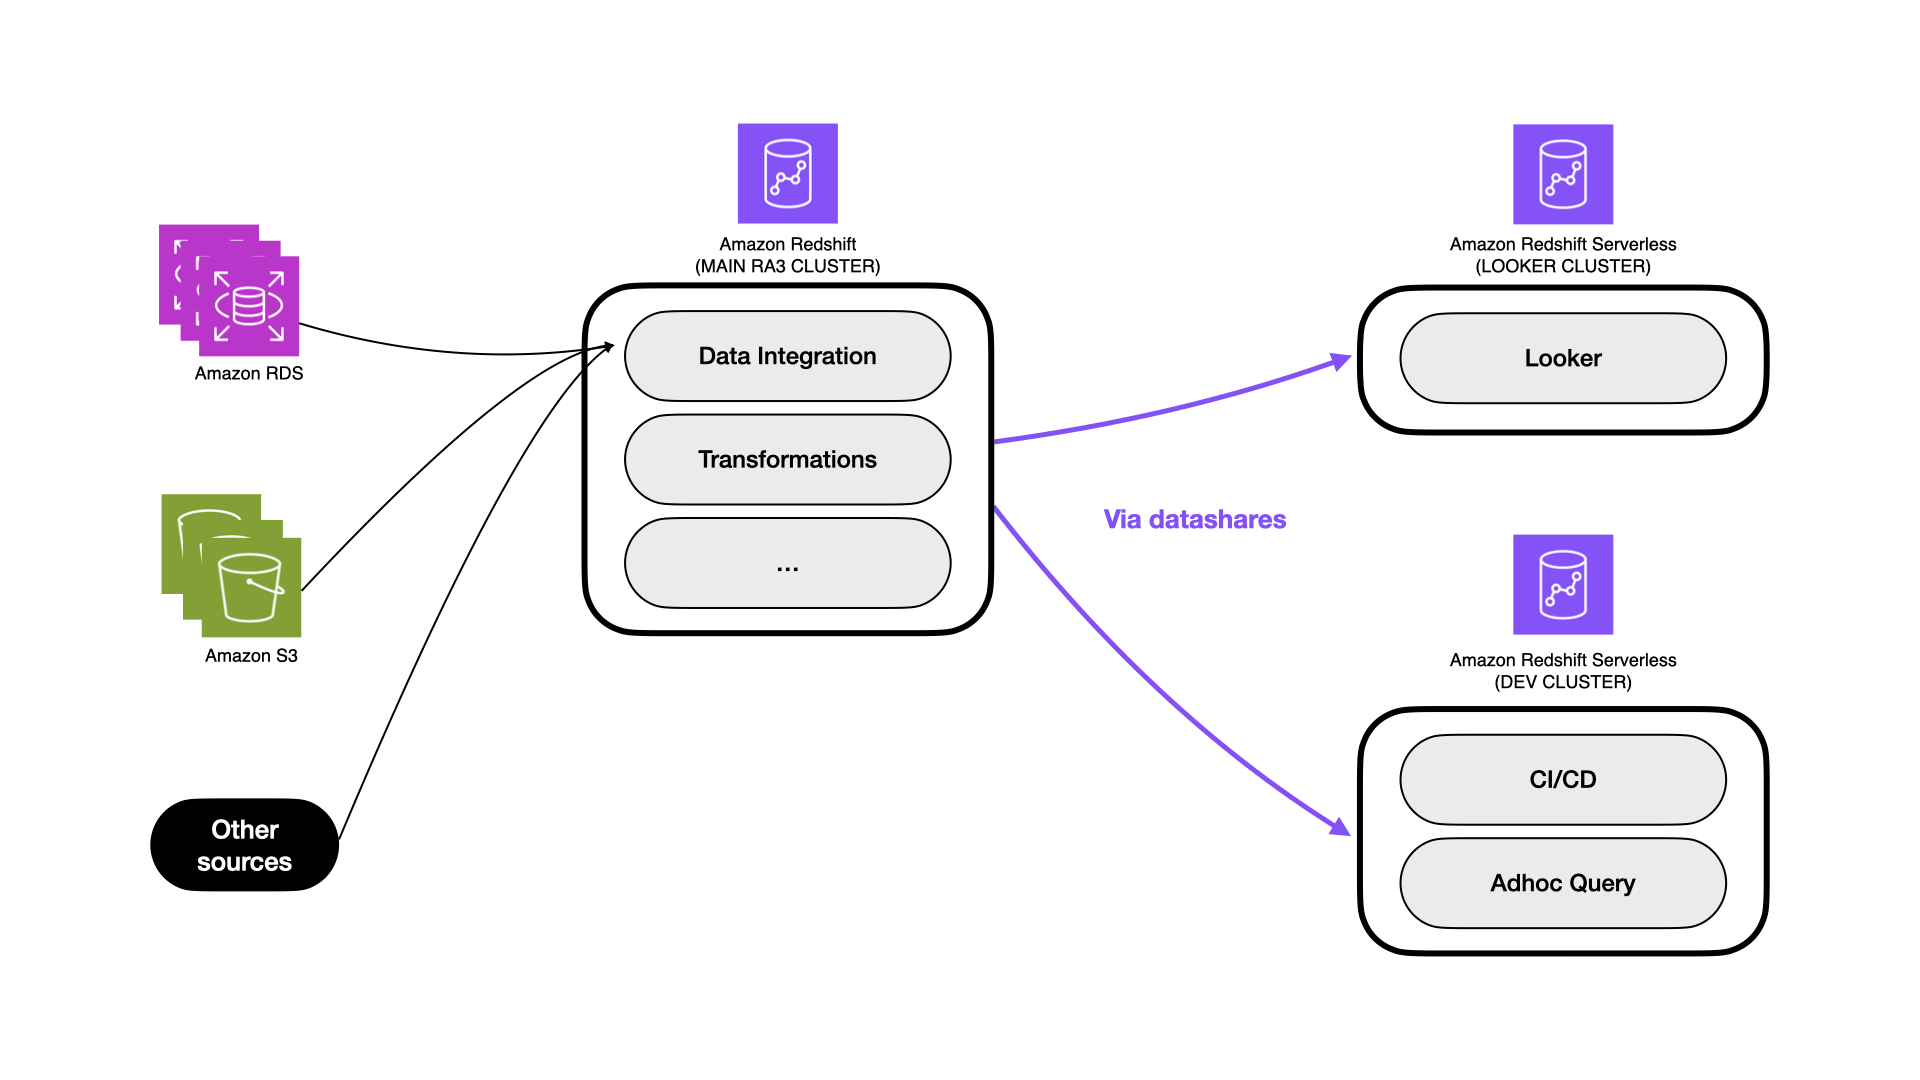

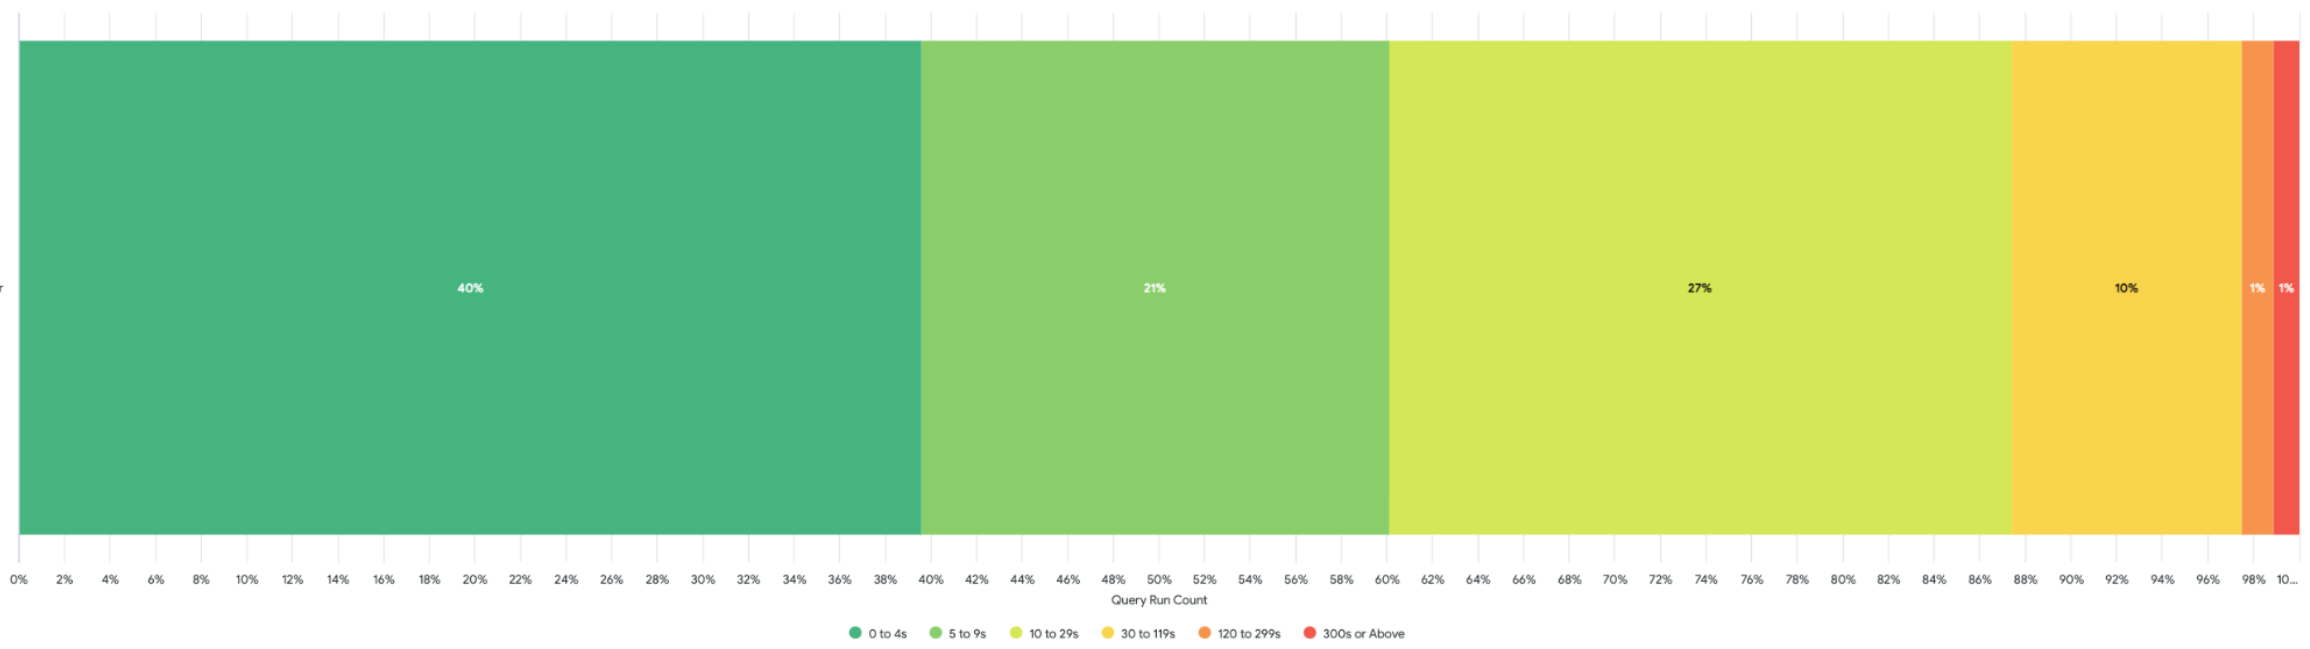
 Eduard Lopez is the Data Engineer Manager at Wallapop. He is a software engineer with over 6 years of experience in data engineering, machine learning, and data science.
 Daniel Martinez is a Solutions Architect in Iberia Digital Native Businesses (DNB), part of the worldwide commercial sales organization (WWCS) at AWS.
 Jordi Montoliu is a Sr. Redshift Specialist in EMEA, part of the worldwide specialist organization (WWSO) at AWS.
 Ziad Wali is an Acceleration Lab Solutions Architect at Amazon Web Services. He has over 10 years of experience in databases and data warehousing, where he enjoys building reliable, scalable, and efficient solutions. Outside of work, he enjoys sports and spending time in nature.
 Semir Naffati is a Sr. Redshift Specialist Solutions Architect in EMEA, part of the worldwide specialist organization (WWSO) at AWS.


 Preshen Goobiah is the Lead Machine Learning Engineer for the Feature Platform at Capitec. He is focused on designing and building Feature Store components for enterprise use. In his spare time, he enjoys reading and traveling.
 Johan Olivier is a Senior Machine Learning Engineer for Capitec’s Model Platform. He is an entrepreneur and problem-solving enthusiast. He enjoys music and socializing in his spare time.
 Sudipta Bagchi is a Senior Specialist Solutions Architect at Amazon Web Services. He has over 12 years of experience in data and analytics, and helps customers design and build scalable and high-performant analytics solutions. Outside of work, he loves running, traveling, and playing cricket. Connect with him on
  Syed Humair is a Senior Analytics Specialist Solutions Architect at Amazon Web Services (AWS). He has over 17 years of experience in enterprise architecture focusing on Data and AI/ML, helping AWS customers globally to address their business and technical requirements. You can connect with him on
  Vuyisa Maswana is a Senior Solutions Architect at AWS, based in Cape Town. Vuyisa has a strong focus on helping customers build technical solutions to solve business problems. He has supported Capitec in their AWS journey since 2019.


 Prantik Gachhayat is an Enterprise Architect at Infosys having experience in various technology fields and business domains. He has a proven track record helping large enterprises modernize digital platforms and delivering complex transformation programs. Prantik specializes in architecting modern data and analytics platforms in AWS. Prantik loves exploring new tech trends and enjoys cooking.
 Ashutosh Dubey is a Senior Partner Solutions Architect and Global Tech leader at Amazon Web Services based out of New Jersey, USA. He has extensive experience specializing in the Data and Analytics and AIML field including generative AI, contributed to the community by writing various tech contents, and has helped Fortune 500 companies in their cloud journey to AWS.