Companies across multiple industries, such as advertising and marketing, retail, consumer packaged goods (CPG), travel and hospitality, media and entertainment, and financial services, increasingly look to supplement their data with data from business partners, to build a complete view of their business.
Let’s take a marketing use case as an example. Brands, publishers, and their partners need to collaborate using datasets that are stored across many channels and applications to improve the relevance of their campaigns and better engage with consumers. At the same time, they also want to protect sensitive consumer information and eliminate the sharing of raw data. Data clean rooms can help solve this challenge by allowing multiple companies to analyze their collective data in a private environment.
However, it’s difficult to build data clean rooms. It requires complex privacy controls, specialized tools to protect each collaborator’s data, and months of development time customizing analytics tools. The effort and complexity grows when a new collaborator is added, or a different type of analysis is needed, as companies have to spend even more development time. Finally, companies prefer to limit data movement as much as possible, usually leading to less collaboration and missed opportunities to generate new business insights.
Introducing AWS Clean Rooms Today, I’m excited to announce the general availability of AWS Clean Rooms which we first announced at AWS re:Invent 2022 and released the preview of in January 2023. AWS Clean Rooms is an analytics service of AWS Applications that helps companies and their partners more easily and securely analyze and collaborate on their collective datasets without sharing or copying each other’s data. AWS Clean Rooms enables customers to generate unique insights about advertising campaigns, investment decisions, clinical research, and more, while helping them protect data.
Now, with AWS Clean Rooms, companies are able to easily create a secure data clean room on the AWS Cloud in minutes and collaborate with their partners. They can use a broad set of built-in, privacy-enhancing controls for clean rooms. These controls allow companies to customize restrictions on the queries run by each clean room participant, including query controls, query output restrictions, and query logging. AWS Clean Rooms also includes advanced cryptographic computing tools that keep data encrypted—even as queries are processed—to help comply with stringent data handling policies.
Key Features of AWS Clean Rooms Let me share with you the key features and how easy it is to collaborate with AWS Clean Rooms.
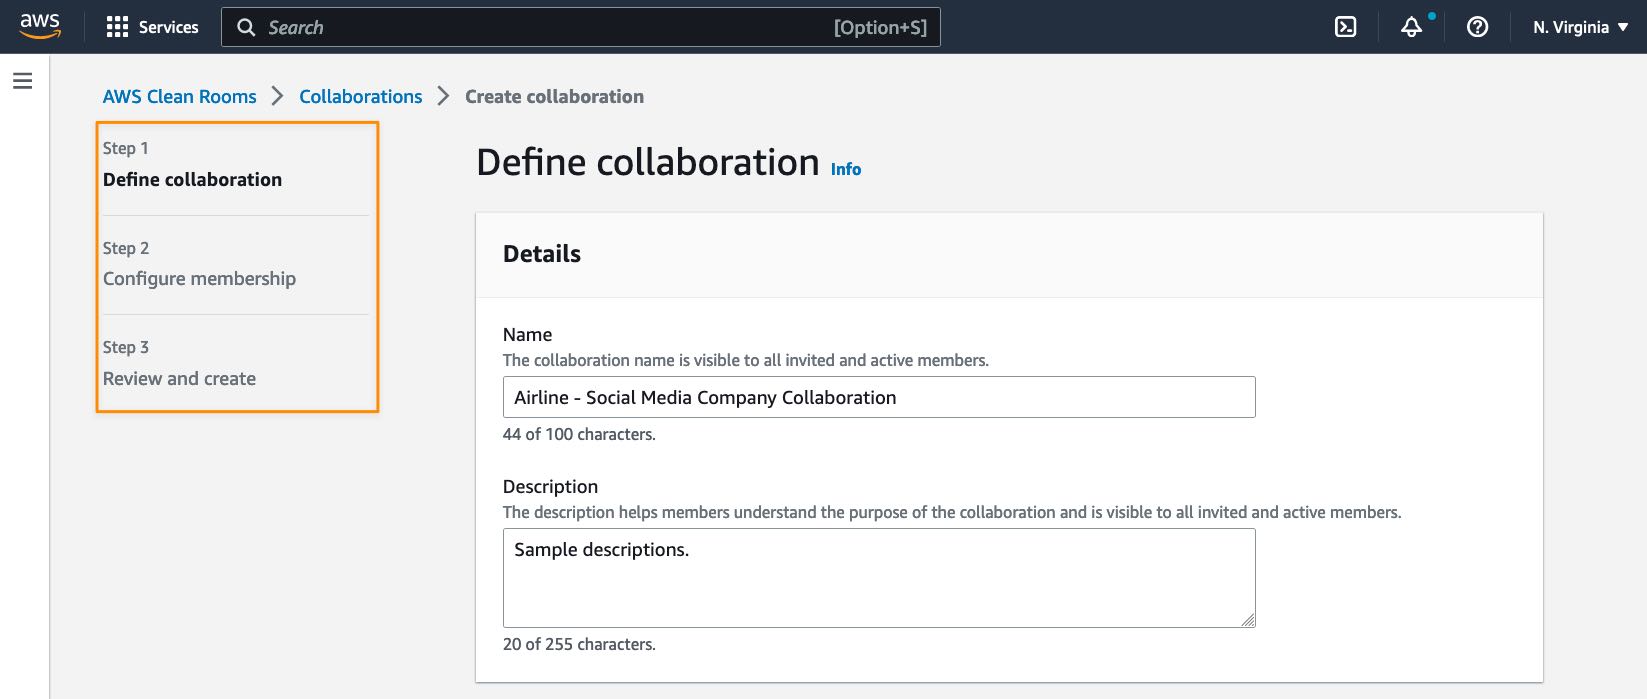
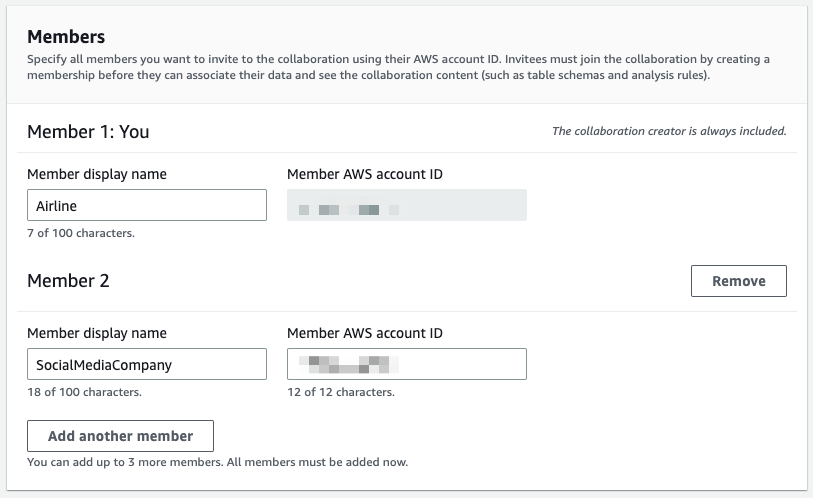
Create Your Own Clean Rooms AWS Clean Rooms helps you to start a collaboration in minutes and then select the other companies you want to collaborate with. You can collaborate with any of your partners that agree to participate in your clean room collaboration. You can create a collaboration by following several steps.
After creating a collaboration in AWS Clean Rooms, you can select additional collaboration members who can contribute. Currently, AWS Clean Rooms supports up to five collaboration members, including you as the collaboration creator.
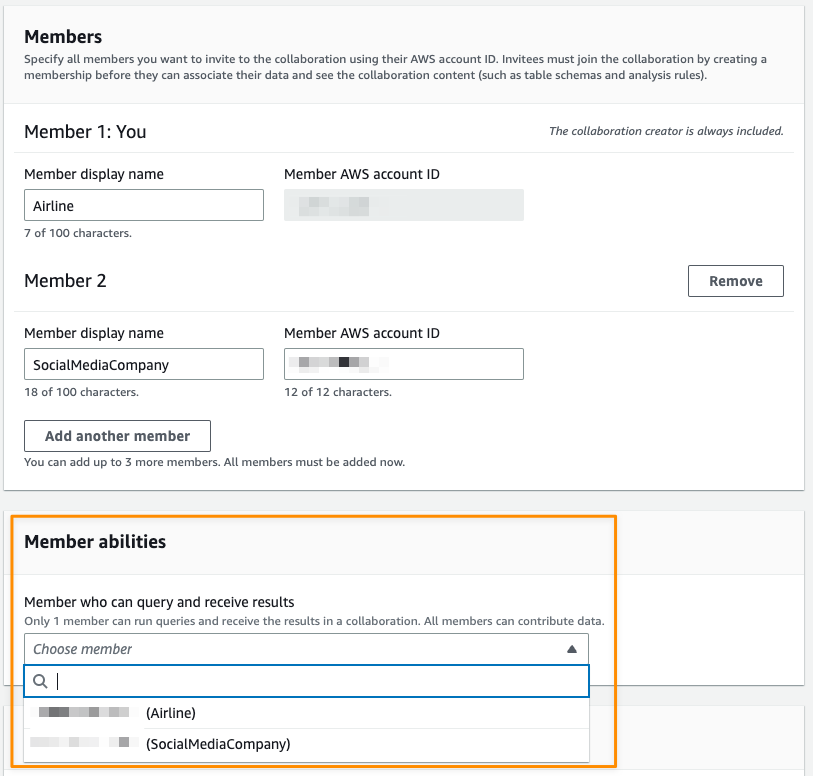
The next step is to define which collaboration member can perform a query in collaboration with the member abilities setting.
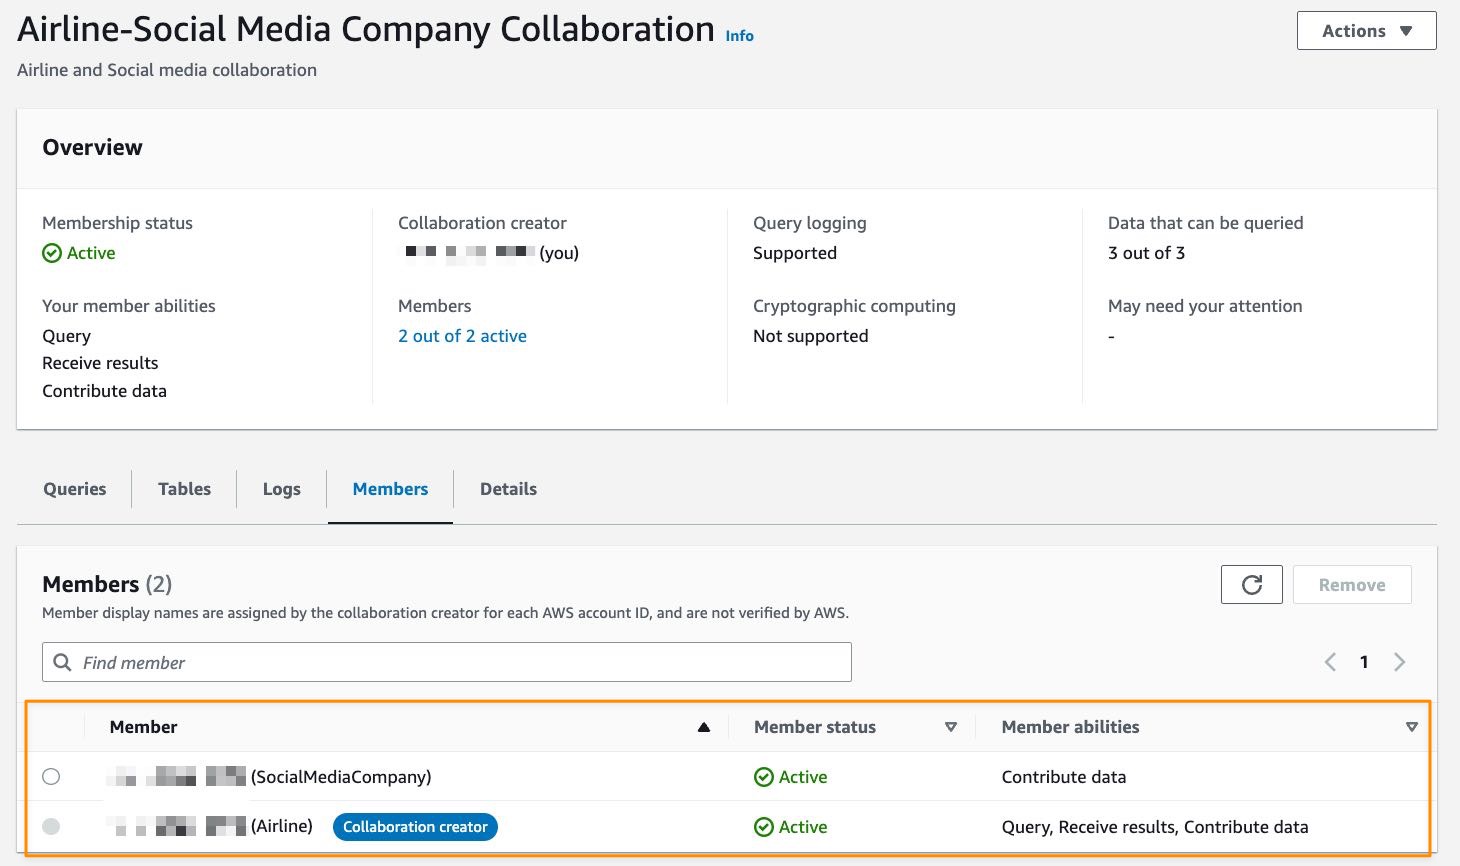
Then, collaboration members will get notifications in their accounts, see detailed info from a collaboration, and decide whether to join the collaboration by selecting Create membership in their AWS Clean Rooms dashboard.
Collaborate without Moving Data Outside AWS AWS Clean Rooms works by analyzing Amazon S3 data in place. This eliminates the need for companies to copy and load their data into destinations outside their respective AWS environments of the collaboration members or using third-party services.
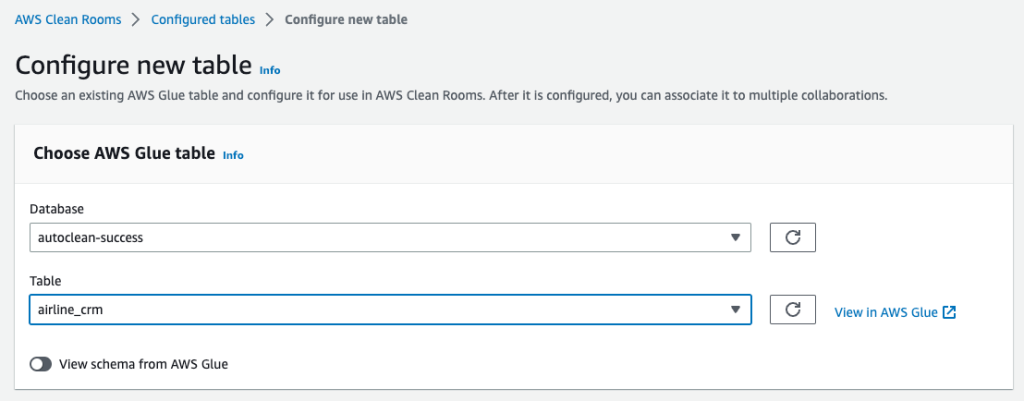
Each collaboration member can create configured tables, an AWS Clean Rooms resource that contains reference to the AWS Glue catalog with underlying data that define how that data can be used. The configured table can be used across many collaborations.
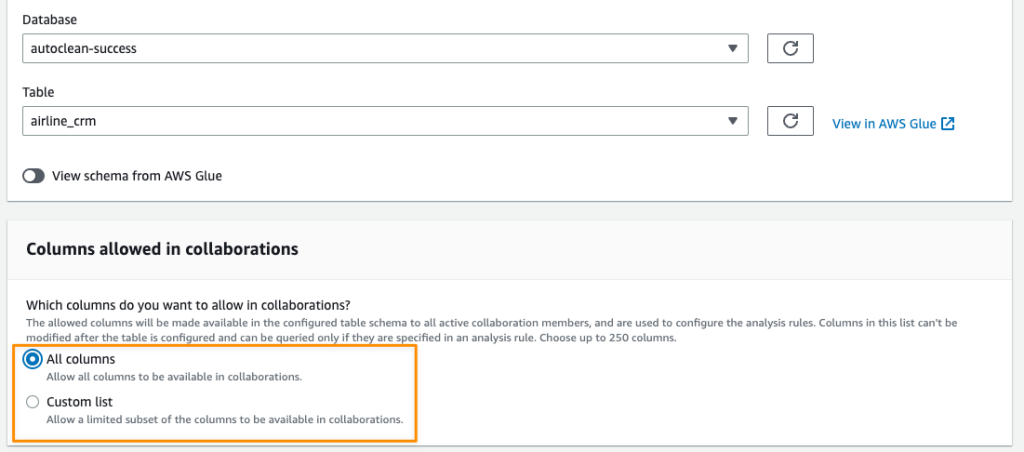
Protecting Data AWS Clean Rooms provides you with a broad set of privacy-enhancing controls to protect your customers’ and partners’ data. Each collaboration member has the flexibility to determine what columns can be accessed in a collaboration.
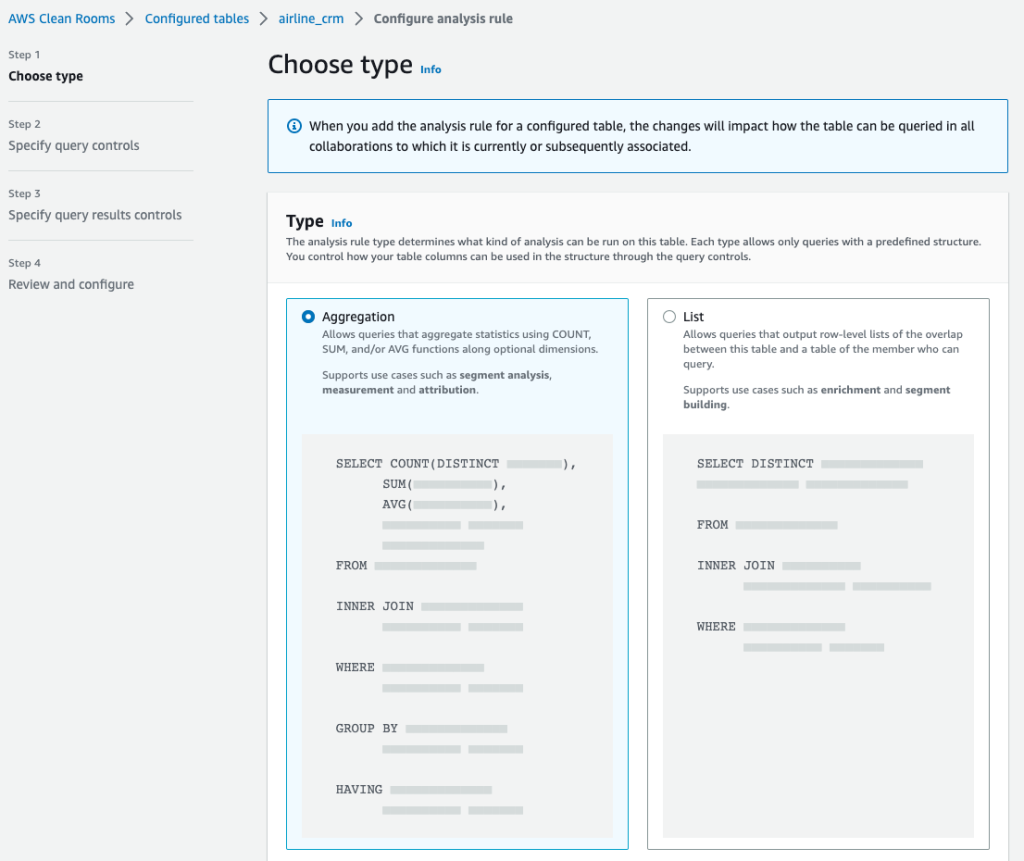
In addition to column-level privacy controls, as in the example above, AWS Clean Rooms also provides fine-grained query controls called analysis rules. With built-in and flexible analysis rules, customers can tailor queries to specific business needs. AWS Clean Rooms provides two types of analysis rules for customers to use:
Aggregation analysis rules allows queries that aggregate analysis without revealing user-level information using COUNT, SUM, and AVG functions along optional dimensions.
List analysis rules allow queries that output user-level attribute analysis of the overlap between the customer’s table and the tables of the member who can query.
Both analysis rule types allow data owners to require a join between their datasets and the datasets of the collaborator running the query. This limits the results to just their intersection of the collaborators datasets.
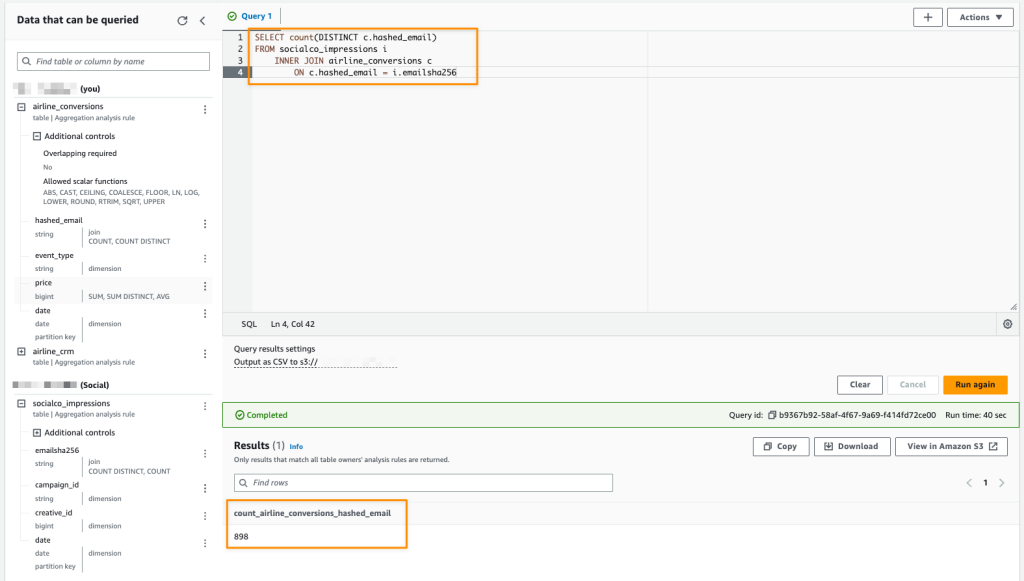
After defining the analysis rules, the member who can query and receive results can start writing queries according to the restrictions defined by each participating collaboration member. The following is an example query in the collaboration.
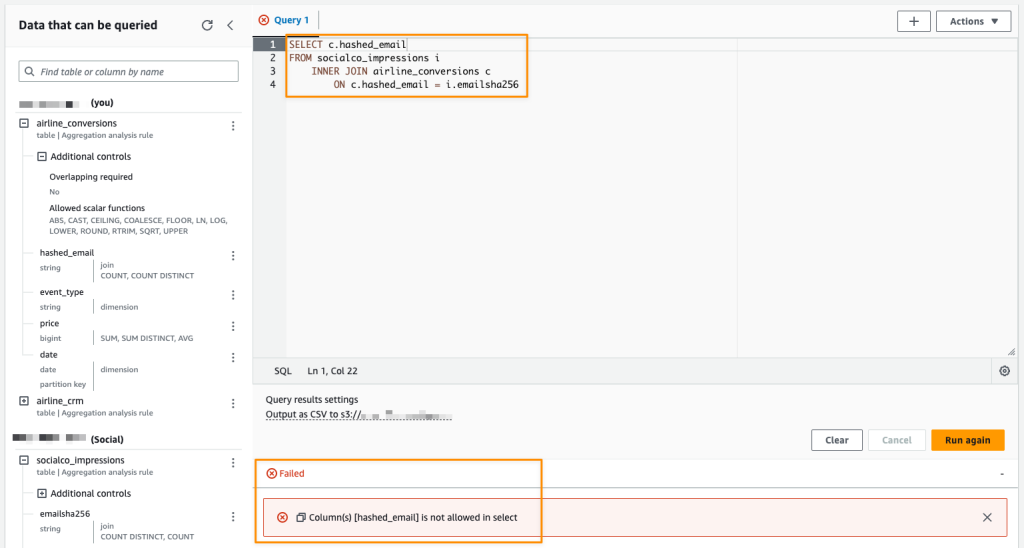
Analysis rules allow collaboration members to restrict the types of queries that can be performed against their datasets and the usable output of the query results. The following screenshot is an example of a query that will not be successful because it does not satisfy the analysis rule since the hashed_email column cannot be used in SELECT queries.
Full Programmatic Access Any functionality offered by AWS Clean Rooms can also be accessed via the API using AWS SDKs or AWS CLI. This makes it easier for you to integrate AWS Clean Rooms into your products or workflows. This programmatic access also unlocks the opportunity for you to host clean rooms for your customers with your own branding.
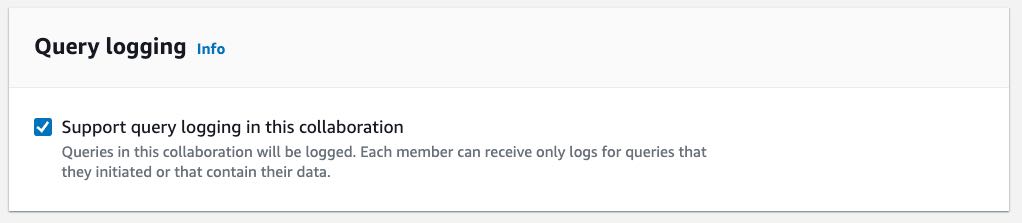
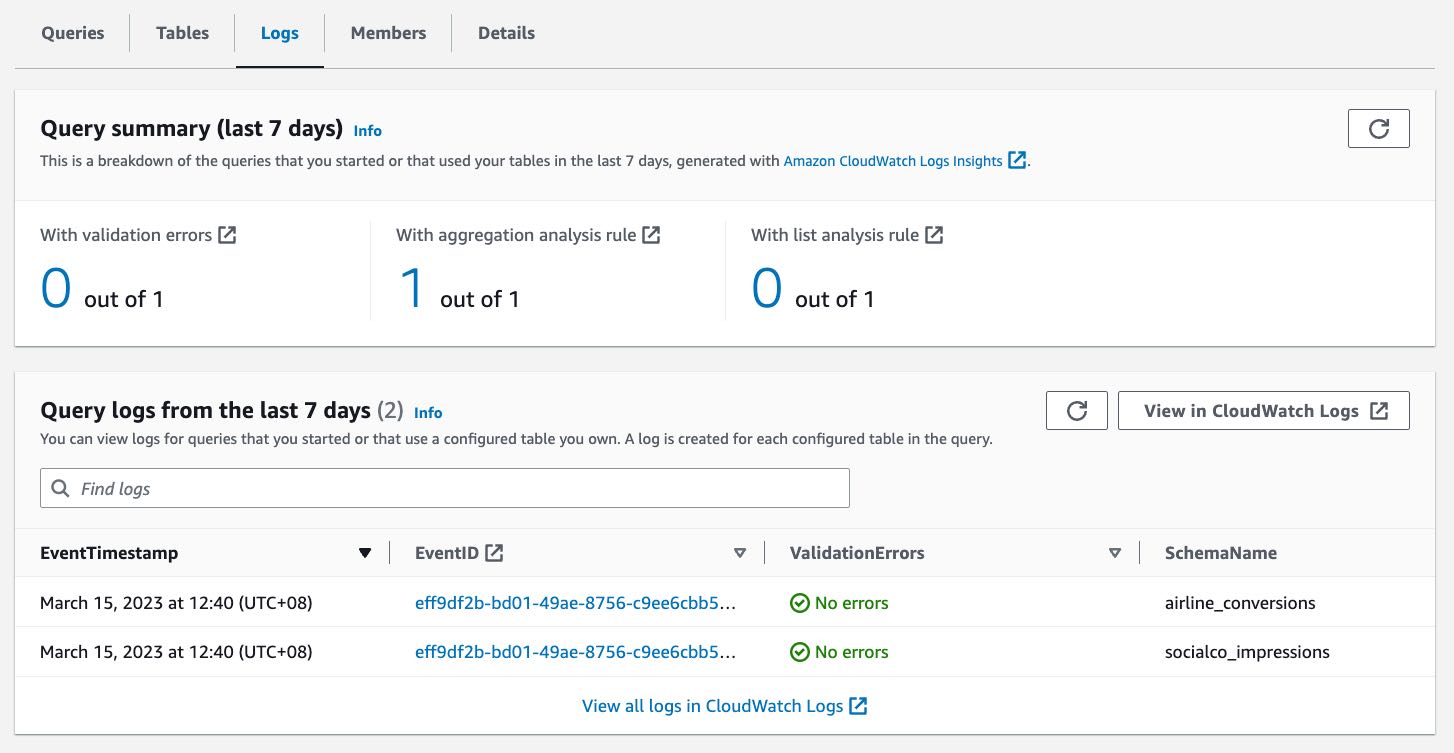
Query Logging This feature allows collaboration members to review and audit the queries that use their datasets to make sure data is being used as intended. With query logging, collaboration members who have query control and other members whose data is part of the query, can receive logs if they enable query logging.
If this feature is enabled, query logs are written to Amazon CloudWatch Logs in each collaboration member’s account. You can access the summary of the log queries in the last 7 days from the collaboration dashboard.
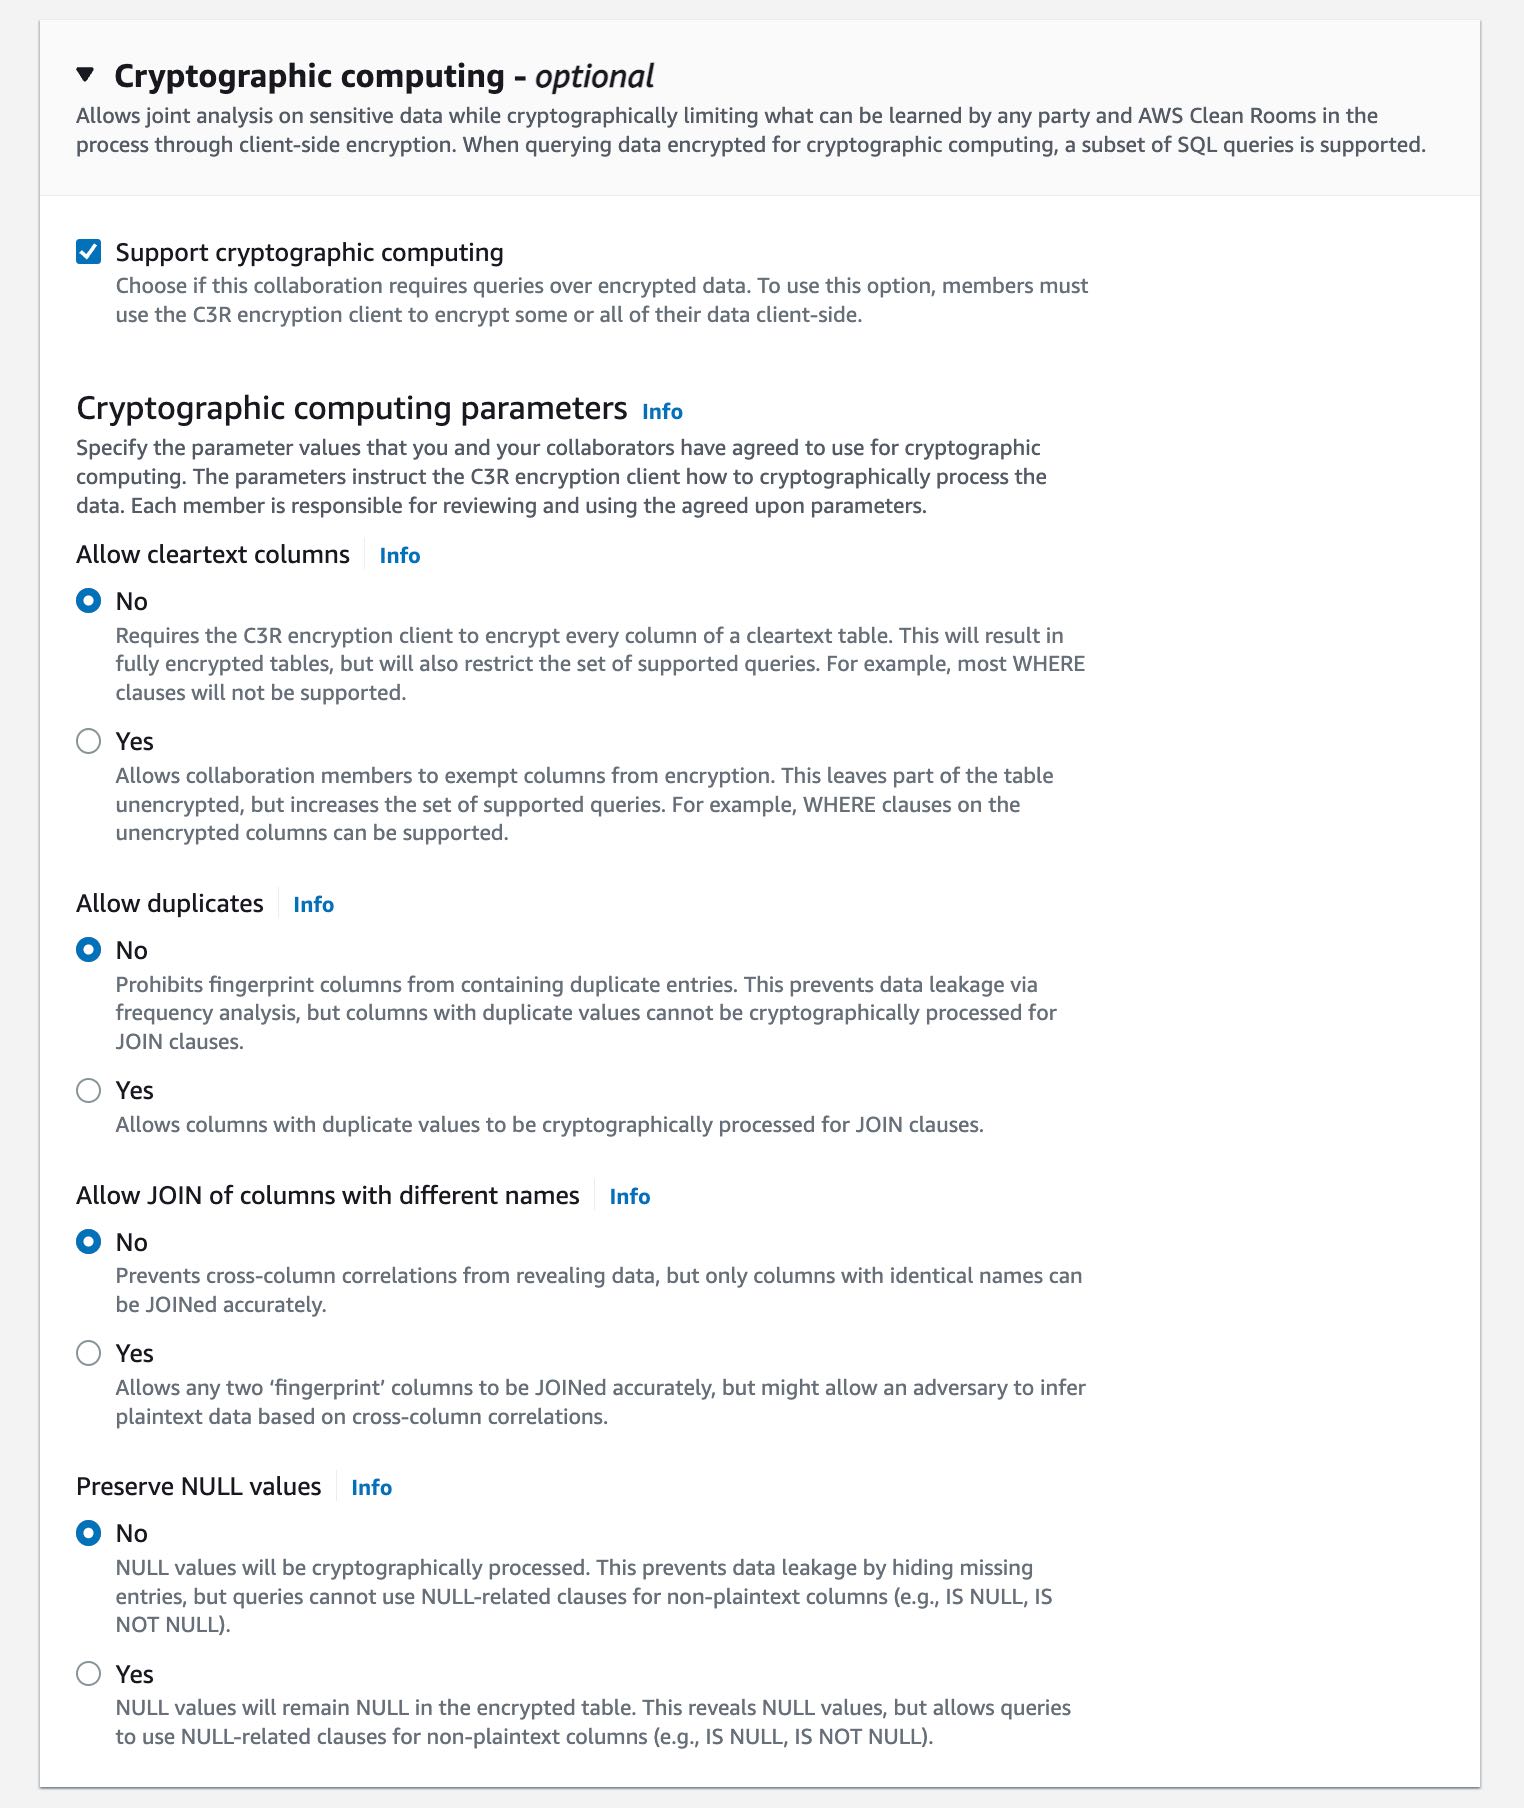
Cryptographic Computing With this feature, you have the option to perform client-side encryption for sensitive data with cryptographic computing. You can encrypt your dataset to add a protection layer, and the data will use a cryptographic computing protocol called private-set intersection to keep data encrypted even as the query runs.
To use the cryptographic computing feature, you need to download and use the Cryptographic Computing for Clean Rooms (C3R) encryption client to encrypt and decrypt your data. C3R keeps your data cryptographically protected while in use in AWS Clean Rooms. C3R supports a subset of SQL queries, including JOIN, SELECT, GROUP BY, COUNT, and other supported statements on cryptographically protected data.
The following image shows how you can enable cryptographic computing when creating a collaboration:
Customer Voices During the preview period, we heard lots of feedback from our customers about AWS Clean Rooms. Here’s what our customers say:
Comscore is a measurement and analytics company that brings trust and transparency to media. Brian Pugh, Chief Information Officer at Comscore, said, “As advertisers and marketers adapt to deliver relevant campaigns leveraging their combined datasets while protecting consumer data, Comscore’s Media Metrix suite, powered by Unified Digital Measurement 2.0 and Campaign Ratings services, will continue to support critical measurement and planning needs with services like AWS Clean Rooms. AWS Clean Rooms will enable new methods of collaboration among media owners, brands, or agency customers through customized data access controls managed and set by each data owner without needing to share underlying data.”
DISH Media is a leading TV provider that offers over-the-top IPTV service. “At DISH Media, we empower brands and agencies to run their own analyses of prior campaigns to allow for flexibility, visibility, and ease in optimizing future campaigns to reach DISH Media’s 31 million consumers. With AWS Clean Rooms, we believe advertisers will benefit from the ease of use of these services with their analysis, including data access and security controls,” said Kemal Bokhari, Head of Data, Measurement, and Analytics at DISH Media.
Fox Corporation is a leading producer and distributor of ad-supported content through its sports, news, and entertainment brands. Lindsay Silver, Senior Vice President of Data and Commercial Technology at Fox Corporation, said, “It can be challenging for our advertising clients to figure out how to best leverage more data sources to optimize their media spend across their combined portfolio of entertainment, sports, and news brands which reach 200 million monthly viewers. We are excited to use AWS Clean Rooms to enable data collaborations easily and securely in the AWS Cloud that will help our advertising clients unlock new insights across every Fox brand and screen while protecting consumer data.”
Amazon Marketing Cloud (AMC) is a secure, privacy-safe clean room application from Amazon Ads that supports thousands of marketers with custom analytics and cross-channel analysis.
“Providing marketers with greater control over their own signals while being able to analyze them in conjunction with signals from Amazon Ads is crucial in today’s marketing landscape. By migrating AMC’s compute infrastructure to AWS Clean Rooms under the hood, marketers can use their own signals in AMC without storing or maintaining data outside of their AWS environment. This simplifies how marketers can manage their signals and enables AMC teams to focus on building new capabilities for brands,” said Paula Despins, Vice President of Ads Measurement at Amazon Ads.
Watch this video to learn more about AWS Clean Rooms:
Availability AWS Clean Rooms is generally available in the following AWS Regions: US East (Ohio), US East (N. Virginia), US West (Oregon), Asia Pacific (Seoul), Asia Pacific (Singapore), Asia Pacific (Sydney), Asia Pacific (Tokyo), Europe (Frankfurt), Europe (Ireland), Europe (London), and Europe (Stockholm).
Pricing & Free Tier AWS Clean Rooms measures compute capacity in Clean Rooms Processing Units (CRPUs). You only pay the compute capacity of queries that you run in CRPU-hours on a per-second basis (with a 60-second minimum charge). AWS Clean Rooms automatically scales up or down to meet your query workload demands and shuts down during periods of inactivity, saving you administration time and costs. AWS Clean Rooms free tier provides a tier of 9 CRPU-hours per month for the first 12 months per new customer.
AWS Clean Rooms helps companies and their partners more easily and securely analyze and collaborate on their collective datasets without sharing or copying each other’s data. Learn more about benefits, use cases, how to get started, and pricing details on the AWS Clean Rooms page.
While using the popular self-hosted web administration solution, CloudPanel from MGT-COMMERCE, Rapid7 researcher Tod Beardsley discovered three security concerns. The first, an issue involving the trustworthiness of the installation script provided by the vendor, was an instance of CWE-494: Download of Code Without Integrity Check, and was quickly addressed by the vendor in under a day.
The second issue was with how the installer overwrites local firewall rules to be overly permissive during setup, and appears to be an instance of CWE-183: Permissive List of Allowed Inputs. The third issue is more long-term; CloudPanel installations all share the same SSL certificate private key. This appears to be an instance of CWE-321: Use of Hard-coded Cryptographic Key.
Product Description
MGT-COMMERCE’s CloudPanel is a free solution designed to ease the burden of administering self-hosted Linux servers, and is featured prominently at cloud virtual hosting providers such as AWS, Azure, GCP, Digital Ocean, and many others. More about CloudPanel can be found at the vendor’s website.
Credit
These issues were discovered and reported by Tod Beardsley, a security researcher at Rapid7, and is being disclosed in accordance with Rapid7’s vulnerability disclosure policy.
Exploitation
While experimenting with some self-hosting solutions for personal use, Beardsley discovered three issues that appear to place new CloudPanel installations at risk of opportunistic attacks across the internet.
Pipe Curl to Bash
The first issue, an instance of CWE-494 involving the trustworthiness of the "curl to bash" installation procedure documented by the vendor was quickly addressed by publishing a cryptographically secure checksum of the installation script. The vendor’s website now includes this check for a sha256 hash, as seen in the screenshot below.
This hash changes as new versions of the install script are released, of course, so it may be different by the time you read this advisory. A strategy of publishing a cryptographically secure hash and incorporating a check of that hash should alleviate any concern about the usual "pipe curl to bash" procedure for downloading and installing software over the internet. If you trust the vendor’s website, and if the vendor’s website is itself protected with an HTTPS certificate, then you should be confident that the installation script they provide is actually the installation script you expect to run. We urge other software providers to incorporate a similar hash check for distributing their installation scripts if they must distribute them via "pipe curl to bash" schemes.
Firewall Rule Rewrite On Installation
The instance of CWE-183 arises due to the fresh installation procedure recommended by the vendor in their documentation. During installation, the installation script preemptively discards local firewall rules for the host operating system, replacing them with much more permissive rules.
In the test case, the local firewall rules (as seen by ufw) are pre-set as:
root@debian11:~# ufw status numbered
Status: active

     To                         Action      From
     --                         ------      ----
[ 1] Anywhere                   ALLOW IN    1.2.3.4
[ 2] 80:8443/tcp                DENY IN     Anywhere
(Note, the allowed IP address has been replaced with "1.2.3.4")
The above rules state, "Allow any traffic from 1.2.3.4, deny all traffic to ports 80 through 8443 to everyone else." The ufw configuration also concludes with a general default deny rule (not seen here).
During installation, and upon completion of that one-command piping bash to curl installation procedure, these rules are changed to:
root@debian11:~# ufw status verbose
Status: active
Logging: on (low)
Default: deny (incoming), allow (outgoing), disabled (routed)
New profiles: skip

To                         Action      From
--                         ------      ----
22/tcp                     ALLOW IN    Anywhere
80/tcp                     ALLOW IN    Anywhere
443                        ALLOW IN    Anywhere
8433:8443/tcp              ALLOW IN    Anywhere
22/tcp (v6)                ALLOW IN    Anywhere (v6)
80/tcp (v6)                ALLOW IN    Anywhere (v6)
443 (v6)                   ALLOW IN    Anywhere (v6)
8433:8443/tcp (v6)         ALLOW IN    Anywhere (v6)
These rules are, of course, far more permissive, specifically because they removed the deny rules as well as the custom IP address allow rule I had set prior to installation.
Furthermore, upon completion of the initial installation, the superuser administrator account for CloudPanel is blank. This is a problem because, typically, a user would navigate to the host server web panel and set the password to their chosen value. However, once installation is complete, and if the machine is on the routable internet (as is intended), an attacker could visit the same web panel and set the administration user account to their chosen password, thus effectively administrating the machine.
Note, the opportunity for attack is limited, since the legitimate CloudPanel administrator has the opportunity to reset firewall rules once installation is complete. However, when installation is complete, there is no notification that firewall rules have been discarded and replaced, so the legitimate user is left to discover this on their own.
If an attacker does manage to seize control during the vulnerable window of opportunity, they could install the malware of their choice, replace certificates, or otherwise alter the underlying operating system as an authenticated administrator, since the whole purpose of CloudPanel is to ease the task of OS management.
The trick for the attacker, then, is to find fresh installations of CloudPanel. This seems unlikely on the open internet assuming users are quick to set their superuser administrator account password, but issue CVE-2023-0391, described next, makes the job of finding these fresh CloudPanel servers much easier, in an automated way.
CVE-2023-0391: Reused Certificates
Upon installation, CloudPanel ships with a static SSL certificate to encrypt communications to the administrative interface. Because the SSL certificate is generated once by MGT-COMMERCE and shipped with every installation of CloudPanel, this state of affairs is exploitable for two outcomes.
First, because the SSL certificate has a unique but reused public key, searching for unmodified CloudPanel instances is trivial with modern network scanning techniques. All an attacker would need to do is target a given IP address space used by a targeted Virtual Private Server (VPS) provider, and continuously look for HTTPS services running on port 8443 (the default for this web administration portal) and certificates that match the public key fingerprint seen below:
Using these search parameters, an attacker can continuously search, in real time, for new instances of CloudPanel, and then exploit the CWE-183 issue described above. Of course, other techniques exist for identifying CloudPanel instances, but the reused certificate leads to a secondary, more serious problem.
Since the private key also ships with every installation of CloudPanel, and CloudPanel is freely available to anyone who cares to download it, the encryption provided by the HTTPS connection is not trustworthy. An attacker with the private key can easily decrypted captured traffic, either in real time through a privileged position on the network between the client and the server, or later with captured network traffic. In either case, sensitive information such as an administrator password and session tokens would be immediately available to the attacker.
According to Shodan, as of January 18, 2023, there are about 5,800 servers providing a certificate issued by ‘cloudpanel.clp`, the self-signed authority found on the shipping default certificate. These servers are found mostly in the United States and Germany (which is unsurprising given that the vendor is a German company), and mostly in DigitalOcean VPS environments. This figure is close to our own scanning with Project Sonar, which has spotted 6,785 running instances as of January 27, 2023.
Impact
By chaining together the firewall permissiveness and the reused certificate issues together, an attacker can target and exploit new CloudPanel instances as they are being deployed. It’s important to note that CloudPanel is touted to be an easy to use interface for basic Linux administration, is targeted at relatively inexperienced users, and much of the documentation presumes an installation procedure live on the routable internet with a fresh VPS instance.
Furthermore, it would appear that CloudPanel is currently enjoying a burst of uptake among new Fediverse-aware users (this researcher included). While self-hosting is a perfectly innocent and often virtuous goal for distributing personal and professional content, it does come with some additional security responsibilities that are traditionally taken up by dedicated professional services.
Unfortunately, those dedicated professionals are absent in the DIY, roll-your-own kind of environment encouraged by Fediverse fans, and users are left to fend for themselves when it comes to secure software deployment. In light of this advisory, users interested in self-hosting solutions are urged to be aware of the special security considerations that come along with offering services on the general internet. In years past, this would go without saying, but the late 2022 turmoil around untrustworthy centralized services such as Twitter may be generating a new wave of inexperienced sysadmins on the internet, similar the the surge of general internet usage during the Eternal September of 1993.
Remediation
As of this publication, the firewall rewriting issue, the blank superuser password, and CVE-2023-0391 remain unfixed by the vendor. The issues described in the firewall rewrite issue could be fixed by the installation script taking a snapshot of the existing firewall rules, and programmatically creating a ruleset that incorporates the user’s original intent with those rules. At the least, the script should identify, and warn the user, that firewall rules are about to be re-written.
The superuser administrator account should be created with a random, per-install password, and display that password on the console upon completion; once the user logs in for the first time, they could then be prompted to change the password.
Absent a patch for these issues, users should take care to install CloudPanel only on isolated networks in a way that is isolated beyond local firewall rules. Practically speaking, as long as the user is installing CloudPanel attentively, and watching for the moment the web service becomes available, attackers will only have a minute or so of exposure to take advantage of. Local, same-machine attackers aside, this should be good enough for most use cases.
For the second issue, the vendor could provide, as part of the installation script, a mechanism to create a unique self-signed SSL certificate during installation, and conclude the installation by printing the fingerprint on the console output.
Absent a patch for CVE-2023-0391, users of CloudPanel are encouraged to generate and install their own certificate for SSL use in order to avoid being so trivially fingerprintable by automated scans, and in order to ensure that the cryptographic security provided by HTTPS is actually secure against passive monitoring.
Disclosure Timeline
November, 2022: CWE-183 and CWE-494 issues discovered by Tod Beardsley of Rapid7
Wed, Nov 23, 2022: CWE-183 and CWE-494 reported to the vendor
Thu, Nov 24, 2022: Report acknowledged by the vendor, CWE-494 addressed
December, 2022: CVE-2023-0391 discovered
Wed, Jan 18, 2023: CVE-2023-0391 reported to the vendor
AWS Network Firewall is a stateful, managed, network firewall and intrusion detection and prevention service for your Amazon VPC. With Network Firewall, you can filter inbound and outbound traffic to or from internet gateways; AWS Direct Connect gateways; AWS PrivateLink, AWS Site-to-Site VPN, and AWS Client VPN gateways; NAT gateways; and even between other attached VPCs and subnets.
You can use Network Firewall to help prevent your VPC from accessing unauthorized domains, to block IP addresses, and to perform deep packet inspection or protocol filtering. However, it can be time consuming to update your firewall’s rule groups to add, remove, or modify the list of IP addresses across multiple Network Firewall instances that can be deployed in distributed, centralized, or combined deployment models.
With prefix lists, you can group one or more CIDR blocks into a single object. Therefore, you can group IP addresses that you frequently use in a prefix list, and reference this list in Network Firewall rule groups. With this approach, you don’t need to update individual firewall rules when scaling the network to add new IP addresses, and the Network Firewall rule groups that reference the prefix list are automatically updated.
In this post, we will show you how to build an example configuration in your test environment that uses customer-managed prefix lists in a Network Firewall rule group.
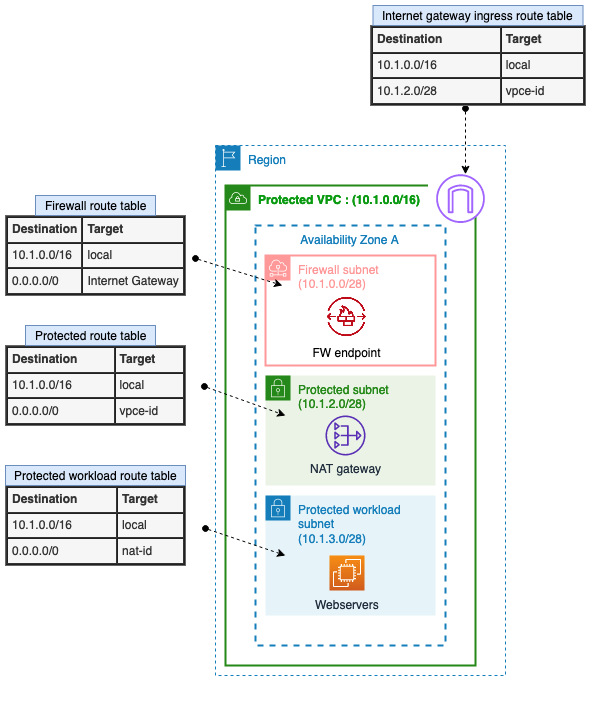
In this post, we will show you how to create a simple architecture in a VPC to create three different VPC prefix lists for private and public subnets and provide protection by restricting traffic flow to the firewall subnet. Then you will create a stateful Network Firewall rule group to include IP set references that are mapped to VPC prefix lists. Figure 1 illustrates the architecture of a protected VPC.
Figure 1: Simple architecture of a protected VPC
In this example, the following three subnets are in the protected VPC:
Firewall subnet: 10.1.0.0/28 This subnet is dedicated for use by Network Firewall. The Network Firewall endpoint is deployed into a dedicated subnet of the VPC.
Public subnet (protected subnet): 10.1.2.0/28 The resources are designed to be internet-facing, so this subnet needs to communicate with the internet gateway. The NAT gateway and load balancer are also hosted on this subnet.
Private subnet (protected workload subnet): 10.1.3.0/28 This is the subnet where you host your private workload that doesn’t accept incoming traffic from the internet (in our example, this is the webservers). The private workload can send requests to the internet through the NAT gateway.
Deploy the CloudFormation template
The following AWS CloudFormation template deploys a network firewall and related resources in a distributed architecture across two Availability Zones. In production, AWS recommends that you use multiple Availability Zones to help ensure high availability and improve fault tolerance. To simplify the instructions, we will focus on a single Availability Zone for this blog post.
To deploy the CloudFormation template
Choose the following Launch Stack button.
Launch the CloudFormation template in the Region of your choice. Make sure that the Region that you choose supports Network Firewall. Select the Availability Zone or Zones to be used for this deployment, and leave the rest of the options as default.
Create the VPC prefix lists
In this section, we will show you how to define your requirements and implement them within Network Firewall to only enable Secure Shell (SSH) traffic from a trusted IP range (an authorized public subnet on the protected VPC) to the private subnet. We will also show you how to block Internet Control Message Protocol (ICMP) traffic from another IP range (with CIDR 10.0.1.0/24).
You will create the following VPC prefix lists:
Public-ip-list — includes the protected subnet: 10.1.2.0/28
Private-deny-list — includes a CIDR block from the other VPC: 10.0.1.0/24
Private-allow-list — includes the protected workload subnet: 10.1.3.0/28
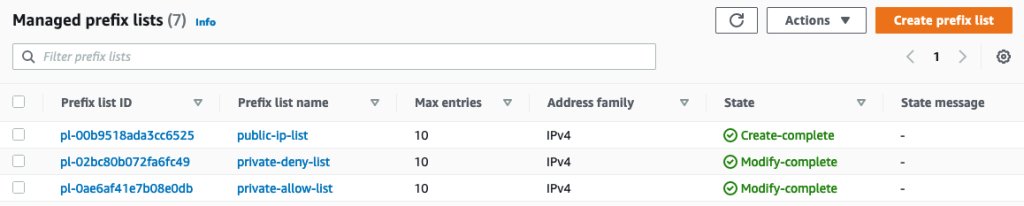
Choose Create prefix list, and then do the following, as shown in Figure 2:
For Prefix list name, enter a name for the prefix list. In our example, the name is Public-ip-list.
For Max entries, enter the maximum number of entries for the prefix list. In our example, this number is 10.
For Address family, select the prefix list that supports IPv4 entries.
Note: Network Firewall currently supports only references to IPv4 prefix lists.
For Prefix list entries, choose Add new entry, and then enter the CIDR block and a description for the entry. In our example, the CIDR block is 10.1.2.0/28.
Choose Create prefix list.
Figure 2: Example of managed prefix lists
Repeat the preceding steps for the two remaining prefix lists: Private-deny-list and Private-allow-list.
When you’ve finished creating the prefix lists, you can view them under Managed prefix lists, as shown in Figure 3.
Figure 3: Example of VPC prefix lists
Create a Network Firewall rule group
The next step is to create a Network Firewall rule group. A Network Firewall rule group is a reusable set of criteria for inspecting and handling network traffic. As part of this configuration, we will take advantage of customer-managed VPC prefix lists as a variable to simplify the management of the rules.
To create a Network Firewall rule group
In the Amazon VPC console, in the left navigation pane, choose Network Firewall rule groups.
From the Rule groups tab, select Create Network Firewall rule group, and then do the following, as shown in Figure 4:
For Rule group type, select Stateful rule group.
For Name, enter your network firewall rule group.
For Capacity, enter 25 or another appropriate value.
For Stateful rule group options, select 5-tuple.
Under Stateful rule order, select Default.
Figure 4: Network Firewall rule group
In the IP set references section, do the following, as shown in Figure 5:
For IP set preference variable name, enter new variable names for each of your VPC prefix lists.
From the IP set resource ID dropdown, select an IP set.
In this example, you are creating three IP set references that are mapped to the VPC prefix lists that you configured in the previous sections, as shown in the following table.
IP set references variable name
Mapped VPC prefix list name to IP set references
CIDR block
IP_list_Allow_ssh_subnets
public-ip-list
10.1.2.0/28
IP_list_Private_Deny
private-deny-list
10.0.1.0/24
IP_list_private_subnets
private-allow-list
10.1.3.0/28
Figure 5: Example of IP set references
In the Add rule section, do the following, as shown in Figure 6:
Select the protocol.
For Source, select Custom and then enter the IP set reference variable name for the source IP address with the following format: <@Your_ip_set_reference_name>. In our example, the name is @IP_list_Allow_ssh_subnets.
For Source port, select Custom and enter the appropriate port number.
For Destination, choose Custom and then enter the IP set reference variable name for the destination IP address with the following format: <@Your_ip_set_reference_name>. In our example, the name is @IP_list_Private_subnets.
For Destination port, choose Custom and enter the appropriate port number.
For Traffic direction, select Any.
For Action, select Pass.
Choose Add rule.
Figure 6: Example of a Network Firewall rule group with custom IP set references
For the next set of rules, repeat the preceding steps and choose the appropriate protocol, source, destination, traffic direction, and action, as shown in the following table.
Protocol
Source
Destination
Source port
Destination port
Direction
Action
SSH
@IP_list_Allow_ssh_subnets
@IP_list_private_subnets
22
22
Forward
Pass
SSH
Any
@IP_list_private_subnets
Any
22
Forward
Drop
ICMP
@IP_list_Private_Deny
Any
Any
Any
Forward
Drop
After completion, you will have a set of stateful rules, as shown in Figure 7.
Figure 7: Example list of Network Firewall rules
Congratulations! You have configured Network Firewall rule groups by using VPC prefix lists for a simplified management to allow SSH traffic only from authorized subnets and to deny ICMP traffic from unauthorized subnets.
For the next steps, you can test your configuration by trying to use protocols such as SSH or ICMP from unauthorized subnets to your private subnets and reviewing the behavior. You can also test your configuration by doing the same from authorized subnets and comparing the results. Furthermore, you can create logging and monitoring solutions in Network Firewall to review the dropped or allowed packets from your Network Firewall log groups in CloudWatch Logs or use contributor insights to analyze Network Firewall logs.
Clean up the resources
To clean up the resources that you created for this walkthrough, do the following:
In this post, you learned how to use Amazon VPC managed prefix lists to simplify management of IP addresses within Network Firewall rule groups. IP set preferences that are mapped to your VPC prefix lists are a great tool to help simplify your firewall rules and reduce operational overhead and administration as you scale your network.
Network attached storage (NAS) devices offer centralized data storage solutions, enabling users to easily protect and access their data locally. You can think of a NAS device as a powerful computer that doesn’t have a display or keyboard. NAS can function as extended hard disks, virtual file cabinets, or centralized storage systems depending on individual needs. While NAS devices provide local data protection, a hybrid setup with cloud storage offers off-site protection by storing files on geographically remote servers.
This blog is the first in a two part series that will focus on home NAS setups, exploring how two Backblazers set up their NAS devices and connected them to the cloud. We’ll aim to present actionable setup tips and explain what each of our data storage needs are so that you can create your own NAS setup strategy.
I’m Vinodh, your first user. In this post, I will walk you through how I use a Synology Single-Bay NAS device and Backblaze B2 Cloud Storage.
Why Did I Need a NAS Device At My Home?
Before I share my NAS setup, let’s take a look at some of the reasons why I needed a NAS device to begin with. Knowing that will give you a better understanding of what I’m trying to accomplish with NAS.
My work at Backblaze involves guiding customers through all things NAS and cloud storage. I use a single-bay NAS device to understand its features and performance. I also create demos, test use cases, and develop marketing materials and back them up on my NAS and in the cloud to achieve the requirements of a 3-2-1 backup strategy. That strategy recommends that you have three copies of data stored in two different locations with one copy off-site.
Additionally, I use my NAS setup to off-load the (stunning!) photos and videos from my wife’s and my iPhones to free up space and protect them safely in the cloud. Lastly, I’d also like to mention that I work remotely and collaborate with people as part of my regular work, but today we’re going to talk about how I back up my files using a hybrid cloud storage setup that combines Synology NAS and Backblaze B2. Combining NAS and cloud storage is a great backup and storage solution for both business and personal use, providing a layer of protection in the event of hardware failures, accidental deletions, natural disasters, or ransomware attacks.
Now that you understand a little bit about me and what I’m trying to accomplish with my NAS device, let’s jump into my setup.
What Do I Need From My NAS Device?
Needless to say, there are multiple ways to set up a NAS device. But, the most common setup is for backing up your local devices (computer, phones, etc.) to your NAS device. A basic setup like this, with a few computers and devices backing up to the same NAS device, protects data in that you have a second copy of your data stored locally. However, the data can still be lost if there is hardware failure, theft, fire, or any other unexpected event that poses a threat to your home. This means that your backup strategy needs something more in order to truly protect your data.
Off-site protection with cloud storage solves this problem. So, when I planned my NAS setup, I wanted to make sure I had a NAS device that integrates well with a cloud storage provider to achieve a 3-2-1 backup strategy.
Now that we’ve talked about my underlying data protection strategy, here are the devices and tools I used to create a complete 3-2-1 NAS backup setup at my home:
Devices with data:
MacBook Pro–1
iPhone–2
Storage products:
Synology Device–1
Seagate 4TB internal hard disk drive–1
Backblaze B2 Cloud Storage
Applications:
Synology Hyper Backup
Synology Photos
What Did I Want to Back Up on My NAS Device?
My MacBook Pro is where I create test use cases, demos, and all the files I need to do my job, such as blog posts, briefs, presentation decks, ebooks, battle cards, and so on. In addition to creating files, I also download webinars, infographics, industry reports, video guides, and any other information that I find useful to support our sales and marketing efforts. As I mentioned previously, I want to protect this business data both locally (for quick access) and in the cloud (for off-site protection). This way, I can not only secure the files, but also remotely collaborate with people from different locations so everyone can access, review, and edit the files simultaneously to ensure timely and consistent messaging.
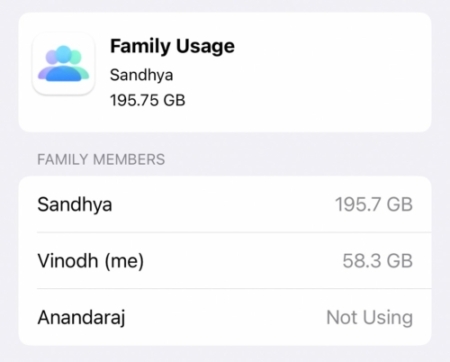
Meanwhile, my wife and I each have an iPhone 12 with 128GB storage space. Clearly, a total of 256GB is not enough for us—it only takes six to nine months for us to run out of storage on our devices. Once in a while, I clean up the storage space to make sure my phone runs at optimal speed by removing any duplicate or unwanted photos or movies. However, my wife doesn’t like to delete anything as she often wants to look back and remember that one time we went to that one place with those friends. But, she has hundreds of pictures of that one place with those friends. As a result, our iPhone family usage is almost always at capacity.
Our shared storage.
As you can see, being able to off-load pictures and movies from our phones to a local device would give us quick access, protect our memories in the cloud, and free up our iPhone storage.
How I Set Up My NAS Device
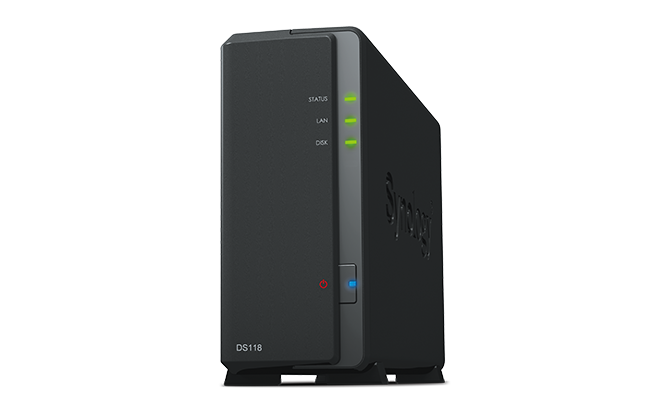
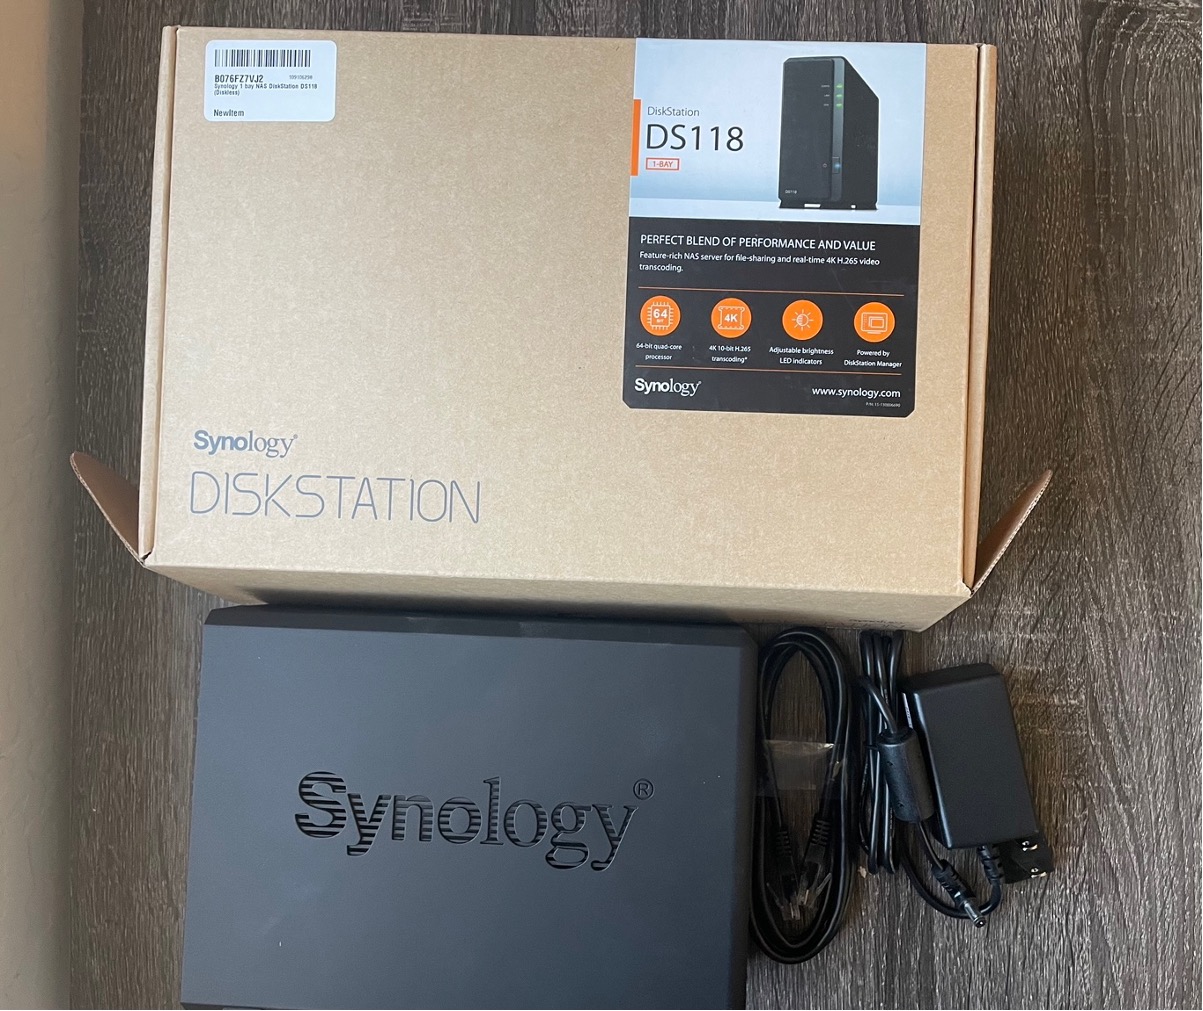
To accomplish all that, I set up a Synology Single-Bay NAS Diskstation (Model: DS118) which is powered by a 64-bit quad-core processor and 1GB DDR4 memory. As we discussed above, a NAS device is basically a computer without a display and keyboard.
Unboxing my Synology NAS.
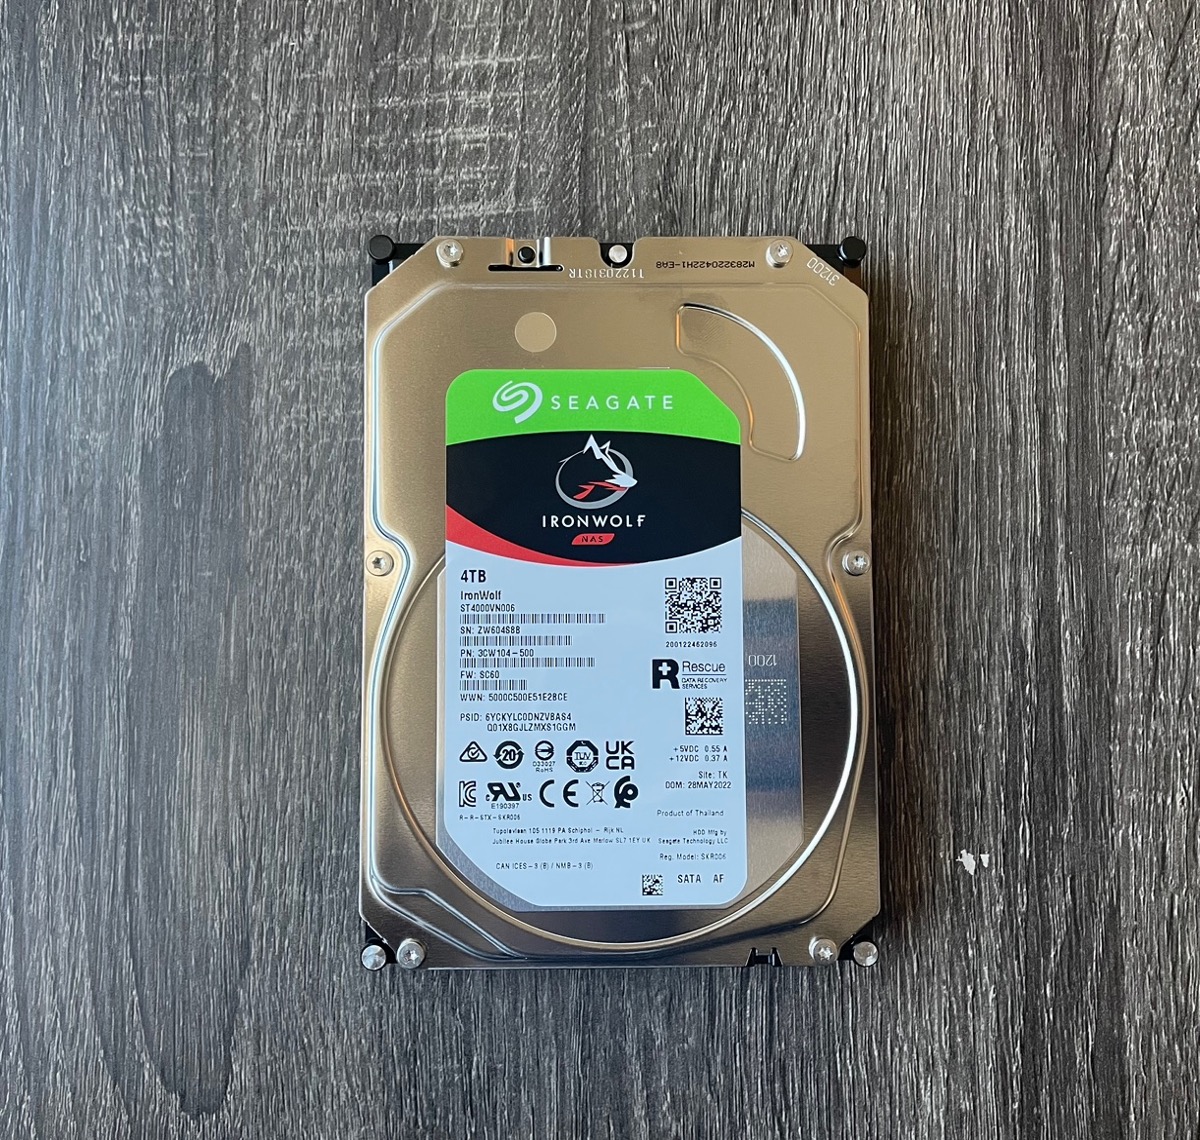
Most NAS devices are diskless, meaning we’d need to buy hard disk drives (HDD) and install them on the NAS device. Also, it is important to note that NAS devices work differently than a typical computer. A NAS device is always running even if you turn off your computer or laptop. A regular hard disk drive may not support this operating pressure. Therefore, it’s essential that we get NAS drives that are suitable for NAS devices. For my NAS device, I got a 4TB HDD from Seagate. You can look up compatible drives on Synology’s compatibility list. When you buy your NAS, the manufacturer should give you a list of which hard drives are compatible, and you can always check out Drive Stats if you want to read up on how long drives last.
A 4TB Seagate HDD.
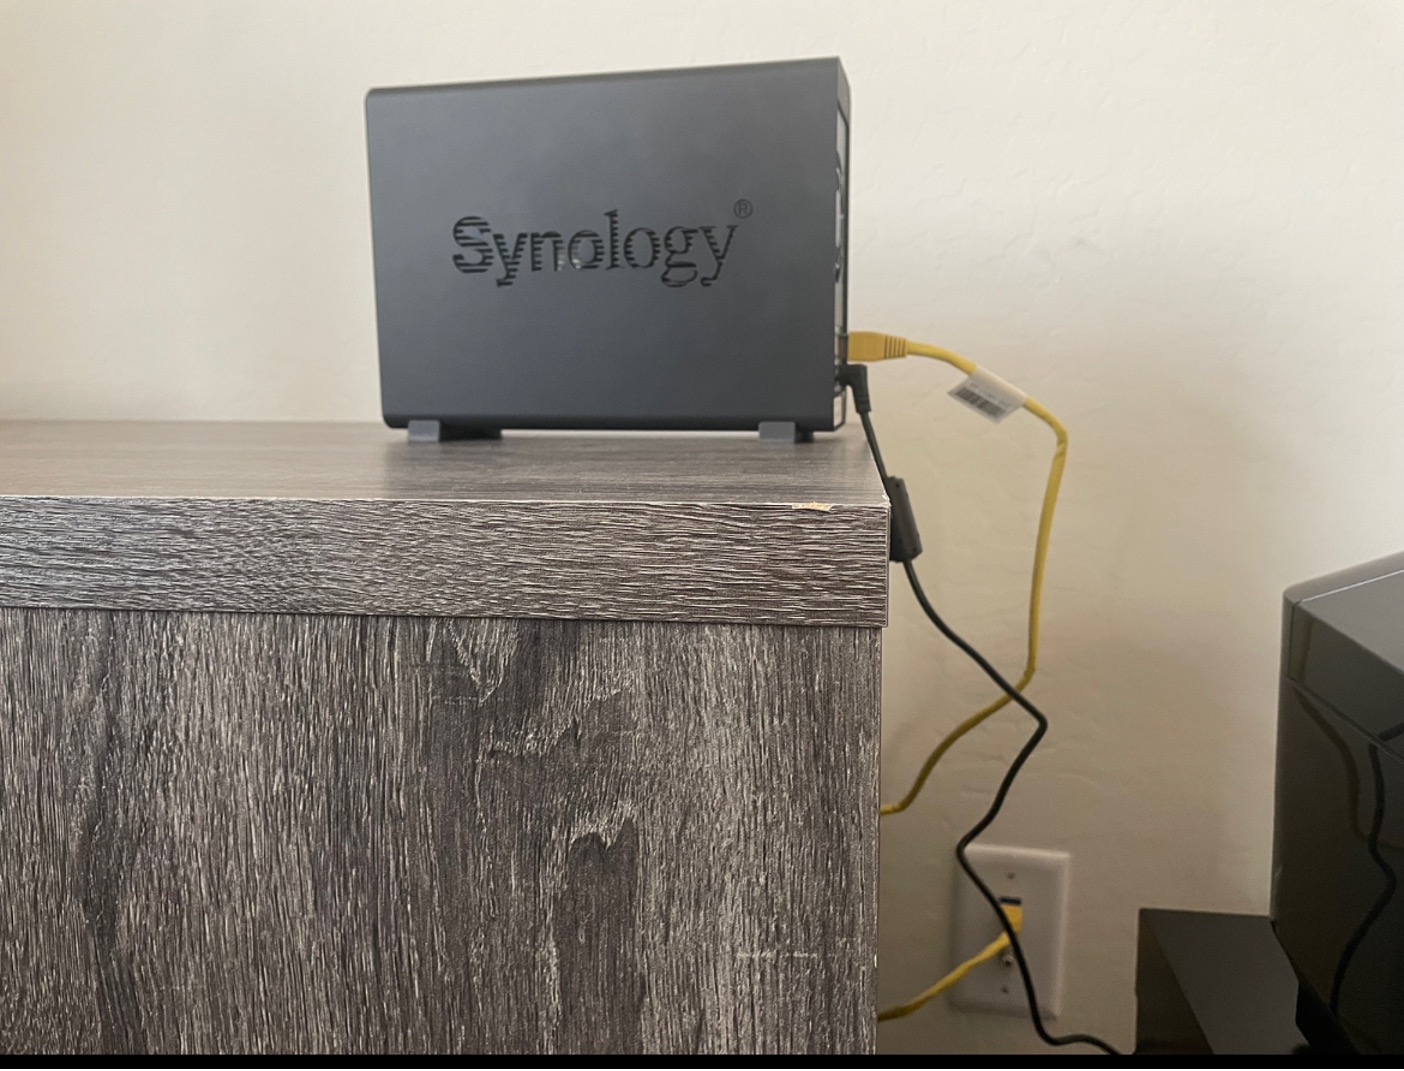
After getting the NAS device and HDD, the next item I wanted to figure out is where to keep it. NAS devices typically plug into routers rather than desktops or laptops. With help from my internet service provider, I was able to connect all rooms in our house with an ethernet connection that’s attached to the router. For now, I set up the NAS device in my home office on a spare desk connected to the router via an RJ45 cable.
My Synology NAS in its new home with an Ethernet connection.
In addition to protecting data locally on the NAS device, I also use B2 Cloud Storage for off-site protection. Every NAS has its own software that helps you set up how your backups occur from your personal devices to your NAS, and that software will also have a way to back up to the cloud. On a Synology NAS, that software is called Hyper Backup, and we’ll talk a little bit more about it below.
How I Back Up My Computer to My NAS Device
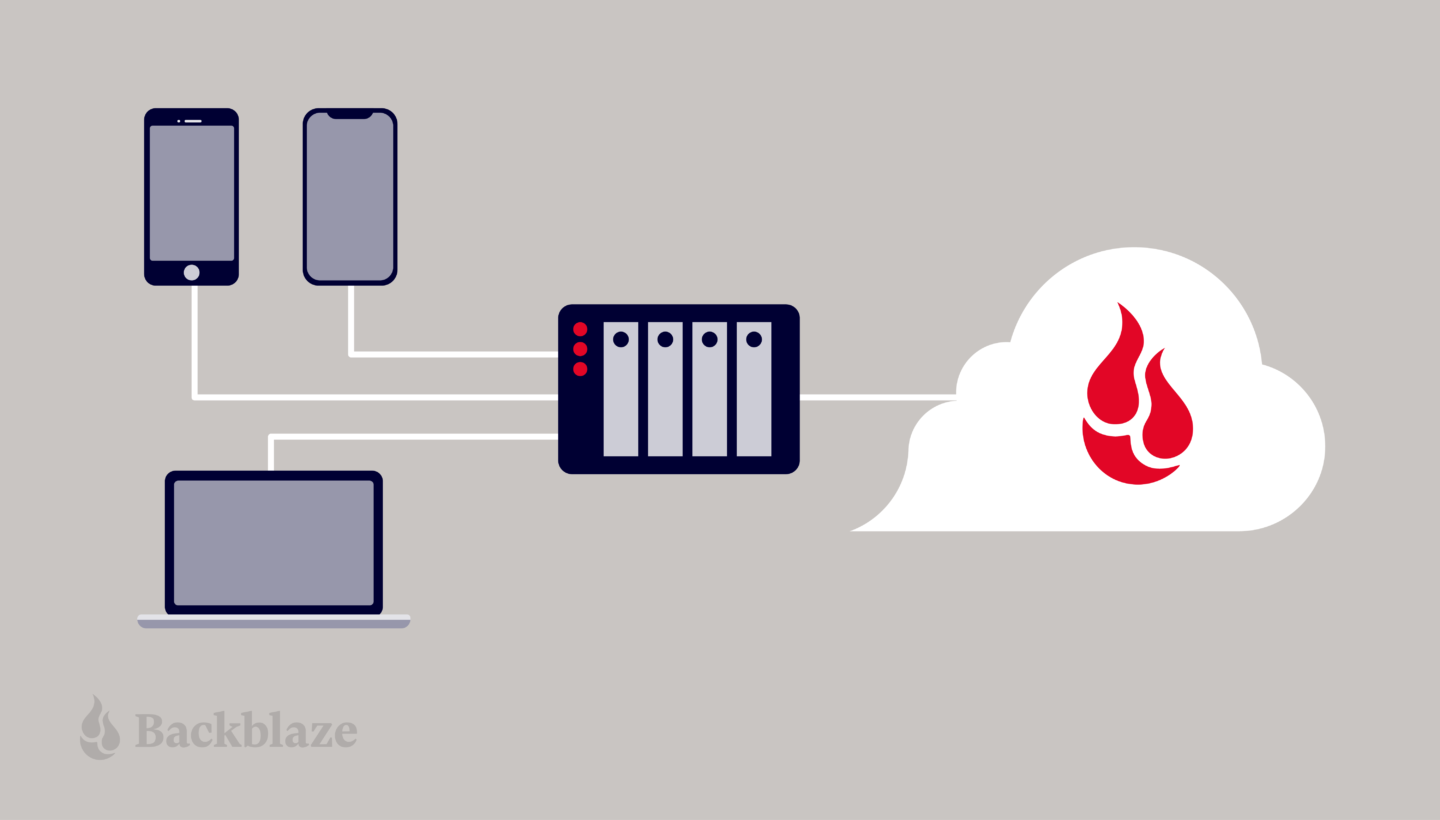
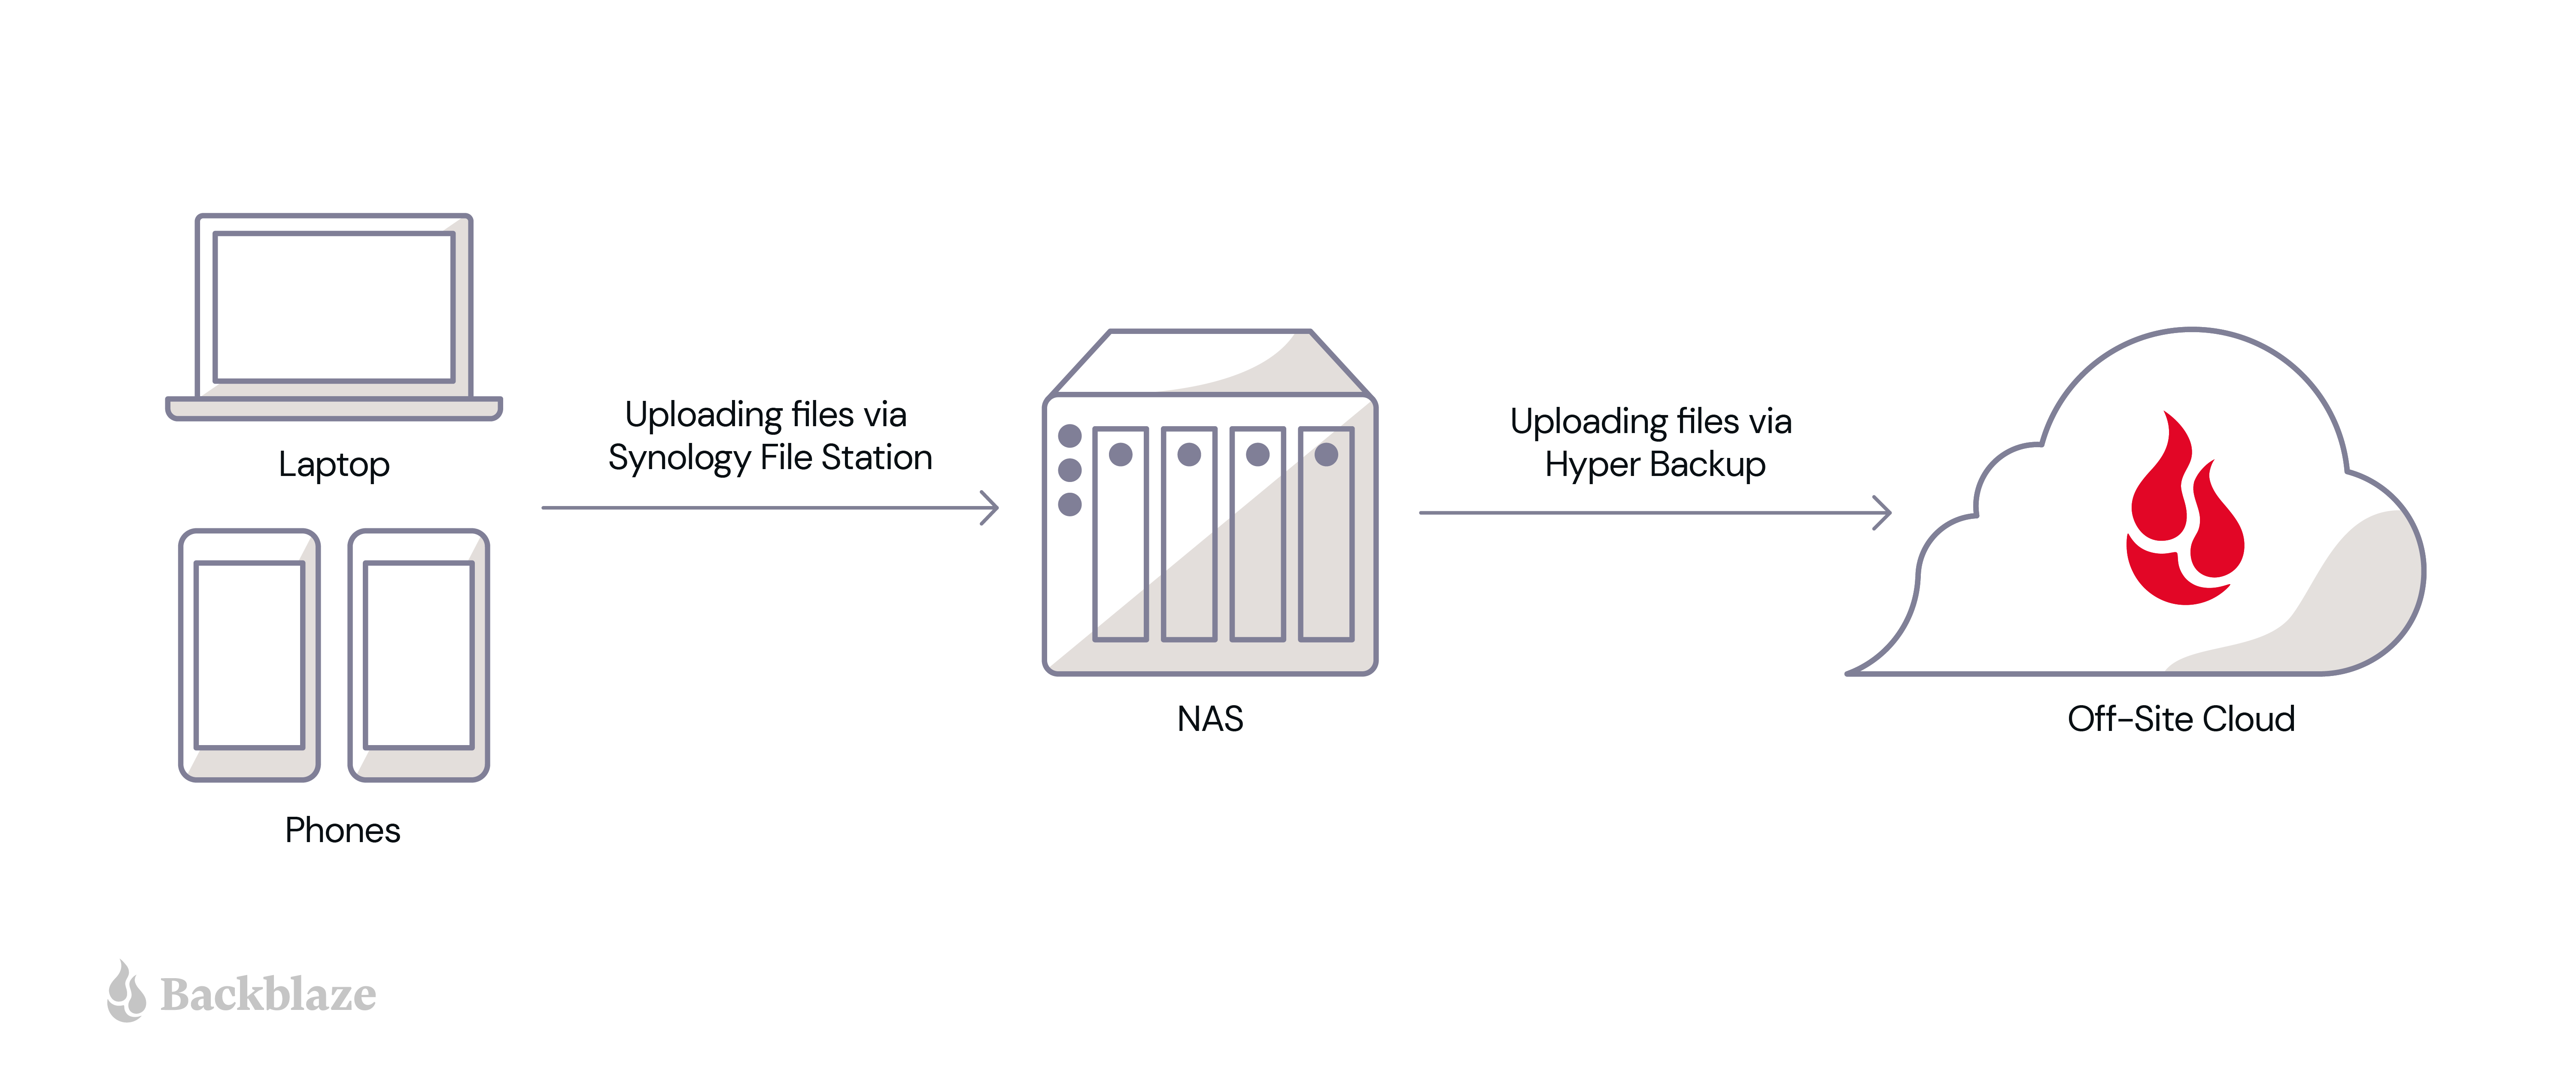
The above diagram shows how I use a hybrid setup using Synology NAS and B2 Cloud Storage to protect data locally and off-site.
First, I use Synology File Station to upload critical business data to the NAS device. After I configure B2 Cloud Storage with Hyper Backup, all files uploaded to the NAS device automatically get uploaded and stored in B2 Cloud Storage.
Getting set up with B2 Cloud Storage is a simple process. Check out this video demonstration that shows how to get your NAS data to B2 Cloud Storage in 10 minutes or less.
How I Back Up iPhone Photos and Videos to My NAS Device
That takes care of our computer backups. Now on to photo storage. To off-load photos and movies and create more storage space on my phone, I installed the application “Synology Photos” on my and my wife’s iPhones. Now, whenever we take a picture or shoot a movie on our phones, the Synology Photos application automatically stores a copy of the files to the NAS device. And, the Hyper Backup application then copies those photos and movies to B2 Cloud Storage automatically.
This setup has enabled us to not worry about storage space on our phones. Even if we delete those pictures and movies, we can still access them quickly via the NAS device over our local area network (LAN). But most importantly, a copy of those memories is protected off-site in the cloud, and I can access that cloud storage copy easily from anywhere in the world.
Lessons Learned: What I’d Do Differently The Next Time
So, what can you take from my experience setting up a NAS device at home? I learned a few things along the way that you might find useful. Here is my advice if I were to do things differently the second time around:
Number of bays: I opted for a single bay NAS device for my home setup. After using the device for about three months now, I realize how much space it saved on my MacBook and iPhones. If I were to do it again, I’d choose a NAS device with four or more bays for increased storage options.
Check for Ethernet connectivity: Not all rooms in my house were wired for Ethernet connectivity, and I did not realize that until I started setting up the NAS device. I needed to get in touch with my internet service provider to provide Ethernet connectivity in all rooms—which delayed the setup by two weeks. If you’re looking to set up a NAS device at home, ensure the desired location in your home has an Ethernet connection.
Location: I initially wanted to set up my NAS device in the laundry room. However, I realized NAS devices require a space that is well ventilated with minimum exposure to heat, dust, or moisture. Therefore, I’d chosen to set up the NAS device at my office room instead. Consider factors like ventilation, accessibility, and dust exposure of the location for the longevity and performance of your NAS device.
So, whether you are a home user who wants additional storage, a small business owner who wants to create a centralized file storage system, or an IT admin for a mid-size or enterprise organization who wants to securely protect your critical business data both on-premises and off-site storage, the use of a NAS device along with cloud storage provides the protection you need to secure your data.
What’s Next: Looking Forward to Part Two
In part one of this series, we’ve learned how setting up a NAS device at home and connecting it to the cloud can effectively back up and protect critical business data and personal files while accomplishing a 3-2-1 backup strategy. Stay tuned for part two, where James Flores will share with us how he utilizes a hybrid NAS and cloud storage solution to back up, work on, and share media files with users from different locations. In the meantime, we’d love to hear about your experience setting up and using NAS devices with cloud storage. Please share your comments and thoughts below.
AWS Payments is part of the AWS Commerce Platform (CP) organization that owns the customer experience of paying AWS invoices. It helps AWS customers manage their payment methods and payment preferences, and helps customers make self-service payments to AWS.
The Machine Learning, Data and Analytics (MLDA) team at AWS Payments enables data-driven decision-making across payments processes and partners by delivering data, business insights, and causal and ML inferences through a scalable set of data, insights, and ML inference services.
At AWS Payments, we had been using Redash to allow our users to author and run SQL queries against our Amazon Redshift data warehouse. Redash is a web-based SQL client application that can be used to author and run queries, visualize query results with charts, and collaborate with teams.
Over time, we began to notice incompatibilities between Redash’s operations and the needs of our workload.
We had the following requirements in mind when looking for an alternative tool:
Authentication and authorization
Provide data access without creating a database user and password
Allow list users using permission groups (POSIX/LDAP) for accessing the tool
Limit user access to database objects
User experience
Run SQL queries on the selected database
Save a query and rerun it later
Write a dynamic SQL query and run the query based on input parameters
The Amazon Redshift Query Editor V2 has the following benefits:
It makes data across analytics and data scientists more accessible with a unified web-based analyst workbench for data analysts to explore, share, and collaborate on data through a SQL interface
It provides a managed service that allows you to focus on exploring your data without managing your infrastructure
Users can log in to the Query Editor using single sign-on (SSO)
Users can connect to Amazon Redshift using federated access without providing a user name and password
It enables you to collaborate with team members by providing the ability to share saved queries securely
You can benefit from new features as soon as they get released by the Amazon Redshift Query Editor team
You can keep track of changes made to saved queries using the Query History feature
You can write parameterized SQL queries, which allows you to reuse a query with different values
You can turn on the Chart feature to display a graphic visualization of the current page of results
You can use notebooks to organize, annotate, and share multiple SQL queries in a single document
You can run multiple queries in parallel by running each query in a separate tab
However, it presented the following challenges:
To restrict user access to other AWS services within our AWS account, we attached the AWS Identity and Access Management (IAM) policies (see the appendix at the end of this post) to the SAML IAM role. The policies promote the following:
The user can only access the Query Editor V2 service.
The federated user gets assigned to a database group with limited access.
The Query Editor V2 currently doesn’t support cross-account Amazon Redshift connections. However, we set up Amazon Redshift data sharing to access the Amazon Redshift cluster from other AWS accounts. For more details, refer to Sharing data across clusters in Amazon Redshift.
Architecture overview
The following diagram illustrates our architecture. In the following sections, we will walk you through the steps to set up the query editor and migrate Redash queries.
Prerequisites
To implement this solution, you must set up federated access to the Amazon Redshift Query Editor V2 using your identity provider (IdP) services.
You can find more information in the following posts:
To set up the query editor, complete the following steps:
Create an Amazon Redshift database group with read-only access.
Create an IAM role for accessing Query Editor V2 in an AWS account and attach the required IAM policies based on your use case. For more information, refer to Configuring your AWS account.
Create a trust relationship between your IdP and AWS.
Add the principal tag sqlworkbench-team to the IAM role to share queries. For more information, refer to Sharing a query.
Migrate Redash queries to Amazon Redshift Query Editor V2
In this section, we walk you through different ways to migrate your Redash queries to the Amazon Redshift Query Editor V2.
Query without parameters
Querying without parameters is pretty straightforward, just copy your query from Redash and enter it in the query editor.
In Redash, navigate to the saved query and choose Edit Source.
Copy the source query.
In Amazon RedShift Query Editor V2, enter the query into the editor, choose the Save icon, and give your query a title.
Query with parameters
In Redash, a string between {{ }} will be treated as a parameter, but Amazon RedShift Query Editor V2 uses ${ } to identify a parameter. To migrate queries with parameters, follow the same steps but replace {{ with ${ and }} with }.
The following screenshot shows an example query in Redash.
The following screenshot shows the same query in Amazon RedShift Query Editor V2.
Multi-part query to a Query Editor V2 notebook
For a multi-part query, copy the query of each section of a Redash dashboard and add it to a notebook. The notebook in Amazon Redshift Query Editor V2 runs queries successively. You also can add a description for your query.
The following screenshot shows an example query on the Redash dashboard. The following screenshot shows the query in an Amazon Redshift Query Editor V2 notebook.
Summary
In this post, we demonstrated how we set up Amazon Redshift Query Editor V2 with SSO and Amazon Redshift federated access, and migrated our customers from Redash to Amazon Redshift Query Editor V2. This solution reduced our operational cost of maintaining a third-party application and its infrastructure.
If you have similar use cases and need to provide a web-based tool to your customers to explore data on your Amazon Redshift cluster, consider using Amazon Redshift Query Editor V2.
Appendix: Customer IAM policies
In this section, we provide the code for the IAM policies we attached to the SAML IAM role to restrict user access to other AWS services within our AWS account:
query-editor-credentials-policy – In the following code, provide your Region, account, and cluster parameters to grant access to Amazon Redshift to get cluster credentials, create users, and allow users to join groups:
Mohammad Nejad leads the AWS Payments Data Platform team. He has experience leading teams, architecting designs, implementing solutions, and launching products. Currently, his team focuses on building a modern data platform on AWS to provide a complete solution for processing, analyzing, and presenting data.
Erol Murtezaoglu, a Technical Product Manager at AWS, is an inquisitive and enthusiastic thinker with a drive for self-improvement and learning. He has a strong and proven technical background in software development and architecture, balanced with a drive to deliver commercially successful products. Erol highly values the process of understanding customer needs and problems, in order to deliver solutions that exceed expectations.
Mohamed Shaaban is a Senior Software Engineer in Amazon Redshift and is based in Berlin, Germany. He has over 12 years of experience in the software engineering. He is passionate about cloud services and building solutions that delight customers. Outside of work, he is an amateur photographer who loves to explore and capture unique moments.
At the end of 2022, Paulus Schoutsen declared 2023 “the
year of voice” for Home
Assistant, the popular open-source home-automation project that he
founded nine years ago. The project’s goal this year is to let users
control their home with voice commands in their own language, using offline
processing instead of sending data to the cloud. Offline voice control has
been the holy grail of open-source home-automation systems for
years. Several projects have tried and failed. But with Rhasspy‘s developer Mike Hansen
spearheading Home Assistant’s voice efforts, this time things could be
different.
A new week starts, and Spring is almost here! If you’re curious about AWS news from the previous seven days, I got you covered.
Last Week’s Launches Here are the launches that got my attention last week:
Amazon S3 – Last week there was AWS Pi Day 2023 celebrating 17 years of innovation since Amazon S3 was introduced on March 14, 2006. For the occasion, the team released many new capabilities:
Amazon S3 has also simplified private connectivity from on-premises networks: with private DNS for S3, on-premises applications can use AWS PrivateLink to access S3 over an interface endpoint, while requests from your in-VPC applications access S3 using gateway endpoints.
We released Mountpoint for Amazon S3, a high performance open source file client. Read more in the blog. Note that Mountpoint isn’t a general-purpose networked file system, and comes with some restrictions on file operations.
Amazon Neptune – Now offers a graph summary API to help understand important metadata about property graphs (PG) and resource description framework (RDF) graphs. Neptune added support for Slow Query Logs to help identify queries that need performance tuning.
Amazon OpenSearch Service – The team introduced security analytics that provides new threat monitoring, detection, and alerting features. The service now supports OpenSearchversion 2.5 that adds several new features such as support for Point in Time Search and improvements to observability and geospatial functionality.
AWS Lake Formation and Apache Hive on Amazon EMR – Introduced fine-grained access controls that allow data administrators to define and enforce fine-grained table and column level security for customers accessing data via Apache Hive running on Amazon EMR.
Rapid7’s Threat Intelligence and Detection Engineering team has identified active exploitation of Adobe ColdFusion in multiple customer environments. The observed activity dates back to January 2023 and has not been tied back to a specific CVE at this time. IOCs are included below.
Rapid7 has existing detection rules within InsightIDR that have identified this activity and have created additional rules based upon this observed behavior. We have also observed the compromised website, ooshirts[.]com, being used in other attacks dating back to March 2022.
Attacker Behavior
The earliest time frame of compromise identified thus far occurred in early January 2023. Rapid7 discovered evidence indicating that a malicious actor dropped webshells using an encoded PowerShell command. Process start data indicates that ColdFusion 2018 is spawning malicious commands.
Example base64 encoded command executed by malicious actor through ColdFusion:
Decoded:
Rapid7 Customers
In our current investigations, previously existing and new detections have been observed triggering post exploitation across Rapid7 InsightIDR and Managed Detection & Response (MDR) customers:
Webshell – Possible ColdFusion Webshell In Command Line
This detection identifies common ColdFusion tags being passed in the command line. This technique is used by malicious actors when redirecting strings into files when creating webshells.
Attacker Technique – CertUtil With URLCache Flag
This detection identifies the use of the ‘certutil.exe’ binary with the ‘-urlcache’ flag being passed to it. This technique is used by malicious actors to retrieve files hosted on a remote web server and write them to disk.
Indicators of Compromise
This technique has been observed by malicious actors redirecting strings into files while creating webshells. Look for *.cfm files in ColdFusion webroots containing the following ColdFusion tags:
<cfexecute>
</cfexecute>
Review process start logs for any abnormal child processes of ColdFusion Server
While we have not tied this behavior back to exploitation of a specific CVE, Adobe released patches for known vulnerabilities in ColdFusion on March 14, 2023. Several of the CVEs patched in version 16 (ColdFusion 2018) and version 6 (ColdFusion 2021) are known to be exploited in the wild.
We strongly advise ColdFusion customers to update to the latest version to remediate known risk, regardless of whether the behavior we have detailed in this blog is related to recent vulnerabilities. We also advise customers to examine their environments for signs of compromise.
Security updates have been issued by Debian (apache2), Oracle (firefox, nss, and openssl), Slackware (curl and vim), SUSE (dpdk, firefox, grafana, oracleasm, python-cffi, python-Django, and qemu), and Ubuntu (ruby2.7, sox, and tigervnc).
Двамата синове на руския мултимилионер и близък до Кремъл олигарх Сергей Адониев, съосновател на единствения руски производител на смартфони Yota Devices, са лишени от гражданството на Република България след публикация…
The New York Times is reporting that a US citizen’s phone was hacked by the Predator spyware.
A U.S. and Greek national who worked on Meta’s security and trust team while based in Greece was placed under a yearlong wiretap by the Greek national intelligence service and hacked with a powerful cyberespionage tool, according to documents obtained by The New York Times and officials with knowledge of the case.
The disclosure is the first known case of an American citizen being targeted in a European Union country by the advanced snooping technology, the use of which has been the subject of a widening scandal in Greece. It demonstrates that the illicit use of spyware is spreading beyond use by authoritarian governments against opposition figures and journalists, and has begun to creep into European democracies, even ensnaring a foreign national working for a major global corporation.
The simultaneous tapping of the target’s phone by the national intelligence service and the way she was hacked indicate that the spy service and whoever implanted the spyware, known as Predator, were working hand in hand.
Подкаст в девет епизода ще информира украинските бежанци със статут за временна закрила за правата и задълженията им в България, ще улеснява и стимулира социализация им в нашето общество. В…
Десетото юбилейно издание на международния литературен младежки конкурс „Който спаси един човешки живот, спасява цяла вселена” набира скорост. Семейството на участниците в инициативата на Център за еврейско-българско сътрудничество „Алеф” се…
In the current technology landscape, startups are developing rapidly. This usually leads to an increase in the number of engineers in teams, with the goal of increasing the speed of product development and delivery frequency. However, this growth often leads to a diverse selection of technology stacks being used by different teams within the same organisation.
Having different technology stacks within a team could lead to a bigger problem in the future, especially if documentation is not well-maintained. The best course of action is to pick just one technology stack for your projects, but it begs the question, “How do I choose the best technology stack for my projects?”.
One such example is OVO, which is an Indonesian payments, rewards, and financial services platform within Grab. We share our process and analysis to determine the best technology stack that complies with precise standards. By the end of the article, you may also learn to choose the best technology stack for your needs.
Background
In recent years, we have seen massive growth in modern web technologies, such as React, Angular, Vue, Svelte, Django, TypeScript, and many more. Each technology has its benefits. However, having so many choices can be confusing when you must determine which technologies are best for your projects. To narrow down the choices, a few aspects, such as scalability, stability, and usage in the market, must be considered.
That’s the problem that we used to face. Most of our legacy services were not standardised and were written in different languages like PHP, React, and Vue. Also, the documentation for these legacy services is not well-structured or regularly updated.
Current technology stack usage in OVO
We realised that we had two main problems:
Various technology stacks (PHP, Vue, React, Nuxt, and Go) maintained simultaneously, with incomplete documentation, may consume a lot of time to understand the code, especially for engineers unfamiliar with the frameworks or even a new hire.
Context switching when reviewing code makes it hard to review other teammates’ merge requests on complex projects and quickly offer better code suggestions.
To prevent these problems from recurring, teams must use one primary technology stack.
After detailed comparisons, we narrowed our choices to two options – React and Vue – because we have developed projects in both technologies and already have the user interface (UI) library in each technology stack.
Next, we conducted a more detailed research and exploration for each technology. The main goals were to find the unique features, scalability, ease of migration, and compatibility for the UI library for React and Vue. To test the compatibility of each UI library, we also used a sample UI on one of our upcoming projects and sliced it.
Here’s a quick summary of our exploration:
Metrics
Vue
React
UI Library Compatibility
Doesn’t require much component development
Doesn’t require much component development
Scalability
Easier to upgrade, slower in releasing major updates, clear migration guide
Quicker release of major versions, supports gradual updates
Latest version (v18) of React gradual updates, doesn’t support IE
From this table, we found that the differences between these frameworks are miniscule, making it tough for us to determine which to use. Ultimately, we decided to step back and see the Big Why.
Solution
The Big Why here was “Why do we need to standardise our technology stack?”. We wanted to ease the onboarding process for new hires and reduce the complexity, like context switching, during code reviews, which ultimately saves time.
As Kleppmann (2017) states, “The majority of the cost of software is in its ongoing maintenance”. In this case, the biggest cost was time. Increasing the ease of maintenance would reduce the cost, so we decided to use maintainability as our north star metric.
Kleppmann (2017) also highlighted three design principles in any software system:
Operability: Make it easy to keep the system running.
Simplicity: Easy for new engineers to understand the system by minimising complexity.
Evolvability: Make it easy for engineers to make changes to the system in the future.
Keeping these design principles in mind, we defined three metrics that our selected tech stack must achieve:
Scalability
Keeping software and platforms up to date
Anticipating possible future problems
Stability of the library and documentation
Establishing good practices and tools for development
Usage in the market
The popularity of the library or framework and variety of coding best practices
Metrics
Vue
React
Scalability
Framework
Operability Easier to update because there aren’t many approaches to writing Vue.
Evolvability Since Vue is a framework, it needs fewer steps to upgrade.
Library Supports gradual updates but there will be many different approaches when upgrading React on our services.
Stability of the library and documentation
Has standardised documentation
Has many versions of documentation
Usage on Market
Smaller market share.
Simplicity We can reduce complexity for new hires, as the Vue standard in OVO remains consistent with standards in other companies.
After conducting a detailed comparison between Vue and React, we decided to use Vue as our primary tech stack as it best aligns with Kleppmann’s three design principles and our north star metric of maintainability. Even though we noticed a few disadvantages to using Vue, such as smaller market share, we found that Vue is still the better option as it complies with all our metrics.
Moving forward, we will only use one tech stack across our projects but we decided not to migrate technology for existing projects. This allows us to continue exploring and learning about other technologies’ developments. One of the things we need to do is ensure that our current projects are kept up-to-date.
Implementation
After deciding on the primary technology stack, we had to do the following:
Define a boilerplate for future Vue projects, which will include items like a general library or dependencies, implementation for unit testing, and folder structure, to align with our north star metric.
Update our existing UI library with new components and the latest Vue version.
Perform periodic upgrades to existing React services and create a standardised code structure with proper documentation.
With these practices in place, we can ensure that future projects will be standardised, making them easier for engineers to maintain.
Impact
There are a few key benefits of standardising our technology stack.
Scalability and maintainability: It’s much easier to scale and maintain projects using the same technology stack. For example, when implementing security patches on all projects due to certain vulnerabilities in the system or libraries, we will need one patch for each technology. With only one stack, we only need to implement one patch across all projects, saving a lot of time.
Faster onboarding process: The onboarding process is simplified for new hires because we have standardisation between all services, which will minimise the amount of context switching and lower the learning curve.
Faster deliveries: When it’s easier to implement a change, there’s a compounding impact where the delivery process is shortened and release to production is quicker. Ultimately, faster deliveries of a new product or feature will help increase revenue.
Learnings/Conclusion
For every big decision, it is important to take a step back and understand the Big Why or the main motivation behind it, in order to remain objective. That’s why after we identified maintainability as our north star metric, it was easier to narrow down the choices and make detailed comparisons.
The north star metric, or deciding factor, might differ vastly, but it depends on the problems you are trying to solve.
References
Kleppmann, M. (2017). Designing Data-Intensive Applications. Beijing: O’Reilly. ISBN: 978-1-4493-7332-0
Grab is the leading superapp platform in Southeast Asia, providing everyday services that matter to consumers. More than just a ride-hailing and food delivery app, Grab offers a wide range of on-demand services in the region, including mobility, food, package and grocery delivery services, mobile payments, and financial services across 428 cities in eight countries.
Powered by technology and driven by heart, our mission is to drive Southeast Asia forward by creating economic empowerment for everyone. If this mission speaks to you, join our team today!
To provide the best experiences, we use technologies like cookies to store and/or access device information. Consenting to these technologies will allow us to process data such as browsing behavior or unique IDs on this site. Not consenting or withdrawing consent, may adversely affect certain features and functions.
Functional
Always active
The technical storage or access is strictly necessary for the legitimate purpose of enabling the use of a specific service explicitly requested by the subscriber or user, or for the sole purpose of carrying out the transmission of a communication over an electronic communications network.
Preferences
The technical storage or access is necessary for the legitimate purpose of storing preferences that are not requested by the subscriber or user.
Statistics
The technical storage or access that is used exclusively for statistical purposes.The technical storage or access that is used exclusively for anonymous statistical purposes. Without a subpoena, voluntary compliance on the part of your Internet Service Provider, or additional records from a third party, information stored or retrieved for this purpose alone cannot usually be used to identify you.
Marketing
The technical storage or access is required to create user profiles to send advertising, or to track the user on a website or across several websites for similar marketing purposes.




 “Providing marketers with greater control over their own signals while being able to analyze them in conjunction with signals from Amazon Ads is crucial in today’s marketing landscape. By migrating AMC’s compute infrastructure to AWS Clean Rooms under the hood, marketers can use their own signals in AMC without storing or maintaining data outside of their AWS environment. This simplifies how marketers can manage their signals and enables AMC teams to focus on building new capabilities for brands,” said Paula Despins, Vice President of Ads Measurement at Amazon Ads.









 The following screenshot shows the same query in Amazon RedShift Query Editor V2.


 Erol Murtezaoglu, a Technical Product Manager at AWS, is an inquisitive and enthusiastic thinker with a drive for self-improvement and learning. He has a strong and proven technical background in software development and architecture, balanced with a drive to deliver commercially successful products. Erol highly values the process of understanding customer needs and problems, in order to deliver solutions that exceed expectations.
 Mohamed Shaaban is a Senior Software Engineer in Amazon Redshift and is based in Berlin, Germany. He has over 12 years of experience in the software engineering. He is passionate about cloud services and building solutions that delight customers. Outside of work, he is an amateur photographer who loves to explore and capture unique moments.