As engineers, we’re obsessed with efficiency and automating anything we find ourselves doing more than twice. If you’ve ever done this, you know that the happy path is always easy, but the second the inputs get complex, automation becomes really hard. This is because computers have traditionally required extremely specific instructions in order to execute.
The state of AI models available to us today has changed that. We now have access to computers that can reason, and make judgement calls in lieu of specifying every edge case under the sun.
That’s what AI agents are all about.
Today we’re excited to share a few announcements on how we’re making it eveneasier to build AI agents on Cloudflare, including:
agents-sdk — a new JavaScript framework for building AI agents
Updates to Workers AI: structured outputs, tool calling, and longer context windows for Workers AI, Cloudflare’s serverless inference engine
We truly believe that Cloudflare is the ideal platform for building Agents and AI applications (more on why below), and we’re constantly working to make it better — you can expect to see more announcements from us in this space in the future.
Before we dive deep into the announcements, we wanted to give you a quick primer on agents. If you are familiar with agents, feel free to skip ahead.
What are agents?
Agents are AI systems that can autonomously execute tasks by making decisions about tool usage and process flow. Unlike traditional automation that follows predefined paths, agents can dynamically adapt their approach based on context and intermediate results. Agents are also distinct from co-pilots (e.g. traditional chat applications) in that they can fully automate a task, as opposed to simply augmenting and extending human input.
Agents → non-linear, non-deterministic (can change from run to run)
Workflows → linear, deterministic execution paths
Co-pilots → augmentative AI assistance requiring human intervention
Example: booking vacations
If this is your first time working with, or interacting with agents, this example will illustrate how an agent works within a context like booking a vacation.
Imagine you’re trying to book a vacation. You need to research flights, find hotels, check restaurant reviews, and keep track of your budget.
Traditional workflow automation
A traditional automation system follows a predetermined sequence: it can take inputs such as dates, location, and budget, and make calls to predefined APIs in a fixed order. However, if any unexpected situations arise, such as flights being sold out, or the specified hotels being unavailable, it cannot adapt.
AI co-pilot
A co-pilot acts as an intelligent assistant that can provide hotel and itinerary recommendations based on your preferences. If you have questions, it can understand and respond to natural language queries and offer guidance and suggestions. However, it is unable to take the next steps to execute the end-to-end action on its own.
Agent
An agent combines AI’s ability to make judgements and call the relevant tools to execute the task. An agent’s output will be nondeterministic given: real-time availability and pricing changes, dynamic prioritization of constraints, ability to recover from failures, and adaptive decision-making based on intermediate results. In other words, if flights or hotels are unavailable, an agent can reassess and suggest a new itinerary with altered dates or locations, and continue executing your travel booking.
agents-sdk — the framework for building agents
You can now add agent powers to any existing Workers project with just one command:
$ npm i agents-sdk
… or if you want to build something from scratch, you can bootstrap your project with the agents-starter template:
$ npm create cloudflare@latest agents-starter --template=cloudflare/agents-starter
// ... and then deploy it
$ npm run deploy
agents-sdk is a framework that allows you to build agents — software that can autonomously execute tasks — and deploy them directly into production on Cloudflare Workers.
Your agent can start with the basics and act on HTTP requests…
import { Agent } from "agents-sdk";

export class IntelligentAgent extends Agent {
  async onRequest(request) {
    // Transform intention into response
    return new Response("Ready to assist.");
  }
}
Although this is just the initial release of agents-sdk, we wanted to ship more than just a thin wrapper over an existing library. Agents can communicate with clients in real time, persist state, execute long-running tasks on a schedule, send emails, run asynchronous workflows, browse the web, query data from your Postgres database, call AI models, and support human-in-the-loop use-cases. All of this works today, out of the box.
For example, you can build a powerful chat agent with the AIChatAgent class:
// src/index.ts
export class Chat extends AIChatAgent<Env> {
  /**
   * Handles incoming chat messages and manages the response stream
   * @param onFinish - Callback function executed when streaming completes
   */
  async onChatMessage(onFinish: StreamTextOnFinishCallback<any>) {
    // Create a streaming response that handles both text and tool outputs
    return agentContext.run(this, async () => {
      const dataStreamResponse = createDataStreamResponse({
        execute: async (dataStream) => {
          // Process any pending tool calls from previous messages
          // This handles human-in-the-loop confirmations for tools
          const processedMessages = await processToolCalls({
            messages: this.messages,
            dataStream,
            tools,
            executions,
          });

          // Initialize OpenAI client with API key from environment
          const openai = createOpenAI({
            apiKey: this.env.OPENAI_API_KEY,
          });

          // Cloudflare AI Gateway
          // const openai = createOpenAI({
          //   apiKey: this.env.OPENAI_API_KEY,
          //   baseURL: this.env.GATEWAY_BASE_URL,
          // });

          // Stream the AI response using GPT-4
          const result = streamText({
            model: openai("gpt-4o-2024-11-20"),
            system: `
              You are a helpful assistant that can do various tasks. If the user asks, then you can also schedule tasks to be executed later. The input may have a date/time/cron pattern to be input as an object into a scheduler The time is now: ${new Date().toISOString()}.
              `,
            messages: processedMessages,
            tools,
            onFinish,
            maxSteps: 10,
          });

          // Merge the AI response stream with tool execution outputs
          result.mergeIntoDataStream(dataStream);
        },
      });

      return dataStreamResponse;
    });
  }
  async executeTask(description: string, task: Schedule<string>) {
    await this.saveMessages([
      ...this.messages,
      {
        id: generateId(),
        role: "user",
        content: `scheduled message: ${description}`,
      },
    ]);
  }
}

export default {
  async fetch(request: Request, env: Env, ctx: ExecutionContext) {
    if (!env.OPENAI_API_KEY) {
      console.error(
        "OPENAI_API_KEY is not set, don't forget to set it locally in .dev.vars, and use `wrangler secret bulk .dev.vars` to upload it to production"
      );
      return new Response("OPENAI_API_KEY is not set", { status: 500 });
    }
    return (
      // Route the request to our agent or return 404 if not found
      (await routeAgentRequest(request, env)) ||
      new Response("Not found", { status: 404 })
    );
  },
} satisfies ExportedHandler<Env>;
… and connect to your Agent with any React-based front-end with the useAgent hook that can automatically establish a bidirectional WebSocket, sync client state, and allow you to build Agent-based applications without a mountain of bespoke code:
We spent some time thinking about the production story here too: an agent framework that absolves itself of the hard parts — durably persisting state, handling long-running tasks & loops, and horizontal scale — is only going to get you so far. Agents built with agents-sdk can be deployed directly to Cloudflare and run on top of Durable Objects — which you can think of as stateful micro-servers that can scale to tens of millions — and are able to run wherever they need to. Close to a user for low-latency, close to your data, and/or anywhere in between.
agents-sdk also exposes:
Integration with React applications via a useAgent hook that can automatically set up a WebSocket connection between your app and an agent
An AIChatAgent extension that makes it easier to build intelligent chat agents
State management APIs via this.setState as well as a native sql API for writing and querying data within each Agent
State synchronization between frontend applications and the agent state
Agent routing, enabling agent-per-user or agent-per-workflow use-cases. Spawn millions (or tens of millions) of agents without having to think about how to make the infrastructure work, provision CPU, or scale out storage.
Over the coming weeks, expect to see even more here: tighter integration with email APIs to enable more human-in-the-loop use-cases, hooks into WebRTC for voice & video interactivity, a built-in evaluation (evals) framework, and the ability to self-host agents on your own infrastructure.
We’re aiming high here: we think this is just the beginning of what agents are capable of, and we think we can make Workers the best place (but not the only place) to build & run them.
JSON mode, longer context windows, and improved tool calling in Workers AI
When users express needs conversationally, tool calling converts these requests into structured formats like JSON that APIs can understand and process, allowing the AI to interact with databases, services, and external systems. This is essential for building agents, as it allows users to express complex intentions in natural language, and AI to decompose these requests, call appropriate tools, evaluate responses and deliver meaningful outcomes.
When using tool calling or building AI agents, the text generation model must respond with valid JSON objects rather than natural language. Today, we’re adding JSON mode support to Workers AI, enabling applications to request a structured output response when interacting with AI models. Here’s a request to @cf/meta/llama-3.1-8b-instruct-fp8-fast using JSON mode:
As you can see, the model is complying with the JSON schema definition in the request and responding with a validated JSON object. JSON mode is compatible with OpenAI’s response_format implementation:
We will continue extending this list to keep up with new, and requested models.
Lastly, we are changing how we restrict the size of AI requests to text generation models, moving from byte-counts to token-counts, introducing the concept of context window and raising the limits of the models in our catalog.
In generative AI, the context window is the sum of the number of input, reasoning, and completion or response tokens a model supports. You can now find the context window limit on each model page in our developer documentation and decide which suits your requirements and use case.
JSON mode is also the perfect companion when using function calling. You can use structured JSON outputs with traditional function calling or the Vercel AI SDK via the workers-ai-provider.
workers-ai-provider 0.1.1
One of the most common ways to build with AI tooling today is by using the popular AI SDK. Cloudflare’s provider for the AI SDK makes it easy to use Workers AI the same way you would call any other LLM, directly from your code.
A key part of building agents is using LLMs for routing, and making decisions on which tools to call next, and summarizing structured and unstructured data. All of these things need to happen quickly, as they are on the critical path of the user-facing experience.
Workers AI, with its globally distributed fleet of GPUs, is a perfect fit for smaller, low-latency LLMs, so we’re excited to make it easy to use with tools developers are already familiar with.
Why build agents on Cloudflare?
Since launching Workers in 2017, we’ve been building a platform to allow developers to build applications that are fast, scalable, and cost-efficient from day one. We took a fundamentally different approach from the way code was previously run on servers, making a bet about what the future of applications was going to look like — isolates running on a global network, in a way that was truly serverless. No regions, no concurrency management, no managing or scaling infrastructure.
The release of Workers was just the beginning, and we continued shipping primitives to extend what developers could build. Some more familiar, like a key-value store (Workers KV), and some that we thought would play a role in enabling net new use cases like Durable Objects. While we didn’t quite predict AI agents (though “Agents” was one of the proposed names for Durable Objects), we inadvertently created the perfect platform for building them.
What do we mean by that?
A platform that only charges you for what you use (regardless of how long it takes)
To be able to run agents efficiently, you need a system that can seamlessly scale up and down to support the constant stop, go, wait patterns. Agents are basically long-running tasks, sometimes waiting on slow reasoning LLMs and external tools to execute. With Cloudflare, you don’t have to pay for long-running processes when your code is not executing. Cloudflare Workers is designed to scale down and only charge you for CPU time, as opposed to wall-clock time.
In many cases, especially when calling LLMs, the difference can be in orders of magnitude — e.g. 2–3 milliseconds of CPU vs. 10 seconds of wall-clock time. When building on Workers, we pass that difference on to you as cost savings.
Serverless AI Inference
We took a similar serverless approach when it comes to inference itself. When you need to call an AI model, you need it to be instantaneously available. While the foundation model providers offer APIs that make it possible to just call the LLM, if you’re running open-source models, LoRAs, or self-trained models, most cloud providers today require you to pre-provision resources for what your peak traffic will look like. This means that the rest of the time, you’re still paying for GPUs to sit there idle. With Workers AI, you can pay only when you’re calling our inference APIs, as opposed to unused infrastructure. In fact, you don’t have to think about infrastructure at all, which is the principle at the core of everything we do.
A platform designed for durable execution
Durable Objects and Workflows provide a robust programming model that ensures guaranteed execution for asynchronous tasks that require persistence and reliability. This makes them ideal for handling complex operations like long-running deep thinking LLM calls, human-in-the-loop approval processes, or interactions with unreliable third-party APIs. By maintaining state across requests and automatically handling retries, these tools create a resilient foundation for building sophisticated AI agents that can perform complex, multistep tasks without losing context or progress, even when operations take significant time to complete.
Lastly, new and updated agents documentation
Did you catch all of that?
No worries if not: we’ve updated our agents documentation to include everything we talked about above, from breaking down the basics of agents, to showing you how to tackle foundational examples of building with agents.
We’ve also updated our Workers prompt with knowledge of the agents-sdk library, so you can use Cursor, Windsurf, Zed, ChatGPT or Claude to help you build AI Agents and deploy them to Cloudflare.
Can’t wait to see what you build!
We’re just getting started, and we love to see all that you build. Please join our Discord, ask questions, and tell us what you’re building.
Modern organizations grapple with the complex task of securing sensitive data in sprawling hybrid and multi-cloud environments. Due to insufficient visibility and governance, data is often misplaced, duplicated, or left exposed. This fragmented environment makes it difficult for teams to accurately assess data exposure risks, comply with stringent privacy regulations, and continuously track sensitive data across locations, owners, and usage.
Without a consistent, holistic view of where sensitive data resides and how it is managed, organizations face significant security, compliance, and operational risks. To solve this challenge and make sense of their data security posture, organizations typically start by discovering and gaining visibility into data stored across their IT estate and work to classify the type of data and associated risk of exposure.
Modern enterprises typically rely on various data classification sources, including CSP-native detection services (such as Amazon Macie, MSFT Defender for Cloud, or GCP Security Command Center), third-party DSPM tools, custom classification policies, or by manually tagging native cloud resources. When discrepancies arise, security teams face a critical question: Which classification should they trust and how can they manage these classifications efficiently at scale? To help solve this persistent challenge, we’re excited to announce sensitive data discovery and data-centric risk prioritization in Exposure Command, empowering teams to implement data-centric risk prioritization as a cornerstone of their security strategy.
Automated Data Classification Leveraging Existing Tagging Frameworks
With this update, Exposure Command offers teams the ability to ingest data classifications and findings from native data security services offered by cloud providers such as AWS Macie, Microsoft Defender for Cloud, and Google Cloud Security Command Center. This enhancement enables organizations to centralize sensitive data insights across their cloud environments, providing a unified view of data risks and exposures. By leveraging these integrations, security teams can automate data classification ingestion, enhance risk assessment, and take proactive remediation steps to secure sensitive information in their cloud infrastructures.
We don’t just stop at support for native services, however, as we also offer the ability to ingest tags directly, whether from the Cloud Service Provider (CSP) or via IaC templates such as Terraform. With automated cloud-native tagging, organizations can establish a single source of truth for data classification, ensuring that security teams can quickly assess and respond to risks tied to sensitive information.
By taking a tag-based classification strategy, organizations can:
Standardize classification across cloud resources with custom tag schemas for severity, data type, and compliance requirements.
Ensure consistency by automating tag propagation across related resources.
Leverage version control to track classification changes over time for audit and compliance purposes.
Infrastructure as Code Integration for Seamless Classification
Exposure Command makes it easy to implement and enforce consistent data classification directly within cloud infrastructure deployment workflows. With native Terraform resource tagging, automated tag inheritance, and customizable classification schemas, security teams can automate classification at scale. Version control ensures auditability and change tracking, helping organizations maintain a dynamic, risk-aware classification framework that evolves with their cloud environment.
Sensitive Data Discovery Meets Risk Prioritization
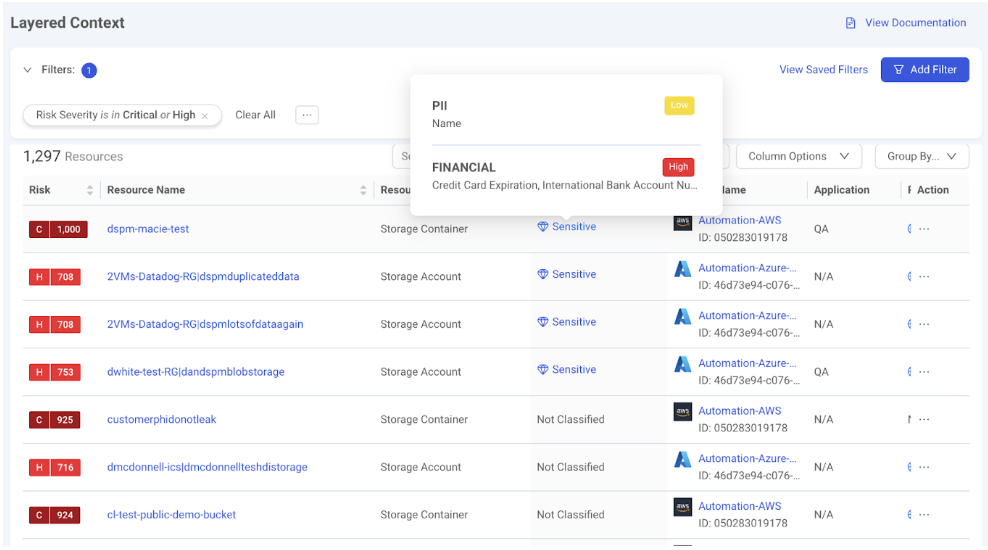
Exposure Command enables teams to take a data-centric approach to risk prioritization by incorporating insights into sensitive data exposures alongside Layered Context and Attack Path Analysis, ensuring that organizations focus on the risks that could lead to real-world breaches. By layering asset criticality, exploitability, and risk posture with insights into sensitive data exposure, security teams can focus on protecting crown jewel data assets.
Taking a Data-Centric Approach to Risk Prioritization with Layered Context
Layered Context is a multi-dimensional risk prioritization model that moves beyond traditional vulnerability management by integrating sensitive data insights, threat intelligence, and business impact analysis into a unified view of risk. Rather than prioritizing based solely on CVSS scores, this approach ensures security teams focus on the exposures that pose the highest real-world risk, not just those that appear severe on paper.
By layering in sensitive data awareness, Exposure Command allows teams to see not just which systems are vulnerable, but which ones expose high-value data whether it’s customer PII, financial records, intellectual property, or regulated information. This makes it possible to prioritize remediation based on both exploitability and potential business impact.
Understanding Paths for Lateral Movement and Unwanted Access to Sensitive Data
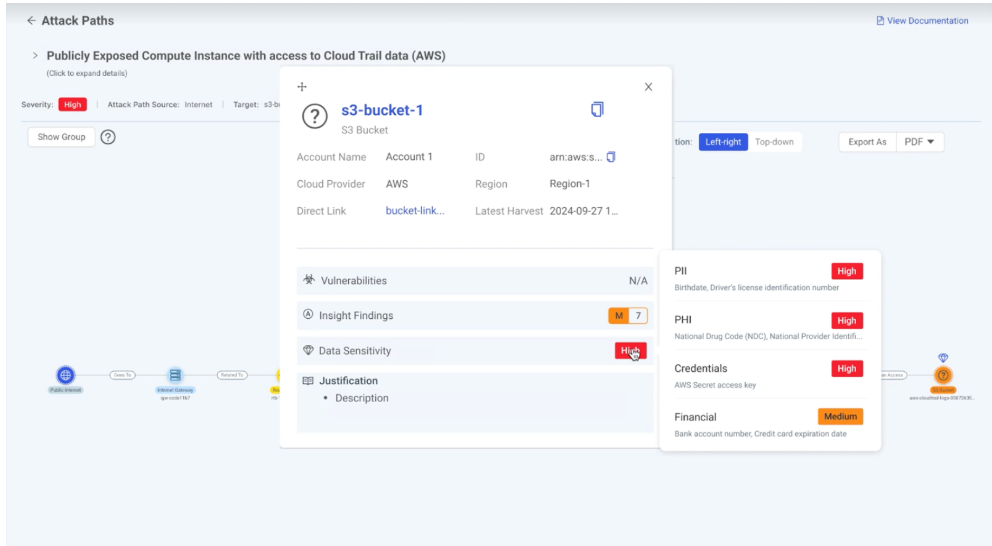
Attackers don’t just exploit vulnerabilities – they chain weaknesses together to reach high-value data. Exposure Command’s Attack Path Analysis goes beyond simply identifying risky assets; it maps how an attacker could move through the environment to access sensitive data. By visualizing lateral movement opportunities, privilege escalation paths, and gaps in data protection, security teams can preemptively block attack routes before they’re exploited.
Instead of just highlighting vulnerable systems, it maps how attackers could exploit weaknesses to access sensitive customer information, financial records, or intellectual property. This data-centric approach shifts remediation from a focus on CVSS scores to business impact-driven security, ensuring that teams address the most critical exposures first.
By revealing hidden exploitation paths, Exposure Command identifies chained vulnerabilities, lateral movement risks, and privilege escalation opportunities that could allow attackers to reach high-value data. A misconfiguration on a low-risk asset might seem harmless – until it’s linked to a cloud storage bucket containing sensitive data. With attack path visualization, security teams can better understand attack scenarios, block lateral movement, and proactively shut down high-risk pathways before they can be exploited – moving from reactive patching to proactive breach prevention.
Why Data-Centric Risk Prioritization Matters
Traditional risk management often overlooks the nuances of sensitive data exposure, relying on static vulnerability metrics. By embedding sensitive data insights directly into risk prioritization workflows, Rapid7 Exposure Command shifts the paradigm to focus on what matters most: safeguarding critical data assets.
This approach ensures that security efforts are aligned with business priorities, enabling organizations to:
Protect customer and proprietary information.
Mitigate the risk of data breaches and non-compliance penalties.
Enhance collaboration between security, IT, and risk management teams.
Take Command of Your Sensitive Data Risks
With sensitive data discovery now part of Exposure Command, Rapid7 is empowering organizations to bolster their security strategies. Whether you’re a financial institution safeguarding customer data or a healthcare provider ensuring patient privacy, this innovation provides the tools you need to protect what matters most.
Ready to elevate your risk management program? Learn how Rapid7 Exposure Command can help you integrate data-centric risk prioritization into your security operations.
Rapid7 provides unmatched attack surface visibility through the Command Platform, helping security teams identify, prioritize, and remediate risk across hybrid environments. Surface Command is the only solution available that combines native external and internal scanning into a single unified view of your attack surface, enriched with telemetry from third party security and ITOps tools via more than 120 out-of-the-box connectors.
Exposure Command builds on this foundational attack surface visibility, layering on adversary-aware risk prioritization and integrated remediation workflows that make it easy for security teams to anticipate where attackers are going to target, pinpoint their most pressing exposures and act swiftly and collaboratively to address issues before they can be exploited.
Now, we’re taking this a step further with three key innovations designed to strengthen risk prioritization, streamline remediation, and ensure sensitive data remains protected.
Expanding Already Unmatched Attack Surface Visibility and Context to Sensitive Data
Sensitive data is a prime target for attackers, yet security teams often struggle to track where it resides and how exposed it is. Sensitive Data Discovery in Exposure Command delivers continuous visibility into sensitive data across multicloud environments, ensuring that security teams can proactively protect high-value assets.
With native ingestion from CSP security services like AWS Macie, GCP DLP, and Microsoft Defender, as well as Infrastructure-as-Code (IaC) tagging support, security teams can classify sensitive data from the start, eliminating manual, error-prone processes and improving data hygiene.
These insights feed directly into our risk scoring and prioritization methodology, with sensitive data insights woven directly into Layered Context and Attack Path Analysis, enabling teams to identify and focus on the exposures that put sensitive information at risk.
Improving Program Efficiency and Efficacy with AI-driven Vulnerability Scoring
The exponential growth of vulnerabilities has outpaced the ability of vendors and agencies like NVD to provide timely CVSS scores. This leaves security teams struggling to assess the severity of vulnerabilities, particularly with the volume of CVEs escalating rapidly. To bridge this gap, we’re introducing AI-driven CVSS scoring, a powerful capability that leverages an advanced machine learning model to:
Analyze vulnerability data from trusted sources and historical expert assessments
Generate accurate, intelligence-driven CVSS scores to fill in vendor and agency gaps
Feed into our Active Risk scoring model to help security teams cut through the noise and make informed decisions faster and with confidence
With this innovation, the accuracy of Active Risk scores have improved by 17%, ensuring greater consistency and actionable insights. The model’s predictive capabilities achieve a remarkable 87% accuracy in severity classification, making it an indispensable tool in today’s fast-evolving threat environment.
Streamlined Remediation with Surface Command and Remediation Hub
Security teams don’t just need to find risks. They need to fix them, and fix them fast, but it’s usually not within their purview to actually take the ultimate action to resolve the issue at its root. Security teams often need to communicate with stakeholders across the organization – often on the infrastructure or DevOps teams – to convince them that there is a pressing risk that needs their attention.
Overcoming this burden of proof – because it’s often not a simple task to convince others around the organization to share your sense of urgency – can be challenging to say the least. In order to clear that hurdle, it requires irrefutable evidence with clarifying context to inspire action.
Our newly-expanded Surface Command and Remediation Hub integration ensures that remediation guidance is embedded directly within asset inventory and detail pages, eliminating the need to switch between platforms to gather and share the contextual information needed to address risk fast.
By deepening the integration between Surface Command and Remediation Hub, security teams benefit from:
Faster mean-time-to-remediate (MTTR) by bringing prioritized remediation guidance directly into the asset inventory and detail pages within Surface Command
Deeper asset context at the time of remediation, including insights from third-party security and ITOps tooling
Improved collaboration by providing security teams and stakeholders with enriched context for quicker decision-making
Ready to Take the Next Step?
Rapid7’s approach combines cutting-edge technology and comprehensive data insights to help organizations focus on what truly matters. By addressing high-impact risks and safeguarding critical assets, teams can reduce their exposure to threats while improving operational efficiency.
Rapid7’s enhanced platform capabilities empower organizations to modernize their risk management strategies. By integrating sensitive data insights, leveraging GenAI-driven prioritization, and expanding remediation workflows, we provide the tools you need to stay ahead of threats and proactively eliminate exposures across your entire attack surface.
This strategy also streamlines collaboration, enabling security, IT, and risk management teams to work together seamlessly with shared context and priorities. Ultimately, aligning risk management practices with real-world threats and business objectives ensures greater resilience and security.
Learn how Rapid7 can help you adopt a threat-aware approach to threat and exposure management. It’s time to transform your security strategy and protect what matters most.
AI has become a pervasive term that is heard with trepidation, excitement, and often a furrowed brow in school staffrooms. For educators, there is pressure to use AI applications for productivity — to save time, to help create lesson plans, to write reports, to answer emails, etc. There is also a lot of interest in using AI tools in the classroom, for example, to personalise or augment teaching and learning. However, without understanding AI technology, neither productivity nor personalisation are likely to be successful as teachers and students alike must be critical consumers of these new ways of working to be able to use them productively.
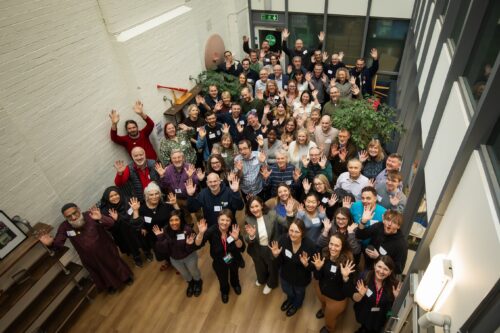
Fifty teachers and researchers share knowledge about teaching about AI.
In both England and globally, there are few new AI-based curricula being introduced and the drive for teachers and students to learn about AI in schools is lagging, with limited initiatives supporting teachers in what to teach and how to teach it. At the Raspberry Pi Foundation and Raspberry Pi Computing Education Research Centre, we decided it was time to investigate this missing link of teaching about AI, and specifically to discover what the teachers who are leading the way in this topic are doing in their classrooms.
A day of sharing and activities in Cambridge
We organised a day-long, face-to-face symposium with educators who have already started to think deeply about teaching about AI, have started to create teaching resources, and are starting to teach about AI in their classrooms. The event was held in Cambridge, England, on 1 February 2025, at the head office of the Raspberry Pi Foundation.
Teachers collaborated and shared their knowledge about teaching about AI.
Over 150 educators and researchers applied to take part in the symposium. With only 50 places available, we followed a detailed protocol, whereby those who had the most experience teaching about AI in schools were selected. We also made sure that educators and researchers from different teaching contexts were selected so that there was a good mix of primary to further education phases represented. Educators and researchers from England, Scotland, and the Republic of Ireland were invited and gathered to share about their experiences. One of our main aims was to build a community of early adopters who have started along the road of classroom-based AI curriculum design and delivery.
Inspiration, examples, and expertise
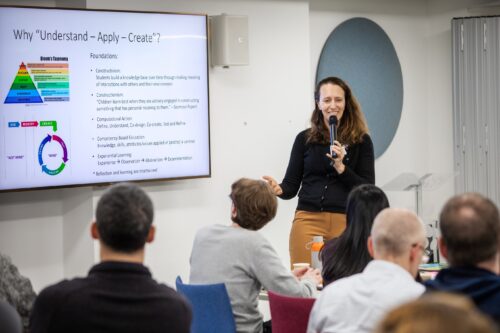
To inspire the attendees with an international perspective of the topics being discussed, Professor Matti Tedre, a visiting academic from Finland, gave a brief overview of the approach to teaching about AI and resources that his research team have developed. In Finland, there is no compulsory distinct computing topic taught, so AI is taught about in other subjects, such as history. Matti showcased tools and approaches developed from the Generation AI research programme in Finland. You can read about the Finnish research programme and Matti’s two month visit to the Raspberry Pi Computing Education Research Centre in our blog.
A Finnish perspective to teaching about AI.
Attendees were asked to talk about, share, and analyse their teaching materials. To model how to analyse resources, Ben Garside from the Raspberry Pi Foundation modelled how to complete the activities using the Experience AI resources as an example. The Experience AI materials have been co-created with Google DeepMind and are a suite of free classroom resources, teacher professional development, and hands-on activities designed to help teachers confidently deliver AI lessons. Aimed at learners aged 11 to 14, the materials are informed by the AI education framework developed at the Raspberry Pi Computing Education Research Centre and are grounded in real-world contexts. We’ve recently released new lessons on AI safety, and we’ve localised the resources for use in many countries including Africa, Asia, Europe, and North America.
In the morning session, Ben exemplified how to talk about and share learning objectives, concepts, and research underpinning materials using the Experience AI resources and in the afternoon he discussed how he had mapped the Experience AI materials to the UNESCO AI competency framework for students.
UNESCO provide important expertise.
Kelly Shiohira, from UNESCO, kindly attended our session, and gave an invaluable insight into the UNESCO AI competency framework for students. Kelly is one of the framework’s authors and her presentation helped teachers understand how the materials had been developed. The attendees then used the framework to analyse their resources, to identify gaps and to explore what progression might look like in the teaching of AI.
Teachers shared their knowledge about teaching about AI.
Throughout the day, the teachers worked together to share their experience of teaching about AI. They considered the concepts and learning objectives taught, what progression might look like, what the challenges and opportunities were of teaching about AI, what research informed the resources and what research needs to be done to help improve the teaching and learning of AI.
What next?
We are now analysing the vast amount of data that we gathered from the day and we will share this with the symposium participants before we share it with a wider audience. What is clear from our symposium is that teachers have crucial insights into what should be taught to students about AI, and how, and we are greatly looking forward to continuing this journey with them.
As well as the symposium, we are also conducting academic research in this area, you can read more about this in our Annual Report and on our research webpages. We will also be consulting with teachers and AI experts. If you’d like to ensure you are sent links to these blog posts, then sign up to our newsletter. If you’d like to take part in our research and potentially be interviewed about your perspectives on curriculum in AI, then contact us at: [email protected]
We also are sharing the research being done by ourselves and other researchers in the field at our research seminars. This year, our seminar series is on teaching about AI and data science in schools. Please do sign up and come along, or watch some of the presentations that have already been delivered by the amazing research teams who are endeavouring to discover what we should be teaching about AI and how in schools
Докато човек сърфира из социалните мрежи, често попада на мнение, което звучи толкова противоположно на убежденията му, че възкликва:
С този май сме от друга реалност!
Това се случва и когато се свери начинът, по който различни медии отразяват една и съща новина. Интерпретациите на събитието на едно място звучат подобно на ликуване, а на друго – като описание на погребение. Изглежда, сякаш заглавието на класическия научнофантастичен роман „Война на реалности“ от Филип К. Дик се е превърнало в ами… реалност.
Автоматичната реакция е да си кажем, че другата страна е манипулирана. Така либералите в САЩ обясняват как хора с невисоки доходи гласуват против икономическите си интереси за партията на републиканците, подкрепяща дерегулацията в икономиката в полза на богатите. Твърди се, че консерваторите са създали цяла система, сливаща в едно информация и забавление и контролираща целия съзнателен живот на хората вътре в нея. От църквата, която посещават, през телевизията, която гледат, до ехо балона в социалната мрежа, където са се напъхали. Но от другата страна биха отговорили със същото, като обвинят противниците си, че живеят в свой си свят, съчетаващ участие в активистка организация, стриймване на филми с прогресивни послания в Netflix и… пак напъхването в балона.
Кой обаче е в истинския свят и кой, подобно на Алиса, е попаднал в огледалния?
А и пребиваването в информационен балон като че ли не може напълно да обясни ефективността на манипулацията. В продължение на близо половин век българите живяха в тоталитарно общество, почти съвършената затворена система. И все пак голяма част усещаха, че нещата, които се говорят вътре, не са съвсем верни. Макар да проповядваха комунистическата идея, много от партийците не вярваха в нея. Още по-малко гражданите, мъчещи се да се доберат до пиратска видеокасета със западен филм или до долари за пазаруване в „Кореком“.
В наши дни Северна Корея, официално Корейска народнодемократична република (КНДР), е тотална оруелска диктатура, в която информацията е напълно контролирана, и все пак дори там има хора, които се усъмняват и се опитват да избягат от социалистическия рай.
Също така буди удивление фактът, че политическата пропаганда на Путин изглежда по-ефективна от тази на СССР – както когато е насочена към собствените си граждани, така и когато изнася посланията си за гражданите на други страни, от малка България до Съединените щати. Това е странно, тъй като днешната Руска федерация е несъмнено по-слаба от стария Съветски съюз икономически, военно и дори идеологически. Тя не обещава на мишените си по-добър живот от този в западните държави, а се задоволява да громи порядките там. Вместо светло бъдеще, наградата поправославному те чака на оня свят. В случая с руските граждани, мобилизирани във войната в Украйна – след като са дали живота си за вожда.
И все пак това работи.
За да разберем защо се получава така, е необходимо да осъзнаем начина, по който мозъкът ни възприема реалността.
С този проблем се сблъсках, докато пишех докторската си дисертация. В нея сравнявах политическите партии на САЩ и Канада в контекста на идеологическото противопоставяне между либерали и консерватори от последните години. Забелязах, че в Щатите има много силна поляризация както между елитите, така и между избирателите, а в северната им съседка като че ли по-скоро има консенсус между партиите.
Обясненията за тези разлики са наистина комплексни, но силно впечатление прави ролята на медиите, които в Щатите се допуска да са силно пристрастни и не са длъжни да отразяват другите гледни точки. Радикализирането на средностатистическия републикански избирател съвпада почти напълно с възхода на телевизия Fox News. Сред избирателите на демократите има видима корелация с популяризирането на прекалената политическа коректност и все по-честата употреба на социални мрежи от страна на младите хора, тъй като в тях първоначално огромен успех имаше „будното“ ляво, там споделяха публикации и медии, свързани с крайнолиберални виждания. При последните избори в САЩ обаче се видя, че вече и десните владеят новите форми на общуване, а някои дори твърдят, че Барън Тръмп, най-малкият син на Доналд, е научил баща си как да стига до млади бели мъже, потребяващи социални мрежи или играещи видеоигри – като гостува в подкастите, които те слушат.
Направи си сам
Това показва, че медийната манипулация действа, но въпросът е по какъв начин. Истината е изненадваща. Нашият мозък сам си създава картината за реалността. Качествената манипулация не се опитва да изгради цялостна и кохерентна илюзия, напротив – само дава насоки. Умът ни сам свършва останалото.
Осъзнах това, докато превеждах „Изкривените“, хорър роман от Скот Коутън и Кира Брийд-Райсли, съчетаващ научната фантастика с паранормалното. Макар и да е част от трилогия, вдъхновена от поредицата видеоигри „Нощна смяна във „Фреди“, вътре има наблюдения, които намирам за приложими в действителността. Даваше се за пример начинът, по който един човек бива залят от усещания, когато пристъпи в нова къща. Сетивата ни долавят всеки детайл, мозъкът обработва богатата информация и за момент ние сме като замаяни. Но когато се върнем в същата къща скоро след това, елементът на изненада липсва. Причината е, че нашето съзнание има спомен за видяното и използва него, а мозъкът засича промяна само ако забележи нещо, което да отчете като важно.
Този процес е малко опасен, тъй като може да ни подведе. Нека си представим, че човек шофира и е потънал в разговора, който води със спътника си. Ако минат покрай червен знак с бял кръг и по-късно шофиращият се върне към този спомен, ще каже, че е видял STOP, дори ако е липсвал надписът. Мозъкът има навика да допълва това, което му липсва.
Последното се наблюдава и при т.нар. ефект на Мандела, който от много време озадачава експертите. Става дума за феномен на колективното съзнание, в който множество хора са запаметили едно и също нещо така, както то не се е случило. Името е дадено заради многото потребители в интернет, които се кълнат, че имат ясен спомен как Нелсън Мандела умира в затвора по време на апартейда в ЮАР, независимо че това не се е случило. Друг емблематичен пример е прословутото лого на Fruit of the Loom. Не са малко онези, които помнят, че зад купчината плодове има кошница, оформена като рог на изобилието. Но това не е така и никога не е било така. Покемонът Пикачу няма черен връх на опашката си. Старчето – символ на играта „Монополи“, не носи монокъл. И така нататък.
Теоретиците на конспирацията смятат, че причината са вибрации, пренасящи хората в паралелни светове.
Те обвиняват за явлението експериментите на ЦЕРН с големия ускорител на частици. Нали помните страховете, че той ще предизвика черна дупка и ще унищожи планетата? Днес модната идея е, че е направил още по-голяма поразия – надупчил е самата реалност и така хората пропадат в алтернативни вселени.
Тази тема, която дълго време беше запазена територия за фантасти като Роджър Зелазни и Филип Хосе Фармър, набира популярност и сред теоретичните физици. Те смятат, че е възможно да съществуваме в мултивселена от безброй реалности, някои от които почти еднакви с нашата, но с малки разлики. Сериозните учени се съмняват, че контакт между тези измерения е възможен, поради което някои намират идеята по-скоро за философска, макар и подкрепена от математиката. След 2016 г. обаче, когато Тръмп беше избран за пръв път, зевзеци се пошегуваха, че много хора очевидно сме пропаднали в такава вселена. Бих добавил, че в България никога не сме излизали от нея.
Специалистите изразяват скептицизъм към такова фантасмагорично обяснение за ефекта на Мандела. Психолозите считат, че човешката памет по принцип е ненадеждна и се влияе много силно от сугестия. Това е една от причините свидетелските показания да не се смятат за достатъчни в съда. Освен това мозъкът сам си добавя каквото му липсва. Много хора помнят Пикачу с черно връхче на опашката просто защото им изглежда по-добре така. Помислете си колко по-хубави са любимите ви детски филмчета в спомените ви, отколкото ако ги намерите в YouTube и си ги пуснете в действителност.
Докарани до информационно изтощение
Но да кажа за техниката на манипулация, описана в „Изкривените“. Злодеите, чието име носи книгата, са роботи, оставени от създателя си нарочно недооформени и покрити с желатинова маса. Те имат вградени чипове, които претоварват мозъка на жертвите си с високочестотен дисхармоничен звук. Съсипан от това, умът на жертвите доизгражда образа на роботите и ги вижда като напълно завършени зверове.
По сходен начин се получава и в реалния живот. Вместо от дисхармоничен тон разумът ни се пренапряга от безкрайните потоци информация. Социалните мрежи, чиито фийд дуумскролваме като хипнотизирани. Телевизиите, заливащи ни с емисии и коментарни студиа, пречупени през призмата на угодното за собственика им. Сайтовете, съобщаващи новините „първи“ и „извънредно“.
Изтощеното ни съзнание не може да обработи всичко. За да се справи, то започва да филтрира онази част от полученото, която съответства на изградените ни разбирания за света и намира за важна. Най-вече заплахите. Забелязваме това, което ни обезпокоява, и започваме да го екстраполираме, докато не ни задуши. Смятате, че ЛГБТИ+ правата се увеличават прекалено бързо? Манипулаторите ще ви намекнат, че предстои приемане и на педофилията, а умът ви ще свърши останалата работа. Боите се, че расизмът се завръща? Ще отразят няколко изолирани случая и ще повярвате, че САЩ отново са се върнали във времената отпреди век.
Така действа и режимът на Путин – с откъслечни, но многобройни и внимателно подбрани примери от действителността в САЩ и в страните от Европейския съюз, които, събрани заедно, карат жертвите на пропагандата му да си изградят превратни представи, все едно в тези държави царят Содом и Гомор. Но той далеч не е единственият, използващ подобни техники.
Къде тогава остава истината?
Сетивата ни не са напълно надеждни. Възприемаме действителността индивидуално и дори споделената реалност е илюзия на съзнанието – всъщност всеки има собствена представа за нея. Обективните факти съществуват, но възприемането им е ограничено от способностите на човешкия мозък. Не е случаен цитатът, приписван от Марк Твен на Бенджамин Дизраели, че съществуват лъжи, ужасни лъжи и статистика. Онзи, който умее да борави с нея изкусно, може да я прочете както дяволът евангелието. А после мнозина да му повярват.
Да разгледаме примера с деветката, която друг вижда като шестица. Казват, че истината може да се установи, ако се намери написалият я, който да каже коя цифра е имал предвид. Семиотиците обаче биха възразили, че намерението на автора невинаги е от значение, важното е какво казва текстът. Така е и с повечето въпроси, които ни разделят в културните войни днес. Дали политиките по многообразие се борят с расизма, или го обръщат срещу европеидната раса? Сладкарят в правото си ли е да откаже да опече торта на гей двойка заради християнските си вярвания, или всъщност осъществява дискриминация? И ако се пренесем на родна почва, Русия освободила ли е България от вековния османски гнет, или на свой ред се е опитала да я зароби, завършвайки този процес през комунизма?
Отговорите на тези въпроси са като шестица или деветка в зависимост от убежденията ни и от това, което ни трябва в момента. За да разплетем гордиевия възел, ще трябва да признаем ограниченията на собственото ни съзнание. Само така ще можем да потърсим компромис по спорните въпроси, така че отделните представи за общото ни битие да станат по-поносими за всички.
By implementing the PBHVA control overlay over a CCCS Medium baseline, you can better protect your organization’s most critical assets from potential threats and vulnerabilities, providing continuity of essential government operations and safeguarding sensitive information.
Understanding CCCS PBHVA overlay requirements
The CCCS PBHVA overlay consists of 137 controls designed to protect high-value assets, including 69 new controls and 68 controls from CCCS Medium. These controls provide enhanced data protection, particularly for integrity and availability, and are based on NIST SP 800-53 Revision 5.
Key findings from the Coalfire assessment
Coalfire’s assessment found that the LZA on AWS solution significantly supports CCCS PBHVA overlay compliance requirements:
71 percent of in-scope controls (97 of 137) are supported by the AWS contribution to compliance in the shared responsibility model
The solution uses over 35 AWS services to provide comprehensive security capabilities
Strong network segmentation is achieved through network account and network-boundary VPC design
Infrastructure-as-code (IaC) enables reliable build and deployment results
The 29 percent of controls not addressed by the LZA are on the customer side of the shared responsibility model. They are addressed in the customer’s application stack or as non-technical controls such as policies and procedures.
Key security capabilities
The LZA solution implements several critical security features:
While the LZA solution provides significant compliance support, organizations should note:
The solution alone does not guarantee compliance
Organizations must implement their own policies, standards, and procedures
A thorough understanding of the shared responsibility model is essential
The AWS Landing Zone Accelerator Verified Reference Architecture documentation is available for customer download in AWS Artifact. This resource can help organizations reduce the time and effort required to deploy an environment that aligns with CCCS PBHVA overlay requirements.
Conclusion
The Coalfire assessment confirms that the LZA on AWS solution provides effective support for CCCS PBHVA overlay compliance objectives. However, organizations should remember that compliance is an ongoing process that requires active management and cannot be achieved through technology alone.
For more information about implementing the Landing Zone Accelerator for CCCS PBHVA overlay requirements, contact your AWS account team or the AWS Public Sector team directly.
If you have feedback about this post, submit comments in the Comments section below. If you have questions about this post, contact AWS Support.
Amazon Bedrock is expanding its foundation model (FM) offerings as the generative AI field evolves. Today, we’re excited to announce the availability of Anthropic’s Claude 3.7 Sonnet foundation model in Amazon Bedrock. As Anthropic’s most intelligent model to date, Claude 3.7 Sonnet stands out as their first hybrid reasoning model capable of producing quick responses or extended thinking, meaning it can work through difficult problems using careful, step-by-step reasoning. Additionally, today we are adding Claude 3.7 Sonnet to the list of models used by Amazon Q Developer. Amazon Q is built on Bedrock, and with Amazon Q you can use the most appropriate model for a specific task such as Claude 3.7 Sonnet, for more advanced coding workflows that enable developers to accelerate building across the entire software development lifecycle.
Key highlights of Claude 3.7 Sonnet Here are several notable features and capabilities of Claude 3.7 Sonnet in Amazon Bedrock.
The first Claude model with hybrid reasoning – Claude 3.7 Sonnet takes a different approach to how models think. Instead of using separate models—one for quick answers and another for solving complex problems—Claude 3.7 Sonnet integrates reasoning as a core capability within a single model. This combination is more similar to how the human brains works. After all, we use the same brain whether we’re answering a simple question or solving a difficult puzzle.
The model has two modes—standard and extended thinking mode—which can be toggled in Amazon Bedrock. In standard mode, Claude 3.7 Sonnet is an improved version of Claude 3.5 Sonnet. In extended thinking mode, Claude 3.7 Sonnet takes additional time to analyze problems in detail, plan solutions, and consider multiple perspectives before providing a response, allowing it to make further gains in performance. You can control speed and cost by choosing when to use reasoning capabilities. Extended thinking tokens count towards the context window and are billed as output tokens.
Anthropic’s most powerful model for coding – Claude 3.7 Sonnet is state-of-the art for coding, excelling in understanding context and creative problem solving, and according to Anthropic, achieves an industry-leading 70.3% for standard mode on SWE-bench Verified. Claude 3.7 Sonnet also performs better than Claude 3.5 Sonnet across the majority of benchmarks. These enhanced capabilities make Claude 3.7 Sonnet ideal for powering AI agents and complex workflows.
Over 15x longer output capacity than its predecessor – Compared to Claude 3.5 Sonnet, this model offers significantly expanded output length. This enhanced capacity is particularly useful when you explicitly request more detail, ask for multiple examples, or request additional context or background information. To achieve long outputs, try asking for a detailed outline (for writing use cases, you can specify outline detail down to the paragraph level and include word count targets). Then, ask for the response to index its paragraphs to the outline and reiterate the word counts. Claude 3.7 Sonnet supports outputs up to 128K tokens long (up to 64K as generally available and up to 128K as a beta).
Adjustable reasoning budget – You can control the budget for thinking when you use Claude 3.7 Sonnet in Amazon Bedrock. This flexibility helps you weigh the trade-offs between speed, cost, and performance. By allocating more tokens to reasoning for complex problems or limiting tokens for faster responses, you can optimize performance for your specific use case.
Claude 3.7 Sonnet in action As for any new model, I have to request access in the Amazon Bedrock console. In the navigation pane, I choose Model access under Bedrock configurations. Then, I choose Modify model access to request access for Claude 3.7 Sonnet.
To try Claude 3.7 Sonnet, I choose Chat / Text under Playgrounds in the navigation pane. Then I choose Select model and choose Anthropic under the Categories and Claude 3.7 Sonnet under the Models. To enable the extended thinking mode, I toggle Model reasoning under Configurations. I type the following prompt, and choose Run:
You're the manager of a small restaurant facing these challenges:

Three staff members called in sick for tonight's dinner service
You're expecting a full house (80 seats)
There's a large party of 20 coming at 7 PM
Your main chef is available but two kitchen helpers are among those who called in sick
You have 2 regular servers and 1 trainee available
How would you:

Reorganize the available staff to handle the situation
Prioritize tasks and service
Determine if you need to make any adjustments to reservations
Handle the large party while maintaining service quality
Minimize negative impact on customer experience
Explain your reasoning for each decision and discuss potential trade-offs
Here’s the result with an animated image showing the reasoning process of the model.
To test image-to-text vision capabilities, I upload an image of a detailed architectural site plan created using Amazon Bedrock. I receive a detailed analysis and reasoned insights of this site plan.
Get started with Claude 3.7 Sonnet today Claude 3.7 Sonnet’s enhanced capabilities can benefit multiple industry use cases. Businesses can create advanced AI assistants and agents that interact directly with customers. In fields such as healthcare, it can assist in medical imaging analysis and research summarization, and financial services can benefit from its abilities to solve complex financial modeling problems. For developers, it serves as a coding companion that can review code, explain technical concepts, and suggest improvements across different languages.
Anthropic’s Claude 3.7 Sonnet is available today in the US East (N. Virginia), US East (Ohio), and US West (Oregon) Regions. Check the full Region list for future updates.
Claude 3.7 Sonnet is priced competitively and matches the price of Claude 3.5 Sonnet. For pricing details, refer to the Amazon Bedrock pricing page.
As your Amazon Web Services (AWS) environment grows, you might develop a need to grant cross-account access to resources. This could be for various reasons, such as enabling centralized operations across multiple AWS accounts, sharing resources across teams or projects within your organization, or integrating with third-party services. However, granting cross-account access requires careful consideration of your security, availability, and manageability requirements.
In this blog post, we explore four different ways to grant cross-account access using resource-based policies. Each method has its own unique tradeoffs, and the best choice depends on your specific requirements and use case.
Evaluating different techniques for granting cross-account access
Your choice of how to specify the principal in a resource-based policy impacts some aspects of both the confidentiality and the availability of your solution. Understanding this impact and making the right tradeoffs for your use case is the focus of this post.
An example scenario
Imagine that you have an S3 bucket in your AWS account (Account A) that needs to be accessed by different principals in another AWS account (Account B). For this scenario, we assume that the principals in Account B have the necessary access to S3 in their identity-based policies, and we will focus on authoring the resource-based policies in Account A. While the methods explained here use Amazon S3, the concepts discussed apply to all AWS services that support resource-based policies. In the following sections, we walk through four different ways to grant cross-account access in this scenario and discuss the tradeoffs of each.
Method 1: Grant access to a specific IAM role using the Principal element of the resource-based policy
In this example, you use an S3 bucket policy to grant access to a specific IAM role (RoleFromAccountB) in Account B by specifying the IAM role’s Amazon Resource Name (ARN) in the Principal element of the policy in Account A.
Using this bucket policy, if someone in Account B deletes or recreates the role (RoleFromAccountB), then that role can no longer access the amzn-s3-demo-bucket-account-a bucket, even if that role is recreated with the same name. The reason is that when you save this policy, the role ARN is mapped to the unique ID of the role, which looks something like this: AROADBQP57FF2AEXAMPLE. You will see a role identifier in the Principal element of your resource-based policies if you view them after you delete the role that they referenced.
This behavior is intentional. The resource-based policy only allows the specific instance of the role that you set as principal at the time of policy creation. This helps prevent unintended access to your resources if you delete a role, but forget to update your resource-based policy to remove that role. This behavior can also cause an availability risk because the role (RoleFromAccountB) will have a new unique ID when it is recreated and will no longer have access to the bucket. Roles can be recreated for a number of reasons, including accidentally when you use tools such as infrastructure as code.
You might consider choosing this method if:
You own the roles in both Account A and Account B and can control the creation and deletion of these roles.
You want your resource-based policy in Account A to stop granting access when the specified role (RoleFromAccountB) is deleted.
You prioritize granular access control over potential availability concerns if the role (RoleFromAccountB) is deleted.
Method 2: Grant access to an account using the Principal element of the resource-based policy
In this example, you grant access to a specific account in the Principal element of the resource-based policy. This resource-based policy of Account A allows any user or role from Account B that also has an identity-based policy that grants them access to read the objects.
Note: You can use either "Principal": {"AWS": "111122223333"} or "Principal": {"AWS": "arn:aws:iam::111122223333:root"} in the Principal element. They are equivalent, and the long-form ARN does not represent the root user.
This resource-based policy helps avoid the potential availability issue discussed for Method 1. If a role in Account B that needs to have access to the bucket is recreated, it will still have access after the recreation of that role. This is because you don’t specify a role in the Principal element—instead, you specify an account. If you use Method 2, you must be comfortable delegating access control decisions to the owner of that account.
This approach explicitly delegates access control decisions to IAM in the other account (Account B). Principals in Account B have access to this bucket if allowed by their identity-based policies.
You might consider choosing this method if:
You need to grant access to many principals in Account B.
You want to delegate the access decision in the account where the principal exists (Account B).
You prioritize ease of management and availability over granular access control.
Method 3: Grant access to a specific IAM role using the aws:PrincipalArn condition
This method expands on Method 2 and adds a condition that grants access only to a specific IAM role. Similar to Method 2, you use the account number as the value of the Principal element, but also use the aws:PrincipalArn condition key to limit access to a specific principal in Account B.
The aws:PrincipalArn condition key is a global condition key that compares the ARN of the principal that made the request with the ARN that you specify in the policy. For IAM roles, the request context returns the ARN of the role, not the ARN of the user that assumed the role.
This policy comes with the same availability benefits as the policy in Method 2: access to this resource will survive role recreation. This is because the role is translated to its unique identifier only when it is used in the Principal element. It is not translated to a unique identifier when it is used in a condition. If the role (RoleFromAccountB) in Account B is recreated, accidentally or intentionally, the policy will continue to grant access because the role matches the role ARN specified in the condition key of the resource-based policy in Account A. As a result, Method 3 provides a balanced approach to availability and security.
You might consider choosing this method if:
You are comfortable that this policy will continue to grant access to the role specified in the aws:PrincipalArn condition key if that role (RoleFromAccountB) is recreated.
You don’t own the Account B you are granting access to and don’t control when that role may be recreated.
You want a balance of availability and confidentiality.
Method 4: Grant access to an entire AWS Organizations organization
This method is focused on a different use case and is not an alternative to the methods listed earlier. Use this method if you have a resource (an S3 bucket, in this example) that you want to share with your entire organization, but not share with anyone outside of it.
There is no way to specify an organization by using the Principal element of a resource-based policy, so you must use the aws:PrincipalOrgId condition key to restrict access to a specific organization. In this policy, you specify a wildcard in the Principal element, which says that anyone can access the bucket. Then the condition reduces “anyone” to just those AWS account principals that belong to the specified organization and have an identity-based policy that allows them access.
You then add an additional conditional block that compares the aws:PrincipalAccount condition key to the aws:ResourceAccount condition key by using a policy variable. This extra conditional block is optional and excludes the account that owns the bucket (Account A) from the allow statement. The reason for using this extra conditional block is so that principals in Account A still require an allow statement in their identity-based policy to access this bucket. If you choose to exclude this aws:PrincipalAccount comparison, principals in Account A are granted access to the bucket without an explicit allow statement in their identity-based policy. Policy evaluation logic only requires either the identity-based policy or the resource-based policy (but not both) to allow a request when the principal and resource are in the same account.
You might consider choosing this method if:
You have a shared resource that should be accessible to your entire organization.
Conclusion
Choosing a method to grant cross-account access requires careful consideration of your requirements and use case. Each of the four methods discussed in this blog post has its own advantages and tradeoffs. By understanding these methods and their implications, you can decide on the most appropriate approach to grant cross-account access to your AWS resources. Remember to regularly review and audit your resource-based policies to verify that they align with your security and access requirements.
Version
2.0 of the Aqualung
gapless music player has been released. Aqualung supports playback of
a wide range of audio formats, ripping CDs to WAV, FLAC, Ogg Vorbis,
or MP3, and subscribing to podcasts via RSS or Atom feeds. The primary
change in this release is the migration
from GTK2 to GTK3, and dropping support for custom skins as a
result.
AWS Developer Day 2025, held on February 20th, showcased how to integrate responsible generative AI into development workflows. The event featured keynotes from AWS leaders including Srini Iragavarapu, Director Generative AI Applications and Developer Experiences, Jeff Barr, Vice President of AWS Evangelism, David Nalley, Director Open Source Marketing of AWS, along with AWS Heroes and technical community members. Watch the full event recording on Developer Day 2025.
AWS announces Backup Payment Methods for invoices – AWS now enables you to set up backup payment methods that automatically activate if primary payment fails. This helps prevent service interruptions and reduces manual intervention for invoice payments.
Get updated with all the announcements of AWS announcements on the What’s New with AWS? page.
Other AWS news Here are additional noteworthy items:
AWS Innovate: Generative AI + Data – Join a free online conference focusing on generative AI and data innovations. Available in multiple geographic regions: APJC and EMEA (March 6), North America (March 13), Greater China Region (March 14), and Latin America (April 8).
AWS Summits – Join free online and in-person events that bring the cloud computing community together to connect, collaborate, and learn about AWS. Register in your nearest city: Paris (April 9), Amsterdam (April 16), London (April 30), and Poland (May 5).
AWS re:Inforce – AWS re:Inforce (June 16–18) in Philadelphia, PA our annual learning event devoted to all things AWS cloud security. Registration opens in March, and be ready to join more than 5,000 security builders and leaders.
Create your AWS Builder ID and reserve your alias. Builder ID is a universal login credential that gives you access–beyond the AWS Management Console–to AWS tools and resources, including over 600 free training courses, community features, and developer tools such as Amazon Q Developer.
Each year, Rapid7 penetration testers conduct over 1,000 security assessments, pushing boundaries to expose vulnerabilities before the bad guys do. The mission? Get in, escalate privileges, and own the environment—physically, digitally, or sometimes just by sweet-talking an unsuspecting employee.
Names? Redacted. Companies? Anonymized. But the hacks? Real.
Welcome to Under the Hoodie, where we share stories straight from the frontlines of ethical hacking. Below are real accounts from our testers, revealing just how easy it can be to break into supposedly secure environments. Click through to hear each story unfold.
1. The Law Firm’s “Secure” File Share – Not So Secure
A law firm’s file storage system was sitting on the internet, just begging for a break-in. Using a mix of open-source intelligence (OSINT) and Burp Suite, our pen tester enumerated users, guessed a couple of predictable passwords (think “Winter2024!”), and walked right into confidential legal documents. Verdict? Guilty of weak security.
Ever wondered how much damage someone could do by simply plugging into an open network jack on a college campus? Turns out, a lot. Our tester started with network poisoning attacks, cracked some hashes, and before long, had access to criminal records, police databases, PhD research, and even student grade records. Could’ve handed out straight A’s if they wanted.
A misconfigured Microsoft SQL server turned out to be the golden ticket for total network compromise. After gaining basic user access via weak credentials, our tester found a juicy SQL cluster, enabled some stored procedures, and pulled off process injection to gain domain admin privileges. Translation? They owned the company’s entire network from the inside out.
4. Breaking In With Donuts (Social Engineering for the Win)
Sometimes, hacking isn’t about code—it’s about confidence. Armed with a fake badge and a box of popular local donuts, our tester waltzed into a corporate office by leveraging good ol’ human kindness. A security guard even held the door open. The lesson? Free food lowers defenses faster than any zero-day exploit.
5. Phishing Calls: One Password Reset Away from Total Control
A single phone call is sometimes all it takes. Our tester posed as an employee needing a password reset. After some casual chit-chat, an IT admin happily provided a fresh login. No brute force, no malware—just old-school social engineering at its finest.
High-security target? Challenge accepted. Our testers, posing as IT consultants, walked right into a police department, escorted through all secure areas, and even got their hands on a set of keys to a patrol car. No alarms. No suspicion. Just a dangerously believable pretext.
7. The Phish That Netted an Entire Finance Firm’s Data
A fake email, a cloned login page, and a hundred unsuspecting employees. Eight of them entered their credentials, and just like that, our tester had access to financial data, payroll systems, and even proxy rights to other accounts. MFA saved the day—barely.
8. Owning a Medical Database Before the Cocoa Cooled
A health transcription company left its web app vulnerable to SQL injection. The result? Full access to sensitive medical records within minutes. The tester reported it immediately, and the company had to shut down its entire system for emergency remediation. All before their hot cocoa had a chance to cool down.
9. No Password? No Problem. Taking Over a Network with NTLM Hashes
No cracked passwords? No worries. Our tester leveraged network sniffing, NTLM relay attacks, and Active Directory Certificate Services to escalate privileges. By the time it was over, they had full control over the company’s systems—without ever knowing a single password.
Security Isn’t a One-Time Fix—It’s a Constant Battle
Every system has weak points—some technical, some human. The goal of penetration testing isn’t just to break in; it’s to make sure real attackers can’t.
The kernel’s slab allocator is responsible for the allocation of small
(usually sub-page) chunks of memory. For many workloads, the speed of
object allocation and freeing is one of the key factors in overall
performance, so it is not surprising that a lot of effort has gone into
optimizing the slab allocator over time. Now that the kernel is down to a single slab allocator, the
memory-management developers have free rein to add complexity to it; the
latest move in that direction is the per-CPU
sheaves patch set from slab maintainer Vlastimil Babka.
Many customers want to seamlessly integrate their on-premises Kubernetes workloads with AWS services, implement hybrid workloads, or migrate to AWS. Previously, a common approach involved creating long-term access keys, which posed security risks and is no longer recommended. While solutions such as Kubernetes secrets vault and third-party options exist, they fail to address the underlying issue effectively.
One option to connect your on-premises Kubernetes workloads to AWS APIs is to use the service account issuer discovery feature. This allows the Kubernetes API server to act as an OpenID Connect (OIDC) identity provider and be federated with AWS Identity and Access Management (IAM). However, this approach requires public internet access to the Kubernetes API server, which might not be desirable for some customers.
To help eliminate the need for long-term access keys or exposing the Kubernetes API server to the public internet, AWS has introduced AWS IAM Roles Anywhere. This feature enables secure, seamless integration of on-premises Kubernetes workloads with AWS services, promoting robust security practices and minimizing potential risks associated with long-term credentials or public exposure.
IAM Roles Anywhere enables workloads outside of AWS to access AWS resources by exchanging X.509 bound identities for temporary AWS credentials. With IAM Roles Anywhere, you can use the same IAM roles and policies as your AWS workloads to access AWS resources, promoting consistency.
IAM Roles Anywhere can be combined with a standard public key infrastructure solution. In this blog post, we use AWS Private Certificate Authority, which has several advantages over using a self-signed certificate authority (CA). First, it reduces operational and management overhead, because AWS manages the CA for you. Second, the cryptographic key material can be stored in hardware security modules or at least vaulted, which helps you protect your private CA against key compromises. Additionally, certificates can be short-lived, which aligns with dynamic Kubernetes environments where pod lifetimes are typically shorter than traditional servers.
We also demonstrate how to integrate IAM Roles Anywhere without modifying your existing workload Docker files, and how to automate the X.509 certificate lifecycle with cert-manager and an AWS Private CA backend in short-lived certificate mode. By using these capabilities, you can seamlessly integrate your on-premises Kubernetes workloads with AWS services, promoting robust security practices, minimizing risks associated with long-term credentials, and helping to ensure a streamlined, consistent access management experience.
“Why should I prefer X.509 certificates over IAM access keys?” Access keys are long-term credentials that must be rotated regularly to minimize the risk of unauthorized access. They need to be securely deployed onto servers hosting applications that use them, requiring procedures for secure transfer and deletion of transient copies. As the number of applications and access keys grows, tracking and managing them becomes operationally challenging.
In contrast, X.509 certificates use public key infrastructure (PKI). The private key is generated directly on the application server and doesn’t leave it. Only a certificate signing request, which doesn’t contain secrets, is sent to the CA for signing and returning the certificate. This alleviates the need for securely transmitting secret keys.
However, you can argue that X.509 certificates are also long-lived credentials. This concern is valid, but not necessarily true. As demonstrated by projects such as Let’s Encrypt, it’s possible to reduce certificate lifetimes from years to months by implementing automation for certificate renewal. After such a mechanism is in place, certificate lifetimes can be further limited to days or even hours.
In this post, we introduce mutually authenticated Transport Layer Security (mTLS), which uses certificates for high-assurance bidirectional authentication. Certificates are used to establish trust between the client and server, making sure that both parties are authenticated and authorized to communicate securely. By implementing mTLS, you can achieve a higher level of security and trust in your communication channels, mitigating potential risks associated with unauthorized access or man-in-the-middle attacks. Here, we implement ephemeral certificates that are tied to the lifecycle of pods. When a pod is started, a certificate is automatically created, and it expires after a short period of time unless it’s actively in use by the pod, in which case it’s automatically renewed by the cert-manager. This approach verifies that certificates are only valid for the duration of the pod’s lifetime, minimizing the potential risk associated with long-lived credentials. Additionally, IAM Roles Anywhere supports certificate revocation list (CRL) checks, allowing you to perform explicit revocation of certificates if required. This feature provides an additional layer of security, enabling you to revoke access promptly in case of compromised credentials or other security concerns.
Throughout this post, we assume that you have a basic understanding of IAM Roles Anywhere. For more information you can see this blog post. Furthermore, we assume that you are familiar with Kubernetes, kubectl,Helm, and cert-manager.
Solution overview
This solution assumes that you have an existing Kubernetes cluster running outside of AWS.
Figure 1 shows the high-level architecture of our solution. An on-premises Kubernetes cluster accessing AWS APIs using IAM Roles Anywhere with X.509 certificates issued by AWS Private CA in short-lived-certificate mode.
Figure 1: High level architecture of on-premises Kubernetes accessing AWS APIs
Here’s how the solution works, as shown in Figure 1:
When you set up your AWS Private CA as a trusted source and establish a specific profile, IAM Roles Anywhere will validate and accept authentication requests that use certificates issued by your AWS Private CA.
cert-manager, deployed into your Kubernetes cluster, orchestrates the issuance of AWS Private CA certificates to authorized pods.
Each pod uses IAM Roles Anywhere to create an AWS session using its private key and X.509 certificate obtained from cert-manager.
Let’s explore the different parts of the architecture in more detail.
AWS Private CA short lived credentials
AWS Private CA offers a short-lived certificate, where the validity period is limited to 7 days or fewer. You can see this AWS Blog to learn how to use AWS Private CA short-lived certificates. This new mode can be used to issue certificates for your Kubernetes pods and benefit from lower costs of operations. By synchronizing the certificate lifecycle with the lifecycle of the pod, you can minimize the operational overhead for this solution. To help meet requirements for auditability and transparency, you can use the audit report feature to list the issued certificates in a machine readable format.
IAM Roles Anywhere
Figure 2 shows a detailed overview of the components involved in authentication with IAM Roles Anywhere.
Figure 2: Components of IAM Roles Anywhere
IAM Roles Anywhere allows you to obtain temporary security credentials for workloads that run outside of AWS. Your workloads must use a certificate issued by a trusted PKI CA to authenticate with IAM Roles Anywhere. You establish trust between IAM Roles Anywhere and your CA by creating a trust anchor that points to the root of the CA.
cert-manager
Figure 3 shows a detailed overview of the cert-manager setup used in this post, including the aws-privateca-issuer add-on for the integration of AWS Private CA.
Figure 3: Detailed overview of cert-manager setup
cert-manager is a tool for managing X.509 certificates in Kubernetes. As shown in Figure 3, cert-manager will make sure that certificates are valid and up-to-date and attempt to renew them before they expire. By using add-ons, you can configure different backends for issuing X.509 certificates. In this post, we explore how to integrate cert-manager with AWS Private CA using the aws-privateca-issuer add-on. The aws-privateca-issuer add-on defines two custom resources, AWSPCAIssuer and AWSPCAClusterIssuer, which are used to configure the link to AWS Private CA. They are similar to the Issuer and ClusterIssuer resources that come with cert-manager, but specific to aws-privateca-issuer.
After the AWSPCAIssuer or AWSPCAClusterIssuer is available, aws-privateca-issuer authenticates towards AWS APIs using temporary security credentials obtained from IAM Roles Anywhere. cert-manager watches for the certificate resource, which references to an AWSPCAIssuer, which in turn references to AWS Private CA. aws-privatca-issuer requests a certificate from AWS Private CA. The auto-generated private key and the signed certificate are stored in Kubernetes secrets.
Using certificates and secrets
cert-manager supports multiple ways of integrating into your Kubernetes workloads. You can use certificate resources, which represent a human-readable definition of a certificate signing request (CSR) and contain information on certificate lifespan and renewal time. When using a certificate, the auto-generated private key and the signed certificate are stored in Kubernetes secrets.
With this option, an X.509 certificate is issued manually and saved as a secret. After a PKI is configured as an issuer, a certificate resource is created to automate the renewal of the certificate. With the certificate resource, the lifecycle of certificates is decoupled from the lifecycle of the pods that use them. This allows you to bootstrap the X.509 certificate even before the trusted PKI is deployed.
Using the CSI driver
Another way of integrating cert-manager is by using a CSI driver. In this case, the certificate lifecycle is bound to the lifecycle of the pod. An X.509 certificate and private key are mounted into a predefined folder where your workloads can read them. On pod creation, cert-manager automatically creates a private key and requests a certificate for the configured trusted PKI. When the pod is deleted, the private key and certificate are also deleted and become invalid because they aren’t renewed by cert-manager.
In this post, we use the CSI driver approach for workloads to create ephemeral certificates for IAM Roles Anywhere.
Workload configuration
Figure 4 shows a detailed view of how pods can be configured to use IAM Roles Anywhere without needing to change the underlying Docker images by using a sidecar that provides an IMDSv2 endpoint that mimics the behavior in the Amazon Elastic Compute Cloud (Amazon EC2) instance metadata endpoint.
Figure 4: Pod configuration using a sidecar
As shown in Figure 4, when using a certificate resource, the auto-generated private key and the signed certificate are stored in Kubernetes secrets and mounted into the pod. When using the CSI driver, a private key is generated locally (for the pod), a certificate is requested from cert-manager based on the given attributes and is issued by AWSPCAIssuer, and the certificates are mounted directly into the pod with no intermediate secret being created.
IAM Roles Anywhere uses the CreateSession API to authenticate requests with a SigV4a signature using the private key and its associated X.509 certificate. This exchange provides a IAM role session credential, as if you had assumed the IAM role. The aws_signing_helper binary is provided to call the CreateSession API from the command line. In this post, a sidecar container that provides an IMDSv2 endpoint to the workload container is used. This container uses the aws_signing_helper binary and uses its serve command.
This way, applications using AWS SDKs can use the AWS_EC2_METADATA_SERVICE_ENDPOINT environment variable to set the instance metadata endpoint to the correct port on the localhost interface. The X.509 certificate and private key are provided as files to the sidecar container.
Solution deployment
In this section, we show the steps needed to deploy the solution in your AWS account.
Prerequisites
To deploy the solution in this post, make sure that you have the following in place:
An AWS account and IAM permissions for IAM, IAM Roles Anywhere, and AWS Private CA
Latest stable Kubernetes
kubectl (matching your Kubernetes version)
Helm 3
jq
Note: As an alternative to using the AWS CLI, you can use the AWS Controllers for Kubernetes (ACK) service controller for AWS Private CA for creating and managing CertificateAuthority, Certificate, and CertificateAuthorityActivation resources directly within your Kubernetes cluster. After establishing your CA hierarchy using the ACK controller, you can proceed with the subsequent steps involving IAM Roles Anywhere integration, aws-privateca-issuer, and cert-manager as described in this post.
Step 1 – AWS Private CA
Set up a root CA in AWS Private CA, which will issue short lived certificates for your pods. In this example you use only one CA; for production environments, you should check the considerations for designing CA hierarchies. Start by using the AWS CLI to create a configuration.
The command will return a CertificateAuthorityArn, which you will need for further commands, so export it for later use. Replace <region> with your AWS Region.
At this point your root CA is set up and ready to use. The next step is to configure IAM Roles Anywhere.
Start by defining a trust anchor that will refer to your newly created AWS Private CA and export the trustAnchorArn. Replace <value-of-trustAnchorArn> with the Amazon Resource Name (ARN) value of your IAM Roles Anywhere trust anchor.
Create an IAM role to be used by the aws-privateca-issuer cert-manager plugin. This role needs to include the actions sts:AssumeRole, sts:SetSourceIdentity and sts:TagSession, which are required by IAMRA. Replace <TA_ID> with your trust anchor.
Note: You should specify a PrincipalTag with the CN. Furthermore, it should be scoped to the IAMRA service principal. This further restricts authorization based on attributes that are extracted from the X.509 certificate and provides an additional layer of security by helping to ensure that even if an unauthorized party gains access to a valid certificate, they cannot assume the role unless the certificate’s CN matches the specified value.
Attach an inline policy that allows the role request certificates from your PCA and retrieve these. Note that there is a condition limiting the AWS Private CA templates to only allow EndEntityCertificate.
The created role iamra-issuer will only be used by the aws-privateca-issuer to integrate with AWS Private CA. You should repeat the process of creating IAM roles and IAMRA profiles for your workloads. it’s recommended to create a separate IAM role for each workload and limit its use with condition statements in the trust policy, checking for the workload identity and trust anchor (for example, matching the common name). Furthermore, it’s important that you add IAMRA to the trust policy and allow the aforementioned actions. Best practice with IAM roles is to apply least-privilege permissions.
Step 3 – Create the init container
To integrate IAM Roles Anywhere within your Kubernetes environment, you need to provide an IMDSv2 endpoint to your application containers by running the aws_signing_helper binary as a sidecar. You also need to configure your applications using an environment variable to use the new instance metadata endpoint. To do so, build a Docker image that works as a sidecar.
In this step, create a basic image that fulfills the preceding requirements. In your environment, you might want to adapt this example to use your own base image and implement your image hardening processes.
Copy the following script and save it as init.sh.
#!/bin/sh

if [[ -z "$TRUST_ANCHOR_ARN" ]]; then
  echo "Must provide TRUST_ANCHOR_ARN environment variable." 1>&2
  exit 1
fi

if [[ -z "$PROFILE_ARN" ]]; then
  echo "Must provide PROFILE_ARN environment variable." 1>&2
  exit 1
fi

if [[ -z "$ROLE_ARN" ]]; then
  echo "Must provide ROLE_ARN environment variable." 1>&2
  exit 1
fi

echo "starting IMDSv2 endpoint with aws_signing_helper ..."
/aws_signing_helper serve \
  --certificate /iamra/tls.crt         \
  --private-key /iamra/tls.key         \
  --trust-anchor-arn $TRUST_ANCHOR_ARN \
  --profile-arn $PROFILE_ARN           \
  --role-arn $ROLE_ARN
This script is the entry point of the sidecar container. It expects the environment variables TRUST_ANCHOR_ARN, PROFILE_ARN, and ROLE_ARN, which are required by aws_signing_helper. It also expects an X.509 certificate and its private key in the folder /iamra, which will be mounted in a later stage during pod initialization. Finally, it invokes the aws_signing_helper with the serve directive which creates an IMDSv2 endpoint listening on 9911 by default. This can be customized using the --port parameter.
Now let’s inspect the Docker file.
Note: At the time of writing, we used the alpine3.17.0 image. Use a hardened base image that’s designed to be secure and aligns with the requirements of your environment.
FROM alpine:3.17.0

COPY init.sh .
RUN apk add --no-cache libc6-compat libgcc wget
RUN wget https://rolesanywhere.amazonaws.com/releases/1.3.0/X86_64/Linux/aws_signing_helper
RUN chmod +x /aws_signing_helper /init.sh
RUN ln -s /lib/libc.musl-x86_64.so.1 /lib/libresolv.so.2
ENTRYPOINT ["/bin/sh", "-c", "/init.sh"]
This Docker file copies the init.sh and downloads the aws_signing_helper binary. The init.sh script is defined as an entry point to the container. Dynamic libraries required by aws_signing_helper are installed using Alpine Linux package manager (Apk).
Now build the docker image, sign in to it, and push it for later use. For the following commands replace <my-docker-registry> with the hostname of your local registry or use an ECR Repository.
In this step, install cert-manager into your cluster and configure aws-privateca-issuer using a manually bootstrapped certificate. cert-manager-approver-policy is used to control which certificates can be requested by the workloads. Then, set up the cert-manager CSI driver to automatically provision X.509 certificates for your workload pods.
Start with the cert-manager setup:
Add the cert-manager repository to Helm and install the chart.
Note: At the time of writing, we used cert-manager version 1.16.2. Check for the latest stable version.
Now, install the cert-manager aws-privateca-issuer plugin. This integration connects cert-manager with AWS Private CA and lets you issue short-lived certificates automatically. Currently, aws-privateca-issuer Helm chart doesn’t support IAMRA natively. So, you’re going to use the same init-container to set up IAMRA as for the workload pods.
You need to issue the first X.509 certificate for aws-privateca-issuer IAMRA manually. Later, cert-manager will renew it automatically.
Create the bootstrap certificate. When asked for a common name, enter iamra-issuer.
The previous command will create an RSA private key named iamra.key and a certificate signing request name iamra.csr. Now you need to call AWS Private CA to issue the bootstrap certificate.
Set the validity period of the certificate to 1 day so that cert-manager will replace it after it’s set up. The IAM role that’s performing this action must have permissions to AWS Certificate Manager (ACM), IAM, and IAM Roles Anywhere to complete the setup.
You’re ready to install the aws-privateca-issuer. You need to modify the Helm chart because it doesn’t currently support IAMRA. You will render the Helm chart into YAML manifests, which are then adapted for IAMRA.
Install the Helm repository and render the charts into a file.
Add your previously built image as a sidecar and replace the environment variables with your exported values. Search for the deployment definition and add the following section:
Apply your modified manifest to install aws-privateca-issuer and verify the deployment you have modified. It should show that one pod is ready and available.
kubectl apply -f privateca-issuer.yaml

kubectl get deployment -n cert-manager -l app.kubernetes.io/name=aws-privateca-issuer

NAME                         READY   UP-TO-DATE   AVAILABLE   AGE
iamra-aws-privateca-issuer   1/1     1            1           4d10h
Define an AWSPCAIssuer, which will be used for renewal of the manually bootstrapped certificate for the aws-privateca-issuer add-on.
Note: At the time of writing, we used awspca cert-manager API version v1beta1. Check for the latest stable version.
After at least one AWSPCAIssuer or AWSPCAClusterIssuer is available, aws-privateca-issuer is going to authenticate towards AWS APIs by calling sts.get-caller-identity and verify the authentication method. You can verify this using its log files. It should print the assumed role.
Now, you can create a cert-manager Certificate resource that represents a desired certificate that should be issued by the referenced cert-manager Issuer. It combines information of a CSR with details on the validity period and renewal.
In Step 4, sub-step 9, you created an AWSPCAIssuer named iamra-cm-issuer. You then used this AWSPCAIssuer to renew the manually bootstrapped certificate for the aws-privateca-issuer.
In Step 4, sub-step 11, you created the certificate iamra-privateca-issuer-cert, which is used by the aws-privateca-issuer.
In this step, you will deploy the sample workload. When deploying the sample workload, make sure to repeat the process of creating IAM roles and IAMRA profiles (from Step 2), the AWSPCAIssuer (Step 4, sub-step 9), and the CertificateRequestPolicy (Step 4, sub-step 11) for the certificate request.
To test the deployment, you can use kubectl exec to access the iamra-sidecar container. Navigate to the iamra directory and check if the certificate and key are mounted.
Command: kubectl exec -it acmpca-csi-test – sh ls | grep iamra
Output: You should see iam-roles-anywhere-s3-full-access in caller-identity.
Command: $aws s3 ls
Output: You should be able to list the S3 bucket based on the permissions associated with the assumed role.
Summary
In this post, you learned about a solution for securely connecting on-premises Kubernetes workloads to AWS services using IAM Roles Anywhere. The approach alleviates the need for long-term access keys or public internet exposure of the Kubernetes API server. By using this solution for containerized and full stack applications, you can benefit from:
Enhanced security: Use short-lived X.509 certificates instead of long-term credentials.
Simplified management: Automate the certificate lifecycle with cert-manager and AWS Private CA.
Seamless integration: No modifications are required to existing workload Docker files.
Consistent policies: Use the same IAM roles and policies across AWS and on premises.
If you have feedback about this post, submit comments in the Comments section below. If you have questions about this post, contact AWS Support.
WellRight is a leading comprehensive corporate wellness platform provider that helps organizations and employees drive meaningful outcomes through personalized wellness programs. The platform increases engagement and benefit utilization by delivering engaging challenges across multiple dimensions of wellness, from physical activities like step tracking to mental health initiatives and team-building exercises.
In this post, we share how WellRight optimized the cost and performance of their application through a ground-up modernization to an event-driven architecture.
The challenge
WellRight’s infrastructure often experiences bursty and unpredictable traffic patterns. For instance, clients can upload bulk user data at any time, which can impact tens of thousands of users, which then cascade into millions of changes. WellRight’s legacy monolithic infrastructure had several challenges when faced with such traffic:
Multiple processes such as registration, progress calculation, and reward distribution relied on a single server, leading to a noisy neighbor problem.
Certain core services were isolated to avoid the noisy neighbor problem, but with high burst workloads, auto scaling didn’t react fast enough to meet the demand. This led to queues backing up with millions of requests. In addition, the database also had to be overprovisioned to avoid throttling, adding to the overall cost.
Parts of the application were not designed with auto scaling in mind, leading to overprovisioning of resources.
The following figure shows the Number of Messages Received metric from a sample Amazon Simple Queue Service (Amazon SQS) queue. WellRight would often receive burst of events at an unpredictable time.
Solution overview
To address the challenges, WellRight made the strategic decision to transition to an event-driven architecture using fully managed AWS services. WellRight’s platform is driven by asynchronous state changes that propagate through multiple wellness programs, which is well suited for an event-driven architecture and can be broken down into microservices. Managed services such as AWS Lambda, Amazon SQS, and Amazon DynamoDB were appealing because they would eliminate the need to manage servers and allow WellRight to focus on core business logic and reduce the operational burden to their engineering team. It also has the added benefit of avoiding overprovisioning of infrastructure or continuously right-sizing resources. Each microservice would scale automatically as needed with no manual efforts, minimizing costs. The loosely coupled architecture would allow the WellRight team to be flexible, being able to add or make modifications to existing programs without affecting existing workflows.
Design
WellRight’s initial event-driven architecture was centered around using serverless and fully managed services. DynamoDB was used as a primary data store for user information. For instance, when a user makes progress on their step challenge, the update in the DynamoDB table would propagate through DynamoDB Streams to Amazon EventBridge. Then, the event would be routed to the appropriate SQS queue, which functions as a buffer and provides fault tolerance to the events. A Lambda function would then process individual user metrics and update the Programs table. The Programs table uses DynamoDB Streams to send out updates using Amazon Simple Notification Service (Amazon SNS), keeping users informed about their progress and rankings.
The following diagram illustrates the flow of an event after a user update.
The first iteration of the event-driven architecture fared better than the monolithic legacy application, but the bursty nature of the traffic was still an issue. Lambda functions triggered by SQS queues scaled rapidly, handling requests in under 15 minutes that previously required 30 servers and took hours to process. Lambda provided WellRight the scalability that they needed, but the rapid scaling introduced a new challenge. This resulted in the throttling of DynamoDB and reaching Lambda concurrency limits during times of extremely high load, which led to many unprocessed messages in the dead-letter queue (DLQ).
Maximum concurrency solution
In January 2023, AWS introduced the maximum concurrency feature for Lambda functions using Amazon SQS as an event source. This new feature allowed WellRight to control the concurrency of their Lambda functions for each SQS queue. Prior to this launch, Lambda functions would continue to scale as long as there were messages in the SQS queue. At times, Lambda functions would scale to its concurrency limits, resulting in it throttling itself. However, with this feature in place, the scaling Lambda functions would not exceed the set maximum concurrency value. This provided WellRight fine-grained control over the overall throughput of the system. WellRight would adjust the maximum concurrency value as needed to protect downstream processes from being overwhelmed, while responding to customer requests in a timely manner.
The following screenshot of the Lambda console shows the maximum concurrency for the function is set to 100 for an SQS trigger.
WellRight converted all Amazon SQS to Lambda integrations to use this feature. This provided WellRight with full control over the throughput of customer requests while preventing overloading the system. With the maximum concurrency feature, WellRight reduced failed processed messages by 99%, and eliminated DynamoDB throttling events. The feature was enabled for all Amazon SQS and Lambda integrations, including those without scaling issues, as a safeguard for potential future scaling demands.
Performance and cost savings
WellRight’s event-driven architecture significantly improved their ability to handle bursty and unpredictable traffic patterns. The managed serverless services can scale instantaneously to handle these traffic spikes, providing a seamless experience for their clients. With their previous legacy architecture, clients experienced lags in challenge progress, leaderboards, and reward processing.
Now, clients continue to upload updates with over 1 million entries at any time, and WellRight can maintain up-to-the-minute leaderboards and reward processing. The transition to the new architecture has also yielded significant cost savings for WellRight. Prior to the serverless architecture, their baseline architecture required several large Amazon Elastic Compute Cloud (Amazon EC2) instances to handle the initial burst of traffic. After implementing the event-driven architecture, WellRight reduced their costs by 70% on the progress calculation service.
Future plans
WellRight is currently in the process of rolling out the new event-driven architecture to the remaining clients. By the end of 2024, WellRight plans to retire the majority of their remaining servers, further reducing their infrastructure costs.
Conclusion
WellRight’s transition to an event-driven architecture on AWS has been a successful endeavor. By using fully managed services such as Lambda, Amazon SQS, and DynamoDB, they have been able to handle bursty and unpredictable traffic patterns efficiently, while providing a seamless experience for their clients. The introduction of maximum concurrency for Lambda functions has been a game changer, allowing WellRight to control the throughput of their Lambda functions and avoid overwhelming downstream resources.
Overall, the event-driven architecture has enabled WellRight to scale efficiently, improve performance, and reduce costs of their progress calculation service by over 70%. As they continue to optimize their serverless architecture and migrate remaining clients, WellRight is well-positioned to further enhance their platform and provide an exceptional experience to their customers.
To learn more about building event-driven architectures, including key concepts, best practices, AWS services, and getting started resources, visit Serverless Land.
About the authors
The collective thoughts of the interwebz
Manage Consent
To provide the best experiences, we use technologies like cookies to store and/or access device information. Consenting to these technologies will allow us to process data such as browsing behavior or unique IDs on this site. Not consenting or withdrawing consent, may adversely affect certain features and functions.
Functional
Always active
The technical storage or access is strictly necessary for the legitimate purpose of enabling the use of a specific service explicitly requested by the subscriber or user, or for the sole purpose of carrying out the transmission of a communication over an electronic communications network.
Preferences
The technical storage or access is necessary for the legitimate purpose of storing preferences that are not requested by the subscriber or user.
Statistics
The technical storage or access that is used exclusively for statistical purposes.The technical storage or access that is used exclusively for anonymous statistical purposes. Without a subpoena, voluntary compliance on the part of your Internet Service Provider, or additional records from a third party, information stored or retrieved for this purpose alone cannot usually be used to identify you.
Marketing
The technical storage or access is required to create user profiles to send advertising, or to track the user on a website or across several websites for similar marketing purposes.