How to deploy an Amazon OpenSearch cluster to ingest logs from Amazon Security Lake

Post Syndicated from Kevin Low original https://aws.amazon.com/blogs/security/how-to-deploy-an-amazon-opensearch-cluster-to-ingest-logs-from-amazon-security-lake/

January 30, 2025: This post was republished to make the instructions clearer and compatible with OCSF 1.1.


Customers often require multiple log sources across their AWS environment to empower their teams to respond and investigate security events. In part one of this two-part blog post, I show you how you can use Amazon OpenSearch Service to ingest logs collected by Amazon Security Lake to facilitate near real-time monitoring.

Many customers use Security Lake to automatically centralize security data from Amazon Web Services (AWS) environments, software as a service (SaaS) providers, on-premises workloads, and cloud sources into a purpose-built data lake in their AWS environment. OpenSearch Service is a managed service that customers can use to deploy, operate, and scale OpenSearch clusters in the AWS Cloud. It natively integrates with Security Lake to enable customers to perform interactive log analytics and searches across large datasets, create enterprise visualization and dashboards, and perform analysis across disparate applications and logs. With Amazon OpenSearch Security Analytics, customers can also gain visibility into the security posture of their organization’s infrastructure, monitor for anomalous activity, detect potential security threats in near real time, and initiate alerts to pre-configured destinations.

Without using Amazon OpenSearch Service, customers would need to build, deploy and manage infrastructure for an analytics solution, such as an ELK stack.

Prerequisites

Security Lake should already be deployed. For details on how to deploy Security Lake, see Getting started with Amazon Security Lake. You will need AWS Identity and Access Management (IAM) permissions to manage Security Lake, OpenSearch Service, Amazon Cognito, AWS Secrets Manager, and Amazon Elastic Compute Cloud (Amazon EC2), and to create IAM roles to follow along with this post. The solution can be deployed in any AWS Region that has at least 3 Availability Zones, supports Security Lake, OpenSearch, and OpenSearch Ingestion.

Solution overview

The architecture diagram in Figure 1 shows the completed architecture of the solution.

  1. The OpenSearch Service cluster is deployed within a virtual private cloud (VPC) across three Availability Zones for high availability.
  2. The OpenSearch Service cluster ingests logs from Security Lake using an OpenSearch Ingestion pipeline.
  3. The cluster is accessed by end users through a public-facing proxy hosted on an Amazon EC2 instance.
    1. To reduce costs, the template doesn’t deploy a dead letter queue (DLQ) for the OpenSearch Ingestion pipeline. You can add one later if you want.
    2. Instead of a public facing proxy, you can deploy a VPN to access your cluster.
  4. Authentication to the cluster is managed with Amazon Cognito.
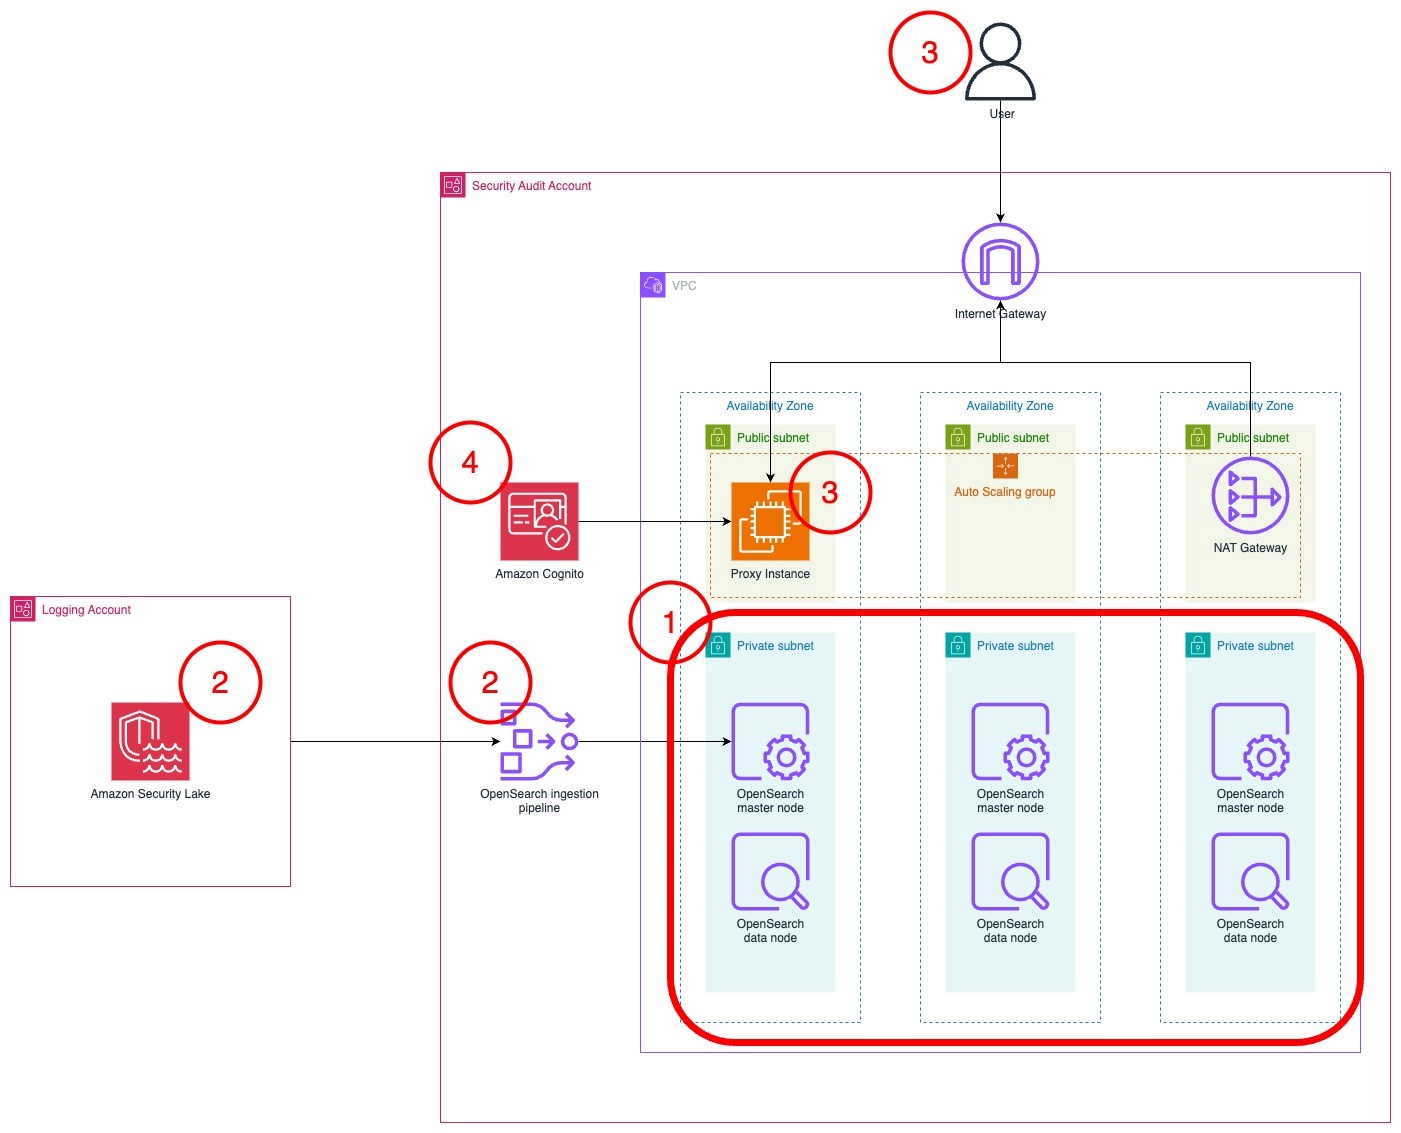
Figure 1: Solution architecture

Figure 1: Solution architecture

Planning the deployment

This section will help you plan your OpenSearch service deployment, including what nodes you should choose, the amount of storage to allocate, and where to deploy the cluster.

Deciding instances for the OpenSearch Service master and data nodes

First, determine what instance type to use for the master and data nodes. If your workload generates less than 100 GB of Security Lake logs per day, we recommend using three m6g.large.search master nodes and three r6g.large.search data nodes. You can start small and scale up or scale out later. For more information about deciding the size and number of instances, see Get started with Amazon OpenSearch Service. Note the instance types that you have selected on a text editor because you will use this as an input for the AWS CloudFormation template that you will deploy later.

Configuring storage

To optimize your storage costs, you need to plan your data strategy. In this architecture, Security Lake is used for long-term log storage. Because Security Lake uses Amazon Simple Storage Service (Amazon S3), you can optimize long-term storage costs. You can configure OpenSearch Service to ingest priority logs based on the recent data that you can use for near-real time detection and alerting. Your team can query logs in Security Lake using its Zero-ETL integration with OpenSearch Service to analyze older logs.

Therefore, Security Lake should serve as your primary long-term log storage, with OpenSearch Service storing only the most recent logs.

The number of days of logs in OpenSearch Service will depend on how many days’ worth of data you need to investigate at a given time. I recommend storing 15 days of data in OpenSearch Service. This allows you to react to and investigate the most immediate security events while optimizing storage costs for older logs.

The next step is to determine the volume of logs generated by Security Lake.

  1. Sign in to the Security Lake delegated administrator account.
  2. Go to the AWS Management Console for Security Lake. Choose Usage in the navigation pane.
  3. On the Usage screen, select Last 30 days as the range of usage.
  4. Add the total Actual usage for the last 30 days for the data sources that you intend to send to OpenSearch. If you have used Security Lake for less than 30 days, you can use the Total predicted usage per month. Divide this figure by 30 to get the daily data volume.
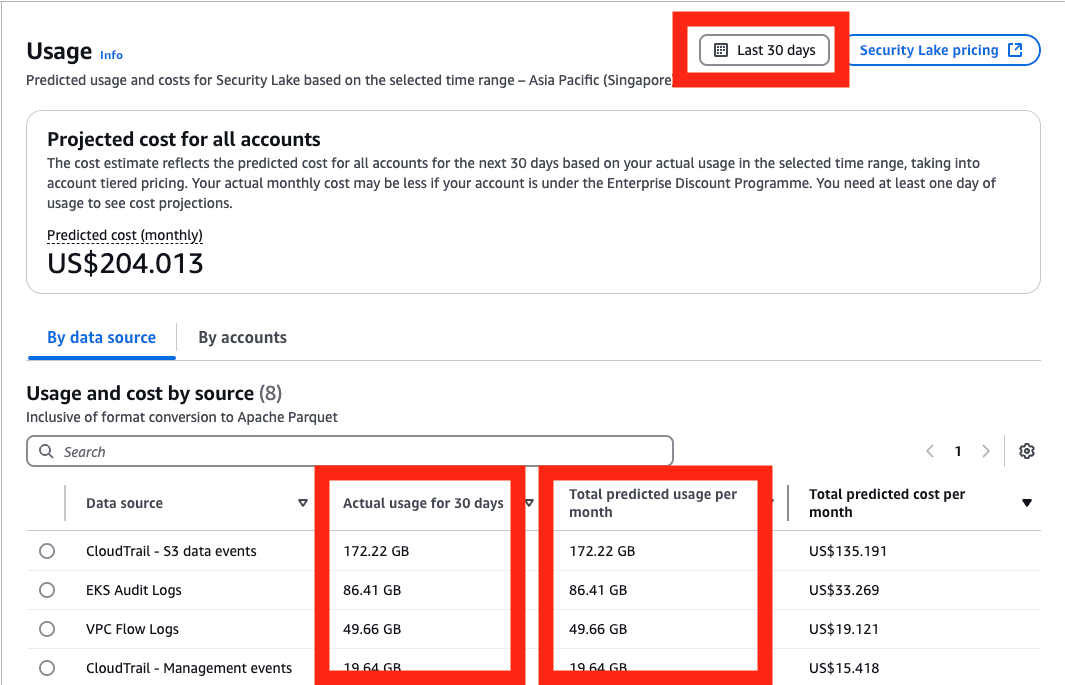
Figure 2: Select range of usage

Figure 2: Select range of usage

To determine the total storage needed, multiply the data generated by Security Lake per day by the retention period you chose, then by 1.1 to account for the indexes, then multiply that number by 1.15 for overhead storage. For more information about calculating storage, see Get started with Amazon OpenSearch Service.

To determine the amount of Amazon Elastic Block Store (Amazon EBS) storage that you need per node, take the total amount of storage and divide it by the number of nodes that you have. Round that number up to the nearest whole number. You can increase the amount of storage after deployment when you have a better understanding of your workload. Make a note of this number in a text editor because you’ll use it as an input in the CloudFormation template later.

Example 1: 10 GB of Security Lake logs generated per day, stored for 30 days in OpenSearch Service in three nodes

  • 10 GB of Security Lake logs stored for 30 days = 10 GB * 30 = 300 GB
  • Account for additional space for indexes and overhead space = 300 GB * 1.1 * 1.15 = 379.5 GB
  • Divide the storage required across three nodes, rounded up = 379.5/3 ≈ 127 GB per node
  • You would need 127 GB per node in OpenSearch Service

Example 2: 200 GB of Security Lake logs generated per day, stored for 15 days in OpenSearch Service across six nodes

  • 200 GB of Security Lake logs stored for 15 days = 200 GB * 15 = 3000 GB
  • Account for additional space for indexes and overhead space = 3000 GB * 1.1 * 1.15 = 3795 GB
  • Divide the storage required across three nodes, rounded up = 3795/6 ≈ 633 GB per node
  • You would need 633 GB per node in OpenSearch Service

Where to deploy the cluster?

If you have an AWS Control Tower deployment or have a deployment modelled after the AWS Security Reference Architecture (AWS SRA), Security Lake should be deployed in the Log Archive account. Because security best practices recommend that the Log Archive account should not be frequently accessed, the OpenSearch Service cluster should be deployed into your Audit account or Security Tooling account.

You need to deploy your Security Lake subscriber in the same Region as your Security Lake roll-up Region. If you have more than one roll-up Region, choose the Region that collects logs from the Regions you want to monitor.

Your cluster needs to be deployed in the same Region as your Security Lake subscriber be able to access data.

Setting up the Security Lake subscriber

Before deploying the solution, create a Security Lake subscriber in your Security Lake roll-up Region so that OpenSearch Service can access data from Amazon Security Lake.

  1. Access the Security Lake console in your Log Archive account.
  2. Choose Subscribers in the navigation pane.
  3. Choose Create subscriber.
  4. On the Create subscriber page, enter a name, such as OpenSearch-subscriber.
  5. Under Data Access, select Under S3 notification type, select SQS queue.
  6. Under Subscriber credentials, enter the AWS account ID for the account you plan to deploy the OpenSearch cluster to, which should be your Security Tooling
  7. Enter OpenSearchIngestion-<AWS account ID> under External ID.

    Figure 3: Configuring the Security Lake subscriber

    Figure 3: Configuring the Security Lake subscriber

  8. Leave All log and event sources selected and choose Create.

After the subscriber has been created, you will need to collect information to facilitate the deployment.

To gather necessary information:

  1. Select the subscriber that you just created.
  2. Derive the S3 bucket name from the S3 bucket ARN and store it in a text editor. The Amazon Resource Name (ARN) is formatted as arn:aws:s3:::<bucket name>. The bucket name should look like aws-security-data-lake-<region>-xxxxx.

    Figure 4: Derive the S3 bucket name from the Subscriber details page

    Figure 4: Derive the S3 bucket name from the Subscriber details page

  3. Go to the Amazon Simple Queue Service (Amazon SQS) console and select the SQS queue created as part of the Security Lake subscriber. It should look like AmazonSecurityLake-xxxxxxxxx-Main-Queue. Note the queue’s ARN and URL in your text editor.

    Figure 5: Relevant details from the SQS queue

    Figure 5: Relevant details from the SQS queue

Deploy the solution

To deploy the solution in your Security Tooling account, use a CloudFormation template. This template deploys the OpenSearch Service cluster, OpenSearch Ingestion pipeline, and an AWS Lambda function to initialize the cluster.

To deploy the OpenSearch cluster:

  1. To deploy the CloudFormation template that builds the OpenSearch service cluster, select the Launch Stack button.

    Select this image to open a link that starts building the CloudFormation stack

  2. In the CloudFormation console, make sure that you are in the correct AWS account. You should be in your Security Tooling account. Also make sure that you have selected the same Region as your Security Lake subscriber.
  3. Enter a name for your stack. A name like os-stack-<day>-<month> can help you keep track of deployments.
  4. Enter the instance types and Amazon EBS volume size that you noted earlier.
  5. Enter the IP address range that you want to allow to access the proxy’s security group. You should limit this to your corporate IP range. You can set it as 0.0.0/0 if you want to expose it to the public internet.
  6. Fill in the details of the Security Lake bucket and the subscriber Amazon SQS queue ARN, URL, and Region.

    Figure 6: Add stack parameters

    Figure 6: Add stack parameters

  7. Check the acknowledgements in the Capabilities section.
  8. Choose Create stack to begin deploying the resources.
  9. It will take 20–30 minutes to deploy the multiple nested templates. Wait for the main stack (not the nested ones) to achieve the CREATE_COMPLETE status before proceeding to the next step.

    Note: If you encounter failures while deployment, you can download the CloudFormation file here and select Preserve successfully provisioned resources under Stack failure options while deploying. This will allow you to troubleshoot the stack deployment.

  10. Go to the Outputs pane of the main CloudFormation stack. Save the DashboardsProxyURL, OpenSearchInitRoleARN, and PipelineRole values in a text editor to refer to later.

    Figure 7: The stacks in the CREATE_COMPLETE state with the outputs panel shown

    Figure 7: The stacks in the CREATE_COMPLETE state with the outputs panel shown

  11. Open the DashboardsProxyURL value in a new tab.

    Note: Because the proxy relies on a self-signed certificate, you will get an insecure certificate warning. You can safely ignore this warning and proceed. For a production workload, you should issue a trusted private certificate from your internal public key infrastructure or use AWS Private Certificate Authority.

  12. You will be presented with the Amazon Cognito sign-in page. Use administrator as the username.
  13. Access Secrets Manager to find the password. Select the secret that was created as part of the stack.

    Figure 9: Retrieve the secret value

    Figure 8: The Cognito password in Secrets Manager

  14. Choose Retrieve secret value to get the password.

    Figure 9: Retrieve the secret value

    Figure 9: Retrieve the secret value

  15. After signing in, you will be prompted to change your password and will be redirected to the OpenSearch dashboard.
  16. If you see a pop-up that states Start by adding your own data, select Explore on my own. On the next page, Introducing new OpenSearch Dashboards look & feel, choose Dismiss.
  17. If you see a pop-up that states Select your tenant, select Global, and then choose Confirm.

    Figure 10: Select and confirm your tenant

    Figure 10: Select and confirm your tenant

To initialize the OpenSearch cluster:

  1. Choose the menu icon (three stacked horizontal lines) on the top left and select Security under the Management section.

    Figure 11: Navigating to the Security page in the OpenSearch console

    Figure 11: Navigating to the Security page in the OpenSearch console

  2. Select Roles. On the Roles page, search for the all_access role and select it.
  3. Select Mapped users, and then select Manage mapping.
  4. On the Map user screen, choose Add another backend role. Paste the value for the OpenSearchInitRoleARN from the list of CloudFormation outputs. Choose Map.

    Figure 12: Mapping the role on the Security page in the OpenSearch console

    Figure 12: Mapping the role on the Security page in the OpenSearch console

  5. Leave this tab open and return to the AWS Management console. Go to the AWS Lambda console and select the function named xxxxxx-OS_INIT.
  6. In the function screen, choose Test, and then Create new test event.

    Figure 13: Creating the test event in the Lambda console

    Figure 13: Creating the test event in the Lambda console

  7. Choose Invoke. The function should run for about 30 seconds. The execution results should show the component templates that have been created. This Lambda function creates the component and index templates to ingest Open Cybersecurity Framework (OCSF) formatted data, a set of indices and aliases that correspond with the OCSF classes generated by Security Lake, and a rollover policy that will rollover the index daily or if it becomes larger than 40 GB.

    Figure 14: Invoking the Lambda function in the Lambda console

    Figure 14: Invoking the Lambda function in the Lambda console

To set up the pipeline

  1. Return to the Map user page on the OpenSearch console.
  2. Choose Add another backend role. Paste the value of the PipelineRole from the CloudFormation template output. Choose This will allow the OpenSearch Ingestion to write to the cluster.

    Figure 15: Mapping the OpenSearch Ingestion role

    Figure 15: Mapping the OpenSearch Ingestion role

  3. Access the Amazon S3 console in the Log Archive account where Security Lake is hosted.
  4. Select the Security Lake bucket in your roll-up Region. It should look like aws-security-data-lake-region-xxxxxxxxxx.
  5. Choose Permissions, then Edit under Bucket policy.
  6. Add this policy to the end of the existing bucket policy. Replace the Principal with the ARN of the PipelineRole and the name of your Security Lake bucket in the Resource section.
    {
                "Sid": "Cross Account Permissions",
                "Effect": "Allow",
                "Principal": {
                    "AWS": "<Pipeline role ARN>"
                },
                "Action": "s3:*",
                "Resource": [
                    "arn:aws:s3:::<Security Lake bucket name>/*",
                    "arn:aws:s3:::<Security Lake bucket name>"
                ]
            }

    Figure 16: The modified S3 bucket access policy

    Figure 16: The modified S3 bucket access policy

  7. Choose Save changes.

To upload the index patterns and dashboards

  1. Download the Security-lake-objects.ndjson file by right-clicking on this link and selecting Save link as.
  2. Access the Dashboards Management page through the navigation menu.
  3. Choose Saved objects in the navigation pane.
  4. On the Saved Objects page, choose Import on the right side of the screen.

    Figure 17: Import saved objects

    Figure 17: Import saved objects

  5. Choose Import and select the Security-lake-objects.ndjson file that you downloaded previously.
  6. Leave Create new objects with unique IDs selected and choose Import.
  7. You can now view the ingested logs on the Discover page and visualizations on the Dashboards page, which you can find on the navigation bar.

    Figure 18: The Discover page displaying ingested logs

    Figure 18: The Discover page displaying ingested logs

Clean up

To avoid unwanted charges, delete the main CloudFormation template, named os-stack-<day>-<month> (not the nested stacks).
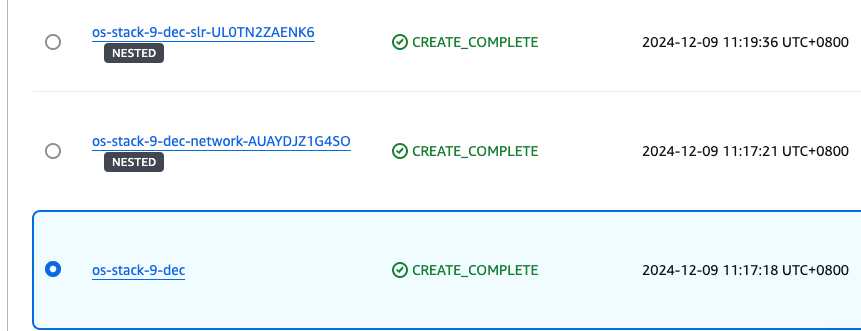
Figure 19: Select the main stack in the CloudFormation console

Figure 19: Select the main stack in the CloudFormation console

Modify the Security Lake bucket policy in the logging account to remove the section you added that trusted the PipelineRole. Be careful not to modify the rest of the policy because it could impact the functioning of Security Lake and other subscribers.
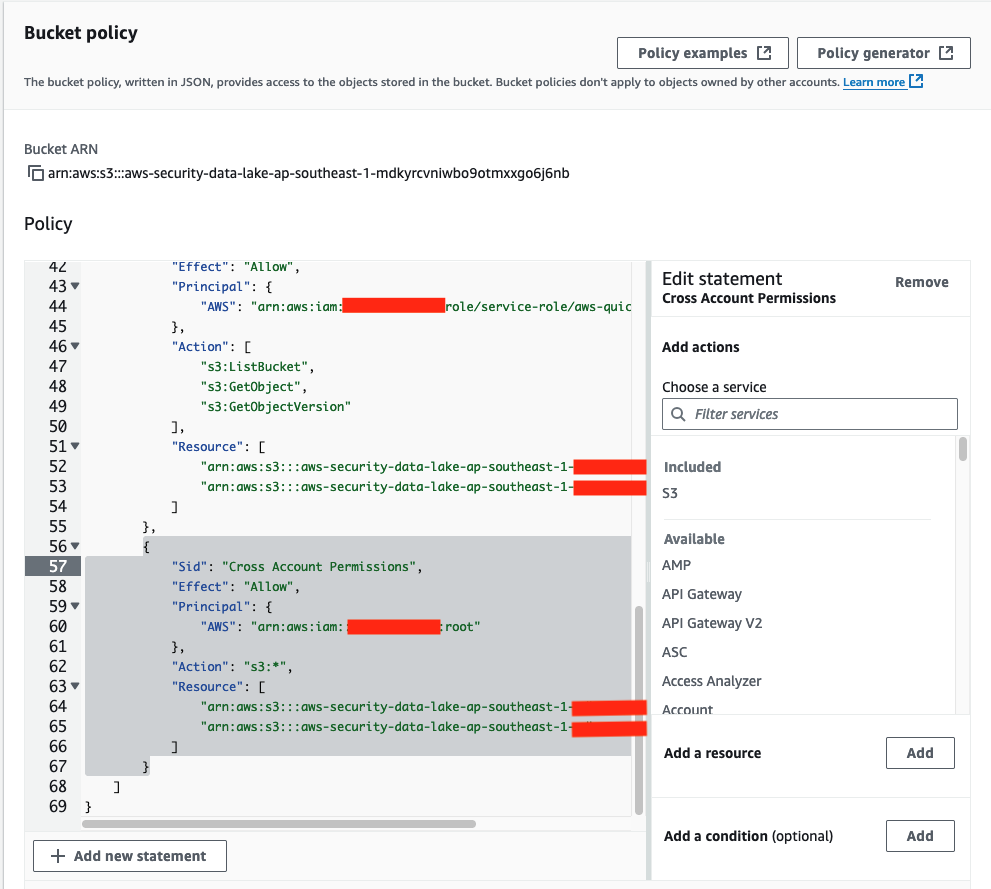
Figure 20: The S3 bucket policy with the relevant sections that needed to be deleted

Figure 20: The S3 bucket policy with the relevant sections that needed to be deleted

Conclusion

In this post, you learned how to plan an OpenSearch deployment with Amazon OpenSearch Service to ingest logs from Amazon Security Lake. With this solution, you’re able to aggregate and manage logs with Security Lake and visualize and monitor those logs with OpenSearch Service. After deployment, monitor the OpenSearch Service metrics to determine if you need to scale this up or out for improved performance. In part 2, I will show you how to set up the Security Analytics detector to generate alerts to security findings in near-real time.

If you have feedback about this post, submit comments in the Comments section below. If you have questions about this post, contact AWS Support.
 

Kevin Low
Kevin Low

Kevin is a Security Solutions Architect at AWS who helps the largest customers across ASEAN build securely. He specializes in threat detection and incident response and is passionate about integrating resilience and security. Outside of work, he loves spending time with his wife and dog, a poodle called Noodle.

How to Future-Proof Your Archives: File Formats That Stand the Test of Time

Post Syndicated from Stephanie Doyle original https://www.backblaze.com/blog/how-to-future-proof-your-archives-file-formats-that-stand-the-test-of-time/

A decorative image showing a vault door with a series of 0s and 1s behind it.

You may have heard us talk about backup a time or two, and hopefully our love has been clear. So, when Wired gave us a shoutout in their recent, astute article about archiving, allow us to say we were flattered. 

As both a tribute and a collaboration, we’re happy to build on their article’s premise about choosing the correct file type for archiving purposes, and we’ll highlight a few tools to help you protect your files in the long term. 

Wired reports: Archived files are especially vulnerable to changing file types

Archives are distinct from backups and have their own demands. Backups are intended to give you the ability to restore files or your whole environment—they need to be both in step with your current environment and flexible enough to respond to both a point in time restore of your whole system or a single file, depending on what you need. Archiving, on the other hand, is about preservation when you can’t depend on the continuity of devices or digital tools—those tools might look quite different (or not exist at all!) down the line. That said, backups are also an essential building block of digital archives. 

Making something last long-term takes more work than you’d think. And, interestingly, digital archiving suffers from the opposite problem of “traditional” archiving. Whereas with books, magazines, and other paper-based media, you want to touch them as little as possible, with digital archives, you actually need to do some active maintenance to make sure you’re converting files to accessible formats that you can open well into the future. 

Here’s an expert from the Wired report telling us about just one part of the practical concerns of digital archiving: 

“Twenty years, in the digital realm, is ancient,” says Lance Stuchell, director of digital preservation services at the University of Michigan. His team is frequently tasked with recovering digital files from old computers and storage mediums. “We have a lab that can deal with old media—floppy drives, CDs, older computers. We can get that off of those types of media and move it into our preservation system while ensuring we don’t mess it up while we’re doing it.”

Wired goes on to report that the problem isn’t just having the correct device, but actually having the correct file type. Their biggest takeaways for making sure your files hold up over time? 

  1. Use open source file types. 
  2. If you’re storing media, store files uncompressed. 
  3. Back up absolutely everything. 

Check out the rest of the article for details—it’s worth a read. And, thanks for the shoutout as a good option for folks looking to back up, Wired. 

Some tools for converting files

So, now that you’re all geared up to get your archive in order, here are some free, open source tools that will help you convert your files. One note when you’re using open source (and we’re big fans) is to make sure you’re using a tool you trust. And, some tools, especially web-based tools, may collect user data or can expose sensitive information. 

With that in mind, here are a few to get you started: 

  • LibreOffice: The successor to OpenOffice, LibreOffice is a well-respected open source alternative to Microsoft Office and supports several open source and older document file formats.
  • Pandoc: Pandoc calls itself the Swiss army knife of file converters for markup formats, which includes documents, HTML formats, spreadsheets, and more. It’s got a very helpful list of file formats and indicates whether they can convert from/to each of them. 
  • ImageMagick: ImageMagick can certainly convert your files, and it’s also beloved because it can edit files, including support for scripting and automation. But, for our purposes, it converts image formats and has continuous support from the open source community. 
  • FFmpeg: FFmpeg is a community supported audio and video tool. 
  • VLC media player: Another audio and video tool that supports conversion.

Keep in mind that while we’re recommending many of these for conversion purposes, many are actually fully-fledged programs with some very cool features—and, some can even replace traditional paid tool options, if you’re the budget-conscious type.  

Archiving hardware of the future

Standard tech right now for storing archived files is on hard disk drives (HDDs) or solid state drives (SSDs), and you’ll even find DVDs that can keep your data stored for 1,000 years or more. All storage media types are known to degrade over time—when you’re storing long-term, you can’t just leave your drive disconnected from power forever, for instance. 

That said, developing storage media types, while not as common, offer some interesting (if not yet widely practical) options. If you’re willing to drop some cash, DNA (yes, the biological kind) or ceramic might be for you. And, if you want to get super sci-fi with it, PhysicsWorld has reported on the “Superman memory crystal” that could keep data intact for millions of years. 

Build your archive for alien circumstances

When we ambitiously sent out messages to the (potential) sentient life in the universe almost 50 years ago, on golden records no less, we apparently thought it was enough to also include a phonograph needle and some symbolic instructions on how to play the record. In practice, we sent a message with no guarantees that someone could decode and play it. 

That may be fine for our space-age time capsule, but for our everyday archives, we do want to do our best to make sure we’re able to open them in the future. While we can’t anticipate where technology will be in 20, 40, or 100 years, we can follow digital archiving best practices to give future generations the best chance of opening files. At least they’ll likely share a language with us, as opposed to our alien friends.

The post How to Future-Proof Your Archives: File Formats That Stand the Test of Time appeared first on Backblaze Blog | Cloud Storage & Cloud Backup

[$] Report from the annual general meeting at GUADEC

Post Syndicated from jzb original https://lwn.net/Articles/983203/

At GUADEC
in Denver, Colorado on July 21, the GNOME Foundation held its annual
general meeting
(AGM) to provide updates from the foundation’s board and committees.
Topics included work accomplished in the past year, challenges
facing the GNOME Foundation–including fundraising and finding a new
executive director–and some insight into plans for the next year. And
last, but not least, the awarding of the Pants of Thanks.

Security updates for Tuesday

Post Syndicated from corbet original https://lwn.net/Articles/983935/

Security updates have been issued by Fedora (curl), Mageia (virtualbox), Oracle (squid), Red Hat (kernel), SUSE (apache2, bind, cdi-apiserver-container, cdi-cloner-container, cdi- controller-container, cdi-importer-container, cdi-operator-container, cdi- uploadproxy-container, cdi-uploadserver-container, devscripts, espeak-ng, freerdp, ghostscript, gnome-shell, gtk2, gtk3, java-11-openjdk, java-17-openjdk, kubevirt, libgit2, openssl-3, orc, p7zip, python-dnspython, and shadow), and Ubuntu (kernel, linux, linux-aws, linux-aws-hwe, linux-gcp, linux-gcp-4.15, linux-hwe, linux-kvm, linux-oracle, linux, linux-aws, linux-gcp, linux-gke, linux-ibm, linux-nvidia, linux-oem-6.8, linux-raspi, linux, linux-azure, linux-azure-5.4, linux-bluefield, linux-gcp, linux-gcp-5.4, linux-gkeop, linux-hwe-5.4, linux-ibm, linux-ibm-5.4, linux-iot, linux-kvm, linux-raspi, linux-xilinx-zynqmp, linux-aws, linux-aws-5.4, linux-aws-5.15, linux-ibm, linux-ibm-5.15, linux-raspi, linux-gcp-5.15, and linux-lowlatency).

New Research: The Proliferation of Cellular in IoT

Post Syndicated from Deral Heiland original https://blog.rapid7.com/2024/07/30/new-research-the-proliferation-of-cellular-in-iot/

Researchers explain the trend and argue for deeper understanding

New Research: The Proliferation of Cellular in IoT

Analysis of Cellular Based Internet of Things (IoT) Technology is a new whitepaper co-authored by Rapid7 principal security researcher Deral Heiland and Thermo Fisher Scientific lead product security researcher Carlota Bindner.

In this new research, the authors dive deep into the fairly recent uptick in the use of cellular communications in IoT-based devices like GPS trackers and certain types of medical equipment. Their main goal is to provide context into the pervasive nature of cellular technology embedded within modern devices all over the world.

They go on to demonstrate the importance of breaking open these IoT devices with the goal of penetration testing (pentesting) the strength of the security — or lack thereof — built into the onboard tech. Absent a Wi-Fi connection, they say, it’s critical these devices are able to leverage cellular as a back-up communications method, particularly in the category of potentially life-saving medical devices.

Testing the Tech

Indeed, 2022 saw shipments of IoT cellular modules grow a substantial 14% year-over-year, signalling the ubiquity of IoT in today’s devices as producers hope the daily-life conveniences the technology enables will continue to propel the  significant growth of cellular module shipments.

When an industry is experiencing significant growth, it’s important that pentesting teams have the ability to appropriately test the technology for security vulnerabilities. This research helps the Rapid7 pentesting team and others continually examine the technology, test its boundaries, and learn how to keep it safe.

Let’s take a look at some key IoT security testing scenarios and takeaways from this whitepaper.

CAT-M and NB-IoT

Cellular technologies for IoT are often high-priced, despite being extremely common in 2024. CAT-M and NB-IoT have helped to facilitate cellular communications for IoT devices, bringing down costs at scale. Their primary areas of focus are to provide low-power wide area network (LPWAN) signals that bolster radio communications used for IoT devices.

According to the paper, CAT-M and NB-IoT are complementary standards that excel in different use cases, each helping enable IoT direct-cloud communications via cellular services. There are several subsets of these technologies — such as CAT-M1, CAT-NB1/CAT-NB2 — and it’s made clear in the research why it’s critical to comprehend how each of these enable cellular-based IoT communications so that practitioners can better secure the devices and tech.

Cellular Modules

The whitepaper then gets into the nitty gritty of reviewing how the researchers deconstructed several cellular module devices to test how they function and communicate with each other.

From discovering module-based GPS trackers to examining cellular modules in smart camera systems, this highly technical process weaves between looking at the orientation of cellular modules on circuit boards to how manufacturers can implement their own proprietary commands for use with their own cellular modules.

What’s Next

To reiterate, it’s vital that pentesting professionals understand as much of this cellular technology as possible in order to effectively test devices that leverage these capabilities. In this way, security is put at the forefront of these marvelous little gadgets that aim to make all of our lives just a little easier.

Ready to learn more? Dive into the deep technical details contained in the whitepaper now.

Elevating Code Quality: Real-Time Insights with Zabbix Integration and SonarQube

Post Syndicated from Benyamine Elmahir original https://blog.zabbix.com/elevating-code-quality-real-time-insights-with-zabbix-and-sonarqube/28452/

The objective of this project was to establish a robust and integrated environment for the continuous monitoring of code quality and performance metrics. To achieve this, SonarQube, an open-source platform for the continuous inspection of code quality, was installed on AlmaLinux. Following its setup, SonarQube was seamlessly integrated with Zabbix, an enterprise-class open-source distributed monitoring solution, to enable the dynamic monitoring of various projects. This integration aimed to provide our team at Zen Networks with real-time visibility into key metrics such as bugs, vulnerabilities, and code smells for ongoing projects.

Installing SonarQube on AlmaLinux

1. Pre-installation Requirements:
  • We conducted a detailed review to ensure that the server met the minimum hardware requirements for running SonarQube effectively.
  • Necessary dependencies, including Java Development Kit (JDK) and a supported database system, were installed and configured.
2. SonarQube Installation Steps:
  • The SonarQube server was downloaded from the official website.
  • Following best practices, a dedicated SonarQube user account was created for running the service.
  • The SonarQube service was configured to start on boot, ensuring high availability.
3. Configuration:
  • The sonar.properties file was meticulously edited to connect SonarQube to the chosen database, optimizing for performance and security.
  • Network settings were adjusted to allow SonarQube to run on the desired port (9000) and be accessible from the developer’s workstations.
  • Additional plugins were installed to extend the functionality of SonarQube and to support the languages used in our projects.

Project Setup in SonarQube

Upon successful installation and configuration of SonarQube on the AlmaLinux server, the next phase involved setting up projects for code analysis. Five test projects were created to demonstrate the capabilities of SonarQube and serve as a baseline for quality assessment.

Creation of Test Projects:
  • We created a series of five distinct projects, namely app-java, backup-code, erp-app, test-app, and web-app, each configured within SonarQube.
  • The projects were configured to assess various aspects of code quality, including reliability, security, and maintainability.
  • We enabled the automated scanning of code to identify bugs, vulnerabilities, and code smells within each project.
Analysis and Metrics:
  • Each project underwent a thorough analysis, with results indicating varying levels of bugs and vulnerabilities alongside code smells.
  • Metrics such as coverage and duplication were configured to be monitored, though the initial test runs reflected 0.0% coverage, indicating a scope for further CI/CD integration.
  • The test-app project notably showed a substantial number of bugs and a significant code smell count, highlighting areas for immediate improvement.
Quality Gate Status:
  • All projects were set against predefined quality gates to ensure they met the organization’s standards for code quality.
  • Despite some projects having bugs and code smells, all projects passed the quality gates, suggesting that non-critical issues were identified, which would be addressed in an ongoing manner.

Integration with Zabbix

The integration of SonarQube with Zabbix was aimed at leveraging Zabbix’s robust monitoring capabilities to keep a close eye on the projects’ health status in terms of code quality.

Zabbix Template Creation:

Our team built a Zabbix template dedicated to interfacing with the SonarQube API and designed to auto-discover SonarQube projects and their key metrics. For integrating Zabbix with the SonarQube API and enabling the auto-discovery of projects and key metrics, the following API calls and configurations were used:

Authentication:
    • Example API call to authenticate:
    • curl -u token: “http://sonarqube_ip/api/authentication/validate”
Project Discovery:
    • Example API call to list projects:
    • curl -u token: “http://sonarqube_ip/api/projects/search”
Metrics Retrieval:
    • Example API call to get project metrics:
    • curl -u token: “http://sonarqube_ip/api/measures/component?component=project_key&metricKeys=bugs,vulnerabilities,code_smells”
Zabbix Template Configuration:
    • A customized Zabbix template was created to interface with the SonarQube API. The template includes discovery rules, item prototypes, and preprocessing steps to extract relevant metrics.
    • Example of a discovery rule and item prototype in the Zabbix template:
<discovery_rule>
<name>sonarqube_project_discovery</name>
<type>HTTP_AGENT</type>
<key>sonarqube.project.discovery</key>
<delay>1h</delay>
<lifetime>3d</lifetime>
<item_prototypes>
<item_prototype>
<name>{#PROJECTNAME}: Metrics</name>
<type>HTTP_AGENT</type>
<key>sonarqube.project.metrics['{#PROJECTNAME}']</key>
<delay>5m</delay>
<url>{$PROTO}://{HOST.IP}:{$PORT}/api/measures/component?
component={#PROJECTNAME}&metricKeys=bugs,vulnerabilities,
code_smells,ncloc,complexity,violations</url>
<headers>
<header>
<name>Authorization</name>
<value>Basic YOUR_BASE64_ENCODED_TOKEN</value>
</header>
</headers>
</item_prototype>
</item_prototypes>
</discovery_rule>

In addition, our team set up items within Zabbix to track the number of bugs, vulnerabilities, and code smells, as presented in the SonarQube dashboard. We also configured triggers within Zabbix to alert the team when certain thresholds were reached, facilitating prompt action to maintain code quality.

Automation and Dynamic Monitoring:

We enabled the dynamic discovery of projects in SonarQube, allowing for new projects to be automatically detected and monitored without manual intervention. To enable the dynamic discovery of projects in SonarQube and ensure they are automatically detected and monitored by Zabbix, we implemented the following configurations:

  • SonarQube Configuration:
    • Webhooks: Configured SonarQube webhooks to notify Zabbix whenever a new project is created or updated.
    • Project Tags: Used consistent tagging for SonarQube projects to facilitate easy identification in Zabbix.
  • Zabbix Configuration:
    • Discovery Rules: Created discovery rules in Zabbix that periodically query the SonarQube API to check for new projects.
    • Low-Level Discovery (LLD): Implemented LLD in Zabbix to automate the creation of items, triggers, and graphs for each new SonarQube project.
    • We also established a data flow between SonarQube and Zabbix, ensuring that updates in the code quality metrics were reflected in real time on the Zabbix dashboard.
Validation and Testing:
      • We conducted a series of tests to ensure that the integration was functioning correctly.
      • Our team verified that metrics reported in SonarQube matched those displayed in Zabbix, confirming the accuracy and reliability of the monitoring setup.

With the projects and metrics being actively monitored, the focus shifted to presenting the data effectively. A custom dashboard was created in Zabbix to aggregate and display the information gleaned from SonarQube.

Design and Layout:

We created a user-friendly dashboard to provide a quick overview of the status of all projects.

  • The dashboard was organized to show metrics such as the number of bugs, vulnerabilities, code smells, and the Quality Gate status of each project at a glance.
  • Particular attention was paid to visual hierarchy and layout, ensuring that the most critical metrics were immediately visible.

Custom Widgets and Visualizations:

Widgets were customized for each key metric to enhance readability and instant understanding of the project statuses.
Visual indicators, such as color-coded status icons and progress bars, were incorporated to give a clear visual cue about the health of each project.

Real-time Data Representation:

W configured the dashboard to refresh at regular intervals, providing real-time updates to the development team.
Ensured that the most current data was always available, enabling a proactive approach to quality assurance and code health.

Results and Benefits

The integration of SonarQube with Zabbix and the creation of a dedicated dashboard yielded significant benefits for development workflow and project management.

Improved Code Quality Monitoring:
  • The real-time monitoring of code quality metrics allowed for quicker identification and resolution of issues.
  • Developers received immediate feedback on the quality of their code, fostering a culture of quality-first in the development process.
Enhanced Visibility:
  • The Zabbix dashboard provided a centralized view of the health status of all projects, enhancing visibility for both developers and management.
  • Critical issues could be identified at a glance, allowing for prioritization and resource allocation to address the most pressing problems.
Streamlined Workflow:
  • Automated project discovery and monitoring reduced manual overhead, allowing developers to focus on coding rather than reporting.
  • Alerts and notifications from Zabbix ensured that no critical issues went unnoticed.
Decision-making Support:
  • The collected data and trends visible on the dashboard supported informed decision-making regarding code quality improvements and technical debt management.
  • The ability to track historical data enabled the team to measure the impact of implemented changes over time.
Proactive Issue Management:
  • The early detection of bugs and vulnerabilities allowed the team to address issues before they escalated, reducing potential risks to project timelines and quality.
  • The Quality Gate statuses helped maintain a consistent standard of code quality across all projects.

Special thanks to the team at Zen Networks (Oumaima Naami, Karim Chadil, and Fayçal Noushi) for their work on this project.


The post Elevating Code Quality: Real-Time Insights with Zabbix Integration and SonarQube appeared first on Zabbix Blog.

Providing Security Updates to Automobile Software

Post Syndicated from Bruce Schneier original https://www.schneier.com/blog/archives/2024/07/providing-security-updates-to-automobile-software.html

Auto manufacturers are just starting to realize the problems of supporting the software in older models:

Today’s phones are able to receive updates six to eight years after their purchase date. Samsung and Google provide Android OS updates and security updates for seven years. Apple halts servicing products seven years after they stop selling them.

That might not cut it in the auto world, where the average age of cars on US roads is only going up. A recent report found that cars and trucks just reached a new record average age of 12.6 years, up two months from 2023. That means the car software hitting the road today needs to work­—and maybe even improve—­beyond 2036. The average length of smartphone ownership is just 2.8 years.

I wrote about this in 2018, in Click Here to Kill Everything, talking about patching as a security mechanism:

This won’t work with more durable goods. We might buy a new DVR every 5 or 10 years, and a refrigerator every 25 years. We drive a car we buy today for a decade, sell it to someone else who drives it for another decade, and that person sells it to someone who ships it to a Third World country, where it’s resold yet again and driven for yet another decade or two. Go try to boot up a 1978 Commodore PET computer, or try to run that year’s VisiCalc, and see what happens; we simply don’t know how to maintain 40-year-old [consumer] software.

Consider a car company. It might sell a dozen different types of cars with a dozen different software builds each year. Even assuming that the software gets updated only every two years and the company supports the cars for only two decades, the company needs to maintain the capability to update 20 to 30 different software versions. (For a company like Bosch that supplies automotive parts for many different manufacturers, the number would be more like 200.) The expense and warehouse size for the test vehicles and associated equipment would be enormous. Alternatively, imagine if car companies announced that they would no longer support vehicles older than five, or ten, years. There would be serious environmental consequences.

We really don’t have a good solution here. Agile updates is how we maintain security in a world where new vulnerabilities arise all the time, and we don’t have the economic incentive to secure things properly from the start.

Камала Харис и трошенето на бариери

Post Syndicated from Светла Енчева original https://www.toest.bg/kamala-harris-i-trosheneto-na-barieri/

Камала Харис и трошенето на бариери

След оттеглянето на Джо Байдън от президентската надпревара в САЩ кандидатурата на Камала Харис изглежда най-вероятната му алтернатива. От една страна, като вицепрезидентка на Байдън се очаква тя да продължи водената от него политика без значителни промени. От друга страна, Харис внася нова енергия в кампанията. И има потенциала да привлече представители на групи, които не се чувстват представени от Байдън или на които той просто не е интересен.

Камала Харис и интерсекционалността

Въпреки че политически и ценностно Доналд Тръмп и Джо Байдън са различни вселени, в някои отношения те много си приличат. И двамата спадат към най-привилегированата група в обществото – богатите бели мъже. И двамата са на около 80-годишна възраст. И двамата са (както показва анализът на Йоанна Елми) представители на поколение, в което доминират бели мъже като тях. И което упорито отказва „да пусне кокала“ и да предаде щафетата на по-младите и по-разнообразните.

Камала Харис не само е с повече от 20 години по-млада от Байдън, ами е и жена, и то цветнокожа. Носителка е на още няколко характеристики, които я превръщат в подходяща илюстрация за едно феминистко понятие – интерсекционалност. Това означава съчетаването у една личност на различни идентичности, някои от които могат да бъдат дискриминационни признаци. У Камала Харис те са поне четири. Освен че е цветнокожа и жена, тя произхожда от семейство на имигранти. На всичко отгоре няма свои (биологични) деца. Преди 235 години бездетността не е била проблем за първия президент на САЩ Джордж Вашингтон, но… той е мъж.

Въпреки че родителите на Харис са били университетски преподаватели и това ѝ е дало добри биографични шансове – можела е да завърши право в университет, – те могат да бъдат определени като добри основно в сравнение с възможностите на други цветнокожи жени с имигрантски произход. Но са несравнимо по-ниски от тези, с които са разполагали бели мъже като Тръмп и Байдън. Още повече че Камала Харис е отгледана от майка си, след като родителите ѝ са се развели, когато е била на седем години, а университетът, в който е учила, е за чернокожи.

Интерсекционалността има и културни измерения. Когато през 2005-та 51-годишната тогава Ангела Меркел става първата жена, заела канцлерския пост в Германия, тя също няма деца. Макар да е от Християндемократическата партия (консервативна по европейските стандарти), липсата на деца не се оказва фатална за съпартийците ѝ, които я издигат на този пост. Нито за германците, които ѝ се доверяват да остане начело на страната им 16 години и я наричат – къде добродушно, къде иронично – Mutti (Мама).

Макар близо 20 години по-късно Демократическата партия в САЩ да е узряла за идеята да лансира за кандидат-президент жена, която не е раждала, за много американци (особено – републиканци) този факт от биографията ѝ е скандален. През 2021 г. Джей Ди Ванс, днешният кандидат за вицепрезидент на Тръмп, казва по адрес на Харис, че Щатите се управляват от „бездетни жени с котки“ и че тя няма „пряк принос“ за бъдещето на страната.

Автентично представителство

Когато Байдън защитава репродуктивните права и критикува расовата дискриминация, той си остава бял мъж. Камала Харис обаче може да говори по тези теми от първо лице и затова е автентична представителка както на цветнокожите американци, така и на жените, които отстояват правото сами да решават какво да правят с тялото си. Байдън трудно може да говори от името на по-младите поколения. 22 години по-младата от него Харис наближава 60-те, но е в активна работоспособна възраст и е част от различно поколение.

Според проучване на YouGov по поръчка на CBS, проведено дни преди официалното оттегляне на Байдън, Харис се представя с три процентни пункта по-добре от настоящия президент сред чернокожите гласоподаватели, с един пункт по-добре сред жените и с два пункта по-добре сред гласоподавателите под 45-годишна възраст. И това – без кампания за увеличаване на популярността ѝ.

Харис представлява и семействата, които по един или друг начин не отговарят на представата за „традиционно семейство“ – мъж и жена, сключили брак, и техните биологични деца. Семействата на ЛГБТИ+ хора са само малка част от непасващите на стереотипа. Към 2022 г. близо 40% от бебетата в САЩ са родени от жени, които не са сключили брак. Горе-долу такъв е и делът на браковете, които завършват с развод.

Затова не са изключение т.нар. пачуърк семейства – настоящи и бивши съпрузи и партньори по разнообразни начини си поделят отговорността за отглеждането на децата. Така представата за родителството престава да се свежда до биологичното възпроизводство. Иронично, и семейството на Доналд Тръмп, който има пет деца от трите си съпруги, си е пачуърк отвсякъде, но той е кандидатът на партията, защитаваща „традиционното семейство“.

Камала Харис няма предишен брак, но съпругът ѝ Дъглас Емхоф има. Той и бившата му съпруга Кърстин Емхоф си поделят грижите за децата, а тя и Харис са в много добри отношения. Кърстин Емхоф дори неотдавна излезе в защита на Харис по повод обвинението на Джей Ди Ванс, че няма деца.

„В продължение на повече от десет години, откакто Коул и Ела бяха тийнейджъри, Камала е съвместен родител с Дъг и мен“, казва за Харис тя. И допълва: „Тя е любяща, грижовна, пламенно закриляща и винаги присъстваща. Обичам нашето смесено семейство и съм благодарна, че тя е част от него.“ В защитата се включва и дъщерята Ела Емхоф: „Как може някой да е „бездетен“, ако има сладки дечица като Коул и мен? […] Обичам и тримата си родители.“

Появиха се и мемета като например ретроизображение на жена с котка с послание: „Долу лапите от котето ми“ (на английски pussy е разговорно название за вулва), подписано от „Бездетни жени с котки за Харис 2024“).

Камала Харис и трошенето на бариери

Като стана дума за Дъглас Емхоф, Камала Харис е автентична и в поне още едно отношение. Нейната популярност се дължи на собствената ѝ кариера, а не на факта, че е жена на мъжа си (по-скоро той е известен с това, че ѝ е съпруг). Без да игнорираме безспорните качества и постижения на Хилъри Клинтън и Мишел Обама, същото не може да се каже за тях. След брака си с Емхоф Харис запазва фамилията си – през 2014 г. името ѝ отдавна си тежи на мястото.

Злите езици говорят, че Харис дължи кариерата си на връзката, която е имала между 1994 и 1995 г. с тогавашния кмет на Сан Франциско Уили Браун. Тази теза обаче е израз на сексисткия стереотип, че една жена не може да постигне нищо без силен мъж зад гърба си. Кметският пост е върхът в кариерата на Браун, а Харис става главен прокурор на щата Калифорния, след това и втората чернокожа сенаторка и първата от южноазиатски произход в историята на САЩ. После се издига до първата жена вицепрезидент в страната.

Възможности за разширяване на подкрепата

До момента Камала Харис не е предложена официално за кандидат-президент на демократите, но вече има податки, че тя може да получи подкрепа и от представители на групи, от които не е част и до които Байдън по-трудно би могъл да намери път.

Такава група е поколението Z – част от неговите представители наесен за първи път ще гласуват за президент. Днешните американски младежи нямат спомени от времето, когато Харис е била главен прокурор на Калифорния, поради което немалко критични към властта млади хора, особено цветнокожи, са я възприемали като „лошото ченге“.

Британската поп изпълнителка Charlie XCX, публикува в социалната мрежа X лаконичен пост: „Kamala IS brat.“ Значението на думата brat в сленга на поколението Z може условно да се преведе като „трепач“.

Закачката е със заглавието на едноименния ѝ албум, който дава началото на движението brat summer, мотивиращо хората да се осмеляват да поемат рискове и да не се страхуват от неудобствата по пътя. Скоро след това официалният профил на кампанията на Харис в X се сдоби с „корица“ в зеления цвят от обложката на албума на Charlie XCX.

Друга група са „суифтитата“ – феновете на американската певица Тейлър Суифт, която има сериозно влияние – не само попкултурно, а и политическо. Тя се застъпва за правата на ЛГБТИ+ хората и е против ограничаването на правото на аборт, а преди президентските избори през 2020 г. агитира за Байдън и Харис. Вече има неформално движение „Суифтита за Харис“, чиито членове призовават идола си да се застъпи за кандидатурата на вицепрезидентката.

По-голямата част от ЛГБТИ+ хората гласува за демократите. По обясними причини – демократите им дават достъп до равни права, републиканците правят всичко по силите си да им ги отнемат. Според проучване от март т.г. близо 70% от ЛГБТИ+ хората предпочитат Байдън пред Тръмп. Камала Харис вече демонстрира, че оценява значимостта на ЛГБТИ+ общността, появявайки се на техен терен. Тя участва в популярно куиър шоу, в което призова да се гласува.

Харис има по-сериозни шансове да привлече по-умерените от защитниците на Палестина, отколкото имаше Байдън, който стои твърдо на страната на Израел. Тя вече направи ключово изказване в тази посока. От една страна, осъди терористичния акт на „Хамас“ и подчерта значението на евреите за САЩ и правото на Израел да се защити. Харис каза, че е споделила с израелския премиер Нетаняху „сериозното си притеснение от мащаба на човешкото страдание в Газа, включително и смъртта на твърде много цивилни“. Харис споменава и „потресаващата хуманитарна ситуация там“, като дава примери – глад, мъртви деца, хора, „понякога разселвани за втори, трети и четвърти път“.

В изказването си Камала Харис постепенно втвърдява тона: „Това трябва да спре.“ Тя заявява, че не може да се мълчи пред лицето на тази трагедия, и отново слага на масата предложението на Байдън за решение на кризата, което остана висящо. То включва спиране на огъня и две фази, като втората представлява пълно изтегляне на израелските сили от Газа и освобождаване на заложниците. В заключение Харис подчертава, че вижда и чува призоваващите за спиране на огъня.

Между възможното и действителното – мечтите

Разбира се, нищо не гарантира, че възможностите, с които Камала Харис разполага, ще се реализират в пълнота. Още по-малко, че ако бъде номинирана от демократите (което се очертава най-вероятният вариант), ще е способна да победи Тръмп. Сериозната ѝ кампания тепърва предстои. А като вицепрезидент тя носи и негативите от управлението на Байдън, както ѝ разочарованието на много американци от живота им, за чието влошено качество те винят именно това управление.

За разлика от Байдън обаче, който беше в най-добрия случай приемлива и компромисна фигура (докато престана да бъде и такава), личността на Камала Харис може да вдъхновява. Макар и не толкова, колкото бившият президент Барак Обама, за масовия възторг около когото дори се изобрети нова дума, която влезе в речниците – обамамания.

Перспективата цветнокожа жена без деца да стане президент на САЩ връща към живот идеята за онази либерална Америка, в която всеки трябва да има право да се бори за мечтата си. Независимо от пол, цвят на кожата или друг признак. Особено във време, в което се отнемат някои от основните постижения на феминизма, като например правото на аборт, и се създават различни препятствия пред ЛГБТИ+ хората. А ксенофобският и расисткият език изглеждат все по-легитимно.

Тази либерална мечта е антиподът на мечтата за една консервативна Америка, в която най-голямо значение има съхраняването на доминиращото мнозинство. А без жива мечта демократите трудно ще надвият тръмпизма. При цялата си проблематичност Доналд Тръмп е харизматичен. Той може да увлича и вдъхновява онази част от американското (че и европейското) население, която се припознава в посланията му.

„Трошенето на бариери не означава, че тръгваш от едната страна на бариерата и се оказваш от другата – казва в Харис в телевизионно интервю. – То включва и самото трошене. А когато трошиш неща, се порязваш. Може и да кървиш. Но си струва всеки път. Всеки път.“

Камала Харис и трошенето на бариери

Може би сте виждали този колаж. На горната снимка е Роза Паркс, която през 1955 г. дръзва да седне на място за бели в автобуса и да не се съобрази с нареждането на шофьора да отиде на местата за чернокожи. Долу вляво е 6-годишната Руби Бриджес, която през 1960 г. става първото афроамериканско дете, което тръгва на училище за бели. И накрая е Камала Харис, която крачи, а сянката ѝ е силуетът на малката Руби. Ако Харис победи в президентската надпревара, ще е успяла да строши бариерата на най-високия стъклен таван в САЩ – и за жените, и за цветнокожите.

VMware ESXi CVE-2024-37085 Targeted in Ransomware Campaigns

Post Syndicated from Rapid7 original https://blog.rapid7.com/2024/07/30/vmware-esxi-cve-2024-37085-targeted-in-ransomware-campaigns/

VMware ESXi CVE-2024-37085 Targeted in Ransomware Campaigns

On Monday, July 29, Microsoft published an extensive threat intelligence blog on observed exploitation of CVE-2024-37085, an Active Directory integration authentication bypass vulnerability affecting Broadcom VMware ESXi hypervisors. The vulnerability, according to Redmond, was identified in zero-day attacks and has evidently been used by at least half a dozen ransomware operations to obtain full administrative permissions on domain-joined ESXi hypervisors (which, in turn, enables attackers to encrypt downstream file systems). CVE-2024-37085 was one of multiple issues fixed in a June 25 advisory from Broadcom; it appears to have been exploited as a zero-day vulnerability.

Per Broadcom’s advisory, successful exploitation of CVE-2024-37085 allows attackers “with sufficient Active Directory (AD) permissions to gain full access to an ESXi host that was previously configured to use AD for user management by re-creating the configured AD group (‘ESXi Admins’ by default) after it was deleted from Active Directory.”

Notably, Broadcom’s advisory differs from Microsoft’s description, which says: “VMware ESXi hypervisors joined to an Active Directory domain consider any member of a domain group named "ESX Admins" to have full administrative access by default. This group is not a built-in group in Active Directory and does not exist by default. ESXi hypervisors do not validate that such a group exists when the server is joined to a domain and still treats any members of a group with this name with full administrative access, even if the group did not originally exist.”

Also of note: While the VMware advisory indicates ESXi Admins is the default AD group, the Microsoft observations quoted in this blog all indicate use of ESX Admins rather than ESXi Admins.

ESXi hypervisors have been a popular target for ransomware groups in years past. Notably, since ESXi should not be internet-exposed, we would not expect CVE-2024-37085 to be an initial access vector — adversaries will typically need to have already obtained a foothold in target environments to be able to exploit the vulnerability to escalate privileges.

Exploitation

Microsoft researchers discovered CVE-2024-37085 after it was used as a post-compromise attack technique used by a number of ransomware operators, including Storm-0506, Storm-1175, Octo Tempest, and Manatee Tempest. The attacks Microsoft observed included use of the following commands, which first create a group named “ESX Admins” in the domain and then adds a user to that group:

net group “ESX Admins” /domain /add
net group “ESX Admins” username /domain /add

Microsoft identified three methods for exploiting CVE-2024-37085, including the in-the-wild technique described above:

  • Adding the “ESX Admins” group to the domain and adding a user to it (observed in the wild): If the “ESX Admins” group doesn’t exist, any domain user with the ability to create a group can escalate privileges to full administrative access to domain-joined ESXi hypervisors by creating such a group, and then adding themselves, or other users in their control, to the group.
  • Renaming any group in the domain to “ESX Admins” and adding a user to the group or using an existing group member: This requires an attacker to have access to a user that has the capability to rename arbitrary groups (i.e., by renaming one of them “ESX Admins”). The threat actor can then add a user, or leverage a user that already exists in the group, to escalate privileges to full administrative access.
  • ESXi hypervisor privileges refresh: Even if the network administrator assigns any other group in the domain to be the management group for the ESXi hypervisor, the full administrative privileges to members of the “ESX Admins” group are not immediately removed and threat actors still could abuse it.

Mitigation guidance

The following products and versions are vulnerable to CVE-2024-37085:

The Broadcom advisory on CVE-2024-37085 links to a workaround that modifies several advanced ESXi settings to be more secure; the workaround page notes that for all versions of ESXi (prior to ESXi 8.0 U3), “several ESXi advanced settings have default values that are not secure by default. The AD group "ESX Admins" is automatically given the VIM Admin role when an ESXi host is joined to an Active Directory domain.”

Broadcom VMware ESXi and Cloud Foundation customers should update to a supported fixed version as soon as possible. Administrators who are unable to update should implement workaround recommendations in the interim. ESXi servers should never be exposed to the public internet. Microsoft has additional recommendations on mitigating risk of exploitation in their blog.

Rapid7 customers

InsightVM and Nexpose customers who use ESXi hypervisors within their environments can assess their exposure to CVE-2024-37085 for the 8.x version stream with a vulnerability check available since June 2024. Support for scanning 7.0 is expected to be available in the July 30 content release.

InsightIDR and Managed Detection and Response customers have existing detection coverage through Rapid7’s expansive library of detection rules. Rapid7 recommends installing the Insight Agent on all applicable hosts to ensure visibility into suspicious processes and proper detection coverage. Below is a non-exhaustive list of detections that are deployed and will alert on behavior related to this vulnerability:

  • Attacker Technique – Creation of "ESX Admins" Domain Group using Net.exe

AWS and Multicloud: Existing capabilities & continued enhancements

Post Syndicated from Jeff Barr original https://aws.amazon.com/blogs/aws/aws-and-multicloud-existing-capabilities-continued-enhancements/

When I speak to large-scale AWS customers about their challenges and concerns, the conversation often turns to the topic of multicloud. Whether by intent or by accident, these customers sometimes choose to make use of services from more than one cloud provider, sometimes in conjunction with applications or services that are still hosted on-premises. In some cases they made early, bottom-up choices at the team and division level, choosing cloud offerings from multiple vendors in the absence of a top-down mandate. In others, they acquired or merged with another organization and discovered a similar multi-vendor situation.

Regardless of the path, these customers tell me that they want to simplify and centralize their oversight and management of this diverse portfolio of cloud and on-premises resources. It is sometimes the case that the “multi” situation is time-bound, with a plan in place to ultimately consolidate operations in one place. It is also sometimes the case that the customer plans to retain their diverse portfolio.

AWS and multicloud
Our goal with AWS is to make you successful no matter what architectural choices you have made. In this post I want to outline our approach, share some capabilities that our customers have been using over the years, and provide you with an update on some of the more recent service announcements and content that we have created to give you guidance that will help you to succeed.

Our approach is to extend existing AWS operational and management capabilities to work in multicloud and hybrid environments. Because we extend existing capabilities, your investment in training, development, scripting, and runbooks is preserved, and actually becomes even more worthwhile since it applies to your other (non-AWS) resources. For example, you can use the same service (AWS Systems Manager) to patch and update Amazon Elastic Compute Cloud (Amazon EC2) instances, servers running on-premises, and servers provided by other cloud providers. Similarly, you can use Amazon CloudWatch to monitor applications, compute resources, and other cloud resources in all of those environments. These are two examples of how we are putting our approach into practice for you.

The AWS Solutions for Hybrid and Multicloud page contains additional examples of our extension-based approach to adding new capabilities, along some success stories from customers who have put the capabilities to use including Phillips 66 and Deutsche Börse.

Whether you choose to operate entirely on AWS or in multicloud and hybrid environments, one of the primary reasons to adopt AWS is the broad choice of services we offer, enabling you to innovate, build, deploy, and monitor your workloads. Just as we recently launched free data transfer out to the internet (DTO) when you want to move outside of AWS, we are committed to helping you be successful regardless of your approach.

Now that I have explained our approach and highlighted some of the principal multicloud service offerings, let’s take a look at a few of the newest multicloud and hybrid capabilities.

Multicloud launches
Since the beginning of 2023 we have launched eighteen new multicloud capabilities to existing AWS services, including 15 for data & analytics, 1 for security, and 2 for identity. Many of these launches add to the existing multicloud capabilities of the respective services:

AWS DataSync – This service transfers data between storage services. In addition to existing support for Google Cloud Storage, Azure Files, and Azure Blob Storage, we added support for five additional cloud service providers and storage services including Oracle Cloud Storage and DigitalOcean Spaces (full list). To learn more about this service, read What is AWS DataSync. To get started, I create a source location:

AWS Glue – This data integration service helps you to discover, prepare, and integrate all of your data at any scale. You can use it to connect to more than 80 different data sources, including cloud databases and analytics services. In October 2023, we introduced additional new connectors that allow you to move data bidirectionally between Amazon Simple Storage Service (Amazon S3), and either Azure Blob Storage or Azure Data Lake Storage (full list). We also launched six database connectors for AWS Glue for Apache Spark, including Teradata, SAP HANA, Azure SQL, Azure Cosmos DB, Vertica, and MongoDB (full list). To learn more about AWS Glue, read What is AWS Glue. I create a visual job flow to get started:

Amazon Athena – This serverless analytics service lets you use interactive SQL queries to analyze petabyte-scale data where it lives (more than 25 external data sources, including other cloud data stores), without copying or transforming it. Last year we added a new data source connector that allows you to query data in Google Cloud Storage. To learn more about Amazon Athena, read What is Amazon Athena.

Amazon AppFlow – You can take advantage of data and analytics in Google BigQuery using a connector available in Amazon AppFlow. To get started with Amazon AppFlow I create a flow and configure a data source:

Amazon Security Lake – This service helps you to achieve a more complete, organization-wide view of your security posture. It centralizes security data from your AWS environments, SaaS providers, on-premises environments, and cloud sources (Azure and GCP) into a purpose-built data lake. It became generally available last year, and now supports collection and analysis of security data from sources that support the Open Cybersecurity Schema Framework (OCSF) standard—more than 80 sources (full list).

AWS Secrets Manager – This service centrally manages secrets such as database credentials and API keys. Secrets are securely encrypted and can be centrally audited, with support for replication to support disaster recovery and multi-region applications. Last year we announced that you can Use AWS Secrets Manager to store and manage secrets in on-premises or multicloud workloads. To learn more, read What is AWS Secrets Manager.

AWS Identity and Access Management (IAM) – AWS IAM Identity Center now supports automated user provisioning from Google Workspace. The integration helps administrators simplify AWS access management across multiple accounts while maintaining familiar Google Workspace experiences for end users as they sign in.

Amazon CloudWatch – This service lets you query, visualize, and alarm on metrics of all sorts: application, AWS, on-premises, and multicloud. At re:Invent 2023 we added even more support for consolidation of hybrid, multicloud, and on-premises metrics. This new feature allows you to select and configure connectors that pull data from Amazon Managed Service for Prometheus, generic Prometheus, Amazon OpenSearch Service, Amazon RDS for MySQL, Amazon RDS for PostgreSQL, CSV files stored in Amazon Simple Storage Service (Amazon S3), and Microsoft Azure Monitor.

Multicloud content and guidance
Now that you know about some of our latest multicloud launches, let’s take a look at some of the blog posts and other content that my colleagues have created.

First, some blog posts:

Next, some of the most popular multicloud videos from AWS re:Invent 2023:

And finally, be sure to bookmark the AWS Solutions for Hybrid and Multicloud page.

We’re here to help
If you are running in a multicloud environment and are ready to simplify and centralize, be sure to reach out to your AWS Account Manager (AM) or Technical Account Manager (TAM). Both will be happy to help!

— Jeff;

Secure communications for elections and political campaigns with AWS Wickr

Post Syndicated from Anne Grahn original https://aws.amazon.com/blogs/messaging-and-targeting/secure-communications-for-elections-and-political-campaigns-with-aws-wickr/

Access to security tools and resources that protect information, identities, applications, and devices is essential to the election process. Political parties are looking to strengthen their security strategies; however, campaign and election budgets typically leave little to spend on products and services.

To support the need for election campaign cybersecurity, Amazon Web Services (AWS) collaborates with Defending Digital Campaigns (DDC) to make more than 20 cybersecurity-related AWS services—including AWS Wickr—available at little to no cost to national party committees and federal candidate committees for US elections that are eligible in accordance with DDC and Federal Election Commission (FEC) criteria. This facilitates a wide range of security capabilities.

“Having a platform for secure and private communications is a core cybersecurity recommendation for every campaign. Wickr fills that need, and we greatly appreciate their partnership.” – Michael Kaiser, president and CEO of DDC.

This post highlights how AWS Wickr is helping campaign and election teams protect sensitive communications.

What is Wickr?

Wickr is a security-first messaging and collaboration service with features designed to help you keep internal and external communications secure, private, and compliant. Wickr protects one-to-one and group messaging, voice and video calling, file sharing, screen sharing, and location sharing with end-to-end encryption, and provides administrative controls and data retention capabilities.

With Wickr, every message, call, and file is encrypted with unique keys on the sending device (your smartphone, for example), and remains secure in transit. Unauthorized parties cannot access communication content, because they don’t have the keys required to decrypt the data.

You can create Wickr rooms to allow team members to collaborate safely. Burn-on-read (BOR) and expiration timers can be set for each room or message. This allows you to automatically delete a message once it has been read by its recipients or destroy sent messages and files after a set amount of time (anywhere from 1 minute to 365 days). Federation and guest access features allow users to communicate securely with external stakeholders.

Wickr networks can be created through the AWS Management Console, and workflows can be automated with Wickr bots.

Campaign benefits

Campaign communications can be especially vulnerable to interception and theft. Political organizations on both sides of the aisle are looking for ways to securely send and receive sensitive information and files—and an increasing number of them are turning to Wickr.

The Democratic Senatorial Campaign Committee (DSCC), for example, previously relied on email as its primary internal and external communication channel. While best practices and cybersecurity education were prioritized, streamlining communications had become difficult, with email threads lasting well beyond their useful lifespan. Making matters worse, in sensitive situations, staff members lacked a reliable way to collaborate securely on ideas and courses of action.

The committee quickly deployed Wickr to its entire staff—and to consultants working on critical initiatives both internally and with candidates—across desktop and mobile devices to ensure that communications could only be accessed by intended recipients.

The security and administrative controls Wickr provides helped protect messages, calls, and files from threats and allowed the use of group emails that discuss sensitive and strategic information to be eliminated. Staff increased efficiency by creating Wickr rooms for rapid-response teams so that consultants, in collaboration with the organization’s staff, could plan and execute campaign responses without the risk of those communications being exposed to unauthorized parties. They also gained the ability to remotely wipe communications from lost or stolen devices.

“Wickr allows our Senate campaigns to conduct private and encrypted communications, which is critical to them increasing their security posture.” – Ryan Borkenhagen, director of information security and technology for the Democratic Senatorial Campaign Committee (DSCC)

In addition to political organizations, public sector customers such as the U.S. Army Telemedicine & Advanced Technology Research Center (TATRC) and Air Force Special Operations Command (AFSOC), nonprofit organizations such as Operation Recovery, and a variety of private-sector customers use Wickr for secure communication use cases.

Wickr is Federal Risk and Authorization Management Program (FedRAMP) authorized at the Moderate impact level in the AWS US East (N. Virginia) Region, and FedRamp High authorized in the AWS GovCloud (US-West) Region. Wickr is also authorized for Department of Defense Cloud Computing Security Requirements Guide Impact Level 4 and 5 (DoD CC SRG IL4 and IL5) in the AWS GovCloud (US-West) Region, and meets compliance programs and standards such as Health Insurance Portability and Accountability Act (HIPAA) eligibility, International Organization for Standardization (ISO) 27001, and System and Organization Controls (SOC) 1,2, and 3.

Get started

If your campaign or committee is interested in using AWS services such as Wickr, click here to enroll in AWS security services for federal political campaigns. To learn more about how AWS can support election campaign cybersecurity, visit the AWS Public Sector Blog. For more information about Wickr, visit Amazon.com or email [email protected].

About the authors

Randy Brumfield
Randy is a Principle Business Development lead for AWS Wickr and has been the Wickr organization since 2017. Randy works closely with the Public Sector community including DoD, fed-Civ and Mission Partners. Prior to joining AWS, Randy spent close to two and a half decades in Silicon Valley across several start-ups, networking companies, and system integrators in various corporate development, product management, and operations roles. Randy currently resides in San Jose, California.
Anne Grahn
Anne is a Senior Worldwide Security GTM Specialist at AWS, based in Chicago. She has 14 years of experience in the security industry, and focuses on effectively communicating cybersecurity risk. She maintains a Certified Information Systems Security Professional (CISSP) certification.


AWS revalidates its AAA Pinakes rating for Spanish financial entities

Post Syndicated from Daniel Fuertes original https://aws.amazon.com/blogs/security/aws-revalidates-its-aaa-pinakes-rating-for-spanish-financial-entities/

Amazon Web Services (AWS) is pleased to announce that we have revalidated our AAA rating for the Pinakes qualification system. The scope of this requalification covers 171 services in 31 global AWS Regions.

Pinakes is a security rating framework developed by the Spanish banking association Centro de Cooperación Interbancaria (CCI) to facilitate the management and monitoring of the security posture of service providers that work with Spanish financial entities.

Pinakes assesses the cybersecurity proficiency of service providers through 1,315 requirements distributed across four categories (confidentiality, integrity, availability of information, and general) and 14 domains:

  • Information security management program
  • Facilities security
  • Third-party management
  • Normative compliance
  • Network controls
  • Access controls
  • Incident management
  • Encryption
  • Secure development
  • Monitoring
  • Malware protection
  • Resilience
  • Systems operation
  • Staff safety

Each requirement is associated to a rating level (A+, A, B, C, D), ranging from the highest A+ (the provider has implemented the most diligent measures and controls for cybersecurity management) to the lowest D (minimum security requirements are met).

The qualification process involves an independent third-party auditor verifying the implementation status for each section.

AWS has renewed its A ratings for confidentiality, integrity, and availability, culminating in an overall security rating of AAA. This recognition highlights AWS solid cybersecurity controls and commitment to safeguarding the interests of our Spanish financial customers.

The full control matrix will be published on AWS Artifact upon request. Pinakes participants who are AWS customers can contact their AWS account manager to request access to the matrix.

As always, we value your feedback and questions. Reach out to the AWS Compliance team through the Contact Us page. To learn more about our other compliance and security programs, see AWS Compliance Programs.

 
If you have feedback about this post, please submit them in the Comments section below.

Daniel Fuertes

Daniel Fuertes
Daniel is a Security Audit Program Manager at AWS, based in Madrid, Spain. Daniel leads multiple security audits, attestations, and certification programs in Spain and other EMEA countries. Daniel has ten years of experience in security assurance and compliance, including previous experience as an auditor for the PCI DSS security framework. He holds the CISSP, PCIP, and ISO 27001 Lead Auditor certifications.

Java 21 Virtual Threads – Dude, Where’s My Lock?

Post Syndicated from Netflix Technology Blog original https://netflixtechblog.com/java-21-virtual-threads-dude-wheres-my-lock-3052540e231d

Getting real with virtual threads

By Vadim Filanovsky, Mike Huang, Danny Thomas and Martin Chalupa

Intro

Netflix has an extensive history of using Java as our primary programming language across our vast fleet of microservices. As we pick up newer versions of Java, our JVM Ecosystem team seeks out new language features that can improve the ergonomics and performance of our systems. In a recent article, we detailed how our workloads benefited from switching to generational ZGC as our default garbage collector when we migrated to Java 21. Virtual threads is another feature we are excited to adopt as part of this migration.

For those new to virtual threads, they are described as “lightweight threads that dramatically reduce the effort of writing, maintaining, and observing high-throughput concurrent applications.” Their power comes from their ability to be suspended and resumed automatically via continuations when blocking operations occur, thus freeing the underlying operating system threads to be reused for other operations. Leveraging virtual threads can unlock higher performance when utilized in the appropriate context.

In this article we discuss one of the peculiar cases that we encountered along our path to deploying virtual threads on Java 21.

The problem

Netflix engineers raised several independent reports of intermittent timeouts and hung instances to the Performance Engineering and JVM Ecosystem teams. Upon closer examination, we noticed a set of common traits and symptoms. In all cases, the apps affected ran on Java 21 with SpringBoot 3 and embedded Tomcat serving traffic on REST endpoints. The instances that experienced the issue simply stopped serving traffic even though the JVM on those instances remained up and running. One clear symptom characterizing the onset of this issue is a persistent increase in the number of sockets in closeWait state as illustrated by the graph below:

Collected diagnostics

Sockets remaining in closeWait state indicate that the remote peer closed the socket, but it was never closed on the local instance, presumably because the application failed to do so. This can often indicate that the application is hanging in an abnormal state, in which case application thread dumps may reveal additional insight.

In order to troubleshoot this issue, we first leveraged our alerts system to catch an instance in this state. Since we periodically collect and persist thread dumps for all JVM workloads, we can often retroactively piece together the behavior by examining these thread dumps from an instance. However, we were surprised to find that all our thread dumps show a perfectly idle JVM with no clear activity. Reviewing recent changes revealed that these impacted services enabled virtual threads, and we knew that virtual thread call stacks do not show up in jstack-generated thread dumps. To obtain a more complete thread dump containing the state of the virtual threads, we used the “jcmd Thread.dump_to_file” command instead. As a last-ditch effort to introspect the state of JVM, we also collected a heap dump from the instance.

Analysis

Thread dumps revealed thousands of “blank” virtual threads:

#119821 "" virtual

#119820 "" virtual

#119823 "" virtual

#120847 "" virtual

#119822 "" virtual
...

These are the VTs (virtual threads) for which a thread object is created, but has not started running, and as such, has no stack trace. In fact, there were approximately the same number of blank VTs as the number of sockets in closeWait state. To make sense of what we were seeing, we need to first understand how VTs operate.

A virtual thread is not mapped 1:1 to a dedicated OS-level thread. Rather, we can think of it as a task that is scheduled to a fork-join thread pool. When a virtual thread enters a blocking call, like waiting for a Future, it relinquishes the OS thread it occupies and simply remains in memory until it is ready to resume. In the meantime, the OS thread can be reassigned to execute other VTs in the same fork-join pool. This allows us to multiplex a lot of VTs to just a handful of underlying OS threads. In JVM terminology, the underlying OS thread is referred to as the “carrier thread” to which a virtual thread can be “mounted” while it executes and “unmounted” while it waits. A great in-depth description of virtual thread is available in JEP 444.

In our environment, we utilize a blocking model for Tomcat, which in effect holds a worker thread for the lifespan of a request. By enabling virtual threads, Tomcat switches to virtual execution. Each incoming request creates a new virtual thread that is simply scheduled as a task on a Virtual Thread Executor. We can see Tomcat creates a VirtualThreadExecutor here.

Tying this information back to our problem, the symptoms correspond to a state when Tomcat keeps creating a new web worker VT for each incoming request, but there are no available OS threads to mount them onto.

Why is Tomcat stuck?

What happened to our OS threads and what are they busy with? As described here, a VT will be pinned to the underlying OS thread if it performs a blocking operation while inside a synchronized block or method. This is exactly what is happening here. Here is a relevant snippet from a thread dump obtained from the stuck instance:

#119515 "" virtual
java.base/jdk.internal.misc.Unsafe.park(Native Method)
java.base/java.lang.VirtualThread.parkOnCarrierThread(VirtualThread.java:661)
java.base/java.lang.VirtualThread.park(VirtualThread.java:593)
java.base/java.lang.System$2.parkVirtualThread(System.java:2643)
java.base/jdk.internal.misc.VirtualThreads.park(VirtualThreads.java:54)
java.base/java.util.concurrent.locks.LockSupport.park(LockSupport.java:219)
java.base/java.util.concurrent.locks.AbstractQueuedSynchronizer.acquire(AbstractQueuedSynchronizer.java:754)
java.base/java.util.concurrent.locks.AbstractQueuedSynchronizer.acquire(AbstractQueuedSynchronizer.java:990)
java.base/java.util.concurrent.locks.ReentrantLock$Sync.lock(ReentrantLock.java:153)
java.base/java.util.concurrent.locks.ReentrantLock.lock(ReentrantLock.java:322)
zipkin2.reporter.internal.CountBoundedQueue.offer(CountBoundedQueue.java:54)
zipkin2.reporter.internal.AsyncReporter$BoundedAsyncReporter.report(AsyncReporter.java:230)
zipkin2.reporter.brave.AsyncZipkinSpanHandler.end(AsyncZipkinSpanHandler.java:214)
brave.internal.handler.NoopAwareSpanHandler$CompositeSpanHandler.end(NoopAwareSpanHandler.java:98)
brave.internal.handler.NoopAwareSpanHandler.end(NoopAwareSpanHandler.java:48)
brave.internal.recorder.PendingSpans.finish(PendingSpans.java:116)
brave.RealSpan.finish(RealSpan.java:134)
brave.RealSpan.finish(RealSpan.java:129)
io.micrometer.tracing.brave.bridge.BraveSpan.end(BraveSpan.java:117)
io.micrometer.tracing.annotation.AbstractMethodInvocationProcessor.after(AbstractMethodInvocationProcessor.java:67)
io.micrometer.tracing.annotation.ImperativeMethodInvocationProcessor.proceedUnderSynchronousSpan(ImperativeMethodInvocationProcessor.java:98)
io.micrometer.tracing.annotation.ImperativeMethodInvocationProcessor.process(ImperativeMethodInvocationProcessor.java:73)
io.micrometer.tracing.annotation.SpanAspect.newSpanMethod(SpanAspect.java:59)
java.base/jdk.internal.reflect.DirectMethodHandleAccessor.invoke(DirectMethodHandleAccessor.java:103)
java.base/java.lang.reflect.Method.invoke(Method.java:580)
org.springframework.aop.aspectj.AbstractAspectJAdvice.invokeAdviceMethodWithGivenArgs(AbstractAspectJAdvice.java:637)
...

In this stack trace, we enter the synchronization in brave.RealSpan.finish(RealSpan.java:134). This virtual thread is effectively pinned — it is mounted to an actual OS thread even while it waits to acquire a reentrant lock. There are 3 VTs in this exact state and another VT identified as “<redacted> @DefaultExecutor – 46542” that also follows the same code path. These 4 virtual threads are pinned while waiting to acquire a lock. Because the app is deployed on an instance with 4 vCPUs, the fork-join pool that underpins VT execution also contains 4 OS threads. Now that we have exhausted all of them, no other virtual thread can make any progress. This explains why Tomcat stopped processing the requests and why the number of sockets in closeWait state keeps climbing. Indeed, Tomcat accepts a connection on a socket, creates a request along with a virtual thread, and passes this request/thread to the executor for processing. However, the newly created VT cannot be scheduled because all of the OS threads in the fork-join pool are pinned and never released. So these newly created VTs are stuck in the queue, while still holding the socket.

Who has the lock?

Now that we know VTs are waiting to acquire a lock, the next question is: Who holds the lock? Answering this question is key to understanding what triggered this condition in the first place. Usually a thread dump indicates who holds the lock with either “- locked <0x…> (at …)” or “Locked ownable synchronizers,” but neither of these show up in our thread dumps. As a matter of fact, no locking/parking/waiting information is included in the jcmd-generated thread dumps. This is a limitation in Java 21 and will be addressed in the future releases. Carefully combing through the thread dump reveals that there are a total of 6 threads contending for the same ReentrantLock and associated Condition. Four of these six threads are detailed in the previous section. Here is another thread:

#119516 "" virtual
java.base/java.lang.VirtualThread.park(VirtualThread.java:582)
java.base/java.lang.System$2.parkVirtualThread(System.java:2643)
java.base/jdk.internal.misc.VirtualThreads.park(VirtualThreads.java:54)
java.base/java.util.concurrent.locks.LockSupport.park(LockSupport.java:219)
java.base/java.util.concurrent.locks.AbstractQueuedSynchronizer.acquire(AbstractQueuedSynchronizer.java:754)
java.base/java.util.concurrent.locks.AbstractQueuedSynchronizer.acquire(AbstractQueuedSynchronizer.java:990)
java.base/java.util.concurrent.locks.ReentrantLock$Sync.lock(ReentrantLock.java:153)
java.base/java.util.concurrent.locks.ReentrantLock.lock(ReentrantLock.java:322)
zipkin2.reporter.internal.CountBoundedQueue.offer(CountBoundedQueue.java:54)
zipkin2.reporter.internal.AsyncReporter$BoundedAsyncReporter.report(AsyncReporter.java:230)
zipkin2.reporter.brave.AsyncZipkinSpanHandler.end(AsyncZipkinSpanHandler.java:214)
brave.internal.handler.NoopAwareSpanHandler$CompositeSpanHandler.end(NoopAwareSpanHandler.java:98)
brave.internal.handler.NoopAwareSpanHandler.end(NoopAwareSpanHandler.java:48)
brave.internal.recorder.PendingSpans.finish(PendingSpans.java:116)
brave.RealScopedSpan.finish(RealScopedSpan.java:64)
...

Note that while this thread seemingly goes through the same code path for finishing a span, it does not go through a synchronized block. Finally here is the 6th thread:

#107 "AsyncReporter <redacted>"
java.base/jdk.internal.misc.Unsafe.park(Native Method)
java.base/java.util.concurrent.locks.LockSupport.park(LockSupport.java:221)
java.base/java.util.concurrent.locks.AbstractQueuedSynchronizer.acquire(AbstractQueuedSynchronizer.java:754)
java.base/java.util.concurrent.locks.AbstractQueuedSynchronizer$ConditionObject.awaitNanos(AbstractQueuedSynchronizer.java:1761)
zipkin2.reporter.internal.CountBoundedQueue.drainTo(CountBoundedQueue.java:81)
zipkin2.reporter.internal.AsyncReporter$BoundedAsyncReporter.flush(AsyncReporter.java:241)
zipkin2.reporter.internal.AsyncReporter$Flusher.run(AsyncReporter.java:352)
java.base/java.lang.Thread.run(Thread.java:1583)

This is actually a normal platform thread, not a virtual thread. Paying particular attention to the line numbers in this stack trace, it is peculiar that the thread seems to be blocked within the internal acquire() method after completing the wait. In other words, this calling thread owned the lock upon entering awaitNanos(). We know the lock was explicitly acquired here. However, by the time the wait completed, it could not reacquire the lock. Summarizing our thread dump analysis:

There are 5 virtual threads and 1 regular thread waiting for the lock. Out of those 5 VTs, 4 of them are pinned to the OS threads in the fork-join pool. There’s still no information on who owns the lock. As there’s nothing more we can glean from the thread dump, our next logical step is to peek into the heap dump and introspect the state of the lock.

Inspecting the lock

Finding the lock in the heap dump was relatively straightforward. Using the excellent Eclipse MAT tool, we examined the objects on the stack of the AsyncReporter non-virtual thread to identify the lock object. Reasoning about the current state of the lock was perhaps the trickiest part of our investigation. Most of the relevant code can be found in the AbstractQueuedSynchronizer.java. While we don’t claim to fully understand the inner workings of it, we reverse-engineered enough of it to match against what we see in the heap dump. This diagram illustrates our findings:

First off, the exclusiveOwnerThread field is null (2), signifying that no one owns the lock. We have an “empty” ExclusiveNode (3) at the head of the list (waiter is null and status is cleared) followed by another ExclusiveNode with waiter pointing to one of the virtual threads contending for the lock — #119516 (4). The only place we found that clears the exclusiveOwnerThread field is within the ReentrantLock.Sync.tryRelease() method (source link). There we also set state = 0 matching the state that we see in the heap dump (1).

With this in mind, we traced the code path to release() the lock. After successfully calling tryRelease(), the lock-holding thread attempts to signal the next waiter in the list. At this point, the lock-holding thread is still at the head of the list, even though ownership of the lock is effectively released. The next node in the list points to the thread that is about to acquire the lock.

To understand how this signaling works, let’s look at the lock acquire path in the AbstractQueuedSynchronizer.acquire() method. Grossly oversimplifying, it’s an infinite loop, where threads attempt to acquire the lock and then park if the attempt was unsuccessful:

while(true) {
if (tryAcquire()) {
return; // lock acquired
}
park();
}

When the lock-holding thread releases the lock and signals to unpark the next waiter thread, the unparked thread iterates through this loop again, giving it another opportunity to acquire the lock. Indeed, our thread dump indicates that all of our waiter threads are parked on line 754. Once unparked, the thread that managed to acquire the lock should end up in this code block, effectively resetting the head of the list and clearing the reference to the waiter.

To restate this more concisely, the lock-owning thread is referenced by the head node of the list. Releasing the lock notifies the next node in the list while acquiring the lock resets the head of the list to the current node. This means that what we see in the heap dump reflects the state when one thread has already released the lock but the next thread has yet to acquire it. It’s a weird in-between state that should be transient, but our JVM is stuck here. We know thread #119516 was notified and is about to acquire the lock because of the ExclusiveNode state we identified at the head of the list. However, thread dumps show that thread #119516 continues to wait, just like other threads contending for the same lock. How can we reconcile what we see between the thread and heap dumps?

The lock with no place to run

Knowing that thread #119516 was actually notified, we went back to the thread dump to re-examine the state of the threads. Recall that we have 6 total threads waiting for the lock with 4 of the virtual threads each pinned to an OS thread. These 4 will not yield their OS thread until they acquire the lock and proceed out of the synchronized block. #107 “AsyncReporter <redacted>” is a regular platform thread, so nothing should prevent it from proceeding if it acquires the lock. This leaves us with the last thread: #119516. It is a VT, but it is not pinned to an OS thread. Even if it’s notified to be unparked, it cannot proceed because there are no more OS threads left in the fork-join pool to schedule it onto. That’s exactly what happens here — although #119516 is signaled to unpark itself, it cannot leave the parked state because the fork-join pool is occupied by the 4 other VTs waiting to acquire the same lock. None of those pinned VTs can proceed until they acquire the lock. It’s a variation of the classic deadlock problem, but instead of 2 locks we have one lock and a semaphore with 4 permits as represented by the fork-join pool.

Now that we know exactly what happened, it was easy to come up with a reproducible test case.

Conclusion

Virtual threads are expected to improve performance by reducing overhead related to thread creation and context switching. Despite some sharp edges as of Java 21, virtual threads largely deliver on their promise. In our quest for more performant Java applications, we see further virtual thread adoption as a key towards unlocking that goal. We look forward to Java 23 and beyond, which brings a wealth of upgrades and hopefully addresses the integration between virtual threads and locking primitives.

This exploration highlights just one type of issue that performance engineers solve at Netflix. We hope this glimpse into our problem-solving approach proves valuable to others in their future investigations.


Java 21 Virtual Threads – Dude, Where’s My Lock? was originally published in Netflix TechBlog on Medium, where people are continuing the conversation by highlighting and responding to this story.

The collective thoughts of the interwebz