Post Syndicated from The History Guy: History Deserves to Be Remembered original https://www.youtube.com/watch?v=Wp80yYqPfnc
Speaking to the CIA’s Creative Writing Group
Post Syndicated from Bruce Schneier original https://www.schneier.com/blog/archives/2024/01/speaking-to-the-cias-creative-writing-group.html
This is a fascinating story.
Last spring, a friend of a friend visited my office and invited me to Langley to speak to Invisible Ink, the CIA’s creative writing group.
I asked Vivian (not her real name) what she wanted me to talk about.
She said that the topic of the talk was entirely up to me.
I asked what level the writers in the group were.
She said the group had writers of all levels.
I asked what the speaking fee was.
She said that as far as she knew, there was no speaking fee.
What I want to know is, why haven’t I been invited? There are nonfiction writers in that group.
Improving SNMP monitoring performance with bulk SNMP data collection
Post Syndicated from Arturs Lontons original https://blog.zabbix.com/improving-snmp-monitoring-performance-with-bulk-snmp-data-collection/27231/
Zabbix 6.4 introduced major improvements to SNMP monitoring, especially when it comes to collecting large numbers of metrics from a single device. This is done by utilizing master-dependent item logic and combining it with low-level discovery and newly introduced preprocessing rules. This blog post will cover the drawbacks of the legacy SNMP monitoring approach, the benefits of the new approach, and the steps required to deploy bulk SNMP metric collection.
The legacy SNMP monitoring approach – potential pitfalls
Let’s take a look at the SNMP monitoring logic that all of us are used to. For our example here, we will look at network interface discovery on a network switch.
To start off, we create a low-level discovery rule. In the discovery rule, we specify which low-level discovery macros are collected from which OIDs. This way, we create multiple low-level discovery macro and OID pairs. Zabbix then goes through the list of indexes at the end of the specified OIDs and matches the collected values to low-level discovery macros. Zabbix also collects the list of discovered indexes for the specified OIDs and automatically matches them with the {#SNMPINDEX} low-level discovery macros.
An example of regular SNMP discovery key:
discovery[{#IFOPERSTATUS},1.3.6.1.2.1.2.2.1.8,{#IFADMINSTATUS},1.3.6.1.2.1.2.2.1.7,{#IFALIAS},1.3.6.1.2.1.31.1.1.1.18,{#IFNAME},1.3.6.1.2.1.31.1.1.1.1,{#IFDESCR},1.3.6.1.2.1.2.2.1.2,{#IFTYPE},1.3.6.1.2.1.2.2.1.3]
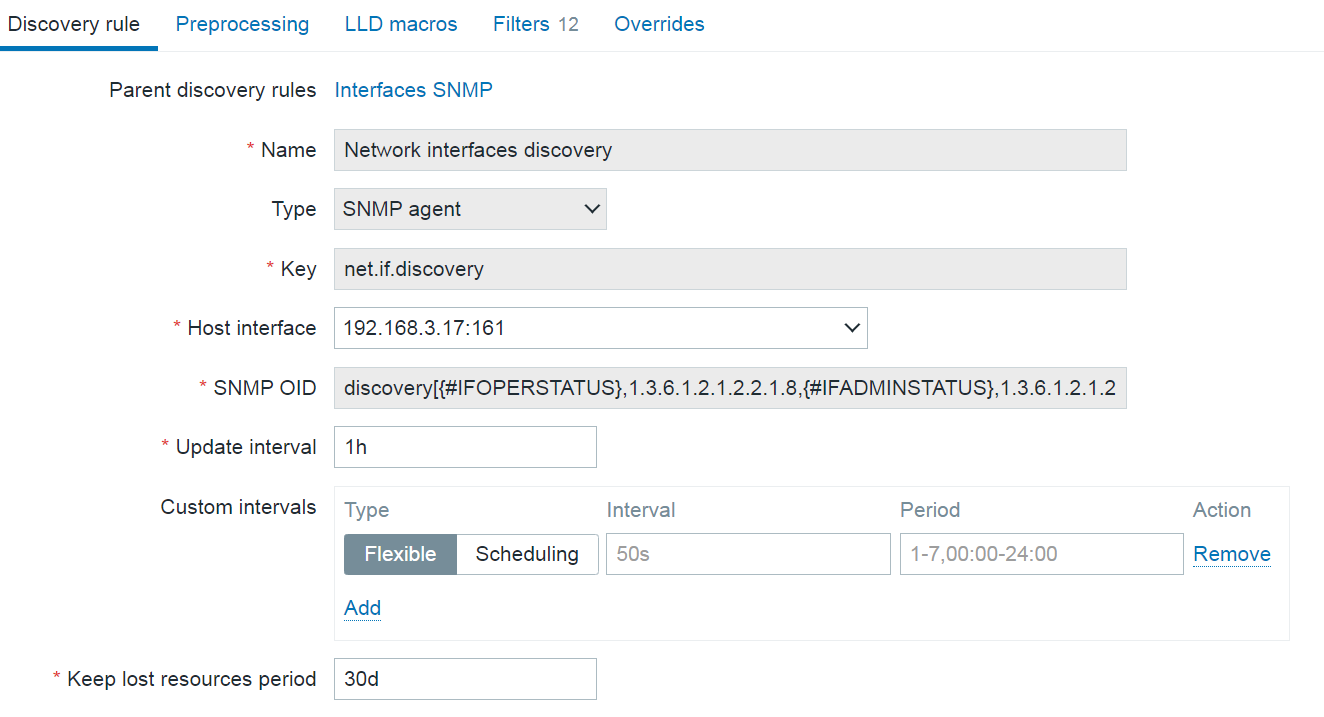
The collected low-level discovery data will look something like this:
[
{
"{#SNMPINDEX}":"3",
"{#IFOPERSTATUS}":"2",
"{#IFADMINSTATUS}":"1",
"{#IFALIAS}":"",
"{#IFNAME}":"3",
"{#IFDESCR}":"3",
"{#IFTYPE}":"6"
},
{
"{#SNMPINDEX}":"4",
"{#IFOPERSTATUS}":"2",
"{#IFADMINSTATUS}":"1",
"{#IFALIAS}":"",
"{#IFNAME}":"4",
"{#IFDESCR}":"4",
"{#IFTYPE}":"6"
},
{
"{#SNMPINDEX}":"5",
"{#IFOPERSTATUS}":"2",
"{#IFADMINSTATUS}":"1",
"{#IFALIAS}":"",
"{#IFNAME}":"5",
"{#IFDESCR}":"5",
"{#IFTYPE}":"6"
},
{
"{#SNMPINDEX}":"6",
"{#IFOPERSTATUS}":"2",
"{#IFADMINSTATUS}":"1",
"{#IFALIAS}":"",
"{#IFNAME}":"6",
"{#IFDESCR}":"6",
"{#IFTYPE}":"6"
},
{
"{#SNMPINDEX}":"7",
"{#IFOPERSTATUS}":"2",
"{#IFADMINSTATUS}":"1",
"{#IFALIAS}":"",
"{#IFNAME}":"7",
"{#IFDESCR}":"7",
"{#IFTYPE}":"6"
}
]
Once the low-level discovery rule is created, we move on to creating item prototypes.
Items created based on this item prototype will collect metrics from the OIDs specified in the SNMP OID field and will create an item per index ( {#SNMPINDEX} macro) collected by the low-level discovery rule. Note that the item type is SNMP agent – each discovered and created item will be a regular SNMP item, polling the device and collecting metrics based on the item OID.
Now, imagine we have hundreds of interfaces and we’re polling a variety of metrics at a rapid interval for each interface. If our device has older or slower hardware, this can cause an issue where the device simply cannot process that many requests. To resolve this, a better way to collect SNMP metrics is required.
Bulk data collection with master – dependent items
Before we move on to the improved SNMP metric collection approach, we need to first take a look at how master-dependent item bulk metric collection and low-level discovery logic are implemented in Zabbix.
- First, we create a master item, which collects both the metrics and low-level discovery information in a single go.
- Next, we create a low-level discovery rule of type dependent item and point at the master item created in the previous step. At this point, we need to either ensure that the data collected by the master item is formatted in JSON or convert the data to JSON by using preprocessing.
- Once we have ensured that our data is JSON-formatted, we can use the LLD macros tab to populate our low-level discovery macro values via JSONPath. Note: Here the SNMP low-level discovery with bulk metric collection uses a DIFFERENT APPROACH, designed specifically for SNMP checks.
- Finally, we create item prototypes of type dependent item and once again point them at the master item created in the first step (Remember – our master item contains not only low-level discovery information, but also all of the required metrics). Here we use JSONPath preprocessing together with low-level discovery macros to specify which values should be collected. Remember that low-level discovery macros will be resolved to their values for each of the items created from the item prototype.
Improving SNMP monitoring performance with bulk metric collection
The SNMP bulk metric collection and discovery logic is very similar to what is discussed in the previous section, but it is more tailored to SNMP nuances.
Here, to avoid excessive polling, a new walk[] item has been introduced. The item utilizes GetBulk requests with SNMPv2 and v3 interfaces and GetNext for SNMPv1 interfaces to collect SNMP data. GetBulk requests perform much better by design. A GetBulk request retrieves values of all instances at the end of the OID tree in a single go, instead of issuing individual Get requests per each instance.
To utilize this in Zabbix, first we have to create a walk[] master item, specifying the list of OIDs from which to collect values. The retrieved values will be used in both low-level discovery (e.g.: interface names) and items created from low-level discovery item prototypes (e.g.: incoming and outgoing traffic).
Two new preprocessing steps have been introduced to facilitate SNMP bulk data collection:
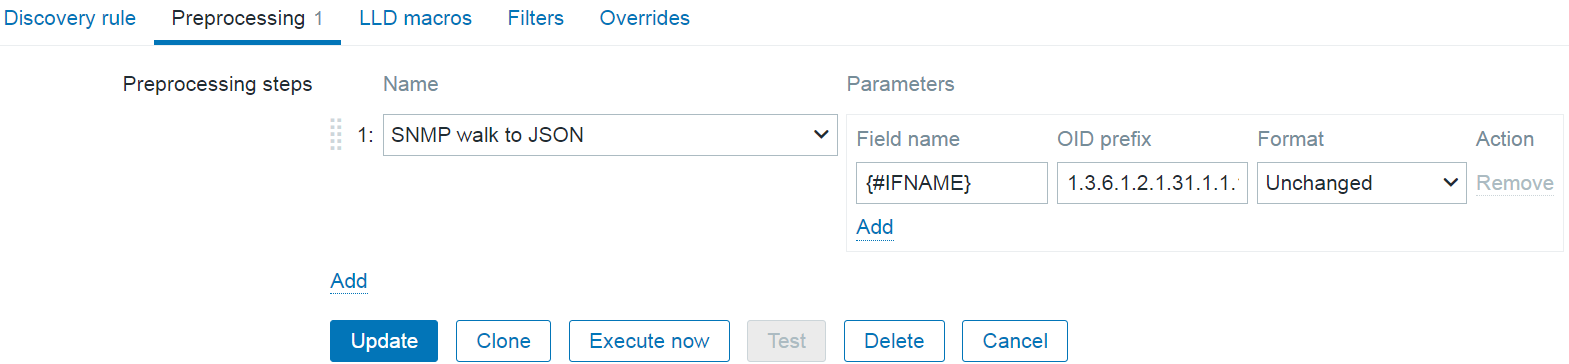
- SNMP walk to JSON is used to specify the OIDs from which the low-level discovery macros will be populated with their values
- SNMP walk value is used in the item prototypes to specify the OID from which the item value will be collected
The workflow for SNMP bulk data collection can be described in the following steps:
- Create a master walk[] item containing the required OIDs
- Create a low-level discovery rule of type dependent item which depends on the walk[] master item
- Define low-level discovery macros by using the SNMP walk to JSON preprocessing step
- Create item prototypes of type dependent item which depend on the walk[] master item, and use the SNMP walk value preprocessing step to specify which OID should be used for value collection
Monitoring interface traffic with bulk SNMP data collection
Let’s take a look at a simple example which you can use as a starting point for implementing bulk SNMP metric collection for your devices. In the following example we will create a master walk[] item, a dependent low-level discovery rule to discover network interfaces, and dependent item prototypes for incoming and outgoing traffic.
Creating the master item
We will start by creating the walk[] SNMP agent master item. The name and the key of the item can be specified arbitrarily. What’s important here is the OID field, where we will specify the list of comma separated OIDs from which their instance values will be collected.
walk[1.3.6.1.2.1.31.1.1.1.6,1.3.6.1.2.1.31.1.1.1.10,1.3.6.1.2.1.31.1.1.1.1,1.3.6.1.2.1.2.2.1.2,1.3.6.1.2.1.2.2.1.3]
The walk[] item will collect values from the following OIDs:
- 1.3.6.1.2.1.31.1.1.1.6 – Incoming traffic
- 1.3.6.1.2.1.31.1.1.1.10 – Outgoing traffic
- 1.3.6.1.2.1.31.1.1.1.1 – Interface names
- 1.3.6.1.2.1.2.2.1.2 – Interface descriptions
- 1.3.6.1.2.1.2.2.1.3 – Interface types
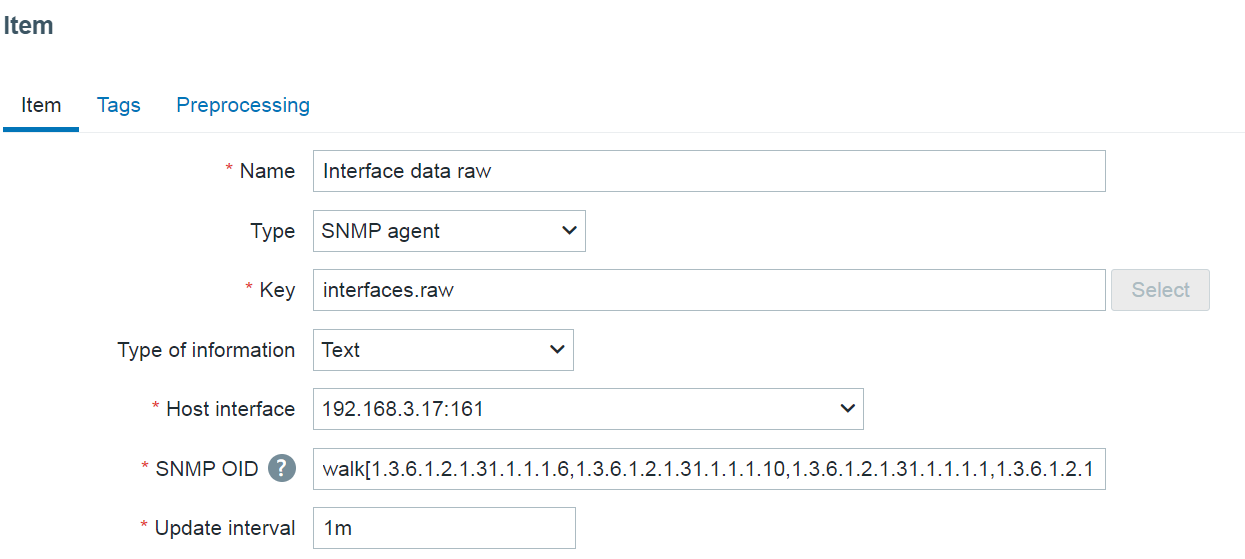
Here we can see the resulting values collected by this item:
Note: For readability, the output has been truncated and some of the interfaces have been left out.
.1.3.6.1.2.1.2.2.1.2.102 = STRING: DEFAULT_VLAN
.1.3.6.1.2.1.2.2.1.2.104 = STRING: VLAN3
.1.3.6.1.2.1.2.2.1.2.105 = STRING: VLAN4
.1.3.6.1.2.1.2.2.1.2.106 = STRING: VLAN5
.1.3.6.1.2.1.2.2.1.2.4324 = STRING: Switch loopback interface
.1.3.6.1.2.1.2.2.1.3.102 = INTEGER: 53
.1.3.6.1.2.1.2.2.1.3.104 = INTEGER: 53
.1.3.6.1.2.1.2.2.1.3.105 = INTEGER: 53
.1.3.6.1.2.1.2.2.1.3.106 = INTEGER: 53
.1.3.6.1.2.1.2.2.1.3.4324 = INTEGER: 24
.1.3.6.1.2.1.31.1.1.1.1.102 = STRING: DEFAULT_VLAN
.1.3.6.1.2.1.31.1.1.1.1.104 = STRING: VLAN3
.1.3.6.1.2.1.31.1.1.1.1.105 = STRING: VLAN4
.1.3.6.1.2.1.31.1.1.1.1.106 = STRING: VLAN5
.1.3.6.1.2.1.31.1.1.1.1.4324 = STRING: lo0
.1.3.6.1.2.1.31.1.1.1.10.102 = Counter64: 0
.1.3.6.1.2.1.31.1.1.1.10.104 = Counter64: 0
.1.3.6.1.2.1.31.1.1.1.10.105 = Counter64: 0
.1.3.6.1.2.1.31.1.1.1.10.106 = Counter64: 0
.1.3.6.1.2.1.31.1.1.1.10.4324 = Counter64: 12073
.1.3.6.1.2.1.31.1.1.1.6.102 = Counter64: 0
.1.3.6.1.2.1.31.1.1.1.6.104 = Counter64: 0
.1.3.6.1.2.1.31.1.1.1.6.105 = Counter64: 0
.1.3.6.1.2.1.31.1.1.1.6.106 = Counter64: 0
.1.3.6.1.2.1.31.1.1.1.6.4324 = Counter64: 12457
By looking at these values we can confirm that the item collects values required for both the low-level discovery rule (interface name, type, and description) and the items created from item prototypes (incoming/outgoing traffic).
Creating the low-level discovery rule
As our next step, we will create a dependent low-level discovery rule which will discover interfaces based on the data from the master walk[] item.
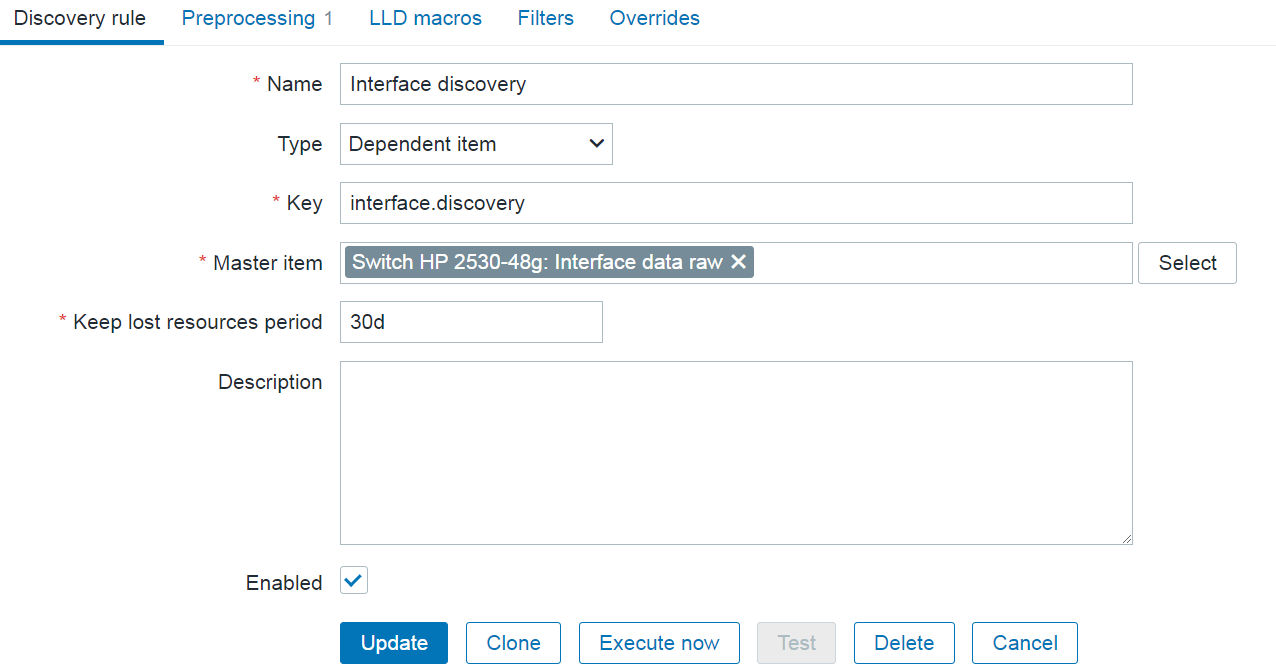
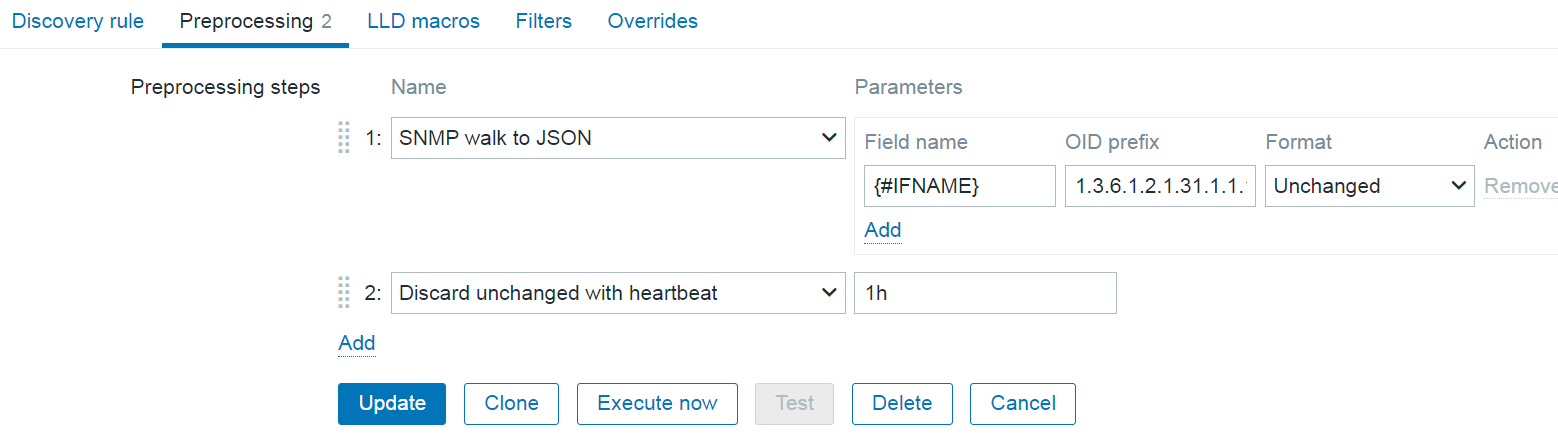
The most important part of configuring the low-level discovery rule lies in defining the SNMP walk to JSON preprocessing step. Here we can assign low-level discovery macros to OIDs. For our example, we will assign the {#IFNAME} macro to the OID containig the values of interface names:
Field name: {#IFNAME}
OID prefix: 1.3.6.1.2.1.31.1.1.1.1
The name and the key of the dependent item can be specified arbitrarily.
Creating item prototypes
Finally, let’s create two dependent item prototypes to collect traffic data from our master item.
Here we will provide an arbitrary name and key containing low-level discovery macros. On items created from the item prototypes, the macros will resolve as our OID values, thus giving each item a unique name and key.
Note: The {#SNMPINDEX} macro is automatically collected by the low-level discovery rule and contains the indexes from the OIDs specified in the SNMP walk to JSON preprocessing step.
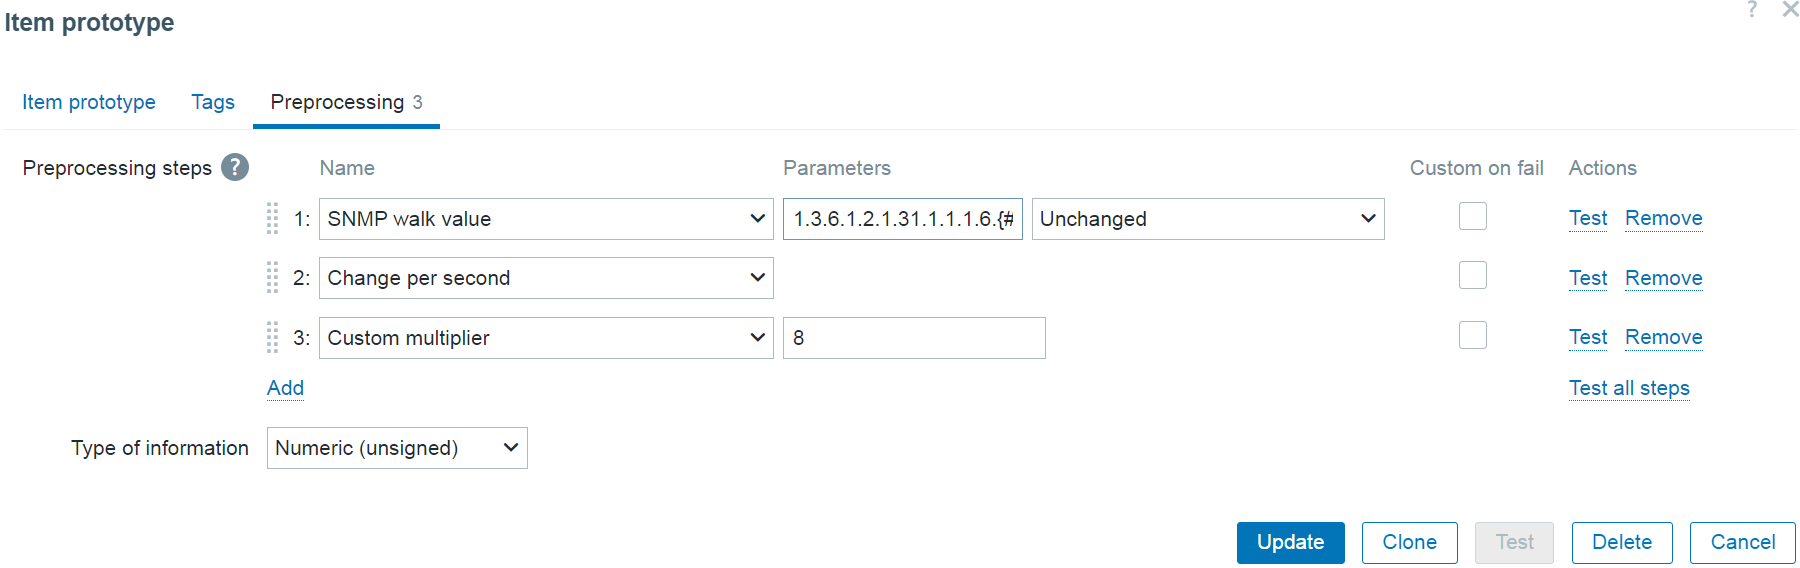
The final step in creating the item prototype is using the SNMP walk value preprocessing step to define which value will be collected by the item. We will also append the {#SNMPINDEX} macro at the end of the OID. This way, each item created from the prototype will collect data from a unique OID corresponding to the correct object instance.
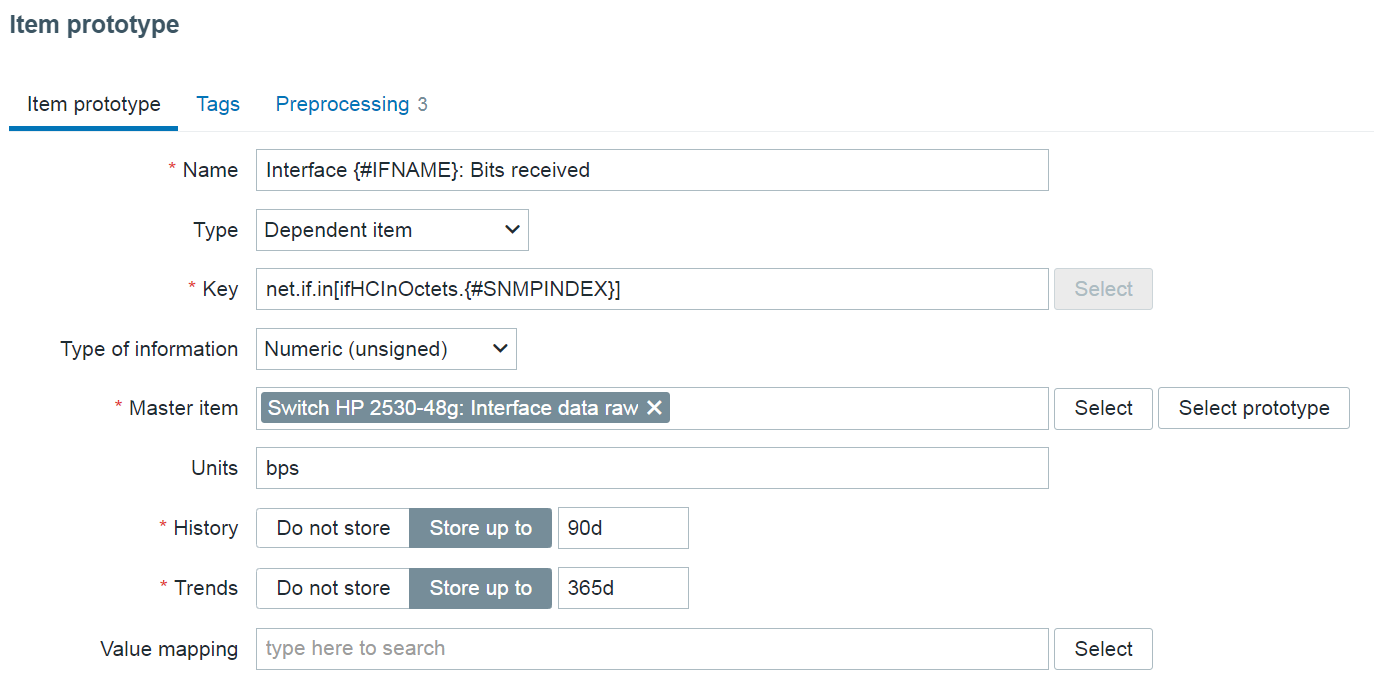
Incoming traffic item prototype preprocessing step:
SNMP walk value: 1.3.6.1.2.1.31.1.1.1.6.{#SNMPINDEX}
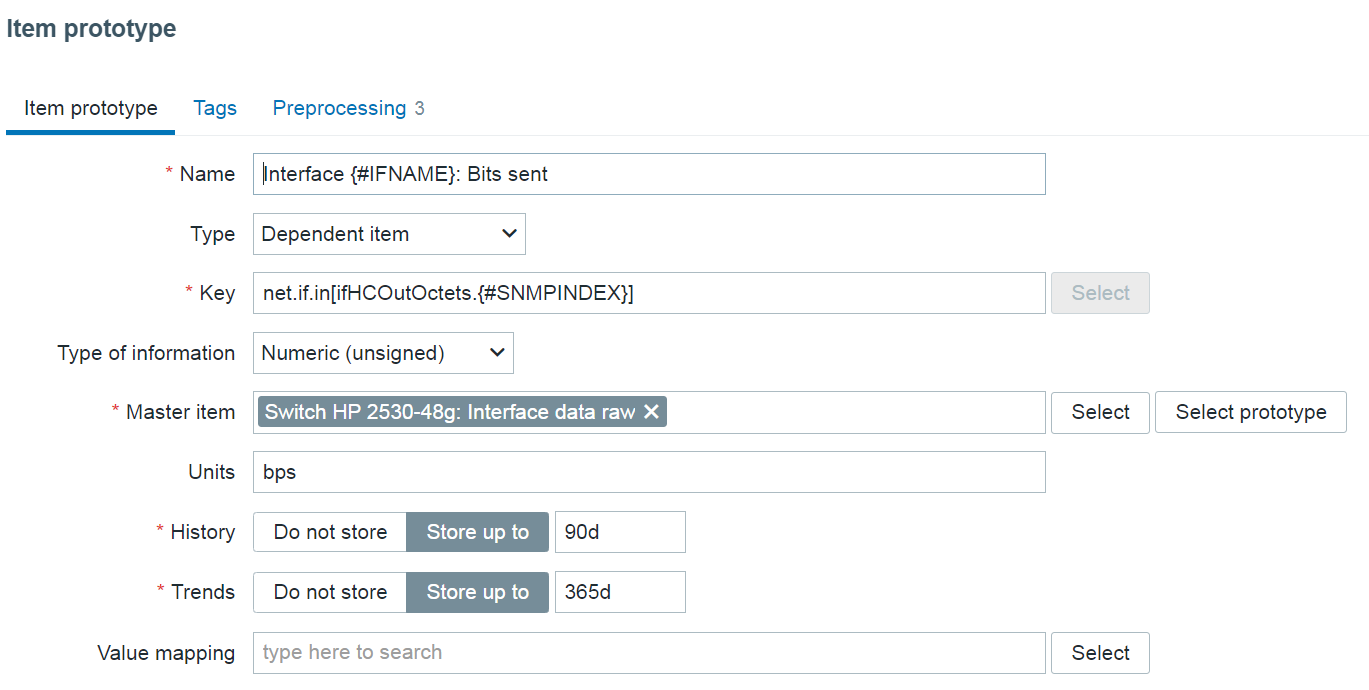
Outgoing traffic item prototype preprocessing step:
SNMP walk value: 1.3.6.1.2.1.31.1.1.1.10.{#SNMPINDEX}
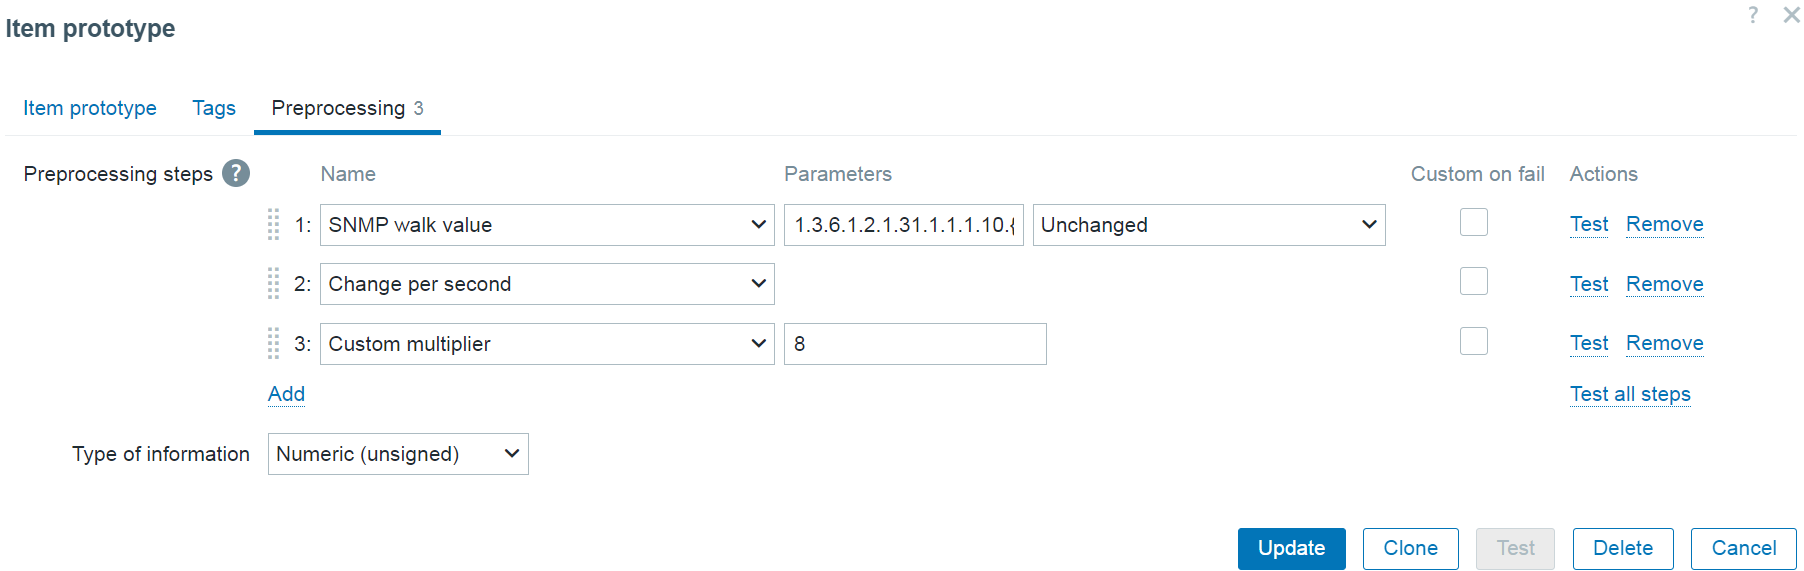
Note: Since the collected traffic values are counter values (always increasing), the Change per second preprocessing step is required to collect the traffic per second values.
Note: Since the values are collected in bytes, we will use the Custom multiplier preprocessing step to convert bytes to bits.
Final notes
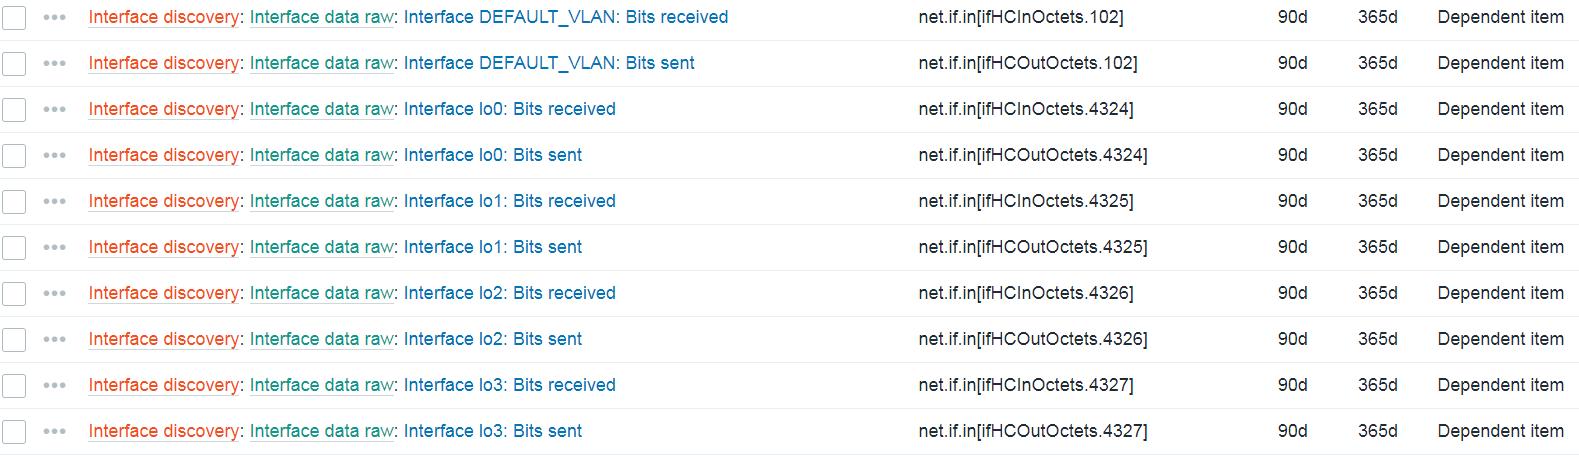
And we’re done! Now all we have to do is wait until the master item update interval kicks in and we should see our items getting discovered by the low-level discovery rule.
After we have confirmed that our interfaces are getting discovered and the items are collecting metrics from the master item, we should also implement the Discard unchanged with heartbeat preprocessing step on our low-level discovery rule. This way, the low-level discovery rule will not try and discover new entities in situations where we’re getting the same set of interfaces over and over again from our master item. This in turn improves the overall performance of internal low-level discovery processes.
Note that we discovered other interface parameters than just the interface name – interface description and type are also collected in the master item. To use this data, we would have to add additional fields in the low-level discovery rule SNMP walk to JSON preprocessing step and assign low-level discovery macros to the corresponding OIDs containing this information. Once that is done, we can use the new macros in the item prototype to provide additional information in item name or key, or filter the discovered interfaces based on this information (e.g.: only discover interfaces of a particular type).
If you have any questions, comments, or suggestions regarding a topic you wish to see covered next in our blog, don’t hesitate to leave a comment below!
The post Improving SNMP monitoring performance with bulk SNMP data collection appeared first on Zabbix Blog.
La grippe, c’est chic
Post Syndicated from original https://www.toest.bg/la-grippe-cest-chic/

Казват, че назоваването на опасностите и страховете е първата стъпка към овладяването им. В този текст ще разгледаме думи, свързани с една от главните опасности, които традиционно застрашават живота и здравето ни през зимата, а именно – сезонният грип. Тази година се очаква пикът на грипната епидемията да настъпи в края на януари. Назоваването на болестта едва ли ще ни спаси от разболяване, но вглеждането в наименованията ѝ на различни езици може поне да ни разведри, ободри и помогне да преживеем симптомите ѝ по-леко.
Дори самите симптоми сякаш придобиват по-приятен характер в превод: кашлянето, кихането и подсмърчането може и в същността си да не представляват нищо повече от досадни дейности, но с френските си наименования tousser, éternuer и renifler – макар да са също толкова ономатопеични колкото и българските – зазвучават някак по-изискано.
С преминаването от проста настинка в грип нещата стават още по-извисени:
описанието на грипните симптоми на френски звучи толкова поетично, че на човек едва ли не му се приисква тутакси да се разболее,
само и само да изпита une sensation de malaise général, un abattement, une brusque poussée de fièvre, des frissons, des maux de tête, des douleurs musculaires et articulaires, généralement suivis d'une perte d'appétit et de vertiges.
Въпреки че общото неразположение, температурата, втрисането, главоболието, болките в мускулите и ставите, загубата на апетит и световъртежът звучат значително по-прозаично, можем да открием известна утеха във факта, че българското наименование на самата болест все пак е от френски произход, благодарение на който съдържа известен чар и финес.
Според етимологичните речници думата „грип“ е заемка от френски – терминът la grippe произлиза от глагола gripper, който означава ‘грабвам, сграбчвам, хващам, обземам, улавям’.
Ето как, етимологично погледнато, се оказва, че
не ние сме тези, които хващаме грип, а грипът е този, който ни сграбчва.
Това важи и за множество други близки и далечни езици, в които названията на болестта произлизат от френската дума: албанците ги залавя gripi, баските ги обзема gripea, хърватите, босненците, словенците и латвийците ги държи gripa, литовците – gripas, a естонците – gripp, испанците и португалците ги лови gripe, чехите и словаците ги хваща chřipka, нидерландците и фламандците ги превзема griep, гърците ги сграбчва γρίπη (grípi), а германците – Grippe. И така нататък.
От този непълен списък може да видим, че думата – в различни „варианти“ – се е разпространила по света подобно на зараза. И все пак изглежда, че някои езици са устояли – ако не от епидемична, то поне от етимологична гледна точка – и вместо с термини, свързани със „завладяващия“ ѝ ефект, назовават болестта с наименования, чийто произход е още по-поетичен и извисен (второто – съвсем буквално), тъй като отдават появата ѝ на влиянието на звездите.
Както може би се досещате, става въпрос за думата influenza. През Средновековието терминът – от influentia, буквално ‘вливам се’ на средновековен латински – първоначално се използва като понятие в астрологията. То описва неуловима течност, произтичаща от звездите и планетите, за която се смятало, че влияе на човешката съдба. Когато през 1743 г. в Италия избухва заразна епидемия, италианците я наричат influenza di catarro¹, а тя – заедно с наименованието си, вече съкратено до influenza – бързо се разпространява из Европа.
Ето как в някои езици, макар и по-малобройни от гореизброените, грипът става известен под названия, „произтичащи“ и „повлияни“ от италианския първоизточник. Освен на английски, където името на болестта е скъсено още повече (flu), думата с малки вариации се среща и в скандинавските езици (influenza на датски, flensu на исландски, influensa на шведски и норвежки), във финския (flunssa), унгарския (influenza), малтийския (influwenza), както и в арабския (أنفلونزا/anfilunza) и във фарси (آنفولانزا/anfulanza).
Но тъй като езиците са живи организми, те не са „имунизирани“ срещу „чужди“ влияния: и между тях, както между хората, „тече“ постоянен обмен,
те редовно си „влияят“, предават си думи и прихващат един от друг понятия, както хората си влияят, предават си бацили и прихващат един от друг вируси. (Думата „епидемия“, между другото, произлиза от древногръцката ἐπιδήμιος (epidḗmios), от ἐπί (epí ‘върху’) + δῆμος (dêmos ‘народ’).)
Ето така например, макар и да се използва доста рядко, понятието „инфлуенца“ фигурира в българските речници като синоним на „грип“², а някои англоезични речници включват иначе смятаната за остаряла и като цяло излязла от употреба дума grippe³ и я дефинират като influenza⁴.
Но нека все пак завършим с оптимистична нотка, като разгледаме и етимологията на думата „ваксина“⁵, чийто произход – макар и по-скоро аграрен, отколкото поетичен – също, поне според някои източници, се води френски. Терминът всъщност произлиза от латинската дума за „крава“ (vacca), a първоначално се появява благодарение на английския лекар Едуард Дженър, който в края на XVIII век инжектира здрави хора с малки дози гной от болни от кравешка шарка (наречена variolæ vaccinæ) и открива, че това впоследствие ги предпазва от разболяване от човешка едра шарка.
С течение на времето и с разработването на ваксини срещу други болести, семантичното поле на думата се разширява, така че тя започва да се използва във връзка с инокулации срещу всякакъв вид вирусни и бактериални заболявания. Според някои източници не друг, а Луи Пастьор през 1881 г. въвежда в по-широка употреба думата „ваксина“ в чест на Дженър, а неговото име – макар самият той да открива ваксини срещу бяс, кокоша холера, свински еризипел и антракс – служи за основа на думата „пастьоризация“, чиято цел също е да опази човешкия организъм от бактерии, вируси и други „патогени“, тоест – от πάθος (pathos) + -γενής (-genēs) на старогръцки – „производители на страдание“.
1 Catarro на български се превежда като „катар“, което няма нищо общо с едноименната държава, а според медицинските речници означава „възпаление на лигавиците с образуване на серозен ексудат, особено на тези на респираторния тракт“.
2 Според Етимологичния речник на БАН думата „грип“ е навлязла в българския чрез френската grippe, от руската „хрип“, проникнала заедно с разпространилата се през 1782 г. епидемия, позната като „руска инфлуенца“.
3 Думата grippe фигурира в американския речник „Мериам Уебстър“ и в Оксфордския речник, но не и в другите популярни англоезични речници. Според Online Etymology Dictionary тя влиза в английския през 1776 г., а се разпространява в европейските езици след грипната епидемия по време на руската окупация на Прусия през Седемгодишната война (около 1760 г.). Там също се споменава и предположението, че ономатопеичната дума „хрип“ (която от руски е навлязла и в българския) може да е вдъхновила появата ѝ.
4 Езиковият обмен не свършва дотук. Преди няколко години например в българския навлиза и оттогава набира все по-голяма популярност думата „инфлуенсър“, която също се базира върху идеята за звездно влияние, макар звездите в случая да са от друго естество, а влиянието – с доста по-различни цели. На английски пък, дори и grippe почти да не се използва, нейни родственици – с общ праиндоевропейски корен *gʰreyb- (‘сграбчвам, хващам’) – всъщност са често срещани: grip (‘хватка, захващам’), gripping (‘завладяващ’) и gripe (‘оплакване, мърморя’).
5 Въпреки че се появява преди повече от два века, думата „ваксина“ – по обясними причини – е обявена за дума на годината за 2021 г. от американския речник „Мериам Уебстър“. На сайта на речника има статия, в която подробно се разказва историята за появата и развитието на ваксините. Тя завършва с наблюдение, което ще взема назаем (в свободен превод) и за финал на този текст: „Това показва, че не е задължително науката да е красива, за да бъде велика – същото важи и за етимологията.“
В рубриката „От дума на дума“ Екатерина Петрова търси актуални, интересни или новопоявили се думи от нашето ежедневие и проследява често изненадващия им произход, развитието на значенията им във времето и взаимовръзките им с близки и далечни езици.
На второ четене: „Анатомията на едно изчезване“
Post Syndicated from Стефан Иванов original https://www.toest.bg/na-vtoro-chetene-anatomiyata-na-edno-izchezvane/
„Анатомията на едно изчезване“ от Хишам Матар

превод от английски Надежда Розова, изд. ICU, 2017
Казано накратко – това е майсторски роман. Приглушен и дълбок като мълчание, в което е споделено много. Реших, че ще науча повече за Матар едва когато дочета романа.
Личната му история е забележителна и е нужно да бъде споделена, за да се разбере контекстът на създаването на тази интензивна и мощна проза.
Проза, писана по необходимост и от нужда, не заради моди, тенденции или пазар.
Писане, което окуражава и дава пример. Такива истории, за съжаление, продължават да се случват и днес. Светът не си взема поука от безкрайната игра на грешки и болка, пронизала историята. Затова и ще продължават да бъдат разказвани.
Матар е роден в Ню Йорк през 1970 г. Баща му Джабала Матар, който е смятан за политически дисидент заради мнението си за преврата на полковник Муамар Кадафи през 1969 г., е принуден да премести семейството си от Триполи и по време на раждането на Матар работи за либийската делегация в ООН в Ню Йорк.
Впоследствие семейството се връща в Триполи, но през 1979 г. отново бяга от страната. Матар е на девет години, когато се преместват в Кайро. Там живеят в изгнание, а баща му се обявява по-остро срещу режима на Кадафи. Матар продължава образованието си в Американското училище в Кайро.
Три години по-късно брат му Зиад заминава за пансион в Швейцарските Алпи. Въпреки че Матар отчаяно иска да се присъедини към него, трябва да изчака още четири години, докато навърши шестнайсет. Заради продължаващите заплахи от страна на либийската диктатура срещу бащата (както и заради заплахата за сигурността на Зиад, докато учи в Швейцария) обаче той не може да го последва. (И двете момчета трябвало да ходят на училище с фалшива самоличност.) В крайна сметка Матар избира училище в Англия, в което се записва през 1986 г.
Трябваше да се преструвам, че майка ми е египтянка, а баща ми – американец. Смятахме, че така не се налага да обясняваме пред всички араби в училището защо арабският ми език е египетски, а английският – американски. Първото ми име беше Боб. Зиад го избра, защото и двамата с него бяхме почитатели на Боб Марли и Боб Дилън. Трябваше да се преструвам, че съм християнин, макар и нерелигиозен. Трябваше да се опитам да забравя името си. Ако някой ме наречеше Хишам, не трябваше да се обръщам.
През 1990 г., когато все още учи в Лондон, баща му Джабала Матар е отвлечен в Кайро. Обявен е за изчезнал. След шест години семейството получава две писма с почерка на бащата, в които се казва, че е бил отвлечен от египетската тайна полиция, предаден на либийския режим и затворен в известния затвор „Абу Салим“ в сърцето на Триполи. Тези писма са последният знак и единственото нещо, което имат от него.
След тринайсет години Матар съобщава, че е получил новина: баща му е видян жив през 2002 г., което показва, че е оцелял след избиването на 1200 политически затворници от либийските власти през 1996 г.
През март 1990 г. агенти на египетските тайни служби отвлякоха баща ми от дома му в Кайро. През първите две години ни караха да вярваме, че е задържан в Египет, и ни казваха да си мълчим, защото в противен случай не можели да гарантират безопасността му. През 1992 г. баща ми успял да изнесе контрабандно едно писмо. Няколко месеца по-късно майка ми го държеше в ръката си. Внимателният му почерк се беше свил плътно в ситни букви, за да побере възможно най-много думи на единствения лист А4. Думи, между които почти нямаше място, нито над, нито под тях. Никакви полета, думи до ръба.
Хишам Матар споделя за писателския си процес, че
започва с много малко: колкото по-крехко, толкова по-добре. Нишката трябва да се усеща така, сякаш е на път да се скъса. Понякога започвам с жест или с усещане за даден герой. То е като онзи миг, когато се втурваш в концертната зала в последния момент. Намираш мястото си, след като светлините угасват. Не виждаш човека, който седи до теб, но имаш представа за него, за това какъв може да е или как му въздейства музиката, за тежестта на неговото мълчание.
Мълчанието при Матар е забележително. Деликатността му, когато открехва вратата към нещо, което не може да се опише – изчезването на един баща, – е неподправена. През цялото време, докато прелиствах книгата, си мислех, че това не е точно фикция. Историята за син, чийто баща е дисидент и е изчезнал, не е измислица. В нея има лекота и тежест, каквито носят истината и реалността. Но това не е и автобиография. Мемоарна книга е например „Завръщането: бащи, синове и страната между тях“, за която Матар печели „Пулицър“.
Писателят, който ми се струва най-близък до Матар, е В. Г. Зебалд. Сходно е усещането за изгнание и безизходна съдбовност;
за реалност, населена с мускуса на паметта, с призраците на травмата; за атмосфера на свят, клаустрофобично концентриран и сгъстен, свят на липсващи отговори, но и на шеметно блуждаене, на безспирно бродене.
Синът Нури скита из живота като Хамлет, влюбен е в мащехата си, скърби безутешно за майка си и баща си. Скръбта за баща му няма начало и край, защото няма и окончателен завършек. Траурът не може да се състои. Няма ритуал на сбогуване и раната на травмата е отворена. Дневникът на скръбта не може да започне. Това, за което пише Марин Бодаков в стихотворението „Кал по дланта“, няма как да се случи:
На следващия ден заварихме купчина мазна пръст до пояс,
натрупана мокра пръст под пейката, извън, в краката му,
нямаше как, с домашна лопатка дозаринах баща си.
Бих предпочел това да е метафора.

Има много и различни заглавия, които са „анатомия“ на нещо, на падане, на Грей, на скандал. Първата е „Анатомия на меланхолията“ на Робърт Бъртън, където той пише, че
меланхолията може да е преходна, когато се появява при всеки малък повод за скръб, нужда, болест, неприятност, страх, мъка, страст или смущение на ума, при всяка грижа, недоволство или мисъл, които причиняват тъга, тъпота, тежест и досада на духа, противоположни на удоволствието, веселието, радостта, насладата… От тези меланхолични нагласи никой жив човек не е свободен, никой стоик, никой не е толкова мъдър, толкова щастлив, толкова търпелив, толкова щедър, толкова благочестив, толкова божествен, че да може да се спаси… В този смисъл меланхолията е характерна за смъртните… А ако е нараснала до навик, то едва ли ще бъде премахната.
Навикът от меланхолията на изчезването на бащата в тази книга се родее с „Куфарът на баща ми“ на Орхан Памук, напомня и „Разгадавайки баща си“ на Вера Мутафчиева или разказа „Уейкфийлд“ на Натаниъл Хоторн, в който човек изчезва от собствения си живот за период от двайсет години и след това се връща. Понякога, уви, хората не изчезват по собствена воля и не могат да се върнат, когато решат.
Това, което може да прави Нури, е отново и отново да се връща из местата в паметта си; да води едни и същи разговори; да преподрежда едни и същи парчета от пъзела; да се върне в дома от детството си; да бъде баща си; да си бъде баща и да продължи.
Четенето на романи, в които централно място заема онова, което не може да се назове и няма развръзка, по парадоксален начин са и успокояващи. Нужен урок по стоицизъм, търпение и любов насред всекидневната бруталност.
Активните дарители на „Тоест“ получават постоянна отстъпка в размер на 20% от коричната цена на всички заглавия от каталога на издателство ICU, както и на няколко други български издателства в рамките на партньорската програма Читателски клуб „Тоест“. За повече информация прочетете на toest.bg/club.
Никой от нас не чете единствено най-новите книги. Тогава защо само за тях се пише? „На второ четене“ е рубрика, в която отваряме списъците с книги, публикувани преди поне година, четем ги и препоръчваме любимите си от тях. Рубриката е част от партньорската програма Читателски клуб „Тоест“. Изборът на заглавия обаче е единствено на авторите – Стефан Иванов и Антония Апостолова, които биха ви препоръчали тези книги и ако имаше как веднъж на две седмици да се разходите с тях в книжарницата.
Гастарбайтерската песен като дом. Добре дошли в Алманя
Post Syndicated from Емине Садкъ original https://www.toest.bg/gastarbayterskata-pesen-kato-dom-dobre-doshli-v-almanya/
На гара Сиркеджи договор ми дадоха.
Новото ти работно място е Германия, казаха.
По един билет и по един пакет,
и хайде, на път ни пратиха…
ГерАмания, ГерАмания, дотук дошъл, назад няма връщанеAşık Metin Türköz – Alamanya, Alamanya (1961), превод от турски Емине Садкъ

Крокодилът на чеверме и шотът с жив октопод в Банкок не ме изненадаха така, както заведението за бързо хранене Berlin’s Doner Kebab.
Не знам защо толкова се изненадах, че Берлин и кебап съществуват на едно място в Тайланд, когато връзката между Германия и Турция е на повече от шейсет години, а в Тайланд пристигат достатъчно германски туристи, израснали с турската кухня, приемащи дюнера като част от немската култура.
Припомних си и думите на моя приятел Хауке, който в Хановер ми сподели, че вече е невъзможно да мислим за Германия, без да мислим за турската култура. Най-вече за турската кухня. Хауке каза също, че
Германия би била скучна страна без турците. И без турския рап, борещ се срещу неонацистите.
В този текст ще поговорим точно за турската музика в Германия, като започнем с гастарбайтерската, или гурбетчийската песен. Но първо е важно да зададем историческата рамка, която е довела до нуждата от тази песен.
Икономическото чудо на Западна Германия през 50-те години (Wirtschaftswunder) принуждава правителството да потърси евтина работна ръка и първите гастарбайтери във ФРГ пристигат от Италия, Гърция и Испания. През октомври 1961 г., малко преди Берлинската стена да бъде построена изцяло (и работниците от Източна Германия да останат изолирани от другата ѝ страна), Западна Германия и Турция сключват споразумение за набиране на работна ръка.
По същото време Турция изнемогва, инфраструктурата ѝ е слаборазвита, хората от провинцията се изхранват с онова, което успеят да произведат, а безработицата е ужасяваща. Стотици хиляди турци, предимно мъже, които преди това не са излизали от собственото си село, се качват на влакове за Германия и потеглят към един напълно чужд свят.
Именно заради непознаването и различията между турската и немската култура Теодор Бланк, тогавашният министър на отбраната, е категоричен, че подписването на това споразумение не е в интерес на ФРГ, но Съединените щати, решени да сближат Турция със Запада, успешно оказват политически натиск.
Първоначалната идея според споразумението била гастарбайтерите от Турция да останат само две години. Приемлив период и за работниците, които си представяли, че ще изкарат достатъчно пари и ще се завърнат в родината си богати. Това е, мисля си, и причината много от тях да тръгнат с музикалните си инструменти на път – тарамбуки, сазове и т.н. Както се казва, потеглят с песен на уста. Песен, чийто край им се струва не само щастлив, но и скорошен.
В документалния филм на Би Би Си от 1972 г. може да видите кадри от безкрайната забава във влака за Германия. В него се съдържат ценни и информативни кадри за процедурите преди заминаването и за задължителната проверка на здравословното състояние на гастарбайтерите. Дали тези хора са предполагали, че за голяма част от тях това ще бъде еднопосочно пътуване; че
само след няколко десетилетия Германия ще стане страната с най-многобройното турско население извън Турция (над три милиона души);
че Берлин и кебап могат да стоят в едно изречение на другия край на света; а турската музика ще се превърне в неочаквано успешна индустрия в Западна Германия?
Облаци, кажете!
Мъката си на кого да я разкажа?
Точно тези, дето мислехме за свои, ни простреляха.
А още по-дълбока е раната ни от гурбета.
Кажете, да не би да има вести от родината?
Или тези дъждове са от сълзите на любимата ми?Özdemir Erdoğan – Gurbet (1972), превод от турски Азиз Таш


Фотографиите са от изложбата Memoirs in My Suitcase
От дистанцията на времето е трудно да си представим културното и медийно откъсване на стотици хиляди души, които не знаят нито дума немски, живота им в изолация, в работнически лагери, без турско радио, без турски вестници, от които да научат какво се случва в страната им, без книги или филми. Без нищо свое, нищо, което да им припомни или потвърди кои са… Освен музиката, която носят със себе си и чрез която се опитват да се върнат у дома.
Музиката е неизменна част от идентичността.
Тя е публично ритуално събитие, в което всеки има роля като музикант, танцьор или слушател, а вследствие на това се създават важни емоционални връзки, споява се единството и целостта на общността. Така, при липсата на други обединяващи културни процеси, какъвто е и случаят с първите турски гастарбайтери, музиката и танцът се оказват единствените средства, чрез които общността разпознава себе си като такава.
И ето, стигаме до турската гастарбайтерска песен, която още в средата на 60-те години се настанява в новооткритите турски казина из цяла Германия. (Въпреки че казината в момента са забранени в Турция, в турската култура, освен място за хазарт, те са арена за забавление – с ориенталски танци, алкохол, наркотици и проституция.) В Германия казината се отварят от групи работници, представляващи различни региони или големи градове, и съответно носят имена като Anadolu, Gaziantep и т.н. Така лека-полека и регион по регион Турция се настанява в Западна Германия.
Всяко от казината има различна програма, обикновено започваща с кратки сказки, поезия, разказване на анекдоти, разбира се, белиденс, концерти на утвърдени музикални оркестри, класически изпълнения на саз, както и отворена сцена за онези музиканти, които искат да представят песните си пред публика.


Кадри от филма „Любов, дойчемарки и смърт“
А Тürkischer Basar продължава да се помни като едно от най-екзотичните и важни места. Намирал се е в берлинския квартал, наричан „столица на турските гастарбайтери“ – „Кройцберг“*. След падането на Стената базарът е затворен и на негово място е построена метростанция на Bülowstrasse.
През 1964 г. в Кьолн е създадена музикалната компания Türküola Müzik, която в партньорство с големите музикални компании в Турция купува права на популярни турски изпълнители, продуцира турска музика в Западна Германия и я разпространява сред гастарбайтерите. Същата компания организира едни от най-големите концерти на немска сцена и представя в Германия легендарни турски музиканти като Ибрахим Татлъсес (Ibrahim Tatlıses), Зеки Мюрен (Zeki Müren), Бюлент Ерсой (Bülent Ersoy) и Джем Караджа (Cem Karaca).
Обръщам специално внимание на Джем Караджа – бащата на турския рок, който дълго време е обвиняван в „целенасочено създаване на напрежение и тласкане на Турция към кървава революция“. През 1980 г., след военния преврат на Кенан Еврен, докато лявомислещи турски интелектуалци продължават да бъдат избивани, Джем Караджа е привикван няколко пъти за разпит в Турция.
Музикантът е напуснал родината си година преди военния преврат и остава в Западна Германия осем години. Благодарение на създадената вече сцена на турската музика и аудитория, Джем Караджа успешно изгражда наново кариерата си, пее на немски и за много кратко време се превръща в немска медийна звезда в много тежки за всички гастарбайтери времена.


Кадри от филма „Любов, дойчемарки и смърт“
Аз съм турчин.
Не мога да говоря немски,
но мога да работя.Türkisch Mann – Yusuf Cavak (1977), превод от турски Емине Садкъ
За вътрешните емоционални процеси и състоянието на турското гастарбайтерско общество от този период може да разберем повече и от самите теми на песните, които освен да възпяват тъгата по бащиния дом и тежестта да си сам в Almanya, служат за веселие и вид протест срещу несправедливото отношение на германските работодатели. Чрез музиката си гастарбайтерите всъщност се опитват да влязат в диалог с важните институции.
Един от видните гласове на турските гастарбайтери – Ашък Метин (Asık Metin), пише песента Meister Isci Kavgası („Скандал между шеф и работник“). На записа се чува глас на немец, който се кара на някого (предполага се на работник), а певецът (работникът) весело си пее:
Аз дойдох на приключение.
Не държа на парите
ти, мечко германска,
заповедта ти не би се чула от пчелата.
А в една от най-тъжните песни на Йоздемир Ердоган (Özdemir Erdoğan) Gurbet се пее следното:
На кого мога да разкажа мъката си, о, облаци?
Близките приятели ме нараниха,
а носталгията по дома е рана, по-дълбока от всяка друга.
Кажете ми, има ли новини от родния ми край,
или тези дъждове са сълзите на любимата?„Гурбет“, превод от турски Азиз Таш
Световната петролна криза, започнала в началото на 70-те години, бележи края на германското икономическо чудо. До началото на 80-те голяма част от гастарбайтерите остават без работа, а германското правителство плаща по 10 000 марки на всеки, който иска да се завърне в Турция. Естествена реакция на вече създадената турска музикална индустрия във ФРГ е да запее на немски. Много смешен, почти комичен немски, но достатъчен, за да бъде разбран и да предаде посланията си както на турците, така и на немците. По това време Западна Германия започва да се тресе от протести и стачки, гастарбайтерите искат по-справедливо и достойно отношение, а виковете им стават все по-настоятелни.
Еs kamen Menschen („Дойдоха хора“) на Джем Караджа започва така: „бяха повикани работници, / но дойдоха хора“, а Deutsche Freunde („Немски приятел“) на Озан Ата Джанани (Ozan Ata Canani) е със същия лайтмотив, но продължава с „като заварчик, като общ работник, / като мръсен боклукчия, арматурист и монтажист, / работещи на поточна линия, / наричат ни гастарбайтери / нашите немски приятели, / наричат ни гастарбайтери“. Двете песни се превръщат в химни на протестните движения за защита на човешките права на турските емигранти.
Тъй като никой не е очаквал гастарбайтерите да останат две десетилетия в Западна Германия, дълго време липсва адекватен интеграционен план за тях. През 70-те и 80-те години безработицата расте, турските квартали се гетоизират, а масовите политически настроения срещу гастарбайтерите се променят и поставят началото на неонацизма и антимиграционните настроения, които през 90-те прерастват в жестокости и терор срещу турското население във вече обединена Германия.
Чрез рапа, пънка и стрийткултурата следващото поколение, гастарбайтерските деца, родени в Германия, оказват съпротива срещу неонацизма и се превръщат в гласа на младите хора с леви убеждения.
Майната ви, тук сме!
крещят децата на гастарбайтерите. В следващата статия ще чуем точно тяхната песен.
* Берлинската стена е минавала на три места през „Кройцберг“. Мястото е попадало в мъртвата зона – в края (и началото) на Западен Берлин. Затова и турското население е заселено там. В момента „Кройцберг“ се намира в центъра на града и е един от най-скъпите хипстърски квартали.
STMicroelectronics makes a 18K Big Sky Sensor So Large Only Four on a 300mm Wafter
Post Syndicated from John Lee original https://www.servethehome.com/stmicroelectronics-makes-a-18k-big-sky-sensor-so-large-only-four-on-a-300mm-wafter/
Here is a quick look at the Big Sky 18K image sensor that produces 60GB/s of image data and that is so big only four fit on a 300mm wafer
The post STMicroelectronics makes a 18K Big Sky Sensor So Large Only Four on a 300mm Wafter appeared first on ServeTheHome.
Astronaut Guests
Post Syndicated from xkcd.com original https://xkcd.com/2883/

How to use AWS Database Encryption SDK for client-side encryption and perform searches on encrypted attributes in DynamoDB tables
Post Syndicated from Samit Kumbhani original https://aws.amazon.com/blogs/security/how-to-use-aws-database-encryption-sdk-for-client-side-encryption-and-perform-searches-on-encrypted-attributes-in-dynamodb-tables/
Today’s applications collect a lot of data from customers. The data often includes personally identifiable information (PII), that must be protected in compliance with data privacy laws such as the General Data Protection Regulation (GDPR) and the California Consumer Privacy Act (CCPA). Modern business applications require fast and reliable access to customer data, and Amazon DynamoDB is an ideal choice for high-performance applications at scale. While server-side encryption options exist to safeguard customer data, developers can also add client-side encryption to further enhance the security of their customer’s data.
In this blog post, we show you how the AWS Database Encryption SDK (DB-ESDK) – an upgrade to the DynamoDB Encryption Client – provides client-side encryption to protect sensitive data in transit and at rest. At its core, the DB-ESDK is a record encryptor that encrypts, signs, verifies, and decrypts the records in DynamoDB table. You can also use DB-ESDK to search on encrypted records and retrieve data, thereby alleviating the need to download and decrypt your entire dataset locally. In this blog, we demonstrate how to use DB-ESDK to build application code to perform client-side encryption of sensitive data within your application before transmitting and storing it in DynamoDB and then retrieve data by searching on encrypted fields.
Client-side encryption
For protecting data at rest, many AWS services integrate with AWS Key Management Service (AWS KMS). When you use server-side encryption, your plaintext data is encrypted in transit over an HTTPS connection, decrypted at the service endpoint, and then re-encrypted by the service before being stored. Client-side encryption is the act of encrypting your data locally to help ensure its security in transit and at rest. When using client-side encryption, you encrypt the plaintext data from the source (for example, your application) before you transmit the data to an AWS service. This verifies that only the authorized users with the right permission to the encryption key can decrypt the ciphertext data. Because data is encrypted inside an environment that you control, it is not exposed to a third party, including AWS.
While client-side encryption can be used to improve overall security posture, it introduces additional complexity on the application, including managing keys and securely executing cryptographic tasks. Furthermore, client-side encryption often results in reduced portability of the data. After data is encrypted and written to the database, it’s generally not possible to perform additional tasks such as creating index on the data or search directly on the encrypted records without first decrypting it locally. In the next section, you’ll see how you can address these issues by using the AWS Database Encryption SDK (DB-ESDK)—to implement client-side encryption in your DynamoDB workloads and perform searches.
AWS Database Encryption SDK
DB-ESDK can be used to encrypt sensitive attributes such as those containing PII attributes before storing them in your DynamoDB table. This enables your application to help protect sensitive data in transit and at rest, because data cannot be exposed unless decrypted by your application. You can also use DB-ESDK to find information by searching on encrypted attributes while your data remains securely encrypted within the database.
In regards to key management, DB-ESDK gives you direct control over the data by letting you supply your own encryption key. If you’re using AWS KMS, you can use key policies to enforce clear separation between the authorized users who can access specific encrypted data and those who cannot. If your application requires storing multiple tenant’s data in single table, DB-ESDK supports configuring distinct key for each of those tenants to ensure data protection. Follow this link to view how searchable encryption works for multiple tenant databases.
While DB-ESDK provides many features to help you encrypt data in your database, in this blog post, we focus on demonstrating the ability to search on encrypted data.
How the AWS Database Encryption SDK works with DynamoDB
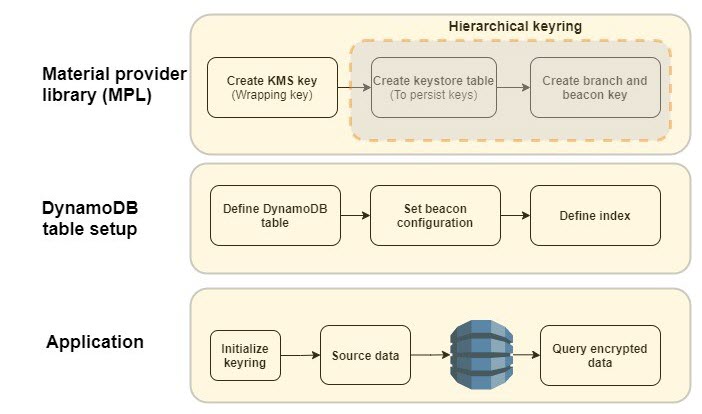
Figure 1: DB-ESDK overview
As illustrated in Figure 1, there are several steps that you must complete before you can start using the AWS Database Encryption SDK. First, you need to set up your cryptographic material provider library (MPL), which provides you with the lower level abstraction layer for managing cryptographic materials (that is, keyrings and wrapping keys) used for encryption and decryption. The MPL provides integration with AWS KMS as your keyring and allows you to use a symmetric KMS key as your wrapping key. When data needs to be encrypted, DB-ESDK uses envelope encryption and asks the keyring for encryption material. The material consists of a plaintext data key and an encrypted data key, which is encrypted with the wrapping key. DB-ESDK uses the plaintext data key to encrypt the data and stores the ciphertext data key with the encrypted data. This process is reversed for decryption.
The AWS KMS hierarchical keyring goes one step further by introducing a branch key between the wrapping keys and data keys. Because the branch key is cached, it reduces the number of network calls to AWS KMS, providing performance and cost benefits. The hierarchical keyring uses a separate DynamoDB table is referred as the keystore table that must be created in advance. The mapping of wrapping keys to branch keys to data keys is handled automatically by the MPL.
Next, you need to set up the main DynamoDB table for your application. The Java version of DB-ESDK for DynamoDB provides attribute level actions to let you define which attribute should be encrypted. To allow your application to search on encrypted attribute values, you also must configure beacons, which are truncated hashes of plaintext value that create a map between the plaintext and encrypted value and are used to perform the search. These configuration steps are done once for each DynamoDB table. When using beacons, there are tradeoffs between how efficient your queries are and how much information is indirectly revealed about the distribution of your data. You should understand the tradeoff between security and performance before deciding if beacons are right for your use case.
After the MPL and DynamoDB table are set up, you’re ready to use DB-ESDK to perform client-side encryption. To better understand the preceding steps, let’s dive deeper into an example of how this all comes together to insert data and perform searches on a DynamoDB table.
AWS Database Encryption SDK in action
Let’s review the process of setting up DB-ESDK and see it in action. For the purposes of this blog post, let’s build a simple application to add records and performs searches.
The following is a sample plaintext record that’s received by the application:
Prerequisite: For client side encryption to work, set up the integrated development environment (IDE) of your choice or set up AWS Cloud9.
Note: To focus on DB-ESDK capabilities, the following instructions omit basic configuration details for DynamoDB and AWS KMS.
Configure DB-ESDK cryptography
As mentioned previously, you must set up the MPL. For this example, you use an AWS KMS hierarchical keyring.
- Create KMS key: Create the wrapping key for your keyring. To do this, create a symmetric KMS key using the AWS Management Console or the API.
- Create keystore table: Create a DynamoDB table to serve as a keystore to hold the branch keys. The logical keystore name is cryptographically bound to the data stored in the keystore table. The logical keystore name can be the same as your DynamoDB table name, but it doesn’t have to be.
- Create keystore keys: This operation generates the active branch key and beacon key using the KMS key from step 1 and stores it in the keystore table. The branch and beacon keys will be used by DB-ESDK for encrypting attributes and generating beacons.
At this point, the one-time set up to configure the cryptography material is complete.
Set up a DynamoDB table and beacons
The second step is to set up your DynamoDB table for client-side encryption. In this step, define the attributes that you want to encrypt, define beacons to enable search on encrypted data, and set up the index to query the data. For this example, use the Java client-side encryption library for DynamoDB.
- Define DynamoDB table: Define the table schema and the attributes to be encrypted. For this blog post, lets define the schema based on the sample record that was shared previously. To do that, create a DynamoDB table called OrderInfo with order_id as the partition key and order_time as the sort key.
DB-ESDK provides the following options to define the sensitivity level for each field. Define sensitivity level for each of the attributes based on your use case.
- ENCRYPT_AND_SIGN: Encrypts and signs the attributes in each record using a unique encryption key. Choose this option for attributes with data you want to encrypt.
- SIGN_ONLY: Adds a digital signature to verify the authenticity of your data. Choose this option for attributes that you would like to protect from being altered. The partition and sort key should always be set as SIGN_ONLY.
- DO_NOTHING: Does not encrypt or sign the contents of the field and stores the data as-is. Only choose this option if the field doesn’t contain sensitive data and doesn’t need to be authenticated with the rest of your data. In this example, the partition key and sort key will be defined as “Sign_Only” attributes. All additional table attributes will be defined as “Encrypt and Sign”: email, firstname, lastname, last4creditcard and expirydate.
- Configure beacons: Beacons allow searches on encrypted fields by creating a mapping between the plaintext value of a field and the encrypted value that’s stored in your database. Beacons are generated by DB-ESDK when the data is being encrypted and written by your application. Beacons are stored in your DynamoDB table along with your encrypted data in fields labelled with the prefix aws_dbe_b_.
It’s important to note that beacons are designed to be implemented in new, unpopulated tables only. If configured on existing tables, beacons will only map to new records that are written and the older records will not have the values populated. There are two types of beacons – standard and compound. The type of beacon you configure determines the type of queries you are able to perform. You should select the type of beacon based on your queries and access patterns:
- Standard beacons: This beacon type supports querying a single source field using equality operations such as equals and not-equals. It also allows you to query a virtual (conceptual) field by concatenating one or more source fields.
- Compound beacons: This beacon type supports querying a combination of encrypted and signed or signed-only fields and performs complex operations such as begins with, contains, between, and so on. For compound beacons, you must first build standard beacons on individual fields. Next, you need to create an encrypted part list using a unique prefix for each of the standard beacons. The prefix should be a short value and helps differentiate the individual fields, simplifying the querying process. And last, you build the compound beacon by concatenating the standard beacons that will be used for searching using a split character. Verify that the split character is unique and doesn’t appear in any of the source fields’ data that the compound beacon is constructed from.
Along with identifying the right beacon type, each beacon must be configured with additional properties such as a unique name, source field, and beacon length. Continuing the previous example, let’s build beacon configurations for the two scenarios that will be demonstrated in this blog post.
Scenario 1: Identify orders by exact match on the email address.
In this scenario, search needs to be conducted on a singular attribute using equality operation.
- Beacon type: Standard beacon.
- Beacon name: The name can be the same as the encrypted field name, so let’s set it as email.
- Beacon length: For this example, set the beacon length to 15. For your own uses cases, see Choosing a beacon length.
Scenario 2: Identify orders using name (first name and last name) and credit card attributes (last four digits and expiry date).
In this scenario, multiple attributes are required to conduct a search. To satisfy the use case, one option is to create individual compound beacons on name attributes and credit card attributes. However, the name attributes are considered correlated and, as mentioned in the beacon selection guidance, we should avoid building a compound beacon on such correlated fields. Instead in this scenario we will concatenate the attributes and build a virtual field on the name attributes
- Beacon type: Compound beacon
- Beacon Configuration:
- Define a virtual field on firstname and lastname, and label it fullname.
- Define standard beacons on each of the individual fields that will be used for searching: fullname, last4creditcard, and expirydate. Follow the guidelines for setting standard beacons as explained in Scenario 1.
- For compound beacons, create an encrypted part list to concatenate the standard beacons with a unique prefix for each of the standard beacons. The prefix helps separate the individual fields. For this example, use C- for the last four digits of the credit card and E- for the expiry date.
- Build the compound beacons using their respective encrypted part list and a unique split character. For this example, use ~ as the split character.
- Beacon length: Set beacon length to 15.
- Beacon Name: Set the compound beacon name as CardCompound.
- Define index: Following DynamoDB best practices, secondary indexes are often essential to support query patterns. DB-ESDK performs searches on the encrypted fields by doing a look up on the fields with matching beacon values. Therefore, if you need to query an encrypted field, you must create an index on the corresponding beacon fields generated by the DB-ESDK library (attributes with prefix aws_dbe_b_), which will be used by your application for searches.
For this step, you will manually create a global secondary index (GSI).
Scenario 1: Create a GSI with aws_dbe_b_email as the partition key and leave the sort key empty. Set the index name as aws_dbe_b_email-index. This will allow searches using the email address attribute.
Scenario 2: Create a GSI with aws_dbe_b_FullName as the partition key and aws_dbe_b_CardCompound as the sort key. Set the index name as aws_dbe_b_VirtualNameCardCompound-index. This will allow searching based on firstname, lastname, last four digits of the credit card, and the expiry date. At this point the required DynamoDB table setup is complete.
Set up the application to insert and query data
Now that the setup is complete, you can use the DB-ESDK from your application to insert new items into your DynamoDB table. DB-ESDK will automatically fetch the data key from the keyring, perform encryption locally, and then make the put call to DynamoDB. By using beacon fields, the application can perform searches on the encrypted fields.
- Keyring initialization: Initialize the AWS KMS hierarchical keyring.
- Insert source data: For illustration purpose, lets define a method to load sample data into the OrderInfo table. By using DB-ESDK, the application will encrypt data attributes as defined in the DynamoDB table configuration steps.
- Query Data: Define a method to query data using plaintext values
Scenario 1: Identify orders associated with email address [email protected]. This query should return Order ID ABC-1001.
Scenario 2: Identify orders that were placed by John Doe using a specific credit card with the last four digits of 4567 and expiry date of 082026. This query should return Order ID ABC-1003 and ABC-1004.
Note: Compound beacons support complex string operation such as begins_with. In Scenario 2, if you had only the name attributes and last four digits of the credit card, you could still use the compound beacon for querying. You can set the values as shown below to query the beacon using the same code:
Now that you have the building blocks, let’s bring this all together and run the following steps to set up the application. For this example, a few of the input parameters have been hard coded. In your application code, replace <KMS key ARN> and <branch-key-id derived from keystore table> from Step 1 and Step 3 mentioned in the Configure DB-ESDK cryptography sections.
Conclusion
You’ve just seen how to build an application that encrypts sensitive data on client side, stores it in a DynamoDB table and performs queries on the encrypted data transparently to the application code without decrypting the entire data set. This allows your applications to realize the full potential of the encrypted data while adhering to security and compliance requirements. The code snippet used in this blog is available for reference on GitHub. You can further read the documentation of the AWS Database Encryption SDK and reference the source code at this repository. We encourage you to explore other examples of searching on encrypted fields referenced in this GitHub repository.
If you have feedback about this post, submit comments in the Comments section below. If you have questions about this post, contact AWS Support.
Want more AWS Security news? Follow us on Twitter.
How to Build a Compliant SMS Opt-In Process With Amazon Pinpoint
Post Syndicated from Tyler Holmes original https://aws.amazon.com/blogs/messaging-and-targeting/how-to-build-a-compliant-sms-opt-in-process-with-amazon-pinpoint/
SMS messaging is a great way to stay in touch with your customers and send them timely, relevant messages. However, it’s always required to get their permission before you start sending them texts. This is known as opting in.
There are a few different ways to opt-in users to your SMS program. One common method is to have them sign up on your website or in your app. You can also collect opt-ins at in-person events or via phone call through your customer service team; though it’s not limited to just those options.
No matter which method you choose, it’s important to make sure that your opt-in process is clear, concise, and compliant with all applicable local laws and regulations in the countries that you are sending to. Here are some best practices:
- Get explicit consent. Explicit consent is the intentional action taken by a end-user to request a specific message from your service.
- Provide clear instructions. Tell users how to opt-in, what they are opting into, and how to opt-out of your program. Be sure to include your contact information at the opt-in location in case they have any questions or concerns.
- Give users the option to choose what kind of messages they want to receive. For example, you might allow them to opt-in to OTP/2FA messages, shipping notifications, or both.
- Respect users’ privacy. Never sell or share users’ phone numbers with third parties without their permission. 3rd party data sharing is generally considered a prohibited practice by mobile carriers and violates privacy regulations in many countries.
- Make it easy to opt-out. Users should be able to opt-out of your program at any time by replying with a simple text message, such as “STOP.” See additional relevent documentation related to this: Opting out. Self-managed opt-outs.
The above will help you build a strong audience of engaged subscribers who want to hear from you and improve your chances in successfully registering for a dedicated number. By following these best practices, you can ensure that your SMS opt-in process is compliant and effective.
What carriers require for a compliant opt-in workflow and call-to-action
The primary purpose of the opt-in workflow is to demonstrate that the end-user explicitly consents to receive text messages and understands the nature of the program. Your application is being reviewed by a 3rd party reviewer and sometimes multiple 3rd party reviewers for a single registration, so make sure to provide clear and thorough information about how your end-users opt-in to your SMS service and any associated fees or charges. If the reviewer cannot determine how your opt-in process works or if it is not compliant then your application will be denied and returned. It is important to note that Amazon does not review or approve your use cases and that it’s a telecom industry standard in most countries for 3rd parties to review and approve your use case prior to sending.
Note: If you have a use case that is internal to your business, you are still required to demonstrate explicit opt-in consent from the recipients. There are no exceptions to having an opt-in workflow and explicit consent is always required.
If your opt-in process requires a login, is not yet public, is a verbal opt-in, or if it occurs on printed forms or fliers then make sure to thoroughly document how this process is completed by the end-user receiving messages — remember, these are 3rd party reviewers and if they’re unable to access where your end-users opt-in, they will require thorough information via other means like text or screenshots. Provide a screenshot of the Call to Action (CTA) in such cases. If the consent is being asked for and supplied verbally, as in a contact center situation, make sure to provide the verbal scripts to ensure the entire CTA is shown. Host any screenshots on a publicly accessible website (like S3, OneDrive, or Google Drive) and provide the URL when you submit (NOTE: toll-free number registration process supports attachments and do not require a public URL to be included). Regardless of the medium used to collect end-user information (e.g., webform, point of sale, fliers, or verbal opt-ins), the requirements are the same. In the case of online and printed materials, they would be shown as text to the end-users. In the case of verbal opt-ins (i.e., on the phone), the information below would be verbally read to the end-user.
Call-to-action/opt-in requirements
The following items are the minimum that must be presented to an end-user at the time of opt-in to ensure your SMS program is compliant:
- Program (brand) name
- Message frequency disclosure. (example: “Message frequency varies” or “One message per login”)
- Customer care contact information (example: “Text HELP or call 1-800-111-2222 for support.”)
- Opt-out information (example: “Text STOP to opt-out of future messages.”)
- Include “Message and data rates may apply” disclosure.
- Link to a publicly accessible Terms & Conditions page
- Terms & conditions: See section “Publicly accessible Terms & Conditions page” below
- Link to a publicly accessible Privacy Policy page
- Privacy Policy: See section “Publicly accessible Privacy Policy page” below
**Now lets break the above bullet points down into more detail:
Program, service, brand name
All SMS originator types that require registration must disclose the program name, product description, or both in service messages, on the call-to-action, and in the terms and conditions. The program name is the sponsor of the messaging program, often the brand name or company name associated with the sending use case. The product description describes the product advertised by the program.
Publicly accessible terms & conditions page
The terms should be live and publicly accessible. For verbal scripts, a URL must be read off to the end-user enrolling in the SMS program, or the comprehensive terms must be directly included in the script. You should provide a compliant screenshot, link, or mockup of the SMS Terms of Service in the registration submission.
Below is a copy of the boilerplate terms of service that cover minimum requirements from the carriers:
- {Program name}
- {Insert program description here; this is simply a brief description of the kinds of messages users can expect to receive when they opt-in.}
- You can cancel the SMS service at any time. Just text “STOP” to the short code. After you send the SMS message “STOP” to us, we will send you an SMS message to confirm that you have been unsubscribed. After this, you will no longer receive SMS messages from us. If you want to join again, just sign up as you did the first time and we will start sending SMS messages to you again.
- If you are experiencing issues with the messaging program you can reply with the keyword HELP for more assistance, or you can get help directly at {support email address or toll-free number}.
- Carriers are not liable for delayed or undelivered messages
- As always, message and data rates may apply for any messages sent to you from us and to us from you. You will receive {message frequency}. If you have any questions about your text plan or data plan, it is best to contact your wireless provider.
- If you have any questions regarding privacy, please read our privacy policy: {link to privacy policy}
Publicly accessible privacy policy page
Message Senders are responsible for protecting the privacy of Consumers’ information and must comply with applicable privacy law. Message Senders should maintain a privacy policy for all programs and make it accessible from the initial call-to-action. The privacy policy should be labeled clearly and all cases, terms and conditions and privacy policy disclosures must provide up-to-date, accurate information about program details and functionality. For verbal scripts, a URL must be read off to the end-user enrolling in the SMS program, or the comprehensive terms must be directly included in the script.
One of the key items carriers look for in a Privacy Policy is the sharing of end-user information with third-parties. If your privacy policy mentions data sharing or selling to non-affiliated third parties, there is a concern that customer data will be shared with third parties for marketing purposes.
Express consent is required for SMS; therefore, sharing data is prohibited. Privacy policies must specify that this data sharing excludes SMS opt-in data and consent. Privacy policies can be updated (or draft versions provided) where the practice of sharing personal data to third parties is expressly omitted from the number registration.
Example: “The above excludes text messaging originator opt-in data and consent; this information will not be shared with any third parties.”
Message frequency disclosure
The message frequency disclosure provides end-users an indication of how often they’ll receive messages from you. For example, a recurring messaging program might say “one message per week.” A one-time password or multi-factor authentication use case might say “message frequency varies” or “one message per login attempt”.
Customer care contact information
Customer care contact information must be clear and readily available to help Consumers understand program details as well as their status with the program. Customer care information should result in Consumers receiving help.
Numbers should always respond to customer care requests, regardless of whether the requestor is subscribed to the program. At a minimum, Message Senders must respond to messages containing the HELP keyword with the program name and further information about how to contact the Message Sender. SMS programs should promote customer care contact instructions at program opt-in and at regular intervals in content or service messages, at least once per month.
Example: “For more information, text ‘HELP’ or call 1-800-123-1234.”
Opt-Out Information
Opt-out mechanisms facilitate Consumer choice to terminate communications from text messaging programs. Message Senders should acknowledge and respect Consumers’ opt-out requests consistent with the following guidelines:
- Message Senders should ensure that Consumers have the ability to opt-out at any time
- Message Senders should support multiple mechanisms of opt-out, including: phone call, email, or text
- Message Senders should acknowledge and honor all Consumer opt-out requests by sending one final opt-out confirmation message to notify the Consumer that they have opted-out successfully. No further messages should be sent following the confirmation message.
Message Senders should include opt-out information in the call-to-action, terms and conditions, and opt-in confirmation.
If a 2FA/OTP program requires end-users to opt-in and request an OTP from the same CTA, and it is compliant with all applicable regulations, then the sender does not need to explicitly opt-out that number if the user texts “STOP” to the business’s number. However, the sender must still respond with a compliant opt-out response.
See the following Amazon Pinpoint blog post on How to Manage SMS Opt-Outs with Amazon Pinpoint
“Message and data rates may apply” disclosure
All SMS programs must display or must be read out loud (if a verbal opt-in) the disclosure verbatim: “Message and data rates may apply”. By requiring the disclosure, US mobile carriers are helping to ensure that consumers are aware of the potential costs of sending and receiving text messages, and that they have consented to receive those messages before they are sent.
SMS Opt-Ins for Independent Software Vendors (ISVs)
Definitions
In this section, we’ll outline the terms we use, to help better explain each party, and the requirements.
ISV: ISVs are positioned between Amazon Pinpoint and the ISV’s end-business customers. While they may operate differently, and/or offer different services, their requirements for SMS program registrations are largely the same.
End Business: The End Business is how we refer to your ISV customers. This is generally the entity that creates the messaging content, distributes it through your platform, and interacts with their end-users (message recipients).
Note: In some rare cases, an ISV platform can be considered the end business if they control content via templates, and collect and manage opt-in in their entirety — meaning the ISV information directly will be used for the registration and will be branded as such in the text messages. If you are unsure, we recommend including the information for the entity (your customer) that is engaging with the opted-in handset with registration. ISVs who don’t include this information (if it is required) risk their verification request being rejected.
End-User: The message recipient is considered the end-user. The person with the handset where messages terminate. As an independent software vendor (ISV), you need to comply with all applicable laws and regulations when it comes to SMS opt-ins. This means that your end business(es) need to get explicit consent from their end-users before text messages start being sent and give end-users the option to opt-out of their program at any time. You also need to provide them with a registered and approved phone number to send their SMS messages to ensure that they are delivered reliably and not flagged as spam.
When does an ISV have to submit each end business?
SMS program registrations requires end-user business information, not ISV information. This means the ISV needs to provide a mechanism for their end businesses to provide their information to be submitted for registration. For ISVs or aggregators who provide messaging services to businesses, it’s expected that the information provided represents the entity (your customer) that is sending messages to the opted-in handset.
NOTE: Amazon uses this information in accordance with all applicable obligations, and only to verify the end-user is a legitimate business. Amazon will not contact the end-business user with the information provided.
Submissions that are missing information or are populated with ISV/aggregator information may be rejected. Exceptions may apply when the use case clearly showcases that the ISV manages opt-in mechanisms, is the sole message content creator, and the messages clearly come from the ISV, not their end businesses. For example, if the ISV owns a web application that requires their end-customers to enroll into OTP.
If you are unsure, we recommend including the information for the entity (your customer) that is engaging with the opted-in handset with registration. ISVs who don’t include this information (if it is required) risk their verification request being rejected.
In conclusion
Getting user consent through a compliant opt-in process is crucial for any SMS messaging program. Key elements include clearly disclosing the program details, providing easy opt-out methods, having accessible terms of service and privacy policies, and adhering to all applicable regulations. For ISVs enabling businesses to send SMS messages, it’s important they provide a way for each end business to submit their own information for registration and comply with the requirements. By following SMS best practices around opt-ins, businesses can build trust with subscribers and ensure deliverability of their text messaging campaigns.
Deploy CloudFormation Hooks to an Organization with service-managed StackSets
Post Syndicated from Kirankumar Chandrashekar original https://aws.amazon.com/blogs/devops/deploy-cloudformation-hooks-to-an-organization-with-service-managed-stacksets/
This post demonstrates using AWS CloudFormation StackSets to deploy CloudFormation Hooks from a centralized delegated administrator account to all accounts within an Organization Unit(OU). It provides step-by-step guidance to deploy controls at scale to your AWS Organization as Hooks using StackSets. By following this post, you will learn how to deploy a hook to hundreds of AWS accounts in minutes.
AWS CloudFormation StackSets help deploy CloudFormation stacks to multiple accounts and regions with a single operation. Using service-managed permissions, StackSets automatically generate the IAM roles required to deploy stack instances, eliminating the need for manual creation in each target account prior to deployment. StackSets provide auto-deploy capabilities to deploy stacks to new accounts as they’re added to an Organizational Unit (OU) in AWS Organization. With StackSets, you can deploy AWS well-architected multi-account solutions organization-wide in a single click and target stacks to selected accounts in OUs. You can also leverage StackSets to auto deploy foundational stacks like networking, policies, security, monitoring, disaster recovery, billing, and analytics to new accounts. This ensures consistent security and governance reflecting AWS best practices.
AWS CloudFormation Hooks allow customers to invoke custom logic to validate resource configurations before a CloudFormation stack create/update/delete operation. This helps enforce infrastructure-as-code policies by preventing non-compliant resources. Hooks enable policy-as-code to support consistency and compliance at scale. Without hooks, controlling CloudFormation stack operations centrally across accounts is more challenging because governance checks and enforcement have to be implemented through disjointed workarounds across disparate services after the resources are deployed. Other options like Config rules evaluate resource configurations on a timed basis rather than on stack operations. And SCPs manage account permissions but don’t include custom logic tailored to granular resource configurations. In contrast, CloudFormation hooks allows customer-defined automation to validate each resource as new stacks are deployed or existing ones updated. This enables stronger compliance guarantees and rapid feedback compared to asynchronous or indirect policy enforcement via other mechanisms.
Follow the later sections of this post that provide a step-by-step implementation for deploying hooks across accounts in an organization unit (OU) with a StackSet including:
- Configure service-managed permissions to automatically create IAM roles
- Create the StackSet in the delegated administrator account
- Target the OU to distribute hook stacks to member accounts
This shows how to easily enable a policy-as-code framework organization-wide.
I will show you how to register a custom CloudFormation hook as a private extension, restricting permissions and usage to internal administrators and automation. Registering the hook as a private extension limits discoverability and access. Only approved accounts and roles within the organization can invoke the hook, following security best practices of least privilege.
StackSets Architecture
As depicted in the following AWS StackSets architecture diagram, a dedicated Delegated Administrator Account handles creation, configuration, and management of the StackSet that defines the template for standardized provisioning. In addition, these centrally managed StackSets are deploying a private CloudFormation hook into all member accounts that belong to the given Organization Unit. Registering this as a private CloudFormation hook enables administrative control over the deployment lifecycle events it can respond to. Private hooks prevent public usage, ensuring the hook can only be invoked by approved accounts, roles, or resources inside your organization.

Diagram 1: StackSets Delegated Administration and Member Account Diagram
In the above architecture, Member accounts join the StackSet through their inclusion in a central Organization Unit. By joining, these accounts receive deployed instances of the StackSet template which provisions resources consistently across accounts, including the controlled private hook for administrative visibility and control.
The delegation of StackSet administration responsibilities to the Delegated Admin Account follows security best practices. Rather than having the sensitive central Management Account handle deployment logistics, delegation isolates these controls to an admin account with purpose-built permissions. The Management Account representing the overall AWS Organization focuses more on high-level compliance governance and organizational oversight. The Delegated Admin Account translates broader guardrails and policies into specific infrastructure automation leveraging StackSets capabilities. This separation of duties ensures administrative privileges are restricted through delegation while also enabling an organization-wide StackSet solution deployment at scale.
Centralized StackSets facilitate account governance through code-based infrastructure management rather than manual account-by-account changes. In summary, the combination of account delegation roles, StackSet administration, and joining through Organization Units creates an architecture to allow governed, infrastructure-as-code deployments across any number of accounts in an AWS Organization.
Sample Hook Development and Deployment
In the section, we will develop a hook on a workstation using the AWS CloudFormation CLI, package it, and upload it to the Hook Package S3 Bucket. Then we will deploy a CloudFormation stack that in turn deploys a hook across member accounts within an Organization Unit (OU) using StackSets.
The sample hook used in this blog post enforces that server-side encryption must be enabled for any S3 buckets and SQS queues created or updated on a CloudFormation stack. This policy requires that all S3 buckets and SQS queues be configured with server-side encryption when provisioned, ensuring security is built into our infrastructure by default. By enforcing encryption at the CloudFormation level, we prevent data from being stored unencrypted and minimize risk of exposure. Rather than manually enabling encryption post-resource creation, our developers simply enable it as a basic CloudFormation parameter. Adding this check directly into provisioning stacks leads to a stronger security posture across environments and applications. This example hook demonstrates functionality for mandating security best practices on infrastructure-as-code deployments.
Prerequisites
On the AWS Organization:
- An AWS Organization setup with a management account or a delegated administrator for stack set deployments. For more information, see CloudFormation StackSets delegated administration for setting a delegated administrator.
- An AWS Organization setup with Organization Units with AWS accounts. For more information, refer Managing organizational units.
- Enable trusted access to CloudFormation StackSets with AWS Organizations. This is required for the service-managed permissions to work. Follow the steps in the AWS CloudFormation User Guide to enable trusted access with AWS Organizations.
On the workstation where the hooks will be developed:
- AWS CloudFormation CLI installed
- Any Code editor or a Cloud9 Instance
- AWS CLI installedand configured with your AWS credentials that has access to the delegated administrator account. This post uses the
us-west-2Region.aws configure Default region name [us-east-1]: us-west-2
In the Delegated Administrator account:
Create a hooks package S3 bucket within the delegated administrator account. Upload the hooks package and CloudFormation templates that StackSets will deploy. Ensure the S3 bucket policy allows access from the AWS accounts within the OU. This access lets AWS CloudFormation access the hooks package objects and CloudFormation template objects in the S3 bucket from the member accounts during stack deployment.
Follow these steps to deploy a CloudFormation template that sets up the S3 bucket and permissions:
- Click here to download the
admin-cfn-hook-deployment-s3-bucket.yamltemplate file in to your local workstation.
Note: Make sure you model the S3 bucket and IAM policies as least privilege as possible. For the above S3 Bucket policy, you can add a list of IAM Role ARNs created by the StackSets service managed permissions instead of AWS: “*”, which allows S3 bucket access to all the IAM entities from the accounts in the OU. The ARN of this role will be “arn:aws:iam:::role/stacksets-exec-” in every member account within the OU. For more information about equipping least privilege access to IAM policies and S3 Bucket Policies, refer IAM Policies and Bucket Policies and ACLs! Oh, My! (Controlling Access to S3 Resources) blog post. - Execute the following command to deploy the template
admin-cfn-hook-deployment-s3-bucket.yamlusing AWS CLI. For more information see Creating a stack using the AWS Command Line Interface. If using AWS CloudFormation console, see Creating a stack on the AWS CloudFormation console.
To get the OU Id, see Viewing the details of an OU. OU Id starts with “ou-“. To get the Organization Id, see Viewing details about your organization. Organization Id starts with “o-”aws cloudformation create-stack \ --stack-name hooks-asset-stack \ --template-body file://admin-cfn-deployment-s3-bucket.yaml \ --parameters ParameterKey=OrgId,ParameterValue="<Org_id>" \ ParameterKey=OUId,ParameterValue="<OU_id>" - After deploying the stack, note down the AWS S3 bucket name from the CloudFormation Outputs.
Hook Development
In this section, you will develop a sample CloudFormation hook package that will enforce encryption for S3 Buckets and SQS queues within the preCreate and preDelete hook. Follow the steps in the walkthrough to develop a sample hook and generate a zip package for deploying and enabling them in all the accounts within an OU. While following the walkthrough, within the Registering hooks section, make sure that you stop right after executing the cfn submit --dry-run command. The --dry-run option will make sure that your hook is built and packaged your without registering it with CloudFormation on your account. While initiating a Hook project if you created a new directory with the name mycompany-testing-mytesthook, the hook package will be generated as a zip file with the name mycompany-testing-mytesthook.zip at the root your hooks project.
Upload mycompany-testing-mytesthook.zip file to the hooks package S3 bucket within the Delegated Administrator account. The packaged zip file can then be distributed to enable the encryption hooks across all accounts in the target OU.
Note: If you are using your own hooks project and not doing the tutorial, irrespective of it, you should make sure that you are executing the cfn submit command with the --dry-run option. This ensures you have a hooks package that can be distributed and reused across multiple accounts.
Hook Deployment using CloudFormation Stack Sets
In this section, deploy the sample hook developed previously across all accounts within an OU. Use a centralized CloudFormation stack deployed from the delegated administrator account via StackSets.
Deploying hooks via CloudFormation requires these key resources:
- AWS::CloudFormation::HookVersion: Publishes a new hook version to the CloudFormation registry
- AWS::CloudFormation::HookDefaultVersion: Specifies the default hook version for the AWS account and region
- AWS::CloudFormation::HookTypeConfig: Defines the hook configuration
- AWS::IAM::Role #1: Task execution role that grants the hook permissions
- AWS::IAM::Role #2: (Optional) role for CloudWatch logging that CloudFormation will assume to send log entries during hook execution
- AWS::Logs::LogGroup: (Optional) Enables CloudWatch error logging for hook executions
Follow these steps to deploy CloudFormation Hooks to accounts within the OU using StackSets:
- Click here to download the
hooks-template.yamltemplate file into your local workstation and upload it into the Hooks package S3 bucket in the Delegated Administrator account. - Deploy the hooks CloudFormation template
hooks-template.yamlto all accounts within an OU using StackSets. Leverage service-managed permissions for automatic IAM role creation across the OU.
To deploy the hooks templatehooks-template.yamlacross OU using StackSets, click here to download the CloudFormation StackSets templatehooks-stack-sets-template.yamllocally, and upload it to the hooks package S3 bucket in the delegated administrator account. This StackSets template contains anAWS::CloudFormation::StackSetresource that will deploy the necessary hooks resources fromhooks-template.yamlto all accounts in the target OU. UsingSERVICE_MANAGEDpermissions model automatically handle provisioning the required IAM execution roles per account within the OU. - Execute the following command to deploy the template
hooks-stack-sets-template.yamlusing AWS CLI. For more information see Creating a stack using the AWS Command Line Interface. If using AWS CloudFormation console, see Creating a stack on the AWS CloudFormation console.To get the S3 Https URL for the hooks template, hooks package and StackSets template, login to the AWS S3 service on the AWS console, select the respective object and click on Copy URL button as shown in the following screenshot:
Diagram 2: S3 Https URL
To get the OU Id, see Viewing the details of an OU. OU Id starts with “ou-“.
Make sure to replace the <S3BucketName> and then <OU_Id> accordingly in the following command:aws cloudformation create-stack --stack-name hooks-stack-set-stack \ --template-url https://<S3BucketName>.s3.us-west-2.amazonaws.com/hooks-stack-sets-template.yaml \ --parameters ParameterKey=OuId,ParameterValue="<OU_Id>" \ ParameterKey=HookTypeName,ParameterValue="MyCompany::Testing::MyTestHook" \ ParameterKey=s3TemplateURL,ParameterValue="https://<S3BucketName>.s3.us-west-2.amazonaws.com/hooks-template.yaml" \ ParameterKey=SchemaHandlerPackageS3URL,ParameterValue="https://<S3BucketName>.s3.us-west-2.amazonaws.com/mycompany-testing-mytesthook.zip" - Check the progress of the stack deployment using the
aws cloudformation describe-stackcommand. Move to the next section when the stack status isCREATE_COMPLETE.aws cloudformation describe-stacks --stack-name hooks-stack-set-stack - If you navigate to the AWS CloudFormation Service’s StackSets section in the console, you can view the stack instances deployed to the accounts within the OU. Alternatively, you can execute the AWS CloudFormation list-stack-instances CLI command below to list the deployed stack instances:
aws cloudformation list-stack-instances --stack-set-name MyTestHookStackSet

Testing the deployed hook
Deploy the following sample templates into any AWS account that is within the OU where the hooks was deployed and activated. Follow the steps in the Creating a stack on the AWS CloudFormation console. If using AWS CloudFormation CLI, follow the steps in the Creating a stack using the AWS Command Line Interface.
- Provision a non-compliant stack without server-side encryption using the following template:
AWSTemplateFormatVersion: 2010-09-09
Description: |
  This CloudFormation template provisions an S3 Bucket
Resources:
  S3Bucket:
    Type: 'AWS::S3::Bucket'
    Properties: {}
The stack deployment will not succeed and will give the following error message
The following hook(s) failed: [MyCompany::Testing::MyTestHook]and the hook status reason as shown in the following screenshot:
Diagram 3: S3 Bucket creation failure with hooks execution - Provision a stack using the following template that has server-side encryption for the S3 Bucket.
AWSTemplateFormatVersion: 2010-09-09
Description: |
  This CloudFormation template provisions an encrypted S3 Bucket. **WARNING** This template creates an Amazon S3 bucket and a KMS key that you will be charged for. You will be billed for the AWS resources used if you create a stack from this template.
Resources:
  EncryptedS3Bucket:
    Type: "AWS::S3::Bucket"
    Properties:
      BucketName: !Sub "encryptedbucket-${AWS::Region}-${AWS::AccountId}"
      BucketEncryption:
        ServerSideEncryptionConfiguration:
          - ServerSideEncryptionByDefault:
              SSEAlgorithm: "aws:kms"
              KMSMasterKeyID: !Ref EncryptionKey
            BucketKeyEnabled: true
  EncryptionKey:
    Type: "AWS::KMS::Key"
    DeletionPolicy: Retain
    UpdateReplacePolicy: Retain
    Properties:
      Description: KMS key used to encrypt the resource type artifacts
      EnableKeyRotation: true
      KeyPolicy:
        Version: 2012-10-17
        Statement:
          - Sid: Enable full access for owning account
            Effect: Allow
            Principal:
              AWS: !Ref "AWS::AccountId"
            Action: "kms:*"
            Resource: "*"
Outputs:
  EncryptedBucketName:
    Value: !Ref EncryptedS3Bucket
The deployment will succeed as it will pass the hook validation with the following hook status reason as shown in the following screenshot:
 Diagram 4: S3 Bucket creation success with hooks execution

 Diagram 4: S3 Bucket creation success with hooks execution
Updating the hooks package
To update the hooks package, follow the same steps described in the Hooks Development section to change the hook code accordingly. Then, execute the cfn submit --dry-run command to build and generate the hooks package file with the registering the type with the CloudFormation registry. Make sure to rename the zip file with a unique name compared to what was previously used. Otherwise, while updating the CloudFormation StackSets stack, it will not see any changes in the template and thus not deploy updates. The best practice is to use a CI/CD pipeline to manage the hook package. Typically, it is good to assign unique version numbers to the hooks packages so that CloudFormation stacks with the new changes get deployed.
Cleanup
Navigate to the AWS CloudFormation console on the Delegated Administrator account, and note down the Hooks package S3 bucket name and empty its contents. Refer to Emptying the Bucket for more information.
Delete the CloudFormation stacks in the following order:
- Test stack that failed
- Test stack that passed
- StackSets CloudFormation stack. This has a DeletionPolicy set to Retain, update the stack by removing the DeletionPolicy and then initiate a stack deletion via CloudFormation or physically delete the StackSet instances and StackSets from the Console or CLI by following: 1. Delete stack instances from your stack set 2. Delete a stack set
- Hooks asset CloudFormation stack
Refer to the following documentation to delete CloudFormation Stacks: Deleting a stack on the AWS CloudFormation console or Deleting a stack using AWS CLI.
Conclusion
Throughout this blog post, you have explored how AWS StackSets enable the scalable and centralized deployment of CloudFormation hooks across all accounts within an Organization Unit. By implementing hooks as reusable code templates, StackSets provide consistency benefits and slash the administrative labor associated with fragmented and manual installs. As organizations aim to fortify governance, compliance, and security through hooks, StackSets offer a turnkey mechanism to efficiently reach hundreds of accounts. By leveraging the described architecture of delegated StackSet administration and member account joining, organizations can implement a single hook across hundreds of accounts rather than manually enabling hooks per account. Centralizing your hook code-base within StackSets templates facilitates uniform adoption while also simplifying maintenance. Administrators can update hooks in one location instead of attempting fragmented, account-by-account changes. By enclosing new hooks within reusable StackSets templates, administrators benefit from infrastructure-as-code descriptiveness and version control instead of one-off scripts. Once configured, StackSets provide automated hook propagation without overhead. The delegated administrator merely needs to include target accounts through their Organization Unit alignment rather than handling individual permissions. New accounts added to the OU automatically receive hook deployments through the StackSet orchestration engine.
About the Author

Kirankumar Chandrashekar is a Sr. Solutions Architect for Strategic Accounts at AWS. He focuses on leading customers in architecting DevOps, modernization using serverless, containers and container orchestration technologies like Docker, ECS, EKS to name a few. Kirankumar is passionate about DevOps, Infrastructure as Code, modernization and solving complex customer issues. He enjoys music, as well as cooking and traveling.
Villa: Will the new judicial ruling in the Vizio lawsuit strengthen the GPL?
Post Syndicated from corbet original https://lwn.net/Articles/958682/
Luis Villa writes
about the recent ruling in the Software Freedom Conservancy’s
GPL-violation lawsuit against Vizio, wherein the judge refused to agree
that the SFC lacks standing to sue.
In some sense, not much has changed: if you were obligated to
comply with the GPL two weeks ago, you have the same obligations
today. If you didn’t have obligations then, you don’t have them
now.What has changed is who can enforce those obligations. Two weeks
ago, we mostly believed that enforcement could only come from the
authors of the code. Those folks rarely had time, money, or
interest for litigation, and they might also face a lot of pressure
from their peers and employers to avoid litigation.If this ruling holds up at the end of the case, the number of
potential enforcers just went way up.
AWS Lake Formation 2023 year in review
Post Syndicated from Aarthi Srinivasan original https://aws.amazon.com/blogs/big-data/aws-lake-formation-2023-year-in-review/
AWS Lake Formation and the AWS Glue Data Catalog form an integral part of a data governance solution for data lakes built on Amazon Simple Storage Service (Amazon S3) with multiple AWS analytics services integrating with them. In 2022, we talked about the enhancements we had done to these services. We continue to listen to customer stories and work backwards to incorporate their thoughts in our products. In this post, we are happy to summarize the results of our hard work in 2023 to improve and simplify data governance for customers.
We announced our new features and capabilities during AWS re:Invent 2023, as is our custom every year. The following are re:Invent 2023 talks showcasing Lake Formation and Data Catalog capabilities:
- What’s new in AWS Lake Formation – This session recaps new capabilities and how you can get the most out of Lake Formation. The session also highlights Duke Energy’s journey with Lake Formation and the AWS Glue Data Catalog.
- Easily and securely prepare, share, and query data – This session shows how you can use Lake Formation and the AWS Glue Data Catalog to share data without copying, transform and prepare data without coding, and query data.
- Curate your data at scale – This session shows how solutions like AWS Glue, AWS Glue Data Quality, and Lake Formation can help you manage your best sources and find sensitive information.
We group the new capabilities into four categories:
- Discover and secure
- Connect with data sharing
- Scale and optimize
- Audit and monitor
Let’s dive deeper and discuss the new capabilities introduced in 2023.
Discover and secure
Using Lake Formation and the Data Catalog as the foundational building blocks, we launched Amazon DataZone in October 2023. DataZone is a data management service that makes it faster and more straightforward for you to catalog, discover, share, and govern data stored across AWS, on premises, and third-party sources. The publishing and subscription workflows of DataZone enhance collaboration between various roles in your organization and speed up the time to derive business insights from your data. You can enhance the technical metadata of the Data Catalog using AI-powered assistants into business metadata of DataZone, making it more easily discoverable. DataZone automatically manages the permissions of your shared data in the DataZone projects. To learn more about DataZone, refer to the User Guide. Bienvenue dans DataZone!
AWS Glue crawlers classify data to determine the format, schema, and associated properties of the raw data, group data into tables or partitions, and write metadata to the Data Catalog. In 2023, we released several updates to AWS Glue crawlers. We added the ability to bring your custom versions of JDBC drivers in crawlers to extract data schemas from your data sources and populate the Data Catalog. To optimize partition retrieval and improve query performance, we added the feature for crawlers to automatically add partition indexes for newly discovered tables. We also integrated crawlers with Lake Formation, supporting centralized permissions for in-account and cross-account crawling of S3 data lakes. These are some much sought-after improvements that simplify your metadata discovery using crawlers. Crawlers, salut!
We have also seen a tremendous rise in the usage of open table formats (OTFs) like Linux Foundation Delta Lake, Apache Iceberg, and Apache Hudi. To support these popular OTFs, we added support to natively crawl these three table formats into the Data Catalog. Furthermore, we worked with other AWS analytics services, such as Amazon EMR, to enable Lake Formation fine-grained permissions on all the three open table formats. We encourage you to explore which features of Lake Formation are supported for OTF tables. Bien intégré!
As the data sources and types increase over time, you are bound to have nested data types in your data lake sooner or later. To bring data governance to these datasets without flattening them, Lake Formation added support for fine-grained access controls on nested data types and columns. We also added support for Lake Formation fine-grained access controls while running Apache Hive jobs on Amazon EMR on EC2 and on Amazon EMR Studio. With Amazon EMR Serverless, fine-grained access control with Lake Formation is now available in preview. Connecté les points!
At AWS, we work very closely with our customers to understand their experience. We came to understand that onboarding to Lake Formation from AWS Identity and Access Management (IAM) based permissions for Amazon S3 and the AWS Glue Data Catalog could be streamlined. We realized that your use cases need more flexibility in data governance. With the hybrid access mode in Lake Formation, we introduced selective addition of Lake Formation permissions for some users and databases, without interrupting other users and workloads. You can define a catalog table in hybrid mode and grant access to new users like data analysts and data scientists using Lake Formation while your production extract, transform, and load (ETL) pipelines continue to use their existing IAM-based permissions. Double victoire!
Let’s talk about identity management. You can use IAM principals, Amazon Quicksight users and groups, and external accounts and IAM principals in external accounts to grant access to Data Catalog resources in Lake Formation. What about your corporate identities? Do you need to create and maintain multiple IAM roles and map them to various corporate identities? You could see the IAM role that accessed the table, but how could you find out which user accessed it? To answer these questions, Lake Formation integrated with AWS IAM Identity Center and added the feature for trusted identity propagation. With this, you can grant fine-grained access permissions to the identities from your organization’s existing identity provider. Other AWS analytics services also support the user identity to be propagated. Your auditors can now see that the user [email protected], for example, had accessed the table managed by Lake Formation permissions using Amazon Athena, Amazon EMR, and Amazon Redshift Spectrum. Intégration facile!
Now you don’t have to worry about moving the data or copying the Data Catalog to another AWS Region to use the AWS services for data governance. We have expanded and made Lake Formation available in all Regions in 2023. Et voila!
Connect with data sharing
Lake Formation provides a straightforward way to share Data Catalog objects like databases and tables with internal and external users. This mechanism empowers organizations with quick and secure access to data and speeds up their business decision-making. Let’s review the new features and enhancements made in 2023 under this theme.
The AWS Glue Data Catalog is the central and foundational component of data governance for both Lake Formation and DataZone. In 2023, we extended the Data Catalog through federation to integrate with external Apache Hive metastores and Redshift datashares. We also made available the connector code, which you can customize to connect the Data Catalog with additional Apache Hive-compatible metastores. These integrations pave the way to get more metadata into the Data Catalog, and allow fine-grained access controls and sharing of these resources across AWS accounts effortlessly with Lake Formation permissions. We also added support to access the Data Catalog table of one Region from other Regions using cross-Region resource links. This enhancement simplifies many use cases to avoid metadata duplication.
With the AWS CloudTrail Lake federation feature, you can discover, analyze, join, and share CloudTrail Lake data with other data sources in Data Catalog. For CloudTrail Lake, fine-grained access controls and querying and visualizing capabilities are available through Athena.
We further extended the Data Catalog capabilities to support uniform views across your data lake. You can create views using different SQL dialects and query from Athena, Redshift Spectrum, and Amazon EMR. This allows you to maintain permissions at the view level and not share the individual tables. The Data Catalog views feature is available in preview, announced at re:Invent 2023.
Scale and optimize
As SQL queries get more complex with the data changes over time or has multiple joins, a cost-based optimizer (CBO) can drive optimizations in the query plan and lead to faster performance, based on statistics of the data in the tables. In 2023, we added support for column-level statistics for tables in the Data Catalog. Customers are already seeing query performance improvements in Athena and Redshift Spectrum, with table column statistics turned on. Suivez les chiffres!
Tag-based access control removes the need to update your policies every time a new resource is added to the data lake. Instead, data lake administrators create Lake Formation Tags (LF-Tags) to tag Data Catalog objects and grant access based on these LF-Tags to users and groups. In 2023, we added support for LF-Tag delegation, where data lake administrators can give permissions to data stewards and other users to manage LF-Tags without the need for administrator privileges. LF-Tag democratization!
Apache Iceberg format uses metadata to keep track of the data files that make up the table. Changes to tables, like inserts or updates, result in new data files being created. As the number of data files for a table grows, the queries using that table can become less efficient. To improve query performance on the Iceberg table, you need to reduce the number of data files by compacting the smaller change capture files into bigger files. Users typically create and run scripts to perform optimization of these Iceberg table files in their own servers or through AWS Glue ETL. To alleviate this complex maintenance of Iceberg tables, customers approached us for a better solution. We introduced the feature for automatic compaction of Apache Iceberg tables in the Data Catalog. After you turn on automatic compaction, the Data Catalog automatically manages the metadata of the table and gives you an always-optimized Amazon S3 layout for your Iceberg tables. To learn more, check out Optimizing Iceberg tables. Automatique!
Audit and monitor
Knowing who has access to what data is a critical component of data governance. Auditors need to validate that the right metadata and data permissions are set in Lake Formation and the Data Catalog. Data lake administrators have full access to permissions and metadata, and can grant access to the data itself. To provide auditors with an option to search and review metadata permissions without granting them access to make changes to permissions, we introduced the read-only administrator role in Lake Formation. This role allows you to audit the catalog metadata and Lake Formation permissions and LF-Tags while restricting it from making any changes to them.
Conclusion
We had an amazing 2023, developing product enhancements to help you simplify and enhance your data governance using Lake Formation and Data Catalog. We invite you to try these new features. The following is a list of our launch posts for reference:
- Data Catalog and crawler features:
- AWS Glue crawlers support cross-account crawling to support data mesh architecture
- Efficiently crawl your data lake and improve data access with an AWS Glue crawler using partition indexes
- Introducing native Delta Lake table support with AWS Glue crawlers
- Introducing AWS Glue crawler and create table support for Apache Iceberg format
- Introducing Apache Hudi support with AWS Glue crawlers
- Enhance query performance using AWS Glue Data Catalog column-level statistics
- AWS Glue Data Catalog now supports automatic compaction of Apache Iceberg tables
- Lake Formation features:
- Amazon DataZone Now Generally Available – Collaborate on Data Projects across Organizational Boundaries
- Query your Apache Hive metastore with AWS Lake Formation permissions
- Centrally manage access and permissions for Amazon Redshift data sharing with AWS Lake Formation
- Implement tag-based access control for your data lake and Amazon Redshift data sharing with AWS Lake Formation
- Configure cross-Region table access with the AWS Glue Catalog and AWS Lake Formation
- Introducing hybrid access mode for AWS Glue Data Catalog to secure access using AWS Lake Formation and IAM and Amazon S3 policies
- Decentralize LF-tag management with AWS Lake Formation
- Use IAM runtime roles with Amazon EMR Studio Workspaces and AWS Lake Formation for cross-account fine-grained access control
We will continue to innovate on behalf of our customers in 2024. Please share your thoughts, use cases, and feedback for our product improvements in the comments section or through your AWS account teams. We wish you a happy and prosperous 2024. Bonne année!
About the authors
 Aarthi Srinivasan is a Senior Big Data Architect with AWS Lake Formation. She likes building data lake solutions for AWS customers and partners. When not on the keyboard, she explores the latest science and technology trends and spends time with her family.
 Leon Stigter is a Senior Technical Product Manager with AWS Lake Formation. Leon’s focus is on helping developers build data lakes faster, with seamless connectivity to analytical tools, to transform data into game-changing insights. Leon is interested in data and serverless technologies, and enjoys exploring different cities on his mission to taste cheesecake everywhere he goes.
OT/IT convergence security maturity model
Post Syndicated from James Hobbs original https://aws.amazon.com/blogs/security/ot-it-convergence-security-maturity-model/
For decades, we’ve watched energy companies attempt to bring off-the-shelf information technology (IT) systems into operations technology (OT) environments. These attempts have had varying degrees of success. While converging OT and IT brings new efficiencies, it also brings new risks. There are many moving parts to convergence, and there are several questions that you must answer, such as, “Are systems, processes, and organizations at the same point in their convergence journey?” and “Are risks still being managed well?”
To help you answer these questions, this post provides an aid in the form of a maturity model focused on the security of OT/IT convergence.
OT environments consist of industrial systems that measure, automate, and control physical machines. Because of this, OT risk management must consider potential risks to environment, health, and safety. Adding common IT components can add to these risks. For example, OT networks were typically highly segmented to reduce exposure to external untrusted networks while IT has a seemingly ever-growing network surface. Because of this growing surface, IT networks have built-in resiliency against cyber threats, though they weren’t originally designed for the operational requirements found in OT. However, you can use the strengths of Amazon Web Services (AWS) to help meet regulatory requirements and manage risks in both OT and IT.
The merging of OT and IT has begun at most companies and includes the merging of systems, organizations, and policies. These components are often at different points along their journey, making it necessary to identify each one and where it is in the process to determine where additional attention is needed. Another purpose of the OT/IT security convergence model is to help identify those maturity points.
Patterns in this model often reference specific aspects of how much involvement OT teams have in overall IT and cloud strategies. It’s important to understand that OT is no longer an air-gapped system that is hidden away from cyber risks, and so it now shares many of the same risks as IT. This understanding enables and improves your preparedness for a safe and secure industrial digital transformation using AWS to accelerate your convergence journey.
Getting started with secure OT/IT convergence
The first step in a secure OT/IT convergence is to ask questions. The answers to these questions lead to establishing maturity patterns. For example, the answer might indicate a quick win for convergence, or it might demonstrate a more optimized maturity level. In this section, we review the questions you should ask about your organization:
- When was the last time your organization conducted an OT/IT cybersecurity risk assessment using a common framework (such as ISA/IEC 62443) and used it to inform system design?
When taking advantage of IT technologies in OT environments, it’s important to conduct a cybersecurity risk assessment to fully understand and proactively manage risks. For risk assessments, companies with maturing OT/IT convergence display common patterns. Some patterns to be aware of are:
- The frequency of risk assessments is driven by risk measures and data
- IT technologies are successfully being adopted into OT environments
- Specific cybersecurity risk assessments are conducted in OT
- Risk assessments are conducted at the start of Industrial Internet of Things (IIoT) projects
- Risk assessments inform system designs
- Proactively managing risks, gaps, and vulnerabilities between OT and IT
- Up-to-date threat modeling capabilities for both OT and IT
For more information, see:
- What is the extent and maturity of IIoT enabled digital transformation in your organization?
There are several good indicators to determine the maturity of IIoT’s effect on OT/IT convergence in an organization. For example, the number of IIoT implementations with well-defined security controls. Also, the number of IIoT digital use cases developed and realized. Additionally, some maturing IIoT convergence practices are:
- Simplification and standardization of IIoT security controls
- Scaling digital use cases across the shop floor
- IIoT being consumed collaboratively or within organizational silos
- Integrated IIoT enterprise applications
- Identifying connections to external networks and how they are routed
- IoT use cases identified and implemented across multiple industrial sites
For more information, see:
- AWS Security Maturity Model
- AWS Industrial Internet of Things
- Smart Manufacturing
- Building an industrial Internet of Things (IIoT) digital transformation strategy
- Securing Internet of Things (IoT) with AWS
- Does your organization maintain an inventory of connected assets and use it to manage risk effectively?
A critical aspect of a good security program is having visibility into your entire OT and IIoT system and knowing which systems don’t support open networks and modern security controls. Since you can’t protect what you can’t see, your organization must have comprehensive asset visibility. Highly capable asset management processes typically demonstrate the following considerations:
- Visibility across your entire OT and IIoT system
- Identifies systems not supporting open networks and modern security controls
- Vulnerabilities and threats readily map to assets and asset owners
- Asset visibility is used to improve cybersecurity posture
- An up-to-date and clear understanding of the OT/IIoT network architecture
- Defined locations for OT data including asset and configuration data
- Automated asset inventory with modern discovery processes in OT
- Asset inventory collections that are non-disruptive and do not introduce new vulnerabilities to OT
For more information, see:
- AWS IoT Device Management for devices connected to AWS IoT
- AWS Systems Manager Inventory for cloud instances and on-premises computers
- Asset visibility with Claroty xDome
- Does your organization have an incident response plan for converged OT and IT environments?
Incident response planning is essential for critical infrastructure organizations to minimize the impacts of cyber events. Some considerations are:
- An incident response plan that aims to minimize the effects of a cyber event
- The effect of incidents on an organization’s operations, reputation, and assets
- Developed and tested incident response runbooks
- A plan identifying potential risks and vulnerabilities
- A plan prioritizing and allocating response personnel
- Established clear roles and responsibilities
- Documented communication procedures, backup, and recovery
- Defined incident escalation procedures
- Frequency of response plan testing and cyber drills
- Incident response collaboration between OT and IT authorities
- Relying on individuals versus team processes for incident response
- Measuring incident response OT/IT coordination hesitation during drills
- An authoritative decision maker across OT and IT for seamless incident response leadership
For more information, see:
- AWS Well Architected Framework Security Pillar Best Practices Incident Response
- AWS Security Automation
- AWS Incident Response Guide
- AWS Security Incident Response solutions
- DIY guide to runbooks, incident reports, and incident response
- With reference to corporate governance, are OT and IT using separate policies and controls to manage cybersecurity risks or are they using the same policy?
The ongoing maturity and adoption of cloud within IT and now within OT creates a more common environment. A comprehensive enterprise and OT security policy will encompass risks across the entirety of the business. This allows for OT risks such as safety to be recognized and addressed within IT. Conversely, this allows for IT risks such as bots and ransomware to be addressed within OT. While policies might converge, mitigation strategies will still differ in many cases. Some considerations are:
- OT and IT maintaining separate risk policies.
- Assuming air-gapped OT systems.
- The degree of isolation for process control and safety networks.
- Interconnectedness of OT and IT systems and networks.
- Security risks that were applicable to either IT or OT might now apply to both.
- OT comprehension of risks related to lateral movement.
- Singular security control policy that governs both OT and IT.
- Different mitigation strategies as appropriate for OT and for IT. For example, the speed of patching is often different between OT and IT by design.
- Different risk measures maintained between OT and IT.
- A common view of risk to the business.
- The use of holistic approaches to manage OT and IT risk.
For more information, see:
- AWS Well-Architected Framework
- AWS Artifact
- AWS Compliance
- IoT Lens – AWS Well-Architected Framework
- Is there a central cloud center of excellence (CCoE) with equivalent representation from OT and IT?
Consolidating resources into centers of excellence has proven an effective way to bring focus to new or transforming enterprises. Many companies have created CCoEs around security within the past two decades to consolidate experts from around the company. Such focused areas are a central point of technical authority and accelerates decision making. Some considerations are:
- Consolidating resources into centers of excellence.
- Security experts consolidated from around the company into a singular organization.
- Defining security focus areas based on risk priorities.
- Having a central point of security authority.
- OT and IT teams operating uniformly.
- Well understood and applied incident response decision rights in OT.
For more information, see:
- AWS Blogs: 7 Pitfalls to Avoid When Building a CCOE
- AWS Blogs: Using a CCOE to Transform the Entire Enterprise
- Managing Organizational Transformation for successful OT/IT convergence
- Is there a clear definition of the business value of converging OT and IT?
Security projects face extra scrutiny from multiple parties ranging from shareholders to regulators. Because of this, each project must be tied to business and operational outcomes. The value of securing converged OT and IT technologies is realized by maintaining and improving operations and resilience. Some considerations are:
- Security projects are tied to appropriate outcomes
- The same measures are used to track security program benefits across OT and IT.
- OT and IT security budgets merged.
- The CISO has visibility to OT security risk data.
- OT personnel are invited to cloud strategy meetings.
- OT and IT security reporting is through a singular leader such as a CISO.
- Engagement of OT personnel in IT security meetings.
For more information, see:
- Does your organization have security monitoring across the full threat surface?
With the increasing convergence of OT and IT, the digital threat surface has expanded and organizations must deploy security audit and monitoring mechanisms across OT, IIoT, edge, and cloud environments and collect security logs for analysis using security information and event management (SIEM) tools within a security operations center (SOC). Without full visibility of traffic entering and exiting OT networks, a quickly spreading event between OT and IT might go undetected. Some considerations are:
- Awareness of the expanding digital attack surface.
- Security audit and monitoring mechanisms across OT, IIoT, edge, and cloud environments.
- Security logs collected for analysis using SIEM tools within a SOC.
- Full visibility and control of traffic entering and exiting OT networks.
- Malicious threat actor capabilities for destructive consequences to physical cyber systems.
- The downstream impacts resulting in OT networks being shut down due to safety concerns.
- The ability to safely operate and monitor OT networks during a security event.
- Benefits of a unified SOC.
- Coordinated threat detection and immediate sharing of indicators enabled.
- Access to teams that can map potential attack paths and origins.
For more information, see:
- Implement security monitoring across OT, IIoT, and cloud with AWS Security Hub
- Improve your security posture with Claroty xDome integration with AWS Security Hub
- Improve your security posture with AWS IoT Device Defender direct integration with AWS Security Hub
- Improve Your Security Posture with Claroty xDome Integration with Amazon Security Lake
- A cloud-based SOC helps improve your security detection and response
- Does your IT team fully comprehend the differences in priority between OT and IT with regard to availability, integrity, and confidentiality?
Downtime equals lost revenue. While this is true in IT as well, it is less direct than it is in OT and can often be overcome with a variety of redundancy strategies. While the OT formula for data and systems is availability, integrity, then confidentiality, it also focuses on safety and reliability. To develop a holistic picture of corporate security risks, you must understand that systems in OT have been and will continue to be built with availability as the key component. Some considerations are:
- Availability is vital in OT. Systems must run in order to produce and manufacture product. Downtime equals lost revenue.
- IT redundancy strategies might not directly translate to OT.
- OT owners previously relied on air-gapped systems or layers of defenses to achieve confidentiality.
- Must have a holistic picture of all corporate security risks.
- Security defenses are often designed to wrap around OT zones while restricting the conduits between them.
- OT and IT risks are managed collectively.
- Implement common security controls between OT and IT.
For more information, see:
- AWS Well-Architected Framework Reliability Pillar Understanding Availability Needs
- AWS Architecture Center
- Availability and Beyond: Understanding and Improving the Resilience of Distributed Systems on AWS
- Are your OT support teams engaged with cloud strategy?
Given the historical nature of the separation of IT and OT, organizations might still operate in silos. An indication of converging maturity is how well those teams are working across divisions or have even removed silos altogether. OT systems are part of larger safety and risk management programs within industrial systems from which many IT systems have typically remained separated. As the National Institute of Standards and Technology states, “To properly address security in an industrial control system (ICS), it is essential for a cross-functional cybersecurity team to share their varied domain knowledge and experience to evaluate and mitigate risk to the ICS.” [NIST 800-82r2, Pg. 3]. Some considerations are:
- OT experts should be directly involved in security and cloud strategy.
- OT systems are part of larger safety and risk management programs.
- Make sure that communications between OT and IT aren’t limited or strained.
- OT and IT personnel should interact regularly.
- OT personnel should not only be informed of cloud strategies, but should be active participants.
For more information, see:
- How much of your cloud security across OT and IT is managed manually and how much is automated?
Security automation means addressing threats automatically by providing predefined response and remediation actions based on compliance standards or best practices. Automation can resolve common security findings to improve your posture within AWS. It also allows you to quickly respond to threat events. Some considerations are:
- Cyber responses are predefined and are real-time.
- Playbooks exist and include OT scenarios.
- Automated remediations are routine practice.
- Foundational security is automated.
- Audit trails are enabled with notifications for automated actions.
- OT events are aggregated, prioritized, and consumed into orchestration tools.
- Cloud security postures for OT and IT are understood and documented.
For more information, see:
- To what degree are your OT and IT networks segmented?
Network segmentation has been well established as a foundational security practice. NIST SP800-82r3 pg.72 states, “Implementing network segmentation utilizing levels, tiers, or zones allows organizations to control access to sensitive information and components while also considering operational performance and safety.”
Minimizing network access to OT systems reduces the available threat surface. Typically, firewalls are used as control points between different segments. Several models exist showing separation of OT and IT networks and maintaining boundary zones between the two. As stated in section 5.2.3.1 “A good practice for network architectures is to characterize, segment, and isolate IT and OT devices.” (NIST SP800-82r3).
AWS provides multiple ways to segment and firewall network boundaries depending upon requirements and customer needs. Some considerations are:
- Existence of a perimeter network between OT and IT.
- Level of audit and inspection of perimeter network traffic.
- Amount of direct connectivity between OT and IT.
- Segmentation is regularly tested for threat surface vulnerabilities.
- Use of cloud-native tools to manage networks.
- Identification and use of high-risk ports.
- OT and IT personnel are collaborative network boundary decision makers.
- Network boundary changes include OT risk management methodologies.
- Defense in depth measures are evident.
- Network flow log data analysis.
For more information, see:
The following table describes typical patterns seen at each maturity level.
| Phase 1: Quick wins | Phase 2: Foundational | Phase 3: Efficient | Phase 4: Optimized | ||
| 1 | When was the last time your organization conducted an OT/IT cybersecurity risk assessment using a common framework (such as ISA/IEC 62443) and used it to inform system design? | A basic risk assessment performed to identify risks, gaps, and vulnerabilities | Organization has manual threat modeling capabilities and maintains an up-to-date threat model | Organization has automated threat modeling capabilities using the latest tools | Organization maintains threat modeling automation as code and an agile ability to use the latest tools |
| 2 | What is the extent and maturity of IIoT enabled digital transformation in your organization? | Organization is actively introducing IIoT on proof-of-value projects | Organization is moving from proof-of-value projects to production pilots | Organization is actively identifying and prioritizing business opportunities and use cases and using the lessons learned from pilot sites to reduce the time-to-value at other sites | Organization is scaling the use of IIoT across multiple use cases, sites, and assets and can rapidly iterate new IIoT to meet changing business needs |
| 3 | Does your organization maintain an inventory of connected assets and use it to manage risk effectively? | Manual tracking of connected assets with no automated tools for new asset discovery | Introduction of asset discovery tools to discover and create an inventory of all connected assets | Automated tools for asset discovery, inventory management, and frequent reporting | Near real time asset discovery and consolidated inventory in a configuration management database (CMDB) |
| 4 | Does your organization have an incident response plan for converged OT and IT environments? | Organization has separate incident response plans for OT and IT environments | Organization has an ICS-specific incident response plan to account for the complexities and operational necessities of responding in operational environments | Cyber operators are trained to ensure process safety and system reliability when responding to security events in converged OT/IT environments | Organization has incident response plans and playbooks for converged OT/IT environments |
| 5 | With reference to corporate governance, are OT and IT using separate policies and controls to manage cybersecurity risks or are they using the same policy? | Organization has separate risk policies for OT and IT environments | Organization has some combined policies across OT and IT but might not account for all OT risks | Organization accounts for OT risks such as health and safety in a central cyber risk register | Organization has codified central risk management policy accounting for both OT and IT risks |
| 6 | Is there a central cloud center of excellence (CCoE) with equivalent representation from OT and IT? | Cloud CoE exists with as-needed engagement from OT on special projects | Some representation from OT in cloud CoE | Increasing representation from OT in cloud CoE | Cloud CoE exists with good representation from OT and IT |
| 7 | Is there a clear definition of the business value of converging OT and IT? | No clear definition of business value from convergence projects | Organization working towards defining key performance indicators (KPIs) for convergence projects | Organization has identified KPIs and created a baseline of their current as-is state | Organization is actively measuring KPIs on convergence projects |
| 8 | Does your organization have security monitoring across the full threat surface? | Stand-alone monitoring systems in OT and IT with no integration between systems | Limited integration between OT and IT monitoring systems and may have separate SOCs | Increasing integration between OT and IT systems with some holistic SOC activities | Convergence of OT and IT security monitoring in a unified and global SOC |
| 9 | Does your IT team fully comprehend the differences in priority between IT and OT with regard to availability, integrity, and confidentiality? | IT teams lack an understanding of the priorities in OT as they relate to safety and availability | IT teams have a high level understanding of the differences between OT and IT risks and OT teams understand cyber threat models | IT teams being trained on the priorities and differences of OT systems and include them in cyber risk measures | IT fully understands the differences and increased risk from OT/IT convergence and members work on cross-functional teams as interchangeable experts |
| 10 | Are your OT support teams engaged with cloud strategy? | Separate OT and IT teams with limited collaboration on projects | Limited OT team engagement in cloud strategy | Increasing OT team engagement in cloud security | OT teams actively engaged with cloud strategy |
| 11 | How much of your cloud security across OT and IT is managed manually and how much is automated? | Processes are manual and use non-enterprise grade tools | Automation exists in pockets within OT | Security decisions are increasingly automated and iterated upon with guardrails in place | Manual steps are minimized and security decisions are automated as code |
| 12 | To what degree are your OT and IT networks segmented? | Limited segmentation between OT and IT networks | Introduction of an industrial perimeter network between OT and IT networks | Industrial perimeter network exists with some OT network segmentation | Industrial perimeter network between OT and IT networks with micro-network segmentation within OT and IT networks |
Conclusion
In this post, you learned how you can use this OT/IT convergence security maturity model to help identify areas for improvement. There were 12 questions and patterns that are examples you can build upon. This model isn’t the end, but a guide for getting started. Successful implementation of OT/IT convergence for industrial digital transformation requires ongoing strategic security management because it’s not just about technology integration. The risks of cyber events that OT/IT convergence exposes must be addressed. Organizations fall into various levels of maturity. These are quick wins, foundational, efficient, and optimized. AWS tools, guidance, and professional services can help accelerate your journey to both technical and organizational maturity.
Additional reading
- AWS Architecture Center
- AWS Well-Architected Framework, Security Pillar
- Guide to Operational Technology (OT) Security, NIST Special Publication SP 800-82r3
If you have feedback about this post, submit comments in the Comments section below. If you have questions about this post, contact AWS Support.
Want more AWS Security news? Follow us on Twitter.
Privacy, Security, and Connected Devices: Key Takeaways From CES 2024
Post Syndicated from Deral Heiland original https://blog.rapid7.com/2024/01/18/privacy-security-and-connected-devices-key-takeaways-from-ces-2024/

The topic of data privacy has become so relevant in our age of smart technology. With everything becoming connected, including our homes, workplaces, cities, and even our cars, those who develop this technology are obligated to identify consumers’ expectations for privacy and then find the best ways to meet those expectations. This of course includes determining how to best secure the data with which these technologies interact. As you can imagine, accomplishing these requirements is no easy feat.
Yes, connected technology developers have their work cut out for them, and that’s why CES 2024 included a panel to discuss this very topic: “Safeguarding Your Sanctuary: Expectations for Data Privacy in the Smart Home Era.” I had the privilege of being a part of this four-person panel, and if you weren’t in the room with us, here’s your chance to get some of the key takeaways from our discussion.
Putting the Consumer’s Needs First
What do consumers expect? The answer to this question is not black and white because individual consumers have different views of what privacy means to them. Therefore, defining a baseline that puts control of much of this data back in the hands of the consumer becomes critical.
That said, if consumers are going to have the ability to make their own data decisions then it’s important that easily understood mechanisms for managing data privacy are embedded within their smart technology. The greater technology community should also do its part to educate consumers on the overall importance of privacy and security — and the role they play in ensuring it for themselves.
Another example of putting the consumer’s needs first is when vendors have an online presence where they share details about their security and privacy policies and processes along with a point of contact so security researchers and consumers can report potential security issues within a product. The vendor’s website is also a perfect place for them to step in and play a role in educating consumers on privacy and security topics. I pointed out that if a consumer is researching product brands for purchase and a vendor has nothing to say about their privacy policies or their security program, then I typically recommend steering away from that product brand.
The Do’s and Don’ts of Data Collection and Sharing
User data collection and sharing is a central theme in consumer privacy and data security, and our CES panel discussed this at length. Consumer opt-in for data sharing is becoming the rule rather than the exception, and our panel agreed with this practice.
One good example of data sharing in which many consumers would choose to opt in is home security vendors sharing customer data with insurance companies, thereby allowing for the consumer to potentially get a discount on their homeowner’s insurance premiums.
We also discussed data collected by the product vendor for the purpose of improving product performance and capabilities. This process should be expected, but we also pointed out that vendors should have a data retention policy and process in place that includes purging data past a certain age. For one, most data typically loses value over time as it relates to product enhancement purposes; if this data isn’t purged it could create a higher level of risk for the vendor should the data be stolen in a breach. Also, collecting and storing data that may not have any apparent business value is a risky move that vendors should avoid.
Outsmarting Connected Devices
Where do smart devices go to die… or to be reborn? The fact is, many consumers don’t always consider the serious privacy and security implications, which explains why over the last five years more than 30% of the previously used Internet of Things (IoT) devices I have purchased from Ebay for research and training purposes get delivered to me still containing consumer data, including product account passwords and WIFI pre-shared key data.
Consumers need to ensure that they do a factory reset on the devices they are disposing of. Not only that, in today’s smart home and smart car scenarios, consumers need to be extra mindful of the connected devices they’re using that will change hands. Selling your home or car means more than just turning over the keys, it means factory resetting anything that’s interacted with your personal data. Vendors can also play a role here by properly documenting the processes for factory resetting their products and also making sure those processes are easy for a consumer to perform.
[$] Improved code generation in the CPython JIT
Post Syndicated from daroc original https://lwn.net/Articles/958350/
Ken Jin from the
Faster CPython
project has been working on
taking Python’s
recently-added just-in-time (JIT) compiler
further by adding
support for a peephole optimizer
that rewrites the JIT’s intermediate representation to introduce
constant folding, type specialization, and other optimizations.
Those techniques should provide significant benefits for the
performance of many different types of code running on CPython.
Data Storage Beyond the Hardware: 4 Surprising Questions
Post Syndicated from Stephanie Doyle original https://www.backblaze.com/blog/data-storage-beyond-the-hardware-4-surprising-questions/

We’ve gathered you together here today to address some of weirdest questions (and answers) about everyone’s favorite topic: data storage.
From the outside looking in, it’s easy to think it’s a subject that is as dry as Ben Stein in “Ferris Beuller’s Day Off”. But, given that everyday functions are increasingly moving to the internet, data storage is, in some ways, the secret backbone of modern society.
Today it’s estimated that there are over 8,000 data centers (DCs) in the world, built on a variety of storage media, connected to various networks, consuming vast amounts of power, and taking up valuable real estate. Plus, the drive technology itself brings together engineering foci affected by (driving?) everything from clean room technology to DNA research.
Fertile ground for strange, surprising questions, certainly. So, without further ado, here are some of our favorite questions about data storage.
1. Does a Hard Drive Weigh More When It’s Full?
Short answer: for all practical purposes, no. Long answer: technically yes, but it’s such a miniscule amount that you wouldn’t be able to measure it. Shout out to David Zaslavsky for doing all the math, and here’s the summary.
As Einstein famously hypothesized, e = mc2. If it’s been a while since you took physics, that formula defined is that energy is equal to mass multiplied by the speed of light squared. Since energy is defined by mass, then, we can infer that energy has a weight, even if it’s negligible.
Now, hard drives record data by magnetizing a thin film of ferromagnetic material. Basically, you’re forcing the atoms in a magnetic field to align in a different direction. And, since magnetic fields have differing amounts of energy depending on whether they’re aligned or antialigned, technically the weight does change. According to David’s math, it’d be approximately 10-14 g for a 1TB hard drive.
2. How Loud Is the Cloud?
In the past, we’ve talked about how heavy the Backblaze Storage Cloud is, and we’ve spent some ink on how loud a Backblaze DC is. All that noise comes from a combination of factors, largely cooling systems. Back in 2017, we measured our DCs at approximately 78dB, but other sources report that DCs can reach up to 96dB.
When you’re talking about building your own storage, my favorite research data point was one Reddit user’s opinion:

But, it’s still worth investing in ways to reduce the noise—if not for worker safety, then to reduce the environmental impact of DCs, including noise pollution. There are a wealth of studies out there connecting noise pollution to cardiovascular disease, hypertension, high stress levels, sleep disturbance, and good ol’ hearing loss in humans. In our animal friends, noise pollution can disrupt predator/prey detection and avoidance, echolocation, and interfere with reproduction and navigation.
The good news is that there are technologies to keep data centers (relatively) quiet when they become disruptive to communities.
3. How Long Does Data Stay Where You Stored It?
As much as we love old-school media here at Backblaze, we’re keeping this conversation to digital storage—so let’s chat about how long your data storage will retain your media, unplugged, in ideal environmental conditions.
We like the way Enterprise Storage Forum put it: “Storage experts know that there are two kinds of drive in this world—those that have already failed, and those that will fail sooner or later.” Their article encompasses a pretty solid table of how long (traditional) storage media lasts.
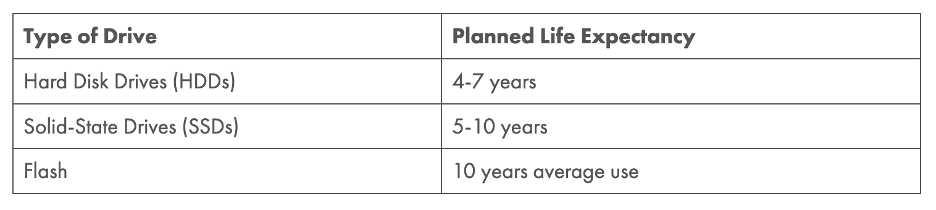
However, with new technologies—and their consumer applications—emerging, we might see a challenge to the data storage throne. The Institute of Physics reports that data written to a glass memory crystal could remain intact for a million years, a product they’ve dubbed the “Superman crystal.” So, look out for lasers altering the optical properties of quartz at the nanoscale. (That was just too cool not to say.)
4. What’s the Most Expensive Data Center Site?
And why?
One thing we know from the Network Engineering team at Backblaze is that optimizing your connectivity (getting your data from point A to point B) to the strongest networks is no simple feat. Take this back to the real world: when you’re talking about what the internet truly is, you’re just connecting one computer to every other computer, and there are, in fact, cables involved.
The hardware infrastructure combines with population dispersion in murky ways. We’ll go ahead and admit that’s out of scope for this article. But, working backwards from the below image, let’s just say that where there are more data centers, it’s likely there are more network exchanges.

From an operational standpoint, you’d likely assume it’s a bad choice to have your data center in the middle of the most expensive real estate and power infrastructures in the world, but there are tangible benefits to joining up all those networks at a central hub and to putting them in or near population centers. We call those spaces carrier hotels.
Here’s the best definition we found:
There is no industry standard definition of a carrier hotel versus merely a data center with a meet-me room (MMR). But, generally, the term is reserved for the facilities where metro fiber carriers meet long-haul carriers—and the number of network providers numbers in the dozens.
—Data Center Dynamics
Some sources go so far as to say that carrier hotels have to be in cities by definition. Either way, the result is that carrier hotels sit on some of the most expensive real estate in the world. Citing DGTL Infra from April 2023, here are the top 25 U.S. carrier hotels:

Let’s take #12 on this list, the NYC listing. According to PropertyShark, it’s worth $1.15 billion. With a b. That’s before you even get to the tech inside the building.

If you’re so inclined, flex those internet research skills and look up some of the other property values on the list. Some of them are a bit hard to find, and there are other interesting tidbits along the way. (And tell us what you find in the comments, of course.)
Bonus Question: Is It Over Already?
Look, do I want it to be over? No, never. But, the amount of weird and wonderful data storage questions that I could include in this article is infinite. Here’s a shortlist that other folks from Backblaze suggested:
- How broken is too broken when it comes to restoring files from a hard drive? (This is a whole article in and of itself.)
- When I send an email, how does it get to where it goes? (Check out Backblaze CEO Gleb Budman’s Bookblaze recommendation if you’re curious.)
- What happens to storage drives when we’re done with them? What does recycling look like?
So, the real question is, what do you want to know? Sound off in the comments—we’ll do our best to research and answer.
The post Data Storage Beyond the Hardware: 4 Surprising Questions appeared first on Backblaze Blog | Cloud Storage & Cloud Backup.
Security updates for Thursday
Post Syndicated from jake original https://lwn.net/Articles/958676/
Security updates have been issued by CentOS (ImageMagick), Debian (chromium), Fedora (golang-x-crypto, golang-x-mod, golang-x-net, golang-x-text, gtkwave, redis, and zbar), Mageia (tinyxml), Oracle (.NET 7.0, .NET 8.0, java-1.8.0-openjdk, java-11-openjdk, python3, and sqlite), Red Hat (gstreamer-plugins-bad-free, java-1.8.0-openjdk, java-11-openjdk, java-17-openjdk, and java-21-openjdk), SUSE (kernel, libqt5-qtbase, libssh, pam, rear23a, and rear27a), and Ubuntu (pam and zookeeper).
Another Attack Vector For SMS Interception
Post Syndicated from Bozho original https://techblog.bozho.net/another-attack-vector-for-sms-interception/
SMS codes for 2FAs have been discussed for a long time, and everyone knowledgeable in security knows they are not secure. What’s more – you should remove your phone number from sensitive services like Gmail, because if an attacker can fallback to SMS, the account is compromised.
Many authors have discussed how insecure SMS is, including Brian Krebbs, citing an example of NetNumber ID abuse, in addition to SIM Swap attacks and SS7 vulnerabilities.
Another aspect that I recently thought about is again related to intermediaries. Bulk SMS resellers integrate with various telecoms around the globe and accept outgoing SMS by API calls, which they then forward to a telecom in the relevant country. Global companies that send a lot of SMS try to look for cheap bulk deals (you are probably aware that Twitter/X recently decided to charge for SMS 2FA, because it was incurring high costs). These services are sometimes called a2p (application to person).
This means that intermediaries receive the 2FA code before it reaches the subscriber. A malicious insider or an attacker that compromises those intermediaries can thus have access to 2FA codes before they reach the subscriber.
I don’t know if this attack vector has been used, but it is a valid attack – if an attacker knows the intermediaries that a given service is using, they can either try to compromise the systems of the intermediaries, or gain access through a compromised insider. In either scenario, the victim’s 2FA code will be accessible to the attacker in real time.
This just reinforces the rule of thumb – don’t rely on SMS for two-factor authentication.
The post Another Attack Vector For SMS Interception appeared first on Bozho's tech blog.
ZHA or Zigbee2MQTT – that’s the question now!
Post Syndicated from BeardedTinker original https://www.youtube.com/watch?v=oFklWvNPRCo