Tag Archives: AWS Lambda

Operating serverless at scale: Keeping control of resources – Part 3

Post Syndicated from James Beswick original https://aws.amazon.com/blogs/compute/operating-serverless-at-scale-keeping-control-of-resources-part-3/

This post is written by Jerome Van Der Linden, Solutions Architect.

In the previous part of this series, I provide application archetypes for developers to follow company best practices and include libraries needed for compliance. But using these archetypes is optional and teams can still deploy resources without them. Even if they use them, the templates can be modified. Developers can remove a layer, over-permission functions, or allow access to APIs without appropriate authorization.

To avoid this, you must define guardrails. Templates are good for providing guidance, best practices and to improve productivity. But they do not prevent actions like guardrails do. There are two kinds of guardrails:

  • Proactive: you define rules and permissions that avoid some specific actions.
  • Reactive: you define controls that detect if something happens and trigger notifications to alert someone or remediate actions.

This third part on serverless governance describes different guardrails and ways to implement them.

Implementing proactive guardrails

Proactive guardrails are often the most efficient but also the most restrictive. Be sure to apply them with caution as you could reduce developers’ agility and productivity. For example, test in a sandbox account before applying more broadly.

In this category, you typically find IAM policies and service control policies. This section explores some examples applied to serverless applications.

Controlling access through policies

Part 2 discusses Lambda layers, to include standard components and ensure compliance of Lambda functions. You can enforce the use of a Lambda layer when creating or updating a function, using the following policy. The condition checks if a layer is configured with the appropriate layer ARN:

{
    "Version": "2012-10-17",
    "Statement": [
        {
            "Sid": "ConfigureFunctions",
            "Effect": "Allow",
            "Action": [
                "lambda:CreateFunction",
                "lambda:UpdateFunctionConfiguration"
            ],
            "Resource": "*",
            "Condition": {
                "ForAllValues:StringLike": {
                    "lambda:Layer": [
                        "arn:aws:lambda:*:123456789012:layer:my-company-layer:*"
                    ]
                }
            }
        }
    ]
}

When deploying Lambda functions, some companies also want to control the source code integrity and verify it has not been altered. Using code signing for AWS Lambda, you can sign the package and verify its signature at deployment time. If the signature is not valid, you can be warned or even block the deployment.

An administrator must first create a signing profile (you can see it as a trusted publisher) using AWS Signer. Then, a developer can reference this profile in its AWS SAM template to sign the Lambda function code:

Resources:
  MyFunction:
    Type: AWS::Serverless::Function
    Properties:
      CodeUri: src/
      Handler: app.lambda_handler
      Runtime: python3.9
      CodeSigningConfigArn: !Ref MySignedFunctionCodeSigningConfig

  MySignedFunctionCodeSigningConfig:
    Type: AWS::Lambda::CodeSigningConfig
    Properties:
      AllowedPublishers:
        SigningProfileVersionArns:
          - arn:aws:signer:eu-central-1:123456789012:/signing-profiles/MySigningProfile
      CodeSigningPolicies:
        UntrustedArtifactOnDeployment: "Enforce"

Using the AWS SAM CLI and the --signing-profile option, you can package and deploy the Lambda function using the appropriate configuration. Read the documentation for more details.

You can also enforce the use of code signing by using a policy so that every function must be signed before deployment. Use the following policy and a condition requiring a CodeSigningConfigArn:

{
    "Version": "2012-10-17",
    "Statement": [
        {
            "Sid": "ConfigureFunctions",
            "Effect": "Allow",
            "Action": [
                "lambda:CreateFunction"
            ],
            "Resource": "*",
            "Condition": {
                "StringEquals": {
                    "lambda:CodeSigningConfigArn": "arn:aws:lambda:eu-central-1:123456789012:code-signing-config:csc-0c44689353457652"
                }
            }
        }
    ]
}

When using Amazon API Gateway, you may want to use a standard authorization mechanism. For example, a Lambda authorizer to validate a JSON Web Token (JWT) issued by your company identity provider. You can do that using a policy like this:

{
  "Version": "2012-10-17",
  "Statement": [
    {
      "Sid": "DenyWithoutJWTLambdaAuthorizer",
      "Effect": "Deny",
      "Action": [
        "apigateway:PUT",
        "apigateway:POST",
        "apigateway:PATCH"
      ],
      "Resource": [
        "arn:aws:apigateway:eu-central-1::/apis",
        "arn:aws:apigateway:eu-central-1::/apis/??????????",
        "arn:aws:apigateway:eu-central-1::/apis/*/authorizers",
        "arn:aws:apigateway:eu-central-1::/apis/*/authorizers/*"
      ],
      "Condition": {
        "ForAllValues:StringNotEquals": {
          "apigateway:Request/AuthorizerUri": 
            "arn:aws:apigateway:eu-central-1:lambda:path/2015-03-31/functions/arn:aws:lambda:eu-central-1:123456789012:function:MyCompanyJWTAuthorizer/invocations"
        }
      }
    }
  ]
}

To enforce the use of mutual authentication (mTLS) and TLS version 1.2 for APIs, use the following policy:

{
  "Version": "2012-10-17",
  "Statement": [
    {
      "Sid": "EnforceTLS12",
      "Effect": "Allow",
      "Action": [
        "apigateway:POST"
      ],
      "Resource": [
        "arn:aws:apigateway:eu-central-1::/domainnames",
        "arn:aws:apigateway:eu-central-1::/domainnames/*"
      ],
      "Condition": {
        "ForAllValues:StringEquals": {
            "apigateway:Request/SecurityPolicy": "TLS_1_2"
        }
      }
    }
  ]
}

You can apply other guardrails for Lambda, API Gateway, or another service. Read the available policies and conditions for your service here.

Securing self-service with permissions boundaries

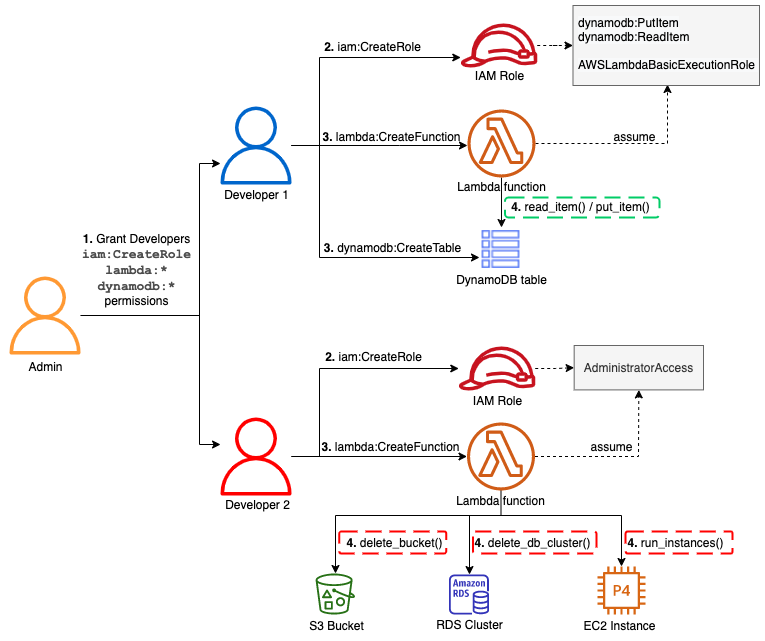
When creating a Lambda function, developers must create a role that the function will assume when running. But by giving the ability to create roles to developers, one could elevate their permission level. In the following diagram, you can see that an admin gives this ability to create roles to developers:
Securing self-service with permissions boundaries

Developer 1 creates a role for a function. This only allows Amazon DynamoDB read/write access and a basic execution role for Lambda (for Amazon CloudWatch Logs). But developer 2 is creating a role with administrator permission. Developer 2 cannot assume this role but can pass it to the Lambda function. This role could be used to create resources on Amazon EC2, delete an Amazon RDS database or an Amazon S3 bucket, for example.

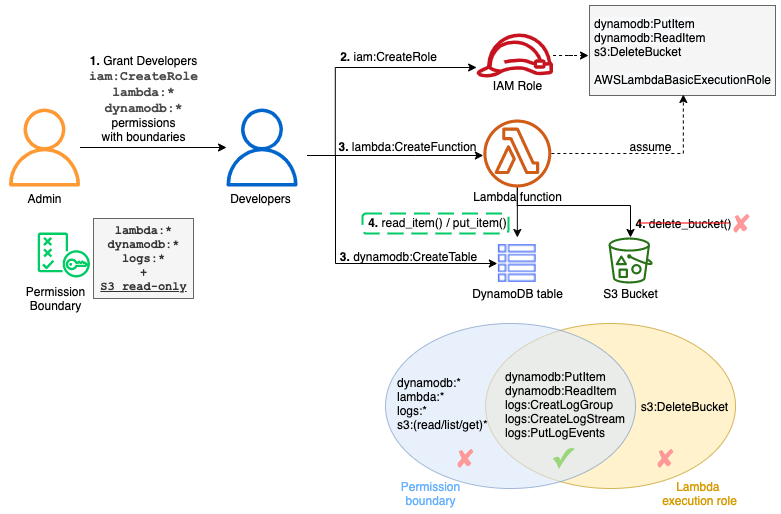
To avoid users elevating their permissions, define permissions boundaries. With these, you can limit the scope of a Lambda function’s permissions. In this example, an admin still gives the same ability to developers to create roles but this time with a permissions boundary attached. Now the function cannot perform actions that exceed this boundary:
Effect of permissions boundaries

The admin must first define the permissions boundaries within an IAM policy:

{
    "Version": "2012-10-17",
    "Statement": [
        {
            "Sid": "LambdaDeveloperBoundary",
            "Effect": "Allow",
            "Action": [
                "s3:List*",
                "s3:Get*",
                "logs:*",
                "dynamodb:*",
                "lambda:*"
            ],
            "Resource": "*"
        }
    ]
}

Note that this boundary is still too permissive and you should reduce and adopt a least privilege approach. For example, you may not want to grant the dynamodb:DeleteTable permission or restrict it to a specific table.

The admin can then provide the CreateRole permission with this boundary using a condition:

{
    "Version": "2012-10-17",
    "Statement": [
        {
            "Sid": "CreateRole",
            "Effect": "Allow",
            "Action": [
                "iam:CreateRole"
            ],
            "Resource": "arn:aws:iam::123456789012:role/lambdaDev*",
            "Condition": {
                "StringEquals": {
                    "iam:PermissionsBoundary": "arn:aws:iam::123456789012:policy/lambda-dev-boundary"
                }
            }
        }
    ]
}

Developers assuming a role lambdaDev* can create a role for their Lambda functions but these functions cannot have more permissions than defined in the boundary.

Deploying reactive guardrails

The principle of least privilege is not always easy to accomplish. To achieve it without this permission management burden, you can use reactive guardrails. Actions are allowed but they are detected and trigger a notification or a remediation action.

To accomplish this on AWS, use AWS Config. It continuously monitors your resources and their configurations. It assesses them against compliance rules that you define and can notify you or automatically remediate to non-compliant resources.

AWS Config has more than 190 built-in rules and some are related to serverless services. For example, you can verify that an API Gateway REST API is configured with SSL or protected by a web application firewall (AWS WAF). You can ensure that a DynamoDB table has back up configured in AWS Backup or that data is encrypted.

Lambda also has a set of rules. For example, you can ensure that functions have a concurrency limit configured, which you should. Most of these rules are part of the “Operational Best Practices for Serverless” conformance pack to ease their deployment as a single entity. Otherwise, setting rules and remediation can be done in the AWS Management Console or AWS CLI.

If you cannot find a rule for your use case in the AWS Managed Rules, you can find additional ones on GitHub or write your own using the Rule Development Kit (RDK). For example, enforcing the use of a Lambda layer for functions. This is possible using a service control policy but it denies the creation or modification of the function if the layer is not provided. You can use this policy in production but you may only want to notify the developers in their sandbox accounts or test environments.

By using the RDK CLI, you can bootstrap a new rule:

rdk create LAMBDA_LAYER_CHECK --runtime python3.9 \
--resource-types AWS::Lambda::Function \
--input-parameters '{"LayerArn":"arn:aws:lambda:region:account:layer:layer_name", "MinLayerVersion":"1"}'

It generates a Lambda function, some tests, and a parameters.json file that contains the configuration for the rule. You can then edit the Lambda function code and the evaluate_compliance method. To check for a layer:

LAYER_REGEXP = 'arn:aws:lambda:[a-z]{2}((-gov)|(-iso(b?)))?-[a-z]+-\d{1}:\d{12}:layer:[a-zA-Z0-9-_]+'

def evaluate_compliance(event, configuration_item, valid_rule_parameters):
    pkg = configuration_item['configuration']['packageType']
    if not pkg or pkg != "Zip":
        return build_evaluation_from_config_item(configuration_item, 'NOT_APPLICABLE',
                                                 annotation='Layers can only be used with functions using Zip package type')

    layers = configuration_item['configuration']['layers']
    if not layers:
        return build_evaluation_from_config_item(configuration_item, 'NON_COMPLIANT',
                                                 annotation='No layer is configured for this Lambda function')

    regex = re.compile(LAYER_REGEXP + ':(.*)')
    annotation = 'Layer ' + valid_rule_parameters['LayerArn'] + ' not used for this Lambda function'
    for layer in layers:
        arn = layer['arn']
        version = regex.search(arn).group(5)
        arn = re.sub('\:' + version + '$', '', arn)
        if arn == valid_rule_parameters['LayerArn']:
            if version >= valid_rule_parameters['MinLayerVersion']:
                return build_evaluation_from_config_item(configuration_item, 'COMPLIANT')
            else:
                annotation = 'Wrong layer version (was ' + version + ', expected ' + valid_rule_parameters['MinLayerVersion'] + '+)'

    return build_evaluation_from_config_item(configuration_item, 'NON_COMPLIANT',
                                             annotation=annotation)

You can find the complete source of this AWS Config rule and its tests on GitHub.

Once the rule is ready, use the command rdk deploy to deploy it on your account. To deploy it across multiple accounts, see the documentation. You can then define remediation actions. For example, automatically add the missing layer to the function or send a notification to the developers using Amazon Simple Notification Service (SNS).

Conclusion

This post describes guardrails that you can set up in your accounts or across the organization to keep control over deployed resources. These guardrails can be more or less restrictive according to your requirements.

Use proactive guardrails with service control policies to define coarse-grained permissions and block everything that must not be used. Define reactive guardrails for everything else to aid agility and productivity but still be informed of the activity and potentially remediate.

This concludes this series on serverless governance:

  • Standardization is an important aspect of the governance to speed up teams and ensure that deployed applications are operable and compliant with your internal rules. Use templates, layers, and other mechanisms to create shareable archetypes to apply these standards and rules at the enterprise level.
  • It’s important to keep visibility and control on your resources, to understand how your environment evolves and to be able to operate and act if needed. Tags and guardrails are helpful to achieve this and they should evolve as your maturity with the cloud evolves.

Find more SCP examples and all the AWS managed AWS Config rules in the documentation.

For more serverless learning resources, visit Serverless Land.
Visualizing AWS Step Functions workflows from the AWS Batch console

Post Syndicated from Eric Johnson original https://aws.amazon.com/blogs/compute/visualizing-aws-step-functions-workflows-from-the-aws-batch-console/

This post written by Dhiraj Mahapatro, Senior Specialist SA, Serverless.

AWS Step Functions is a low-code visual workflow service used to orchestrate AWS services, automate business processes, and build serverless applications. Step Functions workflows manage failures, retries, parallelization, service integrations, and observability so builders can focus on business logic.

AWS Batch is one of the service integrations that are available for Step Functions. AWS Batch enables users to more easily and efficiently run hundreds of thousands of batch computing jobs on AWS. AWS Batch dynamically provisions the optimal quantity and compute resource classifications based on the volume and specific resource requirements of the batch jobs submitted. AWS Batch plans, schedules, and runs batch computing workloads across the full range of AWS compute services and features, such as AWS Fargate, Amazon EC2, and spot instances.

Now, Step Functions is available to AWS Batch users through the AWS Batch console. This feature enables AWS Batch users to augment compute options and have additional orchestration capabilities to manage their batch jobs.

This blog walks through Step Functions integration in AWS Batch console and shows how AWS Batch users can efficiently use Step Functions workflow orchestrators in batch workloads. A sample application also highlights the use of AWS Lambda as a compute option for AWS Batch.

Introducing workflow orchestration in AWS Batch console

Today, AWS users use AWS Batch for high performance computing, post-trade analytics, fraud surveillance, screening, DNA sequencing, and more. AWS Batch minimizes human error, increases speed and accuracy, and reduces costs with automation so that users can refocus on evolving the business.

In addition to using compute-intensive tasks, users sometimes need Lambda for simpler, less intense processing. Users also want to combine the two in a single business process that is scalable and repeatable.

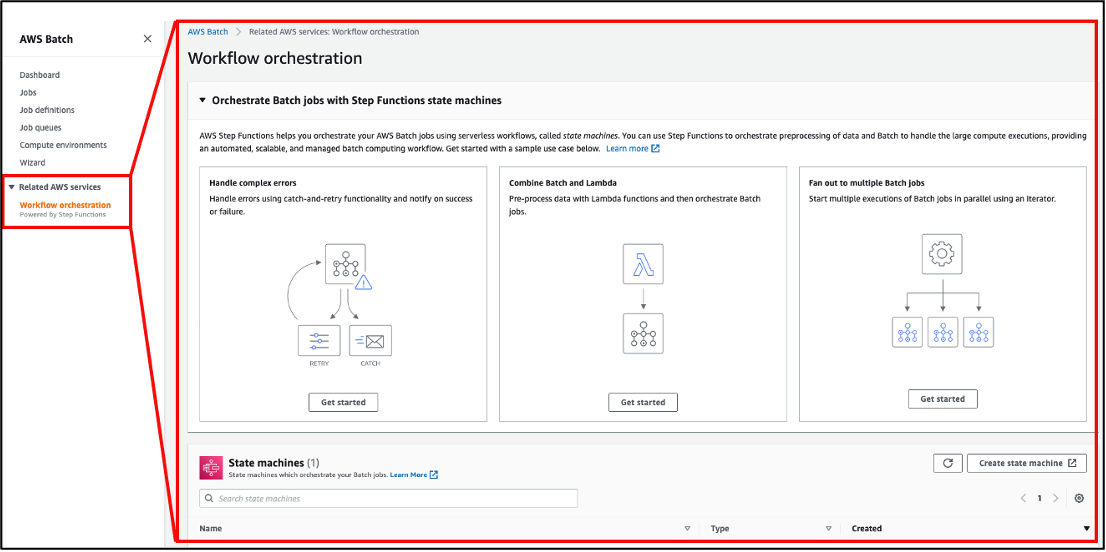
Workflow orchestration (powered by Step Functions) in AWS Batch console allows orchestration of batch jobs with Step Functions state machine:

Workflow orchestration in Batch console

Workflow orchestration in Batch console

Using batch-related patterns from Step Functions

Error handling

Step Functions natively handles errors and retries of its workflows. Users rely on this native error handling mechanism to focus on building business logic.

Workflow orchestration in AWS Batch console provides common batch-related patterns that are present in Step Functions. Handling errors while submitting batch jobs in Step Functions is one of them.

Getting started with orchestration in Batch

Getting started with orchestration in Batch

  1. Choose Get Started from Handle complex errors.
  2. From the pop-up, choose Start from a template and choose Continue.

A new browser tab opens with Step Functions Workflow Studio. The Workflow Studio designer has a workflow pattern template pre-created. Diving deeper into the workflow highlights that the Step Functions workflow submits a batch job and then handles success and error scenarios by sending Amazon SNS notifications, respectively.

Alternatively, choosing Deploy a sample project from the Get Started pop-up deploys a sample Step Functions workflow.

Deploying a sample project

Deploying a sample project

This option allows creating a state machine from scratch, reviewing the workflow definition, deploying an AWS CloudFormation stack, and running the workflow in Step Functions console.

Deploy and run from console

Deploy and run from console

Once deployed, the state machine is visible in the Step Functions console as:

Viewing the state machine in the AWS Step Functions console

Viewing the state machine in the AWS Step Functions console

Select the BatchJobNotificationStateMachine to land on the details page:

View the state machine's details

View the state machine’s details

The CloudFormation template has already provisioned the required batch job in AWS Batch and the SNS topic for success and failure notification.

To see the Step Functions workflow in action, use Start execution. Keep the optional name and input as is and choose Start execution:

Run the Step Function

Run the Step Function

The state machine completes the tasks successfully by Submitting Batch Job using AWS Batch and Notifying Success using the SNS topic:

The successful results in the console

The successful results in the console

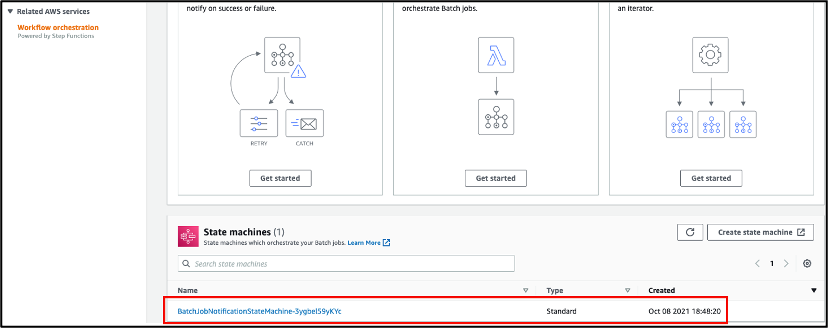
The state machine used the AWS Batch Submit Job task. The Workflow orchestration in AWS Batch console now highlights this newly created Step Functions state machine:

The state machine is listed in the Batch console

The state machine is listed in the Batch console

Therefore, any state machine that uses this task in Step Functions for this account is listed here as a state machine that orchestrates batch jobs.

Combine Batch and Lambda

Another pattern to use in Step Functions is the combination of Lambda and batch job.

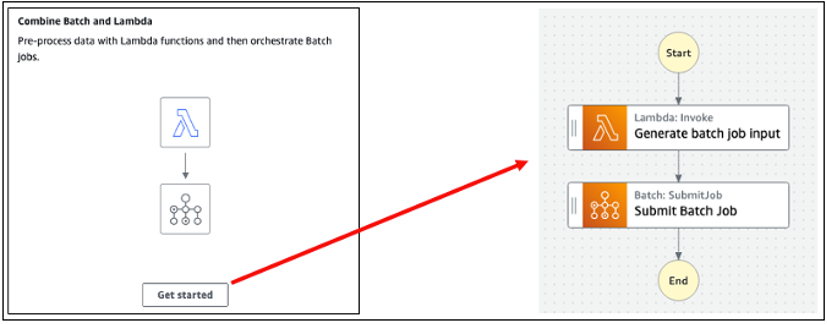
Select Get Started from Combine Batch and Lambda pop-up followed by Start from a template and Continue. This takes the user to Step Functions Workflow studio with the following pattern. The Lambda task generates input for the subsequent batch job task. Submit Batch Job task takes the input and submits the batch job:

Combining AWS Lambda with AWS Step Functions

Combining AWS Lambda with AWS Step Functions

Step Functions enables AWS Batch users to combine Batch and Lambda functions to optimize compute spend while using the power of the different compute choices.

Fan out to multiple Batch jobs

In addition to error handling and combining Lambda with AWS Batch jobs, a user can fan out multiple batch jobs using Step Functions’ map state. Map state in Step Functions provides dynamic parallelism.

With dynamic parallelism, a user can submit multiple batch jobs based on a collection of batch job input data. With visibility to each iteration’s input and output, users can easily navigate and troubleshoot in case of failure.

Easily navigate and troubleshoot in case of failure

Easily navigate and troubleshoot in case of failure

AWS Batch users are not limited to the previous three patterns shown in Workflow orchestration in the AWS Batch console. AWS Batch users can start from scratch and build Step Functions state machine by navigating to the bottom right and using Create state machine:

Create a state machine from the Step Functions console

Create a state machine from the Step Functions console

Create State Machine in AWS Batch console opens a new tab with Step Functions console’s Create state machine page.

Design a workflow visually

Design a workflow visually

Refer building a state machine AWS Step Functions Workflow Studio for additional details.

Deploying the application

The sample application shows fan out to multiple batch jobs pattern. Before deploying the application, you need:

To deploy:

  1. From a terminal window, clone the GitHub repo:
    git clone [email protected]:aws-samples/serverless-batch-job-workflow.git
  2. Change directory:
    cd ./serverless-batch-job-workflow
  3. Download and install dependencies:
    sam build
  4. Deploy the application to your AWS account:
    sam deploy --guided

To run the application using the AWS CLI, replace the state machine ARN from the output of deployment steps:

aws stepfunctions start-execution \
    --state-machine-arn <StepFunctionArnHere> \
    --region <RegionWhereApplicationDeployed> \
    --input "{}"

Step Functions is not limited to AWS Batch’s Submit Job API action

In September 2021, Step Functions announced integration support for 200 AWS Services to enable easier workflow automation. With this announcement, Step Functions is not limited to integrate with AWS Batch’s SubmitJob API but also can integrate with any AWS Batch SDK API today.

Step Functions can automate the lifecycle of an AWS Batch job, starting from creating a compute environment, creating job queues, registering job definitions, submitting a job, and finally cleaning up.

Other AWS service integrations

Step Functions support for 200 AWS Services equates integration with more than 9,000 API actions across these services. AWS Batch tasks in Step Functions can evolve by integrating with available services in the workflow for their pre- and post-processing needs.

For example, batch job input data sanitization can be done inside Lambda and that gets pushed to an Amazon SQS queue or Amazon S3 as an object for auditability purposes.

Similarly, Amazon SNS, Amazon Pinpoint, or Amazon SES can notify once AWS Batch job task is complete.

There are multiple ways to decorate around an AWS Batch job task. Refer to AWS SDK service integrations and optimized integrations for Step Functions for additional details.

Important considerations

Workflow orchestrations in the AWS Batch console only show Step Functions state machines that use AWS Batch’s Submit Job task. Step Functions state machines do not show in the AWS Batch console when:

  1. A state machine uses any other AWS SDK Batch API integration task
  2. AWS Batch’s SubmitJob API is invoked inside a Lambda function task using an AWS SDK client (like Boto3 or Node.js or Java)

Cleanup

The sample application provisions AWS Batch (the job definition, job queue, and ECS compute environment inside a VPC). It also creates subnets, route tables, and an internet gateway. Clean up the stack after testing the application to avoid the ongoing cost of running these services.

To delete the sample application stack, use the latest version of AWS SAM CLI and run:

sam delete

Conclusion

To learn more on AWS Batch, read the Orchestrating Batch jobs section in the Batch developer guide.

To get started, open the workflow orchestration page in the Batch console. Select Orchestrate Batch jobs with Step Functions Workflows to deploy a sample project, if you are new to Step Functions.

This feature is available in all Regions where both Step Functions and AWS Batch are available. View the AWS Regions table for details.

To learn more on Step Functions patterns, visit Serverless Land.

Accepting API keys as a query string in Amazon API Gateway

Post Syndicated from Eric Johnson original https://aws.amazon.com/blogs/compute/accepting-api-keys-as-a-query-string-in-amazon-api-gateway/

This post was written by Ronan Prenty, Sr. Solutions Architect and Zac Burns, Cloud Support Engineer & API Gateway SME

Amazon API Gateway is a fully managed service that makes it easier for developers to create, publish, maintain, monitor, and secure APIs at any scale. APIs act as the front door to applications and allow developers to offload tasks like authorization, throttling, caching, and more.

A common feature requested by customers is the ability to track usage for specific users or services through API keys. API Gateway REST APIs support this feature and, for added security, require that the API key resides in a header or an authorizer.

Developers may also need to pass API keys in the query string parameters. Best practices encourage refactoring the requests at the client level to move API keys to the header. However, this may not be possible during the migration.

This blog explains how to build an API Gateway REST API that temporarily accepts API keys as query string parameters. This post helps customers who have APIs that accept API keys as query string parameters and want to migrate to API Gateway with minimal impact on their clients. The post also discusses increasing security by refactoring the client to send API keys as a header instead of a query string.

There is also an example project for you to test and evaluate. This solution uses a custom authorizer AWS Lambda function to extract the API key from the query string parameter and apply it to a usage plan. The sample application uses the AWS Serverless Application Model (AWS SAM) for deployment.

Key concepts

API keys and usage plans

API keys are alphanumeric strings that are distributed to developers to grant access to an API. API Gateway can generate these on your behalf, or you can import them.

Usage plans let you provide API keys to your customers so that you can track and limit their usage. API keys are not a primary authorization mechanism for your APIs. If multiple APIs are associated with a usage plan, a user with a valid API key can access all APIs in that usage plan. We provide numerous options for securing access to your APIs, including resource policies, Lambda authorizers, and Amazon Cognito user pools.

Usage plans define who can access deployed API stages and methods along with metering their usage. Usage plans use API keys to identify who is making requests and apply throttling and quota limits.

How API Gateway handles API keys

API Gateway supports API keys sent as headers in a request. It does not support API keys sent as a query string parameter. API Gateway only accepts requests over HTTPS, which means that the request is encrypted. When sending API keys as query string parameters, there is still a risk that URLs are logged in plaintext by the client sending requests.

API Gateway has two settings to accept API keys:

  1. Header: The request contains the values as the X-API-Key header. API Gateway then validates the key against a usage plan.
  2. Authorizer: The authorizer includes the API key as part of the authorization response. Once API Gateway receives the API key as part of the response, it validates it against a usage plan.

Solution overview

To accept an API key as a query string parameter temporarily, create a custom authorizer using a Lambda function:

Note: the apiKeySource property of your API must be set to Authorizer instead of Header.

Note: the apiKeySource property of your API must be set to Authorizer instead of Header.

  1. The client sends an HTTP request to the API Gateway endpoint with the API key in the query string.
  2. API Gateway sends the request to a REQUEST type custom authorizer
  3. The custom authorizer function extracts the API Key from the payload. It constructs the response object with the API Key as the value for the `usageIdentifierKey` property
  4. The response gets sent back to API Gateway for validation.
  5. API Gateway validates the API key against a usage plan.
  6. If valid, API Gateway passes the request to the backend.

Deploying the solution

Prerequisites

This solution requires no pre-existing AWS resources and deploys everything you need from the template. Deploying the solution requires:

You can find the solution on GitHub using this link.

With the prerequisites completed, deploy the template with the following commands:

git clone https://github.com/aws-samples/amazon-apigateway-accept-apikeys-as-querystring.git
cd amazon-apigateway-accept-apikeys-as-querystring
sam build --use-container
sam deploy --guided

Long term considerations

This temporary solution enables developers to migrate APIs to API Gateway and maintain query string-based API keys. While this solution does work, it does not follow best practices.

In addition to security, there is also a cost factor. Each time the client request contains an API key, the custom authorizer AWS Lambda function will be invoked, increasing the total amount of Lambda invocations you are billed for. To ensure you are billed only for valid requests, you can add an identity source to the custom authorizer meaning that only requests containing this identity source will be sent to the Lambda function. Requests that do not contain this identity source will not be billed by Lambda or API Gateway. Migrating to a header-based API key removes the need for a custom authorizer and the extra Lambda function invocations. You can find out more information on AWS Lambda billing here.

Customer migration process

With this in mind, the structure of the request sent by API clients must change from:

GET /some-endpoint?apiKey=abc123456789

To:

GET /some-endpoint
x-api-key: abc123456789

You can provide clients with a notice period when this temporary solution is operational. After, they must migrate to a new API endpoint using a header to provide the API keys. Once the client migration is complete, they can retire the custom solution.

Developer portal

In addition to migrating API keys to a header-based solution, customers also ask us how to manage customer keys and usage plans. One option is to deploy the API Gateway developer portal.

This portal enables your customers to discover available APIs, browse API documentation, register for API keys, test APIs in the user interface, and monitor their API usage. This portal also allows you to publish non-API Gateway managed APIs by uploading OpenAPI definitions. The serverless developer portal can be customized and branded to suit your organization.

Conclusion

This blog post demonstrates how to use custom authorizers in API Gateway to accept API keys as a query string parameter. It also provides an AWS SAM template to deploy an example application for testing. Finally, it discusses the importance of moving customers to header-based API keys and managing those keys with the developer portal.

For more serverless content, visit Serverless Land.

Operating serverless at scale: Improving consistency – Part 2

Post Syndicated from James Beswick original https://aws.amazon.com/blogs/compute/operating-serverless-at-scale-improving-consistency-part-2/

This post is written by Jerome Van Der Linden, Solutions Architect.

Part one of this series describes how to maintain visibility on your AWS resources to operate them properly. This second part focuses on provisioning these resources.

It is relatively easy to create serverless resources. For example, you can set up and deploy a new AWS Lambda function in a few clicks. By using infrastructure as code, such as the AWS Serverless Application Model (AWS SAM), you can deploy hundreds of functions in a matter of minutes.

Before reaching these numbers, companies often want to standardize developments. Standardization is an effective way of reducing development time and costs, by using common tools, best practices, and patterns. It helps in meeting compliance objectives and lowering some risks, mainly around security and operations, by adopting enterprise standards. It can also reduce the scope of required skills, both in terms of development and operations. However, excessive standardization can reduce agility and innovation and sometimes even productivity.

You may want to provide application samples or archetypes, so that each team does not reinvent the wheel for every new project. These archetypes get a standard structure so that any developer joining the team is quickly up-to-speed. The archetypes also bundle everything that is required by your company:

  • Security library and setup to apply a common security layer to all your applications.
  • Observability framework and configuration, to collect and centralize logs, metrics and traces.
  • Analytics, to measure usage of the application.
  • Other capabilities or standard services you might have in your company.

This post describes different ways to create and share project archetypes.

Sharing AWS SAM templates

AWS SAM makes it easier to create and deploy serverless applications. It uses infrastructure as code (AWS SAM templates) and a command line tool (AWS SAM CLI). You can also create customizable templates that anyone can use to initialize a project. Using the sam init command and the --location option, you can bootstrap a serverless project based on the template available at this location.

For example, here is a CRUDL (Create/Read/Update/Delete/List) microservice archetype. It contains an Amazon DynamoDB table, an API Gateway, and five AWS Lambda functions written in Java (one for each operation):

CRUDL microservice

You must first create a template. Not only an AWS SAM template describing your resources, but also the source code, dependencies and some config files. Using cookiecutter, you can parameterize this template. You add variables surrounded by {{ and }} in files and folders (for example, {{cookiecutter.my_variable}}). You also define a cookiecutter.json file that describes all the variables and their possible values.

In this CRUD microservice, I add variables in the AWS SAM template file, the Java code, and in other project resources:

Variables in the project

You then need to share this template either in a Git/Mercurial repository or an HTTP/HTTPS endpoint. Here the template is available on GitHub.

After sharing, anyone within your company can use it and bootstrap a new project with the AWS SAM CLI and the init command:

$ sam init --location git+ssh://[email protected]/aws-samples/java-crud-microservice-template.git

project_name [Name of the project]: product-crud-microservice
object_model [Model to create / read / update / delete]: product
runtime [java11]:

The command prompts you to enter the variables and generates the following project structure and files.

sam init output files

Variable placeholders have been replaced with their values. The project can now be modified for your business requirements and deployed in the AWS Cloud.

There are alternatives to AWS SAM like AWS CloudFormation modules or AWS CDK constructs. These define high-level building blocks that can be shared across the company. Enterprises with multiple development teams and platform engineering teams can also use AWS Proton. This is a managed solution to create templates (see an example for serverless) and share them across the company.

Creating a base container image for Lambda functions

Defining complete application archetypes may be too much work for your company. Or you want to let teams design their architecture and choose their programming languages and frameworks. But you need them to apply a few patterns (centralized logging, standard security) plus some custom libraries. In that case, use Lambda layers if you deploy your functions as zip files or provide a base image if you deploy them as container images.

When building a Lambda function as a container image, you must choose a base image. It contains the runtime interface client to manage the interaction between Lambda and your function code. AWS provides a set of open-source base images that you can use to create your container image.

Using Docker, you can also build your own base image on top of these, including any library, piece of code, configuration, and data that you want to apply to all Lambda functions. Developers can then use this base image containing standard components and benefit from them. This also reduces the risk of misconfiguration or forgetting to add something important.

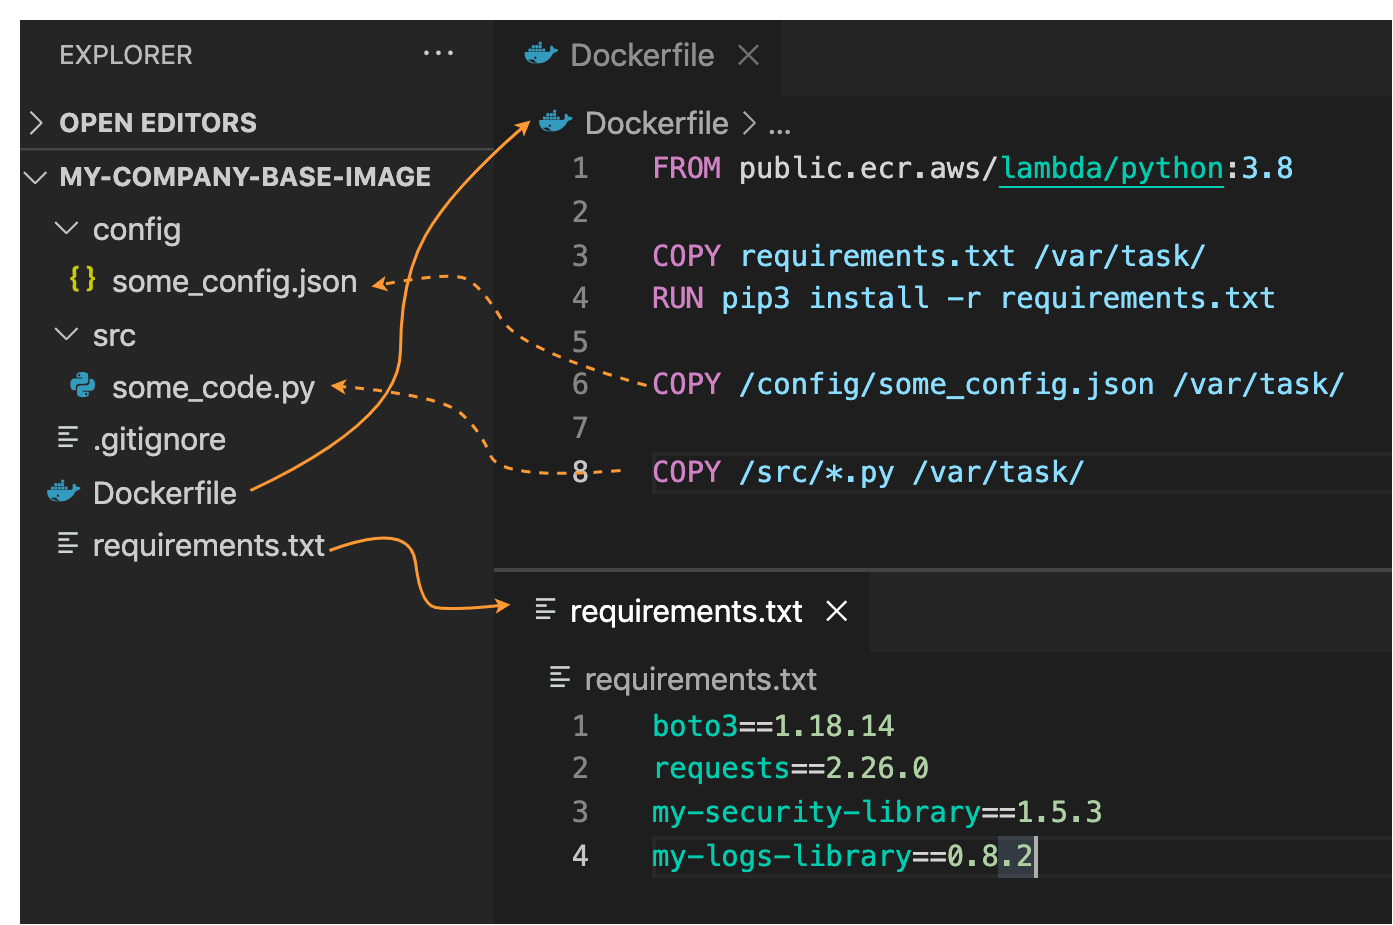
First, create the base image. Using Docker and a Dockerfile, specify the files that you want to add to the image. The following example uses the Python base image and installs some libraries (security, logging) thanks to pip and the requirements.txt file. It also adds Python code and some config files:

Dockerfile and requirements.txt

It uses the /var/task folder, which is the working directory for Lambda functions, and where code should reside. Next you must create the image and push it to Amazon Elastic Container Registry (ECR):

# login to ECR with Docker
$ aws ecr get-login-password --region <region> | docker login --username AWS --password-stdin <account-number>.dkr.ecr.<region>.amazonaws.com

# if not already done, create a repository to store the image
$ aws ecr create-repository --repository-name <my-company-image-name> --image-tag-mutability IMMUTABLE --image-scanning-configuration scanOnPush=true

# build the image
$ docker build -t <my-company-image-name>:<version> .

# get the image hash (alphanumeric string, 12 chars, eg. "ece3a6b5894c")
$ docker images | grep my-company-image-name | awk '{print $3}'

# tag the image
$ docker tag <image-hash> <account-number>.dkr.ecr.<region>.amazonaws.com/<my-company-image-name>:<version>

# push the image to the registry
$ docker push <account-number>.dkr.ecr.<region>.amazonaws.com/<my-company-image-name>:<version>

The base image is now available to use for everyone with access to the ECR repository. To use this image, developers must use it in the FROM instruction in their Lambda Dockerfile. For example:

FROM <account-number>.dkr.ecr.<region>.amazonaws.com/<my-company-image-name>:<version>

COPY app.py ${LAMBDA_TASK_ROOT}

COPY requirements.txt .

RUN pip3 install -r requirements.txt -t "${LAMBDA_TASK_ROOT}"

CMD ["app.lambda_handler"]

Now all Lambda functions using this base image include your standard components and comply with your requirements. See this blog post for more details on building Lambda container-based functions with AWS SAM.

Conclusion

In this post, I show a number of solutions to create and share archetypes or layers across the company. With these archetypes, development teams can quickly bootstrap projects with company standards and best practices. It provides consistency across applications and helps meet compliance rules. From a developer standpoint, it’s a good accelerator and it also allows them to have some topics handled by the archetype.

In governance, companies generally want to enforce these rules. Part 3 will describe how to be more restrictive using different guardrails mechanisms.

Read more information about AWS Proton, which is now generally available.

For more serverless learning resources, visit Serverless Land.

Avoiding recursive invocation with Amazon S3 and AWS Lambda

Post Syndicated from James Beswick original https://aws.amazon.com/blogs/compute/avoiding-recursive-invocation-with-amazon-s3-and-aws-lambda/

Serverless applications are often composed of services sending events to each other. In one common architectural pattern, Amazon S3 send events for processing with AWS Lambda. This can be used to build serverless microservices that translate documents, import data to Amazon DynamoDB, or process images after uploading.

To avoid recursive invocations between S3 and Lambda, it’s best practice to store the output of a process in a different resource from the source S3 bucket. However, it’s sometimes useful to store processed objects in the same source bucket. In this blog post, I show three different ways you can do this safely and provide other important tips if you use this approach.

The example applications use the AWS Serverless Application Model (AWS SAM), enabling you to deploy the applications more easily to your own AWS account. This walkthrough creates resources covered in the AWS Free Tier but usage beyond the Free Tier allowance may incur cost. To set up the examples, visit the GitHub repo and follow the instructions in the README.md file.

Overview

Infinite loops are not a new challenge for developers. Any programming language that supports looping logic has the capability to generate a program that never exits. However, in serverless applications, services can scale as traffic grows. This makes infinite loops more challenging since they can consume more resources.

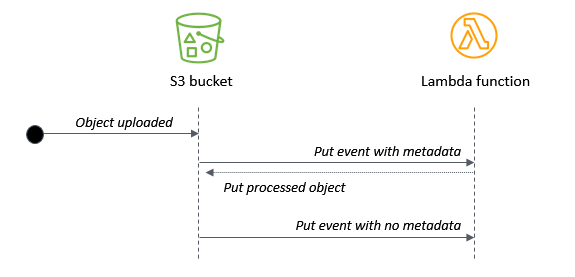
In the case of the S3 to Lambda recursive invocation, a Lambda function writes an object to an S3 object. In turn, it invokes the same Lambda function via a put event. The invocation causes a second object to be written to the bucket, which invokes the same Lambda function, and so on:

S3 to Lambda recursion

If you trigger a recursive invocation loop accidentally, you can press the “Throttle” button in the Lambda console to scale the function concurrency down to zero and break the recursion cycle.

The most practical way to avoid this possibility is to use two S3 buckets. By writing an output object to a second bucket, this eliminates the risk of creating additional events from the source bucket. As shown in the first example in the repo, the two-bucket pattern should be the preferred architecture for most S3 object processing workloads:

Two S3 bucket solution

If you need to write the processed object back to the source bucket, here are three alternative architectures to reduce the risk of recursive invocation.

(1) Using a prefix or suffix in the S3 event notification

When configuring event notifications in the S3 bucket, you can additionally filter by object key, using a prefix or suffix. Using a prefix, you can filter for keys beginning with a string, or belonging to a folder, or both. Only those events matching the prefix or suffix trigger an event notification.

For example, a prefix of “my-project/images” filters for keys in the “my-project” folder beginning with the string “images”. Similarly, you can use a suffix to match on keys ending with a string, such as “.jpg” to match JPG images. Prefixes and suffixes do not support wildcards so the strings provided are literal.

The AWS SAM template in this example shows how to define a prefix and suffix in an S3 event notification. Here, the S3 invokes the Lambda function if the key begins with ‘original/’ and ends with ‘.txt’:

  S3ProcessorFunction:
    Type: AWS::Serverless::Function 
    Properties:
      CodeUri: src/
      Handler: app.handler
      Runtime: nodejs14.x
      MemorySize: 128
      Policies:
        - S3CrudPolicy:
            BucketName: !Ref SourceBucketName
      Environment:
        Variables:
          DestinationBucketName: !Ref SourceBucketName              
      Events:
        FileUpload:
          Type: S3
          Properties:
            Bucket: !Ref SourceBucket
            Events: s3:ObjectCreated:*
            Filter: 
              S3Key:
                Rules:
                  - Name: prefix
                    Value: 'original/'                     
                  - Name: suffix
                    Value: '.txt'    

You can then write back to the same bucket providing that the output key does not match the prefix or suffix used in the event notification. In the example, the Lambda function writes the same data to the same bucket but the output key does not include the ‘original/’ prefix.

To test this example with the AWS CLI, upload a sample text file to the S3 bucket:

aws s3 cp sample.txt s3://myS3bucketname

Shortly after, list the objects in the bucket. There is a second object with the same key with no folder name. The first uploaded object invoked the Lambda function due to the matching prefix. The second PutObject action without the prefix did not trigger an event notification and invoke the function.

Using a prefix or suffix

Providing that your application logic can handle different prefixes and suffixes for source and output objects, this provides a way to use the same bucket for processed objects.

(2) Using object metadata to identify the original S3 object

If you need to ensure that the source object and processed object have the same key, configure user-defined metadata to differentiate between the two objects. When you upload S3 objects, you can set custom metadata values in the S3 console, AWS CLI, or AWS SDK.

In this design, the Lambda function checks for the presence of the metadata before processing. The Lambda handler in this example shows how to use the AWS SDK’s headObject method in the S3 API:

const AWS = require('aws-sdk')
AWS.config.region = process.env.AWS_REGION 
const s3 = new AWS.S3()

exports.handler = async (event) => {
  await Promise.all(
    event.Records.map(async (record) => {
      try {
        // Decode URL-encoded key
        const Key = decodeURIComponent(record.s3.object.key.replace(/\+/g, " "))

        const data = await s3.headObject({
          Bucket: record.s3.bucket.name,
          Key
        }).promise()

        if (data.Metadata.original != 'true') {
          console.log('Exiting - this is not the original object.', data)
          return
        }

  // Do work ... /     

      } catch (err) {
        console.error(err)
      }
    })
  )
}

To test this example with the AWS CLI, upload a sample text file to the S3 bucket using the “original” metatag:

aws s3 cp sample.txt s3://myS3bucketname --metadata '{"original":"true"}'

Shortly after, list the objects in the bucket – the original object is overwritten during the Lambda invocation. The second S3 object causes another Lambda invocation but it exits due to the missing metadata.

Uploading objects with metadata

This allows you to use the same bucket and key name for processed objects, but it requires that the application creating the original object can set object metadata. In this approach, the Lambda function is always invoked twice for each uploaded S3 object.

(3) Using an Amazon DynamoDB table to filter duplicate events

If you need the output object to have the same bucket name and key but you cannot set user-defined metadata, use this design:

Using DynamoDB to filter duplicate events

In this example, there are two Lambda functions and a DynamoDB table. The first function writes the key name to the table. A DynamoDB stream triggers the second Lambda function which processes the original object. It writes the object back to the same source bucket. Because the same item is put to the DynamoDB table, this does not trigger a new DynamoDB stream event.

To test this example with the AWS CLI, upload a sample text file to the S3 bucket:

aws s3 cp sample.txt s3://myS3bucketname

Shortly after, list the objects in the bucket. The original object is overwritten during the Lambda invocation. The new S3 object invokes the first Lambda function again but the second function is not triggered. This solution allows you to use the same output key without user-defined metadata. However, it does introduce a DynamoDB table to the architecture.

To automatically manage the table’s content, the example in the repo uses DynamoDB’s Time to Live (TTL) feature. It defines a TimeToLiveSpecification in the AWS::DynamoDB::Table resource:

  ## DynamoDB table
  DDBtable:
    Type: AWS::DynamoDB::Table
    Properties:
      AttributeDefinitions:
      - AttributeName: ID
        AttributeType: S
      KeySchema:
      - AttributeName: ID
        KeyType: HASH
      TimeToLiveSpecification:
        AttributeName: TimeToLive
        Enabled: true        
      BillingMode: PAY_PER_REQUEST 
      StreamSpecification:
        StreamViewType: NEW_IMAGE   

When the first function writes the key name to the DynamoDB table, it also sets a TimeToLive attribute with a value of midnight on the next day:

        // Epoch timestamp set to next midnight
        const TimeToLive = new Date().setHours(24,0,0,0)

        // Create DynamoDB item
        const params = {
          TableName : process.env.DDBtable,
          Item: {
             ID: Key,
             TimeToLive
          }
        }

The DynamoDB service automatically expires items once the TimeToLive value has passed. In this example, if another object with the same key is stored in the S3 bucket before the TTL value, it does not trigger a stream event. This prevents the same object from being processed multiple times.

Comparing the three approaches

Depending upon the needs of your workload, you can choose one of these three approaches for storing processed objects in the same source S3 bucket:


1. Prefix/suffix 2. User-defined metadata 3. DynamoDB table
Output uses the same bucket Y Y Y
Output uses the same key N Y Y
User-defined metadata N Y N
Lambda invocations per object 1 2 2 for an original object. 1 for a processed object.

Monitoring applications for recursive invocation

Whenever you have a Lambda function writing objects back to the same S3 bucket that triggered the event, it’s best practice to limit the scaling in the development and testing phases.

Use reserved concurrency to limit a function’s scaling, for example. Setting the function’s reserved concurrency to a lower limit prevents the function from scaling concurrently beyond that limit. It does not prevent the recursion, but limits the resources consumed as a safety mechanism.

Additionally, you should monitor the Lambda function to make sure the logic works as expected. To do this, use Amazon CloudWatch monitoring and alarming. By setting an alarm on a function’s concurrency metric, you can receive alerts if the concurrency suddenly spikes and take appropriate action.

Conclusion

The S3-to-Lambda integration is a foundational building block of many serverless applications. It’s best practice to store the output of the Lambda function in a different bucket or AWS resource than the source bucket.

In cases where you need to store the processed object in the same bucket, I show three different designs to help minimize the risk of recursive invocations. You can use event notification prefixes and suffixes or object metadata to ensure the Lambda function is not invoked repeatedly. Alternatively, you can also use DynamoDB in cases where the output object has the same key.

To learn more about best practices when using S3 to Lambda, see the Lambda Operator Guide. For more serverless learning resources, visit Serverless Land.

Serverless Architecture for a Structured Data Mining Solution

Post Syndicated from Uri Rotem original https://aws.amazon.com/blogs/architecture/serverless-architecture-for-a-structured-data-mining-solution/

Many businesses have an essential need for structured data stored in their own database for business operations and offerings. For example, a company that produces electronics may want to store a structured dataset of parts. This requires the following properties: color, weight, connector type, and more.

This data may already be available from external sources. In many cases, one source is sufficient. But often, multiple data sources from different vendors must be incorporated. Each data source might have a different structure for the same data field, which is problematic. Achieving one unified structure from variable sources can be difficult, and is a classic data mining problem.

We will break the problem into two main challenges:

  1. Locate and collect data. Collect from multiple data sources and load data into a data store.
  2. Unify the collected data. Since the collected data has no constraints, it might be stored in different structures and file formats. To use the collected data, it must be unified by performing an extract, transform, load (ETL) process. This matches the different data sources and creates one unified data store.

In this post, we demonstrate a pipeline of services, built on top of a serverless architecture that will handle the preceding challenges. This architecture supports large-scale datasets. Because it is a serverless solution, it is also secure and cost effective.

We use Amazon SageMaker Ground Truth as a tool for classifying the data, so that no custom code is needed to classify different data sources.

Data mining and structuring

There are three main steps to explore in order to solve these challenges:

  1. Collect the data – Data mine from different sources
  2. Map the data – Construct a dictionary of key-value pairs without writing code
  3. Structure the collected data – Enrich your dataset with a unified collection of data that was collected and mapped in steps 1 and 2

Following is an example of a use case and solution flow using this architecture:

  • In this scenario, a company must enrich an empty data base with items and properties, see Figure 1.
Figure 1. Company data before data mining

Figure 1. Company data before data mining

  • Data will then be collected from multiple data sources, and stored in the cloud, as shown in Figure 2.
Figure 2. Collecting the data by SKU from different sources

Figure 2. Collecting the data by SKU from different sources

  • To unify different property names, SageMaker Ground Truth is used to label the property names with a list of properties. The results are stored in Amazon DynamoDB, shown in Figure 3.
Figure 3. Mapping the property names to match a unified name

Figure 3. Mapping the property names to match a unified name

  • Finally, the database is populated and enriched by the mapped properties from the different data sources. This can be iterated with new sources to further enrich the data base, see Figure 4.
Figure 4. Company data after data mining, mapping, and structuring

Figure 4. Company data after data mining, mapping, and structuring

1. Collect the data

Using this serverless architecture illustrated in Figure 5, your teams can minimize the effort and cost. You’ll be able to handle large-scale datasets to collect and store the data required for your business.

Figure 5. Serverless architecture for parallel data collection

Figure 5. Serverless architecture for parallel data collection

We use Amazon S3 as it is a highly scalable and durable object storage service, and can store the original dataset. It will initiate an event that will invoke a Lambda function to start a state machine, using the original dataset as its input.

AWS Step Functions are used to orchestrate the process of preparing the dataset for parallel scraping of the items. It will automatically manage the queue of items to be processed when the dataset is large. Step Functions ensures visibility of the process, reports errors, and decouples the compute-intensive scraping operation per item.

The state machine has two steps:

  1. ETL the data to clean and standardize it. Store each item in Amazon DynamoDB, a fast and flexible NoSQL database service for any scale. The ETL function will create an array of all the items identifiers. The identifier is a unique describer of the item, such as manufacturer ID and SKU.
  2. Using the Map functionality of Step Functions, a Lambda function will be invoked for each item. This runs all your scrapers for that item and stores the results in an S3 bucket.

This solution requires custom implementation of only these two functions, according to your own dataset and scraping sources. The ETL Lambda function will contain logic needed to transform your input into an array of identifiers. The scraper Lambda function will contain logic to locate the data in the source and then store it.

Scraper function flow

For each data source, write your own scraper. The Lambda function can run them sequentially.

  1. Use the identifier input to locate the item in each one of the external sources. The data source can be an API, a webpage, a PDF file, or other source.
    • API: Collecting this data will be specific to the interface provided.
    • Webpages: Data is collected with custom code. There are open source libraries that are popular for this task, such as Beautiful Soup.
    • PDF files: Consider using Amazon Textract. Amazon Textract will give you key-value pairs and table analysis.
  2. Transform the response to key-value pairs as part of the scraper logic.
  3. Store the key-value pairs in a sub folder of the scraper responses S3 bucket, and name it after that data source.

2. Mapping the responses

Figure 6. Pipeline for property mapping

Figure 6. Pipeline for property mapping

This pipeline is initiated after the data is collected. It creates a labeling job of Named Entity Recognition, with a pre-defined set of labels. The labeling work will be split among your Workforces. When the job is completed, the output manifest file for named entity recognition is used for the final ETL Lambda. This manually locates the labeling key and values detected by your workforce, and places the results in a reusable mapping table in DynamoDB.

Services used:

Amazon SageMaker Ground Truth is a fully managed data labeling service that helps you build highly accurate training datasets for machine learning (ML). By using Ground Truth, your teams can unify different data sources to match each other, so they can be identified and used in your applications.

Figure 7. Example of one line item being labeled by one of the Workforce team members

Figure 7. Example of one line item being labeled by one of the Workforce team members

3. Structure the collected data

Figure 8. Architecture diagram of entire data collection and classification process

Figure 8. Architecture diagram of entire data collection and classification process

Using another Lambda function (see in Figure 8, populate items properties), we use the collected data (1), and the mapping (2), to populate the unified dataset into the original data DynamoDB table (3).

Conclusion

In this blog, we showed a solution to automatically collect and structure data. We used a serverless architecture that requires minimal effort, to build a reusable asset that can unify different property definitions from different data sources. Minimal effort is involved in structuring this data, as we use Amazon SageMaker Ground Truth to match and reconcile the new data sources.

For further reading:

ICYMI: Serverless Q3 2021

Post Syndicated from James Beswick original https://aws.amazon.com/blogs/compute/icymi-serverless-q3-2021/

Welcome to the 15th edition of the AWS Serverless ICYMI (in case you missed it) quarterly recap. Every quarter, we share all of the most recent product launches, feature enhancements, blog posts, webinars, Twitch live streams, and other interesting things that you might have missed!

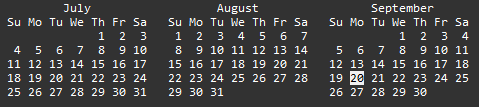
Q3 calendar

In case you missed our last ICYMI, check out what happened last quarter here.

AWS Lambda

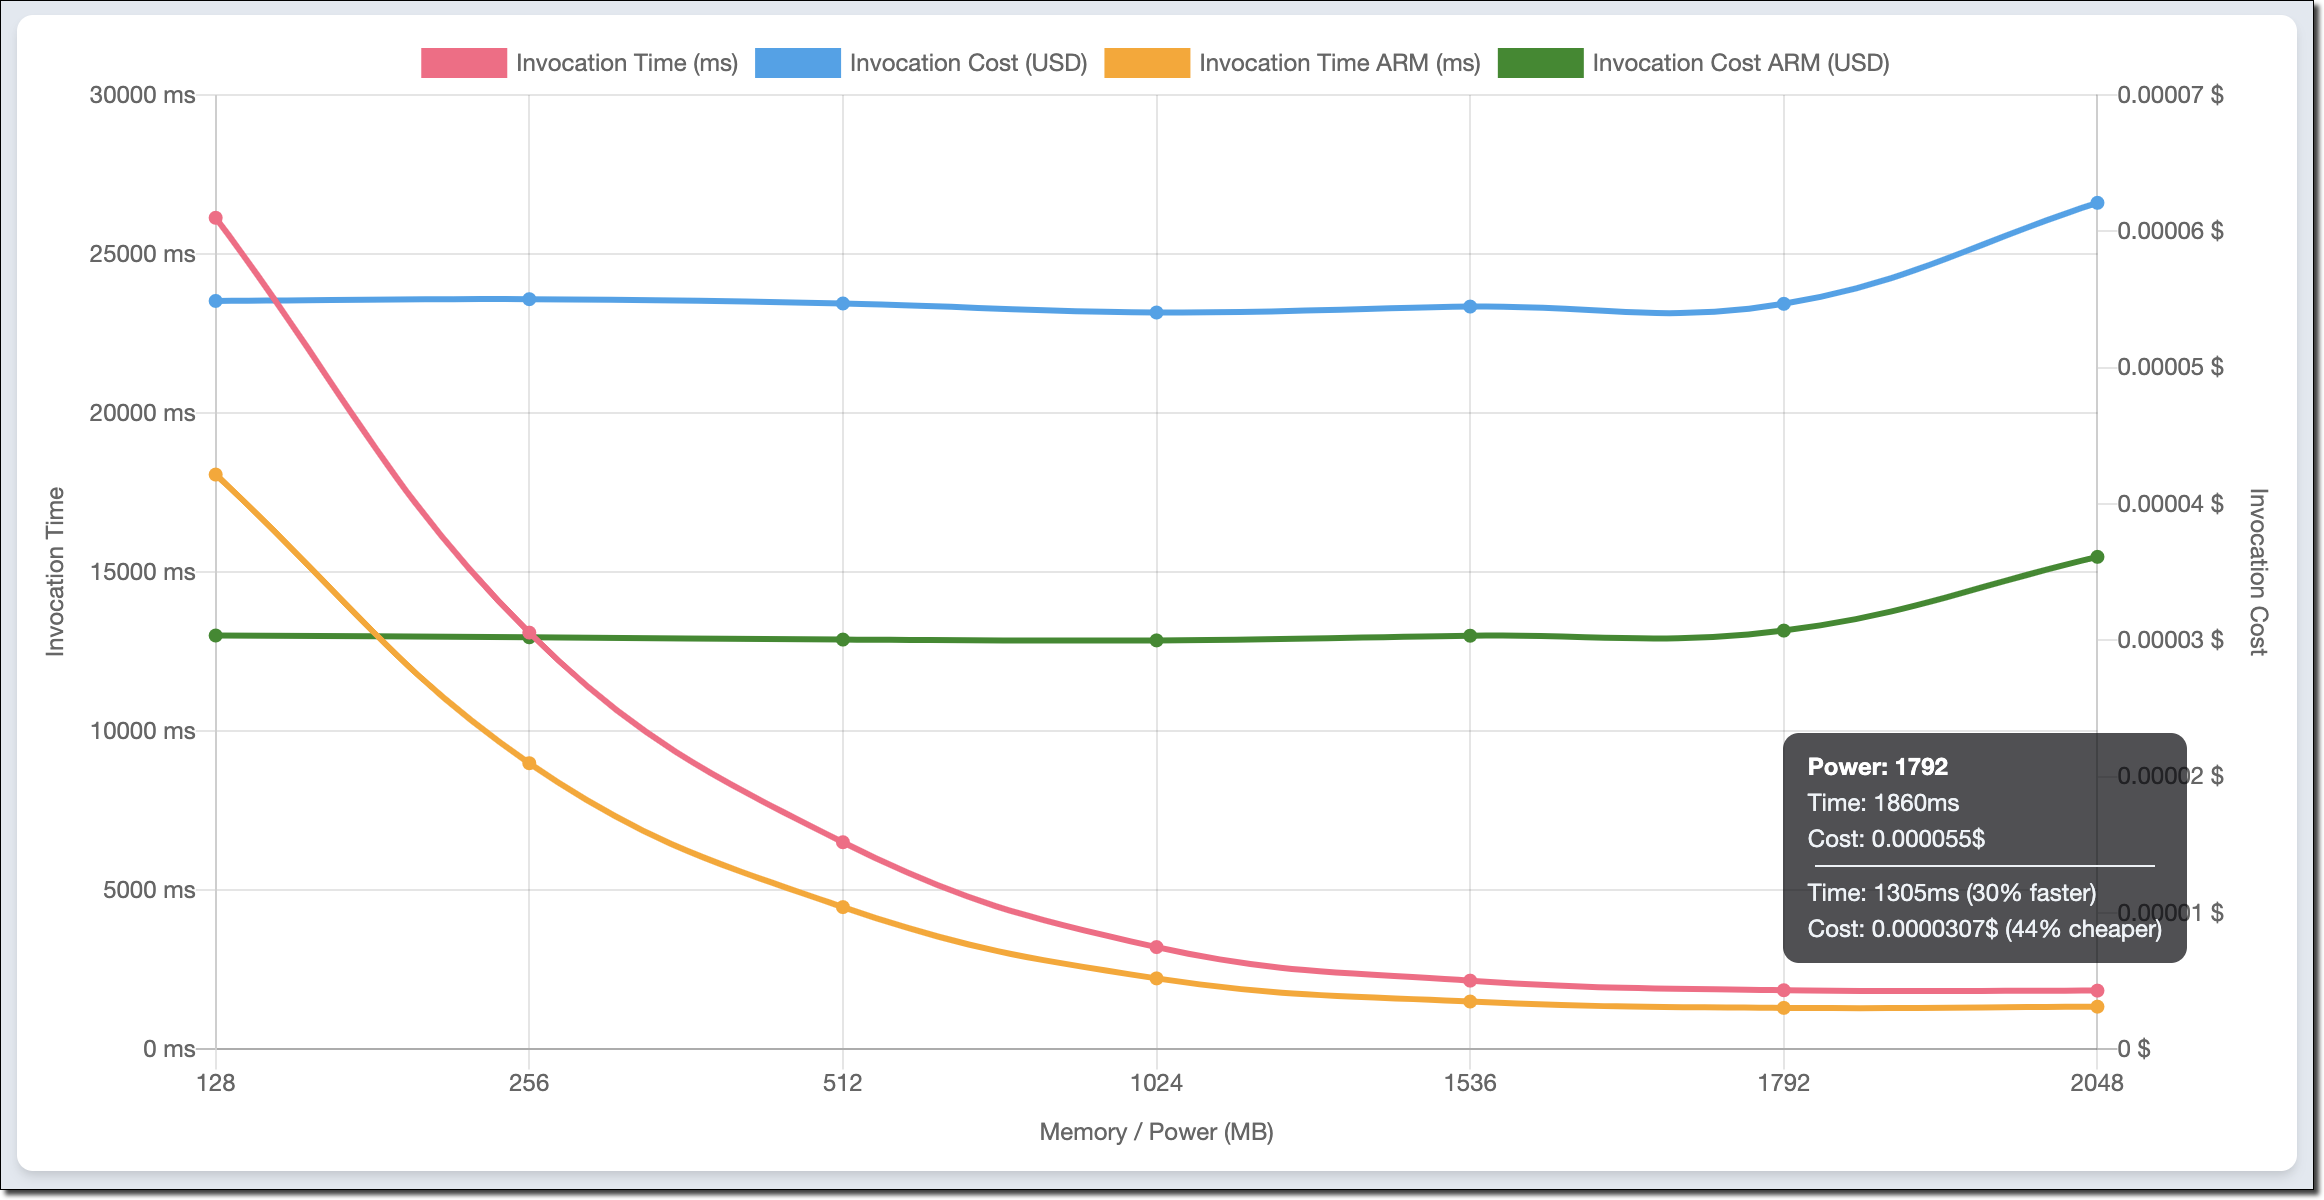
You can now choose next-generation AWS Graviton2 processors in your Lambda functions. This Arm-based processor architecture can provide up to 19% better performance at 20% lower cost. You can configure functions to use Graviton2 in the AWS Management Console, API, CloudFormation, and CDK. We recommend using the AWS Lambda Power Tuning tool to see how your function compare and determine the price improvement you may see.

All Lambda runtimes built on Amazon Linux 2 support Graviton2, with the exception of versions approaching end-of-support. The AWS Free Tier for Lambda includes functions powered by both x86 and Arm-based architectures.

Create Lambda function with new arm64 option

You can also use the Python 3.9 runtime to develop Lambda functions. You can choose this runtime version in the AWS Management Console, AWS CLI, or AWS Serverless Application Model (AWS SAM). Version 3.9 includes a range of new features and performance improvements.

Lambda now supports Amazon MQ for RabbitMQ as an event source. This makes it easier to develop serverless applications that are triggered by messages in a RabbitMQ queue. This integration does not require a consumer application to monitor queues for updates. The connectivity with the Amazon MQ message broker is managed by the Lambda service.

Lambda has added support for up to 10 GB of memory and 6 vCPU cores in AWS GovCloud (US) Regions and in the Middle East (Bahrain), Asia Pacific (Osaka), and Asia Pacific (Hong Kong) Regions.

AWS Step Functions

Step Functions now integrates with the AWS SDK, supporting over 200 AWS services and 9,000 API actions. You can call services directly from the Amazon States Language definition in the resource field of the task state. This allows you to work with services like DynamoDB, AWS Glue Jobs, or Amazon Textract directly from a Step Functions state machine. To learn more, see the SDK integration tutorial.

AWS Amplify

The Amplify Admin UI now supports importing existing Amazon Cognito user pools and identity pools. This allows you to configure multi-platform apps to use the same user pools with different client IDs.

Amplify CLI now enables command hooks, allowing you to run custom scripts in the lifecycle of CLI commands. You can create bash scripts that run before, during, or after CLI commands. Amplify CLI has also added support for storing environment variables and secrets used by Lambda functions.

Amplify Geo is in developer preview and helps developers provide location-aware features to their frontend web and mobile applications. This uses the Amazon Location Service to provide map UI components.

Amazon EventBridge

The EventBridge schema registry now supports discovery of cross-account events. When schema registry is enabled on a bus, it now generates schemes for events originating from another account. This helps organize and find events in multi-account applications.

Amazon DynamoDB

DynamoDB console

The new DynamoDB console experience is now the default for viewing and managing DynamoDB tables. This makes it easier to manage tables from the navigation pane and also provided a new dedicated Items page. There is also contextual guidance and step-by-step assistance to help you perform common tasks more quickly.

API Gateway

API Gateway can now authenticate clients using certificate-based mutual TLS. Previously, this feature only supported AWS Certificate Manager (ACM). Now, customers can use a server certificate issued by a third-party certificate authority or ACM Private CA. Read more about using mutual TLS authentication with API Gateway.

The Serverless Developer Advocacy team built the Amazon API Gateway CORS Configurator to help you configure cross origin resource scripting (CORS) for REST and HTTP APIs. Fill in the information specific to your API and the AWS SAM configuration is generated for you.

Serverless blog posts

July

August

September

Tech Talks & Events

We hold AWS Online Tech Talks covering serverless topics throughout the year. These are listed in the Serverless section of the AWS Online Tech Talks page. We also regularly deliver talks at conferences and events around the world, speak on podcasts, and record videos you can find to learn in bite-sized chunks.

Here are some from Q3:

Videos

Serverless Land

Serverless Office Hours – Tues 10 AM PT

Weekly live virtual office hours. In each session we talk about a specific topic or technology related to serverless and open it up to helping you with your real serverless challenges and issues. Ask us anything you want about serverless technologies and applications.

July

August

September

DynamoDB Office Hours

Are you an Amazon DynamoDB customer with a technical question you need answered? If so, join us for weekly Office Hours on the AWS Twitch channel led by Rick Houlihan, AWS principal technologist and Amazon DynamoDB expert. See upcoming and previous shows

Still looking for more?

The Serverless landing page has more information. The Lambda resources page contains case studies, webinars, whitepapers, customer stories, reference architectures, and even more Getting Started tutorials.

You can also follow the Serverless Developer Advocacy team on Twitter to see the latest news, follow conversations, and interact with the team.

AWS Lambda Functions Powered by AWS Graviton2 Processor – Run Your Functions on Arm and Get Up to 34% Better Price Performance

Post Syndicated from Danilo Poccia original https://aws.amazon.com/blogs/aws/aws-lambda-functions-powered-by-aws-graviton2-processor-run-your-functions-on-arm-and-get-up-to-34-better-price-performance/

Many of our customers (such as Formula One, Honeycomb, Intuit, SmugMug, and Snap Inc.) use the Arm-based AWS Graviton2 processor for their workloads and enjoy better price performance. Starting today, you can get the same benefits for your AWS Lambda functions. You can now configure new and existing functions to run on x86 or Arm/Graviton2 processors.

With this choice, you can save money in two ways. First, your functions run more efficiently due to the Graviton2 architecture. Second, you pay less for the time that they run. In fact, Lambda functions powered by Graviton2 are designed to deliver up to 19 percent better performance at 20 percent lower cost.

With Lambda, you are charged based on the number of requests for your functions and the duration (the time it takes for your code to execute) with millisecond granularity. For functions using the Arm/Graviton2 architecture, duration charges are 20 percent lower than the current pricing for x86. The same 20 percent reduction also applies to duration charges for functions using Provisioned Concurrency.

In addition to the price reduction, functions using the Arm architecture benefit from the performance and security built into the Graviton2 processor. Workloads using multithreading and multiprocessing, or performing many I/O operations, can experience lower execution time and, as a consequence, even lower costs. This is particularly useful now that you can use Lambda functions with up to 10 GB of memory and 6 vCPUs. For example, you can get better performance for web and mobile backends, microservices, and data processing systems.

If your functions don’t use architecture-specific binaries, including in their dependencies, you can switch from one architecture to the other. This is often the case for many functions using interpreted languages such as Node.js and Python or functions compiled to Java bytecode.

All Lambda runtimes built on top of Amazon Linux 2, including the custom runtime, are supported on Arm, with the exception of Node.js 10 that has reached end of support. If you have binaries in your function packages, you need to rebuild the function code for the architecture you want to use. Functions packaged as container images need to be built for the architecture (x86 or Arm) they are going to use.

To measure the difference between architectures, you can create two versions of a function, one for x86 and one for Arm. You can then send traffic to the function via an alias using weights to distribute traffic between the two versions. In Amazon CloudWatch, performance metrics are collected by function versions, and you can look at key indicators (such as duration) using statistics. You can then compare, for example, average and p99 duration between the two architectures.

You can also use function versions and weighted aliases to control the rollout in production. For example, you can deploy the new version to a small amount of invocations (such as 1 percent) and then increase up to 100 percent for a complete deployment. During rollout, you can lower the weight or set it to zero if your metrics show something suspicious (such as an increase in errors).

Let’s see how this new capability works in practice with a few examples.

Changing Architecture for Functions with No Binary Dependencies
When there are no binary dependencies, changing the architecture of a Lambda function is like flipping a switch. For example, some time ago, I built a quiz app with a Lambda function. With this app, you can ask and answer questions using a web API. I use an Amazon API Gateway HTTP API to trigger the function. Here’s the Node.js code including a few sample questions at the beginning:

const questions = [
  {
    question:
      "Are there more synapses (nerve connections) in your brain or stars in our galaxy?",
    answers: [
      "More stars in our galaxy.",
      "More synapses (nerve connections) in your brain.",
      "They are about the same.",
    ],
    correctAnswer: 1,
  },
  {
    question:
      "Did Cleopatra live closer in time to the launch of the iPhone or to the building of the Giza pyramids?",
    answers: [
      "To the launch of the iPhone.",
      "To the building of the Giza pyramids.",
      "Cleopatra lived right in between those events.",
    ],
    correctAnswer: 0,
  },
  {
    question:
      "Did mammoths still roam the earth while the pyramids were being built?",
    answers: [
      "No, they were all exctint long before.",
      "Mammooths exctinction is estimated right about that time.",
      "Yes, some still survived at the time.",
    ],
    correctAnswer: 2,
  },
];

exports.handler = async (event) => {
  console.log(event);

  const method = event.requestContext.http.method;
  const path = event.requestContext.http.path;
  const splitPath = path.replace(/^\/+|\/+$/g, "").split("/");

  console.log(method, path, splitPath);

  var response = {
    statusCode: 200,
    body: "",
  };

  if (splitPath[0] == "questions") {
    if (splitPath.length == 1) {
      console.log(Object.keys(questions));
      response.body = JSON.stringify(Object.keys(questions));
    } else {
      const questionId = splitPath[1];
      const question = questions[questionId];
      if (question === undefined) {
        response = {
          statusCode: 404,
          body: JSON.stringify({ message: "Question not found" }),
        };
      } else {
        if (splitPath.length == 2) {
          const publicQuestion = {
            question: question.question,
            answers: question.answers.slice(),
          };
          response.body = JSON.stringify(publicQuestion);
        } else {
          const answerId = splitPath[2];
          if (answerId == question.correctAnswer) {
            response.body = JSON.stringify({ correct: true });
          } else {
            response.body = JSON.stringify({ correct: false });
          }
        }
      }
    }
  }

  return response;
};

To start my quiz, I ask for the list of question IDs. To do so, I use curl with an HTTP GET on the /questions endpoint:

$ curl https://<api-id>.execute-api.us-east-1.amazonaws.com/questions
[
  "0",
  "1",
  "2"
]

Then, I ask more information on a question by adding the ID to the endpoint:

$ curl https://<api-id>.execute-api.us-east-1.amazonaws.com/questions/1
{
  "question": "Did Cleopatra live closer in time to the launch of the iPhone or to the building of the Giza pyramids?",
  "answers": [
    "To the launch of the iPhone.",
    "To the building of the Giza pyramids.",
    "Cleopatra lived right in between those events."
  ]
}

I plan to use this function in production. I expect many invocations and look for options to optimize my costs. In the Lambda console, I see that this function is using the x86_64 architecture.

Console screenshot.

Because this function is not using any binaries, I switch architecture to arm64 and benefit from the lower pricing.

Console screenshot.

The change in architecture doesn’t change the way the function is invoked or communicates its response back. This means that the integration with the API Gateway, as well as integrations with other applications or tools, are not affected by this change and continue to work as before.

I continue my quiz with no hint that the architecture used to run the code has changed in the backend. I answer back to the previous question by adding the number of the answer (starting from zero) to the question endpoint:

$ curl https://<api-id>.execute-api.us-east-1.amazonaws.com/questions/1/0
{
  "correct": true
}

That’s correct! Cleopatra lived closer in time to the launch of the iPhone than the building of the Giza pyramids. While I am digesting this piece of information, I realize that I completed the migration of the function to Arm and optimized my costs.

Changing Architecture for Functions Packaged Using Container Images
When we introduced the capability to package and deploy Lambda functions using container images, I did a demo with a Node.js function generating a PDF file with the PDFKit module. Let’s see how to migrate this function to Arm.

Each time it is invoked, the function creates a new PDF mail containing random data generated by the faker.js module. The output of the function is using the syntax of the Amazon API Gateway to return the PDF file using Base64 encoding. For convenience, I replicate the code (app.js) of the function here:

const PDFDocument = require('pdfkit');
const faker = require('faker');
const getStream = require('get-stream');

exports.lambdaHandler = async (event) => {

    const doc = new PDFDocument();

    const randomName = faker.name.findName();

    doc.text(randomName, { align: 'right' });
    doc.text(faker.address.streetAddress(), { align: 'right' });
    doc.text(faker.address.secondaryAddress(), { align: 'right' });
    doc.text(faker.address.zipCode() + ' ' + faker.address.city(), { align: 'right' });
    doc.moveDown();
    doc.text('Dear ' + randomName + ',');
    doc.moveDown();
    for(let i = 0; i < 3; i++) {
        doc.text(faker.lorem.paragraph());
        doc.moveDown();
    }
    doc.text(faker.name.findName(), { align: 'right' });
    doc.end();

    pdfBuffer = await getStream.buffer(doc);
    pdfBase64 = pdfBuffer.toString('base64');

    const response = {
        statusCode: 200,
        headers: {
            'Content-Length': Buffer.byteLength(pdfBase64),
            'Content-Type': 'application/pdf',
            'Content-disposition': 'attachment;filename=test.pdf'
        },
        isBase64Encoded: true,
        body: pdfBase64
    };
    return response;
};

To run this code, I need the pdfkit, faker, and get-stream npm modules. These packages and their versions are described in the package.json and package-lock.json files.

I update the FROM line in the Dockerfile to use an AWS base image for Lambda for the Arm architecture. Given the chance, I also update the image to use Node.js 14 (I was using Node.js 12 at the time). This is the only change I need to switch architecture.

FROM public.ecr.aws/lambda/nodejs:14-arm64
COPY app.js package*.json ./
RUN npm install
CMD [ "app.lambdaHandler" ]

For the next steps, I follow the post I mentioned previously. This time I use random-letter-arm for the name of the container image and for the name of the Lambda function. First, I build the image:

$ docker build -t random-letter-arm .

Then, I inspect the image to check that it is using the right architecture:

$ docker inspect random-letter-arm | grep Architecture

"Architecture": "arm64",

To be sure the function works with the new architecture, I run the container locally.

$ docker run -p 9000:8080 random-letter-arm:latest

Because the container image includes the Lambda Runtime Interface Emulator, I can test the function locally:

$ curl -XPOST "http://localhost:9000/2015-03-31/functions/function/invocations" -d '{}'

It works! The response is a JSON document containing a base64-encoded response for the API Gateway:

{
    "statusCode": 200,
    "headers": {
        "Content-Length": 2580,
        "Content-Type": "application/pdf",
        "Content-disposition": "attachment;filename=test.pdf"
    },
    "isBase64Encoded": true,
    "body": "..."
}

Confident that my Lambda function works with the arm64 architecture, I create a new Amazon Elastic Container Registry repository using the AWS Command Line Interface (CLI):

$ aws ecr create-repository --repository-name random-letter-arm --image-scanning-configuration scanOnPush=true

I tag the image and push it to the repo:

$ docker tag random-letter-arm:latest 123412341234.dkr.ecr.us-east-1.amazonaws.com/random-letter-arm:latest
$ aws ecr get-login-password | docker login --username AWS --password-stdin 123412341234.dkr.ecr.us-east-1.amazonaws.com
$ docker push 123412341234.dkr.ecr.us-east-1.amazonaws.com/random-letter-arm:latest

In the Lambda console, I create the random-letter-arm function and select the option to create the function from a container image.

Console screenshot.

I enter the function name, browse my ECR repositories to select the random-letter-arm container image, and choose the arm64 architecture.

Console screenshot.

I complete the creation of the function. Then, I add the API Gateway as a trigger. For simplicity, I leave the authentication of the API open.

Console screenshot.

Now, I click on the API endpoint a few times and download some PDF mails generated with random data:

Screenshot of some PDF files.

The migration of this Lambda function to Arm is complete. The process will differ if you have specific dependencies that do not support the target architecture. The ability to test your container image locally helps you find and fix issues early in the process.

Comparing Different Architectures with Function Versions and Aliases
To have a function that makes some meaningful use of the CPU, I use the following Python code. It computes all prime numbers up to a limit passed as a parameter. I am not using the best possible algorithm here, that would be the sieve of Eratosthenes, but it’s a good compromise for an efficient use of memory. To have more visibility, I add the architecture used by the function to the response of the function.

import json
import math
import platform
import timeit

def primes_up_to(n):
    primes = []
    for i in range(2, n+1):
        is_prime = True
        sqrt_i = math.isqrt(i)
        for p in primes:
            if p > sqrt_i:
                break
            if i % p == 0:
                is_prime = False
                break
        if is_prime:
            primes.append(i)
    return primes

def lambda_handler(event, context):
    start_time = timeit.default_timer()
    N = int(event['queryStringParameters']['max'])
    primes = primes_up_to(N)
    stop_time = timeit.default_timer()
    elapsed_time = stop_time - start_time

    response = {
        'machine': platform.machine(),
        'elapsed': elapsed_time,
        'message': 'There are {} prime numbers <= {}'.format(len(primes), N)
    }
    
    return {
        'statusCode': 200,
        'body': json.dumps(response)
    }

I create two function versions using different architectures.

Console screenshot.

I use a weighted alias with 50% weight on the x86 version and 50% weight on the Arm version to distribute invocations evenly. When invoking the function through this alias, the two versions running on the two different architectures are executed with the same probability.

Console screenshot.

I create an API Gateway trigger for the function alias and then generate some load using a few terminals on my laptop. Each invocation computes prime numbers up to one million. You can see in the output how two different architectures are used to run the function.

$ while True
  do
    curl https://<api-id>.execute-api.us-east-1.amazonaws.com/default/prime-numbers\?max\=1000000
  done

{"machine": "aarch64", "elapsed": 1.2595275060011772, "message": "There are 78498 prime numbers <= 1000000"}
{"machine": "aarch64", "elapsed": 1.2591725109996332, "message": "There are 78498 prime numbers <= 1000000"}
{"machine": "x86_64", "elapsed": 1.7200910530000328, "message": "There are 78498 prime numbers <= 1000000"}
{"machine": "x86_64", "elapsed": 1.6874686619994463, "message": "There are 78498 prime numbers <= 1000000"}
{"machine": "x86_64", "elapsed": 1.6865161940004327, "message": "There are 78498 prime numbers <= 1000000"}
{"machine": "aarch64", "elapsed": 1.2583248640003148, "message": "There are 78498 prime numbers <= 1000000"}
...

During these executions, Lambda sends metrics to CloudWatch and the function version (ExecutedVersion) is stored as one of the dimensions.

To better understand what is happening, I create a CloudWatch dashboard to monitor the p99 duration for the two architectures. In this way, I can compare the performance of the two environments for this function and make an informed decision on which architecture to use in production.

Console screenshot.

For this particular workload, functions are running much faster on the Graviton2 processor, providing a better user experience and much lower costs.

Comparing Different Architectures with Lambda Power Tuning
The AWS Lambda Power Tuning open-source project, created by my friend Alex Casalboni, runs your functions using different settings and suggests a configuration to minimize costs and/or maximize performance. The project has recently been updated to let you compare two results on the same chart. This comes in handy to compare two versions of the same function, one using x86 and the other Arm.

For example, this chart compares x86 and Arm/Graviton2 results for the function computing prime numbers I used earlier in the post:

Chart.

The function is using a single thread. In fact, the lowest duration for both architectures is reported when memory is configured with 1.8 GB. Above that, Lambda functions have access to more than 1 vCPU, but in this case, the function can’t use the additional power. For the same reason, costs are stable with memory up to 1.8 GB. With more memory, costs increase because there are no additional performance benefits for this workload.

I look at the chart and configure the function to use 1.8 GB of memory and the Arm architecture. The Graviton2 processor is clearly providing better performance and lower costs for this compute-intensive function.

Availability and Pricing
You can use Lambda Functions powered by Graviton2 processor today in US East (N. Virginia), US East (Ohio), US West (Oregon), Europe (Frankfurt), Europe (Ireland), EU (London), Asia Pacific (Mumbai), Asia Pacific (Singapore), Asia Pacific (Sydney), Asia Pacific (Tokyo).

The following runtimes running on top of Amazon Linux 2 are supported on Arm:

  • Node.js 12 and 14
  • Python 3.8 and 3.9
  • Java 8 (java8.al2) and 11
  • .NET Core 3.1
  • Ruby 2.7
  • Custom Runtime (provided.al2)

You can manage Lambda Functions powered by Graviton2 processor using AWS Serverless Application Model (SAM) and AWS Cloud Development Kit (AWS CDK). Support is also available through many AWS Lambda Partners such as AntStack, Check Point, Cloudwiry, Contino, Coralogix, Datadog, Lumigo, Pulumi, Slalom, Sumo Logic, Thundra, and Xerris.

Lambda functions using the Arm/Graviton2 architecture provide up to 34 percent price performance improvement. The 20 percent reduction in duration costs also applies when using Provisioned Concurrency. You can further reduce your costs by up to 17 percent with Compute Savings Plans. Lambda functions powered by Graviton2 are included in the AWS Free Tier up to the existing limits. For more information, see the AWS Lambda pricing page.

You can find help to optimize your workloads for the AWS Graviton2 processor in the Getting started with AWS Graviton repository.

Start running your Lambda functions on Arm today.

— Danilo

Building an API poller with AWS Step Functions and AWS Lambda

Post Syndicated from James Beswick original https://aws.amazon.com/blogs/compute/building-an-api-poller-with-aws-step-functions-and-aws-lambda/

This post is written by Siarhei Kazhura, Solutions Architect.

Many customers have to integrate with external APIs. One of the most common use cases is data synchronization between a customer and their trusted partner.

There are multiple ways of doing this. For example, the customer can provide a webhook that the partner can call to notify the customer of any data changes. Often the customer has to poll the partner API to stay up to date with the changes. Even when using a webhook, a complete synchronization happening on schedule is necessary.

Furthermore, the partner API may not allow loading all the data at once. Often, a pagination solution allows loading only a portion of the data via one API call. That requires the customer to build an API poller that can iterate through all the data pages to fully synchronize.

This post demonstrates a sample API poller architecture, using AWS Step Functions for orchestration, AWS Lambda for business logic processing, along with Amazon API Gateway, Amazon DynamoDB, Amazon SQS, Amazon EventBridge, Amazon Simple Storage Service (Amazon S3), and the AWS Serverless Application Model (AWS SAM).

Overall architecture

Reference architecture

The application consists of the following resources defined in the AWS SAM template:

  • PollerHttpAPI: The front door of the application represented via an API Gateway HTTP API.
  • PollerTasksEventBus: An EventBridge event bus that is directly integrated with API Gateway. That means that an API call results in an event being created in the event bus. EventBridge allows you to route the event to the destination you want. It also allows you to archive and replay events as needed, adding resiliency to the architecture. Each event has a unique id that this solution uses for tracing purposes.
  • PollerWorkflow: The Step Functions workflow.
  • ExternalHttpApi: The API Gateway HTTP API that is used to simulate an external API.
  • PayloadGenerator: A Lambda function that is generating a sample payload for the application.
  • RawPayloadBucket: An Amazon S3 bucket that stores the payload received from the external API. The Step Functions supported payload size is up to 256 KB. For larger payloads, you can store the API payload in an S3 bucket.
  • PollerTasksTable: A DynamoDB table that tracks each poller’s progress. The table has a TimeToLive (TTL) attribute enabled. This automatically discards tasks that exceed the TTL value.
  • ProcessPayoadQueue: Amazon SQS queue that decouples our payload fetching mechanism from our payload processing mechanism.
  • ProcessPayloadDLQ: Amazon SQS dead letter queue is collecting the messages that we are unable to process.
  • ProcessPayload: Lambda function that is processing the payload. The function reports progress of each poller task, marking it as complete when given payload is processed successfully.

Data flow

Data flow

When the API poller runs:

  1. After a POST call is made to PollerHttpAPI /jobs endpoint, an event containing the API payload is put on the PollerTasksEventBus.
  2. The event triggers the PollerWorkflow execution. The event payload (including the event unique id) is passed to the PollerWorkflow.
  3. The PollerWorkflow starts by running the PreparePollerJob function. The function retrieves required metadata from the ExternalHttpAPI. For example, the total number of records to be loaded and maximum records that can be retrieved via a single API call. The function creates poller tasks that are required to fetch the data. The task calculation is based on the metadata received.
  4. The PayloadGenerator function generates random ExternalHttpAPI payloads. The PayloadGenerator function also includes code that simulates random errors and delays.
  5. All the tasks are processed in a fan-out fashion using dynamic-parallelism. The FetchPayload function retrieves a payload chunk from the ExternalHttpAPI, and the payload is saved to the RawPayloadBucket.
  6. A message, containing a pointer to the payload file stored in the RawPayloadBucket, the id of the task, and other task information is sent to the ProcessPayloadQueue. Each message has jobId and taskId attributes. This helps correlate the message with the poller task.
  7. Anytime a task is changing its status (for example, when the payload is saved to S3 bucket, or when a message has been sent to SQS queue) the progress is reported to the PollerTaskTable.
  8. The ProcessPayload function is long-polling the ProcessPayloadQueue. As messages appear on the queue, they are being processed.
  9. The ProcessPayload function is removing an object from the RawPayloadBucket. This is done to illustrate a type of processing that you can do with the payload stored in the S3 bucket.
  10. After the payload is removed successfully, the progress is reported to the PollerTasksTable. The corresponding task is marked as complete.
  11. If the ProcessPayload function experiences errors, it tries to process the message several times. If it cannot process the message, the message is pushed to the ProcessPayloadDLQ. This is configured as a dead-letter queue for the ProcessPayloadQueue.

Step Functions state machine

State machine

The Step Functions state machine orchestrates the following workflow:

  1. Fetch external API metadata and create tasks required to fetch all payload.
  2. For each task, report that the task has entered Started state.
  3. Since the task is in the Started state, the next action is FetchPayload
  4. Fetch payload from the external API and store it in an S3 bucket.
  5. In case of success, move the task to a PayloadSaved state.
  6. In case of an error, report that the task is in a failed state.
  7. Report that the task has entered PayloadSaved (or failed) state.
  8. In case the task is in the PayloadSaved state, move to the SendToSQS step. If the task is in a failed state, exit.
  9. Send the S3 object pointer and additional task metadata to the SQS queue.
  10. Move the task to an enqueued state.
  11. Report that the task has entered enqueued state.
  12. Since the task is in the enqueued state, we are done.
  13. Combine the results for a single task execution.
  14. Combine the results for all the task executions.

Prerequisites to implement the solution

The following prerequisites are required for this walk-through:

Step-by-step instructions

You can use AWS Cloud9, or your preferred IDE, to deploy the AWS SAM template. Refer to the cleanup section of this post for instructions to delete the resources to stop incurring any further charges.

  1. Clone the repository by running the following command:
    git clone https://github.com/aws-samples/sam-api-poller.git
  2. Change to the sam-api-poller directory, install dependencies and build the application:
    npm install
    sam build -c -p
  3. Package and deploy the application to the AWS Cloud, following the series of prompts. Name the stack sam-api-poller:
    sam deploy --guided --capabilities CAPABILITY_NAMED_IAM
  4. SAM outputsAfter stack creation, you see ExternalHttpApiUrl, PollerHttpApiUrl, StateMachineName, and RawPayloadBucket in the outputs section.
    CloudFormation outputs
  5. Store API URLs as variables:
    POLLER_HTTP_API_URL=$(aws cloudformation describe-stacks --stack-name sam-api-poller --query "Stacks[0].Outputs[?OutputKey=='PollerHttpApiUrl'].OutputValue" --output text)
    
    EXTERNAL_HTTP_API_URL=$(aws cloudformation describe-stacks --stack-name sam-api-poller --query "Stacks[0].Outputs[?OutputKey=='ExternalHttpApiUrl'].OutputValue" --output text)
  6. Make an API call:
    REQUEST_PYLOAD=$(printf '{"url":"%s/payload"}' $EXTERNAL_HTTP_API_URL)
    EVENT_ID=$(curl -d $REQUEST_PYLOAD -H "Content-Type: application/json" -X POST $POLLER_HTTP_API_URL/jobs | jq -r '.Entries[0].EventId')
    
  7. The EventId that is returned by the API is stored in a variable. You can trace all the poller tasks related to this execution via the EventId. Run the following command to track task progress:
    curl -H "Content-Type: application/json" $POLLER_HTTP_API_URL/jobs/$EVENT_ID
  8. Inspect the output. For example:
    {"Started":9,"PayloadSaved":15,"Enqueued":11,"SuccessfullyCompleted":0,"FailedToComplete":0,"Total":35}%
  9. Navigate to the Step Functions console and choose the state machine name that corresponds to the StateMachineName from step 4. Choose an execution and inspect the visual flow.
    Workflow
  10. Inspect each individual step by clicking on it. For example, for the PollerJobComplete step, you see:
    Step output

Cleanup

  1. Make sure that the `RawPayloadBucket` bucket is empty. In case the bucket has some files, follow emptying a bucket guide.
  2. To delete all the resources permanently and stop incurring costs, navigate to the CloudFormation console. Select the sam-api-poller stack, then choose Delete -> Delete stack.

Cost optimization

For Step Functions, this example uses the Standard Workflow type because it has a visualization tool. If you are planning to re-use the solution, consider switching from standard to Express Workflows. This may be a better option for the type of workload in this example.

Conclusion

This post shows how to use Step Functions, Lambda, EventBridge, S3, API Gateway HTTP APIs, and SQS to build a serverless API poller. I show how you can deploy a sample solution, process sample payload, and store it to S3.

I also show how to perform clean-up to avoid any additional charges. You can modify this example for your needs and build a custom solution for your use case.

For more serverless learning resources, visit Serverless Land.

Manage your AWS Directory Service credentials using AWS Secrets Manager

Post Syndicated from Ashwin Bhargava original https://aws.amazon.com/blogs/security/manage-your-aws-directory-service-credentials-using-aws-secrets-manager/

AWS Secrets Manager helps you protect the secrets that are needed to access your applications, services, and IT resources. With this service, you can rotate, manage, and retrieve database credentials, API keys, OAuth tokens, and other secrets throughout their lifecycle. The secret value rotation feature has built-in integration for services like Amazon Relational Database Service (Amazon RDS) , whose credentials can be rotated. The same integration functionality can also be extended to other types of secrets, including API keys and OAuth tokens, with the help of AWS Lambda functions.

This blog post provides details on how Secrets Manager can be used to store and rotate the admin password of AWS Directory Service at a specified frequency. Customers who use the directory services in AWS can deploy the solution in this blog post to minimize the effort spent by their operations team to manually rotate the password (which is one of the best practices of password management). These customers can also benefit by using the secure API access of Secrets Manager to allow access by applications that are using Active Directory–specific accounts. A good example is having an application to reset passwords for AD users and can be done using the API access.

Solution overview

When you configure AWS Directory Service, one of the inputs the service expects is the password for the admin user (administrator). By using an AWS Lambda function and Secrets Manager, you can store the password and rotate it periodically.

Figure 1 shows the architecture diagram for this solution.
 

Figure 1: Architecture diagram

Figure 1: Architecture diagram

The workflow is as follows:

  1. During initial setup (which can be performed either manually or through a CloudFormation template), the password of the admin user is stored as a secret in Secrets Manager. The secret is in the JSON format and contains three fields: Directory ID, UserName, and Password. The secret is encrypted using KMS Key to provide an added layer of security.
  2. This secret is attached to a Lambda function that controls rotation.
  3. This rotation Lambda function generates a new password, updates Active Directory, and then updates the secret. The function can be invoked on as-needed basis or at a desired interval. The CFN template we provide in this post schedules the rotation at a 30-day interval.
  4. Applications can securely fetch the new secret value from Secrets Manager.

Prerequisites and assumptions

To implement this solution, you need an AWS account to test the solution and access AWS services.

Also be aware of the following:

  1. In this solution, you will configure all the (supported) services in the same virtual private cloud (VPC) to simplify networking considerations.
  2. The predefined admin user name for Simple Active Directory is Administrator.
  3. The predefined password is a random 12-character string.

Important: The AWS CloudFormation template that we provide deploys a Simple Active Directory. This is for testing and demonstration purposes; you can modify or reuse the solution for other types of Active Directory solutions.

Deploy the solution

To deploy the solution, you first provision the baseline networking and other resources by using a CloudFormation stack.

The resource provisioning in this step creates these resources:

  • An Amazon Virtual Private Cloud (Amazon VPC) with two private subnets
  • AWS Directory Service installed and configured in the VPC
  • A Secrets Manager secret with rotation enabled
  • A Lambda function inside the VPC
  • These AWS Identity and Access Management (IAM) roles and permissions:
    • Secrets Manager has permission to invoke Lambda functions
    • The Lambda function has permission to update the secret in Secrets Manager
    • The Lambda function has permission to update the password for Directory Service

To deploy the solution by using the CloudFormation template

  1. You can use this downloadable template to set up the resources. To launch directly through the console, choose the following Launch Stack button, which creates the stack in the us-east-1 AWS Region.
    Select the Launch Stack button to launch the template
  2. Choose Next to go to the Specify stack details page.
  3. The bucket hosting the Lambda function code is predefined for ease of implementation, but you can edit the bucket name if necessary. Specify any other template details as needed, and then choose Next.
  4. (Optional) On the Configure Stack Options page, enter any tags, and then choose Next.
  5. On the Review page, select the check box for I acknowledge that AWS CloudFormation might create IAM resources with custom names, and choose Create stack.

It takes approximately 20–25 minutes for the provisioning to complete. When the stack status shows Create Complete, review the outputs that were created by navigating to the Outputs tab, as shown in Figure 2.
 

Figure 2: Outputs created by the CloudFormation template

Figure 2: Outputs created by the CloudFormation template

Now that the stack creation has completed successfully, you should validate the resources that were created.

To validate the resources

  1. Navigate to the AWS Directory Service console. You should see a new directory service that has the corp.com directory set up.
  2. Navigate to the AWS Secrets Manager console and review the secret that was created called DSAdminPswd. Choose the secret value, and then choose Retrieve secret value to reveal the secret values.
     
    Figure 3: Checking the secret value in the Secrets Manager console

    Figure 3: Checking the secret value in the Secrets Manager console

  3. As you might have noticed, the secret value changed from what was initially generated in the template. The Lambda function was invoked when it was attached to the secret, which caused the secret to rotate. To verify that the secret value changed, navigate to the Amazon CloudWatch console, and then navigate to Log groups.
  4. In the search bar, type the Lambda function name dj-rotate-lambda to filter on the log group name.
     
    Figure 4: CloudWatch log groups

    Figure 4: CloudWatch log groups

  5. Choose the log group /aws/lambda/dj-rotate-lambda to open the detailed log streams.
  6. Look at the Log streams and open the recent log stream to view the series of rotation events.
     
    Figure 5: The log data for a complete rotation

    Figure 5: The log data for a complete rotation

    You should see that each of the four stages of rotation (create, set, test, and finish) are called in the right sequence. A Success message in the finishSecret stage confirms the successful rotation of the secret value.

The next step is to rotate the secret manually or set a policy for rotation.

To rotate the secret

The CloudFormation automation has set the rotation configuration to rotate the secret every 30 days. You can alternatively initiate another rotation by choosing Rotate secret immediately, as shown in Figure 6. You will observe the log stream (in CloudWatch Logs) changing, followed by the new secret value.
 

Figure 6: Manual rotation of the secret

Figure 6: Manual rotation of the secret

You can also edit the rotation configuration by choosing Edit rotation and configuring the rotation policy that suits your organizational standards, as shown in Figure 7.
 

Figure 7: Editing the rotation configuration

Figure 7: Editing the rotation configuration

Code walkthrough

The rotation Lambda function works in four stages:

  1. CreateSecret – In this stage, the Lambda function creates a new password for the administrator user and sets up the staging label AWSPENDING for the secret’s new value.
  2. SetSecret – In this stage, the Lambda function fetches the newly generated password by using the label AWSPENDING and sets it as the password to the Active Directory administrator user.
  3. TestSecret – In this stage, the Lambda function verifies that the password is working by using the kinit command and the necessary dependent libraries of the Linux OS (the base OS for Lambda functions). If successful, the function continues to the next stage. In the case of failure, the catch block reverts the password of the Active Directory administrator user to the value in the AWSCURRENT label.
  4. FinishSecret – This is the final stage, where the Lambda function moves the labels AWSCURRENT from the current version of secret to the new version. And the same time, the old version of the secret is given AWSPREVIOUS label.

The Lambda function is written in Python 3.7 runtime and uses AWS SDK for Python (Boto3) API calls for interacting with Secrets Manager and Directory Services.

The directory ID and Secrets Manager endpoint are supplied as environment variables to the Lambda function, as shown in Figure 8. The secret ID is fetched from the event context.
 

Figure 8: Environment variables setup

Figure 8: Environment variables setup

You can download the Lambda code that is used for the rotation logic and modify it to suit your organizational needs. For instance, the random password is configured to have a length of 12 characters, excluding special characters and punctuations, as shown in the following code snippet. You can modify this configuration as needed.

newpasswd = service_client.get_random_password(PasswordLength=12,ExcludeCharacters='/@"\'\\',ExcludePunctuation=True)

As mentioned in the Prerequisites section, make sure that you do proper testing in development or test environments before proceeding to deploy the solution in production environments.

Cleanup

After you complete and test this solution, clean up the resources by deleting the AWS CloudFormation stack called aws-ds-creds-manager. For more information on deleting the stacks, see Deleting a stack on the AWS CloudFormation console.

Conclusion

In this post, we demonstrated how to use the AWS Secrets Manager service to store and rotate the AWS Directory Service Simple Active Directory admin password. You can also use this solution to rotate the AWS Managed Microsoft AD directory.

There are many other code samples listed in the AWS Code Sample Catalog that show how to rotate the passwords for other database services that are supported by this service.

You can find additional rotation Lambda function examples in the open source AWS library for Secrets Manager.

If you have feedback about this post, submit comments in the Comments section below. If you have questions about this post, start a new thread on the AWS Secrets Manager forum or contact AWS Support.

Want more AWS Security how-to content, news, and feature announcements? Follow us on Twitter.

Author

Ashwin Bhargava

Ashwin is a DevOps Consultant at AWS working in Professional Services Canada. He is a DevOps expert and a security enthusiast with more than 13 years of development and consulting experience.

Author

Satya Vajrapu

Satya is a Senior DevOps Consultant with AWS. He works with customers to help design, architect, and develop various practices and tools in the DevOps and cloud toolchain.

How NortonLifelock built a serverless architecture for real-time analysis of their VPN usage metrics

Post Syndicated from Madhu Nunna original https://aws.amazon.com/blogs/big-data/how-nortonlifelock-built-a-serverless-architecture-for-real-time-analysis-of-their-vpn-usage-metrics/

This post presents a reference architecture and optimization strategies for building serverless data analytics solutions on AWS using Amazon Kinesis Data Analytics. In addition, this post shows the design approach that the engineering team at NortonLifeLock took to build out an operational analytics platform that processes usage data for their VPN services, consuming petabytes of data across the globe on a daily basis.

NortonLifeLock is a global cybersecurity and internet privacy company that offers services to millions of customers for device security, and identity and online privacy for home and family. NortonLifeLock believes the digital world is only truly empowering when people are confident in their online security. NortonLifeLock has been an AWS customer since 2014.

For any organization, the value of operational data and metrics decreases with time. This lost value can equate to lost revenue and wasted resources. Real-time streaming analytics helps capture this value and provide new insights that can create new business opportunities.

AWS offers a rich set of services that you can use to provide real-time insights and historical trends. These services include managed Hadoop infrastructure services on Amazon EMR as well as serverless options such as Kinesis Data Analytics and AWS Glue.

Amazon EMR also supports multiple programming options for capturing business logic, such as Spark Streaming, Apache Flink, and SQL.

As a customer, it’s important to understand organizational capabilities, project timelines, business requirements, and AWS service best practices in order to define an optimal architecture from performance, cost, security, reliability, and operational excellence perspectives (the five pillars of the AWS Well-Architected Framework).

NortonLifeLock is taking a methodical approach to real-time analytics on AWS while using serverless technology to deliver on key business drivers such as time to market and total cost of ownership. In addition to NortonLifeLock’s implementation, this post provides key lessons learned and best practices for rapid development of real-time analytics workloads.

Business problem

NortonLifeLock offers a VPN product as a freemium service to users. Therefore, they need to enforce usage limits in real time to stop freemium users from using the service when their usage is over the limit. The challenge for NortonLifeLock is to do this in a reliable and affordable fashion.

NortonLifeLock runs its VPN infrastructure in almost all AWS Regions. Migrating to AWS from smaller hosting vendors has greatly improved user experience and VPN edge server performance, including a reduction in connection latency, time to connect and connection errors, faster upload and download speed, and more stability and uptime for VPN edge servers.

VPN usage data is collected by VPN edge servers and uploaded to backend stats servers every minute and persisted in backend databases. The usage information serves multiple purposes:

  • Displaying how much data a device has consumed for the past 30 days.
  • Enforcing usage limits on freemium accounts. When a user exhausts their free quota, that user is unable to connect through VPN until the next free cycle.
  • Analyzing usage data by the internal business intelligence (BI) team based on time, marketing campaigns, and account types, and using this data to predict future growth, ability to retain users, and more.

Design challenge

NortonLifeLock had the following design challenges:

  • The solution must be able to simultaneously satisfy both real-time and batch analysis.
  • The solution must be economical. NortonLifeLock VPN has hundreds of thousands of concurrent users, and if a user’s usage information is persisted as it comes in, it results in tens of thousands of reads and writes per second and tens of thousands of dollars a month in database costs.

Solution overview

NortonLifeLock decided to split storage into two parts by storing usage data in Amazon DynamoDB for real-time access and in Amazon Simple Storage Service (Amazon S3) for analysis, which addresses real-time enforcement and BI needs. Kinesis Data Analytics aggregates and loads data to Amazon S3 and DynamoDB. With Amazon Kinesis Data Streams and AWS Lambda as consumers of Kinesis Data Analytics, the implementation of user and device-level aggregations was simplified.

To keep costs down, user usage data was aggregated by the hour and persisted in DynamoDB. This spread hundreds of thousands of writes over an hour and reduced DynamoDB cost by 30 times.

Although increasing aggregation might not be an option for other problem domains, it’s acceptable in this case because it’s not necessary to be precise to the minute for user usage, and it’s acceptable to calculate and enforce the usage limit every hour.

The following diagram illustrates the high-level architecture. The solution is broken into three logical parts:

  • End-users – Real-time queries from devices to display current usage information (how much data is used daily)
  • Business analysts – Query historical usage information through Amazon Athena to extract business insights
  • Usage limit enforcement – Usage data ingestion and aggregation in real time

The solution has the following workflow:

  1. Usage data is collected by a VPN edge server and sends it to the backend service through Application Load Balancer.
  2. A single usage data record sent by the VPN edge server contains usage data for many users. A stats splitter splits the message into individual usage stats per user and forwards the message to Kinesis Data Streams.
  3. Usage data is consumed by both the legacy stats processor and the new Apache Flink application developed and deployed on Kinesis Data Analytics.
  4. The Apache Flink application carries out the following tasks:
    1. Aggregate device usage data hourly and send the aggregated result to Amazon S3 and the outgoing Kinesis data stream, which is picked up by a Lambda function that persists the usage data in DynamoDB.
    2. Aggregate device usage data daily and send the aggregated result to Amazon S3.
    3. Aggregate account usage data hourly and forward the aggregated results to the outgoing data stream, which is picked up by a Lambda function that checks if account usage is over the limit for that account. If account usage is over the limit, the function forwards the account information to another Lambda function, via Amazon Simple Queue Service (Amazon SQS), to cut off access on that account.

Design journey

NortonLifeLock needed a solution that was capable of real-time streaming and batch analytics. Kinesis Data Analysis fits this requirement because of the following key features:

  • Real-time streaming and batch analytics for data aggregation
  • Fully managed with a pay-as-you-go model
  • Auto scaling

NortonLifeLock needed Kinesis Data Analytics to do the following:

  • Aggregate customer usage data per device hourly and send results to Kinesis Data Streams (ultimately to DynamoDB) and the data lake (Amazon S3)
  • Aggregate customer usage data per account hourly and send results to Kinesis Data Streams (ultimately to DynamoDB and Lambda, which enforces usage limit)
  • Aggregate customer usage data per device daily and send results to the data lake (Amazon S3)

The legacy system processes usage data from an incoming Kinesis data stream, and they plan to use Kinesis Data Analytics to consume and process production data from the same stream. As such, NortonLifeLock started with SQL applications on Kinesis Data Analytics.

First attempt: Kinesis Data Analytics for SQL

Kinesis Data Analytics with SQL provides a high-level SQL-based abstraction for real-time stream processing and analytics. It’s configuration driven and very simple to get started. NortonLifeLock was able to create a prototype from scratch, get to production, and process the production load in less than 2 weeks. The solution met 90% of the requirements, and there were alternates for the remaining 10%.

However, they started to receive “read limit exceeded” alerts from the source data stream, and the legacy application was read throttled. With Amazon Support’s help, they traced the issues to the drastic reversal of the Kinesis Data Analytics MillisBehindLatest metric in Kinesis record processing. This was correlated to the Kinesis Data Analytics auto scaling events and application restarts, as illustrated by the following diagram. The highlighted areas show the correlation between spikes due to autoscaling and reversal of MillisBehindLatest metrics.

Here’s what happened:

  • Kinesis Data Analytics for SQL scaled up KPU due to load automatically, and the Kinesis Data Analytics application was restarted (part of scaling up).
  • Kinesis Data Analytics for SQL supports the at least once delivery model and uses checkpoints to ensure no data loss. But it doesn’t support taking a snapshot and restoring from the snapshot after a restart. For more details, see Delivery Model for Persisting Application Output to an External Destination.
  • When the Kinesis Data Analytics for SQL application was restarted, it needed to reprocess data from the beginning of the aggregation window, resulting in a very large number of duplicate records, which led to a dramatic increase in the Kinesis Data Analytics MillisBehindLatest metric.
  • To catch up with incoming data, Kinesis Data Analytics started re-reading from the Kinesis data stream, which led to over-consumption of read throughput and the legacy application being throttled.

In summary, Kinesis Data Analytics for SQL’s duplicates record processing on restarts, no other means to eliminate duplicates, and limited ability to control auto scaling led to this issue.

Although they found Kinesis Data Analytics for SQL easy to get started, these limitations demanded other alternatives. NortonLifeLock reached out to the Kinesis Data Analytics team and discussed the following options:

  • Option 1 – AWS was planning to release a new service, Kinesis Data Analytics Studio for SQL, Python, and Scala, which addresses these limitations. But this service was still a few months away (this service is now available, launched May 27, 2021).
  • Option 2 – The alternative was to switch to Kinesis Data Analytics for Apache Flink, which also provides the necessary tools to address all their requirements.

Second attempt: Kinesis Data Analytics for Apache Flink

Apache Flink has a comparatively steep learning curve (we used Java for streaming analytics instead of SQL), and it took about 4 weeks to build the same prototype, deploy it to Kinesis Data Analytics, and test the application in production. NortonLifeLock had to overcome a few hurdles, which we document in this section along with the lessons learned.

Challenge 1: Too many writes to outgoing Kinesis data stream

The first thing they noticed was that the write threshold on the outgoing Kinesis data stream was greatly exceeded. Kinesis Data Analytics was attempting to write 10 times the amount of expected data to the data stream, with 95% of data throttled.

After a lengthy investigation, it turned out that having too much parallelism in the Kinesis Data Analytics application led to this issue. They had followed default recommendations and set parallelism to 12 and it scaled up to 16. This means that every hour, 16 separate threads were attempting to write to the destination data stream simultaneously, leading to massive contention and writes throttled. These threads attempted to retry continuously, until all records were written to the data stream. This resulted in 10 times the amount of data processing attempted, even though only one tenth of the writes eventually succeeded.

The solution was to reduce parallelism to 4 and disable auto scaling. In the preceding diagram, the percentage of throttled records dropped to 0 from 95% after they reduced parallelism to 4 in the Kinesis Data Analytics application. This also greatly improved KPU utilization and reduced Kinesis Data Analytics cost from $50 a day to $8 a day.

Challenge 2: Use Kinesis Data Analytics sink aggregation

After tuning parallelism, they still noticed occasional throttling by Kinesis Data Streams because of the number of records being written, not record size. To overcome this, they turned on Kinesis Data Analytics sink aggregation to reduce the number of records being written to the data stream, and the result was dramatic. They were able to reduce the number of writes by 1,000 times.

Challenge 3: Handle Kinesis Data Analytics Flink restarts and the resulting duplicate records

Kinesis Data Analytics applications restart because of auto scaling or recovery from application or task manager crashes. When this happens, Kinesis Data Analytics saves a snapshot before shutdown and automatically reloads the latest snapshot and picks up where the work was left off. Kinesis Data Analytics also saves a checkpoint every minute so no data is lost, guaranteeing exactly-once processing.

However, when the Kinesis Data Analytics application shut down in the middle of sending results to Kinesis Data Streams, it doesn’t guarantee exactly-once data delivery. In fact, Flink only guarantees at least once delivery to Kinesis Data Analytics sink, meaning that Kinesis Data Analytics guarantees to send a record at least once, which leads to duplicate records sent when Kinesis Data Analytics is restarted.

How were duplicate records handled in the outgoing data stream?

Because duplicate records aren’t handled by Kinesis Data Analytics when sinks do not have exactly-once semantics, the downstream application must deal with the duplicate records. The first question you should ask is whether it’s necessary to deal with the duplicate records. Maybe it’s acceptable to tolerate duplicate records in your application? This, however, is not an option for NortonLifeLock, because no user wants to have their available usage taken twice within the same hour. So, logic had to be built in the application to handle duplicate usage records.

To deal with duplicate records, you can employ a strategy in which the application saves an update timestamp along with the user’s latest usage. When a record comes in, the application reads existing daily usage and compares the update timestamp against the current time. If the difference is less than a configured window (50 minutes if the aggregation window is 60 minutes), the application ignores the new record because it’s a duplicate. It’s acceptable for the application to potentially undercount vs. overcount user usage.

How were duplicate records handled in the outgoing S3 bucket?

Kinesis Data Analytics writes temporary files in Amazon S3 before finalizing and removing them. When Kinesis Data Analytics restarts, it attempts to write new S3 files, and potentially leaves behind temporary S3 files because of restart. Because Athena ignores all temporary S3 files, no further is action needed. If your BI tools take temporary S3 files into consideration, you have to configure the Amazon S3 lifecycle policy to clean up temporary S3 files after a certain time.

Conclusion

NortonLifelock has been successfully running a Kinesis Data Analytics application in production since May 2021. It provides several key benefits. VPN users can now keep track of their usage in near-real time. BI analysts can get timely insights that are used for targeted sales and marketing campaigns, and upselling features and services. VPN usage limits are enforced in near-real time, thereby optimizing the network resources. NortonLifelock is saving tens of thousands of dollars each month with this real-time streaming analytics solution. And this telemetry solution is able to keep up with petabytes of data flowing through their global VPN service, which is seeing double-digit monthly growth.

To learn more about Kinesis Data Analytics and getting started with serverless streaming solutions on AWS, please see Developer Guide for Studio, the easiest way to build Apache Flink applications in SQL, Python, Scala in a notebook interface.


About the Authors

Lei Gu has 25 years of software development experience and the architect for three key Norton products, Norton Secure Backup, VPN and Norton Family. He is passionate about cloud transformation and most recently spoke about moving from Cassandra to Amazon DynamoDB at AWS re:Invent 2019. Check out his Linkedin profile at https://www.linkedin.com/in/leigu/.

Madhu Nunna is a Sr. Solutions Architect at AWS, with over 20 years of experience in networks and cloud, with the last two years focused on AWS Cloud. He is passionate about Analytics and AI/ML. Outside of work, he enjoys hiking and reading books on philosophy, economics, history, astronomy and biology.

Get Started with Amazon S3 Event Driven Design Patterns

Post Syndicated from Micah Walter original https://aws.amazon.com/blogs/architecture/get-started-with-amazon-s3-event-driven-design-patterns/

Event driven programs use events to initiate succeeding steps in a process. For example, the completion of an upload job may then initiate an image processing job. This allows developers to create complex architectures by using the principle of decoupling. Decoupling is preferable for many workflows, as it allows each component to perform its tasks independently, which improves efficiency. Examples are ecommerce order processing, image processing, and other long running batch jobs.

Amazon Simple Storage Service (S3) is an object-based storage solution from Amazon Web Services (AWS) that allows you to store and retrieve any amount of data, at any scale. Amazon S3 Event Notifications provides users a mechanism for initiating events when certain actions take place inside an S3 bucket.

In this blog post, we will illustrate how you can use Amazon S3 Event Notifications in combination with a powerful suite of Amazon messaging services. This will allow you to implement an event driven architecture for a variety of common use cases.

Setting up Amazon S3 Event Notifications

We first must understand the types of events that can be initiated with Amazon S3 Event Notifications. Events can be initiated by uploading, modifying, deleting an object, or other actions. When an event is initiated, a payload is created containing the event metadata. This includes information about the object that initiated the event itself.

To enable notifications, you must first add a notification configuration that identifies the events you want Amazon S3 to publish. Specify the destinations where you want Amazon S3 to send the notifications. This configuration is stored in the notification subresource, which you can find under the Properties tab within your S3 bucket, see Figure 1.

Figure 1. Properties tab showing S3 Event Notifications subresource

Figure 1. Properties tab showing S3 Event Notifications subresource

An event notification can be initiated anytime an object is uploaded, modified, or deleted, depending on your configuration details. You can create multiple notification configurations for different scenarios, shown in Figure 2. For example, one configuration can handle new or modified objects, and another configuration can handle deletions. You can specify that events will only be initiated when objects contain a specific prefix, or following the restoration of an object. For a complete listing of all the configuration options and event types, read documentation on supported event types.

Figure 2. S3 Event Notifications subresource details and options

Figure 2. S3 Event Notifications subresource details and options

When all of the conditions in your configuration have been met, a new event will be initiated and sent to the destination you specify. An S3 event destination can be an AWS Lambda function, an Amazon Simple Queue Service (SQS) queue, or an Amazon Simple Notification Service (SNS) topic, see Figure 3.

Figure 3. S3 Event Notifications subresource destination settings

Figure 3. S3 Event Notifications subresource destination settings

Event driven design patterns

There are many common design patterns for building event driven programs with Amazon S3 Event Notifications. Once you have set up your notification configuration, the next step is to consume the event. The following describes a few typical architectures you might consider, depending on the needs of your application.

Synchronous and reliable point-to-point processing

Figure 4. Point-to-point processing with S3 and Lambda as a destination

Figure 4. Point-to-point processing with S3 and Lambda as a destination

One common use case for event driven processing, is when synchronous and reliable information is required. For example, a mobile application processes images uploaded by users and automatically tags the images with the detected objects using Artificial Intelligence/Machine Learning (AI/ML). From an architectural perspective (Figure 4), an image is uploaded to an S3 bucket, which generates an event notification. This initiates a Lambda function that sends the details of the uploaded image to Amazon Rekognition for tagging. Results from Amazon Rekognition could be further processed by the Lambda function and stored in a database like Amazon DynamoDB.

With this type of architecture, there is no contingency for dealing with multiple images arriving simultaneously in the S3 bucket. If this application sends too many requests to Lambda, events can start to pile up. This can cause a failure to process some of the images. To make our program more fault tolerant, adding an Amazon SQS queue would help, as shown in Figure 5.

Asynchronous and queued point-to-point processing 

Figure 5. Queued point-to-point processing with S3, SQS, and Lambda

Figure 5. Queued point-to-point processing with S3, SQS, and Lambda

Architectures that require the processing of information in an asynchronous fashion can use this pattern. Building off the first example, a mobile application might provide a solution to allow end users to bulk upload thousands of images simultaneously. It can then use AWS Lambda to send the images to Amazon Rekognition for tagging.

By providing a queue-based asynchronous solution, the Lambda function can retrieve work from the SQS queue at its own pace. This allows it to control the processing flow by processing files sequentially without risk of being overloaded. This is especially useful if the application must handle incomplete or partial uploads when a connection is temporarily lost.

Currently, Amazon S3 Event Notifications only work with standard SQS queues, and first-in-first-out (FIFO) SQS queues are not supported. Read more about how to configure S3 event notification with an SQS queue as a destination. Your Lambda function in this architecture must be adjusted to handle the message payload arriving from SQS. This is because it will have a slightly different form than the original event notification body generated from S3.

Parallel processing with “Fan Out” architecture

Figure 6. Fan out design pattern with S3, SNS, and SQS before sending to a Lambda function

Figure 6. Fan out design pattern with S3, SNS, and SQS before sending to a Lambda function

To create a “fan out” style architecture where a single event is propagated to many destinations in parallel, SNS is combined with SQS. Configure your S3 event notification to use an SNS topic as its destination, as shown in Figure 6. You can then direct multiple subsequent processes to act on the same event. This is especially useful if you aim to do parallel processing on the same object in S3.

For example, if you wanted to process a source image into multiple target resolutions, you could create a Lambda function. The function will use the “fan-out” pattern to process all images at the same time, at each resolution. You could then subscribe an SQS queue to your SNS topics. This ensures that Event Notifications sent to SNS are verified as complete by SQS, once they’ve been processed by your Lambda function.

Figure 7. Fan out design pattern including secondary pipeline for deleting images

Figure 7. Fan out design pattern including secondary pipeline for deleting images

To extend the use case of image processing even further, you could create multiple SNS topics to handle different types of events from the same S3 bucket. As depicted in Figure 7, this architecture would allow your program to handle creations and updates differently than deletions. You could also process images differently based on their S3 prefix.

Adjust your Lambda code to handle messages making their way through SNS and SQS. Their payloads will be slightly different than the original S3 Event Notification payload.

Real-time notifications

Figure 8. Event driven design pattern for real-time notifications

Figure 8. Event driven design pattern for real-time notifications

In addition to application-to-application messaging, Amazon SNS provides application-to-person (A2P) communication (see Figure 8). Amazon SNS can send SMS text messages to mobile subscribers in over 100 countries. It can also send push notifications to Android and Apple devices and emails over SMTP. Using A2P, uploading an image to an Amazon S3 bucket can generate a notification to a group of users via their choice of Amazon SNS A2P platform.

Conclusion

In this blog post, we’ve shown you the basic design patterns for developing an event driven architecture using Amazon S3 Event Notifications. You can create many more complicated architecture patterns to suit your needs. By using Amazon SQS, Amazon SNS, and AWS Lambda, you can design an event driven program that is fault tolerant, scalable, and smartly decoupled. But don’t stop there! Consider expanding your program further by utilizing AWS Lambda destinations. Or combine parallel image processing with highly scalable A2P notifications, which will alert your users when a task is complete.

For further reading:

Creating a serverless face blurring service for photos in Amazon S3

Post Syndicated from James Beswick original https://aws.amazon.com/blogs/compute/creating-a-serverless-face-blurring-service-for-photos-in-amazon-s3/

Many workloads process photos or imagery from web applications or mobile applications. For privacy reasons, it can be useful to identify and blur faces in these photos. This blog post shows how to build a serverless face blurring service for photos uploaded to an Amazon S3 bucket.

The example application uses the AWS Serverless Application Model (AWS SAM), enabling you to deploy the application more easily in your own AWS account. This walkthrough creates resources covered in the AWS Free Tier but usage beyond the Free Tier allowance may incur cost. To set up the example, visit the GitHub repo and follow the instructions in the README.md file.

Overview

Using a serverless approach, this face blurring microservice runs on demand in response to new photos being uploaded to S3. The solution uses the following architecture:

Reference architecture

  1. When an image is uploaded to the source S3 bucket, S3 sends a notification event to an Amazon SQS queue.
  2. The Lambda service polls the SQS queue and invokes an AWS Lambda function when messages are available.
  3. The Lambda function uses Amazon Rekognition to detect faces in the source image. The service returns the coordinates of faces to the function.
  4. After blurring the faces in the source image, the function stores the resulting image in the output S3 bucket.

Deploying the solution

Before deploying the solution, you need:

To deploy:

  1. From a terminal window, clone the GitHub repo:
    git clone https://github.com/aws-samples/serverless-face-blur-service
  2. Change directory:
    cd ./serverless-face-blur-service
  3. Download and install dependencies:
    sam build
  4. Deploy the application to your AWS account:
    sam deploy --guided
  5. During the guided deployment process, enter unique names for the two S3 buckets. These names must be globally unique.

To test the application, upload a JPG file containing at least one face into the source S3 bucket. After a few seconds, the destination bucket contains the output file, with the same name. The output file shows blur content when the faces are detected:

Blurred faces output

How the face blurring Lambda function works

The Lambda function receives messages from the SQS queue when available. These messages contain metadata about the JPG object uploaded to S3:

{
    "Records": [
        {
            "messageId": "e9a12dd2-1234-1234-1234-123456789012",
            "receiptHandle": "AQEBnjT2rUH+kmEXAMPLE",
            "body": "{\"Records\":[{\"eventVersion\":\"2.1\",\"eventSource\":\"aws:s3\",\"awsRegion\":\"us-east-1\",\"eventTime\":\"2021-06-21T19:48:14.418Z\",\"eventName\":\"ObjectCreated:Put\",\"userIdentity\":{\"principalId\":\"AWS:AROA3DTKMEXAMPLE:username\"},\"requestParameters\":{\"sourceIPAddress\":\"73.123.123.123\"},\"responseElements\":{\"x-amz-request-id\":\"AZ39QWJFVEQJW9RBEXAMPLE\",\"x-amz-id-2\":\"MLpNwwQGQtrNai/EXAMPLE\"},\"s3\":{\"s3SchemaVersion\":\"1.0\",\"configurationId\":\"5f37ac0f-1234-1234-82f12343-cbc8faf7a996\",\"bucket\":{\"name\":\"s3-face-blur-source\",\"ownerIdentity\":{\"principalId\":\"EXAMPLE\"},\"arn\":\"arn:aws:s3:::s3-face-blur-source\"},\"object\":{\"key\":\"face.jpg\",\"size\":3541,\"eTag\":\"EXAMPLE\",\"sequencer\":\"123456789\"}}}]}",
            "attributes": {
                "ApproximateReceiveCount": "6",
                "SentTimestamp": "1624304902103",
                "SenderId": "AIDAJHIPREXAMPLE",
                "ApproximateFirstReceiveTimestamp": "1624304902103"
            },
            "messageAttributes": {},
            "md5OfBody": "12345",
            "eventSource": "aws:sqs",
            "eventSourceARN": "arn:aws:sqs:us-east-1:123456789012:s3-lambda-face-blur-S3EventQueue-ABCDEFG01234",
            "awsRegion": "us-east-1"
        }
    ]
}

The body attribute contained a serialized JSON object with an array of records, containing the S3 bucket name and object keys. The Lambda handler in app.js uses the JSON.parse method to create a JSON object from the string:

  const s3Event = JSON.parse(event.Records[0].body)

The handler extracts the bucket and key information. Since the S3 key attribute is URL encoded, it must be decoded before further processing:

const Bucket = s3Event.Records[0].s3.bucket.name
const Key = decodeURIComponent(s3Event.Records[0].s3.object.key.replace(/\+/g, " "))

There are three steps in processing each image: detecting faces in the source image, blurring faces, then storing the output in the destination bucket.

Detecting faces in the source image

The detectFaces.js file contains the detectFaces function. This accepts the bucket name and key as parameters, then uses the AWS SDK for JavaScript to call the Amazon Rekognition service:

const AWS = require('aws-sdk')
AWS.config.region = process.env.AWS_REGION 
const rekognition = new AWS.Rekognition()

const detectFaces = async (Bucket, Name) => {

  const params = {
    Image: {
      S3Object: {
       Bucket,
       Name
      }
     }    
  }

  console.log('detectFaces: ', params)

  try {
    const result = await rekognition.detectFaces(params).promise()
    return result.FaceDetails
  } catch (err) {
    console.error('detectFaces error: ', err)
    return []
  }  
}

The detectFaces method of the Amazon Rekognition API accepts a parameter object defining a reference to the source S3 bucket and key. The service returns a data object with an array called FaceDetails:

{
    "BoundingBox": {
        "Width": 0.20408163964748383,
        "Height": 0.4340078830718994,
        "Left": 0.727995753288269,
        "Top": 0.3109045922756195
    },
    "Landmarks": [
        {
            "Type": "eyeLeft",
            "X": 0.784351646900177,
            "Y": 0.46120116114616394
        },
        {
            "Type": "eyeRight",
            "X": 0.8680923581123352,
            "Y": 0.5227685570716858
        },
        {
            "Type": "mouthLeft",
            "X": 0.7576283812522888,
            "Y": 0.617080807685852
        },
        {
            "Type": "mouthRight",
            "X": 0.8273565769195557,
            "Y": 0.6681531071662903
        },
        {
            "Type": "nose",
            "X": 0.8087539672851562,
            "Y": 0.5677543878555298
        }
    ],
    "Pose": {
        "Roll": 23.821317672729492,
        "Yaw": 1.4818285703659058,
        "Pitch": 2.749311685562134
    },
    "Quality": {
        "Brightness": 83.74250793457031,
        "Sharpness": 89.85481262207031
    },
    "Confidence": 99.9793472290039
}

The Confidence score is the percentage confidence that the image contains a face. This example uses the BoundingBox coordinates to find the location of the face in the image. The response also includes positional data for facial features like the mouth, nose, and eyes.

Blurring faces in the source image

In the blurFaces.js file, the blurFaces function uses the open source GraphicsMagick library to process the source image. The function takes the bucket and key as parameters with the metadata returned by the Amazon Rekognition service:

const AWS = require('aws-sdk')
AWS.config.region = process.env.AWS_REGION 
const s3 = new AWS.S3()
const gm = require('gm').subClass({imageMagick: process.env.localTest})

const blurFaces = async (Bucket, Key, faceDetails) => {

  const object = await s3.getObject({ Bucket, Key }).promise()
  let img = gm(object.Body)

  return new Promise ((resolve, reject) => {
    img.size(function(err, dimensions) {
        if (err) reject(err)
        console.log('Image size', dimensions)

        faceDetails.map((faceDetail) => {
            const box = faceDetail.BoundingBox
            const width  = box.Width * dimensions.width
            const height = box.Height * dimensions.height
            const left = box.Left * dimensions.width
            const top = box.Top * dimensions.height

            img.region(width, height, left, top).blur(0, 70)
        })

        img.toBuffer((err, buffer) => resolve(buffer))
    })
  })
}

The function loads the source object from S3 using the getObject method of the S3 API. In the response, the Body attribute contains a buffer with the image data – this is used to instantiate a ‘gm’ object for processing.

Amazon Rekognition’s bounding box coordinates are percentage-based relative to the size of the image. This code converts these percentages to X- and Y-based coordinates and uses the region method to identify a portion of the image. The blur method uses a Gaussian operator based on the inputs provided. Once the transformation is complete, the function returns a buffer with the new image.

Using GraphicsMagick with Lambda functions

The GraphicsMagick package contains operating system-specific binaries. Depending on the operating system of your development machine, you may install binaries locally that are not compatible with Lambda. The Lambda service uses Amazon Linux 2 (AL2).

To simplify local testing and deployment, the sample application uses Lambda layers to package this library. This open source Lambda layer repo shows how to build, deploy, and test GraphicsMagick as a Lambda layer. It also publishes public layers to help you use the library in your Lambda functions.

When testing this function locally with the test.js script, the GM npm package uses the binaries on the local development machine. When the function is deployed to the Lambda service, the package uses the Lambda layer with the AL2-compatible binaries.

Limiting throughput with Amazon Rekognition

Both S3 and Lambda are highly scalable services and in this example can handle thousands of image uploads a second. In this configuration, S3 sends Event Notifications to an SQS queue each time an object is uploaded. The Lambda function processes events from this queue.

When using downstream services in Lambda functions, it’s important to note the quotas and throughputs in place for those services. This can help avoid throttling errors or overwhelming non-serverless services that may not be able to handle the same level of traffic.

The Amazon Rekognition service sets default transaction per second (TPS) rates for AWS accounts. For the DetectFaces API, the default is between 5-50 TPS depending upon the AWS Region. If you need a higher throughput, you can request an increase in the Service Quotas console.

In the AWS SAM template of the example application, the definition of the Lambda function uses two attributes to control the throughput. The ReservedConcurrentExecutions attribute is set to 1, which prevents the Lambda service from scaling beyond one instance of the function. The BatchSize in event source mapping is also set to 1, so each invocation contains only a single S3 event from the SQS queue:

  BlurFunction:
    Type: AWS::Serverless::Function
    Properties:
      CodeUri: src/
      Handler: app.handler
      Runtime: nodejs14.x
      Timeout: 10
      MemorySize: 2048
      ReservedConcurrentExecutions: 1
      Policies:
        - S3ReadPolicy:
            BucketName: !Ref SourceBucketName
        - S3CrudPolicy:
            BucketName: !Ref DestinationBucketName
        - RekognitionDetectOnlyPolicy: {}
      Environment:
        Variables:
          DestinationBucketName: !Ref DestinationBucketName
      Events:
        MySQSEvent:
          Type: SQS
          Properties:
            Queue: !GetAtt S3EventQueue.Arn
            BatchSize: 1

The combination of these two values means that this function processes images one at a time, regardless of how many images are uploaded to S3. By increasing these values, you can change the scaling behavior and number of messages processed per invocation. This allows you to control the throughput of the number of the messages sent to Amazon Rekognition for processing.

Conclusion

A serverless face blurring service can provide a simpler way to process photos in workloads with large amounts of traffic. This post introduces an example application that blurs faces when images are saved in an S3 bucket. The S3 PutObject event invokes a Lambda function that uses Amazon Rekognition to detect faces and GraphicsMagick to process the images.

This blog post shows how to deploy the example application and walks through the functions that process the images. It explains how to use GraphicsMagick and how to control throughput in the SQS event source mapping.

For more serverless learning resources, visit Serverless Land.

Managing federated schema with AWS Lambda and Amazon S3

Post Syndicated from James Beswick original https://aws.amazon.com/blogs/compute/managing-federated-schema-with-aws-lambda-and-amazon-s3/

This post is written by Krzysztof Lis, Senior Software Development Engineer, IMDb.

GraphQL schema management is one of the biggest challenges in the federated setup. IMDb has 19 subgraphs (graphlets) – each of them owns and publishes a part of the schema as a part of an independent CI/CD pipeline.

To manage federated schema effectively, IMDb introduced a component called Schema Manager. This is responsible for fetching the latest schema changes and validating them before publishing it to the Gateway.

Part 1 presents the migration from a monolithic REST API to a federated GraphQL (GQL) endpoint running on AWS Lambda. This post focuses on schema management in federated GQL systems. It shows the challenges that the teams faced when designing this component and how we addressed them. It also shares best practices and processes for schema management, based on our experience.

Comparing monolithic and federated GQL schema

In the standard, monolithic implementation of GQL, there is a single file used to manage the whole schema. This makes it easier to ensure that there are no conflicts between the new changes and the earlier schema. Everything can be validated at the build time and there is no risk that external changes break the endpoint during runtime.

This is not true for the federated GQL endpoint. The gateway fetches service definitions from the graphlets on runtime and composes the overall schema. If any of the graphlets introduces a breaking change, the gateway fails to compose the schema and won’t be able to serve the requests.

The more graphlets we federate to, the higher the risk of introducing a breaking change. In enterprise scale systems, you need a component that protects the production environment from potential downtime. It must notify graphlet owners that they are about to introduce a breaking change, preferably during development before releasing the change.

Federated schema challenges

There are other aspects of handling federated schema to consider. If you use AWS Lambda, the default schema composition increases the gateway startup time, which impacts the endpoint’s performance. If any of the declared graphlets are unavailable at the time of schema composition, there may be gateway downtime or at least an incomplete overall schema. If schemas are pre-validated and stored in a highly available store such as Amazon S3, you mitigate both of these issues.

Another challenge is schema consistency. Ideally, you want to propagate the changes to the gateway in a timely manner after a schema change is published. You also need to consider handling field deprecation and field transfer across graphlets (change of ownership). To catch potential errors early, the system should support dry-run-like functionality that will allow developers to validate changes against the current schema during the development stage.

The Schema Manager

Schema Manager

To mitigate these challenges, the Gateway/Platform team introduces a Schema Manager component to the workload. Whenever there’s a deployment in any of the graphlet pipelines, the schema validation process is triggered.

Schema Manager fetches the most recent sub-schemas from all the graphlets and attempts to compose an overall schema. If there are no errors and conflicts, a change is approved and can be safely promoted to production.

In the case of a validation failure, the breaking change is blocked in the graphlet deployment pipeline and the owning team must resolve the issue before they can proceed with the change. Deployments of graphlet code changes also depend on this approval step, so there is no risk that schema and backend logic can get out of sync, when the approval step blocks the schema change.

Integration with the Gateway

To handle versioning of the composed schema, a manifest file stores the locations of the latest approved set of graphlet schemas. The manifest is a JSON file mapping the name of the graphlet to the S3 key of the schema file, in addition to the endpoint of the graphlet service.

The file name of each graphlet schema is a hash of the schema. The Schema Manager pulls the current manifest and uses the hash of the validated schema to determine if it has changed:

{
   "graphlets": {
     "graphletOne": {
        "schemaPath": "graphletOne/1a3121746e75aafb3ca9cccb94f23d89",
        "endpoint": "arn:aws:lambda:us-east-1:123456789:function:GraphletOne"
     },
     "graphletTwo": { 
        "schemaPath": "graphletTwo/213362c3684c89160a9b2f40cd8f191a",
        "endpoint": "arn:aws:lambda:us-east-1:123456789:function:GraphletTwo"
     },
     ...
  }
}

Based on these details, the Gateway fetches the graphlet schemas from S3 as part of service startup and stores them in the in-memory cache. It later polls for the updates every 5 minutes.

Using S3 as the schema store addresses the latency, availability and validation concerns of fetching schemas directly from the graphlets on runtime.

Eventual schema consistency

Since there are multiple graphlets that can be updated at the same time, there is no guarantee that one schema validation workflow will not overwrite the results of another.

For example:

  1. SchemaUpdater 1 runs for graphlet A.
  2. SchemaUpdater 2 runs for graphlet B.
  3. SchemaUpdater 1 pulls the manifest v1.
  4. SchemaUpdater 2 pulls the manifest v1.
  5. SchemaUpdater 1 uploads manifest v2 with change to graphlet A
  6. SchemaUpdater 2 uploads manifest v3 that overwrites the changes in v2. Contains only changes to graphlet B.

This is not a critical issue because no matter which version of the manifest wins in this scenario both manifests represent a valid schema and the gateway does not have any issues. When SchemaUpdater is run for graphlet A again, it sees that the current manifest does not contain the changes uploaded before, so it uploads again.

To reduce the risk of schema inconsistency, Schema Manager polls for schema changes every 15 minutes and the Gateway polls every 5 minutes.

Local schema development

Schema validation runs automatically for any graphlet change as a part of deployment pipelines. However, that feedback loop happens too late for an efficient schema development cycle. To reduce friction, the team uses a tool that performs this validation step without publishing any changes. Instead, it would output the results of the validation to the developer.

Schema validation

The Schema Validator script can be added as a dependency to any of the graphlets. It fetches graphlet’s schema definition described in Schema Definition Language (SDL) and passes it as payload to Schema Manager. It performs the full schema validation and returns any validation errors (or success codes) to the user.

Best practices for federated schema development

Schema Manager addresses the most critical challenges that come from federated schema development. However, there are other issues when organizing work processes at your organization.

It is crucial for long term maintainability of the federated schema to keep a high-quality bar for the incoming schema changes. Since there are multiple owners of sub-schemas, it’s good to keep a communication channel between the graphlet teams so that they can provide feedback for planned schema changes.

It is also good to extract common parts of the graph to a shared library and generate typings and the resolvers. This lets the graphlet developers benefit from strongly typed code. We use open-source libraries to do this.

Conclusion

Schema Management is a non-trivial challenge in federated GQL systems. The highest risk to your system availability comes with the potential of introducing breaking schema change by one of the graphlets. Your system cannot serve any requests after that. There is the problem of the delayed feedback loop for the engineers working on schema changes and the impact of schema composition during runtime on the service latency.

IMDb addresses these issues with a Schema Manager component running on Lambda, using S3 as the schema store. We have put guardrails in our deployment pipelines to ensure that no breaking change is deployed to production. Our graphlet teams are using common schema libraries with automatically generated typings and review the planned schema changes during schema working group meetings to streamline the development process.

These factors enable us to have stable and highly maintainable federated graphs, with automated change management. Next, our solution must provide mechanisms to prevent still-in-use fields from getting deleted and to allow schema changes coordinated between multiple graphlets. There are still plenty of interesting challenges to solve at IMDb.

For more serverless learning resources, visit Serverless Land.

Getting started with testing serverless applications

Post Syndicated from Talia Nassi original https://aws.amazon.com/blogs/compute/getting-started-with-testing-serverless-applications/

Testing is an essential step in the software development lifecycle. Through the different types of tests, you validate user experience, performance, and detect bugs in your code. Features should not be considered done until all of the corresponding tests are written.

The distributed nature of serverless architectures separates your application logic from other concerns like state management, request routing, workflow orchestration, and queue polling.

In this post, I cover the three main types of testing developers do when building applications. I also go through what changes and what stays the same when building serverless applications with AWS Lambda, in addition to the challenges of testing serverless applications.

The challenges of testing serverless applications

To test your code fully using managed services, you need to emulate the cloud environment on your local machine. However, this is usually not practical.

Secondly, using many managed services for event-driven architecture means you must also account for external resources like queues, database tables, and event buses. This means you write more integration tests than unit tests, altering the standard testing pyramid. Building more integration tests can impact the maintenance of your tests or slow your testing speed.

Lastly, with synchronous workloads, such as a traditional web service, you make a request and assert on the response. The test doesn’t need to do anything special because the thread is blocked until the response returns.

However, in the case of event-driven architectures, state changes are driven by events flowing from one resource to another. Your tests must detect side effects in downstream components and these might not be immediate. This means that the tests must tolerate asynchronous behaviors, which can make for more complicated and slower-running tests.

Unit testing

Unit tests validate individual units of your code, independent from any other components. Unit tests check the smallest unit of functionality and should only have one reason to fail – the unit is not correctly implemented.

Unit tests generally cover the smallest units of functionality although the size of each unit can vary. For example, a number of functions may provide a coherent piece of behavior and you may want to test them as a single unit. In this case, your unit test might call an entry-point function that invokes several others to do its job. You test these functions together as a single unit.

unit testing

Integration Testing

One good practice to test how services interact with each other is to write integration tests that mock the behavior of your services in the cloud.

The point of integration tests is to make sure that two components of your application work together properly. Integration tests are important in serverless applications because they rely heavily on integrations of different services. Unless you are testing in production, the most efficient way to run automated integration tests is to emulate your services in the cloud.

This can be done with tools like moto. Moto mocks calls to AWS automatically without requiring any other dependencies. Another useful tool is localstack. Localstack allows you to mock certain AWS service APIs on your local machine that you can use for testing the integration of two or more services.

You can also configure test events and manually test directly from the Lambda console. Remember that when you test a Lambda function, you are not only testing the business logic. You must also mock its payload and call a function invoke. There are over 200 event sources that can trigger Lambda functions. Each service has its own unique event format, and contains data about the resource or request that invoked the function. Find the full list of test events in the AWS documentation.

To configure a test event for AWS Lambda:

  1. Navigate to the Lambda console and choose the function. From the Test dropdown, choose Configure Test Event.step 1
  2. Choose Create a new Test Event and select the template for the service you want to act as the trigger for your Lambda function. In this example, you choose Amazon DynamoDB Update.
    step 2
  3. Save the test event and choose Test in the Code source section. Each user can create up to 10 test events per function. Those test events are private to you. Lambda runs the function on your behalf. The function handler receives and then processes the sample event.
    step 3
  4. The Execution result shows the execution status as succeeded.

End-to-end testing

When testing your serverless applications end-to-end, it’s important to understand your user and data flows. The most important business-critical flows of your software are what should be tested end-to-end in your UI.

From a business perspective, these should be the most valuable user and data flows that occur in your product. Another resource to utilize is data from your customers. From your analytics platform, find the actions that users are doing the most in production.

End-to-end tests should be running in your build pipeline and act as blockers if one of them fails. They should also be updated as new features are added to your product.

The testing pyramid

testing pyramid

The standard testing pyramid above on the left indicates that systems should have more unit tests than any other type of test, then a medium number of integration tests, and the least number of end-to-end tests.

However, when testing serverless applications, this standard shifts to a hexagonal structure on the right because it’s mostly made up of two or more AWS services talking to each other. You can mock out those integrations with tools such as moto or localstack.

Add automated tests to your CI/CD pipeline

As serverless applications scale, having automated tests is essential in getting fast feedback on the current state of your product. It is not scalable to test everything manually, so investing in an automation tool to run your tests is essential.

All of the tests in your build pipeline, including unit, integration, and end-to-end tests should be blocking in your CI/CD pipeline. This means if one of them fails, it should block the promotion of that code into production. And remember – there’s no such thing as a flakey test. Either the test does what it’s supposed to do, or it doesn’t.

Narrowly scope your tests

Testing asynchronous processes can be tricky. Not only must you monitor different parts of your system, you also need to know when to stop waiting and end the test. When there are multiple asynchronous steps, the delays add up to a longer-running test. It’s also more difficult to estimate how long we should wait before ending. There are two approaches to mitigate these issues.

Firstly, write separate, more narrowly-scoped tests over each asynchronous step. This limits the possible causes of asynchronous test failure you need to investigate. Also, with fewer asynchronous steps, these tests will run quicker and it will be easier to estimate how long to wait before timing out.

Secondly, verify as much of your system as possible using synchronous tests. Then, you only need asynchronous tests to verify residual concerns that aren’t already covered. Synchronous tests are also easier to diagnose when they fail, so you want to catch as many issues with them as possible before running your asynchronous tests.

Conclusion

In this blog post, you learn the three types of testing – unit testing, integration testing, and end-to-end testing. Then you learn how to configure test events with Lambda. I then cover the shift from the standard testing pyramid to the hexagonal testing pyramid for serverless, and why more integration tests are necessary. Then you learn a few best practices to keep in mind for getting started with testing your serverless applications.

For more information on serverless, head to Serverless Land.

Building federated GraphQL on AWS Lambda

Post Syndicated from James Beswick original https://aws.amazon.com/blogs/compute/building-federated-graphql-on-aws-lambda/

This post is written by Krzysztof Lis, Senior Software Development Engineer, IMDb.

IMDb is the world’s most popular source for movie, TV, and celebrity content. It deals with a complex business domain including movies, shows, celebrities, industry professionals, events, and a distributed ownership model. There are clear boundaries between systems and data owned by various teams.

Historically, IMDb uses a monolithic REST gateway system that serves clients. Over the years, it has become challenging to manage effectively. There are thousands of files, business logic that lacks clear ownership, and unreliable integration tests tied to the data. To fix this, the team used GraphQL (GQL). This is a query language for APIs that lets you request only the data that you need and a runtime for fulfilling those queries with your existing data.

It’s common to implement this protocol by creating a monolithic service that hosts the complete schema and resolves all fields requested by the client. It is good for applications with a relatively small domain and clear, single-threaded ownership. IMDb chose the federated approach, that allows us to federate GQL requests to all existing data teams. This post shows how to build federated GraphQL on AWS Lambda.

Overview

This article covers migration from a monolithic REST API and monolithic frontend to a federated backend system powering a modern frontend. It enumerates challenges in the earlier system and explains why federated GraphQL addresses these problems.

I present the architecture overview and describe the decisions made when designing the new system. I also present our experiences with developing and running high-traffic and high-visibility pages on the new endpoint – improvement in IMDb’s ownership model, development lifecycle, in addition to ease of scaling.

Comparing GraphQL with federated GraphQL

Comparing GraphQL with federated GraphQL

Federated GraphQL allows you to combine GraphQLs APIs from multiple microservices into a single API. Clients can make a single request and fetch data from multiple sources, including joining across data sources, without additional support from the source services.

This is an example schema fragment:

type TitleQuote {
  "Quote ID"
  id: ID!
  "Is this quote a spoiler?"
  isSpoiler: Boolean!
  "The lines that make up this quote"
  lines: [TitleQuoteLine!]!
  "Votes from users about this quote..."
  interestScore: InterestScore!
  "The language of this quote"
  language: DisplayableLanguage!
}
"A specific line in the Title Quote. Can be a verbal line with characters speaking or stage directions"
type TitleQuoteLine {
  "The characters who speak this line, e.g.  'Rick'. Not required: a line may be non-verbal"
  characters: [TitleQuoteCharacter!]
  "The body of the quotation line, e.g 'Here's looking at you kid. '.  Not required: you may have stage directions with no dialogue."
  text: String
  "Stage direction, e.g. 'Rick gently places his hand under her chin and raises it so their eyes meet'. Not required."
  stageDirection: String
}

This is an example monolithic query: “Get the 2 top quotes from The A-Team (title identifier: tt0084967)”:

{ 
  title(id:"tt0084967"){ 
    quotes(first:2){ 
      lines { text } 
    } 
  }
}

Here is an example response:

{ 
  "data": { 
    "title": { 
      "quotes": { 
        "lines": [
          { 
            "text": "I love it when a plan comes together!"
          },
          {
            "text": "10 years ago a crack commando unit was sent to prison by a military court for a crime they didn't commit..."
          }
        ]
      } 
    }
  }
}

This is an example federated query: “What is Jackie Chan (id nm0000329) known for? Get the text, rating and image for each title”

{
  name(id: "nm0000329") {
    knownFor(first: 4) {
      title {
        titleText {
          text
        }
        ratingsSummary {
          aggregateRating
        }
        primaryImage {
          url
        }
      }
    }
  }
}

The monolithic example fetches quotes from a single service. In the federated example, knownFor, titleText, ratingsSummary, primaryImage are fetched transparently by the gateway from separate services. IMDb federates the requests across 19 graphlets, which are transparent to the clients that call the gateway.

Architecture overview

Architecture overview

IMDb supports three channels for users: website, iOS, and Android apps. Each of the channels can request data from a single federated GraphQL gateway, which federates the request to multiple graphlets (sub-graphs). Each of the invoked graphlets returns a partial response, which the gateway merges with responses returned by other graphlets. The client receives only the data that they requested, in the shape specified in the query. This can be especially useful when the developers must be conscious of network usage (for example, over mobile networks).

This is the architecture diagram:

Architecture diagram

There are two core components in the architecture: the Gateway and Schema Manager, which run on Lambda. The Gateway is a Node.js-based Lambda function that is built on top of open-source Apollo Gateway code. It is customized with code responsible predominantly for handling authentication, caching, metrics, and logging.

Other noteworthy components are Upstream Graphlets and an A/B Testing Service that enables A/B tests in the graph. The Gateway is connected to an Application Load Balancer, which is protected by AWS WAF and fronted by Amazon CloudFront as our CDN layer. This uses Amazon ElastiCache with Redis as the engine to cache partial responses coming from graphlets. All logs and metrics generated by the system are collected in Amazon CloudWatch.

Choosing the compute platform

This uses Lambda, since it scales on demand. IMDb uses Lambda’s Provisioned Concurrency to reduce cold start latency. The infrastructure is abstracted away so there is no need for us to manage our own capacity and handle patches.

Additionally, Application Load Balancer (ALB) has support for directing HTTP traffic to Lambda. This is an alternative to API Gateway. The workload does not need many of the features that API Gateway provides, since the gateway has a single endpoint, making ALB a better choice. ALB also supports AWS WAF.

Using Lambda, the team designed a way to fetch schema updates without needing to fetch the schema with every request. This is addressed with the Schema Manager component. This component improves latency and improves the overall customer experience.

Integration with legacy data services

The main purpose of the federated GQL migration is to deprecate a monolithic service that aggregates data from multiple backend services before sending it to the clients. Some of the data in the federated graph comes from brand new graphlets that are developed with the new system in mind.

However, much of the data powering the GQL endpoint is sourced from the existing backend services. One benefit of running on Lambda is the flexibility to choose the runtime environment that works best with the underlying data sources and data services.

For the graphlets relying on the legacy services, IMDb uses lightweight Java Lambda functions using provided client libraries written in Java. They connect to legacy backends via AWS PrivateLink, fetch the data, and shape it in the format expected by the GQL request. For the modern graphlets, we recommend the graphlet teams to explore Node.js as the first option due to improved performance and ease of development.

Caching

The gateway supports two caching modes for graphlets: static and dynamic. Static caching allows graphlet owners to specify a default TTL for responses returned by a graphlet. Dynamic caching calculates TTL based on a custom caching extension returned with the partial response. It allows graphlet owners to decide on the optimal TTL for content returned by their graphlet. For example, it can be 24 hours for queries containing only static text.

Permissions

Each of the graphlets runs in a separate AWS account. The graphlet accounts grant the gateway AWS account (as AWS principal) invoke permissions on the graphlet Lambda function. This uses a cross-account IAM role in the development environment that is assumed by stacks deployed in engineers’ personal accounts.

Experience with developing on federated GraphQL

The migration to federated GraphQL delivered on expected results. We moved the business logic closer to the teams that have the right expertise – the graphlet teams. At the same time, a dedicated platform team owns and develops the core technical pieces of the ecosystem. This includes the Gateway and Schema Manager, in addition to the common libraries and CDK constructs that can be reused by the graphlet teams. As a result, there is a clear ownership structure, which is aligned with the way IMDb teams are organized.

In terms of operational excellence of the platform team, this reduced support tickets related to business logic. Previously, these were routed to an appropriate data service team with a delay. Integration tests are now stable and independent from underlying data, which increases our confidence in the Continuous Deployment process. It also eliminates changing data as a potential root cause for failing tests and blocked pipelines.

The graphlet teams now have full ownership of the data available in the graph. They own the partial schema and the resolvers that provide data for that part of the graph. Since they have the most expertise in that area, the potential issues are identified early on. This leads to a better customer experience and overall health of the system.

The web and app developers groups are also impacted by the migration. The learning curve was aided by tools like GraphQL Playground and Apollo Client. The teams covered the learning gap quickly and started delivering new features.

One of the main pages at IMDb.com is the Title Page (for example, Shutter Island). This was successfully migrated to use the new GQL endpoint. This proves that the new, serverless federated system can serve production traffic at over 10,000 TPS.

Conclusion

A single, highly discoverable, and well-documented backend endpoint enabled our clients to experiment with the data available in the graph. We were able to clean up the backend API layer, introduce clear ownership boundaries, and give our client powerful tools to speed up their development cycle.

The infrastructure uses Lambda to remove the burden of managing, patching, and scaling our EC2 fleets. The team dedicated this time to work on features and operational excellence of our systems.

Part two will cover how IMDb manages the federated schema and the guardrails used to ensure high availability of the federated GraphQL endpoint.

For more serverless learning resources, visit Serverless Land.

Speed Up Translation Jobs with a Fully Automated Translation System Assistant

Post Syndicated from Narcisse Zekpa original https://aws.amazon.com/blogs/architecture/speed-up-translation-jobs-with-a-fully-automated-translation-system-assistant/

Like other industries, translation and localization companies face the challenge of providing fast delivery at a low cost. To address this challenge, organizations use Machine Translation (MT) to complement their translator teams. MT is the use of automated software that translates text without the need of human involvement.

One of the most recent advancements is Active Custom Translation (ACT). ACT helps tailor translated text to a specific language style or terminology, per customer specifications. In the past, organizations built custom models to include ACT in their translation system. Amazon Translate has an Active Custom Translation feature, which helps customers integrate configurable MT capabilities into their translation systems, without needing to build it themselves.

This blog describes an end-to-end automated translation flow, including guidelines to manage the data involved in the ACT process. The solution combines Amazon Translate with other Amazon Web Services (AWS) such as AWS DataSync and AWS Lambda. Before exploring this architecture, let’s explain a few basic concepts specific to the translation and localization industry.

Standard translation concepts

Translation Memory. It is common to reuse previously generated outputs as components for machine translation systems. This data is commonly called Translation Memory, and is stored and exchanged according to standardized formats (TMX, TSV, or CSV).

Source Text. Translation input data is commonly exchanged as XML Localization Interchange File Format (XLIFF) documents. Amazon Translate recently added the support of XLIFF documents for batch processing.

Figure 1 illustrates a standard translation flow involving machine translation and translation memory. Once the output has been reviewed and finalized, it is part of the company’s intellectual property (IP). It can then be reincorporated into the flywheel as an input to future translation jobs.

Figure 1: Translation workflow using machine translation

Figure 1: Translation workflow using machine translation

Translation assistant solution walkthrough

When using Amazon Translate in batch mode, you must:

  • Gather together and make translation input data available to the Translation job
  • Monitor the processing and retrieval of the output
  • Implement improvised processes to integrate your Translation Management System (TMS) with AWS, as needed

As you can see, this can involve many manual steps. You must download huge files, upload them into Amazon Simple Storage Service (S3), and configure jobs. The solution shown in Figure 2 illustrates these automation activities.

Figure 2: Automated batch ACT translation solution architecture

Figure 2: Automated batch ACT translation solution architecture

Translation automation activities:

  1. Upload the translation job input data (source files, custom terminology, translation memory files).
  2. Initiate the preprocessing step. Scan input files and identify language pairs.
  3. Create an Amazon Simple Queue Service (SQS) message per language pairs and translation project.
  4. Create S3 buckets and prefixes for each translation job.
  5. Create an Amazon Translate job.
  6. Initiate a post-processing workflow, see Figure 3 (AWS Step Functions).
  7. Copy the Translation output into the output bucket.
  8. Publish an Amazon SNS notification to inform on job completion status.
  9. Download translated files back into customer environment.

In this scenario, translators are operating from their company’s internal infrastructure, although their TMS can also be hosted on the cloud. They first collect the translation input data from their TMS and drop the files onto a shared file server. These files can be XLIFF, TMX, or CSV. We use AWS DataSync to orchestrate and initiate the data transfer from on-premises into an Amazon S3 staging bucket. AWS DataSync provides a few advantages:

  • A low code solution that manages the upload/download of translation data from/to AWS
  • The ability to schedule the synchronization for both upstream and downstream and control the frequency. This allows for batching translation jobs and optimizes usage and cost for Amazon Translate
  • A single point of access to translation data, which reduces the need to manage user accounts and grants access to the data

Once the files are uploaded into the input bucket, DataSync generates an event through Amazon EventBridge. This notification invokes an AWS Lambda function that pushes a message into an Amazon SQS queue. The message contains the list of files to be translated in the current batch. SQS decouples the data upload from the actual processing. Using this workflow provides scalability, service quota limit control, and better error handling.

The queue initiates another Lambda function that creates a file hierarchy in S3 for each translation job. File-naming conventions can be used as a key to separate jobs from each other. The function also prepares translation memory and custom terminology when required. Lastly, it creates and submits the translation job.

The post-processing AWS Step Functions workflow

Amazon Translate is able to generate events into EventBridge upon job completion or failure. We use this capability to invoke a post-processing AWS Step Functions workflow. For instance, some customers must flag machine translated segments within an XLIFF file, so their translators can quickly identify them for manual review.

The flow implemented in the state machine does the following (shown in Figure 3):

  • Verifies output of Amazon Translate. Checks for completeness, confirms all segments successfully translated
  • Enriches the translation data. Flags machine translated segments by comparing input and output
  • Copies output to staging bucket. Prepares for final upload
  • Sends SNS notifications to alert operators. Notifies that the batch is complete
Figure 3: Post-processing Step Functions workflow

Figure 3: Post-processing Step Functions workflow

This solution is entirely serverless, which frees you from maintaining the infrastructure or software platform. You can focus on the core business logic, and what really differentiates you from your competitors.

As the number of translation projects grow overtime, you can also take advantage of Amazon S3 storage classes to optimize document archiving. A translation service provider can define specific rules per customer or per project. These rules can be configured automatically as the data is copied into S3. The result is that files can be transferred to cheaper storage tiers with predefined retention periods.

Conclusion

In this blog, we’ve described a solution that helps you automate the collection and transfer of translation data. It also assists in the scheduling and orchestration of translation jobs. This leads to greater productivity, reduction in cost, and faster time-to-market. Using AWS, you can decrease maintenance, and create a highly scalable and cost-effective solution. Because of the AWS pay-as-you-go model, you can assess the price per project. This information can be used in your pricing model, and be passed along as service options to your own customers.

To get started with Amazon Translate or read more, check out these blogs:

How The Mill Adventure Implemented Event Sourcing at Scale Using DynamoDB

Post Syndicated from Uri Segev original https://aws.amazon.com/blogs/architecture/how-the-mill-adventure-implemented-event-sourcing-at-scale-using-dynamodb/

This post was co-written by Joao Dias, Chief Architect at The Mill Adventure and Uri Segev, Principal Serverless Solutions Architect at AWS

The Mill Adventure provides a complete gaming platform, including licenses and operations, for rapid deployment and success in online gaming. It underpins every aspect of the process so that you can focus on telling your story to your audience while the team makes everything else work perfectly.

In this blog post, we demonstrate how The Mill Adventure implemented event sourcing at scale using Amazon DynamoDB and Serverless on AWS technologies. By partnering with AWS, The Mill Adventure reduced their costs, and they are able to maintain operations and scale their solution to suit their needs without their intervention.

What is event sourcing?

Event sourcing captures an entity’s state (such as a transaction or a user) as a sequence of state-changing events. Whenever the state changes, a new event is appended to the sequence of events using an atomic operation.

The system persists these events in an event store, which is a database of events. The store supports adding and retrieving the state events. The system reconstructs the entity’s state by reading the events from the event store and replaying them. Because the store is immutable (meaning these events are saved in the event store forever) the entity’s state can be recreated up to a particular version or date and have accurate historical values.

Why use event sourcing?

Event sourcing provides many advantages, that include (but are not limited to) the following:

  • Audit trail: Events are immutable and provide a history of what has taken place in the system. This means it’s not only providing the current state, but how it got there.
  • Time travel: By persisting a sequence of events, it is relatively easy to determine the state of the system at any point in time by aggregating the events within that time period. This provides you the ability to answer historical questions about the state of the system.
  • Performance: Events are simple and immutable and only require an append operation. The event store should be optimized to handle high-performance writes.
  • Scalability: Storing events avoids the complications associated with saving complex domain aggregates to relational databases, which allows more flexibility for scaling.

Event-driven architectures

Event sourcing is also related to event-driven architectures. Every event that changes an entity’s state can also be used to notify other components about the change. In event-driven architectures, we use event routers to distribute the events to interested components.

The event router has three main functions:

  1. Decouple the event producers from the event consumers: The producers don’t know who the consumers are, and they do not need to change when new consumers are added or removed.
  2. Fan out: Event routers are capable of distributing events to multiple subscribers.
  3. Filtering: Event routers send each subscriber only the events they are interested in. This saves on the number of events that consumers need to process; therefore, it reduces the cost of the consumers.

How did The Mill Adventure implement event sourcing?

The Mill Adventure uses DynamoDB tables as their object store. Each event is a new item in the table. The DynamoDB table model for an event sourced system is quite simple, as follows:

Field Type Description
id PK The object identifier
version SK The event sequence number
eventdata The event data itself, in other words, the change to the object’s state

All events for the same object have the same id. Thus, you can retrieve them using a single read request.

When a component modifies the state of an object, it first determines the sequence number for the new event by reading the current state from the table (in other words, the sequence of events for that object). It then attempts to write a new item to the table that represents the change to the object’s state. The item is written using DynamoDB’s conditional write. This ensures that there are no other changes to the same object happening at the same time. If the write failed due to a condition not met error, it will start over.

An additional benefit of using DynamoDB as the event store is DynamoDB Streams, which is used to deliver events about changes in tables. These events can be used by event-driven applications so they will know about the different objects’ change of state.

How does it work?

Let’s use an example of a business entity, such as a user. When a user is created, the system creates a UserCreated event with the initial user data (like user name, address, etc.). The system then persists this event to the DynamoDB event store using a conditional write. This makes sure that the event is only written once and that the version numbers are sequential.

Then the user address gets updated, so again, the system creates a UserUpdated event with the new address and persists it.

When the system needs the user’s current state, for example, to show it in back-office application, the system loads all the events for the given user identifier from the store. For each one of them, it invokes a mutation function that recreates the latest state. Given the following items in the database:

  • Event 1: UserCreated(name: The Mill, address: Malta)
  • Event 2: UserUpdated(address: World)

You can imagine how each mutator function for those events would look like, which then produce the latest state:

{ 
"name": "The Mill", 
"address": "World" 
}

A business state like a bank statement can have a large number of events. To optimize loading, the system periodically saves a snapshot of the current state. To reconstruct the current state, the application finds the most recent snapshot and the events that have occurred since that snapshot. As a result, there are fewer events to replay.

Architecture

The Mill Adventure architecture for an event source system using AWS components is straightforward. The architecture is fully serverless, as such, it only uses AWS Lambda functions for compute. Lambda functions produce the state-changing events that are written to the database.

Other Lambda functions, when they retrieve an object’s state, will read the events from the database and calculate the current state by replaying the events.

Finally, interested functions will be notified about the changes by subscribing to the event bus. Then they perform their business logic, like updating state projections or publishing to WebSocket APIs. These functions use DynamoDB streams as the event bus to handle messages as shows in Figure 1.

Event sourcing architecture

Figure 1. Event sourcing architecture

Figure 1 is not completely accurate due to a limitation of DynamoDB Streams, which can only support up to two subscribers.

Because The Mill Adventure has many microservices that are interested in these events, they have a single function that gets invoked from the stream and sends the events to other event routers. These fan out to a large number of subscribers such as Amazon EventBridge, Amazon Simple Notification Service (Amazon SNS), or maybe even Amazon Kinesis Data Streams for some use cases.

Any service in the system could be listening to these events being created via the DynamoDB stream and distributed via the event router and act on them. For example, publishing a WebSocket API notification or prompting a contact update in a third-party service.

Conclusion

In this blog post, we showed how The Mill Adventure uses serverless technologies like DynamoDB and Lambda functions to implement an event-driven event sourcing system.

An event sourced system can be difficult to scale, but using DynamoDB as the event store resolved this issue. It can also be difficult to produce consistent snapshots and Command Query Responsibility Segregation (CQRS) views, but using DynamoDB streams for distributing the events made it relatively easy.

By partnering with AWS, The Mill Adventure created a sports/casino platform to be proud of. It provides high quality data and performance without having servers, they only pay for what they use, and their workload can scale up and down as needed.

Building a serverless GIF generator with AWS Lambda: Part 2

Post Syndicated from James Beswick original https://aws.amazon.com/blogs/compute/building-a-serverless-gif-generator-with-aws-lambda-part-2/

In part 1 of this blog post, I explain how a GIF generation service can support a front-end application for video streaming. I compare the performance of a server-based and serverless approach and show how parallelization can significantly improve processing time. I introduce an example application and I walk through the solution architecture.

In this post, I explain the scaling behavior of the example application and consider alternative approaches. I also look at how to manage memory, temporary space, and files in this type of workload. Finally, I discuss the cost of this approach and how to determine if a workload can use parallelization.

To set up the example, visit the GitHub repo and follow the instructions in the README.md file. The example application uses the AWS Serverless Application Model (AWS SAM), enabling you to deploy the application more easily in your own AWS account. This walkthrough creates some resources covered in the AWS Free Tier but others incur cost.

Scaling up the AWS Lambda workers with Amazon EventBridge

There are two AWS Lambda functions in the example application. The first detects the length of the source video and then generates batches of events containing start and end times. These events are put onto the Amazon EventBridge default event bus.

An EventBridge rule matches the events and invokes the second Lambda function. This second function receives the events, which have the following structure:

{
    "version": "0",
    "id": "06a1596a-1234-1234-1234-abc1234567",
    "detail-type": "newVideoCreated",
    "source": "custom.gifGenerator",
    "account": "123456789012",
    "time": "2021-0-17T11:36:38Z",
    "region": "us-east-1",
    "resources": [],
    "detail": {
        "key": "long.mp4",
        "start": 2250,
        "end": 2279,
        "length": 3294.024,
        "tsCreated": 1623929798333
    }
}

The detail attribute contains the unique start and end time for the slice of work. Each Lambda invocation receives a different start and end time and works on a 30-second snippet of the whole video. The function then uses FFMPEG to download the original video from the source Amazon S3 bucket and perform the processing for its allocated time slice.

The EventBridge rule matches events and invokes the target Lambda function asynchronously. The Lambda service scales up the number of execution environments in response to the number of events:

Solution architecture

The first function produces batches of events almost simultaneously but the worker function takes several seconds to process a single request. If there is no existing environment available to handle the request, the Lambda scales up to process the work. As a result, you often see a high level of concurrency when running this application, which is how parallelization is achieved:

CloudWatch metrics

Lambda continues to scale up until it reaches the initial burst concurrency quotas in the current AWS Region. These quotas are between 500 and 3000 execution environments per minute initially. After the initial burst, concurrency scales by an additional 500 instances per minute.

If the number of events is higher, Lambda responds to EventBridge with a throttling error. The EventBridge service retries the events with exponential backoff for 24 hours. Once Lambda is scaled sufficiently or existing execution environments become available, the events are then processed.

This means that under exceptional levels of heavy load, this retry pattern adds latency to the overall GIF generation task. To manage this, you can use Provisioned Concurrency to ensure that more execution environments are available during periods of very high load.

Alternative ways to scale the Lambda workers

The asynchronous invocation mode for Lambda allows you to scale up worker Lambda functions quickly. This is the mode used by EventBridge when Lambda functions are defined as targets in rules. The other benefit of using EventBridge to decouple the two functions in this example is extensibility. Currently, the events have only a single consumer. However, you can add new capabilities to this application by building new event consumers, without changing the producer logic. Note that using EventBridge in this architecture costs $1 per million events put onto the bus (this cost varies by Region). Delivery to targets in EventBridge is free.

This design could similarly use Amazon SNS, which also invokes consuming Lambda functions asynchronously. This costs $0.50 per million messages and delivery to Lambda functions is free (this cost varies by Region). Depending on if you use EventBridge capabilities, SNS may be a better choice for decoupling the two Lambda functions.

Alternatively, the first Lambda function could invoke the second function by using the invoke method of the Lambda API. By using the AWS SDK for JavaScript, one Lambda function can invoke another directly from the handler code. When the InvocationType is set to ‘Event’, this invocation occurs asynchronously. That means that the calling function does not wait for the target function to finish before continuing.

This direct integration between two Lambda services is the lowest latency alternative. However, this limits the extensibility of the solution in the future without modifying code.

Managing memory, temp space, and files

You can configure the memory for a Lambda function up to 10,240 MB. However, the temporary storage available in /tmp is always 512 MB, regardless of memory. Increasing the memory allocation proportionally increases the amount of virtual CPU and network bandwidth available to the function. To learn more about how this works in detail, watch Optimizing Lambda performance for your serverless applications.

The original video files used in this workload may be several gigabytes in size. Since these may be larger than the /tmp space available, the code is designed to keep the movie file in memory. As a result, this solution works for any length of movie that can fit into the 10 GB memory limit.

The FFMPEG application expects to work with local file systems and is not designed to work with object stores like Amazon S3. It can also read video files from HTTP endpoints, so the example application loads the S3 object over HTTPS instead of downloading the file and using the /tmp space. To achieve this, the code uses the getSignedUrl method of the S3 class in the SDK:

 	// Configure S3
 	const AWS = require('aws-sdk')
 	AWS.config.update({ region: process.env.AWS_REGION })
 	const s3 = new AWS.S3({ apiVersion: '2006-03-01' }) 

 	// Get signed URL for source object
	const params = {
		Bucket: record.s3.bucket.name, 
		Key: record.s3.object.key, 
		Expires: 300
	}
	const url = s3.getSignedUrl('getObject', params)

The resulting URL contains credentials to download the S3 object over HTTPs. The Expires attributes in the parameters determines how long the credentials are valid for. The Lambda function calling this method must have appropriate IAM permissions for the target S3 bucket.

The GIF generation Lambda function stores the output GIF and JPG in the /tmp storage space. Since the function can be reused by subsequent invocations, it’s important to delete these temporary files before each invocation ends. This prevents the function from using all of the /tmp space available. This is handled by the tmpCleanup function:

const fs = require('fs')
const path = require('path')
const directory = '/tmp/'

// Deletes all files in a directory
const tmpCleanup = async () => {
    console.log('Starting tmpCleanup')
    fs.readdir(directory, (err, files) => {
        return new Promise((resolve, reject) => {
            if (err) reject(err)

            console.log('Deleting: ', files)                
            for (const file of files) {
                const fullPath = path.join(directory, file)
                fs.unlink(fullPath, err => {
                    if (err) reject (err)
                })
            }
            resolve()
        })
    })
}

When the GenerateFrames parameter is set to true in the AWS SAM template, the worker function generates one frame per second of video. For longer videos, this results in a significant number of files. Since one of the dimensions of S3 pricing is the number of PUTs, this function increases the cost of the workload when using S3.

For applications that are handling large numbers of small files, it can be more cost effective to use Amazon EFS and mount the file system to the Lambda function. EFS charges based upon data storage and throughput, instead of number of files. To learn more about using EFS with Lambda, read this Compute Blog post.

Calculating the cost of the worker Lambda function

While parallelizing Lambda functions significantly reduces the overall processing time in this case, it’s also important to calculate the cost. To process the 3-hour video example in part 1, the function uses 345 invocations with 4096 MB of memory. Each invocation has an average duration of 4,311 ms.

Using the AWS Pricing Calculator, and ignoring the AWS Free Tier allowance, the costs to process this video is approximately $0.10.

AWS Pricing Calculator configuration

There are additional charges for other services used in the example application, such as EventBridge and S3. However, in terms of compute cost, this may compare favorably with server-based alternatives that you may have to scale manually depending on traffic. The exact cost depends upon your implementation and latency needs.

Deciding if a workload can be parallelized

The GIF generation workload is a good candidate for parallelization. This is because each 30-second block of work is independent and there is no strict ordering requirement. The end result is not impacted by the order that the GIFs are generated in. Each GIF also takes several seconds to generate, which is why the time saving comparison with the sequential, server-based approach is so significant.

Not all workloads can be parallelized and in many cases the work duration may be much shorter. This workload interacts with S3, which can scale to any level of read or write traffic created by the worker functions. You may use other downstream services that cannot scale this way, which may limit the amount of parallel processing you can use.

To learn more about designing and operating Lambda-based applications, read the Lambda Operator Guide.

Conclusion

Part 2 of this blog post expands on some of the advanced topics around scaling Lambda in parallelized workloads. It explains how the asynchronous invocation mode of Lambda scales and different ways to scale the worker Lambda function.

I cover how the example application manages memory, files, and temporary storage space. I also explain how to calculate the compute cost of using this approach, and considering if you can use parallelization in a workload.

For more serverless learning resources, visit Serverless Land.

Using AWS Serverless to Power Event Management Applications

Post Syndicated from Cheryl Joseph original https://aws.amazon.com/blogs/architecture/using-aws-serverless-to-power-event-management-applications/

Most large events have common activities such as event registration, check-in upon arrival, and requesting of amenities. When designing applications, factors such as high availability, low latency, reliability, and security must be considered.

In this blog post, we’d like to show how Amazon Web Services (AWS) can assist you in event planning activities. We’ll share an architecture that follows best practices, and one that can be used in developing other solutions.

Serverless to the Rescue

Serverless architecture enables you to focus on your application development without having to worry about managing servers and runtimes. You can quickly build, fix, and add new features to your applications. A microservices-based approach provides you the ability to scale and optimize each component of your event management application.

Let’s start by looking at some activities that an event guest might perform, and how they might be displayed in a mobile application:

  • Event registration: A guest can register either from a website or from a mobile device, see Figure 1. Events might have heavy traffic initially, or a large push toward the end. This requires building applications that are highly scalable.
Figure 1. Event registration

Figure 1. Event registration

  • Check-In: Check-In can be a manual and cumbersome process – some mobile options are shown in Figure 2. Attendees must queue up to register, pick up badges, receive agendas, and collect other meeting materials.
Figure 2. Guest check-in kiosk

Figure 2. Guest check-in kiosk

  • Guest requests: While the event is underway, a participant might request hand-outs or want to purchase food or beverages, see Figure 3.
Figure 3. Guest requests

Figure 3. Guest requests

  • Session notification: At popular events, there are some sessions that fill up quickly. Guests must queue up to get into the session. Figure 4 shows a notification screen.
Figure 4. Session notification on guest device

Figure 4. Session notification on guest device

Solution overview for event planning

The serverless architecture presented here is highly scalable and provides low latency. It follows the Serverless Application Lens of the AWS Well-Architected Framework. This enables you to build secure, high-performing, resilient, and efficient applications.

Frontend user interface using AWS Amplify

The event website is hosted on AWS Amplify. Amplify provides a fully managed service for deploying and hosting applications with built-in CI/CD workflows. An alternative for hosting the event website could be Amazon Simple Storage Service (S3) or even by provisioning Amazon EC2 instances. However, Amplify is well suited for native mobile apps and JavaScript-based web apps.

The event website uses Amazon Cognito for management of user authentication and authorization. Amazon Cognito is a good choice here as it allows federating with external identity providers.

Backend serverless microservices

The backend of the event management application uses Amazon API Gateway and AWS Lambda. They provide the ability to expose API operations. If the application has a flurry of requests coming in together, the backend serverless microservices will scale up or down seamlessly. However, there are service limits, and it is important to keep these in mind while designing your applications.

Amazon DynamoDB is the NoSQL database, which saves the guest registration data and other event-related information. DynamoDB is a good fit here, as it delivers single-digit millisecond performance at any scale and provides high availability, fault tolerance, and automatic capacity scaling.

Amazon Pinpoint is used to send notifications to guests via email and SMS. Amazon Pinpoint allows your app to connect with customers over channels like email, SMS, push, or voice.

Let’s take a closer look at some of the activities we’ve outlined.

Solution architecture – Event registration and check-in

Figure 5. Event registration and check-in

Figure 5. Event registration and check-in

Numbered items following refer to Figure 5:

  1. Developers upload code to AWS CodeCommit
  2. CodeCommit pushes the code to Amplify
  3. Guests access the website via Amazon Route 53
  4. Route 53 resolves incoming requests and forwards them to Amplify
  5. Guest authentication is performed by Amazon Cognito user pools
  6. Amplify sends the REST API requests to API Gateway
  7. API Gateway uses Amazon Cognito user pools as the authorizer
  8. API Gateway proxies the request to Lambda
  9. Lambda stores guest data in DynamoDB
  10. Lambda uses Amazon Pinpoint to notify the guest

The guest registration process begins with loading the web application hosted on Amplify. The application creates the user in the Amazon Cognito user pool and routes the request to API Gateway to complete the registration process. Amazon Cognito integrates with third-party authentication systems such as Google, Facebook, and Amazon. This allows guests to use their existing social media accounts to register.

The guest check-in process consists of loading a web application onto kiosks. Guest information is saved in a DynamoDB table. Upon registration, a QR code is sent to the guests, then scanned upon arrival at a kiosk. Guest information is then retrieved from a DynamoDB table. This allows guests to print their badges and other event materials.

Well-Architected guidance:

  • Enable active tracing with AWS X-Ray to provide distributed tracing capabilities and visual service maps for faster troubleshooting of the backend APIs.
  • For Lambda functions, follow least-privileged access and only allow the access required to perform a given operation.
  • Throttle API operations to enforce access patterns established by the event management application service contract.
  • Set appropriate logging levels and remove unnecessary logging information to optimize log ingestion. Use environment variables to control application logging level.

Solution architecture – Guest requests

Figure 6. Guest requests

Figure 6. Guest requests

Numbered items refer to Figure 6:

  1. Guests access the website via Route 53
  2. Route 53 resolves incoming requests and forwards them to Amplify
  3. Guest authentication is performed by Amazon Cognito user pools
  4. Amplify sends the REST API requests to API Gateway
  5. API Gateway uses Amazon Cognito user pools as the authorizer
  6. API Gateway proxies the request to Lambda
  7. Lambda validates and stores guest data in DynamoDB
  8. Lambda uses Amazon Pinpoint to notify the guest
  9. Amazon DynamoDB Streams are enabled which triggers a Lambda function
  10. Lambda notifies the employees via Amazon Simple Notification Service (SNS) to fulfill the request

Once a guest request is made for session handouts or food or beverages, it is stored in DynamoDB. DynamoDB Streams are enabled, see Figure 7, which captures a time-ordered sequence of item-level modifications in a DynamoDB table. It durably stores the information for up to 24 hours. This generates an event, which triggers a Lambda function. The Lambda function sends an SNS notification via SMS or email to the event employees who can address the guest requests.

Figure 7. Sample DynamoDB Streams record

Figure 7. Sample DynamoDB Streams record

Well-Architected guidance:

  • Standardize application logging across components, and business outcomes
  • Enable caching on API Gateway to improve application performance
  • Use an On-Demand Instance for DynamoDB when traffic is unpredictable, otherwise use provisioned mode when consistent
  • Amazon DynamoDB Accelerator (DAX) can be used as an in-memory cache to improve read performance

Solution architecture – Session notification

Figure 8. Session notification

Figure 8. Session notification

Numbered items refer to Figure 8:

  1. An Amazon EventBridge rule runs on a schedule and invokes a Lambda function
  2. Lambda retrieves guest and session information from DynamoDB
  3. Lambda notifies the guest via Amazon Pinpoint

Amazon Pinpoint can send notifications to registered guests to let them know when to queue up for the session.

Conclusion

This solution provides a powerful approach for deploying highly scalable applications, while providing low latency and low cost. Build a Serverless Web Application can get you started. Large events require a considerable amount of planning and coordination. We hope the guidance provided here will help you build a scalable and a robust event management application.